nng-toyota rav4 - navtv - home - nav-tv · pdf filenng-toyota rav4 kit content. 1. toyota rav4...
TRANSCRIPT

3950 NW 120th Ave, Coral Springs, FL 33065 TEL: 561-955-9770 FAX: 561-955-9760
NNG-Toyota RAV4 Navigation System for Toyota RAV4 (with APPs)
NTV-KIT604
NTV-DOC222
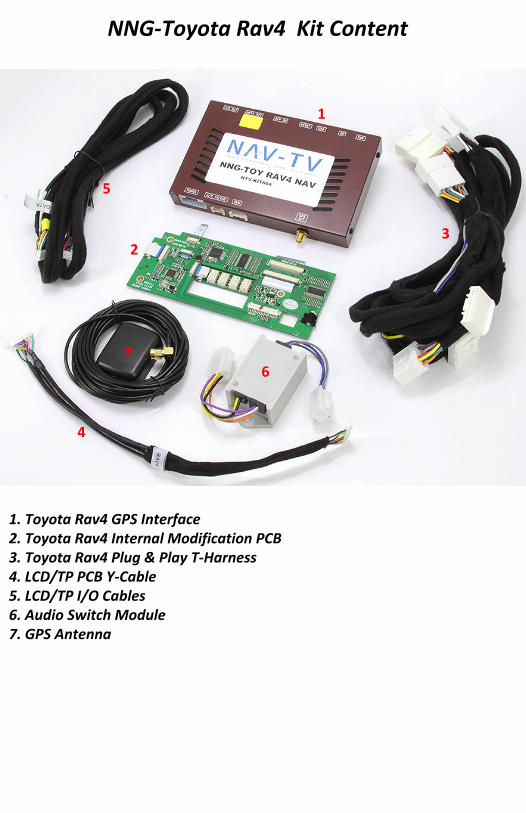
NNG-Toyota Rav4 Kit Content
1. Toyota Rav4 GPS Interface2. Toyota Rav4 Internal Modification PCB3. Toyota Rav4 Plug & Play T-Harness4. LCD/TP PCB Y-Cable5. LCD/TP I/O Cables6. Audio Switch Module7. GPS Antenna
1
23
4
5
67

1 | P a g e
2014 Toyota RAV 4 (with APPS) Dash / Radio Removal
WARRANTY DISCLAIMER NOTICE! Radio removal, disassembly, installation of
Navigation Electronics, and Radio re-assembly / re-installation is the responsibility of
the installer. It is recommended that you contact a professional installer that is
experienced with proper work methods involving electronics and knowledgeable of
specific procedures for radio disassembly, Navigation Electronics installation, and re-
assembly / re-installation of the Radio Head Unit in the vehicle. INSTALLATION
DAMAGE TO THE VEHICLE RADIO HEAD UNIT IS EXPRESSLY NOT COVERED UNDER
THE PRODUCT WARRANTY.
To avoid dangerous distractions that may lead to an accident, the driver should
never operate the system while the vehicle is in motion. Before installing the
product, the seller should inform the end-user of proper use and compliance with
the proper instructions and all states and federal laws.
Before beginning your installation, familiarize yourself with the installation
instructions and the Navigation system components.
CAUTION: It is advisable to disconnect the negative battery cable for 3 minutes
before beginning installation, to avoid unintended air bag deployment. Note and
record any anti-theft radio codes prior to disconnecting.
Factory Radio / Dash Pull and remove top trim piece by hand
Pull and remove clock / hazard from dash Pull and remove both AC vents from dash
NTV-DOC222
2 | P a g e
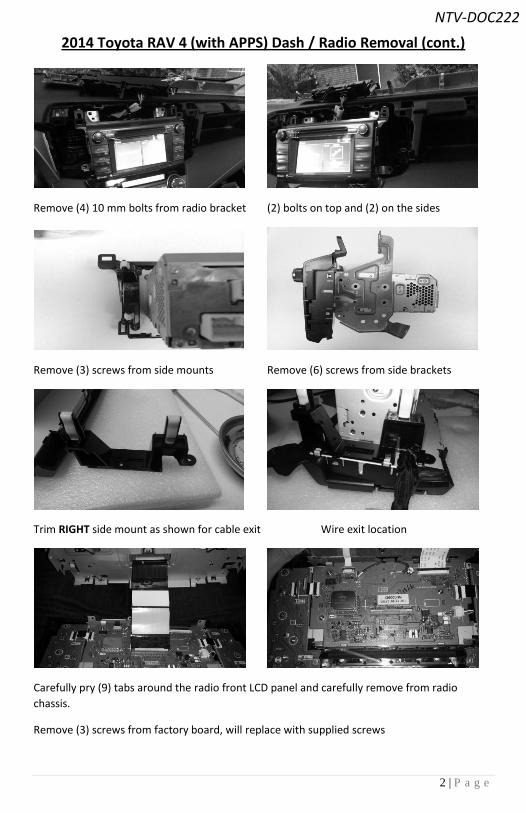
2014 Toyota RAV 4 (with APPS) Dash / Radio Removal (cont.)
Remove (4) 10 mm bolts from radio bracket (2) bolts on top and (2) on the sides
Remove (3) screws from side mounts Remove (6) screws from side brackets
Trim RIGHT side mount as shown for cable exit Wire exit location
Carefully pry (9) tabs around the radio front LCD panel and carefully remove from radio
chassis.
Remove (3) screws from factory board, will replace with supplied screws
NTV-DOC222

3 | P a g e
2014 Toyota RAV 4 (with APPS) PCB Installation
Lay New PCB on top as shown
Remove factory touch screen and display ribbon cable; connect NEW ribbon cables to factory
board; RECONNECT factory ribbon cables to NEW PCB connections. (All ribbon locations and
connections should align coordinately)
Remove ribbon cable from side control board; flip and reconnect to the NEW PCB board
Insert 2in1 TP LCD cable as shown (metal face up) Cable exit location as shown
NTV-DOC222
4 | P a g e
2014 Toyota RAV 4 (with APPS) PCB Installation (cont.)
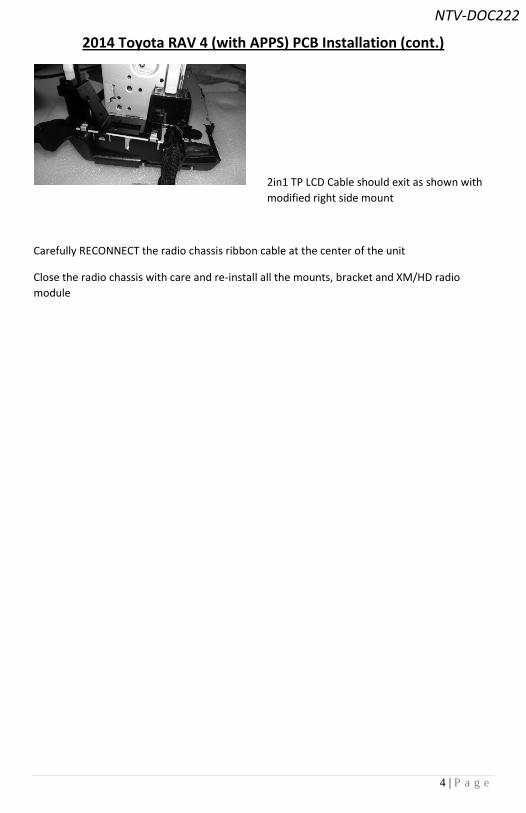
2in1 TP LCD Cable should exit as shown with
modified right side mount
Carefully RECONNECT the radio chassis ribbon cable at the center of the unit
Close the radio chassis with care and re-install all the mounts, bracket and XM/HD radio
module
NTV-DOC222

5 | P a g e
2014 Toyota RAV 4 (with APPS) GPS Module Installation
Review the overall wire connections in the figure above
(3) T-Harness for Radio Connections for Audio Box
Connection at GPS Module Data Out / LCD Out connections
NTV-DOC222

6 | P a g e
2014 Toyota RAV 4 (with APPS) GPS Module Installation (cont.)
Data Out / LCD Out extension connections (noted the orientation of plugs and wire color
coordination)
Connect GPS Antenna to GPS Module (best GPS Antenna location is under passenger side A-
pillar cover, on top of dash)
Test system thoroughly before re-assemble of the radio and dash
Test reverse camera function
Test driver side speaker integration function (mute and voice from navigation software)
Press and hold “HOME” button on left side of radio for activation of
navigation screen
NTV-DOC222
7 | P a g e
2014 Toyota RAV 4 (with APPS) Trouble Shooting
Please follow all the steps in this installation manual, failure to do so might
void the product warranty and damage the factory radio
Power
2014 Toyota Rav4 Radio will have factory loading screen whenever
the power is disconnected. It is normal to see factory loading screen
for about 1-2 minutes before the radio is operational.
Display
No Display
1. There are two led lights at the GPS module to indicate data
and power. If led lights are OFF and radio is ON, check the
power fuse inside the black box from the main harness
2. Check all wiring connectors for any loose connection
3. Check all wiring shielding for any damage during the
installation process
4. Check all wiring for any type of damage
5. Check PCB ribbon cables for loose, misalignment, or
damage
No Touch Response
6. Check both Radio mode and NAV mode for touch responses
7. Check led lights for power and data indications
8. Check 2in1 TP/LCD IN cable for any loose connection, or
damage
9. Check PCB ribbon cables for loose, misalignment, or
damage
No GPS software loaded, touch screen alignment screen occurred
Check map SD card at GPS module, see any sign of missing,
loose, pop-out, misalignment, or damage
Sound
1. Check all cable for connections to Audio Box for loose, or damage
2. Check software volume settings, ensure volume is not muted
3. Check connections at radio for loose, damaged wires
NTV-DOC222