new features what’s new for avid media composer |...
TRANSCRIPT
New Features
1
What’s New forAvid® Media Composer® | Software v8.3
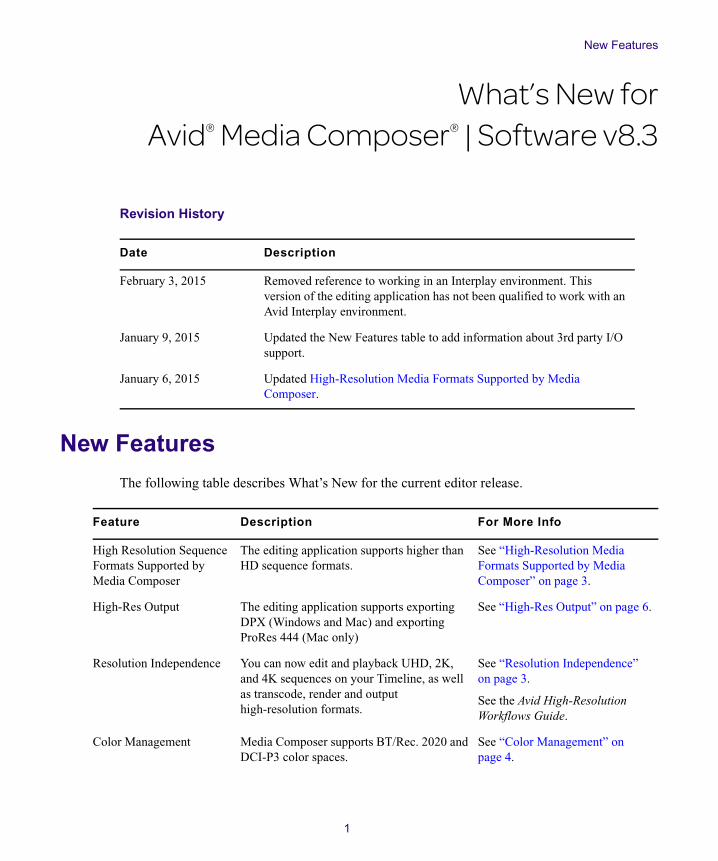
Revision History
New Features
The following table describes What’s New for the current editor release.
Date Description
February 3, 2015 Removed reference to working in an Interplay environment. This version of the editing application has not been qualified to work with an Avid Interplay environment.
January 9, 2015 Updated the New Features table to add information about 3rd party I/O support.
January 6, 2015 Updated High-Resolution Media Formats Supported by Media Composer.
Feature Description For More Info
High Resolution Sequence Formats Supported by Media Composer
The editing application supports higher than HD sequence formats.
See “High-Resolution Media Formats Supported by Media Composer” on page 3.
High-Res Output The editing application supports exporting DPX (Windows and Mac) and exporting ProRes 444 (Mac only)
See “High-Res Output” on page 6.
Resolution Independence You can now edit and playback UHD, 2K, and 4K sequences on your Timeline, as well as transcode, render and output high-resolution formats.
See “Resolution Independence” on page 3.
See the Avid High-Resolution Workflows Guide.
Color Management Media Composer supports BT/Rec. 2020 and DCI-P3 color spaces.
See “Color Management” on page 4.
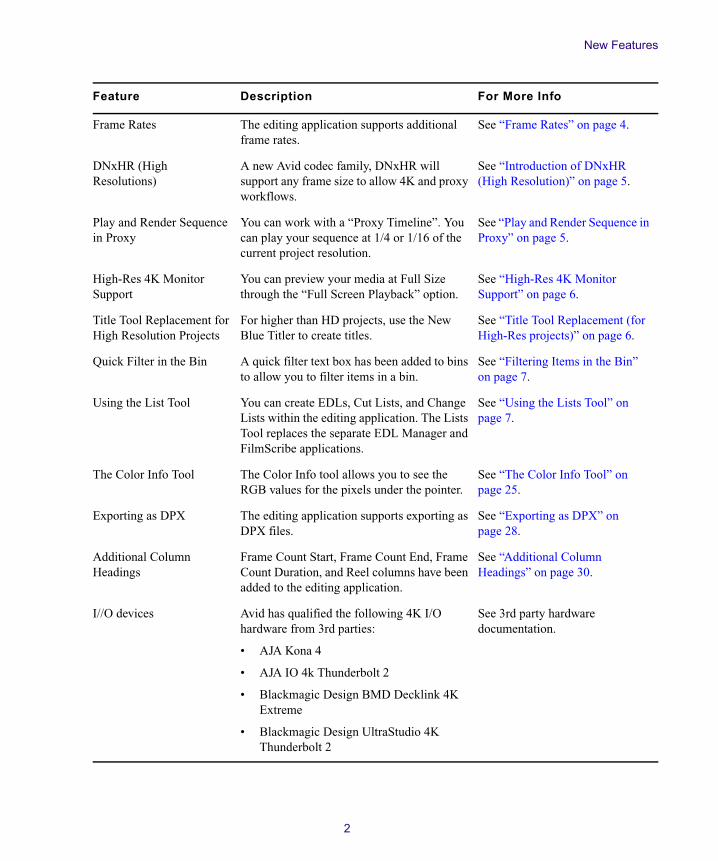
New Features
2
Frame Rates The editing application supports additional frame rates.
See “Frame Rates” on page 4.
DNxHR (High Resolutions)
A new Avid codec family, DNxHR will support any frame size to allow 4K and proxy workflows.
See “Introduction of DNxHR (High Resolution)” on page 5.
Play and Render Sequence in Proxy
You can work with a “Proxy Timeline”. You can play your sequence at 1/4 or 1/16 of the current project resolution.
See “Play and Render Sequence in Proxy” on page 5.
High-Res 4K Monitor Support
You can preview your media at Full Size through the “Full Screen Playback” option.
See “High-Res 4K Monitor Support” on page 6.
Title Tool Replacement for High Resolution Projects
For higher than HD projects, use the New Blue Titler to create titles.
See “Title Tool Replacement (for High-Res projects)” on page 6.
Quick Filter in the Bin A quick filter text box has been added to bins to allow you to filter items in a bin.
See “Filtering Items in the Bin” on page 7.
Using the List Tool You can create EDLs, Cut Lists, and Change Lists within the editing application. The Lists Tool replaces the separate EDL Manager and FilmScribe applications.
See “Using the Lists Tool” on page 7.
The Color Info Tool The Color Info tool allows you to see the RGB values for the pixels under the pointer.
See “The Color Info Tool” on page 25.
Exporting as DPX The editing application supports exporting as DPX files.
See “Exporting as DPX” on page 28.
Additional Column Headings
Frame Count Start, Frame Count End, Frame Count Duration, and Reel columns have been added to the editing application.
See “Additional Column Headings” on page 30.
I//O devices Avid has qualified the following 4K I/O hardware from 3rd parties:
• AJA Kona 4
• AJA IO 4k Thunderbolt 2
• Blackmagic Design BMD Decklink 4K Extreme
• Blackmagic Design UltraStudio 4K Thunderbolt 2
See 3rd party hardware documentation.
Feature Description For More Info
New Features
3
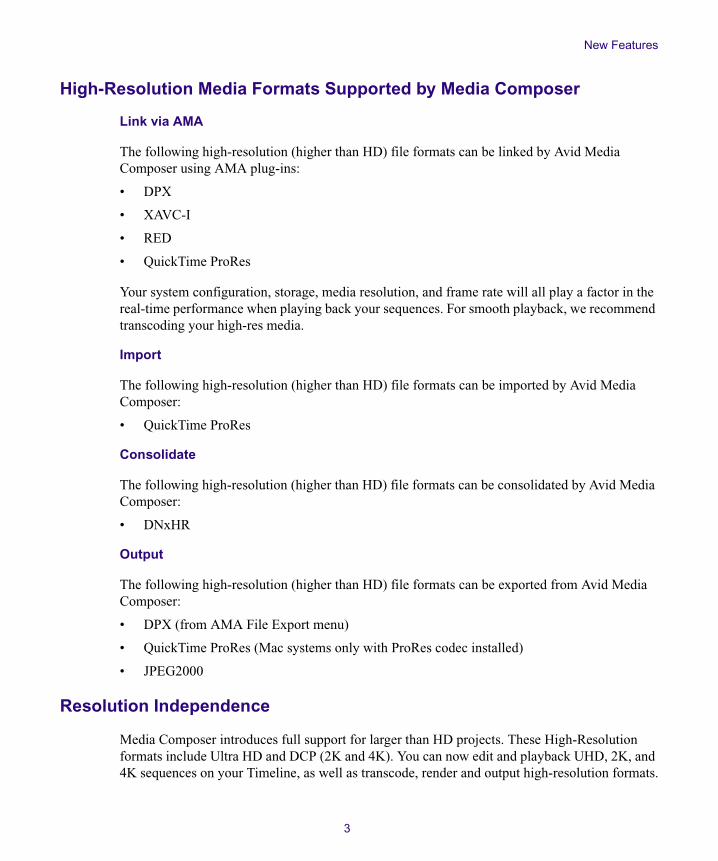
High-Resolution Media Formats Supported by Media Composer
Link via AMA
The following high-resolution (higher than HD) file formats can be linked by Avid Media Composer using AMA plug-ins:
• DPX
• XAVC-I
• RED
• QuickTime ProRes
Your system configuration, storage, media resolution, and frame rate will all play a factor in the real-time performance when playing back your sequences. For smooth playback, we recommend transcoding your high-res media.
Import
The following high-resolution (higher than HD) file formats can be imported by Avid Media Composer:
• QuickTime ProRes
Consolidate
The following high-resolution (higher than HD) file formats can be consolidated by Avid Media Composer:
• DNxHR
Output
The following high-resolution (higher than HD) file formats can be exported from Avid Media Composer:
• DPX (from AMA File Export menu)
• QuickTime ProRes (Mac systems only with ProRes codec installed)
• JPEG2000
Resolution Independence
Media Composer introduces full support for larger than HD projects. These High-Resolution formats include Ultra HD and DCP (2K and 4K). You can now edit and playback UHD, 2K, and 4K sequences on your Timeline, as well as transcode, render and output high-resolution formats.
New Features
4
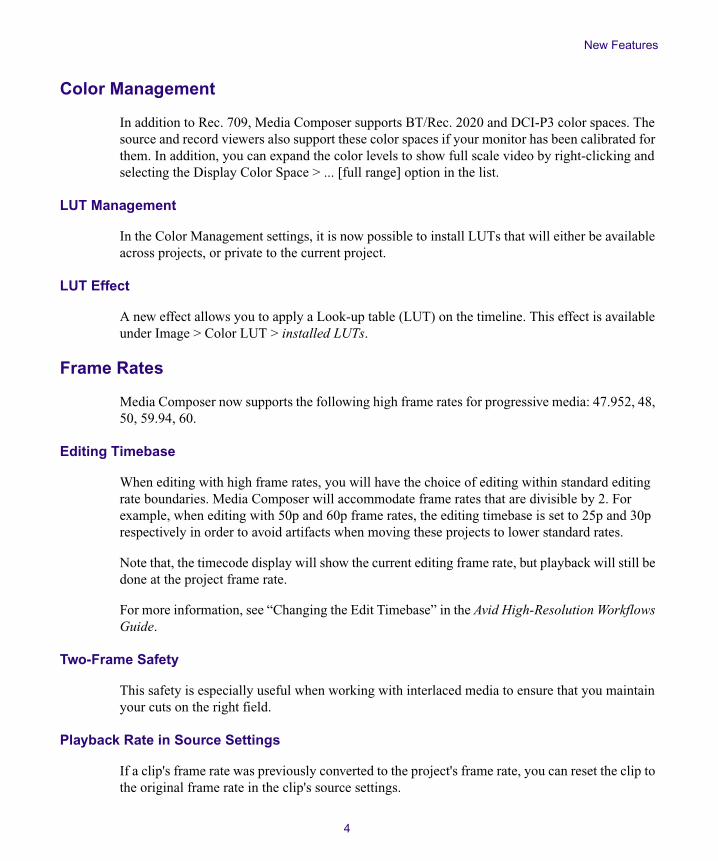
Color Management
In addition to Rec. 709, Media Composer supports BT/Rec. 2020 and DCI-P3 color spaces. The source and record viewers also support these color spaces if your monitor has been calibrated for them. In addition, you can expand the color levels to show full scale video by right-clicking and selecting the Display Color Space > ... [full range] option in the list.
LUT Management
In the Color Management settings, it is now possible to install LUTs that will either be available across projects, or private to the current project.
LUT Effect
A new effect allows you to apply a Look-up table (LUT) on the timeline. This effect is available under Image > Color LUT > installed LUTs.
Frame Rates
Media Composer now supports the following high frame rates for progressive media: 47.952, 48, 50, 59.94, 60.
Editing Timebase
When editing with high frame rates, you will have the choice of editing within standard editing rate boundaries. Media Composer will accommodate frame rates that are divisible by 2. For example, when editing with 50p and 60p frame rates, the editing timebase is set to 25p and 30p respectively in order to avoid artifacts when moving these projects to lower standard rates.
Note that, the timecode display will show the current editing frame rate, but playback will still be done at the project frame rate.
For more information, see “Changing the Edit Timebase” in the Avid High-Resolution Workflows Guide.
Two-Frame Safety
This safety is especially useful when working with interlaced media to ensure that you maintain your cuts on the right field.
Playback Rate in Source Settings
If a clip's frame rate was previously converted to the project's frame rate, you can reset the clip to the original frame rate in the clip's source settings.
New Features
5
Alternatively, you may want to convert the clip's frame rate to match the project frame rate. This can also be done through the clips's source settings.
For more information, see “Setting the Playback Rate of a Clip” in the Avid High-Resolution Workflows Guide.
Introduction of DNxHR (High Resolution)
With the introduction of High-Res native editorial enhancements, Avid also solves high storage requirements by introducing DNxHR. The new Avid codec family, DNxHR will support any frame size to allow 4K and proxy workflows. This new codec family includes the following:
• DNxHR LB (low bandwidth)
• DNxHR SQ (standard quality)
• DNxHR HQ (high quality)
• DNxHR HQX (high quality 10-bit)
• DNxHR 444 (cinema quality)
n DNxHD will still be used for HD resolutions. These codecs are only available for HD frame sizes.
Play and Render Sequence in Proxy
Improve your editing experience by working in “Proxy” mode. Use the Proxy setting in the Project Format dialog to play your sequence at 1/4 or 1/16 of the current project resolution. This will allow you to edit more fluidly from your original media, and render your effects to a proxy resolution. Set the Format settings back to Off, and you just need to re-render the effects to high-resolution. Should you switch back to proxy mode, the rendered proxy media will still be available.
For optimum performance, you can first transcode your media to 1/4 res and then set your timeline to playback at 1/4. By matching the proxy settings of the media and the timeline, there is no on-the-fly processing required when these clips are played. For more information, see “Using a Proxy Workflow” in the Avid High-Resolution Workflows Guide.
Project Settings
The project dialog box now contains additional settings that support high-resolution formats and proxy workflows. For more details, see “Creating a New Project” in the Media Composer help.
To give you a quick reference, the timeline header now displays the project resolution, frame rate and if the proxy mode is used.
New Features
6
New Transcoding Options
You will now be able to transcode to the Frame Size of your original media, regardless of the Project you are working in. You can transcode to the Original, 1/4 or 1/16 of the Frame Size. (Working at 1/16th will allow you to transcode your high-res media to even lower than HD resolutions).
When transcoding, you can now choose to keep the media at its original frame rate. This will allow you to relink back to the AMA source material after editing with the transcoded media (previously a limitation in Media Composer).
High-Res 4K Monitor Support
If you work with a 4K computer monitor, you can preview your media at Full Size through the “Full Screen Playback” option. You can also view your native High-Res media on a client monitor via third-party I/O hardware. Simply select the appropriate option from the Video Output tool.
High-Res Output
Media Composer will initially provide the following file-based output types that support greater than HD:
• DPX export through the Avid File Sequencer.
• QuickTime (ProRes 444 is supported on the Mac only)
Title Tool Replacement (for High-Res projects)
We are migrating our titling application to support 3rd party titling applications including NewBlue® Titler Pro, which is already bundled with Media Composer. At present, you can use the NewBlue Titler to create titles and rasters for high-res projects directly within Media Composer.
The old Media Composer Title Tool does not work with larger than HD projects or with HD projects with the new frame rates (30, 50, 59.94, 60).
Using the New Blue Titler, does not work from the clip menu. Either drop the NewBlue effect onto a clip or select the clip in the Timeline and right-click and select Add/Edit Title.
New Features
7
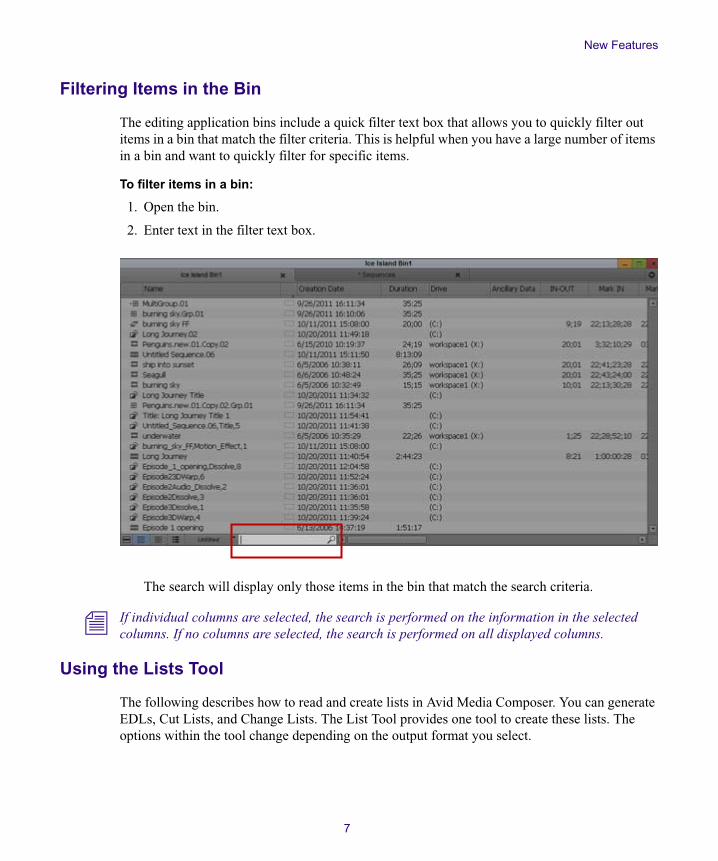
Filtering Items in the Bin
The editing application bins include a quick filter text box that allows you to quickly filter out items in a bin that match the filter criteria. This is helpful when you have a large number of items in a bin and want to quickly filter for specific items.
To filter items in a bin:
1. Open the bin.
2. Enter text in the filter text box.
The search will display only those items in the bin that match the search criteria.
n If individual columns are selected, the search is performed on the information in the selected columns. If no columns are selected, the search is performed on all displayed columns.
Using the Lists Tool
The following describes how to read and create lists in Avid Media Composer. You can generate EDLs, Cut Lists, and Change Lists. The List Tool provides one tool to create these lists. The options within the tool change depending on the output format you select.
New Features
8
What is an EDL?
An edit decision list (EDL) is an instruction list for edits you make. The EDL is used for exchanging information between editing systems. This list can include cuts, wipes, dissolves, fades, and black edits. It lets you take a project from Avid Media Composer to a high-end, nonlinear, online editing system. It is common to use EDLs in DI (digital intermediate) workflows.
What is a Cut List?
A cut list is generated the first time to conform a work print, negative, sound track, or optical effect to match the sequence.
What is a Change List?
A change list is generated to simplify the process of updating conformed cuts to match and compare changes in versions of the sequence or sequences.
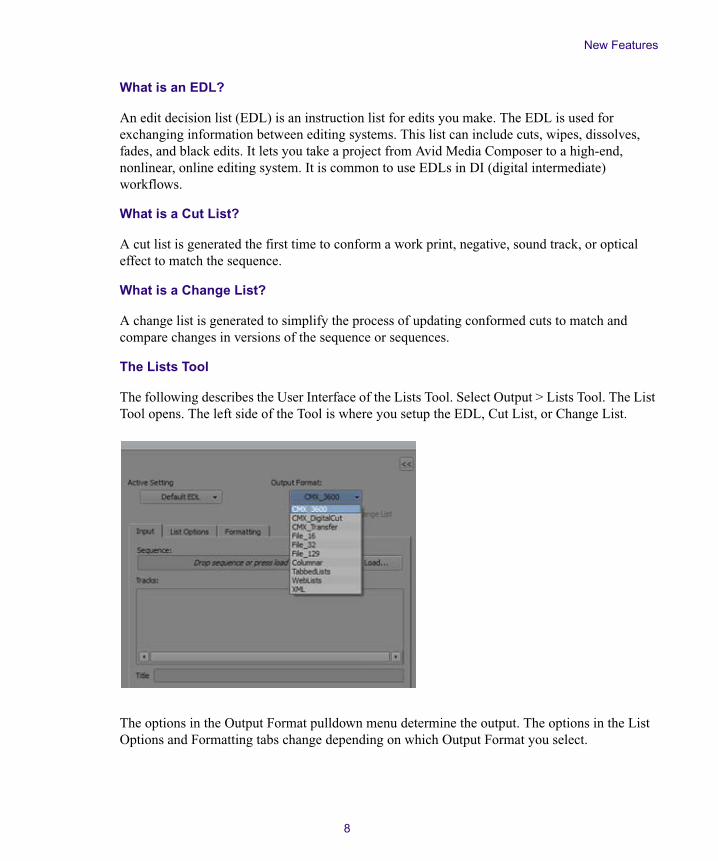
The Lists Tool
The following describes the User Interface of the Lists Tool. Select Output > Lists Tool. The List Tool opens. The left side of the Tool is where you setup the EDL, Cut List, or Change List.
The options in the Output Format pulldown menu determine the output. The options in the List Options and Formatting tabs change depending on which Output Format you select.
New Features
9
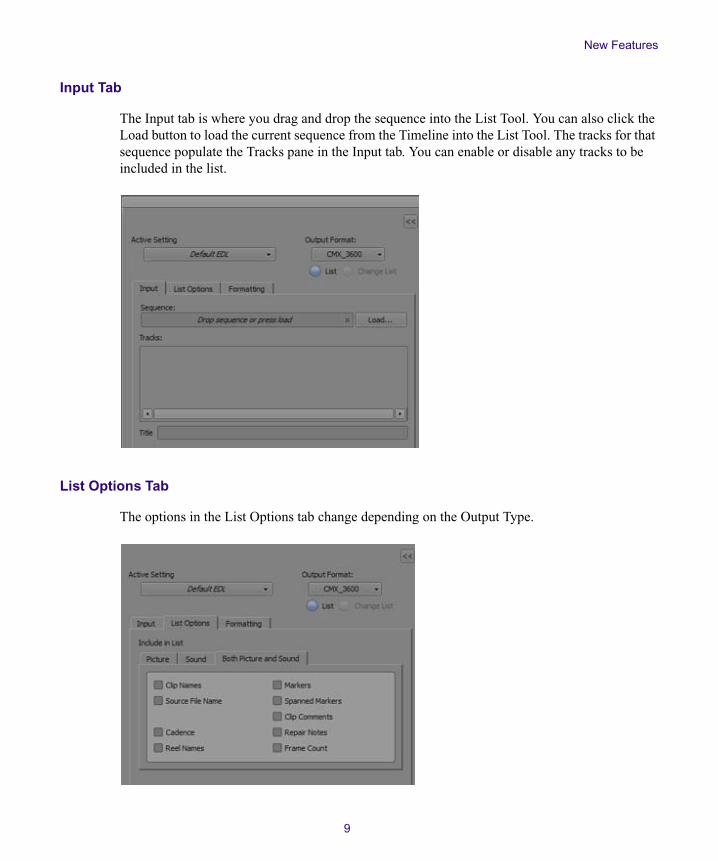
Input Tab
The Input tab is where you drag and drop the sequence into the List Tool. You can also click the Load button to load the current sequence from the Timeline into the List Tool. The tracks for that sequence populate the Tracks pane in the Input tab. You can enable or disable any tracks to be included in the list.
List Options Tab
The options in the List Options tab change depending on the Output Type.
New Features
10
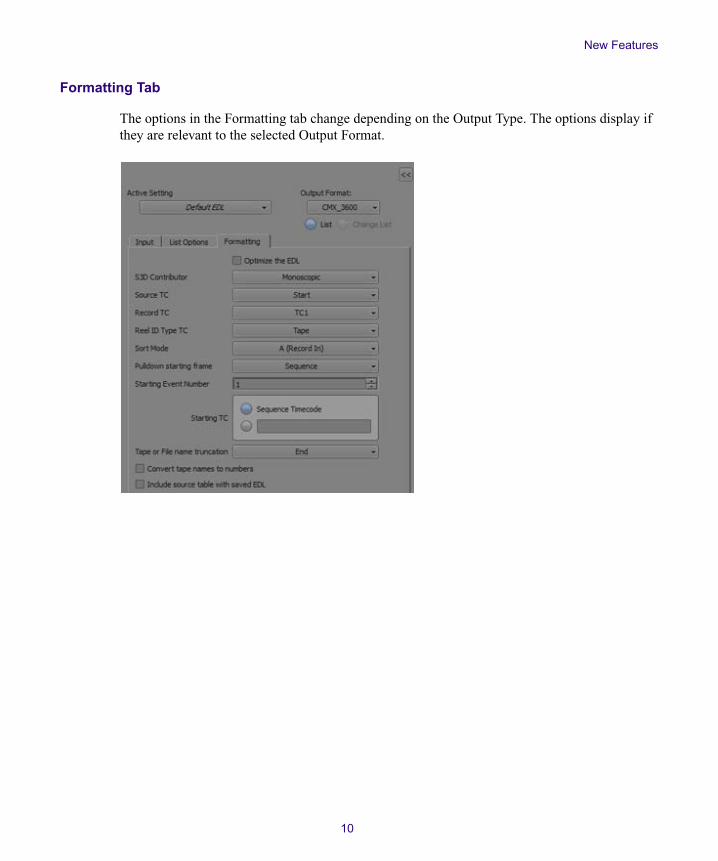
Formatting Tab
The options in the Formatting tab change depending on the Output Type. The options display if they are relevant to the selected Output Format.
New Features
11
Preview Pane
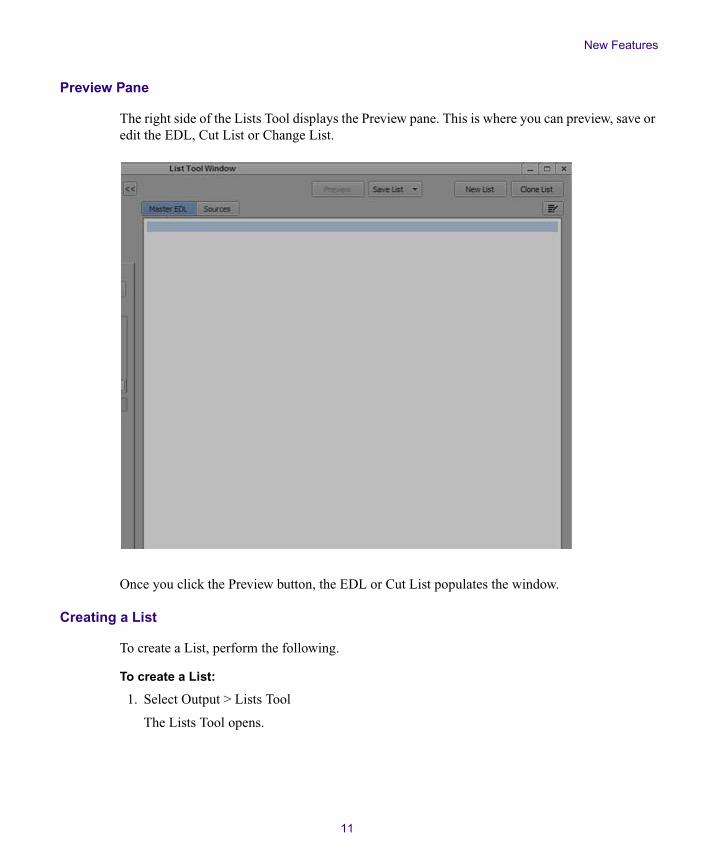
The right side of the Lists Tool displays the Preview pane. This is where you can preview, save or edit the EDL, Cut List or Change List.
Once you click the Preview button, the EDL or Cut List populates the window.
Creating a List
To create a List, perform the following.
To create a List:
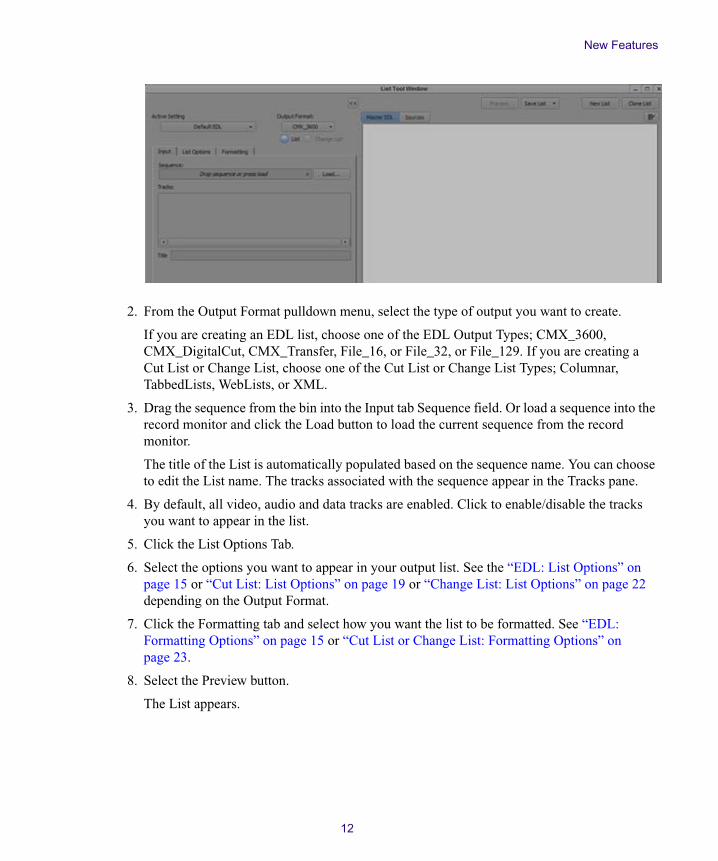
1. Select Output > Lists Tool
The Lists Tool opens.
New Features
12
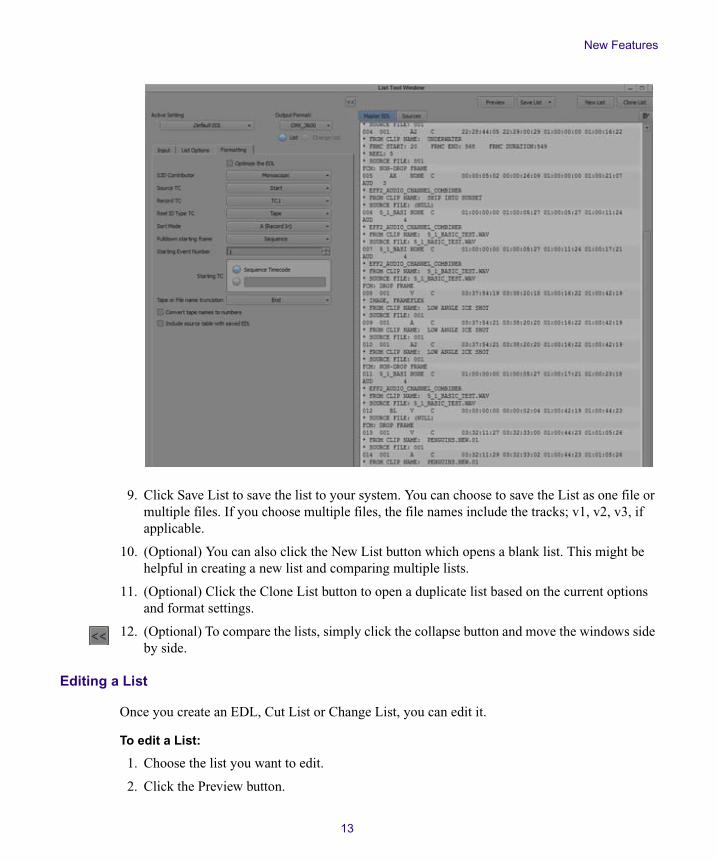
2. From the Output Format pulldown menu, select the type of output you want to create.
If you are creating an EDL list, choose one of the EDL Output Types; CMX_3600, CMX_DigitalCut, CMX_Transfer, File_16, or File_32, or File_129. If you are creating a Cut List or Change List, choose one of the Cut List or Change List Types; Columnar, TabbedLists, WebLists, or XML.
3. Drag the sequence from the bin into the Input tab Sequence field. Or load a sequence into the record monitor and click the Load button to load the current sequence from the record monitor.
The title of the List is automatically populated based on the sequence name. You can choose to edit the List name. The tracks associated with the sequence appear in the Tracks pane.
4. By default, all video, audio and data tracks are enabled. Click to enable/disable the tracks you want to appear in the list.
5. Click the List Options Tab.
6. Select the options you want to appear in your output list. See the “EDL: List Options” on page 15 or “Cut List: List Options” on page 19 or “Change List: List Options” on page 22 depending on the Output Format.
7. Click the Formatting tab and select how you want the list to be formatted. See “EDL: Formatting Options” on page 15 or “Cut List or Change List: Formatting Options” on page 23.
8. Select the Preview button.
The List appears.
New Features
13
9. Click Save List to save the list to your system. You can choose to save the List as one file or multiple files. If you choose multiple files, the file names include the tracks; v1, v2, v3, if applicable.
10. (Optional) You can also click the New List button which opens a blank list. This might be helpful in creating a new list and comparing multiple lists.
11. (Optional) Click the Clone List button to open a duplicate list based on the current options and format settings.
12. (Optional) To compare the lists, simply click the collapse button and move the windows side by side.
Editing a List
Once you create an EDL, Cut List or Change List, you can edit it.
To edit a List:
1. Choose the list you want to edit.
2. Click the Preview button.
New Features
14
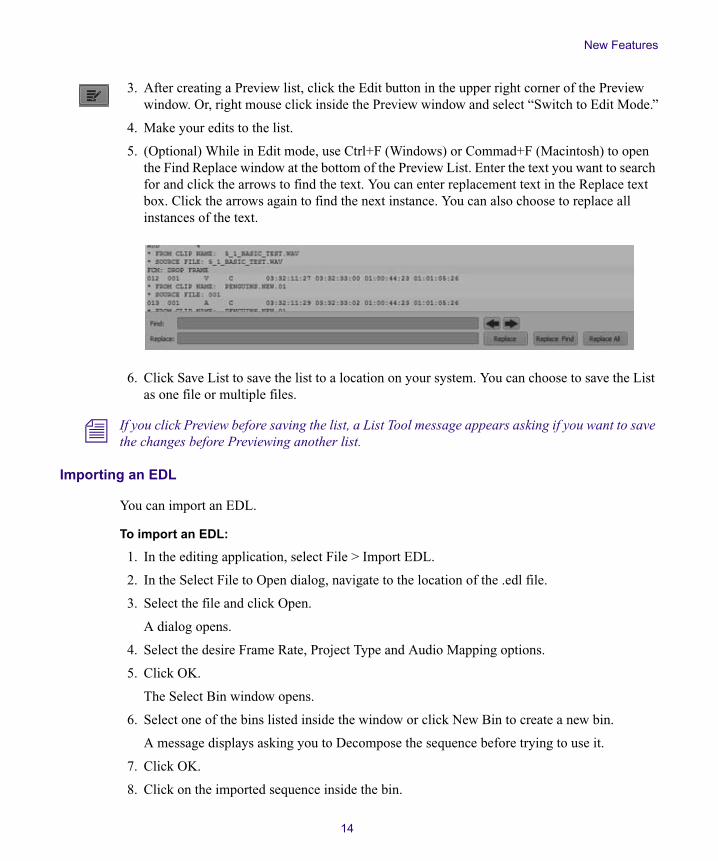
3. After creating a Preview list, click the Edit button in the upper right corner of the Preview window. Or, right mouse click inside the Preview window and select “Switch to Edit Mode.”
4. Make your edits to the list.
5. (Optional) While in Edit mode, use Ctrl+F (Windows) or Commad+F (Macintosh) to open the Find Replace window at the bottom of the Preview List. Enter the text you want to search for and click the arrows to find the text. You can enter replacement text in the Replace text box. Click the arrows again to find the next instance. You can also choose to replace all instances of the text.
6. Click Save List to save the list to a location on your system. You can choose to save the List as one file or multiple files.
n If you click Preview before saving the list, a List Tool message appears asking if you want to save the changes before Previewing another list.
Importing an EDL
You can import an EDL.
To import an EDL:
1. In the editing application, select File > Import EDL.
2. In the Select File to Open dialog, navigate to the location of the .edl file.
3. Select the file and click Open.
A dialog opens.
4. Select the desire Frame Rate, Project Type and Audio Mapping options.
5. Click OK.
The Select Bin window opens.
6. Select one of the bins listed inside the window or click New Bin to create a new bin.
A message displays asking you to Decompose the sequence before trying to use it.
7. Click OK.
8. Click on the imported sequence inside the bin.
New Features
15
9. From the Clip menu, select Decompose.
10. Select the desired Decompose options.
11. Click OK.
The decompose process begins. When the decompose process is completed, the bin contains decomposed clips (.new) and a decomposed sequence if “Create New Sequence” was enabled inside the Decompose window. The Video resolution of the Decomposed clips is determined by the Capture tab inside the Media Creation Setting.
The Decomposed master clips and sequences are available for conform.
EDL: List Options
Choose from the following options:
EDL: Formatting Options
Choose from the following options:
Option Description
Picture Select the picture options you want included in your EDL. You can choose to include: Dissolves, Other Transitions, 3rd Party Transitions, Black Edits, Color Effects, Other Segment Effects, 3rd Party Segment Effects and Color Decision Lists.
Sound Select the sound options you want included in your EDL: Dissolves, Volume, Track Patching, EQ Effects and Track Effects:
Both Picture and Sound Select the picture and sound options you want included in your EDL: Clip Names, Source File Name, Cadence, Reel Names, Markers, Spanned Markers, Clip Comments, Repair Notes and Frame Count
Option Description
Optimize the EDL Optimization is a process that simplifies your EDL. An optimized EDL contains simplified text and events that are combined or condensed to speed up the online assembly process. If two tracks of video and one channel of audio share the same Record IN and Record OUT timecodes and they come from the same source tape, optimization expresses them as one edit instead of three.
S3D Contributor Monoscopic: Set this option for standard sequences, or if you only want to use the “leading eye” clips in a stereoscopic sequence.
S3D Left: Only displays the left eye clips.
S3D Right: Only displays the right eye clips.
New Features
16
Source TC Start: The starting timecode
VITC: The vertical interval timecode
Sound_TC: Audio timecode.
Film_TC: Film timecode
TC24: 24 fps
TC25PD: 25fps with pulldown
TC25: 25fps
TC30: 30fps
AUX_1_TC - AUX_5_TC: The timecode from the timecode column in the bin
AUX_TC_24: 24 fps auxiliary timecode
Record TC TCI: The timecode from the timecode column in the bin
TC24: 24fps
TC25PD: 25fps with pulldown
TC25: 25fps
TC30DF: 30fps drop frame
TC30ND: 30fps non-drop frame
TC30NP: 30fps without pulldown
Real ID Type TC Tape: Uses the reel ID from the tape source from which you captured your video.
Sound_Roll: Uses the reel ID from the sound roll source, (if you entered this information in the bin). Used for film projects.
Camera_Roll: Uses the reel ID from the camera source (if you entered this information in the bin). Used for film projects.
Lab_Roll:
Disk_Label:
Option Description
New Features
17
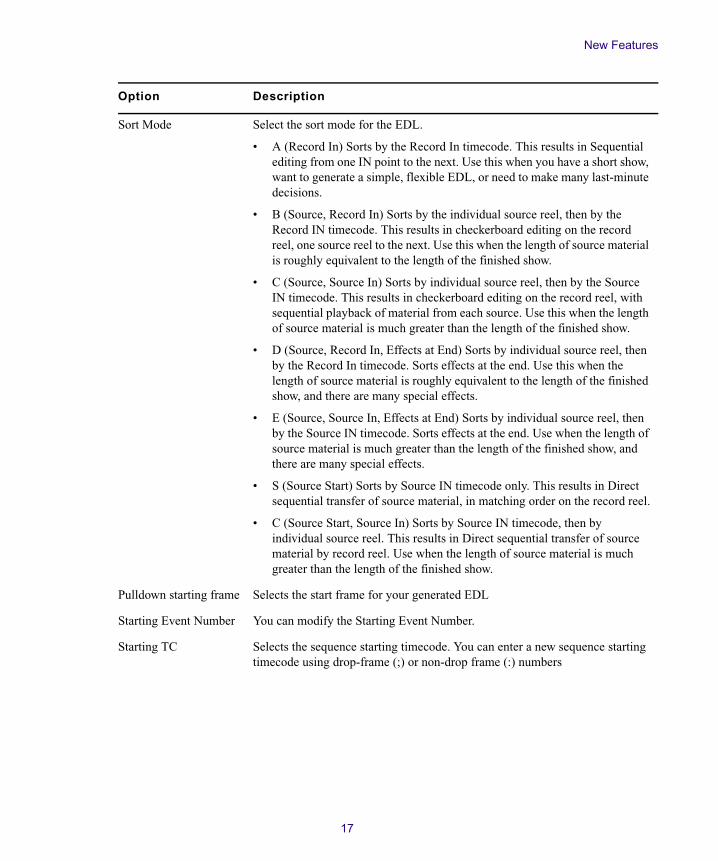
Sort Mode Select the sort mode for the EDL.
• A (Record In) Sorts by the Record In timecode. This results in Sequential editing from one IN point to the next. Use this when you have a short show, want to generate a simple, flexible EDL, or need to make many last-minute decisions.
• B (Source, Record In) Sorts by the individual source reel, then by the Record IN timecode. This results in checkerboard editing on the record reel, one source reel to the next. Use this when the length of source material is roughly equivalent to the length of the finished show.
• C (Source, Source In) Sorts by individual source reel, then by the Source IN timecode. This results in checkerboard editing on the record reel, with sequential playback of material from each source. Use this when the length of source material is much greater than the length of the finished show.
• D (Source, Record In, Effects at End) Sorts by individual source reel, then by the Record In timecode. Sorts effects at the end. Use this when the length of source material is roughly equivalent to the length of the finished show, and there are many special effects.
• E (Source, Source In, Effects at End) Sorts by individual source reel, then by the Source IN timecode. Sorts effects at the end. Use when the length of source material is much greater than the length of the finished show, and there are many special effects.
• S (Source Start) Sorts by Source IN timecode only. This results in Direct sequential transfer of source material, in matching order on the record reel.
• C (Source Start, Source In) Sorts by Source IN timecode, then by individual source reel. This results in Direct sequential transfer of source material by record reel. Use when the length of source material is much greater than the length of the finished show.
Pulldown starting frame Selects the start frame for your generated EDL
Starting Event Number You can modify the Starting Event Number.
Starting TC Selects the sequence starting timecode. You can enter a new sequence starting timecode using drop-frame (;) or non-drop frame (:) numbers
Option Description

New Features
18
Tape or File Name truncation
Determines which part of the tapename you want to save.
• End - Truncates the end of the tape name. For example, CHICAGO138101 becomes CHICAGO1.
• Middle - Takes half of the allowed number of characters from the front and the other half from the end of the tape name. For example, CHICAGO138101 becomes CHIC8101.
• Beginning - Removes the beginning of the tape name. For example, CHICAGO138101 becomes GO138101.
• First_N - Keeps the first character and the last character and removes everything in between. For example, CHICAGO138101 becomes CO138101.
Convert tape names to numbers
Changes all generated EDL reel ID names to numbers.
Include source table with saved EDL.
Includes the source table information whenever you save an EDL.
Option Description

New Features
19
Cut List: List Options
Choose from the following options:
Option Description
Assemble The Assemble list shows the order in which a sequence’s clips, optical effects, or standard dissolves and fades are assembled from start to finish in the edited sequence. The assemble list also flags duplicate frames.
• LFOA: (Last Frame of Action) Determines the duration of a sequence at the last frame that is part of the sequence, minus the length of the head and/or tail. Select the option and type the length of the head and/or tail.
• Mark Short Cuts: Searches the assemble list for cuts that are shorter than a user-specified minimum. All such cuts are flagged with a comment. Not included in XML output.
• Mark Jump Cuts: Searches the assemble list for jump cuts that are shorter than a user-specified minimum. All such cuts are flagged with a comment. A jump cut occurs when a short piece of material is “missing” between adjacent cuts from the same source material. Not included in XML output.
• Show Dupe Refs:
• Include Pull List:
• First Sort by: Controls how a list is sorted. None, Labroll, Camroll, Soundroll, Scene and Take, Name, and Reel #
• Second Sort by: Same choices as First sort by
• Third Sort by: KN Start, Auxiliary Ink, Transfer, DPX, VFX, Start TC, Film TC, Sound TC, Auxiliary TC1
• Order: Heads Out (ascending edge numbers) Tails Out (descending edge numbers)
• Place Separators: Select this option to control where separators are placed in the list. The options are First Sort Field, Second Sort Field, Keycode or Ink Prefix, and Prefix or every 1000 ft. The separator’s appearance depends on the template; usually it appears as a horizontal line.
• Include Leader: Check this option to include leader in the list.
• Include Opticals: Check this option to include opticals in the list.
New Features
20
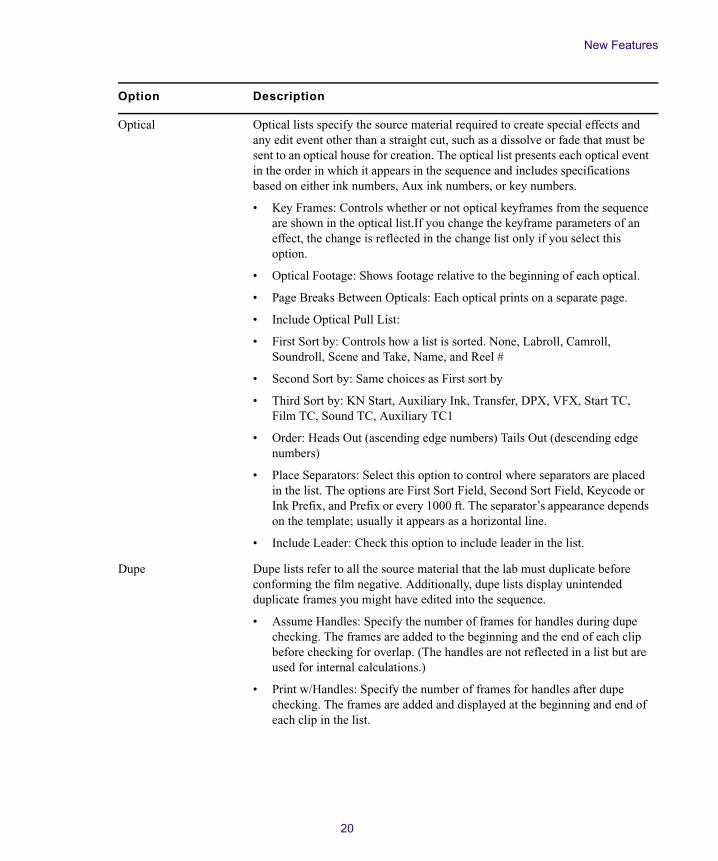
Optical Optical lists specify the source material required to create special effects and any edit event other than a straight cut, such as a dissolve or fade that must be sent to an optical house for creation. The optical list presents each optical event in the order in which it appears in the sequence and includes specifications based on either ink numbers, Aux ink numbers, or key numbers.
• Key Frames: Controls whether or not optical keyframes from the sequence are shown in the optical list.If you change the keyframe parameters of an effect, the change is reflected in the change list only if you select this option.
• Optical Footage: Shows footage relative to the beginning of each optical.
• Page Breaks Between Opticals: Each optical prints on a separate page.
• Include Optical Pull List:
• First Sort by: Controls how a list is sorted. None, Labroll, Camroll, Soundroll, Scene and Take, Name, and Reel #
• Second Sort by: Same choices as First sort by
• Third Sort by: KN Start, Auxiliary Ink, Transfer, DPX, VFX, Start TC, Film TC, Sound TC, Auxiliary TC1
• Order: Heads Out (ascending edge numbers) Tails Out (descending edge numbers)
• Place Separators: Select this option to control where separators are placed in the list. The options are First Sort Field, Second Sort Field, Keycode or Ink Prefix, and Prefix or every 1000 ft. The separator’s appearance depends on the template; usually it appears as a horizontal line.
• Include Leader: Check this option to include leader in the list.
Dupe Dupe lists refer to all the source material that the lab must duplicate before conforming the film negative. Additionally, dupe lists display unintended duplicate frames you might have edited into the sequence.
• Assume Handles: Specify the number of frames for handles during dupe checking. The frames are added to the beginning and the end of each clip before checking for overlap. (The handles are not reflected in a list but are used for internal calculations.)
• Print w/Handles: Specify the number of frames for handles after dupe checking. The frames are added and displayed at the beginning and end of each clip in the list.
Option Description
New Features
21
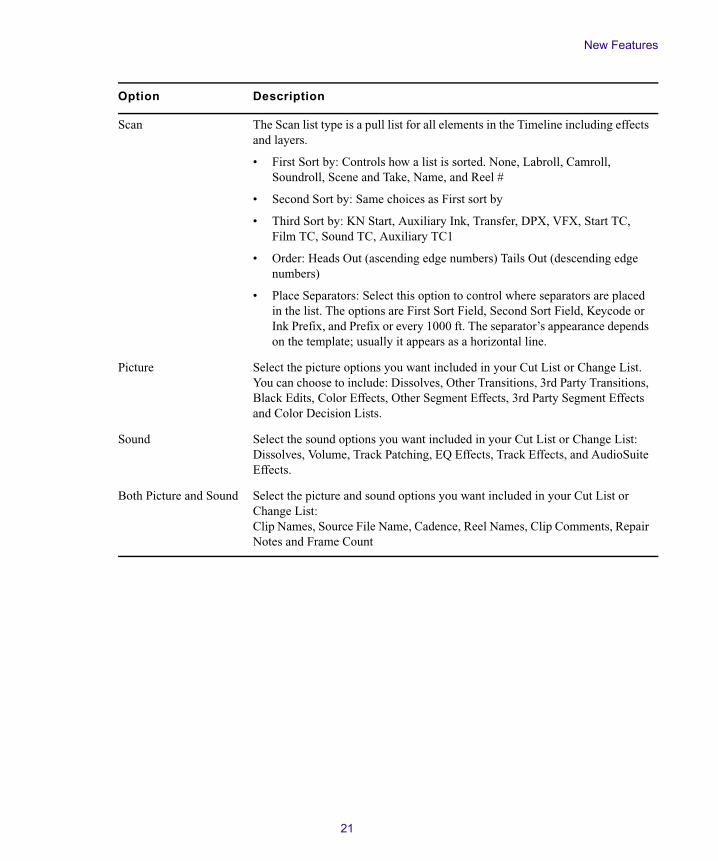
Scan The Scan list type is a pull list for all elements in the Timeline including effects and layers.
• First Sort by: Controls how a list is sorted. None, Labroll, Camroll, Soundroll, Scene and Take, Name, and Reel #
• Second Sort by: Same choices as First sort by
• Third Sort by: KN Start, Auxiliary Ink, Transfer, DPX, VFX, Start TC, Film TC, Sound TC, Auxiliary TC1
• Order: Heads Out (ascending edge numbers) Tails Out (descending edge numbers)
• Place Separators: Select this option to control where separators are placed in the list. The options are First Sort Field, Second Sort Field, Keycode or Ink Prefix, and Prefix or every 1000 ft. The separator’s appearance depends on the template; usually it appears as a horizontal line.
Picture Select the picture options you want included in your Cut List or Change List. You can choose to include: Dissolves, Other Transitions, 3rd Party Transitions, Black Edits, Color Effects, Other Segment Effects, 3rd Party Segment Effects and Color Decision Lists.
Sound Select the sound options you want included in your Cut List or Change List: Dissolves, Volume, Track Patching, EQ Effects, Track Effects, and AudioSuite Effects.
Both Picture and Sound Select the picture and sound options you want included in your Cut List or Change List: Clip Names, Source File Name, Cadence, Reel Names, Clip Comments, Repair Notes and Frame Count
Option Description
New Features
22
Change List: List Options
Choose from the following options:
Option Description
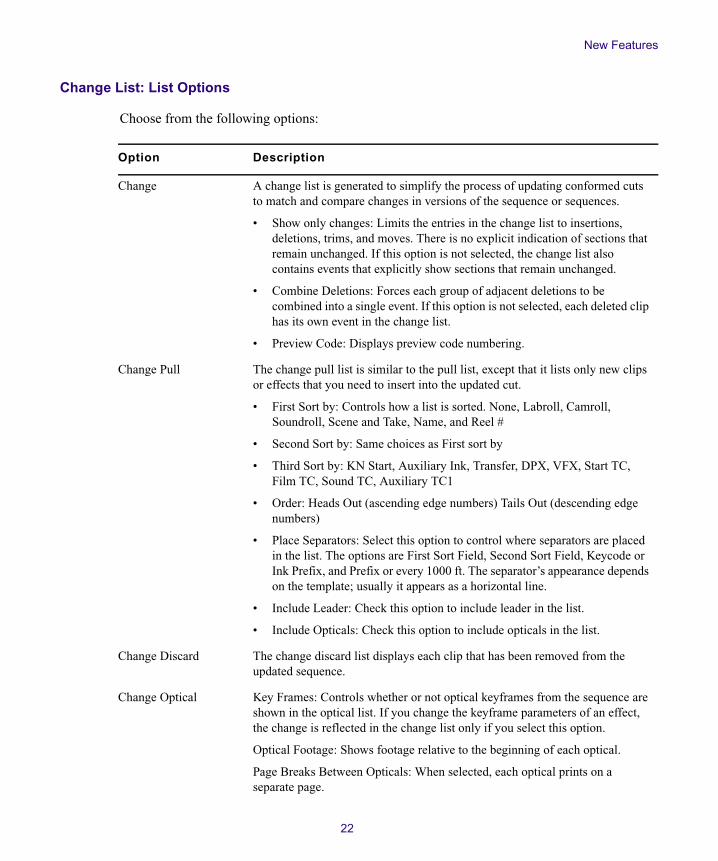
Change A change list is generated to simplify the process of updating conformed cuts to match and compare changes in versions of the sequence or sequences.
• Show only changes: Limits the entries in the change list to insertions, deletions, trims, and moves. There is no explicit indication of sections that remain unchanged. If this option is not selected, the change list also contains events that explicitly show sections that remain unchanged.
• Combine Deletions: Forces each group of adjacent deletions to be combined into a single event. If this option is not selected, each deleted clip has its own event in the change list.
• Preview Code: Displays preview code numbering.
Change Pull The change pull list is similar to the pull list, except that it lists only new clips or effects that you need to insert into the updated cut.
• First Sort by: Controls how a list is sorted. None, Labroll, Camroll, Soundroll, Scene and Take, Name, and Reel #
• Second Sort by: Same choices as First sort by
• Third Sort by: KN Start, Auxiliary Ink, Transfer, DPX, VFX, Start TC, Film TC, Sound TC, Auxiliary TC1
• Order: Heads Out (ascending edge numbers) Tails Out (descending edge numbers)
• Place Separators: Select this option to control where separators are placed in the list. The options are First Sort Field, Second Sort Field, Keycode or Ink Prefix, and Prefix or every 1000 ft. The separator’s appearance depends on the template; usually it appears as a horizontal line.
• Include Leader: Check this option to include leader in the list.
• Include Opticals: Check this option to include opticals in the list.
Change Discard The change discard list displays each clip that has been removed from the updated sequence.
Change Optical Key Frames: Controls whether or not optical keyframes from the sequence are shown in the optical list. If you change the keyframe parameters of an effect, the change is reflected in the change list only if you select this option.
Optical Footage: Shows footage relative to the beginning of each optical.
Page Breaks Between Opticals: When selected, each optical prints on a separate page.
New Features
23
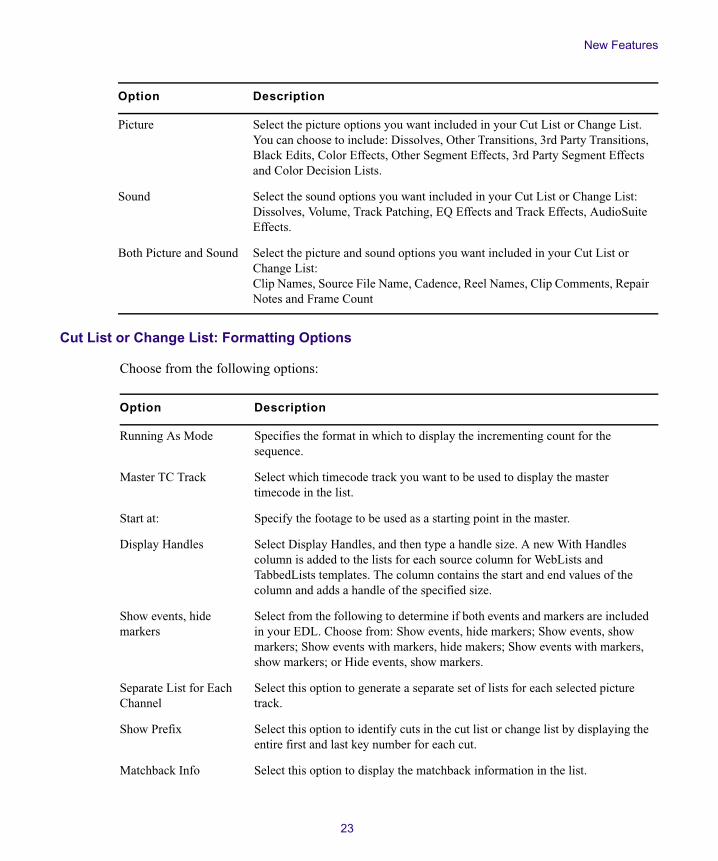
Cut List or Change List: Formatting Options
Choose from the following options:
Picture Select the picture options you want included in your Cut List or Change List. You can choose to include: Dissolves, Other Transitions, 3rd Party Transitions, Black Edits, Color Effects, Other Segment Effects, 3rd Party Segment Effects and Color Decision Lists.
Sound Select the sound options you want included in your Cut List or Change List: Dissolves, Volume, Track Patching, EQ Effects and Track Effects, AudioSuite Effects.
Both Picture and Sound Select the picture and sound options you want included in your Cut List or Change List: Clip Names, Source File Name, Cadence, Reel Names, Clip Comments, Repair Notes and Frame Count
Option Description
Option Description
Running As Mode Specifies the format in which to display the incrementing count for the sequence.
Master TC Track Select which timecode track you want to be used to display the master timecode in the list.
Start at: Specify the footage to be used as a starting point in the master.
Display Handles Select Display Handles, and then type a handle size. A new With Handles column is added to the lists for each source column for WebLists and TabbedLists templates. The column contains the start and end values of the column and adds a handle of the specified size.
Show events, hide markers
Select from the following to determine if both events and markers are included in your EDL. Choose from: Show events, hide markers; Show events, show markers; Show events with markers, hide makers; Show events with markers, show markers; or Hide events, show markers.
Separate List for Each Channel
Select this option to generate a separate set of lists for each selected picture track.
Show Prefix Select this option to identify cuts in the cut list or change list by displaying the entire first and last key number for each cut.
Matchback Info Select this option to display the matchback information in the list.

New Features
24
Cut List and Change List Icons
The following table list the icons available in both the cut list and change list. The icons only appear if Show Icons is enabled in the Formatting tab. Icons only display in Columnar Cut Lists and Change Lists.
Disable Perf Slip Select to instruct the Cut List tool to ignore any audio perf slipping and offset data when displaying ink numbers.
Show Icons Select to include icons that graphically represent edit events in your lists. See “Cut List and Change List Icons” on page 24 and “Change List Icons” on page 25.
Ignore all Special Characters from Display
Select to exclude special characters.
Option Description
Icon Event
Fade Out
Fade In
Dupe
Dissolve
Optical
Optical Media
Media Offline
New Features
25
T
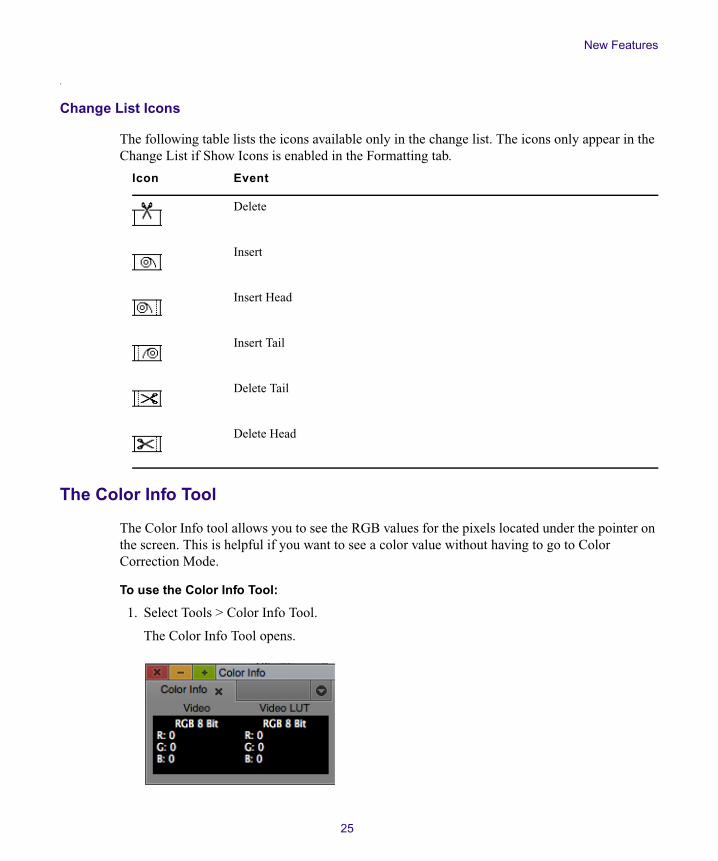
Change List Icons
The following table lists the icons available only in the change list. The icons only appear in the Change List if Show Icons is enabled in the Formatting tab.
The Color Info Tool
The Color Info tool allows you to see the RGB values for the pixels located under the pointer on the screen. This is helpful if you want to see a color value without having to go to Color Correction Mode.
To use the Color Info Tool:
1. Select Tools > Color Info Tool.
The Color Info Tool opens.
Icon Event
Delete
Insert
Insert Head
Insert Tail
Delete Tail
Delete Head
New Features
26
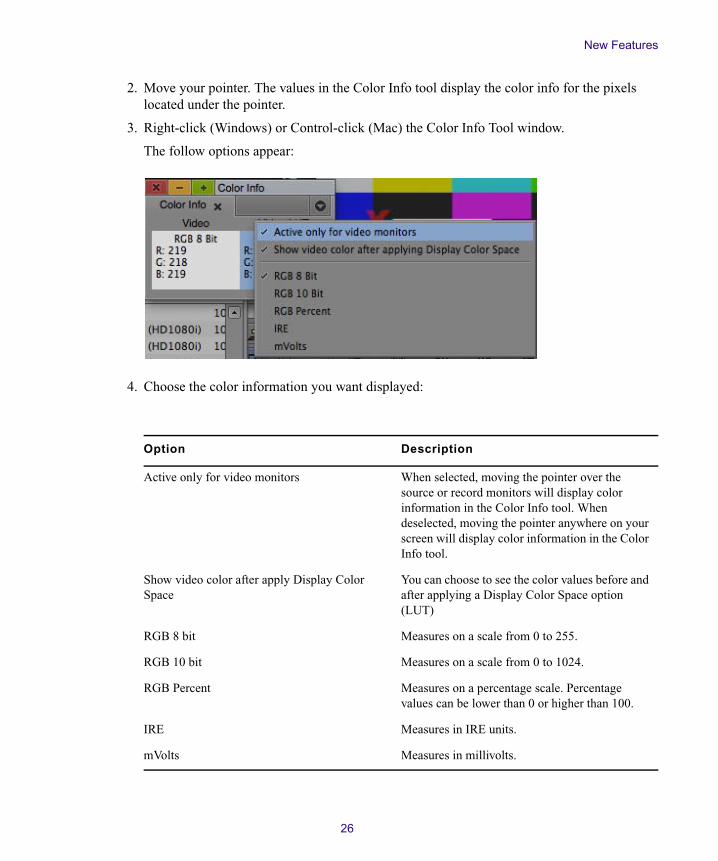
2. Move your pointer. The values in the Color Info tool display the color info for the pixels located under the pointer.
3. Right-click (Windows) or Control-click (Mac) the Color Info Tool window.
The follow options appear:
4. Choose the color information you want displayed:
Option Description
Active only for video monitors When selected, moving the pointer over the source or record monitors will display color information in the Color Info tool. When deselected, moving the pointer anywhere on your screen will display color information in the Color Info tool.
Show video color after apply Display Color Space
You can choose to see the color values before and after applying a Display Color Space option (LUT)
RGB 8 bit Measures on a scale from 0 to 255.
RGB 10 bit Measures on a scale from 0 to 1024.
RGB Percent Measures on a percentage scale. Percentage values can be lower than 0 or higher than 100.
IRE Measures in IRE units.
mVolts Measures in millivolts.
New Features
27
You can also access the Color Info tool by clicking the Color Info button in the Color Correction Tool.
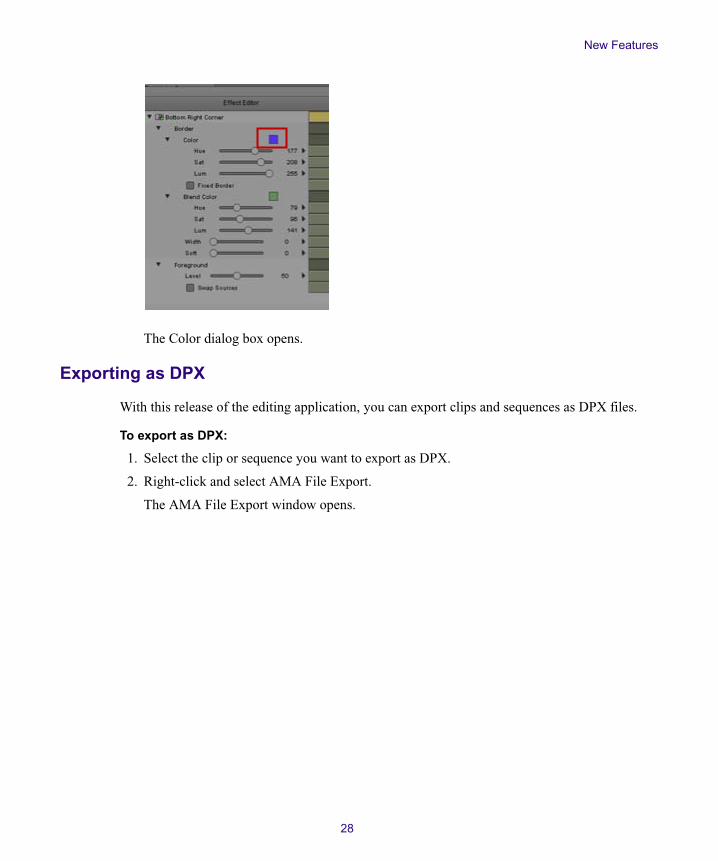
Changes to Selecting Color in the Effect Editor
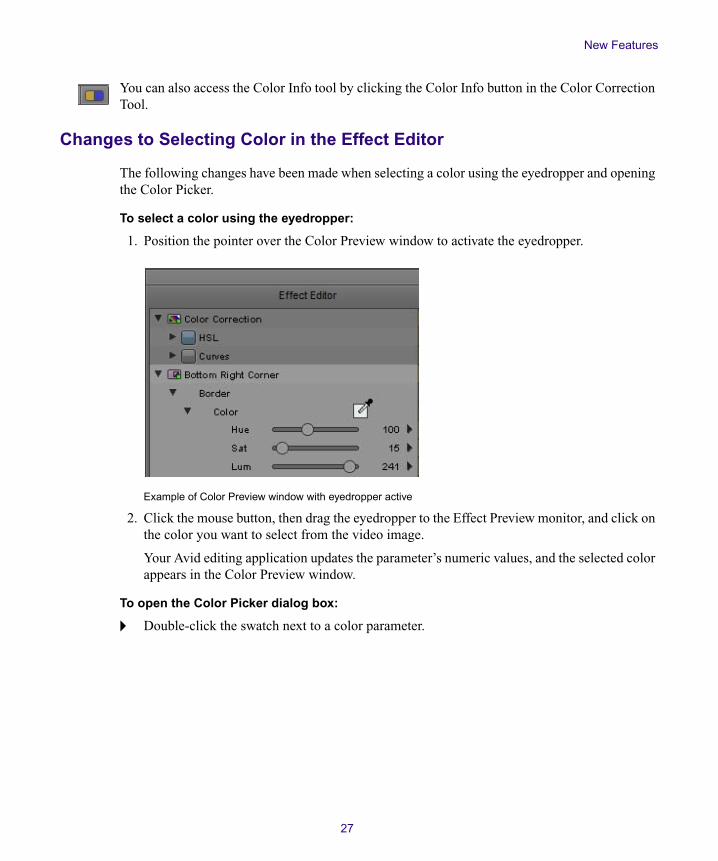
The following changes have been made when selecting a color using the eyedropper and opening the Color Picker.
To select a color using the eyedropper:
1. Position the pointer over the Color Preview window to activate the eyedropper.
Example of Color Preview window with eyedropper active
2. Click the mouse button, then drag the eyedropper to the Effect Preview monitor, and click on the color you want to select from the video image.
Your Avid editing application updates the parameter’s numeric values, and the selected color appears in the Color Preview window.
To open the Color Picker dialog box:
t Double-click the swatch next to a color parameter.
New Features
28
The Color dialog box opens.
Exporting as DPX
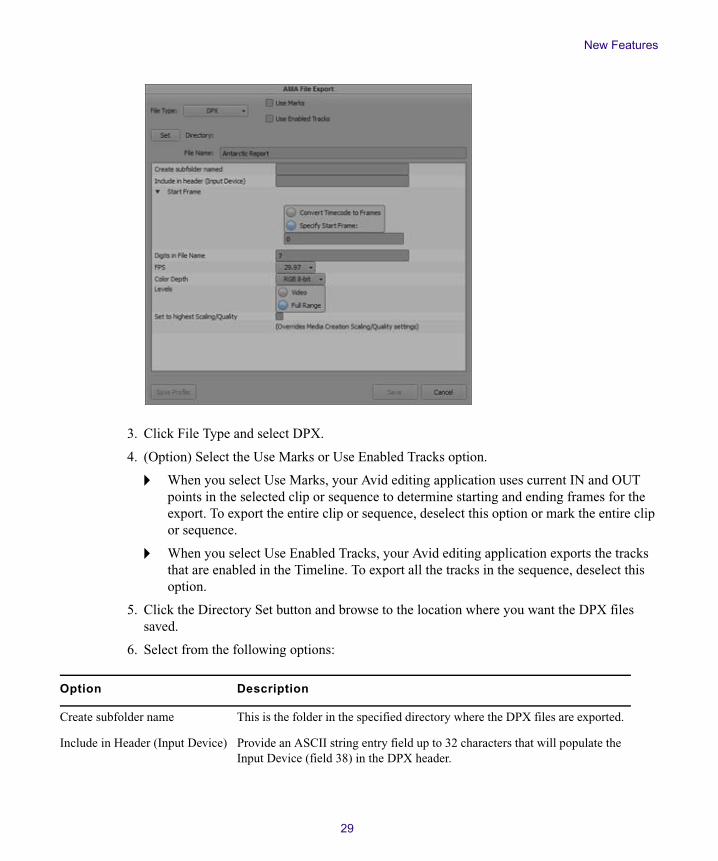
With this release of the editing application, you can export clips and sequences as DPX files.
To export as DPX:
1. Select the clip or sequence you want to export as DPX.
2. Right-click and select AMA File Export.
The AMA File Export window opens.
New Features
29
3. Click File Type and select DPX.
4. (Option) Select the Use Marks or Use Enabled Tracks option.
t When you select Use Marks, your Avid editing application uses current IN and OUT points in the selected clip or sequence to determine starting and ending frames for the export. To export the entire clip or sequence, deselect this option or mark the entire clip or sequence.
t When you select Use Enabled Tracks, your Avid editing application exports the tracks that are enabled in the Timeline. To export all the tracks in the sequence, deselect this option.
5. Click the Directory Set button and browse to the location where you want the DPX files saved.
6. Select from the following options:
Option Description
Create subfolder name This is the folder in the specified directory where the DPX files are exported.
Include in Header (Input Device) Provide an ASCII string entry field up to 32 characters that will populate the Input Device (field 38) in the DPX header.
New Features
30
7. Click Save.
The DPX files are exported to the folder set in Step 5..
.
Additional Column Headings
The following column headings are now included with the editing application: Frame Count Start, Frame Count End, Frame Count Duration, and Reel. The information in these columns applies to clips and subclips. The information does not apply to sequences or group clips.
• Frame Count Start: Displays the start frame for the clip. You can edit the number in the column to change the starting frame.
• Frame Count End: Displays the end frame count for the clip. This number is automatically adjusted if you change the Frame Count Start.
• Frame Count Duration: Displays the frame count duration of the clip.
• Reel: Displays the reel information from the camera or capture device for those devices that support REEL info.
Start Frame Enter a value from 0 to 999999999. Entering a value into this field will reflect the first frame in the export and will increment for all additional frames. For example if you enter 20 and have entered 7 into the number of digits in the file name, the first file name in the sequence would be: name.0000020.dpx.
Convert Timecode to Frames Converts the Timecode of the Sequence or master clip to frames. For example the sequence timecode is 02:00:10:00 would show the file name as name.173040.dpx.
Digits in File Name Determines how many digits are in the file name. The range is from 1 to 9. The default is 7. For example a value of 2 would be name.01.dpx, name.02.dpx, etc. If the count reached 99 an additional digit is added, name.100.dpx.
Color Depth Supports RGB 8bit, RGB 10bit and RGB 16bit.
FPS Declare a frame rate and embed it into the DPX header.
Set to highest scaling quality Disabling this option accesses the scaling/quality settings from the Media Creation Settings. Enabling this option provides the highest available scaling/quality and overrides the Media Creation Settings.
Levels Enabling Video provides 64-940. Full Range provides 0-1023.
Option Description
New Features
31
Legal NoticesProduct specifications are subject to change without notice and do not represent a commitment on the part of Avid Technology, Inc.
This product is subject to the terms and conditions of a software license agreement provided with the software. The product may only be used in accordance with the license agreement.
This product may be protected by one or more U.S. and non-U.S patents. Details are available at www.avid.com/patents.
This document is protected under copyright law. An authorized licensee of Avid Media Composer may reproduce this publication for the licensee’s own use in learning how to use the software. This document may not be reproduced or distributed, in whole or in part, for commercial purposes, such as selling copies of this document or providing support or educational services to others. This document is supplied as a guide for Avid Media Composer. Reasonable care has been taken in preparing the information it contains. However, this document may contain omissions, technical inaccuracies, or typographical errors. Avid Technology, Inc. does not accept responsibility of any kind for customers’ losses due to the use of this document. Product specifications are subject to change without notice.
Copyright © 2014 Avid Technology, Inc. and its licensors. All rights reserved.
The following disclaimer is required by Apple Computer, Inc.:APPLE COMPUTER, INC. MAKES NO WARRANTIES WHATSOEVER, EITHER EXPRESS OR IMPLIED, REGARDING THIS PRODUCT, INCLUDING WARRANTIES WITH RESPECT TO ITS MERCHANTABILITY OR ITS FITNESS FOR ANY PARTICULAR PURPOSE. THE EXCLUSION OF IMPLIED WARRANTIES IS NOT PERMITTED BY SOME STATES. THE ABOVE EXCLUSION MAY NOT APPLY TO YOU. THIS WARRANTY PROVIDES YOU WITH SPECIFIC LEGAL RIGHTS. THERE MAY BE OTHER RIGHTS THAT YOU MAY HAVE WHICH VARY FROM STATE TO STATE.
The following disclaimer is required by Sam Leffler and Silicon Graphics, Inc. for the use of their TIFF library:Copyright © 1988–1997 Sam Leffler Copyright © 1991–1997 Silicon Graphics, Inc.
Permission to use, copy, modify, distribute, and sell this software [i.e., the TIFF library] and its documentation for any purpose is hereby granted without fee, provided that (i) the above copyright notices and this permission notice appear in all copies of the software and related documentation, and (ii) the names of Sam Leffler and Silicon Graphics may not be used in any advertising or publicity relating to the software without the specific, prior written permission of Sam Leffler and Silicon Graphics.
THE SOFTWARE IS PROVIDED “AS-IS” AND WITHOUT WARRANTY OF ANY KIND, EXPRESS, IMPLIED OR OTHERWISE, INCLUDING WITHOUT LIMITATION, ANY WARRANTY OF MERCHANTABILITY OR FITNESS FOR A PARTICULAR PURPOSE.
IN NO EVENT SHALL SAM LEFFLER OR SILICON GRAPHICS BE LIABLE FOR ANY SPECIAL, INCIDENTAL, INDIRECT OR CONSEQUENTIAL DAMAGES OF ANY KIND, OR ANY DAMAGES WHATSOEVER RESULTING FROM LOSS OF USE, DATA OR PROFITS, WHETHER OR NOT ADVISED OF THE POSSIBILITY OF DAMAGE, AND ON ANY THEORY OF LIABILITY, ARISING OUT OF OR IN CONNECTION WITH THE USE OR PERFORMANCE OF THIS SOFTWARE.
The following disclaimer is required by the Independent JPEG Group:This software is based in part on the work of the Independent JPEG Group.
This Software may contain components licensed under the following conditions:Copyright (c) 1989 The Regents of the University of California. All rights reserved.
Redistribution and use in source and binary forms are permitted provided that the above copyright notice and this paragraph are duplicated in all such forms and that any documentation, advertising materials, and other materials related to such distribution and use acknowledge that the software was developed by the University of California, Berkeley. The name of the University may not be used to endorse or promote products derived from this software without specific prior written permission. THIS SOFTWARE IS PROVIDED ``AS IS'' AND WITHOUT ANY EXPRESS OR IMPLIED WARRANTIES, INCLUDING, WITHOUT LIMITATION, THE IMPLIED WARRANTIES OF MERCHANTABILITY AND FITNESS FOR A PARTICULAR PURPOSE.
Copyright (C) 1989, 1991 by Jef Poskanzer.
Permission to use, copy, modify, and distribute this software and its documentation for any purpose and without fee is hereby granted, provided that the above copyright notice appear in all copies and that both that copyright notice and this permission notice appear in supporting documentation. This software is provided "as is" without express or implied warranty.
Copyright 1995, Trinity College Computing Center. Written by David Chappell.
New Features
32
Permission to use, copy, modify, and distribute this software and its documentation for any purpose and without fee is hereby granted, provided that the above copyright notice appear in all copies and that both that copyright notice and this permission notice appear in supporting documentation. This software is provided "as is" without express or implied warranty.
Copyright 1996 Daniel Dardailler.
Permission to use, copy, modify, distribute, and sell this software for any purpose is hereby granted without fee, provided that the above copyright notice appear in all copies and that both that copyright notice and this permission notice appear in supporting documentation, and that the name of Daniel Dardailler not be used in advertising or publicity pertaining to distribution of the software without specific, written prior permission. Daniel Dardailler makes no representations about the suitability of this software for any purpose. It is provided "as is" without express or implied warranty.
Modifications Copyright 1999 Matt Koss, under the same license as above.
Copyright (c) 1991 by AT&T.
Permission to use, copy, modify, and distribute this software for any purpose without fee is hereby granted, provided that this entire notice is included in all copies of any software which is or includes a copy or modification of this software and in all copies of the supporting documentation for such software.
THIS SOFTWARE IS BEING PROVIDED "AS IS", WITHOUT ANY EXPRESS OR IMPLIED WARRANTY. IN PARTICULAR, NEITHER THE AUTHOR NOR AT&T MAKES ANY REPRESENTATION OR WARRANTY OF ANY KIND CONCERNING THE MERCHANTABILITY OF THIS SOFTWARE OR ITS FITNESS FOR ANY PARTICULAR PURPOSE.
This product includes software developed by the University of California, Berkeley and its contributors.
The following disclaimer is required by Nexidia Inc.:© 2010 Nexidia Inc. All rights reserved, worldwide. Nexidia and the Nexidia logo are trademarks of Nexidia Inc. All other trademarks are the property of their respective owners. All Nexidia materials regardless of form, including without limitation, software applications, documentation and any other information relating to Nexidia Inc., and its products and services are the exclusive property of Nexidia Inc. or its licensors. The Nexidia products and services described in these materials may be covered by Nexidia's United States patents: 7,231,351; 7,263,484; 7,313,521; 7,324,939; 7,406,415, 7,475,065; 7,487,086 and/or other patents pending and may be manufactured under license from the Georgia Tech Research Corporation USA.
The following disclaimer is required by Paradigm Matrix:Portions of this software licensed from Paradigm Matrix.
The following disclaimer is required by Ray Sauers Associates, Inc.:“Install-It” is licensed from Ray Sauers Associates, Inc. End-User is prohibited from taking any action to derive a source code equivalent of “Install-It,” including by reverse assembly or reverse compilation, Ray Sauers Associates, Inc. shall in no event be liable for any damages resulting from reseller’s failure to perform reseller’s obligation; or any damages arising from use or operation of reseller’s products or the software; or any other damages, including but not limited to, incidental, direct, indirect, special or consequential Damages including lost profits, or damages resulting from loss of use or inability to use reseller’s products or the software for any reason including copyright or patent infringement, or lost data, even if Ray Sauers Associates has been advised, knew or should have known of the possibility of such damages.
The following disclaimer is required by Videomedia, Inc.:“Videomedia, Inc. makes no warranties whatsoever, either express or implied, regarding this product, including warranties with respect to its merchantability or its fitness for any particular purpose.”
“This software contains V-LAN ver. 3.0 Command Protocols which communicate with V-LAN ver. 3.0 products developed by Videomedia, Inc. and V-LAN ver. 3.0 compatible products developed by third parties under license from Videomedia, Inc. Use of this software will allow “frame accurate” editing control of applicable videotape recorder decks, videodisc recorders/players and the like.”
The following disclaimer is required by Altura Software, Inc. for the use of its Mac2Win software and Sample Source Code:©1993–1998 Altura Software, Inc.
The following disclaimer is required by Ultimatte Corporation:Certain real-time compositing capabilities are provided under a license of such technology from Ultimatte Corporation and are subject to copyright protection.
The following disclaimer is required by 3Prong.com Inc.:Certain waveform and vector monitoring capabilities are provided under a license from 3Prong.com Inc.
New Features
33
The following disclaimer is required by Interplay Entertainment Corp.:The “Interplay” name is used with the permission of Interplay Entertainment Corp., which bears no responsibility for Avid products.
This product includes portions of the Alloy Look & Feel software from Incors GmbH.
This product includes software developed by the Apache Software Foundation (http://www.apache.org/).
© DevelopMentor
This product may include the JCifs library, for which the following notice applies:JCifs © Copyright 2004, The JCIFS Project, is licensed under LGPL (http://jcifs.samba.org/). See the LGPL.txt file in the Third Party Software directory on the installation CD.
Avid Interplay contains components licensed from LavanTech. These components may only be used as part of and in connection with Avid Interplay.
Attn. Government User(s). Restricted Rights LegendU.S. GOVERNMENT RESTRICTED RIGHTS. This Software and its documentation are “commercial computer software” or “commercial computer software documentation.” In the event that such Software or documentation is acquired by or on behalf of a unit or agency of the U.S. Government, all rights with respect to this Software and documentation are subject to the terms of the License Agreement, pursuant to FAR §12.212(a) and/or DFARS §227.7202-1(a), as applicable.
Trademarks003, 192 Digital I/O, 192 I/O, 96 I/O, 96i I/O, Adrenaline, AirSpeed, ALEX, Alienbrain, AME, AniMatte, Archive, Archive II, Assistant Station, AudioPages, AudioStation, AutoLoop, AutoSync, Avid, Avid Active, Avid Advanced Response, Avid DNA, Avid DNxcel, Avid DNxHD, Avid DS Assist Station, Avid Liquid, Avid Media Engine, Avid Media Processor, Avid MEDIArray, Avid Mojo, Avid Remote Response, Avid Unity, Avid Unity ISIS, Avid VideoRAID, AvidRAID, AvidShare, AVIDstripe, AVX, Axiom, Beat Detective, Beauty Without The Bandwidth, Beyond Reality, BF Essentials, Bomb Factory, Boom, Bruno, C|24, CaptureManager, ChromaCurve, ChromaWheel, Cineractive Engine, Cineractive Player, Cineractive Viewer, Color Conductor, Command|24, Command|8, Conectiv, Control|24, Cosmonaut Voice, CountDown, d2, d3, DAE, Dazzle, Dazzle Digital Video Creator, D-Command, D-Control, Deko, DekoCast, D-Fi, D-fx, Digi 003, DigiBase, DigiDelivery, Digidesign, Digidesign Audio Engine, Digidesign Development Partners, Digidesign Intelligent Noise Reduction, Digidesign TDM Bus, DigiLink, DigiMeter, DigiPanner, DigiProNet, DigiRack, DigiSerial, DigiSnake, DigiSystem, Digital Choreography, Digital Nonlinear Accelerator, DigiTest, DigiTranslator, DigiWear, DINR, DNxchange, DPP-1, D-Show, DSP Manager, DS-StorageCalc, DV Toolkit, DVD Complete, D-Verb, Eleven, EM, Euphonix, EUCON, EveryPhase, Expander, ExpertRender, Fader Pack, Fairchild, FastBreak, Fast Track, Film Cutter, FilmScribe, Flexevent, FluidMotion, Frame Chase, FXDeko, HD Core, HD Process, HDPack, Home-to-Hollywood, HYBRID, HyperControl, HyperSPACE, HyperSPACE HDCAM, iKnowledge, Image Independence, Impact, Improv, iNEWS, iNEWS Assign, iNEWS ControlAir, Instantwrite, Instinct, Intelligent Content Management, Intelligent Digital Actor Technology, IntelliRender, Intelli-Sat, Intelli-sat Broadcasting Recording Manager, InterFX, Interplay, inTONE, Intraframe, iS Expander, ISIS, IsoSync, iS9, iS18, iS23, iS36, ISIS, IsoSync, KeyRig, KeyStudio, LaunchPad, LeaderPlus, LFX, Lightning, Link & Sync, ListSync, LKT-200, Lo-Fi, Luna, MachineControl, Magic Mask, Make Anything Hollywood, make manage move | media, Marquee, MassivePack, Massive Pack Pro, M-Audio, M-Audio Micro, Maxim, Mbox, Media Composer, MediaFlow, MediaLog, MediaMatch, MediaMix, Media Reader, Media Recorder, MEDIArray, MediaServer, MediaShare, MetaFuze, MetaSync, MicroTrack, MIDI I/O, Midiman, Mix Rack, MixLab, Moviebox, Moviestar, MultiShell, NaturalMatch, NewsCutter, NewsView, Nitris, NL3D, NLP, Nova, NRV-10 interFX, NSDOS, NSWIN, Octane, OMF, OMF Interchange, OMM, OnDVD, Open Media Framework, Open Media Management, Ozone, Ozonic, Painterly Effects, Palladium, Personal Q, PET, Podcast Factory, PowerSwap, PRE, ProControl, ProEncode, Profiler, Pro Tools LE, Pro Tools M-Powered, Pro Transfer, Pro Tools, QuickPunch, QuietDrive, Realtime Motion Synthesis, Recti-Fi, Reel Tape Delay, Reel Tape Flanger, Reel Tape Saturation, Reprise, Res Rocket Surfer, Reso, RetroLoop, Reverb One, ReVibe, Revolution, rS9, rS18, RTAS, Salesview, Sci-Fi, Scorch, Scorefitter, ScriptSync, SecureProductionEnvironment, Serv|LT, Serv|GT, Session, Shape-to-Shape, ShuttleCase, Sibelius, SIDON, SimulPlay, SimulRecord, Slightly Rude Compressor, Smack!, Soft SampleCell, Soft-Clip Limiter, Solaris, SoundReplacer, SPACE, SPACEShift, SpectraGraph, SpectraMatte, SteadyGlide, Streamfactory, Streamgenie, StreamRAID, Strike, Structure, Studiophile, SubCap, Sundance Digital, Sundance, SurroundScope, Symphony, SYNC HD, Synchronic, SynchroScope, SYNC I/O, Syntax, TDM FlexCable, TechFlix, Tel-Ray, Thunder, Titansync, Titan, TL Aggro, TL AutoPan, TL Drum Rehab, TL Everyphase, TL Fauxlder, TL In Tune, TL MasterMeter, TL Metro, TL Space, TL Utilities, tools for storytellers, Torq, Torq Xponent, Transfuser, Transit, TransJammer, Trigger Finger, Trillium Lane Labs, TruTouch, UnityRAID, Vari-Fi, Velvet, Video the Web Way, VideoRAID, VideoSPACE, VideoSpin, VTEM, Work-N-Play, Xdeck, X-Form, Xmon, XPAND!, Xponent, X-Session, and X-Session Pro are either registered trademarks or trademarks of Avid Technology, Inc. in the United States and/or other countries.
Adobe and Photoshop are either registered trademarks or trademarks of Adobe Systems Incorporated in the United States and/or other countries. Apple and Macintosh are trademarks of Apple Computer, Inc., registered in the U.S. and other countries. Windows is either a registered trademark or trademark of Microsoft Corporation in the United States and/or other countries. All other trademarks contained herein are the property of their respective owners.
New Features
34
FootageArri — Courtesy of Arri/Fauer — John Fauer, Inc.Bell South “Anticipation” — Courtesy of Two Headed Monster — Tucker/Wayne Atlanta/GMS.Canyonlands — Courtesy of the National Park Service/Department of the Interior.Eco Challenge British Columbia — Courtesy of Eco Challenge Lifestyles, Inc., All Rights Reserved. Eco Challenge Morocco — Courtesy of Discovery Communications, Inc.It’s Shuttletime — Courtesy of BCP & Canadian Airlines. Nestlé Coffee Crisp — Courtesy of MacLaren McCann Canada. Saturn “Calvin Egg” — Courtesy of Cossette Communications. “Tigers: Tracking a Legend” — Courtesy of www.wildlifeworlds.com, Carol Amore, Executive Producer."The Big Swell" — Courtesy of Swell Pictures, Inc.Windhorse — Courtesy of Paul Wagner Productions.
Arizona Images — KNTV Production — Courtesy of Granite Broadcasting, Inc., Editor/Producer Bryan Foote.Canyonlands — Courtesy of the National Park Service/Department of the Interior.Ice Island — Courtesy of Kurtis Productions, Ltd.Tornados + Belle Isle footage — Courtesy of KWTV News 9.WCAU Fire Story — Courtesy of NBC-10, Philadelphia, PA.Women in Sports – Paragliding — Courtesy of Legendary Entertainment, Inc.
What’s New • 0130-30397-01 Rev K • February 2015