network inventory quick start guide - emco software · pdf filenetwork inventory quick start...
TRANSCRIPT

copy Copyright 2001-2012 EMCO Software
Network Inventory Quick StartGuide
Knowledgebase Article
Company web site ltSITE_LABELgt
Support email ltSUPPORT_EMAILgt
Support telephone +44 20 3287-7651
+1 646 233-1163
copy Copyright 2001-2012 EMCO SoftwareltSITE_LABELgt
What is EMCO Network Inventory
Knowledgebase Article
2
What is EMCO Network Inventory
EMCO Network Inventory is an advanced easy to use tool that helps systems administrators get up-to-dateinformation about the hardware and software available on computers in the office Local Area Network (LAN) orWide Area Network (WAN) Using EMCO Network Inventory you can quickly scan all the computers in yournetwork and generate a report about the hardware and software installed on the computers You can also keeptrack of application licenses on all the computers in your network
EMCO Network Inventory 5 performs fast and comprehensive PC hardware inventory and software audits withvery little load on the network it is low priced and very easy to use
EMCO Network Inventory can help you answer such questions as
How many computers in your network are running MS Vista
Which computers are still running WinXP and have less than 1GB RAM
On which computers is Photoshop CS3 installed and how much did you spend for it
Do you need more software licenses or do you have enough
How much extra hardware would you need if you were to change the operating system
Are there any unwanted files like mp3 or avi files and who has them
Is there any adware or spyware on any of the machines in the network
EMCO Network Inventory is one of the most popular inventory tools in the market It is being used by industrialleaders small businesses governments nonprofit organizations and educational institutions
Main Features of EMCO Network Inventory
Using EMCO Network Inventory you can -
Collect information about the hardware on computers in your network such as the processor memorymotherboard video card monitor etc
Collect information about the Operating System and Service Packs installed on computers in your network
Automatically add new machines into the database using the Auto-Fetch schedule
Scan computers by using a specific domain name or a range of IP addresses
Get a list of installed applications and hotfixes running processes and services etc
Perform custom scans using user-defined specifications
Store all scanned information in a database
Search the registry of any machine on the network for a specific key or value
Keep track of all purchased software licenses and calculate the number of licenses required for installedapplications taking versions into account
Compare the number of required licenses against available licenses
Automatically calculate license costs
Identify changes that may have occurred in licenses between networks or at different times on the samenetwork
Generate print-ready reports in one of the following formats PDF HTML RTF JPEG or plain text
Customize the information to be included in the reports
Create pie charts bar charts or line charts from the collected data
Export data to Microsoft Excel
copy Copyright 2001-2012 EMCO SoftwareltSITE_LABELgt
Installing on the Local Machine
Knowledgebase Article
3
Installing on the Local MachineEMCO Network Inventory needs to be installed on just one machine in your network
When you install EMCO Network Inventory two stub files are also installed Use these stub files to collectinformation from Windows 9x and NT machines
See Installing on Remote Computers for more details about using the stub files
To install EMCO Network Inventory on the local machine
1 Double-click on the Network Inventory setup exe file that you have downloaded from the EMCO NetworkInventory Downloads page
The setup file for EMCO Network Inventory Enterprise Edition is networkinventoryentsetupexe and forthe Professional Edition it is networkinventoryprosetupexe and for The Starter Edition isnetworkinventorystartersetupexe
If you have downloaded the archived setup file you will have to first extract the above-named setup exe filefrom the zip file that you have downloaded
2 On the first screen of the setup program click Next
The License Agreement will be displayed
The EMCO Network Inventory License Agreement
3 Click on I accept the agreement and then click Next
copy Copyright 2001-2012 EMCO SoftwareltSITE_LABELgt
Installing on the Local Machine
Knowledgebase Article
4
Select Destination Location
4 Click Next
Select Start Menu Folder
5 Click Next
copy Copyright 2001-2012 EMCO SoftwareltSITE_LABELgt
Installing on the Local Machine
Knowledgebase Article
5
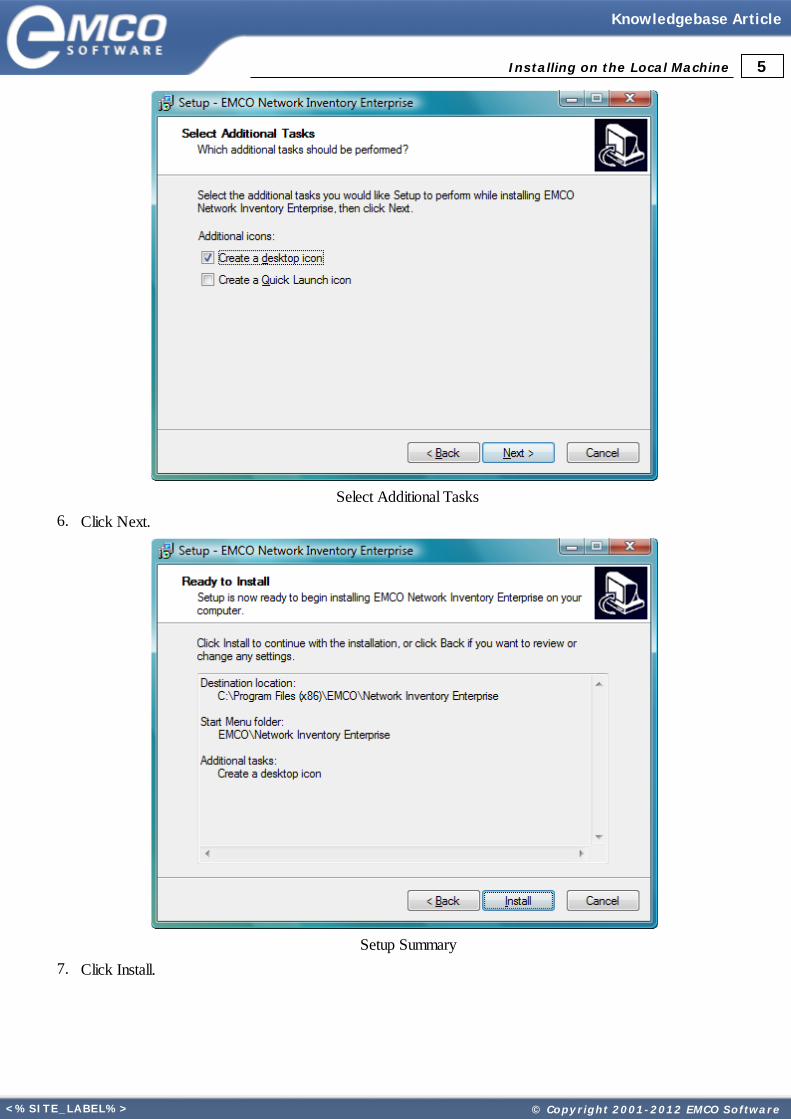
Select Additional Tasks
6 Click Next
Setup Summary
7 Click Install
copy Copyright 2001-2012 EMCO SoftwareltSITE_LABELgt
Installing on the Local Machine
Knowledgebase Article
6
The EMCO Network Inventory program will be installed to the desired location Once the program is installedthe following screen is displayed
Completing the EMCO Network Inventory Setup
8 Click Finish to complete the installation If you have selected the Launch EMCO Network Inventory checkbox the EMCO Network Inventory is launched
Installing on Remote Computers
It is not necessary to install EMCO Network Inventory on every machine in your network Instead EMCOprovides special programs called stub analyzers to collect information from Win9x and NT machines To use thesestub analyzers you need to copy the relevant stub analyzer files to the Win9x and NT machines and execute themWhen you execute the stub analyzer on a computer it collects the information about that computer and stores it in afile called ltMACHINE NAMEgtmdax5x (where ltMACHINE NAMEgt is the name of the computer on which thestub analyzer is executed) You can then import this information into EMCO Network Inventory for chartingreporting and printing
You should run these stub analyzers individually on each machine to collect the information of that machinebecause if there is concurrent access for the data folder by more then one machine it can corrupt theinformation and the data will not be consistent
To use a stub analyzer
1 Create a temporary folder on the computer that you want to scan
2 From the CProgram FilesEMCONetwork Inventory EnterpriseStubs folder copy the relevant stub analyzerfilemdashMInfo9xexe for a Win9x machine or MInfoNTexe for a WinNT machinemdashand the Optionsini andDefaultcsc5x files and paste them into this temporary folder
3 If necessary configure the Optionsini file to match your requirements
4 Run the stub analyzer filemdashMInfo9xexe or MInfoNTexe The stub analyzer will collect the information aboutthe computer and store it in the ltMACHINE NAMEgtmdax5x file
5 On the local machine start EMCO Network Inventory and import the scan data from the ltMACHINENAMEgtmdax5x file
copy Copyright 2001-2012 EMCO SoftwareltSITE_LABELgt
Installing on the Local Machine
Knowledgebase Article
7
The following table describes the commands you can use in the Optionsini file
Command Description
Use Directory= Set this to 1 if you want the scan results should be stored in afolder Otherwise set this to 0 (zero)
Use Directory=1
Directory= Specify the name of the folder in which to store the scanresults This is used only if you have set Use Directory to 1
Directory=cTemp
RunOnce= Set this to 1 if you want to run the stub analyzer only onceOtherwise set this to 0 (zero) RunOnce will only execute thestub if no data exists for the machine
RunOnce=0
AllData= If you set AllData to 0 specify what information you want toscan by setting the corresponding command to 1
AllData=1
ShareAccess NetworkPrinters HotFixes and UserAccounts are not available in Win9x
Command Default Value
BasicInfo= BasicInfo=0
OSDescription= OSDescription=0
WMIInfo= WMIInfo=0
UseWMIforPhysicalMemory= UseWMIforPhysicalMemory=0
DigitalProductID= DigitalProductID=0
OfficeDigitalProductID= OfficeDigitalProductID=0
InstalledApps= InstalledApps=0
CustomScans= CustomScans=0
Shares= Shares=0
ShareAccess= ShareAccess=0
Printers= Printers=0
NetworkPrinters= NetworkPrinters=0
MappedDrives= MappedDrives=0
DiskInfo= DiskInfo=0
CdromDrives= CdromDrives=1
Processes= Processes=0
StartupCommands= StartupCommands=0
ProgramFolders= ProgramFolders=0
Processors= Processors=0
NetworkCards= NetworkCards=0
EnvironmentalVars= EnvironmentalVars=0
UserEnvVars= UserEnvVars=0
Services= Services=0
MemoryBanks= MemoryBanks=0
DataSourcesODBC= DataSourcesODBC=0
UserDataSourcesODBC= UserDataSourcesODBC=0
HotFixes= HotFixes=0
copy Copyright 2001-2012 EMCO SoftwareltSITE_LABELgt
Installing on the Local Machine
Knowledgebase Article
8
ScheduledTasks= ScheduledTasks=0
Fonts= Fonts=0
There is no need to use the stub analyzers if your computers are operating under Windows NT Windows2000 Windows XP Pro or Windows Vista SP1 and you have the required ports open EMCO NetworkInventory can directly scan computers that use these operating systems
Getting Started with EMCO Network Inventory
In this section we shall see how to -
Start EMCO Network Inventory
Scan the network for data
View reports
Export the collected data to Excel
Starting EMCO Network Inventory
To start EMCO Network Inventory
1 Click Start gt All Programs gt EMCO gt Network Inventory Enterprise gt Network Inventory Enterprise
If you have installed the Professional version of Network Inventory you will have to select Start gt AllPrograms gt EMCO gt Network Inventory Professional gt Network Inventory Professional in the abovemenu
If you have installed the Starter version of Network Inventory you will have to select Start gt All Programsgt EMCO gt Network Inventory Starter gt Network Inventory Starter in the above menu
OR
1 Double-click on the EMCO Network Inventory icon on your desktop
If this is the first time you are running EMCO Network Inventory the following message will be displayed
Note down the folder name that is displayed in the message EMCO Network Inventory will not be able tofunction properly if any other program tries to access the DATA folder Therefore you should exclude theDATA folder from your anti-virus scans (Refer to your anti-virus programs user guide for more informationon excluding folders from scans)
After noting down the folder name click OK to close the dialog box
copy Copyright 2001-2012 EMCO SoftwareltSITE_LABELgt
Getting Started with EMCO Network Inventory
Knowledgebase Article
9
2 If you have not yet activated your copy of EMCO Network Inventory the Trial dialog is displayed on thescreen
Closing EMCO Network Inventory
To close EMCO Network Inventory
Click File gt Exit
OR
Click Close button at the top right hand corner of the EMCO Network Inventory program window
copy Copyright 2001-2012 EMCO SoftwareltSITE_LABELgt
Getting Started with EMCO Network Inventory
Knowledgebase Article
10
The Main Screen
The Main EMCO Network Inventory Screen
Importing Data from the Stub Analyzers into EMCO Network Inventory
If you do want to get the scan information from the Machines running on Windows 9X you should install configureand execute the stub analyzers on them Once the stub analyzers have been run you can import the collected datainto EMCO Network Inventorys database
Refer to the next section Installing on Remote Computers for more information about the stub analyzers
To import the stub analyzer data
As you click on items in the left panel the details of the selected item appear in this panel
Select these tabs to (a) manage the information collected from the machines on your network (b) change theEMCO Network Inventory settings or (c) provide alternate credentials
Select items from this list to view details and perform other operations on the collected information
1 In the main EMCO Network Inventory screen right-click on Networking
copy Copyright 2001-2012 EMCO SoftwareltSITE_LABELgt
Getting Started with EMCO Network Inventory
Knowledgebase Article
11
2 In the context menu that appears select Load Machine Data gt Load From Data File(s)
Load From Data Files
3 In the Open dialog that appears select the relevant ltMACHINE NAMEgtmdax5x file and click on the Openbutton
The scan data from the selected machine will be imported into EMCO Network Inventory
4 If you now open any of the branches in the left panel of the main screen you will see the imported data
Main Screen after importing data
copy Copyright 2001-2012 EMCO SoftwareltSITE_LABELgt
Getting Started with EMCO Network Inventory
Knowledgebase Article
12
Scanning the Network
EMCO Network Inventory allows you to perform a variety of scan operations on machines in your network
Use This Scan To
Scan for File Search the computers on your network for specific files and folders Scan for Disk Search through the various drives on your local and remote computers for specific types of
files Scan for Registry Search the registry of local and remote computers for a specific value Scan Registry Search the registry of local and remote computers for a specific key or value
Scan for File Scan for Disk Scan for Registry and Scan Registry are available only in the EMCO NetworkInventory Enterprise Edition
Scanning the Network consists of two distinct operations
Defining the Scan and
Executing the Scan
Defining a Scan Operation
1 Expand San operations node and select one of the Scan nodes
Selecting the Disk Scan node
copy Copyright 2001-2012 EMCO SoftwareltSITE_LABELgt
Getting Started with EMCO Network Inventory
Knowledgebase Article
13
2 Click Add button to add a new item The Add Scan Task Detail dialog appears
The Add Scan Task dialog
3 Type a name and description for the job and click OK button
4 Auto expand the node and select your newly defined task
5 Press the Add button to open the Machine Queue dialog
Clicking on the Add Machine button
copy Copyright 2001-2012 EMCO SoftwareltSITE_LABELgt
Getting Started with EMCO Network Inventory
Knowledgebase Article
14
6 Check the required Machines
Machine Queue
7 Press OK button to proceed
8 Specify the other settings of the scan
copy Copyright 2001-2012 EMCO SoftwareltSITE_LABELgt
Getting Started with EMCO Network Inventory
Knowledgebase Article
15
Executing the Scan Operation
1 Click Run Now button to execute the scan The scan is executed and the scan results are added to ScanResults
2 Select the result you want to view details for and click View The details for the selected scan result aredisplayed
The Results of the Scan
Viewing Reports
Once you have collected data from the various machines on your network you can view or print reports based onthis data for all or selected machines
To view or print reports
1 In the left panel of the EMCO Network Inventory screen expand the Networking node
2 Expand the desired Network node
3 Expand the DomainWorkgroup for which you want to view or print reports
copy Copyright 2001-2012 EMCO SoftwareltSITE_LABELgt
Getting Started with EMCO Network Inventory
Knowledgebase Article
16
4 Select one or more machines from the list of machines in the left panel
To select multiple machines -
First click on one machine
Hold down the Ctrl key and click once on each of the other machines that you want to use for thereport
Release the Ctrl key
5 Right-click on any of the selected machines
6 Select Report Selected gt To Screen from the context menu
Instead of the screen you can also send the report to a PDF HTML RTF JPEG or plain text file byselecting To Individual File in the context menu
7 In the Field Output Selection dialog select the fields that you want displayed in your report and click OK
The Field Output Selection dialog
copy Copyright 2001-2012 EMCO SoftwareltSITE_LABELgt
Getting Started with EMCO Network Inventory
Knowledgebase Article
17
Viewing the Report
Exporting Data
You can export part or all of the data you have collected to an Excel file or Access database
To export data
1 Expand the Networking node on the left of the EMCO Network Inventory screen
2 Expand the desired Network node
3 Expand the DomainWorkgroup you want to view or print reports for
copy Copyright 2001-2012 EMCO SoftwareltSITE_LABELgt
Getting Started with EMCO Network Inventory
Knowledgebase Article
18
4 Select one or more machines from the list of machines in the left pane
To select multiple machines -
First click on one machine
Hold down the Ctrl key and click once on each of the other machines that you want to use for thereport
Release the Ctrl key
5 Click on File gt Export All
6 In the Field Output Selection dialog select the fields that you want to export and click OK
The Field Output Selection dialog
7 Type a name for the file you are exporting and select a file type from the Save as type drop-down list
8 Press Save button to export the data
Activating EMCO Network Inventory
To avoid piracy of its products EMCO Software follows a license management system Each product has a licensefile which shows that a particular product is registered to a certain company When you download a trial version ofa product it generally comes with a free trial license allowing you to use that product during the trial period Whenthe evaluation period of that product ends it will not work any more until you purchase a license for it
The free trial version of EMCO Network Inventory will only run 30 times If you want to continue using theprogram you should purchase a license for it When you purchase a license for EMCO Network Inventory aLicense Code is sent to you via e-mail
copy Copyright 2001-2012 EMCO SoftwareltSITE_LABELgt
Activating EMCO Network Inventory
Knowledgebase Article
19
To active the EMCO Network Inventory program
1 Start EMCO Network Inventory
2 In the Trial dialog that appears whenever you start the trial version of EMCO Network Inventory press theEnter License Codehellip button
The Trial dialog
3 In the Enter License Code dialog that appears enter the License Code that you have received via email andclick OK
You can also open the Enter License Code dialog box by clicking on Help gt Enter License Codehellip
The Help Menu
Your copy of EMCO Network Inventory is now activated
- What is EMCO Network Inventory
-
- Main Features of EMCO Network Inventory
-
- Installing on the Local Machine
-
- Installing on Remote Computers
-
- Getting Started with EMCO Network Inventory
-
- Starting EMCO Network Inventory
- Closing EMCO Network Inventory
- The Main Screen
- Importing Data from the Stub Analyzers into EMCO Network Inventory
- Scanning the Network
-
- Defining a Scan Operation
- Executing the Scan Operation
-
- Viewing Reports
- Exporting Data
-
- Activating EMCO Network Inventory
-

copy Copyright 2001-2012 EMCO SoftwareltSITE_LABELgt
What is EMCO Network Inventory
Knowledgebase Article
2
What is EMCO Network Inventory
EMCO Network Inventory is an advanced easy to use tool that helps systems administrators get up-to-dateinformation about the hardware and software available on computers in the office Local Area Network (LAN) orWide Area Network (WAN) Using EMCO Network Inventory you can quickly scan all the computers in yournetwork and generate a report about the hardware and software installed on the computers You can also keeptrack of application licenses on all the computers in your network
EMCO Network Inventory 5 performs fast and comprehensive PC hardware inventory and software audits withvery little load on the network it is low priced and very easy to use
EMCO Network Inventory can help you answer such questions as
How many computers in your network are running MS Vista
Which computers are still running WinXP and have less than 1GB RAM
On which computers is Photoshop CS3 installed and how much did you spend for it
Do you need more software licenses or do you have enough
How much extra hardware would you need if you were to change the operating system
Are there any unwanted files like mp3 or avi files and who has them
Is there any adware or spyware on any of the machines in the network
EMCO Network Inventory is one of the most popular inventory tools in the market It is being used by industrialleaders small businesses governments nonprofit organizations and educational institutions
Main Features of EMCO Network Inventory
Using EMCO Network Inventory you can -
Collect information about the hardware on computers in your network such as the processor memorymotherboard video card monitor etc
Collect information about the Operating System and Service Packs installed on computers in your network
Automatically add new machines into the database using the Auto-Fetch schedule
Scan computers by using a specific domain name or a range of IP addresses
Get a list of installed applications and hotfixes running processes and services etc
Perform custom scans using user-defined specifications
Store all scanned information in a database
Search the registry of any machine on the network for a specific key or value
Keep track of all purchased software licenses and calculate the number of licenses required for installedapplications taking versions into account
Compare the number of required licenses against available licenses
Automatically calculate license costs
Identify changes that may have occurred in licenses between networks or at different times on the samenetwork
Generate print-ready reports in one of the following formats PDF HTML RTF JPEG or plain text
Customize the information to be included in the reports
Create pie charts bar charts or line charts from the collected data
Export data to Microsoft Excel
copy Copyright 2001-2012 EMCO SoftwareltSITE_LABELgt
Installing on the Local Machine
Knowledgebase Article
3
Installing on the Local MachineEMCO Network Inventory needs to be installed on just one machine in your network
When you install EMCO Network Inventory two stub files are also installed Use these stub files to collectinformation from Windows 9x and NT machines
See Installing on Remote Computers for more details about using the stub files
To install EMCO Network Inventory on the local machine
1 Double-click on the Network Inventory setup exe file that you have downloaded from the EMCO NetworkInventory Downloads page
The setup file for EMCO Network Inventory Enterprise Edition is networkinventoryentsetupexe and forthe Professional Edition it is networkinventoryprosetupexe and for The Starter Edition isnetworkinventorystartersetupexe
If you have downloaded the archived setup file you will have to first extract the above-named setup exe filefrom the zip file that you have downloaded
2 On the first screen of the setup program click Next
The License Agreement will be displayed
The EMCO Network Inventory License Agreement
3 Click on I accept the agreement and then click Next
copy Copyright 2001-2012 EMCO SoftwareltSITE_LABELgt
Installing on the Local Machine
Knowledgebase Article
4
Select Destination Location
4 Click Next
Select Start Menu Folder
5 Click Next
copy Copyright 2001-2012 EMCO SoftwareltSITE_LABELgt
Installing on the Local Machine
Knowledgebase Article
5
Select Additional Tasks
6 Click Next
Setup Summary
7 Click Install
copy Copyright 2001-2012 EMCO SoftwareltSITE_LABELgt
Installing on the Local Machine
Knowledgebase Article
6
The EMCO Network Inventory program will be installed to the desired location Once the program is installedthe following screen is displayed
Completing the EMCO Network Inventory Setup
8 Click Finish to complete the installation If you have selected the Launch EMCO Network Inventory checkbox the EMCO Network Inventory is launched
Installing on Remote Computers
It is not necessary to install EMCO Network Inventory on every machine in your network Instead EMCOprovides special programs called stub analyzers to collect information from Win9x and NT machines To use thesestub analyzers you need to copy the relevant stub analyzer files to the Win9x and NT machines and execute themWhen you execute the stub analyzer on a computer it collects the information about that computer and stores it in afile called ltMACHINE NAMEgtmdax5x (where ltMACHINE NAMEgt is the name of the computer on which thestub analyzer is executed) You can then import this information into EMCO Network Inventory for chartingreporting and printing
You should run these stub analyzers individually on each machine to collect the information of that machinebecause if there is concurrent access for the data folder by more then one machine it can corrupt theinformation and the data will not be consistent
To use a stub analyzer
1 Create a temporary folder on the computer that you want to scan
2 From the CProgram FilesEMCONetwork Inventory EnterpriseStubs folder copy the relevant stub analyzerfilemdashMInfo9xexe for a Win9x machine or MInfoNTexe for a WinNT machinemdashand the Optionsini andDefaultcsc5x files and paste them into this temporary folder
3 If necessary configure the Optionsini file to match your requirements
4 Run the stub analyzer filemdashMInfo9xexe or MInfoNTexe The stub analyzer will collect the information aboutthe computer and store it in the ltMACHINE NAMEgtmdax5x file
5 On the local machine start EMCO Network Inventory and import the scan data from the ltMACHINENAMEgtmdax5x file
copy Copyright 2001-2012 EMCO SoftwareltSITE_LABELgt
Installing on the Local Machine
Knowledgebase Article
7
The following table describes the commands you can use in the Optionsini file
Command Description
Use Directory= Set this to 1 if you want the scan results should be stored in afolder Otherwise set this to 0 (zero)
Use Directory=1
Directory= Specify the name of the folder in which to store the scanresults This is used only if you have set Use Directory to 1
Directory=cTemp
RunOnce= Set this to 1 if you want to run the stub analyzer only onceOtherwise set this to 0 (zero) RunOnce will only execute thestub if no data exists for the machine
RunOnce=0
AllData= If you set AllData to 0 specify what information you want toscan by setting the corresponding command to 1
AllData=1
ShareAccess NetworkPrinters HotFixes and UserAccounts are not available in Win9x
Command Default Value
BasicInfo= BasicInfo=0
OSDescription= OSDescription=0
WMIInfo= WMIInfo=0
UseWMIforPhysicalMemory= UseWMIforPhysicalMemory=0
DigitalProductID= DigitalProductID=0
OfficeDigitalProductID= OfficeDigitalProductID=0
InstalledApps= InstalledApps=0
CustomScans= CustomScans=0
Shares= Shares=0
ShareAccess= ShareAccess=0
Printers= Printers=0
NetworkPrinters= NetworkPrinters=0
MappedDrives= MappedDrives=0
DiskInfo= DiskInfo=0
CdromDrives= CdromDrives=1
Processes= Processes=0
StartupCommands= StartupCommands=0
ProgramFolders= ProgramFolders=0
Processors= Processors=0
NetworkCards= NetworkCards=0
EnvironmentalVars= EnvironmentalVars=0
UserEnvVars= UserEnvVars=0
Services= Services=0
MemoryBanks= MemoryBanks=0
DataSourcesODBC= DataSourcesODBC=0
UserDataSourcesODBC= UserDataSourcesODBC=0
HotFixes= HotFixes=0
copy Copyright 2001-2012 EMCO SoftwareltSITE_LABELgt
Installing on the Local Machine
Knowledgebase Article
8
ScheduledTasks= ScheduledTasks=0
Fonts= Fonts=0
There is no need to use the stub analyzers if your computers are operating under Windows NT Windows2000 Windows XP Pro or Windows Vista SP1 and you have the required ports open EMCO NetworkInventory can directly scan computers that use these operating systems
Getting Started with EMCO Network Inventory
In this section we shall see how to -
Start EMCO Network Inventory
Scan the network for data
View reports
Export the collected data to Excel
Starting EMCO Network Inventory
To start EMCO Network Inventory
1 Click Start gt All Programs gt EMCO gt Network Inventory Enterprise gt Network Inventory Enterprise
If you have installed the Professional version of Network Inventory you will have to select Start gt AllPrograms gt EMCO gt Network Inventory Professional gt Network Inventory Professional in the abovemenu
If you have installed the Starter version of Network Inventory you will have to select Start gt All Programsgt EMCO gt Network Inventory Starter gt Network Inventory Starter in the above menu
OR
1 Double-click on the EMCO Network Inventory icon on your desktop
If this is the first time you are running EMCO Network Inventory the following message will be displayed
Note down the folder name that is displayed in the message EMCO Network Inventory will not be able tofunction properly if any other program tries to access the DATA folder Therefore you should exclude theDATA folder from your anti-virus scans (Refer to your anti-virus programs user guide for more informationon excluding folders from scans)
After noting down the folder name click OK to close the dialog box
copy Copyright 2001-2012 EMCO SoftwareltSITE_LABELgt
Getting Started with EMCO Network Inventory
Knowledgebase Article
9
2 If you have not yet activated your copy of EMCO Network Inventory the Trial dialog is displayed on thescreen
Closing EMCO Network Inventory
To close EMCO Network Inventory
Click File gt Exit
OR
Click Close button at the top right hand corner of the EMCO Network Inventory program window
copy Copyright 2001-2012 EMCO SoftwareltSITE_LABELgt
Getting Started with EMCO Network Inventory
Knowledgebase Article
10
The Main Screen
The Main EMCO Network Inventory Screen
Importing Data from the Stub Analyzers into EMCO Network Inventory
If you do want to get the scan information from the Machines running on Windows 9X you should install configureand execute the stub analyzers on them Once the stub analyzers have been run you can import the collected datainto EMCO Network Inventorys database
Refer to the next section Installing on Remote Computers for more information about the stub analyzers
To import the stub analyzer data
As you click on items in the left panel the details of the selected item appear in this panel
Select these tabs to (a) manage the information collected from the machines on your network (b) change theEMCO Network Inventory settings or (c) provide alternate credentials
Select items from this list to view details and perform other operations on the collected information
1 In the main EMCO Network Inventory screen right-click on Networking
copy Copyright 2001-2012 EMCO SoftwareltSITE_LABELgt
Getting Started with EMCO Network Inventory
Knowledgebase Article
11
2 In the context menu that appears select Load Machine Data gt Load From Data File(s)
Load From Data Files
3 In the Open dialog that appears select the relevant ltMACHINE NAMEgtmdax5x file and click on the Openbutton
The scan data from the selected machine will be imported into EMCO Network Inventory
4 If you now open any of the branches in the left panel of the main screen you will see the imported data
Main Screen after importing data
copy Copyright 2001-2012 EMCO SoftwareltSITE_LABELgt
Getting Started with EMCO Network Inventory
Knowledgebase Article
12
Scanning the Network
EMCO Network Inventory allows you to perform a variety of scan operations on machines in your network
Use This Scan To
Scan for File Search the computers on your network for specific files and folders Scan for Disk Search through the various drives on your local and remote computers for specific types of
files Scan for Registry Search the registry of local and remote computers for a specific value Scan Registry Search the registry of local and remote computers for a specific key or value
Scan for File Scan for Disk Scan for Registry and Scan Registry are available only in the EMCO NetworkInventory Enterprise Edition
Scanning the Network consists of two distinct operations
Defining the Scan and
Executing the Scan
Defining a Scan Operation
1 Expand San operations node and select one of the Scan nodes
Selecting the Disk Scan node
copy Copyright 2001-2012 EMCO SoftwareltSITE_LABELgt
Getting Started with EMCO Network Inventory
Knowledgebase Article
13
2 Click Add button to add a new item The Add Scan Task Detail dialog appears
The Add Scan Task dialog
3 Type a name and description for the job and click OK button
4 Auto expand the node and select your newly defined task
5 Press the Add button to open the Machine Queue dialog
Clicking on the Add Machine button
copy Copyright 2001-2012 EMCO SoftwareltSITE_LABELgt
Getting Started with EMCO Network Inventory
Knowledgebase Article
14
6 Check the required Machines
Machine Queue
7 Press OK button to proceed
8 Specify the other settings of the scan
copy Copyright 2001-2012 EMCO SoftwareltSITE_LABELgt
Getting Started with EMCO Network Inventory
Knowledgebase Article
15
Executing the Scan Operation
1 Click Run Now button to execute the scan The scan is executed and the scan results are added to ScanResults
2 Select the result you want to view details for and click View The details for the selected scan result aredisplayed
The Results of the Scan
Viewing Reports
Once you have collected data from the various machines on your network you can view or print reports based onthis data for all or selected machines
To view or print reports
1 In the left panel of the EMCO Network Inventory screen expand the Networking node
2 Expand the desired Network node
3 Expand the DomainWorkgroup for which you want to view or print reports
copy Copyright 2001-2012 EMCO SoftwareltSITE_LABELgt
Getting Started with EMCO Network Inventory
Knowledgebase Article
16
4 Select one or more machines from the list of machines in the left panel
To select multiple machines -
First click on one machine
Hold down the Ctrl key and click once on each of the other machines that you want to use for thereport
Release the Ctrl key
5 Right-click on any of the selected machines
6 Select Report Selected gt To Screen from the context menu
Instead of the screen you can also send the report to a PDF HTML RTF JPEG or plain text file byselecting To Individual File in the context menu
7 In the Field Output Selection dialog select the fields that you want displayed in your report and click OK
The Field Output Selection dialog
copy Copyright 2001-2012 EMCO SoftwareltSITE_LABELgt
Getting Started with EMCO Network Inventory
Knowledgebase Article
17
Viewing the Report
Exporting Data
You can export part or all of the data you have collected to an Excel file or Access database
To export data
1 Expand the Networking node on the left of the EMCO Network Inventory screen
2 Expand the desired Network node
3 Expand the DomainWorkgroup you want to view or print reports for
copy Copyright 2001-2012 EMCO SoftwareltSITE_LABELgt
Getting Started with EMCO Network Inventory
Knowledgebase Article
18
4 Select one or more machines from the list of machines in the left pane
To select multiple machines -
First click on one machine
Hold down the Ctrl key and click once on each of the other machines that you want to use for thereport
Release the Ctrl key
5 Click on File gt Export All
6 In the Field Output Selection dialog select the fields that you want to export and click OK
The Field Output Selection dialog
7 Type a name for the file you are exporting and select a file type from the Save as type drop-down list
8 Press Save button to export the data
Activating EMCO Network Inventory
To avoid piracy of its products EMCO Software follows a license management system Each product has a licensefile which shows that a particular product is registered to a certain company When you download a trial version ofa product it generally comes with a free trial license allowing you to use that product during the trial period Whenthe evaluation period of that product ends it will not work any more until you purchase a license for it
The free trial version of EMCO Network Inventory will only run 30 times If you want to continue using theprogram you should purchase a license for it When you purchase a license for EMCO Network Inventory aLicense Code is sent to you via e-mail
copy Copyright 2001-2012 EMCO SoftwareltSITE_LABELgt
Activating EMCO Network Inventory
Knowledgebase Article
19
To active the EMCO Network Inventory program
1 Start EMCO Network Inventory
2 In the Trial dialog that appears whenever you start the trial version of EMCO Network Inventory press theEnter License Codehellip button
The Trial dialog
3 In the Enter License Code dialog that appears enter the License Code that you have received via email andclick OK
You can also open the Enter License Code dialog box by clicking on Help gt Enter License Codehellip
The Help Menu
Your copy of EMCO Network Inventory is now activated
- What is EMCO Network Inventory
-
- Main Features of EMCO Network Inventory
-
- Installing on the Local Machine
-
- Installing on Remote Computers
-
- Getting Started with EMCO Network Inventory
-
- Starting EMCO Network Inventory
- Closing EMCO Network Inventory
- The Main Screen
- Importing Data from the Stub Analyzers into EMCO Network Inventory
- Scanning the Network
-
- Defining a Scan Operation
- Executing the Scan Operation
-
- Viewing Reports
- Exporting Data
-
- Activating EMCO Network Inventory
-

copy Copyright 2001-2012 EMCO SoftwareltSITE_LABELgt
Installing on the Local Machine
Knowledgebase Article
4
Select Destination Location
4 Click Next
Select Start Menu Folder
5 Click Next
copy Copyright 2001-2012 EMCO SoftwareltSITE_LABELgt
Installing on the Local Machine
Knowledgebase Article
5
Select Additional Tasks
6 Click Next
Setup Summary
7 Click Install
copy Copyright 2001-2012 EMCO SoftwareltSITE_LABELgt
Installing on the Local Machine
Knowledgebase Article
6
The EMCO Network Inventory program will be installed to the desired location Once the program is installedthe following screen is displayed
Completing the EMCO Network Inventory Setup
8 Click Finish to complete the installation If you have selected the Launch EMCO Network Inventory checkbox the EMCO Network Inventory is launched
Installing on Remote Computers
It is not necessary to install EMCO Network Inventory on every machine in your network Instead EMCOprovides special programs called stub analyzers to collect information from Win9x and NT machines To use thesestub analyzers you need to copy the relevant stub analyzer files to the Win9x and NT machines and execute themWhen you execute the stub analyzer on a computer it collects the information about that computer and stores it in afile called ltMACHINE NAMEgtmdax5x (where ltMACHINE NAMEgt is the name of the computer on which thestub analyzer is executed) You can then import this information into EMCO Network Inventory for chartingreporting and printing
You should run these stub analyzers individually on each machine to collect the information of that machinebecause if there is concurrent access for the data folder by more then one machine it can corrupt theinformation and the data will not be consistent
To use a stub analyzer
1 Create a temporary folder on the computer that you want to scan
2 From the CProgram FilesEMCONetwork Inventory EnterpriseStubs folder copy the relevant stub analyzerfilemdashMInfo9xexe for a Win9x machine or MInfoNTexe for a WinNT machinemdashand the Optionsini andDefaultcsc5x files and paste them into this temporary folder
3 If necessary configure the Optionsini file to match your requirements
4 Run the stub analyzer filemdashMInfo9xexe or MInfoNTexe The stub analyzer will collect the information aboutthe computer and store it in the ltMACHINE NAMEgtmdax5x file
5 On the local machine start EMCO Network Inventory and import the scan data from the ltMACHINENAMEgtmdax5x file
copy Copyright 2001-2012 EMCO SoftwareltSITE_LABELgt
Installing on the Local Machine
Knowledgebase Article
7
The following table describes the commands you can use in the Optionsini file
Command Description
Use Directory= Set this to 1 if you want the scan results should be stored in afolder Otherwise set this to 0 (zero)
Use Directory=1
Directory= Specify the name of the folder in which to store the scanresults This is used only if you have set Use Directory to 1
Directory=cTemp
RunOnce= Set this to 1 if you want to run the stub analyzer only onceOtherwise set this to 0 (zero) RunOnce will only execute thestub if no data exists for the machine
RunOnce=0
AllData= If you set AllData to 0 specify what information you want toscan by setting the corresponding command to 1
AllData=1
ShareAccess NetworkPrinters HotFixes and UserAccounts are not available in Win9x
Command Default Value
BasicInfo= BasicInfo=0
OSDescription= OSDescription=0
WMIInfo= WMIInfo=0
UseWMIforPhysicalMemory= UseWMIforPhysicalMemory=0
DigitalProductID= DigitalProductID=0
OfficeDigitalProductID= OfficeDigitalProductID=0
InstalledApps= InstalledApps=0
CustomScans= CustomScans=0
Shares= Shares=0
ShareAccess= ShareAccess=0
Printers= Printers=0
NetworkPrinters= NetworkPrinters=0
MappedDrives= MappedDrives=0
DiskInfo= DiskInfo=0
CdromDrives= CdromDrives=1
Processes= Processes=0
StartupCommands= StartupCommands=0
ProgramFolders= ProgramFolders=0
Processors= Processors=0
NetworkCards= NetworkCards=0
EnvironmentalVars= EnvironmentalVars=0
UserEnvVars= UserEnvVars=0
Services= Services=0
MemoryBanks= MemoryBanks=0
DataSourcesODBC= DataSourcesODBC=0
UserDataSourcesODBC= UserDataSourcesODBC=0
HotFixes= HotFixes=0
copy Copyright 2001-2012 EMCO SoftwareltSITE_LABELgt
Installing on the Local Machine
Knowledgebase Article
8
ScheduledTasks= ScheduledTasks=0
Fonts= Fonts=0
There is no need to use the stub analyzers if your computers are operating under Windows NT Windows2000 Windows XP Pro or Windows Vista SP1 and you have the required ports open EMCO NetworkInventory can directly scan computers that use these operating systems
Getting Started with EMCO Network Inventory
In this section we shall see how to -
Start EMCO Network Inventory
Scan the network for data
View reports
Export the collected data to Excel
Starting EMCO Network Inventory
To start EMCO Network Inventory
1 Click Start gt All Programs gt EMCO gt Network Inventory Enterprise gt Network Inventory Enterprise
If you have installed the Professional version of Network Inventory you will have to select Start gt AllPrograms gt EMCO gt Network Inventory Professional gt Network Inventory Professional in the abovemenu
If you have installed the Starter version of Network Inventory you will have to select Start gt All Programsgt EMCO gt Network Inventory Starter gt Network Inventory Starter in the above menu
OR
1 Double-click on the EMCO Network Inventory icon on your desktop
If this is the first time you are running EMCO Network Inventory the following message will be displayed
Note down the folder name that is displayed in the message EMCO Network Inventory will not be able tofunction properly if any other program tries to access the DATA folder Therefore you should exclude theDATA folder from your anti-virus scans (Refer to your anti-virus programs user guide for more informationon excluding folders from scans)
After noting down the folder name click OK to close the dialog box
copy Copyright 2001-2012 EMCO SoftwareltSITE_LABELgt
Getting Started with EMCO Network Inventory
Knowledgebase Article
9
2 If you have not yet activated your copy of EMCO Network Inventory the Trial dialog is displayed on thescreen
Closing EMCO Network Inventory
To close EMCO Network Inventory
Click File gt Exit
OR
Click Close button at the top right hand corner of the EMCO Network Inventory program window
copy Copyright 2001-2012 EMCO SoftwareltSITE_LABELgt
Getting Started with EMCO Network Inventory
Knowledgebase Article
10
The Main Screen
The Main EMCO Network Inventory Screen
Importing Data from the Stub Analyzers into EMCO Network Inventory
If you do want to get the scan information from the Machines running on Windows 9X you should install configureand execute the stub analyzers on them Once the stub analyzers have been run you can import the collected datainto EMCO Network Inventorys database
Refer to the next section Installing on Remote Computers for more information about the stub analyzers
To import the stub analyzer data
As you click on items in the left panel the details of the selected item appear in this panel
Select these tabs to (a) manage the information collected from the machines on your network (b) change theEMCO Network Inventory settings or (c) provide alternate credentials
Select items from this list to view details and perform other operations on the collected information
1 In the main EMCO Network Inventory screen right-click on Networking
copy Copyright 2001-2012 EMCO SoftwareltSITE_LABELgt
Getting Started with EMCO Network Inventory
Knowledgebase Article
11
2 In the context menu that appears select Load Machine Data gt Load From Data File(s)
Load From Data Files
3 In the Open dialog that appears select the relevant ltMACHINE NAMEgtmdax5x file and click on the Openbutton
The scan data from the selected machine will be imported into EMCO Network Inventory
4 If you now open any of the branches in the left panel of the main screen you will see the imported data
Main Screen after importing data
copy Copyright 2001-2012 EMCO SoftwareltSITE_LABELgt
Getting Started with EMCO Network Inventory
Knowledgebase Article
12
Scanning the Network
EMCO Network Inventory allows you to perform a variety of scan operations on machines in your network
Use This Scan To
Scan for File Search the computers on your network for specific files and folders Scan for Disk Search through the various drives on your local and remote computers for specific types of
files Scan for Registry Search the registry of local and remote computers for a specific value Scan Registry Search the registry of local and remote computers for a specific key or value
Scan for File Scan for Disk Scan for Registry and Scan Registry are available only in the EMCO NetworkInventory Enterprise Edition
Scanning the Network consists of two distinct operations
Defining the Scan and
Executing the Scan
Defining a Scan Operation
1 Expand San operations node and select one of the Scan nodes
Selecting the Disk Scan node
copy Copyright 2001-2012 EMCO SoftwareltSITE_LABELgt
Getting Started with EMCO Network Inventory
Knowledgebase Article
13
2 Click Add button to add a new item The Add Scan Task Detail dialog appears
The Add Scan Task dialog
3 Type a name and description for the job and click OK button
4 Auto expand the node and select your newly defined task
5 Press the Add button to open the Machine Queue dialog
Clicking on the Add Machine button
copy Copyright 2001-2012 EMCO SoftwareltSITE_LABELgt
Getting Started with EMCO Network Inventory
Knowledgebase Article
14
6 Check the required Machines
Machine Queue
7 Press OK button to proceed
8 Specify the other settings of the scan
copy Copyright 2001-2012 EMCO SoftwareltSITE_LABELgt
Getting Started with EMCO Network Inventory
Knowledgebase Article
15
Executing the Scan Operation
1 Click Run Now button to execute the scan The scan is executed and the scan results are added to ScanResults
2 Select the result you want to view details for and click View The details for the selected scan result aredisplayed
The Results of the Scan
Viewing Reports
Once you have collected data from the various machines on your network you can view or print reports based onthis data for all or selected machines
To view or print reports
1 In the left panel of the EMCO Network Inventory screen expand the Networking node
2 Expand the desired Network node
3 Expand the DomainWorkgroup for which you want to view or print reports
copy Copyright 2001-2012 EMCO SoftwareltSITE_LABELgt
Getting Started with EMCO Network Inventory
Knowledgebase Article
16
4 Select one or more machines from the list of machines in the left panel
To select multiple machines -
First click on one machine
Hold down the Ctrl key and click once on each of the other machines that you want to use for thereport
Release the Ctrl key
5 Right-click on any of the selected machines
6 Select Report Selected gt To Screen from the context menu
Instead of the screen you can also send the report to a PDF HTML RTF JPEG or plain text file byselecting To Individual File in the context menu
7 In the Field Output Selection dialog select the fields that you want displayed in your report and click OK
The Field Output Selection dialog
copy Copyright 2001-2012 EMCO SoftwareltSITE_LABELgt
Getting Started with EMCO Network Inventory
Knowledgebase Article
17
Viewing the Report
Exporting Data
You can export part or all of the data you have collected to an Excel file or Access database
To export data
1 Expand the Networking node on the left of the EMCO Network Inventory screen
2 Expand the desired Network node
3 Expand the DomainWorkgroup you want to view or print reports for
copy Copyright 2001-2012 EMCO SoftwareltSITE_LABELgt
Getting Started with EMCO Network Inventory
Knowledgebase Article
18
4 Select one or more machines from the list of machines in the left pane
To select multiple machines -
First click on one machine
Hold down the Ctrl key and click once on each of the other machines that you want to use for thereport
Release the Ctrl key
5 Click on File gt Export All
6 In the Field Output Selection dialog select the fields that you want to export and click OK
The Field Output Selection dialog
7 Type a name for the file you are exporting and select a file type from the Save as type drop-down list
8 Press Save button to export the data
Activating EMCO Network Inventory
To avoid piracy of its products EMCO Software follows a license management system Each product has a licensefile which shows that a particular product is registered to a certain company When you download a trial version ofa product it generally comes with a free trial license allowing you to use that product during the trial period Whenthe evaluation period of that product ends it will not work any more until you purchase a license for it
The free trial version of EMCO Network Inventory will only run 30 times If you want to continue using theprogram you should purchase a license for it When you purchase a license for EMCO Network Inventory aLicense Code is sent to you via e-mail
copy Copyright 2001-2012 EMCO SoftwareltSITE_LABELgt
Activating EMCO Network Inventory
Knowledgebase Article
19
To active the EMCO Network Inventory program
1 Start EMCO Network Inventory
2 In the Trial dialog that appears whenever you start the trial version of EMCO Network Inventory press theEnter License Codehellip button
The Trial dialog
3 In the Enter License Code dialog that appears enter the License Code that you have received via email andclick OK
You can also open the Enter License Code dialog box by clicking on Help gt Enter License Codehellip
The Help Menu
Your copy of EMCO Network Inventory is now activated
- What is EMCO Network Inventory
-
- Main Features of EMCO Network Inventory
-
- Installing on the Local Machine
-
- Installing on Remote Computers
-
- Getting Started with EMCO Network Inventory
-
- Starting EMCO Network Inventory
- Closing EMCO Network Inventory
- The Main Screen
- Importing Data from the Stub Analyzers into EMCO Network Inventory
- Scanning the Network
-
- Defining a Scan Operation
- Executing the Scan Operation
-
- Viewing Reports
- Exporting Data
-
- Activating EMCO Network Inventory
-
copy Copyright 2001-2012 EMCO SoftwareltSITE_LABELgt
Installing on the Local Machine
Knowledgebase Article
5
Select Additional Tasks
6 Click Next
Setup Summary
7 Click Install
copy Copyright 2001-2012 EMCO SoftwareltSITE_LABELgt
Installing on the Local Machine
Knowledgebase Article
6
The EMCO Network Inventory program will be installed to the desired location Once the program is installedthe following screen is displayed
Completing the EMCO Network Inventory Setup
8 Click Finish to complete the installation If you have selected the Launch EMCO Network Inventory checkbox the EMCO Network Inventory is launched
Installing on Remote Computers
It is not necessary to install EMCO Network Inventory on every machine in your network Instead EMCOprovides special programs called stub analyzers to collect information from Win9x and NT machines To use thesestub analyzers you need to copy the relevant stub analyzer files to the Win9x and NT machines and execute themWhen you execute the stub analyzer on a computer it collects the information about that computer and stores it in afile called ltMACHINE NAMEgtmdax5x (where ltMACHINE NAMEgt is the name of the computer on which thestub analyzer is executed) You can then import this information into EMCO Network Inventory for chartingreporting and printing
You should run these stub analyzers individually on each machine to collect the information of that machinebecause if there is concurrent access for the data folder by more then one machine it can corrupt theinformation and the data will not be consistent
To use a stub analyzer
1 Create a temporary folder on the computer that you want to scan
2 From the CProgram FilesEMCONetwork Inventory EnterpriseStubs folder copy the relevant stub analyzerfilemdashMInfo9xexe for a Win9x machine or MInfoNTexe for a WinNT machinemdashand the Optionsini andDefaultcsc5x files and paste them into this temporary folder
3 If necessary configure the Optionsini file to match your requirements
4 Run the stub analyzer filemdashMInfo9xexe or MInfoNTexe The stub analyzer will collect the information aboutthe computer and store it in the ltMACHINE NAMEgtmdax5x file
5 On the local machine start EMCO Network Inventory and import the scan data from the ltMACHINENAMEgtmdax5x file
copy Copyright 2001-2012 EMCO SoftwareltSITE_LABELgt
Installing on the Local Machine
Knowledgebase Article
7
The following table describes the commands you can use in the Optionsini file
Command Description
Use Directory= Set this to 1 if you want the scan results should be stored in afolder Otherwise set this to 0 (zero)
Use Directory=1
Directory= Specify the name of the folder in which to store the scanresults This is used only if you have set Use Directory to 1
Directory=cTemp
RunOnce= Set this to 1 if you want to run the stub analyzer only onceOtherwise set this to 0 (zero) RunOnce will only execute thestub if no data exists for the machine
RunOnce=0
AllData= If you set AllData to 0 specify what information you want toscan by setting the corresponding command to 1
AllData=1
ShareAccess NetworkPrinters HotFixes and UserAccounts are not available in Win9x
Command Default Value
BasicInfo= BasicInfo=0
OSDescription= OSDescription=0
WMIInfo= WMIInfo=0
UseWMIforPhysicalMemory= UseWMIforPhysicalMemory=0
DigitalProductID= DigitalProductID=0
OfficeDigitalProductID= OfficeDigitalProductID=0
InstalledApps= InstalledApps=0
CustomScans= CustomScans=0
Shares= Shares=0
ShareAccess= ShareAccess=0
Printers= Printers=0
NetworkPrinters= NetworkPrinters=0
MappedDrives= MappedDrives=0
DiskInfo= DiskInfo=0
CdromDrives= CdromDrives=1
Processes= Processes=0
StartupCommands= StartupCommands=0
ProgramFolders= ProgramFolders=0
Processors= Processors=0
NetworkCards= NetworkCards=0
EnvironmentalVars= EnvironmentalVars=0
UserEnvVars= UserEnvVars=0
Services= Services=0
MemoryBanks= MemoryBanks=0
DataSourcesODBC= DataSourcesODBC=0
UserDataSourcesODBC= UserDataSourcesODBC=0
HotFixes= HotFixes=0
copy Copyright 2001-2012 EMCO SoftwareltSITE_LABELgt
Installing on the Local Machine
Knowledgebase Article
8
ScheduledTasks= ScheduledTasks=0
Fonts= Fonts=0
There is no need to use the stub analyzers if your computers are operating under Windows NT Windows2000 Windows XP Pro or Windows Vista SP1 and you have the required ports open EMCO NetworkInventory can directly scan computers that use these operating systems
Getting Started with EMCO Network Inventory
In this section we shall see how to -
Start EMCO Network Inventory
Scan the network for data
View reports
Export the collected data to Excel
Starting EMCO Network Inventory
To start EMCO Network Inventory
1 Click Start gt All Programs gt EMCO gt Network Inventory Enterprise gt Network Inventory Enterprise
If you have installed the Professional version of Network Inventory you will have to select Start gt AllPrograms gt EMCO gt Network Inventory Professional gt Network Inventory Professional in the abovemenu
If you have installed the Starter version of Network Inventory you will have to select Start gt All Programsgt EMCO gt Network Inventory Starter gt Network Inventory Starter in the above menu
OR
1 Double-click on the EMCO Network Inventory icon on your desktop
If this is the first time you are running EMCO Network Inventory the following message will be displayed
Note down the folder name that is displayed in the message EMCO Network Inventory will not be able tofunction properly if any other program tries to access the DATA folder Therefore you should exclude theDATA folder from your anti-virus scans (Refer to your anti-virus programs user guide for more informationon excluding folders from scans)
After noting down the folder name click OK to close the dialog box
copy Copyright 2001-2012 EMCO SoftwareltSITE_LABELgt
Getting Started with EMCO Network Inventory
Knowledgebase Article
9
2 If you have not yet activated your copy of EMCO Network Inventory the Trial dialog is displayed on thescreen
Closing EMCO Network Inventory
To close EMCO Network Inventory
Click File gt Exit
OR
Click Close button at the top right hand corner of the EMCO Network Inventory program window
copy Copyright 2001-2012 EMCO SoftwareltSITE_LABELgt
Getting Started with EMCO Network Inventory
Knowledgebase Article
10
The Main Screen
The Main EMCO Network Inventory Screen
Importing Data from the Stub Analyzers into EMCO Network Inventory
If you do want to get the scan information from the Machines running on Windows 9X you should install configureand execute the stub analyzers on them Once the stub analyzers have been run you can import the collected datainto EMCO Network Inventorys database
Refer to the next section Installing on Remote Computers for more information about the stub analyzers
To import the stub analyzer data
As you click on items in the left panel the details of the selected item appear in this panel
Select these tabs to (a) manage the information collected from the machines on your network (b) change theEMCO Network Inventory settings or (c) provide alternate credentials
Select items from this list to view details and perform other operations on the collected information
1 In the main EMCO Network Inventory screen right-click on Networking
copy Copyright 2001-2012 EMCO SoftwareltSITE_LABELgt
Getting Started with EMCO Network Inventory
Knowledgebase Article
11
2 In the context menu that appears select Load Machine Data gt Load From Data File(s)
Load From Data Files
3 In the Open dialog that appears select the relevant ltMACHINE NAMEgtmdax5x file and click on the Openbutton
The scan data from the selected machine will be imported into EMCO Network Inventory
4 If you now open any of the branches in the left panel of the main screen you will see the imported data
Main Screen after importing data
copy Copyright 2001-2012 EMCO SoftwareltSITE_LABELgt
Getting Started with EMCO Network Inventory
Knowledgebase Article
12
Scanning the Network
EMCO Network Inventory allows you to perform a variety of scan operations on machines in your network
Use This Scan To
Scan for File Search the computers on your network for specific files and folders Scan for Disk Search through the various drives on your local and remote computers for specific types of
files Scan for Registry Search the registry of local and remote computers for a specific value Scan Registry Search the registry of local and remote computers for a specific key or value
Scan for File Scan for Disk Scan for Registry and Scan Registry are available only in the EMCO NetworkInventory Enterprise Edition
Scanning the Network consists of two distinct operations
Defining the Scan and
Executing the Scan
Defining a Scan Operation
1 Expand San operations node and select one of the Scan nodes
Selecting the Disk Scan node
copy Copyright 2001-2012 EMCO SoftwareltSITE_LABELgt
Getting Started with EMCO Network Inventory
Knowledgebase Article
13
2 Click Add button to add a new item The Add Scan Task Detail dialog appears
The Add Scan Task dialog
3 Type a name and description for the job and click OK button
4 Auto expand the node and select your newly defined task
5 Press the Add button to open the Machine Queue dialog
Clicking on the Add Machine button
copy Copyright 2001-2012 EMCO SoftwareltSITE_LABELgt
Getting Started with EMCO Network Inventory
Knowledgebase Article
14
6 Check the required Machines
Machine Queue
7 Press OK button to proceed
8 Specify the other settings of the scan
copy Copyright 2001-2012 EMCO SoftwareltSITE_LABELgt
Getting Started with EMCO Network Inventory
Knowledgebase Article
15
Executing the Scan Operation
1 Click Run Now button to execute the scan The scan is executed and the scan results are added to ScanResults
2 Select the result you want to view details for and click View The details for the selected scan result aredisplayed
The Results of the Scan
Viewing Reports
Once you have collected data from the various machines on your network you can view or print reports based onthis data for all or selected machines
To view or print reports
1 In the left panel of the EMCO Network Inventory screen expand the Networking node
2 Expand the desired Network node
3 Expand the DomainWorkgroup for which you want to view or print reports
copy Copyright 2001-2012 EMCO SoftwareltSITE_LABELgt
Getting Started with EMCO Network Inventory
Knowledgebase Article
16
4 Select one or more machines from the list of machines in the left panel
To select multiple machines -
First click on one machine
Hold down the Ctrl key and click once on each of the other machines that you want to use for thereport
Release the Ctrl key
5 Right-click on any of the selected machines
6 Select Report Selected gt To Screen from the context menu
Instead of the screen you can also send the report to a PDF HTML RTF JPEG or plain text file byselecting To Individual File in the context menu
7 In the Field Output Selection dialog select the fields that you want displayed in your report and click OK
The Field Output Selection dialog
copy Copyright 2001-2012 EMCO SoftwareltSITE_LABELgt
Getting Started with EMCO Network Inventory
Knowledgebase Article
17
Viewing the Report
Exporting Data
You can export part or all of the data you have collected to an Excel file or Access database
To export data
1 Expand the Networking node on the left of the EMCO Network Inventory screen
2 Expand the desired Network node
3 Expand the DomainWorkgroup you want to view or print reports for
copy Copyright 2001-2012 EMCO SoftwareltSITE_LABELgt
Getting Started with EMCO Network Inventory
Knowledgebase Article
18
4 Select one or more machines from the list of machines in the left pane
To select multiple machines -
First click on one machine
Hold down the Ctrl key and click once on each of the other machines that you want to use for thereport
Release the Ctrl key
5 Click on File gt Export All
6 In the Field Output Selection dialog select the fields that you want to export and click OK
The Field Output Selection dialog
7 Type a name for the file you are exporting and select a file type from the Save as type drop-down list
8 Press Save button to export the data
Activating EMCO Network Inventory
To avoid piracy of its products EMCO Software follows a license management system Each product has a licensefile which shows that a particular product is registered to a certain company When you download a trial version ofa product it generally comes with a free trial license allowing you to use that product during the trial period Whenthe evaluation period of that product ends it will not work any more until you purchase a license for it
The free trial version of EMCO Network Inventory will only run 30 times If you want to continue using theprogram you should purchase a license for it When you purchase a license for EMCO Network Inventory aLicense Code is sent to you via e-mail
copy Copyright 2001-2012 EMCO SoftwareltSITE_LABELgt
Activating EMCO Network Inventory
Knowledgebase Article
19
To active the EMCO Network Inventory program
1 Start EMCO Network Inventory
2 In the Trial dialog that appears whenever you start the trial version of EMCO Network Inventory press theEnter License Codehellip button
The Trial dialog
3 In the Enter License Code dialog that appears enter the License Code that you have received via email andclick OK
You can also open the Enter License Code dialog box by clicking on Help gt Enter License Codehellip
The Help Menu
Your copy of EMCO Network Inventory is now activated
- What is EMCO Network Inventory
-
- Main Features of EMCO Network Inventory
-
- Installing on the Local Machine
-
- Installing on Remote Computers
-
- Getting Started with EMCO Network Inventory
-
- Starting EMCO Network Inventory
- Closing EMCO Network Inventory
- The Main Screen
- Importing Data from the Stub Analyzers into EMCO Network Inventory
- Scanning the Network
-
- Defining a Scan Operation
- Executing the Scan Operation
-
- Viewing Reports
- Exporting Data
-
- Activating EMCO Network Inventory
-

copy Copyright 2001-2012 EMCO SoftwareltSITE_LABELgt
Installing on the Local Machine
Knowledgebase Article
8
ScheduledTasks= ScheduledTasks=0
Fonts= Fonts=0
There is no need to use the stub analyzers if your computers are operating under Windows NT Windows2000 Windows XP Pro or Windows Vista SP1 and you have the required ports open EMCO NetworkInventory can directly scan computers that use these operating systems
Getting Started with EMCO Network Inventory
In this section we shall see how to -
Start EMCO Network Inventory
Scan the network for data
View reports
Export the collected data to Excel
Starting EMCO Network Inventory
To start EMCO Network Inventory
1 Click Start gt All Programs gt EMCO gt Network Inventory Enterprise gt Network Inventory Enterprise
If you have installed the Professional version of Network Inventory you will have to select Start gt AllPrograms gt EMCO gt Network Inventory Professional gt Network Inventory Professional in the abovemenu
If you have installed the Starter version of Network Inventory you will have to select Start gt All Programsgt EMCO gt Network Inventory Starter gt Network Inventory Starter in the above menu
OR
1 Double-click on the EMCO Network Inventory icon on your desktop
If this is the first time you are running EMCO Network Inventory the following message will be displayed
Note down the folder name that is displayed in the message EMCO Network Inventory will not be able tofunction properly if any other program tries to access the DATA folder Therefore you should exclude theDATA folder from your anti-virus scans (Refer to your anti-virus programs user guide for more informationon excluding folders from scans)
After noting down the folder name click OK to close the dialog box
copy Copyright 2001-2012 EMCO SoftwareltSITE_LABELgt
Getting Started with EMCO Network Inventory
Knowledgebase Article
9
2 If you have not yet activated your copy of EMCO Network Inventory the Trial dialog is displayed on thescreen
Closing EMCO Network Inventory
To close EMCO Network Inventory
Click File gt Exit
OR
Click Close button at the top right hand corner of the EMCO Network Inventory program window
copy Copyright 2001-2012 EMCO SoftwareltSITE_LABELgt
Getting Started with EMCO Network Inventory
Knowledgebase Article
10
The Main Screen
The Main EMCO Network Inventory Screen
Importing Data from the Stub Analyzers into EMCO Network Inventory
If you do want to get the scan information from the Machines running on Windows 9X you should install configureand execute the stub analyzers on them Once the stub analyzers have been run you can import the collected datainto EMCO Network Inventorys database
Refer to the next section Installing on Remote Computers for more information about the stub analyzers
To import the stub analyzer data
As you click on items in the left panel the details of the selected item appear in this panel
Select these tabs to (a) manage the information collected from the machines on your network (b) change theEMCO Network Inventory settings or (c) provide alternate credentials
Select items from this list to view details and perform other operations on the collected information
1 In the main EMCO Network Inventory screen right-click on Networking
copy Copyright 2001-2012 EMCO SoftwareltSITE_LABELgt
Getting Started with EMCO Network Inventory
Knowledgebase Article
11
2 In the context menu that appears select Load Machine Data gt Load From Data File(s)
Load From Data Files
3 In the Open dialog that appears select the relevant ltMACHINE NAMEgtmdax5x file and click on the Openbutton
The scan data from the selected machine will be imported into EMCO Network Inventory
4 If you now open any of the branches in the left panel of the main screen you will see the imported data
Main Screen after importing data
copy Copyright 2001-2012 EMCO SoftwareltSITE_LABELgt
Getting Started with EMCO Network Inventory
Knowledgebase Article
12
Scanning the Network
EMCO Network Inventory allows you to perform a variety of scan operations on machines in your network
Use This Scan To
Scan for File Search the computers on your network for specific files and folders Scan for Disk Search through the various drives on your local and remote computers for specific types of
files Scan for Registry Search the registry of local and remote computers for a specific value Scan Registry Search the registry of local and remote computers for a specific key or value
Scan for File Scan for Disk Scan for Registry and Scan Registry are available only in the EMCO NetworkInventory Enterprise Edition
Scanning the Network consists of two distinct operations
Defining the Scan and
Executing the Scan
Defining a Scan Operation
1 Expand San operations node and select one of the Scan nodes
Selecting the Disk Scan node
copy Copyright 2001-2012 EMCO SoftwareltSITE_LABELgt
Getting Started with EMCO Network Inventory
Knowledgebase Article
13
2 Click Add button to add a new item The Add Scan Task Detail dialog appears
The Add Scan Task dialog
3 Type a name and description for the job and click OK button
4 Auto expand the node and select your newly defined task
5 Press the Add button to open the Machine Queue dialog
Clicking on the Add Machine button
copy Copyright 2001-2012 EMCO SoftwareltSITE_LABELgt
Getting Started with EMCO Network Inventory
Knowledgebase Article
14
6 Check the required Machines
Machine Queue
7 Press OK button to proceed
8 Specify the other settings of the scan
copy Copyright 2001-2012 EMCO SoftwareltSITE_LABELgt
Getting Started with EMCO Network Inventory
Knowledgebase Article
15
Executing the Scan Operation
1 Click Run Now button to execute the scan The scan is executed and the scan results are added to ScanResults
2 Select the result you want to view details for and click View The details for the selected scan result aredisplayed
The Results of the Scan
Viewing Reports
Once you have collected data from the various machines on your network you can view or print reports based onthis data for all or selected machines
To view or print reports
1 In the left panel of the EMCO Network Inventory screen expand the Networking node
2 Expand the desired Network node
3 Expand the DomainWorkgroup for which you want to view or print reports
copy Copyright 2001-2012 EMCO SoftwareltSITE_LABELgt
Getting Started with EMCO Network Inventory
Knowledgebase Article
16
4 Select one or more machines from the list of machines in the left panel
To select multiple machines -
First click on one machine
Hold down the Ctrl key and click once on each of the other machines that you want to use for thereport
Release the Ctrl key
5 Right-click on any of the selected machines
6 Select Report Selected gt To Screen from the context menu
Instead of the screen you can also send the report to a PDF HTML RTF JPEG or plain text file byselecting To Individual File in the context menu
7 In the Field Output Selection dialog select the fields that you want displayed in your report and click OK
The Field Output Selection dialog
copy Copyright 2001-2012 EMCO SoftwareltSITE_LABELgt
Getting Started with EMCO Network Inventory
Knowledgebase Article
17
Viewing the Report
Exporting Data
You can export part or all of the data you have collected to an Excel file or Access database
To export data
1 Expand the Networking node on the left of the EMCO Network Inventory screen
2 Expand the desired Network node
3 Expand the DomainWorkgroup you want to view or print reports for
copy Copyright 2001-2012 EMCO SoftwareltSITE_LABELgt
Getting Started with EMCO Network Inventory
Knowledgebase Article
18
4 Select one or more machines from the list of machines in the left pane
To select multiple machines -
First click on one machine
Hold down the Ctrl key and click once on each of the other machines that you want to use for thereport
Release the Ctrl key
5 Click on File gt Export All
6 In the Field Output Selection dialog select the fields that you want to export and click OK
The Field Output Selection dialog
7 Type a name for the file you are exporting and select a file type from the Save as type drop-down list
8 Press Save button to export the data
Activating EMCO Network Inventory
To avoid piracy of its products EMCO Software follows a license management system Each product has a licensefile which shows that a particular product is registered to a certain company When you download a trial version ofa product it generally comes with a free trial license allowing you to use that product during the trial period Whenthe evaluation period of that product ends it will not work any more until you purchase a license for it
The free trial version of EMCO Network Inventory will only run 30 times If you want to continue using theprogram you should purchase a license for it When you purchase a license for EMCO Network Inventory aLicense Code is sent to you via e-mail
copy Copyright 2001-2012 EMCO SoftwareltSITE_LABELgt
Activating EMCO Network Inventory
Knowledgebase Article
19
To active the EMCO Network Inventory program
1 Start EMCO Network Inventory
2 In the Trial dialog that appears whenever you start the trial version of EMCO Network Inventory press theEnter License Codehellip button
The Trial dialog
3 In the Enter License Code dialog that appears enter the License Code that you have received via email andclick OK
You can also open the Enter License Code dialog box by clicking on Help gt Enter License Codehellip
The Help Menu
Your copy of EMCO Network Inventory is now activated
- What is EMCO Network Inventory
-
- Main Features of EMCO Network Inventory
-
- Installing on the Local Machine
-
- Installing on Remote Computers
-
- Getting Started with EMCO Network Inventory
-
- Starting EMCO Network Inventory
- Closing EMCO Network Inventory
- The Main Screen
- Importing Data from the Stub Analyzers into EMCO Network Inventory
- Scanning the Network
-
- Defining a Scan Operation
- Executing the Scan Operation
-
- Viewing Reports
- Exporting Data
-
- Activating EMCO Network Inventory
-

copy Copyright 2001-2012 EMCO SoftwareltSITE_LABELgt
Getting Started with EMCO Network Inventory
Knowledgebase Article
18
4 Select one or more machines from the list of machines in the left pane
To select multiple machines -
First click on one machine
Hold down the Ctrl key and click once on each of the other machines that you want to use for thereport
Release the Ctrl key
5 Click on File gt Export All
6 In the Field Output Selection dialog select the fields that you want to export and click OK
The Field Output Selection dialog
7 Type a name for the file you are exporting and select a file type from the Save as type drop-down list
8 Press Save button to export the data
Activating EMCO Network Inventory
To avoid piracy of its products EMCO Software follows a license management system Each product has a licensefile which shows that a particular product is registered to a certain company When you download a trial version ofa product it generally comes with a free trial license allowing you to use that product during the trial period Whenthe evaluation period of that product ends it will not work any more until you purchase a license for it
The free trial version of EMCO Network Inventory will only run 30 times If you want to continue using theprogram you should purchase a license for it When you purchase a license for EMCO Network Inventory aLicense Code is sent to you via e-mail
copy Copyright 2001-2012 EMCO SoftwareltSITE_LABELgt
Activating EMCO Network Inventory
Knowledgebase Article
19
To active the EMCO Network Inventory program
1 Start EMCO Network Inventory
2 In the Trial dialog that appears whenever you start the trial version of EMCO Network Inventory press theEnter License Codehellip button
The Trial dialog
3 In the Enter License Code dialog that appears enter the License Code that you have received via email andclick OK
You can also open the Enter License Code dialog box by clicking on Help gt Enter License Codehellip
The Help Menu
Your copy of EMCO Network Inventory is now activated
- What is EMCO Network Inventory
-
- Main Features of EMCO Network Inventory
-
- Installing on the Local Machine
-
- Installing on Remote Computers
-
- Getting Started with EMCO Network Inventory
-
- Starting EMCO Network Inventory
- Closing EMCO Network Inventory
- The Main Screen
- Importing Data from the Stub Analyzers into EMCO Network Inventory
- Scanning the Network
-
- Defining a Scan Operation
- Executing the Scan Operation
-
- Viewing Reports
- Exporting Data
-
- Activating EMCO Network Inventory
-

copy Copyright 2001-2012 EMCO SoftwareltSITE_LABELgt
Activating EMCO Network Inventory
Knowledgebase Article
19
To active the EMCO Network Inventory program
1 Start EMCO Network Inventory
2 In the Trial dialog that appears whenever you start the trial version of EMCO Network Inventory press theEnter License Codehellip button
The Trial dialog
3 In the Enter License Code dialog that appears enter the License Code that you have received via email andclick OK
You can also open the Enter License Code dialog box by clicking on Help gt Enter License Codehellip
The Help Menu
Your copy of EMCO Network Inventory is now activated
- What is EMCO Network Inventory
-
- Main Features of EMCO Network Inventory
-
- Installing on the Local Machine
-
- Installing on Remote Computers
-
- Getting Started with EMCO Network Inventory
-
- Starting EMCO Network Inventory
- Closing EMCO Network Inventory
- The Main Screen
- Importing Data from the Stub Analyzers into EMCO Network Inventory
- Scanning the Network
-
- Defining a Scan Operation
- Executing the Scan Operation
-
- Viewing Reports
- Exporting Data
-
- Activating EMCO Network Inventory
-