network detective - rapidfire tools - it assessments · network detective™ network ... this guide...
TRANSCRIPT
Copyright©2015 RapidFire Tools, inc. All Rights Reserved. 20150201
Network Detective
User Guide
Network Detective™ Network Detective User Guide
1
Contents Contents............................................................................................................................... 1
Purpose of this Guide .......................................................................................................... 6
About Network Detective..................................................................................................... 6
Network Detective Overview ............................................................................................... 7
Installing and Running Network Detective .......................................................................... 8
Network Detective Sites ...................................................................................................... 9
Creating a Site ................................................................................................................. 9
Using a Site .................................................................................................................... 10
Starting an Assessment ................................................................................................. 10
Using the Checklist ........................................................................................................ 12
Collecting Data ............................................................................................................... 14
Importing a Scan ............................................................................................................ 15
Generating Reports........................................................................................................ 17
Report Preferences ........................................................................................................ 20
Adding a Connector to a Site......................................................................................... 21
Downloading Scans with Client Connector ................................................................... 22
Initiating an External Scan ............................................................................................. 24
Adding an InForm Sheet ................................................................................................ 25
Finishing/Archiving Assessments .................................................................................. 27
Changing the Type of an Assessment .......................................................................... 27
Enabling/Disabling Sites ................................................................................................ 29
Removing Sites .............................................................................................................. 31
Network Detective Data Explorer ...................................................................................... 32
Requirements ................................................................................................................. 32
Creating a Site ............................................................................................................... 32
Opening the Data Explorer ............................................................................................ 33
The Data Explorer Dashboard ....................................................................................... 34
Using Filters ................................................................................................................... 35
Network Detective Data Collector ..................................................................................... 36
Network Detective Data Collector Wizard ..................................................................... 37
Step 1 - Select Scan Types ........................................................................................ 37
Step 3 - Specify Domains ........................................................................................... 39
Network Detective™ Network Detective User Guide
2
Step 4 - External Domains ......................................................................................... 40
Step 5 - IP Ranges ..................................................................................................... 41
Step 6 - SNMP Information ........................................................................................ 42
Step 7 - Microsoft Baseline Security Analyzer .......................................................... 43
Step 8 - User Control Tests ........................................................................................ 44
Step 9 - Verify and Run .............................................................................................. 45
Protocol Availability Scan ....................................................................................... 46
Step 10 - Collection Progress .................................................................................... 47
Step 11 - Finish ........................................................................................................... 48
Exchange Assessment Data Collector ............................................................................. 49
Exchange Assessment Data Collector Wizard ............................................................. 50
Step 1 – Select Your Exchange Version.................................................................... 50
Step 2 – Verify Required Files ................................................................................... 51
Microsoft Exchange Online for Office 365 ............................................................. 51
Microsoft Exchange 2010 ...................................................................................... 52
Microsoft Exchange 2007 ...................................................................................... 53
Step 3 – Input Credentials .......................................................................................... 54
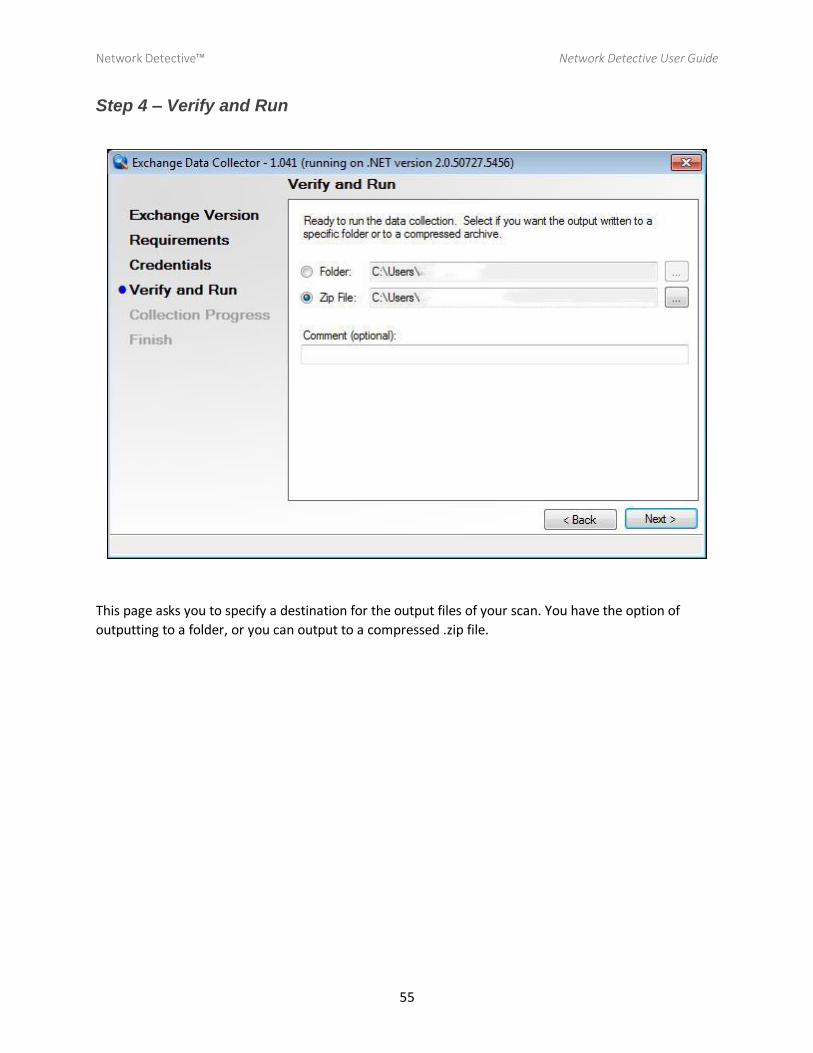
Step 4 – Verify and Run ............................................................................................. 55
Step 5 – Collection Progress ...................................................................................... 56
Step 6 – Finish ............................................................................................................ 57
SQL Server Assessment ................................................................................................... 58
SQL Server Assessment Data Collector Wizard .......................................................... 59
Step 1 - Input Credentials........................................................................................... 59
Step 2 - Verify and Run .............................................................................................. 59
Step 3 - Collection Progress ...................................................................................... 60
Step 4 – Finish ............................................................................................................ 60
Running Network Detective – Network Detective Wizard ................................................ 61
Network Detective Application .......................................................................................... 62
Scans.............................................................................................................................. 63
Recent Scans.............................................................................................................. 63
All Scans ..................................................................................................................... 64
External Scans ............................................................................................................ 65
Import Scan .................................................................................................................... 66
Network Detective™ Network Detective User Guide
3
Reports ........................................................................................................................... 67
Generating Reports .................................................................................................... 67
Report Customization ................................................................................................. 68
Preview a Report ........................................................................................................ 72
Assessment Modules ................................................................................................. 73
Network Assessments............................................................................................ 73
Standard Reports ............................................................................................... 73
Client Risk Report ........................................................................................... 73
Full Detail Report ............................................................................................ 73
Excel Report .................................................................................................... 73
Specialty Reports ............................................................................................... 73
Full Detail Change Report .............................................................................. 73
Site Diagram* .................................................................................................. 73
Site Diagrams Export to Microsoft Visio* ....................................................... 73
Asset Detail Report ......................................................................................... 73
Security Assessments ............................................................................................ 74
Standard Reports ............................................................................................... 74
Security Risk Report ....................................................................................... 74
Internal Vulnerabilities Report ........................................................................ 74
Security Policy Assessment ........................................................................... 74
Specialty Reports ............................................................................................... 74
Share Permission Report................................................................................ 74
Share Permission Report by User .................................................................. 74
Vulnerability Scan Detail Report..................................................................... 74
Exchange Assessments ......................................................................................... 75
Standard Reports ............................................................................................... 75
Exchange Risk Report .................................................................................... 75
Exchange Mailbox Detail Report .................................................................... 75
Exchange Traffic and Use Report .................................................................. 75
Exchange Distribution Lists Report ................................................................ 75
Specialty Reports ............................................................................................... 75
Exchange Mobile Device Report .................................................................... 75
Exchange Mailbox Permission Report by Mailbox ........................................ 75
Network Detective™ Network Detective User Guide
4
Exchange Mailbox Permissions by User ........................................................ 75
SQL Server Assessment Reports .......................................................................... 76
Standard Reports ............................................................................................... 76
Routine Health Report .................................................................................... 76
SQL Server Detail Report ............................................................................... 76
Database Detail Report .................................................................................. 76
SQL Server Agent Jobs Report ...................................................................... 76
Maintenance Plan Report ............................................................................... 76
InForm ............................................................................................................................ 77
Overview ..................................................................................................................... 77
Templates ................................................................................................................... 77
Creating a New Template ...................................................................................... 77
Modifying an Existing Template .............................. Error! Bookmark not defined.
Cloning an Existing Template ................................. Error! Bookmark not defined.
Site Interviews ............................................................. Error! Bookmark not defined.
Creating a Site Interview ........................................................................................ 80
Inputting Interview Data .......................................... Error! Bookmark not defined.
Creating InForm Reports ............................................. Error! Bookmark not defined.
Reports Available in InForm.................................... Error! Bookmark not defined.
Client Interview Form .......................................... Error! Bookmark not defined.
Interview Response Report ................................. Error! Bookmark not defined.
IT SWOT Analysis ............................................... Error! Bookmark not defined.
Initiate External Vulnerability Scan ................................................................................ 81
Exporting Configuration Items ....................................................................................... 82
Export fields for Autotask ........................................................................................... 83
Export fields for ConnectWise .................................................................................... 83
Manage Users ................................................................................................................ 85
Billing Information .......................................................................................................... 86
Preferences .................................................................................................................... 87
Appendices ........................................................................................................................ 88
Appendix I – Using a USB drive .................................................................................... 88
Appendix II – ConnectWise Configuration Items .......................................................... 89
Setting up an “Integrator Login” in ConnectWise .................................................. 89
Network Detective™ Network Detective User Guide
5
ConnectWise Connection Manager ........................................................................... 90
Appendix III – Group Policy Reference ......................................................................... 91
Forward and Introduction ........................................................................................... 91
Policies for Windows Firewall ................................................................................ 91
Policies for Windows Services ........................................................................... 91
3rd party Firewalls – and Group Policy Considerations ..................................... 91
Appendix IV – Mac Data Collector ................................................................................ 92
Running As .cmd .................................................................................................... 92
Scripting .................................................................................................................. 92
Troubleshooting ...................................................................................................... 92
Appendix V – Push-Deploy Tool ................................................................................... 93
Step 1 – Download and Run .................................................................................. 93
Step 2 – Complete Settings and Configuration ..................................................... 93
Step 3 – Input Computers and/or IP Range .......................................................... 94
Step 4 –Start Collection ......................................................................................... 95
Step 5 – Scan Output ............................................................................................. 96
Network Detective™ Network Detective User Guide
6
Purpose of this Guide
This document is intended for users of Network Detective. It will guide you through the initial use of the
software as well as the more advanced features. Additional guides are available for various modules.
This guide is designed to be used in conjunction with other supplementary guides.
About Network Detective
Network Detective performs automated assessments to uncover and document network assets,
problems and security risks. Service Providers and MSPs save countless hours when proposing or on-
boarding new clients and performing periodic network documentation of existing customers, while IT
departments benefit from periodic reports to assist in network documentation and compliance projects.
For “On Demand” users who pay per report, running the data collection and viewing the “Preview
Report” is free, and there is a charge to run the “Full Report.” Certain “Premium Reports” are at an
additional charge, while some reports are only available to annual subscribers.
Annual subscribers enjoy the benefit of running an unlimited number of scans and reports, including the
Premium reports, for a fixed annual cost. They also have access to reports that are not available in the
“On Demand” model and the Export feature, which integrates with other services, like Autotask and
ConnectWise, to automatically populate configuration items.
Network Detective™ Network Detective User Guide
7
Network Detective Overview
Network Detective is composed of the Network Detective application, the Network Detective Data
Collectors (for Network and Security modules), and various other Data Collector, and the optional
External Vulnerability scanner (for subscription accounts only).
Network Detective is quick and easy to use; there are just three basic steps:
1. Create Sites to organize your assessments. Sites can be customers, remote offices, data centers, departments, organizational units, or any structure that is applicable for your environment.
2. Run scans as required for the individual module. If possible, run the Network Scan from the Primary Domain Controller on the network. The output of the scan will either be a .zip or module specific scan files (.ndf, .cdf, .sdf, .hdf) used to generate reports via Network Detective.
3. Run the Network Detective tool. Import the files generated in step 1 into an assessment. Customize the report by branding with your logos and client information, and run the reports. The Wizard will walk you through your first time!
You can initiate an external Vulnerability scan from the Network Detective console BEFORE or AFTER
performing the network scan. (Only available to “Subscribers.”)
Network Detective™ Network Detective User Guide
8
Installing and Running Network Detective
Install the Network Detective Application on your system from www.rapidfiretools.com/nd. This is not
installed on a client network – only the Data Collector is run on the client network. It is a click-once
application and you should always accept the update to have the latest version.
When you run Network Detective the first time, it will launch the Network Detective Wizard. You can
dismiss the dialog and simply use the Site Model. If you use the wizard to do ad-hoc reporting, you have
three options:
1. Generate Report from a New Scan – This is the fastest way to import the data from a scan and run a report; it combines the two actions:
a. Import a Scan where you will:
Browse to the ZIP/NDF file from the Network Data Collection
If you have CDF and/or SDF files, put them in a folder with the NDF file to simplify this step
Create a new NDZ “Archive” file
b. Generate a Report where you will:
Select the Reports that you want to run Note 1: Do NOT select the “Full Detail Change Report” unless you have a second NDZ file (network scan) that you are comparing against. Note 2: The “Premium Reports” are an extra charge for non-subscriber accounts
Choose the Vulnerability Scan for this network (or click Cancel if there is not one)
Customize the report with your logo and company information, and the client information
Generate the set of reports
NOTE: The recommended best practice is to use Sites and always organize your scans. See the following
chapter for information on how to use Sites properly.
Network Detective™ Network Detective User Guide
9
Network Detective Sites
The Site Model for Network Detective is a framework which enables users to intuitively organize client
information. A Site is a collection of scans, reports, and associated data. An advantage of this
abstraction is that you can choose what a Site represents to fit your business model. For example, if your
client’s organization has multiple physical locations, you may choose to create one Site for the entire
organization, or you can represent each one as an individual Site.
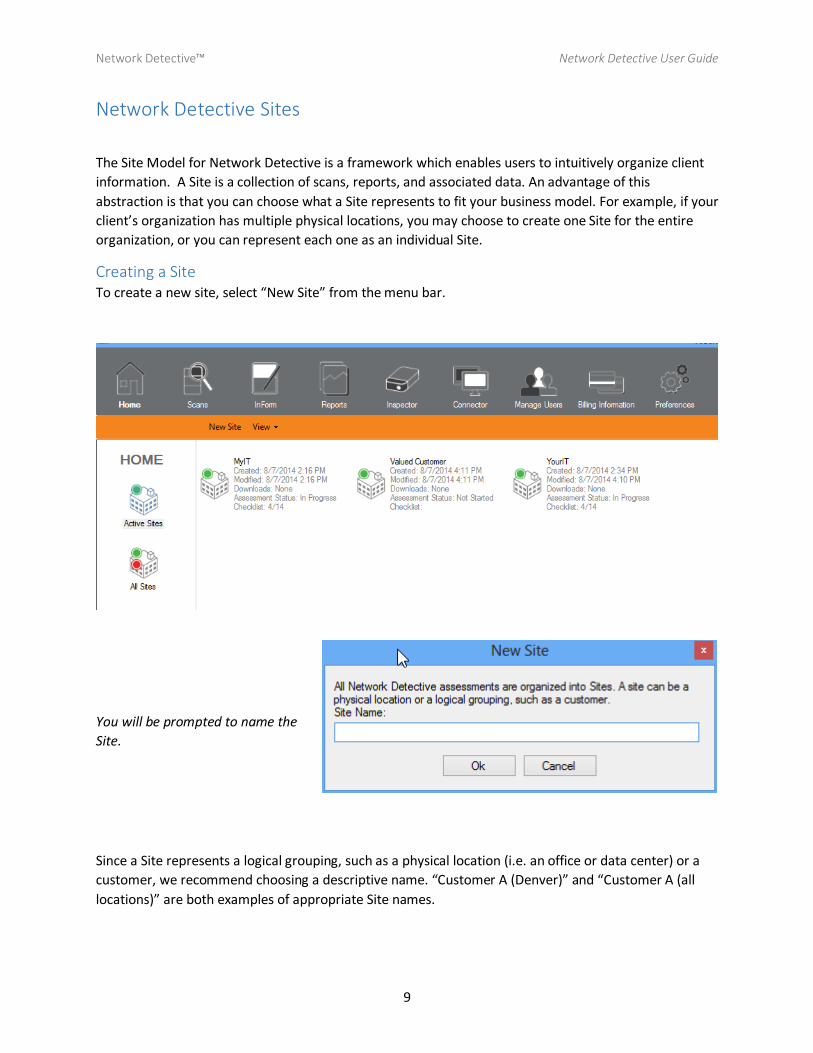
Creating a Site To create a new site, select “New Site” from the menu bar.
You will be prompted to name the
Site.
Since a Site represents a logical grouping, such as a physical location (i.e. an office or data center) or a
customer, we recommend choosing a descriptive name. “Customer A (Denver)” and “Customer A (all
locations)” are both examples of appropriate Site names.
Network Detective™ Network Detective User Guide
10
Using a Site After creating and naming a new Site, the Network Detective application will display the Site’s
Dashboard. From here, you can change the Site’s name, make it Active or Inactive, add Connectors, edit
the Site-specific report preferences, or start an Assessment.
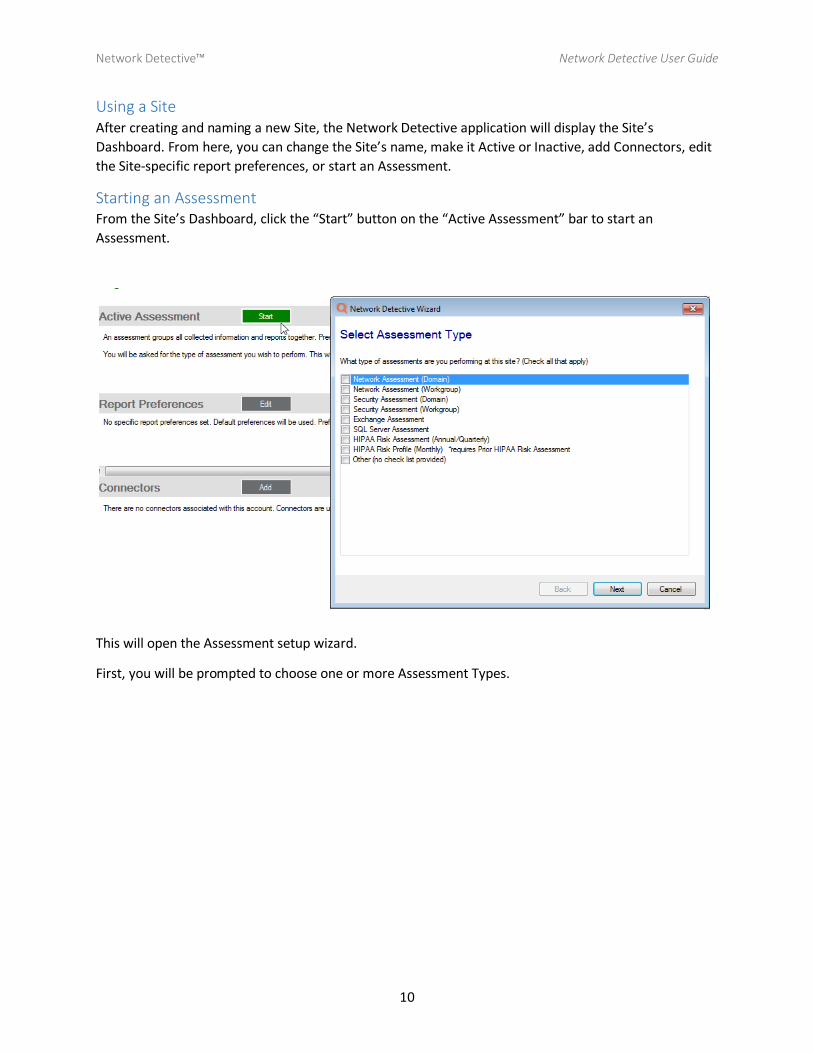
Starting an Assessment From the Site’s Dashboard, click the “Start” button on the “Active Assessment” bar to start an
Assessment.
This will open the Assessment setup wizard.
First, you will be prompted to choose one or more Assessment Types.

Network Detective™ Network Detective User Guide
11
After selecting Assessment Types, click “Next.” The wizard will ask you to enter a label and comment for
your Assessment. Please note that while the comment section is optional, the label is required and each
label must be unique.

Network Detective™ Network Detective User Guide
12
The final window of the setup wizard summarizes the new Assessment and provides a link to the
Checklist, which you can use to track the progress of your Assessment.
After starting a new Assessment, the Network Detective application will display the Assessment’s
Dashboard. From there, you can edit the Assessment label and type, associate a previous Assessment,
collect data, generate Reports, and finish the Assessment. You can also view the updated Checklist.
Using the Checklist The Checklist is a helpful outline of the information you will need to collect to complete the Assessment.
It is continuously updated to reflect completed items and changed to your Assessment. By using the
Checklist, you can make sure that your tasks are complete on schedule and that all relevant data you
collect is integrated into your reports.
Network Detective™ Network Detective User Guide
13
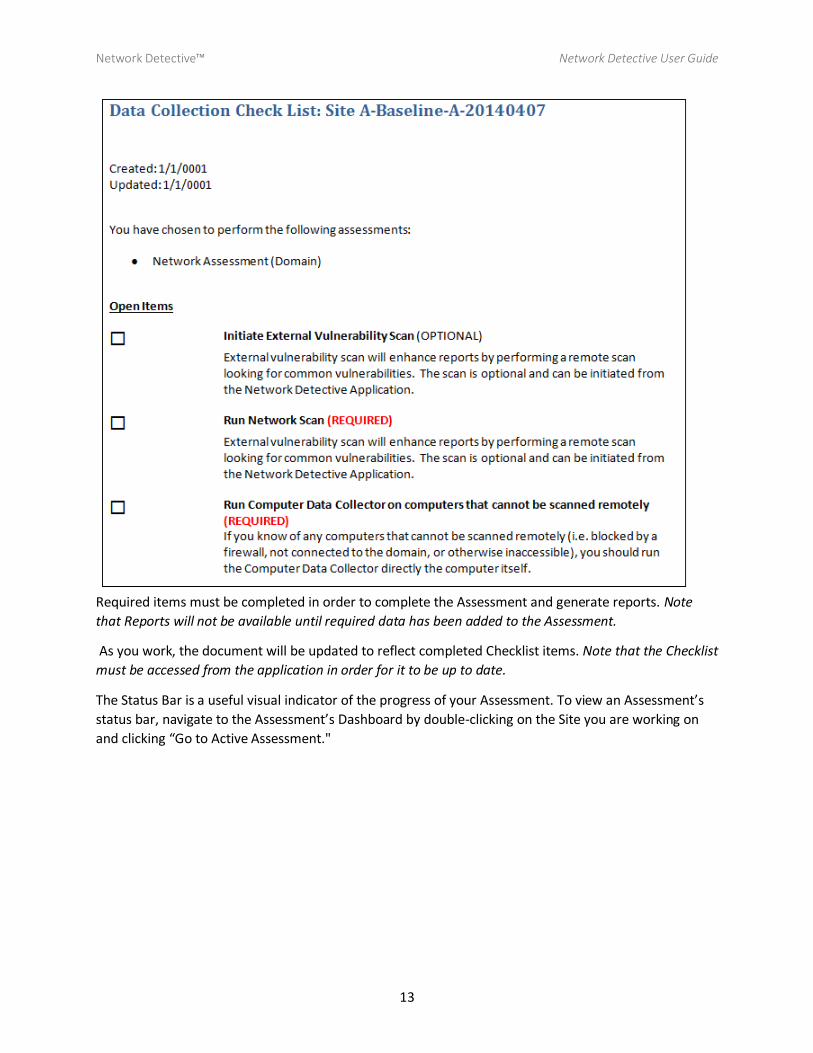
Required items must be completed in order to complete the Assessment and generate reports. Note
that Reports will not be available until required data has been added to the Assessment.
As you work, the document will be updated to reflect completed Checklist items. Note that the Checklist
must be accessed from the application in order for it to be up to date.
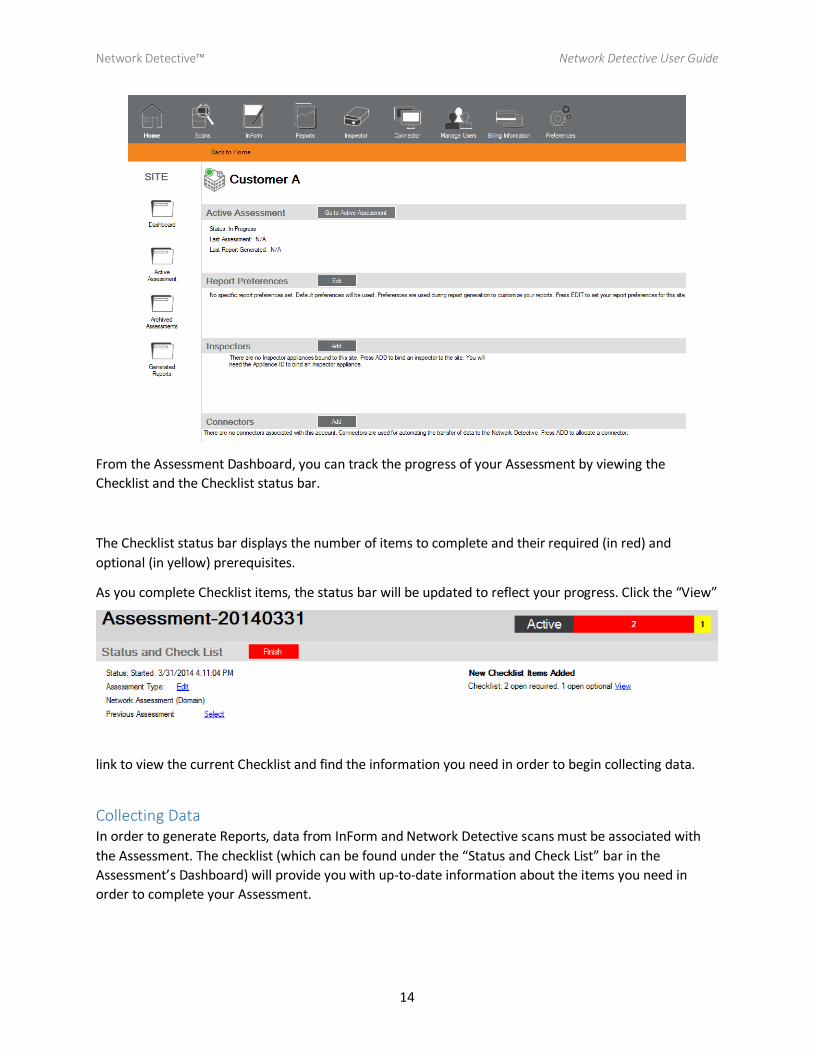
The Status Bar is a useful visual indicator of the progress of your Assessment. To view an Assessment’s
status bar, navigate to the Assessment’s Dashboard by double-clicking on the Site you are working on
and clicking “Go to Active Assessment."
Network Detective™ Network Detective User Guide
14
From the Assessment Dashboard, you can track the progress of your Assessment by viewing the
Checklist and the Checklist status bar.
The Checklist status bar displays the number of items to complete and their required (in red) and
optional (in yellow) prerequisites.
As you complete Checklist items, the status bar will be updated to reflect your progress. Click the “View”
link to view the current Checklist and find the information you need in order to begin collecting data.
Collecting Data In order to generate Reports, data from InForm and Network Detective scans must be associated with
the Assessment. The checklist (which can be found under the “Status and Check List” bar in the
Assessment’s Dashboard) will provide you with up-to-date information about the items you need in
order to complete your Assessment.
Network Detective™ Network Detective User Guide
15
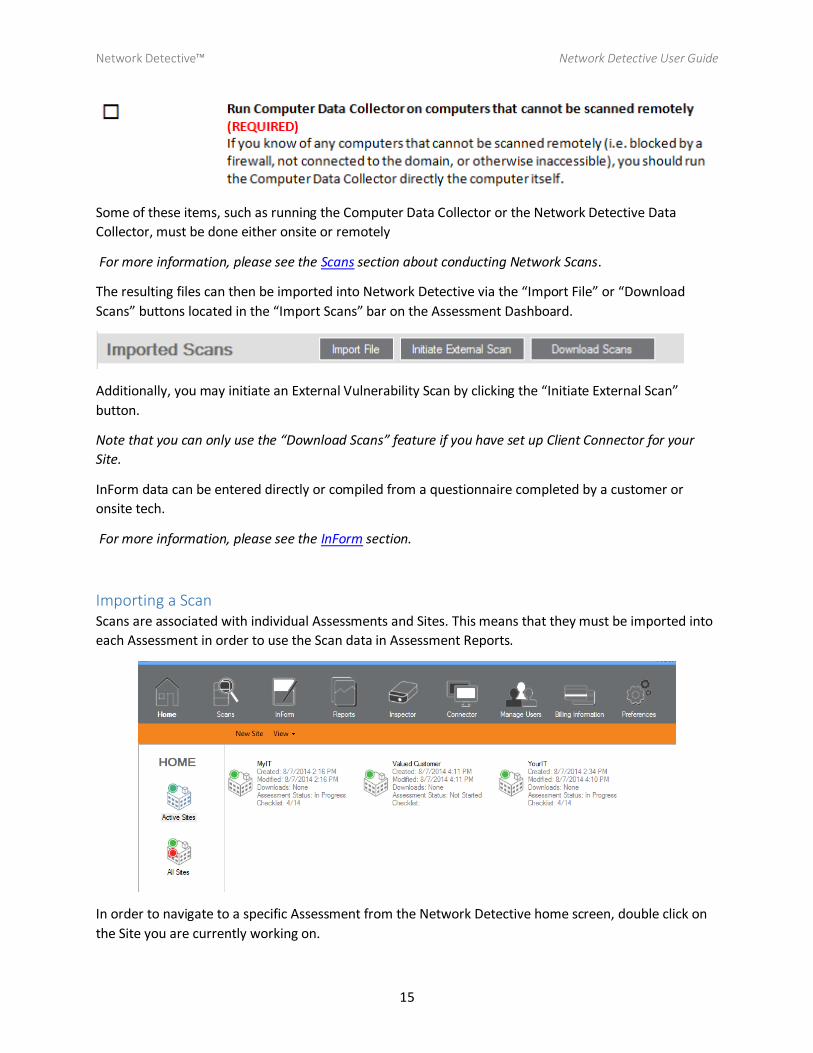
Some of these items, such as running the Computer Data Collector or the Network Detective Data
Collector, must be done either onsite or remotely
For more information, please see the Scans section about conducting Network Scans.
The resulting files can then be imported into Network Detective via the “Import File” or “Download
Scans” buttons located in the “Import Scans” bar on the Assessment Dashboard.
Additionally, you may initiate an External Vulnerability Scan by clicking the “Initiate External Scan”
button.
Note that you can only use the “Download Scans” feature if you have set up Client Connector for your
Site.
InForm data can be entered directly or compiled from a questionnaire completed by a customer or
onsite tech.
For more information, please see the InForm section.
Importing a Scan Scans are associated with individual Assessments and Sites. This means that they must be imported into
each Assessment in order to use the Scan data in Assessment Reports.
In order to navigate to a specific Assessment from the Network Detective home screen, double click on
the Site you are currently working on.
Network Detective™ Network Detective User Guide
16
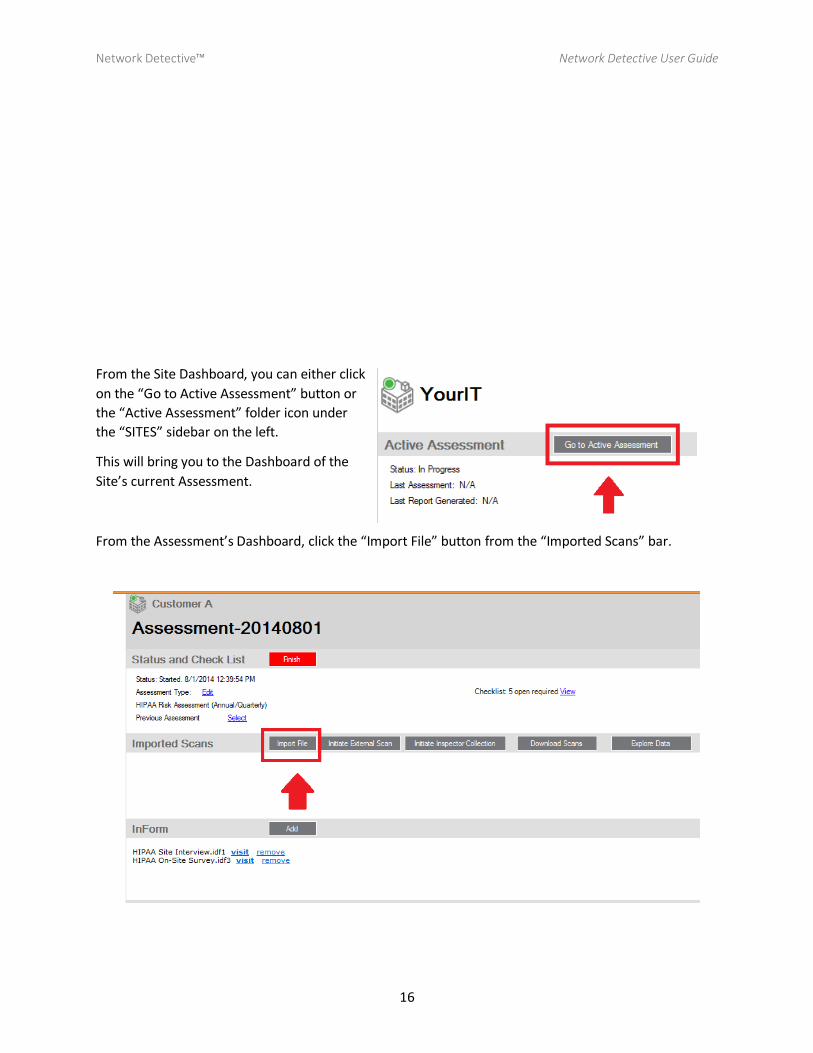
From the Site Dashboard, you can either click
on the “Go to Active Assessment” button or
the “Active Assessment” folder icon under
the “SITES” sidebar on the left.
This will bring you to the Dashboard of the
Site’s current Assessment.
From the Assessment’s Dashboard, click the “Import File” button from the “Imported Scans” bar.
Network Detective™ Network Detective User Guide
17
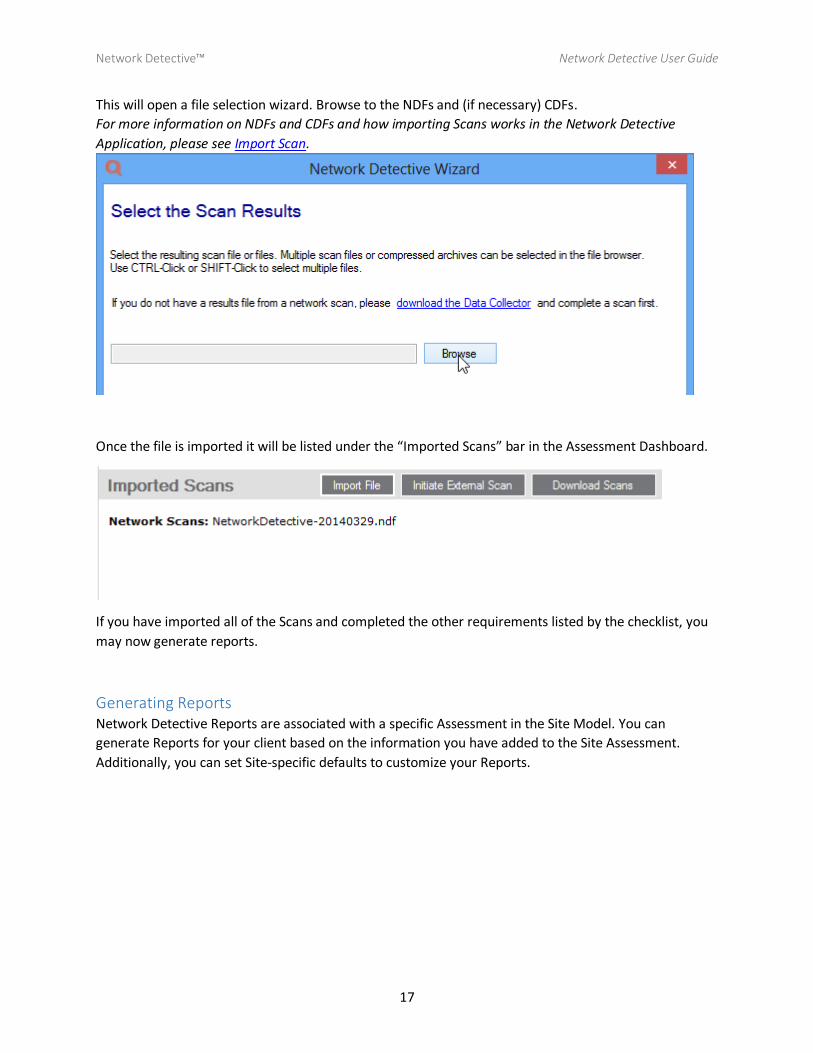
This will open a file selection wizard. Browse to the NDFs and (if necessary) CDFs.
For more information on NDFs and CDFs and how importing Scans works in the Network Detective
Application, please see Import Scan.
Once the file is imported it will be listed under the “Imported Scans” bar in the Assessment Dashboard.
If you have imported all of the Scans and completed the other requirements listed by the checklist, you
may now generate reports.
Generating Reports Network Detective Reports are associated with a specific Assessment in the Site Model. You can
generate Reports for your client based on the information you have added to the Site Assessment.
Additionally, you can set Site-specific defaults to customize your Reports.
Network Detective™ Network Detective User Guide
18
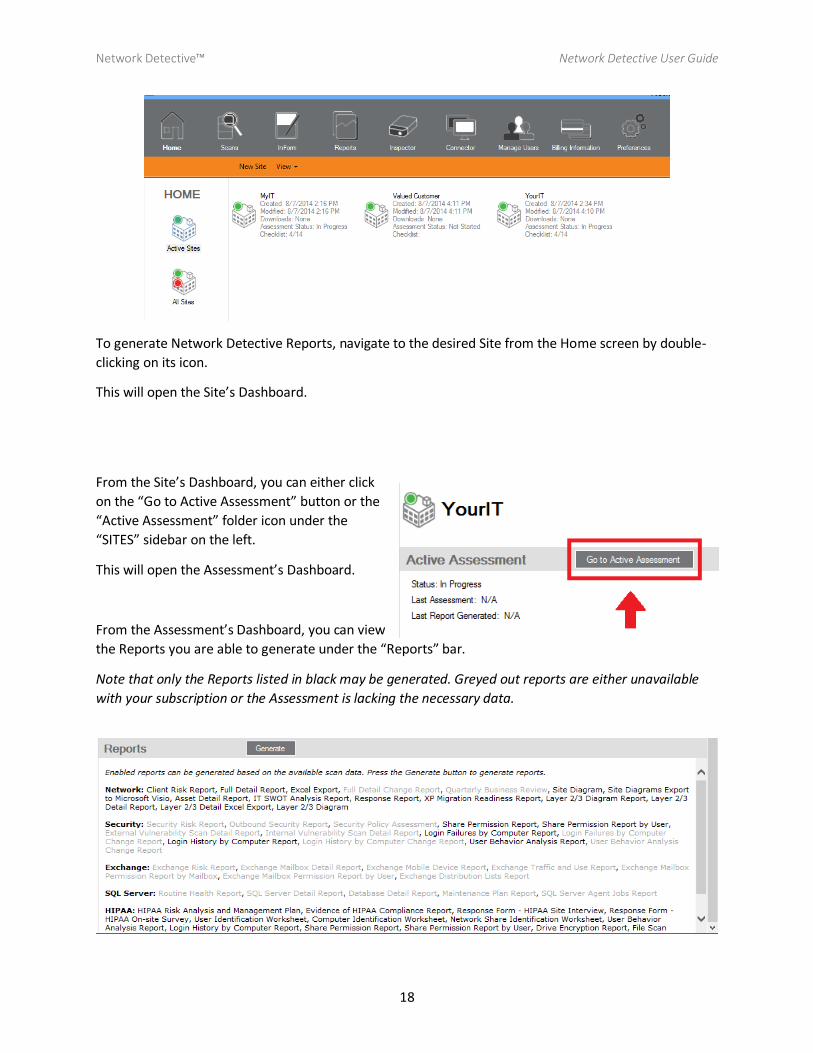
To generate Network Detective Reports, navigate to the desired Site from the Home screen by double-
clicking on its icon.
This will open the Site’s Dashboard.
From the Site’s Dashboard, you can either click
on the “Go to Active Assessment” button or the
“Active Assessment” folder icon under the
“SITES” sidebar on the left.
This will open the Assessment’s Dashboard.
From the Assessment’s Dashboard, you can view
the Reports you are able to generate under the “Reports” bar.
Note that only the Reports listed in black may be generated. Greyed out reports are either unavailable
with your subscription or the Assessment is lacking the necessary data.
Network Detective™ Network Detective User Guide
19
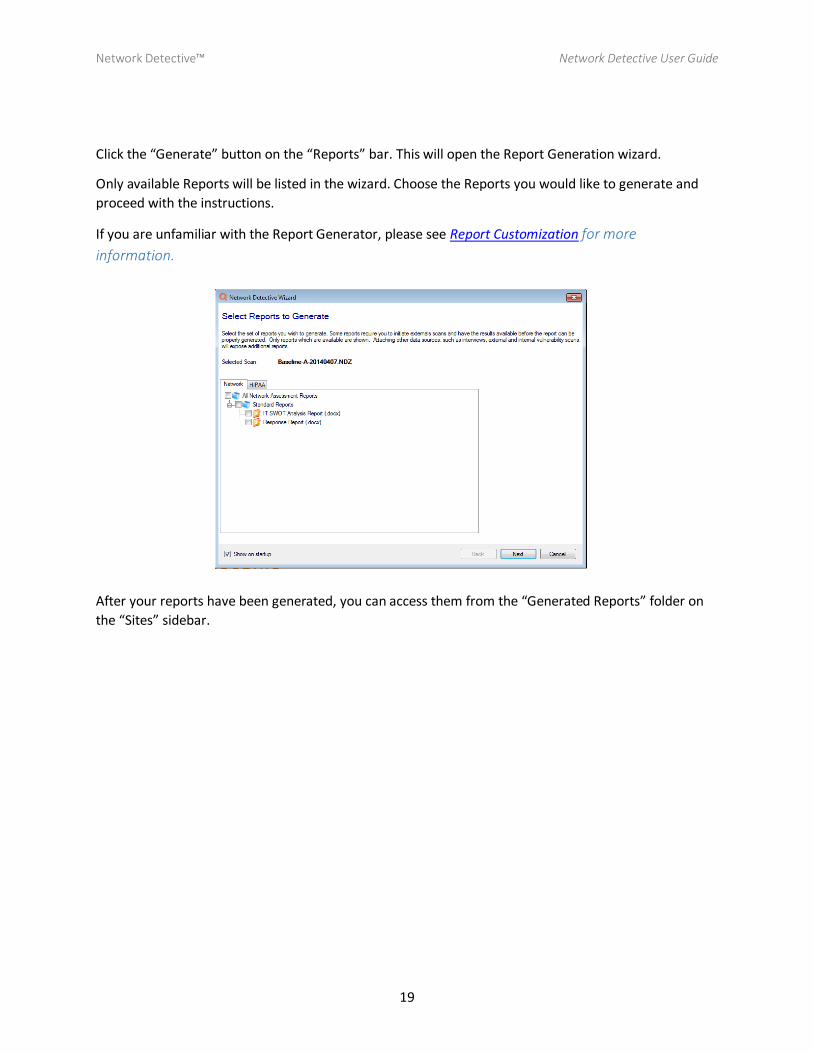
Click the “Generate” button on the “Reports” bar. This will open the Report Generation wizard.
Only available Reports will be listed in the wizard. Choose the Reports you would like to generate and
proceed with the instructions.
If you are unfamiliar with the Report Generator, please see Report Customization for more
information.
After your reports have been generated, you can access them from the “Generated Reports” folder on
the “Sites” sidebar.
Network Detective™ Network Detective User Guide
20
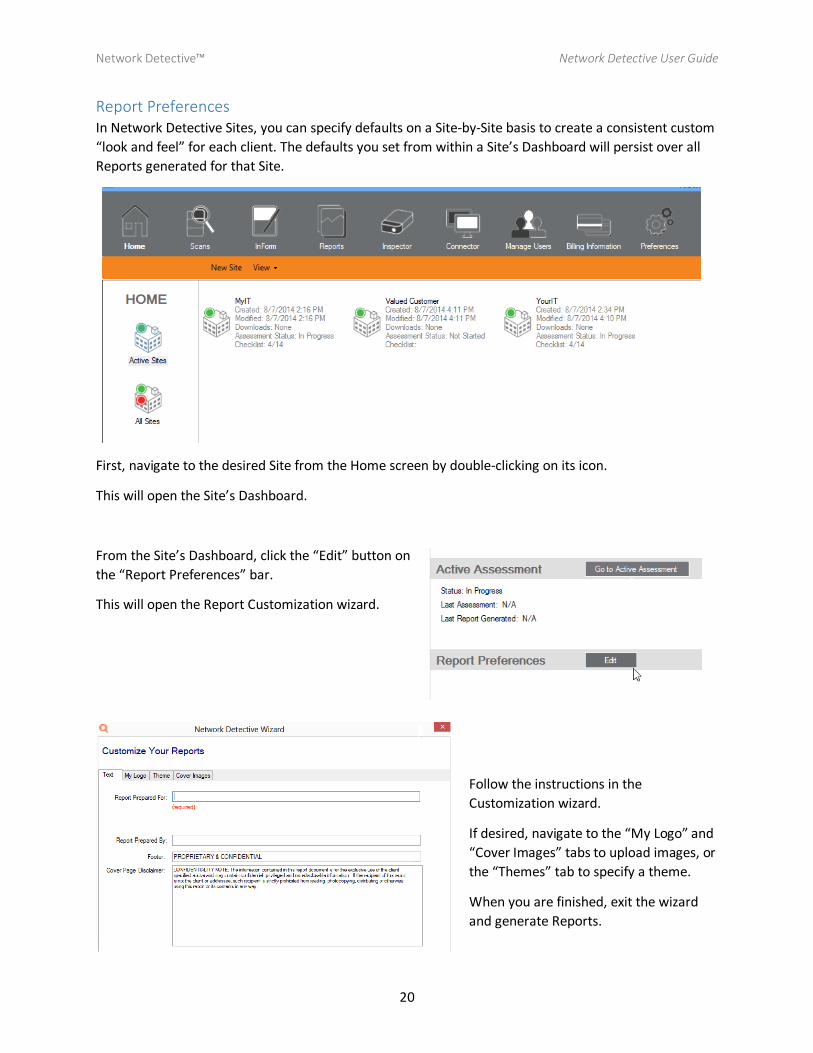
Report Preferences In Network Detective Sites, you can specify defaults on a Site-by-Site basis to create a consistent custom
“look and feel” for each client. The defaults you set from within a Site’s Dashboard will persist over all
Reports generated for that Site.
First, navigate to the desired Site from the Home screen by double-clicking on its icon.
This will open the Site’s Dashboard.
From the Site’s Dashboard, click the “Edit” button on
the “Report Preferences” bar.
This will open the Report Customization wizard.
Follow the instructions in the
Customization wizard.
If desired, navigate to the “My Logo” and
“Cover Images” tabs to upload images, or
the “Themes” tab to specify a theme.
When you are finished, exit the wizard
and generate Reports.

Network Detective™ Network Detective User Guide
21
Adding a Connector to a Site As an alternative to importing Scans from a local source, Scans can be downloaded remotely via the
Network Detective Client Connector service.
Preferences for Client Connectors are configured on a Site-by-Site basis and can be customized for each
individual site.
To add a Connector to a Site, first navigate to the desired Site from the Home screen by double-clicking
on its icon.
This will open the Site’s Dashboard.
From the Site’s Dashboard, select “Add” from the “Connectors” bar.

Network Detective™ Network Detective User Guide
22
You will be prompted with a wizard to configure the Connector. Enter a unique label for the Connector.
If you wish, the label can be identical to the Site name.
Note that the Connector ID is randomly generated and will be used to configure the Connector.
Next, configure your Connector.
You can now use your Connector to download Scans and associate them with your Assessments.
Downloading Scans with Client Connector Downloading Scans using the Site Model is done on a Site-by-Site basis. In order to download Scans, you
must first set up a Connector to associate with your Site (see “Adding a Connector to a Site”).
First, navigate to the desired Site from the Home screen by double-clicking on its icon.
This will open the Site’s Dashboard.
Network Detective™ Network Detective User Guide
23
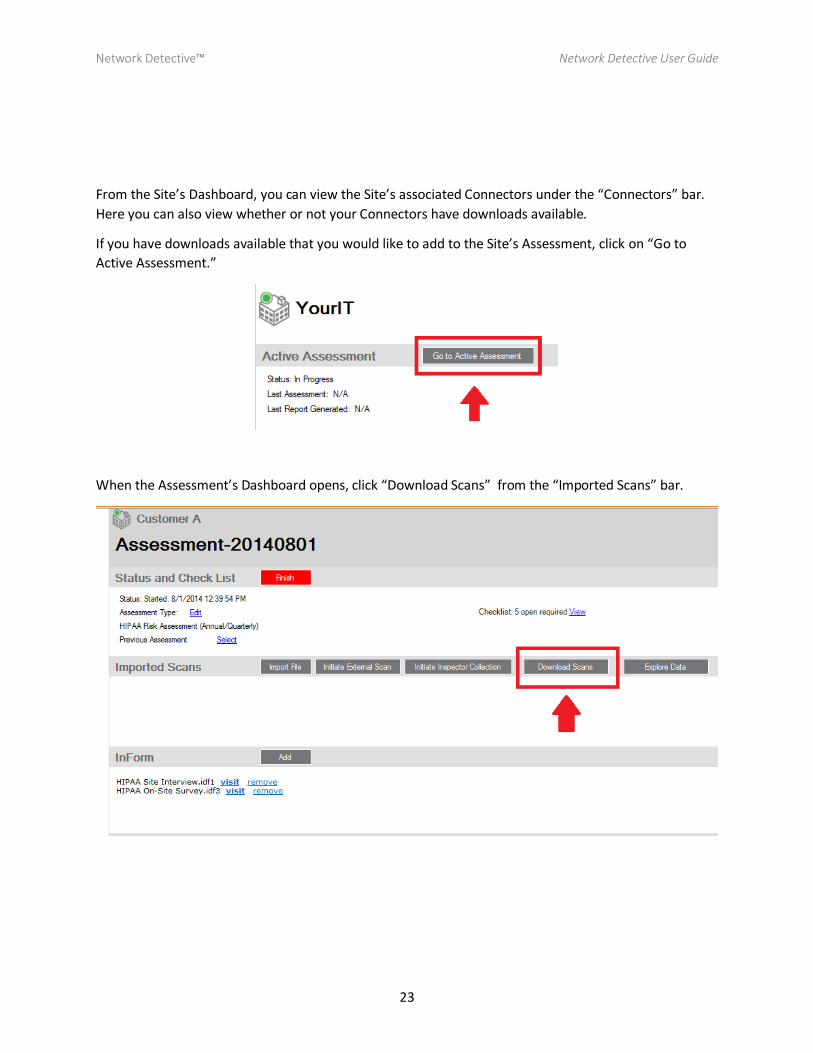
From the Site’s Dashboard, you can view the Site’s associated Connectors under the “Connectors” bar.
Here you can also view whether or not your Connectors have downloads available.
If you have downloads available that you would like to add to the Site’s Assessment, click on “Go to
Active Assessment.”
When the Assessment’s Dashboard opens, click “Download Scans” from the “Imported Scans” bar.

Network Detective™ Network Detective User Guide
24
This will open a dialog box which
will allow you to browse the
Scans available from the
Connector. You can select
specific scans or use the
“Download All” option.
After your Scans have finished
downloading, they will be listed
under the “Imported Scans” bar
and you can use them to
generate Reports.
Initiating an External Scan Some Reports either require or have the option of using External Vulnerability Scans. These can either
be imported or downloaded from an outside source or initiated from within the Assessment.
First,
navigate to the desired Site from the Home screen by double-clicking on its icon.
This will open the Site’s Dashboard.
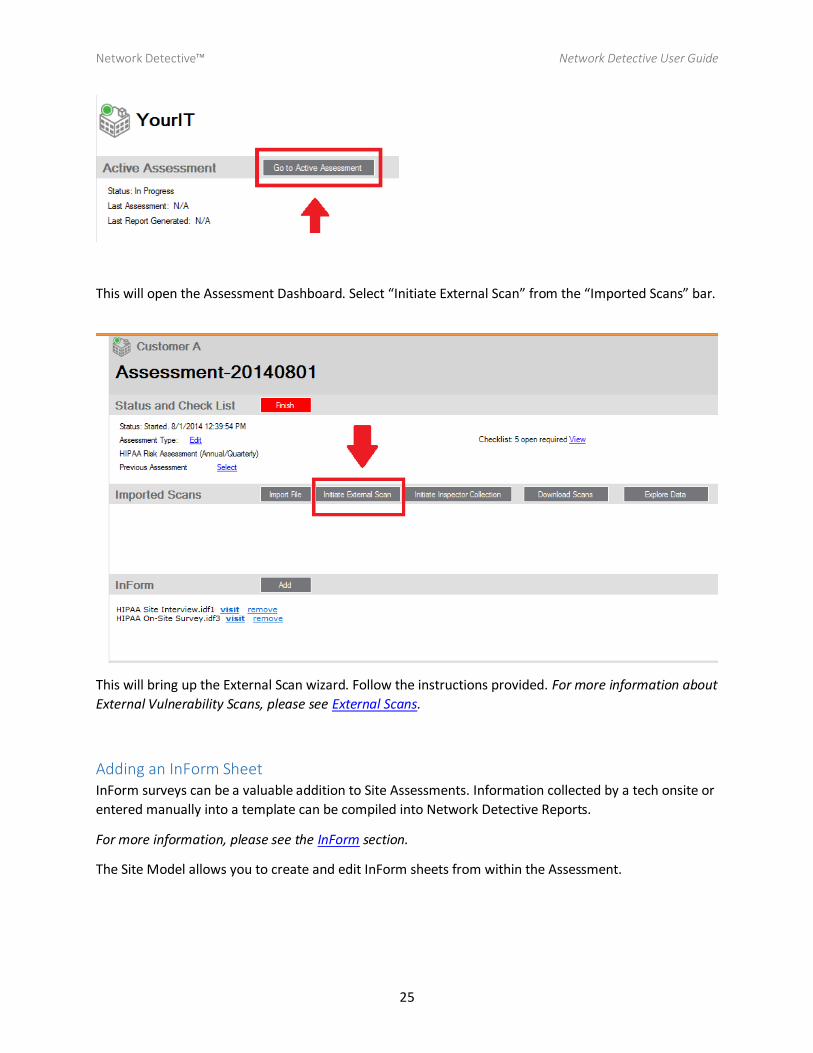
When the Site opens, click on the “Go to Active Assessment” button in the “Active Assessment” bar.
Network Detective™ Network Detective User Guide
25
This will open the Assessment Dashboard. Select “Initiate External Scan” from the “Imported Scans” bar.
This will bring up the External Scan wizard. Follow the instructions provided. For more information about
External Vulnerability Scans, please see External Scans.
Adding an InForm Sheet InForm surveys can be a valuable addition to Site Assessments. Information collected by a tech onsite or
entered manually into a template can be compiled into Network Detective Reports.
For more information, please see the InForm section.
The Site Model allows you to create and edit InForm sheets from within the Assessment.
Network Detective™ Network Detective User Guide
26
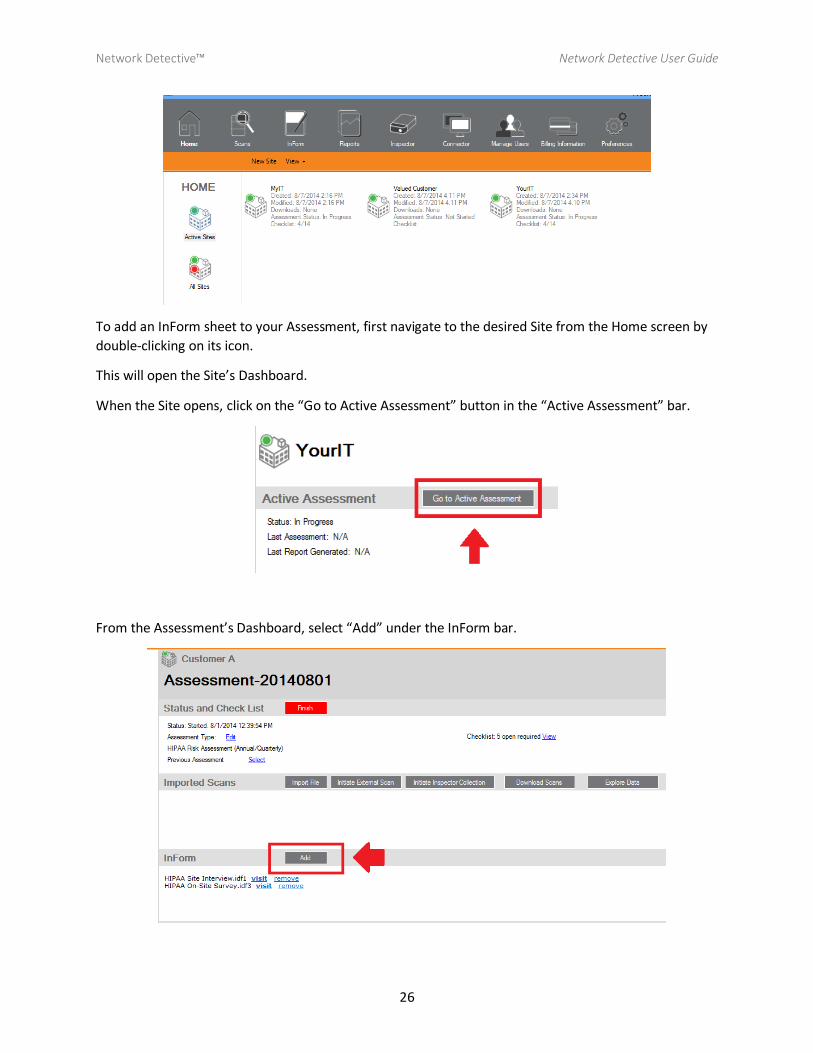
To add an InForm sheet to your Assessment, first navigate to the desired Site from the Home screen by
double-clicking on its icon.
This will open the Site’s Dashboard.
When the Site opens, click on the “Go to Active Assessment” button in the “Active Assessment” bar.
From the Assessment’s Dashboard, select “Add” under the InForm bar.
Network Detective™ Network Detective User Guide
27
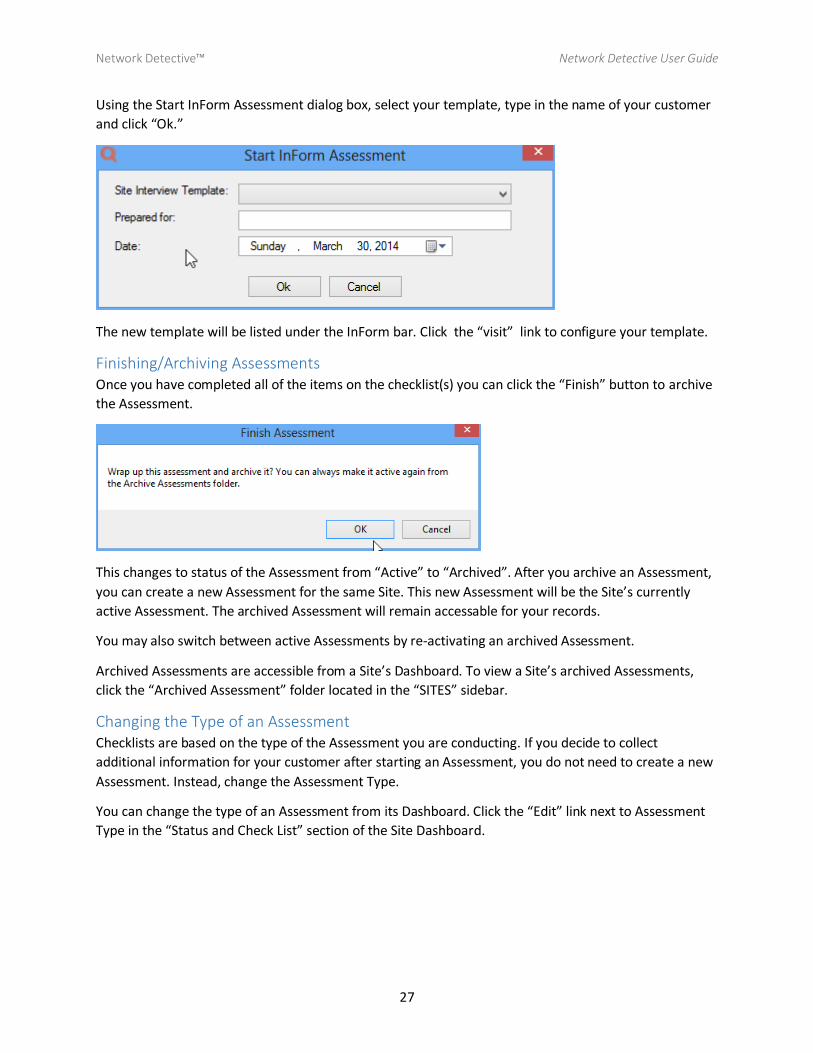
Using the Start InForm Assessment dialog box, select your template, type in the name of your customer
and click “Ok.”
The new template will be listed under the InForm bar. Click the “visit” link to configure your template.
Finishing/Archiving Assessments Once you have completed all of the items on the checklist(s) you can click the “Finish” button to archive
the Assessment.
This changes to status of the Assessment from “Active” to “Archived”. After you archive an Assessment,
you can create a new Assessment for the same Site. This new Assessment will be the Site’s currently
active Assessment. The archived Assessment will remain accessable for your records.
You may also switch between active Assessments by re-activating an archived Assessment.
Archived Assessments are accessible from a Site’s Dashboard. To view a Site’s archived Assessments,
click the “Archived Assessment” folder located in the “SITES” sidebar.
Changing the Type of an Assessment Checklists are based on the type of the Assessment you are conducting. If you decide to collect
additional information for your customer after starting an Assessment, you do not need to create a new
Assessment. Instead, change the Assessment Type.
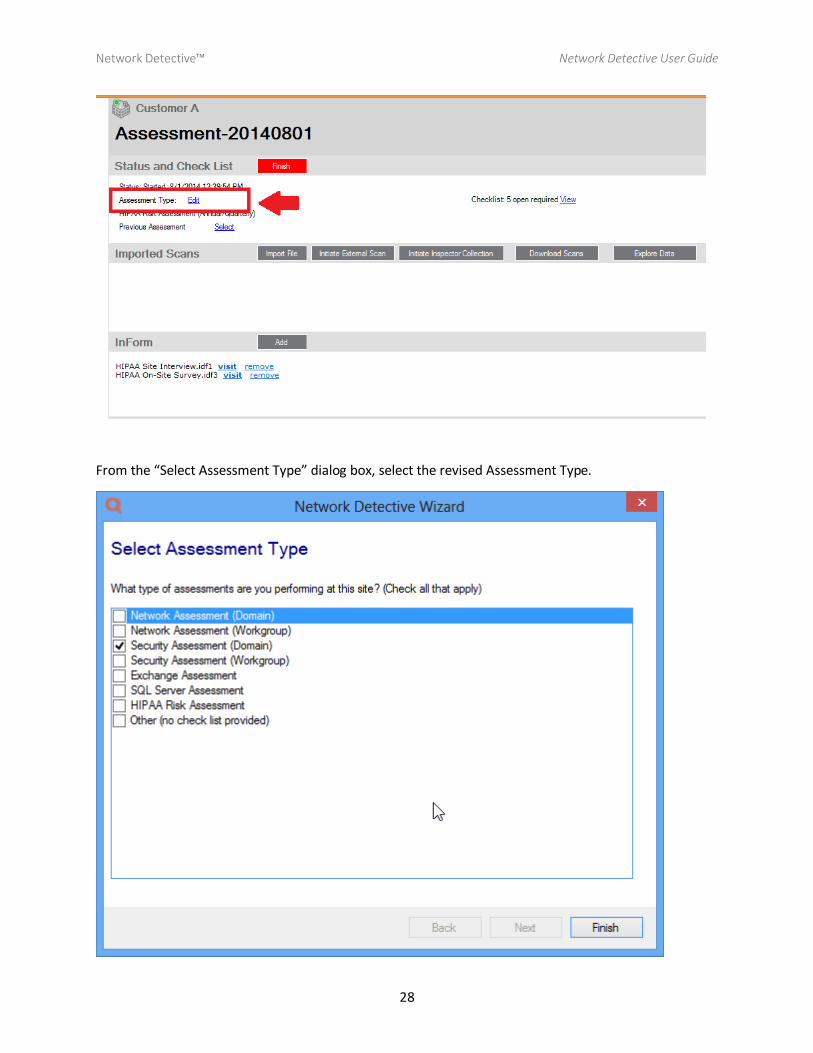
You can change the type of an Assessment from its Dashboard. Click the “Edit” link next to Assessment
Type in the “Status and Check List” section of the Site Dashboard.
Network Detective™ Network Detective User Guide
28
From the “Select Assessment Type” dialog box, select the revised Assessment Type.
Network Detective™ Network Detective User Guide
29
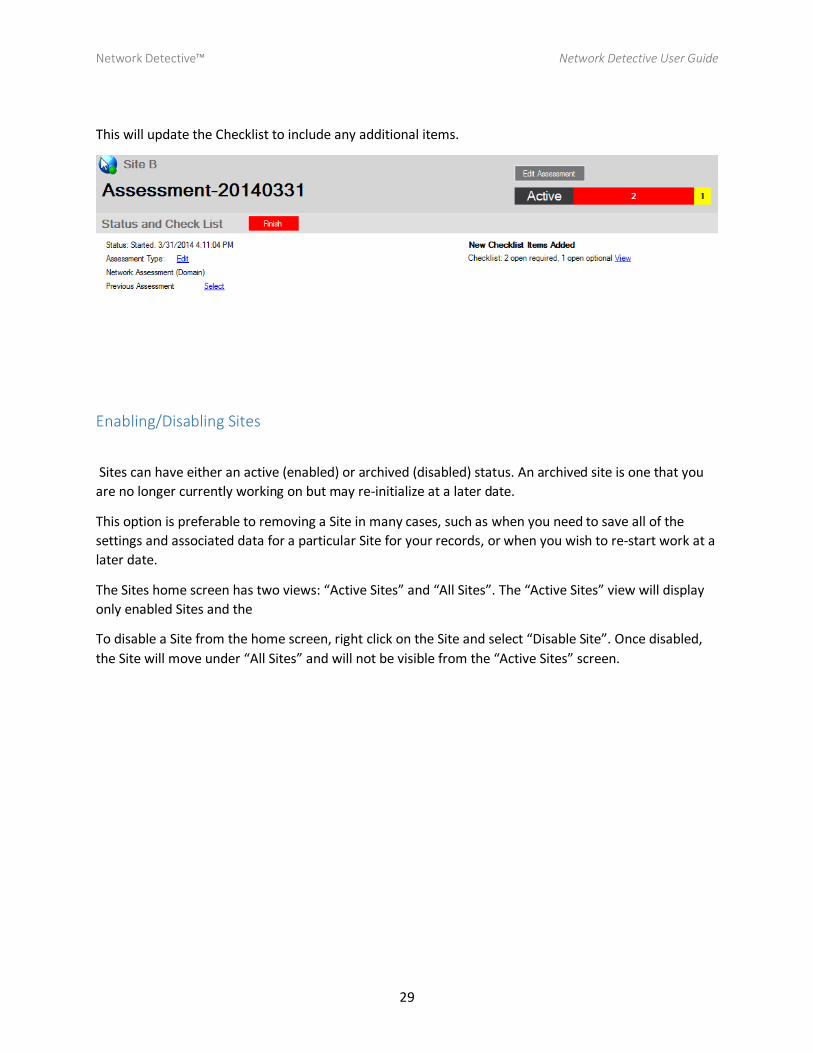
This will update the Checklist to include any additional items.
Enabling/Disabling Sites
Sites can have either an active (enabled) or archived (disabled) status. An archived site is one that you
are no longer currently working on but may re-initialize at a later date.
This option is preferable to removing a Site in many cases, such as when you need to save all of the
settings and associated data for a particular Site for your records, or when you wish to re-start work at a
later date.
The Sites home screen has two views: “Active Sites” and “All Sites”. The “Active Sites” view will display
only enabled Sites and the
To disable a Site from the home screen, right click on the Site and select “Disable Site”. Once disabled,
the Site will move under “All Sites” and will not be visible from the “Active Sites” screen.
Network Detective™ Network Detective User Guide
30
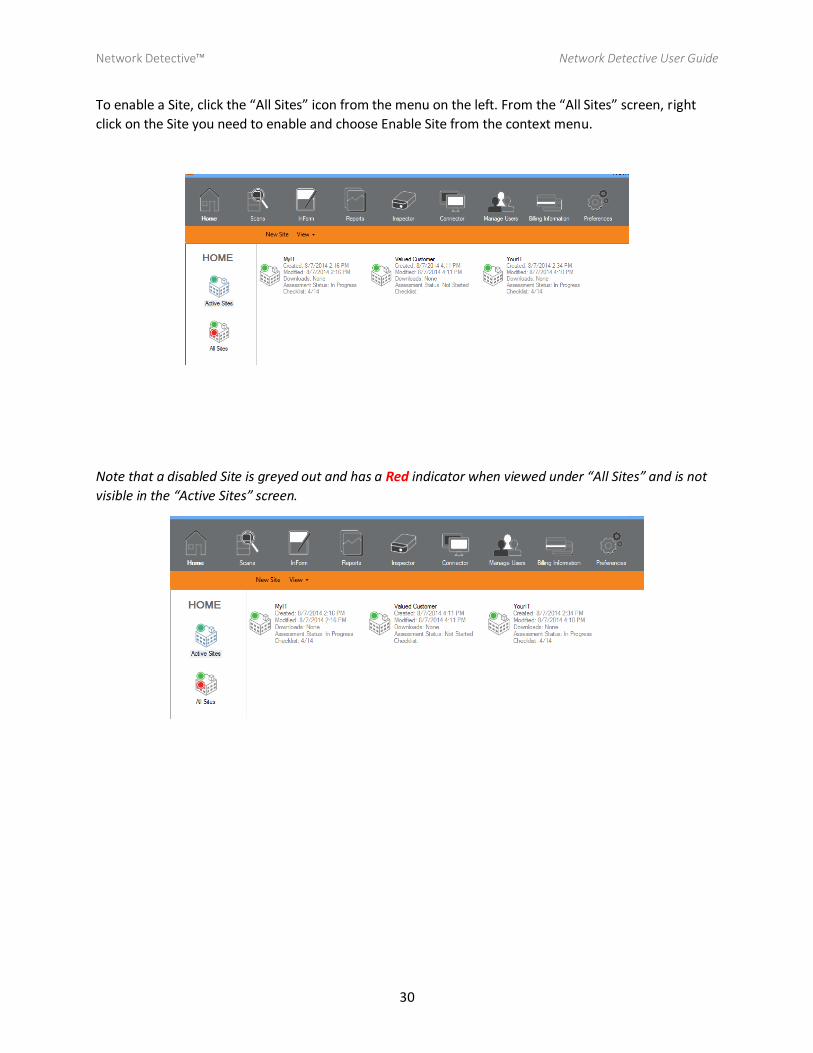
To enable a Site, click the “All Sites” icon from the menu on the left. From the “All Sites” screen, right
click on the Site you need to enable and choose Enable Site from the context menu.
Note that a disabled Site is greyed out and has a Red indicator when viewed under “All Sites” and is not
visible in the “Active Sites” screen.
Network Detective™ Network Detective User Guide
31
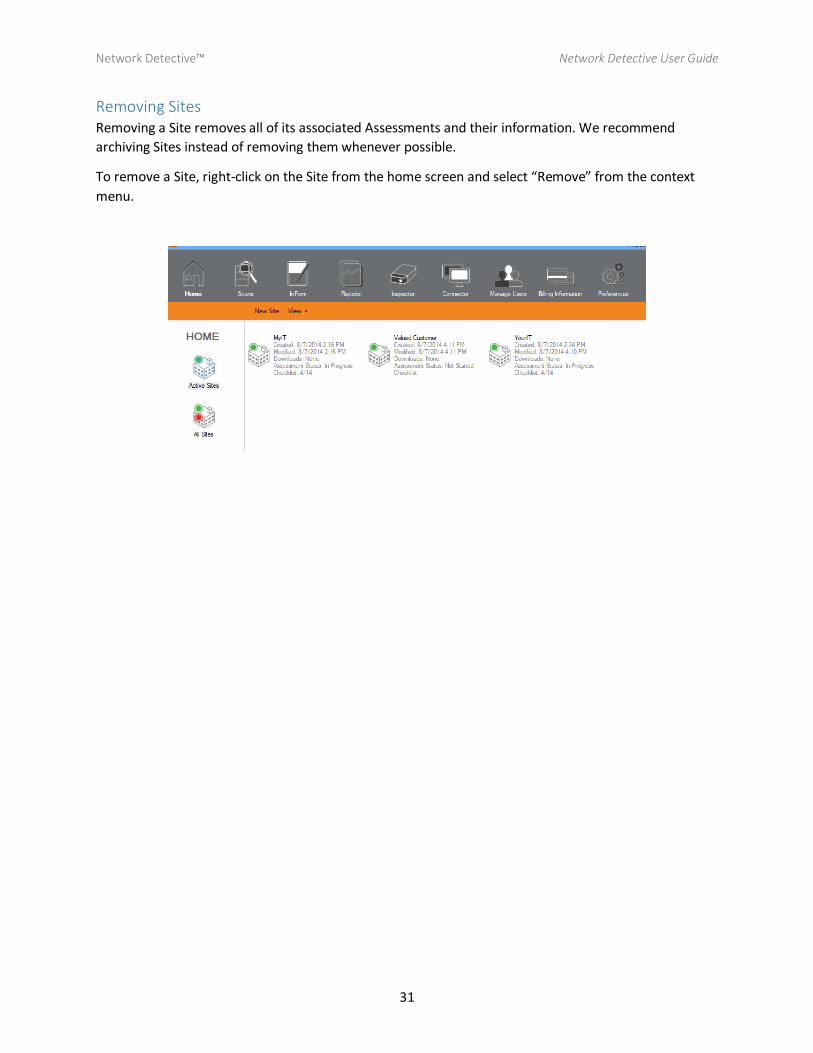
Removing Sites Removing a Site removes all of its associated Assessments and their information. We recommend
archiving Sites instead of removing them whenever possible.
To remove a Site, right-click on the Site from the home screen and select “Remove” from the context
menu.
Network Detective™ Network Detective User Guide
32
Network Detective Data Explorer This section describes how to use the Network Detective Data Explorer. The Data Explorer is a tool
available to Network Detective subscribers. It enables the user to preview report data and continuously
monitor customer metrics. Used with the Site Module, this is a powerful way to ensure that you get the
most from Network Detective.
Requirements Network Detective Application
Network Detective Subscription
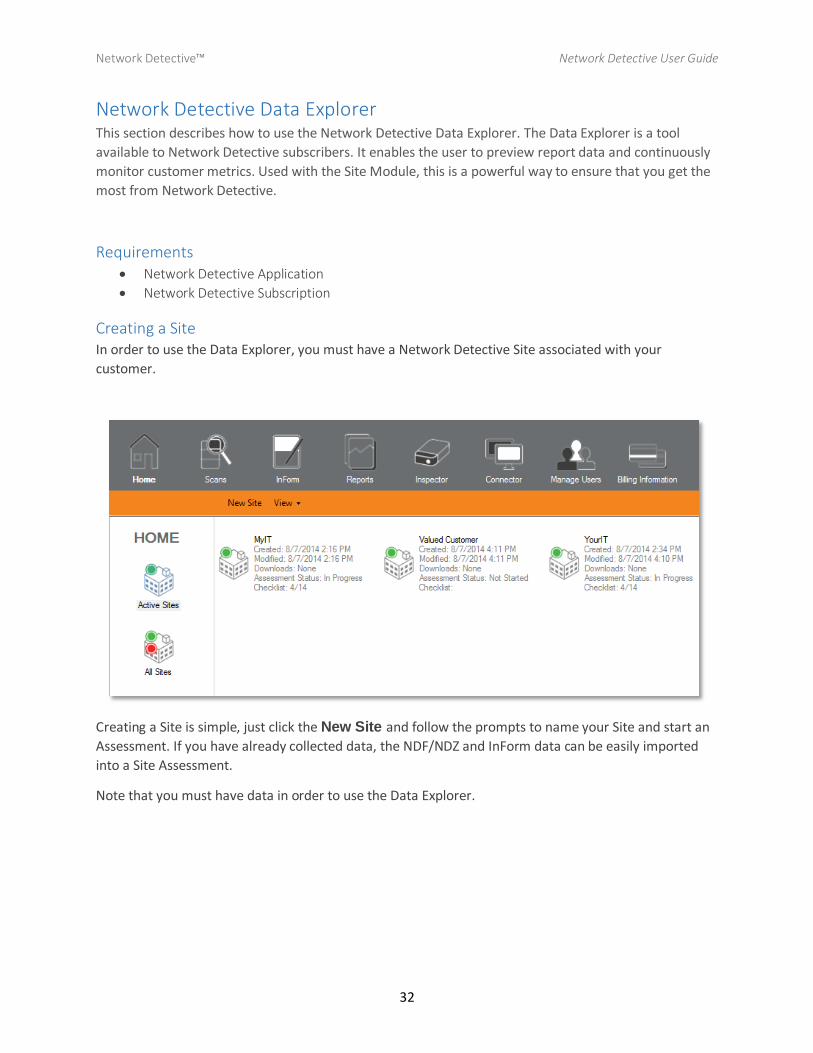
Creating a Site In order to use the Data Explorer, you must have a Network Detective Site associated with your
customer.
Creating a Site is simple, just click the New Site and follow the prompts to name your Site and start an
Assessment. If you have already collected data, the NDF/NDZ and InForm data can be easily imported
into a Site Assessment.
Note that you must have data in order to use the Data Explorer.

Network Detective™ Network Detective User Guide
33
Opening the Data Explorer After you have created a Site for your customer, initialized an Assessment, and added Scan data, you can
use the Data Explorer tool to preview graphs and charts that may be included in your Reports.
In the Network Detective application, navigate to Sites>Your Site > Go To Active Assessment.
From the Active Assessment, click the Explore Data button.
This will bring up the Data Explorer.
Network Detective™ Network Detective User Guide
34
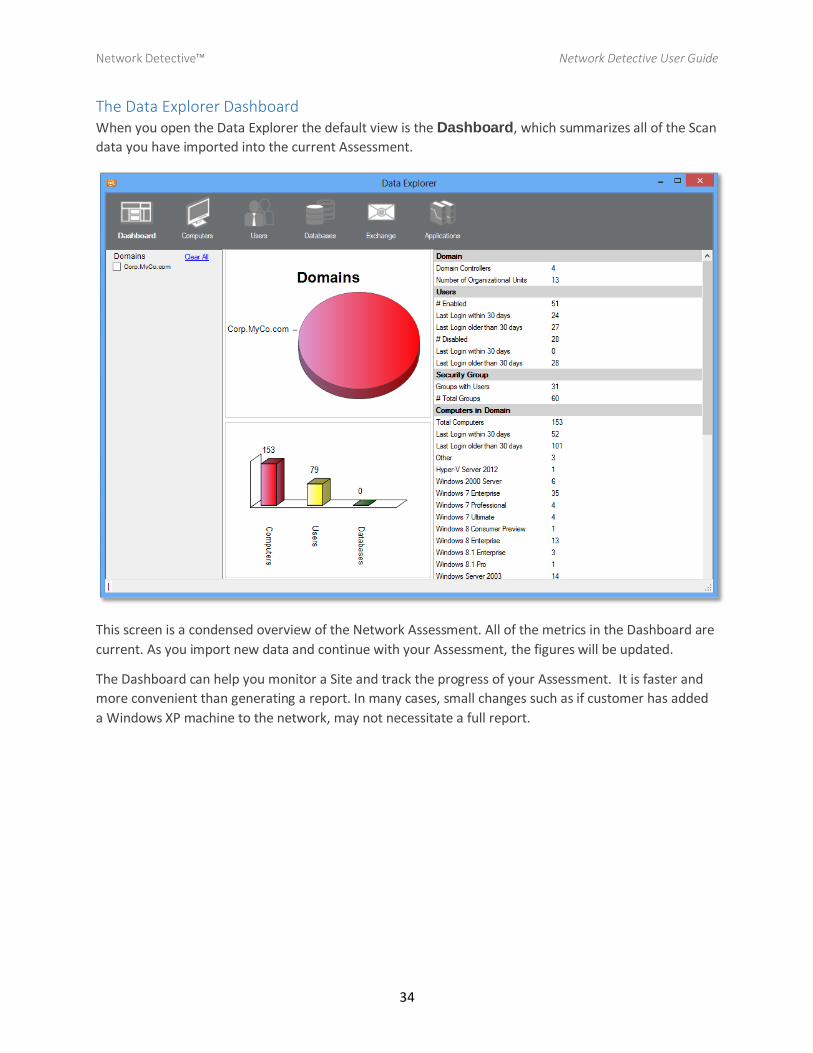
The Data Explorer Dashboard When you open the Data Explorer the default view is the Dashboard, which summarizes all of the Scan
data you have imported into the current Assessment.
This screen is a condensed overview of the Network Assessment. All of the metrics in the Dashboard are
current. As you import new data and continue with your Assessment, the figures will be updated.
The Dashboard can help you monitor a Site and track the progress of your Assessment. It is faster and
more convenient than generating a report. In many cases, small changes such as if customer has added
a Windows XP machine to the network, may not necessitate a full report.
Network Detective™ Network Detective User Guide
35
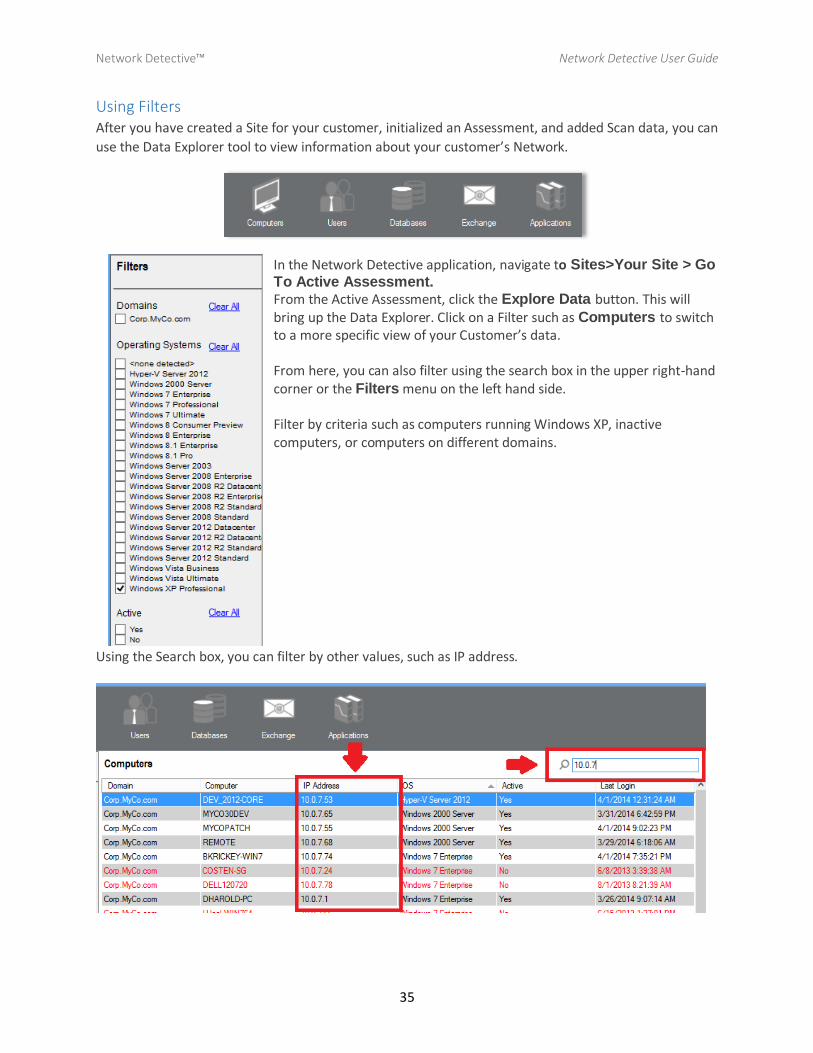
Using Filters After you have created a Site for your customer, initialized an Assessment, and added Scan data, you can
use the Data Explorer tool to view information about your customer’s Network.
In the Network Detective application, navigate to Sites>Your Site > Go To Active Assessment. From the Active Assessment, click the Explore Data button. This will bring up the Data Explorer. Click on a Filter such as Computers to switch to a more specific view of your Customer’s data. From here, you can also filter using the search box in the upper right-hand corner or the Filters menu on the left hand side. Filter by criteria such as computers running Windows XP, inactive computers, or computers on different domains.
Using the Search box, you can filter by other values, such as IP address.
Network Detective™ Network Detective User Guide
36
Network Detective Data Collector
The Network Data Collector is a self-extracting zip file that executes an “.EXE” and is completely non-
invasive – it is not “installed” on the domain controller or any other machine on the client’s network,
and does not make any changes to the system.
The Data Collector makes use of multiple technologies/approaches for collecting information on the
client network, including:
• Active Directory Access and APIs
• Network API calls*
• DNS and DHCP lookups
• Microsoft APIs and Event Logs*
• Remote WMI, RPC and Remote Registry (over the network)
• “whois” and network lookups*
• Microsoft Baseline Security Analyzer (MBSA)*
* Network Data Collector Only
When using the Network Data Collector for the Network Assessment module, to get the most
information from the systems on the network, you will want to make sure that WMI and Remote
Registry calls are available:
• Enable “Windows Firewall: Allow remote administration exception” in Group Policy.
• Add/Define “Windows Firewall: Define Port Exceptions” – “enabled:Remote Registry” for IP range in Group Policy.
(While enabling remote protocols is optional and not always possible, this will provide network access to each
of the machines so that the data collector can gather data from the individual systems. Even without this,
Network Detective can provide useful information on the systems from Active Directory and the port scans.)
For information on modifying Group Policies, see
Appendix III – Group Policy Reference
Network Detective™ Network Detective User Guide
37
Network Detective Data Collector Wizard
After downloading the Network Detective (ND) and the Network Detective Data Collector (NDDC), run
the NDDC with administrator privileges to generate the files necessary to create reports in ND. On non-
domain networks, you still must run a “Network Data Collection.” Choose one of the systems on the
peer-peer network, and enable both the Network Data Collector and the Local Computer Data Collector.
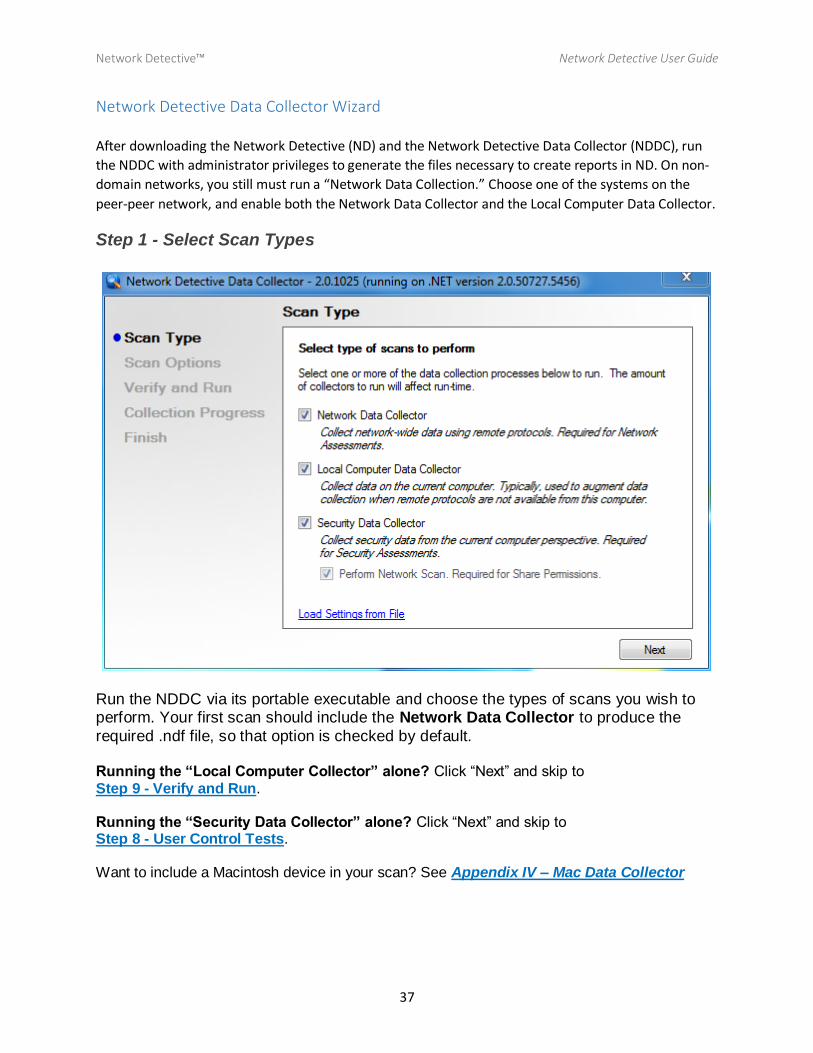
Step 1 - Select Scan Types
Run the NDDC via its portable executable and choose the types of scans you wish to perform. Your first scan should include the Network Data Collector to produce the
required .ndf file, so that option is checked by default. Running the “Local Computer Collector” alone? Click “Next” and skip to Step 9 - Verify and Run. Running the “Security Data Collector” alone? Click “Next” and skip to Step 8 - User Control Tests. Want to include a Macintosh device in your scan? See Appendix IV – Mac Data Collector
Network Detective™ Network Detective User Guide
38
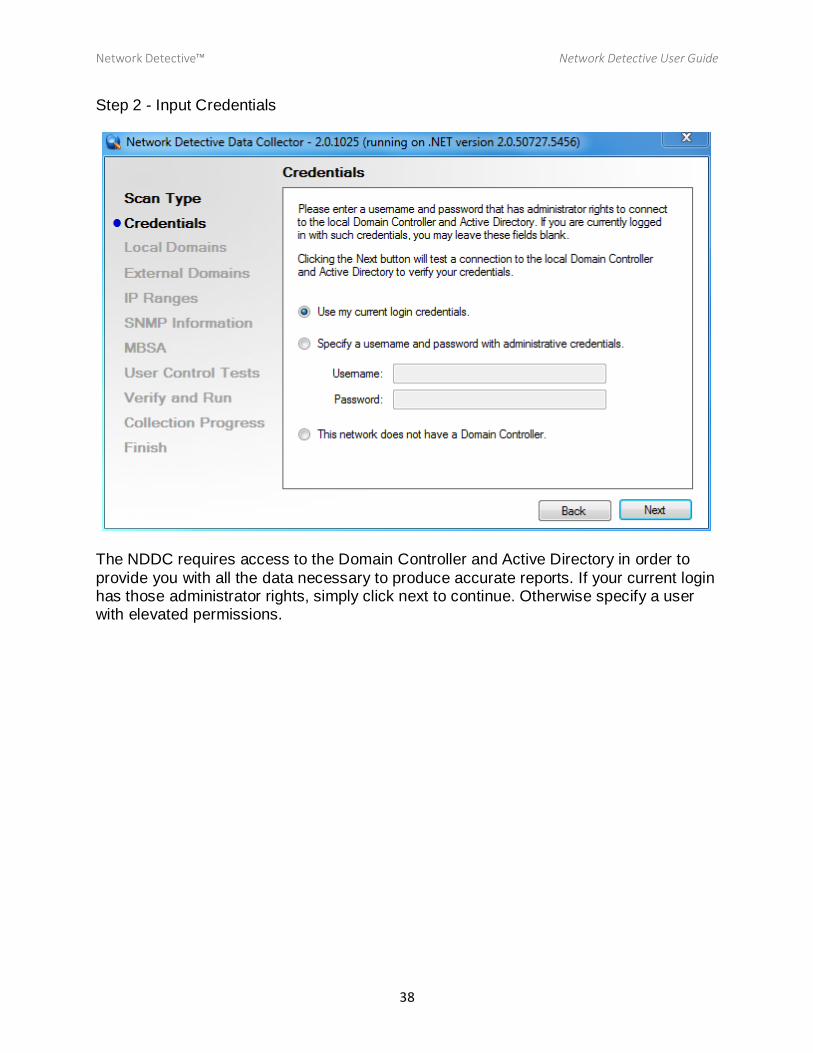
Step 2 - Input Credentials
The NDDC requires access to the Domain Controller and Active Directory in order to
provide you with all the data necessary to produce accurate reports. If your current login has those administrator rights, simply click next to continue. Otherwise specify a user with elevated permissions.
Network Detective™ Network Detective User Guide
39
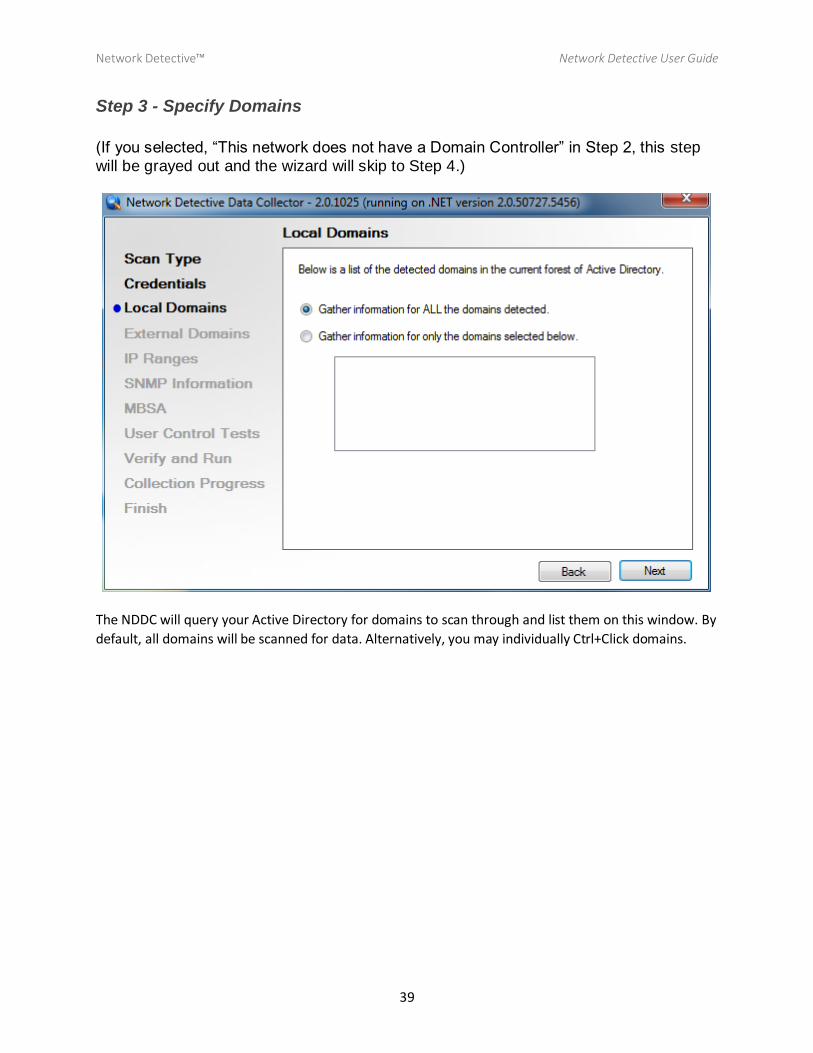
Step 3 - Specify Domains
(If you selected, “This network does not have a Domain Controller” in Step 2, this step
will be grayed out and the wizard will skip to Step 4.)
The NDDC will query your Active Directory for domains to scan through and list them on this window. By
default, all domains will be scanned for data. Alternatively, you may individually Ctrl+Click domains.
Network Detective™ Network Detective User Guide
40
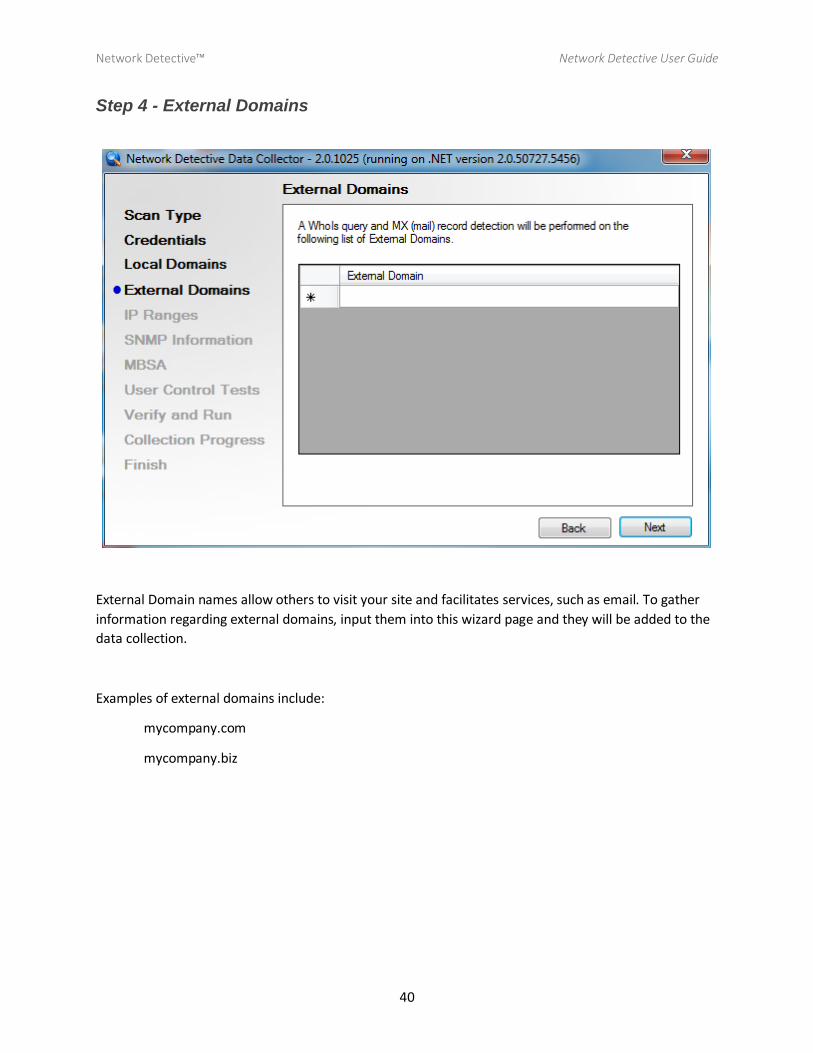
Step 4 - External Domains
External Domain names allow others to visit your site and facilitates services, such as email. To gather
information regarding external domains, input them into this wizard page and they will be added to the
data collection.
Examples of external domains include:
mycompany.com
mycompany.biz
Network Detective™ Network Detective User Guide
41
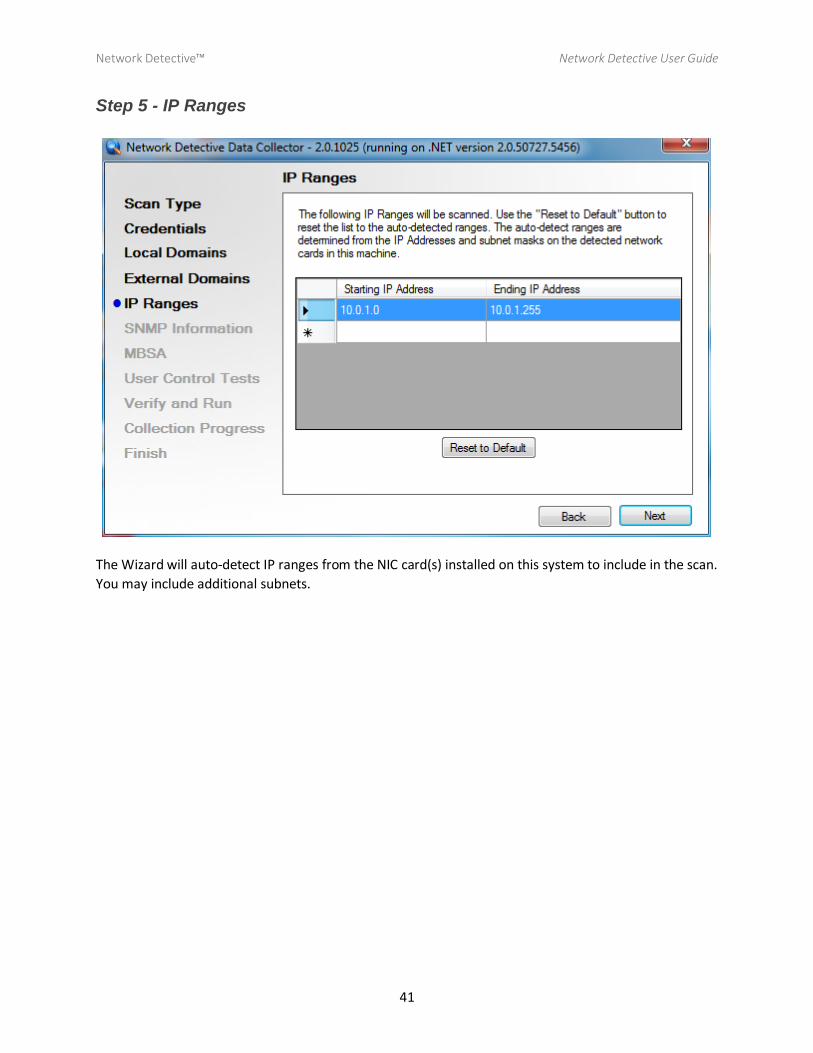
Step 5 - IP Ranges
The Wizard will auto-detect IP ranges from the NIC card(s) installed on this system to include in the scan.
You may include additional subnets.
Network Detective™ Network Detective User Guide
42
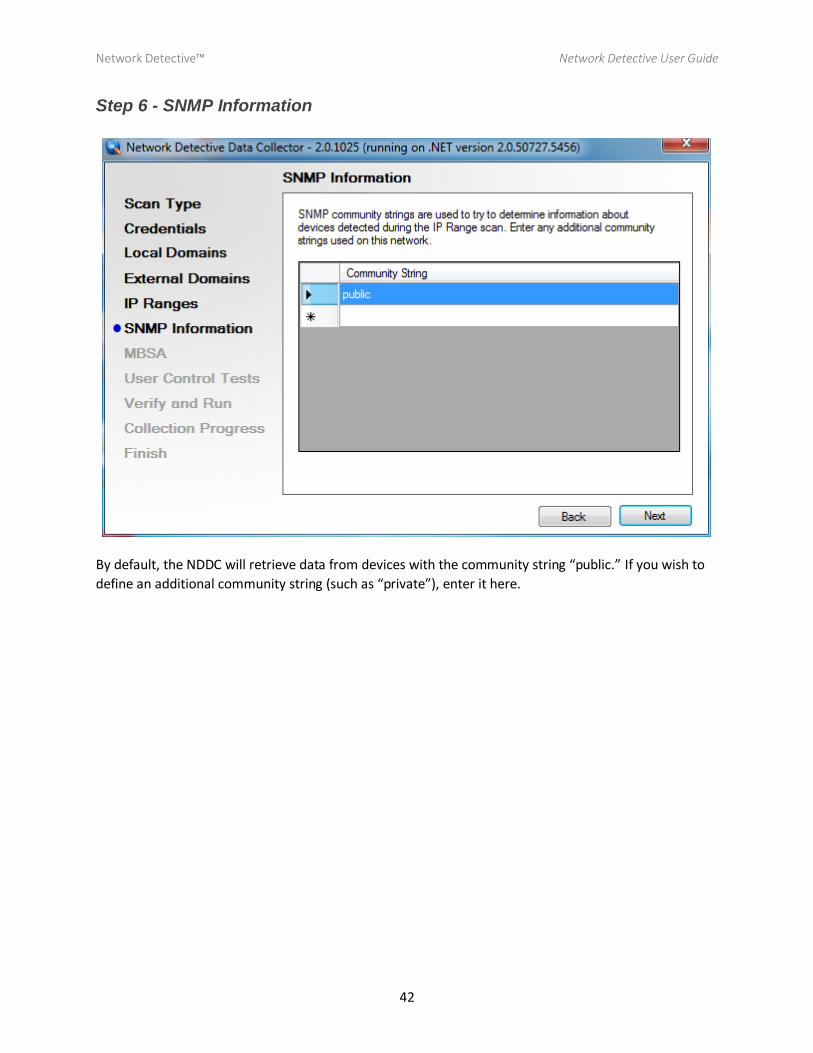
Step 6 - SNMP Information
By default, the NDDC will retrieve data from devices with the community string “public.” If you wish to
define an additional community string (such as “private”), enter it here.
Network Detective™ Network Detective User Guide
43
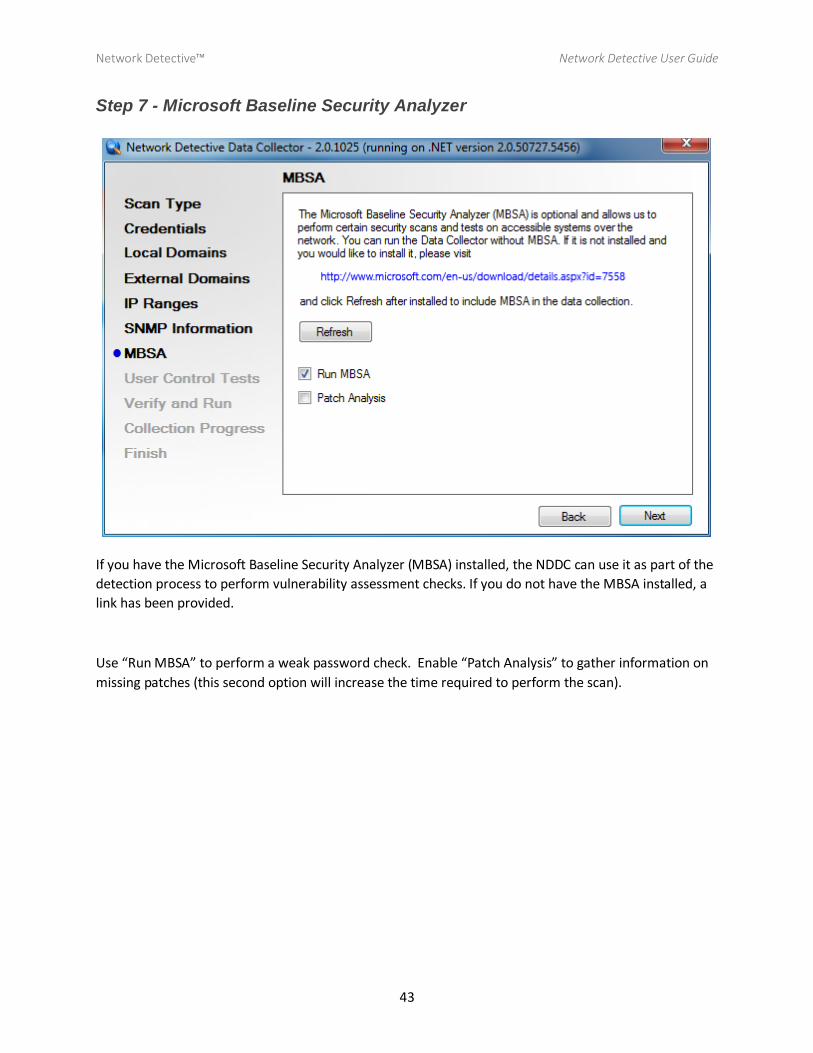
Step 7 - Microsoft Baseline Security Analyzer
If you have the Microsoft Baseline Security Analyzer (MBSA) installed, the NDDC can use it as part of the
detection process to perform vulnerability assessment checks. If you do not have the MBSA installed, a
link has been provided.
Use “Run MBSA” to perform a weak password check. Enable “Patch Analysis” to gather information on
missing patches (this second option will increase the time required to perform the scan).
Network Detective™ Network Detective User Guide
44
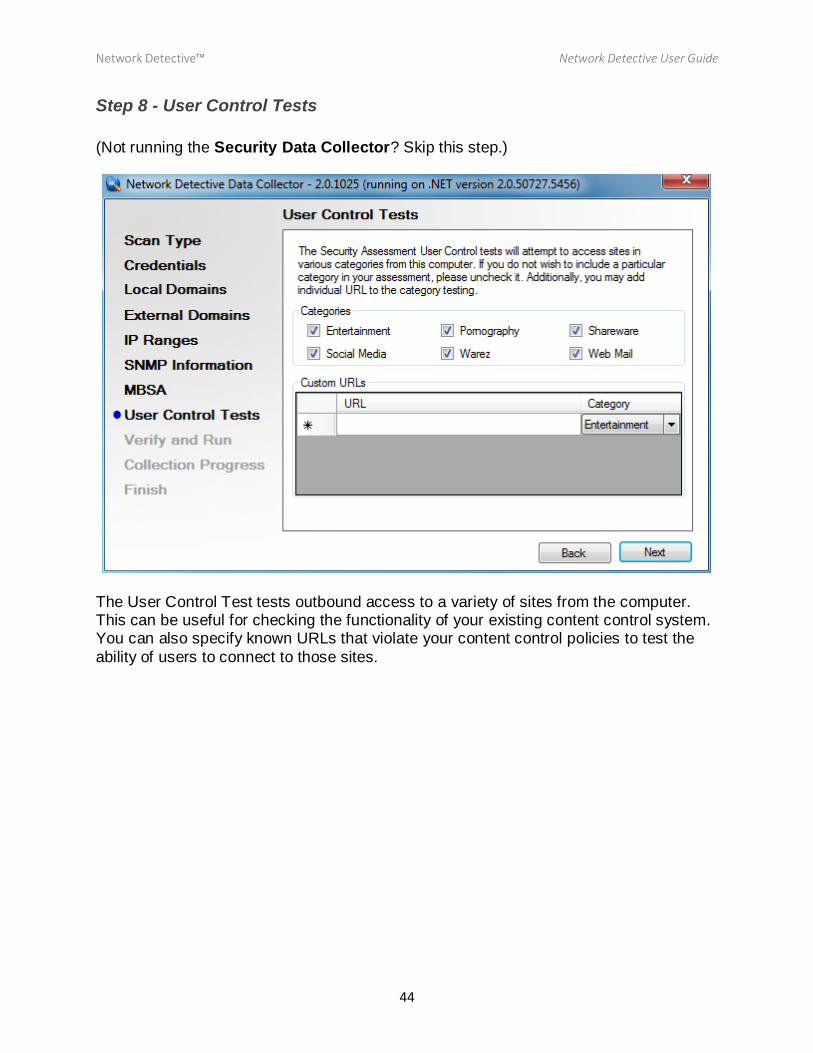
Step 8 - User Control Tests
(Not running the Security Data Collector? Skip this step.)
The User Control Test tests outbound access to a variety of sites from the computer. This can be useful for checking the functionality of your existing content control system. You can also specify known URLs that violate your content control policies to test the
ability of users to connect to those sites.
Network Detective™ Network Detective User Guide
45
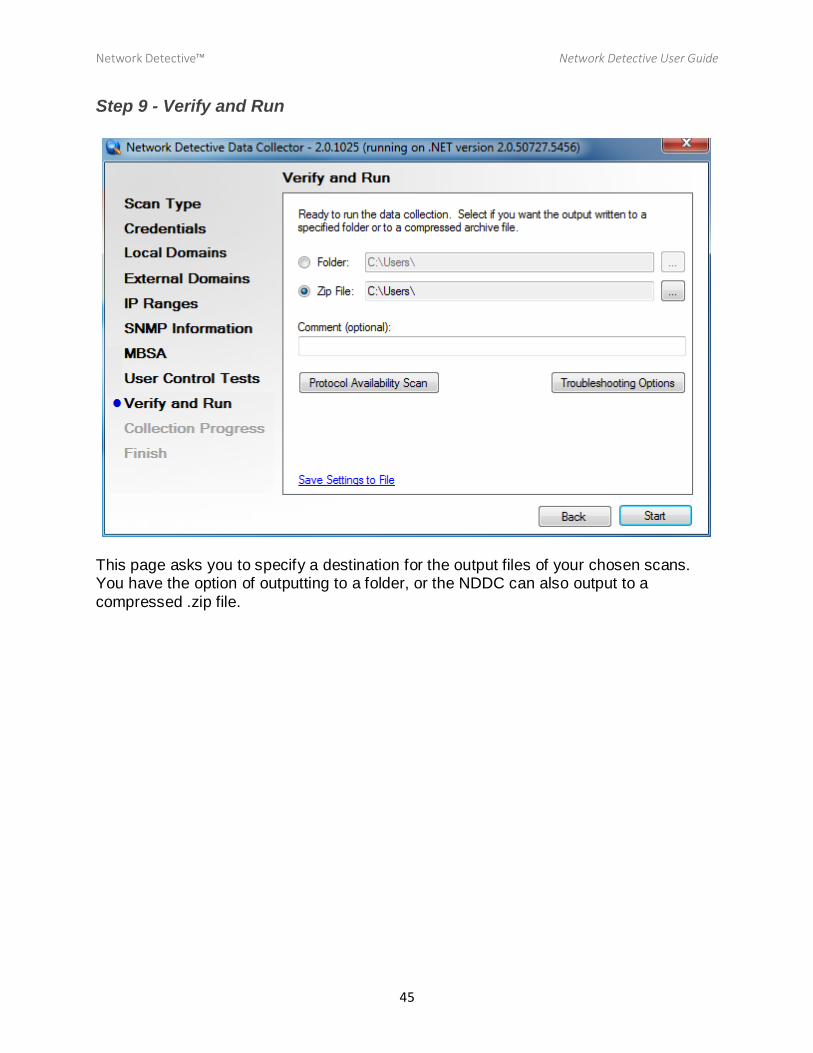
Step 9 - Verify and Run
This page asks you to specify a destination for the output files of your chosen scans. You have the option of outputting to a folder, or the NDDC can also output to a
compressed .zip file.
Network Detective™ Network Detective User Guide
46
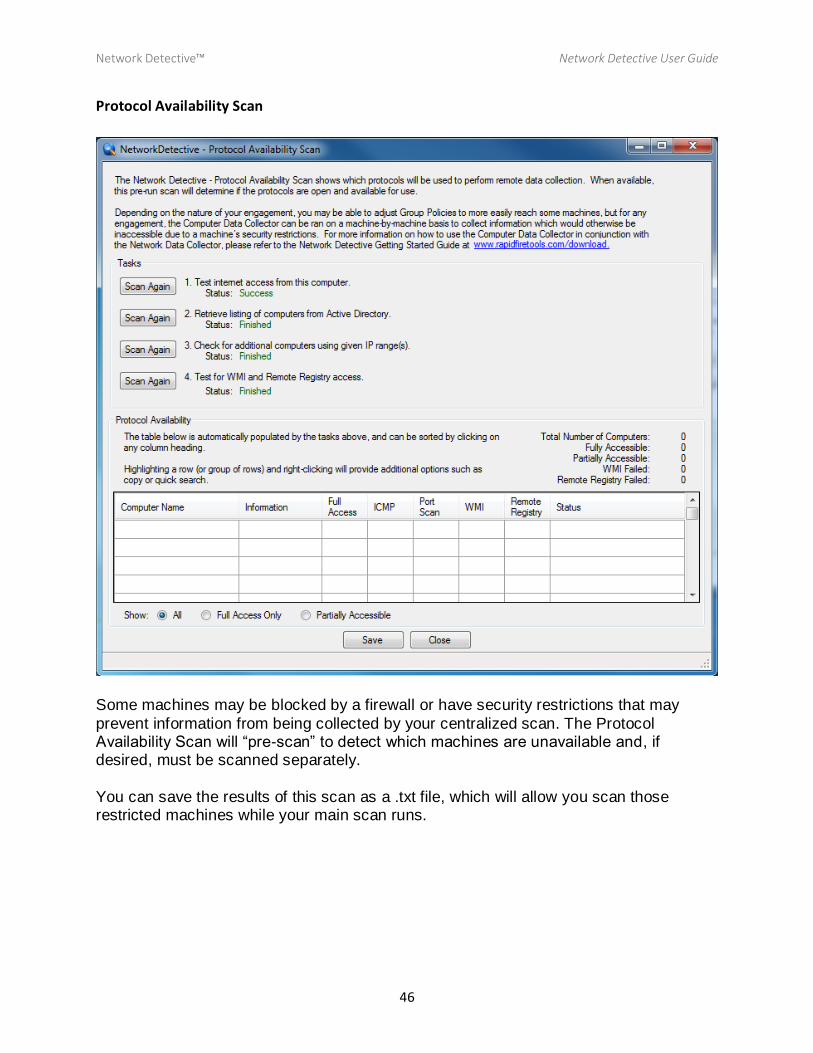
Protocol Availability Scan
Some machines may be blocked by a firewall or have security restrictions that may
prevent information from being collected by your centralized scan. The Protocol Availability Scan will “pre-scan” to detect which machines are unavailable and, if desired, must be scanned separately.
You can save the results of this scan as a .txt file, which will allow you scan those restricted machines while your main scan runs.
Network Detective™ Network Detective User Guide
47
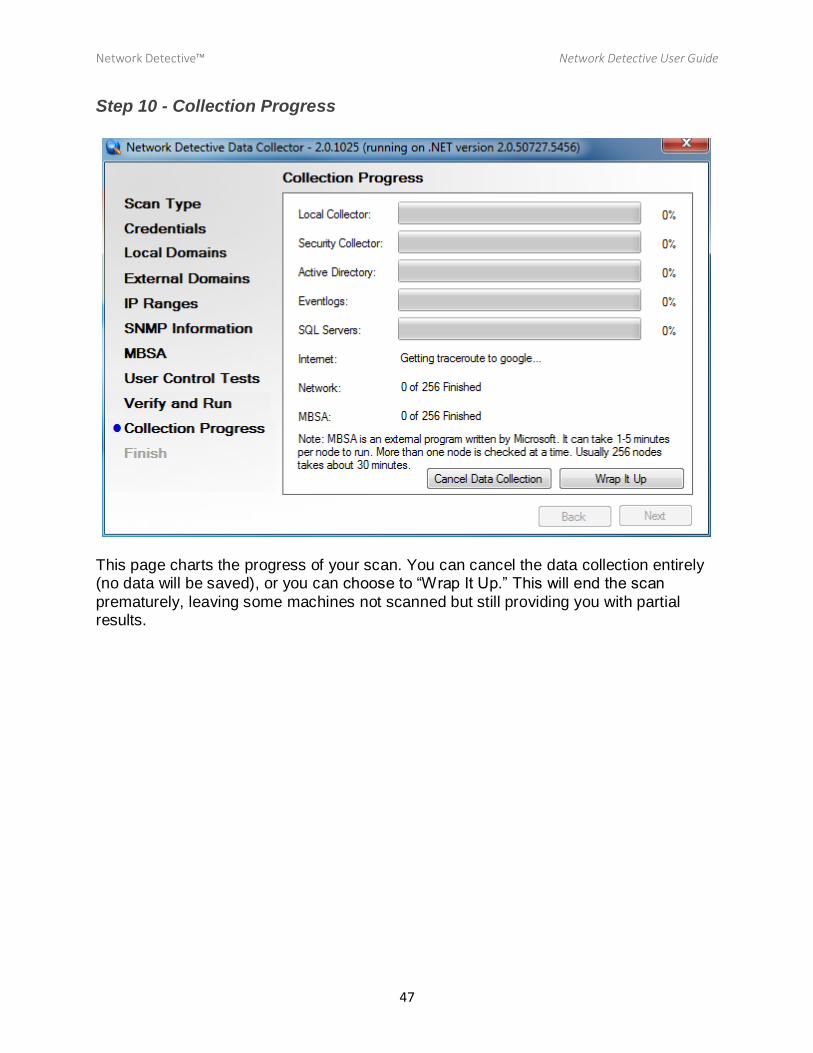
Step 10 - Collection Progress
This page charts the progress of your scan. You can cancel the data collection entirely (no data will be saved), or you can choose to “Wrap It Up.” This will end the scan
prematurely, leaving some machines not scanned but still providing you with partial results.
Network Detective™ Network Detective User Guide
48
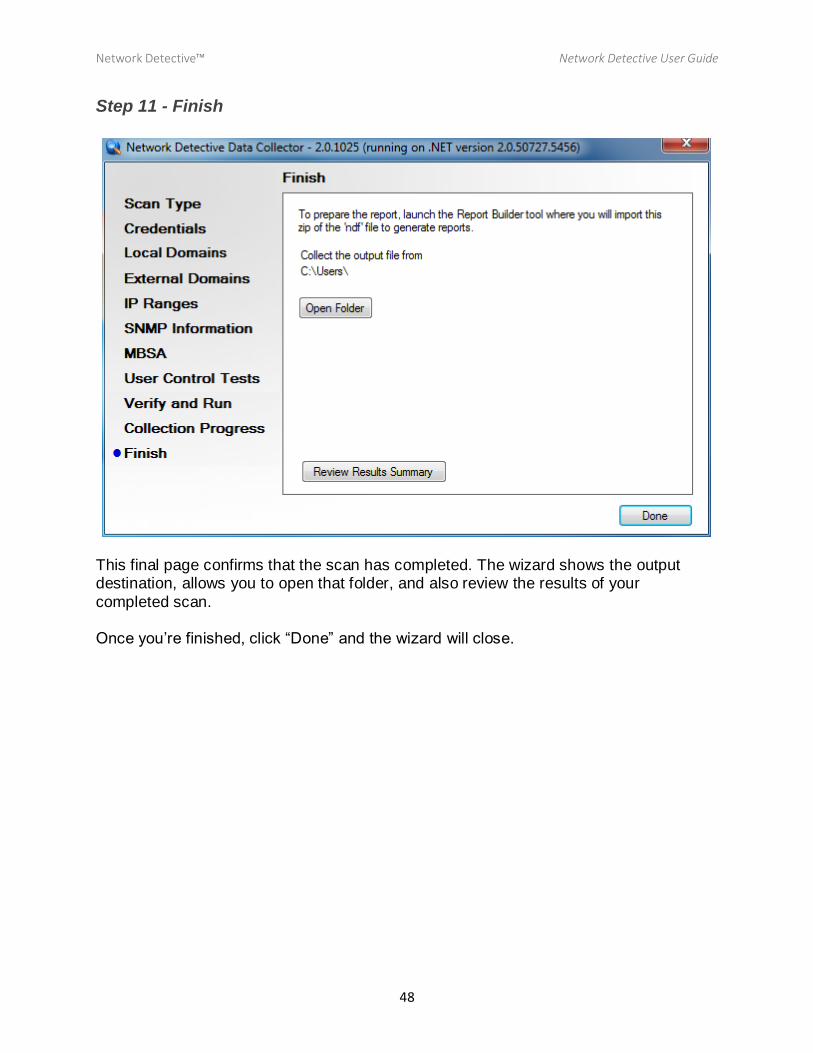
Step 11 - Finish
This final page confirms that the scan has completed. The wizard shows the output destination, allows you to open that folder, and also review the results of your
completed scan. Once you’re finished, click “Done” and the wizard will close.

Network Detective™ Network Detective User Guide
49
Exchange Assessment Data Collector
The Exchange Assessment Data Collector is a self-extracting zip file that executes an “.EXE” and is
completely non-invasive – it is not “installed” on the Exchange server or any other machine on the
client’s network, and does not make any changes to the system.
The Data Collector makes use of multiple technologies/approaches for collecting information on the
Microsoft Exchange environment depending on the version of Exchange. Remote protocols are used to
access Office 365 environments, while the use of local PowerShell CmdLets specific for Microsoft
Exchange are used for local scans.
In most cases, the server Microsoft Exchange will already have PowerShell and the proper CmdLets
installed. The Exchange Assessment Data Collector will check for pre-requisites before performing its
scan.
For local Exchange 2007 and 2010, the Exchange Assessment Data Collector must be run on the server
running Exchange.
Network Detective™ Network Detective User Guide
50
Exchange Assessment Data Collector Wizard
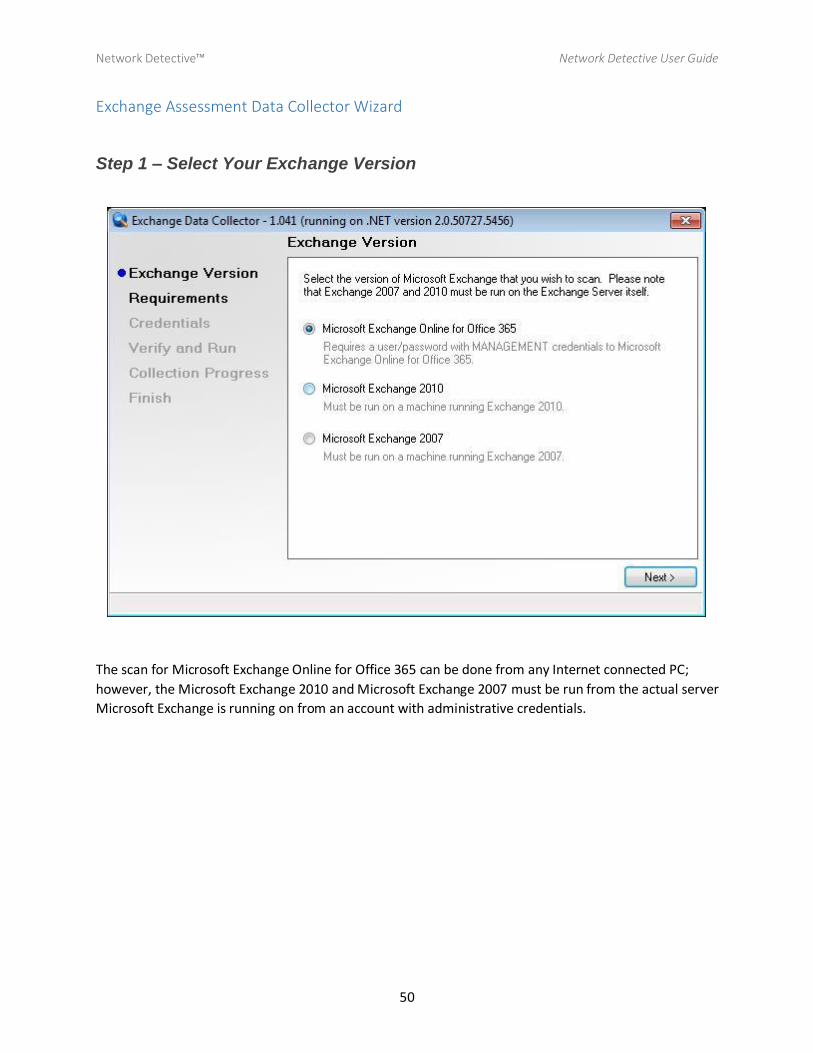
Step 1 – Select Your Exchange Version
The scan for Microsoft Exchange Online for Office 365 can be done from any Internet connected PC;
however, the Microsoft Exchange 2010 and Microsoft Exchange 2007 must be run from the actual server
Microsoft Exchange is running on from an account with administrative credentials.
Network Detective™ Network Detective User Guide
51
Step 2 – Verify Required Files
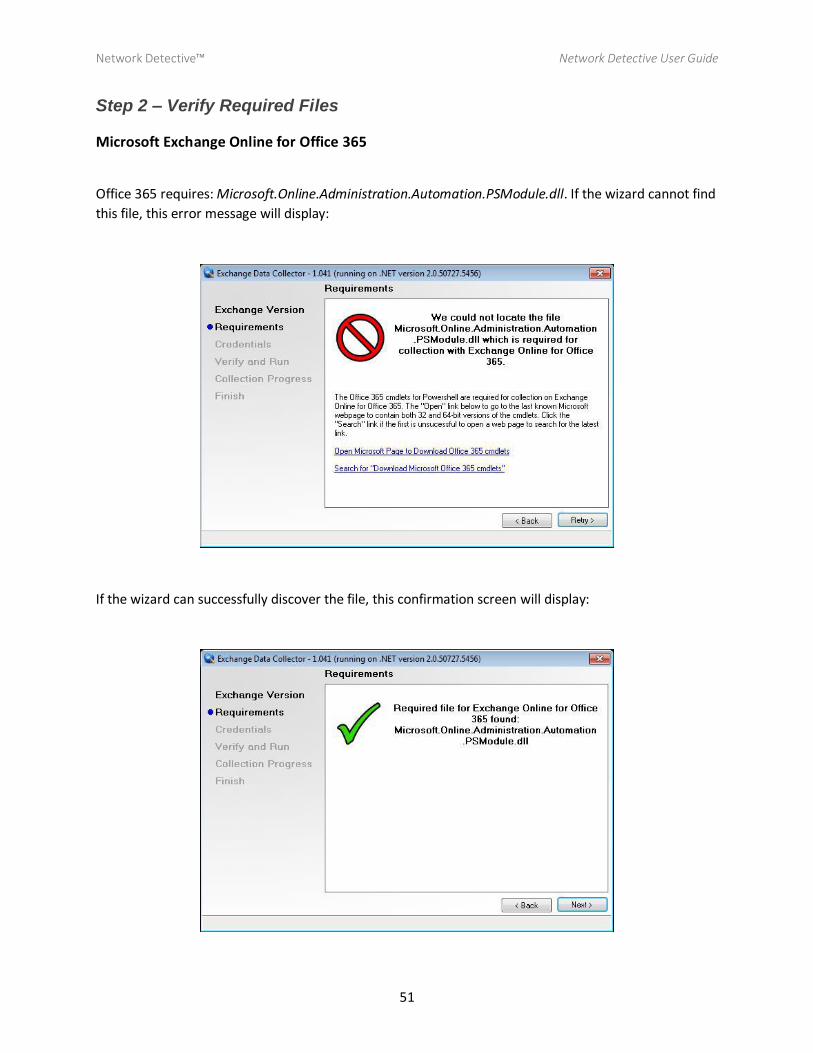
Microsoft Exchange Online for Office 365
Office 365 requires: Microsoft.Online.Administration.Automation.PSModule.dll. If the wizard cannot find
this file, this error message will display:
If the wizard can successfully discover the file, this confirmation screen will display:
Network Detective™ Network Detective User Guide
52
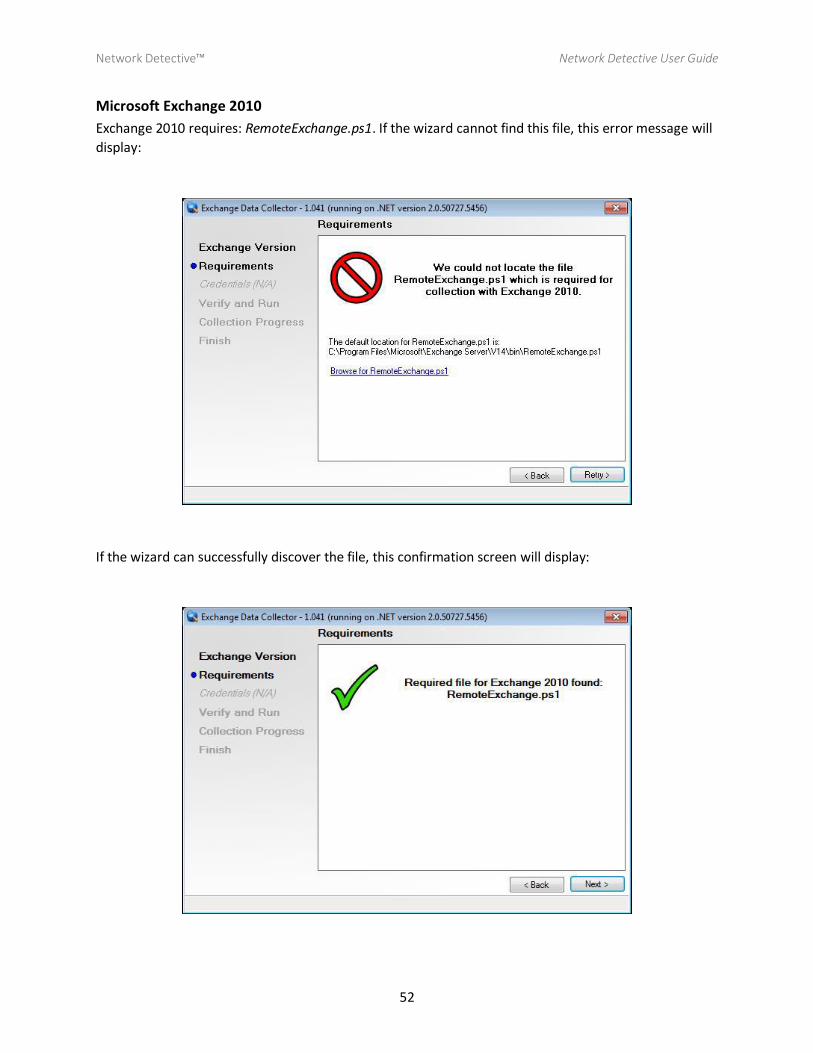
Microsoft Exchange 2010
Exchange 2010 requires: RemoteExchange.ps1. If the wizard cannot find this file, this error message will
display:
If the wizard can successfully discover the file, this confirmation screen will display:
Network Detective™ Network Detective User Guide
53
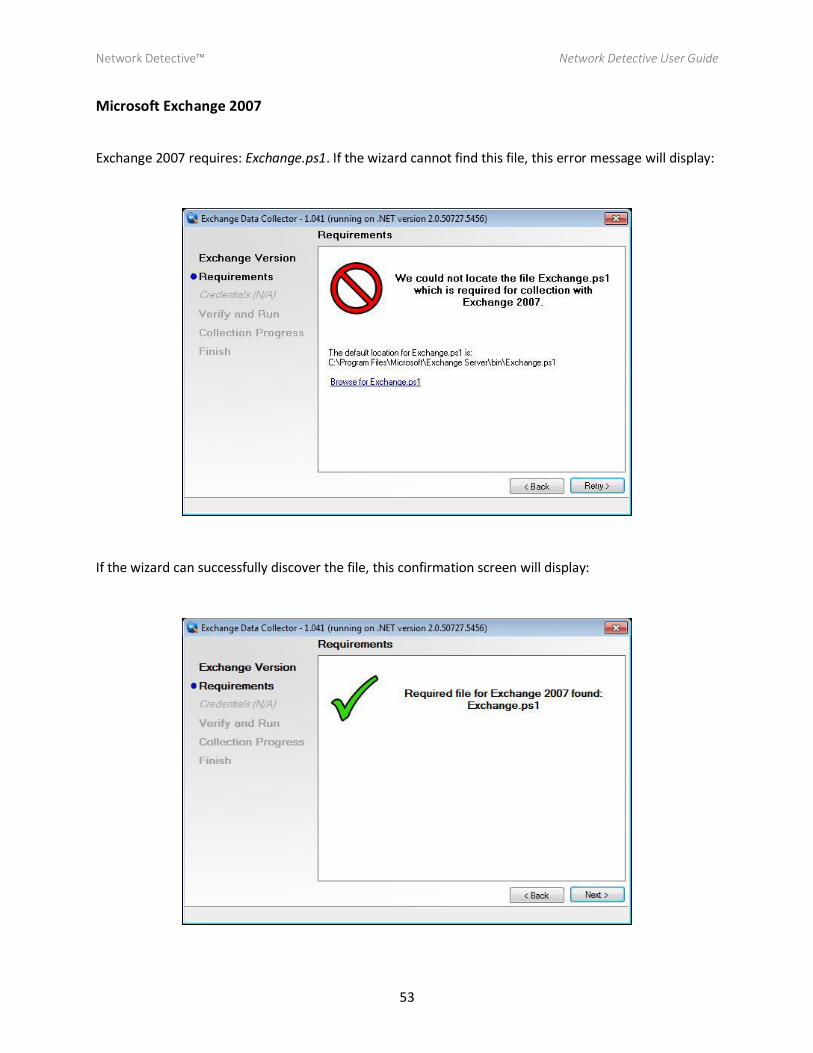
Microsoft Exchange 2007
Exchange 2007 requires: Exchange.ps1. If the wizard cannot find this file, this error message will display:
If the wizard can successfully discover the file, this confirmation screen will display:
Network Detective™ Network Detective User Guide
54
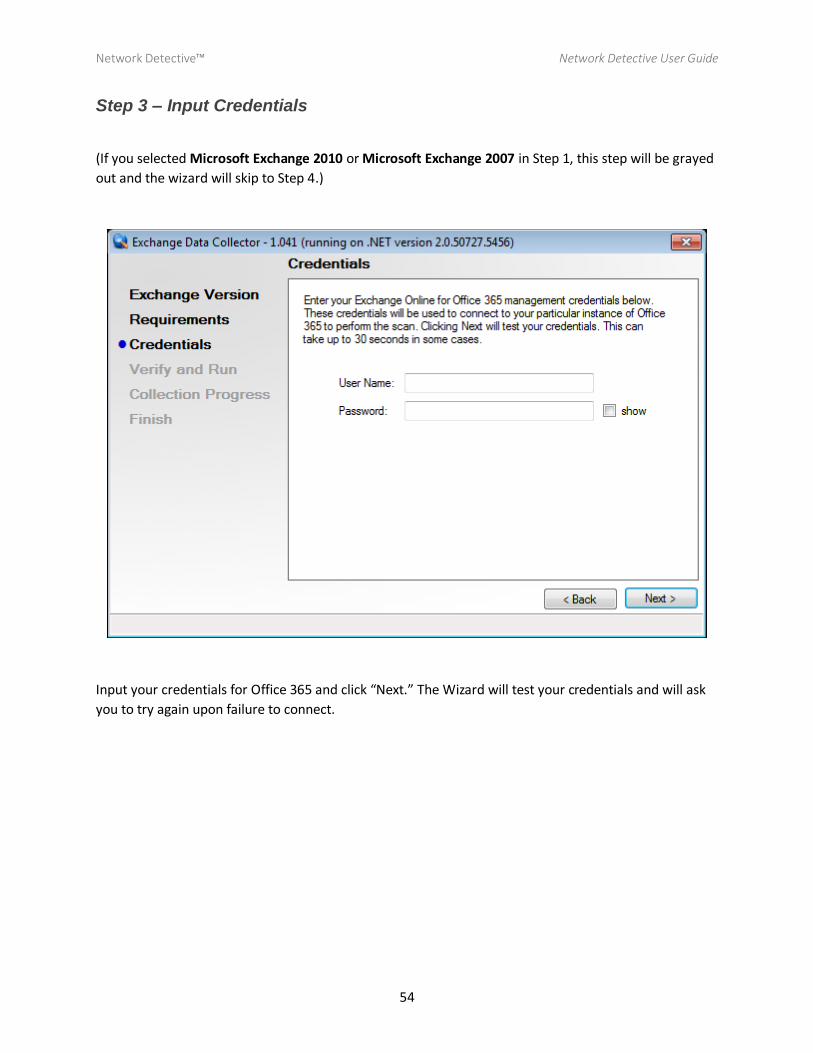
Step 3 – Input Credentials
(If you selected Microsoft Exchange 2010 or Microsoft Exchange 2007 in Step 1, this step will be grayed
out and the wizard will skip to Step 4.)
Input your credentials for Office 365 and click “Next.” The Wizard will test your credentials and will ask
you to try again upon failure to connect.
Network Detective™ Network Detective User Guide
55
Step 4 – Verify and Run
This page asks you to specify a destination for the output files of your scan. You have the option of
outputting to a folder, or you can output to a compressed .zip file.

Network Detective™ Network Detective User Guide
56
Step 5 – Collection Progress
This page charts the progress of your scan. You can cancel the data collection entirely - no data will be
saved. Doing so will show the following screen:
If this was done in error, you have the option to “Start Again.”

Network Detective™ Network Detective User Guide
57
Step 6 – Finish
This final page confirms that the scan has completed. The wizard reminds you of where it outputted the
results and allows you to open that folder.
Once you’re finished, simply click “Done” and the wizard will close.
Network Detective™ Network Detective User Guide
58
SQL Server Assessment The SQL Server Assessment Data Collector is a self-extracting zip file that executes an “.EXE” and is completely non-invasive – it is not “installed” on the SQL Server or any other machine on the client’s network, and does not make any changes to the system. The Data Collector makes use of multiple various protocols to scan a SQL Server instance and can be done remotely. The SQL Server Assessment Data Collector can be used to inspect any SQL Server on the LAN or hosted at a remote location so long as it can be accessed using SQL Server Authentication (the same as Management Studio).
Network Detective™ Network Detective User Guide
59
SQL Server Assessment Data Collector Wizard
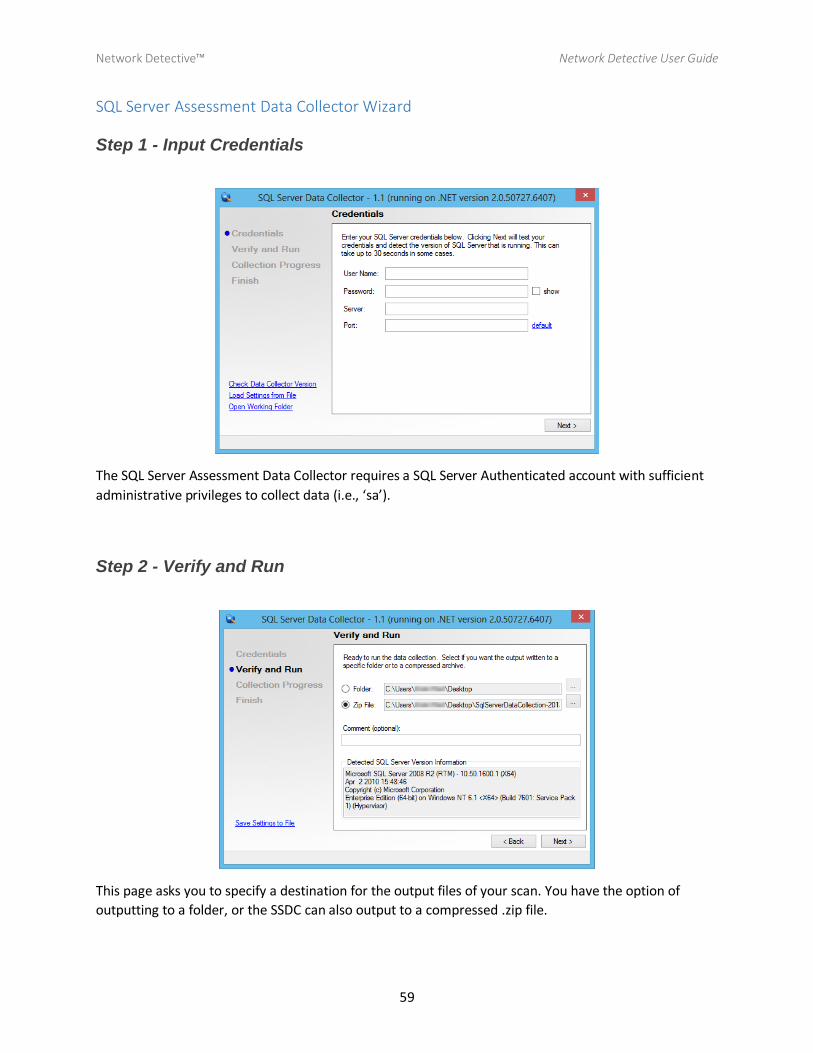
Step 1 - Input Credentials
The SQL Server Assessment Data Collector requires a SQL Server Authenticated account with sufficient
administrative privileges to collect data (i.e., ‘sa’).
Step 2 - Verify and Run
This page asks you to specify a destination for the output files of your scan. You have the option of
outputting to a folder, or the SSDC can also output to a compressed .zip file.
Network Detective™ Network Detective User Guide
60
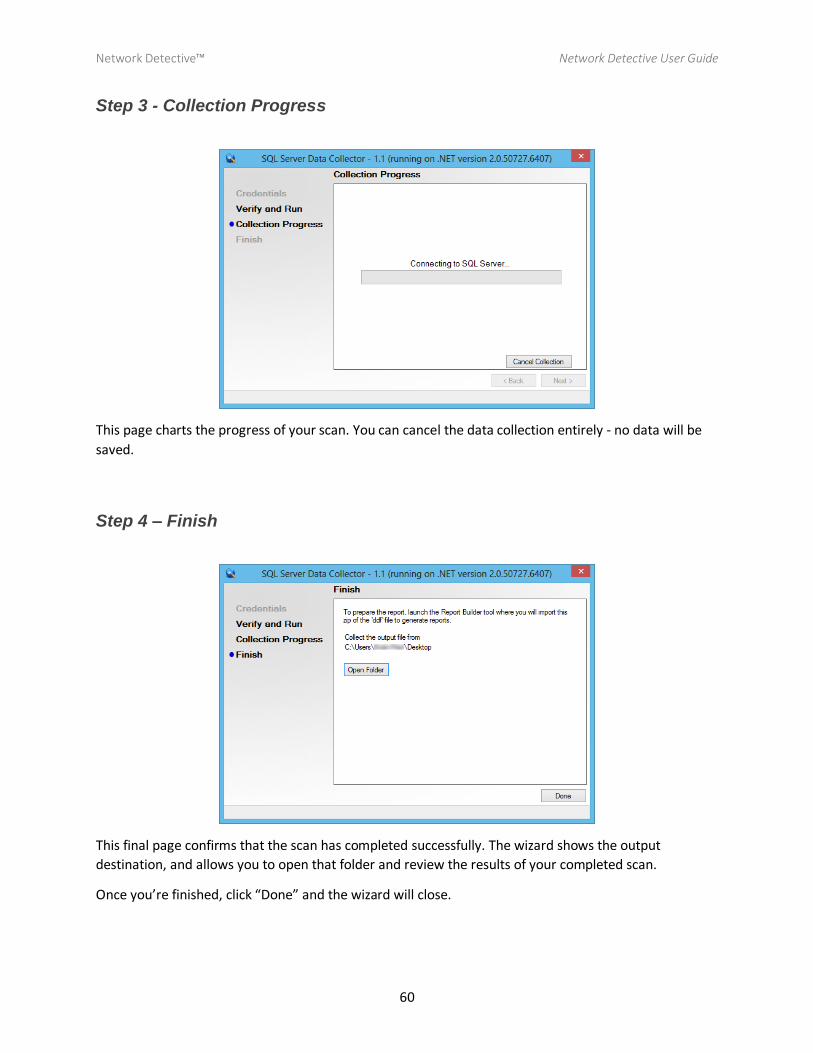
Step 3 - Collection Progress
This page charts the progress of your scan. You can cancel the data collection entirely - no data will be
saved.
Step 4 – Finish
This final page confirms that the scan has completed successfully. The wizard shows the output
destination, and allows you to open that folder and review the results of your completed scan.
Once you’re finished, click “Done” and the wizard will close.
Network Detective™ Network Detective User Guide
61
Running Network Detective – Network Detective Wizard
Install the Network Detective Application on your system from www.rapidfiretools.com/download. This
is not installed on a client network – only the Data Collector is run on the client network. It is a click-
once application and you should always accept the update to have the latest version.
When you run Network Detective the first time, it will launch the Network Detective Wizard. You have
three options:
2. Generate Report from a New Scan – This is the fastest way to import the data from a scan and run a report; it combines the two actions:
a. Import a Scan where you will:
Browse to the ZIP/NDF file from the Network Data Collection
If you have CDF and/or SDF files, put them in a folder with the NDF file to simplify this step
Create a new NDZ “Archive” file
b. Generate a Report where you will:
Select the Reports that you want to run Note 1: Do NOT select the “Full Detail Change Report” unless you have a second NDZ file (network scan) that you are comparing against. Note 2: The “Premium Reports” are an extra charge for non-subscriber accounts
Choose the Vulnerability Scan for this network (or click Cancel if there is not one)
Customize the report with your logo and company information, and the client information
Generate the set of reports
See the sections below with more detail on both of these Actions.
3. Download the Data Collector – Takes you to the Download page where you can download the Network Data Collector, Computer Data Collector, and other resources.
4. Initiate an External Vulnerability Scan – Allows you to initiate an External Vulnerability scan. You can do this prior to going on-site to run the Network Data Collection, or after you have run the Data Collection.
Network Detective™ Network Detective User Guide
62
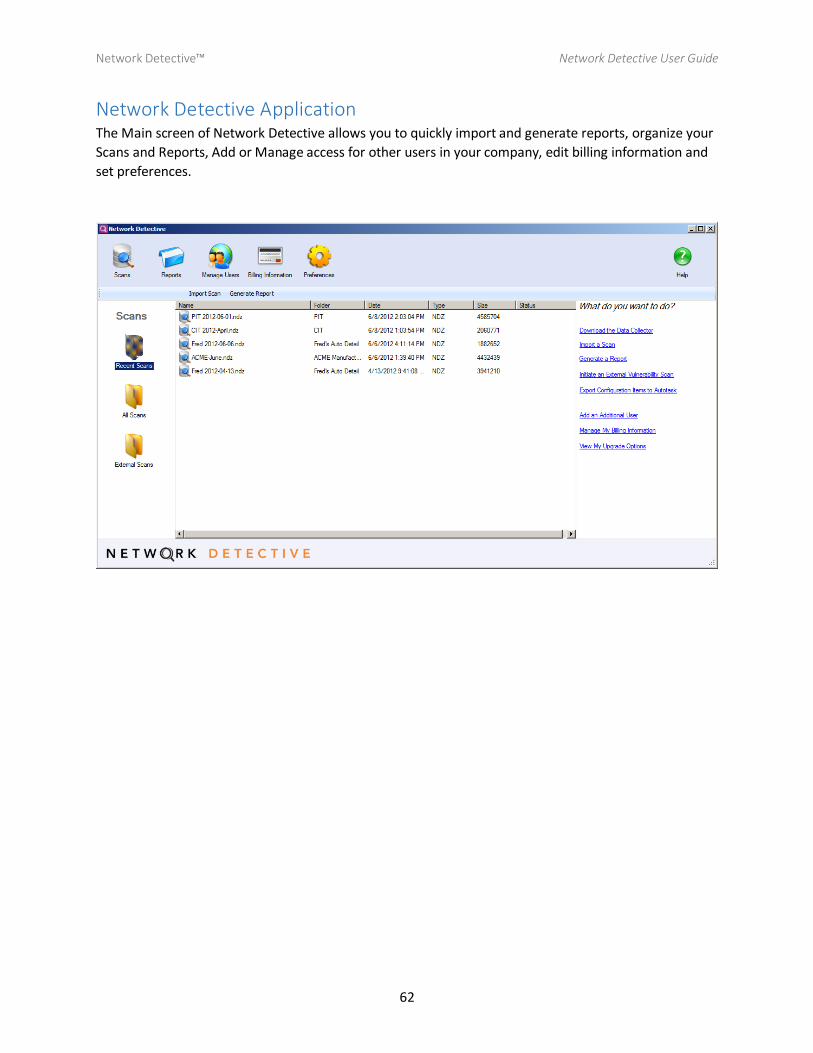
Network Detective Application The Main screen of Network Detective allows you to quickly import and generate reports, organize your
Scans and Reports, Add or Manage access for other users in your company, edit billing information and
set preferences.
Network Detective™ Network Detective User Guide
63
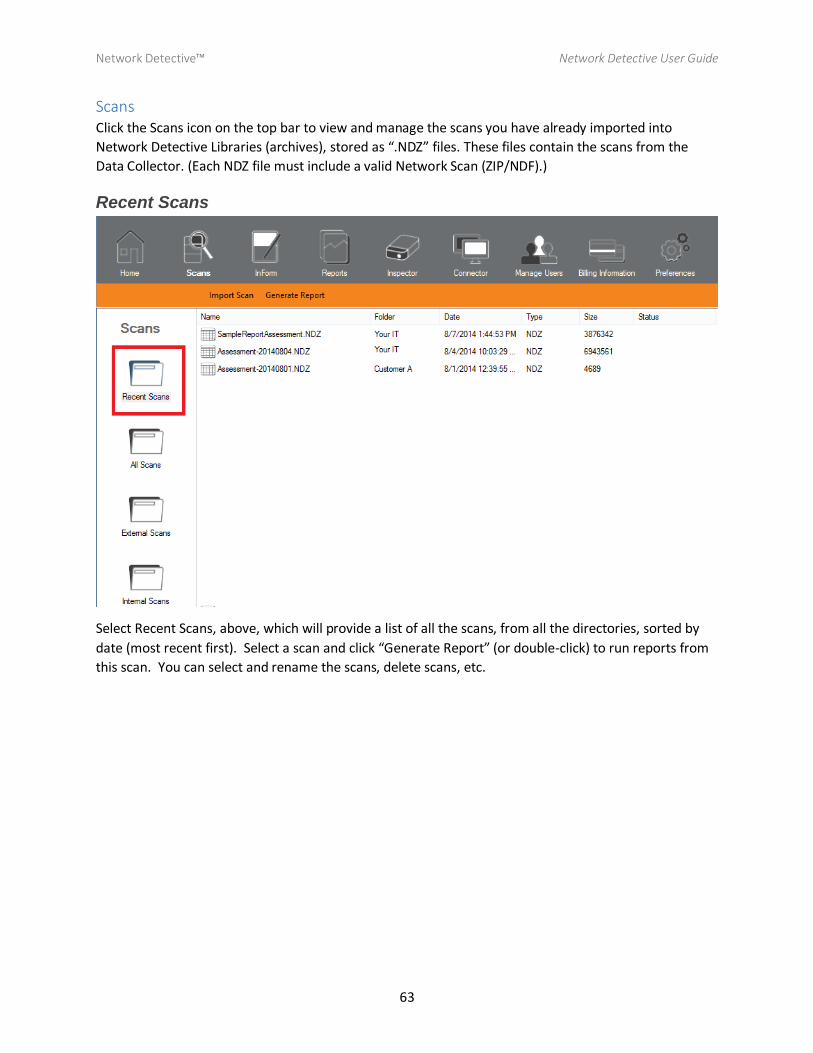
Scans Click the Scans icon on the top bar to view and manage the scans you have already imported into
Network Detective Libraries (archives), stored as “.NDZ” files. These files contain the scans from the
Data Collector. (Each NDZ file must include a valid Network Scan (ZIP/NDF).)
Recent Scans
Select Recent Scans, above, which will provide a list of all the scans, from all the directories, sorted by
date (most recent first). Select a scan and click “Generate Report” (or double-click) to run reports from
this scan. You can select and rename the scans, delete scans, etc.
Network Detective™ Network Detective User Guide
64
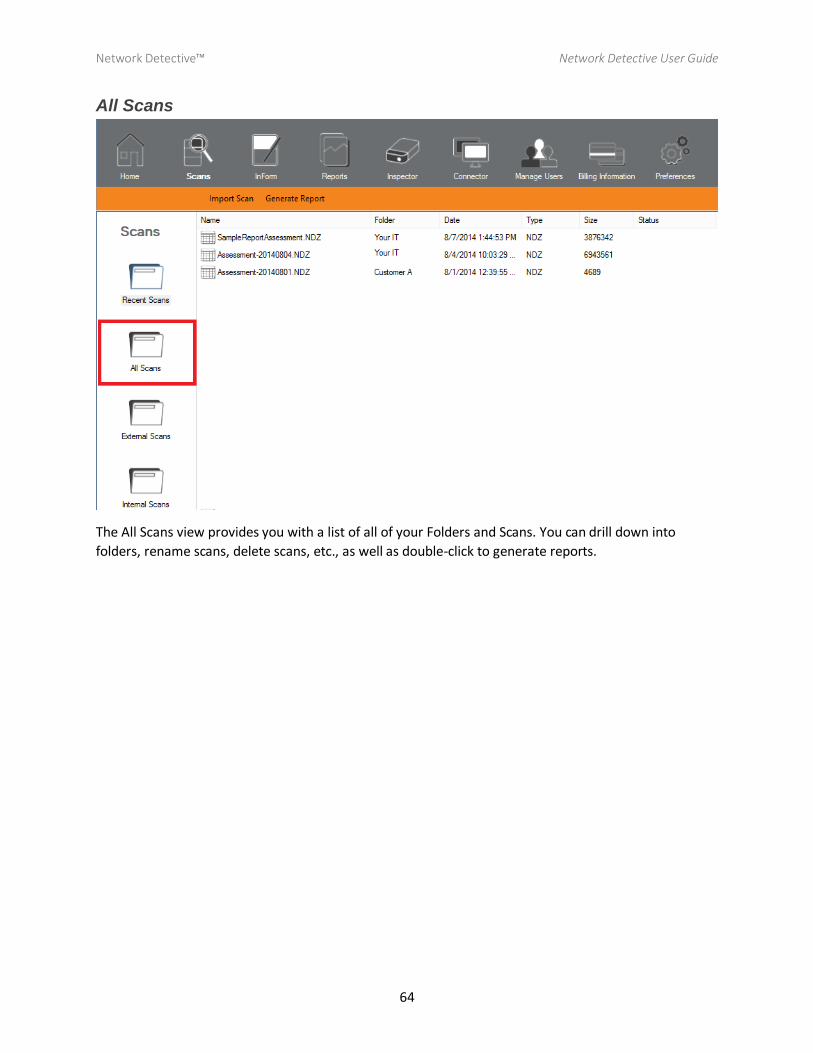
All Scans
The All Scans view provides you with a list of all of your Folders and Scans. You can drill down into
folders, rename scans, delete scans, etc., as well as double-click to generate reports.
Network Detective™ Network Detective User Guide
65
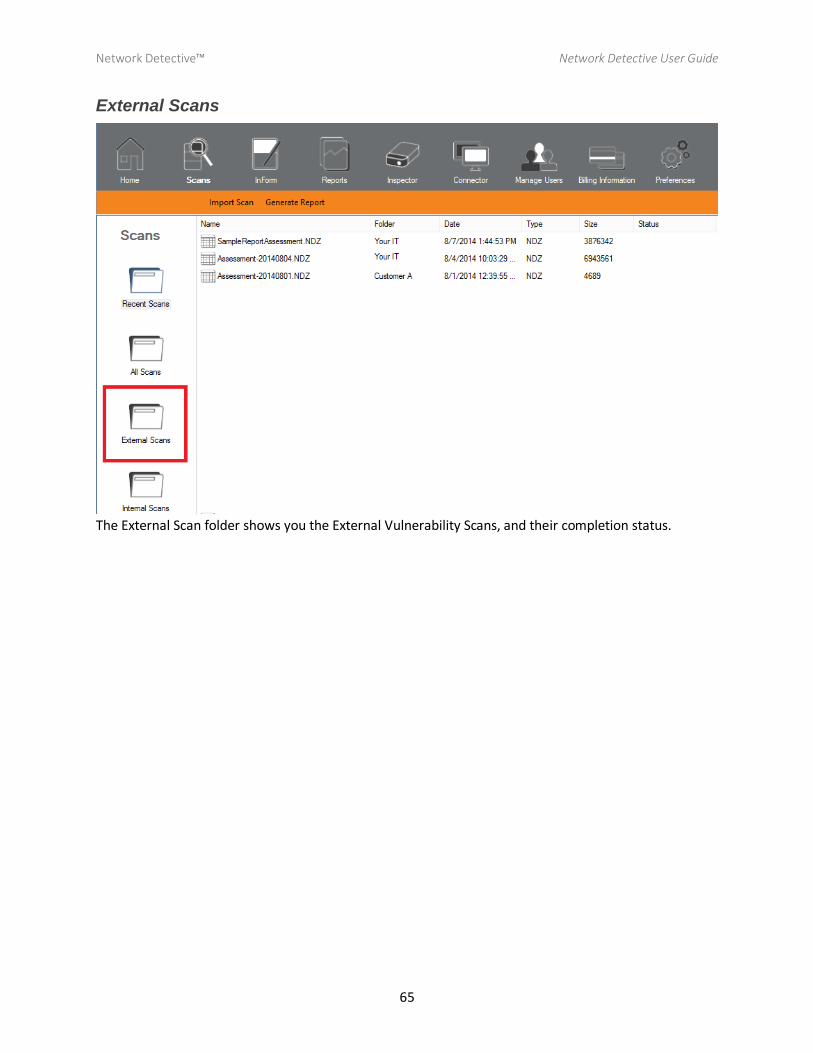
External Scans
The External Scan folder shows you the External Vulnerability Scans, and their completion status.

Network Detective™ Network Detective User Guide
66
Import Scan Click Import Scan to import one NDF/ZIP file from a Network Data Collection and optionally, multiple
CDF/SDF files from Local/Computer Data Collections and Security Scans into a Network Detective
archive file (NDZ file). Each NDZ file must include a valid Network Scan (ZIP/NDF).
There are two steps:
1. Select the Scan Results. Browse to the NDF and optionally the CDF files. It is helpful if you have them all in a single directory. If necessary, you can add CDF files to an existing NDZ at a later time.
2. Import into a Scan Library/Archive. Browse to select an existing NDZ archive file, or create a new one.
a. If the NDZ does not already exist it will be created.
b. If the NDZ does exist, and you are importing an NDF, the NDF will be replaced.
c. If the NDZ does exist and you are adding CDF files, the CDF files will be merged into the NDF file inside the NDZ archive (the CDF files are not retained as separate files). When the CDFs are merged, you can determine which Domain – either a Custom Domain that you can name (e.g.-WORKGROUP), merge it into the Domain from the Network Scan (shown in green), or choose to exclude it from the merge.
Click “Merge Now” to perform the Merge. Clicking close will skip the merge entirely.
d. You MUST create the NDZ or new folder within the Network Detective “Scans” Folder in order for Network Detective to manage these from the Scans screen.
Network Detective™ Network Detective User Guide
67
Reports
Generating Reports
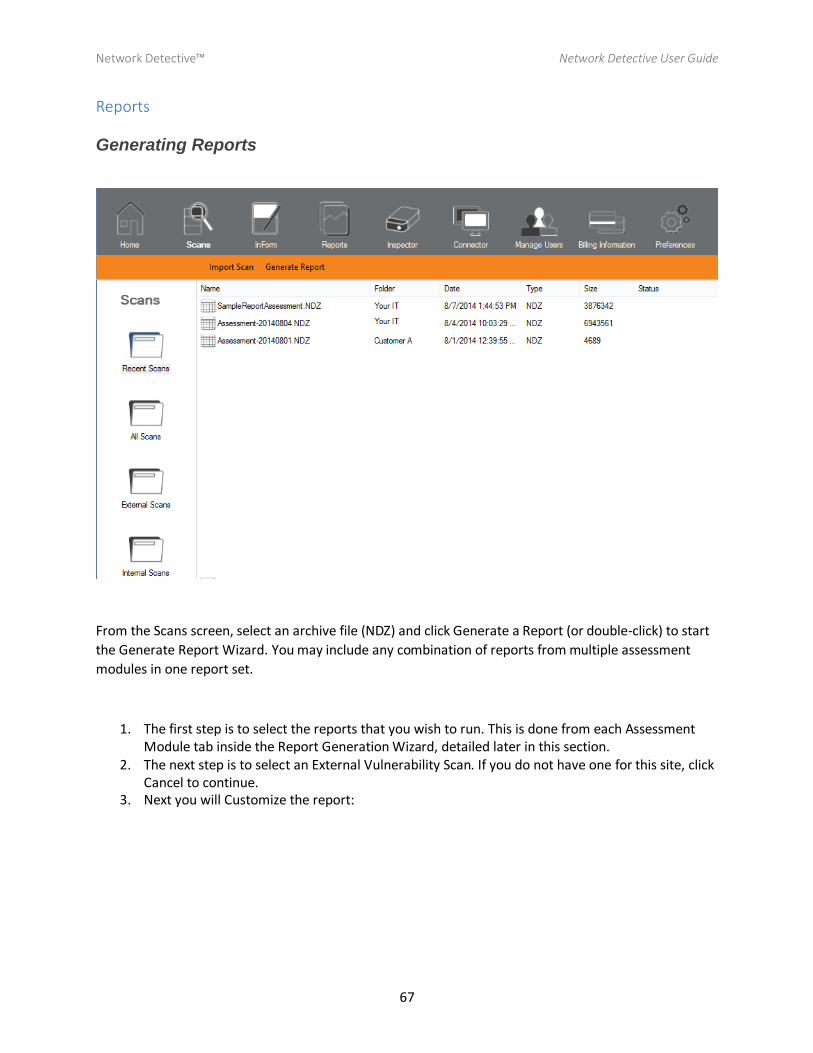
From the Scans screen, select an archive file (NDZ) and click Generate a Report (or double-click) to start
the Generate Report Wizard. You may include any combination of reports from multiple assessment
modules in one report set.
1. The first step is to select the reports that you wish to run. This is done from each Assessment Module tab inside the Report Generation Wizard, detailed later in this section.
2. The next step is to select an External Vulnerability Scan. If you do not have one for this site, click Cancel to continue.
3. Next you will Customize the report:
Network Detective™ Network Detective User Guide
68
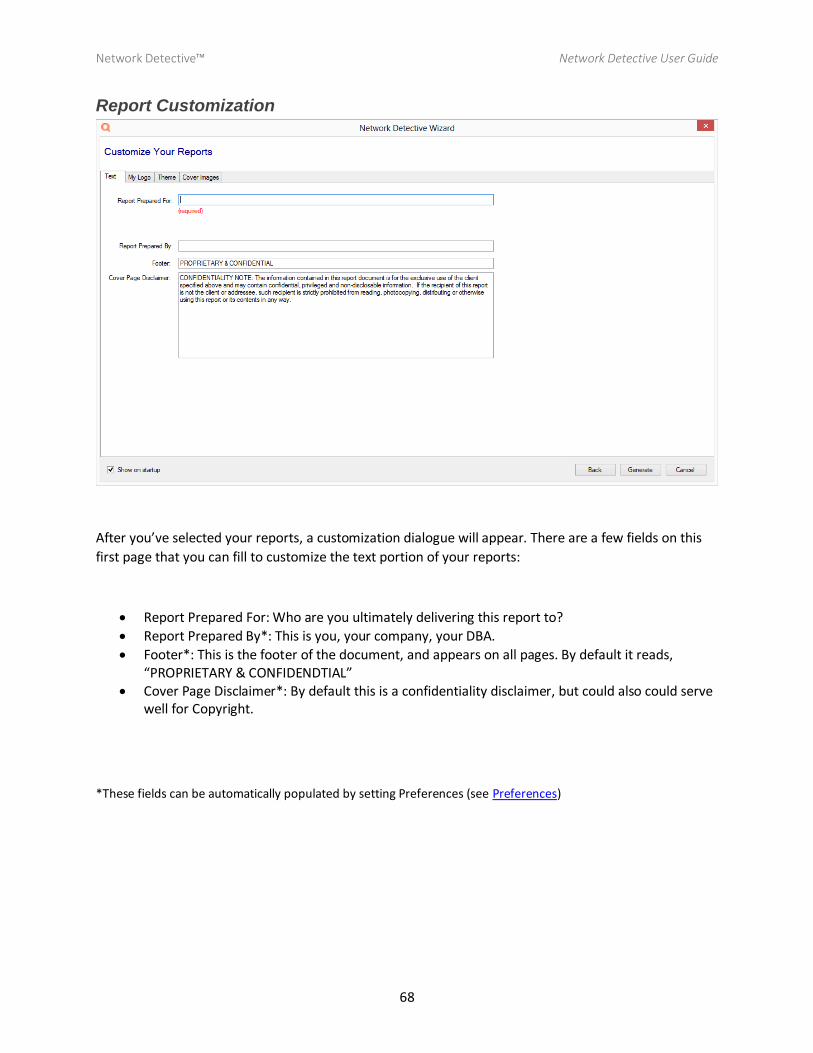
Report Customization
After you’ve selected your reports, a customization dialogue will appear. There are a few fields on this
first page that you can fill to customize the text portion of your reports:
Report Prepared For: Who are you ultimately delivering this report to?
Report Prepared By*: This is you, your company, your DBA.
Footer*: This is the footer of the document, and appears on all pages. By default it reads, “PROPRIETARY & CONFIDENDTIAL”
Cover Page Disclaimer*: By default this is a confidentiality disclaimer, but could also could serve well for Copyright.
*These fields can be automatically populated by setting Preferences (see Preferences)
Network Detective™ Network Detective User Guide
69
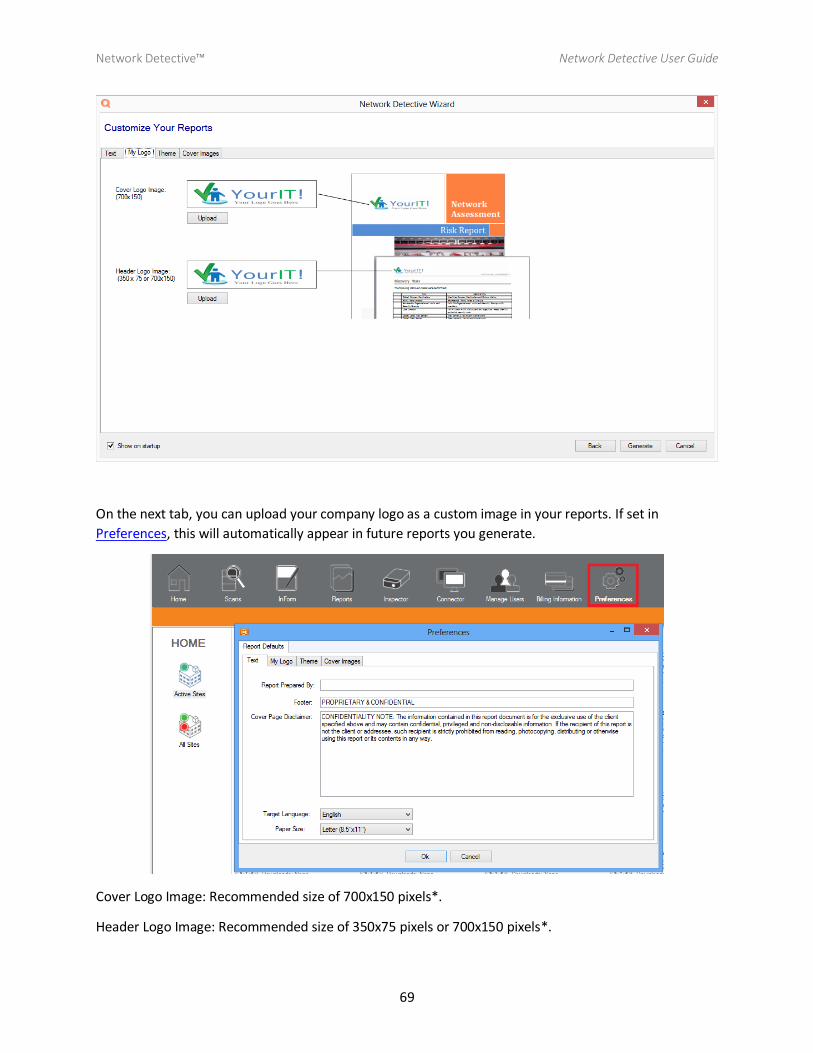
On the next tab, you can upload your company logo as a custom image in your reports. If set in
Preferences, this will automatically appear in future reports you generate.
Cover Logo Image: Recommended size of 700x150 pixels*.
Header Logo Image: Recommended size of 350x75 pixels or 700x150 pixels*.

Network Detective™ Network Detective User Guide
70
Each report generated follows a pre-built theme and is color-coded based on the Assessment Module it
comes from. On this page, select your desired theme and pre-defined color palette, or specify your own
colors.(Note: Some Color Palettes and Themes available only to Subscribers)
Network Detective™ Network Detective User Guide
71
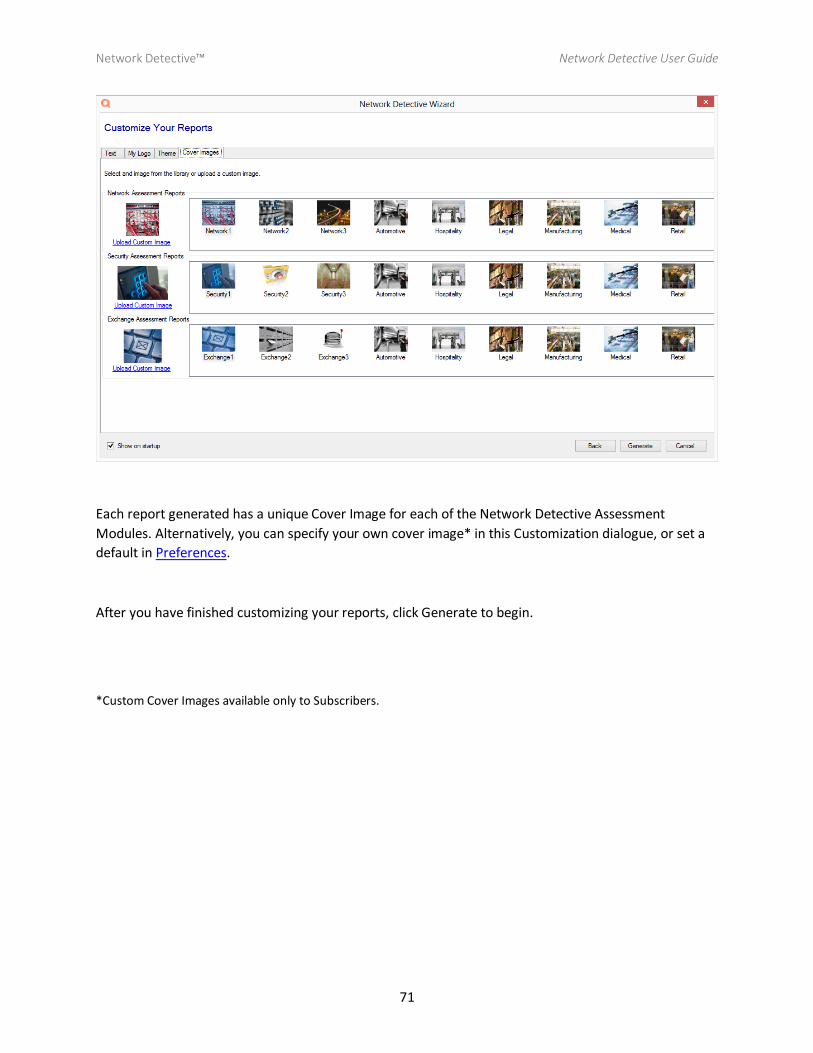
Each report generated has a unique Cover Image for each of the Network Detective Assessment
Modules. Alternatively, you can specify your own cover image* in this Customization dialogue, or set a
default in Preferences.
After you have finished customizing your reports, click Generate to begin.
*Custom Cover Images available only to Subscribers.
Network Detective™ Network Detective User Guide
72
The standard set of reports for the Trial Edition includes:
Client Risk Report (Executive Summary) (.docx)
Full Detail Report (.docx)
Excel details (.xlsx)
Full Detail Change Report (.docx) – only select this report when you are creating a comparison to a previous scan on the same network.
Note that these reports are delivered to you as Microsoft® Word and/or Excel documents so that you
are able to add information to the report, or extract information to be included in your own
documentation, sort and analyze, in Excel, etc.
For Trial Edition users, please remember that generating any of these reports is a billable event (or
decrements your pre-paid report quota). If needed, you may re-run or regenerate reports from the same
.NDF (NDZ) file without additional charge should you later want the .XLSX, for instance, or simply need to
change your logo. However, the step of merging CDF files creates a new NDF file inside the NDZ, and
would be considered a new, billable, report.
(Note: Please keep in mind that each .NDF file has its own unique ID. You can re-run reports for the
SAME NDF file at no charge. Running a new data collection on the same network as a previous scan and
then running reports is a separate chargeable event.)
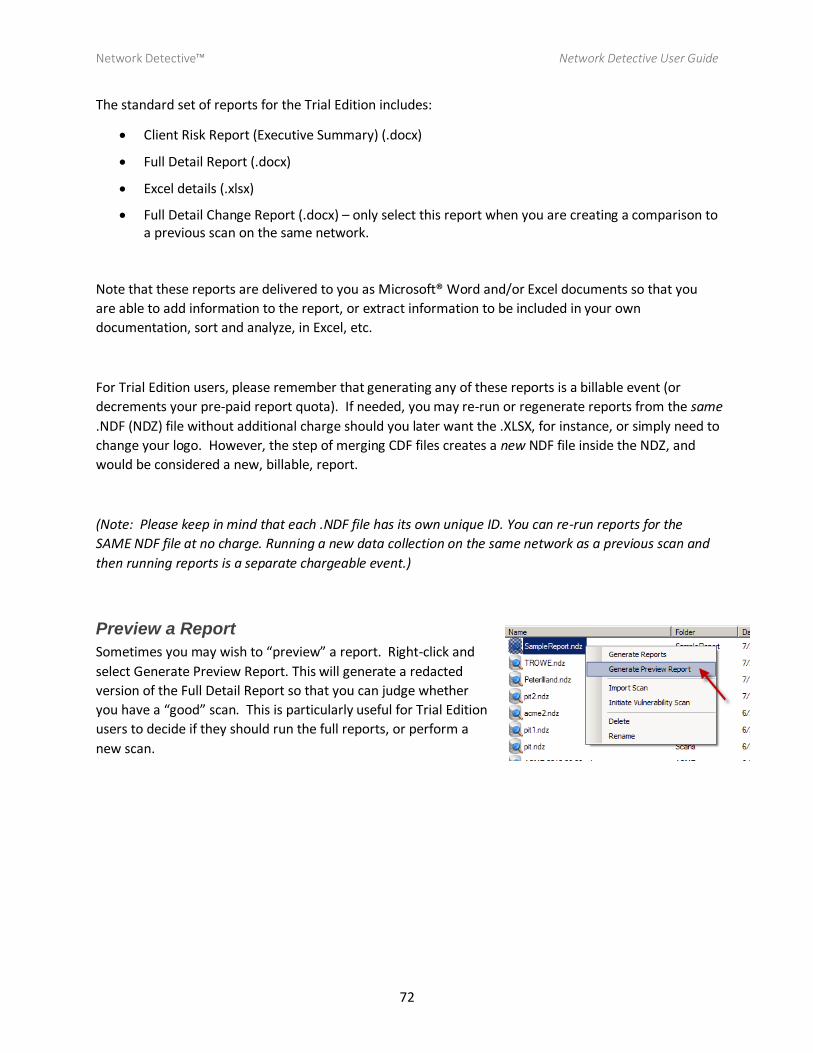
Preview a Report
Sometimes you may wish to “preview” a report. Right-click and
select Generate Preview Report. This will generate a redacted
version of the Full Detail Report so that you can judge whether
you have a “good” scan. This is particularly useful for Trial Edition
users to decide if they should run the full reports, or perform a
new scan.
Network Detective™ Network Detective User Guide
73
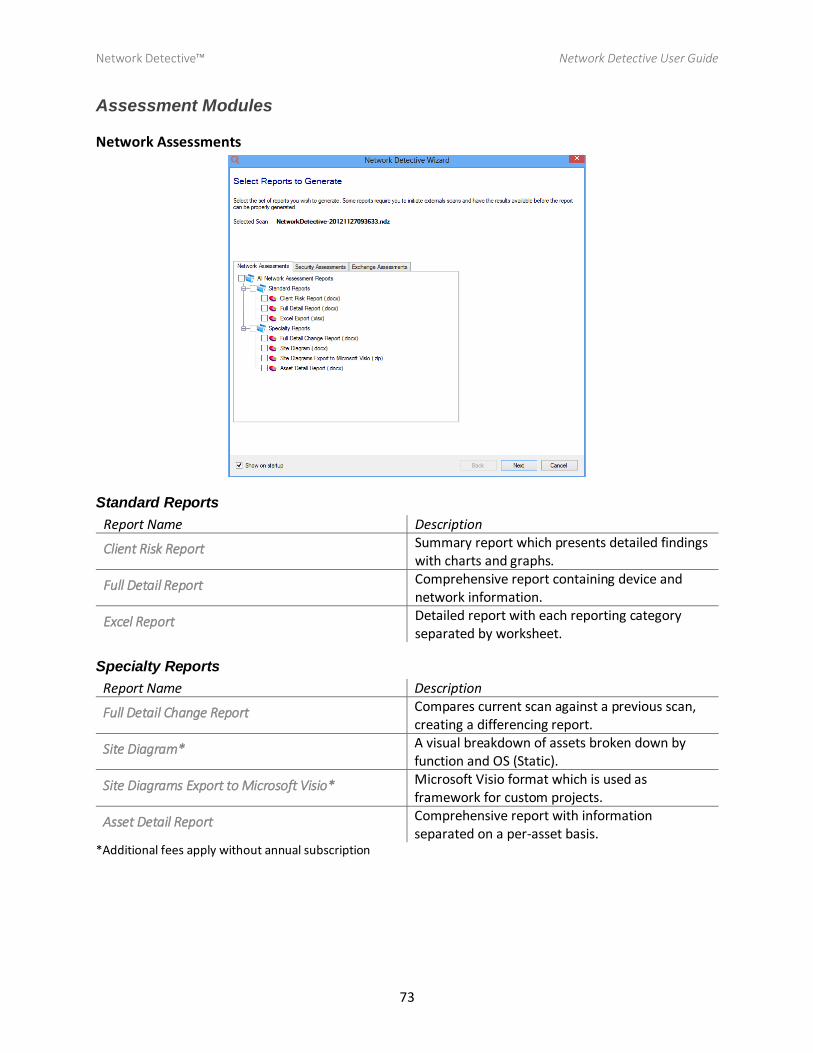
Assessment Modules
Network Assessments
Standard Reports
Report Name Description
Client Risk Report Summary report which presents detailed findings with charts and graphs.
Full Detail Report Comprehensive report containing device and network information.
Excel Report Detailed report with each reporting category separated by worksheet.
Specialty Reports
Report Name Description
Full Detail Change Report Compares current scan against a previous scan, creating a differencing report.
Site Diagram* A visual breakdown of assets broken down by function and OS (Static).
Site Diagrams Export to Microsoft Visio* Microsoft Visio format which is used as framework for custom projects.
Asset Detail Report Comprehensive report with information separated on a per-asset basis.
*Additional fees apply without annual subscription
Network Detective™ Network Detective User Guide
74
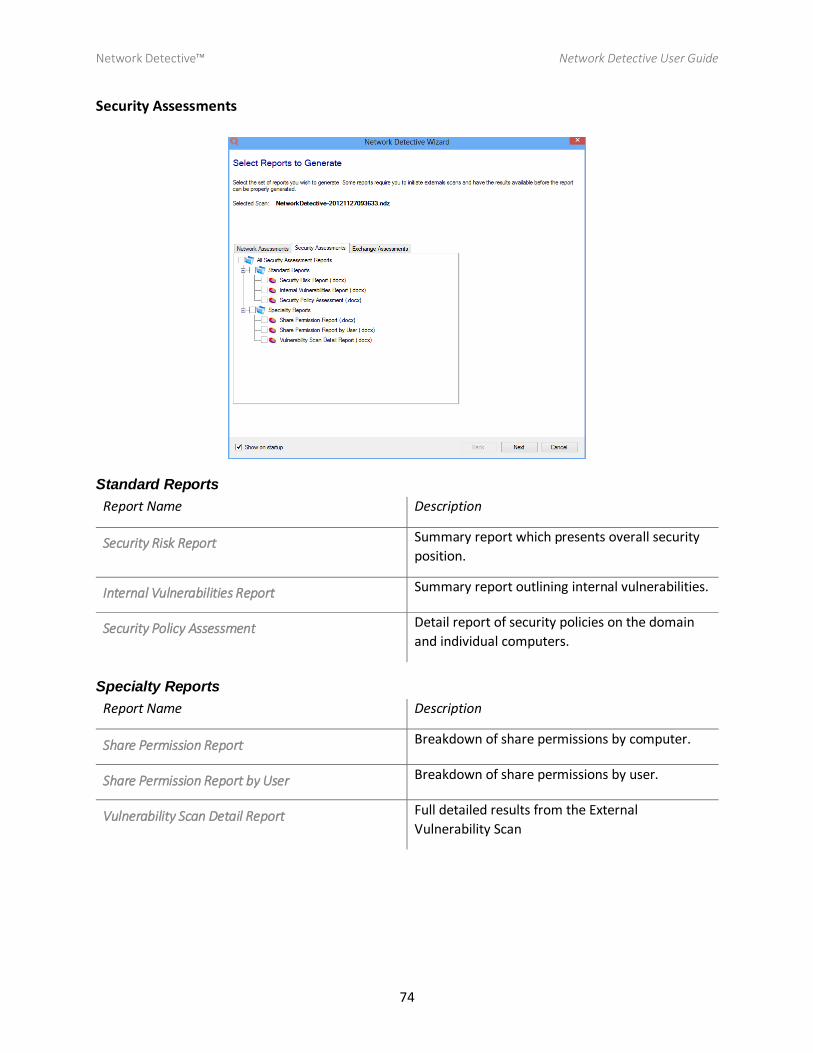
Security Assessments
Standard Reports
Report Name Description
Security Risk Report Summary report which presents overall security
position.
Internal Vulnerabilities Report Summary report outlining internal vulnerabilities.
Security Policy Assessment Detail report of security policies on the domain
and individual computers.
Specialty Reports
Report Name Description
Share Permission Report Breakdown of share permissions by computer.
Share Permission Report by User Breakdown of share permissions by user.
Vulnerability Scan Detail Report Full detailed results from the External
Vulnerability Scan

Network Detective™ Network Detective User Guide
75
Exchange Assessments
Standard Reports
Report Name Description
Exchange Risk Report Summary report presenting an assessment and summary of the Exchange Server.
Exchange Mailbox Detail Report Detailed report for each mailbox on the Exchange Server.
Exchange Traffic and Use Report Report showing traffic analysis and mailbox usage on the Exchange Server.
Exchange Distribution Lists Report Detailed report showing all distribution lists.
Specialty Reports
Report Name Description
Exchange Mobile Device Report Detailed report of mobile device users.
Exchange Mailbox Permission Report by Mailbox Detailed report showing mailbox permissions by mailbox.
Exchange Mailbox Permissions by User Detailed report showing mailbox permissions by user.
Network Detective™ Network Detective User Guide
76
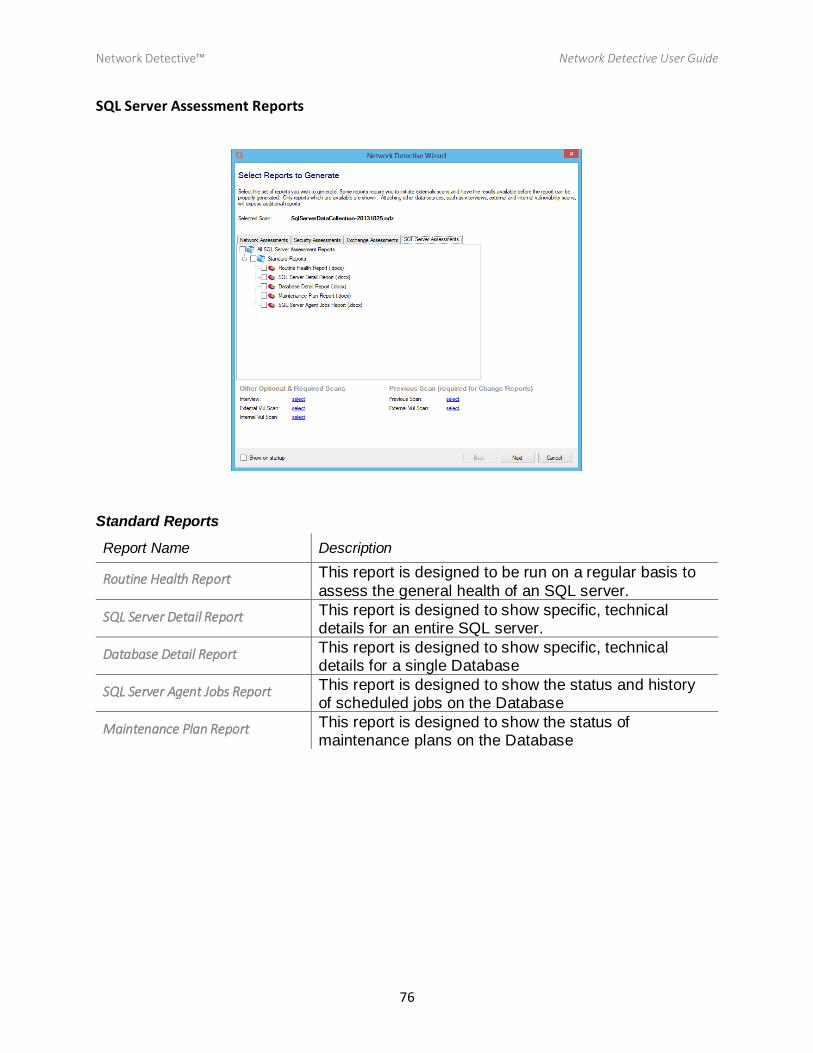
SQL Server Assessment Reports
Standard Reports
Report Name Description
Routine Health Report This report is designed to be run on a regular basis to
assess the general health of an SQL server.
SQL Server Detail Report This report is designed to show specific, technical details for an entire SQL server.
Database Detail Report This report is designed to show specific, technical details for a single Database
SQL Server Agent Jobs Report This report is designed to show the status and history of scheduled jobs on the Database
Maintenance Plan Report This report is designed to show the status of maintenance plans on the Database

Network Detective™ Network Detective User Guide
77
InForm
Overview
InForm allows you to create custom forms to gather information about a client and their site and
generate reports. Your Interviews could focus on anything from purely technical information – server
room security, cable management, etc. – to policies like BYOD.
Templates
Templates represent a re-usable form design. Templates contain the list of Categories and Topics. You
can have multiple templates for different types of clients (e.g. – Managed Services, Prospect, IT Site
Survey etc.) or services (e.g. – Security Audit).
Creating a New Template
From the InForm screen within Network Detective, click “Site Interview Templates.”
This will bring up the template builder.

Network Detective™ Network Detective User Guide
78
Change the name of the form. This will also change the filename for the template description file.
Right-click on the Form header or any other node to bring up the context menu. From this menu, you
can Add New Categories. Categories are used to group various topics together.
Use the category editor to change the label of the category and add instructions for the category as a
whole.
Select the Category and right-click to add individual topics.
Network Detective™ Network Detective User Guide
79
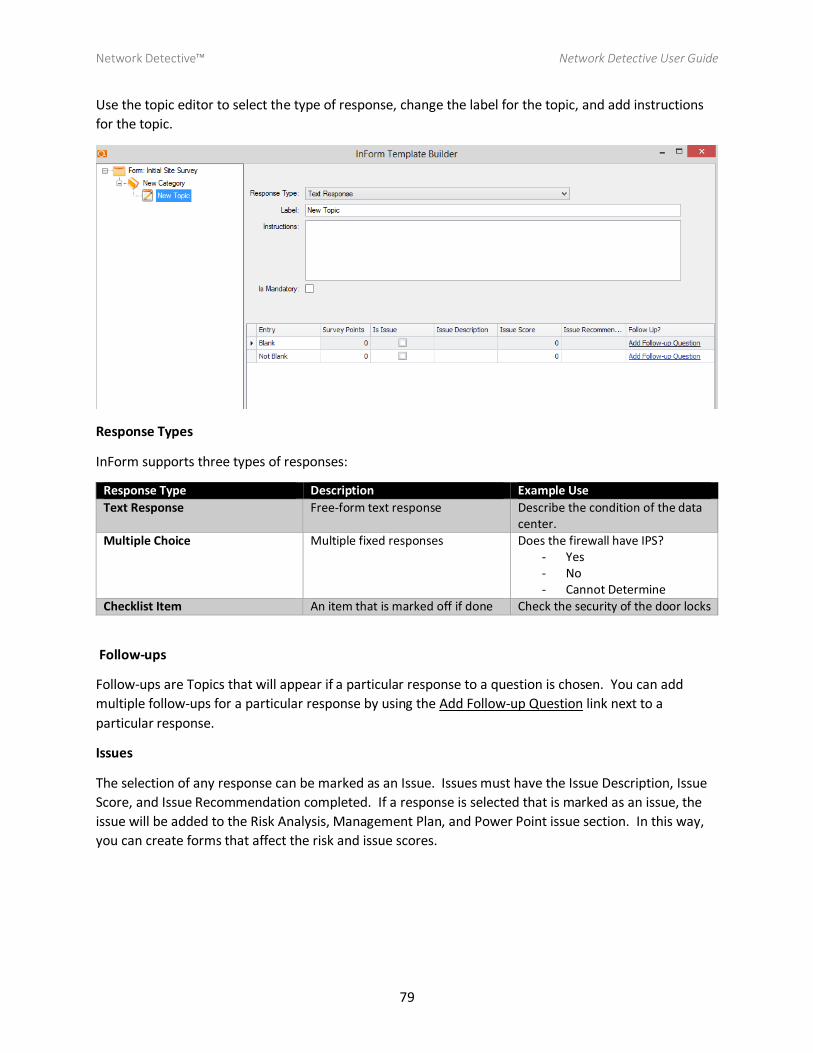
Use the topic editor to select the type of response, change the label for the topic, and add instructions
for the topic.
Response Types
InForm supports three types of responses:
Response Type Description Example Use
Text Response Free-form text response Describe the condition of the data center.
Multiple Choice Multiple fixed responses Does the firewall have IPS? - Yes - No - Cannot Determine
Checklist Item An item that is marked off if done Check the security of the door locks
Follow-ups
Follow-ups are Topics that will appear if a particular response to a question is chosen. You can add
multiple follow-ups for a particular response by using the Add Follow-up Question link next to a
particular response.
Issues
The selection of any response can be marked as an Issue. Issues must have the Issue Description, Issue
Score, and Issue Recommendation completed. If a response is selected that is marked as an issue, the
issue will be added to the Risk Analysis, Management Plan, and Power Point issue section. In this way,
you can create forms that affect the risk and issue scores.
Network Detective™ Network Detective User Guide
80
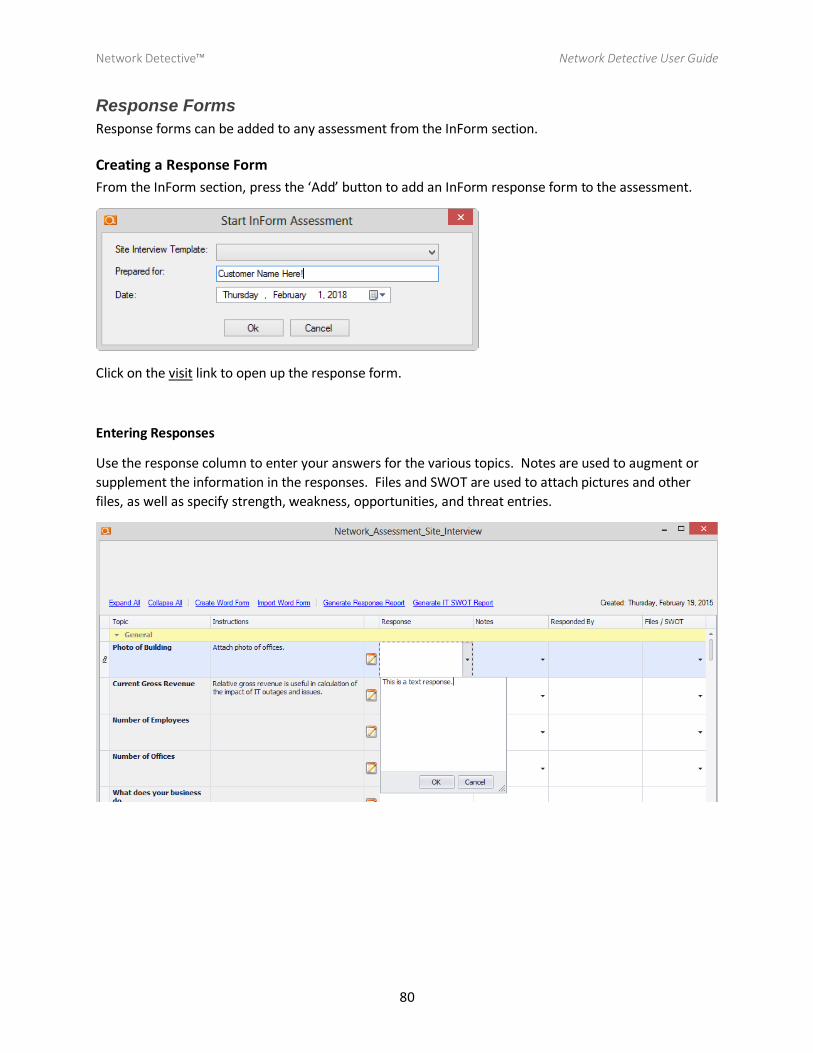
Response Forms
Response forms can be added to any assessment from the InForm section.
Creating a Response Form
From the InForm section, press the ‘Add’ button to add an InForm response form to the assessment.
Click on the visit link to open up the response form.
Entering Responses
Use the response column to enter your answers for the various topics. Notes are used to augment or
supplement the information in the responses. Files and SWOT are used to attach pictures and other
files, as well as specify strength, weakness, opportunities, and threat entries.
Network Detective™ Network Detective User Guide
81
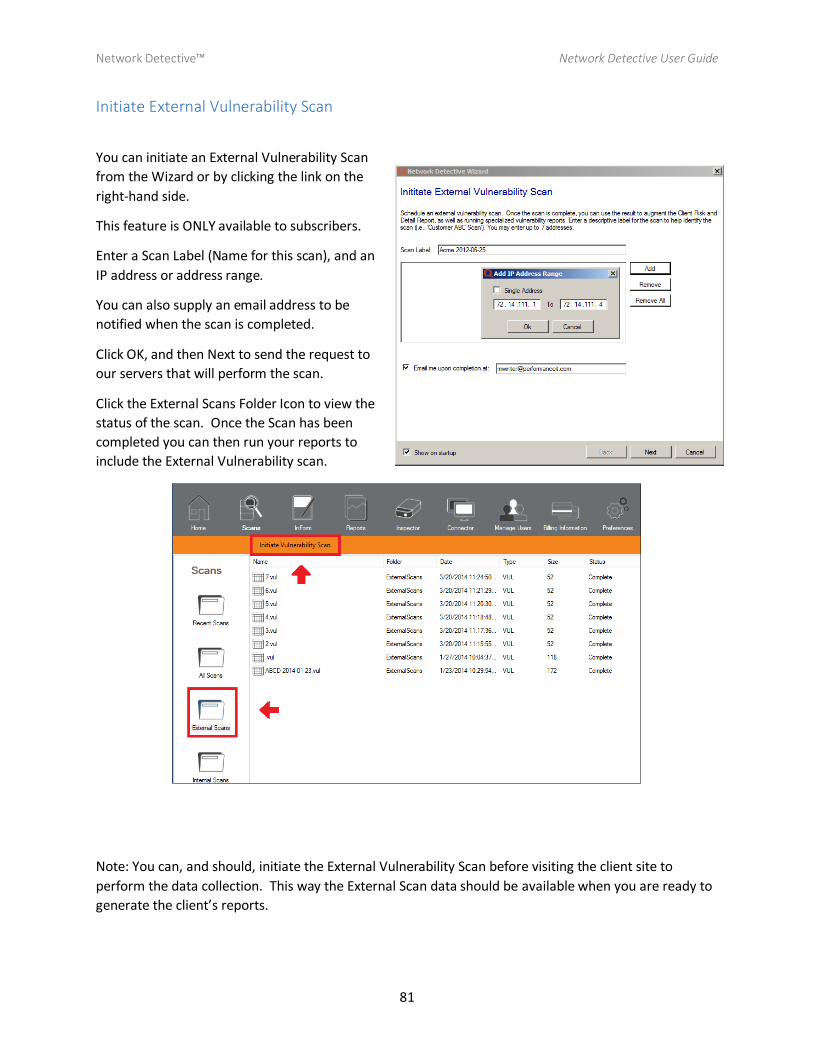
Initiate External Vulnerability Scan
You can initiate an External Vulnerability Scan
from the Wizard or by clicking the link on the
right-hand side.
This feature is ONLY available to subscribers.
Enter a Scan Label (Name for this scan), and an
IP address or address range.
You can also supply an email address to be
notified when the scan is completed.
Click OK, and then Next to send the request to
our servers that will perform the scan.
Click the External Scans Folder Icon to view the
status of the scan. Once the Scan has been
completed you can then run your reports to
include the External Vulnerability scan.
Note: You can, and should, initiate the External Vulnerability Scan before visiting the client site to
perform the data collection. This way the External Scan data should be available when you are ready to
generate the client’s reports.
Network Detective™ Network Detective User Guide
82
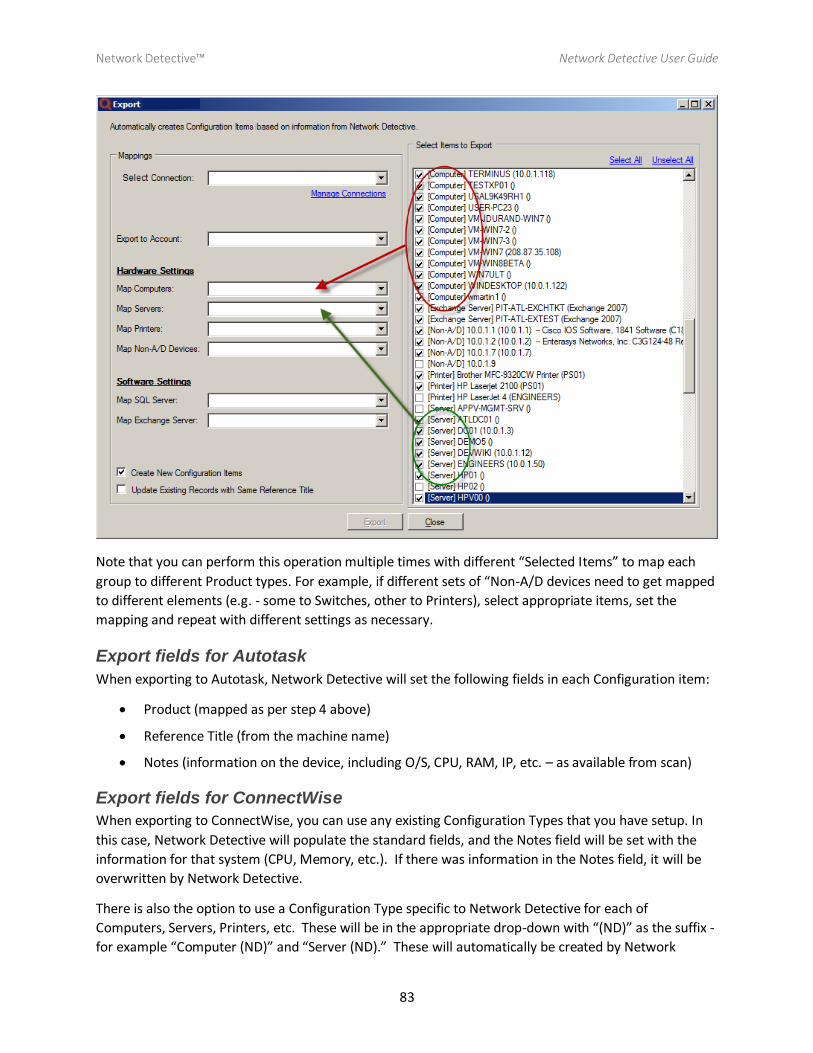
Exporting Configuration Items
You can use Network Detective to export data to configuration items within PSA/CRM or Ticketing
Systems such as Autotask and ConnectWise. Select the archive (NDZ file) and click “Export Configuration
Items to Autotask” or “Export Configuration Items to ConnectWise.” Network Detective will Create
and/or Update Configuration items.
1. Enter your PSA Connection information so that Network Detective can login to your PSA database to populate the drop-down items. If you have not setup a Connection, click the Manage Connection link to enter the login/connection information.
a. For Autotask, this will be a user’s login to Autotask (preferably an administrative user).
b. For ConnectWise, you must first setup an Integrator login. Please see Appendix II.
2. Select the Company/Account where you want the items to be mapped.
3. You then select the Items to Export (right hand column)
4. Map the known Network Detective elements (Computers, Servers, Printers, SQL Servers, etc.) to the configuration item in your PSA system.
5. Choose whether to Create New configuration items
6. Select Update Existing Records with Same Reference Title if you want to update existing configuration items with information from Network Detective.
Network Detective™ Network Detective User Guide
83
Note that you can perform this operation multiple times with different “Selected Items” to map each
group to different Product types. For example, if different sets of “Non-A/D devices need to get mapped
to different elements (e.g. - some to Switches, other to Printers), select appropriate items, set the
mapping and repeat with different settings as necessary.
Export fields for Autotask
When exporting to Autotask, Network Detective will set the following fields in each Configuration item:
Product (mapped as per step 4 above)
Reference Title (from the machine name)
Notes (information on the device, including O/S, CPU, RAM, IP, etc. – as available from scan)
Export fields for ConnectWise
When exporting to ConnectWise, you can use any existing Configuration Types that you have setup. In
this case, Network Detective will populate the standard fields, and the Notes field will be set with the
information for that system (CPU, Memory, etc.). If there was information in the Notes field, it will be
overwritten by Network Detective.
There is also the option to use a Configuration Type specific to Network Detective for each of
Computers, Servers, Printers, etc. These will be in the appropriate drop-down with “(ND)” as the suffix -
for example “Computer (ND)” and “Server (ND).” These will automatically be created by Network

Network Detective™ Network Detective User Guide
84
Detective. If you use this Configuration Type, Network Detective will create and set custom
Configuration Questions relevant to the Configuration type. For example, for Computers (ND), the
Configuration Questions include: Computer Name, Operating System, CPU, etc. The full list of
information will also be entered into the Configuration Question: Misc.

Network Detective™ Network Detective User Guide
85
Manage Users You can add users to the account so that they can run reports. Set them to Standard User to prevent
them from accessing the Manage Users, Billing and Preferences screens.
Network Detective™ Network Detective User Guide
86
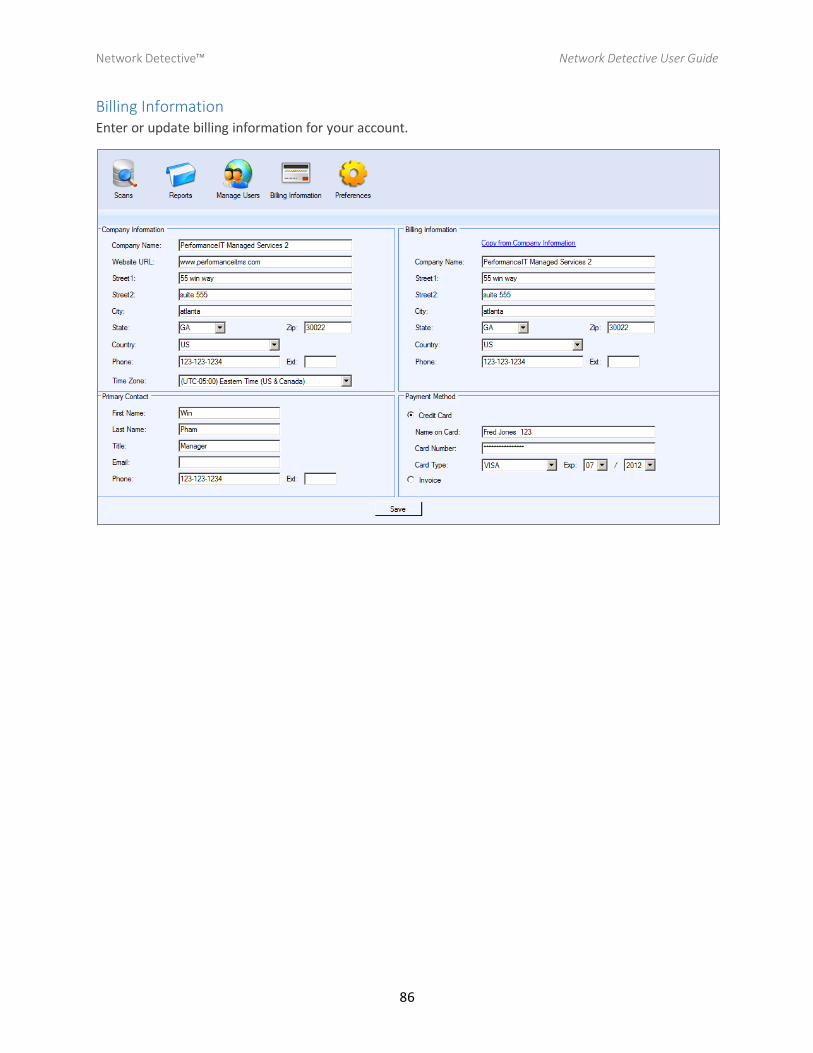
Billing Information Enter or update billing information for your account.
Network Detective™ Network Detective User Guide
87
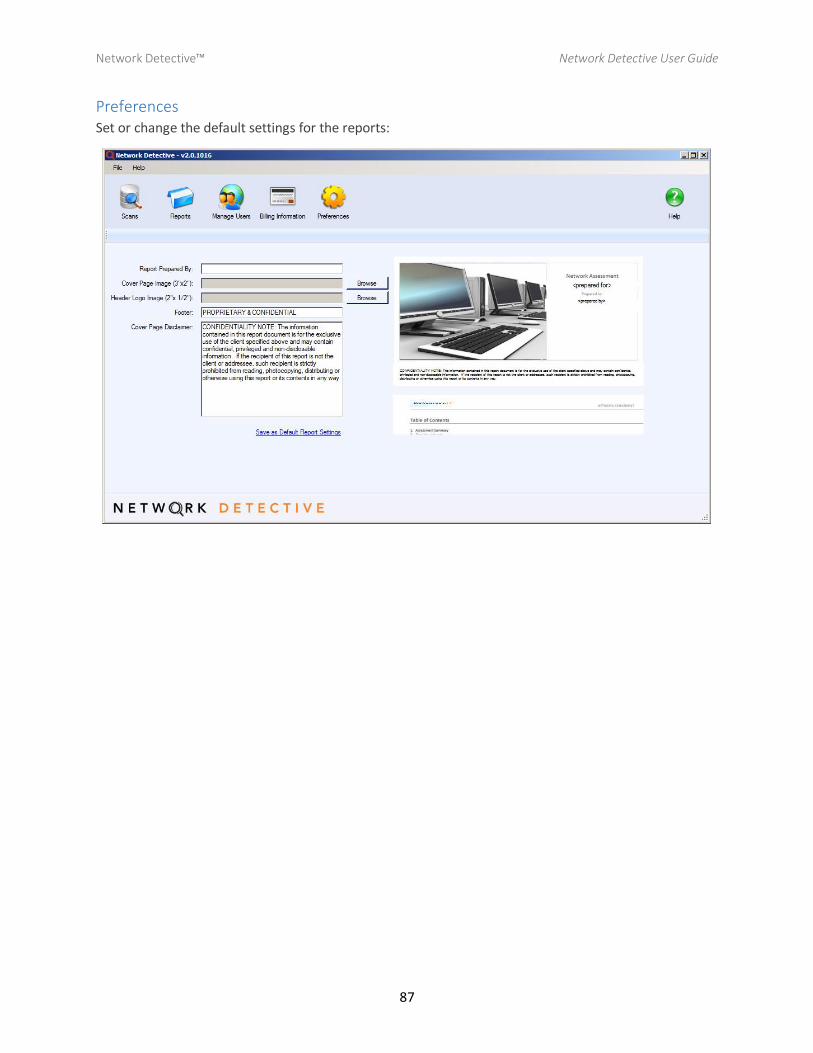
Preferences Set or change the default settings for the reports:
Network Detective™ Network Detective User Guide
88
Appendices
Appendix I – Using a USB drive It is often handy to use a USB drive so that you are not downloading anything onto the client or prospect
machine. And it is extremely useful when using the Local Data Collector.
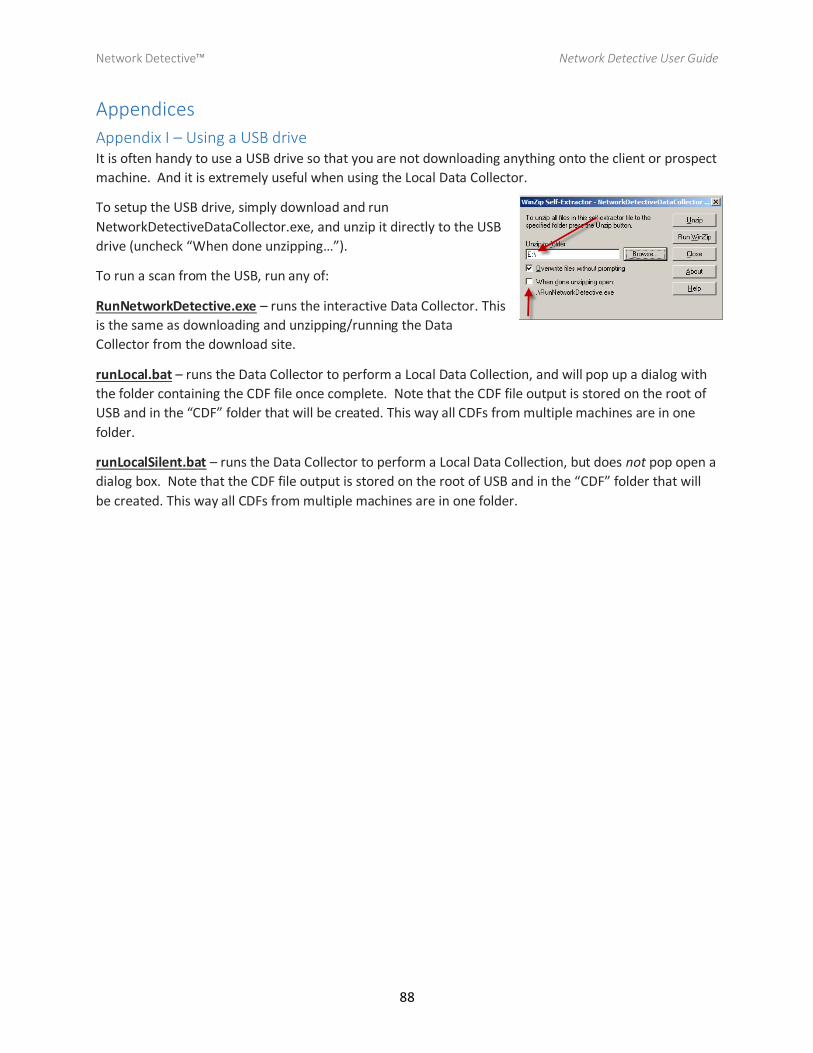
To setup the USB drive, simply download and run
NetworkDetectiveDataCollector.exe, and unzip it directly to the USB
drive (uncheck “When done unzipping…”).
To run a scan from the USB, run any of:
RunNetworkDetective.exe – runs the interactive Data Collector. This
is the same as downloading and unzipping/running the Data
Collector from the download site.
runLocal.bat – runs the Data Collector to perform a Local Data Collection, and will pop up a dialog with
the folder containing the CDF file once complete. Note that the CDF file output is stored on the root of
USB and in the “CDF” folder that will be created. This way all CDFs from multiple machines are in one
folder.
runLocalSilent.bat – runs the Data Collector to perform a Local Data Collection, but does not pop open a
dialog box. Note that the CDF file output is stored on the root of USB and in the “CDF” folder that will
be created. This way all CDFs from multiple machines are in one folder.

Network Detective™ Network Detective User Guide
89
Appendix II – ConnectWise Configuration Items Before configuration items can be imported into the ConnectWise PSA, the appropriate permissions
must be setup in your ConnectWise system and you must configure a “ConnectWise Connection” in
Network Detective.
Setting up an “Integrator Login” in ConnectWise
Navigate to Setup-> Setup Tables
Type “Integrator” into the Table lookup and hit Enter
Click the Integrator Login link
Click the “New” Icon to bring up the New Integrator
login screen as shown on the right.
Enter and record Username and Password values which
you will need later on when configuring a
“ConnectWise Connection” in the Network Detective
tool (see below).
Set the Access Level to “All Records.”
Enable both Company API and Configuration API.
Click the Save icon to save this Integrator Login.
(Note, if you already have an Integrator Login
configured, you may use it as long as the Company and
Configuration API’s are enabled.)

Network Detective™ Network Detective User Guide
90
ConnectWise Connection Manager
From the Export to ConnectWise screen, click Manage Connections to provide the login credentials so
Network Detective can connect to your ConnectWise database.
(If you have already done this, select a “Connection” from the drop down box and skip this step.)
From the ConnectWise Connections Manager screen, click “New” to create a new Connection.
Enter the Username and Password that you setup in in the Integrator Login step, above.
Enter your Company ID that is specified when you log into the ConnectWise PSA client.
Enter the hostname of the ConnectWise site that you connect to into the PSA URL. For instance: If your
Site is http://test.connectwise.com, enter “test.connectwise.com.” (without the quotes).
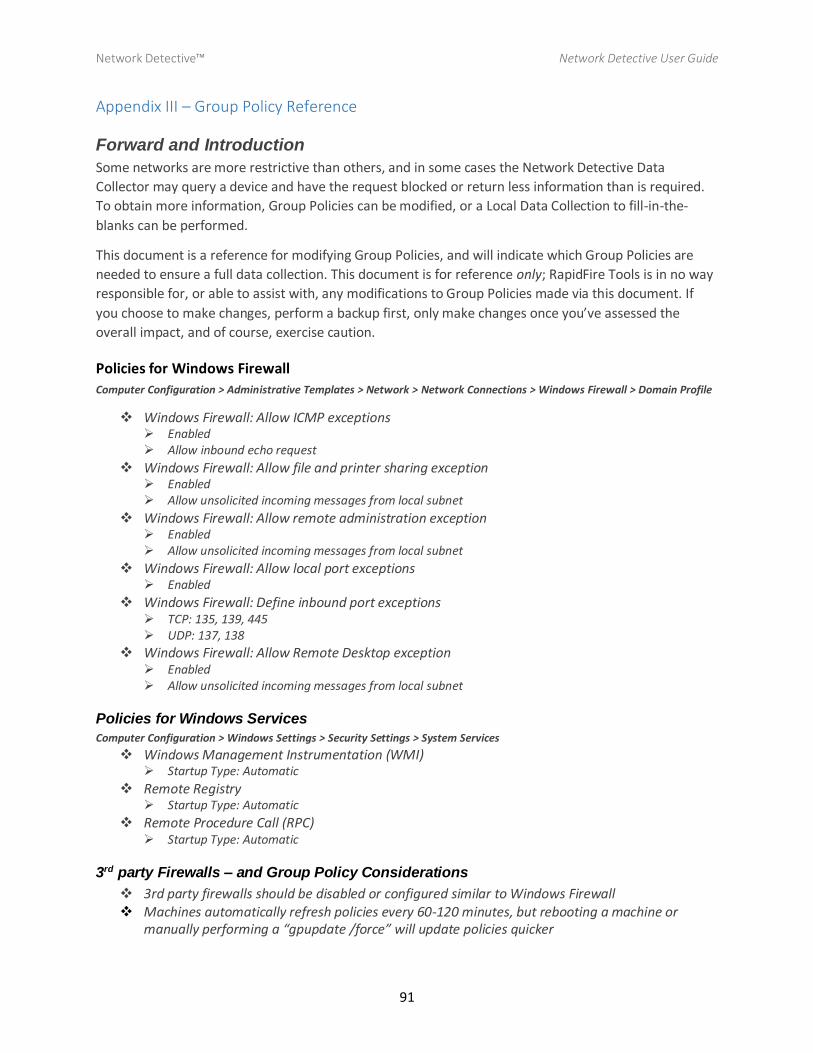
Network Detective™ Network Detective User Guide
91
Appendix III – Group Policy Reference
Forward and Introduction
Some networks are more restrictive than others, and in some cases the Network Detective Data
Collector may query a device and have the request blocked or return less information than is required.
To obtain more information, Group Policies can be modified, or a Local Data Collection to fill-in-the-
blanks can be performed.
This document is a reference for modifying Group Policies, and will indicate which Group Policies are
needed to ensure a full data collection. This document is for reference only; RapidFire Tools is in no way
responsible for, or able to assist with, any modifications to Group Policies made via this document. If
you choose to make changes, perform a backup first, only make changes once you’ve assessed the
overall impact, and of course, exercise caution.
Policies for Windows Firewall
Computer Configuration > Administrative Templates > Network > Network Connections > Windows Firewall > Domain Profile
Windows Firewall: Allow ICMP exceptions Enabled Allow inbound echo request
Windows Firewall: Allow file and printer sharing exception Enabled Allow unsolicited incoming messages from local subnet
Windows Firewall: Allow remote administration exception Enabled Allow unsolicited incoming messages from local subnet
Windows Firewall: Allow local port exceptions Enabled
Windows Firewall: Define inbound port exceptions TCP: 135, 139, 445 UDP: 137, 138
Windows Firewall: Allow Remote Desktop exception Enabled Allow unsolicited incoming messages from local subnet
Policies for Windows Services
Computer Configuration > Windows Settings > Security Settings > System Services
Windows Management Instrumentation (WMI) Startup Type: Automatic
Remote Registry Startup Type: Automatic
Remote Procedure Call (RPC) Startup Type: Automatic
3rd party Firewalls – and Group Policy Considerations
3rd party firewalls should be disabled or configured similar to Windows Firewall Machines automatically refresh policies every 60-120 minutes, but rebooting a machine or
manually performing a “gpupdate /force” will update policies quicker
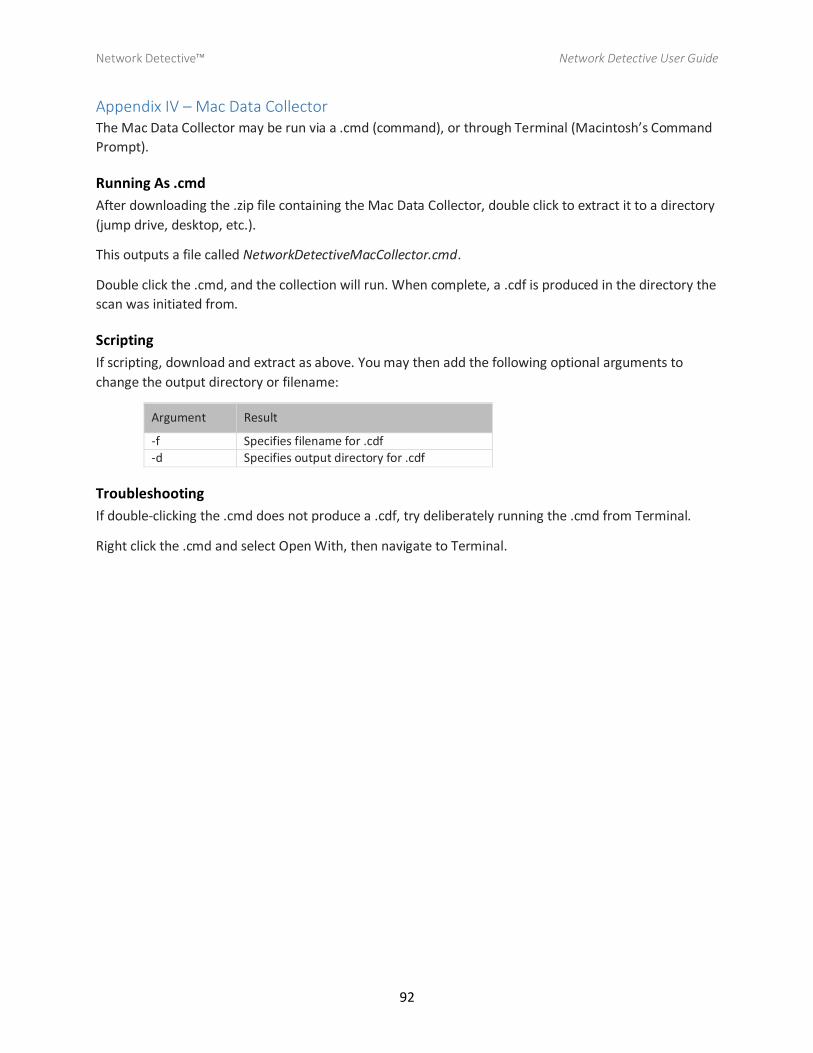
Network Detective™ Network Detective User Guide
92
Appendix IV – Mac Data Collector The Mac Data Collector may be run via a .cmd (command), or through Terminal (Macintosh’s Command
Prompt).
Running As .cmd
After downloading the .zip file containing the Mac Data Collector, double click to extract it to a directory
(jump drive, desktop, etc.).
This outputs a file called NetworkDetectiveMacCollector.cmd.
Double click the .cmd, and the collection will run. When complete, a .cdf is produced in the directory the
scan was initiated from.
Scripting
If scripting, download and extract as above. You may then add the following optional arguments to
change the output directory or filename:
Argument Result
-f Specifies filename for .cdf
-d Specifies output directory for .cdf
Troubleshooting
If double-clicking the .cmd does not produce a .cdf, try deliberately running the .cmd from Terminal.
Right click the .cmd and select Open With, then navigate to Terminal.
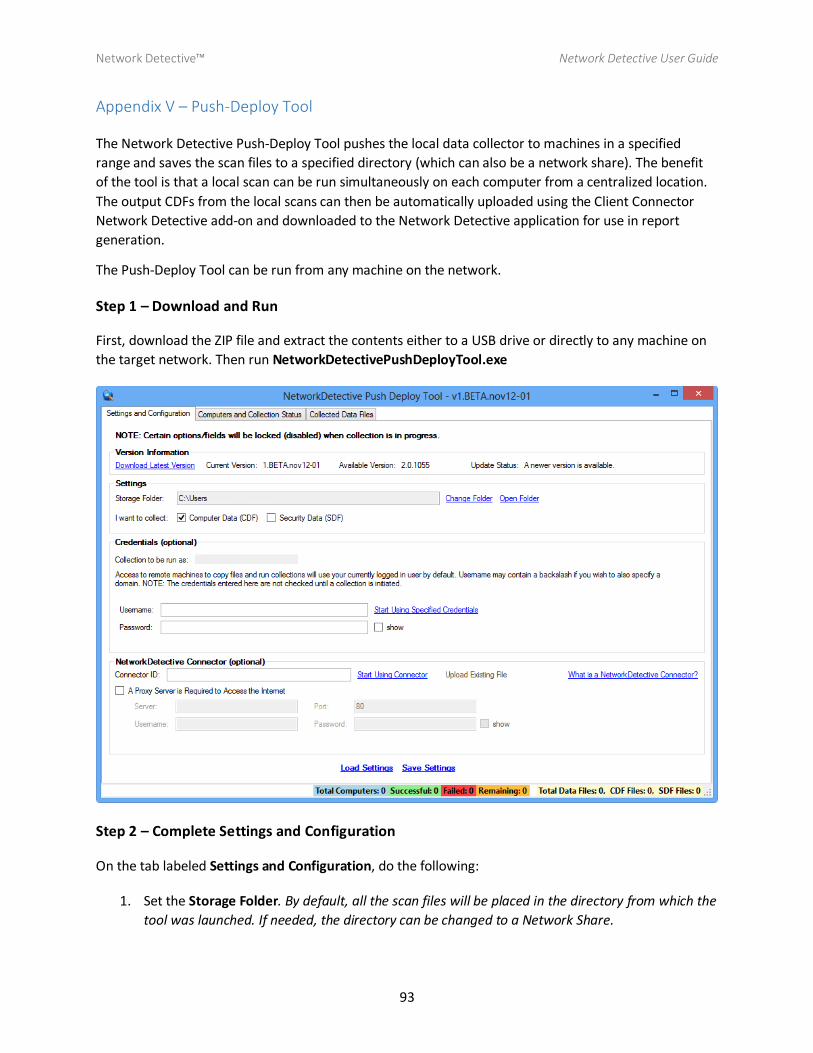
Network Detective™ Network Detective User Guide
93
Appendix V – Push-Deploy Tool
The Network Detective Push-Deploy Tool pushes the local data collector to machines in a specified
range and saves the scan files to a specified directory (which can also be a network share). The benefit
of the tool is that a local scan can be run simultaneously on each computer from a centralized location.
The output CDFs from the local scans can then be automatically uploaded using the Client Connector
Network Detective add-on and downloaded to the Network Detective application for use in report
generation.
The Push-Deploy Tool can be run from any machine on the network.
Step 1 – Download and Run
First, download the ZIP file and extract the contents either to a USB drive or directly to any machine on
the target network. Then run NetworkDetectivePushDeployTool.exe
Step 2 – Complete Settings and Configuration
On the tab labeled Settings and Configuration, do the following:
1. Set the Storage Folder. By default, all the scan files will be placed in the directory from which the
tool was launched. If needed, the directory can be changed to a Network Share.
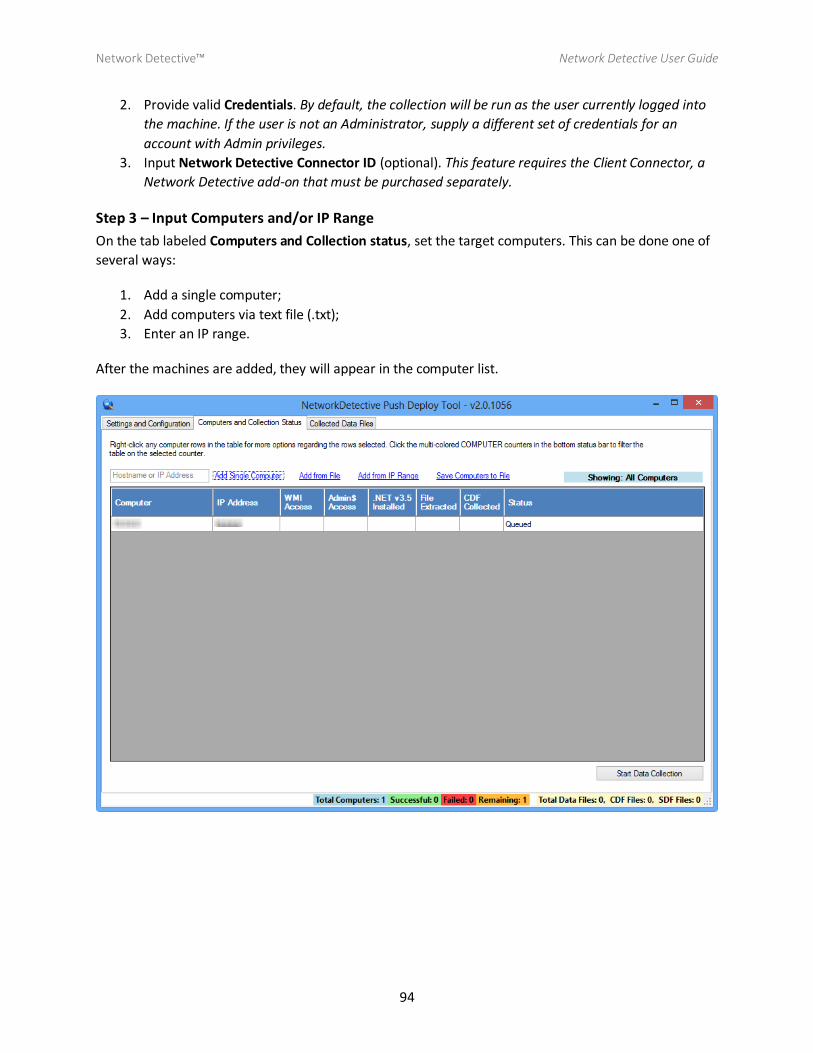
Network Detective™ Network Detective User Guide
94
2. Provide valid Credentials. By default, the collection will be run as the user currently logged into
the machine. If the user is not an Administrator, supply a different set of credentials for an
account with Admin privileges.
3. Input Network Detective Connector ID (optional). This feature requires the Client Connector, a
Network Detective add-on that must be purchased separately.
Step 3 – Input Computers and/or IP Range
On the tab labeled Computers and Collection status, set the target computers. This can be done one of
several ways:
1. Add a single computer;
2. Add computers via text file (.txt);
3. Enter an IP range.
After the machines are added, they will appear in the computer list.
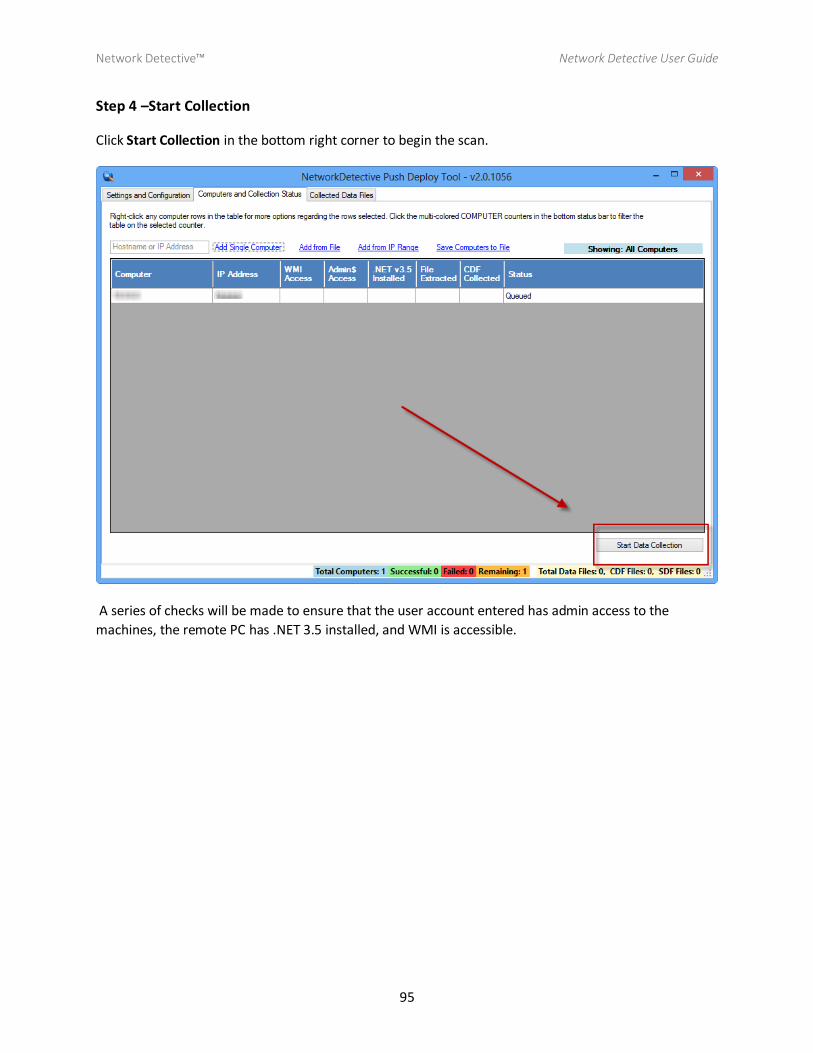
Network Detective™ Network Detective User Guide
95
Step 4 –Start Collection
Click Start Collection in the bottom right corner to begin the scan.
A series of checks will be made to ensure that the user account entered has admin access to the
machines, the remote PC has .NET 3.5 installed, and WMI is accessible.
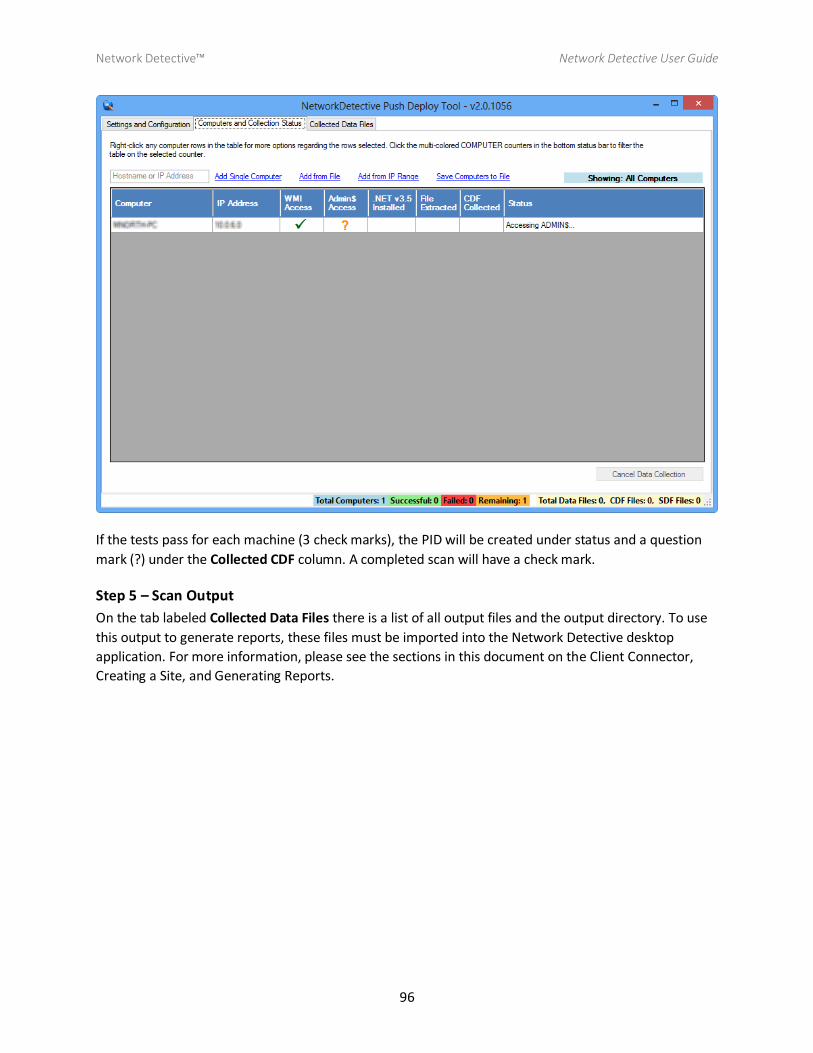
Network Detective™ Network Detective User Guide
96
If the tests pass for each machine (3 check marks), the PID will be created under status and a question
mark (?) under the Collected CDF column. A completed scan will have a check mark.
Step 5 – Scan Output
On the tab labeled Collected Data Files there is a list of all output files and the output directory. To use
this output to generate reports, these files must be imported into the Network Detective desktop
application. For more information, please see the sections in this document on the Client Connector,
Creating a Site, and Generating Reports.