network configuration manager - ca...
TRANSCRIPT
Network Configuration Manager
User GuideDocument 5180

NoticeThis documentation (the "Documentation") and related computer software program (the "Software") (hereinafter collectively referred to as the "Product") is for the end user's informational purposes only and is subject to change or withdrawal by CA at any time.
This Product may not be copied, transferred, reproduced, disclosed, modified or duplicated, in whole or in part, without the prior written consent of CA. This Product is confidential and proprietary information of CA and protected by the copyright laws of the United States and international treaties.
Notwithstanding the foregoing, licensed users may print a reasonable number of copies of the Documentation for their own internal use, and may make one copy of the Software as reasonably required for back-up and disaster recovery purposes, provided that all CA copyright notices and legends are affixed to each reproduced copy. Only authorized employees, consultants, or agents of the user who are bound by the provisions of the license for the Software are permitted to have access to such copies.
The right to print copies of the Documentation and to make a copy of the Software is limited to the period during which the license for the Product remains in full force and effect. Should the license terminate for any reason, it shall be the user's responsibility to certify in writing to CA that all copies and partial copies of the Product have been returned to CA or destroyed.
EXCEPT AS OTHERWISE STATED IN THE APPLICABLE LICENSE AGREEMENT, TO THE EXTENT PERMITTED BY APPLICABLE LAW, CA PROVIDES THIS PRODUCT "AS IS" WITHOUT WARRANTY OF ANY KIND, INCLUDING WITHOUT LIMITATION, ANY IMPLIED WARRANTIES OF MERCHANTABILITY, FITNESS FOR A PARTICULAR PURPOSE OR NONINFRINGEMENT. IN NO EVENT WILL CA BE LIABLE TO THE END USER OR ANY THIRD PARTY FOR ANY LOSS OR DAMAGE, DIRECT OR INDIRECT, FROM THE USE OF THIS PRODUCT, INCLUDING WITHOUT LIMITATION, LOST PROFITS, BUSINESS INTERRUPTION, GOODWILL, OR LOST DATA, EVEN IF CA IS EXPRESSLY ADVISED OF SUCH LOSS OR DAMAGE.
The use of this Product and any product referenced in the Documentation is governed by the end user's applicable license agreement.
The manufacturer of this Product is CA.
This Product is provided with "Restricted Rights." Use, duplication or disclosure by the United States Government is subject to the restrictions set forth in FAR Sections 12.212, 52.227-14, and 52.227-19(c)(1) - (2) and DFARS Section 252.227-7013(c)(1)(ii), as applicable, or their successors.
All trademarks, trade names, service marks, and logos referenced herein belong to their respective companies.
Copyright © 2008 CA. All rights reserved.
3
Contents
Preface. . . . . . . . . . . . . . . . . . . . . . . . . . . . . . . . . . . . . . . . . . . . . . . . . . . . . . . . . . . . . . . 7
Chapter 1: Overview of Network Configuration Manager . . . . . . . . . . . . . . . . . . . . . . . . 9
Network Configuration Manager Capabilities . . . . . . . . . . . . . . . . . . . . . . . . . . . . . . . . . 10
Access Network Configuration Manager . . . . . . . . . . . . . . . . . . . . . . . . . . . . . . . . . . . . 10
Key Terms . . . . . . . . . . . . . . . . . . . . . . . . . . . . . . . . . . . . . . . . . . . . . . . . . . . . . . . . 11
Types of Configurations . . . . . . . . . . . . . . . . . . . . . . . . . . . . . . . . . . . . . . . . . . . . . . . 12
Running Configuration . . . . . . . . . . . . . . . . . . . . . . . . . . . . . . . . . . . . . . . . . . . . . . 12
Startup Configuration . . . . . . . . . . . . . . . . . . . . . . . . . . . . . . . . . . . . . . . . . . . . . . 12
Configuration File . . . . . . . . . . . . . . . . . . . . . . . . . . . . . . . . . . . . . . . . . . . . . . . . . 12
Supported Devices . . . . . . . . . . . . . . . . . . . . . . . . . . . . . . . . . . . . . . . . . . . . . . . . . . . 12
Device Families . . . . . . . . . . . . . . . . . . . . . . . . . . . . . . . . . . . . . . . . . . . . . . . . . . . . . 13
How Network Configuration Manager Determines Device Families . . . . . . . . . . . . . . . . 13
Extension Toolkit . . . . . . . . . . . . . . . . . . . . . . . . . . . . . . . . . . . . . . . . . . . . . . . . . . . . 14
Network Configuration Manager Prerequisites . . . . . . . . . . . . . . . . . . . . . . . . . . . . . . . . 14
Communication Modes . . . . . . . . . . . . . . . . . . . . . . . . . . . . . . . . . . . . . . . . . . . . . . . . 15
SSH v2 Support . . . . . . . . . . . . . . . . . . . . . . . . . . . . . . . . . . . . . . . . . . . . . . . . . . 15
Cisco Devices and SCP . . . . . . . . . . . . . . . . . . . . . . . . . . . . . . . . . . . . . . . . . . . . . 15
Unsolicited Notifications of Device Configuration Changes . . . . . . . . . . . . . . . . . . . . . . . . 16
Device Traps . . . . . . . . . . . . . . . . . . . . . . . . . . . . . . . . . . . . . . . . . . . . . . . . . . . . 16
Device MIB Objects . . . . . . . . . . . . . . . . . . . . . . . . . . . . . . . . . . . . . . . . . . . . . . . . 17
Network Configuration Manager and Global Collections . . . . . . . . . . . . . . . . . . . . . . . . . . 17
Maintenance Mode . . . . . . . . . . . . . . . . . . . . . . . . . . . . . . . . . . . . . . . . . . . . . . . . . . . 17
Network Configuration Manager Report Packs . . . . . . . . . . . . . . . . . . . . . . . . . . . . . . . . 17
Chapter 2: Network Configuration Manager Configurations . . . . . . . . . . . . . . . . . . . . . 19
Configure Network Configuration Manager . . . . . . . . . . . . . . . . . . . . . . . . . . . . . . . . . . 19
Configure General Configuration . . . . . . . . . . . . . . . . . . . . . . . . . . . . . . . . . . . . . . . 19
Configure a TFTP Server . . . . . . . . . . . . . . . . . . . . . . . . . . . . . . . . . . . . . . . . . . . . 20
Configure Network Configuration Manager to Use a Local FTP Server . . . . . . . . . . . . . 24
Configure Export for Device Configurations . . . . . . . . . . . . . . . . . . . . . . . . . . . . . . . 25
Configure a Device Family . . . . . . . . . . . . . . . . . . . . . . . . . . . . . . . . . . . . . . . . . . . . . . 26
Access Network Configuration Manager Device Family Configurations . . . . . . . . . . . . . 26
Configure Device Family General Configuration . . . . . . . . . . . . . . . . . . . . . . . . . . . . 26
Configure Device Family Communication Mode . . . . . . . . . . . . . . . . . . . . . . . . . . . . . 27
Advanced Device Family Communication Mode . . . . . . . . . . . . . . . . . . . . . . . . . . . . . 28
Configure Device Family Masks . . . . . . . . . . . . . . . . . . . . . . . . . . . . . . . . . . . . . . . . 28
4 Network Configuration Manager User Guide
Contents
Configure a Single Device to Override Device Family Settings . . . . . . . . . . . . . . . . . . . . . 29
Access Network Configuration Manager Settings on a Single Device . . . . . . . . . . . . . . 29
Enable or Disable Network Configuration Manager on a Single Device . . . . . . . . . . . . . 29
Configure Unsolicited Device Configuration Captures on a Single Device . . . . . . . . . . . 30
Configure Communication Mode on a Single Device . . . . . . . . . . . . . . . . . . . . . . . . . . 30
Configure a Mask on a Single Device . . . . . . . . . . . . . . . . . . . . . . . . . . . . . . . . . . . . 31
Network Configuration Manager Extension Utility . . . . . . . . . . . . . . . . . . . . . . . . . . . . . . 32
Create a Custom Device Family . . . . . . . . . . . . . . . . . . . . . . . . . . . . . . . . . . . . . . . 33
Place a Device in a Device Family . . . . . . . . . . . . . . . . . . . . . . . . . . . . . . . . . . . . . . 34
Extension Toolkit Script Configuration . . . . . . . . . . . . . . . . . . . . . . . . . . . . . . . . . . . 35
Perl Modules . . . . . . . . . . . . . . . . . . . . . . . . . . . . . . . . . . . . . . . . . . . . . . . . . . . . . 42
Import and Export Scripts . . . . . . . . . . . . . . . . . . . . . . . . . . . . . . . . . . . . . . . . . . . 46
Maintaining a Script Backup and History . . . . . . . . . . . . . . . . . . . . . . . . . . . . . . . . . 47
Chapter 3: Global Synchronization Task . . . . . . . . . . . . . . . . . . . . . . . . . . . . . . . . . . . . 49
About Global Synchronization . . . . . . . . . . . . . . . . . . . . . . . . . . . . . . . . . . . . . . . . . . . 49
About Enterasys/Riverstone SSR Devices . . . . . . . . . . . . . . . . . . . . . . . . . . . . . . . . . 50
Schedule Global Synchronization . . . . . . . . . . . . . . . . . . . . . . . . . . . . . . . . . . . . . . . . . 50
On-Demand Global Sync Task . . . . . . . . . . . . . . . . . . . . . . . . . . . . . . . . . . . . . . . . . . . 51
View Configuration History for a Single Device . . . . . . . . . . . . . . . . . . . . . . . . . . . . . . . . 51
View Startup Versus Running Differences from a Configuration Alarm . . . . . . . . . . . . . . . 52
View Global Sync Task Results . . . . . . . . . . . . . . . . . . . . . . . . . . . . . . . . . . . . . . . . . . . 52
Chapter 4: Network Configuration Manager Device-Level Tasks . . . . . . . . . . . . . . . . . 53
Manually Capture Configurations . . . . . . . . . . . . . . . . . . . . . . . . . . . . . . . . . . . . . . . . . 53
Manually Upload Configurations to a Single Device . . . . . . . . . . . . . . . . . . . . . . . . . . . . . 54
Chapter 5: Network Configuration Manager Bulk Tasks . . . . . . . . . . . . . . . . . . . . . . . . 57
Create Upload Task . . . . . . . . . . . . . . . . . . . . . . . . . . . . . . . . . . . . . . . . . . . . . . . . . . 58
Determine How an Enterasys/Riverstone SSR Device Responds to an Upload Task . . . . 59
Create Sync Task . . . . . . . . . . . . . . . . . . . . . . . . . . . . . . . . . . . . . . . . . . . . . . . . . . . . 60
Create Save to Startup Task . . . . . . . . . . . . . . . . . . . . . . . . . . . . . . . . . . . . . . . . . . . . 61
View Critical Statistics on All Bulk Tasks . . . . . . . . . . . . . . . . . . . . . . . . . . . . . . . . . . . . 61
View Detailed Statistics for a Bulk Task . . . . . . . . . . . . . . . . . . . . . . . . . . . . . . . . . . . . 62
Delete Tasks . . . . . . . . . . . . . . . . . . . . . . . . . . . . . . . . . . . . . . . . . . . . . . . . . . . . . . . 62
Chapter 6: Network Configuration Manager Policies . . . . . . . . . . . . . . . . . . . . . . . . . . 63
Create Network Configuration Manager Policies . . . . . . . . . . . . . . . . . . . . . . . . . . . . . . . 64
Repair Non-Compliant Devices from the Policy Table . . . . . . . . . . . . . . . . . . . . . . . . . . . 70
Repair Non-Compliant Devices from a Policy Violation Alarm . . . . . . . . . . . . . . . . . . . . . . 71
Edit Policies . . . . . . . . . . . . . . . . . . . . . . . . . . . . . . . . . . . . . . . . . . . . . . . . . . . . . . . . 71
Delete Policies . . . . . . . . . . . . . . . . . . . . . . . . . . . . . . . . . . . . . . . . . . . . . . . . . . . . . . 72

Contents
Network Configuration Manager User Guide 5
Enable and Disable Policies from the Policy Table . . . . . . . . . . . . . . . . . . . . . . . . . . . . . . 72
View Policy Details . . . . . . . . . . . . . . . . . . . . . . . . . . . . . . . . . . . . . . . . . . . . . . . . . . . 72
View Critical Statistics on All Policies . . . . . . . . . . . . . . . . . . . . . . . . . . . . . . . . . . . . . . 73
View Critical Statistics for Policies Applied to a Global Collection . . . . . . . . . . . . . . . . . . . 73
View Critical Statistics for All Policies Applied to a Single Device . . . . . . . . . . . . . . . . . . . 73
Appendix A: Supported Devices ................................................................................... 75Cisco Supported Devices . . . . . . . . . . . . . . . . . . . . . . . . . . . . . . . . . . . . . . . . . . . . . . . 76
Cisco CAT Supported Devices . . . . . . . . . . . . . . . . . . . . . . . . . . . . . . . . . . . . . . . . . . . 92
Enterasys Supported Devices . . . . . . . . . . . . . . . . . . . . . . . . . . . . . . . . . . . . . . . . . . . 94
Extreme Supported Devices . . . . . . . . . . . . . . . . . . . . . . . . . . . . . . . . . . . . . . . . . . . . 94
Foundry Supported Devices . . . . . . . . . . . . . . . . . . . . . . . . . . . . . . . . . . . . . . . . . . . . . 96
Nortel Baystack Supported Devices . . . . . . . . . . . . . . . . . . . . . . . . . . . . . . . . . . . . . . 102
Juniper Supported Devices . . . . . . . . . . . . . . . . . . . . . . . . . . . . . . . . . . . . . . . . . . . . 102
Nortel Passport Supported Devices . . . . . . . . . . . . . . . . . . . . . . . . . . . . . . . . . . . . . . . 103
Enterasys/Riverstone SSR Supported Devices . . . . . . . . . . . . . . . . . . . . . . . . . . . . . . . 104
Appendix B: Network Configuration Manager Events ................................................. 107Events Generated on the Device . . . . . . . . . . . . . . . . . . . . . . . . . . . . . . . . . . . . . . . . 107
Configuration Change Notification from Device . . . . . . . . . . . . . . . . . . . . . . . . . . . . 107
Configuration Change Detected by NCM . . . . . . . . . . . . . . . . . . . . . . . . . . . . . . . . . 107
Startup and Running Configurations Same/Differ . . . . . . . . . . . . . . . . . . . . . . . . . . 107
Startup Differs from Running Alarm Generating Events . . . . . . . . . . . . . . . . . . . . . . 108
Device Compliant/Noncompliant with Policy . . . . . . . . . . . . . . . . . . . . . . . . . . . . . . 108
Device Noncompliant with Policy Alarm Generating Events . . . . . . . . . . . . . . . . . . . . 108
Capture Succeeded/Failed . . . . . . . . . . . . . . . . . . . . . . . . . . . . . . . . . . . . . . . . . . 109
Upload Succeeded/Failed . . . . . . . . . . . . . . . . . . . . . . . . . . . . . . . . . . . . . . . . . . . 109
Upload Failed Alarm Generating Events . . . . . . . . . . . . . . . . . . . . . . . . . . . . . . . . . 109
Write to Startup Succeeded/Failed . . . . . . . . . . . . . . . . . . . . . . . . . . . . . . . . . . . . 109
NCM Enabled/Disabled on Device . . . . . . . . . . . . . . . . . . . . . . . . . . . . . . . . . . . . . 110
NCM Disabled, Operation Not Performed . . . . . . . . . . . . . . . . . . . . . . . . . . . . . . . . 110
Device Firmware Load . . . . . . . . . . . . . . . . . . . . . . . . . . . . . . . . . . . . . . . . . . . . . 110
Device Added/Removed from Device Family . . . . . . . . . . . . . . . . . . . . . . . . . . . . . . 110
Events Generated on Policies . . . . . . . . . . . . . . . . . . . . . . . . . . . . . . . . . . . . . . . . . . . 110
Policy Enabled/Disabled . . . . . . . . . . . . . . . . . . . . . . . . . . . . . . . . . . . . . . . . . . . . 110
Policy Modified . . . . . . . . . . . . . . . . . . . . . . . . . . . . . . . . . . . . . . . . . . . . . . . . . . 111
Policy has Violators . . . . . . . . . . . . . . . . . . . . . . . . . . . . . . . . . . . . . . . . . . . . . . . 111
Violated Policy, Alarm Generating Events . . . . . . . . . . . . . . . . . . . . . . . . . . . . . . . . 111

6 Network Configuration Manager User Guide
Contents
Events Generated on Tasks Global Sync, Capture, Upload and Write to Startup . . . . . . . . 111
Task Scheduled/Unscheduled . . . . . . . . . . . . . . . . . . . . . . . . . . . . . . . . . . . . . . . . 111
Task Started, Stopped, Completed, Partially Completed . . . . . . . . . . . . . . . . . . . . . . 111
Task Partially Completed Alarm Generating Events . . . . . . . . . . . . . . . . . . . . . . . . . 112
Events Generated on the Configuration Manager Application . . . . . . . . . . . . . . . . . . . . . 112
Global Unsolicited Notification . . . . . . . . . . . . . . . . . . . . . . . . . . . . . . . . . . . . . . . . 112
Events Generated on Device Families . . . . . . . . . . . . . . . . . . . . . . . . . . . . . . . . . . . . . 112
Appendix C: Network Configuration Manager Privileges ............................................ 113
Index . . . . . . . . . . . . . . . . . . . . . . . . . . . . . . . . . . . . . . . . . . . . . . . . . . . . . . . . . . . . . . 115
7
Preface
This guide is intended for network administrators who want to monitor, control, troubleshoot, and document network device configurations from one or more locations on a network. It is also intended for novice users of Network Configuration Manager (NCM) who are learning about the application in their work environment.
What is in this book
This guide contains the following chapters:
• Chapter 1, “Overview of Network Configuration Manager,” on page 9 — provides a general overview and explains major concepts of Network Configuration Manager in SPECTRUM/OneClick.
• Chapter 2, “Network Configuration Manager Configurations,” on page 19 — describes how to configure Network Configuration Manager on your network.
• Chapter 3, “Global Synchronization Task,” on page 49 — describes how to set up a global synchronization task on your network with Network Configuration Manager. By running a global synchronization task, you will begin building a running history of device configurations. You will also have device configurations captured prior to configuring Network Configuration Manager policies.
• Chapter 4, “Network Configuration Manager Device-Level Tasks,” on page 53 — describes how to manually capture and upload configurations for devices in your network using Network Configuration Manager.
• Chapter 5, “Network Configuration Manager Bulk Tasks,” on page 57 — describes how to create an automatic Bulk Upload task, Sync task, and Write to Startup task. These tasks interact with devices by capturing/uploading host configurations. You can create a task to run anytime on a single device or on a list of devices. These on-demand tasks are useful if you want to roll out the same configuration (with minor differences such as IP addresses) to multiple devices on your network.
• Chapter 6, “Network Configuration Manager Policies,” on page 63 — describes how to create and configure policies in Network Configuration Manager. You should have configurations captured prior to setting up a Network Configuration Manager policy.
• Appendix A, “Supported Devices,” on page 75 — lists devices supported by Network Configuration Manager.
8 Network Configuration Manager User Guide
Preface
• Appendix B, “Network Configuration Manager Events,” on page 107 — lists events generated by Network Configuration Manager.
• Appendix C, “Network Configuration Manager Privileges,” on page 113 — lists Network Configuration Manager privileges.
Text Conventions
The following text conventions are used in this document:
Documentation Feedback
To send feedback regarding SPECTRUM documentation, access the following web address:
http://supportconnectw.ca.com/public/ca_common_docs/docserver_email.asp
Thank you for helping us improve our documentation.
Online Documentation
SPECTRUM documentation is available online at the following address:
http://support.concord.com/support/secure/products/Spectrum_Doc/
Check this site for the latest updates and additions.
Element Convention Used Example
Variables
(The user supplies a value for the variable.)
Courier and Italic in angle brackets (<>)
Enter the following:
DISPLAY=<workstation name>:0.0 export display
The directory where you installed SPECTRUM
(The user supplies a value for the variable.)
<$SPECROOT> Navigate to:
<$SPECROOT>/app-defaults
Linux, Solaris, and Windows directory paths
Unless otherwise noted, directory paths are common to the operating systems, with the exception that slashes (/) are used in Linux and Solaris paths, and backslashes (\) are used in Windows paths.
<$SPECROOT>/app-defaults on Linux and Solaris is equivalent to <$SPECROOT>\app-defaults on Windows.
On-screen text Courier The following line displays:
path=”/audit”
User-typed text Courier Enter the following path name:
C:\ABC\lib\db
Cross-references Underlined and hypertext-blue
See “Documentation Feedback” on page 8.
References to SPECTRUM documents (title and number)
Italic SPECTRUM Installation Guide (5136)
9
Chapter 1: Overview of Network Configuration Manager
This chapter provides a general overview of Network Configuration Manager (NCM).
In this chapter
• “Network Configuration Manager Capabilities” on page 10
• “Access Network Configuration Manager” on page 10
• “Key Terms” on page 11
• “Types of Configurations” on page 12
• “Supported Devices” on page 12
• “Device Families” on page 13
• “Extension Toolkit” on page 14
• “Network Configuration Manager Prerequisites” on page 14
• “Communication Modes” on page 15
• “Unsolicited Notifications of Device Configuration Changes” on page 16
• “Network Configuration Manager and Global Collections” on page 17
• “Maintenance Mode” on page 17
• “Network Configuration Manager Report Packs” on page 17
10 Network Configuration Manager User Guide
Chapter 1: Overview of Network Configuration Manager
Network Configuration Manager CapabilitiesConfiguration management is the process of identifying and monitoring configurations of single devices and device families that comprise a network. Devices include routers, hubs, and switches.
The benefits of using the Network Configuration Manager include the following:
• Increased network uptime by reducing the time to resolve network issues.
• Lower network support costs by reducing the occurrence of network issues that require reactive troubleshooting and fixes.
• Lower network operational costs by reducing the time to administer system-wide changes.
Each device on the network is configured to provide specific services. Details about how a device operates and how it is customized from other network devices are contained in its configuration.
Network Configuration Manager allows you to perform the following tasks:
• Manage configurations for supported devices modeled in SPECTRUM/OneClick
• Capture network device configurations and store them in the SPECTRUM database
• Check running versus startup configurations
• Upload Perl configuration scripts
• Load firmware
• Export configurations
• Load/merge configurations to one or more devices of the same family type
Note: Merging content appends information to an existing file (it does not overwrite or restore).
• Verify that the correct configuration is running on a device
• Set up a schedule of automatic captures and policies to ensure reliable device configurations
• Detect performance problems by verifying device configurations
• Maintain a history of network device configurations for comparison and reconfiguration purposes
• Create policies to monitor content in configurations and verify that device content is compliant
Access Network Configuration ManagerThis section describes how to access Network Configuration Manager.
To access Network Configuration Manager
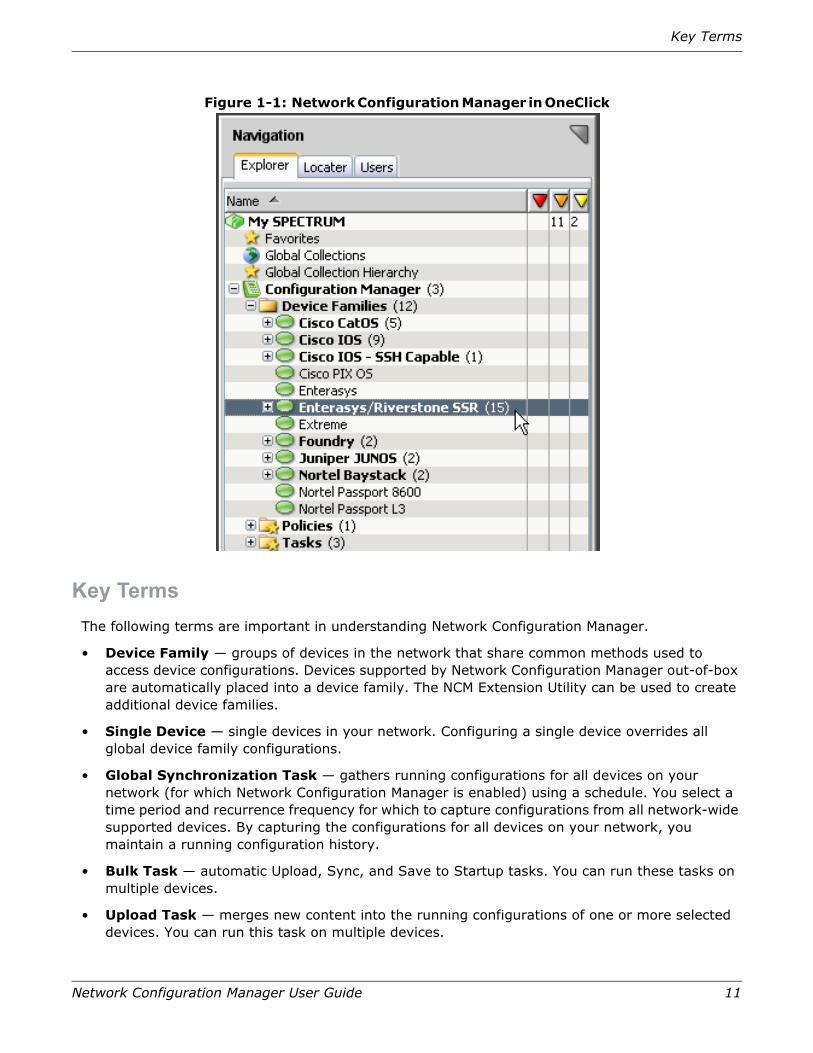
In the OneClick Console, select Configuration Manager from the Explorer tab (Figure 1-1).
When you expand the Configuration Manager node, the Device Families, Policies, and Tasks views appear.
For details on OneClick concepts and functionality, see the OneClick Console User Guide (5130).
Key Terms
Network Configuration Manager User Guide 11
Figure 1-1: Network Configuration Manager in OneClick
Key TermsThe following terms are important in understanding Network Configuration Manager.
• Device Family — groups of devices in the network that share common methods used to access device configurations. Devices supported by Network Configuration Manager out-of-box are automatically placed into a device family. The NCM Extension Utility can be used to create additional device families.
• Single Device — single devices in your network. Configuring a single device overrides all global device family configurations.
• Global Synchronization Task — gathers running configurations for all devices on your network (for which Network Configuration Manager is enabled) using a schedule. You select a time period and recurrence frequency for which to capture configurations from all network-wide supported devices. By capturing the configurations for all devices on your network, you maintain a running configuration history.
• Bulk Task — automatic Upload, Sync, and Save to Startup tasks. You can run these tasks on multiple devices.
• Upload Task — merges new content into the running configurations of one or more selected devices. You can run this task on multiple devices.
12 Network Configuration Manager User Guide
Chapter 1: Overview of Network Configuration Manager
• Sync Task — captures and verifies policy-compliant device configurations for selected devices on your network and shows the results in realtime. When a Sync task captures a device’s configuration, it checks the configuration against all policies pertaining to the device. You can run this task on multiple devices.
• Save to Startup Task — writes a current running configuration to the startup configuration of one or more selected devices. A device saves its configuration in the NVRAM (Nonvolatile Random Access Memory). You can run this task on multiple devices.
• Network Configuration Manager Policy — monitors content in configurations and verifies that device content is compliant. Policies specify a certain aspect of a device’s host configuration. A policy is checked and compared every time a device’s host configuration file is captured. Devices that violate the policy can generate an alarm and be semi-automatically repaired. A policy is checked for compliance when there is a configuration change on a device.
Types of ConfigurationsThe following sections describe the different configurations for a device.
Running Configuration
A running configuration is a version of a configuration that is loaded on a device and defines how the device currently operates. It is only valid for the current run-time session.
Startup Configuration
A startup configuration is the backup version of a configuration that is stored on a device. It is used when the device is rebooted. Some devices have primary and secondary startup configurations. A device replaces the previous running configuration with a copy of the startup configuration when it is rebooted.
Configuration File
A configuration file contains a subset of attributes from a running configuration by device manufacturers. Many devices let Network Configuration Manager capture complete configuration files. You can edit captured configuration files.
Supported DevicesNetwork Configuration Manager supports Cisco, Juniper, Baystack, Enterasys, Extreme, Foundry, Nortel, and Enterasys/Riverstone SSR device families out-of-box. For more information about out-of-box supported device families, see Appendix A, “Supported Devices,” on page 75.
Devices that do not fall into one of the out-of-box supported device families can be configured using the Network Configuration Manager Extension Utility. For more information on Network Configuration Manager Extension Utility capabilities, see “Network Configuration Manager Extension Utility” on page 32.
Device Families
Network Configuration Manager User Guide 13
Device FamiliesA device must reside in a device family for it to be supported by Network Configuration Manager. Devices supported out-of-box are automatically assigned to the proper device family. A device can only reside in a single device family. A Network Configuration Manager device family provides a central place to configure access methods that will be used to access device configurations from family members. Device family settings can be overridden at the local device if desired. For more information about configuring device families, see “Configure a Device Family” on page 26.
The Network Configuration Manager Extension Utility provides the ability to create additional device families on demand and which extends Network Configuration Manager to support additional devices and vendors. For details on manually creating additional device families and manually moving devices to user created device families, see “Extension Toolkit” on page 14.
How Network Configuration Manager Determines Device Families
Network Configuration Manager automatically determines the device family for out-of-box supported devices. Typically, this determination is made based on vendor. See Appendix A, “Supported Devices,” on page 75 for more information.
There are two device families for Cisco IOS devices:
• Cisco IOS – SSH Capable (supports SSH/SCP communication mode)
• Cisco IOS (does not support SSH/SCP communication mode)
For a device to be placed into the Cisco IOS – SSH Capable family, the device descriptor is parsed and must have:
Firmware Version >= 12.2 (18) Feature Set must contain letters “K9” indicating the device has the necessary encryption functionality needed for SCP
For example, a device with the following description will be placed in the Cisco IOS – SSH Capable family:
Cisco IOS Software, 7200 Software (C7200-JK9S-M), Version 12.3(14)T6, RELEASE SOFTWARE (fc2)Technical Support: http://www.cisco.com/techsupportCopyright (c) 1986-2006 by Cisco Systems, Inc.Compiled Thu 05-Jan-06 05:36 by dchih
A device with the following description will be placed in the Cisco IOS family and is not capable of obtaining configurations using SSH/SCP:
Cisco Internetwork Operating System SoftwareIOS (tm) C2600 Software (C2600-J1S3-M), Version 12.3(17a), RELEASE SOFTWARE (fc2)Technical Support: http://www.cisco.com/techsupportCopyright (c) 1986-2005 by cisco Systems, Inc.Compiled Mon 12-Dec-05 1
14 Network Configuration Manager User Guide
Chapter 1: Overview of Network Configuration Manager
Extension ToolkitThe Extension Toolkit expands Network Configuration Manager to manage additional devices and vendors through the use of Perl scripts. You can provide Perl scripts for any, or all, of the five operations Network Configuration Manager executes on a device. These operations are:
• Capture Startup Configuration — Captures the device’s startup configuration.
• Capture Running Configuration — Captures the device’s running configuration.
• Upload Running Configuration — Upload/merges specified content into the device’s running configuration.
• Write Startup Configuration — Writes the device’s current running configuration to its startup configuration.
• Load Firmware — Loads firmware to the device.
Scripts can be configured within Network Configuration Manager for each of these operations. Any operation that does not have a script configured is handled as an unsupported operation within Network Configuration Manager for that device family.
The Cisco PIX OS out-of-box device family provides an example of how scripts are used to extend Network Configuration Manager support.
For information on Network Configuration Manager Extension Toolkit configurations, see “Network Configuration Manager Extension Utility” on page 32.
Network Configuration Manager PrerequisitesYou must perform the following prerequisites to successfully run Network Configuration Manager on your network and actively maintain a running history of device configurations on the managed network.
• Model devices with Read/Write community strings. See Modeling Your IT Infrastructure Guide (5176) for more information.
• Ensure Devices are SCP enabled if using SSH. See “Communication Modes” on page 15 for more information.
Communication Modes
Network Configuration Manager User Guide 15
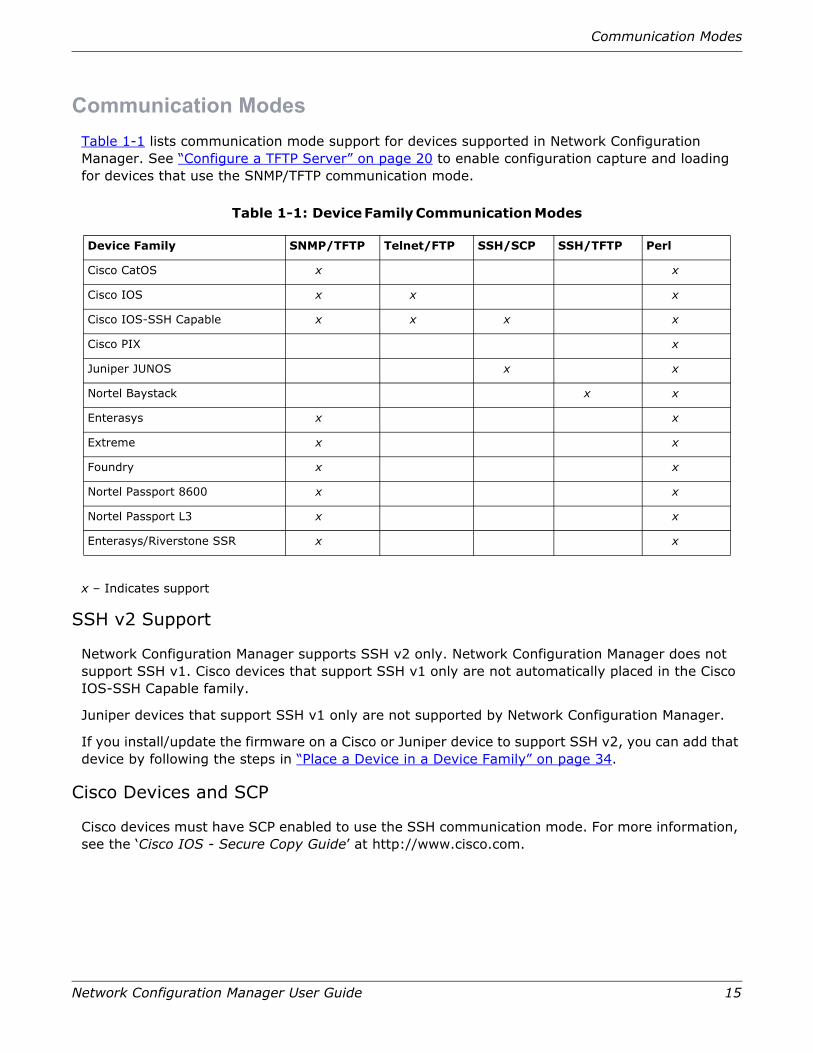
Communication ModesTable 1-1 lists communication mode support for devices supported in Network Configuration Manager. See “Configure a TFTP Server” on page 20 to enable configuration capture and loading for devices that use the SNMP/TFTP communication mode.
Table 1-1: Device Family Communication Modes
x – Indicates support
SSH v2 Support
Network Configuration Manager supports SSH v2 only. Network Configuration Manager does not support SSH v1. Cisco devices that support SSH v1 only are not automatically placed in the Cisco IOS-SSH Capable family.
Juniper devices that support SSH v1 only are not supported by Network Configuration Manager.
If you install/update the firmware on a Cisco or Juniper device to support SSH v2, you can add that device by following the steps in “Place a Device in a Device Family” on page 34.
Cisco Devices and SCP
Cisco devices must have SCP enabled to use the SSH communication mode. For more information, see the ‘Cisco IOS - Secure Copy Guide’ at http://www.cisco.com.
Device Family SNMP/TFTP Telnet/FTP SSH/SCP SSH/TFTP Perl
Cisco CatOS x x
Cisco IOS x x x
Cisco IOS-SSH Capable x x x x
Cisco PIX x
Juniper JUNOS x x
Nortel Baystack x x
Enterasys x x
Extreme x x
Foundry x x
Nortel Passport 8600 x x
Nortel Passport L3 x x
Enterasys/Riverstone SSR x x
16 Network Configuration Manager User Guide
Chapter 1: Overview of Network Configuration Manager
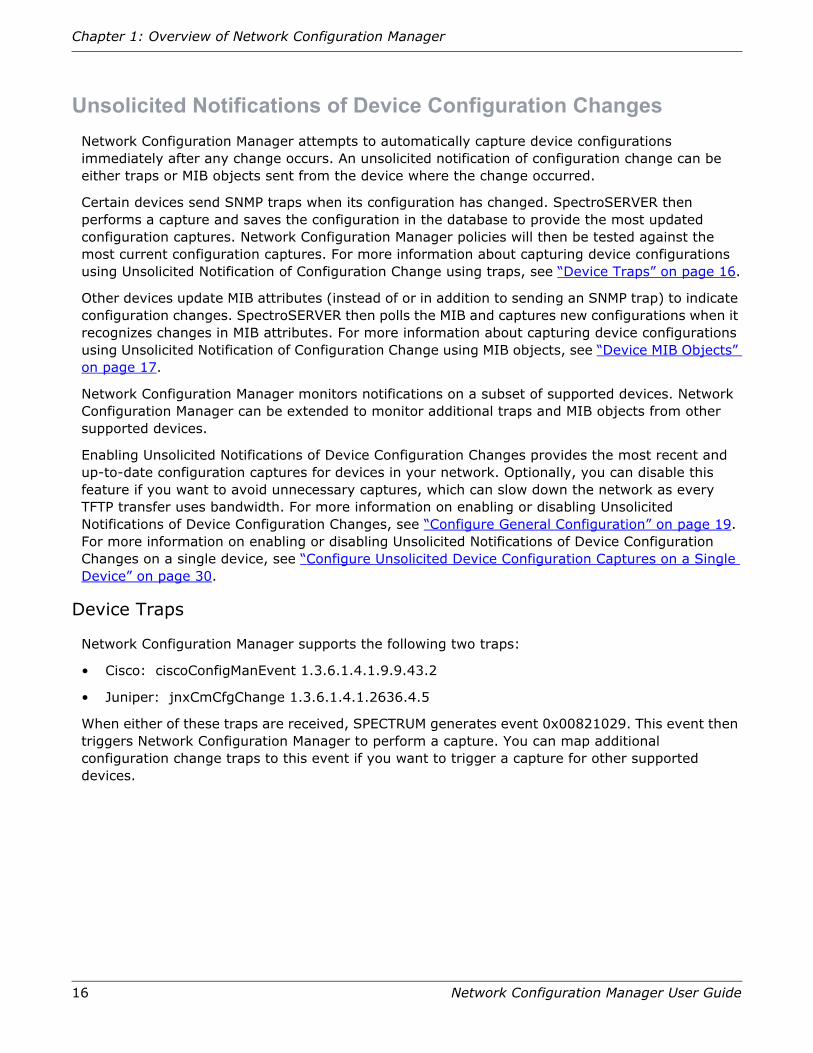
Unsolicited Notifications of Device Configuration ChangesNetwork Configuration Manager attempts to automatically capture device configurations immediately after any change occurs. An unsolicited notification of configuration change can be either traps or MIB objects sent from the device where the change occurred.
Certain devices send SNMP traps when its configuration has changed. SpectroSERVER then performs a capture and saves the configuration in the database to provide the most updated configuration captures. Network Configuration Manager policies will then be tested against the most current configuration captures. For more information about capturing device configurations using Unsolicited Notification of Configuration Change using traps, see “Device Traps” on page 16.
Other devices update MIB attributes (instead of or in addition to sending an SNMP trap) to indicate configuration changes. SpectroSERVER then polls the MIB and captures new configurations when it recognizes changes in MIB attributes. For more information about capturing device configurations using Unsolicited Notification of Configuration Change using MIB objects, see “Device MIB Objects” on page 17.
Network Configuration Manager monitors notifications on a subset of supported devices. Network Configuration Manager can be extended to monitor additional traps and MIB objects from other supported devices.
Enabling Unsolicited Notifications of Device Configuration Changes provides the most recent and up-to-date configuration captures for devices in your network. Optionally, you can disable this feature if you want to avoid unnecessary captures, which can slow down the network as every TFTP transfer uses bandwidth. For more information on enabling or disabling Unsolicited Notifications of Device Configuration Changes, see “Configure General Configuration” on page 19. For more information on enabling or disabling Unsolicited Notifications of Device Configuration Changes on a single device, see “Configure Unsolicited Device Configuration Captures on a Single Device” on page 30.
Device Traps
Network Configuration Manager supports the following two traps:
• Cisco: ciscoConfigManEvent 1.3.6.1.4.1.9.9.43.2
• Juniper: jnxCmCfgChange 1.3.6.1.4.1.2636.4.5
When either of these traps are received, SPECTRUM generates event 0x00821029. This event then triggers Network Configuration Manager to perform a capture. You can map additional configuration change traps to this event if you want to trigger a capture for other supported devices.
Network Configuration Manager and Global Collections
Network Configuration Manager User Guide 17
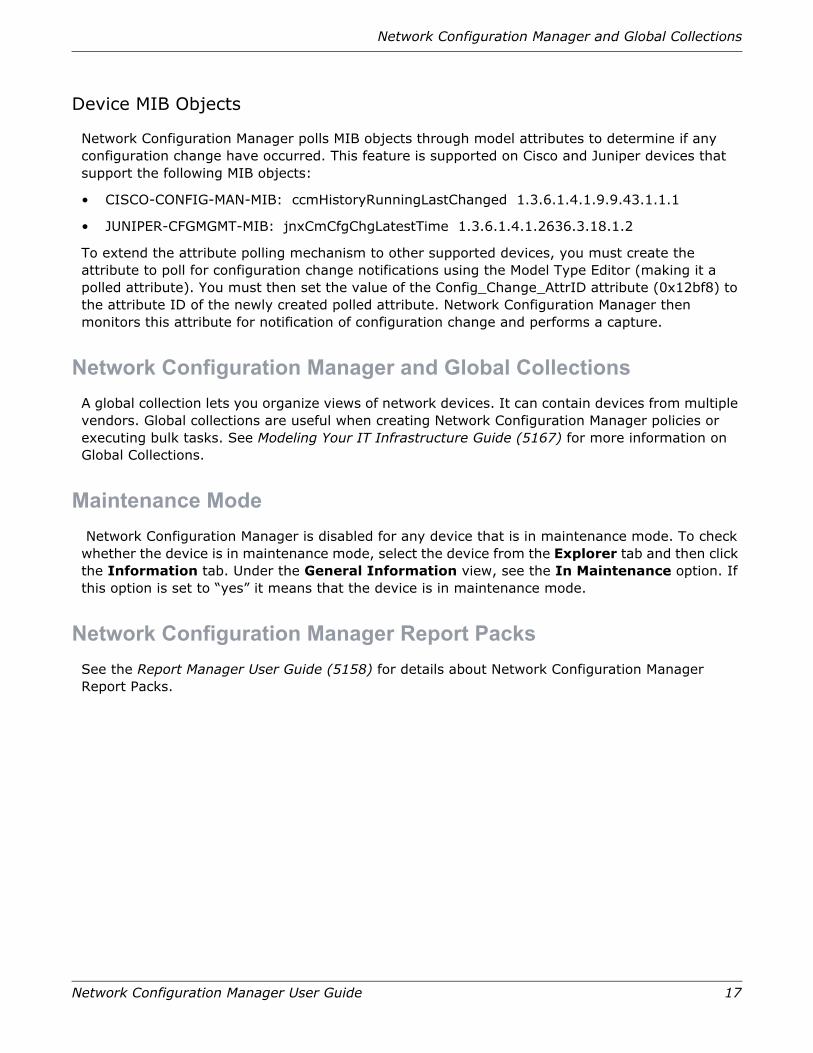
Device MIB Objects
Network Configuration Manager polls MIB objects through model attributes to determine if any configuration change have occurred. This feature is supported on Cisco and Juniper devices that support the following MIB objects:
• CISCO-CONFIG-MAN-MIB: ccmHistoryRunningLastChanged 1.3.6.1.4.1.9.9.43.1.1.1
• JUNIPER-CFGMGMT-MIB: jnxCmCfgChgLatestTime 1.3.6.1.4.1.2636.3.18.1.2
To extend the attribute polling mechanism to other supported devices, you must create the attribute to poll for configuration change notifications using the Model Type Editor (making it a polled attribute). You must then set the value of the Config_Change_AttrID attribute (0x12bf8) to the attribute ID of the newly created polled attribute. Network Configuration Manager then monitors this attribute for notification of configuration change and performs a capture.
Network Configuration Manager and Global CollectionsA global collection lets you organize views of network devices. It can contain devices from multiple vendors. Global collections are useful when creating Network Configuration Manager policies or executing bulk tasks. See Modeling Your IT Infrastructure Guide (5167) for more information on Global Collections.
Maintenance Mode Network Configuration Manager is disabled for any device that is in maintenance mode. To check whether the device is in maintenance mode, select the device from the Explorer tab and then click the Information tab. Under the General Information view, see the In Maintenance option. If this option is set to “yes” it means that the device is in maintenance mode.
Network Configuration Manager Report PacksSee the Report Manager User Guide (5158) for details about Network Configuration Manager Report Packs.
18 Network Configuration Manager User Guide
Chapter 1: Overview of Network Configuration Manager
19
Chapter 2: Network Configuration Manager Configurations
This chapter describes the different configurations available for Network Configuration Manager (NCM).
In this chapter
• “Configure Network Configuration Manager” on page 19
• “Configure a Device Family” on page 26
• “Configure a Single Device to Override Device Family Settings” on page 29
• “Network Configuration Manager Extension Utility” on page 32
Configure Network Configuration ManagerThis section describes the fundamental configurations for Network Configuration Manager.
Configure General Configuration
This section describes how to configure general configuration for Network Configuration Manager.
To configure general configuration
1. Select Configuration Manager in the Explorer tab.
Information and configurations display in the Information tab of the Contents panel.
2. Expand the General Configuration sub-view.
The General Configuration options display.
3. Click set next to Unsolicited Device Configuration Captures to enable or disable Network Configuration Manager from capturing a device’s configuration when it receives an unsolicited notification from a device. An unsolicited notification of configuration change can be either traps or MIB objects that Network Configuration Manager is monitoring for changes. See “Unsolicited Notifications of Device Configuration Changes” on page 16 for more information.
The selected value displays next to the Unsolicited Device Configuration Captures field.
20 Network Configuration Manager User Guide
Chapter 2: Network Configuration Manager Configurations
4. Click set next to Capture Newly Modeled Device’s Configuration to specify how you want to globally handle newly modeled devices on your network. The available values are:
• Select On Next Global Sync if you want to capture newly modeled devices according to the global synchronization schedule.
• Select Do Not Capture if you want to disable Network Configuration Manager on the newly modeled device. To enable Network Configuration Manager functionality, you must manually enable Network Configuration Manager on the device as explained in “Configure a Single Device to Override Device Family Settings” on page 29.
• Select Immediately if you want to capture newly modeled devices immediately (once they have been modeled) rather than waiting for the global synchronization to run.
The selected value displays next to the Capture Newly Modeled Device’s Configuration field.
5. Click set next to Maximum Stored Configurations Per Device to specify the maximum number of stored configurations per device. The default value is 25, which indicates that the latest 25 configurations for each device reside in the SPECTRUM database. Enter the value and press Enter.
The selected value displays next to the Maximum Stored Configurations Per Device field.
6. Click set next to Task Work Quene Size to specify the maximum number of devices that are parallel processed on each SPECTRUM host. The default value is 10. Enter the value and press Enter.
Note: When manually stopping a task that is running, all devices currently in the queue are processed after the stop command is received.
The selected value displays next to the Task Work Quene Size field.
Configure a TFTP Server
This section describes how to manually start a Trivial File Transfer Protocol (TFTP) server on a SpectroSERVER system (see Table 1-1 on page 15 for supported device family communication modes). TFTP transfers configuration files.
If you have a distributed SpectroSERVER (DSS) environment, TFTP servers must be running on every SpectroServer for Network Configuration Manager to properly run.
Note: Ensure that each device in your network is properly modeled using the appropriate read/write community name.
Configure Network Configuration Manager
Network Configuration Manager User Guide 21
On Solaris
Follow these steps to set up your Solaris system to support TFTP.
To configure a TFTP Server on Solaris
1. Login as root.
2. Create the /tftpboot directory and give all users read/write permission to the directory as follows:
mkdir /tftpbootchmod 777 /tftpboot
3. Ensure that there is a tftp entry in the /etc/services file. To search for the entry, enter:
cd /etcgrep tftp services
You should see the following entry in the /etc/services file:
tftp 69/udp
If this entry does not appear, edit the services file and add it to the “Host specific functions” section.
4. In the /etc/inetd.conf file, find the following line and uncomment it by deleting the pound character (#) from the beginning of the line:
#tftp dgram udp wait root /usr/sbin/in.tftpd in.tftpd -s /tftpboot
5. Ensure the entry ends with the -s /tftpboot option. This specifies the tftp directory (in this case, /tftpboot).
6. Enter the following command to get the inetd process ID:
ps -ef | grep inetd
7. Enter the following command on the process ID number. The process ID number is the first number in the line after the user ID.kill -1 <process_ID>
The kill command with the -1 option reinitializes the process.
When your system is set up as a TFTP server, ensure that devices are modeled with the read/write community string for TFTP transfer to work.
8. Click Configuration Manager in the Explorer tab in OneClick.
9. Click the Information tab in the Contents panel.
10. Expand the TFTP Configuration sub-view.
11.Click Set in the Default TFTP Directory column and enter a valid TFTP Server path. For example, /tftpboot.
12.Click Set in the TFTP Transfer Timeout column and specify a timeout (in seconds) for contact with the TFTP Server. The default is 50 seconds, which means there is a 50-second interval between data transfers.
22 Network Configuration Manager User Guide
Chapter 2: Network Configuration Manager Configurations
On Linux
Follow these steps to set up your Linux system to support TFTP.
To configure a TFTP Server on Linux
1. Login as root.
2. Verify that a TFTP server is installed on your system by running the following command:
%rpm -q tftp-server
The following message should appear, which indicates tftp is installed:
tftp-server-<version>.EL3.1
a. If this message does not appear, a TFTP server is not installed. You can download the TFTP package from the Redhat website at http://www.redhat.com. After downloading the package, run the following command:
% rpm –i <package.rpm>
b. Follow the instructions on how to install the rpm package from the Redhat web site.
3. Create the /tftpboot directory and give all users read/write permission to the directory as follows:
mkdir /tftpbootchmod 777 /tftpboot
4. Go to etc/xinet.d directory.
5. Edit the file named tftp as follows:
Set disable=no
6. Save and close the file.
7. Run the following command to restart xinetd services:
% service xinetd restart
The following message appears
Stopping xinetd OKStarting xinetd OK
8. Verify the TFTP server is running. One way to do this is run a Network Configuration Manager capture. If you receive a TFTP timeout error /event 0x821001, it indicates that TFTP is not running.
9. Click Configuration Manager in the Explorer tab in OneClick.
10.Click the Information tab in the Contents panel.
11.Click TFTP Configuration.
12.Click Set in the Default TFTP Directory column and enter a valid TFTP Server path. For example, /tftpboot.
Configure Network Configuration Manager
Network Configuration Manager User Guide 23
13.Click Set in the TFTP Transfer Timeout column and specify a timeout (in seconds) for contact with the TFTP Server. The default is 50 seconds, which means there is a 50-second interval between data transfers.
On Windows
Follow these steps to configure your Windows system to support TFTP.
To configure a TFTP Server on Windows:
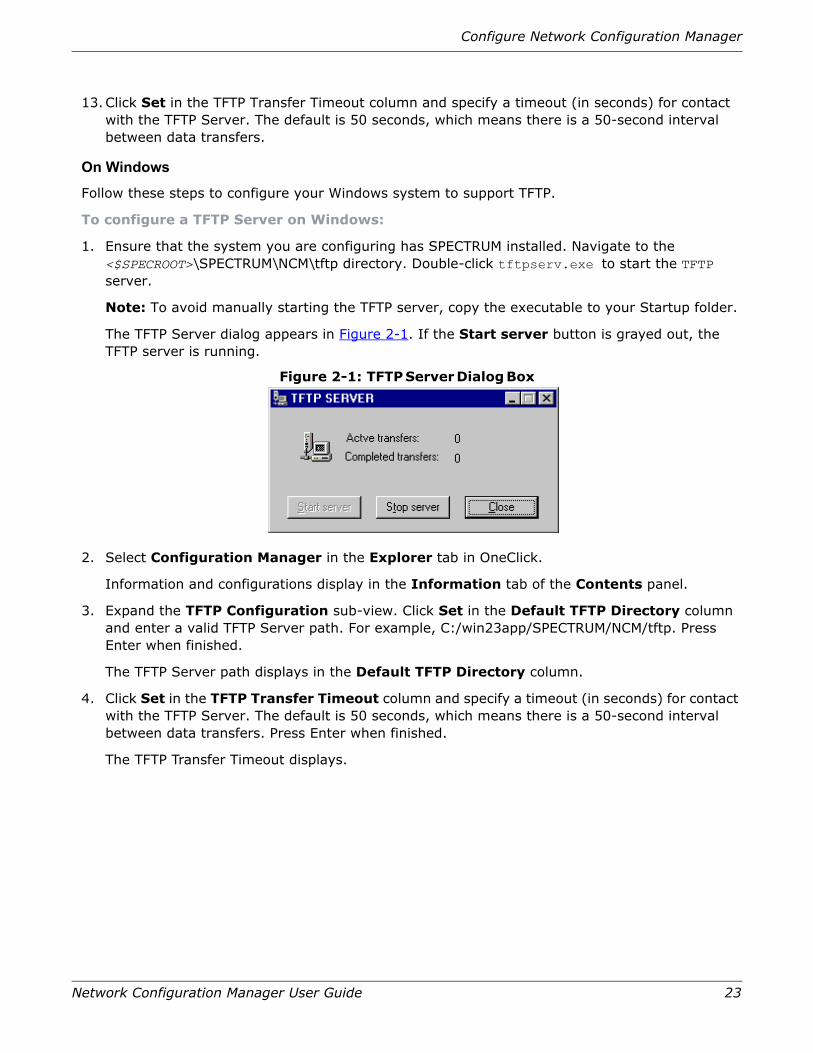
1. Ensure that the system you are configuring has SPECTRUM installed. Navigate to the <$SPECROOT>\SPECTRUM\NCM\tftp directory. Double-click tftpserv.exe to start the TFTP server.
Note: To avoid manually starting the TFTP server, copy the executable to your Startup folder.
The TFTP Server dialog appears in Figure 2-1. If the Start server button is grayed out, the TFTP server is running.
Figure 2-1: TFTP Server Dialog Box
2. Select Configuration Manager in the Explorer tab in OneClick.
Information and configurations display in the Information tab of the Contents panel.
3. Expand the TFTP Configuration sub-view. Click Set in the Default TFTP Directory column and enter a valid TFTP Server path. For example, C:/win23app/SPECTRUM/NCM/tftp. Press Enter when finished.
The TFTP Server path displays in the Default TFTP Directory column.
4. Click Set in the TFTP Transfer Timeout column and specify a timeout (in seconds) for contact with the TFTP Server. The default is 50 seconds, which means there is a 50-second interval between data transfers. Press Enter when finished.
The TFTP Transfer Timeout displays.

24 Network Configuration Manager User Guide
Chapter 2: Network Configuration Manager Configurations
Configure Network Configuration Manager to Use a Local FTP Server
This section describes how to configure Network Configuration Manager to use a local FTP server on a SpectroSERVER system (see Table 1-1 on page 15 for supported device family communication modes).
If you are using devices that use FTP for file transfers, you must configure an FTP Server. CA recommends that you install and configure a native FTP server associated with your platform. For Windows platforms, the following links describe how to install and configure the native FTP Service.
• Windows 2000 FTP Service: http://support.microsoft.com/kb/300662
• Windows 2003 FTP Service: http://support.microsoft.com/kb/323384
Note: The FTP server (part of IIS) is available on Windows XP Professional. Follow the same directions as described for Windows 2003.
To configure Network Configuration Manager to use a local FTP server
1. Click Configuration Manager in the Explorer tab.
Information and configurations display in the Information tab of the Contents panel.
2. Expand the FTP Configuration sub-view. Click Set in the FTP Username column and enter a FTP username. Press Enter when finished.
The FTP username displays.
3. Click Set in the FTP Password column and enter a FTP password. Press Enter when finished.
The FTP password displays.
4. Click Set in the Default FTP Directory column and enter a valid FTP Server path for your platform.
The FTP server path displays.
Set up a TFTP or FTP Server to Run on a Different Host System
By default, the host system running the SpectroSERVER is also the host system for both the TFTP and FTP servers. This section describes how to set up a TFTP or FTP server to run on a different host system.
Note: Both the specified TFTP and FTP directories must be locally accessible from the host system running SPECTRUM.
To set up a TFTP or FTP server to run on a different host system
1. Select the devices that will use the TFTP or FTP servers on the different host system in the Explorer tab. Select the List tab in the Contents panel and select the devices. Select Utilities from the Tools menu. Select Attribute Editor.
The Attribute Editor screen appears.
2. Select the User Defined folder and click Add.
The Attribute Selector screen appears.
Configure Network Configuration Manager
Network Configuration Manager User Guide 25
3. Enter “host” in the Filter field. Select the NCM_FTP_Host attribute and click OK. Select the NCM_TFTP_Host attribute and click OK.
These two attributes now appear under the User Defined folder.
4. Double-click both attributes to display editable values in the right pane. Disable No Change and enter the IP addresses of the host system running the TFTP and FTP protocols. Click Set As Default and click OK to have all newly created devices automatically inherit these values. Click Yes to confirm this change in the message box.
The Attribute Edit Results screen appears with the results of the change (for example, success). Click Close to exit the screen.
Configure Export for Device Configurations
This section describes how to configure device configuration exports in Network Configuration Manager. You can configure Network Configuration Manager to automatically export device configurations to a text file for historical archiving purposes. You must manually manage this file system outside of SPECTRUM and OneClick.
To configure export for device configurations
1. Select Configuration Manager in the Explorer tab.
Information and configurations display in the Information tab of the Contents panel.
2. Expand the Export Configuration sub-view. Click set next to Export Configuration. The default is “Do Not Export.” Select one of the following options:
• Export Unique Configurations Only — export device configurations only if they differ from previously captured configurations.
• Export Unique and Global Sync Configurations — export device configurations only if they differ from previously captured configurations or on a global synchronization. For example, one file per device will be generated each day if you have configured a global synchronization to run on a daily basis. See “About Global Synchronization” on page 49 for more information.
The export configuration displays next to Export Configuration.
3. Click set in the Export Directory column to specify a local directory in which to export configuration text files for UNIX (Solaris/Linux) and/or Windows. The export files are named with a device name and a timestamp. If you want to export configuration text files to a network share, you must specify the UNC path to the directory. For example, \\Shared_Server\Export\ExportFiles. Press Enter when finished.
The export directory displays.
26 Network Configuration Manager User Guide
Chapter 2: Network Configuration Manager Configurations
Configure a Device FamilyThe device family provides a central location to configure how Network Configuration Manager should interact with devices in the device family. Configurations made to a device family take effect on all devices contained within the family. Device family settings can be overridden at the local device level if desired. For more information about configuring a single device to override device family settings, see “Configure a Single Device to Override Device Family Settings” on page 29.
The available configurations for a device family are discussed in the following sections.
Access Network Configuration Manager Device Family Configurations
This section discusses how to access Network Configuration Manager configurations for a device family.
To access the configurations for a device family
Select a device family from Device Families in the Explorer tab then select the Information tab in the Contents panel.
Device family configurations display.
Configure Device Family General Configuration
The General Configuration sub-view contains the Configuration Manager configuration. Configuration Manager allows the entire device family to be disabled. When Configuration Manager is set to disabled, Network Configuration Manager operations will not be performed on any of the devices contained by this device family. Configuration Manager can also be disabled at the local device level if there are any devices contained in the Device Family for which Network Configuration Manager should be disabled.
For more information, see “Configure a Single Device to Override Device Family Settings” on page 29.
To configure device family general configuration
1. Navigate to device family configurations as described in “Access Network Configuration Manager Device Family Configurations” on page 26. Expand the General Configuration sub-view.
The general configurations for the selected device family display.
2. Click set next to Configuration Manager to enable or disable Network Configuration Manager tasks and Network Configuration Manager functionality for the device family. Configuration Manager is enabled by default.
The device family’s current state of communication with Network Configuration Manager displays next to Configuration Manager.
Configure a Device Family
Network Configuration Manager User Guide 27
Configure Device Family Communication Mode
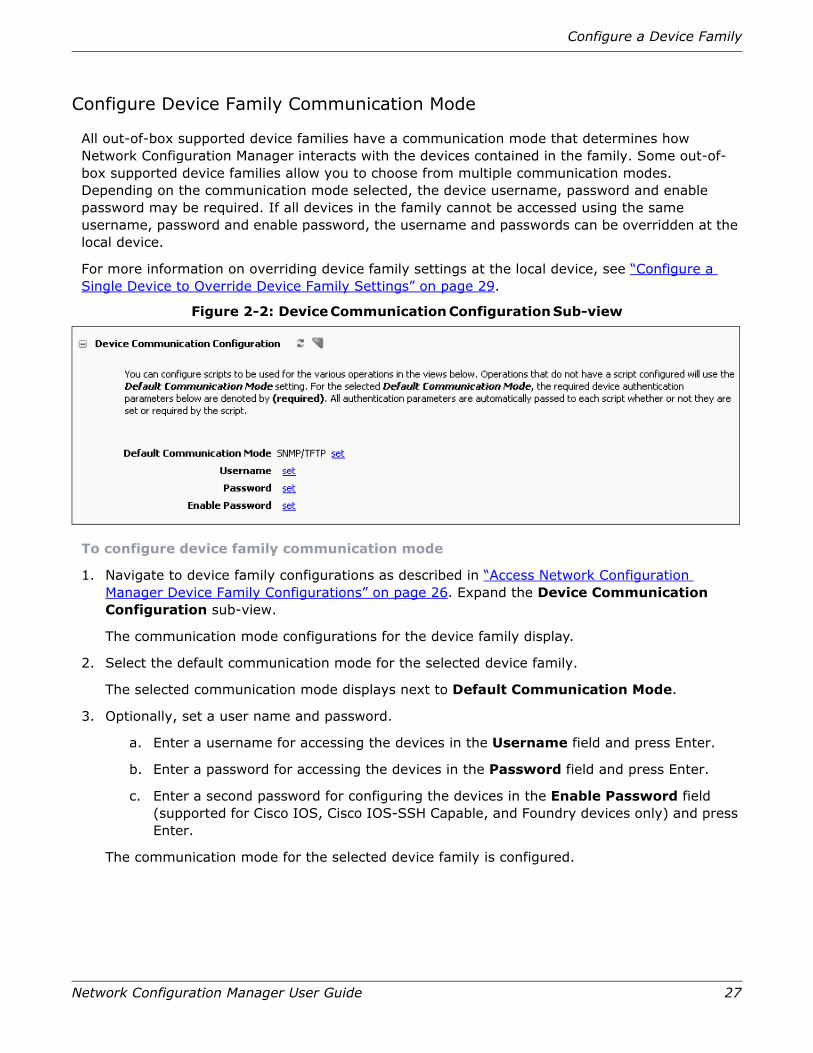
All out-of-box supported device families have a communication mode that determines how Network Configuration Manager interacts with the devices contained in the family. Some out-of-box supported device families allow you to choose from multiple communication modes. Depending on the communication mode selected, the device username, password and enable password may be required. If all devices in the family cannot be accessed using the same username, password and enable password, the username and passwords can be overridden at the local device.
For more information on overriding device family settings at the local device, see “Configure a Single Device to Override Device Family Settings” on page 29.
Figure 2-2: Device Communication Configuration Sub-view
To configure device family communication mode
1. Navigate to device family configurations as described in “Access Network Configuration Manager Device Family Configurations” on page 26. Expand the Device Communication Configuration sub-view.
The communication mode configurations for the device family display.
2. Select the default communication mode for the selected device family.
The selected communication mode displays next to Default Communication Mode.
3. Optionally, set a user name and password.
a. Enter a username for accessing the devices in the Username field and press Enter.
b. Enter a password for accessing the devices in the Password field and press Enter.
c. Enter a second password for configuring the devices in the Enable Password field (supported for Cisco IOS, Cisco IOS-SSH Capable, and Foundry devices only) and press Enter.
The communication mode for the selected device family is configured.
28 Network Configuration Manager User Guide
Chapter 2: Network Configuration Manager Configurations
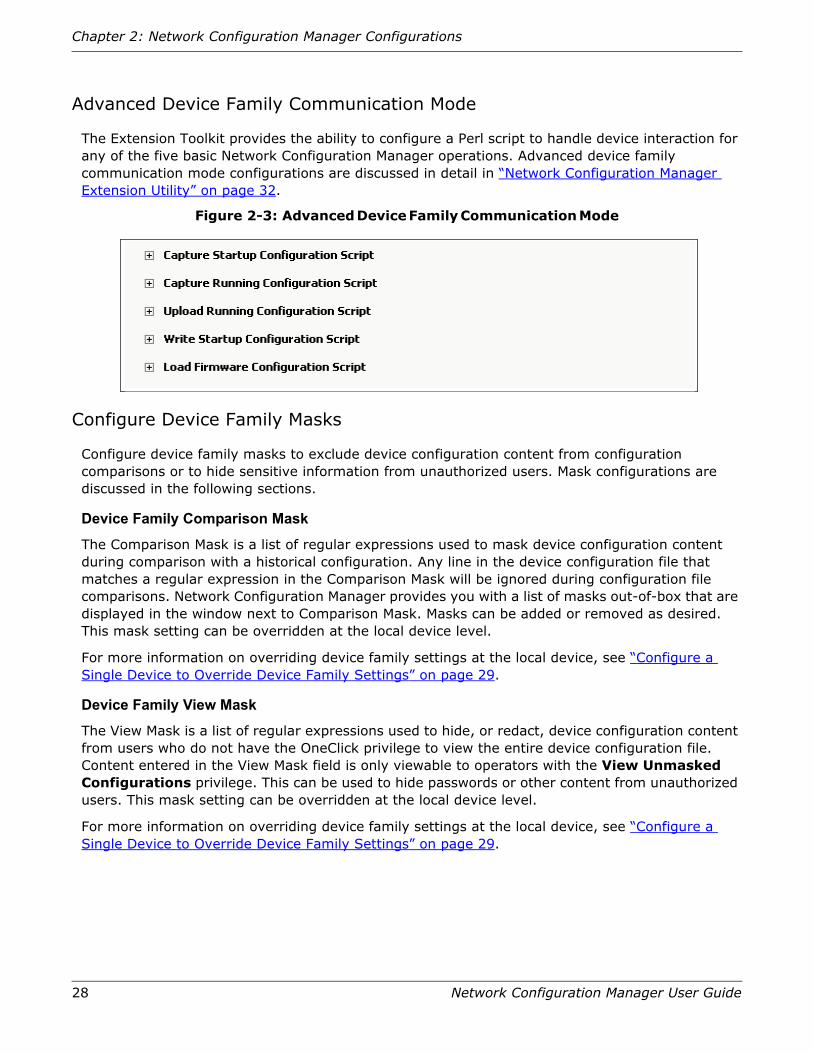
Advanced Device Family Communication Mode
The Extension Toolkit provides the ability to configure a Perl script to handle device interaction for any of the five basic Network Configuration Manager operations. Advanced device family communication mode configurations are discussed in detail in “Network Configuration Manager Extension Utility” on page 32.
Figure 2-3: Advanced Device Family Communication Mode
Configure Device Family Masks
Configure device family masks to exclude device configuration content from configuration comparisons or to hide sensitive information from unauthorized users. Mask configurations are discussed in the following sections.
Device Family Comparison Mask
The Comparison Mask is a list of regular expressions used to mask device configuration content during comparison with a historical configuration. Any line in the device configuration file that matches a regular expression in the Comparison Mask will be ignored during configuration file comparisons. Network Configuration Manager provides you with a list of masks out-of-box that are displayed in the window next to Comparison Mask. Masks can be added or removed as desired. This mask setting can be overridden at the local device level.
For more information on overriding device family settings at the local device, see “Configure a Single Device to Override Device Family Settings” on page 29.
Device Family View Mask
The View Mask is a list of regular expressions used to hide, or redact, device configuration content from users who do not have the OneClick privilege to view the entire device configuration file. Content entered in the View Mask field is only viewable to operators with the View Unmasked Configurations privilege. This can be used to hide passwords or other content from unauthorized users. This mask setting can be overridden at the local device level.
For more information on overriding device family settings at the local device, see “Configure a Single Device to Override Device Family Settings” on page 29.
Configure a Single Device to Override Device Family Settings
Network Configuration Manager User Guide 29
To enter a mask
1. Select Add under Configuration Mask or View Mask.
The Add dialog opens.
2. Enter the mask for the selected device family. For example, for comment lines, enter: [!#] or enter any regular expression. Click OK to accept your entries.
The content you entered for the mask displays. You have now set a mask for all devices in the device family. Repeat step 1 and step 2 to enter more masks.
Configure a Single Device to Override Device Family SettingsThis section describes how to configure a single device to override the configuration of its associated device family. Most device family settings can be overridden at the local device level.
Access Network Configuration Manager Settings on a Single Device
Network Configuration Manager settings for a single device are available in the Network Configuration Manager sub-view.
To access Network Configuration Manager settings for a device
1. Select a single device in the Explorer tab.
Information and configurations display in the Information tab of the Contents panel.
2. Scroll down the page and expand the Network Configuration Manager sub-view.
The Network Configuration Manager device configuration options display. Configurations made here override the device family settings.
Enable or Disable Network Configuration Manager on a Single Device
All Network Configuration Manager operations can be disabled at the local device. Network Configuration Manager must be enabled on the device’s associated device family for this setting to have an effect. For more information on enabling Network Configuration Manager for a device family, see “Configure Device Family General Configuration” on page 26.
To enable or disable Network Configuration Manager on a single device
1. Expand the Network Configuration Manager sub-view as described in “Access Network Configuration Manager Settings on a Single Device” on page 29.
The Network Configuration Manager device configuration options display.
2. Click set next to Configuration Manager to enable or disable Network Configuration Manager tasks and Network Configuration Manager functionality. Configuration Manager is enabled by default.
The device’s current state of communication with Network Configuration Manager displays next to Configuration Manager.
30 Network Configuration Manager User Guide
Chapter 2: Network Configuration Manager Configurations
Configure Unsolicited Device Configuration Captures on a Single Device
Unsolicited Device Configuration Captures can be disabled at the local device. However, Unsolicited Device Configuration Captures must be enabled on the device's device family for this local setting to have an effect.
For more information on Unsolicited Notifications of Device Configuration Changes, see “Unsolicited Notifications of Device Configuration Changes” on page 16.
To configure unsolicited device configuration captures on a single device
1. Expand the Network Configuration Manager sub-view as described in “Access Network Configuration Manager Settings on a Single Device” on page 29.
The Network Configuration Manager device configuration options display.
2. Click set next to Unsolicited Device Configuration Captures to enable or disable automatic device captures.
The value displays next to Unsolicited Device Configuration Captures.
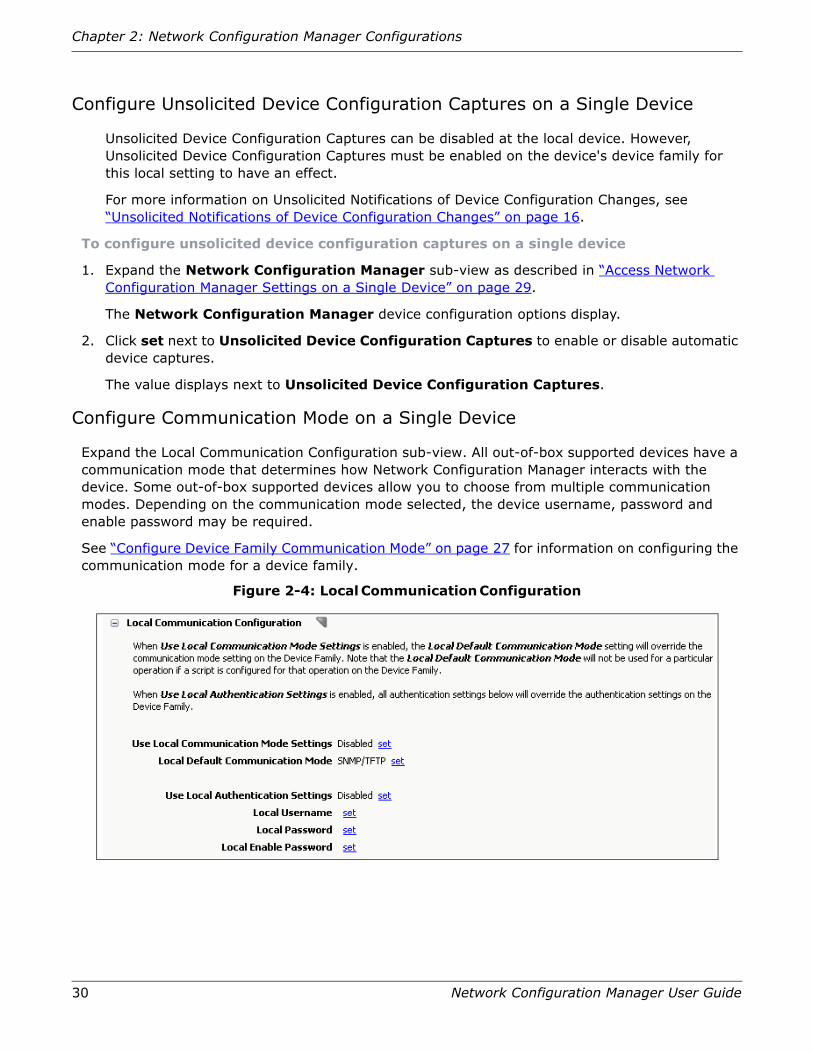
Configure Communication Mode on a Single Device
Expand the Local Communication Configuration sub-view. All out-of-box supported devices have a communication mode that determines how Network Configuration Manager interacts with the device. Some out-of-box supported devices allow you to choose from multiple communication modes. Depending on the communication mode selected, the device username, password and enable password may be required.
See “Configure Device Family Communication Mode” on page 27 for information on configuring the communication mode for a device family.
Figure 2-4: Local Communication Configuration
Configure a Single Device to Override Device Family Settings
Network Configuration Manager User Guide 31
To configure the communication mode on a single device
1. Expand the Network Configuration Manager sub-view as described in “Access Network Configuration Manager Settings on a Single Device” on page 29.
The Network Configuration Manager device configuration options display.
2. Expand the Local Communication Configuration sub-view.
The Local Communication Configuration options display.
3. Click set next to Use Local Communication Mode Settings to override the device family’s settings.
The value displays next to Use Local Communication Mode Settings.
4. Click set next to Local Default Communication Mode to change the communication mode if your device allows you to choose from more than one communication mode.
The selected communication mode displays next to Local Default Communication Mode.
5. Optionally, set a user name and password.
a. Enter a username for accessing the devices in the Local Username field and press Enter.
b. Enter a password for accessing the devices in the Local Password field and press Enter.
c. Enter a second password for configuring the devices in the Local Enable Password field (supported for Cisco IOS, Cisco IOS-SSH Capable, and Foundry devices only) and press Enter.
The local communication mode for the selected device is configured to override the device family communication mode.
Configure a Mask on a Single Device
Configure masks to exclude script content from configuration comparisons or to hide sensitive information from unauthorized users. Masks configured at the local device level override the mask settings of the device’s associated device family. Mask configurations on a single device are discussed in the following sections.
Configure Comparison Mask on a Single Device
The Comparison Mask is a list of regular expressions used to mask device configuration content during comparison with a historical configuration. Any line in the device configuration file that matches a regular expression in the Comparison Mask will be ignored during configuration file comparisons. Network Configuration Manager provides you with a list of masks out-of-box that are displayed in the window next to Comparison Mask. Masks configured on a local device override the mask settings of the device family.
32 Network Configuration Manager User Guide
Chapter 2: Network Configuration Manager Configurations
Configure the View Mask on a Single Device
The View Mask is a list of regular expressions used to hide, or redact, device configuration content from users who do not have the OneClick privilege to view the entire device configuration file. Content entered in the View Mask field is only viewable to operators with the View Unmasked Configurations privilege. This can be used to hide passwords or other content from unauthorized users. Masks configured on a local device override the mask settings of the device family.
For more information about the View Unmasked Configuration privilege, see Appendix C, “Network Configuration Manager Privileges,” on page 113.
To enter a mask
1. Select Add under Configuration Mask or View Mask.
The Add dialog opens.
2. Enter the mask for the selected device. For example, for comment lines, enter: [!#] or enter any regular expression. Click OK to accept your entries.
The content you entered for the mask displays. You have now set a mask for the selected. Repeat step 1 and step 2 to enter more masks.
Network Configuration Manager Extension UtilityThe Network Configuration Manager Extension Utility allows Network Configuration Manager to be extended to additional devices and vendors through the use of Perl scripts. Network Configuration Manager can be extended by providing Perl scripts for any, or all, of the five operations Network Configuration Manager performs on a device. These operations are:
• Capture Startup Configuration — Capture the device’s startup configuration.
• Capture Running Configuration — Capture the device’s running configuration.
• Upload Running Configuration — Upload/Merge specified content into the device’s running configuration.
• Write Startup Configuration — Write the device’s current running configuration to its startup configuration.
• Load Device Firmware — Initiate a load of the specified firmware image on the device.
Scripts can be configured for each of these operations within device families that are created on demand. Any operation that does not have a script configured is handled as an unsupported operation for the given Device Family and all devices contained within it.
The utility also allows Perl scripts to be used to alter how Network Configuration Manager interacts with devices that reside in out-of-box device families.
The Extension Utility is discussed in the following sections.
Network Configuration Manager Extension Utility
Network Configuration Manager User Guide 33
Create a Custom Device Family
Network Configuration Manager supports Cisco, Juniper, Baystack, Enterasys, Extreme, Foundry, Nortel, and Enterasys/Riverstone SSR device families out-of-box. The Network Configuration Manager Extension Utility allows you to create additional device families.
To create a custom device family
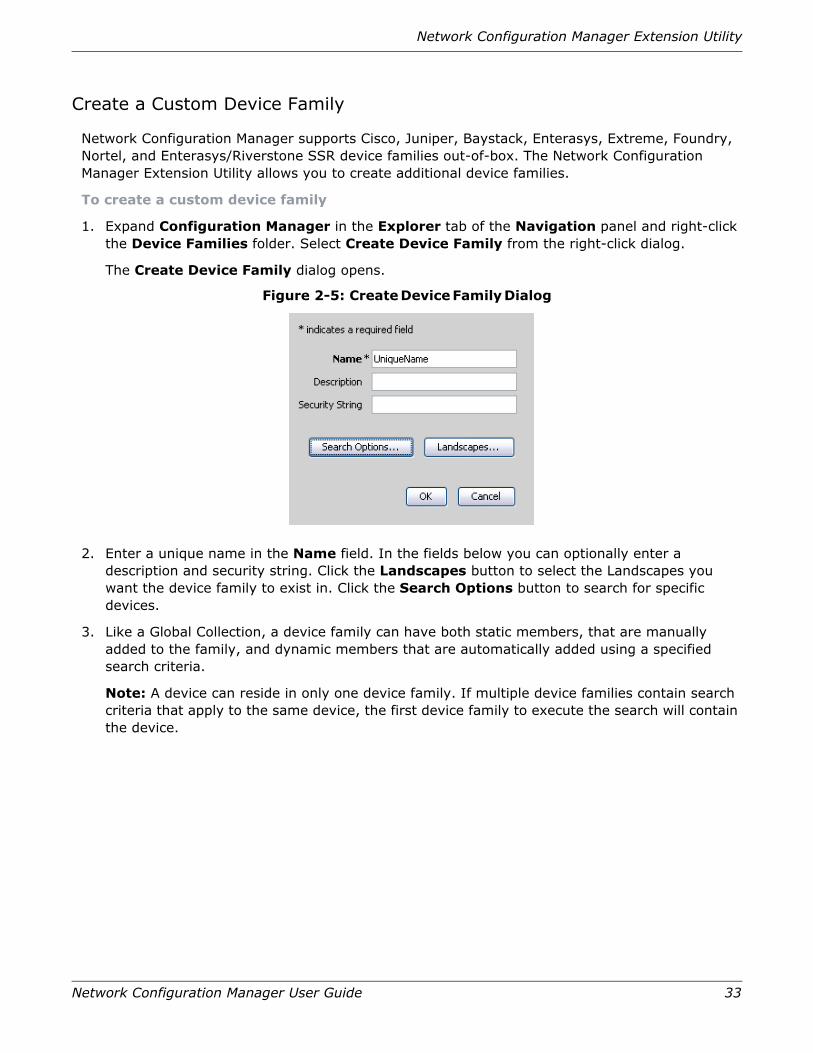
1. Expand Configuration Manager in the Explorer tab of the Navigation panel and right-click the Device Families folder. Select Create Device Family from the right-click dialog.
The Create Device Family dialog opens.
Figure 2-5: Create Device Family Dialog
2. Enter a unique name in the Name field. In the fields below you can optionally enter a description and security string. Click the Landscapes button to select the Landscapes you want the device family to exist in. Click the Search Options button to search for specific devices.
3. Like a Global Collection, a device family can have both static members, that are manually added to the family, and dynamic members that are automatically added using a specified search criteria.
Note: A device can reside in only one device family. If multiple device families contain search criteria that apply to the same device, the first device family to execute the search will contain the device.
34 Network Configuration Manager User Guide
Chapter 2: Network Configuration Manager Configurations
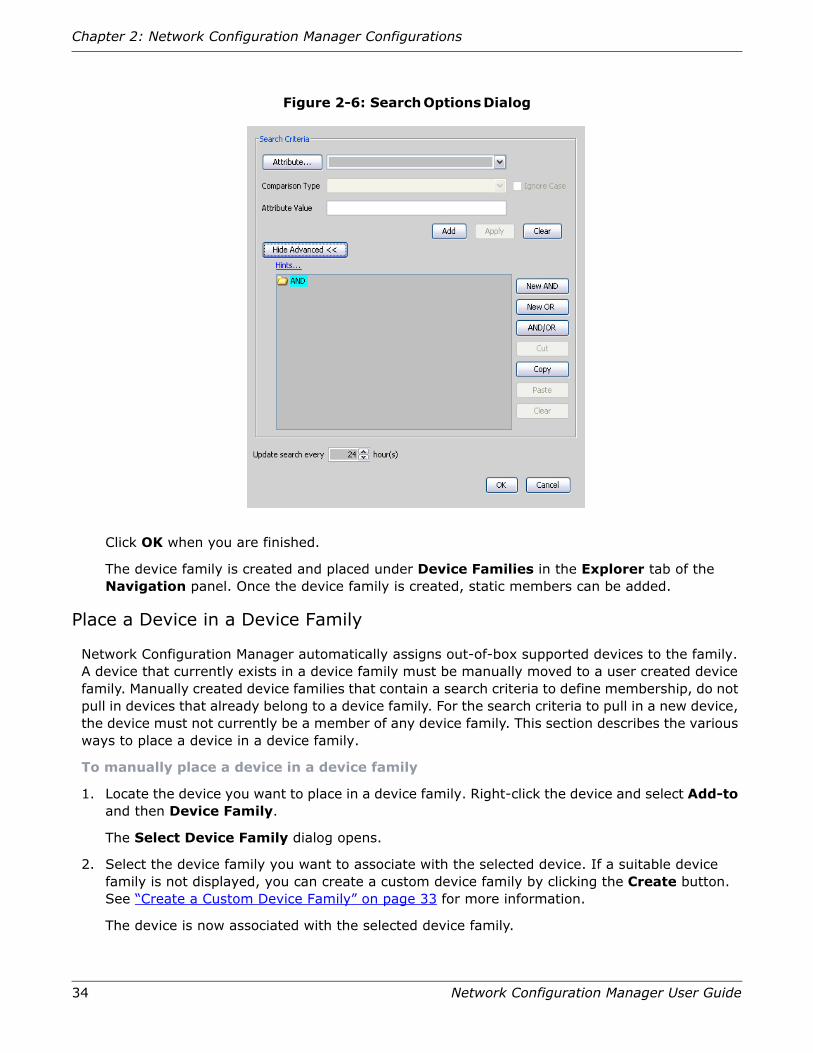
Figure 2-6: Search Options Dialog
Click OK when you are finished.
The device family is created and placed under Device Families in the Explorer tab of the Navigation panel. Once the device family is created, static members can be added.
Place a Device in a Device Family
Network Configuration Manager automatically assigns out-of-box supported devices to the family. A device that currently exists in a device family must be manually moved to a user created device family. Manually created device families that contain a search criteria to define membership, do not pull in devices that already belong to a device family. For the search criteria to pull in a new device, the device must not currently be a member of any device family. This section describes the various ways to place a device in a device family.
To manually place a device in a device family
1. Locate the device you want to place in a device family. Right-click the device and select Add-to and then Device Family.
The Select Device Family dialog opens.
2. Select the device family you want to associate with the selected device. If a suitable device family is not displayed, you can create a custom device family by clicking the Create button. See “Create a Custom Device Family” on page 33 for more information.
The device is now associated with the selected device family.
Network Configuration Manager Extension Utility
Network Configuration Manager User Guide 35
To force a manually created device family to update using its defined search criteria
Select the device family from the Navigation panel and select Update Device Family from the right-click menu.
The device family searches and adds all devices that meed the search criteria and do not currently belong to a device family. For more information on device family search criteria, see “Create a Custom Device Family” on page 33.
To move a device back into one of the out-of-box supported device families
Select a device that is not currently in any device family and select Reconfiguration from the right-click menu. Select Reevaluate NCM Device Family.
Important! Cisco PIX devices do not support the Reevaluate NCM Device Family function.
Network Configuration Manager reevaluates the device to determine if it should belong to an out-of-box device family. If Network Configuration Manager determines the device should belong, the device is automatically added to the device family.
Note: The Reevaluate NCM Device Family action on a device that is currently in a manually created device family has no affect.
For more information about out-of-box supported device families, see Appendix A, “Supported Devices,” on page 75.
Extension Toolkit Script Configuration
All interaction with Network Configuration Manager scripts is done through OneClick. Network Configuration Manager handles all script administration within the SPECTRUM environment. The available scripting options are discussed in the following sections.
Scripting Considerations
When a script is configured for a Network Configuration Manager operation, the script is used for all devices in the family. For example, if scripts are configured for all five operations in the Cisco IOS SSH Capable device family, the Communication Mode setting at the device family, and any overridden Communication Mode at local devices, will have no effect. In this example the scripts for all five Network Configuration Manager operations on all devices contained in the Cisco IOS SSH Capable Device Family will be used.
In the case where only a subset of the Network Configuration Manager operations have scripts configured, Network Configuration Manager uses the Communication Mode selected at the device family, or overridden at the local device, for the operations for which no script is configured.
Username, Password and Enable Password are always sent to the scripts as command line parameters. The values specified in the device family are used unless they are overridden at the local device in which case the locally overridden values are used.
36 Network Configuration Manager User Guide
Chapter 2: Network Configuration Manager Configurations
Default Script Command Line Parameters
By default Network Configuration Manager provides the following parameters, in the order shown, to every script. If the script does not make use of these parameters, the script must still be written to accept them.
• Device IP
• Absolute filename of file containing content to upload. (Upload operation only)
• Device Username
• Device Password
• Device Enable Password
Additional Script Command Line Parameters
Optionally, unlimited additional command line parameters can be configured for each of the five supported operations. The parameters are passed on the command line to the script after the default set of parameters. The parameters are passed in the order they are shown in the Additional Script Parameters list.
Upload Running Configuration and Load Device Firmware operations can have additional command line parameters configured in such a way that the user is prompted for a value at runtime. A label and default value can also be displayed when prompting at runtime.
Error Code Mappings
Network Configuration Manager provides the ability to map non-zero integer values returned by the script to a textual error message which displays in OneClick if the error occurs. This enables script creators to provide detailed information on the failure mode.
Script Error Handling
For Network Configuration Manager to report success of a script based operation the script must return a value of zero. Network Configuration Manager assumes the operation failed if a non-zero value is returned by the script.
Additional Error Detail Returned in STDERR Buffer
If a script returns a non-zero value, in addition to the error mapping above, Network Configuration Manager will also look for any output returned by the script in the STDERR buffer. If content is found, it will also displays in OneClick as additional error information.
Enter a Configuration Script
Network Configuration Manager can use Perl scripts for the following operations:
• Capture Startup Configuration — This script must return the device's startup configuration in the STDOUT buffer. All content returned in the STDOUT buffer is considered to be the device's startup configuration.
• Capture Running Configuration — This script must return the device's running configuration in the STDOUT buffer. All content returned in the STDOUT buffer is considered to be the device's running configuration.
Network Configuration Manager Extension Utility
Network Configuration Manager User Guide 37
• Upload Running Configuration — This script reads the file identified by the Absolute Filename parameter discussed above in Default Script Command Line Parameters. It then upload/merge the content of the file to the device's running configuration.
• Write Startup Configuration — This script causes the device's running configuration to be written to its startup configuration.
• Load Device Firmware — This script loads a new firmware version on the device.
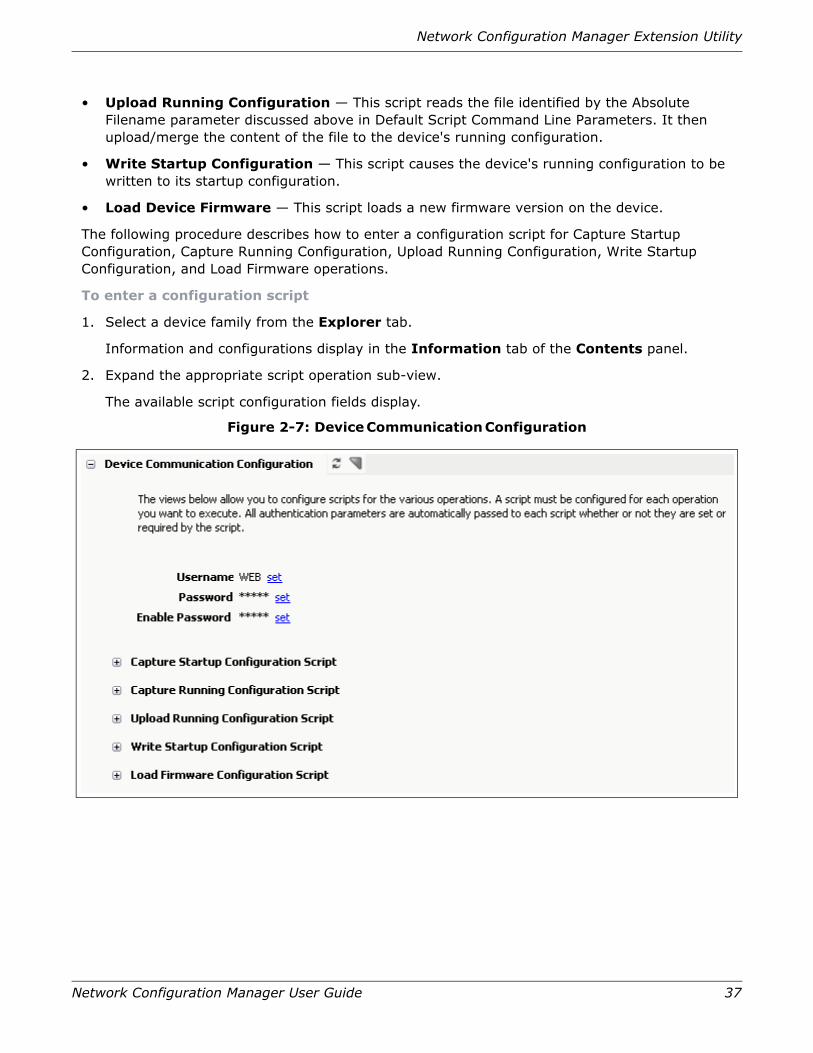
The following procedure describes how to enter a configuration script for Capture Startup Configuration, Capture Running Configuration, Upload Running Configuration, Write Startup Configuration, and Load Firmware operations.
To enter a configuration script
1. Select a device family from the Explorer tab.
Information and configurations display in the Information tab of the Contents panel.
2. Expand the appropriate script operation sub-view.
The available script configuration fields display.
Figure 2-7: Device Communication Configuration

38 Network Configuration Manager User Guide
Chapter 2: Network Configuration Manager Configurations
3. Depending on the script operation sub-view, click set next to Capture Startup Script, Capture Running Script, Upload Running Script, Write Startup Script, or Load Firmware.
The Select Script dialog opens.
Figure 2-8: Select Script Dialog
4. Select the script (if displayed), click OK, and skip to step 9.
If you have not yet created a script designed for the selected device family, you must click Create to upload or create one.
Network Configuration Manager Extension Utility
Network Configuration Manager User Guide 39
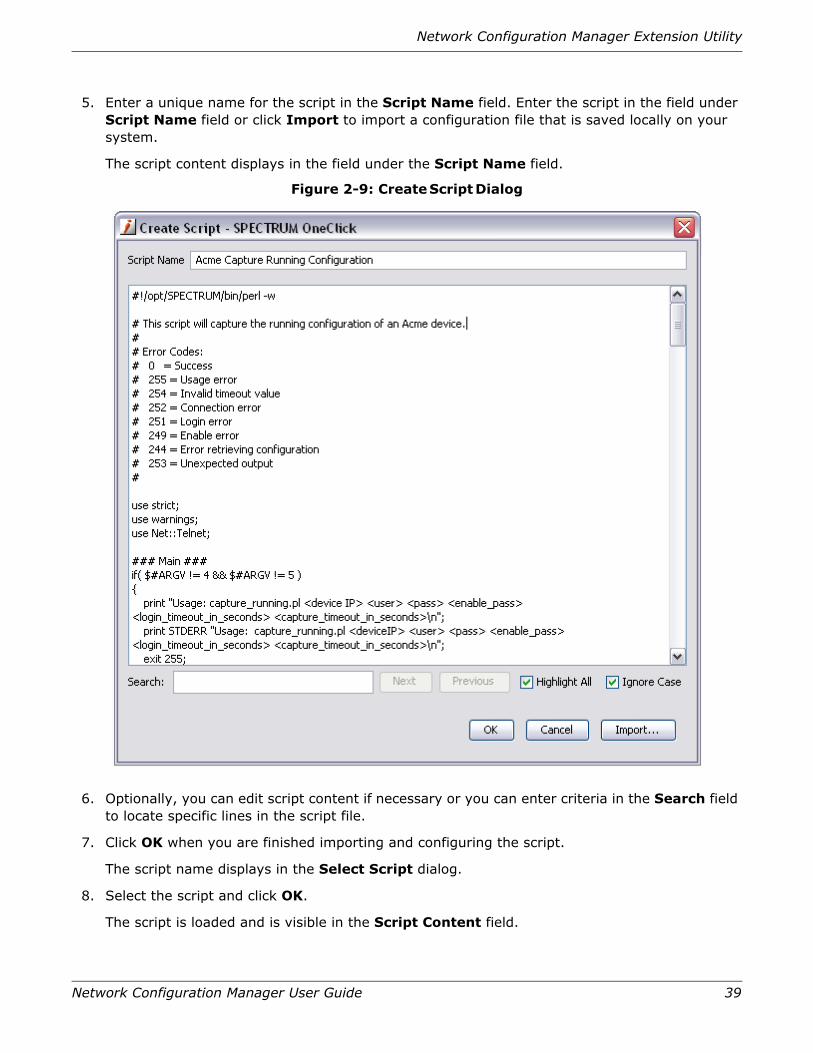
5. Enter a unique name for the script in the Script Name field. Enter the script in the field under Script Name field or click Import to import a configuration file that is saved locally on your system.
The script content displays in the field under the Script Name field.
Figure 2-9: Create Script Dialog
6. Optionally, you can edit script content if necessary or you can enter criteria in the Search field to locate specific lines in the script file.
7. Click OK when you are finished importing and configuring the script.
The script name displays in the Select Script dialog.
8. Select the script and click OK.
The script is loaded and is visible in the Script Content field.
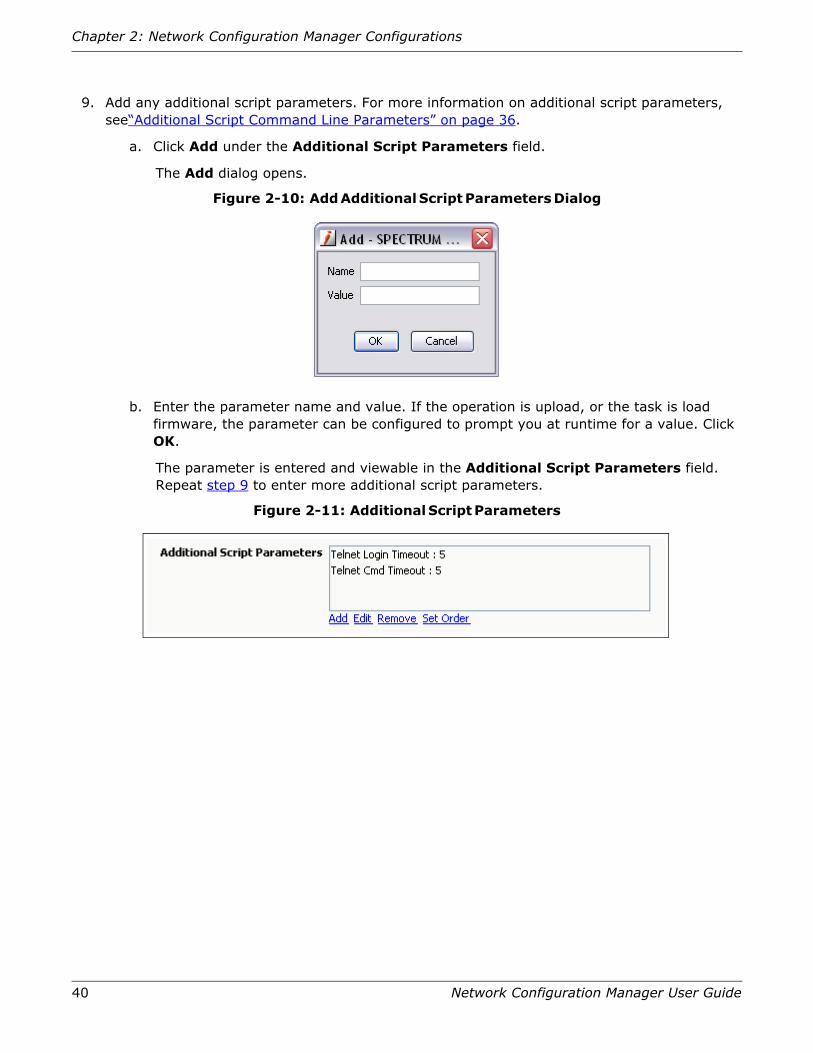
40 Network Configuration Manager User Guide
Chapter 2: Network Configuration Manager Configurations
9. Add any additional script parameters. For more information on additional script parameters, see“Additional Script Command Line Parameters” on page 36.
a. Click Add under the Additional Script Parameters field.
The Add dialog opens.
Figure 2-10: Add Additional Script Parameters Dialog
b. Enter the parameter name and value. If the operation is upload, or the task is load firmware, the parameter can be configured to prompt you at runtime for a value. Click OK.
The parameter is entered and viewable in the Additional Script Parameters field. Repeat step 9 to enter more additional script parameters.
Figure 2-11: Additional Script Parameters

Network Configuration Manager Extension Utility
Network Configuration Manager User Guide 41
10.Add any error code mappings. For more information on error code mappings, see “Error Code Mappings” on page 36.
a. Click Add under the Error Code Mappings field.
The Add dialog opens.
Figure 2-12: Add Additional Error Code Mappings Dialog
b. Enter the error code in the Error Code field and the corresponding message in the Error Message field then click OK.
The error code is mapped and viewable in the Error Code Mappings field. Repeat step 10 to enter more error code mappings.
Figure 2-13: Error Code Mappings
The configuration script is ready.
42 Network Configuration Manager User Guide
Chapter 2: Network Configuration Manager Configurations
Perl Modules
SPECTRUM ships all Perl Modules (for the Windows/Solaris platforms) required to run the Perl scripts that are provided out-of-box. That includes:
• Net::Telnet
In addition, SPECTRUM also comes with certain perl modules that may be useful in developing scripts for the NCM Extention toolkit. These include:
• Net::SSH
• Net::SSH::Expect
• Expect
• Net::TFTP
• Net::SCP
• Net::FTP
Perl modules that ship with SPECTRUM can be viewed at:/opt/SPECTRUM/lib/perl5
Important! Perl modules not compiled and installed correctly may result in failure or other undesirable behavior.
Using SSH-based Perl scripts for NCM Operations
SPECTRUM’s out-of-the-box scripts-based support for NCM operations is based on the Net::Telnet module. If you want to use SSH-based scripts for NCM operations:
• Windows and Solaris — SPECTRUM includes a completed perl install and the Net::SSH::Expect module.
• Linux — You must install perl to a separate location on your system and configure SPECTRUM to use that perl.
This Perl installation and configuration on SPECTRUM will have to be done on a per landscape basis in a DSS. You will have to set up perl for each landscape (Linux) on which you have devices modeled to use SSH-based scripts.
Note: If you want to continue to use SPECTRUM’s out-of-box scripts once you have configured SPECTRUM to use your custom Perl install, then your custom Perl area must have the Net::Telnet perl module installed. You can download and install this module from www.cpan.org. Otherwise SPECTRUM’s out-of-box scripts will fail.
In order to set up SSH-based scripts, follow the instructions specific to your platform.
Network Configuration Manager Extension Utility
Network Configuration Manager User Guide 43
On Windows
1. Install Perl.
SPECTRUM ships with Cygwin’s complete version of Perl, so you are not required to install anything more if you want to use scripts based on the Net::SSH::Expect module.
If you would like to use scripts based on some other module, complete one of the following depending on the module you are using:
• If the perl module is compatible with a version of Perl other than Cygwin, then we recommend that you install that specific Perl on to your SpectroSERVER machine, then install your specific perl module, and then configure SPECTRUM to use your particular Perl install. (See “Configuring SPECTRUM to Use a Custom Perl Install” on page 44.)
• If the perl module that you want to install is only compatible with Cygwin’s perl, and it’s a change module (i.e. doesn’t require compilation of C libraries), then you can add it to the SPECTRUM Perl install. Just place the <Module_Name>.pm file in $SPECROOT/NT-Tools/SRE/lib/perl5/site_perl/5.8
• If the perl module that you want to install is only compatible with Cygwin’s perl and also requires C libraries to be compiled, then this module will have to be compiled and shipped with SPECTRUM. Contact SPECTRUM support for this enhancement request.
2. Install SSH-based perl modules and SSH program.
SPECTRUM ships with the Net::SSH::Expect (and its required) modules and the ssh program (that is required by Net::SSH::Expect). For instructions on how to develop NCM scripts using this module check the documentation for Net::SSH::Expect on www.cpan.org
3. Configure SPECTRUM to use the custom Perl install.
Since SPECTRUM’s perl is set up for this purpose, you don’t have to configure SPECTRUM to use a custom perl install.
On Solaris
SPECTRUM on Solaris comes with the Perl modules listed above. To use a perl module other than the ones that are shipped with SPECTRUM, you must install perl to a custom area.
1. Install Perl.
Perl is available in many different versions for Solaris. You can download Perl that is compiled for your particular Solaris version from Sun Freeware (www.sunfreeware.com). Perl v5.8.8 has been tested for and is compatible with the Net::SSH::Expect perl module.
Note: SunOS may come with its own version of perl (v5.005), but we do not recommend using this version for NCM scripts purposes as you may run into incompatibility issues with some of the modules required for NCM communication.
2. Install SSH-based perl modules and the SSH program.
If you want to use the Net::SSH::Expect module, all you need to do is set up the ‘ssh’ program.
The Net::SSH::Expect module requires the ‘ssh’ utility to be installed. If your system does not already contain the utility, you may download and install it from www.sunfreeware.com by installing the OpenSSH package.
44 Network Configuration Manager User Guide
Chapter 2: Network Configuration Manager Configurations
If you want to use additional modules, you can download them from www.cpan.org
Be sure to install these modules to the custom Perl area you installed above.
This can be done by specifying the full-path of the perl binary when you are installing the modules such as:
<PERL_FULL_PATH>/perl Makefile.pl
Note: Some Perl modules are dependent on C/C++ code libararies. In order to install such modules, you have to install the gcc compiler so that you can link against the libraries. This can also be obtained from www.sunfreeware.com
3. Configure SPECTRUM to use the custom Perl install.
See “Configuring SPECTRUM to Use a Custom Perl Install” on page 44 and point SPECTRUM to the perl install area from Step 1 above.
SPECTRUM is configured by default to use the Perl with which it was shipped. If you want to use additional perl modules that are not shipped with SPECTRUM, and have installed them to a perl area, you can configure SPECTRUM to use your custom perl install.
On Linux
1. Install Perl
The OS already has Perl installed (check /usr/bin/). This pre-installed Perl can be used for NCM scripts.
2. Install SSH-based perl modules and the SSH program.
You will need to download and install the Net::SSH::Expect module, its dependent modules and the ‘ssh’ utility.
The dependency tree for Net::SSH::Expect looks like:
Net::SSH::Expect -> Expect -> IO::Pty
where the ‘->’ represents a “requires” relationship.
You can download all of these modules from www.cpan.org
Be sure to install these modules to the custom Perl area you installed above.
This can be done by specifying the full-path of the perl binary when you are installing the modules such as:
<PERL_FULL_PATH>/perl Makefile.pl
Note: Some Perl modules are dependent on C/C++ code libararies. In order to install such modules, you have to install the gcc compiler so that you can link against the libraries. You can install the gcc compiler by using rpm to add the latest gcc package.
3. Configure SPECTRUM to use the custom Perl install.
See “Configuring SPECTRUM to Use a Custom Perl Install” on page 44 and point SPECTRUM to the perl install area from Step 1 above.
Network Configuration Manager Extension Utility
Network Configuration Manager User Guide 45
Configuring SPECTRUM to Use a Custom Perl Install
SPECTRUM is configured by default to use Perl that is shipped with it. If you want to use additional perl modules that are not shipped with SPECTRUM, and have installed them to a perl area, you can configure SPECTRUM to use your custom perl install. To set this up, click the Configuration Manager model in the Explorer tab in OneClick. In its Information view, expand the Perl Configuration subview. You will find a table that contains the Perl directory configuration per landscape.
Note that the Use Custom Perl option has to be set to Enabled to be able to specify a custom perl directory. If not, then the default Perl that comes with SPECTRUM will be used.
To point SPECTRUM to a custom Perl location that you have installed on a particular SpectroSERVER system
On a given landscape, set the Use Custom Perl to Enabled. Once you have enabled the use of a custom Perl area, you may specify the Custom Perl Directory. Note that the Custom Perl directory should contain the full-path name of the directory that contains the perl.exe (Windows) or the perl program (Solaris/Linux).
For example, if the ‘perl’ program is located in /usr/local/bin/, then Custom Perl Directory needs to be specified as /usr/local/bin.
Note: If you want to continue to use SPECTRUM’s out-of-box scripts once you have configured SPECTRUM to use your custom Perl install, then your custom Perl area must have the Net::Telnet perl module installed. You can download and install this module from www.cpan.org. Otherwise SPECTRUM’s out-of-box scripts will fail.
To disable the use of your custom Perl area and use the default SPECTRUM Perl
Set the Use Custom Perl to Disabled (use SPECTRUM default). Note that when you disable the use of a custom Perl area, the Custom Perl Directory can not be seen or edited. But when you enable Use Custom Perl again, your previously specified Custom Perl Directory will be restored.
Using Additional Perl Modules
If you want to use scripts based on your favorite perl module, you must install the perl module to the area that will be used.
On Windows
Depending on the module that you want to use you have three options:
• If the perl module is compatible with a version of Perl other than Cygwin, then we recommend that you install that specific Perl on to your SpectroSERVER machine, then install your specific perl module and then configure SPECTRUM to use your particular Perl install. (See “Configuring SPECTRUM to Use a Custom Perl Install” on page 44)
• If the perl module that you want to install is only compatible with Cygwin’s perl, and it’s a text-based module (ie. doesn’t require compilation of C libraries), then you can add it to the SPECTRUM Perl install. Just place the <Module_Name>.pm file in $SPECROOT/NT-Tools/SRE/lib/perl5/site_perl/5.8

46 Network Configuration Manager User Guide
Chapter 2: Network Configuration Manager Configurations
• If the perl module that you want to install is only compatible with Cygwin’s perl and also requires C libraries to be compiled, then this module will have to be compiled and shipped with SPECTRUM. Contact SPECTRUM support for this enhancement request.
On Solaris and Linux
It is required that you install Perl to a separate area on your SpectroSERVER, then install the required perl modules using that Perl and configure SPECTRUM to use the Perl install area. Once you have installed Perl, refer to the installation instructions of the specific perl module that you want to install. Then refer to “Configuring SPECTRUM to Use a Custom Perl Install” on page 44. You may refer to the “Using SSH-based Perl scripts for NCM Operations” on page 42 for details about how to use scripts based on the Net::SSH::Expect module but you may use the procedure as a guideline for integrating any perl module.
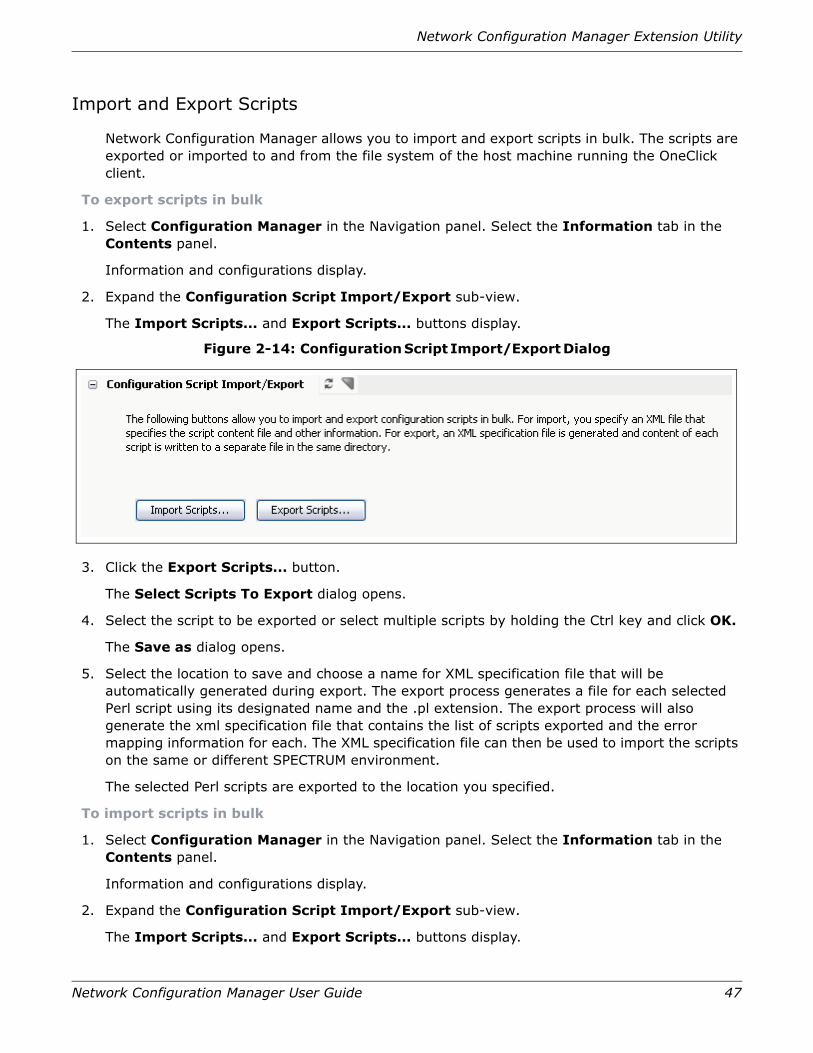
Network Configuration Manager Extension Utility
Network Configuration Manager User Guide 47
Import and Export Scripts
Network Configuration Manager allows you to import and export scripts in bulk. The scripts are exported or imported to and from the file system of the host machine running the OneClick client.
To export scripts in bulk
1. Select Configuration Manager in the Navigation panel. Select the Information tab in the Contents panel.
Information and configurations display.
2. Expand the Configuration Script Import/Export sub-view.
The Import Scripts... and Export Scripts... buttons display.
Figure 2-14: Configuration Script Import/Export Dialog
3. Click the Export Scripts... button.
The Select Scripts To Export dialog opens.
4. Select the script to be exported or select multiple scripts by holding the Ctrl key and click OK.
The Save as dialog opens.
5. Select the location to save and choose a name for XML specification file that will be automatically generated during export. The export process generates a file for each selected Perl script using its designated name and the .pl extension. The export process will also generate the xml specification file that contains the list of scripts exported and the error mapping information for each. The XML specification file can then be used to import the scripts on the same or different SPECTRUM environment.
The selected Perl scripts are exported to the location you specified.
To import scripts in bulk
1. Select Configuration Manager in the Navigation panel. Select the Information tab in the Contents panel.
Information and configurations display.
2. Expand the Configuration Script Import/Export sub-view.
The Import Scripts... and Export Scripts... buttons display.
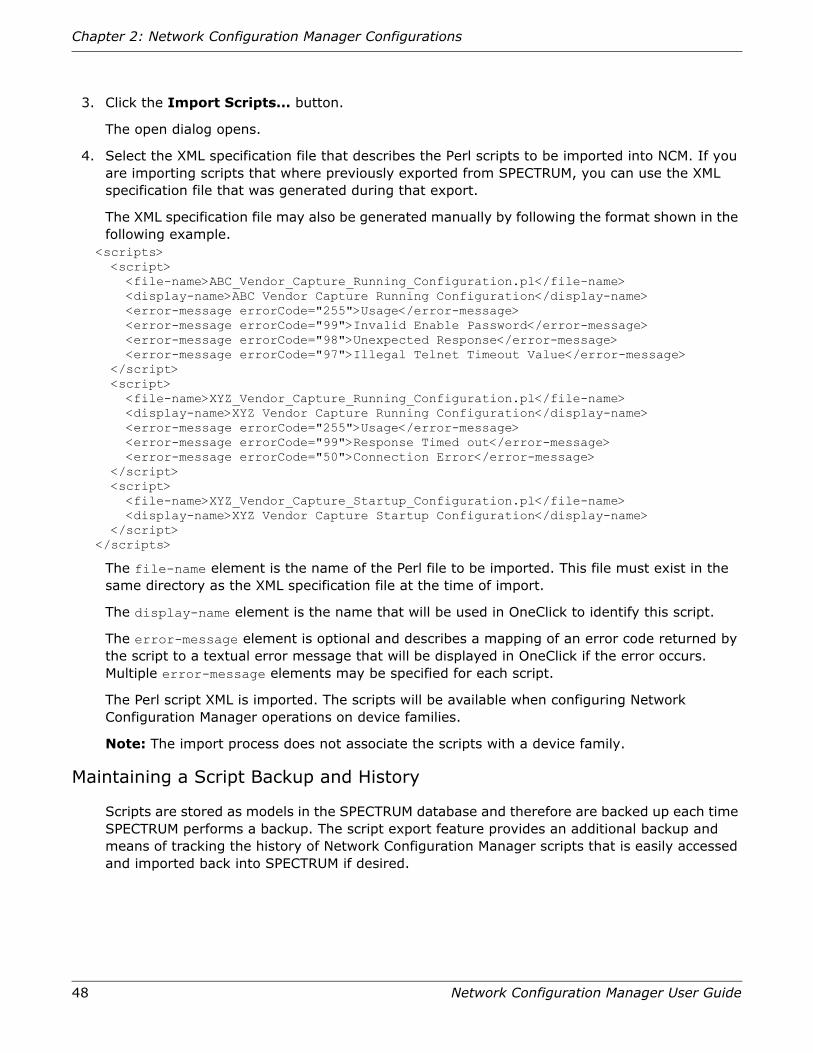
48 Network Configuration Manager User Guide
Chapter 2: Network Configuration Manager Configurations
3. Click the Import Scripts... button.
The open dialog opens.
4. Select the XML specification file that describes the Perl scripts to be imported into NCM. If you are importing scripts that where previously exported from SPECTRUM, you can use the XML specification file that was generated during that export.
The XML specification file may also be generated manually by following the format shown in the following example.
<scripts> <script> <file-name>ABC_Vendor_Capture_Running_Configuration.pl</file-name> <display-name>ABC Vendor Capture Running Configuration</display-name> <error-message errorCode="255">Usage</error-message> <error-message errorCode="99">Invalid Enable Password</error-message> <error-message errorCode="98">Unexpected Response</error-message> <error-message errorCode="97">Illegal Telnet Timeout Value</error-message> </script> <script> <file-name>XYZ_Vendor_Capture_Running_Configuration.pl</file-name> <display-name>XYZ Vendor Capture Running Configuration</display-name> <error-message errorCode="255">Usage</error-message> <error-message errorCode="99">Response Timed out</error-message> <error-message errorCode="50">Connection Error</error-message> </script> <script> <file-name>XYZ_Vendor_Capture_Startup_Configuration.pl</file-name> <display-name>XYZ Vendor Capture Startup Configuration</display-name> </script></scripts>
The file-name element is the name of the Perl file to be imported. This file must exist in the same directory as the XML specification file at the time of import.
The display-name element is the name that will be used in OneClick to identify this script.
The error-message element is optional and describes a mapping of an error code returned by the script to a textual error message that will be displayed in OneClick if the error occurs. Multiple error-message elements may be specified for each script.
The Perl script XML is imported. The scripts will be available when configuring Network Configuration Manager operations on device families.
Note: The import process does not associate the scripts with a device family.
Maintaining a Script Backup and History
Scripts are stored as models in the SPECTRUM database and therefore are backed up each time SPECTRUM performs a backup. The script export feature provides an additional backup and means of tracking the history of Network Configuration Manager scripts that is easily accessed and imported back into SPECTRUM if desired.
49
Chapter 3: Global Synchronization Task
This chapter describes how to set up the Global Synchronization task on your network with Network Configuration Manager. When you run the Global Synchronization task, Network Configuration Manager captures and saves all device configurations.
Note: CA recommends you capture device configurations prior to configuring Network Configuration Manager policies.
In this chapter
• “About Global Synchronization” on page 49
• “Schedule Global Synchronization” on page 50
• “On-Demand Global Sync Task” on page 51
• “View Configuration History for a Single Device” on page 51
• “View Startup Versus Running Differences from a Configuration Alarm” on page 52
• “View Global Sync Task Results” on page 52
About Global SynchronizationA Global Synchronization task gathers running configurations for all devices on your network (for which Network Configuration Manager is enabled) using a schedule. You select a time period and recurrence frequency to capture configurations from all network-wide supported devices. For example, capture device configurations after 9 PM and no later than 5 AM on a daily basis. By capturing the configurations for all devices on your network, you maintain a running configuration history.
You can set Global Synchronization to verify if the startup configurations are the same as the running configurations. If they differ, you can configure Network Configuration Manager to generate an alarm. A Global Synchronization captures the startup configuration and compares it to the running configuration for any changes. See “Types of Configurations” on page 12 for descriptions on startup and running configurations.
Note: You can also gather running configurations for selected devices on your network and view the results in realtime by creating an automatic Sync task. See “Create Sync Task” on page 60 for details.

50 Network Configuration Manager User Guide
Chapter 3: Global Synchronization Task
About Enterasys/Riverstone SSR Devices
Configuration captures performed on Enterasys/Riverstone SSR devices provide the startup configuration and not the running configuration. Therefore, the device configuration history maintained by Network Configuration Manager is a history of the startup configurations on SSR devices. See “Determine How an Enterasys/Riverstone SSR Device Responds to an Upload Task” on page 59 for details on how SSR devices handle Network Configuration Manager configuration uploads.
Schedule Global SynchronizationYou can schedule a global synchronization to gather running configurations for all devices on your network. The order in which devices are processed is in random order.
Note: If a scheduled global synchronization does not complete in the allotted time, the next execution will first randomly process the unprocessed devices from the previous execution. All remaining devices are then processed in a random order.
Caution: Do not schedule a “one-shot” global synchronization if SPECTRUM landscapes exist in multiple timezones. Performing this type of task will result in the global synchronization running only in the earliest timezone.
To schedule a global synchronization
1. Select Configuration Manager in the Explorer tab.
Information and configurations display in the Information tab of the Contents panel.
2. Expand the Global Synchronization sub-view and click Schedule.
The Select Schedule dialog appears. Select a default schedule for scheduling configuration captures for devices on your network and skip to step 5, or create a custom schedule in step 3 and step 4.
3. Click Create to create a customized schedule.
The Create Schedule dialog appears.
4. Specify the schedule options and click OK.
Network Configuration Manager is now maintaining a history of device configurations on your network. This Global Sync task appears under Tasks in the Explorer tab.
5. Optionally, specify a minor, major, or critical alarm in If Sync Task Not Completed in Allotted Time, Assert Task Alarm if you want to be notified by alarm if the global synchronization task did not properly complete. If you manage many devices and run a scheduled global sync periodically, a Sync task stops at the end of the scheduled period as capturing configurations can use up valuable bandwidth on slow links.
Optionally, enable Verify Startup Equals Running Configuration if you want to compare a startup configuration against a currently running configuration for devices in your network.
Optionally, specify a minor (yellow), major (orange), or critical (red) alarm in When Startup Differs, Assert Device Alarm if you want to generate an alarm for devices with startup configurations that differ from running configurations.
A global synchronization is now scheduled.
On-Demand Global Sync Task
Network Configuration Manager User Guide 51
On-Demand Global Sync TaskYou can run an on-demand Global Sync task to automatically gather running configurations for all devices on your network. The order in which devices are processed is random.
To run an on-demand Global Sync task
Select Global Sync Task from the Tasks view under Configuration Manager. Select the List tab in the Contents panel. Click the Start Selected Task icon.
The Sync Task Results dialog appears with a list of processed devices and the results of the Global Sync.
View Configuration History for a Single DeviceThis section describes how to view a configuration history for a single device. See “Manually Upload Configurations to a Single Device” on page 54 for details on uploading configurations to network devices.
To view the configuration history of a single device
1. Select a device in the Explorer tab. Verify the List tab is selected in the Contents panel and select the Host Configuration tab in the Component Detail panel.
The following details display:
• Capture Time — the time (M-DD-YYY HH:MM:SS) that the configuration was first captured on the device.
• Lines Changed — the number of changed lines (if applicable) when compared with the previous configuration on the device. Displays the changes hyperlink if changed lines exist.
• Running vs. Startup — the configuration differences in the startup and running configuration files (if applicable). Displays the View Differences hyperlink if differences exist.
• Last Verified Time — the last time (M-DD-YYY HH:MM:SS) Network Configuration Manager verified that the configuration still exists on the device.
• Captured By — the name of the SPECTRUM/OneClick user that configured the task.
A new row is created when one or more changes are detected by Network Configuration Manager.
2. Click the changes hyperlink (if applicable) in the Lines Changed column to view added, removed, or changed lines in the configuration of the selected device.
The Configuration Differences dialog appears. The highlighted text indicates the following:
• Green - these lines were recently added.
• Red - these lines have been removed.
• Blue - these lines have changed.
Click Next or Previous to move forwards or backwards to the differences in the file.

52 Network Configuration Manager User Guide
Chapter 3: Global Synchronization Task
3. Click the View Differences hyperlink (if applicable) in the Running vs. Startup column in the Host Configuration tab to view added, removed, or changed lines.
The Running vs. Startup dialog appears displaying differences in running and startup configuration files for the captured device. The startup configuration appears in the left column. The highlighted text indicates the following:
• Green - these lines were recently added.
• Red - these lines have been removed.
• Blue - these lines have changed.
Click Next or Previous to move forwards or backwards to the differences in the file.
View Startup Versus Running Differences from a Configuration Alarm
This section describes how to view startup versus running differences for a single device from the Alarm Details tab.
To view startup versus running differences from the Alarm Details tab
1. Select a device, device family, or global collection from the Explorer tab. Select the Alarms tab in the Contents panel.
Alarms for the device, device family, or global collection display.
2. Select an alarm that displays “Startup and Running Configurations are Different” in the Title column then select the Alarm Details tab in the Component Detail panel.
Alarm details display.
3. Click View Differences.
The Running vs. Startup screen appears displaying differences in running and startup configuration files for the captured device. The startup configuration appears in the left column.
View Global Sync Task ResultsThis section describes how to view lists of devices for which global synchronizations failed and succeeded.
To view a Global Sync task results
Expand Configuration Manager and select Tasks in the Explorer tab. Select the Global Sync Task.
Information and results display in the Information tab of the Contents panel. Enter a name, type, condition, or device family in the Filter field to filter the results lists.

53
Chapter 4: Network Configuration Manager Device-Level Tasks
This chapter describes how to manually capture, export, and upload configurations for devices in your network using Network Configuration Manager.
In this chapter
• “Manually Capture Configurations” on page 53
• “Manually Upload Configurations to a Single Device” on page 54
Manually Capture ConfigurationsThis section describes how to manually capture device configurations.
To manually capture a device configuration
1. Select a single device in the Explorer tab.
The device appears in the List tab of the Contents panel.
2. Select the Host Configuration tab in the Component Detail panel.
The results of any previous manual captures display.
3. Click the Capture Configuration icon.
The results of the capture appear. Either a new configuration appears in the list or the last verified time is updated for the current configuration.
54 Network Configuration Manager User Guide
Chapter 4: Network Configuration Manager Device-Level Tasks
Manually Upload Configurations to a Single DeviceThis section describes how to manually upload a configuration file to a single device on your network. When you upload a configuration file, you merge it into the existing configuration file. You can use this feature to bring a newly installed device or a replacement/standby remote device quickly online.
Note: You can upload configurations and view the results in realtime by creating a bulk Upload task. See “Create Upload Task” on page 58 for details.
Procedure
To upload a device configuration to a single device:
1. Select a single device or device family in the Explorer tab.
The device or devices associated with the selected device family appear in the List tab of the Contents panel.
2. Select the Host Configuration tab in the Component Detail panel.
The results of any previous captures display.
3. Click the Upload icon.
The Upload Configuration screen appears with the last known configuration information for the selected device.
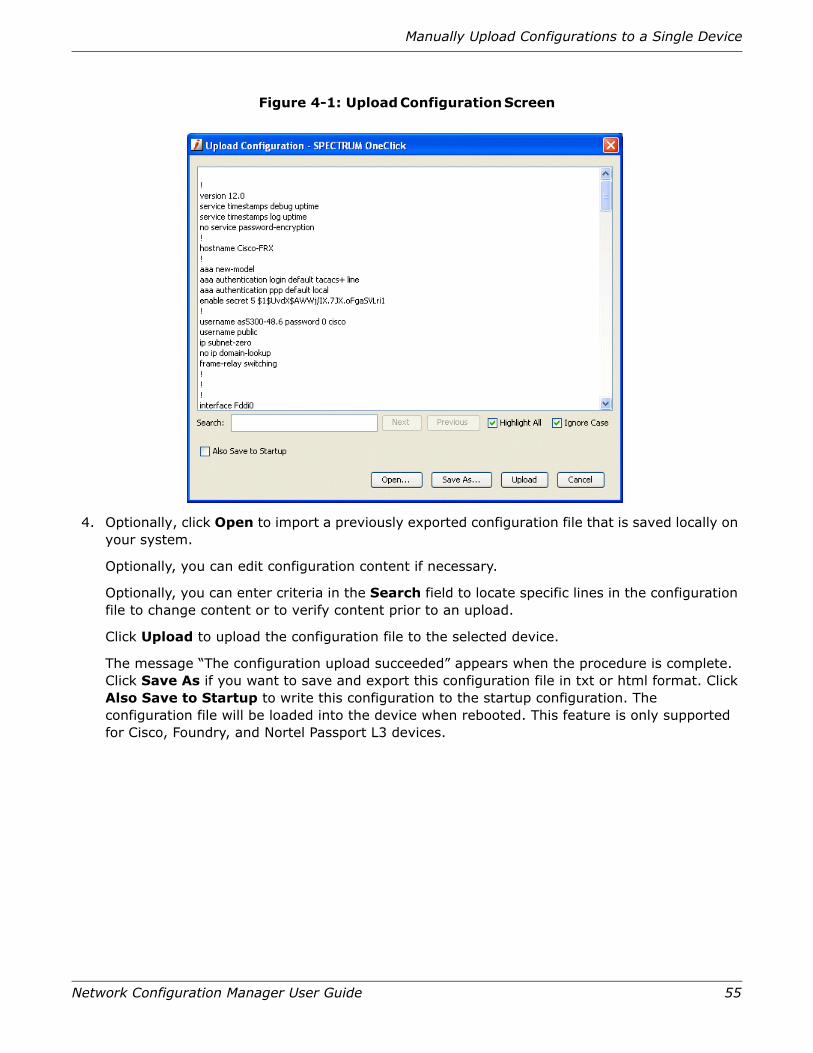
Manually Upload Configurations to a Single Device
Network Configuration Manager User Guide 55
Figure 4-1: Upload Configuration Screen
4. Optionally, click Open to import a previously exported configuration file that is saved locally on your system.
Optionally, you can edit configuration content if necessary.
Optionally, you can enter criteria in the Search field to locate specific lines in the configuration file to change content or to verify content prior to an upload.
Click Upload to upload the configuration file to the selected device.
The message “The configuration upload succeeded” appears when the procedure is complete. Click Save As if you want to save and export this configuration file in txt or html format. Click Also Save to Startup to write this configuration to the startup configuration. The configuration file will be loaded into the device when rebooted. This feature is only supported for Cisco, Foundry, and Nortel Passport L3 devices.

56 Network Configuration Manager User Guide
Chapter 4: Network Configuration Manager Device-Level Tasks
57
Chapter 5: Network Configuration Manager Bulk Tasks
This chapter describes how to create an on-demand bulk Upload task, Sync task, and Save to Startup task with Network Configuration Manager. These tasks interact with devices by capturing/uploading host configurations. You can create a task to run anytime on a single device or on a list of devices. These on-demand tasks are useful if you want to roll out the same configuration (with minor differences such as IP addresses) to multiple devices on your network.
Once a Network Configuration Manager task is run, it is sent to the Lost and Found view and purged within 24 hours.
In this chapter
• “Create Upload Task” on page 58
• “Create Sync Task” on page 60
• “Create Save to Startup Task” on page 61
• “View Critical Statistics on All Bulk Tasks” on page 61
• “View Detailed Statistics for a Bulk Task” on page 62
• “Delete Tasks” on page 62
58 Network Configuration Manager User Guide
Chapter 5: Network Configuration Manager Bulk Tasks
Create Upload TaskThis section describes how to create an automatic Upload task and view the results in realtime. A bulk Upload task merges new content into the running configurations of one or more selected devices. The order in which devices are processed is random.
Important: If you are uploading to Enterasys/Riverstone SSR devices, see “Determine How an Enterasys/Riverstone SSR Device Responds to an Upload Task” on page 59 before continuing with this task.
To create an Upload task
1. Select a single device, device family, global collection, or a device from a search result or container (such as Universe) in the Explorer tab. Select the List tab and select the devices for the Upload task. Select Upload Task from the Create NCM Task icon on the toolbar.
The Upload Task dialog appears.
Note: If the selected devices do not appear in the Allow tab, click Disallow to display devices that are either disabled from Network Configuration Manager tasks or do not have necessary privileges.
2. Click Continue.
The Create Task dialog appears.
3. Create the task.
a. Optionally, enter a unique name in the Name field. Network Configuration Manager provides a default name (<task type>.YY-MM-DD_HH:MM.<user name>). For example, Upload.2006-10-17_15:48:04.Administrator.
b. Optionally, enter a description for the task in the Description field.
c. Click Edit to specify content for uploading and merging into the device configuration in the Upload Content box. You can also click Open to import content from a text file.
d. Enter criteria in the Search field to locate specific lines in the configuration file.
e. Select Commit to Startup (if applicable) to copy the entire running configuration to the startup configuration after new content is merged.
f. Select Alarm device on Failure to generate an alarm on each device on which the task fails.
g. Click Save.
The Save Task dialog appears.
4. Click Upload to upload the task to the selected device.
Note: If you click Exit, the task does not run; however, it is available to run at a future time. You can edit and run the task by selecting it from Tasks in the Explorer tab under Configuration Manager.
The Upload Task Results dialog appears.

Create Upload Task
Network Configuration Manager User Guide 59
5. Click the Content tab if you want to view the content that you are uploading. Click Close if you want to run the task in the background.
The task statistics are updated on a 10-second poll cycle during this procedure.
6. Click Stop if you want to cancel the task. The task finishes processing any devices that are in progress. It then stops processing any remaining devices.
The name, condition, type, and status of the task are shown in the Results tab. When complete, the status for the Upload task displays in the Task Status field (Pending, Failed, or Succeeded).
This Upload task appears in the Task list in the Explorer tab with either a custom name that you specified or the default name and timestamp (<task type>.YY-MM-DD_HH:MM.<user name>). Select the Upload task from Tasks in the Explorer tab and click List to view, edit, delete, or run the Upload task.
Determine How an Enterasys/Riverstone SSR Device Responds to an Upload Task
Enterasys/Riverstone SSR devices do not respond consistently to configuration uploads. Some of these devices replace both the running and startup configurations with uploaded content. Others merge the uploaded content into both the running and startup configuration. Configuration captures performed on Enterasys/Riverstone SSR devices provide the startup configuration and not the running configuration. Therefore, CA recommends that you test devices running Enterasys firmware, as they might replace both the running and startup configurations with uploaded content.
To test how an Enterasys/Riverstone SSR device responds to an Upload task
1. Select a single SSR device from a search result or container (such as Universe) in the Explorer tab. Select the List tab of the Contents panel. Select the Host Configuration tab in the Component Detail panel.
Previously captured configurations display.
2. Select the Capture Configuration icon to capture the current configuration of the selected device. Select the Upload icon.
The Upload Configuration screen appears. The content of the current startup configuration displays in the bottom pane.
3. Edit the existing configuration in the Upload Configuration screen. For example, remove the location line value (or remove a line):
system set location “value”
Select the Upload icon again to upload the modified device configuration. Select the Capture Configuration icon again to capture the new configuration from the device.
If the location is not present in the newly captured configuration, it indicates that the device is replacing (not merging) both the running and the startup configuration with the uploaded content.
60 Network Configuration Manager User Guide
Chapter 5: Network Configuration Manager Bulk Tasks
Create Sync TaskThis section describes how to create an automatic Sync task. A Sync task lets you capture and verify policy-compliant device configurations for selected devices on your network and view the results in realtime. When a Sync task captures a device’s configuration, it checks the configuration against all policies pertaining to the device (if applicable). The order in which devices are processed is random.
See “Create Network Configuration Manager Policies” on page 64 for details on Network Configuration Manager policies.
See “About Global Synchronization” on page 49 for details on running global sync tasks in background mode.
To create a Sync task
1. Select a single device, device family, global collection, or a device from a search result or container (such as Universe) in the Explorer tab. Select the List tab in the Contents panel and select the devices that you want to include in the Sync task. Click Sync Task from the Create NCM Task icon on the toolbar.
The Sync Task screen appears.
Note: If the selected devices do not appear in the Allow tab, click Disallow to display devices that are either disabled from Network Configuration Manager tasks or do not have necessary privileges.
2. Click Run Sync Task Now.
The Sync Task Results screen appears. The name, condition, type, and status of the task is shown in this screen. Results display in the Task Status field (Pending, Failed, or Succeeded).
3. Click Close if you want to run the task in the background.
This Sync task appears in the Task list in the Explorer tab with a name and timestamp (<task type>.YY-MM-DD_HH:MM.<user name>). For example, Sync.2006-10-18_12:05:08.Administrator.
4. Select the Sync task from Tasks in the Explorer tab and select the List tab in the Contents panel to view the status of a background Sync task.
The status and results of the task display.
Create Save to Startup Task
Network Configuration Manager User Guide 61
Create Save to Startup TaskThis section describes how to create an automatic Save to Startup task and view the results in realtime. A device saves its configuration in the NVRAM (Nonvolatile Random Access Memory). A Save to Startup task writes a current running configuration to the startup configuration of one or more selected devices. The order in which devices are processed is random.
To create a Save to Startup task
1. Select a single device, device family, global collection, or a device from a search result or container (such as Universe) in the Explorer tab. Select the List tab in the Contents panel and select the devices that you want to upload. Click Save to Startup Task from the Create NCM Task icon on the toolbar.
The Write Task dialog appears.
Note: If the selected devices do not appear in the Allow tab, click Disallow to display devices that are either disabled from Network Configuration Manager tasks or do not have necessary privileges.
2. Select Run Save to Startup Task Now.
The Save to Startup Task Results dialog appears. The name, condition, type, and task status (Pending, Failed, or Succeeded) is shown in this dialog. If failed, the results display in the Cause of Failure field.
3. Click Close if you want to run the task in the background.
This Save to Startup task appears in the Task list in the Explorer tab with a name and timestamp (<task type>.YY-MM-DD_HH:MM.<user name>). For example, WriteStartup.2006-10-18_12:05:08.Administrator.
4. Select the Save to Startup task from Tasks in the Explorer tab and click List to view tasks results or to delete the task.
Note: Any “Startup Versus Running Configurations are Different” alarms on task devices will be automatically cleared by this task. See “View Startup Versus Running Differences from a Configuration Alarm” on page 52 for more information.
View Critical Statistics on All Bulk TasksThis section describes how to view critical statistics on all bulk tasks.
To view critical statistics
Select Tasks under Configuration Manager in the Explorer tab. Select the List tab in the Contents panel.
Statistics for all bulk tasks display.
62 Network Configuration Manager User Guide
Chapter 5: Network Configuration Manager Bulk Tasks
View Detailed Statistics for a Bulk TaskThis section describes how to view detailed statistics on a single bulk task.
To view detailed statistics for a bulk task
Select an Upload, Sync, or Save to Startup task from Tasks in the Explorer tab. Select the Information tab in the Contents panel.
Information on each task displays. Enter a name, type, condition, or device family in the Filter field to filter the device lists.
Delete TasksTo delete a task
1. Select Tasks under Configuration Manager in the Explorer tab. Select the List tab in the Contents panel and select a task for deletion. Click the Delete selected tasks icon in the toolbar.
The Confirm Delete dialog appears.
2. Click Yes to delete.
The selected task is deleted.
Note: Tasks that are running or locked for edit cannot be deleted.
63
Chapter 6: Network Configuration Manager Policies
This chapter describes how to create and configure Network Configuration Manager policies. Network Configuration Manager Policies monitor content in configurations and verify that device content is compliant.
Note: CA recommends that you have configurations captured prior to setting up Network Configuration Manager policies. See “Global Synchronization Task” to set up a global synchronization task on your network.
In this chapter
• “Create Network Configuration Manager Policies” on page 64
• “Repair Non-Compliant Devices from the Policy Table” on page 70
• “Repair Non-Compliant Devices from a Policy Violation Alarm” on page 71
• “Edit Policies” on page 71
• “Delete Policies” on page 72
• “Enable and Disable Policies from the Policy Table” on page 72
• “View Policy Details” on page 72
• “View Critical Statistics on All Policies” on page 73
• “View Critical Statistics for Policies Applied to a Global Collection” on page 73
• “View Critical Statistics for All Policies Applied to a Single Device” on page 73

64 Network Configuration Manager User Guide
Chapter 6: Network Configuration Manager Policies
Create Network Configuration Manager PoliciesA Network Configuration Manager policy specifies a certain aspect of a device’s host configuration. A policy is checked and compared every time a device’s host configuration file is captured. Devices that violate the policy can generate an alarm and be remediated (semi-automatically repaired). A policy is checked for compliance when there is a configuration change on a device.
Policies can be created and applied to single devices and global collections. If created and applied to a global collection, the policy is then enforced on all global collection members per device family. See “Network Configuration Manager and Global Collections” on page 17 for details on setting up global collections.
Note: Configuration captures performed on Enterasys/Riverstone SSR devices provide the startup configuration and not the running configuration. Therefore, it is the startup configuration that is used when determining if a device is compliant with Network Configuration Manager policies. Refer to “Determine How an Enterasys/Riverstone SSR Device Responds to an Upload Task” on page 59 for details on how SSR devices handle Network Configuration Manager configuration uploads.
To create a policy
1. Select a single device or a global collection in the Explorer tab.
Information and configurations display in the Information tab of the Contents panel.
2. Click Network Configuration Policies.
The following screen appears (Figure 6-1):
Figure 6-1: Network Configuration Policies Screen
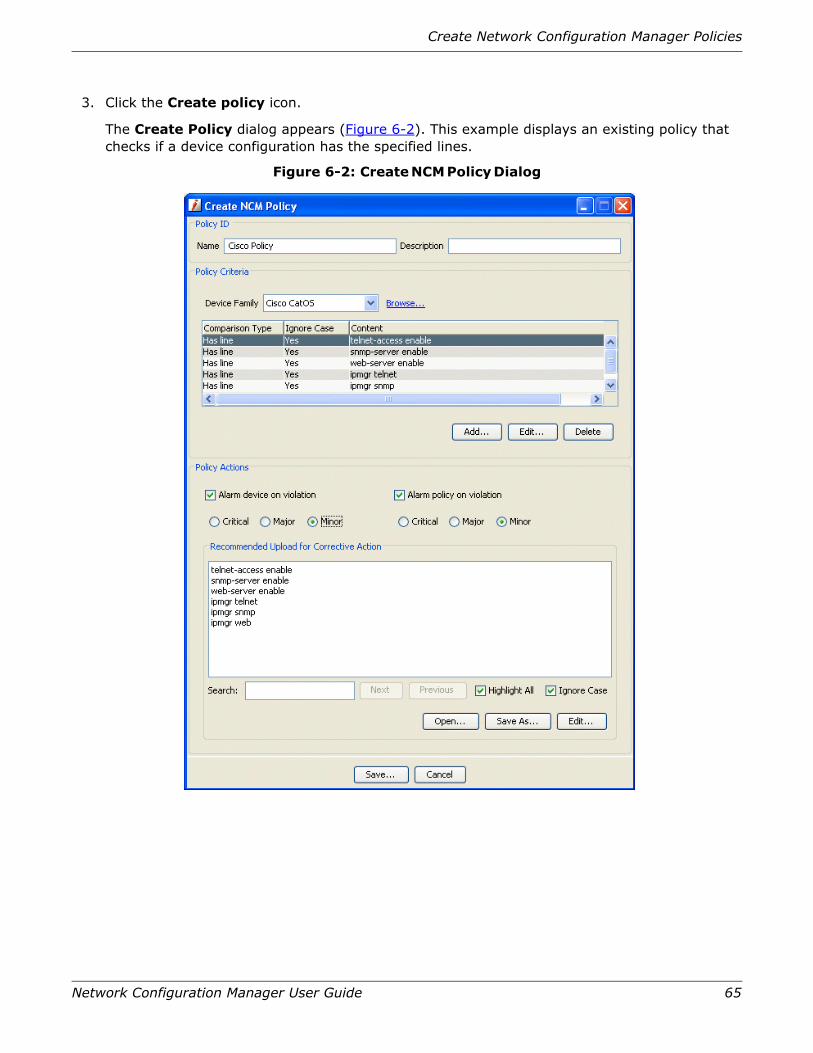
Create Network Configuration Manager Policies
Network Configuration Manager User Guide 65
3. Click the Create policy icon.
The Create Policy dialog appears (Figure 6-2). This example displays an existing policy that checks if a device configuration has the specified lines.
Figure 6-2: Create NCM Policy Dialog
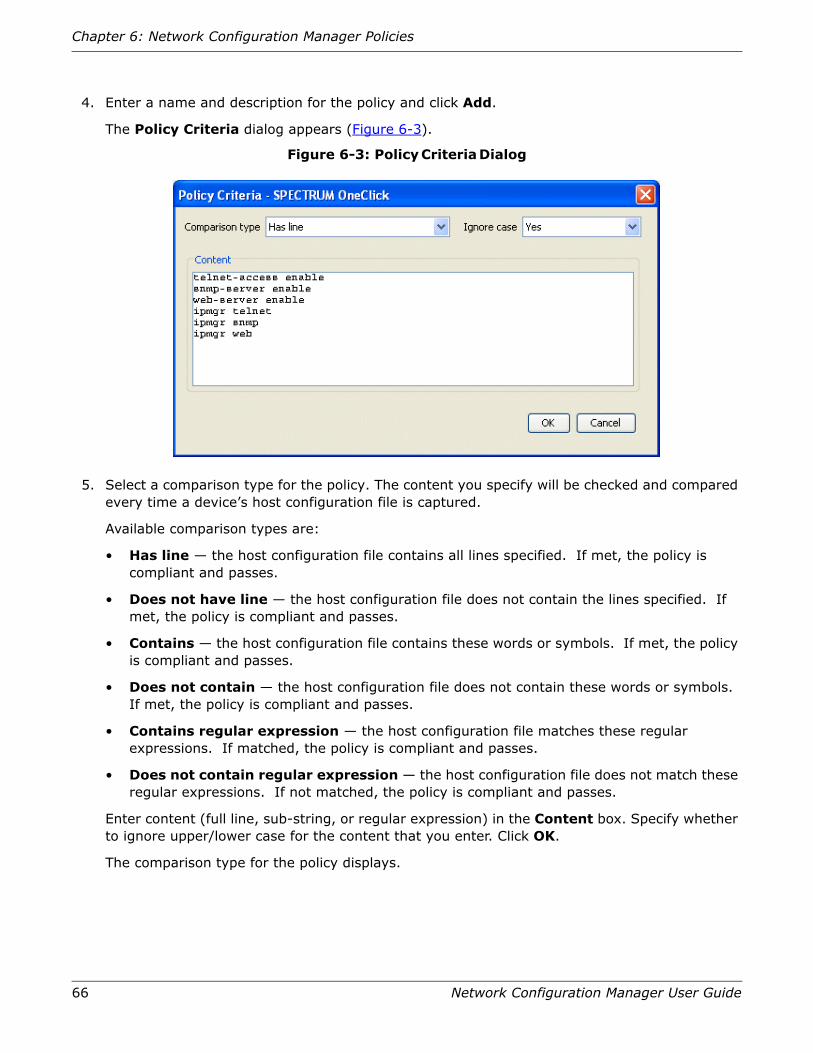
66 Network Configuration Manager User Guide
Chapter 6: Network Configuration Manager Policies
4. Enter a name and description for the policy and click Add.
The Policy Criteria dialog appears (Figure 6-3).
Figure 6-3: Policy Criteria Dialog
5. Select a comparison type for the policy. The content you specify will be checked and compared every time a device’s host configuration file is captured.
Available comparison types are:
• Has line — the host configuration file contains all lines specified. If met, the policy is compliant and passes.
• Does not have line — the host configuration file does not contain the lines specified. If met, the policy is compliant and passes.
• Contains — the host configuration file contains these words or symbols. If met, the policy is compliant and passes.
• Does not contain — the host configuration file does not contain these words or symbols. If met, the policy is compliant and passes.
• Contains regular expression — the host configuration file matches these regular expressions. If matched, the policy is compliant and passes.
• Does not contain regular expression — the host configuration file does not match these regular expressions. If not matched, the policy is compliant and passes.
Enter content (full line, sub-string, or regular expression) in the Content box. Specify whether to ignore upper/lower case for the content that you enter. Click OK.
The comparison type for the policy displays.
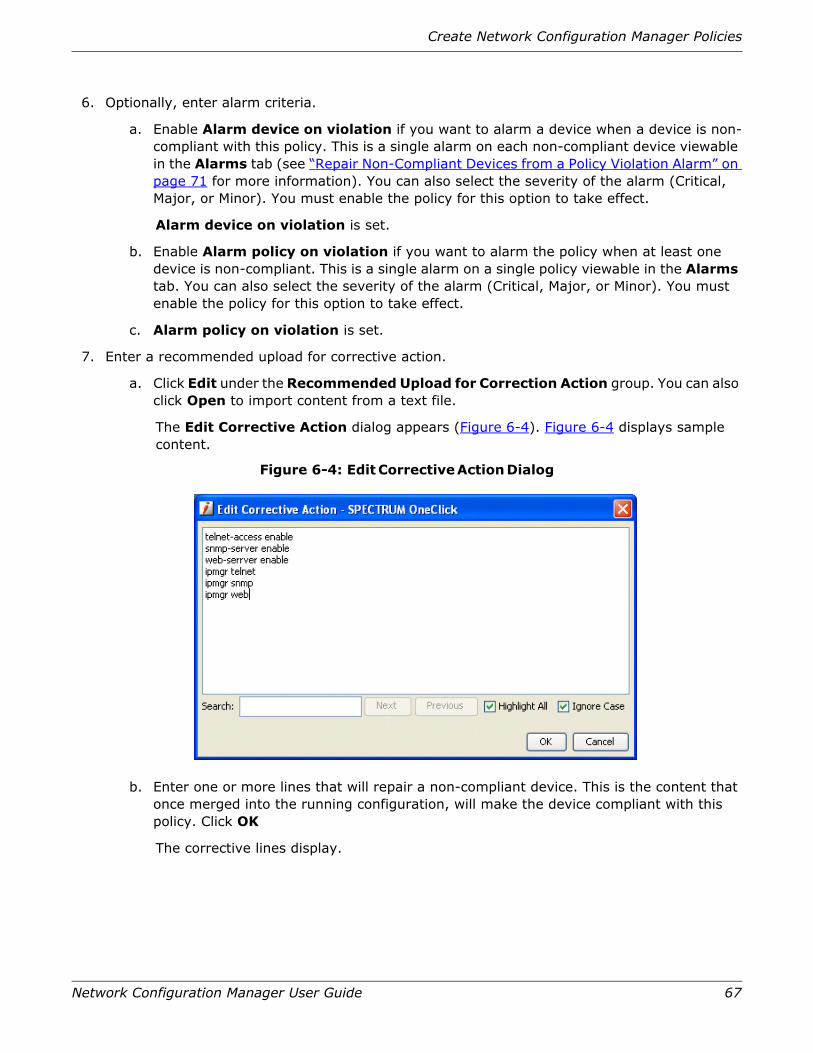
Create Network Configuration Manager Policies
Network Configuration Manager User Guide 67
6. Optionally, enter alarm criteria.
a. Enable Alarm device on violation if you want to alarm a device when a device is non-compliant with this policy. This is a single alarm on each non-compliant device viewable in the Alarms tab (see “Repair Non-Compliant Devices from a Policy Violation Alarm” on page 71 for more information). You can also select the severity of the alarm (Critical, Major, or Minor). You must enable the policy for this option to take effect.
Alarm device on violation is set.
b. Enable Alarm policy on violation if you want to alarm the policy when at least one device is non-compliant. This is a single alarm on a single policy viewable in the Alarms tab. You can also select the severity of the alarm (Critical, Major, or Minor). You must enable the policy for this option to take effect.
c. Alarm policy on violation is set.
7. Enter a recommended upload for corrective action.
a. Click Edit under the Recommended Upload for Correction Action group. You can also click Open to import content from a text file.
The Edit Corrective Action dialog appears (Figure 6-4). Figure 6-4 displays sample content.
Figure 6-4: Edit Corrective Action Dialog
b. Enter one or more lines that will repair a non-compliant device. This is the content that once merged into the running configuration, will make the device compliant with this policy. Click OK
The corrective lines display.
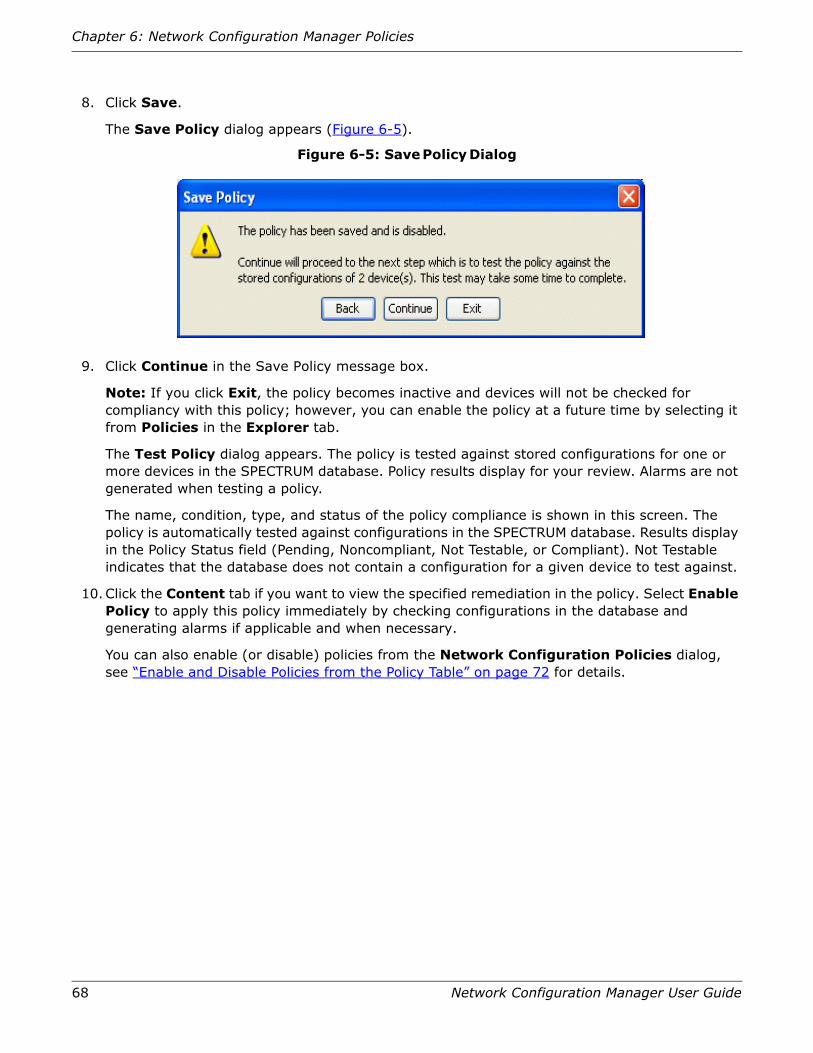
68 Network Configuration Manager User Guide
Chapter 6: Network Configuration Manager Policies
8. Click Save.
The Save Policy dialog appears (Figure 6-5).
Figure 6-5: Save Policy Dialog
9. Click Continue in the Save Policy message box.
Note: If you click Exit, the policy becomes inactive and devices will not be checked for compliancy with this policy; however, you can enable the policy at a future time by selecting it from Policies in the Explorer tab.
The Test Policy dialog appears. The policy is tested against stored configurations for one or more devices in the SPECTRUM database. Policy results display for your review. Alarms are not generated when testing a policy.
The name, condition, type, and status of the policy compliance is shown in this screen. The policy is automatically tested against configurations in the SPECTRUM database. Results display in the Policy Status field (Pending, Noncompliant, Not Testable, or Compliant). Not Testable indicates that the database does not contain a configuration for a given device to test against.
10.Click the Content tab if you want to view the specified remediation in the policy. Select Enable Policy to apply this policy immediately by checking configurations in the database and generating alarms if applicable and when necessary.
You can also enable (or disable) policies from the Network Configuration Policies dialog, see “Enable and Disable Policies from the Policy Table” on page 72 for details.

Create Network Configuration Manager Policies
Network Configuration Manager User Guide 69
11. If the device is non-compliant, click View Violation for information on why the device is non-compliant.
The View Violation screen appears (Figure 6-6). In this example, missing lines exist in the configuration for the device and thus the policy is violated.
Figure 6-6: View Violation Dialog
12.Click Repair in the Test Policy dialog to upload and merge the correct content to the device to make it compliant with the policy. See “Repair Non-Compliant Devices from the Policy Table” on page 70 for details. Click Finish when finished.
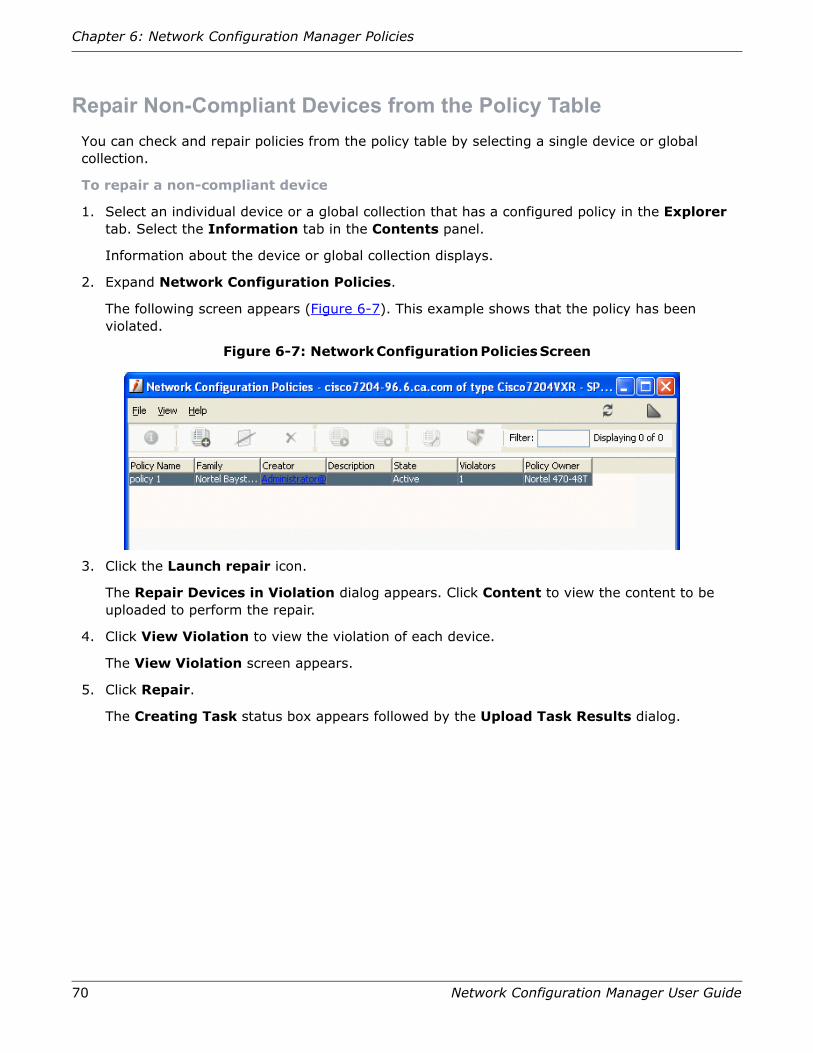
70 Network Configuration Manager User Guide
Chapter 6: Network Configuration Manager Policies
Repair Non-Compliant Devices from the Policy TableYou can check and repair policies from the policy table by selecting a single device or global collection.
To repair a non-compliant device
1. Select an individual device or a global collection that has a configured policy in the Explorer tab. Select the Information tab in the Contents panel.
Information about the device or global collection displays.
2. Expand Network Configuration Policies.
The following screen appears (Figure 6-7). This example shows that the policy has been violated.
Figure 6-7: Network Configuration Policies Screen
3. Click the Launch repair icon.
The Repair Devices in Violation dialog appears. Click Content to view the content to be uploaded to perform the repair.
4. Click View Violation to view the violation of each device.
The View Violation screen appears.
5. Click Repair.
The Creating Task status box appears followed by the Upload Task Results dialog.
Repair Non-Compliant Devices from a Policy Violation Alarm
Network Configuration Manager User Guide 71
Repair Non-Compliant Devices from a Policy Violation AlarmYou can view a violation and upload/merge the correct content to the device to make it compliant with the policy from the Alarm Details tab.
Procedure
To repair a non-compliant device from a policy violation alarm:
1. Select an individual device, a global collection that has a configured policy, or a policy (from the Policy node) in the Explorer tab. In the Alarms tab in the Contents panel, select an alarm with “NCM Policy Violated” in the Alarm Title column. Click View Violation Details in the Alarm Details tab in the Component Detail panel.
The Repair Devices in Violation screen appears.
2. Click Content to view the content to be uploaded to perform the repair. Click View Violation to view the violation of each device.
The View Violation screen appears.
3. Click Repair.
The Creating Task status box appears followed by the Upload Task Results screen.
Edit PoliciesYou can edit an existing Network Configuration Manager policy. After you edit a policy, you must save and enable it.
Procedure
To edit a policy:
1. Select a policy under the Policies node in the Explorer tab. Select the List tab in the Contents panel
The policy displays.
2. Select the policy and click the Edit icon in the toolbar.
The Edit NCM Policy dialog appears.
3. Make changes as necessary and click Save.
The policy is disabled. Enable the policy as explained in “Create Network Configuration Manager Policies” on page 64.
Note: Optionally, you can edit a policy by selecting a global collection, clicking the Information tab, and editing the associated policy. You can also select an individual device, click the Information tab, click Network Configuration Policies, and edit the associated policy.
72 Network Configuration Manager User Guide
Chapter 6: Network Configuration Manager Policies
Delete PoliciesYou can delete a policy that you no longer need by selecting the policy from Policies in the explorer tab and selecting Delete from the right-click menu.
Note: Optionally, you can delete a policy by selecting a global collection, clicking the Information tab, and deleting the associated policy. You can also select an individual device, click the Information tab, click Network Configuration Policies, and delete the associated policy.
Enable and Disable Policies from the Policy TableYou can enable and disable Network Configuration Manager policies from the policy table.
To enable/disable a policy
1. Select a policy under the Policies node in the Explorer tab. Select the List tab of the Contents panel.
A list of policies displays.
2. Select a policy and click the Enable selected policies icon if you want to enable a policy.
Enabling a policy causes any specified alarms to immediately appear for all non-compliant
3. Select a policy and click the Disable select policies icon if you want to disable a policy.
Disabling a policy immediately clears any existing alarms on non-compliant devices and violated policies.
Note: Optionally, you can enable and disable a policy by selecting a global collection, clicking the Information tab, and enable/disable the associated policy. You can also select an individual device, click the Information tab, click Network Configuration Policies, and enable/disable the associated policy.
View Policy DetailsYou can view details for Network Configuration Manager policies.
To view component details for a Network Configuration Manager policy
1. Select a single device or a global collection in the Explorer tab for which a policy has been created. Select the Information tab in the Contents panel.
Information and configurations for the selected device or global collection display.
2. Expand Network Configuration Policies and click the View the Component Detail for the selected model icon.
The Component Detail panel for the selected policy appears.
Note: You can also access this screen by selecting a policy from Policies in the Explorer tab.
View Critical Statistics on All Policies
Network Configuration Manager User Guide 73
View Critical Statistics on All PoliciesYou can view critical statistics for policies by selecting Policies under Configuration Manager in the Explorer tab and selecting the List tab in the Contents panel.
Statistics for all policies display.
View Critical Statistics for Policies Applied to a Global CollectionYou can view critical statistics for policies applied to a collection by selecting an existing collection from Global Collections under Configuration Manager in the Explorer tab and selecting the
To view critical statistics for policies applied to a collection
1. Select an existing Global Collection from the Explorer tab. Select the Information tab of the Contents panel.
Information displays in the Contents panel.
2. Select Network Configuration Policies.
Statistics for all policies applied to a collection display.
View Critical Statistics for All Policies Applied to a Single DeviceTo view critical statistics for policies applied to a single device
1. Select a device then select the Information tab.
Information about the device displays.
2. Select Network Configuration Policies.
Statistics for all policies applied to a single device display.

74 Network Configuration Manager User Guide
Chapter 6: Network Configuration Manager Policies
75
Appendix A: Supported Devices
This appendix lists devices supported by SPECTRUM Network Configuration Manager.
In this Appendix
• “Cisco Supported Devices” on page 76
• “Cisco CAT Supported Devices” on page 92
• “Enterasys Supported Devices” on page 94
• “Extreme Supported Devices” on page 94
• “Foundry Supported Devices” on page 96
• “Nortel Baystack Supported Devices” on page 102
• “Juniper Supported Devices” on page 102
• “Nortel Passport Supported Devices” on page 103
• “Enterasys/Riverstone SSR Supported Devices” on page 104
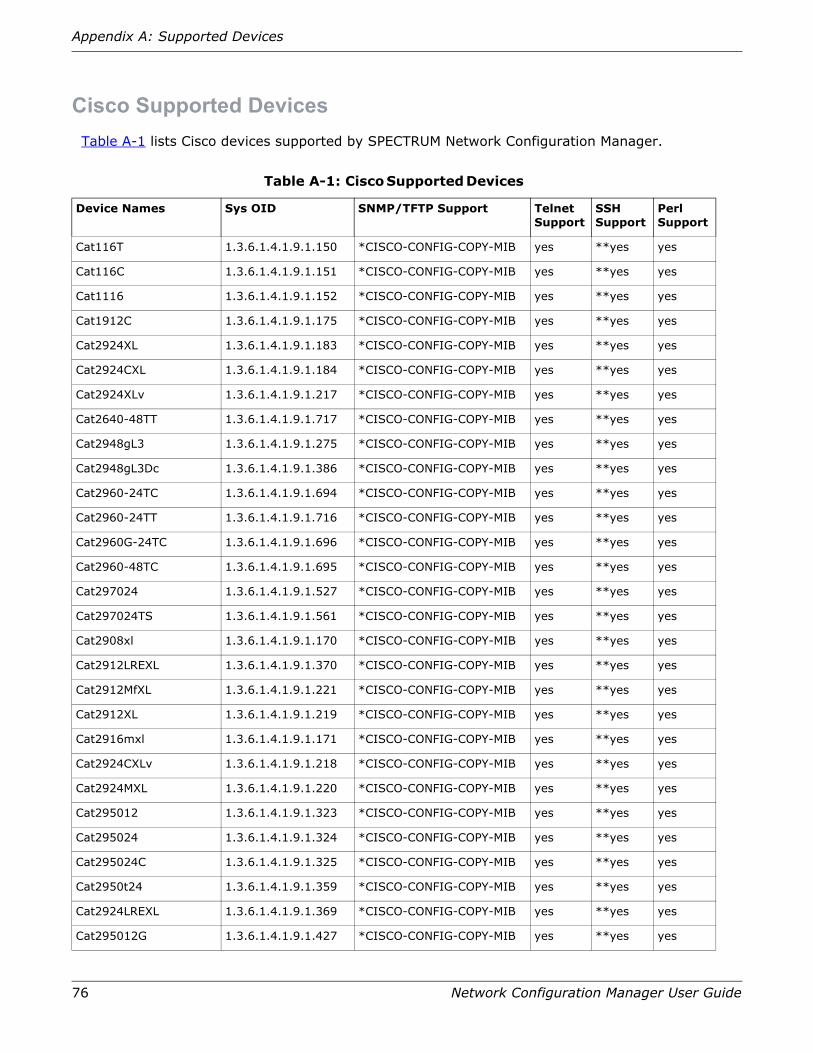
76 Network Configuration Manager User Guide
Appendix A: Supported Devices
Cisco Supported DevicesTable A-1 lists Cisco devices supported by SPECTRUM Network Configuration Manager.
Table A-1: Cisco Supported Devices
Device Names Sys OID SNMP/TFTP Support Telnet Support
SSH Support
Perl Support
Cat116T 1.3.6.1.4.1.9.1.150 *CISCO-CONFIG-COPY-MIB yes **yes yes
Cat116C 1.3.6.1.4.1.9.1.151 *CISCO-CONFIG-COPY-MIB yes **yes yes
Cat1116 1.3.6.1.4.1.9.1.152 *CISCO-CONFIG-COPY-MIB yes **yes yes
Cat1912C 1.3.6.1.4.1.9.1.175 *CISCO-CONFIG-COPY-MIB yes **yes yes
Cat2924XL 1.3.6.1.4.1.9.1.183 *CISCO-CONFIG-COPY-MIB yes **yes yes
Cat2924CXL 1.3.6.1.4.1.9.1.184 *CISCO-CONFIG-COPY-MIB yes **yes yes
Cat2924XLv 1.3.6.1.4.1.9.1.217 *CISCO-CONFIG-COPY-MIB yes **yes yes
Cat2640-48TT 1.3.6.1.4.1.9.1.717 *CISCO-CONFIG-COPY-MIB yes **yes yes
Cat2948gL3 1.3.6.1.4.1.9.1.275 *CISCO-CONFIG-COPY-MIB yes **yes yes
Cat2948gL3Dc 1.3.6.1.4.1.9.1.386 *CISCO-CONFIG-COPY-MIB yes **yes yes
Cat2960-24TC 1.3.6.1.4.1.9.1.694 *CISCO-CONFIG-COPY-MIB yes **yes yes
Cat2960-24TT 1.3.6.1.4.1.9.1.716 *CISCO-CONFIG-COPY-MIB yes **yes yes
Cat2960G-24TC 1.3.6.1.4.1.9.1.696 *CISCO-CONFIG-COPY-MIB yes **yes yes
Cat2960-48TC 1.3.6.1.4.1.9.1.695 *CISCO-CONFIG-COPY-MIB yes **yes yes
Cat297024 1.3.6.1.4.1.9.1.527 *CISCO-CONFIG-COPY-MIB yes **yes yes
Cat297024TS 1.3.6.1.4.1.9.1.561 *CISCO-CONFIG-COPY-MIB yes **yes yes
Cat2908xl 1.3.6.1.4.1.9.1.170 *CISCO-CONFIG-COPY-MIB yes **yes yes
Cat2912LREXL 1.3.6.1.4.1.9.1.370 *CISCO-CONFIG-COPY-MIB yes **yes yes
Cat2912MfXL 1.3.6.1.4.1.9.1.221 *CISCO-CONFIG-COPY-MIB yes **yes yes
Cat2912XL 1.3.6.1.4.1.9.1.219 *CISCO-CONFIG-COPY-MIB yes **yes yes
Cat2916mxl 1.3.6.1.4.1.9.1.171 *CISCO-CONFIG-COPY-MIB yes **yes yes
Cat2924CXLv 1.3.6.1.4.1.9.1.218 *CISCO-CONFIG-COPY-MIB yes **yes yes
Cat2924MXL 1.3.6.1.4.1.9.1.220 *CISCO-CONFIG-COPY-MIB yes **yes yes
Cat295012 1.3.6.1.4.1.9.1.323 *CISCO-CONFIG-COPY-MIB yes **yes yes
Cat295024 1.3.6.1.4.1.9.1.324 *CISCO-CONFIG-COPY-MIB yes **yes yes
Cat295024C 1.3.6.1.4.1.9.1.325 *CISCO-CONFIG-COPY-MIB yes **yes yes
Cat2950t24 1.3.6.1.4.1.9.1.359 *CISCO-CONFIG-COPY-MIB yes **yes yes
Cat2924LREXL 1.3.6.1.4.1.9.1.369 *CISCO-CONFIG-COPY-MIB yes **yes yes
Cat295012G 1.3.6.1.4.1.9.1.427 *CISCO-CONFIG-COPY-MIB yes **yes yes
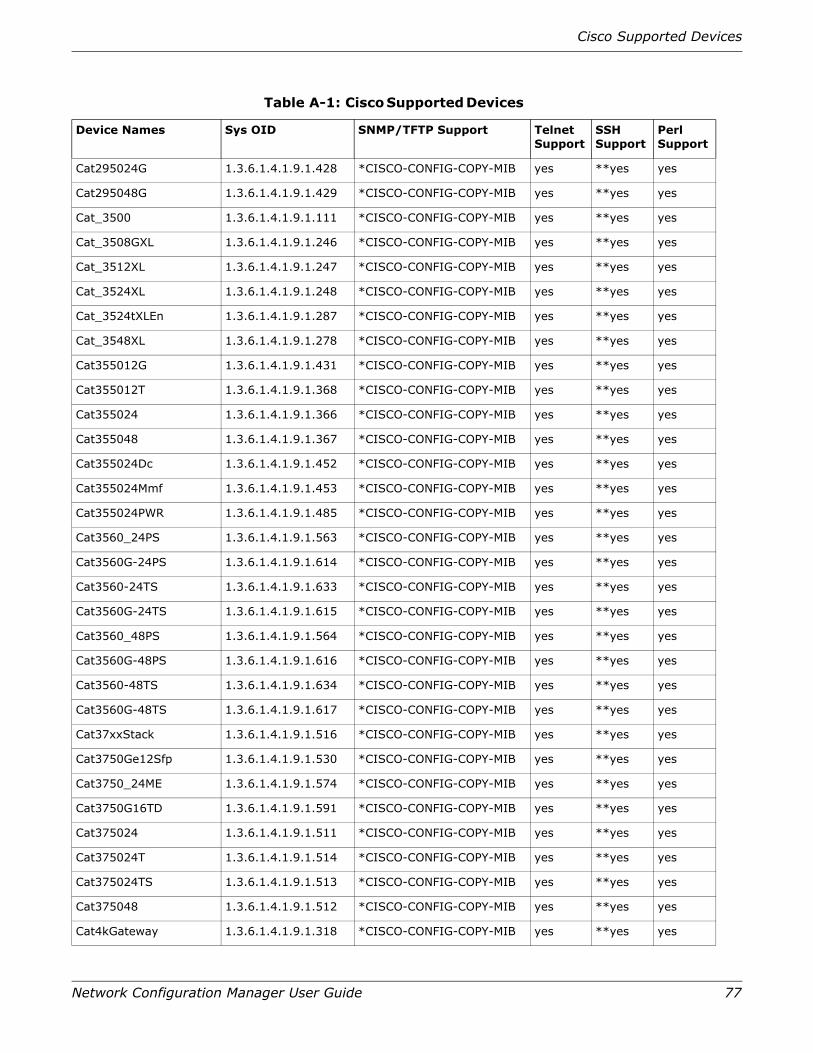
Cisco Supported Devices
Network Configuration Manager User Guide 77
Cat295024G 1.3.6.1.4.1.9.1.428 *CISCO-CONFIG-COPY-MIB yes **yes yes
Cat295048G 1.3.6.1.4.1.9.1.429 *CISCO-CONFIG-COPY-MIB yes **yes yes
Cat_3500 1.3.6.1.4.1.9.1.111 *CISCO-CONFIG-COPY-MIB yes **yes yes
Cat_3508GXL 1.3.6.1.4.1.9.1.246 *CISCO-CONFIG-COPY-MIB yes **yes yes
Cat_3512XL 1.3.6.1.4.1.9.1.247 *CISCO-CONFIG-COPY-MIB yes **yes yes
Cat_3524XL 1.3.6.1.4.1.9.1.248 *CISCO-CONFIG-COPY-MIB yes **yes yes
Cat_3524tXLEn 1.3.6.1.4.1.9.1.287 *CISCO-CONFIG-COPY-MIB yes **yes yes
Cat_3548XL 1.3.6.1.4.1.9.1.278 *CISCO-CONFIG-COPY-MIB yes **yes yes
Cat355012G 1.3.6.1.4.1.9.1.431 *CISCO-CONFIG-COPY-MIB yes **yes yes
Cat355012T 1.3.6.1.4.1.9.1.368 *CISCO-CONFIG-COPY-MIB yes **yes yes
Cat355024 1.3.6.1.4.1.9.1.366 *CISCO-CONFIG-COPY-MIB yes **yes yes
Cat355048 1.3.6.1.4.1.9.1.367 *CISCO-CONFIG-COPY-MIB yes **yes yes
Cat355024Dc 1.3.6.1.4.1.9.1.452 *CISCO-CONFIG-COPY-MIB yes **yes yes
Cat355024Mmf 1.3.6.1.4.1.9.1.453 *CISCO-CONFIG-COPY-MIB yes **yes yes
Cat355024PWR 1.3.6.1.4.1.9.1.485 *CISCO-CONFIG-COPY-MIB yes **yes yes
Cat3560_24PS 1.3.6.1.4.1.9.1.563 *CISCO-CONFIG-COPY-MIB yes **yes yes
Cat3560G-24PS 1.3.6.1.4.1.9.1.614 *CISCO-CONFIG-COPY-MIB yes **yes yes
Cat3560-24TS 1.3.6.1.4.1.9.1.633 *CISCO-CONFIG-COPY-MIB yes **yes yes
Cat3560G-24TS 1.3.6.1.4.1.9.1.615 *CISCO-CONFIG-COPY-MIB yes **yes yes
Cat3560_48PS 1.3.6.1.4.1.9.1.564 *CISCO-CONFIG-COPY-MIB yes **yes yes
Cat3560G-48PS 1.3.6.1.4.1.9.1.616 *CISCO-CONFIG-COPY-MIB yes **yes yes
Cat3560-48TS 1.3.6.1.4.1.9.1.634 *CISCO-CONFIG-COPY-MIB yes **yes yes
Cat3560G-48TS 1.3.6.1.4.1.9.1.617 *CISCO-CONFIG-COPY-MIB yes **yes yes
Cat37xxStack 1.3.6.1.4.1.9.1.516 *CISCO-CONFIG-COPY-MIB yes **yes yes
Cat3750Ge12Sfp 1.3.6.1.4.1.9.1.530 *CISCO-CONFIG-COPY-MIB yes **yes yes
Cat3750_24ME 1.3.6.1.4.1.9.1.574 *CISCO-CONFIG-COPY-MIB yes **yes yes
Cat3750G16TD 1.3.6.1.4.1.9.1.591 *CISCO-CONFIG-COPY-MIB yes **yes yes
Cat375024 1.3.6.1.4.1.9.1.511 *CISCO-CONFIG-COPY-MIB yes **yes yes
Cat375024T 1.3.6.1.4.1.9.1.514 *CISCO-CONFIG-COPY-MIB yes **yes yes
Cat375024TS 1.3.6.1.4.1.9.1.513 *CISCO-CONFIG-COPY-MIB yes **yes yes
Cat375048 1.3.6.1.4.1.9.1.512 *CISCO-CONFIG-COPY-MIB yes **yes yes
Cat4kGateway 1.3.6.1.4.1.9.1.318 *CISCO-CONFIG-COPY-MIB yes **yes yes
Table A-1: Cisco Supported Devices
Device Names Sys OID SNMP/TFTP Support Telnet Support
SSH Support
Perl Support
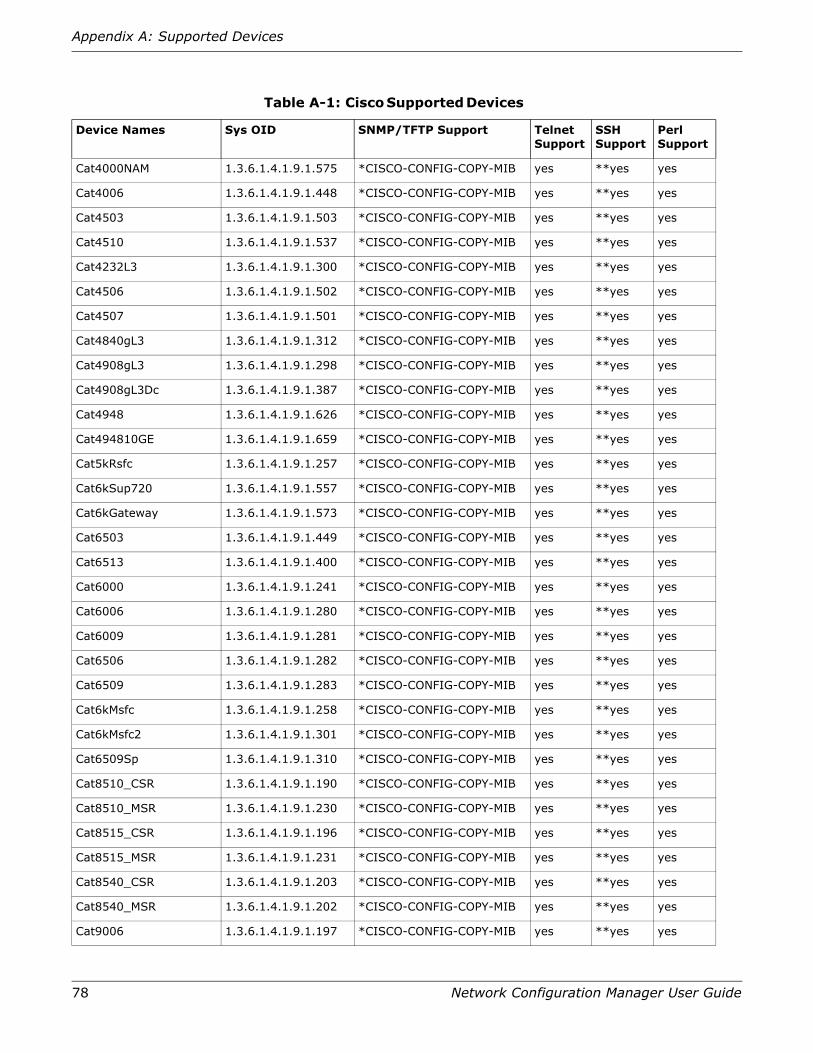
78 Network Configuration Manager User Guide
Appendix A: Supported Devices
Cat4000NAM 1.3.6.1.4.1.9.1.575 *CISCO-CONFIG-COPY-MIB yes **yes yes
Cat4006 1.3.6.1.4.1.9.1.448 *CISCO-CONFIG-COPY-MIB yes **yes yes
Cat4503 1.3.6.1.4.1.9.1.503 *CISCO-CONFIG-COPY-MIB yes **yes yes
Cat4510 1.3.6.1.4.1.9.1.537 *CISCO-CONFIG-COPY-MIB yes **yes yes
Cat4232L3 1.3.6.1.4.1.9.1.300 *CISCO-CONFIG-COPY-MIB yes **yes yes
Cat4506 1.3.6.1.4.1.9.1.502 *CISCO-CONFIG-COPY-MIB yes **yes yes
Cat4507 1.3.6.1.4.1.9.1.501 *CISCO-CONFIG-COPY-MIB yes **yes yes
Cat4840gL3 1.3.6.1.4.1.9.1.312 *CISCO-CONFIG-COPY-MIB yes **yes yes
Cat4908gL3 1.3.6.1.4.1.9.1.298 *CISCO-CONFIG-COPY-MIB yes **yes yes
Cat4908gL3Dc 1.3.6.1.4.1.9.1.387 *CISCO-CONFIG-COPY-MIB yes **yes yes
Cat4948 1.3.6.1.4.1.9.1.626 *CISCO-CONFIG-COPY-MIB yes **yes yes
Cat494810GE 1.3.6.1.4.1.9.1.659 *CISCO-CONFIG-COPY-MIB yes **yes yes
Cat5kRsfc 1.3.6.1.4.1.9.1.257 *CISCO-CONFIG-COPY-MIB yes **yes yes
Cat6kSup720 1.3.6.1.4.1.9.1.557 *CISCO-CONFIG-COPY-MIB yes **yes yes
Cat6kGateway 1.3.6.1.4.1.9.1.573 *CISCO-CONFIG-COPY-MIB yes **yes yes
Cat6503 1.3.6.1.4.1.9.1.449 *CISCO-CONFIG-COPY-MIB yes **yes yes
Cat6513 1.3.6.1.4.1.9.1.400 *CISCO-CONFIG-COPY-MIB yes **yes yes
Cat6000 1.3.6.1.4.1.9.1.241 *CISCO-CONFIG-COPY-MIB yes **yes yes
Cat6006 1.3.6.1.4.1.9.1.280 *CISCO-CONFIG-COPY-MIB yes **yes yes
Cat6009 1.3.6.1.4.1.9.1.281 *CISCO-CONFIG-COPY-MIB yes **yes yes
Cat6506 1.3.6.1.4.1.9.1.282 *CISCO-CONFIG-COPY-MIB yes **yes yes
Cat6509 1.3.6.1.4.1.9.1.283 *CISCO-CONFIG-COPY-MIB yes **yes yes
Cat6kMsfc 1.3.6.1.4.1.9.1.258 *CISCO-CONFIG-COPY-MIB yes **yes yes
Cat6kMsfc2 1.3.6.1.4.1.9.1.301 *CISCO-CONFIG-COPY-MIB yes **yes yes
Cat6509Sp 1.3.6.1.4.1.9.1.310 *CISCO-CONFIG-COPY-MIB yes **yes yes
Cat8510_CSR 1.3.6.1.4.1.9.1.190 *CISCO-CONFIG-COPY-MIB yes **yes yes
Cat8510_MSR 1.3.6.1.4.1.9.1.230 *CISCO-CONFIG-COPY-MIB yes **yes yes
Cat8515_CSR 1.3.6.1.4.1.9.1.196 *CISCO-CONFIG-COPY-MIB yes **yes yes
Cat8515_MSR 1.3.6.1.4.1.9.1.231 *CISCO-CONFIG-COPY-MIB yes **yes yes
Cat8540_CSR 1.3.6.1.4.1.9.1.203 *CISCO-CONFIG-COPY-MIB yes **yes yes
Cat8540_MSR 1.3.6.1.4.1.9.1.202 *CISCO-CONFIG-COPY-MIB yes **yes yes
Cat9006 1.3.6.1.4.1.9.1.197 *CISCO-CONFIG-COPY-MIB yes **yes yes
Table A-1: Cisco Supported Devices
Device Names Sys OID SNMP/TFTP Support Telnet Support
SSH Support
Perl Support

Cisco Supported Devices
Network Configuration Manager User Guide 79
Cat9009 1.3.6.1.4.1.9.1.198 *CISCO-CONFIG-COPY-MIB yes **yes yes
Cat295024GDC 1.3.6.1.4.1.9.1.472 *CISCO-CONFIG-COPY-MIB yes **yes yes
Cat295024S 1.3.6.1.4.1.9.1.430 *CISCO-CONFIG-COPY-MIB yes **yes yes
Cat295024SX 1.3.6.1.4.1.9.1.480 *CISCO-CONFIG-COPY-MIB yes **yes yes
Cat295024LREG 1.3.6.1.4.1.9.1.484 *CISCO-CONFIG-COPY-MIB yes **yes yes
Cat295024LRESt 1.3.6.1.4.1.9.1.482 *CISCO-CONFIG-COPY-MIB yes **yes yes
Cat29508LRESt 1.3.6.1.4.1.9.1.483 *CISCO-CONFIG-COPY-MIB yes **yes yes
Cat2955C12 1.3.6.1.4.1.9.1.489 *CISCO-CONFIG-COPY-MIB yes **yes yes
Cat2955S12 1.3.6.1.4.1.9.1.508 *CISCO-CONFIG-COPY-MIB yes **yes yes
Cat2955T12 1.3.6.1.4.1.9.1.488 *CISCO-CONFIG-COPY-MIB yes **yes yes
Cat29408TF 1.3.6.1.4.1.9.1.542 *CISCO-CONFIG-COPY-MIB yes **yes yes
Cat29408TT 1.3.6.1.4.1.9.1.540 *CISCO-CONFIG-COPY-MIB yes **yes yes
Cat295048SX 1.3.6.1.4.1.9.1.560 *CISCO-CONFIG-COPY-MIB yes **yes yes
Cat295048T 1.3.6.1.4.1.9.1.559 *CISCO-CONFIG-COPY-MIB yes **yes yes
Cat2950St24LRE997 1.3.6.1.4.1.9.1.551 *CISCO-CONFIG-COPY-MIB yes **yes yes
CatExpress500-24LC 1.3.6.1.4.1.9.1.725 *CISCO-CONFIG-COPY-MIB yes **yes yes
CatExpress500-12TC 1.3.6.1.4.1.9.1.727 *CISCO-CONFIG-COPY-MIB yes **yes yes
CatExpress500-24PC 1.3.6.1.4.1.9.1.726 *CISCO-CONFIG-COPY-MIB yes **yes yes
CatExpress500-24TT 1.3.6.1.4.1.9.1.724 *CISCO-CONFIG-COPY-MIB yes **yes yes
CatWsCBS3040FSC 1.3.6.1.4.1.9.1.784 *CISCO-CONFIG-COPY-MIB yes **yes yes
CiscoDSC9216K9 1.3.6.1.4.1.9.1.521 *CISCO-CONFIG-COPY-MIB yes **yes yes
Cisco677i 1.3.6.1.4.1.9.1.363 *CISCO-CONFIG-COPY-MIB yes **yes yes
Cisco741 1.3.6.1.4.1.9.1.94 *CISCO-CONFIG-COPY-MIB yes **yes yes
Cisco742 1.3.6.1.4.1.9.1.95 *CISCO-CONFIG-COPY-MIB yes **yes yes
Cisco743 1.3.6.1.4.1.9.1.96 *CISCO-CONFIG-COPY-MIB yes **yes yes
Cisco744 1.3.6.1.4.1.9.1.97 *CISCO-CONFIG-COPY-MIB yes **yes yes
Cisco751 1.3.6.1.4.1.9.1.81 *CISCO-CONFIG-COPY-MIB yes **yes yes
Cisco752 1.3.6.1.4.1.9.1.82 *CISCO-CONFIG-COPY-MIB yes **yes yes
Cisco753 1.3.6.1.4.1.9.1.83 *CISCO-CONFIG-COPY-MIB yes **yes yes
Cisco761 1.3.6.1.4.1.9.1.98 *CISCO-CONFIG-COPY-MIB yes **yes yes
Cisco762 1.3.6.1.4.1.9.1.99 *CISCO-CONFIG-COPY-MIB yes **yes yes
Cisco765 1.3.6.1.4.1.9.1.102 *CISCO-CONFIG-COPY-MIB yes **yes yes
Table A-1: Cisco Supported Devices
Device Names Sys OID SNMP/TFTP Support Telnet Support
SSH Support
Perl Support
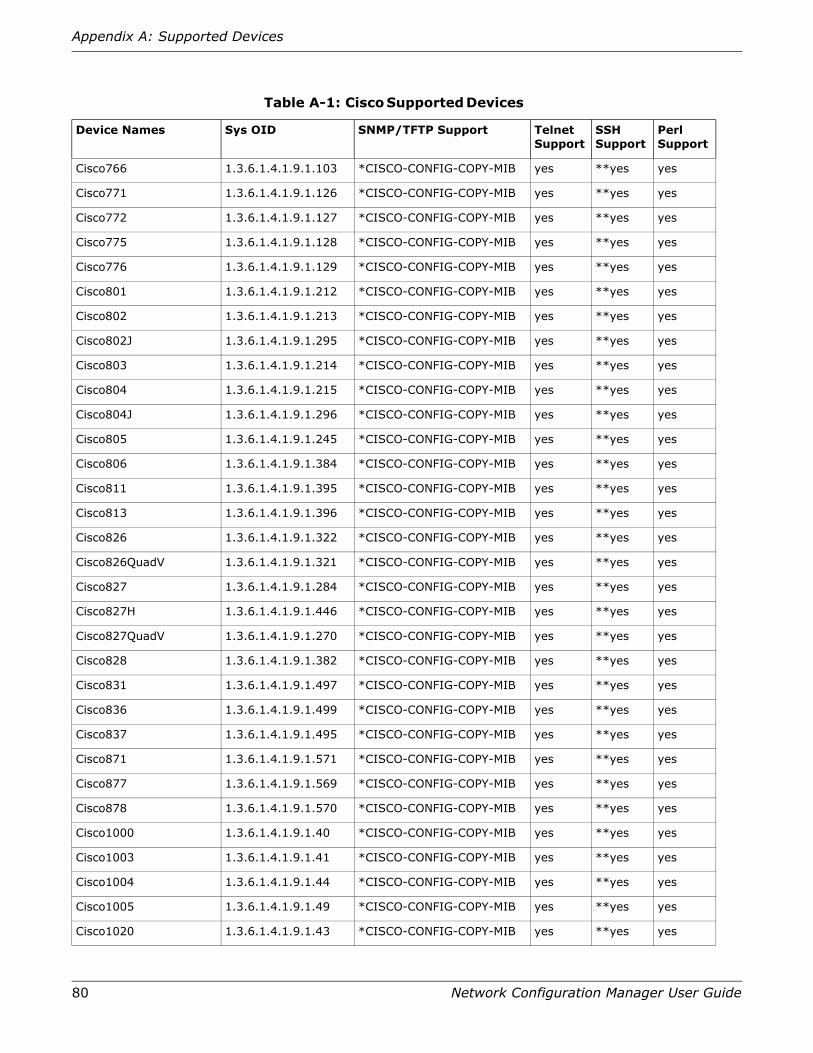
80 Network Configuration Manager User Guide
Appendix A: Supported Devices
Cisco766 1.3.6.1.4.1.9.1.103 *CISCO-CONFIG-COPY-MIB yes **yes yes
Cisco771 1.3.6.1.4.1.9.1.126 *CISCO-CONFIG-COPY-MIB yes **yes yes
Cisco772 1.3.6.1.4.1.9.1.127 *CISCO-CONFIG-COPY-MIB yes **yes yes
Cisco775 1.3.6.1.4.1.9.1.128 *CISCO-CONFIG-COPY-MIB yes **yes yes
Cisco776 1.3.6.1.4.1.9.1.129 *CISCO-CONFIG-COPY-MIB yes **yes yes
Cisco801 1.3.6.1.4.1.9.1.212 *CISCO-CONFIG-COPY-MIB yes **yes yes
Cisco802 1.3.6.1.4.1.9.1.213 *CISCO-CONFIG-COPY-MIB yes **yes yes
Cisco802J 1.3.6.1.4.1.9.1.295 *CISCO-CONFIG-COPY-MIB yes **yes yes
Cisco803 1.3.6.1.4.1.9.1.214 *CISCO-CONFIG-COPY-MIB yes **yes yes
Cisco804 1.3.6.1.4.1.9.1.215 *CISCO-CONFIG-COPY-MIB yes **yes yes
Cisco804J 1.3.6.1.4.1.9.1.296 *CISCO-CONFIG-COPY-MIB yes **yes yes
Cisco805 1.3.6.1.4.1.9.1.245 *CISCO-CONFIG-COPY-MIB yes **yes yes
Cisco806 1.3.6.1.4.1.9.1.384 *CISCO-CONFIG-COPY-MIB yes **yes yes
Cisco811 1.3.6.1.4.1.9.1.395 *CISCO-CONFIG-COPY-MIB yes **yes yes
Cisco813 1.3.6.1.4.1.9.1.396 *CISCO-CONFIG-COPY-MIB yes **yes yes
Cisco826 1.3.6.1.4.1.9.1.322 *CISCO-CONFIG-COPY-MIB yes **yes yes
Cisco826QuadV 1.3.6.1.4.1.9.1.321 *CISCO-CONFIG-COPY-MIB yes **yes yes
Cisco827 1.3.6.1.4.1.9.1.284 *CISCO-CONFIG-COPY-MIB yes **yes yes
Cisco827H 1.3.6.1.4.1.9.1.446 *CISCO-CONFIG-COPY-MIB yes **yes yes
Cisco827QuadV 1.3.6.1.4.1.9.1.270 *CISCO-CONFIG-COPY-MIB yes **yes yes
Cisco828 1.3.6.1.4.1.9.1.382 *CISCO-CONFIG-COPY-MIB yes **yes yes
Cisco831 1.3.6.1.4.1.9.1.497 *CISCO-CONFIG-COPY-MIB yes **yes yes
Cisco836 1.3.6.1.4.1.9.1.499 *CISCO-CONFIG-COPY-MIB yes **yes yes
Cisco837 1.3.6.1.4.1.9.1.495 *CISCO-CONFIG-COPY-MIB yes **yes yes
Cisco871 1.3.6.1.4.1.9.1.571 *CISCO-CONFIG-COPY-MIB yes **yes yes
Cisco877 1.3.6.1.4.1.9.1.569 *CISCO-CONFIG-COPY-MIB yes **yes yes
Cisco878 1.3.6.1.4.1.9.1.570 *CISCO-CONFIG-COPY-MIB yes **yes yes
Cisco1000 1.3.6.1.4.1.9.1.40 *CISCO-CONFIG-COPY-MIB yes **yes yes
Cisco1003 1.3.6.1.4.1.9.1.41 *CISCO-CONFIG-COPY-MIB yes **yes yes
Cisco1004 1.3.6.1.4.1.9.1.44 *CISCO-CONFIG-COPY-MIB yes **yes yes
Cisco1005 1.3.6.1.4.1.9.1.49 *CISCO-CONFIG-COPY-MIB yes **yes yes
Cisco1020 1.3.6.1.4.1.9.1.43 *CISCO-CONFIG-COPY-MIB yes **yes yes
Table A-1: Cisco Supported Devices
Device Names Sys OID SNMP/TFTP Support Telnet Support
SSH Support
Perl Support
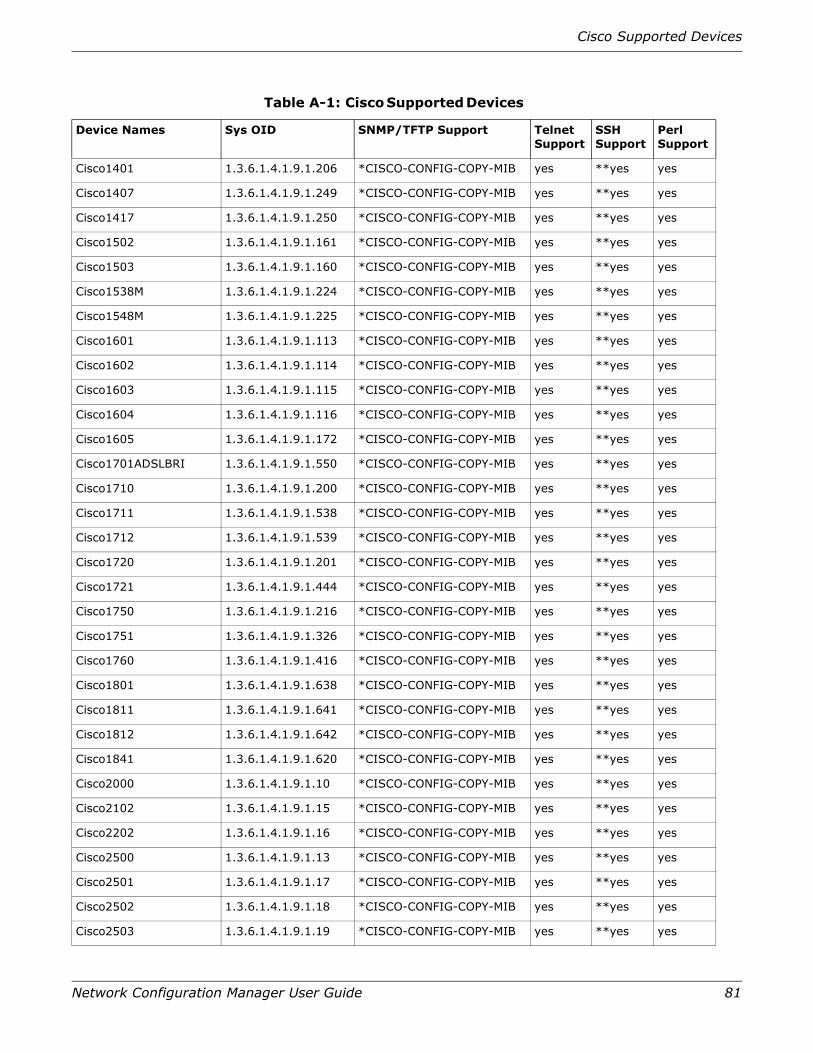
Cisco Supported Devices
Network Configuration Manager User Guide 81
Cisco1401 1.3.6.1.4.1.9.1.206 *CISCO-CONFIG-COPY-MIB yes **yes yes
Cisco1407 1.3.6.1.4.1.9.1.249 *CISCO-CONFIG-COPY-MIB yes **yes yes
Cisco1417 1.3.6.1.4.1.9.1.250 *CISCO-CONFIG-COPY-MIB yes **yes yes
Cisco1502 1.3.6.1.4.1.9.1.161 *CISCO-CONFIG-COPY-MIB yes **yes yes
Cisco1503 1.3.6.1.4.1.9.1.160 *CISCO-CONFIG-COPY-MIB yes **yes yes
Cisco1538M 1.3.6.1.4.1.9.1.224 *CISCO-CONFIG-COPY-MIB yes **yes yes
Cisco1548M 1.3.6.1.4.1.9.1.225 *CISCO-CONFIG-COPY-MIB yes **yes yes
Cisco1601 1.3.6.1.4.1.9.1.113 *CISCO-CONFIG-COPY-MIB yes **yes yes
Cisco1602 1.3.6.1.4.1.9.1.114 *CISCO-CONFIG-COPY-MIB yes **yes yes
Cisco1603 1.3.6.1.4.1.9.1.115 *CISCO-CONFIG-COPY-MIB yes **yes yes
Cisco1604 1.3.6.1.4.1.9.1.116 *CISCO-CONFIG-COPY-MIB yes **yes yes
Cisco1605 1.3.6.1.4.1.9.1.172 *CISCO-CONFIG-COPY-MIB yes **yes yes
Cisco1701ADSLBRI 1.3.6.1.4.1.9.1.550 *CISCO-CONFIG-COPY-MIB yes **yes yes
Cisco1710 1.3.6.1.4.1.9.1.200 *CISCO-CONFIG-COPY-MIB yes **yes yes
Cisco1711 1.3.6.1.4.1.9.1.538 *CISCO-CONFIG-COPY-MIB yes **yes yes
Cisco1712 1.3.6.1.4.1.9.1.539 *CISCO-CONFIG-COPY-MIB yes **yes yes
Cisco1720 1.3.6.1.4.1.9.1.201 *CISCO-CONFIG-COPY-MIB yes **yes yes
Cisco1721 1.3.6.1.4.1.9.1.444 *CISCO-CONFIG-COPY-MIB yes **yes yes
Cisco1750 1.3.6.1.4.1.9.1.216 *CISCO-CONFIG-COPY-MIB yes **yes yes
Cisco1751 1.3.6.1.4.1.9.1.326 *CISCO-CONFIG-COPY-MIB yes **yes yes
Cisco1760 1.3.6.1.4.1.9.1.416 *CISCO-CONFIG-COPY-MIB yes **yes yes
Cisco1801 1.3.6.1.4.1.9.1.638 *CISCO-CONFIG-COPY-MIB yes **yes yes
Cisco1811 1.3.6.1.4.1.9.1.641 *CISCO-CONFIG-COPY-MIB yes **yes yes
Cisco1812 1.3.6.1.4.1.9.1.642 *CISCO-CONFIG-COPY-MIB yes **yes yes
Cisco1841 1.3.6.1.4.1.9.1.620 *CISCO-CONFIG-COPY-MIB yes **yes yes
Cisco2000 1.3.6.1.4.1.9.1.10 *CISCO-CONFIG-COPY-MIB yes **yes yes
Cisco2102 1.3.6.1.4.1.9.1.15 *CISCO-CONFIG-COPY-MIB yes **yes yes
Cisco2202 1.3.6.1.4.1.9.1.16 *CISCO-CONFIG-COPY-MIB yes **yes yes
Cisco2500 1.3.6.1.4.1.9.1.13 *CISCO-CONFIG-COPY-MIB yes **yes yes
Cisco2501 1.3.6.1.4.1.9.1.17 *CISCO-CONFIG-COPY-MIB yes **yes yes
Cisco2502 1.3.6.1.4.1.9.1.18 *CISCO-CONFIG-COPY-MIB yes **yes yes
Cisco2503 1.3.6.1.4.1.9.1.19 *CISCO-CONFIG-COPY-MIB yes **yes yes
Table A-1: Cisco Supported Devices
Device Names Sys OID SNMP/TFTP Support Telnet Support
SSH Support
Perl Support
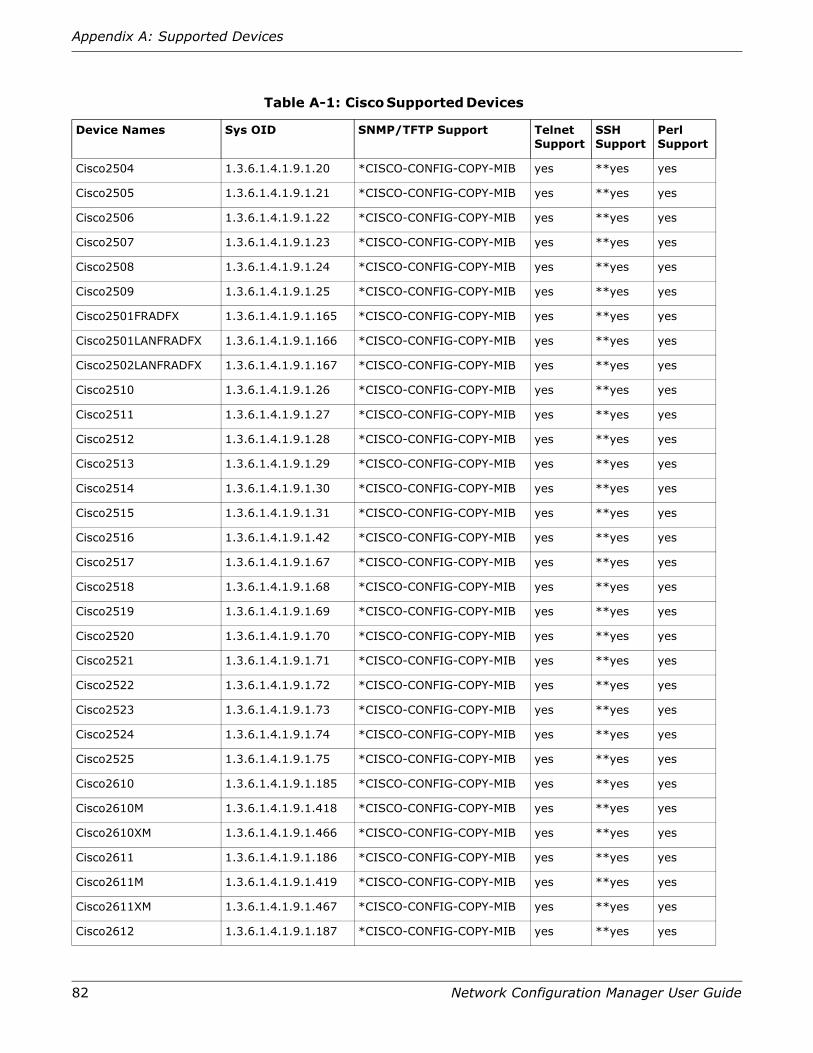
82 Network Configuration Manager User Guide
Appendix A: Supported Devices
Cisco2504 1.3.6.1.4.1.9.1.20 *CISCO-CONFIG-COPY-MIB yes **yes yes
Cisco2505 1.3.6.1.4.1.9.1.21 *CISCO-CONFIG-COPY-MIB yes **yes yes
Cisco2506 1.3.6.1.4.1.9.1.22 *CISCO-CONFIG-COPY-MIB yes **yes yes
Cisco2507 1.3.6.1.4.1.9.1.23 *CISCO-CONFIG-COPY-MIB yes **yes yes
Cisco2508 1.3.6.1.4.1.9.1.24 *CISCO-CONFIG-COPY-MIB yes **yes yes
Cisco2509 1.3.6.1.4.1.9.1.25 *CISCO-CONFIG-COPY-MIB yes **yes yes
Cisco2501FRADFX 1.3.6.1.4.1.9.1.165 *CISCO-CONFIG-COPY-MIB yes **yes yes
Cisco2501LANFRADFX 1.3.6.1.4.1.9.1.166 *CISCO-CONFIG-COPY-MIB yes **yes yes
Cisco2502LANFRADFX 1.3.6.1.4.1.9.1.167 *CISCO-CONFIG-COPY-MIB yes **yes yes
Cisco2510 1.3.6.1.4.1.9.1.26 *CISCO-CONFIG-COPY-MIB yes **yes yes
Cisco2511 1.3.6.1.4.1.9.1.27 *CISCO-CONFIG-COPY-MIB yes **yes yes
Cisco2512 1.3.6.1.4.1.9.1.28 *CISCO-CONFIG-COPY-MIB yes **yes yes
Cisco2513 1.3.6.1.4.1.9.1.29 *CISCO-CONFIG-COPY-MIB yes **yes yes
Cisco2514 1.3.6.1.4.1.9.1.30 *CISCO-CONFIG-COPY-MIB yes **yes yes
Cisco2515 1.3.6.1.4.1.9.1.31 *CISCO-CONFIG-COPY-MIB yes **yes yes
Cisco2516 1.3.6.1.4.1.9.1.42 *CISCO-CONFIG-COPY-MIB yes **yes yes
Cisco2517 1.3.6.1.4.1.9.1.67 *CISCO-CONFIG-COPY-MIB yes **yes yes
Cisco2518 1.3.6.1.4.1.9.1.68 *CISCO-CONFIG-COPY-MIB yes **yes yes
Cisco2519 1.3.6.1.4.1.9.1.69 *CISCO-CONFIG-COPY-MIB yes **yes yes
Cisco2520 1.3.6.1.4.1.9.1.70 *CISCO-CONFIG-COPY-MIB yes **yes yes
Cisco2521 1.3.6.1.4.1.9.1.71 *CISCO-CONFIG-COPY-MIB yes **yes yes
Cisco2522 1.3.6.1.4.1.9.1.72 *CISCO-CONFIG-COPY-MIB yes **yes yes
Cisco2523 1.3.6.1.4.1.9.1.73 *CISCO-CONFIG-COPY-MIB yes **yes yes
Cisco2524 1.3.6.1.4.1.9.1.74 *CISCO-CONFIG-COPY-MIB yes **yes yes
Cisco2525 1.3.6.1.4.1.9.1.75 *CISCO-CONFIG-COPY-MIB yes **yes yes
Cisco2610 1.3.6.1.4.1.9.1.185 *CISCO-CONFIG-COPY-MIB yes **yes yes
Cisco2610M 1.3.6.1.4.1.9.1.418 *CISCO-CONFIG-COPY-MIB yes **yes yes
Cisco2610XM 1.3.6.1.4.1.9.1.466 *CISCO-CONFIG-COPY-MIB yes **yes yes
Cisco2611 1.3.6.1.4.1.9.1.186 *CISCO-CONFIG-COPY-MIB yes **yes yes
Cisco2611M 1.3.6.1.4.1.9.1.419 *CISCO-CONFIG-COPY-MIB yes **yes yes
Cisco2611XM 1.3.6.1.4.1.9.1.467 *CISCO-CONFIG-COPY-MIB yes **yes yes
Cisco2612 1.3.6.1.4.1.9.1.187 *CISCO-CONFIG-COPY-MIB yes **yes yes
Table A-1: Cisco Supported Devices
Device Names Sys OID SNMP/TFTP Support Telnet Support
SSH Support
Perl Support
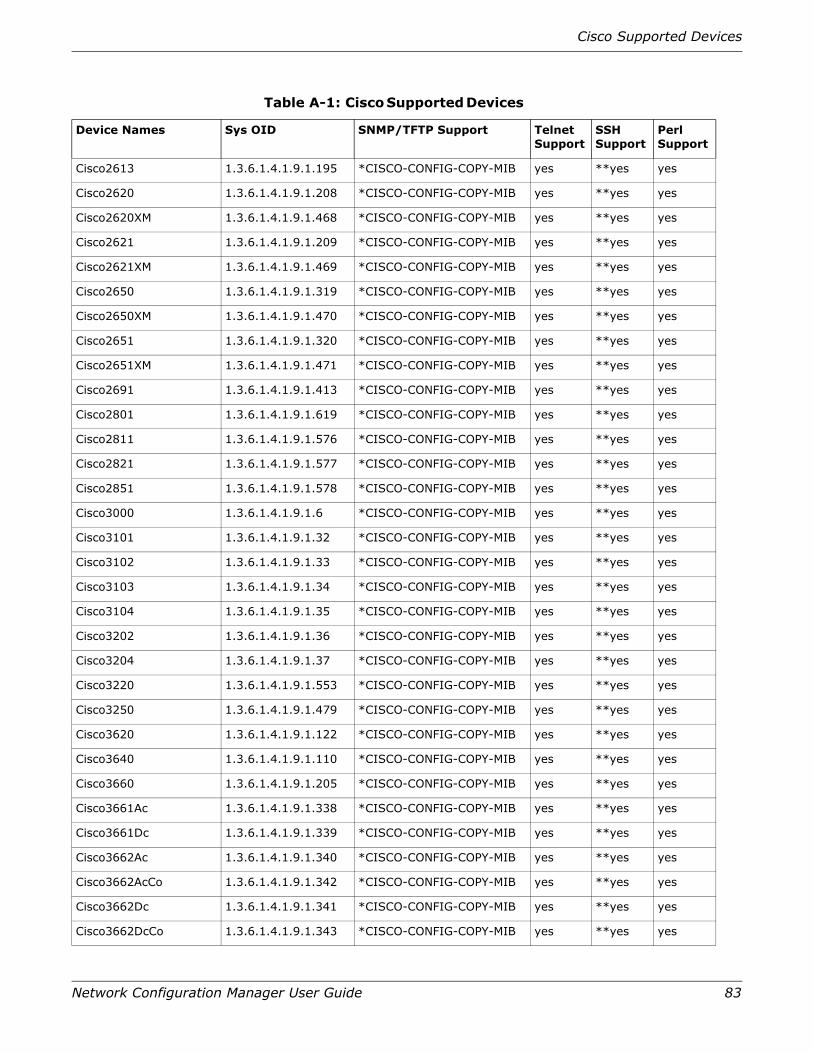
Cisco Supported Devices
Network Configuration Manager User Guide 83
Cisco2613 1.3.6.1.4.1.9.1.195 *CISCO-CONFIG-COPY-MIB yes **yes yes
Cisco2620 1.3.6.1.4.1.9.1.208 *CISCO-CONFIG-COPY-MIB yes **yes yes
Cisco2620XM 1.3.6.1.4.1.9.1.468 *CISCO-CONFIG-COPY-MIB yes **yes yes
Cisco2621 1.3.6.1.4.1.9.1.209 *CISCO-CONFIG-COPY-MIB yes **yes yes
Cisco2621XM 1.3.6.1.4.1.9.1.469 *CISCO-CONFIG-COPY-MIB yes **yes yes
Cisco2650 1.3.6.1.4.1.9.1.319 *CISCO-CONFIG-COPY-MIB yes **yes yes
Cisco2650XM 1.3.6.1.4.1.9.1.470 *CISCO-CONFIG-COPY-MIB yes **yes yes
Cisco2651 1.3.6.1.4.1.9.1.320 *CISCO-CONFIG-COPY-MIB yes **yes yes
Cisco2651XM 1.3.6.1.4.1.9.1.471 *CISCO-CONFIG-COPY-MIB yes **yes yes
Cisco2691 1.3.6.1.4.1.9.1.413 *CISCO-CONFIG-COPY-MIB yes **yes yes
Cisco2801 1.3.6.1.4.1.9.1.619 *CISCO-CONFIG-COPY-MIB yes **yes yes
Cisco2811 1.3.6.1.4.1.9.1.576 *CISCO-CONFIG-COPY-MIB yes **yes yes
Cisco2821 1.3.6.1.4.1.9.1.577 *CISCO-CONFIG-COPY-MIB yes **yes yes
Cisco2851 1.3.6.1.4.1.9.1.578 *CISCO-CONFIG-COPY-MIB yes **yes yes
Cisco3000 1.3.6.1.4.1.9.1.6 *CISCO-CONFIG-COPY-MIB yes **yes yes
Cisco3101 1.3.6.1.4.1.9.1.32 *CISCO-CONFIG-COPY-MIB yes **yes yes
Cisco3102 1.3.6.1.4.1.9.1.33 *CISCO-CONFIG-COPY-MIB yes **yes yes
Cisco3103 1.3.6.1.4.1.9.1.34 *CISCO-CONFIG-COPY-MIB yes **yes yes
Cisco3104 1.3.6.1.4.1.9.1.35 *CISCO-CONFIG-COPY-MIB yes **yes yes
Cisco3202 1.3.6.1.4.1.9.1.36 *CISCO-CONFIG-COPY-MIB yes **yes yes
Cisco3204 1.3.6.1.4.1.9.1.37 *CISCO-CONFIG-COPY-MIB yes **yes yes
Cisco3220 1.3.6.1.4.1.9.1.553 *CISCO-CONFIG-COPY-MIB yes **yes yes
Cisco3250 1.3.6.1.4.1.9.1.479 *CISCO-CONFIG-COPY-MIB yes **yes yes
Cisco3620 1.3.6.1.4.1.9.1.122 *CISCO-CONFIG-COPY-MIB yes **yes yes
Cisco3640 1.3.6.1.4.1.9.1.110 *CISCO-CONFIG-COPY-MIB yes **yes yes
Cisco3660 1.3.6.1.4.1.9.1.205 *CISCO-CONFIG-COPY-MIB yes **yes yes
Cisco3661Ac 1.3.6.1.4.1.9.1.338 *CISCO-CONFIG-COPY-MIB yes **yes yes
Cisco3661Dc 1.3.6.1.4.1.9.1.339 *CISCO-CONFIG-COPY-MIB yes **yes yes
Cisco3662Ac 1.3.6.1.4.1.9.1.340 *CISCO-CONFIG-COPY-MIB yes **yes yes
Cisco3662AcCo 1.3.6.1.4.1.9.1.342 *CISCO-CONFIG-COPY-MIB yes **yes yes
Cisco3662Dc 1.3.6.1.4.1.9.1.341 *CISCO-CONFIG-COPY-MIB yes **yes yes
Cisco3662DcCo 1.3.6.1.4.1.9.1.343 *CISCO-CONFIG-COPY-MIB yes **yes yes
Table A-1: Cisco Supported Devices
Device Names Sys OID SNMP/TFTP Support Telnet Support
SSH Support
Perl Support
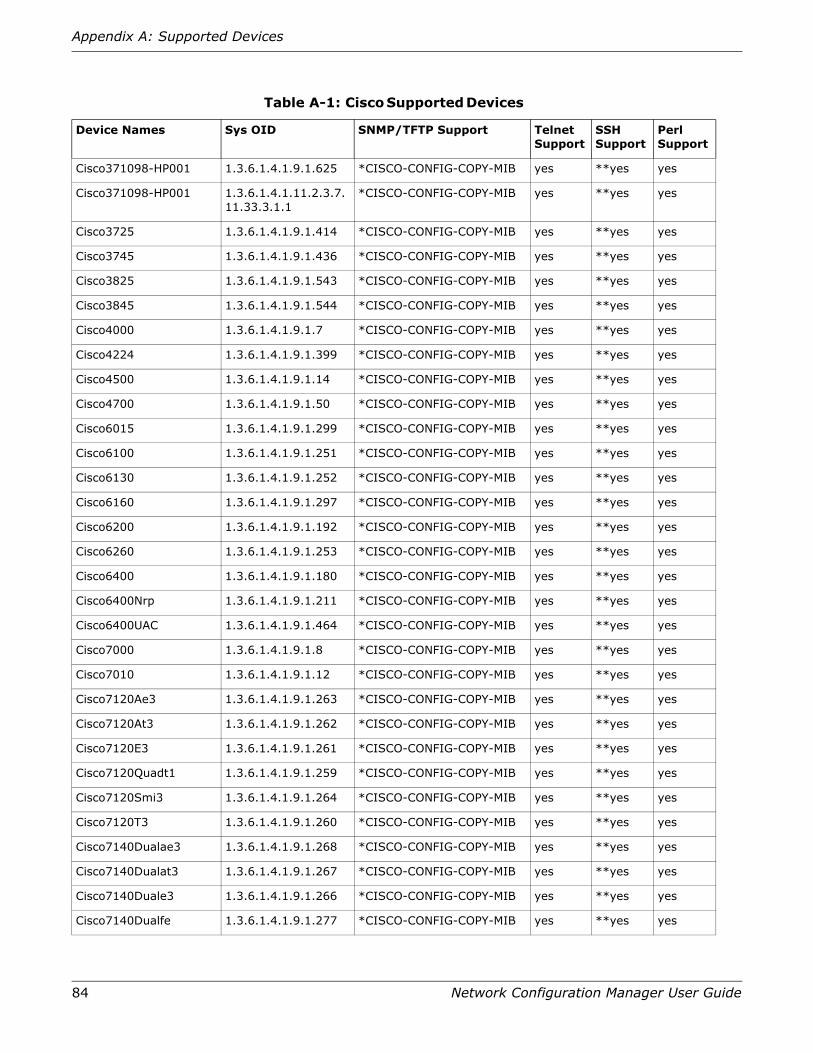
84 Network Configuration Manager User Guide
Appendix A: Supported Devices
Cisco371098-HP001 1.3.6.1.4.1.9.1.625 *CISCO-CONFIG-COPY-MIB yes **yes yes
Cisco371098-HP001 1.3.6.1.4.1.11.2.3.7.11.33.3.1.1
*CISCO-CONFIG-COPY-MIB yes **yes yes
Cisco3725 1.3.6.1.4.1.9.1.414 *CISCO-CONFIG-COPY-MIB yes **yes yes
Cisco3745 1.3.6.1.4.1.9.1.436 *CISCO-CONFIG-COPY-MIB yes **yes yes
Cisco3825 1.3.6.1.4.1.9.1.543 *CISCO-CONFIG-COPY-MIB yes **yes yes
Cisco3845 1.3.6.1.4.1.9.1.544 *CISCO-CONFIG-COPY-MIB yes **yes yes
Cisco4000 1.3.6.1.4.1.9.1.7 *CISCO-CONFIG-COPY-MIB yes **yes yes
Cisco4224 1.3.6.1.4.1.9.1.399 *CISCO-CONFIG-COPY-MIB yes **yes yes
Cisco4500 1.3.6.1.4.1.9.1.14 *CISCO-CONFIG-COPY-MIB yes **yes yes
Cisco4700 1.3.6.1.4.1.9.1.50 *CISCO-CONFIG-COPY-MIB yes **yes yes
Cisco6015 1.3.6.1.4.1.9.1.299 *CISCO-CONFIG-COPY-MIB yes **yes yes
Cisco6100 1.3.6.1.4.1.9.1.251 *CISCO-CONFIG-COPY-MIB yes **yes yes
Cisco6130 1.3.6.1.4.1.9.1.252 *CISCO-CONFIG-COPY-MIB yes **yes yes
Cisco6160 1.3.6.1.4.1.9.1.297 *CISCO-CONFIG-COPY-MIB yes **yes yes
Cisco6200 1.3.6.1.4.1.9.1.192 *CISCO-CONFIG-COPY-MIB yes **yes yes
Cisco6260 1.3.6.1.4.1.9.1.253 *CISCO-CONFIG-COPY-MIB yes **yes yes
Cisco6400 1.3.6.1.4.1.9.1.180 *CISCO-CONFIG-COPY-MIB yes **yes yes
Cisco6400Nrp 1.3.6.1.4.1.9.1.211 *CISCO-CONFIG-COPY-MIB yes **yes yes
Cisco6400UAC 1.3.6.1.4.1.9.1.464 *CISCO-CONFIG-COPY-MIB yes **yes yes
Cisco7000 1.3.6.1.4.1.9.1.8 *CISCO-CONFIG-COPY-MIB yes **yes yes
Cisco7010 1.3.6.1.4.1.9.1.12 *CISCO-CONFIG-COPY-MIB yes **yes yes
Cisco7120Ae3 1.3.6.1.4.1.9.1.263 *CISCO-CONFIG-COPY-MIB yes **yes yes
Cisco7120At3 1.3.6.1.4.1.9.1.262 *CISCO-CONFIG-COPY-MIB yes **yes yes
Cisco7120E3 1.3.6.1.4.1.9.1.261 *CISCO-CONFIG-COPY-MIB yes **yes yes
Cisco7120Quadt1 1.3.6.1.4.1.9.1.259 *CISCO-CONFIG-COPY-MIB yes **yes yes
Cisco7120Smi3 1.3.6.1.4.1.9.1.264 *CISCO-CONFIG-COPY-MIB yes **yes yes
Cisco7120T3 1.3.6.1.4.1.9.1.260 *CISCO-CONFIG-COPY-MIB yes **yes yes
Cisco7140Dualae3 1.3.6.1.4.1.9.1.268 *CISCO-CONFIG-COPY-MIB yes **yes yes
Cisco7140Dualat3 1.3.6.1.4.1.9.1.267 *CISCO-CONFIG-COPY-MIB yes **yes yes
Cisco7140Duale3 1.3.6.1.4.1.9.1.266 *CISCO-CONFIG-COPY-MIB yes **yes yes
Cisco7140Dualfe 1.3.6.1.4.1.9.1.277 *CISCO-CONFIG-COPY-MIB yes **yes yes
Table A-1: Cisco Supported Devices
Device Names Sys OID SNMP/TFTP Support Telnet Support
SSH Support
Perl Support

Cisco Supported Devices
Network Configuration Manager User Guide 85
Cisco7140Dualmm3 1.3.6.1.4.1.9.1.269 *CISCO-CONFIG-COPY-MIB yes **yes yes
Cisco7140Dualt3 1.3.6.1.4.1.9.1.265 *CISCO-CONFIG-COPY-MIB yes **yes yes
Cisco7140Octt1 1.3.6.1.4.1.9.1.276 *CISCO-CONFIG-COPY-MIB yes **yes yes
Cisco7150Dualfe 1.3.6.1.4.1.9.1.355 *CISCO-CONFIG-COPY-MIB yes **yes yes
Cisco7150Dualt3 1.3.6.1.4.1.9.1.357 *CISCO-CONFIG-COPY-MIB yes **yes yes
Cisco7150Octt1 1.3.6.1.4.1.9.1.356 *CISCO-CONFIG-COPY-MIB yes **yes yes
Cisco7202 1.3.6.1.4.1.9.1.194 *CISCO-CONFIG-COPY-MIB yes **yes yes
Cisco7204 1.3.6.1.4.1.9.1.125 *CISCO-CONFIG-COPY-MIB yes **yes yes
Cisco7204VXR 1.3.6.1.4.1.9.1.223 *CISCO-CONFIG-COPY-MIB yes **yes yes
Cisco7206 1.3.6.1.4.1.9.1.108 *CISCO-CONFIG-COPY-MIB yes **yes yes
Cisco7206VXR 1.3.6.1.4.1.9.1.222 *CISCO-CONFIG-COPY-MIB yes **yes yes
UBR_7246 1.3.6.1.4.1.9.1.179 *CISCO-CONFIG-COPY-MIB yes **yes yes
Cisco7301 1.3.6.1.4.1.9.1.476 *CISCO-CONFIG-COPY-MIB yes **yes yes
Cisco7304 1.3.6.1.4.1.9.1.439 *CISCO-CONFIG-COPY-MIB yes **yes yes
Cisco7401ASR 1.3.6.1.4.1.9.1.403 *CISCO-CONFIG-COPY-MIB yes **yes yes
Cisco7401VXR 1.3.6.1.4.1.9.1.376 *CISCO-CONFIG-COPY-MIB yes **yes yes
Cisco7505 1.3.6.1.4.1.9.1.48 *CISCO-CONFIG-COPY-MIB yes **yes yes
Cisco7507z 1.3.6.1.4.1.9.1.288 *CISCO-CONFIG-COPY-MIB yes **yes yes
Cisco7506 1.3.6.1.4.1.9.1.47 *CISCO-CONFIG-COPY-MIB yes **yes yes
Cisco7507 1.3.6.1.4.1.9.1.45 *CISCO-CONFIG-COPY-MIB yes **yes yes
Cisco7507mx 1.3.6.1.4.1.9.1.290 *CISCO-CONFIG-COPY-MIB yes **yes yes
Cisco7513 1.3.6.1.4.1.9.1.46 *CISCO-CONFIG-COPY-MIB yes **yes yes
Cisco7513mx 1.3.6.1.4.1.9.1.291 *CISCO-CONFIG-COPY-MIB yes **yes yes
Cisco7513z 1.3.6.1.4.1.9.1.289 *CISCO-CONFIG-COPY-MIB yes **yes yes
Cisco7576 1.3.6.1.4.1.9.1.204 *CISCO-CONFIG-COPY-MIB yes **yes yes
Cisco7603 1.3.6.1.4.1.9.1.401 *CISCO-CONFIG-COPY-MIB yes **yes yes
Cisco7604 1.3.6.1.4.1.9.1.658 *CISCO-CONFIG-COPY-MIB yes **yes yes
Cisco7606 1.3.6.1.4.1.9.1.402 *CISCO-CONFIG-COPY-MIB yes **yes yes
Cisco7609 1.3.6.1.4.1.9.1.509 *CISCO-CONFIG-COPY-MIB yes **yes yes
Cisco7613 1.3.6.1.4.1.9.1.528 *CISCO-CONFIG-COPY-MIB yes **yes yes
Cisco9004 1.3.6.1.4.1.9.1.424 *CISCO-CONFIG-COPY-MIB yes **yes yes
Cisco10005 1.3.6.1.4.1.9.1.437 *CISCO-CONFIG-COPY-MIB yes **yes yes
Table A-1: Cisco Supported Devices
Device Names Sys OID SNMP/TFTP Support Telnet Support
SSH Support
Perl Support
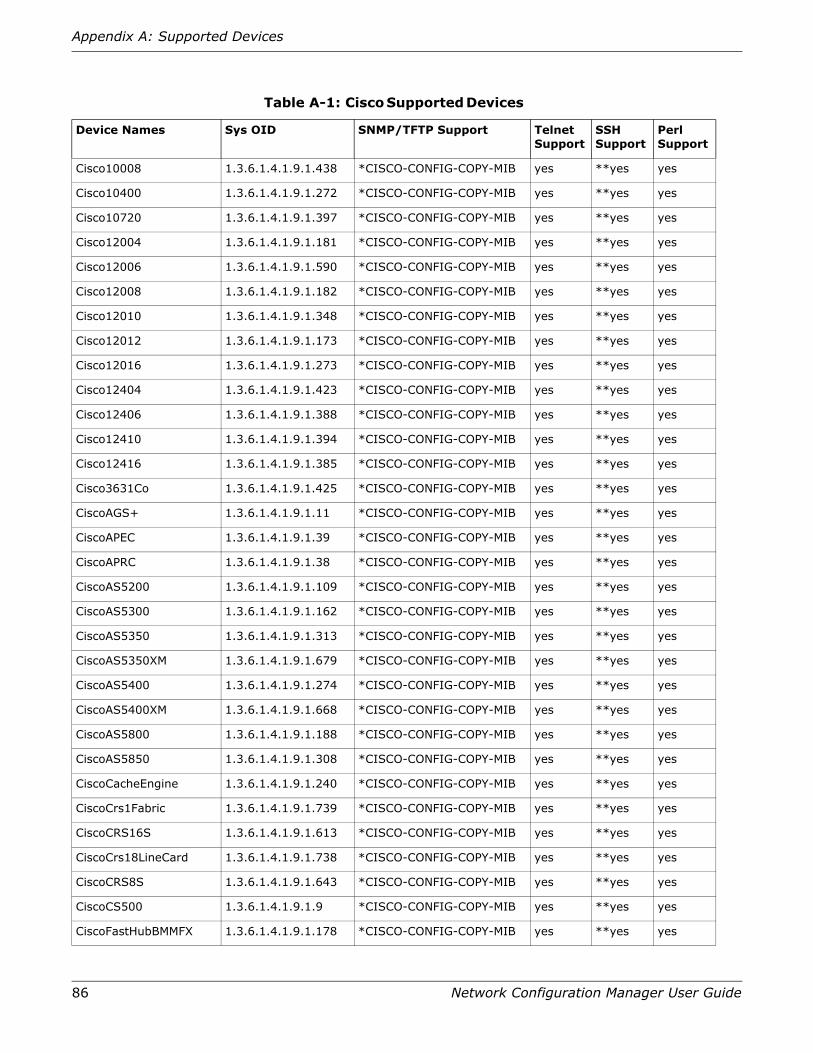
86 Network Configuration Manager User Guide
Appendix A: Supported Devices
Cisco10008 1.3.6.1.4.1.9.1.438 *CISCO-CONFIG-COPY-MIB yes **yes yes
Cisco10400 1.3.6.1.4.1.9.1.272 *CISCO-CONFIG-COPY-MIB yes **yes yes
Cisco10720 1.3.6.1.4.1.9.1.397 *CISCO-CONFIG-COPY-MIB yes **yes yes
Cisco12004 1.3.6.1.4.1.9.1.181 *CISCO-CONFIG-COPY-MIB yes **yes yes
Cisco12006 1.3.6.1.4.1.9.1.590 *CISCO-CONFIG-COPY-MIB yes **yes yes
Cisco12008 1.3.6.1.4.1.9.1.182 *CISCO-CONFIG-COPY-MIB yes **yes yes
Cisco12010 1.3.6.1.4.1.9.1.348 *CISCO-CONFIG-COPY-MIB yes **yes yes
Cisco12012 1.3.6.1.4.1.9.1.173 *CISCO-CONFIG-COPY-MIB yes **yes yes
Cisco12016 1.3.6.1.4.1.9.1.273 *CISCO-CONFIG-COPY-MIB yes **yes yes
Cisco12404 1.3.6.1.4.1.9.1.423 *CISCO-CONFIG-COPY-MIB yes **yes yes
Cisco12406 1.3.6.1.4.1.9.1.388 *CISCO-CONFIG-COPY-MIB yes **yes yes
Cisco12410 1.3.6.1.4.1.9.1.394 *CISCO-CONFIG-COPY-MIB yes **yes yes
Cisco12416 1.3.6.1.4.1.9.1.385 *CISCO-CONFIG-COPY-MIB yes **yes yes
Cisco3631Co 1.3.6.1.4.1.9.1.425 *CISCO-CONFIG-COPY-MIB yes **yes yes
CiscoAGS+ 1.3.6.1.4.1.9.1.11 *CISCO-CONFIG-COPY-MIB yes **yes yes
CiscoAPEC 1.3.6.1.4.1.9.1.39 *CISCO-CONFIG-COPY-MIB yes **yes yes
CiscoAPRC 1.3.6.1.4.1.9.1.38 *CISCO-CONFIG-COPY-MIB yes **yes yes
CiscoAS5200 1.3.6.1.4.1.9.1.109 *CISCO-CONFIG-COPY-MIB yes **yes yes
CiscoAS5300 1.3.6.1.4.1.9.1.162 *CISCO-CONFIG-COPY-MIB yes **yes yes
CiscoAS5350 1.3.6.1.4.1.9.1.313 *CISCO-CONFIG-COPY-MIB yes **yes yes
CiscoAS5350XM 1.3.6.1.4.1.9.1.679 *CISCO-CONFIG-COPY-MIB yes **yes yes
CiscoAS5400 1.3.6.1.4.1.9.1.274 *CISCO-CONFIG-COPY-MIB yes **yes yes
CiscoAS5400XM 1.3.6.1.4.1.9.1.668 *CISCO-CONFIG-COPY-MIB yes **yes yes
CiscoAS5800 1.3.6.1.4.1.9.1.188 *CISCO-CONFIG-COPY-MIB yes **yes yes
CiscoAS5850 1.3.6.1.4.1.9.1.308 *CISCO-CONFIG-COPY-MIB yes **yes yes
CiscoCacheEngine 1.3.6.1.4.1.9.1.240 *CISCO-CONFIG-COPY-MIB yes **yes yes
CiscoCrs1Fabric 1.3.6.1.4.1.9.1.739 *CISCO-CONFIG-COPY-MIB yes **yes yes
CiscoCRS16S 1.3.6.1.4.1.9.1.613 *CISCO-CONFIG-COPY-MIB yes **yes yes
CiscoCrs18LineCard 1.3.6.1.4.1.9.1.738 *CISCO-CONFIG-COPY-MIB yes **yes yes
CiscoCRS8S 1.3.6.1.4.1.9.1.643 *CISCO-CONFIG-COPY-MIB yes **yes yes
CiscoCS500 1.3.6.1.4.1.9.1.9 *CISCO-CONFIG-COPY-MIB yes **yes yes
CiscoFastHubBMMFX 1.3.6.1.4.1.9.1.178 *CISCO-CONFIG-COPY-MIB yes **yes yes
Table A-1: Cisco Supported Devices
Device Names Sys OID SNMP/TFTP Support Telnet Support
SSH Support
Perl Support

Cisco Supported Devices
Network Configuration Manager User Guide 87
CiscoFastHubBMMTX 1.3.6.1.4.1.9.1.177 *CISCO-CONFIG-COPY-MIB yes **yes yes
CiscoFastHub216T 1.3.6.1.4.1.9.1.169 *CISCO-CONFIG-COPY-MIB yes **yes yes
CiscoGS 1.3.6.1.4.1.9.1.1 *CISCO-CONFIG-COPY-MIB yes **yes yes
CiscoIGESM 1.3.6.1.4.1.9.1.592 *CISCO-CONFIG-COPY-MIB yes **yes yes
CiscoIGS 1.3.6.1.4.1.9.1.5 *CISCO-CONFIG-COPY-MIB yes **yes yes
CiscoLocalDirector 1.3.6.1.4.1.9.1.244 *CISCO-CONFIG-COPY-MIB yes **yes yes
Cisco MC3810 1.3.6.1.4.1.9.1.286 *CISCO-CONFIG-COPY-MIB yes **yes yes
Cisco MC3810 1.3.6.1.4.1.9.1.157 *CISCO-CONFIG-COPY-MIB yes **yes yes
CiscoME6340ACA 1.3.6.1.4.1.9.1.713 *CISCO-CONFIG-COPY-MIB yes **yes yes
CiscoME6340DCA 1.3.6.1.4.1.9.1.714 *CISCO-CONFIG-COPY-MIB yes **yes yes
CiscoME6340DCB 1.3.6.1.4.1.9.1.715 *CISCO-CONFIG-COPY-MIB yes **yes yes
CiscoMicroWebServer2 1.3.6.1.4.1.9.1.176 *CISCO-CONFIG-COPY-MIB yes **yes yes
CiscoMWR1900 1.3.6.1.4.1.9.1.398 *CISCO-CONFIG-COPY-MIB yes **yes yes
CiscoMWR1941DC 1.3.6.1.4.1.9.1.520 *CISCO-CONFIG-COPY-MIB yes **yes yes
CiscoOlympus 1.3.6.1.4.1.9.1.358 *CISCO-CONFIG-COPY-MIB yes **yes yes
CiscoOpticalRegenerator 1.3.6.1.4.1.9.1.254 *CISCO-CONFIG-COPY-MIB yes **yes yes
CiscoPro316C 1.3.6.1.4.1.9.1.148 *CISCO-CONFIG-COPY-MIB yes **yes yes
CiscoPro316T 1.3.6.1.4.1.9.1.147 *CISCO-CONFIG-COPY-MIB yes **yes yes
CiscoPro741 1.3.6.1.4.1.9.1.84 *CISCO-CONFIG-COPY-MIB yes **yes yes
CiscoPro742 1.3.6.1.4.1.9.1.85 *CISCO-CONFIG-COPY-MIB yes **yes yes
CiscoPro743 1.3.6.1.4.1.9.1.86 *CISCO-CONFIG-COPY-MIB yes **yes yes
CiscoPro744 1.3.6.1.4.1.9.1.87 *CISCO-CONFIG-COPY-MIB yes **yes yes
CiscoPro751 1.3.6.1.4.1.9.1.76 *CISCO-CONFIG-COPY-MIB yes **yes yes
CiscoPro752 1.3.6.1.4.1.9.1.77 *CISCO-CONFIG-COPY-MIB yes **yes yes
CiscoPro753 1.3.6.1.4.1.9.1.78 *CISCO-CONFIG-COPY-MIB yes **yes yes
CiscoPro761 1.3.6.1.4.1.9.1.88 *CISCO-CONFIG-COPY-MIB yes **yes yes
CiscoPro762 1.3.6.1.4.1.9.1.89 *CISCO-CONFIG-COPY-MIB yes **yes yes
CiscoPro765 1.3.6.1.4.1.9.1.92 *CISCO-CONFIG-COPY-MIB yes **yes yes
CiscoPro766 1.3.6.1.4.1.9.1.93 *CISCO-CONFIG-COPY-MIB yes **yes yes
CiscoPro1003 1.3.6.1.4.1.9.1.51 *CISCO-CONFIG-COPY-MIB yes **yes yes
CiscoPro1004 1.3.6.1.4.1.9.1.52 *CISCO-CONFIG-COPY-MIB yes **yes yes
CiscoPro1005 1.3.6.1.4.1.9.1.53 *CISCO-CONFIG-COPY-MIB yes **yes yes
Table A-1: Cisco Supported Devices
Device Names Sys OID SNMP/TFTP Support Telnet Support
SSH Support
Perl Support
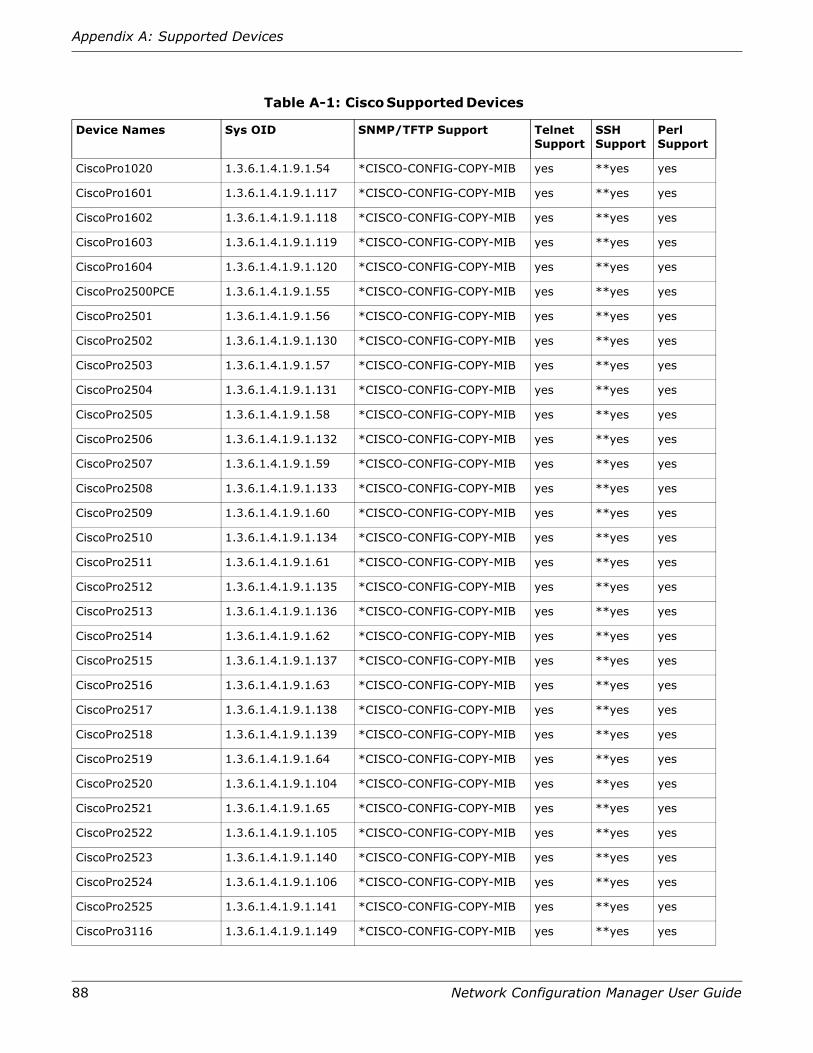
88 Network Configuration Manager User Guide
Appendix A: Supported Devices
CiscoPro1020 1.3.6.1.4.1.9.1.54 *CISCO-CONFIG-COPY-MIB yes **yes yes
CiscoPro1601 1.3.6.1.4.1.9.1.117 *CISCO-CONFIG-COPY-MIB yes **yes yes
CiscoPro1602 1.3.6.1.4.1.9.1.118 *CISCO-CONFIG-COPY-MIB yes **yes yes
CiscoPro1603 1.3.6.1.4.1.9.1.119 *CISCO-CONFIG-COPY-MIB yes **yes yes
CiscoPro1604 1.3.6.1.4.1.9.1.120 *CISCO-CONFIG-COPY-MIB yes **yes yes
CiscoPro2500PCE 1.3.6.1.4.1.9.1.55 *CISCO-CONFIG-COPY-MIB yes **yes yes
CiscoPro2501 1.3.6.1.4.1.9.1.56 *CISCO-CONFIG-COPY-MIB yes **yes yes
CiscoPro2502 1.3.6.1.4.1.9.1.130 *CISCO-CONFIG-COPY-MIB yes **yes yes
CiscoPro2503 1.3.6.1.4.1.9.1.57 *CISCO-CONFIG-COPY-MIB yes **yes yes
CiscoPro2504 1.3.6.1.4.1.9.1.131 *CISCO-CONFIG-COPY-MIB yes **yes yes
CiscoPro2505 1.3.6.1.4.1.9.1.58 *CISCO-CONFIG-COPY-MIB yes **yes yes
CiscoPro2506 1.3.6.1.4.1.9.1.132 *CISCO-CONFIG-COPY-MIB yes **yes yes
CiscoPro2507 1.3.6.1.4.1.9.1.59 *CISCO-CONFIG-COPY-MIB yes **yes yes
CiscoPro2508 1.3.6.1.4.1.9.1.133 *CISCO-CONFIG-COPY-MIB yes **yes yes
CiscoPro2509 1.3.6.1.4.1.9.1.60 *CISCO-CONFIG-COPY-MIB yes **yes yes
CiscoPro2510 1.3.6.1.4.1.9.1.134 *CISCO-CONFIG-COPY-MIB yes **yes yes
CiscoPro2511 1.3.6.1.4.1.9.1.61 *CISCO-CONFIG-COPY-MIB yes **yes yes
CiscoPro2512 1.3.6.1.4.1.9.1.135 *CISCO-CONFIG-COPY-MIB yes **yes yes
CiscoPro2513 1.3.6.1.4.1.9.1.136 *CISCO-CONFIG-COPY-MIB yes **yes yes
CiscoPro2514 1.3.6.1.4.1.9.1.62 *CISCO-CONFIG-COPY-MIB yes **yes yes
CiscoPro2515 1.3.6.1.4.1.9.1.137 *CISCO-CONFIG-COPY-MIB yes **yes yes
CiscoPro2516 1.3.6.1.4.1.9.1.63 *CISCO-CONFIG-COPY-MIB yes **yes yes
CiscoPro2517 1.3.6.1.4.1.9.1.138 *CISCO-CONFIG-COPY-MIB yes **yes yes
CiscoPro2518 1.3.6.1.4.1.9.1.139 *CISCO-CONFIG-COPY-MIB yes **yes yes
CiscoPro2519 1.3.6.1.4.1.9.1.64 *CISCO-CONFIG-COPY-MIB yes **yes yes
CiscoPro2520 1.3.6.1.4.1.9.1.104 *CISCO-CONFIG-COPY-MIB yes **yes yes
CiscoPro2521 1.3.6.1.4.1.9.1.65 *CISCO-CONFIG-COPY-MIB yes **yes yes
CiscoPro2522 1.3.6.1.4.1.9.1.105 *CISCO-CONFIG-COPY-MIB yes **yes yes
CiscoPro2523 1.3.6.1.4.1.9.1.140 *CISCO-CONFIG-COPY-MIB yes **yes yes
CiscoPro2524 1.3.6.1.4.1.9.1.106 *CISCO-CONFIG-COPY-MIB yes **yes yes
CiscoPro2525 1.3.6.1.4.1.9.1.141 *CISCO-CONFIG-COPY-MIB yes **yes yes
CiscoPro3116 1.3.6.1.4.1.9.1.149 *CISCO-CONFIG-COPY-MIB yes **yes yes
Table A-1: Cisco Supported Devices
Device Names Sys OID SNMP/TFTP Support Telnet Support
SSH Support
Perl Support
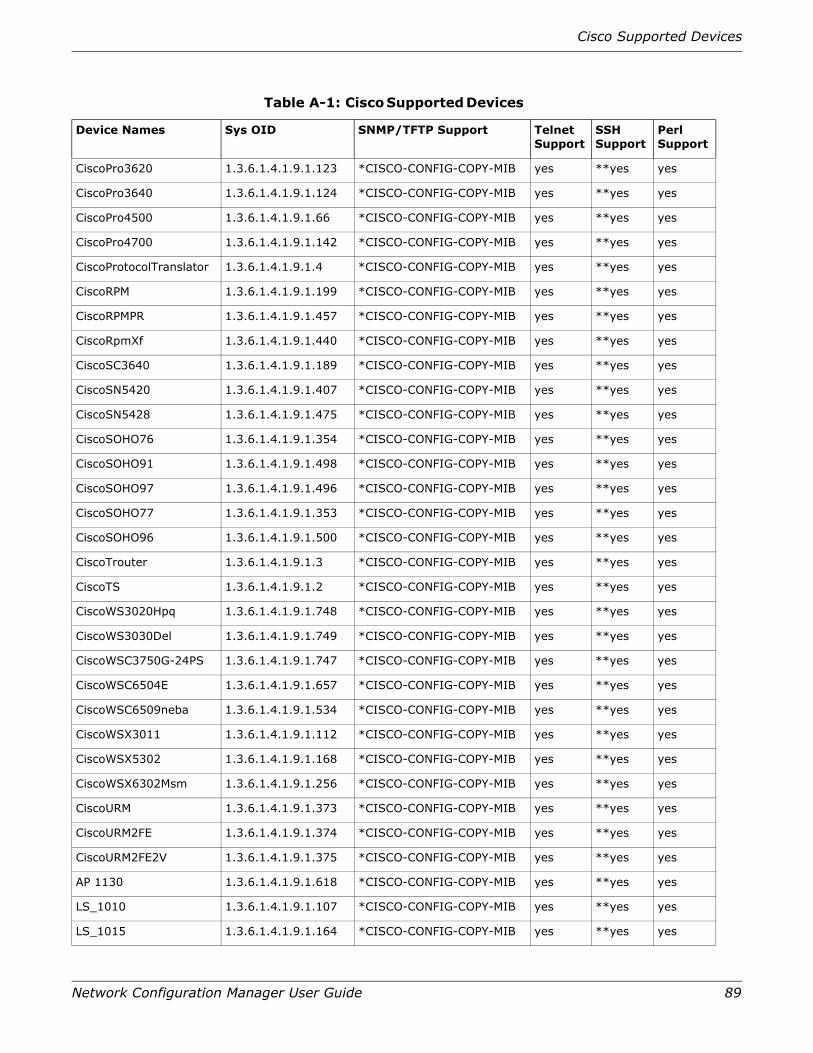
Cisco Supported Devices
Network Configuration Manager User Guide 89
CiscoPro3620 1.3.6.1.4.1.9.1.123 *CISCO-CONFIG-COPY-MIB yes **yes yes
CiscoPro3640 1.3.6.1.4.1.9.1.124 *CISCO-CONFIG-COPY-MIB yes **yes yes
CiscoPro4500 1.3.6.1.4.1.9.1.66 *CISCO-CONFIG-COPY-MIB yes **yes yes
CiscoPro4700 1.3.6.1.4.1.9.1.142 *CISCO-CONFIG-COPY-MIB yes **yes yes
CiscoProtocolTranslator 1.3.6.1.4.1.9.1.4 *CISCO-CONFIG-COPY-MIB yes **yes yes
CiscoRPM 1.3.6.1.4.1.9.1.199 *CISCO-CONFIG-COPY-MIB yes **yes yes
CiscoRPMPR 1.3.6.1.4.1.9.1.457 *CISCO-CONFIG-COPY-MIB yes **yes yes
CiscoRpmXf 1.3.6.1.4.1.9.1.440 *CISCO-CONFIG-COPY-MIB yes **yes yes
CiscoSC3640 1.3.6.1.4.1.9.1.189 *CISCO-CONFIG-COPY-MIB yes **yes yes
CiscoSN5420 1.3.6.1.4.1.9.1.407 *CISCO-CONFIG-COPY-MIB yes **yes yes
CiscoSN5428 1.3.6.1.4.1.9.1.475 *CISCO-CONFIG-COPY-MIB yes **yes yes
CiscoSOHO76 1.3.6.1.4.1.9.1.354 *CISCO-CONFIG-COPY-MIB yes **yes yes
CiscoSOHO91 1.3.6.1.4.1.9.1.498 *CISCO-CONFIG-COPY-MIB yes **yes yes
CiscoSOHO97 1.3.6.1.4.1.9.1.496 *CISCO-CONFIG-COPY-MIB yes **yes yes
CiscoSOHO77 1.3.6.1.4.1.9.1.353 *CISCO-CONFIG-COPY-MIB yes **yes yes
CiscoSOHO96 1.3.6.1.4.1.9.1.500 *CISCO-CONFIG-COPY-MIB yes **yes yes
CiscoTrouter 1.3.6.1.4.1.9.1.3 *CISCO-CONFIG-COPY-MIB yes **yes yes
CiscoTS 1.3.6.1.4.1.9.1.2 *CISCO-CONFIG-COPY-MIB yes **yes yes
CiscoWS3020Hpq 1.3.6.1.4.1.9.1.748 *CISCO-CONFIG-COPY-MIB yes **yes yes
CiscoWS3030Del 1.3.6.1.4.1.9.1.749 *CISCO-CONFIG-COPY-MIB yes **yes yes
CiscoWSC3750G-24PS 1.3.6.1.4.1.9.1.747 *CISCO-CONFIG-COPY-MIB yes **yes yes
CiscoWSC6504E 1.3.6.1.4.1.9.1.657 *CISCO-CONFIG-COPY-MIB yes **yes yes
CiscoWSC6509neba 1.3.6.1.4.1.9.1.534 *CISCO-CONFIG-COPY-MIB yes **yes yes
CiscoWSX3011 1.3.6.1.4.1.9.1.112 *CISCO-CONFIG-COPY-MIB yes **yes yes
CiscoWSX5302 1.3.6.1.4.1.9.1.168 *CISCO-CONFIG-COPY-MIB yes **yes yes
CiscoWSX6302Msm 1.3.6.1.4.1.9.1.256 *CISCO-CONFIG-COPY-MIB yes **yes yes
CiscoURM 1.3.6.1.4.1.9.1.373 *CISCO-CONFIG-COPY-MIB yes **yes yes
CiscoURM2FE 1.3.6.1.4.1.9.1.374 *CISCO-CONFIG-COPY-MIB yes **yes yes
CiscoURM2FE2V 1.3.6.1.4.1.9.1.375 *CISCO-CONFIG-COPY-MIB yes **yes yes
AP 1130 1.3.6.1.4.1.9.1.618 *CISCO-CONFIG-COPY-MIB yes **yes yes
LS_1010 1.3.6.1.4.1.9.1.107 *CISCO-CONFIG-COPY-MIB yes **yes yes
LS_1015 1.3.6.1.4.1.9.1.164 *CISCO-CONFIG-COPY-MIB yes **yes yes
Table A-1: Cisco Supported Devices
Device Names Sys OID SNMP/TFTP Support Telnet Support
SSH Support
Perl Support
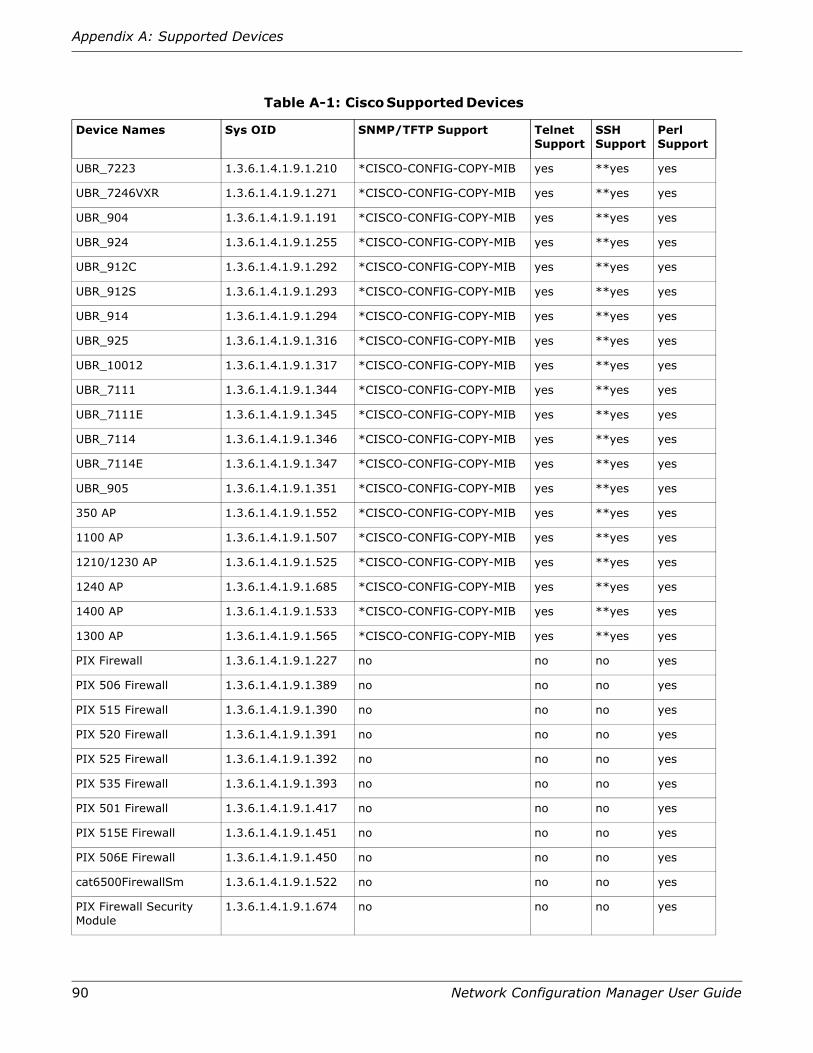
90 Network Configuration Manager User Guide
Appendix A: Supported Devices
UBR_7223 1.3.6.1.4.1.9.1.210 *CISCO-CONFIG-COPY-MIB yes **yes yes
UBR_7246VXR 1.3.6.1.4.1.9.1.271 *CISCO-CONFIG-COPY-MIB yes **yes yes
UBR_904 1.3.6.1.4.1.9.1.191 *CISCO-CONFIG-COPY-MIB yes **yes yes
UBR_924 1.3.6.1.4.1.9.1.255 *CISCO-CONFIG-COPY-MIB yes **yes yes
UBR_912C 1.3.6.1.4.1.9.1.292 *CISCO-CONFIG-COPY-MIB yes **yes yes
UBR_912S 1.3.6.1.4.1.9.1.293 *CISCO-CONFIG-COPY-MIB yes **yes yes
UBR_914 1.3.6.1.4.1.9.1.294 *CISCO-CONFIG-COPY-MIB yes **yes yes
UBR_925 1.3.6.1.4.1.9.1.316 *CISCO-CONFIG-COPY-MIB yes **yes yes
UBR_10012 1.3.6.1.4.1.9.1.317 *CISCO-CONFIG-COPY-MIB yes **yes yes
UBR_7111 1.3.6.1.4.1.9.1.344 *CISCO-CONFIG-COPY-MIB yes **yes yes
UBR_7111E 1.3.6.1.4.1.9.1.345 *CISCO-CONFIG-COPY-MIB yes **yes yes
UBR_7114 1.3.6.1.4.1.9.1.346 *CISCO-CONFIG-COPY-MIB yes **yes yes
UBR_7114E 1.3.6.1.4.1.9.1.347 *CISCO-CONFIG-COPY-MIB yes **yes yes
UBR_905 1.3.6.1.4.1.9.1.351 *CISCO-CONFIG-COPY-MIB yes **yes yes
350 AP 1.3.6.1.4.1.9.1.552 *CISCO-CONFIG-COPY-MIB yes **yes yes
1100 AP 1.3.6.1.4.1.9.1.507 *CISCO-CONFIG-COPY-MIB yes **yes yes
1210/1230 AP 1.3.6.1.4.1.9.1.525 *CISCO-CONFIG-COPY-MIB yes **yes yes
1240 AP 1.3.6.1.4.1.9.1.685 *CISCO-CONFIG-COPY-MIB yes **yes yes
1400 AP 1.3.6.1.4.1.9.1.533 *CISCO-CONFIG-COPY-MIB yes **yes yes
1300 AP 1.3.6.1.4.1.9.1.565 *CISCO-CONFIG-COPY-MIB yes **yes yes
PIX Firewall 1.3.6.1.4.1.9.1.227 no no no yes
PIX 506 Firewall 1.3.6.1.4.1.9.1.389 no no no yes
PIX 515 Firewall 1.3.6.1.4.1.9.1.390 no no no yes
PIX 520 Firewall 1.3.6.1.4.1.9.1.391 no no no yes
PIX 525 Firewall 1.3.6.1.4.1.9.1.392 no no no yes
PIX 535 Firewall 1.3.6.1.4.1.9.1.393 no no no yes
PIX 501 Firewall 1.3.6.1.4.1.9.1.417 no no no yes
PIX 515E Firewall 1.3.6.1.4.1.9.1.451 no no no yes
PIX 506E Firewall 1.3.6.1.4.1.9.1.450 no no no yes
cat6500FirewallSm 1.3.6.1.4.1.9.1.522 no no no yes
PIX Firewall Security Module
1.3.6.1.4.1.9.1.674 no no no yes
Table A-1: Cisco Supported Devices
Device Names Sys OID SNMP/TFTP Support Telnet Support
SSH Support
Perl Support
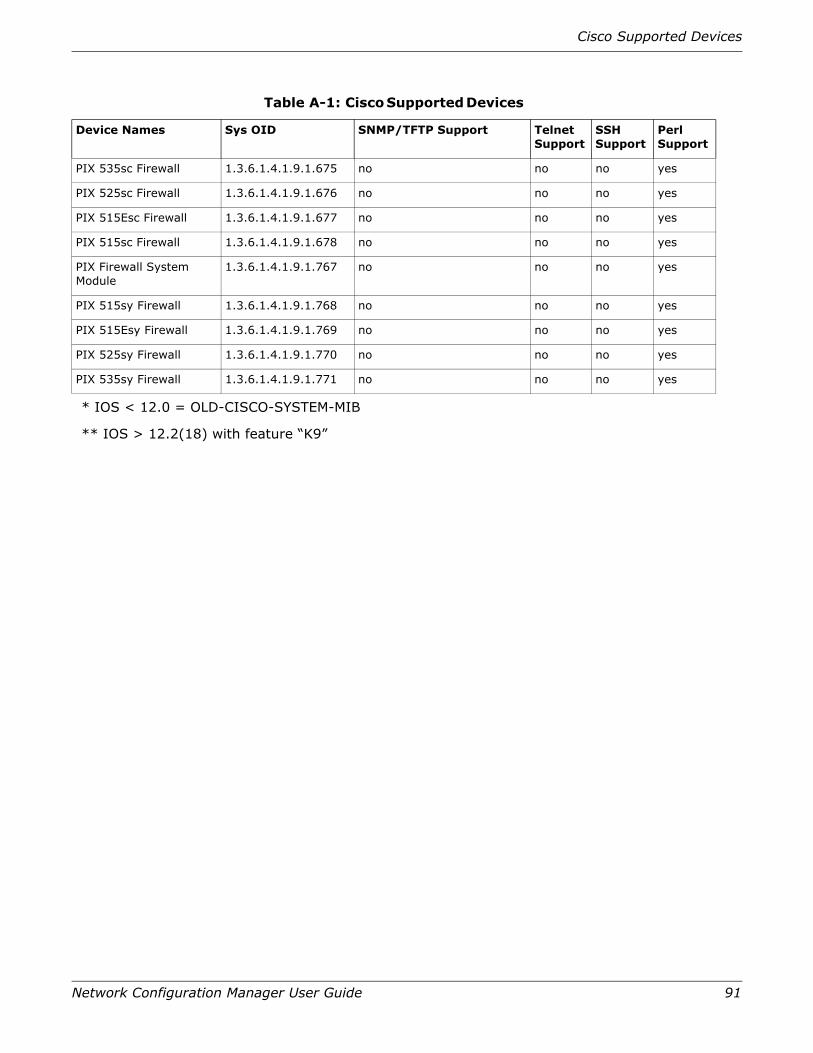
Cisco Supported Devices
Network Configuration Manager User Guide 91
* IOS < 12.0 = OLD-CISCO-SYSTEM-MIB
** IOS > 12.2(18) with feature “K9”
PIX 535sc Firewall 1.3.6.1.4.1.9.1.675 no no no yes
PIX 525sc Firewall 1.3.6.1.4.1.9.1.676 no no no yes
PIX 515Esc Firewall 1.3.6.1.4.1.9.1.677 no no no yes
PIX 515sc Firewall 1.3.6.1.4.1.9.1.678 no no no yes
PIX Firewall System Module
1.3.6.1.4.1.9.1.767 no no no yes
PIX 515sy Firewall 1.3.6.1.4.1.9.1.768 no no no yes
PIX 515Esy Firewall 1.3.6.1.4.1.9.1.769 no no no yes
PIX 525sy Firewall 1.3.6.1.4.1.9.1.770 no no no yes
PIX 535sy Firewall 1.3.6.1.4.1.9.1.771 no no no yes
Table A-1: Cisco Supported Devices
Device Names Sys OID SNMP/TFTP Support Telnet Support
SSH Support
Perl Support

92 Network Configuration Manager User Guide
Appendix A: Supported Devices
Cisco CAT Supported DevicesTable A-2 lists Cisco CAT devices supported by SPECTRUM Network Configuration Manager.
Table A-2: Cisco CAT Devices
Device Names Sys OID SNMP/TFTP Support Telnet Support
SSH Support
Perl Support
Cat2926 1.3.6.1.4.1.9.5.35 CISCO-CONFIG-COPY-MIB* no no yes
Cat_2948G 1.3.6.1.4.1.9.5.42 CISCO-CONFIG-COPY-MIB* no no yes
Cat2948ggetx 1.3.6.1.4.1.9.5.62 CISCO-CONFIG-COPY-MIB* no no yes
Cat2980ga 1.3.6.1.4.1.9.5.51 CISCO-CONFIG-COPY-MIB* no no yes
Cat_2980GSW 1.3.6.1.4.1.9.5.49 CISCO-CONFIG-COPY-MIB* no no yes
Cat_4003 1.3.6.1.4.1.9.5.40 CISCO-CONFIG-COPY-MIB* no no yes
Cat_4006 1.3.6.1.4.1.9.5.46 CISCO-CONFIG-COPY-MIB* no no yes
Cat4503 1.3.6.1.4.1.9.5.58 CISCO-CONFIG-COPY-MIB* no no yes
Cat_4506 1.3.6.1.4.1.9.5.59 CISCO-CONFIG-COPY-MIB* no no yes
Cat4912 1.3.6.1.4.1.9.5.41 CISCO-CONFIG-COPY-MIB* no no yes
Cat6knam 1.3.6.1.4.1.9.5.48 CISCO-CONFIG-COPY-MIB* no no yes
Cat6503 1.3.6.1.4.1.9.5.56 CISCO-CONFIG-COPY-MIB* no no yes
Cat6509neba 1.3.6.1.4.1.9.5.61 CISCO-CONFIG-COPY-MIB* no no yes
Cat7603 1.3.6.1.4.1.9.5.53 CISCO-CONFIG-COPY-MIB* no no yes
Cat7604 1.3.6.1.4.1.9.5.63 CISCO-CONFIG-COPY-MIB* no no yes
Cat7606 1.3.6.1.4.1.9.5.54 CISCO-CONFIG-COPY-MIB* no no yes
Cat7609 1.3.6.1.4.1.9.5.55 CISCO-CONFIG-COPY-MIB* no no yes
Cat7613 1.3.6.1.4.1.9.5.60 CISCO-CONFIG-COPY-MIB* no no yes
CiscoWSC6504E 1.3.6.1.4.1.9.5.64 CISCO-CONFIG-COPY-MIB* no no yes
HubCat1400 1.3.6.1.4.1.9.5.6 CISCO-CONFIG-COPY-MIB* no no yes
HubCat5000 1.3.6.1.4.1.9.5.7 CISCO-CONFIG-COPY-MIB* no no yes
HubCat5002 1.3.6.1.4.1.9.5.29 CISCO-CONFIG-COPY-MIB* no no yes
HubCat5500 1.3.6.1.4.1.9.5.17 CISCO-CONFIG-COPY-MIB* no no yes
HubCat5505 1.3.6.1.4.1.9.5.34 CISCO-CONFIG-COPY-MIB* no no yes
HubCat5509 1.3.6.1.4.1.9.5.36 CISCO-CONFIG-COPY-MIB* no no yes
SwCat1200 1.3.6.1.4.1.9.5.5 CISCO-CONFIG-COPY-MIB* no no yes
WS-C6006 1.3.6.1.4.1.9.5.38 CISCO-CONFIG-COPY-MIB* no no yes
WS-C6009 1.3.6.1.4.1.9.5.39 CISCO-CONFIG-COPY-MIB* no no yes
WS-C6506 1.3.6.1.4.1.9.5.45 CISCO-CONFIG-COPY-MIB* no no yes
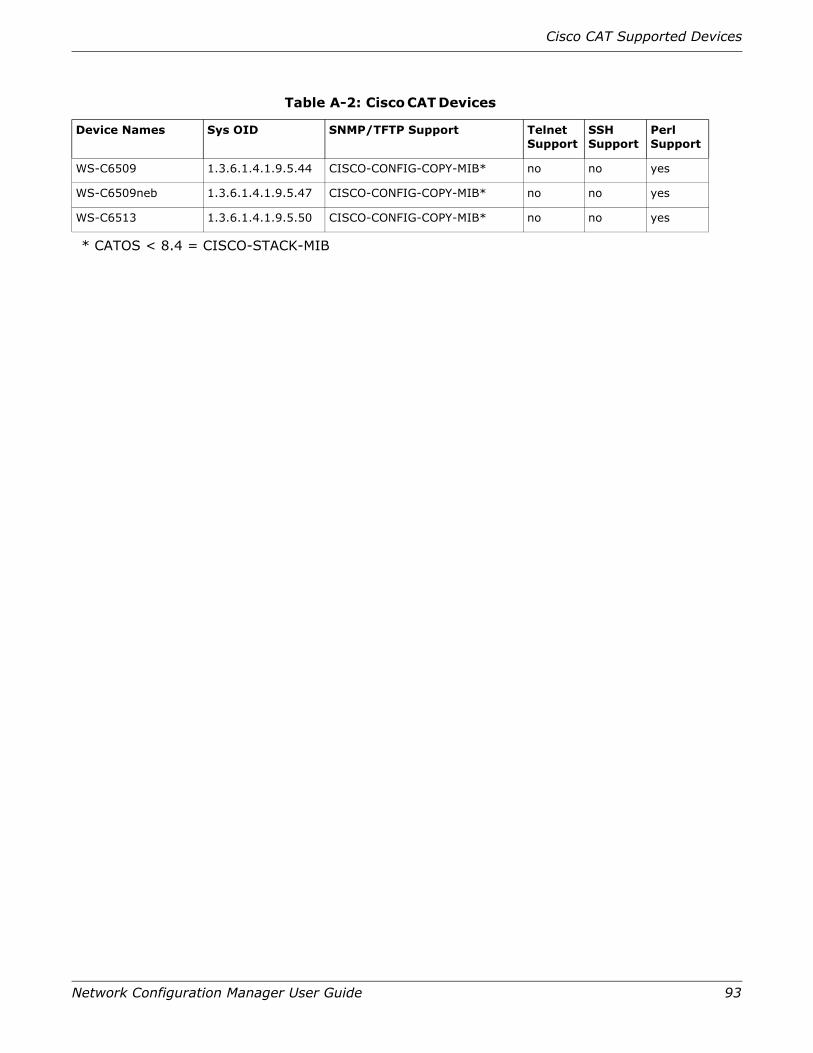
Cisco CAT Supported Devices
Network Configuration Manager User Guide 93
* CATOS < 8.4 = CISCO-STACK-MIB
WS-C6509 1.3.6.1.4.1.9.5.44 CISCO-CONFIG-COPY-MIB* no no yes
WS-C6509neb 1.3.6.1.4.1.9.5.47 CISCO-CONFIG-COPY-MIB* no no yes
WS-C6513 1.3.6.1.4.1.9.5.50 CISCO-CONFIG-COPY-MIB* no no yes
Table A-2: Cisco CAT Devices
Device Names Sys OID SNMP/TFTP Support Telnet Support
SSH Support
Perl Support
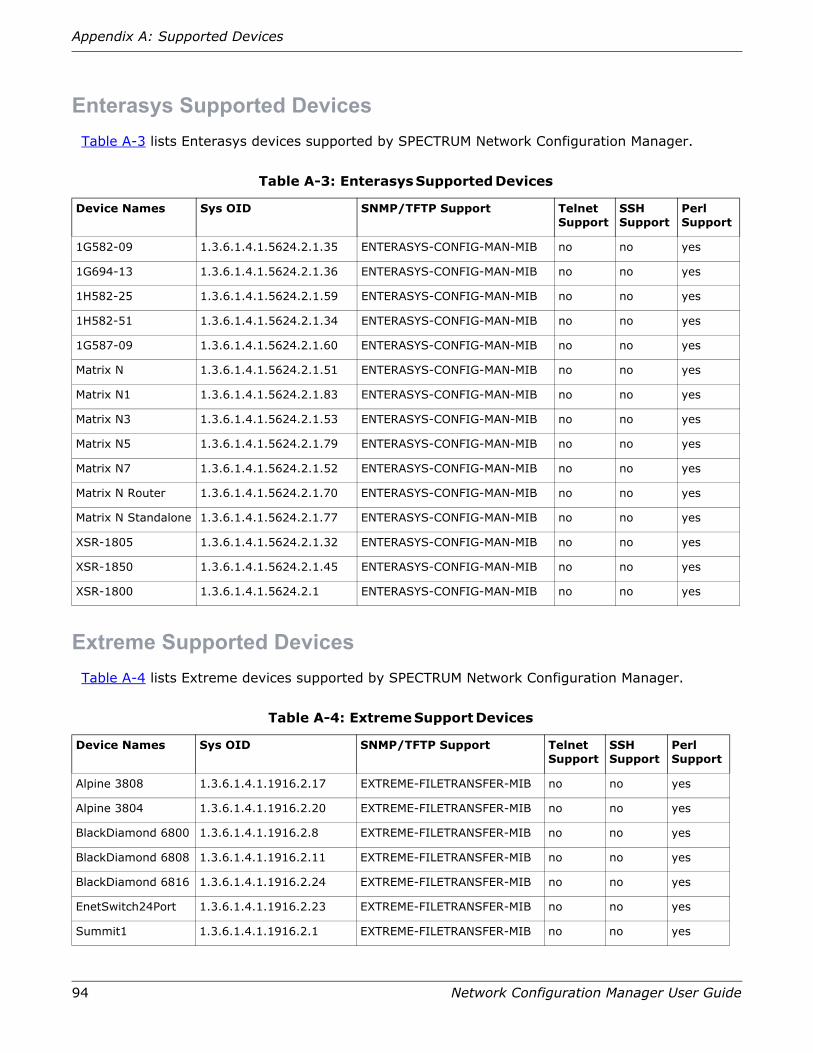
94 Network Configuration Manager User Guide
Appendix A: Supported Devices
Enterasys Supported DevicesTable A-3 lists Enterasys devices supported by SPECTRUM Network Configuration Manager.
Extreme Supported DevicesTable A-4 lists Extreme devices supported by SPECTRUM Network Configuration Manager.
Table A-3: Enterasys Supported Devices
Device Names Sys OID SNMP/TFTP Support Telnet Support
SSH Support
Perl Support
1G582-09 1.3.6.1.4.1.5624.2.1.35 ENTERASYS-CONFIG-MAN-MIB no no yes
1G694-13 1.3.6.1.4.1.5624.2.1.36 ENTERASYS-CONFIG-MAN-MIB no no yes
1H582-25 1.3.6.1.4.1.5624.2.1.59 ENTERASYS-CONFIG-MAN-MIB no no yes
1H582-51 1.3.6.1.4.1.5624.2.1.34 ENTERASYS-CONFIG-MAN-MIB no no yes
1G587-09 1.3.6.1.4.1.5624.2.1.60 ENTERASYS-CONFIG-MAN-MIB no no yes
Matrix N 1.3.6.1.4.1.5624.2.1.51 ENTERASYS-CONFIG-MAN-MIB no no yes
Matrix N1 1.3.6.1.4.1.5624.2.1.83 ENTERASYS-CONFIG-MAN-MIB no no yes
Matrix N3 1.3.6.1.4.1.5624.2.1.53 ENTERASYS-CONFIG-MAN-MIB no no yes
Matrix N5 1.3.6.1.4.1.5624.2.1.79 ENTERASYS-CONFIG-MAN-MIB no no yes
Matrix N7 1.3.6.1.4.1.5624.2.1.52 ENTERASYS-CONFIG-MAN-MIB no no yes
Matrix N Router 1.3.6.1.4.1.5624.2.1.70 ENTERASYS-CONFIG-MAN-MIB no no yes
Matrix N Standalone 1.3.6.1.4.1.5624.2.1.77 ENTERASYS-CONFIG-MAN-MIB no no yes
XSR-1805 1.3.6.1.4.1.5624.2.1.32 ENTERASYS-CONFIG-MAN-MIB no no yes
XSR-1850 1.3.6.1.4.1.5624.2.1.45 ENTERASYS-CONFIG-MAN-MIB no no yes
XSR-1800 1.3.6.1.4.1.5624.2.1 ENTERASYS-CONFIG-MAN-MIB no no yes
Table A-4: Extreme Support Devices
Device Names Sys OID SNMP/TFTP Support Telnet Support
SSH Support
Perl Support
Alpine 3808 1.3.6.1.4.1.1916.2.17 EXTREME-FILETRANSFER-MIB no no yes
Alpine 3804 1.3.6.1.4.1.1916.2.20 EXTREME-FILETRANSFER-MIB no no yes
BlackDiamond 6800 1.3.6.1.4.1.1916.2.8 EXTREME-FILETRANSFER-MIB no no yes
BlackDiamond 6808 1.3.6.1.4.1.1916.2.11 EXTREME-FILETRANSFER-MIB no no yes
BlackDiamond 6816 1.3.6.1.4.1.1916.2.24 EXTREME-FILETRANSFER-MIB no no yes
EnetSwitch24Port 1.3.6.1.4.1.1916.2.23 EXTREME-FILETRANSFER-MIB no no yes
Summit1 1.3.6.1.4.1.1916.2.1 EXTREME-FILETRANSFER-MIB no no yes
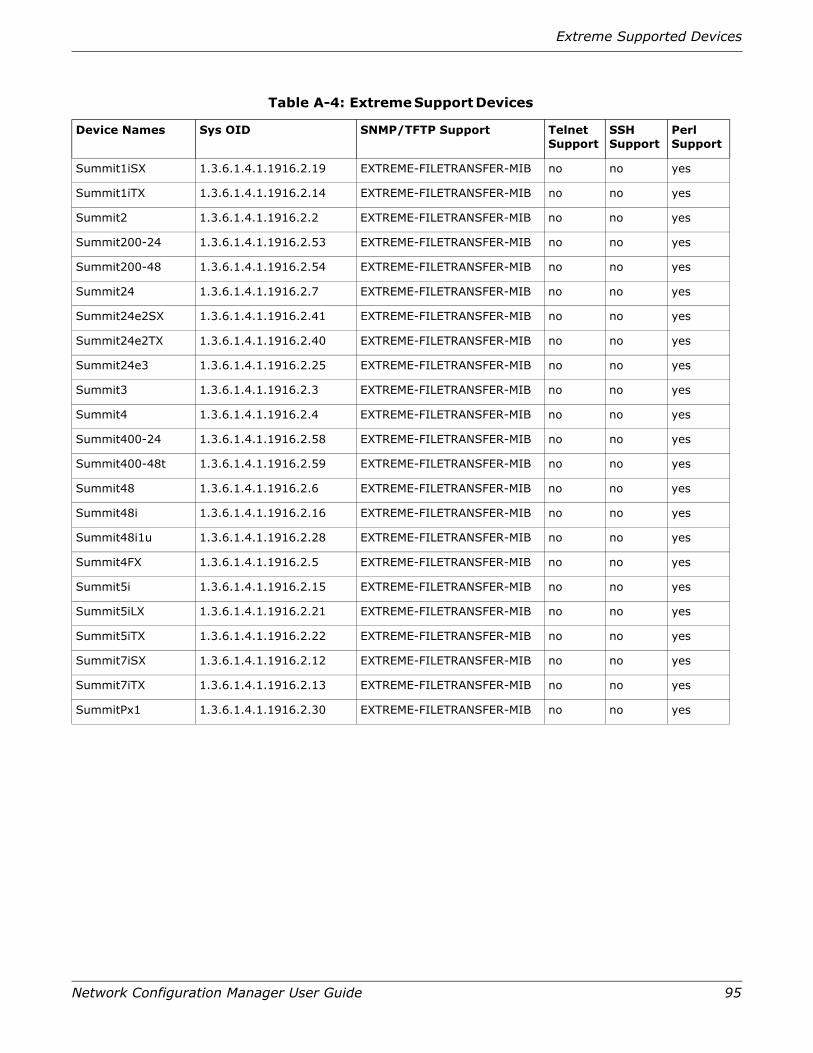
Extreme Supported Devices
Network Configuration Manager User Guide 95
Summit1iSX 1.3.6.1.4.1.1916.2.19 EXTREME-FILETRANSFER-MIB no no yes
Summit1iTX 1.3.6.1.4.1.1916.2.14 EXTREME-FILETRANSFER-MIB no no yes
Summit2 1.3.6.1.4.1.1916.2.2 EXTREME-FILETRANSFER-MIB no no yes
Summit200-24 1.3.6.1.4.1.1916.2.53 EXTREME-FILETRANSFER-MIB no no yes
Summit200-48 1.3.6.1.4.1.1916.2.54 EXTREME-FILETRANSFER-MIB no no yes
Summit24 1.3.6.1.4.1.1916.2.7 EXTREME-FILETRANSFER-MIB no no yes
Summit24e2SX 1.3.6.1.4.1.1916.2.41 EXTREME-FILETRANSFER-MIB no no yes
Summit24e2TX 1.3.6.1.4.1.1916.2.40 EXTREME-FILETRANSFER-MIB no no yes
Summit24e3 1.3.6.1.4.1.1916.2.25 EXTREME-FILETRANSFER-MIB no no yes
Summit3 1.3.6.1.4.1.1916.2.3 EXTREME-FILETRANSFER-MIB no no yes
Summit4 1.3.6.1.4.1.1916.2.4 EXTREME-FILETRANSFER-MIB no no yes
Summit400-24 1.3.6.1.4.1.1916.2.58 EXTREME-FILETRANSFER-MIB no no yes
Summit400-48t 1.3.6.1.4.1.1916.2.59 EXTREME-FILETRANSFER-MIB no no yes
Summit48 1.3.6.1.4.1.1916.2.6 EXTREME-FILETRANSFER-MIB no no yes
Summit48i 1.3.6.1.4.1.1916.2.16 EXTREME-FILETRANSFER-MIB no no yes
Summit48i1u 1.3.6.1.4.1.1916.2.28 EXTREME-FILETRANSFER-MIB no no yes
Summit4FX 1.3.6.1.4.1.1916.2.5 EXTREME-FILETRANSFER-MIB no no yes
Summit5i 1.3.6.1.4.1.1916.2.15 EXTREME-FILETRANSFER-MIB no no yes
Summit5iLX 1.3.6.1.4.1.1916.2.21 EXTREME-FILETRANSFER-MIB no no yes
Summit5iTX 1.3.6.1.4.1.1916.2.22 EXTREME-FILETRANSFER-MIB no no yes
Summit7iSX 1.3.6.1.4.1.1916.2.12 EXTREME-FILETRANSFER-MIB no no yes
Summit7iTX 1.3.6.1.4.1.1916.2.13 EXTREME-FILETRANSFER-MIB no no yes
SummitPx1 1.3.6.1.4.1.1916.2.30 EXTREME-FILETRANSFER-MIB no no yes
Table A-4: Extreme Support Devices
Device Names Sys OID SNMP/TFTP Support Telnet Support
SSH Support
Perl Support
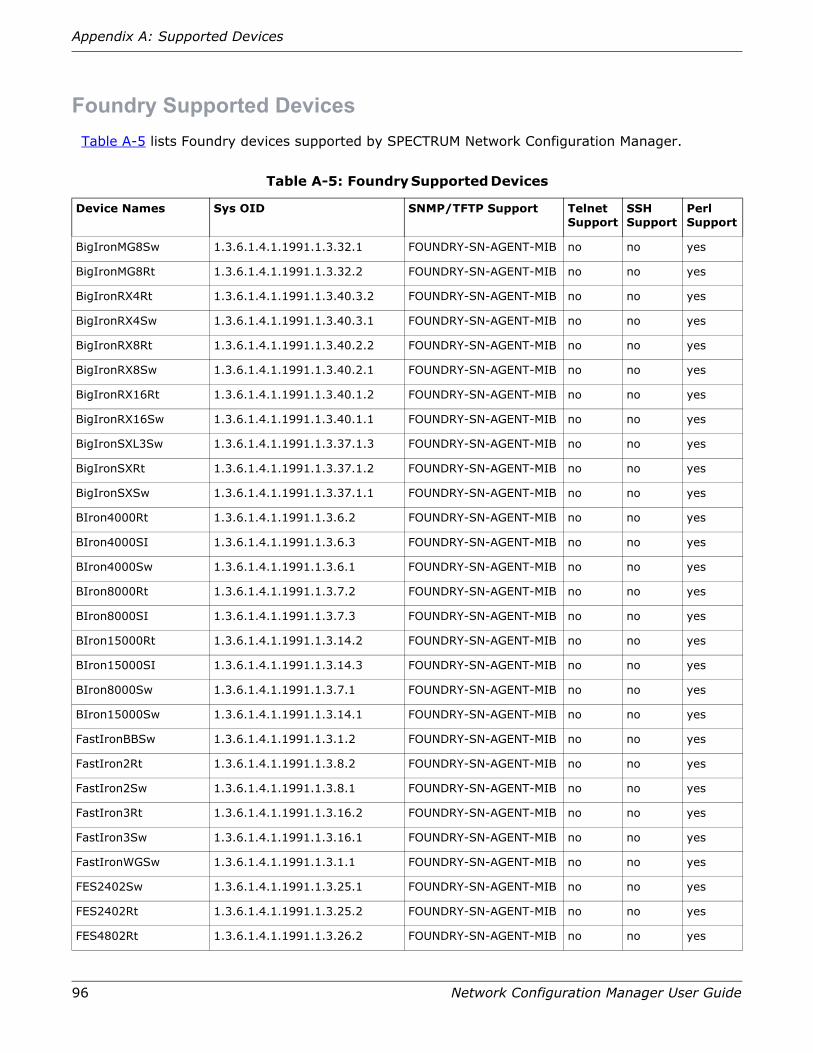
96 Network Configuration Manager User Guide
Appendix A: Supported Devices
Foundry Supported DevicesTable A-5 lists Foundry devices supported by SPECTRUM Network Configuration Manager.
Table A-5: Foundry Supported Devices
Device Names Sys OID SNMP/TFTP Support Telnet Support
SSH Support
Perl Support
BigIronMG8Sw 1.3.6.1.4.1.1991.1.3.32.1 FOUNDRY-SN-AGENT-MIB no no yes
BigIronMG8Rt 1.3.6.1.4.1.1991.1.3.32.2 FOUNDRY-SN-AGENT-MIB no no yes
BigIronRX4Rt 1.3.6.1.4.1.1991.1.3.40.3.2 FOUNDRY-SN-AGENT-MIB no no yes
BigIronRX4Sw 1.3.6.1.4.1.1991.1.3.40.3.1 FOUNDRY-SN-AGENT-MIB no no yes
BigIronRX8Rt 1.3.6.1.4.1.1991.1.3.40.2.2 FOUNDRY-SN-AGENT-MIB no no yes
BigIronRX8Sw 1.3.6.1.4.1.1991.1.3.40.2.1 FOUNDRY-SN-AGENT-MIB no no yes
BigIronRX16Rt 1.3.6.1.4.1.1991.1.3.40.1.2 FOUNDRY-SN-AGENT-MIB no no yes
BigIronRX16Sw 1.3.6.1.4.1.1991.1.3.40.1.1 FOUNDRY-SN-AGENT-MIB no no yes
BigIronSXL3Sw 1.3.6.1.4.1.1991.1.3.37.1.3 FOUNDRY-SN-AGENT-MIB no no yes
BigIronSXRt 1.3.6.1.4.1.1991.1.3.37.1.2 FOUNDRY-SN-AGENT-MIB no no yes
BigIronSXSw 1.3.6.1.4.1.1991.1.3.37.1.1 FOUNDRY-SN-AGENT-MIB no no yes
BIron4000Rt 1.3.6.1.4.1.1991.1.3.6.2 FOUNDRY-SN-AGENT-MIB no no yes
BIron4000SI 1.3.6.1.4.1.1991.1.3.6.3 FOUNDRY-SN-AGENT-MIB no no yes
BIron4000Sw 1.3.6.1.4.1.1991.1.3.6.1 FOUNDRY-SN-AGENT-MIB no no yes
BIron8000Rt 1.3.6.1.4.1.1991.1.3.7.2 FOUNDRY-SN-AGENT-MIB no no yes
BIron8000SI 1.3.6.1.4.1.1991.1.3.7.3 FOUNDRY-SN-AGENT-MIB no no yes
BIron15000Rt 1.3.6.1.4.1.1991.1.3.14.2 FOUNDRY-SN-AGENT-MIB no no yes
BIron15000SI 1.3.6.1.4.1.1991.1.3.14.3 FOUNDRY-SN-AGENT-MIB no no yes
BIron8000Sw 1.3.6.1.4.1.1991.1.3.7.1 FOUNDRY-SN-AGENT-MIB no no yes
BIron15000Sw 1.3.6.1.4.1.1991.1.3.14.1 FOUNDRY-SN-AGENT-MIB no no yes
FastIronBBSw 1.3.6.1.4.1.1991.1.3.1.2 FOUNDRY-SN-AGENT-MIB no no yes
FastIron2Rt 1.3.6.1.4.1.1991.1.3.8.2 FOUNDRY-SN-AGENT-MIB no no yes
FastIron2Sw 1.3.6.1.4.1.1991.1.3.8.1 FOUNDRY-SN-AGENT-MIB no no yes
FastIron3Rt 1.3.6.1.4.1.1991.1.3.16.2 FOUNDRY-SN-AGENT-MIB no no yes
FastIron3Sw 1.3.6.1.4.1.1991.1.3.16.1 FOUNDRY-SN-AGENT-MIB no no yes
FastIronWGSw 1.3.6.1.4.1.1991.1.3.1.1 FOUNDRY-SN-AGENT-MIB no no yes
FES2402Sw 1.3.6.1.4.1.1991.1.3.25.1 FOUNDRY-SN-AGENT-MIB no no yes
FES2402Rt 1.3.6.1.4.1.1991.1.3.25.2 FOUNDRY-SN-AGENT-MIB no no yes
FES4802Rt 1.3.6.1.4.1.1991.1.3.26.2 FOUNDRY-SN-AGENT-MIB no no yes
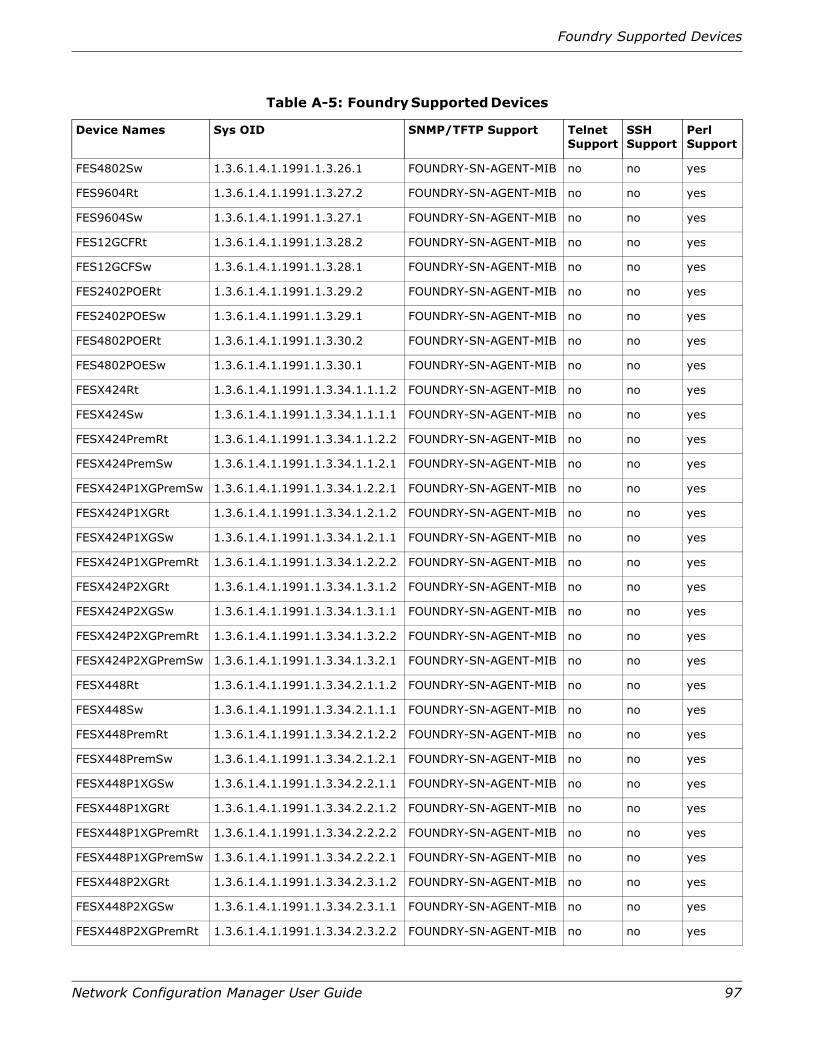
Foundry Supported Devices
Network Configuration Manager User Guide 97
FES4802Sw 1.3.6.1.4.1.1991.1.3.26.1 FOUNDRY-SN-AGENT-MIB no no yes
FES9604Rt 1.3.6.1.4.1.1991.1.3.27.2 FOUNDRY-SN-AGENT-MIB no no yes
FES9604Sw 1.3.6.1.4.1.1991.1.3.27.1 FOUNDRY-SN-AGENT-MIB no no yes
FES12GCFRt 1.3.6.1.4.1.1991.1.3.28.2 FOUNDRY-SN-AGENT-MIB no no yes
FES12GCFSw 1.3.6.1.4.1.1991.1.3.28.1 FOUNDRY-SN-AGENT-MIB no no yes
FES2402POERt 1.3.6.1.4.1.1991.1.3.29.2 FOUNDRY-SN-AGENT-MIB no no yes
FES2402POESw 1.3.6.1.4.1.1991.1.3.29.1 FOUNDRY-SN-AGENT-MIB no no yes
FES4802POERt 1.3.6.1.4.1.1991.1.3.30.2 FOUNDRY-SN-AGENT-MIB no no yes
FES4802POESw 1.3.6.1.4.1.1991.1.3.30.1 FOUNDRY-SN-AGENT-MIB no no yes
FESX424Rt 1.3.6.1.4.1.1991.1.3.34.1.1.1.2 FOUNDRY-SN-AGENT-MIB no no yes
FESX424Sw 1.3.6.1.4.1.1991.1.3.34.1.1.1.1 FOUNDRY-SN-AGENT-MIB no no yes
FESX424PremRt 1.3.6.1.4.1.1991.1.3.34.1.1.2.2 FOUNDRY-SN-AGENT-MIB no no yes
FESX424PremSw 1.3.6.1.4.1.1991.1.3.34.1.1.2.1 FOUNDRY-SN-AGENT-MIB no no yes
FESX424P1XGPremSw 1.3.6.1.4.1.1991.1.3.34.1.2.2.1 FOUNDRY-SN-AGENT-MIB no no yes
FESX424P1XGRt 1.3.6.1.4.1.1991.1.3.34.1.2.1.2 FOUNDRY-SN-AGENT-MIB no no yes
FESX424P1XGSw 1.3.6.1.4.1.1991.1.3.34.1.2.1.1 FOUNDRY-SN-AGENT-MIB no no yes
FESX424P1XGPremRt 1.3.6.1.4.1.1991.1.3.34.1.2.2.2 FOUNDRY-SN-AGENT-MIB no no yes
FESX424P2XGRt 1.3.6.1.4.1.1991.1.3.34.1.3.1.2 FOUNDRY-SN-AGENT-MIB no no yes
FESX424P2XGSw 1.3.6.1.4.1.1991.1.3.34.1.3.1.1 FOUNDRY-SN-AGENT-MIB no no yes
FESX424P2XGPremRt 1.3.6.1.4.1.1991.1.3.34.1.3.2.2 FOUNDRY-SN-AGENT-MIB no no yes
FESX424P2XGPremSw 1.3.6.1.4.1.1991.1.3.34.1.3.2.1 FOUNDRY-SN-AGENT-MIB no no yes
FESX448Rt 1.3.6.1.4.1.1991.1.3.34.2.1.1.2 FOUNDRY-SN-AGENT-MIB no no yes
FESX448Sw 1.3.6.1.4.1.1991.1.3.34.2.1.1.1 FOUNDRY-SN-AGENT-MIB no no yes
FESX448PremRt 1.3.6.1.4.1.1991.1.3.34.2.1.2.2 FOUNDRY-SN-AGENT-MIB no no yes
FESX448PremSw 1.3.6.1.4.1.1991.1.3.34.2.1.2.1 FOUNDRY-SN-AGENT-MIB no no yes
FESX448P1XGSw 1.3.6.1.4.1.1991.1.3.34.2.2.1.1 FOUNDRY-SN-AGENT-MIB no no yes
FESX448P1XGRt 1.3.6.1.4.1.1991.1.3.34.2.2.1.2 FOUNDRY-SN-AGENT-MIB no no yes
FESX448P1XGPremRt 1.3.6.1.4.1.1991.1.3.34.2.2.2.2 FOUNDRY-SN-AGENT-MIB no no yes
FESX448P1XGPremSw 1.3.6.1.4.1.1991.1.3.34.2.2.2.1 FOUNDRY-SN-AGENT-MIB no no yes
FESX448P2XGRt 1.3.6.1.4.1.1991.1.3.34.2.3.1.2 FOUNDRY-SN-AGENT-MIB no no yes
FESX448P2XGSw 1.3.6.1.4.1.1991.1.3.34.2.3.1.1 FOUNDRY-SN-AGENT-MIB no no yes
FESX448P2XGPremRt 1.3.6.1.4.1.1991.1.3.34.2.3.2.2 FOUNDRY-SN-AGENT-MIB no no yes
Table A-5: Foundry Supported Devices
Device Names Sys OID SNMP/TFTP Support Telnet Support
SSH Support
Perl Support
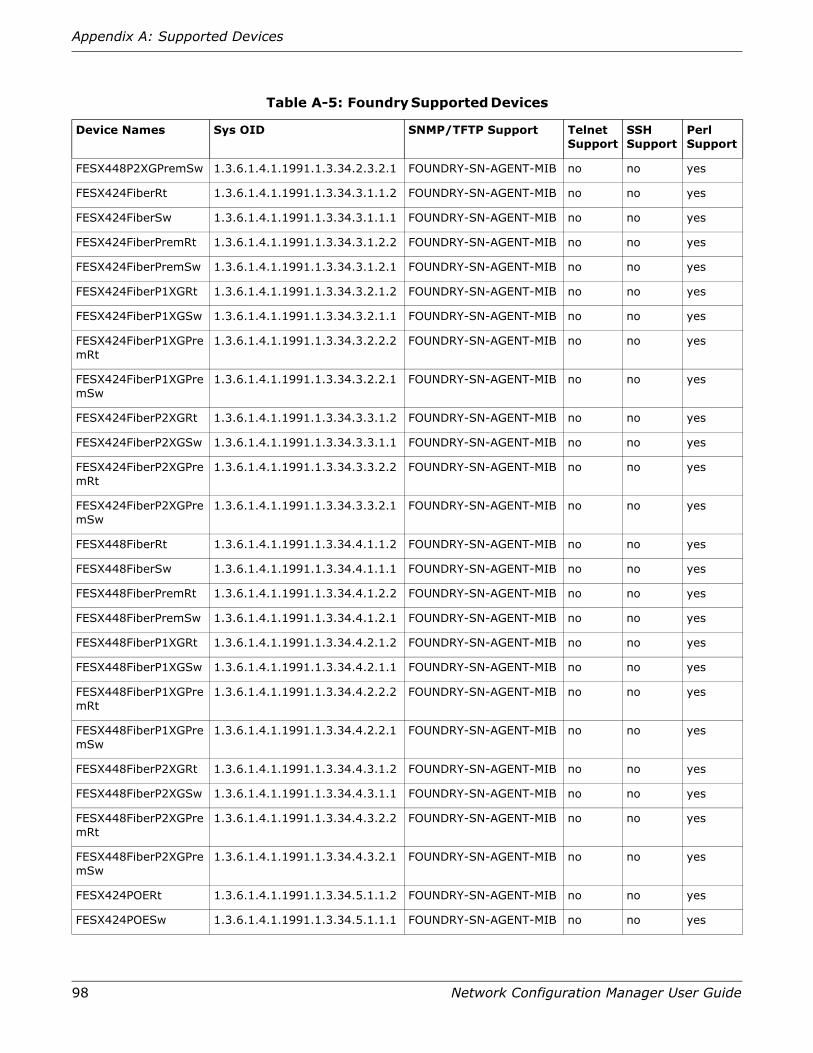
98 Network Configuration Manager User Guide
Appendix A: Supported Devices
FESX448P2XGPremSw 1.3.6.1.4.1.1991.1.3.34.2.3.2.1 FOUNDRY-SN-AGENT-MIB no no yes
FESX424FiberRt 1.3.6.1.4.1.1991.1.3.34.3.1.1.2 FOUNDRY-SN-AGENT-MIB no no yes
FESX424FiberSw 1.3.6.1.4.1.1991.1.3.34.3.1.1.1 FOUNDRY-SN-AGENT-MIB no no yes
FESX424FiberPremRt 1.3.6.1.4.1.1991.1.3.34.3.1.2.2 FOUNDRY-SN-AGENT-MIB no no yes
FESX424FiberPremSw 1.3.6.1.4.1.1991.1.3.34.3.1.2.1 FOUNDRY-SN-AGENT-MIB no no yes
FESX424FiberP1XGRt 1.3.6.1.4.1.1991.1.3.34.3.2.1.2 FOUNDRY-SN-AGENT-MIB no no yes
FESX424FiberP1XGSw 1.3.6.1.4.1.1991.1.3.34.3.2.1.1 FOUNDRY-SN-AGENT-MIB no no yes
FESX424FiberP1XGPremRt
1.3.6.1.4.1.1991.1.3.34.3.2.2.2 FOUNDRY-SN-AGENT-MIB no no yes
FESX424FiberP1XGPremSw
1.3.6.1.4.1.1991.1.3.34.3.2.2.1 FOUNDRY-SN-AGENT-MIB no no yes
FESX424FiberP2XGRt 1.3.6.1.4.1.1991.1.3.34.3.3.1.2 FOUNDRY-SN-AGENT-MIB no no yes
FESX424FiberP2XGSw 1.3.6.1.4.1.1991.1.3.34.3.3.1.1 FOUNDRY-SN-AGENT-MIB no no yes
FESX424FiberP2XGPremRt
1.3.6.1.4.1.1991.1.3.34.3.3.2.2 FOUNDRY-SN-AGENT-MIB no no yes
FESX424FiberP2XGPremSw
1.3.6.1.4.1.1991.1.3.34.3.3.2.1 FOUNDRY-SN-AGENT-MIB no no yes
FESX448FiberRt 1.3.6.1.4.1.1991.1.3.34.4.1.1.2 FOUNDRY-SN-AGENT-MIB no no yes
FESX448FiberSw 1.3.6.1.4.1.1991.1.3.34.4.1.1.1 FOUNDRY-SN-AGENT-MIB no no yes
FESX448FiberPremRt 1.3.6.1.4.1.1991.1.3.34.4.1.2.2 FOUNDRY-SN-AGENT-MIB no no yes
FESX448FiberPremSw 1.3.6.1.4.1.1991.1.3.34.4.1.2.1 FOUNDRY-SN-AGENT-MIB no no yes
FESX448FiberP1XGRt 1.3.6.1.4.1.1991.1.3.34.4.2.1.2 FOUNDRY-SN-AGENT-MIB no no yes
FESX448FiberP1XGSw 1.3.6.1.4.1.1991.1.3.34.4.2.1.1 FOUNDRY-SN-AGENT-MIB no no yes
FESX448FiberP1XGPremRt
1.3.6.1.4.1.1991.1.3.34.4.2.2.2 FOUNDRY-SN-AGENT-MIB no no yes
FESX448FiberP1XGPremSw
1.3.6.1.4.1.1991.1.3.34.4.2.2.1 FOUNDRY-SN-AGENT-MIB no no yes
FESX448FiberP2XGRt 1.3.6.1.4.1.1991.1.3.34.4.3.1.2 FOUNDRY-SN-AGENT-MIB no no yes
FESX448FiberP2XGSw 1.3.6.1.4.1.1991.1.3.34.4.3.1.1 FOUNDRY-SN-AGENT-MIB no no yes
FESX448FiberP2XGPremRt
1.3.6.1.4.1.1991.1.3.34.4.3.2.2 FOUNDRY-SN-AGENT-MIB no no yes
FESX448FiberP2XGPremSw
1.3.6.1.4.1.1991.1.3.34.4.3.2.1 FOUNDRY-SN-AGENT-MIB no no yes
FESX424POERt 1.3.6.1.4.1.1991.1.3.34.5.1.1.2 FOUNDRY-SN-AGENT-MIB no no yes
FESX424POESw 1.3.6.1.4.1.1991.1.3.34.5.1.1.1 FOUNDRY-SN-AGENT-MIB no no yes
Table A-5: Foundry Supported Devices
Device Names Sys OID SNMP/TFTP Support Telnet Support
SSH Support
Perl Support
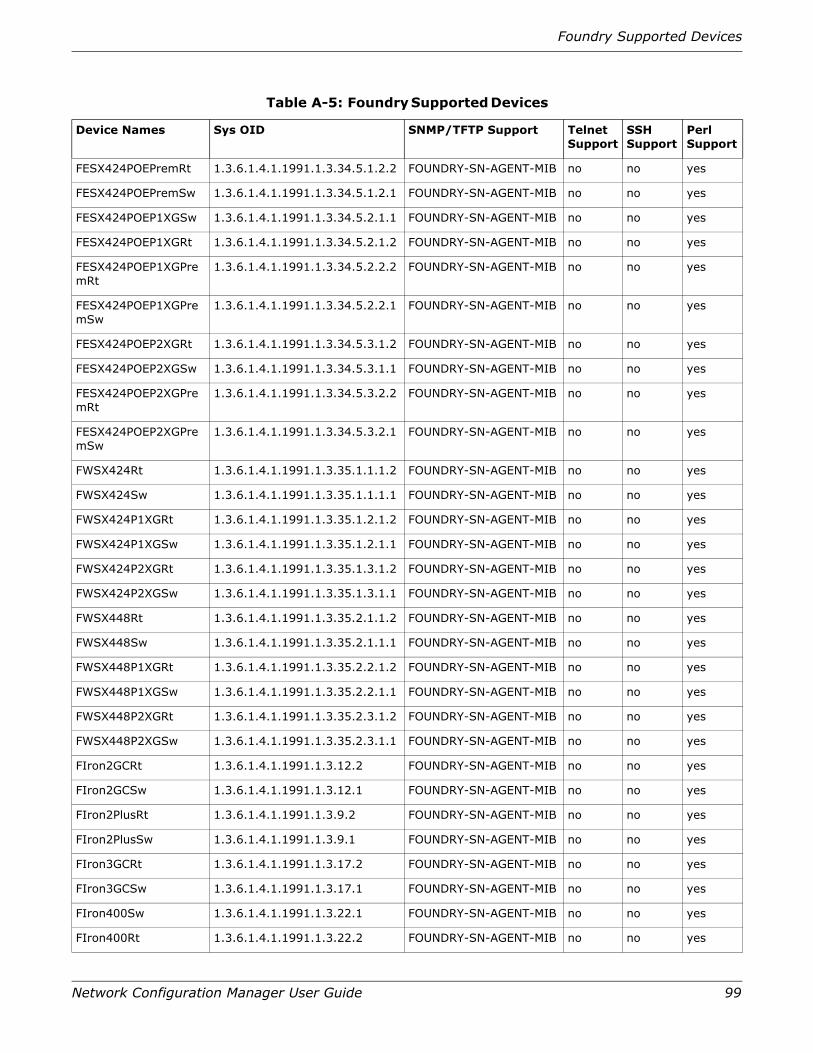
Foundry Supported Devices
Network Configuration Manager User Guide 99
FESX424POEPremRt 1.3.6.1.4.1.1991.1.3.34.5.1.2.2 FOUNDRY-SN-AGENT-MIB no no yes
FESX424POEPremSw 1.3.6.1.4.1.1991.1.3.34.5.1.2.1 FOUNDRY-SN-AGENT-MIB no no yes
FESX424POEP1XGSw 1.3.6.1.4.1.1991.1.3.34.5.2.1.1 FOUNDRY-SN-AGENT-MIB no no yes
FESX424POEP1XGRt 1.3.6.1.4.1.1991.1.3.34.5.2.1.2 FOUNDRY-SN-AGENT-MIB no no yes
FESX424POEP1XGPremRt
1.3.6.1.4.1.1991.1.3.34.5.2.2.2 FOUNDRY-SN-AGENT-MIB no no yes
FESX424POEP1XGPremSw
1.3.6.1.4.1.1991.1.3.34.5.2.2.1 FOUNDRY-SN-AGENT-MIB no no yes
FESX424POEP2XGRt 1.3.6.1.4.1.1991.1.3.34.5.3.1.2 FOUNDRY-SN-AGENT-MIB no no yes
FESX424POEP2XGSw 1.3.6.1.4.1.1991.1.3.34.5.3.1.1 FOUNDRY-SN-AGENT-MIB no no yes
FESX424POEP2XGPremRt
1.3.6.1.4.1.1991.1.3.34.5.3.2.2 FOUNDRY-SN-AGENT-MIB no no yes
FESX424POEP2XGPremSw
1.3.6.1.4.1.1991.1.3.34.5.3.2.1 FOUNDRY-SN-AGENT-MIB no no yes
FWSX424Rt 1.3.6.1.4.1.1991.1.3.35.1.1.1.2 FOUNDRY-SN-AGENT-MIB no no yes
FWSX424Sw 1.3.6.1.4.1.1991.1.3.35.1.1.1.1 FOUNDRY-SN-AGENT-MIB no no yes
FWSX424P1XGRt 1.3.6.1.4.1.1991.1.3.35.1.2.1.2 FOUNDRY-SN-AGENT-MIB no no yes
FWSX424P1XGSw 1.3.6.1.4.1.1991.1.3.35.1.2.1.1 FOUNDRY-SN-AGENT-MIB no no yes
FWSX424P2XGRt 1.3.6.1.4.1.1991.1.3.35.1.3.1.2 FOUNDRY-SN-AGENT-MIB no no yes
FWSX424P2XGSw 1.3.6.1.4.1.1991.1.3.35.1.3.1.1 FOUNDRY-SN-AGENT-MIB no no yes
FWSX448Rt 1.3.6.1.4.1.1991.1.3.35.2.1.1.2 FOUNDRY-SN-AGENT-MIB no no yes
FWSX448Sw 1.3.6.1.4.1.1991.1.3.35.2.1.1.1 FOUNDRY-SN-AGENT-MIB no no yes
FWSX448P1XGRt 1.3.6.1.4.1.1991.1.3.35.2.2.1.2 FOUNDRY-SN-AGENT-MIB no no yes
FWSX448P1XGSw 1.3.6.1.4.1.1991.1.3.35.2.2.1.1 FOUNDRY-SN-AGENT-MIB no no yes
FWSX448P2XGRt 1.3.6.1.4.1.1991.1.3.35.2.3.1.2 FOUNDRY-SN-AGENT-MIB no no yes
FWSX448P2XGSw 1.3.6.1.4.1.1991.1.3.35.2.3.1.1 FOUNDRY-SN-AGENT-MIB no no yes
FIron2GCRt 1.3.6.1.4.1.1991.1.3.12.2 FOUNDRY-SN-AGENT-MIB no no yes
FIron2GCSw 1.3.6.1.4.1.1991.1.3.12.1 FOUNDRY-SN-AGENT-MIB no no yes
FIron2PlusRt 1.3.6.1.4.1.1991.1.3.9.2 FOUNDRY-SN-AGENT-MIB no no yes
FIron2PlusSw 1.3.6.1.4.1.1991.1.3.9.1 FOUNDRY-SN-AGENT-MIB no no yes
FIron3GCRt 1.3.6.1.4.1.1991.1.3.17.2 FOUNDRY-SN-AGENT-MIB no no yes
FIron3GCSw 1.3.6.1.4.1.1991.1.3.17.1 FOUNDRY-SN-AGENT-MIB no no yes
FIron400Sw 1.3.6.1.4.1.1991.1.3.22.1 FOUNDRY-SN-AGENT-MIB no no yes
FIron400Rt 1.3.6.1.4.1.1991.1.3.22.2 FOUNDRY-SN-AGENT-MIB no no yes
Table A-5: Foundry Supported Devices
Device Names Sys OID SNMP/TFTP Support Telnet Support
SSH Support
Perl Support
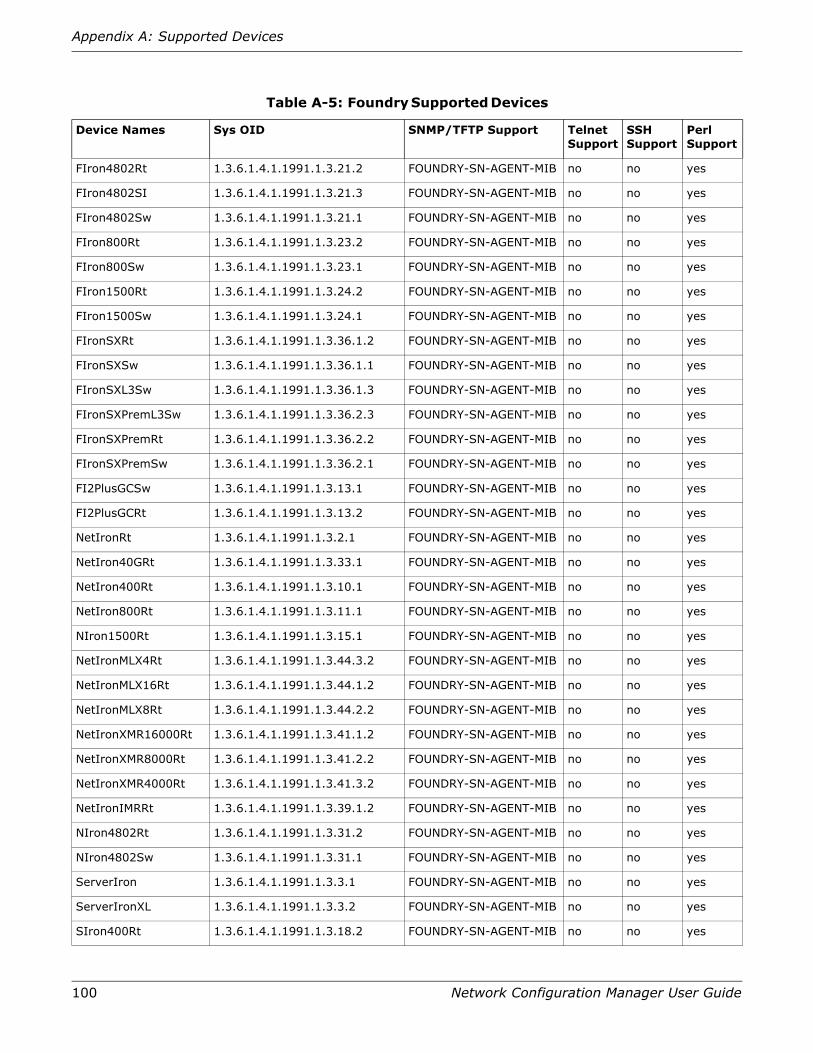
100 Network Configuration Manager User Guide
Appendix A: Supported Devices
FIron4802Rt 1.3.6.1.4.1.1991.1.3.21.2 FOUNDRY-SN-AGENT-MIB no no yes
FIron4802SI 1.3.6.1.4.1.1991.1.3.21.3 FOUNDRY-SN-AGENT-MIB no no yes
FIron4802Sw 1.3.6.1.4.1.1991.1.3.21.1 FOUNDRY-SN-AGENT-MIB no no yes
FIron800Rt 1.3.6.1.4.1.1991.1.3.23.2 FOUNDRY-SN-AGENT-MIB no no yes
FIron800Sw 1.3.6.1.4.1.1991.1.3.23.1 FOUNDRY-SN-AGENT-MIB no no yes
FIron1500Rt 1.3.6.1.4.1.1991.1.3.24.2 FOUNDRY-SN-AGENT-MIB no no yes
FIron1500Sw 1.3.6.1.4.1.1991.1.3.24.1 FOUNDRY-SN-AGENT-MIB no no yes
FIronSXRt 1.3.6.1.4.1.1991.1.3.36.1.2 FOUNDRY-SN-AGENT-MIB no no yes
FIronSXSw 1.3.6.1.4.1.1991.1.3.36.1.1 FOUNDRY-SN-AGENT-MIB no no yes
FIronSXL3Sw 1.3.6.1.4.1.1991.1.3.36.1.3 FOUNDRY-SN-AGENT-MIB no no yes
FIronSXPremL3Sw 1.3.6.1.4.1.1991.1.3.36.2.3 FOUNDRY-SN-AGENT-MIB no no yes
FIronSXPremRt 1.3.6.1.4.1.1991.1.3.36.2.2 FOUNDRY-SN-AGENT-MIB no no yes
FIronSXPremSw 1.3.6.1.4.1.1991.1.3.36.2.1 FOUNDRY-SN-AGENT-MIB no no yes
FI2PlusGCSw 1.3.6.1.4.1.1991.1.3.13.1 FOUNDRY-SN-AGENT-MIB no no yes
FI2PlusGCRt 1.3.6.1.4.1.1991.1.3.13.2 FOUNDRY-SN-AGENT-MIB no no yes
NetIronRt 1.3.6.1.4.1.1991.1.3.2.1 FOUNDRY-SN-AGENT-MIB no no yes
NetIron40GRt 1.3.6.1.4.1.1991.1.3.33.1 FOUNDRY-SN-AGENT-MIB no no yes
NetIron400Rt 1.3.6.1.4.1.1991.1.3.10.1 FOUNDRY-SN-AGENT-MIB no no yes
NetIron800Rt 1.3.6.1.4.1.1991.1.3.11.1 FOUNDRY-SN-AGENT-MIB no no yes
NIron1500Rt 1.3.6.1.4.1.1991.1.3.15.1 FOUNDRY-SN-AGENT-MIB no no yes
NetIronMLX4Rt 1.3.6.1.4.1.1991.1.3.44.3.2 FOUNDRY-SN-AGENT-MIB no no yes
NetIronMLX16Rt 1.3.6.1.4.1.1991.1.3.44.1.2 FOUNDRY-SN-AGENT-MIB no no yes
NetIronMLX8Rt 1.3.6.1.4.1.1991.1.3.44.2.2 FOUNDRY-SN-AGENT-MIB no no yes
NetIronXMR16000Rt 1.3.6.1.4.1.1991.1.3.41.1.2 FOUNDRY-SN-AGENT-MIB no no yes
NetIronXMR8000Rt 1.3.6.1.4.1.1991.1.3.41.2.2 FOUNDRY-SN-AGENT-MIB no no yes
NetIronXMR4000Rt 1.3.6.1.4.1.1991.1.3.41.3.2 FOUNDRY-SN-AGENT-MIB no no yes
NetIronIMRRt 1.3.6.1.4.1.1991.1.3.39.1.2 FOUNDRY-SN-AGENT-MIB no no yes
NIron4802Rt 1.3.6.1.4.1.1991.1.3.31.2 FOUNDRY-SN-AGENT-MIB no no yes
NIron4802Sw 1.3.6.1.4.1.1991.1.3.31.1 FOUNDRY-SN-AGENT-MIB no no yes
ServerIron 1.3.6.1.4.1.1991.1.3.3.1 FOUNDRY-SN-AGENT-MIB no no yes
ServerIronXL 1.3.6.1.4.1.1991.1.3.3.2 FOUNDRY-SN-AGENT-MIB no no yes
SIron400Rt 1.3.6.1.4.1.1991.1.3.18.2 FOUNDRY-SN-AGENT-MIB no no yes
Table A-5: Foundry Supported Devices
Device Names Sys OID SNMP/TFTP Support Telnet Support
SSH Support
Perl Support
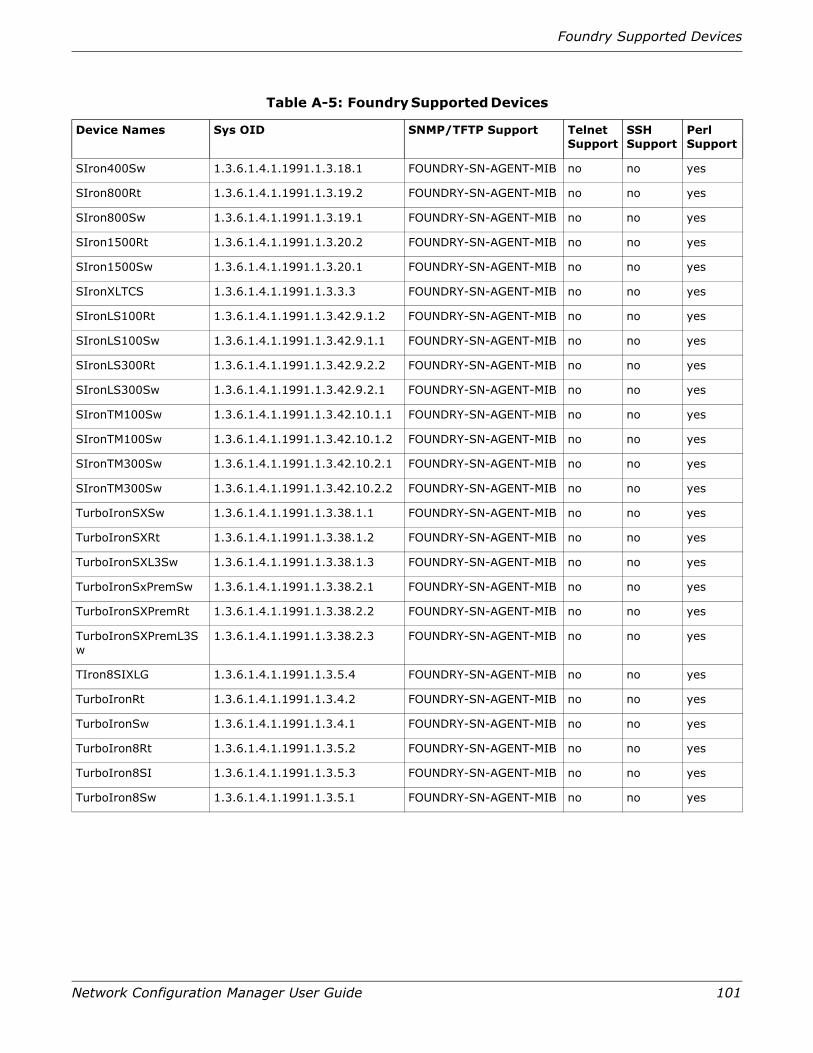
Foundry Supported Devices
Network Configuration Manager User Guide 101
SIron400Sw 1.3.6.1.4.1.1991.1.3.18.1 FOUNDRY-SN-AGENT-MIB no no yes
SIron800Rt 1.3.6.1.4.1.1991.1.3.19.2 FOUNDRY-SN-AGENT-MIB no no yes
SIron800Sw 1.3.6.1.4.1.1991.1.3.19.1 FOUNDRY-SN-AGENT-MIB no no yes
SIron1500Rt 1.3.6.1.4.1.1991.1.3.20.2 FOUNDRY-SN-AGENT-MIB no no yes
SIron1500Sw 1.3.6.1.4.1.1991.1.3.20.1 FOUNDRY-SN-AGENT-MIB no no yes
SIronXLTCS 1.3.6.1.4.1.1991.1.3.3.3 FOUNDRY-SN-AGENT-MIB no no yes
SIronLS100Rt 1.3.6.1.4.1.1991.1.3.42.9.1.2 FOUNDRY-SN-AGENT-MIB no no yes
SIronLS100Sw 1.3.6.1.4.1.1991.1.3.42.9.1.1 FOUNDRY-SN-AGENT-MIB no no yes
SIronLS300Rt 1.3.6.1.4.1.1991.1.3.42.9.2.2 FOUNDRY-SN-AGENT-MIB no no yes
SIronLS300Sw 1.3.6.1.4.1.1991.1.3.42.9.2.1 FOUNDRY-SN-AGENT-MIB no no yes
SIronTM100Sw 1.3.6.1.4.1.1991.1.3.42.10.1.1 FOUNDRY-SN-AGENT-MIB no no yes
SIronTM100Sw 1.3.6.1.4.1.1991.1.3.42.10.1.2 FOUNDRY-SN-AGENT-MIB no no yes
SIronTM300Sw 1.3.6.1.4.1.1991.1.3.42.10.2.1 FOUNDRY-SN-AGENT-MIB no no yes
SIronTM300Sw 1.3.6.1.4.1.1991.1.3.42.10.2.2 FOUNDRY-SN-AGENT-MIB no no yes
TurboIronSXSw 1.3.6.1.4.1.1991.1.3.38.1.1 FOUNDRY-SN-AGENT-MIB no no yes
TurboIronSXRt 1.3.6.1.4.1.1991.1.3.38.1.2 FOUNDRY-SN-AGENT-MIB no no yes
TurboIronSXL3Sw 1.3.6.1.4.1.1991.1.3.38.1.3 FOUNDRY-SN-AGENT-MIB no no yes
TurboIronSxPremSw 1.3.6.1.4.1.1991.1.3.38.2.1 FOUNDRY-SN-AGENT-MIB no no yes
TurboIronSXPremRt 1.3.6.1.4.1.1991.1.3.38.2.2 FOUNDRY-SN-AGENT-MIB no no yes
TurboIronSXPremL3Sw
1.3.6.1.4.1.1991.1.3.38.2.3 FOUNDRY-SN-AGENT-MIB no no yes
TIron8SIXLG 1.3.6.1.4.1.1991.1.3.5.4 FOUNDRY-SN-AGENT-MIB no no yes
TurboIronRt 1.3.6.1.4.1.1991.1.3.4.2 FOUNDRY-SN-AGENT-MIB no no yes
TurboIronSw 1.3.6.1.4.1.1991.1.3.4.1 FOUNDRY-SN-AGENT-MIB no no yes
TurboIron8Rt 1.3.6.1.4.1.1991.1.3.5.2 FOUNDRY-SN-AGENT-MIB no no yes
TurboIron8SI 1.3.6.1.4.1.1991.1.3.5.3 FOUNDRY-SN-AGENT-MIB no no yes
TurboIron8Sw 1.3.6.1.4.1.1991.1.3.5.1 FOUNDRY-SN-AGENT-MIB no no yes
Table A-5: Foundry Supported Devices
Device Names Sys OID SNMP/TFTP Support Telnet Support
SSH Support
Perl Support
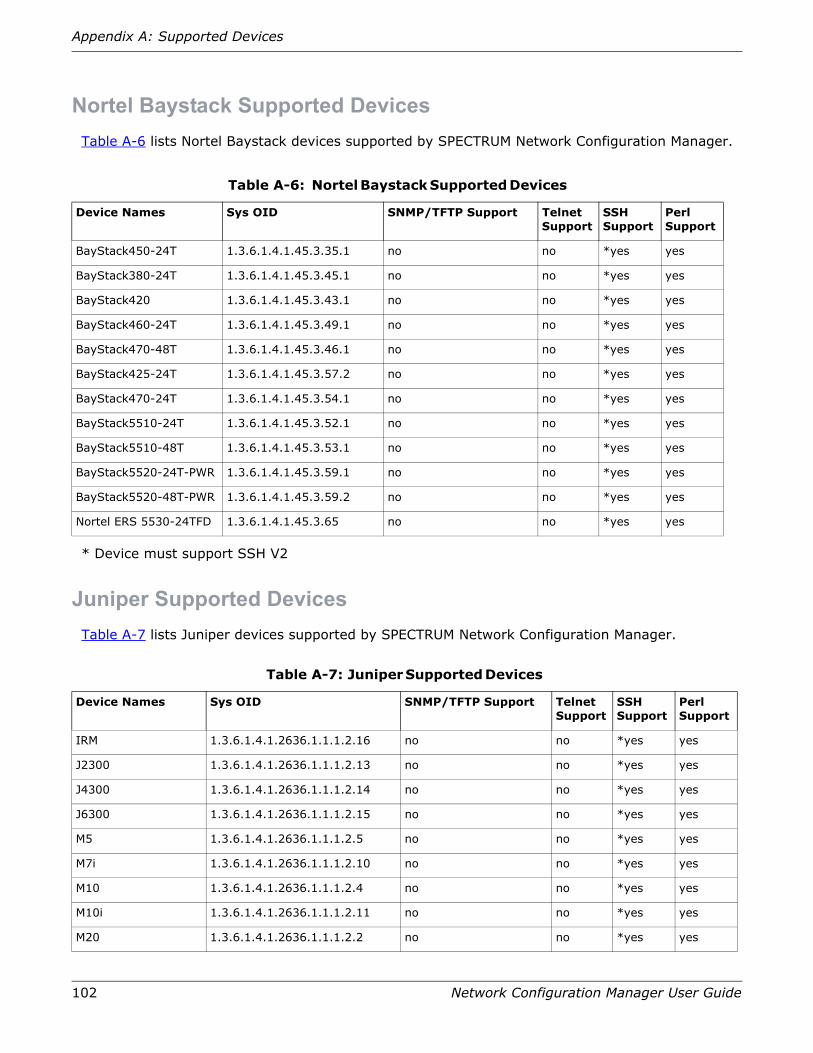
102 Network Configuration Manager User Guide
Appendix A: Supported Devices
Nortel Baystack Supported DevicesTable A-6 lists Nortel Baystack devices supported by SPECTRUM Network Configuration Manager.
* Device must support SSH V2
Juniper Supported DevicesTable A-7 lists Juniper devices supported by SPECTRUM Network Configuration Manager.
Table A-6: Nortel Baystack Supported Devices
Device Names Sys OID SNMP/TFTP Support Telnet Support
SSH Support
Perl Support
BayStack450-24T 1.3.6.1.4.1.45.3.35.1 no no *yes yes
BayStack380-24T 1.3.6.1.4.1.45.3.45.1 no no *yes yes
BayStack420 1.3.6.1.4.1.45.3.43.1 no no *yes yes
BayStack460-24T 1.3.6.1.4.1.45.3.49.1 no no *yes yes
BayStack470-48T 1.3.6.1.4.1.45.3.46.1 no no *yes yes
BayStack425-24T 1.3.6.1.4.1.45.3.57.2 no no *yes yes
BayStack470-24T 1.3.6.1.4.1.45.3.54.1 no no *yes yes
BayStack5510-24T 1.3.6.1.4.1.45.3.52.1 no no *yes yes
BayStack5510-48T 1.3.6.1.4.1.45.3.53.1 no no *yes yes
BayStack5520-24T-PWR 1.3.6.1.4.1.45.3.59.1 no no *yes yes
BayStack5520-48T-PWR 1.3.6.1.4.1.45.3.59.2 no no *yes yes
Nortel ERS 5530-24TFD 1.3.6.1.4.1.45.3.65 no no *yes yes
Table A-7: Juniper Supported Devices
Device Names Sys OID SNMP/TFTP Support Telnet Support
SSH Support
Perl Support
IRM 1.3.6.1.4.1.2636.1.1.1.2.16 no no *yes yes
J2300 1.3.6.1.4.1.2636.1.1.1.2.13 no no *yes yes
J4300 1.3.6.1.4.1.2636.1.1.1.2.14 no no *yes yes
J6300 1.3.6.1.4.1.2636.1.1.1.2.15 no no *yes yes
M5 1.3.6.1.4.1.2636.1.1.1.2.5 no no *yes yes
M7i 1.3.6.1.4.1.2636.1.1.1.2.10 no no *yes yes
M10 1.3.6.1.4.1.2636.1.1.1.2.4 no no *yes yes
M10i 1.3.6.1.4.1.2636.1.1.1.2.11 no no *yes yes
M20 1.3.6.1.4.1.2636.1.1.1.2.2 no no *yes yes
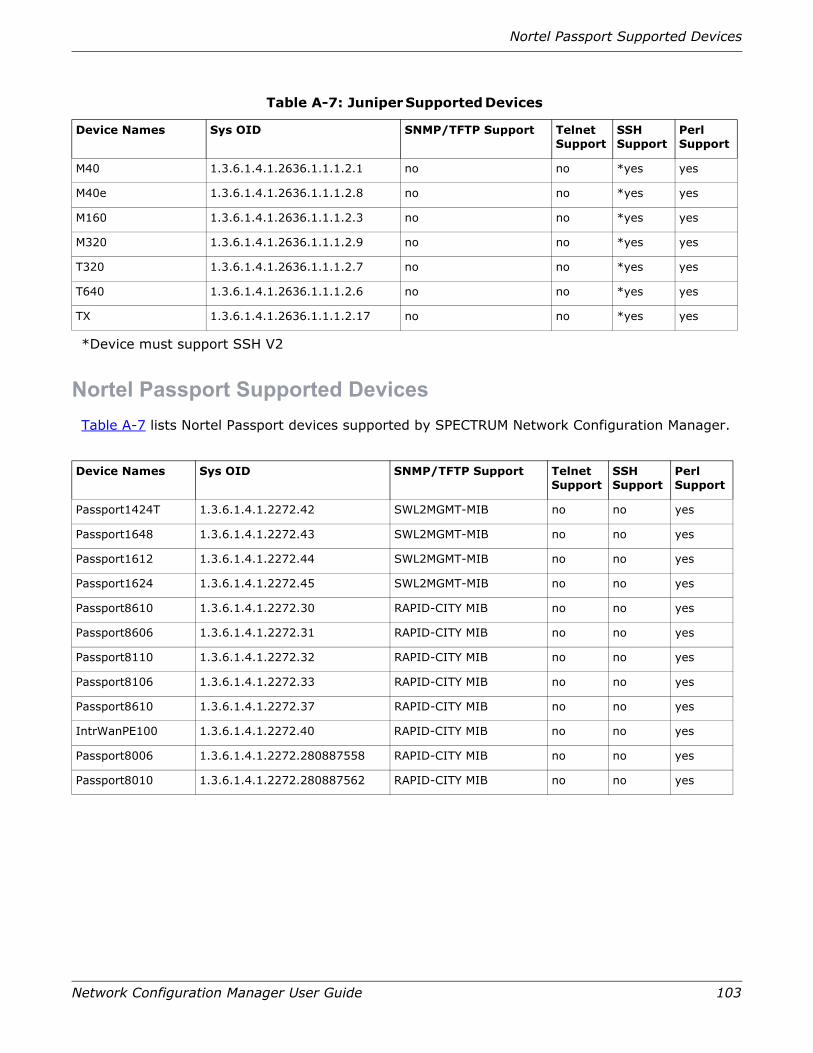
Nortel Passport Supported Devices
Network Configuration Manager User Guide 103
*Device must support SSH V2
Nortel Passport Supported DevicesTable A-7 lists Nortel Passport devices supported by SPECTRUM Network Configuration Manager.
M40 1.3.6.1.4.1.2636.1.1.1.2.1 no no *yes yes
M40e 1.3.6.1.4.1.2636.1.1.1.2.8 no no *yes yes
M160 1.3.6.1.4.1.2636.1.1.1.2.3 no no *yes yes
M320 1.3.6.1.4.1.2636.1.1.1.2.9 no no *yes yes
T320 1.3.6.1.4.1.2636.1.1.1.2.7 no no *yes yes
T640 1.3.6.1.4.1.2636.1.1.1.2.6 no no *yes yes
TX 1.3.6.1.4.1.2636.1.1.1.2.17 no no *yes yes
Device Names Sys OID SNMP/TFTP Support Telnet Support
SSH Support
Perl Support
Passport1424T 1.3.6.1.4.1.2272.42 SWL2MGMT-MIB no no yes
Passport1648 1.3.6.1.4.1.2272.43 SWL2MGMT-MIB no no yes
Passport1612 1.3.6.1.4.1.2272.44 SWL2MGMT-MIB no no yes
Passport1624 1.3.6.1.4.1.2272.45 SWL2MGMT-MIB no no yes
Passport8610 1.3.6.1.4.1.2272.30 RAPID-CITY MIB no no yes
Passport8606 1.3.6.1.4.1.2272.31 RAPID-CITY MIB no no yes
Passport8110 1.3.6.1.4.1.2272.32 RAPID-CITY MIB no no yes
Passport8106 1.3.6.1.4.1.2272.33 RAPID-CITY MIB no no yes
Passport8610 1.3.6.1.4.1.2272.37 RAPID-CITY MIB no no yes
IntrWanPE100 1.3.6.1.4.1.2272.40 RAPID-CITY MIB no no yes
Passport8006 1.3.6.1.4.1.2272.280887558 RAPID-CITY MIB no no yes
Passport8010 1.3.6.1.4.1.2272.280887562 RAPID-CITY MIB no no yes
Table A-7: Juniper Supported Devices
Device Names Sys OID SNMP/TFTP Support Telnet Support
SSH Support
Perl Support
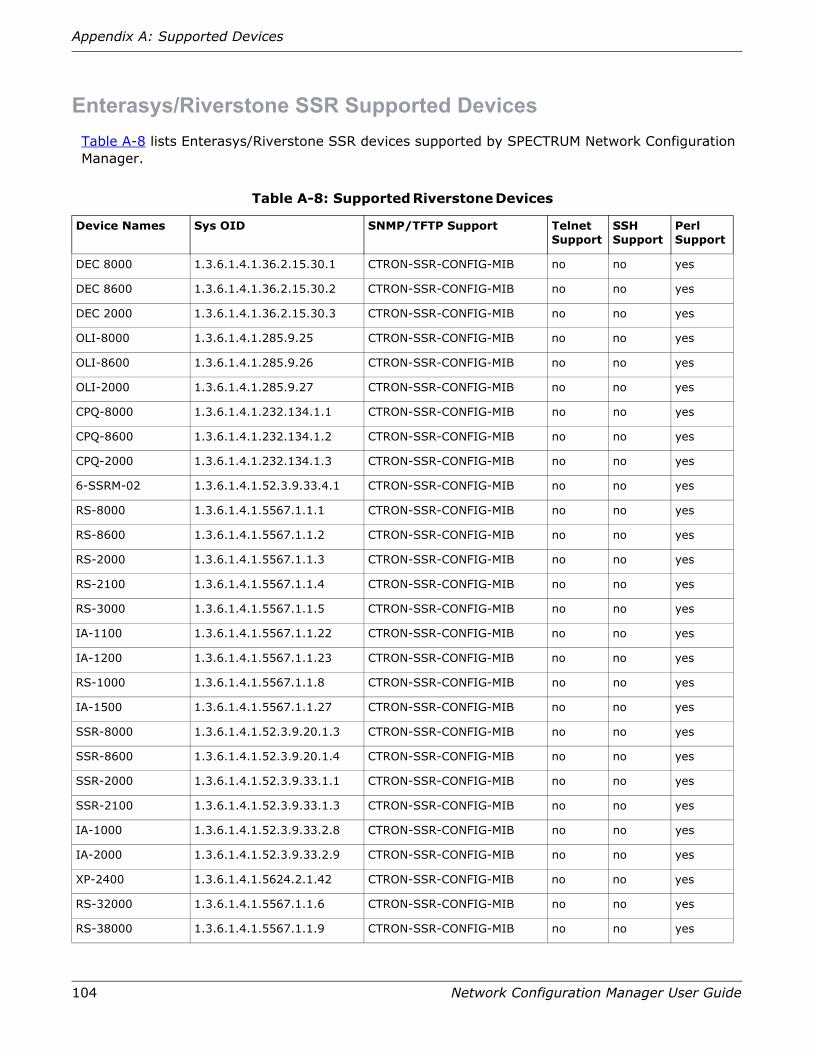
104 Network Configuration Manager User Guide
Appendix A: Supported Devices
Enterasys/Riverstone SSR Supported DevicesTable A-8 lists Enterasys/Riverstone SSR devices supported by SPECTRUM Network Configuration Manager.
Table A-8: Supported Riverstone Devices
Device Names Sys OID SNMP/TFTP Support Telnet Support
SSH Support
Perl Support
DEC 8000 1.3.6.1.4.1.36.2.15.30.1 CTRON-SSR-CONFIG-MIB no no yes
DEC 8600 1.3.6.1.4.1.36.2.15.30.2 CTRON-SSR-CONFIG-MIB no no yes
DEC 2000 1.3.6.1.4.1.36.2.15.30.3 CTRON-SSR-CONFIG-MIB no no yes
OLI-8000 1.3.6.1.4.1.285.9.25 CTRON-SSR-CONFIG-MIB no no yes
OLI-8600 1.3.6.1.4.1.285.9.26 CTRON-SSR-CONFIG-MIB no no yes
OLI-2000 1.3.6.1.4.1.285.9.27 CTRON-SSR-CONFIG-MIB no no yes
CPQ-8000 1.3.6.1.4.1.232.134.1.1 CTRON-SSR-CONFIG-MIB no no yes
CPQ-8600 1.3.6.1.4.1.232.134.1.2 CTRON-SSR-CONFIG-MIB no no yes
CPQ-2000 1.3.6.1.4.1.232.134.1.3 CTRON-SSR-CONFIG-MIB no no yes
6-SSRM-02 1.3.6.1.4.1.52.3.9.33.4.1 CTRON-SSR-CONFIG-MIB no no yes
RS-8000 1.3.6.1.4.1.5567.1.1.1 CTRON-SSR-CONFIG-MIB no no yes
RS-8600 1.3.6.1.4.1.5567.1.1.2 CTRON-SSR-CONFIG-MIB no no yes
RS-2000 1.3.6.1.4.1.5567.1.1.3 CTRON-SSR-CONFIG-MIB no no yes
RS-2100 1.3.6.1.4.1.5567.1.1.4 CTRON-SSR-CONFIG-MIB no no yes
RS-3000 1.3.6.1.4.1.5567.1.1.5 CTRON-SSR-CONFIG-MIB no no yes
IA-1100 1.3.6.1.4.1.5567.1.1.22 CTRON-SSR-CONFIG-MIB no no yes
IA-1200 1.3.6.1.4.1.5567.1.1.23 CTRON-SSR-CONFIG-MIB no no yes
RS-1000 1.3.6.1.4.1.5567.1.1.8 CTRON-SSR-CONFIG-MIB no no yes
IA-1500 1.3.6.1.4.1.5567.1.1.27 CTRON-SSR-CONFIG-MIB no no yes
SSR-8000 1.3.6.1.4.1.52.3.9.20.1.3 CTRON-SSR-CONFIG-MIB no no yes
SSR-8600 1.3.6.1.4.1.52.3.9.20.1.4 CTRON-SSR-CONFIG-MIB no no yes
SSR-2000 1.3.6.1.4.1.52.3.9.33.1.1 CTRON-SSR-CONFIG-MIB no no yes
SSR-2100 1.3.6.1.4.1.52.3.9.33.1.3 CTRON-SSR-CONFIG-MIB no no yes
IA-1000 1.3.6.1.4.1.52.3.9.33.2.8 CTRON-SSR-CONFIG-MIB no no yes
IA-2000 1.3.6.1.4.1.52.3.9.33.2.9 CTRON-SSR-CONFIG-MIB no no yes
XP-2400 1.3.6.1.4.1.5624.2.1.42 CTRON-SSR-CONFIG-MIB no no yes
RS-32000 1.3.6.1.4.1.5567.1.1.6 CTRON-SSR-CONFIG-MIB no no yes
RS-38000 1.3.6.1.4.1.5567.1.1.9 CTRON-SSR-CONFIG-MIB no no yes
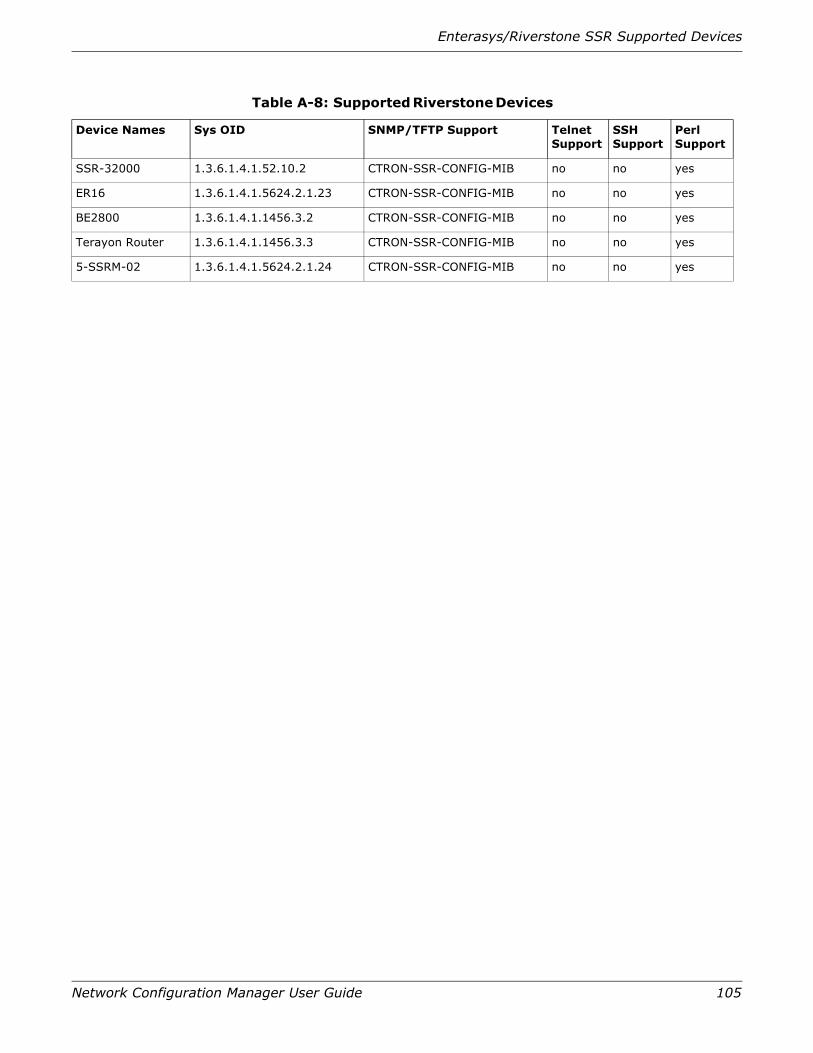
Enterasys/Riverstone SSR Supported Devices
Network Configuration Manager User Guide 105
SSR-32000 1.3.6.1.4.1.52.10.2 CTRON-SSR-CONFIG-MIB no no yes
ER16 1.3.6.1.4.1.5624.2.1.23 CTRON-SSR-CONFIG-MIB no no yes
BE2800 1.3.6.1.4.1.1456.3.2 CTRON-SSR-CONFIG-MIB no no yes
Terayon Router 1.3.6.1.4.1.1456.3.3 CTRON-SSR-CONFIG-MIB no no yes
5-SSRM-02 1.3.6.1.4.1.5624.2.1.24 CTRON-SSR-CONFIG-MIB no no yes
Table A-8: Supported Riverstone Devices
Device Names Sys OID SNMP/TFTP Support Telnet Support
SSH Support
Perl Support

106 Network Configuration Manager User Guide
Appendix A: Supported Devices
107
Appendix B: Network Configuration Manager Events
This appendix lists events generated by SPECTRUM Network Configuration Manager, Version 8.1:
In this Appendix
• “Events Generated on the Device” on page 107
• “Events Generated on Policies” on page 110
• “Events Generated on Tasks Global Sync, Capture, Upload and Write to Startup” on page 111
• “Events Generated on the Configuration Manager Application” on page 112
• “Events Generated on Device Families” on page 112
Events Generated on the Device
Configuration Change Notification from Device
Event00821029:{d "%w- %d %m-, %Y - %T"} Configuration Manager - A configuration change notification was received from device {m}. (event [{e}])
Configuration Change Detected by NCM
Event0082101b:{d "%w- %d %m-, %Y - %T"} Configuration Manager - Configuration change detected on device {m} of type {t} on landscape {S 3}. (event [{e}])
Startup and Running Configurations Same/Differ
Event00821024:{d "%w- %d %m-, %Y - %T"} Configuration Manager - The startup configuration of device {m} on landscape {S 3} differs from its running configuration. (event [{e}])
Event00821028:{d "%w- %d %m-, %Y - %T"} Configuration Manager - The startup configuration of device {m} on landscape {S 3} is equal to its running configuration. (event [{e}])
108 Network Configuration Manager User Guide
Appendix B: Network Configuration Manager Events
Startup Differs from Running Alarm Generating Events
Event00821025:{d "%w- %d %m-, %Y - %T"} Configuration Manager - The startup configuration of device {m} on landscape {S 3} differs from its running configuration. A minor alarm will be generated on this model. (event [{e}])
Event00821026:{d "%w- %d %m-, %Y - %T"} Configuration Manager - The startup configuration of device {m} on landscape {S 3} differs from its running configuration. A major alarm will be generated on this model. (event [{e}])
Event00821027:{d "%w- %d %m-, %Y - %T"} Configuration Manager - The startup configuration of device {m} on landscape {S 3} differs from its running configuration. A critical alarm will be generated on this model. (event [{e}])
Device Compliant/Noncompliant with Policy
Event00821016:{d "%w- %d %m-, %Y - %T"} Configuration Manager - Device {m} of type {t} is compliant with policy {S 1} on landscape {S 3}. (event [{e}])
Event00821017:{d "%w- %d %m-, %Y - %T"} Configuration Manager - Device {m} of type {t} is not compliant with policy {S 1} on landscape {S 3}. (event [{e}])
Event00821051:{d "%w- %d %m-, %Y - %T"} Configuration Manager - Unable to verify policy compliance of host configuration on device {m} of type {t} on landscape {S 1}. Specific error: {S 2} (event [{e}])
Event00821055:{d "%w- %d %m-, %Y - %T"} Configuration Manager - Device {m} of type {t} is no longer in violation of policy {S 1} because the device has been removed from global collection {S 2} on landscape {S 3}. (event [{e}])
Event00821056:{d "%w- %d %m-, %Y - %T"} Configuration Manager - Device {m} of type {t} is no longer in violation of policy {S 1} because the device has been removed from device family {S 2} on landscape {S 3}. (event [{e}])
Event00821057:{d "%w- %d %m-, %Y - %T"} Configuration Manager - Device {m} of type {t} on landscape {S 2} is no longer in violation of policy {S 1} because the policy has been deleted. (event [{e}])
Device Noncompliant with Policy Alarm Generating Events
Event00821020:{d "%w- %d %m-, %Y - %T"} Configuration Manager - Device {m} has violated policy {S 1} on landscape {S 3}. The severity of this violation is minor. (event [{e}])
Event00821021:{d "%w- %d %m-, %Y - %T"} Configuration Manager - Device {m} has violated policy {S 1} on landscape {S 3}. The severity of this violation is major. (event [{e}])
Event00821022:{d "%w- %d %m-, %Y - %T"} Configuration Manager - Device {m} has violated policy {S 1} on landscape {S 3}. The severity of this violation is critical. (event [{e}])
Events Generated on the Device
Network Configuration Manager User Guide 109
Capture Succeeded/Failed
Event00821000:{d "%w- %d %m-, %Y - %T"} Configuration Manager - Capture succeeded for host configuration file from device {m} of type {t} on landscape {S 1} initiated by user {S 2}. (event [{e}])
Event00821001:{d "%w- %d %m-, %Y - %T"} Configuration Manager - Capture failed for host configuration file from device {m} of type {t} on landscape {S 1} initiated by user {S 2}. Specific error: {S 3} (event [{e}])
Event00821049:{d "%w- %d %m-, %Y - %T"} Configuration Manager - Capture succeeded for host startup configuration file from device {m} of type {t} on landscape {S 1} initiated by user {u}. (event [{e}])
Event00821050:{d "%w- %d %m-, %Y - %T"} Configuration Manager - Capture failed for host startup configuration file from device {m} of type {t} on landscape {S 1} initiated by user {u}. Specific error: {S 3} (event [{e}])
Upload Succeeded/Failed
Event00821002:{d "%w- %d %m-, %Y - %T"} Configuration Manager - Load succeeded for host configuration on device {m} of type {t} on landscape {S 1} initiated by user {S 2}. (event [{e}])
Event00821003:{d "%w- %d %m-, %Y - %T"} Configuration Manager - Load failed for host configuration on device {m} of type {t} on landscape {S 1} initiated by user {S 2}. Specific error: {S 4} (event [{e}])
Upload Failed Alarm Generating Events
Event00821035:{d "%w- %d %m-, %Y - %T"} Configuration Manager - Load failed for host configuration on device {m} of type {t} on landscape {S 1} initiated by user {S 2}. The severity of this failure is minor. (event [{e}])
Event00821036:{d "%w- %d %m-, %Y - %T"} Configuration Manager - Load failed for host configuration on device {m} of type {t} on landscape {S 1} initiated by user {S 2}. The severity of this failure is major. (event [{e}])
Event00821037:{d "%w- %d %m-, %Y - %T"} Configuration Manager - Load failed for host configuration on device {m} of type {t} on landscape {S 1} initiated by user {S 2}. The severity of this failure is critical. (event [{e}])
Write to Startup Succeeded/Failed
Event00821018:{d "%w- %d %m-, %Y - %T"} Configuration Manager - Successfully wrote the running configuration to the startup configuration on device {m} of type {t} on landscape {S 1} initiated by {S 2}. (event [{e}])
Event00821019:{d "%w- %d %m-, %Y - %T"} Configuration Manager - The attempt to write the running configuration to the startup configuration on device {m} of type {t} failed on landscape {S 1}. This operation was initiated by {S 2}. Specific Error: {S 3}. (event [{e}])
110 Network Configuration Manager User Guide
Appendix B: Network Configuration Manager Events
NCM Enabled/Disabled on Device
Event0082102f:{d "%w- %d %m-, %Y - %T"} Configuration Manager - NCM has been disabled for device {m}. (event [{e}])
Event00821030:{d "%w- %d %m-, %Y - %T"} Configuration Manager - NCM has been enabled for device {m}. (event [{e}])
NCM Disabled, Operation Not Performed
Event00821032:{d "%w- %d %m-, %Y - %T"} Configuration Manager - The requested NCM operation was not performed on model {m} because NCM is disabled on the models device family. (event [{e}])
Event00821033:{d "%w- %d %m-, %Y - %T"} Configuration Manager - The requested NCM operation was not performed on model {m} because NCM is disabled on this model. (event [{e}])
Event00821034:{d "%w- %d %m-, %Y - %T"} Configuration Manager - The requested NCM operation was not performed on model {m} because this model is a proxy model. (event [{e}])
Device Firmware Load
Event00821053:{d "%w- %d %m-, %Y - %T"} Configuration Manager - Firmware load completed successfully on device {m} of type {t} on landscape {S 1}. Firmware script was executed with command line parameters: {S 3} This operation was initiated by {u}. (event [{e}])
Event00821054:{d "%w- %d %m-, %Y - %T"} Configuration Manager - Firmware load failed on device {m} of type {t} on landscape {S 1}. Specific error: {S 2} Firmware script was executed with command line parameters: {S 3} (event [{e}])
Device Added/Removed from Device Family
Event00821058:{d "%w- %d %m-, %Y - %T"} Configuration Manager - Device {m} of type {t} has been added to device family {S 2} on landscape {S 1}. (event [{e}])
Event00821059:{d "%w- %d %m-, %Y - %T"} Configuration Manager - Device {m} of type {t} has been removed from device family {S 2} on landscape {S 1}. (event [{e}])
Events Generated on Policies
Policy Enabled/Disabled
Event00821014:{d "%w- %d %m-, %Y - %T"} Configuration Manager - Policy {m} been enabled by {u}. (event [{e}])
Event00821015:{d "%w- %d %m-, %Y - %T"} Configuration Manager - Policy {m} been disabled by {u}. (event [{e}])
Event00821023:{d "%w- %d %m-, %Y - %T"} Configuration Manager - Policy {S 1} has been disabled. Any alarms previously generated by violations of this policy have been cleared. (event [{e}])
Events Generated on Tasks Global Sync, Capture, Upload and Write to Startup
Network Configuration Manager User Guide 111
Policy Modified
Event00821011:{d "%w- %d %m-, %Y - %T"} Configuration Manager - Policy {m} has been modified by {u}. (event [{e}])
Policy has Violators
Event00821012:{d "%w- %d %m-, %Y - %T"} Configuration Manager - Policy {m} has a violator on landscape {S 1}. (event [{e}])
Event00821013:{d "%w- %d %m-, %Y - %T"} Configuration Manager - Policy {m} no longer has a violator on landscape {S 1}. (event [{e}])
Violated Policy, Alarm Generating Events
Event0082101d:{d "%w- %d %m-, %Y - %T"} Configuration Manager - Policy {m} has a violator on landscape {S 1}. The severity of this violation is minor. (event [{e}])
Event0082101e:{d "%w- %d %m-, %Y - %T"} Configuration Manager - Policy {m} has a violator on landscape {S 1}. The severity of this violation is major. (event [{e}])
Event0082101f:{d "%w- %d %m-, %Y - %T"} Configuration Manager - Policy {m} has a violator on landscape {S 1}. The severity of this violation is critical. (event [{e}])
Events Generated on Tasks Global Sync, Capture, Upload and Write to Startup
Task Scheduled/Unscheduled
Event00821040:{d "%w- %d %m-, %Y - %T"} Configuration Manager - Task Scheduled - Task {m} of type {t} has been scheduled for {S 1} on landscape {S 2}. (event [{e}])
Event00821041:{d "%w- %d %m-, %Y - %T"} Configuration Manager - Task Unscheduled - Task {m} of type {t} has had the schedule removed on landscape {S 1}. (event [{e}])
Task Started, Stopped, Completed, Partially Completed
Event00821042:{d "%w- %d %m-, %Y - %T"} Configuration Manager - Task Started - Task {m} of type {t} has been started by {S 1} on {I 2} devices on landscape {S 3}. (event [{e}])
Event00821043:{d "%w- %d %m-, %Y - %T"} Configuration Manager - Task Stopping - Task {m} of type {t} was stopped by {S 1} on landscape {S 3}. (event[{e}])
Event00821045:{d "%w- %d %m-, %Y - %T"} Configuration Manager - Task Completed - Task {m} of type {t} has completed with all devices processed on landscape {S 1}. Out of a total of {I 2} devices, {I 3} succeeded and {I 4} failed. (event [{e}])
Event00821044:{d "%w- %d %m-, %Y - %T"} Configuration Manager - Task Partially Completed - Task {m} of type {t} completed with {I 5} unprocessed devices on landscape {S 1}. For a total of {I 2} deivces, {I 3} succeeded, {I 4} failed and {I 5} devices remained unprocessed. (event [{e}])
112 Network Configuration Manager User Guide
Appendix B: Network Configuration Manager Events
Task Partially Completed Alarm Generating Events
Event00821046:{d "%w- %d %m-, %Y - %T"} Configuration Manager - Task Partially Completed - Task {m} of type {t} completed with {I 5} unprocessed devices on landscape {S 1}. For a total of {I 2} devices, {I 3} succeeded, {I 4} failed and {I 5} devices remained unprocessed. A minor alarm has been generated. (event [{e}])
Event00821047:{d "%w- %d %m-, %Y - %T"} Configuration Manager - Task Partially Completed - Task {m} of type {t} completed with {I 5} unprocessed devices on landscape {S 1}. For a total of {I 2} devices, {I 3} succeeded, {I 4} failed and {I 5} devices remained unprocessed. A major alarm has been generated. (event [{e}])
Event00821048:{d "%w- %d %m-, %Y - %T"} Configuration Manager - Task Partially Completed - Task {m} of type {t} completed with {I 5} unprocessed devices on landscape {S 1}. For a total of {I 2} devices, {I 3} succeeded, {I 4} failed and {I 5} devices remained unprocessed. A critical alarm has been generated. (event [{e}])
Events Generated on the Configuration Manager ApplicationEvent0082101a:{d "%w- %d %m-, %Y - %T"} Cannot connect to Configuration Manager - Cannot connect to the NCM secure communication daemon on landscape {S 1}. (event [{e}])
Event0082101c:{d "%w- %d %m-, %Y - %T"} Configuration Manager - Cannot create file in Archive Directory. Unable to archive a device configuration. Could not create a file in the archive directory {S 1} on landscape {S 2}. (event [{e}])
Event00821052:{d "%w- %d %m-, %Y - %T"} Configuration Manager - Connection to the ncmservice daemon has been restored. (event [{e}])
Global Unsolicited Notification
Event0082102b:{d "%w- %d %m-, %Y - %T"} Configuration Manager - The ability to respond to unsolicited notifications of configuration change has been globally disabled on all landscapes. (event [{e}])
Event0082102c:{d "%w- %d %m-, %Y - %T"} Configuration Manager - The ability to respond to unsolicited notifications of configuration change has been globally enabled on all landscapes. (event [{e}])
Events Generated on Device FamiliesEvent0082102d:{d "%w- %d %m-, %Y - %T"} Configuration Manager - NCM enabled/disabled for device family {m}. (event [{e}])
Event0082102e:{d "%w- %d %m-, %Y - %T"} Configuration Manager - NCM has been enabled for device family {m}. (event [{e}])
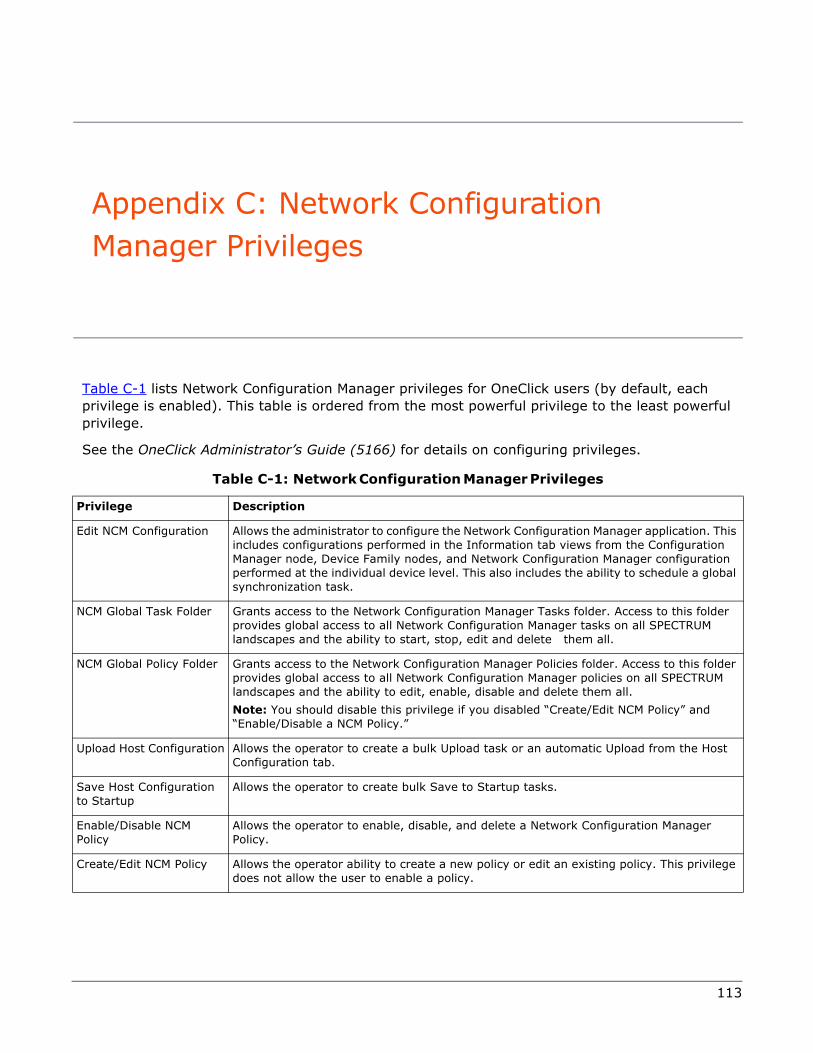
113
Appendix C: Network Configuration Manager Privileges
Table C-1 lists Network Configuration Manager privileges for OneClick users (by default, each privilege is enabled). This table is ordered from the most powerful privilege to the least powerful privilege.
See the OneClick Administrator’s Guide (5166) for details on configuring privileges.
Table C-1: Network Configuration Manager Privileges
Privilege Description
Edit NCM Configuration Allows the administrator to configure the Network Configuration Manager application. This includes configurations performed in the Information tab views from the Configuration Manager node, Device Family nodes, and Network Configuration Manager configuration performed at the individual device level. This also includes the ability to schedule a global synchronization task.
NCM Global Task Folder Grants access to the Network Configuration Manager Tasks folder. Access to this folder provides global access to all Network Configuration Manager tasks on all SPECTRUM landscapes and the ability to start, stop, edit and delete them all.
NCM Global Policy Folder Grants access to the Network Configuration Manager Policies folder. Access to this folder provides global access to all Network Configuration Manager policies on all SPECTRUM landscapes and the ability to edit, enable, disable and delete them all.
Note: You should disable this privilege if you disabled “Create/Edit NCM Policy” and “Enable/Disable a NCM Policy.”
Upload Host Configuration Allows the operator to create a bulk Upload task or an automatic Upload from the Host Configuration tab.
Save Host Configuration to Startup
Allows the operator to create bulk Save to Startup tasks.
Enable/Disable NCM Policy
Allows the operator to enable, disable, and delete a Network Configuration Manager Policy.
Create/Edit NCM Policy Allows the operator ability to create a new policy or edit an existing policy. This privilege does not allow the user to enable a policy.
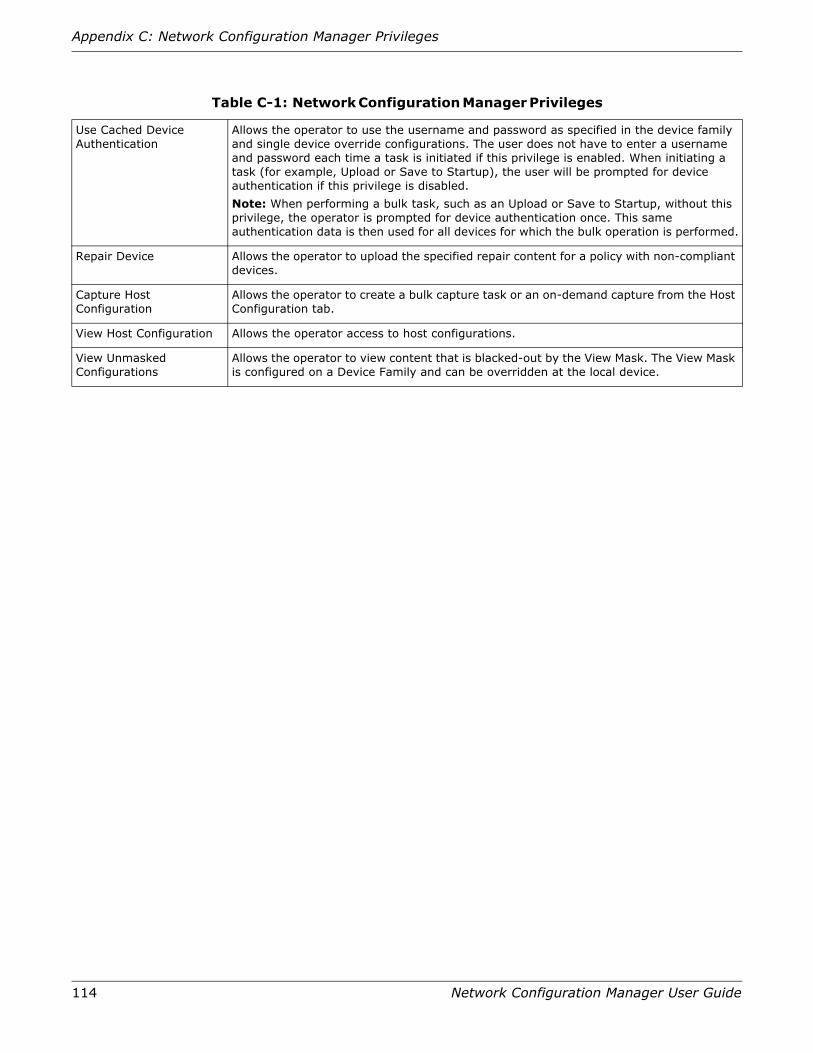
114 Network Configuration Manager User Guide
Appendix C: Network Configuration Manager Privileges
Use Cached Device Authentication
Allows the operator to use the username and password as specified in the device family and single device override configurations. The user does not have to enter a username and password each time a task is initiated if this privilege is enabled. When initiating a task (for example, Upload or Save to Startup), the user will be prompted for device authentication if this privilege is disabled.
Note: When performing a bulk task, such as an Upload or Save to Startup, without this privilege, the operator is prompted for device authentication once. This same authentication data is then used for all devices for which the bulk operation is performed.
Repair Device Allows the operator to upload the specified repair content for a policy with non-compliant devices.
Capture Host Configuration
Allows the operator to create a bulk capture task or an on-demand capture from the Host Configuration tab.
View Host Configuration Allows the operator access to host configurations.
View Unmasked Configurations
Allows the operator to view content that is blacked-out by the View Mask. The View Mask is configured on a Device Family and can be overridden at the local device.
Table C-1: Network Configuration Manager Privileges
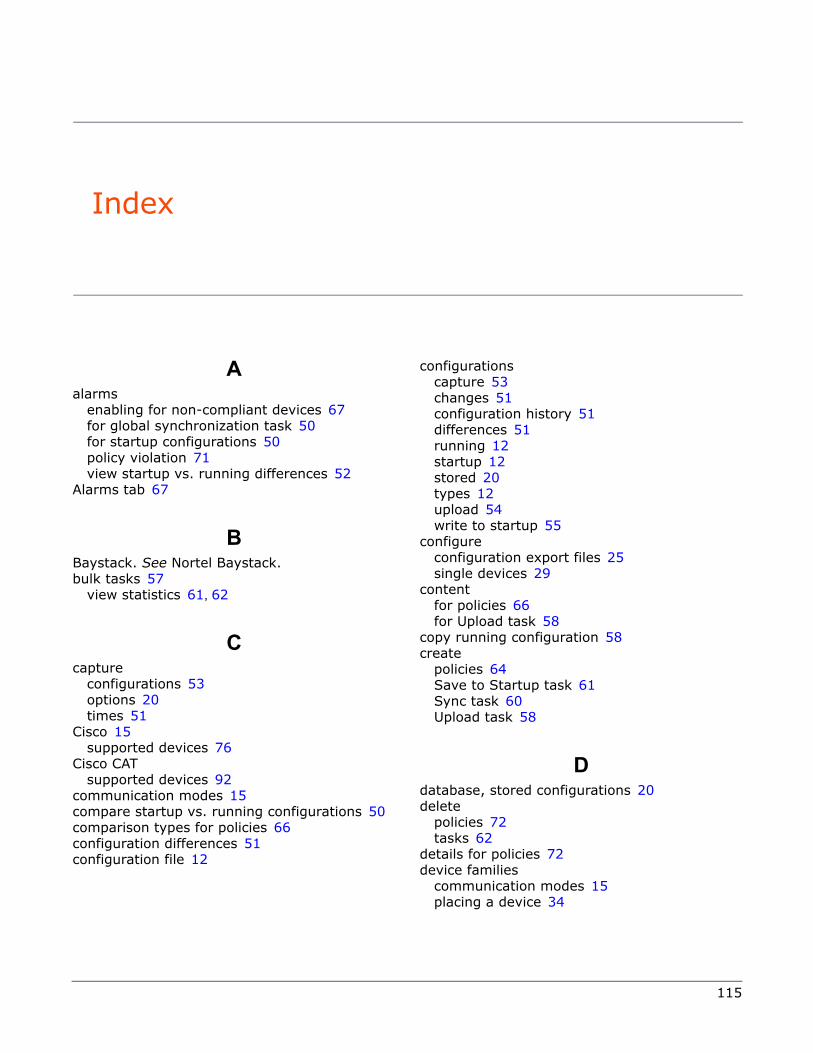
115
Index
Aalarms
enabling for non-compliant devices 67for global synchronization task 50for startup configurations 50policy violation 71view startup vs. running differences 52
Alarms tab 67
BBaystack. See Nortel Baystack.bulk tasks 57
view statistics 61, 62
Ccapture
configurations 53options 20times 51
Cisco 15supported devices 76
Cisco CATsupported devices 92
communication modes 15compare startup vs. running configurations 50comparison types for policies 66configuration differences 51configuration file 12
configurationscapture 53changes 51configuration history 51differences 51running 12startup 12stored 20types 12upload 54write to startup 55
configureconfiguration export files 25single devices 29
contentfor policies 66for Upload task 58
copy running configuration 58create
policies 64Save to Startup task 61Sync task 60Upload task 58
Ddatabase, stored configurations 20delete
policies 72tasks 62
details for policies 72device families
communication modes 15placing a device 34
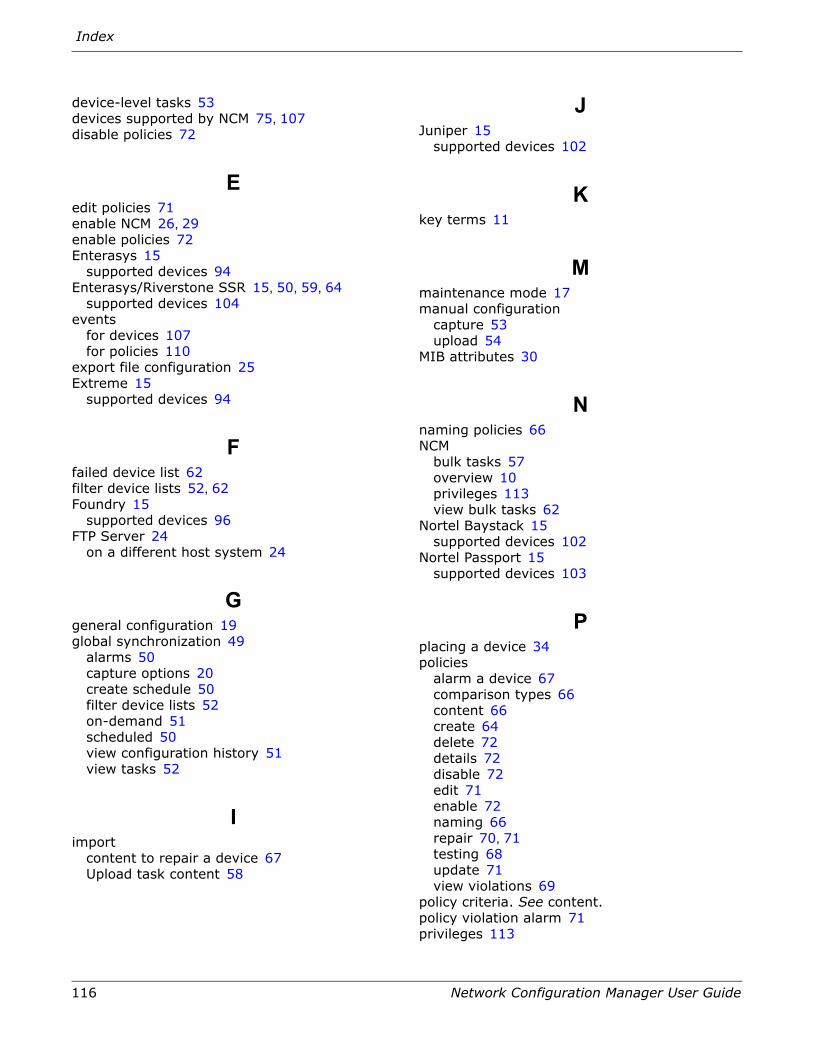
116 Network Configuration Manager User Guide
Index
device-level tasks 53devices supported by NCM 75, 107disable policies 72
Eedit policies 71enable NCM 26, 29enable policies 72Enterasys 15
supported devices 94Enterasys/Riverstone SSR 15, 50, 59, 64
supported devices 104events
for devices 107for policies 110
export file configuration 25Extreme 15
supported devices 94
Ffailed device list 62filter device lists 52, 62Foundry 15
supported devices 96FTP Server 24
on a different host system 24
Ggeneral configuration 19global synchronization 49
alarms 50capture options 20create schedule 50filter device lists 52on-demand 51scheduled 50view configuration history 51view tasks 52
Iimport
content to repair a device 67Upload task content 58
JJuniper 15
supported devices 102
Kkey terms 11
Mmaintenance mode 17manual configuration
capture 53upload 54
MIB attributes 30
Nnaming policies 66NCM
bulk tasks 57overview 10privileges 113view bulk tasks 62
Nortel Baystack 15supported devices 102
Nortel Passport 15supported devices 103
Pplacing a device 34policies
alarm a device 67comparison types 66content 66create 64delete 72details 72disable 72edit 71enable 72naming 66repair 70, 71testing 68update 71view violations 69
policy criteria. See content.policy violation alarm 71privileges 113
Index
Network Configuration Manager User Guide 117
Rre-evaluate device 34remove tasks 52, 62repair
non-compliant devices from policy table 70non-compliant devices from policy violation
alarm 71Riverstone. See Enterasys/Riverstone SSR.running configuration 12, 50
copy to startup 58running vs. startup configuration 52
SSave to Startup task 61schedule global synchronization 50SCP 15search, Upload task configuration files 58single devices
configure 29enable NCM 26, 29view configuration history 51
SNMP trap attributes 30SNMP/TFTP 15SPECTRUM database, stored configurations 20SSH/SCP 15SSH/TFTP 15startup configuration 12, 50startup vs. running differences 52succeeded device list 62supported devices 75, 107Sync task 60
results 60
Ttask device list 62tasks
delete 62remove 52, 62Save to Startup 61Sync 60Upload task 58view 62
Telnet/FTP 15testing devices running Enterasys firmware 59testing policies 68
TFTP Server 20on a different host system 24on Linux 22on Solaris 21on Windows 23
Trivial File Transfer Protocol 20types of configurations 12
Uupdate policies 71Upload task 58
stopping 59testing devices running Enterasys firmware 59
Vview
bulk tasks 62configuration differences 51filter device lists 62global sync task 52policy details 72policy violations 69running vs. startup differences 52
violations for policies 69
Wwrite configurations to startup 55

118 Network Configuration Manager User Guide
Index