netop school 5.0 quick guidedownload.netop.com/manuals/500/quickguide_en.pdf · ·...
TRANSCRIPT
QuickGuide
NetOp® School 5.0
Teaching and management software for the networked classroom
M o v i n g e x p e r t i s e — n o t p e o p l e ®
Danware Data A/S
Bregnerodvej 127DK-3460 BirkerodDenmark
tel: +45 4590 2525fax: +45 4590 2526email: [email protected]: www.netop.com
Quick guide_School 5,0 10/04/06 14:59 Side 1

Teaching.book Page 1 Tuesday, April 11, 2006 3:49 PM
Teaching with NetOp School
1

Teaching.book Page 2 Tuesday, April 11, 2006 3:49 PM
Copyright© 2005 Danware Data A/S. All rights reservedDocument revision: 2006101Please send comments to:Danware Data A/S, Bregnerodvej 127, DK-3460 Birkerod, DenmarkFax: Int +45 45 90 25 26E-mail: [email protected]: http://help.netop.comInternet: http://www.netop.com
2
Contents
Teaching.book Page 3 Tuesday, April 11, 2006 3:49 PM
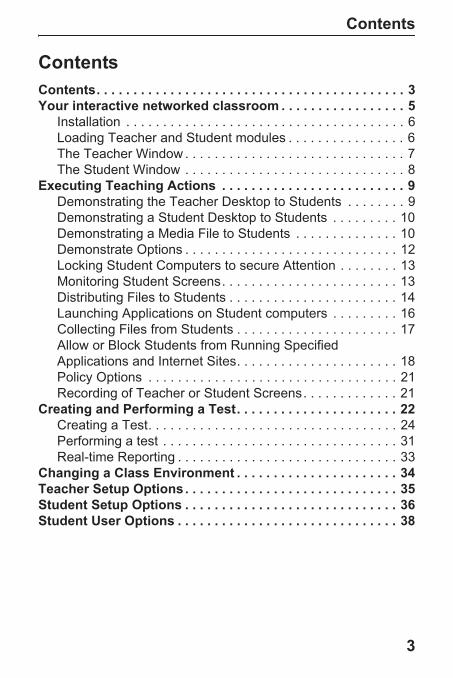
ContentsContents. . . . . . . . . . . . . . . . . . . . . . . . . . . . . . . . . . . . . . . . . . 3Your interactive networked classroom . . . . . . . . . . . . . . . . . 5
Installation . . . . . . . . . . . . . . . . . . . . . . . . . . . . . . . . . . . . . . 6Loading Teacher and Student modules . . . . . . . . . . . . . . . . 6The Teacher Window . . . . . . . . . . . . . . . . . . . . . . . . . . . . . . 7The Student Window . . . . . . . . . . . . . . . . . . . . . . . . . . . . . . 8
Executing Teaching Actions . . . . . . . . . . . . . . . . . . . . . . . . . 9Demonstrating the Teacher Desktop to Students . . . . . . . . 9Demonstrating a Student Desktop to Students . . . . . . . . . 10Demonstrating a Media File to Students . . . . . . . . . . . . . . 10Demonstrate Options . . . . . . . . . . . . . . . . . . . . . . . . . . . . . 12Locking Student Computers to secure Attention . . . . . . . . 13Monitoring Student Screens. . . . . . . . . . . . . . . . . . . . . . . . 13Distributing Files to Students . . . . . . . . . . . . . . . . . . . . . . . 14Launching Applications on Student computers . . . . . . . . . 16Collecting Files from Students . . . . . . . . . . . . . . . . . . . . . . 17Allow or Block Students from Running Specified Applications and Internet Sites. . . . . . . . . . . . . . . . . . . . . . 18Policy Options . . . . . . . . . . . . . . . . . . . . . . . . . . . . . . . . . . 21Recording of Teacher or Student Screens. . . . . . . . . . . . . 21
Creating and Performing a Test. . . . . . . . . . . . . . . . . . . . . . 22Creating a Test. . . . . . . . . . . . . . . . . . . . . . . . . . . . . . . . . . 24Performing a test . . . . . . . . . . . . . . . . . . . . . . . . . . . . . . . . 31Real-time Reporting . . . . . . . . . . . . . . . . . . . . . . . . . . . . . . 33
Changing a Class Environment . . . . . . . . . . . . . . . . . . . . . . 34Teacher Setup Options. . . . . . . . . . . . . . . . . . . . . . . . . . . . . 35Student Setup Options . . . . . . . . . . . . . . . . . . . . . . . . . . . . . 36Student User Options . . . . . . . . . . . . . . . . . . . . . . . . . . . . . . 38
3

Teaching.book Page 4 Tuesday, April 11, 2006 3:49 PM
4
Your interactive networked classroom
Teaching.book Page 5 Tuesday, April 11, 2006 3:49 PM
Your interactive networked classroomYou are a Teacher, an Instructor, a Supervisor. Your audience -students / colleagues - may be physically right in front of you in a classroom or they may be spread around the library, campus, offices or departments, in the same building, city or around the globe.
NetOp School creates an interactive classroom by connecting your computer with the computers of your audience creating an interactive classroom on the network. Furthermore, you get a number of effective teaching tools such as the ability to show your screen to the entire class, monitor classroom screens, control student activities, perform tests and other tools to help you supervise and stay in control of classroom activity.
Enjoy reading the following pages to get familiar with some of the many teaching tools available to you and start using NetOp School to provide faster and better learning through hands-on experiences in the interactive classroom.
5
Your interactive networked classroom
Teaching.book Page 6 Tuesday, April 11, 2006 3:49 PM
InstallationNetOp School consists of two modules: The Teacher module which is installed on the teacher’s, instructor’s or supervisor’s computer and the Student module, which is installed on the computers that need to be part of the interactive classroom.
Insert the NetOp School CD into a CD drive to display the main installation window on the screen. Select your language version and follow the on-screen instructions.
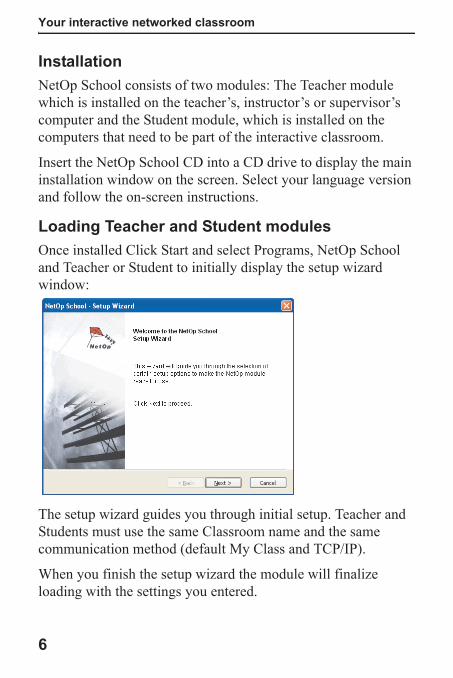
Loading Teacher and Student modulesOnce installed Click Start and select Programs, NetOp School and Teacher or Student to initially display the setup wizard window:
The setup wizard guides you through initial setup. Teacher and Students must use the same Classroom name and the same communication method (default My Class and TCP/IP).
When you finish the setup wizard the module will finalize loading with the settings you entered.
6
Your interactive networked classroom
Teaching.book Page 7 Tuesday, April 11, 2006 3:49 PM
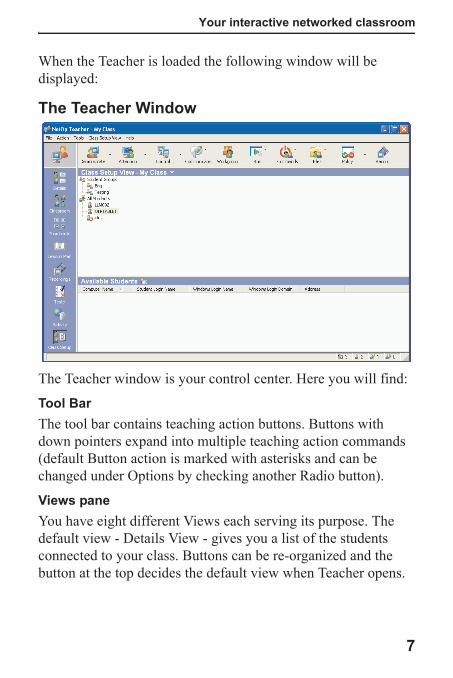
When the Teacher is loaded the following window will be displayed:
The Teacher Window
The Teacher window is your control center. Here you will find:
Tool BarThe tool bar contains teaching action buttons. Buttons with down pointers expand into multiple teaching action commands (default Button action is marked with asterisks and can be changed under Options by checking another Radio button).
Views paneYou have eight different Views each serving its purpose. The default view - Details View - gives you a list of the students connected to your class. Buttons can be re-organized and the button at the top decides the default view when Teacher opens.
7
Your interactive networked classroom
Teaching.book Page 8 Tuesday, April 11, 2006 3:49 PM
Groups paneThis pane by default displays the All folder containing all student records. Use Class Setup View to organize your class in sub-groups. Folders created here will be displayed in the Groups pane to facilitate selection of students for carrying out desired teaching actions.
Students that are already loaded and use an identical Class name (Waiting for My Class) will automatically join the class and show up in the Student list when the Teacher module is started.
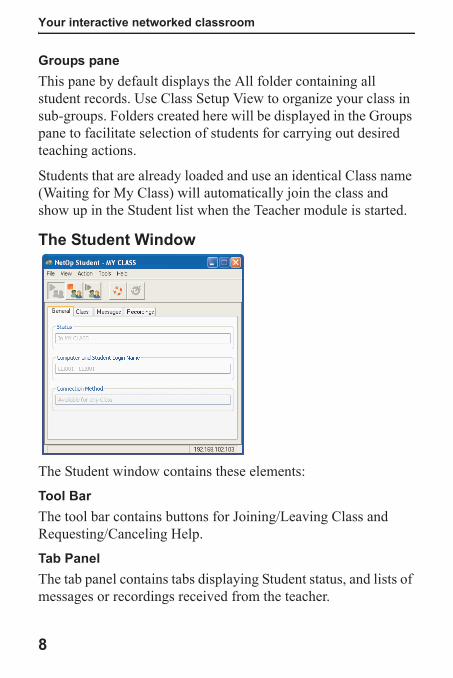
The Student Window
The Student window contains these elements:
Tool BarThe tool bar contains buttons for Joining/Leaving Class and Requesting/Canceling Help.
Tab PanelThe tab panel contains tabs displaying Student status, and lists of messages or recordings received from the teacher.
8
Executing Teaching Actions
Teaching.book Page 9 Tuesday, April 11, 2006 3:49 PM
By default the Student module will load when the computer is started, ready to join the selected class when a Teacher module is loaded. If a Teacher module is already loaded with the selected Class name, the Students will automatically join the class.
Tip: The Student Window can be completely hidden (Stealth mode) to prevent unauthorized change of the pre-configured settings.
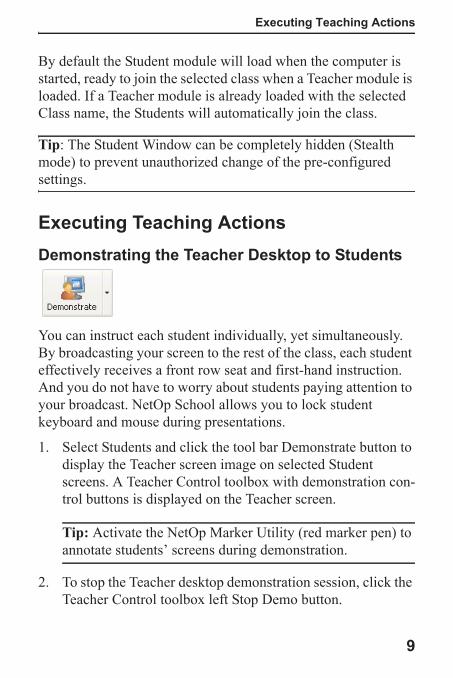
Executing Teaching ActionsDemonstrating the Teacher Desktop to Students
You can instruct each student individually, yet simultaneously. By broadcasting your screen to the rest of the class, each student effectively receives a front row seat and first-hand instruction. And you do not have to worry about students paying attention to your broadcast. NetOp School allows you to lock student keyboard and mouse during presentations.
1. Select Students and click the tool bar Demonstrate button to display the Teacher screen image on selected Student screens. A Teacher Control toolbox with demonstration con-trol buttons is displayed on the Teacher screen.
Tip: Activate the NetOp Marker Utility (red marker pen) to annotate students’ screens during demonstration.
2. To stop the Teacher desktop demonstration session, click the Teacher Control toolbox left Stop Demo button.
9
Executing Teaching Actions
Teaching.book Page 10 Tuesday, April 11, 2006 3:49 PM
Demonstrating a Student Desktop to Students1. Select Students and right-click one of them to display the
Student shortcut menu.
2. Select Demonstrate this Student to display the screen image of this Student on the other selected Students’ screens and on the Teacher screen. A Teacher Control toolbox with dem-onstration control buttons is displayed on the Teacher screen.
Note: When a Student desktop is demonstrated, the Teacher remote controls the Student.
3. To stop the Student desktop demonstration session, click the Teacher Control toolbox left Stop Demo button.
Demonstrating a Media File to StudentsIt is easy to support your oral presentations with instructional videos. Videos are broadcast to all students simultaneously, while the replay function is controlled centrally from the teacher’s computer. Films can be paused at any time, and student workstations can be locked to enhance concentration.
10
Executing Teaching Actions
Teaching.book Page 11 Tuesday, April 11, 2006 3:49 PM
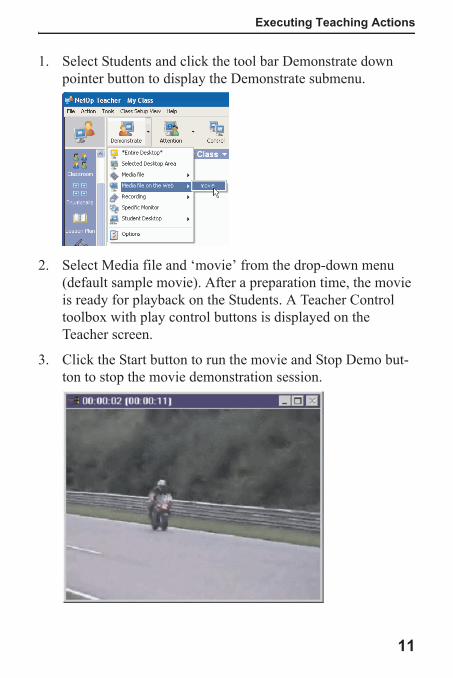
1. Select Students and click the tool bar Demonstrate down pointer button to display the Demonstrate submenu.
2. Select Media file and ‘movie’ from the drop-down menu (default sample movie). After a preparation time, the movie is ready for playback on the Students. A Teacher Control toolbox with play control buttons is displayed on the Teacher screen.
3. Click the Start button to run the movie and Stop Demo but-ton to stop the movie demonstration session.
11
Executing Teaching Actions
Teaching.book Page 12 Tuesday, April 11, 2006 3:49 PM
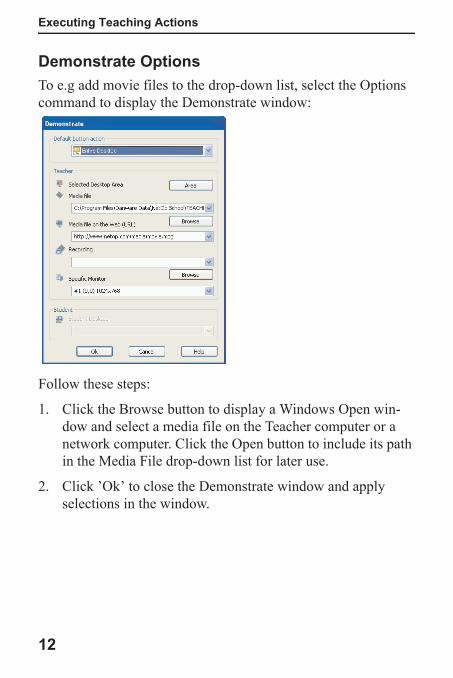
Demonstrate OptionsTo e.g add movie files to the drop-down list, select the Options command to display the Demonstrate window:
Follow these steps:
1. Click the Browse button to display a Windows Open win-dow and select a media file on the Teacher computer or a network computer. Click the Open button to include its path in the Media File drop-down list for later use.
2. Click ’Ok’ to close the Demonstrate window and apply selections in the window.
12
Executing Teaching Actions
Teaching.book Page 13 Tuesday, April 11, 2006 3:49 PM
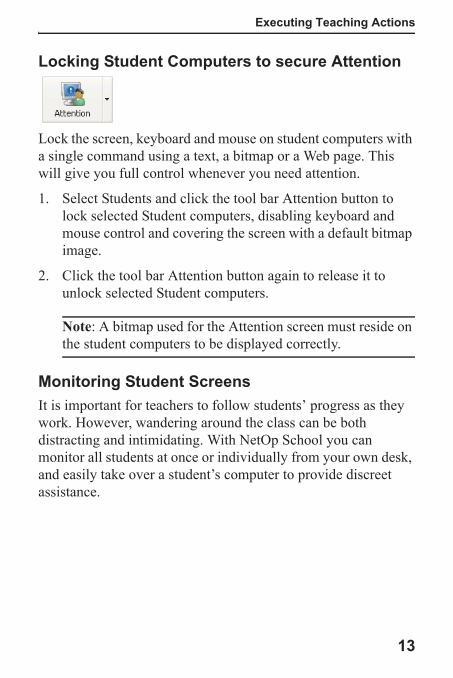
Locking Student Computers to secure Attention
Lock the screen, keyboard and mouse on student computers with a single command using a text, a bitmap or a Web page. This will give you full control whenever you need attention.
1. Select Students and click the tool bar Attention button to lock selected Student computers, disabling keyboard and mouse control and covering the screen with a default bitmap image.
2. Click the tool bar Attention button again to release it to unlock selected Student computers.
Note: A bitmap used for the Attention screen must reside on the student computers to be displayed correctly.
Monitoring Student ScreensIt is important for teachers to follow students’ progress as they work. However, wandering around the class can be both distracting and intimidating. With NetOp School you can monitor all students at once or individually from your own desk, and easily take over a student’s computer to provide discreet assistance.
13
Executing Teaching Actions
Teaching.book Page 14 Tuesday, April 11, 2006 3:49 PM
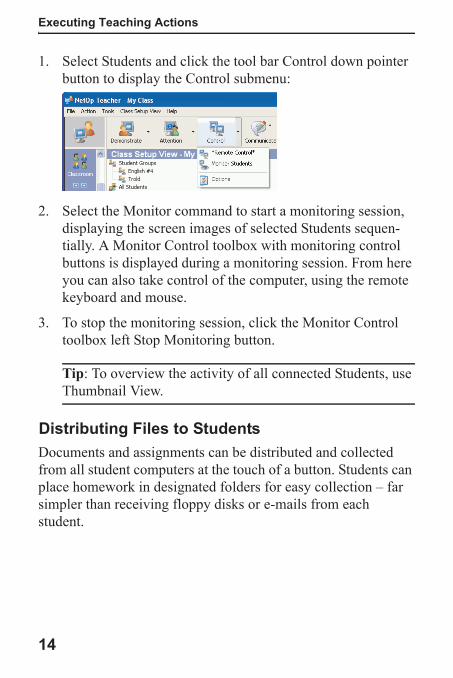
1. Select Students and click the tool bar Control down pointer button to display the Control submenu:
2. Select the Monitor command to start a monitoring session, displaying the screen images of selected Students sequen-tially. A Monitor Control toolbox with monitoring control buttons is displayed during a monitoring session. From here you can also take control of the computer, using the remote keyboard and mouse.
3. To stop the monitoring session, click the Monitor Control toolbox left Stop Monitoring button.
Tip: To overview the activity of all connected Students, use Thumbnail View.
Distributing Files to StudentsDocuments and assignments can be distributed and collected from all student computers at the touch of a button. Students can place homework in designated folders for easy collection – far simpler than receiving floppy disks or e-mails from each student.
14
Executing Teaching Actions
Teaching.book Page 15 Tuesday, April 11, 2006 3:49 PM
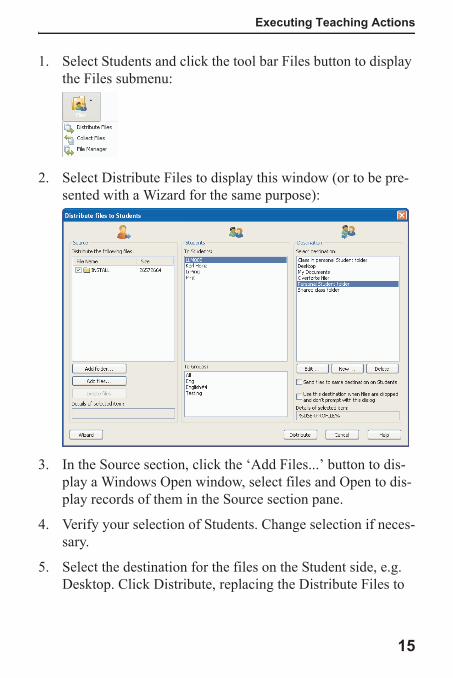
1. Select Students and click the tool bar Files button to display the Files submenu:
2. Select Distribute Files to display this window (or to be pre-sented with a Wizard for the same purpose):
3. In the Source section, click the ‘Add Files...’ button to dis-play a Windows Open window, select files and Open to dis-play records of them in the Source section pane.
4. Verify your selection of Students. Change selection if neces-sary.
5. Select the destination for the files on the Student side, e.g. Desktop. Click Distribute, replacing the Distribute Files to
15
Executing Teaching Actions
Teaching.book Page 16 Tuesday, April 11, 2006 3:49 PM
Students window by the File Distribution window display-ing distribution results.
6. Click ’Ok’ to close the File Distribution window.
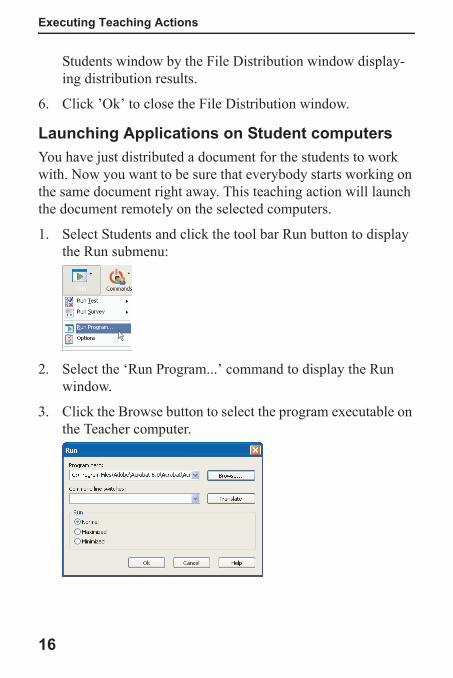
Launching Applications on Student computersYou have just distributed a document for the students to work with. Now you want to be sure that everybody starts working on the same document right away. This teaching action will launch the document remotely on the selected computers.
1. Select Students and click the tool bar Run button to display the Run submenu:
2. Select the ‘Run Program...’ command to display the Run window.
3. Click the Browse button to select the program executable on the Teacher computer.
16
Executing Teaching Actions
Teaching.book Page 17 Tuesday, April 11, 2006 3:49 PM
4. Click ’Ok’ to close the Run window and apply selections in the window, running the program on selected Student com-puters.
Note: Use Options to add pre-defined elements to the Run submenu. To run a document successfully on Student computers, the document file must reside in the same path on the Teacher computer and on Student computers.
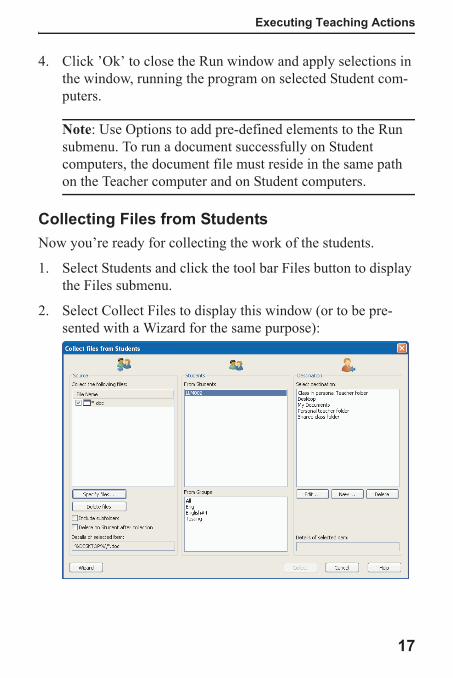
Collecting Files from StudentsNow you’re ready for collecting the work of the students.
1. Select Students and click the tool bar Files button to display the Files submenu.
2. Select Collect Files to display this window (or to be pre-sented with a Wizard for the same purpose):
17

Executing Teaching Actions
Teaching.book Page 18 Tuesday, April 11, 2006 3:49 PM
3. If files or folders were previously distributed to Students during the session, the Source section pane displays records of the distributed files or folders. To collect only recently distributed files, make no changes in the Source section. Verify your selection of Students. Change selection if neces-sary.
4. In the Destination section pane, select one of the default Teacher file locations, e.g. My Documents which is often the Teacher’s home drive. A number of subfolders correspond-ing the selection of Students will be created.
5. Click Collect, replacing the Collect Files from Students win-dow by the File Collection window displaying collection results.
6. Click ’Ok’ to close the File Collection window.
Allow or Block Students from Running Specified Applications and Internet SitesYou do not have to worry about students accessing inappropriate web sites or playing games instead of working.
Activity ViewNetop School offers total class management at the click of your mouse. In a single view you are able to grant or deny programs to run and Internet sites to be accessed.
18
Executing Teaching Actions
Teaching.book Page 19 Tuesday, April 11, 2006 3:49 PM
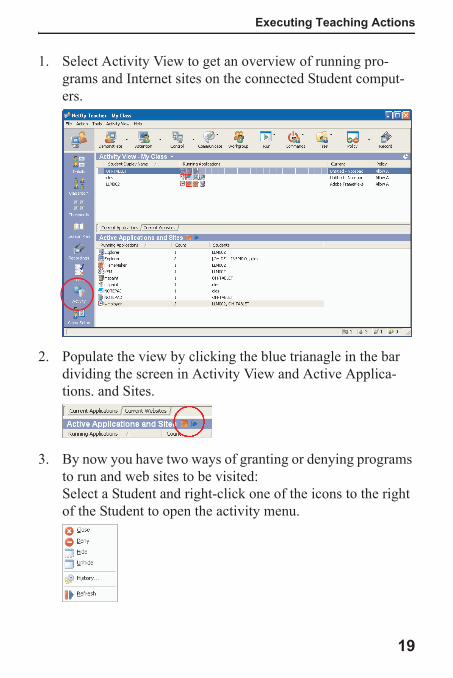
1. Select Activity View to get an overview of running pro-grams and Internet sites on the connected Student comput-ers.
2. Populate the view by clicking the blue trianagle in the bar dividing the screen in Activity View and Active Applica-tions. and Sites.
3. By now you have two ways of granting or denying programs to run and web sites to be visited:Select a Student and right-click one of the icons to the right of the Student to open the activity menu.
19
Executing Teaching Actions
Teaching.book Page 20 Tuesday, April 11, 2006 3:49 PM
By letting the cursor touch the icon a tooltip informs you of the name of the program or the name of the web site.
4. During a lesson it may be necessary to switch off a program which runs on a student. Select the icon of the program and right-click to select ‘Hide’. The program still runs but is inaccessible. To re-activate the program right-click it and ‘Unhide’ it.
5. From the list of active applications below the bar dividing the view, right-click a program and select ‘Deny’. This means that the program cannot be accessed by any of the connected students.
Note: Selecting ‘Deny’ to programs can be considered as temporary policies or rules which regulate the student behavior for as long as the student is connected to the class.If you want to set rules or policies which applies always, set up policies for programs and web sites in the Policy Options.
20
Executing Teaching Actions
Teaching.book Page 21 Tuesday, April 11, 2006 3:49 PM
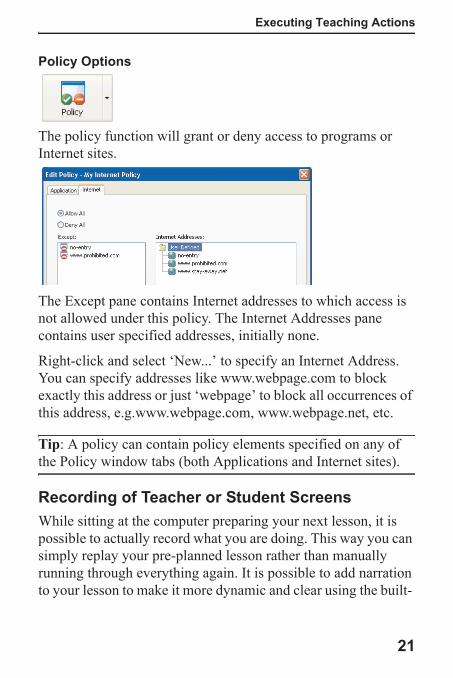
Policy Options
The policy function will grant or deny access to programs or Internet sites.
The Except pane contains Internet addresses to which access is not allowed under this policy. The Internet Addresses pane contains user specified addresses, initially none.
Right-click and select ‘New...’ to specify an Internet Address. You can specify addresses like www.webpage.com to block exactly this address or just ‘webpage’ to block all occurrences of this address, e.g.www.webpage.com, www.webpage.net, etc.
Tip: A policy can contain policy elements specified on any of the Policy window tabs (both Applications and Internet sites).
Recording of Teacher or Student ScreensWhile sitting at the computer preparing your next lesson, it is possible to actually record what you are doing. This way you can simply replay your pre-planned lesson rather than manually running through everything again. It is possible to add narration to your lesson to make it more dynamic and clear using the built-
21
Creating and Performing a Test
Teaching.book Page 22 Tuesday, April 11, 2006 3:49 PM
in microphone. In addition you can record and playback student screens as you monitor their progress.
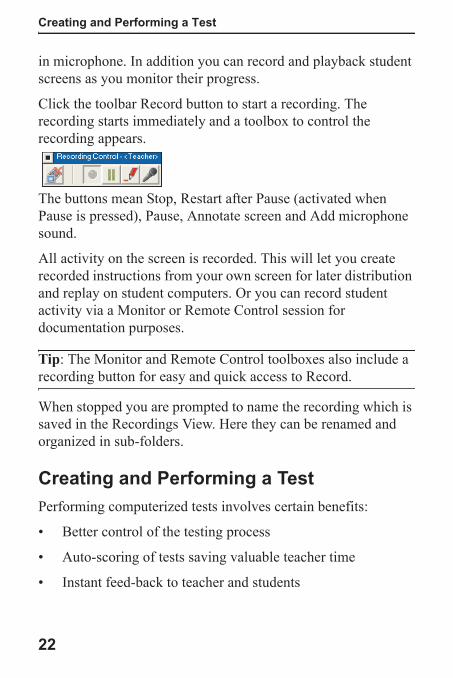
Click the toolbar Record button to start a recording. The recording starts immediately and a toolbox to control the recording appears.
The buttons mean Stop, Restart after Pause (activated when Pause is pressed), Pause, Annotate screen and Add microphone sound.
All activity on the screen is recorded. This will let you create recorded instructions from your own screen for later distribution and replay on student computers. Or you can record student activity via a Monitor or Remote Control session for documentation purposes.
Tip: The Monitor and Remote Control toolboxes also include a recording button for easy and quick access to Record.
When stopped you are prompted to name the recording which is saved in the Recordings View. Here they can be renamed and organized in sub-folders.
Creating and Performing a TestPerforming computerized tests involves certain benefits:
• Better control of the testing process
• Auto-scoring of tests saving valuable teacher time
• Instant feed-back to teacher and students
22
Creating and Performing a Test
Teaching.book Page 23 Tuesday, April 11, 2006 3:49 PM
NetOp School handles this along with the possibility of using the computer for easy creation of the tests.
Generating a test is a three-step process:
1. Creating the questions.
2. Selecting the style for the test (as presented on Students).
3. Setting the options for the test.
Before running the test you can change the reporting option, which by default is set to real-time reporting.
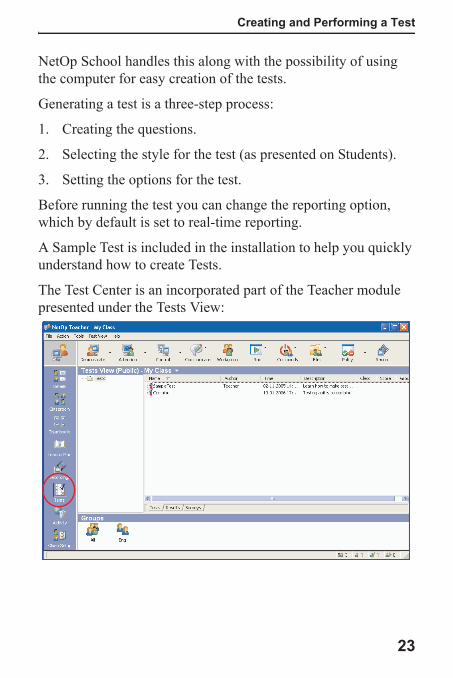
A Sample Test is included in the installation to help you quickly understand how to create Tests.
The Test Center is an incorporated part of the Teacher module presented under the Tests View:
23
Creating and Performing a Test
Teaching.book Page 24 Tuesday, April 11, 2006 3:49 PM
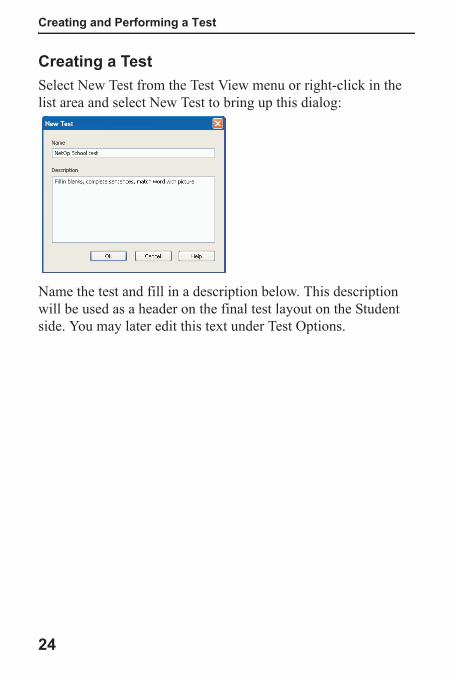
Creating a TestSelect New Test from the Test View menu or right-click in the list area and select New Test to bring up this dialog:
Name the test and fill in a description below. This description will be used as a header on the final test layout on the Student side. You may later edit this text under Test Options.
24
Creating and Performing a Test
Teaching.book Page 25 Tuesday, April 11, 2006 3:49 PM
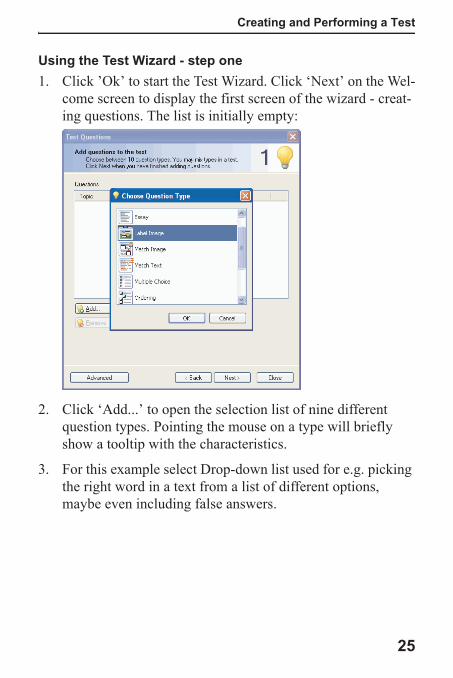
Using the Test Wizard - step one1. Click ’Ok’ to start the Test Wizard. Click ‘Next’ on the Wel-
come screen to display the first screen of the wizard - creat-ing questions. The list is initially empty:
2. Click ‘Add...’ to open the selection list of nine different question types. Pointing the mouse on a type will briefly show a tooltip with the characteristics.
3. For this example select Drop-down list used for e.g. picking the right word in a text from a list of different options, maybe even including false answers.
25
Creating and Performing a Test
Teaching.book Page 26 Tuesday, April 11, 2006 3:49 PM
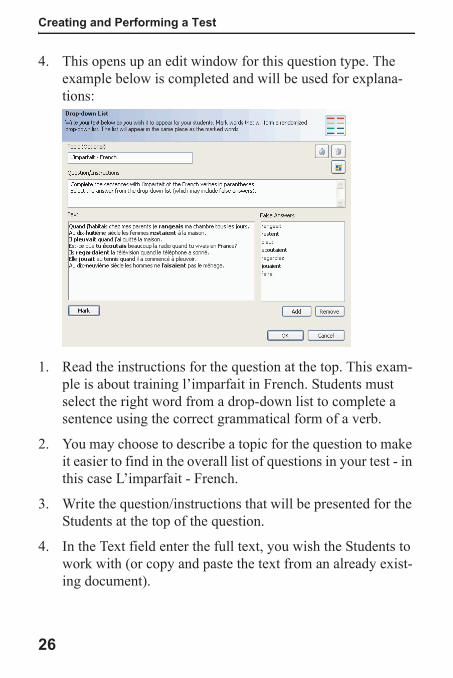
4. This opens up an edit window for this question type. The example below is completed and will be used for explana-tions:
1. Read the instructions for the question at the top. This exam-ple is about training l’imparfait in French. Students must select the right word from a drop-down list to complete a sentence using the correct grammatical form of a verb.
2. You may choose to describe a topic for the question to make it easier to find in the overall list of questions in your test - in this case L’imparfait - French.
3. Write the question/instructions that will be presented for the Students at the top of the question.
4. In the Text field enter the full text, you wish the Students to work with (or copy and paste the text from an already exist-ing document).
26
Creating and Performing a Test
Teaching.book Page 27 Tuesday, April 11, 2006 3:49 PM
5. Now, select the words that should form the drop-down list. Select a word (e.g. by double-clicking) and press the Mark button. The word is now part of the drop-down list. Con-tinue until you have marked all words for the list.
6. Finally add false answers to the list (optional). You’re done with this question. To edit the question later, double-click it in the list.
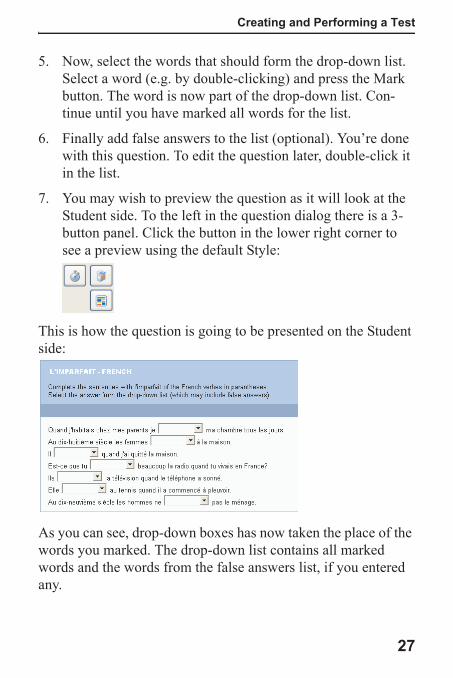
7. You may wish to preview the question as it will look at the Student side. To the left in the question dialog there is a 3-button panel. Click the button in the lower right corner to see a preview using the default Style:
This is how the question is going to be presented on the Student side:
As you can see, drop-down boxes has now taken the place of the words you marked. The drop-down list contains all marked words and the words from the false answers list, if you entered any.
27
Creating and Performing a Test
Teaching.book Page 28 Tuesday, April 11, 2006 3:49 PM
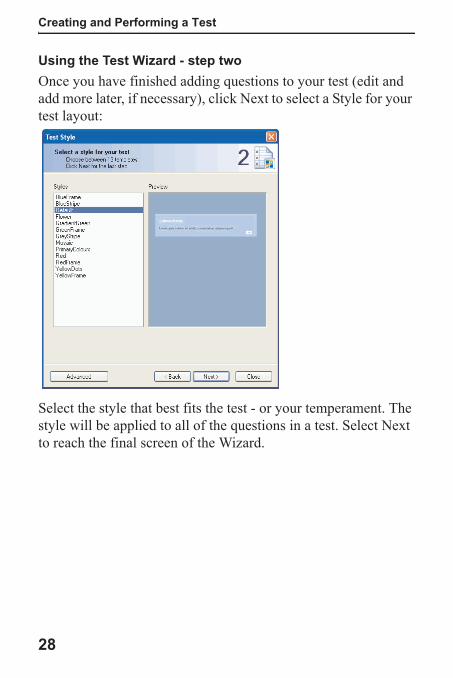
Using the Test Wizard - step twoOnce you have finished adding questions to your test (edit and add more later, if necessary), click Next to select a Style for your test layout:
Select the style that best fits the test - or your temperament. The style will be applied to all of the questions in a test. Select Next to reach the final screen of the Wizard.
28
Creating and Performing a Test
Teaching.book Page 29 Tuesday, April 11, 2006 3:49 PM
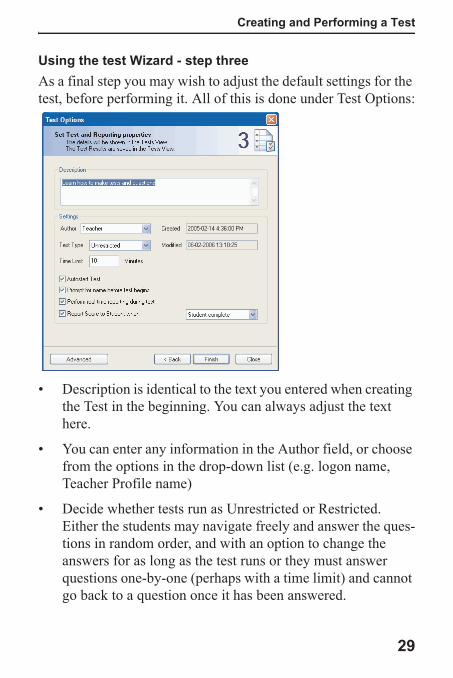
Using the test Wizard - step threeAs a final step you may wish to adjust the default settings for the test, before performing it. All of this is done under Test Options:
• Description is identical to the text you entered when creating the Test in the beginning. You can always adjust the text here.
• You can enter any information in the Author field, or choose from the options in the drop-down list (e.g. logon name, Teacher Profile name)
• Decide whether tests run as Unrestricted or Restricted. Either the students may navigate freely and answer the ques-tions in random order, and with an option to change the answers for as long as the test runs or they must answer questions one-by-one (perhaps with a time limit) and cannot go back to a question once it has been answered.
29
Creating and Performing a Test
Teaching.book Page 30 Tuesday, April 11, 2006 3:49 PM
• Autostart Test will start the test simultaneously on all Stu-dents once reported ready. Not checked means that the teacher will start the test manually from his Test Control Toolbox.
• You may wish to follow the Student tests as they go along and if you chose to auto-score the answers you may wish to return results to the Students immediately - when each of them has finished the test or once the test is completed for all.
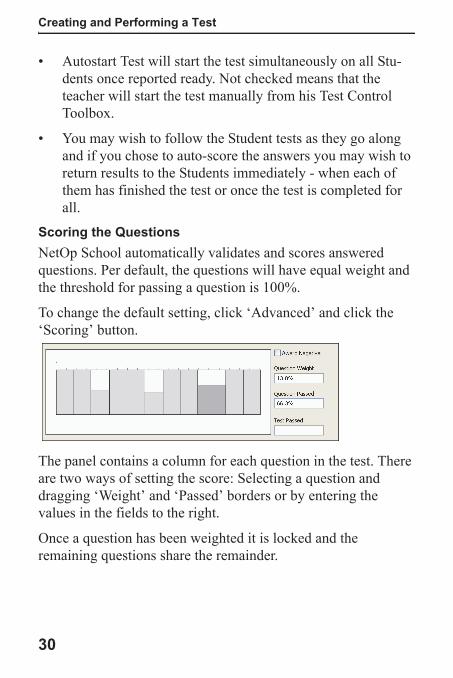
Scoring the QuestionsNetOp School automatically validates and scores answered questions. Per default, the questions will have equal weight and the threshold for passing a question is 100%.
To change the default setting, click ‘Advanced’ and click the ‘Scoring’ button.
The panel contains a column for each question in the test. There are two ways of setting the score: Selecting a question and dragging ‘Weight’ and ‘Passed’ borders or by entering the values in the fields to the right.
Once a question has been weighted it is locked and the remaining questions share the remainder.
30
Creating and Performing a Test
Teaching.book Page 31 Tuesday, April 11, 2006 3:49 PM
That’s it! You took all the steps necessary to create a test!
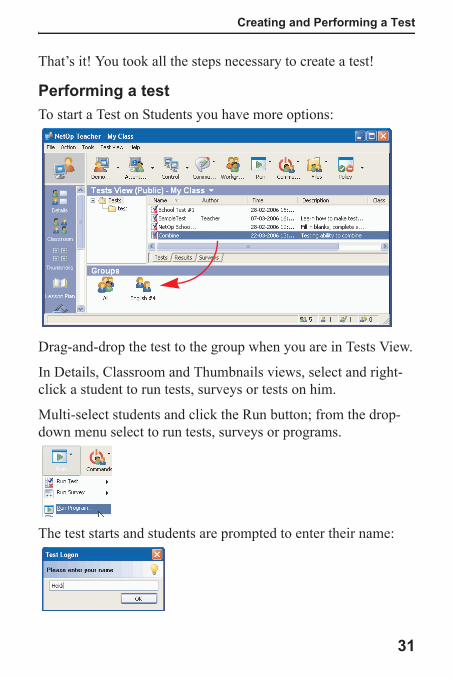
Performing a testTo start a Test on Students you have more options:
Drag-and-drop the test to the group when you are in Tests View.
In Details, Classroom and Thumbnails views, select and right-click a student to run tests, surveys or tests on him.
Multi-select students and click the Run button; from the drop-down menu select to run tests, surveys or programs.
The test starts and students are prompted to enter their name:
31
Creating and Performing a Test
Teaching.book Page 32 Tuesday, April 11, 2006 3:49 PM
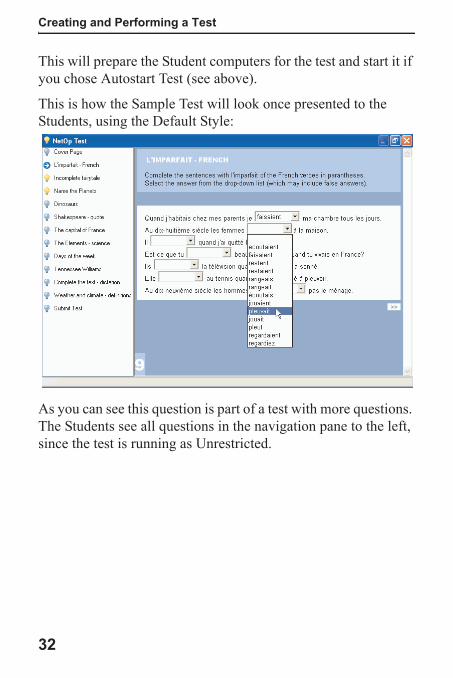
This will prepare the Student computers for the test and start it if you chose Autostart Test (see above).
This is how the Sample Test will look once presented to the Students, using the Default Style:
As you can see this question is part of a test with more questions. The Students see all questions in the navigation pane to the left, since the test is running as Unrestricted.
32
Creating and Performing a Test
Teaching.book Page 33 Tuesday, April 11, 2006 3:49 PM
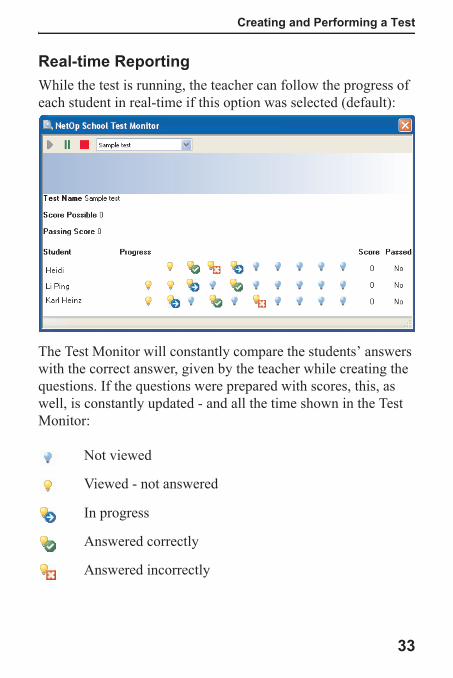
Real-time ReportingWhile the test is running, the teacher can follow the progress of each student in real-time if this option was selected (default):
The Test Monitor will constantly compare the students’ answers with the correct answer, given by the teacher while creating the questions. If the questions were prepared with scores, this, as well, is constantly updated - and all the time shown in the Test Monitor:
Not viewed
Viewed - not answered
In progress
Answered correctly
Answered incorrectly
33
Changing a Class Environment
Teaching.book Page 34 Tuesday, April 11, 2006 3:49 PM
Read more details about using the Test Center in the User’s Manual or in the Help system.
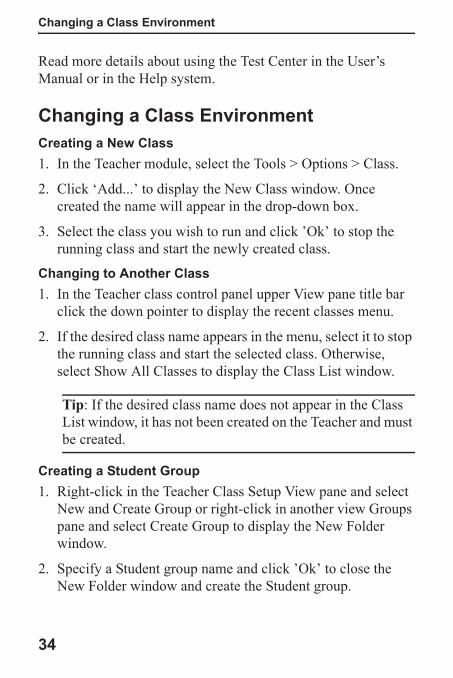
Changing a Class EnvironmentCreating a New Class1. In the Teacher module, select the Tools > Options > Class.
2. Click ‘Add...’ to display the New Class window. Once created the name will appear in the drop-down box.
3. Select the class you wish to run and click ’Ok’ to stop the running class and start the newly created class.
Changing to Another Class1. In the Teacher class control panel upper View pane title bar
click the down pointer to display the recent classes menu.
2. If the desired class name appears in the menu, select it to stop the running class and start the selected class. Otherwise, select Show All Classes to display the Class List window.
Tip: If the desired class name does not appear in the Class List window, it has not been created on the Teacher and must be created.
Creating a Student Group1. Right-click in the Teacher Class Setup View pane and select
New and Create Group or right-click in another view Groups pane and select Create Group to display the New Folder window.
2. Specify a Student group name and click ’Ok’ to close the New Folder window and create the Student group.
34

Teacher Setup Options
Teaching.book Page 35 Tuesday, April 11, 2006 3:49 PM
Adding a Student to a Student Group1. In the Teacher Class Setup View pane drag a Student from
the All Students folder to a user-created Student group folder to create a Student shortcut in the Student group folder. Alternatively, in Details View, Classroom View or Thumbnail View drag a Student record, icon or thumbnail in the View pane to a Groups pane Student group folder other than All.
Note: A Student can be a member of multiple Student groups.
Connecting a Student to a Specified Class1. On the Student, select the Tools > Options > Class.
2. The Connect to Class drop-down box field displays the specified class name. The drop-down box list contains class names that have been specified on the Student. If the desired class name is in the list, select it to display it in the drop-down box field. Otherwise, specify the desired class name in the drop-down box field.
3. Click ’Ok’ to connect to the specified class if running, otherwise waiting for the specified class as displayed in the Student window title bar.
Teacher Setup OptionsInitial Teacher setup using the setup wizard default options makes the Teacher operational and unprotected. The following setup options should be considered to protect the Teacher installation.
35
Student Setup Options
Teaching.book Page 36 Tuesday, April 11, 2006 3:49 PM
Protection PasswordThe proctection password protects the Teacher setup against accidental or unauthorized changes. A protection password is applied in Tools > Protection Password > Change Protection Password window.
Teacher ProfilesTeacher profiles protect access to the Teacher window by individual password protected user logon. Apply Teacher profiles on the Tools > Options > Teachers.
Student Setup OptionsInitial Student setup using the setup wizard default options makes the Student operational with default class connection and unprotected. The following setup options should be considered for protection of Student and network resources and other class connection options.
Installation and SetupThe installation and setup of NetOp Student on multiple computers in an organization is typically handled by a system or network administrator to assure uniform setup and protection of system and network resources.
Student Deployment enables installing identical NetOp Student setups on multiple networked Windows XP, 2000 and NT4 computers from a network computer.
Protection PasswordThe proctection password protects the Student setup against accidental or unauthorized changes. Furthermore, the password can protect agains unloading or stopping the Student or disconnecting from a class. Student configuration files can be
36
Student Setup Options
Teaching.book Page 37 Tuesday, April 11, 2006 3:49 PM
protected. Protection password and Student configuration files protection is applied in Tools > Protection Password window.
Load and Start OptionsAmong other options, the following load and start options are available on the Tools > Options > General tab:
Join class at program startup: Check to join class when the Student module is loaded.
Load Student at Windows startup: Check to load the Student module automatically when Windows is started on the computer.
Stealth mode: Check to hide the Student interface completely to protect the Student setup against accidental or unauthorized changes.
Class Connection OptionsThe following class connection options are available on the Tools menu Options command/Class tab:
Connect to class: When joining class, connect to a specified class if running on the network, otherwise wait for it (default selection).
Browse for Classes: When joining class, display classes (Teacher modules running) on the network to select to connect to one of them.
Be available for any Class: When joining class, become available for any class running on the network.
Select Class: Specify an already running class on a Teacher on the local subnet or a different subnet.
37
Student User Options
Teaching.book Page 38 Tuesday, April 11, 2006 3:49 PM
Use Class Server: When joining class, automatically connect to an already centrally scheduled class. This option demands that the Class Server module (optional) is used for planning of classes.
Student User OptionsIn addition to responding to teaching actions, Student users can request help from the Teacher user. If Student users are allowed access to the Student module interface they are also able to see saved messages under the Messages Tab or playback recordings listed under the Recordings Tab.
By default the Student user has access to the interface, but this can be changed by selecting the Student Startup Option Stealth mode (hide Student interface when started).
38

QuickGuide
NetOp® School 5.0
Teaching and management software for the networked classroom
M o v i n g e x p e r t i s e — n o t p e o p l e ®
Danware Data A/S
Bregnerodvej 127DK-3460 BirkerodDenmark
tel: +45 4590 2525fax: +45 4590 2526email: [email protected]: www.netop.com
Quick guide_School 5,0 10/04/06 14:59 Side 1