ncr counterpoint course 309 multi-site exercise … · multi-site 1 exercise handbook summary of...
TRANSCRIPT

NCR Integrated Stall Solution 1
©NCR Corporation 2012
NCR Counterpoint
Course 309 Multi-Site Exercise Handbook

Multi-Site 1 Exercise Handbook
Summary of Exercises
Deploying Counterpoint and DataXtend When initially setting up Counterpoint and DataXtend, follow the steps in Exercises 1-
5 in the order shown.
Other exercises in this manual are presented to further the learning process.
Exercise 1 Configuring the Systems
Step 1 Pre-configure all server systems
Obtain static IP address or DNS-resolvable hostname
Install Microsoft SQL Server 2008 or 2005 with SP2 on Hub server and, optionally, on any Remote server
Install Counterpoint prerequisites on Hub Server and each Remote server
Configure client protocols and remote connections
Configure SQL memory
Install clock synchronization software on managed computers
Open Port 242 on Hub Server and Remote servers
Exercise 2 Preparing to Install Counterpoint
Step 2 Collect files needed for Counterpoint installation on Hub server
Copy Counterpoint registration file to Hub server
Create any custom schema scripts and replication rules on a development system and copy them to Hub server
If it exists, copy company's pre-configured V8.4 Counterpoint database files to Hub server and attach database
Exercise 3 Deploying Counterpoint on the Hub server
Step 3 Install Counterpoint on Hub server
Install Counterpoint on the Multi-Site Hub server
Open the port assigned to CPServices on the Hub server
Step 4 Prepare Hub server for Remote server installations
Start CPServices on the Hub server
Build data in company’s database on Hub server
Define current year calendar and set Current Year ID for company
Define Counterpoint stores and locations
Define Counterpoint workgroups and assign Hub to a workgroup
Define Counterpoint system administrators
Multi-Site 2 Exercise Handbook
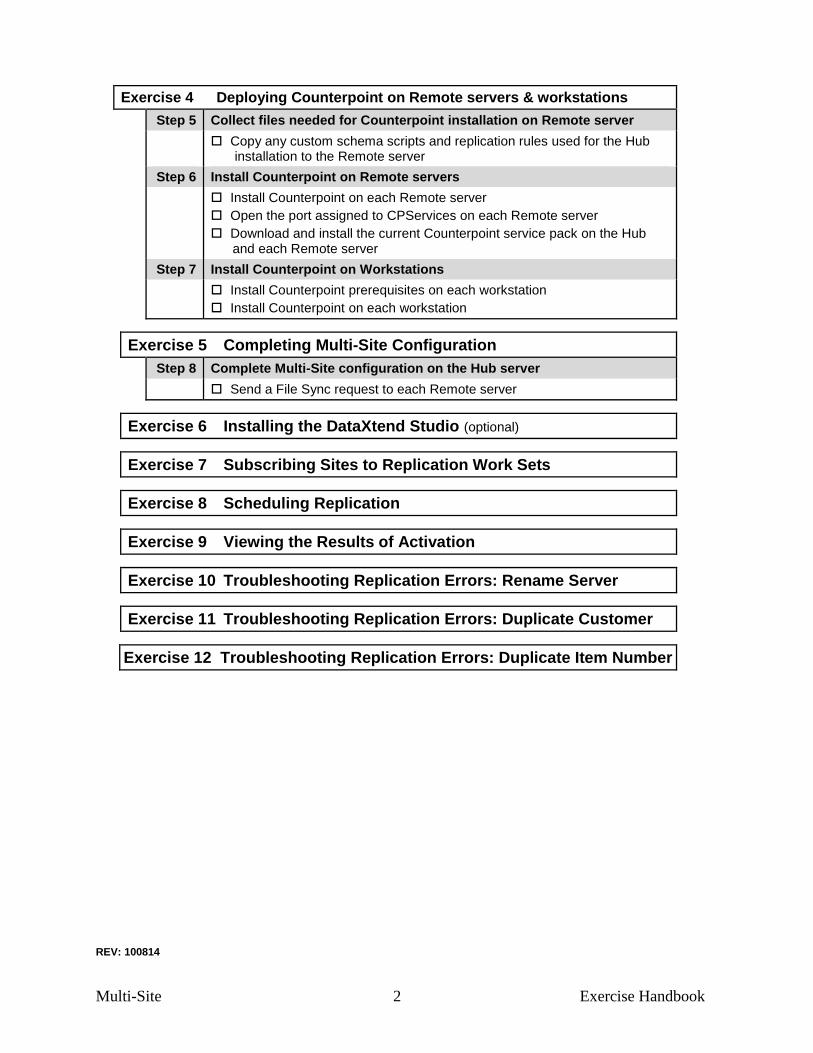
Exercise 4 Deploying Counterpoint on Remote servers & workstations
Step 5 Collect files needed for Counterpoint installation on Remote server
Copy any custom schema scripts and replication rules used for the Hub installation to the Remote server
Step 6 Install Counterpoint on Remote servers
Install Counterpoint on each Remote server
Open the port assigned to CPServices on each Remote server
Download and install the current Counterpoint service pack on the Hub and each Remote server
Step 7 Install Counterpoint on Workstations
Install Counterpoint prerequisites on each workstation
Install Counterpoint on each workstation
Exercise 5 Completing Multi-Site Configuration
Step 8 Complete Multi-Site configuration on the Hub server
Send a File Sync request to each Remote server
Exercise 6 Installing the DataXtend Studio (optional)
Exercise 7 Subscribing Sites to Replication Work Sets
Exercise 8 Scheduling Replication
Exercise 9 Viewing the Results of Activation
Exercise 10 Troubleshooting Replication Errors: Rename Server
Exercise 11 Troubleshooting Replication Errors: Duplicate Customer
Exercise 12 Troubleshooting Replication Errors: Duplicate Item Number
REV: 100814

Multi-Site 3 Exercise Handbook
In class: MSSQL 2005 with SP2 is already installed on the Hub Server that you are using in class. To confirm this, open Control Panel, access Administrative Tools and click Services. Look for the service named SQL SERVER (MSSQLSERVER) and ensure its status is "Started".
Verify that SQL Server has been installed to allow for SQL
Server and Windows authentication by starting SQL Server Management Studio. Right-click the server name in the Object Explorer and select Properties. In the Server Properties window, select Security. The Server authentication selection should be SQL Server and Windows Authentication mode.
SSE 2005 with SP2 is also already installed on the Remote
Server. Verify that the SQL SERVER service is also started on that system.
Exercise 1: Configuring the Systems
In this exercise, you perform the steps to configure your servers and managed computers.
1. Pre-configure all Server Systems
Obtain static IP address or DNS-resolvable hostname Each server (Hub and all Remote servers) must have a static IP address or a
DNS-resolvable hostname so that managed computers can initiate a connection with the Hub Server.
Install MSSQL 2008 or 2005 with SP2 on the Hub Server and, optionally,
on any Remote Server. Microsoft SQL Server 2008 or 2005 is required on the Hub Server, and must be
present prior to installing Counterpoint. Install MSSQL "manually" and configure it to allow for both Windows and SQL
authentication. Also ensure that it is running as a service.
In class: Exit to a command prompt on each system and run ipconfig /all to verify that each computer has an IP address.
Ping each system’s IP address to ensure they can connect.
Multi-Site 4 Exercise Handbook
In class: Insert the Counterpoint flash drive on the Hub Server and navigate to the CPSQLPrereqs folder under CPSQL8.4.x. Run CPSQLPrerequisites.exe.
Select the Multi-Site Server option. When you receive the message to stop all instances of
CPServices, check the Windows services to ensure that the Counterpoint Services is not running (in class, it should not even appear in the Services window).
Because you selected to install on a Multi-Site server, you will
be prompted to install .NET Framework 1.1, followed by DXRE V8.2. Take all defaults during both installations.
If .NET Framework 4.0 is installed, you will be prompted to
reboot when it completes. After rebooting, the prerequisites will continue to install. If any other prerequisites are installed, you will be prompted to reboot the computer again when it finishes.
Repeat this step on each Remote Server.
Install prerequisites on Hub Server and each remote server Several parts of Counterpoint are built using the .NET software for Windows
operating systems. To run Counterpoint, several components must be installed: Microsoft .NET Framework 3.5 SP1 and .NET Framework 4.0, Microsoft SQL Server Native Client, SQL Server Management Objects, and SQLXML4.
In addition, two additional components must be present in order for your pre-attached database to be provisioned during the Counterpoint installation. Install any of the missing components on each server using the Counterpoint Prerequisites installer on the Counterpoint download. Note: On Windows 2008 servers, you must use Start>Administrative Tools>Server Manager to manually install .NET Framework 3.5 SP1 before installing Counterpoint Prerequisites. To install prerequisites, log in to the server as a Windows administrator and browse the Counterpoint “Complete” download files. Copy the \CPSQLPrereqs folder to your hard drive. Then run CPSQLPrerequisites.exe from that folder.
Multi-Site 5 Exercise Handbook
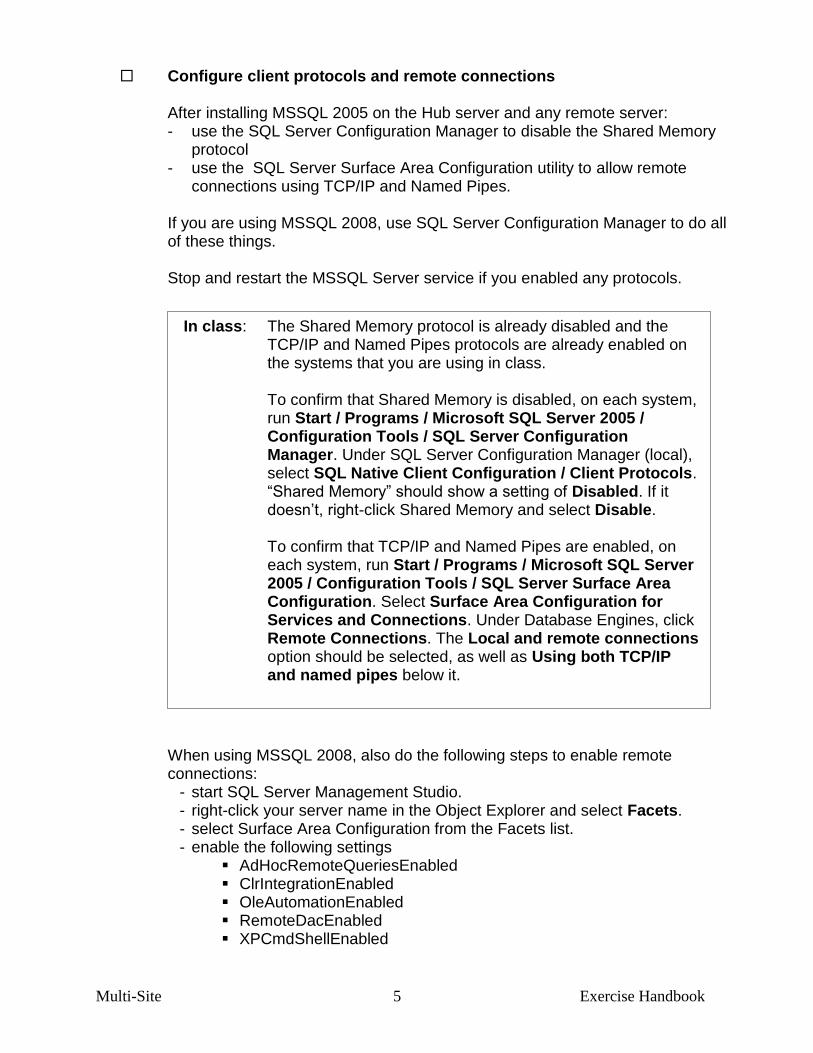
In class: The Shared Memory protocol is already disabled and the TCP/IP and Named Pipes protocols are already enabled on the systems that you are using in class.
To confirm that Shared Memory is disabled, on each system,
run Start / Programs / Microsoft SQL Server 2005 / Configuration Tools / SQL Server Configuration Manager. Under SQL Server Configuration Manager (local), select SQL Native Client Configuration / Client Protocols. “Shared Memory” should show a setting of Disabled. If it doesn’t, right-click Shared Memory and select Disable.
To confirm that TCP/IP and Named Pipes are enabled, on
each system, run Start / Programs / Microsoft SQL Server 2005 / Configuration Tools / SQL Server Surface Area Configuration. Select Surface Area Configuration for Services and Connections. Under Database Engines, click Remote Connections. The Local and remote connections option should be selected, as well as Using both TCP/IP and named pipes below it.
Configure client protocols and remote connections After installing MSSQL 2005 on the Hub server and any remote server:
- use the SQL Server Configuration Manager to disable the Shared Memory protocol
- use the SQL Server Surface Area Configuration utility to allow remote connections using TCP/IP and Named Pipes.
If you are using MSSQL 2008, use SQL Server Configuration Manager to do all
of these things. Stop and restart the MSSQL Server service if you enabled any protocols.
When using MSSQL 2008, also do the following steps to enable remote connections:
- start SQL Server Management Studio. - right-click your server name in the Object Explorer and select Facets. - select Surface Area Configuration from the Facets list. - enable the following settings
AdHocRemoteQueriesEnabled ClrIntegrationEnabled OleAutomationEnabled RemoteDacEnabled XPCmdShellEnabled
Multi-Site 6 Exercise Handbook
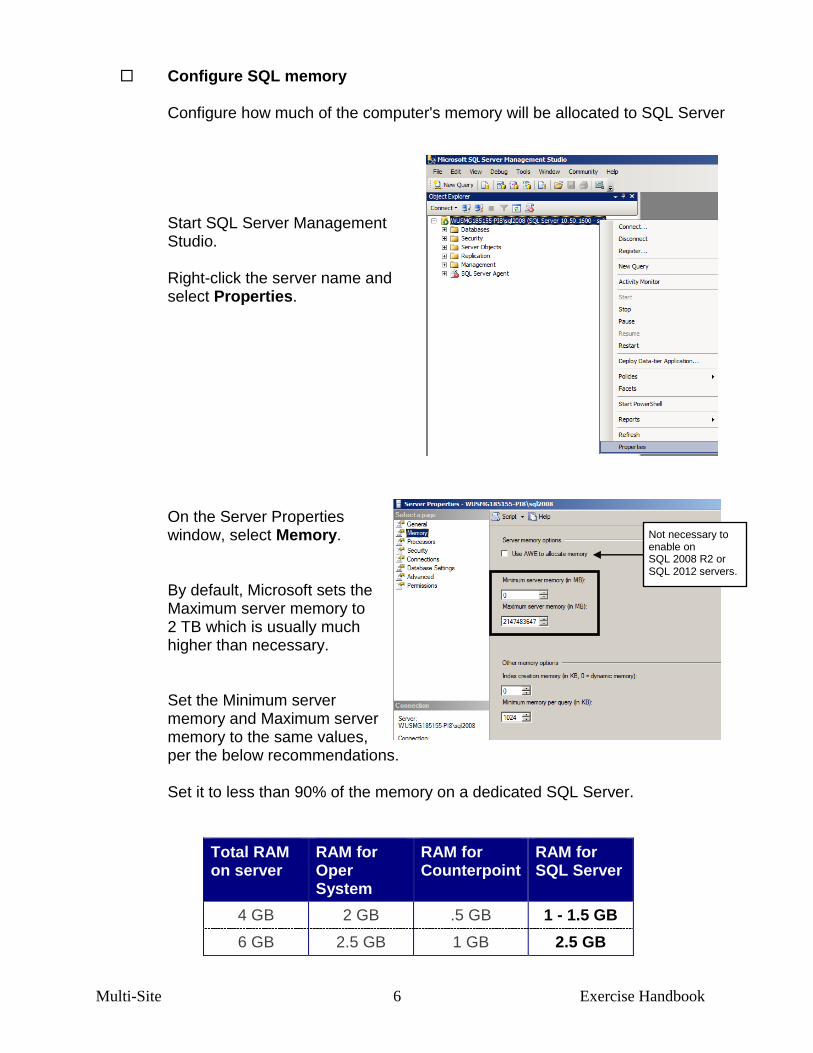
Not necessary to enable on SQL 2008 R2 or SQL 2012 servers.
Configure SQL memory
Configure how much of the computer's memory will be allocated to SQL Server
Start SQL Server Management Studio. Right-click the server name and select Properties. On the Server Properties window, select Memory. By default, Microsoft sets the Maximum server memory to 2 TB which is usually much higher than necessary. Set the Minimum server memory and Maximum server memory to the same values, per the below recommendations. Set it to less than 90% of the memory on a dedicated SQL Server.
Total RAM on server
RAM for Oper System
RAM for Counterpoint
RAM for SQL Server
4 GB 2 GB .5 GB 1 - 1.5 GB
6 GB 2.5 GB 1 GB 2.5 GB

Multi-Site 7 Exercise Handbook
Install clock synchronization software
Systems that will be replicating database changes should be using clock
synchronization software so that times between systems remain within a 10-minute variance (ignoring time zone differences).
Tardis 2000 and Dimension 4 are examples of clock synchronization software.
Open necessary ports
Any firewall on the Hub Server and Remote Servers must allow TCP traffic for replication to occur. Open port 242 for inbound and outbound communications on all servers.
This ensures that the site can act as a replication partner for sites that are not
behind the firewall.
End of Exercise 1
In class: The firewall is disabled on all systems that you are using in class, and security is being enforced with a group policy instead.
In class: Tardis 2000 is already installed on the systems that you are using in class.
STOP HERE
In class: Set both Minimum and Maximum server memory to 1000 MB.
Multi-Site 8 Exercise Handbook
In class: Create C:\CUSTOM on the Hub server. Then browse the CPSQLMS-OFFTrainCD folder on the flash
drive and copy Registration.hub from the MS Class folder to C:\CUSTOM on the Hub server.
In class: The most current release of Counterpoint (V8.4.6) is provided in class, so that you will not have to also apply the minor release.
Exercise 2: Preparing to Install Counterpoint
In this exercise, you perform the next steps to prepare for the installation of
Counterpoint. Step 2. Collect files needed for Counterpoint installation on Hub server
- If necessary, download the current “complete” Counterpoint file - Copy Counterpoint registration file to the Hub server - Create any custom schema scripts and replication rules and copy them to
the Hub server - Copy company's database to the Hub server and attach it
2. Collect files needed for Counterpoint installation on Hub server Download the “Complete” Counterpoint image.
You should always install the most current release of Counterpoint, rather installing a slightly earlier release and then applying a service pack. If replication rule changes are included in a service pack, you will be prevented from installing the service pack on a Multi-Site server and will instead need to install from the complete download.
Copy Registration.hub to the Hub server.
For a new Multi-Site installation, create the directory C:\CUSTOM on the Hub server and copy the Counterpoint registration file to that directory. For a Multi-Site upgrade from V8.3.8 or V8.3.9, create the CUSTOM directory below the previous version’s top-level Counterpoint directory.
Multi-Site 9 Exercise Handbook
In class: There are no custom schema scripts or replication rules to include, so do nothing for this step.
Copy any custom schema scripts and replication rules from the development system to the Hub server.
If you plan to customize the database schema, copy the scripts that make the database change from the development system where they were made to the CUSTOM directory on the Hub server. Also copy the custom replication rules to that directory if you modified them.
For a Multi-Site upgrade, also copy the Deployment.ini file into the CUSTOM
directory.
Copy company's database to the Hub Server and attach it.
If the company's V8.4 Counterpoint database has already been set up (on a different system with Counterpoint), copy the .mdf and .ldf database files to C:\Program Files\Microsoft SQL Server\MSSQL.1\MSSQL\Data on the Hub Server.
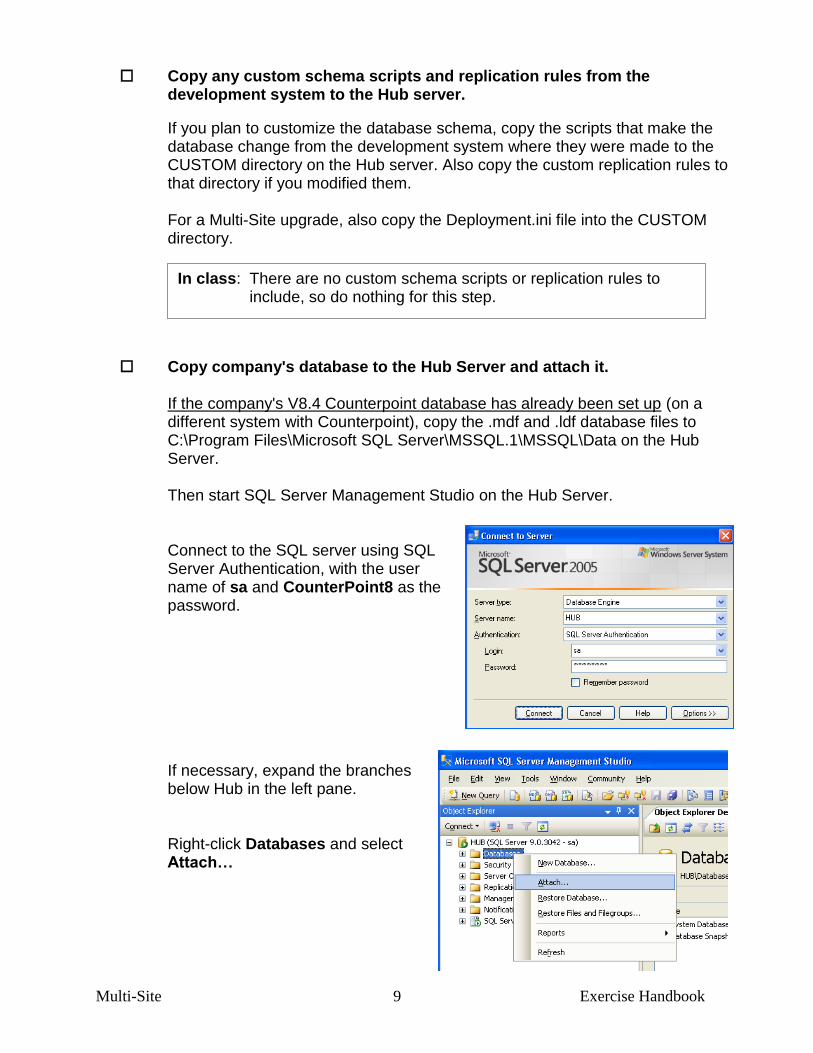
Then start SQL Server Management Studio on the Hub Server. Connect to the SQL server using SQL
Server Authentication, with the user name of sa and CounterPoint8 as the password.
If necessary, expand the branches
below Hub in the left pane. Right-click Databases and select
Attach…

Multi-Site 10 Exercise Handbook
In class: Copy DemoHub.mdf and DemoHub.ldf from the MS Class folder under the CPSQLMS-OFFTrainCD folder on the flash drive, and place both files in C:\Program Files\Microsoft SQL
Server\MSSQL.1\MSSQL\Data on the Hub server. Login to SQL Server Management Studio, using “sa” as the ID
and “CounterPoint8” as the password. Attach the database.
Click to browse to C:\Program Files\ Microsoft SQL Server\MSSQL.1\ MSSQL\ Data. Select the .mdf file for your database. If necessary, change the database owner to a user who is a system administrator with public and dbowner properties. (Do not specify pduser.) During installation, whether you indicate that you have a pre-attached database or you choose to create a new database, the database will be activated for replication.
End of Exercise 2
STOP HERE
Multi-Site 11 Exercise Handbook
Exercise 3: Deploying Counterpoint
In this exercise, you install Counterpoint on the Hub server. After that, you will do
some additional preparation tasks on the Hub server so that it is ready when Counterpoint is installed on Remote servers.
3. Install Counterpoint on Hub server
Install Counterpoint on the Hub server
Log in to the Hub server as a Windows administrator. Ensure that the SQL Server (MSSQLSERVER) service is started on the server.
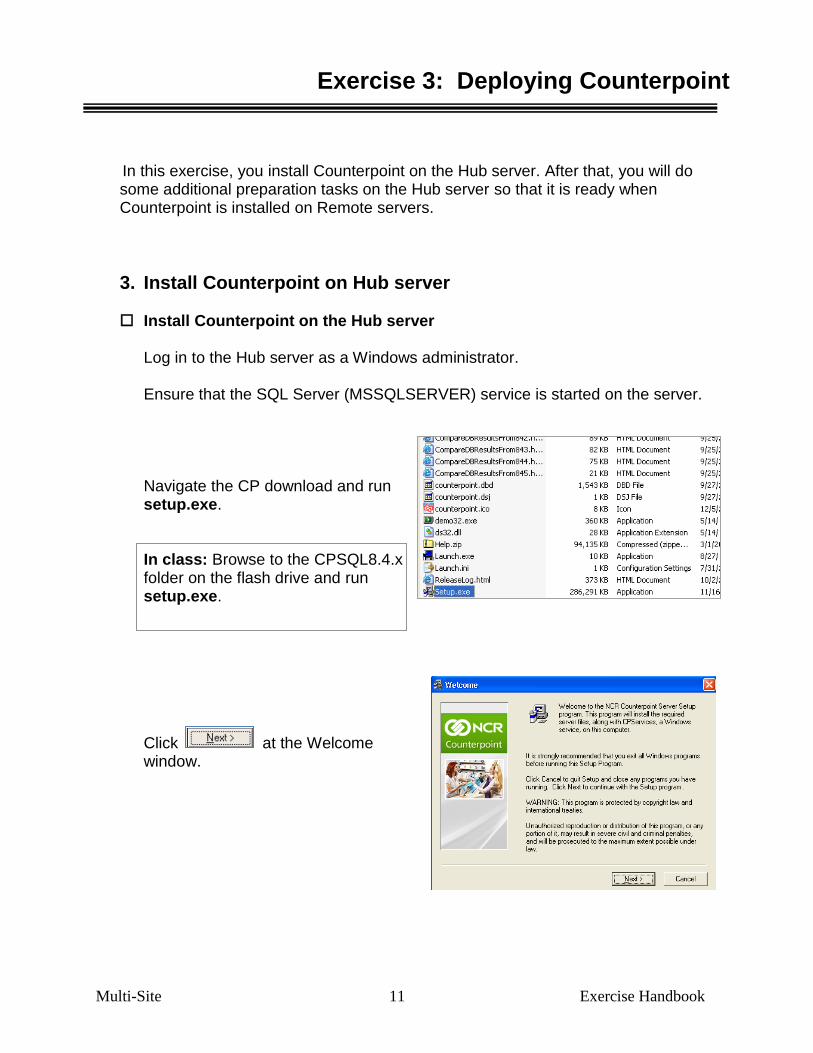
Navigate the CP download and run
setup.exe. In class: Browse to the CPSQL8.4.x
folder on the flash drive and run setup.exe.
Click at the Welcome
window.

Multi-Site 12 Exercise Handbook
Click Agree at the License Agreement
window and then click . Select the Folder name under which you
want Counterpoint installed on the server.
To upgrade your Hub’s Multi-Site
database from either V8.3.8 or V8.3.9, enable the “I am updating from a previous version” check box.
In class: Use CPSQL.1 as the folder
name. Do not enable the “updating” check box.
At the Select Role window, select
Multi-Site Hub server with Remote servers reporting to it.
Identify whether offline workstations will be connected to the Hub server. In class: The Hub server will not have
any offline workstations.
For the CPUser login information, when
using a pre-attached database, set the user ID and password to the SQL user who owns the database.
In class: Change the CPUser to sa
with a password of CounterPoint8.
Leave the PDUser login information set
to pduser and PDPassword8.
Multi-Site 13 Exercise Handbook
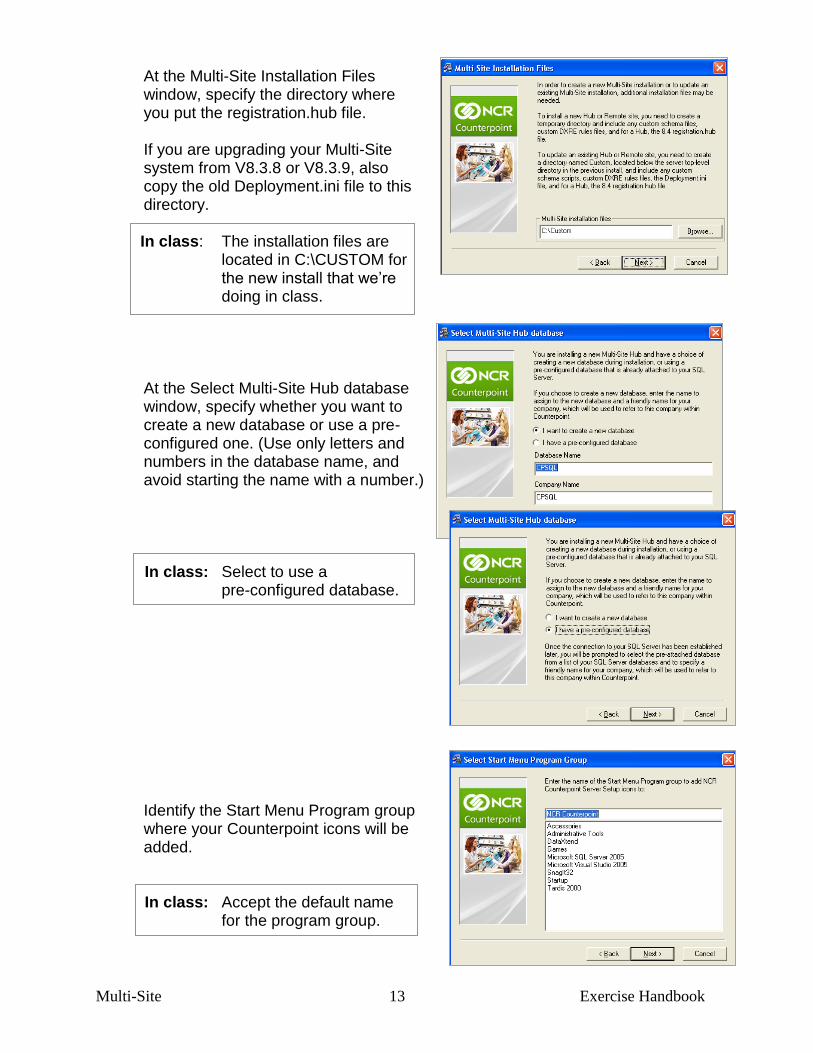
At the Multi-Site Installation Files window, specify the directory where you put the registration.hub file.
If you are upgrading your Multi-Site
system from V8.3.8 or V8.3.9, also copy the old Deployment.ini file to this directory.
In class: The installation files are
located in C:\CUSTOM for the new install that we’re doing in class.
At the Select Multi-Site Hub database window, specify whether you want to create a new database or use a pre-configured one. (Use only letters and numbers in the database name, and avoid starting the name with a number.)
In class: Select to use a
pre-configured database. Identify the Start Menu Program group
where your Counterpoint icons will be added.
In class: Accept the default name for the program group.
Multi-Site 14 Exercise Handbook
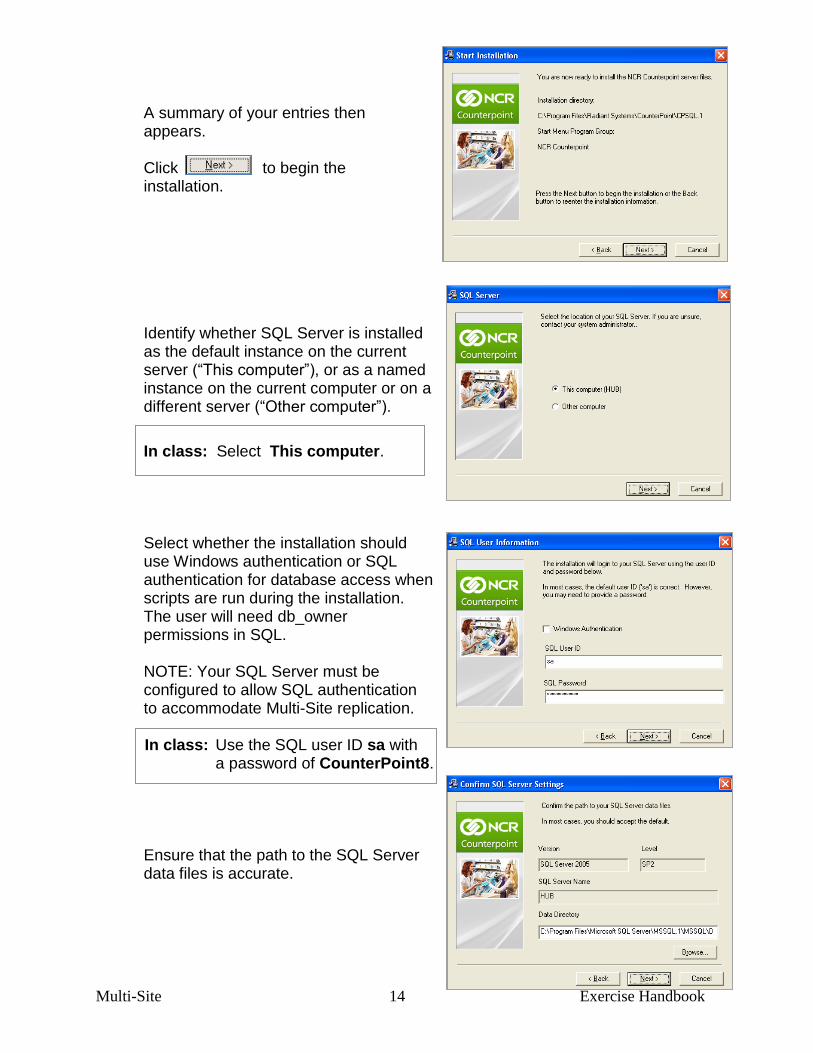
A summary of your entries then appears.
Click to begin the
installation. Identify whether SQL Server is installed
as the default instance on the current server (“This computer”), or as a named instance on the current computer or on a different server (“Other computer”).
In class: Select This computer. Select whether the installation should
use Windows authentication or SQL authentication for database access when scripts are run during the installation. The user will need db_owner permissions in SQL.
NOTE: Your SQL Server must be
configured to allow SQL authentication to accommodate Multi-Site replication.
In class: Use the SQL user ID sa with
a password of CounterPoint8. Ensure that the path to the SQL Server
data files is accurate.

Multi-Site 15 Exercise Handbook
If you chose to use a pre-configured
database, select the database that you want to use and enter an alias for it.
In class: Select the DemoHub
database and enter DemoHub as the alias.
The installation of Counterpoint on the
Hub server then starts. The database activation process begins.
This message appears when activation has completed.
Another set of scripts are then applied to the
activated database.
Multi-Site 16 Exercise Handbook
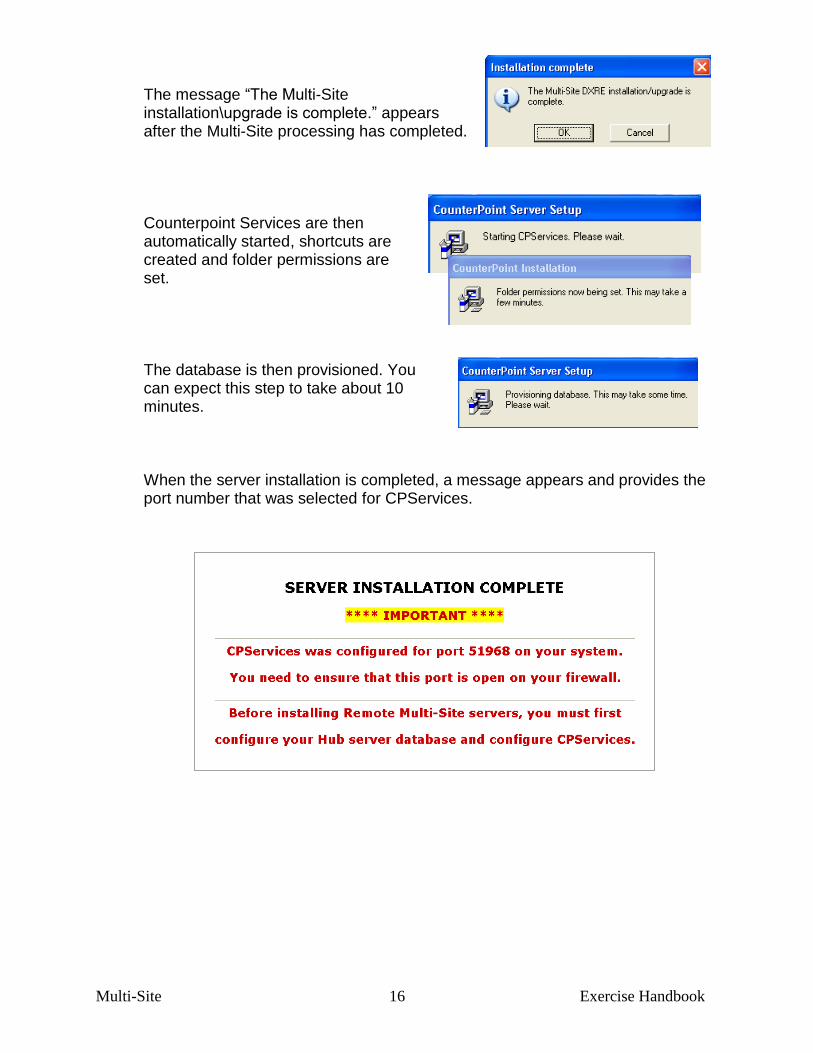
The message “The Multi-Site
installation\upgrade is complete.” appears after the Multi-Site processing has completed.
Counterpoint Services are then
automatically started, shortcuts are created and folder permissions are set.
The database is then provisioned. You
can expect this step to take about 10 minutes.
When the server installation is completed, a message appears and provides the
port number that was selected for CPServices.

Multi-Site 17 Exercise Handbook
In class: The lab systems used in class do not have a firewall enabled, so skip this step.
In class: Close the message window. Then select to create a shortcut on the desktop and click .
When you close the message, the
Installation Complete window appears.
Select Create shortcut on
desktop if you want to add a Counterpoint shortcut on the server.
Then click to close the
window.
A message appears to inform you that the sysstem must be rebooted.
Open the port assigned to CPServices on the Hub server
The Server Installation Complete message shows the port that was selected for CPServices. You can change the port if desired, using the Configure Local Services utility (Start / Programs / NCR Counterpoint / Utilities / Configure Local Services). You will need to ensure that the CPServices port you plan to use is open on your firewall.

Multi-Site 18 Exercise Handbook
In class: Select Start / Programs / CounterPoint / Utilities / Configure Local Services.
Verify that Counterpoint Services for the CPSQL.1 instance
is running.
In class: The company’s data has already been built in the pre-configured DemoHub database that you are using in class.
4. Prepare Hub server for Remote server installations
Start CPServices on the Hub server
Before you can install Counterpoint on Remote servers or workstations, CPServices must be running on the Hub server. On the Hub server, run Start / Programs / NCR Counterpoint / Utilities / Configure Local Services.
If CPServices does not show a status of “running”, select to Start it.
Build data in the company’s database on the Hub server If you chose to create a new database (rather than using a pre-configured one),
use Counterpoint on the Hub server to build your company’s data in the new database before you install Counterpoint on your remote servers or workstations.
Verify data in the pre-configured database on the Hub server If you chose to use a pre-configured database, start Counterpoint on the Hub
server and select the company name.
Multi-Site 19 Exercise Handbook
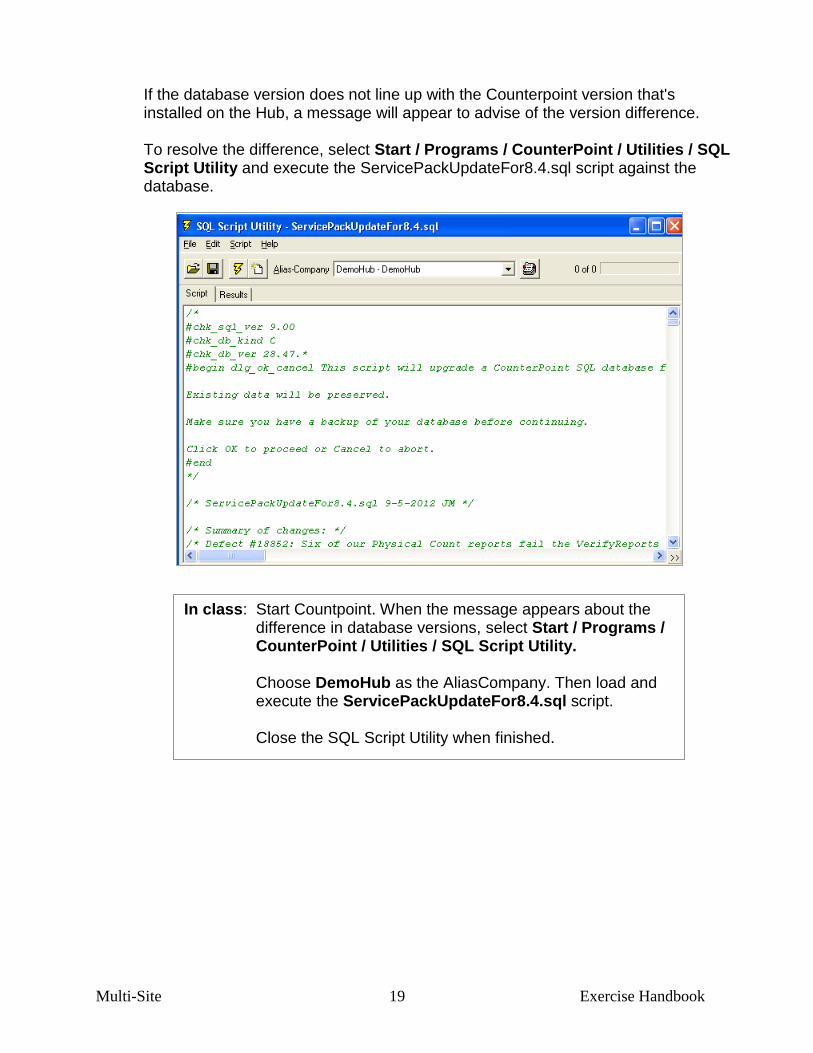
In class: Start Countpoint. When the message appears about the difference in database versions, select Start / Programs / CounterPoint / Utilities / SQL Script Utility.
Choose DemoHub as the AliasCompany. Then load and
execute the ServicePackUpdateFor8.4.sql script. Close the SQL Script Utility when finished.
If the database version does not line up with the Counterpoint version that's
installed on the Hub, a message will appear to advise of the version difference. To resolve the difference, select Start / Programs / CounterPoint / Utilities / SQL
Script Utility and execute the ServicePackUpdateFor8.4.sql script against the database.
Multi-Site 20 Exercise Handbook
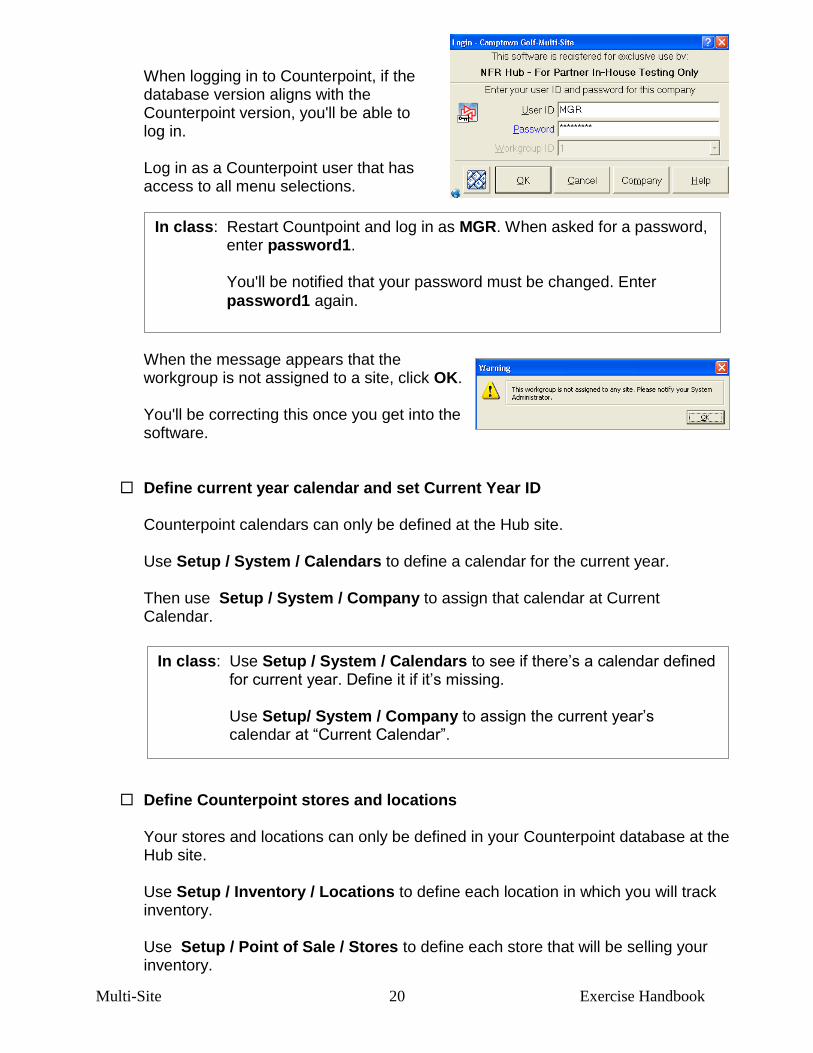
In class: Restart Countpoint and log in as MGR. When asked for a password, enter password1.
You'll be notified that your password must be changed. Enter
password1 again.
In class: Use Setup / System / Calendars to see if there’s a calendar defined for current year. Define it if it’s missing.
Use Setup/ System / Company to assign the current year’s
calendar at “Current Calendar”.
When logging in to Counterpoint, if the database version aligns with the Counterpoint version, you'll be able to log in.
Log in as a Counterpoint user that has
access to all menu selections.
When the message appears that the
workgroup is not assigned to a site, click OK. You'll be correcting this once you get into the
software. Define current year calendar and set Current Year ID
Counterpoint calendars can only be defined at the Hub site.
Use Setup / System / Calendars to define a calendar for the current year. Then use Setup / System / Company to assign that calendar at Current
Calendar.
Define Counterpoint stores and locations Your stores and locations can only be defined in your Counterpoint database at the
Hub site. Use Setup / Inventory / Locations to define each location in which you will track
inventory. Use Setup / Point of Sale / Stores to define each store that will be selling your
inventory.
Multi-Site 21 Exercise Handbook
In class: Use Setup / Inventory / Locations to view the locations that are already defined in the DemoHub database.
Use Setup/ Point of Sale / Stores to view the stores that are
already defined in the DemoHub database.
In class: Use Setup / System / Workgroups to view the workgroups that are already defined in the DemoHub database. For workgroup 1, set
This site ID to Main Store (the Hub).
Define Counterpoint workgroups You will need to define a workgroup for each site, including the Hub, in your
Counterpoint database at the Hub site. Typically, each workgroup would “point” to the store and location associated with each site.
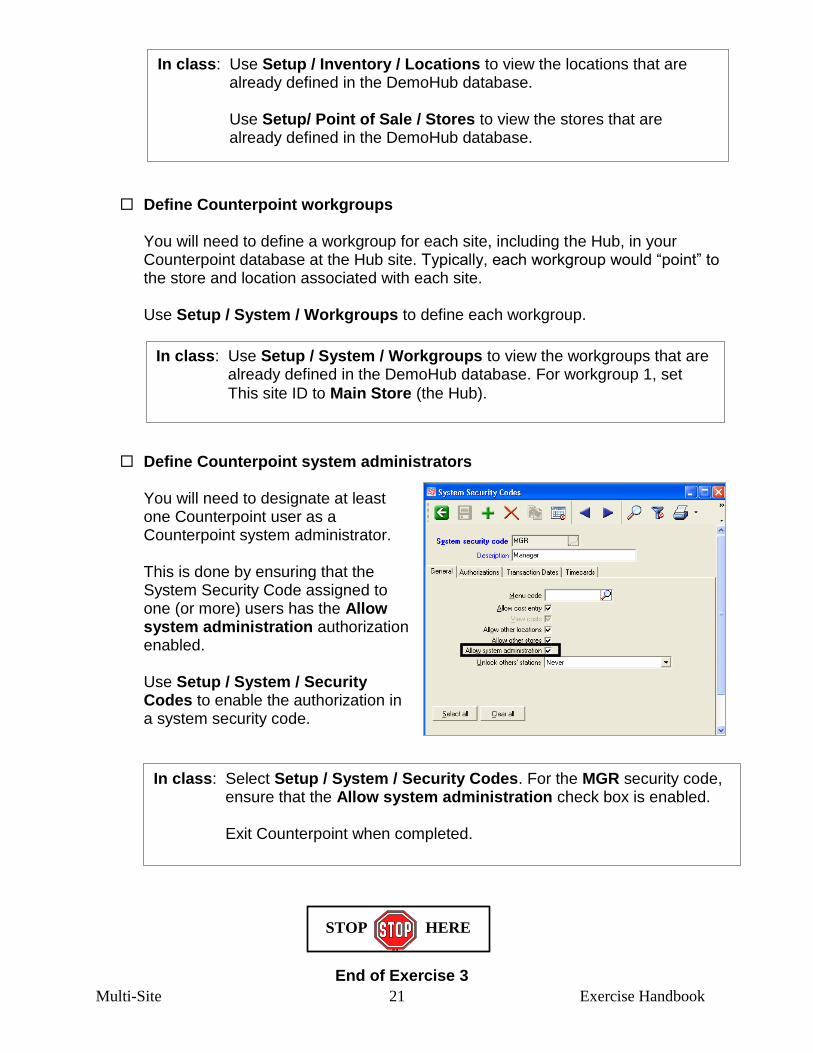
Use Setup / System / Workgroups to define each workgroup. Define Counterpoint system administrators
You will need to designate at least one Counterpoint user as a Counterpoint system administrator.
This is done by ensuring that the System Security Code assigned to one (or more) users has the Allow system administration authorization enabled.
Use Setup / System / Security Codes to enable the authorization in a system security code.
End of Exercise 3
STOP HERE
In class: Select Setup / System / Security Codes. For the MGR security code, ensure that the Allow system administration check box is enabled.
Exit Counterpoint when completed.

Multi-Site 22 Exercise Handbook
Exercise 4: Deploying Counterpoint on Remote Servers & Workstations
Counterpoint must be installed on the Hub server, and the database on the Hub
server must be activated before you deploy Counterpoint on other servers or workstations.
The Hub’s database must already have stores, locations and workgroups defined,
and at least one user must have system administration authorization (in the System Security Code).
It is also best if your Counterpoint data has already been built in the Hub’s database
before you deploy Counterpoint on other servers. In addition, CPServices must be running on the Hub server and Registration.hub must
be located in the CUSTOM folder on the Hub server. The Remote server will also need to have an active connection to the Hub. In this exercise, you install Counterpoint on each Remote server and each
workstation.
5. Collect files needed for Counterpoint installation on Remote server
Copy any custom schema scripts and replication rules from the Hub
server to the Remote server.
If you used custom schema scripts and/or replication rules during the installation on the Hub server, create the CUSTOM directory on the Remote server. Create C:\CUSTOM for a new Multi-Site installation. For a Multi-Site upgrade, create CUSTOM below the previous version’s top-level Counterpoint directory.
Then copy the same scripts and replication rules from the Hub server to the
CUSTOM directory on the Remote server. For an upgrade, also copy Deployment.ini to that directory.
This ensures that the Remote server’s database is built using the exact same
schema and replication rules as the Hub server’s database, or replication will fail.
Do not copy Registration.hub from the Hub server to the Remote server.
Multi-Site 23 Exercise Handbook
In class: There are no custom schema scripts, replication rules, or Deployment.ini file to include, so do nothing for this step.
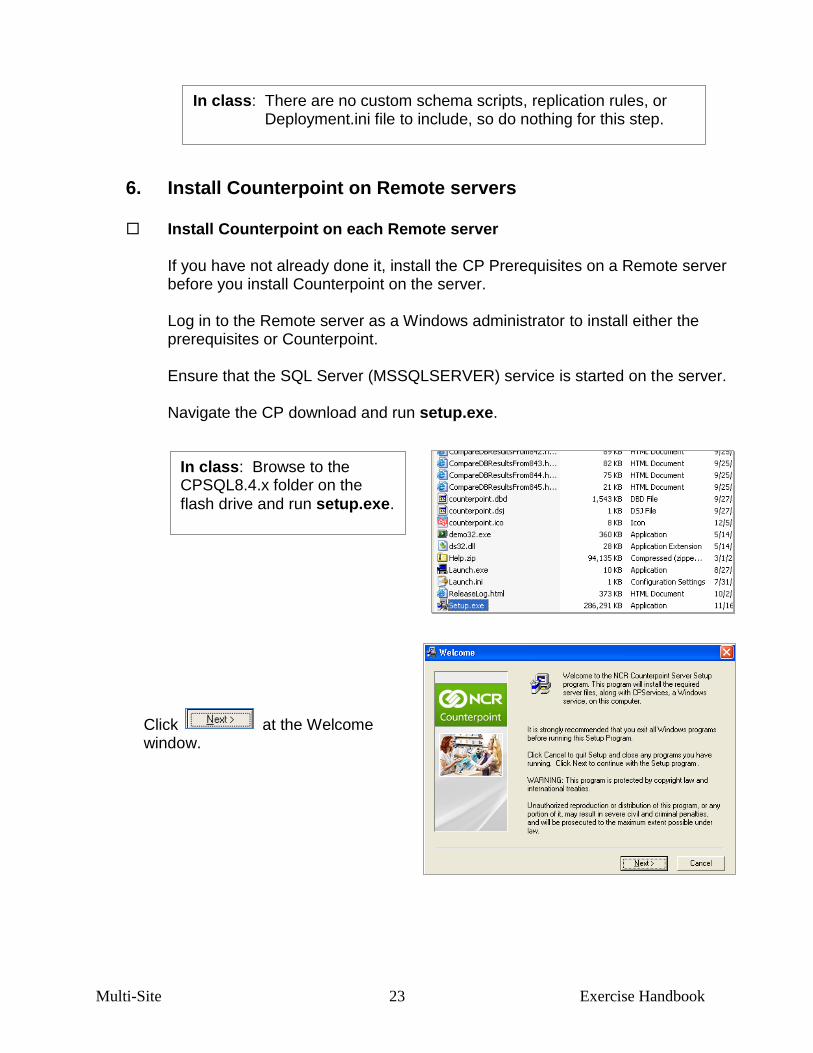
6. Install Counterpoint on Remote servers Install Counterpoint on each Remote server If you have not already done it, install the CP Prerequisites on a Remote server
before you install Counterpoint on the server. Log in to the Remote server as a Windows administrator to install either the
prerequisites or Counterpoint. Ensure that the SQL Server (MSSQLSERVER) service is started on the server. Navigate the CP download and run setup.exe.
Click at the Welcome
window.
In class: Browse to the CPSQL8.4.x folder on the
flash drive and run setup.exe.

Multi-Site 24 Exercise Handbook
Click Agree at the License
Agreement window and then click . Select the Folder name under which
you want Counterpoint installed on the server.
If you upgraded your Hub’s Multi-Site
database from either V8.3.8 or V8.3.9, and want to also upgrade the Remote server’s database, enable the “I am updating from a previous version” check box.
In class: Use CPSQL.1 as the folder
name. Do not enable the “updating” check box.
At the Select Role window, select Multi-Site Remote server that reports to a Hub.
Identify whether offline workstations will be managed by the Remote server. In class: The Remote server will
NOT have offline workstations.
Enter East Store as the
server friendly name for this remote site.

Multi-Site 25 Exercise Handbook
In class: Use CPSQL as the CPUser ID, and CounterPoint8 as the Password (these are the defaults).
Do not change the PDUser login information.
If you did not select to update from a previous version, the New Remote Multi-Site Install window appears to let you know that a new database will be created on the Remote server.
Ensure that you prepared the Hub server for
Remote server installations before continuing. In class: You prepared the Hub server in the previous exercise. For the CPUser login information, if
you selected to update from a previous version, enter the SQL user ID and password for the user who owns the database.
If a new database is being created
for the Remote server, you can use the default user ID and password of CPSQL and CounterPoint8.
Leave the PDUser login information
set to pduser and PDPassword8. At the Multi-Site Installation Files
window, specify the directory where you put the custom schema scripts, replication rules or Deployment.ini file.
If none of these files are involved in
the Remote server’s installation, select I do not have custom schema scripts or rules files.
Multi-Site 26 Exercise Handbook
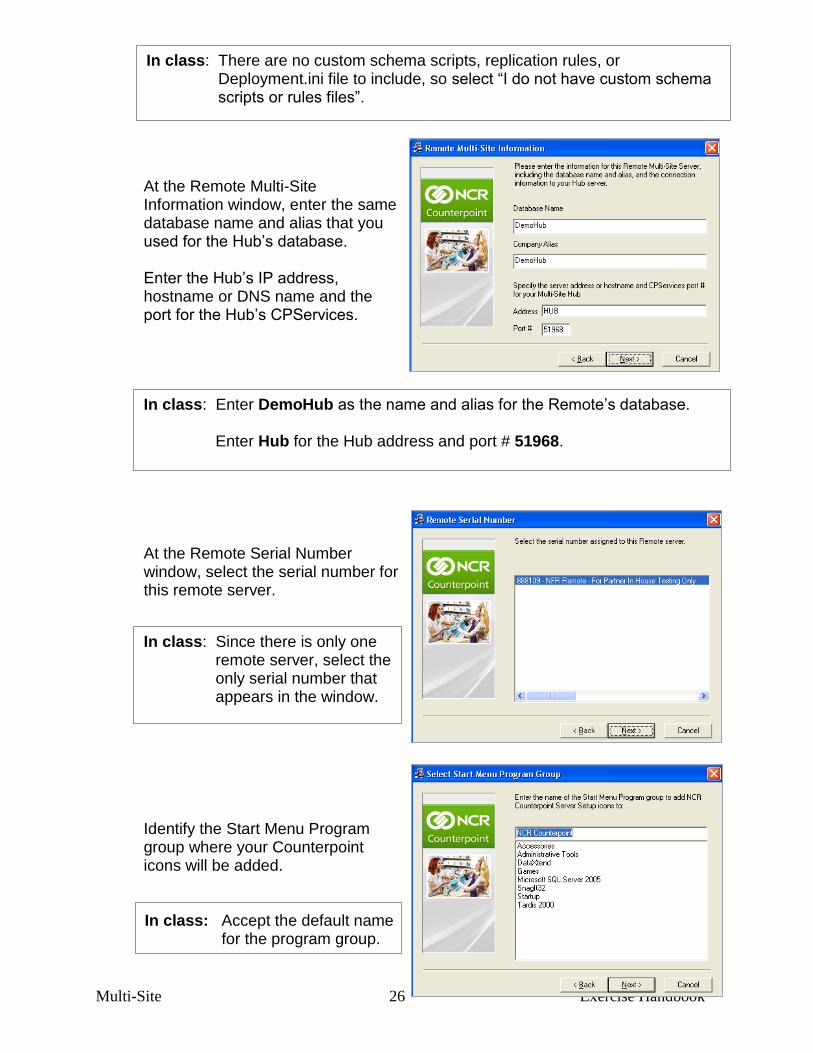
In class: There are no custom schema scripts, replication rules, or Deployment.ini file to include, so select “I do not have custom schema scripts or rules files”.
In class: Enter DemoHub as the name and alias for the Remote’s database. Enter Hub for the Hub address and port # 51968.
In class: Since there is only one remote server, select the only serial number that appears in the window.
At the Remote Multi-Site
Information window, enter the same database name and alias that you used for the Hub’s database.
Enter the Hub’s IP address, hostname or DNS name and the port for the Hub’s CPServices.
At the Remote Serial Number window, select the serial number for this remote server. Identify the Start Menu Program group where your Counterpoint icons will be added.
In class: Accept the default name
for the program group.

Multi-Site 27 Exercise Handbook
A summary of your entries then appears.
Click to begin the
installation.
Identify whether SQL Server is
installed as the default instance on the current server (“This computer”), or as a named instance on the current computer or on a different server (“Other computer”).
In class: Select This computer.
Select whether the installation should use Windows authentication or SQL authentication for database access when scripts are run during the installation.
NOTE: Your SQL Server must be set
up to allow SQL authentication for Multi-Site replication.
In class: Enter a SQL user ID of sa with a password of
CounterPoint 8.
Ensure that the path to the SQL
Server data files is accurate.

Multi-Site 28 Exercise Handbook
The installation of Counterpoint on the Remote server then starts. Several messages appear during the installation.
The activation process is occurring when this window appears.
You’ll need to respond when the first part
of activation completes. The second part of activation then occurs.
You’ll also need to respond when the
second part of activation completes
and again when the Multi-Site information has finished.
Multi-Site 29 Exercise Handbook
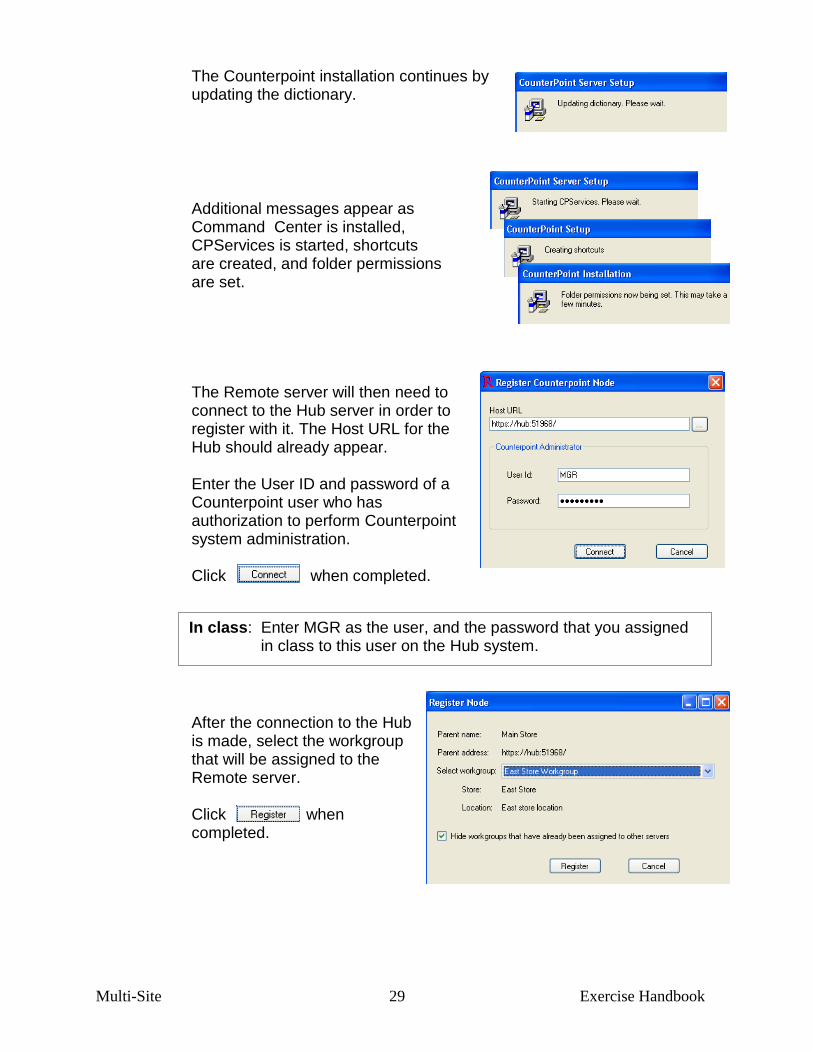
In class: Enter MGR as the user, and the password that you assigned in class to this user on the Hub system.
The Counterpoint installation continues by updating the dictionary.
Additional messages appear as
Command Center is installed, CPServices is started, shortcuts are created, and folder permissions are set.
The Remote server will then need to
connect to the Hub server in order to register with it. The Host URL for the Hub should already appear.
Enter the User ID and password of a
Counterpoint user who has authorization to perform Counterpoint system administration.
Click when completed. After the connection to the Hub
is made, select the workgroup that will be assigned to the Remote server.
Click when
completed.
Multi-Site 30 Exercise Handbook
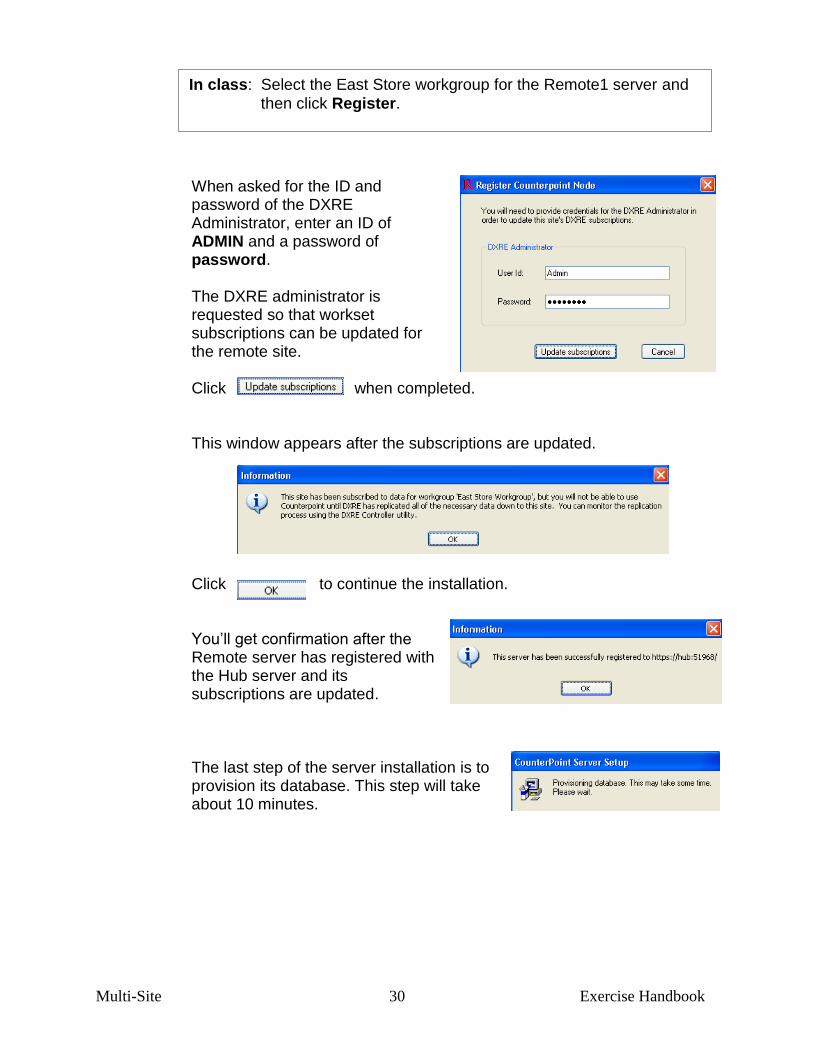
In class: Select the East Store workgroup for the Remote1 server and
then click Register.
When asked for the ID and
password of the DXRE Administrator, enter an ID of ADMIN and a password of password.
The DXRE administrator is requested so that workset subscriptions can be updated for the remote site.
Click when completed. This window appears after the subscriptions are updated.
Click to continue the installation. You’ll get confirmation after the
Remote server has registered with the Hub server and its subscriptions are updated.
The last step of the server installation is to
provision its database. This step will take about 10 minutes.
Multi-Site 31 Exercise Handbook
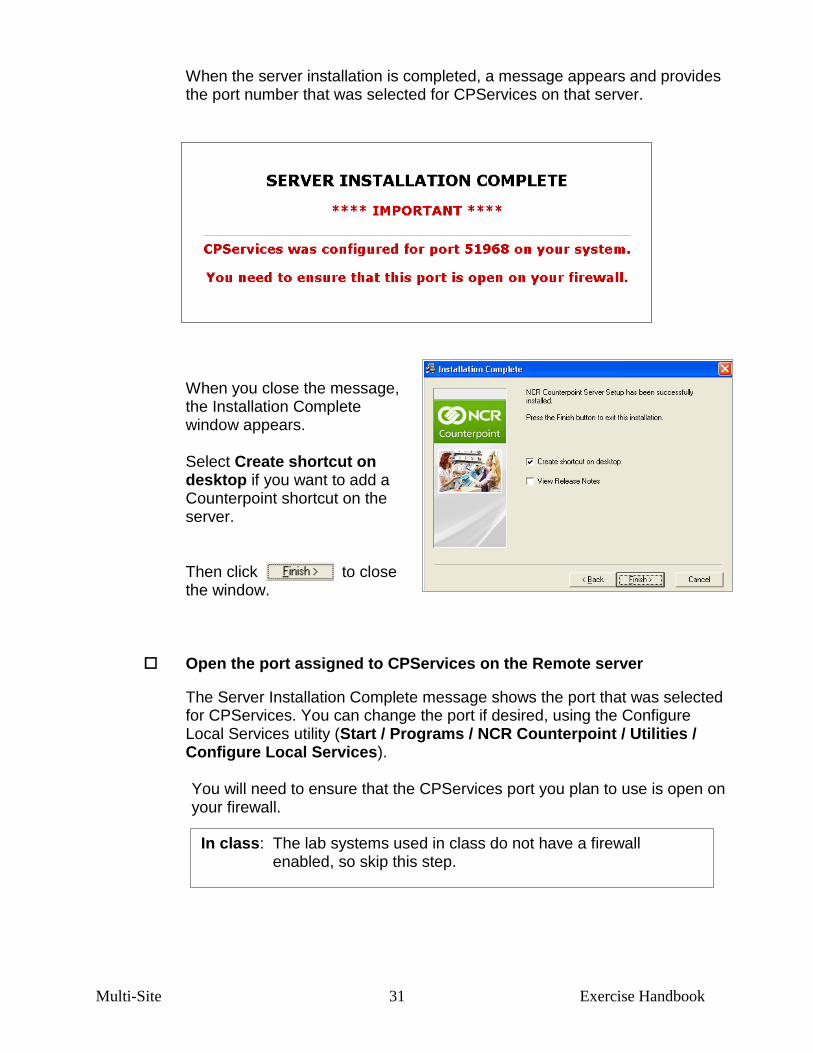
In class: The lab systems used in class do not have a firewall enabled, so skip this step.
When the server installation is completed, a message appears and provides the port number that was selected for CPServices on that server. When you close the message, the Installation Complete window appears. Select Create shortcut on desktop if you want to add a Counterpoint shortcut on the server. Then click to close the window.
Open the port assigned to CPServices on the Remote server
The Server Installation Complete message shows the port that was selected for CPServices. You can change the port if desired, using the Configure Local Services utility (Start / Programs / NCR Counterpoint / Utilities / Configure Local Services).
You will need to ensure that the CPServices port you plan to use is open on your firewall.
Multi-Site 32 Exercise Handbook
In class: Check with your instructor to see whether you should install the service pack (CPSQL846#.EXE), located in the CPSQLTRAINCD folder on the flash drive.
. If you do install it, ensure that you install it on the Hub server and
the Remote1 server. Stop the replication engine at each site before installing it.
When requested, enter CPSQL.1 as the Counterpoint instance
name. If also asked for SQL credentials, enter sa as the user ID and CounterPoint8 as the password.
Download and install the current Counterpoint Service Pack on both
the Hub and Remote servers.
If you installed Counterpoint using the most current complete installation image, you may be able to skip this step. If the current service pack consists of only a “hotfix”, you should install it.
Download the service pack (CPSP84.EXE.ZIP) from the Support area of
Radiant Retail's web site. Execute the service pack file on the Hub and all Remote servers. Stop the replication engine at a site to avoid the chance that the database is being replicated when the service pack is attempting to update it.
You will be requested to provide the Counterpoint instance name (e.g.,
“CPSQL.1”). If the service pack includes schema changes, you will also be asked to provide SQL credentials so that the database schema can be updated.

Multi-Site 33 Exercise Handbook
7. Install Counterpoint on Workstations
Remove SQL Server Native Client from workstations that will be used in offline mode
Workstations that will be used for Offline Ticket Entry must have the SQL
Server Native Client removed before installing the CP Prerequisites. Log in to the workstation as a Windows administrator. Then use the Add/Remove Programs function in the Windows Control Panel to
remove Microsoft SQL Server Native Client.
Install Counterpoint prerequisites on each workstation Like servers, every workstation that will run Counterpoint must have the
Counterpoint prerequisites installed – whether they will be non-offline or offline workstations.
Install any of the missing components on each workstation using the
Counterpoint Prerequisites installer on the Counterpoint download. To install prerequisites on a workstation, you can:
a) copy the \CPSQLPrereqs folder from the Counterpoint download to the installation directory on the server (C:\Program Files \ Radiant Systems \ CounterPoint \ CPSQL.1) and then execute CPSQLPrerequisites.exe from the workstation, OR
b) copy just CPSQLPrerequisites.exe to the installation directory on the server and execute it from the workstation (the workstation will need an active Internet connection to use this option).
You will need to log on to the workstation as a Windows administrator
regardless of the option you select.
In class: For the Multi-Site class, the workstation will not be configured for Offline Ticket Entry, so skip this step.
Multi-Site 34 Exercise Handbook
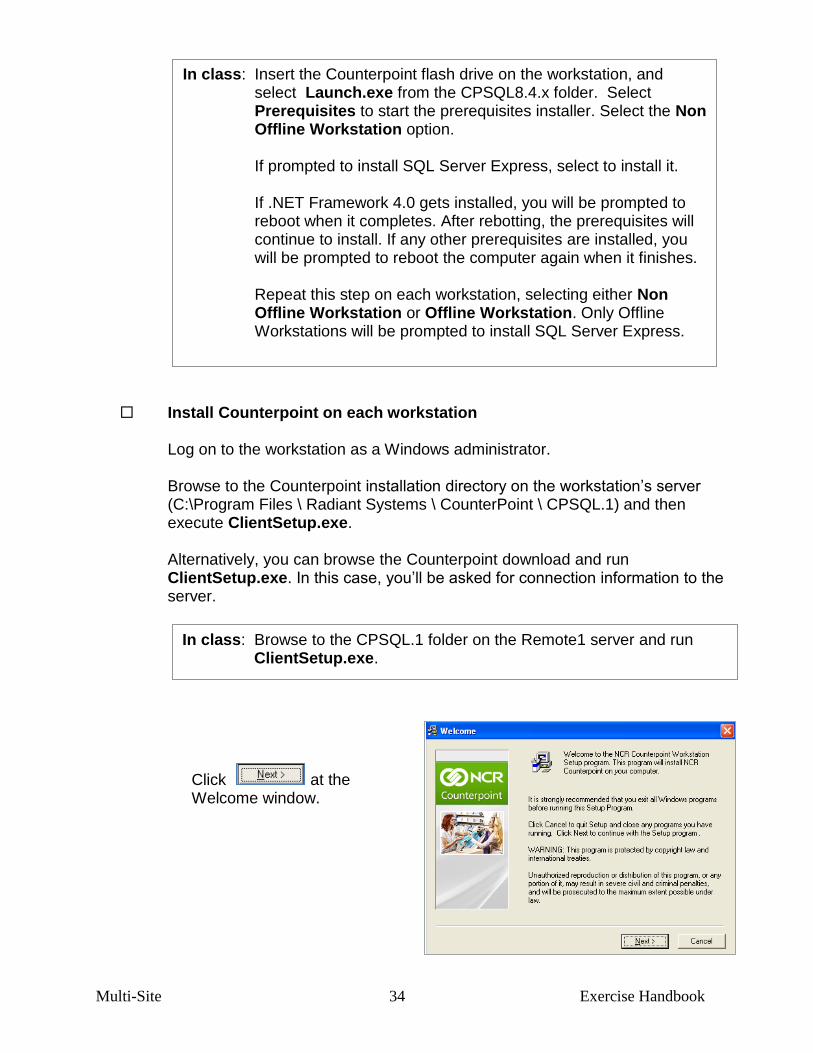
In class: Browse to the CPSQL.1 folder on the Remote1 server and run ClientSetup.exe.
In class: Insert the Counterpoint flash drive on the workstation, and select Launch.exe from the CPSQL8.4.x folder. Select Prerequisites to start the prerequisites installer. Select the Non Offline Workstation option.
If prompted to install SQL Server Express, select to install it. If .NET Framework 4.0 gets installed, you will be prompted to
reboot when it completes. After rebotting, the prerequisites will continue to install. If any other prerequisites are installed, you will be prompted to reboot the computer again when it finishes.
Repeat this step on each workstation, selecting either Non
Offline Workstation or Offline Workstation. Only Offline Workstations will be prompted to install SQL Server Express.
Install Counterpoint on each workstation Log on to the workstation as a Windows administrator. Browse to the Counterpoint installation directory on the workstation’s server
(C:\Program Files \ Radiant Systems \ CounterPoint \ CPSQL.1) and then execute ClientSetup.exe.
Alternatively, you can browse the Counterpoint download and run
ClientSetup.exe. In this case, you’ll be asked for connection information to the server.
Click at the
Welcome window.
Multi-Site 35 Exercise Handbook
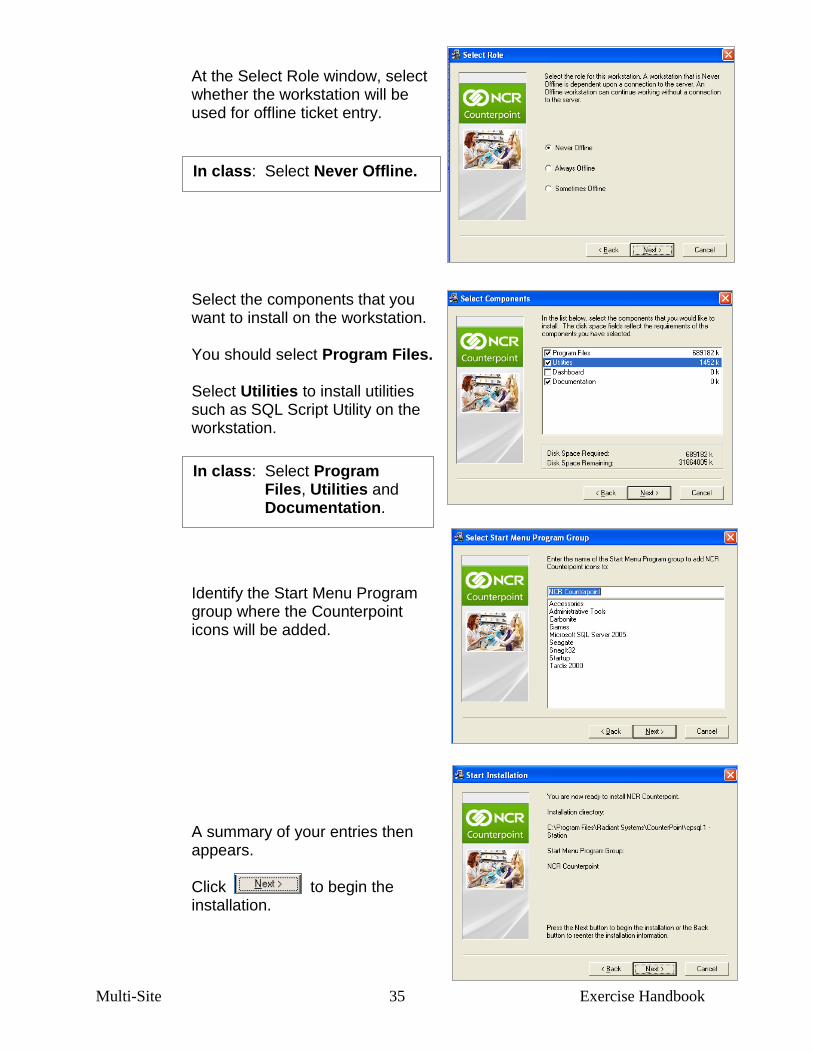
At the Select Role window, select whether the workstation will be used for offline ticket entry.
Select the components that you want to install on the workstation. You should select Program Files. Select Utilities to install utilities such as SQL Script Utility on the workstation. Identify the Start Menu Program group where the Counterpoint icons will be added. A summary of your entries then appears.
Click to begin the
installation.
In class: Select Program Files, Utilities and Documentation.
In class: Select Never Offline.
Multi-Site 36 Exercise Handbook
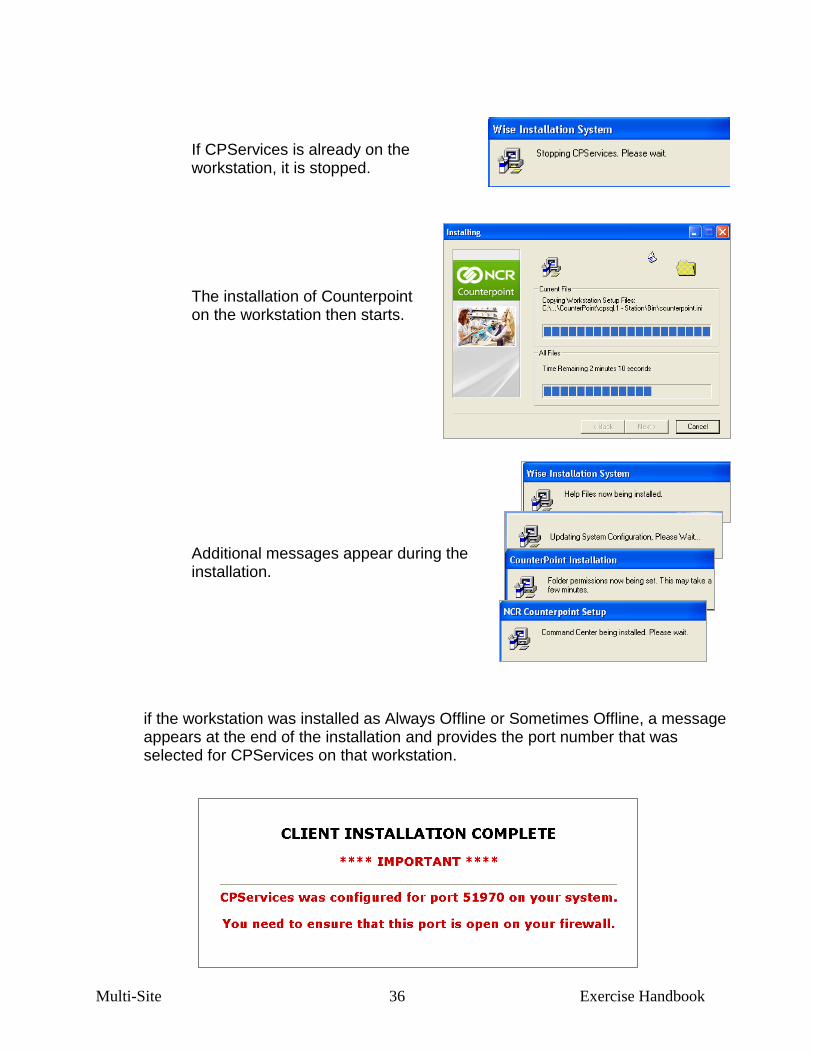
If CPServices is already on the workstation, it is stopped. The installation of Counterpoint on the workstation then starts. Additional messages appear during the installation.
if the workstation was installed as Always Offline or Sometimes Offline, a message appears at the end of the installation and provides the port number that was selected for CPServices on that workstation.
Multi-Site 37 Exercise Handbook
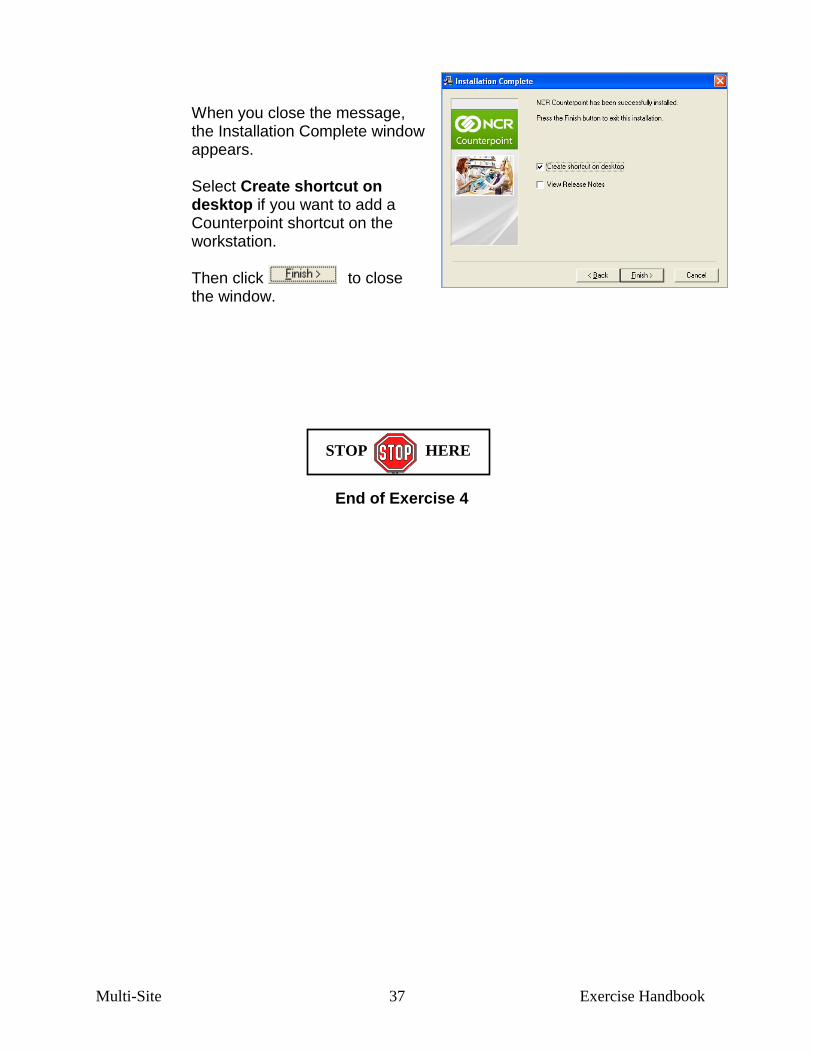
When you close the message, the Installation Complete window appears.
Select Create shortcut on
desktop if you want to add a Counterpoint shortcut on the workstation.
Then click to close the window.
End of Exercise 4
STOP HERE
Multi-Site 38 Exercise Handbook
Exercise 5: Completing Multi-Site Configuration
8. Complete Multi-Site configuration on the Hub server
Send a File Sync request to each Remote server.
Each Remote server will need to obtain the company’s Counterpoint top-level files from the Hub server. These files include any saved lookups, filters, data dictionary changes, custom reports and forms for the company. The File Sync function will automatically send those files at 2:30 am each day (Remote server time). Only changes are sent after the initial synchronization.
If you need the company’s top-level files to be sent sooner, you can
manually initiate a File Sync request by using Management Console on the Hub server.
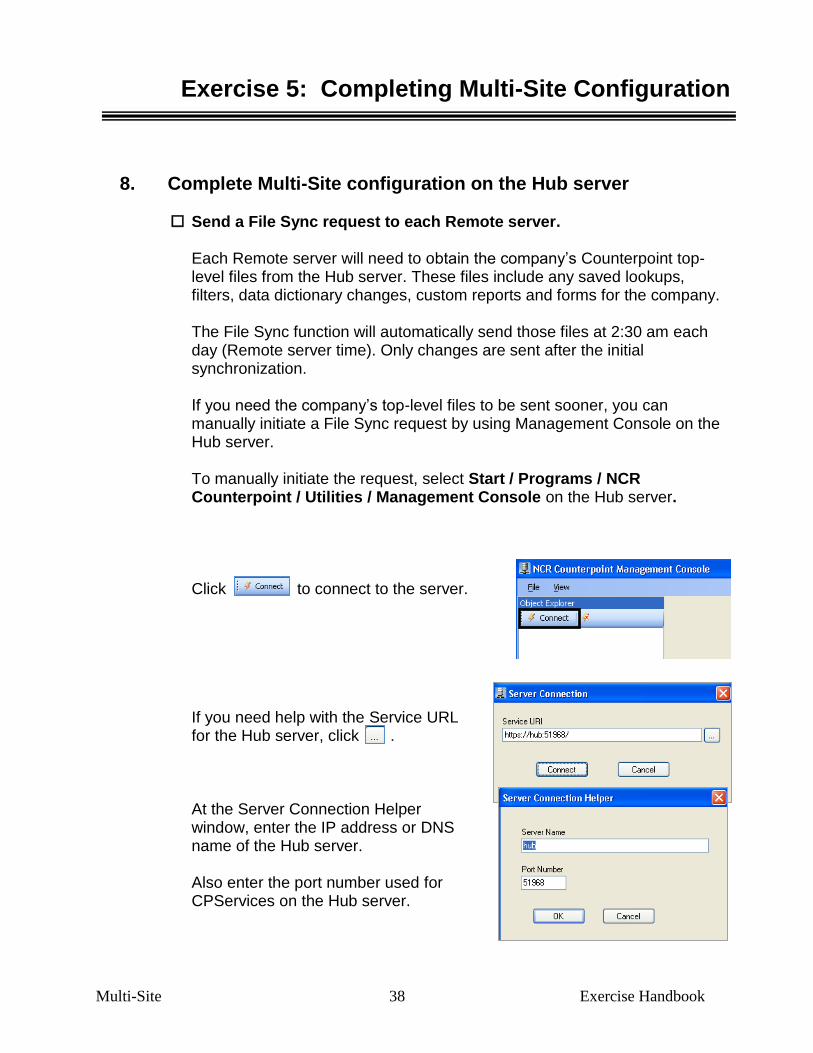
To manually initiate the request, select Start / Programs / NCR
Counterpoint / Utilities / Management Console on the Hub server. Click to connect to the server. If you need help with the Service URL
for the Hub server, click . At the Server Connection Helper
window, enter the IP address or DNS name of the Hub server.
Also enter the port number used for
CPServices on the Hub server.
Multi-Site 39 Exercise Handbook
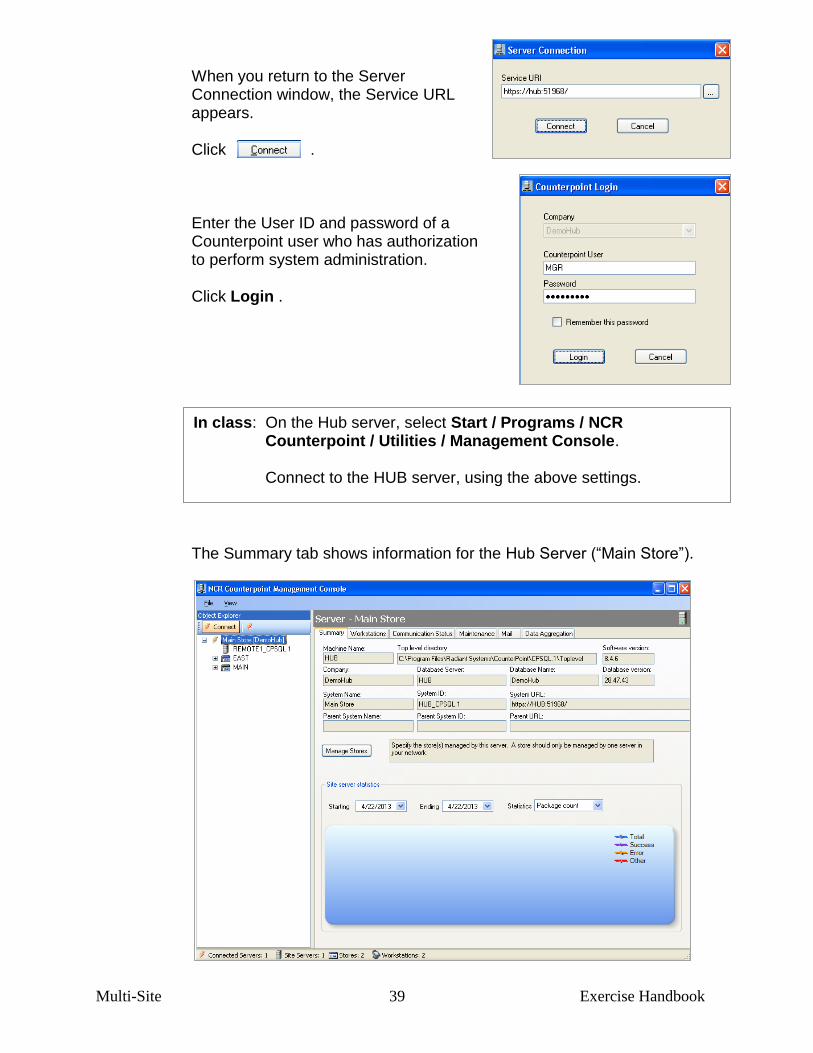
When you return to the Server Connection window, the Service URL appears.
Click . Enter the User ID and password of a
Counterpoint user who has authorization to perform system administration.
Click Login . The Summary tab shows information for the Hub Server (“Main Store”).
In class: On the Hub server, select Start / Programs / NCR Counterpoint / Utilities / Management Console.
Connect to the HUB server, using the above settings.

Multi-Site 40 Exercise Handbook
Click the Remote server’s name in the Object Explorer on the left. The Summary tab now shows information about the Remote server’s registration with the Hub server.
Click to manually initiate a File Sync with the Remote server. Confirm the request
to perform the File Sync.
A message appears to indicate that
the File Sync request has been submitted to the Remote server.
Switch to the Communication Detail tab to see the request.
Multi-Site 41 Exercise Handbook
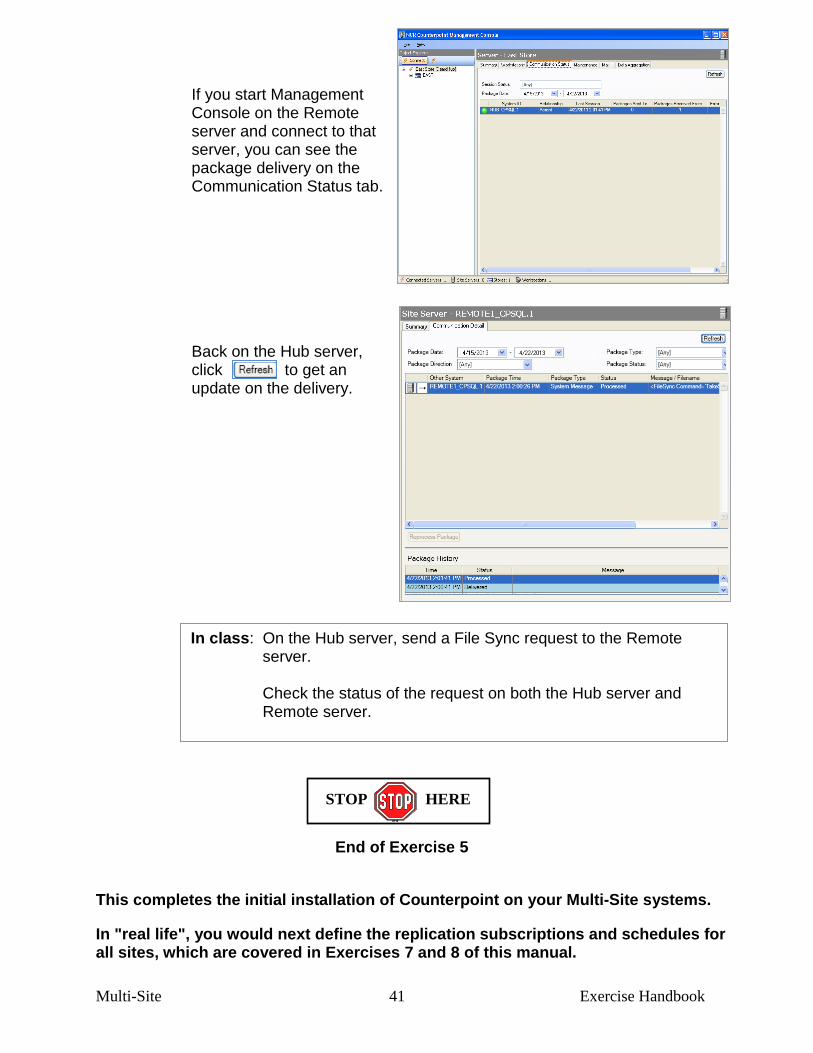
If you start Management
Console on the Remote server and connect to that server, you can see the package delivery on the Communication Status tab.
Back on the Hub server,
click to get an update on the delivery.
End of Exercise 5
This completes the initial installation of Counterpoint on your Multi-Site systems.
In "real life", you would next define the replication subscriptions and schedules for all sites, which are covered in Exercises 7 and 8 of this manual.
In class: On the Hub server, send a File Sync request to the Remote server.
Check the status of the request on both the Hub server and
Remote server.
STOP HERE
Multi-Site 42 Exercise Handbook
Exercise 6: Installing the DataXtend Studio
Perform this exercise on your own computer. In this exercise, you install the DataXtend Studio and import the Counterpoint
replication rules into the DemoHub database so that you can use the DataXtend Designer to see the contents of the replication rules.
You will need the flash drive so that you can access both the CPSQL8.4.x folder and
the CPSQLMS-OFFTrainCD folder. The below instructions apply only when performing the exercise in class. In "real life",
you would install the DataXtend Studio only if you plan to customize the database schema and need to create a custom rules file to incorporate the schema changes. In that case, you would install the DataXtend Studio on a development system.
To set up the development system, follow the instructions in the Counterpoint
Multi-Site Online Help file, under Custom tables and columns. The same information is provided in Appendix 5 of your Multi-Site training manual.
1. Prior to installing the Studio, you will need SSE or MSSQL 2005 or 2008 on your system. If necessary, install CP Prerequisites from the CPSQL8.4.x folder on the flash drive to install SSE 2008.
2. Create a folder named PDTRAIN in the root level (C:\) of your computer's hard drive.
Browse to the folder named MS Class under the CPSQLMS-OFFTrainCD folder on
the flash drive and copy the following files to the PDTrain folder on your hard drive: Makepduser&ImportRules.bat MsDelta.rul PDLFXR.PDL
3. Browse to the DXRE Studio folder under the CPSQL8.4.x folder on the flash drive, right-click DXS_v82_Windows.exe and select Run as Administrator.
Multi-Site 43 Exercise Handbook
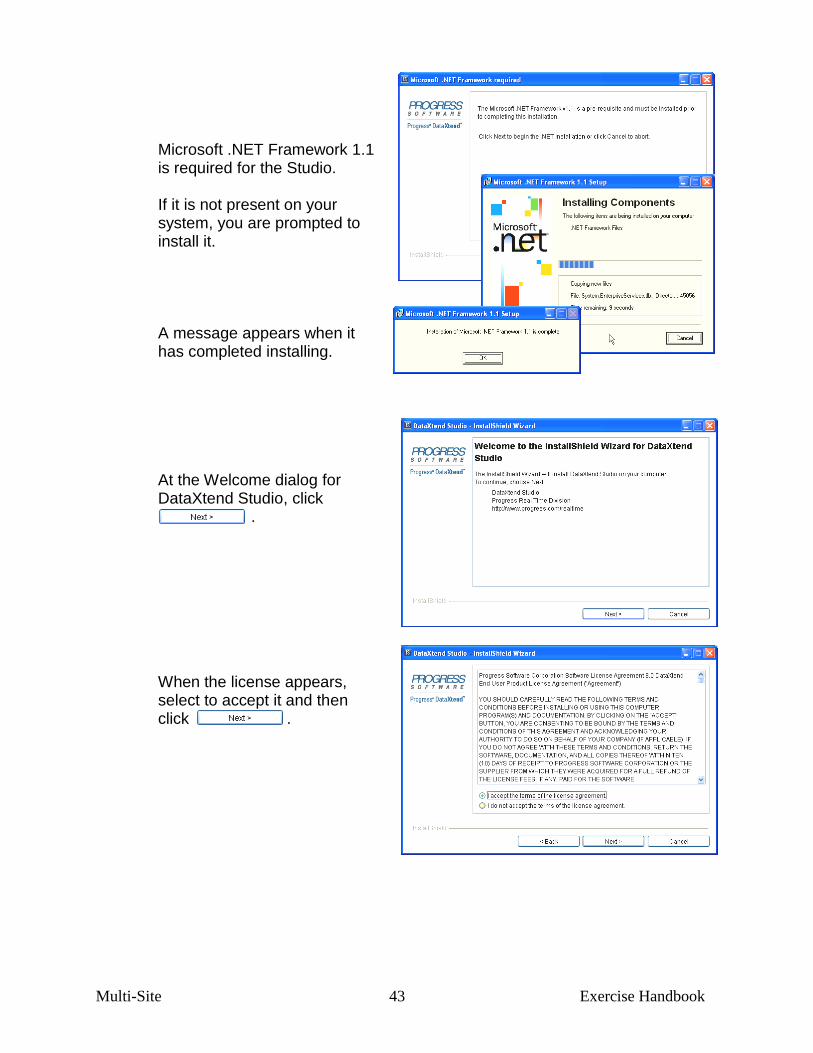
Microsoft .NET Framework 1.1
is required for the Studio. If it is not present on your
system, you are prompted to install it.
A message appears when it
has completed installing. At the Welcome dialog for
DataXtend Studio, click . When the license appears,
select to accept it and then click .
Multi-Site 44 Exercise Handbook
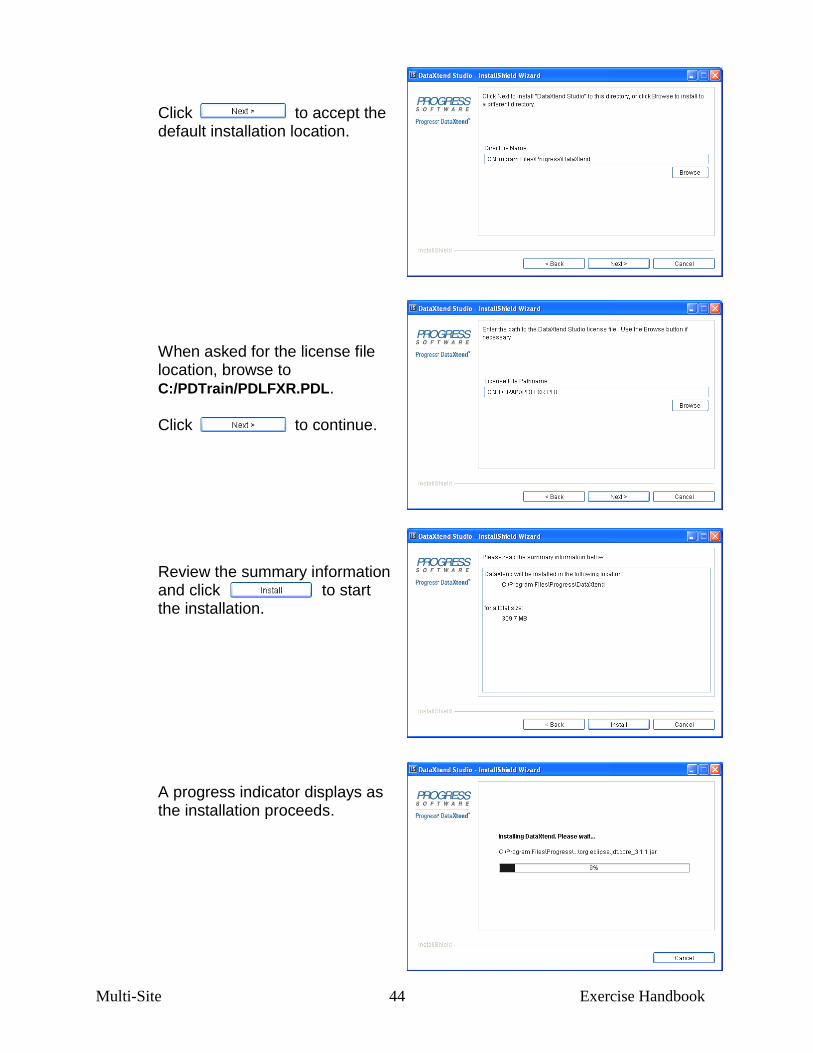
Click to accept the
default installation location. When asked for the license file
location, browse to C:/PDTrain/PDLFXR.PDL.
Click to continue. Review the summary information
and click to start the installation.
A progress indicator displays as
the installation proceeds.
Multi-Site 45 Exercise Handbook
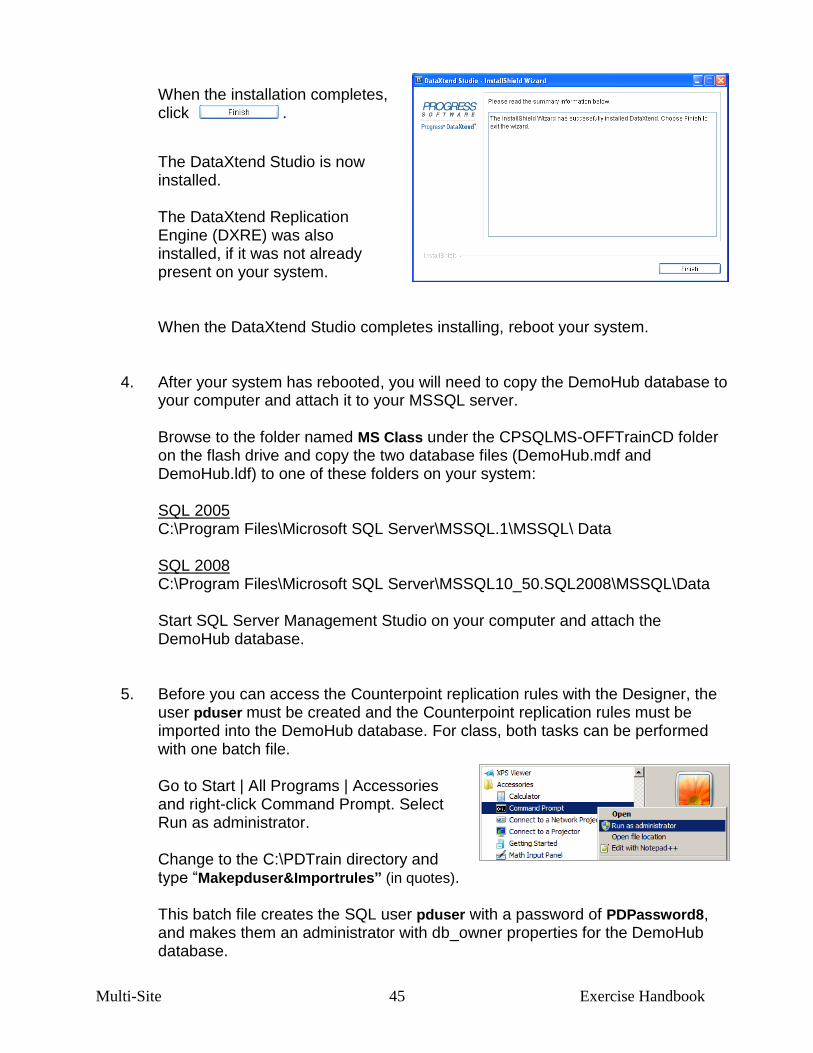
When the installation completes,
click .
The DataXtend Studio is now installed.
The DataXtend Replication
Engine (DXRE) was also installed, if it was not already present on your system.
When the DataXtend Studio completes installing, reboot your system.
4. After your system has rebooted, you will need to copy the DemoHub database to your computer and attach it to your MSSQL server.
Browse to the folder named MS Class under the CPSQLMS-OFFTrainCD folder
on the flash drive and copy the two database files (DemoHub.mdf and DemoHub.ldf) to one of these folders on your system:
SQL 2005 C:\Program Files\Microsoft SQL Server\MSSQL.1\MSSQL\ Data SQL 2008 C:\Program Files\Microsoft SQL Server\MSSQL10_50.SQL2008\MSSQL\Data Start SQL Server Management Studio on your computer and attach the
DemoHub database.
5. Before you can access the Counterpoint replication rules with the Designer, the user pduser must be created and the Counterpoint replication rules must be imported into the DemoHub database. For class, both tasks can be performed with one batch file.
Go to Start | All Programs | Accessories and right-click Command Prompt. Select Run as administrator. Change to the C:\PDTrain directory and type “Makepduser&Importrules” (in quotes).
This batch file creates the SQL user pduser with a password of PDPassword8,
and makes them an administrator with db_owner properties for the DemoHub database.
Multi-Site 46 Exercise Handbook
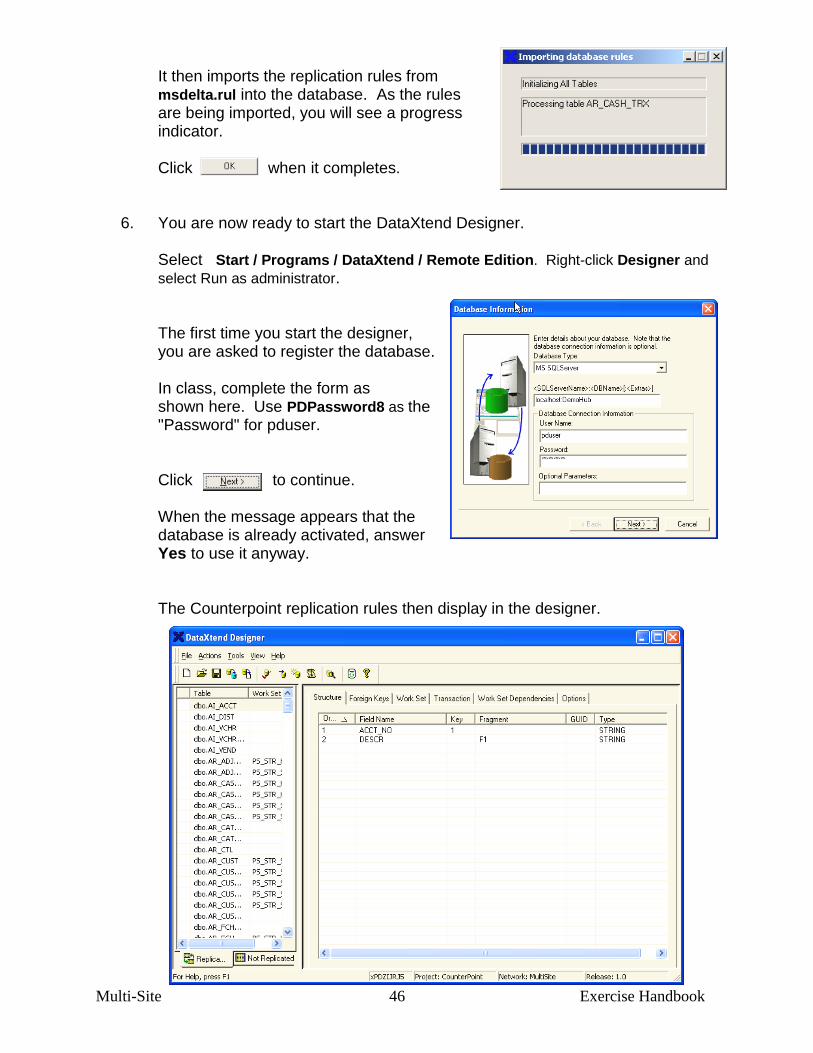
It then imports the replication rules from msdelta.rul into the database. As the rules are being imported, you will see a progress indicator.
Click when it completes.
6. You are now ready to start the DataXtend Designer. Select Start / Programs / DataXtend / Remote Edition. Right-click Designer and
select Run as administrator. The first time you start the designer,
you are asked to register the database. In class, complete the form as
shown here. Use PDPassword8 as the "Password" for pduser.
Click to continue. When the message appears that the
database is already activated, answer Yes to use it anyway.
The Counterpoint replication rules then display in the designer.
Multi-Site 47 Exercise Handbook
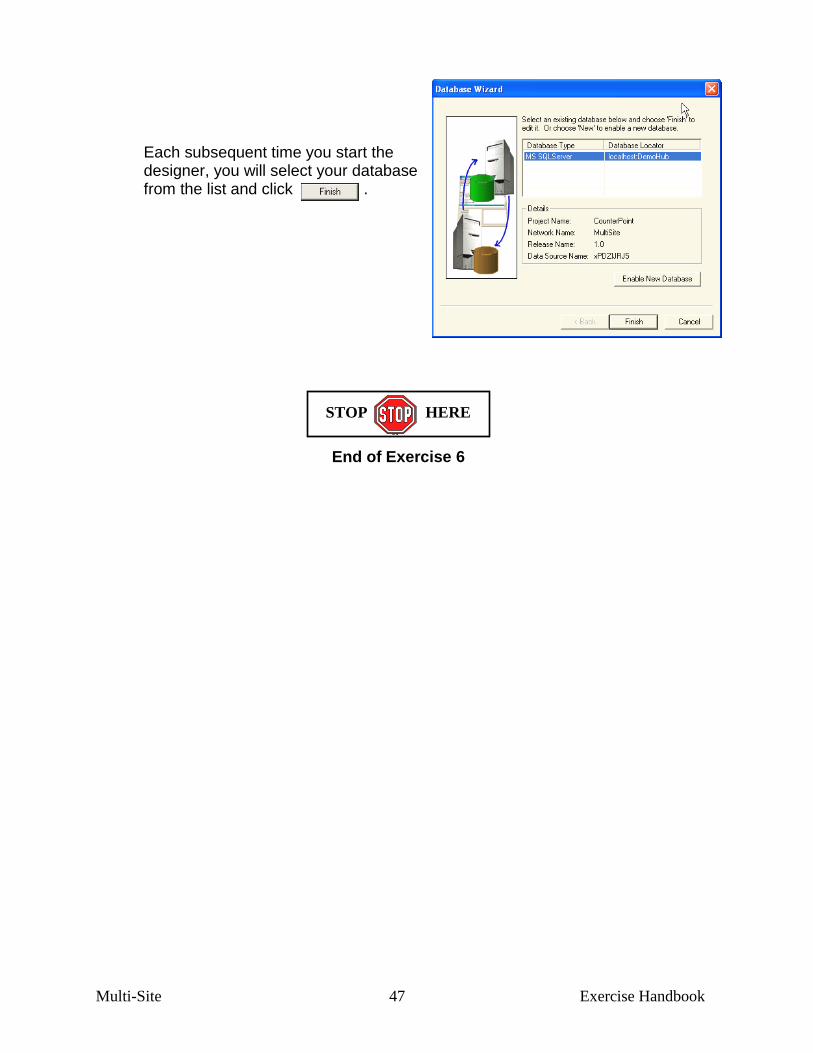
Each subsequent time you start the designer, you will select your database from the list and click .
End of Exercise 6
STOP HERE
Multi-Site 48 Exercise Handbook
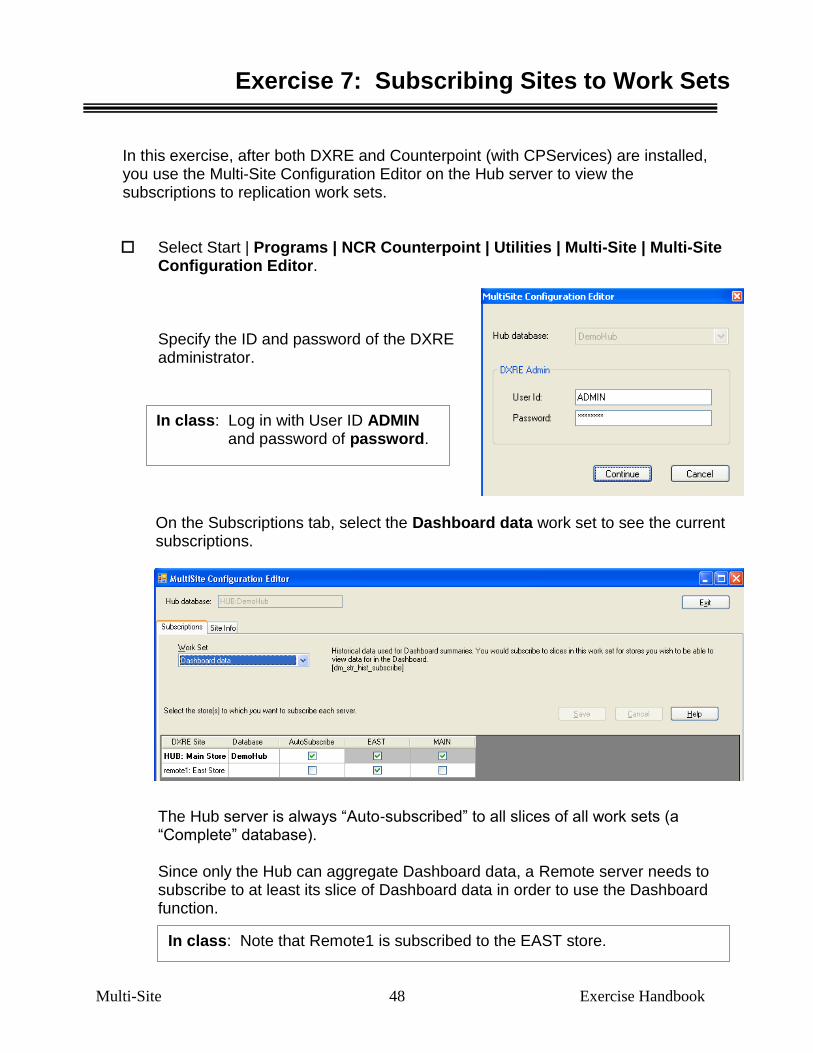
In class: Note that Remote1 is subscribed to the EAST store.
In class: Log in with User ID ADMIN and password of password.
Exercise 7: Subscribing Sites to Work Sets
In this exercise, after both DXRE and Counterpoint (with CPServices) are installed,
you use the Multi-Site Configuration Editor on the Hub server to view the subscriptions to replication work sets.
Select Start | Programs | NCR Counterpoint | Utilities | Multi-Site | Multi-Site Configuration Editor. Specify the ID and password of the DXRE administrator.
On the Subscriptions tab, select the Dashboard data work set to see the current
subscriptions.
The Hub server is always “Auto-subscribed” to all slices of all work sets (a “Complete” database).
Since only the Hub can aggregate Dashboard data, a Remote server needs to
subscribe to at least its slice of Dashboard data in order to use the Dashboard function.
Multi-Site 49 Exercise Handbook
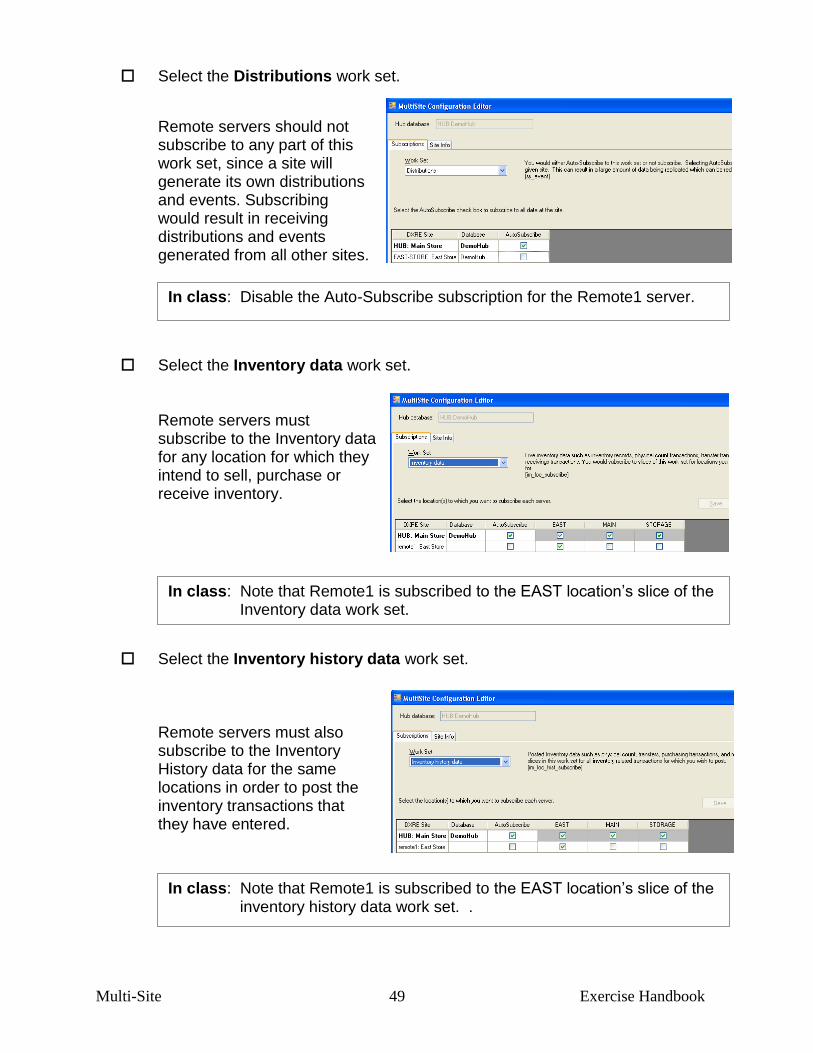
In class: Disable the Auto-Subscribe subscription for the Remote1 server.
In class: Note that Remote1 is subscribed to the EAST location’s slice of the Inventory data work set.
In class: Note that Remote1 is subscribed to the EAST location’s slice of the inventory history data work set. .
Select the Distributions work set.
Remote servers should not subscribe to any part of this work set, since a site will generate its own distributions and events. Subscribing would result in receiving distributions and events generated from all other sites.
Select the Inventory data work set. Remote servers must
subscribe to the Inventory data for any location for which they intend to sell, purchase or receive inventory.
Select the Inventory history data work set. Remote servers must also
subscribe to the Inventory History data for the same locations in order to post the inventory transactions that they have entered.

Multi-Site 50 Exercise Handbook
In class: Subscribe Remote1 to the EAST store’s slice of the Misc store history data work set. Save your changes.
In class: Note that Remote1 is subscribed to the EAST location’s slice of this work set..
Select the Location History work set.
If a Remote server plans to enter forecasts (for forecast-driven replenishment ) for its site, it will need to subscribe to at least their own location’s slice of the Location History work set.
Select the Misc store history data work set.
Remote servers must subscribe to their own store’s slice of the Misc store history data work set in order to post their tickets, to post Receivables transactions, and to view Timecard data.

Multi-Site 51 Exercise Handbook
In class: Subscribe Remote1 to the EAST store’s slice of the Point of Sale history data work set, and specify to retain 90 days of history. Save your changes.
In class: On the Hub, use Setup>Point of Sale>Stores to define store 99. The settings for this store won't matter.
Use SQL Server Management Studio to edit the AR_CUST table
and change the value of STR_ID to 99 for every customer. When done, subscribe Remote1 to the 99 store's slice of the Store
Config data work set. Save your changes.
Select the Point of Sale history data work set.
Remote servers must subscribe to their own store’s slice of the Point of Sale history data work set in order to post tickets for their store.
You can also limit the number of
days of ticket history that will be retained on the remote server, where 0 means that there is no limit.
Select the Store Config data work set.
In order to sell to any customer, a remote server would normally need to subscribe to all slices of the Store Config data work set.
Alternatively, you can define a
"fake" store in Counterpoint (one without any stations or drawers), and then assign that store to the template customer for each workgroup. You can then subscribe each site to the fake store to ensure that all sites receive all customer records.
End of Exercise 7
STOP HERE
Multi-Site 52 Exercise Handbook
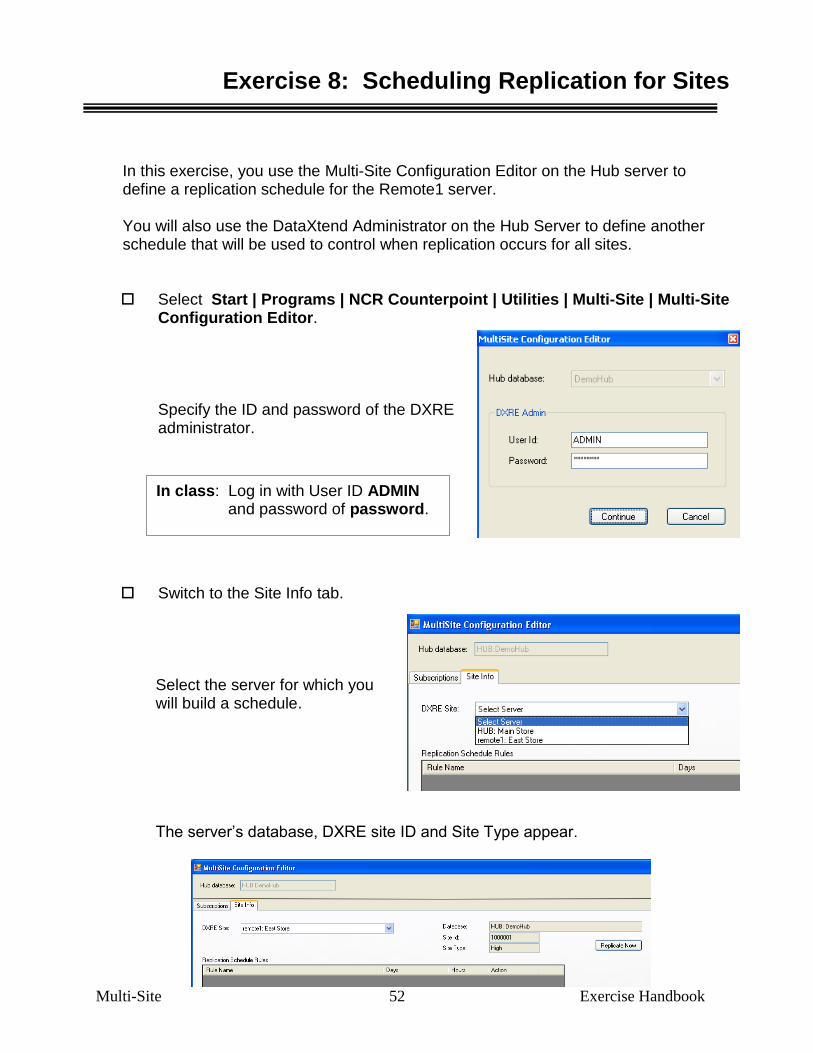
In class: Log in with User ID ADMIN and password of password.
Exercise 8: Scheduling Replication for Sites
In this exercise, you use the Multi-Site Configuration Editor on the Hub server to
define a replication schedule for the Remote1 server. You will also use the DataXtend Administrator on the Hub Server to define another
schedule that will be used to control when replication occurs for all sites.
Select Start | Programs | NCR Counterpoint | Utilities | Multi-Site | Multi-Site Configuration Editor. Specify the ID and password of the DXRE administrator.
Switch to the Site Info tab. Select the server for which you will build a schedule. The server’s database, DXRE site ID and Site Type appear.

Multi-Site 53 Exercise Handbook
Click to define a schedule for the server. Enter the replication schedule as shown here. After you click Save Changes, the replication schedule appears in the list of rules for the server. Click Replicate Now to force replication between the Hub and Remote server, to immediately send the new schedule to the remote site.
Now you will use the DataXtend Administrator to view the schedule that you just built for Remote1, and you will also define a new schedule that will apply to all sites.
Select Start | Programs | DataXtend | Remote Edition | Administrator on the
Hub Server.
Click remote1 in the left panel and switch to the Schedule tab.

Multi-Site 54 Exercise Handbook
The schedule you built in the
Multi-Site Configuration Editor appears.
Click High Sites in the left panel. This is the default schedule for all Remote servers that’s included with DXRE.
Click All Sites in the left panel. Then click .
Add the following replication
schedule for All Sites. Click when
finished to save the schedule.

Multi-Site 55 Exercise Handbook
Class-specific Settings
- Days of the Week are set to include Saturday, for classes that fall on Saturday. - Between the hours of is set for normal class time. - Replicate every is set for just 3 minutes, to avoid waiting in class. - Scatter is disabled, since you can only enter data on one system at a time.
The schedule and subscriptions from the prior exercise must be replicated to the other sites in order for them to take effect at those sites.
To accomplish this, you will manually run the Replication Engine and specifically
select to replicate with the other sites.
Select Start / Programs / DataXtend / Remote Edition / Controller. Select Initiate Replication
from the Actions menu. From the Initiate Replication dialog,
click so that you can select
the replication partner.

Multi-Site 56 Exercise Handbook
A list of other Sites in the replication
network displays. Select to replicate with the East Store
(Remote1), and click . When it completes, you would repeat
the process for any additional sites in your replication network.
End of Exercise 8
STOP HERE
Multi-Site 57 Exercise Handbook
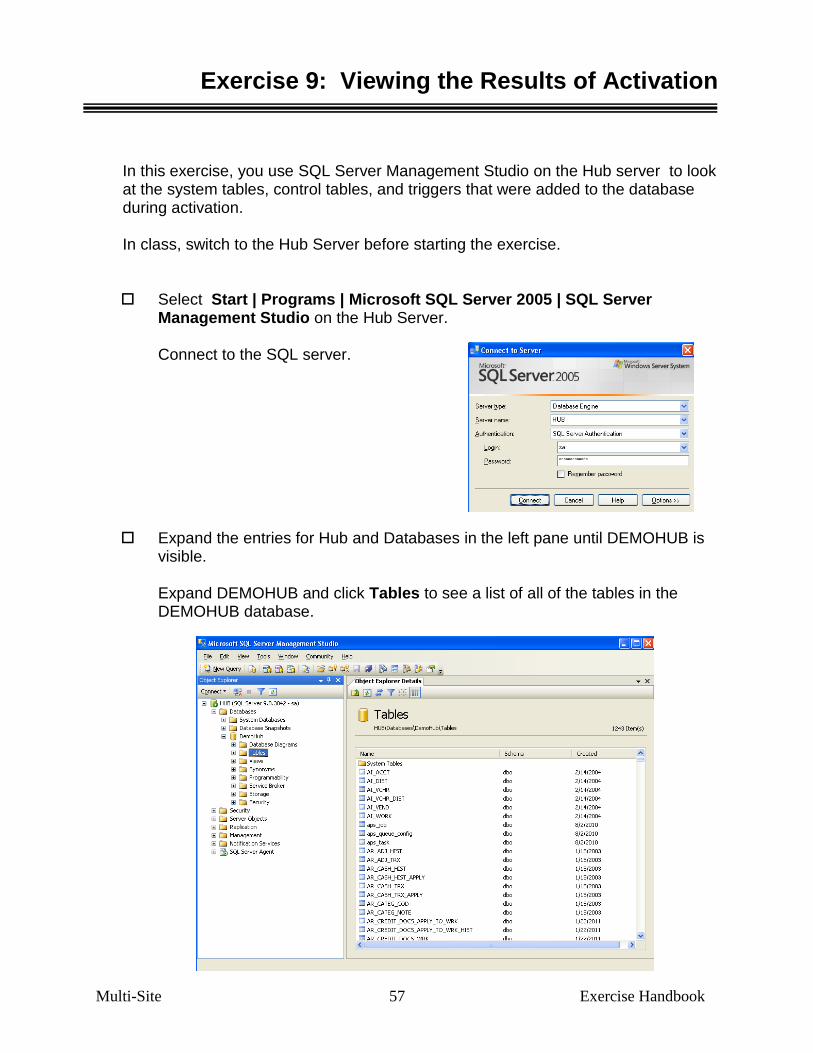
Exercise 9: Viewing the Results of Activation
In this exercise, you use SQL Server Management Studio on the Hub server to look
at the system tables, control tables, and triggers that were added to the database during activation.
In class, switch to the Hub Server before starting the exercise.
Select Start | Programs | Microsoft SQL Server 2005 | SQL Server Management Studio on the Hub Server.
Connect to the SQL server.
Expand the entries for Hub and Databases in the left pane until DEMOHUB is visible.
Expand DEMOHUB and click Tables to see a list of all of the tables in the
DEMOHUB database.
Multi-Site 58 Exercise Handbook
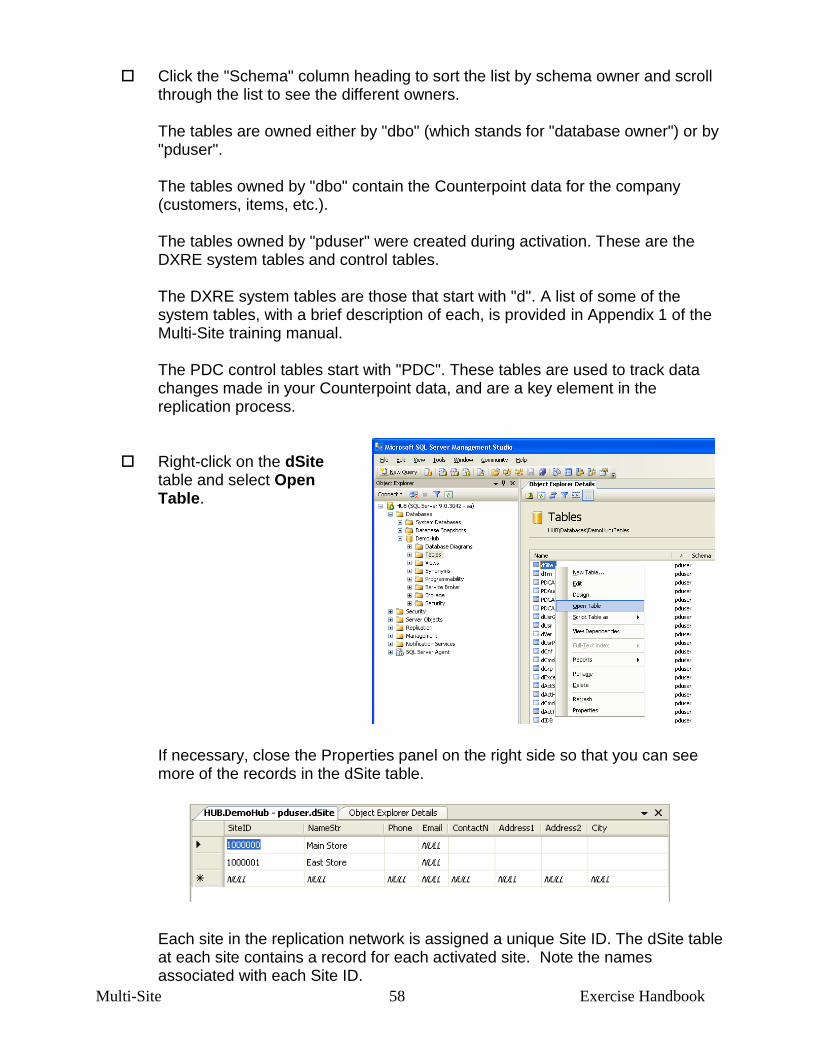
Click the "Schema" column heading to sort the list by schema owner and scroll through the list to see the different owners.
The tables are owned either by "dbo" (which stands for "database owner") or by
"pduser". The tables owned by "dbo" contain the Counterpoint data for the company
(customers, items, etc.). The tables owned by "pduser" were created during activation. These are the
DXRE system tables and control tables. The DXRE system tables are those that start with "d". A list of some of the
system tables, with a brief description of each, is provided in Appendix 1 of the Multi-Site training manual.
The PDC control tables start with "PDC". These tables are used to track data
changes made in your Counterpoint data, and are a key element in the replication process.
Right-click on the dSite table and select Open Table.
If necessary, close the Properties panel on the right side so that you can see more of the records in the dSite table.
Each site in the replication network is assigned a unique Site ID. The dSite table
at each site contains a record for each activated site. Note the names associated with each Site ID.

Multi-Site 59 Exercise Handbook
Scroll across until you see the AvgBW column. This is an average bandwidth of
all replication sessions that this site has participated in, calculated by the replication engine. This information is considered when the replication engine chooses a replication partner for a site.
Close the dSite table when done. Expand dbo.AR_CUST under
Tables in the left pane, and then expand Triggers.
The three PDx_ARCUST
triggers update the associated PD Control table PDC_ARCUST when data is deleted, inserted, or updated in AR_CUST.
The five TR_AR_CUST_xxx
triggers update the associated Delta table AR_CUST_MSD when one of the delta columns in AR_CUST changes.
Trigger From To
PDx_ARCUST AR_CUST PDCAR_CUST
TR_AR_CUST_xxx AR_CUST AR_CUST_MSD The two TR_RS_AR_CUST_x triggers are used to track new and changed
customers done by an Offline Ticket Entry workstation. Right-click any of the triggers and select Modify to see the SQL text of the
trigger. Close the Trigger query window when done viewing the trigger.
Multi-Site 60 Exercise Handbook
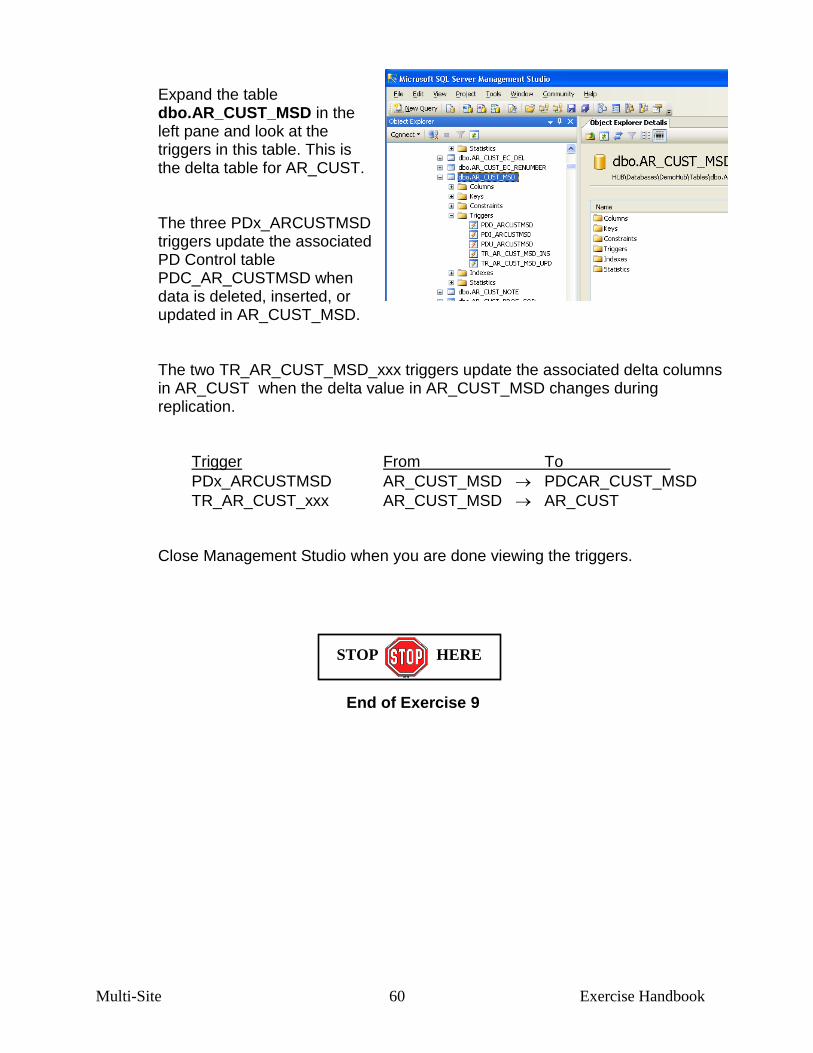
Expand the table
dbo.AR_CUST_MSD in the left pane and look at the triggers in this table. This is the delta table for AR_CUST.
The three PDx_ARCUSTMSD
triggers update the associated PD Control table PDC_AR_CUSTMSD when data is deleted, inserted, or updated in AR_CUST_MSD.
The two TR_AR_CUST_MSD_xxx triggers update the associated delta columns
in AR_CUST when the delta value in AR_CUST_MSD changes during replication.
Trigger From To
PDx_ARCUSTMSD AR_CUST_MSD PDCAR_CUST_MSD
TR_AR_CUST_xxx AR_CUST_MSD AR_CUST Close Management Studio when you are done viewing the triggers.
End of Exercise 9
STOP HERE
Multi-Site 61 Exercise Handbook
Exercise 10: Troubleshooting – Renaming a Server
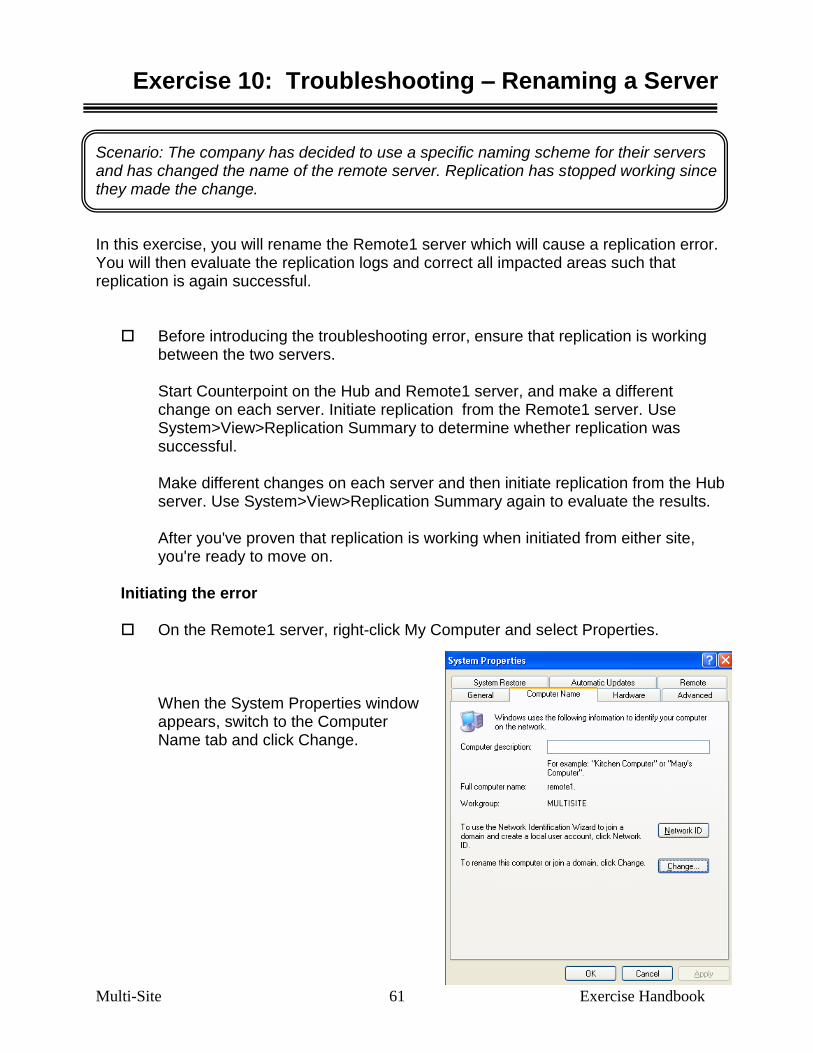
Scenario: The company has decided to use a specific naming scheme for their servers and has changed the name of the remote server. Replication has stopped working since they made the change. In this exercise, you will rename the Remote1 server which will cause a replication error. You will then evaluate the replication logs and correct all impacted areas such that replication is again successful.
Before introducing the troubleshooting error, ensure that replication is working between the two servers. Start Counterpoint on the Hub and Remote1 server, and make a different change on each server. Initiate replication from the Remote1 server. Use System>View>Replication Summary to determine whether replication was successful. Make different changes on each server and then initiate replication from the Hub server. Use System>View>Replication Summary again to evaluate the results. After you've proven that replication is working when initiated from either site, you're ready to move on.
Initiating the error
On the Remote1 server, right-click My Computer and select Properties.
When the System Properties window appears, switch to the Computer Name tab and click Change.
Multi-Site 62 Exercise Handbook
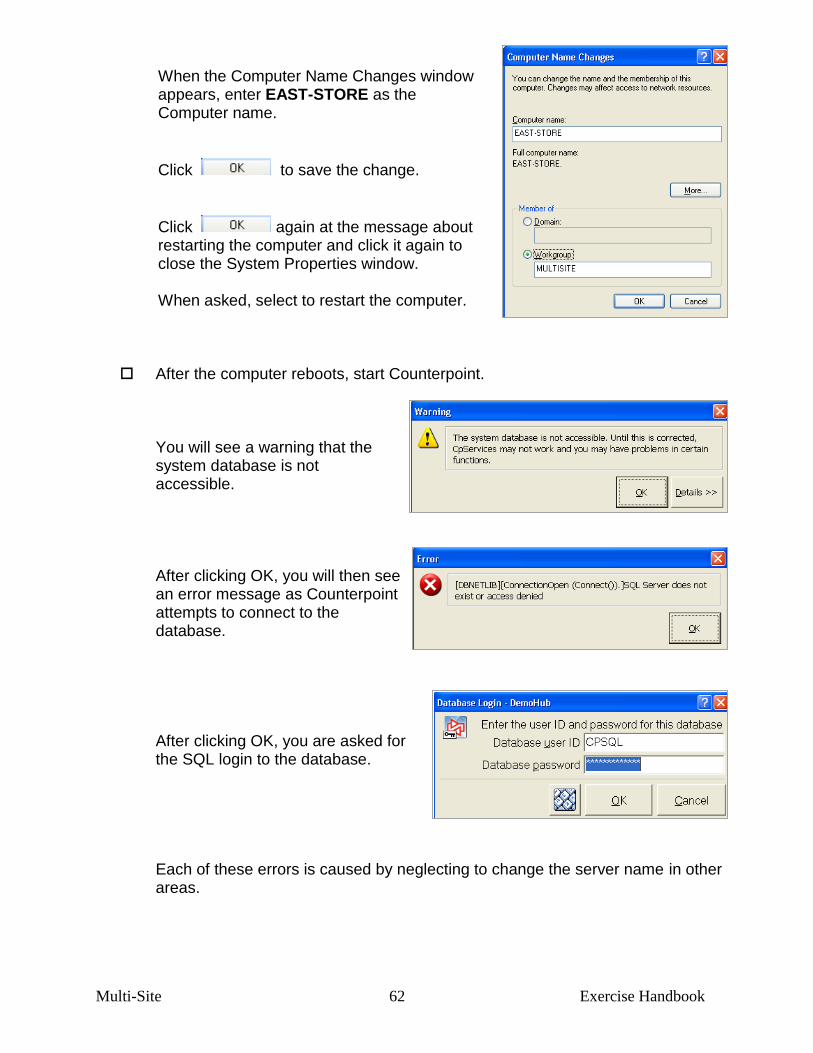
When the Computer Name Changes window appears, enter EAST-STORE as the Computer name.
Click to save the change.
Click again at the message about restarting the computer and click it again to close the System Properties window. When asked, select to restart the computer.
After the computer reboots, start Counterpoint.
You will see a warning that the system database is not accessible. After clicking OK, you will then see an error message as Counterpoint attempts to connect to the database. After clicking OK, you are asked for the SQL login to the database.
Each of these errors is caused by neglecting to change the server name in other areas.

Multi-Site 63 Exercise Handbook
Steps to resolve the error
a. Rename SQL Server at Remote b. Change the server name in the DataXtend DSN* c. Change the server name in the Windows registry key for DataXtend* d. Change the server name in the DataXtend dSite table* e. Update the CP connection string to the database and system database f. Update the ServiceURI server name in Counterpoint.ini g. Update the Hosts files on other systems that connect to the server h. Update the SenderId value in RCSender in CPSystem database i. Update the shared_dir value in DB_CTL j. Re-register the Remote server with the Hub server k. [maybe optional] Set Recovery Model to Simple, backup the database and
then shrink the database. l. Run replication.
* an alternative to performing these three steps is to execute the duninst and pdactivate commands.
See details following step d instructions.
a. To rename the SQL Server, start SQL Server Management Studio on the
Remote server.
Connect to the server, using the new server name.
Click to open a query window. Type select @@servername to find out the current SQL server name. It should return the value REMOTE1.

Multi-Site 64 Exercise Handbook
To change the server name, you must first drop the current server name. Type sp_dropserver 'REMOTE1' and execute the query. Now type sp_addserver 'EAST-STORE', local and execute it.
Restart the SQL Server by right-clicking the server name and selecting Restart.
Close all existing query windows and open a new one. Verify the server name has been successfully changed by again executing
select @@servername. It should now return EAST-STORE.
b. To change the server name in the DataXtend DSN, use Control Panel to open the ODBC Data Source Administrator.
On the System DSN tab, select to Configure the DSN for the DataXtend database.
Multi-Site 65 Exercise Handbook
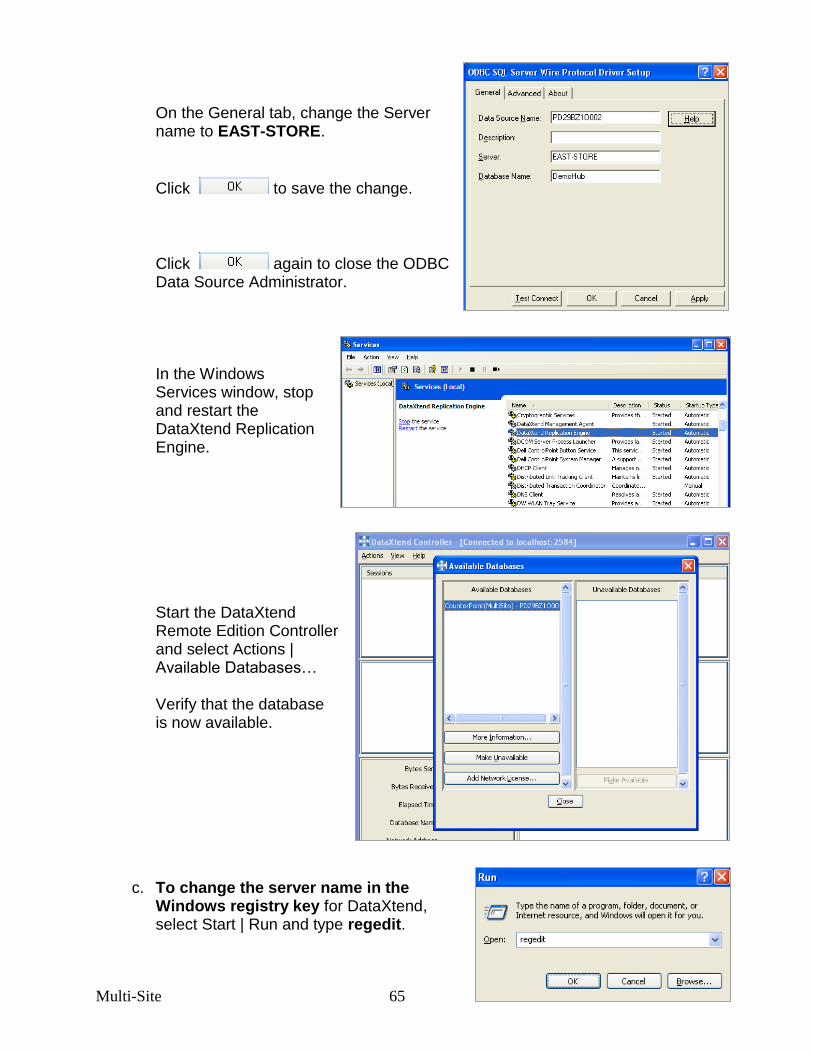
On the General tab, change the Server name to EAST-STORE.
Click to save the change.
Click again to close the ODBC Data Source Administrator.
In the Windows
Services window, stop and restart the DataXtend Replication Engine.
Start the DataXtend
Remote Edition Controller and select Actions | Available Databases…
Verify that the database
is now available.
c. To change the server name in the Windows registry key for DataXtend, select Start | Run and type regedit.
Multi-Site 66 Exercise Handbook
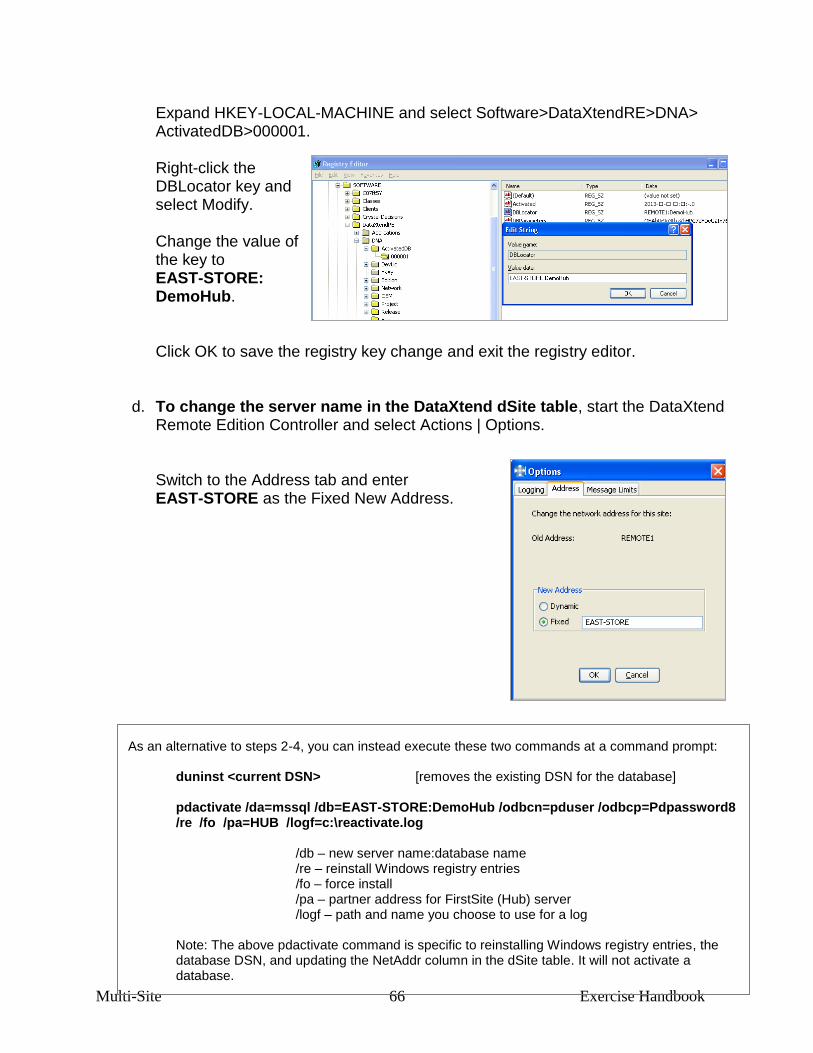
Expand HKEY-LOCAL-MACHINE and select Software>DataXtendRE>DNA> ActivatedDB>000001. Right-click the DBLocator key and select Modify. Change the value of the key to EAST-STORE: DemoHub. Click OK to save the registry key change and exit the registry editor.
d. To change the server name in the DataXtend dSite table, start the DataXtend Remote Edition Controller and select Actions | Options.
Switch to the Address tab and enter EAST-STORE as the Fixed New Address.
As an alternative to steps 2-4, you can instead execute these two commands at a command prompt: duninst <current DSN> [removes the existing DSN for the database] pdactivate /da=mssql /db=EAST-STORE:DemoHub /odbcn=pduser /odbcp=Pdpassword8
/re /fo /pa=HUB /logf=c:\reactivate.log
/db – new server name:database name /re – reinstall Windows registry entries /fo – force install /pa – partner address for FirstSite (Hub) server /logf – path and name you choose to use for a log
Note: The above pdactivate command is specific to reinstalling Windows registry entries, the database DSN, and updating the NetAddr column in the dSite table. It will not activate a database.

Multi-Site 67 Exercise Handbook
e. To update the CP connection string to the database and system database, start the Counterpoint System Configuration utility.
Select Companies.
Click the ellipsis button
for the DemoHub database in the ConnectionString column.
In the Data Link Properties window, on the
Connection tab, change the server name to EAST-STORE.
Click Test Connection to ensure that a
connection to the database can be made outside of Counterpoint.
Click OK to return to the Company Names
window.

Multi-Site 68 Exercise Handbook
At the bottom of the window, click the ellipsis button next to the System database connection string.
Also change the server name here to
EAST-STORE and test the connection. Click OK to return to the Company Names
window.
Click on the toolbar to save the connection string changes.
f. To update the ServiceURI server name in Counterpoint.ini, use Windows Explorer to navigate to the CPSQL.1\TopLevel folder.
Open Counterpoint.ini in Notepad and change the server name in the ServiceURI setting.
Save the change. Make the same change to Counterpoint.ini in
the CPSQL.1\Bin folder on the workstation.
Multi-Site 69 Exercise Handbook
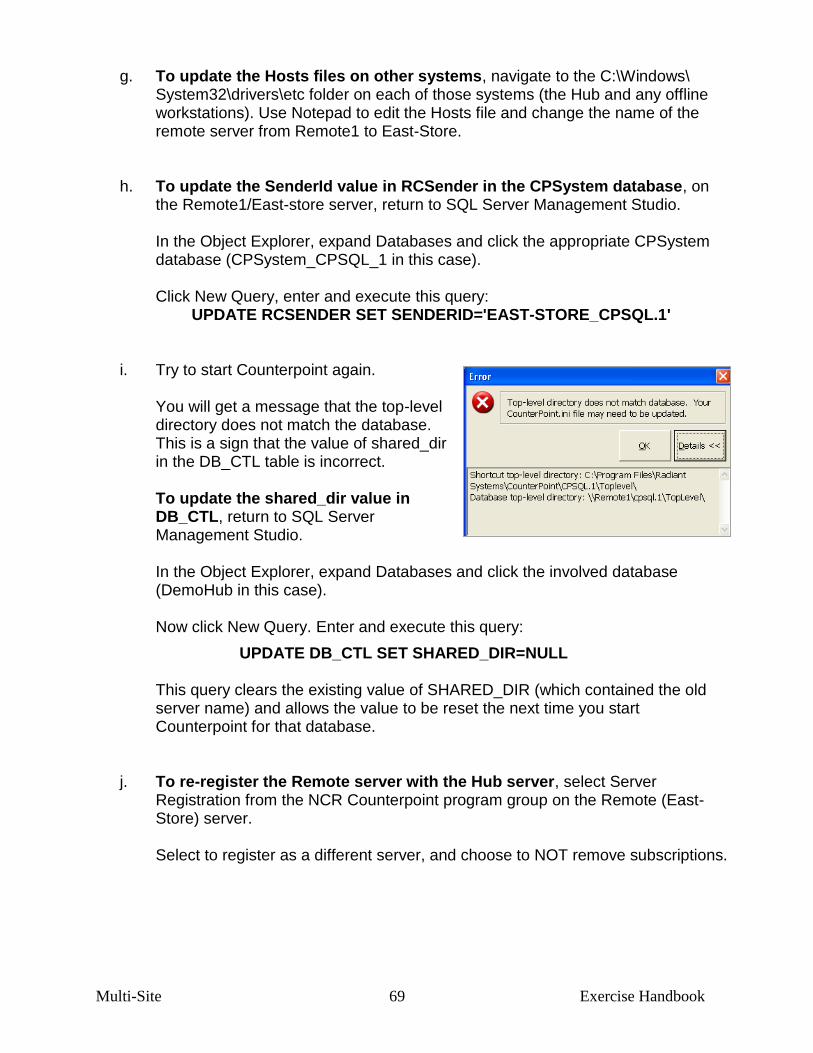
g. To update the Hosts files on other systems, navigate to the C:\Windows\ System32\drivers\etc folder on each of those systems (the Hub and any offline workstations). Use Notepad to edit the Hosts file and change the name of the remote server from Remote1 to East-Store.
h. To update the SenderId value in RCSender in the CPSystem database, on
the Remote1/East-store server, return to SQL Server Management Studio. In the Object Explorer, expand Databases and click the appropriate CPSystem database (CPSystem_CPSQL_1 in this case).
Click New Query, enter and execute this query:
UPDATE RCSENDER SET SENDERID='EAST-STORE_CPSQL.1'
i. Try to start Counterpoint again. You will get a message that the top-level directory does not match the database. This is a sign that the value of shared_dir in the DB_CTL table is incorrect.
To update the shared_dir value in DB_CTL, return to SQL Server Management Studio. In the Object Explorer, expand Databases and click the involved database (DemoHub in this case).
Now click New Query. Enter and execute this query:
UPDATE DB_CTL SET SHARED_DIR=NULL This query clears the existing value of SHARED_DIR (which contained the old
server name) and allows the value to be reset the next time you start Counterpoint for that database.
j. To re-register the Remote server with the Hub server, select Server Registration from the NCR Counterpoint program group on the Remote (East-Store) server.
Select to register as a different server, and choose to NOT remove subscriptions.
Multi-Site 70 Exercise Handbook
k. Now start Counterpoint again. Make a harmless change (such as editing an item description). After saving the change, use the Remote Edition Synchronizer to force replication. View the results in System>Views>Replication Summary to see if it was successful. You can also review the replication log to see the results.
End of Exercise 10
STOP HERE

Multi-Site 71 Exercise Handbook
Exercise 11: Troubleshooting – Duplicate Customer
Scenario: Replication between the Hub and Remote server is not currently occurring, so a new customer record entered at the Hub did not get sent to the Remote server. The Remote site decides to add the same customer record at its own site. In this exercise, you will configure the Hub and Remote servers so that you can reproduce the replication error. You will then review the replication logs, analyze the systems in order to determine at which site to resolve the error, and then correct all impacted areas such that replication is again successful. Installing Notepad++
Before performing this exercise, install Notepad++ on both the Hub and Remote servers. Notepad++ is a good tool for reading the complex replication logs. The file npp.6.3.2.Installer.exe is located in the CPSQLMS-OFFTrainCD folder on the thumb drive.
Initiating the error
On the Hub server, select Setup>System>Company and ensure the Calendar ID is set to the current year.
In Setup>System> Workgroups, disable auto-assign for customer numbers in both workgroups.
After saving the change, start the DataXtend Controller and select Actions|Initiate Replication to replicate with the Remote server. In Counterpoint, use System>Views>Replication Summary to ensure that replication was successful.
Stop replication on the Remote server by typing pdre stop at a command prompt.

Multi-Site 72 Exercise Handbook
Restart Counterpoint on
the Hub server. Use Customers> Customers to add customer number 9900. Set the customer type as A/R and use your name and address.
Enter a ticket for the customer, using A/R as the tender. Count the drawer and post the ticket.
On the Remote server, use Customers/Customers to define the same customer, using the same customer number (9900), name, address and set the customer type as A/R. Add a note that says "Didn't receive from Hub".
Enter a ticket for the customer where you sell a new gift card and use A/R charge as the tender. Count the drawer and post the ticket.

Multi-Site 73 Exercise Handbook
Start replication on the Remote server by typing pdre start at a commmand prompt.
Then use the DataXtend Synchronizer to start replication.
When the replication session completes, select System>View> Replication Summary at both the Hub and Remote servers to view the status of the last replication session.
Start the DataXtend Site Monitor at both the Hub and Remote sites. Select File|Open Database|MS SQLServer. Enter the database connection information, using pduser as the User Name. After connecting, the Basic Site Information appears:

Multi-Site 74 Exercise Handbook
Select View|Session Info and look for a status of Failed at the end. Scroll over until you see the name of the Start Log and End Log, and make note of the log name(s).
Select DataXtend|Remote Edition|Replication Engine Logs at both sites. On each system, locate the end log and right-click it. Select to open it with Notepad++.
Press Ctrl+F and select to find all occurrences of E<space>0 in the current document.
Compare how the error information appears in the log at the site where the error occurred (Hub) to the log at the site where replication was initiated (Remote).
Remote
Hub
Multi-Site 75 Exercise Handbook
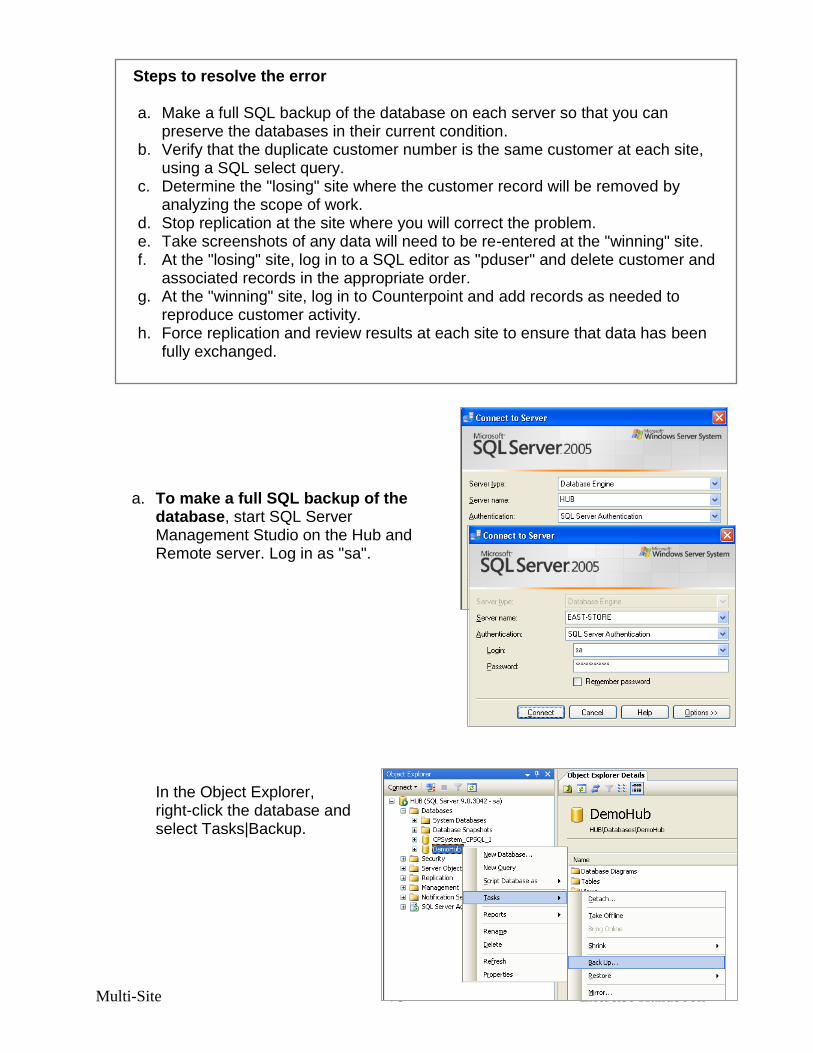
Steps to resolve the error
a. Make a full SQL backup of the database on each server so that you can preserve the databases in their current condition.
b. Verify that the duplicate customer number is the same customer at each site, using a SQL select query.
c. Determine the "losing" site where the customer record will be removed by analyzing the scope of work.
d. Stop replication at the site where you will correct the problem. e. Take screenshots of any data will need to be re-entered at the "winning" site. f. At the "losing" site, log in to a SQL editor as "pduser" and delete customer and
associated records in the appropriate order. g. At the "winning" site, log in to Counterpoint and add records as needed to
reproduce customer activity. h. Force replication and review results at each site to ensure that data has been
fully exchanged.
a. To make a full SQL backup of the database, start SQL Server Management Studio on the Hub and Remote server. Log in as "sa".
In the Object Explorer,
right-click the database and select Tasks|Backup.
Multi-Site 76 Exercise Handbook
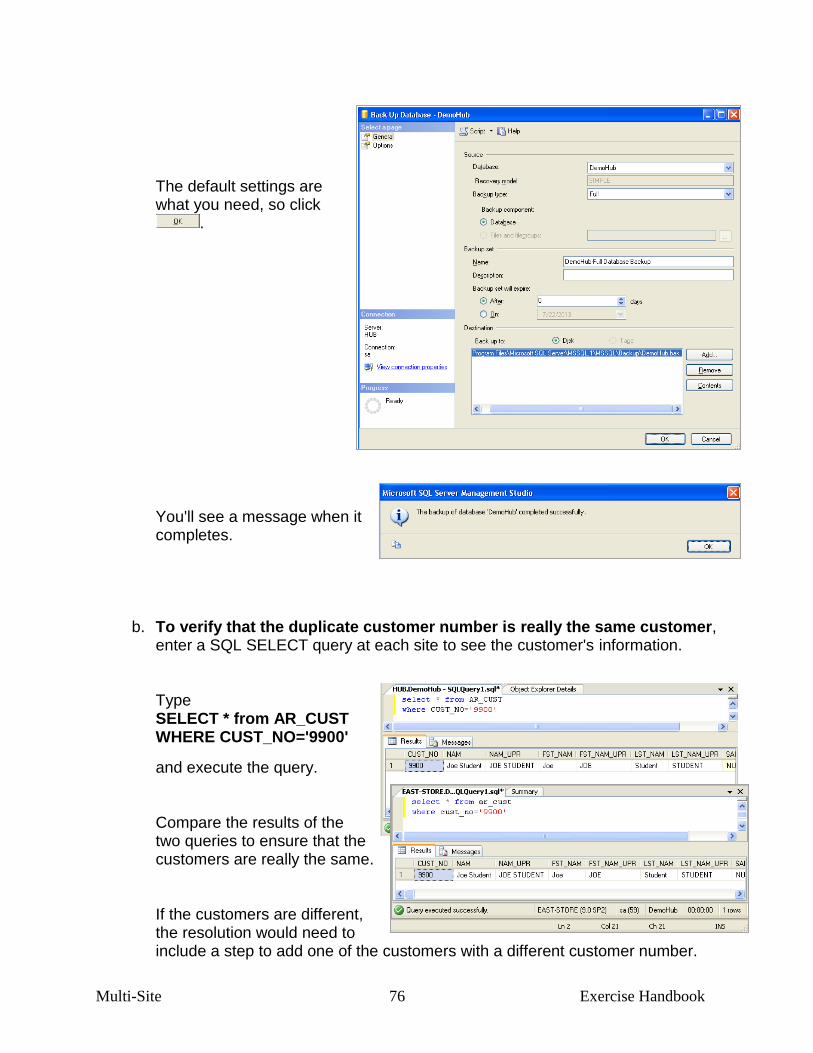
The default settings are
what you need, so click .
You'll see a message when it
completes.
b. To verify that the duplicate customer number is really the same customer, enter a SQL SELECT query at each site to see the customer's information.
Type SELECT * from AR_CUST WHERE CUST_NO='9900'
and execute the query. Compare the results of the
two queries to ensure that the customers are really the same.
If the customers are different,
the resolution would need to include a step to add one of the customers with a different customer number.
Multi-Site 77 Exercise Handbook
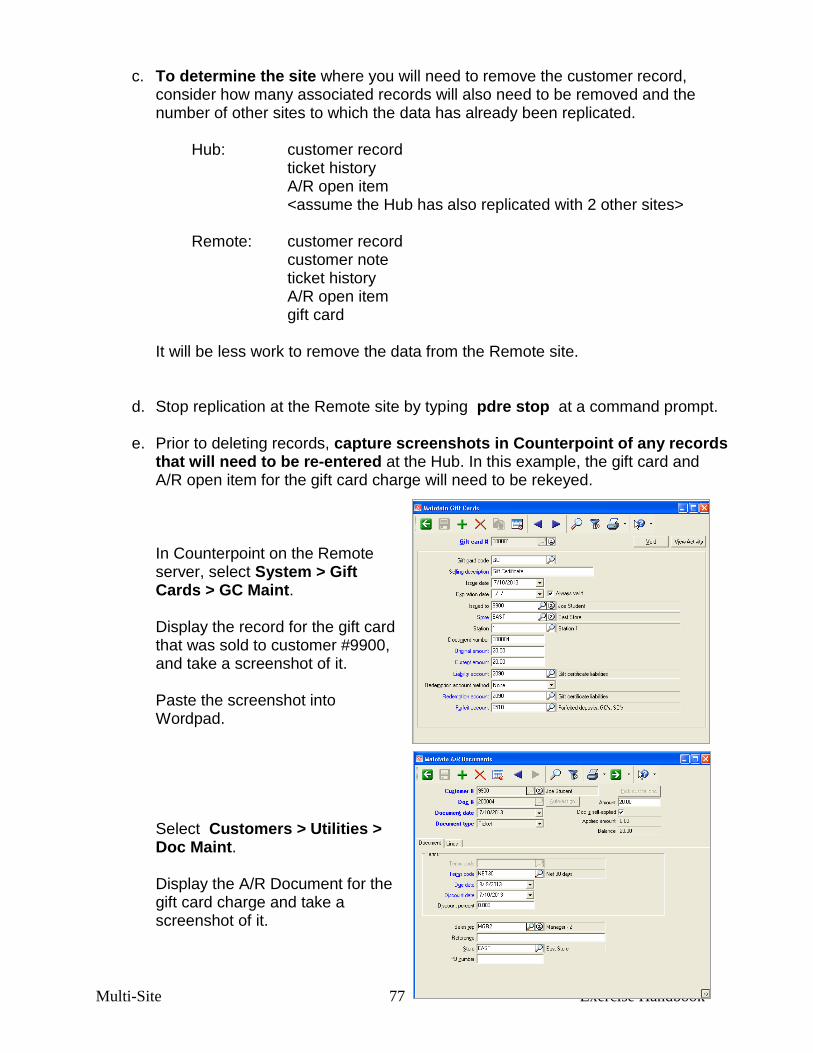
c. To determine the site where you will need to remove the customer record, consider how many associated records will also need to be removed and the number of other sites to which the data has already been replicated.
Hub: customer record ticket history A/R open item <assume the Hub has also replicated with 2 other sites> Remote: customer record customer note ticket history A/R open item gift card It will be less work to remove the data from the Remote site.
d. Stop replication at the Remote site by typing pdre stop at a command prompt.
e. Prior to deleting records, capture screenshots in Counterpoint of any records that will need to be re-entered at the Hub. In this example, the gift card and A/R open item for the gift card charge will need to be rekeyed.
In Counterpoint on the Remote server, select System > Gift Cards > GC Maint. Display the record for the gift card that was sold to customer #9900, and take a screenshot of it. Paste the screenshot into Wordpad.
Select Customers > Utilities >
Doc Maint. Display the A/R Document for the
gift card charge and take a screenshot of it.
Multi-Site 78 Exercise Handbook
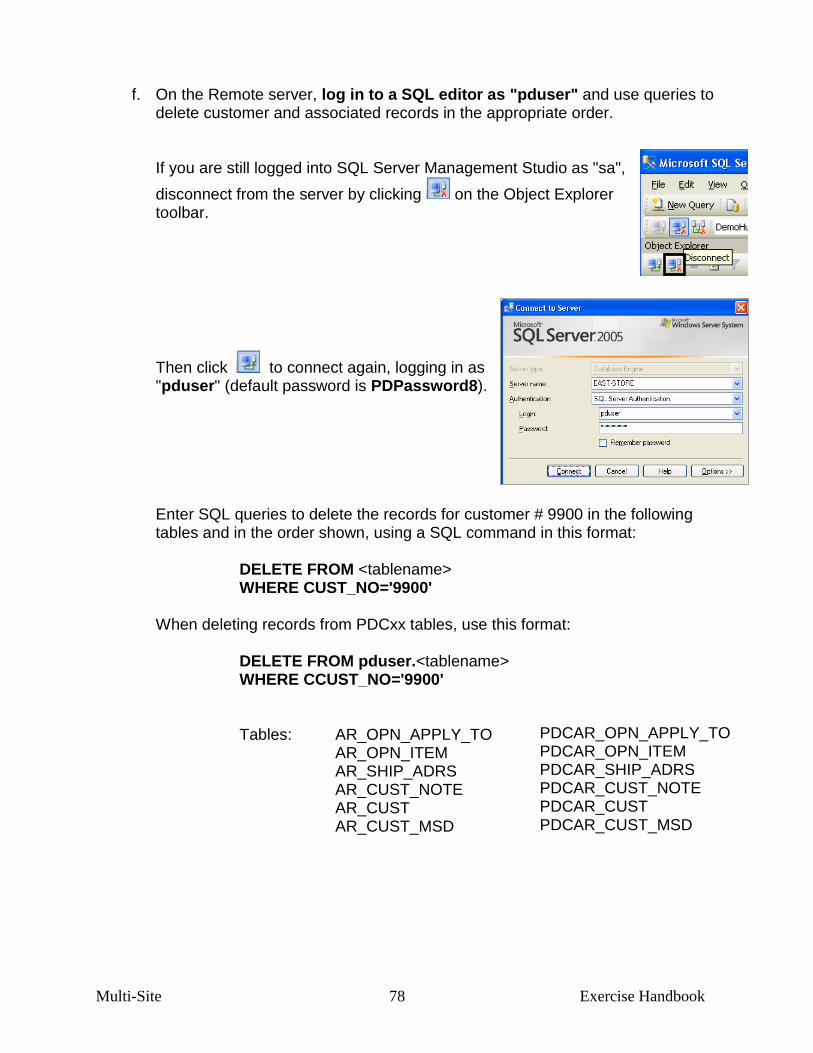
f. On the Remote server, log in to a SQL editor as "pduser" and use queries to
delete customer and associated records in the appropriate order.
If you are still logged into SQL Server Management Studio as "sa",
disconnect from the server by clicking on the Object Explorer toolbar.
Then click to connect again, logging in as "pduser" (default password is PDPassword8). Enter SQL queries to delete the records for customer # 9900 in the following tables and in the order shown, using a SQL command in this format: DELETE FROM <tablename> WHERE CUST_NO='9900' When deleting records from PDCxx tables, use this format: DELETE FROM pduser.<tablename> WHERE CCUST_NO='9900' Tables: AR_OPN_APPLY_TO AR_OPN_ITEM AR_SHIP_ADRS AR_CUST_NOTE AR_CUST AR_CUST_MSD
PDCAR_OPN_APPLY_TO PDCAR_OPN_ITEM PDCAR_SHIP_ADRS PDCAR_CUST_NOTE PDCAR_CUST PDCAR_CUST_MSD

Multi-Site 79 Exercise Handbook
g. At the Hub, log in to Counterpoint and add records as needed to reproduce customer activity.
Log in to Counterpoint as a normal user. Select System > Gift Cards > GC Maint. Check to see if the gift card is already present. If it is not, add it using the information from the screenshot.
Select Customers > Utilities > Doc Maint. Check to see if the invoice for
purchase of the gift card is already present. If it is not, add it using the information from the screenshot.
Select Customers > Utilities > Recalc Bal and recalculate the balance for the
customer (filter to just this customer). Make note of the customer's balance after recalculating.
h. Start the replication engine (“pdre start”) and force replication between the Hub and Remote sites, using the DataXtend Controller.
When it completes, use System > Views > Replication Summary to see if replication was successful. If it was, review the results at each site to ensure that data has been fully exchanged. At the Remote site, check to see if:
- customer #9900 exists - if the customer's balance is correct (same as the balance at the Hub) - both invoices appear as A/R documents for the customer: one for the
purchase made at the Hub, and the other for the gift card purchase made at the Remote
if both invoices do not appear, run pdfixcutoff at the Remote site to roll back the last replication time for the AR_OPN_ITEM table (refer to "When to use pdfixcutoff" in the Multi-Site training manual for how to run this utility).
- gift card is present and has the correct balance
At the Hub site, check to see if: - if the customer's balance is still the same - both invoices appear as A/R documents for the customer: one for the
purchase made at the Hub, and the other for the gift card purchase made at the Remote.
- gift card is present and has the correct balance - ticket history is present for the ticket that was entered and posted at the
Remote site
End of Exercise 11
STOP HERE

Multi-Site 80 Exercise Handbook
Exercise 12: Troubleshooting – Duplicate Item Numbers
Scenario: Someone who normally works at the Hub is working at the Remote site for the day and logs in with the wrong workgroup. In this exercise, you will configure the Hub and Remote servers so that you can reproduce the replication error. You will then review the replication logs, analyze the systems in order to determine at which site to resolve the error, and then correct all impacted areas such that replication is again successful.
Initiating the error
On the Hub server, select Setup>System>Workgroups and clear the "Restrict site ID" check box for both workgroups.
Use DataXtend>Remote Edition>Controller and replicate the change with the Remote server.
On the Remote server, after replication completes, stop replication by typing pdre stop at a command prompt.
Multi-Site 81 Exercise Handbook
On the Hub server,
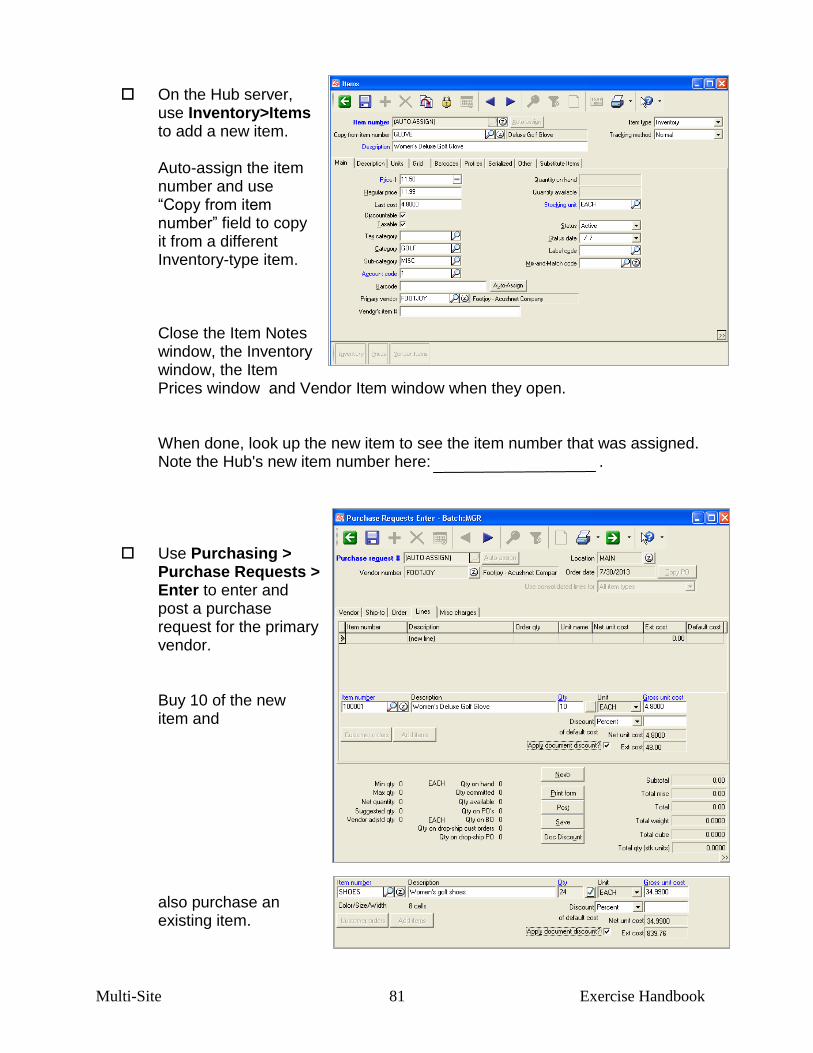
use Inventory>Items to add a new item.
Auto-assign the item number and use “Copy from item number” field to copy it from a different Inventory-type item. Close the Item Notes window, the Inventory window, the Item Prices window and Vendor Item window when they open. When done, look up the new item to see the item number that was assigned. Note the Hub's new item number here: .
Use Purchasing > Purchase Requests > Enter to enter and post a purchase request for the primary vendor. Buy 10 of the new item and also purchase an existing item.
Multi-Site 82 Exercise Handbook
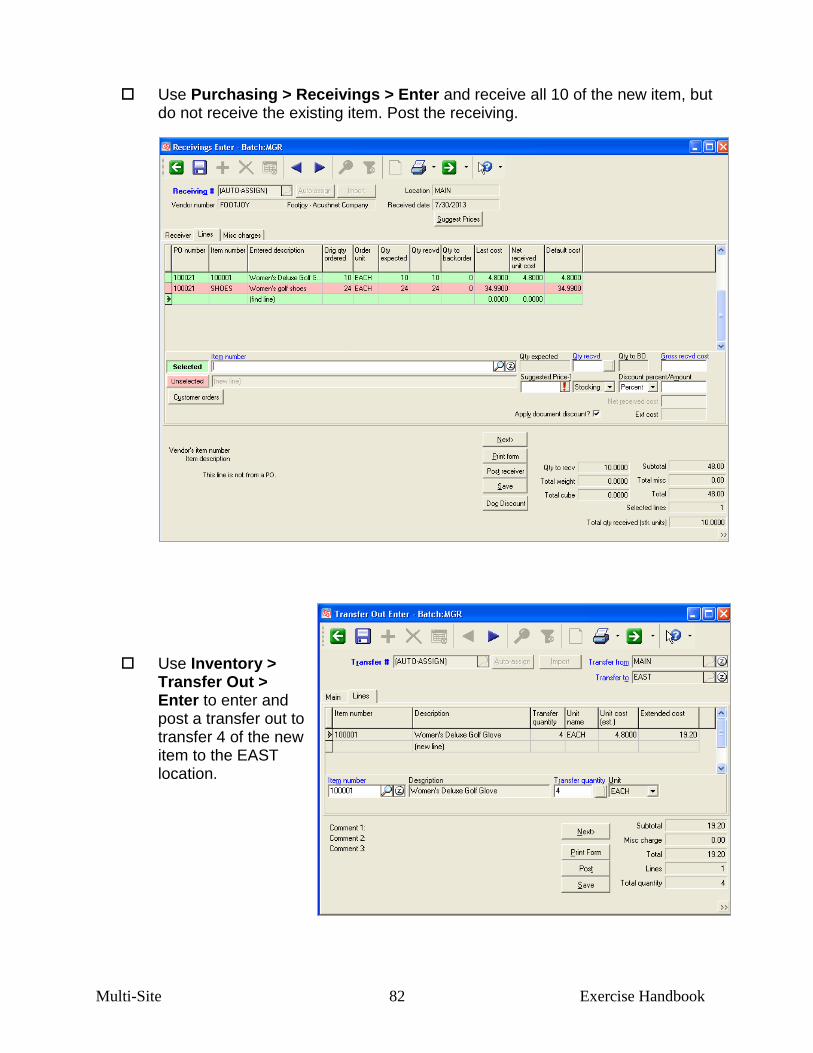
Use Purchasing > Receivings > Enter and receive all 10 of the new item, but
do not receive the existing item. Post the receiving.
Use Inventory > Transfer Out > Enter to enter and post a transfer out to transfer 4 of the new item to the EAST location.

Multi-Site 83 Exercise Handbook
On the Remote server, login to Counterpoint as MGR, allowing it to default to workgroup 1.
When you get the "Workgroup is not assigned to this site" message, ignore it. Also ignore the next message that tells you the default location for the workgroup is not on file.
Use Inventory > Items to add a different new item, auto-assigning the item number and copying from a different item (use "Copy from item number" field). When you receive the message that the location is not on file, click OK to ignore it.
When the Inventory window appears, click the VCR button to see the inventory record that was created for EAST. Close the Inventory window, the Item Prices window when it opens, as well as the Vendor Items window.
When done, look up the new item to see the item number that was assigned. Note the Remote site's new item number here: .
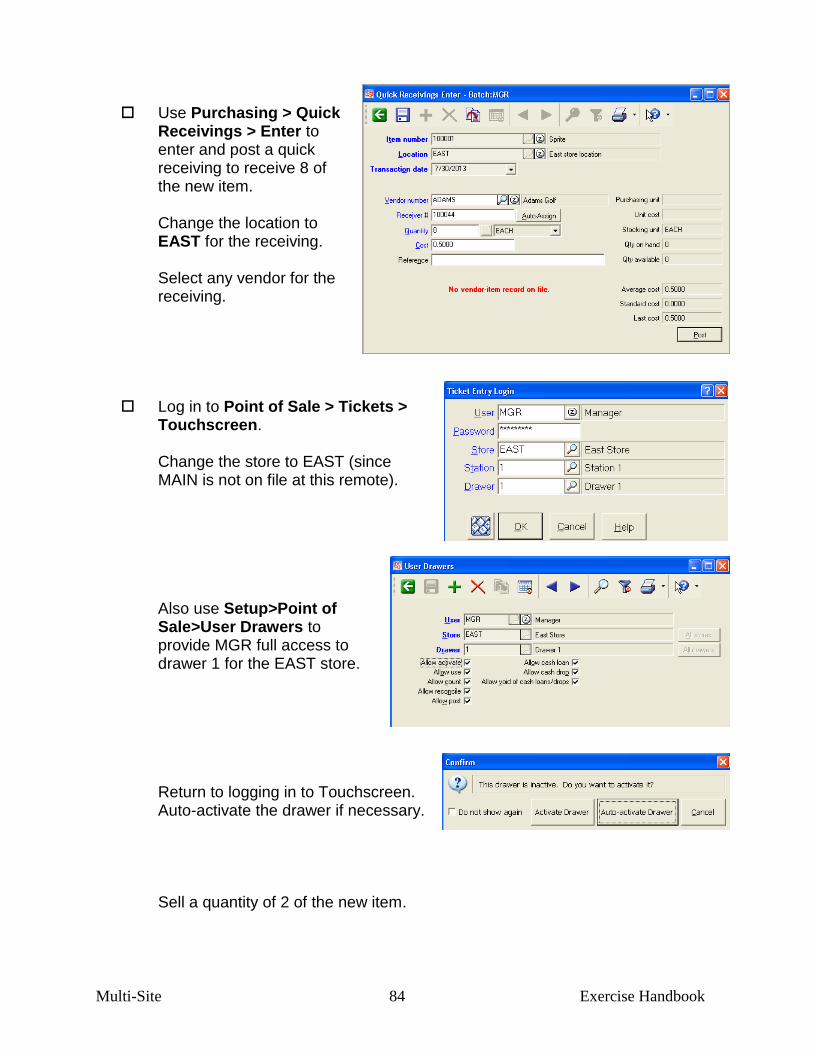
Multi-Site 84 Exercise Handbook
Use Purchasing > Quick Receivings > Enter to enter and post a quick receiving to receive 8 of the new item. Change the location to EAST for the receiving.
Select any vendor for the receiving.
Log in to Point of Sale > Tickets > Touchscreen. Change the store to EAST (since MAIN is not on file at this remote). Also use Setup>Point of Sale>User Drawers to provide MGR full access to drawer 1 for the EAST store.
Return to logging in to Touchscreen. Auto-activate the drawer if necessary.
Sell a quantity of 2 of the new item.
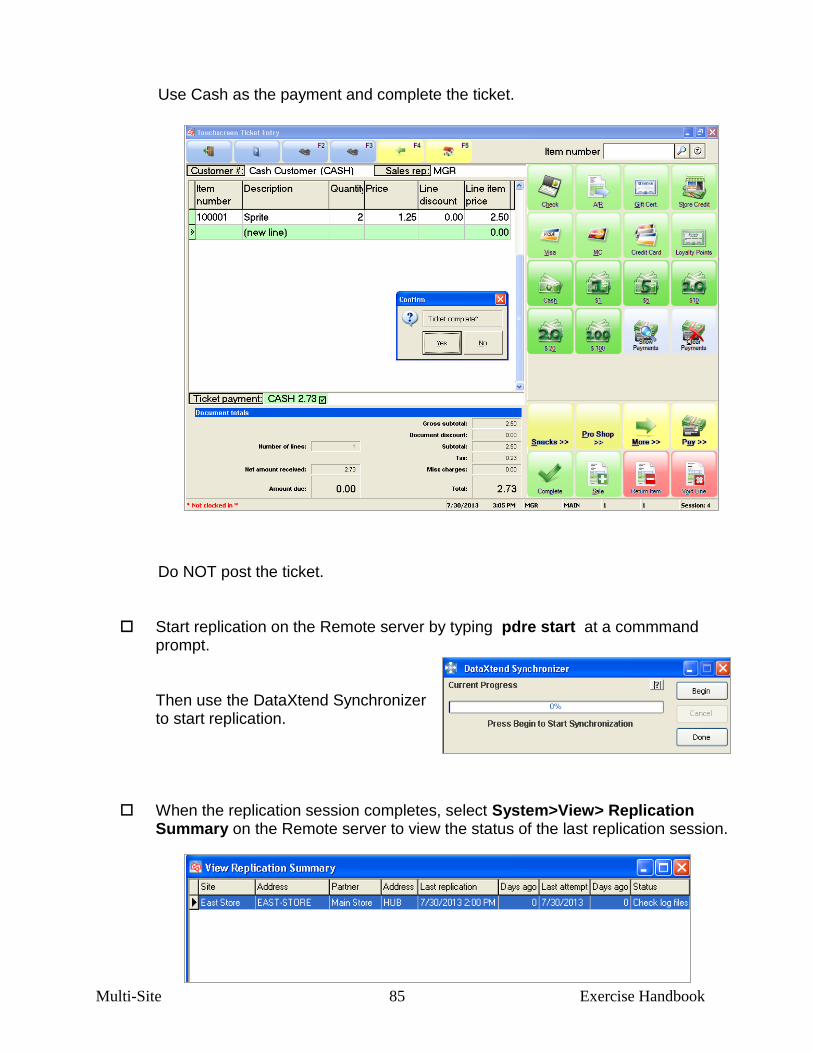
Multi-Site 85 Exercise Handbook
Use Cash as the payment and complete the ticket.
Do NOT post the ticket.
Start replication on the Remote server by typing pdre start at a commmand prompt.
Then use the DataXtend Synchronizer to start replication.
When the replication session completes, select System>View> Replication Summary on the Remote server to view the status of the last replication session.
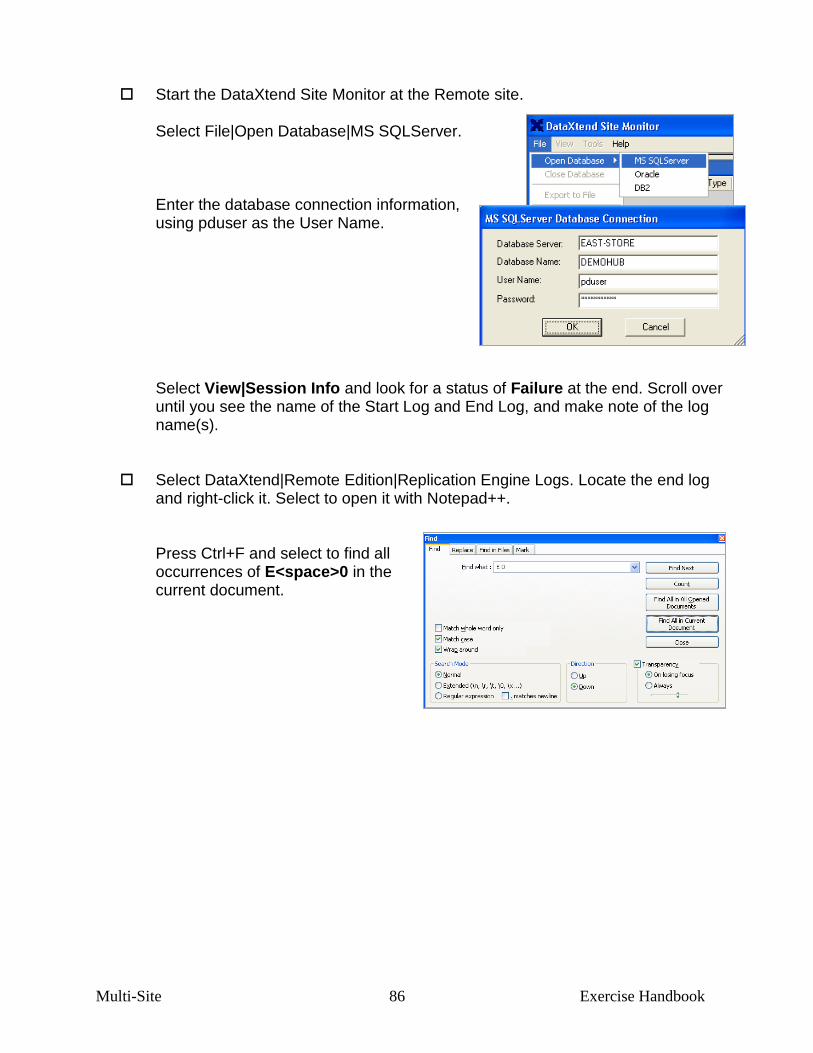
Multi-Site 86 Exercise Handbook
Start the DataXtend Site Monitor at the Remote site.
Select File|Open Database|MS SQLServer. Enter the database connection information, using pduser as the User Name. Select View|Session Info and look for a status of Failure at the end. Scroll over until you see the name of the Start Log and End Log, and make note of the log name(s).
Select DataXtend|Remote Edition|Replication Engine Logs. Locate the end log
and right-click it. Select to open it with Notepad++.
Press Ctrl+F and select to find all occurrences of E<space>0 in the current document.

Multi-Site 87 Exercise Handbook
You should see multiple "duplicate key" error messages. Below the error messages, locate LOCAL_SITE_ID and LOCAL_SITE_NAME,
as well as PARTNER_SITE_ID and PARTNER_SITE_NAME. Note the tables and key values (search for "having key" to find them) shown in
each message.
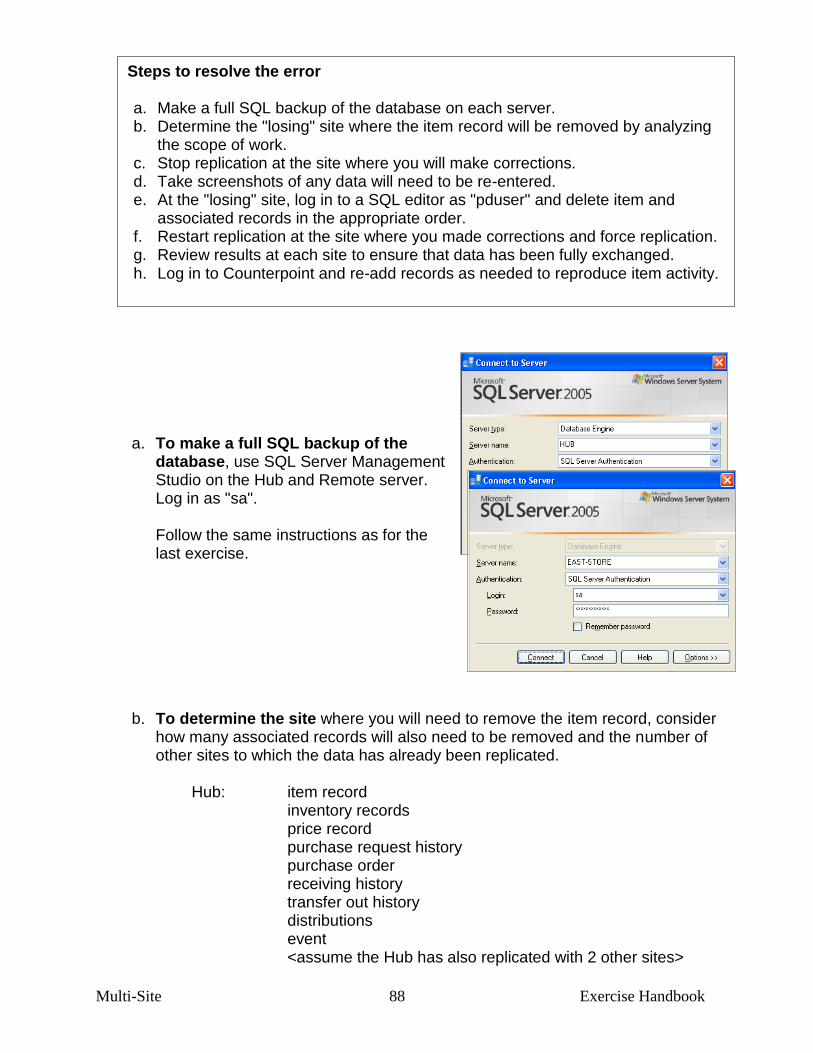
Multi-Site 88 Exercise Handbook
a. To make a full SQL backup of the database, use SQL Server Management Studio on the Hub and Remote server. Log in as "sa".
Follow the same instructions as for the last exercise.
b. To determine the site where you will need to remove the item record, consider
how many associated records will also need to be removed and the number of other sites to which the data has already been replicated.
Hub: item record inventory records price record purchase request history purchase order receiving history transfer out history distributions event <assume the Hub has also replicated with 2 other sites>
Steps to resolve the error
a. Make a full SQL backup of the database on each server. b. Determine the "losing" site where the item record will be removed by analyzing
the scope of work. c. Stop replication at the site where you will make corrections. d. Take screenshots of any data will need to be re-entered. e. At the "losing" site, log in to a SQL editor as "pduser" and delete item and
associated records in the appropriate order. f. Restart replication at the site where you made corrections and force replication. g. Review results at each site to ensure that data has been fully exchanged. h. Log in to Counterpoint and re-add records as needed to reproduce item activity.
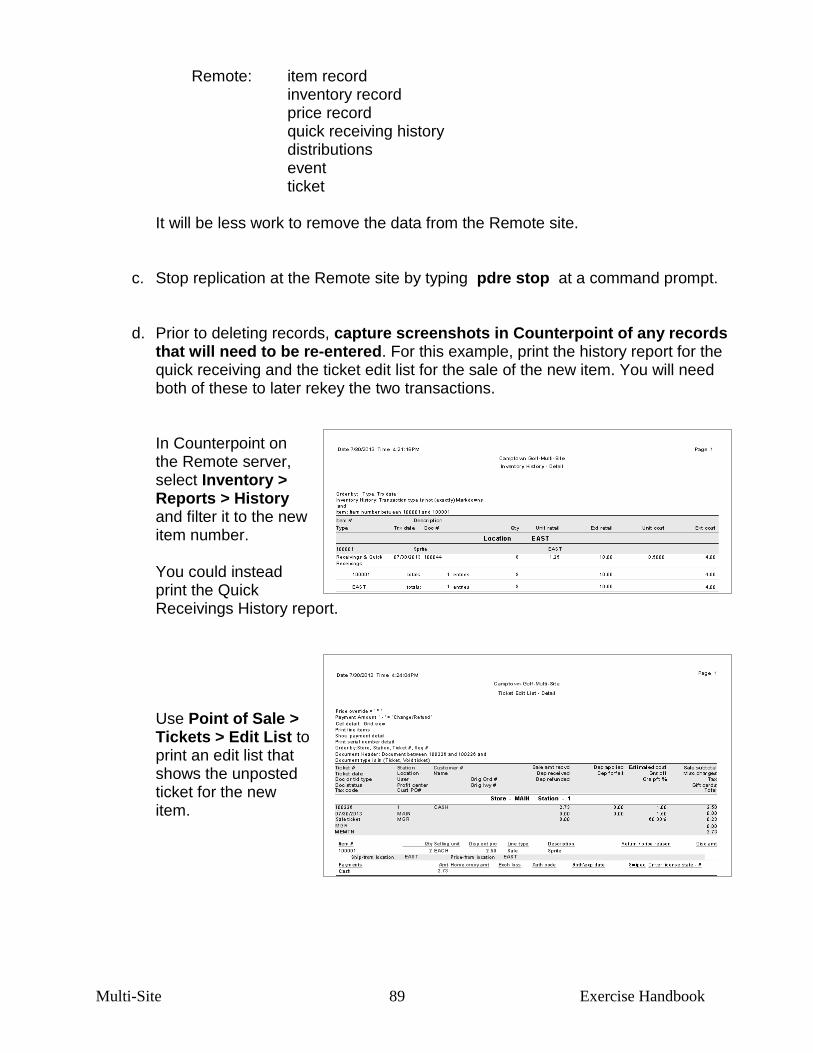
Multi-Site 89 Exercise Handbook
Remote: item record inventory record price record quick receiving history distributions event ticket It will be less work to remove the data from the Remote site.
c. Stop replication at the Remote site by typing pdre stop at a command prompt.
d. Prior to deleting records, capture screenshots in Counterpoint of any records that will need to be re-entered. For this example, print the history report for the quick receiving and the ticket edit list for the sale of the new item. You will need both of these to later rekey the two transactions.
In Counterpoint on the Remote server, select Inventory > Reports > History and filter it to the new item number. You could instead print the Quick Receivings History report.
Use Point of Sale >
Tickets > Edit List to print an edit list that shows the unposted ticket for the new item.

Multi-Site 90 Exercise Handbook
e. On the Remote server, log in to a SQL editor as "pduser" and use queries to delete item and associated records in the appropriate order.
If you are using SQL Server Management Studio and are still
logged in as "sa", disconnect from the server by clicking on the Object Explorer toolbar.
Then click to connect again, logging in as "pduser" (default password is PDPassword8). Delete Distributions and Event
Before you delete the item records, you should delete the distributions and event related to the posted quick receiving. To do that, you will need to find the corresponding event number. In Counterpoint, select System > Views > Events and use the lookup to find the Quick Receivings posting event. Make note of the event number.
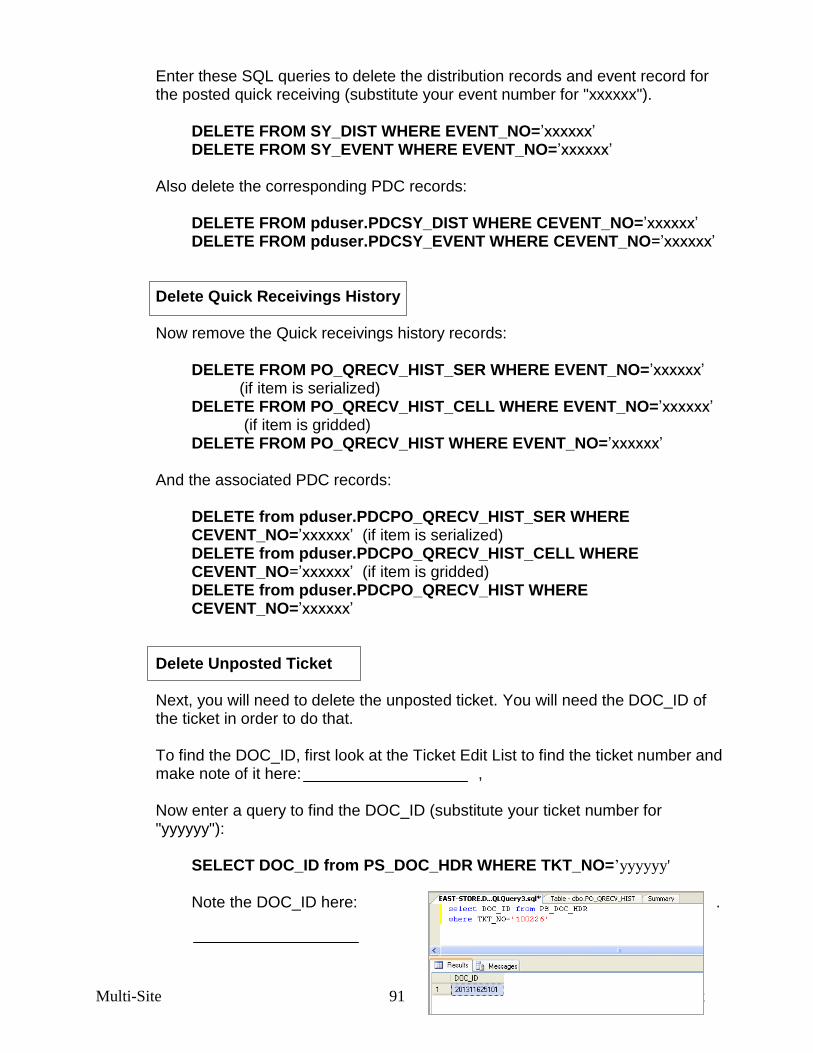
Multi-Site 91 Exercise Handbook
Enter these SQL queries to delete the distribution records and event record for the posted quick receiving (substitute your event number for "xxxxxx").
DELETE FROM SY_DIST WHERE EVENT_NO=’xxxxxx’ DELETE FROM SY_EVENT WHERE EVENT_NO=’xxxxxx’
Also delete the corresponding PDC records:
DELETE FROM pduser.PDCSY_DIST WHERE CEVENT_NO=’xxxxxx’ DELETE FROM pduser.PDCSY_EVENT WHERE CEVENT_NO=’xxxxxx’
Delete Quick Receivings History Now remove the Quick receivings history records:
DELETE FROM PO_QRECV_HIST_SER WHERE EVENT_NO=’xxxxxx’ (if item is serialized)
DELETE FROM PO_QRECV_HIST_CELL WHERE EVENT_NO=’xxxxxx’ (if item is gridded)
DELETE FROM PO_QRECV_HIST WHERE EVENT_NO=’xxxxxx’ And the associated PDC records:
DELETE from pduser.PDCPO_QRECV_HIST_SER WHERE CEVENT_NO=’xxxxxx’ (if item is serialized)
DELETE from pduser.PDCPO_QRECV_HIST_CELL WHERE CEVENT_NO=’xxxxxx’ (if item is gridded)
DELETE from pduser.PDCPO_QRECV_HIST WHERE CEVENT_NO=’xxxxxx’
Delete Unposted Ticket Next, you will need to delete the unposted ticket. You will need the DOC_ID of the ticket in order to do that. To find the DOC_ID, first look at the Ticket Edit List to find the ticket number and make note of it here: , Now enter a query to find the DOC_ID (substitute your ticket number for "yyyyyy"): SELECT DOC_ID from PS_DOC_HDR WHERE TKT_NO=’yyyyyy'
Note the DOC_ID here: .

Multi-Site 92 Exercise Handbook
Run the USP_DEL_TKT stored procedure to delete the ticket in all live tables (substitute your DOC_ID for zzzzzz): exec USP_DEL_TKT zzzzzz To remove the associated PDC records, follow these steps to copy the text of the USP_DEL_TKT stored procedure and edit it. In SQL Management Studio,
expand Programmability | Stored procedures.
Right-click USP_DEL_TKT
and select Script Stored Procedure as > CREATE to > New Query Editor Window.
Press CTRL-H to open the Quick Replace
window and replace all occurrences of PS_DOC with pduser.PDCPS_DOC.
When that completes, use Quick Replace
again to replace all occurrences of DOC_ID with CDOC_ID.
At the top of the window,
highlight and delete the text from "GO" through "Create procedure [dbo].[USP_DEL_TKT]".

Multi-Site 93 Exercise Handbook
Insert DECLARE in front of "@DocID" and delete C from "T_CDOC_ID".
Replace "as" with
set @DocID=zzzzzz (replace zzzzzz with your DOC_ID).
When completed editing the query, execute it. Delete Item Record You are now ready to delete the item record and other associated definition records, as well as the corresponding PDC records . Start by entering a query to delete the item: DELETE FROM IM_ITEM WHERE ITEM_NO='100001' You will see an error message if records in other tables have foreign keys that tie back to the item record: The REFERENCE constraint in the message reflects the table that contains the record with the foreign key. In this example, IM_INV is the table with the record. Enter a query to delete the record in that table:

Multi-Site 94 Exercise Handbook
If the deletion is successful, next delete the associated PDC record: DELETE FROM PDCIM_INV WHERE CITEM_NO='100001' Try to delete the Item record again. If any other records have foreign keys that tie back to it, you will see additional error messages. Continue to delete the item-related records and associated PDC records. The following list of tables may be involved: IM_PRC PDCIM_PRC IM_BARCOD PDCIM_BARCOD IM_SKU <no PDC table for IM_SKU> IM_INV_MSD* PDCIM_INV_MSD* IM_INV PDCIM_INV IM_ITEM_NOTE PDCIM_ITEM_NOTE IM_ITEM PDCIM_ITEM PO_VEND_ITEM PDCPO_VEND_ITEM * when deleting records from MSD tables, include the LOC_ID in the WHERE clause. For example: DELETE FROM IM_INV_MSD WHERE ITEM_NO='100001' and LOC_ID='EAST' DELETE FROM PDCIM_INV_MSD WHERE CITEM_NO='100001' and CLOC_ID='EAST'
f. Restart replication at the Remote site by typing pdre start at a command
prompt. Force replication with the Hub, using the DataXtend Controller.
g. After successful completion, log in to Counterpoint at the Remote site, using the correct workgroup. Check to ensure that the item originally added at the Hub was replicated to the Remote site, and that an inventory record for EAST is present.
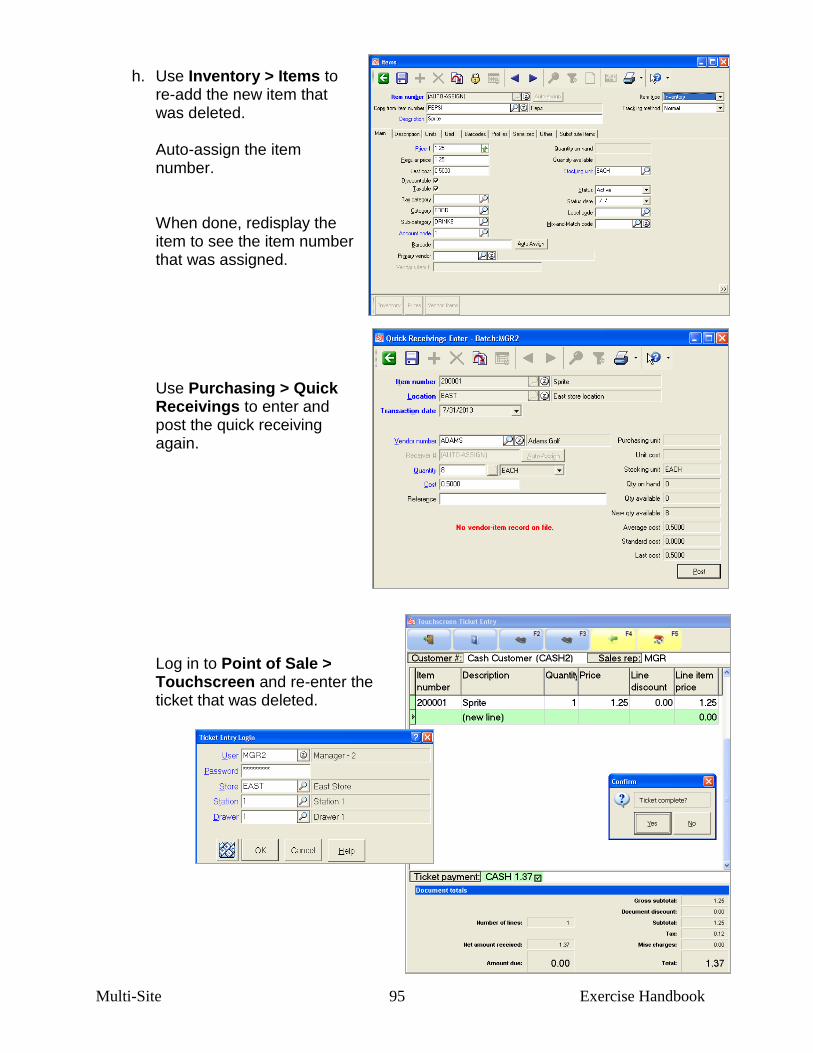
Multi-Site 95 Exercise Handbook
h. Use Inventory > Items to re-add the new item that was deleted. Auto-assign the item number.
When done, redisplay the
item to see the item number that was assigned.
Use Purchasing > Quick Receivings to enter and post the quick receiving again.
Log in to Point of Sale >
Touchscreen and re-enter the ticket that was deleted.
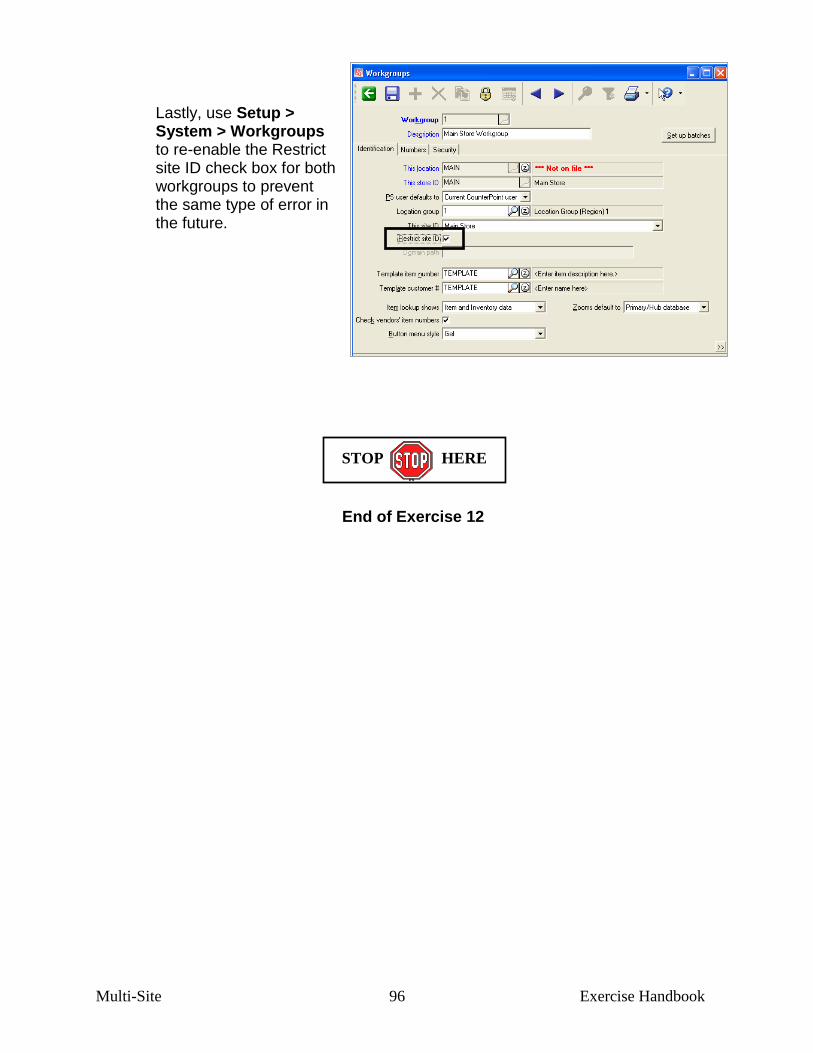
Multi-Site 96 Exercise Handbook
Lastly, use Setup >
System > Workgroups to re-enable the Restrict site ID check box for both workgroups to prevent the same type of error in the future.
End of Exercise 12
STOP HERE

Specialty Retail
6060 Primacy Parkway, Suite 460 � Memphis, TN 38119
(800) 852-5852 � www.CounterPointPOS.com