nch software wavepad sound editorhelp.nchsoftware.com/help/en/wavepad/win/help.pdf · nch software...
TRANSCRIPT
NCH Software
WavePad Sound Editor
This user guide has been created for use with
WavePad Sound Editor Version 8.xx
©NCH Software
Technical Support
If you have difficulties using WavePad Sound Editor please read the applicable topic before requesting support. If your problem is not covered in this user guide please view the up-to-date WavePad Sound Editor Online Technical Support at www.nch.com.au/wavepad/support.html. If that does not solve your problem, you can contact us using the technical support contacts listed on that page.
Software Suggestions
If you have any suggestions for improvements to WavePad Sound Editor, or suggestions for other related software that you might need, please post it on our Suggestions page at www.nch.com.au/suggestions/index.html. Many of our software projects have been undertaken after suggestions from users like you. You get a free upgrade if we follow your suggestion.
WavePad Sound Editor
ContentsUpgrading to WavePad Master's Edition........................................................................................ 5NCH Software Suite ....................................................................................................................... 6Software License Terms................................................................................................................. 7Google Authorization Process on Windows XP and Vista.............................................................. 10
Basics
Overview......................................................................................................................................... 11General Audio Concepts................................................................................................................ 12WavePad Basics............................................................................................................................. 15Main Screen Reference.................................................................................................................. 16Undo and Redo............................................................................................................................... 19Working With Files.......................................................................................................................... 20Cloud Services................................................................................................................................ 22Recording ....................................................................................................................................... 23The Frequency Spectrogram View................................................................................................. 24Bookmarks and Regions................................................................................................................ 25WavePad Projects.......................................................................................................................... 27Shortcut Keys Reference................................................................................................................ 28Quick Start Wizards........................................................................................................................ 31
Editing
Convert Sample Rate and Channels.............................................................................................. 32Movement and Selection ................................................................................................................ 33Cut, Copy, and Paste ..................................................................................................................... 34Paste Mix........................................................................................................................................ 35Delete ............................................................................................................................................. 36Split ................................................................................................................................................ 37Split into Multiple Parts................................................................................................................... 38Batch Join....................................................................................................................................... 40Join Mono Files to Make Stereo..................................................................................................... 41Duplicate......................................................................................................................................... 42Copy to New................................................................................................................................... 43Mix With File................................................................................................................................... 44Repeat Loop................................................................................................................................... 45Silence............................................................................................................................................ 46Trim................................................................................................................................................ 47Edit Samples................................................................................................................................... 49
1
Save Selected Region As............................................................................................................... 50Insert File........................................................................................................................................ 51Lossless MP3 Editing..................................................................................................................... 52
Effects
Effects and Audio Processes.......................................................................................................... 54Effect Chain.................................................................................................................................... 55DirectX Effects ................................................................................................................................ 56VST Plugins .................................................................................................................................... 57Amplify............................................................................................................................................ 58Normalize........................................................................................................................................ 59Compressor.................................................................................................................................... 60Equalizer......................................................................................................................................... 63Envelope......................................................................................................................................... 66Stereo Pan...................................................................................................................................... 67Echo............................................................................................................................................... 68Pitch Shifter .................................................................................................................................... 69Reverb............................................................................................................................................ 70Phaser ............................................................................................................................................ 71Flanger........................................................................................................................................... 72Vibrato ............................................................................................................................................ 73Tremolo.......................................................................................................................................... 74Doppler........................................................................................................................................... 75Wah-Wah........................................................................................................................................ 76Chorus............................................................................................................................................ 77Distortion......................................................................................................................................... 78AM Radio Effect.............................................................................................................................. 79Telephone Effect............................................................................................................................. 80Reverse .......................................................................................................................................... 81Fading............................................................................................................................................ 82Speed and Pitch Changing............................................................................................................. 84Reduce Vocals................................................................................................................................ 85Voice Change................................................................................................................................. 86
Audio Cleanup
Noise Reduction............................................................................................................................. 87Click/Pop Removal......................................................................................................................... 88High-Pass Filter.............................................................................................................................. 89Low-Pass Filter ............................................................................................................................... 90Automatic Gain Control .................................................................................................................. 91DC Offset Correction...................................................................................................................... 92
Tools2

Frequency Analysis (FFT and TFFT)............................................................................................. 93Text To Speech.............................................................................................................................. 95Navigate Speech............................................................................................................................ 96Batch Converter.............................................................................................................................. 97Create Ringtone.............................................................................................................................. 98Download From Sound Library....................................................................................................... 99Surround Sound Editor................................................................................................................... 100
Options
Options ........................................................................................................................................... 102General........................................................................................................................................... 103Audio.............................................................................................................................................. 105Recording ....................................................................................................................................... 106VSTs............................................................................................................................................... 108Appearance.................................................................................................................................... 109Mouse............................................................................................................................................. 110Playback......................................................................................................................................... 111Keys and Macros............................................................................................................................ 112File Types....................................................................................................................................... 113
Output Formats
WavePad Output Formats .............................................................................................................. 114WAV Settings.................................................................................................................................. 115MP3 Settings.................................................................................................................................. 116Vox/Raw Settings........................................................................................................................... 117OGG Settings................................................................................................................................. 118FLAC Settings................................................................................................................................. 119AAC/M4A Settings.......................................................................................................................... 120AMR Settings.................................................................................................................................. 121RSS Podcast Settings.................................................................................................................... 122M3U Playlist Settings...................................................................................................................... 123PLS Playlist Settings ...................................................................................................................... 125WPL Playlist Settings ..................................................................................................................... 126
Advanced
Command Line Options.................................................................................................................. 128
Suite
3
Recommended Programs............................................................................................................... 131
NCH Sound Library
NCH Sound Library ........................................................................................................................ 132
Screen References
Opus Encoder Options................................................................................................................... 133
Other Links
Recommended HardwareRecommended MicrophonesRecommended HeadphonesRecommended SpeakersRecommended Audio DevicesMPC SettingsAPE SettingsSPX Settings
4

Upgrading to WavePad Master's EditionA number of professional tools for WavePad are only available if you have purchased an upgrade to WavePad Master's Edition.
To view pricing and to purchase an upgrade to WavePad Master's Edition please open https://secure.nch.com.au/cgi-bin/register.exe?software=wavepad.
Once you have purchased and activated your license you will receive a registration with your name and contact details. Use the menu File -> Register Master's Edition Upgrade and enter the details exactly as they appear in the registration.
5
NCH Software SuiteThis is a useful way to browse all the software available from NCH Software
You can see a set of products by type like Audio, Video and so on and view the product. From there you can try out the product and it will download and install it for you to trial. If you already have the product installed then you can click "Run It Now" and the program will be launched for you.
There is also a list of features for products in the category. Click on a feature, such as "Edit a Video File", to install a product with that ability.
Search
Search our website for products matching any keywords you type.
See more of our software
Browse our website for more software.
Subscribe to our newsletter
You can subscribe to our newsletter for announcements of new releases and discounts. You can unsubscribe at any time.
See the latest discounts for purchase
See the latest discounts we are offering for purchasing our products.
6
Software License TermsThis EULA limits our liability and is governed by an arbitration agreement and venue agreement. Please read below as these terms affect your rights.
1. The copyrights in this software and any visual or audio work distributed with the software belong to NCH Software and others listed in the about box. All rights are reserved. Installation of this software and any software bundled with or installed-on-demand from this software, including shortcuts and start menu folders, is licensed only in accordance with these terms.
2. By installing, using or distributing the software you, on your own behalf and on behalf of your employer or principal, agree to be bound by these terms. If you do not agree to any of these terms, you may not use, copy, transmit, distribute, nor install this software - return it to the place of purchase within 14 days to receive a full refund.
3. This software, and all accompanying files, data and materials, are distributed "as is" and with no warranties of any kind, whether express or implied except as required by law. If you intend to rely on this software for critical purposes you must test it fully prior to using it, install redundant systems and assume any risk.
4. We will not be liable for any loss arising out of the use of this software including, but not limited to, any special, incidental or consequential loss. Your entire remedy against us for all claims is limited to receiving a full refund for the amount you paid for the software.
5. You may not use this software in any circumstances where there is any risk that failure of this software might result in a physical injury or loss of life. You may not use this software if you do not regularly backup your computer, or do not have antivirus and firewall software installed on the computer, or keep sensitive data unencrypted on your computer. You agree to indemnify us from any claims relating to such unauthorized use.
6. You may copy or distribute the installation file of this software in its complete unaltered form but you may not, under any circumstances, distribute any software registration code for any of our programs without written permission. In the event that you do distribute a software registration code, you will be liable to pay the full purchase price for each location where the unauthorized use occurs.
7. Use of data collected by the software is subject to the NCH Software Privacy Statement which allows automatic anonymized collection of usage statistics in limited circumstances.
8. Choice of Law. If you reside in the United States, your relationship is with NCH Software, Inc, a United States company, and this agreement is governed by the laws and courts of Colorado. If you reside anywhere in the world outside of the United States, your relationship is with NCH Software Pty Ltd, an Australian company, and this agreement is governed by the laws and courts of the Australian Capital Territory. Such courts have continuing and exclusive jurisdiction over any dispute between you and us, regardless of the nature of the dispute.
9. U.S. Customers Only: Arbitration Agreement and Class Action Waiver: PLEASE READ THIS CAREFULLY. IT MAY AFFECT YOUR RIGHTS.
7
If you reside in the United States, NCH Software and you agree to arbitrate all disputes and claims between us. This agreement to arbitrate is intended to be broadly interpreted. References to "NCH" "you," and "us" include our respective subsidiaries, affiliates, agents, employees, predecessors in interest, successors, and assigns. This arbitration agreement does not preclude you from bringing issues to the attention of U.S. federal, state, or local agencies. Such agencies can, if the law allows, seek relief against us on your behalf. This Agreement evidences a transaction in interstate commerce, and thus the Federal Arbitration Act governs the interpretation and enforcement of this provision. This arbitration provision shall survive termination of this Agreement.
A party who intends to seek arbitration must first send to the other, by certified mail, a written Notice of Dispute ("Notice"). The Notice to NCH should be addressed to:
Legal Department
NCH Software, Inc.
6120 Greenwood Plaza Blvd, Ste 120
Greenwood Village CO, 80111
USA
("Notice Address"). The Notice must (a) describe the nature and basis of the claim or dispute; and (b) set forth the specific relief sought ("Demand"). If NCH and you do not reach an agreement to resolve the claim within 30 days after the Notice is received, you or NCH may commence an arbitration proceeding. The amount of any settlement offer made by NCH or you shall not be disclosed to the arbitrator.
A. The arbitration will be governed by the Commercial Arbitration Rules and the Supplementary Procedures for Consumer Related Disputes (collectively, "AAA Rules") of the American Arbitration Association ("AAA"), as modified by this Agreement, and will be administered by the AAA. The AAA Rules are available online at adr.org, by calling the AAA at 1-800-778-7879, or by writing to the Notice Address. The arbitrator is bound by the terms of this Agreement. All issues are for the arbitrator to decide, including issues relating to the scope and enforceability of the arbitration provision. Unless NCH and you agree otherwise, any arbitration hearings will take place in Greenwood Village Colorado. If your claim is for $10,000 or less, we agree that you may choose whether the arbitration will be conducted solely on the basis of documents submitted to the arbitrator, through a telephonic hearing, or by an in-person hearing as established by the AAA Rules. If your claim exceeds $10,000, the right to a hearing will be determined by the AAA Rules. Regardless of the manner in which the arbitration is conducted, the arbitrator shall issue a reasoned written decision. NCH will pay all AAA filing, administration, and arbitrator fees for any arbitration initiated in accordance with the notice requirements above. If, however, the arbitrator finds that either the substance of your claim or the relief sought in the Demand is frivolous or brought for an improper purpose then the payment of all such fees will be governed by the AAA Rules. In such case, you agree to reimburse NCH for all monies previously disbursed by it that are otherwise your obligation to pay under the AAA Rules. In addition, if you initiate an arbitration in which you seek more than $75,000 in damages, the payment of these fees will be governed by the AAA rules.
8
B. The arbitrator may award declaratory or injunctive relief only in favor of the individual party seeking relief and only to the extent necessary to provide relief warranted by that party's individual claim. YOU AND NCH AGREE THAT EACH MAY BRING CLAIMS AGAINST THE OTHER ONLY IN YOUR OR ITS INDIVIDUAL CAPACITY, AND NOT AS A PLAINTIFF OR CLASS MEMBER IN ANY PURPORTED CLASS OR REPRESENTATIVE PROCEEDING. Further, unless both you and NCH agree otherwise, the arbitrator may not consolidate more than one person's claims, and may not otherwise preside over any form of a representative or class proceeding. If this specific provision is found to be unenforceable, then the entirety of this arbitration provision shall be null and void.
C. Notwithstanding any provision in this Agreement to the contrary, we agree that if NCH makes any future change to this arbitration provision (other than a change to the Notice Address) you may reject any such change by sending us written notice within 30 days of the change to the Arbitration Notice Address provided above. By rejecting any future change, you are agreeing that you will arbitrate any dispute between us in accordance with the language of this provision.
D. To opt out of this Arbitration Agreement and class action waiver send an Opt Out notice to the Notice Address stating "I am electing to opt out of the Arbitration Agreement and class action waiver contained in the Legal Terms applicable to my purchase of an NCH product." Your Opt Out Notice must include the date and proof of purchase. The Opt Out Notice must be postmarked no later than thirty (30) days after the date of purchase. A separate Opt Out Notice must be sent for each product purchased.
9
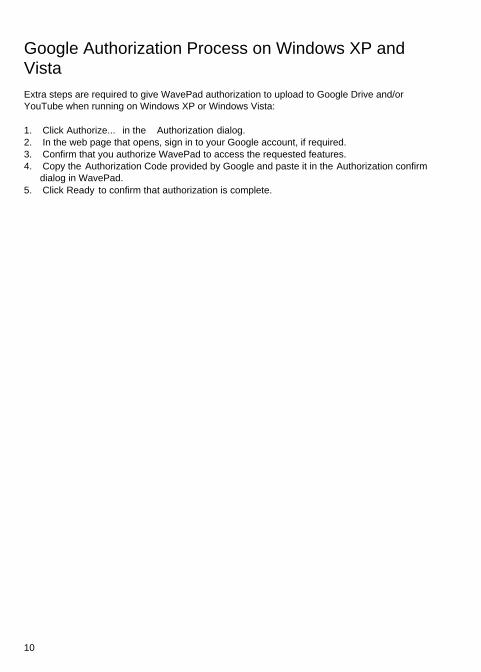
Google Authorization Process on Windows XP and VistaExtra steps are required to give WavePad authorization to upload to Google Drive and/or YouTube when running on Windows XP or Windows Vista:
1. Click Authorize... in the Authorization dialog. 2. In the web page that opens, sign in to your Google account, if required. 3. Confirm that you authorize WavePad to access the requested features. 4. Copy the Authorization Code provided by Google and paste it in the Authorization confirm
dialog in WavePad. 5. Click Ready to confirm that authorization is complete.
10
Basics - OverviewWavePad is a sound editor program for Windows and Mac OS X. It lets you record and edit voice and other audio recordings. You can cut, copy and paste parts of recording and, if required, add effects like echo, amplification and noise reduction.
WavePad is designed to be very easy and intuitive to use. Within minutes you will be able to open or record a file and edit it. But if you take time to explore the other features you will find many powerful tools designed with the professional sound engineer in mind.
WavePad Basic Edition is free, but we hope you will consider upgrading to WavePad Master's Edition. With the Master's Edition you have a set a features designed with the professional in mind. To view pricing or to purchase WavePad Master's Edition please see https://secure.nch.com.au/cgi-bin/register.exe?software=wavepad.
Features
● Supports a number of file formats including wav (multiple codecs), mp3, flac, ogg, vox, gsm, real audio and many more.
● A wide range of editing capabilities including Cut, Copy, Paste, Delete, Insert, Silence, Auto Trim and others.
● Effects including Amplify, Normalize, Equalizer, Envelope, Reverb, Echo, Noise Reduction, Sample Rate Conversion and more.
● A Frequency Spectrogram View, with frequency-based editing.● Sound effect and music library with 1,000 free audio clips included. ● Surround sound editor to produce surround sound audio.● Supports sample rates from 6000 to 192000Hz, stereo or mono, 8, 16, 24 or 32 bits.● Ability to work with multiple files at the same time.● Includes a CD ripper to load audio direct from a CD-ROM.● Player includes Scrub/Cue control for precise editing.● Recorder supports pause, retake, auto trim and voice activated recording.● Support MDI (Multiple Document Interface), which allows displaying multiple files all on one
screen.● Support for MME, DirectSound and ASIO playback.● Support for MME and ASIO recording.● Full support for VST plugins.
System Requirements
● Windows XP/Vista/7/8/10
WavePad is just one component of the NCH Software suite of audio, video and business software. If you have not done so already, please visit www.nch.com.au to download many other related programs.
11
Basics - General Audio ConceptsThis is a general introduction to key audio concepts for those who have not worked with sound before. If you class yourself as an "audiophile", or if you have some other past experience learning about sound, you can skip this page.
Sound
The starting point for everything WavePad does is sound. Sound is vibrating air traveling very fast like a wave. It is created by a vibrating object (e.g. our vocal cords, a guitar string or a speaker) and can be detected by an ear or a microphone. A microphone converts these vibrations into alternating electronic voltage which the computer's sound card can turn into the data used by WavePad.
Frequency
One way to analyze sound is by looking at the speed it vibrates as it travels through the air. The number of times this vibration happens per second is called the "frequency" of the sound, and is measured in Hertz (Hz) or kiloHertz (kHz).
It is quite often the case that sounds will not consist of a single wave vibrating at a certain frequency through the air, often they will contain multiple waves vibrating at different speeds and different volume levels. WavePad contains a couple of tools that will allow you to see this effect for yourself, please see Frequency Analysis (FFT and TFFT) for further information.
The human ear is said to be able to hear sounds ranging from about 20Hz (20 vibrations per second) up to 20,000Hz (20,000 vibrations per second). In reality, most of us only hear to about 15,000Hz, but audio enthusiasts often claim they can hear sounds up to the 20,000Hz mark. The frequencies of a person's voice can range between 300Hz and 3000Hz.
Loudness, Volume, Amplitude, Level and Gain
The terms loudness, volume, amplitude and level mean roughly the same thing. The more volume a sound is given the more power has been used to create it and the louder it sounds.
When adjusting the volume level of a sound (for example when using the Amplify Effect of WavePad), the "Gain" value signifies the amount of increase or decrease in the level. This value can be represented in percent or in a scale called the "decibel" or "dB" scale (read on!).
The human ear can hear a remarkably broad range of sounds from very low to very high power. The ear does not perceive differences in power in direct proportion to power but in a logarithmic way. To more closely match the way we hear loudness sound engineers use the decibel scale (dB). To give you a feel for how this works, reducing the volume level of a sound by 6dB means you are dropping the amplitude by 1/2 or the power by 1/4. Conversely, a 6dB increase in the level corresponds to doubling the amplitude. A 20dB drop means 1/10 of the amplitude (or 1/100 of the power). The smallest unit of loudness change a person will notice is around + / - 3dB.
Audio Recording and Computers12
In order to store and reproduce audio on your computer, the audio signal from the microphone is converted by your sound card into a series of numbers in quick succession. You can think of these numbers as representing the pressure on the surface of the microphone at different points over time. This process of converting audio into a series a numbers is called "sampling".
Sample Rate
The sample rate is the number of times that the amplitude is converted to a number per second. For example, at CD quality recording, your computer stores 44100 numbers per second each representing the amplitude at the specific point in time.
It can be shown that the maximum possible frequency that can be carried in a sampled sound is exactly half of the sample rate. In reality it is a little less. So for example, a recording made with a 44100 sampling rate will carry frequencies up to 20000Hz.
A quick guide to sample rates follows:
● 6000 - Very low quality voice● 8000 - Telephone quality voice● 11025 - Reasonable quality voice - e.g., dictation● 22050 - Good quality voice, Reasonable quality music - e.g., multimedia CD.● 44100 - CD Quality.
Higher sample rates including 48000, 88200, 96000 and even 192000 are sometimes used but many sound engineers point out that they do not offer any real audible quality improvement (aside from adding a bit more redundancy to the system).
Tip: always record and work with audio in the Sample Rate that you will use in the end, because every time you convert you lose a little quality. For example - if you are making a CD use 44100. If it is for telephone use 8000.
Channels Stereo / Mono
Multiple "channels" of audio can be recorded at the same time. Most commonly, "Stereo" recording is two channels (left and right) with which our two ears give us a sense of audio direction and space. Recording with just one channel is referred to as "Mono" recording.
Tip: If you are recording voice, be sure to record in Mono mode. If you are recording music with multiple instruments then use Stereo mode.
8/16/24/32 bits
You might have seen terms like "8 bits" or "16 bits" when looking at sound files but are not sure what they mean. The number of bits, like in the sample rate, is an indicator of the quality or resolution of the sound inside the file. The more bits the better resolution. WavePad uses 32 bits internally for optimal audio quality. However 16 bits is usually more than adequate for saving.
Audio File Compression and Codecs
13
One of the problems with high quality audio is that you can end up with very large-sized audio files. In order to avoid this, you can use what is known as "compression" to reduce the size of your files. The systems used to implement compression in audio files are called "codecs".
" There are a number of different codecs around, including MPEG Layer-3/MP3, and GSM (good for telephone or voice). Most codecs are designed for a specific function, usually to store either music or voice.
You can select the compression codec to use when using the File -> Save As option in WavePad. You should note that almost all compression codecs are lossy, however - this means you lose audio quality every time you save the file. For this reason it is important that you do not save audio in a compressed form until it is really needed. For example, if you need to save a file when you want to do further work on it, save it in an uncompressed form like 44100 Hz, 16 bit PCM format Wave.
Audio File Compression must not be confused with Audio Dynamic Range Compression. File Compression is all about reducing file size whereas Dynamic Range Compression is about volume control. For more about Dynamic Range Compression see Effects.
Editing and Effects
Editing means deleting or inserting audio. Effects are processes that change the audio in some way (e.g., add echo or make it softer).
See the WavePad Edit and Effects menu. Each effect is fully explained on the page Effects.
14
Basics - WavePad Basics
Play
To play from the current position press F9.
Play Again
To repeat playing a file from the same cursor position press CTRL+Space.
Record
To record (at the current position or over the selected region) press the F5 key.
Moving Around the File
To go to the beginning press the Home key or press the End key to move to the end. To rewind press and hold down the left arrow key and to fast-forward press the right arrow key.
You can also move the position by clicking on one of the wave windows.
Scrub
To find accurate edit positions with your ears press F6 to activate scrub. This allows much finer movement (with the arrow keys) while listening to the point you want to edit.
Selecting Regions
Before you can apply some effects or edit functions you need to select the region to edit or apply the effect to. Press Ctrl+A to select the entire file. To select with the mouse click on the wave window and drag over the part you want to select.
15
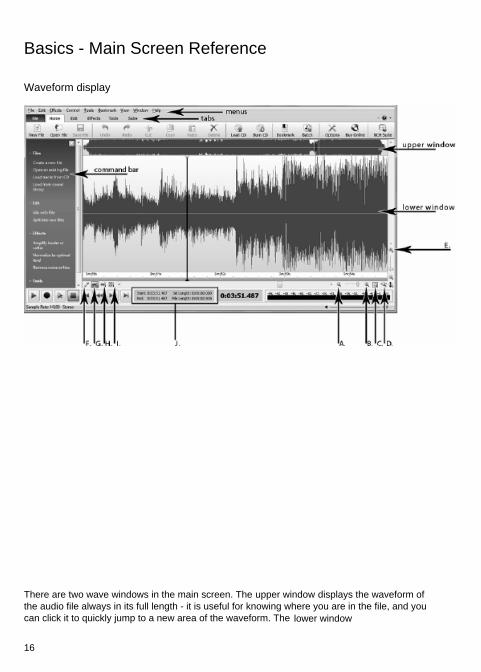
Basics - Main Screen Reference
Waveform display
There are two wave windows in the main screen. The upper window displays the waveform of the audio file always in its full length - it is useful for knowing where you are in the file, and you can click it to quickly jump to a new area of the waveform. The lower window
16
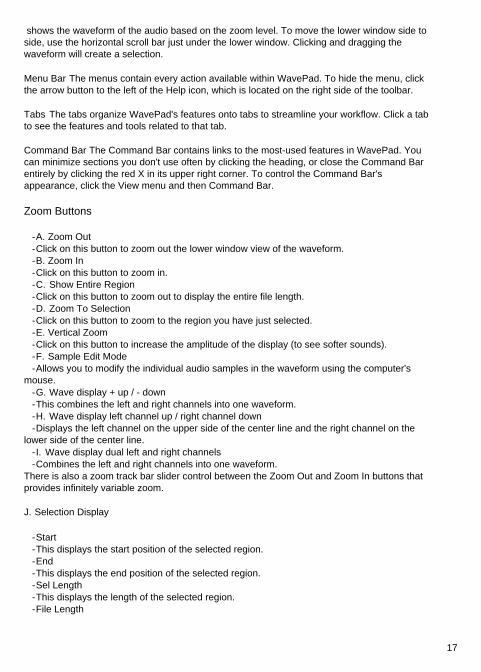
shows the waveform of the audio based on the zoom level. To move the lower window side to side, use the horizontal scroll bar just under the lower window. Clicking and dragging the waveform will create a selection.
Menu Bar The menus contain every action available within WavePad. To hide the menu, click the arrow button to the left of the Help icon, which is located on the right side of the toolbar.
Tabs The tabs organize WavePad's features onto tabs to streamline your workflow. Click a tab to see the features and tools related to that tab.
Command Bar The Command Bar contains links to the most-used features in WavePad. You can minimize sections you don't use often by clicking the heading, or close the Command Bar entirely by clicking the red X in its upper right corner. To control the Command Bar's appearance, click the View menu and then Command Bar.
Zoom Buttons
-A. Zoom Out -Click on this button to zoom out the lower window view of the waveform. -B. Zoom In -Click on this button to zoom in. -C. Show Entire Region -Click on this button to zoom out to display the entire file length. -D. Zoom To Selection -Click on this button to zoom to the region you have just selected. -E. Vertical Zoom -Click on this button to increase the amplitude of the display (to see softer sounds). -F. Sample Edit Mode -Allows you to modify the individual audio samples in the waveform using the computer's mouse. -G. Wave display + up / - down -This combines the left and right channels into one waveform. -H. Wave display left channel up / right channel down -Displays the left channel on the upper side of the center line and the right channel on the lower side of the center line. -I. Wave display dual left and right channels -Combines the left and right channels into one waveform.There is also a zoom track bar slider control between the Zoom Out and Zoom In buttons that provides infinitely variable zoom.
J. Selection Display
-Start -This displays the start position of the selected region. -End -This displays the end position of the selected region. -Sel Length -This displays the length of the selected region. -File Length
17

-This displays the length of the entire file.To select a region, you can either click on the wave window and drag to the position you want or hold down the Shift key and press the left or right arrow buttons.
18
Basics - Undo and Redo
Undo (Ctrl+Z)
To Undo is to restore the file to its state before the previous edit function. This is useful if you want to try an edit or just make a mistake. To undo your last action press Ctrl+Z.
Note: You can undo up to 32 last actions.
Redo (Ctrl+Y)
If, after undoing, you decide that the change really was what you wanted, then you can redo.
19
Basics - Working With Files
Create a New Audio File
To create a new file press Ctrl+N.
When creating a new file WavePad will prompt you to select the sample rate and channels. You can disable this prompt and set the default rate using WavePad Options.
For more information to guide you when selecting sample rates and channels please see General Audio Concepts.
Open an Existing Audio File
To open and existing file press Ctrl+O, browse to locate the file you want to open and click Open.
You can also load audio tracks from the CDs by select File -> Load Audio CD Track(s). Select a track by click on it or hold down the Ctrl key for selecting multiple tracks.
Save an Audio File
To save the current audio file with the current name press Ctrl+S.
See Cloud Services for information about cloud services support in WavePad.
To save the file with a different name or in a different format use the menu File -> Save As (or press Ctrl+Shift+S).
Note: When working with audio files, you should not save the file in a compressed format until you have finished all editing because every time you save and reload in a compressed format you lose some quality. Save as a PCM wav file to preserve quality.
See Output Formats section for more information.
Copy file(s) to CD
Selecting this option will let you burn any open files to a CD by using Express Burn CD Recorder also made by NCH Software. Just select "Copy file(s) to CD" then select the CD Type (either Data CD or Audio CD), then follow the onscreen prompts.
Send an Audio File
WavePad allows you to send the file by either email or direct internet connection. You can select how to send a file by using the menu File->Send.
20

If you select this option, WavePad will send the file as an attachment to an email.
Enter the email address of the recipient in the Email Address box.
Email - Settings
By default WavePad uses the MAPI system to send email using your existing email software (Eudora, Outlook, Lotus Notes etc.). To use this you must have email software installed and set as the "default MAPI server". The advantage of this system is that your email software manages the email. However, there can be some problems with some email software. If you have MAPI problems, try the alternative internal SMTP.
If you select the "Internal Simple SMTP" option, email is sent directly by WavePad to your server. You must enter the SMTP mail host used by your ISP for sending of mail (call them if you do not know it).
If, when using Internal Simple SMTP, it does not work, it might be that your server requires an authenticated login (a username and password) to send email. If so, append :username:password to the SMTP server (i.e. smtp.yourserver.com:username:password).
Direct Internet Connection
WavePad can send files directly to an internet server. This is faster than the email option but requires that your recipient have access to a web hosting (FTP) service to store the files.
Select the Direct Internet Connection option and enter the Server, User Name, Password and Directory as setup for your FTP server for your recipient.
21
Basics - Cloud Services
Open from Cloud
WavePad allows you to open files from Dropbox, Google Drive, or SoundCloud. Dropbox and Google Drive are cloud-based storage services that let you upload, store, access and share your files from anywhere. For Dropbox the first 2 GB, and for Google Drive the first 15 GB of storage are free, but additional storage packages are available for a monthly fee.
SoundCloud is an online Audio distribution and streaming platform. SoundCloud allows users to upload 3 hours of audio for free, but additional allowance is available for a monthly or annual fee.
To set up this option, you need to have an existing Dropbox, SoundCloud, or Google account.
Using 'Download file from Cloud Service...' option under the 'File' menu of WavePad, you can choose one of the above cloud services. After authenticating with your account, you will be able to navigate through the folders to select the desired file and open it in WavePad. It should be noted that Dropbox only allows you to use the 'Apps\WavePad' folder with WavePad.
Save to Cloud
WavePad allows you to save your audio files and WavePad projects to different cloud services including Google Drive, Dropbox, and SoundCloud. Audio files can be stored on any of the mentioned platforms while project files can only be stored on Dropbox and Google Drive. The audio files will be uploaded under the 'Apps\WavePad' folder in your Dropbox home.
Using 'Upload File to Cloud Service...' option under the file menu, you can choose any of the above cloud services. You can then choose whether to save what you have as a Wavepad project or as an audio file. Then, you can navigate through the folders and type in a name for your file, and click on 'upload'.
22
Basics - Recording
Recording
To start recording, press the F5 key, or the Record button. The recording will be made straight into your currently open file, at the position of your cursor. If you have some audio already selected then this will be replaced by your new recording. If you don't have a file open then recording will start in a new file.
To adjust recording settings, go to , where you can choose your recording device, adjust recording volume, and turn voice activation and automatic trimming on or off.
The recording sample rate will automatically match the sample rate of the current file, unless the recording device doesn't support this sample rate, in which case you will be asked whether to continue the recording at a sample rate that the device does support.
The number of channels in a recording (one for Mono, two for Stereo) will also automatically match the current file. Note that when you record in stereo from a device that only supports mono (such as most microphones), then the left and right channels will be identical copies of the mono recording.
When you start recording, the 'Scrub' button will turn into a 'Pause' button, and the 'Go to start' button will turn into a 'Retake' button. Press the 'Pause' button to pause recording. You can then resume recording by pressing it or the record button again. Press the 'Retake' button to discard your current recording and start again.
23
Basics - The Frequency Spectrogram ViewThe frequency spectrogram view allows you to view the mix of sound frequencies in an audio file. When enabled it appears beneath the waveform. Its horizontal axis represents time, just as the waveform does, but its vertical axis represents sound frequency, with low frequencies at the bottom and high frequencies at the top. The magnitude of a given frequency at a given time is represented by the brightness at that point: White is very loud, black is silent. The spectrogram view allows you to:
● Visualise the frequencies in your audio,● Quickly navigate to a point of interest,● Analyse the frequency content and quality of a recording, and● Select a range of frequencies over a span of time, which you can:
● Playback to hear what you have selected,● Cut, copy, paste or delete,● Apply effects to, or● Use to isolate a particular sound within a mixture of sounds.
The spectrogram view can be enabled through the View menu, or by using the buttons at the bottom left of a file window. There are two frequency spectrogram buttons: The first enables the spectrogram view with a linear scale, the second with a logarithmic scale. To hide the view click on the button again.
When first enabled, the spectrogram view may appear blank, but will start filling out from left to right. This is because it takes time to perform the Fourier Transform on the audio data to generate the view.
See Also
● The Frequency Analysis Tools, such as the FFT and TFFT windows. The Frequency Spectrogram view is closely related to the TFFT view.
● Paste Mix, for pasting an isolated sound into a mix.● Movement and Selection● Cut, Copy, and Paste● Effects
24
Basics - Bookmarks and Regions
Bookmarks
Bookmarks are positions within files that you might frequently want to return to. For example you can use a bookmark to store the location of a interesting part in a recorded interview.
To add a bookmark push Ctrl+B and enter the name of the position. When you want to return to the bookmark push Ctrl+Shift+B to open the bookmark list, select it from the list and select Go to Bookmark in the right click menu.
To select from one bookmark to another bookmark, select that bookmark from the list then choose Select to Bookmark... in the right click menu.
Bookmarks (unlike Regions) are linked to an actual file. So they persist even after you close WavePad or the Project. You should delete bookmarks when they are not needed (using the Ctrl+Shift+B list).
Regions
Regions store a selected part of the recording. (A bit like the copy clipboard but you can have many).
To add a region select it, click Ctrl+R and give it a name. Then at any point open the regions list (Ctrl+Shift+R) and use the right click menu to play, select, rename, delete, copy to new, save the region or assemble the regions (see below). You can also export the selected region(s) into one folder by selecting "Export Region(s) to folder"
Regions can be extremely useful when working with a long recording like an interview that needs to be rearranged. As you find each interesting grab, select it and make it a region. When done, use the assemble tool to put all the regions together.
Regions are not persistent. If you close WavePad and you want to keep your region, you must save a WavePad project (see Working with WavePad Projects).
Copy Region(s) to CD
This option in Windows XP will let you burn the selected regions to a CD. Access this feature by selecting Bookmark menu -> Open Region List, then right click on a Region and select "Copy Region(s) to CD..." from the menu that appears.
If you wish to make an audio CD, make certain you have deleted any old audio tracks from Windows Media Player before you burn the new files.
Note: This option will only work with Windows XP. In any other version of Windows it will save the files to a local folder, and you would need to use external CD burning software to burn the selected regions.
25
Export Region(s) to Folder
This option allows you to save the selected regions as separate files in a folder and format of your choosing. Access this feature by selecting Bookmark menu -> Open Region List;, then right clicking on one or more regions and selecting "Export Region(s) to Folder" from the menu that appears. You will be presented with a choice of which folder to export to, and which output format and format settings to use in the exported files.
Assemble Regions Tool
This tool lets you quickly edit a series of regions together. This is particularly useful when editing interviews.
After you have added all the grabs of interest as regions open the Assemble Regions tool (Bookmark -> Assemble Regions). Add the named regions in the order you want. And click OK.
By default WavePad inserts 300ms silence between each region. This can be changed by clicking on Options on the Assemble tool window.
26

Basics - WavePad ProjectsA WavePad Project is all the open files and the regions list stored in perfect 32bit quality audio. It is designed for when you are working on a large job and need to save everything without any quality loss to resume work later. (It should not be used for long term storage of audio).
27
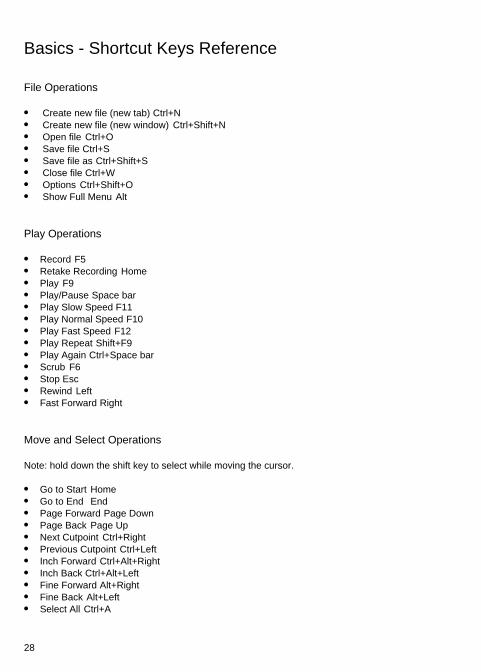
Basics - Shortcut Keys Reference
File Operations
● Create new file (new tab) Ctrl+N ● Create new file (new window) Ctrl+Shift+N ● Open file Ctrl+O ● Save file Ctrl+S ● Save file as Ctrl+Shift+S ● Close file Ctrl+W ● Options Ctrl+Shift+O ● Show Full Menu Alt
Play Operations
● Record F5● Retake Recording Home● Play F9● Play/Pause Space bar● Play Slow Speed F11● Play Normal Speed F10● Play Fast Speed F12● Play Repeat Shift+F9● Play Again Ctrl+Space bar● Scrub F6● Stop Esc● Rewind Left● Fast Forward Right
Move and Select Operations
Note: hold down the shift key to select while moving the cursor.
● Go to Start Home● Go to End End ● Page Forward Page Down● Page Back Page Up● Next Cutpoint Ctrl+Right● Previous Cutpoint Ctrl+Left● Inch Forward Ctrl+Alt+Right● Inch Back Ctrl+Alt+Left● Fine Forward Alt+Right● Fine Back Alt+Left● Select All Ctrl+A
28
● Select None Ctrl+Alt+A● Select Specified Time Ctrl+G● Find and Select Peak Sample Ctrl+Shift+P● Select to Start Shift+Home● Select to End Shift+End● Mark First Position Ctrl+1● Mark Second Position Ctrl+2● Recall Mark Selection Ctrl+Alt+2
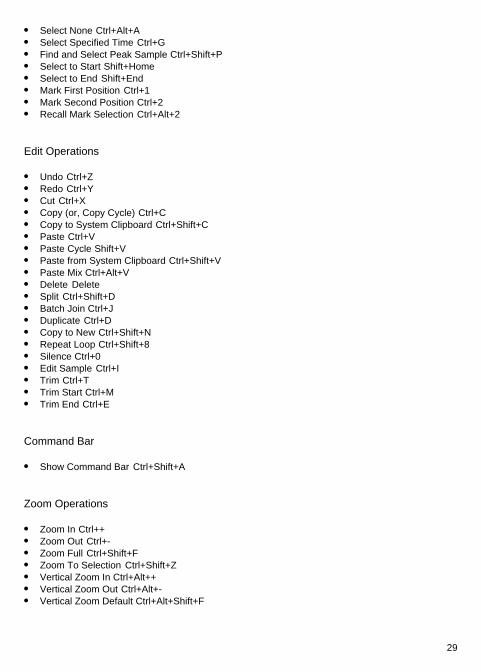
Edit Operations
● Undo Ctrl+Z● Redo Ctrl+Y● Cut Ctrl+X● Copy (or, Copy Cycle) Ctrl+C● Copy to System Clipboard Ctrl+Shift+C● Paste Ctrl+V● Paste Cycle Shift+V● Paste from System Clipboard Ctrl+Shift+V● Paste Mix Ctrl+Alt+V● Delete Delete● Split Ctrl+Shift+D● Batch Join Ctrl+J● Duplicate Ctrl+D● Copy to New Ctrl+Shift+N● Repeat Loop Ctrl+Shift+8● Silence Ctrl+0● Edit Sample Ctrl+I● Trim Ctrl+T● Trim Start Ctrl+M● Trim End Ctrl+E
Command Bar
● Show Command Bar Ctrl+Shift+A
Zoom Operations
● Zoom In Ctrl++● Zoom Out Ctrl+-● Zoom Full Ctrl+Shift+F● Zoom To Selection Ctrl+Shift+Z● Vertical Zoom In Ctrl+Alt++● Vertical Zoom Out Ctrl+Alt+-● Vertical Zoom Default Ctrl+Alt+Shift+F
29

Bookmarks and Regions
● Add Bookmark Ctrl+B● Open Bookmark List Ctrl+Shift+B● Add Region Ctrl+R● Open Region List Ctrl+Shift+R
Help
● Help Contents F1
30

Basics - Quick Start WizardsThe quick start wizards are a group of guided introductions to simple, common tasks you can perform with WavePad. Simply follow the instructions of each wizard by working through each step individually. Each step features a Show Me button. If you click this button, WavePad will show a bubble tip over the relevant part of the screen to help you complete the step.
31
Editing - Convert Sample Rate and Channels
Convert Sample Rate and Convert Channels
WavePad can convert a file's sample rate or number of channels. This change applies to the whole file (you cannot change just parts of the file).
To convert the sample rate of the current file use the menu Edit -> Convert Sample Rate and select the new sample rate. The sample rate must be between 6000 and 192000 samples per second. Typical sample rates are displayed in the pull down list.
To convert the channels of the current file (stereo to mono or vice versa) select Edit -> Convert Channels.
A typical reason for converting the sample rate down is when you know it is going to be used on the telephone (8000 mono) or if you are about to compress the file for internet transmission (e.g., GSM takes 11025 or 8000 mono). For a broad explanation about sample rates see General Audio Concepts.
32
Editing - Movement and Selection
Select All (Ctrl+A).
To select the whole file press Ctrl+A.
Select To Start (Shift+Home).
To select from the beginning position to the current position, press Shift+Home.
Select To End (Shift+End).
To select from the current position to the end, press Shift+End.
Select Specified Time (Ctrl+G).
Use this option if you want to select a particular position or, to select the exact start and end position. Just press Ctrl+G, enter the cursor position and click OK to go to that position. Or enter start and end position and click OK. You can also preview the selection by clicking the Preview button.
Mark First Position / Mark Second Position / Recall Mark Selection
These Edit menu options can be used to mark and then recall any segment of the current file. Use Mark First Position to mark the beginning of the selection, and Mark Second Position to mark the end of the selection. The selected region between the first and second marked positions on the audio file can then be returned to later through use of the Recall Mark Selection option.
Selecting Frequency Ranges
A normal selection selects audio from all frequencies. If you want to select a limited range of frequencies then you can make a selection in the frequency spectrogram view, and you can then playback, cut, copy, paste, and apply effects to that selection.
33
Editing - Cut, Copy, and Paste
Cut (Ctrl+X)
To 'cut' is to delete the selected region but to keep a copy on the clipboard so it can be 'pasted' somewhere else. This is useful when moving parts of the audio around in the file.
To cut select the region and then press Ctrl+X.
Copy (Ctrl+C)
To 'copy' is to make a copy of the selected region to the clipboard so you can paste it in another location. This is useful if you want to duplicate a part of the audio and insert (or mix it) in another file.
To copy select the region and then press Ctrl+C. To copy the entire file press Ctrl+A-C.
Paste (Ctrl+V)
Paste can only be used after you have used the Cut or Copy functions (above) to take a selected region to the clipboard.
The paste function replaces the current selected region (or inserts if there is no selection). To replace a selection press Ctrl+V. To insert click on the position and press Ctrl+V.
Paste Cycle (Shift+V)
Wavepad stores 10 current regions from the 'cut'/'copy' command into its memory. These regions can be pasted using 'Paste Cycle' one after another to a selected region by using the command repeatedly. The region which was selected just before the region which is available in the normal 'Paste' command will start the 'Paste Cycle'. Repeatedly using the command, the 'Paste Cycle' will activate the previously selected region in time. After pasting the region from the paste cycle, this region will become active in the normal 'Paste' command.
System Clipboard
You can also Copy to System Clipboard (Ctrl+Shift+C) and Paste from System Clipboard (Ctrl+Shift+V). The System Clipboard can be used to copy and paste audio to and from other applications.
See Also
● Copy to New● Paste Mix● Movement and Selection
34
Editing - Paste Mix
Paste Mix
This function takes the audio you have previous copied or cut and mixes it with the current selected region.
After you have cut or copied the audio you want to mix select the new region and used Edit -> Paste Mix from the menu (or use Ctrl+Alt+V). You can specify the volume of the mix (that is the volume of the clipboard audio).
Almost always the length of the selected regions will be different. If the mix selection (in the clipboard) is shorter than the current selection then the mixed audio will just end when it ends. If the mix clipboard is longer than the current selection then one of the follow can be selected. "Increase selection" means that the mix just continues past the end until the mix file ends. "Insert Silence" means at the end of the current selection, the mix will be inserted until it ends. The fade out mix means that as the end of the current selection is approach the mix fades out - this is useful for background music beds and SFX.
A typical example of Paste Mix is where you want to mix a music bed behind a voice over. To do this copy the music track from one file, open the voice file select the voice (say with Ctrl+A) then select Edit -> Paste Mix and fade out mix.
If the file you are pasting into is stereo you can select the stereo position of the file to be pasted. For example if you are paste-mixing a sound effect you can place that sound towards the left by sliding the pan fader left.
Audio can also be pasted from the System Clipboard (Ctrl+Alt+Shift+V). The System Clipboard can be used to copy and paste audio to and from other applications.
See also Mix With File, and Cut, Copy, and Paste .
35

Editing - Delete
Delete (Delete)
To delete the selected region press Delete. This is similar to the cut function but a copy is not taken to the clipboard.
36
Editing - Split
Split File At Cursor
Use this option if you want to quickly split the current file into two small tracks. To do this, click on the position where you want to split and select Edit->Split into two at this point. Note that each of your new files shares the undo history of the original file, so the split can be undone in any of the resultant split files.
Split File At Silences
Use this option if you want WavePad to auto split the file by detecting silence below a specified threshold level for a specified duration. You can specify the threshold below which is considered silence (default -36dB) and the minimum duration which will be considered silence (default: 0ms).
Split File At Bookmarks
This will split the file at each bookmark, creating a new file for each region between the bookmarks.
Split File into its Components Channels
This will create one new mono file for each channel in the current file. For example, when used on a stereo file, this will result in two mono files, one for the original left channel, and one for the original right channel. To join the channels again, see Join Mono Files to Make Stereo. See also Convert Sample Rate and Channels and General Audio Concepts.
Split File into Equal Duration
This will split the file into specified pieces with equal duration.
Split File into Intervals
This will split the file into specified intervals.
Split File Automatically
Given an interval or a number of output files, this option will find the best split points in the file. The input will only approximately determine the length or the number of the output files.
37
Editing - Split into Multiple PartsFrom this dialog you can split a file into multiple smaller parts via a number of different methods.
Choosing a Save Location
You can choose to have the resulting split files saved either to disk or directly opened in the editor. If the split operation you are performing will produce more than 10 new files, then you will need to save these to file first - you can't open them directly to the editor window.
When saving to disk, in the Output Location field, choose the folder you would like all the split files to be created in. In the Output Name field enter the file name prefix you would like. The split files will be named using this text with a number appended on the end.
In the Output Format drop down box select the file format you would like to save in.
Splitting at Silences
Use this option to split the file by detecting silence below a specified threshold level for a specified duration. Anything below the threshold level corresponds to what WavePad considers to be "silence". If the audio level stays underneath this threshold for the duration specified in the duration field, then WavePad will create a split at this point.
Splitting at Bookmarks
Use this option if you have a file with bookmarks denoting locations at which you would like to create new files. This will split the file at each bookmark, creating a new file for each region between the bookmarks.
Splitting Into Equal Parts
Use this option to split the original file into equals parts either by entering the number of parts or the duration of each interval.
Split Into Intervals
Split the original file into specified lengths by checking the Duration radio button and entering the hours, minutes, seconds and milliseconds for each interval (the last interval will be shorter or equal in length).
Split Into a Specific Number of Parts
Specify how many files you would like to split the original file into by checking the Quantity radio button and entering the number of splits.
Splitting Automatically
38
Use this option to split the original file either by entering a rough number of output files, or a rought length for the split intervals.
WavePad will try to find the best split points based on the length and the silences in your audio file, and will not strictly split the file into equal parts.
Split Into Rough Intervals
Split the original file into parts of roughly the specified length by checking the Rough interval radio button and entering the hours, minutes, seconds, and milliseconds for the approximate interval length.
Split Into Rough Number of Files
Specify roughly how many files you would like to split the original file into by checking the Rough quantity radio button and entering the approximate number of outputs.
39
Editing - Batch Join
Batch Join (Ctrl+J)
Use this option to join several audio files, regions or several copies of the same file. Batch Join can be used to join both files open in WavePad and outside files. The order of the joining files can be handled through drag and drop. In the joining process the maximum channel count and the sample rate are taken from the selected files. For example, if we join one mono and one stereo file, the merged file will be a stereo file. If we join two files with sample rate 44100 and 64000, then the merged file will have the sample rate of 64000. After the join process the merged file is opened in WavePad.
40
Editing - Join Mono Files to Make Stereo
Join Mono Files to Make Stereo
To join two mono files into a stereo file, select the file you wish to use as the left channel, then on the 'Edit' tab choose 'Join', 'Join as left channel to', and choose the file you wish to use as the right channel. A new stereo file will be created. Note that you can join a mono file to itself to make a stereo file with identical left and right channels, but it's easier just to convert the file from mono stereo.
To split a stereo file into two mono tracks see Split File into its Component Channels.
41
Editing - Duplicate
Duplicate (Ctrl+D)
Duplicate will create a new file window identical to the current open file, except that a suffix will be appended to the new filename to distinguish it from the old filename. The duplicated file will have the same undo history, bookmarks, cursor position, and selection. This is useful if you want to make changes to a file, but still be able to quickly refer back to the original file.
42

Editing - Copy to New
Copy To New
To create a new file with a selected part of the current file, select the region and use the menu Edit -> Copy To New. Alternatively, you can hold down the control key and drag the selected area with the mouse to a blank area of the WavePad workspace.
43
Editing - Mix With File
Mix With File
This is the same as Paste Mix except that you specify a file to mix instead of having to copy the audio to the clipboard first.
44
Editing - Repeat Loop
Repeat Loop
This function repeats the selection a number of times (useful for extending the length of music beds). Select the region you want to repeat and use the menu Edit -> Repeat Loop then enter the number of times to loop.
45
Editing - Silence
Silence Selected Region
This function silences the selected region. This function can be useful to remove breaths or clicks from a voice recording without changing the timing of the words.
Insert Silence
The menu item Edit -> Insert Silence is used to insert silence of a specified duration at or over the selected location.
See also Auto Trim Silence from Start and End and Trim Silences .
46
Editing - Trim
Trim (Ctrl+T)
To 'trim' is to cut off the beginning and the end of the file so only the selected region remains. This is useful when you have just recorded a file but there is silence or noise before the start or after the end.
Select the part of the file you want to keep and then press Ctrl+T.
Trim Start (Ctrl+M)
To delete everything before the current position select Edit -> Trim -> Trim Start.
Trim End (Ctrl+E)
To delete everything after the current position select Edit -> Trim -> Trim End.
Auto Trim Silence from Start and End
Auto Trim removes the silence at the beginning and the end of the selected region without you needing to find the exact position where recording starts.
Auto Trim works by scanning the region for the peak level then removing the start and end that is below the Auto Trim Threshold Level below the peak. The Auto Trim Threshold Level can be adjusted through the Tools -> Options -> Audio Processing tab. The default is -20 dB. Increase this to -15 in noisy environments. Decrease to -24 in a studio.
This feature will not be useful in an environment with high background noise, as WavePad will be unable to differentiate between the background sounds and your voice.
Auto Trim applies to the selected region. Often you might want to Select All (Ctrl+A) first before using Auto Trim.
Trim Silences
The Trim Silences function can be used to remove or shorten silent regions. It is similar to Auto Trim, but provides more advanced functionality. It works by scanning the selected region for the peak level, then searching for regions that are the Auto Trim Threshold level below that peak. These 'silences' can then be removed, or shortened.
-Silence Threshold: -This is the level below the peak that will be considered silence. The default is -20dB. Increase this to -15 in noisy environments, or decrease it to -24 in a studio. -Remove only leading and trailing silence: -Check this if you only want to remove leading and trailing silence. This will make Trim Silences behave like AutoTrim, but it will do a more thorough, albeit slower, analysis.
47
-Minimum Silence Length: -This is the time, in seconds, that a region must be below the Silence Threshold before it will be considered truly silent. The minimum is set to 25ms, which is half the wavelength of a sound at 20Hz, the lowest audible sound. If we were to remove silences shorter than this then we would start to risk losing non-silent audio in a low point of its wave. The default is 200ms. Note that this minimum does not apply to silences at the start and end of the file. These will be identified as silence regardless of length. -New Silence Length: -In some cases you may want to replace long periods of silence with shorter periods. Choose a fixed length to reduce these longer periods to. Audio will be removed from the middle of the original period, to avoid clipping the ends of the audio surrounding the silence. Set this to 0 to completely remove silences. Note that silent regions will not be extended to meet this length, only reduced to it. See also 'Add Multiple of Original Silence' below. -Add Multiple of Original Silence: -This is a multiple of the original silence, to be added to the New Silence Length (see above). This allows you to set the new silence time based on the original silence time. Set this to 0 to completely remove silences, assuming that 'New Silence Length' is also set to 0.
48
Editing - Edit Samples
Sample Editing Mode
Sample edit mode allows you to modify individual audio samples using your computer's mouse. It is useful for manually editing out clicks and pops from noisy recordings.
To edit a sample, zoom in on the audio waveform until the individual samples become visible (they will appear as vertical lines). Click on Sample Editing Mode from the menu or select the pen icon from just below the waveform and edit the amplitude of a sample by holding down the left mouse button and adjusting it's height.
49

Editing - Save Selected Region As
Save Selected Region As
This function saves the selected region. This function can be useful to quickly save out the part that you have just edited.
50

Editing - Insert File
Insert File
The menu item Edit -> Insert File is used to insert a specific audio file at or over the selection location.
51
Editing - Lossless MP3 Editing
Lossless MP3 Editing
WavePad can perform basic editing operations (Cut, Copy, Paste, Delete, Amplify, Normalize) losslessly.
What is Lossless MP3 Editing?
The MP3 format is inherently lossy: every time a file is encoded to MP3 some of its audio information is lost. The format is designed to minimize how audible this loss is, but if a file is repeatedly encoded and decoded then the cumulative loss can become audible. To work around this problem, WavePad can operate in 'Lossless MP3 Editing' mode, in which you can edit an MP3 file and then save it without re-encoding it. WavePad uses the original encoded audio, making changes to its structure and volume without decoding and re-encoding it.
Usage
Toggle Lossless MP3 Editing mode by clicking on the Lossless MP3 Editing button in the Home tab, or in the menu at Tools > Lossless MP3 Editing Editing mode. You can then perform editing operations as usual, but bear in mind the limitations listed below.
Selection Granularity
All editing in Lossless MP3 Editing mode must be made in chunks of 1152 (or sometimes 576) samples, or about 26ms at a typical sample rate of 44100. This is due to the nature of the MP3 format, in which MP3 frames always decode to this fixed number of samples. To make this easier, selections in Lossless MP3 Editing mode snap to 1152-sample boundaries. If you zoom in close enough then these boundaries become visible as dashed orange lines.
Saving
To save an MP3 losslessly, simply save the file to MP3 while in Lossless MP3 Editing mode. Any sections of unmodified audio will be saved without re-encoding them, but modified sections of audio will still go through the usual lossy encoding process. Audio which is cut-and-pasted can still be saved losslessly, except for a few of the frames on the boundary of a cut-and-paste, which may be re-encoded.
Encoder Delay and Padding
Some MP3 files start and end with frames which are shorter than 1152 samples. They achieve this by removing some audio from the start and end of the file. The audio removed from the start is called 'encoder delay', and the audio removed from the end is called 'encoder padding'. To allow for consistent lossless editing, when you enter Lossless MP3 Editing mode these removed samples are added back on to the start and end of the file. They will be removed again when you exit Lossless MP3 Editing mode.
52
Lossless Amplify and Normalize
When you use the Amplify and Normalize features with Lossless MP3 Editing switched on, they will work losslessly. They can do this by adjusting the 'global_gain' field of each MP3 frame, without needing to re-encode the audio data. Note that for this to work you must have Lossless MP3 Editing enabled before you use Amplify or Normalize. Also note that it is possible to cause clipping if you over-amplify the audio, or normalize it to a level above 100%. This is because in Lossless MP3 Editing mode the peak limiting normally used by and Normalize is not possible.
53
Effects - Effects and Audio Processes
Effects and Audio Processes
WavePad comes with many effects and audio processes. Most are applied in a similar way, by selecting where they should be applied, choosing settings, previewing, and then applying.
Selected Region
Most effects apply only to the selected region. To mark the selected region you can either click and hold down on the wave window and drag the mouse or press and hold down the shift key while moving in the file. To select the entire file press Ctrl+A. If you do not have any region selected when accessing an effect, the entire waveform will be selected as default.
Presets
Some effects come with a series of options known as "Presets". The idea behind presets is to save you having to fiddle around with the numbers, which is great if the numbers don't mean a lot to you. Instead, you can just browse the preset list and select the option which best describes the effect you are trying to achieve.
Previewing
The result of applying certain effects can be previewed using the play button in the Effect dialog. If you modify the effect parameters while previewing the file, you should hear the changes taking place. For this to work properly, we recommend using either ASIO or DirectSound as your sound playback system.
Batch Converter
If you have a large number of files that you want to process in the same way use the Batch Converter Tool (Tools -> Batch Converter). You specify the list of files, the list of effects to be applied and WavePad will do them all in one 'batch'. For more information on doing this, please see the topic Batch Converter.
See Also
● General Audio Concepts (Samples, Channels etc..)● Movement and Selection● Recording● Noise Reduction
54
Effects - Effect Chain
Effect Chain
The Effect Chain Dialog allows you to apply multiple effects at once. You can also use it to easily apply the same set of effects to multiple files. Effect chains can be saved and loaded, or you can choose from a selection of predefined effect chains to get you started.
Adding Effects to the Effect Chain
The list of available effects appears in the column on the left. Double-click on an effect to add it to the end of the 'Applied Effects' column, which is your effect chain. Click on an effect in your effect chain to see and adjust its settings. Click and drag applied effects up or down to reorder them.
Previewing your Effect Chain
To hear how a file will sound with your effect chain applied, click on the 'Play With Effects...' button, and choose the name of the file to play.
Applying the Effect Chain to a File
To apply your effect chain to an open file, click on the 'Apply Effects...' button, and choose the file to apply it to. Remember that you can still undo this change later.
After you have applied the effect chain to one file, you can still apply it to another. This is an easy way to apply the same set of effects to multiple files. If you need to process a lot of files then you could also try the Batch Converter
Saving and Loading Effect Chains
If you want to reuse your effect chain some other time, then click on the 'Save Effect Chain' button. The effect chain will be saved to a .ecf file which you can later load with the 'Load Effect Chain' button.
Loading an effect chain will append it to the end of your current effect chain, so you can combine more than one effect chain. If this isn't what you want then first remove all the effects from your chain by selecting them and clicking the 'Remove Effect' button.
Effect Chain Presets
At the bottom of the 'Applied Effects' column you may notice the '<Add Preset>' menu. From this you can insert pre-configured effect chains into your effect chain. Note that these will be added to the end of your current effect chain, rather than replacing it.
55
Effects - DirectX Effects
DirectX Effects
This feature allows you to use DirectX plugins to apply effects to the audio you are working with in WavePad. To use this feature, select Effects menu -> DirectX plugins, and in the window that appears you should see a list of DirectX plugins detected on your computer. Pick the effect you want to use, and click the "Settings" button if you want to change the configuration settings around. Next, click the "OK" button to apply the DirectX effect to your audio.
56
Effects - VST Plugins
VST Plugins
This feature allows you to use Virtual Studio Technology (VST) DLL plugins to apply effects to the audio you are working with in WavePad. To use this feature, select Effects menu -> VST Plugins. In case you have not specified at least one path for the VST plugins, you will be asked if you want to do so. If you click on 'Yes' a window will appear and you can browse for the directory on your computer that contains VST plugins. You can also specify the path(s) for you VST plugins by choosing Options under the Tools menu and navigating to the VSTs tab - note that the plugins must be DLL files! Next, click the "OK" button to see the selected VST plugin effect window.
VST Plugin Effect
Once you have specified a directory name, you should see a list of VST plugin names appear in front of the label 'Effect' in the window. In the VST plugin effect window, you can change the parameters provided by the plugin. You can hear the preview of the audio while adjusting the parameters. Check "Bypass VST" if you want to hear the preview without the plugin effects. You can also select the desired preset from the pull-down list provided by the VST. Otherwise, you can save your parameter settings in a file (.fxp or .fxb format) and later you can load the settings from the file. This will enable you to change the VST parameters without manually handling them each time. Press the "Apply Effect" button to apply the effect to the selected audio.
Also please visit http://www.kvraudio.com, which is a comprehensive information resource for all types of plugins, including VST and DirectX plugins.
To see a list of recommended free VST plugins for WavePad, visit http://www.nch.com.au/wavepad/free-vst-plugins.html .
57
Effects - Amplify
Amplify
To 'amplify' is to increase the loudness or volume of the selected region. To make a part of the recording softer or louder, select it and then use the menu Effects -> Amplify. The volume is entered in percent (100 being no change, 50 being -6dB softer or 200 being +6dB louder).
58
Effects - Normalize
Normalize
To 'normalize' is to adjust the volume so that the loudest peak is equal to (or a percentage of) the maximum signal that can be used in digital audio. Usually you normalize files to 100% as the last stage in production to make it the loudest possible without distortion. Another reason to normalize is to have multiple tracks sound equally loud, or to have equal average loudness.
The 'Peak' normalization method finds the sample of the greatest magnitude within the file. Normalization is then done with this value as the peak. With the Normalize Peak Level set to 100% (0dB), the whole file will be amplified so that the peak reaches 0dB.
The 'Average Loudness (RMS)' normalization method normalizes according to the file's average loudness, or volume. Multiple files normalized to the same peak level using this method will have equal average loudness. The 'Normalize Peak Level' for this method should be set much lower than for the Peak method, because the average loudness will always be lower than the peak sample.
The 'Peak Loudness (RMS)' normalization method attempts to normalize according to how loud the loudest part of the file will sound. This is the best method to use to make multiple tracks sound equally loud. As with Average Loudness, the 'Normalize Peak Level' for this method should be set lower than for the Peak method, because the peak loudness is lower than the peak sample. The actual algorithm used takes the RMS of each 50ms window in the file, ranks the windows from loudest to quietest, and then takes the 95th percentile of these as the 'peak'. Note that no adjustment is made for humans' differing perception of different frequencies.
59
Effects - Compressor
Dynamic Range Compressor
A dynamic range compressor limits the volume levels of a sound recording so that it stays within a certain loudness range.
An example of where it is used is in TV broadcasting, where it ensures that the volume levels of ads are perceived as being louder than the television program itself (without any change in the actual broadcast volume).
It also has a use for recording audio from one medium to another, where the two mediums are not capable of handling the same range of volume levels (e.g. A CD can handle a much greater range than a cassette tape).
The Dynamic Range Compressor dialog has two tabs: "Simple" and "Graphic". Changing settings on the Simple tab will also change the graph on the Graphic tab, but not vice versa as the graph allows more control. There is also an "Advanced Compressor Settings" dialog for adjusting more advanced features.
The Simple Tab
The "Simple" tab of the Dynamic Range Compressor dialog contains settings called "Limiter", "Compressor", and "Noise Gate". While these sound like three different things, they are more accurately viewed as three different ways of using the dynamic range compressor.
The "Limiter" defines the maximum decibel level that the sound recording will be allowed to rise up to. So if, for example, the Limiter Threshold was set to -2dB, then you would never hear the volume level of the recording get louder than -2dB. Any signal over the limiter threshold would be clipped, which would probably cause distortion. Note that setting the Limiter Threshold to 0dB effectively turns the limiter off, because 0dB represents the loudest signal possible in a digital recording.
The "Compressor" reduces the volume of any sound which exceeds its "Threshold" setting. When a signal exceeds the threshold, the compressor gradually attenuates the sound to bring it down below the dB level, and does it in such a way that the listener will not be aware the attenuation is occurring. The compressor differs from the limiter in that the compressor does allow sounds to go above its threshold (for a short time), whereas the limiter does not.
The "Ratio" setting defines the ratio of the reduction in volume of sounds which exceed the compressor threshold. For example, if the ratio is 4:1 and the volume exceeds the threshold by 4dB, then the volume will be reduced to only exceed the threshold by 1dB. Note that a ratio of 1:1 means that there will be no change in volume; it effectively turns the compressor off.
The "Noise Gate" works similarly to the Compressor, except that is reduces the volume of sound below its Threshold. This can be useful for reducing or removing softer background noise from a recording.
60
You will find that the maximum Compressor Threshold you can set is the same as the current Limiter Threshold value. This basically means that, in any situation, the sound will start to attenuate at the Compressor Threshold, but will never be heard louder than the Limiter Threshold. Similarly, the maximum Noise Gate Threshold you can set is the same as the current Compressor Threshold.
The Graphic Tab
The "Graphic" tab of the Dynamic Range Compressor dialog shows a graph which represents the relationship between input and output volumes. The horizontal axis shows input volumes in dB from -60dB to 0dB. The vertical axis shows output volumes on the same scale. The graph will be changed by changes to settings on the Simple tab, but changes to the graph will not be reflected on the Simple tab, because it is possible to represent a wider variety of settings on the graph than is possible in the controls on the Simple tab. When the dynamic range compressor is applied it will use the settings from the Graphic tab.
To change the graph, click and drag the black vertex markers, or click anywhere else to create a new vertex. To remove a vertex, right-click on it.
Advanced Compressor Settings
Clicking on the "Advanced" button in the Dynamic Range Compressor dialog will open the Advanced Compressor Settings dialog. In it are controls for the following properties of the compressor:
-Input Level Sensing - Peak or RMS: -This controls how the compressor determines the audio level. "Peak" sensing looks at the highest point in the window of audio which it examines. It will almost always give a higher reading than "RMS" sensing, which uses an average, or Root Mean Square of the window to determine the audio level. RMS sensing more closely corresponds to the audio level which a human listener would perceive. -Compressor Response: -
-Attack: -The time (between 0 and 1000 milliseconds) that it will take to apply the gain adjustment. The total gain adjustment required will be gradually introduced over this period. -Release: -The time (between 0 and 5000 milliseconds) that it will take to remove the gain adjustment once gain adjustment is no longer needed. This is the opposite of attack. -WindowLength: -The length (between 10 and 50 milliseconds) of the window to use when calculating the current audio level. A shorter window responds to level changes more rapidly, but anything less than 50ms will start to respond inconsistently to bass, since 50ms (20Hz) is the wavelength of the lowest human-audible sound. -LookAhead: -How far ahead (between 0 and 100 milliseconds) to look at the input level when determining the output gain adjustment. This can cause the compressor to start responding to a change in volume before it happens. If this value is the same as the attack time, then the full gain adjustment could be made by the time the louder signal is reached.
61
-Side-Chain Equalizer: -This determines how strongly the compressor should weight different audio frequencies when determining the input level. For example, to compress only when there is a loud bass sound, turn the Bass level up and/or reduce the MidRange and High levels. -Auto Makeup Gain: -When this option is selected compressor automatically makes up the gain lost in the compression process. Select this option if you want to amplify the compressor output to the original audio level.
Dynamic Range Compressor Presets
The following presets have been defined for your convenience. A preset will change the settings of the dynamic range compressor, after which you can make further adjustments if necessary. The presets are: -Default: -Pressing the "Default" button will cause the compressor to have no effect. It sets the output levels to be exactly the same as the input levels, and also resets the advanced settings to their defaults. -Fast Compressor: -This compression preset will cause any spikes over -20dB to be rapidly reduced, but will not cause distortion. It uses peak input level sensing and a fast attack, which will reduce the volume of transient sounds (such as a snare drum hit), but may also change their characteristic sound. Compare this with the Smooth Compressor preset below. -Smooth Compressor: -This preset reduces the volume more gradually when the signal climbs above -20dB. The slow attack time will mean that transients (such as snare drum hits) will not be changed, or if they are then they will be uniformly reduced, thus their characteristic sound will not be significantly altered. -Heavy Compressor: -This preset uses a lot of compression whenever the average volume climbs over -30dB, resulting in a very uniform dynamic range. This can be useful for making the quieter parts of music with a large dynamic range (such as classical music) easier to hear in noisier environments, such as in a car or a restaurant. -Hard Limit: -This preset does not allow any sounds to exceed -12dB. This may cause distortion due to clipping in some tracks. -Soft Limit: -This limit allows short spikes over -6dB, but will prevent longer durations of audio over this threshold. -Noise Gate: -This will remove soft sounds from a track. This can be useful for removing the crackle of a record player during silences, or background noises in a dictation.
62

Effects - Equalizer
Equalizer
An equalizer changes the frequency response of a signal so it has different tonal qualities.
After you select Effects menu -> Equalizer you will see a dialog containing three different Equalizer representations. Use the tabs at the top to select between the Visual Equalizer, Graphic and Parametric Equalizer views.
Visual Equalizer Left click on any point to create a new band point. To remove a band point right click on it. To assist you with shaping the Equalizer graph in the way you want, there is a preset list that displays the most common sorts of filters used in the Equalizer graph. You can choose any preset filter from the list and then manipulate the filter to achieve the effect you desire. The list of filters to choose from and how you can shape them are explained below. Note that all fields where a frequency value is entered can have a maximum value of 20000 (Hertz).
Graphic Equalizer The Graphic Equalizer uses discrete sliders to set the gain or attenuation of a signal at a particular frequency. You can select how many sliders you would like to manipulate by entering a value between 3 and 20 in the box at the top of the display. When you change the number of sliders you would like to utilize, the frequencies are automatically allocated to best span the audible frequency range from 20Hz to 20kHz. Selecting presets allows you to easily configure common filters such as low pass or high pass. Note that when you change the Graphic Equalizer, the Visual and Parametric Equalizer views are not changed, as the changes in the three views are not compatible.
Parametric Equalizer The Parametric Equalizer is similar to the Graphic Equalizer, but with more control. Here you can adjust the frequency and bandwidth of the individual sliders by left clicking on the frequency or Q values below each slider. Frequency must be set between 20Hz and 20,000 Hz. The Q parameter must be set between 0.05 and 20. A higher Q causes the gain or attenuation peak at the frequency to be much sharper, and therefore less likely to impact adjacent frequency content, while a lower Q applies the modification more smoothly across the frequency spectrum.
-Band Pass Filter - Keeps only those frequencies in the audio between a certain range. -Start Frequency -The lower cutoff frequency value, in Hertz. -End Frequency -The upper cutoff frequency value, in Hertz. -Slope Length -The width of the slope extending from the lower and upper cutoff points, in Hertz. -Amplitude -The degree that the frequencies outside the cutoff range are suppressed. 6dB means the volume is reduced to one-half, 12dB means the volume is reduced to one-quarter. Maximum value is 60dB.
63
-Band Stop/Cut Filter - Keeps all frequencies in the audio except those between a certain range.
-Start Frequency -The lower stop frequency, in Hertz. -End Frequency -The upper stop frequency, in Hertz. -Slope Length -The width of the slope extending from the lower and upper stop points, in Hertz. -Rejection -The degree that the frequencies inside the stop range are suppressed. 6dB means the volume is reduced to one-half, 12dB means the volume is reduced to one-quarter. Maximum value is 60dB.
-High Pass Filter - Keeps only those frequencies in the audio above a certain value.
-Pass Frequency -The point at which all frequencies above are to be kept, in Hertz. -Slope Length -The width of the slope extending from the pass frequency, in Hertz.
-Low Pass Filter - Keeps only those frequencies in the audio below a certain value.
-Pass Frequency -The point at which all frequencies below are to be kept, in Hertz. -Slope Length -The width of the slope extending from the pass frequency, in Hertz.
-Notch Filter - Attenuates the frequencies in the specified range to very low levels and passes all other frequencies unaltered. There is no slope - frequencies are either attenuated or not.
-Start Frequency -The lower cutoff frequency value, in Hertz. -End Frequency -The upper cutoff frequency value, in Hertz.
-Boost Filter - Either attenuates or boosts frequencies in the specified range and passes all others unaltered.
-Start Frequency -The lower boost/cut frequency value, in Hertz. -End Frequency
64
-The upper boost/cut frequency value, in Hertz. -Slope Length -The width of the slope extending from the lower and upper boost/cut points, in Hertz. -Amplitude -The degree that the frequencies inside the boost/cut range are either boosted or cut. 6dB means the volume is boosted to twice the original amount, and 12dB means the volume is is boosted to four times the original amount. 20dB.
-High Pass Shelf Filter - Attenuates signals of frequencies below the cut frequency and passes all others unaltered.
-Start Frequency -The lower cut frequency value, in Hertz. -Slope -The width of the slope extending from the lower and upper cut points, in Hertz. -Rejection -The degree that the frequencies inside the cut range are cut. 6dB means the volume is attenuated to about half the original level, and 12dB means the volume is attenuated to about a quarter of the original level.
-Low Pass Shelf Filter - Attenuates signals of frequencies above the cut frequency and passes all others unaltered.
-Start Frequency -The lower cut frequency value, in Hertz. -Slope -The width of the slope extending from the lower and upper cut points, in Hertz. -Rejection -The degree that the frequencies inside the cut range are cut. 6dB means the volume is attenuated to about half the original level, and 12dB means the volume is attenuated to about a quarter of the original level.
If you are using the equalizer simply to drop lower frequencies, you should always try the High Pass filter first (Effects menu -> High Pass Filter), because it is better and faster for very low frequencies.
65
Effects - Envelope
Envelope
The 'envelope' is the change in volume of the select region over time. This can be used to make fine adjustments to the volume over time or even more crude changes like fade in or fade out.
Select the region you want to change the volume over and use the menu Effects -> Envelope. Click on any point to adjust its volume (right click removes the point). Click the Set Flat button to reset the volume and remove extra volume points.
66
Effects - Stereo Pan
Stereo Pan
The stereo pan effect allows you to change how loud the sound is that comes out the left or right speaker. For example if you had a stereo recording with all the sound coming out of only one speaker, you could use the pan effect to "center" the sound yourself. You can also make a centered sound change move one from speaker to the other as the sound file plays.
Select the region you want to change the pan for and choose Effects -> Stereo Pan. Click on a point and move it upwards for an increase in volume on the left speaker, or move it downwards for an increase in volume on the right speaker.
Please note the stereo pan effect only works on stereo files. If your file is not stereo you must first convert it to stereo by choosing Edit -> Convert Channels -> Stereo.
67
Effects - Echo
Echo
An echo is a repeat of the sound after a short time (usually 400 - 1000ms). It sounds a bit like the person is in a large stadium or is shouting between two mountains.
To add echo select the region and use the menu Effects -> Echo then specify the duration and amplitude of the echo. The duration is the length of time after which the sound repeats - usually this is between 400 and 1000ms. The amplitude can be between 1 - 99% (99 being a very loud echo).
68
Effects - Pitch Shifter
Pitch Shifter
Pitch Shifter is a sound effect that raises or lowers the pitch of audio signals. You can adjust pitch shifter speed by dragging the slider in the settings.
69
Effects - Reverb
Reverb
Reverb is many small reflections of the sound that come after a set time. It usually occurs when someone is speaking in a room, hall, etc. More reverb is called wet, no reverb is called dry. When you select the reverb effect, you will see a dialog with two tabs.
Simple
The first tab of the reverb effect allows you to adjust the reverb level and time. The reverb level is the amplitude - 99 is very wet, 0 is dry. The time can be between 100 and 800ms - 200ms sounds like a small room or 800ms a large hall. If you add too much reverb it can sound like the person is in a pipe or in the bathroom.
The Simple tab also includes preset options to choose from, depending on how large the space being simulated is. Click the play button at the bottom of the tab to preview the reverb effect on your audio.
Room Design
The second tab of the reverb effect allows you to specify the dimensions of a room, the position of the source and listener, and the room absorption with preset options for the materials that make up the walls, floor and ceiling of the room. Click the play button at the bottom of the tab to preview the reverb settings on your audio.
70
Effects - Phaser
Phaser
The phaser sound effect is created by mixing a slightly delayed signal with the original. You can set the delay in ms (default 5ms) and the wet dry gain in percent. 100% is wet. 0% is off/dry.
71

Effects - Flanger
Flanger
A Flanger sound effect is similar to the phaser except that the delay is slowly modulated over time. You specify the starting delay time (default 5ms), the frequency of modulation in times per second (default 5Hz which is 0.2 seconds) the depth of modulation (default 70%) and the wet dry gain (100% for wet, 0% for dry, default 60%).
72
Effects - Vibrato
Vibrato
The vibrato sound effect is a pulsating of the pitch at a depth and frequency specified by the user. The higher the Frequency (Hz) set, the more often the pulses will be heard, and the higher the Depth (semitones), the wider the fluctuation in pitch will be.
73

Effects - Tremolo
Tremolo
The tremolo sound effect is similar to the vibrato effect, except that the amplitude pulsates rather than the pitch. The higher the Frequency (Hz) set, the more often the pulsation will be heard, and the higher the Depth (%), the deeper the fluctuation in volume.
74
Effects - Doppler
Doppler
The doppler effect simulates the sound of a passing vehicle, which has a high pitch while approaching, shifting to a low pitch when traveling away from the listener. Specify the Velocity (in km/h) of the passing source; a higher velocity will result in a higher starting pitch and lower ending pitch. Adjust the Listener Horizontal and Vertical Positions to indicate the listener's horizontal and/or vertical position to the passing source; play around with the values to achieve different combinations of pitch.
75
Effects - Wah-Wah
WahWah
As the name suggests, the effect modulates a specified frequency band within the sample, which results in the characteristic "Wah wah" sound. The effect is a bandpass filter with its center frequency (not to be confused with the center frequency parameter, below) alternating between a min frequency and max frequency (specified by the center frequency and depth parameters) and from max frequency to min frequency. The frequency of alternating direction is represented as a triangular wave with a frequency specified by the wah frequency parameter.
Resonance: also known as Q or emphasis, this parameter controls the resonant peak of the bandpass filter. This value determines the sharpness of the wah-wah effect. Higher values produce more resonant/peaky tones.
Depth: this parameter determines the frequency range swept by the bandpass filter. Its range is specified as a percentage of the range (0 to center frequency). If the value of the percentage of the range (0, center frequency) is specified as X, the min and max frequencies are (center frequency - X) and (center frequency + X).
Center Frequency: This parameter is the center frequency of the bandpass filter sweep, and is used to determine the min and max frequencies as mentioned above.
Wah Frequency: This is the frequency of alternating the direction of the sweep, or the frequency of the wah-wah sound. It is the frequency of the triangular wave described above.
76
Effects - Chorus
Chorus
The chorus sound effect is used to make one voice or one instrument sound like 3 voices or instruments by playing the original with variably delayed and slightly pitch changed copies of the original.
Note: Chorus is a very useful way to make a mono source sound more stereo. You should convert your file to stereo first before using Chorus.
77
Effects - Distortion
Distortion
While normally we do everything to reduce distortion, sometimes you want to add it. It is popular for use with guitars. The distortion is measured between 0.0 (off) and 1.0 (clipping). You also specify the level where it kicks in in dB (default -8dB).
For a more consistent sound, you should apply Dynamic Range Compression first before you add distortion.
78
Effects - AM Radio Effect
AM Radio
This simulates an AM Radio. We have made it accurately simulate a 'good' AM radio. To make it worse, apply the effect twice. For a really bad sound, paste mix some soft white noise (use the Tone Generator tool) to simulate bad reception.
79
Effects - Telephone Effect
Telephone
This simulates the audio down a telephone line. It simulates a 'good' telephone line. To make it worse apply the effect twice and paste mix soft white noise.
80
Effects - Reverse
Reverse
This effect reverses the selection in the same way playing a record or tape backwards would.
81
Effects - Fading
Fade In
To fade in use the menu Effects -> Fade In.
Fade Out
To fade out use the menu Effects -> Fade Out.
Fade Out and Trim
The fade out and trim option is a combined function which fades out over the selection then marks the end of the selection as the end of the file. This is frequently used at the end of music tracks.
CrossFade
The CrossFade tool allows you to mix together voice and music in a variety of different ways. You can, for example:
● Fade out a music track while fading in another track,● fade out a music track and cue in a voice track at full volume (or vice versa), or● overlay the end of one voice track with the start of another track.
To use the tool, first select the region of audio you want to perform the crossfade on. If you want to crossfade between two files, you must combine the two files together first into one file. Next, go to Effects menu -> CrossFade. A window will appear, showing a graph and a number of data fields.
The graph is divided into two sections, the top section shows the fading in part of the audio, the bottom shows the fading out. The area that the crossfade is to be performed on is highlighted in blue, and surrounded by markers showing the start and end of the crossfade region. There is a one second portion of the waveform on either side of the highlighted section, which is there to provide a better view of the crossfade.
If you hover your mouse over any part of the graph, you can see what parts of the graph correspond to what time in the audio waveform.
The data fields work as follows:
-Start and End Selected Positions - Tells you the start and end times of the audio you selected in the waveform. Note: These times do NOT correspond to the start and end times you see in the graph window! Read on! -Gap Time -
82
This says how long the crossfade region will be, in milliseconds. This time may be be modified when the crossfade is performed, if the fade in and fade out times are larger than this value. Note: If this time is shorter than the audio you selected then the middle of the selected audio will be lost as a result of the crossfade. -Fade In Time -The length of time to fade in the end of the selected audio. For example, if you select 5000ms of audio and a Fade In Time of 1000ms, then the last 1000ms of your selection will fade in over the last 1000ms of the crossfade. -Fade Out Time -The length of time to fade out the beginning of the selected audio.So with the above information in mind, the crossfade will work as follows:
1. A Fade-Out buffer will be created with a length of the Gap Time. At the start of the buffer will be the start of your audio selection, fading out over the Fade Out Time.
2. A Fade-In buffer will be created with a length of the Gap Time. At the end of the buffer will be the end of your audio selection, fading in over the Fade In Time.
3. The Fade-In and Fade-Out buffers will be mixed together, and replace your audio selection.
83
Effects - Speed and Pitch Changing
Simple Speed and Pitch Change
This plays the recording faster or slower which in turn increases or decreases the pitch too. This function is useful to correct slow or fast tapes.
Speed Change
Normal speed changes (i.e. "Simple Speed and Pitch Change" above) changes the pitch in proportion to the speed. If you want to change the speed but keep the pitch the same use this function. Speed can change the duration of the audio. The time duration (in seconds) can also be adjusted using this effect.
Pitch Change
This changes the pitch of the recording without changing the speed (i.e. the converse of the above). Change of semitones can also be adjusted using this effect
Pitch Speed Profile
This allows you to specify how much to change pitch, speed, or pitch and speed at any point in the file, using a graph.
84
Effects - Reduce Vocals
Reduce Vocals
If you want to reduce the vocals from a music track you can use this effect. WavePad will attempt to identify the voice in the left-to-right spectrum of a stereo recording and remove it. The recording must be stereo (from an original stereo source like a CD - simply converting a file to stereo will not work). It will also remove any instruments near the voice in the stereo spectrum.
Note: it is impossible to remove the vocals perfectly without the original mix track. You will notice some instruments might be removed too and some vocal remain. The effect will also not work on some files which have previously encoded in a highly compressed form like mp3 (because this remove some stereo depth).
85

Effects - Voice Change
Voice Change
The Voice Changer allows vocal distortion by changing pitch, semitones, cents, and timbre, by modulating tone, and adding whisper/noise to the voice.
86
Audio Cleanup - Noise ReductionThere are two ways of reducing noise. The slow but accurate "Spectral Subtraction" method - usually used where noise is really a problem - and the fast "Multiband Noise Gates" method - usually just automatically on batch voice recording jobs.
Sometimes using both (spectral always must be first) then multiband gates works very well.
-Spectral Subtraction - -Automatic Method -This approach leaves WavePad to estimate what is noise and what is not. It usually works well on voice and is nice and easy to use just select the region and apply the effect. -Manual Method - To use this you must: 1. Select a short part of 'noise only'. Usually this is from a gap in the audio.2. Select Effects -> Noise Reduction -> "Grab Noise Sample From Selected Area".3. Select the entire file.4. Select Effects -> Noise Reduction -> "Apply Spectral Subtraction Based on Noise Sample".
-Multiband Noise Gates -To use the all you need to do is enter the level below which you expect noise. Usually this is between -30dB and -20dB. If not enough noise is reduced increase the value. If too much is reduced decrease it.
Noise Gate
A noise gate is a filter which controls the volume of an audio signal. Any part of your audio which is below the Threshold will be attenuated by the amount you specify.
-Threshold -Audio falling below this threshold will be attenuated. -Hold -The period of time (in milliseconds) to wait before applying the attenuation. -Release -The period of time (in milliseconds) taken to fully apply the attenuation. -Attack -The period of time (in milliseconds) taken to fully remove the attenuation. -Attenuation -The amount to attenuate the audio signal when it falls below the threshold.
87
Audio Cleanup - Click/Pop Removal
Auto Click/Pop Removal
This tool allows you to apply a repair of a single click/pop artifact. To use it properly, you must zoom right in to the artifact and select a small region around it. Then select Tools menu -> Auto Click/Pop Removal. The repair will be performed straight away.
Parametric Click/Pop Removal
This tool is designed to remove click and pop sounds from recordings. It is ideal for those who have recorded music onto their computer from LP records and want to repair any defects caused by dust and scratches on the vinyl.
To use the tool, click Tools menu -> Parametric Click/Pop Removal. In the window that appears, you can configure settings for the following fields:
-Click Sensitivity -This is the degree of aggressiveness (as a percentage) that will be applied by the tool when searching for click and pop artifacts. If you don't know what to enter, you can start by leaving it at 50%. The more a piece of audio is damaged, the higher you may have to set it. Moderately damaged audio can require settings of 60% - 80%. Be careful though - if you set it too high, the tool will start thinking parts of the audio are actually clicks/pops. If you set it too low of course, the tool will think some clicks/pops are part of the audio. Try experimenting to find the right value, and note that the level you apply to one file may be different to the level you apply in another file. -Maximum Click Length -This is the maximum length that a click lasts in your audio, in milliseconds. As a general guide, use 450ms if you don't know what to enter. 350ms is appropriate for audio with only small amounts of defects, whereas 550ms or 650ms is appropriate for audio with lots of defects.
88
Audio Cleanup - High-Pass Filter
High-Pass Filter
A high-pass filter (sometimes called a low cut filter) removes all low frequencies below a specified Hz. This is useful if you want to make your recording sound 'clearer' or less 'muddy'. It is very usual to use a high-pass filter of about 300Hz on all voice recordings to improve intelligibility.
89
Audio Cleanup - Low-Pass Filter
Low-Pass Filter
A low-pass filter removes all high frequencies above a specified Hz. This is useful if you want to make your recording sound 'clearer'. It is very usual to use a low-pass filter of about 1600Hz on all voice recordings to improve intelligibility.
90
Audio Cleanup - Automatic Gain Control
Automatic Gain Control
Normal recordings can have the volume of the recording too high in parts and too soft in parts. 'Automatic Gain Control' reduces the too loud parts and increases the too soft parts. This is sometimes a better alternative to normalization (above).
To use AGC select all (Ctrl+A) then use the menu Effects -> Automatic Gain Control.
91
Audio Cleanup - DC Offset Correction
DC Offset Correction
Often when you record audio using bad electronics the recording has a constant 'DC' level throughout the file. Because the ear cannot hear this you will not notice it until you attempt to edit in other audio when you can hear horrible clicks. If you think this is the problem you can run DC Offset Correction over the entire recording before you begin to edit. Another (and possibly better) way to deal with this problem is to run a high pass filter (say at 50Hz) over the recording.
92
Tools - Frequency Analysis (FFT and TFFT)
Frequency Analysis (FFT)
This tool uses a Discrete Fast Fourier Transform (DFFT) to separate the audio at the current selected position of the waveform into its frequency components. To use it, set the waveform cursor to the point in the audio you want to analyze and select Tools -> Frequency Analysis. In the window that opens, you should see one or two graphs displayed, known as FFT graphs. If the audio file you are analyzing is of mono format, there will be one blue graph shown. If the file is stereo, there will be one blue graph for the left channel and one pink graph for the right channel.
In the top right-hand hand corner are the frequency and decibel values of the point in the graph where the mouse cursor is currently located. The decibel values range from 0dB (loudest) at the top, down to -127dB (softest). The frequency range depends on the sample rate of the audio file, ranging from 0Hz on the left to half the sample rate of the audio at the right.
Two window types, Hanning and Hamming, are provided to apply FFT.
To see the FFT graph in more detail, click the Zoom In buttons on either the bottom of the window or along the right-side (this will zoom the graph horizontally or vertically respectively). While zoomed in, you can use the scroll bars along the bottom and right-hand sides to scroll horizontally or vertically.
To zoom the graph out, either click on the respective Zoom Out buttons, or click the button in the bottom-right corner to set the view back to full-scale.
An alternative to using the Zoom In and Zoom Out buttons is simply resizing the FFT graph window. To do this, move the mouse cursor to any edge or corner of the window, and hold the left-mouse button down and move your mouse as appropriate.
Temporal Frequency Analysis (TFFT)
This tool calculates an FFT analysis over time (TFFT), and uses color to display the intensities of the spectral information. To use it, select an area of the audio waveform you would like to analyze and select Tools -> Temporal Frequency Analysis. In the window that opens, you should see a graph displayed, known as the TFFT graph. Time is represented along the horizontal axis and has a range the same as the region of the audio waveform you have selected. Frequency goes along the vertical axis, and goes from zero to half the sample rate of the audio waveform. The colors represent the decibel levels for a specific frequency at a specific point in time, with brighter colors meaning stronger intensities. The decibel values range from 0 (loudest) down to -127dB (softest). The values of time, frequency and decibels can be viewed in the status bar at the bottom of the TFFT window, and will depend on where your mouse cursor is currently located in the graph.
If you are performing an analysis on a stereo waveform, you will see the effect of both channels combined into the one graph.
93
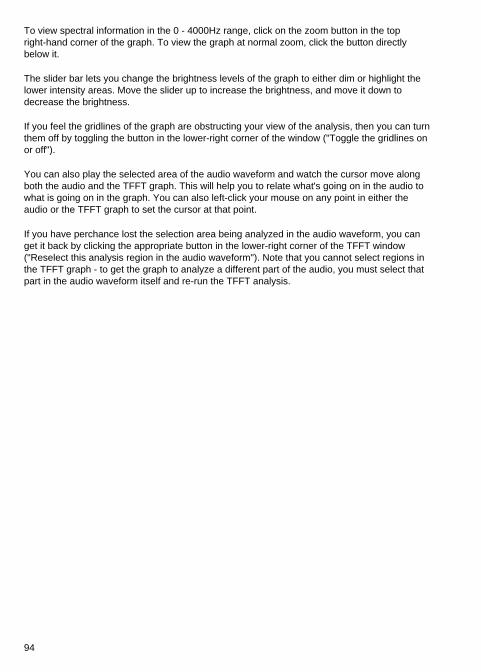
To view spectral information in the 0 - 4000Hz range, click on the zoom button in the top right-hand corner of the graph. To view the graph at normal zoom, click the button directly below it.
The slider bar lets you change the brightness levels of the graph to either dim or highlight the lower intensity areas. Move the slider up to increase the brightness, and move it down to decrease the brightness.
If you feel the gridlines of the graph are obstructing your view of the analysis, then you can turn them off by toggling the button in the lower-right corner of the window ("Toggle the gridlines on or off").
You can also play the selected area of the audio waveform and watch the cursor move along both the audio and the TFFT graph. This will help you to relate what's going on in the audio to what is going on in the graph. You can also left-click your mouse on any point in either the audio or the TFFT graph to set the cursor at that point.
If you have perchance lost the selection area being analyzed in the audio waveform, you can get it back by clicking the appropriate button in the lower-right corner of the TFFT window ("Reselect this analysis region in the audio waveform"). Note that you cannot select regions in the TFFT graph - to get the graph to analyze a different part of the audio, you must select that part in the audio waveform itself and re-run the TFFT analysis.
94
Tools - Text To Speech
Text To Speech (Speech Synthesis)
This tool lets you create computer generated speech from text you enter. Use the menu Tools -> Text to Speech, enter (or paste Ctrl+V) the text and click Synthesize Speech. Some trial and error can be required to get it right. For example spell out numbers "1 thousand 2 hundred" and acronyms "N. C. H. Software".
This feature requires a speech engine which is not installed on all computers. To download the Microsoft speech engine (or for foreign language speech engines) please see www.nch.com.au/speech.
95

Tools - Navigate Speech
Navigate Speech
The Navigate Speech dialog uses a speech recognition engine to generate a rough approximation of the words spoken in an audio file. You can then double-click on a word to move the cursor to that point in the audio window. This can be particularly useful for finding a specific section in a long recording of speech, because it means you don't have to listen all the way through. You can also select a region in the wave window by selecting the text in the Navigate Speech dialog.
96
Tools - Batch ConverterThe batch converter is used to apply the same operations (i.e. effects or conversions) to a whole list of files.
Open the Batch Converter using the menu Tools -> Batch Converter.
Step 1: Select Files
Click on the Add button and browse to the files you want to process. You can select multiple files at the same time by holding down the Shift or Control keys while selecting.
Click Next when you have added all the files.
Step 2: Select Commands
For each command you want to apply to the files, click Add select the command and then click Add again. You can reorder commands by dragging the items in the list.
Step 3: Select Output Format and Folder
By default WavePad will save the files in the same format they were loaded in. But if you want to convert the format select "Convert to file format", select the extension. Some files (e.g., wav or mp3) have other options (bitrate or codec) which can be changed using format options.
Note: if you want to change the sample rate use the Convert Sample Rate comment in the commands (above).
Files are normally saved in the same folder they were loaded from. This means they will be overwritten when saved. Alternatively you can select a different folder to save the files to.
See Also
Effects
97

Tools - Create Ringtone
Select your audio clip
Open an audio with WavePad, and select an audio region to create ringtone. If nothing is selected, the whole audio will be converted to a ringtone.
Select target phone type
● Select iPhone - the ringtone type is m4r.● Select Android phones - the ringtone type is mp3.● Select others - the ringtone type is mp3.
Input your email
Enter the email address you use on the target phone, ringtones will be sent to your phone as an attachment to the email.
Create ringtone and send email
This step may take a bit longer than other steps as you have to wait for WavePad to convert the selected audio to a ringtone and send it as an attachment to your target email.
98
Tools - Download From Sound Library
Download from Sound Library
WavePad gives you access to a Sound Library containing 800 Special Effects (SFX) files and 200 music files. Access the Sound Library from Tools -> Sound Library. This will bring up a dialog containing files with the sound effects organized by category.
Preview a sound by selecting a sound category from the left panel, and then a sound file from the category list. Click the play button at the bottom of the window to hear the sound. If you decide you would like to download the sound, click the large 'Download' button located in the bottom right corner of the window. The WavePad Master's Edition comes with unlimited access to the Sound Library, otherwise, users will be limited to three downloads.
Note: You must have an Internet connection to preview and/or download from the Sound Library.
99
Tools - Surround Sound Editor
Surround Sound Editor
The Surround Sound Editor allows you to mix multiple sound tracks to produce surround sound audio. The Surround Sound Editor supports standard speaker layouts for 5.1 or 7.1 audio. It can also be configured to support any 2-D speaker layout.
The following are the main elements of the Surround Sound Editor:
-Radar Display: -Speakers and sound tracks can be positioned graphically with the help of the Radar Display. Speakers and sound tracks can be added or deleted. -File list: -All currently opened audio files are listed in the File List. This allows selecting/deselecting of sound tracks to include in the Radar Display. -Sound Tracks: -All sound tracks are mono. All multichannel sound tracks are separated into multiple mono sound tracks and added to the File List. A track number is displayed along with a track icon. -Speakers: -A speaker represents a channel in the surround audio mix, which will be usually played back through a single speaker. A channel number is displayed along with a speaker icon. -LFE Speaker: -An LFE speaker is a special type of speaker. It usually carries a Low Frequency Effects (LFE) sound track. Any sound track assigned to an LFE Speaker is played back exclusively through that speaker (channel). -Volume Indicator: -The length of a blue line extending from the speaker icon towards the center of the Radar Display indicates the relative volume of a speaker. When a sound track is selected, the length of the line indicates the percentage of the total volume of the selected track played back through the speaker. -Pan Envelopes: -Pan the envelope of a sound track between multiple speakers. This can be used to create a moving sound effect. The Pan Envelopes graphical display consists of two sets of points. The points on the yellow line control the horizontal movement and the points on the green line control the vertical movement. -Spatial Blur: -Spatial Blur is a parameter which controls the volume distribution of a sound track between multiple speakers. Its main use is to blur the localization of a track. Lower values mean higher localization. -Speaker Weight: -By default all speakers carry equal weight in surround panning. This can be controlled by assigning a weight to each speaker. Low weight means low contribution in panning (Note: LFE speaker does not carry a weight). Setting the lowest weight results in the total exclusion of a speaker from panning.The following are the options available in the surround sound editor dialog:
100
-Add a speaker: -Click on the Add button. -Add an LFE speaker: -Click on the Add LFE button. -Delete a speaker: -Select the speaker using the mouse and click on the Delete button. -Select a preset speaker configuration: -Select a speaker configuration available in the speaker configuration preset combobox. -Add/Remove a track: -Select/deselect a track on the File list. -Change the position a speaker/track: - Left click and drag the speaker/track icon using the mouse. -Assigning a sound track to an LFE speaker: - Drag and position a track on top of an LFE speaker. The color of the speaker icon will change to blue on assignment. -Change speaker weight: -Select a speaker and change the Speaker Weight slider. -Change the spatial blur: -Select the desired spatial blur using Spatial Blur slider. -Enable/Disable Pan Envelope (Moving sound effect): -Select a track and click on Pan Envelopes check box. -Control moving sound effect: -Select a track and adjust the points on the yellow and green lines to control position and timing. The yellow line controls the horizontal movement and the green line controls the vertical movement. Left click and drag creates the new points and right click deletes a point. Click on the red cursor and drag to preview the sound movement graphically. -Saving output: -Once you have positioned your sources, the Apply button will create a new wave window with as many channels as the speakers that you chose. This can then be saved in a file format which supports surround sound, such as WAV.
101
Options - OptionsOpen the WavePad Options Dialog Box by using the menu Tools -> WavePad Options.
Note.: Windows 8 and after DO NOT have File Types page on Options Dialog. If you are the users of these platforms, and would like to set WavePad as the default program, you have to use Windows Control Panel -> Default Programs.
● General● Audio●
● Appearance● Mouse● Playback● Keys and Macros● File Types
102
Options - General
When creating a new file
Prompt for Sample Rate and Channels
Select this option if you want WavePad to prompt for sample rate and channels when you create a new audio file.
Use Defaults
Select this option if you want to use the default sample rate and channels when creating a new audio file. When this option is selected you will be able to change the default sample rate and channels. The sample rate must be between 6000 and 192000 samples per second (see General Audio Concepts).
When saving a file
Don't Prompt for File Format Settings
Select this option if you don't want WavePad to prompt you each time you save a file for the quality settings you would like to use. This option is convenient if you always want to save with the same file format and format settings. You can choose to set this when using 'Save' or 'Save As', or for both. If you choose to set for both, WavePad will use the last used file format settings as default for all future file ‘Save’ and ‘Save As’ operation. If you choose to set for only ‘Save’ operation, then changing the file format settings with ‘Save As’ will change the default settings of ‘Save’ Operation, or vice versa.
Context Menu
Add WavePad into File Explorer context menu Select this option if you want to add WavePad into the right-click context menu in File Explorer for all supported audio file formats. For example, with this option selected, right-click on a .wav file in File Explorer and you should see an item called "Edit with WavePad" in the menu that appears.
Default file name
Use this field to enter your own naming format for the untitled files
The following field(s) can be used in the default file name format
● %autonumber% - auto increase number● %YYYY% - current year● %MM% - current month● %DD% - current day
103

● %HH% - current hour● %MIN% - current minute● %SS% - current second
The "Reset" button will reset the format to the default one if you have changed it.
The "Reset Auto Number" button resets the next auto increase number to be used by %autonumber% to 0.
Some operations in WavePad may include the option to send an email. You can setup your email options here by clicking the Configure Email Settings... button.
104

Options - Audio
Sound Play Device
This is where you select the sound device you would like to WavePad to use for playing back audio files. If you have more than one sound card installed, select the sound card you want using the Sound Play Device pull down list.
If you are an advanced user, you may also like to choose which sound driver model you want to use. If your sound card supports DirectSound or ASIO, simply select your desired sound device from the list prepended with [DirectSound] or [ASIO].
For advice about where to get audio devices, headphones , or speakers, visit the WavePad hardware page.
Warnings
Get notifications about possible sound quality issues during recording.
Auto Trim Threshold
This setting applies to the Auto Trim and Trim Silences functions for more information.
Audio Working Folder
When WavePad loads a file it keeps a copy of the working audio (in full quality 32 bit) in the working folder for fast editing and processing. If you are running out of hard drive space on your C drive you can change this to be some other temporary folder.
Please note: This is a temporary folder and should not be used for storing any data you wish to keep. It is strongly advised not to save any files to this directory as they may be deleted without warning.
105
Options - Recording
Recording Device
This is where you select the device that WavePad should record from. Select your preferred device from the 'Device' list.
The 'Input' list will change depending on your device. Many devices will have two options: 'Windows Record Mixer', and 'Master Volume'. If you select 'Windows Record Mixer' then a button will appear that will allow you to open the Windows Record Mixer and adjust recording levels there. If you select 'Master Volume' then you can adjust the volume directly from the Recording Options window. Some devices will list which channels they have available. If you choose to record in stereo, then WavePad will use more than one of these channels, but you only need to select one.
There is a level display below the Volume control, so you can see the effects of your volume changes. This level display will show the level of any audio picked up through that device. If the level display remains black then no audio is being received.
You should adjust your recording volume to ensure that the level never reaches 0dB during normal recording. Any audio over this level will be 'clipped', which means that it is distorted, losing audio quality.
For professional grade microphones recommended for use with WavePad, see WavePad Recommended Microphones.
Automatic Recording
-Auto Trim Silence from End of Recording: -This will remove trailing audio below the Silence Threshold (see below) from the end of recordings. -Voice Activated Recording: -With this activated, recording will start when audio is received, such as when you speak into the microphone, and pause whenever there is silence. The level that will start recording is the Silence Threshold. The recording will pause when the level falls 4dB below the Silence Threshold. The Silence Threshold should be adjusted so that it is high enough not to start recording when only background noise is heard, and low enough to always start recording when you start speaking. This will depend on your level of background noise, the sensitivity of your microphone, and other factors. -Delay Before Deactivate: -This will adjust the length of the silence recorded between voice-activated recordings. Recording will continue after you stop speaking for the given duration, before pausing to wait for further input. If you have a low Silence Threshold set then you can safely leave this at 0. -Silence Threshold: -
106
This is used by the Voice Activation and Auto Trim Silence from End of Recording features. It defines what level should be considered silence. This is useful because a microphone will often pick up background noise, but this noise should not trigger the voice activation. You should set the Silence Threshold to be slightly higher than the background noise your microphone is picking up. You can gauge this background level by looking at the level that is currently being received in the Recording Device section (see above).
Bookmark
Allow to add recording bookmarks if the window is not empty and is not entirely selected.
See also Recording .
107

Options - VSTs
VST Plugins
This is where you designate the folders where VST Plugins are stored and accessed from.
Individual folders can be disabled. This means WavePad will not search plugins in these folders but will store the references to them so they can be re-enabled in future.
108
Options - Appearance
Options
Auto re-arrange file windows so that they are all visible Select this option if you want WavePad to auto tile windows horizontally all file windows on the Desktop whenever you load a new file into WavePad. This is useful if you want to be able to see all files at anytime.
Maximize newly opened file windows if others are maximized Select this option if you want WavePad to open files in fully maximized windows within the WavePad interface when other files are maximized. Other files will be available to select in tabs at the bottom of the work space.
Show Decibel (dB) markers on waveforms by default Select this to display decibel lines on WaveForms. Lines are shown at 0dB, -6dB, -12dB, and -18dB. 0dB represents full volume, with every reduction of roughly 6dB halving the volume.
Show Custom Tool Tab Select this to display a custom tool tab at the end of all the tabs. You can add and remove your preferred commands to this custom tab. You can use this custom tab for commands which you use most frequently.
109
Options - Mouse
Mouse
Zoom Options Zoom To Playback Cursor
Choose this option if you would like zoom actions (such as scrolling the mouse wheel) to center on the current location of the playback cursor.
Zoom To Mouse Location
Choose this option if you would like zoom actions (such as scrolling the mouse wheel) to center on the current location of the mouse pointer.
110
Options - Playback
Play Options
Play file automatically when opened
Select this option if you want WavePad to automatically play the file when opened.
Automatic playback after any edit or effect
Select this option if you want WavePad to automatically replay your audio file after you have finished performing any edit or effects operation.
Play file automatically after go to bookmark
Select this option if you want WavePad to automatically play the file after you selected a bookmark.
Play file automatically after select region
Select this option if you want WavePad to automatically play the file after you selected a region.
Reduce volume by 8dB with rewind and fast-forward
Select this option if you want WavePad to reduce the play volume by 8dB when rewinding or fast-forwarding.
111
Options - Keys and MacrosIf you find you need to perform a number of edit or effect functions in sequence often, you can use the Keys tab of Settings to assign key macros. When you press the specified key WavePad will perform the list of functions.
To create a new key macro:
1. Open WavePad Options -> Keys.2. Click on Add.3. Press the key you want to assign as a macro.4. Click Add to add a command to the list.5. Select the command(s).6. Click OK.
From then on, whenever you push the assigned key the list of functions will be performed on the current file.
If you have selected a function that requires data or settings you will be prompted for that data when you press the key.
112
Options - File TypesThe users of Windows XP, Windows Vista and Windows 7 have two choices to set WavePad as the default programs
● Use the menu Tools -> Option -> File Types Select from this list of file types those that you would like to open by default in WavePad. For example: if you were to select .mp3 here, this would mean that every time you double clicked an mp3 file, it would be opened using WavePad.
● Use Windows Operating System's Control Panel -> Default Programs Note.: Windows 8 and after DO NOT have File Types page on Options Dialog. If you are the users of these platforms, and would like to set WavePad as the default program, you have to use Windows Control Panel -> Default Programs.
113
Output Formats - WavePad Output FormatsIn WavePad, most formats you can save to have settings dialogs where you can configure the options for a particular format. This dialog is only viewable after you go to File menu -> Save As, and then specify your output format. The following sections detail the contents of the various settings dialogs available in WavePad.
Formats with configurable options:
● Wav●
● Vox / Raw● Mpc● Ape● Spx● Aif / Aiff / Aifc● Au● Ogg● FLAC● AAC / M4A / MP4● AMR● Wma● RSS Playlists● M3U Playlists● PLS Playlists● WPL Playlists
114
Output Formats - WAV Settings
Name
This drop-down list lets you choose from a series of pre-created settings. Choosing a particular name will automatically configure the Format and Attribute options in a particular way.
You can additionally create new settings and remove existing settings. To make a new setting, make a custom selection from the Format and Attribute options, then click on the "Save As..." button. To remove an existing setting, simply select its name and click on the "Remove" button.
Format
This setting lets you choose the desired type of wave encoding you want for your files.
Attributes
This setting lets you choose the bit rate, sampling rate and number of channels for the wave encoding. Note that the list of options available is dependent on the particular type of encoding format chosen.
115
Output Formats - MP3 Settings
Constant Bitrate Encoding (CBR)
Select this option to encode the audio using a constant bit rate. The specific bitrate value can be selected from the bitrate drop-down list.
The "High Quality" checkbox option produces a better quality output but slows down the audio encoding process.
Variable Bitrate Encoding (VBR)
Select this option to encode the audio using a variable bit rate, which is considered to produce superior results to CBR encoding. For this mode you must select minimum and maximum bitrates from the respective bitrate drop-down lists.
The "Quality" option affects the audible quality of the file, with a higher quality yielding a higher file size for the resulting MP3 file. Note that the number 0 will produce the highest quality and highest file size.
Note: Depending on what bitrate(s) are set, the encoder will set the output sample rate accordingly.
Channels
This selects if the MP3 file will be Stereo, Joint, Force or Mono. Force means that the encoding process will force ms_stereo for all frames, which is faster.
Note: If the source file is Mono, the converted file will likely end up being Mono as well. This is not a bug!
Error Protection
This option adds additional CRC information into the MP3 file, and protects against small corruptions that may later develop due to faulty media on which the file is stored.
116
Output Formats - Vox/Raw Settings
Format
Choose the data format of the file from the drop-down list.
Sample
Choose the sampling rate of the file from the drop-down list, or type in your own value.
Channels
Choose the number of channels encoded into the file from the drop-down list.
Note that if you want to load or play any created vox or raw files, you must remember the vox/raw encoder settings specified at the time of conversion. If the correct settings are not specified, the audio file may sound different than expected.
117
Output Formats - OGG Settings
Quality Encoding
Select this option to encode the audio using a quality setting. The setting values range from 0 to 10, with 0 being the lowest quality and file size, and 10 being the highest quality and file size. The (average) bitrate that the encoder uses to encode the file will depend on what quality setting you use and also the sample rate and number of channels in the original file.
Variable Bitrate Encoding (VBR)
Select this option to encode the audio using a variable bit rate. For this mode you must select minimum and maximum bitrates from the respective bitrate drop-down lists.
Note: Depending on what bitrates are set, the encoder will set the output sample rate accordingly.
Channels
This selects if the output file will be Mono or Stereo (one channel or two channels respectively).
Note: If the source file is Mono, the converted file will likely end up being Mono as well. This is not a bug!
Discard Comments
This denotes whether or not to discard any existing comments present in the original audio file. This applies mostly to files of OGG or OGG Flac format.
118
Output Formats - FLAC Settings
Compression Level
This option defines to what degree to compress the FLAC file. A higher level does not produce a different quality of audio, but does increase the audio encoding time.
Sample Rate
Here you can select the sample rate to use for the output file. A higher sample rate will result in a better quality output.
Channels
This selects if the output file will be Mono or Stereo (one channel or two channels respectively).
119
Output Formats - AAC/M4A Settings
Average Bitrate Encoding (ABR)
Select this option to encode the audio using an average bit rate. The specific bitrate value can be selected from the bitrate drop-down list.
Variable Bitrate Encoding (VBR)
Select this option to encode the audio using a variable bit rate, which is considered to produce superior results to ABR encoding. For this mode you only need to select a Quality value from the respective drop-down list. Values range from 10% to 500%, with higher values producing higher quality audio and a larger output file size.
Advanced Options
The advanced options box gives a choice of encoding options that are not normally used for encodings, but may be of value to advanced users who understand the complexities of the format. The options are presented as below.
Advanced Options - Force MPEG2 Output
Forces encoding using AAC MPEG2 audio (if not checked the default is AAC MPEG4 audio).
Advanced Options - Disable Temporal Noise Shaping
Disables usage of Temporal Noise Shaping, a feature that may or may not produce better sounding output audio.
Note: The option to select the output number of channels (i.e. Mono or Stereo) is not presently available, but will be re-implemented in WavePad for a future release.
120
Output Formats - AMR SettingsAMR Narrowband is a popular format used in mobile phones for creating truetone ringtones. To create your ringtone, simply create and edit an audio file in WavePad, and then save it to AMR format. The maximum length of audio you can save will depend on how much storage memory your mobile phone has. Transferring the AMR file can be done via Bluetooth, Infrared, or Cable, depending on what features are available on your phone. Please refer to your phone documentation for further information (please also refer to your documentation to see if your phone supports the AMR format, this format is not universal to all phones).
The only setting to specify for AMR is the bitrate setting. This determines the quality of your AMR file. A lower bitrate choice will produce a low quality AMR file that is smaller in size. A higher bitrate choice will produce a high quality AMR file that is larger in size. Choose a bitrate according to your needs.
121
Output Formats - RSS Podcast SettingsA podcast is an audio file you create that can contain anything you like, such as voice or music recordings. These audio files get uploaded to an Internet server where anyone can then download them using a specialized program designed to look for podcasts. A podcast consists of two components:
● RSS file: this is the file that will be interpreted by podcast programs. It contains information about your audio recording, such as the audio file name, size and the URL where it is stored.
● MP3 file: this is the actual audio recording. It will only get downloaded by podcast programs at the request of the user.
To create your podcasts from scratch, you can use WavePad for both recording and editing. To upload your podcasts to an Internet server, you can use the FTP feature of WavePad (assuming the server supports FTP). Go to File menu -> Send... and choose the FTP upload option. Both RSS and MP3 files must be uploaded. To download your podcast from the webserver, download a program such as iPodder (http://ipodder.sourceforge.net/index.php).
The settings dialog for the RSS podcast is as follows:
Root URL - The URL where you will upload the podcast. This must be an http URL, and should include "http://" at the beginning.
MP3 Settings - Click the "MP3 Settings" button to open the MP3 settings configuration where you can set the format for the MP3 recording (for more information see the MP3 Settings dialog).
122
Output Formats - M3U Playlist SettingsAn M3U playlist is a text file that contains links to the locations of the actual audio files specified within the playlist file. It does not contain any audio itself. M3U files can be loaded into WinAmp (http://www.winamp.com)
In WavePad, M3U support extends specifically towards streaming an audio file off an Internet server - it is currently limited in its other uses. When you save to an M3U file the following components are generated by WavePad:
● M3U file: the file you play in WinAmp.● MP3 file: the file containing your audio recording.
To create your M3U playlist from scratch, you can use WavePad for both recording and editing. To upload your MP3 file to an Internet server, you can use the FTP feature of WavePad (assuming the server supports FTP). Go to File menu -> Send... and choose the FTP upload option. Both M3u and MP3 files must be uploaded if you want others to use your playlist. To test your playlist out, download the M3U file from the Internet server and then play it in WinAmp.
The settings dialog for the M3U Playlist is as follows:
Root URL
The URL where you will upload or store the audio file. This URL can have the following formats:
-Absolute URLs -After creating an M3U file with an absolute URL, you can put the M3U file anywhere and play it as long as you can access the audio file via http or if its on your computer or LAN.
-Standard http URL -e.g. http://www.music.com/ -File URL on your local computer - e.g. C:\music\
-Relative URLs -The M3U files must be put in specific locations relative to the audio file.
-Relative to the root folder -e.g. if you specify "\music" and you play your M3U file from anywhere on your C:\ drive, it will look for the audio file in the path "C:\music" -Relative to the directory -e.g. if you specify "music" and you play your M3U file in the folder "C:\mp3s", it will look for the audio file in the path "C:\mp3s\music"
123
MP3 Settings
Click the "MP3 Settings" button to open the MP3 settings configuration where you can set the format for the MP3 recording (for more information see the MP3 Settings dialog).
124

Output Formats - PLS Playlist SettingsPLS files are text files that contains links to the locations of the actual audio files specified within the playlist file. It does not contain any audio itself. PLS files can be loaded into WinAmp (http://www.winamp.com)
In WavePad, PLS support extends specifically towards streaming an audio file off an Internet server - it is currently limited in its other uses. When you save to a PLS file the following components are generated by WavePad:
● PLS file: the file you play in WinAmp.● MP3 file: the file containing your audio recording.
To create your PLS playlist from scratch, you can use WavePad for both recording and editing. To upload your MP3 file to an Internet server, you can use the FTP feature of WavePad (assuming the server supports FTP). Go to File menu -> Send... and choose the FTP upload option. Both PLS and MP3 files must be uploaded if you want others to use your playlist. To test your playlist out, download the PLS file from the Internet server and then play it in WinAmp.
The settings dialog for the PLS Playlist is as follows:
Root URL
The URL where you will upload or store the audio file. This URL can have the following formats:
-Absolute URLs -After creating PLS files with absolute URLs, you can put the PLS file anywhere and play it, as long as you can access the audio file via http or if its on your computer or LAN.
● Standard http URL e.g. http://www.music.com/● File URL on your local computer e.g. C:\music\
-Relative URLs -The PLS files must be put in specific locations relative to the audio file.
● Relative to the root folder e.g. if you specify "\music" and you play your PLS file from anywhere on your C:\ drive, it will look for the audio file in the path "C:\music"
● Relative to the directory e.g. if you specify "music" and you play your PLS file in the folder "C:\mp3s", it will look for the audio file in the path "C:\mp3s\music"
MP3 Settings
Click the "MP3 Settings" button to open the MP3 settings configuration where you can set the format for the MP3 recording (for more information see the MP3 Settings dialog).
125
Output Formats - WPL Playlist SettingsWPL files are text files that contain links to the locations of the actual audio files specified within the playlist file. It does not contain any audio itself. WPL files can be loaded into Windows Media Player version 10 or later only (http://www.microsoft.com/windows/windowsmedia/default.aspx).
In WavePad, WPL support extends specifically towards streaming an audio file off an Internet server - it is currently limited in its other uses. When you save to a WPL file the following components are generated by WavePad:
● WPL file: the file you play in Windows Media Player.● MP3 file: the file containing your audio recording.
To create your WPL playlist from scratch, you can use WavePad for both recording and editing. To upload your MP3 file to an Internet server, you can use the FTP feature of WavePad (assuming the server supports FTP). Go to File menu -> Send... and choose the FTP upload option. Both WPL and MP3 files must be uploaded if you want others to use your playlist. To test your playlist file out, download the WPL file from the Internet server and then play it in Windows Media Player.
The settings dialog for the WPL Playlist is as follows:
Root URL
The URL where you will upload or store the audio file. This URL can have the following formats:
-Absolute URLs -After creating WPL files with absolute URLs, you can put the WPL file anywhere and play it, as long as you can access the audio file via http or if its on your computer or LAN.
● Standard http URL e.g. http://www.music.com/● File URL on your local computer e.g. C:\music\
-Relative URLs -The WPL files must be put in specific locations relative to the audio file.
● Relative to the root folder e.g. if you specify "\music" and you play your WPL file from anywhere on your C:\ drive, it will look for the audio file in the path "C:\music"
● Relative to the directory e.g. if you specify "music" and you play your WPL file in the folder "C:\mp3s", it will look for the audio file in the path "C:\mp3s\music"
MP3 Settings
126
Click the "MP3 Settings" button to open the MP3 settings configuration where you can set the format for the MP3 recording (for more information see the MP3 Settings dialog.
127

Advanced - Command Line OptionsNote: This feature is only available in WavePad Master's Edition.
You can easily control WavePad from the command line. The WavePad executable is usually located at "C:\Program Files\NCH Software\WavePad\wavepad.exe". The usage of command-line is:
Usage: wavepad.exe [options] [file(s) to edit] OPTIONS: is where you can issue a series of commands to WavePad. The options are:
--save -Save the current file. --saveas <filepath> -Save the current file with a new name or format, where 'filepath' is the full path of the output file --play -Plays the currently active file. --record -Record audio. --stop -Stops the currently playing file. --restart -Sets the cursor to the start of the current file. --close -Close the current file. --exit -Exit WavePad. --minimize -Minimize WavePad window into an icon in the system tray . --maximize -Maximize WavePad window fit the full size of your monitor, with the exception of the task bar. --restore -If the WavePad window is minimized or maximized, the system restores it to its original size and position. --window <width> <height> -Set the width and height of the WavePad window. where 'width' is the width of the window in pixels, and 'height' is the height of the window in pixels. --list [listfilepath] -ListFilePath is a text file containing a list of files that you want to load into WavePad. One file path per line. --batch - --batch [filepath] [filepath] -Add the specified file(s) to the WavePad batch converter file list. If file path is not specified, WavePad will just open the Batch Converter Window. where: [filepath] the full path of the file that you want to add to the batch converter file list. --batch -inpdir [folderpath] [filepath] [filepath]
128

--inpdir option adds the the files from the folder and its sub-folders recursively. Where [folderpath] is the full path of the folder that holds the audio files. Specific file list can also be used with –inpdir command. --batch [scriptfilepath] -inpdir [folderpath] [filepath] -[scriptfilepath] is the script file which holds all the commands that’s been applied to the files. The Wavepad batch script file holds the extension .wpb. If absolute path is not given for scrip file, Wavepad will try to find the script file from the –inpdir command. --batch [scriptfilepath] -inpdir [folderpath] [filepath] –destdir [OutputDir] --destdir specifies the destination directory of the output files. Where [OutputDir] is the output directory of the output files. If –destdir is not used –inpdir is used as the destination directory. --batch [scriptfilepath] -inpdir [folderpath] [filepath] –output .mp3 --output option specifies the output format of the converted files supported by WavePad. The format type name should precede with a dot (.), e.g. '.mp3' or '.wav'. --batch [scriptfilepath] -inpdir [folderpath] [filepath] –output .mp3 –run --run option executes the batch conversion command. This exits the BatchConverter but not WavePad. --batch [scriptfilepath] -inpdir [folderpath] [filepath] –output .mp3 –quit --quit option executes the batch conversion and then exits WavePad.
-FILE(s) TO EDIT: -Where you type in the files you want to load into WavePad. All typed filenames must use the full filepath of the name, and circumfixed with inverted commas.
Examples:
wavepad.exe -save -close
wavepad.exe -saveas "C:\My Music\MyNewFile.mp3" -exit
wavepad.exe -minimize
wavepad.exe -maximize
wavepad.exe -restore
wavepad.exe -window 800 600
wavepad.exe -batch "C:\My Music\MyNewFile.mp3"
wavepad.exe -batch -inpdir "C:\MusicFolder" "C:\My Music\MyNewFile.mp3"
wavepad.exe -batch -inpdir "C:\MusicFolder" "C:\My Music\MyNewFile.mp3" script.wpb
wavepad.exe -batch -inpdir "C:\MusicFolder" script.wpb -destdir "C:\Convert" -output .wav -run
wavepad.exe -batch "C:\My Music\MyNewFile.mp3" -destdir "C:\Convert" -output .wav -quit
wavepad.exe -list "C:\My Music\MyFileList.txt"
wavepad.exe "C:\My Projects\WavePadProject.wpp"
129

wavepad.exe "C:\My Music\Music1.wav" "C:\My Music\Music1.mp3"
130
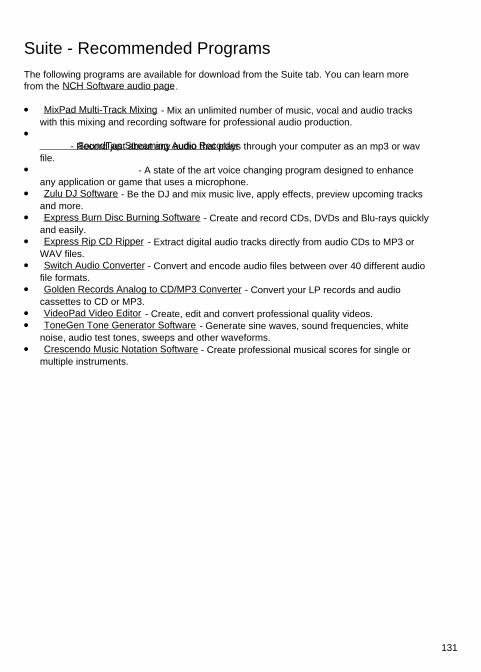
Suite - Recommended ProgramsThe following programs are available for download from the Suite tab. You can learn more from the NCH Software audio page.
● MixPad Multi-Track Mixing - Mix an unlimited number of music, vocal and audio tracks with this mixing and recording software for professional audio production.
● SoundTap Streaming Audio Recorder- Record just about any audio that plays through your computer as an mp3 or wav file.
● - A state of the art voice changing program designed to enhance any application or game that uses a microphone.
● Zulu DJ Software - Be the DJ and mix music live, apply effects, preview upcoming tracks and more.
● Express Burn Disc Burning Software - Create and record CDs, DVDs and Blu-rays quickly and easily.
● Express Rip CD Ripper - Extract digital audio tracks directly from audio CDs to MP3 or WAV files.
● Switch Audio Converter - Convert and encode audio files between over 40 different audio file formats.
● Golden Records Analog to CD/MP3 Converter - Convert your LP records and audio cassettes to CD or MP3.
● VideoPad Video Editor - Create, edit and convert professional quality videos. ● ToneGen Tone Generator Software - Generate sine waves, sound frequencies, white
noise, audio test tones, sweeps and other waveforms. ● Crescendo Music Notation Software - Create professional musical scores for single or
multiple instruments.
131

NCH Sound Library - NCH Sound LibraryThe NCH Sound Library is a collection of thousands of royalty-free sound effects that can be added to your project.
Once you have opened the library, you'll see the following:
Folder Tree
On the left hand side, each folder represents a category of sounds. Expand a folder to either see its subfolders or a list of sounds it contains.
Sound List
On the right hand side, all the sounds in the currently selected category are listed. This will be empty until a category is selected.
Preview Sound
Select a sound in the list then click the Play button to hear it. When you have finished, click .
Download
Select a sound in the list then click the Download button to download the sound (if it hasn't already been downloaded).
132
Screen References - Opus Encoder OptionsEncode audio into the Opus format.
Bitrate
Target bitrate in kbit/sec (6-256 per channel) In VBR mode this specifies the average rate for a large and diverse collection of audio. In CVBR and Hard-CBR mode it specifies the specific output bitrate. Default for >=44.1kHz input is 64kbps per mono stream, 96kbps per coupled pair.
Use default bitrate encoding
In default mode, encoder will choose bitrate automatically. For >=44.1kHz input is 64kbps per mono stream, 96kbps per coupled pair.
Use variable bitrate encoding
In VBR mode the bitrate may go up and down freely depending on the content to achieve more consistent quality.
Use constrained variable bitrate encoding
Outputs to a specific bitrate. This mode is analogous to CBR in AAC/MP3 encoders and managed mode in vorbis coders. This delivers less consistent quality than VBR mode but consistent bitrate.
Use hard constant bitrate encoding
With hard-cbr every frame will be exactly the same size, similar to how speech codecs work. This delivers lower overall quality but is useful where bitrate changes might leak data in encrypted channels or on synchronous transports.
Down mix (None)
Don't down mix, keep the channels same as source.
Downmix to mono
Force to Downmix to mono.
Downmix to stereo
Downmix to stereo if input channels > 2.
133