nch software express animatehelp.nchsoftware.com/help/en/expressanimate/win/help.pdf · nch...
TRANSCRIPT

NCH Software
Express Animate
This user guide has been created for use with
Express Animate Version 3.xx
©NCH Software
Technical Support
If you have difficulties using Express Animate please read the applicable topic before requesting support. If your problem is not covered in this user guide please view the up-to-date Express Animate Online Technical Support at www.nchsoftware.com/animation/support.html. If that does not solve your problem, you can contact us using the technical support contacts listed on that page.
Software Suggestions
If you have any suggestions for improvements to Express Animate, or suggestions for other related software that you might need, please post it on our Suggestions page at www.nch.com.au/suggestions/index.html. Many of our software projects have been undertaken after suggestions from users like you. You get a free upgrade if we follow your suggestion.
Express Animate
ContentsAbout Express Animate.................................................................................................................. 3Getting Started................................................................................................................................ 4NCH Software Suite ....................................................................................................................... 14Flickr Authorization......................................................................................................................... 15Google Authorization Process on Windows XP and Vista.............................................................. 16Software License Terms................................................................................................................. 17
Sample Project
The Sample Project........................................................................................................................ 20
Editing
Bookmarks...................................................................................................................................... 23Composition.................................................................................................................................... 24Composition Tools.......................................................................................................................... 26Composition Properties - Video...................................................................................................... 27Composition Properties - Background............................................................................................ 28Full list of effects ............................................................................................................................. 29Full list of blending modes .............................................................................................................. 31Object Fill ........................................................................................................................................ 32
Image Settings
JPEG Compression Settings .......................................................................................................... 33BMP Encoding Settings.................................................................................................................. 34PNG Encoding Settings.................................................................................................................. 35PNM Encoding Settings.................................................................................................................. 36TIFF Encoding Settings.................................................................................................................. 37JPEG 2000 Compression Settings................................................................................................. 38WebP Compression Settings.......................................................................................................... 39
Keyboard
1
Keyboard Short-Cuts...................................................................................................................... 40
NCH Clipart Library
NCH Clipart Library ........................................................................................................................ 42
NCH Sound Library
NCH Sound Library ........................................................................................................................ 43
Screen References
Welcome Dialog.............................................................................................................................. 44Missing Files Dialog........................................................................................................................ 45File Source Dialog.......................................................................................................................... 46Text Tools....................................................................................................................................... 47HTML5 Export................................................................................................................................. 49HTML5 Export Report..................................................................................................................... 50Composition duration dialog ........................................................................................................... 51Object duration dialog..................................................................................................................... 52Timeline position dialog.................................................................................................................. 53Custom aspect ratio dialog ............................................................................................................. 54Custom Resolution......................................................................................................................... 55Custom Frame Rate....................................................................................................................... 56Detected Format ............................................................................................................................. 57DVD Bitrate Settings....................................................................................................................... 58Speed Change................................................................................................................................ 59Options ~ General .......................................................................................................................... 60
2
About Express AnimateExpress Animate is a motion graphics application developed by NCH Software. It can be used to animate, edit, and compose media in 2D space.
Features
● Layer-oriented: Each individual media object occupies its own layer.● Import and organize video footage.● Load a wide variety of video file formats, including AVI, MOV, MP4, and WMV.● Create, arrange, and composite layers in a composition. Create one or more compositions.● Create and animate vector shapes and masks.● Apply impressive visual effects.● Create unique animated text effects.● Group multiple layers within the same composition by creating a parenting chain.● Dummy objects let you get better control of your animation.● Save the resulting movie to a file, upload it to YouTube, or burn it to DVD.
System Requirements
Operating system Windows XP SP2 / Vista / 7 / 8 / 8.1 / 10CPU Intel Core 2 Duo 2.0 GHz
or
AMD Athlon 64 X2 5000+ RAM 2 GBDisplay 1024 x 768Sound card Windows compatible sound card
3
Getting Started
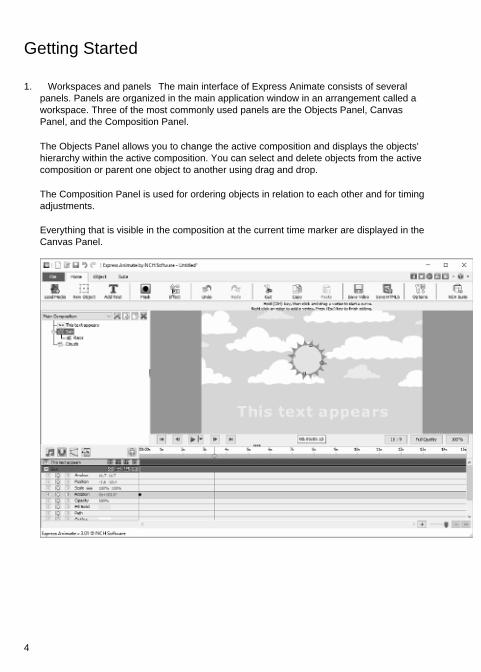
1. Workspaces and panels The main interface of Express Animate consists of several panels. Panels are organized in the main application window in an arrangement called a workspace. Three of the most commonly used panels are the Objects Panel, Canvas Panel, and the Composition Panel.
The Objects Panel allows you to change the active composition and displays the objects' hierarchy within the active composition. You can select and delete objects from the active composition or parent one object to another using drag and drop.
The Composition Panel is used for ordering objects in relation to each other and for timing adjustments.
Everything that is visible in the composition at the current time marker are displayed in the Canvas Panel.
4
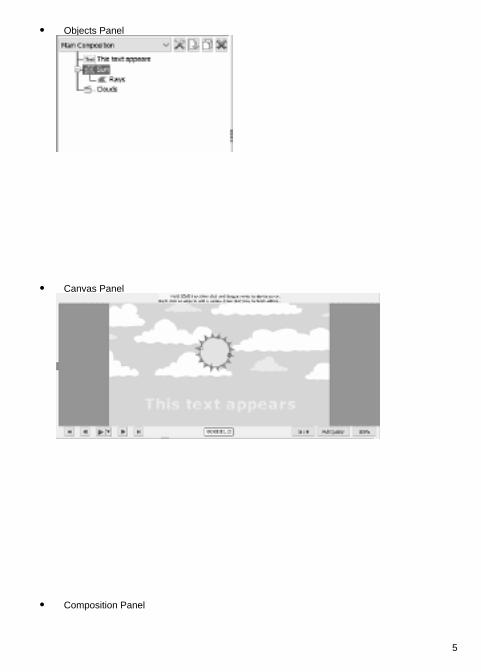
● Objects Panel
● Canvas Panel
● Composition Panel
5
2. Adding Media Objects Load video files (.avi, .mov, etc.), audio files (.aac, .mp3, etc.), or image files (.jpg, .png, etc.) using one of the following ways:
● Drag and drop one or more files from File Explorer or the desktop into the Canvas Tab.● Select File -> Load Media Files... ● Click the Load Media tool bar button
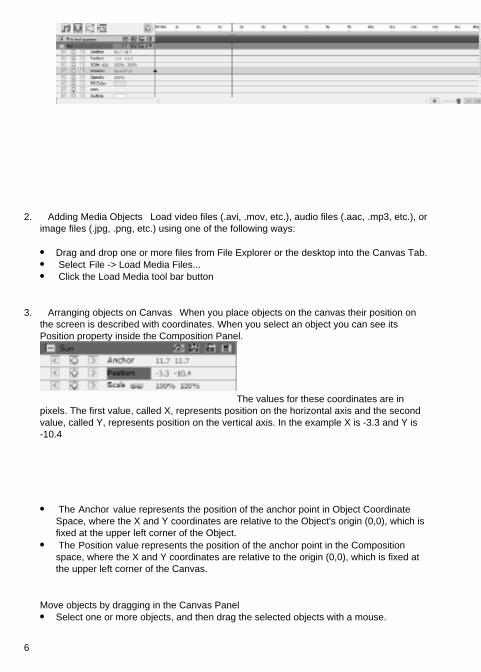
3. Arranging objects on Canvas When you place objects on the canvas their position on the screen is described with coordinates. When you select an object you can see its Position property inside the Composition Panel.
The values for these coordinates are in pixels. The first value, called X, represents position on the horizontal axis and the second value, called Y, represents position on the vertical axis. In the example X is -3.3 and Y is -10.4
● The Anchor value represents the position of the anchor point in Object Coordinate Space, where the X and Y coordinates are relative to the Object's origin (0,0), which is fixed at the upper left corner of the Object.
● The Position value represents the position of the anchor point in the Composition space, where the X and Y coordinates are relative to the origin (0,0), which is fixed at the upper left corner of the Canvas.
Move objects by dragging in the Canvas Panel ● Select one or more objects, and then drag the selected objects with a mouse.
6
● When you move an object by dragging it on canvas, the position property gets automatically adjusted according to the objects' new position as you drag.
Move objects by directly modifying the Position property
1. Select one or more objects.2. Find the Position property in the Composition Panel for the objects.3. Modify the X and Y Position properties.
Move objects with arrow keys
1. Select one or more objects.2. To move selected objects one pixel left, right, up, or down, press an arrow key.
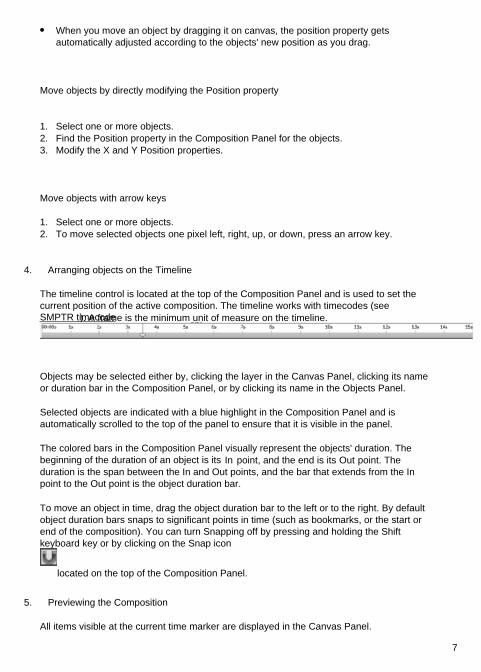
4. Arranging objects on the Timeline
The timeline control is located at the top of the Composition Panel and is used to set the current position of the active composition. The timeline works with timecodes (see SMPTR timecode). A frame is the minimum unit of measure on the timeline.
Objects may be selected either by, clicking the layer in the Canvas Panel, clicking its name or duration bar in the Composition Panel, or by clicking its name in the Objects Panel.
Selected objects are indicated with a blue highlight in the Composition Panel and is automatically scrolled to the top of the panel to ensure that it is visible in the panel.
The colored bars in the Composition Panel visually represent the objects' duration. The beginning of the duration of an object is its In point, and the end is its Out point. The duration is the span between the In and Out points, and the bar that extends from the In point to the Out point is the object duration bar.
To move an object in time, drag the object duration bar to the left or to the right. By default object duration bars snaps to significant points in time (such as bookmarks, or the start or end of the composition). You can turn Snapping off by pressing and holding the Shift keyboard key or by clicking on the Snap icon
located on the top of the Composition Panel.
5. Previewing the Composition
All items visible at the current time marker are displayed in the Canvas Panel.
7
You can adjust the Preview Quality from a drop down box at the bottom of the Canvas Panel. Hint: Decrease the preview quality to improve rendering performance.
Preview Playback Controls are located at the bottom of the Canvas Panel. Use Go to start, Go to end, Step back, and Step forward buttons to change the current timeline position. Click Play button to start the preview playback of the active composition.
There are 3 different playback modes which can be selected using a drop down menu next to the play button:
1. Play every frame - Every frame of the composition is displayed according to the composition framerate. Audio is not available in this mode.
2. Real-time playback - Composition is played back in real time. Frames are dropped if necessary to make sure video and audio are in sync during playback.
3. Real-time playback of cached frames - Composition frames are cached starting from the current timeline position and until the preview cache is filled up completely. After the caching is done, real-time playback of the cached segment is performed in a loop.
6. Trimming objects' duration
To trim an object's duration is to modify its In or Out point so that the object has a different duration. By dragging either end of a layer duration bar you can trim the object's duration or extend it. Trimming object's duration does not alter video footage or original source files.
You can extend image, text and shape objects for any duration, extending their In and Out points out past their original times.
When you trim video or audio file object a pale bar represents the frames of the footage that you are excluding from the composition. You can choose which frames are played within a trimmed duration by dragging the slip-edit bar.
By default, new compositions have the duration of 30 seconds. Image, shape, and text objects have the default duration of 5 seconds, and the duration of video and audio objects is based on the duration of the original file.
To change the duration of a composition click Composition settings button next to the compositions list in the Objects Panel or click the Change composition duration button
located on the top of the Composition Panel.
7. Object properties in the Composition Panel
Each object has properties, many of which you can modify and animate. Every object has a Transform property group that includes Position and Opacity. By adding masks or effects to an object, you can create additional property groups for the object.
To expand or collapse a property group, click the collapse/expand button to the left of the object name or property group name.
8
Set a property value To change a property value click the highlighted value, enter a new value, and then press Enter. Or you can place the cursor over the highlighted value, press and hold the left mouse button, and drag to the left or right to increase or decrease the value.
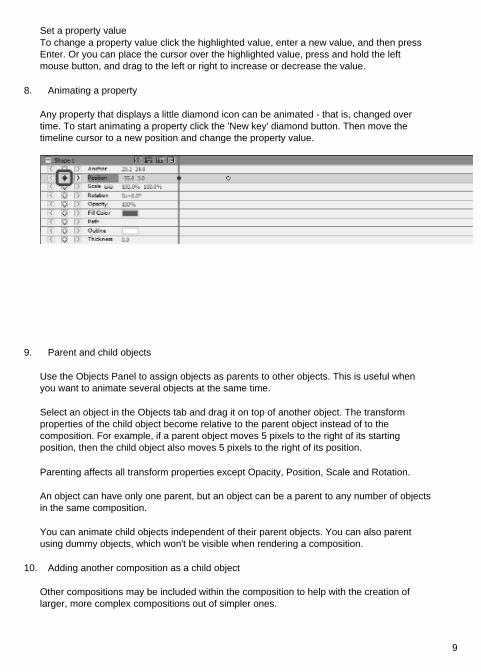
8. Animating a property
Any property that displays a little diamond icon can be animated - that is, changed over time. To start animating a property click the 'New key' diamond button. Then move the timeline cursor to a new position and change the property value.
9. Parent and child objects
Use the Objects Panel to assign objects as parents to other objects. This is useful when you want to animate several objects at the same time.
Select an object in the Objects tab and drag it on top of another object. The transform properties of the child object become relative to the parent object instead of to the composition. For example, if a parent object moves 5 pixels to the right of its starting position, then the child object also moves 5 pixels to the right of its position.
Parenting affects all transform properties except Opacity, Position, Scale and Rotation.
An object can have only one parent, but an object can be a parent to any number of objects in the same composition.
You can animate child objects independent of their parent objects. You can also parent using dummy objects, which won't be visible when rendering a composition.
10. Adding another composition as a child object
Other compositions may be included within the composition to help with the creation of larger, more complex compositions out of simpler ones.
9
To add another composition to the currently selected composition, select the new composition from the Composition button
on the Object tab. The child composition may be parented to any object within the current composition and acts just like any other child object within the composition, so can be scaled, rotated and moved just like any other object.
To edit the child composition, select the child composition from the composition pull-down at the top of the Objects Panel. The child composition can be modified separately of any composition that it may be a child of, all changes to the composition will be reflected in the any composition that it has been included in.
11. Creating shapes and masks
Creating shapes To create a shape object click a shape (e.g. Rectangle, Ellipse, or Custom Shape) button on the tool bar. To select the type of the shape use the drop down menu to the right of the tool bar button.
● To draw a rectangle, click the rectangle tool bar button, move your mouse over the canvas, click and hold the left mouse button and drag diagonally.
● To draw an ellipse, click the ellipse tool bar button, move your mouse over the canvas, click and hold the left mouse button and drag diagonally.
● To draw a custom shape:
1. With the Custom Shape tool bar button selected, click in the Canvas where you want to place the first vertex.
2. Click where you want to place the next vertex to create a straight segment3. By continuing to click, you create a path made of straight line segments connected
by corner points.4. To create a curved segment, click and drag the direction line handle to create the
curve that you want.5. To finish editing press the Enter or Escape key
Creating masks A mask is used for isolating an area of an object to make that part of the object transparent to the objects beneath it. You can create one or more masks for each object in a composition to cut out certain parts of an image, so the objects, positioned in the composition below the selected object, will show through. Masks can be animated over time, for example to follow a moving object in a video.
Editing masks is similar to editing shape objects.
10
To create a new mask select an object and click on the Mask icon on the main toolbar, or choose New Mask from the right-click menu in the Composition Panel. A Mask property group will appear in the objects' list of properties. With the Mask property selected, click and drag on yellow vertices on the canvas to change the shape of the mask. Hold Ctrl key when selecting a vertex to edit a curve for this vertex. Right-click on the Mask to add new vertices.
12. Applying Effects
Every object can have one or more effects applied to it.
To apply a visual effect to a selected object click the Effect toolbar button and select a Video effect from a drop down list.
To apply a sound effect right-click an audio object in the Composition Panel and select an effect from the Sound->New Effect menu. Alternatively you could apply an effect to selected object by selecting Object->Sound Effects from the main menu.
After you've applied an effect to an object, a new property group is created for that object in the Composition Panel. Some effect properties can be animated.
See: Full list of effects
13. Blending mode
It is possible to control the way an object blends with objects beneath it, or use an object as a stencil or silhouette.
The default blending mode is Normal. In this mode the result color is the color of the top object, the underlying color is ignored.
To change the oBject's blending mode right-click an object and select Blending Mode from a context menu.
See: Full list of blending modes
14. Animation Curve Editor
Curve Editor control is used for precise control over the way an object property is animated. To activate the curve editor select a property of an object (e.g. Position, Scale, etc) in the composition panel and click Open the curve editor button
located on the top of the Composition Panel. Drag animation keys and their control points to modify the interpolation curve and control the way the property is animated. To change the interpolation type right-click an animation key and select Linear or Bezier Curve interpolation from the context menu.
15. Rendering video
11
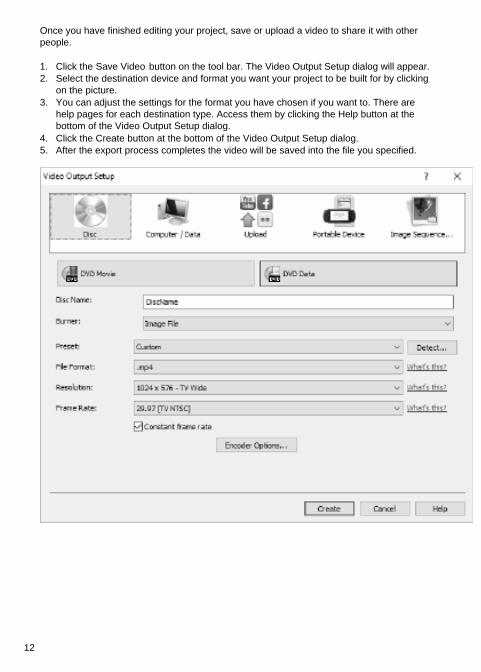
Once you have finished editing your project, save or upload a video to share it with other people.
1. Click the Save Video button on the tool bar. The Video Output Setup dialog will appear.2. Select the destination device and format you want your project to be built for by clicking
on the picture.3. You can adjust the settings for the format you have chosen if you want to. There are
help pages for each destination type. Access them by clicking the Help button at the bottom of the Video Output Setup dialog.
4. Click the Create button at the bottom of the Video Output Setup dialog.5. After the export process completes the video will be saved into the file you specified.
12
16. Exporting to HTML5
The final video may be published as a HTML5 web page that you can include on your own web site.
1. Click the Save HTML5 button on the tool bar. The HTML5 Export Parameters dialog will appear.
2. Select the output folder and resolution you want your project to be saved with.3. Click the Save HTML5 button at the bottom of the HTML5 Export Properties dialog.
See the for a working example of some of the features that are available.
13
NCH Software SuiteThis is a useful way to browse all the software available from NCH Software
You can see a set of products by type like Audio, Video and so on and view the product. From there you can try out the product and it will download and install it for you to trial. If you already have the product installed then you can click "Run It Now" and the program will be launched for you.
There is also a list of features for products in the category. Click on a feature, such as "Edit a Video File", to install a product with that ability.
Search
Search our website for products matching any keywords you type.
See more of our software
Browse our website for more software.
Subscribe to our newsletter
You can subscribe to our newsletter for announcements of new releases and discounts. You can unsubscribe at any time.
See the latest discounts for purchase
See the latest discounts we are offering for purchasing our products.
14
Flickr AuthorizationExpress Animate can make it easy and convenient to upload your photos or videos to Flickr. However, it needs your permission before you use it.
If you click the Authorize... button, the Flickr website will open in your web browser. If the Flickr website shows a login page, please log in. The website will then ask if you want to link Express Animate to your Flickr account. Please click OK, I'll authorize it. The website will then show a nine digit verification code. Please type or copy and paste the code from the website into Express Animate and click Continue .
Flickr Authorization
If Express Animate has the authorization of a Flickr's user, the Authorize... button will be disabled and the Remove Authorization button will be enabled so that you can delete the authorization. Otherwise, you click the Authorize... button to authorize Express Animate for uploading photos or videos to Flickr.
15
Google Authorization Process on Windows XP and VistaExtra steps are required to give ExpressAnimate authorization to upload to Google Drive and/or YouTube when running on Windows XP or Windows Vista:
1. Click Authorize... in the Authorization dialog. 2. In the web page that opens, sign in to your Google account, if required. 3. Confirm that you authorize ExpressAnimate to access the requested features. 4. Copy the Authorization Code provided by Google and paste it in the Authorization confirm
dialog in ExpressAnimate. 5. Click Ready to confirm that authorization is complete.
16
Software License TermsThis EULA limits our liability and is governed by an arbitration agreement and venue agreement. Please read below as these terms affect your rights.
1. The copyrights in this software and any visual or audio work distributed with the software belong to NCH Software and others listed in the about box. All rights are reserved. Installation of this software and any software bundled with or installed-on-demand from this software, including shortcuts and start menu folders, is licensed only in accordance with these terms.
2. By installing, using or distributing the software you, on your own behalf and on behalf of your employer or principal, agree to be bound by these terms. If you do not agree to any of these terms, you may not use, copy, transmit, distribute, nor install this software - return it to the place of purchase within 14 days to receive a full refund.
3. This software, and all accompanying files, data and materials, are distributed "as is" and with no warranties of any kind, whether express or implied except as required by law. If you intend to rely on this software for critical purposes you must test it fully prior to using it, install redundant systems and assume any risk.
4. We will not be liable for any loss arising out of the use of this software including, but not limited to, any special, incidental or consequential loss. Your entire remedy against us for all claims is limited to receiving a full refund for the amount you paid for the software.
5. You may not use this software in any circumstances where there is any risk that failure of this software might result in a physical injury or loss of life. You may not use this software if you do not regularly backup your computer, or do not have antivirus and firewall software installed on the computer, or keep sensitive data unencrypted on your computer. You agree to indemnify us from any claims relating to such unauthorized use.
6. You may copy or distribute the installation file of this software in its complete unaltered form but you may not, under any circumstances, distribute any software registration code for any of our programs without written permission. In the event that you do distribute a software registration code, you will be liable to pay the full purchase price for each location where the unauthorized use occurs.
7. Use of data collected by the software is subject to the NCH Software Privacy Statement which allows automatic anonymized collection of usage statistics in limited circumstances.
8. Choice of Law. If you reside in the United States, your relationship is with NCH Software, Inc, a United States company, and this agreement is governed by the laws and courts of Colorado. If you reside anywhere in the world outside of the United States, your relationship is with NCH Software Pty Ltd, an Australian company, and this agreement is governed by the laws and courts of the Australian Capital Territory. Such courts have continuing and exclusive jurisdiction over any dispute between you and us, regardless of the nature of the dispute.
9. U.S. Customers Only: Arbitration Agreement and Class Action Waiver: PLEASE READ THIS CAREFULLY. IT MAY AFFECT YOUR RIGHTS.
17
If you reside in the United States, NCH Software and you agree to arbitrate all disputes and claims between us. This agreement to arbitrate is intended to be broadly interpreted. References to "NCH" "you," and "us" include our respective subsidiaries, affiliates, agents, employees, predecessors in interest, successors, and assigns. This arbitration agreement does not preclude you from bringing issues to the attention of U.S. federal, state, or local agencies. Such agencies can, if the law allows, seek relief against us on your behalf. This Agreement evidences a transaction in interstate commerce, and thus the Federal Arbitration Act governs the interpretation and enforcement of this provision. This arbitration provision shall survive termination of this Agreement.
A party who intends to seek arbitration must first send to the other, by certified mail, a written Notice of Dispute ("Notice"). The Notice to NCH should be addressed to:
Legal Department
NCH Software, Inc.
6120 Greenwood Plaza Blvd, Ste 120
Greenwood Village CO, 80111
USA
("Notice Address"). The Notice must (a) describe the nature and basis of the claim or dispute; and (b) set forth the specific relief sought ("Demand"). If NCH and you do not reach an agreement to resolve the claim within 30 days after the Notice is received, you or NCH may commence an arbitration proceeding. The amount of any settlement offer made by NCH or you shall not be disclosed to the arbitrator.
A. The arbitration will be governed by the Commercial Arbitration Rules and the Supplementary Procedures for Consumer Related Disputes (collectively, "AAA Rules") of the American Arbitration Association ("AAA"), as modified by this Agreement, and will be administered by the AAA. The AAA Rules are available online at adr.org, by calling the AAA at 1-800-778-7879, or by writing to the Notice Address. The arbitrator is bound by the terms of this Agreement. All issues are for the arbitrator to decide, including issues relating to the scope and enforceability of the arbitration provision. Unless NCH and you agree otherwise, any arbitration hearings will take place in Greenwood Village Colorado. If your claim is for $10,000 or less, we agree that you may choose whether the arbitration will be conducted solely on the basis of documents submitted to the arbitrator, through a telephonic hearing, or by an in-person hearing as established by the AAA Rules. If your claim exceeds $10,000, the right to a hearing will be determined by the AAA Rules. Regardless of the manner in which the arbitration is conducted, the arbitrator shall issue a reasoned written decision. NCH will pay all AAA filing, administration, and arbitrator fees for any arbitration initiated in accordance with the notice requirements above. If, however, the arbitrator finds that either the substance of your claim or the relief sought in the Demand is frivolous or brought for an improper purpose then the payment of all such fees will be governed by the AAA Rules. In such case, you agree to reimburse NCH for all monies previously disbursed by it that are otherwise your obligation to pay under the AAA Rules. In addition, if you initiate an arbitration in which you seek more than $75,000 in damages, the payment of these fees will be governed by the AAA rules.
18
B. The arbitrator may award declaratory or injunctive relief only in favor of the individual party seeking relief and only to the extent necessary to provide relief warranted by that party's individual claim. YOU AND NCH AGREE THAT EACH MAY BRING CLAIMS AGAINST THE OTHER ONLY IN YOUR OR ITS INDIVIDUAL CAPACITY, AND NOT AS A PLAINTIFF OR CLASS MEMBER IN ANY PURPORTED CLASS OR REPRESENTATIVE PROCEEDING. Further, unless both you and NCH agree otherwise, the arbitrator may not consolidate more than one person's claims, and may not otherwise preside over any form of a representative or class proceeding. If this specific provision is found to be unenforceable, then the entirety of this arbitration provision shall be null and void.
C. Notwithstanding any provision in this Agreement to the contrary, we agree that if NCH makes any future change to this arbitration provision (other than a change to the Notice Address) you may reject any such change by sending us written notice within 30 days of the change to the Arbitration Notice Address provided above. By rejecting any future change, you are agreeing that you will arbitrate any dispute between us in accordance with the language of this provision.
D. To opt out of this Arbitration Agreement and class action waiver send an Opt Out notice to the Notice Address stating "I am electing to opt out of the Arbitration Agreement and class action waiver contained in the Legal Terms applicable to my purchase of an NCH product." Your Opt Out Notice must include the date and proof of purchase. The Opt Out Notice must be postmarked no later than thirty (30) days after the date of purchase. A separate Opt Out Notice must be sent for each product purchased.
19
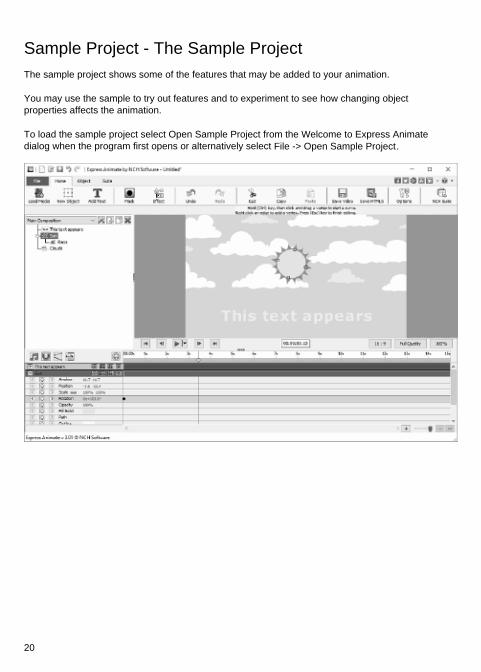
Sample Project - The Sample ProjectThe sample project shows some of the features that may be added to your animation.
You may use the sample to try out features and to experiment to see how changing object properties affects the animation.
To load the sample project select Open Sample Project from the Welcome to Express Animate dialog when the program first opens or alternatively select File -> Open Sample Project.
20
The sample has been built using two compositions.
1. Main Composition
The main composition is made up four objects, three of which are animated, the other is a child and is animated by its parent.
● The "This text appears" Text object has been animated so that it will change its Scale as well change its Opacity over time. It starts of with an opacity of 0% and a scaling of 100% up until the 2 second mark then by the 4.17 second mark the opacity is 100% and the scaling is 113%
The effect of this is the text will appear to fade into view between the 2 second mark and 4.17 seconds as well as grow slightly in size.
● The "Sun" Shape object is made up by an Ellispe object with the proportions of a circle and the "Rays" child object which is another Ellispe which has been modified by adding extra vertices which were moved to give the rays effect.
The Sun object has been animated so that it slowly rotates around its own center, this animation also applies to the child "Rays" object.
● The "Clouds" object is the Clouds Composition which has been animated so that it scrolls from right to left over time. Since the Clouds Composition is wider then the parent composition it will not be fully visible at any one time as it will effectly be masked by the size of the parent composition.
The main composition's background is a solid blue color. This could be changed to be a gradient so that it is lighter towards to top of the frame to give a more sky like coloration.
Try: Change the background to a gradient click on the Composition Settings button next to the composition name on the Objects Panel, open the Background tab and select the Gradient radio button. Move th Direction arrow so that it points vertically from bottom to top, then change the color of the top Stop to be a medium blue and the top Stop to be a lighter blue. Click OK to accept the change.
2. Clouds Composition
The clouds composition is made up of two sets of clouds made up of 10 small and 14 large clouds, each of which were created as Custom Shape objects. They are grouped into small clouds and large clouds by making them the children of either the 'Small clouds' or 'Big clouds' dummy objects. The two dummy objects are a way to create simple groups of objects.
The background fill color is ignored when it is included as a child composition by the main composition.
The clouds composition in this sample does not contain any animation timings itself, it is merely a static image which is animated by the main composition.
Try:
21
Add animation keys to either the small clouds or the big clouds so they move at a different rate. See how it looks when you play the Clouds composition by itself and how the main composition now looks.
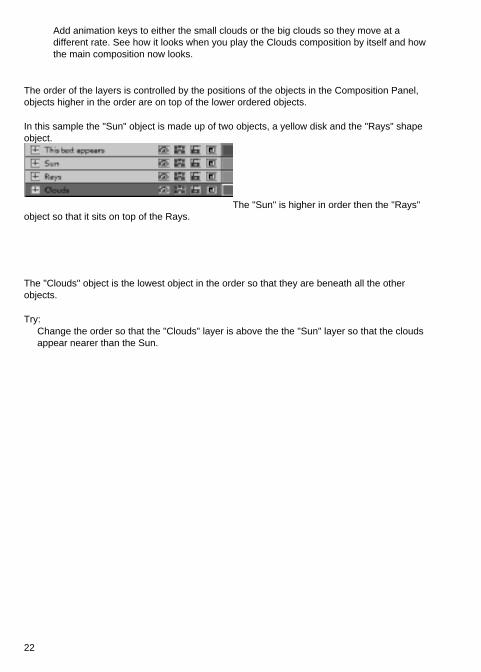
The order of the layers is controlled by the positions of the objects in the Composition Panel, objects higher in the order are on top of the lower ordered objects.
In this sample the "Sun" object is made up of two objects, a yellow disk and the "Rays" shape object.
The "Sun" is higher in order then the "Rays" object so that it sits on top of the Rays.
The "Clouds" object is the lowest object in the order so that they are beneath all the other objects.
Try: Change the order so that the "Clouds" layer is above the the "Sun" layer so that the clouds appear nearer than the Sun.
22
Editing - BookmarksYou can add bookmarks to your timeline to separate the timeline into sections. Timeline cursor and objects will snap to these bookmarks.
Adding a Bookmark
To add a bookmark right-click the timeline at the point you wish to add a bookmark and select Set Bookmark.
The Edit Bookmark dialog will open. Enter the bookmark's name and choose the color you would like your bookmark to be by clicking the color sample, then click OK.
Editing Bookmarks
To change the name or color of a bookmark, right-click it and select Edit Bookmark... The dialog will open.
Removing Bookmarks
To remove a bookmark, right-click it and select Remove Bookmark.
23
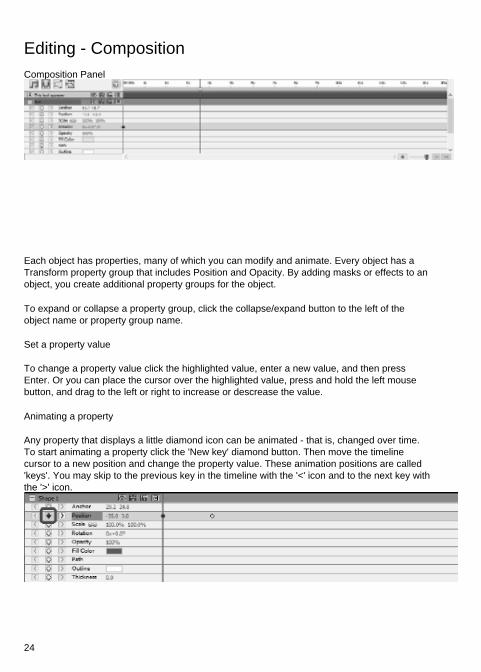
Editing - CompositionComposition Panel
Each object has properties, many of which you can modify and animate. Every object has a Transform property group that includes Position and Opacity. By adding masks or effects to an object, you create additional property groups for the object.
To expand or collapse a property group, click the collapse/expand button to the left of the object name or property group name.
Set a property value
To change a property value click the highlighted value, enter a new value, and then press Enter. Or you can place the cursor over the highlighted value, press and hold the left mouse button, and drag to the left or right to increase or descrease the value.
Animating a property
Any property that displays a little diamond icon can be animated - that is, changed over time. To start animating a property click the 'New key' diamond button. Then move the timeline cursor to a new position and change the property value. These animation positions are called 'keys'. You may skip to the previous key in the timeline with the '<' icon and to the next key with the '>' icon.
24
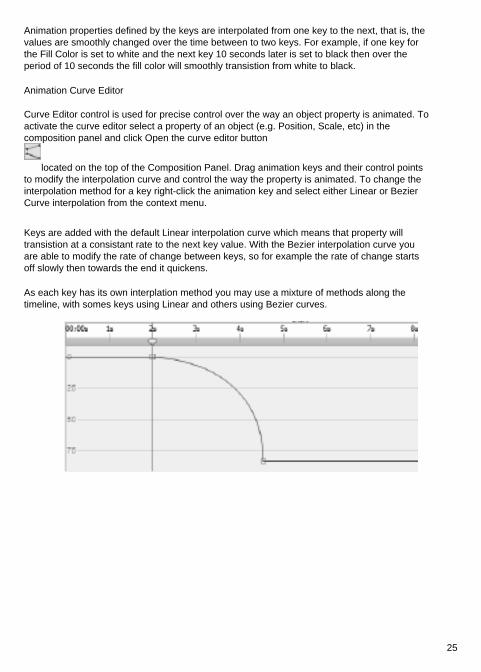
Animation properties defined by the keys are interpolated from one key to the next, that is, the values are smoothly changed over the time between to two keys. For example, if one key for the Fill Color is set to white and the next key 10 seconds later is set to black then over the period of 10 seconds the fill color will smoothly transistion from white to black.
Animation Curve Editor
Curve Editor control is used for precise control over the way an object property is animated. To activate the curve editor select a property of an object (e.g. Position, Scale, etc) in the composition panel and click Open the curve editor button
located on the top of the Composition Panel. Drag animation keys and their control points to modify the interpolation curve and control the way the property is animated. To change the interpolation method for a key right-click the animation key and select either Linear or Bezier Curve interpolation from the context menu.
Keys are added with the default Linear interpolation curve which means that property will transistion at a consistant rate to the next key value. With the Bezier interpolation curve you are able to modify the rate of change between keys, so for example the rate of change starts off slowly then towards the end it quickens.
As each key has its own interplation method you may use a mixture of methods along the timeline, with somes keys using Linear and others using Bezier curves.
25

Editing - Composition ToolsComposition controls toolbar located on the top of the Composition Panel.
● Scratch
- Enable/Disable timeline sound scrubbing.
● Snap
- Enable/Disable object composition duration snapping.
● Curve Editor
- Open the curve editor for the selected animation keys.
● Duration
- Change the composition duration.
26
Editing - Composition Properties - VideoThis dialog is used to modify the parameters of a composition.
● Name - Select a name to use for the composition source. ● Aspect Ratio - Select composition proportions. ● Framerate - Select the number of frames per second in this composition. ● Duration - Set the timecode for the maximum duration for this composition. The actual
content duration can be shorter and is determined by the objects placed on the composition.
27
Editing - Composition Properties - BackgroundThis dialog is used to choose the fill color or gradient for the background.
Select the fill style:
Click either the Solid or Gradient radio button to select the fill style.
No Background
The background will be set transparent. The transparent background will be filled with the checkerboard.
Solid
The background will be filled with a solid color. The current color will be shown in the color box next to the radio option.
Click on the color box to change the color.
Gradient
The background will be filled with a gradient.
Select either the Linear or Radial in the drop-down list to set the gradient type.
The Direction box lets you change the direction, start and end points of the linear gradient. The direction can be changed by moving the square dot and/or the arrow head.
The Stops bar lets you control the stop points of the gradient.
● Click on one of the stop points (little triangles on the right side of the bar) to select the stop point.
● Drag the stop point to move it.● Right-click on the stop point to delete it or press the X button to delete the selected stop
point. ● Click on the Stop Point color box to change the color of the selected stop point.
28
Editing - Full list of effectsVideo Effects Every object can have one or more effects applied to it.
● Black and White - When applied, the image will appear black and white. Also known as gray-scale. For partially desaturating colors, use the Saturation effect instead.
● Sepia - Tints the image with a sepia color.● Negative - Every color is replaced with its negative color, like a film negative.● Noise - Random pixels are drawn on top of the image. The higher the intensity, the more
noise is added, and less of the original image is visible.● Brightness - Applies brightness, contrast, and/or gamma to the image.
For brightness: Negative values give a darker image. Positive values give a brighter image.
For contrast: Negative values give lower contrast, causing dark areas to appear brighter and bright areas to appear darker. Positive values give higher contrast, causing dark areas to appear darker and bright areas to appear brighter.
For gamma: The value specifies non-linear gamma correction. Values less than 1 give a darker image. Values greater than 1 give a brighter image.
● Edge Detection - Finds and highlights the edges of objects in the frame.● Posterize - Reduces the apparent number of colors in the image, changing gradients into
flat areas of color.● Pixelate - The higher the coarseness value, the larger the size of the blocks used to render
the image, and the lower the resolution appears.● Blur / Sharpen - Negative values cause edges in the image to be sharpened. Positive
values cause the image to be smoothed. Also known as blurred or softened.● Saturation - Negative values cause the colors to be desaturated, where the minimum value
gives a black and white image. Positive values cause the colors to be over saturated.● Hue - Shifts the hue of every color in the image by the specified percentage, giving
unnatural colors.● Temperature - Used to correct colors in video or images taken with incorrect white balance.
Negative values make the image cooler. Positive values make the image warmer.● Tint - Tints the image with an RGBA (red / green / blue / alpha) color value. The Intensity
slider changes the alpha.● Two-Tone - The brightest half of the pixels are converted to one color while all the rest are
converted to another color.● Tiles - Makes the image look like it is made of rectangular tiles. The number of tiles and the
spacing between tiles can be changed.
Sound Effects
● Amplify - Increases the loudness (or volume levels) of the selected object. The volume is entered in percent (100 being no change, 50 being -6dB softer or 200 being +6dB louder).
● Chorus - Makes one voice or one instrument sound like 3 voices or instruments by playing the original with variably delayed and slightly pitch changed copies of the original.
29
● Compressor - A Dynamic Range Compressor limits the volume levels of a sound recording so that it stays within a certain loudness range.
An example of where it is used is in TV broadcasting, where it ensures that the volume levels of ads are perceived as being louder than the television program itself (without any change in the actual broadcast volume).
The "Threshold" setting works by detecting when the sound recording volume exceeds a defined decibel level. It then gradually attenuates the sound to bring it down below the dB level, and does it in such a way that the listener will not be aware the attenuation is occurring.
The "Ratio" setting limits the amount the volume level of the recording increases at any one time. If, for example, you wanted the volume levels of a recording to only increase by at most 1/4 of the amount they would normally increase, then this would correspond to a Ratio of 4:1. So if the recording volume level increased by 8dB, then you would only hear a 2dB volume increase.
The "Limit" setting defines at what maximum decibel level the sound recording will be allowed to rise up to. So if, for example, the Limit was set to 0dB, then you will never hear the volume level of the recording get louder than 0dB. The Limit setting has similarities to the Threshold setting, but the main difference is that the Threshold does allow sounds to go above the defined decibel level (for a short time), whereas the Limit does not.
You will find that the minimum Limit volume you can set is the same as the maximum Threshold value. This basically means that, in any situation, the sound will start to attenuate at the threshold level, but will never be heard louder than the limit.
● Distortion - Adds distortion to sound. Degree of distortion is measured in percents. Top Line Level determines the level where the distortion kicks in.
● Echo - Repeat the sound after a specified short time.● Flanger - Similar to the phaser, except that the delay is slowly modulated over time. You
specify the starting delay time, the frequency of modulation, the depth of modulation and the wet dry gain (100% for wet, 0% for dry).
● High Pass - A high-pass filter (sometimes called a low cut filter) removes all low frequencies below a specified Hz. This is useful if you want to make your recording sound 'clearer' or less 'muddy'. It is very usual to use a high-pass filter of about 300Hz on all voice recordings to improve intelligibility.
● Reverb - Reverb is many small reflections of the sound that come after a set time. It usually occurs when someone is speaking in a room, hall etc. More reverb is called wet, no reverb is called dry.
● Pan - Fades the audio between the left and right channels.
30
Editing - Full list of blending modesBlending Modes
● Normal - The result color is the object color. This mode ignores the underlying color. This is the default mode.
● Dissolve - The result color for each pixel is either the object color or the underlying color. The probability that the result color is the object color depends on the opacity of the object. If opacity of the object is 100%, then the result color is the object color. If opacity of the object is 0%, then the result color is the underlying color.
● Dancing Dissolve - Same as Dissolve, but each frame uses a new random seed, so the result varies over time.
● Darken - For each color channel selects the darker of the object color channel value and the underlying color channel value.
● Multiply - For each color channel, multiplies object color channel value with underlying color channel value and divides by 255.
● Lighten - For each color channel selects a lighter of the object color channel value and the underlying color channel value.
● Screen - Multiplies the complements of the channel values, and then takes the complement of the result.
● Overlay - Does Multiply or Screen depending on whether or not the underlying color is lighter than 50% gray. Preserves shadows and highlights.
● Stencil Alpha - Creates a stencil using the alpha channel of an object. ● Stencil Luma - Creates a stencil using the luma values of an object. The brighter the
pixels the more opaque they are. ● Silhouette Alpha - Creates a silhouette using the alpha channel of an object. ● Silhouette Luma - Creates a silhouette using the luma values of an object. The brighter
the pixels of an object the more transparent they are.
31
Editing - Object FillThis dialog is used to choose the fill color or gradient for the selected shape object.
Select the fill style:
Click either the Solid or Gradient radio button to select the fill style.
Solid
The shape will be filled with a solid color. The current color will be shown in the color box next to the radio option.
Click on the color box to change the color.
Gradient
The shape will be filled with a gradient.
Select either the Linear or Radial in the drop-down list to set the gradient type.
The Direction box lets you change the direction, start and end points of the linear gradient. The direction can be changed by moving the square dot and/or the arrow head.
The Stops bar lets you control the stop points of the gradient.
● Click on one of the stop points (little triangles on the right side of the bar) to select the stop point.
● Drag the stop point to move it.● Right-click on the stop point to delete it or press the X button to delete the selected stop
point.● Click on the Stop Point color box to change the color of the selected stop point.
32
Image Settings - JPEG Compression SettingsQuality
Choose between a smaller file with lower quality, or a larger file with higher quality.
33
Image Settings - BMP Encoding SettingsPixel Format
Choose between a file with 8, 24 or 32 bits per pixel. You must select 32 bits per pixel if you wish to have any transparency in the picture.
34
Image Settings - PNG Encoding Settings256 color
You can check this option to 256-color palette PNG which is smaller than true color PNG.
35
Image Settings - PNM Encoding SettingsPortable Anymap Format
Choose either monochrome (portable pixmap), grayscale (portable graymap) or RGB (portable bitmap) format. Each of them can be saved as plain (ASCII) or binary files.
Binary threshold Set the threshold for converting image to binary image. It is only used with monochrome formats.
36
Image Settings - TIFF Encoding Settings256 color
You can check this option to 256-color palette TIFF which is smaller than true color TIFF.
37
Image Settings - JPEG 2000 Compression SettingsLossless compression
Saves the image without any reduction in image quality, but results in a larger file than lossy compression.
Lossy compression Saves a smaller file than lossless compression, but causes some reduction in image quality.
Quality Choose between a smaller file with lower quality, or a larger file with higher quality.
38
Image Settings - WebP Compression SettingsWebP is a new image format developed by Google and supported in Chrome, Opera and Android that is optimized to enable faster and smaller images on the Web. WebP images are about 30% smaller in size compared to PNG and JPEG images at equivalent visual quality.
Lossy compression Saves a smaller file than lossless compression, but causes some reduction in image quality.
Quality Choose between a smaller file with lower quality, or a larger file with higher quality.
39
Keyboard - Keyboard Short-CutsKeyboard short-cuts available in the main window:
Preview Playback
Ctrl+Space Start Preview PlaybackHome Go to Start of PlaybackEnd Go to End of PlaybackPage Up Previous Frame in PlaybackPage Down Next Frame in PlaybackAny Key During Playback Stop Preview Playback
File
Ctrl+Alt+N New ProjectCtrl+O Open ProjectCtrl+S Save Project FileCtrl+Shift+S Save Project File AsCtrl+N New CompositionCtrl+I Load Media File(s)Alt+F4 Exit
Edit
Ctrl+Z UndoCtrl+Y RedoCtrl+X CutCtrl+C CopyCtrl+V PasteCtrl+A Select AllDelete Delete Selected Item(s)Ctrl+Tab Switch to the next composition
Canvas editing
Hold Shift + resize an object Keep current proportionsHold Ctrl + click and drag a vertex Start a curveHold Ctrl + click and drag an object / anchor point Rotate an object / move anchor pointHold Space + drag with the mouse Pan the canvas displayEsc while editing text, mask, or shape Finish editing
Timeline
40
Num + Zoom inNum - Zoom outNum * Show entire region
Help
F1 Help Contents
41
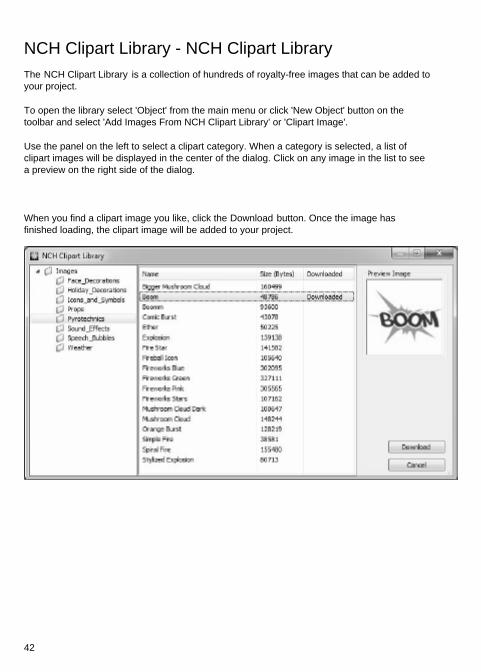
NCH Clipart Library - NCH Clipart LibraryThe NCH Clipart Library is a collection of hundreds of royalty-free images that can be added to your project.
To open the library select 'Object' from the main menu or click 'New Object' button on the toolbar and select 'Add Images From NCH Clipart Library' or 'Clipart Image'.
Use the panel on the left to select a clipart category. When a category is selected, a list of clipart images will be displayed in the center of the dialog. Click on any image in the list to see a preview on the right side of the dialog.
When you find a clipart image you like, click the Download button. Once the image has finished loading, the clipart image will be added to your project.
42
NCH Sound Library - NCH Sound LibraryThe NCH Sound Library is a collection of thousands of royalty-free sound effects that can be added to your project.
Once you have opened the library, you'll see the following:
Folder Tree
On the left hand side, each folder represents a category of sounds. Expand a folder to either see its subfolders or a list of sounds it contains.
Sound List
On the right hand side, all the sounds in the currently selected category are listed. This will be empty until a category is selected.
Preview Sound
Select a sound in the list then click the Play button to hear it. When you have finished, click .
Download
Select a sound in the list then click the Download button to download the sound (if it hasn't already been downloaded).
43
Screen References - Welcome DialogThe Welcome dialog shows when Express Animate starts and has options for creating a new project, opening an existing or sample projects, or reading the Getting Started guide.
Uncheck the Show this dialog when Express Animate starts check-box to prevent this dialog from showing again. To re-enable this option later, check Options -> Show the welcome dialog when Express Animate starts check-box.
44
Screen References - Missing Files DialogThis dialog is used to replace missing files while loading a project.
Every item in the list corresponds to a missing file used by the project. Double click a file and select a new file to use in its place. Missing files can also be resolved later by right-clicking an object and selecting File Source...
45
Screen References - File Source DialogThis dialog is used to access information about the file source used by an object.
Change file used by an object by clicking Change... button and selecting a new file. This could be used to replace missing files. Other parameters of the object (Name, Transform, Effects, Masks, etc) do not change. Sound file can only be replaced with another sound file.
Information about the current used media file format is displayed in the Format field.
46
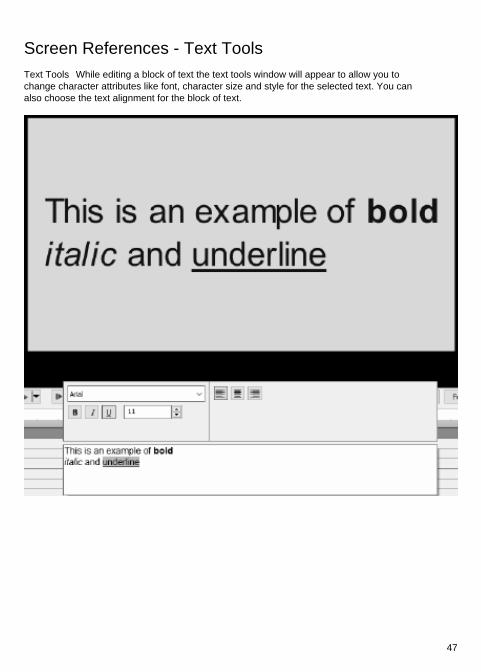
Screen References - Text ToolsText Tools While editing a block of text the text tools window will appear to allow you to change character attributes like font, character size and style for the selected text. You can also choose the text alignment for the block of text.
47
Character attributes You can customize the attributes for selected characters.
Font This pull-down menu contains a list of fonts installed on your computer.
Style Depressing any combination of these buttons will change the style of your text to be Bold
Italic or Underlined.
Font size This control adjusts the height of your text as a percentage of the frame height, from 1% to 100%.
Text alignment Selecting one of the alignment buttons will adjust the alignment of the text block within the frame.
48
Screen References - HTML5 ExportSelect 'Save HTML5...' from the 'File' menu to save the active composition as a web page which can be opened in a web browser.
Please note that for all of the features to work properly the web page must be hosted on a web server and not opened as a local file.
Basic settings
● Output folder - Output folder to save the web page and related files to.● Resolution - Target resolution for the canvas HTML element the composition is rendered
into.● Number of times to loop the composition - The animation will stop after the specified
number of loops. Set to 0 to run animation in a loop until the web page is closed.
Advanced settings
● Codec settings - Select compression settings for every type of media during export.● Save video objects - Select this option to allow output of the video objects. Animated
effects and features which aren't supported by HTML5 must also be saved as video objects, otherwise they are discarded.
Please note that video objects might not work properly in mobile browsers.● Save unsafe fonts as bitmaps - Select this option to save all text objects which use fonts
that might not be supported on all platforms as image or video objects. Using this option might increase the output file size but makes sure text will look the same for everyone.
● Display 'Press to play' prompt when using video or sound objects - Select this to make sure playback only starts after user presses the canvas.
Please note this option must be enabled if you want to use video and sound playback in mobile browsers.
49
Screen References - HTML5 Export ReportThis dialog is displayed after the HTML5 export process has finished.
Click the output folder hyperlink to go to the folder with the HTML web page and its related files.
It might not be possible to export some of the features into HTML5. If there were any problems during export, a special list is displayed. In the list for every object you can see its type, what happened to the object during export (Skipped, Modified, etc), and some details about the problem. Most of the problems could be fixed by enabling video objects export in the Advanced tab of the HTML5 Export Parameters dialog before saving the project as HTML5. But video objects might not work properly in mobile browsers. So the ideal solution is to remove or modify the objects with problems from the list.
Click 'Open Preview' button to start a built-in web server with the new HTML5 web page. The built-in web server's port number is specified in 'Port Number '. Default is 150.
You might need to confirm the Firewall exception for this feature to work properly.
50
Screen References - Composition duration dialogThis dialog is used to specify composition duration. The timecode corresponds to the total number of frames in the composition. Select 'Fit objects duration' to make sure the duration is set to fit the last frame of the last object on the timeline.
51
Screen References - Object duration dialogThis dialog is used to specify object duration. The timecode corresponds to the total number of frames in an object.
52
Screen References - Timeline position dialogThis dialog is used to select a timecode for the current timeline position.
53
Screen References - Custom aspect ratio dialogThis dialog is used to select custom aspect ratio for a composition. The aspect ratio describes the proportional relationship between width and height.
54
Screen References - Custom ResolutionThis dialog allows you to set up the resolution for your video during saving. To set a custom resolution, click the Save button on the toolbar and select the Disc: Make Data Disc, Computer/Data, Portable Device, Image Sequence, or Stereoscopic 3D options. From the Resolution drop menu, select Custom.
In the Custom Resolution dialog that opens, input the width and height in pixels and click OK.
If Keep aspect ratio checkbox is available, you can check it to retain the same aspect ratio when changing the width or height.
55
Screen References - Custom Frame RateThis dialog allows you to set up the frame rate (number of frames per second) for your video. To set a custom frame rate, click the Save button on the toolbar and select either of the Disc: Make Data Disc, Computer/Data, Portable Device, or Stereoscopic 3D options. From the Frame Rate drop menu, select Custom.
In the Custom Frame Rate dialog that opens, input the frame rate and click OK.
56
Screen References - Detected FormatThis dialog shows you the detected format of the video sequence during the saving process. To detect the format of your video, click the Export Video button on the Home tab bar and select either of the following options: Disc, Computer/Data, Portable Device or Stereoscopic 3D.
Click the Detect button next to the Preset field. Detect will adjust the video output resolution format based on your monitor screen size.
If you want to use a different format you can select the format from the Preset drop-down list.
Click OK to use the selected format as the output format.
57
Screen References - DVD Bitrate SettingsThis dialog allows you to specify bitrate for your DVD video. To open this dialog, click the Save icon in the toolbar and select the Disc save option and click the Make DVD Movie option. Click the Advanced button to open the DVD Bitrate Settings dialog.
The default option is to calculate the bitrate automatically. To set the bitrate manually, select the manual option and adjust the video and audio bitrates.
58
Screen References - Speed ChangeUse Speed Change to play an object faster or slower than normal and / or to play it in reverse. 50% is half normal speed, 100% is normal speed, 200% is twice normal speed, etc.
To change object speed, right click it and select Adjust Speed...
59
Screen References - Options ~ GeneralHere you can setup cache parameters, choose the rendering method, and select the destination folder for converted video files.
Cache and preview memory ● Cache folder - Specify a folder where you want to store cached data. Make sure you have
enough free space available in the folder.● Keep recently used cache files when Express Animate exits (MB) - Keeps the specified
amount of recently used cached files on disk, to speed up media loading next time you use Express Animate.
● Maximum amount of RAM to use for preview (MB) - The maximum amount of memory that could be allocated to store the composition cached frames. More memory allows longer fragment during cached preview playback.
● Maximum amount of RAM to use for cache (MB) - The maximum amount of memory that could be allocated to store cached frames for objects. More memory allows more objects to be used in a composition. Express Animate will display a warning icon if it runs out of memory.
Rendering Method Here you can choose a canvas rendering method. Hardware (OpenGL) should generally work faster, but might not work properly on some systems.
Smooth bitmap scaling When this option is enabled bitmaps use smooth bilinear interpolation when scaled. Otherwise nearest neighbour scaling is used.
You can enable this option individually for preview and video export. Please note that enabling this option decreases performance.
Save converted video files to Some of the video files have to be converted in order to use them in Express Animate. This is done automatically, and here you can select a folder to save converted video files to.
Show the welcome dialog when Express Animate starts Select this if you want a welcome dialog to be displayed when application starts. The welcome dialog allows you to choose a project to start with and a link to the 'Getting started' guide.
Show the playback mode selection dialog when adding an object with sound Select this if you want ExpressAnimate to request a playback mode switch when adding an object with sound.
60