mxf ama plug-in guide
TRANSCRIPT
1 MXF AMA Plug-in Guide
Avid supports generic MXF media through Avid’s Media Access (AMA) method from an Avid editing application.
Things You Should Know About the MXF AMA Plug-in• The MXF AMA plug-in is supported with Avid Media Composer v5.0, Avid Symphony
v5.0 and Avid NewsCutter v9.0 and higher.
• Link to MXF media files with the MXF AMA plug-in, including: Omneon and OP1A
• Avid does not support MultiCamera editing with MXF AMA clips.
• For additional MXF AMA information, see www.avid.com/ama.
MXF MediaMaterial Exchange Format (MXF) is a wrapper or container format which encapsulates media and rich production metadata into a single file, which is useful for media storage and exchange. It is an open technology that can is implemented by different manufacturers.
MXF is designed to be flexible enough for use in all stages of content creation, from acquisition, to authoring, to distribution. The primary benefit of MXF is that it provides greater workflow efficiency by preserving useful metadata as media files make their way through the content creation process. The MXF format is independent of the type of content that it contains, so an MXF file can contain video and/or audio at any resolution or compression. In many instances MXF files encapsulate media which is already formatted to one of the existing industry standards.
MXF allows for easy exchange of material between file servers, tape streamers and digital archives. MXF is an ideal interchange format to enable workflow efficiencies in news broadcasting, post production, asset management, and archiving applications.
You can select the MXF format when you capture, link, create titles, or render effects. See “Media Creation Settings,” in the Avid editing Help.
The MXF AMA plug-in should be installed on your system. To link MXF media through the AMA method, use Link to AMA File(s). For more information, see “The Avid Media Access (AMA) Workflow” on page 4 and “Linking Media with AMA” on page 9.
For MXF workflow steps, see “Workflow for Editing MXF Clips with AMA” on page 21.
1 MXF AMA Plug-in Guide
2
MXF Media and AMA
To link supported MXF media through the AMA method, you first need to obtain an MXF file from a supported vendor or through the Avid editing system. Then use the AMA MXF plug-in to link to Avid supported MXF files. For the list of supported MXF files, see “MXF Formats and Resolutions” on page 2.
MXF Formats and Resolutions
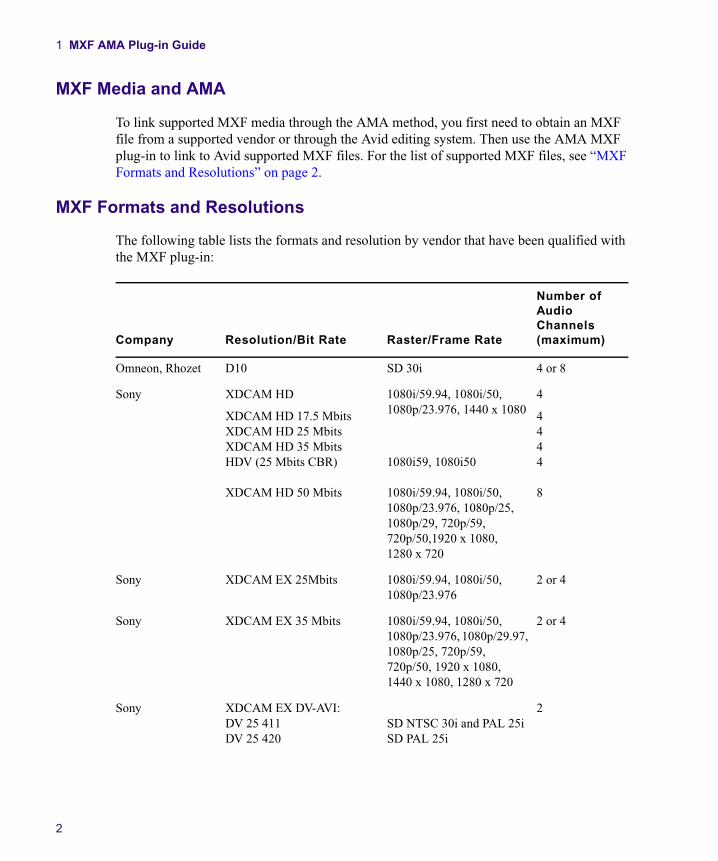
The following table lists the formats and resolution by vendor that have been qualified with the MXF plug-in:
Company Resolution/Bit Rate Raster/Frame Rate
Number of Audio Channels (maximum)
Omneon, Rhozet D10 SD 30i 4 or 8
Sony XDCAM HD
XDCAM HD 17.5 MbitsXDCAM HD 25 MbitsXDCAM HD 35 MbitsHDV (25 Mbits CBR)
XDCAM HD 50 Mbits
1080i/59.94, 1080i/50, 1080p/23.976, 1440 x 1080
1080i59, 1080i50
1080i/59.94, 1080i/50, 1080p/23.976, 1080p/25, 1080p/29, 720p/59, 720p/50,1920 x 1080,1280 x 720
4
4444
8
Sony XDCAM EX 25Mbits 1080i/59.94, 1080i/50, 1080p/23.976
2 or 4
Sony XDCAM EX 35 Mbits 1080i/59.94, 1080i/50, 1080p/23.976, 1080p/29.97, 1080p/25, 720p/59, 720p/50, 1920 x 1080, 1440 x 1080, 1280 x 720
2 or 4
Sony XDCAM EX DV-AVI:DV 25 411 DV 25 420
SD NTSC 30i and PAL 25iSD PAL 25i
2
MXF Media
3
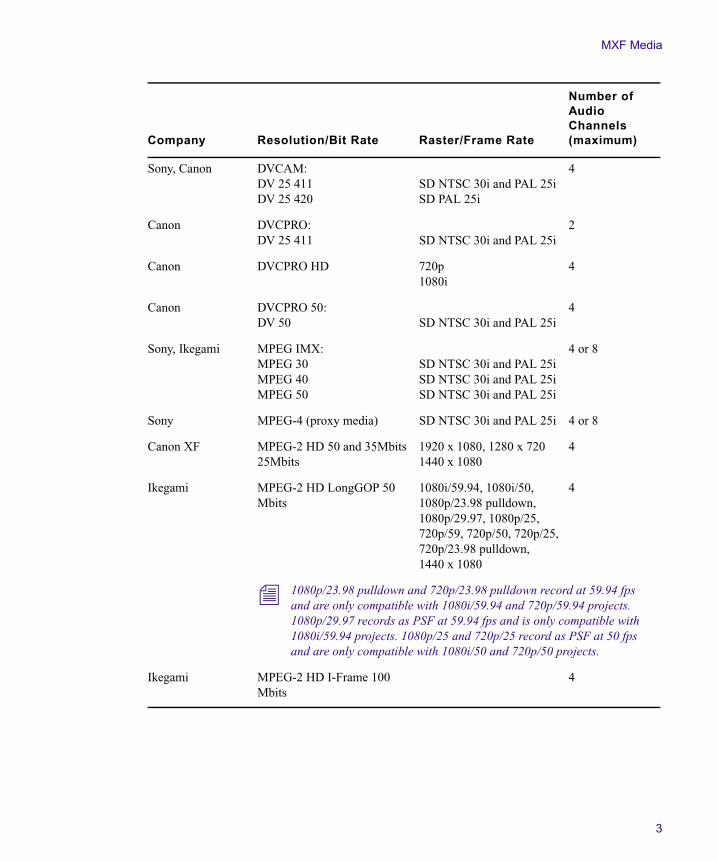
Sony, Canon DVCAM:DV 25 411DV 25 420
SD NTSC 30i and PAL 25iSD PAL 25i
4
Canon DVCPRO:DV 25 411 SD NTSC 30i and PAL 25i
2
Canon DVCPRO HD 720p1080i
4
Canon DVCPRO 50:DV 50 SD NTSC 30i and PAL 25i
4
Sony, Ikegami MPEG IMX:MPEG 30MPEG 40MPEG 50
SD NTSC 30i and PAL 25iSD NTSC 30i and PAL 25iSD NTSC 30i and PAL 25i
4 or 8
Sony MPEG-4 (proxy media) SD NTSC 30i and PAL 25i 4 or 8
Canon XF MPEG-2 HD 50 and 35Mbits25Mbits
1920 x 1080, 1280 x 7201440 x 1080
4
Ikegami MPEG-2 HD LongGOP 50 Mbits
1080i/59.94, 1080i/50, 1080p/23.98 pulldown, 1080p/29.97, 1080p/25, 720p/59, 720p/50, 720p/25, 720p/23.98 pulldown, 1440 x 1080
4
n 1080p/23.98 pulldown and 720p/23.98 pulldown record at 59.94 fps and are only compatible with 1080i/59.94 and 720p/59.94 projects. 1080p/29.97 records as PSF at 59.94 fps and is only compatible with 1080i/59.94 projects. 1080p/25 and 720p/25 record as PSF at 50 fps and are only compatible with 1080i/50 and 720p/50 projects.
Ikegami MPEG-2 HD I-Frame 100 Mbits
4
Company Resolution/Bit Rate Raster/Frame Rate
Number of Audio Channels (maximum)
1 MXF AMA Plug-in Guide
4
The Avid Media Access (AMA) WorkflowAvid Media Access (AMA) is a plug-in architecture that lets you link directly to clips from a third-party volume (for example, a P2, XDCAM or GFCAM device) or to a file based media clip (for example, QuickTime or MXF) into a bin without storing the media directly on your system. AMA lets you be more productive by browsing and editing directly from the device or volume.
The bin lets you log, browse, and view these clips in the usual way. Once the third-party device is disconnected, the bin still exists with the clips, although the media displays as offline. When you reconnect the device, the media appears online. The system automatically displays the media; you do not need to mount the drives.
The AMA method also allows for more metadata to be brought into the bin which gives you more information about the media. For example, essence marks (or locators) associated with the clip are automatically brought into your bin.
To display metadata information in your bin, see “Adding a Metadata Bin Column Heading” in the Avid editing Help.
The following considerations and limitations apply:
• When the AMA setting is activated, the non-AMA method does not appear in the File menu. Deactivate the AMA setting to display the File > Import P2 (and Import XDCAM Proxy) option. The AMA setting is on by default.
• The Link to AMA File(s) menu choice is available for third-party AMA file based media plug-ins. To see the available AMA plug-ins available to download for your Avid editing application, go to www.avid.com/ama.You must have a third-party plug-in installed on your system for the option to display.
• Windows UNC (Universal Naming Convention) paths are not supported with AMA media. To link AMA media, map it to the drive.
In order to link to AMA files on a mapped network drive, enter the command “alldrives 1” in the Console window. This displays the mapped network drive. If you quit and then reopen the Avid editing application, the mapped network drives still display. To turn this function off, enter “alldrives 2.” For more information on mapping network drives, see “Using The Console Window” in the Avid editing Help.
• When you render an audio effect on an AMA media clip, all audio media files are written as PCM (MXF), regardless of what you set for the audio file format.
• The Dynamic Relink option is not supported with AMA clips.
• Avid does not support MultiCamera editing with AMA clips.
• You should not mix workflows. Either use the AMA method or use the traditional import/batch import method.
The Avid Media Access (AMA) Workflow
5
Selecting the AMA Settings
You can set options in the AMA Settings dialog box to turn AMA on or off (on by default), to automatically mount your volumes, to customize your bin, and to set audio channel linking options.
To check for and download additional or updated AMA plug-ins, click the link to www.avid.com/ama.
To set up AMA:
1. In the Project window, click the Settings tab.
2. Double-click AMA.
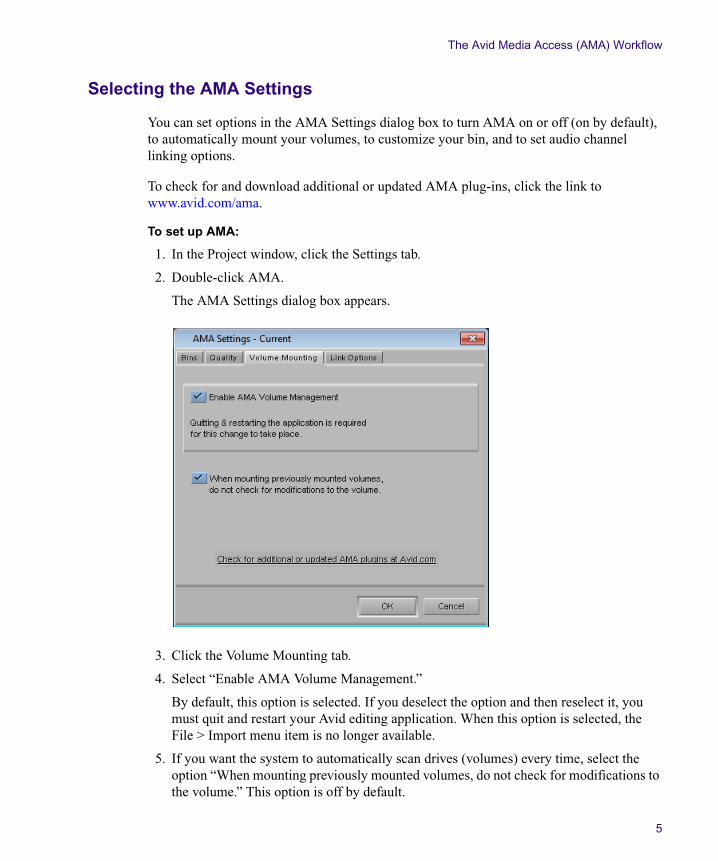
The AMA Settings dialog box appears.
3. Click the Volume Mounting tab.
4. Select “Enable AMA Volume Management.”
By default, this option is selected. If you deselect the option and then reselect it, you must quit and restart your Avid editing application. When this option is selected, the File > Import menu item is no longer available.
5. If you want the system to automatically scan drives (volumes) every time, select the option “When mounting previously mounted volumes, do not check for modifications to the volume.” This option is off by default.
1 MXF AMA Plug-in Guide
6
6. If you remount a volume, deselect the option “When mounting previously mounted volumes, do not check for modifications to the volume,” and the system checks the modification date of the device or drive against the last time the clips were linked. If the date is the same, the clips come back online. If the date is different, the system links the clips again, and links any new clips added to the volume. This option is off by default.
n If you restart your Avid editing application, the system automatically rescans the drives regardless of the options you’ve selected.
7. To customize your bin, click the Bins tab.
By default, the system links your clips into a new bin using the same name as your project name. If you want to change the bin name or want to use an already existing bin, you can make these changes in the Bins tab.
For more information on Bins options, see “AMA Settings: Bins Tab” on page 19.
n Depending on your AMA Settings, every time you insert a card into a reader or connect a device, the system creates a new bin whether the same card or device has been previously inserted or not.
8. To map source audio channels to multichannel or mono tracks in your clips, click the Link Options tab, and then click Edit.
The Set Multichannel Audio dialog box opens. For information on setting multichannel audio options, see “Linking to AMA Multiple Resolution Media” on page 12.
9. Click OK.
Viewing Installed AMA Plug-ins
Once you download and install a third-party plug-in from www.avid.com/ama, you can enter a console command to view a list and the version number of the plug-ins installed on your system.
To display the list of installed AMA plugins:
1. Select Tools > Console.
2. In the command entry text box, type: AMA_ListPlugins
3. Press Enter (Windows) or Return (Macintosh).
AMA_ListPlugins displays a list of the plugins installed on your system.
The Avid Media Access (AMA) Workflow
7
Understanding Linking with AMA
Linking lets you point to media on a device or point to the media directly on your system. The media physically resides on your system or it can reside on an external device. The device can be a camera, a card reader, an optical disk, a virtual volume on your desktop or on a server. The media points to the most recent source. For example, if you link the clips to a virtual volume on your desktop, the drive column displays the desktop as the location where the clips are linked to. If you then insert a card into a reader with the same media, the clips point to the media on the card. If you remove the card, the clips point to the media on the card and the clips appear offline. The card being the most recent source. Once the card is reinserted, the clips in the bin appear online.
AMA Linking with Multichannel Audio
You can use the AMA Settings dialog box to define the audio track formats for the audio channels in your linked media, up to a maximum of 16 audio channels for the clips in your bins. This allows you to specify which source channels are treated as mono or multichannel audio tracks in your project, rather than having to modify the clips in your bin after you link to the AMA media.
The mappings affect all media clips created when you link to your source media. If you want to use different mixes for different master clips or different projects, create a custom AMA Settings template for each separate type of mix and then create your linked master clips.
Each stereo track requires two channels, but you can mix mono and stereo input channels for your linking operation as long as you do not exceed the maximum of 16 audio channels for each master clip.
To specify the multichannel audio mix for linked AMA clips:
1. In the Project window, click the Settings tab.
2. Double-click AMA.
The AMA Settings dialog box appears.
For information about the AMA Settings, see “AMA Settings” on page 19.
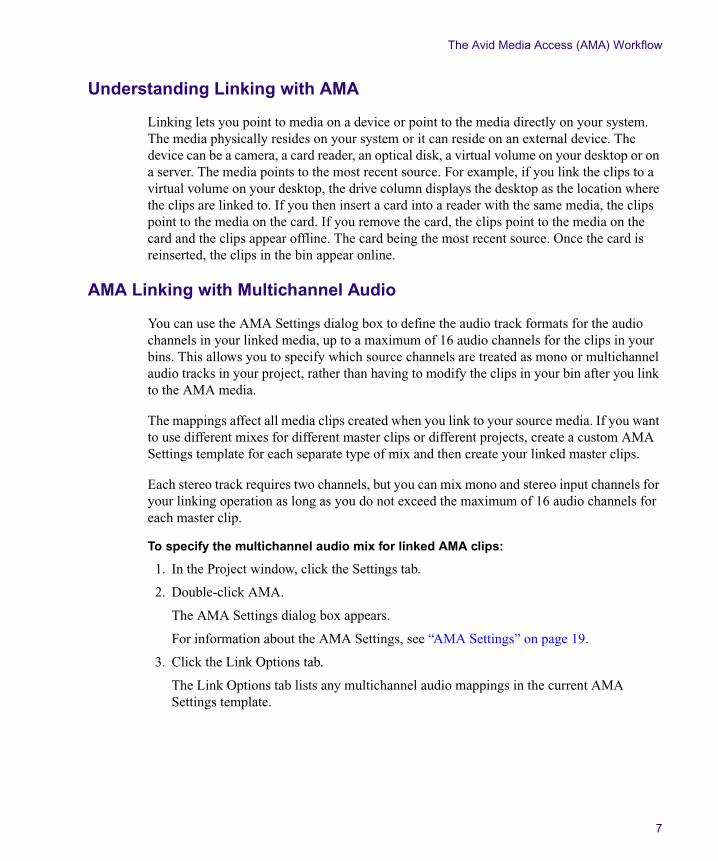
3. Click the Link Options tab.
The Link Options tab lists any multichannel audio mappings in the current AMA Settings template.
1 MXF AMA Plug-in Guide
8
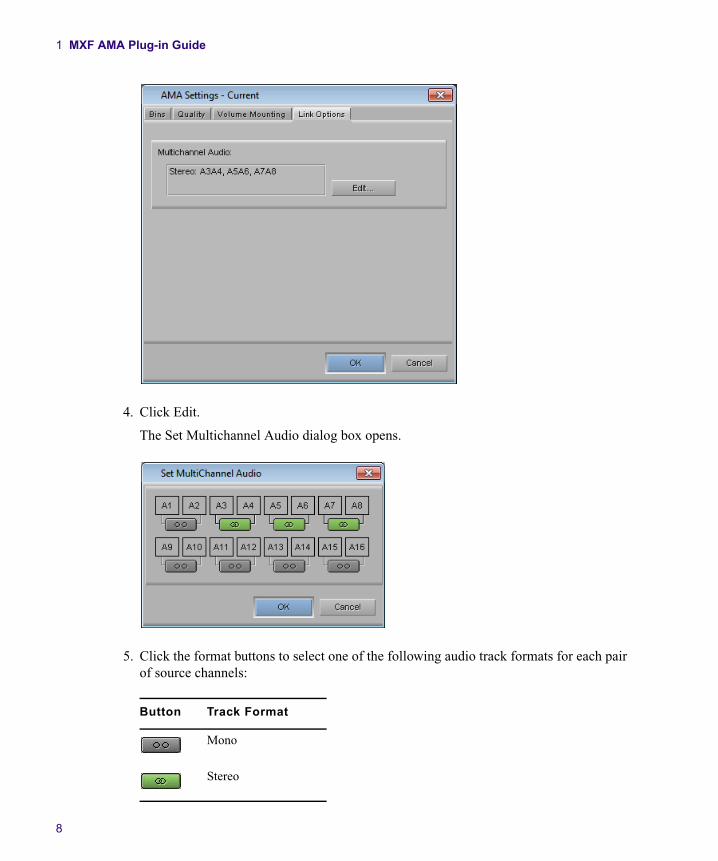
4. Click Edit.
The Set Multichannel Audio dialog box opens.
5. Click the format buttons to select one of the following audio track formats for each pair of source channels:
Button Track Format
Mono
Stereo
The Avid Media Access (AMA) Workflow
9
You must map source audio channels in mono or stereo pairs. For example, you cannot map A1 to a mono track and A2 and A3 to a stereo track. Instead, map A1 and A2 to mono tracks, and A3 and A4 to a stereo track. If the source media does not have an audio channel on A2, the Avid editing application ignores the channel.
6. Click OK to close the Set Multichannel Audio dialog box, and then click OK to close the AMA Settings dialog box.
The Track Formats column in the bin Text view displays the format for all multichannel audio tracks in a master clip.
To save a custom map of linked audio channels as a settings template:
1. Click the Settings tab in the Project window.
The Settings list appears.
2. Click AMA.
3. Select Edit > Duplicate.
A duplicate setting appears in the Settings list.
4. Name the setting by doing the following:
a. Click the custom name column.
b. Type a name.
c. Press Enter (Windows) or Return (Macintosh).
n The custom name column is the center column in the Project window. When you move the pointer over the custom name column, the pointer changes from a pointing finger to a text insertion bar.
You can select this new setting whenever you link clips with AMA.
Linking Media with AMA
Use the File > Link to AMA Volume(s) option if you link to media which originates on a volume (XDCAM EX, XDCAM, P2, RED or GFCAM). You can also use File > Link to AMA Volume(s) if you want to link to multiple QuickTime files located in a single folder. If you link directly to a single media file clip (MXF or QuickTime), use the File > Link to AMA File(s) option.
n For optimum viewing and playing, Avid recommends a single clip length should not exceed more than 12 hours.
n The decompose option from the Clip menu is not available with AMA. You do not need to decompose clips when you use the AMA method.
1 MXF AMA Plug-in Guide
10
To automatically link clips on a volume with AMA:
t Connect the drive or card reader through a USB or FireWire port on your computer, insert a card or disk.
The system scans the device and links the clips into the default bin and with the default multichannel audio track formats (based on the AMA settings). The clips highlight in yellow.
To change the default bin, bin name, or audio track format, from the Project window double-click AMA Settings and select options from the Bins and Link Options tabs. For more information, see “AMA Settings” on page 19 and “Linking to AMA Multiple Resolution Media” on page 12.
To manually link clips from a virtual volume with AMA:
1. Select File > Link to AMA Volumes.
The Browse For Folder dialog box opens.
2. Navigate to the P2, XDCAM, RED, GFCAM clips or the QuickTime folder, and then click OK.
For P2, navigate one level above the Contents folder. For XDCAM disks, navigate to one level above the Clip folder. For XDCAM EX, navigate to one level above the BPAV folder. For RED, navigate to the root directory of the RED card. For GFCAM, navigate to the root directory of the GFPAK. For QuickTime, navigate to the QuickTime folder that holds the QuickTime files.
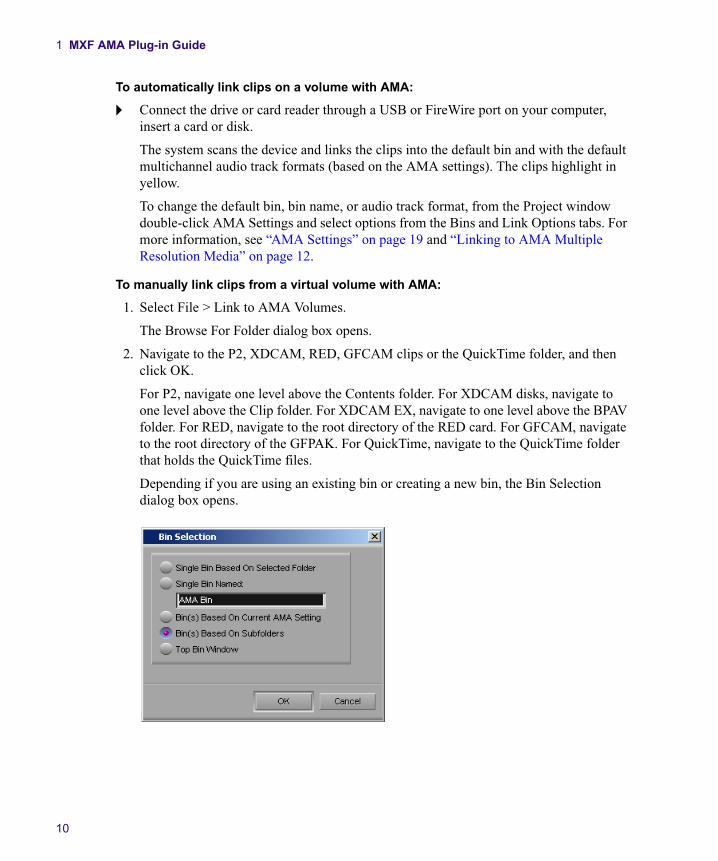
Depending if you are using an existing bin or creating a new bin, the Bin Selection dialog box opens.
The Avid Media Access (AMA) Workflow
11
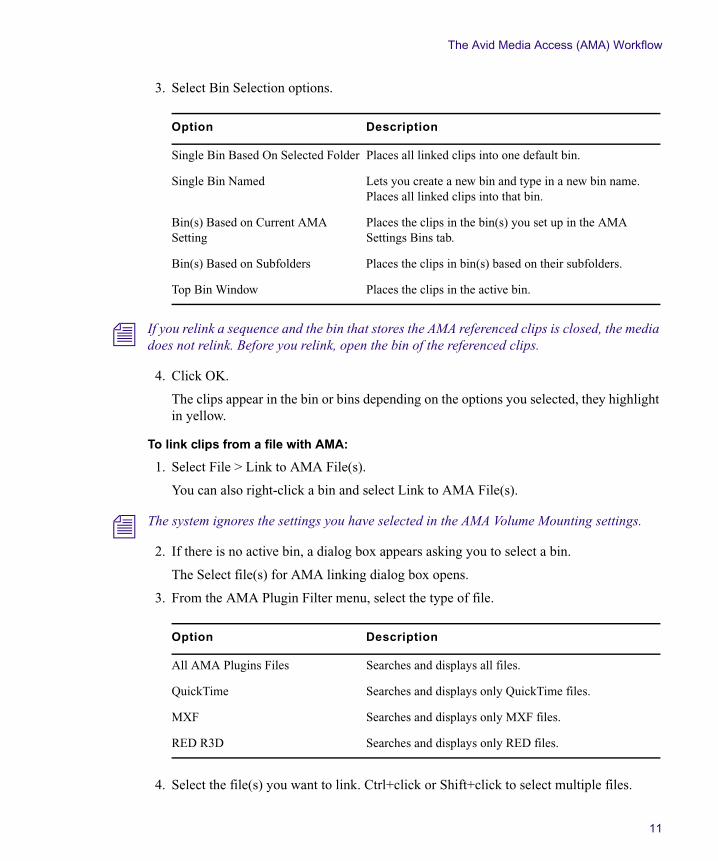
3. Select Bin Selection options.
n If you relink a sequence and the bin that stores the AMA referenced clips is closed, the media does not relink. Before you relink, open the bin of the referenced clips.
4. Click OK.
The clips appear in the bin or bins depending on the options you selected, they highlight in yellow.
To link clips from a file with AMA:
1. Select File > Link to AMA File(s).
You can also right-click a bin and select Link to AMA File(s).
n The system ignores the settings you have selected in the AMA Volume Mounting settings.
2. If there is no active bin, a dialog box appears asking you to select a bin.
The Select file(s) for AMA linking dialog box opens.
3. From the AMA Plugin Filter menu, select the type of file.
4. Select the file(s) you want to link. Ctrl+click or Shift+click to select multiple files.
Option Description
Single Bin Based On Selected Folder Places all linked clips into one default bin.
Single Bin Named Lets you create a new bin and type in a new bin name. Places all linked clips into that bin.
Bin(s) Based on Current AMA Setting
Places the clips in the bin(s) you set up in the AMA Settings Bins tab.
Bin(s) Based on Subfolders Places the clips in bin(s) based on their subfolders.
Top Bin Window Places the clips in the active bin.
Option Description
All AMA Plugins Files Searches and displays all files.
QuickTime Searches and displays only QuickTime files.
MXF Searches and displays only MXF files.
RED R3D Searches and displays only RED files.
1 MXF AMA Plug-in Guide
12
5. Click Open.
The clips appear in the active bin with the default multichannel audio track formats (based on the AMA settings). The clips are highlighted in yellow.
If the system cannot link a file, an error message displays informing you to open the Console window for more information about the file(s) in error.
If you move the clip from the original drive to another drive on your system, the clip displays as offline in your bin.
n If you move a source file from one location to another and then back to the original location, you might need to refresh the bin to redisplay the clip. Close and reopen the bin to refresh the bin.
Working with AMA Multiple Resolution Media
If you choose to link to low-resolution media, you can link to any combination of proxy or high-resolution audio or video media. For instance, you can link to the most compressed (proxy) video and the highest quality audio.
Disks can take some time spinning up to link the high-resolution media, so linking to the low-resolution media saves you time. You can edit with the low-resolution media and once you are finished, you can relink to the high-resolution media.
At this time, Avid AMA supports linking to multiple resolution XDCAM media only.
Linking to AMA Multiple Resolution Media
Before you link to low-resolution or high-resolution media, you need to select the video and audio quality in the AMA Settings Quality tab.
The steps below highlight linking to low-resolution media. You can also link to high-resolution media.
n For information about linking with AMA, see “The Avid Media Access (AMA) Workflow” on page 4.
To link to low-resolution media:
1. In the Project window, click the Settings tab.
2. Double-click AMA.
The AMA Settings dialog box appears.
For information about the AMA Settings, see “AMA Settings” on page 19.
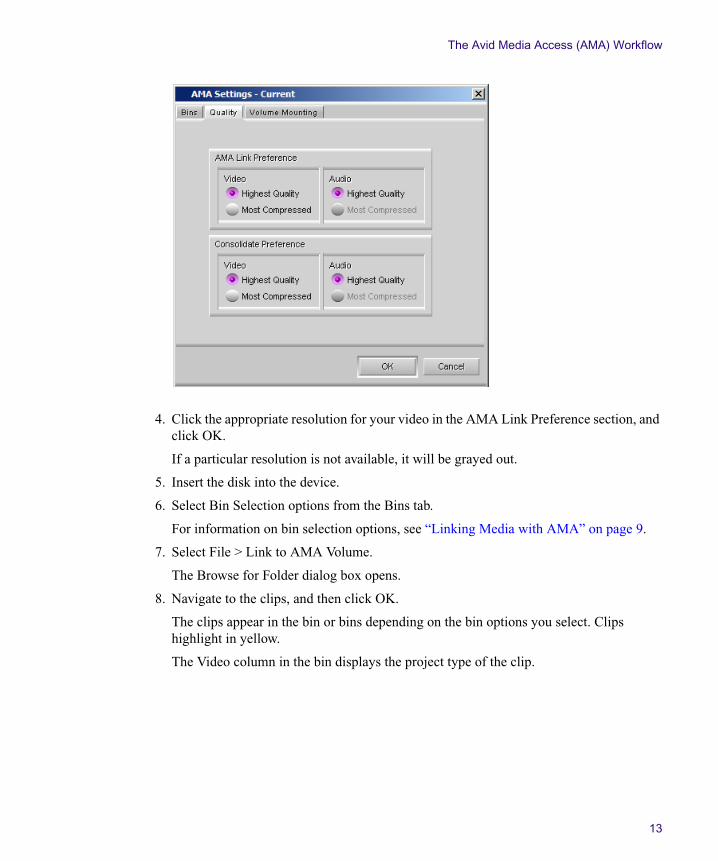
3. Click the Quality tab.
The Avid Media Access (AMA) Workflow
13
4. Click the appropriate resolution for your video in the AMA Link Preference section, and click OK.
If a particular resolution is not available, it will be grayed out.
5. Insert the disk into the device.
6. Select Bin Selection options from the Bins tab.
For information on bin selection options, see “Linking Media with AMA” on page 9.
7. Select File > Link to AMA Volume.
The Browse for Folder dialog box opens.
8. Navigate to the clips, and then click OK.
The clips appear in the bin or bins depending on the bin options you select. Clips highlight in yellow.
The Video column in the bin displays the project type of the clip.
1 MXF AMA Plug-in Guide
14
Switching Between Multiple Resolution Media
Once you link to the low-resolution or high-resolution media and complete your edits, you can easily switch from low to high and high to low-resolution media. When you switch to a different resolution, the system replaces the clip in the bin with the new clip and resolution.
The steps below highlight switching from low-resolution to high-resolution media. You can also switch from high-resolution to low-resolution.
n For XDCAM, if you use the Sony PDZ-1 software to assign a User Disc ID, the Avid editing system displays this information in a bin column and knows what disk name is associated with each clip.
To switch from low-resolution to high-resolution media:
1. Insert the disk in the device.
2. Select the low-resolution clips in the bin.
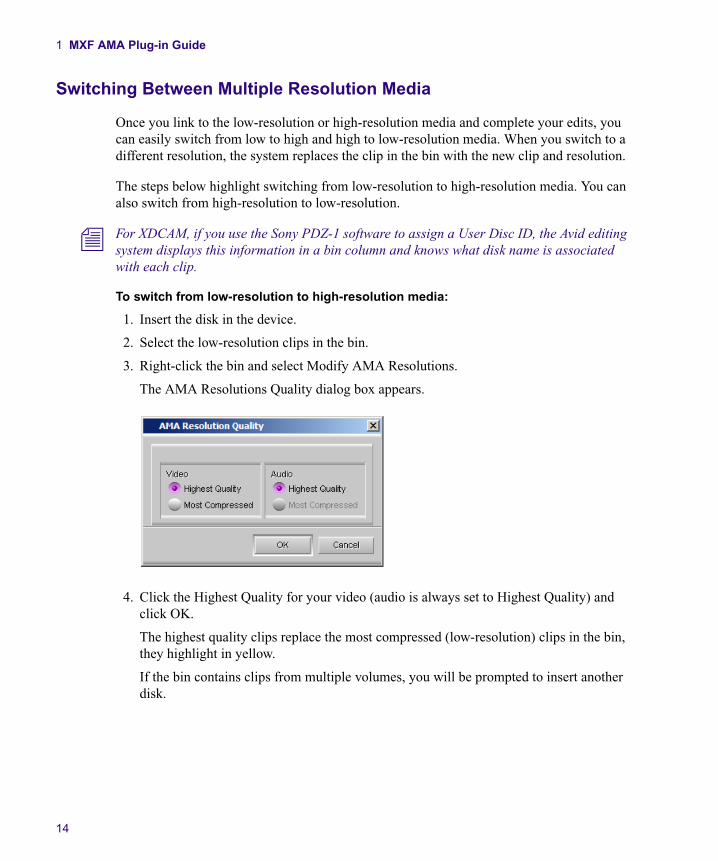
3. Right-click the bin and select Modify AMA Resolutions.
The AMA Resolutions Quality dialog box appears.
4. Click the Highest Quality for your video (audio is always set to Highest Quality) and click OK.
The highest quality clips replace the most compressed (low-resolution) clips in the bin, they highlight in yellow.
If the bin contains clips from multiple volumes, you will be prompted to insert another disk.
The Avid Media Access (AMA) Workflow
15
Consolidating Multiple Resolution Media
When you are ready to move your media to shared storage, you can link to your resolution and consolidate at the same time.
The steps below highlight consolidating high-resolution media. You can also consolidate low-resolution media.
For information on why you should consolidate, see “Consolidating Media” in the Avid editing Help.
To consolidate high-resolution media:
1. In the Project window, click the Settings tab.
2. Double-click AMA.
The AMA Settings dialog box appears.
For information about the AMA Settings, see “AMA Settings” on page 19.
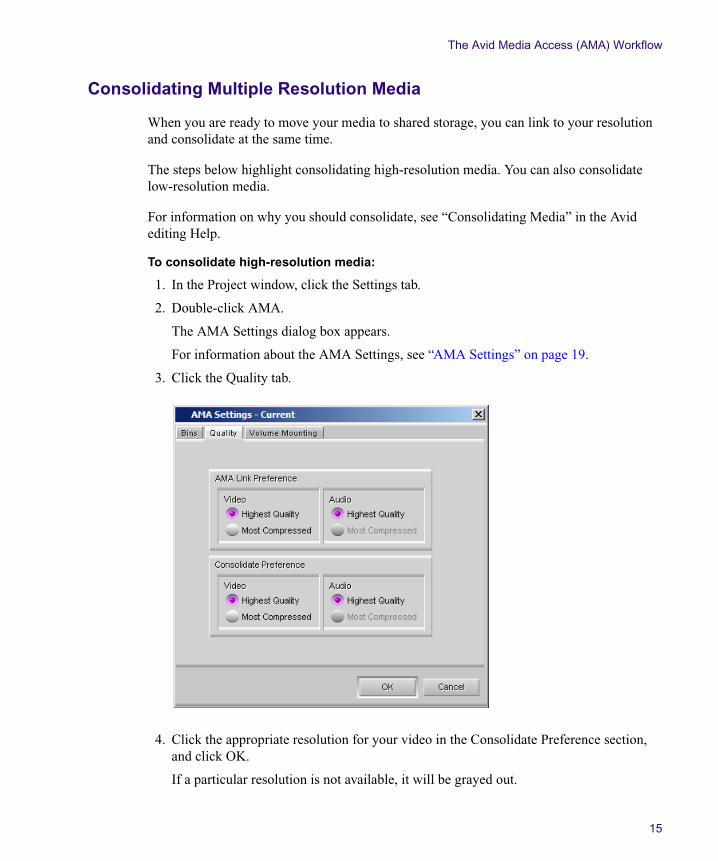
3. Click the Quality tab.
4. Click the appropriate resolution for your video in the Consolidate Preference section, and click OK.
If a particular resolution is not available, it will be grayed out.
1 MXF AMA Plug-in Guide
16
5. To consolidate the clip, follow the steps in “Using the Consolidate Command” in the Avid editing Help.
The resolutions you select in the Consolidate Preference area of the AMA Settings Quality tab displays in the Transcode/Consolidate dialog box when you consolidate or transcode.
Relinking to AMA Files
After you link AMA QuickTime files into your sequence, you have the option to make changes (in a third party applications, such as Adobe After Effects) to that file. If you change the filename or change the location of the file, the best way to link that clip back into your sequence is through the relink option. Relinking to an AMA file allows you to link to a different file. This process only works if the targeted file is compatible with the old file, for example the file has the same duration, edit rate or number of tracks.
This feature is helpful when you have a group of linked clips that were moved to a different folder or drive. You can relink the clips to the new location. You can also use this feature to toggle between different versions of a QuickTime movie, for example a low-resolution version of the movie is myMovie_DV.mov and the high-resolution version of the movie is myMovie_1to1.mov. You can relink to both of these versions, to see which clip works better in your sequence.
At this time, Relink to AMA File(s) is only available with AMA QuickTime files.
To relink to an AMA QuickTime file:
1. Link to an AMA QuickTime file.
The clips highlight yellow in the bin.
For information on linking, see “Linking Media with AMA” on page 9.
2. If you then decide to change the original clip in the bin in your third-party application, create the new movie file.
3. In your bin, Ctrl+click (Windows) or Command+click (Macintosh) or right-click the clip or clips you want to relink.
4. Select Relink to AMA File(s).
The Select file to relink AMA clip dialog box opens asking you to locate the new file.
5. Locate the new file.
If you have multiple clips selected in the bin, the system prompts you for the location of each file, one at a time.
6. Click Open.
The new clip highlights in the bin.
The Avid Media Access (AMA) Workflow
17
n If the new file is not compatible with the clip in the bin (it does not have the same duration, edit rate or number of tracks), the clip in the bin retains its original link.
The AMA Plug-in Log File
The Avid system creates an AMA plug-in log file when you link clips. The log file records errors and information about the clips. If you experience any problems while you link clips or if you receive an error message, check the AMA log file to get more information about the error (for example: a corrupt file or a bad filename). You can view the log file from the following location on your system:
• (Windows) drive:\Program Files\Avid\Media Composer\Avid FatalError Reports. The name of the log file is AMALoggerMM_DD_YY.log.
• (Macintosh) Volume/Users/Shared/AvidMediaComposer/Avid FatalError Reports. The name of the log file is AMALoggerMM_DD_YY.log.
Using Virtual Volumes
You can use a virtual volume to copy media from a card or disk. This lets you use the card or disk again. A virtual volume can be a folder on your desktop or a folder located on a server. However, the virtual volume folder should reside one level down from the root level in order for the system to display it as a virtual volume. The following are examples of virtual volumes:
• C:\Desktop\BPAV
• Z:\P2\Card 1
• Z:\GFPAK\
With the AMA method, all drives and virtual volumes associated with your bin mount automatically. You cannot remove a volume while in AMA, however you can remove a virtual volume.
To unmount a virtual volume:
1. Choose File > Unmount.
The Unmount dialog box opens.
2. Select the virtual volume you want to remove.
3. Click OK.
The system removes the virtual volume from your system and clips linked to this virtual volume appear offline. When you restart your Avid editing application, the system scans the system for virtual volumes and the clips appear online.
1 MXF AMA Plug-in Guide
18
Virtual Volumes and AMA Bins
If you select Volume Name in the AMA Bin Settings tab, the system names the bin the same name as the virtual volume drive name. If you continue to use the same virtual volume to link other media through AMA, the system continues to place the linked media in the same bin. If you want to create a new bin for different types of media you link through AMA, you can either create a new virtual volume drive for each type of media (XDCAM, XDCAM EX, P2, GFCAM, etc.) or you can create a new bin every time you link to new media on a virtual volume.
To create a new bin on the same virtual volume:
1. Before you link your media through AMA, click the Settings tab in the Project window.
2. Double-click AMA.
3. Click the Bins tab.
4. Select “Create a new bin” and specify a new bin name.
5. Click OK.
6. Select File > Link to AMA Volumes.
The media appears in the newly created bin. Repeat these steps for each type of media.
Deleting Clips
You can delete master clips, but you cannot delete media files that reside on drives. Your Avid editing application treats files as read-only devices.
You can delete master clips and media files the same way you delete other master clips and media files. However, you might not be able to delete files that you moved rather than copied. If you cannot delete master clips and media files, first unlock the clips as described in the second procedure, and then delete them.
To delete files from cards/volumes:
1. Quit your Avid editing application.
2. On the desktop, navigate to the drive.
3. Select the files you want to delete and press the Delete key.
AMA Settings
19
To delete files on a local drive in your Avid editing application:
1. In a bin, select the clips you want to delete.
2. (Option) Right-click and select Unlock Bin Selection.
3. Press the Delete key.
The Delete dialog box opens.
4. Select Delete master clips and Delete associated media files.
5. Click OK.
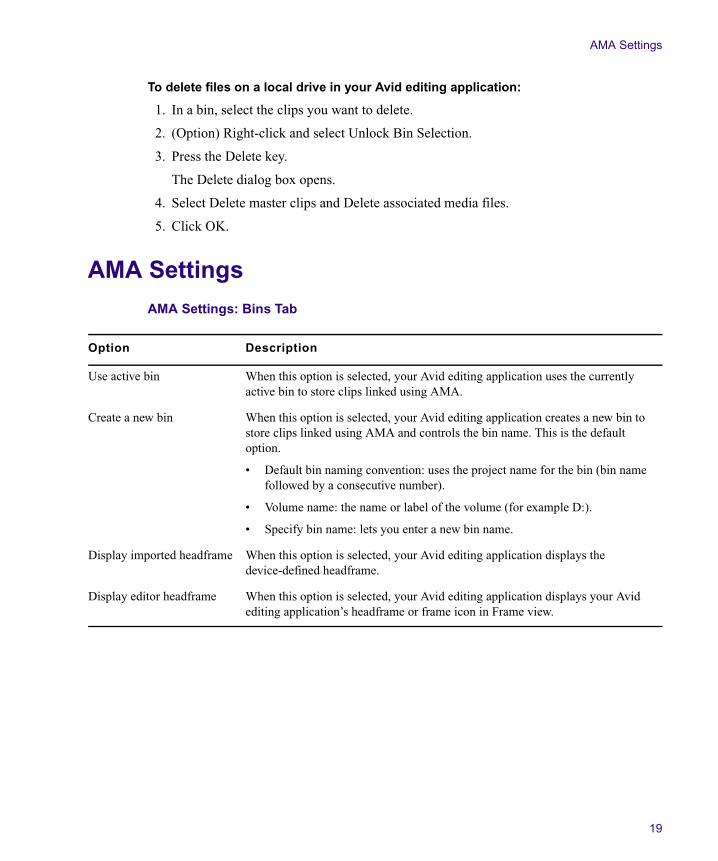
AMA SettingsAMA Settings: Bins Tab
Option Description
Use active bin When this option is selected, your Avid editing application uses the currently active bin to store clips linked using AMA.
Create a new bin When this option is selected, your Avid editing application creates a new bin to store clips linked using AMA and controls the bin name. This is the default option.
• Default bin naming convention: uses the project name for the bin (bin name followed by a consecutive number).
• Volume name: the name or label of the volume (for example D:).
• Specify bin name: lets you enter a new bin name.
Display imported headframe When this option is selected, your Avid editing application displays the device-defined headframe.
Display editor headframe When this option is selected, your Avid editing application displays your Avid editing application’s headframe or frame icon in Frame view.
1 MXF AMA Plug-in Guide
20
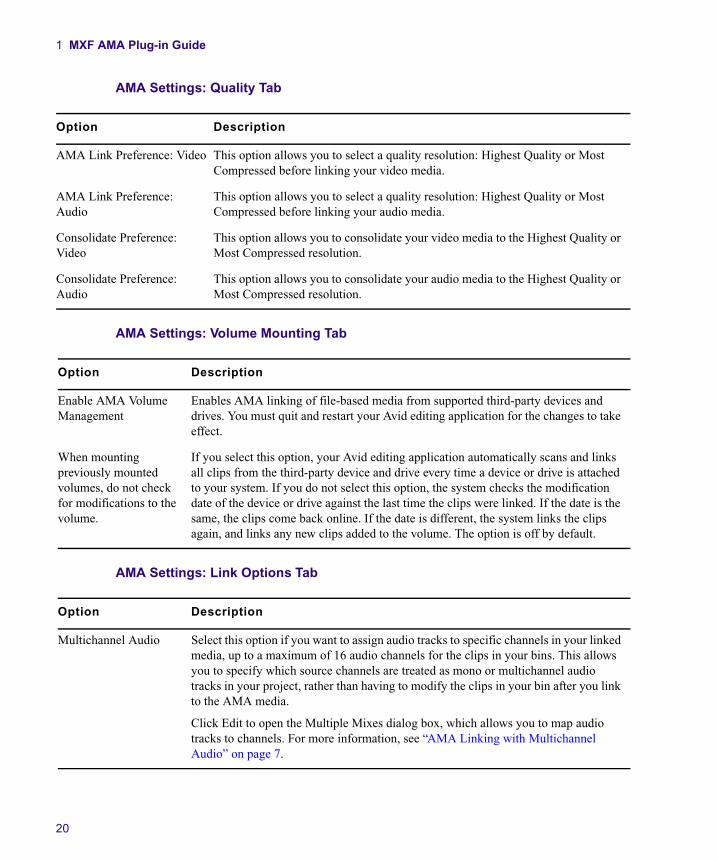
AMA Settings: Quality Tab
AMA Settings: Volume Mounting Tab
AMA Settings: Link Options Tab
Option Description
AMA Link Preference: Video This option allows you to select a quality resolution: Highest Quality or Most Compressed before linking your video media.
AMA Link Preference: Audio
This option allows you to select a quality resolution: Highest Quality or Most Compressed before linking your audio media.
Consolidate Preference: Video
This option allows you to consolidate your video media to the Highest Quality or Most Compressed resolution.
Consolidate Preference: Audio
This option allows you to consolidate your audio media to the Highest Quality or Most Compressed resolution.
Option Description
Enable AMA Volume Management
Enables AMA linking of file-based media from supported third-party devices and drives. You must quit and restart your Avid editing application for the changes to take effect.
When mounting previously mounted volumes, do not check for modifications to the volume.
If you select this option, your Avid editing application automatically scans and links all clips from the third-party device and drive every time a device or drive is attached to your system. If you do not select this option, the system checks the modification date of the device or drive against the last time the clips were linked. If the date is the same, the clips come back online. If the date is different, the system links the clips again, and links any new clips added to the volume. The option is off by default.
Option Description
Multichannel Audio Select this option if you want to assign audio tracks to specific channels in your linked media, up to a maximum of 16 audio channels for the clips in your bins. This allows you to specify which source channels are treated as mono or multichannel audio tracks in your project, rather than having to modify the clips in your bin after you link to the AMA media.
Click Edit to open the Multiple Mixes dialog box, which allows you to map audio tracks to channels. For more information, see “AMA Linking with Multichannel Audio” on page 7.
Workflow for Editing MXF Clips with AMA
21
Workflow for Editing MXF Clips with AMAA typical workflow is as follows:
1. The MXF AMA plug-in should be installed on your system.
2. Create a supported MXF file (create a supported MXF file from your third party application, for example: Rhozet or Omneon).
3. Move the .mxf file onto your Avid editing system.
4. Using the AMA method, link to the MXF clips automatically into a bin.
5. Use the linked clips to edit your sequence.
6. (Option) Rename the clips to help organize your material.
7. Consolidate or transcode your sequence or clips.
The media consolidates to the destination you set in the Media Creation dialog box.
n When you consolidate, if you want to keep your AMA clips linked to the original source, select the option “Keep Master clips linked to media on the original drive,” in the Copying Media Files dialog box.

1 MXF AMA Plug-in Guide
22
Legal NoticesProduct specifications are subject to change without notice and do not represent a commitment on the part of Avid Technology, Inc.
This product is subject to the terms and conditions of a software license agreement provided with the software. The product may only be used in accordance with the license agreement.
Avid products or portions thereof are protected by one or more of the following United States Patents: 5,077,604; 5,267,351; 5,309,528; 5,355,450; 5,396,594; 5,440,348; 5,467,288; 5,513,375; 5,528,310; 5,557,423; 5,568,275; 5,577,190; 5,584,006; 5,634,020; 5,640,601; 5,644,364; 5,654,737; 5,715,018; 5,719,570; 5,724,605; 5,726,717; 5,729,673; 5,745,637; 5,752,029; 5,754,180; 5,754,851; 5,799,150; 5,812,216; 5,828,678; 5,842,014; 5,852,435; 5,905,841; 5,929,836; 5,930,445; 5,946,445; 5,986,584; 5,987,501; 6,016,152; 6,018,337; 6,023,531; 6,058,236; 6,061,758; 6,091,778; 6,105,083; 6,118,444; 6,130,676; 6,134,607; 6,141,691; 6,198,477; 6,201,531; 6,223,211; 6,249,280; 6,269,195; 6,330,369; 6,351,557; 6,353,862; 6,357,047; 6,392,710; 6,404,435; 6,407,775; 6,417,891; 6,426,778; 6,477,271; 6,489,969; 6,512,522; 6,532,043; 6,546,190; 6,552,731; 6,553,142; 6,570,624; 6,571,255; 6,583,824; 6,618,547; 6,636,869; 6,665,450; 6,678,461; 6,687,407; 6,704,445; 6,747,705; 6,763,134; 6,766,063; 6,791,556; 6,810,157; 6,813,622; 6,847,373; 6,871,003; 6,871,161; 6,901,211; 6,907,191; 6,928,187; 7,043,058; 7,081,900; 7,103,231; 7,266,241; 7,280,117; RE40,107; 7,403,561; 7,433,519; 7,512,885; 7,545,957; D352,278; D392,267; D392,268; D392,269; D395,291; D396,853; D398,912. Other patents are pending.
Avid products or portions thereof are protected by one or more of the following European Patents: 0506870; 0515031; 0635188; 0674414; 0694243; 0705517; 0752174; 0857293; 0976108; 0988756; 1068723; 1068734; 1111910; 1173850; 1629675. Other patents are pending.
Avid products or portions thereof are protected by one or more of the following United States Patents: 5,077,604; 5,267,351; 5,309,528; 5,355,450; 5,396,594; 5,440,348; 5,467,288; 5,513,375; 5,528,310; 5,557,423; 5,568,275; 5,577,190; 5,584,006; 5,634,020; 5,640,601; 5,644,364; 5,654,737; 5,715,018; 5,719,570; 5,724,605; 5,726,717; 5,729,673; 5,745,637; 5,752,029; 5,754,180; 5,754,851; 5,799,150; 5,812,216; 5,828,678; 5,842,014; 5,852,435; 5,905,841; 5,929,836; 5,930,445; 5,946,445; 5,986,584; 5,987,501; 5,999,406; 6,016,152; 6,018,337; 6,023,531; 6,038,573; 6,058,236; 6,061,758; 6,069,668; 6,091,778; 6,105,083; 6,118,444; 6,130,676; 6,134,607; 6,141,007; 6,141,691; 6,198,477; 6,201,531; 6,211,869; 6,223,211; 6,249,280; 6,269,195; 6,330,369; 6,351,557; 6,353,862; 6,357,047; 6,392,710; 6,404,435; 6,407,775; 6,417,891; 6,426,778; 6,477,271; 6,489,969; 6,512,522; 6,532,043; 6,546,190; 6,552,731; 6,553,142; 6,570,624; 6,571,255; 6,583,824; 6,596,031; 6,618,547; 6,636,869; 6,665,450; 6,678,461; 6,687,407; 6,704,445; 6,747,705; 6,763,134; 6,763,523; 6,766,063; 6,766,357; 6,791,556; 6,810,157; 6,813,622; 6,847,373; 6,871,003; 6,871,161; 6,901,211; 6,907,191; 6,928,187; 7,043,058; 7,081,900; 7,103,231; 7,266,241; 7,280,117; RE40,107; 7,403,561; 7,433,519; 7,512,885; 7,545,957; D352,278; D372,478; D373,778; D392,267; D392,268; D392,269; D395,291; D396,853; D398,912. Other patents are pending.
Avid products or portions thereof are protected by one or more of the following European Patents: 0506870; 0515031; 0635188; 0674414; 0694243; 0705517; 0752174; 0857293; 0895623; 0976108; 0988756; 1068617; 1068723; 1068734; 1111910; 1173850; 1629675. Other patents are pending.
No part of this document may be reproduced or transmitted in any form or by any means, electronic or mechanical, including photocopying and recording, for any purpose without the express written permission of Avid Technology, Inc.
Copyright © 2010 Avid Technology, Inc. and its licensors. All rights reserved. Printed in USA.
Attn. Government User(s). Restricted Rights LegendU.S. GOVERNMENT RESTRICTED RIGHTS. This Software and its documentation are “commercial computer software” or “commercial computer software documentation.” In the event that such Software or documentation is acquired by or on behalf of a unit or agency of the U.S. Government, all rights with respect to this Software and documentation are subject to the terms of the License Agreement, pursuant to FAR §12.212(a) and/or DFARS §227.7202-1(a), as applicable.
Trademarks003, 192 Digital I/O, 192XD I/O, 888 I/O, AirPlay, AirSPACE, AirSPACE HD, AirSpeed, ALEX, Alienbrain, AniMatte, AudioMarket, AudioPages, AudioSuite, AudioVision, AutoSync, Avid, Avid Advanced Response, Avid DNA, Avid DNxcel, Avid DNxHD, AVIDdrive, Avid DS Assist Station, Avid EditStar, Avid Learning Excellerator, Avid Liquid, Avid Liquid Chrome Xe, Avid MEDIArray, Avid Mojo, AvidNet, AvidNetwork, Avid NewStar, Avid Remote Response, AVIDstripe, Avid Unity, Avid Unity ISIS, Avid VideoRAID, Avid Xpress, AVoption, AVX, Beauty Without The Bandwidth, Boom, C|24, CaptureManager, ChromaCurve, ChromaWheel, Command|24, Conectiv, CountDown, DAE, Dazzle, Dazzle Digital Video Creator, Deko, DekoCast, D-Fi, D-fx, DigiDelivery, Digidesign, Digidesign Audio Engine, Digidesign Intelligent Noise Reduction, DigiDrive, DigiLink, DigiMeter, DigiSerial, DigiStudio, DigiStudio Control, Digital Nonlinear Accelerator, DigiTranslator, DINR, DNxchange, do more, DVD Complete, D-Verb, Eleven, Equinox, EveryPhase, ExpertRender, Fastbreak, Fast Track, FieldPak, Film Composer, FilmScribe, Flexevent, FluidMotion, FXDeko, G7, G-Rack, HD Core, HD Process, HDPack, HYBRID, HyperControl, HyperSPACE, HyperSPACE HDCAM, IllusionFX, Image Independence, iNEWS, iNEWS Assign, iNEWS ControlAir, Instantwrite, Instinct, Intelli-sat Broadcasting Recording Manager, Intelli-Sat, InterFX, Interplay, inTONE, Intraframe, iS9, iS18, iS23, iS36, ISIS, IsoSync, KeyRig, KeyStudio, LaunchPad, LeaderPlus, Lightning, ListSync, Lo-Fi, Magic Mask, Make Anything Hollywood, make manage move | media, Marquee, M-Audio, M-Audio Micro, Maxim, Mbox, MCXpress, Media Browse, Media Composer,
Workflow for Editing MXF Clips with AMA
23
MediaDock, MediaDock Shuttle, Media Fusion, Media Illusion, MediaLog, Media Reader, Media Recorder, MEDIArray, MediaShare, MediaStream, Media Suite, Meridien, MetaFuze, MetaSync, MicroTrack, Midiman, MissionControl, Mix Rack, MixLab, Moviebox, Moviestar, NaturalMatch, Nearchive, NetReview, NewsCutter, Nitris, NRV-10 interFX, Octane, OMF, OMF Interchange, OMM, OnDVD, Open Media Framework, Open Media Management, Palladium, Pinnacle, Pinnacle DistanTV, Pinnacle Geniebox, Pinnacle HomeMusic, Pinnacle MediaSuite, Pinnacle Mobile Media, Pinnacle Studio, Pinnacle Studio MovieBoard, Pinnacle Systems, ProEncode, ProServices, ProSessions, Pro Tools, QuietDrive, Recti-Fi, Reel Tape Delay, Reel Tape Flanger, Reel Tape Saturation, RetroLoop, rS9, rS18, Salesview, Sci-Fi, Scorch, Scorefitter, ScriptSync, SecureProductionEnvironment, Session, Show Center, Sibelius, SIDON, Soft SampleCell, Soft-Clip Limiter, Sound Designer II, SPACE, SPACEShift, SpectraGraph, SpectraMatte, Sputnik, Starplay, SteadyGlide, Streamfactory, Streamgenie, StreamRAID, Strike, Structure, Studiophile, SubCap, Sundance Digital, Sundance, Symphony, SYNC HD, SynchroScience, SynchroScope, Syntax, TDM FlexCable, Thunder, Titan, Titansync, TL Aggro, TL AutoPan, TL Drum Rehab, TL Everyphase, TL Fauxlder, TL In Tune, TL MasterMeter, TL Metro, TL Space, TL Utilities, Torq, Torq Xponent, Transfuser, Trigger Finger, Trillium Lane Labs, TruTouch, UnityRAID, Vari-Fi, Velvet, Venom, VideoRAID, Video Slave Driver, VideoSPACE, VideoSpin, Vortx, Xdeck, X-Form, Xmon, Xponent, and X-Session are either registered trademarks or trademarks of Avid Technology, Inc. in the United States and/or other countries.
Adobe and Photoshop are either registered trademarks or trademarks of Adobe Systems Incorporated in the United States and/or other countries. Apple and Macintosh are trademarks of Apple Computer, Inc., registered in the U.S. and other countries. Windows is either a registered trademark or trademark of Microsoft Corporation in the United States and/or other countries. All other trademarks contained herein are the property of their respective owners.
MXF AMA Plug-in • Part Number 0130-30272-01B • 2/15/11

1 MXF AMA Plug-in Guide
24