mounting instructions, pewag austro st, radial spur, radial zweispur
DESCRIPTION
Mounting Instructions, pewag austro st, radial spur, radial zweispur, english, MA00569TRANSCRIPT
Mounting Instructions
pewag austro st, radial spur, radial zweispur
1
2
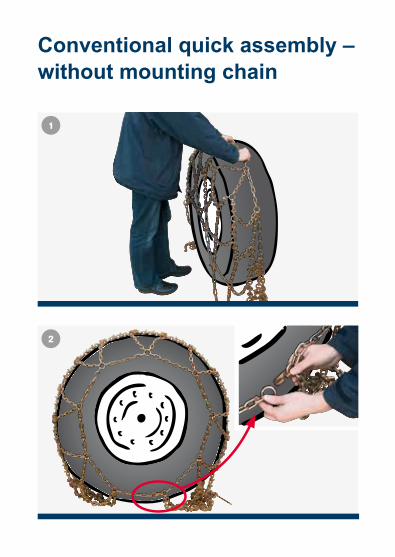
Conventional quick assembly –without mounting chain

3
4
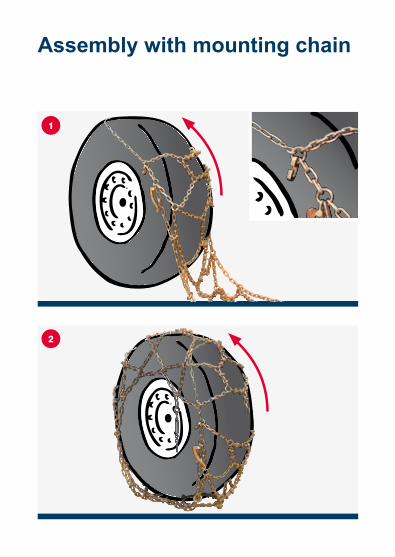
Assembly with mounting chain
1
2
4
3

6
5
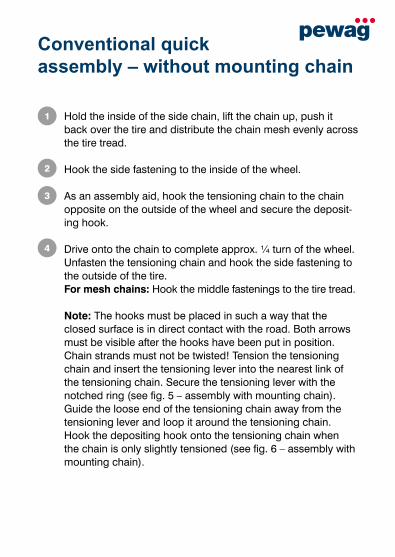
Conventional quick assembly – without mounting chain
Hold the inside of the side chain, lift the chain up, push it back over the tire and distribute the chain mesh evenly across the tire tread.
Hook the side fastening to the inside of the wheel.
As an assembly aid, hook the tensioning chain to the chain opposite on the outside of the wheel and secure the deposit-ing hook.
Drive onto the chain to complete approx. ¼ turn of the wheel. Unfasten the tensioning chain and hook the side fastening to the outside of the tire. For mesh chains: Hook the middle fastenings to the tire tread.
Note: The hooks must be placed in such a way that the closed surface is in direct contact with the road. Both arrows must be visible after the hooks have been put in position. Chain strands must not be twisted! Tension the tensioning chain and insert the tensioning lever into the nearest link of the tensioning chain. Secure the tensioning lever with the notched ring (see fig. 5 – assembly with mounting chain). Guide the loose end of the tensioning chain away from the tensioning lever and loop it around the tensioning chain. Hook the depositing hook onto the tensioning chain when the chain is only slightly tensioned (see fig. 6 – assembly with mounting chain).
1
2
3
4
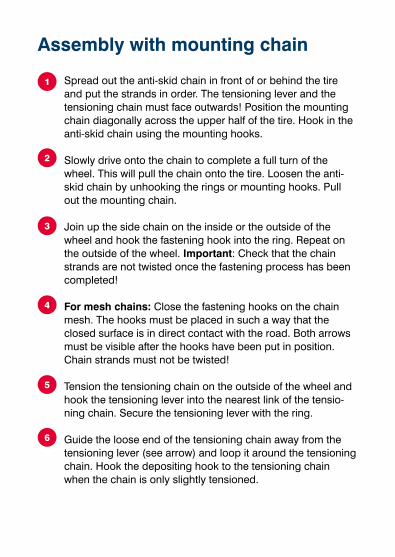
Assembly with mounting chain
Spread out the anti-skid chain in front of or behind the tire and put the strands in order. The tensioning lever and the tensioning chain must face outwards! Position the mounting chain diagonally across the upper half of the tire. Hook in the anti-skid chain using the mounting hooks.
Slowly drive onto the chain to complete a full turn of the wheel. This will pull the chain onto the tire. Loosen the anti-skid chain by unhooking the rings or mounting hooks. Pull out the mounting chain.
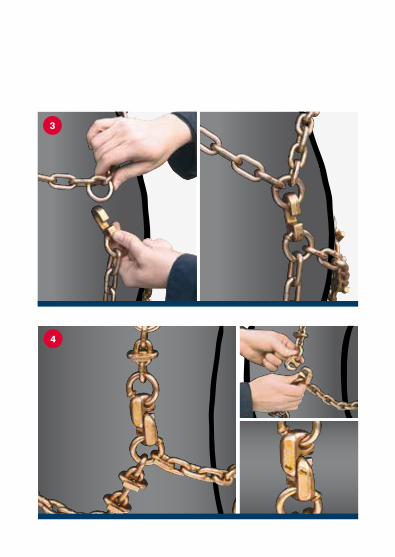
Join up the side chain on the inside or the outside of the wheel and hook the fastening hook into the ring. Repeat on the outside of the wheel. Important: Check that the chain strands are not twisted once the fastening process has been completed!
For mesh chains: Close the fastening hooks on the chain mesh. The hooks must be placed in such a way that the closed surface is in direct contact with the road. Both arrows must be visible after the hooks have been put in position. Chain strands must not be twisted!
Tension the tensioning chain on the outside of the wheel and hook the tensioning lever into the nearest link of the tensio-ning chain. Secure the tensioning lever with the ring.
Guide the loose end of the tensioning chain away from the tensioning lever (see arrow) and loop it around the tensioning chain. Hook the depositing hook to the tensioning chain when the chain is only slightly tensioned.
1
2
3
4
5
6

Assembly of twin chains
Note: The process for spreading the chain and pulling it onto the tire is the same as for pewag single chains.
Important: If you find it difficult to attach the fastening hooks when mounting a twin chain, for instance due to rough-profile, bulky tires, move the vehicle backwards or forwards by approx. one turn of the wheel to straighten out the chain mesh.
Handling: With twin chains, the middle guide chain must be fastened by redirecting / fastening the hook to the guide chain.
Disassembly of anti-skid chains
• Undo the depositing hook• Open the tensioning lever• Loosen the tensioning chain• Undo the fastening hook (start on the outside of the wheel)• For mesh chains: Undo the middle fastening• Slide the chain off the tire
a
b
ba
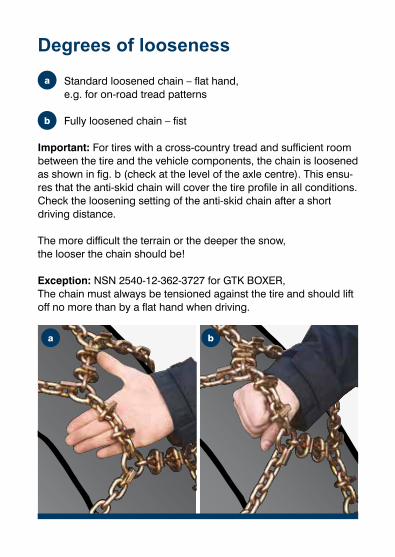
Degrees of looseness
Standard loosened chain – flat hand,e.g. for on-road tread patterns
Fully loosened chain – fist
Important: For tires with a cross-country tread and sufficient room between the tire and the vehicle components, the chain is loosened as shown in fig. b (check at the level of the axle centre). This ensu-res that the anti-skid chain will cover the tire profile in all conditions. Check the loosening setting of the anti-skid chain after a short driving distance. The more difficult the terrain or the deeper the snow, the looser the chain should be!
Exception: NSN 2540-12-362-3727 for GTK BOXER,The chain must always be tensioned against the tire and should lift off no more than by a flat hand when driving.
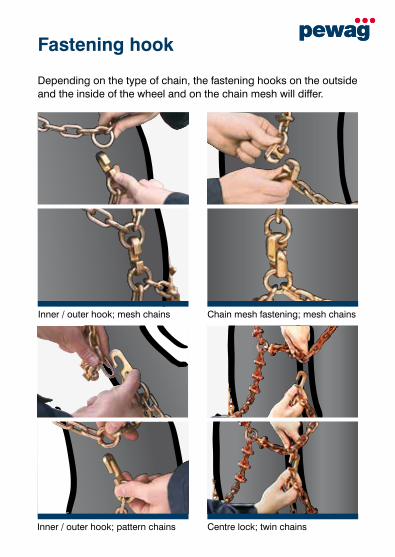
Inner / outer hook; pattern chains Centre lock; twin chains
Fastening hook
Depending on the type of chain, the fastening hooks on the outside and the inside of the wheel and on the chain mesh will differ.
Inner / outer hook; mesh chains Chain mesh fastening; mesh chains
Maintenance and care
• Clean chains after each use with water or mild soapsuds before letting them dry.
• Replace damaged or missing components immediately. • Put the anti-skid chains in the packaging and store in the
equipment box provided. Please ensure that the corresponding mounting chain is available for each anti-skid chain.
Labelling
The fastening of the anti-skid chains and the chain bag are labelled as follows:• Chain no. (NSN)* • Manufacturing date • Manufacturer • Manufacturing code• Tire size* * Check for accuracy!
Repairs
Failed chain components may be replaced using the tools available on board the vehicle.
Note: When ordering parts, the chain number embossed on the fastening and the tire number must be provided.
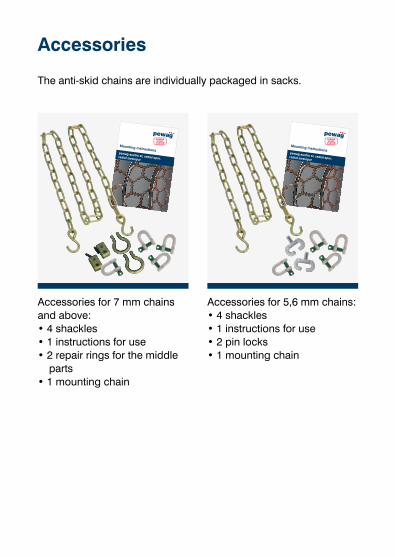
Accessories
The anti-skid chains are individually packaged in sacks.
Accessories for 5,6 mm chains:• 4 shackles• 1 instructions for use• 2 pin locks• 1 mounting chain
Accessories for 7 mm chains and above:• 4 shackles• 1 instructions for use• 2 repair rings for the middle
parts• 1 mounting chain
Mounting Instructionspewag austro st, radial spur, radial zweispur
Mounting Instructionspewag austro st, radial spur, radial zweispur
Safety notes
• Maximum speed 50 km/h (according to § 3, Road Traffic Act)• Sensible driving increases the lifespan of the chains (avoid spin-
ning the wheels). • Anti-skid chains are designed to increase the mobility of wheeled
vehicles while driving on icy and snow-covered roads and off-road. They are not suitable for any other purpose!
• Inspect the anti-skid chains prior to each assembly: If they are worn down by more than 50 %, the risk of failure increases! Replace damaged chain components immediately to prevent damage to the vehicle. Please refer to the user manual of your vehicle when using anti-skid chains. Regularly check the condi-tion of the mounted chains during use. Chains must be used in pairs and consistently across each axle.

pewag Schneeketten GmbH & Co KGA-9371 Brückl, Kettenwerk 1, Phone: +43 316 6070-299, Fax: +43 316 [email protected], www.pewag.com
MA/00569