mountaineering techniques...
TRANSCRIPT
MOUNTAINEERING TECHNIQUES (BASIC)
BILL LYDE GS9/E. LIVINGSTON GS12
SUBCOURSE NO. IN 0486
UNITED STATES ARMY INFANTRY SCHOOLFORT BENNING, GEORGIA 31905-5593
6 Credit Hours
SUBCOURSE OVERVIEW
This subcourse is designed to teach you the techniques you must know in order to copewith mountainous terrain. The subcourse contains information on identifying the differenttypes of terrain; characteristics of weather and climate; acclimatization and conditioning;and basic mountaineering techniques.
Mountains exist in almost every country in the world. Almost every war has includedsome type of mountain operations. This pattern will not change; therefore, you will fightin mountainous terrain in future conflicts. Mountain operations have not changed, but theequipment and transportation available today have changed. The helicopter allows accessto terrain that was once unreachable or could be reached only by slow methodicalclimbing. If bad weather exists, you must still use mountain climbing techniques to reachan objective.
There are no prerequisites for this subcourse.
This subcourse reflects the doctrine which was current at the time it was prepared. In yourown work situation, always refer to the latest publications.
TERMINAL LEARNING OBJECTIVE
TASK: Demonstrate a comprehension and knowledge of terrain, weather, climate,acclimatization and conditioning, and basic mountaineering techniques.
CONDITIONS: Given the subcourse material, a combat (training) scenario, and extracts,as applicable, the student will complete the examination at the end of this subcourse.
STANDARDS: The student will successfully answer 70% of the questions on a multiple-choice based examination for subcourse IN 0486 demonstrating an understanding ofterrain, weather, and climate, acclimatization and conditioning, and basic mountaineeringtechniques.
TABLE OF CONTENTS
LESSON 1: MOUNTAINEERING CONDITIONS
Part A: Terrain
Part B: Climate
Part C: Acclimatization and Conditioning
Part D: Illness and Injury
Practice Exercise
LESSON 2: MOUNTAINEERING EQUIPMENT
Part A: Climbing Ropes and Types of Knots
Part B: Types of Snaplinks
Part C: Equipment and Maintenance
Part D: Types of Pitons and Piton Hammers

Practice Exercise
LESSON 3: CLIMBING TECHNIQUES
Part A: General Techniques
Part B: Belays
Part C: Rappelling
Practice Exercise
ADMINISTRATIVE INSTRUCTIONS
1. Number of lessons in this subcourse. Three.
2. Supervisory requirements: None.
GRADING AND CERTIFICATION INSTRUCTIONS
Examination: This subcourse has a multiple-choice test covering the material contained inthe three lessons. After studying the lessons and working through the practice exercises,complete the examination. A score of 70 or above is passing. Six credit hours will beawarded for successful completion of this examination.
When used in this publication "he," "him," "his," and "men" represent both the masculineand feminine genders, unless otherwise stated.
LESSON ONE MOUNTAINEERING CONDITIONSOVERVIEW
TASK DESCRIPTION:
In this lesson, you will learn to identify terrain, climate, weather, and acclimatization andconditioning.
LEARNING OBJECTIVE:
TASKS: Understand terrain, climate, weather, and acclimatization and conditioning.
CONDITIONS: Given the subcourse material for this lesson, a training scenario, andextracts, as applicable, the student will complete the practical exercise to show anunderstanding of terrain, climate, weather, and acclimatization and conditioning.
STANDARDS: The student will demonstrate his comprehension and knowledge of thetask by displaying an understanding of terrain, climate, weather, and acclimatization andconditioning.
REFERENCES: The material contained in this lesson was derived from the followingpublication: TC 90-6-1
INTRODUCTION
You Must consider the effects terrain and weather will have on your operations, primarilythe effects on you and your logistics effort. Helicopters are a valuable asset for use inmoving men and supplies, but you should never plan to use them as the only means ofmovement and resupply. Alternate methods must be planned due to the variability of
weather. If you are scheduled to deploy to mountainous environments, you shouldbecome self-sufficient and train under various conditions.
PART A - TERRAIN
1. General. Operations in the mountains require you to be physically fit and experiencedin mountain operations. Problems arise in moving men and transporting loads up anddown steep and varied terrain in order to accomplish the mission. Acclimatization,conditioning, and training are important factors in successful military mountaineering.Terrain affects the rate at which units can move men and equipment. Mountainous terrainposes an obstacle to those units not trained for mountain operations. The terrain must beanalyzed in the context of: mountains, roads, and trails, cross-country movement,mountain hazards, cover and concealment, observation, and fields of fire. Each of thesewill be discussed separately.
2. Mountains. Mountains are defined as landforms that rise more than 500 meters abovethe surrounding plain and are characterized by steep slopes. Mountains may consist of anisolated peak, single ridges, glaciers, snowfields, compartments, or complex ranges,extending for long distances and obstructing movement. Mountains usually favor thedefense, however, attacks can succeed by using detailed planning, rehearsals, surprise,and well-led troops.
3. Roads and Trails. There are usually few roads in the mountains. Most are easilydefended, since they follow the easiest avenues of travel in the valleys and throughpasses. However, trails seldom support vehicular traffic and are observable. Successdepends on a force's ability to control these routes and the peaks surrounding them.Detailed maps show roads and many of the trails. You may obtain additional informationfrom terrain analysis, photographic interpretation, and local residents.
4. Cross-Country Movement. You must know the terrain to determine feasible routes forcross-country movement when there are no roads or trails. The following guidelines arenecessary when you are planning mountain operations.
As part of a preparations intelligence effort, you should include topographic andphotographic map coverage as well as detailed weather data for the area ofoperations. When planning mountain operations, it may be necessary to obtainadditional information on size, location, and characteristics of landforms anddrainage, types of rock and soil, and the density and distribution of vegetation.You must decentralize control to lower levels because of varied terrain, erraticweather, and communication problems inherent to mountainous regions.
Movement is often restricted due to terrain and weather. Because of erraticweather, you must be prepared for wide variations in temperature, and types andamounts of precipitation. You must be self-sufficient to cope with normal weatherchanges using materials from your rucksack. Movement during a storm is difficultdue to poor visibility and bad footing on steep terrain. The dampness of rain andsnow, and the penetration of wind may cause you to chill quickly.
When the tactical situation requires continued movement during a storm, youshould take the following precautions.
Maintain visual contact.
Keep warm. You should maintain energy and body heat by eating anddrinking often; you must carry food that can be eaten quickly and while onthe move.
Keep dry. You should wear wet-weather clothing when appropriate, but donot overdress, which can cause excessive perspiration and dampenclothing. As soon as the objective is reached and shelter secured, you mayput on dry clothing.
Do not rush. Hasty movement during storms leads to breaks in contact andaccidents.
If you are lost, stay warm, dry, and calm.
Do not use ravines as routes of approach during a storm as they often fillwith water and are prone to flash floods.
You should avoid high pinnacles and ridge lines during electrical storms.
You should avoid areas of potential avalanche or rockfall danger.
5. Mountain Hazard.
Hazards can be termed natural (caused by natural occurrence), man-made (caused by anindividual's lack of preparation, carelessness, improper diet, equipment misuse), orcombination (human trigger). The seven types of hazards that you should be familiar withare: rockfall; icefall; avalanches; combination of rockfall, icefall, and avalanche; factorsaffecting the snowpack; lightning; and crevasses Each of these hazards will be discussedseparately.
Rockfall. This is the most common hazard encountered by the militarymountaineer. Your understanding of its causes, and measures used to lessen itsimpact, is essential. You should become familiar with the structure andcomposition of a rock area. Rock that has been subjected to severe weathering ismore prone to rockfall Beware of "soft" and stratified rocks; these rocks are proneto rockfall, and can be loose and unstable. As a military mountaineer, you shoulddo everything possible to avoid danger. Avoid areas where rockfall is likely tooccur, and if necessary, enter those areas at the most suitable time of day,avoiding gullies in favor of ridges.
Indicators of rockfall must be learned and observed in the field. Fresh debris at thebottom of the cliff or scree at the bottom of gullies are indicators of rockfall. It is alsoimportant to know at what times rockfall is most likely to occur. Rockfall usually occursearly in the day on east and south mountain faces as the sun first warms them, and it inlate afternoon on west and north faces. There is, however, no absolute rule to be followed.
Icefall. This common hazard may be triggered by natural, man-made, orcombination factors. It is a common hazard when conducting operations in snow,ice, or glaciated terrain. The parameters of rockfall apply to ice as well.
Avalanches: Terrain, climate and weather are the basic elements for the avalanchephenomenon. The two main causes of avalanches are: the weight of large amountsof accumulated snow, and steep slopes that exceed the cohesive forces within thesnowpack or between the snowpack and ground. There are two types of snow, andthey are classified as powder snow (loose, snow) and compact snow (slab). Theeffects of an avalanche can be disastrous to the military mountaineer. Chances foryou to survive after burial by an avalanche are about 50 percent after 30 minutes.After two hours, chances for survival are remote.
Combination factors (rockfall, icefall, and avalanche). This type of hazard consistsof the previously mentioned factors.
Lightning. The danger from lightning is greater on rock than on snow or ice.Lightning can be expected when static electricity is great enough to cause tickling
of the scalp, the hair to stand up, and a slight crackling and appearance of a bluelight (St. Elmo's fire) on metal objects. During a thunderstorm, the followingguidelines can help you reduce injuries due to lightning.
Avoid summits and ridges.Stay away from prominent objects, mainly metal objects.Avoid gullies filled with water.Avoid overhangs and recesses.Avoid cracks in wet rock; lightning ground currents follow them.Take up a squatting position on dry ground or a rucksack with kneesdrawn up.Keep the hands and upper torso insulated from the ground. Avoid metallicobjects extending from the upper body to the ground.
Crevasses. Crevasses are formed when a glacier flows over a slope and makes abend, or when a glacier separates from the rock walls that enclose it. A slope ofonly 2 to 3 degrees is enough to form a crevasse. As a glacier makes a bend, it islikely that crevasses will form at the outside of the bend. Therefore, the safestroute on a glacier would be to the inside of bends, and away from steep slopes andicefalls. Exercise extreme care when moving off of or onto the glacier because ofthe moat that is likely to be present.
6. Cover and Concealment. When moving in the mountains, cover can be provided byoutcroppings, boulders, heavy vegetation, and intermediate terrain features that maskmaneuver. Fighting and temporary fortification positions are often difficult to dig becauseof thin or stony soil, and selection of these positions requires detailed planning. Oneeasily excavated rock type is volcanic tuff. In other areas you may find boulders and otherloose rocks that can be used for building hasty fortifications. In alpine environments,snow and ice blocks may be cut and stacked to supplement dug-in positions. As in alloperations, positions and routes must be camouflaged to blend in with the surroundingterrain and prevent aerial detection.
7. Observation. Because of weather and ground cover, observation in the mountainsvaries. The dominating height of mountainous terrain permits excellent long-rangeobservation. However, rapidly changing weather with frequent periods of high wind, rain,snow, sleet, hail, and fog can limit visibility. The rugged nature of the terrain oftenproduces dead space at midranges.
Due to low cloud cover at higher elevations, observation posts (OPs) established on peaksor mountain tops may be ineffective. On higher elevations, high wind speeds often maskthe noises of troop movement. In order to provide visual coverage of the battle area, OPsmay need to be established laterally, in depth, and at varying altitudes.
In order to obtain concealment from observation, you may consider the nature of theterrain (previously mentioned dead space). When the sun is low and in relatively clearskies, mountainous regions are subject to intense shadowing. The contrast from lighted toshaded areas is such that visual acuity in the shaded regions is considerably reduced.Those shadowed areas can provide increased concealment when combined with othercamouflaging disciplines and should be considered in maneuver plans.
When operating in mountainous regions, you should be well trained in the use of nightobservation devices (NODs). If you are knowledgeable in the use of night vision goggles,periods of darkness will provide excellent opportunities for unobserved movement. TheseNODs can be used in static or moving applications in both offensive and defensiveoperations.
8. Fields of Fire. Fields of fire, like observation, are excellent at long ranges. However,dead space is a problem at short ranges. When forces cannot be positioned to cover deadspace with direct fire, mines and obstacles, or indirect fire must be used. Rangedetermination is deceptive in mountainous terrain. You must routinely train in rangeestimation in mountainous regions to maintain your proficiency.
PART B - CLIMATE
1. General.
The physiology and pathology of the human body is affected by the mountain climate.The human body is sensitive to weather change and differing climates. Analysis ofmountain weather and how it is affected by mountain terrain shows that weather changesare subject to patterns but are less obvious in mountainous terrain than other areas.Conditions greatly change with altitude, latitude, and exposure to atmospheric winds andair masses. Mountain weather can be extremely erratic; within a short time or minor shiftin locality, the wind may vary from stormy to calm, and from extreme cold to warmth.The severity and variance of the weather causes it to have a major impact on militaryoperations.
2. Considerations for Planning.
Mountain weather can be either a dangerous obstacle to operations or a valuable aid,depending on how well it is understood and to what extent advantage is taken of itspeculiar characteristics.
The success or failure of a mission is often determined by the weather. Whenplanning airmobile and airborne operations, military plans must be flexible. Youmust anticipate the weather as part of your planning in order to turn an importantweather factor in your favor. The clouds that often cover the tops of mountainsand the fogs that cover valleys are an excellent means of concealing movementsthat are normally made during darkness or in smoke. Limited visibility can beused as a combat multiplier.
The safety or danger of almost all high mountain regions depends on the weather,especially in winter. A change of a few degrees in temperature above or below thefreezing point may affect the ease and speed of travel. Terrain that can be crossedswiftly and safely one day may become impassable or highly dangerous the nextdue to snowfall, rainfall, or a rise in temperature. The reverse can happen just asquickly. The prevalence of avalanches depends on terrain, snow conditions, andweather factors.
Some mountains, such as those found in desert regions, are dry and barren withtemperatures ranging from extreme heat in the summer to extreme cold in thewinter. In tropical regions, mountains are often covered by lush jungles withheavy seasonal rains and little temperature variations. High rocky crags withglaciated peaks can be found in mountain ranges at most latitudes along thewestern portion of the Americas and Asia.
Severe weather may decrease morale and increase basic survival problems. Theseproblems can be minimized when you have been trained to accept the weather bybeing self-sufficient. As a mountain soldier, properly equipped and trained, youcan use the weather to your advantage in combat operations.
3. Mountain Air.
Mountain air is relatively pure. The higher the elevation, the more pure it becomes.Above 4,500 meters, air is almost germ-free. The composition of the air of high altitudesis different than air at sea level. Falling snow also purifies the air by capturing andholding many of the impurities in the air.
Pressure is low in mountainous areas due to the altitude. The barometer usuallydrops 2.5 centimeters (1 inch) for every 300 meters gained in elevation. Thisequates to a 3 percent drop in pressure for an increase of 300 meters in elevation.
This decreased pressure causes the air to expand, decreasing the amount of oxygen andmoisture in a given volume. Consequently, oxygen decreases with elevation.
High mountain air is dry and may be drier in the winter. Due to this increaseddryness, equipment does not rust as quickly and organic material decomposesslowly. The dry air also requires you to increase consumption of water. Thereduced water vapor in the air causes an increase in evaporation of moisture fromthe skin and in loss of water through transpiration in the respiratory system. Dueto the cold, you do not naturally consume the quantity of fluids that you would athigher temperatures, hence you are encouraged to consciously increase your fluidintake.
The air is thinner as atmospheric pressure drops with the increasing altitude. Athigher altitudes, the thinner, drier air has a reduced molecular content and,consequently, a reduced filtering effect on the sun's rays. Both visible andultraviolet ray intensities are greater with increased altitude. These conditionsincrease the chance of sunburn, especially when combined with a snow cover thatreflects the rays upward.
4. Characteristics.
The following characteristics of weather are the results of the life cycle of a local storm orfrom the movement of traveling storms:
Weather is erratic.
Hurricane winds and gentle breezes may occur within two to three kilometers ofeach other.
Weather in exposed areas contrasts sharply with the weather in sheltered areas.
Weather changes in one day can be so variable that in the same locality there maybe hot sun and cool shade, high winds and calm, gusts of rain or snow, and thenintense sunlight again.
In addition, the effects of storms are modified by the following local influences, whichdominate summer storms:
Variation in altitude.
Differences in exposure.
Distortion of storm movements and the normal winds by irregular mountaintopography.
5. Temperature. For air moving up a mountain with condensation occurring (clouds, fog,and precipitation), the temperature of the air drops 3.5 degrees F with every 300-meterrise in altitude. For air moving up a mountain with no clouds forming, the temperature ofthe air drops 5.5 degrees F for every 300-meter rise in altitude. Mountain temperaturesmay be affected by temperature inversions, solar heating, and weather patterns.
Temperature inversions occur when mountain air is cooled by ice, snow, and heatloss through thermal radiation. This cooler, denser air settles into the valleys andlow areas. During a troop movement or climb started in a valley, highertemperatures may often be encountered as altitude is gained. This reversal of thenormal cooling with elevation is called temperature inversion. The inversioncontinues until the sun warms the surface of the earth or a moderate wind causes amixing of the warm and cold layers. These inversions are common in themountainous regions of the arctic, subarctic, and mid-latitudes.
At high altitude, solar heating is responsible for the greatest temperature contrasts.More sunshine and solar heat are received above the clouds than below. Theimportant effect of altitude is that the sun's rays pass through less of theatmosphere and more direct heat is received than at lower levels, where solarradiation is reflected and absorbed by dust and water vapor. There may bedifferences from 40 to 50 degrees F between surface temperatures in the shadeand surface temperatures in the sun. This is particularly true for dark metallicobjects. The difference in temperature felt on the skin between the sun and shadeis normally 7 degrees F. You must exercise special care to avoid sunburn andsnow blindness. Snow blindness results from the combination of intense sunlightand ultraviolet rays reflected from snowfields or clouds. At high altitudes, thetemperature rises fast after sunrise and drops quickly after sunset. Much of thechilled air drains downward, due to convection currents, so that the differencesbetween day and night temperatures are greater in valleys than on slopes.
The heating and cooling of the air affects planning considerations, mainly theclothing and equipment needed for an operation. Local weather patterns force aircurrents up and over mountain tops. Air is cooled on the windward side of themountain as it gains altitude, but more slowly (3.5 degrees F per 300 meters) if
clouds are forming due to heat release when water vapor becomes liquid. On theleeward side of the mountain, this heat gained from the condensation on thewindward side is added to the normal heating that occurs as the air descends andair pressure increases. Therefore, air and winds on the leeward slope areconsiderably warmer than that on the windward slope, which is referred to aschinook winds.
6. Types of Clouds.
Clouds are indicators of weather conditions. Proper reading of cloud shapes and patternsprovide weather forecasters with little need for additional equipment such as a barometer,wind meter, and thermometer.
Clouds are classified by shape and height.
Shape provides information about the stability of the atmosphere and chance forprecipitation.
Height (above ground level) provides an indication of the distance of a travelingstorm and the chance for precipitation.
Figure 1-1 shows the types and estimated heights of clouds, heights may vary based ongeographical locations.
The two major types of clouds, as classified by shape, are cumulus and stratus.
Cumulus clouds are so-called "puffy" clouds, they resemble tufts of cotton. Theirform from bottom to top is often equal to or greater than its width. They havesharp, distinct edges, because they are composed of water droplets. Airtemperatures within the cloud is warmer than -30 degrees. These clouds areusually indicators of instability at the altitude where they are found, and stormyweather associated with these clouds is usually violent with heavy rain or snowand strong gusty winds. A precipitating cumulus cloud is called a cumulonimbuscloud.
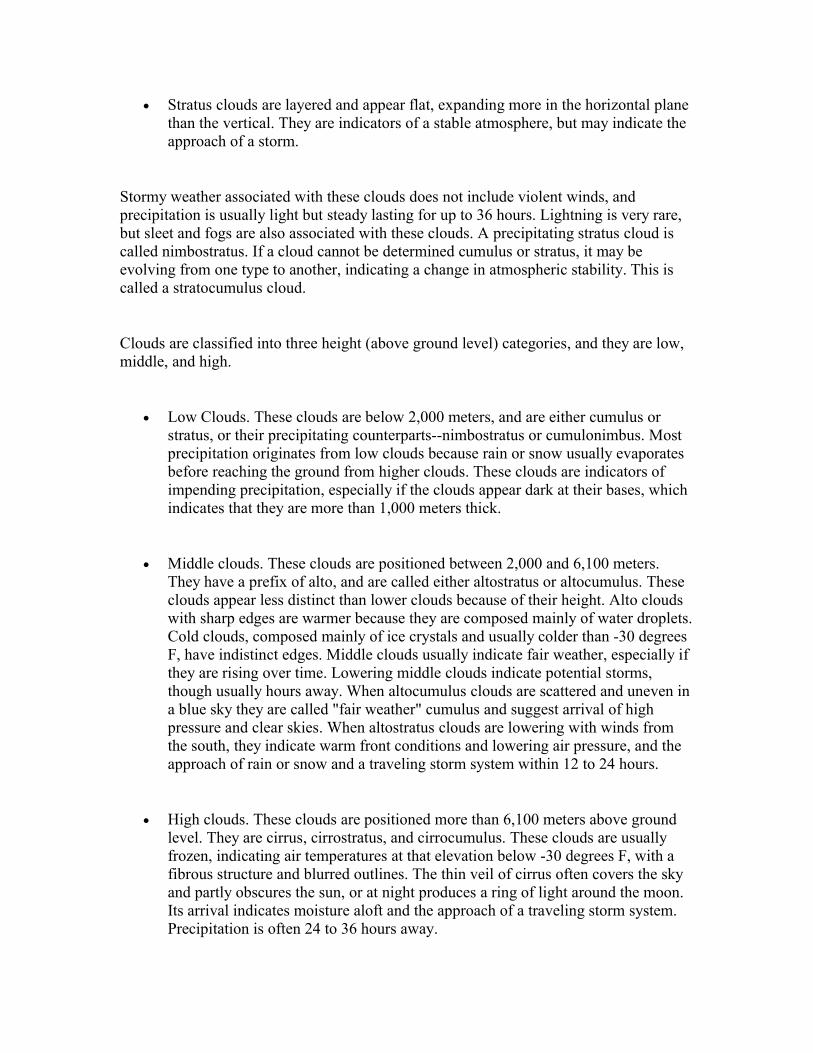
Stratus clouds are layered and appear flat, expanding more in the horizontal planethan the vertical. They are indicators of a stable atmosphere, but may indicate theapproach of a storm.
Stormy weather associated with these clouds does not include violent winds, andprecipitation is usually light but steady lasting for up to 36 hours. Lightning is very rare,but sleet and fogs are also associated with these clouds. A precipitating stratus cloud iscalled nimbostratus. If a cloud cannot be determined cumulus or stratus, it may beevolving from one type to another, indicating a change in atmospheric stability. This iscalled a stratocumulus cloud.
Clouds are classified into three height (above ground level) categories, and they are low,middle, and high.
Low Clouds. These clouds are below 2,000 meters, and are either cumulus orstratus, or their precipitating counterparts--nimbostratus or cumulonimbus. Mostprecipitation originates from low clouds because rain or snow usually evaporatesbefore reaching the ground from higher clouds. These clouds are indicators ofimpending precipitation, especially if the clouds appear dark at their bases, whichindicates that they are more than 1,000 meters thick.
Middle clouds. These clouds are positioned between 2,000 and 6,100 meters.They have a prefix of alto, and are called either altostratus or altocumulus. Theseclouds appear less distinct than lower clouds because of their height. Alto cloudswith sharp edges are warmer because they are composed mainly of water droplets.Cold clouds, composed mainly of ice crystals and usually colder than -30 degreesF, have indistinct edges. Middle clouds usually indicate fair weather, especially ifthey are rising over time. Lowering middle clouds indicate potential storms,though usually hours away. When altocumulus clouds are scattered and uneven ina blue sky they are called "fair weather" cumulus and suggest arrival of highpressure and clear skies. When altostratus clouds are lowering with winds fromthe south, they indicate warm front conditions and lowering air pressure, and theapproach of rain or snow and a traveling storm system within 12 to 24 hours.
High clouds. These clouds are positioned more than 6,100 meters above groundlevel. They are cirrus, cirrostratus, and cirrocumulus. These clouds are usuallyfrozen, indicating air temperatures at that elevation below -30 degrees F, with afibrous structure and blurred outlines. The thin veil of cirrus often covers the skyand partly obscures the sun, or at night produces a ring of light around the moon.Its arrival indicates moisture aloft and the approach of a traveling storm system.Precipitation is often 24 to 36 hours away.
As the storm approaches, the cirrus thickens and lowers, becoming altostratus andeventually stratus. Temperatures are warm, humidity rises, and winds become southerlyor south easterly.
Towering cumulus clouds are the most dangerous of all types and usually never occurwhen temperatures at the surface are below 32 degrees F.

They indicate extreme instability in the atmosphere. These clouds have bases below 2,000meters, and tops over 6,100 meters above ground level. When these clouds are mature,they exhibit frozen stratus clouds at their tops that produce an "anvil head" appearance.These clouds may be local storms or they may be associated with the cold front of atraveling storm. They produce high, gusty winds; lightning; heavy showers; andoccasionally hail and tornados-though the latter are rare in mountainous terrain. Suchthunderstorms are usually short lived and bring clear weather.
Cloud caps often form above pinnacles and peaks, and usually indicate higher windsaloft. Cloud caps with a lens shape, similar to a "flying saucer," are called lenticular andindicate very high winds (over 40 knots). Cloud caps should always be watched forchanges. If they grow and descend, bad weather can be expected.
Serious errors can occur in interpreting the extent of cloud cover, especially when cloudcover must be reported to another location. Sky cover always appears greater on or nearthe horizon, especially if the sky is covered with cumulus clouds, since the observer islooking more at the sides of the clouds rather than between them. Cloud cover estimatesshould be restricted to sky areas more than 40 degrees above the horizon-that is, to thelocal sky.
Clouds and precipitation increase with height until a zone of maximum precipitation isreached; above this zone they decrease. They occur near 1,800 meters elevation in middlelatitudes and at lower levels as the poles are approached. Usually a dense forest marks thezone of maximum rainfall.
Slopes facing the prevailing wind receive heavier precipitation than thoseprotected from the wind-on the leeward side, especially when large bodies ofwater lie to the windward side. At night and in fall and winter, valleys are colderand foggier than higher slopes, particularly when surrounding waters like riversand streams have not yet frozen. REMEMBER! Fog can be used for concealmentduring movement.
Above 1,500 meters, depending on the region, snow can fall at any time of theyear. Excessive snowfall creates avalanche hazards to exposed slopes and canforce changes in selected routes.
7. Wind.
In high mountains, the ridges and passes are seldom calm, however, strong winds inprotected valleys are rare. Normally, wind speed increases with altitude since the earth'sfrictional drag is strongest near the ground. Winds are accelerated when they convergethrough mountain passes and canyons. Because of these funneling effects, the wind mayblast with great force on an exposed mountainside or summit. Usually, the local winddirection is controlled by topography.
Wind blowing at 40 knots pushes four times harder than a wind blowing at 20knots. When wind strength increases to a hurricane force of 64 knots or more, youshould lay on the ground during gusts and continue moving during lulls. If ahurricane-force wind blows where there is sand or snow, dense clouds fill the air.
During the winter season, or at high altitudes, you must be constantly aware of the windchill factor (figure 1-2) and associated cold-weather injuries. You may measure the windchill factor based on the following instructions:
Measure local temperature and wind speed if possible; if not, estimate. Enter the chart atthe closest 5 degrees F interval along the top and with appropriate wind speed along theleft side. The intersection gives an approximate equivalent chill temperature; the rate atwhich an object or man cools, under calm conditions, to the ambient temperature (figure1-2).
NOTE: This chart was constructed using miles per hour (mph), however, a scale givingthe equivalent range in knots has been included on the chart to facilitate its use with eitherunit.
Wind may be calm but freezing danger is great if a person is exposed in a movingvehicle, under helicopter rotors, in propeller blast, and so on. It is the rate ofrelative air movement that counts, and the cooling effect is the same whether youare moving though the air or if it is blowing past you.
Effect of wind will be less if a person has even slight protection for exposed partssuch as light gloves on hands or a parka hood or balaclava shielding the face.

ACTIVITY: Danger is less if the soldier is active. A man produces about 100 watts (341BTUs) of heat standing still but up to 1,000 watts (3,413 BTUs) in vigorous activity likecross-country skiing.
PROPER USE OF CLOTHING and ADEQUATE DIET are both important.
COMMON SENSE: There is no substitute for it. The chart serves only as a guide to thecooling effect of the wind on bare skin when first exposed. General body cooling andmany other factors affect the risk of freezing injury.
Winds in traveling storms are more persistent in speed than those accompanyinglocal storms. There are two winds that result from the daily cycle of solar heating:
Valley or up-valley breezes develop on during calm, clear days in valleys that are subjectto intense solar radiation.
Mountain or down-valley breezes develop on clear nights, the mountainsides lose heatrapidly and cool the surrounding air, which settles downslope.
8. Thunderstorms.
Although individual thunderstorms are normally local and are over quickly, they can bepart of a large weather system that may hinder mountain operations.
In the alpine zone, above the timberline, thunderstorms may be accompanied by freezingprecipitation and sudden, squally winds. Ridges and peaks are focal points forconcentrated electrical activity, which is dangerous.
Local thunderstorms develop from rising air columns, and occur most often in themiddle or late afternoon. Scattered, fair-weather cumulus clouds are harmless, butwhen they continue to grow large and reach high altitudes of several thousandmeters they may turn into thunderstorms.
Thunderstorms that occur at night or in the early morning are associated withmajor changes in the weather, resulting in stormy weather before clearing on thehigh summits.
Thunderstorms occurring at these times may also be part of a storm line, which isfollowed by a prolonged period of cool, dry weather.
9. Lightning.
Many casualties have been reported due to lightning during mountain operations, whichinvolve an increased risk of being struck. Lightning kills more people in the United Statesthan any other weather phenomenon. Mountain climbers are often on prominent peaksand exposed ridges, which are subject to lightning strikes and lesser discharges.
The best way to avoid lightning in the mountains is to stay off exposed peaks orridges, and stay out of an unprotected flat expanse during an electrical storm. Ifsuch a storm can be predicted, it is best not to climb. You should avoid beingunder prominent or isolated trees. If you are caught in an exposed place and havetime before the storm reaches you, you should get as far down the mountain andaway from the exposed ridges as possible. You should avoid ridges that dominatethe skyline-the middle of a ridge is preferred to the end of a ridge.
If lightning strikes seem imminent or are striking nearby, you should seekprotection from direct strikes and ground currents. A flat shelf slope, or slightlyraised area dominated by a nearby high point gives protection from lightningstrikes. If possible, you should stay away from damp or lichen-covered rock. Youshould tie yourself to a point of protection if a severe shock would cause you tofall.
Lightning kills by passing through the upper torso and the heart, causing cardiacarrest. Keep your hands and upper body elevated away from the ground to helpdeny electricity a path through the upper body to the heart. To increase thechances for survival if near a strike, you should avoid upper body proximity to theground and keep objects attached to you away from the ground.
10. Fog.
On windward slopes, persistent fog, cloudiness, and precipitation often continue for days.They are caused mainly by the local barrier effect of the mountains on prevailing winds.Any cloud bank appears as a fog from within. Fog limits visibility and causes white-outconditions that hamper operations by increasing the chance of accidents. It does,however, aid surprise attacks. When ever traveling without landmarks, it is necessary touse a compass, altimeter, and map to maintain direction. If fog and precipitation occur atthe same time, you may need extra clothing for protection against cold and wetness.
11. Traveling Storms.
The most severe conditions, storms with strong winds and heavy precipitation, are due towidespread atmospheric disturbances, which usually travel easterly in the middle andhigh latitudes. If a traveling storm is encountered in the alpine zone during winter, all theequipment and skills of a military mountaineer are tested against low temperatures, highwinds, and blinding snow.
The storms result from the interaction of cold and warm air. The sequence ofweather events, with the approach and passing of a traveling storm, depends onthe storms development, and whether its path is to the north or south of a givenmountain area. Cirrus clouds merge and lower gradually until they becomealtostratus. Traveling storms do not usually occur in tropic regions.
A storm passing to the north may bring warm temperatures with southerly winds.Precipitation may move in from the northwest, and local cloudiness often
obscures frontal passages in the mountains. The storm may go so far to the norththat only the cold front phenomenon of heavy clouds, squalls, thundershowers,and cold weather are experienced. The same storm passing to the south would beaccompanied by a gradual wind shift from northeasterly to northwesterly, with asteady temperature fall and continuous precipitation.
Rapidly changing weather conditions often create glaze, a coating of ice thatforms on exposed objects. Glaze occurs with inversions when light rain or drizzlefalls through air below 32 degrees F, and strikes a surface that is also below 32degrees F, freezing to the surface in the form of glaze, and only persists if colderweather follows.
12. Weather Forecasting.
The use of a portable aneroid barometer, thermometer, wind meter, and hygrometer helpin making local weather forecasts. Reports from other localities and any weather service,including USAF, USN, or the National Weather Bureau, are also helpful. Use theseweather reports in conjunction with the local weather forecast, since weather at variouselevations may be quite different due to cloud height, temperature, and barometricpressure differences. Forecasts must reach the small-unit leaders who are expected tomake use of weather conditions for assigned missions.
13. Bad Weather.
Most of the bad weather experienced in mountain regions is due to:
Local storms in the form of thunderstorms, with or without showers.
Traveling storms, which may be accompanied by radical and severe weatherchanges over a broad area. Usually each type of storm may be identified by theclouds associated with it.
Seasonal moisture-bearing winds (monsoons), which bring bad weather to somemountain ranges and may last for several weeks.
14. Weather Predictions.
Weather predictions are based on educated estimation or on meteorological evidence.Natives of an area may supply weather knowledge that is accurate. An individualremaining in one mountain region for several weeks in any season can add indications forthat area based on his own experience.
Changing Weather. This change may be indicated by a marked shift in pressure,wind velocity, or wind direction; an abnormal change in temperature; or in themoisture content of the air within a 12-hour period.
Traveling Storms. The approach of a traveling storm is indicated when:
A thin veil of cirrus clouds spreads over the sky, thickening and loweringuntil altostratus clouds are formed. The same trend is shown at night whena halo forms around the moon and then darkens until only the glow of themoon is visible. When there is no moon, cirrus clouds only dim the starsbut altostratus clouds completely hide them.
Low clouds, which have been persistent on lower slopes, begin to rise atthe time upper clouds appear.
Various layers of clouds move in at different heights and becomeabundant.
Lens-shaped clouds accompanying strong winds lose their streamlinedshape and other cloud types appear in increasing amounts.
A change in the direction of the wind is accompanied by a rapid rise intemperature not caused by solar radiation. This may also indicate a warm,damp period.
A light green haze is observed shortly after sunrise in mountain regionsabove the timberline.
Local Disturbances. Indications of local thunderstorm showers or squally weatherare:
An increase in size and rapid thickening of scattered cumulus cloudsduring the afternoon.
The approach of a line of large cumulus or cumulonimbus clouds with anadvance guard of altocumulus clouds. At night, increasing lightningwindward of the prevailing wind gives the same warning.
Massive cumulus clouds hanging over a ridge or summit at nighttime ordaytime.
Strong Winds. Indications of approaching strong winds may be:
Plumes of blowing snow from the crests of ridges and peaks or raggedshreds of cloud moving rapidly.
Persistent lens-shaped clouds; or a band of clouds over high peaks andridges, or downwind from them.
A turbulent and ragged banner cloud that hangs to the lee of a peak.
Fair Weather. Fair weather may be associated with:
A cloudless sky and shallow fog, or layers of smoke or haze at valleybottoms in early morning.
A cloudless sky that is blue down to the horizon or down to where a levelhaze layer forms a secondary horizon.
Conditions under which small cumulus clouds appearing in the forenoondo not increase but decrease or vanish during the day.
Clear skies except for a low cloud deck that does not rise or thicken duringthe day.
Signs of Bad Weather (within 24 to 48 hours). This may include:
A gradual lowering of the clouds. This may be the arrival or formation of anew lower strata of clouds. It can also indicate the formation of athunderhead.
An increasing halo around the sun or moon.
An increase in humidity and temperature.
Cirrus (mares tails) clouds.
A decrease in barometric pressure (registered as a gain in elevation on analtimeter).
Signs of Good Weather. This may include:
A gradual rising and diminishing of the clouds.
A decreasing halo around the sun or moon.
Dew on the ground in the morning.
Small snowflakes, ice crystals, or drizzle, which indicate that the cloudsare thin and fair weather may exist at higher altitudes.
An increase in barometric pressure (registered as a loss in elevation on analtimeter).
Precipitation. When there is precipitation and the sky cannot be seen:
Small snowflakes or ice crystals indicate that the clouds above are thin, and fair weatherexists at high altitudes.
A steady fall of snowflakes or raindrops indicate that the precipitation has begun at highlevels, and bad weather is likely to be encountered on ridges and peaks.
PART C - ACCLIMATIZATION AND CONDITIONING
1. General.
Before undertaking extensive military operations in high mountainous elevations, as asoldier, you require a period of acclimatization. It is unrealistic to think that a freshlydeployed, unacclimatized unit can perform well in action. This could be disastrous if theopposing force is acclimatized. Even the physically fit soldier experiences physiologicaland psychological degradation when thrust into high elevations.
Time must be allocated to allow for acclimatization, conditioning and training. Trainingin mountains of low or medium elevation (1,500 to 2,500 meters) does not require specialconditioning and acclimatization procedures, however, impairment of operatingefficiency on some soldiers may occur.
Above 3,000 meters (high elevation), most unacclimatized soldiers may be expected todisplay some altitude effects. About 10 percent may experience symptoms of acutemountain sickness (AMS). Conduct training at a high altitude of about 2,500 metersgradually increasing it and ending at 5,000 meters; acclimatization beyond 5,000 meterswill result in degradation of the body greater than the benefits gained. Employment of thelocal population may be advantageous because they have lived at higher elevations, andcan be expected to out perform the most fit and acclimatized soldier.
2. Symptoms and Adjustments.
You are acclimatized to high altitudes when you are able to effectively perform physicallyand mentally. The acclimatization process begins immediately upon arrival at the higherelevation, and if the change is abrupt, it is expected that most of you will suffer thesymptoms of acute mountain sickness.
These symptoms will disappear from four to seven days, but their disappearance does notindicate complete acclimatization. The process of adjustment continues for weeks ormonths. Complete acclimatization is achieved at about 5,000 meters.
Immediately upon arrival at high elevations, only minimal physical work can beperformed because of physiological changes. The ability to work decreases as yougo higher, about a 10 percent reduction for every 1,000 meters gained above10,000 meters.
Unacclimatized soldiers will display some or all of the following behavioraleffects:
Increased errors in performing simple mental arithmetic.Decreased ability for sustained concentration.Deterioration of memory.Decreased vigilance.Increased irritability in some individuals.Impairment of night vision and some constriction in peripheral vision (upto 30 percent at 2,000 meters).Loss of appetite.Sleep disturbances.Irregular breathing.
Your judgement and self-evaluation are impaired the same as if you wereintoxicated. Because of the high altitude adjustment, during the first few days yourunit will experience difficulties maintaining a coordinated, operational unit. Theterrain and weather will contribute to the problems of unacclimatized soldiers. Ifyou cannot walk a straight line and you have a loss of balance, you should beevacuated to a lower altitude. To walk a straight line, place one foot in front of theother.
3. Personal Hygiene and Sanitation.
The principles of personal hygiene and sanitation that govern operations in low terrainalso apply in the mountains.
Good health is primarily a personal responsibility, and inspections must be conductedfrequently to ensure that personal habits of hygiene are not neglected. You must maintainstandards as a deterrent to disease, and as a reinforcement to discipline and morale.
Personal hygiene. During periods of cold weather, your personal hygiene is veryimportant in the high mountains. Due to the cold weather and scarcity of water,you may neglect washing, which can result in skin infection and vermininfestation. You should check your skin and clean it as often as possible. To helpreduce skin infections you should take snow baths in lieu of water baths.

During cold weather, snow may be used instead of toilet paper. You must avoid water-base creams and lotions since their use will further dehydrate tissues and induce frostbiteby freezing. If possible, use nonwater-base creams to shave in lieu of soap. It is essentialthat you use chapsticks on your lips, nose, and eyelids. Make sure you carry topicalointments for rashes. In order to prevent tooth decay and gum disease your teeth shouldbe brushed daily. Change your underwear as often as possible, but do not substitute it forbathing. If possible, you should carry a complete change of clothing, and you should washyour uniform at least once a week, or if laundering is difficult, your uniform should beshaken and air dried. To protect yourself, clean and air your sleeping bag on a regularbasis.
To protect your feet from cold injuries, you must follow the principles of foot hygiene.When climbing, your boots should be laced tightly to provide needed support. To avoidblisters on your feet, wear your socks with no wrinkles, wash your feet daily, and ifpossible, keep them dry and clean. If you cannot wash your feet on a regular basis, try tochange your socks daily during halts and rest periods. Massage, dry, and sprinkle themwith talc or anti-fungal powder, brushing off the excess powder to avoid clumping, whichmay cause blisters. You may use snow to clean your feet, but dry them quickly. When youchange your socks, check your feet for wrinkles, cracks, blisters, and discolorations. Trimyour nails (long nails wear out socks) but not too short because they will not provideproper support for the ends of your toes. Seek medical attention for any problems.
You should spray your feet two or three times a day with an aluminum chlorohydrateantiperspirant for a week and then once a day for the rest of the winter.
This process controls about 70 percent of the sweating in the feet. If fissures or cracksoccur in the feet, then discontinue spraying until they are healed or spray less often tocontrol the sweating.
During periods of extreme cold weather, you may become constipated. Adequate waterintake plus a low protein, high roughage diet can be helpful in preventing constipation.
Sanitation. If you have to dig latrines, make sure they are located downwind fromyour positions and are buried or covered immediately after use. When using a"cathole" latrine, make sure it is located away from water sources. Since wastefreezes, it can be covered with snow and ice or pushed down a crevasse. In rockyareas you may cover waste with stones.
4. Water Supply.
You should never assume that mountain water is safe for consumption. You must drinkwater only from approved sources. In order for you to operate efficiently, fluids lostthrough respiration, perspiration, and urination must be replaced.
In mountain operations, hyperventilation and the cool, dry atmosphere bring abouta three-to-four-fold increase in water loss by evaporation through the lungs. Youmust make an effort to drink liquids even when you do not feel thirsty. Youshould drink one quart of water, or the equivalent, every four hours. If your unit isconducting rigorous physical activities, you should drink more water.
You should drink at least four quarts of water each day. A loss of two quarts ofbody fluid (2.5 percent of body weight) decreases physical efficiency by 25percent. A loss of 12 quarts (15 percent of body weight) is usually fatal. In yourmeals you should replace the salt lost by sweating to avoid deficiency andcramping. Salt tablets are not necessary and may contribute to dehydration. Yourmilitary rations (three meals a day) provide sufficient sodium replacement.
Drink small amounts of water often, a large volume may slow you down. If youare hot, and the water is cold, severe cramping may result. Keep pure water inreserve for first aid use. You must place emphasis on the three rules of waterdiscipline.
Drink only treated water.Conserve water for drinking. Potable water in the mountains may be inshort supply.Do not contaminate or pollute water sources.
Other sources of water are snow, mountain streams, springs, rain, and lakes. Youmust make sure the water has been purified, no matter how clear it appears. Afterthe water has been purified, you may add fruits, juices, and powdered beverages tosupplement and encourage water intake. If the water supply is insufficient, reduceyour physical activities. Any temporary deficiency must be replaced to maintainmaximum performance.
All water that is to be consumed must be potable. Make sure that you drink wateronly from approved sources or purify it to avoid contamination and disease. Donot drink nonpotable water. Water that is unfit to drink, but is not dangerous, maybe used for bathing. You must avoid wasting water. To stay cool and maintain afunctioning body it is best to drink water as often as possible.
Since water is scarce above the timberline, watering parties should be established.Snow and ice may be available for melting after sundown. You may dig a shallow
reservoir to collect water in areas where it trickles off rocks. Purify water by usingiodine or calcium hypochlorite tablets, or by boiling for 10 minutes (longer athigher elevations). Filtering will remove sediment. Protect the water from freezingby storing it next to you or by placing it in a sleeping bag.
5. Nutrition.
Success in mountain operations depends on proper nutrition. Higher altitudes affecteating habits, therefore, you should take precautions. If possible, you should eat at leastone hot meal each day, which may require heating of individual rations.
The following elements are characteristics of nutritional acclimatization inmountain operations:
Weight loss during the first two to three days at high elevation.A loss of appetite with symptoms of mountain sickness.Loss of weight usually stops with acclimatization.
At progressively higher elevations (greater than 4,300 meters), the tolerance of fatty foodsrapidly decreases. A high carbohydrate diet may lessen the symptoms of acute mountainsickness and is digested better than fat at high altitudes.
Malnutrition may result from the lack of eating properly due to increased fatigue,and the unpleasant taste of cold rations. To increase morale and a sense of well-being, you should ensure that fuel tablets and squad stoves as well as flammablematerial are available and used for heating foods. Since you will experience lossof weight due to dehydration, metabolic changes, and loss of appetite, it isnecessary that you increase consumption of carbohydrates, energy, and liquids bydrinking carbohydrate-containing beverages, such as fruit juices and cocoa.
There are three major components required to maintain a well-functioning body:proteins, fats and oils, and carbohydrates. They provide energy, amino acids,vitamins, fiber, and minerals. To maintain a healthy body, all three componentsmust be provided in the correct proportions.
Proteins consist of a large number of amino acid units that are linked together to form theprotein. The amino acids are absorbed through the intestine into the blood. They make orreplace body proteins, muscle, and body tissue. Some of the usable animal proteinsinclude eggs, milk, cheese, poultry, fish, and meats; other foods such as cereals,vegetables, and legumes also provide amino acid, but are not as balanced in essential

amino compositions. As a daily protein requirement, the minimum is 8 ounces (227grams) for a 154-pound (70-kg) man. Protein requires water for digestion and mayfacilitate dehydration.
Fats and oils are the most concentrated form of food energy. Main sources of fats and oilsare meat, nuts, butter, eggs, milk, and cheese. Fats require more water and oxygen, andare harder to digest at higher altitudes.
Carbohydrates are an important source of calories, and can be found in the mostimportant energy-producing cycles in the body's cells. If the intake exceeds energy needs,moderate amounts are stored in the muscles and liver; larger amounts are converted intofat and stored. The most useful sources of carbohydrates are foods such as unrefinedgrains, vegetables, and fruits.
There are two groups of vitamins. They are distinguished by their ability to dissolve ineither fat or water. Fat-soluble vitamins include A, D, E, and K; water-soluble vitaminsare B, and C, which are found in cereals, vegetables, fruits, and meats. It is necessary thatyou maintain a proper and well-balanced diet which provides all of the required vitamins,including fat- and water-soluble vitamins. If a deployment is to exceed 10 days, youshould consider taking vitamin supplements to prevent the occurrence of an improper andunbalanced diet.
Mineral elements can be divided into two groups: those needed in the diet in amounts of100 milligrams or more a day such as calcium, phosphorous, and magnesium; and traceelements needed in amounts of only a few milligrams a day such as iodine, iron, and zinc.Required minerals are contained in a balanced diet of meats, vegetables, and fruits.
A balanced diet containing adequate amounts of vitamins and minerals ensures anefficient metabolism, and will promote the high level of energy needed to conductdaily activities in mountainous operations.
Depending on you, the efficiency of your body to work above the basal metabolism mayvary from 20 to 40 percent. Over 50 percent of caloric intake is released as heat and is notavailable when you work; about 4,500 calories are expended for strenuous work and3,500 calories for garrison activity. Perspiration causes excessive bodily heat loss. Yourmetabolism may not provide enough heat during inactive periods in cold weather,initiating the "internal thermostat" and causing the muscles to shiver. This releases heatand requires burn up of energy; up to 220 calories per hour is estimated for a 100-poundman.
During ascent to high altitudes, your body experiences physiological acclimatization, andyour circulatory system labors to provide the needed oxygen to the body. Whileacclimatizing at higher elevations, you should eat light meals that are high incarbohydrates. Large meals require the digestive system to work harder, and may beaccompanied by indigestion, shortness of breath, cramps, and illness. Carbohydrates,beginning in the morning and continuing through mid-afternoon, are important inmaintaining energy levels. If possible, you should eat moderately, and rest beforestrenuous physical activity.
You should carry extra, lightweight food that can be eaten hot or cold in case resupplyoperations fail. Meals Ready to Eat (MREs) meet this criteria and provide all of the basicfood groups.
As a leader, you may want to supplement MREs with breakfast bars, juices, fruits, andcandies, cereal bars, and chocolate. Also, to replace water and salt you may use bouilloncubes which warm up cold bodies and stimulate appetites. You may consider hotbeverages of soup, juices, powdered milk, and cider. Because coffee, tea, and hotchocolate are diuretics, do not rely on them for hydration and rehydration of the body.
Keep equipment and ammunition away from cooking areas and remember at higherelevations cooking time may be doubled. You may conserve fuel, stoves, fires, and extrafuel tablets by shielding them from the wind while cooking. Store extra fuel in tightlysealed, marked, metal containers. To purify water and warm food, you should use stovesand heat tabs. You should clean all utensils and canteen cups after use, and your unit mustcarry all food items and garbage. If possible, garbage should be burned or deep-buried toprevent animals from foraging. As all missions are tactical, no trace of a unit should bedetected.
When operating in extremely cold conditions or at high altitudes, you should avoidcertain drugs and medications, alcohol, and smoking. These substances will affect yourcirculation, perspiration, hydration, and judgement.
6. Physical and Psychological Conditioning.
To ensure the success of mountain operations, as a leader, you must implement andprioritize a conditioning/training program in your unit.
U.S. forces do not routinely train in mountainous terrain. To achieve individualand unit effectiveness, the unit must be physically and psychologically
conditioned, and adjusted before undertaking rigorous mountain operations, aswell as trained as a team to cope with the terrain, environment, and enemysituation.
The following factors must be considered:
What are the climatic and terrain conditions of the area of operations?How much time is available for conditioning and training?Will the unit conduct operations with other U.S. or Allied Forces? Arethere language barriers? What assistance will be required? Will trainingand conditioning be required for attached personnel?What additional personnel will accompany the unit? Will they be availablefor training and conditioning?What is the current level of physical fitness of the unit?What is the current level of individual expertise in mountaineering?What type of operations can be expected?What is the composition of the advance party? Will they be available toassist in training and acclimatization?What areas in the U.S. most closely resemble the area of operations?Are predeployment areas and ranges available?Does the unit have qualified instructors in mountain warfare?What type equipment will be required (to fit the season, mission, terrain)?Does the unit have enough of the required equipment? Do personnel knowhow to use the equipment? Will the equipment go with the advance party,with the unit, or follow after the unit's arrival?Are any modifications to equipment required?Are there any special maintenance requirements for weapons andequipment?
Upon arrival at the area of operations, all personnel will require a period ofconditioning and acclimatization; the time schedule should allow for larger andmore frequent periods of rest initially. Water, food, and rest must be considered aspriorities, ensuring enough amounts, while individual metabolisms and bodiesbecome accustomed to functioning at higher elevations.
Since the acclimatization process cannot be shortened, and the absence ofacclimatization hampers the successful execution of operations, deployment tohigher elevations must consider the following:
Move upward by stages, spending two or three days at each stage. The first stage beginsat the 2,500-meter level, and subsequent daily stages are at each succeeding 300-meterincrement until the destination is reached. By this time, some acclimatization will haveoccurred, mountain sickness reduced, and the operational potential increased.

A unit should rest after each 1,000 meters of elevation gain to recuperate and acclimatizefrom the lower elevations. Units can leapfrog, taking an extended rest period every thirdnight.
When available from the medical support channels, pretreat with carbonic anhydraseinhibitors (such as acetazolamide). This reduces the incidence and severity of acutemountain sickness from 40 percent to 60 percent, depending upon the height ofdeployment.
Initially, acclimatize at a high altitude in the continental U.S., or other safe area; thendeploy to the operational site by rapid transport. Do not go down to lower altitudes (24- to48-hour periods) before deployment since reentry to altitude can cause problems inacclimatization.
Move troops directly to high altitudes if allowances can be made for inactivity for the firstthree to five days before mission commitment. Moving troops directly to high altitude canincrease the probability of altitude sickness. Even if there is inactivity followingdeployment the incidence of altitude sickness is more likely than with a gradual ascent.
Personnel involved in mountaineering may have preconceived beliefs about theharmful effects of high altitude. Psychological adjustment is an important factor inthe success of the operation. Ill effects of high altitude can be prevented throughimplementation of educational programs, gradually introducing personnel to thenew terrain and encouraging confidence when negotiating steep slopes of cliffs.Personnel will overcome the fear of heights by becoming familiar with theproblem, and learning the many climbing techniques and principles of mountainmovement.
Regardless of previous flat cross-country Army training, personnel will findmountain movement hard and tiring. During the operation, new techniques ofrhythmic movement must be learned, and different groups of muscles will beused, developed, and hardened. The back and legs will be conditioned byfrequently marching, carrying Table of Organization and Equipment (TOE) andspecial equipment loads. Proper physical conditioning results in decreasedexhaustion.
To increase endurance and physical conditioning, a physical training programshould include: long-distance running for aerobic conditioning; calisthenics andweight training to strengthen the heart, lungs, abdomen, legs, back, arms, andhands; a swimming program to increase lung efficiency; and road marches overmountainous terrain with all combat equipment. Once deployed to high
elevations, the heart rate, metabolism, and lungs must become accustomed to theelevation and thinner air. Therefore, set up a conditioning program on site andintegrate in gradual stages where acclimatization, conditioning, andmountaineering skills are realized.
The conditioning program should begin with basic climbing procedures. The keyto learning and maintaining climbing proficiency and technical skills is repetitiveand reinforcement practice until an instinctive reaction is acquired.
7. Mountain Living.
For the operation to be successful, training should be conducted as realistically aspossible. The units involved must receive advanced training to survive in the harshmountain environment. Training should include activities that require specializedtechniques such as navigation, communications, and movement, and should be conductedunder severe conditions so the individual soldier gains confidence.
During the development of training, the following factors should be considered:
Temperature extremes.Hygiene and sanitation.Limited living space (difficulty of bivouac).Air (dehydration and breathing).Clothing requirements.
8. Mountain Navigation.
Navigation in the mountains is more difficult than on flat terrain because of inaccuratemapping, magnetic attraction affecting compass accuracy, and irregular pace. Soldiersmust be trained to use a variety of equipment and techniques as aids to navigation:compasses, altimeter, pace, rope lengths, map, celestial navigation, terrain association,dead reckoning, resection, and artillery marking.
Skill in navigation develops through experience. To ensure that directions androutes are correctly determined, the individual soldier must display an effectiveuse of lensatic, liquid-filled, prismatic, and other compasses. Also, grid-magnetic(GM) angles must be considered when determining azimuths for direction,intersection, and resection. Do not rely on a compass alone for determining alocation because hidden magnetic anomalies may deflect the earth's magnetic
field. Pace counts should be used in conjunction with a map and altimeter throughterrain association, and determined before movement.
Altimeters are useful in determining altitude and verifying location, but they areonly as accurate as the skill and experience of the individual soldier. Altimetersare usually accurate to within 10 meters of their indicated altitude.
Maps provide a primary source of information concerning the area of operations,1:25,000 maps depict much more detail than 1:50,000 maps, and should be usedwhen choosing routes.
All available information about the friendly and enemy situations must be reviewedbefore selecting a route. Aerial photographs provide details normally not shown on maps.Do not rely on sketch maps' accuracy, but they may be used as a supplement to othersources of information, and if available, you may use forest service and hunters' maps.Standard, military topographic maps are available and are usually accurate graphicdescriptions of the area of operations.
9. Survival.
Survival training should include psychological preparation, locating water, shelterconsiderations, fire building, health hazards, and techniques for obtaining food. Anindividual soldier well trained and prepared to fight and survive in a mountainenvironment will have increased confidence in himself.
10. Communications. During mountainous operations, all means of communicationshould be considered: FM, AM, multichannel, wire, satellite, visual, and messenger. Theyrequire precise planning and extensive coordination among all operational elements. Allpersonnel should receive communications training.
To maintain communications, special antennas and retransmission procedures may haveto be used. Weather may cause problems with communications equipment andmaintenance.
11. Medical Considerations.
After acclimatization, personnel injuries such as sprains, strains, fractures, frostbite,hypothermia, and trench foot pose many problems for medical personnel becausefacilities and supplies may be inadequate to treat all patients. Evacuation of the sick andwounded is compounded by the terrain and weather.
PART D - ILLNESS AND INJURY
To provide effective support during mountainous operations, certain medical aspectsmust be considered. Personnel may suffer injuries and illnesses that are not associatedwith other areas.
1. Evacuation and Treatment.
Since unit's aid stations cannot normally be reached by vehicle, due to rough terrain, itmay be necessary to use litter bearers to move casualties to the rear where they can beevacuated by ground or air to clearing stations. Training must be accomplished with alllitter bearers on evacuation techniques and first aid. The most important course of actionis to provide injured soldiers with medical aid as soon as possible.
2. Cold-Weather Injuries.
Cold-weather injuries can occur during any season of the year. Most of these accidentscan be prevented by proper planning, to include: timely requisition and receipt of suppliesand proper clothing; thorough training of personnel with respect to the hazards of coldweather; effective methods for the receipt, dissemination, and use of cold weather data;periodic inspections of clothing, personnel, and equipment; and personnel receiving abalance of water, rest, and nutrition. As a soldier, you must be prepared to survive, move,and fight in winter conditions.
There are two types of cold-weather injuries: freezing and nonfreezing. Thefreezing type is known as frostbite. The nonfreezing type includes hypothermia,dehydration, trench foot, and immersion foot.
Significant injuries may occur when the temperature falls below 10 degrees C (50 degreesF). Cold injuries result from impaired circulation, and the action of ice formation andcold upon the tissues of the body.
Many other factors, in various combinations, determine if cold injuries will occur.These factors include humidity, wind speed, exposure time, activity, type andcondition of clothing, and numerous host factors such as: previous cold injuries;race; geographic origin; ambient temperatures; wind chill factor; type of mission;terrain; clothing; moisture; dehydration; age; fatigue; concomitant injury;discipline, training, and experience; nutrition; excess activity; and radical changesin the weather.
As a leader, you should ensure that:
Soldiers' uniforms are kept as dry as possible and are protected from the elements.
Soldiers know proper use of clothing systems to avoid the effects of overheating andperspiration (layer dressing and ventilate).
The buddy system is used to observe for early signs of cold-weather injuries.
All soldiers waterproof their equipment.
The rate of movement should be slow, deliberate, and careful. Soldiers should not moveout at a force march pace and then be stationary after they have perspired heavily. Theyshould not wear excessive cold-weather clothing while moving.
Ventilate-insulate-protect (VIP).
The following medical procedures must be implemented when sickness andinjuries occur:
Assess the situation (tactical and environmental).Approach the victim safely (avoid rock or snow slide).Perform emergency first aid.Treat for shock (always assume that shock is present).Check for other injuries/cold injuries.Develop a course of action (decide on a means of evacuation).Execute the plan and monitor the patient's condition.
Body heat may be lost through five different mechanisms:
Radiation. The direct heat loss from the body to its surroundingatmosphere is called radiation heat loss.Conduction. The direct transfer of heat from one object in contact withanother (being rained on or sitting in snow) is called conduction.Convection. Convection is the loss of heat due to moving air or water incontact with the skin. The layer of warm air next to the skin must becontrolled by clothing that ventilates, insulates, and protects.Evaporation. The evaporation of perspiration causes heat loss. Dressing inlayers allows removal or adding of clothing as needed.Respiration. Respiration also cools the body. Placing a wool scarf or maskover the mouth and nose warms inhaled air and assists in keeping the bodywarm.
Some of the most common cold-weather injuries are shock; dehydration;hypothermia; immersion or trenchfoot; blisters; frostbite; constipation; carbonmonoxide poisoning; and snow blindness.
Shock. Shock is a symptom or the result of other injuries, and is the depressed state ofvital organs due to the cardiovascular (heart) system not providing enough blood. Initialsigns of shock include apprehension, shortness of breath, sweating, cold skin, rapid andfaint pulse, and excessive thirst. Provide immediate and adequate first aid because evenminor injuries can produce shock resulting in incoherence, slower heart beat,unconsciousness, and possibly death. When treating a patient you should make him ascomfortable as possible and try to relieve the pain. If needed provide artificial respirationor cardiopulmonary resuscitation. Keep the patient warm but do not overheat him. If thereare no abdominal injuries, and the patient is conscious, you may administer water. Obtainproper medical attention as soon as possible.
Dehydration. Dehydration is the loss of your body fluids. It precedes all cold-weatherinjuries and is a major symptom in acute mountain sickness. Cold weather requirementsfor water are no different than in the desert. You need about 6 liters of water each day toprevent dehydration when living and performing physical labor in a cold or mountainousenvironment. You should avoid drinking large quantities of coffee and tea since theycause excessive urination.
The contributing factors for dehydration are:The thirst mechanism does not function properly in cold weather.Water is often inconvenient to obtain and purify.There is a lack of moisture in the air in cold climates and at high altitudes.Cold causes frequent urination.
The signs of dehydration include darkening urine, decreased amounts of urine beingproduced, dry mouth, tiredness, mental sluggishness, lack of appetite, headache, fainting,rapid heart- beat, dizziness, higher temperature, upset stomach, unconscious- ness anddiarrhea. The symptoms of dehydration are similar to those of hypothermia. To
distinguish between them, open the victim's clothes and feel the stomach wall. If thestomach is cold, the victim is probably hypothermic; if it is warm, he is probablydehydrated.
To treat dehydration, you must consume 4 to 10 liters of fluids each day, and avoidcaffeine and alcohol. Seek shelter from wind and cold. Do not eat snow; eating snow usesbody heat. Fluid replacement, rest, and prompt medical attention are critical to yourrecovery.
Hypothermia. Hypothermia is a general cooling of your body. It may be caused byexposure or by sudden immersion of the body, such as falling into a lake or being sprayedwith fuel or other liquid. Hypothermia is classified as mild (core temperature be- low 95degrees F or 32 degrees C) or severe (core temperature be- low 90 degrees F or 32degrees C). An individual is considered to be "clinically hypothermic" when the coretemperature is less than or equal to 95 degrees F.
The contributing factors for hypothermia are:
Dehydration.
Poor nutrition.
Diarrhea.
Decreased physical activity.
Accidental immersion in water.
Change in weather.
High winds.
Inadequate types or amounts of clothing.

The main sign of hypothermia is when the body core (rectal) temperature falls to about 96degrees F. Other symptoms are: shivering, which begins after a drop in body temperatureof 1 to 2 degrees, making it hard for an individual to take care of himself; bodytemperature drop from 95 degrees F to 90 degrees F, which can cause sluggish thinking ingeneral; body temperature drop from 90 degrees to 85 degrees F, which causes totalincoherence; and body temperature drop from 85 degrees F and below, which causes acomatose state, and related signs.
To guard against hypothermia, you should pair up with a buddy to observe each other forsigns, consume adequate amounts of liquids daily, rest, and eat properly. You may avoidhypothermia by dressing in layers to permit easy additions or deletions; to preventoverheating, becoming too cold, getting wet or windblown.
Treatment of hypothermia depends upon whether the case is mild or severe.
Mild cases: If there are signs of hypothermia in a buddy, prevent additional heat loss bygetting the victim into a shelter, and replace wet clothing with dry, insulated clothing or asleeping bag. You should rewarm the body evenly and without delay. Rehydrate thevictim with warm liquids, sweets, and food, however, you must never force 1liquids onan unconscious or semiconscious person because you might choke him. Keep the victimconscious until his vital signs are normal, and seek medical assistance.
Severe cases: If the victim is unconscious or appears dead without any obvious injury,prevent further heat loss. It is extremely dangerous to attempt to rewarm a victim in thefield, and rapid rewarming of an unconscious victim may create problems and should1dnot be attempted. It is best to stabilize the victim's temperature; to attempt to avoidfurther heat loss; to handle the victim gently; to provide artificial respiration if breathingstops; to be aware that severe complications may arise as the body temperature rises,which may result in cardiac arrest even though the victim seems to be doing well; andevacuate the victim immediately to the nearest medical treatment facility.
Immersion or Trench foot. This is damage to the circulatory and nervous systems of thefeet, which occurs from prolonged exposure to cold and wet at above freezingtemperatures. This can happen wearing boots or not. You may not feel uncomfortableuntil the injury has already begun.
Contributing factors for immersion or trench foot are:
Stepping into water over the boot tops.
Not changing socks often.
Improper hygiene.
Trench warfare.
Lack of planning.
Prolonged exposure (three to five days).
The main signs of immersion or trench foot include the sensation of tingling, numbness,and then pain. As symptoms progress and damage appears, the skin becomes red and thenbluish or black. Swelling may occur.
To treat immersion or trench foot, you should keep your feet dry and clean. You shouldchange socks often, dry the inside of boots, and use foot powder. You must move yourfeet gently and you must not moisten or massage the skin. You must elevate and exposeyour feet to room temperature. You must stay off your feet and seek medical attention.When a severe case does not allow the feet to dry, you must be evacuated as a littercasualty. Drying the feet for 24 hours usually heals mild cases. Moderate cases usuallyheal within three to five days. To prevent it, take good care of your feet.
Blisters. Before its formation or once a blister has formed, cover it with a dressing largeenough to fit over the blister, and then tape it. You must not drain a blister unless it is redor pus is detected; if this occurs, drain the blister using a clean sterile needle, and gentlypress out the fluid from the side leaving the skin intact. Make a doughnut of moleskin togo around the blister and apply to the skin. Toe blisters may be wrapped entirely withadhesive tape over the moleskin.
Frostbite. Frostbite is the freezing or crystalization of living tissues. The extremities ofthe body are the first to be affected; exposure time can be minutes or instantaneous.Damp hands and feet may freeze quickly since moisture conducts heat away from thebody and destroys the insulating value of clothing. Heat loss is compounded with intensecold and inactivity. Your clothing and equipment are one of the most important factors inpreventing frostbite. Frostbite is one of the major nonfatal cold-weather injuriesencountered in military operations.
There are two categories of frostbite: superficial (mild) and deep (severe). Superficialfrostbite involves only the skin. The layer immediately below usually appears white tograyish. The surface feels hard, while the underlying tissue is soft. Deep frostbite extendsbeyond the first layer of skin and may include the bone. Discoloration continues fromgray to black. The texture becomes hard as the tissue freezes deeper. This case requiresimmediate evacuation to a medical facility.
The contributing factors for frostbite are:
Dehydration.
Below-freezing temperatures or wind chill.
Skin contact with supercooled metals or liquids.
Use of caffeine, tobacco, or alcohol.
Neglect.
The signs or symptoms of frostbite vary and may include a cold feeling, pain, burning,numbness, and in the final stages a false sense of warmth. There will be a redness of skin,turning pale; the color may be bluish, and then may appear frosty or waxy white; the skinmay feel hard, may not be movable over the joints and bony prominences, or may befrozen. Deep frostbite is difficult to identify, and often requires three to seven days afterrewarming for medical personnel to diagnose. Blisters, swelling, and pain may occur afterthawing.
The "buddy system" is one of the primary preventers of frostbite. As buddies, you mustwatch each other for signs and provide mutual aid if frostbite occurs. You must ensurethat prompt first aid care is applied in order to prevent further damage. Early signs may betreated by immediately rewarming the body with skin-to-skin contact or by sheltering thebody part under the clothing next to the body. If tissues are allowed to freeze, you shouldnot attempt to thaw any parts of the body. Thawing of a frostbitten victim is a hospitalprocedure. You must evacuate the victim before the part thaws, protect the frozen partsfrom further injury, and seek medical treatment as soon as possible. If frozen extremitiesare involved, evacuate as a litter casualty.
If frostbite is not recognized before it thaws, you should not let the area refreeze since thiscauses more damage and may require amputation. The parts of your body most oftenaffected by frostbite are the hands, fingers, toes, feet, ears, chin, and nose. If evacuationas a litter case is not possible, and you must walk to seek additional treatment, you shouldnot attempt to thaw your feet-it is better to walk on frozen feet than to have them thawand refreeze.
You must always keep the person warm and covered using bandages to separate toes andfingers. If reheating is inevitable, you should not overheat the affected body parts nearflame. Make sure the warming temperature is not greater than the normal bodytemperature. You should not rub the injured parts because the tissues may break internallycausing more damage. Blisters should be covered with a sterile dressing. WhenMEDEVAC is not possible, you may have to self-evacuate. You can walk many miles onfrozen feet, but thawed feet are impossible to walk on.
Constipation. Constipation is the infrequent or difficult passage of stools.
Contributing factors for constipation are:
Lack of fluids.
Improper nutrition.
Not defecating when needed.
The main signs of constipation include headaches, cramping, painful bowel movement,and loss of appetite.
To treat constipation, you must consume adequate amounts and varieties of food. Youshould drink from 4 to 6 liters of liquid each day, and if possible, seek medical attention.
Carbon monoxide poisoning. This is the replacement of oxygen in the blood with carbonmonoxide.
A contributing factor is the inhalation of fumes from burning fuel without properventilation such as fires, stoves, heaters, and running engines.
The main signs are headaches, fatigue, excessive yawning, nausea, dizziness, drowsiness,confusion, and unconsciousness. In some cases death may occur. The one visible sign isbright red lips, mouth, and inside of the eyelids.
To treat carbon monoxide poisoning, if possible, remove the victim from thecontaminated area and administer CPR. Oxygen may be used, if available. You mustevacuate the victim to a medical facility because severe complications may develop evenin casualties who appear to have recovered.
Snow blindness. Snow blindness is a sunburn of the cornea of the eye due to exposure toultraviolet radiation. You may prevent it by using quality sunglasses. In an emergency,you may make a substitute from materials such as cardboard or birchbark.
The contributing factors for snow blindness are:
Reflection of sunlight from all directions off the snow, ice, and water.
Ultraviolet rays can cause vision problems even on cloudy days. They are lessfiltered at higher altitudes than at low altitudes.
The main signs of snow blindness are painful, red, watery eyes; sensation of grit in youreyes; blurred vision; a pink cast to the vision; and a headache.
To treat snow blindness, you may patch both eyes with cold compresses for 24 hours andtake two aspirins every six hours. If possible, seek shelter in a dark place. You must notrub your eyes. Keep your eyes patched until evacuation as a litter patient is possible.
3. Heat Injuries.
Although associated with hot weather, these injuries can occur in cold-weatherenvironments. Most of these accidents can be prevented by proper planning, periodicinspection of personnel clothing and equipment, a balance of water and food intake, andproper rest.
Some of the most common heat injuries are sunburn, heat cramps, heatexhaustion, and heat stroke.
Sunburn. This is the burning of exposed skin surfaces by ultraviolet radiation.
The contributing factors for sunburn are:
Fair skin.
Not accustomed to direct sunlight.
Exposure to intense ultraviolet rays for extended periods.
The main signs of sunburn are painful, burning red or blistered skin with a slightswelling, the skin may be warm to the touch. In severe cases chills, fever, and headachesmay occur.
To treat sunburn, you should keep the skin covered with clothing or sunburn cream evenon cloudy days. Take two aspirins every two to six hours to stop the burning sensation.You may apply cool saline dressings to alleviate pain and swelling. You should not popany blisters; if they break, wash and use bandages, and seek medical attention.
Heat cramps. They are caused by an accumulation of lactic acid in the muscles and a lossof salt through perspiration.
The main contributing factor is that the strenuous exertion causes the body to heat up andto produce heavy perspiration.
The main signs include pain and cramping in the arms, legs, back, and stomach. Thevictim sweats profusely and cannot quench his thirst.
To treat heat cramps, you must rest in a cool shady area, breathe deeply and stretch thecramped muscle as soon as possible to obtain relief. Loosen your clothes and drink coolwater. If pain and cramps continue, seek medical attention.
Heat exhaustion. Strenuous activities in any environment may overheat the body. Theblood vessels in the skin become so dilated that the blood flow to the brain and otherorgans is reduced.
The contributing factors for heat exhaustion are:
Strenuous activity in hot areas.
Unacclimatized troops.
Inadequate diet.
Not enough water or rest.
The main signs of heat exhaustion are similar to fainting but may also include weakness,dizziness, confusion, headache, cold clammy skin, nausea, and a rapid but weak pulse.
To treat heat exhaustion, you must rest in a cool shady area, loosen your clothes andboots, and drink water. You should elevate your legs to help restore proper circulation. Ifthe symptoms persist, seek medical attention.
Heat Stroke. This is a life-threatening situation caused by overexposure to the sun. Thebody is so depleted of liquids that its internal cooling mechanisms fail to function.
The contributing factors for heat stroke are prolonged exposure to direct sunlight andoverexertion.
The main signs of heat stroke include hot and dry skin, dizziness, confusion andincoherency, headache, nausea, seizures, breathing difficulty, a slow pulse, and loss ofconsciousness.
To treat heat stroke, you should cool the victim at once, and restore breathing andcirculation. If the victim is conscious, administer water. If possible, submerge the victimin water to reduce his temperature, treat for shock, and prepare for immediate evacuation.
4. Acute Mountain Sickness.
Acute mountain sickness (AMS) is a temporary illness that affects both the beginner andexperienced climber. You may experience this sickness in altitudes as low as 2,400meters. About 50 to 80 percent of the troops suffer disability and ineffectiveness whenthey are rapidly brought to altitudes above 4,000 meters. At lower altitudes, or whereascent to altitudes is gradual, most personnel can complete assignments with moderateeffectiveness and little discomfort.
Severe symptoms may begin 4 to 12 hours after your arrival at higher altitudes of3,000 to 4,000 meters. These symptoms are:
Sickness.Sluggishness.Fatigue.Headache.Dizziness.Insomnia.Depression.Uncaring attitude.Rapid and labored breathing.Weakness.Loss of appetite.
A headache is the most noticeable symptom and may be severe. Even without theheadache, you may lose your appetite, and experience nausea, leading to less foodintake. Vomiting may occur and contribute to dehydration. Despite extremefatigue, you will be unable to sleep. The symptoms usually develop and increasefor a period of five to seven days. The headache may persist until you are returnedto a lower elevation. AMS is nonfatal.
Treatment for AMS includes:
Take aspirin or an equivalent. Wear sunglasses since bright sunlightaggravates a headache.Rest.Consume liquids and light foods in small amounts often.Move to lower altitudes (600 to 900 meters) to alleviate symptoms, whichprovides for a more gradual acclimatization.Realize physical limitations and progress slowly.Practice deep-breathing exercises.
5. High-Altitude Pulmonary Edema (HAPE).
This is a swelling and filling of the lungs with fluids, caused by rapid ascent to altitude. Itoccurs at high altitudes and limits the oxygen supply to the body.
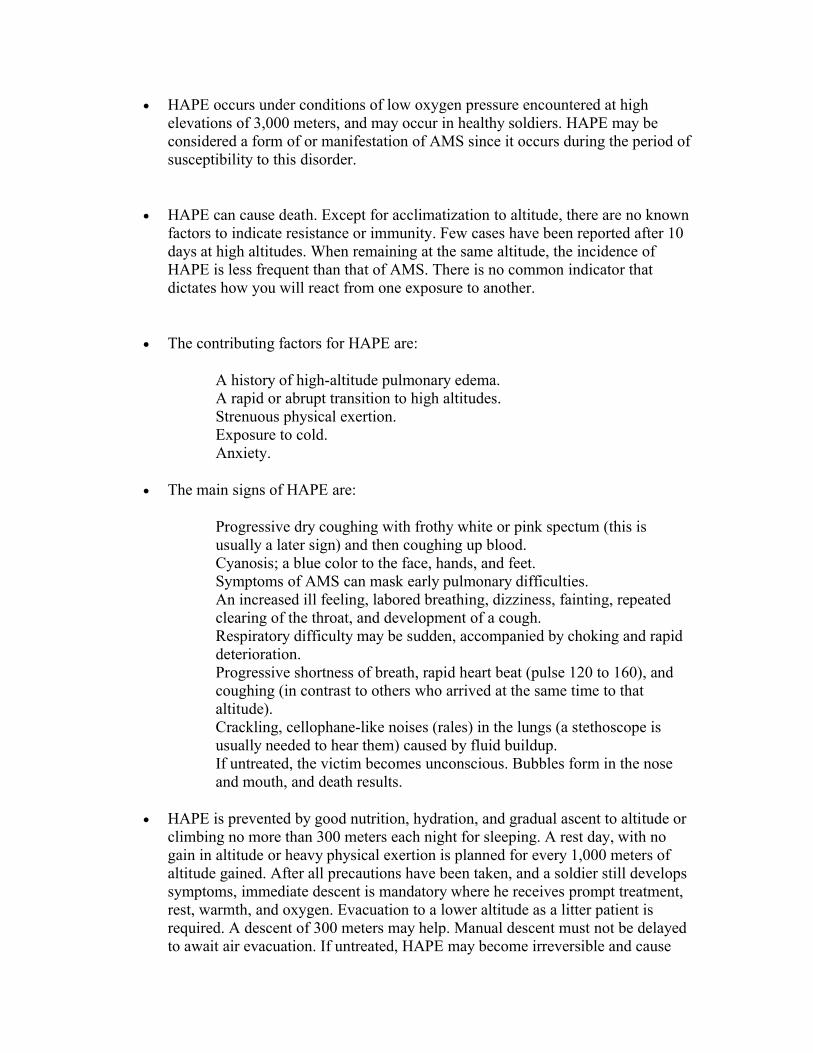
HAPE occurs under conditions of low oxygen pressure encountered at highelevations of 3,000 meters, and may occur in healthy soldiers. HAPE may beconsidered a form of or manifestation of AMS since it occurs during the period ofsusceptibility to this disorder.
HAPE can cause death. Except for acclimatization to altitude, there are no knownfactors to indicate resistance or immunity. Few cases have been reported after 10days at high altitudes. When remaining at the same altitude, the incidence ofHAPE is less frequent than that of AMS. There is no common indicator thatdictates how you will react from one exposure to another.
The contributing factors for HAPE are:
A history of high-altitude pulmonary edema.A rapid or abrupt transition to high altitudes.Strenuous physical exertion.Exposure to cold.Anxiety.
The main signs of HAPE are:
Progressive dry coughing with frothy white or pink spectum (this isusually a later sign) and then coughing up blood.Cyanosis; a blue color to the face, hands, and feet.Symptoms of AMS can mask early pulmonary difficulties.An increased ill feeling, labored breathing, dizziness, fainting, repeatedclearing of the throat, and development of a cough.Respiratory difficulty may be sudden, accompanied by choking and rapiddeterioration.Progressive shortness of breath, rapid heart beat (pulse 120 to 160), andcoughing (in contrast to others who arrived at the same time to thataltitude).Crackling, cellophane-like noises (rales) in the lungs (a stethoscope isusually needed to hear them) caused by fluid buildup.If untreated, the victim becomes unconscious. Bubbles form in the noseand mouth, and death results.
HAPE is prevented by good nutrition, hydration, and gradual ascent to altitude orclimbing no more than 300 meters each night for sleeping. A rest day, with nogain in altitude or heavy physical exertion is planned for every 1,000 meters ofaltitude gained. After all precautions have been taken, and a soldier still developssymptoms, immediate descent is mandatory where he receives prompt treatment,rest, warmth, and oxygen. Evacuation to a lower altitude as a litter patient isrequired. A descent of 300 meters may help. Manual descent must not be delayedto await air evacuation. If untreated, HAPE may become irreversible and cause

death. Cases that are recognized early and treated promptly may recover with noafter effects. Soldiers who have had previous attacks of HAPE are prone to secondattacks.
6. High-Altitude Cerebral Edema (HACE).
This is the accumulation of fluid in the brain, which results in swelling and a depressionof brain function that may result in death. It is caused by a rapid ascent to higher altitudeswithout progressive acclimatization. HAPE and HACE may occur in experienced well-acclimatized mountaineers without warning or obvious predisposing conditions. They canbe fatal; when the first symptoms occur, immediate descent is mandatory.
The contributing factors for HACE are rapid ascent to heights over 2,400 metersand aggravation by overexertion.
The main signs of HACE include mild personality changes, paralysis, stupor,convulsions, coma, inability to concentrate, headaches, vomiting, decrease inurination, and lack of coordination. The main symptom is a severe headache.When this headache is associated with any other disturbances, it should beassumed to be manifestations of HACE. The headache may be accompanied by aloss of coordination, confusion, hallucinations, and unconsciousness, combinedwith symptoms of HAPE. If these symptoms occur, do not leave the person aloneeven though you may think he is irritable or temperamental. The symptoms mayrapidly progress to death. Prompt descent to a lower altitude is vital. Seek medicalattention as soon as possible.
To prevent HACE, you must maintain good eating habits, hydration, and usegradual ascent to higher altitudes. Rest, warmth, and oxygen at lower elevationsenhance recovery. REMEMBER! Due to the severity of high-altitude sickness, thebest treatment is immediate descent.
Conclusion. You have now completed the instructional material for Lesson 1. Before youcomplete the practice exercise for this lesson, you should review the material presented inthis lesson. Answers and feedback for the questions in the practice exercise are providedto show you where further study is required.

LESSON 1 PRACTICAL EXERCISE
InstructionsThe following items will test your understanding of the material covered in this lesson.There is only one correct answer for each item. When you have completed the exercise,check your answers with the answer key that follows. If you answer any item incorrectly,review that part of the lesson which contains the portion involved.
Situation. During the mountainous exercise all members of the unit are required to demonstratetheir abilities by identifying the basic climbing techniques and methods acquired duringtraining.
1. During a mountainous exercise, your unit is moving through an avalanche area. Youshould
a. be aware that the basic elements for the avalanche phenomenon are terrain,climate, and weather.
b. know that the only factor affecting avalanches are snowpacked regions.
c. be aware of the danger and only enter the area in the morning.
d. follow your co-workers since they are experienced in avalanches.
2. When moving through a slope where crevasses and glaciers are formed, you would
a. proceed as trained but move very slowly.
b. move to the inside of bends and away from steep slopes and icefalls.
c. call the unit to a single column and move to the outside of bends.
d. avoid all cracks in rocks and icefalls.
3. While in the mountains, weather changes are so variable and erratic that in one dayhurricane winds occur one after another, and exposed weather contrasts with shelteredweather. These characteristics are the result of
a. typical mountainous weather in high altitudes.
b. poor weather forecast by the military mountaineering.
c. The life cycle of a local storm or from the movement of a traveling storm.
d. the life cycle of a local storm forecasted by the local residents.
4. You know that the approach of cumulus clouds are associated with
a. a stable atmosphere but may indicate the approach of a storm.
b. moderate weather such light winds, moderate rain, and lightning.
c. temperatures below 30 degrees F, producing hail and tornados.
d. violent weather such as heavy rains or snow and strong gusty winds.
5. While in the mountains and during stormy weather, the unit discovers that the approachof lightning is imminent. You should
a. not climb, and get as far down the mountain and away from the exposed ridges,and seek protection from direct strikes and ground current.
b. continue climbing but tie yourself to a point of protection to avoid falling.
c. add another layer of clothing for protection against cold and wetness.
d. stay calm and help your co-workers maintain a steady climb.
6. While in mountainous regions, you must remember that potable water supplies arelimited, and water intake must be only from approved sources. To follow the three rulesof water discipline, you must
a. disinfect the water, obtain approval from the leader of the water party, andmake sure all utensils are clean before use.
b. drink only treated water, conserve water for drinking, and do not contaminatewater sources.
c. drink only treated water, use iodine tablets to double check for germs, and boilthe water for about 20 minutes.
d. drink only treated water, use two iodine tablets to double check for germs, andboil the water for about 30 minutes.
7. One of the members of your unit may be suffering from trench foot. To treat him, youwould
a. check to see if his feet have blisters and a tingling sensation.
b. change his clothes and his socks immediately and seek medical attention.
c. ask him if he has pain, double check the blisters on his feet and drain the pus ifdetected.
d. keep his feet dry and with clean socks, dry the inside of the boots, use footpowder and change socks as often as possible.
LESSON ONE
PRACTICE EXERCISE
ANSWER KEY AND FEEDBACK
Item Correct Answer and Feedback
1. a. be aware that the basic elements for the avalanche phenomenonare terrain, climate and weather.
Accumulated snow and steep slopes can cause avalanches. Anunderstanding of the basic elements is required in order to increasesurvival chances.
2. b. move to the inside of bends and away from steep slopes andicefalls. Care must be exercised when traveling through slopes that haveglaciers or crevasses to avoid the possibility of injuries in the unit.
3. c. the life cycle of a local storm or from the movement of atraveling storm.
The success of the mission depends on your ability to predictchanging weather. During the operation, it is imperative that youanticipate weather changes and turn them in your favor.
4. d. violent weather such as heavy rains or snow and strong gustywinds.
Proper reading of cloud formations and patterns is an invaluabletool to weather forecasters since it reduces the need for additionalweather equipment
.
5. a. not climb and get as far down the mountain and away from theexposed ridges, and seek protection from direct strikes and groundcurrent.
You must be aware that lightning kills more people in the U.S.than any other weather phenomenon. Just because you are in themilitary, you are not an exception. It is your responsibility to takewhatever precautions are necessary to avoid a lightning strike.
6. b. drink only treated water, conserve water for drinking and do notcontaminate water sources.
As a precaution, never assume that mountain water is safe forconsumption. Only drink water from approved sources to avoidcontamination and disease. In order for you to function effectively,you must drink plenty of water.
7. d. keep his feet dry and with clean socks, dry the inside of theboots, use foot powder and change socks as often as possible.
One of the most important factors is your personal hygiene. Thisdisease is the result of neglect and carelessness of your body. Toprevent it take good care of your feet .
LESSON TWO MOUNTAINEERING EQUIPMENTOVERVIEW
TASK DESCRIPTION:
In this lesson, you will learn to identify climbing ropes, knots, and snaplinks.
LEARNING OBJECTIVE:
TASKS: Understand and identify climbing ropes, knots, and snaplinks.
CONDITIONS: Given the subcourse material for this lesson, a training scenario, andextracts as applicable, the student will complete the practical exercise to show anunderstanding of ropes, knots, and snaplinks.
STANDARDS: The student will demonstrate a comprehension and knowledge of the taskby displaying an understanding of ropes, knots, and snaplinks.
REFERENCES: The material contained in this lesson was derived from the followingpublication: TC 90-6-1
INTRODUCTION
The rope is the single most important item of equipment for the mountaineer. Ropesprovide access up, down, and across mountain obstacles. They are designed to withstandsevere force while ensuring your individual safety. The construction standards of theseropes are prescribed by the Union of International Alpine Association (UIAA) or bymilitary specifications.
PART A - CLIMBING ROPES AND TYPES OF KNOTS
1. Climbing Ropes.
No one rope is ideal for all applications. The commander must determine the situation inwhich ropes may be used (such as: urban, rock, ice, climbing, rappelling, ropeinstallations) and in what type of terrain and climate.
Rope selection is affected by the following factors:
Fall factor measures the severity of a fall. This is calculated by dividing the lengthof a fall by the amount of rope paid out at the belay point. The higher the fallfactor, the greater the amount of force generated. Rope drag, intermediateprotection, and other factors of the safety chain reduce the severity of a fall.
Impact force is the sudden stress put on the safety chain (belay anchor, attachmentto belayer, belayer, rope, intermediate protection, attachment to climber, andclimber) when a fall is held. The whole system is only as strong as the weakestlink. If there is a weakness at any point, the shock loading from the impact forcecan cause a failure of the system. The impact force occurs once the fall hasstopped (usually with a sudden jerk on the climber's body). It is the maximumload placed on a rope after all of the energy from a fall has been absorbed in therope's stretch.
Knotability is the ease in tying and untying knots in the rope, as well as the abilityto hold a knot once tied.
Elongation or stretch dissipates the energy produced during a fall, throughout therope rather than directly to the climber's body. Other than in a fall, the rope shouldstretch as little as possible.
The rope should be soft, flexible, resistant to kinking, durable, water repellant,have a high fall rating, and have no sheath slippage (kernmantle only).
There are two types of ropes available to you during a mountainous operation:
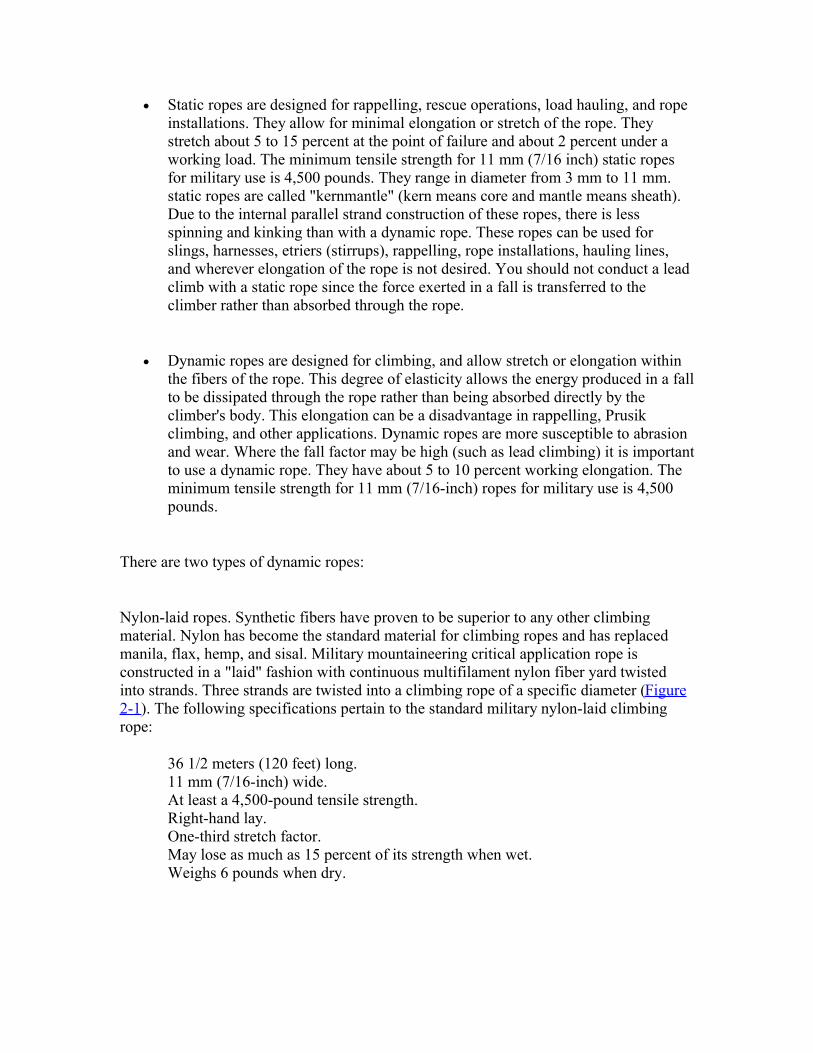
Static ropes are designed for rappelling, rescue operations, load hauling, and ropeinstallations. They allow for minimal elongation or stretch of the rope. Theystretch about 5 to 15 percent at the point of failure and about 2 percent under aworking load. The minimum tensile strength for 11 mm (7/16 inch) static ropesfor military use is 4,500 pounds. They range in diameter from 3 mm to 11 mm.static ropes are called "kernmantle" (kern means core and mantle means sheath).Due to the internal parallel strand construction of these ropes, there is lessspinning and kinking than with a dynamic rope. These ropes can be used forslings, harnesses, etriers (stirrups), rappelling, rope installations, hauling lines,and wherever elongation of the rope is not desired. You should not conduct a leadclimb with a static rope since the force exerted in a fall is transferred to theclimber rather than absorbed through the rope.
Dynamic ropes are designed for climbing, and allow stretch or elongation withinthe fibers of the rope. This degree of elasticity allows the energy produced in a fallto be dissipated through the rope rather than being absorbed directly by theclimber's body. This elongation can be a disadvantage in rappelling, Prusikclimbing, and other applications. Dynamic ropes are more susceptible to abrasionand wear. Where the fall factor may be high (such as lead climbing) it is importantto use a dynamic rope. They have about 5 to 10 percent working elongation. Theminimum tensile strength for 11 mm (7/16-inch) ropes for military use is 4,500pounds.
There are two types of dynamic ropes:
Nylon-laid ropes. Synthetic fibers have proven to be superior to any other climbingmaterial. Nylon has become the standard material for climbing ropes and has replacedmanila, flax, hemp, and sisal. Military mountaineering critical application rope isconstructed in a "laid" fashion with continuous multifilament nylon fiber yard twistedinto strands. Three strands are twisted into a climbing rope of a specific diameter (Figure2-1). The following specifications pertain to the standard military nylon-laid climbingrope:
36 1/2 meters (120 feet) long.11 mm (7/16-inch) wide.At least a 4,500-pound tensile strength.Right-hand lay.One-third stretch factor.May lose as much as 15 percent of its strength when wet.Weighs 6 pounds when dry.
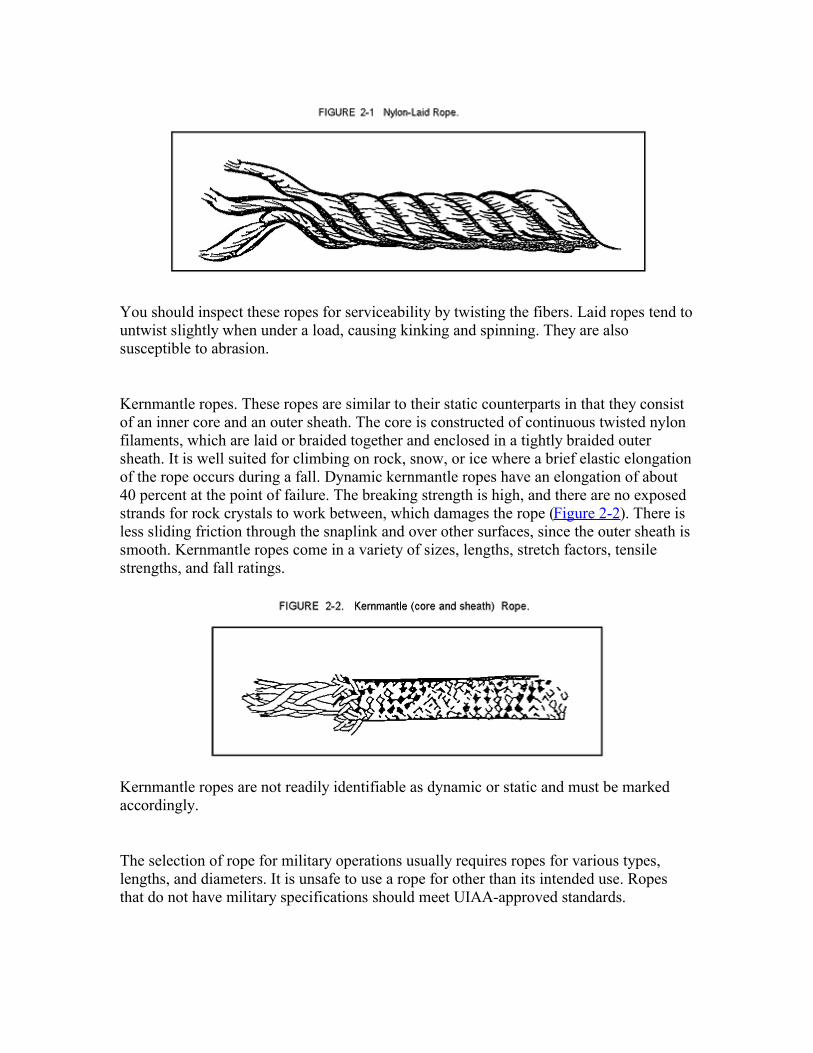
You should inspect these ropes for serviceability by twisting the fibers. Laid ropes tend tountwist slightly when under a load, causing kinking and spinning. They are alsosusceptible to abrasion.
Kernmantle ropes. These ropes are similar to their static counterparts in that they consistof an inner core and an outer sheath. The core is constructed of continuous twisted nylonfilaments, which are laid or braided together and enclosed in a tightly braided outersheath. It is well suited for climbing on rock, snow, or ice where a brief elastic elongationof the rope occurs during a fall. Dynamic kernmantle ropes have an elongation of about40 percent at the point of failure. The breaking strength is high, and there are no exposedstrands for rock crystals to work between, which damages the rope (Figure 2-2). There isless sliding friction through the snaplink and over other surfaces, since the outer sheath issmooth. Kernmantle ropes come in a variety of sizes, lengths, stretch factors, tensilestrengths, and fall ratings.
Kernmantle ropes are not readily identifiable as dynamic or static and must be markedaccordingly.
The selection of rope for military operations usually requires ropes for various types,lengths, and diameters. It is unsafe to use a rope for other than its intended use. Ropesthat do not have military specifications should meet UIAA-approved standards.
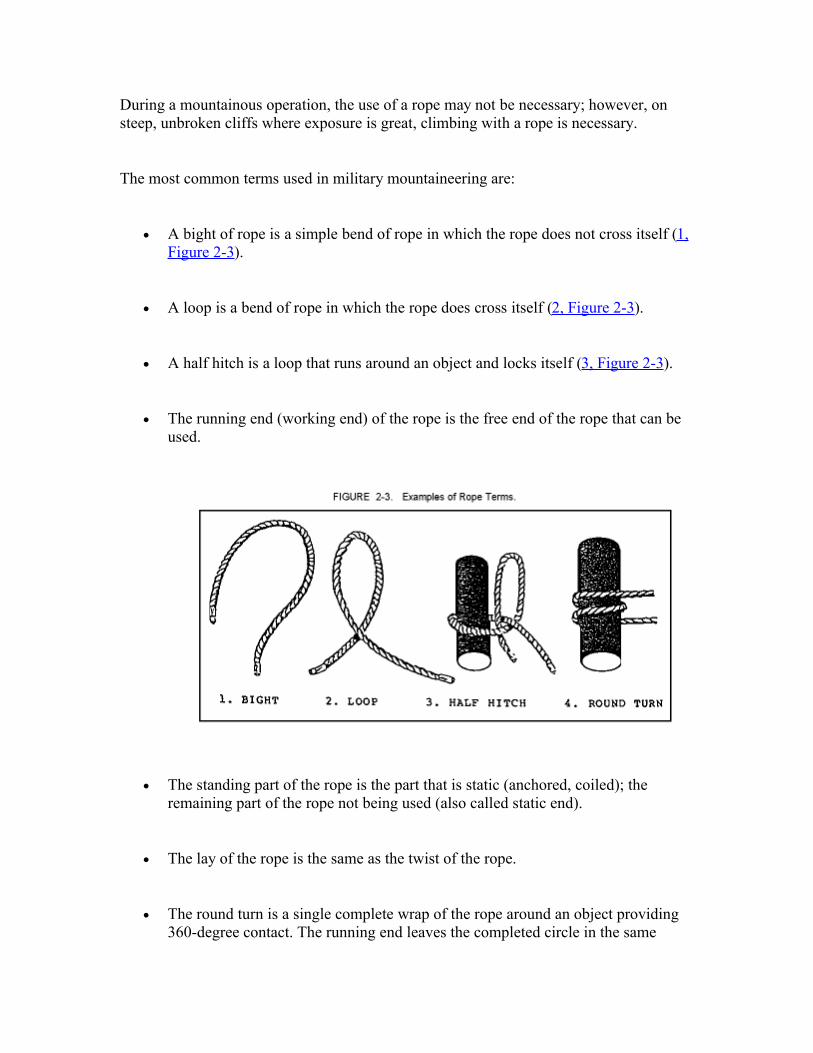
During a mountainous operation, the use of a rope may not be necessary; however, onsteep, unbroken cliffs where exposure is great, climbing with a rope is necessary.
The most common terms used in military mountaineering are:
A bight of rope is a simple bend of rope in which the rope does not cross itself (1,Figure 2-3).
A loop is a bend of rope in which the rope does cross itself (2, Figure 2-3).
A half hitch is a loop that runs around an object and locks itself (3, Figure 2-3).
The running end (working end) of the rope is the free end of the rope that can beused.
The standing part of the rope is the part that is static (anchored, coiled); theremaining part of the rope not being used (also called static end).
The lay of the rope is the same as the twist of the rope.
The round turn is a single complete wrap of the rope around an object providing360-degree contact. The running end leaves the completed circle in the same
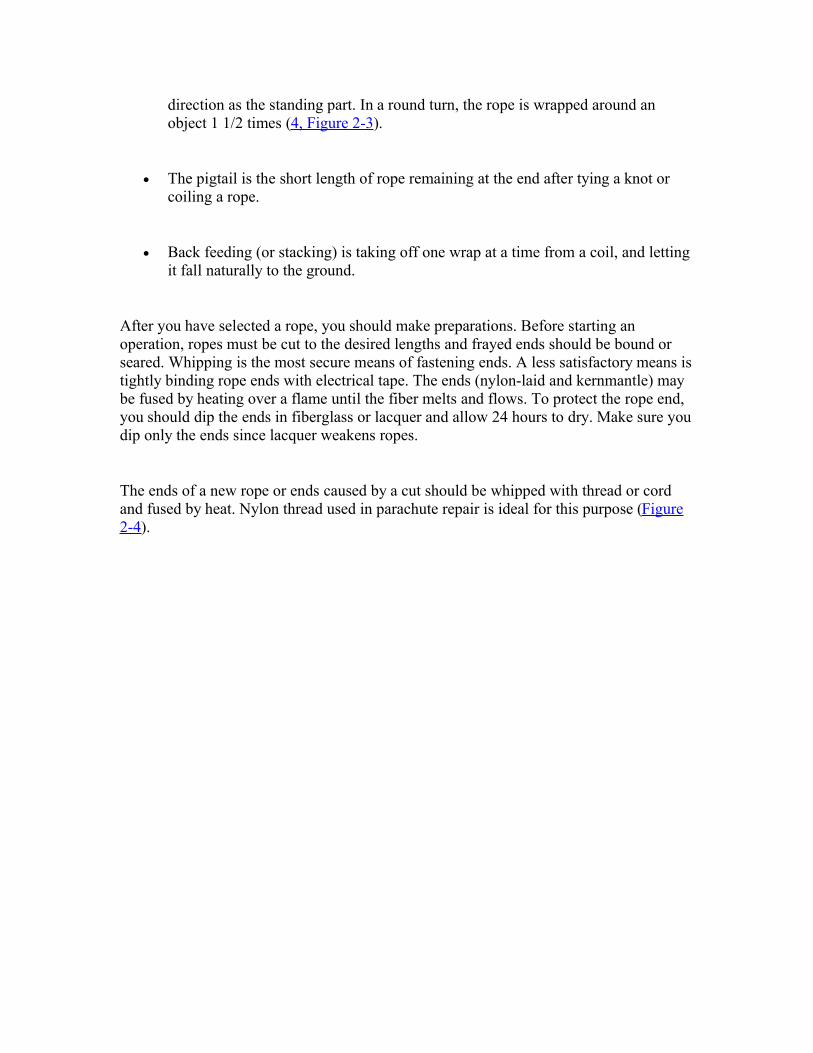
direction as the standing part. In a round turn, the rope is wrapped around anobject 1 1/2 times (4, Figure 2-3).
The pigtail is the short length of rope remaining at the end after tying a knot orcoiling a rope.
Back feeding (or stacking) is taking off one wrap at a time from a coil, and lettingit fall naturally to the ground.
After you have selected a rope, you should make preparations. Before starting anoperation, ropes must be cut to the desired lengths and frayed ends should be bound orseared. Whipping is the most secure means of fastening ends. A less satisfactory means istightly binding rope ends with electrical tape. The ends (nylon-laid and kernmantle) maybe fused by heating over a flame until the fiber melts and flows. To protect the rope end,you should dip the ends in fiberglass or lacquer and allow 24 hours to dry. Make sure youdip only the ends since lacquer weakens ropes.
The ends of a new rope or ends caused by a cut should be whipped with thread or cordand fused by heat. Nylon thread used in parachute repair is ideal for this purpose (Figure2-4).
When in areas of loose rocks, you should inspect the ropes as often as possible to detectcuts and abrasions before they render the rope unsafe.
When using a rope, there are two methods of coiling that you should follow:
Mountaineer's Coil. One of the techniques is to grasp the rope about 3 feet fromthe end with the left hand. The right hand is then placed next to the left hand andruns along the rope until both arms are outstretched. Grasping the rope firmly, thehands are brought together forming a loop, which is laid in the left hand. This isrepeated, forming uniform loops that run in a clockwise direction until the rope iscompletely coiled. If the rope tends to twist or form figure eights, it may be givena slight twist with the right hand when each loop is formed. The rope is coiled in aclockwise direction to conform with the lay.
In completing the hasty coil, a bight about 30 centimeters (12 inches) long is formed withthe starting end of the rope and laid along the top of the coil. The last loop is uncoiled.Using the length of the rope thus obtained, wraps are made around the coil and the bight.Wrapping is made toward the closed end of the bight, making the first wrap bind across
itself to lock it in place. Six to eight wraps should be made to adequately secure the coil.The end of the rope is pushed down through the closed end of the bight. The running endof the bight is then pulled tight to secure the coil. This coil may be carried either in thepack (by forming a figure eight, then by doubling it and placing it under the flap); or byplacing it over the shoulder and under the opposite arm. If the rope to be coiled isanchored as in coiling a belay or rappel line, the coil should start near the end closest tothe anchor so that the kinks can work themselves out of the free end (Figure 2-5).
Farmer's Coil. This method is best for carrying a rope when you want maximumuse of your upper body. This coil is also easier and faster than the mountaineer'scoil. The center of the rope is established either by locating its center mark or bygrasping both ends of the rope and feeding them out until a bight comes up that isthe center of the rope. Coiling begins with the doubled rope the same as themountaineer's coil method. About 4.6 meters (15 feet) of rope are left uncoiled,then the coils are squeezed together and four to six wraps are made around themiddle of the coil, ensuring that the first wrap is held in place by the other wraps.
A bight is formed with the two running ends and is placed through the bight formed bythe top of the coil. The two running ends are then run over the top of the coil and throughthe bight that they formed and dressed down. The running ends are separated, placing thecoil in the center of the back of the carrier. The two ends are run over the shoulders toform shoulder straps. The running ends are then brought under the arms, crossed in theback over the coil, brought around the body of the carrier, and tied off with a square knotat his stomach (Figure 2-5).
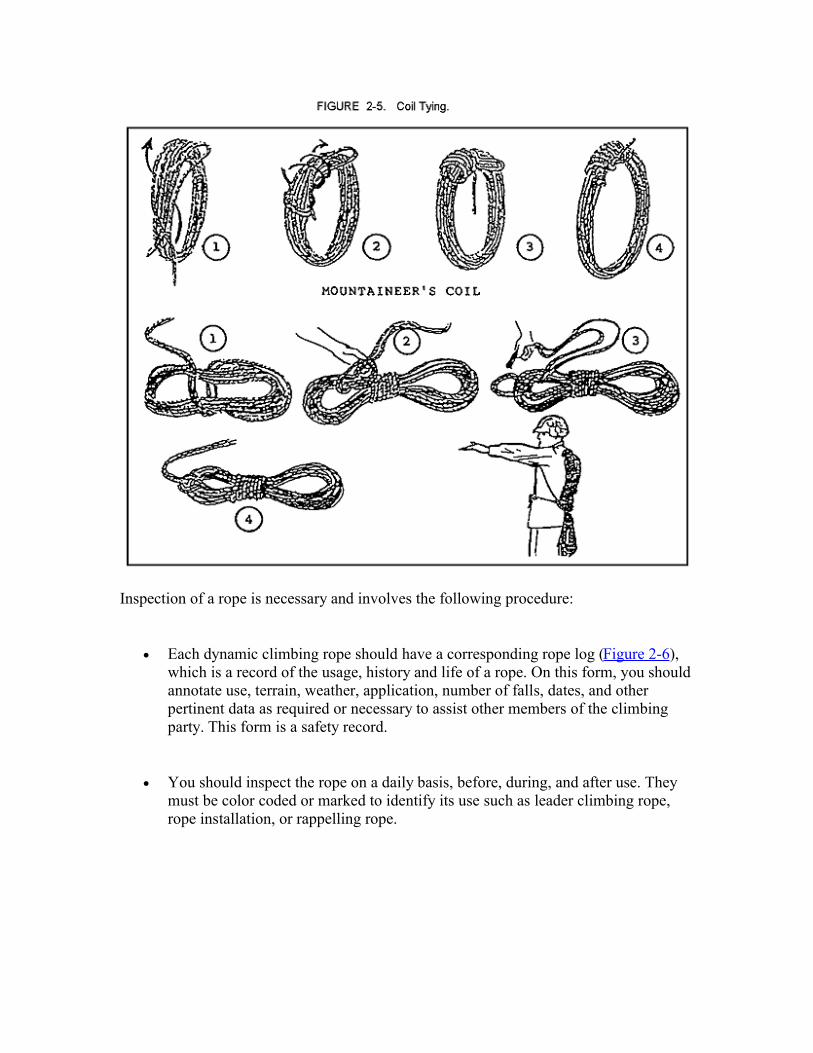
Inspection of a rope is necessary and involves the following procedure:
Each dynamic climbing rope should have a corresponding rope log (Figure 2-6),which is a record of the usage, history and life of a rope. On this form, you shouldannotate use, terrain, weather, application, number of falls, dates, and otherpertinent data as required or necessary to assist other members of the climbingparty. This form is a safety record.
You should inspect the rope on a daily basis, before, during, and after use. Theymust be color coded or marked to identify its use such as leader climbing rope,rope installation, or rappelling rope.
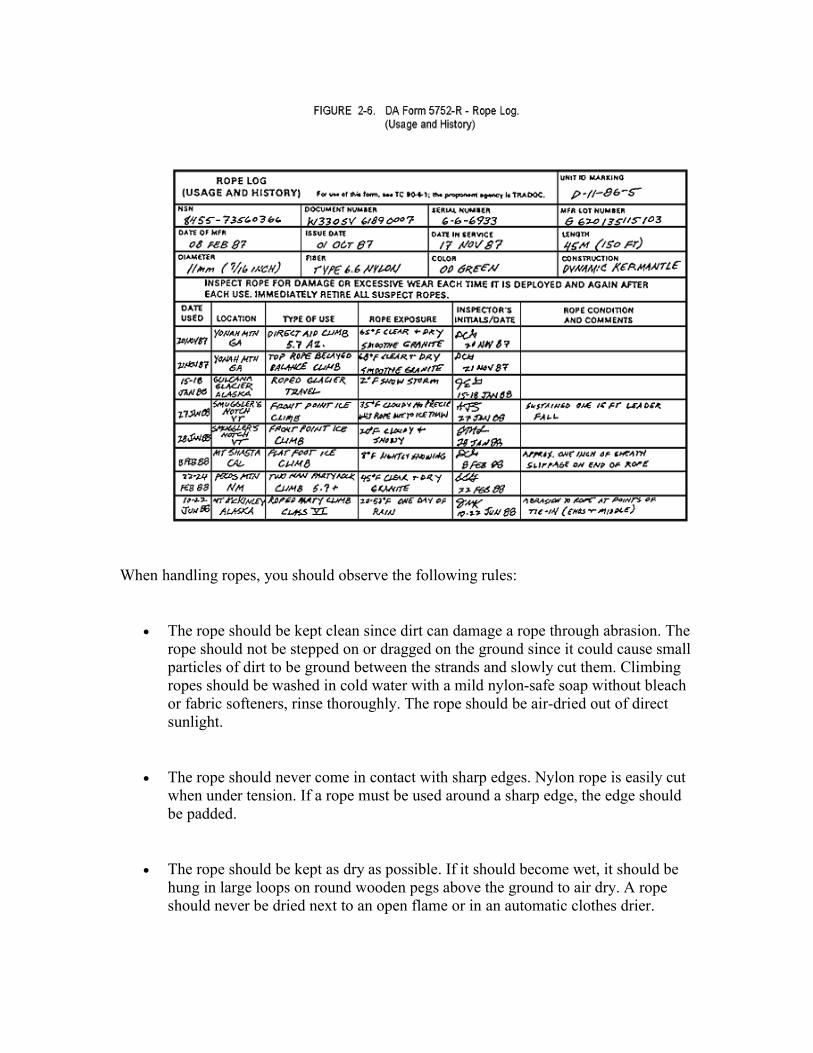
When handling ropes, you should observe the following rules:
The rope should be kept clean since dirt can damage a rope through abrasion. Therope should not be stepped on or dragged on the ground since it could cause smallparticles of dirt to be ground between the strands and slowly cut them. Climbingropes should be washed in cold water with a mild nylon-safe soap without bleachor fabric softeners, rinse thoroughly. The rope should be air-dried out of directsunlight.
The rope should never come in contact with sharp edges. Nylon rope is easily cutwhen under tension. If a rope must be used around a sharp edge, the edge shouldbe padded.
The rope should be kept as dry as possible. If it should become wet, it should behung in large loops on round wooden pegs above the ground to air dry. A ropeshould never be dried next to an open flame or in an automatic clothes drier.
The rope should not be knotted or tightly stretched for long periods. It should notbe hung on sharp edges such as nails.
When using ropes in installations, they should not rub against each other. Thiscauses fraying. Allowing rope-on-rope contact with nylon rope is dangerous sincethe heat produced by the friction may cause the nylon to melt. The rope must beexamined immediately after it has been hit by a falling object (rock, helmet,rucksack, piton hammer). If a sudden strain has been applied to the rope whilepassing over a sharp edge, it should be inspected.
The rope must be protected from chemicals, paints, oils, solvents, acids,corrosives, petroleum products, or excessive heat since these weaken and damagerope fibers.
Throwing. To ensure that the rope does not snarl when thrown, it is backfed. The rope isbackfed (stacked) by taking off one wrap at a time and letting it fall to the ground,ensuring that there are no kinks, knots, or twists that may hinder the rope from feedingout. When the rope is backfed, one end of the rope is anchored off.
The opposite end of the rope is picked up and six to eight coils are made in theleft hand and set on the ground next to the climber. A second set of coils is madewith the remaining rope; two separate stacks of coils should be present. The stackwith six to eight coils is picked up and placed in the left hand. The other stack ofcoils is placed in the right hand.
There are two methods in which to throw the rope-underhand and overhand. Theoverhand method should be used when trees or shrubs are on or near the rappelpoint. Once the method of throwing has been determined, a few preliminaryswings are made with the right arm (this arm holds the second set of coils). Justbefore the rope leaves the hand, the warning "Rope" is shouted to alert personnelat the bottom of the cliff. As the coils are going down the cliff face, the climberfeels a tug. At that time, the coils in the left hand are thrown down. Throwing therope this way is best to ensure that the rope reaches the bottom without snagging.
2. Types of Knots:
A knot is a fastening made by intertwining or tying pieces of string, cord, ropes, orwebbing. All knots used by a climber are divided into four classes:
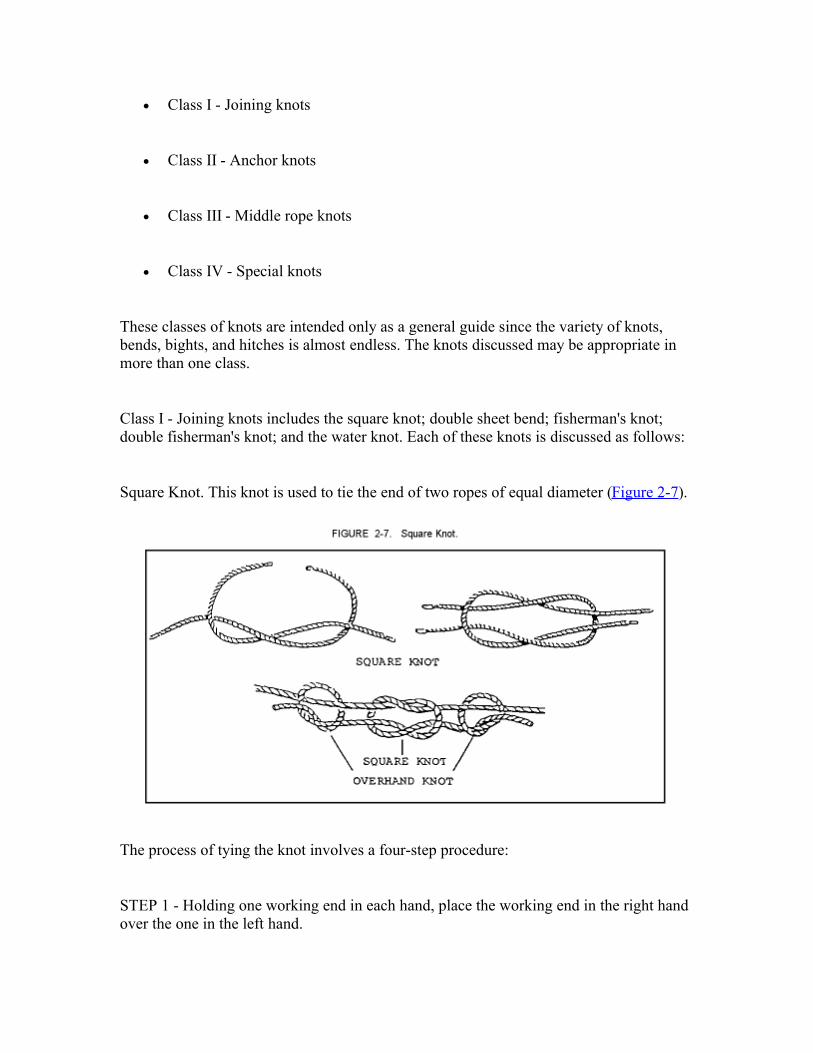
Class I - Joining knots
Class II - Anchor knots
Class III - Middle rope knots
Class IV - Special knots
These classes of knots are intended only as a general guide since the variety of knots,bends, bights, and hitches is almost endless. The knots discussed may be appropriate inmore than one class.
Class I - Joining knots includes the square knot; double sheet bend; fisherman's knot;double fisherman's knot; and the water knot. Each of these knots is discussed as follows:
Square Knot. This knot is used to tie the end of two ropes of equal diameter (Figure 2-7).
The process of tying the knot involves a four-step procedure:
STEP 1 - Holding one working end in each hand, place the working end in the right handover the one in the left hand.
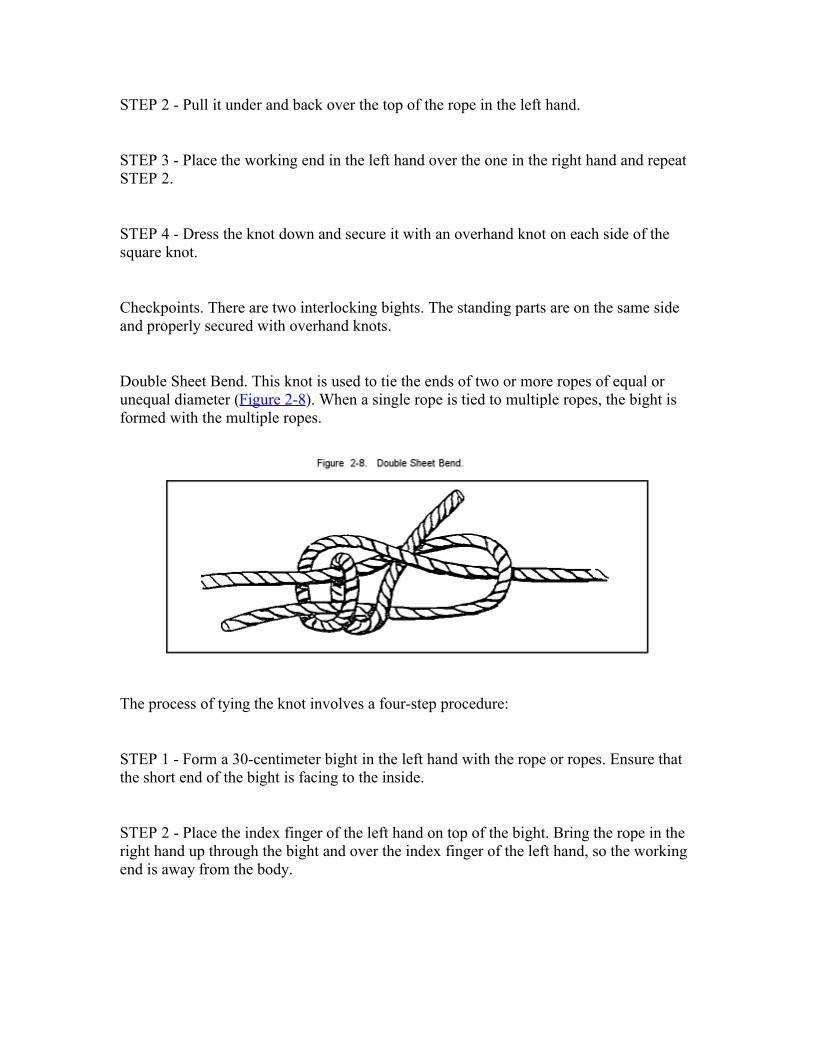
STEP 2 - Pull it under and back over the top of the rope in the left hand.
STEP 3 - Place the working end in the left hand over the one in the right hand and repeatSTEP 2.
STEP 4 - Dress the knot down and secure it with an overhand knot on each side of thesquare knot.
Checkpoints. There are two interlocking bights. The standing parts are on the same sideand properly secured with overhand knots.
Double Sheet Bend. This knot is used to tie the ends of two or more ropes of equal orunequal diameter (Figure 2-8). When a single rope is tied to multiple ropes, the bight isformed with the multiple ropes.
The process of tying the knot involves a four-step procedure:
STEP 1 - Form a 30-centimeter bight in the left hand with the rope or ropes. Ensure thatthe short end of the bight is facing to the inside.
STEP 2 - Place the index finger of the left hand on top of the bight. Bring the rope in theright hand up through the bight and over the index finger of the left hand, so the workingend is away from the body.
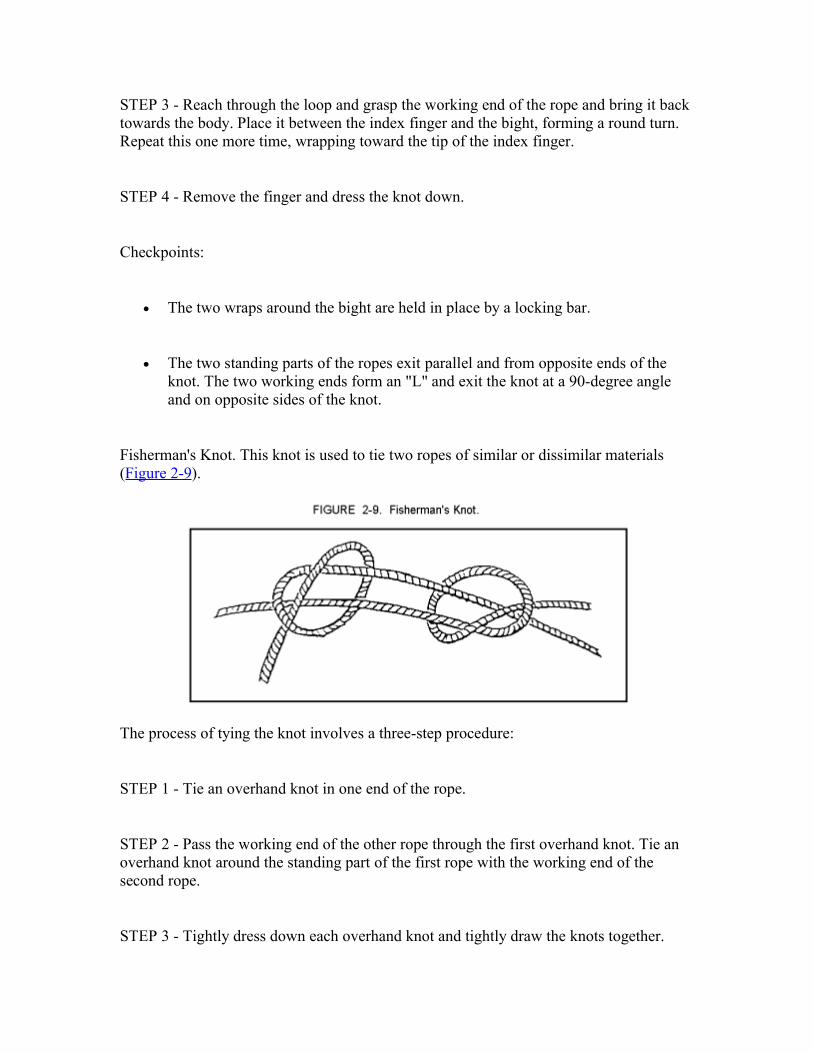
STEP 3 - Reach through the loop and grasp the working end of the rope and bring it backtowards the body. Place it between the index finger and the bight, forming a round turn.Repeat this one more time, wrapping toward the tip of the index finger.
STEP 4 - Remove the finger and dress the knot down.
Checkpoints:
The two wraps around the bight are held in place by a locking bar.
The two standing parts of the ropes exit parallel and from opposite ends of theknot. The two working ends form an "L" and exit the knot at a 90-degree angleand on opposite sides of the knot.
Fisherman's Knot. This knot is used to tie two ropes of similar or dissimilar materials(Figure 2-9).
The process of tying the knot involves a three-step procedure:
STEP 1 - Tie an overhand knot in one end of the rope.
STEP 2 - Pass the working end of the other rope through the first overhand knot. Tie anoverhand knot around the standing part of the first rope with the working end of thesecond rope.
STEP 3 - Tightly dress down each overhand knot and tightly draw the knots together.
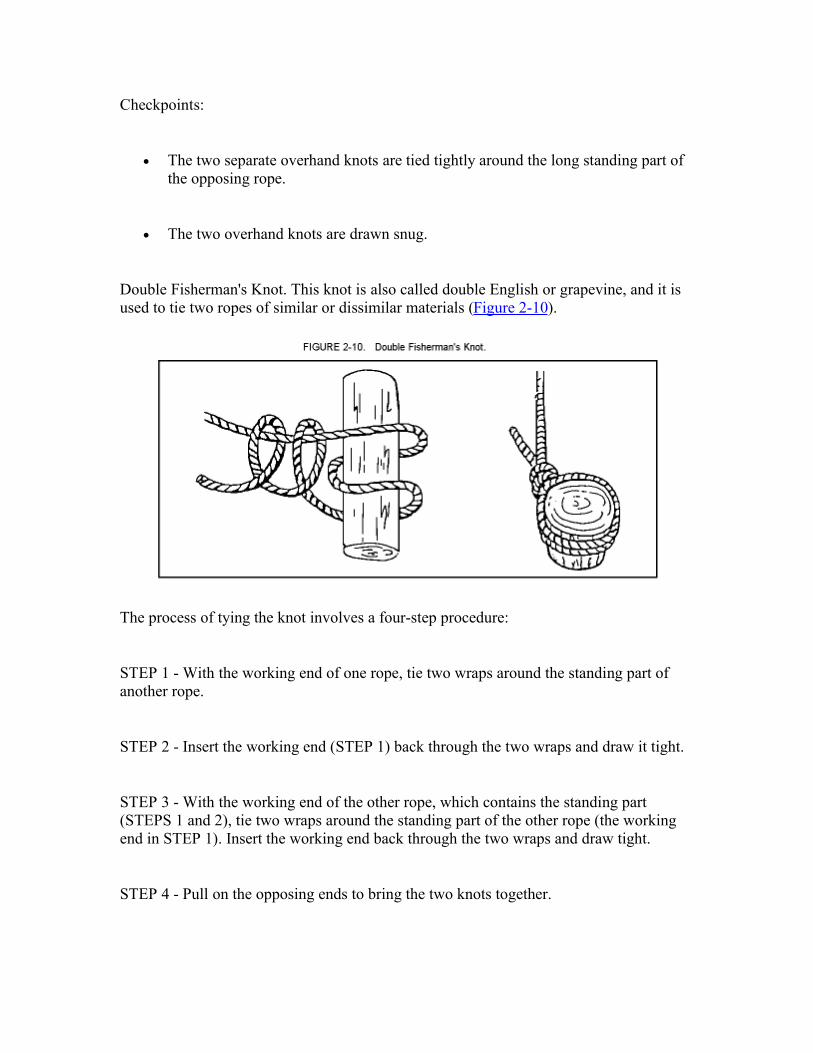
Checkpoints:
The two separate overhand knots are tied tightly around the long standing part ofthe opposing rope.
The two overhand knots are drawn snug.
Double Fisherman's Knot. This knot is also called double English or grapevine, and it isused to tie two ropes of similar or dissimilar materials (Figure 2-10).
The process of tying the knot involves a four-step procedure:
STEP 1 - With the working end of one rope, tie two wraps around the standing part ofanother rope.
STEP 2 - Insert the working end (STEP 1) back through the two wraps and draw it tight.
STEP 3 - With the working end of the other rope, which contains the standing part(STEPS 1 and 2), tie two wraps around the standing part of the other rope (the workingend in STEP 1). Insert the working end back through the two wraps and draw tight.
STEP 4 - Pull on the opposing ends to bring the two knots together.
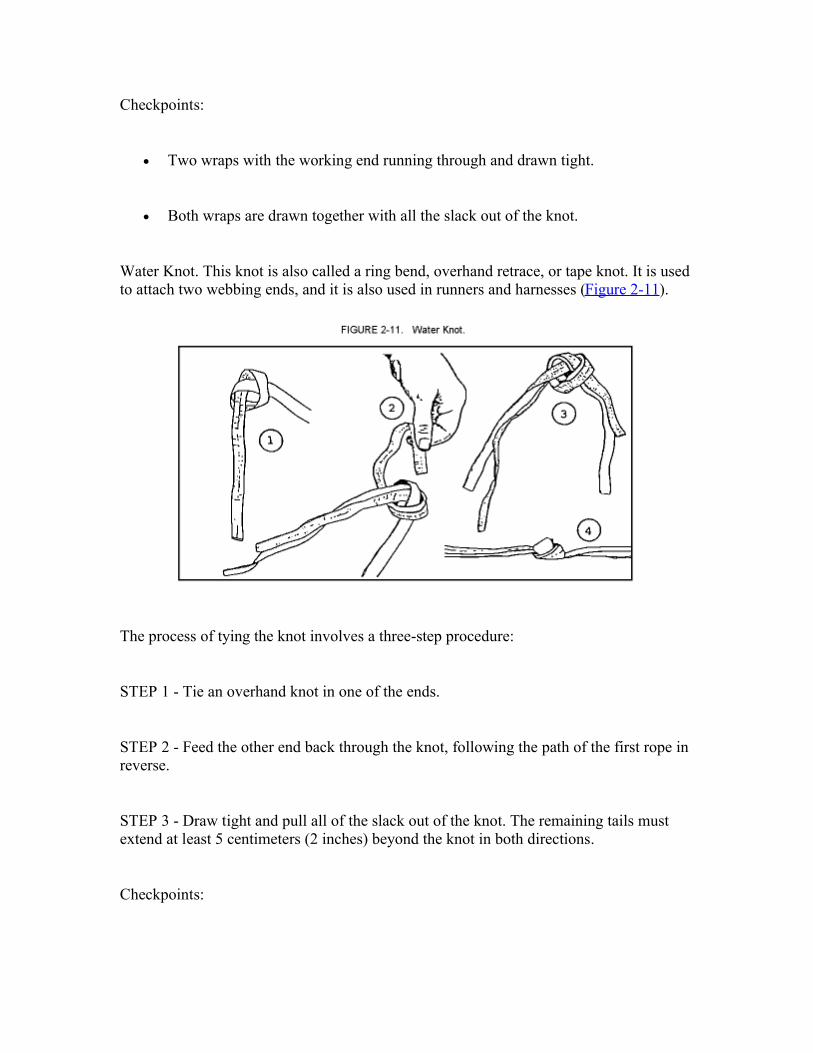
Checkpoints:
Two wraps with the working end running through and drawn tight.
Both wraps are drawn together with all the slack out of the knot.
Water Knot. This knot is also called a ring bend, overhand retrace, or tape knot. It is usedto attach two webbing ends, and it is also used in runners and harnesses (Figure 2-11).
The process of tying the knot involves a three-step procedure:
STEP 1 - Tie an overhand knot in one of the ends.
STEP 2 - Feed the other end back through the knot, following the path of the first rope inreverse.
STEP 3 - Draw tight and pull all of the slack out of the knot. The remaining tails mustextend at least 5 centimeters (2 inches) beyond the knot in both directions.
Checkpoints:
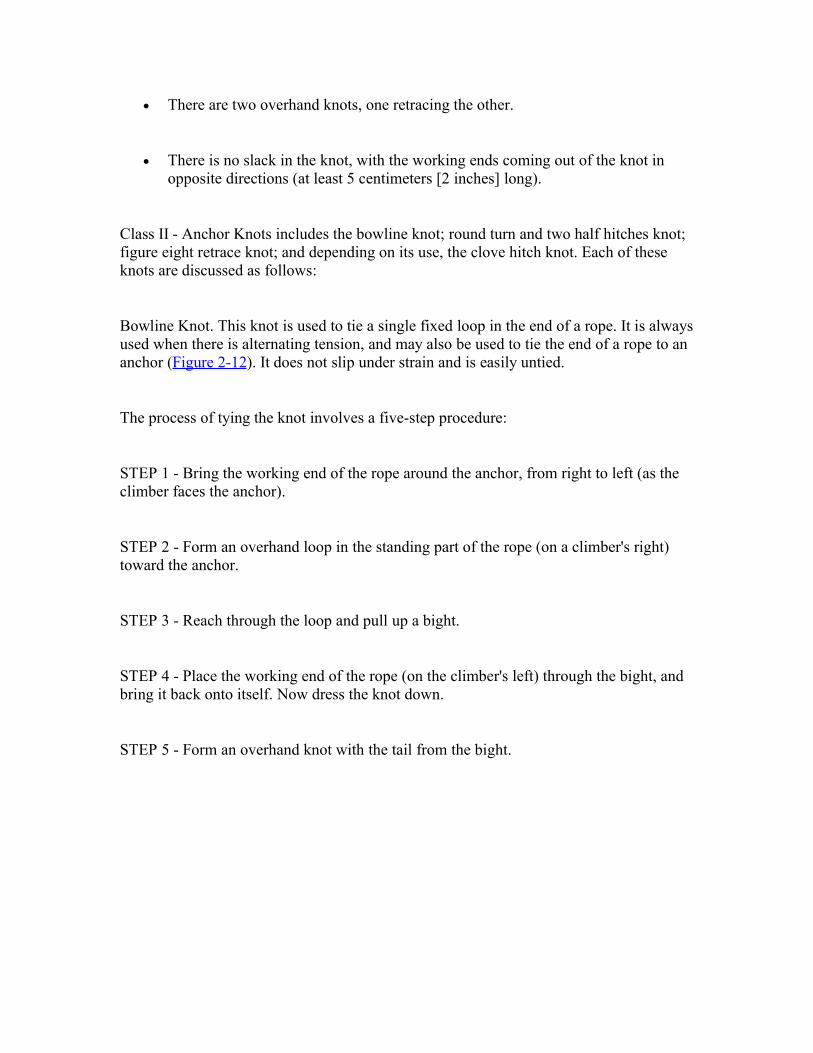
There are two overhand knots, one retracing the other.
There is no slack in the knot, with the working ends coming out of the knot inopposite directions (at least 5 centimeters [2 inches] long).
Class II - Anchor Knots includes the bowline knot; round turn and two half hitches knot;figure eight retrace knot; and depending on its use, the clove hitch knot. Each of theseknots are discussed as follows:
Bowline Knot. This knot is used to tie a single fixed loop in the end of a rope. It is alwaysused when there is alternating tension, and may also be used to tie the end of a rope to ananchor (Figure 2-12). It does not slip under strain and is easily untied.
The process of tying the knot involves a five-step procedure:
STEP 1 - Bring the working end of the rope around the anchor, from right to left (as theclimber faces the anchor).
STEP 2 - Form an overhand loop in the standing part of the rope (on a climber's right)toward the anchor.
STEP 3 - Reach through the loop and pull up a bight.
STEP 4 - Place the working end of the rope (on the climber's left) through the bight, andbring it back onto itself. Now dress the knot down.
STEP 5 - Form an overhand knot with the tail from the bight.
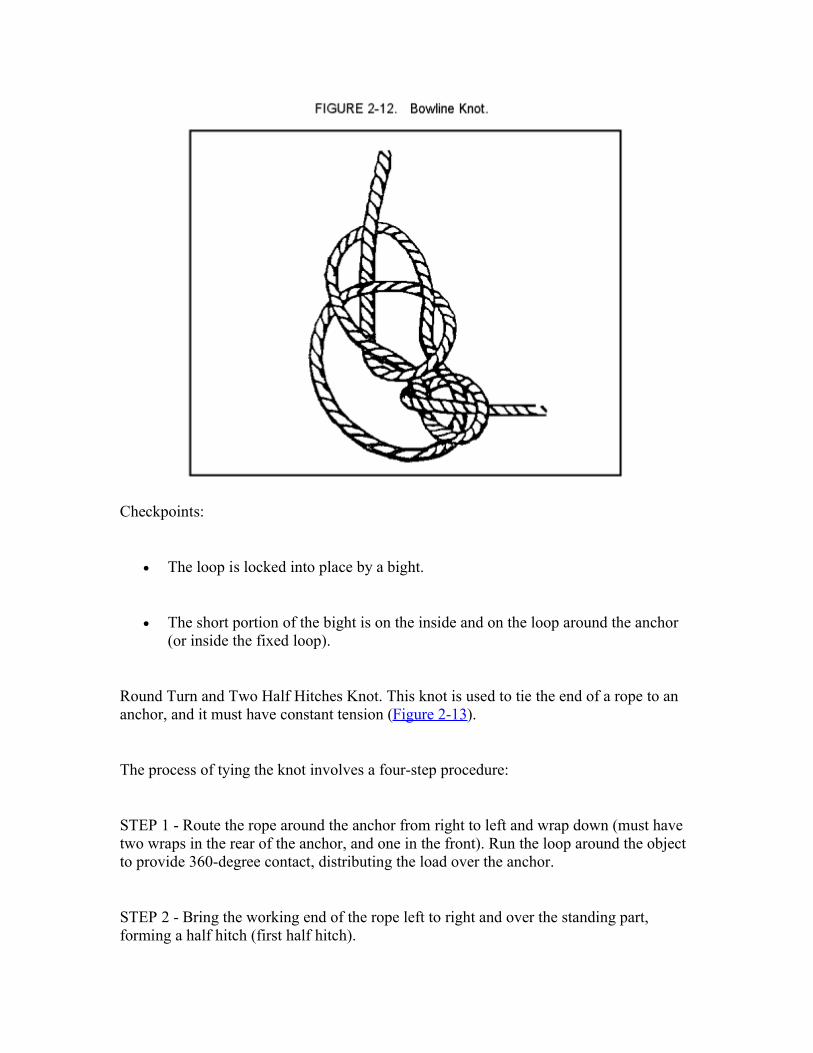
Checkpoints:
The loop is locked into place by a bight.
The short portion of the bight is on the inside and on the loop around the anchor(or inside the fixed loop).
Round Turn and Two Half Hitches Knot. This knot is used to tie the end of a rope to ananchor, and it must have constant tension (Figure 2-13).
The process of tying the knot involves a four-step procedure:
STEP 1 - Route the rope around the anchor from right to left and wrap down (must havetwo wraps in the rear of the anchor, and one in the front). Run the loop around the objectto provide 360-degree contact, distributing the load over the anchor.
STEP 2 - Bring the working end of the rope left to right and over the standing part,forming a half hitch (first half hitch).
STEP 3 - Repeat Step 2 (last half hitch has a 15-centimeter [6 inch] pigtail).
STEP 4 - Dress the knot down.
Checkpoints:
A complete round turn should exist around the anchor with no crosses.
Two half hitches should be held in place by a locking bar with no less than a 15-centimeter tail remaining.
Look at the top of the half hitches; the rope should appear to be one continuousrope.
Figure Eight Retrace Knot. This knot is also called rerouted figure eight. This knotproduces the same result as a figure eight loop discussed in "Class III - middle ropeknots." By tying the knot in a retrace, it can be used to fasten the rope to trees or to placeswhere the loop cannot be used (Figure 2-14).
The process of tying the knot involves a six-step procedure:
STEP 1 - Use a length of rope long enough to go around the anchor, leaving enough ropeto work with.
STEP 2 - Tie a figure eight knot in the standing part of the rope, leaving enough rope togo around the anchor.
To tie a figure eight knot-
Form a loop in the rope.
Wrap the working end around the standing part.
Route the working end through the loop. The finished knot is dressed loosely.
STEP 3 - Take the working end around the anchor point.
STEP 4 - With the working end, insert the rope back through the loop of the knot inreverse.
STEP 5 - Keep the original figure eight as the outside rope and retrace the knot aroundthe wrap and back to the long standing part.
STEP 6 - Safety off with an overhand knot.
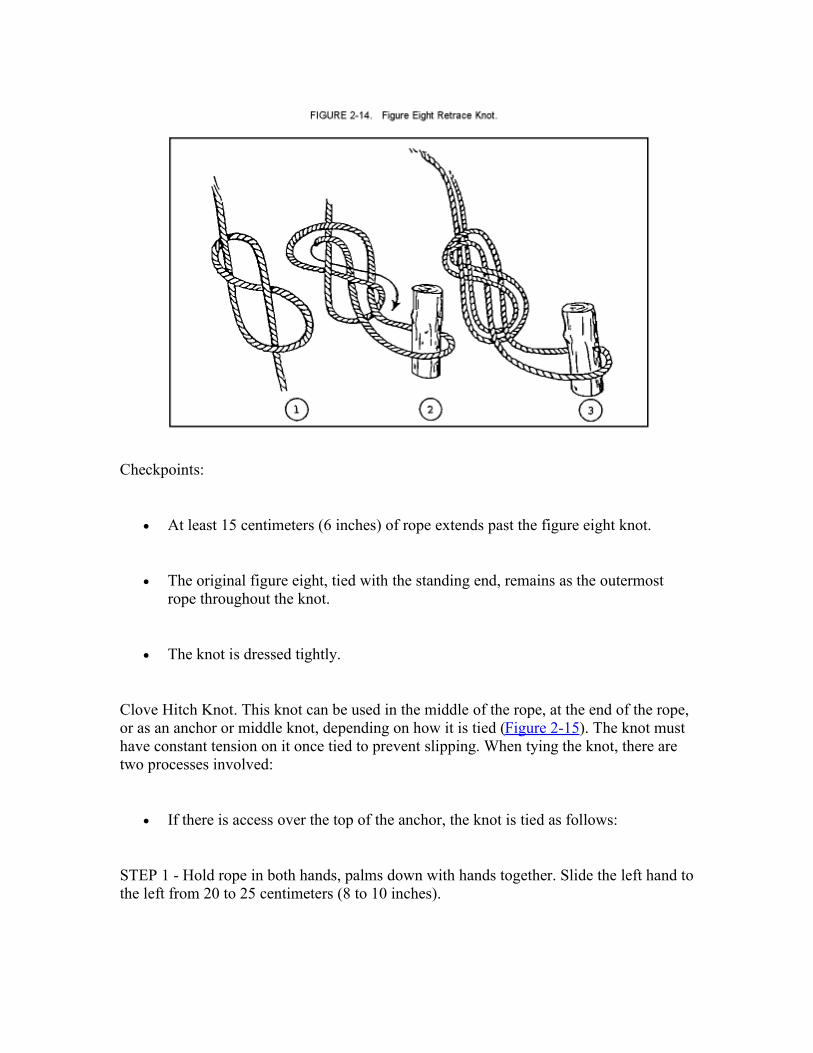
Checkpoints:
At least 15 centimeters (6 inches) of rope extends past the figure eight knot.
The original figure eight, tied with the standing end, remains as the outermostrope throughout the knot.
The knot is dressed tightly.
Clove Hitch Knot. This knot can be used in the middle of the rope, at the end of the rope,or as an anchor or middle knot, depending on how it is tied (Figure 2-15). The knot musthave constant tension on it once tied to prevent slipping. When tying the knot, there aretwo processes involved:
If there is access over the top of the anchor, the knot is tied as follows:
STEP 1 - Hold rope in both hands, palms down with hands together. Slide the left hand tothe left from 20 to 25 centimeters (8 to 10 inches).
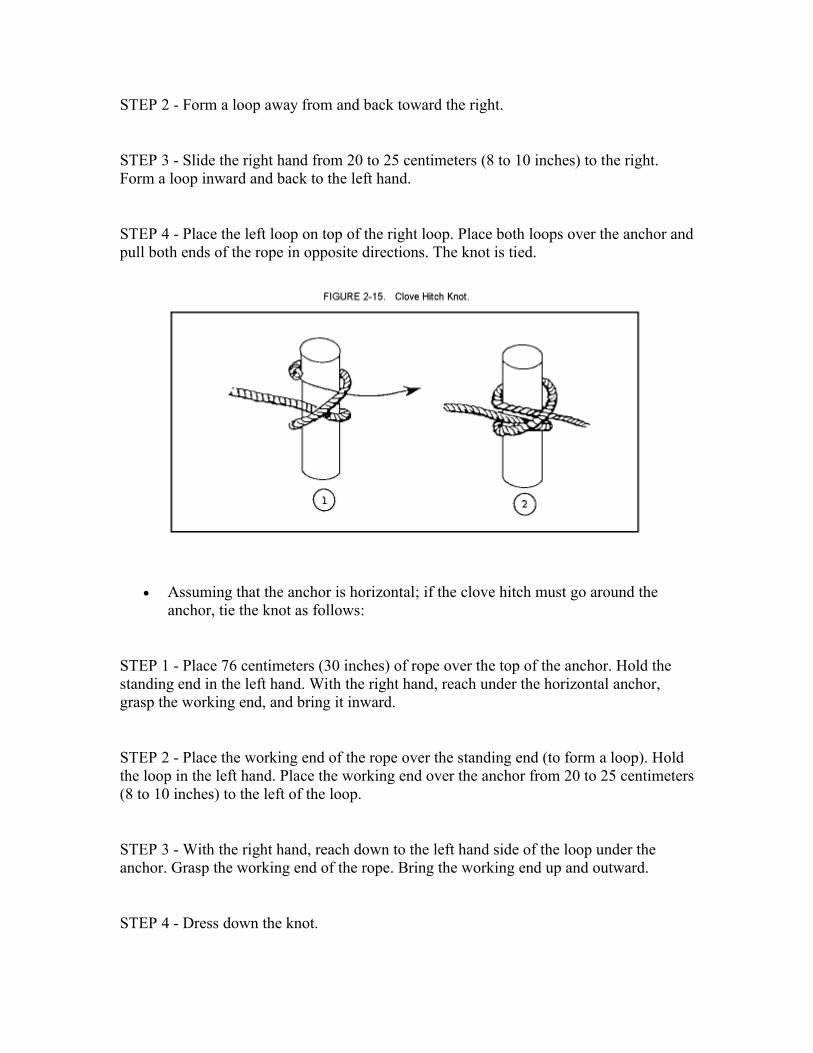
STEP 2 - Form a loop away from and back toward the right.
STEP 3 - Slide the right hand from 20 to 25 centimeters (8 to 10 inches) to the right.Form a loop inward and back to the left hand.
STEP 4 - Place the left loop on top of the right loop. Place both loops over the anchor andpull both ends of the rope in opposite directions. The knot is tied.
Assuming that the anchor is horizontal; if the clove hitch must go around theanchor, tie the knot as follows:
STEP 1 - Place 76 centimeters (30 inches) of rope over the top of the anchor. Hold thestanding end in the left hand. With the right hand, reach under the horizontal anchor,grasp the working end, and bring it inward.
STEP 2 - Place the working end of the rope over the standing end (to form a loop). Holdthe loop in the left hand. Place the working end over the anchor from 20 to 25 centimeters(8 to 10 inches) to the left of the loop.
STEP 3 - With the right hand, reach down to the left hand side of the loop under theanchor. Grasp the working end of the rope. Bring the working end up and outward.
STEP 4 - Dress down the knot.
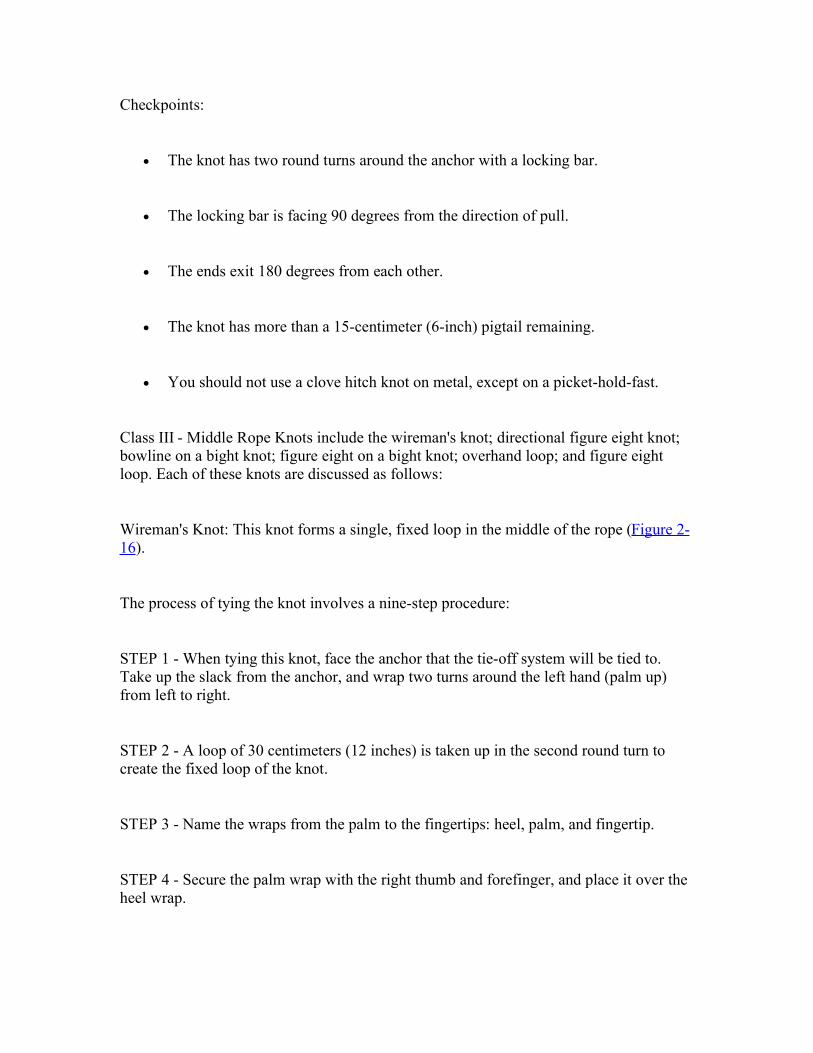
Checkpoints:
The knot has two round turns around the anchor with a locking bar.
The locking bar is facing 90 degrees from the direction of pull.
The ends exit 180 degrees from each other.
The knot has more than a 15-centimeter (6-inch) pigtail remaining.
You should not use a clove hitch knot on metal, except on a picket-hold-fast.
Class III - Middle Rope Knots include the wireman's knot; directional figure eight knot;bowline on a bight knot; figure eight on a bight knot; overhand loop; and figure eightloop. Each of these knots are discussed as follows:
Wireman's Knot: This knot forms a single, fixed loop in the middle of the rope (Figure 2-16).
The process of tying the knot involves a nine-step procedure:
STEP 1 - When tying this knot, face the anchor that the tie-off system will be tied to.Take up the slack from the anchor, and wrap two turns around the left hand (palm up)from left to right.
STEP 2 - A loop of 30 centimeters (12 inches) is taken up in the second round turn tocreate the fixed loop of the knot.
STEP 3 - Name the wraps from the palm to the fingertips: heel, palm, and fingertip.
STEP 4 - Secure the palm wrap with the right thumb and forefinger, and place it over theheel wrap.
STEP 5 - Secure the heel wrap and place it over the fingertip wrap.
STEP 6 - Secure the fingertip wrap and place it over the palm wrap.
STEP 7 - Secure the palm wrap and pull up to form a fixed loop.
STEP 8 - Dress the knot down by pulling on the fixed loop and the two working ends.
STEP 9 - Pull the working ends apart to finish the knot.
Checkpoints:
The completed knot should have four separate bights locking down on themselveswith the fixed loop exiting from the top of the knot and laying toward the nearside anchor point.
Both ends should exit opposite each other without any bends.
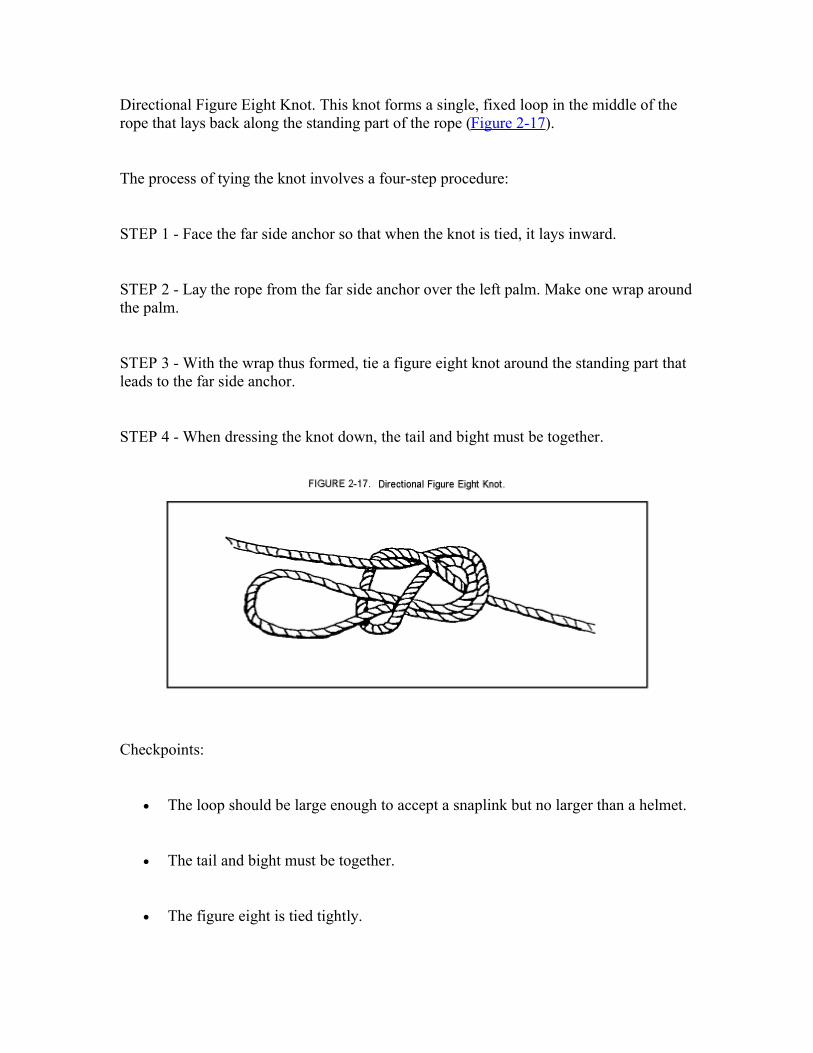
Directional Figure Eight Knot. This knot forms a single, fixed loop in the middle of therope that lays back along the standing part of the rope (Figure 2-17).
The process of tying the knot involves a four-step procedure:
STEP 1 - Face the far side anchor so that when the knot is tied, it lays inward.
STEP 2 - Lay the rope from the far side anchor over the left palm. Make one wrap aroundthe palm.
STEP 3 - With the wrap thus formed, tie a figure eight knot around the standing part thatleads to the far side anchor.
STEP 4 - When dressing the knot down, the tail and bight must be together.
Checkpoints:
The loop should be large enough to accept a snaplink but no larger than a helmet.
The tail and bight must be together.
The figure eight is tied tightly.

The bight in the knot faces back toward the near side.
Bowline on a Bight Knot. This knot is used to form two fixed loops in the middle of arope (Figure 2-18).
The process of tying the knot involves a seven-step procedure:
STEP 1 - Form a bight in the rope about twice as long as the finished loops will be.
STEP 2 - Tie an overhand knot on the bight.
STEP 3 - Hold the overhand knot in the left hand so that the bight is running down andoutward.
STEP 4 - Grasp the bight with the right hand, fold it back over the overhand knot so thatthe overhand knot goes through the bight.
STEP 5 - From the end (apex) of the bight, follow the bight back to where it forms thecross in the overhand knot. Grasp the two ropes that run down and outward and pull up,forming two loops.
STEP 6 - Pull the two ropes out of the overhand knot and dress the knot down.
STEP 7 - A final dress is required: grasp the ends of the two fixed loops and pull,spreading them apart to ensure the loops do not slip.
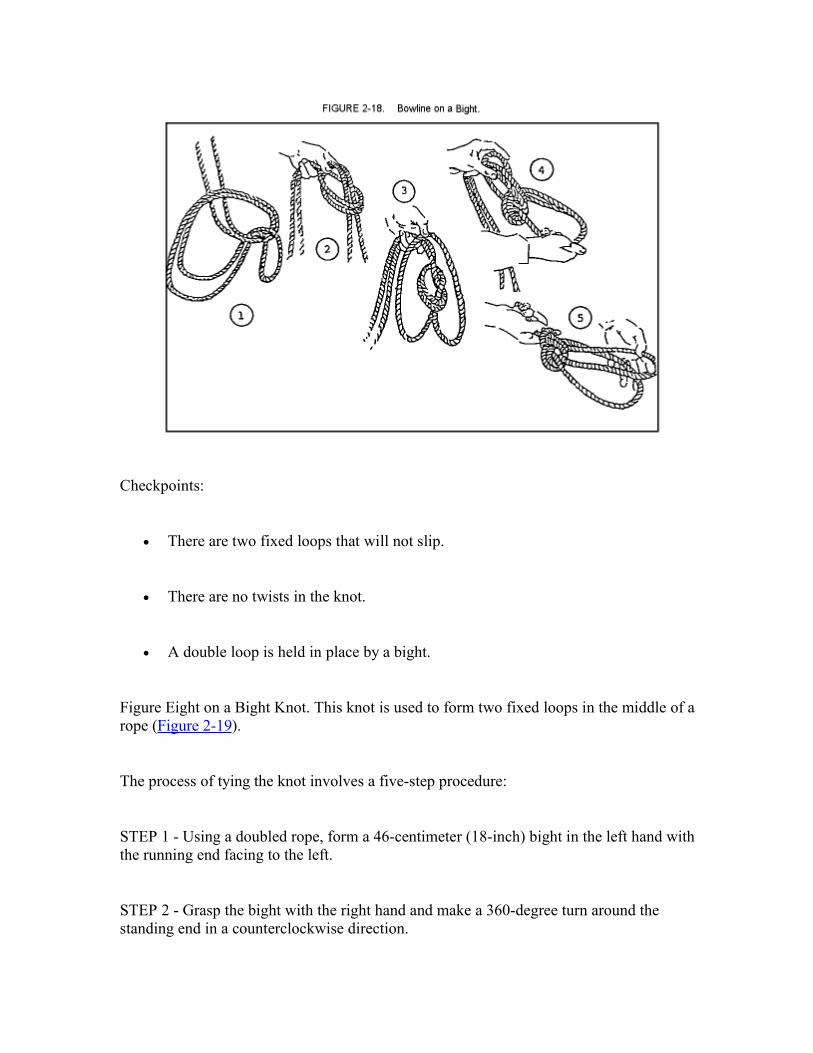
Checkpoints:
There are two fixed loops that will not slip.
There are no twists in the knot.
A double loop is held in place by a bight.
Figure Eight on a Bight Knot. This knot is used to form two fixed loops in the middle of arope (Figure 2-19).
The process of tying the knot involves a five-step procedure:
STEP 1 - Using a doubled rope, form a 46-centimeter (18-inch) bight in the left hand withthe running end facing to the left.
STEP 2 - Grasp the bight with the right hand and make a 360-degree turn around thestanding end in a counterclockwise direction.
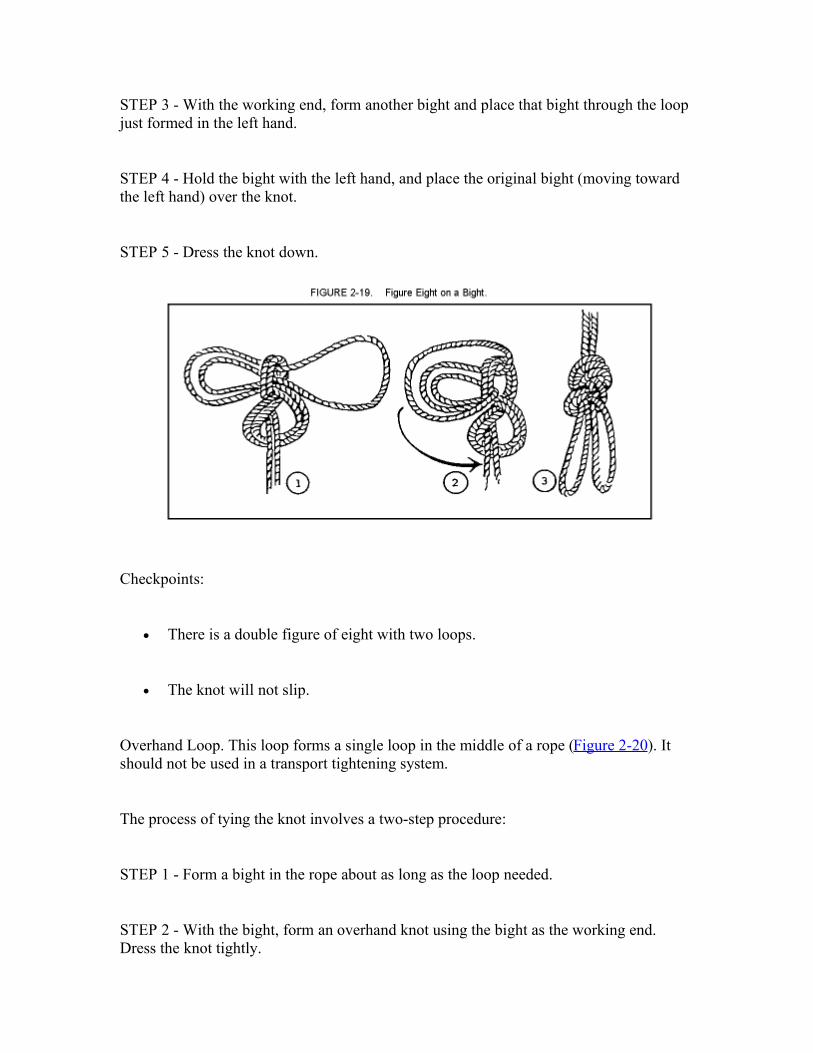
STEP 3 - With the working end, form another bight and place that bight through the loopjust formed in the left hand.
STEP 4 - Hold the bight with the left hand, and place the original bight (moving towardthe left hand) over the knot.
STEP 5 - Dress the knot down.
Checkpoints:
There is a double figure of eight with two loops.
The knot will not slip.
Overhand Loop. This loop forms a single loop in the middle of a rope (Figure 2-20). Itshould not be used in a transport tightening system.
The process of tying the knot involves a two-step procedure:
STEP 1 - Form a bight in the rope about as long as the loop needed.
STEP 2 - With the bight, form an overhand knot using the bight as the working end.Dress the knot tightly.
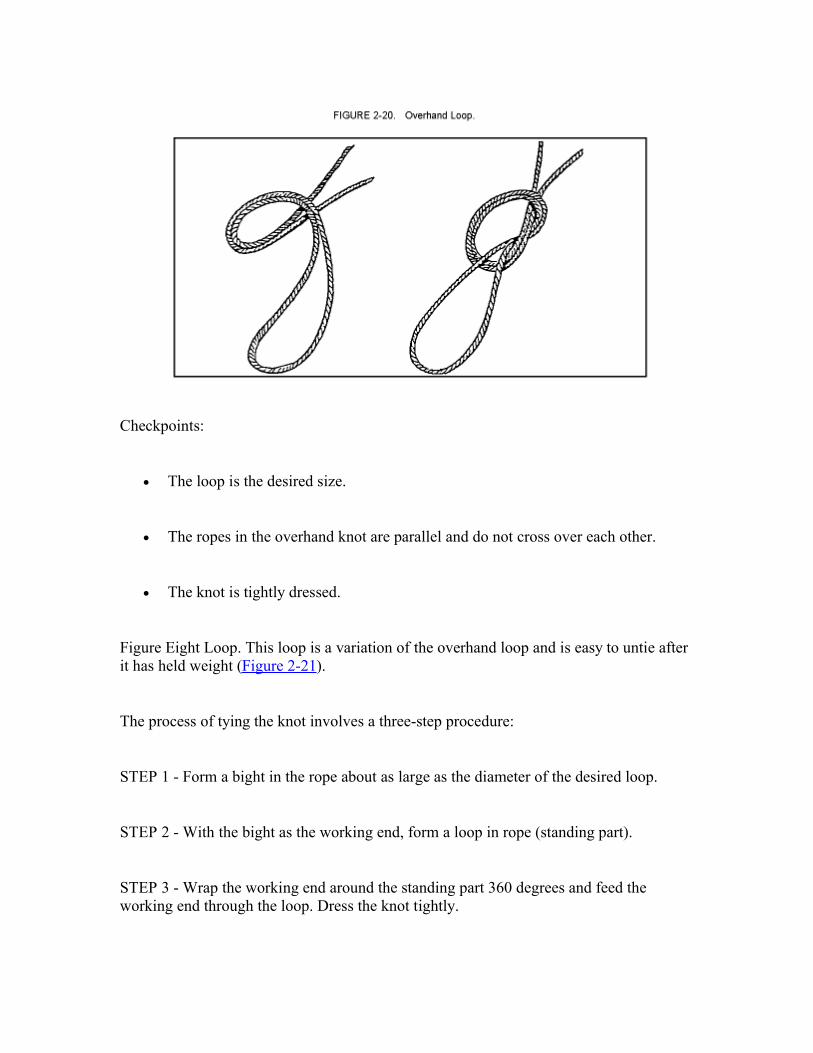
Checkpoints:
The loop is the desired size.
The ropes in the overhand knot are parallel and do not cross over each other.
The knot is tightly dressed.
Figure Eight Loop. This loop is a variation of the overhand loop and is easy to untie afterit has held weight (Figure 2-21).
The process of tying the knot involves a three-step procedure:
STEP 1 - Form a bight in the rope about as large as the diameter of the desired loop.
STEP 2 - With the bight as the working end, form a loop in rope (standing part).
STEP 3 - Wrap the working end around the standing part 360 degrees and feed theworking end through the loop. Dress the knot tightly.
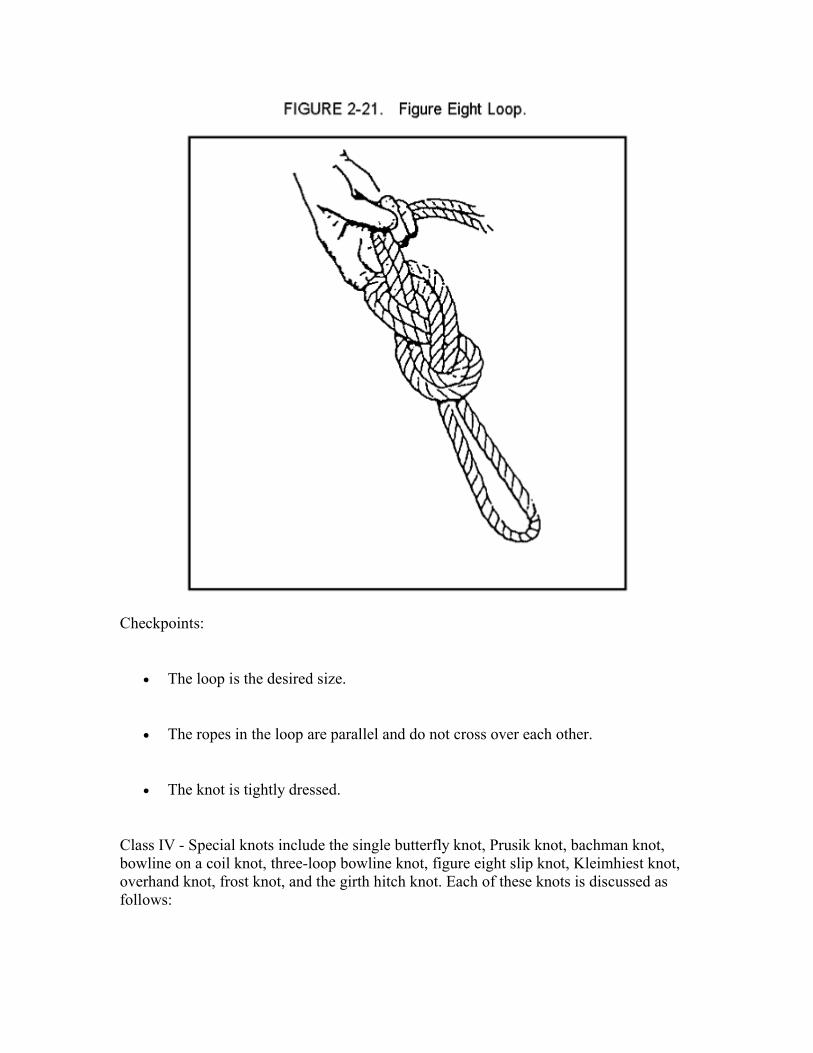
Checkpoints:
The loop is the desired size.
The ropes in the loop are parallel and do not cross over each other.
The knot is tightly dressed.
Class IV - Special knots include the single butterfly knot, Prusik knot, bachman knot,bowline on a coil knot, three-loop bowline knot, figure eight slip knot, Kleimhiest knot,overhand knot, frost knot, and the girth hitch knot. Each of these knots is discussed asfollows:
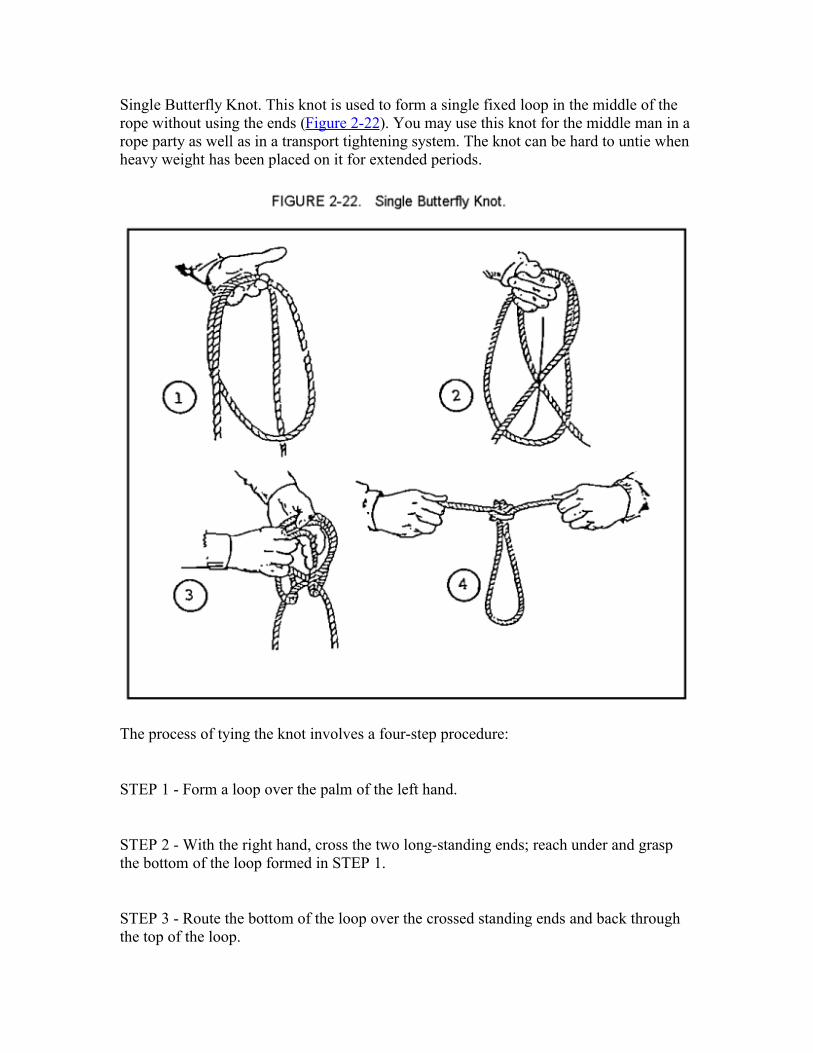
Single Butterfly Knot. This knot is used to form a single fixed loop in the middle of therope without using the ends (Figure 2-22). You may use this knot for the middle man in arope party as well as in a transport tightening system. The knot can be hard to untie whenheavy weight has been placed on it for extended periods.
The process of tying the knot involves a four-step procedure:
STEP 1 - Form a loop over the palm of the left hand.
STEP 2 - With the right hand, cross the two long-standing ends; reach under and graspthe bottom of the loop formed in STEP 1.
STEP 3 - Route the bottom of the loop over the crossed standing ends and back throughthe top of the loop.

STEP 4 - Hold the newly formed loop and dress the knot down, removing all of the slackout of the knot.
Checkpoints:
The wings of the knot must be dressed down tightly and as close together aspossible.
The ropes between the wings must be parallel with no crossovers.
The loop should be no larger than a helmet, but large enough to accept a snaplink.
All ropes in the knot are tightly dressed.
Prusik Knot. This knot is used to put a moveable rope on a fixed rope such as a Prusikascent or a tightening system. This knot can be tied as a middle, finger, or end Prusik.
The process of tying the middle-of-the-rope Prusik knot involves a three-stepprocedure (Figure 2-23).

STEP 1 - Double the short rope, forming a bight, with the working ends even. Lay it overthe long rope so that the closed end of the bight is 30 centimeters (12 inches) below thelong rope and the remaining part of the rope (working ends) is the closes tot he climber;spread the working end apart.
STEP 2 - Reach down through the 30-centimeter (12-inch) bight. Pull up both of theworking ends and lay them over the long rope. Repeat this process making sure that theworking ends pass in the middle of the first two wraps. Now there are four wraps and alocking bar working across them on the long rope.
STEP 3 - Dress the wraps and locking bar down to ensure they are tight and not twisted.Tying an overhand knot with both ropes will prevent the knot from slipping duringperiods of variable tension.
Another way of tying the Prusik knot is the finger Prusik as shown in Figure 2-24,and involves a five-step procedure.
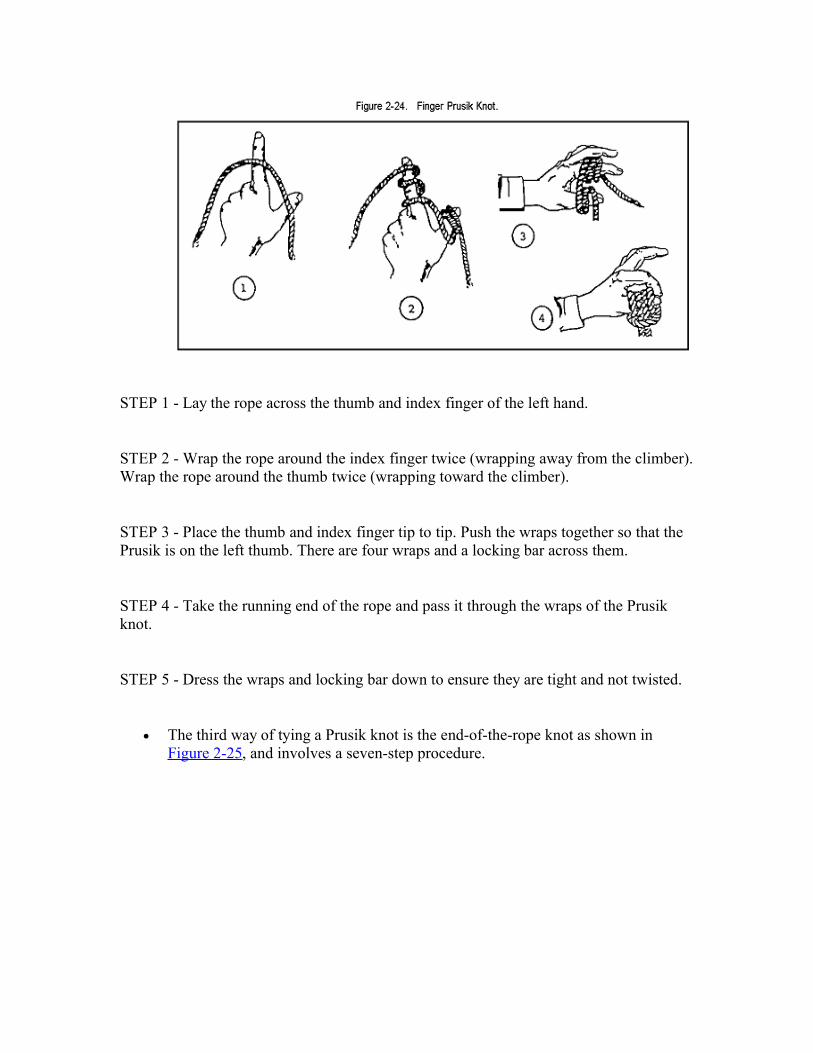
STEP 1 - Lay the rope across the thumb and index finger of the left hand.
STEP 2 - Wrap the rope around the index finger twice (wrapping away from the climber).Wrap the rope around the thumb twice (wrapping toward the climber).
STEP 3 - Place the thumb and index finger tip to tip. Push the wraps together so that thePrusik is on the left thumb. There are four wraps and a locking bar across them.
STEP 4 - Take the running end of the rope and pass it through the wraps of the Prusikknot.
STEP 5 - Dress the wraps and locking bar down to ensure they are tight and not twisted.
The third way of tying a Prusik knot is the end-of-the-rope knot as shown inFigure 2-25, and involves a seven-step procedure.
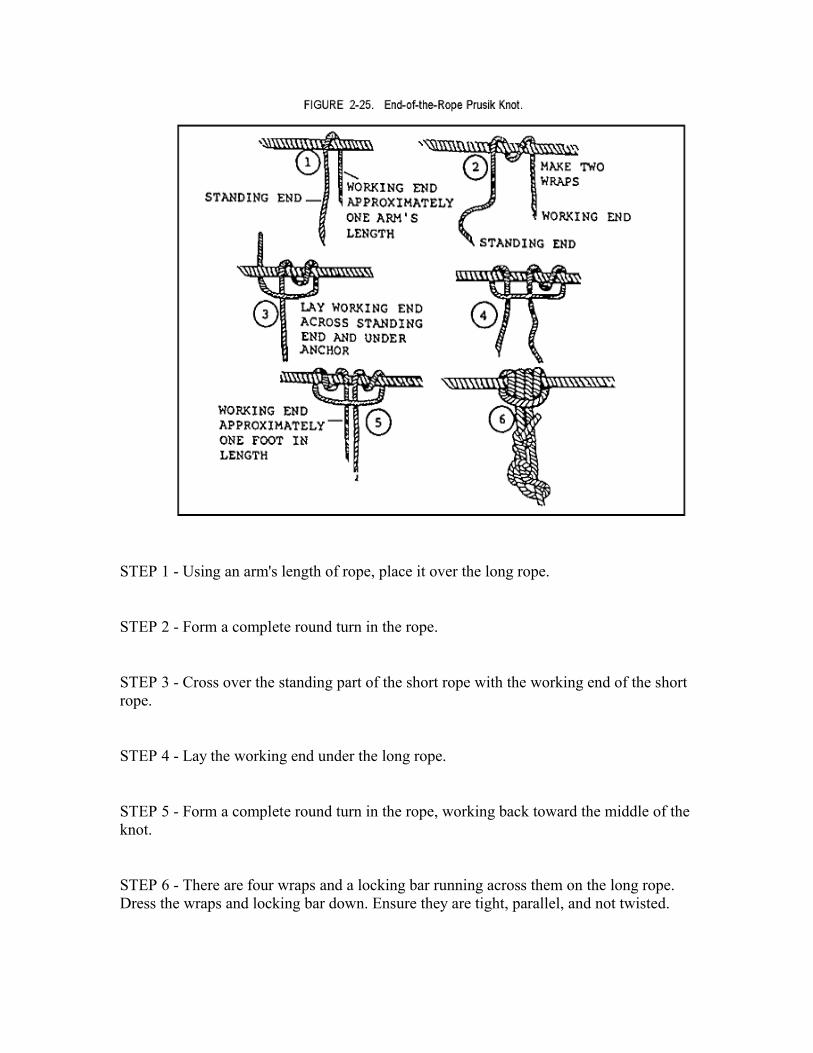
STEP 1 - Using an arm's length of rope, place it over the long rope.
STEP 2 - Form a complete round turn in the rope.
STEP 3 - Cross over the standing part of the short rope with the working end of the shortrope.
STEP 4 - Lay the working end under the long rope.
STEP 5 - Form a complete round turn in the rope, working back toward the middle of theknot.
STEP 6 - There are four wraps and a locking bar running across them on the long rope.Dress the wraps and locking bar down. Ensure they are tight, parallel, and not twisted.
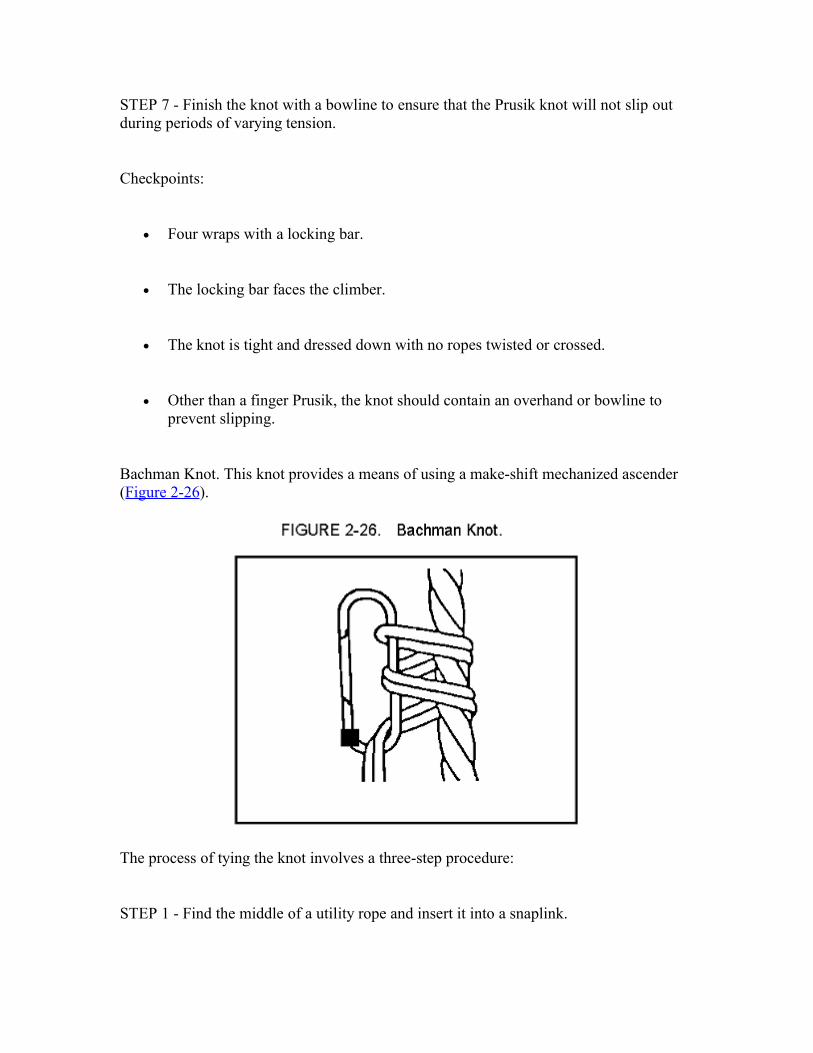
STEP 7 - Finish the knot with a bowline to ensure that the Prusik knot will not slip outduring periods of varying tension.
Checkpoints:
Four wraps with a locking bar.
The locking bar faces the climber.
The knot is tight and dressed down with no ropes twisted or crossed.
Other than a finger Prusik, the knot should contain an overhand or bowline toprevent slipping.
Bachman Knot. This knot provides a means of using a make-shift mechanized ascender(Figure 2-26).
The process of tying the knot involves a three-step procedure:
STEP 1 - Find the middle of a utility rope and insert it into a snaplink.

STEP 2 - Place the snaplink and utility rope next to a long climbing rope.
STEP 3 - With the two ropes parallel from the snaplink, make two or more wraps aroundthe climbing rope and through the inside portion of the snaplink.
Checkpoints:
The bight of the climbing rope is at the top of the snaplink.
The two ropes run parallel without twisting or crossing.
Two or more wraps are made around the long climbing rope and through theinside portion of the snaplink.
Bowline on a Coil. This knot is an expedient tie-in used by climbers in two- and three-man party climbs when a climbing harness is not available (Figure 2-27).
The process of tying the knot involves a seven-step procedure:
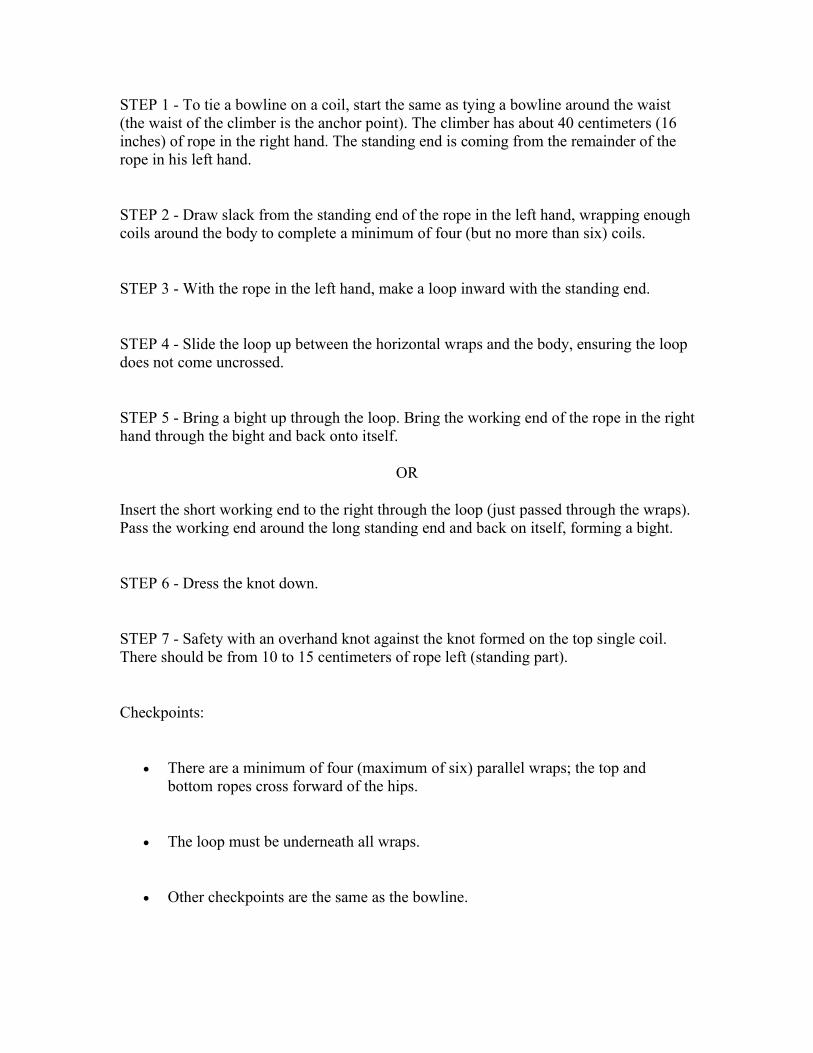
STEP 1 - To tie a bowline on a coil, start the same as tying a bowline around the waist(the waist of the climber is the anchor point). The climber has about 40 centimeters (16inches) of rope in the right hand. The standing end is coming from the remainder of therope in his left hand.
STEP 2 - Draw slack from the standing end of the rope in the left hand, wrapping enoughcoils around the body to complete a minimum of four (but no more than six) coils.
STEP 3 - With the rope in the left hand, make a loop inward with the standing end.
STEP 4 - Slide the loop up between the horizontal wraps and the body, ensuring the loopdoes not come uncrossed.
STEP 5 - Bring a bight up through the loop. Bring the working end of the rope in the righthand through the bight and back onto itself.
OR
Insert the short working end to the right through the loop (just passed through the wraps).Pass the working end around the long standing end and back on itself, forming a bight.
STEP 6 - Dress the knot down.
STEP 7 - Safety with an overhand knot against the knot formed on the top single coil.There should be from 10 to 15 centimeters of rope left (standing part).
Checkpoints:
There are a minimum of four (maximum of six) parallel wraps; the top andbottom ropes cross forward of the hips.
The loop must be underneath all wraps.
Other checkpoints are the same as the bowline.
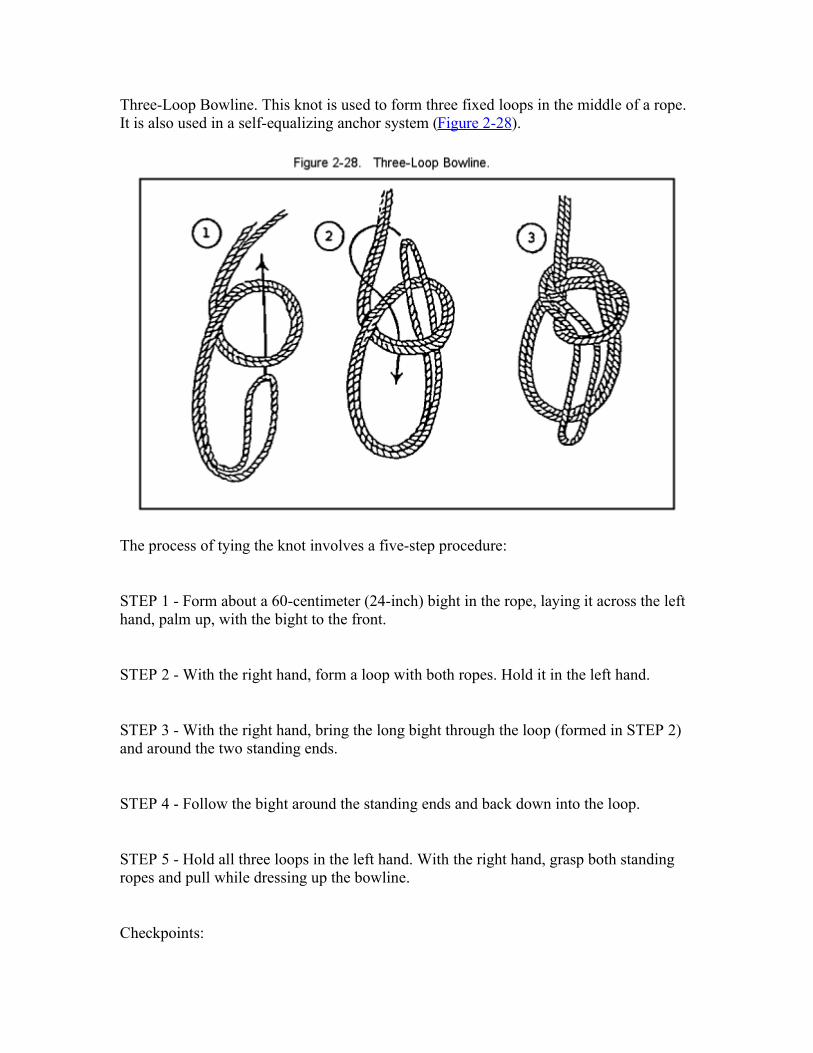
Three-Loop Bowline. This knot is used to form three fixed loops in the middle of a rope.It is also used in a self-equalizing anchor system (Figure 2-28).
The process of tying the knot involves a five-step procedure:
STEP 1 - Form about a 60-centimeter (24-inch) bight in the rope, laying it across the lefthand, palm up, with the bight to the front.
STEP 2 - With the right hand, form a loop with both ropes. Hold it in the left hand.
STEP 3 - With the right hand, bring the long bight through the loop (formed in STEP 2)and around the two standing ends.
STEP 4 - Follow the bight around the standing ends and back down into the loop.
STEP 5 - Hold all three loops in the left hand. With the right hand, grasp both standingropes and pull while dressing up the bowline.
Checkpoints:
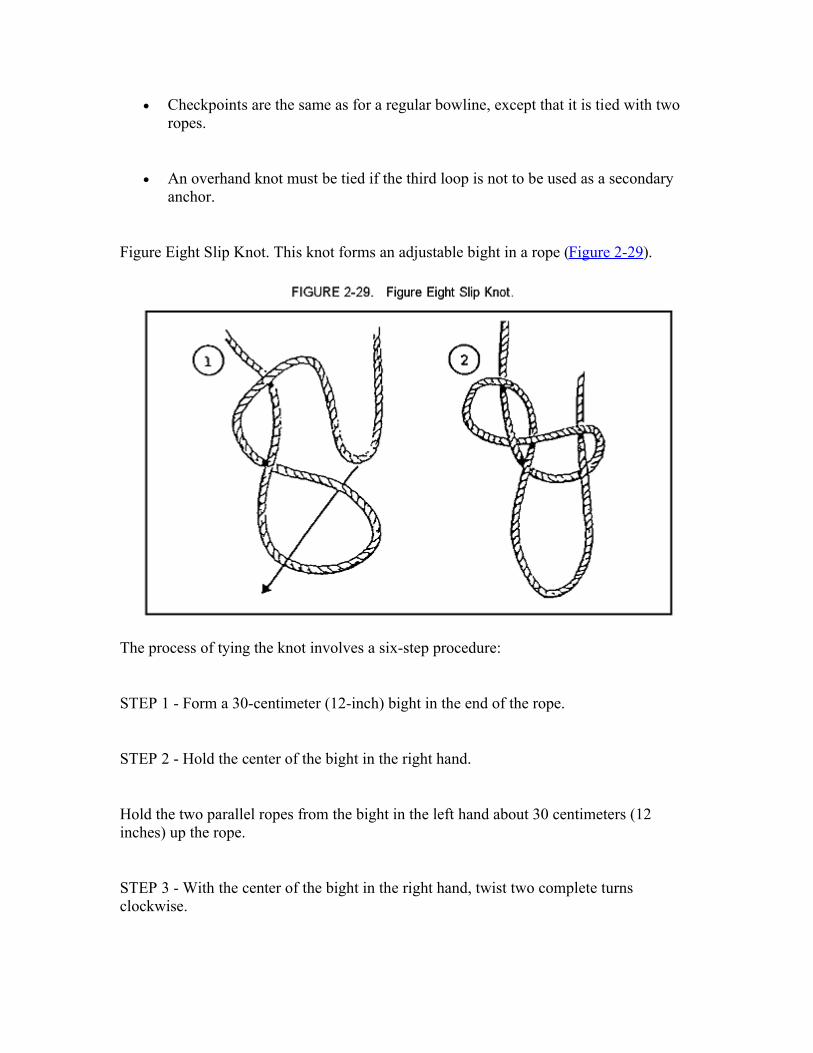
Checkpoints are the same as for a regular bowline, except that it is tied with tworopes.
An overhand knot must be tied if the third loop is not to be used as a secondaryanchor.
Figure Eight Slip Knot. This knot forms an adjustable bight in a rope (Figure 2-29).
The process of tying the knot involves a six-step procedure:
STEP 1 - Form a 30-centimeter (12-inch) bight in the end of the rope.
STEP 2 - Hold the center of the bight in the right hand.
Hold the two parallel ropes from the bight in the left hand about 30 centimeters (12inches) up the rope.
STEP 3 - With the center of the bight in the right hand, twist two complete turnsclockwise.
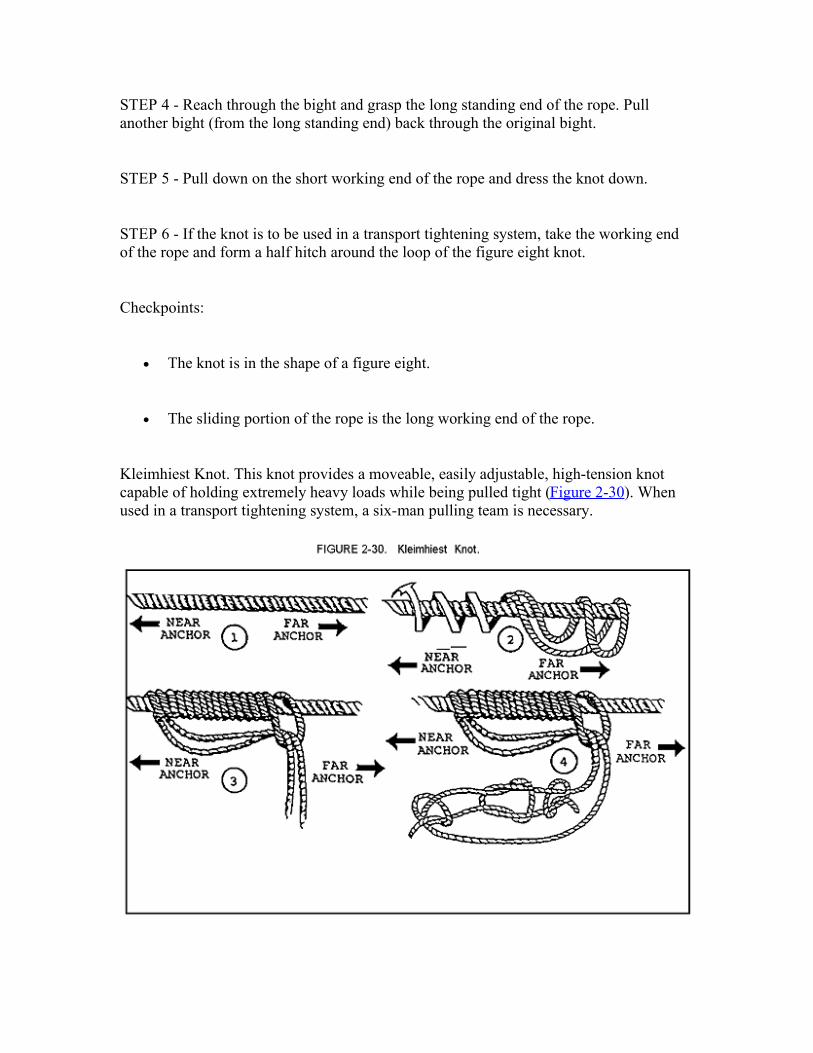
STEP 4 - Reach through the bight and grasp the long standing end of the rope. Pullanother bight (from the long standing end) back through the original bight.
STEP 5 - Pull down on the short working end of the rope and dress the knot down.
STEP 6 - If the knot is to be used in a transport tightening system, take the working endof the rope and form a half hitch around the loop of the figure eight knot.
Checkpoints:
The knot is in the shape of a figure eight.
The sliding portion of the rope is the long working end of the rope.
Kleimhiest Knot. This knot provides a moveable, easily adjustable, high-tension knotcapable of holding extremely heavy loads while being pulled tight (Figure 2-30). Whenused in a transport tightening system, a six-man pulling team is necessary.
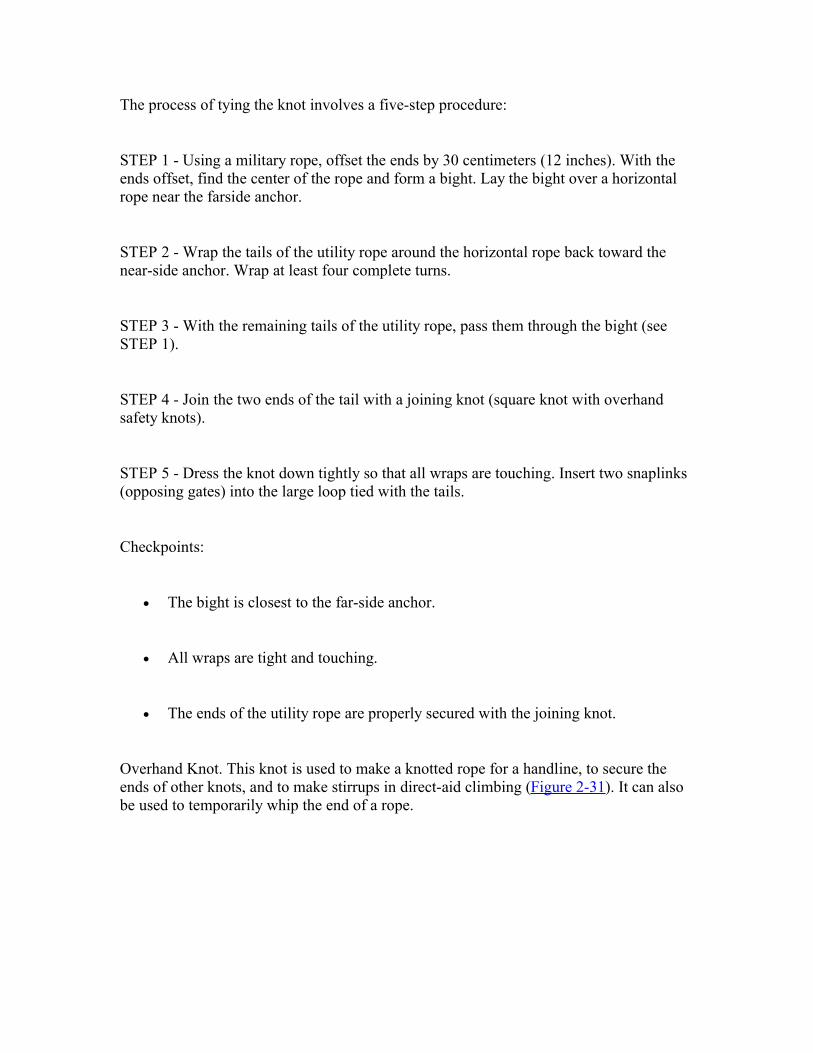
The process of tying the knot involves a five-step procedure:
STEP 1 - Using a military rope, offset the ends by 30 centimeters (12 inches). With theends offset, find the center of the rope and form a bight. Lay the bight over a horizontalrope near the farside anchor.
STEP 2 - Wrap the tails of the utility rope around the horizontal rope back toward thenear-side anchor. Wrap at least four complete turns.
STEP 3 - With the remaining tails of the utility rope, pass them through the bight (seeSTEP 1).
STEP 4 - Join the two ends of the tail with a joining knot (square knot with overhandsafety knots).
STEP 5 - Dress the knot down tightly so that all wraps are touching. Insert two snaplinks(opposing gates) into the large loop tied with the tails.
Checkpoints:
The bight is closest to the far-side anchor.
All wraps are tight and touching.
The ends of the utility rope are properly secured with the joining knot.
Overhand Knot. This knot is used to make a knotted rope for a handline, to secure theends of other knots, and to make stirrups in direct-aid climbing (Figure 2-31). It can alsobe used to temporarily whip the end of a rope.
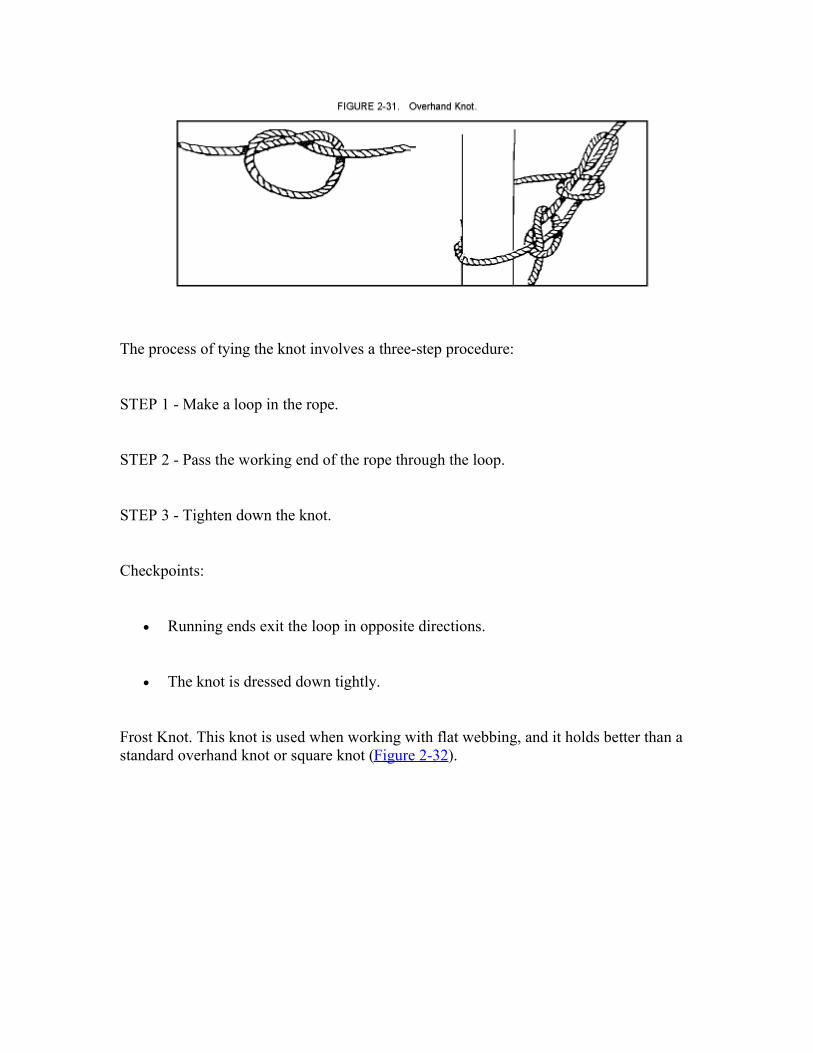
The process of tying the knot involves a three-step procedure:
STEP 1 - Make a loop in the rope.
STEP 2 - Pass the working end of the rope through the loop.
STEP 3 - Tighten down the knot.
Checkpoints:
Running ends exit the loop in opposite directions.
The knot is dressed down tightly.
Frost Knot. This knot is used when working with flat webbing, and it holds better than astandard overhand knot or square knot (Figure 2-32).
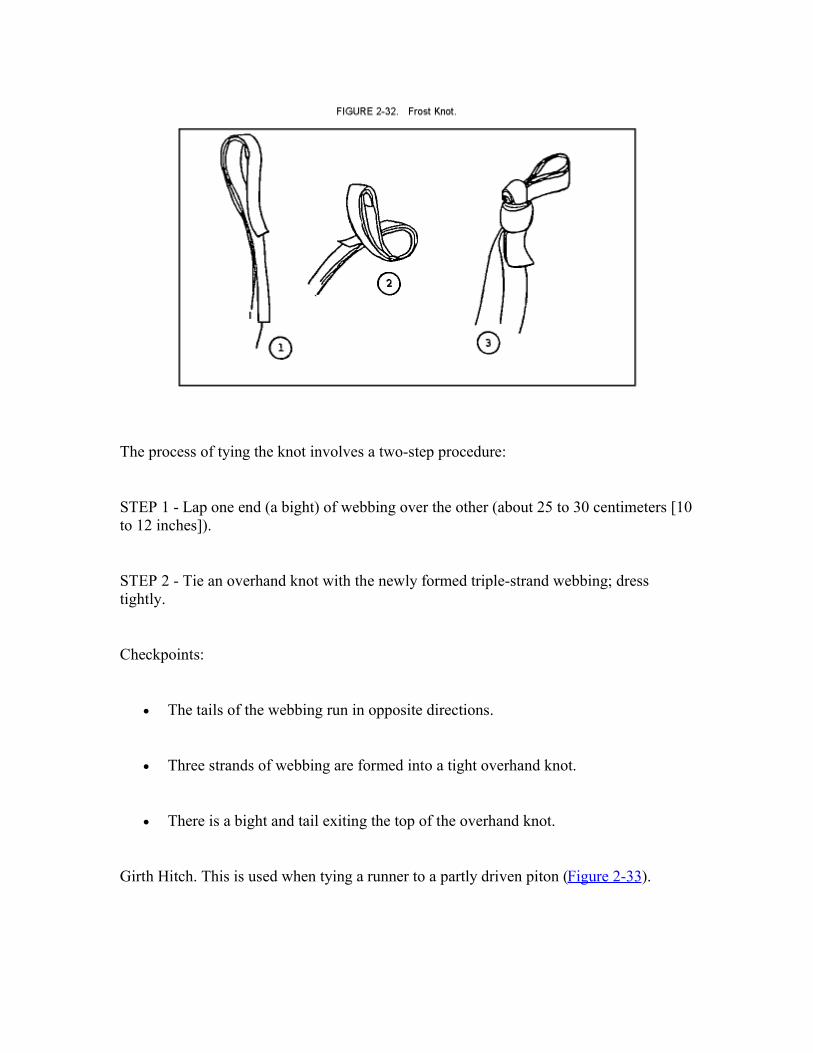
The process of tying the knot involves a two-step procedure:
STEP 1 - Lap one end (a bight) of webbing over the other (about 25 to 30 centimeters [10to 12 inches]).
STEP 2 - Tie an overhand knot with the newly formed triple-strand webbing; dresstightly.
Checkpoints:
The tails of the webbing run in opposite directions.
Three strands of webbing are formed into a tight overhand knot.
There is a bight and tail exiting the top of the overhand knot.
Girth Hitch. This is used when tying a runner to a partly driven piton (Figure 2-33).
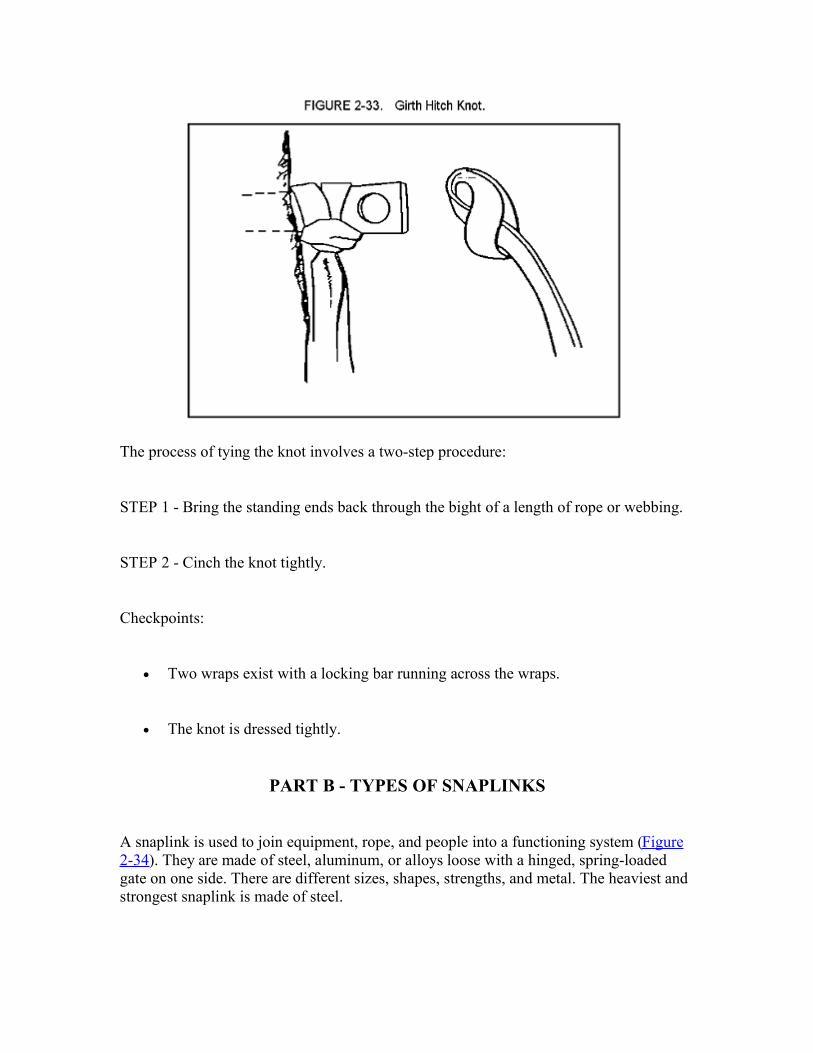
The process of tying the knot involves a two-step procedure:
STEP 1 - Bring the standing ends back through the bight of a length of rope or webbing.
STEP 2 - Cinch the knot tightly.
Checkpoints:
Two wraps exist with a locking bar running across the wraps.
The knot is dressed tightly.
PART B - TYPES OF SNAPLINKS
A snaplink is used to join equipment, rope, and people into a functioning system (Figure2-34). They are made of steel, aluminum, or alloys loose with a hinged, spring-loadedgate on one side. There are different sizes, shapes, strengths, and metal. The heaviest andstrongest snaplink is made of steel.
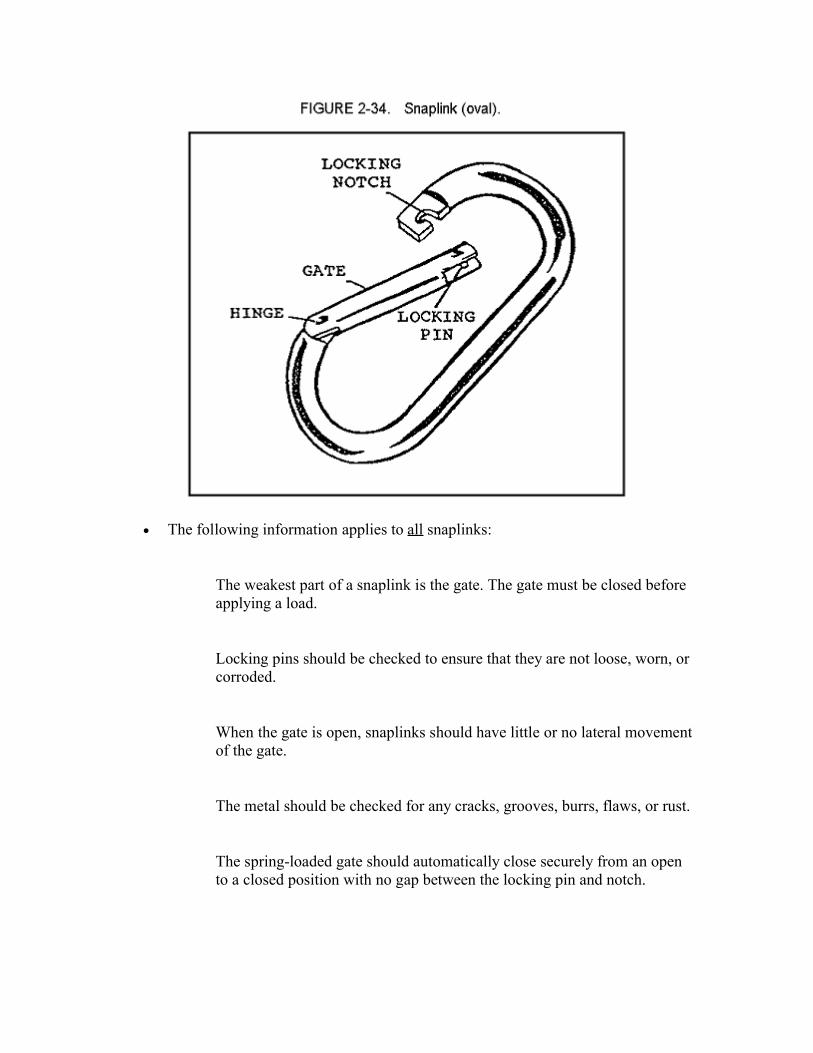
The following information applies to all snaplinks:
The weakest part of a snaplink is the gate. The gate must be closed beforeapplying a load.
Locking pins should be checked to ensure that they are not loose, worn, orcorroded.
When the gate is open, snaplinks should have little or no lateral movementof the gate.
The metal should be checked for any cracks, grooves, burrs, flaws, or rust.
The spring-loaded gate should automatically close securely from an opento a closed position with no gap between the locking pin and notch.
If an engraver is used to mark snaplinks, it should be applied only to thegate, never to the load-bearing side.
A snaplink should never be side loaded (across the gate) since this reducesthe overall strength to the point of gate failure.
The following data pertains to the standard military snaplink: Material: steel.
Shape: oval.
Approximate strength: 2,000 pounds with the gate closed.
Weight: 4.3 ounces.
Hollow snaplinks should be avoided since their use is limited. Some snaplinkshave a locking mechanism with a threaded sleeve on the gate. The sleeve screwstightly over the gate opening end or hinge end to hold the gate closed (Figure 2-35).
A locking snaplink is best when rapelling. A reverse locking gate is necessary to preventa moving rope from unscrewing the sleeve. You should maintain the locking sleeve andthreads free of dirt and grit; if the sleeve is forced to close, it may strip the threads. Youshould inspect the locking mechanism periodically since it will age and weaken afterrepeated use. The nonlocking snaplinks have the advantage of ease of operation, but theyshould be used only where they cannot be accidentally opened.

D-Shaped snaplinks are stronger than the oval type because the shape directs thelargest part of the load to be applied to the longer, stronger side opposite the gate(Figure 2-36).
They are made of steel or aluminum alloys, and there are different sizes and thicknesses,with or without locking gates. Strength and durability should be part of the selectionprocess.
Oval snaplinks are versatile and have a variety of applications (Figure 2-34). Theyare made of steel or aluminum alloys, and there are different sizes andthicknesses. Both sides of an oval snaplink bear the strain equally under loadweight. Many modified ovals are available, most either with or without a lockinggate. All snaplinks must meet military standards or the Union of InternationalAlpine Association (UIAA) specifications.
All snaplinks should be inspected and cared for daily, before, during, and after use.
Make sure the metal does not have cracks, grooves, burrs, rust, and flaws. Ensurethat the gate opens and closes freely without binding; that there is no lateralmovement when the gate is open; and the spring action snaps shut when released.Make sure the locking notch have a slant or slot so that the gate remains shutunder the impact of a climber's fall. The pins should not work their way out oftheir holes and should not be shorter than their holes. If there is a lockingmechanism, you must ensure the threads are not stripped and the sleeve locks thegate tightly.
You should not use the snaplink if burrs, grooves, or rough areas have beenidentified. You may use steel wool, oil, or solvent to rub off rust. Lubricate thespring as needed. To remove cleaning agents, which cause dirt to cling to thesnaplink and rub off on ropes, from the snaplink, you should boil it in water for 20to 30 seconds. It is better to use a lubricant that does not attract dirt such as a dry,graphite-based lubricant.
PART C - EQUIPMENT AND MAINTENANCE
This is an overview of conventional military equipment and the latest items used by theclimber.
Movement. Before starting an operation, units must master techniques andequipment use. Movement over mountainous terrain cannot always beaccomplished without special equipment. This equipment makes it possible forthe military mountaineer to build installations and negotiate rock masses and iceareas quickly and safely. As a military climber, you will soon learn the value ofspecialized equipment, and what it means when a specific piece of equipment isnot available when needed. You should maintain your equipment since your unit'smission, and possibly your life, could depend on that equipment.
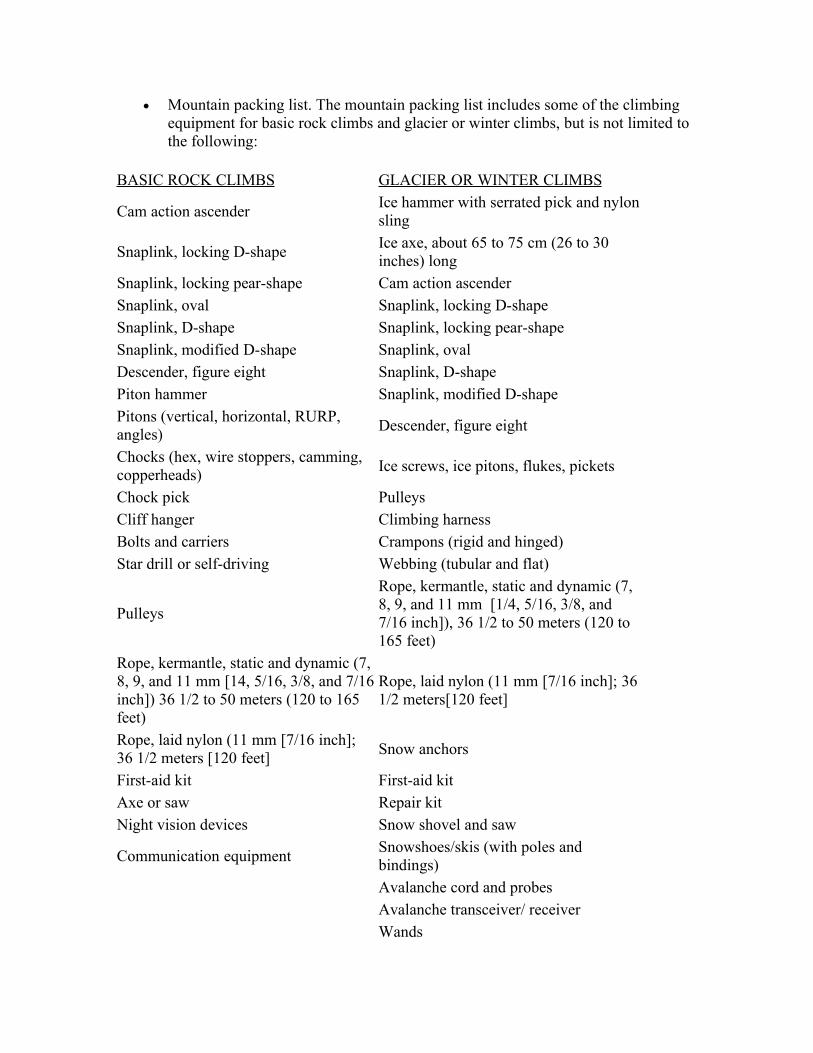
Mountain packing list. The mountain packing list includes some of the climbingequipment for basic rock climbs and glacier or winter climbs, but is not limited tothe following:
BASIC ROCK CLIMBS GLACIER OR WINTER CLIMBS
Cam action ascender Ice hammer with serrated pick and nylonsling
Snaplink, locking D-shape Ice axe, about 65 to 75 cm (26 to 30inches) long
Snaplink, locking pear-shape Cam action ascender Snaplink, oval Snaplink, locking D-shape Snaplink, D-shape Snaplink, locking pear-shape Snaplink, modified D-shape Snaplink, oval Descender, figure eight Snaplink, D-shape Piton hammer Snaplink, modified D-shape Pitons (vertical, horizontal, RURP,angles) Descender, figure eight
Chocks (hex, wire stoppers, camming,copperheads) Ice screws, ice pitons, flukes, pickets
Chock pick Pulleys Cliff hanger Climbing harness Bolts and carriers Crampons (rigid and hinged) Star drill or self-driving Webbing (tubular and flat)
Pulleys
Rope, kermantle, static and dynamic (7,8, 9, and 11 mm [1/4, 5/16, 3/8, and7/16 inch]), 36 1/2 to 50 meters (120 to165 feet)
Rope, kermantle, static and dynamic (7,8, 9, and 11 mm [14, 5/16, 3/8, and 7/16inch]) 36 1/2 to 50 meters (120 to 165feet)
Rope, laid nylon (11 mm [7/16 inch]; 361/2 meters[120 feet]
Rope, laid nylon (11 mm [7/16 inch];36 1/2 meters [120 feet] Snow anchors
First-aid kit First-aid kit Axe or saw Repair kit Night vision devices Snow shovel and saw
Communication equipment Snowshoes/skis (with poles andbindings) Avalanche cord and probes Avalanche transceiver/ receiver Wands
Candles Ahkio, tents, stoves, fuel (missiondependent) Night vision devices Communication equipment
Footwear. When military boots are not practical for mountainous operations, you mayconsider the use of specialized climbing shoes and boots. Climbing shoes, Known ASKletterschue (German) or Varrape (French), have rubber soles with rubber along thesides, and on the toe and heel. These shoes are more flexible and provide better adhesionon rock than military boots.
You may wear the jungle boot for climbing during hot weather; however, the use of thestandard military boot with rubber soles is not practical for wet or icy rock conditions andbefore you use them, the soles should be roughened by using a file or sharp rock.
The following methods apply to the care of boot leather:
The old style leather combat boot is best waterproofed with oils and waxes. Thisshould be done routinely to reestablish water repellency. Seams and welts are themost important areas to cover.
The new speed-lace combat boot has silicone treated leather and must bewaterproofed only with a silicone material.
Siliconized leather retains its water vapor permeability and ventilation qualities whilebeing highly waterproof. Use of oils and waxes on these boots destroys their ability toventilate and stay waterproof, and compromises their ability to siliconize the leatheritself.
The following methods apply to boot fitting:
Boots must be fitted properly IAW their planned use. The foot lengthens, widens,and swells during a march from the load carried and the pounding that occurs.Correct fitting of boots requires extra time but the benefits are worth the effort.Both feet should be measured since they are usually different sizes and shapes. Athin inner sock and a thick outer sock should be worn during the fitting. A packwith the appropriate weight to be carried should be on the soldier's back. Hestands on the shoe sizing device and leans slightly forward with some weight on
the balls of his feet The length and width of each foot is measured two or threetimes to ensure the proper size information.
This process allows a large enough boot to accommodate for the proper socks andthe change in foot size while marching. Two different thicknesses of insoles forthe boots (1.6 mm [1/16 inch] and 3.2 mm [1/8 inch]) compensates for the changein foot volume (swelling). The thicker insole is used at the start of a march. Thesoldier changes to dry socks and to a thinner insole midway through the march toaccommodate for swollen feet, if needed.
The following procedures are necessary for cold-weather foot protection:
March in properly fitted leather boots
Have overshoes available if it is wet or if more insulation is needed.
Use vapor barrier (VB) boots for short moves, sedentary tasks, or in patrol baseswhere marching with loads is not necessary. Heavy marching with VB boots canform blisters. The foot becomes damp and the skin soft inside the VB boot. Thewhite VB boot is designed for use in dry cold region; the black VB boot isdesigned for use in wet cold environment.
Insulate the foot from the soles of the leather boot with insoles. There must beenough volume in the toe cap to allow for thick socks and air space around thetoes. The greatest heat loss from the foot occurs through the sole and toe cap. Thisrequires a larger inside volume of the boot than what is worn daily.
Climbing boots can be either ankle or calf high with full, half, or no rigid shank. Bootswith stiff soles provide better support in small holds and cracks, and when standing inslings and stirrups. They afford better wedging action in jam cracks. Boots are moreversatile in hiking and climbing over changing terrain. They tend to be more windproofand waterproof along with a rougher, sturdier construction. Overboots can be worn tokeep feet dry, but they do not provide the friction needed to climb.
Clothing. During mountain operations, it is necessary to prepare and equippersonnel for very cold weather. Clothing and equipment that support operationsin a mountainous environment are listed in CTA 50-900, and the authorizationsare based on expected seasonal temperature variations. Clothing allowance zones
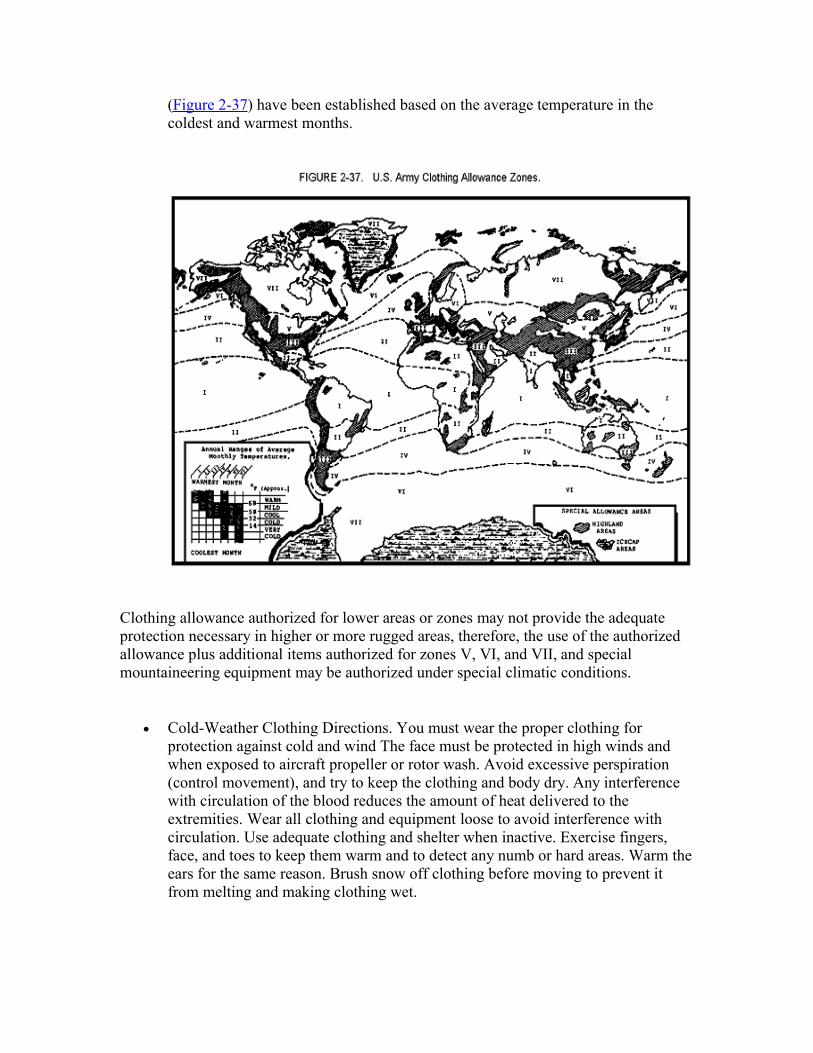
(Figure 2-37) have been established based on the average temperature in thecoldest and warmest months.
Clothing allowance authorized for lower areas or zones may not provide the adequateprotection necessary in higher or more rugged areas, therefore, the use of the authorizedallowance plus additional items authorized for zones V, VI, and VII, and specialmountaineering equipment may be authorized under special climatic conditions.
Cold-Weather Clothing Directions. You must wear the proper clothing forprotection against cold and wind The face must be protected in high winds andwhen exposed to aircraft propeller or rotor wash. Avoid excessive perspiration(control movement), and try to keep the clothing and body dry. Any interferencewith circulation of the blood reduces the amount of heat delivered to theextremities. Wear all clothing and equipment loose to avoid interference withcirculation. Use adequate clothing and shelter when inactive. Exercise fingers,face, and toes to keep them warm and to detect any numb or hard areas. Warm theears for the same reason. Brush snow off clothing before moving to prevent itfrom melting and making clothing wet.
Proper wear of cold-weather clothing helps prevent cold injuries. Army cold-weather gearis designed on the layer principle: loose clothing worn in layers gives maximuminsulating airspace to retain body heat. Ventilation, the process of cooling off slowly, ismuch easier when loose, layered garments can be removed one at a time. Protect theinsulating layers through the use of water and windproofed outer clothing. Eachindividual situation cannot be dictated because all soldiers feel the effects of colddifferently. However, the guidelines are: dress light when moving to prevent sweating andoverheating; change wet clothes when stopped; and add layers when stopped, as needed.
Remember C-O-L-D to keep warm in winter.
Keep clothing Clean.
Avoid Overheating.
Wear clothing Loose and in Layers.
Keep clothing Dry.
Ventilation is accomplished by the following:
Remove headgear or reduce headgear layering for a short period.
Open the front of clothing one layer at a time, down to and including thermalunderwear.
Zip up the outer garment part of the way to allow the body to cool.
Regulate heat loss further by opening, closing, or removing layers of clothing toallow heat to slowly escape from the chest.
Do not open all layers suddenly; cooling will occur too quickly. Do not leavelayers of clothing open, which will allow chilling to occur. Do not allowindividuals to cool so rapidly that they begin to sneeze or shiver.
Socks. Socks provide foot protection in hot and cold weather.
Foot protection includes-
Insulating the feet from cold and heat
Protecting the feet from abrasion by the inside of the boot.
Providing cushioning against shock on the soles of the feet.
Aiding in moisture transfer from the skin to the boot surface.
Allowing for swelling and expansion of the feet during heavy marching.
A good sock-
Is dense enough to prevent abrasion of the feet at areas of highcompression.
Is densely woven
Does not separate under high compression
Is uniform in thickness over the entire foot
Transfers moisture from the foot to the boot
You should wear a polypropylene lightweight sock closest to the foot since the Army ODgreen sock, or any 100 percent wool sock may cause your foot to sweat. If polypropylenesocks are not available, wear a thin cotton or silk sock (Army black dress sock). Keep thetoes free enough to wiggle. If your feet sweat, change socks and liners, but do not wearpolypropylene or silk socks alone. You should wear wool socks as an outer sock, one pairat a time. Wearing more can make your boot fit too tightly, may restrict circulation, andcompress the sock fibers, which reduces air space and hinders insulation.
In cold weather, the best issue socks are the tan/ski mountain socks (75 percent wool and25 percent cotton). You should wear them over a thin inner sock of nylon orpolypropylene. Commercially made socks that are of densely woven, noncushion-solewool are excellent for cold weather. Proper foot care is critical in avoiding cold-weatherinjuries. To prevent foot injury, you should keep your feet dry. Change socks at least oncea day and after every movement. Massage, clean, and thoroughly dry the feet beforereplacing the boots.
Boot Inserts. When in a wet or cold-wet weather. You may choose to wear inserts of theorthotic uplift variety. They are made from "solid" plastic as opposed to other inserts thatare composed of cloth and foam, which retain moisture and hence promote frostbite.Those made of nonporous plastic, promote excessive foot sweating causing you to changesocks more often. If you use inserts, you should have several sets so you can change themwhen changing socks. You must make sure that there is enough room in the boot to allowtoe motion since the inserts provide extra insulation and cushioning, which results in asnugger fit.
Underwear. Undershorts and undershirts provide the first layer of clothing. If the weatheris cold or wet, long underwear should be worn. Wool, polypropylene, and pile longunderwear all provide insulation. Long underwear, as a layer, can be removed if thesoldier becomes too warm. You should change your underwear at least twice a week. If itis not possible to wash them, crumble, shake, and air them for at least two hours.
Trousers and Shirts. These are part of the duty uniform. They may be made of cotton,wool, or a fiber blend. Your uniform should be loose enough to allow for added layersunderneath, but not too loose so that warm air next to the body is lost. Loose clothingmay hinder climbing, rappelling, and using harness and equipment. If not already in theuniform, you should add reinforced knees, elbows, and buttocks. Make sure your uniformis kept dry at all times.
Outerwear. These are external pants, jackets, parkas, and rain gear. They should bewindproof, waterproof, and worn as the outermost layer of clothing.
Gaiters. These are ankle or knee length leg covering that keep wind, water, and snow outof the boots.
Headgear. You should wear caps or hats made of wool, nylon, or pile. They help preventyour head and neck from losing heat in the cold weather. The balaclava protects the head,neck, and the face from wind, wet, and cold, and warms the air before it is breathed. Thepile cap and hood are excellent for use in cold weather. The wool scarf gives addedprotection to the neck against cold. In hot weather, you may use a patrol or BDU cap to
prevent ultraviolet rays from burning your head. The military helmet protects you duringa fall or from falling rocks, ice, or equipment.
Gloves and Mittens. As a member of a climbing party, you should carry work gloves atall times. During cold weather, use mittens to keep the hands and fingers warmer thangloves, but dexterity is lost. The use of gloves allows you the freedom to climb, rappel,belay, and tie knots. To obtain excellent insulation, you may use liners made of wool,silk, nylon, polypropylene, and pile. A shell of leather, cloth, or a combination provides awindproof and waterproof layer as well as adding to insulation. During an emergency,socks may be worn over the hands as mittens.
Sunglasses or Goggles. These protect the eyes from wind, snow, and ultraviolet rays.They should have dark, impact-resistant lenses that stop infrared and ultraviolet rays.They should feature side shields, flexible frames, and a neckband to prevent loss.
The standard packing list for a soldier's rucksack includes items that you will need duringa mission. Remember! Only needed items should be carried
Rucksack Items Rucksack with frame and waistband Food Boots (terrain and weather-dependent) Extra uniform Extra socks (inner, outer, and insulated) Drawers and undershirts Long underwear (polypropylene or wool; cold environment) Wind and rain gear (parka and pants) Headgear (balaclava, wool, rain/sun) Mittens/gloves (inner liner and outer shell) Work gloves Down or synthetic garments (cold environment) Gaithers (cold environment) Sleeping bag Poncho and liner Waterproof bag Sleeping pad Shelter (tent) Repair kit - pliers, wire, cord, needle, thread, pins, oil, rags, tape, clevis pins Stove (accessories and fuel) Weapon cleaning kit
General Equipment.
General equipment includes items used by the unit and not the individual. They assist theunit in sustaining its operational capability. General equipment includes items such asnavigational aids, lights, pioneer tools, repair kits and other equipment.
Map. Before starting an operation, a thorough study should be conducted of militarytopographic maps, sketch maps, photographs, forest service maps, hunter's maps, andother sources. The best available maps must be studied and carried by all unit leaders.
Compass. Use of a compass is a primary means of determining azimuth, direction, andlocation. You must know how to use the compass before starting an operation. Some ofthe compasses available are, but are not limited to, lensatic, liquid-filled, and prismatic.
Protractor. You should include on the packing list the standard, small, plastic protractor,calibrated in mils and degrees since it is needed when working with maps.
Altimeter. The altimeter is a barometer with a dial marked in feet or meters (altitude)rather than pressure. It can verify a location when used with a map and compass. Thealtimeter can be used in both the ascent and the descent as well as finding previous routesthat have been windswept. However, they should not be used as an absolute indicator forelevation since they respond to changes in atmospheric pressure based on local weather.They are usually accurate to within 10 meters of the indicated altitude. For future use, youshould record the readings since they reveal barometric changes that assist in predictingweather changes. Its accuracy will depend on your experience and skill. Before using thealtimeter, you should calibrate it to a known elevation and check it regularly whenencountering known elevations at known locations on the map.
Flashlights and Headlamps. Lights should be carried by all personnel in the climbingparty. You should not emit any light. When a light is needed in a tactical situation, youmust use red or blue filters. You should carry small and compact lights. Alkalinebatteries-BA 30-30, last 50 percent longer than carbon-zinc batteries.
Knife. The main tools to assist you in rope management are a small pocketknife with amain blade and marlinespike. You may carry other blades and tools to suit your needs.
Repair Improvisation. One member of the climbing party should carry a small repair kitcontaining items such as wire, tape, electrical tape, safety pins, needles, thread, rags, 550parachute cord, oil, wire cutters, and pliers.
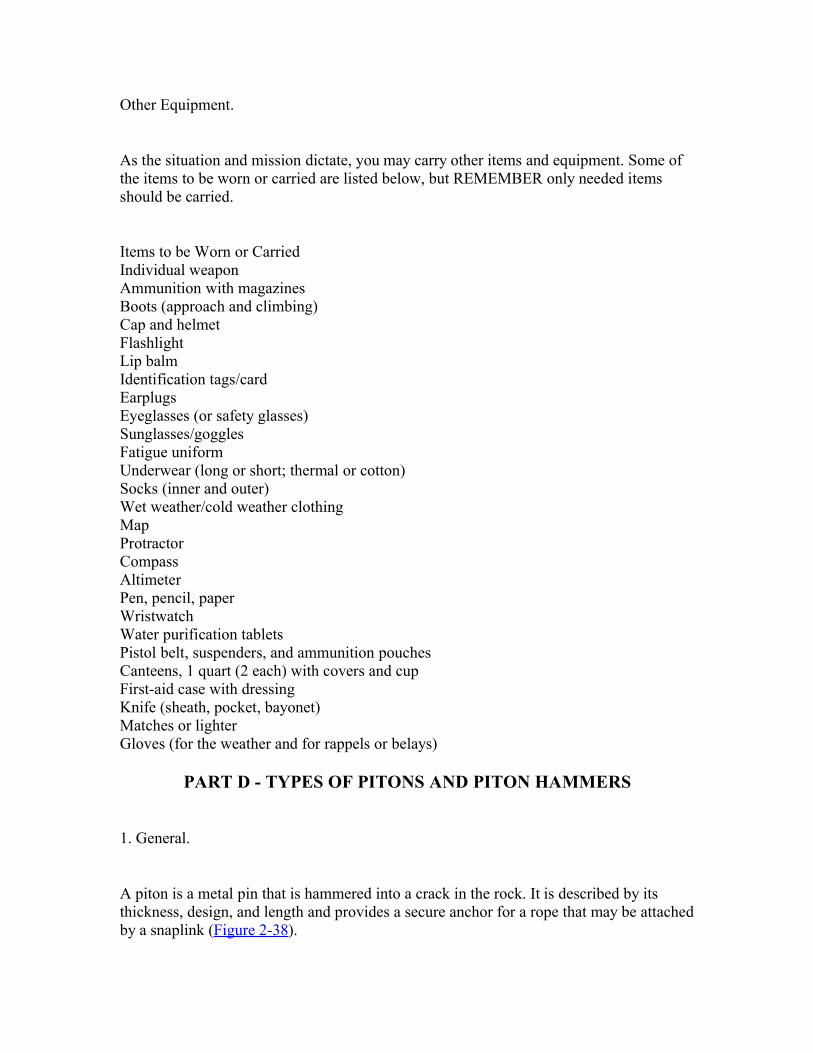
Other Equipment.
As the situation and mission dictate, you may carry other items and equipment. Some ofthe items to be worn or carried are listed below, but REMEMBER only needed itemsshould be carried.
Items to be Worn or Carried Individual weapon Ammunition with magazines Boots (approach and climbing) Cap and helmet Flashlight Lip balm Identification tags/card Earplugs Eyeglasses (or safety glasses) Sunglasses/goggles Fatigue uniform Underwear (long or short; thermal or cotton) Socks (inner and outer) Wet weather/cold weather clothing Map Protractor Compass Altimeter Pen, pencil, paper Wristwatch Water purification tablets Pistol belt, suspenders, and ammunition pouches Canteens, 1 quart (2 each) with covers and cup First-aid case with dressing Knife (sheath, pocket, bayonet) Matches or lighter Gloves (for the weather and for rappels or belays)
PART D - TYPES OF PITONS AND PITON HAMMERS
1. General.
A piton is a metal pin that is hammered into a crack in the rock. It is described by itsthickness, design, and length and provides a secure anchor for a rope that may be attachedby a snaplink (Figure 2-38).

There are four configurations used by the U.S. Army. They are the vertical, horizontal,wafer, and angle, which are made of either malleable or hardened steel, and alloys.
The strength of the piton is determined more by its placement rather than its rated tensilestrength.
2. Types of Pitons.
There are two types of pitons They are: blades that hold when wedged into tight-fittingcracks, and angles that hold blade compression when wedged into a crack.
Vertical pitons. The blade and eye are aligned. Vertical pitons are used in flushvertical cracks (Figure 2-39).
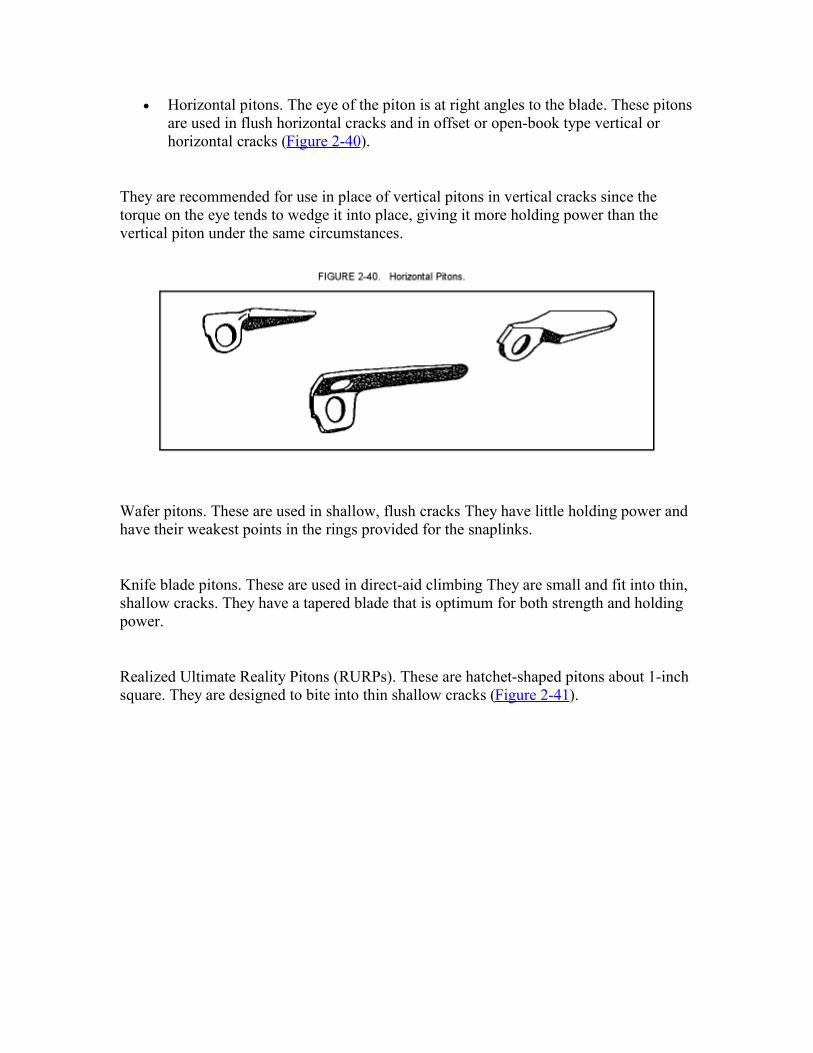
Horizontal pitons. The eye of the piton is at right angles to the blade. These pitonsare used in flush horizontal cracks and in offset or open-book type vertical orhorizontal cracks (Figure 2-40).
They are recommended for use in place of vertical pitons in vertical cracks since thetorque on the eye tends to wedge it into place, giving it more holding power than thevertical piton under the same circumstances.
Wafer pitons. These are used in shallow, flush cracks They have little holding power andhave their weakest points in the rings provided for the snaplinks.
Knife blade pitons. These are used in direct-aid climbing They are small and fit into thin,shallow cracks. They have a tapered blade that is optimum for both strength and holdingpower.
Realized Ultimate Reality Pitons (RURPs). These are hatchet-shaped pitons about 1-inchsquare. They are designed to bite into thin shallow cracks (Figure 2-41).
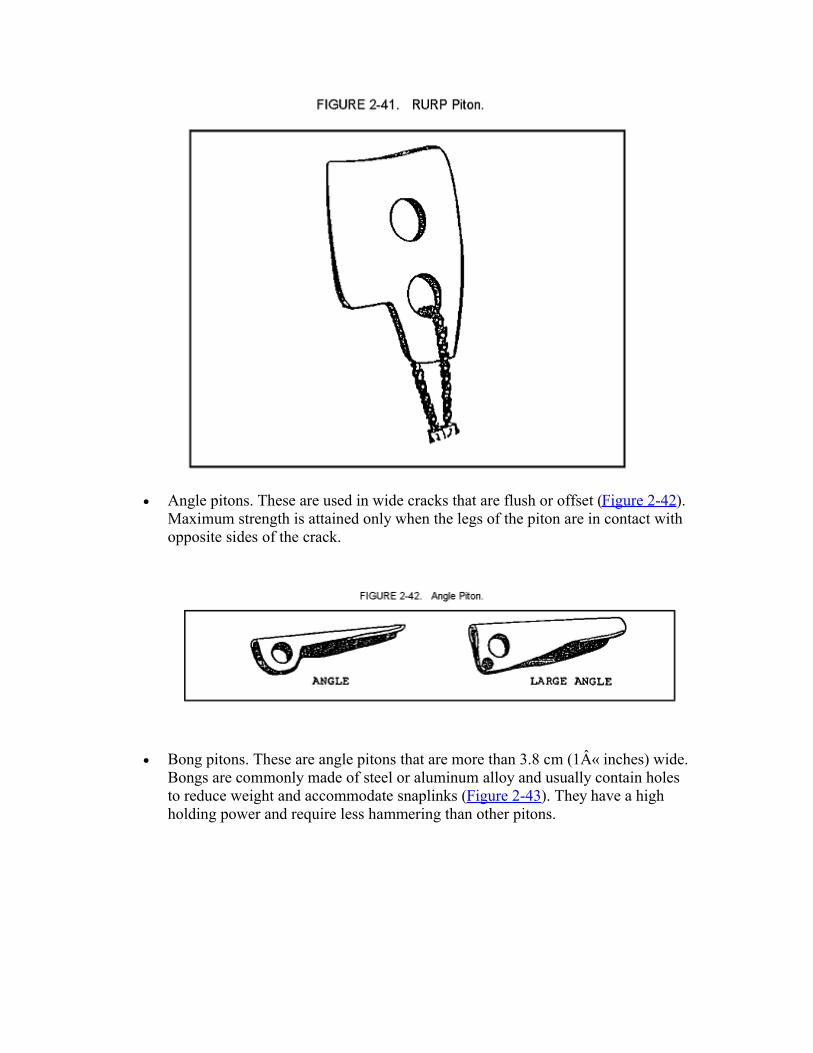
Angle pitons. These are used in wide cracks that are flush or offset (Figure 2-42).Maximum strength is attained only when the legs of the piton are in contact withopposite sides of the crack.
Bong pitons. These are angle pitons that are more than 3.8 cm (1« inches) wide.Bongs are commonly made of steel or aluminum alloy and usually contain holesto reduce weight and accommodate snaplinks (Figure 2-43). They have a highholding power and require less hammering than other pitons.
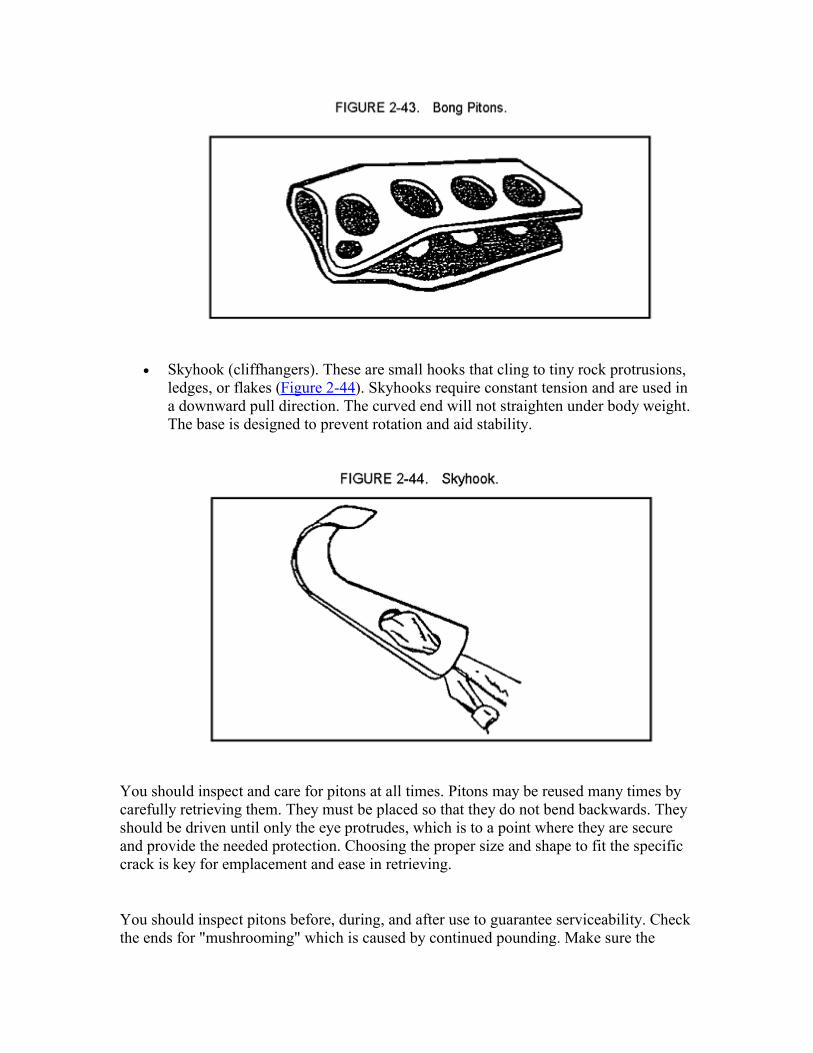
Skyhook (cliffhangers). These are small hooks that cling to tiny rock protrusions,ledges, or flakes (Figure 2-44). Skyhooks require constant tension and are used ina downward pull direction. The curved end will not straighten under body weight.The base is designed to prevent rotation and aid stability.
You should inspect and care for pitons at all times. Pitons may be reused many times bycarefully retrieving them. They must be placed so that they do not bend backwards. Theyshould be driven until only the eye protrudes, which is to a point where they are secureand provide the needed protection. Choosing the proper size and shape to fit the specificcrack is key for emplacement and ease in retrieving.
You should inspect pitons before, during, and after use to guarantee serviceability. Checkthe ends for "mushrooming" which is caused by continued pounding. Make sure the
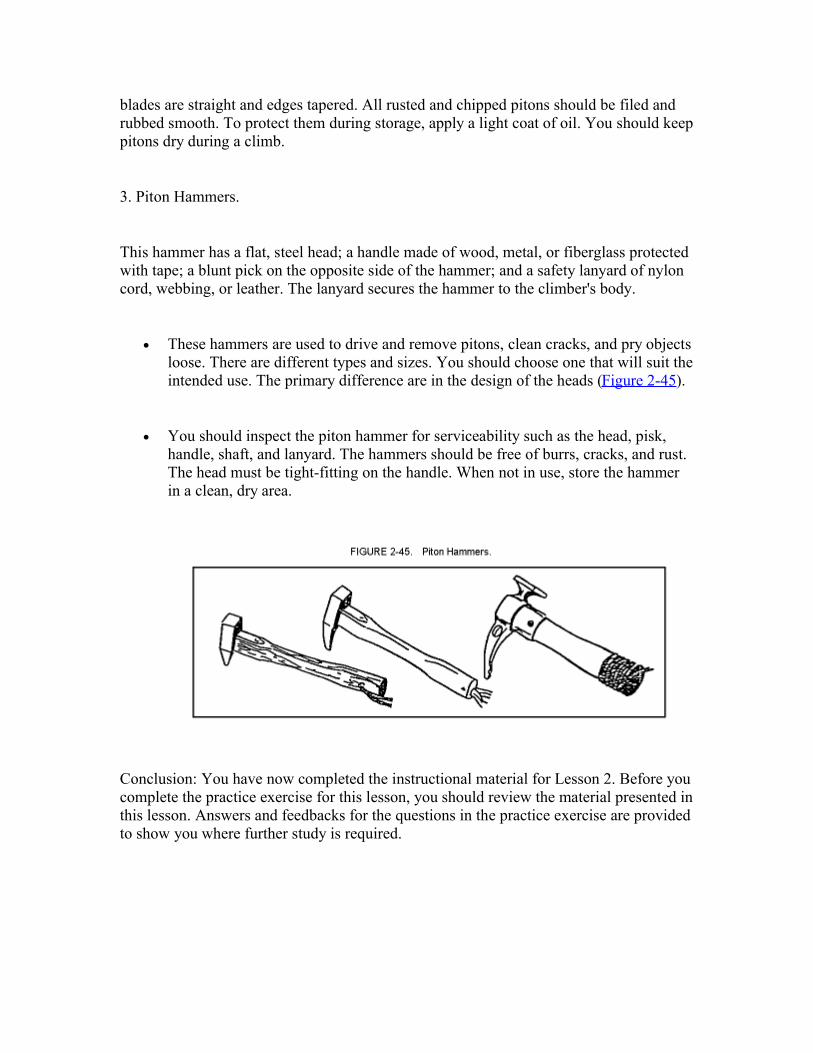
blades are straight and edges tapered. All rusted and chipped pitons should be filed andrubbed smooth. To protect them during storage, apply a light coat of oil. You should keeppitons dry during a climb.
3. Piton Hammers.
This hammer has a flat, steel head; a handle made of wood, metal, or fiberglass protectedwith tape; a blunt pick on the opposite side of the hammer; and a safety lanyard of nyloncord, webbing, or leather. The lanyard secures the hammer to the climber's body.
These hammers are used to drive and remove pitons, clean cracks, and pry objectsloose. There are different types and sizes. You should choose one that will suit theintended use. The primary difference are in the design of the heads (Figure 2-45).
You should inspect the piton hammer for serviceability such as the head, pisk,handle, shaft, and lanyard. The hammers should be free of burrs, cracks, and rust.The head must be tight-fitting on the handle. When not in use, store the hammerin a clean, dry area.
Conclusion: You have now completed the instructional material for Lesson 2. Before youcomplete the practice exercise for this lesson, you should review the material presented inthis lesson. Answers and feedbacks for the questions in the practice exercise are providedto show you where further study is required.
LESSON 2 PRACTICAL EXERCISE
InstructionsThe following items will test your understanding of the material covered in this lesson.There is only one correct answer for each item. When you have completed the exercise,check your answers with the answer key that follows. If you answer any item incorrectly,review that part of the lesson which contains the portion involved.
Situation. As a member of a unit participating in mountainous maneuvers, you are required to selectclimbing ropes and put them to use by selecting the appropriate knot(s) and snaplinksavailable to successfully complete the task assigned.
1. When your unit receives a standard military nylon-laid climbing rope, whatcharacteristics will it have?
a. 36 meters (120 feet) long and 11 millimeters (7/16 inch) wide with at least a4,500-pound tensile strength.
b. 25 meters (80 feet) long and 11 millimeters (7/16 inch) wide with at least a4,500-pound tensile strength.
c. 30 meters (90 feet) long and 11 millimeters (7/16 inch) wide with at least a1,000-pound tensile strength.
d. 26 meters (101 feet) long and 11 millimeters (7/16 inch) wide with at least an8,000-pound tensile strength.
2. During the mountainous exercise you will be handling ropes. As a general rule, youshould
a. keep the rope clean, neatly coiled and stacked up on layers on the ground.
b. keep the rope clean since dirt can damage a rope through abrasion.
c. keep the rope clean by washing it with a mild bleach or fabric softener to avoidabrasions.
d. wash the rope daily to eliminate excessive heat and to avoid weak fibers on therope.
3. As a member of your unit, you have been designated to explain to the less experiencedclimbers the classes of knots used by all climbers. You know
a. there are five classes to include joining knots, anchor knots, middle rope knots,fisherman knots, and special knots.
b. there are only two classes, the joining and middle rope knots.
c. these classes are only a general guide and they are joining, anchor, middle rope,and special knots.
d. these classes are only a general guide and they are the joining and middle ropeknots.
4. After tying a water knot, the first checkpoint you should check, is
a. to make sure there are two round turns around the anchor with a locking bar.
b. to make sure there are four overhand knots, two retracing the other two.
c. to make sure there are four round turns around the anchor with a locking bar
d. to make sure there are two overhand knots, one retracing the other.
5. You have been instructed by the leader of the climbing party to tie a clove hitch knoton a metal anchor. You should
a. not use a clove hitch knot on metal, except on a picket hold fast.
b. form a single, fixed loop in the middle of the rope.
c. form two fixed loops at the end of the rope.
d. form two fixed loops in the middle of the rope.
6. All snaplinks have basically the same characteristics. When using snaplinks, youshould
a. know that all snaplinks are made of steel with an oval shape.
b. know that the weakest part of a snaplink is the gate, and it must be closedbefore applying a load.
c. know that the heaviest and strongest snaplink is made of aluminum and copper.
d. know that the nonlocking snaplinks are the best in the field since they are easyto operate.
LESSON TWO
PRACTICE EXERCISE
ANSWER KEY AND FEEDBACK
Item Correct Answer and Feedback
1. a. 36 meters (120 feet) long and 11 millimeters (7/16 inch)
wide with at least a 4,500-pound tensile strength. Since nylon has replaced manila, flax, hemp, and sisal, andis now the standard material for climbing ropes, as
a military mountaineer it is necessary that you know theexact specifications for future use .
2. b. Keep the rope clean since dirt can damage a rope
through abrasion. It is important to inspect the rope before using it. Propercare of the rope is essential since it will ensure your safety and that of the other members of yourunit.
3. c. These classes are only a general guide and they arejoining, anchor, middle rope, and special knots.
Although these classes of knots are only listed in your textas a general guide, you should know they exist. Sooner orlater, you will be required to demonstrate your ability bytying and untying these knots.
4. d. To make sure there are two overhand knots, one
retracing the other.
When tying any class of knots, it is important to doublecheck your work by following the list of checkpoints. Ifyour knot does not meet the requirements of one of thecheckpoints, repeat the tying process until corrected.
5. a. not use a clove hitch knot on metal, except on a picket
hold fast. This knot should not be tied on metal because as a generalrule once the knot is tied it must have constant tension to avoid slipping (Page 76).
6. b. know that the weakest part of a snaplink is the gate, andit must be closed before applying a load. Snaplinks should be carefully selected and inspected beforeusing to avoid personal injuries or
destruction of equipment.
LESSON THREE CLIMBING TECHNIQUESOVERVIEW
TASK DESCRIPTION:
In this lesson you will learn to identify and demonstrate your knowledge on generaltechniques, pitons and piton hammers, belays, and rappelling.
LEARNING OBJECTIVE:
TASKS: Understand and identify general techniques, pitons and piton hammers, belays,and rappelling.
CONDITIONS: The student will demonstrate a comprehension and knowledge of the taskby displaying an understanding of the general techniques, pitons and piton hammers,belays, and rappelling.
STANDARDS: The material contained in this lesson was derived from the followingpublication:
REFERENCES: The material contained in this lesson was derived from the followingpublication: TC 90-6-1
INTRODUCTION
Climbing equipment and techniques provide the fundamentals for all militarymountaineering operations. These operations provide access to rugged mountainousterrain. In such terrain, there are three adversaries: the weather, mountains, and enemy.These adversaries can be overcome by troops who are skilled in the use of special
mountain climbing equipment and techniques. Mountainous operations requirespecialized equipment and techniques different from those used in other environments.
PART A - GENERAL TECHNIQUES
1. Climbing Techniques.
All leaders operating in mountainous areas must be oriented and skilled in militarymountaineering. The execution and success of the mission in mountainous operationsdepend on the level of individual and unit skill proficiency and conditioning. Onlythrough practice and repetition do actions become reflexive and is the goal of highindividual and unit proficiency realized. Personnel trained in mountain operations shouldform the cadre to train unit personnel. Before undertaking mountain operations it ismandatory to train all unit personnel in balance and party climbing.
Units with a mountaineering mission should have two teams that consist of three expertrock climbers (assault climbers) for each platoon. The other unit members should beskilled in basic military mountaineering (mountain walking, balance climbing, knot tying,building of installations, and bridging).
Preparation for mountain operations is not complete until the unit commander knows howall of his men will react to exposure to height and to the above-average physical effort.Each soldier is exposed to unknown dangers. The fear of falling is a human instinct and ishard to overcome. Analysis of a soldier's reaction to height allows the commander toplace those who do not overcome such fear in a position where they will not endanger thelives of other unit members. A soldier cannot be forced to ignore his fear of height.Physical and psychological conditioning are not enough to produce competent climbers.The soldier must possess a will to climb. These two aspects, conditioning and will,combined with skill gained through practice, produce positive results.
2. Mountain Walking.
The art of mountain walking may mean relearning how to walk. Effective mountainwalking includes the correct technique reinforced by experience. There are severaltechniques, however, all techniques have the same goal: safe movement over difficultterrain with the least expenditure of energy to arrive at a destination in good condition tocomplete the mission.
Proper Technique. You must abide by several mountain principles to ease your movementover difficult terrain. These apply to all mountain walking techniques.
You must center your weight directly over your feet at all times. Place your footflat on the ground to obtain as much (boot) sole-ground contact as possible. Then,place your foot on the uphill side of grass tussocks and other level spots to avoidtwisting the ankle and straining the Achilles tendon. You should rest betweensteps by straightening the knee after each step. Take small steps at a slow pace.You must avoid steep angles of ascent or descent, and take advantage of anyindentation in the ground.
As a mountaineer, you must set a tempo, or number of steps per minute, accordingto the rate at which the unit is moving. Since physical differences mean thetempos of two people moving at the same speed will not be the same, it is bestthat an interval of three to five paces is kept between individuals. This intervalallows each person to adjust his stride for changes of slope or terrain, enhancingtheir tempo, pace, and rhythm. The people at the end of the file will benefit fromthis interval since the accordion effect will be lessened.
The terrain, weather, and light conditions affect the rate of climb. The moreadverse the conditions, the slower the pace. Moving too fast, even under idealconditions, produces early fatigue, requires more rest halts, and results in loss ofclimbing time. You will have greater endurance to climb if you are wellconditioned and acclimatized. You can only move as fast as your legs will allow.The keys to successful mountain operations are: rest, good nutrition, properconditioning and acclimatization, and the will to climb.
Breaks are kept to a minimum. When taking a rest halt, boot laces should beloosened and the body ventilated (through layer dressing). At the end of aday's/night's climb, a good rest is needed to revive tired muscles.
The rest step is used for steep climbing. The pace is kept slow and rhythmic. Thisslow, steady, halting rest step is more efficient than spurts of speed, which arerapidly exhausting and require longer recovery.
Mountain walking is divided into four techniques dependent on the general formation ofthe terrain: walking on hard ground, grassy slopes, scree slopes, and talus slopes.
Walking on Hard Ground. Hard ground is firmly packed dirt that does not giveway under the weight of a soldier's step.
When ascending, your knees must be locked on every step to rest the muscles of the legs.Steep slopes can be traversed rather than climbed straight up. Turning at the end of eachtraverse should be done by stepping off in the new direction with the uphill foot. Thisprevents crossing the feet and possible loss of balance. In traversing, the full-sole (boot)principle is accomplished by rolling the ankle away from the hill on each step. For smallstretches, the herringbone step may be used-ascending straight up a slope with toespointed out. A normal progression as the slope steepens would be from walking straightup the slope, to a herringbone step, and then to a traverse on the steeper areas.
When descending, you should move straight down a slope without traversing. Your backmust be straight and knees bent so they take up the shock of each step. Your body weightmust be directly over the feet, and the full-sole is placed on the ground with each step.Walking with a slight forward lean and with feet in a normal position make the descenteasier.
Grassy Slopes. They are usually composed of small tussocks of growth rather than onecontinuous field. In ascending, the upper side of each hummock or tussock is stepped onwhere the ground is more level than on the lower side.
When descending a grassy slope, a climber should traverse because of the uneven natureof the ground. You can easily build up too much speed and fall if a direct descent is tried.The hop-skip step can be useful on this type of slope. In this technique, the lower legtakes all of the weight, and the upper leg is used only for balance.
When traversing, the climber's uphill foot points in the direction of travel. The downhillfoot points about 45 degrees off the direction of travel. This maintains maximum solecontact and prevents possible downhill ankle roll-out.
Scree Slopes. These consist of small rocks and gravel that have collected belowrock ridges and cliffs. Scree varies in size from grains of sand to the size of a fist.Sometimes it occurs in mixtures of all sizes, but normally scree slopes consist ofthe same size particles.
If possible, you should avoid ascending scree slopes since they are difficult and tiring. Allprinciples of ascending hard ground apply, but each step is chosen carefully so that thefoot does not slide down when weight is placed on it. This is done by kicking in with the
toe of the upper foot so that a step is formed in the scree. After determining that the stepis stable, weight is transferred from the lower to the upper foot. The process is repeated.
The best method for descending scree slopes is to come straight down the slope using ashort shuffling step with the knees bent, back straight, feet pointed downhill, and heelsdug in. When several climbers descend a scree slope together, they should be as closetogether as possible, one behind the other about one arm's length apart, to prevent injuryfrom dislodged rock. Scree slopes can be traversed using the ice axe as a third point ofcontact. Always keep the ice axe on the uphill side.
When the herring-bone step is used to ascend scree, the axe can be used by placing bothhands on top of it. The bottom (or point) of the axe is sunk into the scree, and the axe isused for balance. The climber uses the herringbone step up to the axe. The tendency torun down a scree slope is avoided so control is not lost. When the bottom of the routecannot be seen, caution is used since dropoffs may be encountered.
Talus Slopes. Talus is a slope formed by an accumulation of rock debris muchlarger than a man's fist When walking in talus, whether ascending or descending,always step on the top of and on the uphill side of the rocks. This requires theleast amount of movement into the slope. Always use caution when moving intalus; large rocks can be held in place by smaller keystones; disturbing them cancause rock slides. Climbers must stay in close columns while traversing. Toprevent rockfall injuries, no member of the party traverses below another member.All other basics mentioned apply.
The techniques discussed previously are precautions you may take to reduce the mostcommon mountaineering hazard- rockfall. Whenever a rock is kicked loose, the warning,"Rock," is shouted immediately. Personnel near the bottom of a cliff immediately leaninto the cliff to reduce their exposure, and they do not look up. Personnel more than 10feet away from the bottom of a cliff may look up to determine where the rock is and seekcover behind an obstacle. Warning. Do not run downhill since personal injury couldoccur.
If an ice axe is carried, it may be used as a third point of contact on difficult terrain.Otherwise, it is carried on or in the rucksack with its head down and secured. The sameprocedure applies if it is used on ice. Carelessness can cause the failure of a well-plannedmission. One rock no bigger than a man's head can kill or severely injure several men andruin all security measures. Stepping over, rather than on top of, obstacles such as largerocks or fallen logs help to avoid fatigue. Usually, a talus slope is easier to ascend andtraverse, while a scree slope is a more desirable avenue of descent.
3. Balance Climbing.
Balance climbing is used to climb rock formations. As a climber, you must study theroute you are to travel to ensure you have chosen the best route and have the properequipment. Before starting an operation, you should mentally climb the route chosen toanticipate future events or incidents.
Proper Technique. The proper technique of balance climbing involves the following:
Eyes. As a climber, you must observe the entire route selected to climb. Use youreyes to climb the pitch. You should identify handholds and footholds, possiblebelay positions, alternate routes, rest spots, and a route for down climbing ordescending. You must use your eyes continuously to look for cover, concealment,subsequent handholds and footholds, and rest positions, as well as to continueplanning and revision of the route. Night climbing is facilitated by the use of nightobservation devices (NODs).
Body Position. As you move and climb, your body must be in balance; that is,your weight must be centered over your feet. Use your hands mainly for balance;support your body weight with your feet.
If you lean in toward a rock, your feet will not hold well; you must keep your body outand away from the rock to counter the gravitational pull of the body. With your body inbalance, move with a slow, rhythmic motion (Figure 3-2). If possible, you shouldmaintain three points of contact with the rock, such as two hands and one foot.
You must avoid a spread-eagle position since you must stretch too far and cannot let gowithout falling. When you reach a position of security, try to rest since tensed musclestire quickly. Allow for circulation by keeping your arms as low as possible, and while yourelax, plan your next move.
When selecting handholds, you should keep your hands about waist-to-shoulder level.This allows you the desired upright, balanced position as well as resting your arms. It ispreferred that you use small, intermediate holds rather than stretching and clinging towidely separated holds. Handholds may become subsequent footholds. Your arms or legsshould not be crossed, nor should you use your knees or elbows as handholds orfootholds.
CASHWORTH. This acronym should help you remember proper procedures during balance climbing. C - Conserve energy. A - Always test holds. S - Stand upright on flexed joints. H - Hands are kept low; handholds should be waist-to-shoulder high. W - Watch your feet. O - On three points of contact; avoid using knees and elbows; avoid awkward, out ofbalance positions. R - Rhythmic movement. T - Think and plan ahead. H - Heels are kept lower than the toes and pointed inward.
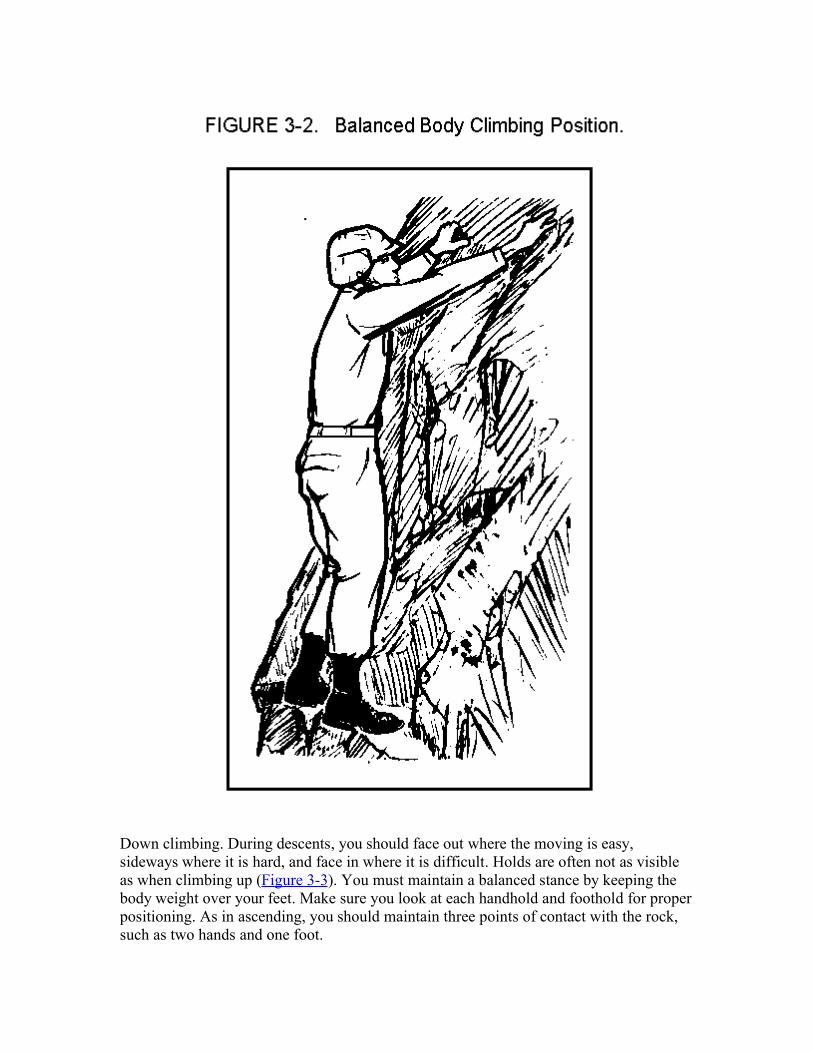
Down climbing. During descents, you should face out where the moving is easy,sideways where it is hard, and face in where it is difficult. Holds are often not as visibleas when climbing up (Figure 3-3). You must maintain a balanced stance by keeping thebody weight over your feet. Make sure you look at each handhold and foothold for properpositioning. As in ascending, you should maintain three points of contact with the rock,such as two hands and one foot.
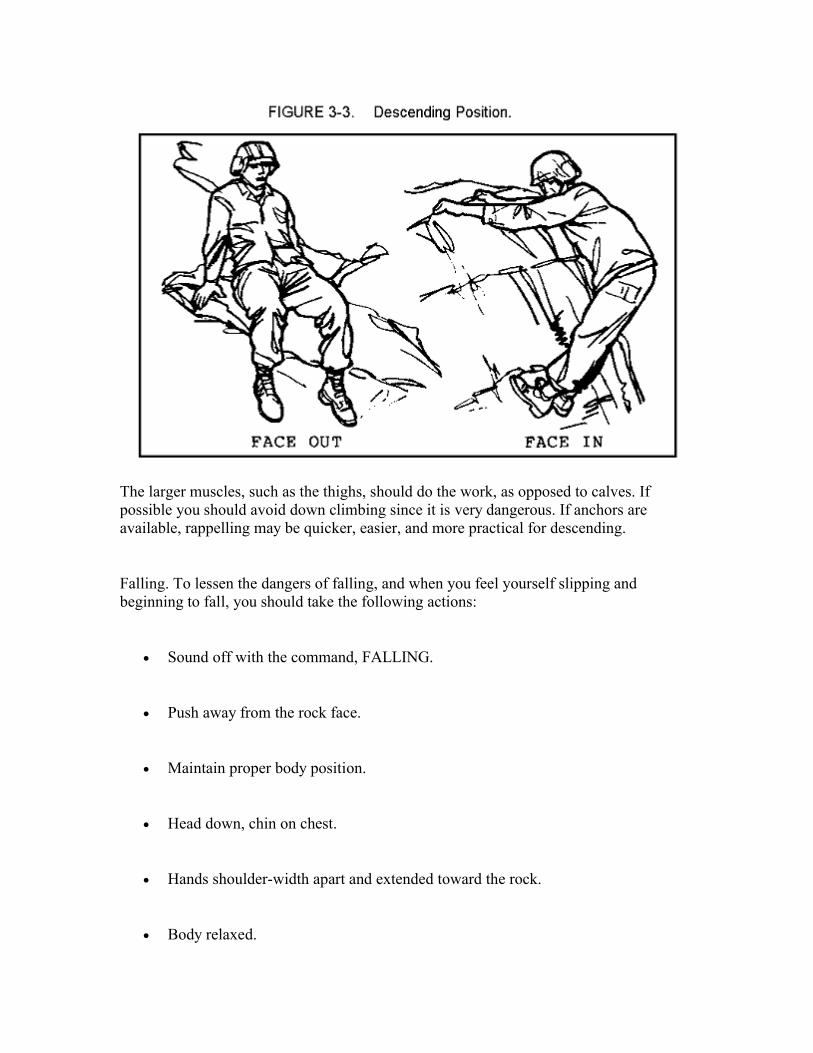
The larger muscles, such as the thighs, should do the work, as opposed to calves. Ifpossible you should avoid down climbing since it is very dangerous. If anchors areavailable, rappelling may be quicker, easier, and more practical for descending.
Falling. To lessen the dangers of falling, and when you feel yourself slipping andbeginning to fall, you should take the following actions:
Sound off with the command, FALLING.
Push away from the rock face.
Maintain proper body position.
Head down, chin on chest.
Hands shoulder-width apart and extended toward the rock.
Body relaxed.
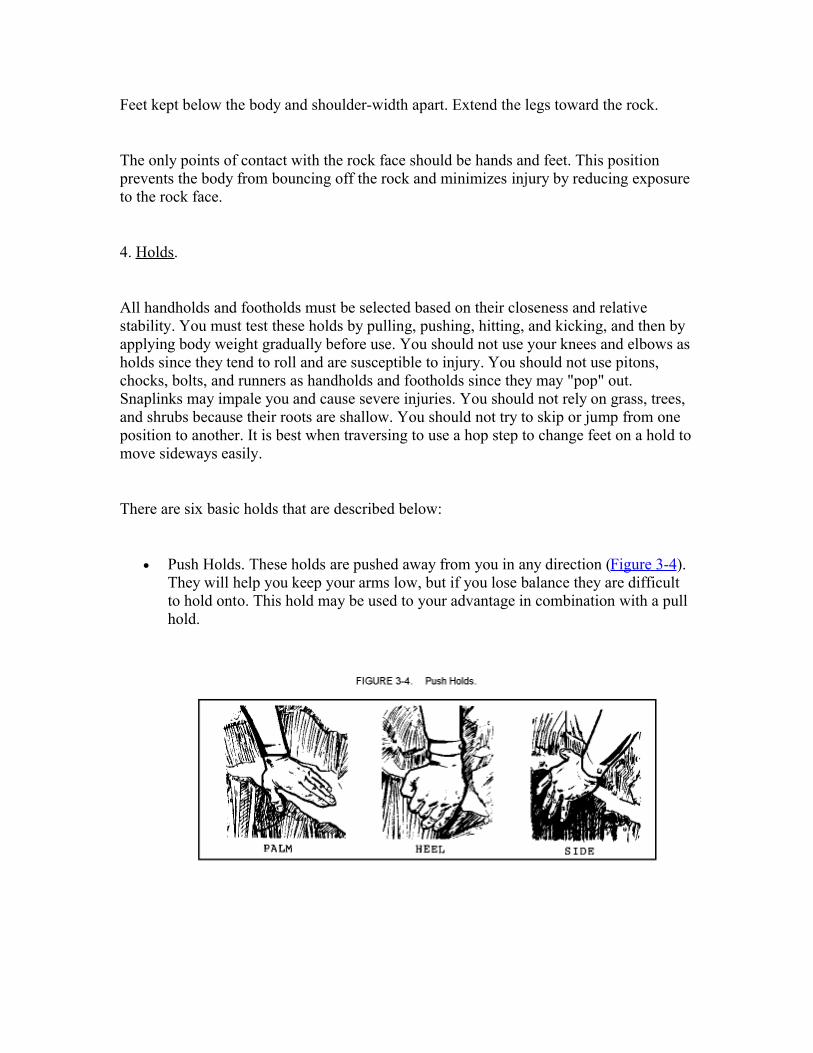
Feet kept below the body and shoulder-width apart. Extend the legs toward the rock.
The only points of contact with the rock face should be hands and feet. This positionprevents the body from bouncing off the rock and minimizes injury by reducing exposureto the rock face.
4. Holds.
All handholds and footholds must be selected based on their closeness and relativestability. You must test these holds by pulling, pushing, hitting, and kicking, and then byapplying body weight gradually before use. You should not use your knees and elbows asholds since they tend to roll and are susceptible to injury. You should not use pitons,chocks, bolts, and runners as handholds and footholds since they may "pop" out.Snaplinks may impale you and cause severe injuries. You should not rely on grass, trees,and shrubs because their roots are shallow. You should not try to skip or jump from oneposition to another. It is best when traversing to use a hop step to change feet on a hold tomove sideways easily.
There are six basic holds that are described below:
Push Holds. These holds are pushed away from you in any direction (Figure 3-4).They will help you keep your arms low, but if you lose balance they are difficultto hold onto. This hold may be used to your advantage in combination with a pullhold.
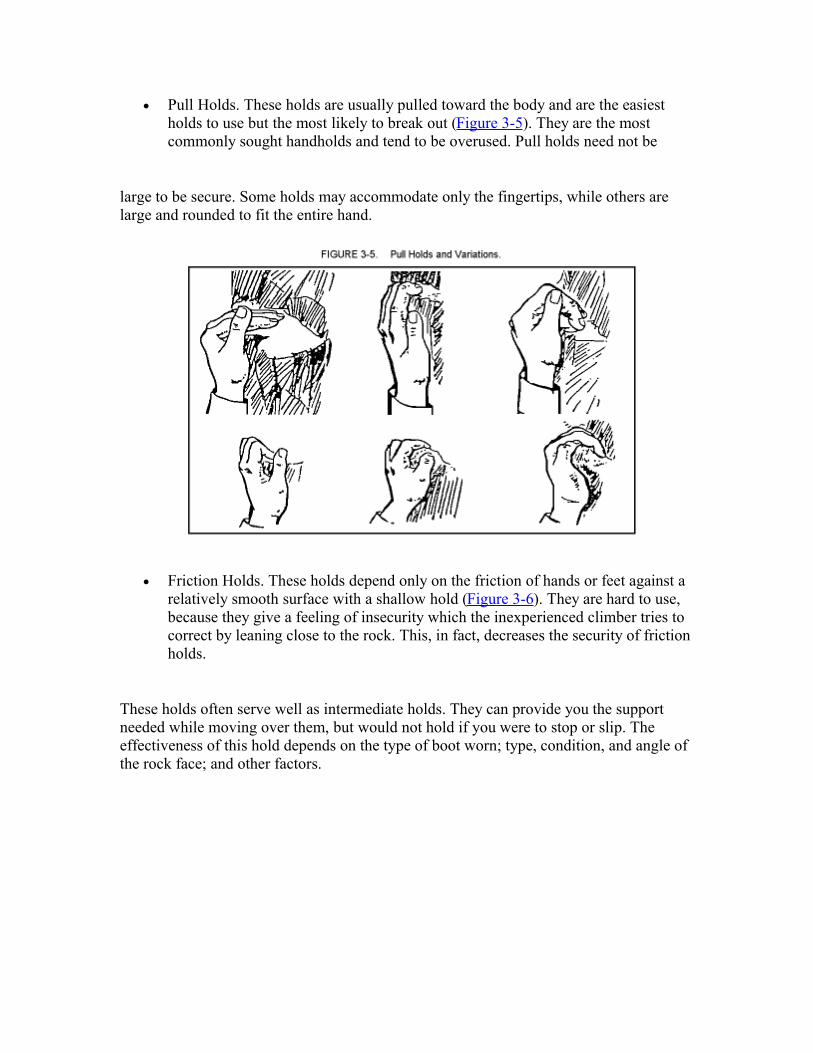
Pull Holds. These holds are usually pulled toward the body and are the easiestholds to use but the most likely to break out (Figure 3-5). They are the mostcommonly sought handholds and tend to be overused. Pull holds need not be
large to be secure. Some holds may accommodate only the fingertips, while others arelarge and rounded to fit the entire hand.
Friction Holds. These holds depend only on the friction of hands or feet against arelatively smooth surface with a shallow hold (Figure 3-6). They are hard to use,because they give a feeling of insecurity which the inexperienced climber tries tocorrect by leaning close to the rock. This, in fact, decreases the security of frictionholds.
These holds often serve well as intermediate holds. They can provide you the supportneeded while moving over them, but would not hold if you were to stop or slip. Theeffectiveness of this hold depends on the type of boot worn; type, condition, and angle ofthe rock face; and other factors.
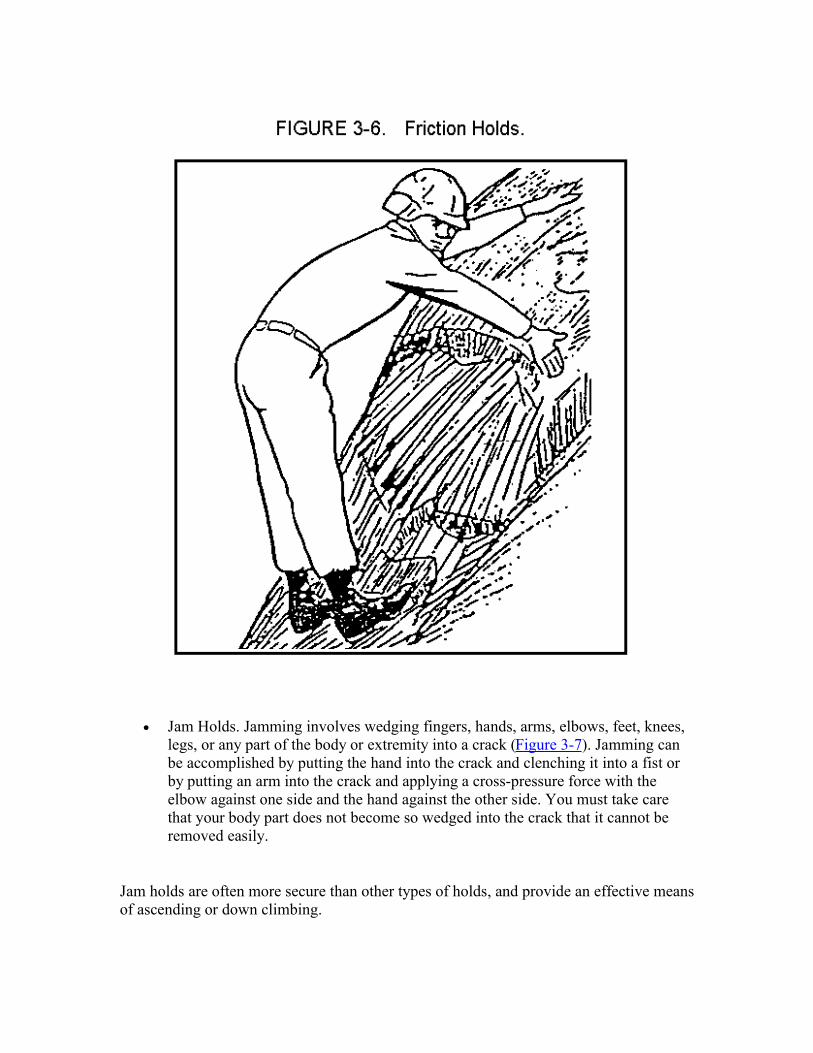
Jam Holds. Jamming involves wedging fingers, hands, arms, elbows, feet, knees,legs, or any part of the body or extremity into a crack (Figure 3-7). Jamming canbe accomplished by putting the hand into the crack and clenching it into a fist orby putting an arm into the crack and applying a cross-pressure force with theelbow against one side and the hand against the other side. You must take carethat your body part does not become so wedged into the crack that it cannot beremoved easily.
Jam holds are often more secure than other types of holds, and provide an effective meansof ascending or down climbing.
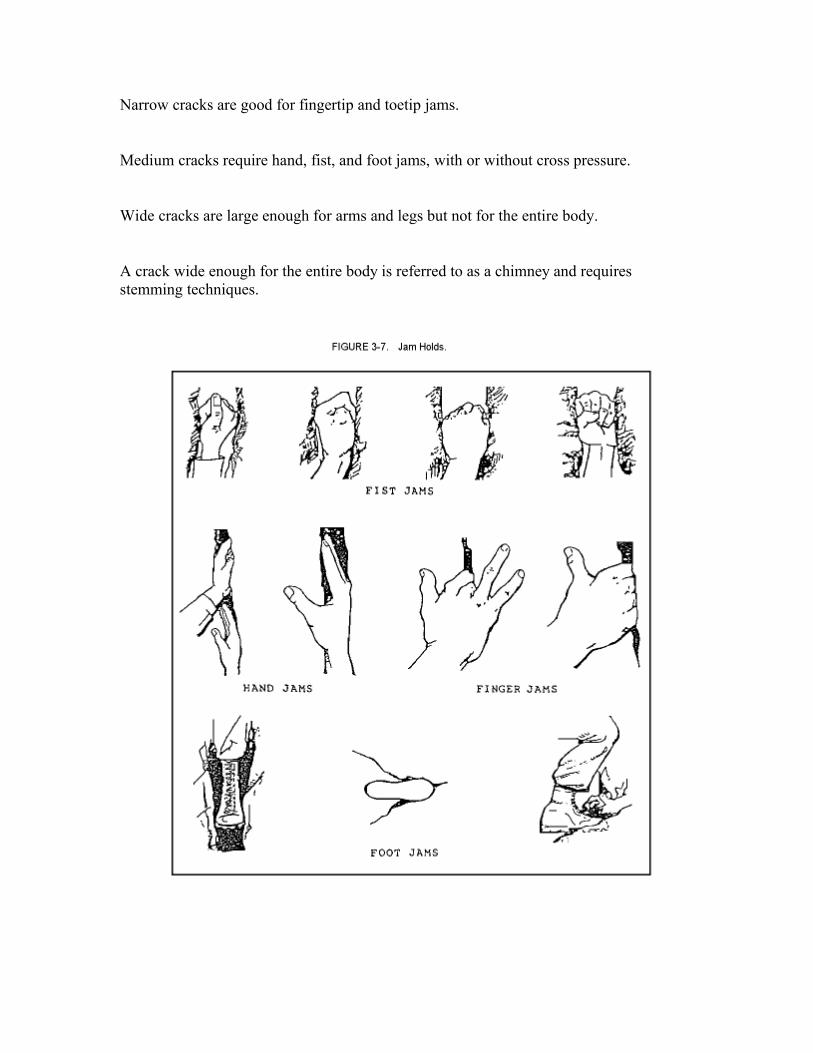
Narrow cracks are good for fingertip and toetip jams.
Medium cracks require hand, fist, and foot jams, with or without cross pressure.
Wide cracks are large enough for arms and legs but not for the entire body.
A crack wide enough for the entire body is referred to as a chimney and requiresstemming techniques.
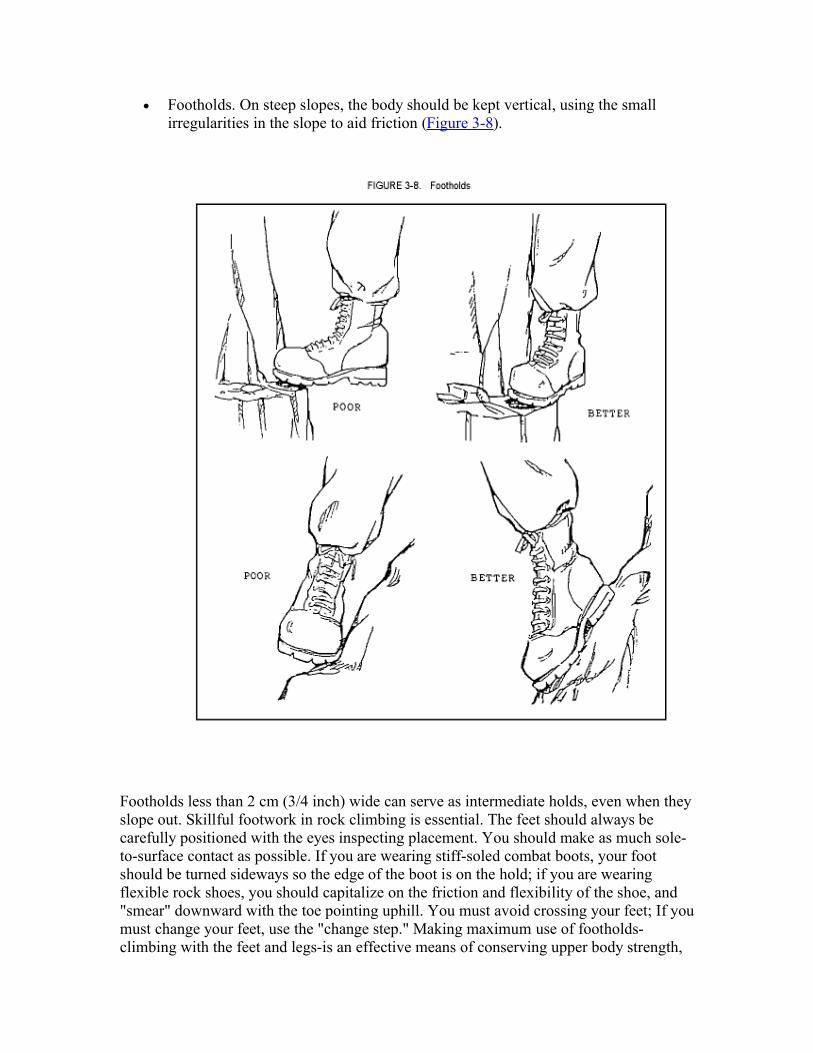
Footholds. On steep slopes, the body should be kept vertical, using the smallirregularities in the slope to aid friction (Figure 3-8).
Footholds less than 2 cm (3/4 inch) wide can serve as intermediate holds, even when theyslope out. Skillful footwork in rock climbing is essential. The feet should always becarefully positioned with the eyes inspecting placement. You should make as much sole-to-surface contact as possible. If you are wearing stiff-soled combat boots, your footshould be turned sideways so the edge of the boot is on the hold; if you are wearingflexible rock shoes, you should capitalize on the friction and flexibility of the shoe, and"smear" downward with the toe pointing uphill. You must avoid crossing your feet; If youmust change your feet, use the "change step." Making maximum use of footholds-climbing with the feet and legs-is an effective means of conserving upper body strength,
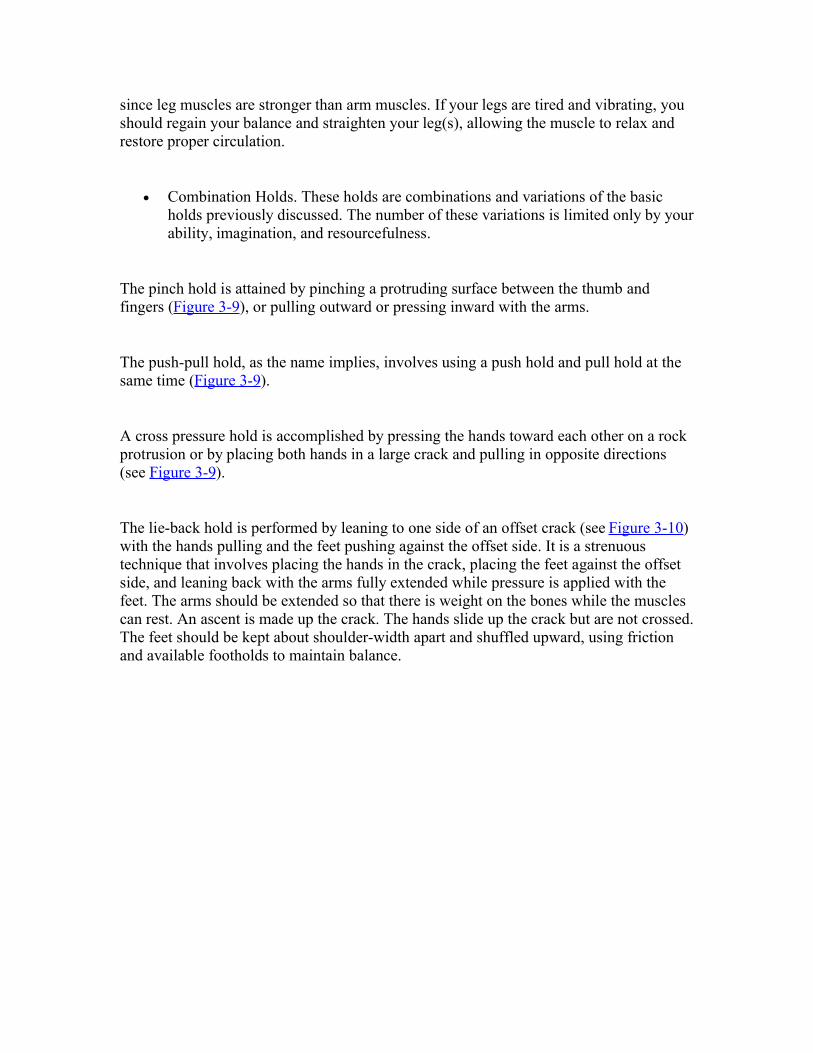
since leg muscles are stronger than arm muscles. If your legs are tired and vibrating, youshould regain your balance and straighten your leg(s), allowing the muscle to relax andrestore proper circulation.
Combination Holds. These holds are combinations and variations of the basicholds previously discussed. The number of these variations is limited only by yourability, imagination, and resourcefulness.
The pinch hold is attained by pinching a protruding surface between the thumb andfingers (Figure 3-9), or pulling outward or pressing inward with the arms.
The push-pull hold, as the name implies, involves using a push hold and pull hold at thesame time (Figure 3-9).
A cross pressure hold is accomplished by pressing the hands toward each other on a rockprotrusion or by placing both hands in a large crack and pulling in opposite directions(see Figure 3-9).
The lie-back hold is performed by leaning to one side of an offset crack (see Figure 3-10)with the hands pulling and the feet pushing against the offset side. It is a strenuoustechnique that involves placing the hands in the crack, placing the feet against the offsetside, and leaning back with the arms fully extended while pressure is applied with thefeet. The arms should be extended so that there is weight on the bones while the musclescan rest. An ascent is made up the crack. The hands slide up the crack but are not crossed.The feet should be kept about shoulder-width apart and shuffled upward, using frictionand available footholds to maintain balance.
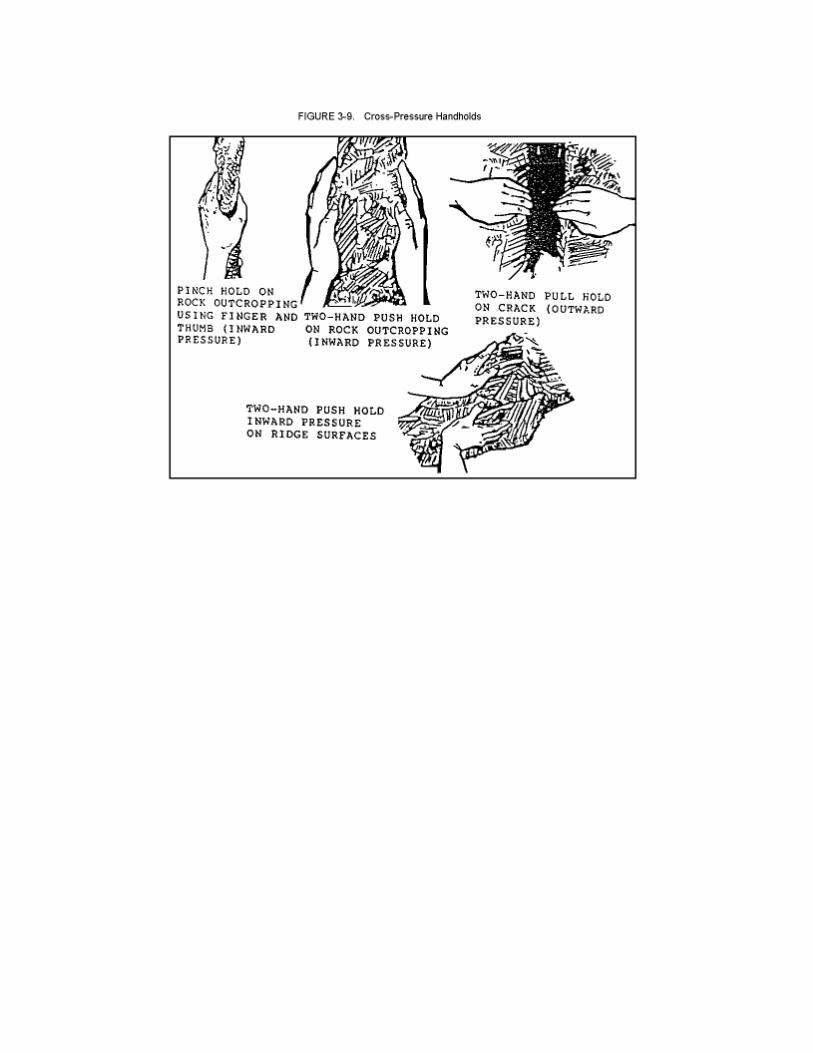
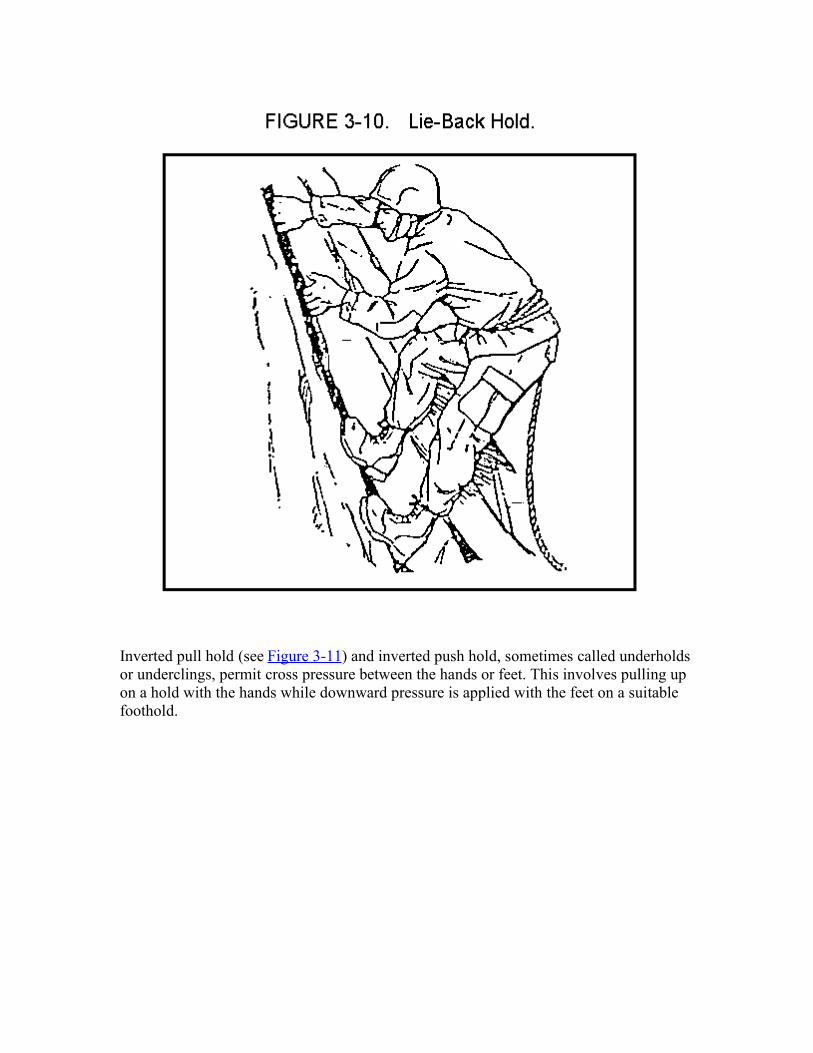
Inverted pull hold (see Figure 3-11) and inverted push hold, sometimes called underholdsor underclings, permit cross pressure between the hands or feet. This involves pulling upon a hold with the hands while downward pressure is applied with the feet on a suitablefoothold.
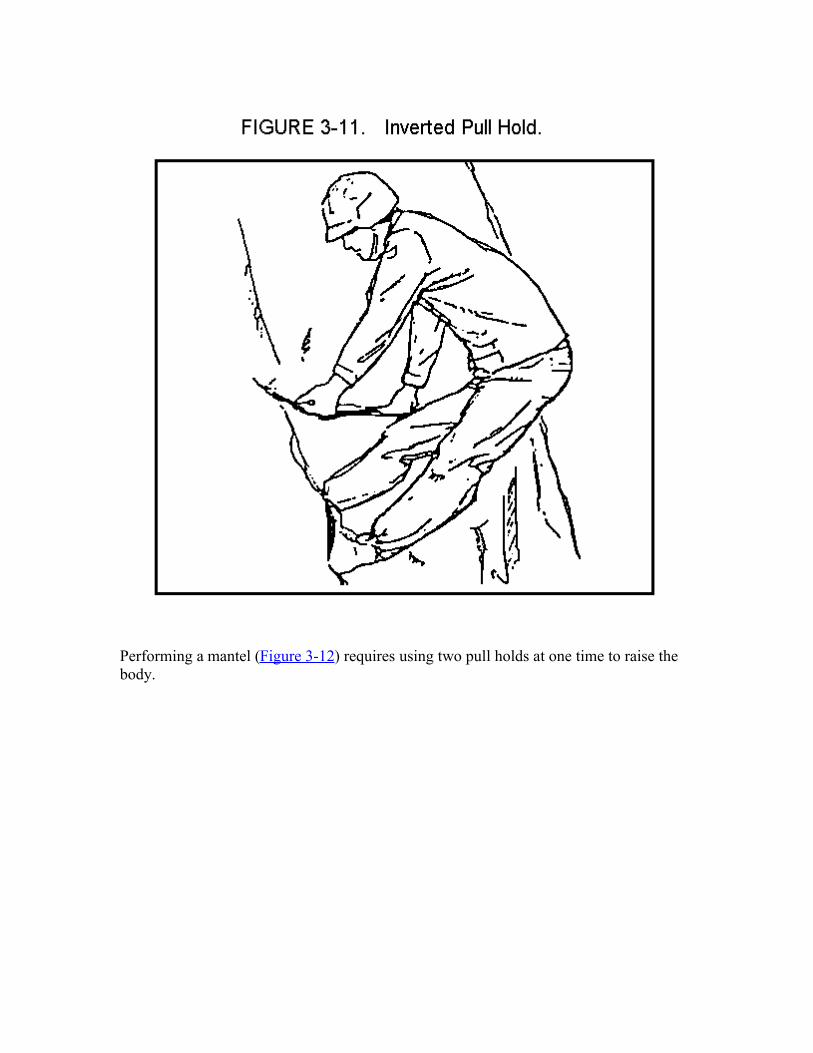
Performing a mantel (Figure 3-12) requires using two pull holds at one time to raise thebody.
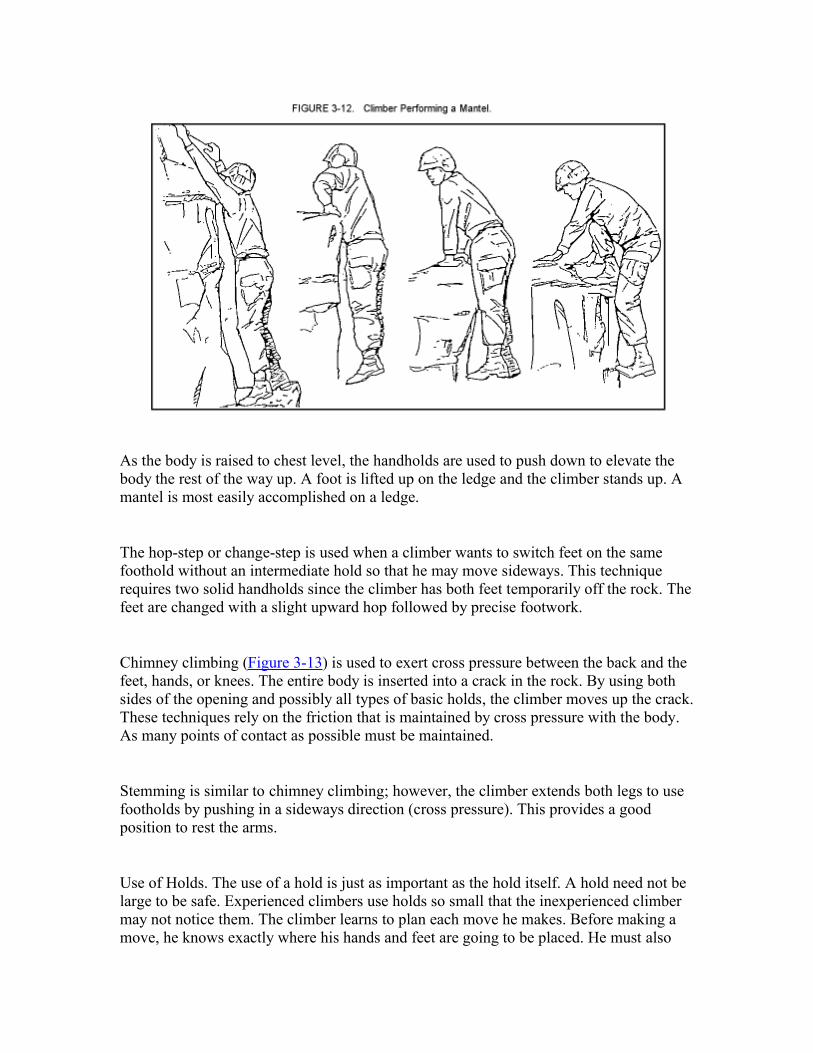
As the body is raised to chest level, the handholds are used to push down to elevate thebody the rest of the way up. A foot is lifted up on the ledge and the climber stands up. Amantel is most easily accomplished on a ledge.
The hop-step or change-step is used when a climber wants to switch feet on the samefoothold without an intermediate hold so that he may move sideways. This techniquerequires two solid handholds since the climber has both feet temporarily off the rock. Thefeet are changed with a slight upward hop followed by precise footwork.
Chimney climbing (Figure 3-13) is used to exert cross pressure between the back and thefeet, hands, or knees. The entire body is inserted into a crack in the rock. By using bothsides of the opening and possibly all types of basic holds, the climber moves up the crack.These techniques rely on the friction that is maintained by cross pressure with the body.As many points of contact as possible must be maintained.
Stemming is similar to chimney climbing; however, the climber extends both legs to usefootholds by pushing in a sideways direction (cross pressure). This provides a goodposition to rest the arms.
Use of Holds. The use of a hold is just as important as the hold itself. A hold need not belarge to be safe. Experienced climbers use holds so small that the inexperienced climbermay not notice them. The climber learns to plan each move he makes. Before making amove, he knows exactly where his hands and feet are going to be placed. He must also
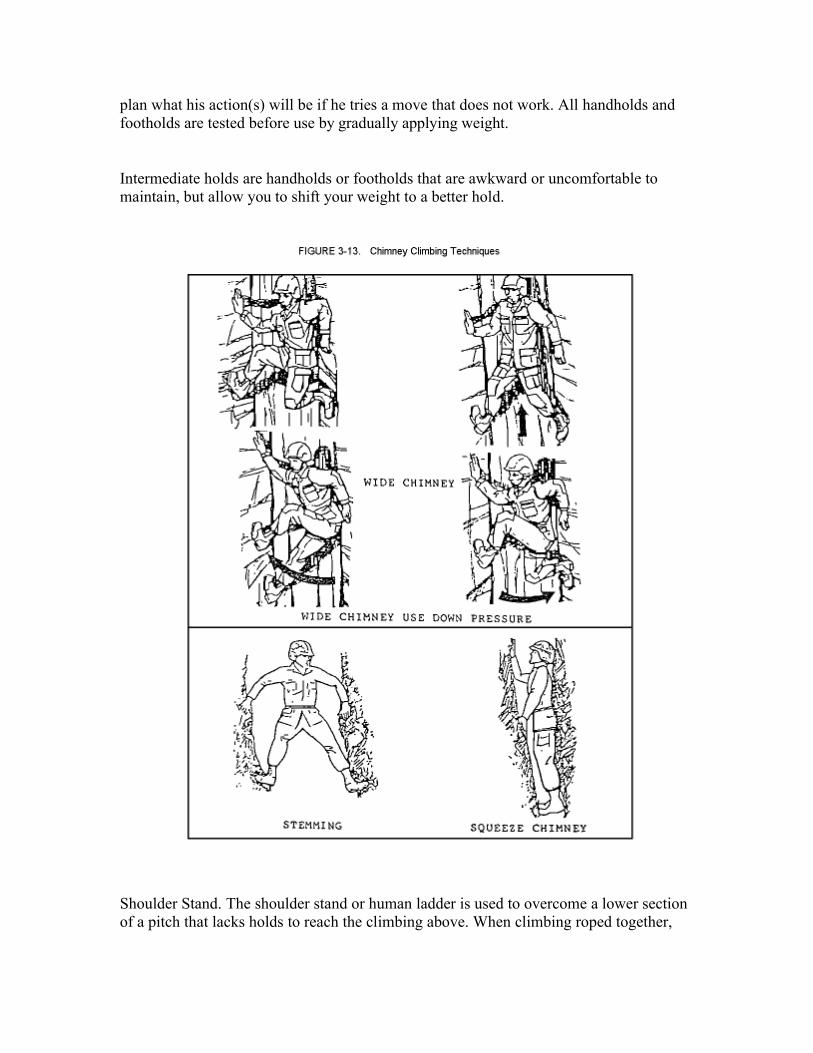
plan what his action(s) will be if he tries a move that does not work. All handholds andfootholds are tested before use by gradually applying weight.
Intermediate holds are handholds or footholds that are awkward or uncomfortable tomaintain, but allow you to shift your weight to a better hold.
Shoulder Stand. The shoulder stand or human ladder is used to overcome a lower sectionof a pitch that lacks holds to reach the climbing above. When climbing roped together,
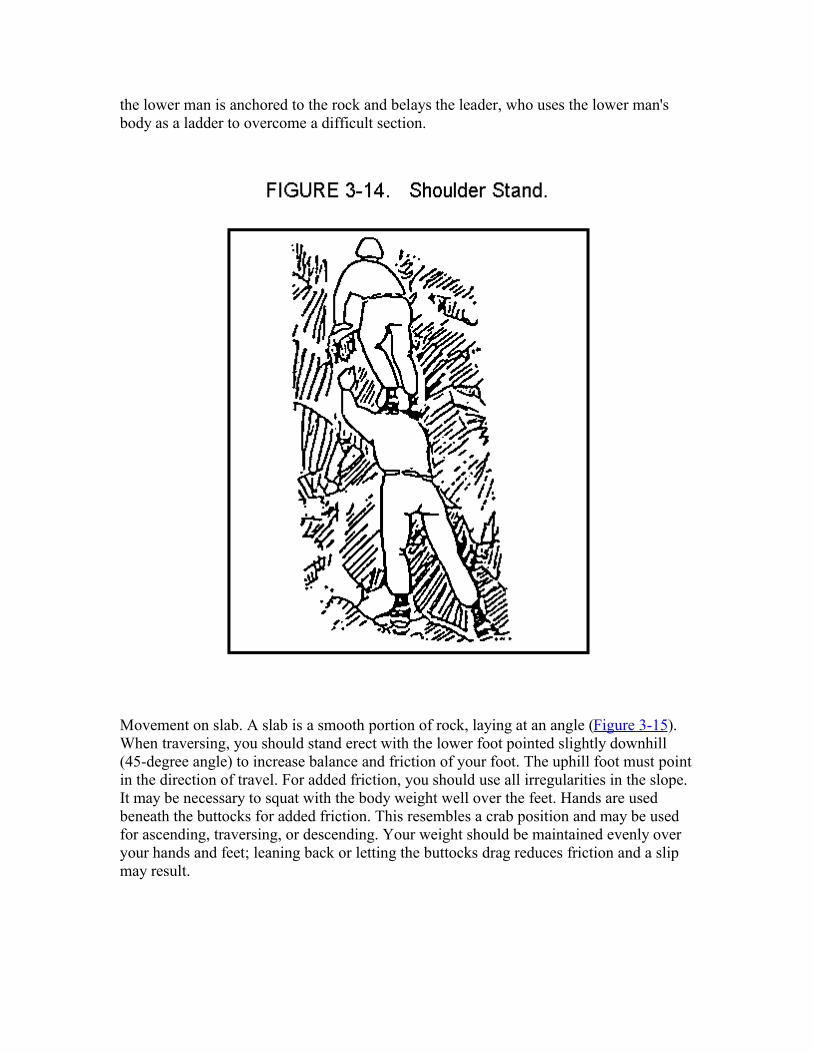
the lower man is anchored to the rock and belays the leader, who uses the lower man'sbody as a ladder to overcome a difficult section.
Movement on slab. A slab is a smooth portion of rock, laying at an angle (Figure 3-15).When traversing, you should stand erect with the lower foot pointed slightly downhill(45-degree angle) to increase balance and friction of your foot. The uphill foot must pointin the direction of travel. For added friction, you should use all irregularities in the slope.It may be necessary to squat with the body weight well over the feet. Hands are usedbeneath the buttocks for added friction. This resembles a crab position and may be usedfor ascending, traversing, or descending. Your weight should be maintained evenly overyour hands and feet; leaning back or letting the buttocks drag reduces friction and a slipmay result.
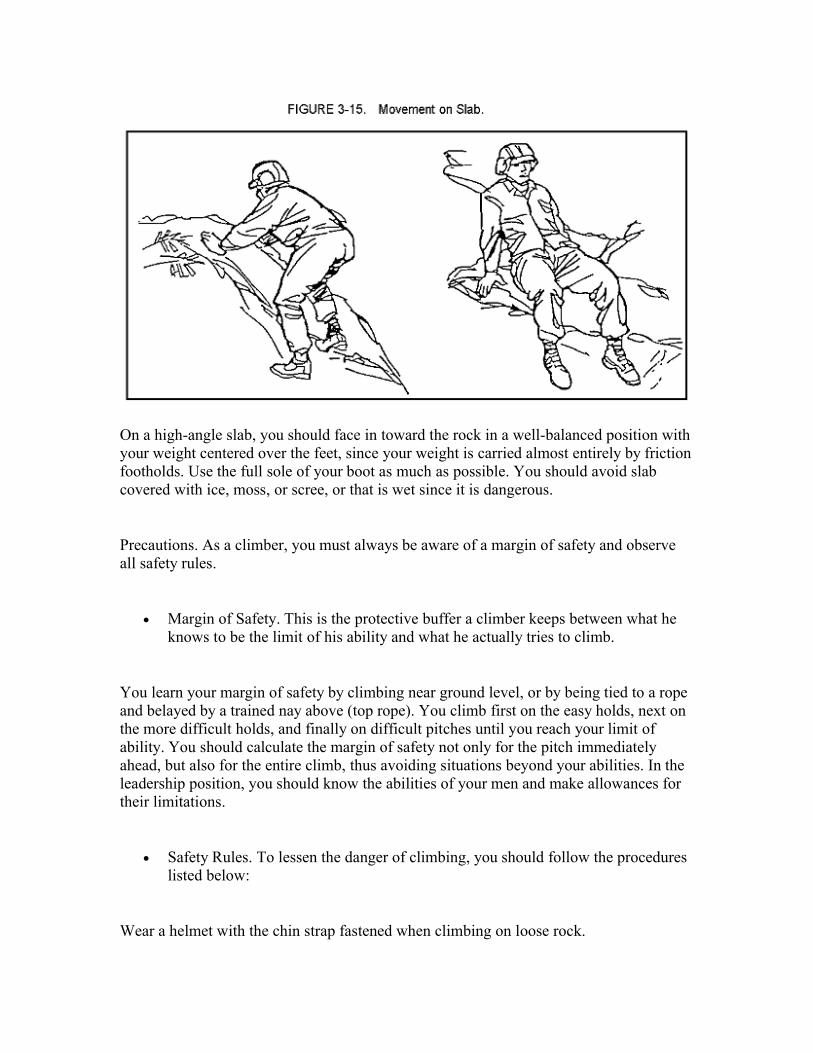
On a high-angle slab, you should face in toward the rock in a well-balanced position withyour weight centered over the feet, since your weight is carried almost entirely by frictionfootholds. Use the full sole of your boot as much as possible. You should avoid slabcovered with ice, moss, or scree, or that is wet since it is dangerous.
Precautions. As a climber, you must always be aware of a margin of safety and observeall safety rules.
Margin of Safety. This is the protective buffer a climber keeps between what heknows to be the limit of his ability and what he actually tries to climb.
You learn your margin of safety by climbing near ground level, or by being tied to a ropeand belayed by a trained nay above (top rope). You climb first on the easy holds, next onthe more difficult holds, and finally on difficult pitches until you reach your limit ofability. You should calculate the margin of safety not only for the pitch immediatelyahead, but also for the entire climb, thus avoiding situations beyond your abilities. In theleadership position, you should know the abilities of your men and make allowances fortheir limitations.
Safety Rules. To lessen the danger of climbing, you should follow the procedureslisted below:
Wear a helmet with the chin strap fastened when climbing on loose rock.
Keep the soles of boots clean and dry. Always clean the boot soles before starting a climbby kicking the feet against the rock. If wearing cleated boots, use a stick or some pointedobject to clean out the cleats.
Avoid lunging or jumping to reach a hold.
Carefully check all handholds and footholds before use to ensure they are not loose.
Never dislodge loose rocks carelessly or intentionally; if a rock becomes dislodged, warnclimbers below immediately by calling out, "Rock." Use the same warning for any fallingobject except for a falling climber, use "Falling." Voice signals are normally not used in atactical situation.
Do not look up when the warning, "Rock", is heard from above. Immediately seek shelteror flatten against the surface.
Tie into the climbing rope on all exposed areas. Anchor all belay points.
Remove watches, rings, and other jewelry from the hands before climbing; it can causesevere injuries when stuck in a crack.
Use care and common sense when climbing on wet rock. Some types of rocks can beextremely slippery when wet.
If vegetation must be used as a hold, test them like any handhold since they have shallowroots.
Avoid using elbows and knees. This creates a ballbearing effect on the rock, which causesthe climber to be off balance. Moreover, these joints may slip and cause severe bodydamage.
When a climber falls, shout the warning, "Falling", to those below.
When falling, remain under control both mentally and physically. Retain proper bodyposition and try to avoid excessive contact (hands and feet only) with the rock.
In initial training or when trying difficult moves low to the ground, use a "spotter" toassist in breaking a climber's fall.
Do not wear gloves while climbing on rock, because they decrease the feel for rock andincrease the chance of slipping. Discourage the use of gloves in training
PART B - BELAYS
1. General.
Belaying provides the necessary safety factor or tension, allowing the party to climb witha minimum of danger. When party climbing, two or three climbers are tied into aclimbing rope. The use of a rope in party climbing is a hazard without belaying skills. Itmay be necessary to use one of several belay positions either with the body or mechanicalbelay device. Belaying involves a stationary man managing and controlling the rope thatis tied to a load. Belaying is used to control descent on rope installations.
2. Safety.
The belay system consists of an interfacing system of parts. It is only as strong as theweakest link. The components of the belay chain affect ascent and descent, addingfriction through points of contact with the rope. These components are:
Belay anchor.
Means of attaching the belayer to the anchor.
Belayer's stance, body, hands, and any apparatus to
control the rope.
Rope.
Any intermediate anchor points.
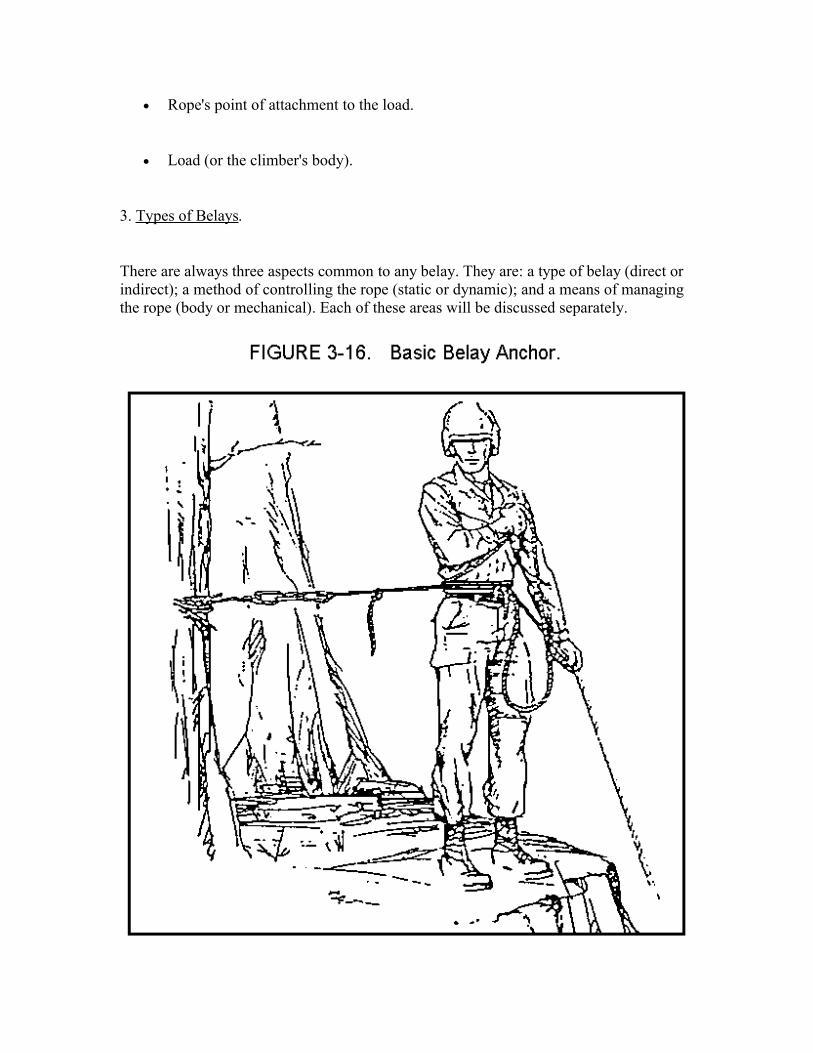
Rope's point of attachment to the load.
Load (or the climber's body).
3. Types of Belays.
There are always three aspects common to any belay. They are: a type of belay (direct orindirect); a method of controlling the rope (static or dynamic); and a means of managingthe rope (body or mechanical). Each of these areas will be discussed separately.
The two basic types of belays are direct and indirect:
Direct Belay. The direct belay is only available when using a mechanical device.The belayer is connected to a point of protection and conducts the mechanicalbelay from another point of protection. In this variation, the load goes directly tothe anchor.
When using the direct belay approach, there are advantages and disadvantages that youmust consider:
Advantages. The belayer does not sustain any of the force generated by a fall because heis removed from the belay chain. He can quickly tie off the rope and assist the climber orrescue party.
Disadvantages. The selected anchor point from which to belay the load must be"bombproof." If the primary and secondary anchors fail, the load falls the full length ofthe rope. It also takes more time to set up and take down than an indirect belay (primaryand secondary anchors for both the belayer and the direct belay point).
Indirect Belay. This belay can be used for mechanical or body belays. The belayeris in direct contact with the climbing rope and is part of the belay chain; with thissetup, the load is absorbed, in part, by the belayer.
When using the indirect belay approach, there are advantages and disadvantages that youmust consider:
Advantages. Only two anchor points (primary and secondary) are necessary for thebelayer and climbing rope. It is easier to set up and retrieve than a direct belay.
Disadvantages. The belayer is part of the belay chain and sustains part of the forcegenerated by the fall. He is a part of the belay chain and cannot readily detach himselffrom the rope to assist the climber.
The two methods of controlling the rope when holding a fall are the static belay and thedynamic belay:
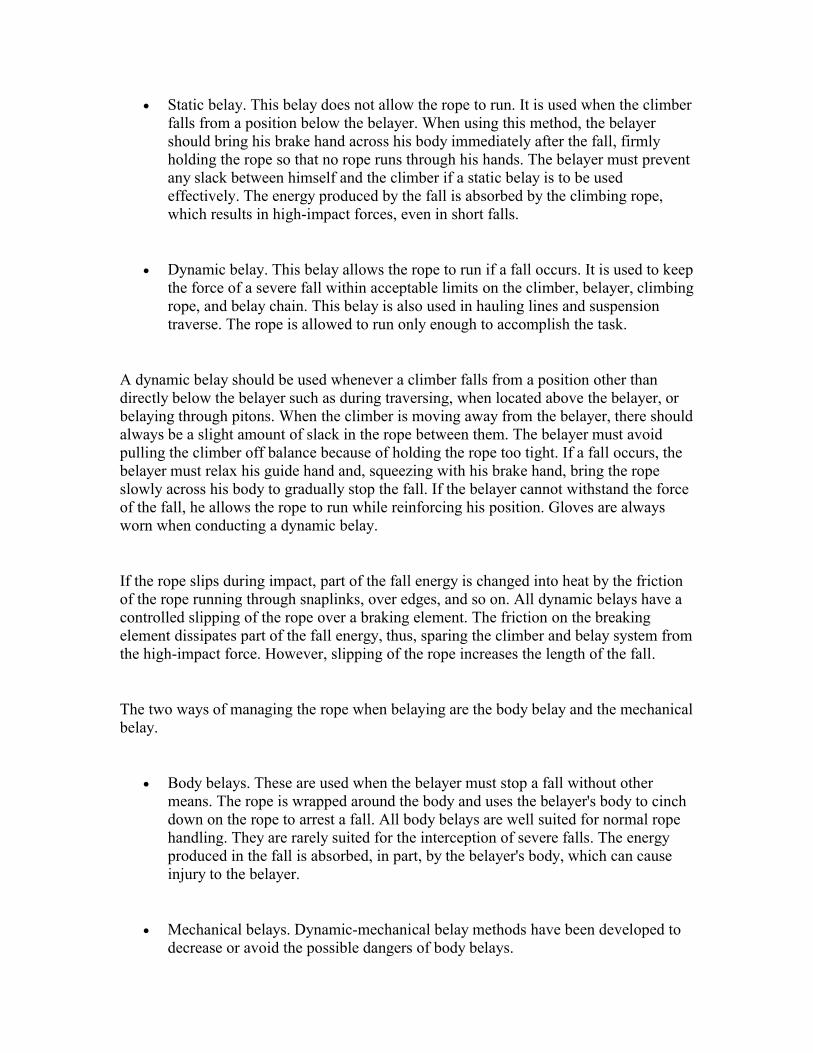
Static belay. This belay does not allow the rope to run. It is used when the climberfalls from a position below the belayer. When using this method, the belayershould bring his brake hand across his body immediately after the fall, firmlyholding the rope so that no rope runs through his hands. The belayer must preventany slack between himself and the climber if a static belay is to be usedeffectively. The energy produced by the fall is absorbed by the climbing rope,which results in high-impact forces, even in short falls.
Dynamic belay. This belay allows the rope to run if a fall occurs. It is used to keepthe force of a severe fall within acceptable limits on the climber, belayer, climbingrope, and belay chain. This belay is also used in hauling lines and suspensiontraverse. The rope is allowed to run only enough to accomplish the task.
A dynamic belay should be used whenever a climber falls from a position other thandirectly below the belayer such as during traversing, when located above the belayer, orbelaying through pitons. When the climber is moving away from the belayer, there shouldalways be a slight amount of slack in the rope between them. The belayer must avoidpulling the climber off balance because of holding the rope too tight. If a fall occurs, thebelayer must relax his guide hand and, squeezing with his brake hand, bring the ropeslowly across his body to gradually stop the fall. If the belayer cannot withstand the forceof the fall, he allows the rope to run while reinforcing his position. Gloves are alwaysworn when conducting a dynamic belay.
If the rope slips during impact, part of the fall energy is changed into heat by the frictionof the rope running through snaplinks, over edges, and so on. All dynamic belays have acontrolled slipping of the rope over a braking element. The friction on the breakingelement dissipates part of the fall energy, thus, sparing the climber and belay system fromthe high-impact force. However, slipping of the rope increases the length of the fall.
The two ways of managing the rope when belaying are the body belay and the mechanicalbelay.
Body belays. These are used when the belayer must stop a fall without othermeans. The rope is wrapped around the body and uses the belayer's body to cinchdown on the rope to arrest a fall. All body belays are well suited for normal ropehandling. They are rarely suited for the interception of severe falls. The energyproduced in the fall is absorbed, in part, by the belayer's body, which can causeinjury to the belayer.
Mechanical belays. Dynamic-mechanical belay methods have been developed todecrease or avoid the possible dangers of body belays.
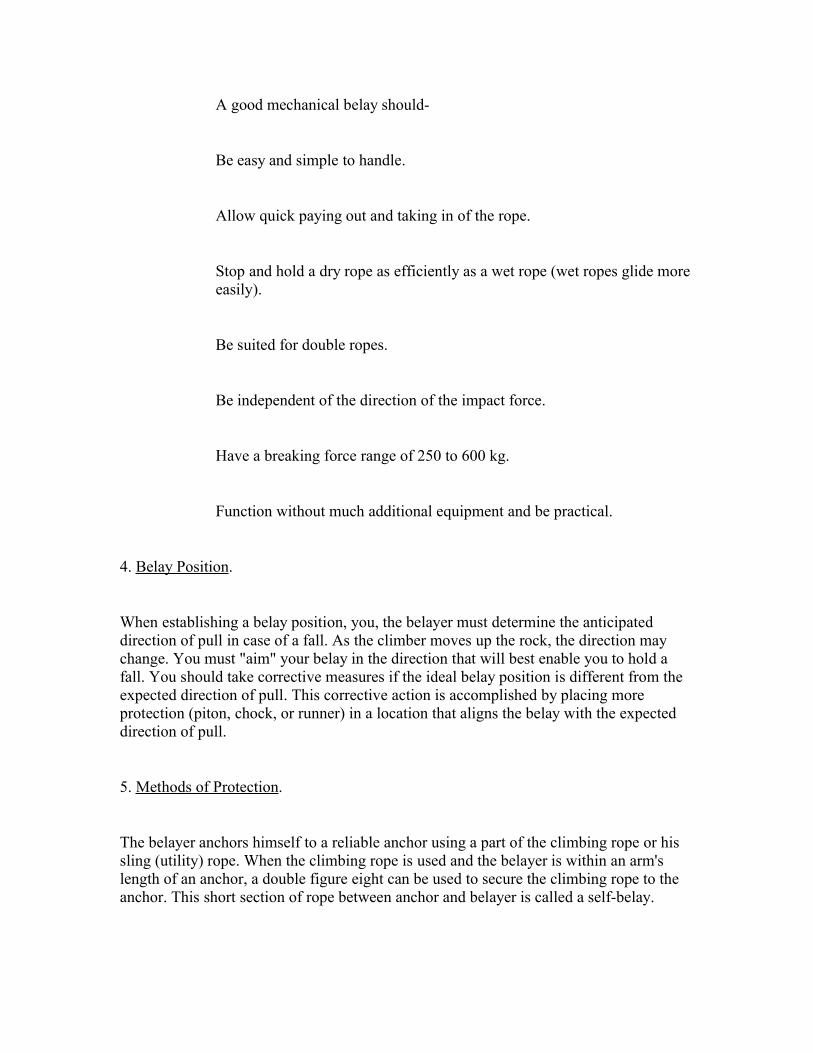
A good mechanical belay should-
Be easy and simple to handle.
Allow quick paying out and taking in of the rope.
Stop and hold a dry rope as efficiently as a wet rope (wet ropes glide moreeasily).
Be suited for double ropes.
Be independent of the direction of the impact force.
Have a breaking force range of 250 to 600 kg.
Function without much additional equipment and be practical.
4. Belay Position.
When establishing a belay position, you, the belayer must determine the anticipateddirection of pull in case of a fall. As the climber moves up the rock, the direction maychange. You must "aim" your belay in the direction that will best enable you to hold afall. You should take corrective measures if the ideal belay position is different from theexpected direction of pull. This corrective action is accomplished by placing moreprotection (piton, chock, or runner) in a location that aligns the belay with the expecteddirection of pull.
5. Methods of Protection.
The belayer anchors himself to a reliable anchor using a part of the climbing rope or hissling (utility) rope. When the climbing rope is used and the belayer is within an arm'slength of an anchor, a double figure eight can be used to secure the climbing rope to theanchor. This short section of rope between anchor and belayer is called a self-belay.
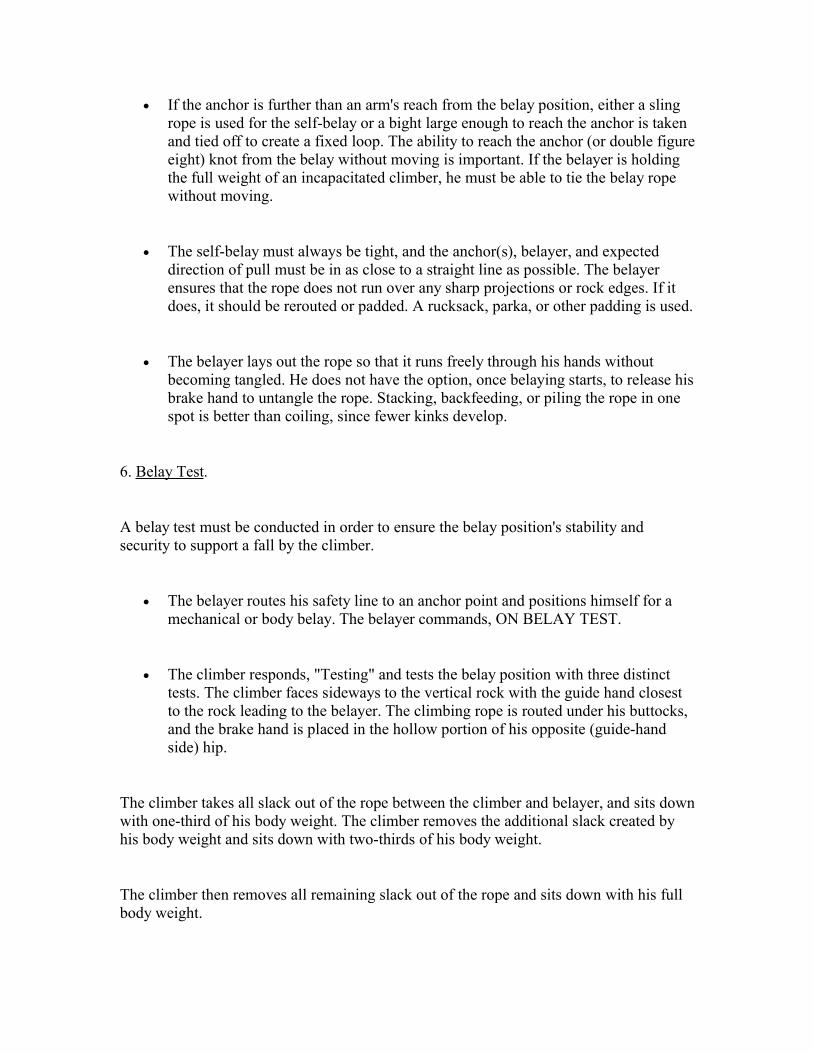
If the anchor is further than an arm's reach from the belay position, either a slingrope is used for the self-belay or a bight large enough to reach the anchor is takenand tied off to create a fixed loop. The ability to reach the anchor (or double figureeight) knot from the belay without moving is important. If the belayer is holdingthe full weight of an incapacitated climber, he must be able to tie the belay ropewithout moving.
The self-belay must always be tight, and the anchor(s), belayer, and expecteddirection of pull must be in as close to a straight line as possible. The belayerensures that the rope does not run over any sharp projections or rock edges. If itdoes, it should be rerouted or padded. A rucksack, parka, or other padding is used.
The belayer lays out the rope so that it runs freely through his hands withoutbecoming tangled. He does not have the option, once belaying starts, to release hisbrake hand to untangle the rope. Stacking, backfeeding, or piling the rope in onespot is better than coiling, since fewer kinks develop.
6. Belay Test.
A belay test must be conducted in order to ensure the belay position's stability andsecurity to support a fall by the climber.
The belayer routes his safety line to an anchor point and positions himself for amechanical or body belay. The belayer commands, ON BELAY TEST.
The climber responds, "Testing" and tests the belay position with three distincttests. The climber faces sideways to the vertical rock with the guide hand closestto the rock leading to the belayer. The climbing rope is routed under his buttocks,and the brake hand is placed in the hollow portion of his opposite (guide-handside) hip.
The climber takes all slack out of the rope between the climber and belayer, and sits downwith one-third of his body weight. The climber removes the additional slack created byhis body weight and sits down with two-thirds of his body weight.
The climber then removes all remaining slack out of the rope and sits down with his fullbody weight.
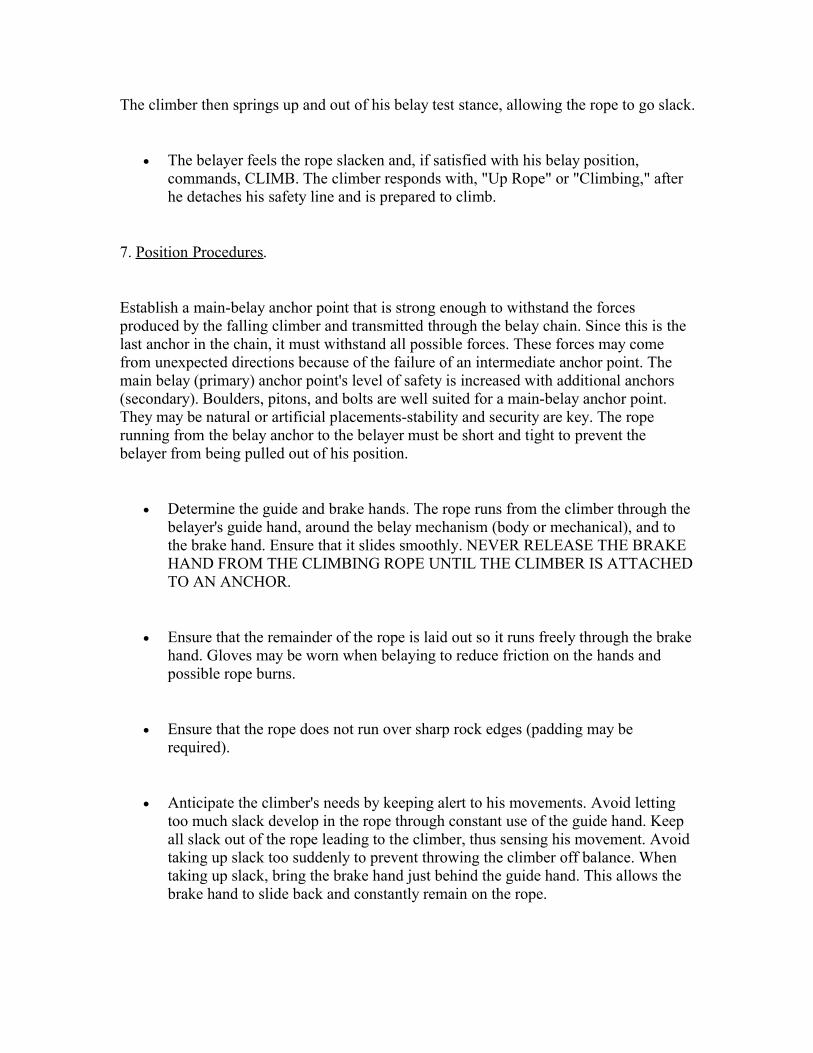
The climber then springs up and out of his belay test stance, allowing the rope to go slack.
The belayer feels the rope slacken and, if satisfied with his belay position,commands, CLIMB. The climber responds with, "Up Rope" or "Climbing," afterhe detaches his safety line and is prepared to climb.
7. Position Procedures.
Establish a main-belay anchor point that is strong enough to withstand the forcesproduced by the falling climber and transmitted through the belay chain. Since this is thelast anchor in the chain, it must withstand all possible forces. These forces may comefrom unexpected directions because of the failure of an intermediate anchor point. Themain belay (primary) anchor point's level of safety is increased with additional anchors(secondary). Boulders, pitons, and bolts are well suited for a main-belay anchor point.They may be natural or artificial placements-stability and security are key. The roperunning from the belay anchor to the belayer must be short and tight to prevent thebelayer from being pulled out of his position.
Determine the guide and brake hands. The rope runs from the climber through thebelayer's guide hand, around the belay mechanism (body or mechanical), and tothe brake hand. Ensure that it slides smoothly. NEVER RELEASE THE BRAKEHAND FROM THE CLIMBING ROPE UNTIL THE CLIMBER IS ATTACHEDTO AN ANCHOR.
Ensure that the remainder of the rope is laid out so it runs freely through the brakehand. Gloves may be worn when belaying to reduce friction on the hands andpossible rope burns.
Ensure that the rope does not run over sharp rock edges (padding may berequired).
Anticipate the climber's needs by keeping alert to his movements. Avoid lettingtoo much slack develop in the rope through constant use of the guide hand. Keepall slack out of the rope leading to the climber, thus sensing his movement. Avoidtaking up slack too suddenly to prevent throwing the climber off balance. Whentaking up slack, bring the brake hand just behind the guide hand. This allows thebrake hand to slide back and constantly remain on the rope.
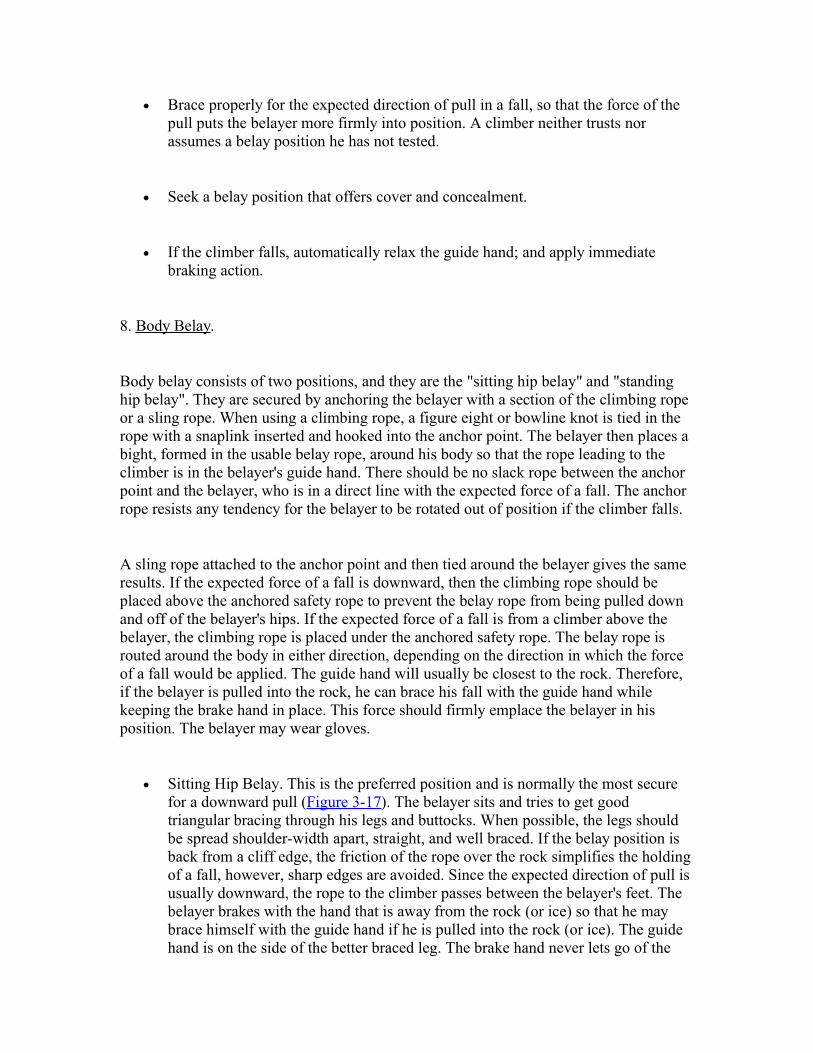
Brace properly for the expected direction of pull in a fall, so that the force of thepull puts the belayer more firmly into position. A climber neither trusts norassumes a belay position he has not tested.
Seek a belay position that offers cover and concealment.
If the climber falls, automatically relax the guide hand; and apply immediatebraking action.
8. Body Belay.
Body belay consists of two positions, and they are the "sitting hip belay" and "standinghip belay". They are secured by anchoring the belayer with a section of the climbing ropeor a sling rope. When using a climbing rope, a figure eight or bowline knot is tied in therope with a snaplink inserted and hooked into the anchor point. The belayer then places abight, formed in the usable belay rope, around his body so that the rope leading to theclimber is in the belayer's guide hand. There should be no slack rope between the anchorpoint and the belayer, who is in a direct line with the expected force of a fall. The anchorrope resists any tendency for the belayer to be rotated out of position if the climber falls.
A sling rope attached to the anchor point and then tied around the belayer gives the sameresults. If the expected force of a fall is downward, then the climbing rope should beplaced above the anchored safety rope to prevent the belay rope from being pulled downand off of the belayer's hips. If the expected force of a fall is from a climber above thebelayer, the climbing rope is placed under the anchored safety rope. The belay rope isrouted around the body in either direction, depending on the direction in which the forceof a fall would be applied. The guide hand will usually be closest to the rock. Therefore,if the belayer is pulled into the rock, he can brace his fall with the guide hand whilekeeping the brake hand in place. This force should firmly emplace the belayer in hisposition. The belayer may wear gloves.
Sitting Hip Belay. This is the preferred position and is normally the most securefor a downward pull (Figure 3-17). The belayer sits and tries to get goodtriangular bracing through his legs and buttocks. When possible, the legs shouldbe spread shoulder-width apart, straight, and well braced. If the belay position isback from a cliff edge, the friction of the rope over the rock simplifies the holdingof a fall, however, sharp edges are avoided. Since the expected direction of pull isusually downward, the rope to the climber passes between the belayer's feet. Thebelayer brakes with the hand that is away from the rock (or ice) so that he maybrace himself with the guide hand if he is pulled into the rock (or ice). The guidehand is on the side of the better braced leg. The brake hand never lets go of the
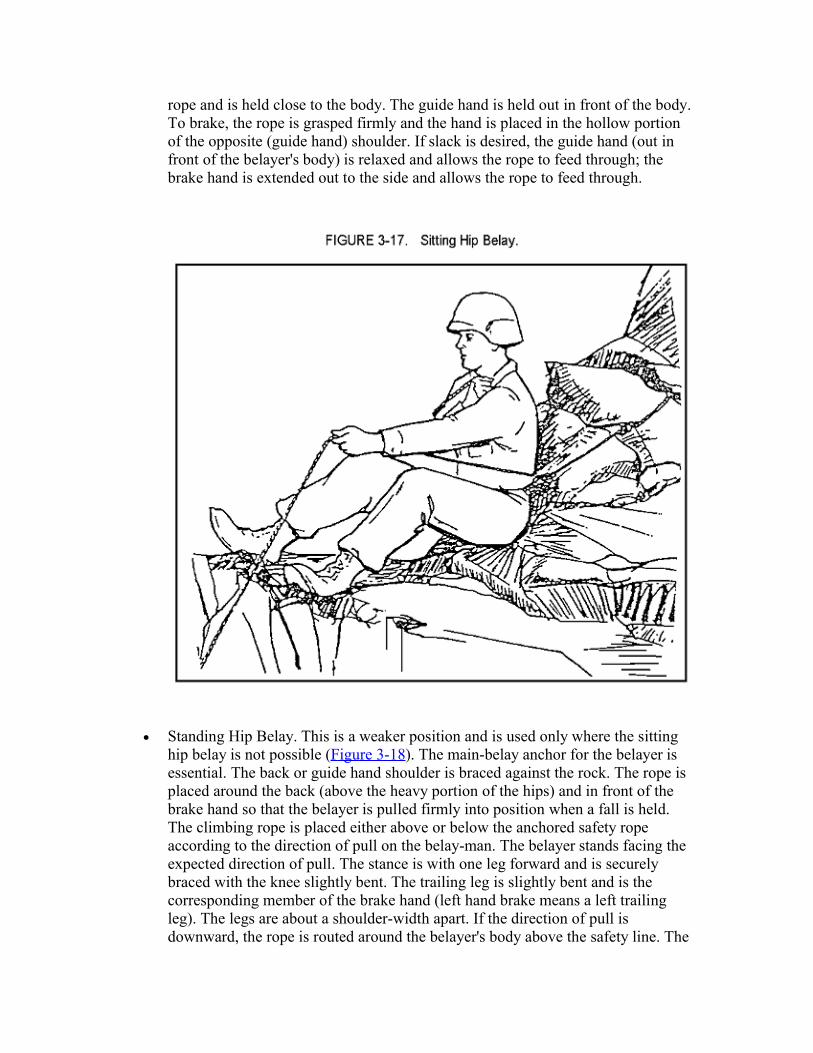
rope and is held close to the body. The guide hand is held out in front of the body.To brake, the rope is grasped firmly and the hand is placed in the hollow portionof the opposite (guide hand) shoulder. If slack is desired, the guide hand (out infront of the belayer's body) is relaxed and allows the rope to feed through; thebrake hand is extended out to the side and allows the rope to feed through.
Standing Hip Belay. This is a weaker position and is used only where the sittinghip belay is not possible (Figure 3-18). The main-belay anchor for the belayer isessential. The back or guide hand shoulder is braced against the rock. The rope isplaced around the back (above the heavy portion of the hips) and in front of thebrake hand so that the belayer is pulled firmly into position when a fall is held.The climbing rope is placed either above or below the anchored safety ropeaccording to the direction of pull on the belay-man. The belayer stands facing theexpected direction of pull. The stance is with one leg forward and is securelybraced with the knee slightly bent. The trailing leg is slightly bent and is thecorresponding member of the brake hand (left hand brake means a left trailingleg). The legs are about a shoulder-width apart. If the direction of pull isdownward, the rope is routed around the belayer's body above the safety line. The

brake position is to the belay's opposite (guide hand) shoulder. The guide hand isextended out in front of the belayer.
Piton Belay. As soon as the leading climber has identified a location for a reliableanchor (piton, chock, bolt, tree, rock), the climber gives the signal "Point" to thebelayer. The belayer keeps his brake hand applied while the climber prepares theplacement. When the climber has secured the climbing rope to the protection,there is now a change in the direction of pull. The belayer will run the belay ropefirmly beneath his buttocks and below his safety line.
The belayer faces the direction of pull and positions himself for a standing hip belay, leftor right hand brake, for an upward pull (Figure 3-19). The stance is with one leg forwardand securely braced with the knee slightly bent; the trailing leg is slightly bent andcorresponds with the brake hand. The guide hand is extended to the front and kept aboutwaist high. The brake hand is moved to the opposite hip in case of a fall (the hollowportion between the top of the thigh and away from the groin). If slack is desired, thebrake hand is moved out to the side, and the grip is relaxed to allow the rope to travelfreely through both hands.

A fall is easier to hold with a piton belay than with a sitting or standing belay because ofthe added friction between rope, rock, and snaplinks. When belaying a climber in atraverse, which is near or horizontal to the belayer, the belayer must anticipate a pullsideways and straight forward He should place the climbing rope underneath his buttocksand be anchored firmly.
Snaplink Body Belay. To ensure the belay rope is easily controlled around thebelayer's body, a snaplink should be placed into the climbing harness or bowlineon a coil on the guide hand side, with the climbing rope running through it.
The snaplink (referred to as the guide snaplink) keeps the belay rope from being strippedaway from the belayer when the direction of pull is up or down (Figure 3-20).
Use of the guide snaplink is the preferred method since it controls the belay rope foreither direction of pull at any time. When placed on the belayer, the gate of the snaplinkshould open down and away from the belayer.

The rope leading from the climber is inserted into the snaplink and routed around thebelayer's body and over (or under) the safety line to the belay anchor. The brake is alwaysto the hollow part of the shoulder of the guide-hand side. There is no need to change therope from a downward to an upward pull since the direction of pull remains constant atthe guide snaplink.
9. Managing Rope with a Body Belay.
When managing a rope while belaying, you should follow the procedure listed below.The brake hand is NEVER removed from the rope.
To take up rope (Figure 3-21), the belayer--
Pulls the rope (with the brake hand) until the brake hand is fully extendedto the side.
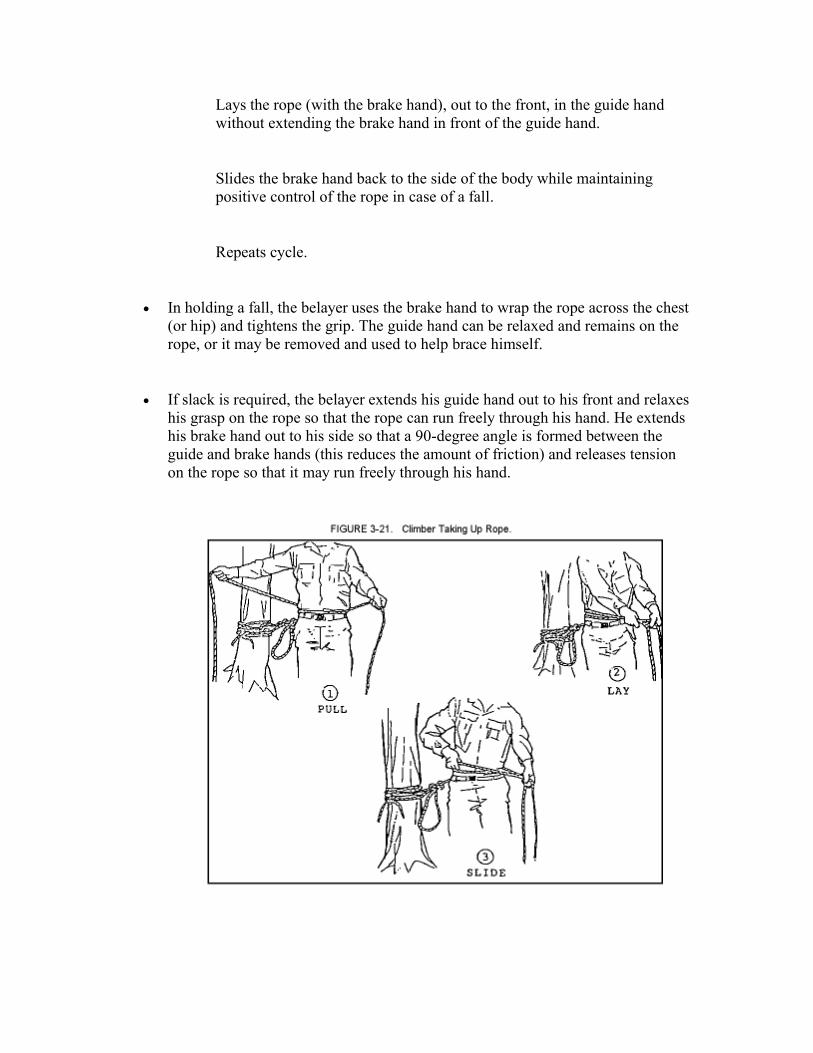
Lays the rope (with the brake hand), out to the front, in the guide handwithout extending the brake hand in front of the guide hand.
Slides the brake hand back to the side of the body while maintainingpositive control of the rope in case of a fall.
Repeats cycle.
In holding a fall, the belayer uses the brake hand to wrap the rope across the chest(or hip) and tightens the grip. The guide hand can be relaxed and remains on therope, or it may be removed and used to help brace himself.
If slack is required, the belayer extends his guide hand out to his front and relaxeshis grasp on the rope so that the rope can run freely through his hand. He extendshis brake hand out to his side so that a 90-degree angle is formed between theguide and brake hands (this reduces the amount of friction) and releases tensionon the rope so that it may run freely through his hand.
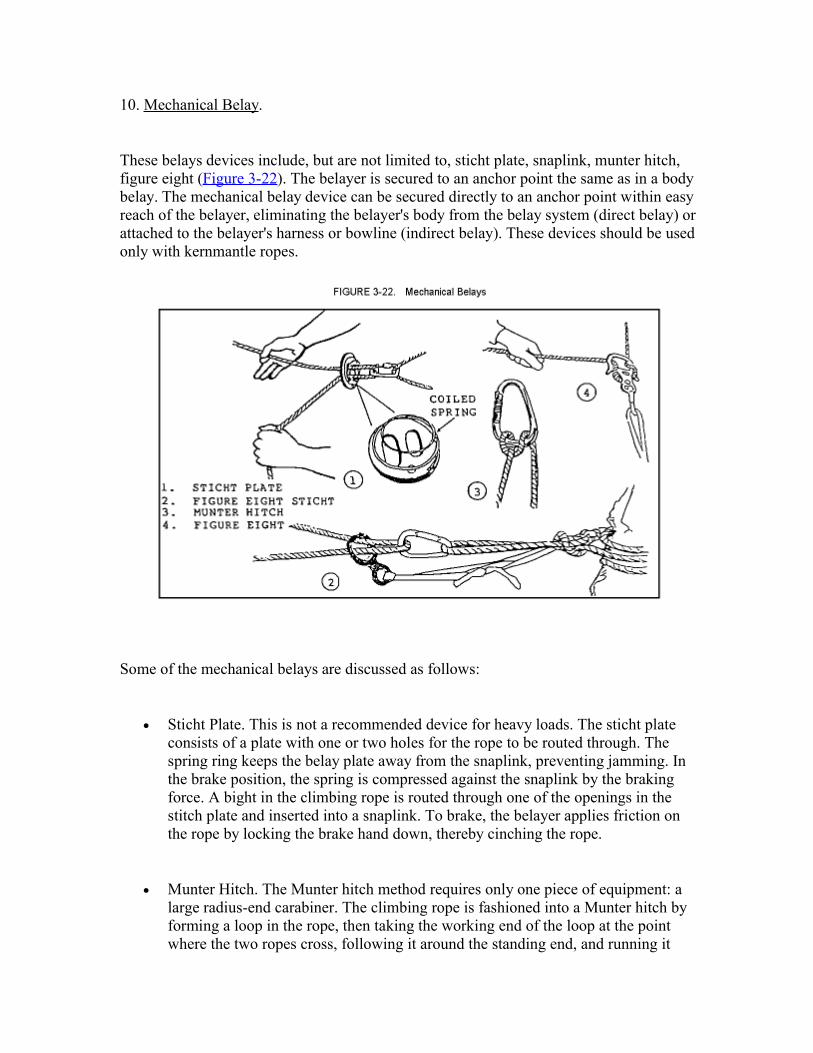
10. Mechanical Belay.
These belays devices include, but are not limited to, sticht plate, snaplink, munter hitch,figure eight (Figure 3-22). The belayer is secured to an anchor point the same as in a bodybelay. The mechanical belay device can be secured directly to an anchor point within easyreach of the belayer, eliminating the belayer's body from the belay system (direct belay) orattached to the belayer's harness or bowline (indirect belay). These devices should be usedonly with kernmantle ropes.
Some of the mechanical belays are discussed as follows:
Sticht Plate. This is not a recommended device for heavy loads. The sticht plateconsists of a plate with one or two holes for the rope to be routed through. Thespring ring keeps the belay plate away from the snaplink, preventing jamming. Inthe brake position, the spring is compressed against the snaplink by the brakingforce. A bight in the climbing rope is routed through one of the openings in thestitch plate and inserted into a snaplink. To brake, the belayer applies friction onthe rope by locking the brake hand down, thereby cinching the rope.
Munter Hitch. The Munter hitch method requires only one piece of equipment: alarge radius-end carabiner. The climbing rope is fashioned into a Munter hitch byforming a loop in the rope, then taking the working end of the loop at the pointwhere the two ropes cross, following it around the standing end, and running it
parallel along the initial loop. The Munter hitch should be clipped into thecarabiner. To brake, the brake hand is pushed forward so that the two ropes areparallel and cinched together.
Figure Eight. The figure eight descender provides a smooth and efficient belay.The rope is run through the device the same as for descending--a bight is taken upthrough the opening and routed over the collar, with the figure eight device beingclipped into a snaplink. To brake, the brake hand is pulled to the rear to cinch theclimbing rope under the collar of the figure eight. If the load is heavy, the wrap isdoubled around the collar of the figure eight to reduce the speed of the roperunning through the system. It is recommended that the rescue-eight version beused since the protruding "ears" on the figure eight do not allow the rope to slideall the way off the collar.
Use of a Mechanical Device Taking Up Rope. The following procedures are the same forbelays with the figure eight descender, Munter hitch, sticht plate, and snaplink brakesystem.
With the mechanical device properly secured and the climber's rope properlyplaced, assume a position from which you can grasp the standing end of the rope(to the climber) about 46 cm (18 inches) from the device. At the same time,maintain control of the working end (to the back-fed pile of rope) with the brakehand.
Slide the brake hand as close to the device as possible without the hands orhandwear becoming entangled.
Grasp the standing end of the rope as far away (at least 46 cm [18 inches]) fromthe device as possible with the guide hand.
While maintaining an even pressure with the guide hand, feed the rope throughthe system by pulling with the brake hand, away from the mechanical device.
Lay the rope from the brake hand into the guide hand, ensuring not to extend thebrake hand beyond the guide hand. Slide the brake hand back to the belay device.
Repeat the process of pull, lay, slide.
PART C - RAPPELLING
1. General.
Rappelling and down climbing are both means of descending; the choice is based onmission, situation, equipment, terrain (available anchors), weather, number of troopsinvolved, and time and equipment available.
2. Selecting a Rappel Point.
The technique of rappelling involves the quick descent of a climber and the retrieval ofthe rope from the bottom. The selection of the rappel point depends on factors such asmission, cover, route, anchor points, and edge composition (loose or jagged rocks). Theanchor point should be above the rappeller's departure point. It is best to use primary andsecondary anchor points (natural anchors are preferred).
As a climber, you should make sure that the rope reaches the bottom or a place fromwhich you can further rappel or climb. The rappel point must be tested and inspected toensure the rope will run freely and that the rope will run freely and that the area is clearedof obstacles that could be pulled off. If a sling or runner is used for a rappel point, itshould be tied twice to form two separate loops. Make sure that loading and off-loadingplatforms are available.
3. Establishing a Rappel Point.
Equal tension between all anchor points on a rappel lane must be established by usingprimary and secondary anchor points. The rappel rope should not extend if one anchorpoints fails.
All the rappelling methods discussed here can be performed with a single or double rope.If possible, a double rope application is better for safety purposes.
If a rappel lane is less than half the rope length, you may use one of the followingtechniques:
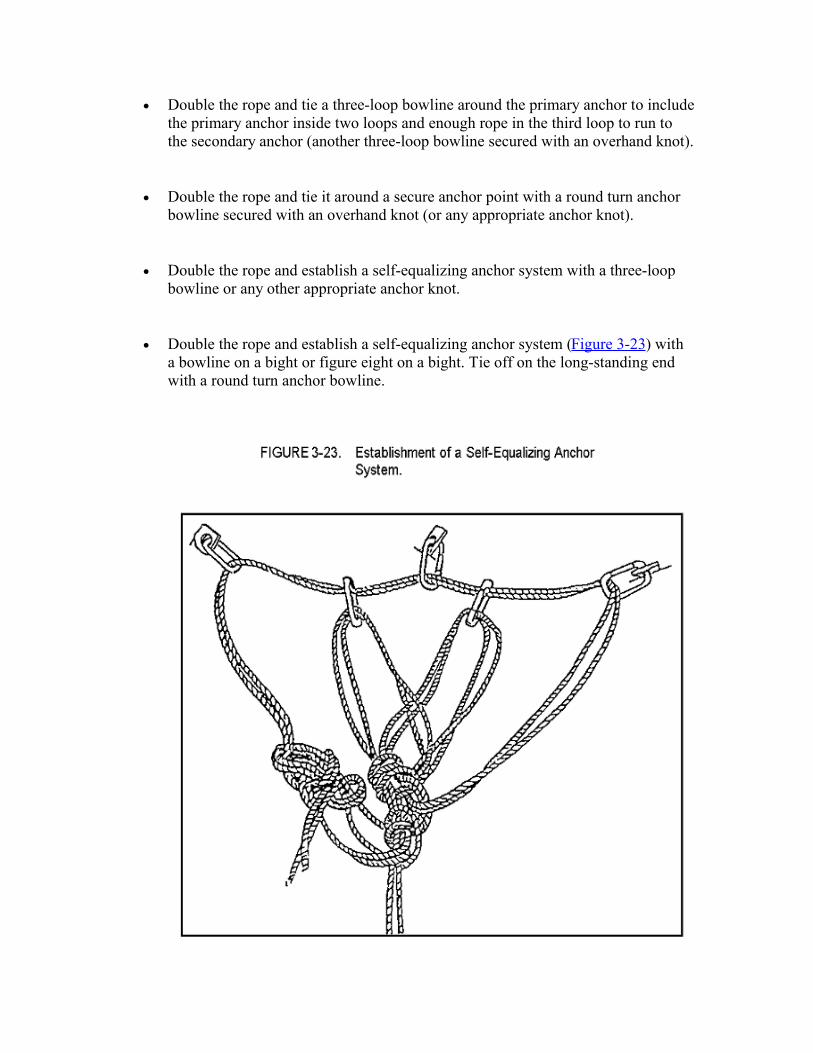
Double the rope and tie a three-loop bowline around the primary anchor to includethe primary anchor inside two loops and enough rope in the third loop to run tothe secondary anchor (another three-loop bowline secured with an overhand knot).
Double the rope and tie it around a secure anchor point with a round turn anchorbowline secured with an overhand knot (or any appropriate anchor knot).
Double the rope and establish a self-equalizing anchor system with a three-loopbowline or any other appropriate anchor knot.
Double the rope and establish a self-equalizing anchor system (Figure 3-23) witha bowline on a bight or figure eight on a bight. Tie off on the long-standing endwith a round turn anchor bowline.

In an emergency, double the rope and place it behind or through a secure anchorpoint, or tie a runner around an anchor point with a snaplink inserted and place therope through the snaplink. To preclude a rappeller from sliding off the end of therappel lane, tie a double figure eight (square knot or double fisherman's knot) atthe bottom end of the rope with both ends.
If a rappel lane is greater than half the rope length, you may apply one of thefollowing techniques:
Use two ropes. With both ropes, tie a round turn anchor bowline around a primaryanchor point. Take the remaining rope (the tail from the primary anchor bowline)and tie another round turn anchor bowline to a secondary anchor point. Thesecondary anchor point should be in a direct line behind the primary anchor point.The anchor can be either natural or artificial. The ends of the rappel lane ropesshould be offset by 15 cm (6 inches) so that the rope ends feed freely through therappeller's snaplink.
Use two ropes. Establish a three-piton anchor system using a bowline on a bight(or figure eight on a bight) and tied off on the long-standing end with a round turnanchor bowline (see Figure 3-23).
In an emergency, use two ropes and tie the two ends together with a joining knot.Place the joined ropes behind or through an anchor point, or tie a runner around ananchor point with a snaplink inserted and place the joined rope through thesnaplink. The joining knot is offset to the left or right of the anchor. Tie off thebottom end of the rope with a joining knot to prevent a rappeller from sliding offthe end of the rappel lane.
Situations may arise where, due to the length of the rappel, the rappel rope cannotbe tied to the anchor (if the rope is used to tie the knots, it will be too short toaccomplish the rappel). You may use the following methods:
o Using a natural anchor:
Tie a sling rope, runner, or another rope around the anchor with a roundturn anchor bowline.
The rappel rope will have a fixed loop (figure eight or butterfly) tied inone end, which is attached to the round turn around the anchor through thetwo snaplinks (opposing gates).
o Using an artificial anchor:
Tie off a sling rope, runner, or another rope to form a loop.
Put the loop through the snaplinks that are attached to the artificial anchorpoint.
Bring the bottom of the loop up and connect it to the snaplinks that arebetween the artificial anchor points.
Grasp the snaplinks that are between the chocks/pitons and pull themdown and together.
Tie a fixed loop (figure eight or butterfly) in the end of the rappel rope andconnect this to the snaplinks that have been pulled together.
REMEMBER! Rerouted figure eight knots can be used instead of bowlines. Runners maybe used from one or more anchor points.
To set up a retrievable rappel point, you must apply one of the following methods:
Double the rope when the rappel is less than half the total length of the rope. Placethe rope, with the bight formed by the midpoint, around the primary anchor. Jointhe tails of the rappel rope and throw the rope over the cliff. Tie a clove hitcharound a snaplink, just below the anchor point, with the locking bar inside thesnaplink away from the gate opening end and facing uphill. Snap the oppositestanding portion into the snaplink. When the rappeller reaches the bottom, hepulls on that portion of the rope to which the snaplink is secured to allow the ropeto slide around the anchor point.
When the length of the rappel is greater than half the length of the rope used, jointwo ropes around the anchor point (double fisherman's knot or square knot).
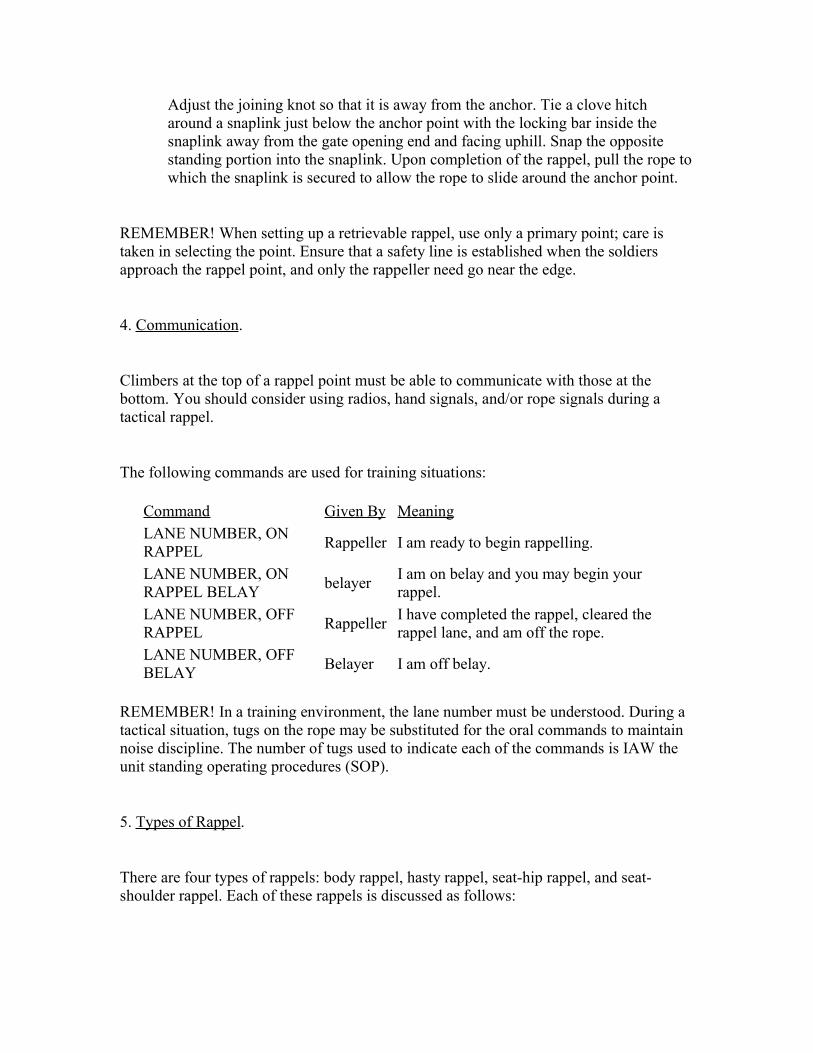
Adjust the joining knot so that it is away from the anchor. Tie a clove hitcharound a snaplink just below the anchor point with the locking bar inside thesnaplink away from the gate opening end and facing uphill. Snap the oppositestanding portion into the snaplink. Upon completion of the rappel, pull the rope towhich the snaplink is secured to allow the rope to slide around the anchor point.
REMEMBER! When setting up a retrievable rappel, use only a primary point; care istaken in selecting the point. Ensure that a safety line is established when the soldiersapproach the rappel point, and only the rappeller need go near the edge.
4. Communication.
Climbers at the top of a rappel point must be able to communicate with those at thebottom. You should consider using radios, hand signals, and/or rope signals during atactical rappel.
The following commands are used for training situations:
Command Given By MeaningLANE NUMBER, ONRAPPEL Rappeller I am ready to begin rappelling.
LANE NUMBER, ONRAPPEL BELAY belayer I am on belay and you may begin your
rappel.LANE NUMBER, OFFRAPPEL Rappeller I have completed the rappel, cleared the
rappel lane, and am off the rope. LANE NUMBER, OFFBELAY Belayer I am off belay.
REMEMBER! In a training environment, the lane number must be understood. During atactical situation, tugs on the rope may be substituted for the oral commands to maintainnoise discipline. The number of tugs used to indicate each of the commands is IAW theunit standing operating procedures (SOP).
5. Types of Rappel.
There are four types of rappels: body rappel, hasty rappel, seat-hip rappel, and seat-shoulder rappel. Each of these rappels is discussed as follows:
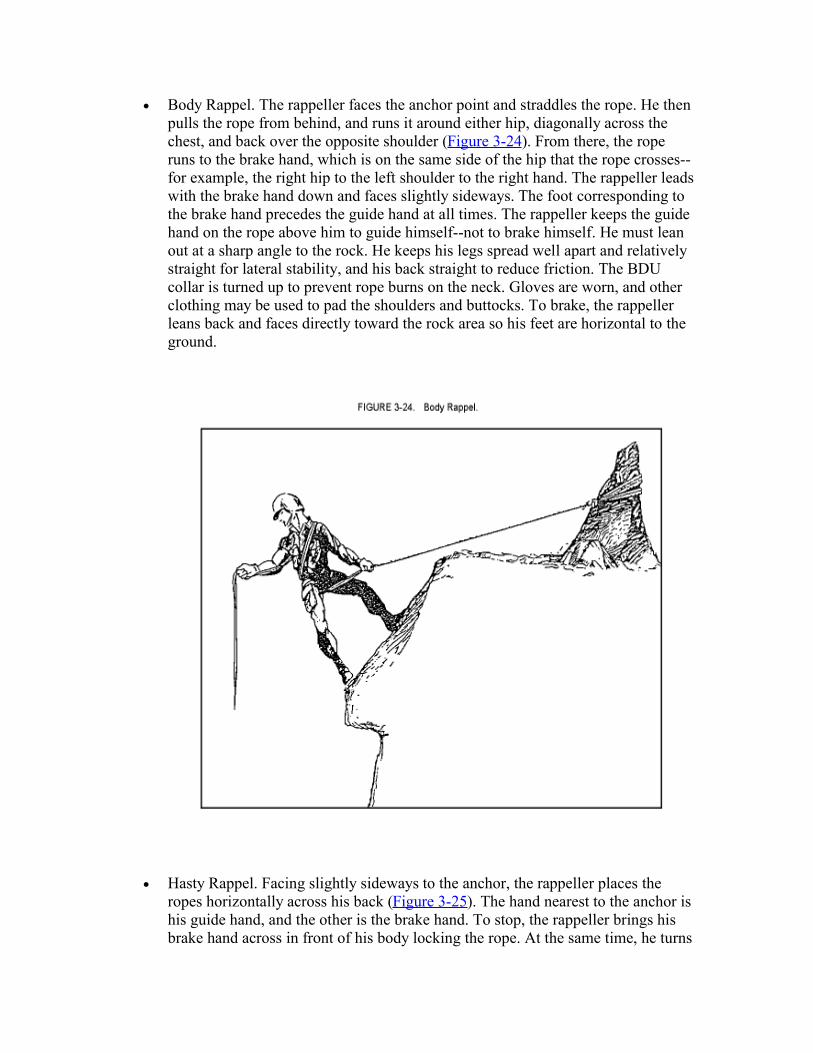
Body Rappel. The rappeller faces the anchor point and straddles the rope. He thenpulls the rope from behind, and runs it around either hip, diagonally across thechest, and back over the opposite shoulder (Figure 3-24). From there, the roperuns to the brake hand, which is on the same side of the hip that the rope crosses--for example, the right hip to the left shoulder to the right hand. The rappeller leadswith the brake hand down and faces slightly sideways. The foot corresponding tothe brake hand precedes the guide hand at all times. The rappeller keeps the guidehand on the rope above him to guide himself--not to brake himself. He must leanout at a sharp angle to the rock. He keeps his legs spread well apart and relativelystraight for lateral stability, and his back straight to reduce friction. The BDUcollar is turned up to prevent rope burns on the neck. Gloves are worn, and otherclothing may be used to pad the shoulders and buttocks. To brake, the rappellerleans back and faces directly toward the rock area so his feet are horizontal to theground.
Hasty Rappel. Facing slightly sideways to the anchor, the rappeller places theropes horizontally across his back (Figure 3-25). The hand nearest to the anchor ishis guide hand, and the other is the brake hand. To stop, the rappeller brings hisbrake hand across in front of his body locking the rope. At the same time, he turns
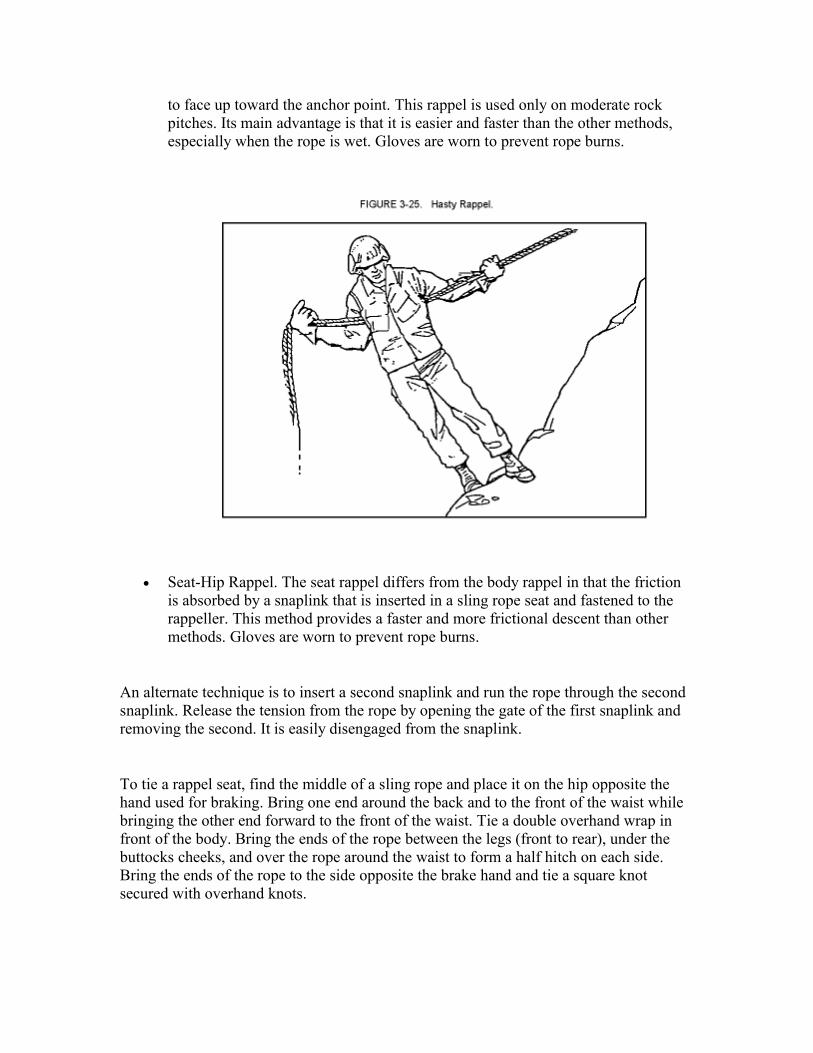
to face up toward the anchor point. This rappel is used only on moderate rockpitches. Its main advantage is that it is easier and faster than the other methods,especially when the rope is wet. Gloves are worn to prevent rope burns.
Seat-Hip Rappel. The seat rappel differs from the body rappel in that the frictionis absorbed by a snaplink that is inserted in a sling rope seat and fastened to therappeller. This method provides a faster and more frictional descent than othermethods. Gloves are worn to prevent rope burns.
An alternate technique is to insert a second snaplink and run the rope through the secondsnaplink. Release the tension from the rope by opening the gate of the first snaplink andremoving the second. It is easily disengaged from the snaplink.
To tie a rappel seat, find the middle of a sling rope and place it on the hip opposite thehand used for braking. Bring one end around the back and to the front of the waist whilebringing the other end forward to the front of the waist. Tie a double overhand wrap infront of the body. Bring the ends of the rope between the legs (front to rear), under thebuttocks cheeks, and over the rope around the waist to form a half hitch on each side.Bring the ends of the rope to the side opposite the brake hand and tie a square knotsecured with overhand knots.
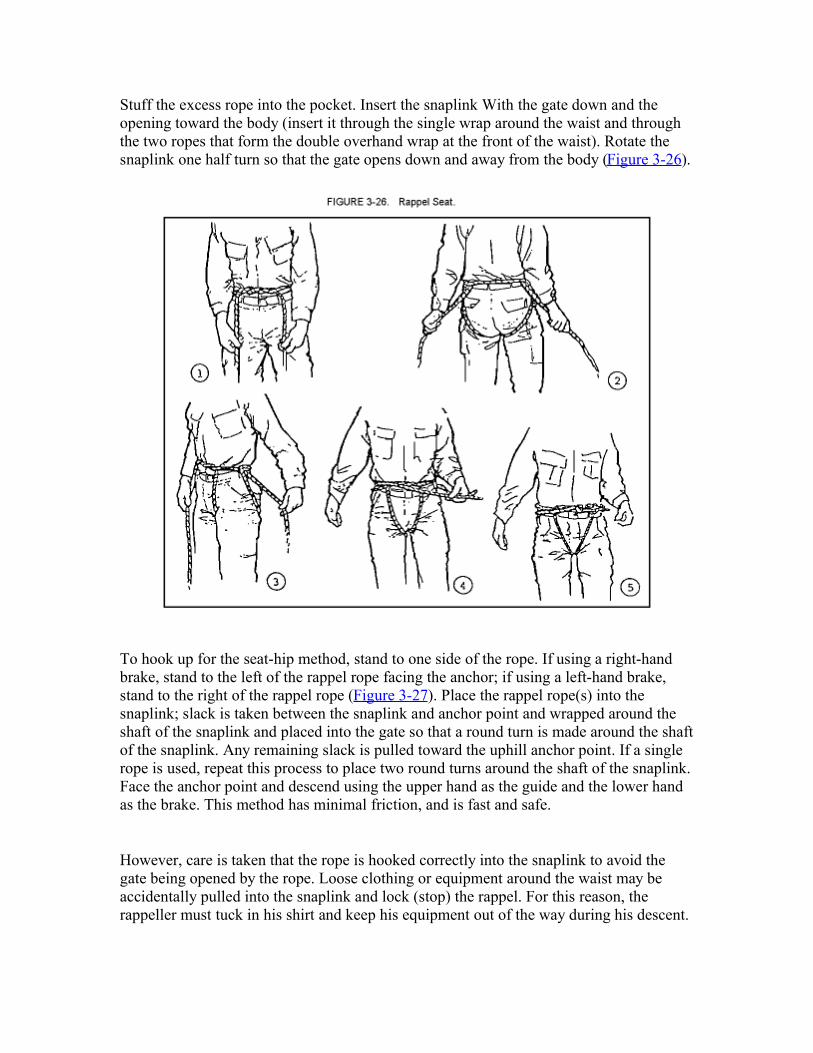
Stuff the excess rope into the pocket. Insert the snaplink With the gate down and theopening toward the body (insert it through the single wrap around the waist and throughthe two ropes that form the double overhand wrap at the front of the waist). Rotate thesnaplink one half turn so that the gate opens down and away from the body (Figure 3-26).
To hook up for the seat-hip method, stand to one side of the rope. If using a right-handbrake, stand to the left of the rappel rope facing the anchor; if using a left-hand brake,stand to the right of the rappel rope (Figure 3-27). Place the rappel rope(s) into thesnaplink; slack is taken between the snaplink and anchor point and wrapped around theshaft of the snaplink and placed into the gate so that a round turn is made around the shaftof the snaplink. Any remaining slack is pulled toward the uphill anchor point. If a singlerope is used, repeat this process to place two round turns around the shaft of the snaplink.Face the anchor point and descend using the upper hand as the guide and the lower handas the brake. This method has minimal friction, and is fast and safe.
However, care is taken that the rope is hooked correctly into the snaplink to avoid thegate being opened by the rope. Loose clothing or equipment around the waist may beaccidentally pulled into the snaplink and lock (stop) the rappel. For this reason, therappeller must tuck in his shirt and keep his equipment out of the way during his descent.

Seat-Shoulder Rappel. To hook up for the seat-shoulder method, face the rappelpoint (see Figure 3-28). Snap into the rope that passes up through the snaplink.Bring the rope over one shoulder and back to the opposite hand (left shoulder toright hand). Use the same technique in the descent as in the body rappel. Thismethod is faster than the body rappel, less frictional, and more efficient forclimbers with packs and during night operations.
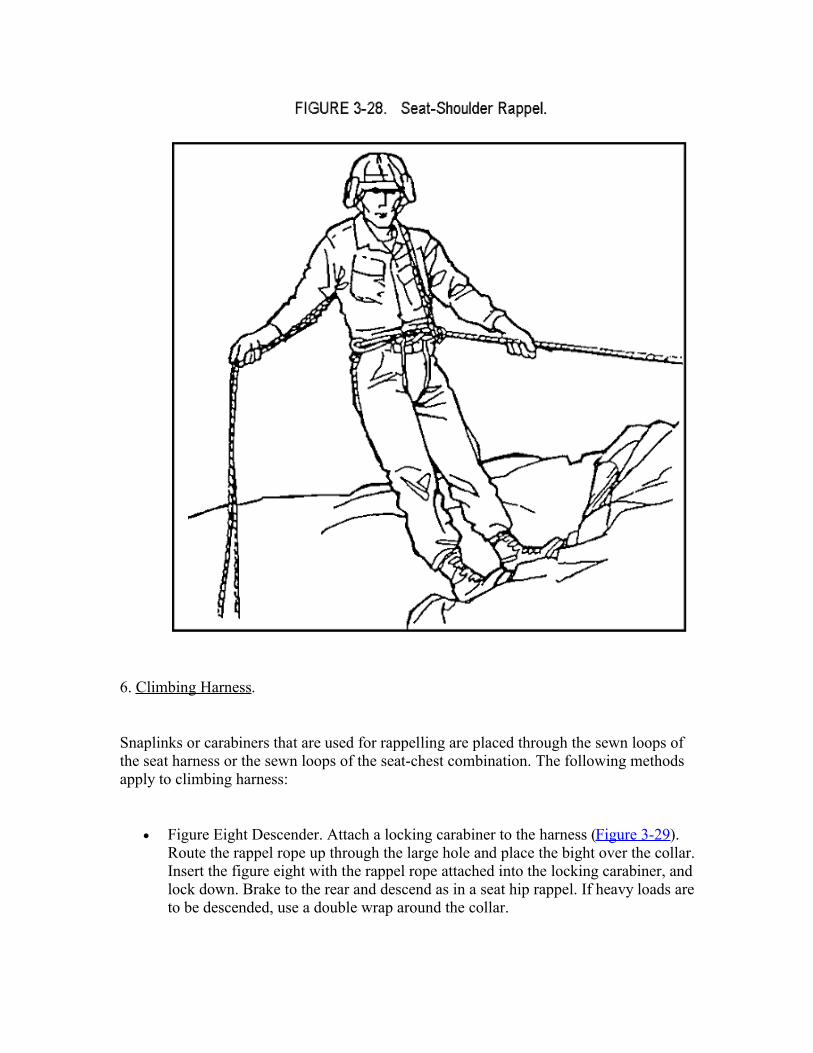
6. Climbing Harness.
Snaplinks or carabiners that are used for rappelling are placed through the sewn loops ofthe seat harness or the sewn loops of the seat-chest combination. The following methodsapply to climbing harness:
Figure Eight Descender. Attach a locking carabiner to the harness (Figure 3-29).Route the rappel rope up through the large hole and place the bight over the collar.Insert the figure eight with the rappel rope attached into the locking carabiner, andlock down. Brake to the rear and descend as in a seat hip rappel. If heavy loads areto be descended, use a double wrap around the collar.
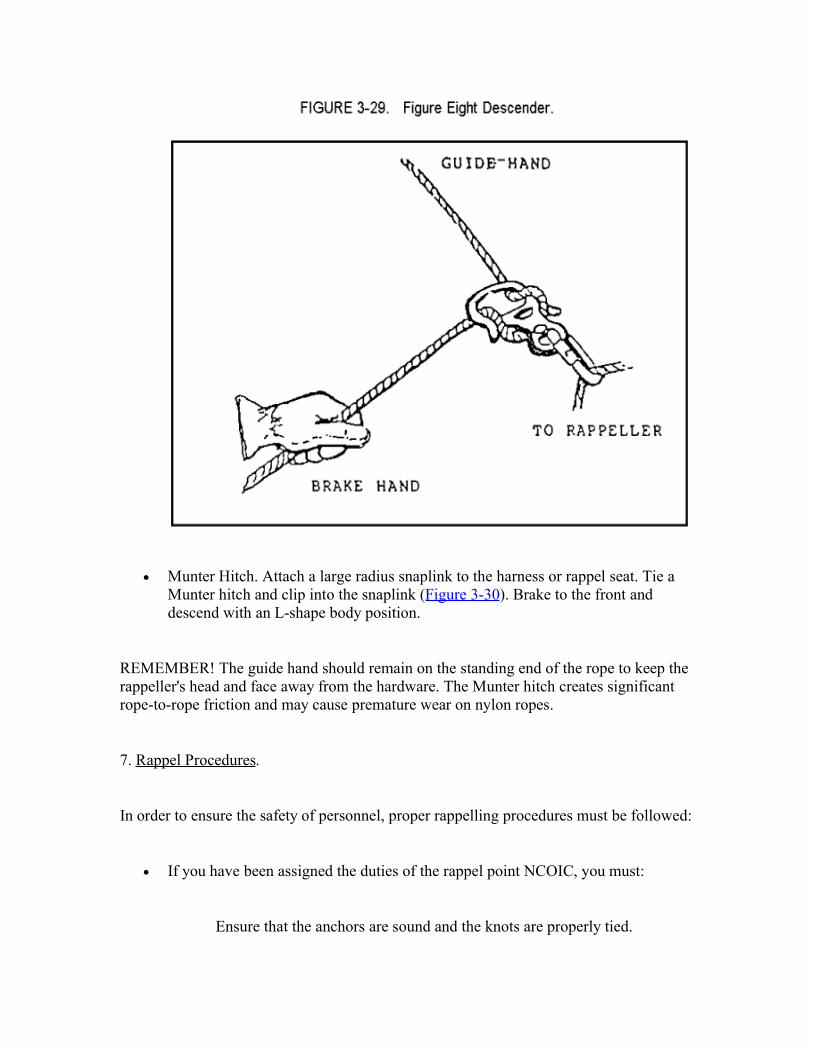
Munter Hitch. Attach a large radius snaplink to the harness or rappel seat. Tie aMunter hitch and clip into the snaplink (Figure 3-30). Brake to the front anddescend with an L-shape body position.
REMEMBER! The guide hand should remain on the standing end of the rope to keep therappeller's head and face away from the hardware. The Munter hitch creates significantrope-to-rope friction and may cause premature wear on nylon ropes.
7. Rappel Procedures.
In order to ensure the safety of personnel, proper rappelling procedures must be followed:
If you have been assigned the duties of the rappel point NCOIC, you must:
Ensure that the anchors are sound and the knots are properly tied.
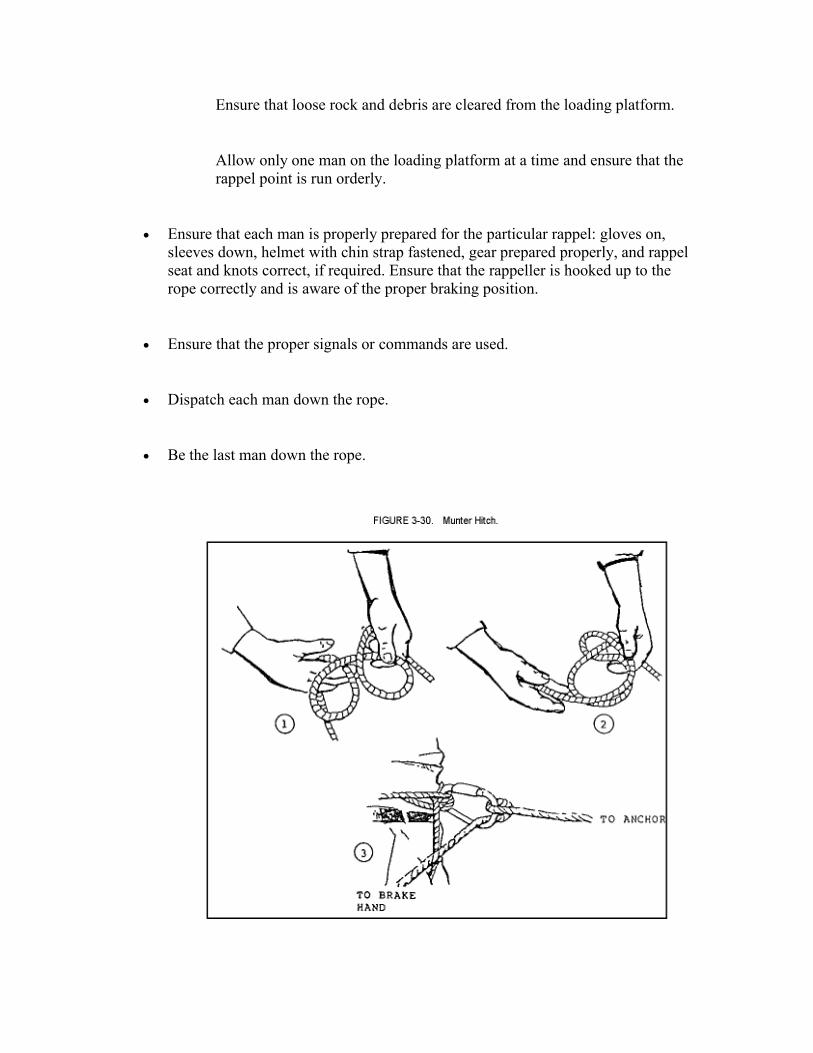
Ensure that loose rock and debris are cleared from the loading platform.
Allow only one man on the loading platform at a time and ensure that therappel point is run orderly.
Ensure that each man is properly prepared for the particular rappel: gloves on,sleeves down, helmet with chin strap fastened, gear prepared properly, and rappelseat and knots correct, if required. Ensure that the rappeller is hooked up to therope correctly and is aware of the proper braking position.
Ensure that the proper signals or commands are used.
Dispatch each man down the rope.
Be the last man down the rope.
If you are the first rappeller down, you must:
Select a smooth route for the rope that is clear of sharp rocks.
Conduct a self-belay with a Prusik knot tied from yourself to the rappelrope.
Clear the route, placing loose rocks far enough back on ledges to be out ofthe way, which the rope may dislodge.
Ensure the rope reaches the bottom or is at a place from which additionalrappels can be made.
Ensure that the rope will run freely around the rappel point when pulledfrom below.
Clear the rappel lane by straightening all twists and tangles from the ropes.
Belay subsequent rappellers down the rope.
Take charge of personnel as they arrive at the bottom (off-loadingplatform).
REMEMBER! A rappeller is always belayed from the bottom, except for the first mandown. The first man belays himself down the rope by using a safety line attached to hisrappel seat that is hooked to the rappel rope with a Prusik knot. As the first man rappelsdown the rope, he "walks" the Prusik knot down with him.
When the tactical situation permits, each rappeller down must indicate with ashout "Off rappel," and ensures all ropes around their anchors are running free. Ifsilence is needed, a planned signal of pulling the rope is substituted for the voicesignal. After the rope is cleared and the rappeller is off rappel, he acts as thebelayer for next rappeller.
While rappelling, all rappellers must inspect the ropes as often as possible.
The last rappeller to descend constructs a retrievable rappel point and rappelsdown. Then, he pulls the rope smoothly to prevent the rising rope end fromentangling with the other rope. He stands clear of the falling rope and any rocksthat it may dislodge.
Rappellers must wear gloves for all types of rappels to avoid rope burns.
Bounding rappels are discouraged since they stress the anchor, and cause unduewear and friction on the rope.
Rappellers descend in a smooth, controlled manner. The body forms an L-shapewith the feet shoulder-width apart, legs straight, and buttocks parallel to theground. When carrying equipment or additional weight, a modified L-shape isused with the legs slightly lower than the buttocks to compensate for theadditional weight. The rappeller's back is straight. He looks over the brakeshoulder. The guide hand is extended on the rope with the elbow extended andlocked. The rope slides freely through the guide hand. The guide hand is used toadjust equipment and assist balance during descent. The rappeller grasps the ropefirmly with the brake hand and places it in the small of his back (Munter hitch is afront brake). Releasing tension on the rope and moving the brake hand out to hisrear at a 45-degree angle regulates the rate of descent. The rappeller never lets goof the ropes with his brake hand until the rappel is complete.
The belayer assumes a position at the base of the lane about one pace away fromthe rock area. He ensures that the rappel ropes are at least even with the groundduring rock and tower rappels. The belayer loosely holds the rappel ropes withboth hands so as not to interfere with the fall. If the rappeller shouts, "Falling," orloses control of his brake hand or descent, the belayer immediately stops therappeller by pulling downward on the rappel ropes. Gloves are not worn by thebelayer unless directed. The belayer watches the rappeller at all times andmaintains constant voice or visual contact with the rappeller. The belayer wears ahelmet to prevent injuries from falling debris. All commands are spoken loudlyand clearly.
Conclusion. You have now completed the instructional material for Lesson 3. Before youcomplete the practice exercise for this lesson, you should review the material presented inthis lesson. Answers and feedback for the questions in the practice exercise are providedto show you where further study is required.
LESSON 3 PRACTICAL EXERCISE
InstructionsThe following items will test your understanding of the material covered in this lesson.There is only one correct answer for each item. When you have completed the exercise,check your answers with the answer key that follows. If you answer any item incorrectly,review that part of the lesson which contains the portion involved.
Situation. During the mountainous exercise all members of the unit are required to demonstratetheir abilities by identifying the basic climbing techniques and methods acquired duringtraining.
1. As a leader, and during the planning of the unit's mountaineering mission you arerequired to select the appropriate personnel. You should
a. select two teams that consist of three expert rock climbers or assault climbersfor each platoon and the remaining personnel should also be skilled in basicmilitary mountaineering.
b. select only personnel skilled in basic military mountaineering and after arrivingat the area of operations select one assault team.
c. select only volunteers that are skilled in basic military mountaineering and afterchecking their qualifications select the rock climber team.
d. select only personnel experienced in mountainous regions, divide your teamsand proceed selection of the best men available.
2. The art of mountain walking may mean relearning how to walk. A proper techniqueyou must consider, is to
a. place your foot at an angle to prevent from falling.
b. set a tempo or number of steps per minute.
c. rest between steps by bending the legs slightly.
d. avoid indentation that was made by someone else.
3. As a military mountaineer and while climbing you must set a cadence per minute basedon the pace the unit is moving. You should
a. keep an interval of one to three paces to enhance the rhythm and tempo.
b. keep an interval of two to four paces to enhance the rhythm and pace.
c. keep an interval of three to five paces between individuals to enhance thetempo, pace, and rhythm.
d. keep an interval of two to four paces between individuals to enhance the tempo,pace, and rhythm.
4. When ascending on hard ground, you must
a. choose each step carefully and make sure your back is straight.
b. use the herringbone step with your toes pointed in.
c. use the lower legs to sustain your weight and the upper legs to keep you inbalance.
d. have your knees locked on every step to rest the muscles of your legs.
5. While climbing, you are required to do a hop-step. You should
a. use this step when you want to switch feet on the same foothold without anintermediate hold so that you may move sideways.
b. use this step to insert your whole body into a crack in the rock.
c. use this step when you want to raise your body.
d. use this step to lean to one side of the rock face without falling.
6. A belay test must be conducted in order to ensure the belay position is stable. Aposition procedure for establishing a main-belay, is to
a. ensure that the rope runs from the belayer through the climber's guide hand.
b. use a pad when rope is running over sharp rocks and ledges.
c. ensure that the rope running from the belayer anchor to the belayer is short andtight.
d. release the middle portion of the rope, when the climber gives "Off Repell".
LESSON THREE
PRACTICE EXERCISE
ANSWER KEY AND FEEDBACK
Item Correct Answer and Feedback
1. a. select two teams that consist of three expert rock climbers or assaultclimbers for each platoon and the remaining personnel should also beskilled in basic military mountaineering.
Selection of personnel is crucial during the preparation of a mountainousoperation. To produce positive results and success, a thorough analysis ofassigned duties should be conducted on each member.
2. b. set a tempo, or number of steps per minute.
According to the rate at which the unit is moving. Since physicaldifference mean the tempos of two people moving at the same speed willnot be the same.
3. c. keep an interval of three to five paces between individuals to enhance
the tempo, pace, and rhythm.
It is important to follow or establish a proper cadence on long marches,otherwise some soldiers will move too fast and others too slow. As analternative or at night the rest step may be used, which is short pause aftereach step.
4. d. have your knees locked on every step to rest the muscles of your legs.

The general formation of the terrain dictates the ascending or descendingapproach you should take. To avoid personal injuries and that of the othermembers of the climbing party, you should familiarize yourself withmountain walking techniques. To conserve upper body strength, maximumutilization of your feet and legs are required.
5. a. use this step when you want to switch feet on the same foothold without
an intermediate hold so that you may move sideways.
Once again, selection of handholds/footholds are crucial to the climber.You should select your holds and plan every move you will make alongwith alternative moves.
6. c. The rope running from the belay anchor to the belayer must be short and
tight. This is to prevent the belayer from being pulled out