morphy richards instruction book · 2 health and safety the use of any electrical appliance...
TRANSCRIPT
g
f
d
p
i
q
}
∂
Soup MakerPlease read and keep these instructions
Soupière électriqueMerci de bien vouloir lire et conserver ces instructions
SuppenbereiterLesen Sie diese Bedienungsanleitung durch und heben Sie sie gut auf
Máquina de Fazer SopaLeia e guarde estas instruções
Soup MakerLeggere e conservare le presenti istruzioni
SuppemaskineLæs og gem denne vejledning
Urzadzenie do przygotowywania zupZapoznaj sie z niniejsza instrukcja obslugi i zachowaj ja do wykorzystania w przyszlosci
Výrobník polévkyPrectete si tyto pokyny a uschovejte si je
FP501020MEE Rev2.qxp_Morphy Richards Instruction Book 26/10/2016 12:09 Page 1

2
Health And Safety The use of any electrical appliance requires the following common sense safety rules.
Please read these instructions carefully before using the product.
• This appliance can be used by persons with reduced physical,sensory or mental capabilities, or lack of experience and knowledge, if they have been given supervision or instructionconcerning the use of the appliance in a safe way and understand the hazards involved.
• Children shall not play with the appliance.• The appliance shall not be used by children. • Keep the appliance and cord out of the reach of children. • After one operation cycle, you must allow the appliance to cool
down completely, then clean the appliance. • This appliance is not intended to be operated by means of an
external timer or separate remote control system.• If the supply cable is damaged, it must be replaced with a
special cable assembly available from the manufacturer or its service agent.
• WARNING: The mixing blade is very sharp. Handle with carewhen using and cleaning.
• For care and cleaning refer to pages 11 & 18.
g
In addition, we offer the following safety advice.
Location• Always locate your appliance away from the edge of a
worktop.
• Ensure that the appliance is used on a firm, flat surface.
• Do not use the appliance outdoors, or near water.
Mains Cable• The mains cable should reach from the socket to the base unit
without straining the connections.
• Do not let the mains cable hang over the edge of a worktopwhere a child could reach it.
• Do not let the cable run across an open space e.g. between a lowsocket and table.
• Do not let the cable run across a cooker or toaster or other hotarea which might damage the cable.
Personal Safety• WARNING: To protect against fire, electric shock and
personal injury, do not immerse cord, plug and appliance inwater or any other liquid.
FP501020MEE Rev2.qxp_Morphy Richards Instruction Book 26/10/2016 12:09 Page 2
3
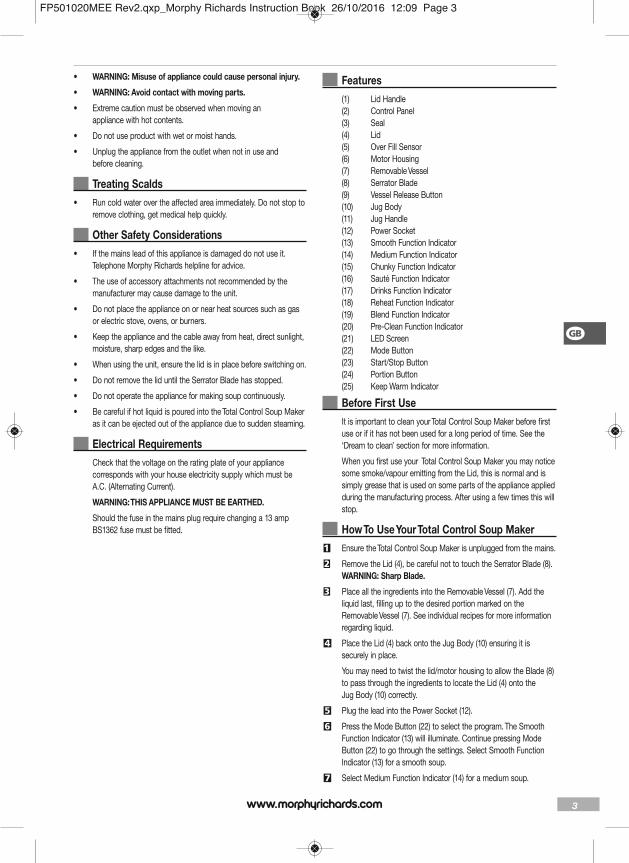
• WARNING: Misuse of appliance could cause personal injury.
• WARNING: Avoid contact with moving parts.
• Extreme caution must be observed when moving an appliance with hot contents.
• Do not use product with wet or moist hands.
• Unplug the appliance from the outlet when not in use and before cleaning.
Treating Scalds• Run cold water over the affected area immediately. Do not stop to
remove clothing, get medical help quickly.
Other Safety Considerations• If the mains lead of this appliance is damaged do not use it.
Telephone Morphy Richards helpline for advice.
• The use of accessory attachments not recommended by themanufacturer may cause damage to the unit.
• Do not place the appliance on or near heat sources such as gasor electric stove, ovens, or burners.
• Keep the appliance and the cable away from heat, direct sunlight,moisture, sharp edges and the like.
• When using the unit, ensure the lid is in place before switching on.
• Do not remove the lid until the Serrator Blade has stopped.
• Do not operate the appliance for making soup continuously.
• Be careful if hot liquid is poured into the Total Control Soup Makeras it can be ejected out of the appliance due to sudden steaming.
Electrical Requirements Check that the voltage on the rating plate of your appliance
corresponds with your house electricity supply which must beA.C. (Alternating Current).
WARNING: THIS APPLIANCE MUST BE EARTHED.
Should the fuse in the mains plug require changing a 13 ampBS1362 fuse must be fitted.
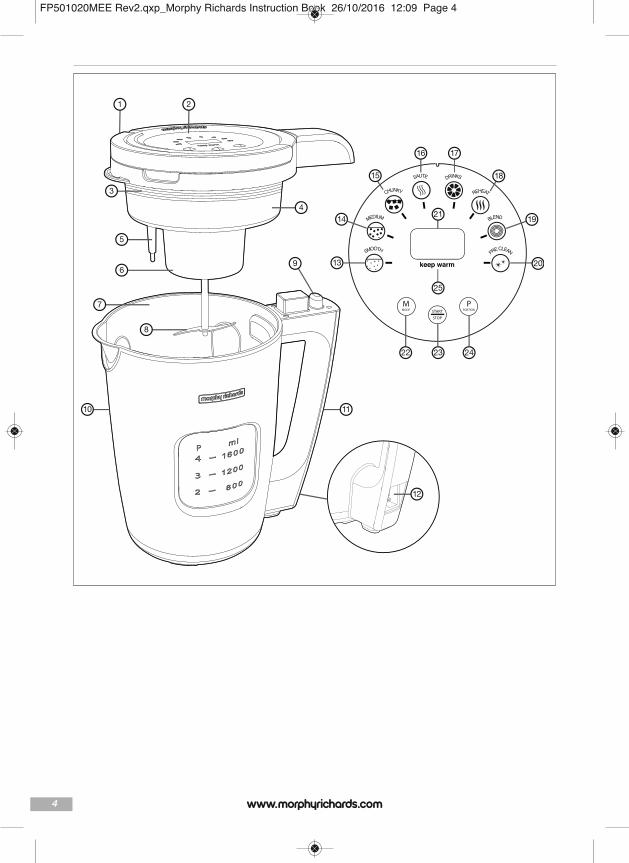
Features (1) Lid Handle (2) Control Panel (3) Seal (4) Lid (5) Over Fill Sensor (6) Motor Housing (7) Removable Vessel (8) Serrator Blade (9) Vessel Release Button (10) Jug Body (11) Jug Handle (12) Power Socket (13) Smooth Function Indicator (14) Medium Function Indicator (15) Chunky Function Indicator (16) Sauté Function Indicator (17) Drinks Function Indicator (18) Reheat Function Indicator (19) Blend Function Indicator (20) Pre-Clean Function Indicator (21) LED Screen (22) Mode Button (23) Start/Stop Button (24) Portion Button (25) Keep Warm Indicator
Before First Use It is important to clean your Total Control Soup Maker before first
use or if it has not been used for a long period of time. See the‘Dream to clean’ section for more information.
When you first use your Total Control Soup Maker you may noticesome smoke/vapour emitting from the Lid, this is normal and issimply grease that is used on some parts of the appliance appliedduring the manufacturing process. After using a few times this willstop.
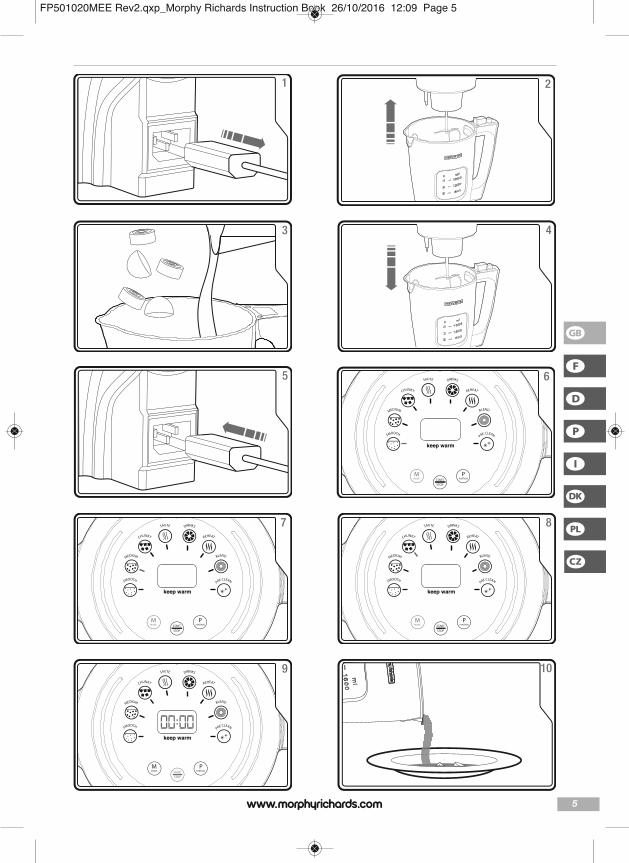
How To Use Your Total Control Soup Maker1 Ensure the Total Control Soup Maker is unplugged from the mains.
2 Remove the Lid (4), be careful not to touch the Serrator Blade (8). WARNING: Sharp Blade.
3 Place all the ingredients into the Removable Vessel (7). Add theliquid last, filling up to the desired portion marked on theRemovable Vessel (7). See individual recipes for more informationregarding liquid.
4 Place the Lid (4) back onto the Jug Body (10) ensuring it issecurely in place.
You may need to twist the lid/motor housing to allow the Blade (8)to pass through the ingredients to locate the Lid (4) onto the Jug Body (10) correctly.
5 Plug the lead into the Power Socket (12).
6 Press the Mode Button (22) to select the program. The SmoothFunction Indicator (13) will illuminate. Continue pressing ModeButton (22) to go through the settings. Select Smooth FunctionIndicator (13) for a smooth soup.
7 Select Medium Function Indicator (14) for a medium soup.
g
FP501020MEE Rev2.qxp_Morphy Richards Instruction Book 26/10/2016 12:09 Page 3
4
PR
E CLEAN
DRINKS
START
STOP
PORTION
SMOOTH
MEDIUM
C
HUNKY
SAUTE
REHEAT
MODEPM
BLEND
1 2
9
5
6
8
10 11
12
4
23
13
14
2422
18
19
20
15
16 17
3
7
21
25
FP501020MEE Rev2.qxp_Morphy Richards Instruction Book 26/10/2016 12:09 Page 4
5
f
d
p
i
q
}
∂
43
21
5 6
START
STOP
PORTIONMODEPM
7
START
STOP
PORTIONMODEPM
8
START
STOP
PORTIONMODEPM
9
START
STOP
PORTIONMODEPM
10
g
FP501020MEE Rev2.qxp_Morphy Richards Instruction Book 26/10/2016 12:09 Page 5

6
15
START
STOP
PORTIONMODEPM
11 12
14
START
STOP
PORTIONMODEPM
16
START
STOP
PORTIONMODEPM
13
17 18
19
START
STOP
PORTIONMODEPM
20
START
STOP
PORTIONMODEPM
FP501020MEE Rev2.qxp_Morphy Richards Instruction Book 26/10/2016 12:09 Page 6

7
f
d
p
i
q
}
∂
21 22
23 24
26
START
STOP
PORTIONMODEPM
2827
START
STOP
PORTIONMODEPM
25
29 30
g
FP501020MEE Rev2.qxp_Morphy Richards Instruction Book 26/10/2016 12:09 Page 7
8
32
START
STOP
PORTIONMODEPM
33
START
STOP
PORTIONMODEPM
31
34
35 36
37 38
START
STOP
PORTIONMODEPM
39
START
STOP
PORTIONMODEPM
40
FP501020MEE Rev2.qxp_Morphy Richards Instruction Book 26/10/2016 12:09 Page 8
9
f
d
p
i
q
}
∂
41 42
44
START
STOP
PORTIONMODEPM
45
START
STOP
PORTIONMODEPM
43
46
4847
g
FP501020MEE Rev2.qxp_Morphy Richards Instruction Book 26/10/2016 12:09 Page 9

10
8 Select Chunky Function Indicator (15) for a chunky soup.
9 Press the Start/Stop Button (23) and the processing time willcountdown on the LED screen (21). Portion control is set to 2portions. If 3 or 4 portions are required it must be set before theStart/Stop Button (23) is pressed. See portion control on page 8.
Smooth and drinks function will be set to 3 portions.
10 When finished, the Total Control Soup Maker will beep for 10seconds. Unplug from the mains, remove the Lid (4) and serve.
WARNING: Take care removing the Lid (4) when making soupto avoid splashing with hot liquid and steaming.
How To Use Portion Control11 Ensure the Total Control Soup Maker is unplugged from the mains.
Remove the Lid (4), be careful not to touch the Serrator Blade (8).WARNING: Sharp Blade.
12 Fill up the Total Control Soup Maker to the level shown on theRemovable Vessel (7) for the desired portion. See individualrecipes for more information.
13 Place the Lid (4) back onto the Jug Body (10) ensuring it issecurely in place and plug the Total Control Soup Maker into themains. See page 7.
14 Press the Mode Button (22) to select the program. The SmoothFunction Indicator (13) will illuminate. Continue pressing Mode Button (22) to go through the settings to select your soupconsistency.
15 After selecting your soup consistency press the Portion Button(24) to select the portion of soup you would like to make (2, 3 or4).
NOTE: Portion control available on certain recipes only.Please see recipes from page 16 for details.
16 Press the Start/Stop Button (23) and the processing time willcountdown on the LED screen (21). When finished, the TotalControl Soup Maker will beep for 10 seconds. Unplug from themains, remove the Lid (4) and serve.
NOTE: Depending on the type of soup you make theingredients will absorb the added liquid and can reduce involume, hence the portions may be less than when started.
How To Use Sauté Function17 Ensure the Total Control Soup Maker is unplugged from the mains.
Remove the Lid (4), be careful not to touch the Serrator Blade (8).WARNING: Sharp Blade.
18 Add a little oil to the Removable Vessel (7). Plug the Total ControlSoup Maker into the mains.
19 Press the Mode Button (22) until the Sauté Function Indicator (16)is highlighted. Replace the Lid (4).
20 Press the Start/Stop Button (23) and your Soup Maker will nowbegin to heat up.
21 After a minute, remove the Lid (4) and carefully add theingredients for sautéing to the Removable Vessel (7). Replace theLid (4) and allow the program to continue. You may need toremove the Lid and stir the ingredients part way through, refer to individual recipes from page 16.
WARNING: Add ingredients carefully to avoid fat splashing.
22 When finished press the Start/Stop Button (23). Add the rest ofthe ingredients to the Removable Vessel (7) and begin the soupmaking process by selecting the desired soup program as shownon page 7.
When the Lid (4) is removed during sauté function to stir or addingredients simply replace the Lid (4) to continue the process. TheLid (4) needs to be in place to continue sautéing. The Soup Makermemory will retain the setting, there is no need to reset.
How To Use Drinks Function23 Ensure the Total Control Soup Maker is unplugged from the mains.
Remove the Lid (4), be careful not to touch the Serrator Blade (8).WARNING: Sharp Blade.
24 Place the ingredients for 3 or 4 portions into the Removable Vessel(7). Add the liquid last.
25 Place the Lid (4) back onto the Jug Body (10) ensuring it issecurely in place and plug the Total Control Soup Maker into themains.
26 Press the Mode Button (22) until the Drinks Function Indicator (17)is highlighted.
27 Press the Start/Stop Button (23) and the processing time willcountdown on the LED screen (21).
NOTE: Drinks function can be used for 3 and 4 portions only.Portion size does not need to be set.
28 When finished, the Total Control Soup Maker will beep for 10seconds. Unplug from the mains, remove the Lid (4) and serve.
How To Use Reheat Function29 Ensure the Total Control Soup Maker is
unplugged from the mains. Remove the Lid (4), be careful not totouch the Serrator Blade (8). WARNING: Sharp Blade.
30 Place the home made soup you would like to reheat into theRemovable Vessel (7). 2 portions minimum, 4 portions maximum.
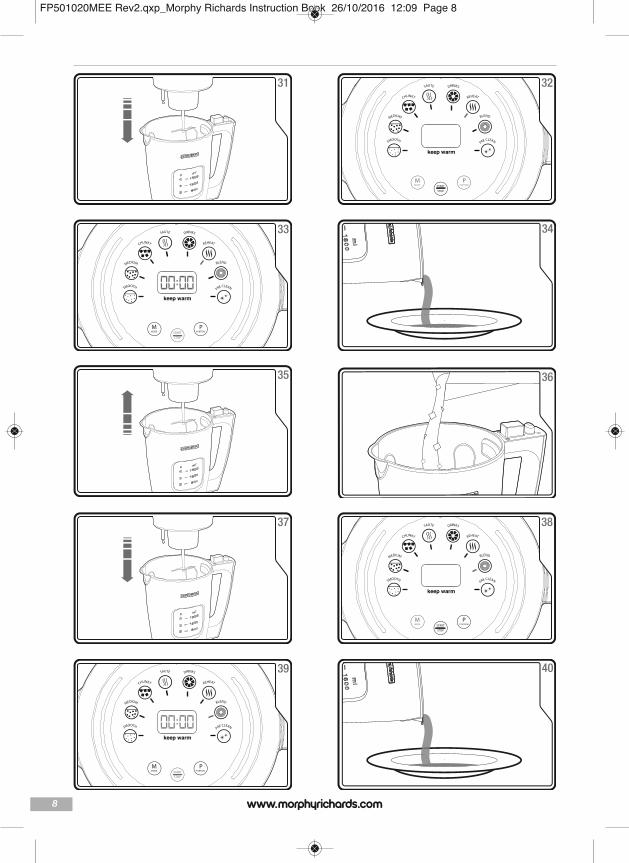
31 Place the Lid (4) back onto the Jug Body (10) ensuring it issecurely in place. Plug the Total Control Soup Maker into themains.
32 Press the Mode Button (22) until the ReheatFunction Indicator (18) is highlighted. Press the Portion Button (24)to select your portion size (2, 3 or 4).
33 Press the Start/Stop Button (23) and the processing time willcountdown on the LED screen (21) .
34 When finished, the Total Control Soup Maker will beep for 10seconds. Unplug from the mains, remove the Lid (4) and serve.
NOTE: The correct portion size must be selected on thecontrol panel to match with the portions of soup added,failure to do this will not heat the soup to the correcttemperature.
Soup consistency may vary after the reheat process.
When reheating chunkier soups the soup will becomesmoother in consistency.
FP501020MEE Rev2.qxp_Morphy Richards Instruction Book 26/10/2016 12:09 Page 10

11
How To Use Blend Function35 Ensure the Total Control Soup Maker is
unplugged from the mains. Remove the Lid (4), be careful not totouch the Serrator Blade (8). WARNING: Sharp Blade.
36 Place the chunky soup into the Removable Vessel (7). NOTE: Only use to blend chunky or medium soup or othercooked soft ingredients.
37 Place the Lid (4) back onto the Jug Body (10) ensuring it issecurely in place. Plug the Soup Maker into the mains.
38 Press the Mode Button (22) until the BlendFunction Indicator (19)is highlighted.
39 Press and hold the Start/Stop Button (23) for the desired blendtime. This is a manual setting allowing you to blend for up to 20seconds, and will stop automatically when you take your finger offthe button. If you need to blend for a few more seconds, repeatthe process.
40 Unplug from the mains, remove the Lid (4) and serve.
ALTERNATIVE: If you wish to blend soup you have madealready in the Removable Vessel (7), continue from stage 4.
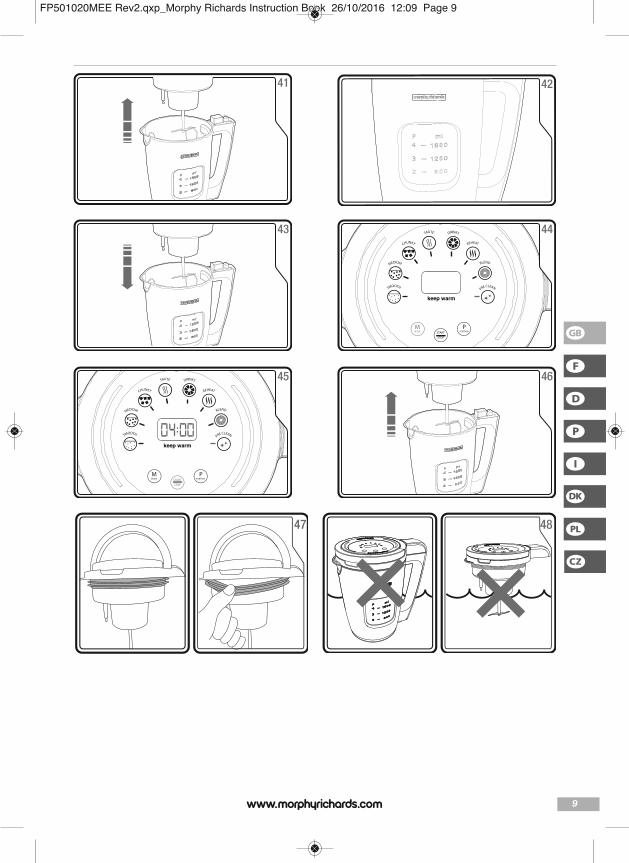
How To Use Pre-Clean Function41 Ensure the Total Control Soup Maker is unplugged from the mains.
Remove the Lid (4), be careful not to touch the Serrator Blade (8).WARNING: Sharp Blade.
42 Pour in 800ml of water into the Removable Vessel (7) and add asmall amount of washing up liquid.
43 Place the Lid (4) back onto the Jug Body (10) ensuring it issecurely in place. Plug the Total Control Soup Maker into themains.
44 Press the Mode Button (22) until the Pre-Clean Function Indicator(20) is highlighted.
45 Press the Start/Stop Button (23) and the processing time willcount down on the LED screen (21). The Pre-Clean program willrun for 4 minutes.
46 When the Pre-Clean cycle has finished ensure the Total ControlSoup Maker is unplugged from the mains. Remove the Lid (4), becareful not to touch the Serrator Blade (8). WARNING: Sharp Blade.
NOTE: The Pre-Clean function will clean the base only.Additional cleaning is required for the Removable Vessel (7)and Lid (4). See A Dream to Clean on page 32. Rinse out yourSoup Maker with water until the water is clear of soapbubbles.
WARNING: Take care as the Removable Vessel (7) will be hotafter the Pre-Clean cycle.
A Dream To Clean The Total Control Soup Maker has a Pre-Clean Function (20). See
page 13. Please note: Pre-Clean only helps to clean theRemovable Vessel base (7). Additional cleaning may be required.
The Total Control Soup Maker is not dishwasher safe, but it issimple and easy to clean. After use, simply wipe the MotorHousing (6) and Serrator Blade (8) with warm soapy water, anddry.
DO NOT immerse lid or jug body in water.
The Total Control Soup Maker Removable Vessel (7) may beremoved from the Jug Body (10) for cleaning. Simply press theVessel Release Button (9) and remove. Simply hand wash theRemovable Vessel (7) with warm soapy water and wipe the JugBody with a soft, damp cloth.
Ensure the Removable Vessel contacts are dried carefully afterwashing. To refit the Removable Vessel into the Jug Body, ensure itis correctly aligned and then press into place.
Certain food types can burn if in contact with the baseheating element. If this happens select the Pre-CleanFunction. If staining persists this is discolouration and willremain. It will not affect the performance or quality of thefood produced. Do not use abrasive scouring pads on theTotal Control Soup Maker or damage may occur.
Removing & Replacing the Seal 47
Occasionally it will be necessary to remove the Lid Seal (3) forcleaning. Wash with hot soapy water, rinse and dry carefullybefore replacing.
48 WARNING: DO NOT immerse the Lid or Jug Body in water, asthey contain electrical components that can be damaged bywater. Do not allow water to get onto the electricalconnections.
Dry thoroughly before use.
Using your Soup Maker Your Total Control Soup Maker has 3 Soup programs and 1 Drinks
program.
Select your choice of program:
Smoothly does it... (13)
The Smooth Soup program is perfect for delicious soup recipesrequiring a smooth consistency. The program ensures theingredients are blended to the right consistency and gentlycooked at the right temperature. (The program lasts for 21minutes for 4 portions and then your soup is ready to serve &enjoy!)
Medium Setting (14)
The Medium Soup program is perfect for delicious soup recipesrequiring a medium consistency. The program lasts for 25 minutesfor 4 portions and then your soup is ready to serve & enjoy!
Chunky Setting (15)
The Chunky Soup program is perfect for rustic soup recipesrequiring a chunkier consistency. The program allows theingredients to be heated for longer to ensure the chunkyingredients are fully cooked. The program lasts for 28 minutes for4 portions. For chunky soup there is no blending process, justheating. It is therefore recommended that you cut any vegetablesinto small dice sized pieces. If your soup is a little too chunky aftercooking, select the Blend function to gain your desiredconsistency. Press and hold the Start/Stop Button for 5 secondsand check.
g
FP501020MEE Rev2.qxp_Morphy Richards Instruction Book 26/10/2016 12:09 Page 11

12
Sauté... (16) The Sauté Function heats the Soup Maker up so food such as
onions or bacon lardons can be sautéed before the rest of theingredients are added to the soup. Add a little oil to the Removable Vessel (7), select the Sauté Function and press theStart/Stop Button (23). Heat the oil for a minute before adding theingredients. The Sauté function is only available when the Lid (4) isin place on the Jug Body (10).The Sauté Function will bedeactivated when the Lid is removed. Note: Do not use theSauté function for more than 10 minutes.
Drinks (17)
The Drinks setting on the Total Control Soup Maker is ideal formaking smoothies or milkshakes from fresh ingredients. For drinksrecipes see pages 29-30. The program lasts for 2 minutes before your drink is ready to serve. The Drinks setting does not heat the ingredients, so it’s perfect forcold drinks in hot weather.
Note: Do not place ice cubes in your Total Control SoupMaker.
A perfect Blend! (19)
The Blend setting allows you to further blend the soup to yourdesired consistency, if required. This function works withoutadditional heating.
To access this function after cooking, press the Start/Stop buttonto exit the Keep Warm mode. Remove the lid then refer to page 12following stages 4 - 6.
Keep Warm
When the Soup Program has finished, the unit goes into KeepWarm mode and will indicate keep warm on the Control Panel (2).If you want to serve the soup immediately lift the Lid and serve.The keep warm will end, when the lid is removed.
Program GuideSmooth 19, 21 mins 3, 4
Medium 22, 24, 26 mins 2, 3, 4
Chunky 25, 27, 29 mins 2, 3, 4
Sauté Max 10 mins -
Drinks 2 mins 3, 4
Reheat 11, 14, 17 mins 2, 3, 4
Blend As required Max 4
Pre-Clean 4 mins -
Keep Warm 30 mins 2, 3, 4
Recipes
We have developed recipes for you to usein your new Total Control Soup Maker,from rich hearty soups to refreshingsmoothies and milkshakes.
The Chunky Setting (15) only cooks theingredients, it will not chop them. If aftercooking, the soup is a little too chunky foryour taste, you can use the Blend Setting(19) to help break down some of thechunks.
The recipes have been developed to fitwithin the minimum and maximumworking levels of the Total Control SoupMaker (800ml-1600ml).
The recipes have been developed forsmooth, medium and chunkyconsistencies, providing ingredientquantities for 2, 3 or 4 portions.
NOTE: 2 portions are available for medium& chunky soup recipes only.
FP501020MEE Rev2.qxp_Morphy Richards Instruction Book 26/10/2016 12:09 Page 12

13
Smooth Function (13)
Basic Vegetable Soup 3 portions 4 portions
Preparation time: 5 minutes 5 minutes
Cooking time: 19 minutes 21 minutes
Setting: Smooth Smooth
Ingredients:
525g 700g vegetables comprising celery, swede, potato, carrot, onion, parsnip, all choppedhot vegetable stock pinch mixed herbs salt and pepper
Method:
1 Place all vegetables into the Removable Vessel (7), add stock up to desired level for the recipe and stir with a wooden spoon.
2 Add a pinch of mixed herbs, select Smooth Function (13), desired portion size and press the Start/Stop Button (23).
3 When ready check the seasoning and serve.
Simple Tomato and Basil Soup 3 portions 4 portions
Preparation time: 5 minutes 5 minutes
Cooking time: 19 minutes 21 minutes
Setting: Smooth Smooth
Ingredients:
• 110g 150g red onion, diced
• 220g 300g potato, diced
• 75g 100g carrot, diced
• 300g 400g tinned chopped tomatoes
• ¾ tbsp 1 tbsp tomato puree
• 1 1 garlic clove, crushed
• 5g 7g basil leaves, roughly torn
• Approx. 500ml Approx. 700ml hot chicken stock
Method:
1 Place the vegetables into the Removable Vessel (7).
2 Add the remaining ingredients, adding stock last to the desired level and stir with a wooden spoon.
3 Fit the Lid (4), select Smooth Function (13), desired number of portions and press Start/Stop Button (23).
4 When ready, add salt and freshly milled black pepper to taste.
g
FP501020MEE Rev2.qxp_Morphy Richards Instruction Book 26/10/2016 12:09 Page 13

14
Medium Function (14)
Mushroom Soup 2 portions 3 portions 4 portions
Preparation time: 15 minutes 15 minutes 15 minutes
Sauté: 10 minutes 10 minutes 10 minutes
Cooking time: 21 minutes 23 minutes 25 minutes
Setting: Medium Medium Medium
Ingredients:
• 310g 465g 625g mushrooms, finely chopped
• 1 tbsp 1½ tbsp 2 tbsp olive oil
• 75g 115g 150g onion, chopped
• 60g 85g 120g celery, chopped
• 1 1 2 garlic clove, crushed
• 5g 7g 10g fresh parsley, roughly chopped
• Approx. 400ml Approx. 530ml Approx. 700ml hot vegetable stock
• 75ml 115ml 150ml single cream
salt and freshly ground black pepper
Method:
1 Place the oil in the Removable Vessel (7), fit Lid (4), select Sauté Function (16) and press Start/Stop Button (23). Heat for 1 minute.
2 Carefully add the onion, celery, garlic, parsley and half the mushrooms, stir with a wooden spoon and sauté for 4 minutes, stirring occasionally.(As the mushrooms cook their volume will reduce).
3 Add the remaining mushrooms to the Removable Vessel (7), stir, and sauté for a further 5 minutes, stirring from time to time.
4 Carefully add the hot stock to the desired level for the recipe. Select Medium Function (14), required portion size and press Start/Stop Button(23).
5 At the end of cooking, add the cream, stir with a wooden spoon and season to taste.
Carrot and Coriander Soup 2 portions 3 portions 4 portions
Preparation time: 15 minutes 15 minutes 15 minutes
Cooking time: 21 minutes 23 minutes 25 minutes
Setting: Medium Medium Medium
Ingredients:
• 50g 75g 100g onion, chopped
• 60g 90g 120g celery, finely chopped
• 250g 375g 500g carrot, cut into small dice
• ½ level tsp ¾ level tsp 1 level tsp ground coriander
• 7g 12g 15g fresh coriander, chopped
• Approx. 400ml Approx. 600ml Approx. 800ml hot vegetable stock
• 25 - 50ml 50 - 100ml 50 - 100ml semi skimmed milk
salt and pepper to taste
Method:
1 Place the onion, celery, carrot, ground and chopped coriander into the Removable Vessel (7), and mix with a wooden spoon.
2 Add the stock to the required level, select Medium Function (14), required number of portions and then press Start/Stop Button (23).
3 At the end of cooking, stir in enough milk with a wooden spoon to give the desired consistency and then season to taste.
4 Serve sprinkled with chopped coriander leaves if desired.
FP501020MEE Rev2.qxp_Morphy Richards Instruction Book 26/10/2016 12:09 Page 14

15
Chunky Function (15)
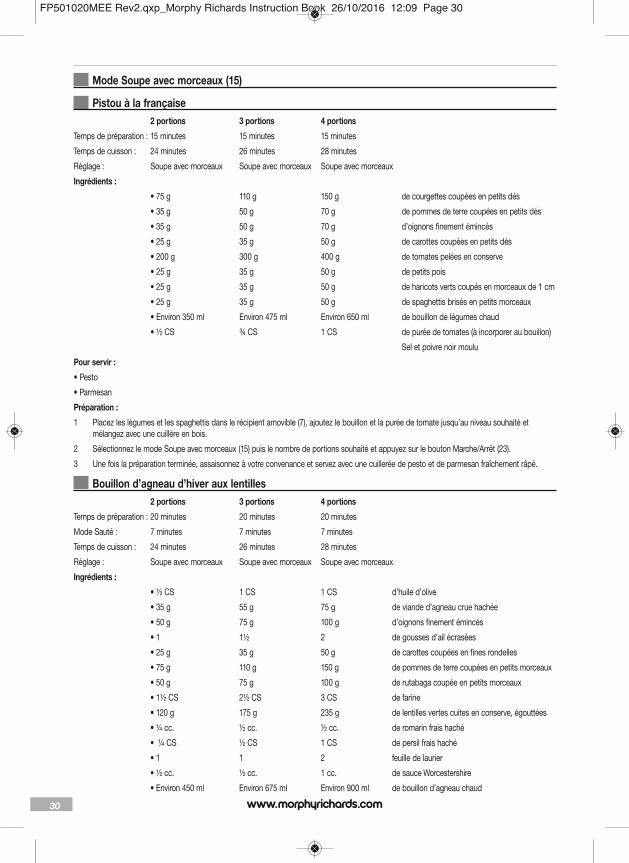
French Style Pistou 2 portions 3 portions 4 portions
Preparation time: 15 minutes 15 minutes 15 minutes
Cooking time: 24 minutes 26 minutes 28 minutes
Setting: Chunky Chunky Chunky
Ingredients:
• 75g 110g 150g courgette, cut into small dice
• 35g 50g 70g potato, cut into small dice
• 35g 50g 70g onion, finely chopped
• 25g 35g 50g carrot, cut into small dice
• 200g 300g 400g canned chopped tomatoes
• 25g 35g 50g petit pois
• 25g 35g 50g french beans, cut into 1cm pieces
• 25g 35g 50g spaghetti, broken into small pieces
• Approx. 350ml Approx. 475ml Approx. 650ml hot vegetable stock
• ½ tbsp ¾ tbsp 1 tbsp tomato puree (mix into the stock)
salt and ground black pepper
To serve:
• Pesto
• Parmesan cheese
Method:
1 Place the vegetables and spaghetti into the Removable Vessel (7), add the vegetable stock/ tomato puree mixture to the desired level and stirwith a wooden spoon.
2 Select Chunky Function (15), required number of portions and press the Start/Stop Button (23).
3 When ready, season to taste and serve with a spoonful of pesto and freshly grated Parmesan cheese.
Winter Lamb and Lentil Broth 2 portions 3 portions 4 portions
Preparation time: 20 minutes 20 minutes 20 minutes
Sauté: 7 minutes 7 minutes 7 minutes
Cooking time: 24 minutes 26 minutes 28 minutes
Setting: Chunky Chunky Chunky
Ingredients:
• ½ tbsp 1 tbsp 1 tbsp olive oil
• 35g 55g 75g raw minced lamb
• 50g 75g 100g onion, finely chopped
• 1 1½ 2 garlic clove, crushed
• 25g 35g 50g carrot, finely chopped
• 75g 110g 150g potato, finely chopped
• 50g 75g 100g swede, finely chopped
• 1½ tbsp 2½ tbsp 3 tbsp plain flour
• 120g 175g 235g tinned cooked green lentils, drained
• ¼ tsp ½ tsp ½ tsp chopped fresh rosemary
• ¼tbsp ½tbsp 1tbsp chopped fresh parsley
g
FP501020MEE Rev2.qxp_Morphy Richards Instruction Book 26/10/2016 12:09 Page 15
16
• 1 1 2 bay leaf
• ½ tsp ½ tsp 1tsp Worcestershire sauce
• Approx. 450ml Approx. 675ml Approx. 900ml hot lamb stock
Method:
1 Place the olive oil in the Removable Vessel (7), fit the Lid (4), select Sauté Function (16) and press the Start/Stop Button (23). After 1 minutecarefully add the lamb mince, refit the Lid (4) and sauté for 2 minutes, stirring occasionally with a wooden spoon until evenly browned.
2 Carefully add the onion, garlic, carrot, potato and swede to the Removable Vessel (7) and sauté for 4 minutes. Stir in the flour then add the rest of the ingredients and hot stock up to the desired level.
3 Stir with a wooden spoon or spatula. Press and hold the Start/Stop Button (23) then select Chunky Function (15), required portion size andpress the Start/Stop Button (23).
4 Season to taste and remove bay leaves (leaf) before serving.
Sauté Function (16)
Celery Soup 3 portions 4 portions
Preparation time: 10 minutes 10 minutes
Sauté: 7 minutes 7 minutes
Cooking time: 19 minutes 21 minutes
Setting: Smooth Smooth
Ingredients:
• 1tbsp 1tbsp olive oil
• 350g 450g celery, roughly chopped (including leaves)
• 75g 100g onion, chopped
• 110g 150g potato, chopped
• Approx. 700ml Approx. 800ml hot vegetable stock
salt and ground black pepper
fresh parsley to garnish
Method:
1 Place the olive oil in the Removable Vessel (7), fit the Lid (4), select Sauté Function (16) and press the Start/Stop Button (23). After 1 minutecarefully add the lamb mince, refit the Lid (4) and sauté for 2 minutes, stirring occasionally with a wooden spoon until evenly browned.
2 Carefully add the onion, garlic, carrot, potato and swede to the Removable Vessel (7) and sauté for 4 minutes. Stir in the flour then add the restof the ingredients and hot stock up to the desired level.
3 Stir with a wooden spoon or spatula. Press and hold the Start/Stop Button (23) then select Chunky Function (15), required portion size andpress the Start/Stop Button (23).
4 Season to taste and remove bay leaves (leaf) before serving.
FP501020MEE Rev2.qxp_Morphy Richards Instruction Book 26/10/2016 12:09 Page 16

17
Broccoli and Stilton Soup 3 portions 4 portions
Preparation time: 10 minutes 10 minutes
Sauté: 6 minutes 6 minutes
Cooking time: 19 minutes 21 minutes
Setting: Smooth Smooth
Ingredients:
• ¾ tbsp 1 tbsp olive oil
• 75g 100g onion, chopped
• 180g 250g potato, diced
• 1 2 cloves garlic, crushed
• 180g 250g broccoli florets and stalks, roughly chopped
• 750ml 1 litre hot vegetable stock
• 115g 150g Blue Stilton, crumbled
freshly ground black pepper
a little salt
Method:
1 Place the oil in the Removable Vessel (7), select the Sauté Function (16) and press the Start/Stop Button (23). Heat the oil for one minute.
2 Carefully add the onion, stir with a wooden spoon and sauté for 3 minutes stirring occasionally.
3 Stir in the potato and garlic, and sauté for 2 minutes stirring occasionally.
4 Add the vegetable stock (do not add any more than the specified quantity), press and hold the Start/Stop Button (23) and then select Smooth Function (13), required portion size and press the Start/Stop Button (23).
5 When 11 minutes remain on the timer, carefully add the broccoli, and then stir with a wooden spoon.
6 When the programme finishes, add the Stilton, select the Blend Function (19) and press and hold the Start/Stop Button (23) until of the desiredconsistency.
7 Adjust the seasoning (the soup may not need any salt) and serve.
Note: Potato thickens the soup. If you prefer to use less than we recommend the soup will be of a thinner consistency.
Drinks Function (17)
Peanut Butter Milkshake 3 portions 4 portions
Preparation time: 5 minutes 5 minutes
Program time: 2 minutes 2 minutes
Ingredients:
• 900ml 1.2L semi skimmed milk
• 125g 175g vanilla ice cream
• 4½ level tbsp 6 level tbsp smooth peanut butter
• 4½ tbsp 6 tbsp maple syrup
Method:
1 Place all ingredients into the Removable Vessel (7) and stir with a wooden spoon.
2 Fit the Lid, select Drinks Function (17) and press the Start/Stop Button (23).
3 Serve immediately.
Note: Clear honey may be used in place of maple syrup.
g
FP501020MEE Rev2.qxp_Morphy Richards Instruction Book 26/10/2016 12:09 Page 17

18
FAQ’s?If you have any questions about the use of your Total ControlSoup Maker, check the list below where we have answeredsome of the more common frequently-asked-questions (FAQ’s). If you require further help, please contact our Helpline: 0344 871 0944.
Does the heating function work when I remove the Lid (4)?No. Removing the Lid cuts the power to the unit for maximumsafety. The heating function only activates when you haveplaced on the Lid (4) and selected either Smooth (13), Medium(14), Chunky (15), Sauté (16) or Reheat (18) soup programs.
Can I remove the Lid mid-cycle?The Total Control Soup Maker will allow you 1 minute in thecycle to add any missed ingredients and enable you to stirduring Sauté (16).
Can I use my Soup Maker to make anything other than soup?No. The available programs are set to make perfect soup anddrinks from scratch. Follow the recipes and adapt them to yourown taste.
Can I use raw meat in soup recipes made in my Soup Maker?Aside from bacon or small amounts of fine minced meat (100g),no. You should first cook meat separately before transferringinto your Soup Maker with additional ingredients from yourrecipe, as your Total Control Soup Maker is only designed togently Sauté (16) bacon or onions, then heat the soup.WARNING: You should not use the sauté function to brownraw meat, other than bacon or minced meat (100g max).
What is the capacity of my Soup Maker?The capacity of your Total Control Soup Maker is 1600ml. This ismarked on the inside and outside of the Removable Vessel (7).Ensure you do not fill your Total Control Soup Maker above thisline, otherwise the overfill detector will cut the power to theSerrator Blade (8) and the LED screen (21) will display ‘E1’. Ifthis happens, simply remove some of your ingredients so the1600ml fill mark is not exceeded and wipe clean the Over FillSensor (5) on the Lid (4). Ensure your ingredients (includingliquid) are above the 2 portions line, failure to do this will impairthe blending function.
Can I change the times on the Smooth, Medium and Chunkysoup settings?No. The times for these settings are preset.
Can I reheat tinned/carton soup?No. The programs are set to make perfect soup from scratch.Tinned or soup in cartons whilst convenient could burn to thebase of the element causing damage to the product.
What if my Total Control Soup Maker stops working?Your Total Control Soup Maker is fitted with a safety thermostat,which cuts the power and stops the product from working toprevent overheating if it is used continuously on 3 or morecycles. If this happens, remove any food from the RemovableVessel and allow the Total Control Soup Maker to cool for 30minutes, before continuing.
If the Blend Function (19) is used continuously for more than 20seconds a safety cut out will cut the power to preventoverheating. When this happens wait for 10 seconds beforereusing the Blend Function (19).
Can I make cold soups like Gazpacho in myTotal ControlSoup Maker?Yes, but you will first need to cook the soup using either theSmooth (13), Medium (14) or Chunky (15) soup setting. Thensimply allow to cool or refrigerate before enjoying.
What if food burns on the base of my Total Control SoupMaker?Due to the starch and sugars present in some foods, a slightburning may occur if they are placed in direct contact with theinside base of the Removable Vessel. To prevent this, add half acup of water or stock to the Total Control Soup Maker beforeplacing in any solid ingredients. Then top up with the remainingliquid specified in your recipe.
Cancelling or changing programs If you have selected a program incorrectly and the Start/StopButton (23) has been pressed, or you want to cancel the program, simply press the Start/StopButton (23) and hold for 2 seconds. Press the Mode Button (22)to select the correct program and press the Start/Stop Button(23) to restart.
Blueberry and Oat Breakfast Smoothie (made with Natural Yogurt) 3 portions 4 portions
Preparation time: 5 minutes 5 minutes
Program time: 2 minutes 2 minutes
Ingredients:
• 675g 800g low fat natural yogurt
• 325ml 400ml semi skimmed milk
• 45g 60g rolled oats
• 115g 150g blueberries
• 2 tbsp 3 tbsp clear honey
Method:
1 Place all ingredients into the Removable Vessel (7) and stir with a wooden spoon.
2 Fit the Lid (4) select Drinks Function (17) and press the Start/Stop Button (23).
FP501020MEE Rev2.qxp_Morphy Richards Instruction Book 26/10/2016 12:09 Page 18

19
Contact usHelpline
If you are having a problem with your appliance, please call ourHelpline, as we are more likely to be able to help than the storeyou purchased the item from.
Please have the product name, model number and serialnumber to hand when you call to help us deal with your enquiryquicker.
UK Helpline: 0344 871 0944
IRE Helpline: 1800 409 119
Spares: 0344 873 0710
Talk To Us
If you have any questions or comments, or want some greattips or recipe ideas to help you get the most out of yourproducts, join us online:
Blog: www.morphyrichards.co.uk/blog
Facebook: www.facebook.com/morphyrichardsuk
Twitter: @loveyourmorphy
Website: www.morphyrichards.com
Morphy Richards Cook & Create App
THIS SECTION IS ONLY APPLICABLE FORCUSTOMERS IN UK AND IRELAND
REGISTERING YOUR TWO YEAR GUARANTEEYour standard one year guarantee is extended for an additional12 months when you register the product within 28 days ofpurchase with Morphy Richards. If you do not register theproduct with Morphy Richards within 28 days, your product isguaranteed for 1 year. To validate your 2 year guarantee registerwith us online at www.morphyrichards.co.uk
N.B. Each qualifying product needs to be registered withMorphy Richards individually. Please refer to the one yearguarantee for more information.
YOUR ONE YEAR GUARANTEEIt is important to retain the retailer’s receipt as proof ofpurchase. Staple your receipt to this back cover for futurereference. Please quote the following information if the productdevelops a fault. These numbers can be found on the base ofthe product.
Model no.Serial no.
All Morphy Richards products are individually tested beforeleaving the factory. In the unlikely event of any applianceproving to be faulty within 28 days of purchase, it should bereturned to the place of purchase for it to be replaced. If thefault develops after 28 days and within 12 months of originalpurchase, you should contact the Helpline number quotingModel number and Serial number on the product, or write toMorphy Richards at the address shown. You may be asked toreturn a copy of proof of purchase. Subject to the exclusionsset out below (see Exclusions), the faulty appliance will then berepaired or replaced and dispatched usually within 7 workingdays of receipt. If, for any reason, this item is replaced duringthe 1 year guarantee period, the guarantee on the new item willbe calculated from original purchase date. Therefore it is vital toretain your original till receipt or invoice to indicate the date ofinitial purchase. To qualify for the 1 year guarantee, theappliance must have been used according to the instructionssupplied. For example, crumb trays should have been emptiedregularly.
EXCLUSIONSMorphy Richards shall not be liable to replace or repair thegoods under the terms of the guarantee where:
1 The fault has been caused or is attributable to accidental use,misuse, negligent use or used contrary to the manufacturer’srecommendations or where the fault has been caused by powersurges or damage caused in transit.
2 The appliance has been used on a voltage supply other than thatstamped on the products.
3 Repairs have been attempted by persons other than our servicestaff (or authorised dealer).
4 The appliance has been used for hire purposes or non domesticuse.
5 The appliance is second hand.
Morphy Richards
g
FP501020MEE Rev2.qxp_Morphy Richards Instruction Book 26/10/2016 12:09 Page 19
20
6 Morphy Richards are not liable to carry out any type of servicingwork, under the guarantee.
7 Plastic filters for all Morphy Richards kettles and coffee makersare not covered by the guarantee.
8 Batteries and damage from leakage are not covered by theguarantee.
9 The filters have not be cleaned and replaced as instructed.
This guarantee does not confer any rights other than thoseexpressly set out above and does not cover any claims forconsequential loss or damage. This guarantee is offered as anadditional benefit and does not affect your statutory rights as aconsumer.
YOUR INTERNATIONAL TWO YEARGUARANTEEThis appliance is covered by two-year repair or replacementwarranty.
It is important to retain the retailers receipt as proof ofpurchase. Staple your receipt to this back cover for futurereference.
Please quote the following information if the product develops afault. These numbers can be found on the base of the product.
Model no.Serial no.
All Morphy Richards products are individually tested beforeleaving the factory. In the unlikely event of any applianceproving to be faulty within 28 days of purchase it should bereturned to the place of purchase for it to be replaced.
If the fault develops after 28 days and within 24 months oforiginal purchase, you should contact your local distributorquoting Model number and Serial number on the product, orwrite to your local distributor at the addresses shown.
You will be asked to return the product (in secure, adequatepackaging) to the address below along with a copy of proof ofpurchase.
Subject to the exclusions set out below (1-9) the faultyappliance will then be repaired or replaced and dispatchedusually within 7 working days of receipt.
If for any reason this item is replaced during the 2-yearguarantee period, the guarantee on the new item will becalculated from original purchase date. Therefore it is vital toretain your original till receipt or invoice to indicate the date ofinitial purchase.
To qualify for the 2-year guarantee the appliance must havebeen used according to the manufacturers instructions. Forexample, appliances must have been descaled and filters musthave been kept clean as instructed.
The local distributor shall not be liable to replace or repair thegoods under the terms of the guarantee where:
1 The fault has been caused or is attributable to accidental use,misuse, negligent use or used contrary to the manufacturersrecommendations or where the fault has been caused by powersurges or damage caused in transit.
2 The appliance has been used on a voltage supply other than that
stamped on the products.
3 Repairs have been attempted by persons other than our servicestaff (or authorised dealer).
4 Where the appliance has been used for hire purposes or nondomestic use.
5 The appliance is second hand.
6 The local distributor are not liable to carry out any type ofservicing work, under the guarantee.
7 The guarantee excludes consumables such as bags, filters andglass carafes.
8 Batteries and damage from leakage are not covered by theguarantee.
9 The filters have not be cleaned and replaced as instructed.
This guarantee does not confer any rights other than thoseexpressly set out above and does not cover any claims forconsequential loss or damage. This guarantee is offered as anadditional benefit and does not affect your statutory rights as aconsumer.
AUSTRALIAN WARRANTYThis appliance is guaranteed for 2 years against faulty material,components and workmanship.
This warranty is in addition and does not affect your statutory rights.
Proof of purchase must be produced for any warranty benefit.
In the unlikely event of any appliance proving to be faulty, securelypack and return the item to the place of purchase accompanied bythe original receipt or invoice.
Our goods come with guarantees that cannot be excluded underthe Australian Consumer Law. You are entitled to a replacement orrefund for a major failure and for compensation for any otherreasonably foreseeable loss or damage. You are also entitled tohave the goods repaired or replaced if the goods fail to be ofacceptable quality and the failure does not amount to a majorfailure.
NOT COVERED BY THIS WARRANTY (Australian only)
• If the appliance has not been used in accordance with themanufacturers’ recommendations or Instructions.
• If the fault is deemed to be caused by abuse, misuse, neglect,modifications or in proper use and or care Eg: Kettles: Excessive build up of scale.Toasters: Excessive build up of crumbs or foreign matter etc.
• Connection to incorrect voltage to that stamped on the product.
• Unauthorised repairs.
• Appliance used other than for domestic purposes.
• Excluding bags, filters, glass, carafes, and cutting blades.
• Freight and insurance costs.
If for any reason this item is replaced during the 2 yearguarantee period, the guarantee on the new item will becalculated from original purchase date. Therefore it is vital toretain your original receipt or invoice to indicate the date oforiginal purchase.
FP501020MEE Rev2.qxp_Morphy Richards Instruction Book 26/10/2016 12:09 Page 20

21
Morphy Richards’s policy is to continually improve qualitydesign and product quality. The company therefore reserves theright to change any specifications or to carry out modificationsas deemed worthy at any time.
The Australian supplier reserves the right to repair, modify,exchange or replace the faulty appliance with the same orsimilar model or product of equivalent value.
g
FP501020MEE Rev2.qxp_Morphy Richards Instruction Book 26/10/2016 12:09 Page 21
22
Santé et sécurité~ L’utilisation de tout appareil électrique implique le respecter des règles de sécurité et de bon sens suivantes.
Veuillez lire attentivement ces instructions avant d’utiliser ce produit.
• Cet appareil peut être utilisé par des personnes aux capacitésphysiques, sensorielles ou mentales réduites, ou manquantd’expérience et de connaissances, pourvu qu’elles soientsurveillées ou qu’on leur fournisse des instructions pourqu’elles se servent de l’appareil de manière sécurisée etqu’elles comprennent les risques que cela comporte.
• Les enfants ne doivent pas jouer avec l’appareil.• Cet appareil ne doit pas être utilisé par des enfants. • Tenir l’appareil et le cordon hors de portée des enfants. • Après un cycle d’utilisation, vous devez impérativement laisser
refroidir l’appareil complètement avant de le nettoyer. • L’appareil n’est pas conçu pour être commandé par un
programmateur externe ni par une télécommande.• Si le cordon d’alimentation est endommagé, il est impératif de
le remplacer par un câble spécial disponible auprès dufabricant ou de son agent de service après-vente.
• ATTENTION : La lame de mixage est très coupante. Manipulezl’appareil avec précaution pendant l’utilisation ou le nettoyage.
• Pour toute information concernant l’entretien et le nettoyage,reportez-vous aux pages 25 et 33.
f
FP501020MEE Rev2.qxp_Morphy Richards Instruction Book 26/10/2016 12:09 Page 22

23
f
Voici en outre quelques conseils supplémentaires de sécurité.
Emplacement• Positionnez toujours votre appareil loin du bord du
plan de travail.
• Posez l’appareil sur une surface solide et plate.
• N’utilisez jamais l’appareil dehors ou près d’une source d’eau.
Cordon d’alimentation• Placez l’appareil de manière que le cordon d’alimentation secteur
puisse atteindre une prise électrique sans être trop tendu.
• Ne laissez pas le cordon d’alimentation dépasser du bord d’unplan de travail, à un endroit où un enfant pourrait l’atteindre.
• Ne laissez jamais le cordon traverser un espace ouvert, parexemple entre une prise murale basse et une table.
• Ne laissez pas passer le câble sur une cuisinière, un grille-pain ouune autre surface chaude qui pourrait l’endommager.
Sécurité personnelle• AVERTISSEMENT : pour vous protéger des risques
d’incendie, de choc électrique et de blessure, ne plongez pas le cordon d’alimentation, la ficheélectrique ou l’appareil lui-même dans l’eau ou dans d’autresliquides.
• ATTENTION : Une mauvaise utilisation de l’appareil pourraitprovoquer des blessures.
• ATTENTION : Évitez de toucher les pièces mobiles.
• Soyez extrêmement prudent lorsque vous déplacez un appareil dont le contenu est chaud.
• N’utilisez pas l’appareil lorsque vos mains sont mouillées ouhumides.
• Débranchez l’appareil de la prise lorsque vous ne l’utilisez pas et avant de le nettoyer.
Traitement des brûlures• Faites couler immédiatement de l’eau froide sur la zone touchée.
Ne prenez pas le temps d’enlever les vêtements, et appelezrapidement un médecin.
Autres consignes de sécurité• Si le cordon d’alimentation de cet appareil est endommagé, ne
l’utilisez pas. Appelez le service d’assistance de Morphy Richardspour demander conseil.
• Si vous utilisez des accessoires non recommandés par lefabricant, vous risquez d’endommager l’appareil.
• Ne placez pas l’appareil sur ou près de sources de chaleur tellesque fours ou brûleurs gaz ou électriques.
• Tenez l’appareil et son cordon d’alimentation éloignés de lachaleur, des rayons du soleil, de l’humidité, des arêtes vives etautres risques.
• Lorsque vous utilisez l’appareil, assurez-vous que le couvercle estbien en place avant de le mettre sous tension.
• Ne retirez pas le couvercle avant que la lame dentelée soitimmobilisée.
• N’utilisez pas l’appareil pour faire de la soupe en continu.
• Attention lorsque vous versez du liquide chaud à l’intérieur devotre soupière électrique Total Control ; il pourrait être projeté del’appareil en raison d’une formation de vapeur soudaine.
Configuration électrique Vérifiez que la tension indiquée sur la plaque signalétique de
l’appareil correspond à l’alimentation électrique de votre domicile,qui doit être CA (courant alternatif).
ATTENTION : CET APPAREIL DOIT ÊTRE MIS À LA TERRE.
Si le fusible de la prise secteur doit être changé, utilisez un fusiblede remplacement (modèle BS1362) de 13 ampères.
Caractéristiques (1) Poignée du couvercle (2) Bandeau de commande (3) Joint (4) Couvercle (5) Détecteur de remplissage excessif (6) Carter du moteur (7) Récipient amovible (8) Lame dentelée (9) Bouton de déverrouillage du récipient (10) Verseuse (11) Poignée de la verseuse (12) Prise électrique (13) Témoin du mode Soupe onctueuse (14) Témoin du mode Soupe moulinée (15) Témoin du mode Soupe avec morceaux (16) Témoin du mode Sauté (17) Témoin du mode Boissons (18) Témoin du mode Réchauffage (19) Témoin du mode Mixage (20) Témoin du mode Pré-nettoyage (21) Écran DEL (22) Bouton Mode (23) Bouton Marche/Arrêt (24) Bouton Portions (25) Témoin de Conservation au chaud
Avant la première utilisation Il est important de nettoyer votre soupière électrique Total Control
avant la première utilisation ou après une période de nonutilisation prolongée. Reportez-vous à la section « Un bonheur ànettoyer » pour plus d’informations.
Lors de la première utilisation de votre soupière électrique TotalControl, vous pourrez remarquer de la fumée/vapeur s’échappantdu couvercle. Ce phénomène est normal. La fumée/vapeurprovient de la graisse appliquée sur certaines pièces de l’appareildurant sa fabrication. Ce phénomène disparaît au bout dequelques utilisations.
FP501020MEE Rev2.qxp_Morphy Richards Instruction Book 26/10/2016 12:09 Page 23

24
Mode opératoire de la soupière électriqueTotal Control
1 Vérifiez que la soupière électrique Total Control est débranchée dusecteur.
2 Retirez le couvercle (4) en veillant à ne pas toucher la lamedentelée (8). ATTENTION : Lame tranchante.
3 Placez tous les ingrédients dans le récipient amovible (7). Ajoutezle liquide en dernier en remplissant jusqu’au trait du nombre deportions souhaité sur le récipient amovible (7). Reportez-vous àchaque recette pour en savoir plus sur le remplissage du liquide.
4 Replacez le couvercle (4) sur la verseuse (10) en veillant à bien lemettre en place.
Il est possible que vous ayez à faire tourner le couvercle/carter dumoteur pour que la lame (8) passe à travers les ingrédients et quele couvercle (4) se positionne correctement sur la verseuse (10).
5 Branchez le cordon à la prise secteur (12).
6 Appuyez sur le bouton Mode (22) pour sélectionner votreprogramme. Le témoin du mode Soupe onctueuse (13) s’allume.Continuez à appuyer sur le bouton Mode (22) pour parcourir lesréglages. Sélectionnez le témoin du mode Soupe onctueuse (13)si vous souhaitez une soupe veloutée.
7 Sélectionnez le témoin du mode Soupe moulinée(14) si voussouhaitez une soupe moulinée.
8 Sélectionnez le témoin du mode Soupe avec morceaux (15) sivous souhaitez une soupe avec des morceaux.
9 Appuyez sur le bouton Marche/Arrêt (23) et le compte à reboursdu temps de préparation s’affichera sur l’écran DEL (21). Lacommande des portions est définie sur 2 portions. Si voussouhaitez préparer 3 ou 4 portions, vous devez régler lacommande avant d’appuyer sur le bouton Marche/Arrêt (23).Reportez-vous à la commande des portions à la page 8.
Le mode Onctueux et Boissons est défini sur 3 portions.
10 Lorsqu’elle a terminé, la soupière électrique Total Control bippependant 10 secondes. Débranchez-la du secteur, ôtez lecouvercle (4) et servez.
ATTENTION : soyez prudent lorsque vous ôtez le couvercle(4) afin de ne pas vous brûler avec des éclaboussures ou lavapeur.
Mode opératoire de la commande desportions
11 Vérifiez que la soupière électrique Total Control est débranchée du secteur. Retirez le Couvercle (4) en veillant àne pas toucher la lame dentelée (8). ATTENTION : Lame tranchante.
12 Remplissez la soupière électrique Total Control jusqu’au trait dunombre de portions souhaité sur le récipient amovible (7).Reportez-vous à chaque recette pour en savoir plus.
13 Replacez le couvercle (4) sur la verseuse (10) en veillant à bien lemettre en place, puis branchez la soupière électrique Total Controlau secteur. Plus d’informations à la page 7.
14 Appuyez sur le bouton Mode (22) pour sélectionner votreprogramme. Le témoin du mode Soupe onctueuse (13) s’allume.Continuez à appuyer sur le bouton Mode (22) pour parcourir les paramètres et sélectionner la texturede la soupe.
15 Une fois que vous avez sélectionné la texture de votre soupe,appuyez sur le bouton Portions (24) pour sélectionner le nombrede portions de soupe que vous souhaitez préparer (2, 3 ou 4).
REMARQUE : Commande des portions disponibleuniquement pour certaines recettes. Veuillez vous reporteraux recettes à partir de la page 16 pour en savoir plus.
16 Appuyez sur le bouton Marche/Arrêt (23) et le compte à reboursdu temps de préparation s’affichera sur l’écran DEL (21).Lorsqu’elle a terminé, la soupière électrique Total Control bippependant 10 secondes. Débranchez-la du secteur, ôtez lecouvercle (4) et servez.
REMARQUE : Selon le type de soupe que vous préparez, lesingrédients peuvent absorber le liquide et le volume peutréduire. Ainsi, le nombre de portions affiché à la fin de lapréparation peut être inférieur au nombre de départ.
Mode opératoire du mode Sauté17 Vérifiez que la soupière électrique Total Control est débranchée du
secteur. Retirez le couvercle (4) en veillant à ne pas toucher lalame dentelée (8). ATTENTION : Lame tranchante.
18 Versez un peu d’huile dans le récipient amovible (7). Branchez lasoupière électrique Total Control au secteur.
19 Appuyez sur le bouton Mode (22) jusqu’à ce que le témoin dumode Sauté (16) soit mis en surbrillance. Refermez le couvercle(4).
20 Appuyez sur le bouton Marche/Arrêt (23) et votre soupièreélectrique commencera à chauffer.
21 Au bout d’une minute, ôtez le couvercle (4) et ajoutezprudemment les ingrédients à faire revenir dans le récipientamovible (7). Refermez le couvercle (4) et laissez le programmesuivre son cours. Vous devrez peut-être ôter le couvercle pourremuer les ingrédients en cours de cuisson. Reportez-vous aux recettes à partir de la page 16.
ATTENTION : Ajoutez les ingrédients délicatement afind’éviter les éclaboussures de matière grasse.
22 Lorsque vous avez terminé, appuyez sur le bouton Marche/Arrêt(23). Ajoutez le reste des ingrédients dans le récipient amovible(7), puis commencez la préparation de la soupe en sélectionnantle programme souhaité, comme indiqué à la page 7.
Si vous ôtez le couvercle (4) pour mélanger ou ajouter desingrédients en mode Sauté, la préparation se poursuivra dès quevous le refermerez (4). Le couvercle (4) doit être bien refermé pourque la préparation continue. La mémoirede la soupière électrique conservera ces paramètres ; il ne seradonc pas nécessaire de recommencer le réglage.
FP501020MEE Rev2.qxp_Morphy Richards Instruction Book 26/10/2016 12:09 Page 24

25
Mode opératoire du mode Boissons23 Vérifiez que la soupière électrique Total Control est débranchée du
secteur. Retirez le couvercle (4) en veillant à ne pas toucher lalame dentelée (8). ATTENTION : Lame tranchante.
24 Placez les ingrédients pour 3 ou 4 portions dans le récipientamovible (7). Ajoutez le liquide en dernier.
25 Replacez le couvercle (4) sur la verseuse (10) en veillant à bien lemettre en place, puis branchez la soupière électrique Total Controlau secteur.
26 Appuyez sur le bouton Mode (22) jusqu’à ce que le témoin dumode Boissons (17) soit mis en surbrillance.
27 Appuyez sur le bouton Marche/Arrêt (23) et le compte à reboursdu temps de préparation s’affichera sur l’écran DEL (21).
REMARQUE : La fonction Boissons n’est disponible que pour3 ou 4 portions. Il n’est donc pas nécessaire de configurer lenombre de portions.
28 Lorsqu’elle a terminé, la soupière électrique Total Control bippependant 10 secondes. Débranchez-la du secteur, ôtez lecouvercle (4) et servez.
Mode opératoire du mode Réchauffage29 Vérifiez que la soupière électrique Total Control est
débranchée du secteur. Retirez le couvercle (4) en veillant à nepas toucher la lame dentelée (8). ATTENTION : Lametranchante.
30 Placez la soupe maison que vous souhaitez réchauffer dans lerécipient amovible (7). 2 portions minimum, 4 portions maximum.
31 Replacez le couvercle (4) sur la verseuse (10) en veillant à bien lemettre en place. Branchez la soupière électrique Total Control ausecteur.
32 Appuyez sur le bouton Mode (22) jusqu’à ce que le témoin dumodeRéchauffage (18) soit mis en surbrillance. Appuyez sur le boutonPortions (24) pour sélectionner le nombre de portions (2, 3 ou 4).
33 Appuyez sur le bouton Marche/Arrêt (23) et le compte à reboursdu temps de préparation s’affichera sur l’écran DEL (21).
34 Lorsqu’elle a terminé, la soupière électrique Total Control bippependant 10 secondes. Débranchez-la du secteur, ôtez lecouvercle (4) et servez.
REMARQUE : Le nombre de portions sélectionné sur lebandeau de commandes doit correspondre au nombre deportions de soupe ajoutées. Si ce n’est pas le cas, la soupene sera pas réchauffée à la température adéquate.
La texture de la soupe peut changer suite au réchauffage.
Lorsque vous réchauffez des soupes moulinées, leur texturepeut devenir plus onctueuse.
Mode opératoire du mode Mixage35 Vérifiez que la soupière électrique Total Control est
débranchée du secteur. Retirez le couvercle (4) en veillant à nepas toucher la lame dentelée (8). ATTENTION : Lametranchante.
36 Placez la soupe avec morceaux dans le récipient amovible (7). REMARQUE : Mode réservé au mixage des soupes avecmorceaux et moulinées, ou d’autres ingrédients cuits etmous.
37 Replacez le couvercle (4) sur la verseuse (10) en veillant à bien lemettre en place. Branchez la soupière électrique au secteur.
38 Appuyez sur le bouton Mode (22) jusqu’à ce que le témoin dumode Mixage (19) soit mis en surbrillance.
39 Appuyez sur le bouton Marche/Arrêt (23) et maintenez-le enfoncépendant la durée de mixage souhaitée. Il s’agit d’un paramètremanuel vous permettant de mixer jusqu’à 20 secondes. Lemixage s’arrête dès que vous retirez votre doigt du bouton.Recommencez l’opération si vous devez poursuivre le mixagependant encore quelques secondes.
40 Débranchez la soupière électrique du secteur, ôtez le couvercle (4)et servez.
ALTERNATIVE : Si vous souhaitez mixer la soupe déjàpréparée dans le récipient amovible (7), commencez à partirde l’étape 4.
Mode opératoire du mode Pré-nettoyage41 Vérifiez que la soupière électrique Total Control est débranchée du
secteur. Retirez le couvercle (4) en veillant à ne pas toucher lalame dentelée (8). ATTENTION : Lame tranchante.
42 Versez 800 ml d’eau dans le récipient amovible (7) et ajoutez unepetite quantité de liquide vaisselle.
43 Replacez le couvercle (4) sur la verseuse (10) en veillant à bien lemettre en place. Branchez la soupière électrique Total Control ausecteur.
44 Appuyez sur le bouton Mode (22) jusqu’à ce que le témoin dumode Pré-nettoyage (20) soit mis en surbrillance.
45 Appuyez sur le bouton Marche/Arrêt (23) et le compte à rebourss’affichera sur l’écran DEL (21). Le programme de pré-nettoyagedure 4 minutes.
46 Une fois le cycle de pré-nettoyage terminé, vérifiez que lasoupière électrique Total Control est débranchée du secteur.Retirez le couvercle (4) en veillant à ne pas toucher la lamedentelée (8). ATTENTION : Lame tranchante.
REMARQUE : Le mode de pré-nettoyage nettoie uniquementla base. Il est nécessaire de procéder à un nettoyagesupplémentaire du récipient amovible (7) et du couvercle (4).Reportez-vous à la section Un bonheur à nettoyer à lapage 32. Rincez votre soupière à l’eau jusqu’à ce qu’il n’y aitplus de bulles de liquide vaisselle.
ATTENTION : Le récipient amovible (7) est chaud après lecycle de pré-nettoyage.
f
FP501020MEE Rev2.qxp_Morphy Richards Instruction Book 26/10/2016 12:09 Page 25
26
Un bonheur à nettoyer La soupière électrique Total Control est dotée d’une fonction de
pré-nettoyage (20). Plus d’informations à la page 13. Remarqueimportante : Le pré-nettoyage facilite uniquement le nettoyage dela base du récipient amovible (7). Un nettoyage supplémentairepeut être nécessaire.
La soupière électrique Total Control ne passe pas au lave-vaissellemais elle est facile à nettoyer. Après utilisation, essuyezsimplement le carter du moteur (6) et la lame dentelée (8) avec del’eau tiède savonneuse, puis séchez le tout.
NE plongez PAS le couvercle ou la verseuse dans l’eau.
Le récipient amovible (7) de la soupière électrique Total Controlpeut être retiré de la verseuse (10) pour le nettoyage. Il vous suffitd’appuyer sur le bouton de déverrouillage du récipient (9) et deretirer ce dernier. Lavez simplement le récipient amovible (7) à lamain avec de l’eau tiède savonneuse et essuyez la verseuse avecun torchon doux humidifié.
Séchez soigneusement les contacts du récipient amovible aprèsle lavage. Pour repositionner le récipient amovible dans laverseuse, vérifiez qu’il est bien droit puis appuyez pourl’enclencher.
Certains types d’aliments peuvent brûler s’ils sont en contactavec la résistance chauffante au fond de l’appareil. Si cela seproduit, sélectionnez le mode Pré-nettoyage. Si les tâches nepartent pas, il s’agit d’une décoloration qui restera. Celan’affectera ni les performances, ni la qualité des préparations.N’utilisez pas de grattoirs sur la soupière électriqueTotal Control, vous risqueriez de l’endommager.
Retirer et repositionner le joint 47
Il sera parfois nécessaire de retirer le joint du couvercle (3) pour lenettoyer. Lavez-le avec de l’eau chaude savonneuse, rincez-le etséchez-le soigneusement avant de le repositionner.
48 ATTENTION : NE plongez PAS le couvercle ni la verseusedans l’eau. Ces pièces contiennent des composantsélectriques qui peuvent être endommagés au contact del’eau. Veillez à ne pas mouiller les connexions électriques.
Sécher soigneusement avant utilisation.
Utilisation de la soupière électrique Votre soupière électrique Total Control propose 3 programmes
pour les soupes et 1 programme pour les boissons.
SОlectionnez le programme de votre choix :
Pour une soupe onctueuse... (13)
Le programme Soupe onctueuse (9) est parfait pour les recettesde soupes à la texture veloutée. Le programme assure un mixagedes ingrédients à la texture voulue et une cuisson en douceur à latempérature adéquate. (Le programme dure 21 minutes pour4 portions, puis la soupe peut être servie et dégustée !)
Mode Soupe moulinée (14)
Le programme Soupe moulinée (9) est parfait pour les recettes desoupes à la texture moulinée. Le programme dure 25 minutespour 4 portions, puis la soupe peut être servie et dégustée !
Mode Soupe avec morceaux (15)
Le programme Soupe avec morceaux (9) est parfait pour lesrecettes de soupes rustiques dont la texture est plus grossière. Ceprogramme chauffe les ingrédients plus longtemps pour garantirune cuisson parfaite des morceaux. Il dure 28 minutes pour4 portions. Pour les soupes avec morceaux, il n’y a pas demixage. L’appareil assure uniquement la cuisson. Il est doncrecommandé de bien couper les légumes en petits dés. Lorsquevotre soupe contient trop de morceaux après la cuisson,sélectionnez la fonction Mixage pour obtenir la consistancedésirée. Appuyez sur le bouton Marche/Arrêt (23) et maintenez-leenfoncé pendant 5 secondes, puis vérifiez la texture.
Mode Sauté... (16) Le mode Sauté chauffe la soupière de manière à pouvoir faire
revenir des aliments tels que les oignons et des lardons avantl’ajout des autres ingrédients dans la soupe. Versez un peu d’huiledans le récipient amovible (7), sélectionnez le mode Sauté et appuyez surle bouton Marche/Arrêt (23). Faites chauffer l’huile pendant uneminute avant d’ajouter les ingrédients. Le mode Sauté estuniquement disponible lorsque le couvercle (4) est fermé sur laverseuse (10). Le mode Sauté se désactive lorsque lecouvercle est soulevé. Remarque : N’utilisez pas le modeSauté pendant plus de 10 minutes.
Boissons (17)
Le mode Boissons de la soupière électrique Total Control est idéalpour préparer des smoothies et des milkshakes à partird’ingrédients frais. Pour consulter des recettes de boissons,reportez-vous aux pages 29 - 30. Au bout de 2 minutes, la boisson peut être servie. Le mode Boissons ne chauffe pas les ingrédients et convientparfaitement à la préparation de boissons rafraîchissantes quandil fait chaud.
Remarque : Ne mettez pas de glaçons dans la soupièreélectrique Total Control.
FP501020MEE Rev2.qxp_Morphy Richards Instruction Book 26/10/2016 12:09 Page 26

27
Un mixage parfait ! (19)
Le mode Mixage vous permet de mixer davantage la soupe pourobtenir la texture souhaitée. Ce mode ne prolonge pas la cuissonde la soupe.
Pour utiliser ce mode après la cuisson, appuyez sur le boutonMarche/Arrêt. Vous quitterez ainsi le mode Conservation auchaud. Ôtez le couvercle, puis reportez-vous aux étapes 4 à 6 dela page 12.
Conservation au chaud
Lorsque le programme de préparation de la soupe est terminé,l’unité passe en mode Conservation au chaud. Ce mode s’affichesur le bandeau de commandes (2). Si vous souhaitez servir lasoupe sans attendre, soulevez le couvercle et servez. Le modeConservation au chaud se désactive dès que vous soulevez lecouvercle.
Guide des programmesSoupe onctueuse 19, 21 min 3, 4
Soupe moulinée 22, 24, 26 min 2, 3, 4
Soupe avec morceaux 25, 27, 29 min 2, 3, 4
Mode Sauté 10 minutes maximum -
Boissons 2 minutes 3, 4
Réchauffage 11, 14, 17 min 2, 3, 4
Mixage À la demande 4 maximum
Pré-nettoyage 4 minutes -
Conservation au chaud 30 minutes 2, 3, 4
Recettes
Soupes riches et généreuses ou encoresmoothies rafraîchissants : nous avonsélaboré pour vous toute une gamme derecettes à réaliser avec votre nouvellesoupière électrique Total Control.
Le mode Soupe avec morceaux (15) permetuniquement de cuire les ingrédients, il nepermet en aucun cas de les découper.Lorsque la soupe contient trop de morceauxà votre goût, vous pouvez utiliser le modeMixage (19) pour la rendre plus onctueuse.
Les recettes ont été conçues pour desquantités situées entre les capacitésminimale et maximale de la soupièreélectrique Total Control (de 800 ml à 1,6 litre).
Les recettes ont été élaborées pour destextures onctueuses, moulinées ou avecmorceaux, et les quantités d’ingrédients sontindiquées pour 2, 3 ou 4 portions.
REMARQUE : Les quantités pour deuxportions sont fournies uniquement pour lessoupes moulinées et avec morceaux.
f
FP501020MEE Rev2.qxp_Morphy Richards Instruction Book 26/10/2016 12:09 Page 27
28
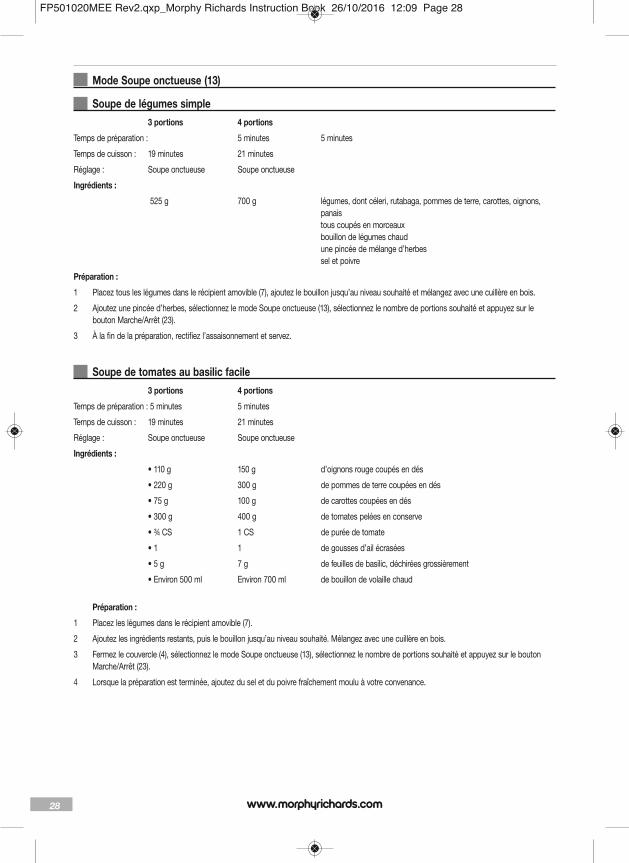
Mode Soupe onctueuse (13)
Soupe de légumes simple 3 portions 4 portions
Temps de préparation : 5 minutes 5 minutes
Temps de cuisson : 19 minutes 21 minutes
Réglage : Soupe onctueuse Soupe onctueuse
Ingrédients :
525 g 700 g légumes, dont céleri, rutabaga, pommes de terre, carottes, oignons,panaistous coupés en morceauxbouillon de légumes chaud une pincée de mélange d’herbes sel et poivre
Préparation :
1 Placez tous les légumes dans le récipient amovible (7), ajoutez le bouillon jusqu’au niveau souhaité et mélangez avec une cuillère en bois.
2 Ajoutez une pincée d’herbes, sélectionnez le mode Soupe onctueuse (13), sélectionnez le nombre de portions souhaité et appuyez sur lebouton Marche/Arrêt (23).
3 À la fin de la préparation, rectifiez l’assaisonnement et servez.
Soupe de tomates au basilic facile 3 portions 4 portions
Temps de préparation : 5 minutes 5 minutes
Temps de cuisson : 19 minutes 21 minutes
Réglage : Soupe onctueuse Soupe onctueuse
Ingrédients :
• 110 g 150 g d’oignons rouge coupés en dés
• 220 g 300 g de pommes de terre coupées en dés
• 75 g 100 g de carottes coupées en dés
• 300 g 400 g de tomates pelées en conserve
• ¾ CS 1 CS de purée de tomate
• 1 1 de gousses d’ail écrasées
• 5 g 7 g de feuilles de basilic, déchirées grossièrement
• Environ 500 ml Environ 700 ml de bouillon de volaille chaud
Préparation :
1 Placez les légumes dans le récipient amovible (7).
2 Ajoutez les ingrédients restants, puis le bouillon jusqu’au niveau souhaité. Mélangez avec une cuillère en bois.
3 Fermez le couvercle (4), sélectionnez le mode Soupe onctueuse (13), sélectionnez le nombre de portions souhaité et appuyez sur le boutonMarche/Arrêt (23).
4 Lorsque la préparation est terminée, ajoutez du sel et du poivre fraîchement moulu à votre convenance.
FP501020MEE Rev2.qxp_Morphy Richards Instruction Book 26/10/2016 12:09 Page 28
29
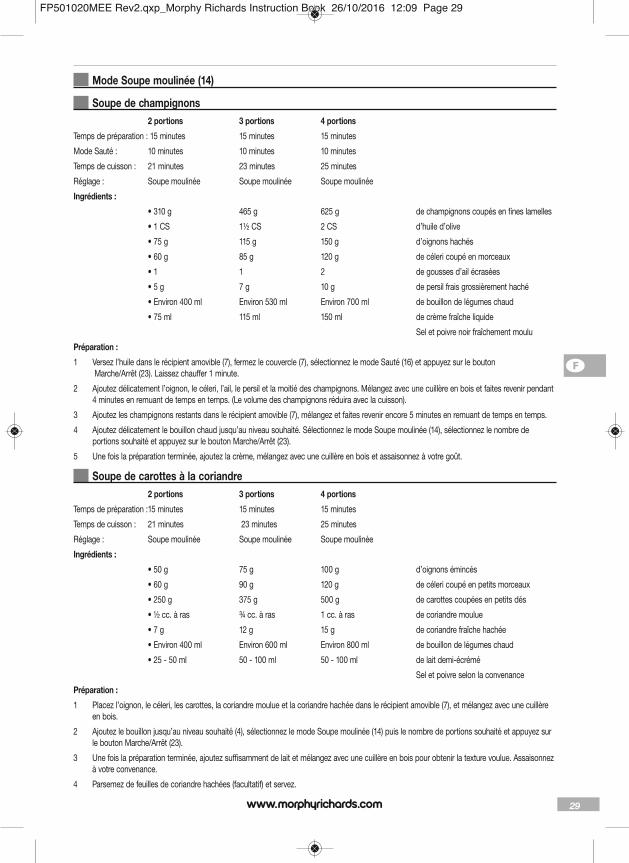
Mode Soupe moulinée (14)
Soupe de champignons 2 portions 3 portions 4 portions
Temps de préparation : 15 minutes 15 minutes 15 minutes
Mode Sauté : 10 minutes 10 minutes 10 minutes
Temps de cuisson : 21 minutes 23 minutes 25 minutes
Réglage : Soupe moulinée Soupe moulinée Soupe moulinée
Ingrédients :
• 310 g 465 g 625 g de champignons coupés en fines lamelles
• 1 CS 1½ CS 2 CS d’huile d’olive
• 75 g 115 g 150 g d’oignons hachés
• 60 g 85 g 120 g de céleri coupé en morceaux
• 1 1 2 de gousses d’ail écrasées
• 5 g 7 g 10 g de persil frais grossièrement haché
• Environ 400 ml Environ 530 ml Environ 700 ml de bouillon de légumes chaud
• 75 ml 115 ml 150 ml de crème fraîche liquide
Sel et poivre noir fraîchement moulu
Préparation :
1 Versez l’huile dans le récipient amovible (7), fermez le couvercle (7), sélectionnez le mode Sauté (16) et appuyez sur le boutonMarche/Arrêt (23). Laissez chauffer 1 minute.
2 Ajoutez délicatement l’oignon, le céleri, l’ail, le persil et la moitié des champignons. Mélangez avec une cuillère en bois et faites revenir pendant4 minutes en remuant de temps en temps. (Le volume des champignons réduira avec la cuisson).
3 Ajoutez les champignons restants dans le récipient amovible (7), mélangez et faites revenir encore 5 minutes en remuant de temps en temps.
4 Ajoutez délicatement le bouillon chaud jusqu’au niveau souhaité. Sélectionnez le mode Soupe moulinée (14), sélectionnez le nombre deportions souhaité et appuyez sur le bouton Marche/Arrêt (23).
5 Une fois la préparation terminée, ajoutez la crème, mélangez avec une cuillère en bois et assaisonnez à votre goût.
Soupe de carottes à la coriandre 2 portions 3 portions 4 portions
Temps de préparation :15 minutes 15 minutes 15 minutes
Temps de cuisson : 21 minutes 23 minutes 25 minutes
Réglage : Soupe moulinée Soupe moulinée Soupe moulinée
Ingrédients :
• 50 g 75 g 100 g d’oignons émincés
• 60 g 90 g 120 g de céleri coupé en petits morceaux
• 250 g 375 g 500 g de carottes coupées en petits dés
• ½ cc. à ras ¾ cc. à ras 1 cc. à ras de coriandre moulue
• 7 g 12 g 15 g de coriandre fraîche hachée
• Environ 400 ml Environ 600 ml Environ 800 ml de bouillon de légumes chaud
• 25 - 50 ml 50 - 100 ml 50 - 100 ml de lait demi-écrémé
Sel et poivre selon la convenance
Préparation :
1 Placez l’oignon, le céleri, les carottes, la coriandre moulue et la coriandre hachée dans le récipient amovible (7), et mélangez avec une cuillèreen bois.
2 Ajoutez le bouillon jusqu’au niveau souhaité (4), sélectionnez le mode Soupe moulinée (14) puis le nombre de portions souhaité et appuyez surle bouton Marche/Arrêt (23).
3 Une fois la préparation terminée, ajoutez suffisamment de lait et mélangez avec une cuillère en bois pour obtenir la texture voulue. Assaisonnezà votre convenance.
4 Parsemez de feuilles de coriandre hachées (facultatif) et servez.
f
FP501020MEE Rev2.qxp_Morphy Richards Instruction Book 26/10/2016 12:09 Page 29
30
Mode Soupe avec morceaux (15)
Pistou à la française 2 portions 3 portions 4 portions
Temps de préparation : 15 minutes 15 minutes 15 minutes
Temps de cuisson : 24 minutes 26 minutes 28 minutes
Réglage : Soupe avec morceaux Soupe avec morceaux Soupe avec morceaux
Ingrédients :
• 75 g 110 g 150 g de courgettes coupées en petits dés
• 35 g 50 g 70 g de pommes de terre coupées en petits dés
• 35 g 50 g 70 g d’oignons finement émincés
• 25 g 35 g 50 g de carottes coupées en petits dés
• 200 g 300 g 400 g de tomates pelées en conserve
• 25 g 35 g 50 g de petits pois
• 25 g 35 g 50 g de haricots verts coupés en morceaux de 1 cm
• 25 g 35 g 50 g de spaghettis brisés en petits morceaux
• Environ 350 ml Environ 475 ml Environ 650 ml de bouillon de légumes chaud
• ½ CS ¾ CS 1 CS de purée de tomates (à incorporer au bouillon)
Sel et poivre noir moulu
Pour servir :
• Pesto
• Parmesan
Préparation :
1 Placez les légumes et les spaghettis dans le récipient amovible (7), ajoutez le bouillon et la purée de tomate jusqu’au niveau souhaité etmélangez avec une cuillère en bois.
2 Sélectionnez le mode Soupe avec morceaux (15) puis le nombre de portions souhaité et appuyez sur le bouton Marche/Arrêt (23).
3 Une fois la préparation terminée, assaisonnez à votre convenance et servez avec une cuillerée de pesto et de parmesan fraîchement râpé.
Bouillon d’agneau d’hiver aux lentilles 2 portions 3 portions 4 portions
Temps de préparation : 20 minutes 20 minutes 20 minutes
Mode Sauté : 7 minutes 7 minutes 7 minutes
Temps de cuisson : 24 minutes 26 minutes 28 minutes
Réglage : Soupe avec morceaux Soupe avec morceaux Soupe avec morceaux
Ingrédients :
• ½ CS 1 CS 1 CS d’huile d’olive
• 35 g 55 g 75 g de viande d’agneau crue hachée
• 50 g 75 g 100 g d’oignons finement émincés
• 1 1½ 2 de gousses d’ail écrasées
• 25 g 35 g 50 g de carottes coupées en fines rondelles
• 75 g 110 g 150 g de pommes de terre coupées en petits morceaux
• 50 g 75 g 100 g de rutabaga coupée en petits morceaux
• 1½ CS 2½ CS 3 CS de farine
• 120 g 175 g 235 g de lentilles vertes cuites en conserve, égouttées
• ¼ cc. ½ cc. ½ cc. de romarin frais haché
• ¼ CS ½ CS 1 CS de persil frais haché
• 1 1 2 feuille de laurier
• ½ cc. ½ cc. 1 cc. de sauce Worcestershire
• Environ 450 ml Environ 675 ml Environ 900 ml de bouillon d’agneau chaud
FP501020MEE Rev2.qxp_Morphy Richards Instruction Book 26/10/2016 12:09 Page 30

31
Préparation :
1 Versez l’huile d’olive dans le récipient amovible (7), fermez le couvercle (7), sélectionnez le mode Sauté (16) et appuyez sur le boutonMarche/Arrêt (23). Au bout d’une minute, ajoutez délicatement la viande d’agneau hachée, refermez le couvercle (4) et faites revenir pendant 2 minutes en remuant de temps en temps avec une cuillère en bois jusqu’à obtenir une coloration homogène.
2 Ajoutez délicatement les oignons, l’ail, les carottes, les pommes de terre et le rutabaga dans le récipient amovible (7), puis faites revenirpendant 4 minutes. Versez la farine puis ajoutez le reste des ingrédients et le bouillon chaud jusqu’au niveau souhaité.
3 Remuez avec une cuillère en bois ou une spatule. Appuyez sur le bouton Marche/Arrêt (23) et maintenez-le enfoncé, sélectionnez le modeSoupe avec morceaux (15) puis le nombre de portions souhaité et appuyez sur le bouton Marche/Arrêt (23).
4 Assaisonnez à votre convenance et retirez les feuilles de laurier avant de servir.
Mode Sauté (16)
Soupe de céleri 3 portions 4 portions
Temps de préparation : 10 minutes 10 minutes
Mode Sauté : 7 minutes 7 minutes
Temps de cuisson : 19 minutes 21 minutes
Réglage : Soupe onctueuse Soupe onctueuse
Ingrédients :
• 1 CS 1 CS d’huile d’olive
• 350 g 450g de céleri coupé grossièrement (avec les feuilles)
• 75 g 100 g d’oignons émincés
• 110 g 150 g de pommes de terre coupées
• Environ 700 ml Environ 800ml de bouillon de légumes chaud
Sel et poivre noir moulu
Persil frais pour la garniture
Préparation :
1 Versez l’huile d’olive dans le récipient amovible (7), fermez le couvercle (7), sélectionnez le mode Sauté (16) et appuyez sur le boutonMarche/Arrêt (23). Au bout d’1 minute, ajoutez délicatement la viande d’agneau hachée, refermez le couvercle (4) et faites revenir pendant2 minutes en remuant de temps en temps avec une cuillère en bois jusqu’à obtenir une coloration homogène.
2 Ajoutez délicatement les oignons, l’ail, les carottes, les pommes de terre et le rutabaga dans le récipient amovible (7), puis faites revenirpendant 4 minutes. Versez la farine puis ajoutez le reste des ingrédients et le bouillon chaud jusqu’au niveau souhaité.
3 Remuez avec une cuillère en bois ou une spatule. Appuyez sur le bouton Marche/Arrêt (23) et maintenez-le enfoncé, sélectionnez le modeSoupe avec morceaux (15) puis le nombre de portions souhaité et appuyez sur le bouton Marche/Arrêt (23).
4 Assaisonnez à votre convenance et retirez les feuilles de laurier avant de servir.
f
FP501020MEE Rev2.qxp_Morphy Richards Instruction Book 26/10/2016 12:09 Page 31

32
Soupe de brocolis et de fromage Stilton 3 portions 4 portions
Temps de préparation : 10 minutes 10 minutes
Mode Sauté : 6 minutes 6 minutes
Temps de cuisson : 19 minutes 21 minutes
Réglage : Soupe onctueuse Soupe onctueuse
Ingrédients :
• ¾ CS 1 CS d’huile d’olive
• 75 g 100 g d’oignons émincés
• 180 g 250 g de pommes de terre coupées en dés
• 1 2 gousses d’ail écrasées
• 180 g 250 g de bouquets et de tiges de brocoli, coupés grossièrement
• 750 ml 1 litre de bouillon de légumes chaud
• 115 g 150 g de fromage Stilton bleu, émietté
Poivre noir fraîchement moulu
Une pincée de sel
Préparation :
1 Versez l’huile dans le récipient amovible (7), sélectionnez le mode Sauté (16) et appuyez sur le bouton Marche/Arrêt (23). Faites chauffer l’huilependant une minute.
2 Ajoutez délicatement l’oignon, remuez avec une cuillère en bois et faites revenir pendant 3 minutes en mélangeant de temps en temps.
3 Ajoutez l’ail et les pommes de terre, et faites revenir pendant 2 minutes en mélangeant de temps en temps.
4 Ajoutez le bouillon de légumes (respectez la quantité indiquée), appuyez sur le bouton Marche/Arrêt (23) et maintenez-le enfoncé, sélectionnez le mode Soupe onctueuse (13) puis le nombre de portions souhaité et appuyez sur lebouton Marche/Arrêt (23).
5 Lorsque le minuteur indique 11 minutes restantes, ajoutez délicatement le brocoli et mélangez avec une cuillère en bois.
6 Une fois le programme terminé, ajoutez le fromage de Stilton, sélectionnez le mode Mixage (19) et maintenez enfoncé le bouton Marche/Arrêt(23) jusqu’à obtention de la texture souhaitée.
7 Rectifiez l’assaisonnement (il n’est peut-être pas nécessaire de saler cette soupe) et servez.
Remarque : Les pommes de terre épaississent la soupe. Si vous préférez en utiliser moins que dans notre recette, la soupe sera plus liquide.
Mode Boissons (17)
Milkshake au beurre de cacahuètes 3 portions 4 portions
Temps de préparation : 5 minutes 5 minutes
Durée du programme : 2 minutes 2 minutes
Ingrédients :
• 900 ml 1,2 litre de lait demi-écrémé
• 125 g 175 g de glace à la vanille
• 4½ CS à ras 6 CS à ras beurre de cacahuètes doux
• 4½ CS 6 CS de sirop d’érable
Préparation :
1 Placez tous les ingrédients dans le récipient amovible (7) et remuez avec une cuillère en bois.
2 Fermez le couvercle, sélectionnez le mode Boissons (17) et appuyez sur le bouton Marche/Arrêt (23).
3 Servez immédiatement.
Remarque : Il est possible d’utiliser du miel liquide à la place du sirop d’érable.
FP501020MEE Rev2.qxp_Morphy Richards Instruction Book 26/10/2016 12:09 Page 32

33
Smoothie de petit-déjeuner aux myrtilles et à l’avoine (avec du yaourt nature) 3 portions 4 portions
Temps de préparation : 5 minutes 5 minutes
Durée du programme : 2 minutes 2 minutes
Ingrédients :
• 675 g 800 g de yaourt nature allégé
• 325 ml 400 ml de lait demi-écrémé
• 45 g 60 g de flocons d’avoine
• 115 g 150 g de myrtilles
• 2 CS 3 CS de miel liquide
Préparation :
1 Placez tous les ingrédients dans le récipient amovible (7) et remuez avec une cuillère en bois.
2 Fermez le couvercle (4), sélectionnez le mode Boissons (17) et appuyez sur le bouton Marche/Arrêt (23).
Foire aux questionsSi vous avez des questions à propos de l’utilisation de votresoupière électrique Total Control, reportez-vous à la liste ci-dessous. Vous y trouverez les réponses aux questions les plusfréquemment posées (FAQ). Pour toute assistance supplémentaire, contactez notre serviced’assistance : 0344 871 0944.
Est-ce que la soupière continue à chauffer lorsque je soulèvele couvercle (4) ?Non. Pour une sécurité maximale, l’alimentation s’interromptdès que vous soulevez le couvercle. La soupière chauffeuniquement lorsque le couvercle (4) est fermé et que leprogramme Soupe onctueuse (13), Soupe moulinée (14), Soupeavec morceaux (15), Sauté (16) ou Réchauffage (18) a étésélectionné.
Puis-je ôter le couvercle en cours de cycle ?À chaque cycle, la soupière électrique Total Control vous
permet d’ajouter les ingrédients oubliés ou de remuer le Sauté(16) pendant 1 minute.
Puis-je utiliser ma soupière électrique pour d’autrespréparations que des soupes ?Non. Les programmes disponibles sont réglés de manière àconcocter des soupes et des boissons idéales à partir desingrédients d’origine. Suivez les recettes et adaptez-les à votregoût.
Puis-je utiliser de la viande crue avec la soupière électrique ?Non, sauf les lardons et les petites quantités de viande hachée(jusqu’à 100 g). Vous devez d’abord cuire la viande séparémentavant d’utiliser celle-ci dans la soupe avec les autresingrédients de la recette car la soupière électrique Total Controlest uniquement conçue pour faire revenir doucement despetites quantités de lardons fumés et d’oignons avant de cuirela soupe. ATTENTION : Vous ne devez pas utiliser le modeSauté pour cuire de la viande crue autre que les lardonsfumés et la viande hachée (100 g max.).
Quelle est la capacité de la soupière électrique ?La capacité de votre soupière électrique Total Control est de1,6 litre. Ceci correspond au trait de repère qui figure àl’intérieur et à l’extérieur du récipient amovible (7). Veillez à nepas remplir votre soupière électrique Total Control au-dessusde ce repère. Dans le cas contraire, le détecteur deremplissage excessif coupera l’alimentation électrique de lalame dentelée (8) et l’écran DEL (21) affichera le message« E1 ». Si cela se produit, il suffit de retirer une partie desingrédients de façon à ne pas dépasser le repère deremplissage 1 600 ml et d’essuyer le détecteur de remplissageexcessif (5) sur le couvercle (4). Assurez-vous que lesingrédients (y compris les liquides) se trouvent au-dessus dutrait pour 2 portions, sinon le mode de Mixage ne pourra pasfonctionner.
Puis-je modifier le temps des modes Soupe onctueuse,Soupe moulinée et Soupe avec morceaux ?Non. Les temps de ces modes sont prédéfinis.
Puis-je réchauffer de la soupe en conserve/brique ?Non. Les programmes sont réglés de manière à concocter dessoupes idéales à partir des ingrédients d’origine. Bien quepratiques, les soupes en conserve/brique peuvent brûler sur larésistance inférieure et endommager le produit.
Que dois-je faire si ma soupière électrique Total Controlcesse de fonctionner ?Votre soupière électrique Total Control est équipée d’unthermostat de sécurité qui coupe l’alimentation électrique etarrête l’appareil pour prévenir toute surchauffe si vous l’utilisezde façon continue sur 3 cycles ou plus. Si cela venait à seproduire, retirez tous les aliments du récipient amovible etlaissez la soupière électrique refroidir pendant 30 minutes avantde reprendre la préparation.
Si vous utilisez le mode Mixage (19) en continu pendant plusde 20 secondes, un arrêt de sécurité coupe l’alimentationélectrique pour prévenir toute surchauffe. Si cela se produit,patientez pendant 10 secondes avant de réutiliser le modeMixage.
f
FP501020MEE Rev2.qxp_Morphy Richards Instruction Book 26/10/2016 12:09 Page 33

34
Puis-je préparer des soupes froides comme les gaspachosdans ma soupière électrique Total Control ?Oui, mais vous devrez d’abord cuire la soupe en utilisant lemode Soupe onctueuse (13), Soupe moulinée (14) ou Soupeavec morceaux (15). Ensuite, il vous suffira de laisser la souperefroidir ou de la mettre au réfrigérateur avant de la déguster.
Que dois-je faire si de la nourriture brûle sur la résistance dela base de la soupière électrique Total Control ?En raison de l’amidon et du sucre présents dans certainsaliments, ces derniers peuvent légèrement brûler lorsqu’ils sonten contact avec la résistance inférieure du récipient amovible(4). Pour éviter ce problème, versez une demi-tasse d’eau ou debouillon dans la soupière électrique Total Control avant d’yplacer des ingrédients solides. Complétez ensuite avec lerestant du liquide préconisé dans votre recette.
Annuler ou modifier les programmes Si vous vous êtes trompé(e) de programme et que vous avezappuyé sur le bouton Marche/Arrêt (23), ou si vous souhaitez annuler le programme sélectionné,appuyez sur le bouton Marche/Arrêt (23) et maintenez-leenfoncé pendant 2 secondes. Appuyez sur le bouton Mode (22)pour sélectionner le programme adéquat puis sur le boutonMarche/Arrêt (23) pour redémarrer.
Nous contacterService d’assistance
Si vous rencontrez un problème avec votre appareil, veuillezappeler notre service d’assistance. Nous pourrons certainementvous aider plus efficacement que le magasin où vous avezacheté l’article.
Munissez-vous du nom de produit, du numéro de modèle et dunuméro de série de l’appareil lorsque vous nous appelez. Celanous aidera à traiter plus rapidement votre demande.
Dialoguer avec nous
Pour toute question ou commentaire, ou pour recevoir plusd’astuces et des idées de recettes et profiter au maximum devotre appareil, vous pouvez nous contacter en ligne :
Blog : www.morphyrichards.co.uk/blog
Facebook : www.facebook.com/morphyrichardsuk
Twitter : @loveyourmorphy
Site Web : www.morphyrichards.com
Appli Morphy Richards Cook & Create
VOTRE GARANTIE DE DEUX ANSPour la clientèle en France
Il est important de conserver le ticket de caisse comme preuved’achat. Agrafez votre ticket de caisse à cette noticed'utilisation; vous pourrez ainsi l’avoir sous la mainultérieurement.
Merci de donner les informations ci-dessous si votre appareiltombe en panne. Vous trouverez ces références à la base del’appareil.
Numéro du modèleNuméro de série
Tous les produits Morphy Richards sont testés individuellementavant de quitter l’usine.
Si un problème survient dans les 24 mois qui suivent l’achatd’origine, vous devez contacter le magasin où vous avezacheté votre appareil muni de votre ticket de caisse, celui ci lerenverra à Glen Dimplex France pour expertise.
Sous réserve des exclusions indiquées ci-dessous (1 à 9),l’appareil défectueux sera alors réparé ou remplacé etréexpédié dans un délai de 15 jours ouvrables maximum àcompter de son arrivée.
Si, pour quelque raison que ce soit, l’article est remplacépendant la période de garantie de deux ans, la période degarantie du nouvel article sera calculée à partir de la dated’achat d’origine. Vous devez donc absolument conserver votreticket de caisse ou votre facture d’origine pour indiquer la dated’achat.
Pour bénéficier de la garantie de deux ans, l’appareil doit avoirété utilisé conformément aux instructions du fabricant. Parexemple, les fers doivent avoir été détartrés et les filtres doiventavoir été nettoyés selon les instructions.
Morphy Richards ne sera pas dans l’obligation de remplacer ouréparer les articles aux termes de la garantie dans les
Morphy Richards
FP501020MEE Rev2.qxp_Morphy Richards Instruction Book 26/10/2016 12:09 Page 34
35
circonstances suivantes :
1 Si le problème provient d’une utilisation accidentelle, d’uneutilisation abusive ou négligente, ou si l’appareil a été utilisé demanière contraire aux recommandations du fabricant, ou encorelorsque le problème provient de sautes de puissance ou dedégâts occasionnés en transit.
2 Si l’appareil a été utilisé sur une alimentation électrique dont latension est différente de celle qui est indiquée sur l’appareil.
3 Si des personnes autres que nos techniciens (ou l’un de nosrevendeurs agréés) ont tenté de faire des réparations.
4 Si l’appareil a été loué ou utilisé dans un contexte nondomestique.
5 Si l’appareil est d’occasion.
6 Morphy Richards n’est pas dans l’obligation de réaliser destravaux d’entretien, quels qu’ils soient, aux termes de la garantie.
7 La garantie exclut les consommables tels que les sacs, les filtreset les carafes en verre.
8 Les batteries et les dégâts provoqués par leur fuite ne sont pascouverts par la garantie.
9 Les filtres n’ont pas été nettoyés ou remplacés suivant lesinstructions.
Cette garantie ne confère aucun droit à l’exception de ceux quisont expressément indiqués ci-dessus, et ne couvre aucuneréclamation pour dommages immatériels ou indirects. Cettegarantie est offerte comme avantage supplémentaire et n’aaucune incidence sur vos droits légaux en tant queconsommateur.
Pour la clientèle en Belgique
Les produits de Morphy Richards sont produits conformémentles normes de qualité, agrée international. Au-dessus vos droitslégaux, Morphy Richards vous garantit qu’à partir d’achat ceproduit sera sans défauts de fabrication ou de matérielspendant une période de deux ans.
Il est important de conserver votre bon d’achat comme preuve.Agrafez votre ticket à cette notice d’installation.
Veuillez mentionner ces informations ci-dessous si votreappareil tombe en panne. Vous trouverez ces informations sur labase de l’appareil.
Numéro du modèleNuméro de série
Si, pour quelque raison que ce soit, l’article est remplacépendant la période de garantie (deux ans), la période degarantie du nouvel article sera calculée à partir de la dated’achat d’origine. Il est donc très importants de conserver votrebon d’achat original afin de connaître la date initiale d’achat.
Cette garantie vaut uniquement quand l’appareil a été utiliséconformément aux instructions du fabricant. Par exemple, lesappareils doivent être détartrés et les filtres doivent être tenuspropre selon le mode d’emploi.
Morphy Richard ne sera pas dans l’obligation de remplacer ouréparer les articles aux termes de la garantie dans lescirconstances suivantes
1 Si le problème, prévient d’une utilisation accidentelle, d’uneutilisation abusive ou négligente, ou si l’appareil a été utilisé demanière contraire aux recommandations du fabricant, ou encorelorsque le problème provient de source de puissance ou dedégâts occasionnés en transit.
2 Si l’appareil a été utilisé sur une alimentation électrique dont latension est différente de celle qui est indiquée sur l’appareil.
3 Si des personnes, autres que nos techniciens (ou revendeursagrées) ont tenté de faire des réparations.
4 Si l’appareil a été loué ou utilisé dans un contexte nondomestique.
5 Si l’appareil est d’occasion.
6 Morphy Richards n’est pas dans l’obligation de réaliser destravaux d’entretien, quels qu’ils soient, aux termes de la garantie.
7 La garantie ne couvre pas les sachets, filtres et brocs en verre.
8 Les batteries et les dégâts provoqués par leur fuite ne sont pascouverts par la garantie.
9 Les filtres n’ont pas été nettoyés ou remplacés suivant lesinstructions.
Cette garantie ne confère aucun droit à l’exception de ceux quisont expressément indiqués ci-dessus, et ne couvre aucuneréclamation pour dommages immatériels ou indirects. Cettegarantie est offerte comme avantage supplémentaire et n’aaucune incidence sur vos droits légaux en tant queconsommateur.
f
FP501020MEE Rev2.qxp_Morphy Richards Instruction Book 26/10/2016 12:09 Page 35

36
Gesundheit und Sicherheit FŁr die Benutzung elektrischer Haushaltsgeršte sind folgende Grundregeln gesunden Menschenverstandes zur Wahrung der Sicherheit
einzuhalten. Lesen Sie bitte die Bedienungsanleitung vor der Verwendung des Produkts aufmerksam durch.
• Dieses Geršt kann von Personen, deren kŲrperliche odergeistige Unversehrtheit oder deren Wahrnehmungsfšhigkeiteingeschršnkt ist, sowie von Personen mit mangelnden Kenntnissen oder Erfahrung benutzt werden. Dies gilt nur unterder Voraussetzung, dass sie beaufsichtigt werden oder dass sieeine Einweisung in die sichere Nutzung des Geršts und diedamit verbundenen Gefahren erhalten haben.
• Kinder dŁrfen nicht mit dem Geršt spielen.• Das Geršt darf nicht von Kindern benutzt werden. • Geršt und Netzkabel nicht in Reichweite von Kindern
aufbewahren. • Nach einem Durchlauf das Geršt vollstšndig abkŁhlen lassen
und danach reinigen, um Einbrennen zu verhindern. • Dieses Geršt ist nicht fŁr den Betrieb Łber eine externe
Zeitschaltvorrichtung oder eine separate Fernsteuerungvorgesehen.
• Wenn das Netzkabel beschšdigt ist, muss es durch einespezielle Kabeleinheit ausgetauscht werden, die vom Herstelleroder seinem Kundenservice erhšltlich ist.
• WARNUNG: Die Mischblštter sind sehr scharf. Bei derBenutzung und Reinigung vorsichtig vorgehen.
• Hinweise zu Pflege und Reinigung finden Sie auf Seite 39 und48.
d
FP501020MEE Rev2.qxp_Morphy Richards Instruction Book 26/10/2016 12:09 Page 36

37
AuŖerdem enthšlt der Text folgende Sicherheitshinweise.
Aufstellungsort• Das Geršt stets weit entfernt von der Kante einer
Arbeitsplatte aufstellen.
• Das Geršt auf einer fest stehenden, flachen Oberflšche benutzen.
• Das Geršt darf nicht im Freien oder in der Nšhe von Wasserbenutzt werden.
Netzkabel• Das Netzkabel muss spannungsfrei von der Steckdose bis zum
Unterteil des Geršts verlegt sein.
• Das Netzkabel nicht Łber die Kante einer Arbeitsplatteherabhšngen lassen. Ein Kind kŲnnte daran ziehen.
• Das Kabel nicht Łber eine offene Flšche verlegen, z. B. zwischeneiner tief angebrachten Steckdose und einem Tisch.
• Das Netzkabel nicht Łber eine warme Herdplatte, einen Toasteroder andere heiŖe Flšchen verlegen, da das Kabel sonstbeschšdigt werden kann.
Eigene Sicherheit• WARNHINWEIS: Zum Schutz vor Feuer, elektrischen Schlšgen
und vor Verletzungen weder das Kabel, noch den Stecker oder dasGeršt in Wasser oder andere FlŁssigkeiten tauchen.
• WARNUNG: Ein Missbrauch des Geršts kann Verletzungenverursachen.
• WARNUNG: BerŁhren Sie keine beweglichen Teile.
• Beim Transportieren von Geršten mit heiŖem Inhalt sehr vorsichtig vorgehen.
• Das Geršt nicht mit feuchten oder nassen Hšnden benutzen.
• Den Netzstecker ziehen, wenn das Geršt nicht benutzt wird oder vor Reinigung.
Behandlung von Verbrennungen• Verbrennungen unverzŁglich mit kaltem Wasser kŁhlen. Mit dem
KŁhlen der Wunde auch beim Ausziehen von KleidungsstŁckennicht aufhŲren und rasch einen Arzt rufen.
Weitere Anmerkungen zur Sicherheit• Geršt nicht verwenden, wenn das Netzkabel des Geršts
beschšdigt ist. Weitere Hilfe erhalten Sie telefonisch bei MorphyRichards.
• Der Einsatz von ZubehŲrein- oder -aufsštzen, die vom Herstellernicht empfohlen werden, kann zu Schšden am Geršt fŁhren.
• Das Geršt nicht auf oder dicht neben Wšrmequellen aufstellen,wie z. B. Gas- oder Elektroherde oder Herdplatten.
• Das Geršt und das Kabel vor Wšrme, direkter Sonnenbestrahlung,Feuchtigkeit, scharfen Kanten und šhnlichen Gefahrenquellenfernhalten.
• Bei der Benutzung sicherstellen, dass der Deckel vor Einschaltendes Geršts angebracht ist.
• Den Deckel nicht abnehmen, solange die Serrator Schneide nochlšuft.
• Das Geršt darf nicht ununterbrochen zur Zubereitung von Suppenverwendet werden.
• Vorsicht beim EingieŖen heiŖer FlŁssigkeiten in den Total ControlSuppenbereiter, da diese durch plŲtzliches Verdampfen aus demGeršt spritzen kŲnnen.
Elektrischer Anschluss ‹berprŁfen Sie, ob die Spannung auf dem Typenschild des Geršts
mit jener Ihrer Hausstromversorgung Łbereinstimmt, der Strommuss Wechselstrom (AC) sein.
WARNUNG: DIESES GERńT MUSS GEERDET WERDEN.
Falls die Sicherung in dem Sicherungshalter ausgetauscht werdenmuss, ist eine Sicherung mit 13 A gemšŖ BS1362 zu verwenden.
Besonderheiten (1) Deckelgriff (2) Bedienfeld (3) Dichtung (4) Deckel (5) ‹berlaufsensor (6) Motorgehšuse (7) Herausnehmbarer Behšlter (8) Serrator Schneide (9) Behšlter-Entriegelungsknopf (10) Kanne (11) Kannengriff (12) Netzbuchse (13) Anzeige ĄCremige Suppeď (14) Anzeige ĄMedium Suppeď (15) Anzeige ĄStŁckige Suppeď (16) Anzeige ĄSautťď (17) Anzeige ĄGetršnkeď (18) Anzeige ĄAufwšrmenď (19) Anzeige ĄZerkleinernď (20) Anzeige ĄVorreinigungď (21) LED Anzeige (22) Modustaste (23) Start/Stop Taste (24) Portionstaste (25) Warmhalteanzeige
Vor der ersten Verwendung Es ist wichtig, dass Sie Ihren Total Control Suppenbereiter vor dem
ersten Gebrauch oder nach lšngerem Nichtgebrauch reinigen.Weitere Informationen kŲnnen Sie dem Abschnitt ĄReinigung undPflegeď entnehmen.
Bei der ersten Benutzung des Total Control Suppenbereiters kannaus dem Deckel ein wenig Qualm/Rauch aufsteigen. Dies istnormal und kommt vom Fett, das bei der Fertigung des Geršts aufeinigen Teilen aufgetragen wird. Diese Qualm-/Rauchbildung wirdnach einigen Einsštzen verschwinden.
Benutzung des Total Control Suppenbereiters1 Stellen Sie sicher, dass der Netzstecker des Suppenbereiters aus
der Steckdose gezogen ist.
2 Deckel entfernen (4) und dabei wenn mŲglich nicht die Serrator-Schneide (8) berŁhren.
d
FP501020MEE Rev2.qxp_Morphy Richards Instruction Book 26/10/2016 12:09 Page 37

38
WARNUNG: Scharfe Schneiden.
3 FŁllen Sie alle Zutaten in den herausnehmbaren Behšlter (7).FŁllen Sie zuletzt die FlŁssigkeit bis zur gewŁnschtenPortionsmarkierung am herausnehmbaren Behšlter (7) ein. WeitereInformationen zu den FlŁssigkeitsmengen finden Sie in deneinzelnen Rezepten.
4 Setzen Sie den Deckel (4) wieder auf die Kanne (10), achten Siedarauf, dass er fest aufsitzt.
Den Deckel/das Motorgehšuse ein wenig drehen, damit dieSchneide (8) durch die Zutaten dringen und den Deckel (4) derKanne (10) finden kann.
5 Stecken Sie das Kabel in die Steckdose (12).
6 Wšhlen Sie mit der Modustaste (22) das gewŁnschte Programm.Die Anzeige ĄCremige Suppeď (13) leuchtet auf. Mit derModustaste (22) kŲnnen Sie die einzelnen Programmedurchlaufen. Wšhlen Sie die Anzeige ĄCremige Suppeď (13) fŁreine cremige Suppenkonsistenz.
7 Wšhlen Sie die Anzeige ĄMedium Suppeď (14) fŁr eine Suppe mitmittelcremiger Konsistenz.
8 Wšhlen Sie die Anzeige ĄStŁckige Suppeď (15) fŁr eine stŁckigeSuppe.
9 DrŁcken Sie die Start/Stop Taste (23) und die Zubereitungszeitwird auf der LED-Anzeige (21) heruntergezšhlt. Die PortionsgrŲŖeist auf 2 Portionen eingestellt. Wenn Sie 3 oder 4 Portionenzubereiten mŲchten, mŁssen Sie dies vor DrŁcken der Start/StopTaste (23) einstellen. Siehe PortionsgrŲŖen auf Seite 8.
Die Programme ĄCremige Suppeď und ĄGetršnkeď sind auf3 Portionen eingestellt.
10 Wenn das Programm beendet ist, piept der Total ControlSuppenbereiter 10 Sekunden lang. Ziehen Sie den Netzstecker,entfernen Sie den Deckel (4) und servieren Sie.
WARNUNG: Vorsicht beim Entfernen des Deckels (4) bei derZubereitung von Suppe! HeiŖe FlŁssigkeiten und heiŖerDampf kŲnnen austreten.
PortionsgrŲŖen einstellen11 Stellen Sie sicher, dass der Netzstecker
des Total Control Suppenbereiters aus der Steckdose gezogen ist.Deckel entfernen (4) und dabei wenn mŲglich nicht die Serrator-Schneide (8) berŁhren. WARNUNG: Scharfe Schneiden.
12 BefŁllen Sie den Total Control Suppenbereiter bis zurgewŁnschten Portionsmarkierung am herausnehmbaren Behšlter(7). Weitere Informationen finden Sie bei den einzelnen Rezepten.
13 Den Deckel (4) fest auf die Kanne (10) setzen und den Total ControlSuppenbereiter mit dem Netzstecker anschlieŖen. Siehe Seite 7.
14 Mit der Modustaste (22) ein Programm wšhlen. Die AnzeigeĄCremige Suppeď (13) leuchtet auf. Mit der Modustatste(22) die einzelnen Programme fŁr die gewŁnschteSuppenkonsistenz durchlaufen.
15 Nach Auswahl der Suppenkonsistenz mit der Portionstaste (24) diegewŁnschte Anzahl Portionen fŁr Suppe einstellen (2, 3 oder 4).
HINWEIS: Die Portionsauswahl ist nicht bei allen RezeptenmŲglich. Weitere Details finden Sie in den Rezepten ab Seite16.
16 DrŁcken Sie die Start/Stop Taste (23) und die Zubereitungsdauerwird auf der LED-Anzeige (21) heruntergezšhlt. Bei Ende desProgramm piept der Total Control Suppenbereiter 10 Sekundenlang. Ziehen Sie den Netzstecker, entfernen Sie den Deckel (4)und servieren Sie.
HINWEIS: Je nach Art der Suppe nehmen die Zutaten dieFlŁssigkeit auf, wodurch sich das Suppenvolumen imVergleich zur EinfŁllmenge reduziert.
Verwendung der†Sautť-Funktion17 Stellen Sie sicher, dass der Netzstecker des Total Control
Suppenbereiters aus der Steckdose gezogen ist. Deckel entfernen(4) und dabei wenn mŲglich nicht die Serrator-Schneide (8)berŁhren. WARNUNG: Scharfe Schneiden.
18 Eine kleine Menge ÷l in den herausnehmbaren Behšlter geben (7).SchlieŖen Sie den Total Control Suppenbereiter an.
19 Die Modustaste (22) drŁcken, bis die Anzeige Sautť (16)aufleuchtet. Setzen Sie den Deckel wieder (4) auf.
20 DrŁcken Sie die Start/Stop Taste (23). Ihr Suppenbereiter heizt nunauf.
21 Den Deckel (4) nach einer Minute abnehmen und die Zutaten zumSautieren vorsichtig in den herausnehmbaren Behšlter (7) fŁllen.Setzen Sie den Deckel (4) wieder auf. Das Programm lšuft weiter.Bei einigen Rezepten ist es nŲtig, den Deckel zu entfernen unddie Zutaten zwischendurch umzurŁhren.Siehe Rezepte ab Seite 16.
WARNUNG: Zutaten vorsichtig hinzugeben, um Spritzer zuvermeiden.
22 Am Ende die Start/Stop Taste (23) drŁcken. Die restlichen Zutatenin den herausnehmbaren Behšlter (7) fŁllen und dieSuppenzubereitung durch Auswahl des gewŁnschten Programmsstarten (siehe Seite 7).
Wenn der Deckel (4) bei der Sautť-Funktion zum UmrŁhren undEinfŁllen von Zutaten abgenommen wurde, wird die Zubereitungfortgesetzt, sobald der Deckel (4) wieder aufgesetzt wurde. DerDeckel (4) muss aufgesetzt werden, bevor das Sautierenfortgesetzt wird. Der Suppenbereiterspeichert die gewšhlten Einstellungen.
Verwendung der Getršnke-Funktion23 Stellen Sie sicher, dass der Netzstecker des Total Control
Suppenbereiters aus der Steckdose gezogen ist. Deckel entfernen(4) und dabei wenn mŲglich nicht die Serrator-Schneide (8)berŁhren. WARNUNG: Scharfe Schneiden .
24 Zutaten fŁr 3 oder 4 Portionen in den herausnehmbaren Behšlter(7) fŁllen. Die FlŁssigkeit zum Schluss einfŁllen.
25 Den Deckel (4) auf die Kanne (10) fest aufsetzen und den TotalControl Suppenbereiter an die Steckdose anschlieŖen.
26 Die Modustaste (22) drŁcken, bis die Getršnke-Funktion (17)aufleuchtet.
27 Die Start/Stop Taste (23) drŁcken. Die Zubereitungsdauer wird inder LED-Anzeige (21) heruntergezšhlt.
HINWEIS: Die Getršnke-Funktion kann nur fŁr 3 oder 4Portionen verwendet werden. Die PortionsgrŲŖe muss nichteingestellt werden.
FP501020MEE Rev2.qxp_Morphy Richards Instruction Book 26/10/2016 12:09 Page 38

39
28 Am Ende des Programms piept der Total Control Suppenbereiter10 Sekunden lang. Ziehen Sie den Netzstecker, entfernen Sie denDeckel (4) und servieren Sie.
Verwendung der Aufwšrmfunktion29 Stellen Sie sicher, dass der
Netzstecker des Suppenbereiters aus der Steckdose gezogen ist.Deckel entfernen (4) und dabei wenn mŲglich nicht die Serrator-Schneide (8) berŁhren. WARNUNG: Scharfe Schneiden.
30 FŁllen Sie die Suppe, die Sie aufwšrmen mŲchten, in denherausnehmbaren Behšlter (7). Sie kŲnnen zwischen 2 bis 4Portionen einfŁllen.
31 Setzen Sie den Deckel (4) wieder auf die Kanne (10), achten Siedarauf, dass er fest aufsitzt. SchlieŖen Sie den Total ControlSuppenbereiter an.
32 Die Modustaste (22) drŁcken, bis die Aufwšrm-Funktion (18) aufleuchtet. Wšhlen Sie mit der Portionstaste (24) diePortionsgrŲŖe aus (2, 3 oder 4).
33 Die Start/Stop Taste (23) drŁcken. Die Zubereitungsdauer wird inder LED-Anzeige (21) heruntergezšhlt.
34 Am Ende des Programms piept der Total Control Suppenbereiter10 Sekunden lang. Ziehen Sie den Netzstecker, entfernen Sie denDeckel (4) und servieren Sie.
HINWEIS: Die korrekte PortionsgrŲŖe muss im Bedienfeldentsprechend der eingefŁllten Suppenportionen eingestelltwerden, damit die Suppe auf die korrekte Temperatur erwšrmtwerden kann.
Die Suppenkonsistenz kann sich durch das Aufwšrmenveršndern.
StŁckige Suppen werden durch das Aufwšrmen cremiger.
Verwendung der Mixerfunktion35 Stellen Sie sicher, dass der Netzstecker des
Suppenbereiters aus der Steckdose gezogen ist. Deckel entfernen(4) und dabei wenn mŲglich nicht die Serrator-Schneide (8)berŁhren. WARNUNG: Scharfe Schneiden.
36 Die stŁckige Suppe in den herausnehmbaren Behšlter (7) fŁllen. HINWEIS: Nur zum PŁrieren von stŁckigen oder Medium-Suppen oder anderer weich gegarter Zutaten.
37 Setzen Sie den Deckel (4) wieder auf die Kanne (10), achten Siedarauf, dass er fest aufsitzt. Den Suppenbereiter mit demStromnetz verbinden.
38 Die Modustaste (22) drŁcken, bis die Mixerfunktion (19)aufleuchtet.
39 Die Start/Stop Taste (23) fŁr die gewŁnschte PŁrierdauer gedrŁckthalten. Mit dieser manuellen Einstellung kŲnnen Sie bis zu 20Sekunden lang pŁrieren. Bei Loslassen der Taste stoppt diePŁrierfunktion automatisch. Wenn Sie weiter pŁrieren mŲchten,drŁcken Sie die Taste erneut.
40 Den Netzstecker ziehen, Deckel (4) entfernen und servieren.
ALTERNATIVE: Wenn Sie eine Suppe pŁrieren mŲchten, dieSie im herausnehmbaren Behšlter (7) zubereitet haben,befolgen Sie die Anweisungen an Schritt 4.
Verwendung der Vorreinigungs-Funktion41 Stellen Sie sicher, dass der Netzstecker des Total Control
Suppenbereiters aus der Steckdose gezogen ist. Deckel entfernen(4) und dabei wenn mŲglich nicht die Serrator-Schneide (8)berŁhren. WARNUNG: Scharfe Schneiden.
42 800 ml Wasser mit einer kleinen Menge SpŁlmittel in denherausnehmbaren Behšlter (7) fŁllen.
43 Setzen Sie den Deckel (4) wieder auf die Kanne (10), achten Siedarauf, dass er fest aufsitzt. SchlieŖen Sie den Total ControlSuppenbereiter an.
44 Die Modustaste (22) drŁcken, bis die Vorreinigungs-Funktion (20)aufleuchtet.
45 Die Start/Stop Taste (23) drŁcken. Die Programmlaufzeit wird inder LED-Anzeige (21) heruntergezšhlt. Das Vorreinigungs-Programm lšuft 4 Minuten.
46 Nach der Vorreinigung den Total Control Suppenbereiter von derSteckdose trennen. Deckel entfernen (4) und dabei wenn mŲglichnicht die Serrator-Schneide (8) berŁhren. WARNUNG: Scharfe Schneiden.
HINWEIS: Die Vorreinigungs-Funktion reinigt nur den Boden.Der herausnehmbare Behšlter (7) und der Deckel (4) mŁssenseparat gereinigt werden. Siehe Reinigungshinweise auf Seite32. Den Suppenbereiter ausspŁlen, bis keine SpŁlmittelrestemehr vorhanden sind.
WARNUNG: Der herausnehmbare Behšlter (7) ist nach derVorreinigung heiŖ.
Einfache Reinigung Der Total Control Suppenbereiter hat eine Vorreinigungs-Funktion
(20). Siehe Seite 13. Hinweis: Mit der Vorreinigung wird nur derBoden des herausnehmbaren Behšlters (7) gereinigt. Andere TeilemŁssen separat gereinigt werden.
Der Total Control Suppenbereiter ist nicht spŁlmaschinenfest, lšsstsich jedoch einfach reinigen. Wischen Sie nach der Benutzungeinfach das Motorgehšuse (6) und die Serrator Schneide (8) mitwarmem Wasser und SpŁlmittel ab und trocknen Sie es.
Deckel und Kanne NICHT in Wasser eintauchen.
Der herausnehmbare Behšlter (7) des Total ControlSuppenbereiters kann zur Reinigung aus der Kanne (10)entnommen werden. Dazu einfach die Taste (9) drŁcken und denBehšlter herausnehmen. Waschen Sie den herausnehmbarenBehšlter (7) einfach mit warmem Wasser und SpŁlmittel ab undwischen Sie die Kanne mit einem weichen, feuchten Tuch ab.
Alle elektrischen Kontakte am Behšlter nach dem Waschensorgfšltig trocknen! Den herausnehmbaren Behšlter in der Kannekorrekt ausrichten und fest eindrŁcken.
Bestimmte Lebensmittel brennen an, wenn sie mit demHeizelement im Boden des Geršts in BerŁhrung kommen.Nutzen Sie in diesem Fall die Vorreinigungs-Funktion. Wenndie Verfšrbung anhšlt, kann sie nicht mehr entfernt werden.Die Funktionsweise des Produkts und die Qualitšt derGerichte werden dadurch nicht beeintršchtigt. Im Total ControlSuppenbereiter keine kratzenden Scheuerschwšmmeverwenden. Sie kŲnnen die Oberflšche beschšdigen.
d
FP501020MEE Rev2.qxp_Morphy Richards Instruction Book 26/10/2016 12:09 Page 39
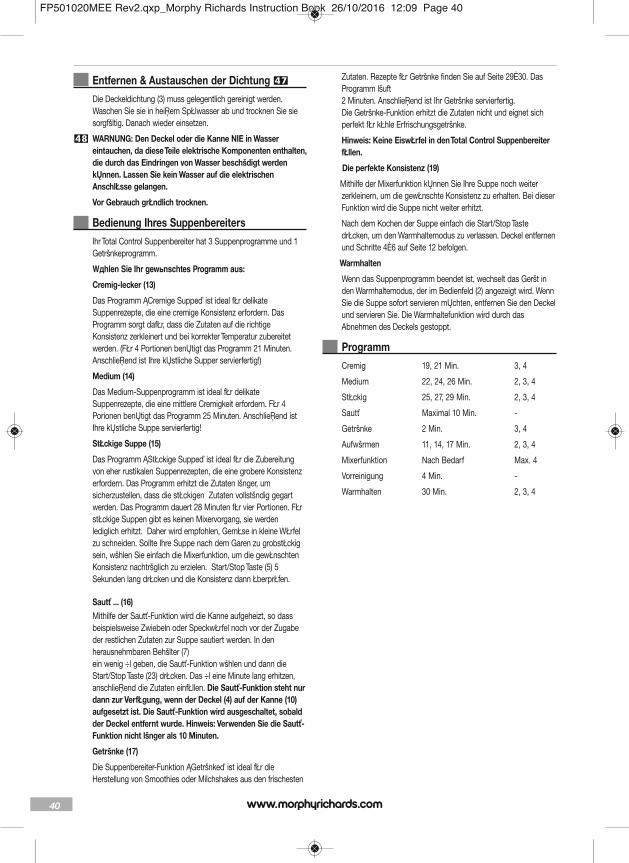
40
Entfernen & Austauschen der Dichtung 47
Die Deckeldichtung (3) muss gelegentlich gereinigt werden.Waschen Sie sie in heiŖem SpŁlwasser ab und trocknen Sie siesorgfšltig. Danach wieder einsetzen.
48 WARNUNG: Den Deckel oder die Kanne NIE in Wassereintauchen, da diese Teile elektrische Komponenten enthalten,die durch das Eindringen von Wasser beschšdigt werdenkŲnnen. Lassen Sie kein Wasser auf die elektrischenAnschlŁsse gelangen.
Vor Gebrauch grŁndlich trocknen.
Bedienung Ihres Suppenbereiters Ihr Total Control Suppenbereiter hat 3 Suppenprogramme und 1
Getršnkeprogramm.
Wдhlen Sie Ihr gewьnschtes Programm aus:
Cremig-lecker (13)
Das Programm ĄCremige Suppeď ist ideal fŁr delikateSuppenrezepte, die eine cremige Konsistenz erfordern. DasProgramm sorgt dafŁr, dass die Zutaten auf die richtigeKonsistenz zerkleinert und bei korrekter Temperatur zubereitetwerden. (FŁr 4 Portionen benŲtigt das Programm 21 Minuten.AnschlieŖend ist Ihre kŲstliche Supper servierfertig!)
Medium (14)
Das Medium-Suppenprogramm ist ideal fŁr delikateSuppenrezepte, die eine mittlere Cremigkeit erfordern. FŁr 4Porionen benŲtigt das Programm 25 Minuten. AnschlieŖend istIhre kŲstliche Suppe servierfertig!
StŁckige Suppe (15)
Das Programm ĄStŁckige Suppeď ist ideal fŁr die Zubereitungvon eher rustikalen Suppenrezepten, die eine grobere Konsistenzerfordern. Das Programm erhitzt die Zutaten lšnger, umsicherzustellen, dass die stŁckigen Zutaten vollstšndig gegartwerden. Das Programm dauert 28 Minuten fŁr vier Portionen. FŁrstŁckige Suppen gibt es keinen Mixervorgang, sie werdenlediglich erhitzt. Daher wird empfohlen, GemŁse in kleine WŁrfelzu schneiden. Sollte Ihre Suppe nach dem Garen zu grobstŁckigsein, wšhlen Sie einfach die Mixerfunktion, um die gewŁnschtenKonsistenz nachtršglich zu erzielen. Start/Stop Taste (5) 5Sekunden lang drŁcken und die Konsistenz dann ŁberprŁfen.
Sautť ... (16) Mithilfe der Sautť-Funktion wird die Kanne aufgeheizt, so dass
beispielsweise Zwiebeln oder SpeckwŁrfel noch vor der Zugabeder restlichen Zutaten zur Suppe sautiert werden. In denherausnehmbaren Behšlter (7) ein wenig ÷l geben, die Sautť-Funktion wšhlen und dann dieStart/Stop Taste (23) drŁcken. Das ÷l eine Minute lang erhitzen,anschlieŖend die Zutaten einfŁllen. Die Sautť-Funktion steht nurdann zur VerfŁgung, wenn der Deckel (4) auf der Kanne (10)aufgesetzt ist. Die Sautť-Funktion wird ausgeschaltet, sobaldder Deckel entfernt wurde. Hinweis: Verwenden Sie die Sautť-Funktion nicht lšnger als 10 Minuten.
Getršnke (17)
Die Suppenbereiter-Funktion ĄGetršnkeď ist ideal fŁr dieHerstellung von Smoothies oder Milchshakes aus den frischesten
Zutaten. Rezepte fŁr Getršnke finden Sie auf Seite 29Ė30. DasProgramm lšuft2 Minuten. AnschlieŖend ist Ihr Getršnke servierfertig. Die Getršnke-Funktion erhitzt die Zutaten nicht und eignet sichperfekt fŁr kŁhle Erfrischungsgetršnke.
Hinweis: Keine EiswŁrfel in den Total Control SuppenbereiterfŁllen.
Die perfekte Konsistenz (19)
Mithilfe der Mixerfunktion kŲnnen Sie Ihre Suppe noch weiterzerkleinern, um die gewŁnschte Konsistenz zu erhalten. Bei dieserFunktion wird die Suppe nicht weiter erhitzt.
Nach dem Kochen der Suppe einfach die Start/Stop TastedrŁcken, um den Warmhaltemodus zu verlassen. Deckel entfernenund Schritte 4Ė6 auf Seite 12 befolgen.
Warmhalten
Wenn das Suppenprogramm beendet ist, wechselt das Geršt inden Warmhaltemodus, der im Bedienfeld (2) angezeigt wird. WennSie die Suppe sofort servieren mŲchten, entfernen Sie den Deckelund servieren Sie. Die Warmhaltefunktion wird durch dasAbnehmen des Deckels gestoppt.
ProgrammCremig 19, 21 Min. 3, 4
Medium 22, 24, 26 Min. 2, 3, 4
StŁckig 25, 27, 29 Min. 2, 3, 4
Sautť Maximal 10 Min. -
Getršnke 2 Min. 3, 4
Aufwšrmen 11, 14, 17 Min. 2, 3, 4
Mixerfunktion Nach Bedarf Max. 4
Vorreinigung 4 Min. -
Warmhalten 30 Min. 2, 3, 4
FP501020MEE Rev2.qxp_Morphy Richards Instruction Book 26/10/2016 12:09 Page 40
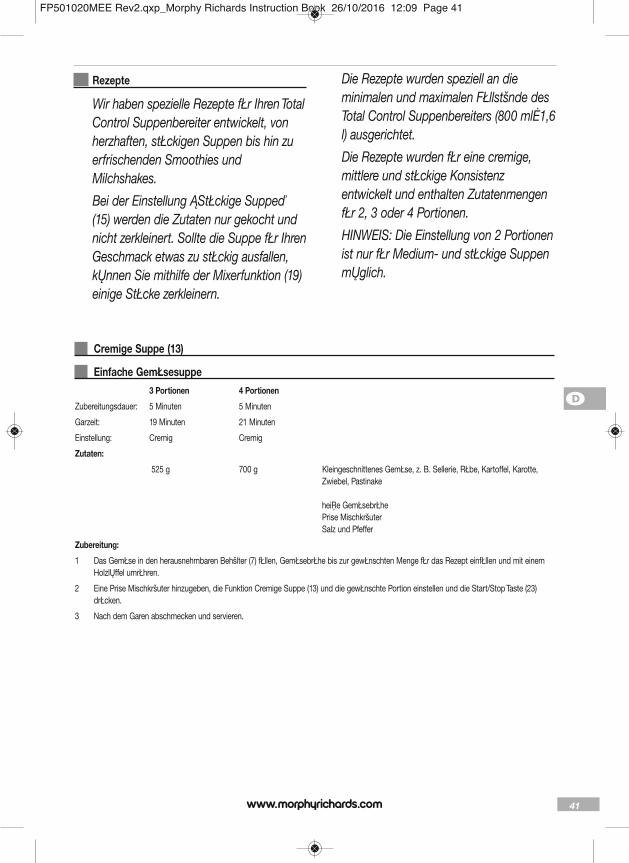
41
Rezepte
Wir haben spezielle Rezepte fŁr Ihren TotalControl Suppenbereiter entwickelt, vonherzhaften, stŁckigen Suppen bis hin zuerfrischenden Smoothies undMilchshakes.
Bei der Einstellung ĄStŁckige Suppeď(15) werden die Zutaten nur gekocht undnicht zerkleinert. Sollte die Suppe fŁr IhrenGeschmack etwas zu stŁckig ausfallen,kŲnnen Sie mithilfe der Mixerfunktion (19)einige StŁcke zerkleinern.
Die Rezepte wurden speziell an dieminimalen und maximalen FŁllstšnde desTotal Control Suppenbereiters (800 mlĖ1,6l) ausgerichtet.
Die Rezepte wurden fŁr eine cremige,mittlere und stŁckige Konsistenzentwickelt und enthalten ZutatenmengenfŁr 2, 3 oder 4 Portionen.
HINWEIS: Die Einstellung von 2 Portionenist nur fŁr Medium- und stŁckige SuppenmŲglich.
Cremige Suppe (13)
Einfache GemŁsesuppe 3 Portionen 4 Portionen
Zubereitungsdauer: 5 Minuten 5 Minuten
Garzeit: 19 Minuten 21 Minuten
Einstellung: Cremig Cremig
Zutaten:
525 g 700 g Kleingeschnittenes GemŁse, z. B. Sellerie, RŁbe, Kartoffel, Karotte,Zwiebel, Pastinake
heiŖe GemŁsebrŁhe Prise Mischkršuter Salz und Pfeffer
Zubereitung:
1 Das GemŁse in den herausnehmbaren Behšlter (7) fŁllen, GemŁsebrŁhe bis zur gewŁnschten Menge fŁr das Rezept einfŁllen und mit einemHolzlŲffel umrŁhren.
2 Eine Prise Mischkršuter hinzugeben, die Funktion Cremige Suppe (13) und die gewŁnschte Portion einstellen und die Start/Stop Taste (23)drŁcken.
3 Nach dem Garen abschmecken und servieren.
d
FP501020MEE Rev2.qxp_Morphy Richards Instruction Book 26/10/2016 12:09 Page 41

42
Einfache Tomatensuppe mit Basilikum 3 Portionen 4 Portionen
Zubereitungsdauer: 5 Minuten 5 Minuten
Garzeit: 19 Minuten 21 Minuten
Einstellung: Cremig Cremig
Zutaten:
• 110 g 150 g rote Zwiebel, gewŁrfelt
• 220 g 300 g Kartoffel, gewŁrfelt
• 75 g 100 g Karotte, gewŁrfelt
• 300 g 400 g Dose gehackte Tomaten
• 3/4 EL 1 EL Tomatenmark
• 1 1 Knoblauchzehe, zerdrŁckt
• 5 g 7 g Basilikumblštter, gerupft
• Ca. 500 ml Ca. 700 ml heiŖe HŁhnerbrŁhe
Zubereitung:
1 GemŁse in den herausnehmbaren Behšlter (7) fŁllen.
2 Die restlichen Zutaten hinzugeben, BrŁhe bis zur gewŁnschten Markierung eingieŖen und mit einem HolzlŲffel umrŁhren.
3 Deckel (4) aufsetzen, die Funktion Cremige Suppe (13) und gewŁnschte PortionsgrŲŖe auswšhlen und die Start/Stop Taste (23) drŁcken.
4 Nach dem Garen mit Salz und frisch gemahlenem Pfeffer abschmecken.
Medium (14)
Pilzsuppe 2 Portionen 3 Portionen 4 Portionen
Zubereitungsdauer: 15 Minuten 15 Minuten 15 Minuten
Sautť: 10 Minuten 10 Minuten 10 Minuten
Garzeit: 21 Minuten 23 Minuten 25 Minuten
Einstellung: Medium Medium Medium
Zutaten:
• 310 g 465 g 625 g Pilze, fein gehackt
• 1 EL 1Ĺ EL 2 EL OlivenŲl
• 75 g 115 g 150 g Zwiebeln, gehackt
• 60 g 85 g 120 g Sellerie, gehackt
• 1 1 2 Knoblauchzehe, zerdrŁckt
• 5 g 7 g 10 g frische Petersilie, gehackt
• Ca. 400 ml Ca. 530 m Ca. 700 ml heiŖe GemŁsebrŁhe
• 75 ml 115 ml 150 ml Sahne
Salz und frisch gemahlenen schwarzen Pfeffer
Zubereitung:
1 ÷l in den herausnehmbaren Behšlter (7) geben, Deckel (4) aufsetzen, die Sautť-Funktion (16) auswšhlen und die Start/StopTaste (23) drŁcken. 1 Minute erhitzen.
2 Vorsichtig Zwiebeln, Sellerie, Knoblauch, Petersilie und die Hšlfte der Pilze hinzugeben, mit einem HolzlŲffel umrŁhren und 4 Minuten unterUmrŁhren andŁnsten. (Das Volumen der Pilze reduziert sich beim Kochen.)
3 Die restlichen Pilze in den herausnehmbaren Behšlter (7) geben, umrŁhren, 5 Minuten weiterdŁnsten, dabei gelegentlich umrŁhren.
4 Die heiŖe BrŁhe vorsichtig bis zur gewŁnschten Markierung eingieŖen. Die Medium-Funktion (14) und PortionsgrŲŖe einstellen und dieStart/Stop Taste (23) drŁcken
FP501020MEE Rev2.qxp_Morphy Richards Instruction Book 26/10/2016 12:09 Page 42

43
5 Am Ende des Garvorgangs die Sahne mit einem HolzlŲffel unterrŁhren und abschmecken.
Karottensuppe mit Koriander 2 Portionen 3 Portionen 4 Portionen
Zubereitungsdauer: 15 Minuten 15 Minuten 15 Minuten
Garzeit: 21 Minuten 23 Minuten 25 Minuten
Einstellung: Medium Medium Medium
Zutaten:
• 50 g 75 g 100 g Zwiebeln, gehackt
• 60 g 90 g 120 g Sellerie, fein gehackt
• 250 g 375 g 500 g Karotten, klein gewŁrfelt
• 1/2 gestrichener TL 3/4 gestrichener TL 1 TL gemahlenen Koriander
• 7 g 12 g 15 g Koriander, gehackt
• Ca. 400 ml Ca. 600 m Ca. 800 ml heiŖe GemŁsebrŁhe
• 25Ė50 ml 50Ė100 ml 50Ė100 ml fettarme Milch
Salz und Pfeffer nach Geschmack
Zubereitung:
1 Zwiebeln, Sellerie, Karotten, gemahlenen und gehackten Koriander in den herausnehmbaren Behšlter (7) fŁllen und mit einem HolzlŲffel umrŁhren.
2 BrŁhe bis zur gewŁnschten Markierung einfŁllen, die Medium-Funktion (14) und Portionsmenge auswšhlen und die Start/Stop Taste (23) drŁcken.
3 Am Ende der Garzeit Milch bis zur gewŁnschten Konsistenz mit einem HolzlŲffel einrŁhren und abschmecken
4 Mit gehackten Korianderblšttern servieren.
StŁckige Suppe (15)
FranzŲsische Pistou-Suppe 2 Portionen 3 Portionen 4 Portionen
Zubereitungsdauer: 15 Minuten 15 Minuten 15 Minuten
Garzeit: 24 Minuten 26 Minuten 28 Minuten
Einstellung: StŁckig StŁckig StŁckig
Zutaten:
• 75 g 110 g 150 g Zucchini, klein gewŁrfelt
• 35 g 50 g 70 g Kartoffeln, klein gewŁrfelt
• 35 g 50 g 70 g Zwiebel, fein gehackt
• 25 g 35 g 50 g Karotten, klein gewŁrfelt
• 200 g 300 g 400 g Dosentomaten, gehackt
• 25 g 35 g 50 g feine Erbsen
• 25 g 35 g 50 g Brechbohnen, in 1 cm groŖe StŁcke geschnitten
• 25 g 35 g 50 g Spaghetti, in kleine StŁcke gebrochen
• Ca. 350 ml Ca. 475 m Ca. 650 m heiŖe GemŁsebrŁhe
• 1/2 EL 3/4 EL 1 EL Tomatenmark (in die BrŁhe mischen)
Salz und gemahlener schwarzer Pfeffer
Zum Servieren:
• Pesto
• Parmesankšse
Zubereitung:
1 GemŁse und Spaghetti in den herausnehmbaren Behšlter (7) fŁllen, GemŁsebrŁhe mit Tomatenmark bis zur gewŁnschten Markierung einfŁllenund mit einem HolzlŲffel umrŁhren.
2 Die Funktion StŁckige Suppe (15) und PortionsgrŲŖe einstellen und die Start/Stop Taste (23) drŁcken.
3 Nach dem Garen abschmecken und mit einem LŲffel Pesto und frisch geriebenem Parmesankšse servieren.
d
FP501020MEE Rev2.qxp_Morphy Richards Instruction Book 26/10/2016 12:09 Page 43
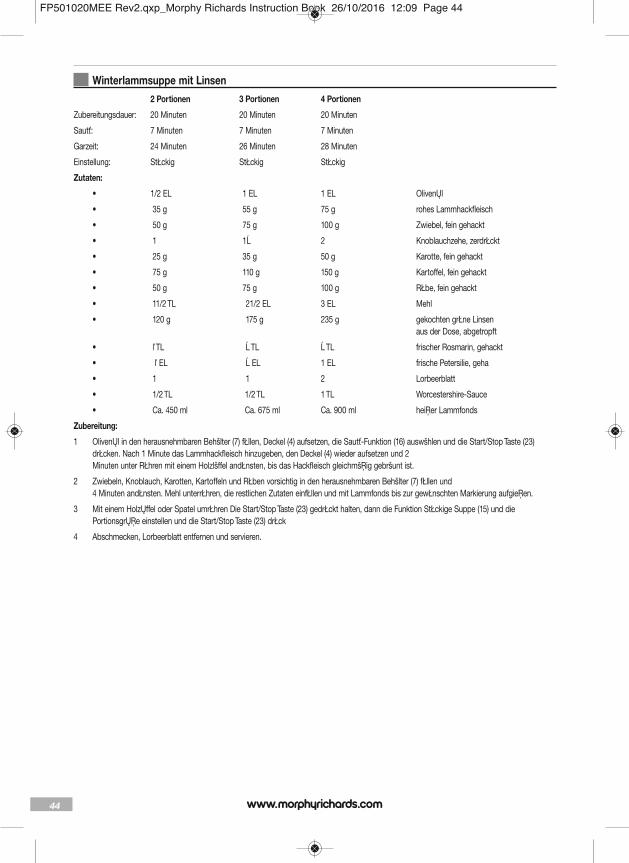
44
Winterlammsuppe mit Linsen 2 Portionen 3 Portionen 4 Portionen
Zubereitungsdauer: 20 Minuten 20 Minuten 20 Minuten
Sautť: 7 Minuten 7 Minuten 7 Minuten
Garzeit: 24 Minuten 26 Minuten 28 Minuten
Einstellung: StŁckig StŁckig StŁckig
Zutaten:
• 1/2 EL 1 EL 1 EL OlivenŲl
• 35 g 55 g 75 g rohes Lammhackfleisch
• 50 g 75 g 100 g Zwiebel, fein gehackt
• 1 1Ĺ 2 Knoblauchzehe, zerdrŁckt
• 25 g 35 g 50 g Karotte, fein gehackt
• 75 g 110 g 150 g Kartoffel, fein gehackt
• 50 g 75 g 100 g RŁbe, fein gehackt
• 11/2 TL 21/2 EL 3 EL Mehl
• 120 g 175 g 235 g gekochten grŁne Linsen aus der Dose, abgetropft
• ľ TL Ĺ TL Ĺ TL frischer Rosmarin, gehackt
• ľ EL Ĺ EL 1 EL frische Petersilie, geha
• 1 1 2 Lorbeerblatt
• 1/2 TL 1/2 TL 1 TL Worcestershire-Sauce
• Ca. 450 ml Ca. 675 ml Ca. 900 ml heiŖer Lammfonds
Zubereitung:
1 OlivenŲl in den herausnehmbaren Behšlter (7) fŁllen, Deckel (4) aufsetzen, die Sautť-Funktion (16) auswšhlen und die Start/Stop Taste (23)drŁcken. Nach 1 Minute das Lammhackfleisch hinzugeben, den Deckel (4) wieder aufsetzen und 2 Minuten unter RŁhren mit einem Holzlšffel andŁnsten, bis das Hackfleisch gleichmšŖig gebršunt ist.
2 Zwiebeln, Knoblauch, Karotten, Kartoffeln und RŁben vorsichtig in den herausnehmbaren Behšlter (7) fŁllen und 4 Minuten andŁnsten. Mehl unterrŁhren, die restlichen Zutaten einfŁllen und mit Lammfonds bis zur gewŁnschten Markierung aufgieŖen.
3 Mit einem HolzŲffel oder Spatel umrŁhren Die Start/Stop Taste (23) gedrŁckt halten, dann die Funktion StŁckige Suppe (15) und diePortionsgrŲŖe einstellen und die Start/Stop Taste (23) drŁck
4 Abschmecken, Lorbeerblatt entfernen und servieren.
FP501020MEE Rev2.qxp_Morphy Richards Instruction Book 26/10/2016 12:09 Page 44

45
Sautť-Funktion (16)
Selleriesuppe 3 Portionen 4 Portionen
Zubereitungsdauer: 10 Minuten 10 Minuten
Sautť: 7 Minuten 7 Minuten
Garzeit: 19 Minuten 21 Minuten
Einstellung: Cremig Cremig
Zutaten:
• 1 EL 1 EL OlivenŲl
• 350 g 450 g Selleriekopf, grob geschnitten (inkl. Blattwerk)
• 75 g 100 g Zwiebeln, gehackt
• 110 g 150 g Kartoffeln, gehackt
• Ca. 700 ml Ca. 800 ml heiŖe GemŁsebrŁhe
Salz und gemahlener schwarzer Pfeffer
frische Petersilie zum Garnieren
Zubereitung:
1 OlivenŲl in den herausnehmbaren Behšlter (7) fŁllen, Deckel (4) aufsetzen, die Sautť-Funktion (16) auswšhlen und die Start/Stop Taste (23)drŁcken. Nach 1 Minute vorsichtig das Lammhackfleisch hinzugeben, den Deckel (4) wieder aufsetzen und 2 Minuten unter RŁhren mit einemHolzlŲffel andŁnsten, bis das Hackfleisch gleichmšŖig gebršunt ist.
2 Zwiebeln, Knoblauch, Karotten, Kartoffeln und RŁben vorsichtig in den herausnehmbaren Behšlter (7) fŁllen und 4 Minuten andŁnsten MehlunterrŁhren, die restlichen Zutaten einfŁllen und mit Lammfonds bis zur gewŁnschten Markierung aufgieŖen.
3 Mit einem HolzŲffel oder Spatel umrŁhren Die Start/Stop Taste (23) gedrŁckt halten, dann die Funktion StŁckige Suppe (15) und diePortionsgrŲŖe einstellen und die Start/Stop Taste (23) drŁck
4 Abschmecken, Lorbeerblatt entfernen und servieren.
d
FP501020MEE Rev2.qxp_Morphy Richards Instruction Book 26/10/2016 12:09 Page 45
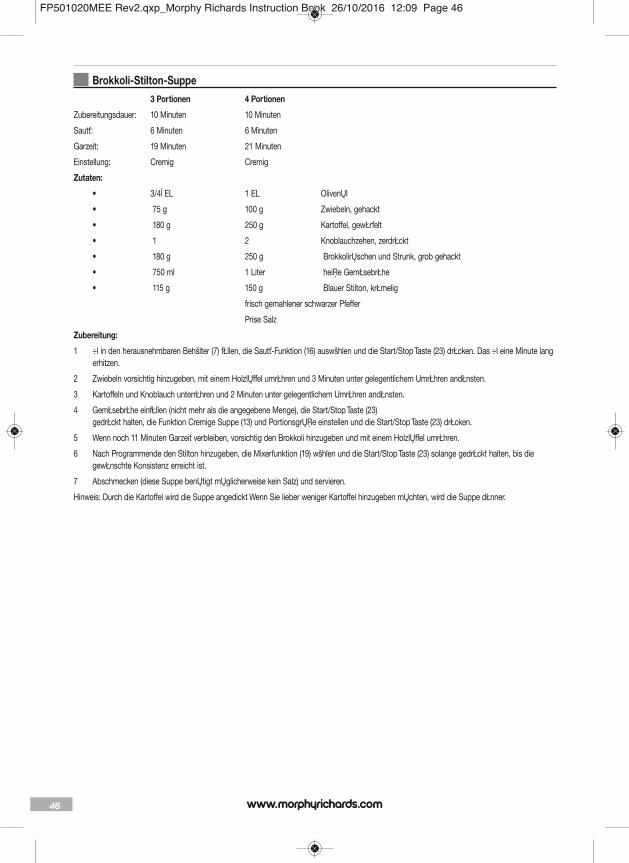
46
Brokkoli-Stilton-Suppe 3 Portionen 4 Portionen
Zubereitungsdauer: 10 Minuten 10 Minuten
Sautť: 6 Minuten 6 Minuten
Garzeit: 19 Minuten 21 Minuten
Einstellung: Cremig Cremig
Zutaten:
• 3/4ĺ EL 1 EL OlivenŲl
• 75 g 100 g Zwiebeln, gehackt
• 180 g 250 g Kartoffel, gewŁrfelt
• 1 2 Knoblauchzehen, zerdrŁckt
• 180 g 250 g BrokkolirŲschen und Strunk, grob gehackt
• 750 ml 1 Liter heiŖe GemŁsebrŁhe
• 115 g 150 g Blauer Stilton, krŁmelig
frisch gemahlener schwarzer Pfeffer
Prise Salz
Zubereitung:
1 ÷l in den herausnehmbaren Behšlter (7) fŁllen, die Sautť-Funktion (16) auswšhlen und die Start/Stop Taste (23) drŁcken. Das ÷l eine Minute langerhitzen.
2 Zwiebeln vorsichtig hinzugeben, mit einem HolzlŲffel umrŁhren und 3 Minuten unter gelegentlichem UmrŁhren andŁnsten.
3 Kartoffeln und Knoblauch unterrŁhren und 2 Minuten unter gelegentlichem UmrŁhren andŁnsten.
4 GemŁsebrŁhe einfŁllen (nicht mehr als die angegebene Menge), die Start/Stop Taste (23) gedrŁckt halten, die Funktion Cremige Suppe (13) und PortionsgrŲŖe einstellen und die Start/Stop Taste (23) drŁcken.
5 Wenn noch 11 Minuten Garzeit verbleiben, vorsichtig den Brokkoli hinzugeben und mit einem HolzlŲffel umrŁhren.
6 Nach Programmende den Stilton hinzugeben, die Mixerfunktion (19) wšhlen und die Start/Stop Taste (23) solange gedrŁckt halten, bis diegewŁnschte Konsistenz erreicht ist.
7 Abschmecken (diese Suppe benŲtigt mŲglicherweise kein Salz) und servieren.
Hinweis: Durch die Kartoffel wird die Suppe angedickt Wenn Sie lieber weniger Kartoffel hinzugeben mŲchten, wird die Suppe dŁnner.
FP501020MEE Rev2.qxp_Morphy Richards Instruction Book 26/10/2016 12:09 Page 46
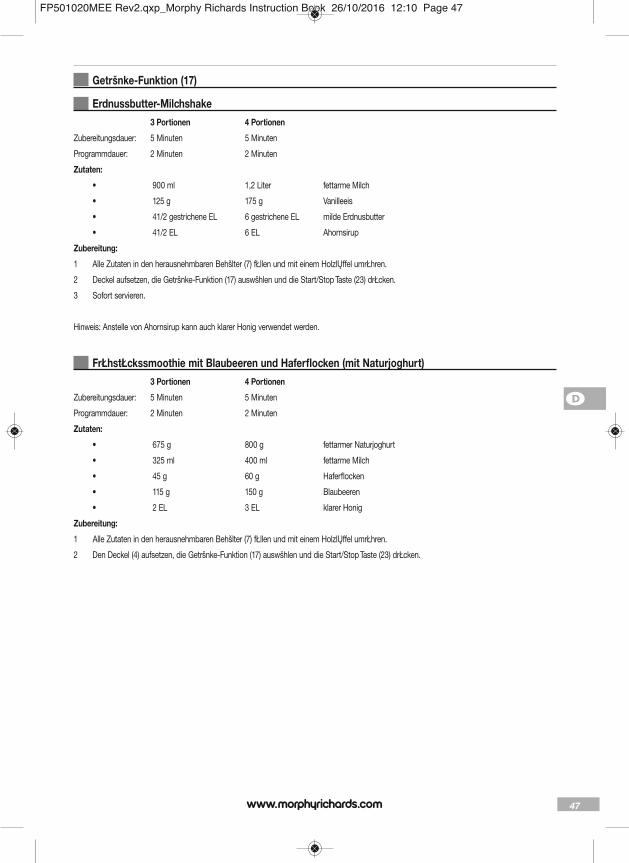
47
Getršnke-Funktion (17)
Erdnussbutter-Milchshake 3 Portionen 4 Portionen
Zubereitungsdauer: 5 Minuten 5 Minuten
Programmdauer: 2 Minuten 2 Minuten
Zutaten:
• 900 ml 1,2 Liter fettarme Milch
• 125 g 175 g Vanilleeis
• 41/2 gestrichene EL 6 gestrichene EL milde Erdnusbutter
• 41/2 EL 6 EL Ahornsirup
Zubereitung:
1 Alle Zutaten in den herausnehmbaren Behšlter (7) fŁllen und mit einem HolzlŲffel umrŁhren.
2 Deckel aufsetzen, die Getršnke-Funktion (17) auswšhlen und die Start/Stop Taste (23) drŁcken.
3 Sofort servieren.
Hinweis: Anstelle von Ahornsirup kann auch klarer Honig verwendet werden.
FrŁhstŁckssmoothie mit Blaubeeren und Haferflocken (mit Naturjoghurt) 3 Portionen 4 Portionen
Zubereitungsdauer: 5 Minuten 5 Minuten
Programmdauer: 2 Minuten 2 Minuten
Zutaten:
• 675 g 800 g fettarmer Naturjoghurt
• 325 ml 400 ml fettarme Milch
• 45 g 60 g Haferflocken
• 115 g 150 g Blaubeeren
• 2 EL 3 EL klarer Honig
Zubereitung:
1 Alle Zutaten in den herausnehmbaren Behšlter (7) fŁllen und mit einem HolzlŲffel umrŁhren.
2 Den Deckel (4) aufsetzen, die Getršnke-Funktion (17) auswšhlen und die Start/Stop Taste (23) drŁcken.
d
FP501020MEE Rev2.qxp_Morphy Richards Instruction Book 26/10/2016 12:10 Page 47
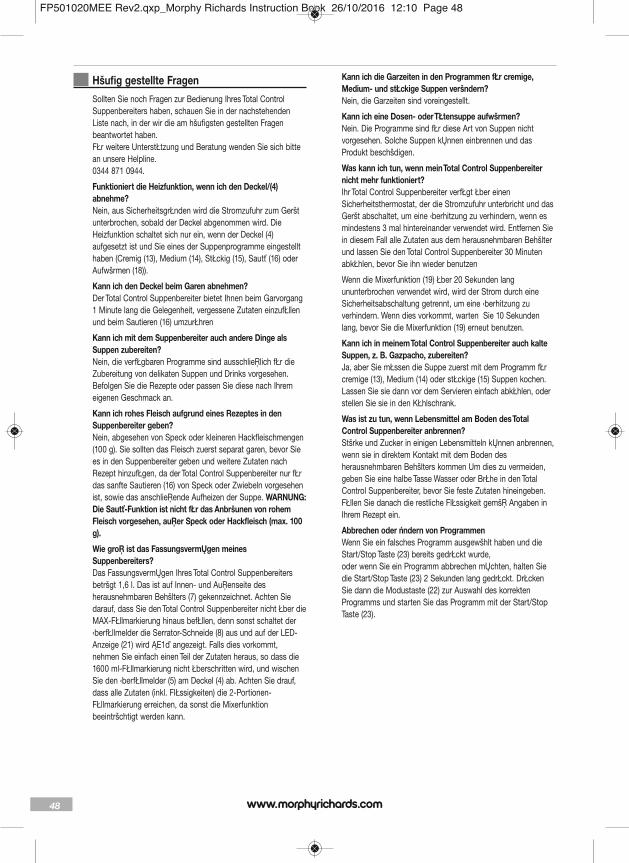
48
Hšufig gestellte FragenSollten Sie noch Fragen zur Bedienung Ihres Total ControlSuppenbereiters haben, schauen Sie in der nachstehendenListe nach, in der wir die am hšufigsten gestellten Fragenbeantwortet haben. FŁr weitere UnterstŁtzung und Beratung wenden Sie sich bittean unsere Helpline. 0344 871 0944.
Funktioniert die Heizfunktion, wenn ich den Deckel/(4)abnehme?Nein, aus SicherheitsgrŁnden wird die Stromzufuhr zum Gerštunterbrochen, sobald der Deckel abgenommen wird. DieHeizfunktion schaltet sich nur ein, wenn der Deckel (4)aufgesetzt ist und Sie eines der Suppenprogramme eingestellthaben (Cremig (13), Medium (14), StŁckig (15), Sautť (16) oderAufwšrmen (18)).
Kann ich den Deckel beim Garen abnehmen?Der Total Control Suppenbereiter bietet Ihnen beim Garvorgang1 Minute lang die Gelegenheit, vergessene Zutaten einzufŁllenund beim Sautieren (16) umzurŁhren
Kann ich mit dem Suppenbereiter auch andere Dinge alsSuppen zubereiten?Nein, die verfŁgbaren Programme sind ausschlieŖlich fŁr dieZubereitung von delikaten Suppen und Drinks vorgesehen.Befolgen Sie die Rezepte oder passen Sie diese nach Ihremeigenen Geschmack an.
Kann ich rohes Fleisch aufgrund eines Rezeptes in denSuppenbereiter geben?Nein, abgesehen von Speck oder kleineren Hackfleischmengen(100 g). Sie sollten das Fleisch zuerst separat garen, bevor Siees in den Suppenbereiter geben und weitere Zutaten nachRezept hinzufŁgen, da der Total Control Suppenbereiter nur fŁrdas sanfte Sautieren (16) von Speck oder Zwiebeln vorgesehenist, sowie das anschlieŖende Aufheizen der Suppe. WARNUNG:Die Sautť-Funktion ist nicht fŁr das Anbršunen von rohemFleisch vorgesehen, auŖer Speck oder Hackfleisch (max. 100g).
Wie groŖ ist das FassungsvermŲgen meinesSuppenbereiters?Das FassungsvermŲgen Ihres Total Control Suppenbereitersbetršgt 1,6 l. Das ist auf Innen- und AuŖenseite desherausnehmbaren Behšlters (7) gekennzeichnet. Achten Siedarauf, dass Sie den Total Control Suppenbereiter nicht Łber dieMAX-FŁllmarkierung hinaus befŁllen, denn sonst schaltet der‹berfŁllmelder die Serrator-Schneide (8) aus und auf der LED-Anzeige (21) wird ĄE1ď angezeigt. Falls dies vorkommt,nehmen Sie einfach einen Teil der Zutaten heraus, so dass die1600 ml-FŁllmarkierung nicht Łberschritten wird, und wischenSie den ‹berfŁllmelder (5) am Deckel (4) ab. Achten Sie drauf,dass alle Zutaten (inkl. FlŁssigkeiten) die 2-Portionen-FŁllmarkierung erreichen, da sonst die Mixerfunktionbeeintršchtigt werden kann.
Kann ich die Garzeiten in den Programmen fŁr cremige,Medium- und stŁckige Suppen veršndern?Nein, die Garzeiten sind voreingestellt.
Kann ich eine Dosen- oder TŁtensuppe aufwšrmen?Nein. Die Programme sind fŁr diese Art von Suppen nichtvorgesehen. Solche Suppen kŲnnen einbrennen und dasProdukt beschšdigen.
Was kann ich tun, wenn mein Total Control Suppenbereiternicht mehr funktioniert?Ihr Total Control Suppenbereiter verfŁgt Łber einenSicherheitsthermostat, der die Stromzufuhr unterbricht und dasGeršt abschaltet, um eine ‹berhitzung zu verhindern, wenn esmindestens 3 mal hintereinander verwendet wird. Entfernen Siein diesem Fall alle Zutaten aus dem herausnehmbaren Behšlterund lassen Sie den Total Control Suppenbereiter 30 MinutenabkŁhlen, bevor Sie ihn wieder benutzen
Wenn die Mixerfunktion (19) Łber 20 Sekunden langununterbrochen verwendet wird, wird der Strom durch eineSicherheitsabschaltung getrennt, um eine ‹berhitzung zuverhindern. Wenn dies vorkommt, warten Sie 10 Sekundenlang, bevor Sie die Mixerfunktion (19) erneut benutzen.
Kann ich in meinem Total Control Suppenbereiter auch kalteSuppen, z. B. Gazpacho, zubereiten?Ja, aber Sie mŁssen die Suppe zuerst mit dem Programm fŁrcremige (13), Medium (14) oder stŁckige (15) Suppen kochen.Lassen Sie sie dann vor dem Servieren einfach abkŁhlen, oderstellen Sie sie in den KŁhlschrank.
Was ist zu tun, wenn Lebensmittel am Boden des TotalControl Suppenbereiter anbrennen?Stšrke und Zucker in einigen Lebensmitteln kŲnnen anbrennen,wenn sie in direktem Kontakt mit dem Boden desherausnehmbaren Behšlters kommen Um dies zu vermeiden,geben Sie eine halbe Tasse Wasser oder BrŁhe in den TotalControl Suppenbereiter, bevor Sie feste Zutaten hineingeben.FŁllen Sie danach die restliche FlŁssigkeit gemšŖ Angaben inIhrem Rezept ein.
Abbrechen oder ńndern von ProgrammenWenn Sie ein falsches Programm ausgewšhlt haben und dieStart/Stop Taste (23) bereits gedrŁckt wurde,oder wenn Sie ein Programm abbrechen mŲchten, halten Siedie Start/Stop Taste (23) 2 Sekunden lang gedrŁckt. DrŁckenSie dann die Modustaste (22) zur Auswahl des korrektenProgramms und starten Sie das Programm mit der Start/StopTaste (23).
FP501020MEE Rev2.qxp_Morphy Richards Instruction Book 26/10/2016 12:10 Page 48
49
AnsprechpartnerHelpline
Sollten Sie ein Problem mit Ihrem Geršt haben, wenden Sie sichbitte telefonisch an unsere Helpline, da wir Ihnen sehrwahrscheinlich besser helfen kŲnnen, als der Hšndler, bei demSie das Geršt erworben haben.
Halten Sie den Gerštenamen sowie die Modell- undSeriennummer bereit, wenn Sie uns anrufen, damit Ihnenschneller geholfen wird.
Sprechen Sie mit uns
Haben Sie Fragen oder Anregungen oder benŲtigen SiegroŖartige Tipps oder Rezeptideen, um unsere Geršte optimalzu nutzen, beteiligen Sie sich online:
Blog: www.morphyrichards.co.uk/blog
Facebook: www.facebook.com/morphyrichardsuk
Twitter: @loveyourmorphy
Website: www.morphyrichards.com
Morphy Richards Cook & Create App
GESETZLICHE GEWÄHRLEISTUNGFür dieses Gerät gilt eine Gewährleistung von 2 Jahren.
Als Kaufnachweis sollte die Quittung des Fachhändlersaufgehoben werden. Heften Sie Ihren Beleg an die Rückseitedieser Unterlagen.
Sollte an diesem Gerät ein Fehler auftreten, sind immernachfolgende Angaben mitzuteilen. Diese Angaben sind auf derUnterseite des Geräts zu finden.
Modellnr.
Seriennr.
Vor dem Verlassen des Werks werden alle Morphy RichardsProdukte geprüft. Sollte einmal der Fall auftreten, dass sich einGerät innerhalb der Gewährleistung als fehlerhaft erweist,wenden Sie sich bitte an unsere Service-Hotline
Falls das Gerät während der 2-jährigen Gewährleistung auswelchem Grund auch immer ausgetauscht wird, wird zurBerechnung der Restgarantie für das neue Gerät das Original-Kaufdatum zugrunde gelegt. Aus diesem Grunde ist esbesonders wichtig, den Original-Kaufbeleg bzw. die Rechnungaufzubewahren, um das Datum des ursprünglichen Kaufsnachweisen zu können.
Damit die 2-jährige Gewährleistung geltend gemacht werdenkann, muss das Gerät im Einklang mit den Anweisungen desHerstellers benutzt worden sein. Beispielsweise muss das Gerätentkalkt worden sein und gemäß den Anweisungen gereinigtwerden.
Morphy Richards übernimmt keine Verpflichtung zur Reparaturoder zum Austausch der Waren im Rahmen derGarantiebedingungen, wenn:
1 der Fehler auf einen versehentlich Gebrauch, Missbrauch,unachtsamen Gebrauch oder auf einen Gebrauch zurückzuführenist, der den Empfehlungen des Herstellers entgegenwirkt oderwenn der Fehler durch Stromspitzen oder durch Transportschädenverursacht wurde.
2 das Gerät mit einer Spannung versorgt wurde, die nicht auf demTypenschild abgedruckt ist.
3 von anderen Personen als unserem Reparatur- undWartungspersonal (oder von einem unserer Vertragshändler)Reparaturversuche unternommen wurden.
4 wenn das Gerät für Vermietungszwecke oder nicht allein fürprivate Zwecke gebraucht wurde.
5 das Gerät aus zweiter Hand stammt.
6 Morphy Richards kann nicht dafür haftbar gemacht werden,Reparaturarbeiten im Rahmen der Gewährleistung auszuführen.
7 Verbrauchsmaterialien wie Tüten, Filter und Glaskaraffen sind vonder Gewährleistung ausgeschlossen.
8 Batterien und Schäden aufgrund undichter Batterien sind von derGewährleistung ausgeschlossen.
9 die Filter nicht gemäß Anleitung gereinigt und ausgewechseltwurden
Diese Gewährleistung erkennt Ihnen ausschließlich die Rechtezu, die ausdrücklich in den oben genannten Bestimmungenniedergelegt sind und erstreckt sich nicht auf Forderungeninfolge eines Verlustes oder einer Beschädigung. DieseGewährleistung wird als zusätzliche Leistung angeboten undgreift Ihre gesetzlich zuerkannten Rechte als Verbraucher nichtan.
Morphy Richards d
FP501020MEE Rev2.qxp_Morphy Richards Instruction Book 26/10/2016 12:10 Page 49

50
Higiene e segurança A utilização de qualquer aparelho elétrico requer o seguimento de regras de senso comum.
Leia atentamente estas instruções antes de utilizar o produto.
• Este utensílio pode ser usado por pessoas com capacidadesfísicas, sensoriais ou mentais reduzidas, ou falta de experiênciae conhecimento, se forem supervisionadas ou se lhes foremfornecidas instruções no que respeita ao uso do utensílio deuma forma segura e entendam os perigos envolvidos.
• As crianças não devem brincar com o aparelho.• O aparelho não deve ser usado por crianças. • Mantenha o aparelho e o respetivo cabo fora do alcance dascrianças. • Após um ciclo de funcionamento, deverá permitir que o
aparelho arrefeça totalmente. Em seguida, limpe o aparelho. • Este aparelho não se destina a ser utilizado com um
temporizador externo ou um sistema de controlo remotoseparado.
• Caso esteja danificado, o cabo de alimentação deverá sersubstituído por um conjunto de cabo especial disponível junto do fabricante ou do respetivo agente de serviço.
• AVISO: A lâmina de mistura é extremamente afiada. Deve sermanuseada com extremo cuidado aquando da sua utilizaçãoou limpeza.
• Para cuidados e limpeza consulte as páginas 13 e 32.
p
FP501020MEE Rev2.qxp_Morphy Richards Instruction Book 26/10/2016 12:10 Page 50
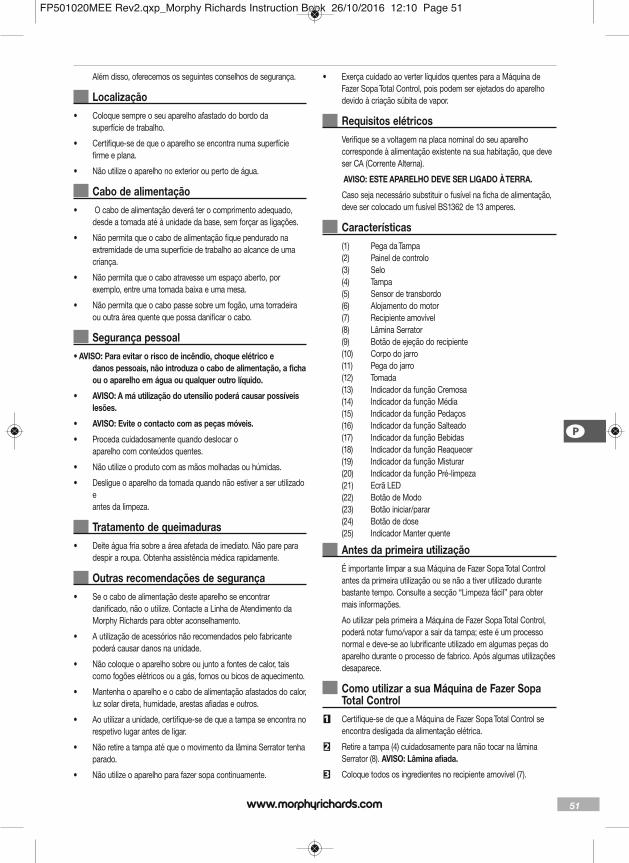
51
Além disso, oferecemos os seguintes conselhos de segurança.
Localização• Coloque sempre o seu aparelho afastado do bordo da
superfície de trabalho.
• Certifique-se de que o aparelho se encontra numa superfíciefirme e plana.
• Não utilize o aparelho no exterior ou perto de água.
Cabo de alimentação• O cabo de alimentação deverá ter o comprimento adequado,
desde a tomada até à unidade da base, sem forçar as ligações.
• Não permita que o cabo de alimentação fique pendurado naextremidade de uma superfície de trabalho ao alcance de umacriança.
• Não permita que o cabo atravesse um espaço aberto, porexemplo, entre uma tomada baixa e uma mesa.
• Não permita que o cabo passe sobre um fogão, uma torradeiraou outra área quente que possa danificar o cabo.
Segurança pessoal• AVISO: Para evitar o risco de incêndio, choque elétrico e
danos pessoais, não introduza o cabo de alimentação, a fichaou o aparelho em água ou qualquer outro líquido.
• AVISO: A má utilização do utensílio poderá causar possíveislesões.
• AVISO: Evite o contacto com as peças móveis.
• Proceda cuidadosamente quando deslocar o aparelho com conteúdos quentes.
• Não utilize o produto com as mãos molhadas ou húmidas.
• Desligue o aparelho da tomada quando não estiver a ser utilizadoe antes da limpeza.
Tratamento de queimaduras• Deite água fria sobre a área afetada de imediato. Não pare para
despir a roupa. Obtenha assistência médica rapidamente.
Outras recomendações de segurança• Se o cabo de alimentação deste aparelho se encontrar
danificado, não o utilize. Contacte a Linha de Atendimento daMorphy Richards para obter aconselhamento.
• A utilização de acessórios não recomendados pelo fabricantepoderá causar danos na unidade.
• Não coloque o aparelho sobre ou junto a fontes de calor, taiscomo fogões elétricos ou a gás, fornos ou bicos de aquecimento.
• Mantenha o aparelho e o cabo de alimentação afastados do calor,luz solar direta, humidade, arestas afiadas e outros.
• Ao utilizar a unidade, certifique-se de que a tampa se encontra norespetivo lugar antes de ligar.
• Não retire a tampa até que o movimento da lâmina Serrator tenhaparado.
• Não utilize o aparelho para fazer sopa continuamente.
• Exerça cuidado ao verter líquidos quentes para a Máquina deFazer Sopa Total Control, pois podem ser ejetados do aparelhodevido à criação súbita de vapor.
Requisitos elétricos Verifique se a voltagem na placa nominal do seu aparelho
corresponde à alimentação existente na sua habitação, que deveser CA (Corrente Alterna).
AVISO: ESTE APARELHO DEVE SER LIGADO À TERRA.
Caso seja necessário substituir o fusível na ficha de alimentação,deve ser colocado um fusível BS1362 de 13 amperes.
Características (1) Pega da Tampa (2) Painel de controlo (3) Selo (4) Tampa (5) Sensor de transbordo (6) Alojamento do motor (7) Recipiente amovível (8) Lâmina Serrator (9) Botão de ejeção do recipiente (10) Corpo do jarro (11) Pega do jarro (12) Tomada (13) Indicador da função Cremosa (14) Indicador da função Média (15) Indicador da função Pedaços (16) Indicador da função Salteado (17) Indicador da função Bebidas (18) Indicador da função Reaquecer (19) Indicador da função Misturar (20) Indicador da função Pré-limpeza (21) Ecrã LED (22) Botão de Modo (23) Botão iniciar/parar (24) Botão de dose (25) Indicador Manter quente
Antes da primeira utilização É importante limpar a sua Máquina de Fazer Sopa Total Control
antes da primeira utilização ou se não a tiver utilizado durantebastante tempo. Consulte a secção “Limpeza fácil” para obtermais informações.
Ao utilizar pela primeira a Máquina de Fazer Sopa Total Control,poderá notar fumo/vapor a sair da tampa; este é um processonormal e deve-se ao lubrificante utilizado em algumas peças doaparelho durante o processo de fabrico. Após algumas utilizaçõesdesaparece.
Como utilizar a sua Máquina de Fazer SopaTotal Control
1 Certifique-se de que a Máquina de Fazer Sopa Total Control seencontra desligada da alimentação elétrica.
2 Retire a tampa (4) cuidadosamente para não tocar na lâminaSerrator (8). AVISO: Lâmina afiada.
3 Coloque todos os ingredientes no recipiente amovível (7).
p
FP501020MEE Rev2.qxp_Morphy Richards Instruction Book 26/10/2016 12:10 Page 51

52
Adicione o líquido em último lugar, enchendo até à quantidadepretendida, assinalada no recipiente amovível (7). Consulte asreceitas individuais para obter mais informações relativamente àquantidade de líquido.
4 Coloque a tampa (4) no jarro (10) certificando-se de que encaixacorretamente na posição.
Pode ter de torcer a tampa/base do motor para permitir que alâmina (8) passe pelos ingredientes para colocar a tampa (4) no jarro (10) corretamente.
5 Ligue o cabo à tomada de alimentação elétrica (12).
6 Prima o botão de modo (22) para selecionar o programa. Oindicador da função Cremosa (13) acende-se. Continue a premir obotão de modo (22) para aceder às definições. Selecione oindicador da função Cremosa (13) para uma sopa cremosa.
7 Selecione o indicador da função Média (14) para uma sopamédia.
8 Selecione o indicador da função Pedaços (15) para fazer umasopa com pedaços.
9 Prima o botão Iniciar/Parar (23) e o tempo de cozedura inicia acontagem decrescente no ecrã LED (21). O controlo de dosesestá definido para 2 doses. Se necessitar de 3 ou 4 doses, temde regular a definição antes de premir o botão Iniciar/Parar (23).Consulte o controlo de doses na página 8.
A função Cremosa e de bebidas está regulada para 3 doses.
10 Depois de terminar, a Máquina de Fazer Sopa Total Control emiteum sinal sonoro durante 10 segundos. Desligue da correnteelétrica, retire a tampa (4) e sirva.
AVISO: Exerça cuidado ao retirar a tampa (4) ao fazer sopapara evitar salpicos de líquidos quentes e vapor.
Como utilizar o Controlo de doses11 Certifique-se de que a Máquina de Fazer Sopa Total Control se
encontra desligada da alimentação elétrica. Retire a tampa (4)cuidadosamente para não tocar na lâmina Serrator (8). AVISO:Lâmina afiada.
12 Encha a Máquina de Fazer Sopa Total Control até ao nívelapresentado no recipiente amovível (7) para obter a dosepretendida. Consulte as receitas individuais para obter maisinformações.
13 Coloque a tampa (4) no jarro (10), certificando-se de que seencontra corretamente encaixada e ligue a Máquina de FazerSopa Total Control à corrente elétrica. Consulte a página 7.
14 Prima o botão de modo (22) para selecionar o programa. Oindicador da função Cremosa (13) acende-se. Continue a premir obotão de modo (22) para aceder às definições para selecionar a consistência dasua sopa.
15 Depois de selecionar a consistência da sua sopa, prima o botãode doses (24) para selecionar a dose de sopa que pretende fazer(2, 3 ou 4).
NOTA: O controlo de doses só se encontra disponível paraalgumas receitas. Consulte as receitas a partir da página 16para obter detalhes.
16 Prima o botão Iniciar/Parar (23) e o tempo de cozedura inicia acontagem decrescente no ecrã LED (21). Depois de terminar, aMáquina de Fazer Sopa Total Control emite um sinal sonorodurante 10 segundos. Desligue da corrente elétrica, retire a tampa(4) e sirva.
NOTA: Dependendo do tipo de sopa que está a fazer, osingredientes absorvem o líquido adicionado e podem reduzirde volume, pelo que as doses podem ser mais pequenas queos volumes iniciais.
Como utilizar a função Saltear17 Certifique-se de que a Máquina de Fazer Sopa Total Control se
encontra desligada da alimentação elétrica. Retire a tampa (4)cuidadosamente para não tocar na lâmina Serrator (8). AVISO:Lâmina afiada.
18 Coloque um pouco de óleo no recipiente amovível (7). Ligue aMáquina de Fazer Sopa à alimentação elétrica.
19 Prima o botão de modo (22) até que o indicador da funçãoSaltear (16) esteja realçado. Coloque novamente a tampa (4).
20 Prima o botão Iniciar/Parar (23) e a sua Máquina de Fazer Sopacomeça a aquecer.
21 Após um minuto, retire a tampa (4) e junte cuidadosamente osingredientes para saltear no recipiente amovível (7). Coloquenovamente a tampa (4) e permita que o programa continue.Poderá ter de remover a tampa e mexer os ingredientes a meiodo processo; consulte as receitas individuais a partir da página16.
AVISO: Junte cuidadosamente os ingredientes para evitarsalpicos de gordura.
22 Depois de terminar, prima o botão Iniciar/Parar (23). Junte osrestantes ingredientes ao recipiente amovível (7) e inicie oprocesso de cozedura da sopa, selecionando o programa desopa pretendido, como se mostra na página 7.
Quando retirar a tampa (4) durante a função de Saltear paramexer ou acrescentar ingredientes, basta colocar novamente atampa (4) para continuar o processo. A tampa (4) tem de estarcolocada para continuar a saltear. A memória da Máquina deFazer Soparetém a definição, pelo que não é necessário reiniciar.
Como utilizar a função Bebidas23 Certifique-se de que a Máquina de Fazer Sopa Total Control se
encontra desligada da alimentação elétrica. Retire a tampa (4)cuidadosamente para não tocar na lâmina Serrator (8). AVISO:Lâmina afiada.
24 Coloque os ingredientes para 3 ou 4 doses no recipiente amovível(7). Por último, adicione o líquido.
25 Coloque a tampa (4) no jarro (10), certificando-se de que seencontra corretamente encaixada e ligue a Máquina de FazerSopa Total Control à corrente elétrica.
26 Prima o botão de modo (22) até que o indicador da funçãoBebidas (17) esteja realçado.
27 Prima o botão Iniciar/Parar (23) e o tempo de cozedura inicia acontagem decrescente no ecrã LED (21).
NOTA: A função de Bebidas só pode ser utilizada para 3 ou 4
FP501020MEE Rev2.qxp_Morphy Richards Instruction Book 26/10/2016 12:10 Page 52

53
doses. O tamanho da dose não tem de ser definido.
28 Depois de terminar, a Máquina de Fazer Sopa Total Control emiteum sinal sonoro durante 10 segundos. Desligue da correnteelétrica, retire a tampa (4) e sirva.
Como utilizar a função Reaquecer29 Certifique-se de que a Máquina de Fazer Sopa Total Control se
encontra desligada da alimentação elétrica. Retire a tampa (4)cuidadosamente para não tocar na lâmina Serrator (8). AVISO:Lâmina afiada.
30 Coloque a sopa caseira que pretende reaquecer no recipienteamovível (7). 2 doses no mínimo, 4 doses no máximo.
31 Coloque a tampa (4) no jarro (10) certificando-se de que encaixacorretamente na posição. Ligue a Máquina de Fazer Sopa àalimentação elétrica.
32 Prima o botão de modo (22) até que o indicador da funçãoReaquecer (18) esteja realçado. Prima o botão de Dose (24) para selecionar otamanho da dose (2, 3 ou 4).
33 Prima o botão Iniciar/Parar (23) e o tempo de cozedura inicia acontagem decrescente no ecrã LED (21).
34 Depois de terminar, a Máquina de Fazer Sopa Total Control emiteum sinal sonoro durante 10 segundos. Desligue da correnteelétrica, retire a tampa (4) e sirva.
NOTA: O tamanho da dose correto deve ser selecionado nopainel de controlo de acordo com as doses de sopaadicionadas; o incumprimento desta instrução resulta noaquecimento da sopa à temperatura incorreta.
A consistência da sopa pode variar após o processo dereaquecimento.
Ao reaquecer sopa com pedaços maiores, a sopa adquireuma consistência mais cremosa.
Como utilizar a função Triturar35 Certifique-se de que a Máquina de Fazer Sopa Total Control se
encontra desligada da alimentação elétrica. Retire a tampa (4)cuidadosamente para não tocar na lâmina Serrator (8). AVISO:Lâmina afiada.
36 Coloque a sopa com pedaços no recipiente amovível (7). NOTA: Utilizar apenas para triturar sopas com pedaços oumédias ou outros alimentos cozinhados macios.
37 Coloque a tampa (4) no jarro (10) certificando-se de que encaixacorretamente na posição. Ligue a Máquina de Fazer Sopa àcorrente elétrica.
38 Prima o botão de modo (22) até que o indicador da função Triturar(19) esteja realçado.
39 Prima sem soltar o botão Iniciar/Parar (23) para obter o tempo detrituração pretendido. Esta é uma definição manual que permitetriturar até 20 segundos e para automaticamente ao retirar o dedodo botão. Se necessitar de misturar por mais alguns segundos,repita o processo.
40 Desligue da corrente elétrica, retire a tampa (4) e sirva.
ALTERNATIVA: Se pretender triturar sopa que tenha feito norecipiente amovível (7), continue a partir do passo 4.
Como utilizar a função Pré-limpar41 Certifique-se de que a Máquina de Fazer Sopa Total Control se
encontra desligada da alimentação elétrica. Retire a tampa (4)cuidadosamente para não tocar na lâmina Serrator (8). AVISO:Lâmina afiada.
42 Verta 800 ml de água no recipiente amovível (7) e junte um poucode detergente da louça.
43 Coloque a tampa (4) no jarro (10) certificando-se de que encaixacorretamente na posição. Ligue a Máquina de Fazer Sopa àalimentação elétrica.
44 Prima o botão de modo (22) até que o indicador da função Pré-limpar (20) esteja realçado.
45 Prima o botão Iniciar/Parar (23) e o tempo de processamentoinicia a contagem decrescente no ecrã LED (21). O programa Pré-limpar tem uma duração de 4 minutos.
46 Quando o ciclo de Pré-limpeza chegar ao fim, certifique-se deque desliga a Máquina de Fazer Sopa da corrente elétrica. Retirea tampa (4) cuidadosamente para não tocar na lâmina Serrator(8). AVISO: Lâmina afiada.
NOTA: A função Pré-limpar limpa apenas a base. É necessárialimpeza adicional para o recipiente amovível (7) e para atampa (4). Consulte a secção Limpeza fácil na página 32.Enxague a sua Máquina de Fazer Sopa até que a água saialimpa sem formar bolas de sabão.
AVISO: Exerça cuidado ao pegar no recipiente amovível (7)que está quente após o ciclo Pré-limpar.
Limpeza fácil A Máquina de Fazer Sopa Total Control possui a função Pré-limpar
(20). Consulte a página 13. Nota: A função Pré-limpar ajudaapenas a limpar a base do recipiente amovível (7). Poderá sernecessária limpeza adicional.
Embora a Máquina de Fazer Sopa Total Control não possa serlavada na máquina de lavar louça, é simples e fácil de limpar.Após a utilização, basta limpar a base do motor (6) e a lâminaSerrator (8) com um pano com água quente e detergente e secar.
NÃO mergulhe a tampa ou o jarro em água.
O recipiente amovível (7) da Máquina de Fazer Sopa Total Controlpode ser retirado do jarro (10) para limpar. Basta premir o botãode libertação do recipiente (9) e retirar. Lave o recipiente amovível(7) à mão com água quente e detergente e limpe o jarro com umpano macio humedecido.
Certifique-se de que os contactos do recipiente amovível sãocuidadosamente secos após a lavagem. Para instalar o recipienteamovível no jarro, certifique-se de que está corretamente alinhadoe pressione para encaixar.
Alguns tipos de alimentos podem queimar quando entram emcontacto com o elemento de aquecimento da base. Se istoacontecer, selecione a função Pré-limpar. Se as manchaspermanecerem, trata-se de descoloração e permaneceráassim. Esta situação não afeta o desempenho ou a qualidadedos cozinhados produzidos. Não utilize esfregões abrasivosna Máquina de Fazer Sopa Total Control pois podem ocorrerdanos.
p
FP501020MEE Rev2.qxp_Morphy Richards Instruction Book 26/10/2016 12:10 Page 53

54
Retirar e substituir o vedante 47
Ocasionalmente, poderá ser necessário retirar o vedante datampa (3) para limpar. Lave com água quente com detergente,enxague e seque cuidadosamente antes de colocar novamente.
48 AVISO: NÃO mergulhe a tampa ou o jarro em água, uma vezque estes incluem componentes elétricos que poderão serdanificados pela água. Não permita a entrada de água noscomponentes elétricos.
Seque completamente antes de utilizar.
Utilizar a sua máquina de fazer sopa A sua Máquina de Fazer Sopa Total Control inclui 3 programas de
sopas e 1 programa de bebidas.
Selecione o programa da sua preferРncia:
Cremosa... (13)
O programa de sopa Cremosa é perfeito para deliciosas receitasde sopas com uma consistência cremosa. O programa asseguraque os ingredientes são misturados com a consistência correta ecozinhados cuidadosamente à temperatura certa. (O programatem uma duração de 21 minutos para 4 doses e logo em seguidaa sua sopa estará pronta para servir e desfrutar!)
Definição Média (14)
O programa de sopa Média é ideal para deliciosas receitas desopas com uma consistência média. O programa tem umaduração de 25 minutos para 4 doses e logo em seguida a suasopa estará pronta para servir e desfrutar!
Definição Pedaços (15)
O programa de sopa Pedaços é ideal para receitas de sopasrústicas com uma consistência mais incorporada. O programapermite que os ingredientes sejam aquecidos durante mais tempopara que os ingredientes aos pedaços sejam totalmentecozinhados. O programa tem uma duração de 28 minutos para 4doses. No caso da sopa com pedaços, há um processo deaquecimento mas não de mistura. Por isso, é recomendável quecorte os vegetais em cubos pequenos. Se a sua sopa tiverdemasiados pedaços depois de feita, selecione a função Triturarpara obter a consistência desejada. Prima sem soltar o botãoIniciar/Parar durante 5 segundos e verifique.
Salteada... (16)
A função Salteado aquece a Máquina de Fazer Sopa de modo aque alimentos como cebolas ou pedaços de bacon possam sersalteados antes dos restantes ingredientes serem adicionados àsopa. Junte um pouco de óleo ao recipiente amovível (7),selecione a função Salteado e prima o botão Iniciar/Parar (23).Aqueça o óleo durante um minuto antes de adicionar osingredientes. A função Salteado só está disponível quando atampa (4) estiver colocada no jarro (10). A função Salteado estádesativada enquanto a tampa estiver retirada. Nota: Nãoutilize a função Salteado por mais de 10 minutos.
Bebidas (17)
A definição Bebidas na Máquina de Fazer Sopa Total Control éideal para fazer smoothies ou batidos com ingredientes frescos.Para receitas de bebidas, consulte as páginas 29-30. O programatem uma duração de 2 minutos após os quais a sua bebida está
pronta a servir. A definição Bebidas não aquece os ingredientes,pelo que é perfeita para bebidas frescas nos dias mais quentes.
Nota: Não coloque cubos de gelo na sua Máquina de FazerSopa Total Control.
Uma mistura perfeita! (19)
A definição Triturar permite misturar um pouco mais a sopa atéobter a consistência desejada, se necessário. Esta função nãoimplica o aquecimento adicional da sopa.
Para aceder a esta função, depois de cozinhar, prima o botãoIniciar/Parar para sair do modo Manter Quente. Retire a tampa econsulte a página 12, seguindo os passos 4 - 6.
Manter Quente
Quando o programa da sopa estiver concluído, a unidade entrano modo Manter Quente e indica este modo no painel de controlo(2). Se pretende servir a sopa de imediato, levante a tampa esirva. O modo Manter Quente chega ao fim ao retirar a tampa.
Guia de programasCremosa 19, 21 minutos 3, 4
Média 22, 24, 26 minutos 2, 3, 4
Pedaços 25, 27, 29 minutos 2, 3, 4
Salteado Máx. 10 minutos -
Bebidas 2 minutos 3, 4
Reaquecer 11, 14, 17 minutos 2, 3, 4
Triturar Conforme necessário Máx. 4
Pré-limpar 4 minutos -
Manter Quente 30 minutos 2, 3, 4
FP501020MEE Rev2.qxp_Morphy Richards Instruction Book 26/10/2016 12:10 Page 54

55
Receitas
Desenvolvemos receitas para utilizar nasua Máquina de Fazer Sopa Total Control,de sopas ricas e intensas a smoothies ebatidos refrescantes.
A definição Pedaços (15) cozinha apenasos alimentos, não os corta. Se, depois decozinhar, a sopa tiver demasiadospedaços para o seu gosto, pode utilizar adefinição Triturar (19) para passar algunsdos pedaços.
As receitas foram desenvolvidas deacordo com os níveis de funcionamentomínimo e máximo da Máquina de FazerSopa Total Control (800 ml-1600 ml).
As receitas foram desenvolvidas para asconsistências cremosa, média e compedaços, com quantidades deingredientes para 2, 3 ou 4 doses.
NOTA: As 2 doses só estão disponíveispara as receitas de sopas comconsistências média e pedaços.
Função Cremosa (13)
Sopa de Vegetais Básica 3 doses 4 doses
Tempo de preparação: 5 minutos 5 minutos
Tempo de cozedura: 19 minutos 21 minutos
Definições: Cremosa Cremosa
Ingredientes:
525 g 700 g Legumes, incluindo aipo, nabo, batata, cenoura, cebola, pastinaca, todos cortadoscaldo de legumes quente ervas variadas sal e pimenta
Método:
1 Coloque todos os legumes no recipiente amovível (7), junte o caldo até ao nível pretendido para a receita e mexa com uma colher de pau.
2 Junte ervas aromáticas variadas, selecione a função Cremosa (13), o tamanho da dose pretendido e prima o botão Iniciar/Parar (23).
3 Ao terminar, verifique os temperos e sirva.
p
FP501020MEE Rev2.qxp_Morphy Richards Instruction Book 26/10/2016 12:10 Page 55
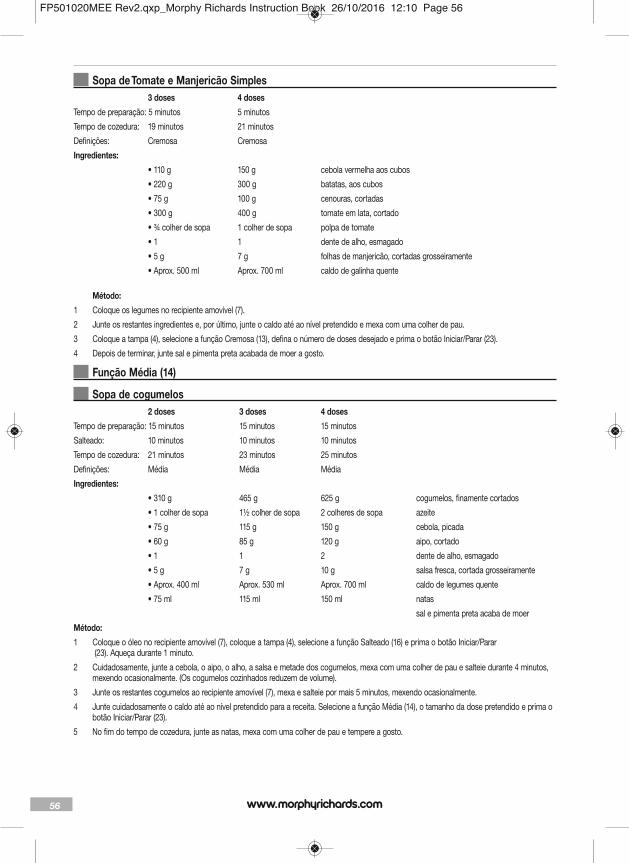
56
Sopa de Tomate e Manjericão Simples 3 doses 4 dosesTempo de preparação: 5 minutos 5 minutos
Tempo de cozedura: 19 minutos 21 minutos
Definições: Cremosa Cremosa
Ingredientes: • 110 g 150 g cebola vermelha aos cubos
• 220 g 300 g batatas, aos cubos
• 75 g 100 g cenouras, cortadas
• 300 g 400 g tomate em lata, cortado
• ¾ colher de sopa 1 colher de sopa polpa de tomate
• 1 1 dente de alho, esmagado
• 5 g 7 g folhas de manjericão, cortadas grosseiramente
• Aprox. 500 ml Aprox. 700 ml caldo de galinha quente
Método:1 Coloque os legumes no recipiente amovível (7).
2 Junte os restantes ingredientes e, por último, junte o caldo até ao nível pretendido e mexa com uma colher de pau.
3 Coloque a tampa (4), selecione a função Cremosa (13), defina o número de doses desejado e prima o botão Iniciar/Parar (23).
4 Depois de terminar, junte sal e pimenta preta acabada de moer a gosto.
Função Média (14)
Sopa de cogumelos 2 doses 3 doses 4 dosesTempo de preparação: 15 minutos 15 minutos 15 minutos
Salteado: 10 minutos 10 minutos 10 minutos
Tempo de cozedura: 21 minutos 23 minutos 25 minutos
Definições: Média Média Média
Ingredientes: • 310 g 465 g 625 g cogumelos, finamente cortados
• 1 colher de sopa 1½ colher de sopa 2 colheres de sopa azeite
• 75 g 115 g 150 g cebola, picada
• 60 g 85 g 120 g aipo, cortado
• 1 1 2 dente de alho, esmagado
• 5 g 7 g 10 g salsa fresca, cortada grosseiramente
• Aprox. 400 ml Aprox. 530 ml Aprox. 700 ml caldo de legumes quente
• 75 ml 115 ml 150 ml natas
sal e pimenta preta acaba de moer
Método:1 Coloque o óleo no recipiente amovível (7), coloque a tampa (4), selecione a função Salteado (16) e prima o botão Iniciar/Parar
(23). Aqueça durante 1 minuto.
2 Cuidadosamente, junte a cebola, o aipo, o alho, a salsa e metade dos cogumelos, mexa com uma colher de pau e salteie durante 4 minutos,mexendo ocasionalmente. (Os cogumelos cozinhados reduzem de volume).
3 Junte os restantes cogumelos ao recipiente amovível (7), mexa e salteie por mais 5 minutos, mexendo ocasionalmente.
4 Junte cuidadosamente o caldo até ao nível pretendido para a receita. Selecione a função Média (14), o tamanho da dose pretendido e prima obotão Iniciar/Parar (23).
5 No fim do tempo de cozedura, junte as natas, mexa com uma colher de pau e tempere a gosto.
FP501020MEE Rev2.qxp_Morphy Richards Instruction Book 26/10/2016 12:10 Page 56

57
Sopa de cenoura e coentros 2 doses 3 doses 4 dosesTempo de preparação: 15 minutos 15 minutos 15 minutos
Tempo de cozedura: 21 minutos 23 minutos 25 minutos
Definições: Média Média Média
Ingredientes: • 50 g 75 g 100 g cebola, picada
• 60 g 90 g 120 g aipo, finamente picado
• 250 g 375 g 500 g cenouras, cortadas em cubos pequenos
• ½ colher de sobremesa rasa ¾ colher de sobremesa rasa 1 colher de sobremesa rasa coentros em grão
• 7 g 12 g 15 g coentros frescos, cortados
• Aprox. 400 ml Aprox. 600 ml Aprox. 800 ml caldo de legumes quente
• 25 - 50 ml 50 - 100 ml 50 - 100 ml leite meio gordo
sal e pimenta a gosto
Método:1 Coloque a cebola, o aipo, as cenouras, os coentros em grão e frescos no recipiente amovível (7) e mexa com uma colher de pau.
2 Junte o caldo até ao nível pretendido, selecione a função Média (14), o número de doses desejado e, em seguida, prima o botão Iniciar/Parar(23).
3 No fim da cozedura, misture leite suficiente e misture com a colher de pau para obter a consistência pretendida e tempere a gosto.
4 Sirva com folhas de coentros cortadas a gosto.
Função Pedaços (15)
Pistou Francês 2 doses 3 doses 4 dosesTempo de preparação: 15 minutos 15 minutos 15 minutos
Tempo de cozedura: 24 minutos 26 minutos 28 minutos
Definições: Pedaços Pedaços Pedaços
Ingredientes: • 75 g 110 g 150 g curgetes, cortadas em cubos pequenos
• 35 g 50 g 70 g batatas, cortadas em cubos pequenos
• 35 g 50 g 70 g cebola, finamente picada
• 25 g 35 g 50 g cenouras, cortadas em cubos pequenos
• 200 g 300 g 400 g tomate em lata, cortado
• 25 g 35 g 50 g ervilhas
• 25 g 35 g 50 g vagens cortadas em pedaços de 1 cm
• 25 g 35 g 50 g Esparguete, cortado em pedaços pequenos
• Aprox. 350 ml Aprox. 475 ml Aprox. 650 ml caldo de legumes quente
• ½ colher de sopa ¾ colher de sopa 1 colher de sopa polpa de tomate (misturada com o caldo)
sal e pimenta preta moída
Para servir:• Pesto
• Queijo Parmesão
Método:1 Coloque os legumes e o esparguete no recipiente amovível (7), junte o caldo de legumes/mistura da polpa de tomate até ao nível pretendido e
mexa com uma colher de pau.
2 Selecione a função Pedaços (15), defina o número pretendido de doses e prima o botão Iniciar/Parar (23).
3 Depois de cozinhar, tempere a gosto e sirva com uma colher de pesto e queijo parmesão ralado.
p
FP501020MEE Rev2.qxp_Morphy Richards Instruction Book 26/10/2016 12:10 Page 57

58
Caldo de Borrego e Lentilhas de Inverno 2 doses 3 doses 4 doses
Tempo de preparação: 20 minutos 20 minutos 20 minutos
Salteado: 7 minutos 7 minutos 7 minutos
Tempo de cozedura: 24 minutos 26 minutos 28 minutos
Definições: Pedaços Pedaços Pedaços
Ingredientes:
• ½ colher de sopa 1 colher de sopa 1 colher de sopa azeite
• 35 g 55 g 75 g borrego picado cru
• 50 g 75 g 100 g cebola, finamente picada
• 1 1½ 2 dente de alho, esmagado
• 25 g 35 g 50 g cenoura, picada finamente
• 75 g 110 g 150 g batata, cortada finamente
• 50 g 75 g 100 g nabo, cortado finamente
• 1½ colher de sopa 2½ colheres de sopa 3 colheres de sopa farinha normal
• 120 g 175 g 235 g lentilhas verdes cozinhas em lata , escorridas
• ¼ colher de sobremesa ½ colher de sobremesa ½ colher de sobremesa rosmaninho fresco cortado
• ¼ colher de sopa ½ colher de sopa 1 colher de sopa salsa fresca cortada
• 1 1 2 folhas de louro
• ½ colher de sobremesa ½ colher de sobremesa 1 colher de sobremesa Molho Worcestershire
• Aprox. 450ml Aprox. 675ml Aprox. 900ml caldo de borrego quente
Método:
1 Coloque o azeite no recipiente amovível (7), coloque a tampa (4), selecione a função Salteado (16) e prima o botão Iniciar/Parar (23). Após 1minuto, junte cuidadosamente a carne de borrego picada, coloque a tampa (4) e salteie durante 2 minutos, mexendo ocasionalmente com uma colher de pau até alourar de um modo uniforme.
2 Junte cuidadosamente a cebola, o alho, as cenouras, as batas e nabos ao recipiente amovível (7) e salteie durante 4 minutos. Misture a farinha e, em seguida, junte os restantes ingredientes e caldo quente até ao nível pretendido.
3 Mexa com uma colher de pau ou espátula. Prima sem soltar o botão Iniciar/Parar (23) e, em seguida, selecione a função Pedaços (15), otamanho das doses necessário e prima o botão Iniciar/Parar (23).
4 Tempere a gosto e retire as folhas de louro antes de servir.
FP501020MEE Rev2.qxp_Morphy Richards Instruction Book 26/10/2016 12:10 Page 58

59
Função Salteado (16)
Sopa de aipo 3 doses 4 doses
Tempo de preparação: 10 minutos 10 minutos
Salteado: 7 minutos 7 minutos
Tempo de cozedura: 19 minutos 21 minutos
Definições: Cremosa Cremosa
Ingredientes:
• 1 colher de sopa 1 colher de sopa azeite
• 350 g 450 g aipo, cortado grosseiramente (incluindo folhas)
• 75g 100g cebola, picada
• 110 g 150 g batata, cortada
• Aprox. 700 ml Aprox. 800 ml caldo de legumes quente
sal e pimenta preta moída
Salsa fresca para guarnecer
Método:
1 Coloque o azeite no recipiente amovível (7), coloque a tampa (4), selecione a função Salteado (16) e prima o botão Iniciar/Parar (23). Após 1minuto, junte cuidadosamente a carne de borrego picada, coloque a tampa (4) e salteie durante 2 minutos, mexendo ocasionalmente com umacolher de pau até alourar de um modo uniforme.
2 Junte cuidadosamente a cebola, o alho, as cenouras, as batas e nabos ao recipiente amovível (7) e salteie durante 4 minutos. Misture a farinhae, em seguida, junte os restantes ingredientes e caldo quente até ao nível pretendido.
3 Mexa com uma colher de pau ou espátula. Prima sem soltar o botão Iniciar/Parar (23) e, em seguida, selecione a função Pedaços (15), otamanho das doses necessário e prima o botão Iniciar/Parar (23).
4 Tempere a gosto e retire as folhas de louro antes de servir.p
FP501020MEE Rev2.qxp_Morphy Richards Instruction Book 26/10/2016 12:10 Page 59
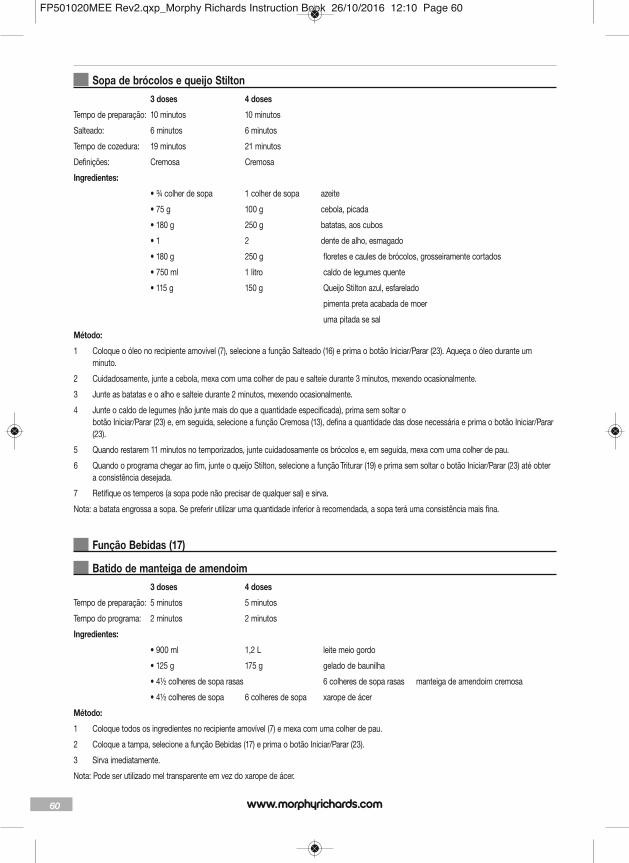
60
Sopa de brócolos e queijo Stilton 3 doses 4 doses
Tempo de preparação: 10 minutos 10 minutos
Salteado: 6 minutos 6 minutos
Tempo de cozedura: 19 minutos 21 minutos
Definições: Cremosa Cremosa
Ingredientes:
• ¾ colher de sopa 1 colher de sopa azeite
• 75 g 100 g cebola, picada
• 180 g 250 g batatas, aos cubos
• 1 2 dente de alho, esmagado
• 180 g 250 g floretes e caules de brócolos, grosseiramente cortados
• 750 ml 1 litro caldo de legumes quente
• 115 g 150 g Queijo Stilton azul, esfarelado
pimenta preta acabada de moer
uma pitada se sal
Método:
1 Coloque o óleo no recipiente amovível (7), selecione a função Salteado (16) e prima o botão Iniciar/Parar (23). Aqueça o óleo durante umminuto.
2 Cuidadosamente, junte a cebola, mexa com uma colher de pau e salteie durante 3 minutos, mexendo ocasionalmente.
3 Junte as batatas e o alho e salteie durante 2 minutos, mexendo ocasionalmente.
4 Junte o caldo de legumes (não junte mais do que a quantidade especificada), prima sem soltar o botão Iniciar/Parar (23) e, em seguida, selecione a função Cremosa (13), defina a quantidade das dose necessária e prima o botão Iniciar/Parar(23).
5 Quando restarem 11 minutos no temporizados, junte cuidadosamente os brócolos e, em seguida, mexa com uma colher de pau.
6 Quando o programa chegar ao fim, junte o queijo Stilton, selecione a função Triturar (19) e prima sem soltar o botão Iniciar/Parar (23) até obtera consistência desejada.
7 Retifique os temperos (a sopa pode não precisar de qualquer sal) e sirva.
Nota: a batata engrossa a sopa. Se preferir utilizar uma quantidade inferior à recomendada, a sopa terá uma consistência mais fina.
Função Bebidas (17)
Batido de manteiga de amendoim 3 doses 4 doses
Tempo de preparação: 5 minutos 5 minutos
Tempo do programa: 2 minutos 2 minutos
Ingredientes:
• 900 ml 1,2 L leite meio gordo
• 125 g 175 g gelado de baunilha
• 4½ colheres de sopa rasas 6 colheres de sopa rasas manteiga de amendoim cremosa
• 4½ colheres de sopa 6 colheres de sopa xarope de ácer
Método:
1 Coloque todos os ingredientes no recipiente amovível (7) e mexa com uma colher de pau.
2 Coloque a tampa, selecione a função Bebidas (17) e prima o botão Iniciar/Parar (23).
3 Sirva imediatamente.
Nota: Pode ser utilizado mel transparente em vez do xarope de ácer.
FP501020MEE Rev2.qxp_Morphy Richards Instruction Book 26/10/2016 12:10 Page 60

61
Smoothie de mirtilos e aveia para o pequeno-almoço (com iogurte natural) 3 doses 4 doses
Tempo de preparação: 5 minutos 5 minutos
Tempo do programa: 2 minutos 2 minutos
Ingredientes:
• 675 g 800 g Iogurte natural magro
• 325 ml 400 ml leite meio gordo
• 45 g 60 g aveia em flocos
• 115 g 150 g mirtilos
• 2 colheres de sopa 3 colheres de sopa Mel transparente
Método:
1. Coloque todos os ingredientes no recipiente amovível (7) e mexa com uma colher de pau.
2 Coloque a tampa (4), selecione a função Bebidas (17) e prima o botão Iniciar/Parar (23).
Perguntas frequentesSe tiver quaisquer questões acerca da utilização da sua máquinade fazer sopa Total Control, consulte a lista abaixo, onderespondemos a algumas das questões mais frequentes. Se precisar de mais ajuda, contacte a nossa linha de assistência: 0344 871 0944.
A função de aquecimento funciona quando retiro a tampa (4)?Não. Retirar a tampa corta a alimentação elétrica da unidadepara garantir a máxima segurança. A função de aquecimento sóé ativada depois de colocar a tampa (4) e selecionar osprogramas de sopa Cremosa (13), Média (14), Pedaços (15),Salteado (16) ou Reaquecer (18).
Posso retirar a tampa a meio do ciclo?A Máquina de Fazer Sopa Total Control permite 1 minuto no ciclopara adicionar quaisquer ingredientes em falta e para mexerdurante o Salteado (16).
Posso utilizar a minha Máquina de Fazer Sopa para outroscozinhados?Não. Os programas disponíveis destinam-se a cozinhar a sopaperfeita e bebidas. Siga as receitas e adapte-as ao seu gosto.
Posso utilizar carne crua em receitas de sopa na minhaMáquina de Fazer Sopa?Além do bacon ou de pequenas quantidades de carne picada(100 g), não. Primeiro, deve cozinhar a carne separadamenteantes de transferi-la para a sua Máquina de Fazer Sopa com osingredientes adicionais da sua receita, uma vez que a Máquinade Fazer Sopa Total Control só foi concebida para saltearligeiramente (16) bacon ou cebola e, em seguida, aquecer asopa. AVISO: Não deve utilizar a função de saltear para alourarcarne além de bacon ou carne picada (100g máx.).
Qual é a capacidade da minha Máquina de Fazer Sopa?A capacidade da Máquina de Fazer Sopa Total Control é de1600ml. Isto encontra-se assinalado no interior e no exterior dorecipiente amovível (7). Certifique-se de que não enche aMáquina de Fazer Sopa Total Control acima desta linha; casocontrário, o detetor de transbordo corta a energia da lâminaSerrator (8) e o ecrã LED (21) mostra a indicação “E1”. Se istoacontecer, basta retirar alguns dos ingredientes para que amarca de 1600ml não seja excedida e limpe o sensor de
transbordo (5) na tampa (4). Certifique-se de que os ingredientes(incluindo líquidos) estão acima da linha de 2 doses; oincumprimento desta instrução afeta a função de triturar.
Posso alterar os tempos das definições de sopas Cremosa,Média e Pedaços?Não. Os tempos para estas definições são predefinidos.
Posso reaquecer sopa em lata/pacote?Não. Os programas são definidos para fazer a sopa perfeitadesde o início. A sopa em lata e de pacote, embora seja prática,pode queimar a base da resistência, provocando danos noproduto.
O que acontece se a Máquina de Fazer Sopa Total Controldeixar de funcionar? A sua Máquina de Fazer Sopa Total Control dispõe de umtermóstato de segurança que desliga a alimentação e interrompeo funcionamento do aparelho para evitar o sobreaquecimento, sea máquina for utilizada continuamente durante 3 ou mais ciclos.Se isto acontecer, retire quaisquer alimentos do recipienteamovível e permita que a Máquina de Fazer Sopa Total Controlarrefeça durante 30 minutos antes de continuar.
Se a função Misturar (19) for utilizada continuamente durantemais de 20 segundos, um corte de segurança irá desligar aalimentação para evitar o sobreaquecimento. Neste caso,aguarde 10 segundos antes de voltar a utilizar a função Misturar(19).
Posso fazer sopas frias, como Gaspacho, na minha Máquinade Fazer Sopa Total Control?Sim, mas primeiro tem de cozinhar a sopa utilizando asdefinições Cremosa (13), Média (14) ou Pedaços (15). Emseguida, permita que arrefeça ou coloque no frigorífico antes desaborear.
E se os alimentos se queimarem na base da minha Máquinade Fazer Sopa Total Control?Devido aos amidos e açúcares de alguns alimentos, podemocorrer ligeiras queimaduras em caso de contacto direto com ointerior da base do recipiente amovível. Para evitar que talaconteça, adicione metade de um copo de água ou caldo àMáquina de Fazer Sopa Total Control antes de colocar quaisqueringredientes sólidos. Em seguida, encha com o líquido restanteindicado na sua receita.
p
FP501020MEE Rev2.qxp_Morphy Richards Instruction Book 26/10/2016 12:10 Page 61

62
Cancelar ou alterar programas Se selecionou um programa incorretamente e premiu o botãoIniciar/Parar (23) ou se pretender cancelar o programa, bastapremir o botão Iniciar/Para (23) durante 2 segundos. Prima obotão de modo (22) para selecionar o programa correto e primao botão Iniciar/Parar (23) para reiniciar.
Contacte-nosLinha de atendimento
Se tiver qualquer problema com o seu aparelho, contacte anossa Linha de atendimento. Provavelmente, poderemos ajudá-lomais do que a loja onde adquiriu o aparelho.
Quando entrar em contacto connosco sobre quaisquer dúvidas,deve ter o nome do produto, o número do modelo e o número desérie disponíveis.
Fale connosco
Se tiver quaisquer questões ou comentários ou se desejar obterdicas ou ideias de receitas para tirar o maior partido dos nossosprodutos, visite-nos online:
Blogue: www.morphyrichards.co.uk/blog
Facebook: www.facebook.com/morphyrichardsuk
Twitter: @loveyourmorphy
Website:www.morphyrichards.com
Aplicação Morphy Richards Cook & Create
A SUA GARANTIA DE DOIS ANOSEste aparelho tem uma garantia de reparação ou substituição de2 anos.
É importante guardar o talão de compra como comprovativo decompra. Agrafe-o ao verso deste folheto para referência futura.
Mencione a seguinte informação se o produto apresentar umaavaria. Estes números podem ser encontrados na base do artigo.
N.º do modeloN.º de série
Todos os artigos Morphy Richards são testados individualmenteantes de saírem da fábrica. No caso improvável de algum produtoapresentar uma avaria no prazo de 28 dias após a compra, omesmo deverá ser devolvido ao local de compra, para a suasubstituição.
Se a avaria surgir passados 28 dias e dentro dos 24 meses apartir da data de aquisição do aparelho, deverá contactar o seudistribuidor local e referir o número do modelo e de série doproduto ou escrever ao seu distribuidor local para o endereçoabaixo citado.
Ser-lhe-á solicitado que devolva o produto (numa embalagemsegura e apropriada) para o endereço apresentado, juntamentecom uma cópia do talão de compra.
Tirando as excepções abaixo referenciadas (1-9), o artigo avariadoserá reparado ou substituído e enviado, normalmente no prazo de7 dias úteis a contar da data de recepção.
Se por qualquer razão, este artigo for substituído durante operíodo de garantia de 2 anos, a garantia do novo artigo serácalculada a partir da data original de compra. Por esta razão, éimportante guardar o talão ou factura originais de modo a indicara data inicial de compra.
Para ser abrangido pela garantia de 2 anos, o artigo deverá tersido utilizado de acordo com as instruções do fabricante. Porexemplo, os artigos têm de ter sido escamados e os filtrosmantidos limpos, tal como indicado nas instruções.
A Morphy Richards ou o distribuidor local não serão obrigados asubstituir ou reparar artigos sob os termos da garantia quando:
1 A avaria tiver sido provocada ou for atribuída a uma utilizaçãoinadvertida, indevida, negligente, contrária às recomendações dofabricante ou no caso de ter sido causada por oscilações decorrente ou danos provocados pelo transporte.
2 O aparelho tiver sido utilizado com uma voltagem diferente darecomendada.
3 Tiverem sido efectuadas tentativas de reparação por pessoas quenão os técnicos da Morphy Richards (ou o seu representanteautorizado).
4 O aparelho tiver sido utilizado com fins de aluguer ou utilização nãodoméstica.
5 O aparelho foi adquirido em segunda mão.
6 A Morphy Richards ou o distribuidor local não são responsáveis pelaexecução de qualquer tipo de trabalho de manutenção, ao abrigo dagarantia.
7 A garantia não abrange consumíveis, tais como sacos, filtros egarrafas de vidro
8 Baterias e danos causados por derrame não estão abrangidos pelagarantia.
9 Os filtros não foram limpos e substituídos de acordo com asinstruções.
Esta garantia não confere quaisquer direitos para além dosexpressamente definidos anteriormente e não abrangequaisquer reclamações por danos ou perdas sucessivos. Estagarantia é um benefício adicional e não afecta quaisquer direitosestatutários do consumidor.
Morphy Richards
FP501020MEE Rev2.qxp_Morphy Richards Instruction Book 26/10/2016 12:10 Page 62

63
Salute e sicurezza Per utilizzare un qualunque apparecchio elettrico, necessario seguire delle basilari regole di sicurezza dettate dal buon senso.
Leggere queste istruzioni con attenzione prima di utilizzare il prodotto.
• Questo elettrodomestico pu essere utilizzato da persone concapacit fisiche, sensoriali o mentali ridotte o una scarsaesperienza e conoscenza, soltanto sotto la dovutasupervisione o previa spiegazione relativa all’utilizzo sicurodell’apparecchio e una volta compresi a fondo i rischi che essocomporta.
• Evitare che i bambini giochino con l’elettrodomestico.• Evitare che i bambini utilizzino questo elettrodomestico. • Mantenere l’elettrodomestico e il cavo lontano dalla portata dei
bambini. • Dopo un ciclo di funzionamento, prima di pulire l’apparecchio,
bisogna farlo raffreddare completamente. • L’elettrodomestico non indicato per l’uso mediante timer
esterno o sistema separato di controllo a distanza.• Se il cavo di alimentazione danneggiato, deve essere
sostituito con un gruppo cavo speciale fornito dal costruttore o dal suorappresentante dell’assistenza.
• AVVERTENZA: Le lame di miscelazione sono molto affilate.Maneggiare con attenzione durante l’uso e la pulizia.
• Per la cura e la pulizia consultare le pagine 66 e 74.
i
i
p
FP501020MEE Rev2.qxp_Morphy Richards Instruction Book 26/10/2016 12:10 Page 63
64
Di seguito sono riportate ulteriori informazioni sulla sicurezza.
Luogo di utilizzo Tenere sempre l’apparecchiatura lontano dal bordo del
piano di lavoro.
Verificare che l’elettrodomestico venga utilizzato su una superficiestabile e piana.
Non utilizzare l’elettrodomestico all’esterno o vicino all’acqua.
Cavo di alimentazione Il cavo dell’alimentazione, che collega la presa a muro e
l’apparecchio, deve essere sufficientemente lungo.
Non lasciare che il cavo di alimentazione penda dal bordo di unpiano di lavoro dove un bambino potrebbe raggiungerlo.
Non lasciare che il cavo dell’alimentazione attraversi uno spazioaperto come, ad esempio, uno spazio tra una presa posta inbasso e un tavolo.
Fare attenzione a che il cavo non si trovi sopra a una cucina a gaso a un tostapane o in altre aree calde che potrebberodanneggiarlo.
Sicurezza personale AVVERTENZA: Per evitare incendi, scosse elettriche e
lesioni personali, non immergere il cavo, la spina ol’apparecchiatura in acqua o in altri liquidi.
AVVERTENZA: L’utilizzo improprio dell’apparecchio pucausare lesioni personali.
AVVERTENZA: non toccare i componenti in movimento.
Porre estrema attenzione quando si sposta un elettrodomestico con contenuto caldo.
Non utilizzare il prodotto con le mani umide o bagnate.
Scollegare l’elettrodomestico dalla presa quando non vieneutilizzato eprima della pulizia.
Trattamento delle scottature Far scorrere immediatamente acqua fredda sull’area interessata.
Non perdere tempo a rimuovere i vestiti ma richiedererapidamente l’intervento di un medico.
Altre informazioni di sicurezza Se il cavo dell’alimentazione dell’elettrodomestico danneggiato,
non usarlo. Contattare l’assistenza telefonica Morphy Richards peristruzioni.
L utilizzo di componenti accessori non consigliati dal produttorepotrebbe danneggiare l’apparecchiatura.
Non posizionare l’elettrodomestico sopra oppure vicino a superficicalde, quali forni elettrici o a gas o fornelli.
Tenere l’apparecchiatura e il cavo lontani da fonti di calore, dallaluce diretta del sole, dall’umidit , da bordi appuntiti e simili.
Durante l’utilizzo dell’apparecchio, assicurarsi che il coperchio siain posizione prima di metterlo in funzione.
Non togliere il coperchio fino a quando la lama Serrator non hasmesso di ruotare.
Per preparare le zuppe, non far funzionare l’apparecchiocontinuamente.
Fare attenzione a non versare liquidi nel Total Control Soup Maker,perch potrebbero essere espulsi dall’apparecchio per improvvisaevaporazione.
Requisiti elettrici Controllare che la tensione indicata sulla targhetta dei dati
dell’elettrodomestico corrisponda a quella dell’abitazione, chedeve essere a corrente alternata (C.A.).
AVVERTENZA: L’ELETTRODOMESTICO DEVE ESSERECOLLEGATO A TERRA.
Qualora il fusibile nella presa da 13 A dovesse essere sostituito,installare un fusibile BS1362 da 13 A.
Componenti (1) Maniglia del coperchio (2) Pannello di controllo (3) Guarnizione (4) Coperchio (5) Sensore di eccessivo riempimento (6) Alloggiamento motore (7) Recipiente rimovibile (8) Lama Serrator (9) Pulsante di sgancio del contenitore (10) Caraffa (11) Impugnatura della caraffa (12) Presa di corrente (13) Spia funzione Smooth (14) Spia funzione Media (15) Spia funzione Chunky (16) Spia funzione Saut (17) Spia funzione Bevande (18) Spia funzione Riscalda (19) Spia funzione Frulla (20) Spia funzione Pre-pulizia (21) Schermo LED (22) Pulsante Modalit (23) Pulsante Start/Stop (24) Pulsante Porzione (25) Spia Mantieni in caldo
Prima di utilizzare l’elettrodomestico Prima di iniziare a utilizzare il Total Control Soup Maker,
necessario pulirlo. Lo stesso vale quando l’apparecchio non vieneutilizzato per lungo tempo. Per maggiori informazioni, consultarela sezione dedicata alla pulizia (Un sogno da pulire).
Quando si utilizza il Total Control Soup Maker per la prima volta possibile notare la fuoriuscita di fumo/vapore dal coperchio; nonsi tratta di un’anomalia ma del grasso utilizzato su alcune partidell’apparecchio durante il processo di produzione. Dopo qualcheutilizzo scomparir .
FP501020MEE Rev2.qxp_Morphy Richards Instruction Book 26/10/2016 12:10 Page 64
65
Utilizzo del Total Control Soup Maker1 Assicurarsi che il Total Control Soup Maker sia scollegato dalla
presa.
2 Togliere il Coperchio (4), fare attenzione a non toccare la LamaSerrator (8). AVVERTENZA: Lame affilate.
3 Versare tutti gli ingredienti nel Contenitore rimovibile (7).Aggiungere il liquido per ultimo, riempire fino alla quantitdesiderata indicata sul Contenitore rimovibile (7). Per maggioriinformazioni sulla quantit di liquido, consultare le singole ricette.
4 Riposizionare il Coperchio (4) sulla Caraffa (10), assicurandosi chesia ben fissato.
Potrebbe essere necessario muovere il coperchio/l’alloggiamentodel motore per fare in modo che la Lama (8) possa spostarsi tragli ingredienti per posizionare adeguatamente il Coperchio (4) sulla Caraffa (10):
5 Inserire la spina nella Presa (12).
6 Premere il Pulsante Modalit (22) per selezionare il programma. LaSpia della funzione Smooth (13) si illumina. Continuare a premereil Pulsante Modalit (22) per scorrere le impostazioni. Selezionarela Spia della funzione Smooth (13) per una zuppa uniforme.
7 Selezionare la Spia della funzione Media (14) per una zuppamedia.
8 Selezionare la Spia della funzione Chunky (15) per una zuppa conpezzetti.
9 Premere il Pulsante Start/Stop (23), il conto alla rovescia per iltempo di preparazione apparir sullo schermo LED (21). Il controllodella quantit impostato su 2 porzioni. Se necessario preparare3 o 4 porzioni, impostarle prima di premere il Pulsante Start/Stop(23). Consultare il controllo quantit porzione a pagina 8.
La funzione Smooth e Bevande viene impostata su 3 porzioni.
10 Una volta terminata la preparazione, il Total Control Soup Makeremetter un bip per 10 secondi. Scollegare il cavo, rimuovere ilCoperchio (4) e servire.
AVVERTENZA: Fare attenzione nel rimuovere il Coperchio (4)durante la preparazione della zuppa per evitare la fuoriuscitadi liquido caldo e di vapore.
Utilizzo del Controllo della quantit11 Assicurarsi che il Total Control Soup Maker sia
scollegato dalla rete elettrica. Togliere il Coperchio (4), fareattenzione a non toccare la Lama Serrator (8). AVVERTENZA:Lame affilate.
12 Riempire il Total Control Soup Maker fino al livello indicato sulContenitore rimovibile (7) per la porzione desiderata. Per ulterioriinformazioni consultare le singole ricette.
13 Riposizionare il Coperchio (4) sulla Caraffa (10), assicurandosi chesia ben fissato e collegare il Total Control Soup Maker alla reteelettrica. Vedere pagina 7.
14 Premere il Pulsante Modalit (22) per selezionare il programma. LaSpia della funzione Smooth (13) si illumina. Continuare a premereil Pulsante Modalit (22) per scorrere le impostazioni e selezionare la consistenza della
zuppa.
15 Dopo aver selezionato la consistenza della zuppa, premere ilPulsante Porzione (24) per selezionare la porzione di zuppa che sidesidera preparare (2, 3 o 4).
NOTA: Controllo porzione disponibile esclusivamente peralcune ricette. Consultare le ricette da pagina 16 per dettagli.
16 Premere il Pulsante Start/Stop (23), il conto alla rovescia deltempo di preparazione apparir sullo schermo LED (21). Una voltaterminata la preparazione, il Total Control Soup Maker emetter unbip per 10 secondi. Scollegare il cavo, rimuovere il Coperchio (4) eservire.
NOTA: In base al tipo di zuppa da preparare, gli ingredientiassorbiranno il liquido aggiunto e potrebbero ridursi divolume; di conseguenza le porzioni potrebbero essereinferiori rispetto a quanto indicato all’inizio.
Utilizzo della funzione Saut17 Assicurarsi che il Total Control Soup Maker sia scollegato dalla
rete elettrica. Togliere il Coperchio (4), fare attenzione a nontoccare la Lama Serrator (8). AVVERTENZA: Lame affilate.
18 Aggiungere un po’ d’olio nel Contenitore rimovibile (7). Collegare ilTotal Control Soup Maker alla presa elettrica.
19 Premere il Pulsante Modalit (22) finch la Spia della funzione Saut(16) non viene evidenziata. Riposizionare il Coperchio (4).
20 Premere il Pulsante Start/Stop (23) e il Soup Maker inizier ascaldarsi.
21 Dopo un minuto, rimuovere il Coperchio (4) e, facendo attenzione,aggiungere gli ingredienti da saltare nel Contenitore rimovibile (7).Riposizionare il Coperchio (4) e lasciar proseguire il programma.Se fosse necessario aprire il Coperchio per mescolare gliingredienti durante la preparazione, consultare le singole ricette da pagina 16.
AVVERTENZA: Aggiungere delicatamente gli ingredienti perevitare fuoriuscite.
22 Una volta terminato, premere il Pulsante Start/Stop (23).Aggiungere il resto degli ingredienti nel Contenitore rimovibile (7) edare avvio al processo di preparazione della zuppa selezionando ilprogramma desiderato come mostrato a pagina 7.
Se il Coperchio (4) viene rimosso durante la funzione Saut permescolare o aggiungere ingredienti, riposizionarlo per proseguirela preparazione. Il Coperchio (4) deve trovarsi in posizione perpoter continuare a saltare gli ingredienti. La memoria del SoupMakerconserver le impostazioni, non quindi necessario reimpostarle.
i
FP501020MEE Rev2.qxp_Morphy Richards Instruction Book 26/10/2016 12:10 Page 65

66
Utilizzo della funzione Bevande23 Assicurarsi che il Total Control Soup Maker sia scollegato dalla
presa elettrica. Togliere il Coperchio (4), fare attenzione a nontoccare la Lama Serrator (8). AVVERTENZA: Lame affilate .
24 Posizionare gli ingredienti per 3 o 4 porzioni nel Contenitorerimovibile (7). Aggiungere il liquido per ultimo.
25 Riposizionare il Coperchio (4) sulla Caraffa (10) assicurandosi chesia ben fissato e collegare il Total Control Soup Maker alla reteelettrica.
26 Premere il Pulsante Modalit (22) finch la Spia della funzioneBevande (17) non viene evidenziata.
27 Premere il Pulsante Start/Stop (23) e il conto alla rovescia per iltempo di preparazione apparir sullo schermo LED (21).
NOTA: La funzione Bevande pu essere utilizzataesclusivamente per 3 o 4 porzioni. Non necessarioimpostare la quantit delle porzioni.
28 Una volta terminata la preparazione, il Total Control Soup Makeremetter un bip per 10 secondi. Scollegare il cavo, rimuovere ilCoperchio (4) e servire.
Utilizzo della funzione Riscalda29 Assicurarsi che il Total Control Soup Maker sia
scollegato dalla presa elettrica. Togliere il Coperchio (4), fareattenzione a non toccare la Lama Serrator (8). AVVERTENZA:Lame affilate.
30 Versare la zuppa fatta in casa che si desidera riscaldare nelContenitore rimovibile (7). 2 porzioni minimo, 4 porzioni massimo.
31 Riposizionare il Coperchio (4) sulla Caraffa (10), assicurandosi chesia ben fissato. Collegare il Total Control Soup Maker alla presaelettrica.
32 Premere il Pulsante Modalit (22) finch la Spia della funzioneRiscalda(18) non viene evidenziata. Premere il Pulsante Porzione (24) perselezionare la quantit della porzione (2, 3 o 4).
33 Premere il Pulsante Start/Stop (23) e il conto alla rovescia per iltempo di preparazione apparir sullo schermo LED (21).
34 Una volta terminata la preparazione, il Total Control Soup Makeremetter un bip per 10 secondi. Scollegare il cavo, rimuovere ilCoperchio (4) e servire.
NOTA: La corretta quantit di una porzione deve essereselezionata sul pannello di controllo per corrispondere alleporzioni di zuppa aggiunte; in caso contrario la zuppa nonverr riscaldata alla temperatura corretta.
La consistenza della zuppa pu variare dopo averla riscaldata.
Quando si riscalda una zuppa a pezzetti, la consistenzadiverr pi uniforme.
Utilizzo della funzione Frulla35 Assicurarsi che il Total Control Soup Maker sia
scollegato dalla presa elettrica. Togliere il Coperchio (4), fareattenzione a non toccare la Lama Serrator (8). AVVERTENZA:Lame affilate.
36 Versare la zuppa a pezzetti nel Contenitore rimovibile (7). NOTA: Utilizzare esclusivamente per frullare una zuppa apezzetti o media o altri ingredienti cotti morbidi.
37 Riposizionare il Coperchio (4) sulla Caraffa (10), assicurandosi chesia ben fissato. Collegare il Soup Maker alla presa elettrica.
38 Premere il Pulsante Modalit (22) finch la Spia della funzione Frulla(19) non viene evidenziata.
39 Tenere premuto il Pulsante Start/Stop (23) per il tempo che sidesidera frullare. Questa un’impostazione manuale che permettedi frullare fino a 20 secondi e si arresta automaticamente unavolta che si rilascia il pulsante. Se si desidera frullare per qualchealtro secondo, ripetere la procedura
40 Scollegare dalla presa elettrica, rimuovere il Coperchio (4) eservire.
ALTERNATIVA: Se si desidera frullare la zuppa gi pronta nelContenitore rimovibile (7), continuare dal passaggio 4.
Utilizzo della funzione Pre-pulizia41 Assicurarsi che il Total Control Soup Maker sia scollegato dalla
presa. Togliere il Coperchio (4), fare attenzione a non toccare laLama Serrator (8). AVVERTENZA: Lame affilate.
42 Versare 800 ml d’acqua nel Contenitore rimovibile (7) edaggiungere una piccola quantit di liquido per il lavaggio.
43 Riposizionare il Coperchio (4) sulla Caraffa (10), assicurandosi chesia ben fissato. Collegare il Total Control Soup Maker alla presaelettrica.
44 Premere il Pulsante Modalit (22) finch la Spia della funzione Pre-pulizia (20) non viene evidenziata.
45 Premere il Pulsante Start/Stop (23), il conto alla rovescia deltempo di preparazione apparir sullo schermo LED (21). Ilprogramma di Pre-pulizia dura 4 minuti.
46 Quando il ciclo di Pre-pulizia terminato, assicurarsi che il TotalControl Soup Maker sia scollegato dalla presa elettrica. Togliere ilCoperchio (4), fare attenzione a non toccare la Lama Serrator (8). AVVERTENZA: Lame affilate.
NOTA: La funzione di Pre-pulizia pulisce solo la base. necessaria una pulizia aggiuntiva per il Contenitore rimovibile(7) e il Coperchio (4). Consultare la sezione dedicata allapulizia (Un sogno da pulire) a pagina 32. Sciacquare il SoupMaker con acqua fino alla completa rimozione del sapone.
AVVERTENZA: Fare attenzione in quanto il Contenitorerimovibile (7) sar caldo dopo il ciclo di Pre-pulizia.
Un sogno da pulire Il Total Control Soup Maker dispone di una funzione di Pre-pulizia
(20). Vedere pagina 13. Nota: la Pre-pulizia aiuta esclusivamente apulire la base del Conteintore rimovibile (7). Potrebbe esserenecessaria un’ulteriore pulizia.
Il Total Control Soup Maker non adatto per il lavaggio in
FP501020MEE Rev2.qxp_Morphy Richards Instruction Book 26/10/2016 12:10 Page 66
67
lavastoviglie, ma veramente facile da pulire. Dopo l’uso, pulirel’Alloggiamento motore (6) e la Lama Serrator (8) con acqua caldae sapone, quindi asciugare.
NON immergere il coperchio o la caraffa in acqua.
Il Contenitore rimovibile (7) del Total Control Soup Maker puessere rimosso dalla Caraffa (10) per la pulizia. Basta premere ilPulsante del Contenitore rimovibile (9) e rimuoverlo. Lavare amano il Contenitore rimovibile (7) con acqua calda e sapone edasciugare la Caraffa con un panno morbido ed umido.
Assicurarsi che i contatti del Contenitore rimovibile venganoasciugati accuratamente dopo il lavaggio. Per reinserire ilContenitore rimovibile nella Caraffa, assicurarsi che siacorrettamente allineato, quindi farlo scattare in posizione.
Alcuni cibi possono bruciare se entrano in contatto conl’elemento riscaldante della base. In questo caso, selezionarela funzione di Pre-pulizia. Se le macchie persistono si tratta diun’alterazione della colorazione che rimarr nel tempo. Ci noninfluir sulle prestazioni o sulla qualit del cibo. Non utilizzarespugnette abrasive sul Total Control Soup Maker altrimentipotrebbe danneggiarsi.
Rimozione e Sostituzione dellaGuarnizione47
Occasionalmente sar necessario rimuovere la Guarnizione delCoperchio (3) per la pulizia. Lavare con acqua calda e sapone,risciacquare ed asciugare facendo attenzione prima diriposizionare.
48 AVVERTENZA: NON immergere il Coperchio o la Caraffa inacqua, perch contengono componenti elettrici che possonodanneggiarsi. Evitare assolutamente che l’acqua penetri neicollegamenti elettrici.
Asciugare perfettamente prima dell’uso.
Utilizzo del Soup Maker Il Total Control Soup Maker dispone di 3 programmi Zuppa e 1
programma Bevande.
Scegliere il programma desiderato:
Consistenza omogenea (13)
Il programma per minestre e zuppe fluide ed omogenee perfettoper preparare deliziose ricette che richiedono una consistenzafluida. Il programma si assicura che gli ingredienti venganomescolati fino a raggiungere la giusta consistenza e cottidelicatamente alla corretta temperatura. (Per 4 porzioni ilprogramma dura 21 minuti, dopodich la zuppa pronta da serviree da gustare!)
Impostazione Media (14)
Il programma per Zuppa Media ideale per ricette di zuppedeliziose che richiedono una consistenza media. Per 4 porzioni ilprogramma dura 25 minuti, dopodich la zuppa pronta da serviree da gustare!
Impostazione Chunky (15)
Il programma per zuppe e minestre con ingredienti a pezzetti perfetto per preparare ricette rustiche che richiedono unaconsistenza pi sostanziosa. Il programma consente di riscaldarepi a lungo gli ingredienti per essere sicuri che i loro pezzi vengano
cotti completamente. Per 4 porzioni il programma dura 28 minuti.Le minestre con ingredienti a pezzetti non richiedono nessun mix,basta il calore. Pertanto si consiglia di tagliare le verdure a dadinipiccoli. Se la zuppa ha troppi pezzetti dopo la cottura, selezionarela funzione Frulla per ottenere la consistenza voluta. Tenerepremuto il Pulsante Start/Stop per 5 secondi e controllare.
Saut ... (16) La funzione Saut scalda il Soup Maker di modo che gli alimenti
come le cipolle o i lardelli di pancetta possano essere soffrittiprima che il resto degli ingredienti venga aggiunto alla zuppa.Aggiungere un po’ d’olio nel Contenitore rimovibile (7), selezionare la funzione Saut e premereil Pulsante Start/Stop (23). Riscaldare l’olio per un minuto prima diaggiungere gli ingredienti. La funzione Saut disponibilesolamente quando il Coperchio (4) si trova sulla Caraffa (10). Lafunzione Saut viene disattivata quando viene rimosso ilCoperchio. Nota: Non utilizzare la funzione Saut per pi di 10minuti alla volta.
Bevande (17)
L’impostazione Bevande del Total Control Soup Maker ideale per farefrapp o frullati con ingredienti freschi. Per ricette di bevandeconsultare le pagine da 29 a 30. Il programma dura 2 minuti prima che la bevanda sia pronta da servire. L’impostazione Bevande non riscalda gli ingredienti, quindi idealeper bevande fredde quando fa caldo.
Nota: Non inserire cubetti di ghiaccio nel Total Control SoupMaker.
Un mix perfetto! (19)
L’impostazione Frulla consente di mescolare ulteriormente la zuppa perportarla, se necessario, alla consistenza desiderata. Questafunzione non prevede di dover ulteriormente scaldare la zuppa.
Per accedere a questa funzione dopo la cottura, premere ilpulsante Start/Stop per uscire dalla modalit Mantieni in caldo.Rimuovere il coperchio, quindi consultare pagina 12 e seguire ipassaggi da 4 a 6.
Mantieni in caldo
Una volta terminato il programma Zuppa, l’unit entra in modalitMantieni in caldo e sul Pannello di controllo (2) viene visualizzatala nuova impostazione. Se si desidera servire la zuppaimmediatamente, sollevare il coperchio e servire. La funzioneMantieni in caldo termina quando viene rimosso il coperchio.
Guida ai programmiSmooth 19, 21 minuti 3, 4
Media 22, 24, 26 minuti 2, 3, 4
Chunky 25, 27, 29 minuti 2, 3, 4
Saut Max. 10 minuti -
Bevande 2 minuti 3, 4
Riscalda 11, 14, 17 minuti 2, 3, 4
Frulla Secondo necessit Max. 4
Pre-pulizia 4 minuti -
Mantieni in caldo 30 minuti 2, 3, 4
i
FP501020MEE Rev2.qxp_Morphy Richards Instruction Book 26/10/2016 12:10 Page 67
68
Ricette
Abbiamo sviluppato delle ricette chepotrete utilizzare con il vostro nuovo TotalControl Soup Maker, dalle ricche minestrecorpose ai freschi frapp e frullati.
L’impostazione Chunky (15) serve solo acucinare gli ingredienti, non li sminuzza.Se dopo la cottura la zuppa risulta un po’troppo pastosa per i vostri gusti, poteteusare l’impostazione Frulla (19) perfrantumare ulteriormente alcuni pezzi.
Le ricette sono state studiate per rientrarenei limiti delle capacit minime e massimedel Total Control Soup Maker (800 - 1.600ml).
Le ricette sono state studiate perconsistenze omogenee, medie e corpose,in base alle quantit degli ingredienti per 2,3 o 4 porzioni.
NOTA: Per le ricette medie e corposesono disponibili solo 2 porzioni.
Funzione Smooth (13)
Minestra di verdure base 3 porzioni 4 porzioni
Tempo di preparazione: 5 minuti 5 minuti
Tempo di cottura: 19 minuti 21 minuti
Impostazione: Smooth Smooth
Ingredienti:
525 g 700 g le verdure includono sedano, navone, patate, carote, cipolle, pastinaca, il brodo vegetalecaldo con verdure sminuzzate un pizzico di erbe miste sale e pepe
Metodo:
1 Versare tutte le verdure nel Contenitore rimovibile (7), aggiungere il brodo fino al livello desiderato per la ricetta scelta e mescolare con uncucchiaio di legno.
2 Aggiungere un pizzico di erbe miste, selezionare la funzione Smooth (13), la porzione desiderata e premere il Pulsante Start/Stop (23).
3 Una volta pronta controllare il condimento e servire.
FP501020MEE Rev2.qxp_Morphy Richards Instruction Book 26/10/2016 12:10 Page 68
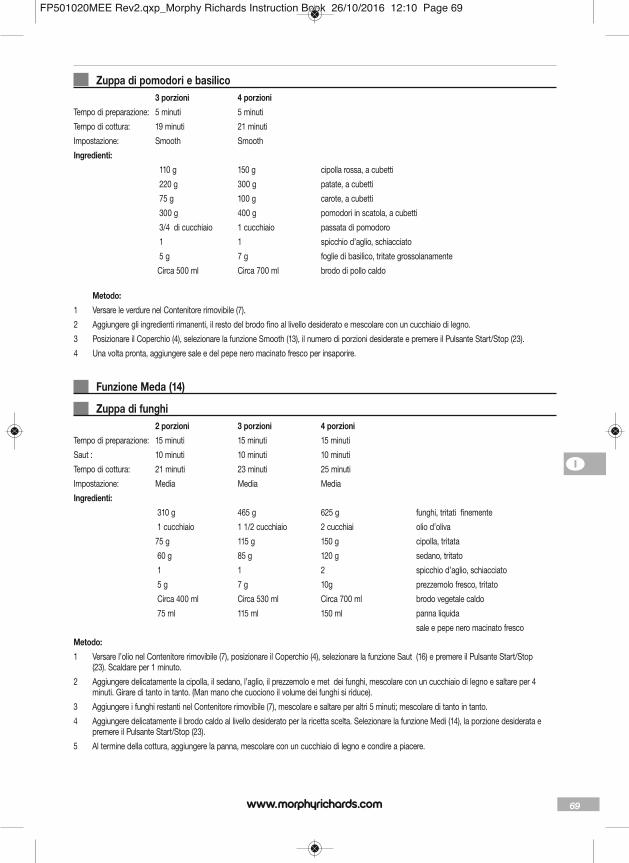
69
Zuppa di pomodori e basilico 3 porzioni 4 porzioni
Tempo di preparazione: 5 minuti 5 minuti
Tempo di cottura: 19 minuti 21 minuti
Impostazione: Smooth Smooth
Ingredienti: � 110 g 150 g cipolla rossa, a cubetti
� 220 g 300 g patate, a cubetti
� 75 g 100 g carote, a cubetti
� 300 g 400 g pomodori in scatola, a cubetti
� 3/4 di cucchiaio 1 cucchiaio passata di pomodoro
� 1 1 spicchio d’aglio, schiacciato
� 5 g 7 g foglie di basilico, tritate grossolanamente
Circa 500 ml Circa 700 ml brodo di pollo caldo
Metodo:1 Versare le verdure nel Contenitore rimovibile (7).
2 Aggiungere gli ingredienti rimanenti, il resto del brodo fino al livello desiderato e mescolare con un cucchiaio di legno.
3 Posizionare il Coperchio (4), selezionare la funzione Smooth (13), il numero di porzioni desiderate e premere il Pulsante Start/Stop (23).
4 Una volta pronta, aggiungere sale e del pepe nero macinato fresco per insaporire.
Funzione Meda (14)
Zuppa di funghi 2 porzioni 3 porzioni 4 porzioni
Tempo di preparazione: 15 minuti 15 minuti 15 minuti
Saut : 10 minuti 10 minuti 10 minuti
Tempo di cottura: 21 minuti 23 minuti 25 minuti
Impostazione: Media Media Media
Ingredienti: 310 g 465 g 625 g funghi, tritati finemente
1 cucchiaio 1 1/2 cucchiaio 2 cucchiai olio d’oliva
75 g 115 g 150 g cipolla, tritata
60 g 85 g 120 g sedano, tritato
1 1 2 spicchio d’aglio, schiacciato
5 g 7 g 10g prezzemolo fresco, tritato
Circa 400 ml Circa 530 ml Circa 700 ml brodo vegetale caldo
75 ml 115 ml 150 ml panna liquida
sale e pepe nero macinato fresco
Metodo:1 Versare l’olio nel Contenitore rimovibile (7), posizionare il Coperchio (4), selezionare la funzione Saut (16) e premere il Pulsante Start/Stop
(23). Scaldare per 1 minuto.
2 Aggiungere delicatamente la cipolla, il sedano, l’aglio, il prezzemolo e met dei funghi, mescolare con un cucchiaio di legno e saltare per 4minuti. Girare di tanto in tanto. (Man mano che cuociono il volume dei funghi si riduce).
3 Aggiungere i funghi restanti nel Contenitore rimovibile (7), mescolare e saltare per altri 5 minuti; mescolare di tanto in tanto.
4 Aggiungere delicatamente il brodo caldo al livello desiderato per la ricetta scelta. Selezionare la funzione Medi (14), la porzione desiderata epremere il Pulsante Start/Stop (23).
5 Al termine della cottura, aggiungere la panna, mescolare con un cucchiaio di legno e condire a piacere.
i
FP501020MEE Rev2.qxp_Morphy Richards Instruction Book 26/10/2016 12:10 Page 69

70
Zuppa di carote e coriandolo 2 porzioni 3 porzioni 4 porzioni
Tempo di preparazione: 15 minuti 15 minuti 15 minuti
Tempo di cottura: 21 minuti 23 minuti 25 minuti
Impostazione: Media Media Media
Ingredienti: 50 g 75 g 100 g cipolla, tritata
60 g 90 g 120 g sedano, finemente tritato
250 g 375 g 500 g carote, tagliate a cubetti
1/2 cucchiaino raso 3/4 cucchiaino raso 1 cucchiaino raso coriandolo in polvere
7 g 12 g 15 g coriandolo fresco, tritato
Circa 400 ml Circa 600 ml Circa 800 ml brodo vegetale caldo
25 - 50 ml 50 - 100 ml 50 - 100 ml latte parzialmente scremato
sale e pepe quanto basta
Metodo:1 Versare la cipolla, il sedano, la carota, il coriandolo macinato e tritato nel Contenitore rimovibile (7) e mescolare con un cucchiaio di legno.
2 Aggiungere il brodo al livello richiesto, selezionare la funzione Media (14), il numero di porzioni necessario e premere il Pulsante Start/Stop (23).
3 Al termine della cottura, mescolare latte quanto basta con un cucchiaio di legno per ottenere la consistenza desiderata, quindi condire apiacere.
4 Servire cosparsa con foglie di coriandolo tritate, secondo gusto.
Funzione Chunky (15)
Pistou alla francese 2 porzioni 3 porzioni 4 porzioni
Tempo di preparazione: 15 minuti 15 minuti 15 minuti
Tempo di cottura: 24 minuti 26 minuti 28 minuti
Impostazione: Chunky Chunky Chunky
Ingredienti: � 75 g 110 g 150 g zucchine, tagliate a cubetti
� 35 g 50 g 70 g patate, tagliate a cubetti
� 35 g 50 g 70 g cipolle, finemente tritate
� 25 g 35 g 50 g carote, tagliate a cubetti
� 200 g 300 g 400 g pomodori tritati in scatola
� 25 g 35 g 50 g pisellini
� 25 g 35 g 50 g fagiolini, tagliati a pezzetti da 1 cm
� 25 g 35 g 50 g spaghetti, spezzati in piccoli pezzi
� Circa 350 ml Circa 475 ml Circa 650 ml brodo vegetale caldo
� 1/2 cucchiaio �3/4 cucchiaio 1 cucchiaio passata di pomodoro (da mischiare nel brodo)
sale e pepe nero macinato
Per servire: Pesto
Parmigiano
Metodo:1 Versare le verdure e gli spaghetti nel Contenitore rimovibile (7), aggiungere il mix di brodo vegetale/passata di pomodoro al livello desiderato e
mescolare con un cucchiaio di legno.
2 Selezionare la funzione Chunky (15), il numero desiderato di porzioni e premere il Pulsante Start/Stop (23).
3 Una volta pronta, condire a piacimento e servire con una cucchiaiata di pesto e parmigiano fresco appena grattato.
FP501020MEE Rev2.qxp_Morphy Richards Instruction Book 26/10/2016 12:10 Page 70

71
Brodo invernale di agnello con lenticchie 2 porzioni 3 porzioni 4 porzioni
Tempo di preparazione: 20 minuti 20 minuti 20 minuti
Saut : 7 minuti 7 minuti 7 minuti
Tempo di cottura: 24 minuti 26 minuti 28 minuti
Impostazione: Chunky Chunky Chunky
Ingredienti:
1/2 cucchiaio 1 cucchiaio 1 cucchiaio olio d’oliva
35 g 55 g 75 g agnello macinato crudo
50 g 75 g 100 g cipolle, finemente tritate
�1 1 2 spicchio d’aglio, schiacciato
25 g 35 g 50 g carote, tritate finemente
�75 g 110 g 150 g patate, tritate finemente
�50 g 75 g 100 g navone, finemente tritato
�1 cucchiaio 2 cucchiai 3 cucchiai farina
�120 g 175 g 235 g lenticchie verdi in scatola precotte, sgocciolate
�1/4 cucchiaino 1/2 cucchiaino 1/2 cucchiaino rosmarino fresco tritato
�1/4 cucchiaio �1/2 cucchiaio 1 cucchiaio prezzemolo fresco tritato
� 1 1 2 foglie di alloro
� 1/2 cucchiaino 1/2 cucchiaino 1 cucchiaino Salsa Worcester
� Circa 450 ml Circa 675 m Circa 900 ml brodo di agnello
Metodo:
1 Versare l’olio d’oliva nel Contenitore rimovibile (7), posizionare il Coperchio (4), selezionare la funzione Saut (16) e premere il Pulsante Start/Stop(23). Dopo 1 minuto aggiungere delicatamente il trito di agnello, riposizionare il Coperchio (4) e saltare per 2 minuti, mescolando occasionalmente con un cucchiaio di legno fino ad ottenere una doratura omogenea.
2 Aggiungere delicatamente la cipolla, l’aglio, la carota, la patata e il navone nel Contenitore rimovibile (7) e saltare per 4 minuti. Mescolare la farina, quindi aggiungere il resto degli ingredienti e il brodo caldo fino al livello desiderato.
3 Mescolare con un cucchiaio di legno o una spatola. Tenere premuto il Pulsante Start/Stop (23), quindi selezionare la funzione Chunky (15), laporzione desiderata e premere il Pulsante Start/Stop (23).
4 Condire a piacimento ed eliminare le foglie di alloro (foglia) prima di servire.
i
FP501020MEE Rev2.qxp_Morphy Richards Instruction Book 26/10/2016 12:10 Page 71

72
Funzione Saut (16)
Zuppa di sedano 3 porzioni 4 porzioni
Tempo di preparazione: 10 minuti 10 minuti
Saut : 7 minuti 7 minuti
Tempo di cottura: 19 minuti 21 minuti
Impostazione: Smooth Smooth
Ingredienti:
�1 cucchiaio 1 cucchiaio olio d’oliva
350 g 450 g sedano, tagliato grossolanamente (incluse le foglie)
75 g 100 g cipolla, tritata
110 g 150 g patate, tritate
Circa 700 ml Circa 800 ml brodo vegetale caldo
sale e pepe nero macinato
prezzemolo fresco per guarnire
Metodo:
1 Versare l’olio d’oliva nel Contenitore rimovibile (7), posizionare il Coperchio (4), selezionare la funzione Saut (16) e premere il Pulsante Start/Stop(23). Dopo 1 minuto, aggiungere delicatamente il trito di agnello, riposizionare il Coperchio (4) e saltare per 2 minuti, mescolandooccasionalmente con un cucchiaio di legno fino ad ottenere una doratura omogenea.
2 Aggiungere delicatamente la cipolla, l’aglio, la carota, la patata e il navone nel Contenitore rimovibile (7) e saltare per 4 minuti. Mescolare lafarina, quindi aggiungere il resto degli ingredienti e il brodo caldo fino al livello desiderato.
3 Mescolare con un cucchiaio di legno o una spatola. Tenere premuto il Pulsante Start/Stop (23), quindi selezionare la funzione Chunky (15), laporzione desiderata e premere il Pulsante Start/Stop (23).
4 Condire a piacimento ed eliminare le foglie di alloro (foglia) prima di servire.
FP501020MEE Rev2.qxp_Morphy Richards Instruction Book 26/10/2016 12:10 Page 72
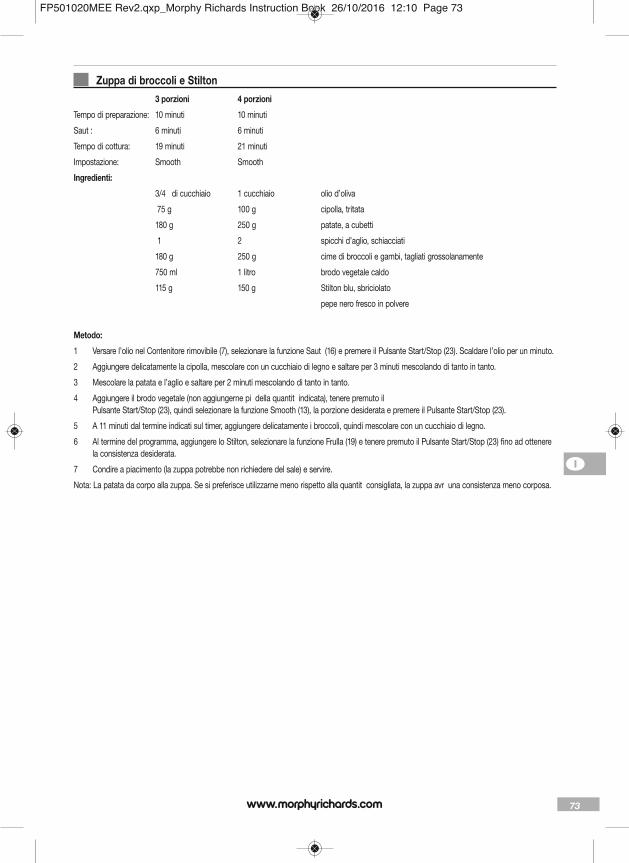
73
Zuppa di broccoli e Stilton 3 porzioni 4 porzioni
Tempo di preparazione: 10 minuti 10 minuti
Saut : 6 minuti 6 minuti
Tempo di cottura: 19 minuti 21 minuti
Impostazione: Smooth Smooth
Ingredienti:
3/4 di cucchiaio 1 cucchiaio olio d’oliva
�75 g 100 g cipolla, tritata
180 g 250 g patate, a cubetti
1 2 spicchi d’aglio, schiacciati
180 g 250 g cime di broccoli e gambi, tagliati grossolanamente
750 ml 1 litro brodo vegetale caldo
115 g 150 g Stilton blu, sbriciolato
pepe nero fresco in polvere
Metodo:
1 Versare l’olio nel Contenitore rimovibile (7), selezionare la funzione Saut (16) e premere il Pulsante Start/Stop (23). Scaldare l’olio per un minuto.
2 Aggiungere delicatamente la cipolla, mescolare con un cucchiaio di legno e saltare per 3 minuti mescolando di tanto in tanto.
3 Mescolare la patata e l’aglio e saltare per 2 minuti mescolando di tanto in tanto.
4 Aggiungere il brodo vegetale (non aggiungerne pi della quantit indicata), tenere premuto il Pulsante Start/Stop (23), quindi selezionare la funzione Smooth (13), la porzione desiderata e premere il Pulsante Start/Stop (23).
5 A 11 minuti dal termine indicati sul timer, aggiungere delicatamente i broccoli, quindi mescolare con un cucchiaio di legno.
6 Al termine del programma, aggiungere lo Stilton, selezionare la funzione Frulla (19) e tenere premuto il Pulsante Start/Stop (23) fino ad ottenerela consistenza desiderata.
7 Condire a piacimento (la zuppa potrebbe non richiedere del sale) e servire.
Nota: La patata da corpo alla zuppa. Se si preferisce utilizzarne meno rispetto alla quantit consigliata, la zuppa avr una consistenza meno corposa.
i
FP501020MEE Rev2.qxp_Morphy Richards Instruction Book 26/10/2016 12:10 Page 73

74
Funzione Bevande (17)
Frullato di burro di arachidi 3 porzioni 4 porzioni
Tempo di preparazione: 5 minuti 5 minuti
Durata programma: 2 minuti 2 minuti
Ingredienti:
900 ml 1,2 l latte parzialmente scremato
� 125 g 175 g gelato alla vaniglia
� 4 1/2 cucchiai rasi 6 cucchiai rasi burro di arachidi omogeneo
� 4 1/2 cucchiai 6 cucchiai sciroppo d’acero
Metodo:
1 Versare tutti gli ingredienti nel Contenitore rimovibile (7) e mescolare con un cucchiaio di legno.
2 Posizionare il Coperchio, selezionare la funzione Bevande (17) e premere il Pulsante Start/Stop (23).
3 Servire immediatamente.
Nota: Al posto dello sciroppo d’acero possibile utilizzare il miele.
Frapp per colazione con mirtilli e avena (con yogurt naturale) 3 porzioni 4 porzioni
Tempo di preparazione: 5 minuti 5 minuti
Durata programma: 2 minuti 2 minuti
Ingredienti:
675 g 800 g yogurt naturale magro
325 ml 400 ml latte parzialmente scremato
45 g 60 g fiocchi d’avena
115 g 150 g mirtilli
2 cucchiai 3 cucchiai miele
Metodo:
1 Versare tutti gli ingredienti nel Contenitore rimovibile (7) e mescolare con un cucchiaio di legno.
2 Posizionare il Coperchio (4), selezionare la funzione Bevande (17) e premere il Pulsante Start/Stop (23).
FAQSe avete qualche domanda sull’uso del Total Control SoupMaker, controllate la lista che segue nella quale riportiamo lerisposte ad alcune delle domande pi frequenti (FAQ). In caso di necessit d’aiuto, contattare la nostra assistenzatelefonica: 0344 871 0944.
La funzione per riscaldare disponibile se rimuovo ilCoperchio (4)?No. Rimuovendo il Coperchio l’alimentazione viene interrottaper la massima sicurezza. La funzione per riscaldare si attivasoltanto quando si posiziona il Coperchio (4) e si selezionano iprogrammi zuppa Smooth (13), Media (14), Chunky (15), Saut(16) o Riscalda (18).
Posso togliere il Coperchio a met ciclo?Il Total Control Soup Maker mette a disposizione 1 minutoall’interno del ciclo per aggiungere gli ingredienti mancanti emescolare durante la funzione Saut (16).
Posso usare il Soup Maker per preparare qualcos’altro chenon siano le zuppe?No. I programmi disponibili sono appositamente concepiti perpreparare zuppe e bevande perfette da zero. Seguire le ricettee adattarle a propri gusti.
Posso usare la carne cruda per le ricette delle zuppe con ilSoup Maker?A parte la pancetta o piccole quantit di carne trita (100 g), no.Bisogna cuocere la carne separatamente prima di metterla nelSoup Maker con gli ingredienti aggiuntivi della propria ricetta,perch il Total Control Soup Maker progettato esclusivamenteper saltare (16) delicatamente la pancetta o le cipolle e poi
FP501020MEE Rev2.qxp_Morphy Richards Instruction Book 26/10/2016 12:10 Page 74

75
cuocere la zuppa. AVVERTENZA: Non si deve usare lafunzione Saut per rosolare la carne cruda ma solo lapancetta e la carne macinata (max. 100 g).
Che capacit ha il Soup Maker?La capacit del Total Control Soup Maker di 1.600 ml. Vieneriportata all’interno e all’esterno del Contenitore rimovibile (7).Assicurarsi di non riempire il Total ControlSoup Maker oltre talelinea, altrimenti il rilevatore di sovrappieno stacca la correntealla Lama Serrator (8) e lo schermo LED (21) visualizza E1 . Sesuccede, sufficiente togliere un po’ di ingredienti, di modo cheil segno di 1.600 ml non venga superato, poi pulire il Sensore disovrappieno (5) sul Coperchio (4). Assicurarsi che gli ingredienti(liquido incluso) superino la linea delle 2 porzioni, in casocontrario la funzione di mescolatura sarebbe compromessa.
Posso modificare la durata delle impostazioni Smooth, Mediae Chunky per la zuppa?No. La durata per queste impostazioni preimpostata.
Posso riscaldare la zuppa in scatola/cartone?No. I programmi sono impostati per preparare una zuppaperfetta a partire da zero. Le zuppe in scatola e in cartoneanche se pratiche potrebbero bruciarsi alla base dell’elementodanneggiando il prodotto.
Cosa faccio se il Total Control Soup Maker smette difunzionare?Il Total Control Soup Maker dotato di un termostato disicurezza che interrompe la corrente e arresta la macchina, perprevenire il surriscaldamento, se viene utilizzata continuamenteper 3 o pi cicli. In questo caso, rimuovere il cibo dalContenitore rimovibile e lasciar raffreddare il Total Control SoupMaker per 30 minuti prima di proseguire.
Se si utilizza la funzione Frulla (19) in modo continuo per pi di20 secondi, un interruttore automatico di sicurezza interrompel’alimentazione per impedire il surriscaldamento. Quando ci siverifica, attendere 10 secondi prima di riutilizzare la medesimafunzione.
Posso preparare zuppe fredde come il gazpacho con il TotalControl Soup Maker?Si, ma si dovr prima cuocere la zuppa utilizzando sial’impostazione per zuppe Smooth (13), che Media (14) o Chunky(15). Quindi lasciar raffreddare o refrigerare prima di gustare.
Cosa accade se il cibo si brucia attaccandosi alla base delTotal Control Soup Maker?A causa dell’amido e degli zuccheri presenti in alcuni alimenti,questi potrebbero bruciarsi leggermente se posti a direttocontatto con la base interna del Contenitore rimovibile. Perprevenire tale situazione, aggiungere mezza tazza d’acqua o dibrodo al Total Control Soup Maker prima di inserire ingredientisolidi. Quindi riempire con il liquido rimanente indicato dallaricetta.
Cancellare o modificare i programmiSe stato selezionato un programma per errore ed statopremuto il Pulsante Start/Stop (23), o si desidera cancellare il programma, sufficiente premere ilPulsante Start/Stop (23) e tenerlo premuto per 2 secondi.Premere il Pulsante Modalit (22) per selezionare il programmacorretto e premere il Pulsante Start/Stop (23) per riavviare.
ContattateciServizio di assistenza telefonica
In caso di problemi col vostro elettrodomestico, vi invitiamo acontattare il nostro Servizio di assistenza telefonica, in quantosaremo in grado di fornirvi un’assistenza pi mirata rispetto aquella fornita dal punto vendita.
Vi consigliamo di tenere a portata di mano il nome del prodotto,il numero del modello e il numero di matricola per consentirci digestire la vostra chiamata nel minor tempo possibile.
Parlatene con noi
Per eventuali domande o commenti, o semplicemente se voletedei suggerimenti o delle idee di ricette per sfruttare al meglio ilvostro elettrodomestico, seguiteci online:
Blog: www.morphyrichards.co.uk/blog
Facebook: www.facebook.com/morphyrichardsuk
Twitter: @loveyourmorphy
Sito web: www.morphyrichards.com
Morphy Richards Cucina e Crea App
GARANZIA DI DUE ANNIQuesto elettrodomestico è coperto da una garanzia di due anniper la riparazione o la sostituzione.
È importante conservare la ricevuta del rivenditore a titolo diprova di acquisto. Appuntare la ricevuta sulla retrocopertina delpresente manuale per futuro riferimento.
Indicare le informazioni riportate di seguito se si verificaun’anomalia sul prodotto. Questi numeri sono riportati sullabase del prodotto.
N. modelloN. di serie
Tutti i prodotti Morphy Richards sono testati singolarmenteprima di lasciare lo stabilimento. Nell’improbabile eventualitàdella comparsa di un difetto entro 28 giorni dall’acquisto, si
Morphy Richards
i
FP501020MEE Rev2.qxp_Morphy Richards Instruction Book 26/10/2016 12:10 Page 75
76
consiglia di restituire il prodotto dove è stato acquistato perrichiederne la sostituzione.
Se il problema si manifesta dopo 28 giorni ed entro 24 mesidall’acquisto, contattare il rivenditore più vicino, citando ilnumero di modello e il numero di matricola riportati sulprodotto oppure scrivergli all’indirizzo indicato.
Verrà richiesto di rispedire il prodotto (in un imballaggio idoneoe sicuro) unitamente alla copia della prova d’acquisto.
Fatte salve le esclusioni sotto riportate (1-9), l’elettrodomesticodifettoso viene riparato o sostituito e spedito di solito entro 7giorni lavorativi dal ricevimento.
Se per qualsiasi motivo questo articolo viene sostituito entro ilperiodo di garanzia di 2 anni, la garanzia sul nuovo prodottosarà calcolata a decorrere dalla data dell’acquisto iniziale. Èpertanto importante conservare la ricevuta o fattura originaleper poter dimostrare la data dell’acquisto.
Per usufruire della garanzia di due anni, l’elettrodomestico deveessere stato usato nel modo indicato dal produttore. Adesempio, è necessario disincrostare l’elettrodomestico e tenerepuliti i filtri nel modo indicato.
Morphy Richards o il rivenditore di zona non sono tenuti asostituire o riparare i prodotti, come indicato dalle disposizionidi garanzia, se:
1 Il guasto è stato causato o è attribuibile a un uso accidentale,improprio, negligente o contrario alle istruzioni del produttoreoppure il guasto è stato causato da sovratensioni momentanee odal trasporto.
2 L’elettrodomestico è stato utilizzato a una tensione diversa daquella indicata su di esso.
3 Le riparazioni sono state eseguite da persone diverse dalpersonale tecnico Morphy Richards (o rivenditori autorizzati).
4 L’elettrodomestico è stato noleggiato oppure non impiegato peruso domestico.
5 L’elettrodomestico è di seconda mano.
6 Morphy Richards o il rivenditore di zona non sono tenuti adeseguire alcun tipo di intervento di assistenza ai sensi dellagaranzia.
7 I sacchetti, i filtri e le caraffe di vetro non sono coperti dallagaranzia.
8 Le batterie e i danni dovuti a perdite non sono coperti dallagaranzia.
9 I filtri non sono stati puliti e sostituiti come da istruzioni.
La presente garanzia non conferisce alcun diritto diverso daquelli sopra elencati e non copre alcuna richiesta di danni operdite consequenziali. La presente garanzia viene offerta a titolodi vantaggio aggiuntivo e non incide sui diritti del consumatoreprevisti dalla legge.
FP501020MEE Rev2.qxp_Morphy Richards Instruction Book 26/10/2016 12:10 Page 76

77
Sundhed og sikkerhed Ved brug af elektriske apparater skal følgende sikkerhedsregler baseret på sund fornuft overholdes.
Læs denne vejledning omhyggeligt, før produktet tages i brug.
• Udstyret kan anvendes af personer med nedsatte fysiske,sansemæssige eller mentale evner eller med manglendeerfaring ellerviden, hvis de får støtte og vejledning i at bruge udstyret sikkertog forstår de risici, der er forbundet med det.
• Børn må ikke lege med apparatet.• Dette apparat må ikke bruges af børn. • Opbevar udstyret uden for børns rækkevidde. • Efter én betjeningscyklus skal du lade apparatet køle helt af og
derefter gøre det rent for at forhindre, at det brænder på. • Apparatet er ikke beregnet til at blive betjent af en
ekstern timer eller et separat fjernbetjeningssystem.• Hvis ledningen er beskadiget, skal den udskiftes med en
speciel ledningssamling, som kan fås hos producenten ellerdennes reparatør.
• ADVARSEL: Røreknivene er meget skarpe. Vær forsigtig, når debruges og rengøres.
• For vedligholdelse og rengøring henvises til side 80 og 88.
q
q
i
FP501020MEE Rev2.qxp_Morphy Richards Instruction Book 26/10/2016 12:10 Page 77
78
Derudover har vi følgende sikkerhedsråd.
Brug• Anbring altid apparatet væk fra kanten af arbejdsbordet.
.
• Sørg for, at apparatet anvendes på en solid, plan overflade, derkan tåle varme.
• Apparatet må ikke bruges udendørs eller nær vand.
Ledning• Ledningen skal kunne nå fra stikkontakten til soklen, uden at den
belaster tilslutningerne.
• Lad ikke ledningen hænge ud over kanten af bordet, hvor et barnkan nå den.
• Før ikke ledningen på tværs af et åbent rum, f.eks. mellem enlavtsiddende kontakt og et bord.
• Før ikke ledningen hen over et komfur, en brødrister eller andrevarme områder, som kan beskadige ledningen.
Personlig sikkerhed• ADVARSEL: For at beskytte mod brand, elektrisk stød og
personskade må man ikke dyppe ledningen, stikket ogapparatet i vand eller andre væsker.
• ADVARSEL: Misbrug af apparatet kan evt. medførepersonskade.
• ADVARSEL: Undgå at komme i kontakt med bevægelige dele.
• Man skal være yderst forsigtig, når et apparat med varm væskeflyttes.
• Produktet må ikke berøres med våde eller fugtig hænder.
• Tag apparatets stik ud af kontakten, når det ikke er i brug, oginden det rengøres..
Behandling af skoldninger• Hæld straks rindende, koldt vand over det skoldede område.
Stands ikke for at fjerne beklædning, og søg straks lægehjælp.
Andre sikkerhedsovervejelser• Brug ikke apparatet, hvis netledningen er ødelagt. Ring til Morphy
Richards’ hjælpelinje, hvis du ønsker råd og vejledning.
• Brugen af tilbehør, der ikke anbefales af producenten, kanbeskadige enheden.
• Placer ikke apparatet på eller nær varmekilder, såsom gas- ellerelkogeplader eller -ovne.
• Hold apparat og ledning væk fra varme, direkte sollys, fugt,skarpe kanter og lignende.
• Når du bruger enheden, skal du sørge for, at låget sidder på,inden du tænder for den.
• Du må ikke fjerne låget, før kniven er standset.
• Brug ikke apparatet kontinuerligt til at lave suppe.
• Undgå, at der komer varm suppe i suppemaskinen, da den kan
blive stødt ud af apparatet på grund af pludselig dampdannelse.
Elektriske krav Kontroller, at enhedens typeskilt viser en spænding, der svarer til
husholdningens (vekselstrøm).
ADVARSEL: DETTE APPARAT SKAL JORDES.
Hvis sikringen i stikket skal udskiftes, skal den udskiftes med en13 A BS1362-sikring.
Funktioner (1) Lågets håndtag (2) Kontrolpanel (3) Pakning (4) Låg (5) Overløbssensor (6) Motorhus (7) Aftageligt kar (8) Serratorkniv (9) Knap til at frigøre kar (10) Kande (11) Kandehåndtag (12) Stikkontakt (13) Blødfunktionsindikator (14) Mellemfunktionsindikator (15) Grovfunktionsindikator (16) Sautéfunktionsindikator (17) Drinksfunktionsindikator (18) Genopvarmningsfunktionsindikator (19) Blendefunktionsindikator (20) Pre-Clean-funktionsindikator (21) LED skærm (22) Tilstandsknap (23) Start-/stopknap (24) Portionsknap (25) Hold varm-indikator
Før første ibrugtagning Det er vigtigt at rengøre din suppemaskine inden første brug, eller
hvis den ikke er blevet brugt i en længere periode. Se afsnittet ompleje og rengøring for yderligere information.
Når du første gang bruger din suppemaskine, kan du opleve, atder kommer røg/damp fra låget. Dette er normalt og blot fedtstof,som anvendes på visse dele af apparatet, når den bliverfremstillet. Det forsvinder, når du har brugt den et par gange.
Sådan bruges suppemaskinen1 Sørg for, at suppemaskinen er afbrudt fra netstikket.
2 Tag låget af (4), og pas på, at du ikke berører serratorkniven (8). ADVARSEL: Skarp kniv.
3 Kom alle dele i det aftagelige kar (7). Kom til sidst væske i, og fyldop til det ønskede niveau angivet på det aftaglige kar (7). Seopskriften for mere information om væske.
4 Sæt låget (4) på kanden (10), og sørg for, at det sidder korrekt.
Du skal evt. dreje låg/motorhus, for at klingen (8) kan trængeigennem og finde låget (4) på kanden (10) korrekt.
FP501020MEE Rev2.qxp_Morphy Richards Instruction Book 26/10/2016 12:10 Page 78

79
5 Sæt ledningen i netstikket (12).
6 Tryk på knappen (22) for at vælge program. Funktionsindikatoren(13) lyser. Tryk på funktionsknappen (22) for at vælge indstillinger.Vælg funktionsindikatoren (13) for en blød suppe.
7 Vælg mellemfunktionsindikator (14) for mellemsuppe.
8 Vælg funktionsindikator (15) for grynet suppe.
9 Tryk på Start/Stop (23), hvorefter tilberedningstiden tæller ned påLED-skærmen (21). Portionskontrollen er indstillet til 2 portioner.Ønskes der 3 eller 4 portioner, skal det vælges før valg afStart/Stop (23). Se portionskontrol på side 8.
Funktionen indstilles til 3 portioner.
10 Når den er færdig, bipper suppemaskinen i 10 sekunder. Tagstikket ud af stikkontakten, fjern låget (4), og servér.
ADVARSEL: Pas på med at fjerne låget (4), når du laver suppe,så du ikke kommer til at sprøjte med varm væske og damp.
Brug af portionskontrol11 Sørg for, at suppemaskinen
er afbrudt fra netstikket. Tag låget af (4), og pas på, at du ikkeberører serratorkniven (8). ADVARSEL: Skarp kniv.
12 Fyld suppemaskinen op til det viste niveau på det aftagelige kar(7), og vælg dermed den ønskede portion. Se opskriften for mereinformation om væske.
13 Sæt låget (4) på kanden (10), og sørg for, at det sidder korrekt, ogtilslut suppemaskinen til netstikket. Se side 7.
14 Tryk på knappen (22) for at vælge program. Funktionsindikatoren(13) lyser. Tryk på funktionsknappen (22) for at vælge indstillingerog suppens konsistens.
15 Efter valg af suppens konsistens skal du trykke påportionsknappen (24) og vælge, hvor mange portioner (2, 3 eller 4)du ønsker.
BEMÆRK: Portionskontrol kun til visse opskrifter. Seopskrifter fra side 16 for detaljer.
16 Tryk på Start/Stop (23), hvorefter tilberedningstiden tæller ned påLED-skærmen (21). Når den er færdig, bipper suppemaskinen i 10sekunder. Tag stikket ud af stikkontakten, fjern låget (4), og servér.
BEMÆRK: Afhængig af den type suppe, du laver, absorberesden tilførte væske og kan reducere mængden, så portionernebliver mindre, end da du startede.
Brug af sauté-funktion17 Sørg for, at suppemaskinen er afbrudt fra netstikket. Tag låget af
(4), og pas på, at du ikke berører serratorkniven (8). ADVARSEL: Skarp kniv.
18 Kom lidt olie i det aftagelige kar (7). Tilslut suppemaskinen tilnetstikket.
19 Tryk på funktionsknappen (22), indtil sautéfunktionsindikatoren (16)lyser. Sæt låget på (4).
20 Tryk på Start/Stop (23), suppemaskinen begynder at varme op.
21 Efter et minut fjernes låget (4), og ingredienser til sautéringkommes i det aftagelige kar (7). Sæt låget på (4), og ladprogrammet fortsætte. Du skal måske fjerne låget og røre iingredienserne undervejs, jf. opskrifterne på side 16.
ADVARSEL: Kom ingredienserne forsigtigt i, og undgå atsprøjte fedtstof.
22Tryk Start/Stop (23), når du er færdig. Kom de andre ingredienser idet aftagelige kar (7), og start suppeprocessen ved at vælge detønskede suppeprogram jf. side 7.
Når låget (4) er fjernet under sautéring for at røre eller tilføjeingredienser, sættes låget (4) på igen for at fortsætte. Låget (4)skal være på for at fortsætte sautéring. Suppemaskinenshukommelse gemmer indstillingen, du behøver ikke nulstille den.
Brug af drinksfunktion23 Sørg for, at suppemaskinen er afbrudt fra netstikket. Tag låget af
(4), og pas på, at du ikke berører serratorkniven (8). ADVARSEL: Skarp kniv.
24 Kom ingredienser til 3 eller 4 portioner i det aftagelige kar (7). Komvand til sidst.
25 Sæt låget (4) på kanden (10), sørg for det sidder korrekt, og tilslutsuppemaskinen til netstikket.
26 Tryk på funktionsknappen (22), indtil drinksfunktionsindikatoren(17) lyser.
27 Tryk på Start/Stop (23), hvorefter tilberedningstiden tæller ned påLED-skærmen (21).
BEMÆRK: Drinksfunktionen kan kun anvendes til 3 og 4portioner. Portionsstørrelse behøver ikke vælges.
28 Når den er færdig, bipper suppemaskinen i 10 sekunder. Tagstikket ud af stikkontakten, fjern låget (4), og servér.
Brug af genopvarmningsfunktion29 Sørg for suppemaskinen
er afbrudt fra netstikket. Tag låget af (4), og pas på, at du ikkeberører serratorkniven (8). ADVARSEL: Skarp kniv.
30 Sæt den hjemmelavede suppe, som du ønsker at opvarme, i detaftagelige kar (7). Mindst 2 portioner, max. 4 portioner.
31 Sæt låget (4) på kanden (10), og sørg for, at det sidder korrekt.Tilslut suppemaskinen til netspændingen.
32 Tryk på funktionsknappen (22), indtil genopvarmningsfunktionensindikator (18) lyser. Tryk på portionsknappen (24), og vælg portionsstørrelse(2, 3 eller 4).
33 Tryk på Start/Stop (23), hvorefter tilberedningstiden tæller ned påLED-skærmen (21).
34 Når den er færdig, bipper suppemaskinen i 10 sekunder. Tagstikket ud af stikkontakten, fjern låget (4), og servér.
BEMÆRK: Den rette portionsstørrelse skal vælges ikontrolpanelet for at passe med de ønskede suppeportioner,ellers opvarmes suppen ikke ved korrekt temperatur.
Suppens konsistens kan variere afhængig af opvarmningen.
Ved opvarmning af grynet suppe får suppen en bløderekonsistens.
q
FP501020MEE Rev2.qxp_Morphy Richards Instruction Book 26/10/2016 12:10 Page 79
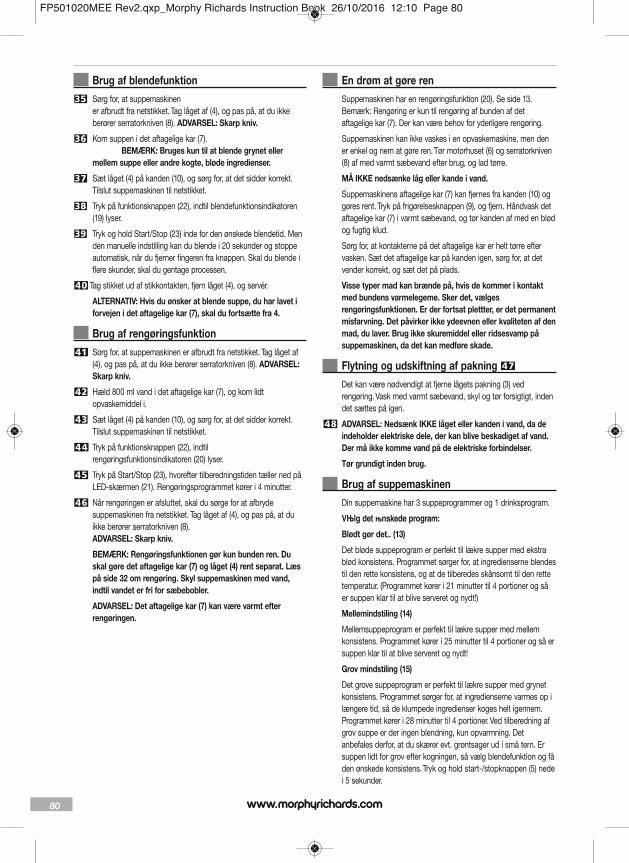
80
Brug af blendefunktion35 Sørg for, at suppemaskinen
er afbrudt fra netstikket. Tag låget af (4), og pas på, at du ikkeberører serratorkniven (8). ADVARSEL: Skarp kniv.
36 Kom suppen i det aftagelige kar (7). BEMÆRK: Bruges kun til at blende grynet eller
mellem suppe eller andre kogte, bløde ingredienser.
37 Sæt låget (4) på kanden (10), og sørg for, at det sidder korrekt.Tilslut suppemaskinen til netstikket.
38 Tryk på funktionsknappen (22), indtil blendefunktionsindikatoren(19) lyser.
39 Tryk og hold Start/Stop (23) inde for den ønskede blendetid. Menden manuelle indstilling kan du blende i 20 sekunder og stoppeautomatisk, når du fjerner fingeren fra knappen. Skal du blende iflere skunder, skal du gentage processen.
40Tag stikket ud af stikkontakten, fjern låget (4), og servér.
ALTERNATIV: Hvis du ønsker at blende suppe, du har lavet iforvejen i det aftagelige kar (7), skal du fortsætte fra 4.
Brug af rengøringsfunktion41 Sørg for, at suppemaskinen er afbrudt fra netstikket. Tag låget af
(4), og pas på, at du ikke berører serratorkniven (8). ADVARSEL:Skarp kniv.
42 Hæld 800 ml vand i det aftagelige kar (7), og kom lidtopvaskemiddel i.
43 Sæt låget (4) på kanden (10), og sørg for, at det sidder korrekt.Tilslut suppemaskinen til netstikket.
44 Tryk på funktionsknappen (22), indtilrengøringsfunktionsindikatoren (20) lyser.
45 Tryk på Start/Stop (23), hvorefter tilberedningstiden tæller ned påLED-skærmen (21). Rengøringsprogrammet kører i 4 minutter.
46 Når rengøringen er afsluttet, skal du sørge for at afbrydesuppemaskinen fra netstikket. Tag låget af (4), og pas på, at duikke berører serratorkniven (8). ADVARSEL: Skarp kniv.
BEMÆRK: Rengøringsfunktionen gør kun bunden ren. Duskal gøre det aftagelige kar (7) og låget (4) rent separat. Læspå side 32 om rengøring. Skyl suppemaskinen med vand,indtil vandet er fri for sæbebobler.
ADVARSEL: Det aftagelige kar (7) kan være varmt efterrengøringen.
En drøm at gøre ren Suppemaskinen har en rengøringsfunktion (20). Se side 13.
Bemærk: Rengøring er kun til rengøring af bunden af detaftagelige kar (7). Der kan være behov for yderligere rengøring.
Suppemaskinen kan ikke vaskes i en opvaskemaskine, men dener enkel og nem at gøre ren. Tør motorhuset (6) og serratorkniven(8) af med varmt sæbevand efter brug, og lad tørre.
MÅ IKKE nedsænke låg eller kande i vand.
Suppemaskinens aftagelige kar (7) kan fjernes fra kanden (10) oggøres rent. Tryk på frigørelsesknappen (9), og fjern. Håndvask detaftagelige kar (7) i varmt sæbevand, og tør kanden af med en blødog fugtig klud.
Sørg for, at kontakterne på det aftagelige kar er helt tørre eftervasken. Sæt det aftagelige kar på kanden igen, sørg for, at detvender korrekt, og sæt det på plads.
Visse typer mad kan brænde på, hvis de kommer i kontaktmed bundens varmelegeme. Sker det, vælgesrengøringsfunktionen. Er der fortsat plettter, er det permanentmisfarvning. Det påvirker ikke ydeevnen eller kvaliteten af denmad, du laver. Brug ikke skuremiddel eller ridsesvamp påsuppemaskinen, da det kan medføre skade.
Flytning og udskiftning af pakning 47
Det kan være nødvendigt at fjerne lågets pakning (3) vedrengøring. Vask med varmt sæbevand, skyl og tør forsigtigt, indendet sættes på igen.
48 ADVARSEL: Nedsænk IKKE låget eller kanden i vand, da deindeholder elektriske dele, der kan blive beskadiget af vand.Der må ikke komme vand på de elektriske forbindelser.
Tør grundigt inden brug.
Brug af suppemaskinen Din suppemaskine har 3 suppeprogrammer og 1 drinksprogram.
VЊlg det њnskede program:
Blødt gør det.. (13)
Det bløde suppeprogram er perfekt til lækre supper med ekstrablød konsistens. Programmet sørger for, at ingredienserne blendestil den rette konsistens, og at de tilberedes skånsomt til den rettetemperatur. (Programmet kører i 21 minutter til 4 portioner og såer suppen klar til at blive serveret og nydt!)
Mellemindstiling (14)
Mellemsuppeprogram er perfekt til lækre supper med mellemkonsistens. Programmet kører i 25 minutter til 4 portioner og så ersuppen klar til at blive serveret og nydt!
Grov mindstiling (15)
Det grove suppeprogram er perfekt til lækre supper med grynetkonsistens. Programmet sørger for, at ingredienserne varmes op ilængere tid, så de klumpede ingredienser koges helt igennem.Programmet kører i 28 minutter til 4 portioner. Ved tilberedning afgrov suppe er der ingen blendning, kun opvarmning. Detanbefales derfor, at du skærer evt. grøntsager ud i små tern. Ersuppen lidt for grov efter kogningen, så vælg blendefunktion og fåden ønskede konsistens. Tryk og hold start-/stopknappen (5) nedei 5 sekunder.
FP501020MEE Rev2.qxp_Morphy Richards Instruction Book 26/10/2016 12:10 Page 80
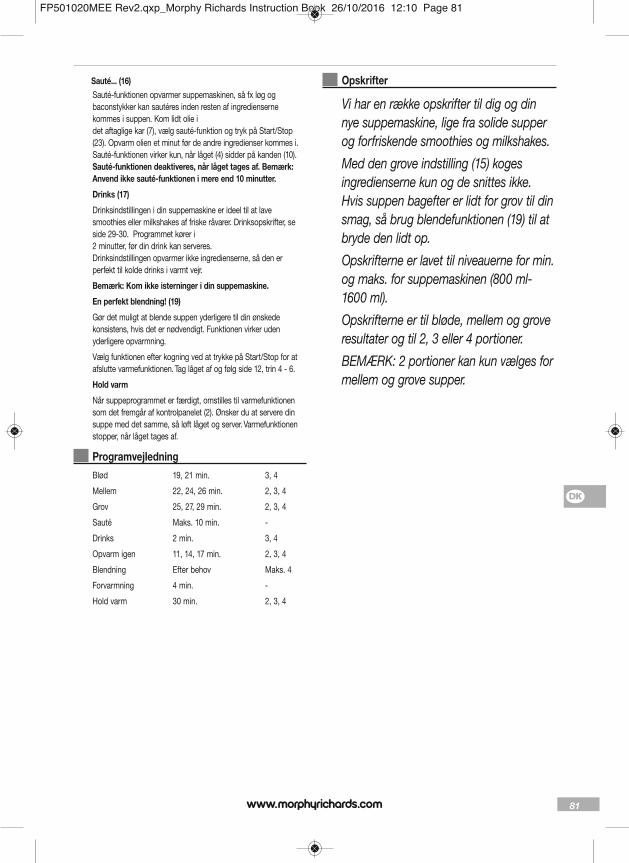
81
Sauté... (16) Sauté-funktionen opvarmer suppemaskinen, så fx løg og
baconstykker kan sautéres inden resten af ingrediensernekommes i suppen. Kom lidt olie i det aftaglige kar (7), vælg sauté-funktion og tryk på Start/Stop(23). Opvarm olien et minut før de andre ingredienser kommes i.Sauté-funktionen virker kun, når låget (4) sidder på kanden (10).Sauté-funktionen deaktiveres, når låget tages af. Bemærk:Anvend ikke sauté-funktionen i mere end 10 minutter.
Drinks (17)
Drinksindstillingen i din suppemaskine er ideel til at lavesmoothies eller milkshakes af friske råvarer. Drinksopskrifter, seside 29-30. Programmet kører i 2 minutter, før din drink kan serveres. Drinksindstillingen opvarmer ikke ingredienserne, så den erperfekt til kolde drinks i varmt vejr.
Bemærk: Kom ikke isterninger i din suppemaskine.
En perfekt blendning! (19)
Gør det muligt at blende suppen yderligere til din ønskedekonsistens, hvis det er nødvendigt. Funktionen virker udenyderligere opvarmning.
Vælg funktionen efter kogning ved at trykke på Start/Stop for atafslutte varmefunktionen. Tag låget af og følg side 12, trin 4 - 6.
Hold varm
Når suppeprogrammet er færdigt, omstilles til varmefunktionensom det fremgår af kontrolpanelet (2). Ønsker du at servere dinsuppe med det samme, så løft låget og server. Varmefunktionenstopper, når låget tages af.
ProgramvejledningBlød 19, 21 min. 3, 4
Mellem 22, 24, 26 min. 2, 3, 4
Grov 25, 27, 29 min. 2, 3, 4
Sauté Maks. 10 min. -
Drinks 2 min. 3, 4
Opvarm igen 11, 14, 17 min. 2, 3, 4
Blendning Efter behov Maks. 4
Forvarmning 4 min. -
Hold varm 30 min. 2, 3, 4
Opskrifter
Vi har en række opskrifter til dig og dinnye suppemaskine, lige fra solide supperog forfriskende smoothies og milkshakes.
Med den grove indstilling (15) kogesingredienserne kun og de snittes ikke.Hvis suppen bagefter er lidt for grov til dinsmag, så brug blendefunktionen (19) til atbryde den lidt op.
Opskrifterne er lavet til niveauerne for min.og maks. for suppemaskinen (800 ml-1600 ml).
Opskrifterne er til bløde, mellem og groveresultater og til 2, 3 eller 4 portioner.
BEMÆRK: 2 portioner kan kun vælges formellem og grove supper.
q
FP501020MEE Rev2.qxp_Morphy Richards Instruction Book 26/10/2016 12:10 Page 81

82
Blød funktion (13)
Blandet grøntsagssuppe 3 portioner 4 portioner
Forberedelsestid: 5 minutter 5 minutter
Tilberedningstid: 19 minutter 21 minutter
Indstilling: Blød Blød
Ingredienser:
525g 700g grøntsager med selleri, kålroe, kartoffel, gulerod, løg, pastinak, alt hakkesdvarm grøntsagsbouillon knivspids blandet urt salt og peber
Fremgangsmåde:
1 Kom alle grøntsager i det aftagelige kar (7), kom bouillon i til det ønskede niveau ifølge opskriften og rør med træske.
2 Kom et knivsspis blandet urt i, vælg blød funktion (13), ønsket portionsstørrelse og tryk Start/Stop (23).
3 Når det er klar, smages til og serveres.
Enkel tomat- og basilikumsuppe 3 portioner 4 portioner
Forberedelsestid: 5 minutter 5 minutter
Tilberedningstid: 19 minutter 21 minutter
Indstilling: Blød Blød
Ingredienser:
• 110g 150 g rødløg, skåret i terninger
• 220g 300g kartoffel, skåret i tern
• 75g 100g gulerod, skåret i tern
• 300g 400g tomater i dåse, hakkede
• ¾ spsk 1 spsk. tomatpuré
• 1 1 fed hvidløg, knust
• 5g 7g basilikumblade, grove
• Ca. 500 ml Ca. 700 ml varm hønsebouillon
Fremgangsmåde:
1 Kom grøntsagerne i det aftagelige kar (7).
2 Kom resterende ingredienser i, kom bouillon i til det ønskede niveau og rør med en træske.
3 Kom låget på (4), vælg blød funktion (13), ønsket antal portioner og tryk på Start/Stop (23).
4 Når det er klar, kommes salt og frisk kværnet peber i, smag til.
FP501020MEE Rev2.qxp_Morphy Richards Instruction Book 26/10/2016 12:10 Page 82
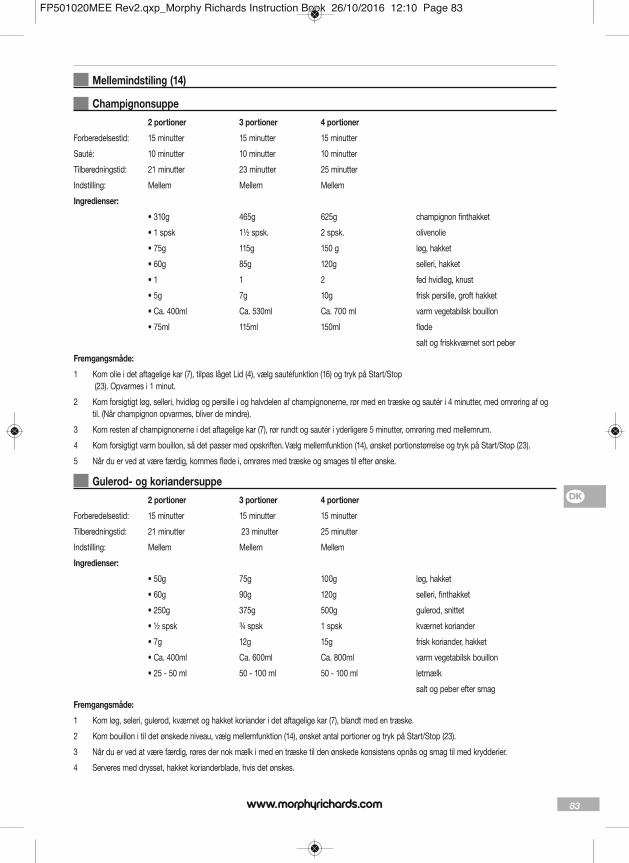
83
Mellemindstiling (14)
Champignonsuppe 2 portioner 3 portioner 4 portioner
Forberedelsestid: 15 minutter 15 minutter 15 minutter
Sauté: 10 minutter 10 minutter 10 minutter
Tilberedningstid: 21 minutter 23 minutter 25 minutter
Indstilling: Mellem Mellem Mellem
Ingredienser:
• 310g 465g 625g champignon fint hakket
• 1 spsk 1½ spsk. 2 spsk. olivenolie
• 75g 115g 150 g løg, hakket
• 60g 85g 120g selleri, hakket
• 1 1 2 fed hvidløg, knust
• 5g 7g 10g frisk persille, groft hakket
• Ca. 400ml Ca. 530ml Ca. 700 ml varm vegetabilsk bouillon
• 75ml 115ml 150ml fløde
salt og friskkværnet sort peber
Fremgangsmåde:
1 Kom olie i det aftagelige kar (7), tilpas låget Lid (4), vælg sautéfunktion (16) og tryk på Start/Stop (23). Opvarmes i 1 minut.
2 Kom forsigtigt løg, selleri, hvidløg og persille i og halvdelen af champignonerne, rør med en træske og sautér i 4 minutter, med omrøring af ogtil. (Når champignon opvarmes, bliver de mindre).
3 Kom resten af champignonerne i det aftagelige kar (7), rør rundt og sautér i yderligere 5 minutter, omrøring med mellemrum.
4 Kom forsigtigt varm bouillon, så det passer med opskriften. Vælg mellemfunktion (14), ønsket portionstørrelse og tryk på Start/Stop (23).
5 Når du er ved at være færdig, kommes fløde i, omrøres med træske og smages til efter ønske.
Gulerod- og koriandersuppe 2 portioner 3 portioner 4 portioner
Forberedelsestid: 15 minutter 15 minutter 15 minutter
Tilberedningstid: 21 minutter 23 minutter 25 minutter
Indstilling: Mellem Mellem Mellem
Ingredienser:
• 50g 75g 100g løg, hakket
• 60g 90g 120g selleri, finthakket
• 250g 375g 500g gulerod, snittet
• ½ spsk ¾ spsk 1 spsk kværnet koriander
• 7g 12g 15g frisk koriander, hakket
• Ca. 400ml Ca. 600ml Ca. 800ml varm vegetabilsk bouillon
• 25 - 50 ml 50 - 100 ml 50 - 100 ml letmælk
salt og peber efter smag
Fremgangsmåde:
1 Kom løg, seleri, gulerod, kværnet og hakket koriander i det aftagelige kar (7), blandt med en træske.
2 Kom bouillon i til det ønskede niveau, vælg mellemfunktion (14), ønsket antal portioner og tryk på Start/Stop (23).
3 Når du er ved at være færdig, røres der nok mælk i med en træske til den ønskede konsistens opnås og smag til med krydderier.
4 Serveres med drysset, hakket korianderblade, hvis det ønskes.
q
FP501020MEE Rev2.qxp_Morphy Richards Instruction Book 26/10/2016 12:10 Page 83
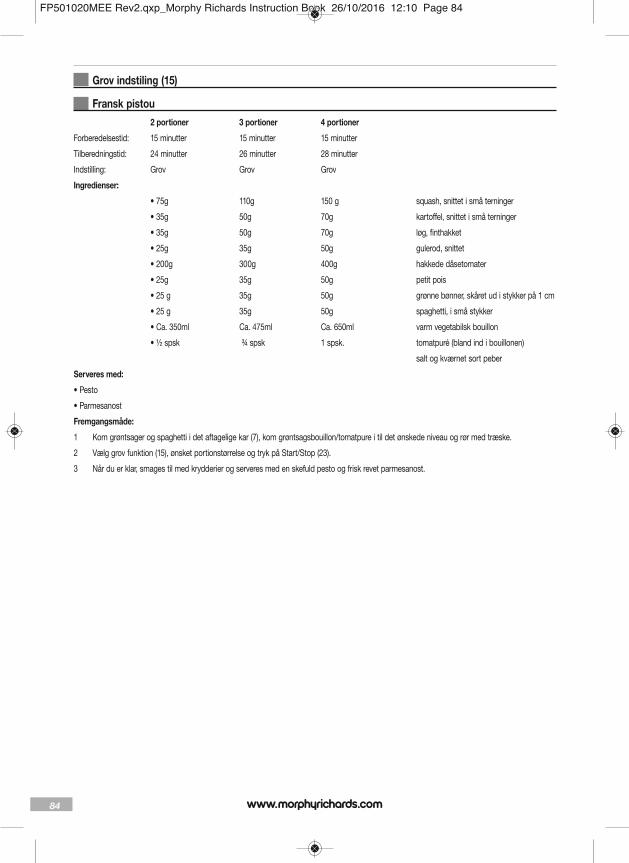
84
Grov indstiling (15)
Fransk pistou 2 portioner 3 portioner 4 portioner
Forberedelsestid: 15 minutter 15 minutter 15 minutter
Tilberedningstid: 24 minutter 26 minutter 28 minutter
Indstilling: Grov Grov Grov
Ingredienser:
• 75g 110g 150 g squash, snittet i små terninger
• 35g 50g 70g kartoffel, snittet i små terninger
• 35g 50g 70g løg, finthakket
• 25g 35g 50g gulerod, snittet
• 200g 300g 400g hakkede dåsetomater
• 25g 35g 50g petit pois
• 25 g 35g 50g grønne bønner, skåret ud i stykker på 1 cm
• 25 g 35g 50g spaghetti, i små stykker
• Ca. 350ml Ca. 475ml Ca. 650ml varm vegetabilsk bouillon
• ½ spsk ¾ spsk 1 spsk. tomatpuré (bland ind i bouillonen)
salt og kværnet sort peber
Serveres med:
• Pesto
• Parmesanost
Fremgangsmåde:
1 Kom grøntsager og spaghetti i det aftagelige kar (7), kom grøntsagsbouillon/tomatpure i til det ønskede niveau og rør med træske.
2 Vælg grov funktion (15), ønsket portionstørrelse og tryk på Start/Stop (23).
3 Når du er klar, smages til med krydderier og serveres med en skefuld pesto og frisk revet parmesanost.
FP501020MEE Rev2.qxp_Morphy Richards Instruction Book 26/10/2016 12:10 Page 84

85
Vintersuppe med lam og linser 2 portioner 3 portioner 4 portioner
Forberedelsestid: 20 minutter 20 minutter 20 minutter
Sauté: 7 minutter 7 minutter 7 minutter
Tilberedningstid: 24 minutter 26 minutter 28 minutter
Indstilling: Grov Grov Grov
Ingredienser:
• ½ spsk 1 spsk. 1 spsk. olivenolie
• 35g 55g 75g fersk hakket lammekød
• 50g 75g 100g løg, finthakket
• 1 1½ 2 fed hvidløg, knust
• 25 g 35g 50g gulerod, finthakket
• 75g 110g 150 g kartoffel, finthakket
• 50g 75g 100g kålrabi, finthakket
• 1½ spsk 2½ spsk 3 spsk. flormel
• 120g 175g 235g kogte grønne dåselinser, drænet
• ¼ spsk ½ spsk ½ spsk hakket frisk rosmarin
• ¼ spsk ½ spsk 1 spsk hakket frisk persille
• 1 1 2 laurbærblad
• ½ spsk ½ spsk 1 tsk. Worcestershire sovs
• Ca. 450ml Ca. 675ml Ca. 900ml varm hønsebouillon
Fremgangsmåde:
1 Kom olivenolie i det aftagelige kar (7), tilpas låget (4), vælg sautéfunktion (16) og tryk på Start/Stop (23). Efter 1 minut kommes lammekødforsigtigt i, tilpas låget (4) og sautér i 2 minutter, rør rundt med mellemrum med træske til det er jævnt brunet.
2 Kom forsigtigt løg, hvidløg, gulerod, kartoffel og kålrabi i det aftagelige kar (7) og sautér i 4 minutter. Rør melet i sammen med resten afingredienserne samt varm bouillon til det ønskede niveau.
3 Rør med træske eller spatel. Tryk og hold Start/Stop (23) vælg grov funktion (15), ønsket portionsstørrelse og tryk på Start/Stop (23).
4 Smages til og fjern laurbærbladene (-bladet) før serveringen.
q
FP501020MEE Rev2.qxp_Morphy Richards Instruction Book 26/10/2016 12:10 Page 85

86
Sautéfunktion (16)
Sellerisuppe 3 portioner 4 portioner
Forberedelsestid: 10 minutter 10 minutter
Sauté: 7 minutter 7 minutter
Tilberedningstid: 19 minutter 21 minutter
Indstilling: Blød Blød
Ingredienser:
• 1 spsk 1 spsk olivenolie
• 350g 450g selleri, groft hakket (samt blade)
• 75g 100g løg, hakket
• 110g 150 g kartoffel, hakket
• Ca. 700ml Ca. 800ml varm vegetabilsk bouillon
salt og kværnet sort peber
frisk persille til pynt
Fremgangsmåde:
1 Kom olivenolie i det aftagelige kar (7), tilpas låget (4), vælg sautéfunktion (16) og tryk på Start/Stop (23). Efter 1 minut kommes lammekødforsigtigt i, tilpas låget (4) og sautér i 2 minutter, rør rundt med mellemrum med træske til det er jævnt brunet.
2 Kom forsigtigt løg, hvidløg, gulerod, kartoffel og kålrabi i det aftagelige kar (7) og sautér i 4 minutter. Rør melet i sammen med resten afingredienserne samt varm bouillon til det ønskede niveau.
3 Rør med træske eller spatel. Tryk og hold Start/Stop (23) vælg grov funktion (15), ønsket portionsstørrelse og tryk på Start/Stop (23).
4 Smages til og fjern laurbærbladene (-bladet) før serveringen.
FP501020MEE Rev2.qxp_Morphy Richards Instruction Book 26/10/2016 12:10 Page 86
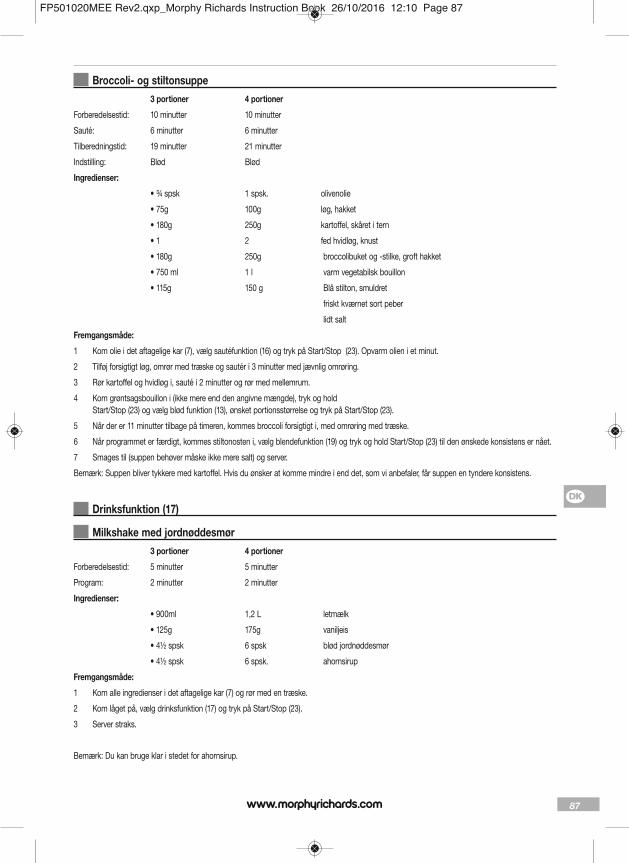
87
Broccoli- og stiltonsuppe 3 portioner 4 portioner
Forberedelsestid: 10 minutter 10 minutter
Sauté: 6 minutter 6 minutter
Tilberedningstid: 19 minutter 21 minutter
Indstilling: Blød Blød
Ingredienser:
• ¾ spsk 1 spsk. olivenolie
• 75g 100g løg, hakket
• 180g 250g kartoffel, skåret i tern
• 1 2 fed hvidløg, knust
• 180g 250g broccolibuket og -stilke, groft hakket
• 750 ml 1 l varm vegetabilsk bouillon
• 115g 150 g Blå stilton, smuldret
friskt kværnet sort peber
lidt salt
Fremgangsmåde:
1 Kom olie i det aftagelige kar (7), vælg sautéfunktion (16) og tryk på Start/Stop (23). Opvarm olien i et minut.
2 Tilføj forsigtigt løg, omrør med træske og sautér i 3 minutter med jævnlig omrøring.
3 Rør kartoffel og hvidløg i, sauté i 2 minutter og rør med mellemrum.
4 Kom grøntsagsbouillon i (ikke mere end den angivne mængde), tryk og hold Start/Stop (23) og vælg blød funktion (13), ønsket portionsstørrelse og tryk på Start/Stop (23).
5 Når der er 11 minutter tilbage på timeren, kommes broccoli forsigtigt i, med omrøring med træske.
6 Når programmet er færdigt, kommes stiltonosten i, vælg blendefunktion (19) og tryk og hold Start/Stop (23) til den ønskede konsistens er nået.
7 Smages til (suppen behøver måske ikke mere salt) og server.
Bemærk: Suppen bliver tykkere med kartoffel. Hvis du ønsker at komme mindre i end det, som vi anbefaler, får suppen en tyndere konsistens.
Drinksfunktion (17)
Milkshake med jordnøddesmør 3 portioner 4 portioner
Forberedelsestid: 5 minutter 5 minutter
Program: 2 minutter 2 minutter
Ingredienser:
• 900ml 1,2 L letmælk
• 125g 175g vaniljeis
• 4½ spsk 6 spsk blød jordnøddesmør
• 4½ spsk 6 spsk. ahornsirup
Fremgangsmåde:
1 Kom alle ingredienser i det aftagelige kar (7) og rør med en træske.
2 Kom låget på, vælg drinksfunktion (17) og tryk på Start/Stop (23).
3 Server straks.
Bemærk: Du kan bruge klar i stedet for ahornsirup.
q
FP501020MEE Rev2.qxp_Morphy Richards Instruction Book 26/10/2016 12:10 Page 87
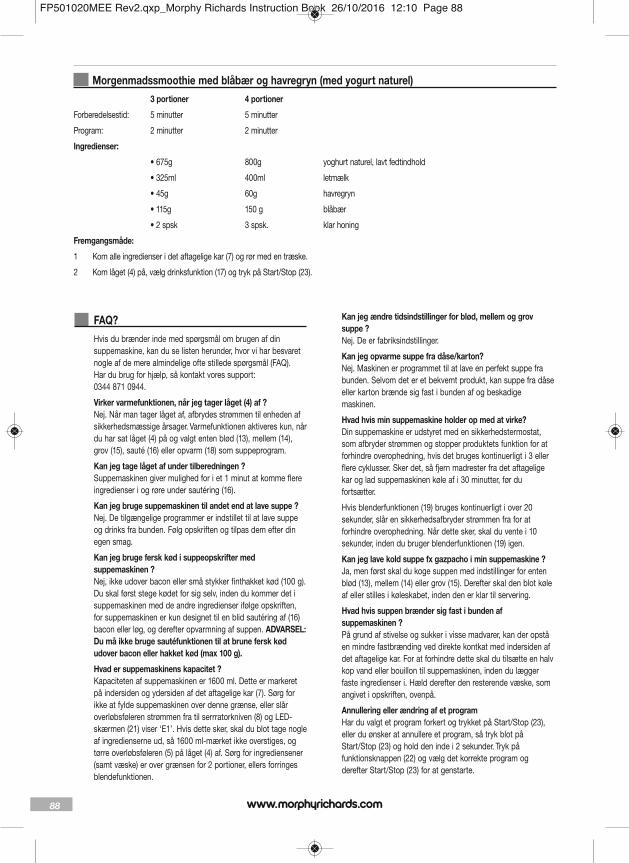
88
Morgenmadssmoothie med blåbær og havregryn (med yogurt naturel) 3 portioner 4 portioner
Forberedelsestid: 5 minutter 5 minutter
Program: 2 minutter 2 minutter
Ingredienser:
• 675g 800g yoghurt naturel, lavt fedtindhold
• 325ml 400ml letmælk
• 45g 60g havregryn
• 115g 150 g blåbær
• 2 spsk 3 spsk. klar honing
Fremgangsmåde:
1 Kom alle ingredienser i det aftagelige kar (7) og rør med en træske.
2 Kom låget (4) på, vælg drinksfunktion (17) og tryk på Start/Stop (23).
Morphy Richards
FAQ?Hvis du brænder inde med spørgsmål om brugen af dinsuppemaskine, kan du se listen herunder, hvor vi har besvaretnogle af de mere almindelige ofte stillede spørgsmål (FAQ). Har du brug for hjælp, så kontakt vores support: 0344 871 0944.
Virker varmefunktionen, når jeg tager låget (4) af ?Nej. Når man tager låget af, afbrydes strømmen til enheden afsikkerhedsmæssige årsager. Varmefunktionen aktiveres kun, nårdu har sat låget (4) på og valgt enten blød (13), mellem (14),grov (15), sauté (16) eller opvarm (18) som suppeprogram.
Kan jeg tage låget af under tilberedningen ?Suppemaskinen giver mulighed for i et 1 minut at komme flereingredienser i og røre under sautéring (16).
Kan jeg bruge suppemaskinen til andet end at lave suppe ?Nej. De tilgængelige programmer er indstillet til at lave suppeog drinks fra bunden. Følg opskriften og tilpas dem efter dinegen smag.
Kan jeg bruge fersk kød i suppeopskrifter medsuppemaskinen ?Nej, ikke udover bacon eller små stykker finthakket kød (100 g).Du skal først stege kødet for sig selv, inden du kommer det isuppemaskinen med de andre ingredienser ifølge opskriften,for suppemaskinen er kun designet til en blid sautéring af (16)bacon eller løg, og derefter opvarmning af suppen. ADVARSEL:Du må ikke bruge sautéfunktionen til at brune fersk kødudover bacon eller hakket kød (max 100 g).
Hvad er suppemaskinens kapacitet ?Kapaciteten af suppemaskinen er 1600 ml. Dette er markeretpå indersiden og ydersiden af det aftagelige kar (7). Sørg forikke at fylde suppemaskinen over denne grænse, eller slåroverløbsføleren strømmen fra til serrratorkniven (8) og LED-skærmen (21) viser ‘E1’. Hvis dette sker, skal du blot tage nogleaf ingredienserne ud, så 1600 ml-mærket ikke overstiges, ogtørre overløbsføleren (5) på låget (4) af. Sørg for ingrediensener(samt væske) er over grænsen for 2 portioner, ellers forringesblendefunktionen.
Kan jeg ændre tidsindstillinger for blød, mellem og grovsuppe ?Nej. De er fabriksindstillinger.
Kan jeg opvarme suppe fra dåse/karton?Nej. Maskinen er programmet til at lave en perfekt suppe frabunden. Selvom det er et bekvemt produkt, kan suppe fra dåseeller karton brænde sig fast i bunden af og beskadigemaskinen.
Hvad hvis min suppemaskine holder op med at virke?Din suppemaskine er udstyret med en sikkerhedstermostat,som afbryder strømmen og stopper produktets funktion for atforhindre overophedning, hvis det bruges kontinuerligt i 3 ellerflere cyklusser. Sker det, så fjern madrester fra det aftageligekar og lad suppemaskinen køle af i 30 minutter, før dufortsætter.
Hvis blenderfunktionen (19) bruges kontinuerligt i over 20sekunder, slår en sikkerhedsafbryder strømmen fra for atforhindre overophedning. Når dette sker, skal du vente i 10sekunder, inden du bruger blenderfunktionen (19) igen.
Kan jeg lave kold suppe fx gazpacho i min suppemaskine ?Ja, men først skal du koge suppen med indstillinger for entenblød (13), mellem (14) eller grov (15). Derefter skal den blot køleaf eller stilles i køleskabet, inden den er klar til servering.
Hvad hvis suppen brænder sig fast i bunden afsuppemaskinen ?På grund af stivelse og sukker i visse madvarer, kan der opståen mindre fastbrænding ved direkte kontkat med indersiden afdet aftagelige kar. For at forhindre dette skal du tilsætte en halvkop vand eller bouillon til suppemaskinen, inden du læggerfaste ingredienser i. Hæld derefter den resterende væske, somangivet i opskriften, ovenpå.
Annullering eller ændring af et program Har du valgt et program forkert og trykket på Start/Stop (23), eller du ønsker at annullere et program, så tryk blot påStart/Stop (23) og hold den inde i 2 sekunder. Tryk påfunktionsknappen (22) og vælg det korrekte program ogderefter Start/Stop (23) for at genstarte.
FP501020MEE Rev2.qxp_Morphy Richards Instruction Book 26/10/2016 12:10 Page 88

89
Kontakt osHjælpelinje
Hvis du har et problem med dit apparat, bedes du ringe tilvores hjælpelinje, da vi muligvis kan hjælpe dig bedre end denforretning, hvor du købte varen.
Hav produktnavn, modelnummer og serienummer parat, når duringer til os, så vi kan ekspedere din forespørgsel hurtigere.
Tal med os
Hvis du har spørgsmål eller kommentarer, eller hvis du ønskernogle gode tip eller opskriftsidéer til at hjælpe dig med at fåmest muligt ud af dine produkter, kan du være med online:
Blog: www.morphyrichards.co.uk/blog
Facebook: www.facebook.com/morphyrichardsuk
Twitter: @loveyourmorphy
Websted: www.morphyrichards.com
Morphy Richards Cook & Create App
DIN TOÅRIGE GARANTIApparatet er dækket af en toårig reparations- ellerombytningsgaranti.
Det er vigtigt, at du gemmer kvitteringen som dokumentation forkøbet. Du kan hæfte kvitteringen til bagsiden af denne vejledningfor fremtidig reference.
Opgiv venligst følgende numre, hvis der opstår fejl ved produktet.Du finder numrene på produktets underside.
Modelnr.Serienr.
Alle produkter fra Morphy Richards testes individuelt, før deforlader fabrikken. Hvis det usandsynlige skulle ske, at der opstårfejl ved enheden inden for 28 dage efter købsdatoen, skalenheden returneres til den forretning, hvor den er købt, ogombyttes med en anden.
Hvis der opstår en fejl efter de første 28 dage efter købsdatoenog inden for 24 måneder fra købsdatoen, skal du kontakte denlokale distributør og give dem produktets modelnummer ogserienummer eller skrive til den lokale distributør på de anførteadresser.
Du bliver bedt om at returnere produktet (forsvarligt indpakket) tilnedenstående adresse sammen med en kopi af kvitteringen.
Det defekte apparat repareres eller ombyttes derefter,sædvanligvis inden for 7 arbejdsdage efter modtagelse, dog medforbehold for undtagelserne som beskrevet nedenfor (1-9).
Hvis enheden af en eller anden grund ombyttes inden forgarantiperioden på to år, beregnes garantien på den nye enhedfra den oprindelige købsdato. Derfor er det vigtigt at gemme denoriginale kvittering eller faktura, så du kan dokumenterekøbsdatoen.
For at være dækket af garantiperioden på to år skal enhedenhave været brugt i overensstemmelse med fabrikantensanvisninger. For eksempel skal enhederne have været afkalket,ligesom filtrene skal have været holdt rene i henhold tilanvisningerne.
Det er ikke Morphy Richards eller den lokale distributørs ansvarat ombytte eller reparere enheden under garantiens betingelser,hvis:
1 Defekten er forårsaget af eller kan tilskrives uforsætlig brug,misbrug, forsømmelig brug eller brug uden at følge fabrikantensanbefalinger, eller hvis defekten er forårsaget af elektriskespændingsbølger eller er opstået under transport.
2 Enheden er anvendt med en anden strømspænding end den, derer påtrykt produktet.
3 Andre personer (ud over vores serviceafdeling eller en autoriseretforhandler) har forsøgt at reparere enheden.
4 Enheden har været brugt til udlejningsformål eller har væretanvendt til andre formål end husholdningsbrug.
5 Enheden er købt brugt.
6 Morphy Richards eller den lokale distributør er ikke ansvarlig forat udføre nogen form for servicearbejde under garantien.
7 Garantien omfatter ikke forbrugsvarer som poser, filtre ogglaskarafler.
8 Batterier og skade fra lækage er ikke dækket af garantien.
9 Filtrene ikke er blevet rengjorte og udskiftet som specificeret.
Denne garanti overdrager ikke nogen rettigheder ud over dem,der udtrykkeligt er beskrevet ovenfor, og dækker ikke krav iforbindelse med følgetab eller -skader. Denne garanti tilbydessom en ekstra fordel og påvirker ikke dine lovbestemterettigheder som forbruger.
Morphy Richards
q
FP501020MEE Rev2.qxp_Morphy Richards Instruction Book 26/10/2016 12:10 Page 89

90
Bezpieczenstwo i ochrona zdrowia Uzytkowanie kazdego urzadzenia elektrycznego wymaga przestrzegania nastepujacych podstawowych zasad bezpieczenstwa.
Przed rozpoczeciem uzywania tego urzadzenia nalezy uwaznie przeczytac te instrukcje.
• Urzadzenie moze byc uzywane przez osoby o ograniczonychzdolnosciach fizycznych, sensorycznych lub umyslowych, badzosoby nieposiadajace odpowiedniego doswiadczenia i wiedzy, pod warunkiem ze osoby te sanadzorowane lub zostaly poinstruowane w zakresie bezpiecznejobslugi urzadzenia i rozumieja grozace niebezpieczenstwa.
• Nalezy dopilnowac, aby dzieci nie uzywaly tego urzadzenia dozabawy.
• Dzieci nie powinny uzywac tego urzadzenia. • Urzadzenie i kabel zasilajacy nalezy trzymac w miejscu
niedostepnym dla dzieci. • Po zakonczeniu uzytkowania nalezy odczekac az urzadzenie
calkowicie ostygnie. Dopiero wtedy mozna rozpoczac czyszczenie imycie urzadzenia.
• Do urzadzenia nie nalezy podlaczac zewnetrznych wylacznik w czasowych ani system w zdalnego sterowania.
• Jesli kabel zasilajacy ulegnie uszkodzeniu, musi zostac wymienionyna odpowiedni specjalny kabel przez producenta lub autoryzowany punkt serwisowy.
• OSTRZEZENIE: Metalowe ostrze jest bardzo ostre. Podczasuzytkowania i czyszczenia nalezy zachowac szczeg lna ostroznosc.
• Informacje na temat konserwacji i czyszczenia znajduja sie nastronach 94 i 102.
}
FP501020MEE Rev2.qxp_Morphy Richards Instruction Book 26/10/2016 12:10 Page 90

91
Ponizej podajemy porady dotyczace bezpiecznego uzytkowaniaurzadzenia.
Lokalizacja Zawsze umieszczaj urzadzenie z dala od
krawedzi blatu.
Upewnij sie, ze urzadzenie stoi na stabilnej, plaskiej powierzchni.
Nie korzystaj z urzadzenia na wolnym powietrzu ani w poblizuwody.
Przew d zasilajacy Po podlaczeniu do gniazda elektrycznego przew d zasilajacy nie
powinien byc naprezony.
Przew d zasilajacy nie moze zwisac z blatu w miejscu, w kt rymbylby w zasiegu dziecka.
Przew d zasilajacy nie moze zwisac swobodnie, np. miedzy niskoumieszczonym gniazdem elektrycznym a stolem.
Przew d zasilajacy nie moze lezec na kuchence ani innej goracejpowierzchni, na kt rej m glby ulec uszkodzeniu.
Bezpieczenstwo os b OSTRZEZENIE: Aby uniknac pozaru, porazenia pradem oraz
obrazen ciala, nie zanurzaj przewodu zasilajacego, wtyczkiani samego urzadzenia w wodzie ani w zadnej innej cieczy.
OSTRZEZENIE: Niewlasciwe uzywanie urzadzenia mozespowodowac obrazenia ciala.
OSTRZEZENIE: Unikaj stycznosci z ruchomymi czesciami.
Podczas przenoszenia urzadzenia z goraca zawartoscia nalezy zachowac szczeg lna ostroznosc.
Nie obsluguj urzadzenia mokrymi ani wilgotnymi rekami.
Jezeli urzadzenie nie jest uzywane, a takze podczas czyszczenia, nalezy odlaczyc je od gniazda elektrycznego.
Pierwsza pomoc przy oparzeniach Natychmiast umiesc poparzone miejsce pod zimna, biezaca
woda. Nie pr buj zdejmowac ubrania, zadzwon szybko po pomocmedyczna.
Inne uwagi dotyczace bezpieczenstwa Jesli przew d zasilajacy urzadzenia ulegnie uszkodzeniu, nie
uzywaj go. W celu uzyskania porady zadzwon na infolinie firmyMorphy Richards.
Korzystanie z dodatkowych przystawek niezalecanych przezproducenta moze doprowadzic do uszkodzenia urzadzenia.
Nie umieszczaj urzadzenia w poblizu zr del ciepla, takich jakkuchenki lub palniki gazowe albo elektryczne.
Urzadzenie i przew d zasilajacy powinny znajdowac sie z dala odmiejsc o wysokiej temperaturze, bezposredniego swiatlaslonecznego, wilgoci, ostrych krawedzi itp.
Przed wlaczeniem urzadzenia upewnij sie, czy pokrywka jestdobrze zamknieta.
Nie zdejmuj pokrywki dop ki ostrze zabkowane pracuje.
Nie nalezy uzywac tego urzadzenia do ciaglego przygotowywania
posilk w.
Podczas wlewania goracych plyn w do urzadzenia doprzygotowywania zup Total Control nalezy zachowac ostroznosc,poniewaz moze ona pryskac na skutek gwaltownego parowania.
Wymagania elektryczne Nalezy upewnic sie, ze napiecie podane na tabliczce znamionowej
urzadzenia odpowiada napieciu w gniezdzie elektrycznymdoprowadzajacym prad przemienny. (AC).
OSTRZEZENIE: URZADZENIE WYMAGA UZIEMIENIA.
Jesli wystapi koniecznosc wymiany bezpiecznika 13 A wewtyczce, nalezy go wymienic na bezpiecznik 13 A o oznaczeniuBS1362.
Wyposazenie (1) Uchwyt pokrywy (2) Panel sterowania (3) Uszczelka (4) Pokrywka (5) Czujnik przepelnienia (6) Obudowa silnika (7) Wyjmowane naczynie (8) Zabkowane ostrze (9) Przycisk zwalniajacy naczynie (10) Dzbanek (11) Uchwyt dzbanka (12) Gniazdo zasilania (13) Wskaznik funkcji Krem (14) Wskaznik funkcji Srednio zmiksowane (15) Wskaznik funkcji Duze kawalki (16) Wskaznik funkcji Podsmazanie (17) Wskaznik funkcji Napoje (18) Wskaznik funkcji Podgrzewanie (19) Wskaznik funkcji Miksowanie (20) Wskaznik funkcji Wstepne czyszczenie (21) Ekran LED (22) Przycisk Mode (tryb) (23) Przycisk Start/Stop (24) Przycisk Porcja (25) Wskaznik funkcji Podtrzymanie ciepla
Przed pierwszym uzyciem Przed pierwszym uzyciem oraz w przypadku dluzszej przerwy w
uzytkowaniu urzadzenie do przygotowywania zup Total Controlnalezy koniecznie oczyscic. Aby uzyskac wiecej informacji, zobaczpozycje Bajecznie prosty w czyszczeniu .
Przy pierwszym uzyciu, z urzadzenia do przygotowywania zupTotal Control moga wydobywac sie opary. Jest to normalnezachowanie, gdyz opary tworza sie od smaru uzywanego donatluszczenia niekt rych element w urzadzenia w procesieprodukcji. Po kilku uzyciach nie bedzie to mialo miejsca.
}
FP501020MEE Rev2.qxp_Morphy Richards Instruction Book 26/10/2016 12:10 Page 91

92
Jak korzystac z urzadzenia doprzygotowywania zup
1 Upewnij sie, ze urzadzenie do przygotowywania zup jestodlaczone od gniazda elektrycznego.
2 Zdejmij pokrywe (4), uwazajac, by nie dotykac zabkowanegoostrza (8). OSTRZEZENIE: Ostre ostrze.
3 Umiesc skladniki w wyjmowanym naczyniu (7). Dodaj plyn jakoostatni, napelniajac urzadzenie do poziomu wskazanego nawyjmowanym naczyniu (7). Wiecej informacji na temat plyn wznajduje sie w poszczeg lnych przepisach.
4 Zal z pokrywke (4) na dzbanek (10), zapewniajac wlasciwe jegozamkniecie.
Byc moze bedzie trzeba odkrecic pokrywke / obudowe silnika,aby umozliwic przejscie ostrza (8) przez skladniki w celuprawidlowego umieszczenia pokrywki (4) na dzbanku (10).
5 Podlacz przew d do gniazda zasilania (12).
6 Nacisnij przycisk Mode (22), aby wybrac program. Zaswieci siewskaznik funkcji krem (13). Naciskaj przycisk MODE (22), abyprzejsc do ustawien. Wybierz wskaznik funkcji Krem (13), abyprzygotowac zupe krem.
7 Wybierz wskaznik funkcji Srednio zmiksowane (14), abyprzygotowac zupe srednio zmiksowana.
8 Wybierz wskaznik funkcji Duze kawalki (15), aby przygotowaczupe z duzymi kawalkami.
9 Nacisnij przycisk Start/Stop (23), aby rozpoczac odliczanie czasuprzygotowania na ekranie LED (21). Liczba porcji jest ustawionana 2. Jesli wymagane sa 3 lub 4 porcje, ich liczbe nalezy ustawicprzed nacisnieciem przycisku Start/Stop (23). Patrz Ustawienieliczby porcji na stronie 8.
Funkcje Krem i Napoje beda ustawione na 3 porcje.
10 Po zakonczeniu pracy urzadzenie do przygotowywania zup TotalControl wyemituje dzwiek przez 10 sekund. Odlacz urzadzenie odzasilania, zdejmij pokrywke (4) i podawaj.
OSTRZEZENIE: Zachowaj ostroznosc przy zdejmowaniupokrywki (4), aby uniknac rozpryskania goracej zupy i pary.
Jak korzystac ustawienia liczby porcji11 Upewnij sie, ze urzadzenie do przygotowywania zup Total Control
jest odlaczone od gniazda elektrycznego. Zdejmij pokrywe (4),uwazajac, by nie dotykac zabkowanego ostrza (8).OSTRZEZENIE: Ostre ostrze.
12 Napelnij urzadzenie do przygotowywania zup Total Control dopoziomu wskazanego na wyjmowanym naczyniu (7) w celuuzyskania zadanej liczby porcji. Wiecej informacji znajduje sie wposzczeg lnych przepisach.
13 Umiesc pokrywke (4) z powrotem na dzbanku (10), upewniajacsie, ze jest ona prawidlowo zalozona, a nastepniepodlacz urzadzenie do przygotowywania zup Total Control dogniazda elektrycznego. Patrz strona 7.
14 Nacisnij przycisk Mode (22), aby wybrac program. Zaswieci siewskaznik funkcji krem (13). Naciskaj przycisk Mode (22), aby wybrac konsystencje zupy w ustawieniach.
15 Po wybraniu konsystencji zupy nacisnij przycisk Porcja (24), abywybrac liczbe porcji (2, 3 lub 4).
UWAGA: Ustawienie liczby porcji mozliwe jest tylko wniekt rych przepisach. Szczeg lowe informacje znajduja sie wprzepisach na 16 stronie.
16 Nacisnij przycisk Start/Stop (23), aby rozpoczac odliczanie czasuprzygotowania na ekranie LED (21). Po zakonczeniupracy urzadzenie do przygotowywania zup Total Control wyemitujedzwiek przez 10 sekund. Odlacz urzadzenie od zasilania, zdejmijpokrywke (4) i podawaj.
UWAGA: W zaleznosci od rodzaju przygotowywanej zupy, jejskladniki wchlaniaja dodany plyn, przez co wielkosc porcjimoze sie zmniejszyc.
Jak korzystac z funkcji Podsmazanie17 Upewnij sie, ze urzadzenie do przygotowywania zup jest
odlaczone od gniazda elektrycznego. Zdejmij pokrywe (4),uwazajac, by nie dotykac zabkowanego ostrza (8).OSTRZEZENIE: Ostre ostrze.
18 Dodaj troche oleju do wyjmowanego naczynia (7).Podlacz urzadzenie do przygotowywania zup do gniazdaelektrycznego.
19 Naciskaj przycisk Mode (22), dop ki nie zaswieci sie wskaznikfunkcji Podsmazanie (16). Zal z pokrywke (4).
20 Nacisnij przycisk Start/Stop (23), aby wlaczyc nagrzewanieurzadzenia do przygotowywania zup.
21 Po minucie zdejmij pokrywke (4) i ostroznie dodaj skladniki dowyjmowanego naczynia (7) w celu podsmazania. Zal z pokrywke(4) i kontynuuj wybrany program. Byc moze konieczne bedziezdjecie pokrywki i wymieszanie skladnik w podczasprzygotowywania potrawy. Szczeg lowe informacje znajduja sie w poszczeg lnych przepisach od strony 16.
OSTRZEZENIE: Ostroznie dodawaj skladniki, aby uniknacrozpryskiwania tluszczu.
22 Po zakonczeniu nacisnij przycisk Start/Stop (23). Dodac reszteskladnik w do wyjmowanego naczynia (7) i zacznij przygotowaniezupy wybierajac zadany program, tak jak pokazano na stronie 7.
Gdy pokrywka (4) zostanie zdjeta podczas podsmazania w celu
FP501020MEE Rev2.qxp_Morphy Richards Instruction Book 26/10/2016 12:10 Page 92

93
wymieszania lub dodania skladnik w, wystarczy zalozyc ja zpowrotem, aby kontynuowac podsmazanie. Aby kontynuowacgotowanie, pokrywka (4) musi byc zalozona na dzbanek.Urzadzenie do przygotowywania zup zapamietuje ustawienia, nie trzeba ustawiac ich ponownie.
Jak korzystac z funkcji Napoje23 Upewnij sie, ze urzadzenie do przygotowywania zup jest
odlaczone od gniazda elektrycznego. Zdejmij pokrywe (4),uwazajac, by nie dotykac zabkowanego ostrza (8).OSTRZEZENIE: Ostre ostrze.
24 Umiesc skladniki na 3 lub 4 porcje w wyjmowanym naczyniu (7).Plyn dodaj jako ostatni.
25 Umiesc pokrywke (4) z powrotem na dzbanku (10), upewniajacsie, ze jest ona prawidlowo zalozona, a nastepniepodlacz urzadzenie do przygotowywania zup Total Control dogniazda elektrycznego.
Naciskaj przycisk Mode (22), dop ki nie zaswieci sie wskaznikfunkcji Napoje (17).
27 Nacisnij przycisk Start/Stop (23), aby rozpoczac odliczanie czasuprzygotowania na ekranie LED (21).
UWAGA: Funkcja Napoje pozwala na przygotowanie tylko 3lub 4 porcji. Liczby porcji nie trzeba ustawiac.
28 Po zakonczeniu pracy urzadzenie do przygotowywania zup TotalControl wyemituje dzwiek przez 10 sekund. Odlacz urzadzenie odzasilania, zdejmij pokrywke (4) i podawaj.
Jak korzystac z funkcji Podgrzewanie29 Upewnij sie, ze urzadzenie do przygotowywania zup jest
odlaczone od gniazda elektrycznego. Zdejmij pokrywe (4),uwazajac, by nie dotykac zabkowanego ostrza (8).OSTRZEZENIE: Ostre ostrze.
30 Umiesc zupe, kt ra chcesz podgrzac, w wyjmowanym naczyniu(7). Minimum 2 porcje , maksimum 4.
31 Zal z pokrywke (4) na dzbanek (10), zapewniajac wlasciwe jegozamkniecie. Podlacz urzadzenie do przygotowywania zup dogniazda elektrycznego.
32 Naciskaj przycisk Mode (22), dop ki nie zaswiecisie wskaznik funkcji Podgrzewanie (18). Nacisnij przycisk Porcje(24), aby wybrac liczbe porcji (2, 3 lub 4).
33 Nacisnij przycisk Start/Stop (23), aby rozpoczac odliczanie czasuprzygotowania na ekranie LED (21).
34 Po zakonczeniu pracy urzadzenie do przygotowywania zup TotalControl wyemituje dzwiek przez 10 sekund. Odlacz urzadzenie odzasilania, zdejmij pokrywke (4) i podawaj.
UWAGA: W panelu sterowania nalezy wybrac prawidlowaliczba porcji, odpowiadajaca liczbie porcji dodanych donaczynia. W przeciwnym razie zupa nie zostanie podgrzanado odpowiedniej temperatury.
Konsystencja zupy moze sie zmieniac po podgrzaniu.
Po podgrzaniu zupa z duzymi kawalkami bedzie mialabardziej plynna konsystencje.
Jak korzystac z funkcji Miksowanie35 Upewnij sie, ze urzadzenie do przygotowywania zup jest
odlaczone od gniazda elektrycznego. Zdejmij pokrywe (4),uwazajac, by nie dotykac zabkowanego ostrza (8).OSTRZEZENIE: Ostre ostrze.
36 Umiesc zupe z duzymi kawalkami w wyjmowanym naczyniu (7). UWAGA: Nalezy uzywac tylko do miksowania zup z duzymikawalkami, zup srednio zmiksowanych lub innychgotowanych, miekkich skladnik w.
37 Zal z pokrywke (4) na dzbanek (10), zapewniajac wlasciwe jegozamkniecie. Podlacz urzadzenie do przygotowywania zup dogniazda elektrycznego.
38 Naciskaj przycisk Mode (22), dop ki nie zaswieci sie wskaznikfunkcji Miksowanie (19).
Nacisnij i przytrzymaj przycisk Start/Stop (23), aby ustawic czasmiksowania. To reczne ustawienie pozwala miksowac przezmaksymalnie 20 sekund. Miksowanie zostaje automatyczniezatrzymane po zdjeciu palca z przycisku. Jesli konieczne jestdodatkowe miksowanie przez kolejne kilka sekund, czynnoscnalezy powt rzyc.
40 Odlacz urzadzenie od zasilania, zdejmij pokrywke (4) i podawaj.
DRUGA MOZLIWOSC: Jesli chcesz zmiksowac zupe, kt razostala juz przygotowana w wyjmowanym naczyniu (7),kontynuuj od kroku 4.
Jak korzystac z funkcji Wstepne czyszczenie41 Upewnij sie, ze urzadzenie do przygotowywania zup jest
odlaczone od gniazda elektrycznego. Zdejmij pokrywe (4),uwazajac, by nie dotykac zabkowanego ostrza (8).OSTRZEZENIE: Ostre ostrze.
42 Wlej 800 ml wody do wyjmowanego naczynia (7) i dodaj niewielkailosc plynu do mycia naczyn.
43 Zal z pokrywke (4) na dzbanek (10), zapewniajac wlasciwe jegozamkniecie. Podlacz urzadzenie do przygotowywania zup dogniazda elektrycznego.
44 Naciskaj przycisk Mode (22), dop ki nie zapali sie wskaznik funkcjiWstepne czyszczenie (20).
45 Nacisnij przycisk Start/Stop (23), aby rozpoczac odliczanie czasuna ekranie LED (21). Program Wstepne czyszczenie bedzierealizowany przez 4 minuty.
46 Po zakonczeniu wstepnego czyszczenia upewnij sie,ze urzadzenie do przygotowywania zup jest odlaczone od gniazdaelektrycznego. Zdejmij pokrywe (4), uwazajac, by nie dotykaczabkowanego ostrza (8). OSTRZEZENIE: Ostre ostrze.
UWAGA: Funkcja wstepnego czyszczenia czysci tylko sp d.Wyjmowane naczynie (7) i pokrywka (4) musza bycczyszczone oddzielnie. Patrz rozdzial Bajecznie prosty wczyszczeniu na stronie 32. Wyplucz urzadzenie doprzygotowywania zup, az woda nie bedzie sie pienic.
OSTRZEZENIE: Zachowaj ostroznosc, poniewaz po cykluwstepnego czyszczenia wyjmowane naczynie (7) bedziegorace.
}
FP501020MEE Rev2.qxp_Morphy Richards Instruction Book 26/10/2016 12:10 Page 93

94
Bajecznie prosty w czyszczeniu Urzadzenie do przygotowywania zup Total Control posiada funkcje
Wstepne czyszczenie (20). Patrz strona 13. Uwaga: FunkcjaWstepne czyszczenie umozliwia tylko czyszczenie wyjmowanegonaczynia (7). Wymagane moze byc dodatkowe czyszczenie.
Urzadzenia do przygotowywania zup Total Control nie mozna mycw zmywarce, ale jego umycie jest bardzo latwe. Po uzyciuwystarczy przetrzec obudowe silnika (6) i zabkowane ostrze (8)ciepla woda z mydlem i wysuszyc.
NIE ZANURZAC pokrywki ani dzbanka w wodzie.
Wyjmowane naczynie (7) mozna wyjac z dzbanka (10) w celuczyszczenia. Wystarczy nacisnac przycisk zwalniajacy wyjmowanenaczynie (9) i wyjac je. Wymyj recznie wyjmowane naczynie (7)ciepla woda z mydlem i wytrzyj dzbanek miekka, wilgotnasciereczka.
Upewnij sie, ze styki wyjmowanego naczynia sa dobrzewysuszone po myciu. Aby zamontowac wyjmowane naczynie wdzbanku, upewnij sie, ze jest ono prawidlowo ustawione, anastepnie wcisnij je na miejsce.
Okreslone rodzaje potraw moga przywierac do podstawy zgrzalka. W takim przypadku nalezy wybrac funkcjewstepnego czyszczenia. Jesli plamy nie ustapia, to sa toprzebarwienia, kt rych nie da sie zmyc. Nie bedzie to mialowplywu na dzialanie urzadzenia ani jakosc przygotowywanejzywnosci. Nie uzywaj zmywak w drucianych doczyszczenia urzadzenia do przygotowywania zup TotalControl, aby uniknac uszkodzen.
Wyjmowanie i wymiana uszczelki 47
Od czasu do czasu nalezy wyjac uszczelke pokrywki (3) w celuoczyszczenia. Nalezy wymyc ja w goracej wodzie z mydlem iprzed zalozeniem dokladnie wysuszyc.
48 OSTRZEZENIE: NIE zanurzaj pokrywki ani dzbanka w wodzie,poniewaz elementy te zawieraja podzespoly elektryczne, kt remoga ulec uszkodzeniu na skutek kontaktu z woda. Niedopusc do zamoczenia woda styk w elektrycznych.
Osusz dokladnie urzadzenie przed uzyciem.
Obsluga urzadzenia do przygotowywania zup Urzadzenie do przygotowywania zup Total Control ma 3 programy
do zup i 1 program do napoj w.
Wybierz odpowiedni program:
Krem (13)
Program Krem idealnie nadaje sie do przepis w na smaczne zupyo kremowej konsystencji. Program zapewnia zmiksowanieskladnik w w celu uzyskania odpowiedniej konsystencji orazdelikatne podgrzanie do odpowiedniej temperatury. (Program tentrwa 21 minut i zapewnia 4 porcje. Nastepnie zupa jest gotowa dopodania i delektowania sie!)
Ustawienie Srednio zmiksowane (14)
Program Srednio zmiksowane idealnie nadaje sie do przepis w nasmaczne zupy o srednio zmiksowanej konsystencji. (Program tentrwa 25 minut i zapewnia 4 porcje. Nastepnie zupa jest gotowa dopodania i delektowania sie!)
Ustawienie Duze kawalki (15)
Program Duze kawalki idealnie nadaje sie do przepis w na wiejskiezupy z duzymi kawalkami skladnik w. W tym programie skladnikisa podgrzewane przez dluzszy czas, dzieki czemu wiekszeskladniki sa w pelni ugotowane. Program trwa 28 minut izapewnia 4 porcje. W przypadku zupy z duzymi kawalkami nie maetapu miksowania, jedynie podgrzewanie. W zwiazku z tymzalecamy poszatkowanie warzyw na male kawalki i plasterki. Jeslipo ugotowaniu zupy jej skladniki sa zbyt duze, nalezy wybracfunkcje miksowania w celu osiagniecia pozadanej konsystencji.Nacisnij i przytrzymaj przycisk Start/Stop przez 5 sekund, anastepnie sprawdz konsystencje.
Podsmazanie... (16) Funkcja Podsmazanie podgrzewa dzbanek, dzieki czemu mozna
podsmazyc takie skladniki jak cebula i boczek, zanim doda siereszte skladnik w zupy. Dodaj troche oleju do wyjmowanego naczynia (7), wybierz funkcje Podsmazanie, anastepnie nacisnij przycisk Start/Stop (23). Przed dodaniemskladnik w rozgrzej olej przez minute. Funkcja Podsmazanie jestdostepna tylko wtedy, gdy pokrywka (4) jest zalozona na dzbanku(10). Funkcja Podsmazanie wylacza sie, gdy pokrywa zostaniezdjeta. Uwaga: Nie nalezy korzystac z funkcji Podsmazanieprzez dluzej niz 10 minut.
Napoje (17)
Ustawienie Napoje w urzadzeniu do przygotowywania zup idealnienadaje sie do przygotowywania koktajli lub koktajli mlecznych zeswiezych skladnik w. Przepisy na przygotowanie napoj w znajdujasie na stronach 29-30. Program ten trwa 2 minuty, a nastepnie nap j jest gotowy do podania. Ustawienie Napoje nie podgrzewa skladnik w, wiec jest to idealnerozwiazanie do przygotowywania zimnych napoj w w czasieupal w.
Uwaga: W urzadzeniu do przygotowywania zup nie wolnoumieszczac kostek lodu.
Doskonale miksowanie! (19)
Jesli chcesz uzyskac bardziej kremowa konsystencje, mozeszmocnej zmiksowac zupe. Funkcja ta dziala bez dodatkowegopodgrzewania.
Aby uzyskac dostep do tej funkcji po ugotowaniu zupy, nalezynacisnac przycisk Start/Stop, aby wyjsc z trybu Podtrzymanieciepla. Zdejmij pokrywe, a nastepnie po krokach 4 - 6 zapoznajsie z informacjami na stronie 12.
Podtrzymanie ciepla
Po zakonczeniu programu urzadzenie przechodzi w trybutrzymywania ciepla, wskazujac funkcje Podtrzymanie ciepla wpanelu sterowania (2). Aby od razu podac zupe, podniespokrywke i podawaj. Podniesienie pokrywki powodujezakonczenie dzialania funkcji Podtrzymanie ciepla.
FP501020MEE Rev2.qxp_Morphy Richards Instruction Book 26/10/2016 12:10 Page 94

95
Przewodnik po programachKrem 19, 21 min 3, 4
Srednio zmiksowane 22, 24, 26 min 2, 3, 4
Duze kawalki 25, 27, 29 min 2, 3, 4
Podsmazanie Maks. 10 min -
Napoje 2 min 3, 4
Podgrzewanie 11, 14, 17 min 2, 3, 4
Miksowanie w razie potrzeby Maks. 4
Wstepne czyszczenie 4 min -
Podtrzymanie ciepla 30 min 2, 3, 4
Przepisy
Przygotowalismy przepisy, kt rewykorzystuja urzadzenie doprzygotowywania zup Total Control, odbogatych w skladniki, pozywnych zup, poorzezwiajace koktajle oraz koktajlemleczne.
Ustawienie Duze kawalki (15) pozwala tylkogotowac skladniki, bez miksowania. Jeslipo ugotowaniu zupa zawiera zbyt duzekawalki, mozna uzyc ustawieniamiksowania (19), aby je rozdrobnic.
Przepisy zostaly opracowane w takispos b, aby podane w nich ilosci miescilysie w minimalnych i maksymalnychpoziomach roboczych urzadzenia doprzygotowywania zup Total Control (800ml - 1600 ml).
Przepisy zostaly przygotowane dla zup okonsystencji kremowej, sredniozmiksowanych oraz zup z duzymikawalkami, z iloscia skladnik w na 2, 3 lub4 porcje.
UWAGA: 2 porcje sa dostepne jedynie dlaprzepis w na zupy srednio zmiksowaneoraz zupy z duzymi kawalkami.
}
FP501020MEE Rev2.qxp_Morphy Richards Instruction Book 26/10/2016 12:10 Page 95

96
Funkcja Krem (13)
Prosta zupa warzywna 3 porcje 4 porcje
Czas przygotowania: 5 minut 5 minut
Czas gotowania: 19 minut 21 minut
Ustawienie: Krem Krem
Skladniki:
525 g 700 g warzywa takie jak seler, brukiew, ziemniaki, marchew, cebula, pasternak, wszystko posiekane, goracy bulion warzywny szczypta zi l mieszanych s l i pieprz
Spos b przyrzadzenia:
1 Umiesc wszystkie warzywa w wyjmowanym naczyniu (7), dodaj bulion do poziomu wskazanego w przepisie i wymieszaj drewniana lyzka.
2 Dodaj szczypte zi l mieszanych, wybierz funkcje Krem (13), zadana liczbe porcji, a nastepnie nacisnij przycisk Start/Stop (23).
3 Gdy wszystko bedzie gotowe, dopraw do smaku i podawaj.
Prosta zupa pomidorowa z bazylia 3 porcje 4 porcje
Czas przygotowania: 5 minut 5 minut
Czas gotowania: 19 minut 21 minut
Ustawienie: Krem Krem
Skladniki:
� 110 g 150 g czerwona cebula, pokrojona w kostke
� 220 g 300 g ziemniaki, pokrojone w kostke
� 75 g 100 g marchew pokrojona w kostke
� 300 g 400 g Pokrojone pomidory z puszki
�3/4 lyzki 1 lyzka przecier pomidorowy
� 1 1 zmiazdzone zabki czosnku
� 5 g 7 g liscie bazylii, porwane na wieksze kawalki
� Okolo 500 ml � Okolo 700 ml goracy bulion drobiowy
Spos b przyrzadzenia:
1 Umiesc warzywa w wyjmowanym naczyniu (7).
2 Dodaj pozostale skladniki, a nastepnie bulion, do zadanego poziomu i zamieszaj drewniana lyzka.
3 Zal z pokrywke (4), wybierz funkcje Krem (13) oraz wymagana liczbe porcji i nacisnij przycisk Start/Stop (23).
4 Gdy wszystko bedzie gotowe, dodaj s l i swiezo zmielony czarny pieprz do smaku.
FP501020MEE Rev2.qxp_Morphy Richards Instruction Book 26/10/2016 12:10 Page 96

97
Funkcja Srednio zmiksowane (14)
Zupa grzybowa 2 porcje 3 porcje 4 porcjeCzas przygotowania: 15 minut 15 minut 15 minut
Podsmazanie: 10 minut 10 minut 10 minut
Czas gotowania: 21 minut 23 minut 25 minut
Ustawienie: Srednio zmiksowane Srednio zmiksowane Srednio zmiksowane
Skladniki: � 310 g 465 g 625 g grzyby, drobno posiekane
� 1 lyzka 11/2 lyzki 2 lyzki oliwa z oliwek
� 75 g 115 g 150 g pokrojona cebula
� 60 g 85 g 120 g posiekany seler
� 1 1 2 zmiazdzone zabki czosnku
� 5 g 7 g 10 g swieza pietruszka, grubo posiekana
� Okolo 400 ml � Okolo 530 ml � Okolo 700 ml Goracy bulion warzywny
� 75 ml � 115 ml � 150 ml smietana o niskiej zawartosci tluszczu
s l i swiezo zmielony czarny pieprz
Spos b przyrzadzenia:1 Umiesc oliwe w wyjmowanym naczyniu (7), zal z pokrywke (4), wybierz funkcje Podsmazanie (16) i nacisnij przycisk Start/Stop
(23). Podgrzewaj przez 1 minute.
2 Ostroznie dodaj cebule, seler, czosnek, pietruszke i polowe grzyb w, wymieszaj drewniana lyzka i podsmaz przez 4 minuty, mieszajac od czasudo czasu. (Podczas podsmazania grzyb w zmniejszy sie ich objetosc).
3 Dodaj pozostale grzyby do wyjmowanego naczynia (7), wymieszaj i smaz przez kolejne 5 minut, mieszajac od czasu do czasu.
4 Ostroznie dodaj goracy bulion do poziomu podanego w przepisie. Wybierz funkcje Srednio zmiksowane (14) oraz wymagana liczbe porcji inacisnij przycisk Start/Stop (23).
5 Pod koniec gotowania dodaj smietane, wymieszaj drewniana lyzka i dopraw do smaku.
Zupa marchewkowa z kolendra 2 porcje 3 porcje 4 porcjeCzas przygotowania: 15 minut 15 minut 15 minut
Czas gotowania: 21 minut 23 minut 25 minut
Ustawienie: Srednio zmiksowane Srednio zmiksowane Srednio zmiksowane
Skladniki: �50 g 75 g 100 g pokrojona cebula
� 60 g 90 g 120 g drobno posiekany seler
� 250 g 375 g 500 g marchew pokrojona na male kostki
� 1/2 plaskiej lyzeczki 3/4 plaskiej lyzeczki 1 plaska lyzeczka mielona kolendra
� 7 g 12 g 15g posiekana swieza kolendra
� Okolo 400 ml � Okolo 600 ml � Okolo 800 ml Goracy bulion warzywny
� 25 - 50 ml 50 - 100 ml 50 - 100 ml czesciowo odtluszczone mleko
s l i pieprz do smaku
Spos b przyrzadzenia:1 Wl z cebule, seler, marchew, zmielona i posiekana kolendre do wyjmowanego naczynia (7) i wymieszaj drewniana lyzka.
2 Dodaj bulion do wymaganego poziomu, wybierz funkcje Srednio zmiksowane (14) oraz wymagana liczbe porcji, a nastepnie nacisnij przyciskStart/Stop (23).
3 Pod koniec gotowania dodaj odpowiednia ilosc mleka i wymieszaj drewniana lyzka, uzyskujac pozadana konsystencje, a nastepnie dopraw dosmaku.
4 Podawaj zupe posypana posiekanymi liscmi kolendry (zgonie z zyczeniem).
}
FP501020MEE Rev2.qxp_Morphy Richards Instruction Book 26/10/2016 12:10 Page 97

98
Funkcja Duze kawalki (15)
Francuska zupa z pesto 2 porcje 3 porcje 4 porcje
Czas przygotowania: 15 minut 15 minut 15 minut
Czas gotowania: 24 minuty 26 minut 28 minut
Ustawienie: Duze kawalki Duze kawalki Duze kawalki
Skladniki:
� 75 g 110 g 150 g cukinia pokrojona na male kostki
� 35 g 50 g 70g ziemniak pokrojony na male kostki
� 35 g 50 g 70 g drobno posiekana cebula
� 25 g 35 g 50 g marchew pokrojona na male kostki
� 200 g 300 g 400g pokrojone pomidory z puszki
� 25 g 35 g 50g groszek
� 25 g 35 g 50 g fasolka szparagowa pocieta na 1 cm paski
� 25 g 35 g 50 g spaghetti polamane na male kawalki
� Okolo 350 ml � Okolo 475 ml � Okolo 650ml goracy bulion warzywny
� 1/2 lyzki �3/4 lyzki 1 lyzka przecier pomidorowy (wymieszany z bulionem)
s l i zmielony czarny pieprz
Dodatkowo do podania:
Pesto
Parmezan
Spos b przyrzadzenia:
1 Wl z warzywa i spaghetti do wyjmowanego naczynia (7), dodaj mieszanke bulionu warzywnego i przecieru pomidorowego do pozadanegopoziomu i wymieszaj drewniana lyzka.
2 Wybierz funkcje Duze kawalki (15) oraz wymagana liczbe porcji i nacisnij przycisk Start/Stop (23).
3 Gdy wszystko bedzie gotowe, dopraw do smaku i podawaj z lyzka pesto i swiezo startego parmezanu.
FP501020MEE Rev2.qxp_Morphy Richards Instruction Book 26/10/2016 12:10 Page 98

99
Zupa z jagnieciny i bulion z soczewica 2 porcje 3 porcje 4 porcje
Czas przygotowania: 20 minut 20 minut 20 minut
Podsmazanie: 7 minut 7 minut 7 minut
Czas gotowania: 24 minuty 26 minut 28 minut
Ustawienie: Duze kawalki Duze kawalki Duze kawalki
Skladniki:
� 1/2 lyzki 1 lyzka 1 lyzka oliwa z oliwek
� 35 g 55 g 75 g surowa mielona jagniecina
� 50 g 75 g 100 g drobno posiekana cebula
� 1 1 1/2 2 zmiazdzone zabki czosnku
� 25 g 35 g 50 g marchew drobno posiekana
� 75 g 110 g 150 g ziemniak drobno posiekany
� 50 g 75 g 100 g drobno posiekana brukiew
11/2 lyzki 21/2 lyzki 3 lyzki maka zwykla
120 g 175 g 235g gotowana, odcedzona zielona soczewica z puszki
� 1/4 lyzeczki 1/2 lyzeczki 1/2 lyzeczki posiekany swiezy rozmaryn
� 1/4 lyzki 1/2 lyzki 1 lyzka poszatkowana swieza pietruszka
1 1 2 listek laurowy
1/2 lyzeczki 1/2 lyzeczki 1 lyzeczka Sos Worcestershire
Okolo 450 ml Okolo 675 ml Okolo 900ml goracy bulion z baraniny
Spos b przyrzadzenia:
1 Wlej oliwe do wyjmowanego naczynia (7), zal z pokrywke (4), wybierz funkcje Podsmazanie (16) i nacisnij przycisk Start/Stop (23). Po 1 minucieostroznie dodaj mielone mieso jagniece, zal z pokrywke (4) i podsmaz przez 2 minuty, mieszajac od czasu do czasu drewniana lyzka, dop ki mieso sie nie zarumieni.
2 Ostroznie dodaj cebule, czosnek, marchew, ziemniaki i brukiew do wyjmowanego naczynia (7) i podsmaz przez 4 minuty. Dodaj make i wymieszaj, a nastepnie dodaj pozostale skladniki i goracy bulion do zadanego poziomu.
3 Mieszaj drewniana lyzka lub lopatka. Wcisnij i przytrzymaj przycisk Start/Stop (23), a nastepnie wybierz funkcje Duze kawalki (15) orazwymagana liczbe porcji, a nastepnie nacisnij przycisk Start/Stop (23).
4 Dopraw do smaku i usun liscie laurowe przed podaniem.}
FP501020MEE Rev2.qxp_Morphy Richards Instruction Book 26/10/2016 12:10 Page 99
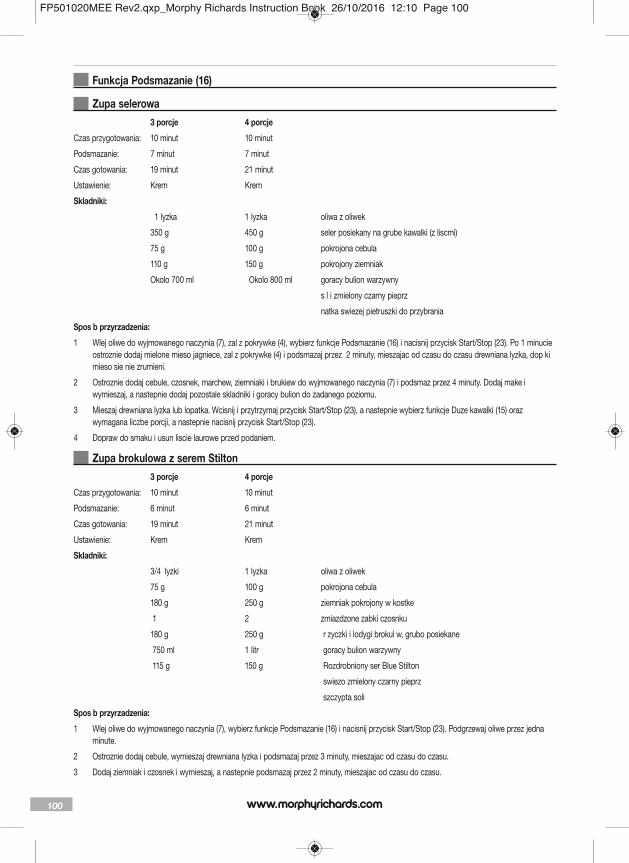
100
Funkcja Podsmazanie (16)
Zupa selerowa 3 porcje 4 porcje
Czas przygotowania: 10 minut 10 minut
Podsmazanie: 7 minut 7 minut
Czas gotowania: 19 minut 21 minut
Ustawienie: Krem Krem
Skladniki:
� 1 lyzka 1 lyzka oliwa z oliwek
� 350 g 450 g seler posiekany na grube kawalki (z liscmi)
� 75 g 100 g pokrojona cebula
� 110 g 150 g pokrojony ziemniak
� Okolo 700 ml � Okolo 800 ml goracy bulion warzywny
s l i zmielony czarny pieprz
natka swiezej pietruszki do przybrania
Spos b przyrzadzenia:
1 Wlej oliwe do wyjmowanego naczynia (7), zal z pokrywke (4), wybierz funkcje Podsmazanie (16) i nacisnij przycisk Start/Stop (23). Po 1 minucieostroznie dodaj mielone mieso jagniece, zal z pokrywke (4) i podsmazaj przez 2 minuty, mieszajac od czasu do czasu drewniana lyzka, dop kimieso sie nie zrumieni.
2 Ostroznie dodaj cebule, czosnek, marchew, ziemniaki i brukiew do wyjmowanego naczynia (7) i podsmaz przez 4 minuty. Dodaj make iwymieszaj, a nastepnie dodaj pozostale skladniki i goracy bulion do zadanego poziomu.
3 Mieszaj drewniana lyzka lub lopatka. Wcisnij i przytrzymaj przycisk Start/Stop (23), a nastepnie wybierz funkcje Duze kawalki (15) orazwymagana liczbe porcji, a nastepnie nacisnij przycisk Start/Stop (23).
4 Dopraw do smaku i usun liscie laurowe przed podaniem.
Zupa brokulowa z serem Stilton 3 porcje 4 porcje
Czas przygotowania: 10 minut 10 minut
Podsmazanie: 6 minut 6 minut
Czas gotowania: 19 minut 21 minut
Ustawienie: Krem Krem
Skladniki:
3/4 lyzki 1 lyzka oliwa z oliwek
� 75 g 100 g pokrojona cebula
� 180 g 250 g ziemniak pokrojony w kostke
� 1 2 zmiazdzone zabki czosnku
� 180 g 250 g r zyczki i lodygi brokul w, grubo posiekane
� 750 ml 1 litr goracy bulion warzywny
� 115 g 150 g Rozdrobniony ser Blue Stilton
swiezo zmielony czarny pieprz
szczypta soli
Spos b przyrzadzenia:
1 Wlej oliwe do wyjmowanego naczynia (7), wybierz funkcje Podsmazanie (16) i nacisnij przycisk Start/Stop (23). Podgrzewaj oliwe przez jednaminute.
2 Ostroznie dodaj cebule, wymieszaj drewniana lyzka i podsmazaj przez 3 minuty, mieszajac od czasu do czasu.
3 Dodaj ziemniak i czosnek i wymieszaj, a nastepnie podsmazaj przez 2 minuty, mieszajac od czasu do czasu.
FP501020MEE Rev2.qxp_Morphy Richards Instruction Book 26/10/2016 12:10 Page 100

101
4 Dodaj bulion warzywny (nie dodawaj wiecej niz podana ilosc), nacisnij i przytrzymaj przycisk Start/Stop (23), a nastepnie wybierz funkcje Krem (13) oraz wymagana liczbe porcji i nacisnij przycisk Start/Stop (23).
5 Gdy na zegarze pozostanie 11 minut, ostroznie dodaj brokuly, a nastepnie wymieszaj drewniana lyzka.
6 Po zakonczeniu programu dodaj ser Stilton, wybierz funkcje Miksowanie (19), a nastepnie nacisnij i przytrzymaj przycisk Start/Stop (23), az douzyskania zadanej konsystencji.
7 Dopraw do smaku (zupa moze nie potrzebowac soli) i podawaj.
Uwaga: Ziemniak zageszcza zupe. Jesli wolisz uzyc mniej ziemniak w niz jest to zalecane, zupa bedzie miala rzadsza konsystencje.
Funkcja Napoje (17)
Koktajl mleczny z maslem orzechowym 3 porcje 4 porcje
Czas przygotowania: 5 minut 5 minut
Czas trwania programu: 2 minuty 2 minuty
Skladniki:
� 900 ml 1,2 l czesciowo odtluszczone mleko
125 g 175 g lody waniliowe
� 4 plaskiej lyzki 6 plaskiej lyzki kremowe maslo orzechowe
� 4 plaskiej lyzki 6 lyzek syrop klonowy
Spos b przyrzadzenia:
1 Umiesc wszystkie skladniki w wyjmowanym naczyniu (7) i wymieszaj drewniana lyzka.
2 Zal z pokrywke, wybierz funkcje Napoje (17), a nastepnie nacisnij przycisk Start/Stop (23).
3 Podawaj natychmiast.
Uwaga: Zamiast syropu klonowego mozna uzyc miodu.
Koktajl sniadaniowy z czarna bor wka i platkami owsianymi (na bazie jogurtu naturalnego) 3 porcje 4 porcje
Czas przygotowania: 5 minuty 5 minuty
Czas trwania programu: 2 minuty 2 minuty
Skladniki:
� 675 g 800 g niskotluszczowy jogurt naturalny
� 325 ml � 400 ml czesciowo odtluszczone mleko
� 45 g 60 g platki owsiane
� 115 g 150 g czarne bor wki
� 2 lyzki 3 lyzki mi d
Spos b przyrzadzenia:
Umiesc wszystkie skladniki w wyjmowanym naczyniu (7) i wymieszaj drewniana lyzka.
2 Zal z pokrywke (4), wybierz funkcje Napoje (17), a nastepnie nacisnij przycisk Start/Stop (23).
}
FP501020MEE Rev2.qxp_Morphy Richards Instruction Book 26/10/2016 12:10 Page 101
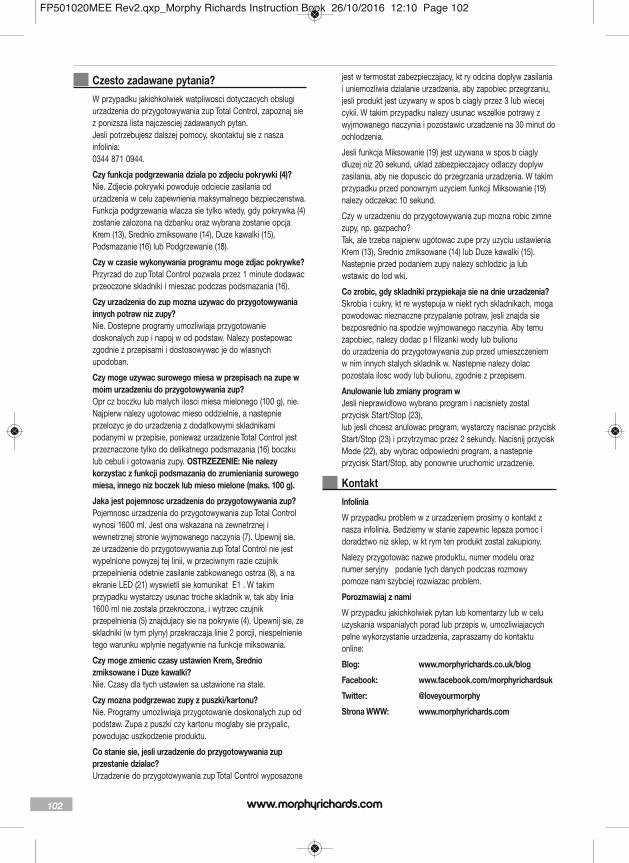
102
Czesto zadawane pytania?W przypadku jakichkolwiek watpliwosci dotyczacych obslugiurzadzenia do przygotowywania zup Total Control, zapoznaj siez ponizsza lista najczesciej zadawanych pytan. Jesli potrzebujesz dalszej pomocy, skontaktuj sie z naszainfolinia: 0344 871 0944.
Czy funkcja podgrzewania dziala po zdjeciu pokrywki (4)?Nie. Zdjecie pokrywki powoduje odciecie zasilania odurzadzenia w celu zapewnienia maksymalnego bezpieczenstwa.Funkcja podgrzewania wlacza sie tylko wtedy, gdy pokrywka (4)zostanie zalozona na dzbanku oraz wybrana zostanie opcjaKrem (13), Srednio zmiksowane (14), Duze kawalki (15),Podsmazanie (16) lub Podgrzewanie (18).
Czy w czasie wykonywania programu moge zdjac pokrywke?Przyrzad do zup Total Control pozwala przez 1 minute dodawacprzeoczone skladniki i mieszac podczas podsmazania (16).
Czy urzadzenia do zup mozna uzywac do przygotowywaniainnych potraw niz zupy?Nie. Dostepne programy umozliwiaja przygotowaniedoskonalych zup i napoj w od podstaw. Nalezy postepowaczgodnie z przepisami i dostosowywac je do wlasnychupodoban.
Czy moge uzywac surowego miesa w przepisach na zupe wmoim urzadzeniu do przygotowywania zup?Opr cz boczku lub malych ilosci miesa mielonego (100 g), nie.Najpierw nalezy ugotowac mieso oddzielnie, a nastepnieprzelozyc je do urzadzenia z dodatkowymi skladnikamipodanymi w przepisie, poniewaz urzadzenie Total Control jestprzeznaczone tylko do delikatnego podsmazania (16) boczkulub cebuli i gotowania zupy. OSTRZEZENIE: Nie nalezykorzystac z funkcji podsmazania do zrumieniania surowegomiesa, innego niz boczek lub mieso mielone (maks. 100 g).
Jaka jest pojemnosc urzadzenia do przygotowywania zup?Pojemnosc urzadzenia do przygotowywania zup Total Controlwynosi 1600 ml. Jest ona wskazana na zewnetrznej iwewnetrznej stronie wyjmowanego naczynia (7). Upewnij sie,ze urzadzenie do przygotowywania zup Total Control nie jestwypelnione powyzej tej linii, w przeciwnym razie czujnikprzepelnienia odetnie zasilanie zabkowanego ostrza (8), a naekranie LED (21) wyswietli sie komunikat E1 . W takimprzypadku wystarczy usunac troche skladnik w, tak aby linia1600 ml nie zostala przekroczona, i wytrzec czujnikprzepelnienia (5) znajdujacy sie na pokrywie (4). Upewnij sie, zeskladniki (w tym plyny) przekraczaja linie 2 porcji, niespelnienietego warunku wplynie negatywnie na funkcje miksowania.
Czy moge zmienic czasy ustawien Krem, Sredniozmiksowane i Duze kawalki?Nie. Czasy dla tych ustawien sa ustawione na stale.
Czy mozna podgrzewac zupy z puszki/kartonu?Nie. Programy umozliwiaja przygotowanie doskonalych zup odpodstaw. Zupa z puszki czy kartonu moglaby sie przypalic,powodujac uszkodzenie produktu.
Co stanie sie, jesli urzadzenie do przygotowywania zupprzestanie dzialac?Urzadzenie do przygotowywania zup Total Control wyposazone
jest w termostat zabezpieczajacy, kt ry odcina doplyw zasilaniai uniemozliwia dzialanie urzadzenia, aby zapobiec przegrzaniu,jesli produkt jest uzywany w spos b ciagly przez 3 lub wiecejcykli. W takim przypadku nalezy usunac wszelkie potrawy zwyjmowanego naczynia i pozostawic urzadzenie na 30 minut doochlodzenia.
Jesli funkcja Miksowanie (19) jest uzywana w spos b ciaglydluzej niz 20 sekund, uklad zabezpieczajacy odlaczy doplywzasilania, aby nie dopuscic do przegrzania urzadzenia. W takimprzypadku przed ponownym uzyciem funkcji Miksowanie (19)nalezy odczekac 10 sekund.
Czy w urzadzeniu do przygotowywania zup mozna robic zimnezupy, np. gazpacho?Tak, ale trzeba najpierw ugotowac zupe przy uzyciu ustawieniaKrem (13), Srednio zmiksowane (14) lub Duze kawalki (15).Nastepnie przed podaniem zupy nalezy schlodzic ja lubwstawic do lod wki.
Co zrobic, gdy skladniki przypiekaja sie na dnie urzadzenia?Skrobia i cukry, kt re wystepuja w niekt rych skladnikach, mogapowodowac nieznaczne przypalanie potraw, jesli znajda siebezposrednio na spodzie wyjmowanego naczynia. Aby temuzapobiec, nalezy dodac p l filizanki wody lub bulionudo urzadzenia do przygotowywania zup przed umieszczeniemw nim innych stalych skladnik w. Nastepnie nalezy dolacpozostala ilosc wody lub bulionu, zgodnie z przepisem.
Anulowanie lub zmiany program w Jesli nieprawidlowo wybrano program i nacisniety zostalprzycisk Start/Stop (23), lub jesli chcesz anulowac program, wystarczy nacisnac przyciskStart/Stop (23) i przytrzymac przez 2 sekundy. Nacisnij przyciskMode (22), aby wybrac odpowiedni program, a nastepnieprzycisk Start/Stop, aby ponownie uruchomic urzadzenie.
KontaktInfolinia
W przypadku problem w z urzadzeniem prosimy o kontakt znasza infolinia. Bedziemy w stanie zapewnic lepsza pomoc idoradztwo niz sklep, w kt rym ten produkt zostal zakupiony.
Nalezy przygotowac nazwe produktu, numer modelu oraznumer seryjny podanie tych danych podczas rozmowypomoze nam szybciej rozwiazac problem.
Porozmawiaj z nami
W przypadku jakichkolwiek pytan lub komentarzy lub w celuuzyskania wspanialych porad lub przepis w, umozliwiajacychpelne wykorzystanie urzadzenia, zapraszamy do kontaktuonline:
Blog: www.morphyrichards.co.uk/blog
Facebook: www.facebook.com/morphyrichardsuk
Twitter: @loveyourmorphy
Strona WWW: www.morphyrichards.com
FP501020MEE Rev2.qxp_Morphy Richards Instruction Book 26/10/2016 12:10 Page 102
103
Aplikacja Morphy Richards Cook & Create
Dwuletnia gwarancjaNiniejsze urządzenie jest objęte dwuletnią gwarancją,upoważniającą do naprawy lub wymiany.
Zachowaj paragon ze sklepu jako dowód zakupu. Aby mócskorzystaç z niego w przyszłości, przymocuj swój paragon dotylnej okładki tej instrukcji za pomocą zszywacza.
Jeśli urządzenie okaże się wadliwe, prosimy podaç następująceinformacje. Informacje umieszczone poniżej znajdują się napodstawie obudowy urządzenia.
ModelNumer seryjny
Przed opuszczeniem fabryki wszystkie produkty MorphyRichards są indywidualnie testowane. Jeżeli urządzenie okażesię wadliwe, należy je zwróciç do punktu sprzedaży w ciągu 28dni od daty zakupu, w celu wymiany.
Jeśli urządzenie okaże się wadliwe po 28 dniach, lecz przedupływem 24 miesięcy od daty zakupu, należy skontaktowaç sięz lokalnym dystrybutorem, podając model i numer seryjnyurządzenia, lub napisaç do lokalnego dystrybutora, wysyłająclist na podany adres.
Zostaniesz poproszony o dostarczenie, na poniższy adres,urządzenia (w odpowiednim opakowaniu zabezpieczającym)wraz z kopią dowodu zakupu.
Jeśli powód wystąpienia wady urządzenia jest inny niż podaneponiżej (1-9), zostanie ono naprawione lub wymienione orazodesłane w ciągu 7 dni roboczych od daty otrzymania.
Jeśli z jakiegoś powodu urządzenie zostanie wymienione wciągu 2 lat gwarancji, gwarancja nowego urządzenia będzieliczona od momentu nabycia oryginalnego produktu. Dlategoteż należy zachowaç oryginalny paragon lub fakturę zumieszczoną datą zakupu urządzenia.
Aby dwuletnia gwarancja obowiązywała, urządzenie musi byçużytkowane zgodnie z instrukcją eksploatacji wydaną przez
producenta. Na przykład niektóre urządzenia muszą byçregularnie odkamieniane, a filtry należy utrzymywaç w czystościwedług zaleceƒ producenta.
Morphy Richards lub lokalny dystrybutor nie dokona naprawyani wymiany urządzenia w ramach gwarancji, jeśli:
1 Wada została spowodowana lub jest związana z przypadkową,niewłaściwą, niedbałą lub niezgodną z zaleceniami producentaeksploatacją urządzenia albo jest wynikiem skoków napięcia lubniewłaściwego transportu.
2 Urządzenie zostało podłączone do źródła zasilania o innymnapięciu niż oznaczono na urządzeniu.
3 Dokonano prób naprawy urządzenia przez osoby nienależące dopersonelu serwisowego firmy Morphy Richards (lubautoryzowanego sprzedawcy urządzenia).
4 Urządzenie było przedmiotem wypożyczania lub było użytkowanew celach innych niż przewidziane w gospodarstwie domowym.
5 Urządzenie pochodzi z wtórnego rynku.
6 Firma Morphy Richards lub lokalny dystrybutor nie wykonuje, wramach niniejszej gwarancji, żadnych czynności serwisowych.
7 Gwarancja nie obejmuje materiałów eksploatacyjnych, np.worków, filtrów czy szklanych karafek.
8 Baterie oraz szkody powstałe w wyniku ich wycieku nie podlegajągwarancji.
9 Baterie oraz szkody powstałe w wyniku ich wycieku nie podlegajągwarancji.
Niniejsza gwarancja nie nadaje żadnych praw innych niż tewyraźnie określone powyżej oraz nie pokrywa roszczeƒzwiązanych ze stratami lub uszkodzeniami wynikającymi zeksploatacji urządzenia. Niniejsza gwarancja stanowidodatkową korzyśç i nie narusza praw konsumenckichużytkownika.
Morphy Richards
}
FP501020MEE Rev2.qxp_Morphy Richards Instruction Book 26/10/2016 12:10 Page 103

104
Ochrana zdraví a bezpecnost Použití jakéhokoliv elektrického spotrebice vyžaduje dodržování následujících bezpecnostních opatrení.
Pred použitím výrobku si peclive prostudujte tento návod.
• Tento spotrebic mohou používat osoby se sníženými fyzickými,senzorickými ci mentálními schopnostmi nebo nedostatkem zkušeností a znalostí pouze pod dohledem, nebopokud byli pouceni o bezpecném použití spotrebice a rozumí prípadným rizikum.
• Deti si nesmí se spotrebicem hrát.• Deti nesmí používat tento spotrebic. • Udržujte spotrebic a jeho kabel mimo dosah detí. • Po jednom provozním cyklu musíte nechat prístroj zcela
vychladnout, pak umýt. • Tento spotrebic není urcen k ovládání prostrednictvím
externího casovace nebo samostatného dálkového ovládacíhosystému.
• Pokud je poškozený elektrický napájecí kabel, musí jej vymenit výrobce nebo jeho servisní zástupce za novou speciální sestavu kabelu.
• VÝSTRAHA: Mixovací cepel je velmi ostrá. Pri používání acištení budte opatrní.
• Informace o péci o spotrebic a jeho cištení naleznete na strane107 a 115.
∂
FP501020MEE Rev2.qxp_Morphy Richards Instruction Book 26/10/2016 12:10 Page 104

105
Krome techto upozornení poskytujeme následující bezpecnostnídoporucení.
Umístení• Spotrebic vždy umistujte dále od okraje
pracovní plochy.
• Ujistete se, že spotrebic je používán na pevném, rovném povrchu.
• Nepoužívejte spotrebic venku nebo v blízkosti vody.
Sítový kabel• Napájecí kabel by mel dosáhnout od zásuvky k podstavci
spotrebice, aniž by docházelo k namáhání prípojek.
• Nenechávejte sítový kabel viset pres okraj pracovní plochy, kde byna nej mohly dosáhnout deti.
• Nenechávejte kabel vést otevreným prostorem, napr. mezizásuvkou u zeme a stolem.
• Nenechávejte kabel procházet pres sporák, toustovac nebo jináhorká místa, která by ho mohla poškodit.
Osobní bezpecnost• VÝSTRAHA: Neponorujte kabel, zástrcku nebo spotrebic do
vody ani jiných tekutin, abyste zabránili požáru, úrazu elektrickým proudem a zranení.
• VÝSTRAHA: Nesprávné používání tohoto spotrebice muževést k prípadnému úrazu.
• VÝSTRAHA: Vyhýbejte se kontaktu s pohybujícími sesoucástmi.
• Pri premistování spotrebice s horkým obsahem je nutné dávat velký pozor.
• Prístroj nepoužívejte mokrýma nebo vlhkýma rukama.
• Když prístroj nepoužíváte nebo cistíte, odpojte jej od síte.
Lécba oparenin• Zasažené místo ihned vložte pod tekoucí studenou vodu.
Nezdržujte se svlékáním odevu, ihned vyhledejte lékarskoupomoc.
Další bezpecnostní pokyny• Pokud je sítový kabel spotrebice poškozený, spotrebic
nepoužívejte. Kontaktujte spolecnost Morphy Richards telefonickya požádejte o radu.
• Používání príslušenství, které není doporuceno výrobcem, mužeprístroj poškodit.
• Spotrebic nepokládejte na nebo do blízkosti zdroju nadmernéhotepla, jako jsou plynové nebo elektrické sporáky, kamna nebovarice.
• Spotrebic a kabel uchovávejte mimo zdroje nadmerného tepla,slunecní svetlo, vlhkost, ostré hrany a pod.
• Pri použití prístroje se pred jeho zapnutím ujistete, že je víkousazeno na svém míste.
• Víko nesnímejte, dokud se vroubkované cepele nezastaví.
• Nepoužívejte zarízení k nepretržité príprave polévky.
• Pokud vléváte do výrobník polévky Total Control horkou tekutinu,dávejte pozor, protože v dusledku náhlého odparení by mohlavychrlit ze spotrebice.
Elektrické požadavky Zkontrolujte, zda napetí na typovém štítku spotrebice odpovídá
sítovému napetí v domácnosti, které musí být strídavé. (str.)
VÝSTRAHA: TENTO SPOTREBIC MUSÍ BÝT UZEMNENÝ.
Když je treba vymenit sítovou pojistku, použijte 13A pojistkuBS1362.
Vybavení (1) Držadlo víka (2) Ovládací panel (3) Tesnení (4) Víko (5) Snímac preplnení (6) Kryt motoru (7) Vyjímatelná nádoba (8) Vroubkovaná cepel (9) Tlacítko pro uvolnení nádoby (10) Telo konvice (11) Držadlo konvice (12) Napájecí zásuvka (13) Indikátor funkce Smooth (Jemná) (14) Indikátor funkce Medium (Strední) (15) Indikátor funkce Chunky (Hutná) (16) Indikátor funkce Sauté (Restování) (17) Indikátor funkce Drinks (Nápoje) (18) Indikátor funkce Reheat (Ohrev) (19) Indikátor funkce Blend (Mixování) (20) Indikátor funkce Pre-Clean (Predcištení) (21) Displej LED (22) Tlacítko režimu (23) Tlacítko Start/Stop (24) Tlacítko poctu porcí (25) Indikátor funkce uchování pokrmu v teplém stavu
Pred prvním použitím Je duležité, abyste výrobník polévky Total Control vycistili pred
prvním použitím nebo v prípade, že se delší dobu nepoužíval.Další informace naleznete v kapitole „Péce a cištení“.
Pri prvním použití výrobníku polévky Total Control mužetepozorovat lehký kour nebo výpary vystupující z víka spotrebice. Toje normální - jedná se o mazivo, které bylo naneseno na nekterésoucásti zarízení v prubehu výrobního procesu. Po nekolikapoužitích ustane.
Jak používat výrobník polévky Total Control1 Zkontrolujte, zda je výrobník polévky Total Control odpojen od
sítového napájení.
2 Sejmete víko (4) a dejte pozor, abyste se nedotkli vroubkovanécepele (8). VÝSTRAHA: Ostrá cepel.
3 Vložte do vyjímatelné nádoby (7) všechny prísady. Jako poslednípridejte tekutinu a naplnte až do požadovaného poctu porcívyznaceného na vyjímatelné nádobe (7). Informace ohlednepridávané tekutiny naleznete v jednotlivých receptech.
∂
FP501020MEE Rev2.qxp_Morphy Richards Instruction Book 26/10/2016 12:10 Page 105
106
4 Usadte víko (4) zpet na konvici (10) a ujistete se, že je bezpecneusazeno.
Je vhodné otocit víkem / skríní motoru, aby cepel (8) mohlaprocházet prísadami a víko (4) správne sedelo na konvici (10).
5 Zapojte napájecí kabel do elektrické zásuvky (12).
6 Stisknete tlacítko režimu (22) a vyberte program. Indikátor funkceSmooth (Jemná) (13) se rozsvítí. Dalším stisknutím tlacítka režimu(22) mužete procházet jednotlivým nastavením. Vyberte indikátorfunkce Smooth (Jemná) (13), chcete-li pripravit jemnou polévku.
7 Vyberte indikátor funkce Medium (Strední) (14), chcete-li pripravitstredne jemnou polévku.
8 Vyberte indikátor funkce Chunky (Hutná) (15), chcete-li pripravithustou polévku s kousky.
9 Stisknete tlacítko Start/Stop (23) a na LED displeji (21) se zobrazícas zpracování. Ovladac poctu porcí je nastaven na 2 porce.Pokud požadujete 3 nebo 4 porce, musíte tuto volbu provést predstisknutím tlacítka Start/Stop (23). Viz pocet porcí na strane 8.
Funkce Smooth (Jemná) a Drinks (Nápoje) se nastaví na 3 porce.
10 Po dokoncení prípravy bude výrobník polévky Total Control 10sekund pípat. Odpojte prístroj od síte, sejmete víko (4) apodávejte.
VÝSTRAHA: Pri snímání víka (4) behem prípravy polévkybudte opatrní, aby nedošlo k rozlití horké tekutiny a únikupáry.
Použití funkce ovládání poctu porcí11 Zkontrolujte, zda je výrobník polévky Total Control odpojen od
sítového napájení. Sejmete víko (4) a dejte pozor, abyste senedotkli cepele Serrator (8). VÝSTRAHA: Ostrá cepel.
12 Naplnte výrobník polévky Total Control do požadovaného objemuna vyjímatelné nádobe (7) a urcující požadovaný pocet porcí. Dalšíinformace naleznete v jednotlivých receptech.
13 Položte víko (4) na telo konvice (10) a overte, zda je správne nasvém míste, pak pripojte výrobník polévky Total Control do síte. Vizstrana 7.
14 Stisknete tlacítko režimu (22) a vyberte program. Indikátor funkceSmooth (Jemná) (13) se rozsvítí. Dalším stisknutím tlacítka režimu (22) mužete procházet jednotlivým nastavením a vybratkonzistenci polévky.
15 Po výberu konzistence polévky stisknete tlacítko poctu porcí (24)a vyberte císlo odpovídající objemu polévky, který chcete pripravit(2, 3 nebo 4).
POZNÁMKA: Ovládání poctu porcí je dostupné pouze pronekteré recepty. Podrobnosti naleznete v receptech na strane16.
16 Stisknete tlacítko Start/Stop (23) a na LED displeji (21) se zobrazícas zpracování. Po dokoncení prípravy bude výrobník polévkyTotal Control 10 sekund pípat. Odpojte prístroj od síte, sejmetevíko (4) a podávejte.
POZNÁMKA: Podle typu pripravované polévky budou prísadyabsorbovat pridanou tekutinu a mohou tak zmenšit celkovýobjem, proto mohou být porce na konci menší.
Použití funkce Sauté (Restování)17 Zkontrolujte, zda je výrobník polévky Total Control odpojen od
sítového napájení. Sejmete víko (4) a dejte pozor, abyste senedotkli cepele Serrator (8). VÝSTRAHA: Ostrá cepel.
18 Pridejte do vyjímatelné nádoby (7) malé množství oleje. Pripojtevýrobník polévky Total Control do sítové zásuvky.
19 Stisknete tlacítko režimu (22), dokud se nerozsvítí indikátor funkceSauté (Restování) (16). Nasadte víko (4).
20 Stisknete tlacítko Start/Stop (23) a výrobník polévky nyní zacneprísady zahrívat.
21 Po minute sejmete víko (4) a opatrne pridejte prísady pro restovánído vyjímatelné nádoby (7). Nasadte víko (4) a nechte programpokracovat. Obcas muže být víko nutné sejmout a prísadypromíchat, postupujte pritom podle jednotlivých receptu na strane 16.
VÝSTRAHA: Opatrne pridejte prísady, aby nedošlo kvystríknutí tuku.
22 Po dokoncení stisknete tlacítko Start/Stop (23). Pridejte zbytekprísad do vyjímatelné nádoby (7) a zacnete pripravovat polévkuvýberem programu podle pokynu na strane 7.
Je-li víko (4) sejmuto behem funkce restování a pridáte prísadnebo je promícháte, jednoduše poté víko (4) znovu priklopte apokracujte. Behem restování musí být víko (4) na svém míste.Pamet výrobníku polévky si uchová nastavení, není nutné jej resetovat.
Použití funkce Drinks (Nápoje)23 Zkontrolujte, zda je výrobník polévky Total Control odpojen od
sítového napájení. Sejmete víko (4) a dejte pozor, abyste senedotkli cepele Serrator (8). VÝSTRAHA: Ostrá cepel.
24 Vložte prísady pro 3 nebo 4 porce do vyjímatelné nádoby (7). Jakoposlední pridejte tekutinu.
25 Položte víko (4) na telo konvice (10) a overte, zda je správne nasvém míste, pak pripojte výrobník polévky Total Control do síte.
26 Stisknete tlacítko režimu (22), dokud se nerozsvítí indikátor funkceDrinks (Nápoje) (17).
27 Stisknete tlacítko Start/Stop (23) a na LED displeji (21) se zobrazícas zpracování.
POZNÁMKA: Funkci Drinks (Nápoje) mužete použít pouze pro3 nebo 4 porce. Velikost porce není nutné nastavovat.
28 Po dokoncení prípravy bude výrobník polévky Total Control 10sekund pípat. Odpojte prístroj od síte, sejmete víko (4) apodávejte.
Použití funkce Reheat (Ohrev)29 Zkontrolujte, zda je výrobník polévky Total Control odpojen od
sítového napájení. Sejmete víko (4) a dejte pozor, abyste senedotkli cepele Serrator (8). VÝSTRAHA: Ostrá cepel.
30 Nalijte pripravenou polévku, kterou chcete ohrát, do vyjímatelnénádoby (7). Minimálne 2 porce, maximálne 4 porce.
31 Usadte víko (4) zpet na konvici (10) a ujistete se, že je bezpecneusazeno. Pripojte výrobník polévky Total Control do sítové zásuvky.
32 Stisknete tlacítko režimu (22), dokud se nerozsvítí indikátor
FP501020MEE Rev2.qxp_Morphy Richards Instruction Book 26/10/2016 12:10 Page 106

107
funkce Reheat (Ohrev) (18). Stisknete tlacítko porce (24) a vybertejejí velikost (2, 3 nebo 4).
33 Stisknete tlacítko Start/Stop (23) a na LED displeji (21) se zobrazícas zpracování.
34 Po dokoncení prípravy bude výrobník polévky Total Control 10sekund pípat. Odpojte prístroj od síte, sejmete víko (4) apodávejte.
POZNÁMKA: Správná velikost porce musí být zvolena naovládacím panelu tak, aby odpovídala poctu pridaných porcípolévky. V opacném prípade se polévka neohreje na správnouteplotu.
Konzistence polévky po ohrátí se muže lišit.
Pokud ohríváte polévky s vetším kousky, bude jejíkonzistence jemnejší.
Použití funkce Blend (Mixování)35 Zkontrolujte, zda je výrobník polévky Total Control odpojen od
sítového napájení. Sejmete víko (4) a dejte pozor, abyste senedotkli cepele Serrator (8). VÝSTRAHA: Ostrá cepel.
36 Nalijte do vyjímatelné nádoby (7) polévku s kousky. POZNÁMKA: Funkci používejte pouze k rozmixování kousku,stredne husté polévky nebo jiných prímesí.
37 Usadte víko (4) zpet na konvici (10) a ujistete se, že je bezpecneusazeno. Pripojte výrobník polévky do sítové zásuvky.
38 Stisknete tlacítko režimu (22), dokud se nerozsvítí indikátor funkceBlend (Mixování) (19).
Stisknete a podržte tlacítko Start/Stop (23) po dobu požadovanouk mixování. Toto rucní nastavení umožnuje mixovat po dobu až 20sekund a automaticky se zastaví, kdy tlacítko uvolníte. Pokudchcete mixovat ješte nekolik dalších sekund, postup opakujte.
40 Odpojte prístroj od síte, sejmete víko (4) a podávejte.
ALTERNATIVNE: Pokud chcete rozmixovat polévku, kteroujste již pripravili ve vyjímatelné nádobe (7), pokracujte odkroku 4.
Použití funkce Pre-Clean (Predcištení)41 Zkontrolujte, zda je výrobník polévky Total Control odpojen od
sítového napájení. Sejmete víko (4) a dejte pozor, abyste senedotkli cepele Serrator (8). VÝSTRAHA: Ostrá cepel.
42 Nalijte 800 ml vody do vyjímatelné nádoby (7) a pridejte malémnožství cisticího prostredku.
43 Usadte víko (4) zpet na konvici (10) a ujistete se, že je bezpecneusazeno. Pripojte výrobník polévky Total Control do sítové zásuvky.
44 Stisknete tlacítko režimu (22), dokud se nerozsvítí indikátor funkcePre-Clean (Predcištení) (20).
45 Stisknete tlacítko Start/Stop (23) a na LED displeji (21) se zacneodpocítávat cas zpracování. Program Pre-Clean (Predcištení) budepracovat 4 minuty.
46 Po dokoncení cyklu predcištení odpojte výrobník polévky TotalControl od síte. Sejmete víko (4) a dejte pozor, abyste se nedotklicepele Serrator (8). VÝSTRAHA: Ostrá cepel.
POZNÁMKA: Funkce Pre-Clean (Predcištení) vycistí pouzezákladnu. Další cištení se vyžaduje u vyjímatelné nádoby (7) avíka (4). Viz cást Cištení jako ve snu na strane 32. Opláchnete
výrobník polévky vodou, až z vody zmizí mýdlové bubliny.
VÝSTRAHA: Budte opatrní, protože vyjímatelná nádoba (7)bude po cyklu predcištení horká.
Jednoduché cištení Výrobník polévky Total Control je vybaven funkcí Pre-Clean
(Predcištení) (20). Viz strana 13. Upozornení: Funkce Pre-Clean(Predcištení) pomáhá cistit základnu vyjímatelné nádoby (7). Mužese vyžadovat další cištení.
Výrobník polévky Total Control nelze sice mýt v mycce nádobí,jeho cištení je však jednoduché. Po použití jednoduše otrete telomotoru (6) a cepel Serrator (8) teplou mýdlovou vodou a vysušte.
NEPONORUJTE víko ani konvici do vody.
Vyjímatelná nádoba (7) výrobníku polévky Total Control muže býtvyjmuta z konvice (10) pro další cištení. Jednoduše stisknetetlacítko pro uvolnení nádoby (9) a vyjmete ji. Jednoduše omyjte vruce vyjímatelnou nádobu (7) teplou mýdlovou vodou a otretekonvici mekkým vlhkým hadrem.
Po omytí opatrne vysušte kontakty vyjímatelné nádoby. Chcete-linasadit vyjímatelnou nádobu do konvice, správne ji vyrovnejte apak zatlacte na místo.
Nekteré typy potravin se mohou pripálit, pokud se dostanoudo styku s topným telesem základny. Pokud k tomu dojde,vyberte funkci Pre-Clean (Predcištení). Pokud skvrny nejsouodstraneny, jedná se o zabarvení, které nelze odstranit. Tonijak neovlivní funkcnost nebo kvalitu pripravovanýchpokrmu. Na výrobník polévky Total Control nepoužívejte pricištení abrazivní mycí houbu, jinak by mohlo dojít k poškozeníspotrebice.
Vyjmutí a náhrada tesnení 47
Príležitostne muže být nutné odstranit víko (3) a zajistit cištení.Omyjte horkou mýdlovou vodou, opláchnete a dukladne osušte.
48 VÝSTRAHA: NEPONORUJTE víko nebo konvici do vody,protože obsahují elektrické soucásti, které by mohly býtpoškozeny vodou. Zabrante styku vody s elektrickýmikontakty.
Pred použitím dukladne vysušte.
Používání výrobníku polévky Váš výrobník polévky Total Control má 3 programy pro prípravu
polévky a 1 program pro prípravu nápoju.
Zvolte po adovan program:
Nejlépe jemná... (13)
Program jemné polévky je ideální pro recepty na lahodnoupolévku vyžadující jemnou konzistenci. Tento program zarucuje, žeprísady budou smíchány se správnou konzistencí a opatrneuvareny pri správné teplote. (Program trvá 21 minut pro 4 porce,pak je polévka pripravena k podávání!)
Nastavení stredne jemné konzistence (14)
Program stredne jemné polévky je ideální pro recepty na lahodnoupolévku vyžadující stredne jemnou konzistenci. Program trvá25minut pro 4 porce, pak je polévka pripravena k podávání!
Nastavení hutné konzistence (15)
∂
FP501020MEE Rev2.qxp_Morphy Richards Instruction Book 26/10/2016 12:10 Page 107
108
Program hutné polévky je ideální pro recepty na selskou polévkuvyžadující hutnejší konzistenci. Tento program zarucuje, že prísadybudou ohrívány déle, aby se vetší kousky dukladne provarily.Program trvá 28 minut pro 4 porce. Polévka s kousky nenímixována, pouze uvarena. Proto se doporucuje nakrájetpridávanou zeleninu na malé kousky. Pokud je polévka po uvarenítrochu moc hutná, zvolte funkci mixování, abyste dosáhlipožadované konzistence. Stisknete a podržte tlacítko Start/Stoppo dobu 5 sekund a zkontrolujte.
Restování... (16) Funkce restování ohrívá konvici na varení, aby bylo možné
orestovat napríklad cibuli nebo plátky slaniny, než budou dopolévky pridány zbývající prísady. Pridejte malé množství oleje do vyjímatelné nádoby (7), vyberte funkci Sauté (Restování) astisknete tlacítko Start/Stop (23). Pred pridáním prísad zahrívejteolej asi minutu. Funkce Sauté (Restování) je k dispozici pouze vprípade, že konvice (10) je zakryta víkem (4). Po sejmutí víka sefunkce Sauté (Restování) vypne. Poznámka: Nepoužívejtefunkci Sauté (Restování) déle než 10 minut.
Nápoje (17)
Nastavení nápoju na výrobníku polévky Total Control je ideální proprípravu ovocných nebo mlécných koktejlu z cerstvých prísad.Recepty na nápoje naleznete na stranách 29-30. Tento programtrvá 2 minuty a potom je nápoj pripraven k podávání. Nastavení nápoju nezahrívá prísady, takže je vhodné pro prípravustudených nápoju v horkém pocasí.
Poznámka: Nevkládejte do výrobníku polévky Total Controlkostky ledu.
Dokonalá smes! (19)
Nastavení mixování umožnuje dále mixovat polévku k dosaženípožadované konzistence podle potreby. Tato funkce pracuje bezdalšího ohrívání.
Prístup k této funkci po varení je možný stisknutím tlacítkaStart/Stop k ukoncení režimu uchování pokrmu v teplém stavu.Sejmete víko, pak postupujte podle pokynu na strane 12, kroky 4- 6.
Udržování tepla
Když program prípravy pokrmu skoncí, jednotka prejde do režimuuchování pokrmu v teplém stavu a bude signalizovat svou cinnostna ovládacím panelu (2). Pokud chcete podávat polévku ihned,zvednete víko a podávejte ji. Funkce uchování pokrmu v teplémstavu skoncí, když sejmete víko.
Pruvodce programySmooth (Jemná) 19, 21 minut 3, 4
Strední 22, 24, 26 minut 2, 3, 4
Chunky (Hutná) 25, 27, 29 minut 2, 3, 4
Sauté (Restování) Maximálne 10 minut -
Nápoje 2 minut 3, 4
Reheat (Ohrev) 11, 14, 17 minut 2, 3, 4
Mixování Podle potreby Maximálne 4
Pre-Clean (Predcištení) 4 minut -
Udržování tepla 30 minut 2, 3, 4
Recepty
Vytvorili jsme pro vás nejaké recepty propoužití spolecne s novým výrobníkempolévky Total Control, od hustých ahutných polévek až po osvežující lehkésmoothies a mlécné koktejly.
Nastavení Chunky (Hutná) (15) sloužípouze k varení, prísady se nemixují. Pokudje na vás uvarená polévka príliš hutná,mužete kousky cástecne rozmelnit pomocínastavení Blend (Mixování) (19).
Recepty byly vyvinuty tak, aby vyhovovalyobjemu mezi minimální a maximálníhladinou výrobníku polévky Total Control(800 - 1600 ml).
Recepty byly vytvoreny pro jemné, strednejemné a hutné konzistence, s prísadami vobjemu potrebném pro 2, 3 nebo 4 porce.
POZNÁMKA: 2 porce jsou k dispozici prostrední a hutnou konzistenci polévek skousky.
FP501020MEE Rev2.qxp_Morphy Richards Instruction Book 26/10/2016 12:10 Page 108

109
Indikátor funkce Smooth (Jemná) (13)
Základní zeleninová polévka 3 porce 4 porce
Doba prípravy: 5 minut 5 minut
Doba varení: 19 minut 21 minut
Nastavení: Smooth (Jemná) Smooth (Jemná)
Prísady:
525g 700g zelenina, vcetne celeru, turínu, brambor, mrkve, cibule, pastináku, vše nasekanéhorký zeleninový vývaršpetka smesky bylineksul a pepr
Postup:
1 Vložte veškerou zeleninu do vyjímatelné nádoby (7), dolijte vývar až na požadovaný objem pro daný recept a zamíchejte drevenou lžíci.
2 Pridejte špetku smesi bylinek, zvolte funkci Smooth (Jemná) (13), nastavte požadovaný pocet porcí a stisknete tlacítko Start/Stop (23).
3 Po dokoncení prípravy pridejte korení a podávejte.
Polévka z rajcat a bazalky 3 porce 4 porce
Doba prípravy: 5 minut 5 minut
Doba varení: 19 minut 21 minut
Nastavení: Smooth (Jemná) Smooth (Jemná)
Prísady:
• 110 g 150 g cervená cibule, nakrájená na kostky
• 220 g 300 g brambory, nakrájené na kostky
• 75 g 100 g mrkve, nakrájená na kostky
• 300 g 400 g plechovka sekaných rajcat
• ¾ polévkové lžíce 1 polévkové lžíce rajcatového protlaku
• 1 1 1 stroužek cesneku, rozmackaný
• 5 g 7 g listy bazalky, hrube natrhané
• Asi 500 ml Asi 700 ml horký kurecí vývar
Postup:
1 Vložte zeleninu do vyjímatelné nádoby (7).
2 Pridejte zbývající prísady, jako poslední prilijte vývar do požadovaného objemu a promíchejte drevenou lžící.
3 Nasadte víko (4), vyberte funkci Smooth (Jemná) (13), nastavte požadovaný pocet porcí a stisknete tlacítko Start/Stop (23).
4 Po dokoncení prípravy pridejte sul a cerstve namletý cerný pepr podle chuti.
∂
FP501020MEE Rev2.qxp_Morphy Richards Instruction Book 26/10/2016 12:10 Page 109
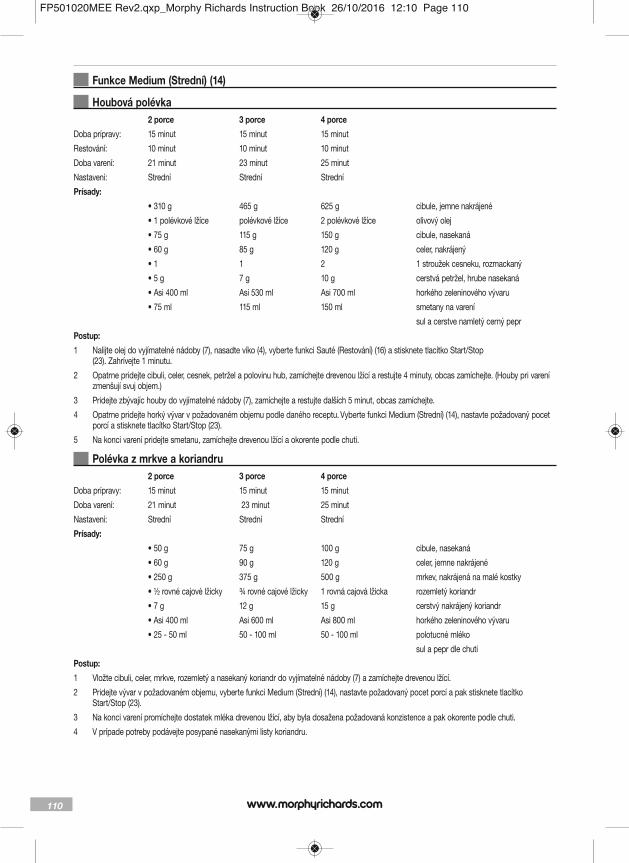
110
Funkce Medium (Strední) (14)
Houbová polévka 2 porce 3 porce 4 porceDoba prípravy: 15 minut 15 minut 15 minut
Restování: 10 minut 10 minut 10 minut
Doba varení: 21 minut 23 minut 25 minut
Nastavení: Strední Strední Strední
Prísady: • 310 g 465 g 625 g cibule, jemne nakrájené
• 1 polévkové lžíce polévkové lžíce 2 polévkové lžíce olivový olej
• 75 g 115 g 150 g cibule, nasekaná
• 60 g 85 g 120 g celer, nakrájený
• 1 1 2 1 stroužek cesneku, rozmackaný
• 5 g 7 g 10 g cerstvá petržel, hrube nasekaná
• Asi 400 ml Asi 530 ml Asi 700 ml horkého zeleninového vývaru
• 75 ml 115 ml 150 ml smetany na varení
sul a cerstve namletý cerný pepr
Postup:1 Nalijte olej do vyjímatelné nádoby (7), nasadte víko (4), vyberte funkci Sauté (Restování) (16) a stisknete tlacítko Start/Stop
(23). Zahrívejte 1 minutu.
2 Opatrne pridejte cibuli, celer, cesnek, petržel a polovinu hub, zamíchejte drevenou lžící a restujte 4 minuty, obcas zamíchejte. (Houby pri varenízmenšují svuj objem.)
3 Pridejte zbývajíc houby do vyjímatelné nádoby (7), zamíchejte a restujte dalších 5 minut, obcas zamíchejte.
4 Opatrne pridejte horký vývar v požadovaném objemu podle daného receptu. Vyberte funkci Medium (Strední) (14), nastavte požadovaný pocetporcí a stisknete tlacítko Start/Stop (23).
5 Na konci varení pridejte smetanu, zamíchejte drevenou lžící a okorente podle chuti.
Polévka z mrkve a koriandru 2 porce 3 porce 4 porceDoba prípravy: 15 minut 15 minut 15 minut
Doba varení: 21 minut 23 minut 25 minut
Nastavení: Strední Strední Strední
Prísady: • 50 g 75 g 100 g cibule, nasekaná
• 60 g 90 g 120 g celer, jemne nakrájené
• 250 g 375 g 500 g mrkev, nakrájená na malé kostky
• ½ rovné cajové lžicky ¾ rovné cajové lžicky 1 rovná cajová lžicka rozemletý koriandr
• 7 g 12 g 15 g cerstvý nakrájený koriandr
• Asi 400 ml Asi 600 ml Asi 800 ml horkého zeleninového vývaru
• 25 - 50 ml 50 - 100 ml 50 - 100 ml polotucné mléko
sul a pepr dle chuti
Postup:1 Vložte cibuli, celer, mrkve, rozemletý a nasekaný koriandr do vyjímatelné nádoby (7) a zamíchejte drevenou lžící.
2 Pridejte vývar v požadovaném objemu, vyberte funkci Medium (Strední) (14), nastavte požadovaný pocet porcí a pak stisknete tlacítkoStart/Stop (23).
3 Na konci varení promíchejte dostatek mléka drevenou lžící, aby byla dosažena požadovaná konzistence a pak okorente podle chuti.
4 V prípade potreby podávejte posypané nasekanými listy koriandru.
FP501020MEE Rev2.qxp_Morphy Richards Instruction Book 26/10/2016 12:10 Page 110

111
Funkce Chunky (Hutná) (15)
Francouzská polévka Pistou 2 porce 3 porce 4 porce
Doba prípravy: 15 minut 15 minut 15 minut
Doba varení: 24 minut 26 minut 28 minut
Nastavení: Chunky (Hutná) Chunky (Hutná) Chunky (Hutná)
Prísady:
• 75 g 110 g 150 g cuketa, nakrájená na malé kostky
• 35 g 50 g 70 g brambory, nakrájené na malé kostky
• 35 g 50 g 70 g cibule, jemne nakrájená
• 25 g 35 g 50 g mrkev, nakrájená na malé kostky
• 200 g 300 g 400 g plechovka sekaných rajcat
• 25 g 35 g 50 g drobný hrášek
• 25 g 35 g 50 g francouzské fazole, nasekané na kousky 1 cm
• 25 g 35 g 50 g špagety, nalámané na kousky
• Asi 350 ml Asi 475 ml Asi 650 ml horkého zeleninového vývaru
• ½ polévkové lžíce ¾ polévkové lžíce 1 polévkové lžíce rajcatový protlak (vmíchaného do vývaru)
Sul a mletý cerný pepr
Servírování:
• Pesto
• Sýr parmazán
Postup:
1 Vložte zeleninu a špagety do vyjímatelné nádoby (7), prijdete smes zeleninového vývaru/rajcatového protlaku v požadovaném objemu apromíchejte drevenou lžící.
2 Vyberte funkci Chunky (Hutná) (15), nastavte požadovaný pocet porcí a stisknete tlacítko Start/Stop (23).
3 Po dokoncení prípravy okorente podle chuti a podávejte s lžickou pesta a cerstve nastrouhaným parmazánem.
∂
FP501020MEE Rev2.qxp_Morphy Richards Instruction Book 26/10/2016 12:10 Page 111

112
Zimní jehnecí vývar s cockovou 2 porce 3 porce 4 porce
Doba prípravy: 20 minut 20 minut 20 minut
Restování: 7 minut 7 minut 7 minut
Doba varení: 24 minut 26 minut 28 minut
Nastavení: Chunky (Hutná) Chunky (Hutná) Chunky (Hutná)
Prísady:
• ½ polévkové lžíce 1 polévkové lžíce 1 polévkové lžíce olivový olej
• 35 g 55 g 75 g syrové mleté hovezí maso
• 50 g 75 g 100 g cibule, jemne nakrájená
• 1 1½ 2 1 stroužek cesneku, rozmackaný
• 25 g 35 g 50 g mrkev, jemne nakrájená
• 75 g 110 g 150 g brambora, jemne nakrájená
• 50 g 75 g 100 g turín, jemne nakrájený
• 1½ polévkové lžíce 2½ polévkové lžíce 3 polévkové lžíce obycejné mouky
• 120 g 175 g 235 g plechovka varené zelené cocky, odkapaná
• ¼ cajové lžicky ½ cajové lžicky ½ cajové lžicky nasekaný cerstvý rozmarýn
• ¼ polévkové lžíce ½ polévkové lžíce 1 polévková lžíce nasekaná cerstvá petržel
• 1 1 2 bobkový list
• ½ cajové lžicky ½ cajové lžicky 1 cajová lžicka Worcesterská omácka
• Asi 450 ml Asi 675 ml Asi 900 ml horký jehnecí vývar
Postup:
1 Nalijte olivový olej do vyjímatelné nádoby (7), nasadte víko (4), vyberte funkci Sauté (Restování) (16) a stisknete tlacítko Start/Stop (23). Po 1minute opatrne pridejte jehnecí maso nakrájené na kostky, nasadte víko (4) a restujte 2 minuty, obcas zamíchejte drevenou lžící až do zhnednutí.
2 Opatrne pridejte cibuli, cesnek, mrkev, brambory a turín do vyjímatelné nádoby (7) a restujte 4 minuty. Primíchejte mouku a pak pridejte zbytek prísad a pridejte horký vývar v požadovaném objemu.
3 Zamíchejte drevenou lžící nebo sterkou. Stisknete a podržte tlacítko Start/Stop (23) a pak vyberte funkci Chunky (Hutná) (15), nastavtepožadovaný pocet porcí a stisknete tlacítko Start/Stop (23).
4 Pred podáním okorente podle chuti a odstrante bobkový list.
FP501020MEE Rev2.qxp_Morphy Richards Instruction Book 26/10/2016 12:10 Page 112

113
Funkce Sauté (Restování) (16)
Celerová polévka 3 porce 4 porce
Doba prípravy: 10 minut 10 minut
Restování: 7 minut 7 minut
Doba varení: 19 minut 21 minut
Nastavení: Smooth (Jemná) Smooth (Jemná)
Prísady:
• 1 polévková lžíce 1 polévková lžíce olivový olej
• 350 g 450 g celer, hrube nakrájený (vcetne listu)
• 75 g 100 g cibule, nasekaná
• 110 g 150 g brambora, jemne nakrájená
• Asi 700 ml Asi 800 ml horkého zeleninového vývaru
Sul a mletý cerný pepr
cerstvá petržel na ozdobu
Postup:
1 Nalijte olivový olej do vyjímatelné nádoby (7), nasadte víko (4), vyberte funkci Sauté (Restování) (16) a stisknete tlacítko Start/Stop (23). Po 1minute opatrne pridejte jehnecí maso nakrájené na kostky, nasadte víko (4) a restujte 2 minuty, obcas zamíchejte drevenou lžící až do zhnednutí.
2 Opatrne pridejte cibuli, cesnek, mrkev, brambory a turín do vyjímatelné nádoby (7) a restujte 4 minuty. Primíchejte mouku a pak pridejte zbytekprísad a pridejte horký vývar v požadovaném objemu.
3 Zamíchejte drevenou lžící nebo sterkou. Stisknete a podržte tlacítko Start/Stop (23) a pak vyberte funkci Chunky (Hutná) (15), nastavtepožadovaný pocet porcí a stisknete tlacítko Start/Stop (23).
4 Pred podáním okorente podle chuti a odstrante bobkový list.
∂
FP501020MEE Rev2.qxp_Morphy Richards Instruction Book 26/10/2016 12:10 Page 113

114
Polévka z brokolice a sýra Stilton 3 porce 4 porce
Doba prípravy: 10 minut 10 minut
Restování: 6 minut 6 minut
Doba varení: 19 minut 21 minut
Nastavení: Smooth (Jemná) Smooth (Jemná)
Prísady:
• ¾ polévkové lžíce 1 polévková lžíce olivový olej
• 75 g 100 g cibule, nasekaná
• 180 g 250 g brambory, nakrájené na kostky
• 1 2 stroužky cesneku, rozmackané
• 180 g 250 g hlavicky a stopky brokolice, hrube nasekané
• 750 ml 1 litr horkého zeleninového vývaru
• 115 g 150 g modrý sýr Stilton, rozdrobený
cerstve umletý cerný pepr
trocha soli
Postup:
1 Nalijte olivový olej do vyjímatelné nádoby (7), vyberte funkci Sauté (Restování) (16) a stisknete tlacítko Start/Stop (23). Zahrívejte olej jednuminutu.
2 Opatrne pridejte cibuli, zamíchejte drevenou lžící a restujte 3 minuty, obcas zamíchejte.
3 Primíchejte bramboru a cesnek, restujte 2 minuty, obcas zamíchejte.
4 Pridejte zeleninový vývar (nepridávejte více, než je stanovené množství), stisknete a podržte tlacítko Start/Stop (23) a pak vyberte funkci Smooth (Jemný) (13), nastavte požadovaný pocet porcí a stisknete tlacítko Start/Stop (23).
5 Když na casovaci zbývá 11 minut, opatrne pridejte brokolici a pak zamíchejte drevenou lžící.
6 Když program skoncí, pridejte sýr Stilton, vyberte funkci Blend (Mixování) (19) a stisknete a podržte tlacítko Start/Stop (23), dokud nedosáhnetepožadované konzistence.
7 Pridejte korení (polévku nemusí být nutné solit) a podávejte.
Poznámka: Brambory polévku zahustí. Pokud dáváte prednost použití menšího objemu prísad, polévka bude hustší.
Funkce Drinks (Nápoje) (17)
Mlécný koktejl z burákového másla 3 porce 4 porce
Doba prípravy: 5 minut 5 minut
Cas programu: 2 minut 2 minut
Prísady:
• 900 ml 1,2 l polotucné mléko
• 125 g 175 g vanilková zmrzlina
• 4½ rovné polévkové lžíce 6 rovných polévkových lžic jemné burákové máslo
• 4½ polévkové lžíce 6 polévkové lžíce javorový sirup
Postup:
1 Pridejte všechny prísady do vyjímatelné nádoby (7) a promíchejte drevenou lžící.
2 Nasadte víko, vyberte funkci Drinks (Nápoje) (17) a stisknete tlacítko Start/Stop (23).
3 Ihned podávejte.
Poznámka: Místo javorového sirupu mužete pridat cirý med.
FP501020MEE Rev2.qxp_Morphy Richards Instruction Book 26/10/2016 12:10 Page 114
115
Smoothie z boruvek a ovesných vlocek (s bílým jogurtem) 3 porce 4 porce
Doba prípravy: 5 minut 5 minut
Cas programu: 2 minut 2 minut
Prísady:
• 675 g 800 g nízkotucný jogurt
• 325 ml 400 ml polotucné mléko
• 45 g 60 g ovesné vlocky
• 115 g 150 g boruvky
• 2 polévkové lžíce 3 polévkové lžíce cirý med
Postup:
1 Pridejte všechny prísady do vyjímatelné nádoby (7) a promíchejte drevenou lžící.
2 Nasadte víko (4), vyberte funkci Drinks (Nápoje) (17) a stisknete tlacítko Start/Stop (23).
Casté dotazy:Pokud máte ohledne použití výrobníku polévky Total Controlnejaké dotazy, podívejte se na seznam níže, kde jsou nekteré zbežných dotazu již zodpovezeny. Pokud potrebujete další pomoc, obratte se na linku podpory: 0344 871 0944.
Pracuje topný clánek pri sejmutí víka (4)?Ne. Sejmutím víka odpojíte napájení jednotky, aby bylazachována maximální bezpecnost. Funkce topného clánku seaktivuje pouze v prípade, že jste umístili víko (4) na prístroj avybrali program Smooth (13), Medium (14), Chunky (15), Sauté(16) nebo Reheat (18)
Mohu sejmou víko uprostred pracovního cyklu?Výrobník polévky Total Control vám poskytne 1 minutu pri cykluna pridání opomenutých prísad a umožní tak zamíchat behemrestování (16).
Mohu používat výrobník polévky k príprave jiných pokrmu,než polévky?Dostupné programy jsou nastaveny tak, abyste mohli pripravit
dokonalé polévky a nápoje bez dalších príprav. Ridte se receptya prizpusobte je vlastní chuti.
Mohu ve výrobníku polévky používat syrové maso uvádené vreceptech na polévku?Ne, krome slaniny nebo malých množství mletého masa (100g). Maso byste meli uvarit samostatne a teprve potom ho vložitdo výrobníku polévky spolecne s dalšími prísadami podlereceptu, protože výrobník polévky Total Control je urcen pouzek lehkému restování (16) slaniny nebo cibule a následnémuvarení polévky. VÝSTRAHA: Funkci restování byste nemelipoužívat k restování syrového masa vyjma slaniny nebomletého masa (maximálne 100 g).
Jaký je objem výrobníku polévky?Výrobník polévky Total Control má objem 1600 ml. To jevyznaceno na vnitrku a vnejšku vyjímatelné nádoby (7). Dávejtepozor, abyste neplnili výrobník polévky Total Control nad tutorysku, jinak detektor preplnení preruší napájení vroubkovanécepele (8) a na displeji LED (21) se zobrazí „E1“. V takovémprípade jednoduše odeberte cást prísad, aby obsah
nepresahoval rysku plnení 1600 ml, a otrete snímac preplnení(5) na víku (4). Dbejte na to, aby byly prísady (vcetne tekutiny)nad ryskou 2 porcí, jinak dojde k narušení funkce mixování.
Mohu zmenit casy prípravy jemné ci stredne jemné polévky apolévky s kousky?Ne. Casy pro tato nastavení jsou predvoleny.
Mohu ohrívat polévku z konzervy/krabice?Ne. Programy jsou nastaveny tak, abyste mohli pripravitdokonalé polévky bez dalších príprav. Polévky zkonzervy/krabice, i když jsou pohodlné, by se mohly pripálit kzákladne topného clánku, což by poškodilo výrobek.
Co když výrobník polévky Total Control prestane pracovat?Výrobník polévky Total Control je vybaven bezpecnostnímtermostatem, který odpojí napájení a vypne spotrebic, abyzabránil jeho prehrívání, pokud se používá nepretržite po dobu3 nebo více cyklu. Pokud k tomu dojde, vyjmete z vyjímatelnénádoby potraviny, ponechte výrobník polévky Total Controlvychladnout po dobu 30 minut, až pak pokracujte.
Pokud budete funkci mixování (19) používat nepretržite po dobudelší než 20 sekund, bezpecnostní systém odpojí napájení, abyzabránil prehrívání. Když k tomu dojde, vyckejte 10 sekund, nežzacnete funkci mixování (19) znovu používat.
Mohu ve výrobníku polévky Total Control pripravovat studenépolévky, jako je gazpacho?Ano, ale nejprve ji budete muset uvarit s nastavením Smooth(13), Medium (14) nebo Chunky (15). Pak ji jednoduše predspotrebováním nechat vychladnout nebo umístíte do lednicky.
Co delat, když se potraviny pripálí k základne výrobníkupolévky Total Control?Protože v nekterých potravinách se vyskytuje škrob a cukry,muže dojít k mírnému pripálení, pokud se tyto prísadydostanou do prímého styku s vnitrkem základny vyjímatelnénádoby. Aby tomu bylo možné zabránit, pridejte do výrobníkupolévky Total Control pul hrnku vody nebo vývaru, až potépridejte tuhé prísady. Pak doplnte zbývající objem tekutinypodle receptu.
∂
FP501020MEE Rev2.qxp_Morphy Richards Instruction Book 26/10/2016 12:10 Page 115
116
Zrušení nebo zmena programu Pokud jste vybrali program nesprávne a stiskli jste tlacítkoStart/Stop (23), nebo chcete-li zrušit program, stisknete tlacítko Start/Stop (23)a podržte jej 2 sekundy. Tlacítkem režimu (22) vyberte správnýprogram a restartujte ho stisknutím tlacítka Start/Stop (23).
Kontaktujte násLinka podpory
Pokud máte se svým spotrebicem problémy, kontaktujte nás nalince podpory, budeme vám patrne schopni pomoci lépe, než vobchodu, kde jste spotrebic zakoupili.
Pred telefonátem si pripravte název výrobku, modelové císlo asériové císlo, urychlíte tak vyrízení svého dotazu.
Promluvte si s námi
Pokud máte nejako dotazy nebo komentáre, nebo chcete získatnekteré vhodné tipy ci recepty, abyste svuj produkt mohlivyužívat co nejlépe, spojte se s námi online:
Blog: www.morphyrichards.co.uk/blog
Facebook: www.facebook.com/morphyrichardsuk
Twitter: @loveyourmorphy
Webové stránky: www.morphyrichards.com
Aplikace k varení Morphy Richards
DVOULETÁ ZÁRUKANa tento spotřebič se vztahuje dvouletá záruka opravy nebovýměny.
Musíte si uschovat stvrzenku od prodejce jako doklad onákupu. Stvrzenku připevněte sešívačkou na zadní obal probudoucí referenční účely.
Pokud se výrobek porouchá, poznamenejte si následujícíinformace. Tato čísla najdete na základně výrobku.
Č. modeluSériové číslo
Všechny výrobky Morphy Richards procházejí před opuštěnímtovárny individuální kontrolou. V nepravděpodobném případě,že se prokáže závada, se musí výrobek do 28 dnů od datakoupě vrátit do místa, kde byl zakoupen, aby se mohl vyměnit.
Pokud dojde k závadě po 28 dnech a do 24 měsíců od datapůvodní koupě, musíte kontaktovat místního prodejce a uvéstčíslo modelu a sériové číslo výrobku nebo napsat místnímuprodejci na uvedené adresy.
Budete požádáni, abyste vrátili výrobek (v náležitém,bezpečném balení) společně s kopií dokladu o nákupu na nížeuvedenou adresu.
S výjimkou níže uvedených případů (1-9) bude vadný výrobekobvykle během sedmi pracovních dnů od data přijetí opravennebo vyměněn a odeslán zpět.
Pokud bude výrobek z jakéhokoliv důvodu během dvouletézáruční lhůty vyměněn, záruka na nový výrobek se bude počítatod data původní koupě. Proto je velmi důležité, abysteuschovali původní stvrzenku nebo fakturu s vyznačeným datempůvodní koupě.
Platnost dvouleté záruky na spotřebič je podmíněna používánímpodle pokynů výrobce. Například spotřebiče se musí zbavovatvodního kamene a filtry se musí udržovat v čistém stavu podlepokynů.
Společnost Morphy Richards nebo místní prodejce nebudoupovinni opravit nebo vyměnit výrobek podle záručníchpodmínek v následujících případech:
1 Závada byla způsobena nebo zaviněna nevhodným, chybnýmnebo nedbalým používáním nebo používáním způsobem, který jev rozporu s doporučeními výrobce, nebo proudovými nárazy vsíti či poškozením při přepravě.
2 Spotřebič byl napájen jiným napětím, než jaké je uvedeno navýrobku.
3 Došlo k pokusu o opravu jinými osobami než naším servisnímpersonálem (nebo autorizovaným prodejcem).
4 Spotřebič se pronajímal nebo používal k jiným účelům než vdomácnosti.
5 Spotřebič je z druhé ruky.
6 Společnost Morphy Richards ani místní prodejce neodpovídají zažádné opravy prováděné v záruční lhůtě.
7 Záruka se nevztahuje na spotřební zboží jako sáčky, filtry askleněné karafy.
8 Baterie a poškození způsobené jejich vytečením není zárukoupokryto.
Morphy Richards
FP501020MEE Rev2.qxp_Morphy Richards Instruction Book 26/10/2016 12:10 Page 116

117
9 Filtry nebyly čištěny a měněny podle pokynů.
Tato záruka nepropůjčuje žádná jiná než výše uvedená práva anevztahuje se na žádné reklamace týkající se následných ztrátnebo škod. Tato záruka je nabízena jako další výhoda a nemávliv na vaše zákonná práva spotřebitele.
∂
FP501020MEE Rev2.qxp_Morphy Richards Instruction Book 26/10/2016 12:10 Page 117

118
g Morphy Richards products are intended for household use only. Morphy Richards has a policy of continuous improvement in product quality and design. The Company, therefore, reserves the right to change the specification of its models at any
time.
The After Sales Division, Morphy Richards Ltd, Mexborough, South Yorkshire, England, S64 8AJ Helpline (office hours) UK 0845 871 0960 Republic of Ireland 1800 409119
o Glen Dimplex Australia Unit 1, 21 Lionel Road, Mount Waverley, Victoria 3149 T : 1300 556 816 E : [email protected]
Glen Dimplex New Zealand38 Harris Road, East Tamaki, Auckland, New Zealand T : 09 2748265 E : [email protected]
f Les produits Morphy Richards sont conçus pour unusage exclusivement domestique. Morphy Richards s’engage à mener une politique d’amélioration continue en termes de qualitéet de conception. Le fabricant se réserve donc le droit de modifier sans préavis la spécificationde ses modèles.
Glen Dimplex France 12 Boulevard du Mont d'Est Immeuble MAILLE NORD 3 93160 NOISY-LE-GRAND France
www.glendimplex.fr T : (0)148155363 d Morphy Richards Produkte sind nur für den Einsatz im Haushalt vorgesehen. Ständige
Verbesserungen an der Produktqualität und dem Design gehören zur Philosophie von MorphyRichards. Aus diesem Grunde behält sich die Firma das Recht vor, die Angaben zu ihren Modellenjederzeit zu ändern.
T : 00800 444 00 888 F : 06071 37048 E : [email protected]
p Os produtos Morphy Richards foram concebidos apenas para utilizaçãodoméstica. A Morphy Richards respeita uma política de aperfeiçoamento contínuo daqualidade e designdo produto. Desta forma, a companhia reserva-se o direitode alterar as especificações destesmodelos a qualquer momento.
Imporaudio Lda Rua D. Marcos Da Cruz 1281 4455-482 Perafita Portugal T : +351 22 996 67 40 F : +351 22 996 67 41
i I prodotti Morphy Richards sono concepiti esclusivamente per uso domestico. Morphy Richards è costantemente impegnata a migliorare la qualità e il design dei propriprodotti, pertanto si riserva il diritto di modificare le specifiche dei diversi modelli in qualunquemomento.
PER ASSISTENZA TECNICA: HELPLINE 199.193.328 LUN-VEN 9,30-13,00 e 14,30-17,30. Costo della chiamata 14,26 cent. di Euro al minuto IVA inclusa (da rete fissa).
E : [email protected] F : +39-0693496270 I prodotti Morphy Richards sono distribuiti in Italia da: Necchi Spa, Via Cancelliera 60 00040 Ariccia (RM).
q Morphy Richards produkter er kun beregnet til husholdningsbrug. Det er praksis hos Morphy Richards at fortsætte udviklingen af produktets kvalitet og design. Firmaet forbeholdersig derfor retten til at ændre modellernes specifikationer når som helst.
Albaline AS Avedoreholmen 84
2650 Hvidovre Denmark T : (45) 3678 8083
} Produkty Morphy Richards są przeznaczone wyłącznie do użytku domowego. Morphy Richardsprowadzi politykę ciągłej poprawy jakości i wzoru produktów. Firma zastrzega sobie prawozmiany specyfikacji modeli w dowolnej chwili.
KuGaNa Logistics Sp. z o.o. UL. Kleczewska 37 62-510 Konin Poland T : +48 63 220 60 20
∂ Výrobky Morphy Richards jsou určeny pouze k použití v domácnostech. Morphy Richards usiluje o neustálé zdokonalování kvality a provedení.Proto si vyhrazuje právo kdykoliv změnit specifikace svých modelů.
Solight s.r.o Na Brne 500 06 Hradec Karlove Czech Republic
g For electrical products sold within the European Community. At the end of the electrical products useful life it should not be disposed of with
household waste. Please recycle where facilities exist. Check with your Local Authority or retailer for recycling advice in your country.
f Pour les appareils électriques vendus dans la Communauté européenne. Lorsque les appareils électriques arrivent à la fin de leur vie utile, il ne faut pas les jeter
à la poubelle. Il faut les recycler dans des centres spécialisés, s’ils existent. Consultez la municipalité ou le magasin où vous avez acheté l’appareil pour obtenir des
conseils sur le recyclage dans votre pays.
d Für elektrische Artikel, die in der europäischen Gemeinschaft verkauft werden. Am Ende der Nutzungsdauer sollte das Gerät nicht im regulären Hausmüll entsorgt
werden. Bitte einer Recycling-Sammelstelle zuführen. Informationen über geeignete Recycling-Annahmestellen erhalten Sie bei Ihrer Stadt-
bzw. Ortsverwaltung.
p Para produtos eléctricos vendidos na Comunidade Europeia. Quando os produtos eléctricos atingirem o final da sua vida útil, não devem ser
eliminados juntamente com o lixo doméstico. Faça a reciclagem nos locais apropriados. Contacte as autoridades locais ou o revendedor para saber como efectuar a reciclagem
no seu país.
i Per gli elettrodomestici venduti all’interno della Comunità europea. Al termine della vita utile, non smaltire l’elettrodomestico nei rifiuti domestici. Riciclarlo laddove esistano le strutture. Verificare con la Locale Autorità o con il dettagliante in merito alle possibilità di
riciclaggio nel proprio paese.
q Angående elektriske produkter, der sælges inden for EU. Når det elektriske produkt har nået enden af sin levetid, må det ikke bortkastes sammen
med husholdningsaffaldet. Det bedes genbrugt, hvor der er faciliteter hertil. Bed de lokale myndigheder eller forhandleren om råd om genbrug i dit land.
} Dla produktów elektrycznych sprzedawanych na terenie Wspólnoty Europejskiej. Po zakończeniu okresu uźywalności produktów elektrycznych, nie naleźy ich wyrzucać
wraz z odpadkami pochodzącymi z gospodarstwa domowego. Jeźeli istnieją odpowiednie zakłady zajmujące się utylizacją, produkty naleźy poddać
recyklingowi. W celu uzyskania porady na temat recyklingu w Twoim kraju zwróć się do miejscowych
władz lub lokalnego sprzedawcy.
∂ Pro elektrické výrobky prodávané v Evropském společenství. Elektrické výrobky se po skončení životnosti nesmí vyhazovat do domovního odpadu. Nechte je recyklovat v příslušných zařízeních. Informace o recyklaci ve vaší zemi si zjistěte od místních úřadů nebo prodejce.
NZ
FP501020MEE Rev2.qxp_Morphy Richards Instruction Book 26/10/2016 12:10 Page 118

119
g
f
d
p
i
q
}
∂
FP501020MEE Rev2.qxp_Morphy Richards Instruction Book 26/10/2016 12:10 Page 119

FP501020MEE Rev2 10/16
FP501020MEE Rev2.qxp_Morphy Richards Instruction Book 26/10/2016 12:10 Page 120