monza - team knowhowdocuments.knowhow.com/computing/monza_ib_111020_web_final.pdf · hard drive...
TRANSCRIPT

Operation Manual
MONZA C1 / E1LAPTOP COMPUTER

3
CONTENTS
RUNNING SYSTEM RECOVERY FROM YOUR HARD DRIVE .................................................................................... 16
Stage 1 ...................................................................................................16Stage 2 ...................................................................................................17Stage 3 ...................................................................................................18
RECOVERY BACKUP WIZARD..................................................... 20RUNNING A SYSTEM RECOVERY FROM DVD/USB.............. 21
SAFETY INSTRUCTIONS .................................................................4TRADEMARKS ...................................................................................5PRODUCT SPECIFICATION.............................................................6GETTING STARTED...........................................................................7PRODUCT OVERVIEW .....................................................................8
Top View with Display Open ...........................................................8Left View .................................................................................................9Right View ............................................................................................10Bottom View ........................................................................................10Front View ............................................................................................ 11
PREPARING YOUR MONZA LAPTOP COMPUTER ................12KEYBOARD FUNCTION KEYS ..................................................... 13TOUCHPAD...................................................................................... 14SYSTEM RECOVERY ....................................................................... 15
Why Reinstall? .....................................................................................15What is Reinstalled? ..........................................................................15Before you start... ...............................................................................15
4
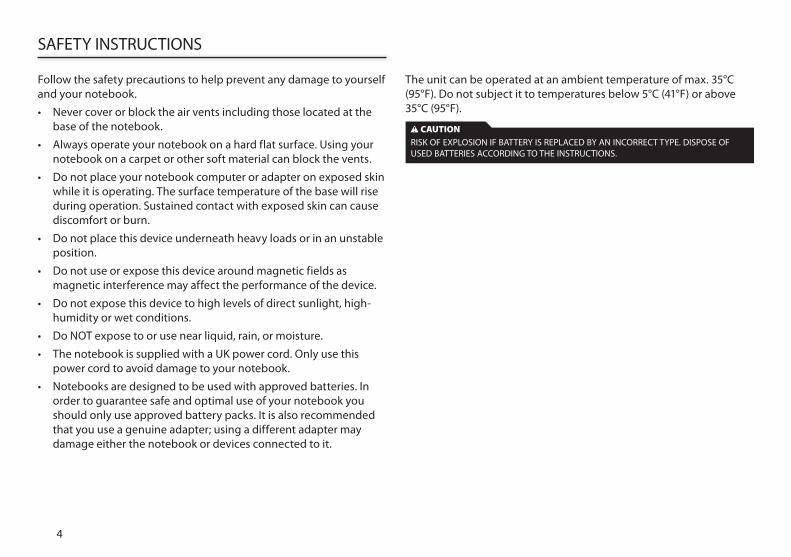
Follow the safety precautions to help prevent any damage to yourself and your notebook.
• Never cover or block the air vents including those located at the base of the notebook.
• Always operate your notebook on a hard flat surface. Using your notebook on a carpet or other soft material can block the vents.
• Do not place your notebook computer or adapter on exposed skin while it is operating. The surface temperature of the base will rise during operation. Sustained contact with exposed skin can cause discomfort or burn.
• Do not place this device underneath heavy loads or in an unstable position.
• Do not use or expose this device around magnetic fields as magnetic interference may affect the performance of the device.
• Do not expose this device to high levels of direct sunlight, high-humidity or wet conditions.
• Do NOT expose to or use near liquid, rain, or moisture.
• The notebook is supplied with a UK power cord. Only use this power cord to avoid damage to your notebook.
• Notebooks are designed to be used with approved batteries. In order to guarantee safe and optimal use of your notebook you should only use approved battery packs. It is also recommended that you use a genuine adapter; using a different adapter may damage either the notebook or devices connected to it.
SAFETY INSTRUCTIONS
The unit can be operated at an ambient temperature of max. 35°C (95°F). Do not subject it to temperatures below 5°C (41°F) or above 35°C (95°F).
CAUTIONRISK OF EXPLOSION IF BATTERY IS REPLACED BY AN INCORRECT TYPE. DISPOSE OF USED BATTERIES ACCORDING TO THE INSTRUCTIONS.

5
AMD and combinations thereof are trademarks of Advanced Micro Devices, Inc.
Windows, Microsoft and Windows logo are registered trademarks of Microsoft Corporation.
HDMI, the HDMI logo and High-Definition Multimedia Interface are trademarks or registered trademarks of HDMI Licensing LLC.
Secure Digital and SD are trademarks of SD Card Association.
MultiMediaCard and MMC are trademarks of MultiMediaCard Association.
Memory Stick and Memory Stick PRO are trademarks or registered trademarks of Sony Corporation.
All trademarks are the property of their respective owners and all rights are acknowledged.
TRADEMARKS
6
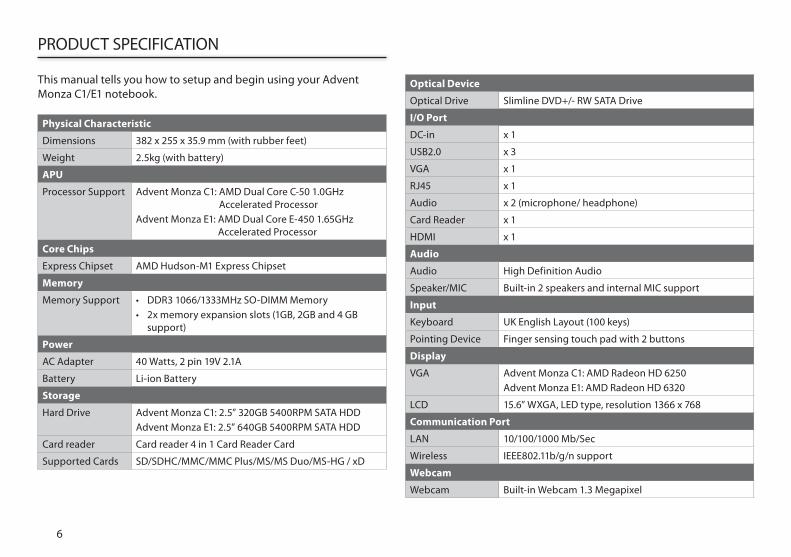
PRODUCT SPECIFICATION
This manual tells you how to setup and begin using your Advent Monza C1/E1 notebook.
Physical Characteristic
Dimensions 382 x 255 x 35.9 mm (with rubber feet)
Weight 2.5kg (with battery)
APU
Processor Support Advent Monza C1: AMD Dual Core C-50 1.0GHz Accelerated Processor
Advent Monza E1: AMD Dual Core E-450 1.65GHz Accelerated Processor
Core Chips
Express Chipset AMD Hudson-M1 Express Chipset
Memory
Memory Support • DDR3 1066/1333MHz SO-DIMM Memory• 2x memory expansion slots (1GB, 2GB and 4 GB
support)
Power
AC Adapter 40 Watts, 2 pin 19V 2.1A
Battery Li-ion Battery
Storage
Hard Drive Advent Monza C1: 2.5” 320GB 5400RPM SATA HDDAdvent Monza E1: 2.5” 640GB 5400RPM SATA HDD
Card reader Card reader 4 in 1 Card Reader Card
Supported Cards SD/SDHC/MMC/MMC Plus/MS/MS Duo/MS-HG / xD
Optical Device
Optical Drive Slimline DVD+/- RW SATA Drive
I/O Port
DC-in x 1
USB2.0 x 3
VGA x 1
RJ45 x 1
Audio x 2 (microphone/ headphone)
Card Reader x 1
HDMI x 1
Audio
Audio High Definition Audio
Speaker/MIC Built-in 2 speakers and internal MIC support
Input
Keyboard UK English Layout (100 keys)
Pointing Device Finger sensing touch pad with 2 buttons
Display
VGA Advent Monza C1: AMD Radeon HD 6250Advent Monza E1: AMD Radeon HD 6320
LCD 15.6” WXGA, LED type, resolution 1366 x 768
Communication Port
LAN 10/100/1000 Mb/Sec
Wireless IEEE802.11b/g/n support
Webcam
Webcam Built-in Webcam 1.3 Megapixel
7
GETTING STARTED
First check what’s in your box:
• Notebook
• Power Cable
• AC Adapter
• Battery Pack
• Welcome Pack with Documentation and 2 x Blank DVD Discs
• Safety, Regulations, Troubleshooting & Recovery Manual
8
PRODUCT OVERVIEW
This section explains the use of various components on your notebook.
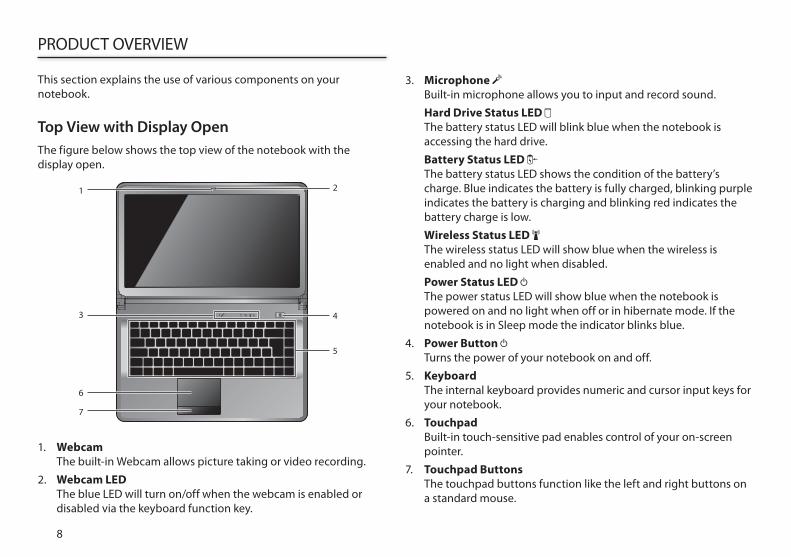
Top View with Display OpenThe figure below shows the top view of the notebook with the display open.
1. WebcamThe built-in Webcam allows picture taking or video recording.
2. Webcam LEDThe blue LED will turn on/off when the webcam is enabled or disabled via the keyboard function key.
3. Microphone Built-in microphone allows you to input and record sound.
Hard Drive Status LED The battery status LED will blink blue when the notebook is accessing the hard drive.
Battery Status LED The battery status LED shows the condition of the battery’s charge. Blue indicates the battery is fully charged, blinking purple indicates the battery is charging and blinking red indicates the battery charge is low.
Wireless Status LED The wireless status LED will show blue when the wireless is enabled and no light when disabled.
Power Status LED The power status LED will show blue when the notebook is powered on and no light when off or in hibernate mode. If the notebook is in Sleep mode the indicator blinks blue.
4. Power Button Turns the power of your notebook on and off.
5. KeyboardThe internal keyboard provides numeric and cursor input keys for your notebook.
6. TouchpadBuilt-in touch-sensitive pad enables control of your on-screen pointer.
7. Touchpad ButtonsThe touchpad buttons function like the left and right buttons on a standard mouse.
2
4
5
3
1
6
7
9
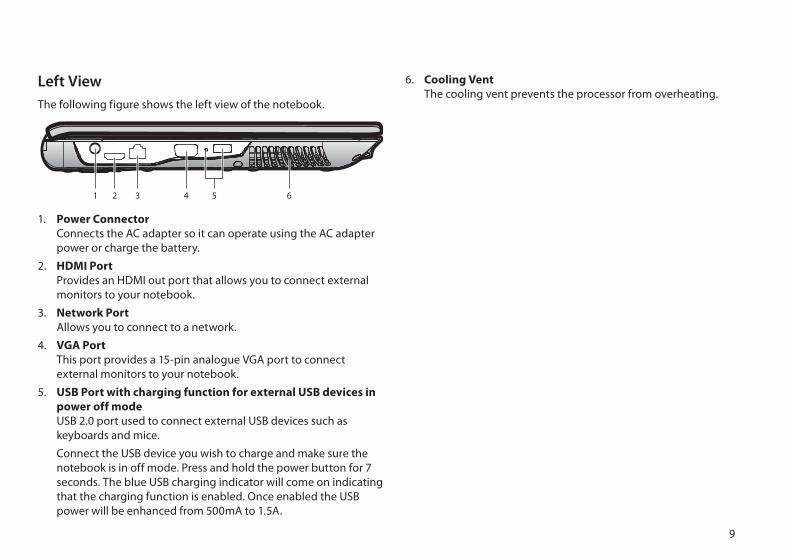
Left ViewThe following figure shows the left view of the notebook.
1. Power ConnectorConnects the AC adapter so it can operate using the AC adapter power or charge the battery.
2. HDMI PortProvides an HDMI out port that allows you to connect external monitors to your notebook.
3. Network PortAllows you to connect to a network.
4. VGA PortThis port provides a 15-pin analogue VGA port to connect external monitors to your notebook.
5. USB Port with charging function for external USB devices in power off modeUSB 2.0 port used to connect external USB devices such as keyboards and mice.
Connect the USB device you wish to charge and make sure the notebook is in off mode. Press and hold the power button for 7 seconds. The blue USB charging indicator will come on indicating that the charging function is enabled. Once enabled the USB power will be enhanced from 500mA to 1.5A.
6. Cooling VentThe cooling vent prevents the processor from overheating.
1 2 3 5 64
10
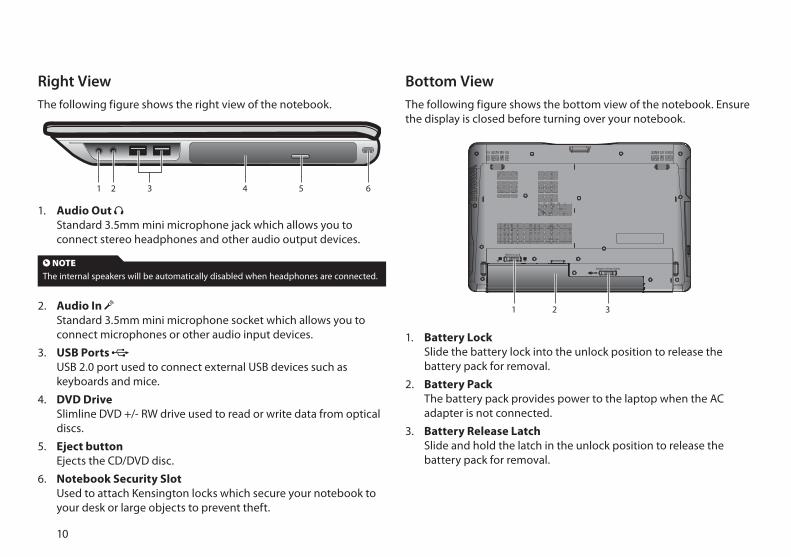
NOTEThe internal speakers will be automatically disabled when headphones are connected.
1. Audio Out Standard 3.5mm mini microphone jack which allows you to connect stereo headphones and other audio output devices.
Right ViewThe following figure shows the right view of the notebook.
Bottom ViewThe following figure shows the bottom view of the notebook. Ensure the display is closed before turning over your notebook.
2. Audio In Standard 3.5mm mini microphone socket which allows you to connect microphones or other audio input devices.
3. USB Ports USB 2.0 port used to connect external USB devices such as keyboards and mice.
4. DVD DriveSlimline DVD +/- RW drive used to read or write data from optical discs.
5. Eject buttonEjects the CD/DVD disc.
6. Notebook Security SlotUsed to attach Kensington locks which secure your notebook to your desk or large objects to prevent theft.
1. Battery LockSlide the battery lock into the unlock position to release the battery pack for removal.
2. Battery Pack The battery pack provides power to the laptop when the AC adapter is not connected.
3. Battery Release LatchSlide and hold the latch in the unlock position to release the battery pack for removal.
Battery Lock
Battery release latch
1 32
1 2 3 4 5 6
11
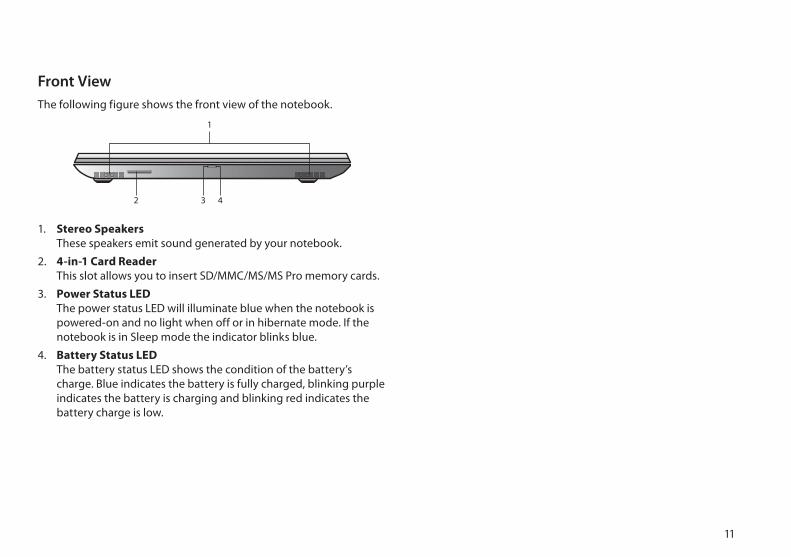
Front ViewThe following figure shows the front view of the notebook.
1. Stereo SpeakersThese speakers emit sound generated by your notebook.
2. 4-in-1 Card ReaderThis slot allows you to insert SD/MMC/MS/MS Pro memory cards.
3. Power Status LEDThe power status LED will illuminate blue when the notebook is powered-on and no light when off or in hibernate mode. If the notebook is in Sleep mode the indicator blinks blue.
4. Battery Status LEDThe battery status LED shows the condition of the battery’s charge. Blue indicates the battery is fully charged, blinking purple indicates the battery is charging and blinking red indicates the battery charge is low.
1
2 3 4
12
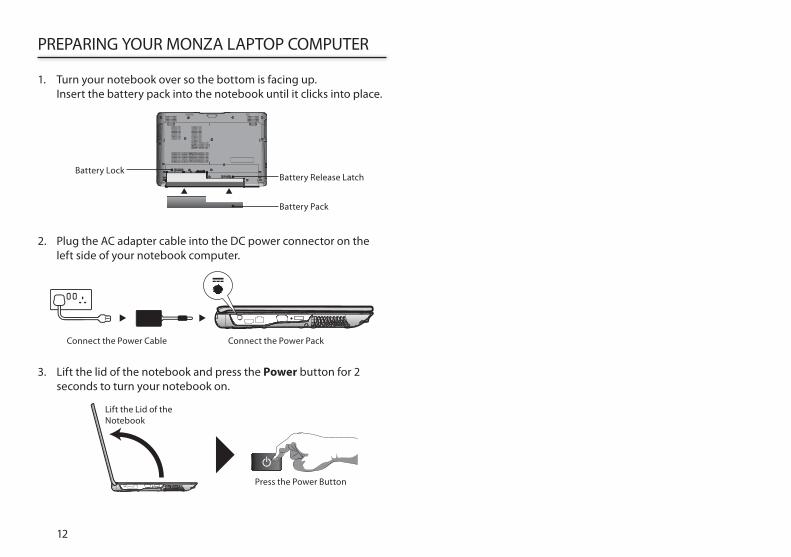
1. Turn your notebook over so the bottom is facing up. Insert the battery pack into the notebook until it clicks into place.
2. Plug the AC adapter cable into the DC power connector on the left side of your notebook computer.
3. Lift the lid of the notebook and press the Power button for 2 seconds to turn your notebook on.
Connect the Power Cable Connect the Power Pack
Press the Power Button
Lift the Lid of the Notebook
Battery LockBattery Release Latch
Battery Pack
PREPARING YOUR MONZA LAPTOP COMPUTER
13
KEYBOARD FUNCTION KEYS
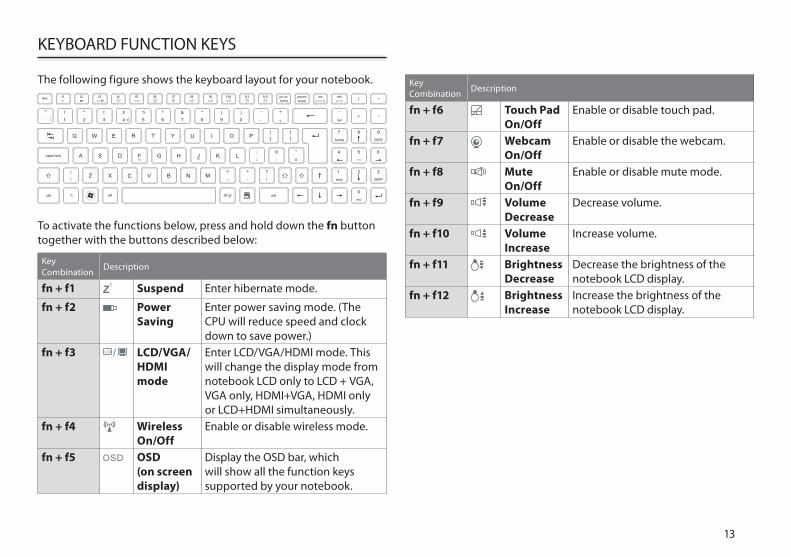
The following figure shows the keyboard layout for your notebook.
To activate the functions below, press and hold down the fn button together with the buttons described below:
Key Combination Description
fn + f1 Suspend Enter hibernate mode.
fn + f2 Power Saving
Enter power saving mode. (The CPU will reduce speed and clock down to save power.)
fn + f3 LCD/VGA/ HDMI mode
Enter LCD/VGA/HDMI mode. This will change the display mode from notebook LCD only to LCD + VGA, VGA only, HDMI+VGA, HDMI only or LCD+HDMI simultaneously.
fn + f4 Wireless On/Off
Enable or disable wireless mode.
fn + f5 OSD (on screen display)
Display the OSD bar, which will show all the function keys supported by your notebook.
Key Combination Description
fn + f6 Touch Pad On/Off
Enable or disable touch pad.
fn + f7 Webcam On/Off
Enable or disable the webcam.
fn + f8 Mute On/Off
Enable or disable mute mode.
fn + f9 Volume Decrease
Decrease volume.
fn + f10 Volume Increase
Increase volume.
fn + f11 Brightness Decrease
Decrease the brightness of the notebook LCD display.
fn + f12 Brightness Increase
Increase the brightness of the notebook LCD display.
14
TOUCHPAD
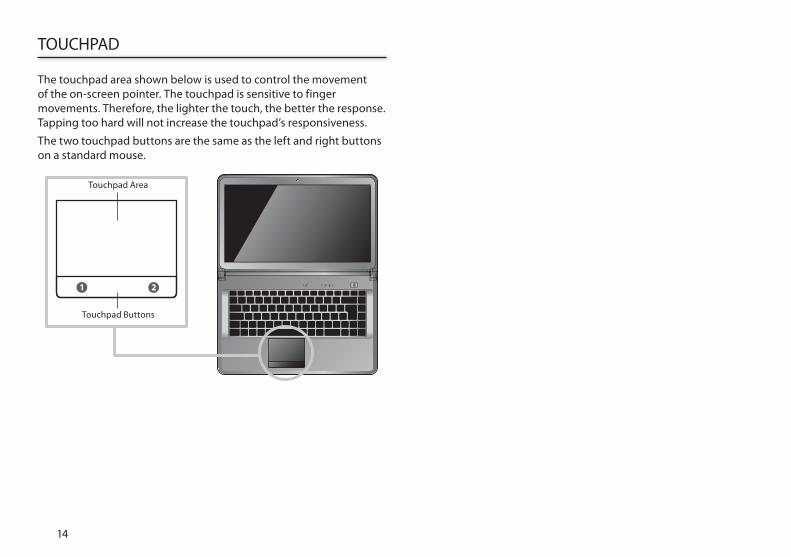
The touchpad area shown below is used to control the movement of the on-screen pointer. The touchpad is sensitive to finger movements. Therefore, the lighter the touch, the better the response. Tapping too hard will not increase the touchpad’s responsiveness.
The two touchpad buttons are the same as the left and right buttons on a standard mouse.
21
Touchpad Buttons
Touchpad Area
15
Why Reinstall?
There are several reasons why you may need or want to re-install Windows®:
• Windows® may become irreparably damaged or corrupt.
• Key hardware such as your motherboard may be changed during a repair.
• You may simply want a clean start.
Regardless of reason, the following pages simplify the process. These pages will explain what you need to do to restore Windows® to its ‘just out of the box’ condition.
What is Reinstalled?
If you choose a destructive recovery it will reinstall Windows® back to its factory default settings, so any software that was preinstalled will be present but any personal files on your computer will be lost. If you choose a non-destructive recovery this will repair Windows®, and you will not lose any personal files. The recovery system takes between 20 and 40 minutes.
Please be aware that the recovery will not reinstall any software, hardware, or peripherals that you have added to your computer. Please see the documentation supplied with these devices for more information.
SYSTEM RECOVERY
Before you start...
It is important to note that the reinstallation process can erase your hard drive and all the files stored on it. Before attempting any reinstallation, it is recommended you save all important items to a CD/DVD, or other external storage device.
16
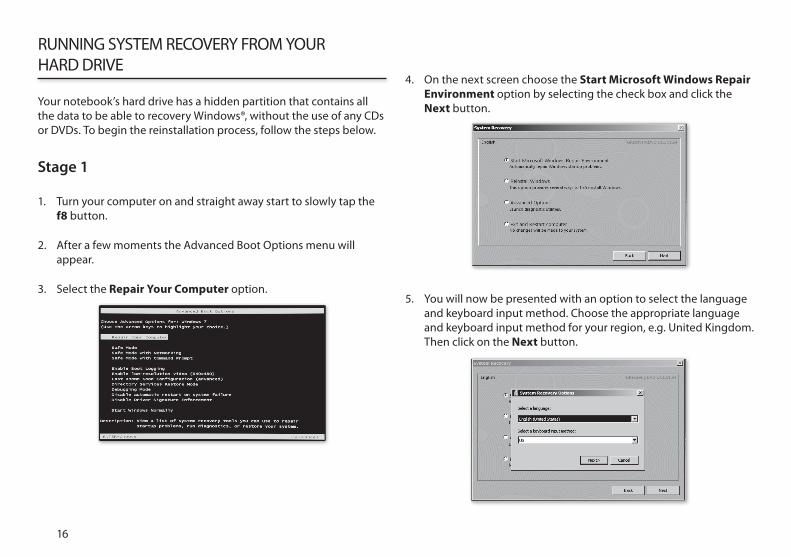
RUNNING SYSTEM RECOVERY FROM YOUR HARD DRIVE
Your notebook’s hard drive has a hidden partition that contains all the data to be able to recovery Windows®, without the use of any CDs or DVDs. To begin the reinstallation process, follow the steps below.
Stage 1
1. Turn your computer on and straight away start to slowly tap the f8 button.
2. After a few moments the Advanced Boot Options menu will appear.
3. Select the Repair Your Computer option.
4. On the next screen choose the Start Microsoft Windows Repair Environment option by selecting the check box and click the Next button.
5. You will now be presented with an option to select the language and keyboard input method. Choose the appropriate language and keyboard input method for your region, e.g. United Kingdom. Then click on the Next button.
17
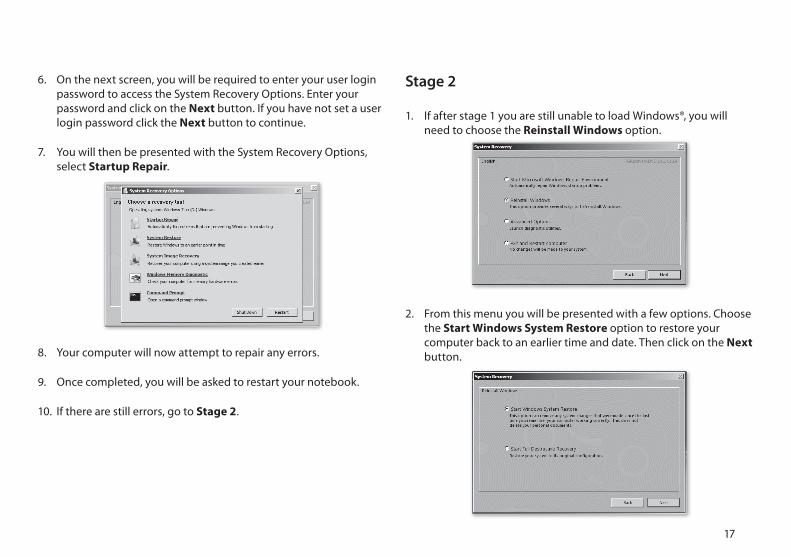
Stage 2
1. If after stage 1 you are still unable to load Windows®, you will need to choose the Reinstall Windows option.
6. On the next screen, you will be required to enter your user login password to access the System Recovery Options. Enter your password and click on the Next button. If you have not set a user login password click the Next button to continue.
7. You will then be presented with the System Recovery Options, select Startup Repair.
8. Your computer will now attempt to repair any errors.
9. Once completed, you will be asked to restart your notebook.
10. If there are still errors, go to Stage 2.
2. From this menu you will be presented with a few options. Choose the Start Windows System Restore option to restore your computer back to an earlier time and date. Then click on the Next button.
18
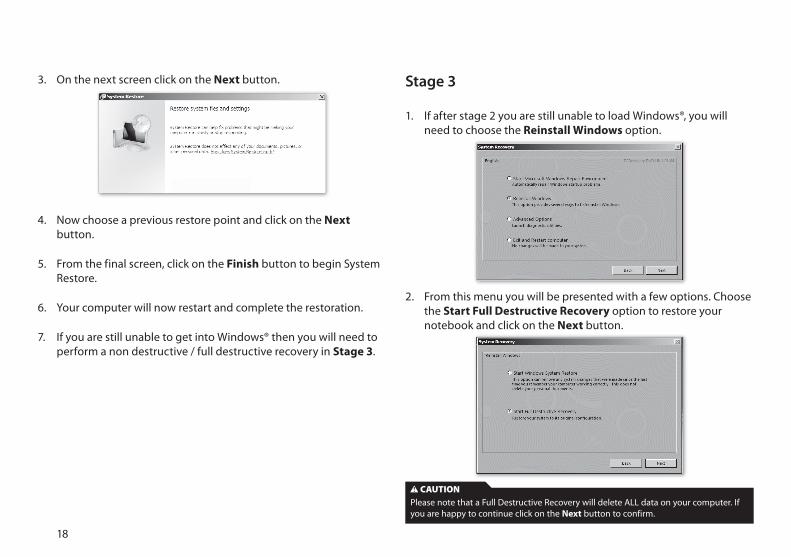
3. On the next screen click on the Next button.
4. Now choose a previous restore point and click on the Next button.
5. From the final screen, click on the Finish button to begin System Restore.
6. Your computer will now restart and complete the restoration.
7. If you are still unable to get into Windows® then you will need to perform a non destructive / full destructive recovery in Stage 3.
Stage 3
1. If after stage 2 you are still unable to load Windows®, you will need to choose the Reinstall Windows option.
2. From this menu you will be presented with a few options. Choose the Start Full Destructive Recovery option to restore your notebook and click on the Next button.
CAUTIONPlease note that a Full Destructive Recovery will delete ALL data on your computer. If you are happy to continue click on the Next button to confirm.
19
3. Your computer will now begin to reinstall Windows®.
4. Once the reinstallation has completed, your computer will restart automatically.
5. Your computer will be restored back to its factory default settings. You will need to install or reinstall any additional software that you have purchased.

20
RECOVERY BACKUP WIZARD
The Recovery Backup Wizard allows you to create a backup of your Recovery to DVD(s) or USB stick in case of hard drive replacement or corruption.
To create a recovery backup, follow the steps below.
1. Make sure your notebook power adapter is connected before you start the recovery process.
2. Click on the Windows® start icon in the left corner of your desktop.
3. Select All Programs Advent Recovery Back Wizard
4. The Recovery Backup wizard will now be displayed on the screen. Click ‘Create your Recovery Backup Now’ to begin and follow the on-screen instructions.
5. Select your preferred method of backup and click on the Next button.
6. If a User Access Control window appears on the screen, click on the Allow button.
7. The backup will now be created and will take around 20 minutes to complete.
8. Once the backup is created, keep it in a safe place.
21
RUNNING A SYSTEM RECOVERY FROM DVD/USB
If you are unable to use the main hard drive-based System Recovery or you have replaced your existing hard drive, then you will need to use the Recovery DVD’s/USB stick you created from the Recovery Backup Wizard.
1. Insert the Recovery DVD or USB Stick that you created, into your notebook and restart it.
2. Straight away start to slowly tap the f7 button.
3. After a few moments the Boot Options menu will appear.
4. Select the appropriate device to boot from, i.e. DVD drive or USB stick.
5. After a few moments the System Recovery window will appear.
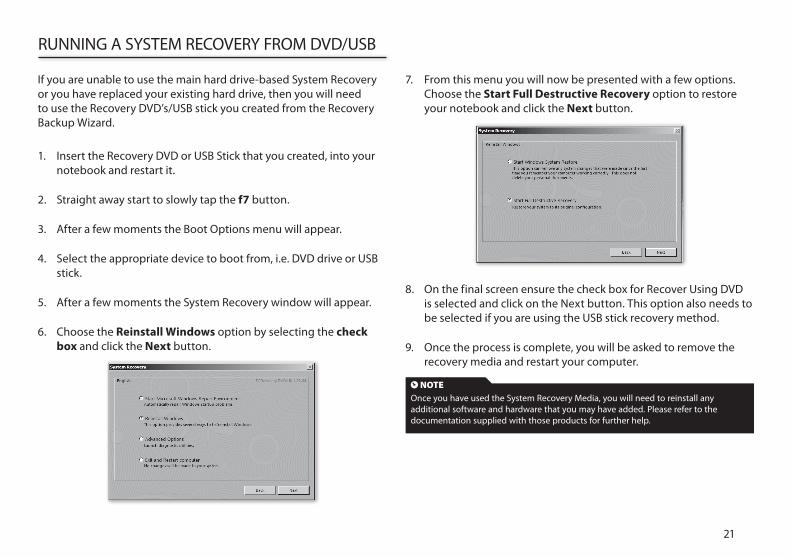
6. Choose the Reinstall Windows option by selecting the check box and click the Next button.
NOTEOnce you have used the System Recovery Media, you will need to reinstall any additional software and hardware that you may have added. Please refer to the documentation supplied with those products for further help.
7. From this menu you will now be presented with a few options. Choose the Start Full Destructive Recovery option to restore your notebook and click the Next button.
8. On the final screen ensure the check box for Recover Using DVD is selected and click on the Next button. This option also needs to be selected if you are using the USB stick recovery method.
9. Once the process is complete, you will be asked to remove the recovery media and restart your computer.
