module 4 : spreadsheets - wordpress.com · module 4 : spreadsheets a spreadsheet program allows you...
TRANSCRIPT
Module 4 : Spreadsheets
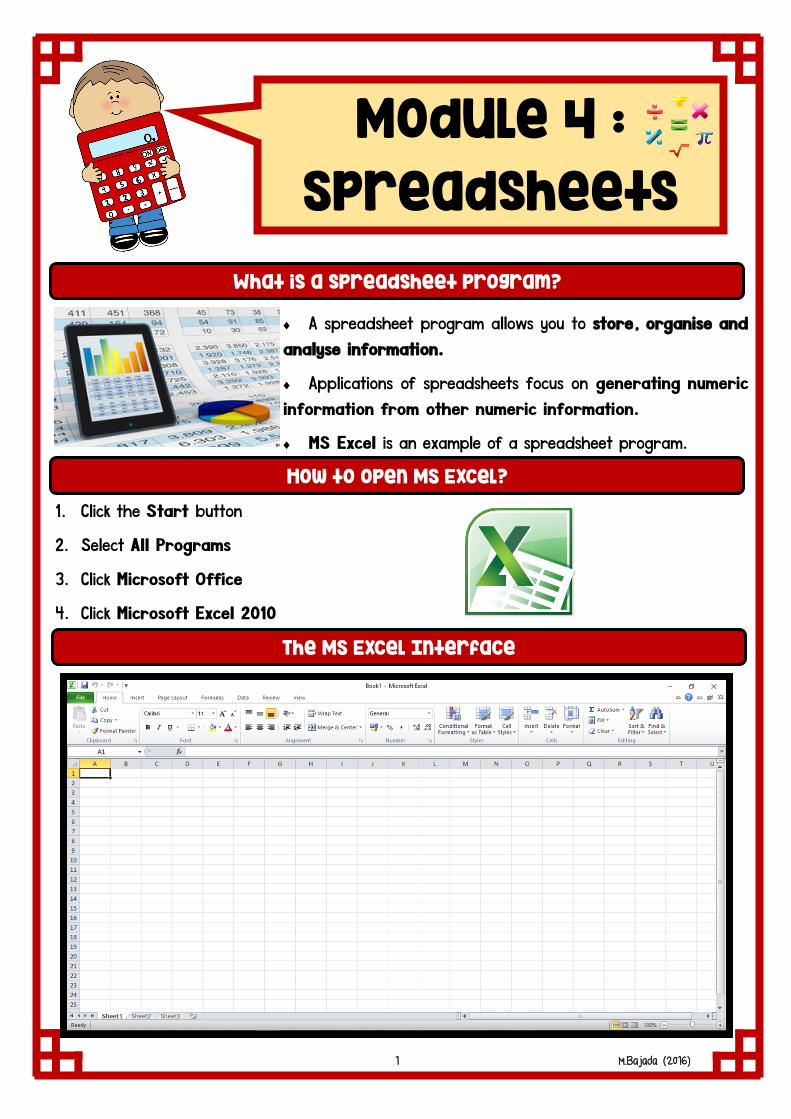
A spreadsheet program allows you to store, organise and
analyse information.
Applications of spreadsheets focus on generating numeric
information from other numeric information.
MS Excel is an example of a spreadsheet program.
1. Click the Start button
2. Select All Programs
3. Click Microsoft Office
4. Click Microsoft Excel 2010
What is a spreadsheet program?
How to open MS Excel?
The MS Excel Interface
1 M.Bajada (2016)
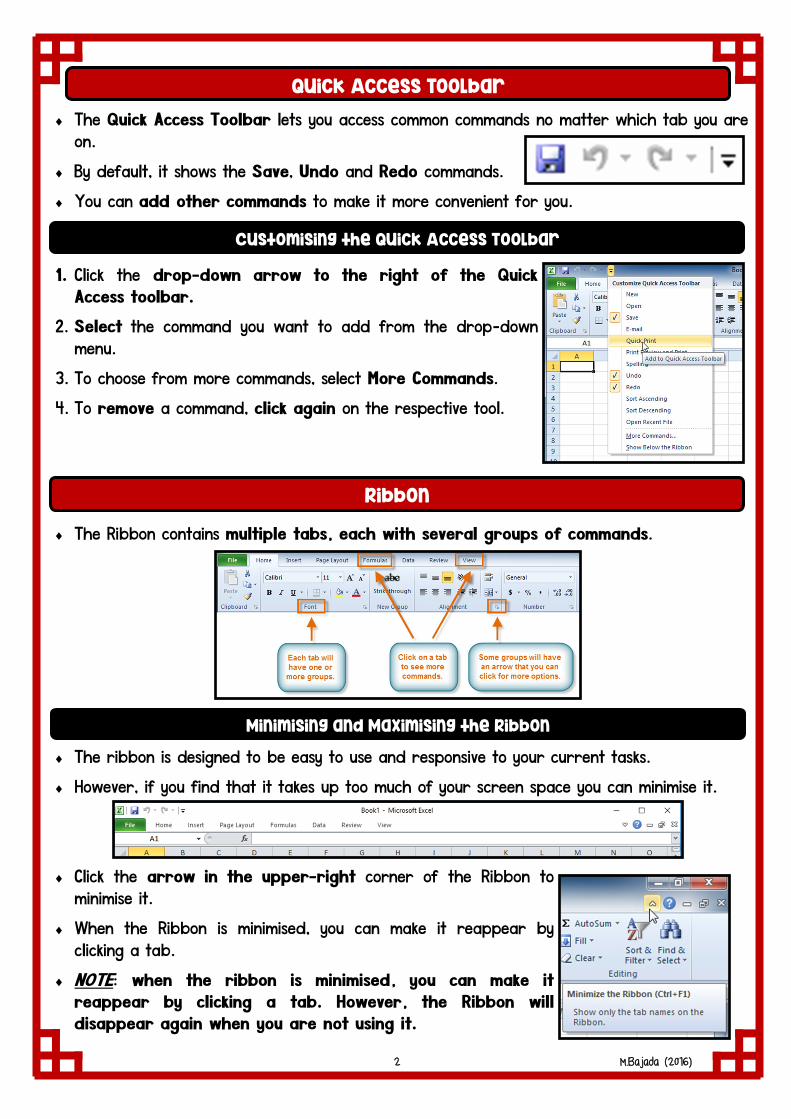
The Quick Access Toolbar lets you access common commands no matter which tab you are
on.
By default, it shows the Save, Undo and Redo commands.
You can add other commands to make it more convenient for you.
1. Click the drop-down arrow to the right of the Quick
Access toolbar.
2. Select the command you want to add from the drop-down
menu.
3. To choose from more commands, select More Commands.
4. To remove a command, click again on the respective tool.
The Ribbon contains multiple tabs, each with several groups of commands.
The ribbon is designed to be easy to use and responsive to your current tasks.
However, if you find that it takes up too much of your screen space you can minimise it.
Click the arrow in the upper-right corner of the Ribbon to
minimise it.
When the Ribbon is minimised, you can make it reappear by
clicking a tab.
NOTE: when the ribbon is minimised, you can make it
reappear by clicking a tab. However, the Ribbon will
disappear again when you are not using it.
Quick Access Toolbar
Customising the Quick Access Toolbar
Ribbon
Minimising and Maximising the Ribbon
2 M.Bajada (2016)
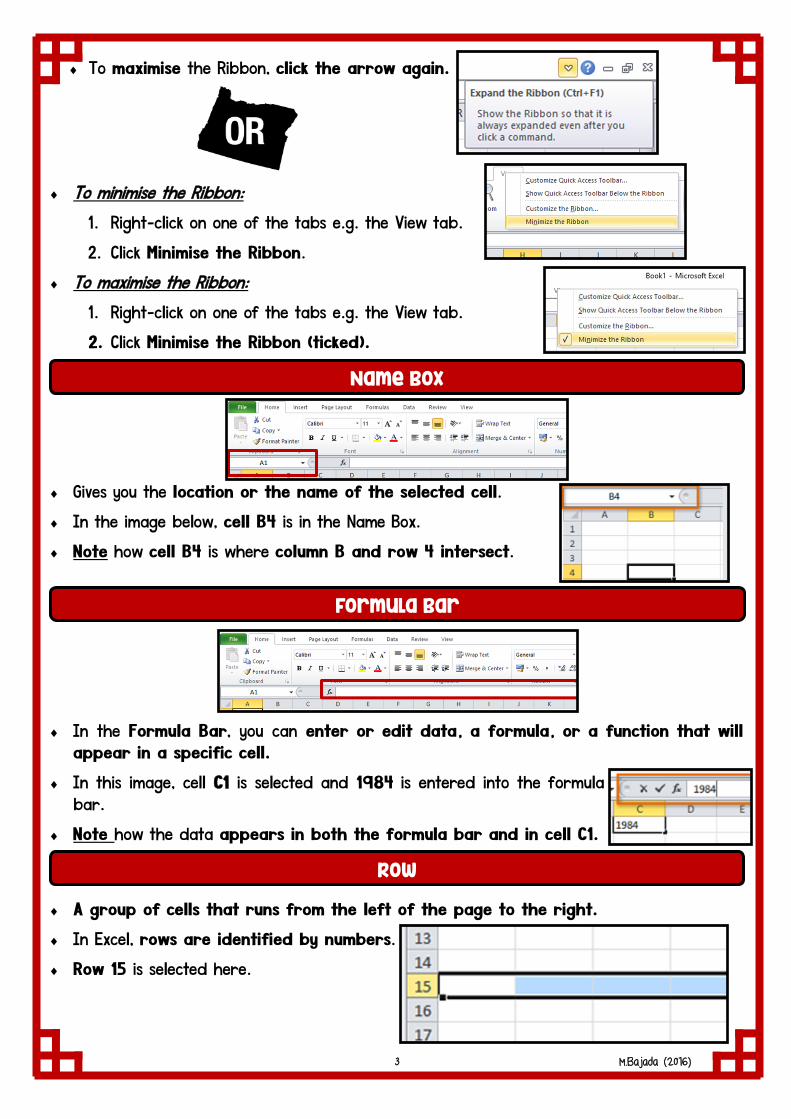
To minimise the Ribbon:
1. Right-click on one of the tabs e.g. the View tab.
2. Click Minimise the Ribbon.
To maximise the Ribbon:
1. Right-click on one of the tabs e.g. the View tab.
2. Click Minimise the Ribbon (ticked).
Gives you the location or the name of the selected cell.
In the image below, cell B4 is in the Name Box.
Note how cell B4 is where column B and row 4 intersect.
In the Formula Bar, you can enter or edit data, a formula, or a function that will
appear in a specific cell.
In this image, cell C1 is selected and 1984 is entered into the formula
bar.
Note how the data appears in both the formula bar and in cell C1.
A group of cells that runs from the left of the page to the right.
In Excel, rows are identified by numbers.
Row 15 is selected here.
Name Box
To maximise the Ribbon, click the arrow again.
Formula Bar
Row
3 M.Bajada (2016)
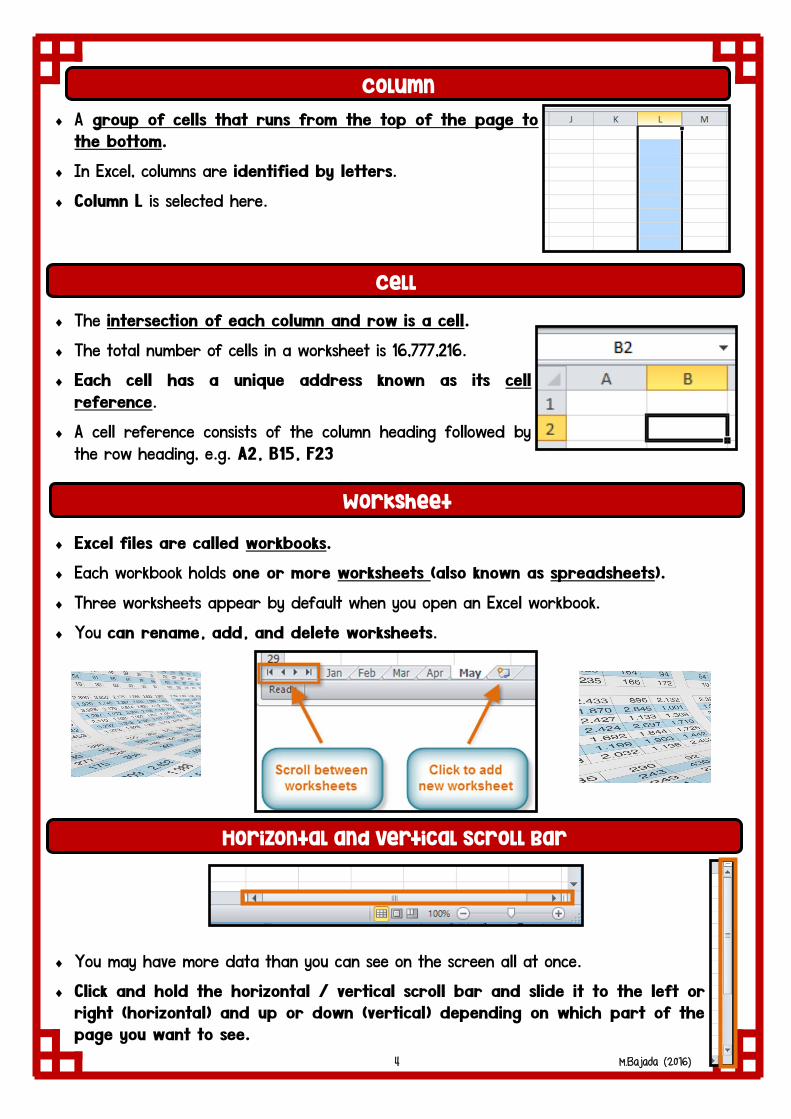
A group of cells that runs from the top of the page to
the bottom.
In Excel, columns are identified by letters.
Column L is selected here.
The intersection of each column and row is a cell.
The total number of cells in a worksheet is 16,777,216.
Each cell has a unique address known as its cell
reference.
A cell reference consists of the column heading followed by
the row heading, e.g. A2, B15, F23
Excel files are called workbooks.
Each workbook holds one or more worksheets (also known as spreadsheets).
Three worksheets appear by default when you open an Excel workbook.
You can rename, add, and delete worksheets.
You may have more data than you can see on the screen all at once.
Click and hold the horizontal / vertical scroll bar and slide it to the left or
right (horizontal) and up or down (vertical) depending on which part of the
page you want to see.
Column
Worksheet
Cell
Horizontal and Vertical Scroll Bar
4 M.Bajada (2016)
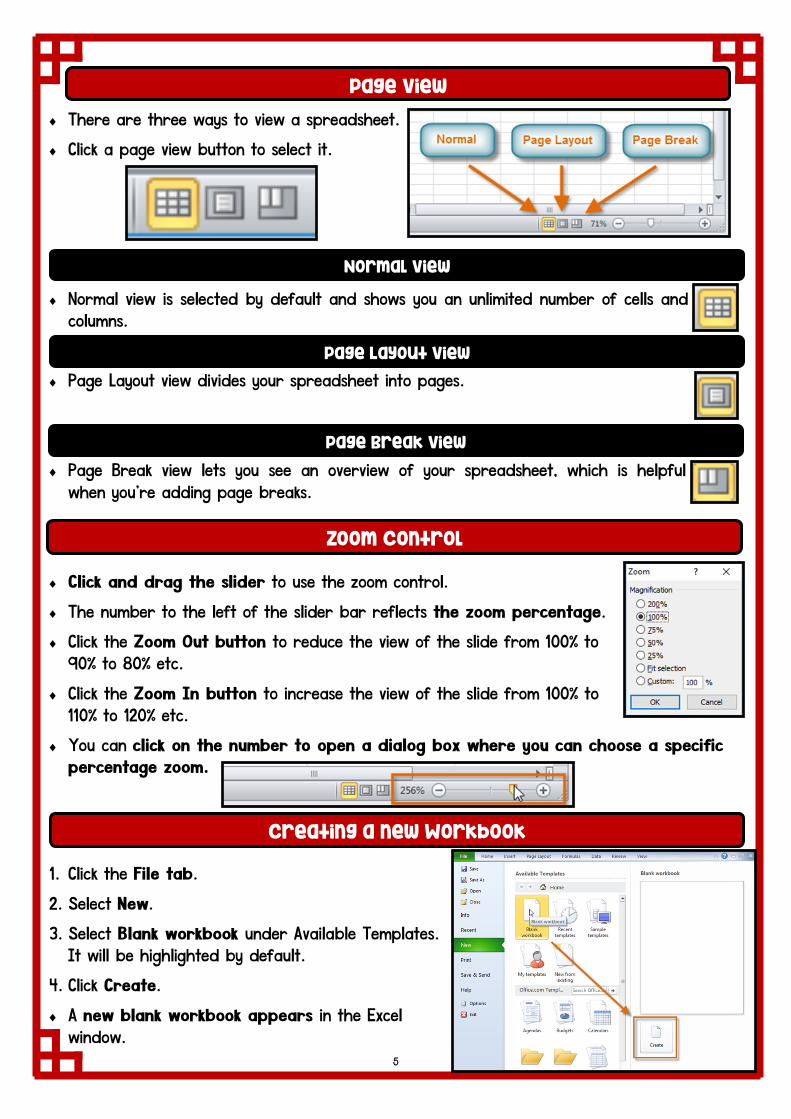
There are three ways to view a spreadsheet.
Click a page view button to select it.
Normal view is selected by default and shows you an unlimited number of cells and
columns.
Page Layout view divides your spreadsheet into pages.
Page Break view lets you see an overview of your spreadsheet, which is helpful
when you're adding page breaks.
Click and drag the slider to use the zoom control.
The number to the left of the slider bar reflects the zoom percentage.
Click the Zoom Out button to reduce the view of the slide from 100% to
90% to 80% etc.
Click the Zoom In button to increase the view of the slide from 100% to
110% to 120% etc.
You can click on the number to open a dialog box where you can choose a specific
percentage zoom.
1. Click the File tab.
2. Select New.
3. Select Blank workbook under Available Templates.
It will be highlighted by default.
4. Click Create.
A new blank workbook appears in the Excel
window.
Page View
Zoom Control
Normal View
Page Layout View
Page Break View
Creating a new Workbook
5
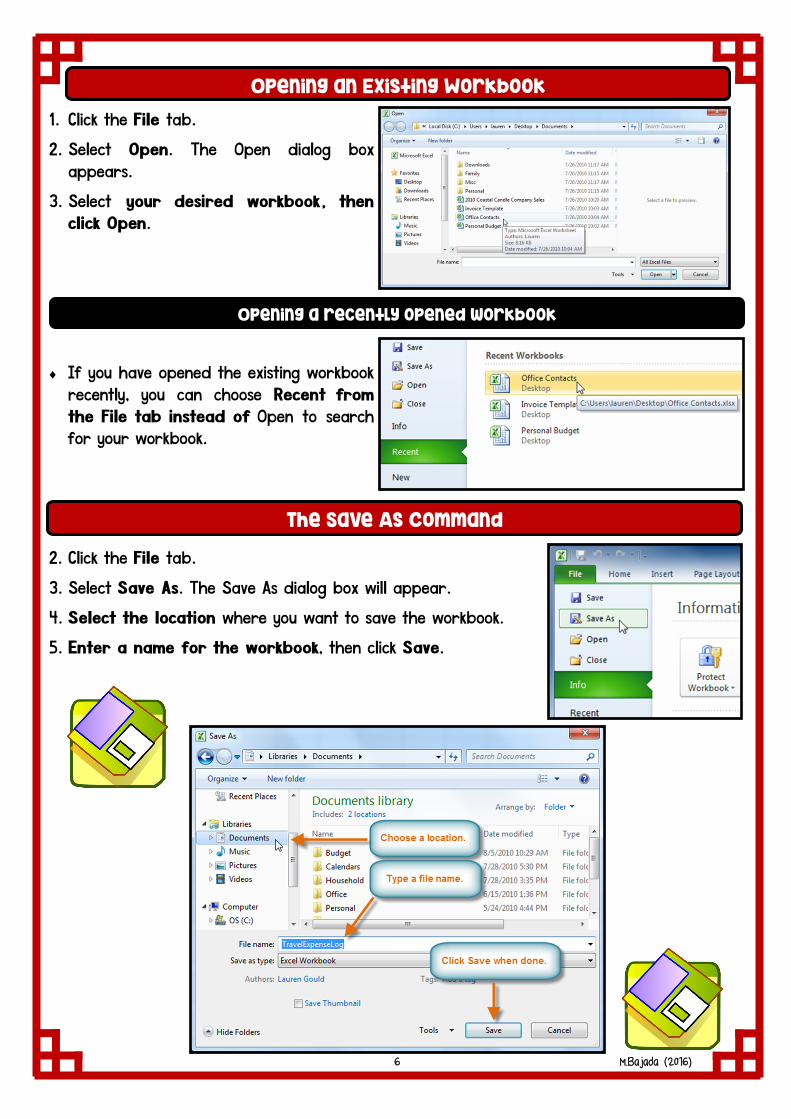
1. Click the File tab.
2. Select Open. The Open dialog box
appears.
3. Select your desired workbook, then
click Open.
If you have opened the existing workbook
recently, you can choose Recent from
the File tab instead of Open to search
for your workbook.
1.
2. Click the File tab.
3. Select Save As. The Save As dialog box will appear.
4. Select the location where you want to save the workbook.
5. Enter a name for the workbook, then click Save.
Opening an Existing Workbook
The Save As Command
Opening a recently opened workbook
6 M.Bajada (2016)
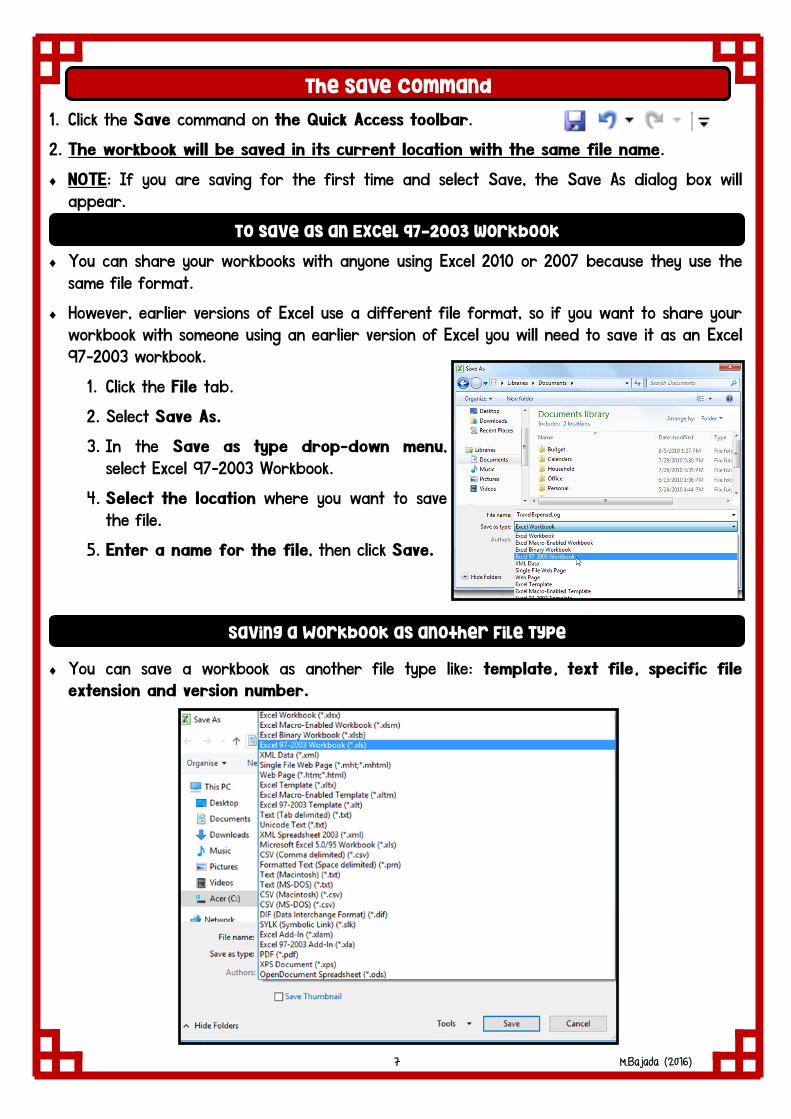
1. Click the Save command on the Quick Access toolbar.
2. The workbook will be saved in its current location with the same file name.
NOTE: If you are saving for the first time and select Save, the Save As dialog box will
appear.
You can share your workbooks with anyone using Excel 2010 or 2007 because they use the
same file format.
However, earlier versions of Excel use a different file format, so if you want to share your
workbook with someone using an earlier version of Excel you will need to save it as an Excel
97-2003 workbook.
1. Click the File tab.
2. Select Save As.
3. In the Save as type drop-down menu,
select Excel 97-2003 Workbook.
4. Select the location where you want to save
the file.
5. Enter a name for the file, then click Save.
You can save a workbook as another file type like: template, text file, specific file
extension and version number.
The Save Command
To save as an Excel 97-2003 workbook
Saving a Workbook as another File Type
7 M.Bajada (2016)
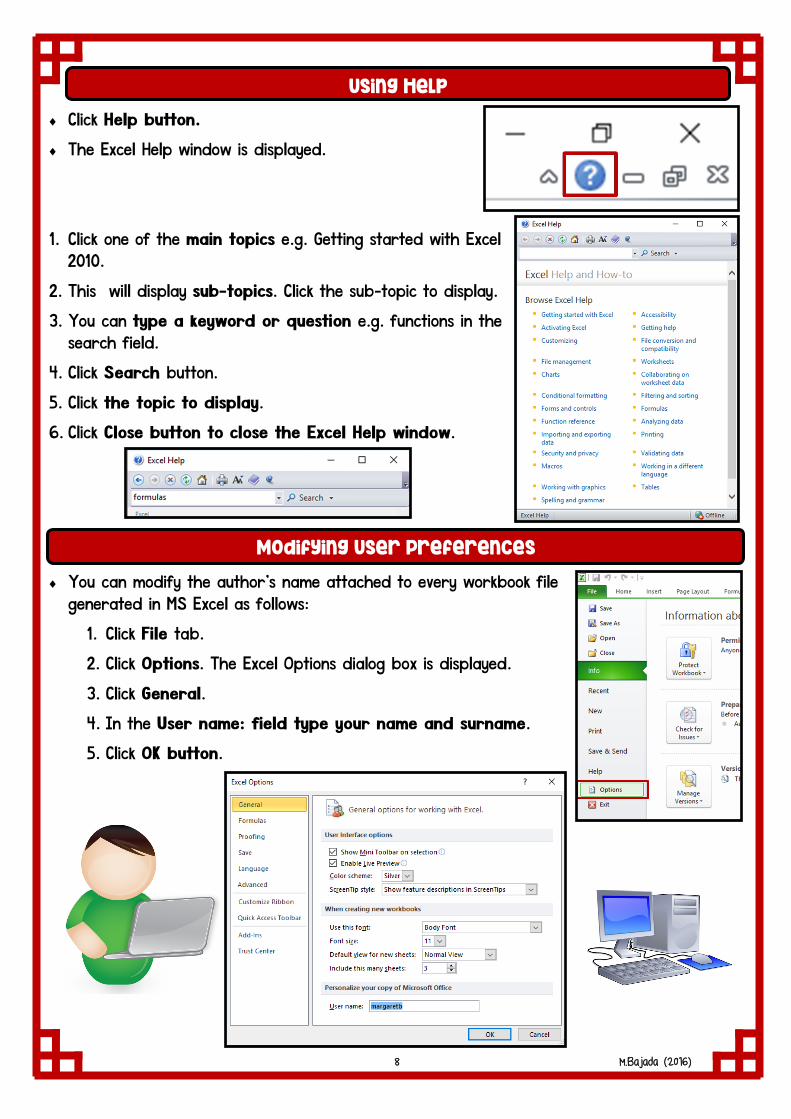
Click Help button.
The Excel Help window is displayed.
1. Click one of the main topics e.g. Getting started with Excel
2010.
2. This will display sub-topics. Click the sub-topic to display.
3. You can type a keyword or question e.g. functions in the
search field.
4. Click Search button.
5. Click the topic to display.
6. Click Close button to close the Excel Help window.
You can modify the author’s name attached to every workbook file
generated in MS Excel as follows:
1. Click File tab.
2. Click Options. The Excel Options dialog box is displayed.
3. Click General.
4. In the User name: field type your name and surname.
5. Click OK button.
Using Help
Modifying User Preferences
8 M.Bajada (2016)
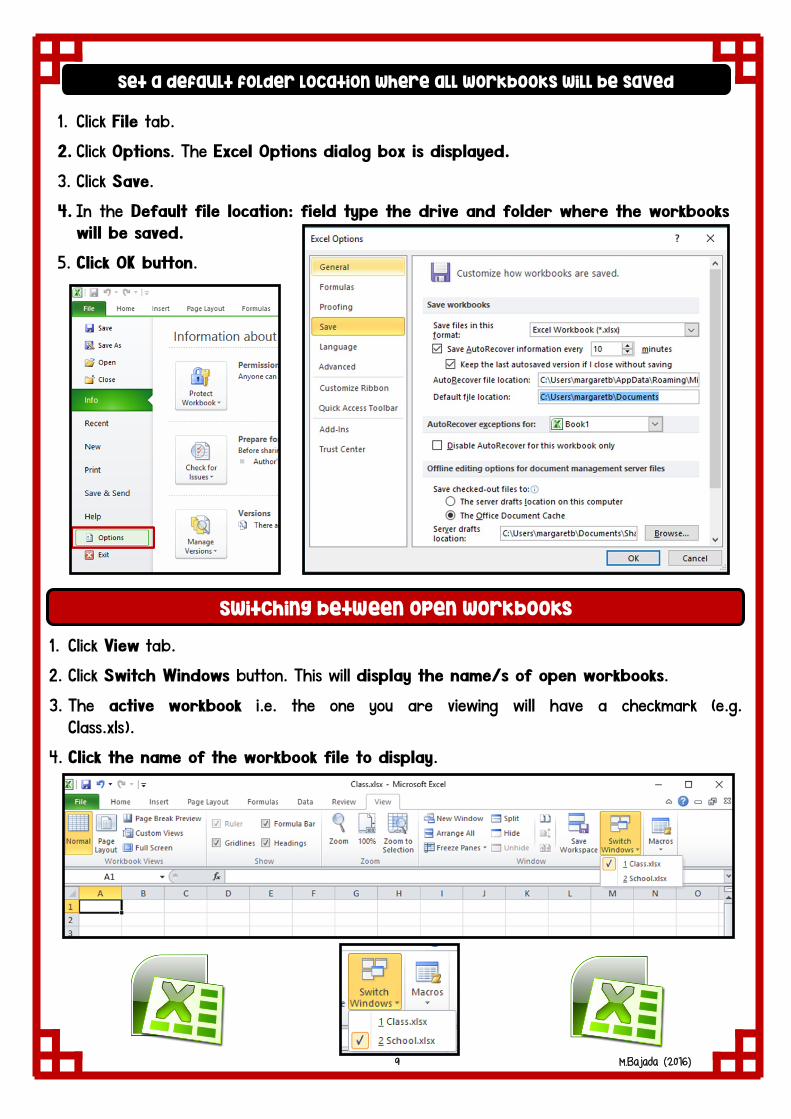
1. Click View tab.
2. Click Switch Windows button. This will display the name/s of open workbooks.
3. The active workbook i.e. the one you are viewing will have a checkmark (e.g.
Class.xls).
4. Click the name of the workbook file to display.
Switching between open workbooks
Set a default folder location where all workbooks will be saved
1. Click File tab.
2. Click Options. The Excel Options dialog box is displayed.
3. Click Save.
4. In the Default file location: field type the drive and folder where the workbooks
will be saved.
5. Click OK button.
9 M.Bajada (2016)