models wd-y57 aa wd-y65 wd-57732 wd-65732 wd-73732 · dlp™ high-definition television models...
TRANSCRIPT

DLP™ HIGH-DEFINITION TELEVISIONMODELS
WD-Y57aaWD-Y65WD-57732WD-65732WD-73732OWNER’S GUIDE• Forquestions:
- CallConsumerRelationsat800-332-2119.- [email protected] Visitourwebsiteatwww.mitsubishi-tv.com.
• ForinformationonDemo ModeandSystem Reset,pleaseseethebackcover.
• Toorderreplacementoradditionalremotecontrols,lampcartridges,orOwner’sGuides,visitourwebsiteatwww.mitsuparts.comorcall800-553-7278.
• GuidelinesforsettingupandusingyournewwidescreenTVstartonpage34.

Thelightningflashwitharrowheadsymbolwithinanequilateraltriangleisintendedtoalerttheuserofthepresenceofuninsulated“dangerousvoltage”withintheproduct’senclosurethatmaybesufficientmagni-tudetoconstituteariskofelectricshock.
Theexclamationpointwithinanequilateraltriangleisintendedtoalerttheusertothepresenceofimpor-tantoperatingandmaintenance(servicing)instructionsintheliteratureaccompanyingtheappliance.
CAUTIONCAUTION:TOREDUCETHERISKOFELECTRICSHOCK,DONOTREMOVECOVER(ORBACK).NOUSERSER-VICEABLEPARTSINSIDE.REFERSERVICINGTOQUALIFIEDSERVICEPERSONNEL.
RISK OF ELECTRIC SHOCKDO NOT OPEN
C A U T I O N
WARNING: TO REDUCE THE RISK OF FIRE OR ELECTRIC SHOCK, DO NOT EXPOSE THIS APPLIANCE TO RAIN OR MOISTURE.
FCC Declaration of ConformityProduct: ProjectionTelevisionReceiver
Models: WD-Y57,WD-Y65,WD-57732,WD-65732,WD-73732
ResponsibleParty: MitsubishiDigitalElectronicsAmerica,Inc. 9351JeronimoRoad Irvine,CA92618-1904
Telephone: (800)332-2119
ThisdevicecomplieswithPart15oftheFCCRules.Operationissubjecttothefollowingtwoconditions:
(1) Thisdevicemaynotcauseharmfulinterference,and
(2) thisdevicemustacceptanyinterferencereceived,includinginterferencethatmaycauseundesiredoperation.
Note:ThisequipmenthasbeentestedandfoundtocomplywiththelimitsforaClassBdigitaldevice,pursuanttopart15oftheFCCRules.Theselimitsaredesignedtoprovidereasonableprotectionagainstharmfulinterferenceinaresidentialinstallation.Thisequipmentgenerates,usesandcanradiateradiofrequencyenergyand,ifnotinstalledandusedinaccordancewiththeinstructions,maycauseharmfulinterferencetoradiocommunications.However,thereisnoguaranteethatinterferencewillnotoccurinaparticularinstallation.Ifthisequipmentdoescauseharmfulinterfer-encetoradioortelevisionreception,whichcanbedeterminedbyturningtheequipmentoffandon,theuserisencour-agedtotrytocorrecttheinterferencebyoneormoreofthefollowingmeasures:
• Reorientorrelocatethereceivingantenna.
• Increasetheseparationbetweentheequipmentandthereceiver.
• Connecttheequipmentintoanoutletonacircuitdifferentfromthattowhichthereceiverisconnected.
• Consultthedealeroranexperiencedradio/TVtechnicianforhelp.
Changes or modifications not expressly approved by Mitsubishi could cause harmful interference and would void the user’s authority to operate this equipment.

For Your Records
Recordthemodelnumber,serialnumber,andpurchasedateofyourTV.ThemodelandserialnumbersareonthebackoftheTV.RefertothispagewhenrequestingassistancewiththisTV.
MODEL NUMBER (check one):
WD-Y57 WD-Y65 WD-57732 WD-65732 WD-73732
SERIAL NUMBER
PURCHASE DATE
Retailer Information
RETAILER NAME
LOCATION
Our Thanks...Thank you for choosing Mitsubishi as your premier Home Entertainment provider
This Owner’s Guide describes the features and functions of your Mitsubishi widescreen, high definition TV. We urge you to examine this Owner’s Guide to become familiar with the innovative features and operations this unique television offers.
The very core of our corporate philosophy is to provide our customers with the very best. Our development team at Mitsubishi has worked to provide you with a television that defines “state-of-the-art,” with the capability to meet your needs now and in the future.
Whether this is your first Mitsubishi electronic product, or an addition to your Mitsubishi collection, we believe you and your family will continue to enjoy your Mitsubishi home theater for many years.
Thank you,
Mitsubishi Digital Electronics America, Inc.

ContentsImportant Information About Your TV
GeneralWarningsandCautions,NotesonInstallationandOperation . . . . . . . . . . . . . . . . . . . . . . . . . . . 6CleaningRecommendations. . . . . . . . . . . . . . . . . . . . . . . . . . . . . . . . . . . . . . . . . . . . . . . . . . . . . . . . . . . . . 7ImportantSafeguards . . . . . . . . . . . . . . . . . . . . . . . . . . . . . . . . . . . . . . . . . . . . . . . . . . . . . . . . . . . . . . . . . . 8
Chapter 1: Television OverviewPackageContents . . . . . . . . . . . . . . . . . . . . . . . . . . . . . . . . . . . . . . . . . . . . . . . . . . . . . . . . . . . . . . . . . . . . 12SpecialFeaturesofYourTV . . . . . . . . . . . . . . . . . . . . . . . . . . . . . . . . . . . . . . . . . . . . . . . . . . . . . . . . . . . . 12TVFrontPanel . . . . . . . . . . . . . . . . . . . . . . . . . . . . . . . . . . . . . . . . . . . . . . . . . . . . . . . . . . . . . . . . . . . . . . . 14TVBackPanel . . . . . . . . . . . . . . . . . . . . . . . . . . . . . . . . . . . . . . . . . . . . . . . . . . . . . . . . . . . . . . . . . . . . . . . 16CableCARD™Technology . . . . . . . . . . . . . . . . . . . . . . . . . . . . . . . . . . . . . . . . . . . . . . . . . . . . . . . . . . . . . 18
Chapter 2: TV ConnectionsConnectionTypes . . . . . . . . . . . . . . . . . . . . . . . . . . . . . . . . . . . . . . . . . . . . . . . . . . . . . . . . . . . . . . . . . . . . 20DigitalVideoandHomeRecording . . . . . . . . . . . . . . . . . . . . . . . . . . . . . . . . . . . . . . . . . . . . . . . . . . . . . . 21HDTVCableBoxorSatelliteReceiverwithComponentVideo . . . . . . . . . . . . . . . . . . . . . . . . . . . . . . . . . 21StandardCableBox,SatelliteReceiver,orOtherDevicewithS-Video . . . . . . . . . . . . . . . . . . . . . . . . . . 22WallOutletCable(nocablebox) . . . . . . . . . . . . . . . . . . . . . . . . . . . . . . . . . . . . . . . . . . . . . . . . . . . . . . . . 22AntennawithaSingleLead . . . . . . . . . . . . . . . . . . . . . . . . . . . . . . . . . . . . . . . . . . . . . . . . . . . . . . . . . . . . 23AntennaswithSeparateUHFandVHFLeads . . . . . . . . . . . . . . . . . . . . . . . . . . . . . . . . . . . . . . . . . . . . . . 23VCRtoanAntennaorWallOutletCable . . . . . . . . . . . . . . . . . . . . . . . . . . . . . . . . . . . . . . . . . . . . . . . . . . 24VCRtoaCableBox(Audio&Video) . . . . . . . . . . . . . . . . . . . . . . . . . . . . . . . . . . . . . . . . . . . . . . . . . . . . . 25HDMIDevice(CableBox,SatelliteReceiver,DVDPlayer,orOtherDevice) . . . . . . . . . . . . . . . . . . . . . . . . . . . . 26DVIVideoDevice(CableBox,SatelliteReceiver,DVDPlayer,orOtherDevice) . . . . . . . . . . . . . . . . . . . 26DVDPlayerwithComponentVideo . . . . . . . . . . . . . . . . . . . . . . . . . . . . . . . . . . . . . . . . . . . . . . . . . . . . . . 27A/VReceiver(SoundSystem) . . . . . . . . . . . . . . . . . . . . . . . . . . . . . . . . . . . . . . . . . . . . . . . . . . . . . . . . . . . 27OlderCableBox . . . . . . . . . . . . . . . . . . . . . . . . . . . . . . . . . . . . . . . . . . . . . . . . . . . . . . . . . . . . . . . . . . . . . 28Camcorder . . . . . . . . . . . . . . . . . . . . . . . . . . . . . . . . . . . . . . . . . . . . . . . . . . . . . . . . . . . . . . . . . . . . . . . . . . 28IEEE1394Devices . . . . . . . . . . . . . . . . . . . . . . . . . . . . . . . . . . . . . . . . . . . . . . . . . . . . . . . . . . . . . . . . . . . 29IREmitterNetCommand®andTVGuideOnScreen . . . . . . . . . . . . . . . . . . . . . . . . . . . . . . . . . . . . . . . . 31HelpfulHintsforNetCommandConnections . . . . . . . . . . . . . . . . . . . . . . . . . . . . . . . . . . . . . . . . . . . . . . 32
Chapter 3: TV SetupGuidelinesforSettingUpandUsingYourNewWidescreenTV . . . . . . . . . . . . . . . . . . . . . . . . . . . . . . . . 34WhenYouFirstPowerOntheTV . . . . . . . . . . . . . . . . . . . . . . . . . . . . . . . . . . . . . . . . . . . . . . . . . . . . . . . . 36UsingtheTV’sSetupMenu . . . . . . . . . . . . . . . . . . . . . . . . . . . . . . . . . . . . . . . . . . . . . . . . . . . . . . . . . . . . 36WhenYouFirstConnectaDevice . . . . . . . . . . . . . . . . . . . . . . . . . . . . . . . . . . . . . . . . . . . . . . . . . . . . . . . 39InitialNetCommand®Setup . . . . . . . . . . . . . . . . . . . . . . . . . . . . . . . . . . . . . . . . . . . . . . . . . . . . . . . . . . . . 42AdditionalSetupUsingtheNetCommandMenu . . . . . . . . . . . . . . . . . . . . . . . . . . . . . . . . . . . . . . . . . . . . 43
Chapter 4: TV Operation and FeaturesRemoteControl . . . . . . . . . . . . . . . . . . . . . . . . . . . . . . . . . . . . . . . . . . . . . . . . . . . . . . . . . . . . . . . . . . . . . . 48ChoosingaProgramSource . . . . . . . . . . . . . . . . . . . . . . . . . . . . . . . . . . . . . . . . . . . . . . . . . . . . . . . . . . . 50ChannelView™ChannelListings . . . . . . . . . . . . . . . . . . . . . . . . . . . . . . . . . . . . . . . . . . . . . . . . . . . . . . . . 50StatusDisplay . . . . . . . . . . . . . . . . . . . . . . . . . . . . . . . . . . . . . . . . . . . . . . . . . . . . . . . . . . . . . . . . . . . . . . . 51SplitScreen . . . . . . . . . . . . . . . . . . . . . . . . . . . . . . . . . . . . . . . . . . . . . . . . . . . . . . . . . . . . . . . . . . . . . . . . . 52TVSignalsandDisplayFormats . . . . . . . . . . . . . . . . . . . . . . . . . . . . . . . . . . . . . . . . . . . . . . . . . . . . . . . . . 54MemoryCardPlayback . . . . . . . . . . . . . . . . . . . . . . . . . . . . . . . . . . . . . . . . . . . . . . . . . . . . . . . . . . . . . . . 56

Chapter 5: TV Menu Settings3DGraphical MenuSystem . . . . . . . . . . . . . . . . . . . . . . . . . . . . . . . . . . . . . . . . . . . . . . . . . . . . 60MainMenu . . . . . . . . . . . . . . . . . . . . . . . . . . . . . . . . . . . . . . . . . . . . . . . . . . . . . . . . . . . . . . . . . . . . . . . . . . 61SetupMenu . . . . . . . . . . . . . . . . . . . . . . . . . . . . . . . . . . . . . . . . . . . . . . . . . . . . . . . . . . . . . . . . . . . . . . . . . 62NetCommandMenu . . . . . . . . . . . . . . . . . . . . . . . . . . . . . . . . . . . . . . . . . . . . . . . . . . . . . . . . . . . . . . . . . . 62ChannelMenu . . . . . . . . . . . . . . . . . . . . . . . . . . . . . . . . . . . . . . . . . . . . . . . . . . . . . . . . . . . . . . . . . . . . . . . 64CaptionsMenu . . . . . . . . . . . . . . . . . . . . . . . . . . . . . . . . . . . . . . . . . . . . . . . . . . . . . . . . . . . . . . . . . . . . . . 66ParentalLockMenu . . . . . . . . . . . . . . . . . . . . . . . . . . . . . . . . . . . . . . . . . . . . . . . . . . . . . . . . . . . . . . . . . . 68
SettingaPassCode . . . . . . . . . . . . . . . . . . . . . . . . . . . . . . . . . . . . . . . . . . . . . . . . . . . . . . . . . . . . . . . 68LockTVbyTimeandFront-PanelLock . . . . . . . . . . . . . . . . . . . . . . . . . . . . . . . . . . . . . . . . . . . . . . . 68RatingMenus . . . . . . . . . . . . . . . . . . . . . . . . . . . . . . . . . . . . . . . . . . . . . . . . . . . . . . . . . . . . . . . . . . . . 68BypassingtheRatingsLockandLockbyTime . . . . . . . . . . . . . . . . . . . . . . . . . . . . . . . . . . . . . . . . . 70
V-ChipSignalInformationTVRatings . . . . . . . . . . . . . . . . . . . . . . . . . . . . . . . . . . . . . . . . . . . . . . . . . . . . . . . . . . . . . . . . . . . . . . . 71MovieRatings . . . . . . . . . . . . . . . . . . . . . . . . . . . . . . . . . . . . . . . . . . . . . . . . . . . . . . . . . . . . . . . . . . . . 71
Audio/VideoMenu . . . . . . . . . . . . . . . . . . . . . . . . . . . . . . . . . . . . . . . . . . . . . . . . . . . . . . . . . . . . . . . . . . . . 72AudioSettings . . . . . . . . . . . . . . . . . . . . . . . . . . . . . . . . . . . . . . . . . . . . . . . . . . . . . . . . . . . . . . . . . . . 72VideoSettings . . . . . . . . . . . . . . . . . . . . . . . . . . . . . . . . . . . . . . . . . . . . . . . . . . . . . . . . . . . . . . . . . . . . 74
Chapter 6: NetCommand FunctionsNetCommand-ControlledDevicesandtheInputSelectionMenu . . . . . . . . . . . . . . . . . . . . . . . . . . . . . . 78NetCommand-ControlledRecording . . . . . . . . . . . . . . . . . . . . . . . . . . . . . . . . . . . . . . . . . . . . . . . . . . . . . 79UsingIEEE1394Devices . . . . . . . . . . . . . . . . . . . . . . . . . . . . . . . . . . . . . . . . . . . . . . . . . . . . . . . . . . . . . . 83
Chapter 7: Using the TV with a Personal ComputerSetup . . . . . . . . . . . . . . . . . . . . . . . . . . . . . . . . . . . . . . . . . . . . . . . . . . . . . . . . . . . . . . . . . . . . . . . . . . . . . . 88VideoAdjustments . . . . . . . . . . . . . . . . . . . . . . . . . . . . . . . . . . . . . . . . . . . . . . . . . . . . . . . . . . . . . . . . . . . 88ConnectingaComputertotheTV . . . . . . . . . . . . . . . . . . . . . . . . . . . . . . . . . . . . . . . . . . . . . . . . . . . . . . . 89AdjustingImageResolution . . . . . . . . . . . . . . . . . . . . . . . . . . . . . . . . . . . . . . . . . . . . . . . . . . . . . . . . . . . . 91ComputerDisplayFormats . . . . . . . . . . . . . . . . . . . . . . . . . . . . . . . . . . . . . . . . . . . . . . . . . . . . . . . . . . . . . 92
AppendicesAppendixA:BypassingtheParentalLock . . . . . . . . . . . . . . . . . . . . . . . . . . . . . . . . . . . . . . . . . . . . . . . . 95AppendixB:Specifications . . . . . . . . . . . . . . . . . . . . . . . . . . . . . . . . . . . . . . . . . . . . . . . . . . . . . . . . . . . . 97AppendixC:LampCartridgeReplacement . . . . . . . . . . . . . . . . . . . . . . . . . . . . . . . . . . . . . . . . . . . . . . . 99AppendixD:ProgrammingtheRemoteControl . . . . . . . . . . . . . . . . . . . . . . . . . . . . . . . . . . . . . . . . . . . 101AppendixE:Troubleshooting . . . . . . . . . . . . . . . . . . . . . . . . . . . . . . . . . . . . . . . . . . . . . . . . . . . . . . . . . . 111
Trademark and License Information . . . . . . . . . . . . . . . . . . . . . . . . . . . . . . . . . . . . . . . . . . . . . . . . . . . 118
Mitsubishi TV Software . . . . . . . . . . . . . . . . . . . . . . . . . . . . . . . . . . . . . . . . . . . . . . . . . . . . . . . . . . . . . . . . 119
Mitsubishi DLP™ Projection Television Limited Warranty . . . . . . . . . . . . . . . . . . . . . . . . . . . . . . 120
Index . . . . . . . . . . . . . . . . . . . . . . . . . . . . . . . . . . . . . . . . . . . . . . . . . . . . . . . . . . . . . . . . . . . . . . . . . . . . . . . . . . . 122

6 Important Information About Your TV
Important Information About Your TVWARNING:ThisproductcontainschemicalsknowntotheStateofCaliforniatocausecancerand/orbirthdefectsorotherreproductiveharm.
CAUTION:TOPREVENTELECTRICSHOCK,MATCHWIDEBLADEOFPLUGTOWIDESLOT,FULLYINSERT.
TV WEIGHT:ThisTVisheavy!Exerciseextremecarewhenliftingormovingit.LiftormovetheTVwithaminimumoftwoadults.TopreventdamagetotheTV,avoidjarringormovingitwhileitisturnedon.AlwayspoweroffyourTVbeforemovingit.
Installation Notes
Stand RequirementCAUTION:UsetheseMitsubishiTVmodelsonlywiththeMitsubishistandmodelsshownhere.Otherstandscanresultininstabilityandpossiblycauseinjury.
TV Model Stand Model
WD-Y57 MB-57GB
WD-Y65 MB-65GB
WD-57732 MB-57GB
WD-65732 MB-65GB
WD-73732 MB-73GB
Custom cabinet installation must allow for proper air circulation around the television.
NOTE TO CATV SYSTEM INSTALLER: THISREMINDERISPROVIDEDTOCALLTHECATVSYSTEMINSTALLER’SATTENTIONTOARTICLE820-40OFTHENECTHATPROVIDESGUIDELINESFORTHEPROPERGROUNDINGAND,INPARTICULAR,SPECIFIESTHATTHECABLEGROUNDSHALLBECONNECTEDTOTHEGROUNDINGSYSTEMOFTHEBUILDING,ASCLOSETOTHEPOINTOFCABLEENTRYASPRACTICAL.
Operating Notes
Standby FanWhentheTVisoff,youmayhearalow-powerstandbyfan.Thisisnormaloperation.ThefancoolsadvancedcircuitryinthisTVthatmustcontinuetooperateevenwhentheTVisturnedoff.
Demo ModeThisTVhasademomodeforuseinretailstores.Toturnoffdemomode:
1. PressMENU.
2. WhentheMainmenuappearswithSetuphighlighted,pressENTER.
3. WhentheSetupmenuopens,press tohighlighttheon-screenDemo Mode Offbutton.
4. PressENTER.
TV Guide On Screen® Access RequirementsTVGuideOnScreenlistingsarenotprovidedbyMitsubishiDigitalElectronicsAmerica,Inc.OperationofTVGuideOnScreenrequiresover-the-airorcableaccesstostationscarryingTVGuideOnScreenprogramlistings.Iflistingsarenotavailableinyourareaorbecomediscon-tinuedbythelocalprovider,TVGuideOnScreenwillnot
operate.TVGuideOnScreendoesnotprovideprogramlistingsforsatelliteTVsystems.
Lamp ReplacementForlamp-replacementinstructions,seeAppendixC.
To Order a Replacement Lamp Under WarrantyCall(800)553-7278.Pleasehavemodelnumber,serialnumber,andTVpurchasedateavailable.
Important:AlllampsreplacedunderwarrantymustbereturnedtoMitsubishiwheretheywillbeinspectedfordefectverification.
To Purchase a Replacement Lamp After WarrantyVisitourwebsiteatwww.mitsuparts.comorcall(800)553-7278.Orderanewlampbypartnumberasshownbelow.
TV Model Number Lamp Part Number
WD-Y57,WD-Y65,WD-57732,WD-65732
915P049010
WD-73732 915P049020

Important Information About Your TV 7
TV Software
Unauthorized Software DonotattempttoupdatethesoftwareofthisTVwithsoftwareorcardsthatarenotprovidedbyorauthorizedbyMitsubishiDigitalElectronicsAmerica,Inc.Non-autho-rizedsoftwaremaydamagetheTVandwillnotbecoveredbythewarranty.
Cleaning RecommendationsNormally,lightdustingwithadry,non-scratchingdusterwillkeepyourTVclean.Ifcleaningbeyondthisisneeded,pleaseusethefollowingguidelines:
First,turnofftheTVandunplugthepowercordfromthepoweroutlet.
Top and Sides of the TV• GentlywipedownyourTVwithasoft,non-abrasive
clothsuchascottonflanneloracleanclothdiaper,lightlymoistenedwithwater.Drywithaseconddry,soft,non-abrasivecloth.
• Foroilydirt,addafewdropsofmildliquiddetergent,suchasdishwashingdetergent,tothewaterusedtomoistenthecloth.Rinsewithasecondclothmoist-enedonlywithwater.Drywithathirddry,soft,non-abrasivecloth.
Screen• Followtheinstructionsforthetopandsides,wiping
gentlyinanupanddownmotion,followingthegroovesinthescreen.
• Cleantheentirescreenevenly,notjustsectionsofthescreen.
• Donotallowliquidtodripdownthegroovesofthescreen,assomeliquidmayentertheTVthroughthegapbetweenthescreenandscreenframe.
• YoumaypurchaseMitsubishiScreenCleaner,partnumberCLEANER-VSS,bycalling(800)553-7278.
General Cleaning Precautions
• DONOTallowliquidtoentertheTVthroughtheventi-lationslotsoranycrevice.
• DONOTuseanystrongorabrasivecleaners,asthesecanscratchthesurfaces.
• DONOTuseanycleanerscontainingammonia,bleach,alcohol,benzene,orthinners,asthesecandullthesurfaces.
• DONOTsprayliquidsorcleanersdirectlyontheTV’ssurfaces.
• DONOTscruborrubtheTVharshly.Wipeitgently.
IMPORTANT
DO NOT use any kind of abrasive cleaner on the surface of the TV screen.

8 Important Information About Your TV8 Important Information About Your TV
Important SafeguardsPleasereadthefollowingsafeguardsforyourTVandretainforfuturereference.Alwaysfollowallwarningsandinstruc-tionsmarkedonthetelevision.
1. Read, Retain and Follow All InstructionsReadallsafetyandoperatinginstructionsbeforeoperatingtheTV.Retainthesafetyandoperatinginstructionsforfuturereference.Followalloperatinganduseinstructions.
2. Heed WarningsAdheretoallwarningsontheapplianceandintheoperatinginstructions.
3. CleaningUnplugtheTVfromthewalloutletbeforecleaning.Donotuseliquid,abrasiveoraerosolcleaners.Cleanerscanpermanentlydamagethecabinetandscreen.Usealightlydampenedclothforcleaning.
4. Attachments and EquipmentNeveraddanyattachmentsand/orequipmentwithoutapprovalofthemanufacturerassuchadditionsmayresultintheriskoffire,electricshockorotherpersonalinjury.
5. Water and MoistureDonotusetheTVwherecontactwithorimmersioninwaterispossible.Donotusenearbathtubs,washbowls,kitchensinks,laundrytubs,swimmingpools,etc.
6. AccessoriesDonotplacetheTVonanunstablecart,stand,tripod,ortable.TheTVmayfall,causingseriousinjurytoachildoradultandseriousdamagetotheTV.Useonlywithacart,stand,tripod,bracketortablerecommendedbythemanufacturer,orsoldwiththeTV.AnymountingoftheTVshouldfollowthemanufacturer’sinstructions,andshouldusemountingaccessoriesrecommendedbythemanufacturer.Anapplianceandcartcombinationshouldbemovedwithcare.Quickstops,excessiveforce,andunevensurfacesmaycausetheapplianceandcartcombinationtooverturn.
7. VentilationSlotsandopeningsinthecabinetareprovidedforventilationandtoensurereliableoperationoftheTVandtoprotectitfromoverheating.DonotblocktheseopeningsorallowthemtobeobstructedbyplacingtheTVonabed,sofa,rug,orothersimilarsurface.Norshoulditbeplacedoveraradiatororheatregister.IftheTVistobeplacedinarackorbookcase,ensurethatthereisadequateventilationandthatthemanufacturer’sinstruc-tionshavebeenadheredto.
8. Power SourceThisTVshouldbeoperatedonlyfromthetypeofpowersourceindicatedonthemarkinglabel.Ifyouarenotsureofthetypeofpowersuppliedtoyourhome,consultyourappliancedealerorlocalpowercompany.
9. Grounding or PolarizationThisTVisequippedwithapolarizedalternatingcurrentlineplughavingonebladewiderthantheother.Thisplugwillfitintothepoweroutletonlyoneway.Ifyouareunabletoinserttheplugfullyintotheoutlet,tryrevers-ingtheplug.Iftheplugshouldstillfailtofit,contactyourelectriciantoreplaceyourobsoleteoutlet.Donotdefeatthesafetypurposeofthepolarizedplug.
10. Power-Cord ProtectionPower-supplycordsshouldberoutedsothattheyarenotlikelytobewalkedonorpinchedbyitemsplaceduponoragainstthem,payingparticularattentiontocordsatplugs,conveniencereceptacles,andthepointwheretheyexitfromtheTV.
11. LightningForaddedprotectionforthisTVduringalightningstorm,orwhenitisleftunattendedandunusedforlongperiodoftime,unplugitfromthewalloutletanddisconnecttheantennaorcablesystem.ThiswillpreventdamagetotheTVduetolightningandpower-linesurges.

Important Information About Your TV 9 Important Information About Your TV 9
Important Safeguards, continued
12. Power LinesAnoutsideantennasystemshouldnotbelocatedinthevicinityofoverheadpowerlinesorotherelectriclightorpowercircuits,orwhereitcanfallintosuchpowerlinesorcircuits.Wheninstallinganoutsideantennasystem,extremecareshouldbetakentokeepfromtouchingsuchpowerlinesorcircuitsascontactwiththemmightbefatal.
13. OverloadingDonotoverloadwalloutletsandextensioncordsasthiscanresultinariskoffireorelectricshock.
14. Object and Liquid EntryNeverpushobjectsofanykindintothisTVthroughopeningsastheymaytouchdangerousvoltagepointsorshort-outpartsthatcouldresultinfireorelectricshock.NeverspillliquidofanykindonorintotheTV.
15. Outdoor Antenna GroundingIfanoutsideantennaorcablesystemisconnectedtotheTV,besuretheantennaorcablesystemisgroundedsoastoprovidesomepro-tectionagainstvoltagesurgesandbuilt-upstaticcharges.
Article810oftheNationalElectricCode,ANSI/NFPANo.70-2002,providesinformationwithrespecttopropergroundingofthemastandsupportingstructure,groundingoftheleadinwiretoanantennadischargeunit,sizeofgroundingconductors,locationofantennadis-chargeunit,connectiontogroundingelectrodes,andrequirementsforthegroundingelectrode.
16. ServicingDonotattempttoservicethisTVyourselfasopeningorremovingcoversmayexposeyoutodangerousvoltageorotherhazards.Referallservicingtoqualifiedserviceperson-nel.
17. Damage Requiring ServiceUnplugtheTVfromthewalloutletandreferservicingtoqualifiedservicepersonnelunderthefollowingcondi-tions:
(a) Whenthepower-supplycordorplugisdamaged.(b) Ifliquidhasbeenspilled,orobjectshavefallenintotheTV.(c) IftheTVhasbeenexposedtorainorwater.(d) IftheTVdoesnotoperatenormallybyfollowingtheoperatinginstructions,adjustonlythosecontrolsthat
arecoveredbytheoperatinginstructionsasanimproperadjustmentofothercontrolsmayresultindamageandwilloftenrequireextensiveworkbyaqualifiedtechniciantorestoretheTVtoitsnormaloperation.
(e) IftheTVhasbeendroppedorthecabinethasbeendamaged.(f) WhentheTVexhibitsadistinctchangeinperformance-thisindicatesaneedforservice.
18. Replacement PartsWhenreplacementpartsarerequired,besuretheservicetechnicianhasusedreplacementpartsspecifiedbythemanufacturerorhavethesamecharacteristicsastheoriginalpart.Unauthorizedsubstitutionsmayresultinfire,electricshockorotherhazards.
19. Safety CheckUponcompletionofanyserviceorrepairtotheTV,asktheservicetechniciantoperformsafetycheckstodeterminethattheTVisinsafeoperatingcondition.
20. HeatTheproductshouldbesituatedawayfromheatsourcessuchasradiators,heatregisters,stovesorotherprod-ucts(includingamplifiers)thatproduceheat.
ANT E NNALE AD IN WIR E
ANT E NNADIS C HAR G E UNIT(NE C AR T IC LE 810-20)
G R OUNDINGC ONDUC T OR S(NE C AR T IC LE 810-21)
G R OUND C LAMP S
P OWE R S E R V IC E G R OUNDINGE LE C T R ODE S Y S T E M(NE C AR T 250, P AR T H)
G R OUND C LAMP
E LE C T R ICS E R V IC EE QUIP ME NT
NE C — NAT IONAL E LE C T R IC AL C ODE
E XAMP LE OF ANT E NNA G R OUNDING


1
Television OverviewPackage Contents . . . . . . . . . . . . . . . . . . . . . . . . . . . . . . . . . . 12Special Features of Your TV . . . . . . . . . . . . . . . . . . . . . . . . . . . . 12TV Front Panel . . . . . . . . . . . . . . . . . . . . . . . . . . . . . . . . . . . . . 14TV Back Panel . . . . . . . . . . . . . . . . . . . . . . . . . . . . . . . . . . . . . 16CableCARD™ Technology . . . . . . . . . . . . . . . . . . . . . . . . . . . . . 18

12 Chapter 1. Television Overview
Package ContentsPleasetakeamomenttoreviewthefollowinglistofitemstoensurethatyouhavereceivedeverything.
1
1. Remote Control
2. Two AA Batteries
3. Two-Ended IR Emitter
4. Owner’s Guide
5. Quick Reference Guide
6. TV Guide On Screen® Interactive Program Guide User’s Manual
7. Product Registration Card
Special Features of Your TVYournewhigh-definitionwidescreentelevisionhasmanyspecialfeaturesthatmakeittheperfectcenterofyourhomeentertainmentsystem,including:
High Definition DLP™ Display SystemYourwidescreenMitsubishiHDTVusesTexasInstrumentsmostadvancedDigitalLightProcessing™technologyforrear-projectiontelevisions.ThisTVistrulyahigh-performancemultimediamonitoruniquelycapableofbothstunninghigh-definitionvideoimagesandclear,detailed,high-resolutionimagesfromapersonalcomputer.
16:9 Widescreen Picture FormatEnjoyafulltheatricalexperienceinthecomfortofyourhome.Viewpicturesasfilmdirectorsintendedthem.DigitalTVbroadcasts,DVDsandnewervideogamecon-solessupportthiswidescreenformat.
Integrated HDTV TunerYourwidescreenMitsubishiHDTVhasaninternalHDTVtunerabletoreceivebothover-the-airHDTVbroadcasts(receivedviaanantenna)andnon-scrambleddigitalcablebroadcasts,includingnon-scrambledHDTVcablepro-gramming.
High-Definition Video Inputs
Component Video Inputs,twoonmodelsWD-Y57andWD-Y65;threeonmodelsWD-57732,WD-65732,andWD-73732.AlsocalledY/Pb/Prinputs,theseinputsreceivestandardanalogvideoformatsof480i,480p,720p,and1080ihigh-definitionsignals.This
providesahighlevelofflexibilitywhenconnectingDVDplayers/recorders,cableboxes,andsatellitereceivers.
Two HDMI Inputsthatacceptdigital480i,480p,720p,1080i,and1080pvideosignalsplusPCMdigitalstereosignals.Usedwithanadapter,theseinputsalsoacceptcompatibleDVIvideosignals.HDMIinputsprovideadditionalhigh-performance,high-definitionconnectionsformaximumflexibilityinyourchoiceofhometheaterproducts.TheHDMIinputsareHDCPcopy-protectioncompatible.
Two IEEE 1394 Digital Interfaces thatreceiveandsendcompresseddigitalsignals,includinghigh-definitionsignals,alongwithdigitalaudioandcontrolsignalsbetweendevicessuchastheTV,digitalcableboxes,andD-VHSdigitalvideorecorders.
ClearThought® Easy Connect Auto Input SensingClearThought®automaticallyrecognizeswhenyoupluginaninputandpromptsyoutoassignanametoit.TheTVignoresanyunusedinputs,sotheresultisanunclutteredInputSelectionmenuwhereyoucaneasilyfindandselectconnecteddevicesbyname.
Digital Cable Ready (CableCARD™)YourwidescreenMitsubishiHDTVis“Plug-and-Play”digitalcableready.Itcandescrambleacableprovider’s
3
AA
AA2

Chapter 1. Television Overview 13
one-waydigitalsignalswiththeuseofaCableCARDsecuritymodule.TheCableCARDisusedinplaceofatraditionalcableboxtoaccessdigitalcableprogramming(includinghighdefinition).Contactyourlocalcablepro-viderforavailabilityinformationandservicedetails.
NetCommand® Home Network Control SystemYourwidescreenMitsubishiHDTVoffersanewlevelofnetworkingthatcanseamlesslyintegrateselectedolderA/Vproductswithnewandfuturedigitalproducts.NetCommandsupportsIEEE1394connections,AudioVideoControlsystem(AV/C),5Ccopyprotection,andIR(infrared)controlofselectedolderproducts,suchasVCRs,DVDplayers,cableboxes,andsatellitereceivers.NetCommandcanlearnremotecontrolsignalsdirectlyfrommanydevices,allowingyoutocreateacustomizedNetCommand-controlledhome-theatersystem.
Memory Card Reader(models WD-57732, WD-65732, WD-73732)YoucandisplayaslideshowofyourfavoriteJPEGpic-turesorlistentoMP3orWMAaudioselectionsrecordedoncompatiblememorycards.
DVI-I Input for Computer VideoConnectyourpersonalcomputer’sHDMIorDVIvideooutputtothisjacktodisplaycomputerimagesontheTV.
TV Guide On Screen® Interactive Program Guide SystemAneight-dayon-screenprogramguideforcable,over-the-air,andCableCARD™reception.Thissubscription-freeguidesystemlistsregular,digital,andhigh-definitionprogramming.Notethatwhenthesystemisfirstsetup,itmaytakeupto24hourstobegintoreceiveTVprogramlistingsandthenitmaytakeuptooneweektoreceivealleightdaysofTVprogramlistings.

14 Chapter 1. Television Overview
Lift cover to use features on the front panel.
TV Front Panel
A/V ResetIfyouwishtoresettheA/V(Audio/Video)settingsbacktothefactorydefaults:
• Toresetallsettingsatonce,pressGUIDEandFORMATonthefrontpanelatthesametime.
• Toresetthedefaultsforindividualdevices,usetheA/V Memory ResetselectionontheAudio/Videomenu.
Front Panel Controls and Indicators
1. Shadedbuttonsareduplicatesofkeysontheremotecontrol
2. POWER/TIMERindicator—litduringnormaloperation;flashingwhenauto-onTVTimerisset
3. LAMPindicatorshowslampcondi-tion(usuallyoffduringnormalTVoperation)
4. STATUSindicator(offduringnormalTVoperation)
5. SYSTEM RESET(seedescriptionthispage)
Control PanelTheshadedbuttonsonthefrontcontrolpanelduplicatekeysontheremotecontrol.TheupperlabelsshowcontrolfunctionswhennoTVmenusaredisplayed;thelowerlabelsindicatefunctionswhenTVmenusaredisplayedorwhenaspecialfunctionhasbeenactivated.See“RemoteControlOverview”inchapter4,“TVOperationandFea-tures,”forfurtherdetailsonthefunctionsofthesebuttons.
System Reset ButtonIftheTVdoesnotrespondtotheremotecontrol,frontpanelcontrols,orwillnotpoweron/off,presstheSYSTEM RESETbuttononthefrontpanelwithapointedobject,suchasthepointofapencilorendtipofapaperclip.ThegreenLEDwillflashquicklyfor
aboutoneminute.WhenthegreenLEDstopsflashing,youmayturnontheTV.Thechangesyoumademostrecently,beforeusingSYSTEM RESET,maybelost.
1
5Right: INPUT 3
and controls on front panel
Input 3INPUT 3providesaneasilyaccessiblesetofstandardaudio/videojacks.Thesejacksallowforconvenientcon-nectionofacamcorderorotheraudio/videodevice.NotethatifyouconnecttotheS-VIDEOjack,theVIDEOjackisdeactivated.
23 4 1
Memory Card Reader(models WD-57732, WD-65732, WD-73732)Thememorycardreaderhasfourcardslotsthatacceptavarietyofpopularmemorycardtypes.ThereaderletsyouviewJPEGpicturesfrommanydigitalcamerasandallowsyoutolistentoMP3orWMAaudiofilesrecordedfromcomputersorotherdigitalrecordingdevices.
Thecardslotsaredesignedforthespecifictypesofcardslistedbelow.OthercardsorobjectsshouldnotbeinsertedintotheslotsasthismaydamagetheTV.Seethediscussionofmemorycardsinchapter4“TVOperationandFeatures”fordetailsaboutJPEG,MP3andWMAfiletypesthatarecompatiblewiththeTV.
Card Compatibility
A. CARD 1 SmartMedia™
B. CARD 2MultiMediaCard™SecureDigital(SD)
C. CARD 3CompactFlash®(TypesIandII)Microdrive®
D. CARD 4MemoryStickPRO™MemoryStick™
A
D
B
C

Chapter 1. Television Overview 15
Front-Panel Indicators
POWER/TIMER Indicator
LED Color TV Condition Additional Information
None TVispoweredoff. Normaloperation.
Green TVispoweredon. Normaloperation.
Green 1. TVjustpluggedintoACoutlet.
Waituntilblinkingstopsbeforeturningon(approximately1minute).Normaloperation.
2. ACjustrestoredafterpowerfailure.
3. TVRebootingafterSystemResetused.
4. TVRebootingafterpowerfluctuationorreceivingabnor-maldigitalsignalsfromdigitalchannel,CableCARD™,ordigitaldevice.
5. Youhavebeguntheproceduretoupdatesoftwarefromanauthorizedflashmemorydevice.
Fordetailedinformation,seetheinstructionsthataccompanytheauthorizedsoftwareupdate.Important:Donotuseunauthorizedsoftwareatanytime.
Green TVpoweredoffandauto-ontimerisset.
Normaloperation.TVcanbeturnedonatanytime.
STATUS Indicator
LED Color TV Condition Additional Information
None NormalTVonorstandbycondition. Normaloperation.
Yellow Roomtemperatureistoohigh.TVwillnotoperatewhentheambientroomtemperatureistoohigh.TurnofftheTVandwaituntiltheroomtemperaturedrops.
Red
TVmayrequireservice. TurnofftheTVandunplugthesetfromtheACpowersource.Waitoneminuteandthenplugthesetbackin.
IftheLEDisstillon,contactyourdealeroraMitsubishiAuthorizedServiceCenter.Seewww.mitsubishi-tv.comorcall1-800-332-2119toreceiveAuthorizedServiceCenterinformation.
LAMP Indicator
LED Color TV Condition Additional Information
None NormalTVonorstandbycondition. Normaloperation.
Green TVjustpoweredoffandlampiscooling.
Startstoblink30secondsafterturningoffTV.TVcanbeturnedonbeforeblinkingstartsorafterblinkingstops,butnotwhiletheindicatorisblinking.Normaloperation.
Yellow 1. Lampaccessdoorisopenornotsecure.
TVwillnotoperateuntillampaccessdoorissecure.SeeAppen-dixCforinstallationinformation.
2. Nolampinstalled.TVwillnotoperatewithoutalamp.SeeAppendixCforinstallationinformation.
Red Lampnolongerilluminatesandhasreachedtheendofthelamplife.
Replacethelamp.TheTVwillnotoperatewhenthelampnolongerilluminates.SeeAppendixCforinstallationinformation.
Off SteadyOn SlowBlinking FastBlinking
16 Chapter 1. Television Overview
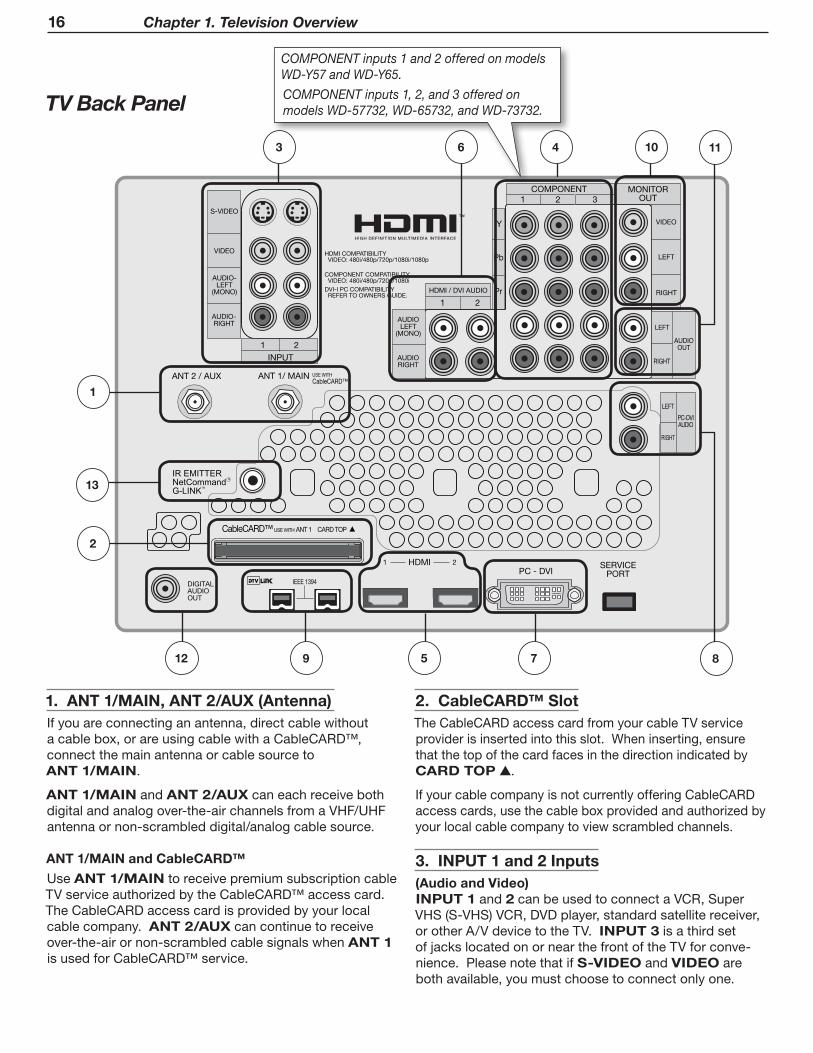
TM
R
TV Back Panel
1. ANT 1/MAIN, ANT 2/AUX (Antenna)Ifyouareconnectinganantenna,directcablewithoutacablebox,orareusingcablewithaCableCARD™,connectthemainantennaorcablesourcetoANT 1/MAIN.
ANT 1/MAINandANT 2/AUXcaneachreceivebothdigitalandanalogover-the-airchannelsfromaVHF/UHFantennaornon-scrambleddigital/analogcablesource.
ANT 1/MAIN and CableCARD™
UseANT 1/MAINtoreceivepremiumsubscriptioncableTVserviceauthorizedbytheCableCARD™accesscard.TheCableCARDaccesscardisprovidedbyyourlocalcablecompany.ANT 2/AUXcancontinuetoreceiveover-the-airornon-scrambledcablesignalswhenANT 1 isusedforCableCARD™service.
2. CableCARD™ SlotTheCableCARDaccesscardfromyourcableTVserviceproviderisinsertedintothisslot.Wheninserting,ensurethatthetopofthecardfacesinthedirectionindicatedbyCARD TOP .
IfyourcablecompanyisnotcurrentlyofferingCableCARDaccesscards,usethecableboxprovidedandauthorizedbyyourlocalcablecompanytoviewscrambledchannels.
3. INPUT 1 and 2 Inputs(Audio and Video)INPUT 1and2canbeusedtoconnectaVCR,SuperVHS(S-VHS)VCR,DVDplayer,standardsatellitereceiver,orotherA/VdevicetotheTV.INPUT 3isathirdsetofjackslocatedonornearthefrontoftheTVforconve-nience.PleasenotethatifS-VIDEOandVIDEOarebothavailable,youmustchoosetoconnectonlyone.
1
9
3 6 4 10
12 5 8
11
2
7
COMPONENT inputs 1 and 2 offered on models WD-Y57 and WD-Y65.
COMPONENT inputs 1, 2, and 3 offered on models WD-57732, WD-65732, and WD-73732.
13

Chapter 1. Television Overview 17
4. COMPONENT Inputs(COMPONENT 1 and 2 on WD-Y57, WD-Y65;COMPONENT 1–3 on WD-57732, WD-65732, WD-73732)(Audio and Video)Y Pb Pr (480i/480p/720p/1080i)Usethesejackstoconnectdeviceswithcomponentvideooutputs,suchasDVDplayers,externalHDTVreceivers,orcompatiblevideogamesystems.PleaseseeAppendixBforsignalcompatibility.
5. HDMI™ 1 and 2TheHDMI(HighDefinitionMultimediaInterface)supportsuncompressedstandardandhigh-definitiondigitalvideoformatsandPCMdigitalaudioformat.ForPCvideo,usethePC-DVIinputinstead.
Do not connect a computer to either TV HDMI jack.
UsetheseinputstoconnecttoEIA/CEA-861compliantdevicessuchasahigh-definitionreceiverorDVDplayer.Theseinputssupport480i,480p,720p,1080i,and1080pvideoformats.
TheseinputscanalsoacceptDVIvideoinputs.ToconnectaDVIinput,useanHDMI-to-DVIadapterorcableplusanalogaudiocables.ConnecttheanalogaudiocablestotheHDMI/DVI AUDIOinputsontheTVtoreceiveleftandrightstereoaudiofromyourDVIdevice.
TheseinputsareHDCP(High-BandwidthDigitalCopyPro-tection)compliant.
Theseinputsare certifiedforproperinteroper-abilitywithotherproductscertifiedbySimplay™.
6. HDMI/DVI AUDIOUsetheseanalogaudioinputswhenconnectingDVIvideodevicestotheTV’sHDMIjacks.UnlikeHDMI,DVIdoesnotcarryaudioinformationonthesamecable. For analog audio from a personal computer, use the PC-DVI AUDIO jacks instead.
7. PC-DVIPC-DVIisaDVI-IinputcompatiblewithbothDVI-A(analog)andDVI-D(digital)inputs.Connectyourpersonalcomputer’sHDMI,DVI,orVGAvideooutputtothisjack.Anadapterorconvertercablemayberequired.PleaseseeAppendixBforsignalcompatibility.Tohearaudiofromthecomputer,connectanalogaudiocablesfromthecom-putertothePC-DVI AUDIOjacks.
8. PC-DVI AUDIOUsethePC-DVI AUDIOjacksinconjunctionwiththePC-DVIvideoinputfromapersonalcomputer.ThesejacksallowyoutosendleftandrightanalogaudiofromyourcomputertotheTV.
9. IEEE 1394/DTVLINK™ThesejacksallowtheTVtoconnecttoexternalIEEE1394digitalproductsbymeansofasinglecable.Seechapter6,“NetCommandOperations”fordetailedinformationregardingIEEE1394connectionsandrecording.
10. MONITOR OUTUsethesecompositevideoandleft/rightaudiojackstosendanalogvideoandaudiosignalstoanexternalrecordingdevicesuchasaVCR.To make recordings from this output, the TV must be in normal full-screen mode rather than in Split Screen mode.
• Youcanwatchanotherdevicewhilerecording,butnotanotherchannel.
• FromthisoutputyoucanrecordaudioandvideosignalsfromANT 1, ANT 2, INPUT 1-3,andIEEE1394devices.
• DigitalsignalsfromANT 1, ANT 2,andIEEE1394devicesareconvertedtoanalogvideoandaudiosignals.
• Somesignalscannotberecordedbecauseofcopy-protectionflagsinthecontent.
11. AUDIO OUT LEFT/RIGHTAUDIO OUT LEFT/RIGHTjackssendanalogaudiooftheprogramcurrentlyshownonthescreentoanA/Vsur-roundsoundreceiverorstereosystem.Digitalaudiofromdigitalchannels,FireWire®(IEEE1394/DTVLink)devicesandHDMIdevicesisconvertedtoanalogaudiobytheTV.IfusingananalogA/Vreceiverorstereosystem,thisistheonlyaudioconnectionneededbetweenitandtheTV.
12. DIGITAL AUDIO OUTThisoutputsendsDolbyDigitalorPCMdigitalaudiotoyourdigitalA/Vsurroundsoundreceiver.AnalogaudiofromanalogchannelsanddevicesisconvertedbytheTVtoPCMdigitalaudio.IfyouhaveadigitalA/Vreceiver,inmostcasesthisistheonlyaudioconnectionneededbetweentheTVandyourA/Vreceiver.
13. IR Emitter NetCommand®IREmittersconnectedtothisjackareusedbytheTV’sNetCommandsystemtocontrolexternalIRremotecon-trolledanalogdevicessuchascableboxes,VCRs,DVDs,satellitereceiversandaudioreceivers.ThissystemalsocoordinateswiththeTVGuideOnScreen®systemtocontrolcableboxesandtoactivatetherecordfeatureofyourVCR.
TV Back Panel, continued

18 Chapter 1. Television Overview
CableCARD™ TechnologyCableCARDisanationwidesystemstandardthatallowsyourlocalcableTVprovidertosupplyyouwithanaccesscardcustomizedtoyouraccount.ThiscardallowsyourTVtoreceive,decode,andunscramblethepremiumdigitalchannelsincludedinyourcableTVsubscriptionwithouttheuseofacablebox.Whenyoumovetoanewcableprovider’sarea,returntheCableCARDtotheoriginalcableproviderandgetanewcardfromyournewprovider.
PleasenotethatCableCARDisarelativelynewtechnologyandyourlocalcableprovidermaynotcurrentlybeoffer-ingthisservice.Astimepasses,thissystemwillbecomebroadlysupportedbymostcableproviders.
TheCableCARDsystemisunidirectional,meaningyourcableprovidercansendupdatestotheTV,buttheTVcannotsendsignalsback.Asaresult,certainadvancedandinteractivedigitalcableservices,suchasrequestsforvideo-on-demandandpay-per-viewprograms,acableoperator’senhancedprogramguide,anddata-enhancedtelevisionservicesmayrequireuseofaset-topboxinstead.Formoreinformation,callyourlocalcableopera-tor.
DigitalcablechannelsauthorizedbytheCableCARDareavailableontheFirewire®IEEE1394networkandcanbesharedbyotherproductsonthenetwork.Youmaybeunabletorecordorcopysomedigitalprograms,however,becauseofcopyrestrictionssetbythecontentorcopy-rightowners.
Using a CableCARD™PowerontheTVandinserttheCableCARDintotheCableCARDslotwiththetopofthecardorientedasindi-catedbyCARD TOP .Whentheinitialscreendis-plays,writedowntheinformationthatappearsandhaveitreadywhencallingyourcableprovider.
In order to start cableservice for this device, please contactyour cable provider1-800-xxx-xxxxCableCARD(tm): xxx-xxx-xxx-xxx-xxx-xHost: xxx-xxx-xxx-xxx-xData: xxx-xxx-xxx-xxUnitAddress: xx-xxxxx-xxxxx-xxx
Press EXIT to exit.
Sample CableCARD initial screen. Record the information before contacting your cable provider.
Toreviewtheinformationlater,pressMENUandwhentheMainmenuappears,press9 9 9tore-displaythescreen.
Note: CableCARD™requirestheTV’sFast Power On setting.IfyouinsertaCableCARD™,theTVwillautomaticallyoverrideaLow PowersettingandchangetotheFast Power Onsetting.
IMPORTANTTo use a CableCARD, connect the primary incoming cable to ANT 1/MAIN on the TV.
CableCARD™ Menu
Press ENTER to select an application. Press EXIT key to exit.
CableCARD menu
Network SetupCableCARD(tm) StatusCableCARD(tm) PairingConditional Access
Sample CableCARD menu
TodisplaytheCableCARDmenuwithlinkstoapplicationsfromyourcableprovider:
1. WhilewatchingCableCARD,pressINPUTtoopentheInputSelectionmenu.
2. WiththeCableCARDiconhighlighted,pressMENUtoopentheCableCARDmenu.
3. Press tohighlightalink(bluetext),thenpressENTERtoaccessthelinkedpage.
4. ToredisplaytheCableCARDmenu,repeatsteps1and2.
5. PressEXITtoreturntoTVviewing.
IftherearetechnicalproblemswiththeCableCARD,anerrorscreenautomaticallydisplayswithinformationthatmaybeneededbyyourcableproviderwhenyoucallthemforassistance.
Moving Through Other CableCARD Screens
InadditiontoCableCARDmenus,otherCableCARDapplicationscreensmaydisplayandrequireyoutomakeadditionalselections.WhenusingthesescreensonyourMitsubishitelevision:
• Bluetextdenotesalinktoanotherscreen.PressENTER tomovetothenextapplication.Screenswithoutbluetextcontainnolinks.
• Youcannotmovebackwardthroughthelinks.ToexittheCableCARDsystem,pressEXIT.TheCANCELkeymaynotworkwithsomeCableCARDscreens.
Allinformationontheseapplicationscreensisprovidedbyyourlocalcablecompany.Contactyourcableproviderifyouhaveanyproblemswiththeapplicationscreendisplays.
IMPORTANTMost CableCARD screens show only status or diagnostic information and do not allow you to make changes. These screens are mean-ingful only to your local cable provider.

2
TV ConnectionsConnection Types . . . . . . . . . . . . . . . . . . . . . . . . . . . . . . . . . . . 20Digital Video and Home Recording . . . . . . . . . . . . . . . . . . . . . . . 21HDTV Cable Box or Satellite Receiver with Component Video . . . . 21Standard Cable Box, Satellite Receiver, or Other Device with
S-Video . . . . . . . . . . . . . . . . . . . . . . . . . . . . . . . . . . . . . . . . 22Wall Outlet Cable (no cable box) . . . . . . . . . . . . . . . . . . . . . . . . . 22Antenna with a Single Lead . . . . . . . . . . . . . . . . . . . . . . . . . . . . 23Antennas with Separate UHF and VHF Leads . . . . . . . . . . . . . . . . 23VCR to an Antenna or Wall Outlet Cable . . . . . . . . . . . . . . . . . . . 24VCR to a Cable Box (Audio & Video) . . . . . . . . . . . . . . . . . . . . . . 25HDMI Device (Cable Box, Satellite Receiver, DVD Player, or
Other Device) . . . . . . . . . . . . . . . . . . . . . . . . . . . . . . . . . . . . . . . 26DVI Video Device (Cable Box, Satellite Receiver, DVD Player,
or Other Device) . . . . . . . . . . . . . . . . . . . . . . . . . . . . . . . . . . 26DVD Player with Component Video . . . . . . . . . . . . . . . . . . . . . . . 27A/V Receiver (Sound System) . . . . . . . . . . . . . . . . . . . . . . . . . . . 27Older Cable Box . . . . . . . . . . . . . . . . . . . . . . . . . . . . . . . . . . . . 28Camcorder . . . . . . . . . . . . . . . . . . . . . . . . . . . . . . . . . . . . . . . . 28IEEE 1394 Devices . . . . . . . . . . . . . . . . . . . . . . . . . . . . . . . . . . 29IR Emitter NetCommand® and TV Guide On Screen . . . . . . . . . . . 31Helpful Hints for NetCommand Connections . . . . . . . . . . . . . . . . 32

20 Chapter 2. TV Connections
Connection Types
Video and Combined Audio/Video ConnectionsThesedescriptionsapplytoTVvideoonlyanddonotcoversignalsfrompersonalcomputers.
Picture Quality(most sources)
Name Signal TypeFigures
(not to scale)Additional Information
Best(carryhigh-definitionvideowhenavailable)
HDMIDigitalaudioandvideo
Carriesdigitalaudioanduncompresseddigitalvideoonasingleone-waycable.
DVI Digitalvideo
Carriesuncompresseddigitalvideoaloneonasingleone-waycable;requiresseparateaudioconnections.
ComponentVideo Analogvideo
YPbPrRCA-styleconnectorsarecoloredgreen,blue,andred.Carriesanaloghigh-definitionandstandard-definitionsignals.
Good S-Video Analogvideo
Carriesanalogstandard-defi-nitionsignals.ProvidesbetterqualityvideothancompositeorRFcoaxialvideo.
Fair CompositeVideo Analogvideo RCA-styleconnector,usually
coloredyellow.Carriesanalogstandard-definitionsignals.
FairtoBest(dependingonsource;carryallqualitiesofsignals)
IEEE1394(FireWire®)
Digitalaudioandvideo
Carriescompresseddigitalvideoandaudioaswellasdevicecontrolsignalsonasingletwo-waycable.
RFCoaxialVideoAnaloganddigitalaudioandvideo
Carriesaudioandvideoonasinglecable.
Note: OnlysomeTVsignalsarehigh-definitionsignals.Toviewhigh-definitionprogrammingfromyourcableorsatelliteprovider,youmustsubscribetotheprovider’shigh-definitionservice.Someover-the-airbroadcastsareinhigh-definitionandcanbereceivedwithahigh-qualityantennasuitedtoyourlocation.
Audio ConnectionsTherearetwotypesofaudioconnectionsusedonthisTV.Refertothetablebelow.
Audio ConnectionFigures
(not to scale)Additional Information
Left/RightAnalogStereoAudio
RCA-styleconnectorsusuallycoloredwhiteforleftandredforrightstereoaudio.Formonauralsound(allspeak-ersplayingthesamesound),useonlythewhiteconnector.
DigitalAudio(Coaxial)
RCA-styleconnectorusuallycoloredorange.UsetosenddigitalaudiofromtheTVtoyourdigitalA/Vreceiverforsurround-soundeffects.Usuallytheonlyaudioconnec-tionrequiredbetweentheTVandtheA/Vreceiver.

Chapter 2. TV Connections 21
Digital Video and Home RecordingThetablebelowwillhelpyoudecidewhichtypeofconnectiontousefordigitalvideo.Digitalvideocomestoyourhomeinacompressedstate,whetherreceivedonrecordedmedia(e.g.,disc)orbroadcastovertheair,overcable,orviasatellite.Somecompresseddigitalvideoisavailableforrecordingasnotedinthetable.
Connection Type into the TV Effect on Home Recording
HDMI or DVICompressedvideoisconvertedtouncompressedformbyanexternaldevicesuchasacablebox,satellitereceiver,orDVDplayerbeforeitissenttotheTVonanHDMIorDVIcable.
YoucannotrecordtheresultantuncompressedvideosenttotheTVviaHDMIorDVI.
IEEE 1394 (FireWire®) ConnectionsYourTVcanreceiveanddecodedigitalchannels,MPEG2compresseddigitalvideo,andDolbyDigitalaudio.
Youcanrecordcompresseddigitalvideoeither• oncompatibledigitalrecordersasdigitalsignalsusingIEEE1394
connections• convertedtoanalogsignalsandrecordedasstandard-definition
compositevideofromtheMONITOR OUTjackYoumaybeunabletorecordsomeprogrammingbecauseofcopyrestric-tionsaddedbythecontentowners.
HDTV Cable Box or Satellite Receiver with Component VideoIfyourcableboxorsatellitereceiverhasHDMIorDVIoutputs,usetheconnectionsforHDMIorDVIvideodevicesdescribedlaterinthischapter.
Required:RCAcomponentvideocables,left/rightanalogaudiocables.Acoaxialsplitter,availableatmostelectronicsupplystores,mayberequiredtocompletethisinstallation.
1. Connectthecablefromtheoutsidecableorsatel-liteservicetoCABLE INorSATELLITE INonthecableboxorsatellitereceiver.Seeyourdevice’sowner’sguideforinstructionsandcablecompatibility.
2. ConnectRCA-typecablesfromtheYPbProutputsontheHDTVcableboxorsatellitereceivertoCOM-PONENTontheTVbackpanel,matchingthecoloredconnections.
3. Connectleft(white)andright(red)audiocablesfromtheHDTVcableboxorsatellitereceivertoCOMPO-NENT /AUDIO LEFTandAUDIO RIGHTontheTVbackpanel.
4. Optional:ToallowuseoftheSplitScreenfeaturewithchannelsfromANT 1andthecableboxorsatellitereceiver,connecttheincomingterrestrialantennaorcableservice(notsatellite)toANT 1/MAINontheTVbackpanel.Acoaxialsplitter,availableatmostelectronicssupplystores,mayberequiredtocom-pletethisinstallation.
Note: Toreceivethebenefitsofdigitalsurroundsound,con-nectthedigitalaudiooutputfromyourcableboxorsatellitereceiverdirectlytoyourdigitalA/Vreceiver.
TM
R
Figure 1. Connecting an external HDTV receiver with component video connections

22 Chapter 2. TV Connections
Standard Cable Box, Satellite Receiver, or Other Device with S-VideoRequired:S-Videocableandleft/rightanalogstereoaudiocables.
1. ConnectthecablefromtheoutsidecableorsatelliteservicetoCABLE INorSATELLITE INonthecableboxorsatellitereceiver.
2. ConnectanS-VideocablefromVIDEO OUTonthecableboxorsatellitereceiverbackpaneltoINPUT S-VIDEOontheTVbackpanel.
3. Connectleft(white)andright(red)audiocablesfromAUDIO OUTonthecableboxorsatellitereceivertoINPUT/AUDIO LEFTandAUDIO RIGHTontheTVbackpanel.
Note: RefertothecableboxorsatellitereceiverOwner’sGuideforcableordishantennaconnectionstothereceiver.
TM
R
Figure 2. Connecting a device with S-Video
Wall Outlet Cable (no cable box)(can be used with a CableCARD™)
ItisveryimportanttoconnecttheincomingcableforyourprimaryviewingsourcetoANT 1/MAIN,especiallyforCableCARD™use.
1. ConnecttheprimaryincomingcoaxialleadcabletoANT 1/MAINontheTVbackpanel.
2. Foranoptionalsecondaryantennasource,connectanantenna(orcable)toANT 2/AUX.
3. IfyouhavesubscribedtoaCableCARD™service,InserttheCableCARDintotheCableCARDslot.ThetopofthecardmustfaceinthedirectionindicatedbytheCARD TOParrow.
Seechapter1,“TelevisionOverview,”foradditionalCableCARDinformation.DetailedTVGuideOnScreeninformationisintheseparateUser’sManual.
TM
R
Figure 3. Wall Outlet Cable

Chapter 2. TV Connections 23
Antennas with Separate UHF and VHF LeadsRequired:UHF/VHFcombinerThisisnotincludedwiththeTV,butisavailableatmostelectronicsstores.
1. ConnecttheUHFandVHFantennaleadstotheUHF/VHFcombiner.
2. PushthecombinerontoANT 1/MAINontheTVbackpanel.
TM
R
Figure 5. Connecting separate UHF and VHF Antennas
Mitsubishi strongly recommends you avoid using antennas with flat twin leads. Flat twin lead antenna wires are subject to interference which may adversely affect the performance of the TV. We recommend using coaxial antenna cable.
Antenna with a Single LeadA. For an antenna with flat twin leadsA300-ohm-to-75-ohmtransformerisrequired.ThisisnotincludedwiththeTV,butisavailableatmostelectronicsstores.
A1. Foranantennawithflattwinleads,connectthe300-ohmtwinleadstothe300-ohm-to-75-ohmtrans-former.
A2.Pushthe75-ohmsideofthetransformerontoANT 1 ontheTVbackpanel.
B. For cable or antenna with coaxial lead
ConnectthecoaxialleaddirectlytoANT 1ontheTVbackpanel.
TM
R
Figure 4. Connecting a Single Antenna

24 Chapter 2. TV Connections
VCR to an Antenna or Wall Outlet CableRequired:Two-wayRFsplitter,3coaxialcables,rightandleftanalogaudiocables,eitherS-videoorvideocable.ThesearenotincludedwiththeTVbutareavailableatmostelectronicsstores.
1. ConnecttheincomingcableorantennatoINontheRFsplitter.
2. ConnectonecoaxialcablefromOUTontheRFsplit-tertoANTENNA INontheVCRbackpanel.
3. ConnectonecoaxialcablefromOUTontheRFsplittertoANT 1/MAINontheTVbackpanel.ThisconnectionalsoallowsyoutousetheTVGuideOnScreen®andSplitScreenfeatures.
4. TousetheTVspeakerswiththeVCR,connectleft(white)andright(red)audiocablesfromAUDIO OUTontheVCRtoINPUT/AUDIO LEFTandAUDIO RIGHTontheTVbackpanel.IfyourVCRismono(non-stereo),connectonlythewhite(left)cable.
Figure 6. Connecting a VCR to an Antenna or Wall Outlet Cable
5. ConnecteitheranS-VideoorcompositevideocablefromVIDEO OUTontheVCRbackpaneltoINPUT/VIDEOorS-VIDEOontheTVbackpanel.Connectonlyonetypeofvideocable;S-Videoisrecommended,ifavailable.
Optional
TousetheTVGuideOnScreenrecordingfeatureandtorecordhigh-definitiondigitalchannelsconvertedtoanalogstandard-definitionvideoandanalogstereoaudio,performthesetwoadditionalsteps.
6. Connectleft(white)andright(red)audiocablesfromAUDIO INontheVCRtoMONITOR OUT LEFT/RIGHTontheTVbackpanel.IfyourVCRismono(non-stereo),connectonlythewhite(left)cable.
7. ConnectacompositevideocablefromVIDEO INontheVCRbackpaneltoMONITOR OUT/VIDEOontheTVbackpanel.
TM
R

Chapter 2. TV Connections 25
VCR to a Cable Box (Audio & Video)Required:Two-wayRFsplitter,4coaxialcables,rightandleftaudiocables,S-Videoorcompositevideocable,pluscomponentorS-VideocablesandaudiocablesrequiredtoconnecttheTVtothecablebox.
1. ConnecttheincomingcabletoINontheRFsplitter.
2. ConnectonecoaxialcablefromOUTontheRFsplit-tertoCABLE INonthecablebox.
3. ConnectonecoaxialcablefromOUTontheRFsplittertoANT 1/MAINontheTVbackpanel.ThisconnectionalsoallowsyoutousetheTVGuideOnScreen®andSplitScreenfeatures.
4. ConnectonecoaxialcablefromOUTonthecableboxtoANTENNA INontheVCRbackpanel.
5. ConnectthecableboxoutputstotheTVasshowninoneoftheoptionslistedbelow.ThisconnectionallowstheTVtoreceivethebestavailablesignaldirectlyfromthecablebox.
Figure 1:ComponentvideooutputtotheTV’sCOMPONENT Y Pb Prjacks;analogstereoaudiototheassociatedAUDIOjacks.
OR
Figure 2:S-VideooutputtotheTV’sINPUT/S-VIDEOjack;analogstereoaudiototheassociatedAUDIOjacks.
Figure 7. Connecting a VCR to a cable box
TM
R
6. TousetheTVspeakerswiththeVCR,connectleft(white)andright(red)audiocablesfromAUDIO OUT ontheVCRbackpaneltoINPUT/AUDIO LEFT andAUDIO RIGHTontheTVbackpanel.IfyourVCRismono(non-stereo),connectonlythewhite(left)cable.
7. ConnecteitheranS-VideoorcompositevideocablefromVIDEO OUTontheVCRbackpaneltoINPUT/VIDEOorINPUT/S-VIDEOontheTVbackpanel.Connectonlyonetypeofvideocable.S-Videoisrecommended,ifavailable.
Optional
8. ToallowrecordingfromtheTVtotheVCR:
a. Connectleft(white)andright(red)audiocablesfromAUDIO INontheVCRbackpaneltoMONITOR OUT/LEFT andRIGHTontheTVbackpanel.
b. ConnectavideocablefromVIDEO INontheVCRbackpaneltoMONITOR OUT/VIDEOontheTVbackpanel.
Note: Whenusingthisconnectionconfigurationwiththeconnectionsusedinstep5,itispossibletoviewlivecableprogramsthroughtheVCRDevice.Forbestpicturequalityalwaysviewlivecablepro-gramsdirectlyfromthecableboxdevice.

26 Chapter 2. TV Connections
DVI Video Device (Cable Box, Satellite Receiver, DVD Player, or Other Device)AnalogstereoaudiocablesandaDVI-to-HDMIcableorDVI/HDMIadapterandHDMIcablearerequired.ThesearenotincludedwiththeTV.Theymaybeavailableatyourlocalelectronicsretailer.
1. ConnecttheDVI-to-HDMIcable(recommended)orHDMIcablewithDVI/HDMIadapterfromtheDVIdevice’sbackpaneltotheTVbackpanel.
NOTE: IfyouareusingaDVI/HDMIadapter,itisimpor-tanttoconnecttheadaptertotheDVIdeviceforbestperformance.
2. ConnectasetofaudiocablesfromAUDIO OUT ontheDVIdevicebackpaneltotheHDMI/DVI AUDIOontheTVbackpanel.ConnecttheredcabletotheRIGHTjackandthewhitecabletotheLEFTjack.
NOTE: TheHDMIconnectionsupportscopyprotection(HDCP).
Somedevicesrequireconnectingtoananaloginputfirst,inordertoviewon-screenmenusandtoselectDVIastheouput.PleasereviewyourequipmentinstructionsforDVIconnectivityandcompatibility.
TM
R
Figure 9. Connecting a DVI device
HDMI Device (Cable Box, Satellite Receiver, DVD Player, or Other Device)Required:HDMI-to-HDMIcable.ThisisnotincludedwiththeTV.
ConnectanHDMIcablefromtheTVbackpaneltotheHDMIdeviceoutput.HDMIdevicesprovidevideoandaudiothroughthiscable,sonootherconnectionisrequired.TherearetwoHDMIinputsontheTVbackpanel.
TM
R
Figure 8. Connecting an HDMI device.
Note: HDMIinputsare certifiedforproperinteroperabilitywithotherproductscertifiedbySimplay™.
IMPORTANTTo connect a personal computer to the TV, see chapter 7, “Using the TV with a Personal Computer.”
The HDMI input processes signals as standard motion video and is not designed to process computer resolutions.
IMPORTANTFor sound from your devices, note that the HDMI inputs can receive digital stereo audio signals only. To use digital surround sound for an HDMI or DVI device, connect that device’s digital audio output directly to your A/V receiver. See the Owner’s Guides for those devices for instructions.

Chapter 2. TV Connections 27
DVD Player with Component VideoComponentvideocablesandanalogaudiocablesarerequired.ThesearenotincludedwiththeTV.
1. ConnectthecomponentvideocablesfromY PB PR VIDEO OUTonthebackoftheDVDplayertotheCOMPONENTjacksontheTVbackpanel,matchingthered,green,andbluecoloredconnec-tions.
2. Connectleft(white)andright(red)stereoaudiocablesfromAUDIO OUTonthebackoftheDVDplayertoCOMPONENT/AUDIO LEFTandRIGHTontheTVbackpanel.
TM
R
Figure 10. Connecting a DVD player with component video
IMPORTANTSee Appendix B for component video signal compatibility information.For digital audio connections to your A/V receiver, see your DVD player and A/V receiver Owner’s Guides.
A/V Receiver (Sound System)Mostsetupsrequireeitheradigitalaudiocableoranalogstereoaudiocables.
TheTVmakesallaudioavailableindigitalandanalogformats.AnalogaudiocomingintotheTVisavailableindigitalformatontheDIGITAL AUDIO OUTjack.DigitalincomingaudioisavailableinanalogformatontheAUDIO OUT LEFT/RIGHTjacks.Usually,onlyoneofthefollowingconnectionsisrequired:
• ToconnectananalogA/VreceiverConnectleft(white)andright(red)audiocablesfrom AUDIO OUT/LEFTandRIGHTontheTVbackpaneltotheTV AUDIO INPUTontheA/Vreceiver.
• ToconnectadigitalA/VreceiverwithDolby Digital surround sound and PCM audio supportConnectoneendofthedigitalaudiocabletoDIGITAL AUDIO OUTonthebackoftheTV.ConnecttheotherendtotheCOAXIAL DIGITAL INPUTonthebackoftheA/Vreceiver.
TM
R
Figure 11. Connecting audio from the TV to an A/V receiver
Note:
Onrareoccasions,anHDMIsignalmaybecopy-restrictedandcannotbeoutputfromtheTVasadigitalsignal.Tohearthesecopy-protectedsignalsthroughtheA/Vreceiver,useconnectionsforanalogA/Vreceivers.
ChecktheA/Vreceiver’sOwner’sGuideforinformationconcerninguseofthedigitalinputandswitchingbetweendigitalsoundandanalogstereosoundfromtheTV.

28 Chapter 2. TV Connections
Older Cable BoxRequired:3coaxialcables,onetwo-wayRFsplitter.ThesearenotincludedwiththeTV.
Whenthissetupiscomplete,youcanusetheTVremotecontrol,whenprogrammed,tochangechannelsonthecablebox.
Note: Thisconnectionisnotrecommended.Theotherconnectionsdescribedinthischapterprovidebet-terqualityaudioandvideototheTV.
1. ConnecttheincomingcabletoINontheRFsplitter.
2. ConnectonecoaxialcablefromOUTontheRFsplit-tertoANT 1/MAINontheTVbackpanel.
3. ConnectonecoaxialcablefromOUTontheRFsplit-tertoINonthestandardcablebox.
4. ConnectonecoaxialcablefromOUTonthecableboxtoANT 2/AUXontheTVbackpanel.
TM
R
Figure 12. Connecting an older cable box
CamcorderRequired:AnalogstereoaudiocablesandeitheranS-Videoorcompositevideocable.
NOTE: ForIEEE1394camcorders,seealsolaterinthischapterunder“IEEE1394Devices.”
1. ConnecteitheranS-VideoorcompositevideocablefromVIDEO OUTonthecamcordertoINPUT 3/VIDEOorS-VIDEOontheTV.Connectonlyonetypeofvideocable;S-Videoisrecommended,ifavail-able.
2. Connectleft(white)andright(red)audiocablesfromAUDIO OUTonthecamcordertoINPUT 3/AUDIO LandAUDIO RontheTV.
Figure 13. Analog connections for a camcorder

Chapter 2. TV Connections 29
IEEE 1394 Devices
Compatible IEEE 1394 DevicesCompatibleA/Vdevicesincludesome,butnotall,cableboxes,D-VHSVCRs,A/Vdiscs,andfutureproducts.SomedevicesmayhaveIEEE1394connectorsbutarenotcompatiblewiththeTV.Areasofcompatibilitytoconsiderare:
1. Digital Video SignalsTheTVcandecodeMPEG2videoasprovidedbycableboxesandsomecamcorders.ManycamcordersprovideDVvideo,whichtheTVcannotdecode.ConnectaDVcamcordertotheTVusinganalogaudiopluscompositevideo,S-video,orcomponentvideo,oruseHDMIaudio/video.Othertypesofdigitalvideo,suchasPCvideoprovidedbysomecomputers,mustbedecodedbythesourcedeviceandsenttotheTVasanalogvideo,S-video,orDVI/HDMIvideo.
2. Digital Audio SignalsWhenreceivedwithvideosignals,theTVcandecodeDolbyDigitalsignalsandMPEGaudiosignals.Othertypesofdigitalaudioasprovidedbysomedigitalrecord-ingdevices,suchasMP3audioandDTSaudio,cannotbedecodedbytheTVwhenreceivedoverIEEE1394con-nections.
TheTVmaynotbeabletopassincompatibledigitalaudiosignalsonthecoaxialdigitalaudiooutput.Thesesignalsmaypasstootherdevices,however,ontheIEEE1394cable.
3. Digital Control SignalTheTVcanserveasthecontrolcenterforIEEE1394audio/videodevices,suchasVCRs,A/VDiscs,tuners,cableboxes,andamplifiersthatarecompatiblewiththefollowingIEEE1394controlstandards.
• EIA-775. Designedfortuningdevicessuchascableboxes,allowingthedevicetosendsimplegraph-ics.Thisstandarddoesnot,however,allowtheTVtocontrolthecableboxbyIEEE1394.
• AV/C (Audio Video Control). Designedtoprovidebasiccontrolssuchasplay,stop,channelselection,andvolume,asappropriateforthedevice.
Four-Pin and 6-Pin ConnectionsTherearetwodifferenttypesofconnectorsusedforIEEE1394terminalsandcables:a4-pinanda6-pintype.Bothtypessendthesamedigitalaudio,video,andcontrolsignals,butthe6-pinconnectorscanalsosupplylow-voltageelectricalpowertoconnecteddevices.ThisTVusesonly4-pintypeconnectors.
A6-pinconnectorcannotbeconnecteddirectlytoa4-pinjack,andviceversa.Toconnecta6-pindevicetoa4-pindevice,usea6-pin-to-4-pinadapteroradaptercable.Thesecablesareavailablefromelectronicsandcomputerstores.
4-pin connector 6-pin connector 6-pin-to-4-pin adapter
Ifyouwishtoconnecta6-pindevicetotheTV(suchasacamcorder),andthedeviceisdesignedtoreceiveelectri-calpowerfromanother6-pindevice,thereareseveralwaystoprovideelectricalpowertothedevice:
• ConnectthecamcorderdirectlytothehouseholdAC.• Usethecamcorder’sbatteryforpower.• Connectthecamcorderdirectlytoanother6-pin
deviceinthenetworkthatcanprovidepower.
Connection MethodsTherearetwoconnectionmethodsforIEEE1394devices.Usethemethodthatfitsyournetworkofaudio/videoproducts.
Direct Device-To-Device MethodTheIEEE1394interfaceallowsyoutochaindevices,unlikeaudioandvideoconnectionsthatrequireyoutoconnecteachindividualdevicedirectlytotheTV.Forexample,youcanconnectyourD-VHStoyour1394A/Vdiscandthenconnectthe1394A/VdisctotheTV.TheresultingIEEE1394chainallowsyoutoaddmoredevicestothechain.YouwillseeaniconforeachdeviceintheTV’sInputSelectionmenuandcanalsosendinformationfromanyIEEE1394devicetoothercompatibledevices.
Hub Connection MethodTheIEEE1394standardallowsyoutousetheTVasahubwithintheaudio/videonetwork.Eachdevicecansendinformation,whichmayincludeaudioandvideo,toanyotherdeviceinthenetwork.

30 Chapter 2. TV Connections
IEEE 1394 Devices, continued
Tips for Connecting IEEE 1394 Devices
• DonotloopthelastdeviceinthechainbacktotheTV.Whenthedevicechainislooped,theTVmaynotbeabletoworkwiththeotherdevices.
• Placedevicesthathaveonlyamechanical(two-position)powerswitchattheendofthechainorleavethepowerswitchintheonposition.Whenturnedoff,IEEE1394signalsmaynotbeabletopassthroughthedevicetootherdevices.
• Placedeviceswiththeslowestcommunicationspeedattheendofthechain.Sometimesthecommunica-tionspeedismarkedneartheIEEE1394connectorwithan“S”number.Thehigherthenumber,thefasterthecommunicationspeed.ThisTVhasacommunica-tionspeedofs400.Deviceswithslowcommunica-tionspeedscaninterferewithIEEE1394signalsfromfasterdevices.Whensettingupadigitalrecordingbetweenafasterdeviceandaslowerdevice,maketheslowerdevicethesourceandmakethefasterdevicetherecorder.
• UseIEEE1394cables15feetorlessinlengthbetweendevices.
• ThisTVisanIEEE1394adevice.ItcanbeusedwithanIEEE1394bsystemwhenanIEEE-1394a-to-1394bconvertorisused.1394bsystemsarecapableofgreaterdistancesandmulti-roomapplications.
• TheTVcanrecognizeamaximumofsevenIEEE1394devicesatanyonetime.
IEEE 1394 Camcorders
• Control Functions.ConnectthecamcordertotheTV’sIEEE1394jackontherearoftheTVandtestusingtheTV’sremotecontroltooperatethecam-corder.Ifyourmodeldoesnotoperateproperly,usethecamcorder’scontrolbuttonsinstead.
• MPEG Camcorder.IfyouareunabletoplaybackovertheIEEE1394interface,usetheanalogaudio/videoconnectionsdescribedinchapter2,“TVCon-nections.”
• DV Camcorder.Connectthecamcorderusingtheanalogaudioandvideoconnectionsdescribedinchapter2,“TVConnections.”
TM
R
You can connect an IEEE 1394 camcorder with an IEEE 1394 cable or with analog audio/video cables. In either case, test using the TV’s remote control to operate the camcorder over the IEEE 1394 cable.

Chapter 2. TV Connections 31
IR Emitter NetCommand® and TV Guide On ScreenAn IR emitter cable is included with the TV.
TheNetCommandsystemusesemittersconnectedtotheIR EMITTERjacktocontrolotherdevicessuchasVCRs,DVDplayers,cableboxes,andsatellitereceiv-ers.ThiscontrolsystemissharedwiththeTVGuideOnScreensystem.
1. ConnecttheplugendofthesuppliedIRemittercabletotheIR EMITTER NetCommand®jackontheTVbackpanel.
2. Runthecableforeachoftheemitterendsunder,alongside,orovereachdevicetobecontrolledsothattheemitterendisinfrontoftheareawheretheremotecontrolsensorislocated.
3. Positiontheemitterendwiththeemitterbulbfacingtheremotecontrolsensor.Thebulbemitsinfraredlightinacone-shapedpattern.Placethebulbfarenoughfromthesensortoallowtheconepatterntoreachthesensor.
TheIRsensorisusuallybehindtheplasticwindowofthefrontdisplaypanel.Itissometimesvisiblewiththeaidofaflashlightandisnormallyaroundorsquarecutoutbehindtheplastic.Ifyoucannotseethesensorandthedevice’sOwner’sGuidedoesnotspecifythelocation,youcanfinditbyfollowingthesestepsusingthedevice’sremotecontrol:
a. Holdtheremoteaboutone-halfinchfromthefrontofthedevice.Startingfromoneendofthedisplaywindowplastic,pressthePOWERbutton.
b. Ifthedevicedoesnotrespond,movetheremotecontroloneinchtowardthecenterandtryagain.
c. Repeatthisuntilthedeviceresponds.
d. Notethislocationandthenstartoverfromtheotherendofthedisplaywindowplastic,repeatinguntilthedevicerespondsagain.
Theremotecontrolsensorissomewherebetweenthesetwopositions.Thisisusuallyenoughaccu-racyforplacementoftheIRemitters.
Withsomedevices,theemitterworksbetterfacingdownwardfromthetopofthedevice.Experimentifneeded.
4. Securetheemitterendsinplaceusingdouble-sidedtape.
5. PlaceanyunusedendsbehindthedevicestopreventstraysignalsfromreachingtheIRsensors.
TM
R
Figure 14. Connecting IR Emitter NetCommand
Figure 15. IR emitters so the signal can be “seen” by the IR sensor on each device.
IMPORTANTPosition IR emitters so that each device’s sensor “sees” the signal from only one emitter. Otherwise, a device receiving signals from multiple sources (remote controls, IR emitters) may not respond at all.

32 Chapter 2. TV Connections
Q. My VCR (or other device) does not have two sets of stereo audio outputs. How can I connect this device’s audio to both the TV and the A/V Receiver?
A. YouneedtoconnectthedevicetotheTVandthenmakechangestotheA/Vreceiversetup.
1. ConnecttheVCR’saudioandvideototheTV;connectthesinglesetofstereoaudiooutputstotheTVonly.
2. Performtheprocedureforsettingupadeviceconnection.Seechapter3,“TVSetup,”andthesectionentitled“WhenYouFirstConnectaDevice.”NetCommandIRLearningisoptional.
2. PressINPUTtodisplaytheInputSelectionmenu,highlighttheVCR’sicon,andpressENTERtoselecttheVCR.
3. PressMENUtoopentheMainmenu,highlighttheNetCommandicon,andpressENTER.
4. UnderAV RECEIVER SETUP,confirmthatthetextboxdisplaysNone.
5. PressEXIT.
Afterperformingthesesteps,theTVwillautomaticallypasstheaudiosignaltotheA/Vreceiver.
Q. I have both the TV stereo audio output and TV digital audio output connected to the same input designa-tions on my A/V Receiver. How do I switch between analog audio and digital audio?
A. Inmostsetups,analogaudioisalsooutputasdigitalaudio,sonoswitchingisrequired,andthereisnoneedtoconnecttheanalogoutput.Insomecircumstances,however,youmayalsoneedanalogaudiofromtheTV.Forexample,MP3audioisonlyoutputinanalogformat,soyoumustconnecttheTV’sanalogAUDIOOUTPUTtotheA/VReceiverifyouwanttohearMP3audiothroughtheA/Vreceiver.RefertoyourA/VReceiveruser’sguidetofindouthowanalog/digitalaudioswitchingworks.
Q. The front panel of my A/V Receiver is too tall or too convex for the IR emitter signal to reach the remote control sensor of the A/V Receiver. What can I do?
A. Thereareseveralpossiblesolutions.
• MounttheIREmitteronthetop,frontedgeoftheA/VReceiverovertheremotecontrolsensor.Usetapetosecureitinplace.
• MounttheIREmitterontheundersideoftheshelfabovetheA/VReceiver(iftheA/VReceiverisinacabinet).Usedoublesidedtapetosecureitinplace.
• Somesmallstick-onemittersfromothermanufacturersmaybecompatiblewiththisTV’sIREmitterjacks.ThesemaybeusedinsteadofthesuppliedIREmitters.
Q. I occasionally need to see the menu from my A/V Receiver. How can I connect it to the TV for this purpose?
A. ConnecttheA/VReceiver’svideooutputtoanunusedinputontheTVandthenusetheA/Vreceiver’sremotecontroltodisplaythemenu.
1. ConnectthevideooutputoftheA/VReceivertoanunusedinputontheTV;Input3onthefrontpanelisthemostconvenient.TheAutoInputSensingscreenwilldisplayswhentheTVdetectsthenewconnection,
2. PressEXITtoclosethescreenwithoutnamingtheinput.
3. SelectINPUT 3(orotherinputyouused)fromtheInputSelectionmenu:pressINPUT,highlighttheInput3icon,andpressENTER.
4. PresstheMENUkeyontheA/Vreceiver’sremotecontroltoopentheA/Vreceiver’smenu.
5. Whenfinished,disconnecttheA/Vreceiver’svideoinputfromtheTV.
Q. I have a high definition receiver I would like to connect and it also has an S-video output I would like to be able use as well. Is there any way to connect this receiver both ways?
A. Yes,thisitemwillappeartwiceintheInputSelectionMenu.JustaddthisunitonceusingtheCOMPONENT orHDMIinputandonceusingoneoftheS-VIDEOinputs.MitsubishisuggeststhatyouconnectstereoaudiooutputswiththeS-videoinputonly.
Helpful Hints for NetCommand Connections

3
TV SetupGuidelines for Setting Up and Using Your New Widescreen TV . . . 34When You First Power On the TV . . . . . . . . . . . . . . . . . . . . . . . . 36Using the TV’s Setup Menu . . . . . . . . . . . . . . . . . . . . . . . . . . . . 36When You First Connect a Device . . . . . . . . . . . . . . . . . . . . . . . . 39Initial NetCommand® Setup . . . . . . . . . . . . . . . . . . . . . . . . . . . 42Additional Setup Using the NetCommand Menu . . . . . . . . . . . . . . 43

34 Chapter 3. TV Setup
Getting Started
1. Readthesectionentitled“Important Information About Your TV”startingonpage6.
2. ChoosealocationforyourTV.
• AllowatleastfourinchesofspaceonallsidesoftheTVtohelppreventoverheating.
• Avoidlocationswherelightmayreflectoffthescreen.
• Seethestandrequirementsunder“Important Information About Your TV.”
3. Installthebatteriesintheremotecontrol.Seechapter 4, “TV Operation and Features,”forinfor-mationonuseoftheremotecontrol.
4. PlugyourTVintoapoweroutlet.ThePOWERindicatoronthefrontoftheTVwillstartblinkingrapidly.AfterthePOWERindicatorstopsblinking,pressthePOWERkeytopowerontheTV.
5. WhentheWelcomescreenappearsthefirsttimeyoupowerontheTV,selectalanguageforTVmenus.YoucanlaterchangethelanguagethroughtheSetup menu.
6. SomeTVsareshippedfromthefactorywithdemomodeactiveforuseinretailstores.IfdemomodeisactivewhenyoufirstturnontheTV:
a. PressMENU.b. WhentheMainmenuappearswithSetuphigh-
lighted,pressENTER.c. WhentheSetupmenuopens,press tohighlight
theon-screenDemo Mode Offbutton.d. PressENTER.
7. ConnectyourA/VdevicestotheTV(seechapter 2, “TV Connections”)andperforminitialsetupasdescribedinchapter 3, “TV Setup.” Chapter3alsoprovidesinstructionsforsettingupNetCommandcontrolofyourhometheaterandforenablingtheTVGuideOnScreen®system.
8. YoucannowstartwatchingTVoryoucanperformaddi-tionalsetupandcustomizationthroughtheTVmenus.
TV Operation
1. Review chapter 4, “TV Operation and Features,”forTVfeaturesincluding:
• Input Selection (viewing source).Selectacon-nectedprogramsourcetowatch,suchasaVCR,DVDplayer,orantenna.PressINPUTontheremotecontroltoselectfromiconsfortheTVinputs.See“Input Selection Menu.”
• Picture Formats.PressFORMATtocyclethroughpicturesizesandshapestofindtheonebestsuitedtotheprogramyou’rewatching.See“TV Signals and Display Formats.”
2. TousetheTVtocontrolrecordingsthroughNetCommand,seechapter 6, “NetCommand Operations.”TousetheTVGuideOnScreensystem
Guidelines for Setting Up and Using Your New Widescreen TVtocontrolrecording,seetheseparateTV Guide On Screen® Interactive Program Guide User’s Manual.
3. TounderstanduseoftheInputSelectionmenuwithNetCommand-controlleddevices,seechapter 6, “NetCommand Operations.”
4. IfyouhaveIEEE1394A/Vdevices,seechapter 6, “NetCommand Operations,”fordetailsonoperatingsuchdevices.
Additional TV Setup
1. Reviewchapter 5, “TV Menu Settings,”tocustom-izeTVoperation.PresstheMENUkeytoenterthemenusystem.Someexamplesofsettingsyoumaywishtochangeinclude:
• Input Name.ChangethedevicenamesthatappearintheInputSelectionmenu.See“Input Name Menu.”
• Icon Order.RearrangethedeviceiconsintheInputSelectionmenutoputfrequentlyusediconsnearthefront.See“Icon Order Menu.”
• FAV.Createlistsofyourfavoritechannelssoyoucanfindthemquickly.See“Channel Menu.”
• Parental Lock.YoucanrestrictTVviewingbyprogramratingorbytimeofday.Youcanalsodisablethefront-panelbuttons—usefulifyouhavesmallchildren.See“Parental Lock Menu.”
• Video Settings.Changethevideoadjustmentstogetthebestpictureforyourviewingconditions.See“Audio/Video Menu.”
YoumaywishtochangethePictureModefromthedefaultBrillianttoeitherBrightorNatural,whicharesuitableformosthomeviewingenvironments.
2. ToprogramtheremotecontroltooperateA/VdevicesnotunderNetCommandcontrol,seeAppendix D, “Programming the Remote Control.”
TV Care
• Lamp Cartridge.Whenthelampcartridgeneedsreplacement,replace the lamp yourself and save the cost of a service call.SeeAppendix Cforinstructions.
• General Cleaning.TokeepyourTVlookingitsbest,seethecleaningrecommendationsunder“Important Information About Your TV.”
Assistance
• Fortroubleshooting,service,andproductsupport,seeAppendix E.
• Forwarrantyinformation,seetheTVwarrantyinthebackofthisbook.

Chapter 3. TV Setup 35
Installing the Remote Control Batteries1. Removetheremotecontrol’sbackcoverbygently
pressinginthetabandliftingoffthecover.
2. Loadthebatteries,makingsurethepolarities(+)and(-)arecorrect.Forbestresults,insertthenegative(-)endfirst.
3. Snapthecoverbackinplace.
2
1
The remote control requires two AA alkaline batteries.
TV Tips
Turning the TV On or OffToturntheTVonoroff,pointtheremotecontrolatthefrontoftheTVandpressthePOWERbutton.Alternatively,pressthePOWERbuttononthefrontpaneloftheTV.
If You Turn Off the TV by Mistake
1. PressPOWERagainwithinabout30seconds,whilethelampisstillhot,tohavetheTVcomebackonimmediately.
2. IftheLAMPindicatorstartsblinking(about30secondsafteryoushutoffpower),wait about one minute for the LAMP indicator to stop blinking and press POWER to turn the TV on again.
Controlling Sound VolumePressVOL / toadjustthesoundlevel.
Changing ChannelsTochangechannels:
• EnterthechannelnumberusingthenumberkeysontheremotecontrolandpressENTER.Foratwo-partdigitalchannel,suchas3-1,press3 —
CANCEL 1toenteradash(separator).
• PressCH / tochangechannelsonechannelatatime.
• PressandholdCH / tomovequicklythroughchannels.
• PressQV(QuickView)toswitchbacktotheprevi-ouslytunedchannel.
• UsetheFAV(Favorites)featuretosetuplistsoffavoritechannelsandtunetothemwiththeFAVkey.See“ChannelMenu”inchapter5.
NOTE:Memorizechannelstomakefindingchannelseasier.
Care of the Remote Control
• Useonlyalkalinebatteries.
• Bewithin20feetoftheequipment.
• Donotpresstwoormorebuttonsatthesametimeunlessinstructedtodoso.
• Donotallowunittogetwetorbecomeheated.
• Avoiddroppingonhardsurfaces.
• Donotuseharshchemicalstoclean.Useonlyasoft,lightlymoistenedcloth.
• Donotmixoldandnewbatteries.
• Donotheat,takeapart,orthrowbatteriesintofire.

36 Chapter 3. TV Setup
When You First Power On the TV
Choosing a Language for MenusWhenyoupowerontheTVforthefirsttime,youcanselecteitherEnglishorSpanishforallmenus.YoucanlaterchangethelanguagethroughtheSetupmenu.
Figure 1. The Welcome screen lets you change the menu language when you first power on the TV.
TV Guide On Screen Setup ReminderIfyoudonotsetuptheTVGuideOnScreensystemwhenyoufirstturnontheTV,areminderscreenwillappearthenextsixtimesyouturnontheTV(seefigure2).TosetuptheTVGuideOnScreensystem,see“AdditionalSetupwiththeNetCommandMenu”laterinthischapter.
Figure 2. TV Guide On Screen setup reminder
Using the TV’s Setup MenuUsetheSetupmenuforbasicTVsetupoptions.TodisplaytheSetupmenu,pressMENUtoopentheMainmenu.WiththeSetupiconhighlighted,pressENTER.
Figure 3. Open the Setup menu from the Main menu.
Language (Setup Menu)Choosetodisplayon-screenmenusineitherEnglishorSpanish(Español).
Tolistentoaudioinotherlanguages(whenavailable),seechapter5,“TVMenuSettings,andthe“AudioSettings”section.Thenrefertoeither“SAP”(analogsignal)or“Language”(digitalsignal).
Memorize Channels (Setup Menu)For ANT 1/MAIN and ANT 2/AUXThememorizationprocessperformstwoscansofallpos-siblechannelsontheselectedANTinput.Analogchan-nelsarescannedfirst,thentheprocessisrepeatedfordigitalchannels.Channelmemorizationmaytakeupto15minutestocomplete.
To start channel memorization
1. Highlightaninputselectionbasedonyourconnections:
Input Condition
Ant1Air,Ant2Air
Whenconnectedtoanindoor/outdoorantenna
Ant1Cable,Ant2Cable
Whenconnectedtodirectcable(nocablebox)
2. PressENTERtostartautomaticchannelmemorization.
To stop channel memorization before completion PressCANCEL.
ChannelsmemorizedbeforeyoupressedCANCELareretainedinmemory.Ifyourestartmemorization,allprevi-ouslymemorizedchannelsfortheselectedantennainputareerasedandtheprocessrestarts.
Afterchannelmemorization,pressCH / totunetomemorizedchannels.SelecttheChannelmenuforfurtherchannelediting,suchasaddinganddeletingchannelsfrommemory,namingchannels,andsavingfavoritechan-nelsincustommemorybanks.

Chapter 3. TV Setup 37
Note:
• IfusingaCableCARD™,thecompletelistofavailablechannelsisprovidedthroughtheCableCARDandtheANT 1optionisgrayedout.
• IntheTVGuideOnScreen®system,thechan-nelsdisplayedandtheorderinwhichtheyaredisplayedareindependentoftheTV’schannelmemorization.RefertotheTV Guide On Screen Interactive Program Guide User’s Manualfordetailedinstructionsoneditingchannelsshowninthisguide.
Clock (Setup Menu)SettheclockifyouwishtousetheTV’sTimerfunctionorscheduleNetCommand-controlledrecordings.Youcanuseeitherthemanualorautomethodtosettheclock.
Figure 4. Clock submenu
Setting the Clock ManuallyTime
Withthehourhighlightedinyellowcharacters,press repeatedlytoslowlyincrementthehourandassociatedAM/PM indicatororpressandholdtoquicklyincrementthehour.PressENTERtohighlighttheminutesinyellow.Press tosettheminutes.Press tomovetotheDatebox.
DateWiththemonthhighlightedinyellowcharacters,press toselectthecorrectmonth.PressENTERtohighlighttheday.Press toselectthecorrectday.PressENTER tohighlighttheyear.Press toselectthecurrentyear.Press tomovetotheTime Zonebox.
Time ZoneSelectyourcorrecttimezone.Press or toselectthetimezoneforyourarea(Atlantic, Eastern, Central, Mountain, Pacific, AlaskaorHawaii).Press tomovetotheDaylight Savingsbox.
Daylight SavingsPress or toselecteitherAppliesorIgnore,dependingonwhetherornotdaylightsavingstimeisusedinyourarea.
Timer (Setup Menu)
Figure 5. Timer submenu
TheTimerfeatureallowsyoutosetadayandtimefortheTVtoturnonautomaticallyandthedeviceandchanneltodisplaywhenitswitcheson.IftheTVisalreadyonattherequestedtime,theTVautomaticallytunestothechannelyoudesignatedintheTimermenu.
WhentheTimerturnsontheTV,thescreendisplaysthemessage“PressabuttonfortheTVtostayon.”PressanybuttonontheremotecontrolwithinfiveminutesifyouwishtheTVtoremainon.
Note: TheTVclockmustbesetbeforeyoucanusetheTimerfeature.
On/OffPress toenableordisabletheTimer.Press tomovetotheDaybox.
Note: IfClock SettingissettoManual,eachtimethetimechangeoccurs,youmustopenthismenuandsettheTV’sclockaheadorback.
IfyouhaveselectedAutoforClock Setting,theTV’sclockadjustsautomaticallytodaylightsavingstime.
Setting the Clock AutomaticallySelecttheTime ZoneandtheDaylight Savings(DST)optionsforyourstate.Press toselectAppliesorIgnore.YoumaythentunetoachannelonANT 1orANT 2thatusesExtendedDataService(XDS)timedata,typicallyaPBSchannel.WithAutoselected,theTVauto-maticallyretrievesthecorrecttimeanddateinformationfromthischannel.
Beawarethatifachanneldisplaysincorrecttimeinforma-tion,itisbecauseofinformationsentfromthebroadcasterandisnotadefectoftheTV.
Note: Youmayfindthatsomechannelssendtheincor-recttimeandtheTVclockisreseteverytimeyoutunetothosechannels.Topreventunwantedclockresets,firstusetheAutomethodtosettheclockfromachannelsendingthecorrecttime,thenchangethemethodtoManual.
Setup Menu, continued

38 Chapter 3. TV Setup
Set DaySelectthedayordaysthattheTVwillturnonautomati-cally.Press or toselectDaily, Mon-Fri(MondaythroughFriday),orindividualdaysoftheweek.Press tomovetotheTimebox.
Set TimeWiththehourhighlightedinyellowcharacters,press repeatedlytoslowlyincrementthehourandassociatedAM/PM indicatororpressandholdtoquicklyincrementthehour.PressENTERtohighlighttheminutes.Press tosettheminutes.Press tomovetotheDevicebox.
DevicePress or toselectthedevicetousewhentheTimerturnsontheTV.IftheTVisalreadyonattheselectedtime,theTimerwillswitchtheTVtothisdevice.Press tomovetotheChannelbox.
ChannelWhentheselecteddeviceisanantenna,youcanselectachannelfortheTVtotunetowhenitcomeson.HighlighttheChannelboxand
• pressCH / or tochoosefrommemorizedchannels.
• Enterachannelnumberfromtheremotecontrol.Youcanalsoentersub-channelnumbersfordigitalchannelsbyusingthe—/CANCELkey.
Note: ThePOWER/TIMERindicatorflashesgreenwhentheTVisofftoindicatetheTVTimerhasbeenset.
Energy Mode (Setup Menu)TheEnergyModeoptionletsyouselecttheTV’slevelofpowerconsumptionwhiletheTVisturnedoff.Choose
Setup Menu, continued eitherLow PowerorFast Power On.TheLow Power settinguseslessenergy,butTVpower-ontakeslonger.ThedefaultisFast Power On.KeepthissettingatFast Power Onifyou:
• ExpecttousetheTVTimerfunctiontoturnontheTVatapreselectedtime.
• NeedtheTVClocktoremainaccuratefortheTVTimerandforschedulingNetCommand-controlledrecordings.WiththeLow Powersetting,youmustresettheTVClockiftheTVisleftturnedoffforover48hours.
• WishtoreceiveupdatestotheTVGuideOnScreenprogramlistings.
• Needfasterpoweron.• WishtoturnofftheTVwhilemakingaNetCom-
mand-controlledrecording.• WishtoschedulefutureNetCommand-controlled
recordingsforatimewhentheTVwillbeoff.
Note: CableCARD™andTVGuideOnScreen®re-quiretheFast Power Onsetting.IfyouinsertaCableCARD™oractivateTVGuideOnScreen,theTVwillautomaticallyoverrideaLow PowersettingandchangetotheFast Power Onsetting.
Demo Mode Off (Setup Menu)IfDemoModeisactive,highlighttheDemo Mode Off buttonandpressENTER.
Software Version (Setup Menu)Forservicingpurposes,theTV’ssoftwareversionisdis-playedattheupperrightsideoftheSetupmenu.

Chapter 3. TV Setup 39
When You First Connect a DeviceDuringtheinitialset-upprocessforadevice,theTVwill:
a. detecttheconnecteddeviceb. promptyoutoidentifythedevicebynamec. promptyoutoperformNetCommandset-upfor
thedevice,ifapplicabled. repeattheabovestepsforanyadditionalnewly
connecteddevices
ClearThought® Easy Connect Auto Input SensingThisTV’sClearThought®autoinputsensingfeaturedetectsmostconnectionsautomatically.ThefirsttimeyouconnecttoaClearThoughtinput,youarepromptedtoselectanamefortheconnecteddevice.ThetablebelowdefinesconnectionstheTVcandetect.
Auto Detection Active No Auto Detection
INPUT 1, 2, 3videojacks ANT 1/ANT 2
COMPONENTvideojacks MONITOR OUT(alljacks)HDMI*
PC-DVI*AllAUDIOjacks
IEEE 1394
* Ifthedeviceispoweredoffwhenconnected,detec-tionoccurswhenthedeviceisnextpoweredon.
1. ConnectyourdevicestotheTV,makingnoteofwhichTVinputyouhaveusedforeachdevice.
TheTVandthedevicescanbeeitheronoroffwhenconnecting.IftheTVispoweredoff,thedetectionprocesswilloccurthenexttimeyouturnontheTV.
2. Formostdevices,theAutoInputSensingscreenopens(seefigure6).Withthetextboxhighlighted,press toselectanameforthedevicefromthefollowinglistofnames:
CableboxCamcorderDVDDVD2DVR(digitalvideorecorder,recordableDVD)GameHD Disc (high-definitiondisc)SatelliteVCR
ThenameyouassignherewillappearintheInputSelectionmenuandcanbechangedlaterthroughtheInputNamemenu.
Ifyouselectoneofthedevicenamescheckedinthetableabove,theon-screenLearnbuttonwillchangefromgrayedouttofullcolor,indicatingthatNetCommand“learning”isavailableforthedevice.
NetCommand “Learn” button(initially grayed out)
Name you select for the input TV connec-
tion used for this device
Figure 6. The Auto Input Sensing screen appears when a device is first detected. Select a name for the connected device in this screen.
3. Nowyoucaneither:
HighlightLearnandpressENTERtoperformNetCommand“learning”forthedevice,ifappli-cable(recommended).NetCommand“learning”canbeusedtocontrolthedevicetypescheckedintheprecedinglist.See“InitialNetCommandSetup”laterinthischapter.YoucanperformNetCommandsetupatalatertime,ifpreferred,byusingtheLearnoptionintheNetCommandmenu.
PressEXITtoclosethescreen.TheTVwilldisplaytheAutoInputSensingscreenforthenextcon-nectionitfinds.
Note: TocontinuewithNetCommandsetupforthecur-rentdevice:
• YoumusthaveconnectedandproperlyplacedNetCommandIRemitters(seechapter2,“TVConnections”).
• YoumusthaveathandtheremotecontrolsfortheTVandthecurrentdevice.
More About Auto Input Sensing
• Becarefultochooseadifferentnameforeachinput.
• YoucanchangetheinputnameatalatertimeusingtheInputNamemenu.
• Ifyoudisconnectadeviceandthenlaterconnectadifferentdevicetothevacatedjack,usetheInputNamemenutoupdatethedevicename.IfyouwantthedeviceunderNetCommandcontrol,youmustperformNetCommand“learning”forthenewdevice.
• Antennainputs(ANT 1/ANT 2),audioconnections,andTVoutputsareneverdetected.

40 Chapter 3. TV Setup
IEEE 1394 ConnectionsTheNew1394DevicescreenappearsifyouconnectedanIEEE1394device.Seefigure7.IEEE1394devicesareautomaticallyunderNetCommandcontrol.TheTVcanrecognizeuptosevenIEEE1394devicesatonetime.Ifyouconnectmorethanonedeviceofthesametype,auniqueidentifierisaddedtothenameforeachone.Forexample,ifyouconnectthreeA/Vdiscs,youmayseeAV Disc, AV Disc1, AV Disc2.
Figure 7. The New 1394 Device screen shows the device name and includes a check box for an associated analog connection.
IEEE 1394 Device with an Analog ConnectionSomeIEEE1394deviceshavebothdigitalandanalogoutputstotheTV.Ifyouhavesuchadevice,placeacheckmarkintheAnalog ConnectioncheckboxtoallowyoutousetheTV’sInputSelectionmenutoselecteithertheanalogordigitaloutput.
When You First Connect a Device, continued
Forinstructionsonswitchingbetweenanaloganddigitaloutputs,seechapter6,“NetCommandOperations.”
IfyourIEEE1394devicecanbeconnectedtotheTVwithananalogconnection,followtheinstructionsbelow.
1. ConnectthedevicetotheTVwith an IEEE 1394 cable first.
2. WhentheNew1394DevicescreenappearswiththeAnalog Connectioncheckboxhighlighted,pressENTERtoenteracheckmark.
3. IntheNew1394Devicescreen,notethenameassignedtothedevice,asyouwillneedtousethesamenameinalaterstep.Seefigure7,New1394Devicescreen.
4. ConnectthedevicetotheTVwiththesupplementalanalogcable.
5. ThenextscreenistheautoInputSensingscreen(seefigure6)inwhichyoucanselectanameforthedevice.Ifyouselectthewrongnameforthedevice,youwillbeunabletoswitchbetweentheanaloganddigitalinputstotheTV.
Ifthedeviceisacablebox,selectthenameCABLE asthenamefortheanaloginput.
Note: Ifyouconnectedthecablesinreversesequence(analogfirst),youwilllaterneedtochangetheinputnameintheInputNamemenu.
a. Switchtoanyviewingdeviceotherthantheoneyouwishtochange(pressINPUTtoopentheInputSelectionmenu).
b. OpentheNetCommandmenuandthenopentheInputNamemenu.
c. HighlightthetextboxfortheanaloginputusedfortheIEEE1394device.
d. Press toscrollthroughtheavailablenamestodisplaythenameyouearliernotedfortheIEEE1394device.
e. PressEXIT.

Chapter 3. TV Setup 41 Chapter 3. TV Setup 41
NetCommand Specialized Device KeysRefertothischartwhen“learning”devicekeys.WriteinfunctionsyouassigntotheF1–F4keys.
* These are paired functions (e.g. Power and Power Off). When the original remote control uses a single button for both functions, learn only the first of the paired functions.
** This function is performed only when the Input Selection Menu is displayed and the device icon is highlighted.*** Channel Up/Down as Guide Page Up/Down in effect only after pressing GUIDE; returns to channel functions after
pressing ENTER or CANCEL.† If there are two ENTER keys, learn the ENTER key used for channel selection here. The ENTER button on the
remote sends the correct IR code when digits are entered.‡ Learn the sub-channel separator if a special key is used to add a separator (dash or dot) in a digital channel. Press
the CANCEL button on the remote to add the separator‡‡ DVD includes functions for DVD, DVD2, DVR, and HD disc.‡‡‡ The GUIDE key is unavailable for a cable box guide when TV Guide On Screen is enabled.
A/VReceiver
Cable, Sat, DVD ‡‡
VCRLearning Screen Check Box Name
FunctionName on TV Remote
X X X Power* PowerOnorPowerOn/Off POWER**X X X Power(Off)* PowerOff POWER**X VolumeUp VolumeUp VOL X VolumeDown VolumeDown VOL X Mute Mute MUTE
X Input(1-4) AVRInputSelectAutomatic(whendeviceisselected)
X X ChannelUp ChannelScanUp CH X X ChannelDown ChannelScanDown CH X X Recall LastChannelRecall QVX Guide Discmenuortopmenu GUIDE ‡‡‡
X XAdjustUp,Down,Left,Right
ArrowmoveUp,Down,Left,Right
X X Enter Enter/Select ENTERX X Menu DeviceMenuorSetupMenu MENU **X X Cancel CancelorExit CANCEL X X Info StatusInformationDisplay INFO (presstwice)X PageUp GuidePageUp CH *** X PageDown GuidePageDown CH ***
X X Play Play (PLAY)X X Stop Stop (STOP)X X Forward FastForward/FwdSearch (FAST FORWARD)X X Rewind Rewind/ReverseSearch (REVERSE)X X Pause Pause (PAUSE)X X Record Record (RECORD)X X Enter(digits)† Enterforchannelnumbers ENTERX X 1,2,3,4,5,6,7,8,9,0 1,2,3,4,5,6,7,8,9,0 1, 2, 3, 4, 5, 6, 7, 8, 9, 0
X Input InputChange GUIDE**
XSub-channelsepara-tor‡
DigitalSubchannel —CANCEL (—/CANCEL)
X X F1 F1
X X F2 F2
X X F3 F3
X X F4 F4
ASSIGN YOURCHOICE OF
SPECIALIZED FUNCTIONS

42 Chapter 3. TV Setup
3. IntheAutoInputsensingscreen(seefigure8),high-lighttheLearnbuttonandpressENTERtoopentheLearnscreenforthedevice(seefigure9).
NetCommand “Learn” button
Name you select for the device
Figure 8. Highlight the Auto Input Sensing screen’s Learn button and press ENTER to open the NetCommand Learn screen.
Figure 9. In the NetCommand Learn screen, you tell the TV to remember key commands to send to another device via an IR emitter.
4. ThefirstfunctionhighlightedintheLearnscreenisalwaysPower (On).AimtheTV’sremotecontrolattheTVandpressENTERtobeginlearningforthatfunc-tion.
5. WhenthePower (On)textstartsflashing,aimthedevice’sremotecontrolattheTVandpressandholdthePOWERkeyuntilacheckmarkappearsinthebox.Ifthetextstopsflashingbeforethecheckmarkappears,repeatthisstep.
6. IfthedevicehasaseparatePOWER OFFkey,press tohighlightthecheckboxforPower Off.Repeattheprecedingstepto“learn”thePOWER OFFkey.
If device has no POWER OFF key, skip this step.
By completing “learning” for the power keys, the TV’s remote control now operates the power function for the device when you set it as the current viewing device in the Input Selection menu. Point the remote control at the TV to control the device.
Initial NetCommand® Setup
What You Need to Know About NetCommand
• NetCommandsetupisoptional.
• NetCommandoperatesbysendingsignalsfromtheTVtoyourotherdevicesviatheIRemitters,tellingthedevicestoplay,record,changeinputs,adjustvolume,changechannelsandmanymorefunctions.AllthisisaccomplishedwiththeTV’sremotecontrolandtheslideswitchleftintheTVposition.
• TheIR“Learning”featureofNetCommandallowstheTVtolearntheremotecontrolsignalsforyourA/Vdevices.
• NetCommand®cancontrolIEEE1394devicesbysendingcontrolsignalsoveraFireWire®cable.
• YoucanchoosethelevelofNetCommandcontrolforyourhometheater.
Limited Setup. Performalimitedsetupifyou:
WantNetCommandtocontrolonlyafewdevices,suchastheTV,aplaybackdevice(likeaDVDplayer),andacablebox.Withthissetup,youcanusetheTV’sremotecontroltooperatethesedevices.
WanttouseTVGuideOnScreen®tocontrolyourcableboxandVCRand/orA/Vdisc.Afterperformingthissetup,youcanusetheTV’sremotecontroltooperatethesedevices.
WanttheeaseandflexibilityofNetCommand-controlledrecording,withseamlesssetupoftime-delayedorimmediaterecordingsamongnetworkeddevices.
Full Setup. PerformafullsetupifyouwanttogiveNetCommandthefollowingadditonalcontrol:
ControlasurroundsoundA/Vreceiver.
AutomaticallychangeinputselectionsfortheA/Vreceiver.
Initial NetCommand Setup for Most Device Types
• TosetupanA/Vreceiver,see“AdditionalSetupUsingtheNetCommandMenu”laterinthischapter.
• Forsetuplater,ortomakechangestothesetup,see“AdditionalSetupUsingtheNetCommandMenu”laterinthischapter.
1. ConnectandpositiontheIRemittersasdescribedinchapter2,“TVConnections.”
2. HavetheremotecontrolsfortheTVandtheotherdevicereadybeforebeginning.SettheTVremotecontrol’sslideswitchtotheTVposition.

Chapter 3. TV Setup 43
Initial NetCommand® Setup, continued7. Pressthe keysontheTV’sremotecontrol
tohighlightotherkeysonthelist.Repeatsteps4and5foreachadditionalfunctionyouwishtocontrolthroughNetCommand.
8. Ifthedevice’sremotecontrolhaskeysthatdonotappearinthelist,youcanassociateuptofourkeyswiththeF1throughF4keys.Forexample,foraDVDplayer,assigntheF1andF2keystotheDVDplayer’sCHAPTER SKIP FORWARDandCHAPTER SKIP BACKkeys.PerformNetCommandsetupfortheFkeysthesameasyoudidforthenamedkeys.
9. PressEXITtocontinuewithsetupforadditionaldevices.
Additional Setup Using the NetCommand MenuUsetheNetCommandmenuatanytimeto:
• SeealistofallconnectionstotheTV.
• SetupTVGuideOnScreen®ormakechangestothesetup.
• AddNetCommandcontroltoadevice.UsetheLearn buttontoopentheNetCommandLearnscreenforthecurrentlyselecteddevice.
• AddorremovespecificdevicekeysfromNetCommandcontrol.
• AddNetCommandcontroltoanA/Vreceiver.WhentheA/Vreceiveristheaudiosource,audiofromadevicecanbeautomaticallyswitchedtotheA/VreceiverwhenthedeviceisselectedintheTV’sInputSelectionmenu.
• AssignmeaningfulnamestotheinputiconsintheInputSelectionmenu(seechapter5,“TVMenuSet-tings”).
• ChangetheorderoficonsintheInputSelectionmenu(seechapter5,“TVMenuSettings”).
ToopentheNetCommandmenu,pressMENUtofirstopentheMainmenu,highlighttheNetCommandicon,andpressENTER.Seefigure10.
Figure 10. Additional NetCommand setup options are accessible through the NetCommand menu.
Review TV ConnectionsYoucanverifyTVconnectionsduringTVsetuporatanytimeafterwardusingtheReviewscreen.IntheNetCommandmenu,press tohighlightReview andpressENTERtodisplaytheReviewscreen(seefigure11).
Figure 11. The Review screen lists all TV connections. IEEE 1394 devices are listed separately on the right.
Set Up TV Guide On Screen®SetupoftheTVGuideOnScreensystemisoptional.
• ManyfeaturesofTVGuideOnScreenareavail-ablewithoutNetCommandcontrol.Forexample,programlistings,programsearches,andprogramremindersfunctionwithoutNetCommand.
• Forfullfunctionality,youmustsetupNetCommandcontrolofanydeviceassociatedwithTVGuideOnScreen,e.g.,arecordingdeviceifyouwishtosetuprecordingsthroughTVGuideOnScreen.
1. HighlighttheGuidebuttonintheNetCommandmenuandpressENTERtodisplayTVGuideOnScreensetupoptions.
2. ToenabletheTVGuideOnScreensystem,highlighttheOnbutton.Ifyouwishtodisablethesystem,high-lighttheOffbutton.

44 Chapter 3. TV Setup
Additional Setup Using the NetCommand Menu, continued
Figure 12. TV Guide On Screen setup
3. Selectprogramsourcesforthelistings.Youcanselectoneover-the-airsourceandonecablesourceforTVGuideOnScreen.If,however,youhavemul-tiplecablesources,thechannel-numberassignmentsmaynotmatchupcorrectly.Seethefollowingtableandnotesforthepreferredconnectioncombinations.
If One Source Is:The Other Source Can Be:
Ant-1 Air Ant-2 Air
CableBox
CableCard N/A
Ant-1ChannelsviaCable N/A
Ant-2ChannelsviaCable N/A
Note:• InputstoTVGuideOnScreencaninclude:
Onlyoneover-the-airsource Onlyonecablesource
• AnantennainputisrequiredfordownloadingTVGuideOnScreenschedules.IfyourcableboxisconnectedusingHDMIorIEEE-1394,youmustalsoconnectanantennainput.
• IfyourcableboxisconnectedtoaCOMPONENT input,besuretheboxissettosendanalogchannelsas480i.Ifthisisnotpossible,addanantennainput.
4. MovetotheZIP Codeboxandenterthefive-digitZIP codeforyourlocation.Toreceivethecorrectprogramlistingsforyourarea,youmustentertheZIPcode.
FordetailedinformationonusingtheTVGuideOnScreensystem,pleaseseetheseparateTV Guide On Screen Interactive Program Guide User’s Manual.
Add or Remove Device Keys from NetCommand Control
1. To“Learn”devicekeys,youmustbewatchingthedevice.PressINPUT,highlighttheiconfortheaffecteddevice,andpressENTER.
2. OpentheNetCommandmenu,highlighttheLearn button,andpressENTER.
3. WhentheLearnscreendisplays,continueasdescribedearlierunder“InitialNetCommandSetupforMostDeviceTypes.”
To Replace One Device with Another on an Input Jack
1. DisconnectthedeviceyouwishtoremovefromtheTV.
2. Connectthenewdevicetothevacatedjack.
3. BeforeselectingtheinputfromtheInputSelec-tionmenu,opentheInputNamemenufromtheNetCommandmenu.
4. Highlighttheinputtextboxandpress toselectadevicenamefromthelistassociatedwiththeinput.
5. PressINPUTtoopentheInputSelectionmenu.High-lighttheinputiconandpressENTER.
6. PressMENUandreturntotheNetCommandmenu.
7. HighlighttheLearnbuttonandpressENTER.
8. WhentheLearnscreendisplays,continueasdescribedearlierunder“InitialNetCommandSetupforMostDeviceTypes.”
9. PressEXITwhenfinished.
Other Options on the NetCommand Menu• ForInput NameandIcon Orderoptions,seechapter
5,“TVMenuSettings.”• UsethePC DVI Inputoptiontospecifythetypeof
videosignalcomingfromyourcomputer.Formoreaboutthisoption,seechapter7,“UsingtheTVwithaPersonalComputer.”
Set Up NetCommand Control of an A/V ReceiverPerformthissetuptoenabletheA/VreceivertoswitchautomaticallytothecorrectaudioinputwhenyouselectadeviceintheTV’sInputSelectionmenu.YoumusthaveathandtheremotecontrolsforboththeTVandA/Vreceivertoperformthisprocedure.
ThisisasamplesetupforaDVDplayer,directantennaordirectcable(toANT 1orANT 2),andananalogVCR.ThisexampleillustratesthreescenariosforsendingaudiotoanA/Vreceiver:
• DigitalSurroundSound.Adevice(e.g.,DVDplayer,cablebox,satellitereceiver)cansenddigitalsurround

Chapter 3. TV Setup 45
soundsuchasDolbyDigitalorDTSdirectlytotheA/Vreceiver,bypassingtheTVentirely.ADVDplayerisusedinthisexample.
Itisalsopossibleforyoursetuptoincludetwo(ormore)deviceswithdigitalsurroundsoundconnecteddirectlytotheA/Vreceiver.ThesedevicescouldbeyourDVDplayerplusacableboxorsatellitereceiver.
• AudioDirectlyfromTV.AudiofromANT 1andANT 2,memorycards,andIEEE1394devicesissenttotheA/VreceiverfromtheTV’sanalogAUDIO OUT LEFT/RIGHTorDIGITAL AUDIO OUT.Inthissetup,youtellNetCommandtoswitchtotheA/Vreceiver’sdesignatedTVaudioinput.
• AnalogStereoOutputOnly.Audiofromsourceswithonlyanalogstereooutput(suchasaVCR)canbesentdirectlytotheA/VreceiverordirectlytotheTVfirstandthenontotheA/Vreceiver.
MitsubishirecommendsyousendaudiodirectlytotheTV,whichcanconvertthesignaltodigitalaudioandsendittoadigitalA/Vreceiverasdigitalaudio.
Part 1: Learn IR Codes for A/V Receiver Inputs
1. ConnectyourA/VreceivertotheTVandDVDplayer.Seechapter2,“TVConnections,”forsuggestions.
2. OpentheNetCommandmenu.
3. HighlighttheLearnbuttonunderAV RECEIVER SETUPandpressENTERtodisplaytheAVReceiver(AVR)Learnscreen.Seefigure13.
WhentheAVReceiverLearnscreenopens,thehighlightisonthecheckboxforInput 1.ThetermsInput 1–Input 4aregenericreferencestotheA/VreceiverinputsforwhichtheTVcanlearnIRcodes.
4. Inthisexample,theIRcodefortheA/Vreceiver’sTV Audioinputwillbe“learned”asInput 1.PressENTERontheTV’sremotecontrolandwhilethetextInput 1isflashing,pressandholdtheTV INPUTkeyontheA/Vreceiver’sremotecontrol.
5. Whenacheckappearsinthecheckbox,releasetheTV INPUTkey.
Additional Setup Using the NetCommand Menu, continued
A/V Receiver Audio Inputs(numbers 1–4 refer to the IR learning sequence in this screen)
Text Boxes for You to Enter the Name of the Destination A/V Receiver Audio Input
A/V Receiver Key Commands the TV Can Send to the A/V
Receiver When “Learned”
Figure 13. The AV Receiver (AVR) Learn screen lets you set up NetCommand control of your A/V receiver.
6. Press tohighlightthetextboxforInput 1.Toenteraname:• Use ontheTV’sremotecontroltoselecta
character.• PressENTERtosettheletterandmovethehighlight
tothenextletter.• Todeletealetter,highlightitandpressCANCEL
orpress toinsertablankspace(underscorecharacter).
• Toreturnthehighlighttothefirstcharacter,repeatedlypressCANCEL.
• Toreturntothedefaultname,highlightthefirstcharacterandpressCANCEL.
7. Press tohighlightthecheckboxforInput 2.Inthisexample,theIRcodefortheA/Vreceiver’sDVD Audioinputwillbe“learned”asInput 2.
8. PressENTERontheTV’sremotecontrolandwhilethetextInput 2isflashing,pressandholdtheDVD INPUTkeyontheA/Vreceiver’sremotecontrol.
9. Whenacheckappearsinthecheckbox,releasetheDVDkey.
10. Press tohighlightthetextboxforInput 2.EnterthenameDVD.Use toenterthenameTV. PressENTERtoseteachletter.
11. Repeatsteps7through10foranyadditionalA/Vreceiverinputsconnectedtootherdevices.
Figure 14. Assign names to identify “learned” A/V receiver audio inputs
IMPORTANTAll audio from what you are watching on the TV is always available as an output on both the TV’s AUDIO OUT LEFT/RIGHT and DIGITAL AUDIO OUT jacks.
To use the surround sound capabilities of your A/V receiver however, you must connect your DVD player, satellite receiver, or cable box directly to the A/V receiver, as surround sound may not be available from the TV’s audio output.
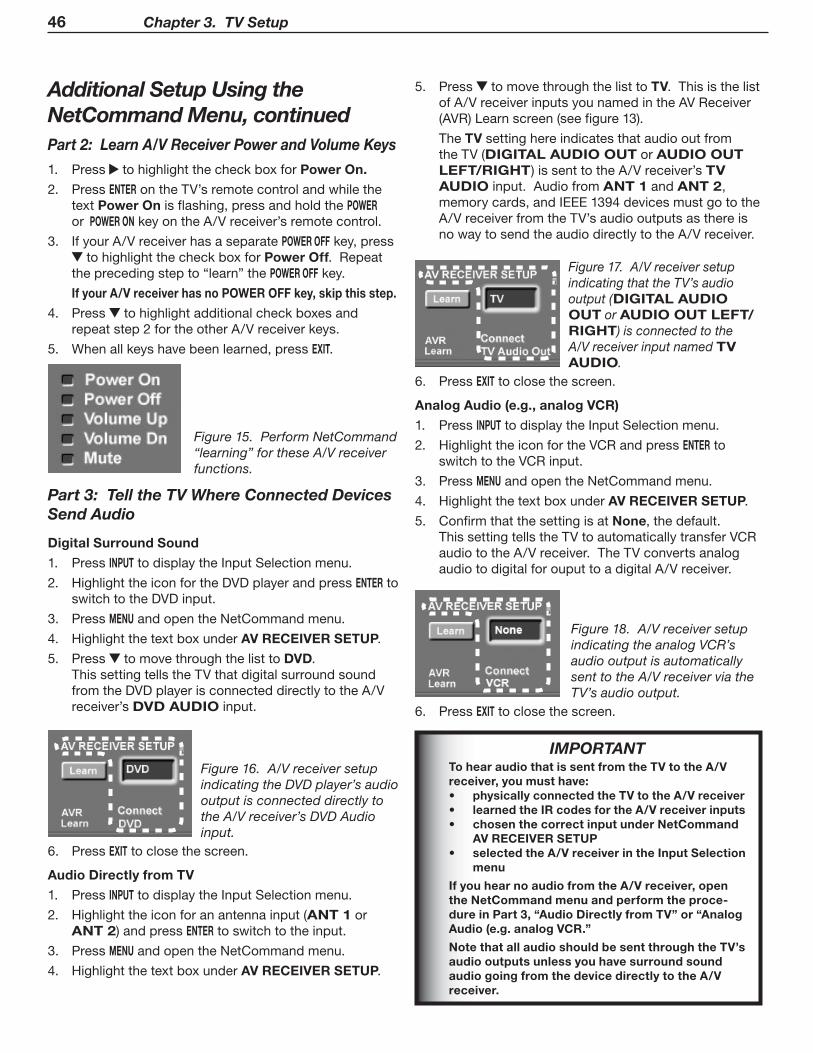
46 Chapter 3. TV Setup
Additional Setup Using the NetCommand Menu, continuedPart 2: Learn A/V Receiver Power and Volume Keys
1. Press tohighlightthecheckboxforPower On.
2. PressENTERontheTV’sremotecontrolandwhilethetextPower Onisflashing,pressandholdthePOWER or POWER ONkeyontheA/Vreceiver’sremotecontrol.
3. IfyourA/VreceiverhasaseparatePOWER OFFkey,presstohighlightthecheckboxforPower Off.Repeat
theprecedingstepto“learn”thePOWER OFFkey.
If your A/V receiver has no POWER OFF key, skip this step.
4. Press tohighlightadditionalcheckboxesandrepeatstep2fortheotherA/Vreceiverkeys.
5. Whenallkeyshavebeenlearned,pressEXIT.
Figure 15. Perform NetCommand “learning” for these A/V receiver functions.
Part 3: Tell the TV Where Connected Devices Send Audio
Digital Surround Sound
1. PressINPUTtodisplaytheInputSelectionmenu.
2. HighlighttheiconfortheDVDplayerandpressENTERtoswitchtotheDVDinput.
3. PressMENUandopentheNetCommandmenu.
4. HighlightthetextboxunderAV RECEIVER SETUP.
5. Press tomovethroughthelisttoDVD.ThissettingtellstheTVthatdigitalsurroundsoundfromtheDVDplayerisconnecteddirectlytotheA/Vreceiver’sDVD AUDIOinput.
Figure 16. A/V receiver setup indicating the DVD player’s audio output is connected directly to the A/V receiver’s DVD Audio input.
6. PressEXITtoclosethescreen.
Audio Directly from TV
1. PressINPUTtodisplaytheInputSelectionmenu.
2. Highlighttheiconforanantennainput(ANT 1orANT 2)andpressENTERtoswitchtotheinput.
3. PressMENUandopentheNetCommandmenu.
4. HighlightthetextboxunderAV RECEIVER SETUP.
5. Press tomovethroughthelisttoTV.ThisisthelistofA/VreceiverinputsyounamedintheAVReceiver(AVR)Learnscreen(seefigure13).
TheTVsettinghereindicatesthataudiooutfromtheTV(DIGITAL AUDIO OUTorAUDIO OUT LEFT/RIGHT)issenttotheA/Vreceiver’sTV AUDIOinput.AudiofromANT 1andANT 2, memorycards,andIEEE1394devicesmustgototheA/VreceiverfromtheTV’saudiooutputsasthereisnowaytosendtheaudiodirectlytotheA/Vreceiver.
Figure 17. A/V receiver setup indicating that the TV’s audio output (DIGITAL AUDIO OUT or AUDIO OUT LEFT/RIGHT) is connected to the A/V receiver input named TV AUDIO.
6. PressEXITtoclosethescreen.
Analog Audio (e.g., analog VCR)
1. PressINPUTtodisplaytheInputSelectionmenu.
2. HighlighttheiconfortheVCRandpressENTERtoswitchtotheVCRinput.
3. PressMENUandopentheNetCommandmenu.
4. HighlightthetextboxunderAV RECEIVER SETUP.
5. ConfirmthatthesettingisatNone,thedefault.ThissettingtellstheTVtoautomaticallytransferVCRaudiototheA/Vreceiver.TheTVconvertsanalogaudiotodigitalforouputtoadigitalA/Vreceiver.
Figure 18. A/V receiver setup indicating the analog VCR’s audio output is automatically sent to the A/V receiver via the TV’s audio output.
6. PressEXITtoclosethescreen.
IMPORTANTTo hear audio that is sent from the TV to the A/V receiver, you must have:• physically connected the TV to the A/V receiver• learned the IR codes for the A/V receiver inputs• chosenthecorrectinputunderNetCommand
AV RECEIVER SETUP• selected the A/V receiver in the Input Selection
menu
If you hear no audio from the A/V receiver, open the NetCommand menu and perform the proce-dure in Part 3, “Audio Directly from TV” or “Analog Audio (e.g. analog VCR.”
Note that all audio should be sent through the TV’s audio outputs unless you have surround sound audio going from the device directly to the A/V receiver.

TV Operation and FeaturesRemote Control . . . . . . . . . . . . . . . . . . . . . . . . . . . . . . . . . . . . 48Choosing a Program Source . . . . . . . . . . . . . . . . . . . . . . . . . . . 50ChannelView™ Channel Listings . . . . . . . . . . . . . . . . . . . . . . . . 50Status Display . . . . . . . . . . . . . . . . . . . . . . . . . . . . . . . . . . . . . 51Split Screen . . . . . . . . . . . . . . . . . . . . . . . . . . . . . . . . . . . . . . . 52TV Signals and Display Formats . . . . . . . . . . . . . . . . . . . . . . . . . 54Memory Card Playback . . . . . . . . . . . . . . . . . . . . . . . . . . . . . . . 56
4

48 Chapter 4. TV Operation and Features
Remote Control
OverviewFigure 1, next page
1. Slide Switch:SelectstheA/Vdevicetobecontrolledbytheremotecontrol.SettheslideswitchtoTVforoperationoftheTV,NetCommand-controlleddevices,andIEEE1394devices.Controlofadditionaldevicesrequiresprograming(seeAppendixD,“ProgrammingtheRemoteControl.”.
2. SLEEP:SetstheTVtoturnoffwithin2hours.Seethenextpageforinstructions.
3. Digits/Letters:Allowyoutotunetoachannelbyenteringchannelnumbers;pressENTERforfastertuning.Usenumbersandthe CANCEL keytoenterdigitalsub-channels.Alsouseforenteringinformationintomenus.
Toselectletterswhennamingchannels,repeatedlypresstheassociatednumberkey.Thefollowingspecialcharactersareavailablewiththe1and0keys:
1 !&blankspace0 / * -
4. —/CANCEL (SUB-CHANNEL/CANCEL):Whenenteringdigitalchannelnumbers,addsaseparatorbetweenmainandsub-channelnumbers.ClearsFAVandsomemenuentries.
5. POWER:TurnsTVpoweronandoff.
6. QV (QuickView™):Switchesbetweenthecurrentchannelandthelastchannelviewed.
7. MUTE:TurnsTVsoundofforon.
8. SPLIT:TurnsSplitScreenmodeonandoff.
9. VOL / (Volume Up/Down):Changessoundlevel.
10. CH/PAGE / (Channel or Page Up/Down):Scansupordownthroughmemorizedchannels.PagesupanddownthroughscreenswhenusedwiththeTVGuideOnScreensystemorChannelView™.
11 FAV (Favorites):Scansthroughmemorizedlistsoffavoritechannels.See“ChannelMenu”inchapter5,“TVMenuSettings,”formoreinformation.
12. FORMAT:ChangestheshapeandsizeofthemainTVpicture.WheninSplitScreenmode,changesthesizeofthesplitimageswhilemaintainingtheiraspectratios.
13. INPUT:DisplaystheInput Selectionmenufromwhichyoucanselectaninputsourcetoview,suchasanantennainput(ANT 1/2)oraconnecteddevice.
14. (Adjust Up/down/Left/Right):Navigatemenusandchangesettings.
15. ENTER:Selectsachannelnumberormenuitem.
16. GUIDE: DisplaysorremovesChannelView™channellistingforANT 1andANT 2.WiththeTVGuideOnScreensystemenabled,launchesTVGuideOnScreen.DisplaysDVDdiscortopmenuforaNetCommand-controlledDVDplayer.
17. INFO:Displaysanon-screensummaryofthecurrentdeviceinuseandanybroadcastinformationavailable,includingcurrentV-Chipinformation.Seechapter4,“TVOperationandFeatures,”fordetails.
18. AUDIO:Selectsindividualaudiosettingsforadjustment.
19. VIDEO:Selectsindividualvideosettingsforadjustment.
20. MENU:DisplaysthemainTVmenuusingthe on-screenmenusystem.Whenasub-menuisopen,backsuponelevel.
21. EXIT:ClosesallTVon-screenmenusanddisplaysandreturnstonormalTVviewing.
22. F1–F4
For devices under NetCommand control:PerformNetCommand“Learning”toassignfunctionstotheF1–F4keys.
For devices operating independently of NetCommand:TheF1–F4keysworkliketheA,B,C,Dbuttonsonsomecableboxes,satellitereceivers,andDVDplayers.Programtheremotecontrolforyourequipmentandtestthekeys.SeeAppendixD,“ProgrammingtheRemoteControl.”
24. (PAUSE): FreezesabroadcastTVpicturewhennoSplitScreenimageisdisplayed.WhenSplitScreenisdisplayed,freezesthesub-picture.Seebelowforusewithrecordablemedia.
Record/Playback KeysToenabletherecordingandplaybackfunctions:• programtheremoteforyourVCRorDVDplayer/
recorderandsettheslideswitchtoVCRorDVD.• PerformNetCommand“Learning”forthedevice.• Seechapter6,“NetCommandOperations,”forcontrol
ofIEEE1394devices.
23. (RECORD):RecordswithaVCRorDVDrecorder.
24. (PAUSE): PausesaVCRorDVD.SeeaboveforuseduringTVviewing.
25. (STOP):StopsplayofaVCRorDVD.
26. (REVERSE): RewindsaVCR.Reversescansa DVD.
27. (PLAY):PlaysaVCRorDVD.
28. (FAST FORWARD):FastforwardsaVCR.ForwardscansaDVD.
Note: TheTV’sremotecontrolcanoperateotheraudio/videodevices.
• Seechapter3,“TVSetup,”forNetCommand“Learning”ofdevicekeys.
• SeeAppendixD,“ProgrammingtheRemoteControl”forinstructionsonprogramming.
• ForcontrolofIEEE1394devices,seechapter6.

Chapter 4. TV Operation and Features 49
22
28
10
1
2
3
4
78
9
2423
26 27
25
1617
1112
13
14
15
5
6
1819
2021
Figure 1. Remote Control Overview
Sleep TimerSetting the Sleep Timer
1. PressSLEEPontheremotecontrol.
2. PressSLEEPadditionaltimestoincreasethetimein30-minuteincrementsuptothemaximumof120minutes.
3. PressEXITorwaitfivesecondswithoutpressinganybuttonsforthemessagetodisappear.
4. PressSLEEPtoviewthetimeremainingbeforethesleeptimerturnsofftheTV.
Cancelling the Sleep Timer
1. PressSLEEPtodisplaytheon-screenmessage.
2. PressSLEEPrepeatedlyuntilOFF isdisplayed.
Note: Afterfivesecondsofinactivity,themessageboxwilldisappear.
Resetting the Remote ControlIftheslideswitchissettoTVandtheTVdoesnotrespondproperly,dothefollowingtoresettheremotecontrol.
1. PressandholdPOWERforseveralsecondsuntilthebuttonblinkstwiceandgoesoff.
2. ReleasethePOWERbutton.
3. Presskeys0 0 9 3 5andthePOWERbuttonwillblinktwicewhenyoufinishenteringthecode.Whileenter-ingthecode,pauseforamomentbetweeneachkeypresstoensureitisrecognized.
FAV (Favorite Channels)ForuseoftheFAVfeaturewiththeremotecontrol,seechapter5,“TVMenuSettings,”andtheexplanationoftheChannelmenu.
Remote Control, continued

50 Chapter 4. TV Operation and Features
Choosing a Program SourceNOTE: Ifyouronlyviewingsourcesareconnectedtothe
ANT 1andANT 2antennajacks,youcanswitchinputswithouttheInputSelectionmenu.PressINPUTtoswitchbetweenANT 1andANT 2.ToverifywhichisthecurrentsourcewhilewatchingTV,pressINFOtoseetheon-screenstatusdisplay.
Selecting from Multiple Sources: The Input Selection MenuTheInputSelectionmenuallowsyoutoselectaninputtowatchontheTV.Thecurrentinputappearsasagold-coloredicon.
1. PressINPUTontheTV’sremotecontroltodisplaytheInputSelectionmenu(Figure2).
2. Toselectadifferentinput,press ontheTV’sremotecontroltomovethehighlightthroughiconsintheinputsection.
3. PressENTERtoswitchtothedeviceandclosethemenu.
More About the Input Selection Menu
• Toassignmeaningfullabelstotheicons,suchas“VCR”or“DVD,”seethe“InputName”sectionofchapter5,“TVMenuSettings.”
• Torearrangetheicons,seethe“IconOrder”sectionofchapter5,“TVMenuSettings.”
• TousewithNetCommand-controlleddevices,includ-ingIEEE1394/DTVLinkdevices,seeadditionalinfor-mationinchapter6,“NetCommandOperations.”
Input Section Audio Section
Figure 2. Input Selection menu. See chapter 6, “NetCommand Functions,” for use of the Audio section.
withthemajorchannelandsub-channels(orbitstreams).Analogchannelinformationisdisplayedassent.
Note: Iflimiteddataisshownornoprogramdataap-pears,itisbecausethebroadcasterisnotsendingtheinformation. This is not a defect of your TV.
Using ChannelView
Feature Instructions
ViewlistingswhileviewingANT 1orANT 2.
PressGUIDE.
Scanthroughmemorizedchannelsonebyone.
Press or .
Scanquicklythroughmemo-rizedchannels.
PressPAGE / .
Viewdetailedinformationfordigitalchannels.
Press or tohighlightachannelandpress .
Returntoviewingbasiclist-ingsinformation Press .
Figure 3. ChannelView screen, current programs. Use to exchange displays for current and future programs.
Figure 4. ChannelView screen, future programs on the selected channel (digital channels only)
IMPORTANTTo receive ChannelView updates: Set the Energy Mode to Fast Power On and leave the TV powered off for a while each day. If the TV loses power, program listings will be lost until the next update.
ChannelView™ Channel ListingsChannelViewprovideslistings,assentbybroadcast-ers,formemorizedchannelsonANT 1orANT 2. ChannelViewisavailable
• foranantennainputnotassignedtotheTVGuideOnScreensystem.
• WhentheTVGuideOnScreensystemisdisabled.
ChannelsaremarkedwitheitheraDfordigitalchannelsoranAforanalogchannels.Digitalchannelsareshown

Chapter 4. TV Operation and Features 51
Status DisplayTheon-screenstatusdisplayappearswhenyouturnontheTV,changeinputs,changechannels,orpresstheINFO buttonontheremotecontrol.Themostcommondisplays
areshownbelow.Seldomorneverdoallthestatusindi-catorsappearatthesametime.
Analog Program
1. SourceAntennaorInput2. AnalogChannelbeingreceived(Ifanantenna
source)3. ChannelName(ifornamedintheChannelmenu)4. SignalTypeBeingReceived.Possible:
FromANT-1, ANT-2,orINPUTjacks:480iFromCOMPONENTjacks:480i,480p,720p,1080i
5. ScreenFormatinusePossible:Analog480i/480psignals:Standard,Expand,Zoom,Stretch,StretchPlus,Narrow720p/1080isignals:Standard,WideExpand
6. Stereoand/orSAPbeingbroadcast.InSplitScreenmode,thespeakericonisoneithertheleftorrighttoindicatethesoundsource.
7. V-ChipRatings8. ChannelisincurrentFAVbank(FAVbank2)9. DayandTime
Ant-1 3 XXXX XXXXXXXXXX ANT-1 3480i Standard
Stereo SAP
TV-PG DLSV Copy OnceFAV2
Monday 11:00 AMSleep: 30
MUTE
1132
6
7
1
89
10
12
4 5
13
14
10. SleepTimerremainingtime11. SplitScreenpicturesourceandchannel12.AudioMuteon13.Copy-ProtectionStatus.Possible:
CopyOnceCopyNever
14. Programname(ifprovidedbyTVGuideOnScreen)
Digital Program
1. DigitalMajorandSub-ChannelNumber2. DigitalChannelName(onlyifbroadcast)3. SignalTypeBeingReceived
Possible:SD4:3,SD16:9,HD4. ScreenFormatinUse
Possible:SD4:3:Standard,Expand,Zoom,Stretch,StretchPlus,NarrowSD16:9orHD16:9:Standard,WideExpand
5. Language(s)beingbroadcast6. ProgramName(ifbroadcast)orprovidedbyTV
GuideOnScreen7. Copy-ProtectionStatus.Possible:
CopyOnce:ProgramcanberecordedCopyNever[RetentionPeriod]:Programcanneverberecorded;maydisplayprogramretentionperiod
Ant-1 42-1 XXXXXXX XXXXXXXXXXXXXXHD Standard
EnglishTV-PG DLSV Copy Never: 3 DaysFAV2
Monday 11:00 AMSleep: 30
6
7
1
34
5
2
Digital IEEE 1394 Device
1. StatusofD-VHSVCRorIEEE1394device2. CounterofD-VHSVCR3. Specialmessageline(showsonlywhenaspecial
messageisneeded;maybeseenwithanalogsignals)
4. Copy-ProtectionStatus.Possible:CopyOnce:ProgramcanberecordedCopyNoMore:Programcanneverberecorded;programmaybemovable.CopyNever[RetentionPeriod]:Programcanneverberecorded;maydisplayprogramretentionperiod
DVCRHD Standard
EnglishTV-PG DLSV Copy No MorePlay 01:20:15Monday 11:00 AMSleep: 30
Special Message Line
1
3
2
4

52 Chapter 4. TV Operation and Features
Split ScreenSplitScreenallowsyoutoviewpicturesfromtwodifferentsourcesatthesametime.SplitScreenisavailablewhenyouhavevideosourcesconnectedtotheTVinadditiontoconnectionsonANT 1orANT 2.
Operation
IMPORTANT• SplitScreenisunavailableifyouronly
inputs are ANT 1 and ANT 2.
• A1080psignalfromanHDMIjackoraper-sonal computer can be viewed only as the main picture.
Split Screen Operations Instructions
TurnSplitScreenonoroff PressSPLIT.
Switchthesoundsourcebetweenmainandsub-pictures.
Press or .Thespeakericonappearsbrieflytoindicatethesoundsourceaseitherthemainpicture(left)orsub-picture(right).Thesoundsourceisthesideyoucancontrolwiththeremotecontrol.
Checkwhichpictureisthesoundsource.PressINFO.Thespeakericonappearsintheinformationdisplaytoindi-catethesoundsource.
Changethesourceofthesub-picture.
1. Press tomakethesub-picturethesoundsource.
2. PressINPUTandmovethehighlighttotheiconfortheinputyouwishtoviewasthesub-picture(seefigure6).
3. PressENTERtomakethechange.
Grayed-outinputiconsareunavailableasSplitScreensourcesorwiththecurrentsource.
Changesub-picturechannel(whentheinputsourceisANT 1, ANT 2,oraNetCommand-controlledcableboxorsatellitereceiver).
Press tomakethesub-picturethesoundsourcethenpressCH / .
Freezeorunfreezethesub-picture. Press (PAUSE).Press againtoreturntonormalmovingvideo.
Changethesizeofthemainandsub-pictures.
RepeatedlypressFORMATtocyclethroughpicturesizes.Seethefollow-ingpageforsampledisplays.
Makethesubpicturefillthescreen.1. Press tomakethesub-picturethesoundsource.
2. PressSPLITtocloseSplitScreenmode.
Figure 5. Change the source of the sub-picture with the Split Screen Input Selection menu.
Choice of Split Screen sub-Picture Sources
“SPLIT” appears under the Video icon to distinguish this menu from the Input Selection menu.

Chapter 4. TV Operation and Features 53
TV Inputs for Split ScreenTheavailableSplitScreenpicturesourcesarelistedbelow.
Display choices. Press the FORMAT key repeatedly while in Split Screen mode to view different displays.
Split Screen Displays
Sub-PictureMainPicture
ANT 1 ANT 2 INPUT COMPONENTHDMI
(no 1080p)HDMI
(1080p)IEEE 1394
ANT 1
ANT 2
INPUT *
COMPONENT **
HDMI (no 1080p)
HDMI (1080p) ‡
PC-DVI ‡
IEEE 1394
* Onlywhenmainpictureandsub-picturearefromdifferentINPUTjacks.** Onlywhenmainpictureandsub-picturearefromdifferentCOMPONENTjacks.‡ HDMI1080pandPC-DVIappearasmainpictureintheSplitScreencombinationsmarkedinthesecond
rowofscreensaboveunder“SplitScreenDisplays.”
Check marks indicate combinations of picture sources you can view in Split Screen mode.
16:9 Main Picture
16:9 Main Picture
16:9 Main Picture
16:9 Main Picture
16:9 Main Picture
16:9 Main Picture
4:3 Sub-Picture
4:3 Sub-Picture
4:3 Sub-Picture
4:3 Main Picture
4:3 Main Picture
4:3 Main Picture
16:9 Sub- Picture
16:9 Sub- Picture
16:9 Sub- Picture
4:3 Main Picture
4:3 Main Picture
4:3 Main Picture
4:3 Sub-Picture
4:3 Sub-Picture
4:3 Sub-Picture
16:9 Sub- Picture
16:9 Sub- Picture
16:9 Sub- Picture
16:9 Main Picture/ 4:3 Sub-Picture
16:9 Main Picture/ 16:9 Sub-Picture
4:3 Main Picture/ 4:3 Sub-Picture
4:3 Main Picture/ 16:9 Sub-Picture
‡ ‡

54 Chapter 4. TV Operation and Features
TV Signals and Display FormatsThisisawidescreenTV,alsoknownasa16:9TV.ThisshapereflectsthenewtypesofimagesavailablefromHDTVandmanyDVDs.Therearestillmanyolderstylenarrow-screenimages(called4:3aspectratio)youwillencounter.Whilethereisnoperfectsolutionfordis-playingasquarish,narrowerimageonawidescreen,Mitsubishioffersseveraldisplayformatsfromwhichyoucanchoose.
PressFORMATontheTVremotecontroltocyclethroughtheavailabledisplayformats.Thelast-usedformatforeachdeviceisusedwhenyoureturntothatdevice.
Note: • OnlystandardformatisavailableforSplitScreen.• PCformatsvarydependingonthePCsignal.• For1080psignalsfromanHDMIinput,see“Com-
puterDisplayFormats”inchapter7,“UsingtheTVwithaPersonalComputer.”
Signal Definitions480i Signals:TraditionalanaloginterlacedsignalsfromorthroughANT-1and2, INPUT 1–3, COMPONENT andHDMIjacks.
480pSignals:Progressive-scanDVDsignalsonCOM-PONENTandHDMIjacks.
720p and 1080i Signals:High-definitionsignalsreceivedthroughCOMPONENTandHDMIjacks.Thesesignalsarealways16:9(widescreen).
SD 4:3:Standard-definitionnarrow-screenformatsignalsfromdigitalchannelsandIEEE1394devices.
SD 16:9: Standard-definitionwidescreenformatsignalsfromdigitalchannelsandIEEE1394devices.
HD: High-definitionwide-screenformatsignalsfromdigitalchannelsandIEEE-1394devices.Thesesignalsarealways16:9(widescreen).
DVD DefinitionsAnamorphic (or Enhanced for WideScreen TV)TheseDVDsarerecordedinaspecialwaytoproperlyshowwidescreenimageson16:9TVsetsusingtheStandardformatmode.Thisistherecommendedviewingchoice.
Non-Anamorphic (or 4:3, 1:33:1, Letter Box, or Full Screen)TheseDVDsarerecordedforusewithtraditionallyshaped,squarishTVs.Theymaybefullscreen(4:3or1:33:1)whichcropsmoviestofitthenarrowTV,orletterbox,whichaddsblacktopandbottombars.
ThisinformationmaybelistedontheDVDcase.SomeDVDssupportbothtypesofrecordings.
TV Display Format DefinitionsStandard: Thisisthefull-screenformat.HDTVsignalsusethisformat.ThisformatisusefulfordisplayingAnamorphicDVDsthathave1.78:1or1.85:1aspectratios.AnamorphicDVDsthathavea2.35:1aspectratioaredisplayedwithblackbarsatthetopandbottom,butshowtheentireimagecorrectly.Narrow(4:3)imagesarestretchedevenlyfromsidetoside.Availableforallsignals.
Expand:Thisenlargesthepicturetofillthescreen,crop-pingoffsomeoftheimageatthetopandbottom.Thisisusefulforreducingtheletterboxtopandbottombarsofnon-anamorphicDVDimages.Availablefor480i,480p,anddigitalSD4:3signalsonly.
Zoom: Thisenlargesthepicture,croppingoffsomeoftheimageateachsideandtopandbottom.ThisisusefulforremovingorreducingtheblacktopandbottombarsonanamorphicDVDswitha2.35:1aspectratio.Availablefor480i,480p,andSD4:3signalsonly.
Stretch:Thisformatstretchesanarrow(4:3)imageacrossthescreen;thereislessstretchinthecenterthanatthesides,however.ThisallowstheentirenarrowimagetobedisplayedacrossthescreenwithlessdistortionthanisseenintheStandardformat.Availablefor480i,480p,andSD4:3signalsonly.
Stretch Plus: Similartostretchmode,buttominimizedistortionsontheside,thepictureisexpandedtocropoffportionsofthetopandbottom.ExceptwhendisplayingmenusorSplitScreen,press toadjustthepositionofthepicturevertically.Availablefor480i,480p,andSD4:3signalsonly.
Narrow: Thisformatdisplaysnarrow(4:3)imagesintheiroriginalshape,andaddsstationaryblacksidebarstofillthescreen.Availablefor480i,480p,andSD4:3signalsonly.
Wide Expand: Enlargesthepicture,croppingsomeoftheimageonbothsides.ThisExpandformatisusefultoremoveorreduceblacksidebarsaddedtonarrowimagesthatareconvertedto16:9signalsfordigitalbroadcast.Availablefor1080i,720p,digitalSD16:9anddigitalHDsignals.
Note: Allhigh-definitionchannelssendwidescreen(16:9)signals,butnotallprogrammingsentonthesechannelswascreatedforthisformat.Asaresult,thebroadcastermustconvertsuchprogrammingforbroadcast,andmaystretchtheimageoraddsidebarstofillthewidescreenarea.

Chapter 4. TV Operation and Features 55
TV Display FormatsSeedescriptionsontheprecedingpage.

56 Chapter 4. TV Operation and Features
Memory Card Playback
Memory Card Reader(models WD-57732, WD-65732, WD-73732)
Inserting a memory card1. Insertacardintoamatchingcardslotonthefrontof
theTV.Besuretousethecorrectcardslot.Seethetablebelow.Normallythelabelsideshouldbeup,butifthecarddoesnotfit,tryturningthecardoverandinsertagain.Whenproperlyinserted,thelightnexttotheslotwilllightupandtheTVwillautomaticallyswitchtothecarddisplay.Cardsupto1GB,withafileformatofFAT16(blocksize=1024or2048)aresupported.
CARD 1SmartMedia™
CARD 2MultiMediaCard™SecureDigital(SD)
CARD 3CompactFlash®(TypesIandII)Microdrive®
CARD 4MemoryStickPRO™MemoryStick™
2. Next,theMediaDialogbox(figure6)automaticallydisplays.UsetheAUDIOkeytoswitchtoMP3orWMAaudioplaylistsetuporusetheVIDEOkeytoswitchtoJPEGslideshowsetup.
Do not pull the memory card out while it is playing.
Figure 6. Media dialog box, slide show mode. A similar dialog box appears when in audio mode.
3. Ontheremotecontrol,press:
Starttheslideshoworplayaudio.
GUIDE DisplaytheJPEGThumbnailmenu(seefigure7)orAudiotrackplaylist(seefigure8)
FORMAT WhenMediaDialogBoxisopen,displaytheMediaSetupmenu(seefigure9).Whenscreenisblank,displaytheMediaDialogBox(seefigure6).
VIDEO Switchfromaudiomodetoslideshowmode.
AUDIO Switchfromslideshowmodetoaudiomode.
INFO Displayon-screenstatusforthememorycard.
INPUT OpentheInputSelectionmenutoselectadif-ferentdevicetowatch.
Viewing Pictures
Using the Picture Thumbnail Menu1. PressGUIDEontheremotecontroltodisplaytheJPEG
pictureThumbnailmenu.Seefigure7.
2. Press tomovethehighlighttodifferentimages;CH / changespagesoftheThumbnailmenu.Use togotothepreviousslideand togotothenextslide.
3. PressFORMATtorotatetheselectedimage90˚(pressingFORMATfourtimesrotatestheimagecompletelyaroundtotheoriginalposition).
4. Press tobeginplaybackoftheslideshowstartingwiththeselectedimage.
Figure 7. JPEG Thumbnails
Keys for JPEG Picture Slide Show
Beginorresumeslideshowplayback
Pauseorresumeplaybackwhileintheauto-maticadvancemode.
Advancetothenextslide.
Gotothepreviousslide.
FORMAT Singlepressrotatestheslide90˚clockwise.Multiplepressescontinuetorotatetheslide.
Stopslideshow,displaymediadialogbox.
Compatible Picture Files (JPEG Pictures up to 1 GB)
• StillimagesrecordedondigitalcamerasusingtheExchangeableImageFileFormat,version2.1(EXIF2.1)standardfordigitalstillcamerasandDesignRulesforCameraFileSystemsversion1.0(DCF1.0)
Someimagesopenedandresavedonacomputermaynotplaybackormaynotbeabletodisplayapictureinthethumbnaillistbecausethecomputerprogramthatopenedandresavedtheimageschangedthefiletoanincompatibleformat.
• Standarddigitalimageswithamaximumsize5mega-pixelsforeachimage,or2560x1920pixels.Pictures
Warning: Some memory cards available on the market are not properly certified to the card specifications noted and cannot be used by the card reader. If you experience problems reading your file, please transfer your files to a properly certified card.

Chapter 4. TV Operation and Features 57
Playing Audio
Using the Audio Playlist Menu1. PressGUIDEtodisplaythePlaylistmenu.
2. Press toselectdifferenttracks;CH / changespagesofthePlaylist.Use togotothefirsttrackonthepageand togotothelasttrackonthepage.
3. Press tobeginplayback.Thesongcurrentlyplayingishighlighted.
Figure 8. Audio Playlist
Keys for MP3 or WMA Audio Playback
Beginorresumeplaylistplayback.
Pauseorresumeplayback.
Advancetothenexttrack/song.
Gototheprevioustrack/song.
Stopplaybackanddisplaymediadialogbox..
Compatible Audio Files (MP3 or WMA)
• Filesrecordedwithsamplingratesof32kHz,44.1kHzor48kHz.
• Filesrecordedwithfixedbitrates
• Filenameswith.mp3or.wmaextensions
NOTE:
• DuringMP3audioplayback,audiofromthecardissenttotheA/Vreceiverasanalogaudio.Digitaloutisnotavailable.
• RepetitivenoisemaybepresentwhenplayingWMAdigitalaudiofilesfrommemorycards.
Media Setup MenuIntheMediasetupmenuyoucanadjusttheslideshowdisplay,frequency,orinterval,ortheplaylistfrequency.TodisplaytheMediaSetupmenu,pressMENUtwicefromablankscreentofirstdisplaytheMediaDialogbox.NextpressFORMAT.PressFORMATagaintoclosetheMediaSetupmenu.PressMENUontheremotecontroltoredisplaytheMediaDialogBox.
JPEG Picture Slide Show Setup
• ForJPEGpictureslideshowplayback,selectAuto-maticorManualadvance.Formanualoperation,press orENTERtoadvancetothenextslide.
• Forautomaticadvance,selectthefrequencyornumberoftimestoshowthecompleteslideshow,Once,TwiceorContinuously.
• Forautomaticadvance,selecttheintervaltimeeachslideisshown,forexample,fiveseconds,or30seconds
MP3 or WMA Audio Playlist Setup
Selectthefrequencyornumberoftimestoplaythecom-pleteplaylist.Once,TwiceorContinuously.
Figure 9. Media Setup menuIMPORTANT• JPEG images cannot be edited through
the TV. When editing on a personal com-puter, make name changes only to avoid file incompatibility.
• MP3 files must have at least a 32-kHz sampling rate.
Memory Card Playback, continuedwillbescaledtotheTVdisplay.Somepicturesmaybecroppedtofit.
• Fullpathfilenamescanbenolongerthan50char-actersandmustendina.jpgextension.Notall50characterswilldisplay.
Imagesstoredoncardslargerthan256MBcantakealongerinitialtimetodisplay.


5
TV Menu Settings3D Graphical Menu System . . . . . . . . . . . . . . . . . . . . . 60Main Menu . . . . . . . . . . . . . . . . . . . . . . . . . . . . . . . . . . . . . . . . 61Setup Menu . . . . . . . . . . . . . . . . . . . . . . . . . . . . . . . . . . . . . . . 62NetCommand Menu . . . . . . . . . . . . . . . . . . . . . . . . . . . . . . . . . 62Channel Menu . . . . . . . . . . . . . . . . . . . . . . . . . . . . . . . . . . . . . 64Captions Menu . . . . . . . . . . . . . . . . . . . . . . . . . . . . . . . . . . . . . 66Parental Lock Menu . . . . . . . . . . . . . . . . . . . . . . . . . . . . . . . . . 68
Setting a Pass Code . . . . . . . . . . . . . . . . . . . . . . . . . . . . . . . . . 68Lock TV by Time and Front-Panel Lock . . . . . . . . . . . . . . . . . . . . . . 68Rating Menus . . . . . . . . . . . . . . . . . . . . . . . . . . . . . . . . . . . . . 68Bypassing the Ratings Lock and Lock by Time . . . . . . . . . . . . . . . . . 70
V-Chip Signal InformationTV Ratings . . . . . . . . . . . . . . . . . . . . . . . . . . . . . . . . . . . . . . . 71Movie Ratings . . . . . . . . . . . . . . . . . . . . . . . . . . . . . . . . . . . . . 71
Audio/Video Menu . . . . . . . . . . . . . . . . . . . . . . . . . . . . . . . . . . 72Audio Settings . . . . . . . . . . . . . . . . . . . . . . . . . . . . . . . . . . . . . 72Video Settings . . . . . . . . . . . . . . . . . . . . . . . . . . . . . . . . . . . . . 74

60 Chapter 5. TV Menu Settings
Menu Screens
Apicture(icon)ishighlightedonthemenuscreenwhenselectedwiththedirectionalarrows .Youmaythenmakechangeswithinthemenuoraccesssub-menus,ifavailable.
Youcanalsoopensub-menusfromabutton.Sometimeswhenyouselectabutton,anautomaticfunctionbegins.
3D Graphical Menu SystemYourTVhasMitsubishi’sexclusive3DGraphical on-screenoperatingsystem,whichprovideson-screeninformationformenuchoicesandchangesusingtheTV’sremotecontrol.
The systemincludesthefollowingspecialfea-tures:
• Thecurrentlyselectediconorbuttonishighlightedwithayellowoutline;thetextcolorisyellow.
• On-screeninstructions,showninthemessagelineatthebottomofthemenu,providefeatureselectionandadjustmentinformation.
• Someon-screenmenuoptionsmustbesetbeforeotheroptionsareavailable.
Remote Control ButtonsThefollowingbuttonsontheremotecontrolhelpyounavigatewithinthe
system:
Key Function
1 MENU DisplayorclosetheMainmenuormovebackonemenuscreenatatime.
2 EXIT CloseallmenusandreturntoTVviewing.
3 (AdjustLeft/RightKeys)
toselectamenuitemtochange.
4 (AdjustUp/DownKeys)
• tochangethesettings.• toscrollthroughpre-settext-boxentries.
5 ENTER Openamenu,startanautomaticfunction,orselectacheckbox.
6 Numbers,Letters Entercustomnamesinsometextboxes.
7 CANCEL Clearasettingorstopanautomaticfunction.
12
34
5
6
7
3
4

Chapter 5. TV Menu Settings 61
SetupSeechapter3,“TVSetup,”foruseoftheSetupmenu. SelectEnglishorSpanishformenusand
on-screendisplays. Memorizetheavailablechannelsforthe
antennaorcableserviceconnectedtotheANT 1andANT 2jacks.
SettheTV’sinternalclockeithermanuallyorhavetheTVsettheclockautomatically.
SettheTVTimertoturnontheTVauto-maticallyatadesignatedtime.
Settheenergymodeforpowerconsump-tionwhentheTVispoweredoff.
TurnoffDemoMode. ViewtheTV’ssoftwareversion.
NetCommandSeechapter3,“TVSetup,”formoreonuseoftheNetCommandmenu. Seeareviewlistofallconnectionstothe
TV. SetupTVGuideOnScreen®ormake
changestothesetup. Assignmeaningfulnamestotheinputicons
intheInputSelectionmenu. ChangetheorderoficonsintheInput
Selectionmenu. PerformNetCommand“Learning”setup.
• AssociateA/Vreceiverinputswithdevicestoenableautomaticaudioswitching.
Record SetupaNetCommand-controlledrecord-
ing. Viewalistofscheduledrecordings. Setthedefaultdigitalrecordingdevice. Selectanamorphicorcroppedformatfor
analogrecordings.
Main MenuPressMENUontheremotecontroltoopentheMainmenu,figure1.SeebelowforanoverviewoftheoptionsavailablethroughtheMainmenu.
Figure 1. Main menu.
Channel EditchannelsfortheANT 1andANT 2
inputs. Manuallyaddordeletechannelsfrom
memory,nameanalogchannels,oraddyourfavoritechannelstoaFAV(Favorites)list.
Viewsignalstrengthofacurrentlytuneddigitalchannel.
Captions Displayclosedcaptions(ifsentbythe
broadcaster). Selectsettingsforanalogordigitalcap-
tions.
Parental Lock Blockorallowprogrammingbasedon
ratingsignalssentbythebroadcaststation. LocktheTVbytime. Lockthefront-panelbuttons.
Audio/Video Resetaselectedinput’sA/Vmemorytothe
originalfactorysettings. Customizeindividualaudioandvideoset-
tings. Displayabluescreenwhenviewinga
devicewithnovideosignalorapoorvideosignal.
Enable/disableFilmMode. TurntheTVspeakersonoroff.

62 Chapter 5. TV Menu Settings
Setup MenuSeechapter3,“TVSetup,”foruseoftheSetupmenu.
NetCommand MenuThefeaturesdescribedinthissectionareavailableevenifyouhavenotperformedNetCommandsetup.Seechapter3,“TVSetup,”foroptionsavailableforNetCommand-controlleddevices.
Review TV Connections(no NetCommand setup required)
Press tohighlightReviewandpressENTERtodisplaytheReviewscreen(seefigure2).
Figure 2. The Review screen lists all TV connections. IEEE 1394 inputs are listed separately on the right.
Input Name Menu(no NetCommand setup required)
UsetheInputNamemenutoassignusefullabelstotheTVinputsthatappearintheInputSelectionmenu.Seefigures3and4.ThecurrentviewingdeviceandanyunusedinputsappeargrayedoutandunselectableintheInputNamemenu.
Icon for the Input Name menu Icon for the Icon Order menu
Figure 3. The Input Name menu and Icon Order menu are accessible through the NetCommand menu.
Figure 4. Input Name menu
To rename an input
1. Ifyouarecurrentlywatchingtheinputyouwishtorename,firstchangetoanotherinput.Todoso,pressINPUTtoopentheInputSelectionmenu,highlightadif-ferentinput,andpressENTER.
2. WiththeInputNamemenudisplayed,press tomovethehighlighttotheboxfortheinputyouwishtorename.
3. Press toselectfromthefollowinglist.
Cable Box GameCamcorder HD DiscDVD SatelliteDVD2 VCRDVR(digitalvideorecorder,recordableDVD)
OnlyoneVCRlabelisavailable,soIfyouhaveasecondVCRconnected,leavethenameasthedefaultname.
IMPORTANTIt is possible to use the same name for more than one input. To avoid confusion, be sure to use different names for each input.

Chapter 5. TV Menu Settings 63
To Replace One Device with Another on an Input Jack
1. DisconnectthedeviceyouwishtoremovefromtheTV.
2. Connectthenewdevicetothevacatedjack.
3. OpentheInputNamemenufromtheNetCommandmenu.
4. Selectadevicenamefromthelistfortheinput.
5. OpentheReviewscreenandconfirmthechange.
To Remove the Icon for an HDMI DeviceWhenyoudisconnectanHDMIdevice,theiconremainsintheInputSelectionmenuuntilyouchoosetoremoveit.
1. IntheInputNamemenu(seefigure4),highlighttheboxforthedisconnectedHDMIinput.
2. Press toselectOff.
3. PressMENUtoreturntotheNetCommandmenuorpressEXITtocloseallmenus.
Icon Order Menu(no NetCommand setup required)
TheIconOrdermenuallowsyoutorearrangethedeviceiconsthatappearintheInputSelectionmenu.Changethesequencetoputfrequentlyusediconsatthestartofthelist.Seefigures3and5.
To change the icon order
1. Press tohighlighttheicontobemovedandthenpressENTER.
2. Press todragtheicontothedesiredposi-tion.PressENTERtosetthenewposition.
Figure 5. Icon Order menu
NetCommand Menu, continued

64 Chapter 5. TV Menu Settings
Channel Menu
Settings for the Channel Number Shown
FAV Memory Banks
Signal-Strength (digital channels only)
Figure 6. Channel menu
Antenna (Channel Menu)Selecteither1(ANT 1 MAIN)or2(ANT 2 AUX)astheantennasourceforthechannelsyouwishtoedit.
Channel (Channel Menu)Selecttheaffectedchannelnumber(shownintheChannelbox)inanyofthreeways:
• PressCH / toselectfromchannelsalreadyinmemory.Ifyoualsowishtotunetothechannel,pressENTER.
• Highlightthechannelboxandpress tomovethroughallchannelnumbers,oneatatime.Ifyoualsowishtotunetothechannel,pressENTER.
• Highlightthechannelbox,enterthenumberdirectly,andpressENTER.Notethatwiththismethod,youmustpressENTERforthescreentodisplaysettingsfortheselectedchannel.
Channelnumberscanbeonepart,analogordigital(uptofivedigitslong),ortwopartfordigitalchannels.Fora
two-partdigitalchannel,press—
CANCEL ontheremotetoenteraseparatorafterthefirst,second,orthirdnumber,dependingonthebroadcaster’schannelinformation.
Fordigitalchannels,whenthebroadcasterhassentavirtualchannelnumber,thevirtualchannelnumberisshowninthetextboxandtheoriginalphysicaldigitalchannelisshownbelowonscreenasareference.Oneoriginalchannelnumbercanbeassociatedwithseveraldifferentvirtualchannels.
Memory (Channel Menu)AftertheavailablechannelshavebeenmemorizedwithMemorize ChannelsontheSetupmenu,youcanaddweakerchannelsordeleteunwantedchannelsusingthisoption.Forexample,ifyouwishtoseeonlydigitalchan-
nelslisted,usethismenutodeleteanalogchannelsfrommemory.
PressCH / toreviewthechannelsinmemory.Press toselectAddedorDeletedforthechannelshownin
theChannelbox.
To Add a New Digital Channel
1. Inthechannelmenu,enterthephysicalchannelnumberintheChannelbox,includingthesub-chan-nelnumber;press —
CANCEL (—/CANCEL)andthenenterthesub-channelnumber.Ifnosub-channelisspecified,press —
CANCEL and1.
2. PressENTERtotunetothechannel.
3. HighlighttheAddedradiobutton.
NameAnalogchannelsfromANT 1andANT 2canbenamedwithuptofourcharacters.ThenameyouenterherewillappearontheTVscreenaspartoftheon-screenstatusdisplay.Digitalchannelsmayalreadybenamedifthebroadcastersendstheinformation.
1. Pressanumberkeyrepeatedlytocyclethroughthecharactersassociatedwiththekey.Youcanalsouse
tochangeahighlightedcharacter.
2. PressENTERtosettheletterandmovetothenextletterposition.PressCANCELtomovebackoneposition.
Note: WhentheTVGuideOnScreensystemisenabled,thenamedisplayedisthenamesentbythebroad-casterinsteadofthenameyouassign.
Signal Strength (Channel Menu)
Displaystheapproximatesignalstrengthofthecurrentlytuneddigitalchannel.Usethisindicatortohelpyouadjusttheantennadirectionforbestsignalreception.Thetallerthebar,thestrongerthesignal.Thisindicatorappliesonlytodigitalchannels.
Toviewtheeffectsofantennaadjustmentsondigitalchannels,tunetothedigitalchannelyouwishtomeasurewhileremaininginthismenu.Totunetoachannel,either:
• Highlightthechannelbox,pressCH / or todisplaythedesiredchannelnumber,andpressENTER.
• EnterthechannelnumberontheremotecontrolandpressENTER.
TerminologyVirtual Channel NumberAchannelnumberusedbyalocalbroadcastertohelpyouidentifytheirdigitalchannel.Usuallythisisassoci-atedwiththeirtraditionalanalogchannelnumber.
Physical Digital Channel NumberThechannelnumberofficiallyassignedtotheactualbroadcastfrequency.

Chapter 5. TV Menu Settings 65
FAV (Channel Menu)
TheFAVfeatureletsyoustoregroupsoffavoritechannelsinuptoninedifferentFAVmemorybanks.Forexample,eachhouseholdmembercanstorefavoritechannelsintheirownbankoryoucanstoregroupsofchannelsbycontent,e.g.,news,sports,children’sprogramming,etc.YoucanstorethesamechannelinmultipleFAVbanks.
FAV Setup Using the Channel Menu
Initial Setup of a FAV Bank and Adding FAV Channels Using the Menu
1. WiththeChannelmenudisplayed,selectachannelusingoneofthemethodsdescribedontheprecedingpage,forexample,pressCH / foramemorizedchannel.
2. Highlightthedesiredbank(FAV1–FAV9)andpressENTERtocheckmarktheselectedFAVmemorybank.ThechannelnumberdisplayedhasnowbeenaddedtothecheckedFAVbank.
3. WiththeFAVbankstillhighlighted,pressCH / todisplaythenextchannelyouwishtoaddtotheFAVbank.
4. PressENTERtoaddacheckmarknexttothehighlightedFAVbank.
5. Repeatsteps2–4foradditionalchannelsandFAVbanks.
Removing FAV Channels Using the Menu
1. WiththeChannelmenudisplayed,pressCH / todisplaythememo-rizedchannelyouwishtoremove.
2. HighlightthedesiredFAVmemorybank(FAV1–FAV9).
3. PressENTERtoremovethecheckmark.
Channel Menu, continued
OnceyouhaveaddedachanneltoFAVmemory,FAV andthememorybanknumberappearunderthetunedchannelnumberontheTVscreen.YoucanaccesstheFAVfeaturethroughtheChannelmenuoryoucanbypassthemenuanduseonlytheremotecontrol.
Using FAV Channels
Viewing FAV Banks 1. PresstheFAVkey.WaitfortheTVtotunetoachannelinthecurrentFAVbank.
2. PresstheFAVkeyrepeatedlytocyclethroughthechannelsavailableinthecurrentFAVbank.
Changing FAV Banks 1. PresstheFAVkey.WaitfortheTVtotunetoachannelinthecurrentFAVbank.
2. WhentuningiscompleteandwhiletheTVstatusdisplayisstillvisibleonscreen,pressthenumberkeyforthedesiredbank.
Note: Waitforthechannelchangetofinishbeforepressingthenumberkey.Otherwise,theTVmayignoretheFAVnumber.
If No FAV Banks Are Set Up TheFAVkeyswitchestothepreviouslytunedchannel;worksliketheQVkey.
FAV Setup Using Only the Remote Control
Adding FAV Channels 1. WhilewatchingTV,tunetothechannelyouwanttoaddtothecurrentFAVmemorybank.SeetheinstructionsaboveifyouneedtofirstchangetoadifferentFAVbank.
2. PressandholdtheFAVbuttonforabout2seconds.WhenFAVandthememorybanknumberappearunderthechannelnumber,thechannelhasbeensuccessfullyadded.
Removing FAV Channels
Thisprocedureremovesthechannelonlyfromtheselectedbankandleavestheotherbanksunchanged.
1. WhilewatchingTV,presstheFAVbutton
2. WhiletheTVstatusdisplayisstillvisibleonscreen,pressthenumberkeyforthememorybank.
2. PresstheFAVbuttonrepeatedlyuntilyouseethedesiredchannel.
3. WhilethechannelnumberandFAVindicator(withcorrectbanknumber)arestilldisplayedonthescreen,pressCANCEL.YoumustpressCANCEL beforetheindicatordisappears.WhentheFAVindicatordisappears,thechannelhasbeensuccessfullyremoved.

66 Chapter 5. TV Menu Settings
Captions MenuForanalogchannels,broadcasterscansendeitherstan-dardclosedcaptionsortextservice.Standardclosedcaptionsfollowthedialogueofthecharactersonscreenanddisplayinasmallsectionofthescreen.Text-serviceclosedcaptionsoftencontaininformationsuchasweatherornewsandcoveralargeportionofthescreen.
Fordigitalchannels,broadcasterscansenduptosixdif-ferentcaptioningselectionsorcansendanalogcaptionsthatarethesameasthosesentbytheanalogstation.EachTVstationmaybroadcastonlyoneortwotypesofcaptionsornoneatall.TheTVcannotdecodeclosedcaptionsreceivedoncomponentorHDMIinputs.
Figure 7. Captions menu
IMPORTANTWhen analog text closed captioning is selected, a large black or gray box appears on your TV screen if no signal is broadcast.
Analog CaptionsTheTVcandisplayoneofthefollowingcaptionsforanalogsources:
• CC1, CC2, CC3, or CC4: standardclosed-captionsignals
• Text1, Text2, Text3, or Text4:Text-servicesignals
• On if mute:Closedcaptionsappearwhenaudioismuted.Whenselected,pressMUTEontheTVremotecontroltoturnon/offthestandardclosed-captionsignalCC1.
• Off:Noclosedcaptions.
BackgroundTomaketheanalogclosedcaptionseasiertoread,youcanchoosetodisplaythebackgroundcoloraseitherblackorgraybehindthetext.
Digital CaptionsThefollowingdisplayoptionsareavailablefordigitalsources:
• Captions 1–6:Sentbybroadcaster.
• On if Mute:Closedcaptionsaredisplayedwhenaudioismuted.Whenselected,pressMUTEontheTVremotecontroltoturncaptioningon/off(Caption1).
• Off: Noclosedcaptions.
Note:Fordigitalprograms,ifthebroadcasterissendingonlyanalogcaptionsconvertedtodigitalformat,thentheanalogcaptionsettingsapply.
AppearanceTheclosed-captionsproviderselectsthedefaultoptionswhensendingdigitalclosedcaptions.SelectCustomtooverridedefaultsandcustomizetheappearanceofclosedcaptions.Thesesettingsdonotapplytoanalogclosedcaptioningconvertedtodigital.
Digital SettingsTheDigitalSettingsmenuallowsyoutocustomizetheappearanceoftheclosedcaptionssentbythebroad-caster.Digitalsettingsdonotapplytoanalogclosedcap-tionsconvertedtodigital.
ToopentheDigitalSettingsmenu,select CustomfortheAppearanceoption.MovethehighlighttotheDigital SettingsiconandpressENTER.
Figure 8. Closed Captions, Digital Settings sub-menu
FontTheavailablefontoptionsareasfollows:
• Default:Selectedbytheclosed-captionspro-vider
• Font 1:Monospacedfontwithserifs• Font 2:Proportionallyspacedfontwithserifs• Font 3:Monospacedfontwithoutserifs• Font 4:Proportionallyspacedwithoutserifs• Font 5:Casualfont• Font 6:Cursivefont• Font 7:Smallcapitals

Chapter 5. TV Menu Settings 67
Captions Menu, continued
SizeSelectthedesiredfontsize.Largeistherecommendedfontsize.
ColorTheavailablefontcolorsarelistedbelow.Textandback-groundcannotbesettothesamecolor.
White YellowBlack GreenMagenta CyanRed Blue
BackgroundYoucanchangethebackgroundcolortomakethedigitalclosedcaptionseasiertoread.Theavailablebackgroundcolorsarelistedbelow.Textandbackgroundcannotbesettothesamecolor.
White YellowBlack GreenMagenta CyanRed Blue
IMPORTANTMitsubishi recommends you use contrasting colors for captions and background. Black translucent background combined with a white font makes an easy-to-read combination.Use care when selecting custom colors. Your choice may affect the readability of captions.
IMPORTANTThe content of captions is determined by the broadcaster. If your captions show strange characters, misspellings, or odd grammar, it is not a malfunction of the TV.
Opacity (Font)Youcancustomizethevisibilityofyourfontsusingthefol-lowingsettings:
• Translucent:TVprogramisdimmedbehindthetext
• Transparent:InvisibletextrevealstheTVprogrambehind.
• Opaque:SolidtextblocksviewoftheTVprogram
• Flashing:Textflashesatintervals
Background OpacityYoucancustomizethebackgroundfordigitalcaptionsusingthefollowingsettings:
• Translucent:TVprogramisdimmedbehindthebackground
• Transparent:Novisiblebackground
• Opaque:SolidbackgroundcoversTVprogram
• Flashing:Backgroundflashesatintervals

68 Chapter 5. TV Menu Settings
Parental Lock MenuTheParentalLockmenugivesyoucontroloverthreedif-ferenttypesofparentalcontrols.Youmustuseapasscodetoopenthismenutoenable/disablethelockoptions.Thethreeparentalcontrolsavailableare:
• Ratings (U.S. Ratings/Other Ratings)V-Chiptechnologyletsyourestrictaccesstoprogrammingbasedonprogram-ratingsignalssentbythebroadcaster.ForU.S.ratings,youcanalsosetthetimeofdayfortheserestrictionstobeineffect.
• Lock by TimeLetsyourestrictTVusebytimeofday.
• Front Panel LockLetsyoudisablethecontrolsonthefrontoftheTV.UsethisoptioniftherearesmallchildrenneartheTVwhomaybetemptedtopressthebuttons.
Access to Ratings Menus
Lock TV by Time
TV Front Panel Lock On/Off
Figure 9. Parental Lock menu
Setting a Pass CodeYouarepromptedtoenterapasscodewheneveryouselectParentalLockontheMainmenu.Tosetapasscodeforthefirsttime:
1. PressMENU,highlightParental Lock,thenpressENTER. Ascreenpromptingyouforapasscodewilldisplay.
2. Inputafour-digitpasscodeusingthenumberkeysontheremotecontrol.
• PressCANCELtodeleteanumberandmovebackonespace.
• PressMENUorEXITtoclosethemenuwithoutsettingapasscode.
3. PressENTERtosetthepasscodejustinput.
Toresetthepasscode,seetheprocedureinAppendixA.
IMPORTANTIf you forget your four-digit pass code, see Appendix A.
Lock TV by Time and Front-Panel Lock
Lock by Time (Parental Lock Menu)Lock by TimeallowsyoutoblockalluseoftheTVduringspecifiedhours.Duringthelocktime,youmustuseyourpasscodetoviewtheTV.TolocktheTVbytime:
1. Press toselectOnorOffforLock by Time.
2. Press tomovetotheLock Timebox.
a. Withthehournumberhighlightedinyellow,press repeatedlytochangethehourandassoci-
atedAM/PM indicator.Youcanalsojustpressandholdtochangethehour.
b. PressENTERtomovethehighlighttotheminutes.
c. Withtheminutesnumberhighlightedinyellow,press repeatedlytochangetheminutes.Justpressandholdtomovequicklythroughthenumbers.
d. Press tomovetotheUnlock Timeandsetthetimeasdescribedabove.
NOTE: TomakeLock by Timeactive24hoursaday,setLockandUnlocktothesametime.
Front Panel Lock (Parental Lock Menu)Front Panel LockletsyoudisablecontrolsonthefrontpaneltopreventinadvertentchangestoTVsettings.SelectOntodisablethebuttonsandselectOfftorestoretheiroperation.
Toreleasethefrontbuttonlockwithoutusingtheremotecontrol:
• WhenEnergyModeissettoFast Power On,pressandholdtheMENUbuttononthefrontpanelforovereightseconds.IftheTVison,amessagewilldisplayconfirmingreleaseoftheFrontPanelLock.
• WhenEnergyModeissettoLow Power,pressPOWER onthefrontpaneltoturnontheTV.Pressandholdthe MENUbuttononthefrontpanelforovereightseconds.
Rating MenusTheratingmenusallowyouto:
• Turnratingrestrictionsonoroff
• Changethepermittedratinglevel
• Setthetimeofdaytoenforceratingrestrictions(U.S.ratingsonly)
TheTVcomesfromthefactorywithpre-setU.S.V-Chipratingsandwiththeratinglocksturnedoff.Thepre-setratingsareTVratingTV-PGandmovieratingPG.IfyouturnonV-Chipblocking,thesepresetsallowonlypro-gramsratedTV-PG/PGorloweruntilyouchangetheratinglevel.
Afterchangingthechannelordevice,theremaybeadelayofuptofivesecondsbeforetheratingrestrictionstakeeffect.
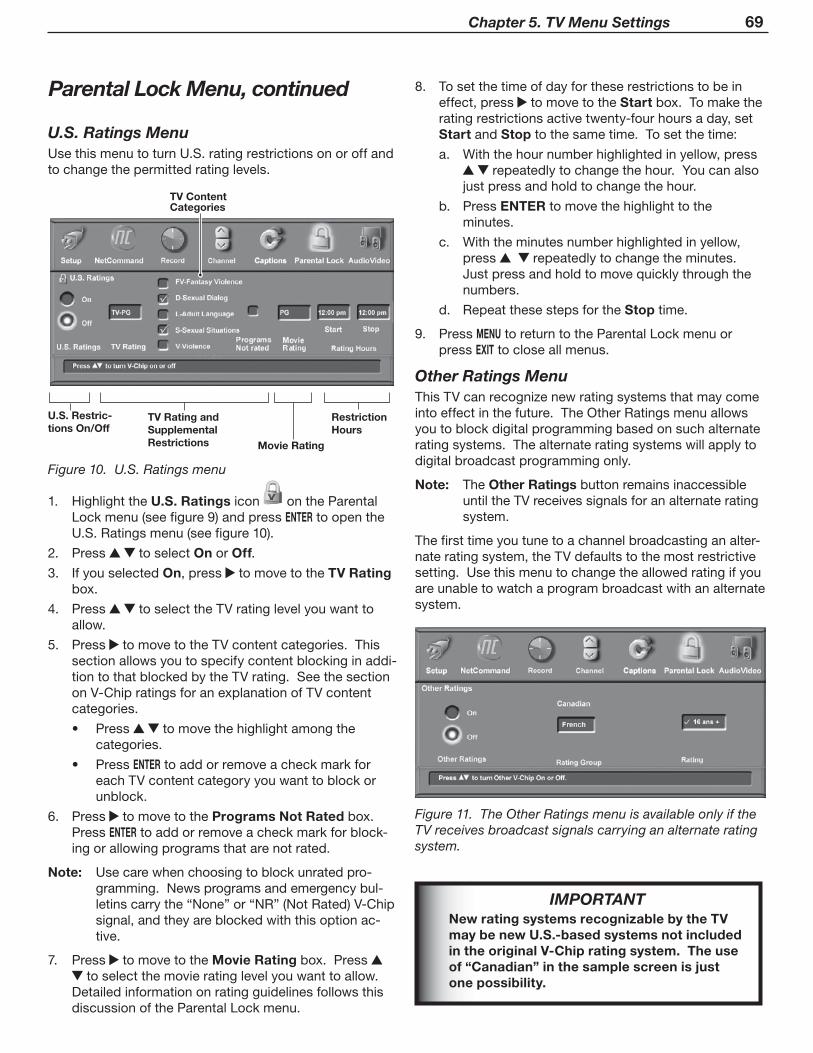
Chapter 5. TV Menu Settings 69
U.S. Ratings MenuUsethismenutoturnU.S.ratingrestrictionsonoroffandtochangethepermittedratinglevels.
U.S. Restric-tions On/Off
TV Rating and Supplemental Restrictions
Restriction Hours
Movie Rating
TV Content Categories
Figure 10. U.S. Ratings menu
1. HighlighttheU.S. Ratingsicon ontheParentalLockmenu(seefigure9)andpressENTERtoopentheU.S.Ratingsmenu(seefigure10).
2. Press toselectOnorOff.
3. IfyouselectedOn,press tomovetotheTV Rating box.
4. Press toselecttheTVratinglevelyouwanttoallow.
5. Press tomovetotheTVcontentcategories.Thissectionallowsyoutospecifycontentblockinginaddi-tiontothatblockedbytheTVrating.SeethesectiononV-ChipratingsforanexplanationofTVcontentcategories.
• Press tomovethehighlightamongthecategories.
• PressENTERtoaddorremoveacheckmarkforeachTVcontentcategoryyouwanttoblockorunblock.
6. Press tomovetothePrograms Not Ratedbox.PressENTERtoaddorremoveacheckmarkforblock-ingorallowingprogramsthatarenotrated.
Note: Usecarewhenchoosingtoblockunratedpro-gramming.Newsprogramsandemergencybul-letinscarrythe“None”or“NR”(NotRated)V-Chipsignal,andtheyareblockedwiththisoptionac-tive.
7. Press tomovetotheMovie Ratingbox.Press toselectthemovieratinglevelyouwanttoallow.
DetailedinformationonratingguidelinesfollowsthisdiscussionoftheParentalLockmenu.
8. Tosetthetimeofdayfortheserestrictionstobeineffect,press tomovetotheStartbox.Tomaketheratingrestrictionsactivetwenty-fourhoursaday,setStartandStoptothesametime.Tosetthetime:
a. Withthehournumberhighlightedinyellow,press repeatedlytochangethehour.Youcanalso
justpressandholdtochangethehour.
b. PressENTERtomovethehighlighttotheminutes.
c. Withtheminutesnumberhighlightedinyellow,press repeatedlytochangetheminutes.Justpressandholdtomovequicklythroughthenumbers.
d. RepeatthesestepsfortheStoptime.
9. PressMENUtoreturntotheParentalLockmenuorpressEXITtocloseallmenus.
Other Ratings MenuThisTVcanrecognizenewratingsystemsthatmaycomeintoeffectinthefuture.TheOtherRatingsmenuallowsyoutoblockdigitalprogrammingbasedonsuchalternateratingsystems.Thealternateratingsystemswillapplytodigitalbroadcastprogrammingonly.
Note: TheOther RatingsbuttonremainsinaccessibleuntiltheTVreceivessignalsforanalternateratingsystem.
Thefirsttimeyoutunetoachannelbroadcastinganalter-nateratingsystem,theTVdefaultstothemostrestrictivesetting.Usethismenutochangetheallowedratingifyouareunabletowatchaprogrambroadcastwithanalternatesystem.
Figure 11. The Other Ratings menu is available only if the TV receives broadcast signals carrying an alternate rating system.
Parental Lock Menu, continued
IMPORTANTNew rating systems recognizable by the TV may be new U.S.-based systems not included in the original V-Chip rating system. The use of “Canadian” in the sample screen is just one possibility.

70 Chapter 5. TV Menu Settings
Parental Lock Menu, continued
1. HighlightthebuttonlabelledOther RatingsontheParentalLockmenu(seefigure9)andpressENTERtoopentheOtherRatingsmenu(seefigure11).
2. Press toselectOnorOff.
3. IfyouselectedOn,press tomovetotheRating Groupbox.
Notethatyoucanchangesettingsonlyfortheratingsystemavailableonthecurrentlytunedchannel.Inthefigureabove,forexample,theCanadianratingsystemisineffect.TochangesettingsatalatertimefortheCanadianratingsystem,youmustagaintunetoachannelbroadcastingtheCanadiansystem.
4. Press toselectfromthesubgroupsavailablefortheratingsystem—EnglishorFrenchinthisexample.
5. Press tomovetotheRatingbox.
6. Press toselecttheprogramratinglevelyouwanttoblock.
7. PressENTERtoaddacheckmarktoindicateblockingisineffectfortherating.Whenaratingshowsacheck
mark,pressENTERtoremovethecheckmarkandallowprogramswiththisrating.
8. Repeatsteps3through7foreachadditionalratingsystemyouwouldliketosetup.
9. PressMENUtoreturntotheParentalLockmenuorpressEXITtocloseallmenus.
Bypassing the Ratings Lock and Lock by TimeIfyoutrytowatchblockedprogramming,anoticeappearspromptingyouforapasscode.TousetheTV:
• Inputyourfour-digitpasscodeandpressENTER.
• Changetoachannelairinganallowedprogramorchangetoanotherdevice.
IfyoutrytousetheTVwhenitislockedbytime,asimilarscreenappears,promptingyouforyourpasscode.
ToreactivatetheratinglockorTVLockbyTimeafterusingthepasscode,powertheTVoffandthenon.

Chapter 5. TV Menu Settings 71
TV RatingsTVratingsapplytoTVprogramsandmade-for-TVmovies.YoucanapplysupplementalblockingtoTVratingsbasedontheTVcontentcategoriesdescribedbelow.TVratingsare:
TV-Y Youth.Forchildrenundertheageof7.TV-Y7 Youth7andolder.TV-G GeneralAudience.Fortheentirefamilytoview.TV-PG ParentalGuidance.ParentalGuidanceis
recommended;maynotbesuitableforsomechildren.
TV-14 Adolescent14andolder.Notrecommendedforchildrenundertheageof14.
TV-MA MatureAudience.Foradultsonly.
TV Content CategoriesUsedinassociationwiththeTVratingsabove,TVcontentcategoriesallowyoutoapplysupplementalblocking.ApplysupplementalblockingusingtheU.S.Ratingsmenu.
FV Fantasy Violence.AppliestoTV-Y7only.D Sexual Dialog.AppliesindifferentdegreestoTV-PG
andTV-14.L Adult Language.Appliesindifferingdegreesto
TV-PG,TV-14,andTV-MA.S Sexual Situations.Appliesindifferingdegreesto
TV-PG,TV-14,andTV-MAV Violence(graphicorrealistic).Appliesindiffering
degreestoTV-PG,TV-14,andTV-MA.
TV Rating FV D L S V
TV-YNot Applicable
TV-Y7 X
TV-PG Not Appli-cable
X X X X
TV-14 X X X X
TV-MA X X X
TV content categories. Boxes marked with an “X” indicate supplemental blocking you can apply to each rating level.
TheTVratingyouselectisfortheleast-restrictiveprogramlevelallowed.Forexample,ifyouselectTV-PG,programsratedTV-Y,TV-Y7,andTV-PGcanbeviewed,butpro-gramsratedTV-14andTV-MAareblocked.
WhenyouselectaTVcontentcategorytoblock,allTVprogramswiththesamecontentcategorylistingareblocked.Forexample,ifyouselecttoblockV(Violence)attheTV-14level,anyprogramswiththeVcategorylistingratedTV-PGarealsoblocked.
V-Chip Signal InformationWhenprovidedbythebroadcasterorprogramsource,V-ChipratingsletyoucontrolthetypesofprogrammingthatcanbeviewedontheTV.WhenV-Chipratingsaresupplied,theyaredisplayedwhenyouchangethechannelorpressINFOontheremotecontrol.
V-CHIP EXCEPTIONS
• V-ChipblockingisineffectiveforprogramsviewedondevicesconnectedtocomponentorHDMIinputs.Manyofthesedevices,however,havetheirownparental-controlsystems.
• Videotapes,laserdiscs,andDVDsmaynotcontainV-Chipratingsignals.V-ChipcannotblockplaybackofrecordingswithoutV-Chipratingsignals.
• BroadcastersarenotcurrentlyrequiredtoincludeV-Chipratingsignals.V-Chipcannotblockpro-grammingbroadcastwithouttheV-Chipratingsignal.
Movie RatingsMovieratingsaretheMPAAratingsusedfortheater-releasedanddirect-to-videomovies.Movieratingsare:
G General Audience.Designedfortheentirefamilytoview.
PG Parental Guidance.ParentalGuidanceisrecommended,maynotbesuitableforsomechildren.
PG-13 Parental Guidance, 13 and Older.Notrecommendedforchildrenundertheageof13.
R Restricted.Restrictedintheatersto17yearsoldandolderunlessaccompaniedbyanadult.
NC-17 No Children 17 or Under.Restrictedintheatersto18yearsoldandolder.
X Adult.Designedforandrestrictedintheaterstoadultaudiencesonly.
Themovieratingyouselectisfortheleast-restrictiveprogramlevelthatcanbeviewed.Forexample,ifyouselectthePG-13rating,moviesratedG,PGandPG-13canbewatched,butmoviesratedR,NC-17,andXareblocked.
Programs Not Rated:Thisreferstoprogramsthatcarrynorating,suchasnews,sports,weather,emergencybul-letins,ormoviespriortoorwithoutMPAAratings.ThisdoesnotincludeprogramswithoutV-Chipsignals.
IMPORTANTIf you enable blocking with the Programs Not Rated option, you may block news or emergency bulletins carrying the “None” or “NR” Not Rated V-Chip rating. Use care when blocking programming that is not rated.

72 Chapter 5. TV Menu Settings
Audio/Video Menu
Figure 12. Audio/Video Menu
A/V Memory ResetA/VMemoryResetallowsyoutoresetaspecificinput’sA/Vsettingstotheoriginalfactorysettings.Highlighttheboxandpress toselecttheinputname.NextpressENTER.
TheaudiosettingsofBalance, Listen to,andLanguage aregeneralTVsettingsunaffectedbyA/VMemoryReset.
ToresetallA/Vsettingsatonce,includingthethreegeneralsettings,performanA/VResetbypressingthefront-panelbuttonsGUIDEandFORMATsimultaneously.
Settings (Audio and Video)EachinputordevicehasitsownA/Vmemory.Press toselecttheinputordeviceintheA/V Memory Reset
box,thenselectAudioorVideotoadjustindividualsettings.PressENTERtoclosethemenuanddisplaytheindividualsettings.
Use tocyclethroughtheindividualsettings.Use tochangethesettingvalues.PressEXITtoreturnto
normalTVviewing.FordescriptionsoftheindividualA/Vsettings,seethefollowingpages.
Video MuteThedefaultisOn,whichdisplaysabluebackgroundwhennosignalisbeingreceivedontheINPUT, COMPO-NENT,orHDMIjacks.
Film Mode (480i signals only)Autoisthedefaultsetting.WithAutoselected,theTVautomaticallydetectsandappliesfilm-decodingcorrec-tionforimagesthatoriginatedon24-frame-per-secondfilmcamerasandwereconvertedto30-frame-per-secondvideoforbroadcast(3:2pulldownconversion).TrytheOffsettingiftheTVaddsnoticeablejaggededgestotheimages.
Whentheoriginalvideowasfilmedon30-frame-per-sec-ondcameras,theAutosettingautomaticallyappliesvideodecoding,thesameasusedwiththeOffsetting.
FilmModeisnoteffectiveforhigh-definitionsignals.
TV SpeakersThisselectionturnstheTV’sinternalspeakersonoroff.SelectOff:
• WhensendingthesoundthroughaseparatesoundsystemorsurroundsoundA/Vreceiver.
• IfyourA/VreceiverisunderNetCommandcontrol
Note: Topreventdamagefromasuddenincreaseinvol-ume,turntheTVvolumedownlowbeforechang-ingthisoptiontoOn.
Audio/Video Settings and the Remote ControlToadjustindividualaudioorvideosettingsdirectlywiththeremotecontrol:
1. PressAUDIOorVIDEO repeatedlytocyclethroughtheavailablesettings.
2. Press toadjustthesetting.Thesettingdisplaywilldisappearafterfivesecondsofinactivity.
Audio Settings
Analog and Digital Audio SettingsEntertheaudioadjustmentmodeusingeithertheAudio/VideomenuortheAUDIOkey.Use tochangesettings.Someadjustablesettingsdisplayasliderandcorrespond-ingnumericvalueonscreen.Valuescanbeadjustedfrom0to63,with31asthemidpoint.
Note: TheeffectsoftheaudiosettingsofBass, Treble, Balance,andSurroundaffectonlythesoundheardthroughtheTVspeakers.
◊ BassEnhancesorreduceslow-pitchedsound.
◊ TrebleEnhancesorreduceshigh-pitchedsound.
◊ BalanceAdjuststhelevelofsoundbetweentheleftandrightTVspeakers.
◊ Surround CreatessimulatedstereoandsurroundeffectsthroughtheTVspeakers.Yourchoicesare:
• Off:Nosurroundeffects(default).
• Simulated Stereo:TheTVcreatesasimu-latedstereoeffectwhenwatchinganon-stereoprogram.
• Surround Sound:TheTVcreatesasimulatedsurroundeffectwhenwatchingastereoprogram.
◊ Level Sound Whenon,automaticallyequalizesthevolumelevelwhentherearesignificantsound-leveldifferencesbetweenprogramsegments,suchasbetweenregularprogrammingandcommercials.

Chapter 5. TV Menu Settings 73
• Toreceivethebestfidelitywithmusicprograms,changethissettingtoOff.
• WhenconnectingtoanA/Vreceiver,setLevel SoundtoOffandturnofftheTVspeakerstosendfulldynamicstotheA/Vreceiver.
Analog-Only Audio SettingsYoucansetanalog-onlyaudiosettingswhileviewingeitheranalogordigitalsources,butthesettingsaffectonlybroadcastanalogcontent.
◊ Listen ToDetermineshowyourTVreceivesabroadcastaudiosignalandplaysthesoundyouhear.
Yourchoicesare:
• Stereo:Defaultsetting.TheTVplaysstereobroadcastsinstereoandmonobroadcastsinmono.ThewordStereoisdisplayedwhenyoutunetoachannelbroadcastinginstereo.
• SAP(SecondAudioProgram):Additionalmonau-ralsoundtrackthatyoucannothearduringnormalTVviewing.TheSAPsignalmightberelatedtotheprogramyouarewatching,(suchasasoundtrackinaforeignlanguage),oritmightbeunre-lated(suchasaweatherreport).IfanSAPsignalisbroadcast,thelettersSAParedisplayedwhenyoutunetothechannel.
• Mono:Reducesbackgroundnoise.Usewhenreceivingaweakstereoaudiosignal.Allaudioisplayedmonowiththissetting.
Listen Toisnotavailablefor1394devicesordevicescon-nectedtotheINPUT, COMPONENTandHDMIjacks.
Digital-Only Audio SettingsYoucansetdigital-onlyaudiosettingswhileviewingeitheranalogordigitalsources,butthesettingsaffectonlybroadcastdigitalcontent.
◊ LanguageDetermineswhatpossiblelanguageyoucanhear.TheLanguageoptionisavailableforIEEE1394devicesbutnotfordevicesconnectedtotheINPUT, COMPONENT,andHDMIjacks.Languagechoicesare:
English PortugueseFrench SpanishGerman OtherItalian
IEEE 1394 Amplifier Settings
◊ BalanceAdjuststhelevelofsoundbetweentheleftandrightspeakers.Thesliderrangeis0–254,with127asthemidpoint.
◊ LoudnessWhenon,makestheaudiolevelmoreuniform.
◊ PresetSelectthemodethatmatchestheaudiosource.Yourchoicesare:
Off Classical MusicJazz MovieRock Speech
◊ EqualizerEqualizesthesound.
Audio/Video Menu, continued

74 Chapter 5. TV Menu Settings
Audio/Video Menu, continued
Video SettingsEnterthevideoadjustmentmodeusingeithertheAudio/VideomenuortheVIDEOkey.PresstheVIDEOkeyrepeatedlytocyclethroughthevideooptionstotheoneyouwanttochange.Use tochangesettings.
Note: Asliderdisplaysonscreenforsomesettings.Whenthesliderisdisplayed,itrepresentsnumericvalues,with63asthemaximum,31asthemid-point,and0astheminimum.
◊ Picture Mode: SetthePictureModefirstbeforeadjustingothersettings,aseachPictureModestoresitsownvaluesforContrast,Brightness,andColorTemperature.PictureModesallowyoutooptimizetheimagefordifferentlightingconditions.ThePictureModesare:
• Bright:Suitedformostdaytimeviewing.• Natural:Suitedformostnighttimeviewing.• Brilliant:Thedefaultsetting.Foruseunder
stronglight.
◊ Contrast (Bright/Natural/Brilliant):Providesaslidertoadjustthewhite-to-blacklevel.Lowcontrastshowsavarietyofshadesindarkerimages,whilehighcontrastshowsdarkerimagesmoreuniformlyblackandmakescolorsappearmorevibrant.Inmosthomelightingsituations,amediumcontrastlooksbest.Highcon-trastisgoodforbrightlylitenvironments.
◊ Brightness (Bright/Natural/Brilliant):Providesaslidertoadjusttheoverallbrightnessofthepicture.
◊ Color: Providesaslidertoadjustcolorintensity.
◊ Tint: Providesaslidertoadjustthered-to-greenratio.
◊ Sharpness: Providesaslidertoadjustthedetailandclarity.
◊ Color Temperature (Bright/Natural/Brilliant):Allowsyoutoadjusthowwhiteisdisplayed.
• Low:Whiteimageshaveawarmcast.Thisadjustmentisanaverageandcanvaryduetoambientroomlighting,videoscenebrightness,andtheTV’sage.Natural/ColorTempatthelowsettingdisplaysvideoatthe6500KindustrystandardforNTSCpictures.
• High:Whiteimageshaveacoolcast.Thissettingmayprovidethemostrealisticpictureunderbrightlighting.
◊ PerfectColor™: Letsyouadjusttheintensityofanyorallofsixcolors(Magenta,Red,Yellow,Green,CyanandBlue)tocreatecolorbalanceforthecurrentimagesource.PerfectColorsettingsarememorizedforeachTVinputordevice.
SelectthePerfectColoroptionandpressENTERtoopentheadjustmentscreen.
Individualslidersforeachcoloraredisplayed.Press tomovefromonecolortothenext.Highlighted
textshowswhichslideryouareadjusting.Press tochangesettings.PressCANCEL whileinthe
PerfectColorscreentoresetallcolorstothedefaultsettings.
Name of affected input
PerfectColor Adjust Mode
Figure 13. Set PerfectColor adjustments independently for each TV input.
◊ PerfecTint™ (models WD-57732, WD-65732, WD-73732):Providesfurthercolorrefinementusingsixcolorslidersmemorizedforeachinput.TousePerfecTint:
1. WiththePerfectColorscreendisplayedandwithAdjust Modehighlightedinyellowcharacters,press toopenthePerfecTintscreen.
2. Press tomovefromonecolortothenext.Press tochangesettings.PressCANCEL toresettothedefaultsettings.
3. ToreturntoPerfectColor,highlightAdjust Mode inyellowcharactersandpress .
Name of affected input
PerfecTint Adjust Mode
Figure 14. PerfecTint adjustments for each TV input let you further refine color adjustments..
◊ Video Noise: Reducesminornoise(graininess)inthepicture.UsetheLowsettingwithgood-qualitysignals.UseHighwithpoor-qualitysignals.Turnofftoleavethepictureunaltered.

Chapter 5. TV Menu Settings 75
Audio/Video Menu, continued
◊ DeepField™ Imager (models WD-57732, WD-65732, WD-73732): WhenOnisselected,theblacklevelsaredynamicallyenhancedinportionsofthescreentoprovidestrongcontrastwithdetailovermixedscreencontent.WhenOffisselected,theentirescreenadjuststhecontrastthesame.WhenDemoisselected,asplitscreenpictureappearsandyoucanseehowthepicturewilllookwhenDeepFieldImagerison(rightside)orwhenitisoff(leftside).
◊ SharpEdge™ (models WD-57732, WD-65732, WD-73732): WhenOnisselected,specialedgesharpnessenhancementsareappliedtotheverticaledgesofimages.
Personal Computer Video SettingsVideosettingsavailableforimagesfromapersonalcom-puterare:
◊ Contrast
◊ Brightness
◊ PerfectColor™.Theadjustmentscreendisplayswithouttheverticalcolorbarswhenusedforacom-puterimage.
◊ PerfecTint™ (models WD-57732, WD-65732, WD-73732)
◊ Auto Position: PressENTERtoautomaticallycenterthepositionofthePCvideo.
◊ HorizPosition (Horizontal Position): ManuallyadjustthehorizontalpositionofPCvideo.ThisselectionoverridestheAutoPositionselection.
◊ VertPosition (Vertical Position): ManuallyadjusttheverticalpositionofPCvideo.ThisselectionoverridestheAutoPositionselection.
◊ Fine Detail: ManuallyadjustthepicturequalityofPCvideo,analogsignalsonly.ThisselectionoverridestheAutoPositionselection.


6
NetCommand FunctionsNetCommand-Controlled Devices and the Input Selection Menu . . 78NetCommand-Controlled Recording . . . . . . . . . . . . . . . . . . . . . . 79Using IEEE 1394 Devices . . . . . . . . . . . . . . . . . . . . . . . . . . . . . . 83

78 Chapter 6. NetCommand Functions
NetCommand-Controlled Devices and the Input Selection MenuFordevicesunderNetCommandcontrol,theInputSelec-tionmenuallowsyouto:
• Selectthedeviceforviewing• SwitchaudiobetweentheTVspeakersandA/V
receiver• Powercompatibledevicesonoroff• Verifythedestinationofsignals.
ConnectionSection
InputSection
AudioSection
Figure 1. The Input selection menu for a NetCommand-controlled device.
Input SectionPress tohighlightaninputiconandpressENTER toselecttheinputtoviewandhear.“Learned”inputsonacompatibleA/Vreceiverareautomaticallychangedatthesametime.
Connection SectionTheConnectionsectionshowsifthereisarecordinginprogressandthedevicethatisrecordingfromthesource.Forexample,iftheDigitalVCR(D-VCR)iscurrentlyrecord-ingfromANT 1,whenyoumovethehighlighttotheAnt-1icon,theD-VCRiconappearsintheConnectionSection.ThisicondisappearswhenyoumovethehighlighttoanothericonorpressCANCELtostoprecording.
Audio SectionANetCommand-controlledA/VreceiverconnectedtotheTVappearsasanAVRiconintheAudiosection.PressAUDIOtochangenavigationtotheAudiosection.Thenpress toselecteithertheTVspeakersiconortheA/Vreceivericon.PressENTERtochangetheaudioselection.PressINPUTtoreturnnavigationtotheInputsection.
The Remote Control and NetCommandPointtheTV’sremotecontrolattheTVwhenoperat-ingNetCommand-controlleddevices.Seethechartinchapter3,“TVSetup,”toreviewdevicefunctionsyoucan“learn”forthedevice.Furtherinformationonsomefunc-tionsisincludedhere.
The Input Selection Menu and NetCommand
Power Devices On/OffFirst“learn”thepowerkey(s)forthedevice.PressINPUT todisplaytheInputSelectionmenu.IfyoupressPOWER withoutfirstdisplayingtheInputSelectionmenu,theTVwillturnoff.
• Devices with separate ON and OFF remote control keys.ThesedevicespoweronautomaticallywhenyouselectthedeviceintheInputSelectionmenuandwillpoweroffwhenyouturnofftheTV.
• Devices that do not power on or off automatically. Topoweron:HighlightthedeviceiconintheInputSelectionmenuandpressPOWER.PressENTERtoselectthedevice.Topoweroff:PressINPUTtoopentheInputSelectionmenuandhighlightthedeviceicon.PressPOWERontheTV’sremotecontrol.
• A/V receiver. OpentheInputSelectionmenuandpressAUDIOtomovenavigationtotheAudiosection.HighlighttheA/VreceivericonandpressPOWERontheTV’sremotecontrol.
Additional Functions
HighlightthedeviceiconintheInputSelectionmenuandpressENTERtoselectthedevice.Re-opentheInputSelectionmenuandpressthe“learned”keyindicatedinthetablebelow.
“Learned” Key for the Device Action
MENU CloseSplitScreenbefore-hand,ifactive.PressMENU toopenthedevice’smenu.Use tonavigatethemenu.
GUIDE(“Learned”tochangeVCRinputs)
PressGUIDErepeatedlytocyclethroughtheVCR’sinputs.
IMPORTANTIf a device does not respond to separate ON or OFF signals from the remote control, the manufacturer has not provided that capabil-ity for the device.

Chapter 6. NetCommand Functions 79
NetCommand-Controlled RecordingThissectiondescribesmakingrecordingsindependentlyoftheTVGuideOnScreensystem.ForinstructionsonsettinguprecordingsusingTVGuideOnScreen,seetheseparateTV Guide On Screen® Interactive Program Guide User’s Manual.
Recording from the Recording Setup MenuYoucanscheduletherecordingtotakeplaceatalatertimeandprogramtherecordingdurationforaminimumof30minutesandamaximumofsixhours(in30-minuteincrements).Thedefaultisonehour.Duringtherecord-ing,youcanviewadifferentdeviceorpowerofftheTV.
Immediate Recording from the Menu
1. Press (RECORD)toopentheRecordingSetupmenu.
Figure 2. The Recording Setup menu
2. Reviewtherecordingsetupinformation.Movethehighlighttoeachboxyouneedtochange.
• Withtheleftmosticonhighlighted(thesource),press tochangethesourceinputifneeded.
• Channel. Ifthesourceisanantenna,selectamemorizedchannelusing , CH / ,orenterthechannelnumberfromtheremotecontrolandpressENTER.
• Record To.Ifyouhavemorethanonerecordabledeviceconnected,use toselectitfromthelistintheRecord Tobox.
• Duration.Use toselectarecordingdurationoffrom30minutestosixhoursin30-minuteincre-ments.Thedefaultisonehour.
3. Press asecondtimetostartrecording.
Time-Delayed Recording from the Menu
1. EnsurethatTVEnergyModeissettoFast Power On andtheTVclockissettothecorrecttimeandday.UsetheSetupmenutomakechanges.
2. Press (RECORD)toopentheRecordingSetupmenu.
3. Reviewtherecordingsetupinformation.Tochangethesource,recordingdevice,orduration,followthestepsdescribedaboveunder“RecordingNow.”
4. Specifywhentostarttherecording.• Start Time
a. Withthehourhighlightedingoldcharacters,press toselectthehour,includingAMorPM.PressENTERtomovethehighlighttotheminutes.
b. Withtheminuteshighlighted,press toselecttheminutes.
• Day.Use toselectadayoftheweek.
5. SelectAddandpressENTERtoaddtherecordingtotheRecordList.Aconfirmationmessagewillbedisplayedifyourselectionissuccessful.Ifyoupickoverlappingtimes,day(s),ordestinationdevices,youwillseeamessagestatingthereisaconflict.
6. WhiletheRecordingSetupmenuisdisplayed,pressGUIDEtodisplaytheRecordList(seefigure3).IntheRecordListyoucanviewalistofscheduledrecord-ingsandverifytheadditionoftherecordingtotheschedule.Amaximumof32recordingscanbescheduled.
7. FromtheRecordListyoucan:• PressCANCELtodeletearecordingfromtheschedule.• PressGUIDEtoreturntotheRecordingSetupmenu.• PressEXITtoreturntoTVviewing.• PressMENUtoreturntotheMainmenu.
Figure 3. Record List screen. From the Record menu, press GUIDE to open the Record List to review or cancel scheduled recordings.
TV Guide On Screen® and the Record ListProgramsscheduledthroughTVGuideOnScreendonotappearintheRecordList.RefertotheseparateTV Guide On Screen® Interactive Program Guide User’s Manual forinformationregardingschedulingrecordingswithTVGuideOnScreen.
IfthereisaconflictbetweenarecordingscheduledthroughTVGuideOnScreenandtheRecordList,theTVGuideOnScreenrecordingtakespriority.
Recording from the ChannelView™ Channel GuideChannelView™isavailablewhenTVGuideOnScreenisdisabled.ChannelViewprovidesprogramlistings,assentbythebroadcasters,formemorizedchannelsonANT 1 andANT 2.PresstheGUIDEkeywhilewatchingANT 1orANT 2toviewChannelViewlistingsandtosetupimme-diateorfuturerecordingsasdescribedhere.

80 Chapter 6. NetCommand Functions
Immediate Recording from ChannelView
1. PressINPUTtoopentheInputSelectionmenu.High-lightanANT 1orANT 2programsourceandpressENTER.
2. PressGUIDEtoopentheChannelViewchannelguideforthecurrentantennainput.
3. Use tohighlightthechannelandprogramyouwishtorecordfromthelistofchannels.
4. Press (RECORD).TheTVwilltunetothechannelifneeded.Ared“R”temporarilydisplaysnexttotheprogramlistingtoindicatetheprogramwillberecorded.
5. PressEXITtoreturntoTVviewing.
Figure 4. A red “R” appears briefly in the ChannelView screen to indicate a scheduled recording.
Time-Delayed Recording from ChannelViewSet Up the Recording
1. EnsurethatTVEnergyModeissettoFast Power On andtheTVclockissettothecorrecttimeandday.See“SetupMenu”inchapter3,“TVSetup.”
2. Performsteps1and2describedabove.
3 Press tohighlightthesourcechannelfromwhichyouwishtorecord.
4. Press toviewalistoffutureprogramsonthatchannel.
5. Press tohighlightafutureprogram.
6. Press (RECORD).Ared“R”temporarilydisplaysnexttotheprogramlistingtoindicatetheprogramwillberecorded.Youcanscheduleamaximumof32recordings.
7. PressEXITtoclosethemenu.
Confirm the Recording Setup
1. Press (RECORD)toopentheRecordmenu.
NetCommand-Controlled Recording, continued
2. PressGUIDEtoopentheRecordList(figure2)andviewallscheduledrecordings.PressCH / topagequicklythroughthelist.
3. Verifythattheprogramyouwishtorecordappearsinthelist.
4. PressEXITtoclosethemenu.
Cancelling Recordings
To Cancel a Recording in Progress
1. PressINPUTtoopentheInputSelectionmenu.
2. Movethehighlighttothesourceinputicon.ThereisnoneedtopressENTER.TheInputSelectionmenudisplaysaniconforanactiverecordingconnection.Seetheconnectioniconinfigure5.
3. PressCANCEL.Theconnectioniconwilldisappeartoindicateterminationoftherecordingconnection.
4. PressEXIT toreturntoTVviewing.
Connection Icon
Figure 5. The Input Selection menu displays an icon for the destination device of a recording in progress.
To Cancel a Scheduled Recording
1. Press (RECORD)toopentheRecordmenu.
2. PressGUIDEtoopentheRecordList(figure2)andviewallscheduledrecordings.PressCH / topagequicklythroughthelist.
3. HighlighttheprogramyouwishtoremovefromtheRecordListandpressCANCEL.
4. PressEXITtoclosethemenu.

Chapter 6. NetCommand Functions 81
Default Digital (Recording) DeviceIfyouhavemorethanonedigitalrecordingdevicecon-nected,thisoptionletsyouspecifywhichtouseasthedefault.Thedevicespecifiedhereisthedigitalrecord-ingdevicetousewheninitiatingarecordingwiththe (RECORD)keyfromwithinChannelView™.
Thisoptionremainsgrayedout(unavailable)untilyouconnectadigitalrecordingdevice.Afterthedeviceisdetectedandnamed,highlighttheboxandpress toselecttherecordingdevice.
Notethatdigitalprogramscanberecordedoneitheradigitaloranalogdevice.Forbestplaybackquality,however,recorddigitalprogramsonadigitalrecordingdevice.
Analog RecordingsWhenyourecorda16:9digitalchanneltoananalogVCRorrecordingdevice,thereisamismatchbetweenthe16:9ratioofthepictureshapefromthesourceandthenar-rower4:3ratiooftheanalogrecorder.
• ForanamorphicplaybackonthiswidescreenTV,choosetheanamorphicpicturedisplayandensure
IMPORTANT
When setting up analog recordings in TV Guide On Screen, set the destination record-ing device as the analog device connected to the TV’s MONITOR OUT VIDEO/LEFT/RIGHT jacks.
Record Menu: Setting Recording DefaultsTheRecordmenuallowsyoutosetdefaultsforyourrecordingdevices,setuprecordings,viewtheRecordList,andcancelscheduledrecordings.HighlighttheRecordiconontheMainmenutoviewtheRecordmenu.
Figure 6. Record menu
Record SetupHighlightRecord SetupandpressENTERtodisplaytheRecordingSetupmenu,describedearlier.
Record ListHighlightRecord ListandpressENTERtodisplaytheRecordList,describedearlierinthischapter.
Copy-Protected MaterialWhenattemptingtorecordcopy-protectedmaterial,therecordfunctionsoftheNetCommandandIEEE1394systemsmaybepreventedorstopped.IfyouhaveaprogramthatwasoriginallytaggedRecord Once, NetCommandwillchangethetagtoRecord No Moreonthenewrecording.
VCR Recording
Setting Up Analog VCR Recordings with TV Guide On Screen®WhensettinguparecordingusingTVGuideOnScreen,notethat:
• YoumustselectthedesiredrecordingdeviceintheTVGuideOnScreenRecordOptionsmenu.
Ifyouhavebothanaloganddigitalrecordingdevices,alwaysverifythattheanalogdeviceisthedefaultdevicebeforestartingananalogrecordingwiththe
(RECORD)key.
• Thedestinationrecordingdeviceforanalogrecord-ingsmustbetheanalogdeviceconnectedtotheTV’sMONITOR OUTjacks.
Restrictions for Traditional VCRs with NetCommand- and TV Guide On Screen-Controlled Recording
• YourVCRmustbeconnecteddirectlytotheMONITOR OUT VIDEOandLEFT/RIGHT outputs.
NetCommand-Controlled Recording, continued
thattheTVscreenformatissettostandard(seethesectiononTVformatsinthisOwner’sGuide).
• Forcroppedplaybackonanolderstyle4:3TV,choosethecroppeddisplaytoremovethetopandbottomsections.Thissettingdoesnotaffectrecordingfromanalogdevices,analogchannels,or4:3digitalchan-nels.

82 Chapter 6. NetCommand Functions
Direct VCR Recording from an Antenna or Cable SourceWhenyourVCRisthecurrentdevice, (RECORD)ontheTV’sremotecontrolfunctionsthesameastherecordbuttonontheVCR’sremotecontrolorfrontpanel.
Torecorddirectlyfromantennaorcable:
1. PressINPUTontheTV’sremotetodisplaytheInputSelectionmenu.HighlightthetraditionalVCRandpressPOWERtoturnontheVCR.Ifnecessary,pressGUIDEtoselecttheinputtheVCRison,suchasAntennainput(orlineinput).
2. PressENTERtoswitchtheTVtotheVCR.
3. SelectthecorrectchannelforrecordingontheVCRandthenpress (RECORD)tostartrecord-ing.Youwillneedtostoptherecordingmanuallyattheendoftheprogram
NetCommand-Controlled Recording, continued• TheVCRmustbesetmanuallyto“LineInput.”
DisplaytheInputSelectionmenu,highlighttheVCRandpressGUIDEtochangeVCRinputs.
• TheTVcanselectchannelsoncompatiblecableboxesforrecordingswhenthecableboxisunderNetCommandcontrol.Leavethecableboxturnedon.
• Ifthesourcedeviceorrecordingdevicedoesnothaveseparatepoweronandofffeatures,thenleavethatdevicepoweredon.
• YoucannotrecordfromsourcedevicesconnectedtotheTVCOMPONENTinputsorHDMI1or2con-nections.

Chapter 6. NetCommand Functions 83
Using IEEE 1394 Devices
IEEE 1394 Devices and the Input Selection MenuWhenyouconnectanIEEE1394devicetotheTVnetworkandpoweriton,thenewdeviceisautomaticallydetected.Somenon-audio/videoorincompatibleIEEE1394devices,suchaspersonalcomputers(PCs),maynotbedetectedbytheTVanddonotappearintheInputSelectionmenu.Suchdevicescan,however,coexistandarestillavailabletoworkwithotherdevicesontheIEEE1394networkthatarecompatiblewiththesenon-audio/videodevices.
Somedevicesmaybeacombinationoftwoormoretypesofdevices,suchasarecordingdevicethatisalsoatuningdevice.Eachportionofthedeviceiscalledasub-unit.WhenyouselectadeviceontheInputSelectionmenuthathassub-units,apop-upmenuwillappeartoallowyoutoselectthesub-unityouwishtouse.
Recording to IEEE 1394 Devices
YoucanusetheTVtocontrolrecordingtoIEEE1394devices.ThefollowingtableletsyouseewhatsignalscanberecordedtoanIEEE1394digitalVCRorA/Vdisc.
Recording Availability
Signal Type TV Input
Canberecorded
Digitalchannels,includ-inghigh-definitionchannels
ANT 1, ANT 2
Digitalsignals,includinghigh-definitionsignals
IEEE1394devices
Cannotberecorded
Analogchannels ANT 1, ANT 2
Analogsignals INPUT 1-3, COMPONENT inputs
Digitalsignals HDMI 1and2, PC-DVI
Summary of signal inputs and recording to an IEEE 1394 digital VCR or A/V disc.
Switching Between Analog and Digital IEEE 1394 OutputsToenableswitchingbetweenanaloganddigitaloutputs,youmusthavecheckmarkedtheAnalog ConnectionboxwhentheNew1394Devicescreendisplayedwhenyoufirstconnectedthedevice.Seechapter3,“TVSetup.”
Figure 7. The ClearThought Auto Input sensing screen for IEEE 1394 devices. Place a check in the Analog Connection box if your device has both analog and digital outputs.
1. PressINPUTtodisplaytheInputSelectionmenu.
2. HighlighttheiconfortheIEEE1394deviceandpressENTER.
3. Press toswitchbetweeniconsrepresentingtheanaloganddigitaloutputsofthedevice.Seefigure8.
Figure 8. The Input Selection menu shows icons for the analog and digital outputs of the IEEE 1394 device.
4. PressENTERagaintoselectthedevice.

84 Chapter 6. NetCommand Functions
The TV Remote Control and IEEE 1394 Devices
• Forcompatiblesatellitereceiversandsomecableboxes,theTVremotecontrolGUIDEkeydisplaystheon-screenprogrammingguideforthereceiverorcablebox.Press andENTERtonavigatethedis-playedprogramguide.
• Forsatellitereceivers,youmayalsobeabletousethenumbersorotheradditionalbuttons.
• ForanIEEE1394cableboxorsatellitereceiver,youcanalsotryusingtheCABLE/SATpositionoftheTVremotecontroltoseeifitcanoperatethedevice.Ifnot,usetheremotecontrolthatcamewiththedevice.
Operation of IEEE 1394 Devices with the TV’s Remote Control(slide switch set to TV position)
Device CABLE/SAT A/V DISC DVCR AMPLIFIERRemote Con-
trol Key
POWER Powerthedeviceon/offwhenhighlightedintheInputselectionmenu.Seetheinstructionsabove.
CH / Channelup/down Pageup/down(whentracklistisdisplayed)
Indexsearchforward/re-verse(ifsupportedbyDVCR)
VOL / VolumeUp/Down
MUTE MuteOn/Off
0-9 (DIGITS) Numberfunctions Searchbytime(whenfollowedby ENTER)
QV LastChannelRecall
EXIT Exitmenus/displays Exitmenus/displays Exitmenus/displays
ENTER Enterorselect Enterorselect Enterorselect
CANCEL Cancelfunction DeleterecordingfromTrackList Cancelfunctionorcounterreset
GUIDEDigital-channelguide(mayneedtopresstwice)
DisplayTrackList.
Up/down/left/right
Skiptobeginningofprogram Up/downintracklist SkipBackwards12seconds
duringplayback SkipForward30seconds
duringplayback
Up/down/left/right
PLAY Play Play
STOP Stop Stop
RECORD Record Record
REV ReversepicturescanorSlowPlay ReverseorRewind
FFWD FastpicturescanorFastPlay FastPlayorFastForward
PAUSE Pause Pause
To Power On or Off a Compatible IEEE 1394 DeviceUsually,compatibleIEEE1394devicespoweronwhenselectedintheInputSelectionmenuandpoweroffwhenyouturnofftheTV.Ifyouneedmanualcontroloverpoweron/off:
1. PressINPUTtoopentheInputSelectionmenu.
2. Movethehighlighttotheiconforthedevice.ThereisnoneedtopressENTER.
3. PressPOWER.
4. PressEXITtoreturntoTVviewing.

Chapter 6. NetCommand Functions 85
Copying A/V Disc RecordingsTracksyourecordtodiscmayhavecopyrestrictionsassignedtothem.Tolearnatrack’scopystatus,high-lightthetrackintheTrackListandpressINFO.Tracksareassignedoneoftheseratings:
Copy Free (ornostatusshown)
Nocopyrestrictionsapply.
Copy Never Thetrackcannotbetransferredtoanotherrecordingdevice.Tracksofthistypemayhaveanassignedretentionperiod.Seebelowformoreinformation.
TheTrackListmayalsodisplaycopystatusforatrack.Youmayseethefollowingstatusdisplays:
Copy Once Thetrackcanbecopiedonceonly.
Copy No More Ifaretentionvalueisshown,thetrackmaybemovableusingyourotherA/Vequipment.MitsubishiTVsdonotsupportthisfunction.
Retention Period
SomeCopy Nevertrackshavearetentionperiodassignedbythecontentprovider.Theretentionperiodisthelengthoftimeyoucankeepandviewtherecording.Theinitialretentionperiod,ifany,isshownnexttothecopystatusintheTrackListINFOdisplay.Tocheckhowmuchtimeremainsoftheretentionperiod,startviewingtherecordingandpressINFO.
Note: TheretentionperiodforalltracksonthediscexpiresifthereisanylossofpowertotheTV,evenmomentary.Forexample,expirationofthereten-tionperiodwilloccurifyou:
• UnplugtheTVfromtheACpowersource.• Experienceapoweroutageorpower
fluctuation.
RememberthatyoucansafelyturnoffTVpowerusingthePOWERbuttonwithoutaffectingthereten-tionperiod.
To Copy a Track to Another IEEE 1394 Device
1. PressINPUTontheremotecontrolandpress toselectthesourceA/Vdisc.PressENTERtoopentheTrackList.
2. Press or toselectatrack.ThenpressENTERtostartplayback.
3. Press (PAUSE)topauseplayback.
4. Press (RECORD)ontheTVremote.TheRecordmenuwilldisplay.
5. IntheRecord Tosection,reviewthedestinationdevice(A/VDisc,DVCR).Changeifnecessary.Ifmoving,leavetheothersettingsunchanged.
6. Press asecondtimetostartrecording.
A/V Disc Search by TimeWhileplayinganIEEE1394A/Vdiscyoucansearchtoaspecifictimeintherecording.
1. StartplayingthedesiredtrackontheA/Vdisc.
2. Usethenumberbuttonstoenterthetimecodeposi-tionofhoursfollowedbyminutes.Forexample,toenteronehourandtwenty-twominutes(1:22)intothetrack,enter1, 2, 2.
3. PressENTERtoskiptothetimecodeposition.Tocanceltherequestortostartover,pressCANCEL insteadofENTER.
A/V Discs
A/V Disc Track List ScreenWhenviewinganA/VDisc:
• PressGUIDEtodisplayitsTrackList(seefigurebelow).• Press or tonavigatethroughtheTrackList.• Toplayatrack,selectitonthelist,thenpressENTER.• PressINFOtoviewdetailsforahighlightedtrack,if
available.• Tomovethroughlistingsquickly,pressPAGE / .• Todeleteatrack,highlightitandpressCANCEL.
Figure 9. A/V Disc Track List screen

86 Chapter 6. NetCommand Functions86 Chapter 6. NetCommand Functions

Using the TV with a Personal ComputerSetup . . . . . . . . . . . . . . . . . . . . . . . . . . . . . . . . . . . . . . . . . . . 88Video Adjustments . . . . . . . . . . . . . . . . . . . . . . . . . . . . . . . . . . 88Connecting a Computer to the TV . . . . . . . . . . . . . . . . . . . . . . . 89Adjusting Image Resolution . . . . . . . . . . . . . . . . . . . . . . . . . . . . 91Computer Display Formats . . . . . . . . . . . . . . . . . . . . . . . . . . . . 92
7

88 Chapter 7. Using the TV with a Personal Computer
Setup1. SeetheTVspecificationsinAppendixBtoconfirm
thatyourcomputervideosignaliscompatiblewiththeTV.
2. Notewhetherthecomputersuppliesadigitaloranalogvideosignal.Youwillneedthisinformationduringthesetupprocedure.
• Digitalvideosignal:Comesfromthecomputer’sDVIorHDMIoutput.
• Analogvideosignal:Comesfromthecomputer’sVGA15-pinoutputandrequiresaVGA-to-DVIcableoraVGAcableandVGA/DVIadapter.
3. PowerontheTV.
IMPORTANT
In the next step, select the correct video signal type (analog or digital) in the NetCommand menu. Otherwise, the TV will be unable to display a picture from the computer.
4. PressMENUtoopentheMainmenu,highlighttheNetCommandicon,andpressENTER.
5. HighlightthePC-DVItextboxandpress tochangethesettingtomatchyourcomputer’svideosignaltype,eitherDigitalorAnalog.
Figure 1. Specify your computer’s video signal type (analog or digital) in the NetCommand menu.
6. PressEXITtocloseallmenus.
7. Connectthecomputer’svideooutputtotheTV’sPC-DVI jack.Seetheconnectiondiagramsinthischaptertofindthemethodbestsuitedtoyourequip-ment.
8. Connectthecomputer’saudiooutputusingoneoftheseoptions:• Connectanalogleft/rightaudiototheTV’s
PC-DVI AUDIOjack.• Ifyourcomputeroffersdigitalaudiooutput,
connectittoadigitalA/Vreceiverinstead.
IMPORTANTSeeAppendixBforsignalcompatibility.
Note
• ThePC-DVIinputontheTVcanaccepteitheranalog(DVI-A)ordigital(DVI-D)signals.
• YoumustspecifythePC DVI InputsettingintheNetCommandmenuaseitherAnalogorDigital, dependingonthesignaltypesentbyyourcomputer.
• Ifyourcomputeroffersdigitalaudiooutput,youcanconnectyourcomputer’sdigitalaudioouttoadigitalinputonadigitalA/Vreceiver.
Video Adjustments1. Poweronthecomputerifitisnotalreadyon.
2. SelectPCfromtheInputSelectionmenu.Todothis,pressINPUTtoopentheInputSelectionmenu,movethehighlighttothePCicon,andpressENTER.
3. Changetheresolutionofthecomputerimage.Thegoalistomaximizethecomputerresolutionwhilemaintainingasuitableaspectratiofortheimage.Seetheexplanationlaterinthischapter.
4. PerformTVvideoadjustments.PressVIDEOrepeat-edlytocyclethroughthevideo-adjustmentoptions.Thefollowingadditionaladjustmentsareavailableforcomputervideo:
Auto Position. PressENTERtoautomaticallycenterthepositionofthePCvideo.
HorizPosition(HorizontalPosition).ManuallyadjustthehorizontalpositionofthePC.ThisselectionoverridestheAuto Positionselection.
VertPosition(VerticalPosition).ManuallyadjusttheverticalpositionofthePC.ThisselectionoverridestheAuto Positionselection.
Fine Detail(analogDVI-Asignalsonly).ManuallyadjustthepicturequalityofthePC.ThisselectionoverridestheAuto Positionselection.
5. ChangetheTVpictureformattosuittheimage.PressFORMATtocyclethroughtheavailablepictureformats.SeethechartlaterinthischaptershowinghowvariouscomputerresolutionsaredisplayedontheTV.
To Remove the Computer Icon from the Input Selection MenuWhenyoudisconnectananalogvideoconnectionfromapersonalcomputer,thecomputericonremainsintheInputSelectionmenuuntilyouremoveit.
1. IntheNetCommandmenu,highlightthePC DVI Inputbox.
2. HighlightthePC DVI Inputboxandpress toselectDigital.
3. PressEXITtocloseallmenus.
ThenexttimeyouopentheInputSelectionmenu,thecomputericonwillnolongerappear.

Chapter 7. Using the TV with a Personal Computer 89
Computer with HDMI Digital Monitor OutputRequired:HDMI-to-DVIcableoranHDMIcablewithanHDMI/DVIadapter,stereoaudiocables
Ifthecomputer’saudiooutputisasingleminijack,aminiaudio-to-RCA-male“Y”adaptercableisalsorequired.
1. Connectthecomputer’sHDMIoutputtotheTV’sPC-DVIjack.UseeitheranHDMI-to-DVIcableoranHDMIcablewithanHDMI/DVIadapter.
2. Connecttheleft(white)andright(red)audiocablesfromthecomputer’sAUDIO OUT toPC-DVI AUDIOontheTVbackpanel.
TM
R
Figure 3. Connecting a personal computer with an HDMI monitor output
Connecting a Computer to the TV
Computer with DVI Digital Monitor OutputRequired:DVI-to-DVIcable,stereoaudiocables
Ifthecomputer’saudiooutputisasingleminijack,aminiaudio-to-RCA-male“Y”adaptercableisalsorequired.
1. ConnecttheDVI-to-DVIcablefromthecomputerDVI outputtothePC-DVIjackontheTVbackpanel.
2. Connecttheleft(white)andright(red)audiocables fromAUDIO OUTonthePCbackpaneltoPC-DVI AUDIOontheTVbackpanel.
TM
R
Figure 2. Connecting a personal computer with DVI Monitor Output

90 Chapter 7. Using the TV with a Personal Computer
Computer with VGA 15-Pin Monitor Output (Analog Video)Required:15-pincomputerVGA-to-DVIcableoraVGAcomputercableandaDVI/VGAadapter,stereoaudiocable.Ifthecomputer’saudiooutputisasingleminijack,aminiaudio-to-RCA-male“Y”adaptercableisalsorequired.
IMPORTANTTo use this connection, you must first select the Analog setting in the PC DVI box of the NetCommand menu. See the “Setup” section for more.
1. Connectthecomputer’sPC MONITOR OUTtoPC-DVIontheTVbackpanel.UseeitheraVGA-to-DVImonitorcableoraVGAcomputercablewithaVGA/DVIadapter.
2. Connecttheleft(white)andright(red)audiocablesfromthecomputer’sanalogaudioouputtoPC-DVI AUDIOontheTVbackpanel.
TM
R
Figure 4. Connecting a computer with a VGA 15-pin monitor output.
Connecting a Computer to the TV, continued

Chapter 7. Using the TV with a Personal Computer 91
Adjusting Image ResolutionYourMitsubishiTVcandisplayresolutionsfromstandardVGA(640x480)through1920x1080signalsatarefreshrateof60Hz.Notethat1280x1024and1920x1080signalsaresupportedonlyfordigitalcomputersignals.Theresolutionof1920x1080issupportedatrefreshratesof24,30,and60Hz.SeeAppendixBinthisbookformoreoncompatiblescreenresolutions.
Inmostcases,thecomputerwillselectthebestresolutionmatchtodisplayontheTV.Youcanoverridethissettingifyouwish.Theinstructionsbelowareforsettingthereso-lutiononmostpersonalcomputers.
1. InthePC’sStartmenu,selectSettings.
2. SelectControl Panel.
3. SelectDisplay.
4. ChoosetheSettingstab.
5. Changetheresolutiontothehighestresolutionwiththeaspectratiobestsuitedfortheimage.SeethetableonthenextpageshowingpossiblePCformats. Dependingonyourcomputer’soperatingsystem,adjusttheresolutionwitheither:
• theScreenareaslider.• theScreenResolutionslider
NOTE: WhenevertheTVispoweredon,thelampisinuse,eveniftheTVscreenappearsdark.AsareminderthattheTVispoweredonandthattimeisbeingaddedtothelamp’selapsedhours,setthecomputer’sscreensavertoapatternthatwilldisplayafterseveralminutesofinactivity.
Figure 5. Computer resolution, XGA selection
6. Tochangetherefreshrate,clickontheAdvanced button.
7. OntheMonitor tab,selectasettingfromtheScreen refresh ratedrop-downlist.Theresolutionof1920x1080issupportedat24,30,and60Hz;otherresolu-tionsaresupportedat60Hz.
Youmayneedtorestartthecomputerforthischangetotakeeffect.

92 Chapter 7. Using the TV with a Personal Computer92 Chapter 7. Using the TV with a Personal Computer
Computer Display Formats
RepeatedlypresstheFORMATkeytocyclethroughtheTVdisplaysavailableforyourcomputer’svideosignal.
Computer Signal As Displayed on TV Screen
Format 16 X 9 Standard 4 X 3 Standard
VGA
640X480
WVGA
848X480
SVGA
800X600
WSVGA
1064X600
Format Standard Zoom
XGA
1024X768
PC 720p
1280X720
WXGA
1365X768(DVI-Dsignalsonly)
Format Reduced Standard
SXGA
1280X1024(DVI-Dsignalsonly)
PC 1080p
1920X1080(DVI-Dsignalsonly)

AppendicesAppendix A: Bypassing the Parental Lock . . . . . . . . . . . . . . . . . . 95Appendix B: Specifications . . . . . . . . . . . . . . . . . . . . . . . . . . . . 97Appendix C: Lamp Cartridge Replacement . . . . . . . . . . . . . . . . . 99Appendix D: Programming the Remote Control . . . . . . . . . . . . . 101Appendix E: Troubleshooting . . . . . . . . . . . . . . . . . . . . . . . . . 111


Appendices 95
Bypassing the Parental LockAfteryousetthelock,youmustuseyourpasscodetoviewalockedprogram,viewthelockedTV,cancelthelock,orentertheParentalLockmenus.
Ifyouforgetyourpasscode,youcanviewthelockedTVwithoutenteringyourpasscode.Whenyouarepromptedforyourpasscode,pressthenumber9andQV buttonsontheTVremotecontrolatthesametime.ThisprocesstemporarilyunlockstheTV
WhenenteringtheParentalLockmenu,thisprocessdeletesyouroldpasscodeandpromptsyoutoenteranewpasscode.PressEXITtoexitthemenu.
Lock B
ypass In
struction
s Have B
een Filed fo
r Fu
ture R
eference
Deactivating the Front Button LockPressandholdtheMENUbuttonontheTVfrontpanelforovereightseconds.IftheTVisoff,thisactionturnsiton.
IMPORTANTCut along the dotted line and file bypass instructions in a safe place for future reference.
IMPORTANTWhen changing or deleting your pass code, you must use the remote control included with this TV. You cannot use a Mitsubishi remote control from another component or a “universal” remote.
Appendix A: Bypassing the Parental Lock

96 Appendices96 Appendices
This page intentionally left blank

Appendices 97 Appendices 97
Appendix B: Specifications
Inputs
Description Qty. Signal Type Input Specifications
Antenna/Cable input 2 RF Fconnector,75-ohm
HDMI (digital video/audio) 2 HDMIEIA-861Bstan-dardfordigitalaudioandvideo
HDMIstandardconnectorVideo: 60Hz:480i,480p,720p,1080i 24Hz,30Hz,60Hz:1080pAudio:PCMstereoNote:Notforusewithpersonalcomputers.
Video/S-Video(onefront,tworear)
3 NTSC480ionly Video: RCAPinPlug,1.0Vp-p,75ohmS-Video: Four-PinDINPlug Y:1.0Vp-p75-ohm C:0.286Vp-p(burstsignal),75-ohm
Component Video (Y/Pr/Pb)
WD-Y57WD-Y65
2 EIA-770.1&EIA770.2480i,480p,EIA770.3720pand1080i(videostandards)
RCAPinPlug(EIA-770.3StandardLevelsandTiming)Y: 1.0Vp-p(includessync),75-ohmPr: 700mVp-p,75-ohmPb: 700mVp-p,75-ohm
WD-57732WD-65732WD-73732
3
Audio Inputs
WD-Y57,WD-Y65 8pairs analogleftandrightaudio RCAPinPlug500mV(fullscale),43-kohmWD-57732,WD-65732,
WD-737329pairs
PC DVI-I Input 1 analoganddigitalvideo
VGA(640x480,60Hz)W-VGA(848x480,60Hz)SVGA(800x600,60Hz)W-SVGA(1064x600,60Hz)XGA(1024x768,60Hz)1280x720,60Hz
digitalvideoonly SXGA(1280x1024,60Hz)1920x1080(24Hz,30Hz,60Hz)WXGA(1360x768,60Hz)
Model Projection System Lamp
WD-Y57,WD-Y65WD-57732,WD-65732 DLP,0.65”chip,1920x1080pixelswithSmoothPicture™ 150-wattVIPtype
WD-73732 DLP,0.843”chip,1920x1080pixelswithSmoothPicture™ 180-wattVIPtype
Reception
Channel Frequency ReceptionOver-the-Air:VHF2–13,UHF14–69AnalogCable:1–125DigitalCable:1–135
Channel Type*
OvertheAir: AnalogNTSC,DigitalATSCwithsub-channels(all18videoformats)
Cable:AnalogNTSC(non-scrambled)DigitalQAM64and256withsub-channels(non-scrambled)
CableCARD™: Authorizedscrambledandnon-scrambleddigitalchannels
*NoteforDigitalChannels:Thechannelnumbersdisplayedonscreenaredeterminedbythebroadcasterorcablecompanyandcanvaryfromthestandardfrequencynumber.Ifthereisnochannel-numberinformationprovidedbythebroadcasterorcablecompany,theTVcreatesachannelnumber.Thecreatedchannelnumberusesthefrequencynumberasthemainchannelnumberandtheprogramnumberasthesub-channelnumber.WhenusinganauthorizedCableCARD,thechannelnumbersaredeterminedbythecablecompany.

98 Appendices98 Appendices
Appendix B: Specifications, continued
IEEE 1394 System Compatibility• ThistelevisionisdesignedtoconformtoIEEE1394AV/CSoftwarestandardsineffectatthetimeofdevelopment.
Thisnetworkingandcontroltechnologyisdesignedtoprovidehigh-performancedigitalconnectionsandproductcontrol,makingtheproducteasiertouse.
• MitsubishiD-VHSVCRsarefullycompatiblewiththisTVinaudio,video,andcontrol.• AsothermanufacturersdistributeproductsthatusetheIEEE1394AV/Cstandards,theywillberesponsiblefor
developingproductsthatmeetthestandardsofthetechnology,aswellascompatibilitytestingwithotherproducts.Mitsubishicannotberesponsiblefortheirefforts,andthereforecannotpromisecompatibilitywiththeseotherprod-ucts.Anycompatibilityproblemswithothermanufacturers’productsshouldbebroughttotheattentionofthosemanufacturers.
HDMITheHDMIinputiscompliantwithEIA-861Bstandardsforstandard,extended,andhigh-definitionvideo;digitalaudio,andHDCPcopyprotection.TheHDMIinputsonthisTVarenotintendedforusewithpersonalcomputersordevicesoutputtingvideosignalswithcomputerresolutions.
Outputs
Description Qty. Output Specifications
Video 1Video:RCAPinPlug1.0Vp-p,75-ohmSignalType:NTSC480ionly
Audio (Signal)2
pairsRCAPinPlug,500mVrms+200mV(fullscale)foranalogsources,1.5Vrms+0.5Vrms(fullscale)fordigitalsources.
Audio (Speakers) 2 5.5"x2.2"
Digital Interfaces
Digital Audio Output 1 RCAPinPlug,SignalType,DolbyDigital,PCM
IEEE 1394 (input/output)(2rear)
2 IEEE1394Four-Pin-TypeTerminal,S400
Physical Characteristics and Power Consumption
ModelDimensions (inches)
Weight Power ConsumptionHeight Width Depth
WD-Y57 363/16 511/2 1715/16 85.8lbs. 250w
WD-Y65 403/4 581/2 1913/16 99.0lbs. 250w
WD-57732 363/16 511/2 1715/16 85.8lbs. 255w
WD-65732 403/4 581/2 1913/16 99.0lbs. 255w
WD-73732 443/4 697/8 215/16 190.0lbs. 290w

Appendices 99 Appendices 99
CAUTIONBURN DANGER!
During normal operation, the surfaces inside the TV near the lamp are extremely hot.
TOUCH THE LAMP CARTRIDGE BY THE HANDLE ONLYDo not touch the glass parts of the lamp cartridge.
CAUTION: If the television is on, press POWER to turn it off. Unplug the television and allow it to cool for at least one hour before attempting to replace the lamp cartridge.
LampThelightsourceforthistelevisionisalamp,whichispartofalampcartridgeassembly.Thelifeofthelampcanvary,basedonthelampitself,theairtemperaturearoundtheTVwhileitisoperating,andyourviewingpatterns.Warmerairorpoorventilationshortenthelamplife,asdoesturningthetelevisiononandofffrequently.Mitsubishiwarrantsthelampforone(1)yearfromthedateoforiginalTVpurchaseatretail.
To Order a New Lamp
To Receive a Replacement Lamp Under WarrantyCall(800)553-7278.Pleasehavemodelnumber,serialnumber,andTVpurchasedateavailable.
Important:AlllampsreplacedunderwarrantymustbereturnedtoMitsubishiwheretheywillbeinspectedfordefectverification.
To Purchase a Replacement Lamp After WarrantyVisitourwebsiteatwww.mitsuparts.comorcall(800)553-7278.Orderanewlampbypartnumberasshownbelow.
TV Model Number Lamp Part Number
WD-Y57,WD-Y65,WD-57732,WD-65732
915P049010
WD-73732 915P049020
Appendix C: Lamp Cartridge Replacement
WARNING• Donotremovethelampcartridgeimmediatelyafterturningoffthetelevision.Youmaygetburnedbecausethe
lampisveryhot.Allowthetelevisiontocoolforatleastonehourbeforereplacingthelampcartridge.
• Donotremovethelampcartridgeexceptwhenreplacingit.Carelesstreatmentcanresultininjuryorfire.
• Donottouchthelampglasselement.Itmaybeveryhotandbreak,causinginjuriesorburns.
• Besurenottoinsertanymetalorflammableobjectintothelampcartridgeopening,asitmaycausefireorelectri-calshock.Ifaforeignobjectisinsertedintotheopening,unplugtheACcordoftheTVandcontactyourdealerforservice.
• Installthelampcartridgesecurely.Failuretodosomaycauseafire.
• Donottouchthelampglasselements.Oilsfromyourfingersmaycauseprematurelampfailure.
Hg =MERCURY
THELAMPINSIDETHISPRODUCTCONTAINSMERCURYANDMUSTBERECYCLEDORDISPOSEDOFACCORDINGTOLOCAL,STATEORFEDERALLAWS.Fordisposalorrecy-clinginformation,pleasecontactyourlocalauthoritiesortheElectronicIndustriesAllianceatwww.eiae.org

100 Appendices
Appendix C: Lamp Cartridge Replacement, continued
Figure 1.WARNING
THECOVERISPROVIDEDWITHANINTERLOCKTOREDUCETHERISKOFEXCESSIVEULTRAVIOLETRADIATION.DONOTDEFEATITSPURPOSEORATTEMPTTOSERVICETHETVWITHOUTREMOVINGTHECOVERCOMPLETELY.
Removing the Old Lamp Cartridge
1. TurnoffTVpowerandallowthelamptocoolforatleastonehourbeforeproceeding.
2. Afterthelamphascooled,removethecover.Refertofigure1.Usea#2(large)Phillipsscrewdrivertoremovethetwoscrewssecuringthecover.Keepthescrewsandcoverforre-installation
3. Withalargeflat-bladescrewdriver,loosenthetwoshinyscrewssecuringthelampcartridgeuntiltheydisengagefromthematingthreads.Thesearecaptivescrewsandcannotbeseparatedfromthelampcartridge.
4. Fullyopenupthebagsuppliedwiththereplacementlampandsettheopenedbagaside.
5. Gentlygraspthehandleofthelampcartridgeandpulltheoldcartridgestraightout.Seefigures1and2.
CAUTION: Donottiltorrotatethecartridge,assmallglassfragmentsmayfallout.
6. Withouttiltingorputtingdownthelampcartridge,insertitintotheopenedbag.Closethebagwhilebeingcarefulnottoletanyglassparticlesfallout.
Installing the New Lamp Cartridge
1. Donottouchtheglasspartsofthenewlampcar-tridge.InsertthenewcartridgeintotheTVusingthefollowingguidelines:
a. Refertofigures3and4andnotethelocationofthetopandbottomguidesinsidethelampcom-partmentandthecorrespondinggroovesonthetopandundersideofthelamp.
b. Holdthelampcartridgelevelwiththelampcom-partment,orientedasshowninfigure5.
c. Alignthegroovesonthecartridgewiththetopandbottomguidesinthelampcompartment.Seefigure5.
Handle
(step 5)
d. Carefullypushinthecartridgeuntilitisfullyseated.Ifthecartridgedoesnotslideinsmoothly,gentlywigglethehandlefromsidetosidewhilepushingin.
Figure 5
Guide in lamp compartment
2. Witheitheryourfingersorthescrewdriver,gentlytightenthetwoshinyscrews.Ifusingascrewdriver,useonlytwofingersforfinaltightening.AVOIDOVERTIGHTENING!
3. Replacetheplasticcoverandretainingscrews.
4. WASHYOURHANDSTHOROUGHLY,ASTHISLAMPCONTAINSMERCURY.
Disposal of the Old Lamp CartridgeLamp under warranty:Alllampsreplacedunderwar-rantymustbereturnedtoMitsubishi.UsethereturnshippinglabelprovidedandsendtoMitsubishiDigitalElectronics,America,1001CherryDrive,Suite2,Brasel-ton,GA30517.
IMPORTANT: Lamps found to be without defect will be returned and charged back to the sender.
Lamp no longer under warranty: ContactyourlocalauthoritiesortheElectronicIndustriesAllianceatwww.eiae.comforlamp-disposalorrecyclinginstructions.Donotdisposeoftheoldlampwithcommontrash.
Figure 3
Figure 2
Figure 4
Guides inside the lamp compartment
Grooves are on the top and underside of the lamp cartridge

Appendices 101
ThisappendixexplainshowtoprogramtheTV’sremotecontroltooperateotherA/Vdevices.ThisisdistinctfromNetCommand“Learning.”Tosummarize:theTV’sremotecontrolcanbemadetooperateotherdevicesbytwodif-ferentmethods:
• RemoteControlProgramming:youmustmovetheslideswitchtothepositionspecifictothetypeofdevice.
• NetCommand®“Learning”:youcanoperateotherdeviceswiththeslideswitchintheTVposi-tion.PositionIRemittersinfrontoftheotherdevicesand“teach”thedevices’IRsignalstotheTV.
Functions Available for Other A/V DevicesTheTV’sremotecontrolcanbeprogrammedtooperateothertypesandbrandsofA/Vproducts.Tousetheremotewhenprogrammed,set the slide switch to the position labelled for the product type.Thefunctionsperformedineachswitchpositioncanvarydependingontheproduct.Notallfunctionsworkforallmodels.Themostcommonfunctionsavailablearelistedonthispage.
IMPORTANTSome manufacturers may change their products or they may use more than one remote control system. The TV’s remote control may be unable to operate your A/V equipment in these cases.
Set the remote control’s slide switch to the type of device you wish to program or control.
VCRs and DVRs
• CH /• POWER• SLEEP• (FAST FORWARD)• (PAUSE)
• (PLAY)• (RECORD)• (REVERSE)• (STOP)• 0–9NumberButtons
MitsubishiVCRsarecompatiblewithsomeadditionalbuttons.
Cable Boxes and Satellite Receivers
• AUDIO• CANCEL(onsome
models)• CH /• ENTER(onsomemodels)• GUIDE(onsomemodels)• PG /• POWER• (onsome
models)• VIDEO
• 0–9NumberButtons(onsomemodels)
• F1–F4(A,B,C,Dkeysonsomemodels)
Therecord/playbackkeys(onsomemodels):• (FAST FORWARD)• (PAUSE)• (PLAY)• (RECORD)• (REVERSE)• (STOP)
A/V Receivers
• MUTE• POWER• SLEEP• VOLUME• 0–9NumberButtons
• DirectInputSelectionbuttons:numbers,FAVandQV(onsomeMitsubishimodels)
CD Players
(notallfunctionsforallmodels)
• SLEEP• (FAST FORWARD)• (PAUSE)• (PLAY)
• (REVERSE)• (STOP)• 0–9NumberButtons
DVD and Laser Disc Players
(notallfunctionsforallmodels)
• CANCEL(onsomemodels)
• CH / (fortrackskiponsomemodels)
• ENTER• MENU• POWER• SLEEP• (onsome
models)
• (FAST FORWARD)• (PAUSE)• (PLAY)• (RECORD)• (REVERSE)• (STOP)• 0-9NumberButtons(on
somemodels)
Appendix D: Programming the Remote Control

102 Appendices
IMPORTANTYou may need to reprogram the remote control after changing the batteries.
Programming the Remote Control
Method 1: Code Entry
1. Movetheslideswitchatthetopoftheremotetothepositionfortheproductyouwanttocontrol.Refertothetablebelow.Onlyoneofeachdevicetypecanbecontrolledineachslide-switchposition.
Switch Position Affected Device
CABLE/SAT CableBoxDTVReceiverSatelliteReceiver
VCR VCRDVRLaserDiscPlayerDVDPlayer/Recorder
DVD DVDPlayer/RecorderDVRLaserDiscPlayerVCR
AUDIO A/VReceiverAudioAmplifierCDPlayer*
2. PressandholdPOWERontheremotecontrolforseveralsecondsuntilthebuttonblinkstwiceandgoesoff.
3. ReleasethePOWERbutton.
4. Enterthefirstfive-digitcodelistedforyourequipment.
• ThePOWERbuttonblinkstwicewhenyoustarttoenterthecodeandthenonceforeachadditionalkeypress.
• ThePOWERbuttonblinkstwicewhenyoufinishenteringavalidcode.
• Movetheslideswitchtoanotherpositionifyouneedtostartoverorwishtoexitprogrammingmode.
5. PointtheremotecontrolattheequipmentandpressPOWER. Iftheproducthasnopoweron/offfunction,pressadifferentkey,suchas (PLAY), (STOP), VOL ,or MUTE.
• Iftheequipmentresponds,theremotecontrolisproperlyprogrammedtooperatetheequipment.
• Iftheequipmentdoesnotrespond,repeatsteps2–4withthenextfive-digitcodelistedforyourequipment.
6. Onceyouhavefoundthecorrectcode,writeitinthespacebelowforfuturereference.
Switch Position Device Type Code
CABLE/SAT
VCR
DVD
AUDIO
Method 2: Code SearchInthismethodofprogramming,youstepthroughtheremotecontrol’sinternalcodelibrarytofindthecorrectcodeforyourA/Vproduct.
1. Movetheslideswitchatthetopoftheremotecontroltothecorrectpositionfortheproduct.Seethetableunder“Method1.”
2. PressandholdPOWERontheremotecontrolforseveralsecondsuntilthebuttonblinkstwiceandgoesoff.
3. Presskeys9 9 1
4. Pressthenumber1, 2,or3dependingontheslide-switchpositionandthetablebelow.
Switch Position Number
CABLE/SAT 1
DVD, VCR 2
AUDIO 3
5. PressCH andPOWERrepeatedlyuntiltheproductrespondsbypoweringonoroff.YoucanpressCH tomovebackwardthroughthecodelibraryifneeded.
NOTE: Iftheproducthasnopoweron/offfunction,checkforaresponseusingadifferentfunction.Press
(PLAY), (STOP), VOL ,or MUTEandthenre-peatedlypress CH / tocheckforaresponse.
6. Whentheproductresponds,pressENTERtosetthecode.
Code VerificationTodeterminethecodeprogrammedforanypositionoftheslideswitch:
1. Movetheslideswitchtothepositionyouwishtoverify.
2. PressandholdPOWERontheremotecontrolforseveralsecondsuntilthebuttonblinkstwiceandgoesoff.
3. Presskeys9 9 0
4. Press1andcounttheblinksofthepowerbutton.Writedownthenumberofblinksasthefirstdigitofthecode.
5. Repeatstep4forthesecond,third,fourth,andfifthdigitsofthecode.
Appendix D: Programming the Remote Control

Appendices 103
Audio AmplifiersBrand CodeAcurus 30765Adcom 31100, 30577AltecLansing 31742Aragon 30765BelCantoDesign 31583Bose 30674Carver 30892Classe 31462,31461CurtisMathes 30300Durabrand 31561Elan 30647GE 30078Harman/Kardon 30892JVC 30331Klipsch 30765LeftCoast 30892Lenoxx 31561Lexicon 31802Logitech 31408Marantz 30892 MarkLevinson 31483McIntosh 30251Mondial 30765Optimus 30823, 30395, 30300Philips 30892Pioneer 30823, 30300, 30257, 30013 PolkAudio 30892RCA 30823, 30300Realistic 30395Sharp 30226Sony 30815Soundesign 30078Technics 30374,30372Toshiba 30353Victor 30331Wards 30078, 30013Yamaha 30354
A/V Receivers Brand CodeADC 30531Adcom 31617,31616Aiwa 31641,31405,31388,31347,
31321,31243,30189,30121Akai 31255Alco 31390AMC 31077AmplifierTechnologies 31584Anam 31609,31074ApexDigital 31774,31430,31257Arcam 31189AtlanticTechnology 31487Audiophase 31387
Audio Lock: Universal A/V Receiver ControlWithAudioLockactive,theremotecontroloperatesthevolumeandmutefunctionsoftheA/Vreceiverinallpositionsoftheslideswitch.ActivateAudioLockifyounormallyuseanA/VreceiverwithyourTVandotherA/Vequipment.
1. ProgramtheAUDIOpositionforyourA/Vreceiverasdescribedearlierinthissection.
2. MovetheslideswitchtotheAUDIOposition.
3. PressandholdPOWERontheremotecontrolforseveralsecondsuntilthebuttonblinkstwiceandgoesoff.
4. Presskeys9 9 3 ENTER
ThePOWERbuttonwillblinktwicetoindicateAudioLockisactive.
To Reset the Remote Control to Operate Volume and Mute for the TV Speakers
1. PressandholdPOWERforseveralsecondsuntilthebuttonblinkstwiceandgoesoff.
2. Presskeys9 9 3 VOL .
ThePOWERbuttonwillblinkfourtimestoindicateAudioLockhascleared.
Programming Codes
Appendix D: Programming the Remote Control

104 Appendices
A/V Receivers Brand CodeAudiotronic 31189Audiovox 31627,31390B&K 30840,30820,30701BelCantoDesign 31584BK 30702Bose 31253,31229,30639Brix 31602CambridgeSoundworks 31477Capetronic 30531Carver 31289, 31189, 30189, 30121Coby 31263Curtis 30797Delphi 31414Denon 31360,31311,31142,30121,Fisher 31801,31409Fosgate 31487GloryHorse 31263GPX 31299Harman/Kardon 31306,31304,31289,30891,
30189, 30110Hitachi 31801, 31273Integra 31320, 31298, 30135JBL 31306,30110JVC 31811,31643,31495,31374,
31282,31263,31058Kenwood 31570,31569,31313KLH 31428,31390Koss 31497,31366Linn 30189LiquidVideo 31497Magnavox 31514,31269,31189,30531,
30189Marantz 31289,31269,31189,30200,
30189, McIntosh 31289Micromega 31189Mitsubishi 31957, 31922, 31921, 31920,
31393,30176Myryad 31189Nakamichi 31555, 31313, 30097Onkyo 31320,31298,30842,30135Optimus 31074,31023,30849,30797,
30670,30531Oritron 31497,31366Outlaw 31487Panasonic 31764,31763,31633,31548,
31518,31509,31363,31350,31316,31308,31288,30309
Philips 31368,31365,31283,31269,31268,31266,31189,30189
Pioneer 31384,31343,31023,30630,30531,30150,30014
PolkAudio 31414,31289,30189Proscan 31254RadioShack 31263
A/V Receivers Brand CodeRCA 31609,31511,31390,31254,
31074,31023,30531Rio 31869Samsung 31500, 31295Sansui 31189, 30189Sanyo 31801Sharp 31386,31361SharperImage 31416,31411,31410,31409,
31385,31263,30797Sherwood 31077Sirius 31811,31627,31602SonicBlue 31869Sony 31858,31759,31758,31658,
31622,31558,31529,31503,31458,31441,31406,31382,31371,31367,31258,31131,31058
Soundesign 30670Stereophonics 31023Sunfire 31313Sylvania 30797Teac 31528,31390,31267,31074Technics 31633,31518,31308,30309Thorens 31189Toshiba 30135Venturer 31390,30849Wards 30189,30014XM 31414,31406Yamaha 31375,31331,31276,31176,
30176
CD PlayersBrand CodeAiwa 30157Akai 30156Arcam 30157Audio-Technica 30170Burmester 30420CaliforniaAudioLabs 30303, 30029Carver 30437,30299,30179,30157Classic 31297Denon 30873,30034,30003DKK 30000DMXElectronics 30157Emerson 30305Fisher 31325,30179,30174Garrard 30420,30393Gemini 30625Genexxa 30305, 30032GPX 31296Harman/Kardon 31202, 30173, 30157, 30083Hitachi 30032Integra 30101
Programming Codes, continued
Appendix D: Programming the Remote Control

Appendices 105
Cable BoxesBrand CodeABC 10017,10014,10013,10011,
10008, 10007, 10003, 10001Allegro 10315, 10153Americast 10899Antronix 10207, 10022Archer 10797, 10207, 10153, 10022BBT 10267Belcor 10056Bell&Howell 10014BellSouth 10899CableStar 10056Cabletenna 10022Cableview 10022Century 10153Citizen 10315, 10153Clearmaster 10883ClearMax 10883ColourVoice 10031, 10025Comtronics 10040Contec 10019Coolmax 10883Digeo 11187Digi 10637Director 10476Dumont 10637Eastern 10002Emerson 10797Everquest 10040,10015Focus 10400Garrard 10153GCElectronics 10207,10056Gemini 10797, 10015GeneralInstrument 10810,10476,10276,10011,
10003GoldStar 10144,10040Goodmind 10797
CD PlayersBrand CodeTAGMcLaren 30157Tascam 30420TDK 31208Teac 30420,30393,30378,30180,
30174Technics 30303, 30029TivoliAudio 31553Toshiba 30299, 30019Victor 30072Wards 30157, 30053Yamaha 31292,30888,30490,30261,
30187,30170,30036,YBA 30625Yorx 30461
CD PlayersBrand CodeJVC 31294,30072Kenwood 30826,30681,30626,30190,
30037, 30028, KLH 31711, 31373, 31372, 31318Koss 31317Krell 30157LG 31208Linn 30157LXI 30305Magnavox 30305, 30157, 30038Marantz 30626,30435,30180,30157,
30038, 30029MarkLevinson 31484McIntosh 30660,30290,30256MCS 30029MGA 30083Miro 30000Mission 30157Mitsubishi 30098, 30083MTC 30625,30420NAD 30299, 30019Nikko 30625,30174,30170NSM 30157Onkyo 31327,30868,30102,30101Optimus 31075,31063,30468,30437,
30420,30305,30179,30145,30087, 30037, 30032, 30000
Panasonic 30752, 30388, 30303, 30029Parasound 30420Philips 30626,30274,30157Pioneer 31087,31063,31062,30551,
30468,30305,30032PolkAudio 30157Proceed 30420Proton 30157QED 30157Quad 30157Quasar 30029RadioShack 31075RCA 31062,30764,30468,30420,
30305, 30179, 30053, 30032Realistic 30420,30180,30179Rotel 30420,30157SAE 30157Sansui 30305, 30157Sanyo 30179, 30087Scott 30305Sears 30305Sharp 30861,30265,30180,30037Sherwood 31067,30180SonicFrontiers 30157Sony 31364,30673,30605,30604,
30490,30185,30100,30000Soundesign 30145Sugden 30157Symphonic 30305
Programming Codes, continued
Appendix D: Programming the Remote Control

106 Appendices
DVD Players/RecordersBrand CodeAdcom 21094Aiwa 20641Akai 21089, 20770 Alco 20790Allegro 20869AmphionMediaWorks 20872AMW 20872ApexDigital 21100,21061,21056,21020,
21004,20797,20796,20794,20755,20717,20672
AspireDigital 21407,21168Audiologic 20736Audiovox 21072,21041,20790Axion 21072B&K 20662,20655BelCantoDesign 21571Blaupunkt 20717BlueParade 20571Broksonic 20695CaliforniaAudioLabs 20490CAVS 21057Cinea 20831CineVision 20876,20869,20833Citizen 21277Coby 21351,21177,21165,21107,
21086,20852,20778Craig 20831
Cable BoxesBrand CodeHamlin 10273,10259,10034,10020,
10009Hitachi 10011Hytex 10007i3Micro 11602Jasco 10315, 10153, 10015Jerrold 10810,10476,10276,10024,
10015,10014,10012,10011,10003
Linsay 10440Magnavox 10027Memorex 10000Motorola 11376,11254,11187,11106,
10810,10476,10276,10014MovieTime 10156,10063Multitech 10883Myrio 11602Novaplex 10618NSC 10156,10063Oak 10019, 10007Optimus 10021Pace 11877, 10237, 10008Panasonic 10107, 10021, 10000Panther 10637Paragon 10000Philips 11305, 10317, 10153, 10031,
10027, 10025Pioneer 11877,10877,10533,10144,
10023PopularMechanics 10400Pulsar 10000Quasar 10000RadioShack 10883, 10797, 10315, 10015RCA 11256,10021Realistic 10207Recoton 10400Regal 10279, 10273, 10259, 10020Regency 10002Rembrandt 10011Runco 10000Samsung 10144,10040ScientificAtlanta 11877,10877,10477,10017,
10008, Seam 10510Sejin 11602Signal 10040,10015Signature 10011SLMarx 10040Sony 11006Sprucer 10021Starcom 10015, 10003Stargate 10797,10040,10015Starquest 10015StarSight 10422Supercable 10276Supermax 10883Sylvania 10001
Cable BoxesBrand CodeTandy 10258TeleCaption 10221Teleview 10040Texscan 10001TFC 10310Thomson 11256Timeless 10418,10040Tocom 10013, 10012Torx 10003Toshiba 10000Tristar 10883Tusa 10015TV86 10063Unika 10207, 10153, 10022UnitedArtists 10007Universal 10207,10191,10153,10056,
10022,V2 10883Viewmaster 10883Viewstar 10258,10063,10027Vision 10883VortexView 10883Zenith 10899,10525,10054,10000Zentek 10400
Programming Codes, continued
Appendix D: Programming the Remote Control

Appendices 107
DVD Players/RecordersBrand CodeMemorex 21270,20831,20695Microsoft 20522Mintek 20839, 20717Mitsubishi 21521, 20521Momitsu 21082Myryad 20894NAD 20741,20692,20591Nakamichi 21222NEC 20785Nesa 20717NextBase 20826NexxTech 21402Norcent 21265,21107,21003,20872Onkyo 20792,20627,20503OptoMediaElectronics 20896Oritron 20651Panasonic 21762,20703,20632,20503,
20490Philips 21354,21267,20675,20646,
20539, 20503, PianoDisc 21024Pioneer 21571,20632,20631,20571,
20525Polaroid 21086,21061,21020PolkAudio 20539Portland 20770Princeton 20674Proceed 20672Proscan 20522ProVision 20778Qwestar 20651RCA 20822, 20790, 20717, 20571,
20522Rio 20869RJTech 21360Rotel 21178,20623Rowa 20823Sampo 20752,20698Samsung 21075,21044,20820,20744,
20573,20490Sansui 20695Sanyo 20873,20695,20670SensoryScience 21158Sharp 21256,20752,20675,20630SharperImage 21117Sherwood 21077,21043,20770,20633Shinsonic 20839, 20533SigmaDesigns 20674SonicBlue 21099,20869Sony 21533,21431,21033,20864,
20533Sungale 21074SVA 21105,20860Sylvania 21268,20675Symphonic 21268,20675TAGMcLaren 20894Teac 20809, 20790Technics 20703,20490Technosonic 20730
DVD Players/RecordersBrand CodeCurtisMathes 21087CyberHome 21129,21117,21024,21023,
20874,20816Daewoo 21242,21234,21172,21169,
20869,20833,20784,20705Daytek 20872Denon 20634,20490Desay 21407Disney 21270,20675Dual 21085,21068Durabrand 21127DVD2000 20521Emerson 21268,20675,20591Enterprise 20591Fisher 20670Funai 21334,21268,20675Gateway 21158, 21077, 21073GE 20815, 20717, 20522GoVideo 21730,21304,21158,21144,
21099,21075,21044,20869,20833,20783,20744,20741,20715
GoVision 21072GoldStar 20741GPX 20769,20699Gradiente 20490Greenhill 20717Grundig 20539Harman/Kardon 20702, 20582Hitachi 20664,20573Hiteker 20672iLo 21348Initial 20717Integra 20627,20571Jaton 21078JBL 20702JSI 21423JVC 21275,21164,20867,20623,
20558jWin 21051,21049Kawasaki 20790Kenwood 20737,20682,20534,20490KLH 21149,21020,20790,20717Konka 20721, 20711Koss 21423,20896,20651Landel 20826Lasonic 21173, 20798Lecson 21533Lenoxx 21127LG 20869,20801,20741,20591LiteOn 21440,21416,21158,21058Loewe 20511Magnavox 20675,20646,20539,20503Malata 21159, 20782Marantz 20539McIntosh 21533, 21273
Programming Codes, continued
Appendix D: Programming the Remote Control

108 Appendices
Laser Disc PlayersBrand CodeAiwa 20203Carver 20323,20194,20064Denon 20243,20241,20172,20059DiscoVision 20023Funai 20203Harman/Kardon 20194Hitachi 20023Kenwood 20258Magnavox 20243,20241,20217,20194Marantz 20194,20064Mitsubishi 20059NAD 20059Optimus 20059Panasonic 20204Philips 20194,20064Pioneer 20059, 20023PolkAudio 20194Quasar 20204Realistic 20203Samsung 20323Sega 20023Sony 20270, 20201, 20193Technics 20204ThetaDigital 20194Yamaha 20451,20217
DVD Players/RecordersBrand CodeTechwood 20692Terapin 21031ThetaDigital 20571Toshiba 21154,20695,20503Tredex 20804,20803,20800,20799UrbanConcepts 20503USLogic 20839Venturer 20790Vizio 21226,21064Vocopro 21027Xbox 20522Xwave 21001Yamaha 20545,20539,20490Yamakawa 20872Zenith 20869,20741,20591,20503Zoece 21265
Satellite ReceiversBrand CodeDirecTV 11856,11749,11640,11639,
11609,11444,11443,11442,11414,11392,11377,11142,11109,11108,11076,10819,10749,10724,10639,10566,10392,10247,10099
DishNetworkSystem 11775, 11505, 11170, 11005, 10775,
Dishpro 11775, 11505, 11005, 10775Echostar 11775, 11505, 11170, 11005,
10775Expressvu 11775, 10775GE 10566,10392GeneralInstrument 10869GOI 11775, 10775Goodmans 11246Hisense 11535Hitachi 11250, 10819HTS 11775, 10775HughesNetworkSystems
11749,11444,11443,11442,11142,10749
iLo 11535Jerrold 10869JVC 11775, 11170, 10775LG 11414,11226Magnavox 10724,10722Memorex 10724Mitsubishi 10749Motorola 10869,10856NEC 11270NextLevel 10869Panasonic 10701,10247Paysat 10724Philips 11749,11442,11142,11076,
10819,10749,10724,10722,10099
Pioneer 11442Proscan 10566,10392Proton 11535RadioShack 10869RCA 11392,10855,10566,10392,
10143,Samsung 11609,11442,11377,11276,
11142,11109,11108Sanyo 11219Sony 11640,11639,10639StarChoice 10869Tivo 11444,11443,11442,11142Toshiba 11749,11285,10819,10790,
10749UltimateTV 11640,11392Uniden 10724,10722USDigital 11535USDTV 11535Voom 10869Zenith 11856
Programming Codes, continued
Satellite ReceiversBrand CodeAlphaStar 10772Chaparral 10216Crossdigital 11109
Appendix D: Programming the Remote Control

Appendices 109
VCRs and DVRsBrand CodeHarman/Kardon 20081, 20075, 20038Harwood 20072,20068Headquarter 20046HewlettPackard 21972HI-Q 20047Hitachi 20105,20089,20042,20041,
20000HowardComputers 21972HP 21972HughesNetworkSystems 20739,20042Humax 20739Hush 21972iBUYPOWER 21972Jensen 20041JVC 21162,20067,20041,20008KEC 20278, 20037Kenwood 20067,20041,20038KLH 20072Kodak 20037, 20035LG 21037Linksys 21972Lloyd’s 20208, 20000Logik 20072LXI 20037Magnasonic 20593Magnavox 20593,20563,20149,20110,
20081, 20039, 20035, 20000Magnin 20240Marantz 20081, 20035Marta 20037Matsushita 21162,20162,20035MediaCenterPC 21972MEI 20035Memorex 21262,21162,21037,20479,
20307,20240,20209,20162,20104,20048,20047,20046,20039, 20037, 20035, 20000
MGA 20240,20061,20043MGNTechnology 20240Microsoft 21972Mind 21972Minolta 20105,20042Mitsubishi 20443,20242,20214,20173,
20075,20067,20061,20043Motorola 20048,20035MTC 20240,20000Multitech 20072, 20000NEC 20104,20067,20041,20040,
20038Nikko 20037Nikon 20034NiveusMedia 21972Noblex 20240Northgate 21972Olympus 20035Onkyo 20222Optimus 21262,21162,21062,21048,
20593,20432,20162,20104,20048,20037
VCRs and DVRsBrand CodeABS 21972Admiral 20479,20209,20048Adventura 20000Aiko 20278Aiwa 20307,20124,20037,20000Akai 20242,20175,20106,20061,
20041Alienware 21972AmericaAction 20278AmericanHigh 20035Asha 20240Audiovox 20278, 20037Beaumark 20240Bell&Howell 20104Broksonic 20479,20295,20209,20184,
20121, 20002Calix 20037Canon 20035Capehart 20020Carver 20081CCE 20278, 20072Citizen 20278, 20037Colt 20072Craig 20271,20240,20072,20047,
20037CurtisMathes 20760,20162,20060,20041,
20035Cybernex 20240CyberPower 21972Daewoo 20637,20561,20278,20045,
20020Daytron 20020Dell 21972Denon 20042DirecTV 20739Durabrand 20039, 20038Dynatech 20000Electrohome 20043,20037Electrophonic 20037Emerex 20032Emerson 21593,20637,20593,20561,
20479,20295,20278,20212,20209,20208,20184,20121,20068,20061,20043,20037,20036,20002,20000
Fisher 20104,20066,20054,20047Fuji 20035, 20033Funai 21593, 20593, 20000Garrard 20000Gateway 21972GE 20761,20760,20240,20202,
20060,20035GoVideo 20643,20526,20432,20240GoldStar 20038, 20037Gradiente 20000HarleyDavidson 20000
Programming Codes, continued
Appendix D: Programming the Remote Control

110 Appendices
VCRs and DVRsBrand CodeOptonica 20062Orion 20479,20295,20209,20184,
20002Panasonic 21262,21162,21062,20616,
20225,20162,20077,20035Penney 20240,20054,20042,20040,
20038, 20037, 20035Pentax 20105,20042Philco 20035Philips 21181,21081,20739,20618,
20110,20081,20062,20035Pilot 20037Pioneer 20067PolkAudio 20081Portland 20020Profitronic 20240Proscan 20761,20760,20202,20060Protec 20072Pulsar 20039Quarter 20046Quartz 20046Quasar 21162,20162,20077,20035RadioShack 21037, 20000Radix 20037Randex 20037RCA 20880,20761,20760,20240,
20202,20149,20106,20105,20077,20060,20042
Realistic 20104,20066,20062,20048,20047,20046,20037,20035,20000
ReplayTV 20616,20614Ricavision 21972Ricoh 20034Runco 20039Salora 20075Samsung 20739,20240,20045Samtron 20643Sanky 20048,20039Sansui 20479,20271,20209,20067,
20041,20000Sanyo 20240,20159,20104,20047,
20046Scott 20212,20210,20184,20121,
20045,20043Sears 20105,20104,20066,20054,
20047,20046,20042,20037,20035, 20000
Sharp 20848,20062,20048Shintom 20072Shogun 20240Singer 20072SonicBlue 20616,20614Sony 21972,21032,20636,20035,
20034,20033,20032,20000Stack9 21972
VCRs and DVRsBrand CodeSTS 20042Sylvania 21593, 20593, 20110, 20081,
20043,20035,20000Symphonic 21593, 20593, 20000Systemax 21972TagarSystems 21972Tatung 20041Teac 20041,20000Technics 20162,20035Teknika 20037, 20035, 20000Thomas 20000Tivo 21503,20739,20636,20618TMK 20240,20208,20036Toshiba 21972, 21503, 21008, 20212,
20210,20209,20066,20045,20043
Totevision 20240,20037Touch 21972Unitech 20240Vector 20045VectorResearch 20040,20038VideoConcepts 20061,20045,20040Videomagic 20037Videosonic 20240Viewsonic 21972Villain 20000Voodoo 21972Wards 20760,20240,20212,20149,
20081,20072,20062,20060,20048,20047,20042,20035,20000
WhiteWestinghouse 20637,20209,20072XR-1000 20072, 20035, 20000Yamaha 20038Zenith 21139,20637,20479,20209,
20039,20034,20033,20000ZTGroup 21972
Programming Codes, continued
Appendix D: Programming the Remote Control

Appendices 111
Service and Support
ServiceIfyouareunabletocorrectaproblemwithyourTV,consultyourMitsubishidealeroraMitsubishiConsumerRelationsat(800)332-2119.
• DONOTadjustanycontrolsotherthanthosedescribedinthisOwner’sGuide.
• DONOTremovetheprotectivebackcoverofyourTV.
Support
• Toorderreplacementoradditionalremotecontrols,lampcartridges,orOwner’sGuides,visitourwebsiteatwww.mitsuparts.comorcall(800)553-7278.
• Forquestions:
CallConsumerRelationsat800-332-2119.
E-mail:[email protected]
Website:www.mitsubishi-tv.com
Important
AlllampsreplacedunderwarrantymustbereturnedtoMitsubishiwheretheywillbeinspectedfordefectverifica-tion.
System Reset Button
IftheTVdoesnotrespondtotheremotecontrol,frontpanelcontrols,orwillnotpoweron/off,presstheSYSTEM RESETbuttononthefrontpanelwithapointedobject,suchasthepointofapencilorendtipofapaperclip.
ThegreenLEDwillflashquicklyforaboutoneminute.WhenthegreenLEDstopsflashing,youmayturnontheTV.Thechangesyoumademostrecently,beforeusingSYSTEM RESET,maybelost.Changesyoumadepreviously,however,arenotlost.
TV Reset Menu
1. SelectanydevicefromtheInputSelectionmenu.
2. PressMENUfollowedby1 2 3toopentheResetServiceMenu.CAUTION:AllsettingsexceptV-Chipwillberesettotheoriginalfactorydefaults
Read on-screen warnings before proceed-ing, as some user data or settings may be erased.3. PressENTERtoresetTVdefaults.
Appendix E: Troubleshooting
Demo ModeThisTVhasademomodeforuseinretailstores.Toturnoffdemomode:
1. PressMENU.2. WhentheMainmenuappearswithSetuphighlighted,
pressENTER.3. WhentheSetupmenuopens,press tohighlightthe
on-screenDemo Mode Offbutton.4. PressENTER.

112 Appendices112 Appendices
Appendix E: Troubleshooting, continued
TV Channels
Symptom Remarks
1. TheTVtakesseveralsecondstorespondtochannelchanges.
• Itisnormalfordigitalchannelstotakelongertotunein.• PressENTERafterachannelnumbertoavoiddelays.• Usea4-digitnumberforanover-the-airdigitalchannel.• Usea6-digitnumberfordigitalcablechannelsifyourcable
serviceisabletorecognize6-digitchannelnumbers.
2. Youcannotaccessachannel. • UsenumberkeysinsteadofCH / .• Besurethechannelyouwanttoviewisinmemory.See
“ChannelMenu”inchapter5,“TVMenuSettings.”• CheckthattheTVisturnedtothecorrectdeviceorantenna
forthatchannelbypressingtheINPUTbutton.• MakesuretheParentalLockisoff.• Ifyoucannottunetoavirtualdigitalchanneleventhoughthe
TVhasalreadymemorizeddigitalchannels,tunetotheactualchannelnumberusedbythebroadcaster.Thevirtualchannelwillthenbeautomaticallyaddedtomemory.
3. Nameoptionsarenotavailableforsomechannels.
Onlymemorizedanalogchannelscanbenamed.
4. WhenChannelView™listisdisplayed,infor-mationappearsincomplete
Availableinformationissentfromthebroadcasterorcablepro-vider.Nootherdataisavailable.
General TV Operation
Symptom Remarks
1. AfanisrunningevenwhiletheTVispoweredoff.
NormalTVoperation.WhentheTVisoff,internalcomponentscontinuetodrawpowerandmustbecooledbythefan.
2. TheTVremotecontroldoesnotwork. • Checkthatthebatteriesareinstalledcorrectly.• CheckthattheslideswitchissettoTV.• Benomorethan20feetfromtheTVwhenusingtheremotecontrol.• ProgramtheremotecontroltooperatetheTVorotherdevice.
3. TVdoesnotrespondtotheremotecontrolortofrontpanelcontrolandTVwillnotpoweronoroff.
UsetheSystemResetbutton.
4. WhenadeviceisselectedfromtheInputSelectionmenu,thescreenisblue(nosignalsource).
• Makesuretheselecteddeviceisturnedon.• BeginplayoftheVCR.
5. DevicesaregrayedoutintheInputSelec-tionmenuortheSplitScreenInputSelectionmenu.
• Arecordingisinprogress.Canceltherecordingtoselectthedevice.
• PCsand1080psourcescannotdisplayintheSplitScreensub-picture.
6. YouhaveforgottenyourParentalLockpasscode. SeeAppendixA,BypassingtheParentalLock.
7. Ratingrestrictionsarenotworking. OpentheParentalLockmenuand:• VerifythattheU.S.RatingsorOtherRatingssettingisOn.• ChecktheLockTime/UnlockTimetocheckifratingrestric-
tionsaredisabled.• RatingrestrictionsapplyonlytocontentonANT1andANT2,
INPUT1–3,andIEEE1394inputs.
8. On-screendisplaysappeareachtimeyouchangeafunction.
NormalTVoperation.
9. CableproviderneedsinformationtostartCableCARD™service.
Ontheremotecontrol,pressMENUandthenenterthenumbers999todisplaytheHostIDandCableCARD™IDinformation.
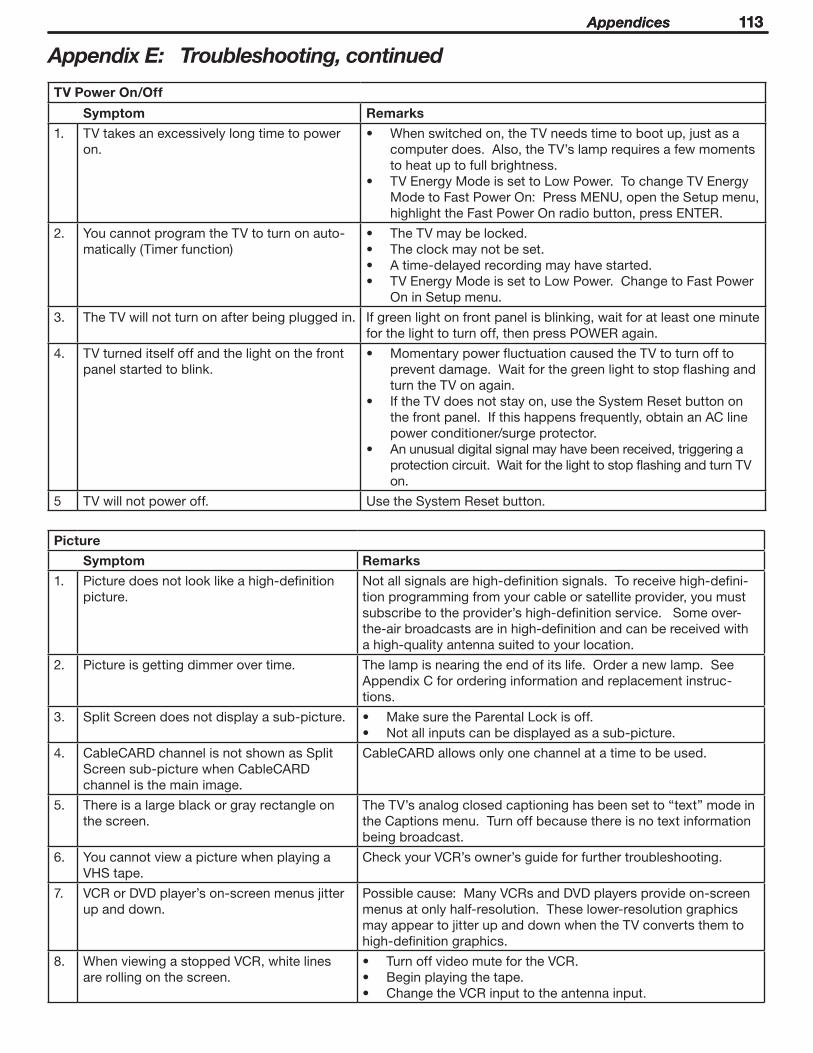
Appendices 113 Appendices 113
Picture
Symptom Remarks
1. Picturedoesnotlooklikeahigh-definitionpicture.
Notallsignalsarehigh-definitionsignals.Toreceivehigh-defini-tionprogrammingfromyourcableorsatelliteprovider,youmustsubscribetotheprovider’shigh-definitionservice.Someover-the-airbroadcastsareinhigh-definitionandcanbereceivedwithahigh-qualityantennasuitedtoyourlocation.
2. Pictureisgettingdimmerovertime. Thelampisnearingtheendofitslife.Orderanewlamp.SeeAppendixCfororderinginformationandreplacementinstruc-tions.
3. SplitScreendoesnotdisplayasub-picture. • MakesuretheParentalLockisoff.• Notallinputscanbedisplayedasasub-picture.
4. CableCARDchannelisnotshownasSplitScreensub-picturewhenCableCARDchannelisthemainimage.
CableCARDallowsonlyonechannelatatimetobeused.
5. Thereisalargeblackorgrayrectangleonthescreen.
TheTV’sanalogclosedcaptioninghasbeensetto“text”modeintheCaptionsmenu.Turnoffbecausethereisnotextinformationbeingbroadcast.
6. YoucannotviewapicturewhenplayingaVHStape.
CheckyourVCR’sowner’sguideforfurthertroubleshooting.
7. VCRorDVDplayer’son-screenmenusjitterupanddown.
Possiblecause:ManyVCRsandDVDplayersprovideon-screenmenusatonlyhalf-resolution.Theselower-resolutiongraphicsmayappeartojitterupanddownwhentheTVconvertsthemtohigh-definitiongraphics.
8. WhenviewingastoppedVCR,whitelinesarerollingonthescreen.
• TurnoffvideomutefortheVCR.• Beginplayingthetape.• ChangetheVCRinputtotheantennainput.
Appendix E: Troubleshooting, continued
TV Power On/Off
Symptom Remarks
1. TVtakesanexcessivelylongtimetopoweron.
• Whenswitchedon,theTVneedstimetobootup,justasacomputerdoes.Also,theTV’slamprequiresafewmomentstoheatuptofullbrightness.
• TVEnergyModeissettoLowPower.TochangeTVEnergyModetoFastPowerOn:PressMENU,opentheSetupmenu,highlighttheFastPowerOnradiobutton,pressENTER.
2. YoucannotprogramtheTVtoturnonauto-matically(Timerfunction)
• TheTVmaybelocked.• Theclockmaynotbeset.• Atime-delayedrecordingmayhavestarted.• TVEnergyModeissettoLowPower.ChangetoFastPower
OninSetupmenu.
3. TheTVwillnotturnonafterbeingpluggedin. Ifgreenlightonfrontpanelisblinking,waitforatleastoneminuteforthelighttoturnoff,thenpressPOWERagain.
4. TVturneditselfoffandthelightonthefrontpanelstartedtoblink.
• MomentarypowerfluctuationcausedtheTVtoturnofftopreventdamage.WaitforthegreenlighttostopflashingandturntheTVonagain.
• IftheTVdoesnotstayon,usetheSystemResetbuttononthefrontpanel.Ifthishappensfrequently,obtainanAClinepowerconditioner/surgeprotector.
• Anunusualdigitalsignalmayhavebeenreceived,triggeringaprotectioncircuit.WaitforthelighttostopflashingandturnTVon.
5 TVwillnotpoweroff. UsetheSystemResetbutton.

114 Appendices114 Appendices
Sound
Symptom Remarks
1. Thereisnosoundevenwhenthevolumeisturnedup.
• CheckiftheMUTEbuttonison.• TheTV’s“Listento:”settingmaybesettoSAP.• CheckthattheTVSpeakerssettingisOnintheAudio/Videomenu.• IfusinganA/Vreceiver,checkaudiosourceinInputSelection
menu.• PerformaSystemReset.
2. Thesounddoesnotmatchthescreenpicture.
• TheTV’sListento:settingmaybesettoSAP.• IfusingstereoorA/Vreceiverspeakers,checktheirinput
selection.• IfusingstereoorA/Vreceiver,checkthatDIGITALAUDIO
OUTand/orAUDIOOUTLEFT/RIGHTonTV’sbackpanelisconnectedtotheA/Vreceiver.
• NetCommand®issetupincorrectly.
Appendix E: Troubleshooting, continued
Indicators
Symptom Remarks
1. Lampindicatorlightisaconstantred. TurntheTVoffforatleast2minutes.Turnitbackon.Iflightisstillred,thelamphasfailed.Replaceit.SeeAppendixCforlampreplacementinformation.Forquestions,pleasecallMitsubishiConsumerrelationsat(800)332-2119.
2. Lampindicatorlightisaflashingyellow. Lampcoverdoorisopenorlampcartridgeisnotsecure.SeeAppendixCforlampreplacementinformation.
3. Statusindicatorlightisasteadyyellow. Roomtemperaturehasexceededproperlevels.Cooltheroom.
4. Statusindicatorlightisasteady/flashingred. Serviceisrequired.ContactyourdealeroraMitsubishiAutho-rizedServiceCentertoarrangeforaserviceevaluation.ListingsofMitsubishiAuthorizedServicelocationscanbeobtainedfromourwebsite,www.mitsubishi-tv.comorbycalling1-800-332-2119.
Picture
Symptom Remarks
9. ScreenisblackwhentryingtoviewdigitalchannelsorIEEE1394device.
ThePerfectColor™colorbalancehasbeenincorrectlyset.PressVIDEOrepeatedlyuntilyouseethePerfectColoroptionandpressENTERtoopenthePerfectColor™menu.
10. DVCRanalog/digitalproblems. Ifthetapeiscurrentlyplayingbutnopicturedisplays,theremaybeamismatchofthemediawiththedisplay.PressINPUTtodisplaytheInputSelectionmenu.PressENTERfortheDVCRdevice.Ifdigitalisselected,tryanalog,orifanalogisselected,trydigital.
11. CannotseeapicturefromaDVCamcorder. TheTVcannotprocessDVsignals.Useanalogaudioandvideoconnections.
Memory Card Reader
Symptom Remarks
1. TVisnotrespondingafterpullingoutamemorycardduringplayback.
• PressSTOPorwaituntilplaybackiscompletebeforeremov-ingmemorycard.
• TurntheTVofffor5to10secondsandthenturnitbackon.• ResettheTVusingtheSYSTEMRESETbutton.
2. Can’tseeathumbnailpictureintheJPEGmenu,orcan’tseeatrack/songnameinthePlaylistmenu.
Filedoesnotmeetfilestandardsforplayback.
3. TVcan’tplayorstopamemorycard. • TurntheTVoffandthenbackon.• Somecardstakelongertoreadthanothers.Ifcardreader
LEDisblinking,waituntilblinkingstopsandtryagain.

Appendices 115 Appendices 115
IEEE 1394 Devices
Symptom Remarks
1. ExcessivedigitalartifactsappearwhenviewinganIEEE1394device.
• TheIEEE1394cableistoolong;15feetbetweendevicesisthemaximum.
• TheremaybeaslowdeviceinthemiddleoftheIEEE1394network.Movetheslowdevicestotheendsothatconnec-tionsforfasterdevicesdonotpassthroughthem.
2. D-VHSrecordingsfordigitalcablehavedrop-outs(lossofpictureorsound),ornoplayback.
DigitalcablesignalsonIEEE1394canexceedthedataratestan-dardssupportedbyDVCR.
IEEE 1394 Recording
Symptom Remarks
1. ProgramtoberecordedwascorrectlyselectedfromChannelView,however,incor-rectprogramwasrecorded.
Thebroadcastersuppliedprograminformationthatwasincorrectand/orwaschangedafterarecordingwasaddedtotheRecordList.
2. IncompleteChannelViewprogramrecorded. Recordingdevicemaylacksufficientblankspacetomakeafullrecording.
3. ChannelViewprogramrecordingfailed. • ConnectionandcompatibilityissueswithIEEE1394(FireWire®)digitaldevices.ThismayincludetoomanyFirewiredevicesinuseatonetime,ortherecordingdevicenotunderstandingtherecordcommand.
• Televisionlostpowerlongenoughtolosecurrentclocktime.• AnalogVCRpowerwasleftoff.• TVenergyModewassettoLowPower.ChangeTVEnergy
modetoFastPowerOn.PressMENU,opentheSetupmenu,highlighttheFastPowerOnradiobutton,pressENTER.
4. CannotrecordtoorfromtheIEEE1394device,includingdubbedrecordings.
• ToinitiatearecordingtoIEEE1394device,pressthe (RECORD)key.TheRecordmenudisplaysallowingsetupoftherecording.
• Thesourcedevicefortherecordingisnotpoweredon.• Whendubbing,thedestinationdevicefortherecordingisnot
poweredon.• Thewrongmedium(analogtapefordigitalrecording,or
digitaltapefortheanalogrecording)isinthedevice.• Theprogramiscopyprotected.• Theprogramhasalreadybeenrecordedonceandthecopy
protectiononlyallowsonerecording.• Unapprovedsourcedeviceforcopyprotectedmaterial.• Therecordingdevicecannotdecodethecopyrightsignal
includedinthesignalsource(tryanotherdeviceifavailable).• Theplayingdevice(fordubbing)doesnotsupportcopy-
rightedmaterial.• Sourceforrecordingiscopyrighted• ToomanyIEEE1394devicesinnetwork.Insufficientband-
widthavailable.Disconnectunuseddevices.• SourceDevicehashighercommunicationspeed(S400)than
recorddevice.Ifpossible,reversedevices,playintheslowerdeviceandrecordinthefasterdevice.
Appendix E: Troubleshooting, continued

116 Appendices116 Appendices
Appendix E: Troubleshooting, continued
IEEE 1394 Devices
Symptom Remarks
3. ThereisnoaudioandvideofromtheIEEE1394device.
• Thedeviceisnotturnedon.Turnthedevicepoweron.• Nomedia(tapeordisc)isinsertedintothedevice.• Themediaisblank(hasnorecording).• Theplaycommandfailed-Trypressingplayagainonthe
device’sremotecontrolorfrontpanel.• Thedeviceisalreadyinuse(forexample,thedeviceiscur-
rentlyrecording).• Thesourceiscopy-protectedorviolatescopyprotection.• Thedevice’sdigitalvideosignalisnotsupportedbytheTV,
asmaybethecasewithanIEEE1394signalfromacom-puter.Useanalogconnectionsinstead,ifavailable.
• Thedeviceisnotanaudio/videodevice.• ToomanyotherdevicesarealreadycommunicatingoverIEEE
1394.Removeorstopsomedevicesandtryagain.
4. TheIEEE1394DeviceisnolongerlistedintheInputSelectionmenu.
• TheIEEE1394plugisdisconnectedorloose.• TheIEEE1394devicehasnotbeenpoweredon.Turnon.• Thedevicehasnotbeendiscovered.• Thedeviceisnotanaudio/videodevice
5. TheIEEE1394devicecannotbeselected(isgrayedout).
• Thedevicemaybebusywitharecording.Canceltherecording.• YouhaveconnectedmorethansevenIEEE1394devices.
Unplugtheeighthdeviceandoneotherdevice.Plugthenewdevicebackin.
6. MENUbuttondoesnotdisplayamenu. • TheIEEE1394devicedoesnotprovideamenu.• TheTVcannotsupportIEEE1394menus.
7. AllIEEE1394devicesdisappear. • TheconnecteddevicesmustnotbeinaloopthatreturnstotheTV.Makesureadeviceisconnectedattheend.
• DisconnectallthecablesanddevicesfromtheTV.Replacethemonebyonetolocatetheproblemdeviceorcable.
• UseSystemReset(frontcontrolpanel).
8. AnIEEE1394devicehasbeenpluggedinbutdoesnotappearintheInputSelectionmenu(notdiscovered).
• TheIEEE1394connectiontotheTVoranotherdeviceisnotsecureorisloose.
• TheIEEE1394deviceisnotpoweredon.• AdeviceintheIEEE1394chainisnotpoweredon.Turnon
allthedevices.• Thedevicediscoverycantakeaslongasaminutetoinitiate.• IEEE1394cableistoolong(maximumof15feetbetween
devices).• TheIEEE1394deviceusesanincompatibleprotocolandwill
notbediscovered
9. CannotviewvideofromanIEEE1394DV camcorder.
Useanalogconnectionsforvideoandaudio.YoucanstillusetheIEEE1394connectionforcontrolfunctions,however.
10. AnIEEE1394deviceisnotrespondingproperly.
• Unplugthedevice’spowercord.Waitatleasttensecondsandplugitinagain.
• SomeIEEE1394devicesarenotsupportedbytheTVbecauseofincompatiblestandards.

Appendices 117 Appendices 117
TV Guide On Screen(see the separate TV Guide On Screen® Interactive Program Guide User’s Manual for detailed information)
Symptom Remarks
1. TVGuideOnScreen®systemshowsnoprogramlistings.
• ProgramlistingsaredownloadedwhiletheTVisoffandthecableboxislefton.Itmaytakeupto24hourstobegintoreceiveTVprogramlistings.ItmaytakeuptooneweektoreceivealleightdaysofTVprogramlistings.
• InvalidZIPcodewasenteredattheinitialTVGuideOnScreensystemsetup.SelectNetCommandfromthemainTVmenu,thenGuideandenterthecorrectZIPcode.
• ChecktheconnectionsbetweentheTVandtheTVGuideOnScreeninput(cable,antennaorcableboxandIRcable).AtleastoneantennaconnectionmustbeassociatedwiththeTVGuideOnScreensystemtoreceiveprogramlistings.
• WhenusingCableCARD™,thecablecompanymayhaveconvertedtheTVGuideOnScreenhostchanneltoadigitalformatandlosttheinformation.ConnectanantennatoANT2andmemorizetheantennachannelsintheTVSetupmenu.AddANT2totheTVGuideOnScreensetupintheNetCommandmenu.Youmaybeabletodownloadfromtheantennainformationforbothcableandantenna.
2. TVGuideOnScreensystemprogramlist-ingsdon’tmatchactualprograms
• IncorrectZIPcodewasenteredatinitialTVGuidesystemsetup.SelectNetCommandmenu,thenGuidetoenterthecorrectZIPcode.
• Forcableprograms,theremaybemorethanonecablecompanyinyourZIPcode.RefertotheTVGuideOnScreensystemmanualforinstructionsontheSetupService.
3. TVGuideOnScreensystemdoesnotchangechannelsonthecablebox.
• CableboxisnotsetupinNetCommand.TheTVGuideOnScreensystemusesNetCommandtocontrolthecableboxandVCR.Tocorrect,selectthecableboxintheInputSelec-tionmenu,opentheNetCommandmenu,andselectLearn.Seechapter3,“TVSetup.”
• NetCommandIRemitterisnotinplaceorproperlypositionedinfrontofthecableboxremotesensor.
Appendix E: Troubleshooting, continued
NetCommand
Symptom Remarks
1. CannotseetheA/VReceivermenu. TheA/VReceiverisnotconnectedtoanyvideoinputoftheTV.TochecktheA/VReceivermenu,temporarilyplugintoanunusedinputoftheTV,suchasInput3.ExittheAutoInputSensingscreenandselectInput3fromtheInputSelectionmenu.PressMENU.
2. NetCommandunabletolearnspecificdevicekeys.
• DevicedoesnotuseIRformatforremotecontrolsignal.ITTandRFformatscannotbelearned.
• Roomlightingmayaffectthesignal.Havetheremotesveryclose(6inchesorless)totheTVduringLearning.
• IflearningaMitsubishiremotecontrol,makesureslideswitchisnotsettoTVposition.
• Some,butnotall,devicekeyfunctionscanbelearnedbyNetCommand.Forexample,POWERandPLAYmaybelearned,butotherfunctionsmaynot.
• Thesignalfromtheremotecontrolmaynotbestrongenough.InsertfreshbatteriesandtryLearningagain.
3. TheA/VReceiveristheselectedaudiosourcebutthereisnosound.
ChecktoseeiftheA/VReceiverpoweristurnedon.Afterthepoweristurnedon,redisplaytheInputSelectionmenuandpressENTERtoallowNetCommandtocorrectlyselecttheA/VReceiverinput.

118 Trademark and License Information118 Trademark and License Information
LICENSOR’SSUPPLIERSDONOTMAKEORPASSONTOENDUSERORANYOTHERTHIRDPARTY,ANYEXPRESS,IMPLIEDORSTATUTORYWARRANTYORREPRESENTATIONONBEHALFOFSUCHSUPPLIERS,INCLUDING,BUTNOTLIMITEDTOTHEIMPLIEDWARRANTIESOFNON-INFRINGEMENT,TITLE,MERCHANTABILITYORFITNESSFORAPARTICULARPURPOSE.
CableCARD™isatrademarkofCableTelevisionLaboratories,Inc.
CompactFlash®andCFaretrademarksoftheCompactFlashAssociation.
DCR™CertificationLogoisatrademarkoftheConsumerElectronicsAssociation.
DigitalLightProcessing™andDLP™aretrademarksofTexasInstruments.
ManufacturedunderlicensefromDolbyLaboratories.DolbyisatrademarkofDolbyLaboratories.
DTVLink™CertificationLogoisatrademarkoftheConsumerElectronicsAssociation.
Firewire®isatrademarkofAppleComputer,Inc.registeredintheU.S.andothercountries.
HDMI™theHDMIlogoandHigh-DefinitionMultimediaInterfacearetrademarksorregisteredtrademarksofHDMILicensingLLC.
ThisproductincorporatescopyrightprotectiontechnologythatisprotectedbyU.S.patentsandotherintellectualprop-ertyrights.UseofthiscopyrightprotectiontechnologymustbeauthorizedbyMacrovision,andisintendedforhomeandotherlimitedpay-per-viewusesonlyunlessotherwiseauthorizedbyMacrovision.Reverseengineeringordisas-semblyprohibited.
MemoryStick™andMemoryStick PRO™aretrademarksofSonyCorp.
Microdrive™isatrademarkofIBMandHitachi.
ThisproductincludestechnologyownedbyMicrosoftCorporationandcannotbeusedordistributedwithoutalicensefromMicrosoftLicensing,Inc.
MultiMediaCard™istrademarkofInfineonTechnologiesandlicensedtotheMultiMediaCardAssociation.
The logoandthewords“Simplay™”and“SimplayHD™”arethetrademarksofSiliconImage,Inc.
SmartMedia™isatrademarkofToshibaCorp.
IntheUnitedStates,TVGUIDEandotherrelatedmarksareregisteredmarksofGemstar-TVGuideInternational,Inc.and/oroneofitsaffiliates.
TheTVGuideOnScreen®systemismanufacturedunderlicensefromGemstar-TVGuideInternational,Inc.and/oroneofitsaffiliates.
TheTVGuideOnScreensystemisprotectedbyoneormoreofthefollowingUnitedStatespatents4,908,713;6,498,895;6,850,693;6,396,546;5,940,073;6,239,794toGemstar-TVGuideInternational,Inc.and/oritssubsidiaries.
Gemstar-TVGuideInternational,Inc.and/oritsrelatedaffiliatesarenotinanywayliablefortheaccuracyoravailabilityoftheprogramscheduleinformationorotherdataintheTVGuideOnScreensystemandcannotguaranteeserviceavailabilityinyourarea.InnoeventshallGemstar-TVGuideInternational,Inc.and/oritsrelatedaffiliatesbeliableforanydamagesinconnectionwiththeaccuracyoravailabilityoftheprogramscheduleinformationorotherdataintheTVGuideOnScreensystem.
ChannelView™,ClearThought®,NetCommand®,PerfectColor™,QuickView™,ViewPoint®aretrademarksofMitsubishiDigitalElectronicsAmerica,Inc.
Trademark and License Information

Trademark and License Information 119 Trademark and License Information 119
Mitsubishi TV SoftwareEND-USER LICENSE AGREEMENT FOR EMBEDDED SOFTWARE
IMPORTANT – READ CAREFULLY:ThisLicenseAgreementisalegalagreementbetweenyou(eitheranindividualoranentity)andMitsubishiDigitalElectronicsAmerica,Inc.(MDEA)forallsoftwarepreinstalledand/orprovidedalongwiththistelevision(“Software”).ByutilizingthistelevisionandSoftware,youagreetobeboundbythetermsofthisLicenseAgreement.
TheSoftwareisprotectedbyUnitedStatescopyrightlawsandinternationaltreatyprovisions,aswellasotherintellectualpropertylawsandtreaties.TheSoftwareislicensed,notsold.
1. LICENSE GRANT. MDEAgrantsyouanon-exclusive,non-transferable,limitedrightandlicensetouseonecopyoftheSoftwareonlywiththeMitsubishitelevisionmodelthatincludedthisowner’sguideandownedbyyou.
2. RIGHTS AND LIMITATIONS.SoftwareNotforResale.YoumaynotresellorotherwisetransferforvaluetheSoftware,exceptinconjunctionwithasaleoftheTVthatSoftwarehasbeenpreinstalled.
ProhibitiononReverseEngineering,DecompilationandDisassembly.TheSoftwarecontainstradesecretsorotherproprietarymaterialinitshumanperceivableformandtoprotectthem,youmaynotreverseengineer,decompile,ordisassemble,orotherwisereducetheSoftwaretoanyhumanperceivableform,excepttotheextentthattheforegoingrestrictionisexpresslyprohibitedbyapplicablelaw.
SeparationofComponents.TheSoftwareislicensedasasingleproduct.ItscomponentpartsmaynotbeseparatedforuseonmorethanoneTV.
NoRental.Youmaynotrent,lease,lend,orsublicensetheSoftware.
Trademarks.ThisLicenseAgreementdoesnotgrantyouanyrightstoanytrademarksofMDEA.
3. VIOLATIONS.Youunderstandthatanyuse,copyingortransferoftheSoftware,exceptaspermittedpursuanttothisLicense,maysubjectyoutoseriouscriminalandcivilpenaltiesincludingdamagesandanawardtoMDEAofattorneys’feesinconnectionwithanyviolationofthisLicense.Youfurtherunderstandthatyoumaybeheldlegallyresponsibleforanycopyrightinfringementorotherviolationofintellectualpropertyrightsthatiscaused,encouraged,orinducedbyyourfailuretoabidebythetermsoftheLicense.Thislicenseiseffectiveuntilterminated,andwillterminateimmediatelywithoutnoticefromMDEAorjudicialresolutionifyoufailtocomplywithanyprovisionofthisLicense.
4. COPYRIGHT. AlltitleandintellectualpropertyrightsinandtotheSoftware(includingbutnotlimitedtoanyimages,photographs,animations,video,audio,music,text,and“applets”incorporatedintotheSoftware),andanyaccompanyingprintedmaterialsareownedbyorlicensedtoMDEA.AlltitleandintellectualpropertyrightsinandtothecontentwhichmaybeaccessedthroughuseoftheSoftwareisthepropertyoftherespectivecontentownerandmaybeprotectedbyapplicablecopyrightorotherintellectualpropertylawsandtreaties.ThisLicenseAgreementgrantsyounorightstousesuchcontent,exceptthatyouownthemediaonwhichtheSoftwareisrecorded,butMDEAanditslicensorsretainownershipoftheSoftwareitself.AllrightsnotexpresslygrantedarereservedbyMDEA.
5. EXPORT RESTRICTIONS. MDEAislicensingtheSoftwareforusewithintheUnitedStates.Youagreethatyouwillnotexportorre-exporttheSoftware.Youspecificallyagreenottoexportorre-exporttheSoftware:(i)toanycountrytowhichtheU.S.hasembargoedorrestrictedtheexportofgoodsorservices,whichcurrentlyinclude,butarenotnecessarilylimitedtoCuba,Iran,Iraq,Libya,NorthKorea,Sudan,andSyria,ortoanynationalofanysuchcountry,whereverlocated,whointendstotransmitortransporttheSoftwarebacktosuchcountry;(ii)toanypersonorentitywhoyouknoworhavereasontoknowwillutilizetheSoftwareinthedesign,development,orproductionofnuclear,chemical,orbiologicalweapons;or(iii)toanypersonorentitywhohasbeenprohibitedfromparticipatinginU.S.exporttransactionsbyanyfederalagencyoftheU.S.government.YouwarrantandrepresentthatneithertheBXAnoranyotherU.S.federalagencyhassuspended,revoked,ordeniedyourexportprivileges.
6. DISCLAIMER OF WARRANTY. EXCEPT AS OTHERWISE PROVIDED IN THIS LICENSE OR IN THE LIMITED WARRANTY APPLICABLE TO THE TV, MDEA MAKES NO OTHER WARRANTIES OF ANY KIND WHATSOEVER REGARDING THE SOFTWARE AND HEREBY EXPRESSLY DISCLAIMS ALL WARRANTIES OF ANY KIND WHATSOEVER, EXPRESS OR IMPLIED, WITH RESPECT TO THE SOFTWARE. ALL IMPLIED WARRANTIES, INCLUDING, WITHOUT LIMITATION, THE IMPLIED WARRANTIES OF MERCHANTABILITY AND FITNESS FOR A PARTICULAR PURPOSE ARE HEREBY EXPRESSLY DISCLAIMED BY MDEA. IN NO EVENT SHALL MDEA BE LIABLE TO YOU OR ANY THIRD PARTIES, IN CONTRACT, IN TORT OR OTHERWISE, FOR ANY DIRECT, INDIRECT, SPECIAL, INCIDENTAL OR CONSEQUENTIAL DAMAGES OF ANY KIND OR NATURE. BECAUSE SOME JURISDICTIONS DO NOT ALLOW THE EXCLUSION OR LIMITATION OF IMPLIED WARRANTIES, THE ABOVE LIMITATION MAY NOT APPLY TO YOU.7. LIMITATION OF LIABILITY. MDEA SHALL NOT, UNDER ANY CIRCUMSTANCES BE LIABLE TO YOU OR ANY THIRD PARTIES FOR ANY DAMAGES OF ANY NATURE, WHETHER INDIRECT, SPECIAL, INCIDENTAL, CONSEQUENTIAL OR OTHERWISE, INCLUDING, BUT NOT LIMITED TO, ANY CLAIMS FOR LOST PROFITS, LOSS OF GOOD WILL OR EXPENDITURES MADE OR COMMITTED FOR IN RELIANCE ON THE CONTINUATION OF THIS LICENSE. YOU AGREE THAT NEITHER MDEA’S BREACH OF THIS LICENSE NOR ITS FAILURE TO REPAIR A DEFECT, ERROR OR BUG SHALL CONSTITUTE A FAILURE OF THE ESSENTIAL PURPOSE OF THIS LICENSE. BECAUSE SOME JURISDICTIONS DO NOT ALLOW THE EXCLUSION OR LIMITATION OF LIABILITY FOR CONSEQUENTIAL OR INCIDENTAL DAMAGES, THE ABOVE LIMITATIONS MAY NOT APPLY TO YOU. MDEA’s liability to you for direct damages for any cause whatsoever and regardless of the form of the action, will be limited to the money paid by you for the TV (based on fair market value of the TV) that caused the damages.8. GENERAL.ThisLicenseAgreementwillbegovernedbythelawsoftheStateofCalifornia.
WARNING:ThisproductcontainschemicalsknowntotheStateofCaliforniatocausecancerand/orbirthdefectsorotherreproductiveharm.

120 120
Mitsubishi DLP™ Projection Television Limited Warranty
MITSUBISHIDIGITALELECTRONICSAMERICA,INC.(“MDEA”)warrantsasfollowstotheoriginalpurchaserofthistelevisionfromanauthorizedMITSUBISHIAudio/VideoDealer,shoulditprovedefectivebyreasonofagainstdefectsarisingfromimproperworkmanshipand/ormaterial:
a. Parts.Thelenticular(i.e.frontpicture)screeniswarrantedagainstdefectsinmaterialsandworkmanshipforaperiodofthirty(30)daysfromthedateoftheoriginalpurchaseatretail.Thelampandallotherparts(exceptanysoftwareincorporatedintothistelevision)arewarrantedforaperiodofone(1)yearfromthedateoftheoriginalpurchaseatretail.Wewillrepairorreplace,atouroption,anydefectivepartwithoutchargeforthepart.Partsusedforreplacementmaybereplacedwiththoseoflikekindandqualityandmaybeneworremanufactured.Partsusedforreplacementarewar-rantedfortheremainderoftheoriginalwarrantyperiod.
b. Embedded Software.MDEAwarrantsthatallsoftwareincorporatedintothistelevisionset(the“EmbeddedSoft-ware”)willperforminaccordancewiththefunctionaldescriptionofEmbeddedSoftwareinallmaterialrespects,butMDEAdoesnotwarrantthattheEmbeddedSoftwareiserror-free.MDEAalsodoesnotwarrantthattheEmbeddedSoftwarewillbecompatibleunderIEEE1394AV/CandHAVisoftwarestandardswithproductsproducedbyanyothermanufacturer.Thelimitedwarrantycontainedinthissectionshallcontinueforaperiodofone(1)yearfromthedateoftheoriginalpurchaseatretail.If,afterpromptnoticewithinthewarrantyperiod,MDEAdeterminesthattheEmbeddedSoftwarehasfailedtoperforminaccordancewithsuchfunctionaldescriptioninallmaterialrespectsandifsuchfailureisnotduetoaccident,misuse,modificationormisapplicationoftheEmbeddedSoftware,thenMDEAshallmodifyorreplacethenonconformingEmbeddedSoftwareatnochargetoyou,whichatMDEA’ssolediscretionmaybefulfilledbymeansofmodificationorreplacementsoftwarecontainedonareplacementmemorycardforCustomerinstallation.TheforegoingshallbeMDEA’ssoleobligationtoyouunderthislimitedwarranty.AllrightsunderthislimitedwarrantyontheEmbeddedSoftwarealsosubjecttoyouracceptanceofandcompliancewiththetermsoftheSoftwareLicenseAgreementapplicabletothistelevision,andthislimitedwarrantyontheEmbeddedSoftwareshallbenullandvoidiftheEmbeddedSoftwareismodifiedorchangedinanymannerexceptasspecificallyauthorizedbyMDEA.
c. Labor.Forthirty(30)daysaftertheoriginalpurchaseatretail,wewillrepairorreplace,atouroption,thelenticularscreenifitprovesdefective.Forcertainitemsthataredesignedtobereplacedbytheconsumer,including(butnotlimitedto)someEmbeddedSoftware,theconsumerissolelyresponsibleforanyreplacementlabor.Forallotherparts,wewillprovidethelaborforawarrantyrepairbyanauthorizedMITSUBISHIservicecenterwithoutchargeforone(1)yearfromtheoriginaldateofpurchaseatretail.
d. Notice.Toobtainwarrantyservice,youmustnotifyanauthorizedMITSUBISHIservicecenterofanydefectwithintheapplicablewarrantytimeperiod.
e.ThisDLPProjectionTelevisionusesasingleDLPchiptocreatethescreenimage.Thistechnologycreatestheimageusingsmalldots,orpictureelements(pixels).YourDLPProjectionTVismanufacturedtoahighlevelofperformanceandquality,infact,99.99%perfectinthenumberofproperlyfunctioningpixels.Asinotherdisplaytechnology,some-timesapixeliscontinuouslyactive,inactiveortheincorrectcolor.Ourstandardisclear;MDEAwarrantsonlythatthepercentageofproperlyfunctioningpixelswillbenotlessthan99.99%ofallpixels.
BEFORE REQUESTING SERVICE, please review the instruction booklet to insure proper installation and correct customer control adjustment. If the problem persists please arrange for warranty service.
1.TOOBTAINWARRANTYSERVICE:
a.ContactyournearestauthorizedMITSUBISHIservicecenter,whosenameandaddresscanbeobtainedfromyourMITSUBISHIdealer,bywritingattheaddressprovidedbelow,callingMDEAatthe800-332-2119,orbyusingthesupportfeatureofourwebsiteatwww.Mitsubishi-tv.com.
b.Warrantyservicewillbeprovidedinyourhomeor,ifrequired,atanauthorizedserviceshop,providedthatyourtelevisionislocatedwithinthegeographicterritorycustomarilycoveredbyanauthorizedMITSUBISHIservicecenter.Ifnot,youmusteitherdeliveryourtelevisiontoanauthorizedservicelocationatyourownexpense,orpayforanytraveland/ortransportationcoststheservicecentermaychargetoandfromyourhome.Actualservicelaborwillbeprovidedwithoutcharge.
c.ProofofpurchasedatefromanauthorizedMITSUBISHIdealerisrequiredwhenrequestingwarrantyservice.Presentyoursalesreceiptorotherdocumentwhichestablishesproofanddateofpurchase.THERETURNOFTHEOWNERREGISTRATIONCARDISNOTACONDITIONOFCOVERAGEUNDERTHISLIMITEDWARRANTY.However,pleasereturntheOwnerRegistrationCardsothatwecancontactyoushouldaquestionofsafetyarisewhichcouldaffectyou.

121 121
d.Toobtainareplacementlampduringthewarrantyperiod,pleasecontacttheMDEAConsumerRelationsDepartmentat(800)332-2119.AfterthewarrantyperiodyoumayorderthelampdirectlyfromtheMDEAPartsDepartmentat(800)553-7278.
2.THISLIMITEDWARRANTYDOESNOTCOVER:
a.Upto.01%pixeloutages(smalldotpictureelementsthataredarkorincorrectlyilluminated).
b.DamagetothelenticularscreenorFresnellens,screenframe,cosmeticdamageortoanyotherdamagewheresuchdamageiscausedbyunauthorizedmodification,alteration,repairstoorserviceoftheproductbyanyoneotherthananauthorizedMITSUBISHIservicecenter;physicalabusetoormisuseoftheproduct(includinganyfailuretocarryoutanymaintenanceasdescribedintheOwner’sGuideincludingairfiltercleaningoranyproductdamagedbyexces-sivephysicalorelectricalstress);anyproductsthathavehadaserialnumberoranypartthereofaltered,defacedorremoved;productuseinanymannercontrarytotheOwner’sGuide;freightdamage;oranydamagecausedbyactsofGodorotherfactorsbeyondthereasonablecontrolofMDEA,suchaspowersurgedamagecausedbyelectricalsystemorlightning.Thislimitedwarrantyalsoexcludesservicecallswherenodefectintheproductcoveredunderthiswarrantyisfound,servicecallsrelatedtounsatisfactoryaudioorvisualreceptionorsignalunlesscausedbyadefectintheproductthatiscoveredunderthislimitedwarranty,allcosts,expensesoranyotherdamagesarisingfromproductinstallation,orset-ups,anyadjustmentsofusercontrols(includingcontrast,brightness,color,tint,finetuning,sharp-ness),otheradjustmentnecessarytopreparetheunitfordisplayoruse,connectionwithanyexternalaudioreceiver,antenna,cableorsatellitesystems,orserviceofproductspurchasedorservicedoutsidetheU.S.A.PleaseconsulttheoperatinginstructionscontainedintheOwner’sGuidefurnishedwiththeproductforinformationregardingusercon-trols.
3.ANYEXPRESSWARRANTYNOTPROVIDEDHEREIN,ANDANYREMEDYWHICH,BUTFORTHISPROVISION,MIGHTARISEBYIMPLICATIONOROPERATIONOFLAW,ISHEREBYEXCLUDEDANDDISCLAIMED.THEIMPLIEDWARRANTIESOFMERCHANTABILITYANDOFFITNESSFORANYPARTICULARPURPOSEAREEXPRESSLYLIMITEDTOATERMOFONEYEAR.
4.UNDERNOCIRCUMSTANCESSHALLMDEABELIABLETOPURCHASERORANYOTHERPERSONFORANYINCIDENTAL,SPECIALORCONSEQUENTIALDAMAGES,WHETHERARISINGOUTOFBREACHOFWARRANTY,BREACHOFCONTRACT,OROTHERWISE.
5.Somestatesdonotallowlimitationsonhowlonganimpliedwarrantylasts,ortheexclusionorlimitationofincidental,special,orconsequentialdamages,sotheabovelimitationsorexclusionsmaynotapplytoyou.
6.Thislimitedwarrantygivesyouspecificlegalrights,andyoumayalsohaveotherrightswhichvaryfromstatetostate.
MITSUBISHIDIGITALELECTRONICSAMERICA,INC.9351JeronimoRoadIrvine,CA92618-1904

122 Index
Index
AA/VDiscs85A/VMemoryReset.SeeResetA/VReceiver
AddingNetCommandControl44Connecting27
A/VReset.SeeResetAdjustKeys(Up/Down/Left/Right)48, 60
AnamorphicPictureFormat81DVDDefinitions54Playback81
AntennaAdjustingandtheSignalStrengthMeter64
Connecting23AntennaInputs(ANT1/MAIN,ANT2/AUX)16
Audio/VideoMenu61, 72AudioSettings72AutoInputSensing39
BBackPanel(illustrated)16, 17Batteries35
CCableCARD™12, 16, 18, 37
andTVEnergyMode38CableBox
andtheRemoteControl48, 84, 101
Connecting22, 25, 28IEEE139429
Camcorder114Connecting(Analog)28DV(DigitalVideo)30, 116IEEE1394Camcorders30Power29
CaptionsMenu61, 66Channels.See alsoFAV
andTVTimer38Changing35DigitalChannelNumbers97Memorizing36Naming64StatusDisplay51
ChannelView™ChannelListings50andRecording79
ChannelMenu61, 64Cleaning7ClearThought®AutoInputSensing
39Clock,SetDateandTime37ClosedCaptions.SeeCaptionsMenuColorAdjustments74, 75ComponentInputs(YPbPr)17, 73Computer.SeePersonalComputer
Connecting:HelpfulHints32ConnectionTypes21CopyRestrictions85
andNetCommand81andStatusDisplay51
CroppedPlayback81
DDate.SeeClockDaylightSavingsTime37DemoMode111DigitalAudioOut17DisplayFormatDefinitions54DolbyDigital17, 27, 98
andIEEE139429DVDs
andtheRemoteControl48, 101andV-ChipRatings71
DVDPlayerwithComponentVideo,Connecting27
DVIDevice,Connecting26DVIJack(forPersonalComputer)17DV(DigitalVideo)30
EEnergyMode38
FF1–F4Keys43, 48FanNoise6FastPowerOn(EnergyMode)38FAV65FilmMode72FireWire®.SeeIEEE1394FreezePicture.SeePauseFrontPanelLock68
GGUIDEKey(button)48
HHDMI
ConnectinganHDMIDevice26DescriptionofHDMIInputs12HDMIJack17, 73PersonalComputerwithHDMIOutput89
RemovetheIconforanHDMIDevice63
HDTVReceiverwithComponentVideo,Connecting21
HD(High-DefinitionSignal)54
IIconOrderMenu63IEEE1394Devices
AmplifierSettings73andAnalogOutputs40, 83
andRecording83andStatusDisplay51CompatibleIEEE1394Devices
29ConnectingIEEE1394Devices
17, 30TVConnectionSpeed30
ImportantInformationAboutYourTV6
INFOKeyStatusDisplay51andNetCommand-ControlledDevices41
InputJacksonTV(StandardAudio/Video)16, 73
InputNameMenu62InputSelectionMenu50
andNetCommand-ControlledDevices78
RemovetheComputerIconfromtheInputSelectionMenu88
RemovetheIconforanHDMIDevice63
IR(Infrared)IREmitterNetCommand®31
JJPEGPictureFiles56
LLampCartridgeReplacement99LAMPIndicator.SeeLEDIndicatorLights
LanguageAudioSetting(DigitalChannels)
73forTVMenus36
“Learn”Feature(NetCommand)Description42DeviceFunctions42LearnA/VReceiverInputIRCodes45
Troubleshooting117LEDIndicatorLights
LAMPIndicator15POWER/TIMERIndicator15STATUSIndicator15Troubleshooting114
LockTV.SeeParentalLockLowPower(EnergyMode)38
MMemorizingChannels36MemoryCards13
MediaSetupMenu57MemoryCardReader14, 56
MONITOROUTJacks17

Index 123
MP3Audio13, 14, 29, 32andMemoryCards57Playback56
MuteAudio
andClosedCaptions66andstatusDisplay51
MUTEkey48VideoMute72
NNetCommand®
A/VReceiverControl43andtheInputSelectionMenu78ComparedtoProgrammingtheRemoteControl101
Description13, 42InitialSetup42IREmitters31Menu43, 62SpecializedDeviceKeys41
NoiseReduction(Video)74
PParentalLock
Bypassing95FrontPanelLock68V-ChipRatings71
PassCodeResetting95Setting68
PAUSEKey48andMemoryCards56
PerfectColor74, 75PerfectTint™74, 75PersonalComputer83
andDisplayFormats54Connecting89RemovetheComputerIcon88Setup88
PictureQualityandConnectionTypes20andFilmMode72Troubleshooting113
PowerConsumption38, 98PowerOn/Off35, 113
QQV(QuickView™)48
RRecording
andMONITOROUTJacks17andSplitScreen17CancellingRecordings80NetCommand-ControlledRe-cording79
RECORDButton115
RECORDKeyandVCRs82RecordList79RecordMenu(SetRecordingDefaults)81
SignalsAvailableforRecording21
RecordingandTVEnergyMode38RecordListScreen79RemoteControl
KeysandFunctions48ProgrammingCodes(referencechart)103
ProgrammingInstructions102Programmingvs.NetCommand“Learning”101
Reset49Reset
A/V(allsettings)14A/VMemory(forindividualde-vices)72
DVCRCounter84PassCode95PerfectColor74RemoteControl49SystemResetButton111
ReviewScreen,TVConnections43, 46
SS-Video
Connecting22ConnectorIllustration20
Safeguards8SAP(SecondAudioProgram)73SatelliteReceiver
andtheRemoteControl101Connecting21, 22IEEE139484
SD(Standard-DefinitionSignal)54ServiceandSupport111SetupMenu36, 61SetUpTV39SignalDefinitions54SleepTimer49SoftwareVersion38Speakers,TurningTVSpeakersOnorOff72
Specifications,TV97SplitScreen
andRecordingfromMONITOROUT 17
Description52Stand,TV6Standard-DefinitionSignal54StatusDisplay51STATUSIndicator.SeeLEDIndicatorLights
StereoSystem.SeeA/VReceiverSystemReset14, 111
T3:2pulldown72Time.SeeClockTimer(TVTimerFeature)37TimeZone.SeeClockTroubleshooting111TVGuideOnScreen®
AccessRequirements6andChannelView79andGUIDEKey48andRecording81andtheRecordList79andTVEnergyMode38ConnectionRequirements24, 44Description13Setup43SetupRequirements42
TVResetMenu111
VVCR
Connecting16, 24, 25IEEE139429andNetCommandControl78Troubleshooting113
VideoNoiseReduction74VideoSettings74ViewingDevice.SeeInputSelectionMenu
WWallOutletCable22WMAAudio13, 14, 56, 57
ZZIPcode44

©2006MitsubishiDigitalElectronicsAmerica,Inc. WrittenandPrintedinU.S.A.853B541B60v3 V33Y/V33+
Website:www.mitsubishi-tv.com
E-mail:[email protected]
For questions, call Consumer Relations at
800-332-2119
To order replacement or additionalremote controls, lamp cartridges, or Owner’s Guides
Visit our website at www.mitsuparts.com
or call
800-553-7278
Demo ModeThisTVhasademomodeforuseinretailstores.DemomodecausestheTVtodisplayaseriesofscreensoutliningtheTV’sfeatures.
Toturnoffdemomode:
1. PressMENU.2. WhentheMainmenuappearswithSetuphigh-
lighted,pressENTER.3. WhentheSetupmenuopens,press tohighlight
theon-screenDemo Mode Offbutton.4. PressENTER.
System ResetIftheTVdoesnotrespondtotheremotecontrol,frontpanelcontrols,orwillnotpoweron/off,presstheSYSTEM RESETbuttononthefrontpanelwithapointedobject,suchasthepointofapencilorendtipofapaperclip.ThegreenLEDwillflashquicklyforaboutoneminute.WhenthegreenLEDstopsflashing,youmayturnontheTV.