model cpd 75 - 100 - home – rev up cprevupcp.com/.../cpd-75-100-instruction-manual-2008... ·...
TRANSCRIPT

Instruction Manual EN
CP COMPRESSOR
Model CPD 75 - 100 62 305 811 65
CPD 75

11/2008 Chicago Pneumatic Compressors Page 2 62 305 811 65
TECHNICAL DATA STANDARD MACHINES
CPD MODEL 75 100
Nominal pressure at full flow PSI 100 125 150 175 100 125 150 175
Actual flow * (as per ISO 1217 : 1996) cfm 347 306 - - 474 404 372 346
Motor power hp 75 100
Ø Discharge orifice NPT 1.5” 1.5”
Sound level at 3.3 ft (as per ISO 2157 + 3 db(A))
dB (A) 72 74
Capacity gal 8.98 8.98
Carryover ppm 3 3
Dimensions (in) L x W x H 43.34 x 79.19 x 70.53 43.34 x 79.19 x 70.53
Approximate weight lbs 2370 2480
CPC MODEL 75 100
Motor power hp 75 100
Main Voltage 230 Volt / 3 / 60Hz
Nominal current (A) 238 310
Power supply cable AWG 350 AWG 500
Fuse protection (Type J) 250 350
Main Voltage 460 Volt / 3 / 60Hz
Nominal current (A) 120 160
Power supply cable AWG 0 AWG 000
Fuse protection (Type J) 125 175
Connection of the electric plate to an external control box
• Install an RC filter on the KM1 coil. • Install an RC filter on the KM2 coil. • All connections between external parts and the compressor must be carried out using a shielded cable, which must be grounded at
one of its ends.
WARNING: the operation connection cables between the different elements must never follow the same path as the existing power cords. A separate installation from the power cords must be carried out.
• Install an RC filter on all the relay coils of the external operation units.

Chicago Pnematic Compressors 11/2008 62 305 811 65 Page 3
CONTENTS PART A: INFORMATION FOR THE USER 1.0 GENERAL CHARACTERISTICS 2.0 INTENDED USE 3.0 OPERATION 4.0 GENERAL SAFETY STANDARDS 5.0 DESCRIPTION OF DANGER SIGNALS 6.0 DANGER ZONES 7.0 SAFETY DEVICES 8.0 POSITION OF LABELS 9.0 COMPRESSOR ROOM 10.0 TRANSPORT AND HANDLING 11.0 UNPACKING 12.0 INSTALLATION 13.0 DIMENSIONAL DRAWING 14.0 MACHINE ILLUSTRATION 15.0 ROUTINE MAINTENANCE 16.0 PERIODS OF INACTIVITY 17.0 SCRAPPING THE UNIT 18.0 LIST OF SPARE PARTS FOR ROUTINE MAINTENANCE 19.0 TROUBLE-SHOOTING AND EMERGENCY REMEDIES PART B: INFORMATION RESERVED FOR TECHNICALLY SKILLED PERSONNEL 20.0 STARTING UP 21.0 ROUTINE MAINTENANCE FOR TRAINED PERSONNEL 22.0 CHANGING THE OIL 23.0 CHANGING THE OIL SEPARATION FILTER 24.0 BELT TENSION 25.0 FLOW DIAGRAM IMPORTANT: THERE IS A COPY OF THE WIRING DIAGRAM INSIDE THE ELECTRIC PANEL
ROTARY SCREW COMPRESSOR
CDP 75 - 100
MACHINE AND MANUFACTURER IDENTIFICATION DATA
1) Position of the identification label
FIG. 1
1

11/2008 Chicago Pneumatic Compressors Page 4 62 305 811 65
INTRODUCTION In the event of breakdown or malfunction of the machine, switch it off and do not tamper with it. If repairs are needed, apply only to a technical assistance center approved by the manufacturer and insist on the use of original spare parts. Failure to comply with the above may endanger the safety of the machine. Keep this manual for future consultation; the use and maintenance manual is an integral part of the machine. Read this manual carefully before carrying out any operations on the compressor unit. The installation of the compressor unit and all operations involving it must be performed in accordance applicable with electrical and safety regulations at the installation site. CHARACTERISTICS AND SAFETY PRECAUTIONS MACHINE WITH AUTOMATIC START BEFORE REMOVING THE PROTECTIVE GUARDS TO CARRY OUT ANY MAINTENANCE WORK ON THE MACHINE, SWITCH OFF THE ELECTRIC POWER SUPPLY AND DISCHARGE THE RESIDUAL PRESSURE INSIDE THE UNIT. THE FAILED COMPLIANCE WITH THE INSTRUCTIONS CONTAINED IN THIS HANDBOOK DETERMINES THE EXPIRATION OF THE WARRANTY TERMS. ALL WORK ON THE ELECTRICALS, HOWEVER SLIGHT, MUST BE CARRIED OUT BY PROFESSIONALLY SKILLED PERSONNEL. The manufacturer does not accept responsibility for damage caused as a result of negligence of failure to abide by the instructions given above. THIS MACHINE IS NOT DESIGNED FOR OUTDOOR INSTALLATION THIS MACHINE CORRESPONDS TO THE SAFETY REQUIREMENTS FORESEEN BY OSHA THE LUBRICATING LIQUIDS MUST NOT BE DISCHARGED INTO THE ENVIRONMENT. THESE PRODUCTS MUST BE DISPOSED OF IN ACCORDANCE WITH GOVERNMENT REGULATIONS.
Chicago Pnematic Compressors 11/2008 62 305 811 65 Page 5
1.0 GENERAL CHARACTERISTICS These units use single-stage rotary screw air compressors with oil injection. The central unit comprises: compressor; oil separator; oil cooler, air cooler; fan; electric start; safety and regulation devices; instrument panel. The unit is completely assembled in the factory; the necessary connections for setting it up are: • connection to the main power (see installation chapter) • connection to the compressed air network (see installation chapter) The compressor-motor unit is fitted on the machine chassis by means of flexible supports: this allows the compressor unit to be laid directly on the floor without any need of further vibration-damping systems. 2.0 INTENDED USE The compressor has been built to supply compressed air for industrial use. The machine cannot be used in premises where there is a risk of fire or explosion or where work is carried out which releases substances into the environment which are dangerous with regard to safety (for example: solvents, inflammable vapours, alcohol, etc.). In particular the compressor cannot be used to produce air to be breathed by humans or used on direct contact with foodstuffs. This compressor must be used only for the purpose for which it was specifically designed. All other uses are to be considered incorrect and therefore unreasonable. The Manufacturer cannot be held responsible for any damage resulting from improper, incorrect or unreasonable use. 3.0 OPERATION Reference flow diagram in section 25.0. The electric motor and the compressor unit are coupled by means of a belt transmission. The compressor unit takes in the outside air through the suction valve. The air taken in is filtered by a panel pre-filter fitted on the panel of the cabinet and by the filter cartridge fitted upstream from the suction valve. Inside the compressor unit, the air and the lubricating oil are compressed and sent to the oil separating filter where the oil is separated from the compressed air; the air is then filtered again by the oil separating cartridge to reduce the amount of suspended oil particles to a minimum. At this point the two flows (of oil and air) are sent to two separate coolers where they are cooled, using a flow of air taken from the environment by a special fan inside the machine. The cooled oil returns to the circuit while the compressed air is sent to the using network. 4.0 GENERAL SAFETY STANDARDS The compressor may be used only by specially trained and authorized personnel. Any tampering with the machine or alterations not approved beforehand by the Manufacturer relieve the latter of responsibility for any damage resulting from the above actions. The removal of or tampering with the safety devices constitutes a violation of OSHA regulations. ATTENTION: UPSTREAM OF THE MACHINE INSTALL AN ISOLATOR KNIFE-SWITCH WITH AN AUTOMATIC DISCONNECT AGAINST CURRENT SURGES. (SEE WIRING DIAGRAM)
ALL WORK ON THE ELECTRICALS, EVEN IF SLIGHT, MUST BE CARRIED OUT BY PROFESSIONALLY SKILLED PERSONEL.

11/2008 Chicago Pneumatic Compressors Page 6 62 305 811 65
5.0 DESCRIPTION OF DANGER SIGNALS 5.1 DESCRIPTION OF COMPULSORY SIGNALS
11) READ THE USE AND MAINTENANCE
INSTRUCTIONS
6.0 DANGERS ZONES
FIG. 2
Risks present on the whole machine
FIG. 3
(1)(7)
(2) (1)
(1)
(1)
(4)
(8)
(11)
8) FLUID EJECTION
5) HIGH PRESSURE
1) DANGER This symbol identifies life threatening electrical voltage levels which will result in severe personal injury or death. All electrical work must be performed by a qualified electrician
6) CAUTION This symbol identifies hot surfaces which could result in personal injury or property damage.
2) DANGER Air from this compressor will cause severe injury or death if used for breathing or food processing. Air used for these process must meet OSHA29CFR1910 OR FDA21XDE178.3570 regulations
7) DANGER This symbol identifies immediate hazards which will result in severe personal injury, death or substantial property damage.
3) NOISE
4) FAN ROTATING 9) COMPRESSOR WITH AUTOMATIC START
10) WARNING Identifies hazards or unsafe practices which could result in minor personal injury or property damage.

Chicago Pnematic Compressors 11/2008 62 305 811 65 Page 7
7.0 SAFETY DEVICES 1) Safety screws 2) Side guard and electrical panel door can be opened using a special key. 3) Fixed protection device - pulleys 4) Emergency stop button 5) Oil filling cap (with safety breather) 6) Safety valve (pressure relief valve)
8.0 POSITION OF LABELS 8.1 POSITION OF THE DANGER LABELS The labels fitted on the compressor unit are part of the machine; they have been applied for safety purposes and must not be removed or spoiled for any reason. 1) Dangers label Code 2202 2096 88 5) Dangerous electric voltage 2) Label “Machine with automatic start” 6) Hazard Plate (atmospheric events) 3) Air not fit for breathing 7) No lifting label 4) Moving parts
FIG. 4
5
6
3 1
2
4
FIG. 5
2 2202 2510 89
1 4
5
63
1
4 2
6
5 7
11/2008 Chicago Pneumatic Compressors Page 8 62 305 811 65
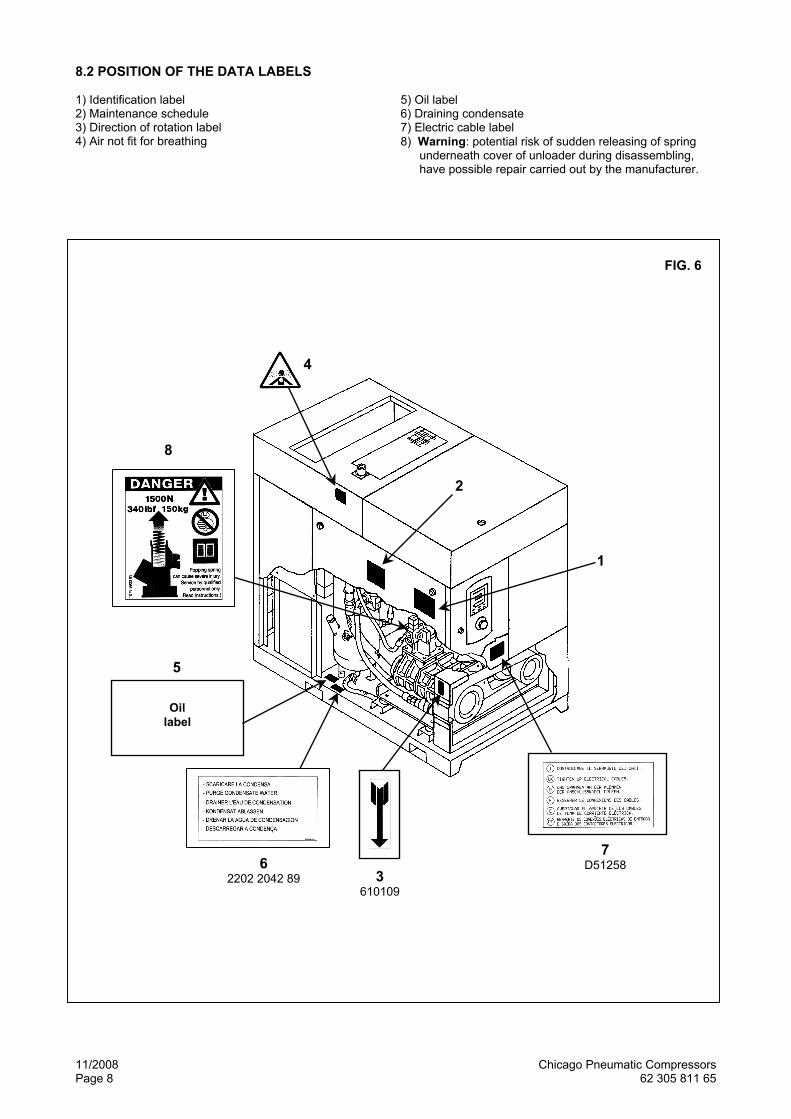
8.2 POSITION OF THE DATA LABELS 1) Identification label 5) Oil label 2) Maintenance schedule 6) Draining condensate 3) Direction of rotation label 7) Electric cable label 4) Air not fit for breathing 8) Warning: potential risk of sudden releasing of spring
underneath cover of unloader during disassembling, have possible repair carried out by the manufacturer.
FIG. 6
2
4
1
7 D51258
3 610109
5
Oil label
6 2202 2042 89
8

Chicago Pnematic Compressors 11/2008 62 305 811 65 Page 9
9.0 COMPRESSOR ROOM 9.1 FLOOR The floor must be even and of industrial type. Consider the total weight of the machine when positioning it. 9.2 VENTILATION When the machine is operating, the room temperature must not be higher than 104 °F or lower than 36 °F. If the environment is dusty it is advisable to fit a filtering panel on this opening. The hot air ejected by the compressor may be led outside with a pipe. This pipe must have a minimum section of 10.76 ft2 and it must not be longer than 9.84 ft. For longer pipes an extra fan must be fitted. 9.3 EXAMPLES OF VENTILATION OF THE COMPRESSOR ROOM
FIG. 7
FAN AIR OUTPUTHOT AIR EJECTION
ATTENTION: REMOVABLE PIPE TO ALLOW CLEANING OF THE COOLER
HOT AIR PIPE

11/2008 Chicago Pneumatic Compressors Page 10 62 305 811 65
10.0 TRANSPORT AND HANDLING ATTENTION: the machine must only be moved with the panels fitted (fig. 8) The machine must be transported as shown in the following figures.
FIG. 8
WOODEN PROTECTION AVOID DAMAGING THE CABINET

Chicago Pnematic Compressors 11/2008 62 305 811 65 Page 11
11.0 UNPACKING After removing the packing, ensure that the machine is unbroken and that there are no visibly damaged parts. If you are unsure, do not use the compressor but request assistance from your local CP distributor. The packing material (plastic bags, polystyrene foam, nails, screws, wood, metal strapping, etc.) must be disposed of appropriately. 12.0 INSTALLATION ANY DAMAGE DUE TO FAILURE TO OBSERVE THE PRECAUTIONS GIVEN BELOW CANNOT BE ATTRIBUTED TO THE MANUFACTURER AND MAY RESULT IN WARRANTY DENIAL. 12.1 POSITIONING After unpacking the equipment and preparing the compressor room, put the compressor into position, checking the following items: • ensure that there is sufficient space around the compressor to allow maintenance (see Fig. 10). • check the compressor is standing on a perfectly flat floor.
FIG. 10 1
3
2
SPACE FOR MAINTENANCE MINIMUM mt 1,5

11/2008 Chicago Pneumatic Compressors Page 12 62 305 811 65
ENSURE THAT THE OPERATOR CAN SEE THE WHOLE COMPRESSOR FROM THE CONTROL PANEL AND CHECK THE PRESENCE OF ANY UNAUTHORIZED PERSONS IN THE VICINITY OF THE COMPRESSOR. 12.2 ELECTRICAL CONNECTION COMPRESSOR WITH AUTOMATIC START • Check that the supply voltage is the same as the value indicated on the compressor data label. • Check the condition of the electrical leads and ensure that there is a grounded lead. • Ensure that there is an automatic disconnect device upstream for the compressor against surges (see Ref. 3 Fig. 10). • Connect the compressor power cables with the greatest care, according to the applicable standards. These cables must
be as indicated on the compressor wiring diagram. • After the first 50 working hours, check that the screws on the electric terminals are tight. ONLY PROFESSIONALLY SKILLED PERSONNEL SHOULD HAVE ACCESS TO THE ELECTRIC PANEL. SWITCH OFF THE POWER BEFORE OPENING THE DOOR OF THE ELECTRIC PANEL.
COMPLIANCE WITH THE APPLICABLE REGULATIONS CONCERNING THE ELECTRICALS IS FUNDAMENTAL FOR OPERATOR SAFETY AND FOR THE PROTECTION OF THE COMPRESSOR CABLES, PLUGS AND ALL OTHER TYPE OF ELECTRIC MATERIAL USED FOR THE CONNECTIONS MUST BE SUITABLE FOR THE USE AND COMPLY WITH THE REQUIREMENTS STATED BY THE APPLICABLE REGULATIONS. 12.3 CONNECTION TO THE COMPRESSED AIR NETWORK Fit a bypass valve Ref. 1 Fig. 10 between the compressor and the compressed air network so that the compressor may be isolated during maintenance operations. Condensate must be drained from the oil receiver (manually) Ref. 2 Fig. 10, in accordance with the local regulations. PIPES, FITTINGS AND CONNECTIONS USED TO INSTALL THE COMPRESSOR MUST COMPLY WITH LOCAL REGULATIONS. ANY DAMAGE DUE TO FAILURE TO OBSERVE THE PRECAUTIONS GIVEN BELOW CANNOT BE ATTRIBUTED TO THE MANUFACTURER AND MAY RESULT IN WARRANTY DENIAL. 12.4 STARTING UP See part B of this manual, Section 20.0

Chicago Pnematic Compressors 11/2008 62 305 811 65 Page 13
13.0 DIMENSIONAL DRAWING
Air connection (A) CPD 75 - 100
1” 1/2 NPT
Dimensions (in) L W H
43.34 79.19 70.53
(A)

11/2008 Chicago Pneumatic Compressors Page 14 62 305 811 65
14.0 COMPRESSOR ILLUSTRATION 14.1 GENERAL LAY-OUT 1 Air suction filter 2 Thermostatic valve 3 Oil filter 4 Air cooler 5 Filter panel 6 Belt tightening system 7 Minimum pressure valve 8 Air-oil separator ( inside the oil collector) 9 Top-up or oil filling cap 10 Control panel 11 Oil gauge
12 Oil discharge 13 Oil collector 14 Pressure gauge tank 15 Control card *16 Safety valve 17 Emergency stop button 18 Electric motor 19 Screw compressor
20 Suction unit 21 Electrical fan
22 Oil radiator ✳ IT IS FORBIDDEN TO TAMPER WITH THE SETTINGS OF THE SAFETY VALVE
FIG. 11
19
2
21
18 6
4
22
16
1
3
10
15
17
20
712
11
9
5
8
13
14

Chicago Pnematic Compressors 11/2008 62 305 811 65 Page 15
14.2 CONTROL PANEL BEFORE OPERATING CAREFULLY READ AND UNDERSTAND THE COMMAND FUNCTIONS. 1) Control panel 2) Emergency stop button with mechanical seal and rotation release
FIG. 12
1
2

11/2008 Chicago Pneumatic Compressors Page 16 62 305 811 65
14.3 ES 3000 CONTROLLER
There is an electronic control and diagnostics display on the electric panel ; this display includes the following functions as shown in figure 13. 1) Top display: indicates the compressor pressure. 2) Bottom display: indicates the temperature, total hours, loaded hours. 3) Button to create a vacuum in the compressor. 4) Navigate to the next field of the screen on the display Ref. 2 5) Buttons to program the controller.
Symbol Description
Pressing the button cancels the stored alarm indication. Pressing the button for more than 3 seconds, the central control unit is tested: all the LEDs must be on.
By pressing this button the compressor is switched on. There is a delay of about 15 seconds before start up.
Pressing the button starts the compressor shut down phase: The compressor runs unloaded for a few seconds before stopping.
FIG. 13
(7)
(6)
(5)
3
2
1
4
5

Chicago Pnematic Compressors 11/2008 62 305 811 65 Page 17
LED - indicates compressor operating status: “RED” pilot lamps (cause compressor stoppage)
Symbol LED flashing LED on
Overpressure alarm in progress
Compressor stopped for overpressure
Wrong rotary way : in progress Wrong rotary way
Oil over temperature alarm in progress (>203 °F)
Compressor stopped for oil over temperature (> 212 °F)
Fan motor overload alarm Compressor lock out due to fan motor thermal trigger
Motor thermal relay alarm in progress
Compressor stopped for motor cool down
General alarm in progress for fault in pressure or temperature probes.
-
To switch off the red LEDs press “reset” LED - indicates compressor operating status: “YELLOW” pilot lamps (do not cause compressor stoppage).
Symbol LED flashing LED on
Not enabled
Not enabled
Warning to replace oil filter
Replace oil filter
Warning to replace separator filter
Replace separator filter
Warning to replace air filter
Replace air filter
Warning to change oil
Change oil
Warning for general check
Perform general check
To switch off the “YELLOW” LEDs see Section 14.6 LED - indicates compressor operating status: “GREEN” pilot lamps
Symbol LED flashing LED on
Not enabled
Not enabled
-
Compressor running under load
Manual unloaded operation of compressor
Unloaded operation of compressor
Compressor in stand-by for start-up (15 seconds) or in shut-down phase (30 seconds).
Compressor on
(G)
(A)
(E)
(P)
(O)
(R)
(Q)
(F)
(H)
(I)
(L)
(M)
(N)
(C)
(D)
(B)

11/2008 Chicago Pneumatic Compressors Page 18 62 305 811 65
ATTENTION: to start up again after a protection has been triggered (alarm) press “RESET”
followed by the start button “I” (6) OPERATION OF THE CONTROLLER The controller is programmed for Energy Saving; it switches off the compressor, thus reducing idle running to a minimum. The controller is preset to run idle before switching off for a period that is shorter the lower the consumption of air. The controller also indicates when filters require maintenance etc.. (Yellow LEDs). 14.4 VIEWING THE HOURS OF OPERATION To view the total hours of operation press Ref. 3, Fig. 13a, the hours of operation appear in the bottom display and a dot lights up in the top display (confirm LED). To view the LOADED hours of operation press Ref. 3 Fig. 13a again and a dot lights up on the right side of the top display (confirm LED). 14.5 VIEWING THE HOURS OF OPERATION OF COMPONENTS SUBJECT TO MAINTENANCE To view the hours of operation of individual components subject to maintenance, proceed according to Section 14.6, to point 4; the operating hours will be viewed on the bottom display. - Press the button Ref. 3 Fig 13a to exit. 14. 6 RESETTING THE MAINTENANCE INTERVAL COUNTERS (YELLOW LEDs excluding LED “A”) To reset a counter (i.e. Ref. L air filter) after having performed the relevant maintenance, proceed as follows: (see Fig. 13a) 1) Press buttons Ref. 7 and Ref. 4 simultaneously until the LED ref. H lights up. 2) Release the buttons Ref. 7 and Ref. 4 3) Use the buttons Ref. 1 and Ref. 2 to select the LED Ref. L (air filter) relevant to the component in question. 4) The operating hours of the component Ref. L (air filter) are viewed on the 5-digit bottom display. 5) Press the button Ref. 4 once and the value viewed flashes, press the button Ref. 4 again; the display is now reset and
the LED Ref. L is lit. 6) Press the button Ref. 3 to exit from RESET 7) To reset another component, move to the relevant LED using the buttons Ref. 1 and Ref. 2. The board exits automatically from programming after 30 seconds of inactivity 14.7 ACTIVATING / DEACTIVATING THE LOAD-UNLOAD OPERATION MODE 1) Press the button Ref. 1 Fig. 13a and the LED Ref. Q flashes, the compressor operates in MANUAL UNLOAD mode. 2) Press the button Ref. 1 Fig. 13a again and the compressor returns to the automatic cycle.
FIG. 13a
H
7
L
Q
1
2
3
4
5
6

Chicago Pnematic Compressors 11/2008 62 305 811 65 Page 19
14.8 OPERATING PARAMETERS OF THE CONTROLLER. The controller is programmed in the factory with the following parameters: P0 = cut-off pressure (107 – 132 - 157 – 182 PSIG) P1 = cut-in pressure (85 – 110 – 135 – 160 PSIG) r 2 = maximum operating temperature (212 °F) t 3 = not active t 4 = not active C5 = maximum number of start-ups per hour (10) The controller is also programmed to measure the pressure in “PSI” (parameter C7) and the temperature in °F (parameter C6). The pressure and temperature units of measurement correspond to the table below.
Name of the parameter Value of the parameter C6 0 = °C 1 = °F C7 0 = bar 1 = °PSI
All parameters described above can be viewed and modified with the procedure indicated in Section 14.9. The parameter number appears in the top display and the value of the parameter appears in the bottom display. 14.9 VIEWING AND MODIFYING THE VALUE OF PARAMETERS. To view the parameters proceed as follows: - Press and hold the button 4 Fig. 13a for a few seconds, until “P0” (cut-off pressure) appears on the top display: the value
of the cut-off pressure in PSI (107 - 132 - 157 or 182 PSIG) appears simultaneously on the bottom display. - By pressing the button Ref. 1 Fig. 13a all the board parameters (P0, P1, r2, t3, t4, C5, C6, C7) will appear in sequence
on the top display while the values set for each parameter will appear on the bottom display. To exit press the button Ref. 3 until the luminous dot on the display is positioned on the symbol.
To change the value of parameters follow the example indicated below: EXAMPLE: the maximum temperature value is to be modified to 203 °F. - Press and hold the button Ref. 4 fig. 13a for a few seconds, until the parameter “P0” appears on the top display. - Press the button Ref. 1 Fig. 13a until reaching the parameter “r2” (maximum temperature). - Press the button Ref. 4 Fig. 13a: the value of the temperature indicated on the bottom display flashes. - Press the button Ref. 2 Fig. 13a until reaching the value 203. - Press the button Ref. 4 Fig. 13a to confirm the modification; the value 203 stops flashing. - Exit from programming by pressing the button Ref. 3 Fig. 13a. The new maximum temperature value is now 203. 14.10 DISPLAYING A TEMPERATURE LEVEL THAT IS TOO LOW The controller is programmed in the factory with a minimum temperature level set at (+ 39.2 °F), if the temperature sensed is lower, it is shown by the bottom display flashing. This fault signal does not mean the compressor cannot be started, but warns the operator that the room temperature is too low.

11/2008 Chicago Pneumatic Compressors Page 20 62 305 811 65
15.0 ROUTINE MAINTENANCE BEFORE CARRYING OUT ANY MAINTENANCE IT IS MANDATORY TO STOP THE COMPRESSOR AND DISCONNECT IT FROM THE MAIN POWER. The maintenance described in this Section may be carried out by the user. The more complex maintenance jobs which require professionally skilled personnel are listed in the section on GENERAL MAINTENANCE.FOR TRAINED PERSONNEL (See Section 21.0) 15.1 GENERAL INFORMATION 15.2 MAINTENANCE SCHEDULE OPERATIONS THAT MAY BE CARRIED OUT BY THE USER
OPERATIONS THAT REQUIRE SKILLED PERSONNEL; THESE OPERATIONS ARE ILLUSTRATED IN PART “B” OF THIS MANUAL.
These maintenance intervals are recommended for work environments that are not dusty and are will ventilated. For particularly dusty environments, double the frequency of maintenance. Every 50 working hours Drain condensate from the oil collector Check the oil level Clean the filtering panel Every 500 hours Clean the air suction filter (see control board LED) Check belt tension Every 2000 hours Change the oil filter (see control board LED) Change the suction filter (see control board LED) Every 4000 hours Clean the finned surface of the air-oil cooler Change the oil separating filter (see control board LED) Every 8000 hours Change the oil (see control board LED) BEFORE CARRYING OUT ANY MAINTENANCE IT IS MANDATORY TO STOP THE COMPRESSOR AND DISCONNECT IT FROM THE MAIN POWER.
MAINTENANCE ON THE ELECTRICAL COMPONENTS CAN ONLY BE PERFORMED BY QUALIFIED TECHNICIANS OR AUTHORIZED FACTORY PERSONNEL. CAUTION When the compressed air cools, part of the moisture sucked in by the compressor condenses. In order to protect the dryer against the risk of an ice plug forming, it is essential to check regularly that the condensate drains are operating properly : On the compressed air storage reservoir and on the filters : • With a manual drain, drain regularly according to the moisture content of the ambient air. • With an automatic drain, set the draining cycle accordingly and check that the drain is in good working condition. This recommendation is also fundamental in a circuit comprising an absorption dryer (risk of saturation of the alumina).
Chicago Pnematic Compressors 11/2008 62 305 811 65 Page 21
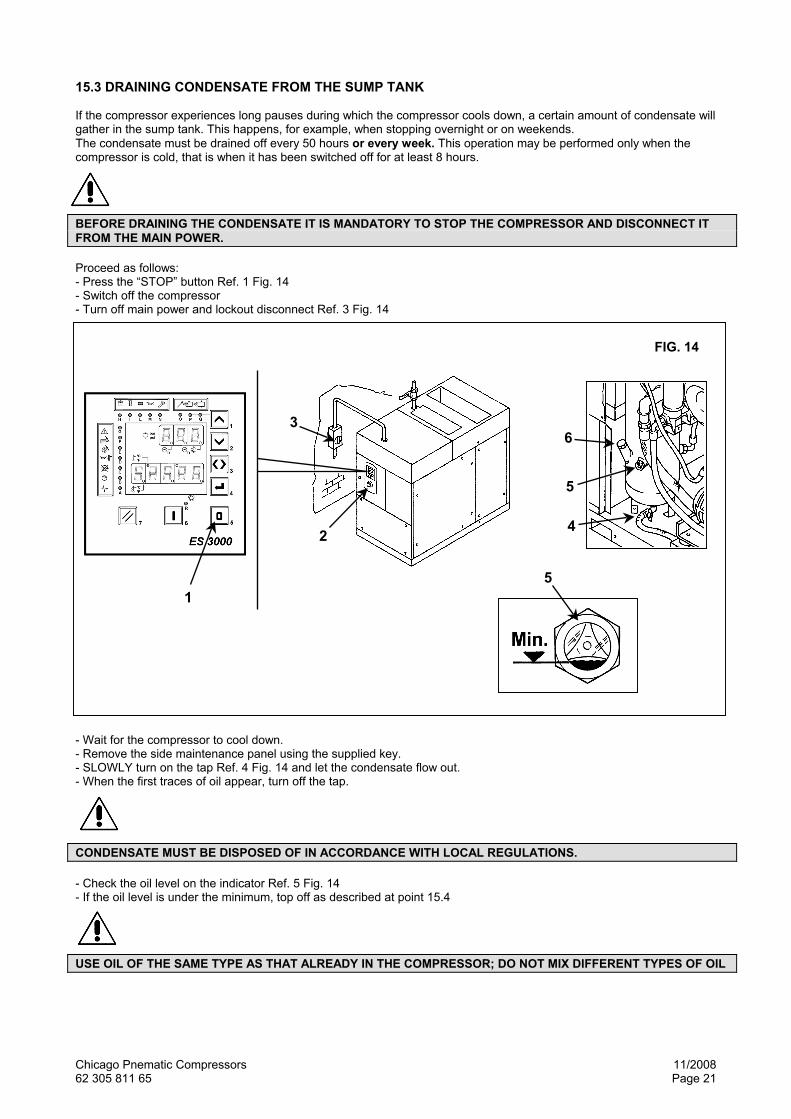
15.3 DRAINING CONDENSATE FROM THE SUMP TANK If the compressor experiences long pauses during which the compressor cools down, a certain amount of condensate will gather in the sump tank. This happens, for example, when stopping overnight or on weekends. The condensate must be drained off every 50 hours or every week. This operation may be performed only when the compressor is cold, that is when it has been switched off for at least 8 hours. BEFORE DRAINING THE CONDENSATE IT IS MANDATORY TO STOP THE COMPRESSOR AND DISCONNECT IT FROM THE MAIN POWER. Proceed as follows: - Press the “STOP” button Ref. 1 Fig. 14 - Switch off the compressor - Turn off main power and lockout disconnect Ref. 3 Fig. 14
- Wait for the compressor to cool down. - Remove the side maintenance panel using the supplied key. - SLOWLY turn on the tap Ref. 4 Fig. 14 and let the condensate flow out. - When the first traces of oil appear, turn off the tap. CONDENSATE MUST BE DISPOSED OF IN ACCORDANCE WITH LOCAL REGULATIONS. - Check the oil level on the indicator Ref. 5 Fig. 14 - If the oil level is under the minimum, top off as described at point 15.4 USE OIL OF THE SAME TYPE AS THAT ALREADY IN THE COMPRESSOR; DO NOT MIX DIFFERENT TYPES OF OIL
FIG. 14
15
3
2 4
5
6

11/2008 Chicago Pneumatic Compressors Page 22 62 305 811 65
15.4 CHECK OIL LEVEL AND TOP OFF - Switch off the compressor using the button Ref. 1 Fig. 14: the compressor will stop after running unloaded for a few seconds. - Turn off main power and lockout disconnect Ref. 3 Fig. 14 - Remove the side maintenance panel using the supplied key. - Wait a few minutes for the foam in the sump tank to abate. - Check the oil level on the indicator Ref. 5 Fig. 14 - If the oil level is under the minimum, top off. USE OIL OF THE SAME TYPE AS THAT ALREADY IN THE COMPRESSOR; DO NOT MIX DIFFERENT TYPES OF OIL. BEFORE CARRYING OUT ANY OPERATION ON THE COMPRESSOR, ENSURE THAT THE ELECTRIC POWER SUPPLY HAS BEEN DISCONNECTED. - Slowly open the fill port Ref. 6 Fig. 14 - Top up to maximum level Ref. 5 Fig. 14, with oil of the same type in the compressor. - Replace the cap on the fill port Ref. 6 Fig. 14. - Close the side maintenance panel using the supplied key 15.5 CLEANING THE FILTRATION PANEL - Press the “STOP” button Ref. 1 Fig. 15 - Switch off the compressor - Turn off main power and lockout disconnect Ref. 3 Fig. 15. - Remove the filters panels Ref. 4 Fig. 15. - Clean the filter panel with water, do not use solvents. - Once the operation has been completed, reassemble the filter panel.
FIG. 15
4
1
4
3
2
Chicago Pnematic Compressors 11/2008 62 305 811 65 Page 23
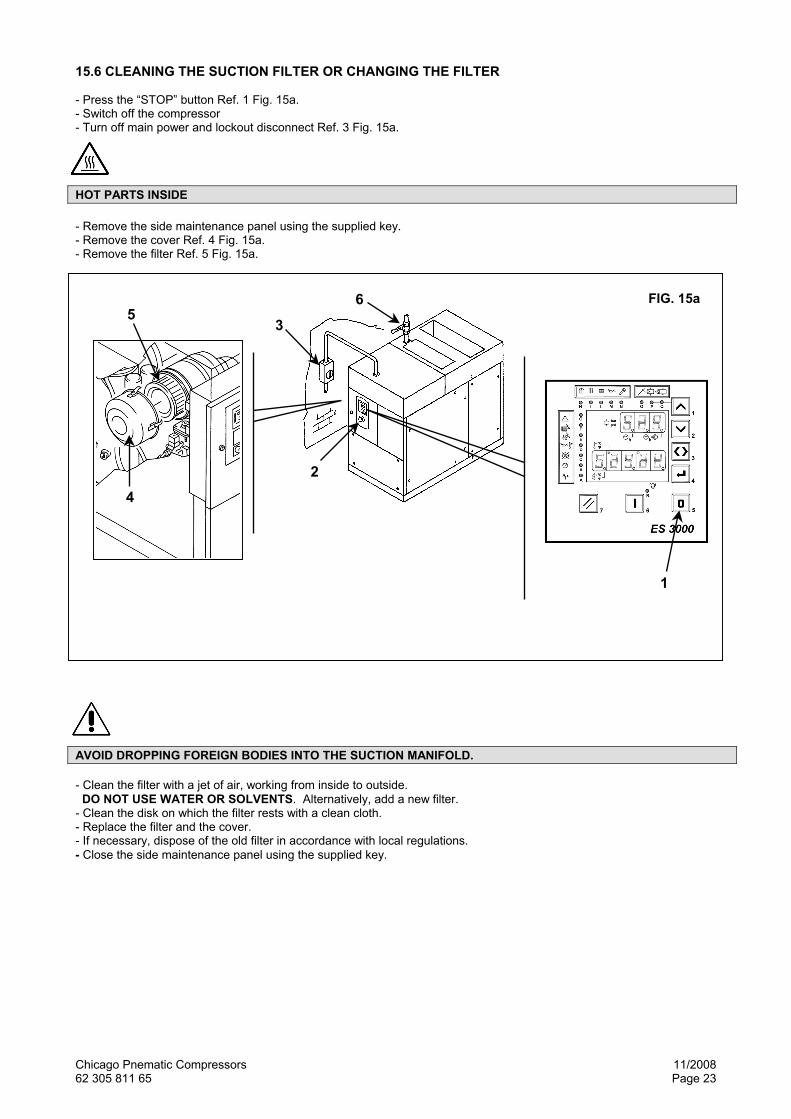
15.6 CLEANING THE SUCTION FILTER OR CHANGING THE FILTER - Press the “STOP” button Ref. 1 Fig. 15a. - Switch off the compressor - Turn off main power and lockout disconnect Ref. 3 Fig. 15a. HOT PARTS INSIDE - Remove the side maintenance panel using the supplied key. - Remove the cover Ref. 4 Fig. 15a. - Remove the filter Ref. 5 Fig. 15a. AVOID DROPPING FOREIGN BODIES INTO THE SUCTION MANIFOLD. - Clean the filter with a jet of air, working from inside to outside. DO NOT USE WATER OR SOLVENTS. Alternatively, add a new filter. - Clean the disk on which the filter rests with a clean cloth. - Replace the filter and the cover. - If necessary, dispose of the old filter in accordance with local regulations. - Close the side maintenance panel using the supplied key.
FIG. 15a
1
2
3
4
56
11/2008 Chicago Pneumatic Compressors Page 24 62 305 811 65
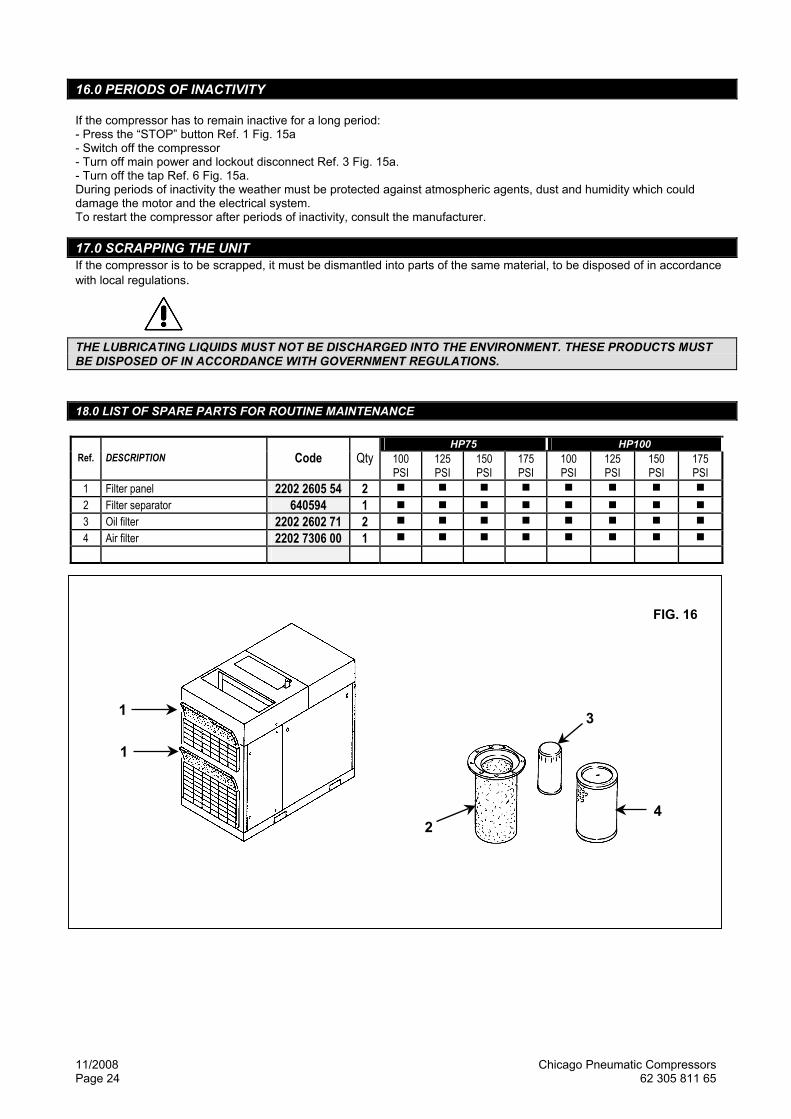
16.0 PERIODS OF INACTIVITY If the compressor has to remain inactive for a long period: - Press the “STOP” button Ref. 1 Fig. 15a - Switch off the compressor - Turn off main power and lockout disconnect Ref. 3 Fig. 15a. - Turn off the tap Ref. 6 Fig. 15a. During periods of inactivity the weather must be protected against atmospheric agents, dust and humidity which could damage the motor and the electrical system. To restart the compressor after periods of inactivity, consult the manufacturer. 17.0 SCRAPPING THE UNIT If the compressor is to be scrapped, it must be dismantled into parts of the same material, to be disposed of in accordance with local regulations. THE LUBRICATING LIQUIDS MUST NOT BE DISCHARGED INTO THE ENVIRONMENT. THESE PRODUCTS MUST BE DISPOSED OF IN ACCORDANCE WITH GOVERNMENT REGULATIONS. 18.0 LIST OF SPARE PARTS FOR ROUTINE MAINTENANCE
HP75 HP100 Ref. DESCRIPTION Code Qty 100
PSI 125 PSI
150 PSI
175 PSI
100 PSI
125 PSI
150 PSI
175 PSI
1 Filter panel 2202 2605 54 2 2 Filter separator 640594 1 3 Oil filter 2202 2602 71 2 4 Air filter 2202 7306 00 1
FIG. 16
1
1
2
3
4
Chicago Pnematic Compressors 11/2008 62 305 811 65 Page 25
19.0 TROUBLE-SHOOTING ALL WORK MUST BE CARRIED OUT BY FACTORY AUTHORIZED PERSONNEL. BEFORE CARRYNG OUT ANY MAINTENANCE IT IS MANDATORY TO STOP THE COMPRESSOR AND DISCONNECT IT FROM THE MAIN POWER. OPERATIONS MARKED + + MUST BE CARRIED OUT BY FACTORY AUTHORIZED PERSONNEL.
PROBLEM POSSIBLE CAUSES SOLUTION 1) The compressor does not start
1A - no power 1B - the transformer protection device
has tripped
- check the power supply line, Section 12.2
- replace fuses 2) The compressor does not start the pilot lamp Ref. 1 (F) flashes (see Fig. A)
2A - the main motor protection device
has tripped
- reset the automatic switch that
protects the fan
3) The compressor does not start the pilot lamp Ref. 2 (D) flashes (see Fig. A)
3A - the oil high temperature
thermostat has tripped
- ambient temperature too high;
improve ventilation in the + + compressor room, Section 9.2
- cooler is dirty, clean the cooler - oil level too low; top off the oil tank
4) The compressor does not start the pilot lamp Ref. 3 (E) flashes (see Fig. A)
4A - The fan motor thermal protection
has triggered
- Reset the fan motor thermal
protection.
5) The compressor does not reach
working pressure
5A - the compressed air consumption
is too high 5B - the discharge electrovalve
remains open, Ref. EV/SC wiring diagram
+ +
- check the electric system
6) Excess oil consumption
6A - deteriorated oil separating filter 6B - oil level is too high
+ + - change the oil separating filter,
Section 23 - Drain some oil
FIG. A
1
2
3

11/2008 Chicago Pneumatic Compressors Page 26 62 305 811 65
PART “B”
ALWAYS WAIT FOR FIVE MINUTES BEFORE REMOVING THE FRONT COVER. ALWAYS CHECK THAT THERE ARE NO DANGEROUS VOLTAGES BEFORE PERFORMING MAINTENANCE ON THE MOTOR.
THIS PART “B” OF THE INSTRUCTIONS MANUAL IS RESERVED
FOR FACTORY AUTHORIZED PERSONNEL APPROVED THE MANUFACTURER.
Chicago Pnematic Compressors 11/2008 62 305 811 65 Page 27
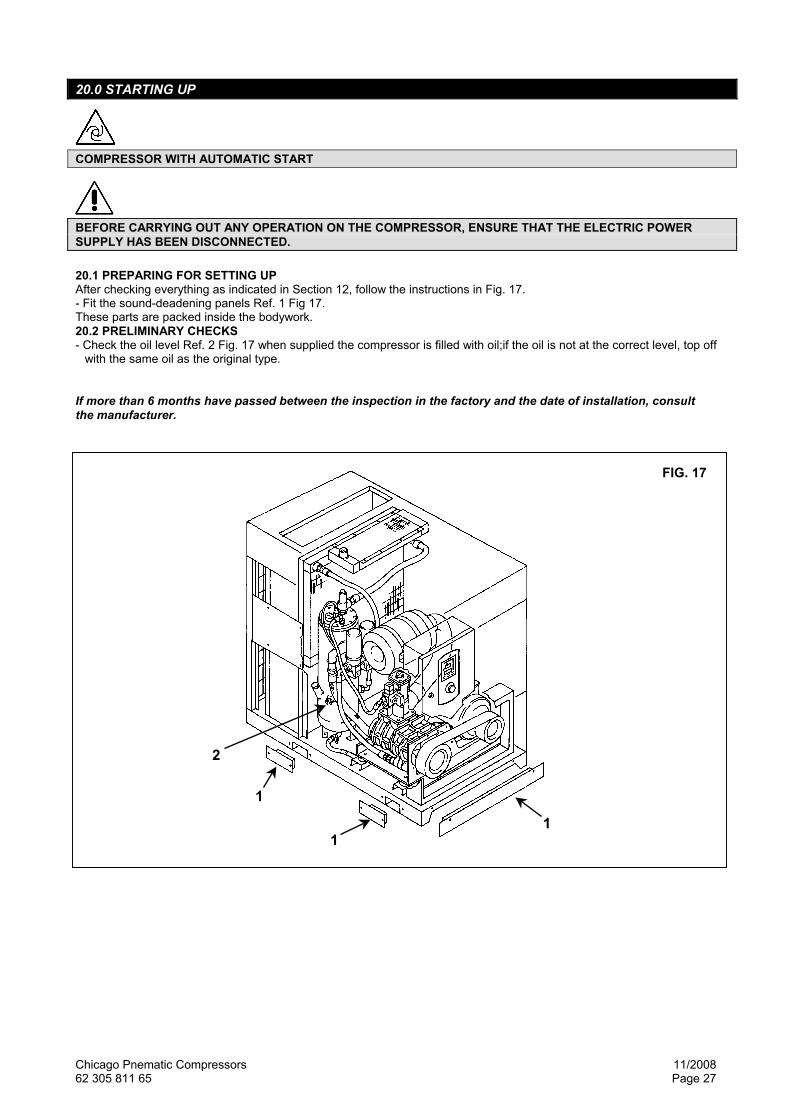
20.0 STARTING UP COMPRESSOR WITH AUTOMATIC START BEFORE CARRYING OUT ANY OPERATION ON THE COMPRESSOR, ENSURE THAT THE ELECTRIC POWER SUPPLY HAS BEEN DISCONNECTED. 20.1 PREPARING FOR SETTING UP After checking everything as indicated in Section 12, follow the instructions in Fig. 17. - Fit the sound-deadening panels Ref. 1 Fig 17. These parts are packed inside the bodywork. 20.2 PRELIMINARY CHECKS - Check the oil level Ref. 2 Fig. 17 when supplied the compressor is filled with oil;if the oil is not at the correct level, top off
with the same oil as the original type. If more than 6 months have passed between the inspection in the factory and the date of installation, consult the manufacturer.
FIG. 17
1 1
1
2
11/2008 Chicago Pneumatic Compressors Page 28 62 305 811 65
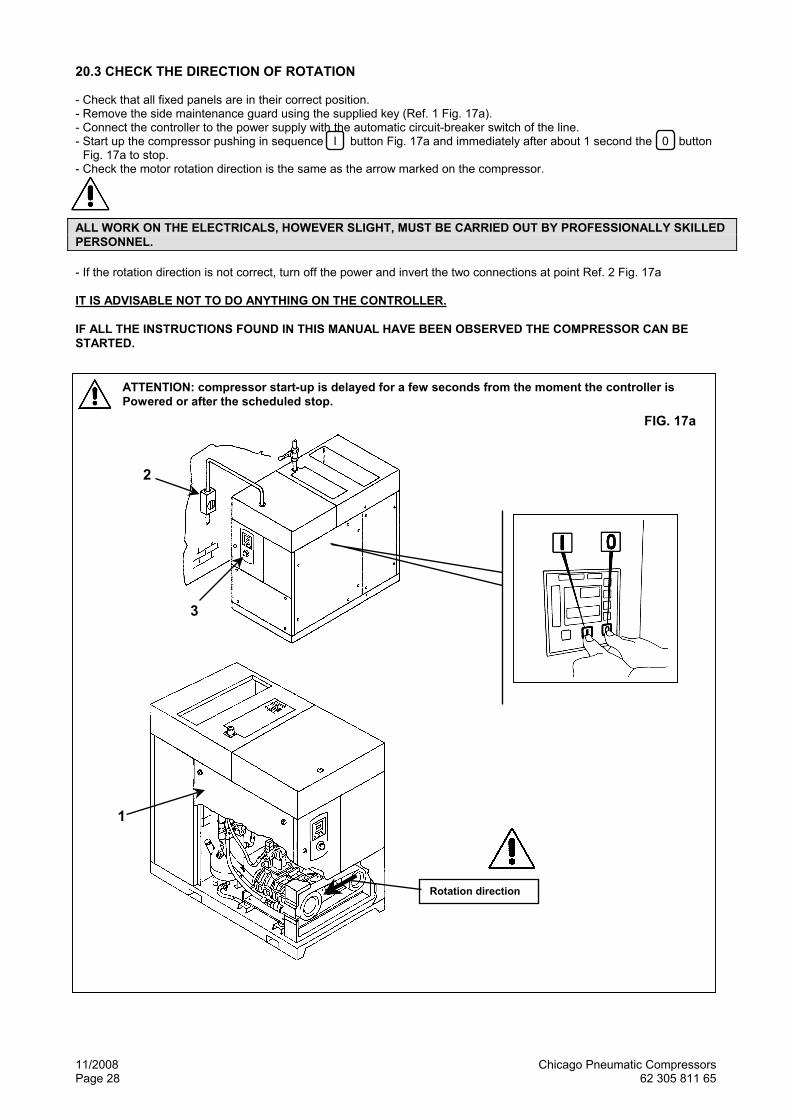
20.3 CHECK THE DIRECTION OF ROTATION - Check that all fixed panels are in their correct position. - Remove the side maintenance guard using the supplied key (Ref. 1 Fig. 17a). - Connect the controller to the power supply with the automatic circuit-breaker switch of the line. - Start up the compressor pushing in sequence I button Fig. 17a and immediately after about 1 second the 0 button
Fig. 17a to stop. - Check the motor rotation direction is the same as the arrow marked on the compressor. ALL WORK ON THE ELECTRICALS, HOWEVER SLIGHT, MUST BE CARRIED OUT BY PROFESSIONALLY SKILLED PERSONNEL.
- If the rotation direction is not correct, turn off the power and invert the two connections at point Ref. 2 Fig. 17a IT IS ADVISABLE NOT TO DO ANYTHING ON THE CONTROLLER. IF ALL THE INSTRUCTIONS FOUND IN THIS MANUAL HAVE BEEN OBSERVED THE COMPRESSOR CAN BE STARTED.
ATTENTION: compressor start-up is delayed for a few seconds from the moment the controller is Powered or after the scheduled stop.
FIG. 17a
Rotation direction
1
2
3

Chicago Pnematic Compressors 11/2008 62 305 811 65 Page 29
21.0 ROUTINE MAINTENANCE FOR TRAINED PERSONNEL BEFORE CARRYING OUT ANY MAINTENANCE IT IS MANDATORY TO STOP THE COMPRESSOR AND DISCONNECT IT FROM THE MAIN POWER. MAINTENANCE SCHEDULE These maintenance intervals are recommended for work environments that are not dusty and are well ventilated. For particularly dusty environments, double the frequency of maintenance. Every 50 working hours Drain condensate from the sump tank Check the oil level Clean the filter panel Every 500 hours Clean the air suction filter (see controller LED) Check belt tension Every 2000 hours Change the oil filter (see controller LED) Change the suction filter (see controller LED) Every 4000 hours Clean the finned surface of the air-oil cooler Change the oil separating filter (see controllerLED) Change belt Every 8000 hours Change the oil MPV overhaul kit Every 12000 hours Maintenance overhaul on entire compressor THE OPERATIONS MARKED ARE DESCRIBED IN PART "A" OF THIS MANUAL ON SECTION 15.3

11/2008 Chicago Pneumatic Compressors Page 30 62 305 811 65
22.0 CHANGING THE OIL BEFORE CARRYING OUT ANY MAINTENANCE JOBS IT IS MANDATORY TO STOP THE COMPRESSOR AND DISCONNECT IT FROM THE MAIN POWER AND FROM THE COMPRESSED AIR DISTRIBUTION NETWORK. Changing oil is an important operation for the compressor: if the lubrication of the bearings is not efficient, the compressor life will be shortened. The oil must be changed when the compressor is still warm, that is immediately after stopping it. The suggestions listed below should be followed. After draining the old oil out of the compressor Ref. 1 Fig. 18. - Fill the oil tank to the MAX level, Ref. 2 Fig. 18. - Start the compressor. - After about 1 minute switch off the compressor by pressing “STOP” (Ref. 3 Fig. 18) after a few seconds of idle running the
compressor will switch off. PROCEED AS DESCRIBED AT POINT SECTION 15.4
THE OLD OIL MUST BE DISPOSED OF IN COMPLIANCE WITH LOCAL REGULATIONS. DO NOT TOP OFF WITH DIFFERENT OILS NOTE ON LUBRICANTS When delivered, the compressor is filled with oil; In normal conditions of use, these lubricants have proved to be able to withstand use for as many as 8,000 hours. If the compressor is being used at high temperatures (continuous operation above 194 °F) or in particularly severe conditions, we advise changing the oil at shorter intervals than those recommended in the maintenance chart.
FIG. 18
32
1

Chicago Pnematic Compressors 11/2008 62 305 811 65 Page 31
23.0 CHANGING THE OIL SEPARATION FILTER BEFORE CARRYING OUT ANY MAINTENANCE THE COMPRESSOR MUST BE STOPPED, DISCONNECT THE COMPRESSOR FROM THE MAIN POWER AND FROM THE COMPRESSED AIR DISTRIBUTION NETWORK, CHECK THAT THE COMPRESSOR IS NOT UNDER PRESSURE. - Press the “STOP” button Ref. 1 Fig. 19 - Switch off the compressor - Turn off main power and lockout disconnect Ref. 3 Fig. 19. - Check there is no pressure inside the compressor: check the pressure gauge Ref. 4 Fig. 19. - Let off the internal pressure through the minimum valve Ref. 5 Fig. 19 and the manual valve Ref. 6 Fig.19. Proceed as follows: - Unecrew the oil recovery pipe Ref. 8 - Take off the cover Ref. 7 fig. 19 - Change the oil-separation filter.
FIG. 19
1
3
2
6
5
4
7
8
7
11/2008 Chicago Pneumatic Compressors Page 32 62 305 811 65
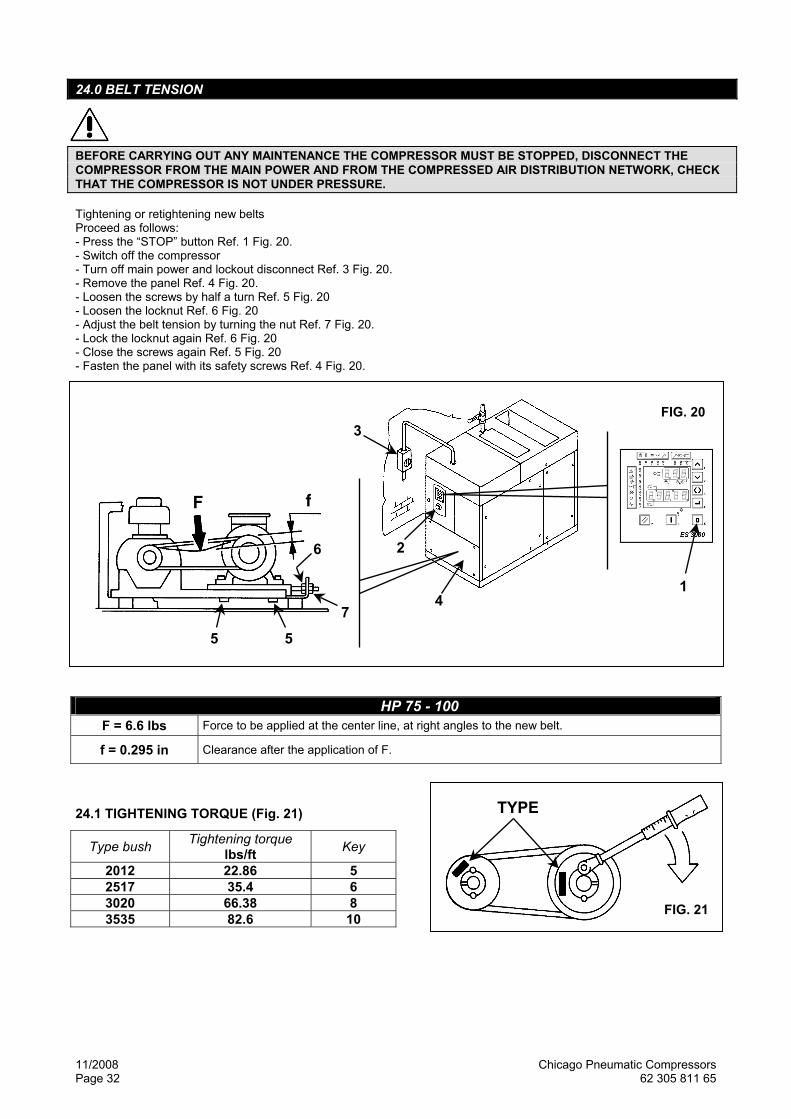
24.0 BELT TENSION BEFORE CARRYING OUT ANY MAINTENANCE THE COMPRESSOR MUST BE STOPPED, DISCONNECT THE COMPRESSOR FROM THE MAIN POWER AND FROM THE COMPRESSED AIR DISTRIBUTION NETWORK, CHECK THAT THE COMPRESSOR IS NOT UNDER PRESSURE. Tightening or retightening new belts Proceed as follows: - Press the “STOP” button Ref. 1 Fig. 20. - Switch off the compressor - Turn off main power and lockout disconnect Ref. 3 Fig. 20. - Remove the panel Ref. 4 Fig. 20. - Loosen the screws by half a turn Ref. 5 Fig. 20 - Loosen the locknut Ref. 6 Fig. 20 - Adjust the belt tension by turning the nut Ref. 7 Fig. 20. - Lock the locknut again Ref. 6 Fig. 20 - Close the screws again Ref. 5 Fig. 20 - Fasten the panel with its safety screws Ref. 4 Fig. 20.
HP 75 - 100 F = 6.6 lbs Force to be applied at the center line, at right angles to the new belt.
f = 0.295 in Clearance after the application of F.
24.1 TIGHTENING TORQUE (Fig. 21)
Type bush Tightening torque lbs/ft Key
2012 22.86 5 2517 35.4 6 3020 66.38 8 3535 82.6 10
FIG. 21
TYPE
FIG. 20
5
7
f F
5
1
6
4
2
3

Chicago Pnematic Compressors 11/2008 62 305 811 65 Page 33
25.0 FLOW DIAGRAM 1 SUCTION FILTER 10 MINIMUM PRESSURE VALVE 2 SUCTION REGULATOR 11 AIR-OIL SEPARATOR 3 SCREW COMPRESSOR 12 PRESSURE GAUGE 4 OIL DISCHARGE VALVE 13 SAFETY VALVE 5 AIR-OIL PRE-SEPARATION 14 TEMPERATURE SENSOR 6 OIL FILTER 15 ELECTRIC MOTOR 7 THERMOSTATIC VALVE 16 NO-LOAD RUNNING SOLENOID VALVE 8 AIR-OIL COOLER 17 OIL LEVEL 9 PRESSURE TRANSDUCER 18 BLED VALVE
AIR CIRCUIT
OIL CIRCUIT
CONTROL CIRCUIT

11/2008 Chicago Pneumatic Compressors Page 34 62 305 811 65
NOTE

Chicago Pnematic Compressors 11/2008 62 305 811 65 Page 35
