modbus rtu slave - automationdirect · t1k-modbus $200.00 the terminator i/o modbus network inter -...
TRANSCRIPT
T1K-MODBUS $200.00The Terminator I/O Modbus network inter-
face module allows you to connect I/O as a slave station on a Modbus RTU network. The T1K-MODBUS can communicate with any Modbus RTU network master using high-level Modbus commands.
DirectLOGIC Modbus communicationsSome of our DirectLOGIC PLCs can be used as Modbus masters, directly through a communication port on the CPU. (Consult the PLC section of this catalog for more information.)
Network configuration optionsYou can configure a simple point-to-point network or create a multidrop network using the RS-232, RS-422/485 HD-15 Modbus port. The T1K-MODBUS has two rotary switches that can be set to desig-nate the module’s slave address. Set the rotary switches to give each slave a unique address in a range from 1-F7 hex (1-247 decimal). The T1K-MODBUS also has an auxiliary RJ12 RS-232 serial port that can be used to configure the Modbus port with the T1K-MODBUS Setup Tool.
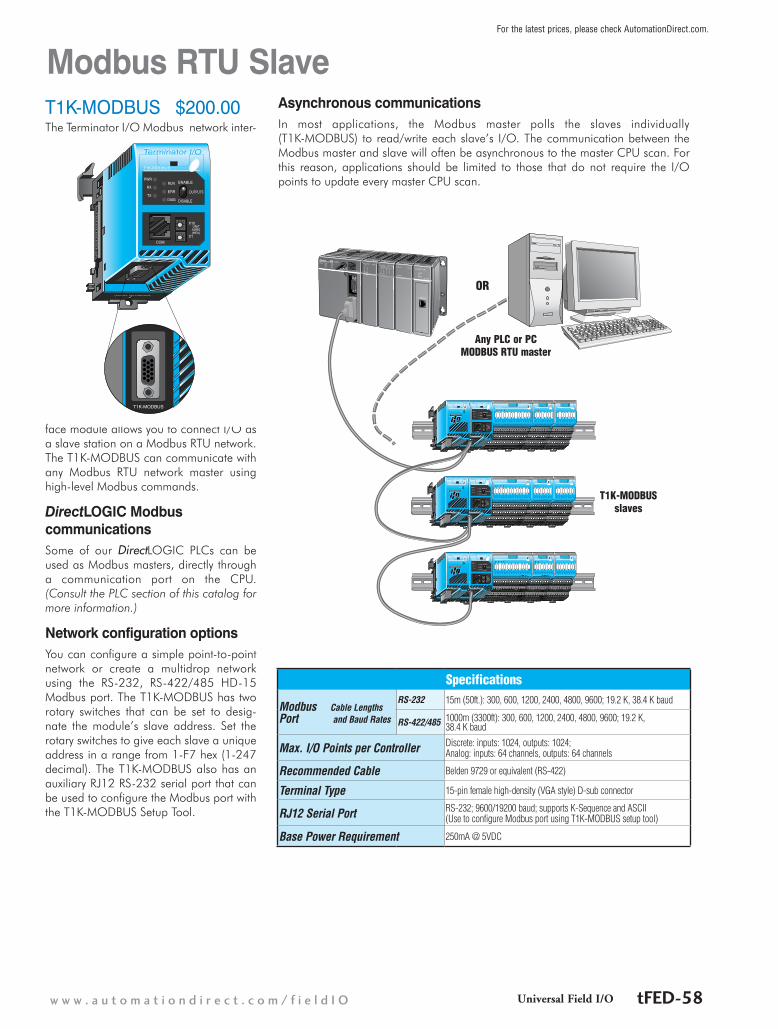
Asynchronous communicationsIn most applications, the Modbus master polls the slaves individually (T1K-MODBUS) to read/write each slave’s I/O. The communication between the Modbus master and slave will often be asynchronous to the master CPU scan. For this reason, applications should be limited to those that do not require the I/O points to update every master CPU scan.
Any PLC or PC MODBUS RTU master
Modbus RTU Slave
OR
Specifications
Modbus Cable Lengths Port and Baud Rates
RS-232 15m (50ft.): 300, 600, 1200, 2400, 4800, 9600; 19.2 K, 38.4 K baud
RS-422/485 1000m (3300ft): 300, 600, 1200, 2400, 4800, 9600; 19.2 K, 38.4 K baud
Max. I/O Points per Controller Discrete: inputs: 1024, outputs: 1024; Analog: inputs: 64 channels, outputs: 64 channels
Recommended Cable Belden 9729 or equivalent (RS-422)
Terminal Type 15-pin female high-density (VGA style) D-sub connector
RJ12 Serial Port RS-232; 9600/19200 baud; supports K-Sequence and ASCII (Use to configure Modbus port using T1K-MODBUS setup tool)
Base Power Requirement 250mA @ 5VDC
T1K-MODBUS slaves
w w w . a u t o m a t i o n d i r e c t . c o m / f i e l d I O Universal Field I/O tFED-58
For the latest prices, please check AutomationDirect.com.
It is important to understand the installa-tion requirements for your Terminator I/O system. This will ensure that the Terminator I/O products work within their environ-mental and electrical limits.
Plan for safetyThis catalog should never be used as a replacement for the technical data sheet that comes with the products or the T1K-INST-M Installation and I/O Manual (available online at www.automationdirect.com.) The tech-nical data sheet contains information that must be followed. The system installation should comply with all appropriate elec-trical codes and standards.
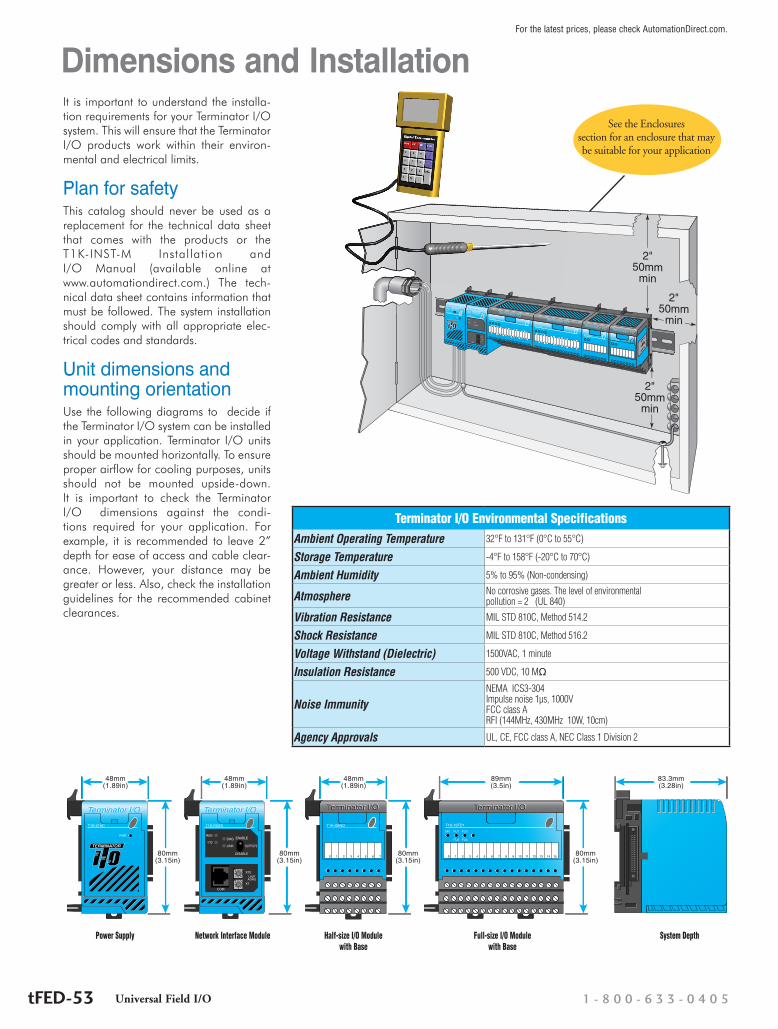
Unit dimensions and mounting orientationUse the following diagrams to decide if the Terminator I/O system can be installed in your application. Terminator I/O units should be mounted horizontally. To ensure proper airflow for cooling purposes, units should not be mounted upside-down. It is important to check the Terminator I/O dimensions against the condi-tions required for your application. For example, it is recommended to leave 2” depth for ease of access and cable clear-ance. However, your distance may be greater or less. Also, check the installation guidelines for the recommended cabinet clearances.
48mm(1.89in)
80mm(3.15in)
80mm(3.15in)
48mm(1.89in)
80mm(3.15in)
48mm(1.89in)
89mm(3.5in)
80mm(3.15in)
83.3mm(3.28in)
Power Supply Network Interface Module Half-size I/O Module with Base
System DepthFull-size I/O Module with Base
Dimensions and Installation
See the Enclosures section for an enclosure that may be suitable for your application
Terminator I/O Environmental SpecificationsAmbient Operating Temperature 32°F to 131°F (0°C to 55°C)
Storage Temperature -4°F to 158°F (-20°C to 70°C)
Ambient Humidity 5% to 95% (Non-condensing)
Atmosphere No corrosive gases. The level of environmental pollution = 2 (UL 840)
Vibration Resistance MIL STD 810C, Method 514.2
Shock Resistance MIL STD 810C, Method 516.2
Voltage Withstand (Dielectric) 1500VAC, 1 minute
Insulation Resistance 500 VDC, 10 Mq
Noise ImmunityNEMA ICS3-304 Impulse noise 1µs, 1000V FCC class A RFI (144MHz, 430MHz 10W, 10cm)
Agency Approvals UL, CE, FCC class A, NEC Class 1 Division 2
1 - 8 0 0 - 6 3 3 - 0 4 0 5tFED-53 Universal Field I/O
For the latest prices, please check AutomationDirect.com.
I/O Module Installation
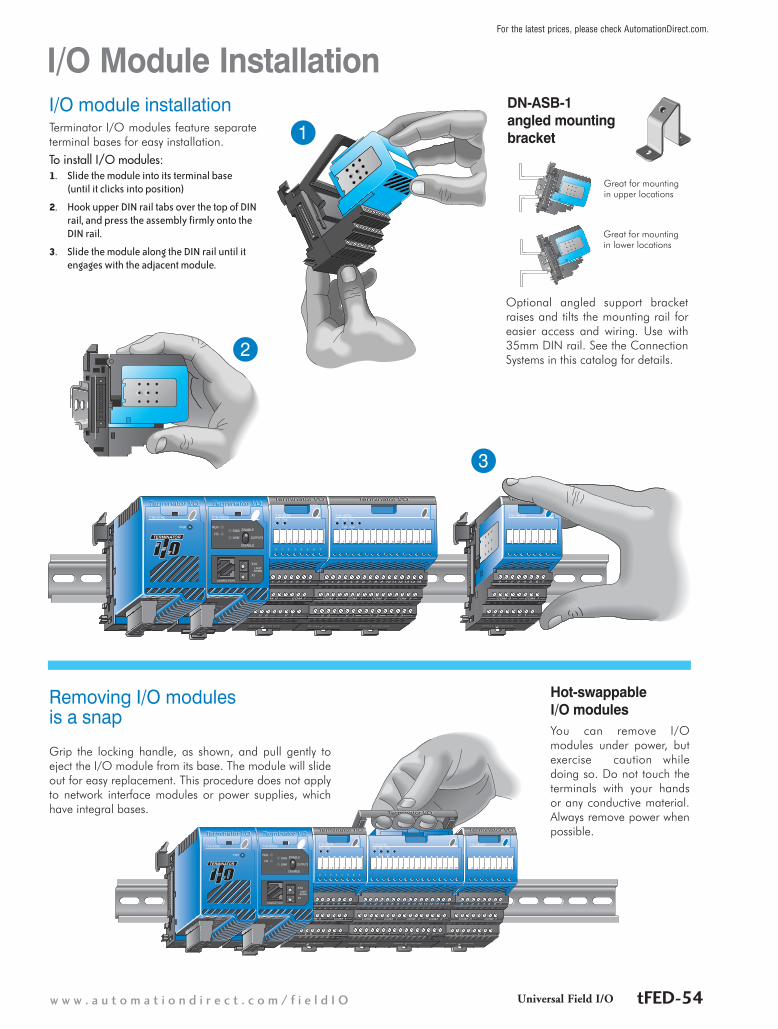
Grip the locking handle, as shown, and pull gently to eject the I/O module from its base. The module will slide out for easy replacement. This procedure does not apply to network interface modules or power supplies, which have integral bases.
Hot-swappable I/O modules You can remove I/O modules under power, but exercise caution while doing so. Do not touch the terminals with your hands or any conductive material. Always remove power when possible.
Removing I/O modules is a snap
I/O module installationTerminator I/O modules feature separate terminal bases for easy installation.
To install I/O modules:1. Slide the module into its terminal base
(until it clicks into position)
2. Hook upper DIN rail tabs over the top of DIN rail, and press the assembly firmly onto the DIN rail.
3. Slide the module along the DIN rail until it engages with the adjacent module.
DN-ASB-1 angled mounting bracket
Optional angled support bracket raises and tilts the mounting rail for easier access and wiring. Use with 35mm DIN rail. See the Connection Systems in this catalog for details.
Great for mounting in upper locations
Great for mounting in lower locations
1
2
3
w w w . a u t o m a t i o n d i r e c t . c o m / f i e l d I O Universal Field I/O tFED-54
For the latest prices, please check AutomationDirect.com.

Calculating the power budgetTo calculate the power budget, read the available power (current rating) from the Power Supply Specifications table and subtract the power consumed by each module to the right of the power supply. Do not include modules to the right of an additional power supply.
Power suppliesThe Terminator I/O product line offers two power supply options: AC or DC. The power supplies are always positioned to the left of the modules to which they supply power. Consult the system configu-ration examples and the power budgeting example for more information on posi-tioning power supplies.
This power supply powers these three I/O modules
This power supply powers the network interface module and the next two I/O modules
Power Supplies and Power RequirementsPower requirements
Power supply specifications
Power Supply Specifications
T1K-
01AC
$1
24.0
0
T1K-
01DC
$1
19.0
0
Input Voltage Range 110/220 VAC 12/24 VDC
Input Frequency 50/60 Hz N/A
Maximum Power 50VA 30W
Max. Inrush Current 20A 10A
Insulation Resistance > 10Mq @ 500 VDC
Voltage Withstand1 min. @ 1500VAC between primary, secondary and field ground
5VDC PWR
Voltage 5.25 VDC 5.25 VDC
Current Rating 2000 mA max (see current option note below)
2000 mA max
Ripple 5% max. 5% max.
24VDC PWR
Voltage 24VDC N/A
Current Rating 300mA max. (see current option note below)
N/A
Ripple 10% max. N/A
Fuse 1 (primary), not replaceable
Replacement Terminal Block (Phoenix Contact)
MVSTBW 2.5/4-ST-5.08 BK
MVSTBW 2.5/6-ST-5.08 BK
Note: 500mA @ 24VDC can be achieved by lowering the 5VDC from 2000mA to 1500mA.
Power Budget ExampleModule 5VDC 24VDC
T1K-01AC +2000mA +300mA
T1H-EBC100 -300mA -0mA
T1K-16ND3 -70mA -0mA
T1K-16TD2 -200mA -0mA
T1F-08AD-1 -75mA -50mA
Remaining +1355mA +250mA
Module 5VDC 24VDC
Analog Input ModulesT1F-08AD-1 75 50*
T1F-08AD-2 75 50*
T1F-16AD-1 75 50*
T1F-16AD-2 75 50*
T1F-16RTD 150 0
T1F-16TMST 150 0
T1F-14THM 60 70*
Analog Output ModulesT1F-08DA-1 75 150*
T1F-08DA-2 75 150*
T1F-16DA-1 75 150*
T1F-16DA-2 75 150*
Combination Analog ModulesT1F-8AD4DA-1 75 60*
T1F-8AD4DA-2 75 70*
* Use either internal or external source for 24VDC
Module 5VDC 24VDC
DC Output ModulesT1H-08TDS 200 0
T1K-08TD1 100 200*
T1K-16TD1 200 400*
T1K-08TD2-1 200 0
T1K-16TD2-1 200 0
AC Output ModulesT1K-08TA 250 0
T1K-16TA 450 0
T1K-08TAS 300 0
Relay Output ModulesT1K-08TR 350 0
T1K-16TR 700 0
T1K-08TRS 400 0
Specialty ModulesT1H-CTRIO 400 0
* Use either internal or external source for 24VDC
Module 5VDC 24VDC
Interface ModulesT1H-EBC100 300 0
T1H-PBC 530 0
T1K-DEVNETS 250 45
T1K-MODBUS 300 0
DC Input ModulesT1K-08ND3 35 0
T1K-16ND3 70 0
AC Input ModulesT1K-08NA-1 35 0
T1K-16NA-1 70 0
Adding additional power suppliesEach power supply furnishes power only to the network interface and I/O modules to its right. Inserting a second power supply closes the power loop for the power supply to the left, while also powering the modules to its right. Perform a power budget calculation for each power supply in the system.
1 - 8 0 0 - 6 3 3 - 0 4 0 5tFED-55 Universal Field I/O
For the latest prices, please check AutomationDirect.com.
Expansion I/O Configurations
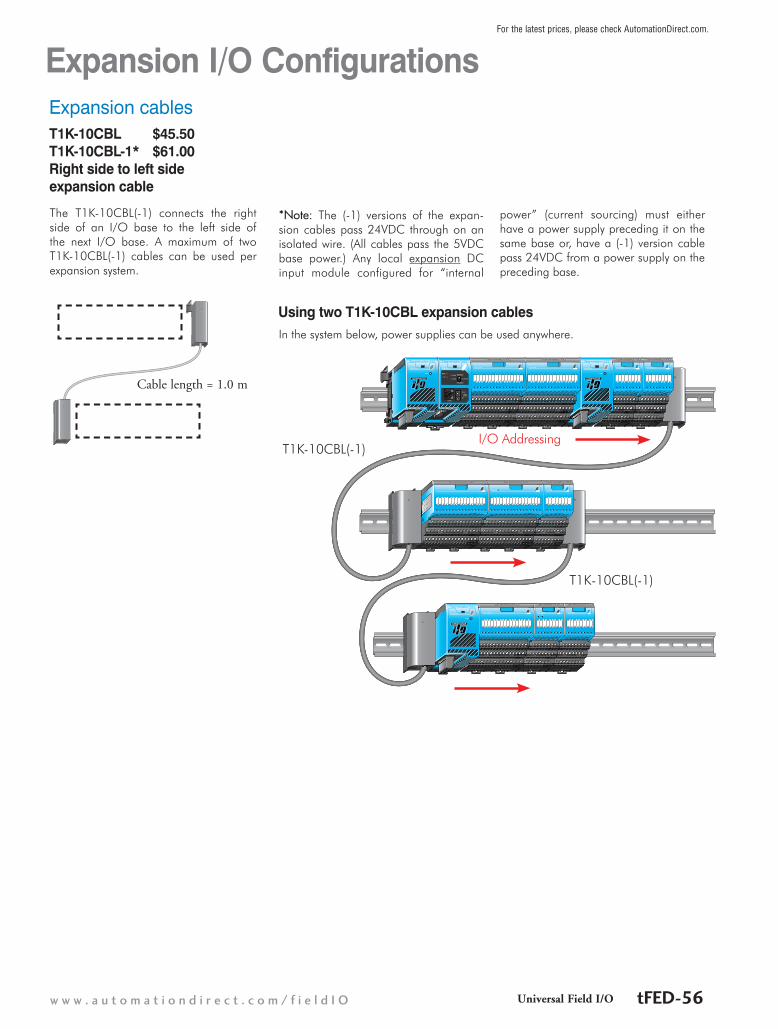
T1K-10CBL $45.50 T1K-10CBL-1* $61.00 Right side to left side expansion cable
Expansion cables
Using two T1K-10CBL expansion cables
The T1K-10CBL(-1) connects the right side of an I/O base to the left side of the next I/O base. A maximum of two T1K-10CBL(-1) cables can be used per expansion system.
*Note: The (-1) versions of the expan-sion cables pass 24VDC through on an isolated wire. (All cables pass the 5VDC base power.) Any local expansion DC input module configured for “internal
power” (current sourcing) must either have a power supply preceding it on the same base or, have a (-1) version cable pass 24VDC from a power supply on the preceding base.
In the system below, power supplies can be used anywhere.
T1K-10CBL(-1)I/O Addressing
T1K-10CBL(-1)
Cable length = 1.0 m
w w w . a u t o m a t i o n d i r e c t . c o m / f i e l d I O Universal Field I/O tFED-56
For the latest prices, please check AutomationDirect.com.
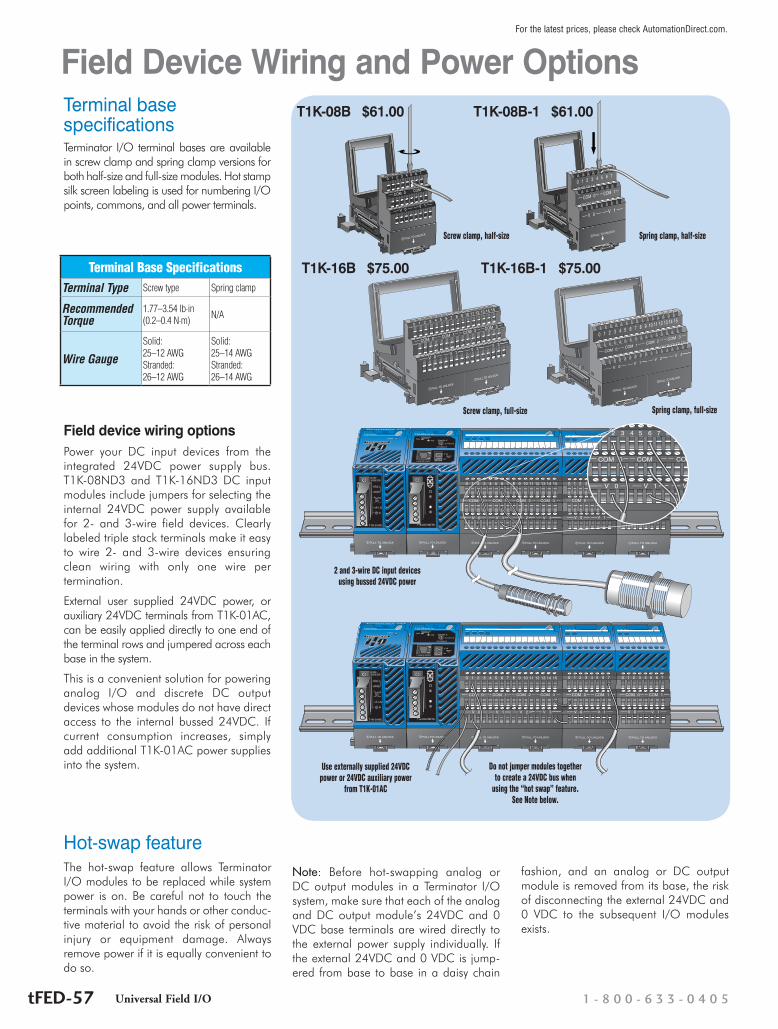
Terminal base specificationsTerminator I/O terminal bases are available in screw clamp and spring clamp versions for both half-size and full-size modules. Hot stamp silk screen labeling is used for numbering I/O points, commons, and all power terminals.
Screw clamp, half-size
Screw clamp, full-size
2 and 3-wire DC input devices using bussed 24VDC power
Use externally supplied 24VDC power or 24VDC auxiliary power
from T1K-01AC
Spring clamp, full-size
Spring clamp, half-size
T1K-08B $61.00
T1K-16B $75.00 T1K-16B-1 $75.00
T1K-08B-1 $61.00
Field Device Wiring and Power Options
Do not jumper modules together to create a 24VDC bus when
using the “hot swap” feature. See Note below.
Terminal Base SpecificationsTerminal Type Screw type Spring clamp
Recommended Torque
1.77–3.54 lb·in (0.2–0.4 N·m) N/A
Wire Gauge
Solid: 25–12 AWG Stranded: 26–12 AWG
Solid: 25–14 AWG Stranded: 26–14 AWG
Field device wiring optionsPower your DC input devices from the integrated 24VDC power supply bus. T1K-08ND3 and T1K-16ND3 DC input modules include jumpers for selecting the internal 24VDC power supply available for 2- and 3-wire field devices. Clearly labeled triple stack terminals make it easy to wire 2- and 3-wire devices ensuring clean wiring with only one wire per termination.
External user supplied 24VDC power, or auxiliary 24VDC terminals from T1K-01AC, can be easily applied directly to one end of the terminal rows and jumpered across each base in the system.
This is a convenient solution for powering analog I/O and discrete DC output devices whose modules do not have direct access to the internal bussed 24VDC. If current consumption increases, simply add additional T1K-01AC power supplies into the system.
Hot-swap featureThe hot-swap feature allows Terminator I/O modules to be replaced while system power is on. Be careful not to touch the terminals with your hands or other conduc-tive material to avoid the risk of personal injury or equipment damage. Always remove power if it is equally convenient to do so.
Note: Before hot-swapping analog or DC output modules in a Terminator I/O system, make sure that each of the analog and DC output module’s 24VDC and 0 VDC base terminals are wired directly to the external power supply individually. If the external 24VDC and 0 VDC is jump-ered from base to base in a daisy chain
fashion, and an analog or DC output module is removed from its base, the risk of disconnecting the external 24VDC and 0 VDC to the subsequent I/O modules exists.
1 - 8 0 0 - 6 3 3 - 0 4 0 5tFED-57 Universal Field I/O
For the latest prices, please check AutomationDirect.com.