miditech pianobox - miditech...
TRANSCRIPT

miditech Pianobox
GM Soundmodul mit 128 GM Sounds und vollständiger GM Implementation
195 Variations-Sounds 9 Drum Sets und ein SFX Set
9 Speicherplätze für eigene SoundsDrumcomputer/Metronom mit 100 Drumpatterns
Vierstelliges DisplayHI-Z Gitarren-Input 6,3mm Klinke
Play/Stop Taster, Direct Taster10 Ziffern-Funktions Taster
MIDI I/OLINE OUT 6,3 mm Klinkenausgänge
Kopfhörer-Ausgang 3,5mm
eMail: [email protected] Internet: www.miditech.de
1
BedienungsanleitungVielen Dank, das Sie sich für die Miditech Pianobox entschieden haben. Die Pianobox stellt Ihnen zum günstigen Preis ein GM Soundmodul und 100 Drumpatterns zur Verfügung. Angeschlossen an ein Masterkeyboard können Sie mit der Pianobox direkt spielen! Die 10 Zifferntaster ermöglichen eine leichte Sound- und Pattern-Auswahl. Oder schliessen Sie Ihre Gitarre an den Gitarreneingang an, und spielen Sie zu einem der 100 Drumpatterns, die in der Pianobox gespeichert sind. Das Tempo ist dabei frei wählbar. Die modernen Patterns aus allen Stilrichtungen ermöglichen ein vielfältiges Spielen, oder auch nur den Einsatz als Metronom. Über MIDI angeschlossen, verbessert die Pianobox den Klang eines älteren Keyboards oder Synthesizers. An einen Computer angeschlossen kann die Pianobox ein Software-Wavetable ersetzen und so MIDIfiles „zum Leben erwecken“! Und das in echter Hifi-Qualität! Oder, schliessen Sie ein Keyboard und eine Gitarre gleichzeitig an, und lassen sich von den Drumpatterns begleiten. Im Verlauf dieser Bedienungsanleitung werden wir einige Hinweise zur Bedienung und Funktionen der Pianobox geben.
Technische Daten der Pianobox:
● Einfacher Anschluss an Keyboards, Masterkeyboards oder den Computer über MIDI● 16 Bit/48 kHz DA Wandler ● Kopfhörer-Ausgang, 32Ω, 65mW, 20Hz- 20kHz, thd 0.1%● Line Out, 10kΩ, 1V, 20Hz- 20kHz, thd 0.01%● Direct Input für Gitarre/Bass 10kΩ, 20Hz- 20kHz● Netzteil im Lieferumfang, 9 V, 1 Ampere● regelbarer Kopfhörer Ausgang
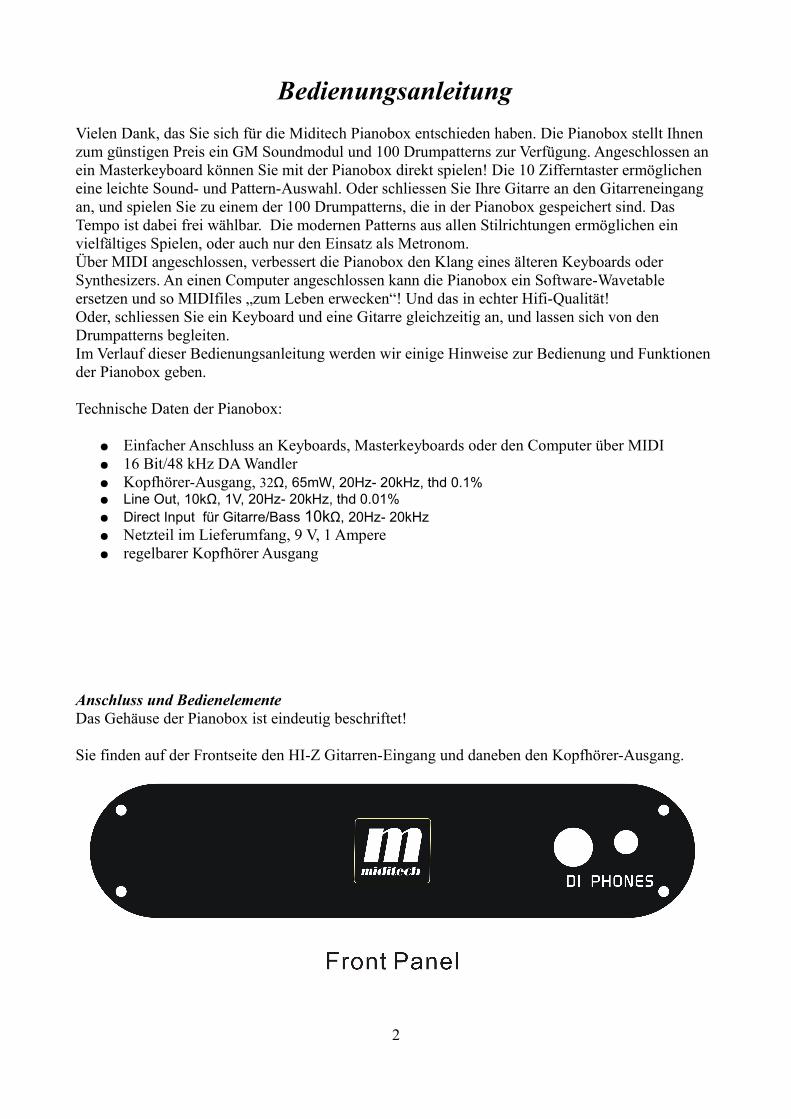
Anschluss und BedienelementeDas Gehäuse der Pianobox ist eindeutig beschriftet!
Sie finden auf der Frontseite den HI-Z Gitarren-Eingang und daneben den Kopfhörer-Ausgang.
2
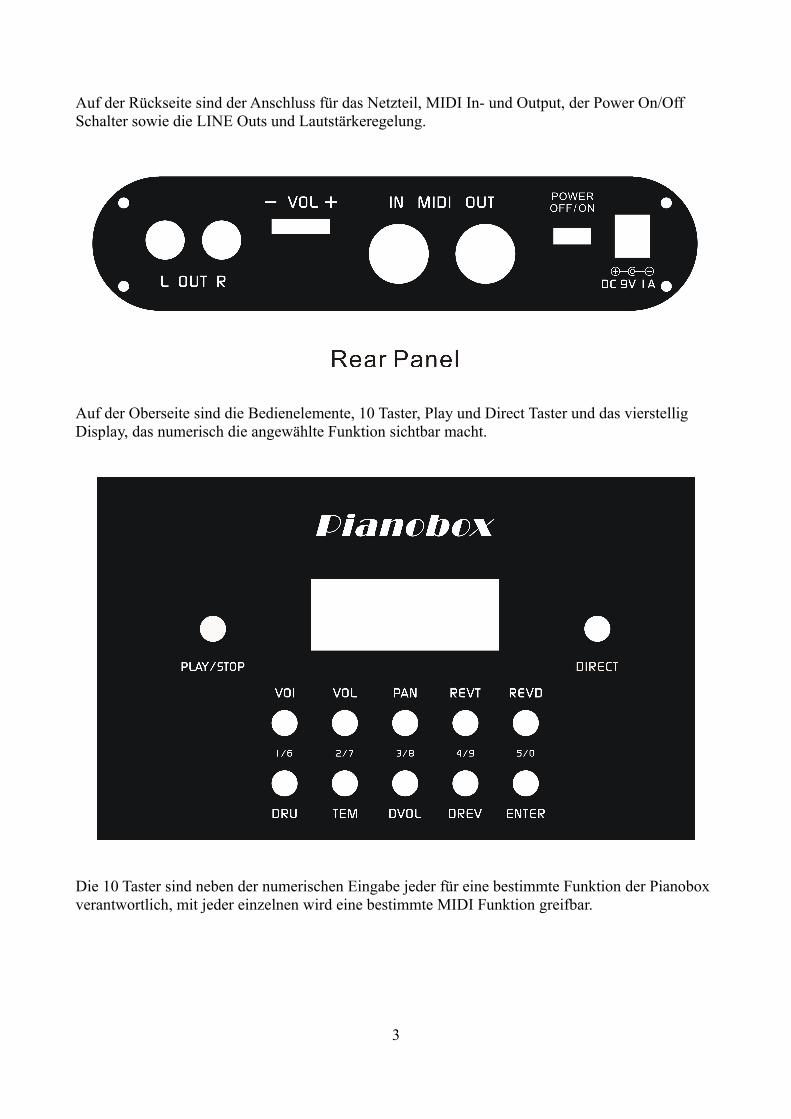
Auf der Rückseite sind der Anschluss für das Netzteil, MIDI In- und Output, der Power On/Off Schalter sowie die LINE Outs und Lautstärkeregelung.
Auf der Oberseite sind die Bedienelemente, 10 Taster, Play und Direct Taster und das vierstellig Display, das numerisch die angewählte Funktion sichtbar macht.
Die 10 Taster sind neben der numerischen Eingabe jeder für eine bestimmte Funktion der Pianobox verantwortlich, mit jeder einzelnen wird eine bestimmte MIDI Funktion greifbar.
3
Anschluß der Pianobox an ein Keyboard, Masterkeyboard oder ComputerDer Anschluss der Pianobox an ein Keyboard oder Masterkeyboard erfolgt über den MIDI IN mit einem herkömmlichen Standard MIDI Kabel. Verbinden Sie den MIDI OUT des Keyboards mit dem MIDI IN der Pianobox. Der Anschluss an den Computer muss über ein sogenanntes MIDI to USB Interface erfolgen. Verbinden Sie auch hier den MIDI OUT des Interfaces mit dem MIDI IN der Pianobox. Zur Stromversorgung schliessen Sie die Pianobox mit dem mitgelieferten Netzteil am Stromnetz an.
Der LINE OUT der Pianobox sind herkömmliche 6,3mm Klinkenbuchsen, verbinden Sie diese über ein LINE Kabel mit Ihrem Verstärker.
HI-Z Instrument DI Eingang (Mono-Klinke 6,3 mm) An diesen Klinken-Eingang können Sie Instrumente mit hoher Impedanz, z.B. E-Gitarren und E-Bässe anschliessen. Das Signal wird zur Pianobox dazugemischt, Sie können gleichzeitig auch den Drumcomputer und die Sounds über MIDI mit einem spielen.
Line Ausgänge (2x Mono-Klinke 6,3 mm)Diese führen zusammen mit dem Kopfhörer Out das gleiche Ausgangs-Signal. Verbinden Sie diese Ausgänge über ein Stereokabel mit einem Eingang Ihres Verstärkers.
Kopfhörer-Ausgang (Stereo-Mini-Klinke 3,5 mm)Hier schliessen Sie Ihren Kopfhörer an, mit dem Drehregler auf der Rückseite können Sie die Lautstärke des Kopfhörer-Ausgangs und des MAIN Outs gleichzeitig regeln.
Bedienung der Pianobox
Die 10 Zifferntaster der Pianobox sind zusätzlich mit der Funktion beschriftet. Hier ein Überblick:
1.VOICE – hier wird die Sound-Programm Nummer eingegeben.2.VOLUMEN – hier wird die Lautstärke des Sound-Programms eingestellt. 3.PAN – hier wird das Panorama des Sound-Programms eingestellt. 4.REVERBTYPE – hier wird der Hallraum/-typ eingestellt.5.REVERBDEPTH – hier wird die Intensität des Halls eingestellt.6.DRUMSTYLE – hier wird das Drumpattern eingestellt.7.TEMPO – hier wird das Tempo eingestellt.8.DRUMVOLUME – hier wird die Lautstärke des Drumpattern eingestellt.9.DRUMREVERBDEPTH – hier wird die Intensität des Halls der Drumpattern eingestellt.10.ENTER/0 – hier wird eine Funktion und Auswahl bestätigt.
4
Das Einstellen eines Parameters geht immer auf die selbe Art und Weise.
1. Wie stelle ich eine Soundnummer ein?Eingabe: 4 Zahlen, beginnend mit 1. Die nächsten 3 Zahlen wählen die Soundnummer an. Z.B. 1001 stellt Stimme 001 ein, Grand Piano. – Mögliche Eingabe: 000-127
2. Wie stelle ich die Lautstärke ein?Eingabe: 4 Zahlen, beginnend mit 2. Die nächsten 3 Zahlen wählen die Lautstärke an. Z.B. 2101 stellt Lautstärkewert 101 ein. – Mögliche Eingabe: 000-127
3. Wie stelle ich das Panorama ein?Eingabe: 4 Zahlen, beginnend mit 3. Die nächsten 3 Zahlen wählen die Panaorama-Position des Sounds an. Z.B. 3127 stellt die PAN Position nach ganz rechts, 3000 stellt die Position nach ganz links. - Mögliche Eingabe: 000-127
4. Wie stelle ich den Halltyp ein?Eingabe: 4 Zahlen, beginnend mit 4. Die nächsten 3 Zahlen wählen den Halltyp an. Z.B. 4000= Room1, 4001= Room2, 4002= Room3, 4003=Hall 1, 4004= Hall 2, 4005= Plate, 4006= Delay, 4007= Pan Delay. – Mögliche Eingabe: 4000-4007
5. Wie stelle ich die Hallstärke ein?Eingabe: 4 Zahlen, beginnend mit 5. Die nächsten 3 Zahlen wählen die Hallstärke aus. Z.B. 5100 stellt Hallwert 100 ein. – Mögliche Eingabe: 000-127
6. Wie stelle ich ein Drumpattern ein?Eingabe: 4 Zahlen, beginnend mit 6. Die nächsten 3 Zahlen wählen das Drumpattern aus. Z.B. 6003 stellt Drumpattern 003 ein. – Mögliche Eingabe: 000-099, die Pianobox enthält 100 Drumpatterns.
7. Wie stelle ich das Tempo ein?Eingabe: 4 Zahlen, beginnend mit 7. Die nächsten 3 Zahlen stellen den Tempowert ein. Z.B. 7128 stellt das Tempo auf 128 bpm. – Mögliche Eingabe: 040-300
8. Wie stelle ich die Lautstärke der Drums ein?Eingabe: 4 Zahlen, beginnend mit 8. Die nächsten 3 Zahlen wählen die Lautstärke an. Z.B. 8100 stellt Lautstärkewert 100 bei den Drums ein. – Mögliche Eingabe: 000-127
9. Wie stelle ich die Hallstärke der Drums ein?Eingabe: 4 Zahlen, beginnend mit 9. Die nächsten 3 Zahlen wählen die Hall-Intensität an. Z.B. 9100 stellt Hallwert 100 ein. – Mögliche Eingabe: 000-127
Wie spielt die Pianobox ein Drumpattern?
Der PLAY/STOP Taster startet die Wiedergabe des angewählten Styles, ein Druck auf den gleichen Taster stoppt die Wiedergabe wieder. Die erste LED blinkt im Takt des Patterns.
Was ist der DIRECT Modus?Im DIRECT Modus, man kann mit einem Druck auf einen Zifferntaster ein Preset schnell laden.
Wie wählt man den DIRECT Modus an? Im NORMAL Modus, drücken Sie den Taster DIRECT. Das LED Display zeigt „LdP“, die Pianobox wechselt zum DIRECT Modus. Ein nochmaliges Drücken schaltet zurück in den NORMAL Modus. Das Display zeigt dann die Sound-Einstellung, z.B. 1001 für Grand Piano.
5
Wie lädt man ein gespeichertes Preset?Durch Drücken der DIRECT Taste schaltet man die Pianobox in den DIRECT Modus. Das LED Display zeigt: „LdP“ (Load Preset) Der nächste Druck auf die Zifferntaster 1-9 lädt das Preset mit entsprechender Nummer, im Display blinkt die Ziffer, um das Warten auf die Bestätigung mit ENTER anzuzeigen. Ein Druck Auf ENTER/0 lädt das Preset, und das Display blinkt nicht mehr. Z.B. bei Druck auf 2 zeigt das Display: LdP2.
Wie speichert man ein Preset? Halten Sie den DIRECT Taster gedrückt und eine Zifferntaste zusätzlich. Die erste Display Stelle blinkt, das zeigt das das Preset auf eine weitere Eingabe wartet. Halten Sie den DIRECT Taster gedrückt und drücken Sie zusätzlich ENTER/0 zum Speichern.Z.B. drücken Sie DIRECT und 1 gleichzeitig, danach ENTER/0. Das Display zeigt St1 und das Preset ist auf Platz 1 gespeichert.
Wie zeigt das Display die derzeitigen Einstellungen an?Halten Sie den DIRECT Taster gedrückt und eine Zifferntaste zusätzlich. Das Display zeigt mit 1 die Soundnummer, zB 1001. Mit 2 die Lautstärke, z.B. 2127. Mit 3 das Panorama, z.B. 3127 (ganz rechts) usw. Die Anzeige bezieht sich auf das aktuell angewählte Preset. Der Punkt am Ende des Displays zeigt dabei an, das es sich um das derzeitig aktive Setting handelt, nicht um das, was der User vielleicht gerade eingestellt hat.
Hinweis: Die Pianobox hat 9 Speicherplätze. Die gespeicherten Sounds bleiben alle beim Ausschalten erhalten. Die Pianobox lädt beim Starten die letzte Einstellung vor dem Ausschalten.
Wie initialisiert man die Pianobox?Halten Sie den DIRECT Taster beim Einschalten gedrückt. Die Pianobox wird auf die Werkseinstellungen zurückgesetzt, alle gespeicherten Sounds und Einstellungen werden gelöscht.
Weitere Informationen zu Erweiterungen, Updates und anderen Produkten der Firma Miditech finden Sie im Internet unter: http://www.miditech.de !
6
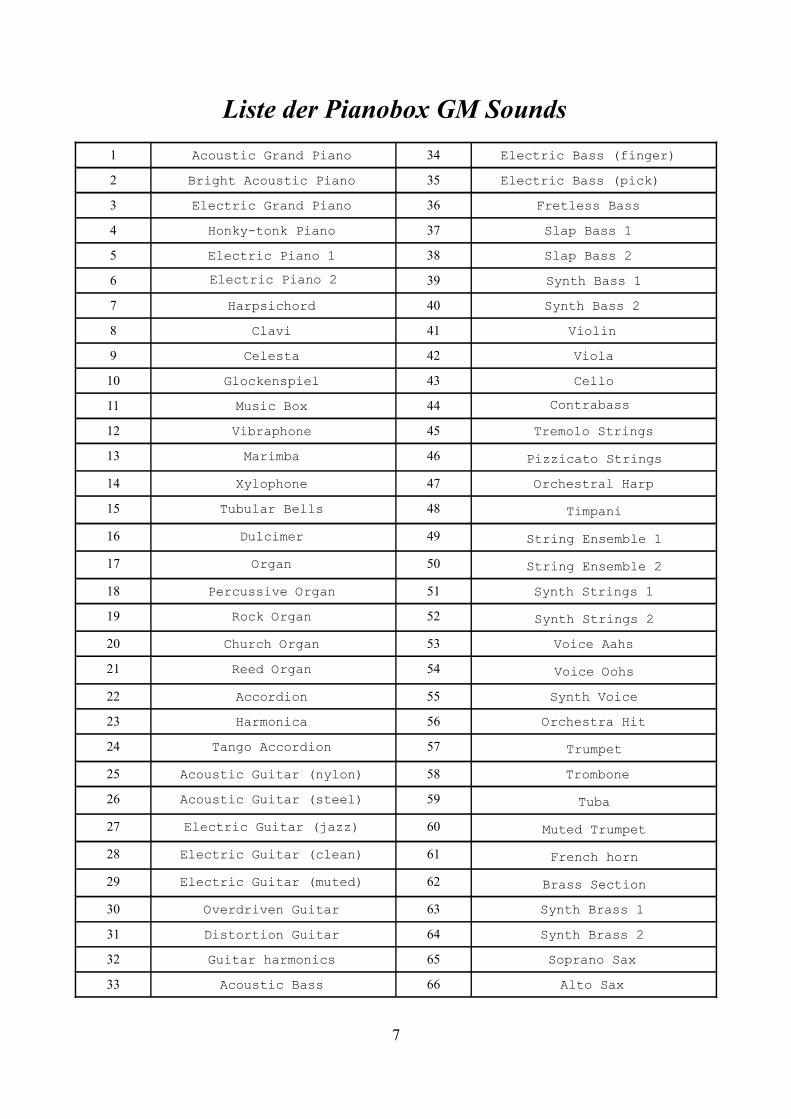
Liste der Pianobox GM Sounds1 Acoustic Grand Piano 34 Electric Bass (finger)
2 Bright Acoustic Piano 35 Electric Bass (pick)
3 Electric Grand Piano 36 Fretless Bass
4 Honky-tonk Piano 37 Slap Bass 1
5 Electric Piano 1 38 Slap Bass 2
6 Electric Piano 2 39 Synth Bass 1
7 Harpsichord 40 Synth Bass 2
8 Clavi 41 Violin
9 Celesta 42 Viola
10 Glockenspiel 43 Cello
11 Music Box 44 Contrabass 12 Vibraphone 45 Tremolo Strings
13 Marimba 46 Pizzicato Strings
14 Xylophone 47 Orchestral Harp
15 Tubular Bells 48 Timpani
16 Dulcimer 49 String Ensemble 1
17 Organ 50 String Ensemble 2
18 Percussive Organ 51 Synth Strings 1
19 Rock Organ 52 Synth Strings 2
20 Church Organ 53 Voice Aahs
21 Reed Organ 54 Voice Oohs
22 Accordion 55 Synth Voice
23 Harmonica 56 Orchestra Hit
24 Tango Accordion 57 Trumpet
25 Acoustic Guitar (nylon) 58 Trombone
26 Acoustic Guitar (steel) 59 Tuba
27 Electric Guitar (jazz) 60 Muted Trumpet
28 Electric Guitar (clean) 61 French horn
29 Electric Guitar (muted) 62 Brass Section
30 Overdriven Guitar 63 Synth Brass 1
31 Distortion Guitar 64 Synth Brass 2
32 Guitar harmonics 65 Soprano Sax
33 Acoustic Bass 66 Alto Sax
7
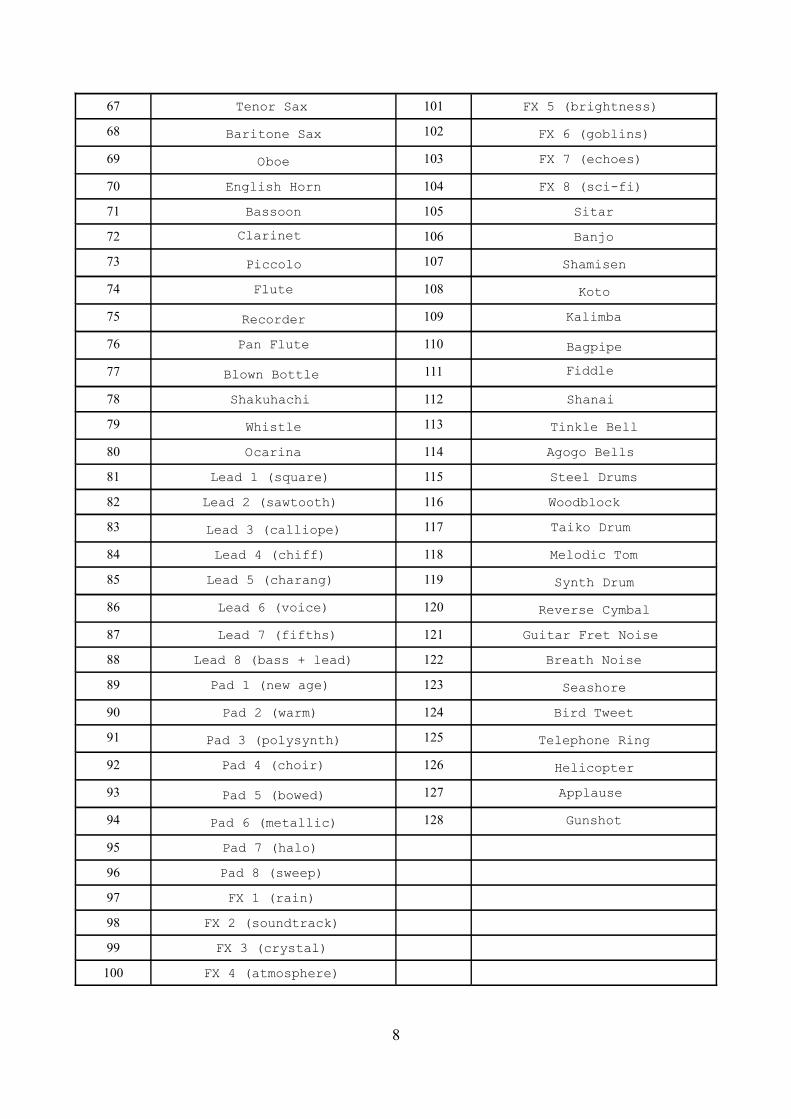
67 Tenor Sax 101 FX 5 (brightness)
68 Baritone Sax 102 FX 6 (goblins)
69 Oboe 103 FX 7 (echoes)
70 English Horn 104 FX 8 (sci-fi)
71 Bassoon 105 Sitar
72 Clarinet 106 Banjo
73 Piccolo 107 Shamisen
74 Flute 108 Koto
75 Recorder 109 Kalimba
76 Pan Flute 110 Bagpipe
77 Blown Bottle 111 Fiddle
78 Shakuhachi 112 Shanai
79 Whistle 113 Tinkle Bell
80 Ocarina 114 Agogo Bells
81 Lead 1 (square) 115 Steel Drums
82 Lead 2 (sawtooth) 116 Woodblock
83 Lead 3 (calliope) 117 Taiko Drum
84 Lead 4 (chiff) 118 Melodic Tom
85 Lead 5 (charang) 119 Synth Drum
86 Lead 6 (voice) 120 Reverse Cymbal
87 Lead 7 (fifths) 121 Guitar Fret Noise
88 Lead 8 (bass + lead) 122 Breath Noise
89 Pad 1 (new age) 123 Seashore
90 Pad 2 (warm) 124 Bird Tweet
91 Pad 3 (polysynth) 125 Telephone Ring
92 Pad 4 (choir) 126 Helicopter
93 Pad 5 (bowed) 127 Applause
94 Pad 6 (metallic) 128 Gunshot
95 Pad 7 (halo)
96 Pad 8 (sweep)
97 FX 1 (rain)
98 FX 2 (soundtrack)
99 FX 3 (crystal)
100 FX 4 (atmosphere)
8

9

Liste der Drumpatterns1 Ballad 01 26 Funk 01
2 Ballad 02 27 Funk 02
3 Ballad 03 28 Funk 03
4 Ballad 04 29 Groove 01
5 Ballad 05 30 Groove 02
6 Ballad 06 31 Groove 03
7 Bossa 01 32 Groove 04
8 Bossa 02 33 Groove 05
9 Bossa 03 34 Groove 06
10 Bossa 04 35 Groove 07
11 Bossa 05 36 Groove 08
12 ChaCha 37 Jazz 01
13 Country 01 38 Jazz 02
14 Country 02 39 Jazz 03
15 Country 03 40 Latin 01
16 Country 04 41 Latin 02
17 Country 05 42 Latin 03
18 Dance 01 43 Latin 04
19 Dance 02 44 Latin 05
20 Disco 01 45 Latin 06
21 Disco 02 46 Latin 07
22 Disco 03 47 Latin 08
23 Disco 04 48 Latin 09
24 Disco 05 49 Pop 01
25 Disco 06 50 Pop 02
10
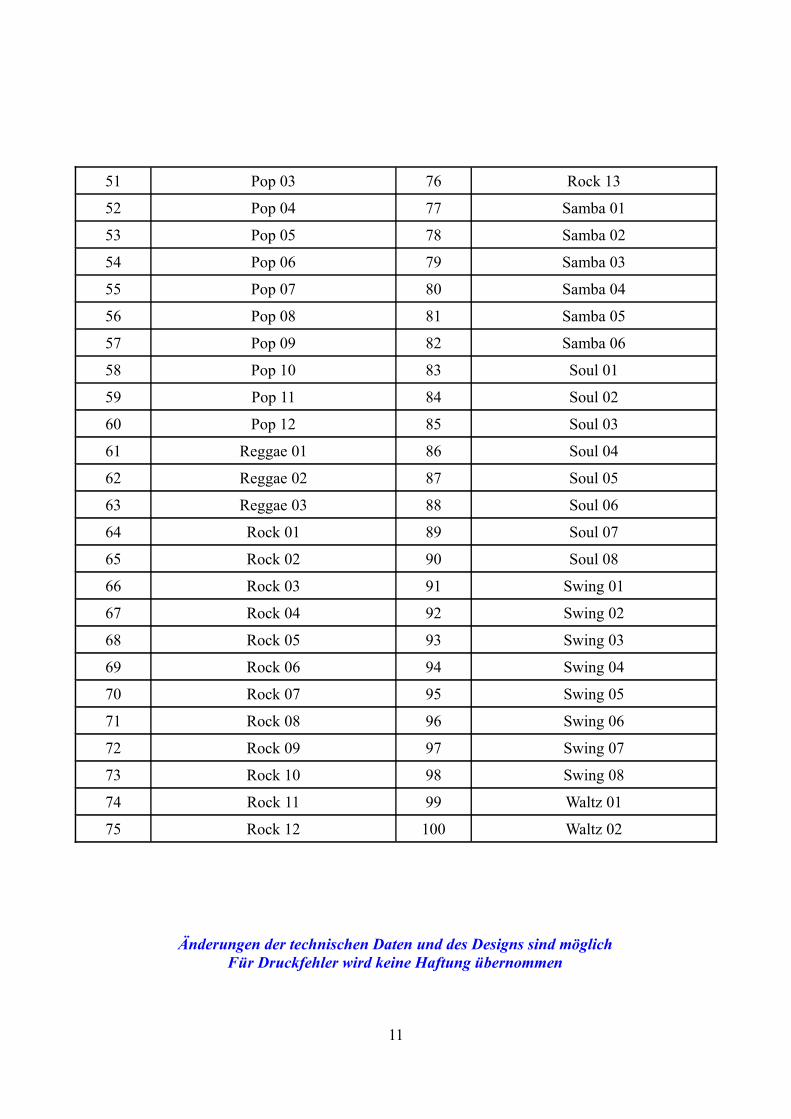
51 Pop 03 76 Rock 13
52 Pop 04 77 Samba 01
53 Pop 05 78 Samba 02
54 Pop 06 79 Samba 03
55 Pop 07 80 Samba 04
56 Pop 08 81 Samba 05
57 Pop 09 82 Samba 06
58 Pop 10 83 Soul 01
59 Pop 11 84 Soul 02
60 Pop 12 85 Soul 03
61 Reggae 01 86 Soul 04
62 Reggae 02 87 Soul 05
63 Reggae 03 88 Soul 06
64 Rock 01 89 Soul 07
65 Rock 02 90 Soul 08
66 Rock 03 91 Swing 01
67 Rock 04 92 Swing 02
68 Rock 05 93 Swing 03
69 Rock 06 94 Swing 04
70 Rock 07 95 Swing 05
71 Rock 08 96 Swing 06
72 Rock 09 97 Swing 07
73 Rock 10 98 Swing 08
74 Rock 11 99 Waltz 01
75 Rock 12 100 Waltz 02
Änderungen der technischen Daten und des Designs sind möglichFür Druckfehler wird keine Haftung übernommen
11
miditech Pianobox
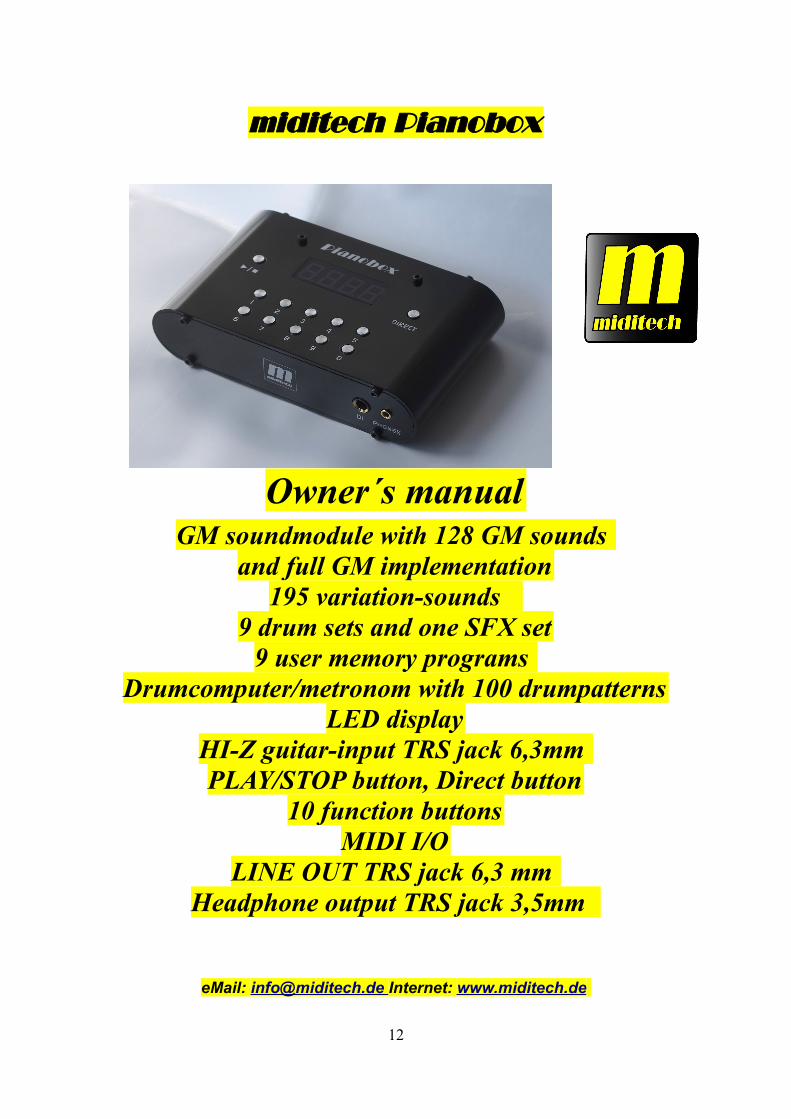
Owner´s manualGM soundmodule with 128 GM sounds
and full GM implementation195 variation-sounds
9 drum sets and one SFX set9 user memory programs
Drumcomputer/metronom with 100 drumpatternsLED display
HI-Z guitar-input TRS jack 6,3mm PLAY/STOP button, Direct button
10 function buttonsMIDI I/O
LINE OUT TRS jack 6,3 mm Headphone output TRS jack 3,5mm
eMail: [email protected] Internet: www.miditech.de
12

PREFACECongratulations on purchasing the Miditech Pianobox GM sound module. With this module you will be able to discover the wonderful world of Music, with a set of complete musical instruments and many drumpatterns in this little black box. Connect your Pianobox to a Masterkeyboard, and you will be able to play easily different sounds, or use it for playback GM files from a Computer or sequenzer. If you are a guitar player, you can use the Direct Input to connect your guitar, and practice songs and riffs by using the Pianobox drumpatterns as a drumcomputer. Many different modern styles are available. This manual is written to help you become familiar with the features of the Miditech Pianobox. Please read the manual carefully to discover all the features of your Pianobox. After reading the manual, you will have a clear understanding of how to use the Pianobox, use its drumpatterns and sounds. At the end of this manual you will find a list of the 100 implemented drumpatterns.
Technical Spezifications of the Pianobox:
● Easy to use with keyboards, masterkeyboards, or computer with MIDI. ● 16 Bit/48 kHz DA converter ● Adjustable headphone out 32Ω, 65mW, 20Hz- 20kHz, thd 0.1%● Line Out, 10kΩ, 1V, 20Hz- 20kHz, thd 0.01%● Direct Input for guitar/bass 10kΩ, 20Hz- 20kHz● Including AC adaptor 9 V, 1 Ampere
Connections and user panel:
On the front of the Pianobox you will find the DI (direct input) for guitar/bass and the headphone out. Please connect your guitar or headphone here.
13

On the rear panel of the Pianobox you will find the LINE Out to connect the Pianobox to an amplifier. Beside the LINE Outs there is the volume leveler, which controls the volume of the LINE Outs and the headphone out at the same time. In the middle, there is the MIDI I/O, please connect your keyboard here with a standard MIDI cable. The MIDI Out from the keyboard must be connected to the MIDI In of the Pianobox.On the right side there is the power switch and the connection for the AC power adaptor. Please connect the power adaptor here, the Pianobox needs 1000mA and a positive polarity at the outside of the connection.
On the top of the Pianobox, you see the display, the PLAY/STOP and the DIRECT button. And below this the 10 function and numeric buttons.
14

How to use the Pianobox
The 10 numeric buttons of the Pianobox have each additional functions. This is an overview:
1.VOICE – to choose the program number 2.VOLUMEN – to choose the volume of a sound program 3.PAN – to choose a panorama setting of a sound program 4.REVERBTYPE – to choose the reverb type5.REVERBDEPTH – to choose the reverb intensity 6.DRUMSTYLE – to choose a drumpattern7.TEMPO – to choose the tempo of a drumpattern.8.DRUMVOLUME – to choose the volume of a drumpattern.9.DRUMREVERBDEPTH – to choose the intensity of the drum pattern reverb.10.ENTER/0 – to confirm a function
1. Q: How to set voice ?
A: Enter 4 digit, start with "1", next 3 digit is the voice value, e.g. "1001" is set voice 001 (Grand Piano)Note: GM voice from 1 to 128
2. Q: How to set volume ? A: Enter 4 digit, start with "2", next 3 digit is the volume value, e.g. "2100" is set volume to 100 Note: volume value from 0 to 127, 0 is turn off the volume
3. Q: How to set pan?A: Enter 4 digit, start with "3", next 3 digit is the pan value, e.g. "3127" is set pan to 127 (right)Note: pan volume from 0 to 127, 0 is most left, 127 is most right
4. Q: How to set reverb type ?A: Enter 4 digit, start with "4", next 3 digit is the type of reverb, 0= room1, 1=room2, 2=room3, 3=hall 1, 4=hall 2, 5=plate, 6=delay, 7=pan delay. e.g. "4003" is set reverb type as "HALL 1"
5. Q: How to set reverb depth ?A: Enter 4 digit, start with "5", next 3 digit is the reverb depth, e.g. "5100" is set reverb depth to100Note: reverb depth is from 0 to 127, 0 is dry
6. Q: How to select drum style ?A: Enter 4 digit, start with "6", next 3 digit is the drum style index, e.g. "6010" is set drum style 10Note: There are 100 drum styles in the Pianobox
15

7. Q: How to set tempo ?A: Enter 4 digit, start with "7", next 3 digit is the tempo value, e.g. "7100" is set tempo to 100Note: min tempo is 40 bpm, max tempo is 300 bpm
8. Q: How to set drum volume ?A: Enter 4 digit, start with "8", next 3 digit is the drum volume value, e.g. "8100" is set drum volume to 100Note: drum volume is from 0 to 127
9. Q: How to set drum reverb depth ?A: Enter 4 digit, start with "9", next 3 digit is the drum reverb depth value, e.g. "9030" is set drum reverb to 30Note: drum reverb depth is from 0 to 127
Q: How to play style ?A: Press button PLAY to start playing style, press the same button for STOP, when the drumplaying the first LED dot shall blink according the beat.
Q:What is the DIRECT mode ?A:In DIRECT mode, press a digit button could load a preset quickly.
Q: How to set to DIRECT mode?A: In NORMAL mode, press button [DIRECT], the LED display "LdP ", the system switch toDIRECT mode; if press [DIRECT] again, it switch back to NORMAL mode, the LED displaycurrent voice setting, e.g. "1.001"
Q: How to load a preset ?A: Press button [DIRECT], switch to DIRECT mode, the LED display "LdP ", then press a digit[1] to [9], e.g. [2], then the LED display "LdP2", the digit 2 is blinking, means waiting for confirm,press buttn [0] to confirm, then the system load preset 2 and the LED stop blinking.
Q: How to display current setting ?A: Press button [DIRECT] plus a digit button [1] to [9], e.g. perss [DIRECT] + [1], then the LEDdisplay current voice, "1.001.", press [DIRECT] + [2], the LED display current volume, "2.100.",be note, the last digit append a dot, means the displayed is current setting, not the user input
Q: How to store preset ?A: Press button "DIRECT" plus a digit button [1] to [9], the LED display the current setting, benote the first digit keep blinking, means this digit also used as preset index and waiting confirm,keep button [DIRECT] pressed and press button [0], the current setting should store as preset withspecified preset index. e.g. press [DIRECT] + [9], keep [DIRECT] pressed, press [0], then the LEDdisplay "St 9", means store preset 9 into system.Note: the system could contain 9 preset, all kept even power off, when power on, the system loadlast setting before power off.
Q: How to reset preset to factory setting ?A: Press button [DIRECT] when power on, the system initialize as factory setting.
16
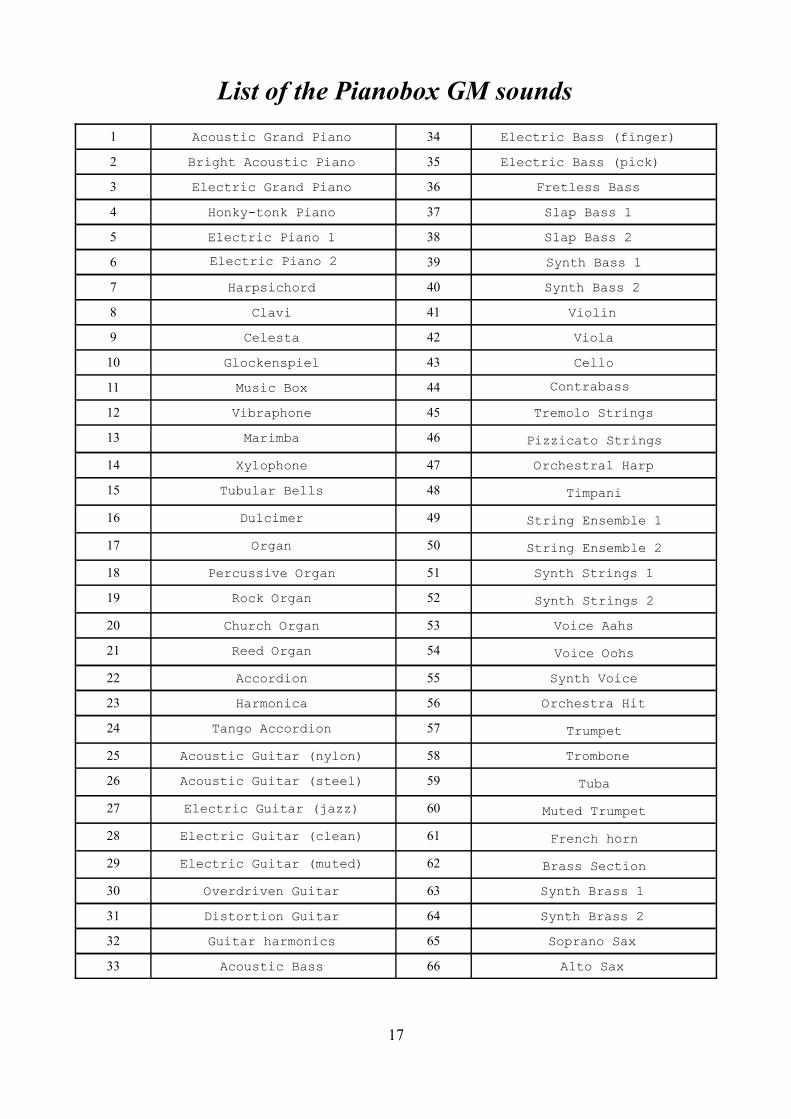
List of the Pianobox GM sounds1 Acoustic Grand Piano 34 Electric Bass (finger)
2 Bright Acoustic Piano 35 Electric Bass (pick)
3 Electric Grand Piano 36 Fretless Bass
4 Honky-tonk Piano 37 Slap Bass 1
5 Electric Piano 1 38 Slap Bass 2
6 Electric Piano 2 39 Synth Bass 1
7 Harpsichord 40 Synth Bass 2
8 Clavi 41 Violin
9 Celesta 42 Viola
10 Glockenspiel 43 Cello
11 Music Box 44 Contrabass 12 Vibraphone 45 Tremolo Strings
13 Marimba 46 Pizzicato Strings
14 Xylophone 47 Orchestral Harp
15 Tubular Bells 48 Timpani
16 Dulcimer 49 String Ensemble 1
17 Organ 50 String Ensemble 2
18 Percussive Organ 51 Synth Strings 1
19 Rock Organ 52 Synth Strings 2
20 Church Organ 53 Voice Aahs
21 Reed Organ 54 Voice Oohs
22 Accordion 55 Synth Voice
23 Harmonica 56 Orchestra Hit
24 Tango Accordion 57 Trumpet
25 Acoustic Guitar (nylon) 58 Trombone
26 Acoustic Guitar (steel) 59 Tuba
27 Electric Guitar (jazz) 60 Muted Trumpet
28 Electric Guitar (clean) 61 French horn
29 Electric Guitar (muted) 62 Brass Section
30 Overdriven Guitar 63 Synth Brass 1
31 Distortion Guitar 64 Synth Brass 2
32 Guitar harmonics 65 Soprano Sax
33 Acoustic Bass 66 Alto Sax
17

67 Tenor Sax 101 FX 5 (brightness)
68 Baritone Sax 102 FX 6 (goblins)
69 Oboe 103 FX 7 (echoes)
70 English Horn 104 FX 8 (sci-fi)
71 Bassoon 105 Sitar
72 Clarinet 106 Banjo
73 Piccolo 107 Shamisen
74 Flute 108 Koto
75 Recorder 109 Kalimba
76 Pan Flute 110 Bagpipe
77 Blown Bottle 111 Fiddle
78 Shakuhachi 112 Shanai
79 Whistle 113 Tinkle Bell
80 Ocarina 114 Agogo Bells
81 Lead 1 (square) 115 Steel Drums
82 Lead 2 (sawtooth) 116 Woodblock
83 Lead 3 (calliope) 117 Taiko Drum
84 Lead 4 (chiff) 118 Melodic Tom
85 Lead 5 (charang) 119 Synth Drum
86 Lead 6 (voice) 120 Reverse Cymbal
87 Lead 7 (fifths) 121 Guitar Fret Noise
88 Lead 8 (bass + lead) 122 Breath Noise
89 Pad 1 (new age) 123 Seashore
90 Pad 2 (warm) 124 Bird Tweet
91 Pad 3 (polysynth) 125 Telephone Ring
92 Pad 4 (choir) 126 Helicopter
93 Pad 5 (bowed) 127 Applause
94 Pad 6 (metallic) 128 Gunshot
95 Pad 7 (halo)
96 Pad 8 (sweep)
97 FX 1 (rain)
98 FX 2 (soundtrack)
99 FX 3 (crystal)
100 FX 4 (atmosphere)
18
19

List of the drumpatterns1 Ballad 01 26 Funk 01
2 Ballad 02 27 Funk 02
3 Ballad 03 28 Funk 03
4 Ballad 04 29 Groove 01
5 Ballad 05 30 Groove 02
6 Ballad 06 31 Groove 03
7 Bossa 01 32 Groove 04
8 Bossa 02 33 Groove 05
9 Bossa 03 34 Groove 06
10 Bossa 04 35 Groove 07
11 Bossa 05 36 Groove 08
12 ChaCha 37 Jazz 01
13 Country 01 38 Jazz 02
14 Country 02 39 Jazz 03
15 Country 03 40 Latin 01
16 Country 04 41 Latin 02
17 Country 05 42 Latin 03
18 Dance 01 43 Latin 04
19 Dance 02 44 Latin 05
20 Disco 01 45 Latin 06
21 Disco 02 46 Latin 07
22 Disco 03 47 Latin 08
23 Disco 04 48 Latin 09
24 Disco 05 49 Pop 01
25 Disco 06 50 Pop 02
20

51 Pop 03 76 Rock 13
52 Pop 04 77 Samba 01
53 Pop 05 78 Samba 02
54 Pop 06 79 Samba 03
55 Pop 07 80 Samba 04
56 Pop 08 81 Samba 05
57 Pop 09 82 Samba 06
58 Pop 10 83 Soul 01
59 Pop 11 84 Soul 02
60 Pop 12 85 Soul 03
61 Reggae 01 86 Soul 04
62 Reggae 02 87 Soul 05
63 Reggae 03 88 Soul 06
64 Rock 01 89 Soul 07
65 Rock 02 90 Soul 08
66 Rock 03 91 Swing 01
67 Rock 04 92 Swing 02
68 Rock 05 93 Swing 03
69 Rock 06 94 Swing 04
70 Rock 07 95 Swing 05
71 Rock 08 96 Swing 06
72 Rock 09 97 Swing 07
73 Rock 10 98 Swing 08
74 Rock 11 99 Waltz 01
75 Rock 12 100 Waltz 02
Design and specifications subject to change without notice.No liability for printing mistakes
21