midi player pro v1.3.0 basic users guide - selasky score information format consist of a duration...
TRANSCRIPT

MIDI Player Pro v1.3.0 basic users guideBy Hans Petter Selasky, November 2015
1. Device configurationBefore you can start using MIDI Player Pro you need to select the «Config» tab and press the«DEV» button. A new window will pop up where you can select from available MIDI devices.Special character devices can be entered by typing «D:xxxx» into the «Device Name» field.
Device selection dialog:

2. Loading a songThere are multiple ways to load a song into MIDI Player Pro.
2.1. Using the Lyrics tab
Type your song into the «Lyrics» tab. The format is: Chords on top and song-text below. You canselect a differnt font for the editor window in the «Config» tab. Typically you want a fixed-size fontfor the editor window. This may or may not be the default depending on your system.

When you are done entering your song, goto the «File» tab and select «To A-Scores» under the«Lyrics» file:
Your song should now be imported into «View A» and «Edit A». You might want to press «New» inthe «A-Scores» file before doing this. Else the import will append to the existing song, if any.

2.2. Using the «Edit A»
In the «Edit A» editor you can write and edit songs and scores in the native format of MIDI PlayerPro. The score information format consist of a duration command «Ux» followed by one or morescores «[ABCDEFGH]x». Comments are denoted like this: /* this is a comment */ To get MIDIPlayer Pro up to date with regard to your song, you will have to press the red icon circled above orgoto the «Play» tab and press the «Compile» button.
2.2.1.Editing or inserting a chord
To edit a chord make sure the cursor is at the line containing the chord you want to edit. Then eitherdouble click on the line or press the chord edit icon in the middle bar. If the currently selected line isempty a new chord will be inserted instead of edited. If it is not possible to edit the current line, nochord editor will appear.

2.2.2.Example converting from traditional notation
Reading the notes above we have a «D» chord followed by three melody notes. Then we have a«G» chord followed by one melody note. In the end we have a «D» chord again. Converting thisinto «MIDI Player Pro» syntax we get: The «D» chord counts as a single step and should last threemore steps. «U4» denotes a single step added by three. Some notes in the melody also appear in thefirst «D» chord. We make these last a bit shorter, see «U1» and «U2» in bold below. Else thesoftware will ignore these notes when played. The «G» chord counts as a single step and should lastone more step. «U2» denotes a single step added by one. Again some melody notes appear in theactive chord and the duration and need to last a bit shorter, see «U1» in bold below. In the end wehave a «D» chord lasting one step followed by no more melody notes. The complete «MIDI PlayerPro» code for the first beat of this song becomes:
L0: /* start label /U4 D3 D4 U1 D5 U4 G5B U2 A5 /* D-chord, multi-step duration */U1 D5 /* melody, 1-step duration */U1 A5 /* melody, 1-step duration */U1 A5 /* melody, 1-step duration */U2 G3 G4 D5 G5 U1 H5 /* G-chord, multi-step duration /U1 H5 /* melody, 1-step duration */U1 D3 D4 D5 G5B A5 /* D-chord */J0 /* jump to L0 */
U4 D3 D4 D5 G5B A5
U1 D5 U1 D5 U1 A5 U1 A5

2.3. Using the database
MIDI Player Pro comes with a simple database feature where you can download ready made songsfrom a default or custom location:
Press the «Download» button to populate the database from the default location. After selection asong, press «Open In A-Scores» to open the song. To permanently save the database to localstorage, go the the «Config» tab and press «Config What». Ensure that «Save database contents» ischecked. Press «Close».
Now press «Config Save» to save the database content to local storage. To verify the databasecontent has really been saved goto «File» and press «Quit». Start the application again.

3. Playing a songMIDI Player Pro supports five different play modes
3.1. «ALL» mode
In this mode the MIDI piano has a 1:1 mapping on its keys and no magic transforms are happening.
3.2. «TRANS» mode
In this mode you use a single key, by default «C» key in fifth octave, C5, to single step the song.The amplitude is taken from the input and distributed to the output. In the «View Mode A» dialogyou can set some options about randomness and contrast that affects the resulting output. Singlestepping using another key than «C5» will cause the song to be transposed either up or downdepending on whether you press a key higher than «C5» or lower than «C5». The «C5» key isconfiguration in the «View Mode A» dialog.
3.3. «FIXED» mode
Same as «TRANS» mode, except that pressing another key does not cause any transponation of the song. In this mode you can use two fingers to output the melody, if it is going very rapid.
3.4. «MIXED» mode
Same as «TRANS» mode, except that keys other than «C5» behave like normal piano keys.
3.5. «CHORD» mode
This mode is most suitable for playing songs which only contain chords and no melody. In«CHORD» mode two key ranges are defined, «the left» range and «the right» range.
The base scores in a chord are mapped with rising harmonic frequency in the following order: «D»,«E», «Db», «Eb». White keys first. Then the black keys.
The melody scores in a chord are mapped with rising harmonic frequency in the following order:«F», «G», «A», «H», «Gb», «Ab», «Hb». White keys first. Then the black keys.
The «C» keys are intentionally left dead to leave some room for errors when pressing keys in thetwo octaves, hence pressing keys in both ranges at the same time will confuse the software.
After rewind the software will wait for input in either «the left» or «the right» range. It doesn'tmatter in which range you start after rewind or a jump. When you make the first key press in «theleft» range for example, the «MIDI Player Pro» software will fetch the first chord from the song,and re-map the keys so that it matches the loaded chord and output those keys to the configuredsynth devices, if any. To advance to the next chord, press a key in the opposite chord range.
By default «the left» range starts at «C5», «C» key in the fifth octave and «the right» range at «C6»,«C» key in the sixth octave. This is configurable through the «Base play key» in the «View AMode» and «View B Mode» dialogs.
RIGHTLEFT
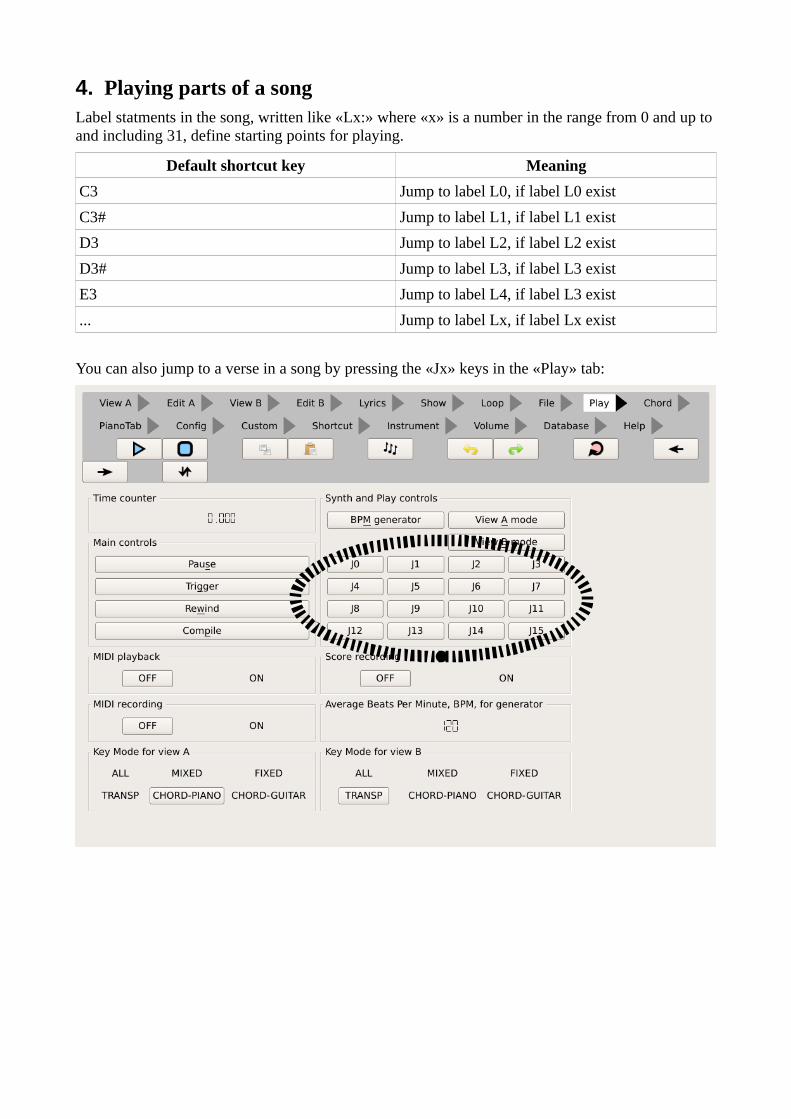
4. Playing parts of a songLabel statments in the song, written like «Lx:» where «x» is a number in the range from 0 and up to and including 31, define starting points for playing.
Default shortcut key Meaning
C3 Jump to label L0, if label L0 exist
C3# Jump to label L1, if label L1 exist
D3 Jump to label L2, if label L2 exist
D3# Jump to label L3, if label L3 exist
E3 Jump to label L4, if label L3 exist
... Jump to label Lx, if label Lx exist
You can also jump to a verse in a song by pressing the «Jx» keys in the «Play» tab:

5. Recording a song
MIDI Player Pro can record everything you play. First press the «Rewind» button to get therecorder back to time zero. Then make sure «MIDI Recording» is switched to «ON». It is supportedto have «MIDI playback» switched to «ON» while recording to record multiple sound tracks. Therecording will automatically start when you press the first key or touch the sustain pedal or othercontrols that output MIDI channel events. When you are done recording press the «Rewind» buttonagain and switch «MIDI recording» to «OFF». Now switch «MIDI playback» to «ON» and pressthe «Trigger» button to start the playback. If you want to save your music recording, goto the «File»tab and select «Save As» under the «MIDI File»:

6. Erasing a song or parts of a songBy pressing «New» under the «MIDI File» found in the «File» tab, you will erase any currentrecordings and reset all the instruments to zero. If you do not want to reset the instruments to zero,go to the «Instrument» tab and press «Mute all», then press «Delete Muted» and finally press«Unmute All»:

7. Splitting the graphical view
The right and left arrows can be used to move any MIDI Player Pro tab to the right side or to the leftside. This can save you some tab switching when working with MIDI Player Pro. You can also drag the grey area in the middle to adjust the size of the right and left view.
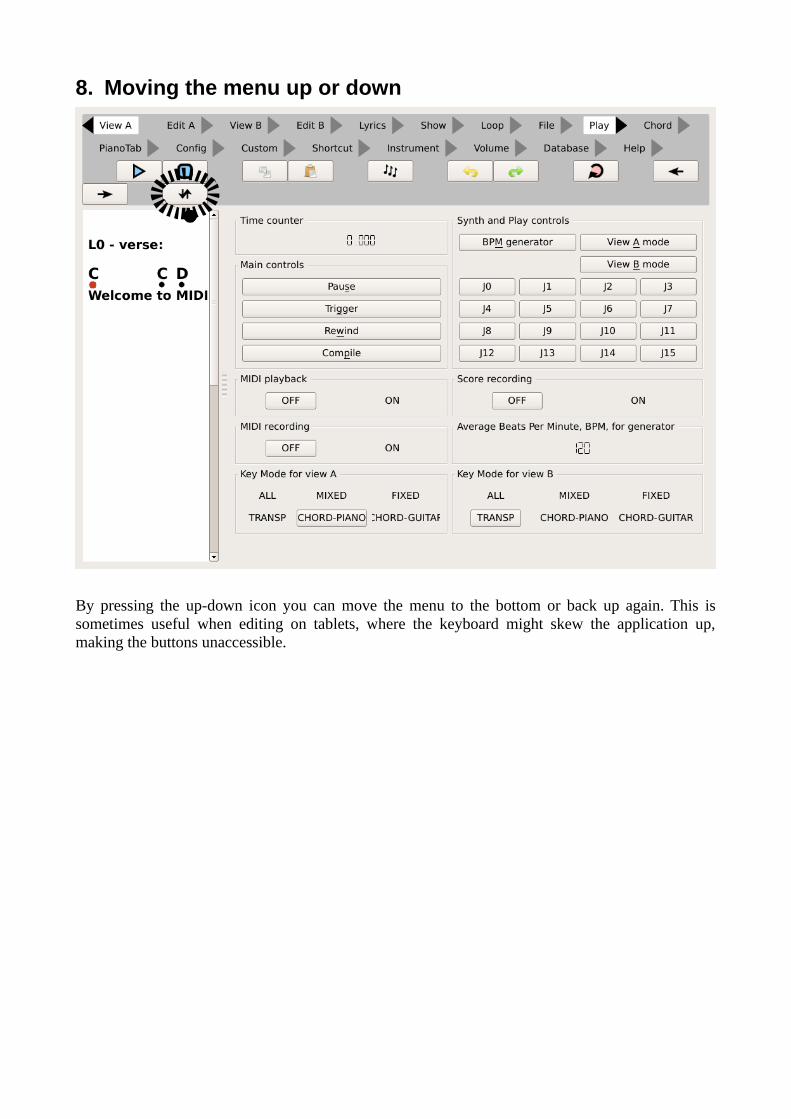
8. Moving the menu up or down
By pressing the up-down icon you can move the menu to the bottom or back up again. This issometimes useful when editing on tablets, where the keyboard might skew the application up,making the buttons unaccessible.

9. Print the pressed piano keysTo speed up writing a new song, MIDI Player Pro can print the scores you press in text format if you set «Score Recording» to «ON» in the currently selected editor:

10. Undo, Redo, Copy and Paste supportAll text editors inside MIDI Player Pro supports undo, redo copy and paste either via the icons or the standard shortcuts for these operations:

11.Interacting with external MIDI modulesThe MIDI Player Pro can be instructed to send MIDI START/STOP and SONG position events by setting «Send MIDI song events» to «ON» in the view mode dialog which will appear when you press the «View A Mode» button the the «Play» tab:
• START event will be automatically sent when
1. «Trigger» button is pressed
2. Blue PLAY icon is pressed
3. First key press or pedal event which triggers the time counter
• STOP event will be sent when
1. «Rewind» button is pressed
2. Blue STOP icon is pressed
• SONG position event will be sent when
1. A label jump command is received as user input
• By use of shortcut keys «C3», «C3#» ...
• By use of «Jx» buttons in the «Play» tab.
NOTE: The song position sent is the same like the label number. A SONG position event is not sentwhen the program executes a jump command.

12. Setting up shortcuts for common operationsBy default jumping to labels through keys «C3», «C3#» ... «H3» is configured.

12.1.How to assign a key to a command
If you know the MIDI sequence in HEX you want to bind to a command, enter it in the line next tothe command. Else press the «REC» button next to the command one time. Then press the wanted«button» or «key» on your MIDI instrument. The MIDI sequence should now appear in the linenext to the command. Else check the configuration of your MIDI input devices. The matchingalgorithm will ignore all MIDI channel and key velocity information.
Keyword Meaning
J0, J1, J2, J3, J4 ... J15 Jump to the given numeric label.
ALL, TRANS, FIXED, MIXED, CHORD Select the given mode for the view connected to the instrument receiving the command.
TRIGGER [Re-]start playback and/or recording.
PAUSE Pause playback and/or recording.
REWIND Move playback to start postion and stop playback and/or recording.
BPMTOG Toggle global BPM generator ON/OFF.
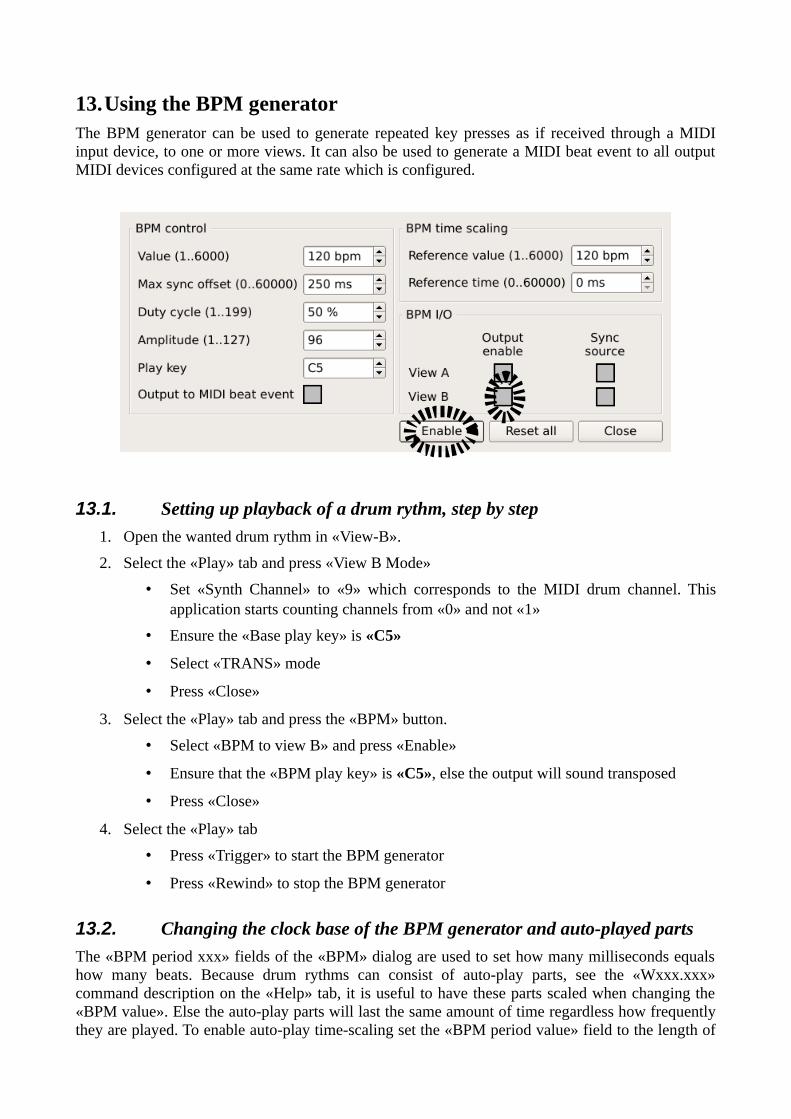
13.Using the BPM generatorThe BPM generator can be used to generate repeated key presses as if received through a MIDIinput device, to one or more views. It can also be used to generate a MIDI beat event to all outputMIDI devices configured at the same rate which is configured.
13.1. Setting up playback of a drum rythm, step by step
1. Open the wanted drum rythm in «View-B».
2. Select the «Play» tab and press «View B Mode»
• Set «Synth Channel» to «9» which corresponds to the MIDI drum channel. Thisapplication starts counting channels from «0» and not «1»
• Ensure the «Base play key» is «C5»
• Select «TRANS» mode
• Press «Close»
3. Select the «Play» tab and press the «BPM» button.
• Select «BPM to view B» and press «Enable»
• Ensure that the «BPM play key» is «C5», else the output will sound transposed
• Press «Close»
4. Select the «Play» tab
• Press «Trigger» to start the BPM generator
• Press «Rewind» to stop the BPM generator
13.2. Changing the clock base of the BPM generator and auto-played parts
The «BPM period xxx» fields of the «BPM» dialog are used to set how many milliseconds equalshow many beats. Because drum rythms can consist of auto-play parts, see the «Wxxx.xxx»command description on the «Help» tab, it is useful to have these parts scaled when changing the«BPM value». Else the auto-play parts will last the same amount of time regardless how frequentlythey are played. To enable auto-play time-scaling set the «BPM period value» field to the length of

the auto-play sequence in milliseconds. The «BPM reference value» is typically «120». Whenloading songs into any view, any «K3.bpm.ms» commands will automatically override thesesettings. To disable auto-play scaling, set the «BPM period value» to zero.

14. Using RePlay AMIDI Player Pro allows you to record a piece of music using MIDI events and then afterwardsreplay it step-by-step instead of automatically. First press "Start MIDI recording". Then play yourpiece of music using your configured MIDI input device(s). When you're done press "Stop MIDIrecording". To test single-stepping press the "Start" button in the rehearse box. Now press any keyon the piano to single step the recorded piece of music.

15. Using show modeMIDI Player Pro can be configured to show the lyrics in a separate window as you play. First selectthe "Show" menu item. The press the "Show Window" button. The press the "LYRICS" button. Thelyrics of the song in View-A should now appear in a separate window.

15.1. How to select one or more background pictures
MIDI Player Pro can be configured to render a background image as part of the show mode. Firstselect the "Show" menu item. The press the "Select image(s)" button. The images selected will benumbered 0, 1, 2, 3, 4 and so on.
15.2. How to save the show mode font
The show mode font is part of the global configuration. To save the last used font goto the "Config"tab and press the "Config save" button.
15.3. How to toggle the show window's fullscreen property
• Press the "Toggle Fullscreen" button in the "Show" tab.
• You can press "ESC" to exit fullscreen mode
• Double-click inside the show window
15.4. Advanced usage
For advanced usage refer to the description of K-commands under the "Help" menu item.

15.5. How to save the show mode settings to a song
MIDI Player Pro can copy the show mode settings to the clipboard. First select the "Show" menuitem. The press the "Copy current settings to clipboard" button. All settings except the font selectionand list of background images will be copied to the clipboard and can then be pasted into any of theEdit-A or Edit-B views at the location where the settings should be loaded.

15.6. Example screenshots