midi arranging project #1 -...
TRANSCRIPT
MIDI Arranging Project #1
Basic Arranging/Orchestration Techniques Objectives:
Sibelius: For this first MIDI Arranging project, we will take a short simple melodic theme and develop a supporting background harmony using common orchestral instruments. We will embellish the Melody to make it more interesting and then embellish the backgrounds to further enhance the flow of the piece.
After that, we will further extend the song form using common arranging techniques to create an Intro and Ending. Also, using Modulation to enhance the arrangement.
Orchestrating the instruments to create a diversity of the sound and to build the song to a climax and resolution.
The style of this piece is a traditional Waltz. The reason for this choice is two fold. First, just to broaden your musical palette and challenge you to be creative within a genre of music that is probably not in your comfort zone. Second, introduce you to some orchestral musical instruments. Even though the sounds of which you may be familiar with, you may not be able to identify the instruments, and have little knowledge of their abilities and or limitations. Outcomes:
• Learn the practical playing and dynamic ranges of some common orchestral instruments.
• Because some of the instruments are of the transposing type, you will be introduced to using a transposed score.
• Introduction to Melodic and Rhythmic embellishment techniques. • The use of Intros, Endings and Modulations to enhance an arrangement. • Expand your musical palette to include orchestral instruments. • Further develop your skills using Finale notation software. • Learn basics of working with MIDI files • Use of basic voice leading and voicing techniques learned in Cont
Harmony II
Finale: Waltzing with Guide Tones Step 1
1. Using the Quick Start, choose a Blank Staff and create a new project in Sibelius which we will call “Waltzing with Guide Tones”. Enter your name as the composer.
2. Setup a Flute, Violin, Cello, Horn in F and Acoustic Bass (Upright-Bass) for your score order.
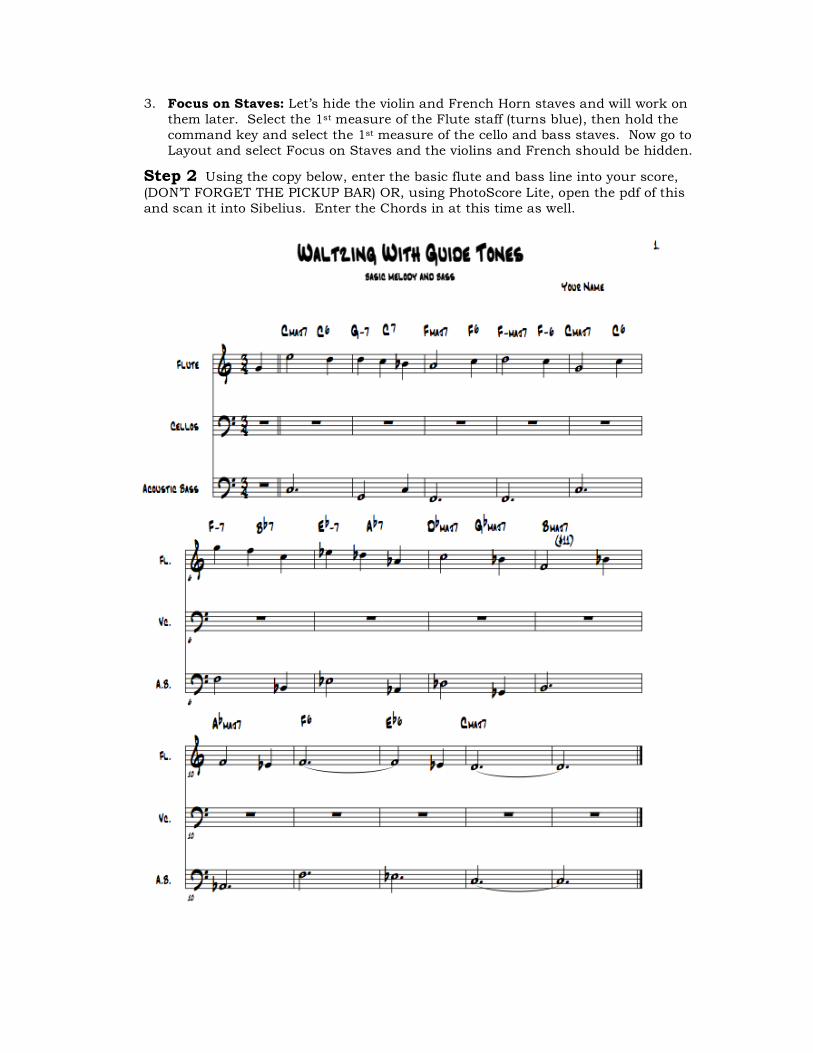
3. Focus on Staves: Let’s hide the violin and French Horn staves and will work on them later. Select the 1st measure of the Flute staff (turns blue), then hold the command key and select the 1st measure of the cello and bass staves. Now go to Layout and select Focus on Staves and the violins and French should be hidden.
Step 2 Using the copy below, enter the basic flute and bass line into your score, (DON’T FORGET THE PICKUP BAR) OR, using PhotoScore Lite, open the pdf of this and scan it into Sibelius. Enter the Chords in at this time as well.
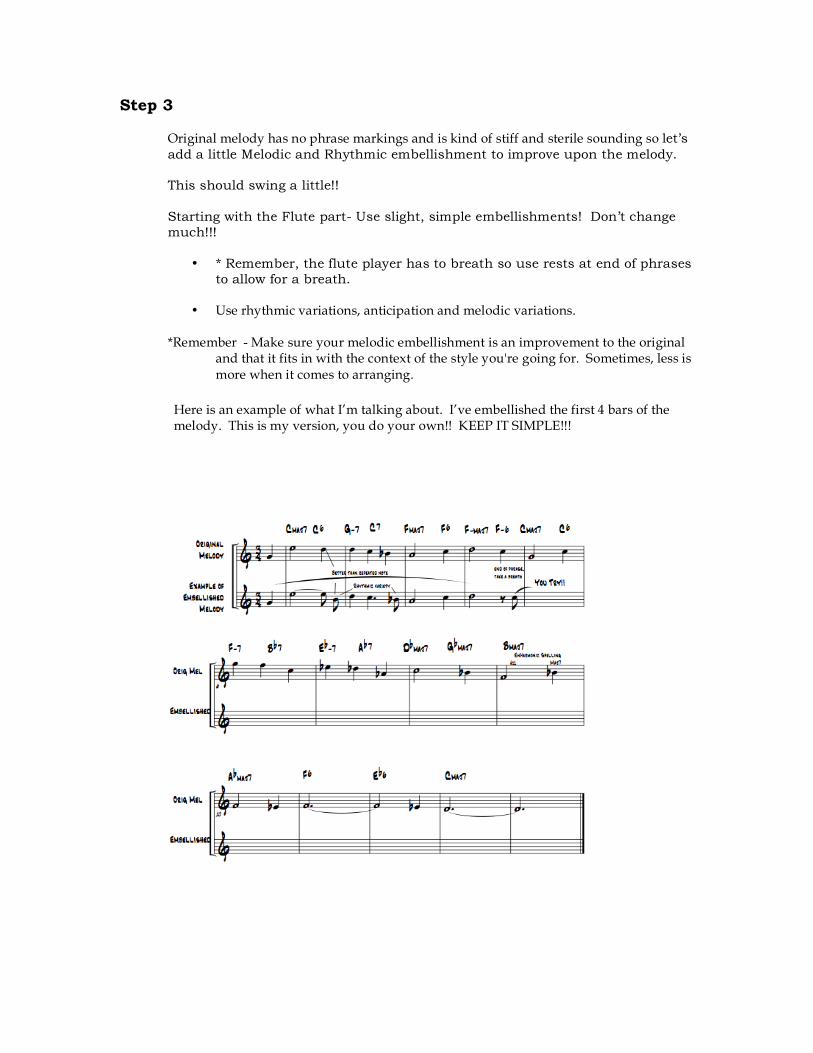
Step 3 Original melody has no phrase markings and is kind of stiff and sterile sounding so let’s add a little Melodic and Rhythmic embellishment to improve upon the melody. This should swing a little!! Starting with the Flute part- Use slight, simple embellishments! Don’t change much!!!
• * Remember, the flute player has to breath so use rests at end of phrases to allow for a breath.
• Use rhythmic variations, anticipation and melodic variations.
*Remember - Make sure your melodic embellishment is an improvement to the original
and that it fits in with the context of the style you're going for. Sometimes, less is more when it comes to arranging.
Here is an example of what I’m talking about. I’ve embellished the first 4 bars of the melody. This is my version, you do your own!! KEEP IT SIMPLE!!!
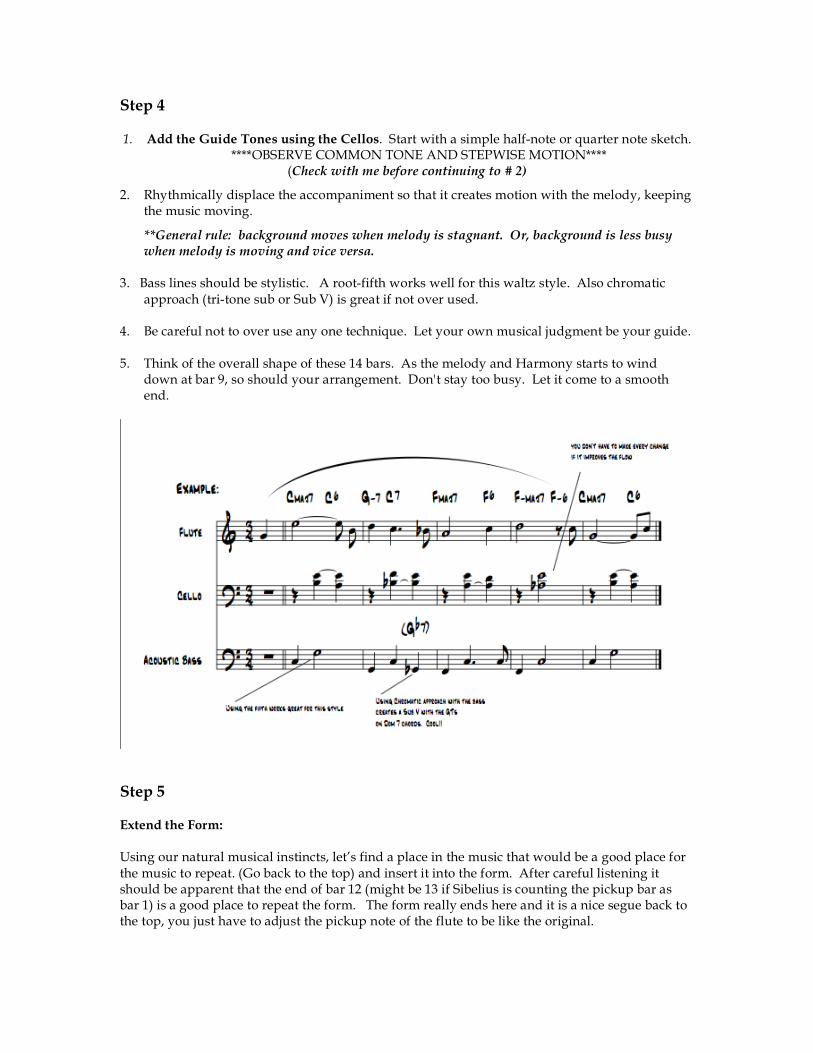
Step 4
1. Add the Guide Tones using the Cellos. Start with a simple half-note or quarter note sketch. ****OBSERVE COMMON TONE AND STEPWISE MOTION****
(Check with me before continuing to # 2)
2. Rhythmically displace the accompaniment so that it creates motion with the melody, keeping the music moving.
**General rule: background moves when melody is stagnant. Or, background is less busy when melody is moving and vice versa.
3. Bass lines should be stylistic. A root-fifth works well for this waltz style. Also chromatic
approach (tri-tone sub or Sub V) is great if not over used. 4. Be careful not to over use any one technique. Let your own musical judgment be your guide. 5. Think of the overall shape of these 14 bars. As the melody and Harmony starts to wind
down at bar 9, so should your arrangement. Don't stay too busy. Let it come to a smooth end.
Step 5 Extend the Form: Using our natural musical instincts, let’s find a place in the music that would be a good place for the music to repeat. (Go back to the top) and insert it into the form. After careful listening it should be apparent that the end of bar 12 (might be 13 if Sibelius is counting the pickup bar as bar 1) is a good place to repeat the form. The form really ends here and it is a nice segue back to the top, you just have to adjust the pickup note of the flute to be like the original.
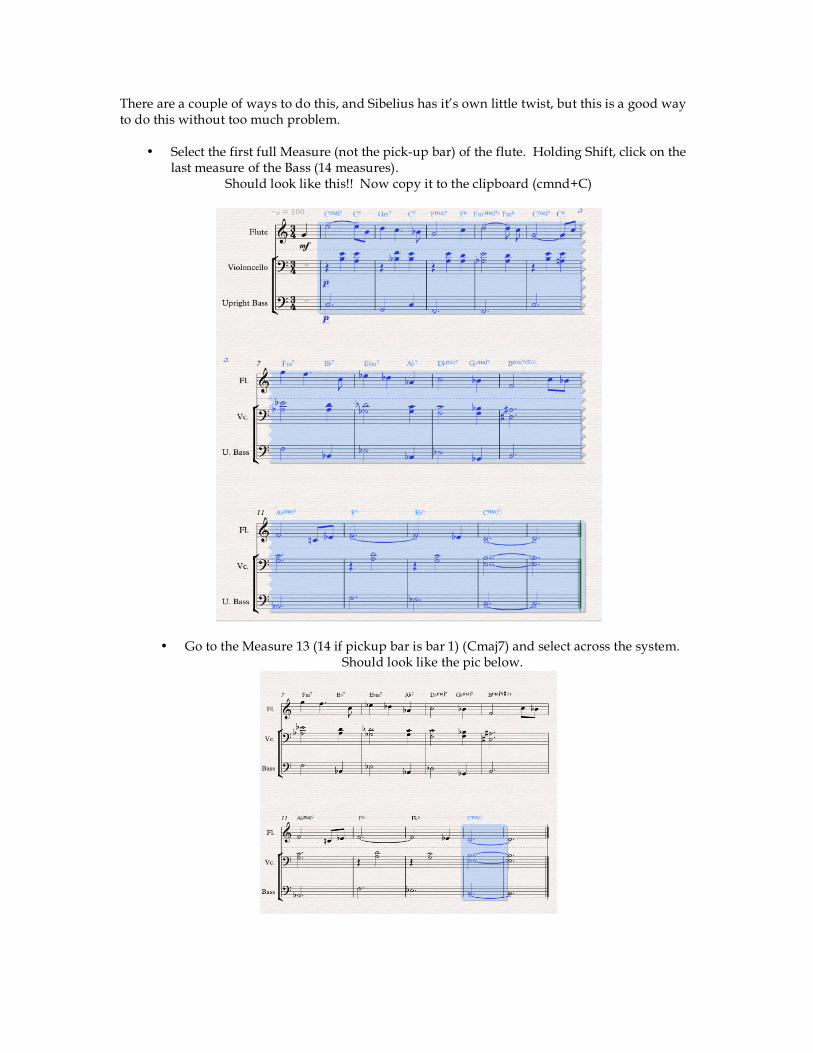
There are a couple of ways to do this, and Sibelius has it’s own little twist, but this is a good way to do this without too much problem.
• Select the first full Measure (not the pick-up bar) of the flute. Holding Shift, click on the last measure of the Bass (14 measures).
Should look like this!! Now copy it to the clipboard (cmnd+C)
• Go to the Measure 13 (14 if pickup bar is bar 1) (Cmaj7) and select across the system. Should look like the pic below.

• Paste the contents of the clipboard (cmnd+V)! This should replace the last 2 measures with the 14 measures from the clipboard!
Should look like this!
• Let’s Re-Number the bars so that the pickup bar is not counted. Dbl-Click on any bar number (like number 7) and reduce it by 1 number (change 7 to 6). All bars will automatically be re-numbered!!
• Now, Let’s place a double bar line between the pickup and bar 1 and between bars 12
and 13. Should look like this!
• Change the Eb pickup note in bar 12 to G (like the top)
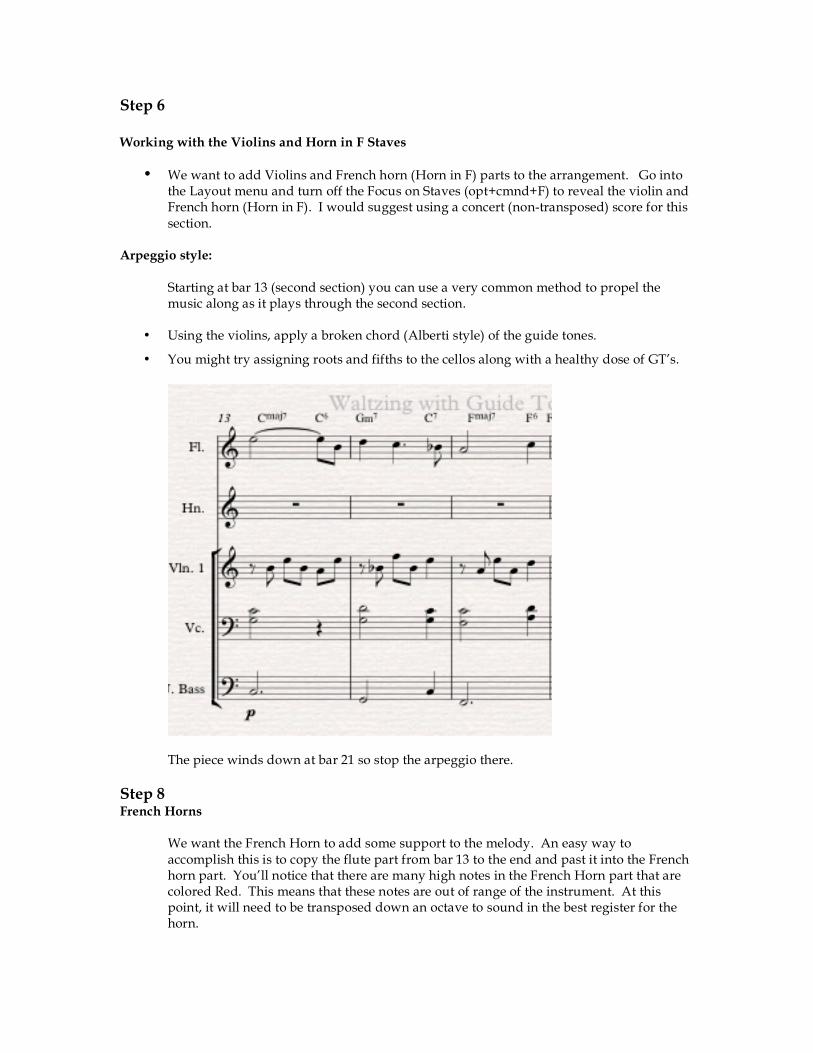
Step 6 Working with the Violins and Horn in F Staves
• We want to add Violins and French horn (Horn in F) parts to the arrangement. Go into the Layout menu and turn off the Focus on Staves (opt+cmnd+F) to reveal the violin and French horn (Horn in F). I would suggest using a concert (non-transposed) score for this section.
Arpeggio style:
Starting at bar 13 (second section) you can use a very common method to propel the music along as it plays through the second section.
• Using the violins, apply a broken chord (Alberti style) of the guide tones.
• You might try assigning roots and fifths to the cellos along with a healthy dose of GT’s.
The piece winds down at bar 21 so stop the arpeggio there.
Step 8 French Horns
We want the French Horn to add some support to the melody. An easy way to accomplish this is to copy the flute part from bar 13 to the end and past it into the French horn part. You’ll notice that there are many high notes in the French Horn part that are colored Red. This means that these notes are out of range of the instrument. At this point, it will need to be transposed down an octave to sound in the best register for the horn.
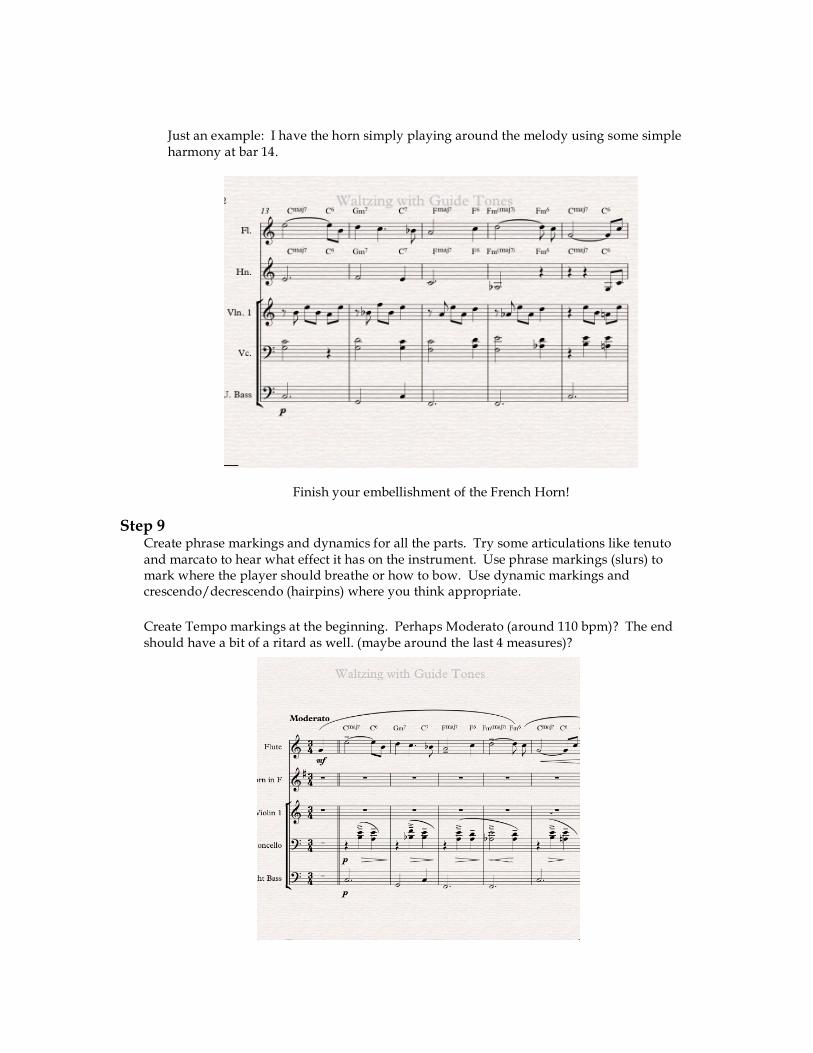
Just an example: I have the horn simply playing around the melody using some simple harmony at bar 14.
Finish your embellishment of the French Horn!
Step 9 Create phrase markings and dynamics for all the parts. Try some articulations like tenuto and marcato to hear what effect it has on the instrument. Use phrase markings (slurs) to mark where the player should breathe or how to bow. Use dynamic markings and crescendo/decrescendo (hairpins) where you think appropriate.
Create Tempo markings at the beginning. Perhaps Moderato (around 110 bpm)? The end should have a bit of a ritard as well. (maybe around the last 4 measures)?
Recap:
This has been a small taste of the arranging and orchestration process. This example could have been arranged in many ways. The process is subjective and each arranger will have his or her own interpretation and ideas of what to do with a piece of music.
There are some common threads as to the shape of the arrangement. Most music has a peek around 2/3rds to 3/4ths the way through and then winds down to end. Even in this short example we can see that the music’s intensity peeks around bar 20 and then winds down.
There are so many colors available using orchestral instruments and I would suggest that you further explore some of their possibilities!