microsoft windows server 2012 r2 remote desktop … · tech editor: toby phipps – mvp, remote...
TRANSCRIPT
Tech Editor: Toby Phipps – MVP, Remote Desktop Services
Microsoft Windows Server 2012 R2
Remote Desktop Services - How to Set Up
(Mostly) Seamless Logon for RDP
Connections KRISTIN L. GRIFFIN – MVP, REMOTE DESKTOP SERVICES
One of the most common questions I get from people implementing RDS is “I want a seamless logon
process but I am not getting it. How do I provide access to my RD Session Host Session Collection(s) with
the least amount of pop-up windows / SSL certificate warnings, and requiring the user to enter their
credentials only once?”
The short answer is that you can attain a seamless logon, but you have to configure your environment
correctly (in multiple places, and on multiple servers) in order to make this happen. To achieve secure
connections and simple sign-on experience to an RDS environment you will need to enable server
authentication for all servers in the connection chain, and enable some form of single sign-on.
First I will explain how the core RDS security technologies work to secure the RDS environment and the
incoming session connections. Then I will show you how to configure security settings and SSL
certificates on all servers in order to both achieve a secure connection and also minimize pop-ups and
logon prompts.
Before we dive in, I’d like to explain two assumptions I make in this paper: you’re using RDP 8.1 and all
examples use wildcard certificates.
Unless you have a really good reason not to use RDP 8.1, then I strongly recommend that you get the
latest version of RDP, available back to Windows 7 SP1. RDP 8.1 gets you the latest and greatest
performance. It also radically simplifies what you must do to enable SSO. If you can’t, then refer to
Appendix A.
Second, I’m using wildcard certificates because this is the simplest way to use the same certificate for all
servers. The names you use on your certificates must match the name the server uses to identify itself.
The wildcard certificate takes the guess work out of this. You don’t have to use wildcard certificates, but
if you don’t then you’ll need to be very careful about which certs you install on which servers.
Enable Server Authentication One danger of communicating with a remote computer that requires you to supply your credentials is
that the server might not be what you think it is. If it’s a malicious server impersonating a real one, you
could inadvertently provide your credentials to an attacker. Server authentication checks to ensure that
you’re connecting to the server you think you’re connecting to.
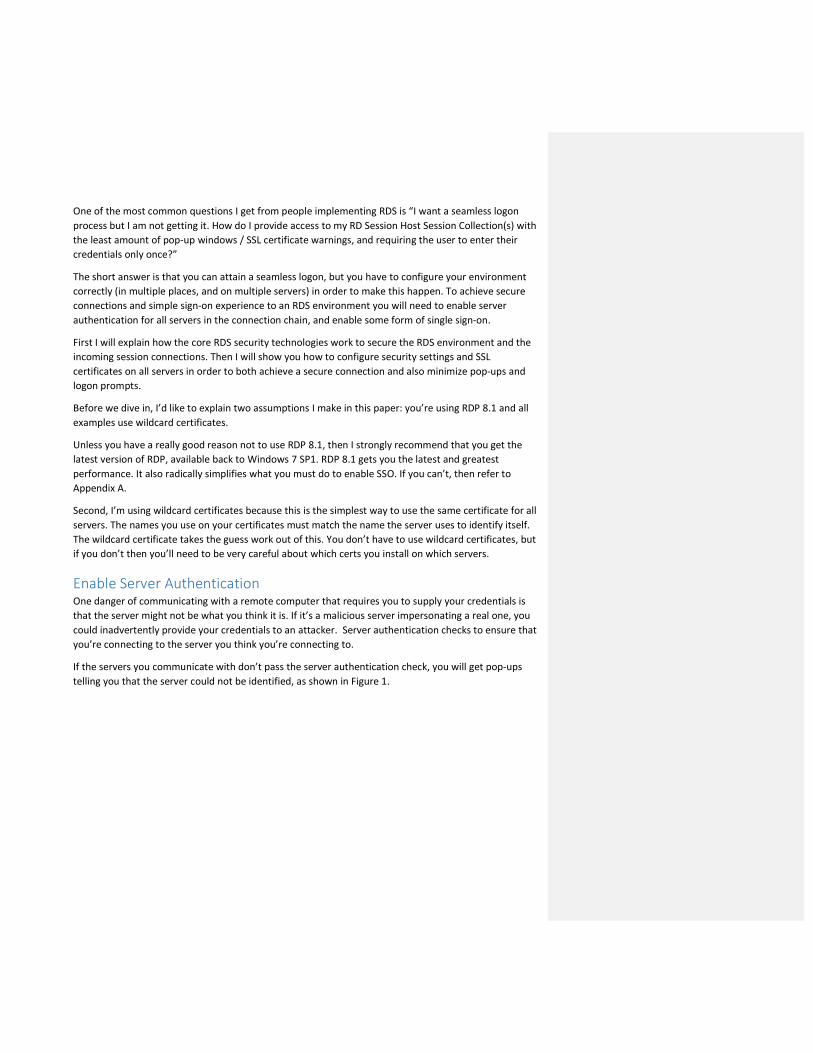
If the servers you communicate with don’t pass the server authentication check, you will get pop-ups
telling you that the server could not be identified, as shown in Figure 1.
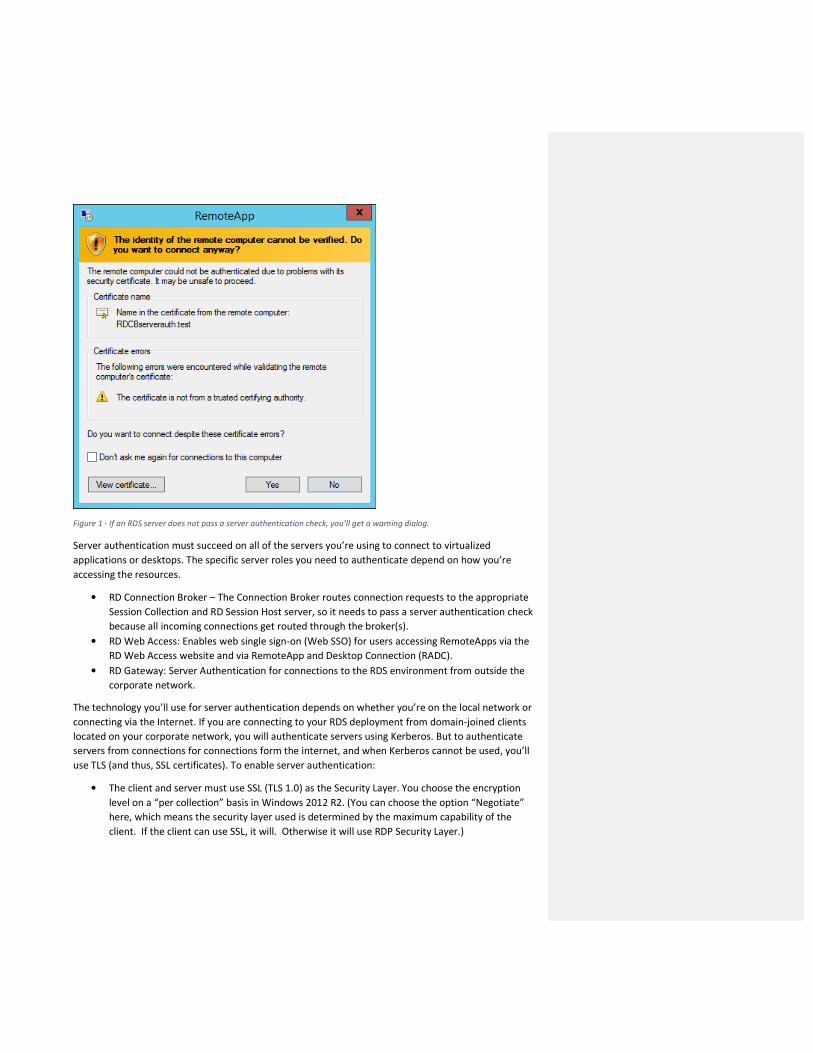
Figure 1 - If an RDS server does not pass a server authentication check, you’ll get a warning dialog.
Server authentication must succeed on all of the servers you’re using to connect to virtualized
applications or desktops. The specific server roles you need to authenticate depend on how you’re
accessing the resources.
• RD Connection Broker – The Connection Broker routes connection requests to the appropriate
Session Collection and RD Session Host server, so it needs to pass a server authentication check
because all incoming connections get routed through the broker(s).
• RD Web Access: Enables web single sign-on (Web SSO) for users accessing RemoteApps via the
RD Web Access website and via RemoteApp and Desktop Connection (RADC).
• RD Gateway: Server Authentication for connections to the RDS environment from outside the
corporate network.
The technology you’ll use for server authentication depends on whether you’re on the local network or
connecting via the Internet. If you are connecting to your RDS deployment from domain-joined clients
located on your corporate network, you will authenticate servers using Kerberos. But to authenticate
servers from connections for connections form the internet, and when Kerberos cannot be used, you’ll
use TLS (and thus, SSL certificates). To enable server authentication:
• The client and server must use SSL (TLS 1.0) as the Security Layer. You choose the encryption
level on a “per collection” basis in Windows 2012 R2. (You can choose the option “Negotiate”
here, which means the security layer used is determined by the maximum capability of the
client. If the client can use SSL, it will. Otherwise it will use RDP Security Layer.)

• The connection between server and client must use High or FIPS encryption. Low encryption
only encrypts the traffic from client to server, not server to client, so it’s not a secure way to
send security capabilities or shared secrets. You choose the encryption level on a “per
collection” basis in Windows 2012 R2. To be clear, you can choose the option “client
compatible”, which encrypts communications at the maximum key strength supported by the
client. It just means that your client needs to support high encryption for server
authentication to work.
• For connections coming over the internet, you must deploy an SSL certificate on each server for
which you will be performing a server authentication check. The name listed on the certificate
must match the name that the server uses to identify itself, and (in some cases) must also be
resolvable via DNS.
• The client must trust the certificate authority (CA) that signs the RDS server’s SSL certificate that
verifies its identity.
The following sections explain how to accomplish this.
Securing the RDP stream
You can configure security settings on a per-collection basis by editing the Session Collection Properties
Security section as shown in Figure 2 below.

Figure 2- To enable server authentication, set the Security Layer and Encryption Level appropriately.
Deploying SSL Certificates
You’ll need to deploy SSL certificates to the roles that you’re using to allow people to connect to Remote
App programs or desktops: RD Connection Broker for sure, possibly RD Web Access, and RD Gateway if
you’re using it to enable connections via the Internet.
You can deploy certificates to your RDS servers using PowerShell or RDMS (Server Manager/ Remote
Desktop Services on your management server). To deploy certificates via RDMS, open the RDS
Deployment Properties and select Certificates, shown in Figure 3.
Figure 3 - Manage your deployment SSL certificates in RDMS.
Add certificates to each of the roles services (one at a time) by highlighting the role service and clicking
“Select Existing Certificate”. Browse to your certificate file, enter the file password, and check the “Allow
the certificate to be added to the Trusted Root Certification Authorities certificate store on the
destination computers” box as shown in Figure 4.
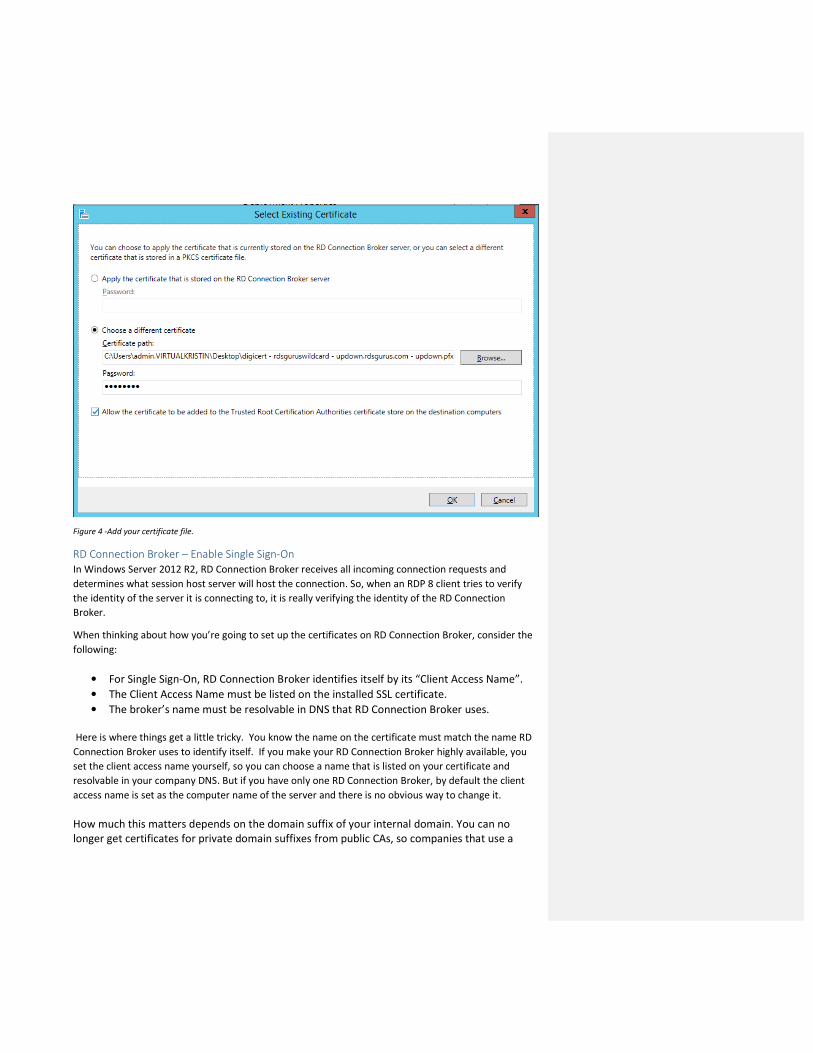
Figure 4 -Add your certificate file.
RD Connection Broker – Enable Single Sign-On
In Windows Server 2012 R2, RD Connection Broker receives all incoming connection requests and
determines what session host server will host the connection. So, when an RDP 8 client tries to verify
the identity of the server it is connecting to, it is really verifying the identity of the RD Connection
Broker.
When thinking about how you’re going to set up the certificates on RD Connection Broker, consider the
following:
• For Single Sign-On, RD Connection Broker identifies itself by its “Client Access Name”.
• The Client Access Name must be listed on the installed SSL certificate.
• The broker’s name must be resolvable in DNS that RD Connection Broker uses.
Here is where things get a little tricky. You know the name on the certificate must match the name RD
Connection Broker uses to identify itself. If you make your RD Connection Broker highly available, you
set the client access name yourself, so you can choose a name that is listed on your certificate and
resolvable in your company DNS. But if you have only one RD Connection Broker, by default the client
access name is set as the computer name of the server and there is no obvious way to change it.
How much this matters depends on the domain suffix of your internal domain. You can no
longer get certificates for private domain suffixes from public CAs, so companies that use a
private (e.g. .local) suffix for their internal domain have a dilemma: how to make the certificate
name match the client access name, which also has to resolve in your corporate internal DNS. I
will explain how to reconcile a server name with a private suffix with the need to map the Client
Access Name to the certificate in the “Connecting Through RD Gateway - Private Domain Suffix”
section. For now, just remember that this is something you’ll need to be careful of.
RD Connection Broker - Publishing
Once you have server authentication taken care of, there’s signing RemoteApp files. You sign your
RemoteApps both so that your clients know it’s safe to open them and because it’s required to enable
Web SSO.
Microsoft Internet Information Services (IIS) doesn’t use CredSSP, so you can’t use CredSSP to pass
credentials to RD Web Access. Users will need to authenticate against the RD Web Access server and
store their credentials in the site. After users are authenticated, they don’t need to authenticate again
to start RemoteApp programs.
The name on the certificate does not need to resolve in DNS. Your clients just need to trust the CA
certificate used to sign your SSL certificate.
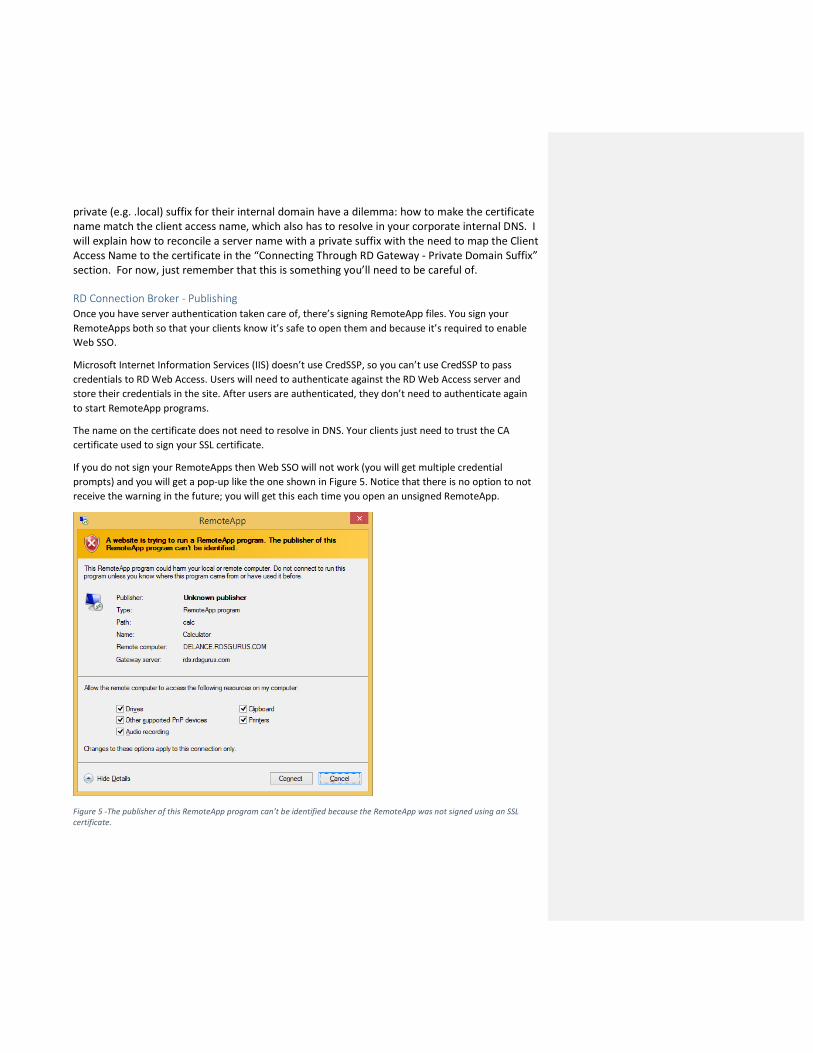
If you do not sign your RemoteApps then Web SSO will not work (you will get multiple credential
prompts) and you will get a pop-up like the one shown in Figure 5. Notice that there is no option to not
receive the warning in the future; you will get this each time you open an unsigned RemoteApp.
Figure 5 -The publisher of this RemoteApp program can’t be identified because the RemoteApp was not signed using an SSL
certificate.
RD Web Access
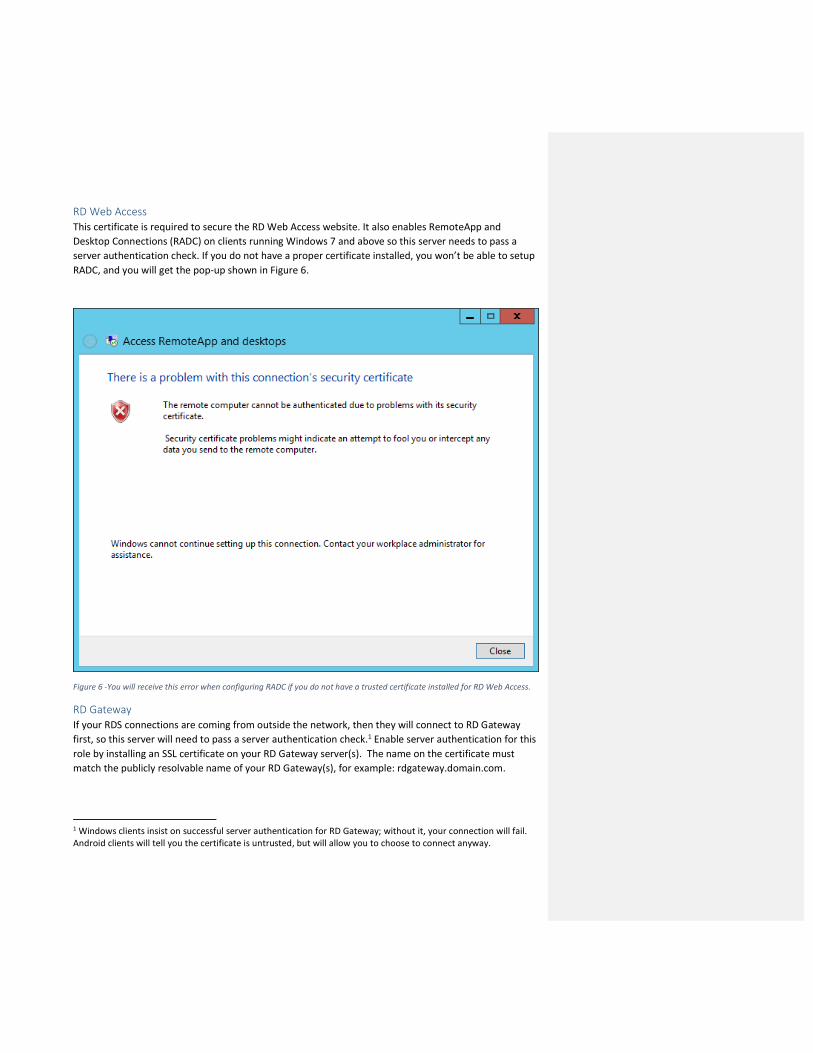
This certificate is required to secure the RD Web Access website. It also enables RemoteApp and
Desktop Connections (RADC) on clients running Windows 7 and above so this server needs to pass a
server authentication check. If you do not have a proper certificate installed, you won’t be able to setup
RADC, and you will get the pop-up shown in Figure 6.
Figure 6 -You will receive this error when configuring RADC if you do not have a trusted certificate installed for RD Web Access.
RD Gateway
If your RDS connections are coming from outside the network, then they will connect to RD Gateway
first, so this server will need to pass a server authentication check.1 Enable server authentication for this
role by installing an SSL certificate on your RD Gateway server(s). The name on the certificate must
match the publicly resolvable name of your RD Gateway(s), for example: rdgateway.domain.com.
1 Windows clients insist on successful server authentication for RD Gateway; without it, your connection will fail.
Android clients will tell you the certificate is untrusted, but will allow you to choose to connect anyway.
Configure Single Sign-On for Local or Internet Connections Single Sign-On and Web SSO produce the same result: a user does not have to enter their credentials
multiple times to access a RemoteApp (for SSO this is also true for full desktop connections). The
difference is how these two technologies work to give you a single-sign on experience. SSO leverages
Group Policy, so it works for domain-joined clients. When a user starts an RDP connection, the
connection logs onto the RDS environment using the credentials the user used to log onto their
machine. Clients that aren’t domain joined can use Web SSO to access RemoteApps or full desktop
connections from either the RD Web Access website or from RADC. 2
Credential caching, introduced in Windows Vista/Windows Server 2008, helps both the user and the
server the user connects to. Credential caching allows users to store credentials for a particular
connection so they don’t need to provide them every time they connect to that server (SSO). It also
provides credentials to the server before it establishes a session, avoiding the overhead of creating a
session if the user is not authorized (network-level authentication, or NLA). The piece that makes
credential caching work is the Credential Security Service Provider (CredSSP). As its part of the operating
system, it’s not related to the version of RDP you’re using. CredSSP is available on Windows XP SP3 and
above.
CredSSP delegates user credentials to a trusted server via a TLS-secured channel. After it has those
credentials, the trusted server can impersonate the user and log onto itself.
Enabling SSO
Typically, people implement SSO on intranets, but you can also use it with RD Gateway.
To make SSO work on your intranet, you must meet the following conditions:
• Your clients must be domain joined and able to receive GPO policies.
• Set the Security Layer on the RDP connection to either Negotiate or SSL (TLS 1.0), and encryption
to either High or FIPS.
• The following Computer GPO must be applied to client computers: Computer Configuration /
Policies / Administrative Templates / System / Credentials Delegation / Allow Delegating Default
Credentials. Add your RDS servers to this list as TERMSRV/<server-name-here>. You may use
wildcards to include many servers for example:
TERMSRV/*.rdsgurus.com
Note: Don’t use TERMSRV/* - this is a security risk as it means: ALL servers running
terminal services.
If you want to use RD Gateway with SSO, apply the following User GPO to your users:
User Configuration / Policies / Administrative Templates / Windows Components / Remote
Desktop Services / RD Gateway / Set RD Gateway Authentication Method
Choose: Use Locally Logged-On Credentials
2 WebSSO now works for full desktop connections with Remote Desktop client 8.0 and above..
Side note: This GPO has a checkbox option for “Allow users to change this setting”. If you check
this box, then if the following RDP file setting is present in the RDP file, it must be set to 0:
gatewayprofileusagemethod
Here’s why: If SSO GPOs are not set (for example, a non-domain joined PC) then if the value of
this setting is set to 1, it allows the RD Gateway value to be used in an RDP connection. If it is
set to 0, then the RD Gateway value disappears. But, if it is present when trying to achieve SSO
and its set to 1, SSO will fail for users where the GPO applies.
(If you do not check the box for allow users to change this setting, then this setting is ignored if
it is included in the RDP file settings).
If for some reason you are sending all connections through RD Gateway (both internal and external
connections) then clients connecting from inside the corporate network will use Kerberos to verify the
authenticity of the RD Connection Broker. But to achieve SSO from outside your corporate network, you
can’t use Kerberos for server authentication – instead you will check the RD Connection Broker’s SSL
certificate. See the “Deploying SSL Certificates” section to add the appropriate SSL certificate to the
deployment.
Enable Web SSO
Web SSO applies when accessing resources via RD Web Access. To enable Web SSO:
• You must use the Internet Explorer browser. You can use other browsers, but your experience
will be less seamless.
• The MsRdpClientShell Active X control must be enabled – you get prompted to enable it if it’s
not already when you login to the RD Web Access website.
You will be prompted to allow the webpage to run the Microsoft Remote Desktop Services Web
Access Control add-on the first time you log into the website (shown in Figure 7).
Figure 7: You will be prompted to run the Microsoft Remote Desktop Services Web Access Control add-on the first time
you log into the website.
You can tell that the add-on is enabled for the website by opening the browser’s tools and
clicking Manage Add-ons. Then double-click the MsRdpClientshell add-on as shown in Figure 8.
The website should be listed as having been approved to use the add-on.
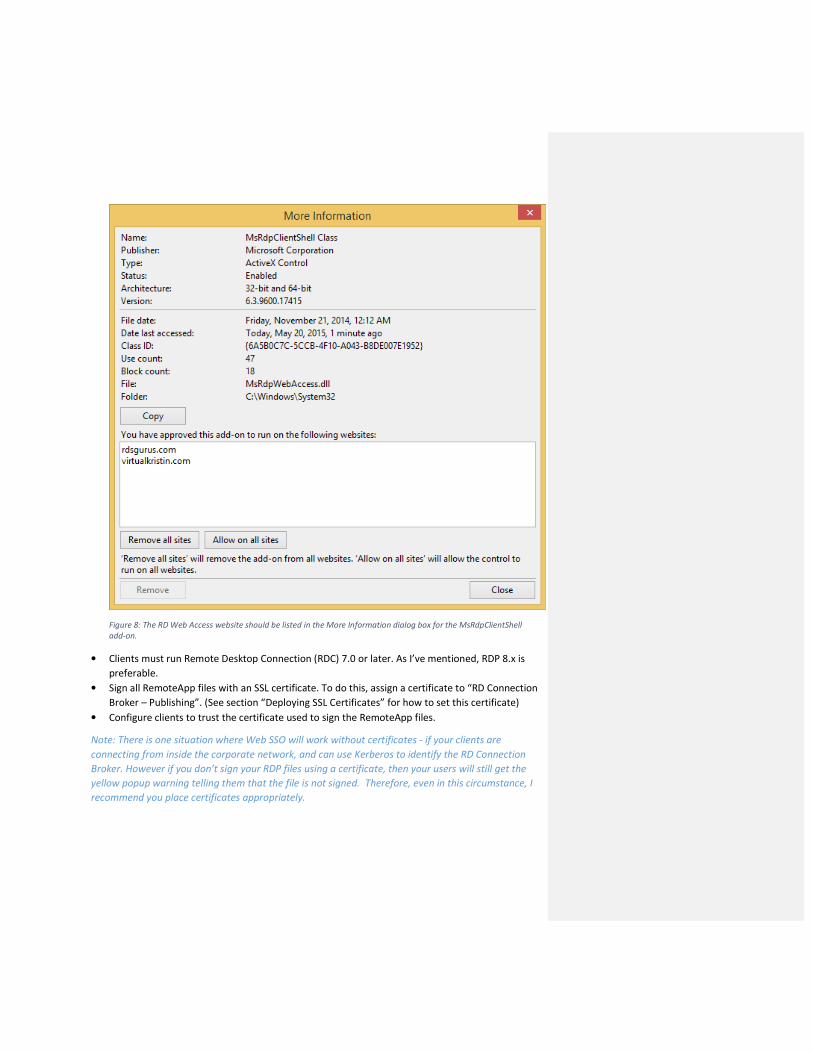
Figure 8: The RD Web Access website should be listed in the More Information dialog box for the MsRdpClientShell
add-on.
• Clients must run Remote Desktop Connection (RDC) 7.0 or later. As I’ve mentioned, RDP 8.x is
preferable.
• Sign all RemoteApp files with an SSL certificate. To do this, assign a certificate to “RD Connection
Broker – Publishing”. (See section “Deploying SSL Certificates” for how to set this certificate)
• Configure clients to trust the certificate used to sign the RemoteApp files.
Note: There is one situation where Web SSO will work without certificates - if your clients are
connecting from inside the corporate network, and can use Kerberos to identify the RD Connection
Broker. However if you don’t sign your RDP files using a certificate, then your users will still get the
yellow popup warning telling them that the file is not signed. Therefore, even in this circumstance, I
recommend you place certificates appropriately.
Scenarios: RDP Connections From Inside and Outside Your Network At this point, you should understand the roles of the various technologies and servers in enabling logons
with the fewest pop-ups and credential prompts. To illustrate how to do this, I will run through a few
common RDS implementation scenarios and talk about any nuances in achieving a simple logon
experience.
Connecting from Inside Your Network, Single RD Connection Broker
This is the simplest model. If you are connecting to your RD Session Host deployment from inside your
own network, you are not using RD Gateway, and your RD Connection Broker is not highly available,
then clients use Kerberos to authenticate server identity. You can follow the instructions to implement
SSO from earlier in this paper, and you won’t need certificates for server authentication. For Web SSO,
you will also use Kerberos to identify the RD Connection Broker. One caveat - if you don’t digitally sign
your RemoteApps, you will get a yellow warning pop-up (but you will still achieve a single sign-on
experience).
Connecting through RD Gateway, or With Highly Available RD Connection Brokers
If your connection goes through RD Gateway, or if RD Connection Broker is in HA mode, you will use
certificates to enable server authentication of RD Gateway and for the RD Connection Broker.
First, the connection will look at the name of the RD Gateway specified in the RDP file and compare it to
the name on the SSL certificate that the server presents. If the names match (and certificate is valid and
trusted) then the gateway server passes the server authentication check.
Once the connection passes through the RD Gateway, the connection request goes to RD Connection
Broker so this role can route it to the correct session collection and RD Session host server. As I said
before, RD Connection Broker identifies itself using its specified Client Access Name, which must both
match the name listed on the SSL certificate and resolve in DNS. When you make your brokers highly
available, then you set the Client Access Name as part of that configuration.
Public Domain Suffix
If the internal domain suffix is a public domain suffix (e.g. Domain.com or domain.org), then the RD
Connection Broker computer name (the default Client Access Name) contains this suffix. It’s easy to get
a certificate from a public CA that matches this naming convention. You can even get a wildcard
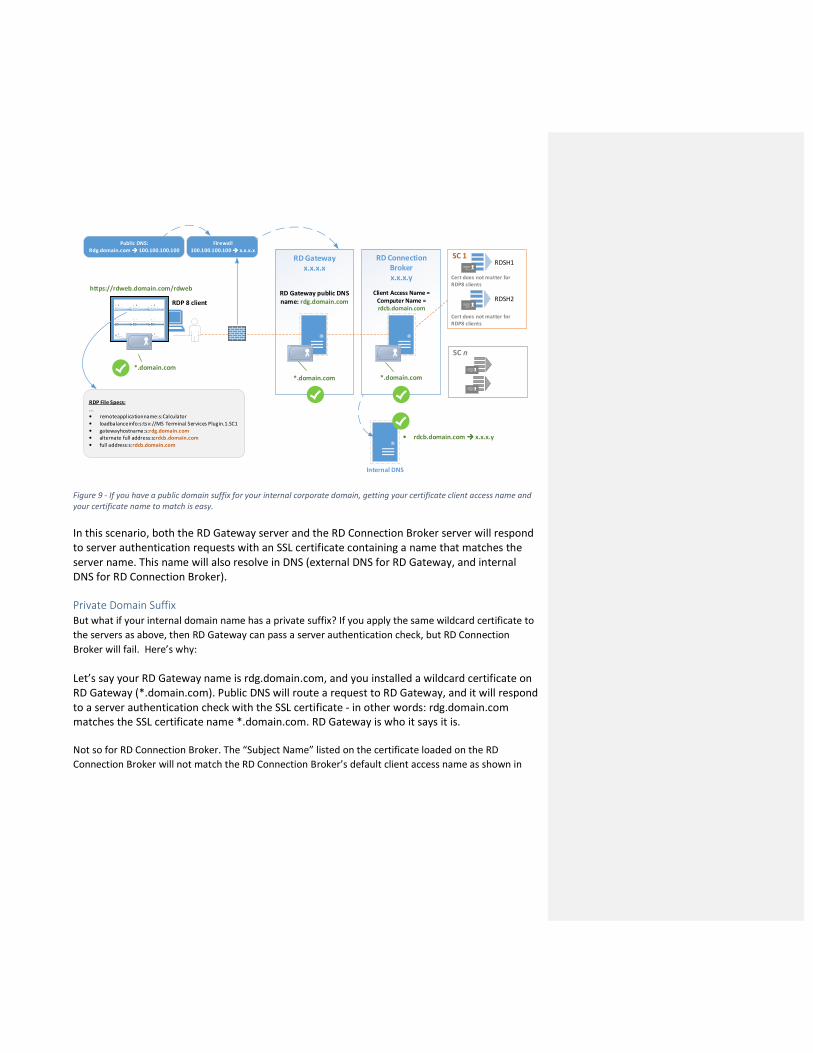
certificate (*.domain.com) and use it across your deployment as shown in Figure 9.
*.domain.com *.domain.com
RD Gateway
x.x.x.x
RD Connection
Broker
x.x.x.y
RDP 8 client
https://rdweb.domain.com/rdweb
*.domain.com
RDP File Specs:
...
• remoteapplicationname:s:Calculator
• loadbalanceinfo:s:tsv://MS Terminal Services Plugin.1.SC1
• gatewayhostname:s:rdg.domain.com
• alternate full address:s:rdcb.domain.com
• full address:s:rdcb.domain.com
RD Gateway public DNS
name: rdg.domain.com
Public DNS:
Rdg.domain.com ���� 100.100.100.100
Firewall
100.100.100.100 ���� x.x.x.x SC 1
Internal DNS
SC n
• rdcb.domain.com ���� x.x.x.y
Cert does not matter for
RDP8 clients
RDSH1
RDSH2
Client Access Name =
Computer Name =
rdcb.domain.com
Cert does not matter for
RDP8 clients
Figure 9 - If you have a public domain suffix for your internal corporate domain, getting your certificate client access name and
your certificate name to match is easy.
In this scenario, both the RD Gateway server and the RD Connection Broker server will respond
to server authentication requests with an SSL certificate containing a name that matches the
server name. This name will also resolve in DNS (external DNS for RD Gateway, and internal
DNS for RD Connection Broker).
Private Domain Suffix
But what if your internal domain name has a private suffix? If you apply the same wildcard certificate to
the servers as above, then RD Gateway can pass a server authentication check, but RD Connection
Broker will fail. Here’s why:
Let’s say your RD Gateway name is rdg.domain.com, and you installed a wildcard certificate on
RD Gateway (*.domain.com). Public DNS will route a request to RD Gateway, and it will respond
to a server authentication check with the SSL certificate - in other words: rdg.domain.com
matches the SSL certificate name *.domain.com. RD Gateway is who it says it is.
Not so for RD Connection Broker. The “Subject Name” listed on the certificate loaded on the RD
Connection Broker will not match the RD Connection Broker’s default client access name as shown in
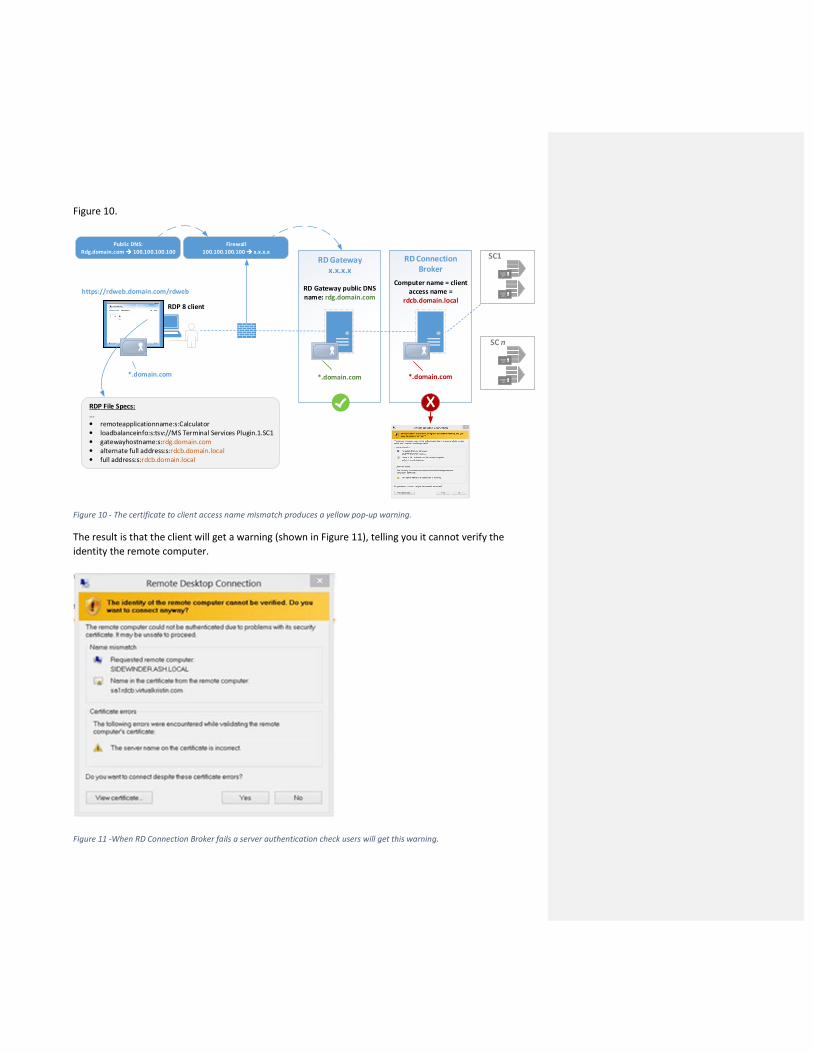
Figure 10.
*.domain.com *.domain.com
Computer name = client
access name =
rdcb.domain.local
RD Gateway
x.x.x.x
RD Connection
Broker
RDP 8 client
SC n
https://rdweb.domain.com/rdweb
*.domain.com
RDP File Specs:
...
• remoteapplicationname:s:Calculator
• loadbalanceinfo:s:tsv://MS Terminal Services Plugin.1.SC1
• gatewayhostname:s:rdg.domain.com
• alternate full address:s:rdcb.domain.local
• full address:s:rdcb.domain.local
RD Gateway public DNS
name: rdg.domain.com
Public DNS:
Rdg.domain.com ���� 100.100.100.100
Firewall
100.100.100.100 ���� x.x.x.xSC1
X
Figure 10 - The certificate to client access name mismatch produces a yellow pop-up warning.
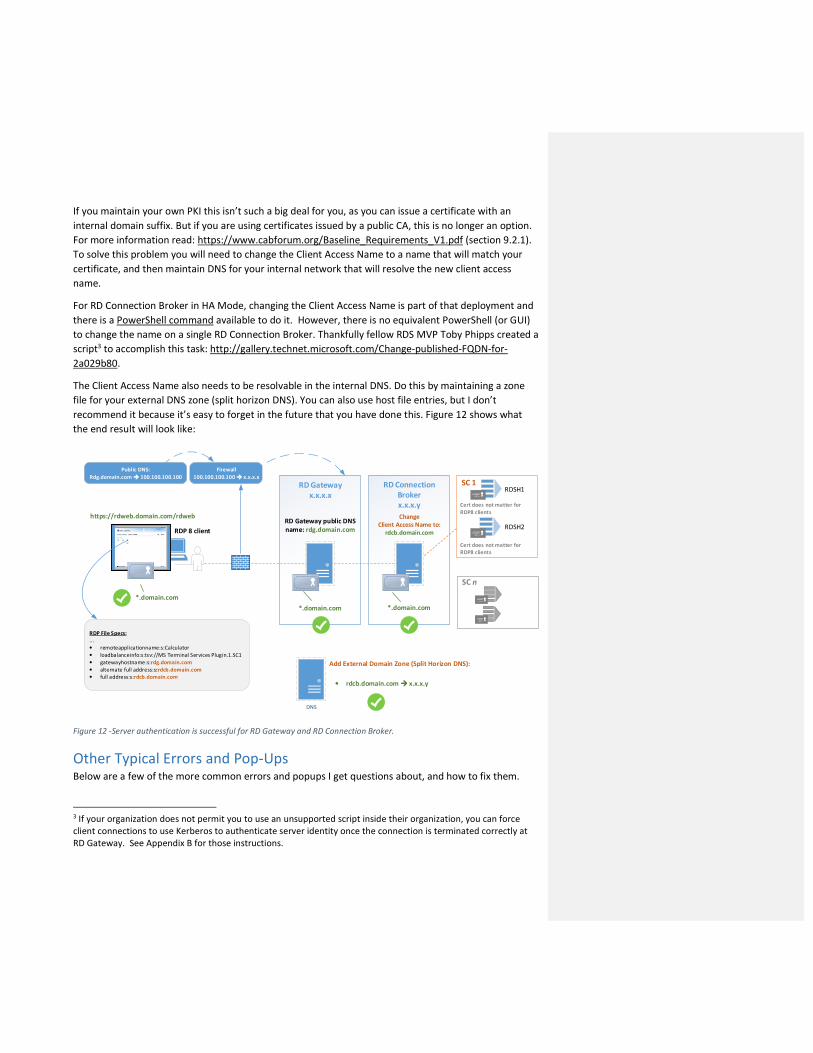
The result is that the client will get a warning (shown in Figure 11), telling you it cannot verify the
identity the remote computer.
Figure 11 -When RD Connection Broker fails a server authentication check users will get this warning.
If you maintain your own PKI this isn’t such a big deal for you, as you can issue a certificate with an
internal domain suffix. But if you are using certificates issued by a public CA, this is no longer an option.
For more information read: https://www.cabforum.org/Baseline_Requirements_V1.pdf (section 9.2.1).
To solve this problem you will need to change the Client Access Name to a name that will match your
certificate, and then maintain DNS for your internal network that will resolve the new client access
name.
For RD Connection Broker in HA Mode, changing the Client Access Name is part of that deployment and
there is a PowerShell command available to do it. However, there is no equivalent PowerShell (or GUI)
to change the name on a single RD Connection Broker. Thankfully fellow RDS MVP Toby Phipps created a
script3 to accomplish this task: http://gallery.technet.microsoft.com/Change-published-FQDN-for-
2a029b80.
The Client Access Name also needs to be resolvable in the internal DNS. Do this by maintaining a zone
file for your external DNS zone (split horizon DNS). You can also use host file entries, but I don’t
recommend it because it’s easy to forget in the future that you have done this. Figure 12 shows what
the end result will look like:
*.domain.com *.domain.com
RD Gateway
x.x.x.x
RD Connection
Broker
x.x.x.y
RDP 8 client
https://rdweb.domain.com/rdweb
*.domain.com
RDP File Specs:
...
• remoteapplicationname:s:Calculator
• loadbalanceinfo:s:tsv://MS Terminal Services Plugin.1.SC1
• gatewayhostname:s:rdg.domain.com
• alternate full address:s:rdcb.domain.com
• full address:s:rdcb.domain.com
RD Gateway public DNS
name: rdg.domain.com
Public DNS:
Rdg.domain.com ���� 100.100.100.100
Firewall
100.100.100.100 ���� x.x.x.x SC 1
DNS
SC n
Add External Domain Zone (Split Horizon DNS):
• rdcb.domain.com ���� x.x.x.y
Cert does not matter for
RDP8 clients
RDSH1
RDSH2
Change
Client Access Name to:
rdcb.domain.com
Cert does not matter for
RDP8 clients
Figure 12 -Server authentication is successful for RD Gateway and RD Connection Broker.
Other Typical Errors and Pop-Ups Below are a few of the more common errors and popups I get questions about, and how to fix them.
3 If your organization does not permit you to use an unsupported script inside their organization, you can force
client connections to use Kerberos to authenticate server identity once the connection is terminated correctly at
RD Gateway. See Appendix B for those instructions.

“The Identity of the remote computer cannot be identified.”
If your session collection is using the RDP security layer, you will get the pop-up shown in Figure 13.
Figure 13 - A Windows 8.1 client connecting to a session collection with security layer set to RDP will get this pop-up.
This makes sense because it’s not using TLS, and therefore cannot identity the server with a certificate.
Change the security layer to TLS.
“The remote computer cannot be authenticated due to problems with its security
certificate.”
In RADC you might see the error shown in Figure 14.
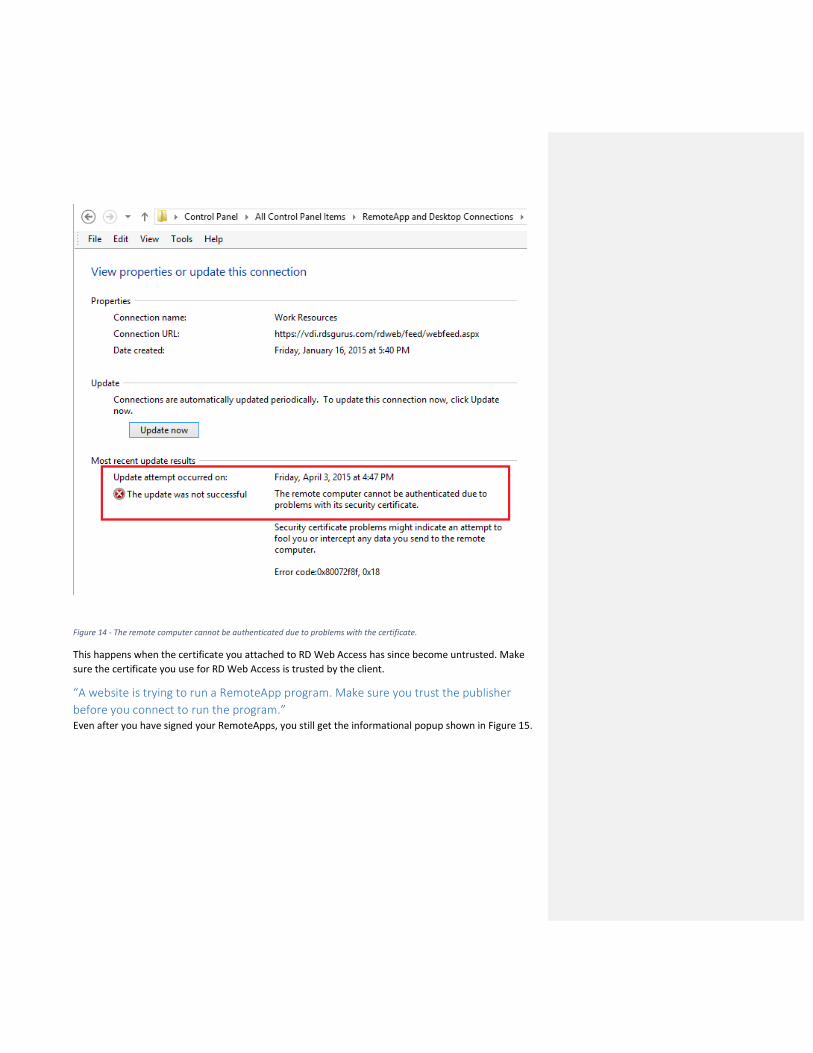
Figure 14 - The remote computer cannot be authenticated due to problems with the certificate.
This happens when the certificate you attached to RD Web Access has since become untrusted. Make
sure the certificate you use for RD Web Access is trusted by the client.
“A website is trying to run a RemoteApp program. Make sure you trust the publisher
before you connect to run the program.”
Even after you have signed your RemoteApps, you still get the informational popup shown in Figure 15.
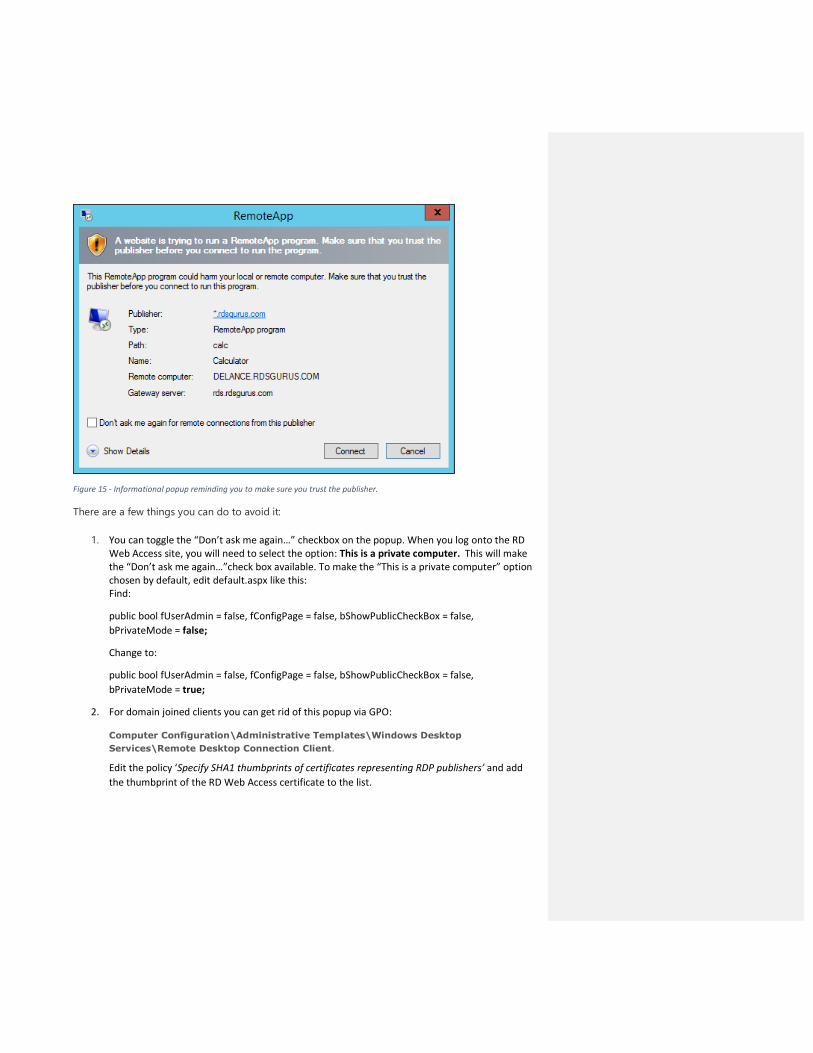
Figure 15 - Informational popup reminding you to make sure you trust the publisher.
There are a few things you can do to avoid it:
1. You can toggle the “Don’t ask me again…” checkbox on the popup. When you log onto the RD
Web Access site, you will need to select the option: This is a private computer. This will make
the “Don’t ask me again…”check box available. To make the “This is a private computer” option
chosen by default, edit default.aspx like this:
Find:
public bool fUserAdmin = false, fConfigPage = false, bShowPublicCheckBox = false,
bPrivateMode = false;
Change to:
public bool fUserAdmin = false, fConfigPage = false, bShowPublicCheckBox = false,
bPrivateMode = true;
2. For domain joined clients you can get rid of this popup via GPO:
Computer Configuration\Administrative Templates\Windows Desktop
Services\Remote Desktop Connection Client.
Edit the policy ‘Specify SHA1 thumbprints of certificates representing RDP publishers’ and add
the thumbprint of the RD Web Access certificate to the list.
Q & A Q: Can I use wildcard certificates with sub-domains?
A: Yes, up to ten. I have seen some confusion about the ability to get sub-domain wildcard certs, and
about how many levels down they would work for, so I talked to DigiCert to get some clarification. Here
is their response:
Consider the RD Connection Broker client access name: cb.localdomain.externaldomain.com (two sub-
levels):
“The Wildcard character (the asterisk symbol) will cover all first level subdomains in its place. So, in this
case the "local domain" part would be covered by the wildcard character, while the "CB" part would not
be. However, you can add up to 10 multi-level subdomains per duplicate certificate anytime you need
to. You will be presented with 10 lines that allow you to add in names that go past what the wildcard
covers, like CB.localdomain.externaldomain.com. You can also go further levels deeper if you need. This
process is explained here: https://www.digicert.com/ssl-support/wildcard-san-names.htm”.
Q: I still need to support RDP7 clients. From XP clients I still receive a yellow server authentication pop-
up warning when I connect to RemoteApps. How can I fix this?
A: If you have non-RDP 8 clients, then the RD Session host servers will answer server authentication
requests too. By default their RDP Listeners are tagged with the thumbprint of a self-signed certificate,
and therefore it’s not trusted by the downlevel clients. Refer to Appendix A for how to change the
thumbprint on the RD Session Host server RDP listener(s).
Summary Ideally, using RemoteApp programs and desktops is seamless for the user. For security reasons,
however, it’s important that users only connect to servers whose identities they can safely trust,
launching programs that they can trust, using an encrypted channel. In this paper, we’ve talked about
what those popups are for and how to configure the servers in your deployment to keep them at a
minimum, so that users can safely and easily connect to resources.
Other Reading • [MS-CSSP]: Credential Security Support Provider (CredSSP) Protocol
• [MS-RDPBCGR]: Remote Desktop Protocol: Basic Connectivity and Graphics Remoting
• Remote Desktop Protocol 8.1 Update for Windows 7 SP1 released to web
• Remote Desktop Services 2012 Wild Card Certificate Publishing Script
• PowerShell - SetRDCertificate
Appendix A: Non-RDP 8 Clients RDP 8 clients authenticate the identity of the RD Connection Broker, and assume that if that is trusted
then it’s safe to connect to the server the broker sends them to. Pre-RDP 8 clients are less trusting: they
not only need to authenticate the identity of the connection broker, but also the RD Session Host server

that will host the session. By default, the RDP Listener has a self-signed certificate thumbprint attached
to it and answers a server authentication check with that certificate information. For pre-RDP8
connections, you will need to import the same SSL certificate on each RD Session host server and set
Thumbprint on the RDP Listener. Your setup could look like Figure 16.
SC 1
SC n
Replace with *.domain.com
cert thumbprint
RDSH1
RDSH2
Replace with *.domain.com
cert thumbprint
*.domain.com *.domain.com
RD Gateway
x.x.x.x
RD Connection
Broker
x.x.x.y
RDP 8 client
https://rdweb.domain.com/rdweb
*.domain.com
RDP File Specs:
...
• remoteapplicationname:s:Calculator
• loadbalanceinfo:s:tsv://MS Terminal Services Plugin.1.SC1
• gatewayhostname:s:rdg.domain.com
• alternate full address:s:rdcb.domain.com
• full address:s:rdcb.domain.com
RD Gateway public DNS
name: rdg.domain.com
Public DNS:
Rdg.domain.com ���� 100.100.100.100
Firewall
100.100.100.100 ���� x.x.x.x
Add External Domain Zone
(Split Horizon DNS):
Change
Client Access Name to:
rdcb.domain.com
Internal DNS
• rdcb.domain.com ���� x.x.x.y
• rdsh1.domain.com ���� x.x.x.a
• rdsh2.domain.com ���� x.x.x.b
Figure 16– For non-RDP8 clients you need to change the thumbprint on each RD Session Host server’s RDP listener. There is no
GUI to change the thumbprint on 2012 R2 RD Session Host RDP Listeners, but Microsoft has a FixIt to help you:
https://support.microsoft.com/en-us/kb/3042780.
Use the same thumbprint on all RD Session Host servers! Also, remember that the name on your
certificate needs to be resolvable in your corporate DNS (on the network where the servers reside). So if
you use your public suffix wildcard certificate, add appropriate DNS entries in your split horizon DNS
setup.
Appendix B - Force Server Authentication through Kerberos
If using a .local domain and a single server, you can use the script we discussed in the section
“Private Domain Suffix” to change the visible name of the RD Connection Broker to make it
match its certificate. If you can’t use the script for policy reasons, you have another option:
force the use of Kerberos for server authentication for requests coming through RD Gateway.
To do so, set the “rdgiskdcproxy:i:1” custom RDP setting on a per-session collection basis4. This custom
RDP setting gets inserted in all RDP files that are made available through RD Web Access.
Run the following PowerShell command on the RD Connection Broker server:
Set-RDSessionCollectionConfiguration –CollectionName "Name-Of-Session-Collection-Goes-
Here" -CustomRdpProperty “rdgiskdcproxy:i:1"
Some caveats: Before you implement this and test it out, you will need to install Rollup 2975719 per this
Hotfix article: https://support.microsoft.com/en-us/kb/2957984. Also, KDC Proxy may not be supported
by all clients, so test this out fully against your client base.
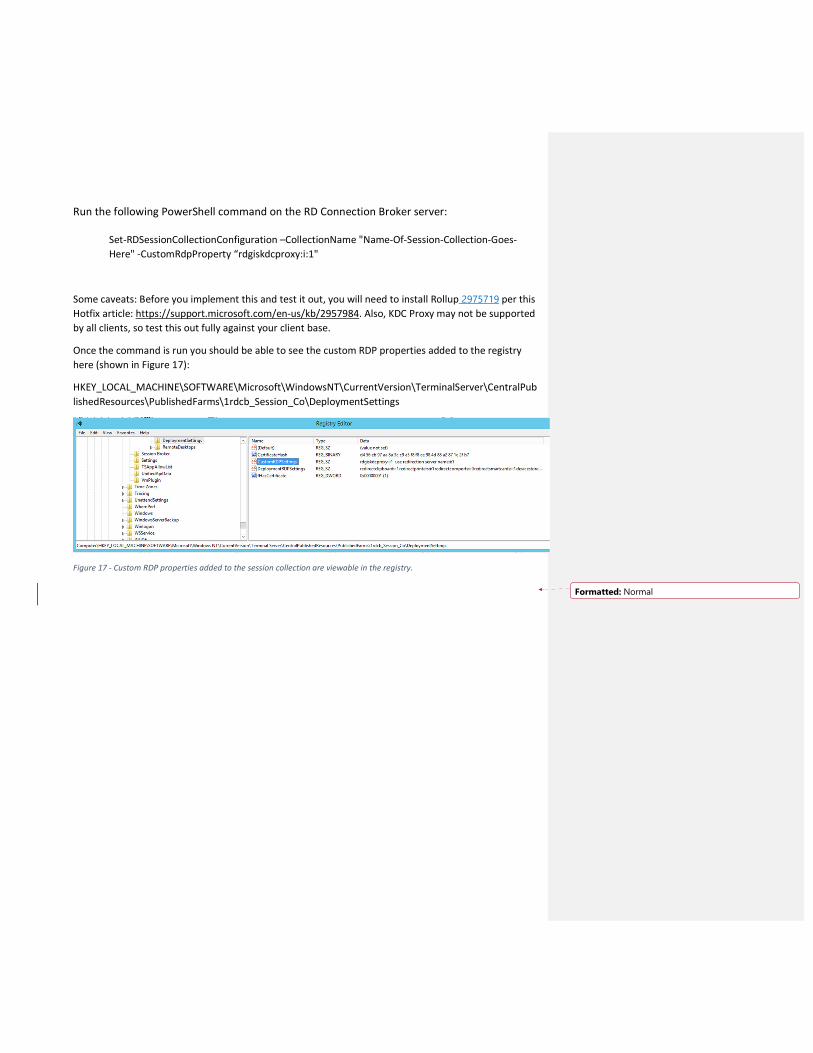
Once the command is run you should be able to see the custom RDP properties added to the registry
here (shown in Figure 17):
HKEY_LOCAL_MACHINE\SOFTWARE\Microsoft\WindowsNT\CurrentVersion\TerminalServer\CentralPub
lishedResources\PublishedFarms\1rdcb_Session_Co\DeploymentSettings
Figure 17 - Custom RDP properties added to the session collection are viewable in the registry.
Formatted: Normal