microsoft dynamics sl 2015 - dslug
TRANSCRIPT

Microsoft Dynamics SL 2015
Web Apps Admin & Deployment (Includes Report Server and Web Services)
(Revised December 2016)

Disclaimer
This document is provided “as-is”. Information and views expressed in this document, including URL
and other Internet Web site references, may change without notice. You bear the risk of using it.
Some examples are for illustration only and are fictitious. No real association is intended or inferred.
This document does not provide you with any legal rights to any intellectual property in any Microsoft
product. You may copy and use this document for your internal, reference purposes only.
Sample Code Warranty disclaimer
Microsoft Corporation disclaims any warranty regarding the sample code contained in this
documentation, including the warranties of merchantability and fitness for a particular purpose.
License agreement
Use of this software is covered by a license agreement provided with it. If you have any questions,
please call the Customer Assistance Department at 800-456-0025 (in the United States or Canada) or
+1-701-281-6500.
Copyright
© 2016 Microsoft Corporation. All rights reserved.
Publication Date
December 2016

Contents i
Contents Introduction 1
Web Applications Deployment Overview ..................................................................................... 1 User’s Guide Overview ................................................................................................................. 1
What is Covered in the User’s Guide? ........................................................................... 1 Who Should Use the User’s Guide? ............................................................................... 1 How to Use the User’s Guide ......................................................................................... 1
Task Guidelines 2
Quick Reference Task List ........................................................................................................... 2 How Do I Administer …? ................................................................................................. 2 How Do I Configure …? ................................................................................................... 2 How Do I Customize …? ................................................................................................. 2 How Do I Deploy …? ....................................................................................................... 2 How Do I Set Up …? ....................................................................................................... 2
Deployment 3
Report Server Deployment .......................................................................................................... 3 Prerequisites for Report Server ..................................................................................... 3 Configure SSRS for Microsoft Dynamics SL................................................................... 4
Web Services Deployment ........................................................................................................... 7 Prerequisites for Web Services ...................................................................................... 7 Configure Web Services ................................................................................................. 8 Removing Existing Web Services and Windows Service................................................ 8 Deploy Web Services ..................................................................................................... 8
Web Apps Deployment ............................................................................................................... 15 Prerequisites for Web Apps ......................................................................................... 15 Deploy Microsoft Dynamics SL Web Apps ................................................................... 15
Configuration 20
All Web Apps .............................................................................................................................. 20 Business Portal to Web Apps Data Migration ............................................................................ 20 Feature Specific Configuration .................................................................................................. 22
Project .......................................................................................................................... 22 Resource Management................................................................................................ 25 Inventory ...................................................................................................................... 26 Requisitions ................................................................................................................. 26 Payroll .......................................................................................................................... 28 Accounts Payable ......................................................................................................... 28 Accounts Receivable .................................................................................................... 29 Shared .......................................................................................................................... 29 Administration .............................................................................................................. 30
Access Rights ............................................................................................................................. 31
Appendix 33
Web Configuration Settings ....................................................................................................... 33 Web Services Administration ..................................................................................................... 37
Logging Levels.............................................................................................................. 37 Screens/Reports .......................................................................................................... 37 Changing the Message Size ......................................................................................... 39 Microsoft Dynamics SL Reporting Service ................................................................... 40 Control Membership in the TrustedWebService role ................................................... 40 Securing Microsoft Dynamics SL Web Services .......................................................... 41

ii Web Apps Admin & Deployment
Access Rights List ........................................................................................................ 43 Setting timeouts ........................................................................................................................ 57
Timeouts for Web Service Method Calls ...................................................................... 57 Timeouts for IIS ............................................................................................................ 57
Microsoft Distributed Transaction Coordinator Setup............................................................... 58 Web Services Reference............................................................................................................ 59
Index 62

Introduction 1
Introduction
Web Applications Deployment Overview Microsoft Dynamics SL Web Apps is a customer experience that is 100% web-based. There is no client
footprint required and users can access project and budget maintenance, resource planning, project
time entry, project expense entry, project time and expense approvals and line item approvals, and
project analyst report functionality from many mobile devices or web browsers.
User’s Guide Overview This user’s guide provides information about the setup and use of Microsoft Dynamics SL Web Apps.
Reviewing the user’s guide can help you make informed decisions about the implementation of
Microsoft Dynamics SL Web Apps in your business.
What is Covered in the User’s Guide?
The user’s guide consists primarily of procedures and checklists that describe how to perform the
various tasks featured in Microsoft Dynamics SL Web Apps. The user’s guide also contains topics that
help you become better acquainted with its capabilities. Topics are arranged in a logical order that
builds on information previously presented in other Microsoft Dynamics SL user’s guides.
Who Should Use the User’s Guide?
The user’s guide is designed for readers who are new to Microsoft Dynamics SL. The guide provides
the information that you need for making decisions about how to use Microsoft Dynamics SL Web
Apps to benefit the most from your system.
How to Use the User’s Guide
Read the appropriate section of the user’s guide before you continue. The user’s guide presents the
procedures and steps required for completing the various deployment and configuration tasks. To help
you locate information, the user’s guide contains:
A table of contents of logically organized activities and tasks.
An alphabetized “Quick Reference Task List” of frequently performed tasks.
An alphabetized index of the information that is provided in the user’s guide.

2 Web Apps Admin & Deployment
Task Guidelines
Quick Reference Task List This list contains tasks that are frequently performed when you use Microsoft Dynamics SL Web Apps.
Each task is cross-referenced to a specific page.
How Do I Administer …?
Administering Web Services — see Web Services Administration on page 37.
How Do I Configure …?
Migrating data from BP to Web Apps – see Business Portal to Web Apps Data Migration on page
20.
Configuring SQL Server Reporting Services — see Configure on page 3.
Configuring SSRS for Microsoft Dynamics SL – see Configure SSRS for Microsoft Dynamics SL on
page 4.
Project Timecards, Expense Entry, Approvals, and so on – see Project on page 22.
Resource Management module – see Resource Management on page 25.
Payroll Timecard and Advanced Timecard – see Payroll on page 28.
Inventory Item Lookup – see Inventory on page 26.
Item Request Entry and Approvals – see Requisitions on page 26.
Access Rights Web App – see Administration on page 30.
How Do I Customize …?
Web.config settings — see Web Configuration Settings on page 33.
How Do I Deploy …?
Deploying Report Server – see Report Server Deployment on page 3.
Deploying Microsoft Dynamics SL Web Services – see Web Services Deployment on page 7.
Deploying Microsoft Dynamics SL Web Apps — see Web Apps Deployment on page 15.
How Do I Set Up …?
Access Rights — see Access Rights on page 31 and Access Rights List on page 43.
Timeouts – see Setting timeouts on page 57.

Deployment 3
Deployment
This section lists, in order, the deployment steps that you must complete to use Microsoft Dynamics
SL Web Apps. In order, these include the following:
1. Prerequisites and deployment for Report Server, starting on this page.
2. Prerequisites and deployment for Microsoft Dynamics SL Web Services, starting on page 7.
3. Prerequisites, configuration, and deployment for Microsoft Dynamics SL Web Apps, starting on
page 15.
Report Server Deployment You must deploy and configure Report Server to use the Project Analyst SSRS reports and the Project
Expense SSRS report.
Prerequisites for Report Server Before you deploy Report Server, you must install and configure SQL Reporting Services 2012 or
SQL Reporting Services 2014, and then deploy Microsoft Dynamics SL Reporting Services reports.
You must also set up security for SQL Reporting Services reports by using Reporting Services
Configuration Manager This section provides details about how to do this.
Note: For machines running Windows Server 2012 R2 and SQL Server 2014, install the
SQLSysCLTypes.msi file version 2012 prior to installing the ReportView.msi file.
SQL Server
Install SQL Server 2012 or SQL Server 2014; with the Reporting Services feature. Or, add the
Reporting Services feature to an existing instance of SQL Server 2012 or SQL Server 2014.
For more information about how to install the Reporting Services feature, see “Install SQL Server
Business Intelligence Features” at the following location: http://msdn.microsoft.com/en-
us/library/hh231681.aspx.
Configure SQL Server Reporting Services
Configure SQL Server Reporting Services (SSRS) by using Reporting Services Configuration Manager.
1. Click Program Files | Microsoft SQL Server | Configuration Tools | Reporting Services
Configuration Manager.
2. At a minimum, accept the default settings.
3. Verify connectivity by successfully opening the link in the Report Manager URL section.
For more information about SQL Server Reporting Services, see “Reporting Services (SSRS)” at the
following location: http://msdn.microsoft.com/en-us/library/ms159106.aspx.
Microsoft Dynamics SL
Log on to Microsoft Dynamics SL 2015 with the server and database with which you plan to work, at
least one time. This creates or updates the Solomon.ini.
For more information about how to install Microsoft Dynamics SL 2015, see the Microsoft Dynamics
SL 2015 Installation Guide.

4 Web Apps Admin & Deployment
Configure SSRS for Microsoft Dynamics SL
Configure and deploy SSRS for Microsoft Dynamics SL in Microsoft Dynamics SL Report Server
Configuration Console.
To configure SSRS for use with Microsoft Dynamics SL, follow these steps:
1. Copy the updated .rdl files from the ProjectAnalyst folder in the Web Apps deployment to the
Project Analyst folder in your Microsoft Dynamics SL installation directory.
For example, copy the contents of the C:\temp\WebAppsFiles\ProjectAnalyst folder to your
C:\Program Files (x86)\Microsoft Dynamics\SL\Applications\ReportServer\Project Analyst folder.
2. Copy the updated .rdl files from the Project folder in the Web Apps deployment to the Project
folder in your Microsoft Dynamics SL installation directory.
For example, copy the contents of the C:\temp\WebAppsFiles\Project folder to your C:\Program
Files (x86)\Microsoft Dynamics\SL\Applications\ReportServer\Project folder.
3. In Control Panel, click Administrative Tools, and then click Microsoft Dynamics SL Report Server
Configuration.
Microsoft Dynamics SL Report Server Configuration Console appears.
Figure 1: Microsoft Dynamics SL Report Server Configuration Console, SQL Server
4. In SQL Server, specify the name of the instance of SQL Server where the Microsoft Dynamics SL
system database exists. This defaults from the Solomon.ini.
5. In System Database, specify the name of the Microsoft Dynamics SL system database. This
defaults from the Solomon.ini.
6. Click Next.

Deployment 5
Report Server page appears.
Figure 2: Microsoft Dynamics SL Report Server Configuration Console, Report Server
7. In Please enter the URL to the Report Server, specify the URL for the Report Server.
8. In Please enter the URL to the Report Manager, specify the URL for the Report Manager.
9. In Base Folder, specify the folder where you want to deploy SSRS for Microsoft Dynamics SL.
Note: Each Microsoft Dynamics SL system database should have a unique Base Folder. Multiple
system databases should not be configured to use the same Base Folder.
10. Click Deploy. Microsoft Dynamics SL Location page appears
Figure 3: Microsoft Dynamics SL Report Server Configuration Console, Microsoft Dynamics SL Location
11. Specify the location of the Microsoft Dynamics SL installation.
6 Web Apps Admin & Deployment
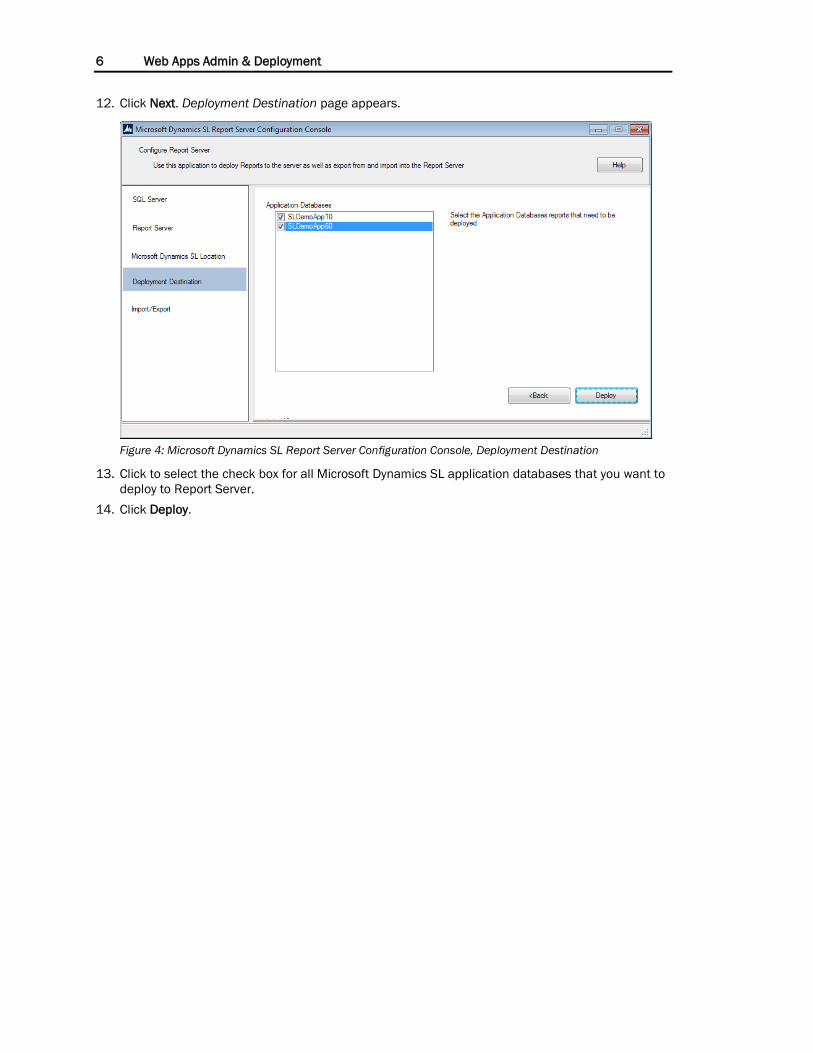
12. Click Next. Deployment Destination page appears.
Figure 4: Microsoft Dynamics SL Report Server Configuration Console, Deployment Destination
13. Click to select the check box for all Microsoft Dynamics SL application databases that you want to
deploy to Report Server.
14. Click Deploy.

Deployment 7
Web Services Deployment
Prerequisites for Web Services Windows Authentication database authentication mode in the Microsoft Dynamics SL databases.
Microsoft Dynamics SL 2015 or 2015 Cumulative Update 1 (CU1) databases hosted on SQL
Server 2012 or SQL Server 2014.
Internet Information Services (IIS) 7.0 or later versions with Transport Layer Security (TLS)
enabled.
Enable SSL (iis.net/learn/manage/configuring-security/how-to-set-up-ssl-on-iis)
Use Server Manager to add the Windows Process Activation Service (WAS) feature with all sub
features.
NOTE: WAS was introduced in Windows Server 2008 R2, however the information provided in
the following web page applies to all the supported Windows Server operating systems.
(technet.microsoft.com/en-us/library/cc770745.aspx)
Use Server Manager to add the .NET Framework’s (latest version) WCF Activation feature.
(iis.net/learn/web-hosting/configuring-servers-in-the-windows-web-platform/windows-
communication-framework-wcf)
On Windows 8/8.1 and Windows Server 2012/2012 R2, select the following sub features:
HTTP Activation, Named Pipes Activation, and TCP Activation.
On Windows 7 SP1 and Windows Server 2008 R2, select the following sub features: HTTP
Activation and Non-HTTP Activation.
Register Microsoft Dynamics SL Web Services (WS) in Dynamics SL System Manager’s
Registration (95.250.00).
If you plan to have SQL Server, Web Services, and Web Apps each installed or deployed on
separate Windows Server computers, consider the following:
You must configure Microsoft Distributed Transaction Coordinator (MSDTC). For instructions,
see “Microsoft Distributed Transaction Coordinator Setup” on page 58.
You must add an Inbound Rule to the Windows Firewall on the server that contains the SQL
databases so that the other servers can reach the databases. The default SQL port is 1433.
To use Microsoft Dynamics SL Web Apps in Windows Server, the following Role Services and
features are required:
Roles
Web Server (IIS)
Common HTTP Features.
Static Content
Application Development.
.Net Extensibility
Security
Windows Authentication
Request Filtering
Management tools
IIS Management Console
Features
Remote Server Administration tools

8 Web Apps Admin & Deployment
Role Administration
Web server (IIS) Tools
Windows Process Activation Services
Process Model
.Net Environment
Configuration API’s
.Net Framework 3.5.1 Features
.Net Framework 3.5.1
WCF Activation
HTTP Activation.
Configure Web Services
Use Trusted Web Service Account Maintenance (95.261.00) to control membership in the
“TrustedWebService” database roles for each Microsoft Dynamics SL database. Trusted Web Service
Account Maintenance (95.261.00) is restricted to users who are members of the sysadmin server role
in SQL Server. You should use a least-privileged user on the Windows domain, a noninteractive user is
best. You will specify this user as the Identity user for the application pool during Web Services
deployment and during Web Apps deployment. Additionally, you can use the same user for running the
Reporting Windows Service, but it is not required.
For more information about this screen, see “Trusted Web Service Account Maintenance (95.261.00)”
on page 38.
Removing Existing Web Services and Windows Service
If you previously installed a version of Microsoft Dynamics SL Web Services which added web services
to Control Panel’s Programs and Features area, uninstall the web services before deployment.
If you previously deployed a version of Microsoft Dynamics SL Web Services which did not create an
entry in Control Panel’s Programs and Features, no uninstall is needed. You can redeploy overtop the
existing web services.
If you want to remove an existing deployment, do this by removing the reporting windows service,
deleting the website and application pool in IIS, and then deleting the folders to which the web
services were installed and the shared reporting output folder.
To remove the reporting windows service, open a command prompt as administrator, and run the
following commands:
sc.exe stop "Microsoft.Dynamics.SL.ROI"
sc.exe delete "Microsoft.Dynamics.SL.ROI"
Deploy Web Services To use Microsoft Dynamics SL Web Services, you must first configure the website, deploy the feature
into an application pool on the web server, and then select the Microsoft Dynamics SL Web Services
that you want to be active.
Note:
This is a complete deployment of web services.
If you create the website manually, make sure that you enable Windows Authentication for the site
in IIS. If you let the Web Services deployment create the website, this is handled automatically.

Deployment 9
During the Web Services deployment, consider selecting a port other than the default 443 to host
the web services. Port 443 is the default external-facing port. Consider using port 444 for your
Web Services deployment and port 443 for your Web Apps deployment.
If you are deploying over top of an existing deployment, follow the steps below to stop and start
the app pools prior to deployment:
On the server where the app pools are located, open a command prompt as Administrator.
Type IISReset and press Enter.
Close the command prompt window when the IISReset has completed.
To deploy Microsoft Dynamics SL Web Services, follow these steps:
1. Run MicrosoftDynamicsSLWebServices.exe. The Microsoft Dynamics SL Web Services
Configuration Console appears, displaying the Site Information page.
Figure 5: Microsoft Dynamics SL Web Services Configuration Console, Site Information Tab
2. In Site Name, select an existing website, or type a new name to create a new website.
Note:
Only sites that have an existing Https protocol are listed as choices.
If an existing site without an Https protocol is entered, an Https protocol must be assigned
before continuing with the deployment.
3. (optional) Select Use Subsite if you want to deploy web services to a subsite. Then, select the
subsite from the list, or type a new value to create a new subsite.
4. In Physical File Location, specify the physical location of the website files.
5. In Https, assign a secure protocol to the site by specifying the Port Number and selecting the
Certificate.

10 Web Apps Admin & Deployment
Note: If you plan to deploy Web Services and Web Apps on different servers, you must export this
certificate from IIS on the web services server and import it into IIS on the web apps server.
6. In Tcp, note the Port Number assigned.
7. Click Next.
Note: If the selected site already exists, clicking Next takes you directly to the Web Service
Selection page.
The Application Pool Information page appears.
Figure 6: Microsoft Dynamics SL Web Services Configuration Console, Application Pool Information Tab
8. In Application Pool Name, select an existing application pool or type a new application pool name.
Note: If you use an existing Application Pool, it must support .NET v4.0. If you create a new
application pool, it will be set to support .NET v4.0
9. In Identity (for new application pools), specify the identity user in domain\username format.
Note: Specify the user who you configured in Trusted Web Service Account Maintenance
(95.261.00).
10. In Password, type the password for the domain user who you specified in Identity.
11. In Confirm Password, retype the password that you specified in Password.
12. Click Proceed.

Deployment 11
The Web Service Selection page appears.
Figure 7: Microsoft Dynamics SL Web Services Configuration Console, Web Service Selection Tab
13. Select which Microsoft Dynamics SL Web Services you want to be active.
Lookup Web Service must always be selected
At least one Login Service must be selected
14. In Server Name, type the instance of the SQL Server that hosts the Microsoft Dynamics SL system
database.
15. In System Database, type the Microsoft Dynamics SL system database name.
16. Click Next.

12 Web Apps Admin & Deployment
The Reporting page appears.
Figure 8: Microsoft Dynamics SL Web Services Configuration Console, Reporting Tab
17. In Service User specify the domain and username of the Windows user who will be running the
Windows Service for Web Apps reporting.
Note:
Specify the user who you use in Trusted Web Service Account Maintenance (95.261.00). This
user does not have to be the same user who you specified on the Application Pool Information
tab.
If you will let users upload reports to SharePoint, this Service User must have read and upload
permissions to the SharePoint site.
18. In Service User Password, type the password for the domain user who you specified.
19. In Confirm Service User Password, retype the password that you specified.
20. In Report Location, specify the location of the “Reports” folder in your website, or in the subsite if
you deployed to a subsite.
21. In Output Location, specify a shared location to which the Service User has full access. For
security, no other users should have permissions to this file share.
Note: You must manually create this shared location through Windows before you try to specify
the location here.
22. Click Next.

Deployment 13
The Verify page appears.
Figure 9: Microsoft Dynamics SL Web Services Configuration Console, Verify Tab
23. Click Verify to confirm that the deployment is correct. If you receive any errors, fix the errors, and
then click Verify again.

14 Web Apps Admin & Deployment
Verify a Successful Web Service Deployment
After you have deployed Web Services, you should check that everything is successfully deployed by
using the basic steps in this topic. In the example that follows, it is assumed that the web service is
installed on a server named slserver.contoso.com on port 444. For example: https://slserver.contoso.com:444/.
1. Open an Internet browser.
2. Locate the LoginWindows.svc file, and then note the URL in the screen shot that follows. For
example:
https://slserver.contoso.com:444/Microsoft.Dynamics.SL.WebServices.Session.L
oginWindows.svc.
If the web service is successfully deployed, you see content similar to one displayed in the
webpage that follows.
3. Check the .wsdl file which is highlighted in the red box that follows. Upon a successful
deployment, this displays the content of the .wsdl file. This is important for generating proxy stubs
for web service consumers.
Figure 10: LoginWindowsService displaying .wsdl file

Deployment 15
Web Apps Deployment
Prerequisites for Web Apps
Before you deploy Microsoft Dynamics SL Web Apps, prepare your system by installing the
prerequisites for Web Apps. These are in addition to the “Prerequisites for Web Services” on page 7.
Install or verify the installation of the following:
A browser that supports HTML5
Microsoft .NET Framework 4.5 or later versions
Microsoft Dynamics SL 2015 or 2015 CU1 with Web Services (functional), on a version of
Windows Server as specified in the System Requirements for Microsoft Dynamics SL 2015 Web
Application (System Requirements_SL2015_WebApplications.pdf).
Open XML SDK 2.5 for Microsoft Office – the deployment prompts you to install this if you do not
already have it installed. You can install OpenXMLSDKV25.msi before deployment from the
following location: http://www.microsoft.com/en-au/download/details.aspx?id=30425
Deploy Microsoft Dynamics SL Web Apps
In order to use Microsoft Dynamics SL Web Apps, you must deploy the feature into an application pool,
configure the website, and point to the Microsoft Dynamics SL Web Services that you previously
installed.
Note: You must deploy the Microsoft Dynamics SL Web Apps to a different application pool and
website than where you deployed the Microsoft Dynamics SL Web Services.
To deploy Microsoft Dynamics SL Web Apps, follow these steps:
1. Run MicrosoftDynamicsSLWebApps.exe.
Note: If you have User Account Control enabled in Windows, you may receive a confirmation
message. Click Continue.
2. The Microsoft Software License Terms appears, click Accept.
Note: If you do not have Open XML SDK 2.5 for Microsoft Office already installed, you receive the
following error message. When you click OK, the program opens the following URL in a browser so
that you can download and install OpenXMLSDKV25.msi: http://www.microsoft.com/en-
au/download/details.aspx?id=30425
When installation of the prerequisite is complete, restart the deployment of Web Apps at step 1.

16 Web Apps Admin & Deployment
3. The Site Information page appears.
Figure 11: Microsoft Dynamics SL Web Configuration Console, Site Information tab
3. Site Name: Select the existing website, or type a new name to create a new website.
4. (optional) Select Use Subsite if you want to deploy web services to a subsite. Then, select the
subsite from the list, or type a new value to create a new subsite.
5. Physical File Location: Specify the physical location of the website files.
Note: To avoid permission conflicts, avoid SharePoint’s directory structure. We recommend that
you select a location that differs from SharePoint’s C:\inetpub\wwwroot\wss.
6. Specify the Port Number. Then, select the Certificate. For more information about TLS and Web
Services, see the Web Services Help or user’s guide.
7. Click Proceed.
8. The Application Pool Information page appears.
Figure 12: Microsoft Dynamics SL Web Configuration Console, Application Pool Information tab

Deployment 17
9. Application Pool Name: select an existing application pool or type a new application pool name
If you use an existing Application Pool, it must support .NET v4.0. If you create a new
application pool, it will be set to support ,NET v4.0
10. Identity: (for new application pools): domain\username format
Specify the user who you configured in Trusted Web Service Account Maintenance
(95.261.00).
The account specified here must have sufficient rights to create and update log files that are
located in the C:\ProgramData folder on the server hosting the application pool. Do not grant
permissions to write to this log to other users.
11. Password: Type the password for the domain user who you specified in Identity.
12. Confirm Password: Retype the password that you specified in Password.
13. Click Next.
Web Service Information page appears.
Figure 13: Microsoft Dynamics SL Web Configuration Console, Web Service Information tab
14. Specify the location and port number of the web services in Web Service Location. If you deployed
to a subsite, make sure that you specify the subsite after the port number.
15. Verify that TCP Port Number is the same as the port number that was specified when you
deployed Web Services.
16. To change the protocol for one or more web services, clear Use default protocols, and then select
the new protocol for one or more web services.
Use Https when the web service is hosted on a remote server. This is typically the slowest
option.
Use Tcp when the web service is hosted on a server that is connected to the same domain as
the server where you are deploying the web application. This is typically faster than Https and
slower than Named Pipes.
Use NamedPipe when the web service is hosted on the same server as the server where you
are deploying the web application. This is typically the fastest option.
17. Click Proceed.

18 Web Apps Admin & Deployment
The Verify page appears.
Figure 14: Microsoft Dynamics SL Web Configuration Console, Verify tab
18. Click Verify to confirm that the installation is correct. If you receive any errors, fix the errors, and
then click Verify again.
19. After the verification is complete, a URL appears at the bottom of the screen. Click the link to test
that you can access the URL.
20. Then, from a mobile device, test that you can access the same URL.
21. Click Exit.
22. Using Windows Explorer, browse to the same location from where you ran
MicrosoftDynamicsSLWebApps.exe.
a) Using SQL Server Management Studio, run WebApps2.01_Sys.sql against the Microsoft
Dynamics SL system database.
b) Then run WebApps2.01_App.sql against the Microsoft Dynamics SL application database(s).

Deployment 19

20 Web Apps Admin & Deployment
Configuration
Before you can use Microsoft Dynamics SL Web Apps, configure your system as described here.
All Web Apps Each user who will use WebApps must have a unique Microsoft Dynamics SL user ID. Verify the list of
users who will use WebApps and, if you need to, add any new users. To do this, use System Manager’s
User Maintenance (95.260.00).
Note: If you have Business Portal (BP) Project users who do not already have unique Microsoft
Dynamics SL user IDs, see “Business Portal to Web Apps Data Migration” on this page for detailed
data migration steps.
Option 1: If you want the users to log in with their Microsoft Dynamics SL credentials, you must set the
WindowsLogin web.config setting to False. Additionally, you must set up a password in Microsoft
Dynamics SL for each user who logs in to Web Apps in User Maintenance (95.260.00).
Option 2: If you want the users to log in with their Windows domain user name and password, you
must set the WindowsLogin web.config setting to True, which is the default value. Make sure that the
Microsoft Dynamics SL user IDs are linked to Windows users in User Maintenance (95.260.00).
Note:
If you want to use Integrated Windows Authentication, you must set the Authentication in IIS
for the Web Apps site to ONLY include Windows Authentication.
Integrated Windows Authentication only works on Windows devices and operating systems. If
you use tablets or computers that use other operating systems, you must ALSO enable
Anonymous Authentication in IIS.
We do not recommend that you use Integrated Windows Authentication on external-facing
websites.
For more information about the WindowsLogin web.config setting, see “WindowsLogin” on page 36.
Business Portal to Web Apps Data Migration Use the data migration scripts to create Microsoft Dynamics SL user IDs for the Business Portal (BP)
Project users who do not already have a unique SL user ID, to link BP Project users who have existing
SL user IDs, and to populate the SL user ID in Employee and Resource Maintenance for BP Project
users and SL user IDs that already match.
1. Log in to SQL Server Management Studio as a SQL administrator.
2. Create backups of all Microsoft Dynamics SL system and application databases that were
previously integrated to Business Portal.
3. Open the BPProjectEmployee folder in the Web Apps installation package.
4. Configure SQL Server Management Studio so that the query results appear in a grid.
(Tools | Options | Query Results | Default destination for results = Results to grids)
5. Run the BPProjectEmployee2.01_Sys.sql script against each system database.
6. Run the BPProjectEmployee2.01_App.sql script against the first application database.
Note: If You Need Help from Technical Support during this process, submit the complete results
from this script with your support case.

Configuration 21
a.) Copy the results in the Recommended Statement column, and paste them into a new query.
b.) Review the statements for accuracy and for any changes that you need to make, such as the
following:
— Changing the name of the BPPROJECTUSER group
— Removing an employee that is no longer employed
— Removing potential SL user ID duplicates, because Web Apps does not support multiple
SL user IDs linked to the same Windows domain user
— Removing potential Project Employee duplicates, because Web Apps does not support
multiple Project Employees linked to the same SL user ID
c.) Run the statements against the same application database.
d.) Repeat this step for each Microsoft Dynamics SL application database.
7. Validate the results as follows on the application database(s):
--View the new users who are added by the data migration:
select vs_UserRec.UserID, vs_UserRec.UserName,
vs_UserRec.WindowsUserAcct, vs_UserGrp.GroupId, PJEMPLOY.employee,
PJEMPLOY.emp_name
from vs_UserRec (nolock)
join vs_UserGrp (nolock) on vs_UserGrp.UserId = vs_UserRec.Userid
join PJEMPLOY (nolock) on PJEMPLOY.user_id = vs_UserRec.Userid
Where GroupID = 'BPPROJECTUSER'
--View all user, group, project employee relationships:
select vs_UserRec.UserID, vs_UserRec.UserName,
vs_UserRec.WindowsUserAcct, vs_UserGrp.GroupId, PJEMPLOY.employee,
PJEMPLOY.emp_name
from vs_UserRec (nolock)
join vs_UserGrp (nolock) on vs_UserGrp.UserId = vs_UserRec.Userid
join PJEMPLOY (nolock) on PJEMPLOY.user_id = vs_UserRec.Userid
--View the new relationship to the project employee added by the data
migration:
select PJEMPLOY.lupd_user, PJEMPLOY.employee, PJEMPLOY.emp_name,
PJEMPLOY.user_id
from PJEMPLOY (nolock) where PJEMPLOY.user_id <> ''
--Locate duplicates (you must resolve these duplicates before you continue):
select p1.lupd_user, p1.employee, p1.emp_name, p1.user_id
from PJEMPLOY (nolock) p1
join PJEMPLOY (nolock) p2 on p2.user_id = p1.user_id and p2.user_id <> ''
and p2.emp_name <> p1.emp_name

22 Web Apps Admin & Deployment
Feature Specific Configuration This section is separated into the configuration steps that you must follow for each feature within
Microsoft Dynamics SL Web Apps.
Note: The Microsoft Dynamics SL SYSADMIN user and all members of the ADMINISTRATORS group
within Microsoft Dynamics SL automatically have Initialize Mode permissions for all web apps. This
does not replace the need to set up project employees, requisition approval levels, or similar business-
related information for these users.
Project
Timecard Entry
This topic describes the steps to configure Timecard Entry for projects.
1. For each user who will have access to project-related Web Apps, link their Microsoft Dynamics SL
user ID with an employee ID in Employee and Resource Maintenance. To do this, specify the
Microsoft Dynamics SL user ID in User ID.
Note: If you want the user to have the project executive role, select Project Executive for the user.
2. Make sure that position and rate information for each project employee is also created in
Employee Position/Rate Maintenance.
3. Follow the steps in “Access Rights” on page 31 to assign permissions to one or more of the
following screens and related web services:
Project Timecard Entry Web App (MD.TMT.CE)
Project Timecard Detail Web App (MD.TMD.LY)
Project Timecard Entry Web App With Rate\Amt (MD.TMT.AA)
Project Timecard Report (RS.TMT.MC)
Project Correcting Timecards Web App (MD.TMC.OR)
4. Make sure that week ending dates exist for the periods for which users will create timecards. Do
this in Week Maintenance (TM.WEM.00).
5. Make sure that you review and configure the following settings in Time and Expense Setup
(TM.SET.00).
e.) Open Microsoft Dynamics SL.
f.) In the Project node, click Time and Expense for Projects.
g.) Under Setup, click Time and Expense Setup. Specify one of the following:
— Labor Transactions and Invoice Comments = Weekly
OR
— Labor Transactions and Invoice Comments = Daily and Time reporting periods > 7 days =
selected (Non-Project Flex Time Entry in Business Portal is not supported after
you specify these settings and begin to use Web Apps.)
Important: Make sure that you review the Time and Expense for Projects Help or user’s
guide to fully understand the effect if you want to change this setting.
h.) (optional) If you want to allow user to enter start times and end times to calculate hours in
Timecard Entry, select the Require use of Time Detail check box on the General Information
tab in Time and Expense Setup (TM.SET.00). This is only available if you have enabled Project
Flex Time in Web Apps.
i.) (optional) If you want to enable Project Flex Time in Web Apps, select Web Enabled on the
Project Flex Time tab.
j.) (optional) If you want to enable correcting timecards in Web Apps, select Allow Correcting
Timecards on the Project Flex Time tab.

Configuration 23
k.) (optional) If you want to enable line item approvals in Web Apps, select Enable Project
Manager Review of Time and Expense Line Items on the Approval Setup tab.
l.) Save and close Time and Expense Setup (TM.SET.00).
Expense Entry
1. For each user who will have access to project-related Web Apps, link their Microsoft Dynamics SL
user ID with an employee ID in Employee and Resource Maintenance. To do this, specify the
Microsoft Dynamics SL user ID in User ID.
Note: If you want the user to have the project executive role, select Project Executive for the user.
2. Make sure that position and rate information for each project employee is also created in
Employee Position/Rate Maintenance.
3. Follow the steps in “Access Rights” on page 31 to assign permissions to one or more of the
following screens and related web services:
Project Expense Entry Web App (MD.TMT.EE)
Project Expense Report (RS.TME.XP)
4. Make sure that week ending dates exist for the periods for which users will create expense
reports. Do this in Week Maintenance (TM.WEM.00).
Approvals
1. For each user who will have access to project-related Web Apps, link their Microsoft Dynamics SL
user ID with an employee ID in Employee and Resource Maintenance. To do this, specify the
Microsoft Dynamics SL user ID in User ID.
Note: If you want the user to have the project executive role, select Project Executive for the user.
2. Make sure that position and rate information for each project employee is also created in
Employee Position/Rate Maintenance.
3. Follow the steps in “Access Rights” on page 31 to assign permissions to one or more of the
following screens and related web services:
Project Invoice Approvals Web App (MD.BII.RA)
Project Budget Revision Approvals Web App (MD.BUB.RA)
Project T&E Approvals Web App (MD.TME.TA)
Project Line Item Approvals Web App (MD.TML.IA)
Delegation Web App (MD.PJD.EL)
4. Make sure that you review and configure the following setting in Time and Expense Setup
(TM.SET.00). If you want to enable line item approvals in Web Apps, you must select Enable
Project Manager Review of Time and Expense Line Items on the Approval Setup tab.
If you turned line item approvals on, make sure that you set Mgr T&E Review to Required on the
Additional Info tab in Project Maintenance (PA.PRJ.00) for each project that you want to approve
on a line item basis.
Note: Make sure that you set the Mgr T&E Review to Required or Not Required on the Task tab in
Project Maintenance (PA.PRJ.00).
Project Maintenance
1. For each user who will have access to project-related Web Apps, link their Microsoft Dynamics SL
user ID with an employee ID in Employee and Resource Maintenance. To do this, specify the
Microsoft Dynamics SL user ID in User ID.
2. Determine also the business role that the user will have. The functionality available to you in the
Project Maintenance Web App depends on your role:
Member of a project – can view the projects of which the user is a member (resource).

24 Web Apps Admin & Deployment
Project Manager – can view projects of which they are a member; can create new projects,
edit, and delete the projects for which they are the manager. Specify the project manager for
each project in Project Controller’s Project Maintenance (PA.PRJ.00) or in the Project
Maintenance Web App.
Project Executive – can do all these for any project; regardless of the project manager. Can
also see and use the Find Projects by filters. If you want the user to have the project executive
role, select Project Executive in Employee and Resource Maintenance.
3. Make sure that position and rate information for each project employee is also created in
Employee Position /Rate Maintenance (TM.EPJ.00).
4. Follow the steps in “Access Rights” on page 31 to assign permissions to one or more of the
following screens and related web services:
Project Maintenance Web App (MD.PAP.RJ)
Project Addresses Web App (MD.PAA.DR)
Project Budget Revisions Web App (MD.BUB.RM)
Project Direct Budgets Web App (MD.PAB.SM)
Project Team Web App (MD.PAP.EM)
Project Maximums Web App (MD.PAP.MM)
Project Analyst SSRS (RS.PAP.JL)
Employee Position/Rate Maintenance
1. For each user who will have access to project-related Web Apps, link their Microsoft Dynamics SL
user ID with an employee ID in Employee and Resource Maintenance. To do this, specify the
Microsoft Dynamics SL user ID in User ID.
2. Follow the steps in “Access Rights” on page 31 to assign permissions to Employee Position/Rate
Maintenance Web App (MD.TME.PJ)
Employee and Resource Maintenance
Follow the steps in “Access Rights” on page 31 to assign permissions to Employee and Resource
Maintenance Web App (MD.PAE.MP)
Project Analyst Report
1. For each user who will have access to project-related Web Apps, link their Microsoft Dynamics SL
user ID with an employee ID in Employee and Resource Maintenance. To do this, specify the
Microsoft Dynamics SL user ID in User ID.
Note: If you want the user to have the project executive role, select Project Executive for the user.
If the user is a Project Executive, they can view data related to all projects. If the user is not a
Project Executive, they can only view data related to projects for which they are the Project
Manager.
2. Follow the steps in “Access Rights” on page 31 to assign permissions to Project Analyst SSRS
(RS.PAP.JL).
3. For each user that you want to see the Labor Rate, Amount, and Base Amount, follow the steps in
“Access Rights” on page 31 to also assign permissions to Project Analyst w/Transaction Labor
Rates (RS.PAP.JR).
Assignment Summary
1. For each user who will have access to project-related Web Apps, link their Microsoft Dynamics SL
user ID with an employee ID in Employee and Resource Maintenance. To do this, specify the
Microsoft Dynamics SL user ID in User ID.

Configuration 25
2. Follow the steps in “Access Rights” on page 31 to assign permissions to Assignment Summary by
Resource Web App (MD.PAR.TI)
Resource Management
1. Establish possible values for Labor Classes, Project Work Locations, Employee Locations,
Employee Skills, Employee Levels, and Employee License and Certifications in Code File
Maintenance (PA.CFM.00). The code types are as follows:
Labor Class Code Type = LABC
Project Work Location Code Type = WLOC
Employee Location Code Type = ELOC
Employee Skill Code Type = ESKL
Employee Level Code Type = ELEV
Employee License Code Type = ELIC
2. (optional) Use Union Rate Maintenance (TM.URE.00) to create Union Codes and associate Union
Codes with Rates by Labor Class and Work Type.
3. (optional) Use Prevailing Wage Rate Maintenance (TM.PRE.00) to create Prevailing Wage Codes
and associate Prevailing Wage Codes with Rates by Labor Class and Group.
4. Use the budgeting (direct or by revision) within the Project Maintenance Web App to initialize
Budget and EAC units for each project/task/account category combination.
5. For each user who will have access to project-related Web Apps, link their Microsoft Dynamics SL
user ID with an employee ID in Employee and Resource Maintenance. To do this, specify the
Microsoft Dynamics SL user ID in User ID.
Note:
If you want the user to have the project executive role, select Project Executive for the user.
The values entered in Location, Skill 1, Skill 2, Level, and License Certification can be used as
selection criteria when filtering the list of possible resources to assign to a project/task in the
Resource Management Web App.
6. Use Employee Maintenance (PA.PEM.00) to assemble a project team of employees who can bill
time to a project and can be assigned as a resource for a specific project/task. If all employees
can bill time to the project, specify that here.
Note: If you do not set up the project team in advance, then the user will be assigned as a
resource to the project team when the user is assigned as a resource to the project/task in
Resource Maintenance.
7. Use Employee Position /Rate Maintenance to define position and rate information and to assign
the default labor class to each employee. Optionally, you can establish the union, work type, and
prevailing wage code here. The values entered in Labor Class, Union, Work Type, and Prevailing
Wage Code can be used as selection criteria when filtering the list of possible employees to assign
to a project/task in the Resource Maintenance Web App.
8. Follow the steps in “Access Rights” on page 31 to assign permissions to one or more of the
following screens and related web services:
Resource Planning by Project Web App (MD.RMP.LP)
Resource Planning by Resource Web App (MD.RMP.LR)
Goal vs. Actual Hours Inquiry Web App (MD.RMG.AI)
Goal vs. Planned Hours Inquiry Web App (MD.RMG.PI)
Goal vs. Planned Hours Detail Inquiry Web App (MD.RMG.PD)

26 Web Apps Admin & Deployment
Goal vs. Actual Revenue Inquiry Web App (MD.RMG.RI)
Employee Goal Maintenance Web App (MD.RME.GM)
Utilization Period Maintenance Web App (MD.RMP.ER)
Budget vs. Planned Hours Inquiry Web App (MD.RMB.PI)
Budget vs. Planned Hours Detail Inquiry Web App (MD.RMB.PD)
Employee Revenue and Expense Inquiry Web App (MD.RMR.EI)
Employee Project Revenue and Expense Detail Inquiry Web App (MD.RMR.ED)
Utilization Type Maintenance Web App (MD.RMT.YP)
9. Throughout Resource Planning, for the user to see the Est Cost, the Actual Cost, or the Net
Revenue, the user must have access rights to Employee Position/Rate Maintenance and be
project employee (resource) on the line or be that resource’s supervisor or manager.
10. Establish direct and indirect utilization types in Utilization Type Maintenance.
11. Enable utilization by selecting Activate Utilization Process on the PC Options and Setup tab in
Project Controller Setup (PA.SET.00), and then specify a default utilization type.
12. Use Project Maintenance to assign utilization types to projects, to determine whether project
hours are included in the resource’s utilization calculation. Make sure that you set at least one
project to have an indirect utilization type.
13. Verify that your labor account categories are set to a Tran Class of Labor in Acct Category
Maintenance (PA.ACC.00).
14. Establish a utilization calendar in Utilization Period Maintenance. A utilization period can be any
time duration specified by a start date and an end date, up to a maximum of 99 periods per year.
You can automatically generate a range of periods representing week, month, or quarter
durations. You can create other durations manually.
15. Use Employee Goal Maintenance to set up available hours and utilization percentages per
utilization period for each employee. This information is used to calculate employee available
hours and utilization in Resource Management.
Inventory
Inventory Item Lookup
Follow the steps in “Access Rights” on page 31 to assign permissions to the following and the related
web methods:
Inventory Item Lookup (MD.102.10)
Requisitions
Item Request Entry & Item Request Approvals
1. Follow the steps in “Access Rights” on page 31 to assign permissions to one or more of the
following and the related web apps:
Item Availability Web App (MD.214.10)
Item Request Entry Web App (MD.RQ1.00)
Alternatives Web App (MD.RQ1.11)
Purpose Web App (MD.RQ1.12)
Requisition Budget Web App (MD.RQ1.15)
Item Request Approval Web App (MD.RQ5.10)

Configuration 27
Approval Comments Web App (MD.RQ5.11)
Inventory Order History Web App (MD.RQ5.12)
2. Before you use the Requisitions module for the first time, configure the following in the stated
modules:
Setting up purchasing accounts in General Ledger
Segmenting subaccounts in Shared Information
Defining User and Group Access in System Manager
Setting up material types in Shared Information
Setting up Authority Levels in Shared Information
Setting up vendor information in Accounts Payable
Selecting Purchasing process options in Purchasing
Defining Bill-To/Ship-To defaults in Purchasing
Selecting default accounts and subaccounts in Purchasing
(optional) Configure the Inventory module
(optional) Configure the Project Controller module
3. Complete the configuration in Requisition Setup (RQ.950.00).
4. Use Department Maintenance (RQ.260.00) to define the department ID, and shipping, contact,
and account and subaccount information for the department that will be using the Requisitions
module. This department-specific information is used when an item request or requisition is
created. Each Requisitions module user is linked to a department.
5. Use Department Assignment (RQ.280.00) to associate users with departments. Requisitions
module users must be assigned to at least one department. They can be assigned to multiple
departments if it is necessary.
6. Use Account / Subaccount Access (RQ.350.00) to limit the accounts and subaccounts that a user
can select when they enter an item request or requisition. A user id is entered and then linked to a
specific list of accounts and subaccounts. Accounts and subaccounts are entered on their
respective access tabs. Groups of accounts or subaccounts can be added by using the Load
Range function, or they can be added all at the same time by selecting the Load All button. In
addition, account and subaccount access can be copied between users. Accounts and
subaccounts can be removed by deleting them from the detail grid.
7. Use Department Approval Maintenance (RQ.290.00) to set up levels of approval authority and
associated dollar limits for each department. You can then assign approval authority levels to
users in the departments.
8. (optional) Use Project Approval Maintenance (RQ.300.00) screen, to set up levels of approval
authority and associated dollar limits for projects that are defined in Project Controller. You can
then assign the approval authority levels to specific users. Project approvals will override
department approvals.
9. (optional) Use Policy Maintenance (RQ.270.00) to set up a parallel approval path. When an
organization has specific approval and budgetary requirements for departments or projects, a
policy can be defined to facilitate a parallel approval path for specified categories of items. A
policy ID and corresponding description are entered in Policy Maintenance (RQ.270.00). The
defined policy IDs are then used in Policy Approval Maintenance (RQ.310.00) to establish
approval rules and paths.
10. (optional) Set up policy approval requirements, if the organization has specific approval
requirements in addition to budgetary requirements for departments or projects. Use Policy
Approval Maintenance (RQ.310.00) to define the levels and material types associated with each
policy. In addition, a user must be assigned for each approval level defined. A policy must have at
least one approval level.

28 Web Apps Admin & Deployment
11. (optional) Set up approval notification email messages by using the Communicator module or by
using Requisition Information Agent (RQ.RIA.00).
Payroll
Time Entry & Advanced Timecard
1. Follow the steps in “Access Rights” on page 31 to assign permissions to one or more of the
following and the related web apps:
Payroll Time Entry Web App (MD.020.10)
Payroll Time and Dollar Web App (MD.020.20) – adds the ability to see earnings and rates
Payroll Advanced Timecard Web App (MD.580.10)
2. Set up employees in Employee Maintenance (02.250.00) or in Employee
Maintenance Web App (MD.022.50).
3. See the Payroll/Direct Deposit user’s guide for more information.
4. For Advanced Timecard, each employee must have a record where Project = NA in Employee
Position/Rate Maintenance (58.290.00).
5. To enable the Service Series related fields, you must set Payroll Interface to Payroll or to Adv
Payroll in Service Series Setup Maintenance (SD.000.00). Then, link each service employee with
its corresponding payroll employee ID in Service Dispatch’s Employee Maintenance (SD.007.00).
Employee Maintenance
1. Follow the steps in “Access Rights” on page 31 to assign permissions to the following and the
related web app:
Payroll Employee Maintenance Web App (MD.022.50).
2. Before you use Employee Maintenance for the first time, see the Payroll/Direct Deposit user’s
guide for setup information.
Accounts Payable
Vendor Maintenance
1. Follow the steps in “Access Rights” on page 31 to assign permissions to the following and the
related web service:
Vendor Maintenance Web App (MD.032.70).
2. Before you use Vendor Maintenance for the first time, see the Accounts Payable user’s guide for
setup information.

Configuration 29
Accounts Receivable
Customer Maintenance
1. Follow the steps in “Access Rights” on page 31 to assign permissions to the following and the
related web service:
Customer Maintenance Web App (MD.082.60).
2. Before you use the Customer Maintenance for the first time, see the Accounts Receivable user’s
guide for setup information.
Shared
Communicator
1. Follow the steps in “Access Rights” on page 31 to assign permissions to one or more of the
following and the related web services:
Communicator View Messages Web App (MD.COC.MD)
Communicator Send Messages Web App (MD.COM.MT)
2. Some communicator messages, such as “Project Activated,” let the user open the related screen
in Microsoft Dynamics SL. This requires that you use Web Apps in a browser on a computer where
the Microsoft Dynamics SL client is installed and the user has access rights to the related screen
in Microsoft Dynamics SL.
Quick Query
Follow the steps in “Access Rights” on page 31 to assign permissions to Quick Query Web App
(MD.QQV.IE), Quick Query Query View List (QQ.QVL.00), the related web service methods, and to each
query that you want the user to be able to see.
For example, if a user should see the Inventory Items quick query in Web Apps, the user needs
permissions to MD.QQV.IE, QQ.QVL.00, QQ.102.50, and the related web service methods.
Reports and Report Queue
1. Follow the steps in “Access Rights” on page 31 to assign permissions for each report to the
specific users who run those reports.
2. (optional) Customize the color of the status messages in Report Queue by editing the .css file that
corresponds to the theme that you use. The default location for the .css files is
Drive:\WebAppsDeployment\Content.
For example, if your existing .css file contains the following, you see the following colors:
.Css Content Status Label
.roi-status-0 { color: blue; } Submitted appears in blue
.roi-status-1 { color: orange; } In Progress appears in orange
.roi-status-2 { color: green; } Completed appears in green
.roi-status-3 { color: red; } Failed appears in red
.roi-status-4 { color: black; } Cancelled appears in black
For more information about the possible colors that you can use, see Color Table at
https://msdn.microsoft.com/en-us/library/ie/ms531197.
3. (optional) Customize the auto refresh functionality in Report Queue by changing the following
settings in Web Apps web.config file:
ReportQueueAutoRefresh – The default setting for Auto Refresh, on or off.
ReportQueueRefreshDelay – The number of sections between each auto refresh.

30 Web Apps Admin & Deployment
ReportQueueRefreshCount – The number of times to sequentially auto refresh.
For information about how to change these settings in the Web Apps web.config, see “Web
Configuration Settings” on page 33.
4. Copy all custom reports from the Usr_Rpts folder on the server where you have Microsoft
Dynamics SL installed to the Usr_Rpts folder on the server where you have the Microsoft
Dynamics SL Web Services deployed. The default locations are as follows:
Dynamics SL: \Program Files (x86)\Microsoft Dynamics\SL\Applications\Usr_Rpts
Web Services: \WebServicesSite\Reports\Usr_Rpts
Note: Custom formats of standard reports will automatically appear in Web Apps. Custom reports
added per the instructions in the Microsoft Dynamics SL Reporting Guide must also be added to
the web_rptcontrol table in the Microsoft Dynamics SL system database if you want them to
appear in Web Apps.
Administration
Access Rights
Follow the steps in “Access Rights” on page 31 to assign permissions to the following screen and the
related web apps:
Administration - Access Rights Web App (MD.952.70)

Configuration 31
Access Rights
To assign access rights for the screens and the appropriate Web Services, follow these steps:
1. Select the screens/reports to which each user has access rights.
a) In Administration | System Manager, click Access Rights Maintenance to open Access Rights
Maintenance (95.270.00).
b) Select either User or Group from the Type list.
c) Type the user ID or group ID in Group/User ID. The name of the user or group displays
automatically in Name.
d) Type the company ID in Company ID or select All Companies to apply the access rights to all
companies. If All Companies is selected, <ALL> appears in Company ID. If you are setting up
access rights for some companies but not all companies, you will have to enter the
information for each company separately.
e) On the Screen/Report/Query tab, add the screens or reports that you want the user or group
to have access to use.
Or, click Preload, select Web Apps(MD) in the list, and then click OK.
Note: These are not physical screens that you can open within Microsoft Dynamics SL.
f) Specify access rights for the screens. By default, the user or group has view access rights.
View — User can view data items.
Update — User or group can change data items. This includes deleting line items.
Insert — User or group can add data items.
Delete — User or group can delete data items or records.
g) Save and close Access Rights Maintenance (95.270.00).
2. After you finish setting access rights to the screens/reports for all users, run the following
statement in SQL Server Management Studio against the Microsoft Dynamics SL system
database.
exec [WebServiceRightsForWebApps]
Note: This automatically assigns permissions to the appropriate web service methods based on
the Web Apps screens/reports that you selected, for all users.
3. (Optional) On the Web Service tab of Access Rights Maintenance (95.270.00), review the web
service methods that were assigned.
Note:
For more information about how to use Access Rights Maintenance (95.270.00), see the
System Manager Help or user’s guide.
For more information about which screens/reports correspond to specific functionality, see
“Access Rights List” on page 43.
To view a specific quick query, the user must have permissions to Web Apps Quick Query
(MD.QQV.IE), Quick Query Query View List (QQ.QVL.00) and the quick query that they want to
view. For example, AP Documents (QQ.030.10).
To view a specific report, the user must have permissions to that report. No other screens in
Web Apps are needed.

32 Web Apps Admin & Deployment
Appendix 33
Appendix
Web Configuration Settings This section describes the settings within the Web.config file that you can configure to customize the
Microsoft Dynamics SL Web Apps for your business. These settings apply to all users and devices for
the deployment.
The Web.config file exists in the folder that you specified in Physical File Location on the Site
Information tab in Microsoft Dynamics SL Web Configuration Console. For more information, see
“Deploy Microsoft Dynamics SL Web Apps” on page 15.
These settings are located in the <appSettings> section of the Web.config file.
AttachmentMaxSizeMegabytes
Description: The maximum file size of an uploaded attachment, expressed in megabytes (MB). If a
file exceeding this limit is uploaded, the upload will fail, and an error will be logged.
Valid Values: Non-negative integers less than 2147
Default Value: 5
Example 1: Attachments that have a file size up to ten megabytes may be uploaded
<add key="AttachmentMaxSizeMegabytes" value="10" />
Example 2: Attachments may not be uploaded
<add key="AttachmentMaxSizeMegabytes" value="0" />
Companies
Description: The list of companies that appear in at login.
Valid Values: all; db:<appDBname>; <id1>,<id2>
Default Value: all
Example 1: All companies associated with a single Microsoft Dynamics SL system database
<add key="Companies" value="all" />
Example 2: All companies associated with a single Microsoft Dynamics SL application database
<add key="Companies" value="db:SLDemoApp60" />
Example 3: Specific company ID(s) 0010 and 0060
<add key="Companies" value="0010,0060" />
LoginPersistence
Description: How long the cookie saved on the client device remains before it expires. This cookie
stores the settings on the Settings pages.
Valid Values: month:1 - month:12; 1 - 31 (days)
Default Value: month:1

Example 1: Nine months
<add key="LoginPersistence" value="month:9" />
Example 2: Twenty days
<add key="LoginPersistence" value="20" />>
MaximumDays
Description: Maximum number of days to display in a Timecard period.
Valid Values: month; 1-31 (days)
Default Value: month
Example 1: A month
<add key="MaximumDays" value="month" />
Example 2: Twenty-one days
<add key="MaximumDays" value="21" />
PhoneFormat
Description: Override default date format
Valid Values: Regular expressions (regex)
Default Value: No entry
The default phone format in web apps is US format (nnn) nnn-nnnn nnnn. To override this the user can
use regular expressions for their own format. A web.config entry with the key “PhoneFormat” would be
added.
Example 1: The default US format (nnn) nnn-nnnn nnnn would be defined as this regular expression
<add key="PhoneFormat" value='^(\d\d\d)(\d{3})(\d{0,4})(\d{4,4})*@($1) $2-$3
$4'/>
Example 2: The format nnn.nnn.nnnn nnnn would be defined as this regular expression
<add key="PhoneFormat" value='^(\d\d\d)(\d{3})(\d{0,4})(\d{4,4})*@$1.$2.$3
$4'/>
ReportQueueAutoRefresh
Description: Initial state of auto refresh.
Valid Values: True, False
Default Value: True
Example: When each user opens the Report Queue, auto refresh is turned off. The user has the choice
to tap Auto Refresh to toggle it on.
<add key="ReportQueueAutoRefresh" value="true" />
ReportQueueRefreshDelay
Description: Number of seconds between auto refresh.
Valid Values: Any positive integer number

Appendix 35
Default Value: 60
Example: Auto Refresh every two minutes.
<add key="ReportQueueRefreshDelay" value="120" />
ReportQueueRefreshCount
Description: Number of times to sequentially auto refresh.
Valid Values: Any positive integer number
Default Value: 10
Example: The Report Queue will automatically refresh 5 times in a row.
<add key="ReportQueueRefreshCount" value="5" />
SessionPasswordRetries
Description: Password retries before warning.
Valid Values: 1 to 10
Default Value: 5
Example: Four retries
<add key="SessionPasswordRetries" value="4" />
Theme
Description: Default theme for all devices. This setting is superseded if the user specifies a theme
in Settings. The user can revert to the Web.config setting by tapping or clicking Reset
Settings in Settings.
Valid Values: Base, Dynamics, Black, Gray, Custom
Default Value: Base
Example: Black theme
<add key="Theme" value="Black" />
ThemePersistence
Description: How long the cookie saved on the client device remains before it expires. This cookie
stores the theme choice on the Theme page.
Valid Values: month:1 - month:12
Default Value: month:12
Example: Three months
<add key="ThemePersistence" value="month:3" />
TimecardPeriodCount
Description: Controls the number of period ending dates to display on the Open Timecards page.
This includes future periods as controlled by the TimecardPeriodFuture Web.config
setting. This setting is superseded if the user sets a default in Settings in Timecard
Entry. The user can revert to the Web.config setting by tapping or clicking Reset
Settings in Settings.
Valid Values: 5, 10, 15, 20

Default Value: 20
Example: Fifteen periods
<add key="TimecardPeriodCount" value="15" />
TimecardPeriodFuture
Description: Controls the number of future timecard periods to display on the Current Entry page.
A future timecard period is any period that contains a week ending date after the
current business date.
Valid Values: Numeric value from 1 to one less than the TimecardPeriodCount value.
Default Value: 1
Example: Twelve periods
<add key="TimecardPeriodFuture" value="12" />
TimecardPFTOvertimeReduce
Description: Control the behavior of regular hours editing. If True then Overtime hours will reduce
the amount of regular hours when entered. If False the Regular hours calculation is
decoupled from the Overtime hours.
Valid Values: True/False
Default Value: True (this can be modified)
Example: Fifteen periods
<add key="TimecardPFTOvertimeReduce" value="True" />
WindowsLogin
Description: Login type of Windows user or Microsoft Dynamics SL user.
Valid Values: True, False
Default Value: True
Example: Microsoft Dynamics SL user
<add key="WindowsLogin" value="False" />
Note: If you set WindowsLogin to False, you must set up a password in Microsoft Dynamics SL for each
user who logs in to Web Apps. Each user can set their own password by logging on to Microsoft
Dynamics SL, and then clicking Set Password on the Tools menu. They should leave the Old Password
blank if this is their first Microsoft Dynamics SL password. Or, an administrator can set the initial
password of behalf of each user in User Maintenance (95.260.00).

Appendix 37
Web Services Administration This section contains things to consider when administering web services.
Logging Levels
Web services support basic logging that relies on generating log entries to an error log file that is
located in a predefined folder named WebServiceLogs. WebServiceLogs is based in the application
data folder (DriveLetter:\ProgramData\Microsoft Dynamics SL\WebServiceLogs). This allows for the
customer to send this error log file to the support team for troubleshooting.
Note: The Web Apps logs are available at DriveLetter:\ProgramData\Microsoft Dynamics
SL\WebClientLogs
For more information, see “Logging Levels” in Microsoft Dynamics SL Web Services Software
Development Kit.
The level of event detail or error detail generated depends on the logging level flag that you specify in
the service web.config file. Here is the default XML entry in the file:
<appSettings>
<add key=”LoggingLevel” value=”1”>
</appSettings>
The following table explains the meaning of each logging level. Be aware that each bigger level
subsumes the smaller levels.
Level Name Level ID Description
Critical Error 1 Include only critical errors that indicate application or system-crash problems. For
example, the loss of connectivity to the database, a security breach, and so on
Warning 2 Include all level 1 + level 2 events.
Level-2 events provide forewarning of possible problems that may occur, or that
are not errors, but do put the feature in a non-ideal state.
Information 3 Include all level 1 + level 2 + level 3 events.
Level-3 events pass noncritical information to the administrator.
Debug 4 Includes all events for all levels.
Additionally, exceptions that would usually be logged are returned to the
consumer instead. This level is not intended for use in a production environment.
Note: This requires each service account to be granted rights to create and edit files in the
WebServiceLogs folder.
Screens/Reports
The following is a list of the Microsoft Dynamics SL screens that you will use to administer Web
Services.
Access Rights Maintenance (95.270.00), Web Service tab
See “Securing Microsoft Dynamics SL Web Services” on page 41.
See “Securing Custom Web Service Methods” in Microsoft Dynamics SL Web Services
Software Development Kit.
Web Service Method Maintenance (98.370.00)
See “Registering Custom Web Service Methods” in Microsoft Dynamics SL Web Services
Software Development Kit.

Web Services Lookup Security (98.380.00)
See “Manage Access Rights for non-Lookup methods” in Microsoft Dynamics SL Web Services
Software Development Kit.
Trusted Web Service Account Maintenance (95.261.00)
See “Control Membership in the TrustedWebService role” on page 40.
Web Service Lookup Maintenance (98.390.00)
See “Adding a Custom Lookup Web Service” in Microsoft Dynamics SL Web Services Software
Development Kit.
Access Rights Report (95.600.00)
See “Access Rights Report (95.600.00)” on page 42.

Appendix 39
Changing the Message Size
One common modification that web service customers may find useful is changing the message size.
To change the message size, follow these steps:
1. Open Visual Studio.
2. On the Tools menu, click WCF Service Configuration Editor.
3. In WCF Configuration Editor, click File, click Open, and then click Config File.
4. Locate the web.config file from the IIS folder where Microsoft Dynamics SL Web Services was
deployed, and then click Open.
5. Expand Bindings, expand basicHttpsBinding, and then click the httpsTransport node.
6. Locate the MaxReceivedMessageSize and MaxBufferSize attributes and change the values.
Note: We typically recommend setting this to 500000000 for those customers who have large
project size requirements.
Figure 15: Microsoft Service Configuration Editor

Microsoft Dynamics SL Reporting Service
The Microsoft Dynamics SL Reporting Service (Microsoft.Dynamics.SL.ROI.exe) runs on the Web
Services server and handles the processing of the report requests from users in Microsoft Dynamics
SL Web Apps.
The configuration file for the service exists in the following location:
C:\WebServices\bin\Microsoft.Dynamics.SL.ROI.exe.config
To remove the reporting windows service, open a command prompt as administrator, and run the
following commands:
sc.exe stop "Microsoft.Dynamics.SL.ROI"
sc.exe delete "Microsoft.Dynamics.SL.ROI"
The Web Services deployment recreates this reporting service automatically.
Control Membership in the TrustedWebService role
Use Trusted Web Service Account Maintenance (95.261.00) to control membership in the
“TrustedWebService” database roles for each Microsoft Dynamics SL system database. The grid
displays a list of all Windows users who are members of the “TrustedWebService” database role for
the Microsoft Dynamics SL system database.
Trusted Web Service Account Maintenance (95.261.00) is related to users who are members of the
Sysadmin server role in SQL Server.
Type a new Windows user name for the service to add a user to the TrustedWebService database role.
If the service account does not have a SQL Server Login, one is created for that Windows user.
Delete a Windows user name to remove a user from the TrustedWebService database role. You will
have to manually delete the corresponding SQL Server Login by using SQL Server tools.
Figure 16: Trusted Web Service Account Maintenance (95.261.00)
The following are the field descriptions for Trusted Web Service Account Maintenance (95.261.00).
Trusted Web Service Account
Trusted Web Service Account is the Windows user name of the members of the TrustedWebService
database role in the Microsoft Dynamics SL application database and system database.

Appendix 41
Securing Microsoft Dynamics SL Web Services
Use the Web Service tab in Access Rights Maintenance (95.270.00) to assign access rights to web
service methods. To populate the Web Service grid, the Preload button selects records according to
the Module assigned in Web Service Maintenance (98.370.00). You can manually enter a Web
Service Method, or press F3 to look up in Web Service Method.
When you use the stored procedure in step 2 of the “Deploy Microsoft Dynamics SL Web Apps” topic,
you must assign access rights to the screens/reports but do not need to manually assign access rights
to the web service methods.
Figure 17: Access Rights Maintenance (95.270.00), Web Service tab
The following are the field descriptions for the Web Service tab in Access Rights Maintenance
(95.270.00).
Web Service Method
Web Service Method is the name of a web service method. Click Preload to load the list of web service
methods from Web Service Method Maintenance (98.370.00). Or, press F3 or double-right click to
select a web service method from the possible values list. Web Service Method is required.
The Web Service grid is sorted first by Module and then by Web Service Method.
Module
Module displays two digit abbreviations for the module that you assigned to the web service method in
Web Service Method Maintenance (98.370.00). Module is display only.
Access
Access specifies whether the group / user ID has permissions to the web service method. Click to
select the Access check box or click to clear the Access check box. Access defaults cleared.

Access Rights Report (95.600.00)
Use Access Rights Report (95.600.00) to generate a user and group access rights report.
Figure 18: Access Rights Report (95.600.00)
Access Rights Report, Report Tab
This is a standard report. For information about the other fields on the tab, see “Generating Reports”
in System Manager user’s guide.
Figure 19: Access Rights Report (95.600.00)

Appendix 43
Access Rights List
This section contains a list to help you set up access rights for Web Apps. To use a feature, the user or
group, must have access rights to both the screen/report and the related web service method.
When you use the stored procedure in step 2 of the “Deploy Microsoft Dynamics SL Web Apps” topic
on page 31, you must assign access rights to the screens/reports but do not need to manually assign
access rights to the web service methods.
Screen/Report Related Web Service Method
Login
Log in to Web Apps
(required for all users)
SystemAccess
MD.020.10
Payroll Time Entry Web App
and/or
MD.020.20
Payroll Time and Dollar Web App
Microsoft.Dynamics.SL.AdvancedTimecardService.
View
- DefaultPayrollTimecard
- FindPayrollTimecard
- ReadPayrollTimecard
- ReadAdvancedTimecardSystemNote
- ReadAdvancedTimecardSystemAttachment
Update
- UpdatePayrollTimecard
- UpdateAdvancedTimecardSystemNote
- UpdateAdvancedTimecardSystemAttachment
Create
- CreatePayrollTimecard
- CreateAdvancedTimecardSystemNote
- CreateAdvancedTimecardSystemAttachment
Delete
- DeletePayrollTimecard
- DeleteAdvancedTimecardSystemNote
- DeleteAdvancedTimecardSystemAttachment
MD.022.50
Payroll Employee Maintenance
Microsoft.Dynamics.SL.PayrollEmployeeService.
View
- DefaultPayrollEmployee
- FindPayrollEmployee
- ReadPayrollEmployee
- ReadPayrollEmployeeSystemNote
- ReadPayrollEmployeeSystemAttachment
Update
- UpdatePayrollEmployee
- UpdatePayrollEmployeeSystemNote
- UpdatePayrollEmployeeSystemAttachment
- GetPayrollEmployeeSystemAttachmentLocation
Create
- CreatePayrollEmployee
- CreatePayrollEmployeeSystemNote
- CreatePayrollEmployeeSystemAttachment
Delete
- DeletePayrollEmployee
- DeletePayrollEmployeeSystemNote
- DeletePayrollEmployeeSystemAttachment

Screen/Report Related Web Service Method
MD.032.70
Vendor Maintenance
Microsoft.Dynamics.SL.VendorService.
View
- DefaultVendor
- FindVendors
- ReadVendor
- ReadVendorSystemAttachment
- ReadVendorSystemNote
Update
- UpdateVendor
- UpdateVendorSystemAttachment
- UpdateVendorSystemNote
- VendorSystemAttachmentLocation
Create
- CreateVendor
- CreateVendorSystemAttachment
- CreateVendorSystemNote
Delete
- DeleteVendor
- DeleteVendorSystemAttachment
- DeleteVendorSystemNote
MD.082.60
Customer Maintenance
Microsoft.Dynamics.SL.CustomerService.
View
- DefaultCustomer
- ReadCustomer
- ReadCustomerSystemNote
- ReadCustomerSystemAttachment
Update
- UpdateCustomer
- UpdateCustomerSystemNote
- UpdateCustomerSystemAttachment
- GetCustomerSystemAttachmentLocation
Create
- CreateCustomer
- CreateCustomerSystemNote
- CreateCustomerSystemAttachment
Delete
- DeleteCustomer
- DeleteCustomerSystemNote
- DeleteCustomerSystemAttachment
MD.102.10
Inventory Item Lookup Web App
Microsoft.Dynamics.SL.WebService.
View
- InventoryItemLookup
Update
- FindAttributeDefinition
MD.214.10
Item Availability
Web App
none
MD.580.10 Microsoft.Dynamics.SL.AdvancedTimecardService.

Appendix 45
Screen/Report Related Web Service Method
Payroll Advanced Timecard Web App
View
- DefaultAdvancedTimecard
- FindAdvancedTimecard
- ReadAdvancedTimecard
- ReadAdvancedTimecardSystemNote
- ReadAdvancedTimecardSystemAttachment
Update
- UpdateAdvancedTimecard
- UpdateAdvancedTimecardSystemNote
- UpdateAdvancedTimecardSystemAttachment
Create
- CreateAdvancedTimecard
- CreateAdvancedTimecardSystemNote
- CreateAdvancedTimecardSystemAttachment
Delete
- DeleteAdvancedTimecard
- DeleteAdvancedTimecardSystemNote
- DeleteAdvancedTimecardSystemAttachment
MD.952.70
Web App Administration Access Rights
Microsoft.Dynamics.SL.WebAppCustomService.
View
- FindWebAppCustom
- ReadWebAppCustom
Update
- UpdateWebAppCustom
Create
- CreateWebAppCustom
Delete
- DeleteWebAppCustom
MD.BII.RA
Project Invoice Approvals Web App
Microsoft.Dynamics.SL.ProjectInvoiceService.
Invoice Approval
- FindProjectInvoiceApprovals
- UpdateProjectInvoiceApproval
Invoice System Notes
- CreateInvoiceSystemNote
- DeleteInvoiceSystemNote
- ReadInvoiceSystemNote
- UpdateInvoiceSystemNote
Timecard System Attachments
- CreateInvoiceSystemAttachment
- DeleteInvoiceSystemAttachment
- GetInvoiceSystemAttachmentLocation
- ReadInvoiceSystemAttachment
- UpdateInvoiceSystemAttachment
MD.BUB.RA
Project Budget Revision Approvals Web App
Microsoft.Dynamics.SL.ProjectService.
Budget Revision Approval
- FindBudgetRevisionApprovals
- UpdateBudgetRevision
- UpdateBudgetRevisionApprovals

Screen/Report Related Web Service Method
Budget Revision System Notes
- CreateProjectSystemNote
- DeleteProjectSystemNote
- ReadProjectSystemNote
- UpdateProjectSystemNote
Budget Revision System Attachments
- CreateProjectSystemAttachment
- DeleteProjectSystemAttachment
- GetProjectSystemAttachmentLocation
- ReadProjectSystemAttachment
- UpdateProjectSystemAttachment
MD.COC.MD
Communicator View Messages Web App
Microsoft.Dynamics.SL.CommunicatorService.
Communicator
- DeleteCommunicator
- FindCommunicator
- ReadCommunicator
- UpdateCommunicator
MD.COM.MT
Communicator Send Messages Web App
Microsoft.Dynamics.SL.CommunicatorService.
Communicator
- CreateCommunicator
- DefaultCommunicator
- ReadCommunicator
MD.PAA.DR
Project Addresses Web App
MD.BUB.RM
Project Budget Revisions Web App
MD.PAB.SM
Project Direct Budgets Web App
MD.PAP.EM
Project Team Web App
MD.PAP.MM
Project Maximums Web App
MD.PAP.RJ
Project Maintenance Web App
RS.PAP.JL
Project Analyst SSRS
Microsoft.Dynamics.SL.ProjectService.
Project
- CopyAndSaveProject
- CopyAndSaveTasks
- CreateProject
- DefaultProject
- DeleteProject
- FindProjects
- UpdateProject
Budget Revision Access
- CreateBudgetRevision
- DefaultBudgetRevision
- DeleteBudgetRevision
- FindBudgetRevision
- ReadBudgetRevision
- UpdateBudgetRevision
Direct Budget Access
- FindProjectDirectBudget
- PostDirectBudget
- ReadProjectDirectBudget
Project Notes
- CreateProjectNote
- DeleteProjectNote
- ReadProjectNote
- UpdateProjectNote
Project System Notes

Appendix 47
Screen/Report Related Web Service Method
- CreateProjectSystemNote
- DeleteProjectSystemNote
- ReadProjectSystemNote
- UpdateProjectSystemNote
Project Doc Share
- CreateDocShareDocument
- CreateDocShareEntity
- ReadDocShareDocument
- ReadDocShareEntity
- ReadDocShareEntityType
- UpdateDocShareDocument
- UpdateDocShareEntity
MD.PAC.HG
Project Charge Entry Web App
Microsoft.Dynamics.SL.ProjectChargeService
View
- DefaultProjectCharge
- FindProjectCharge
- ReadProjectCharge
- ReadChargeSystemAttachment
- ReadChargeSystemNote
Update
- UpdateProjectCharge
- UpdateChargeSystemAttachment
- UpdateChargeSystemNote
- GetChargeSystemAttachmentLocation
Create
- CreateProjectCharge
- CreateChargeSystemAttachment
- CreateChargeSystemNote
- CalcProjectChargeDetAmt
- ReleaseProjectCharge
Delete
- DeleteProjectCharge
- DeleteChargeSystemAttachment
- DeleteChargeSystemNote
MD.PAE.MP
Employee and Resource Maintenance Web App
Microsoft.Dynamics.SL.ProjectEmployeeService.
Employee and Resource
- CreateProjectEmployee
- DefaultProjectEmployee
- DeleteProjectEmployee
- FindProjectEmployee
- ReadProjectEmployee
- UpdateProjectEmployee
Employee and Resource Project Notes
- CreateEmployeeProjectNote
- DeleteEmployeeProjectNote
- ReadEmployeeProjectNote
- UpdateEmployeeProjectNote
Employee and Resource System Notes

Screen/Report Related Web Service Method
- CreateProjectEmployeeSystemNote
- DeleteProjectEmployeeSystemNote
- ReadProjectEmployeeSystemNote
- UpdateProjectEmployeeSystemNote
Employee and Resource System Attachments
- CreateProjectEmployeeSystemAttachment
- DeleteProjectEmployeeSystemAttachment
- GetProjectEmployeeSystemAttachmentLocation
- ReadProjectEmployeeSystemAttachment
- UpdateProjectEmployeeSystemAttachment
MD.PAR.TI
Assignment Summary by Resource Web App
Microsoft.Dynamics.SL.ProjectEmployeeService
- FindProjectEmployee
Microsoft.Dynamics.SL.ProjectResourceAssignmentService
- FindProjectResourceAssignment
- ProjectResourceAssignmentCostsVisible
MD.PJC.HG
Project Change Web App
Microsoft.Dynamics.SL.ProjectChangeService
View
- DefaultProjectChange
- FindProjectChange
- ReadProjectChange
- ReadProjectChangeSystemAttachment
- ReadProjectChangeSystemNote
Update
- UpdateProjectChange
- UpdateProjectChangeSystemAttachment
- UpdateProjectChangeSystemNote
- GetChangeSystemAttachmentLocation
Create
- CreateProjectChange
- CreateProjectChangeSystemAttachment
- CreateProjectChangeSystemNote
Delete
- DeleteProjectChange
- DeleteProjectChangeSystemAttachment
- DeleteProjectChangeSystemNote
MD.PJD.EL
Delegation Web App
Microsoft.Dynamics.SL.CommunicatorService.
Communicator
- DeleteCommunicator
- FindCommunicator
- ReadCommunicator
- UpdateCommunicator
MD.QQV.IE
Quick Query Web App
AND each Quick Query the user should see
Microsoft.Dynamics.SL.QuickQueryService.
QuickQuery
- CreateFilterQueryView
- DeleteFilterQueryView
- ExecuteQuery
- GetQueryConnectionInfo

Appendix 49
Screen/Report Related Web Service Method
- GetQueryPages
- ReadQueryView
- UpdateFilterQueryView
For example, if a user should see the Inventory Items quick query in Web Apps, the user needs permissions to MD.QQV.IE, QQ.QVL.00, QQ.102.50, and the related web service methods that are listed in this row.
MD.RMB.PD
Budget vs Planned Hours Detail Inquiry Web App
Microsoft.Dynamics.SL.ProjectBudgetPlanHrsDetService.
- GetBudgetPlanHrsDet
MD.RMB.PI
Budget vs Planned Hours Inquiry Web App
Microsoft.Dynamics.SL.ProjectBudgetPlanHrsService.
- GetBudgetPlanHrs
MD.RME.GM
Employee Goal Maintenance Web App
Microsoft.Dynamics.SL.ProjectUtilizationGoalService.
View
- DefaultProjectUtilizationGoal
- FindProjectUtilizationGoal
- ReadProjectUtilizationGoal
- ReadUtilizationGoalSystemAttachment
- ReadUtilizationGoalSystemNote
Update
- UpdateProjectUtilizationGoal
- UpdateUtilizationGoalSystemAttachment
- UpdateUtilizationGoalSystemNote
- GetUtilizationGoalSystemAttachmentLocation
Create
- CreateProjectUtilizationGoal
- CreateUtilizationGoalSystemAttachment
- CreateUtilizationGoalSystemNote
- GenerateProjectUtilizationGoal
Delete
- DeleteUtilizationGoalSystemAttachment
- DeleteUtilizationGoalSystemNote
MD.RMG.AI
Goal vs. Actual Hours Inquiry Web App
Microsoft.Dynamics.SL.ProjectUtilGoalActualHoursService.
- GetGoalActualHours
MD.RMG.PD
Goal vs. Planned Hours Detail Inquiry Web App
Microsoft.Dynamics.SL.ProjectUtilGoalPlanHrsDetService.
- GetGoalPlanHrsDet
MD.RMG.PI
Goal vs. Planned Hours Inquiry Web App
Microsoft.Dynamics.SL.ProjectUtilGoalPlanHoursService.
- GetGoalPlanHours
MD.RMG.RI
Goal vs. Actual Revenue Inquiry Web App
Microsoft.Dynamics.SL.ProjectUtilGoalActualRevenueService
- GetGoalActualRevenue
MD.RMP.ER Microsoft.Dynamics.SL.ProjectUtilizationPeriodService.

Screen/Report Related Web Service Method
Utilization Period Maintenance Web App
View
- DefaultProjectUtilizationPeriod
- FindProjectUtilizationPeriod
- ReadProjectUtilizationPeriod
- ReadUtilizationPeriodSystemAttachment
- ReadUtilizationPeriodSystemNote
Update
- UpdateProjectUtilizationPeriod
- UpdateUtilizationPeriodSystemAttachment
- UpdateUtilizationPeriodSystemNote
- GetUtilizationPeriodSystemAttachmentLocation
Create
- CreateProjectUtilizationPeriod
- CreateUtilizationPeriodSystemAttachment
- CreateUtilizationPeriodSystemNote
- AddUtilizationPeriods
Delete
- DeleteProjectUtilizationPeriod
- DeleteUtilizationPeriodSystemAttachment
- DeleteUtilizationPeriodSystemNote
MD.RMP.LP
Resource Planning by Project Web App
and/or
MD.RMP.LR
Resource Planning by Resource Web App
Microsoft.Dynamics.SL. ProjectResourceAssignmentService.
Resource Planning by Project
- CreateProjectResourceAssignment
- DefaultProjectResourceAssignment
- DefaultProjectResourceAssignmentBudgetAmounts
- DeleteProjectResourceAssignment
- FindProjectResourceAssignment
- ProjectResourceAssignmentCostsVisible
- ReadProjectResourceAssignment
- UpdateProjectResourceAssignment
Resource Planning by Project System Notes
- CreateResourceAssignmentSystemNote
- DeleteResourceAssignmentSystemNote
- ReadResourceAssignmentSystemNote
- UpdateResourceAssignmentSystemNote
Resource Planning by Project System Attachments
- CreateResourceAssignmentSystemAttachment
- DeleteResourceAssignmentSystemAttachment
- GetResourceAssignmentSystemAttachmentLocation
- ReadResourceAssignmentSystemAttachment
- UpdateResourceAssignmentSystemAttachment
Resource Planning by Resource
- FindProjectResourceAssignment
- ProjectResourceAssignmentCostsVisible
Microsoft.Dynamics.SL.ProjectResourcePlanService.
- DeleteProjectResourcePlan
- FindProjectResourcePlan
- PopulateProjectResourcePlan
- PopulateResourceHours

Appendix 51
Screen/Report Related Web Service Method
- SaveProjectResourcePlan
Microsoft.Dynamics.SL.ProjectService.
Resource Planning by Resource
- DefaultBudgetRevision
- FindProjects
Direct Budgets and Budget by Revision
- CreateBudgetRevision
- DefaultBudgetRevision
- FindProjects
- PostDirectBudget
MD.RMR.ED
Employee Project Revenue and Expense Detail Inquiry
Microsoft.Dynamics.SL.ProjectUtilEmpRevExpDetService.
- GetEmpRevExpDet
MD.RMR.EI
Employee Revenue and Expense Inquiry Web App
Microsoft.Dynamics.SL.ProjectUtilEmpRevExpService.
- GetEmpRevExp
MD.RMT.YP Utilization Type Maintenance Web App
Microsoft.Dynamics.SL.ProjectUtilizationTypeService.
View
- DefaultProjectUtilizationType
- FindProjectUtilizationType
- ReadProjectUtilizationType
- ReadUtilizationTypeSystemAttachment
- ReadUtilizationTypeSystemNote
Update
- UpdateProjectUtilizationType
- UpdateUtilizationTypeSystemAttachment
- UpdateUtilizationTypeSystemNote
- GetUtilizationTypeSystemAttachmentLocation
Create
- CreateProjectUtilizationType
- CreateUtilizationTypeSystemAttachment
- CreateUtilizationTypeSystemNote
Delete
- DeleteProjectUtilizationType
- DeleteUtilizationTypeSystemAttachment
- DeleteUtilizationTypeSystemNote
MD.RQ1.00
Item Request Entry Web App
Microsoft.Dynamics.SL.ItemRequestService.
View
- FindItemRequest
- ReadItemRequest
- DefaultItemRequest
- ReadItemRequestPurposeNote
- ReadItemRequestAlternativeNote
- ReadItemRequestSystemNote
- ReadItemRequestSystemAttachment
Update

Screen/Report Related Web Service Method
- UpdateItemRequest
- GetComponentsFromKit
- GetItemRequestSystemAttachmentLocation
- UpdateItemRequestPurposeNote
- UpdateItemRequestAlternativeNote
- UpdateItemRequestSystemNote
- UpdateItemRequestSystemAttachment
Create
- CreateItemRequest
- CreateItemRequestPurposeNote
- CreateItemRequestAlternativeNote
- CreateItemRequestSystemNote
- CreateItemRequestSystemAttachment
Delete
- DeleteItemRequestSystemNote
- DeleteItemRequestSystemAttachment
MD.RQ1.11
Alternatives Web App
Microsoft.Dynamics.SL.ItemRequestService.
View
- ReadItemRequestAlternativeNote
MD.RQ1.12
Purpose Web App
Microsoft.Dynamics.SL.ItemRequestService.
View
- ReadItemRequestPurposeNote
MD.RQ1.15
Requisition Budget Web App
Microsoft.Dynamics.SL.ItemRequestService.
View
- GetRequisitionBudget
MD.RQ5.10
Item Request Approval Web App
Microsoft.Dynamics.SL.ItemRequestService.
View
- FindItemRequestApproval
- FindItemRequestDetailApproval
- ReadItemRequestForApproval
- ReadItemRequestSystemAttachment
- ReadItemRequestSystemNote
Update
- UpdateItemRequestApproval
- UpdateItemRequestDetailApproval
MD.RQ5.11
Approval Comments Web App
Microsoft.Dynamics.SL.ItemRequestService.
View
- ReadItemRequestApprovalComment
Update
- UpdateItemRequestApprovalComment
Create
- CreateItemRequestApprovalComment
Delete
- DeleteItemRequestApprovalComment

Appendix 53
Screen/Report Related Web Service Method
MD.RQ5.21
Inventory Order History Web App
Microsoft.Dynamics.SL.WebServices.
Update
- InventoryOrderHistory
MD.TMC.OR
Project Correcting Timecards
Web App
Microsoft.Dynamics.SL.ProjectTimecardService.
**all methods that are listed for Timecard, plus:
Timecard Correction
- CorrectTimecard
MD.TME.PJ
Employee Position/Rate Maintenance Web App
Microsoft.Dynamics.SL.ProjectEmployeePositionRateService.
Employee Position/Rate
- CreateProjectEmployeePositionRate
- DeleteProjectEmployeePositionRate
- FindProjectEmployeePositionRate
- ReadProjectEmployeePositionRate
- UpdateProjectEmployeePositionRate
Employee Position/Rate System Notes
- CreateEmployeePositionRateSystemNote
- DeleteEmployeePositionRateSystemNote
- ReadEmployeePositionRateSystemNote
- UpdateEmployeePositionRateSystemNote
Employee Position/Rate System Attachments
- CreateEmployeePositionRateSystemAttachment
- DeleteEmployeePositionRateSystemAttachment
- GetEmployeePositionRateSystemAttachmentLocation
- ReadEmployeePositionRateSystemAttachment
- UpdateEmployeePositionRateSystemAttachment
Microsoft.Dynamics.SL.ProjectEmployeeService.
- FindProjectEmployee
MD.TME.TA
Project T&E Approvals
Web App
Microsoft.Dynamics.SL.ProjectExpenseService.
Expense Entry
- ReadProjectExpense
Expense Project Notes
- CreateExpenseProjectNote
- DeleteExpenseProjectNote
- ReadExpenseProjectNote
- UpdateExpenseProjectNote
Expense System Notes
- CreateExpenseSystemNote
- DeleteExpenseSystemNote
- ReadExpenseSystemNote
- UpdateExpenseSystemNote
Expense System Attachments
- CreateExpenseSystemAttachment
- DeleteExpenseSystemAttachment
- GetExpenseSystemAttachmentLocation
- ReadExpenseSystemAttachment
- UpdateExpenseSystemAttachment
Expense Approvals
- FindProjectExpenseApproval
- UpdateProjectExpenseApproval
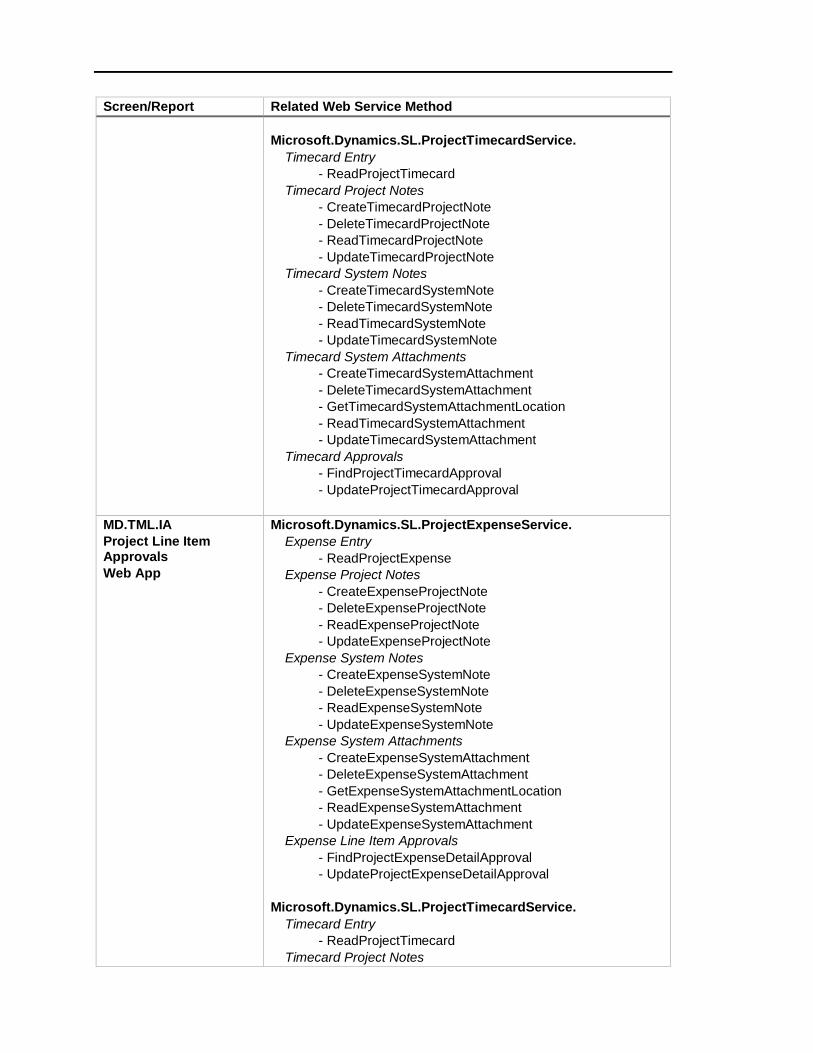
Screen/Report Related Web Service Method
Microsoft.Dynamics.SL.ProjectTimecardService.
Timecard Entry
- ReadProjectTimecard
Timecard Project Notes
- CreateTimecardProjectNote
- DeleteTimecardProjectNote
- ReadTimecardProjectNote
- UpdateTimecardProjectNote
Timecard System Notes
- CreateTimecardSystemNote
- DeleteTimecardSystemNote
- ReadTimecardSystemNote
- UpdateTimecardSystemNote
Timecard System Attachments
- CreateTimecardSystemAttachment
- DeleteTimecardSystemAttachment
- GetTimecardSystemAttachmentLocation
- ReadTimecardSystemAttachment
- UpdateTimecardSystemAttachment
Timecard Approvals
- FindProjectTimecardApproval
- UpdateProjectTimecardApproval
MD.TML.IA
Project Line Item Approvals
Web App
Microsoft.Dynamics.SL.ProjectExpenseService.
Expense Entry
- ReadProjectExpense
Expense Project Notes
- CreateExpenseProjectNote
- DeleteExpenseProjectNote
- ReadExpenseProjectNote
- UpdateExpenseProjectNote
Expense System Notes
- CreateExpenseSystemNote
- DeleteExpenseSystemNote
- ReadExpenseSystemNote
- UpdateExpenseSystemNote
Expense System Attachments
- CreateExpenseSystemAttachment
- DeleteExpenseSystemAttachment
- GetExpenseSystemAttachmentLocation
- ReadExpenseSystemAttachment
- UpdateExpenseSystemAttachment
Expense Line Item Approvals
- FindProjectExpenseDetailApproval
- UpdateProjectExpenseDetailApproval
Microsoft.Dynamics.SL.ProjectTimecardService.
Timecard Entry
- ReadProjectTimecard
Timecard Project Notes

Appendix 55
Screen/Report Related Web Service Method
- CreateTimecardProjectNote
- DeleteTimecardProjectNote
- ReadTimecardProjectNote
- UpdateTimecardProjectNote
Timecard System Notes
- CreateTimecardSystemNote
- DeleteTimecardSystemNote
- ReadTimecardSystemNote
- UpdateTimecardSystemNote
Timecard System Attachments
- CreateTimecardSystemAttachment
- DeleteTimecardSystemAttachment
- GetTimecardSystemAttachmentLocation
- ReadTimecardSystemAttachment
- UpdateTimecardSystemAttachment
Timecard Line Item Approvals
- FindProjectTimecardDetailApproval
- UpdateProjectTimecardDetailApproval
MD.TMT.CE
Project Timecard Entry
Web App
MD.TMT.AA
Project Timecard Entry
Web App With Rate\Amt
MD.TMD.LY
Project Timecard Detail Web App
Microsoft.Dynamics.SL.ProjectTimecardService.
Timecard Entry (only)
- CreateProjectTimecard
- DefaultTimecard
- DeleteProjectTimecard
- FindProjectTimecard
- ReadProjectTimecard
- UpdateProjectTimecard
Timecard Entry With Rate\Amt (only)
- CreateProjectTimecardRate
- DefaultTimecardRate
- DeleteProjectTimecardRate
- FindProjectTimecardRate
- ReadProjectTimecardRate
- UpdateProjectTimecardRate
Timecard Project Notes
- CreateTimecardProjectNote
- DeleteTimecardProjectNote
- ReadTimecardProjectNote
- UpdateTimecardProjectNote
Timecard System Notes
- CreateTimecardSystemNote
- DeleteTimecardSystemNote
- ReadTimecardSystemNote
- UpdateTimecardSystemNote
Timecard System Attachments
- CreateTimecardSystemAttachment
- DeleteTimecardSystemAttachment
- GetTimecardSystemAttachmentLocation
- ReadTimecardSystemAttachment
- UpdateTimecardSystemAttachment

Screen/Report Related Web Service Method
MD.TMT.EE
Project Expense Entry
Web App
Microsoft.Dynamics.SL.ProjectExpenseService.
Expense Entry
- CreateProjectExpense
- DefaultProjectExpense
- DeleteProjectExpense
- FindProjectExpense
- ReadProjectExpense
- UpdateProjectExpense
Expense Project Notes
- CreateExpenseProjectNote
- DeleteExpenseProjectNote
- ReadExpenseProjectNote
- UpdateExpenseProjectNote
Expense System Notes
- CreateExpenseSystemNote
- DeleteExpenseSystemNote
- ReadExpenseSystemNote
- UpdateExpenseSystemNote
Expense System Attachments
- CreateExpenseSystemAttachment
- DeleteExpenseSystemAttachment
- GetExpenseSystemAttachmentLocation
- ReadExpenseSystemAttachment
- UpdateExpenseSystemAttachment
RS.PAP.JL
Project Analyst report
SystemAccess
RS.TME.XP
Project Expense report
SystemAccess
RS.TMT.MC Project Timecard report
SystemAccess

Appendix 57
Setting timeouts The following section contain information about how to adjust timeouts for Microsoft Dynamics SL
Web Apps.
Timeouts for Web Service Method Calls
You can change the time-out duration by setting the SendTimeout property on the WCF service
binding.
Edit the WCF service binding by opening the web.config file for both the web service and for Web Apps
in the Service Configuration Editor (SvcConfigEditor.exe).
For the web service, browse to Bindings and then basicHttpsBinding.
For Web Apps, browse to CustomBinding_ProjectTimecardService.
If you do not have the Service Configuration Editor available, you can also edit the web.config file by
using a text editor. The setting belongs in the <binding> node, similar to the following example:
<system.serviceModel>
<bindings>
<customBinding>
<binding name="CustomBinding_ProjectTimecardService"
SendTimeout="00:01:00">
</binding>
</customBinding>
</bindings>
</system.serviceModel>
You can set other WCF timeouts in the same manner. These timeouts include ReceiveTimeout,
OpenTimeout, and CloseTimeout.
Timeouts for IIS
You can also set timeouts in IIS that affect Web Apps as follows:
Website > Advanced Settings > Limits > Connection Time-out
Website > Authentication > Forms Authentication > Edit > Authentication cookie time-out
Website > Session State > Cookie Settings > Time-out
Application Pool > Advanced Settings > Idle Time-out

Microsoft Distributed Transaction Coordinator Setup If you have Microsoft SQL Server, Microsoft Dynamics SL Web Services, or Microsoft Dynamics SL Web
Apps installed or deployed on different Windows Server computers, you must set up Microsoft
Distributed Transaction Coordinator (MSDTC) on each server.
Note:
You must use either a local administrator or a domain administrator to make these changes.
Changes to MSDTC may require you to restart the computer or restart the SQL Server windows
service.
There are transactional consistency implications when you use Windows Backup and Restore on a
DTC-enabled SQL Server. For more information, see http://technet.microsoft.com/en-
us/library/cc730995.aspx.
To set up Microsoft Distributed Transaction Coordinator, follow these steps on each server:
1. Change the Distributed Transaction Coordinator windows service.
a.) In Administrative Tools, select Services.
b.) In the Services window, locate the Distributed Transaction Coordinator service.
c.) Verify that the settings are as follows:
— Status = Started
— Startup Type = Automatic (Delayed Start)
— Log On As = Network Service
d.) Edit the settings if they do not match, and then restart the service.
e.) Close Services.
2. Change the Windows Firewall to allow MSDTC through.
a.) In Control Panel, select Windows Firewall.
b.) Click Allow a program or feature through Windows Firewall.
c.) Select the check box to the left of Distributed Transaction Coordinator, and at least one of the
network profile check boxes to the right.
d.) Click OK, and then close Windows Firewall.
3. Configure MSDTC to accept network access.
a.) In Administrative Tools, select Component Services.
b.) Expand Component Services, expand Computers, and then expand My Computer.
c.) Expand Distributed Transaction Coordinator, right-click Local DTC, and then click Properties.
d.) On the Security tab, select Network DTC Access.
e.) If this is the server where the Web Services are deployed or SQL Server is installed, also
select the following check boxes: Allow Remote Clients, Allow Inbound, and Allow Outbound.
OR
If this is the server where the Web Apps are deployed, select the Allow Outbound check box.
f.) Click OK.
g.) Close Component Services.

Appendix 59
Web Services Reference The following table lists the available web services and provides a short description for each web
service.
Web Service File Name
Microsoft.Dynamics.SL.WebServices
Name Description
AdvancedTimecard.svc Payroll Time Entry and Advanced Timecard
Provides a web service as the basis for creating, editing, and deleting payroll timecards and advanced payroll timecards.
CommunicatorService.svc Communicator Provides a web service as the basis to the functionality previously available in the Business Portal Project Center Communicator Messages page or Send Messages (CO.MMT.00) and View Messages (CO.CMD.00). The communicator web service includes Create-Read-Update-Delete (CRUD) capability on the Communicator Messages table (PJCOMMUN).
CustomerService.svc Customer Provides a web service as the basis for inputting/exporting data to/from Customer fields, Customer EDI fields, Contact information and Shipping Address information.
DelegationService.svc Delegations Provides a web service as the basis for delegating invoices, budget revisions, timecards, expense reports, and line item approvals to another project employee.
ItemRequestService.svc Item Request Entry
Item Request Approvals
Provides a web service as the basis for entering and approving item requests. This includes managing approval comments, system notes. Also provides viewing of requisition budget
Lookups.LookupsServices.svc
LookupService.svc
Lookups Provides two web services as the foundation for lookups.
PayrollEmployeeService.svc Payroll Employee Maintenance
Provides a web service as the basis for viewing, creating, editing, and deleting payroll employees. Also provides access to the related employee system notes, and system attachments.
ProjectChangeService.svc Project Change Orders Provides a web service as the basis for entering and maintaining change orders for projects.
ProjectChargeService.svc Project Charge Entry Provides a web service as the basis for entering transactions directly into the Project system.
ProjectEmployeePositionRateService.svc Employee Position/Rate Maintenance
Provides a web service as the basis for viewing, creating, editing, and deleting employee’s position/rate. Also provides access to the related system notes, and system attachments.
ProjectEmployeeService.svc Employee and Resource Maintenance
Provides a web service as the basis for viewing, creating, editing, and deleting project employees and project resources. Also provides access to the related project notes, system notes, and system attachments.

Web Service File Name
Microsoft.Dynamics.SL.WebServices
Name Description
ProjectExpenseService.svc Project Expense Entry
Expense/Line Approval
Provides a web service as the basis for creating, editing, and submitting Expense headers and details, together with project notes, system notes, and system attachments.
Lets users approve and reject expenses and expense line items.
ProjectInvoiceService.svc Project Invoice Approvals
Provides a web service as the basis to approve and reject project invoices for Microsoft Dynamics SL. In addition, project invoice documents can be forwarded to other project employees.
ProjectResourceAssignmentService.svc Resource Assignment Provides a web service as the basis for working with resource assignments, together with system notes and system attachments.
ProjectResourcePlanService.svc Resource Planning Provides a web service as the basis for the Resource Management module.
ProjectService.svc Project
Project Budgeting
Budget Revision Approval
Provides a web service as the basis for working with projects, project billings, project maximums, addresses associated with projects, project team members, tasks, task maximums, task assignments, and budget line items.
Provides the basis to work with project budgeting.
Provides a web service as the basis to approve and reject project budget revision documents for Microsoft Dynamics SL. In addition, project budget revision documents can be forwarded to other project employees
ProjectTimecardService.svc Project Time Entry
Project Time Entry with Rate\Amt
PFT/Project Time Entry – Period Entry
Correcting Timecards
Project T-status Timecards
Timecard/Line Approval
Provides a web service as the basis for creating, editing, and submitting timecard headers and details, together with project notes, invoice comments, system notes, and system attachments.
Lets users create, edit, and submit timecards with rates and amounts.
Lets users see their assignments and view daily timecards in a multi-day view.
Lets users enter corrections to previously completed timecards.
Lets users read, update, and delete project timecards that were generated from timesheets.
Lets users approve and reject timecards and timecard line items.
ProjectUtilizationGoalService.svc Resource Management Utilization Goals
Provides a web service that lets you set up available hours and utilization percentages per utilization period for each employee.
ProjectUtilizationPeriodService.svc Resource Management Utilization Periods
Provides a web service that lets you set up utilization periods.

Appendix 61
Web Service File Name
Microsoft.Dynamics.SL.WebServices
Name Description
ProjectUtilizationTypeService.svc Resource Management Utilization Types
Provides a web service that lets you set up utilization types.
QuickQueryService.svc Quick Query Provides a web service that lets users work with the same quick queries that they can already use on a full installation of Microsoft Dynamics SL.
ROIService.svc Web ROI – Reporting and Report Queue
Provides a web service that lets users submit report requests, use templates, sort, select, options, and company selection. The users can save the reports in multiple file formats, and upload to SharePoint.
VendorService.svc Vendor Provides a web service as the basis for inputting/exporting data to/from Vendor fields, Contact information and Shipping Address information.
WebAppCustomService.svc Administration – Access Rights
Provides a web service that lets administrative users assign permissions to web apps, quick queries, and reports. The web service also lets administrative users customize certain web apps, to change which fields are visible, enabled, required, and have default values.
Session.LoginWindows.svc Login Provides a web service to log in.
Session.LoginForms.svc LoginForms Provides a web service to log in.

Index
A Access Rights 31, 43
Access Rights Maintenance (95.270.00) 37,
41
Access Rights Report (95.600.00) 38, 42
C Configuring
SSRS for Microsoft Dynamics SL 4
D Deployment 15
L LoginWindows 14
M Microsoft Dynamics SL 3
Microsoft Dynamics SL Report Server
Configuration Console 4
P Prerequisite
Microsoft Dynamics SL 3
SQL Server 3
SQL Server Reporting Services 3
Prerequisites
install 3, 15
S Screens
Access Rights Maintenance
(95.270.00) 31
Employee and Resource Maintenance
(PA.EMP.00) 23, 24, 25
Employee Position/Rate Maintenance
(TM.EPJ.00) 22, 23
Time and Expense Setup
(TM.SET.00) 23
Trusted Web Service Account
Maintenance (95.261.00) 8
User Maintenance (95.260.00) 20
SQL Server 3
SQL Server Reporting Services 3
SSRS 3
T Trusted Web Service Account Maintenance
(95.261.00) 38, 40
W Web Configuration Settings 33
Web Service Lookup Maintenance
(98.390.00) 38
Web service method 31
Web Service Method Maintenance
(98.370.00) 37, 41
Web Services Lookup Security
(98.380.00) 38
Web.config 33