mfmp u buyer manual - dms.myflorida.com€¦ · mfmp buyer manual 7 dashboard unless otherwise...
TRANSCRIPT

MFMP Buyer
Manual Last Updated: March 2018
MFMP Buyer Manual 2
Table of Contents MFMP SYSTEM OVERVIEW ................................................................................................................................................................ 5
WHAT IS MYFLORIDAMARKETPLACE (MFMP)? ........................................................................................................................................... 5 Five MFMP Modules ........................................................................................................................................................................... 5 MFMP Access ...................................................................................................................................................................................... 6 NAVIGATING MFMP ............................................................................................................................................................................... 6 Compatibility ....................................................................................................................................................................................... 6 Login ................................................................................................................................................................................................... 6 Dashboard........................................................................................................................................................................................... 7 Newsfeed ............................................................................................................................................................................................ 7 Drop-Down Boxes ............................................................................................................................................................................... 7 Calendar Icon ...................................................................................................................................................................................... 7 Links .................................................................................................................................................................................................... 8 Required Fields/Error Messages ......................................................................................................................................................... 8 Timeout Period .................................................................................................................................................................................... 8 Log Out ............................................................................................................................................................................................... 8
MANAGING PREFERENCES ................................................................................................................................................................. 8
CHANGE PASSWORD ................................................................................................................................................................................ 8 Password Complexity Requirements ................................................................................................................................................... 8 CHANGE SECRET QUESTION ....................................................................................................................................................................... 9 DELEGATION OF APPROVAL AUTHORITY ....................................................................................................................................................... 9 CHANGE YOUR PROFILE ........................................................................................................................................................................... 10 EMAIL NOTIFICATION PREFERENCES .......................................................................................................................................................... 10 RESET DEFAULT PREFERENCES .................................................................................................................................................................. 11 MONITORING CONFIDENTIAL DATA ........................................................................................................................................................... 12 REMOVE CONFIDENTIAL INFORMATION ...................................................................................................................................................... 13 Customers no longer with the agency .............................................................................................................................................. 13
REQUISITIONS ................................................................................................................................................................................. 14
CREATING REQUISITIONS ......................................................................................................................................................................... 14 Select items to purchase ................................................................................................................................................................... 14 Enter requisition summary information ............................................................................................................................................ 14 Add Line Item Details ........................................................................................................................................................................ 16 Enter Line Item Accounting Details ................................................................................................................................................... 17 Enter Shipping, Comments, and Attachments .................................................................................................................................. 18 Edit Requisition Approval Flow ......................................................................................................................................................... 19 Submit Requisition ............................................................................................................................................................................ 19 DENIED REQUISITIONS ............................................................................................................................................................................ 19 APPROVAL ESCALATION PROCESS .............................................................................................................................................................. 20 REVIEWING A REQUISITION ...................................................................................................................................................................... 20 Approving a Requisition .................................................................................................................................................................... 20 Deny a Requisition ............................................................................................................................................................................ 21
PURCHASE ORDERS ......................................................................................................................................................................... 22
CREATING CHANGE ORDERS .................................................................................................................................................................... 22 Deleting Line Items on Catalog Orders ............................................................................................................................................. 22 Change Order No Approval Flow (CO No Workflow) ........................................................................................................................ 22 CANCEL AN ORDER (CANCEL REQUISITION EFORM) ...................................................................................................................................... 23 RELEASE AN ENCUMBRANCE .................................................................................................................................................................... 23 RESTORE PO BALANCE EFORM ................................................................................................................................................................. 23 UPDATE ENCUMBRANCE EFORM ............................................................................................................................................................... 24
MFMP Buyer Manual 3
CONTRACTS ..................................................................................................................................................................................... 26
CREATE A CONTRACT REQUEST ................................................................................................................................................................. 27 Contract Definitions .......................................................................................................................................................................... 27 Contract Limits .................................................................................................................................................................................. 29 Contract Pricing Terms ...................................................................................................................................................................... 31 Contract Access Control .................................................................................................................................................................... 33 Contract Appendixes ......................................................................................................................................................................... 33 Contract Summary ............................................................................................................................................................................ 34 CONTRACT APPROVAL FLOW .................................................................................................................................................................... 34 Reviewing a Contract Request .......................................................................................................................................................... 34 APPROVING A CONTRACT REQUEST ........................................................................................................................................................... 34 DENY A CONTRACT REQUEST ................................................................................................................................................................... 34 CONTRACT REQUEST STATUSES ................................................................................................................................................................ 35 CONTRACT STATUSES.............................................................................................................................................................................. 35 MANAGING AND CHANGING CONTRACTS ................................................................................................................................................... 36 Non-Editable Fields on a Contract .................................................................................................................................................... 36 CONTRACT EXEMPTION EFORM ................................................................................................................................................................ 36 RESTORE CONTRACT AMOUNT EFORM ....................................................................................................................................................... 36 CLOSING CONTRACTS ............................................................................................................................................................................. 36
RECEIVING ....................................................................................................................................................................................... 37
RECEIVING COMMODITIES ....................................................................................................................................................................... 37 APPROVING SERVICES ............................................................................................................................................................................. 38 CORRECT RECEIPT/REOPEN ORDER ........................................................................................................................................................... 39
INVOICES ......................................................................................................................................................................................... 40
SUBMIT AN INVOICE ............................................................................................................................................................................... 40 Enter Header Details ......................................................................................................................................................................... 40 Add Items .......................................................................................................................................................................................... 41 Summary ........................................................................................................................................................................................... 42 VIEWING PAYMENT INFORMATION ON A PAID INVOICE ................................................................................................................................. 42
INVOICE RECONCILIATIONS ............................................................................................................................................................. 43
INVOICE RECONCILIATION ROLES ............................................................................................................................................................... 43 Requester/OBO ................................................................................................................................................................................. 43 Exception Handler ............................................................................................................................................................................. 43 Invoice Manager ............................................................................................................................................................................... 43 Invoice Reconciliation Approval Flow ............................................................................................................................................... 44 IR OVERVIEW........................................................................................................................................................................................ 44 INVOICE RECONCILIATION STATUSES .......................................................................................................................................................... 45 EXCEPTIONS .......................................................................................................................................................................................... 45 Header Level Exceptions ................................................................................................................................................................... 45 Line Level Exceptions......................................................................................................................................................................... 46 RECONCILING AN IR ............................................................................................................................................................................... 46 Accessing the IR ................................................................................................................................................................................ 46 Validate Accounting Details .............................................................................................................................................................. 47 Submit IR ........................................................................................................................................................................................... 48 DISPUTE A LINE ITEM .............................................................................................................................................................................. 48 IR SPLIT ACCOUNTING ............................................................................................................................................................................ 49 MANUAL MATCH .................................................................................................................................................................................. 49 APPROVING IRS ..................................................................................................................................................................................... 49 FLAIR LOGIN INFORMATION EFORM ......................................................................................................................................................... 50 INVOICE RECONCILIATION ACCOUNTING UPDATE EFORM (IR MASS UPDATE) ................................................................................................... 51 Mass Updating IRs ............................................................................................................................................................................ 52
MFMP Buyer Manual 4
PAYMENT UPDATE EFORM ...................................................................................................................................................................... 52 DELETE A DISBURSEMENT ........................................................................................................................................................................ 52
TRANSACTION FEE EXEMPTIONS ..................................................................................................................................................... 53
TRANSACTION FEE RULES ........................................................................................................................................................................ 53 AGENCY CONSIDERATIONS FOR EXEMPTIONS............................................................................................................................................... 53 MARK A REQUISITION/INVOICE EXEMPT .................................................................................................................................................... 54
REPORTING ..................................................................................................................................................................................... 55
ANALYSIS OVERVIEW .............................................................................................................................................................................. 55 Report Requests ................................................................................................................................................................................ 55 SYSTEM SEARCHES ................................................................................................................................................................................. 56
APPENDIX A ..................................................................................................................................................................................... 57
METHODS OF PROCUREMENT .................................................................................................................................................................. 57 VOUCHER TYPE AND DESCRIPTION ............................................................................................................................................................ 59 BUYER CODES ....................................................................................................................................................................................... 59 OSD CERTIFICATION .............................................................................................................................................................................. 60 SHIPPING CODES ................................................................................................................................................................................... 61 TRANSACTION FEE EXEMPTION REASONS ................................................................................................................................................... 61
APPENDIX B ..................................................................................................................................................................................... 62
LABELS................................................................................................................................................................................................. 62 ADVANCED PAYMENTS IN MFMP............................................................................................................................................................. 63 Processing Advanced Payments through MFMP Buyer: ................................................................................................................... 63 Monitoring Advanced Payments ....................................................................................................................................................... 64
MFMP GLOSSARY ............................................................................................................................................................................ 65
MFMP RESOURCES .......................................................................................................................................................................... 69
CUSTOMER SERVICE DESK (CSD) .............................................................................................................................................................. 69 MFMP BUYER ...................................................................................................................................................................................... 69 MFMP ANALYSIS .................................................................................................................................................................................. 69 MFMP SOURCING ................................................................................................................................................................................ 69 MFMP WEBSITE ................................................................................................................................................................................... 69 MFMP TRAINING RESOURCES ................................................................................................................................................................. 69 VENDOR SEARCHES ................................................................................................................................................................................ 69
MFMP Buyer Manual 5
MFMP System Overview
What is MyFloridaMarketPlace? Established in 2003, MyFloridaMarketPlace (MFMP) is the State of Florida’s source for centralized electronic procurement. MFMP provides a one-stop shop for online catalogs and information about vendors providing goods and services to the state. MyFloridaMarketPlace offers 24/7 online access to the procurement system, registered vendors, state term contracts (STC), eQuotes, solicitations, and the Vendor Bid System (VBS). MFMP automates transactions, which provides validation of information and integration with the State’s financial and accounting system (FLAIR). Purchasing and Finance and Accounting (F&A) benefit from a reduction in error rates and procurement-to-payment cycle times.
Five MFMP Modules
• Analysis is an analytical reporting application that combines data from MFMP purchase Orders, contracts, vendors’ information, invoices, cycle times, and FLAIR encumbrance and payment information.
• Buyer is the application state agencies use to work with registered vendors to issue purchase Orders (PO) to receive goods and process invoice
• Sourcing is an electronic notification, bidding, and quoting application used for State Term Contracts and agency eQuotes
• Vendor Bid System (VBS) is the system used by agencies to post solicitations for the procurement of goods and services. It is also used by vendors to view all solicitations to choose the bids they want to respond to
• Vendor Information Portal (VIP) is the application in which vendors register to do business with the state and elect to participate in bidding opportunities
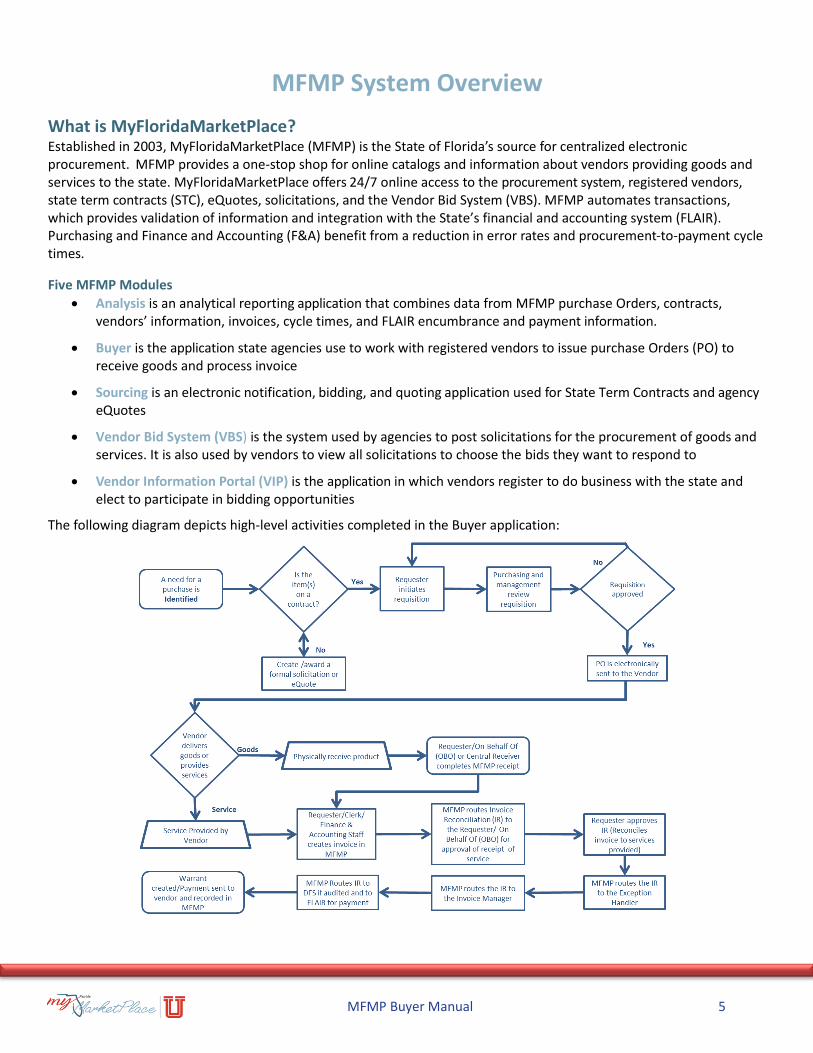
The following diagram depicts high-level activities completed in the Buyer application:
MFMP Buyer Manual 6
State agencies use the Buyer application to electronically route requisitions for approval. Once approved, requisitions become the orders vendors receive. Customers complete receipts for commodities electronically. For services, MFMP routes the invoice to the original requester or On Behalf Of (OBO) for approval. Vendors submit invoices to MFMP as an electronic invoice (eInvoice) or agencies create a PO- or contract-based invoice.
Benefits to using MFMP include:
• Automated procure-to-pay processing
• State Term Contracts (STC) are available in MFMP as catalogs
• eInvoice audits against the order and receipt (if applicable)
• MFMP maintains a PO balance based on the original order amount, minus invoice reconciliations (IRs) in ‘Paid’ status.
• All invoice reconciliations paid in MFMP link to the invoice and the payment information (i.e., warrant number, voucher number and paid date)
MFMP Access The Department of Management Services (DMS) grants MFMP system administration responsibilities to specific individual customers within each agency. Customers may request MFMP access by contacting their agency’s system administrator. If necessary, the MFMP customer service desk (CSD) can assist customers with identifying their system administrator. See the System Administrator manual for more information about System Administrator roles and responsibilities.
Navigating MFMP Compatibility When using the Internet Explorer (IE) web browser for accessing and using MFMP, the MFMP team recommends enabling the compatibility view setting. See the Internet Explorer Compatibility job aid for more information.
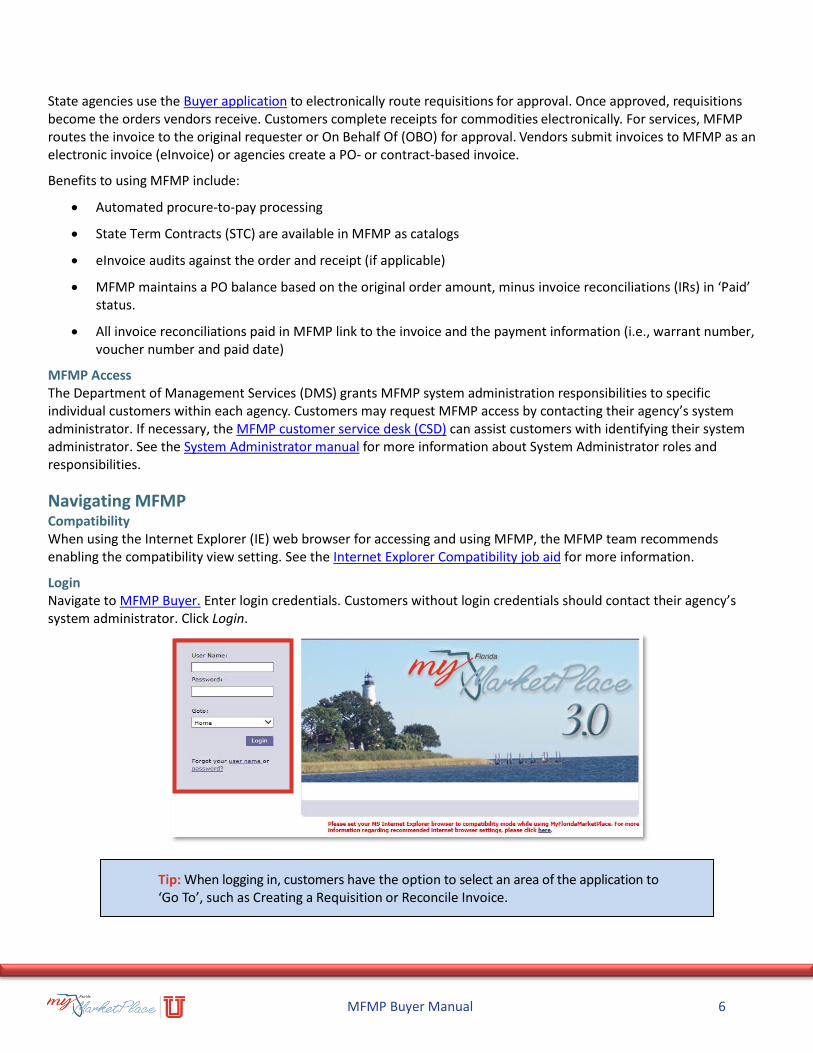
Login Navigate to MFMP Buyer. Enter login credentials. Customers without login credentials should contact their agency’s system administrator. Click Login.
Tip: When logging in, customers have the option to select an area of the application to ‘Go To’, such as Creating a Requisition or Reconcile Invoice.
MFMP Buyer Manual 7
Dashboard Unless otherwise specified, customers will land on the Dashboard after logging in. The Dashboard is the starting point for searching catalogs, creating or approving requisitions, creating an Invoice or processing Invoice Reconciliations. It is easy to customize the Dashboard page. Each functional area has its own Dashboard, which can be accessed through the Dashboard tabs.
Based on the functional area the customer is working in, the Dashboard tabs provide access to pre-defined content, and MFMP will highlight the relevant tabs. The visible Dashboard tabs are based on the groups and roles assigned to the customer. See the System Administrator Manual for detailed information related to groups and roles in MFMP. Click on any tab to switch between views.
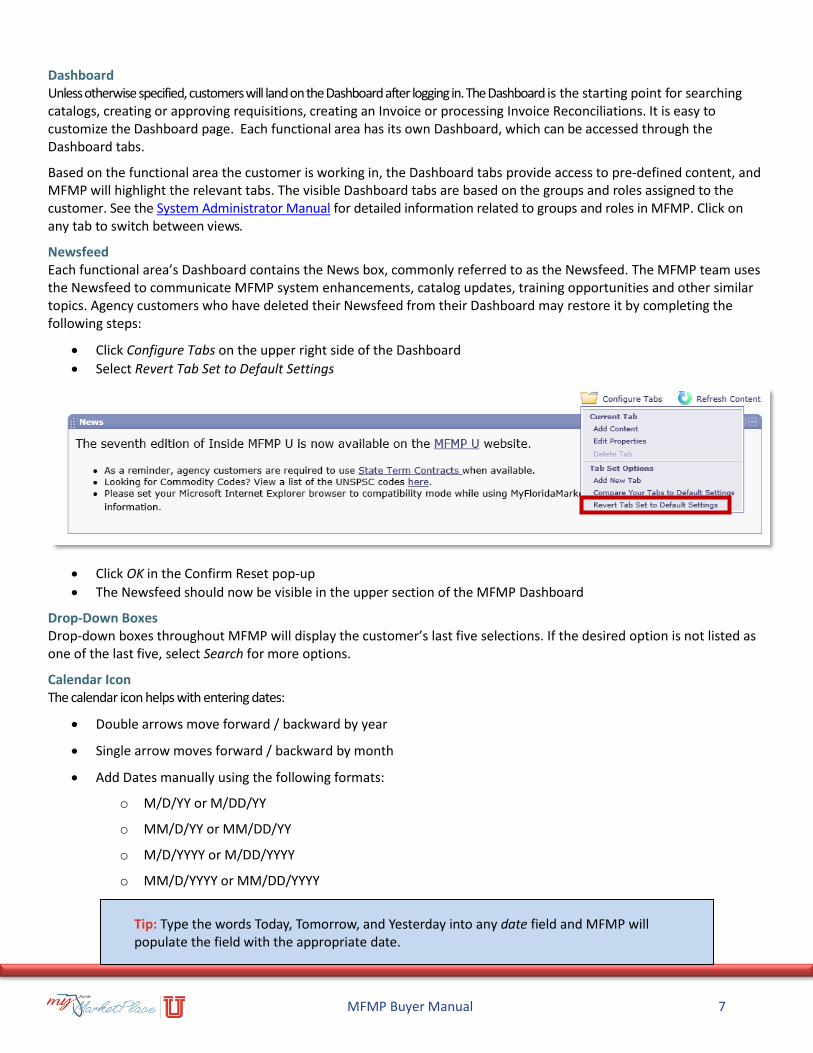
Newsfeed Each functional area’s Dashboard contains the News box, commonly referred to as the Newsfeed. The MFMP team uses the Newsfeed to communicate MFMP system enhancements, catalog updates, training opportunities and other similar topics. Agency customers who have deleted their Newsfeed from their Dashboard may restore it by completing the following steps:
• Click Configure Tabs on the upper right side of the Dashboard
• Select Revert Tab Set to Default Settings
• Click OK in the Confirm Reset pop-up
• The Newsfeed should now be visible in the upper section of the MFMP Dashboard
Drop-Down Boxes Drop-down boxes throughout MFMP will display the customer’s last five selections. If the desired option is not listed as one of the last five, select Search for more options.
Calendar Icon The calendar icon helps with entering dates:
• Double arrows move forward / backward by year
• Single arrow moves forward / backward by month
• Add Dates manually using the following formats:
o M/D/YY or M/DD/YY
o MM/D/YY or MM/DD/YY
o M/D/YYYY or M/DD/YYYY
o MM/D/YYYY or MM/DD/YYYY
Tip: Type the words Today, Tomorrow, and Yesterday into any date field and MFMP will populate the field with the appropriate date.
MFMP Buyer Manual 8
Links Any word or section of words underlined in blue indicates a hyperlink in MFMP. Click these to view related information (i.e., PO Terms and Conditions will provide additional information about the MFMP terms and conditions).
Required Fields/Error Messages Asterisks (*) identify required fields in MFMP. If a required field is not completed, a red asterisk displays along with an error message. Once all the required fields are completed and all error messages are addressed, the customer can complete the transaction. MFMP displays detailed error messages at the top of the screen, including the number of errors. That number reduces as system errors are resolved. The customer may hover their mouse over the highlighted error for more information; use the next button in the error message to move between errors.
Timeout Period MFMP sessions expire after 30 minutes of inactivity. After 29 minutes, a pop-up logout warning with a 60-second countdown will appear. To continue working in MFMP, select Cancel Logout and the current session will remain open, or select Logout to end the session.
Log Out To log out, click the Logout option (located on menu bar across the top of the page). Using the “X” at the top of the Internet browser before logging out is not advised since this action does not end the MFMP session.
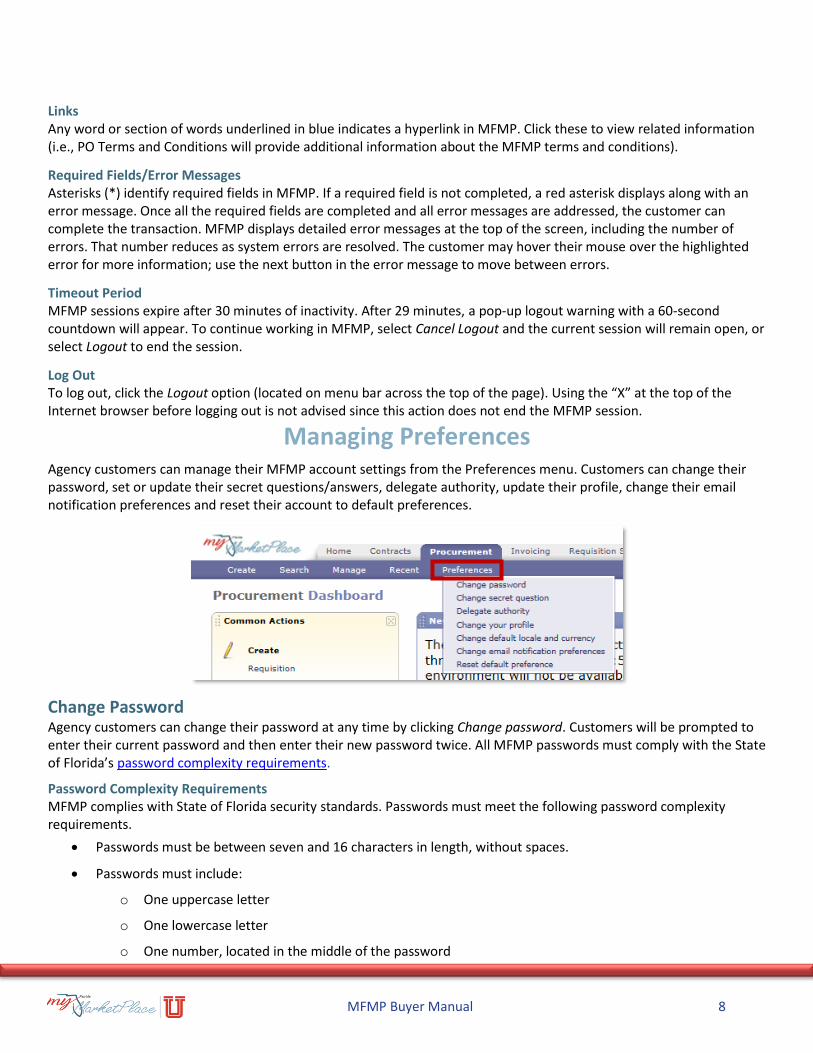
Managing Preferences Agency customers can manage their MFMP account settings from the Preferences menu. Customers can change their password, set or update their secret questions/answers, delegate authority, update their profile, change their email notification preferences and reset their account to default preferences.
Change Password Agency customers can change their password at any time by clicking Change password. Customers will be prompted to enter their current password and then enter their new password twice. All MFMP passwords must comply with the State of Florida’s password complexity requirements.
Password Complexity Requirements MFMP complies with State of Florida security standards. Passwords must meet the following password complexity requirements.
• Passwords must be between seven and 16 characters in length, without spaces.
• Passwords must include:
o One uppercase letter
o One lowercase letter
o One number, located in the middle of the password
MFMP Buyer Manual 9
• Passwords cannot be any of the previously used five passwords.
Change Secret Question MFMP passwords expire every 90 days. However, customers can reset their forgotten password if they have set secret security questions and answers. MFMP requires that customers set secret security questions and answers the first time they log in.
• Click Preferences on the menu bar and select Change Secret Question/Answer.
• Select a secret question from the drop-down field and enter the secret answer. Examples of the secret questions are “What is your pet’s name?” and “What is your mother’s maiden name?” Secret Answers must be at least five characters in length.
Once secret questions and answers are set, customers can click “Forgot your user name or password?” on the MFMP Buyer Login screen. The system requires the customer to enter their User Name or email, and answer their secret question.
Once the secret question is answered correctly, MFMP sends an email to the address on file for the customer profile. The “Password Reset Instructions” email contains a personalized link that allows the customer to access a new screen to enter a new password. Emails for password reset requests expire 24 hours after they are sent. Once a new password is successfully created, the link in the “Password Reset Instructions” email becomes unusable.
MFMP is a secure system; passwords should be protected and kept confidential. Each customer must have his or her own password.
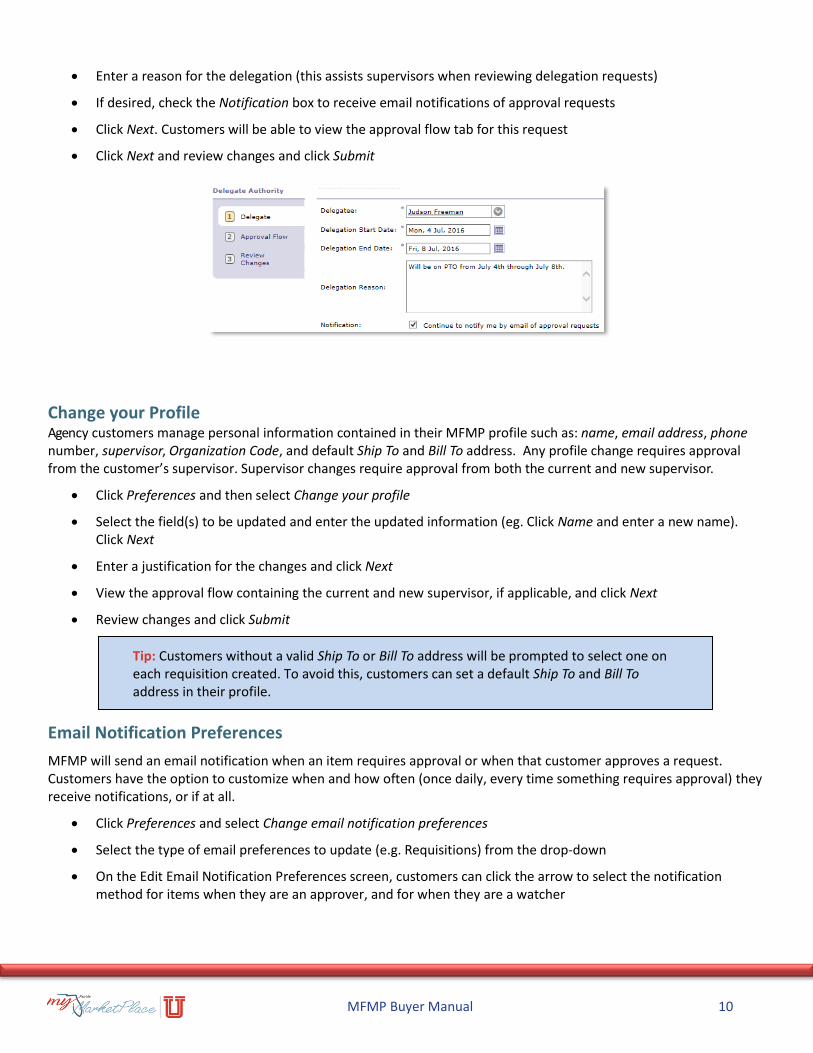
Delegation of Approval Authority Delegation of approval allows approval flows to continue if a customer is absent (i.e., out of the office). It is important to give supervisors adequate time to review the request when submitting a delegation request. The delegation will not start until approved by a supervisor, unless the delegator does not have a supervisor listed in their MFMP user profile.
The delegation starts at 12:00 a.m. on the start date selected and ends at 11:59 p.m. on the end date selected. Customers will select the first full day they are out of the office as the start date, and the day before they return as the end date.
Once the delegation begins, the delegatee logs into the system and chooses who to work as (e.g., either choose him/herself or the person he or she is delegated to act on the behalf of). Approvals completed by a delegatee display in both the Approval Flow tab and the History tab when someone approves on behalf of the delegator.
• Delegate authority by clicking Preferences and then selecting Delegate Approval Authority
• Click on the Delegatee drop down button and select Search for More to search for and select the person who will be the delegatee
• Enter the delegation Start Date and End Date
Tip: For example, Password2 and 2Password are invalid; however, Password22 and Pass2word are both valid.
Tip: After three incorrect responses to the secret question, MFMP disables the password reset functionality. If this happens, customers should contact their agency System Administrator for assistance. Locked accounts will be unlocked after thirty minutes.
Tip: The delegator is the person who is delegating his/her approval authority. The delegatee is the person acting as the delegator.
MFMP Buyer Manual 10
• Enter a reason for the delegation (this assists supervisors when reviewing delegation requests)
• If desired, check the Notification box to receive email notifications of approval requests
• Click Next. Customers will be able to view the approval flow tab for this request
• Click Next and review changes and click Submit
Change your Profile Agency customers manage personal information contained in their MFMP profile such as: name, email address, phone number, supervisor, Organization Code, and default Ship To and Bill To address. Any profile change requires approval from the customer’s supervisor. Supervisor changes require approval from both the current and new supervisor.
• Click Preferences and then select Change your profile
• Select the field(s) to be updated and enter the updated information (eg. Click Name and enter a new name). Click Next
• Enter a justification for the changes and click Next
• View the approval flow containing the current and new supervisor, if applicable, and click Next
• Review changes and click Submit
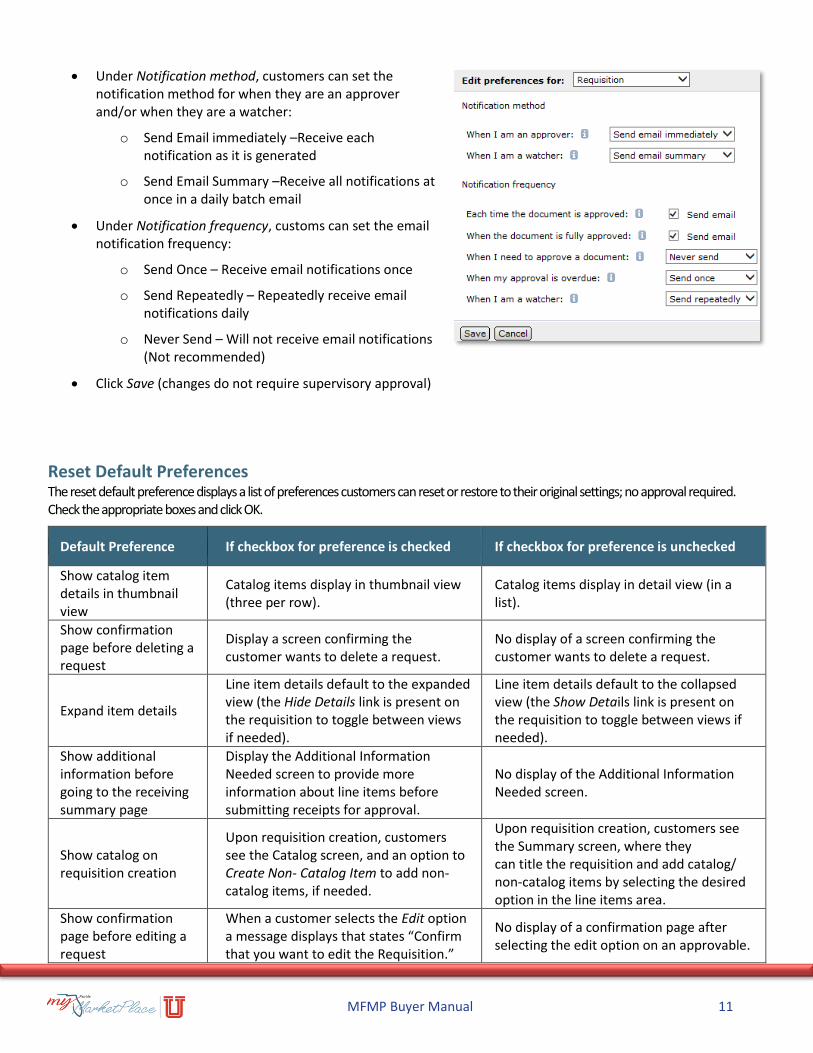
Email Notification Preferences
MFMP will send an email notification when an item requires approval or when that customer approves a request. Customers have the option to customize when and how often (once daily, every time something requires approval) they receive notifications, or if at all.
• Click Preferences and select Change email notification preferences
• Select the type of email preferences to update (e.g. Requisitions) from the drop-down
• On the Edit Email Notification Preferences screen, customers can click the arrow to select the notification method for items when they are an approver, and for when they are a watcher
Tip: Customers without a valid Ship To or Bill To address will be prompted to select one on each requisition created. To avoid this, customers can set a default Ship To and Bill To address in their profile.
MFMP Buyer Manual 11
• Under Notification method, customers can set the notification method for when they are an approver and/or when they are a watcher:
o Send Email immediately –Receive each notification as it is generated
o Send Email Summary –Receive all notifications at once in a daily batch email
• Under Notification frequency, customs can set the email notification frequency:
o Send Once – Receive email notifications once
o Send Repeatedly – Repeatedly receive email notifications daily
o Never Send – Will not receive email notifications (Not recommended)
• Click Save (changes do not require supervisory approval)
Reset Default Preferences The reset default preference displays a list of preferences customers can reset or restore to their original settings; no approval required. Check the appropriate boxes and click OK.
Default Preference If checkbox for preference is checked If checkbox for preference is unchecked
Show catalog item details in thumbnail view
Catalog items display in thumbnail view (three per row).
Catalog items display in detail view (in a list).
Show confirmation page before deleting a request
Display a screen confirming the customer wants to delete a request.
No display of a screen confirming the customer wants to delete a request.
Expand item details
Line item details default to the expanded view (the Hide Details link is present on the requisition to toggle between views if needed).
Line item details default to the collapsed view (the Show Details link is present on the requisition to toggle between views if needed).
Show additional information before going to the receiving summary page
Display the Additional Information Needed screen to provide more information about line items before submitting receipts for approval.
No display of the Additional Information Needed screen.
Show catalog on requisition creation
Upon requisition creation, customers see the Catalog screen, and an option to Create Non- Catalog Item to add non-catalog items, if needed.
Upon requisition creation, customers see the Summary screen, where they can title the requisition and add catalog/ non-catalog items by selecting the desired option in the line items area.
Show confirmation page before editing a request
When a customer selects the Edit option a message displays that states “Confirm that you want to edit the Requisition.”
No display of a confirmation page after selecting the edit option on an approvable.
MFMP Buyer Manual 12
Default Preference If checkbox for preference is checked If checkbox for preference is unchecked
Show navigation panel On the catalog page, a navigation panel displays (includes links to drill the search results down).
No navigation panel and the catalog page defaults to the thumbnail or detail view.
Show the receiving done page
After a customer completes a receipt, customers see a “Receiving - Done” page informing them that the receipt is complete; provides them with the option to select another request to receive or return to the home page.
After customer completes a receipt, the system returns to the Select Request page to begin another receipt.
Show the reconciliation done page
After customer completes an Invoice Reconciliation, customers see a “Invoicing - Done” page informing them that the Invoice Reconciliation (IR) is complete; provides the option to print a copy of the request, view the status of the request, continue working on other IRs or return to the home page.
No display of the “Invoicing - Done” screen following approval of an IR.
Receive email notifications in plain text format
Customers receive email notifications in plain text format.
Customers receive email notifications in non-plain text format.
Receive email notifications in compact text format
Customers receive email notifications in compact text format. This includes additional information, such as comments and approval flow status.
Customers receive email notifications in non-compact text format.
Monitoring Confidential Data Information in the MFMP system is considered public record. Agency customers need to redact all confidential information prior to scanning and attaching in MFMP. Confidential information includes information in the comments field, line item description, as well as attachments. Including such information in MFMP may violate Chapter 119, Florida Statutes, as well as comparable federal regulations, such as the Health Insurance Portability and Accountability Act (HIPAA), relating to confidentiality.
Each agency submits an annual security policy to MFMP stating no confidential information will be input to MFMP. Policies should state how an agency monitors for confidential information. The MFMP System Administrator manual includes a sample confidential information policy.
Agency-specific questions about confidential information should be directed to the agency’s HIPAA compliance officer or General Counsel Office.
Examples of confidential information include, but are not limited to, the following items:
• Client/Patient names
• All elements of dates (except year) directly related to an individual, including birth date, admission date, discharge date, and date of death
• Telephone numbers
• Email addresses
• Social Security numbers
MFMP Buyer Manual 13
• Medical record numbers
• Health plan beneficiary numbers
• Certificate/license numbers
• All geographic subdivisions smaller than a state, including street addresses, city, county and zip codes
The MFMP Secure Reports website includes reports to assist agencies in reviewing transactions that might contain confidential data. For more information about this process and the recommended confidentiality review process, please view the MFMP System Administrator Manual.
Remove Confidential Information The customer who originally attaches a document into MFMP can delete the attachment and/or edit or delete comments.
If a requester attaches confidential information to a requisition and someone detects it during the approval flow, the requester (customer who originally attached the document) can delete the attachment and attach a new document without the requisition approval starting over.
• Navigate to the transaction containing the attachment or comment.
• Locate the attachment or comment that needs to be removed on the Summary tab.
• Click on the Delete link for comments or the Delete button for attachments.
• Confirm the attachment or comment was removed by reviewing the History tab. The History tab provides an audit trail for edits and deletion of comments/attachments for requisitions, orders, Invoices, and Invoice Reconciliations.
For more information about removing confidential data, customers should consult their agency’s confidential information policy.
Customers no longer with the agency To remove confidential information for a customer that is no longer with the agency:
• Complete the purge request form located on the MFMP forms page
• Agency Purchasing Director, F&A Director, or Security Officer signs the form
• Email completed form to MFMP at [email protected]
• Customer Service Desk responds to notify the customer of receipt
• The Department of Management Services reviews and approves/denies the request
• Customer Service Desk responds to notify the customer when DMS approves the request and when the purge is complete

MFMP Buyer Manual 14
Requisitions A requisition officially notifies purchasing offices of a need for a commodity and/or service. MFMP automates the approval process and approved requisitions generate Purchase Orders. Requisitions have approval flows based on agency Purchasing Unit Identifier (PUI), individual profiles and the amounts / items purchased.
When a requisition is created, MFMP assigns a requisition number. Once fully approved, MFMP assigns an order number. If requisition is set to auto encumber through MFMP, the encumbrance number and the order number are the same.
MFMP uses two types of catalogs for purchases: line item catalog and punchout catalog. If an item is not on a catalog, click the non-catalog Item button to create the requisition by manually entering all of the information.
Advantages of using catalog items include auto-populated description, item number, supplier (vendor) information, commodity code and the contract identification.
MFMP contains eligible state term contracts as one of two catalog types:
• Line Item catalog is a state term contract (STC); MFMP lists them as line item contracts allowing customers to select and add as line items to a requisition
• Punchout catalog is an STC that links to the vendor’s website allowing the customer to ‘punchout’ and add items to populate the requisition. Like other online ordering processes, punchout catalogs allow the customer to shop and add to the cart. When the customer checks out, the selected items populate on the MFMP requisition
Creating Requisitions Select items to purchase
• Click Requisition under Create in the Common Actions box to search for items in the MFMP catalog
• Search for the desired product or service in an existing MFMP catalog. View the Searching Catalogs in MFMP video for more information on searching catalogs
• Select the desired product or service. If not available on an MFMP catalog, click the Create Non-Catalog Item button and enter the required information. Be as detailed as possible
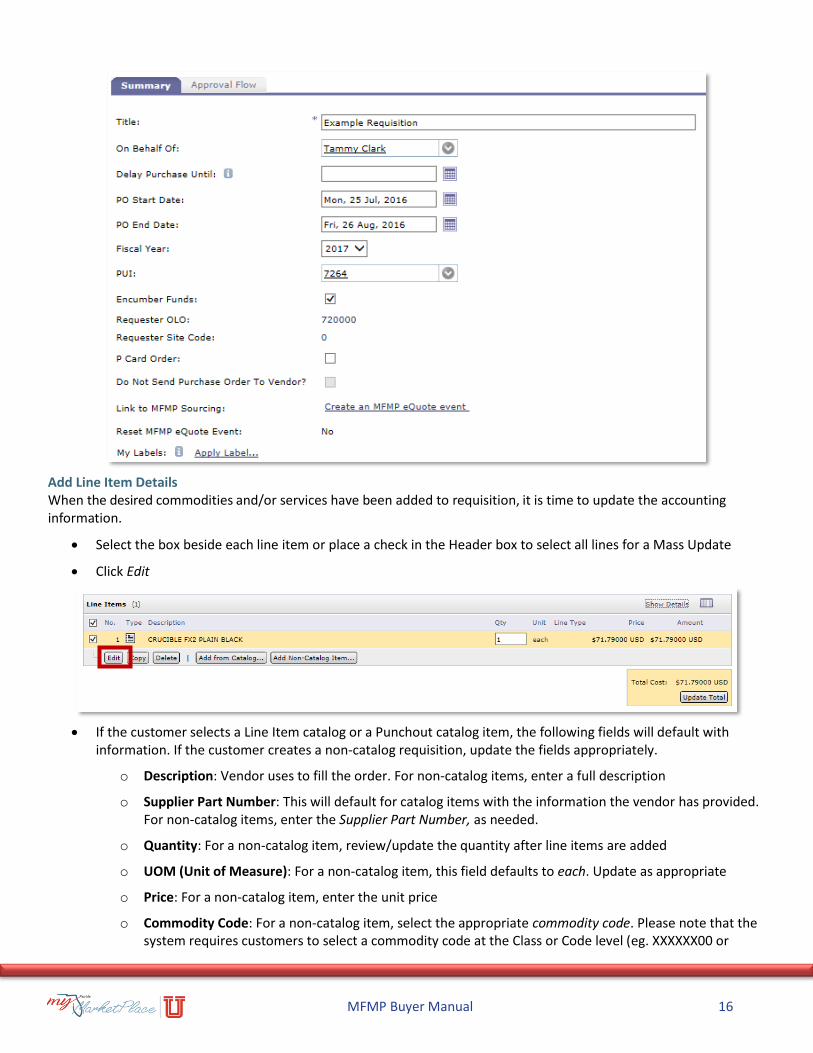
Enter requisition summary information On the Summary tab of the requisition complete the following fields:
• Enter the title based on agency naming conventions (required field)
• The On Behalf Of defaults to requester’s name but can be changed as needed. (NOTE: If the OBO is changed to another individual, this person will be the first approver in the approval flow and services Invoices route to them for approval)
Tip: It is mandatory for agencies to use catalogs when available for state term contract purchases; always review catalogs before issuing a requisition. View the Searching Catalogs in MFMP video form more information.
MFMP Buyer Manual 15
• Enter the Delay Purchase Until to delay delivery of the Purchase Order. If a date is entered here, MFMP holds the approved requisition and delivers it to the vendor on the selected date. If the requisition is marked to encumber, MFMP sends it to FLAIR on the Delay Purchase Until date. Indicate the desired date by selecting a date from the calendar box or typing in the date field. If no date is specified, the Purchase Order is generated upon final requisition approval
• Enter the PO Start Date. This is the start date of the order. Select ‘PO Start Date’ from the calendar box or type in the date field. PO Start and End Dates are required for service based requisitions
• Enter the PO End Date. This is the end date of the order. Select ‘PO End Date’ from the calendar box or type in the date field
• The Fiscal Year defaults to the current fiscal year. If a customer wishes to set up a requisition for the next fiscal year, update this to reflect the appropriate year
• The PUI number defaults to the PUI indicated in the On Behalf Of user profile
• The Encumber Funds box defaults based on the preferences of the customer’s agency. Customers may check the box to encumber funds in FLAIR or to allow MFMP to process the requisition as unencumbered based on agency specific practices. Please note that some agencies do not allow their users to edit this field.
• The Requester OLO defaults to the value in the On Behalf Of user profile. OLO (Operating Level Organization) is a FLAIR term and indicates the agency’s highest possible level of organizational access
• The Requester Site Code automatically populates based on information from the On Behalf Of user profile. Site Code is a FLAIR term and indicates an agency grouping character used for printing vouchers and journal transfers. The use of this character will vary among agencies depending on agency needs
• If using a PCard as payment, select the PCard Order check box to indicate that the requisition payment will be processed using the PCard. Please note that PCard orders cannot be encumbered
• Customers have the option to record a PCard number on the accounting details page. Please note that only the requestor and the vendor are able to view the PCard number
• The Do Not Send Purchase Order To Vendor box should be checked if the customer does not want MFMP to automatically send the vendor a copy of the approved order. This option is not available to all customers. If a customer needs to check this box and it is greyed out, please use the comments section to ask the purchasing staff to select the box. By default, purchase orders are sent to vendors
• Apply a label through My Labels to assist with future searches. If an appropriate label does not exist, create a new one by clicking on ‘New Label’. (For more information, see Labels)
Tip: If the PCard box is checked, the customer will not be able to initiate invoices against the order through MFMP.
MFMP Buyer Manual 16
Add Line Item Details When the desired commodities and/or services have been added to requisition, it is time to update the accounting information.
• Select the box beside each line item or place a check in the Header box to select all lines for a Mass Update
• Click Edit
• If the customer selects a Line Item catalog or a Punchout catalog item, the following fields will default with information. If the customer creates a non-catalog requisition, update the fields appropriately.
o Description: Vendor uses to fill the order. For non-catalog items, enter a full description
o Supplier Part Number: This will default for catalog items with the information the vendor has provided. For non-catalog items, enter the Supplier Part Number, as needed.
o Quantity: For a non-catalog item, review/update the quantity after line items are added
o UOM (Unit of Measure): For a non-catalog item, this field defaults to each. Update as appropriate
o Price: For a non-catalog item, enter the unit price
o Commodity Code: For a non-catalog item, select the appropriate commodity code. Please note that the system requires customers to select a commodity code at the Class or Code level (eg. XXXXXX00 or
MFMP Buyer Manual 17
XXXXXXXX). For more information about commodity codes, please view the Commodity Code job aid
o Supplier: Populates when the vendor location is selected
o Vendor Location: For a non-catalog item, select the appropriate vendor location. For more information about selecting vendors, view the Searching for Vendors in VIP online training
o Buyer Code: Select the appropriate code from the list, if applicable, to assist in further defining the Purchase Order. Customers should check with their purchasing office prior to selecting a Buyer Code. For a full list, see Appendix A
o Terms and Conditions: MFMP adds a link to the Terms and Conditions
o Method of Procurement (MOP): If a customer creates a requisition from a catalog, MFMP will auto populate the MOP to “A”. If the purchase is off of a state term contract not available on an MFMP catalog, select MOP A or B, as appropriate, on the non-catalog requisition. For a full list, see Appendix A
Enter Line Item Accounting Details
• For all requisitions, reference or update the following fields as needed:
o Bill To: Defaults based on the On Behalf Of user profile. Update as needed
o PCard Order: Reflects the information selected on the requisition summary page. If selected, customers will be able to enter a PCard Number and PCard Expiration Date
o Advanced Payment Indicator: Select the Advanced Payment Indicator to notify F&A (Finance and Accounting) when the requisition completes the approval flow. See the Advance Payment section in Appendix B for more information
o Available Balance Override Indicator: The Available Balance Override Indicator (ABOI) requires a special permission to check. If this box is checked, it overrides FLAIR balance requirements
o Encumbrance Number: MFMP assigns the encumbrance number when the requisition completes the approval flow
o Encumbrance Line Number: MFMP assigns the Encumbrance Line Number when it assigns the encumbrance number
o Organization Code: The Organization Code field defaults based on the ‘On Behalf Of’ user profile. Update the code using the dropdown box and selecting Search for more
o Expansion Option: Click on the drop-down and select ‘Search for more.’ The pop-up box will show a list of expansion options valid for the previously selected organization code. Select the Expansion Option with the latest version unless otherwise directed by agency F&A staff
o Object Code: The object code defaults based on the select commodity code, but can be changed
o Certified Forward Indicator: To certify funds, change the “N” to a “C”
o Transaction Fee Exempt: Check the Transaction Fee Exempt box if this vendor and/or purchase is
Tip: Always select the Expansion Option from the dropdown by selecting ‘Search for more’. If there are two listings for the same Expansion Option, it is generally recommended to select the one with the latest Opt Version.
Tip: The Amount field is not editable, however, it will automatically calculate based on price and quantity
MFMP Buyer Manual 18
exempt from the transaction fee per Rule 60A-1.031, F.A.C. This permission requires a special group
o Transaction Fee Exemption Reason: Select the Transaction Fee Exemption Reason from the dropdown box by selecting Search for more. Select the appropriate reason for the exemption based on the rule noted above. View a list of all Exemption Reasons in Appendix A
o Split Accounting: In MFMP, customers can split encumbrances or payments against different accounting combinations. Click the Split Accounting button at the bottom of the Accounting details page. Customers can choose to split the transaction by percentage, quantity, or amount. MFMP populates the split accounting lines from the original accounting details. Add lines by Clicking on Add Split. Once changes are complete and the total allocated reflects 100 percent allocated, save the changes
• Click OK to return to the requisition summary page to update the shipping, comments, and attachments and then submit the requisition
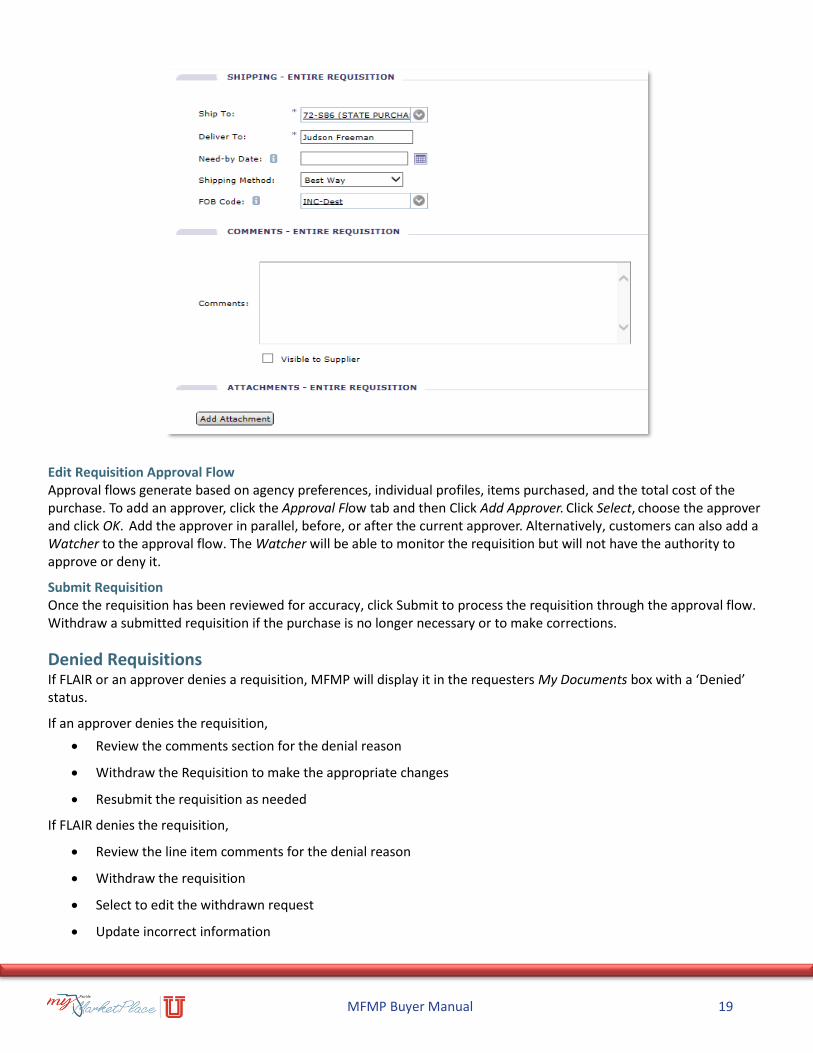
Enter Shipping, Comments, and Attachments
• MFMP defaults the Ship To field based on the OBO's user profile. Update as needed
• The Deliver To field is a free text field. Update this field as desired. The person listed here does not have to be an MFMP customer
• A Need-by-Date can be entered per the agency’s practice
• Shipping method defaults to Best Way. For a full list of shipping codes, see Appendix A
• The Freight on Board (FOB) codes denote the shipping terms for the purchase
• Enter comments or justifications to communicate to agency staff, information about the requisition or select the ‘Visible to Supplier’ option to communicate to the vendor
• Add Attachments. All customers must check the confidentiality box agreeing not to attach any confidential information into MFMP. If the vendor needs visibility to the document, select the ‘Visible to Supplier’ box.
o Click Add Attachment
o Click Browse
o Select file by clicking once on desired file
o Click Open
o Select the statement certifying confidential information will not be attached
o Click Ok
To add additional attachments, repeat the above steps.
Tip: The comments field accepts an unlimited number of characters.
Tip: Individual attachments must be less than 4 MB in size. The total size of all attachments marked ‘Visible to Supplier’ must also be less than 4 MB; however, there is no limit for total attachments.
MFMP Buyer Manual 19
Edit Requisition Approval Flow Approval flows generate based on agency preferences, individual profiles, items purchased, and the total cost of the purchase. To add an approver, click the Approval Flow tab and then Click Add Approver. Click Select, choose the approver and click OK. Add the approver in parallel, before, or after the current approver. Alternatively, customers can also add a Watcher to the approval flow. The Watcher will be able to monitor the requisition but will not have the authority to approve or deny it.
Submit Requisition Once the requisition has been reviewed for accuracy, click Submit to process the requisition through the approval flow. Withdraw a submitted requisition if the purchase is no longer necessary or to make corrections.
Denied Requisitions If FLAIR or an approver denies a requisition, MFMP will display it in the requesters My Documents box with a ‘Denied’ status.
If an approver denies the requisition,
• Review the comments section for the denial reason
• Withdraw the Requisition to make the appropriate changes
• Resubmit the requisition as needed
If FLAIR denies the requisition,
• Review the line item comments for the denial reason
• Withdraw the requisition
• Select to edit the withdrawn request
• Update incorrect information
MFMP Buyer Manual 20
• Resubmit the requisition
When a ‘Denied’ requisition is resubmitted, it follows the original approval flow.
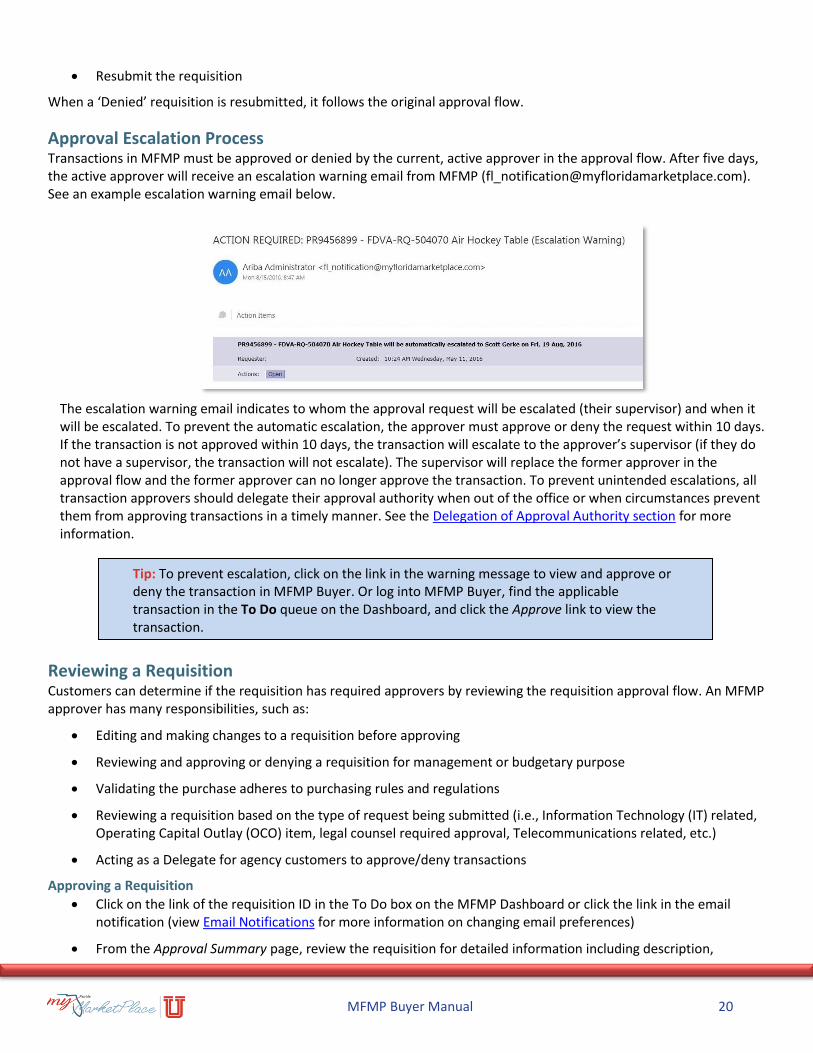
Approval Escalation Process Transactions in MFMP must be approved or denied by the current, active approver in the approval flow. After five days, the active approver will receive an escalation warning email from MFMP ([email protected]). See an example escalation warning email below.
•
• The escalation warning email indicates to whom the approval request will be escalated (their supervisor) and when it will be escalated. To prevent the automatic escalation, the approver must approve or deny the request within 10 days. If the transaction is not approved within 10 days, the transaction will escalate to the approver’s supervisor (if they do not have a supervisor, the transaction will not escalate). The supervisor will replace the former approver in the approval flow and the former approver can no longer approve the transaction. To prevent unintended escalations, all transaction approvers should delegate their approval authority when out of the office or when circumstances prevent them from approving transactions in a timely manner. See the Delegation of Approval Authority section for more information.
Reviewing a Requisition Customers can determine if the requisition has required approvers by reviewing the requisition approval flow. An MFMP approver has many responsibilities, such as:
• Editing and making changes to a requisition before approving
• Reviewing and approving or denying a requisition for management or budgetary purpose
• Validating the purchase adheres to purchasing rules and regulations
• Reviewing a requisition based on the type of request being submitted (i.e., Information Technology (IT) related, Operating Capital Outlay (OCO) item, legal counsel required approval, Telecommunications related, etc.)
• Acting as a Delegate for agency customers to approve/deny transactions
Approving a Requisition
• Click on the link of the requisition ID in the To Do box on the MFMP Dashboard or click the link in the email notification (view Email Notifications for more information on changing email preferences)
• From the Approval Summary page, review the requisition for detailed information including description,
Tip: To prevent escalation, click on the link in the warning message to view and approve or deny the transaction in MFMP Buyer. Or log into MFMP Buyer, find the applicable transaction in the To Do queue on the Dashboard, and click the Approve link to view the transaction.

MFMP Buyer Manual 21
commodity code, Method of Procurement, and the accounting information
• Click Approve if the information listed on the requisition is correct, (the purchase appropriately adheres to all guidelines and the supporting documentation is provided)
• Enter comments as appropriate
• Click OK
Deny a Requisition An approver has the ability to deny a requisition. If an approver denies a requisition, MFMP displays the requisition in the requester’s My Documents box in ‘Denied’ status. The requester will have to withdraw the requisition, make the required updates, and resubmit the requisition into the original approval flow.
• Click the link of the requisition ID in the To Do box; customers may click the link from an email as well
• Click Deny
• Enter comments as appropriate (When denying items, enter comments as a good business practice)
• Click OK
•
MFMP Buyer Manual 22
Purchase Orders After an encumbered requisition is fully approved, MFMP submits it to FLAIR to generate an encumbrance. If the funds are available, FLAIR approves the encumbrance and MFMP creates a purchase order and sends it to the vendor, if the Do not send to vendor box is unchecked. The requisition moves to an ‘Ordered’ status. After an Unencumbered Requisition is fully approved, MFMP immediately creates a purchase order and sends it to the vendor if the Do not send to vendor box is unchecked.
Creating Change Orders Customers complete change orders (CO) by initiating a change to the requisition and submitting for approval. Change orders allow customers to make changes to approved orders. Most fields can be changed except the vendor and vendor location. MFMP validates changed items against accepted receipts to determine any discrepancies. If customers receive more than the original or changed quantity, MFMP displays an error message providing the total quantity received and will allow customers to increase it. MFMP also validates changed items against invoices to determine any discrepancies. If customers have invoiced more than the original or changed quantity, MFMP displays an error message providing the total quantity invoiced and will allow customers to increase it.
MyFloridaMarketPlace overrides the FLAIR balance to match the MFMP balance for each line unless the encumbrance is zeroed out in FLAIR (MFMP cannot re-encumber the funds). MyFloridaMarketPlace documents the requisition with a message at the bottom if it fails FLAIR and returns it to the requester.
Customers should initiate change orders:
• To make any changes to an order description or accounting
• To notify the vendor of any changes
• To reduce or increase an order
• To change the OBO
The change button may not be visible on the requisition if:
• An associated IR is pending FLAIR integration.
• A requisition change is already in ‘Composing’ or ‘Submitted’ status
Deleting Line Items on Catalog Orders When deleting a line item on an existing order, MFMP recommends that customers use the Update Encumbrance eForm to reduce the ordered amount for the applicable line item to zero. If a customer wishes to delete a line item while creating a CO, they may update the applicable line item’s quantity to zero, which will remove that line’s encumbrance in FLAIR. Agency customers should not create a CO, navigate to the punchout catalog and delete the item from the punchout catalog. This will not delete the line’s encumbrance and thus will create an encumbrance discrepancy between MFMP and FLAIR.
Change Order No Approval Flow (CO No Workflow) System Administrators can grant select agency customers permission to create change requests that do not generate an approval flow. Only select fields on a requisition are editable without generating an approval flow with the CO No Workflow permission. Editing any other field will always generate an approval flow, regardless of permissions. View the CO No Workflow fields that do not generate an approval flow in Appendix B of the System Administrator manual.
Agencies also have the option to opt into additional functionality where a change to any CO No Workflow field and a change to the OBO field only generates the new OBO in the approval flow, assuming that the customer has the CO No
Tip: The change button is only visible on the requisition.
MFMP Buyer Manual 23
Workflow group. Any change to the OBO and a field not on the CO No Workflow list will regenerate the standard approval flow. In order to activate this functionally, agencies must contact the MFMP Customer Service Desk and the update will be made per a standard Operational Data Request (ODU).
Cancel an Order (Cancel Requisition eForm) Cancellations take place on the requisition. Purchase orders should be canceled when the service or commodity is no longer required. Orders cannot be canceled after they are received. For most agencies, a Cancellation Approver populates in the approval flow of the Cancel Requisition eForm, or may populate based only on the amount of the purchase.
• To cancel an order, click Cancel Requisition on the Common Actions box. If this option is not visible, please contact the agency’s System Administrator.
• Enter a title.
• Select the requisition to cancel by clicking on the select link. Customers may use the drop-down box to search for Purchase Requisitions by ID, Title, Status or Total. Select the requisition to cancel.
• Add comments and/or attachments to explain why the order is being canceled.
• Click Submit.
If the order was encumbered, follow-up by reviewing the requisition or contact the agency’s F&A office to ensure MFMP released the encumbrance.
Release an Encumbrance Use the Release Encumbrance eForm to release all remaining funds associated on an order. If the Release Encumbrance eForm is not successful, email the customer service desk with the following information:
• Requisition Number
• Prior Period Indicator (PPI)
• Encumbrance Number
• Encumbrance Line Number
• Release Encumbrance eForm ID previously completed
Some common reasons why a Release Encumbrance eForm might fail:
• F&A processes payments against the order in FLAIR but does not update MFMP, closing one or more encumbrance lines in FLAIR but not MFMP.
• The customer completing the eForm does not have the appropriate permissions in MFMP and/or FLAIR.
• MFMP did not encumber the order in FLAIR.
Restore PO Balance eForm Use the Restore PO Balance eForm to restore the PO balance of an order. Upon completion of this form, it displays in the Payment Details on the order. This eForm only increases the PO amount, it does not add the disbursed funds back to the encumbrance in FLAIR. Please use the Update Encumbrance eForm to update encumbrance amounts.
For example, if a customer processes a payment in MFMP and cancels the warrant or deletes a voucher, they should complete the Restore PO Balance eForm to add that amount back to the MFMP order.
Tip: Check the requisition comments to validate FLAIR released encumbered funds.
MFMP Buyer Manual 24
Update Encumbrance eForm Use the Update Encumbrance eForm to restore funds to an encumbered order, updating the encumbrance information in MFMP and FLAIR. Customers may need to restore funds if a warrant is cancelled or an encumbered disbursement fails Central FLAIR, reducing the encumbrance balance in MFMP and FLAIR.
Please note that this form only updates the encumbrance amount in FLAIR; it does not update the Purchase Order balance. Therefore, customers may wish to use this form in conjunction with the Restore PO Balance eForm. Customers will need the Encumbrance Update eForm group in their user account to access this form.
Customers can only update requisitions with the ‘Ordered’, ‘Receiving’, or ‘Received’ statuses. Customers cannot update encumbrances on a requisition that has an invoice reconciliation that is pending ‘FLAIR Integration’ or if there is a submitted change order associated to the requisition that is moving through the approval flow.
• To update an encumbrance, click Update Encumbrance on the Common Actions box. If this option is not visible, customers should contact their agency’s system administrator.
• Enter a Title.
• Add a Label, if desired.
• Select the requisition to update by clicking on the select link. Customers may use the drop-down box to search for Purchase Requisitions by ID, Title, Status or Total. Customers can only select requisitions with the ‘Ordered’, ‘Receiving’, or ‘Received’ statuses.
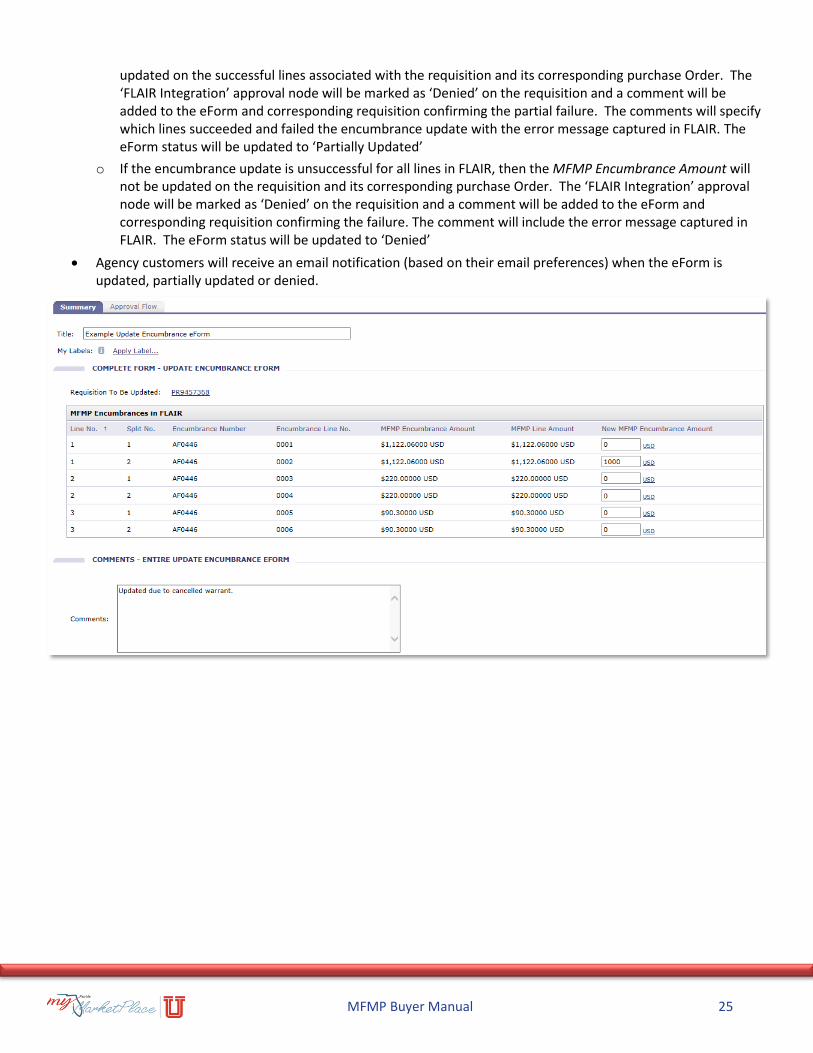
• When a requisition that meets the aforementioned criteria is selected, the eForm will display the following read-only fields associated to the requisition:
o Line No. – Line item number on the requisition. Example: 1
o Split No. – Split number on the requisition line item. Example: 1
o Encumbrance Number – Encumbrance number associated to the requisition. Example: A12345
o Encumbrance Line No. – Encumbrance number recorded in FLAIR. Example: 0001
o MFMP Encumbrance Amount – MFMP FLAIR encumbrance balance (“Current FLAIR Amount”). Example: $75.00
o MFMP Line Amount – Line item amount on the requisition. Example: $100.00
• Enter the desired, positive encumbrance amount for each line item New MFMP Encumbrance Amount for each line of the requisition. This value cannot exceed the MFMP line amount associated to the encumbrance line in question. Agency customers may leave the New MFMP Encumbrance Amount field blank for any line they do not wish to update.
• Add comments and/or attachments to explain why the encumbrance is being updated.
• Add additional approvers, as needed.
• Click Submit.
o If the encumbrance update is successful in FLAIR for all lines, then the MFMP Encumbrance Amount will be updated on all lines associated to the requisition and its corresponding purchase Order. The ‘FLAIR Integration’ approval node will be marked as ‘Approved’ on the requisition, the eForm status will be updated to ‘Updated,’ and a comment will be added to the eForm confirming the successful encumbrance update
o If the encumbrance update is partially successful in FLAIR, then the MFMP Encumbrance Amount will only be
Tip: Do not enter a negative number (reduce the PO amount) or exceed the amount ordered (increase the PO amount).
MFMP Buyer Manual 25
updated on the successful lines associated with the requisition and its corresponding purchase Order. The ‘FLAIR Integration’ approval node will be marked as ‘Denied’ on the requisition and a comment will be added to the eForm and corresponding requisition confirming the partial failure. The comments will specify which lines succeeded and failed the encumbrance update with the error message captured in FLAIR. The eForm status will be updated to ‘Partially Updated’
o If the encumbrance update is unsuccessful for all lines in FLAIR, then the MFMP Encumbrance Amount will not be updated on the requisition and its corresponding purchase Order. The ‘FLAIR Integration’ approval node will be marked as ‘Denied’ on the requisition and a comment will be added to the eForm and corresponding requisition confirming the failure. The comment will include the error message captured in FLAIR. The eForm status will be updated to ‘Denied’
• Agency customers will receive an email notification (based on their email preferences) when the eForm is updated, partially updated or denied.
MFMP Buyer Manual 26
Contracts Agencies enter their agency’s legal contracts into MFMP Buyer as an MFMP contract. The MFMP contract is the operational document that supports the legal contract between the vendor and the state. The MFMP contract facilitates the procure-to-pay process in MFMP and will allow the agency to track spend on the contract through MFMP. MFMP contracts allow agencies to:
• Electronically track spend against agency contracts
• Define the scope of purchases against contracts
• Allows agencies to manage budget (Contract Amount)
• Document multi-year agreements that are “Release Required” (require purchase orders)
• The agency can issue a new release (purchase order) for each fiscal year
The Department of Financial Services requires all two-party agreements to be posted on the DFS Florida Accountability Contract Tracking System (FACTS) website. All releases or Invoices tied to an MFMP contract will be automatically uploaded to FACTS when ordered or paid.
Agencies can set up their contracts to allow customers to create purchase order off the contract or to allow them to simply create invoices directly from the contract. Contracts that require purchase orders are called ‘Release Required.’
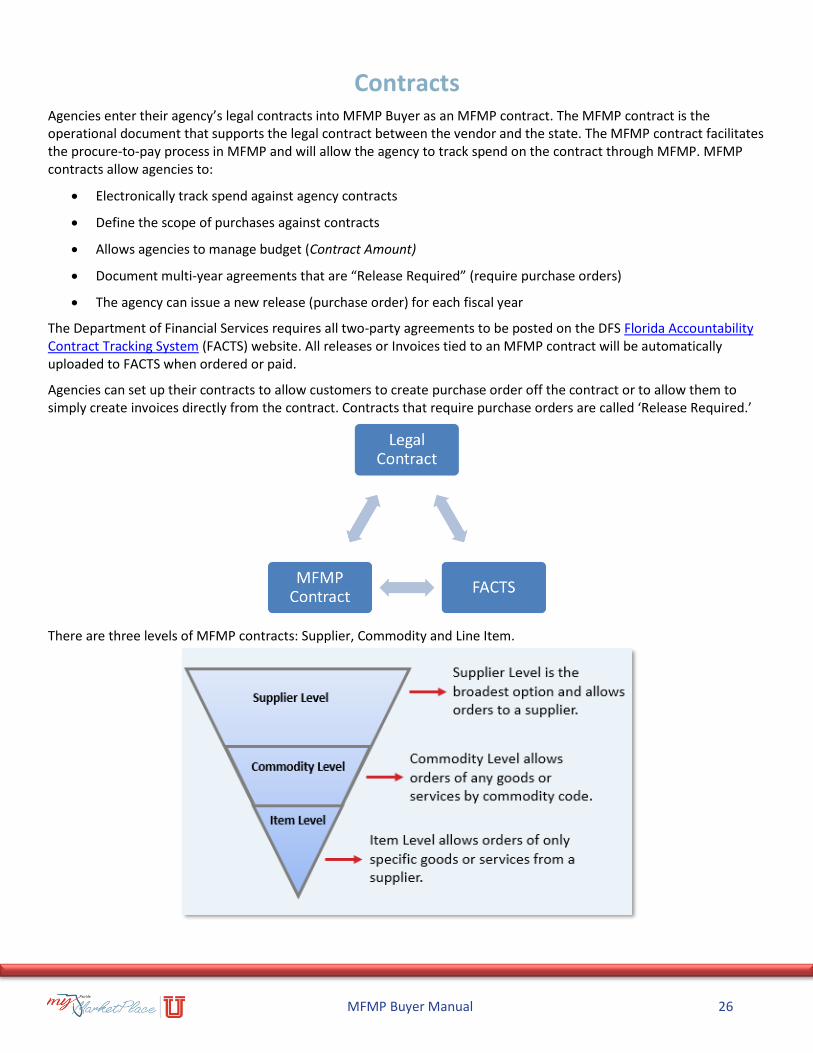
There are three levels of MFMP contracts: Supplier, Commodity and Line Item.
MFMP Buyer Manual 27
Create a Contract Request A contract request (CR) allows the purchasing office to monitor and track all associated spend. Customers must have contract permissions in the system in order to create contract requests.
When a contract request is created, MFMP assigns a CR number. Once fully approved, MFMP assigns a contract number. The contract request (CR) number and the contract (C) number are the same.
• Click Contract Request under Create in the Common Actions box. If this link is not visible under create, click on the word “More”. If this option is still not visible, customers should contact their System Administrator to see if they have the appropriate permissions
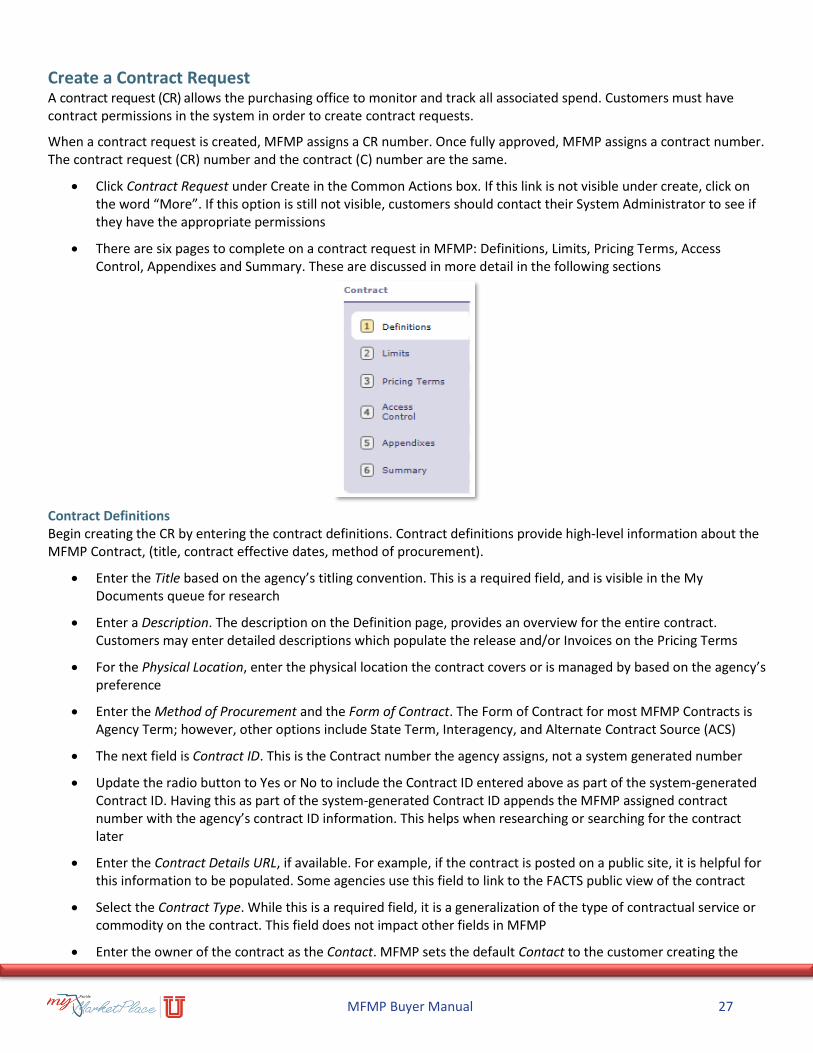
• There are six pages to complete on a contract request in MFMP: Definitions, Limits, Pricing Terms, Access Control, Appendixes and Summary. These are discussed in more detail in the following sections
Contract Definitions Begin creating the CR by entering the contract definitions. Contract definitions provide high-level information about the MFMP Contract, (title, contract effective dates, method of procurement).
• Enter the Title based on the agency’s titling convention. This is a required field, and is visible in the My Documents queue for research
• Enter a Description. The description on the Definition page, provides an overview for the entire contract. Customers may enter detailed descriptions which populate the release and/or Invoices on the Pricing Terms
• For the Physical Location, enter the physical location the contract covers or is managed by based on the agency’s preference
• Enter the Method of Procurement and the Form of Contract. The Form of Contract for most MFMP Contracts is Agency Term; however, other options include State Term, Interagency, and Alternate Contract Source (ACS)
• The next field is Contract ID. This is the Contract number the agency assigns, not a system generated number
• Update the radio button to Yes or No to include the Contract ID entered above as part of the system-generated Contract ID. Having this as part of the system-generated Contract ID appends the MFMP assigned contract number with the agency’s contract ID information. This helps when researching or searching for the contract later
• Enter the Contract Details URL, if available. For example, if the contract is posted on a public site, it is helpful for this information to be populated. Some agencies use this field to link to the FACTS public view of the contract
• Select the Contract Type. While this is a required field, it is a generalization of the type of contractual service or commodity on the contract. This field does not impact other fields in MFMP
• Enter the owner of the contract as the Contact. MFMP sets the default Contact to the customer creating the
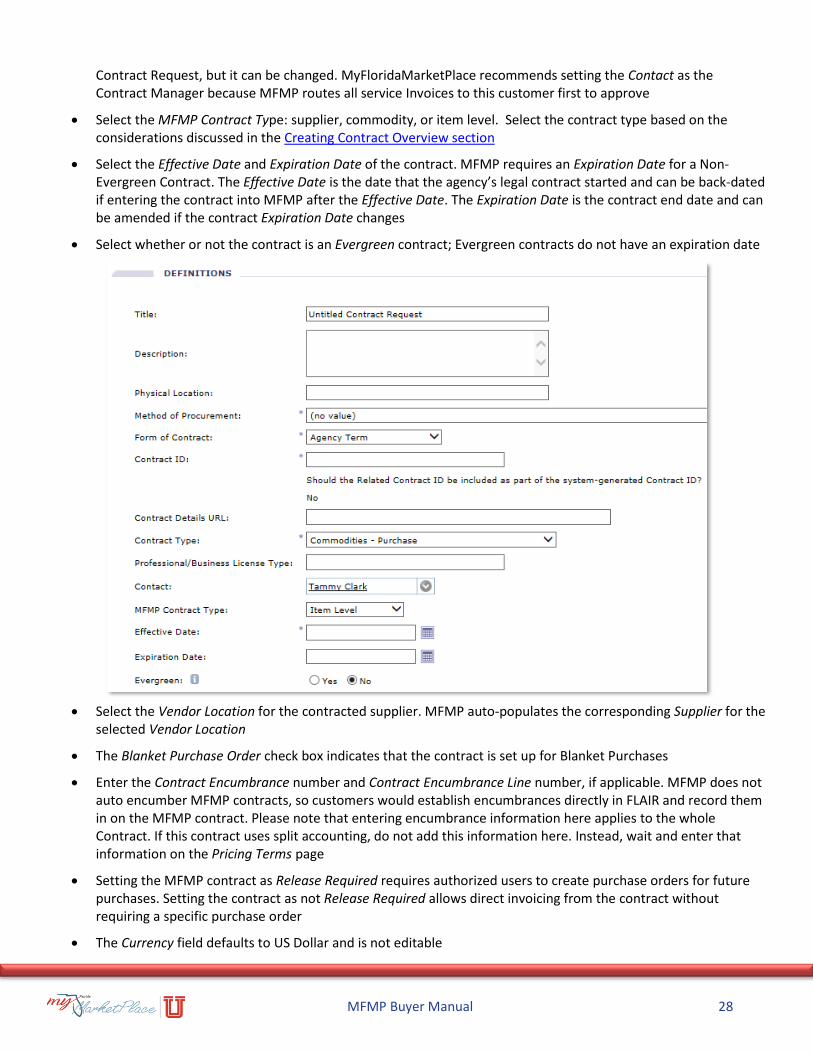
MFMP Buyer Manual 28
Contract Request, but it can be changed. MyFloridaMarketPlace recommends setting the Contact as the Contract Manager because MFMP routes all service Invoices to this customer first to approve
• Select the MFMP Contract Type: supplier, commodity, or item level. Select the contract type based on the considerations discussed in the Creating Contract Overview section
• Select the Effective Date and Expiration Date of the contract. MFMP requires an Expiration Date for a Non-Evergreen Contract. The Effective Date is the date that the agency’s legal contract started and can be back-dated if entering the contract into MFMP after the Effective Date. The Expiration Date is the contract end date and can be amended if the contract Expiration Date changes
• Select whether or not the contract is an Evergreen contract; Evergreen contracts do not have an expiration date
• Select the Vendor Location for the contracted supplier. MFMP auto-populates the corresponding Supplier for the selected Vendor Location
• The Blanket Purchase Order check box indicates that the contract is set up for Blanket Purchases
• Enter the Contract Encumbrance number and Contract Encumbrance Line number, if applicable. MFMP does not auto encumber MFMP contracts, so customers would establish encumbrances directly in FLAIR and record them in on the MFMP contract. Please note that entering encumbrance information here applies to the whole Contract. If this contract uses split accounting, do not add this information here. Instead, wait and enter that information on the Pricing Terms page
• Setting the MFMP contract as Release Required requires authorized users to create purchase orders for future purchases. Setting the contract as not Release Required allows direct invoicing from the contract without requiring a specific purchase order
• The Currency field defaults to US Dollar and is not editable
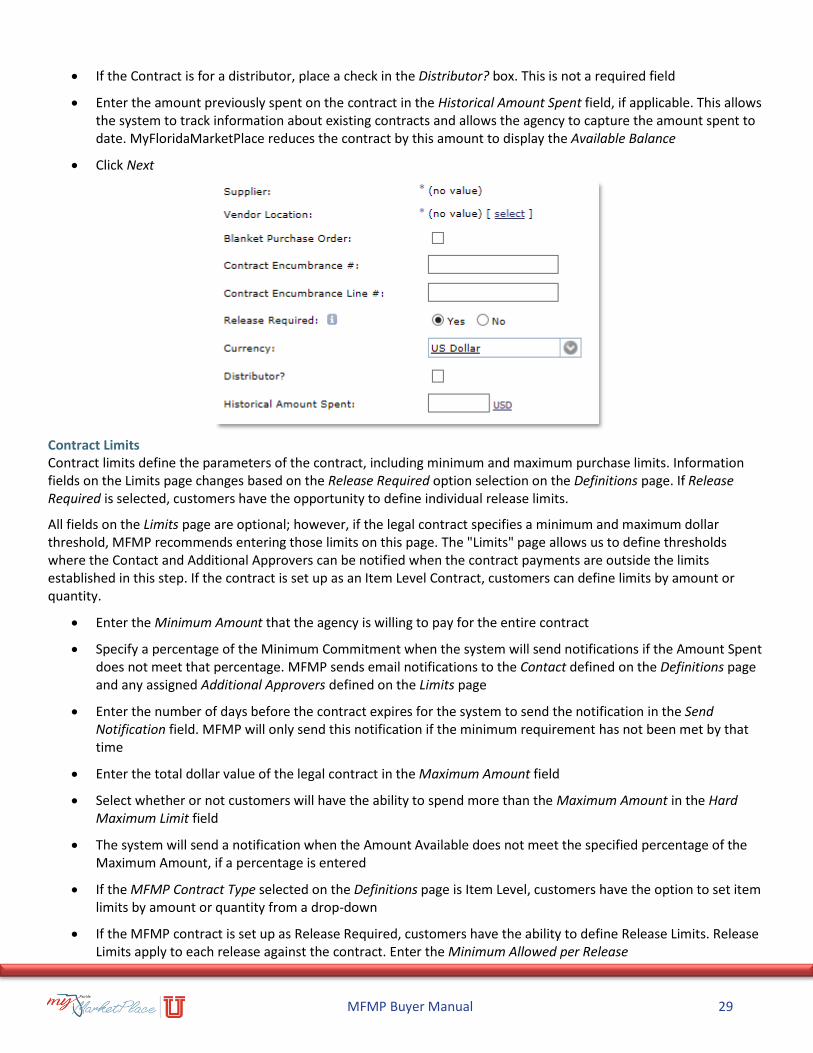
MFMP Buyer Manual 29
• If the Contract is for a distributor, place a check in the Distributor? box. This is not a required field
• Enter the amount previously spent on the contract in the Historical Amount Spent field, if applicable. This allows the system to track information about existing contracts and allows the agency to capture the amount spent to date. MyFloridaMarketPlace reduces the contract by this amount to display the Available Balance
• Click Next
Contract Limits Contract limits define the parameters of the contract, including minimum and maximum purchase limits. Information fields on the Limits page changes based on the Release Required option selection on the Definitions page. If Release Required is selected, customers have the opportunity to define individual release limits.
All fields on the Limits page are optional; however, if the legal contract specifies a minimum and maximum dollar threshold, MFMP recommends entering those limits on this page. The "Limits" page allows us to define thresholds where the Contact and Additional Approvers can be notified when the contract payments are outside the limits established in this step. If the contract is set up as an Item Level Contract, customers can define limits by amount or quantity.
• Enter the Minimum Amount that the agency is willing to pay for the entire contract
• Specify a percentage of the Minimum Commitment when the system will send notifications if the Amount Spent does not meet that percentage. MFMP sends email notifications to the Contact defined on the Definitions page and any assigned Additional Approvers defined on the Limits page
• Enter the number of days before the contract expires for the system to send the notification in the Send Notification field. MFMP will only send this notification if the minimum requirement has not been met by that time
• Enter the total dollar value of the legal contract in the Maximum Amount field
• Select whether or not customers will have the ability to spend more than the Maximum Amount in the Hard Maximum Limit field
• The system will send a notification when the Amount Available does not meet the specified percentage of the Maximum Amount, if a percentage is entered
• If the MFMP Contract Type selected on the Definitions page is Item Level, customers have the option to set item limits by amount or quantity from a drop-down
• If the MFMP contract is set up as Release Required, customers have the ability to define Release Limits. Release Limits apply to each release against the contract. Enter the Minimum Allowed per Release
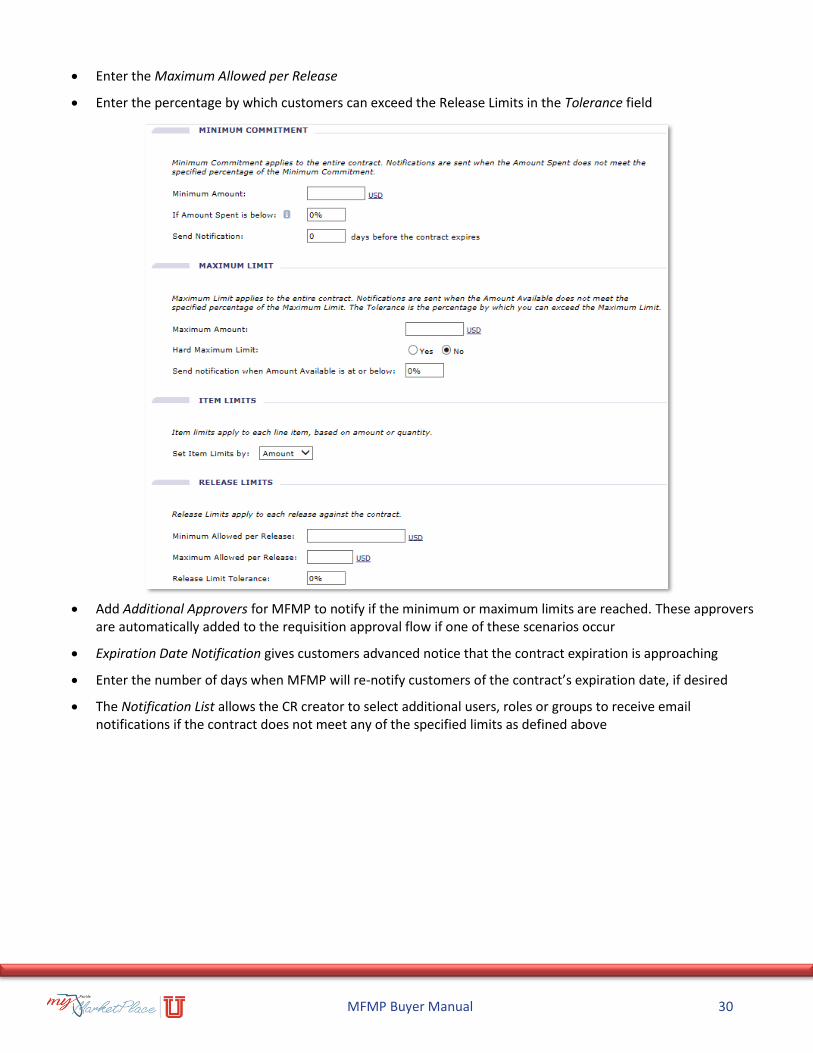
MFMP Buyer Manual 30
• Enter the Maximum Allowed per Release
• Enter the percentage by which customers can exceed the Release Limits in the Tolerance field
• Add Additional Approvers for MFMP to notify if the minimum or maximum limits are reached. These approvers are automatically added to the requisition approval flow if one of these scenarios occur
• Expiration Date Notification gives customers advanced notice that the contract expiration is approaching
• Enter the number of days when MFMP will re-notify customers of the contract’s expiration date, if desired
• The Notification List allows the CR creator to select additional users, roles or groups to receive email notifications if the contract does not meet any of the specified limits as defined above
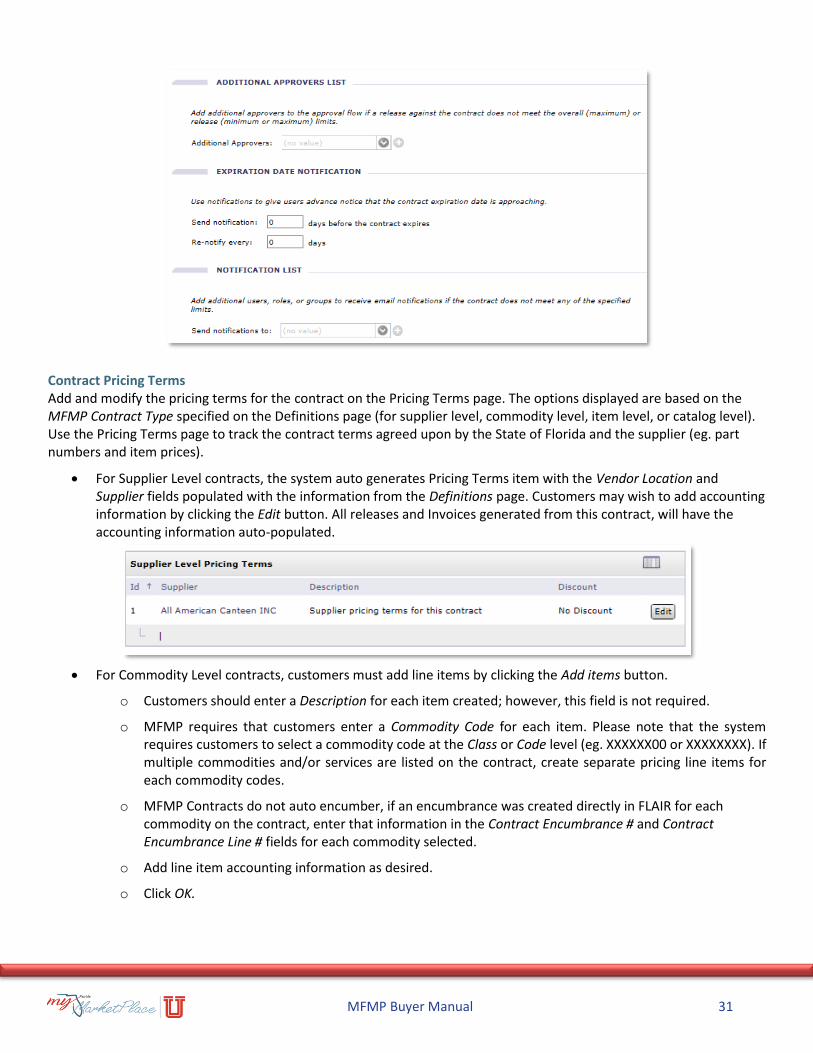
MFMP Buyer Manual 31
Contract Pricing Terms Add and modify the pricing terms for the contract on the Pricing Terms page. The options displayed are based on the MFMP Contract Type specified on the Definitions page (for supplier level, commodity level, item level, or catalog level). Use the Pricing Terms page to track the contract terms agreed upon by the State of Florida and the supplier (eg. part numbers and item prices).
• For Supplier Level contracts, the system auto generates Pricing Terms item with the Vendor Location and Supplier fields populated with the information from the Definitions page. Customers may wish to add accounting information by clicking the Edit button. All releases and Invoices generated from this contract, will have the accounting information auto-populated.
• For Commodity Level contracts, customers must add line items by clicking the Add items button.
o Customers should enter a Description for each item created; however, this field is not required.
o MFMP requires that customers enter a Commodity Code for each item. Please note that the system requires customers to select a commodity code at the Class or Code level (eg. XXXXXX00 or XXXXXXXX). If multiple commodities and/or services are listed on the contract, create separate pricing line items for each commodity codes.
o MFMP Contracts do not auto encumber, if an encumbrance was created directly in FLAIR for each commodity on the contract, enter that information in the Contract Encumbrance # and Contract Encumbrance Line # fields for each commodity selected.
o Add line item accounting information as desired.
o Click OK.
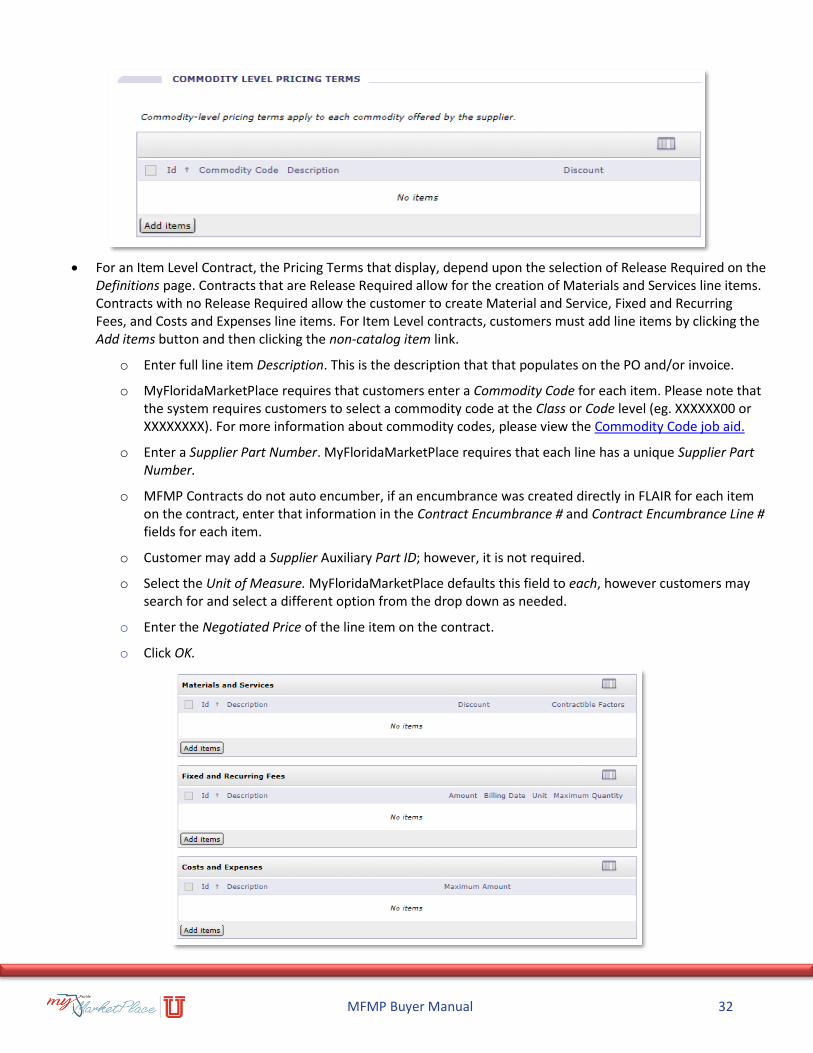
MFMP Buyer Manual 32
• For an Item Level Contract, the Pricing Terms that display, depend upon the selection of Release Required on the Definitions page. Contracts that are Release Required allow for the creation of Materials and Services line items. Contracts with no Release Required allow the customer to create Material and Service, Fixed and Recurring Fees, and Costs and Expenses line items. For Item Level contracts, customers must add line items by clicking the Add items button and then clicking the non-catalog item link.
o Enter full line item Description. This is the description that that populates on the PO and/or invoice.
o MyFloridaMarketPlace requires that customers enter a Commodity Code for each item. Please note that the system requires customers to select a commodity code at the Class or Code level (eg. XXXXXX00 or XXXXXXXX). For more information about commodity codes, please view the Commodity Code job aid.
o Enter a Supplier Part Number. MyFloridaMarketPlace requires that each line has a unique Supplier Part Number.
o MFMP Contracts do not auto encumber, if an encumbrance was created directly in FLAIR for each item on the contract, enter that information in the Contract Encumbrance # and Contract Encumbrance Line # fields for each item.
o Customer may add a Supplier Auxiliary Part ID; however, it is not required.
o Select the Unit of Measure. MyFloridaMarketPlace defaults this field to each, however customers may search for and select a different option from the drop down as needed.
o Enter the Negotiated Price of the line item on the contract.
o Click OK.
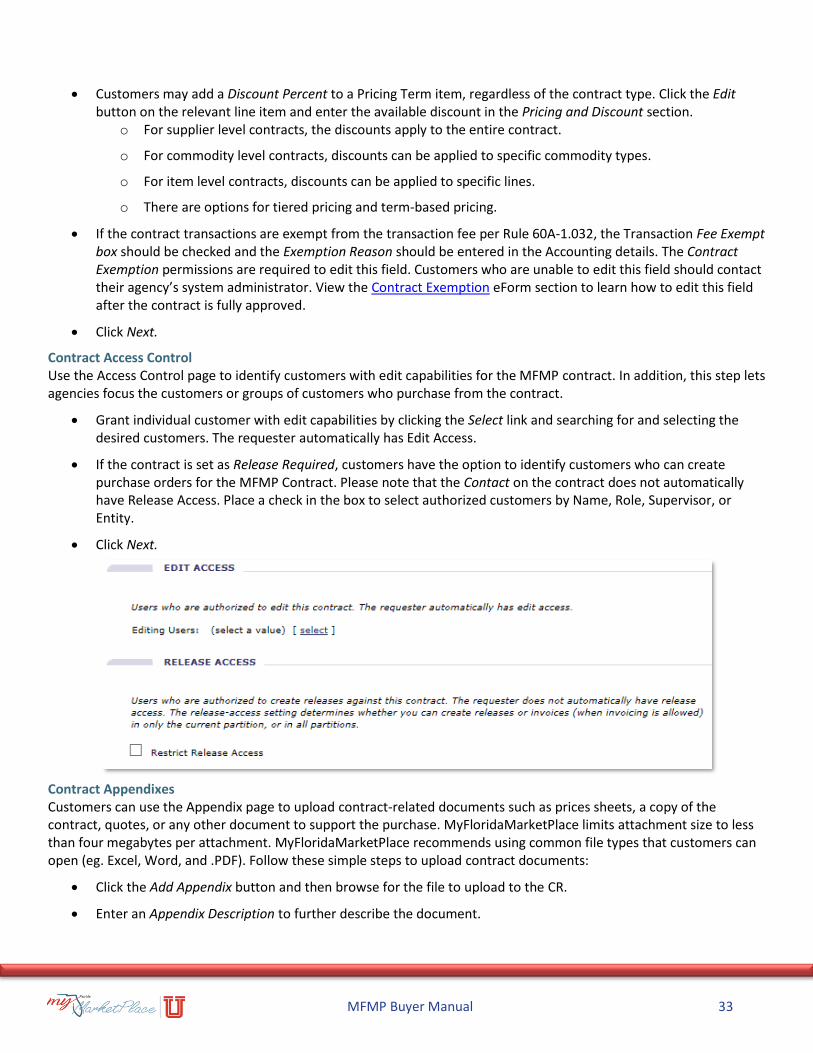
MFMP Buyer Manual 33
• Customers may add a Discount Percent to a Pricing Term item, regardless of the contract type. Click the Edit button on the relevant line item and enter the available discount in the Pricing and Discount section.
o For supplier level contracts, the discounts apply to the entire contract.
o For commodity level contracts, discounts can be applied to specific commodity types.
o For item level contracts, discounts can be applied to specific lines.
o There are options for tiered pricing and term-based pricing.
• If the contract transactions are exempt from the transaction fee per Rule 60A-1.032, the Transaction Fee Exempt box should be checked and the Exemption Reason should be entered in the Accounting details. The Contract Exemption permissions are required to edit this field. Customers who are unable to edit this field should contact their agency’s system administrator. View the Contract Exemption eForm section to learn how to edit this field after the contract is fully approved.
• Click Next.
Contract Access Control Use the Access Control page to identify customers with edit capabilities for the MFMP contract. In addition, this step lets agencies focus the customers or groups of customers who purchase from the contract.
• Grant individual customer with edit capabilities by clicking the Select link and searching for and selecting the desired customers. The requester automatically has Edit Access.
• If the contract is set as Release Required, customers have the option to identify customers who can create purchase orders for the MFMP Contract. Please note that the Contact on the contract does not automatically have Release Access. Place a check in the box to select authorized customers by Name, Role, Supervisor, or Entity.
• Click Next.
Contract Appendixes Customers can use the Appendix page to upload contract-related documents such as prices sheets, a copy of the contract, quotes, or any other document to support the purchase. MyFloridaMarketPlace limits attachment size to less than four megabytes per attachment. MyFloridaMarketPlace recommends using common file types that customers can open (eg. Excel, Word, and .PDF). Follow these simple steps to upload contract documents:
• Click the Add Appendix button and then browse for the file to upload to the CR.
• Enter an Appendix Description to further describe the document.
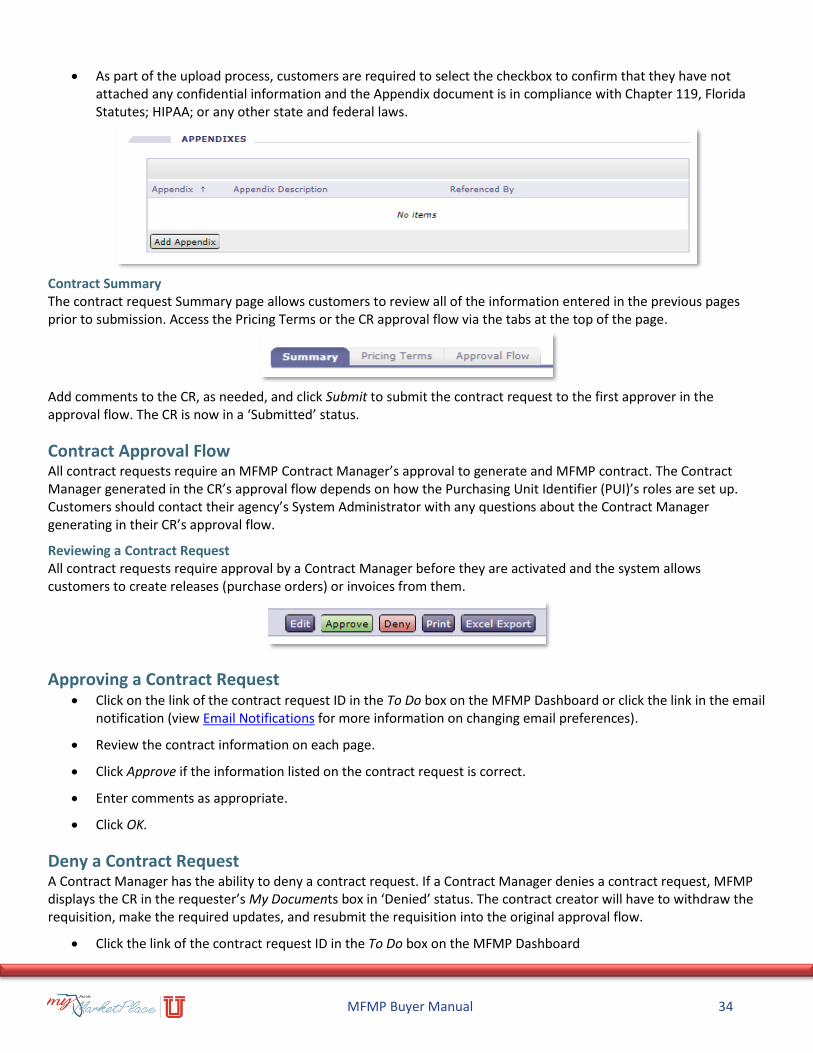
MFMP Buyer Manual 34
• As part of the upload process, customers are required to select the checkbox to confirm that they have not attached any confidential information and the Appendix document is in compliance with Chapter 119, Florida Statutes; HIPAA; or any other state and federal laws.
Contract Summary The contract request Summary page allows customers to review all of the information entered in the previous pages prior to submission. Access the Pricing Terms or the CR approval flow via the tabs at the top of the page.
Add comments to the CR, as needed, and click Submit to submit the contract request to the first approver in the approval flow. The CR is now in a ‘Submitted’ status.
Contract Approval Flow All contract requests require an MFMP Contract Manager’s approval to generate and MFMP contract. The Contract Manager generated in the CR’s approval flow depends on how the Purchasing Unit Identifier (PUI)’s roles are set up. Customers should contact their agency’s System Administrator with any questions about the Contract Manager generating in their CR’s approval flow.
Reviewing a Contract Request
All contract requests require approval by a Contract Manager before they are activated and the system allows customers to create releases (purchase orders) or invoices from them.
Approving a Contract Request • Click on the link of the contract request ID in the To Do box on the MFMP Dashboard or click the link in the email
notification (view Email Notifications for more information on changing email preferences).
• Review the contract information on each page.
• Click Approve if the information listed on the contract request is correct.
• Enter comments as appropriate.
• Click OK.
Deny a Contract Request A Contract Manager has the ability to deny a contract request. If a Contract Manager denies a contract request, MFMP displays the CR in the requester’s My Documents box in ‘Denied’ status. The contract creator will have to withdraw the requisition, make the required updates, and resubmit the requisition into the original approval flow.
• Click the link of the contract request ID in the To Do box on the MFMP Dashboard

MFMP Buyer Manual 35
• Review the contract information on each page.
• Click Deny.
• Enter comments as appropriate (When denying items, enter comments as a good business practice).
• Click OK.
Contract Request Statuses
Contract Statuses
Status Status Description
Composing Customer creates the Contract Request; also, a Contract Request can return to the Composing status if the preparer withdraws the request.
Submitted Customer submitted the Contract Request for approval.
Denied An approver denied the Contract Request.
Approved The appropriate approvers fully approved the Contract Request.
Processed The approvers approve the Contract Request and MFMP creates its associated Contract.
Status Status Description
Processed Contract has completed processing and is ready for use.
Open The Contract status moves to Open when one of the following events occurs: • Contract’s effective date starts. • Current date is between the Contract’s effective and expiration dates and has a valid
available amount. • Agency manually opens the Contract after it has been manually closed.
Inactive Reached the Contract Expiration; however, has a remaining balance that allows processing of Invoices.
Closed The Contract status moves to Closed when one of the following events occurs: • Reach Contract’s expiration date and there is no available balance remaining on the
Contract; or • Agency manually closes the Contract.
MFMP Buyer Manual 36
Managing and Changing Contracts There may be situations where customers need to make changes to an MFMP contract. For example, an amendment to the contract, changes to accounting or financial information or a change to the contact. To do this, an agency customer who was granted edit capabilities on the CR may change the CR associated with the MFMP contract. Once the authorized agency representative approves the changes, MFMP displays the amended MFMP contract number as a version of the original number.
Non-Editable Fields on a Contract Some fields are not editable on a CR when completing a change. These fields are:
• MFMP Contract Type
• Vendor Location, and
• Release Required
There are fields within the "Pricing Terms" that cannot be modified when completing a change. These fields are:
• Description
• Supplier
• Supplier Part Number
• Supplier Auxiliary Part ID, and
• Unit of Measure
Contract Exemption eForm Use the Contract Exemption eForm to mark a contract as transaction fee exempt. This allows customers to order or invoice directly against a contract as fee exempt and prevents the vendor from being billed for fees related to payments from the exempted contract. Vendors may still be subject to pay fees for other fee eligible transactions. Customers will need the Contract Exemption permission in order to access the eForm. View the Designating Transaction Fee Exemptions section for more details on when to exempt vendors from paying the transaction fee.
Restore Contract Amount eForm The Restore Contract Amount eForm is used to adjust the contract amount without versioning the contract. Agency customers may add monies to the contract (Restoring Dollars). This may occur due to a warrant that is cancelled. Customers also have the option to remove money from the contract (Deplete Dollars). This may be needed due to a loss of funding. Remember, if this Contract is encumbered, the encumbrance will need to be updated directly in FLAIR.
The following customers have access to this eForm:
• The contract initiator (or preparer)
• The Contact, which should be the Contract Manager or the person designated to manage the contract in MFMP. This could be the same as the preparer
• Customers with the "edit" permission for the contract
Closing Contracts An MFMP contract will move to a closed status if an agency customer manually closes the contract or if the contract has a zero balance when it expires.
Agencies are unable to process Invoices against a closed contract. However, agencies are still able to Invoice against inactive contracts. MFMP contracts move to an inactive status when there is an available balance remaining on the contract when it expires.
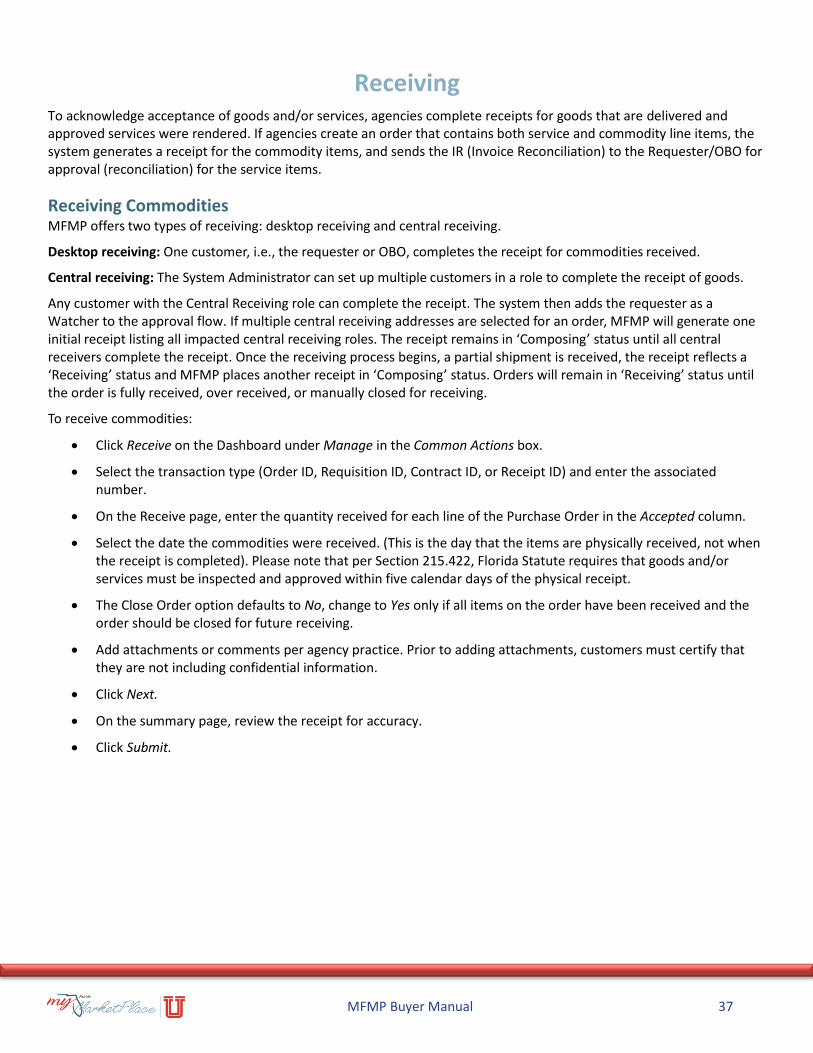
MFMP Buyer Manual 37
Receiving To acknowledge acceptance of goods and/or services, agencies complete receipts for goods that are delivered and approved services were rendered. If agencies create an order that contains both service and commodity line items, the system generates a receipt for the commodity items, and sends the IR (Invoice Reconciliation) to the Requester/OBO for approval (reconciliation) for the service items.
Receiving Commodities MFMP offers two types of receiving: desktop receiving and central receiving.
Desktop receiving: One customer, i.e., the requester or OBO, completes the receipt for commodities received.
Central receiving: The System Administrator can set up multiple customers in a role to complete the receipt of goods.
Any customer with the Central Receiving role can complete the receipt. The system then adds the requester as a Watcher to the approval flow. If multiple central receiving addresses are selected for an order, MFMP will generate one initial receipt listing all impacted central receiving roles. The receipt remains in ‘Composing’ status until all central receivers complete the receipt. Once the receiving process begins, a partial shipment is received, the receipt reflects a ‘Receiving’ status and MFMP places another receipt in ‘Composing’ status. Orders will remain in ‘Receiving’ status until the order is fully received, over received, or manually closed for receiving.
To receive commodities:
• Click Receive on the Dashboard under Manage in the Common Actions box.
• Select the transaction type (Order ID, Requisition ID, Contract ID, or Receipt ID) and enter the associated number.
• On the Receive page, enter the quantity received for each line of the Purchase Order in the Accepted column.
• Select the date the commodities were received. (This is the day that the items are physically received, not when the receipt is completed). Please note that per Section 215.422, Florida Statute requires that goods and/or services must be inspected and approved within five calendar days of the physical receipt.
• The Close Order option defaults to No, change to Yes only if all items on the order have been received and the order should be closed for future receiving.
• Add attachments or comments per agency practice. Prior to adding attachments, customers must certify that they are not including confidential information.
• Click Next.
• On the summary page, review the receipt for accuracy.
• Click Submit.
MFMP Buyer Manual 38
Approving Services MyFloridaMarketPlace identifies services based on the selected commodity codes. Commodity codes beginning with ’70-94’ indicate services. Customers may also click on the hyperlinked commodity code throughout MFMP to determine if the code is for a good or a service. MFMP routes Invoices for services to the requester or On Behalf Of (OBO) for approval to confirm receipt of services prior to the IR routing to the F&A office. MFMP identifies the appropriate customer as follows:
• PO (including release orders) – User listed in the On Behalf Of field
• Contract (C) – User listed in the Contact field
To Approve a Service:
• Click on the IR link in the ‘To Do’ box or from an email notification.
• Click the Open button.
• Review the details of the Exceptions tab. To review the invoice submitted by the vendor, click the Invoice link on the Exceptions tab and scroll to the bottom. Click on the invoice attachment, if one was included (eInvoices do not require an attached invoice).
• Click Back.
• Enter comments relevant to the services provided.
• Click Approve if services are approved for payment.
• Enter comments if not previously entered. As an example, a statement for contractual services.
• Click Submit.
Tip: To view all receipts in composing status, select Manage on the menu bar, select Receive, and then click the Search button.
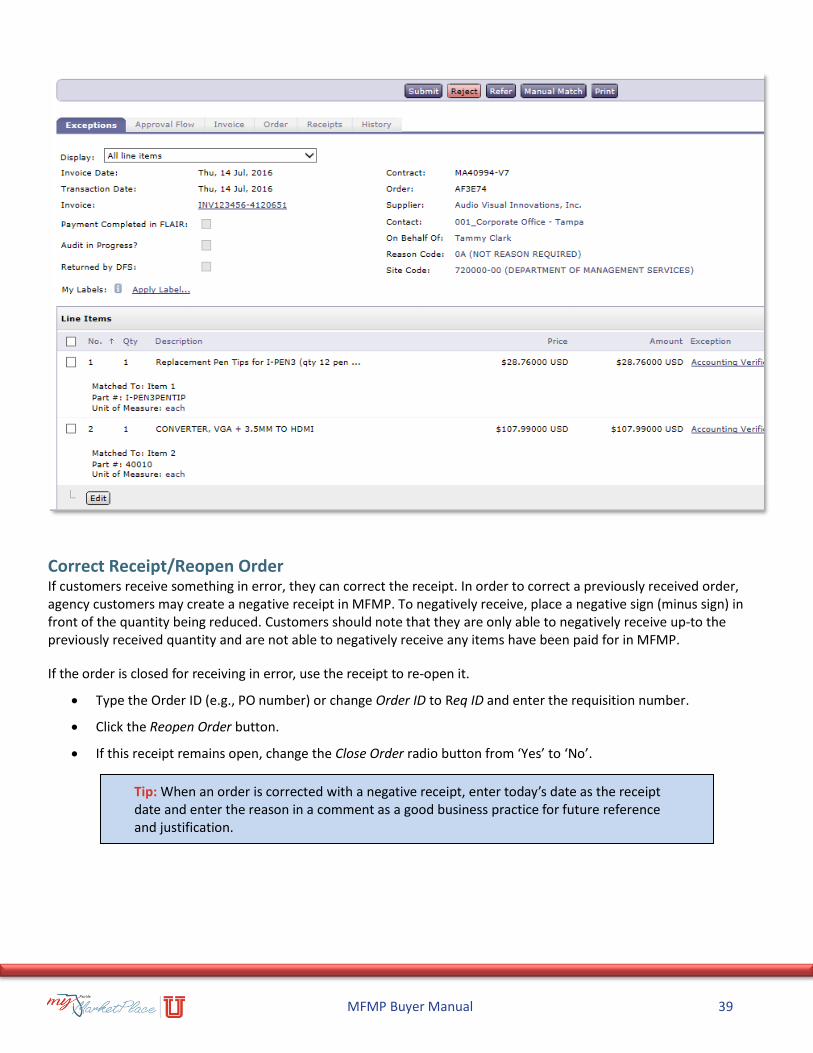
MFMP Buyer Manual 39
Correct Receipt/Reopen Order If customers receive something in error, they can correct the receipt. In order to correct a previously received order, agency customers may create a negative receipt in MFMP. To negatively receive, place a negative sign (minus sign) in front of the quantity being reduced. Customers should note that they are only able to negatively receive up-to the previously received quantity and are not able to negatively receive any items have been paid for in MFMP.
If the order is closed for receiving in error, use the receipt to re-open it.
• Type the Order ID (e.g., PO number) or change Order ID to Req ID and enter the requisition number.
• Click the Reopen Order button.
• If this receipt remains open, change the Close Order radio button from ‘Yes’ to ‘No’.
Tip: When an order is corrected with a negative receipt, enter today’s date as the receipt date and enter the reason in a comment as a good business practice for future reference and justification.
MFMP Buyer Manual 40
Invoices There are three types of invoices in MFMP.
1. Vendors submit electronic Invoices (eInvoices) to MFMP. These are also known as a PO flip or AN (Ariba Network) invoice. For an eInvoice, a paper copy of the invoice is not required because DFS (Department of Financial Services) considers the eInvoice the original invoice.
2. Agency customers create PO-based invoices based on purchase orders and the paper or emailed copy of the Invoice from the vendor. DFS requires a scanned image of the invoice and supporting documentation as an attachment.
3. Agency customers create Contract-based invoices based on contracts in MFMP that are set up with ‘No Release Required’ and the paper or emailed copy of the invoice from the vendor. DFS requires a scanned image of the Invoice and supporting documentation as an attachment.
All requesters and accounting customers with the Invoicing group can create an invoice. Customers should create the invoice in MFMP when they receive it from the vendor. Creating the invoice in MFMP begins the review and/or payment process by generating an IR.
As discussed in the Receiving section, the IR lists the requester or ‘On Behalf Of’ as the first approver for the invoice, to verify the vendor provided the appropriate services, if applicable. The requester may receive an email notification (based on his or her email notification preferences) when the IR is pending their approval. The requester must approve the invoice, which is the MFMP process for verifying that the service was received.
Each MFMP invoice must match the paper invoice the vendor sent.
Submit an Invoice Create a PO or Contract-based invoice by completing these sections:
• Invoice Header
• Add Items
• Summary
Enter Header Details
• The On Behalf Of defaults to the person creating the invoice
• Enter the Supplier Invoice number located on the vendor’s paper invoice. If the vendor does not provide an Invoice number, follow agency standard practices. The last 9 digits of Supplier Invoice number are visible in FLAIR
• Enter the Supplier Invoice Date located on the Invoice from the vendor
• Enter the Supplier Location. This opens a pop-up box where the vendor name or FEIN (Federal Employer Identification Number) can be entered; this must match the information on the PO. Identify the location and click select
• Select the Purchase Order number. This opens as a pop-up box. Enter the PO number and click Done.
• If a customer inputs a PO number or vendor location other than what is listed on the order, MFMP will return ‘No Results.’ Verify the PO number and vendor sequence number and repeat the previous step.
Tip: When MFMP displays the vendor for selection, customers will see the vendor W-9 status field. Requests for payment may fail FLAIR if a vendor does not have a valid W-9 on file.
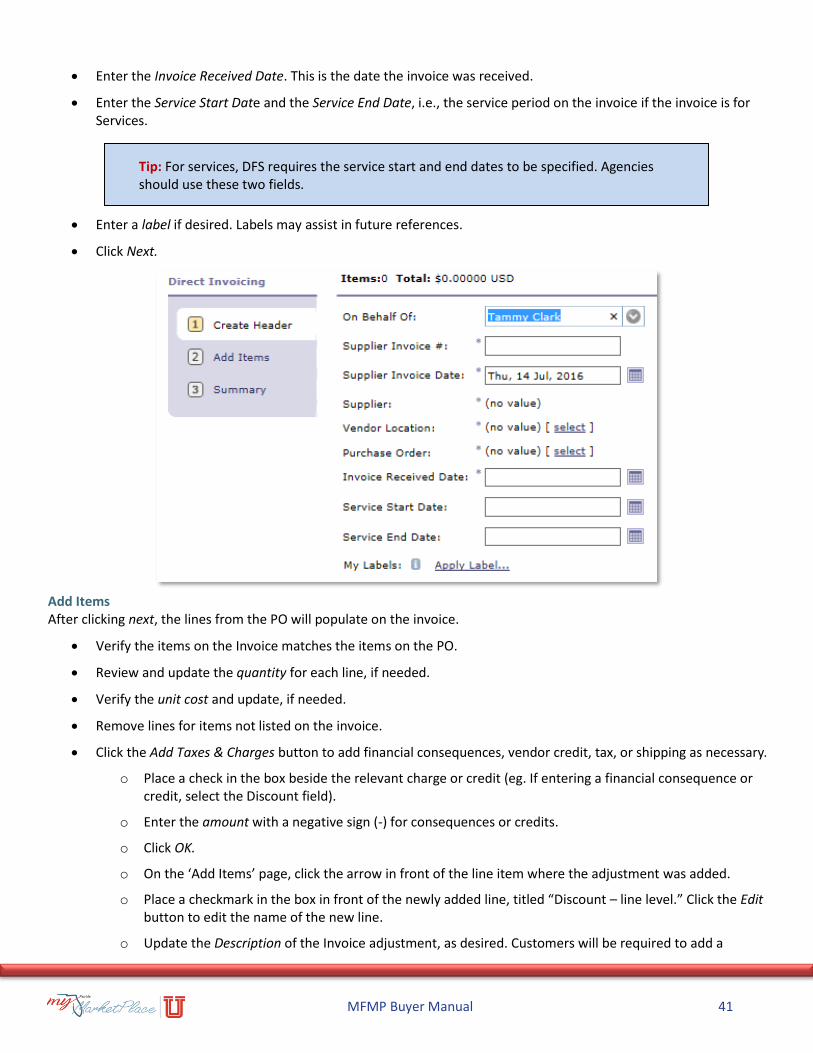
MFMP Buyer Manual 41
• Enter the Invoice Received Date. This is the date the invoice was received.
• Enter the Service Start Date and the Service End Date, i.e., the service period on the invoice if the invoice is for Services.
• Enter a label if desired. Labels may assist in future references.
• Click Next.
Add Items After clicking next, the lines from the PO will populate on the invoice.
• Verify the items on the Invoice matches the items on the PO.
• Review and update the quantity for each line, if needed.
• Verify the unit cost and update, if needed.
• Remove lines for items not listed on the invoice.
• Click the Add Taxes & Charges button to add financial consequences, vendor credit, tax, or shipping as necessary.
o Place a check in the box beside the relevant charge or credit (eg. If entering a financial consequence or credit, select the Discount field).
o Enter the amount with a negative sign (-) for consequences or credits.
o Click OK.
o On the ‘Add Items’ page, click the arrow in front of the line item where the adjustment was added.
o Place a checkmark in the box in front of the newly added line, titled “Discount – line level.” Click the Edit button to edit the name of the new line.
o Update the Description of the Invoice adjustment, as desired. Customers will be required to add a
Tip: For services, DFS requires the service start and end dates to be specified. Agencies should use these two fields.
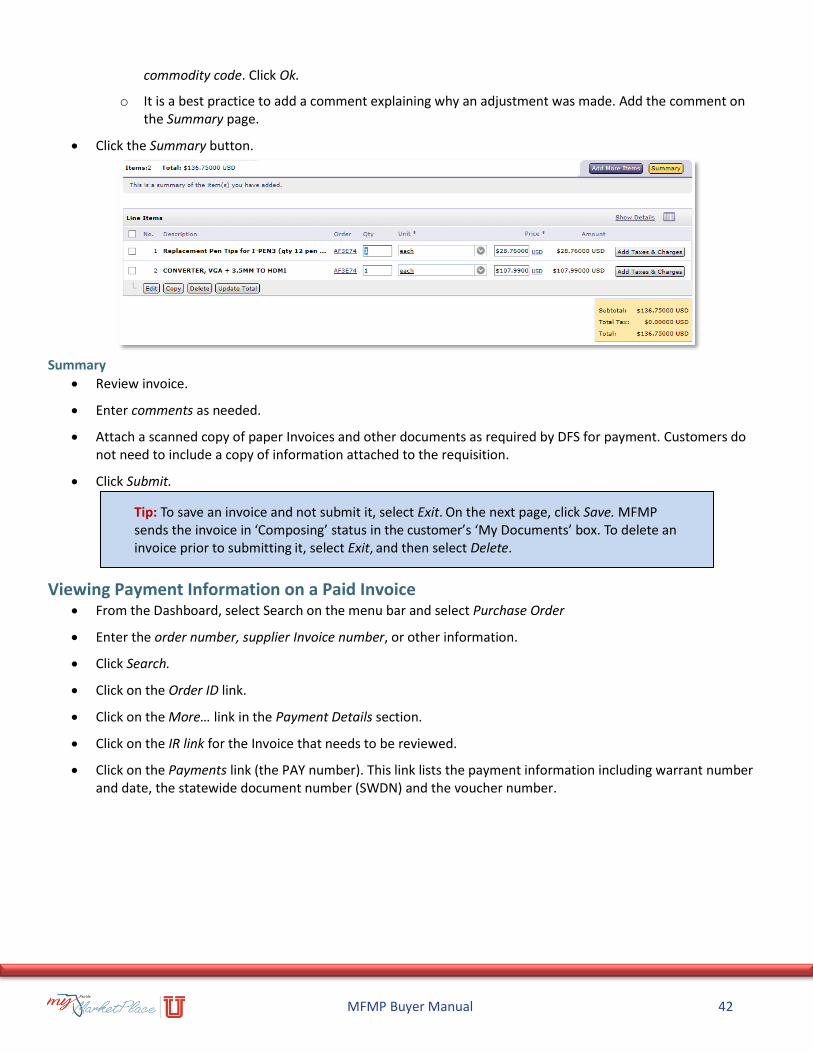
MFMP Buyer Manual 42
commodity code. Click Ok.
o It is a best practice to add a comment explaining why an adjustment was made. Add the comment on the Summary page.
• Click the Summary button.
Summary
• Review invoice.
• Enter comments as needed.
• Attach a scanned copy of paper Invoices and other documents as required by DFS for payment. Customers do not need to include a copy of information attached to the requisition.
• Click Submit.
Viewing Payment Information on a Paid Invoice • From the Dashboard, select Search on the menu bar and select Purchase Order
• Enter the order number, supplier Invoice number, or other information.
• Click Search.
• Click on the Order ID link.
• Click on the More… link in the Payment Details section.
• Click on the IR link for the Invoice that needs to be reviewed.
• Click on the Payments link (the PAY number). This link lists the payment information including warrant number and date, the statewide document number (SWDN) and the voucher number.
Tip: To save an invoice and not submit it, select Exit. On the next page, click Save. MFMP sends the invoice in ‘Composing’ status in the customer’s ‘My Documents’ box. To delete an invoice prior to submitting it, select Exit, and then select Delete.

MFMP Buyer Manual 43
Invoice Reconciliations MFMP auto generates an invoice reconciliation (IR) after an agency customer submits an invoice in MFMP (see Invoices for more information). Invoice reconciliations are generated to allow Finance and Accounting to audit invoices prior to submission to FLAIR for payment.
MFMP compares invoice line items for services to the PO, called a two-way match, and adds the requester/OBO as the first approver in the flow. They are required to approve the IR to affirm that the services were performed as listed on the invoice. For invoice line items for commodities, MFMP performs a three-way match comparing the invoice, PO, and receipt. MFMP lists all discrepancies or differences on the IR as exceptions. Exception Handlers must reconcile all exceptions before the Invoice Manager approves the IR for payment. View Invoice Reconciliation Roles for more information about each role in the IR process.
Invoice Reconciliation Roles Requester/OBO
• Only appears on IRs with line items with service commodity codes
• Validates that the services were performed as listed on the invoice
Exception Handler
• The first F&A approver
• Responsible for reconciling all exceptions
• Validates that the Invoice matches to the terms of the order
• Validates the receipt of commodities or approval of services
• Verifies that the transaction date is accurate
Invoice Manager
• Verifies the invoice should be approved
• Validates that the transaction date is accurate
• FLAIR records the FLAIR username and password when the IR is approved
• Last agency approver of the invoice
• MFMP adds the Invoice Manager to the approval flow if DFS returns the IR for additional information
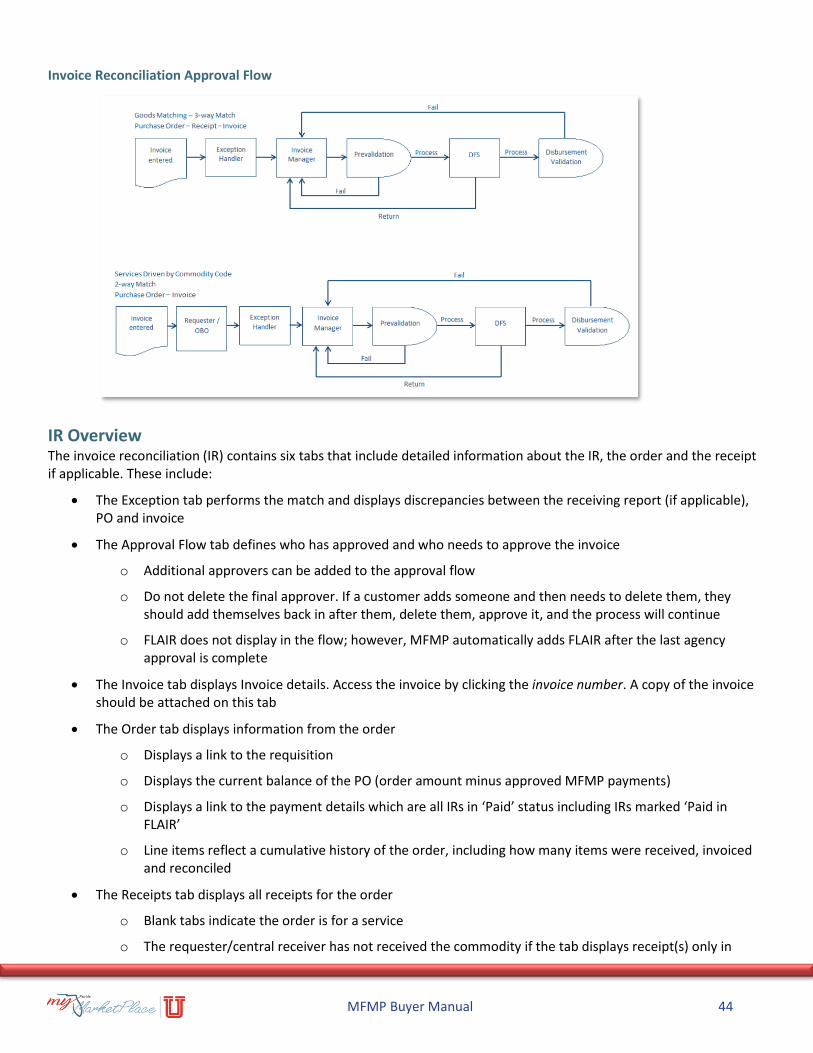
MFMP Buyer Manual 44
Invoice Reconciliation Approval Flow
IR Overview The invoice reconciliation (IR) contains six tabs that include detailed information about the IR, the order and the receipt if applicable. These include:
• The Exception tab performs the match and displays discrepancies between the receiving report (if applicable), PO and invoice
• The Approval Flow tab defines who has approved and who needs to approve the invoice
o Additional approvers can be added to the approval flow
o Do not delete the final approver. If a customer adds someone and then needs to delete them, they should add themselves back in after them, delete them, approve it, and the process will continue
o FLAIR does not display in the flow; however, MFMP automatically adds FLAIR after the last agency approval is complete
• The Invoice tab displays Invoice details. Access the invoice by clicking the invoice number. A copy of the invoice should be attached on this tab
• The Order tab displays information from the order
o Displays a link to the requisition
o Displays the current balance of the PO (order amount minus approved MFMP payments)
o Displays a link to the payment details which are all IRs in ‘Paid’ status including IRs marked ‘Paid in FLAIR’
o Line items reflect a cumulative history of the order, including how many items were received, invoiced and reconciled
• The Receipts tab displays all receipts for the order
o Blank tabs indicate the order is for a service
o The requester/central receiver has not received the commodity if the tab displays receipt(s) only in

MFMP Buyer Manual 45
‘Composing’ status
o For orders fully received and/or with the Close Order option selected, the tab shows receipt(s) in ‘Approved’ status
• The History tab tracks all changes/edits made on the IR
Invoice Reconciliation Statuses
Exceptions MFMP conducts a match against the order, Invoice and receipt (if applicable) and displays the differences as Exceptions. There are two types of exceptions: Header Level and Line Level.
Header Level Exceptions Header Level exceptions apply to the entire Invoice. Some examples are:
Amount Variance: occurs when the total cost of the invoice is different from the total cost of the PO; occurs with a partial payment for an order.
PCard Order Variance: occurs when a vendor submits an eInvoice against a requisition with the PCard box selected. If paid by PCard, reject the invoice.
Auto Reject Amount Variance: occurs when the Invoice amount exceeds the order and previously Invoiced amounts. For example, if finance and accounting previously processed an invoice for the same amount as the order and another invoice is submitted. If this occurs, reconcile the order to Invoices paid to verify there is purchasing authority for the purchase.
Invoice Reconciliation Already Exists: occurs when an IR with the same Invoice number and supplier already exists. This could result from the vendor having sent an eInvoice previously or the recycling of the last nine digits of an Invoice number from larger vendors. If this occurs, MFMP places the IR into auto-reject status. When an IR is auto-rejected, agency Exception Handlers and Invoice Managers must clear the exception before processing the IR. This provides agencies with an opportunity to confirm whether they duplicated an Invoice, and reject the IR from the system. If the agency did not duplicate the IR, cancel the rejection, and process as normal.
Status Status Description
Reconciling Awaiting the requester or On Behalf Of to approve, if it is a service, otherwise, awaiting the Exception Handler’s reconciliation.
Approving Awaiting the Invoice Manager or the Department of Financial Services FLAIR's approval.
Rejected The Exception Handler or the Invoice Manager rejected the IR. If the Exception Handler rejects an IR, the Invoice Manager has to approve the rejection.
Paid The IR has gone through the audit process and FLAIR has disbursed the funds or the “Paid in FLAIR” box was selected and the IR is fully approved.
MFMP Buyer Manual 46
Line Level Exceptions Line Item exceptions apply to each line. These include:
Accounting Verification Exception: displays on every line. Verify accounting information before accepting this exception.
Price Variance: displays when the invoice line item price is different from the price on the order line item. This occurs if the invoice is set up with a price other than that listed on the order. Customers should follow their agency’s standard practice concerning paying amounts different from the approved order.
Quantity Variance: displays when the Invoice line item quantity is different from the quantity left to invoice on the purchase order line. This may occur when customers are previously Invoiced for the full amount of the order. Customers should follow their agency’s practice for invoicing above the order quantity.
Received Quantity Variance: displays when the invoice line item quantity is different from the received quantity for the order. This typically occurs when a receipt is incomplete for the order. This can be verified by reviewing receipt details via the ‘Receipt’ tab. If the received amount is less than the Invoiced amount, the requester/central receiver needs to complete the receipt prior to the IR being approved.
Reconciling an IR Reconciling an IR resolves outstanding exceptions. This is the agency ‘audit’ process. The Exception Handler normally performs the reconciliation.
Accessing the IR
• On the Dashboard To Do Box, click the link of the IR in Reconciling status. Customer may also access IRs by clicking Reconcile Invoice under Manage in the Common Actions box
• Click the Open button
• Validate the Transaction Date. The transaction date is the latter of the invoice received date, supplier invoice date, and the goods received date (per section 215.422, Florida Statutes). MFMP selects the best date based on information available in the system when the IR is generated; however, the receipt may be approved after the invoice
• Click the Invoice link to view the attached Invoice paper copy. DFS requires a copy of the invoice to be attached on the Invoice tab for all PO- and contract-based invoices
• Verify the Service Start and End Dates
• Check the Payment Completed in FLAIR box if the agency paid the invoice directly in FLAIR. This allows MFMP to:
o Update the PO balance
o Display all payments showing complete payment history
DFS requires that when agencies process encumbered transactions through MFMP and the corresponding disbursements through FLAIR, they reconcile the transactions by entering the FLAIR payment information into MFMP for the applicable transactions. For more information, please refer to Comptroller/Chief Financial Officer Memoranda #3, for fiscal year 2003-04.
• Review the Header Level exceptions if applicable. Customers may not have a Header Level exception if they are paying the exact amount of the PO
Tip: Complete a Payment Update eForm to record the payment information or record a canceled warrant.
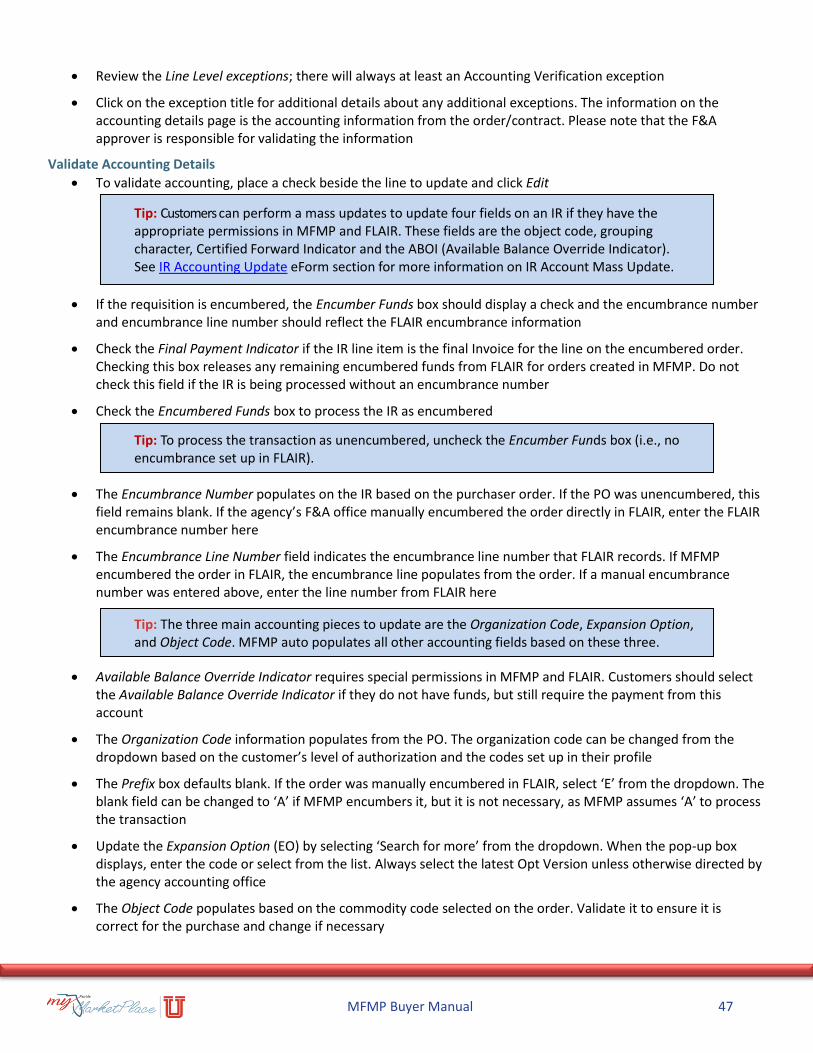
MFMP Buyer Manual 47
• Review the Line Level exceptions; there will always at least an Accounting Verification exception
• Click on the exception title for additional details about any additional exceptions. The information on the accounting details page is the accounting information from the order/contract. Please note that the F&A approver is responsible for validating the information
Validate Accounting Details
• To validate accounting, place a check beside the line to update and click Edit
• If the requisition is encumbered, the Encumber Funds box should display a check and the encumbrance number and encumbrance line number should reflect the FLAIR encumbrance information
• Check the Final Payment Indicator if the IR line item is the final Invoice for the line on the encumbered order. Checking this box releases any remaining encumbered funds from FLAIR for orders created in MFMP. Do not check this field if the IR is being processed without an encumbrance number
• Check the Encumbered Funds box to process the IR as encumbered
• The Encumbrance Number populates on the IR based on the purchaser order. If the PO was unencumbered, this field remains blank. If the agency’s F&A office manually encumbered the order directly in FLAIR, enter the FLAIR encumbrance number here
• The Encumbrance Line Number field indicates the encumbrance line number that FLAIR records. If MFMP encumbered the order in FLAIR, the encumbrance line populates from the order. If a manual encumbrance number was entered above, enter the line number from FLAIR here
• Available Balance Override Indicator requires special permissions in MFMP and FLAIR. Customers should select the Available Balance Override Indicator if they do not have funds, but still require the payment from this account
• The Organization Code information populates from the PO. The organization code can be changed from the dropdown based on the customer’s level of authorization and the codes set up in their profile
• The Prefix box defaults blank. If the order was manually encumbered in FLAIR, select ‘E’ from the dropdown. The blank field can be changed to ‘A’ if MFMP encumbers it, but it is not necessary, as MFMP assumes ‘A’ to process the transaction
• Update the Expansion Option (EO) by selecting ‘Search for more’ from the dropdown. When the pop-up box displays, enter the code or select from the list. Always select the latest Opt Version unless otherwise directed by the agency accounting office
• The Object Code populates based on the commodity code selected on the order. Validate it to ensure it is correct for the purchase and change if necessary
Tip: Customers can perform a mass updates to update four fields on an IR if they have the appropriate permissions in MFMP and FLAIR. These fields are the object code, grouping character, Certified Forward Indicator and the ABOI (Available Balance Override Indicator). See IR Accounting Update eForm section for more information on IR Account Mass Update.
Tip: To process the transaction as unencumbered, uncheck the Encumber Funds box (i.e., no encumbrance set up in FLAIR).
Tip: The three main accounting pieces to update are the Organization Code, Expansion Option, and Object Code. MFMP auto populates all other accounting fields based on these three.
MFMP Buyer Manual 48
• Enter the Project ID, as applicable
• Enter a Grouping Character if the customer’s agency uses grouping characters to identify workloads or group vouchers
• The Certified Forward Indicator field defaults to N (No). Click the drop-down box and select C (Certified) if payments will need to be made with certified forward funds
• The Description field populates in FLAIR (if this field is populated on the IR, it displays in FLAIR). Information entered into this field is available for any FLAIR or report distribution systems (RDS) report that displays the description field. The field size is limited to 16 characters
• See the Transaction Fee Exemption section for more information on selecting the Transaction Fee Exemption checkbox
• The Sub-Vendor free-text field is not required but can be used when a payment is being made to one party and the charges are attributed to another party (e.g. memberships dues, conference fees, lodging costs or notary renewals). To use this field, the sub-vendor should have an active record within the Statewide Vendor File or the Employee Vendor File in FLAIR. The information entered in this field will only be visible to the agency customer who entered the value. For information taken from the Employee Vendor File (i.e., not vendors), the employee's employee ID number should be used, not their social security number
• Click OK after reviewing all applicable fields
Submit IR
• After validating all exceptions on the Header and the Line, the IR is ready to process for payment. First, accept all the exceptions
o Place a check beside the Header line and click Accept. A confirmation page appears
o Click OK
o Place a check beside each detail Line and click Accept. A confirmation page appears
o Click OK
• Repeat these steps as needed
• After accepting the exceptions, the Status column updates to reflect the new status. After all of the exceptions are reconciled, a ‘the Invoice is now reconciled’ message displays at the top left-hand side of the screen.
• Click Submit
• The IR status changes from ‘Reconciling’ to ‘Approving’
Dispute a Line Item Exception Handlers can dispute a line of the IR instead of rejecting the entire Invoice if other lines are correct and they want to process the payment.
• Place a check in the box beside the line to dispute
Tip: DFS identifies the Commodity Code/Object Code defaulting through a one-to-one match. If customers see a commodity code that populates an incorrect object code, please update the code and notify the MFMP team. The MFMP team will work with DFS to review.
Tip: To split the accounting between multiple budgets, see Split Accounting.
MFMP Buyer Manual 49
• Click Dispute
• The Confirm Dispute of Exception page displays. The Confirm Dispute of Exception screen lists the invoiced amount and the pay amount for the line item. The system will not process payment for disputed line items. The line item will reduce the quantity to zero
IR Split Accounting Split Accounting splits payment between multiple organizational codes, funds, or budgets. Customers can set up the Split Accounting on the requisition or F&A can update the information on the IR.
• Click on Split Accounting (this creates two lines displaying the original accounting information from the IR)
• Select how to split the accounting, percentage, amount, or quantity
• Enter the percent, amount or quantity on line one
• Update the accounting for the second split and enter the percent, amount or quantity in the designated area for line two
• If there is a need for additional splits, click Add Split in the lower left-hand corner
• Click OK once the lines add up to 100 percent of the original line amount (view in the lower right-hand corner)
Manual Match Use the Manual Match process when a vendor submits an invoice that is matched to the overall PO, but not the appropriate line of the PO. MyFloridaMarketPlace allows Exception Handlers to manually match the line items in lieu of creating new invoices in the system. The Manual Match process can only be completed while the IR is in ‘Reconciling’ status. Do not click the Manual Match button at the top; this is to match the entire IR to a different invoice.
• Place a check in the box beside the line to manually match
• Click Manual Match
o The PO line number matching the line displays
• Click Select
o The top of the screen displays the invoice line item selected and the bottom displays all of the lines on the PO. If there are multiple PO lines, scroll until locating the correct PO line for the IR. Select the appropriate line of the order to match the invoice line
• Click OK
o The Manual Match screen will not display any of the changes made earlier
• Back on the Exceptions tab of the IR, the line item now reflects that it is matched to the appropriate line of the PO. The manual match description contains the word ‘Discount;’ therefore, for audit purposes, it may be useful to add a general comment, such as: “This IR was manually matched. This does not reflect any additional discount from the vendor”
Approving IRs The IR displays in the To Do box for the Invoice Manager’s approval once the Exception Handler approves it. MFMP sends the Invoice Manager’s FLAIR username and password to FLAIR when they approve the IR. View the FLAIR Login Information eForm section for more information about this process.
If FLAIR returns the IR for additional information, MFMP displays it in the approving Invoice Manager’s To Do box with ‘Yes’ displayed in the Returned by DFS column.

MFMP Buyer Manual 50
• On the Dashboard in the To Do box, click on the Approve link to approve
• Review the six tabs for detailed information about the IR, the order and the receipts
• Validate the transaction date (FLAIR uses this date to calculate prompt payment per section 215.422, Florida Statues)
• Verify that all exceptions are in ‘Accepted’ status. If they are in any other status, follow the reconciliation process
• Verify the Accounting Details
• Verify that a copy of the invoice is attached and the Start and End Dates are included for service based invoices
• Click Approve
• Enter comments as needed
• Click Submit.
FLAIR Login Information eForm Customers with the FLAIR Maintenance group can access the FLAIR Login Information eForm. All customers with the Invoice Manager role and the Invoicing FLAIR Maintenance groups must update their passwords in FLAIR and keep in sync in MFMP. This gives MFMP authority to pass transactions to FLAIR.
• Customers assigned the FLAIR Maintenance group only have the ability to update their agency’s FLAIR
encumbrance login credentials by entity and site code
• Customers assigned the FLAIR Maintenance and Invoicing groups have the ability to update their individual
FLAIR disbursement login credentials by entity and site code
The FLAIR Login Information eForm is case sensitive and the login credentials must match the FLAIR username and password exactly. If a customer’s password expires or the password is entered incorrectly, that customer’s Requisitions and Invoice Reconciliations will fail FLAIR Integration. If the encumbered PR or IR fails FLAIR, MFMP enters a message on the bottom of the PR or IR. If this occurs, the customer must update their FLAIR Login Information eForm and resubmit the PR or IR.
The Validate Credentials in FLAIR checkbox defaults to checked, signifying the login credentials entered on the eForm will be validated in FLAIR. Please note that FLAIR must be operational in order for the credentials entered on the MFMP FLAIR Login Information eForm to be validated against the login credentials in FLAIR. Therefore, if the eForm is submitted after normal FLAIR business hours or another scenario, the checkbox may be unchecked to update the FLAIR login credentials in MFMP without sending the credentials to FLAIR.
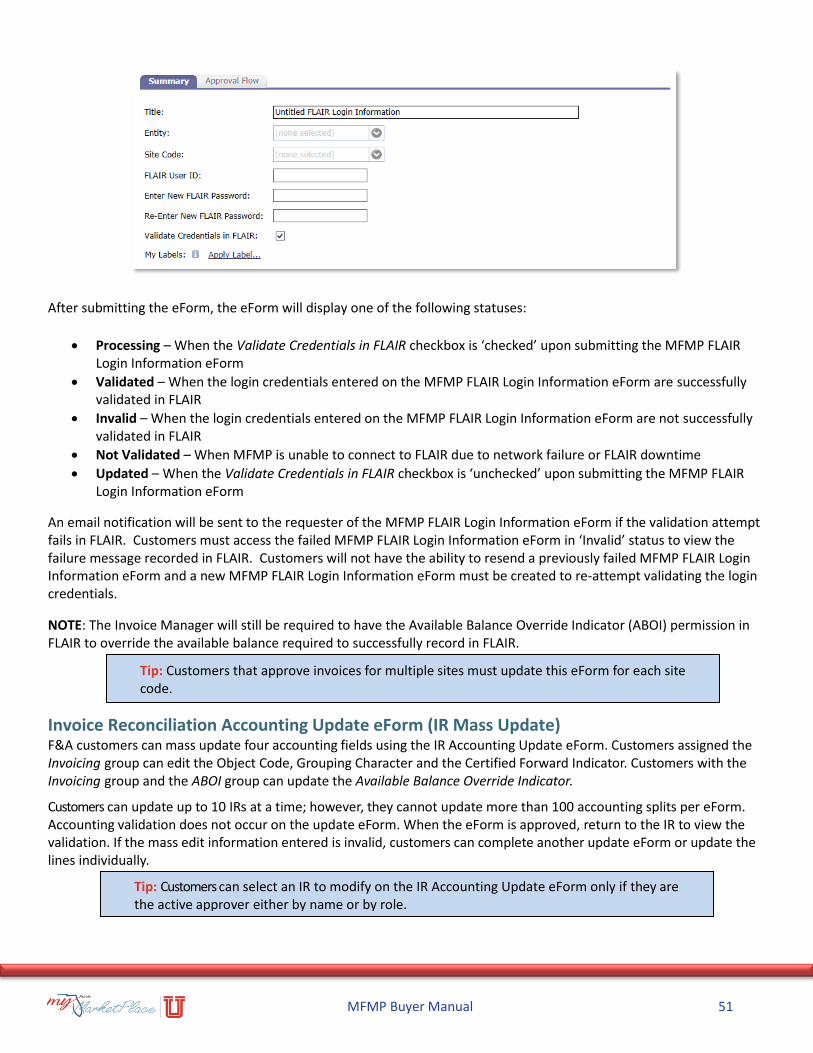
MFMP Buyer Manual 51
After submitting the eForm, the eForm will display one of the following statuses:
• Processing – When the Validate Credentials in FLAIR checkbox is ‘checked’ upon submitting the MFMP FLAIR Login Information eForm
• Validated – When the login credentials entered on the MFMP FLAIR Login Information eForm are successfully validated in FLAIR
• Invalid – When the login credentials entered on the MFMP FLAIR Login Information eForm are not successfully validated in FLAIR
• Not Validated – When MFMP is unable to connect to FLAIR due to network failure or FLAIR downtime
• Updated – When the Validate Credentials in FLAIR checkbox is ‘unchecked’ upon submitting the MFMP FLAIR Login Information eForm
An email notification will be sent to the requester of the MFMP FLAIR Login Information eForm if the validation attempt fails in FLAIR. Customers must access the failed MFMP FLAIR Login Information eForm in ‘Invalid’ status to view the failure message recorded in FLAIR. Customers will not have the ability to resend a previously failed MFMP FLAIR Login Information eForm and a new MFMP FLAIR Login Information eForm must be created to re-attempt validating the login credentials.
NOTE: The Invoice Manager will still be required to have the Available Balance Override Indicator (ABOI) permission in FLAIR to override the available balance required to successfully record in FLAIR.
Invoice Reconciliation Accounting Update eForm (IR Mass Update) F&A customers can mass update four accounting fields using the IR Accounting Update eForm. Customers assigned the Invoicing group can edit the Object Code, Grouping Character and the Certified Forward Indicator. Customers with the Invoicing group and the ABOI group can update the Available Balance Override Indicator.
Customers can update up to 10 IRs at a time; however, they cannot update more than 100 accounting splits per eForm. Accounting validation does not occur on the update eForm. When the eForm is approved, return to the IR to view the validation. If the mass edit information entered is invalid, customers can complete another update eForm or update the lines individually.
Tip: Customers can select an IR to modify on the IR Accounting Update eForm only if they are the active approver either by name or by role.
Tip: Customers that approve invoices for multiple sites must update this eForm for each site code.
MFMP Buyer Manual 52
Mass Updating IRs
• Select IR Accounting Update eForm on the Dashboard under Create in the Common Actions box
• Select the Invoice Reconciliation(s) to update (the entire IR number must be included, before and after the dash)
• Select the new Object Code for the IRs, if applicable
• Select the drop-down for the Grouping Character. If a customer selects the update to option, another box pops up where they enter the grouping character
• Select the drop-down for the Certified Forward and select the appropriate code. If the IR is not certified, do not update this field
• If a customer needs to override the available balance and they have the appropriate permissions in FLAIR and MFMP, place a check in the ABOI box. (Customers can view this field only if they have the appropriate permission in MFMP)
• Enter comments as required by the agency
As long as approvers were not added, the approval process is immediate upon submission. Any changes made using the Mass Update eForm display as part of the History on the IR.
Payment Update eForm Use the Payment Update eForm to update payment information for IRs marked ‘Payment Completed in FLAIR.’ This provides reconciliation to the orders encumbered in MFMP when paid directly in FLAIR.
When completing the Payment Update eForm, the Payment to Modify is the PAY number found on the payment details link of the IR. The PAY number is case sensitive and it must be entered exactly as it appears on the IR.
The warrant number and warrant date are required fields. Optional fields include the Statewide Document number, Voucher number, and the Payee field, a free text field.
Delete a Disbursement Customers with the Invoicing group can complete the Delete Disbursement eForm to delete a disbursement before the Chief Financial Officer issues a warrant. Disbursement deletions can be performed the same day that the FLAIR confirmation message displays on the IR. After Central FLAIR approves the disbursement, it cannot be deleted through MFMP. When the eForm is successful, MFMP automatically adds a comment to the IR and returns the IR to the approving Invoice Manager. Review the comment on the IR to validate that the Delete Disbursement eForm was successful.
Tip: This does not restore the FLAIR encumbrance or restore the amount to the PO. Complete the Restore PO Balance eForm to add the funds back to the order.
Tip: If the warrant is cancelled, check the Cancel Warrant box.
MFMP Buyer Manual 53
Transaction Fee Exemptions Subsection 287.057(23), Florida Statutes, grants DMS specific authority to:
• Create an online procurement system
• Impose and collect fees to pay for the system and procurement functions
• Develop rules and regulations governing the online procurement system
To obtain additional information for Florida Statutes, please visit: http://www.leg.state.fl.us/statutes/.
Transaction Fee Rules Effective July 1, 2003, DMS implemented Rules for the online procurement system that became MFMP:
• Rule 60A-1.030, Florida Administrative Code (F.A.C.) addresses MFMP vendor registration
• Rule 60A-1.031, F.A.C. addresses the use of transaction fee language in purchasing transactions (unless exempted) Rule 60A-1.032, F.A.C. addresses the MFMP transaction fee exemptions
• Rule 60A-1.031, F.A.C. established the use of the MFMP transaction fee
o Directs state agencies to include the transaction fee language in all agency contracts, unless specifically exempt by Rule 60A-1.032, F.A.C.
o Provides specific contract language to include:
▪ Vendors pay the fee on payments received from State of Florida executive agencies
▪ Vendor also pay the fee on payments received from entities leveraging STC and alternate contract source (ACS) pricing (e.g., local governments, educational institutions, others)
To obtain additional information for Rules, please visit: https://www.flrules.org/.
All business conducted with State of Florida agencies is subject to the transaction fee unless specifically exempt by Rule. Exemption requirements are outlined in Rule 60A-1.032, F.A.C.
Agency Considerations for Exemptions Certain vendors are not required to register in MFMP as outlined in Rule 60A-1.030, F.A.C.; examples include:
• Agencies process payments to the vendor exclusively by PCard
• Vendor is exempt from disclosure under the Public Records Law, Chapter 119, Florida Statutes
• Exemption from paying the transaction fee does not in itself exempt the vendor or an agency from the registration requirements of Rule 60A-1.030, F.A.C.
Considerations for any contract exemptions authorized by Rule 60A-1.032, F.A.C:
• Complete the Contract Exemption eForm
• MFMP tracks associated releases and Invoices as exempt for this contract
• Agencies should maintain a completed copy of PUR 3777 (Notice of Transaction Fee Exemption) in the contract file
• Rule 60A-1.032, F.A.C. authorizes the DMS State Purchasing Director to approve a particular contract exempt from the transaction fee in advance of the procurement
• The procurement must meet two elements:
o Critical to the agency’s mission or necessary for the public health, safety, or welfare; and

MFMP Buyer Manual 54
o Imposition of the fee would prevent the consummation of the transaction
To request a contract exemption, complete PUR 3778, located on the MFMP buyer website. The agency head as per Rule 60A-1.032 (2), F.A.C., must certify PUR3778.
Mark a Requisition/Invoice Exempt An agency may exempt a particular transaction from the transaction fee if:
• The governor suspends purchasing regulations due to an emergency; or
• The agency head declares an emergency under section 287.057(5)(a), Florida Statutes
• Other statutory basis outlined in the Transaction Fee Exemption section
Agencies can complete a Transaction Level exemption at the requisition/invoice reconciliation level.
Customers must have the Transaction Fee Exempt group to check the Transaction Fee Exempt box on a requisition or Invoice.
• Select the Transaction Fee Exempt? checkbox within the accounting details of the Requisition or Invoice Reconciliation that should be flagged as exempt
• Using the Transaction Fee Exemption Reason drop-down menu, select the exemption code that matches the exemption reason. View the available reasons in Appendix A
• Repeat these steps as needed for items with multiple lines
Tip: The exemption status listed on a requisition is transferred to IRs created against the associated order.
MFMP Buyer Manual 55
Reporting MFMP provides three reporting methods to assist MFMP agency customers to better understand spending patterns and create adequate budgets:
Analysis: Analytical reporting tool that enables the customer to create custom “on-demand” reports
Secure reports: Operational reports designed with an emphasis on F&A data
System Searches: Created within MFMP Buyer for transactions based on the standard search options, or custom searches customers can create and save
Analysis Overview The MFMP Analysis application provides insight into the State of Florida’s spending patterns and gives customers the power to base buying decisions on self-customized data analysis. Analysis improves the ability to see spending patterns and identify how much is spent, where it is spent, and on what products and services. The Analysis cycle time reports also provide insight into agency approval processes.
The data in Analysis comes from several sources, including MFMP purchase orders, invoices, and contracts, VIP vendor data, and FLAIR payment and encumbrance data.
In Analysis, customers can create analytical reports and graphs, such as pie charts, bar charts, and pivot tables. This enables customers to investigate spending patterns and identify opportunities to improve cycle times.
For more information about MFMP Analysis, check out the MFMP Reporting Manual.
Secure Reports
Secure reports are operational reports, based on data collected through MFMP Buyer, to assist in daily tasks. Secure Reports run regularly based on the report parameters.
Access these reports through a secure website available at http://dms-purchasing-ftp.state.fl.us/xx00/. All customers with password authorization have access to Secure Reports. Reports are in a CSV (comma separated value) format but can be opened in Excel, and requires WinZip or other zip file utility software.
The MFMP Secure Report Job Aid discusses reports available to all agencies. This list includes key information about each report, including the reports’ intended purpose, the fields included, the report(s) update frequency (daily, weekly, bi-weekly, monthly or quarterly, etc.), and the intended audience.
Report Requests If a customer identifies a report that does not already exist and it cannot be run in Analysis, please use the report request process.
• Complete the Report Request form, located on the MFMP website under MFMP Forms
• Email the completed form to the MFMP CSD at [email protected] for review and implementation
• After MFMP generates the report, MFMP notifies the requesting agency to review the file on the MFMP Secure Report website
Tip: To generate reports, customers must have the Analysis group to access this application.
Tip: The report request process is an operational process that can take up to 20 business days from DMS approval and depends on how many report requests are in the queue.
MFMP Buyer Manual 56
System Searches Any MFMP customer can easily create a system search within MFMP. MFMP encourages customers to use a minimum of three search filters unless they are using the transaction number (eg. Requisition number). To see transactions other than their own, customers need the Query group. A system search displays/returns up to 750 records at a time. Customers can export system search results to Excel. Customers can export all returned records, or select to export the current page, which exports only 40 records.
Tip: Searches default to the last three months to optimize performance of searches, but this can be changed
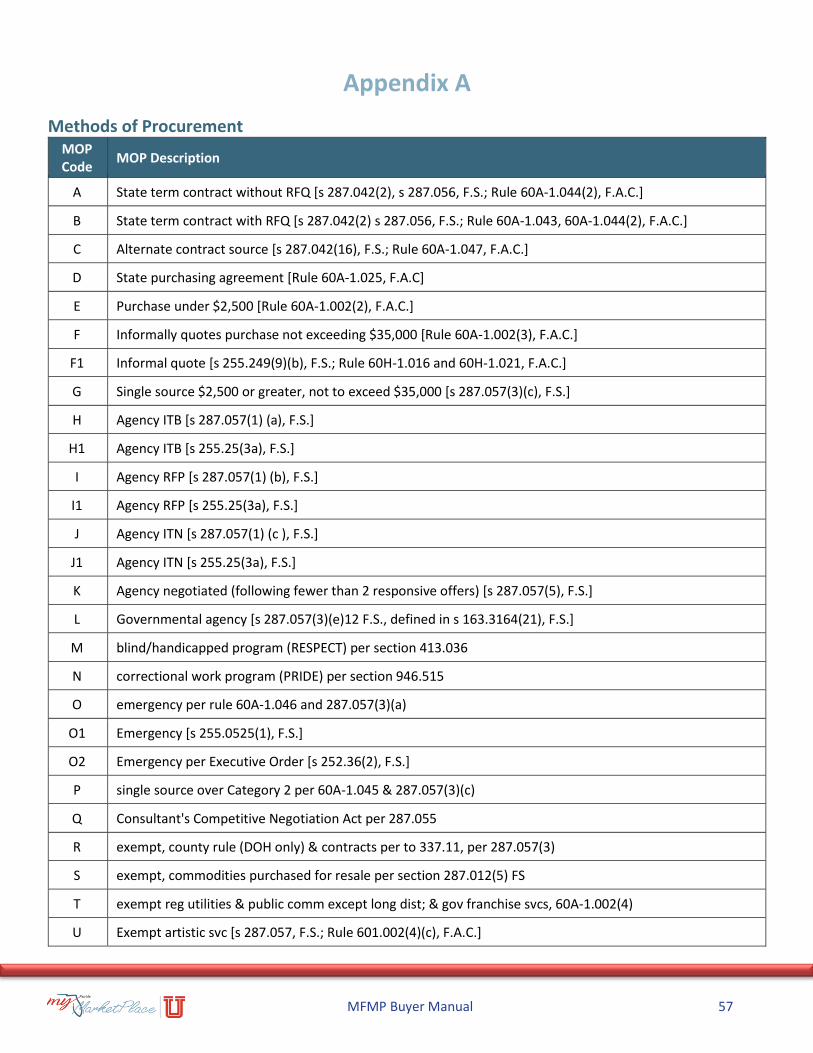
MFMP Buyer Manual 57
Appendix A
Methods of Procurement MOP Code
MOP Description
A State term contract without RFQ [s 287.042(2), s 287.056, F.S.; Rule 60A-1.044(2), F.A.C.]
B State term contract with RFQ [s 287.042(2) s 287.056, F.S.; Rule 60A-1.043, 60A-1.044(2), F.A.C.]
C Alternate contract source [s 287.042(16), F.S.; Rule 60A-1.047, F.A.C.]
D State purchasing agreement [Rule 60A-1.025, F.A.C]
E Purchase under $2,500 [Rule 60A-1.002(2), F.A.C.]
F Informally quotes purchase not exceeding $35,000 [Rule 60A-1.002(3), F.A.C.]
F1 Informal quote [s 255.249(9)(b), F.S.; Rule 60H-1.016 and 60H-1.021, F.A.C.]
G Single source $2,500 or greater, not to exceed $35,000 [s 287.057(3)(c), F.S.]
H Agency ITB [s 287.057(1) (a), F.S.]
H1 Agency ITB [s 255.25(3a), F.S.]
I Agency RFP [s 287.057(1) (b), F.S.]
I1 Agency RFP [s 255.25(3a), F.S.]
J Agency ITN [s 287.057(1) (c ), F.S.]
J1 Agency ITN [s 255.25(3a), F.S.]
K Agency negotiated (following fewer than 2 responsive offers) [s 287.057(5), F.S.]
L Governmental agency [s 287.057(3)(e)12 F.S., defined in s 163.3164(21), F.S.]
M blind/handicapped program (RESPECT) per section 413.036
N correctional work program (PRIDE) per section 946.515
O emergency per rule 60A-1.046 and 287.057(3)(a)
O1 Emergency [s 255.0525(1), F.S.]
O2 Emergency per Executive Order [s 252.36(2), F.S.]
P single source over Category 2 per 60A-1.045 & 287.057(3)(c)
Q Consultant's Competitive Negotiation Act per 287.055
R exempt, county rule (DOH only) & contracts per to 337.11, per 287.057(3)
S exempt, commodities purchased for resale per section 287.012(5) FS
T exempt reg utilities & public comm except long dist; & gov franchise svcs, 60A-1.002(4)
U Exempt artistic svc [s 287.057, F.S.; Rule 601.002(4)(c), F.A.C.]
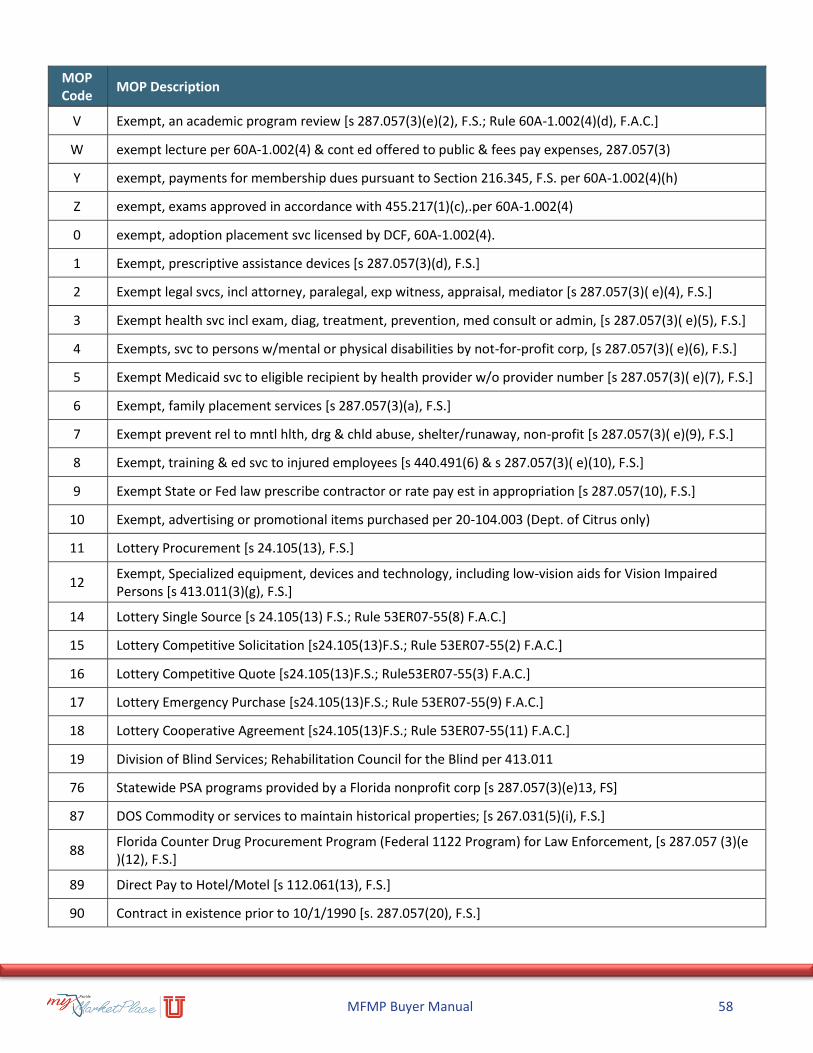
MFMP Buyer Manual 58
MOP Code
MOP Description
V Exempt, an academic program review [s 287.057(3)(e)(2), F.S.; Rule 60A-1.002(4)(d), F.A.C.]
W exempt lecture per 60A-1.002(4) & cont ed offered to public & fees pay expenses, 287.057(3)
Y exempt, payments for membership dues pursuant to Section 216.345, F.S. per 60A-1.002(4)(h)
Z exempt, exams approved in accordance with 455.217(1)(c),.per 60A-1.002(4)
0 exempt, adoption placement svc licensed by DCF, 60A-1.002(4).
1 Exempt, prescriptive assistance devices [s 287.057(3)(d), F.S.]
2 Exempt legal svcs, incl attorney, paralegal, exp witness, appraisal, mediator [s 287.057(3)( e)(4), F.S.]
3 Exempt health svc incl exam, diag, treatment, prevention, med consult or admin, [s 287.057(3)( e)(5), F.S.]
4 Exempts, svc to persons w/mental or physical disabilities by not-for-profit corp, [s 287.057(3)( e)(6), F.S.]
5 Exempt Medicaid svc to eligible recipient by health provider w/o provider number [s 287.057(3)( e)(7), F.S.]
6 Exempt, family placement services [s 287.057(3)(a), F.S.]
7 Exempt prevent rel to mntl hlth, drg & chld abuse, shelter/runaway, non-profit [s 287.057(3)( e)(9), F.S.]
8 Exempt, training & ed svc to injured employees [s 440.491(6) & s 287.057(3)( e)(10), F.S.]
9 Exempt State or Fed law prescribe contractor or rate pay est in appropriation [s 287.057(10), F.S.]
10 Exempt, advertising or promotional items purchased per 20-104.003 (Dept. of Citrus only)
11 Lottery Procurement [s 24.105(13), F.S.]
12 Exempt, Specialized equipment, devices and technology, including low-vision aids for Vision Impaired Persons [s 413.011(3)(g), F.S.]
14 Lottery Single Source [s 24.105(13) F.S.; Rule 53ER07-55(8) F.A.C.]
15 Lottery Competitive Solicitation [s24.105(13)F.S.; Rule 53ER07-55(2) F.A.C.]
16 Lottery Competitive Quote [s24.105(13)F.S.; Rule53ER07-55(3) F.A.C.]
17 Lottery Emergency Purchase [s24.105(13)F.S.; Rule 53ER07-55(9) F.A.C.]
18 Lottery Cooperative Agreement [s24.105(13)F.S.; Rule 53ER07-55(11) F.A.C.]
19 Division of Blind Services; Rehabilitation Council for the Blind per 413.011
76 Statewide PSA programs provided by a Florida nonprofit corp [s 287.057(3)(e)13, FS]
87 DOS Commodity or services to maintain historical properties; [s 267.031(5)(i), F.S.]
88 Florida Counter Drug Procurement Program (Federal 1122 Program) for Law Enforcement, [s 287.057 (3)(e )(12), F.S.]
89 Direct Pay to Hotel/Motel [s 112.061(13), F.S.]
90 Contract in existence prior to 10/1/1990 [s. 287.057(20), F.S.]
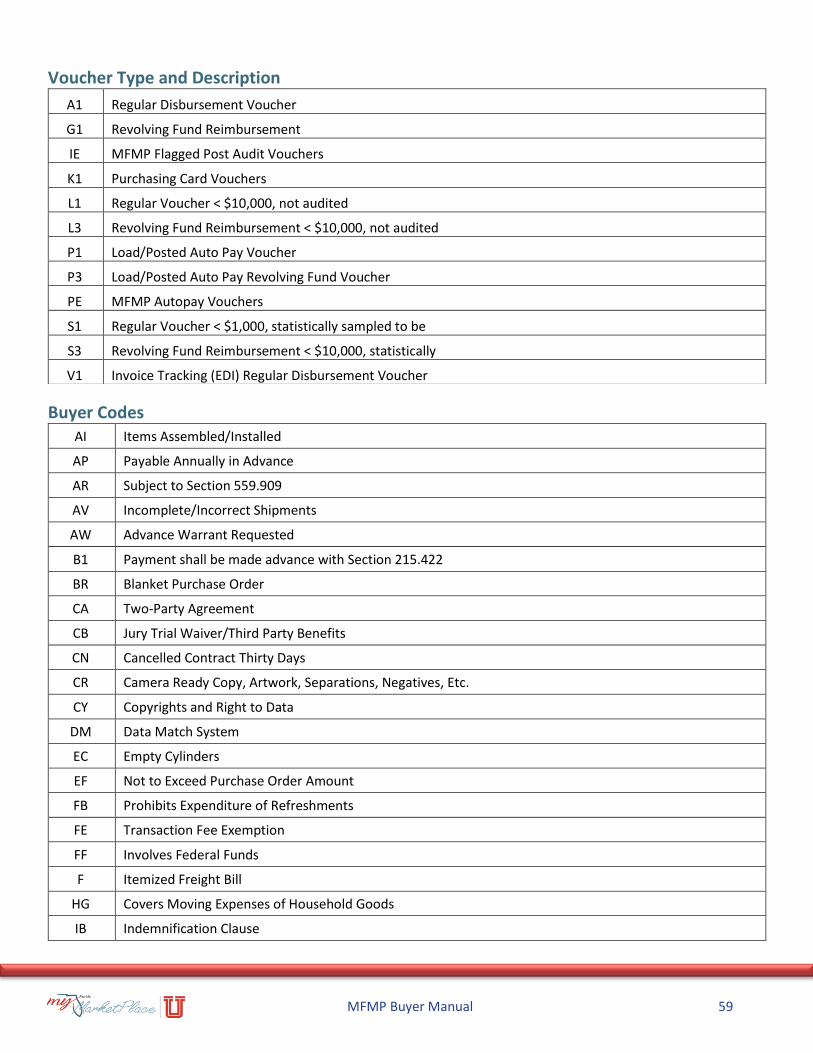
MFMP Buyer Manual 59
Voucher Type and Description
Buyer Codes AI Items Assembled/Installed
AP Payable Annually in Advance
AR Subject to Section 559.909
AV Incomplete/Incorrect Shipments
AW Advance Warrant Requested
B1 Payment shall be made advance with Section 215.422
BR Blanket Purchase Order
CA Two-Party Agreement
CB Jury Trial Waiver/Third Party Benefits
CN Cancelled Contract Thirty Days
CR Camera Ready Copy, Artwork, Separations, Negatives, Etc.
CY Copyrights and Right to Data
DM Data Match System
EC Empty Cylinders
EF Not to Exceed Purchase Order Amount
FB Prohibits Expenditure of Refreshments
FE Transaction Fee Exemption
FF Involves Federal Funds
F Itemized Freight Bill
HG Covers Moving Expenses of Household Goods
IB Indemnification Clause
A1 Regular Disbursement Voucher
G1 Revolving Fund Reimbursement
IE MFMP Flagged Post Audit Vouchers
K1 Purchasing Card Vouchers
L1 Regular Voucher < $10,000, not audited
L3 Revolving Fund Reimbursement < $10,000, not audited
P1 Load/Posted Auto Pay Voucher
P3 Load/Posted Auto Pay Revolving Fund Voucher
PE MFMP Autopay Vouchers
S1 Regular Voucher < $1,000, statistically sampled to be
S3 Revolving Fund Reimbursement < $10,000, statistically
V1 Invoice Tracking (EDI) Regular Disbursement Voucher
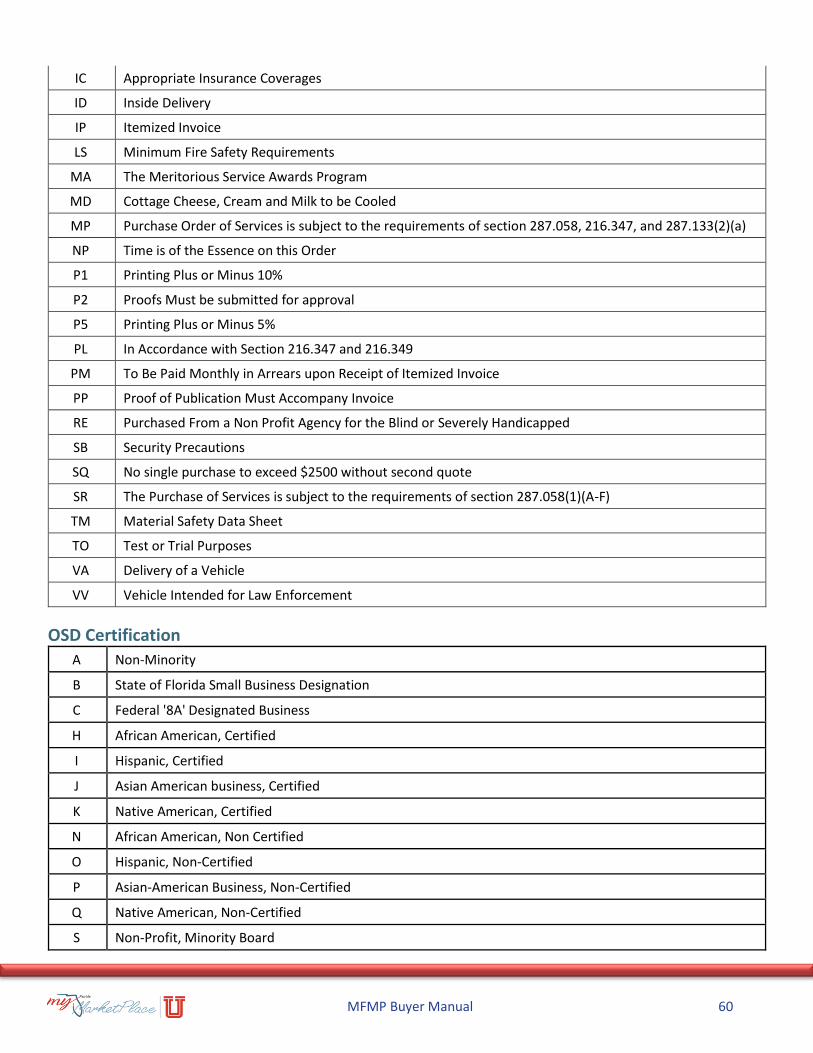
MFMP Buyer Manual 60
IC Appropriate Insurance Coverages
ID Inside Delivery
IP Itemized Invoice
LS Minimum Fire Safety Requirements
MA The Meritorious Service Awards Program
MD Cottage Cheese, Cream and Milk to be Cooled
MP Purchase Order of Services is subject to the requirements of section 287.058, 216.347, and 287.133(2)(a)
NP Time is of the Essence on this Order
P1 Printing Plus or Minus 10%
P2 Proofs Must be submitted for approval
P5 Printing Plus or Minus 5%
PL In Accordance with Section 216.347 and 216.349
PM To Be Paid Monthly in Arrears upon Receipt of Itemized Invoice
PP Proof of Publication Must Accompany Invoice
RE Purchased From a Non Profit Agency for the Blind or Severely Handicapped
SB Security Precautions
SQ No single purchase to exceed $2500 without second quote
SR The Purchase of Services is subject to the requirements of section 287.058(1)(A-F)
TM Material Safety Data Sheet
TO Test or Trial Purposes
VA Delivery of a Vehicle
VV Vehicle Intended for Law Enforcement
OSD Certification
A Non-Minority
B State of Florida Small Business Designation
C Federal '8A' Designated Business
H African American, Certified
I Hispanic, Certified
J Asian American business, Certified
K Native American, Certified
N African American, Non Certified
O Hispanic, Non-Certified
P Asian-American Business, Non-Certified
Q Native American, Non-Certified
S Non-Profit, Minority Board
MFMP Buyer Manual 61
T Non-Profit, Minority Employees
U Non-Profit, Minority Community Served
V Other Non-Profit
Shipping Codes Best Way
Air Carrier
Overnight Delivery
Common Carrier
USPS
Pickup
Railroad
Truck Carrier
UPS
Transaction Fee Exemption Reasons 3A Procurement under Section 337.11 Florida Statutes
3B Procurement under Section 287.055 Florida Statutes
3C Procurement under Chapter 255 Florida Statutes
3D Transaction with Non-Profit Entity
3E Transaction with another Governmental Agency
3F Transaction with required Sole Provider or price paid and payee established by federal or private grant
3G Payment to Unregistered Vendor under Rule 60A-1.033(3)
3H Payment to vendor in exchange for providing health care services at or below Medicaid rates
3I Disbursement to Recipient or Sub-Recipient; payment to satisfy Maintenance of Efforts requirement; or payment to match federal award
4 The transaction is critical to the agency’s mission or necessary for the public health, safety, or welfare; and, imposition of the fee would prevent the consummation of the transaction
5A Emergency Transaction per Rule 60A-1.031(5)(a)
5B Emergency Transaction per Rule 60A-1.031(5)(b)

MFMP Buyer Manual 62
Appendix B
Labels Labels allow customers to assign or “tag” similar transactions with a common title or description. Labels can be used to help categorize frequently referenced transactions.
To add labels to a document, use one of the following three options:
• On the Summary tab for any document being submitted, edited or reviewed:
o Click Apply Label
o Click New Label
o Enter a label in the Add Label pop-up window and click OK
o To assign an existing label, click Apply Label, and then click the desired label. (Customers can assign multiple labels to a document)
• Customers may add labels to multiple documents at the same time:
o On the Search page, click the check box for one or more of the documents in the search results, then click Labels
o Select an existing label or click New Label and then enter a name in the Add Label pop-up window and click OK
• Customers may also assign labels to documents when approving them by selecting the request to approve or deny and following these steps:
o Select the document from the ‘To Do’ portlet
o Review the document as needed and make any necessary edits
o Select to Approve or Deny the document, as appropriate
o On the following Comment page, enter an optional comment
o By default, approved requests are assigned a default label (Archive Item) to make it easy to find later through a label search
o Customers may deselect the Archive items to label check box if they do not want to assign a label to their document
▪ If a customer wants to assign a different label, they can select another label from the drop-down menu or create a new label for the document
To find documents associated with a label:
• In the ’Search box’ on the Dashboard or on the ‘Search page’, select the type of document (for example, requisition or invoice reconciliation)
• Click on the Label link under the ‘My Labels’ heading to view all items with the associated label
NOTE: Repeat the label search for each document type that has the same label. For example, if a customer assigns the same label to requisitions and to Invoices, they must run two label searches - one for requisitions and one for Invoices.
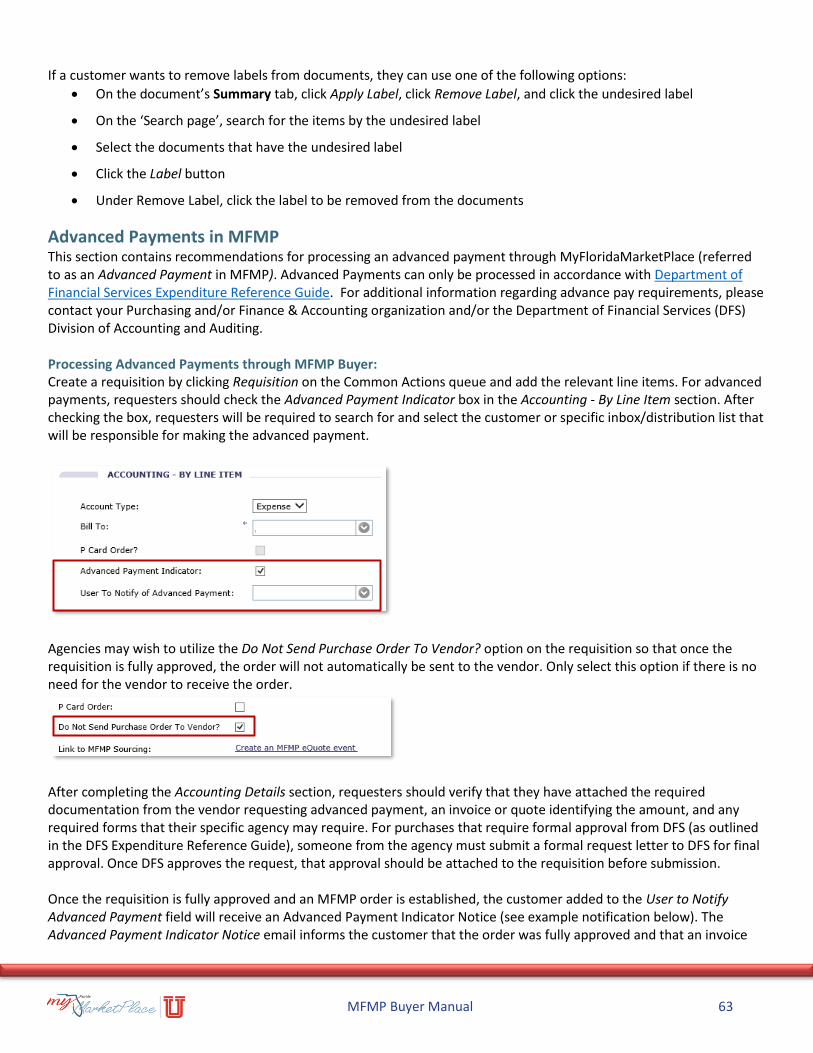
MFMP Buyer Manual 63
If a customer wants to remove labels from documents, they can use one of the following options:
• On the document’s Summary tab, click Apply Label, click Remove Label, and click the undesired label
• On the ‘Search page’, search for the items by the undesired label
• Select the documents that have the undesired label
• Click the Label button
• Under Remove Label, click the label to be removed from the documents
Advanced Payments in MFMP This section contains recommendations for processing an advanced payment through MyFloridaMarketPlace (referred to as an Advanced Payment in MFMP). Advanced Payments can only be processed in accordance with Department of Financial Services Expenditure Reference Guide. For additional information regarding advance pay requirements, please contact your Purchasing and/or Finance & Accounting organization and/or the Department of Financial Services (DFS) Division of Accounting and Auditing. Processing Advanced Payments through MFMP Buyer: Create a requisition by clicking Requisition on the Common Actions queue and add the relevant line items. For advanced payments, requesters should check the Advanced Payment Indicator box in the Accounting - By Line Item section. After checking the box, requesters will be required to search for and select the customer or specific inbox/distribution list that will be responsible for making the advanced payment.
Agencies may wish to utilize the Do Not Send Purchase Order To Vendor? option on the requisition so that once the requisition is fully approved, the order will not automatically be sent to the vendor. Only select this option if there is no need for the vendor to receive the order.
After completing the Accounting Details section, requesters should verify that they have attached the required documentation from the vendor requesting advanced payment, an invoice or quote identifying the amount, and any required forms that their specific agency may require. For purchases that require formal approval from DFS (as outlined in the DFS Expenditure Reference Guide), someone from the agency must submit a formal request letter to DFS for final approval. Once DFS approves the request, that approval should be attached to the requisition before submission. Once the requisition is fully approved and an MFMP order is established, the customer added to the User to Notify Advanced Payment field will receive an Advanced Payment Indicator Notice (see example notification below). The Advanced Payment Indicator Notice email informs the customer that the order was fully approved and that an invoice
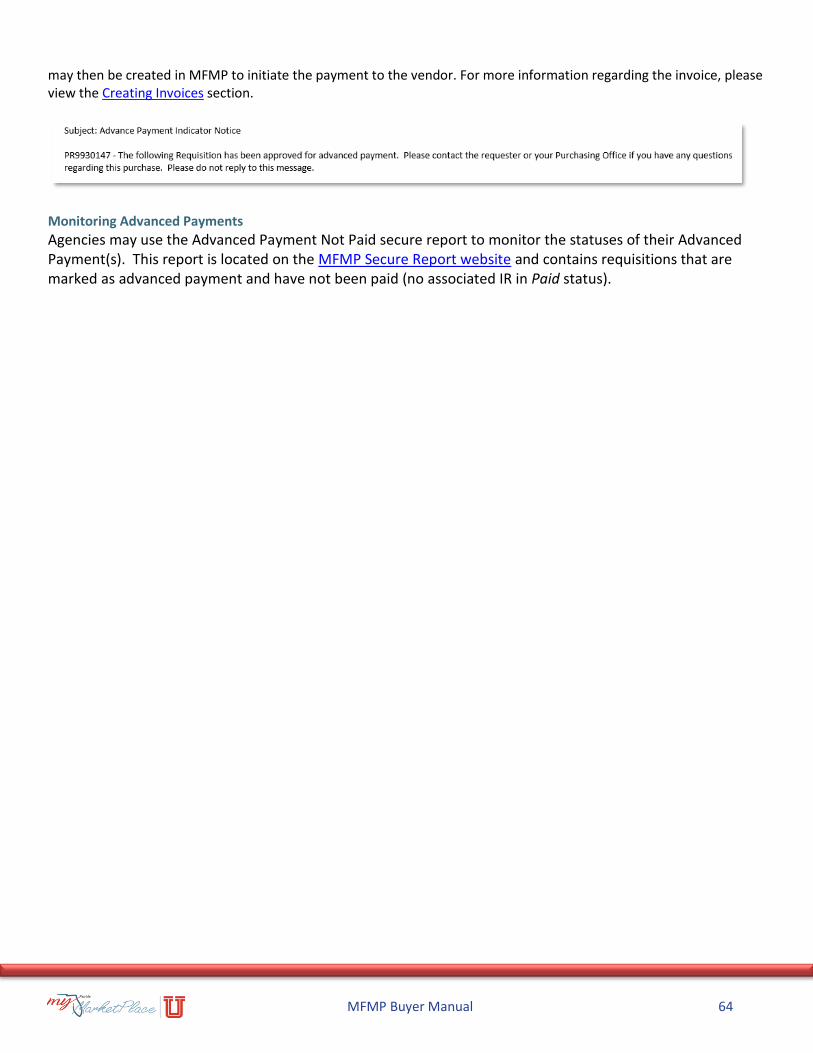
MFMP Buyer Manual 64
may then be created in MFMP to initiate the payment to the vendor. For more information regarding the invoice, please view the Creating Invoices section.
Monitoring Advanced Payments
Agencies may use the Advanced Payment Not Paid secure report to monitor the statuses of their Advanced Payment(s). This report is located on the MFMP Secure Report website and contains requisitions that are marked as advanced payment and have not been paid (no associated IR in Paid status).
MFMP Buyer Manual 65
MFMP Glossary Accounting Verification Exception - Generates for all Invoice Reconciliation (IR) documents. This exception is a reminder to verify that the accounting information for each line item associated with the Invoice is correct prior to approving payment.
Agency - Any state offices, departments, divisions, and bureaus of the executive or cabinet branch of state government. “Agency” does not include the university and college boards of trustees or the state universities or colleges. This is also known as the ‘OLO’ (Operating Level Organization) in FLAIR.
Amount Variance Exception - A header level exception that occurs when the total cost of the Invoice is greater than the total cost of the purchase.
Approvable - A transaction that requires approval from designated personnel in the MFMP system before customers take any further action.
Approval Authority - Authority to approve requests. (See also Delegated Approval Authority)
Approval flow - Specifies a group of customers (either by name or role) that are expected to review a transaction prior to its acceptance in MFMP. Customers can view the approval flow in the MFMP system.
Approver - A customer with the authority to approve a transaction that is active in his or her approval To Do portlet. In many cases, agencies require a set of approvers with different levels of approval authority to approve a transaction, as outlined in the approval flow.
Ariba Network (AN) – The system vendors use to electronically receive Purchase Orders and submit eInvoices to agencies through MFMP.
Auto Reject Amount Variance Exception - A header-level exception that occurs when the total cost of the Invoice is greater than the total cost of the Purchase Order. By default, if MFMP finds this type of exception, it auto-rejects the Invoice.
Available Balance – An auxiliary file from FLAIR that maintains current balances for Fund Cash, Unexpended Fund Releases, Organization Cash, and Organization Allotments. Customers with the appropriate group may select to override the automatic system check of this file by selecting the Available Balance Override Indicator (ABOI).
Bill To Address - Address Buyer designates while creating the requisition to receive the Invoice.
Browse - The act of searching for an attachment to include in MFMP.
Buyer - Anyone who requisitions or processes a Purchase Order or Invoice for goods and services through MFMP.
Catalog - An organized descriptive list of goods or services on state term contracts available to potential buyers. MFMP uses line item catalogs and punchout catalogs. (See also separate entries for each catalog type)
Central Receiver - Customer(s) identified to receive goods shipped to an agency’s central receiving address.
Certified Business Enterprise (CBE) - Vendor that meets that state’s requirements to be a certified business enterprise by the Florida Office of Supplier Diversity. These vendors have designated codes to identify their minority status in MFMP and MFMP customers can view them.
Change Order - Changes an existing Purchase Order, by making changes to the requisition.
Commodity - An item of physical property customers order and vendors deliver. This is also known as a good.
Commodity Code - A system of numbers (with descriptions) designed to identify and list commodities or services by categories and classes in MFMP.
Confidential Information - Information exempt from public records requirements under state or federal statutes.
Contract - A formal agreement set up electronically in MFMP.
MFMP Buyer Manual 66
Dashboard - The MFMP home page that customers customize for their work needs.
Delay Purchase Until - Requisitions created with a Delay Purchase Until date proceed through the approval flow and MFMP holds them until the specified date; on that date, MFMP releases them to FLAIR (if encumbered) and the vendor.
Delegated Approval Authority - Authority to approve requests on behalf of the original approver, only when designated. (See also Approval Authority)
Delegatee - Someone with ‘delegated approval’ authority on behalf of another customer. The delegate receives and approves requisitions and Invoice Reconciliations for the original customer.
Delegator - Customer who assigns approval authority to another customer.
Desktop Receiving - Original requester responsible for completing the receipt when agency receives purchases.
eForm - An electronic form.
Encumbrance - The number associated to a request to reserve funds for a purchase in FLAIR, the state’s financial system. Customers can automatically mark a requisition to encumber funds through MyFloridaMarketPlace and FLAIR. Customers can pay MFMP or FLAIR encumbrances through MFMP.
eProcurement - Applies eCommerce technology to streamline the purchasing process; integrates customer and vendor business processes.
eQuote - Electronic quotation for goods and/or services submitted to vendors who respond electronically.
Exception - Variances between the Purchase Order, receipt (if applicable), and the Invoice Reconciliation including Amount Variance Exception, Accounting Verification Exception, etc. Agencies must accept or reconcile these exceptions to process Invoice Reconciliations.
Exception Handler - The first Finance and Accounting approver for an Invoice Reconciliation that is responsible for reconciling all exceptions.
Groups – Categories of permissions assigned by the agency system administrator to control the level of access a customer can have to system functions, notifications or operations.
Invoice - A document, written or electronic, delivered to the ‘Bill To’ address indicated on the Purchase Order itemizing the goods and/or services the vendor provided, associated costs, and the total costs.
Invoice Manger - The final agency approver for an IR.
Invoice Reconciliation (IR) - When customers submit an Invoice in MFMP or a vendor submits an electronic Invoice (eInvoice), MFMP creates Invoice Reconciliations (IR). IRs displays all exceptions (differences between the order, Invoice and receipt if applicable) that must be reconciled before the IR is approved for payment. IRs can be submitted to FLAIR for disbursement requests.
IR Sequence Number - The numbers that appear after the dash (“-“) in the IR number, for example, in IR1100140684-1526335 the IR sequence number is 1526335.
Line Item - One item on an order, regardless of quantity.
Line Item Catalog - MFMP enters state term contracts in the system as searchable line items. MFMP populates Line Item Catalogs with the supplier location, vendor name, commodity code, and unit price and part number if applicable. Customers select line items for their requisitions.
Log Out Warning - When a customer’s session has been idle for 29 minutes, a Logout Warning popup, with a countdown of 60 seconds appears on the screen.
Menu Bar - Provides direct access for the customer to open the home page, log out, preferences, tips, currency, and online help; located at the top of the screen.
MFMP Buyer Manual 67
Method of Procurement (MOP) - Indicates the statutory authority a customer is using to make a purchase.
MyFloridaMarketPlace (MFMP) - The State of Florida eProcurement program represented by four main applications: Buyer, Sourcing, Analysis, and the Vendor Information Portal (VIP).
Need By Date - Date when the customer needs to receive an item or services from the vendor.
Non-catalog Item - An item not listed in a line item catalog or a Punchout catalog. The customer manually enters the detail information for the desired item.
On Behalf Of (OBO) - Requester’s can specify if they are creating a requisition on behalf of another user. The OBO will be responsible for receiving goods for the order or approving the IR for services.
Parallel Approver - Approvers that receive the same transaction simultaneously. The transaction cannot fully process until all the approvers approve it.
Preparer - Customer who actually created a requisition “On Behalf Of” another customer; the “On Behalf Of” customer is the Requester.
Price Variance Exception - Exception that occurs when the price on the Invoice line item is different from the price on the Purchase Order line item.
Purchasing Unit Identifier (PUI) - Number that identifies customer’s purchasing unit and defaults based on the requester’s profile. MFMP uses the PUI for transaction routing purposes.
Punchout Catalog - Customers “punchout” from MFMP to a vendor website to purchase items directly; items then populate in line item form on the MFMP requisition.
Purchase Order (PO) - Created when a requisition completes the approval process in MFMP. MyFloridaMarketPlace sends POs to the chosen supplier by fax, email, or through the vendor’s ASN (Ariba Suppliers’ Network) account (depending on the vendor’s preferred method). Encumbered orders generate an alphanumeric PO number and unencumbered orders generate a “PO” number.
Purchasing Card (PCard) - A State of Florida bank card issued to state employees for the payment of commodities and services. Agencies identify requisitions they wish to pay with a PCard.
Quantity Variance Exception - Exception that occurs when the quantity on the Invoice line item is different from the quantity left to Invoice on the Purchase Order line item.
Receipt - Electronic receiving report the requester or On Behalf of completes when he or she receives the commodity on a Purchase Order. (Complete receipts in compliance with section 215.422, Florida Statutes.)
Received Quantity Variance Exception - Exception that occurs when the quantity field on the Invoice line item is different from the quantity left to Invoice on the receipt line item.
Reconcile - Resolving exceptions contained on the Invoice Reconciliation (IR). The On Behalf Of is also responsible for reconciling IRs for services in order to verify that services were rendered.
Redact - To obscure or remove confidential information before scanning and attaching a document into MFMP.
Release - Purchase Order created against an MFMP Contract to notify a vendor to ship products or services as designated on the contract.
Requester - Customer designated in the On Behalf Of field on a requisition who establishes the need for procuring goods or services.
Requisition (PR) - A request to identify a need to procure a commodity and/or service. Once the requisition completes the approval process, MFMP generates a PO and transmits it to the vendor.
Requisition Number - Unique identifying number MFMP assigns to each requisition.
MFMP Buyer Manual 68
Roles - PUI-specific assignment used for routing purposes in the approved approval flow. Customers may have no roles or multiple roles based upon their responsibilities. Roles do not provide any access and groups are used for assigning permissions.
Services - Work a vendor provides that does not include the manufacturing or delivery of goods.
Session - A single period of time a customer logs in to use the MyFloridaMarketPlace system. A customer’s session will time-out after 30 minutes of inactivity. See also Log Out Warning
Ship To Address - The physical address set up to identify where vendors deliver commodities and/or provide services.
Sourcing - Electronic tool used to develop and manage both strategic sourcing procurements (RFP, ITB, and ITN) and electronic quotes (eQuotes).
Split Accounting - Allows customers to split the cost of a line between different accounts, organizations, and/or funds. At the line item level, customers can specify a split for the charge across multiple accounts by percentage, quantity, or total amount.
Transaction Fee - Effective July 1, 2003, the state instituted, through Rule 60A-1 of the Florida Administrative Code (F.A.C.), a transaction fee for procurement transactions to provide funding for state-of-the-art purchasing tools and technology.
Three-way Match - Process by which the system matches the Purchase Order, receipt, and Invoice to check for variances in quantity or amount. This applies to all orders for commodities.
Two-way Match - Process by which MFMP matches the Purchase Order and Invoice to check for variances in quantity or amount, and applies to all orders for services.
Unmatched Invoice - Exception that occurs when MFMP is unable to match a Purchase Order to the eInvoice. These IRs are rejected on the agency’s behalf. Agencies can coordinate with vendors to receive the Invoice with an adequate Purchase Order.
Unmatched Line Item - Exception that occurs when the vendor or agency customer creates eInvoices or Invoices against an unknown line number of the Purchase Order.
User Profile - Specific customer’s MFMP preferences and settings, in addition to roles and groups in the system.
Vendor - Businesses registered with MFMP to conduct business with the State of Florida and its entities.
Watcher (Optional Approver) - Customer the agency added to an approval flow to monitor a transaction, but without authority to approve or deny.
MFMP Buyer Manual 69
MFMP Resources
Customer Service Desk (CSD) Contact the MFMP CSD at [email protected], 866-352-3776 or using the Customer Assistance Request (CAR) Form for assistance with MFMP.
For password resets, customers should use the password reset functionality or contact their agency’s System Administrator.
MFMP Buyer
https://Buyer.MyFloridaMarketPlace.com/
MFMP Analysis http://Analysis.MyFloridaMarketPlace.com/
MFMP Sourcing https://Sourcing.MyFloridaMarketPlace.com/Sourcing/Main?System&passwordadapter=PasswordAdapter1
MFMP Website
www.myfloridamarketplace.com
MFMP Training Resources
http://www.dms.myflorida.com/mfmp/training
Vendor Searches
Vendor Information Portal (VIP) Vendor Search: https://Vendor.MyFloridaMarketPlace.com/
• Username and password: ‘publicuser’ (enter in lower case)