melb susjam.toolkit
Post on 19-Oct-2014
12.839 views
DESCRIPTION
A collation of methods from open source toolkits, tailored for participants in the Melbourne Sustainability Jam ToolkitTRANSCRIPT
THE TOOLKIT
BEFORE YOU BEGINKEEP IN MIND...- The approach- The life cycle- The people- The environment
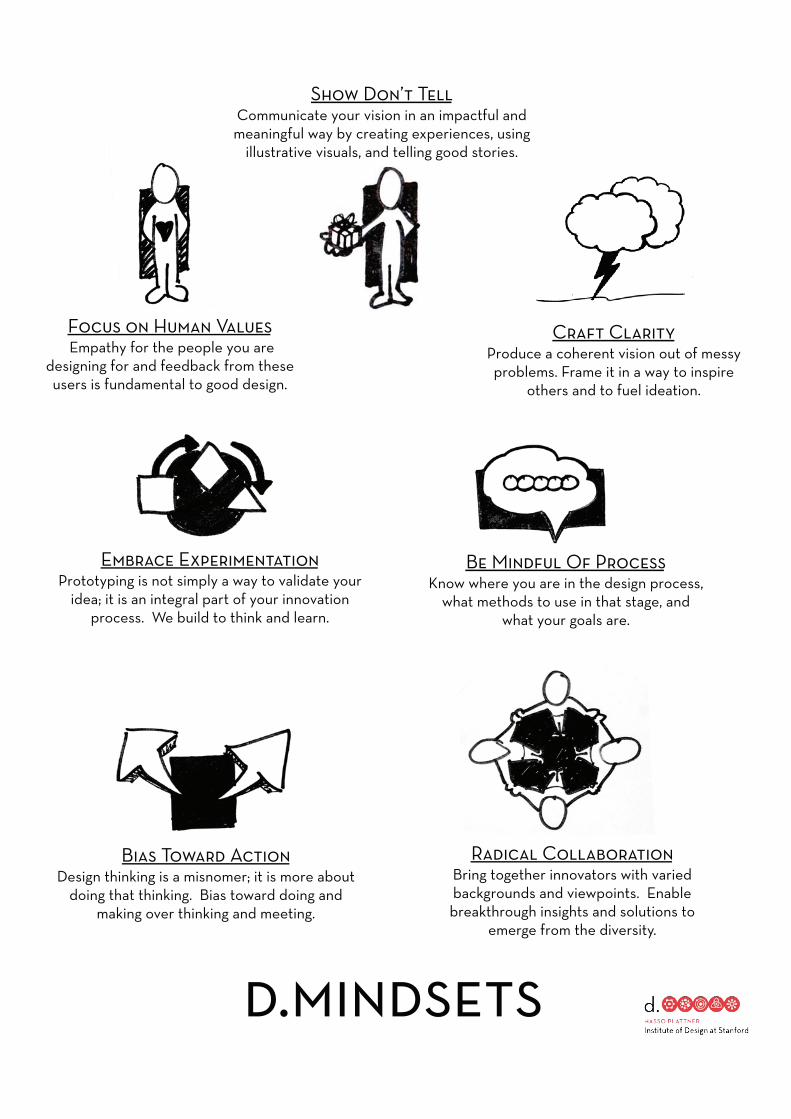
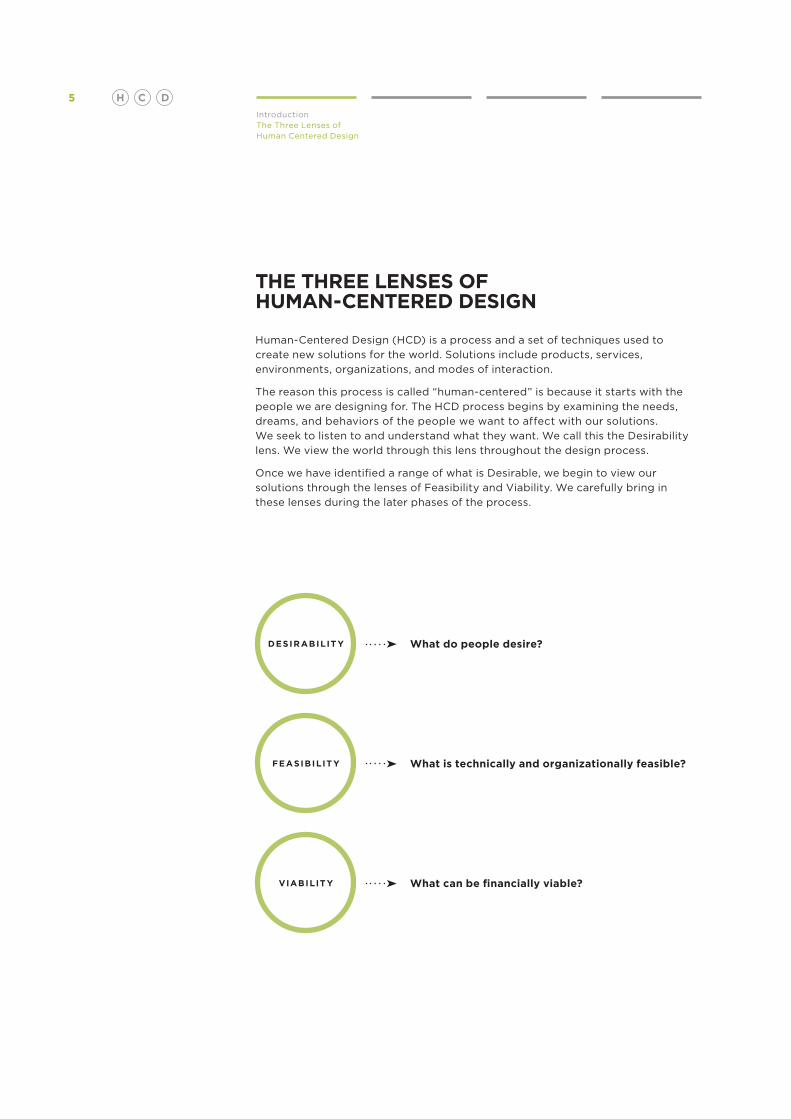
Focus on Human Values Empathy for the people you are
designing for and feedback from these users is fundamental to good design.
Radical Collaboration Bring together innovators with varied backgrounds and viewpoints. Enable breakthrough insights and solutions to
emerge from the diversity.
Embrace Experimentation Prototyping is not simply a way to validate your
idea; it is an integral part of your innovation process. We build to think and learn.
Show Don’t Tell Communicate your vision in an impactful and meaningful way by creating experiences, using
illustrative visuals, and telling good stories.
Be Mindful Of Process Know where you are in the design process,
what methods to use in that stage, and what your goals are.
Craft Clarity Produce a coherent vision out of messy problems. Frame it in a way to inspire
others and to fuel ideation.
Bias Toward Action Design thinking is a misnomer; it is more about
doing that thinking. Bias toward doing and making over thinking and meeting.
d.mindsets
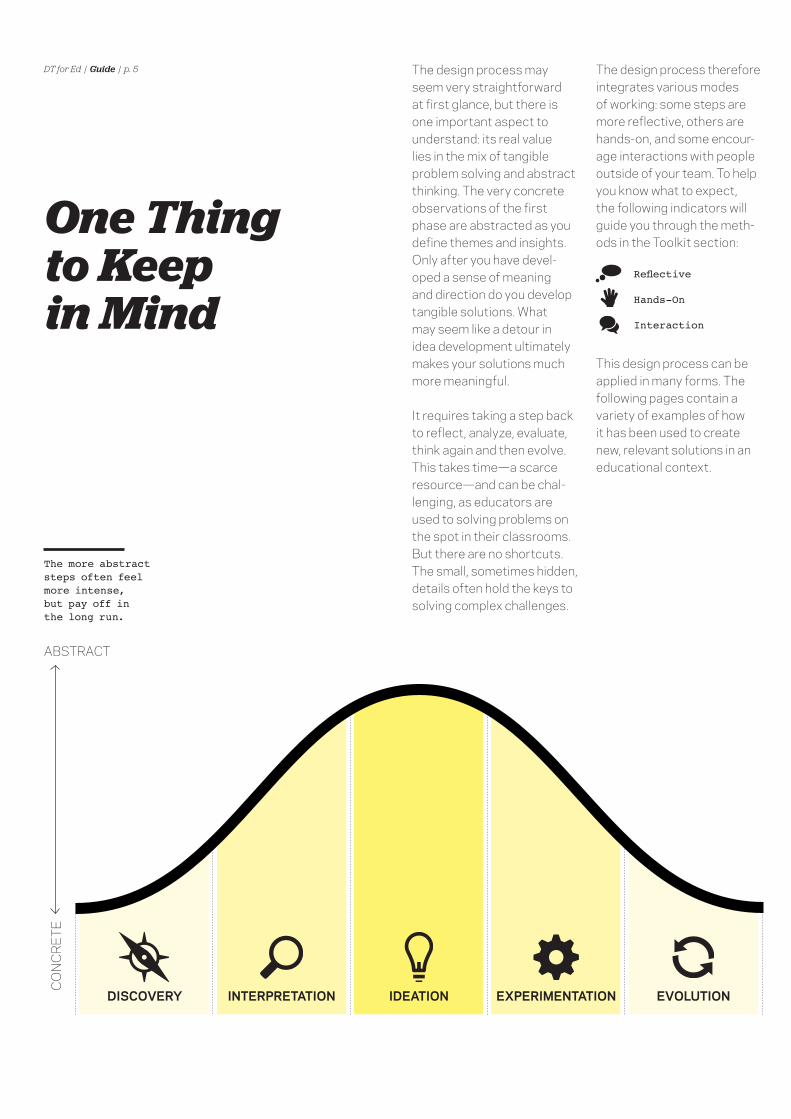
DT for Ed | Guide | p. 5 The design process may seem very straightforward at first glance, but there is one important aspect to understand: its real value lies in the mix of tangible problem solving and abstract thinking. The very concrete observations of the first phase are abstracted as you define themes and insights. Only after you have devel-oped a sense of meaning and direction do you develop tangible solutions. What may seem like a detour in idea development ultimately makes your solutions much more meaningful.
It requires taking a step back to reflect, analyze, evaluate, think again and then evolve. This takes time—a scarce resource—and can be chal-lenging, as educators are used to solving problems on the spot in their classrooms. But there are no shortcuts. The small, sometimes hidden, details often hold the keys to solving complex challenges.
The design process therefore integrates various modes of working: some steps are more reflective, others are hands-on, and some encour-age interactions with people outside of your team. To help you know what to expect, the following indicators will guide you through the meth-ods in the Toolkit section:
This design process can be applied in many forms. The following pages contain a variety of examples of how it has been used to create new, relevant solutions in an educational context.
One Thing to Keep in Mind
ABSTRACT
CO
NC
RE
TE
DISCOVERY INTERPRETATION IDEATION EXPERIMENTATION EVOLUTION
The more abstract steps often feel more intense, but pay off in the long run.
Hands-On
Interaction

PHASE 1:BRAINSTORMING- Warm up- Rapid- Open- Anything goes under the theme of sustainability
DT for Ed | Toolkit
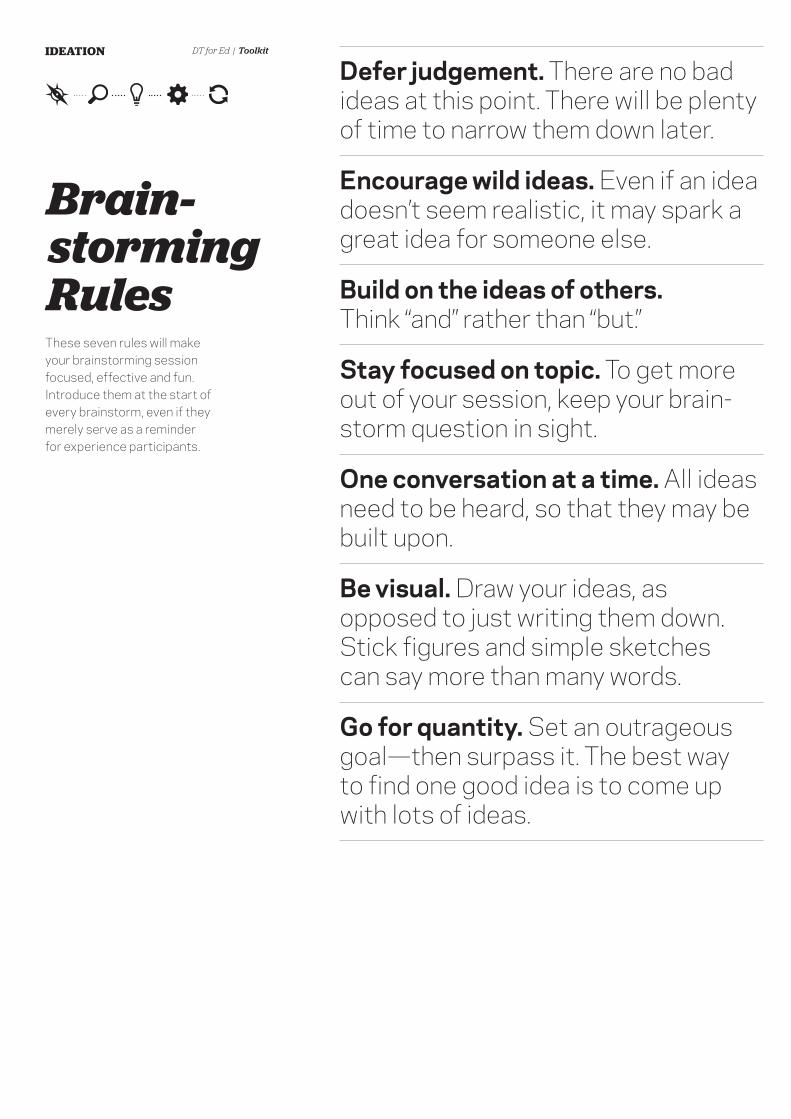
Brain-storming RulesThese seven rules will make your brainstorming session focused, effective and fun. Introduce them at the start of every brainstorm, even if they merely serve as a reminder for experience participants.
Defer judgement. There are no bad ideas at this point. There will be plenty of time to narrow them down later.
Encourage wild ideas. Even if an idea doesn’t seem realistic, it may spark a great idea for someone else.
Build on the ideas of others. Think “and” rather than “but.”
Stay focused on topic. To get more out of your session, keep your brain-storm question in sight.
One conversation at a time. All ideas need to be heard, so that they may be built upon.
Be visual. Draw your ideas, as opposed to just writing them down. Stick figures and simple sketches can say more than many words.
Go for quantity. Set an outrageous goal—then surpass it. The best way to find one good idea is to come up with lots of ideas.
IDEATION
DT for Ed | Toolkit
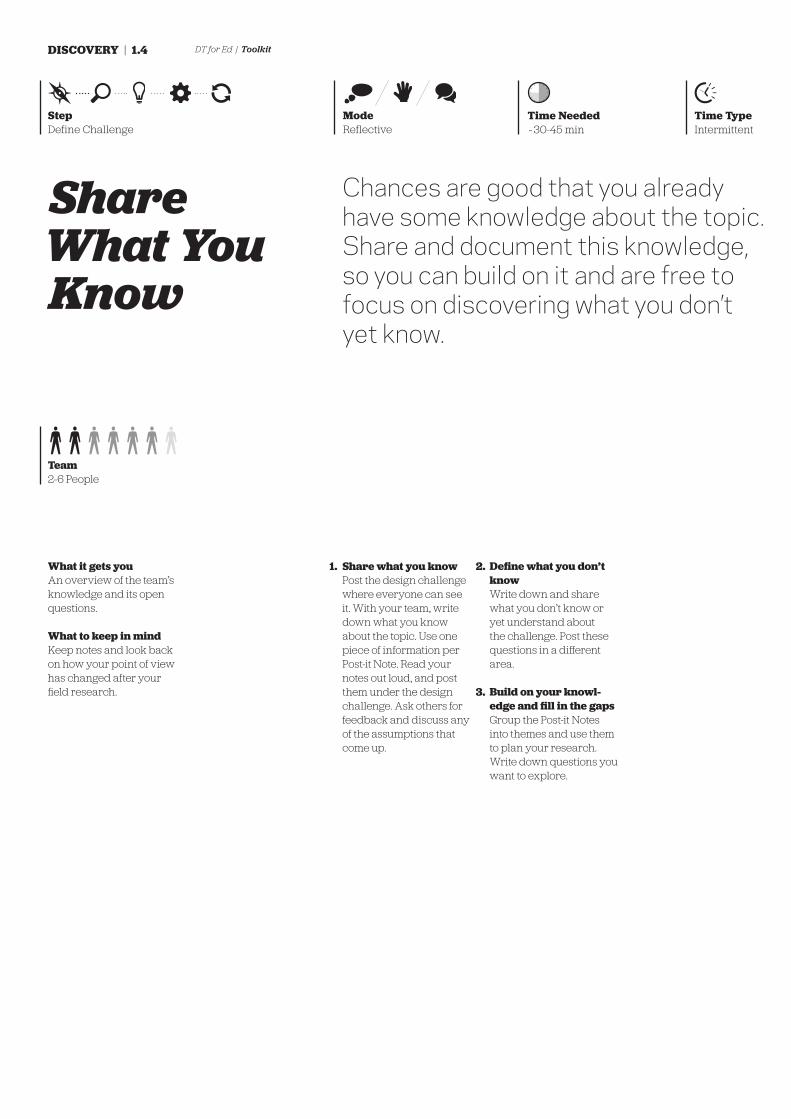
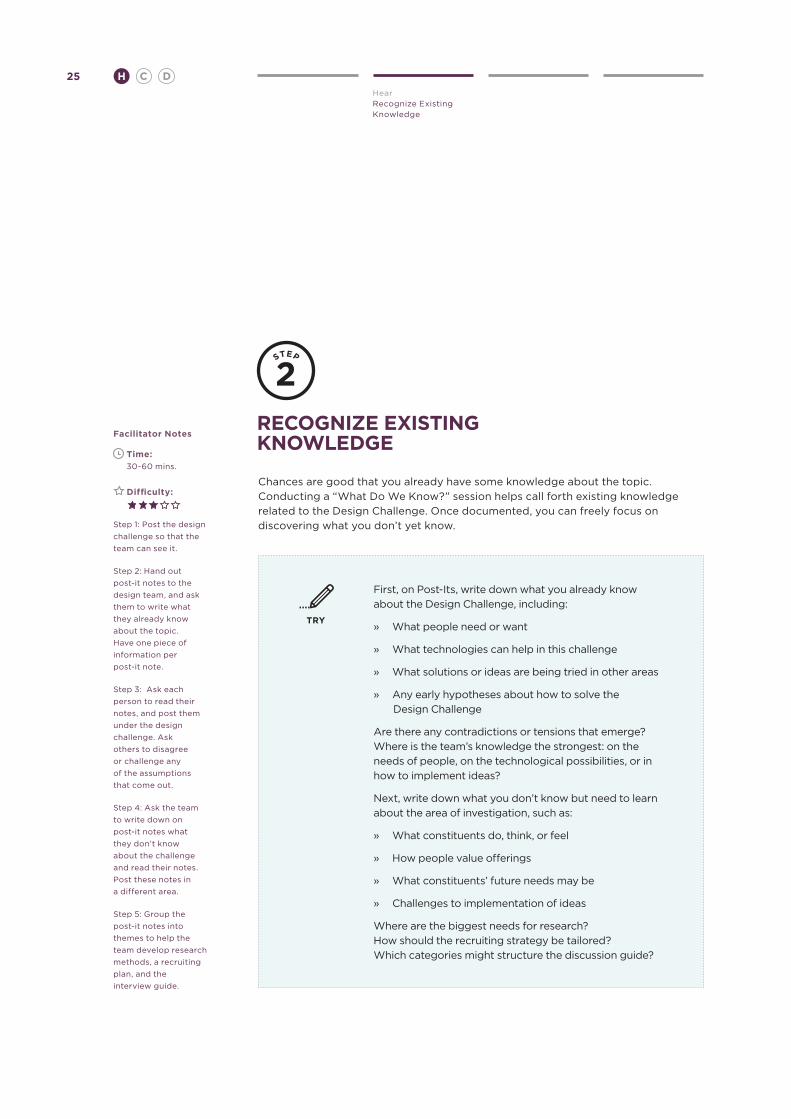
Share What You Know
Chances are good that you already have some knowledge about the topic.Share and document this knowledge, so you can build on it and are free to focus on discovering what you don’t yet know.
Share what you knowPost the design challenge where everyone can see it. With your team, write down what you know about the topic. Use one piece of information per Post-it Note. Read your notes out loud, and post them under the design challenge. Ask others for feedback and discuss any of the assumptions that come up.
Define what you don’t know Write down and share what you don’t know or yet understand about the challenge. Post these questions in a different area.
Build on your knowl-edge and fill in the gapsGroup the Post-it Notes into themes and use them to plan your research. Write down questions you want to explore.
What it gets you An overview of the team’s knowledge and its open questions.
What to keep in mindKeep notes and look back on how your point of view has changed after your field research.
ModeReflective
StepDefine Challenge
DISCOVERY | 1.4
Time TypeIntermittent
1.
3.
2.
Time Needed~30-45 min
Team2-6 People
Saturate and Group METHOD
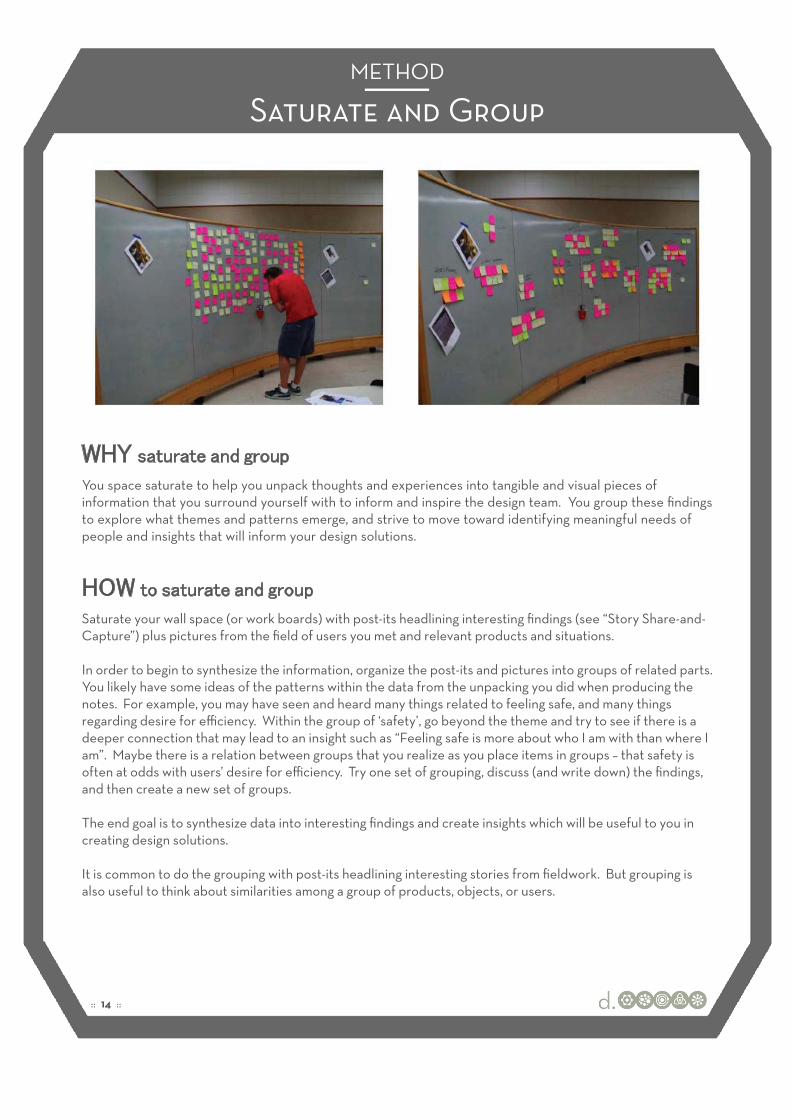
You space saturate to help you unpack thoughts and experiences into tangible and visual pieces of information that you surround yourself with to inform and inspire the design team. You group these findings to explore what themes and patterns emerge, and strive to move toward identifying meaningful needs of people and insights that will inform your design solutions.
Saturate your wall space (or work boards) with post-its headlining interesting findings (see “Story Share-and-Capture”) plus pictures from the field of users you met and relevant products and situations.
In order to begin to synthesize the information, organize the post-its and pictures into groups of related parts. You likely have some ideas of the patterns within the data from the unpacking you did when producing the notes. For example, you may have seen and heard many things related to feeling safe, and many things regarding desire for efficiency. Within the group of ‘safety’, go beyond the theme and try to see if there is a deeper connection that may lead to an insight such as “Feeling safe is more about who I am with than where I am”. Maybe there is a relation between groups that you realize as you place items in groups – that safety is often at odds with users’ desire for efficiency. Try one set of grouping, discuss (and write down) the findings, and then create a new set of groups.
The end goal is to synthesize data into interesting findings and create insights which will be useful to you in creating design solutions.
It is common to do the grouping with post-its headlining interesting stories from fieldwork. But grouping is also useful to think about similarities among a group of products, objects, or users.
:: 14 ::
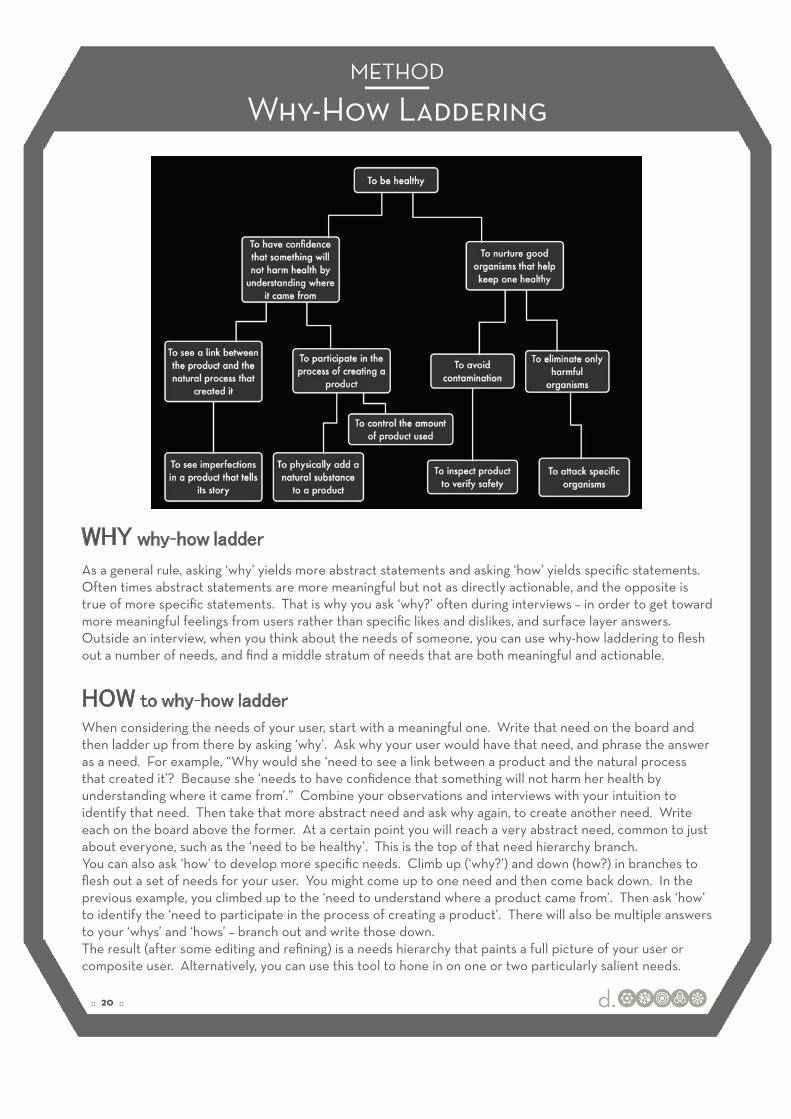
Why-How Laddering METHOD
-
-
As a general rule, asking ‘why’ yields more abstract statements and asking ‘how’ yields specific statements. Often times abstract statements are more meaningful but not as directly actionable, and the opposite is true of more specific statements. That is why you ask ‘why?’ often during interviews – in order to get toward more meaningful feelings from users rather than specific likes and dislikes, and surface layer answers. Outside an interview, when you think about the needs of someone, you can use why-how laddering to flesh out a number of needs, and find a middle stratum of needs that are both meaningful and actionable.
When considering the needs of your user, start with a meaningful one. Write that need on the board and then ladder up from there by asking ‘why’. Ask why your user would have that need, and phrase the answer as a need. For example, “Why would she ‘need to see a link between a product and the natural process that created it’? Because she ‘needs to have confidence that something will not harm her health by understanding where it came from’.” Combine your observations and interviews with your intuition to identify that need. Then take that more abstract need and ask why again, to create another need. Write each on the board above the former. At a certain point you will reach a very abstract need, common to just about everyone, such as the ‘need to be healthy’. This is the top of that need hierarchy branch. You can also ask ‘how’ to develop more specific needs. Climb up (‘why?’) and down (how?) in branches to flesh out a set of needs for your user. You might come up to one need and then come back down. In the previous example, you climbed up to the ‘need to understand where a product came from’. Then ask ‘how’ to identify the ‘need to participate in the process of creating a product’. There will also be multiple answers to your ‘whys’ and ‘hows’ – branch out and write those down. The result (after some editing and refining) is a needs hierarchy that paints a full picture of your user or composite user. Alternatively, you can use this tool to hone in on one or two particularly salient needs.
:: 20 ::
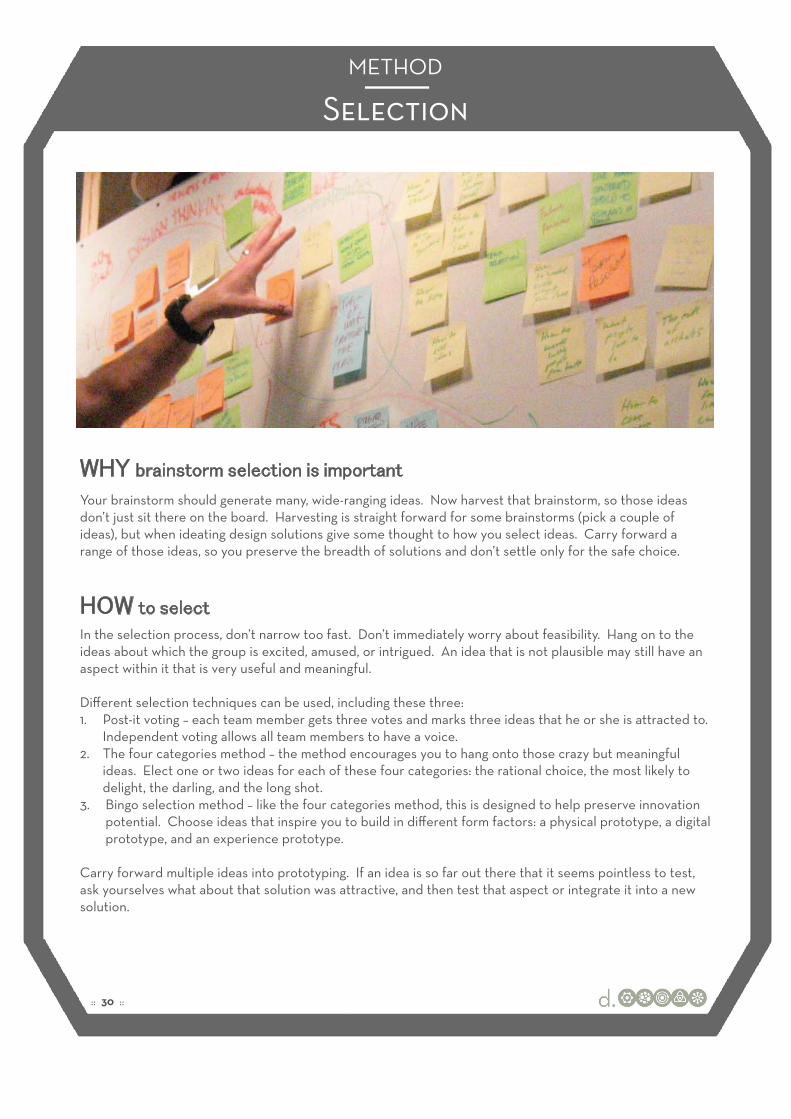
Selection METHOD
Your brainstorm should generate many, wide-ranging ideas. Now harvest that brainstorm, so those ideas don’t just sit there on the board. Harvesting is straight forward for some brainstorms (pick a couple of ideas), but when ideating design solutions give some thought to how you select ideas. Carry forward a range of those ideas, so you preserve the breadth of solutions and don’t settle only for the safe choice.
In the selection process, don’t narrow too fast. Don’t immediately worry about feasibility. Hang on to the ideas about which the group is excited, amused, or intrigued. An idea that is not plausible may still have an aspect within it that is very useful and meaningful.
Different selection techniques can be used, including these three: 1.! Post-it voting – each team member gets three votes and marks three ideas that he or she is attracted to.
Independent voting allows all team members to have a voice. 2.! The four categories method – the method encourages you to hang onto those crazy but meaningful
ideas. Elect one or two ideas for each of these four categories: the rational choice, the most likely to delight, the darling, and the long shot.
3. Bingo selection method – like the four categories method, this is designed to help preserve innovation potential. Choose ideas that inspire you to build in different form factors: a physical prototype, a digital prototype, and an experience prototype.
Carry forward multiple ideas into prototyping. If an idea is so far out there that it seems pointless to test, ask yourselves what about that solution was attractive, and then test that aspect or integrate it into a new solution.
:: 30 ::
DEFINE CONCEPT
- Find themes- Highlight potential concepts- Create a problem question and identify an issue to resolve
DT for Ed | Toolkit
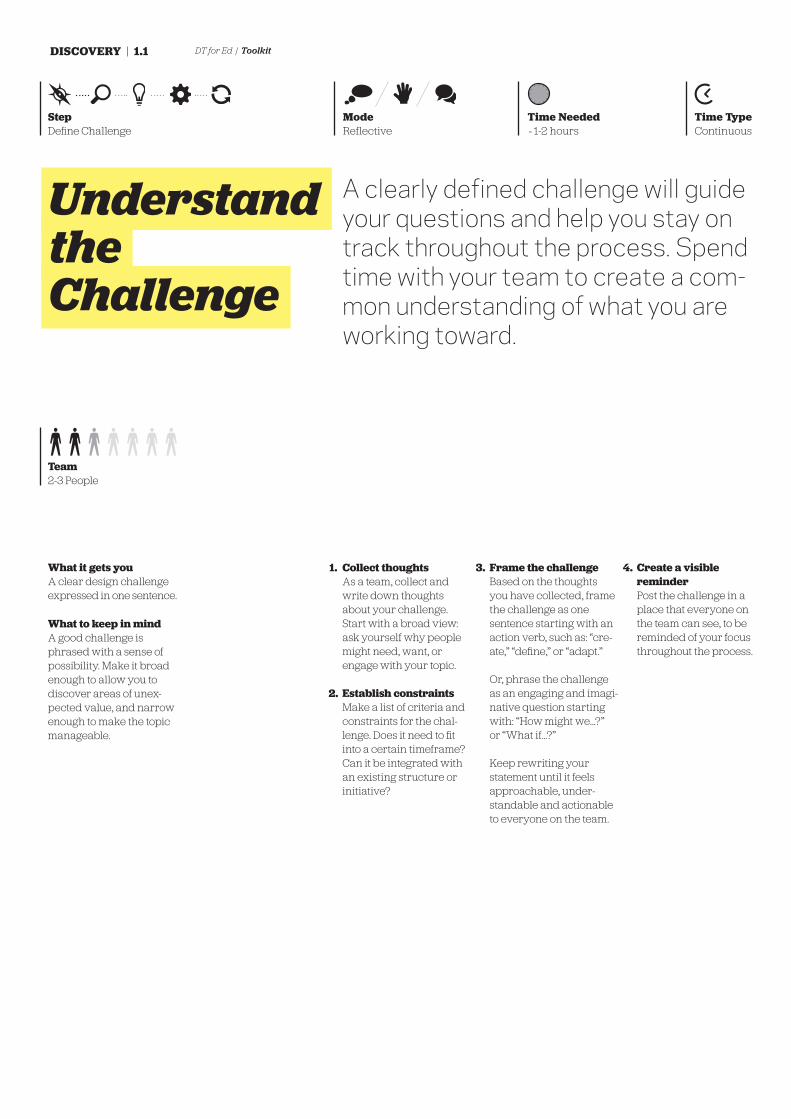
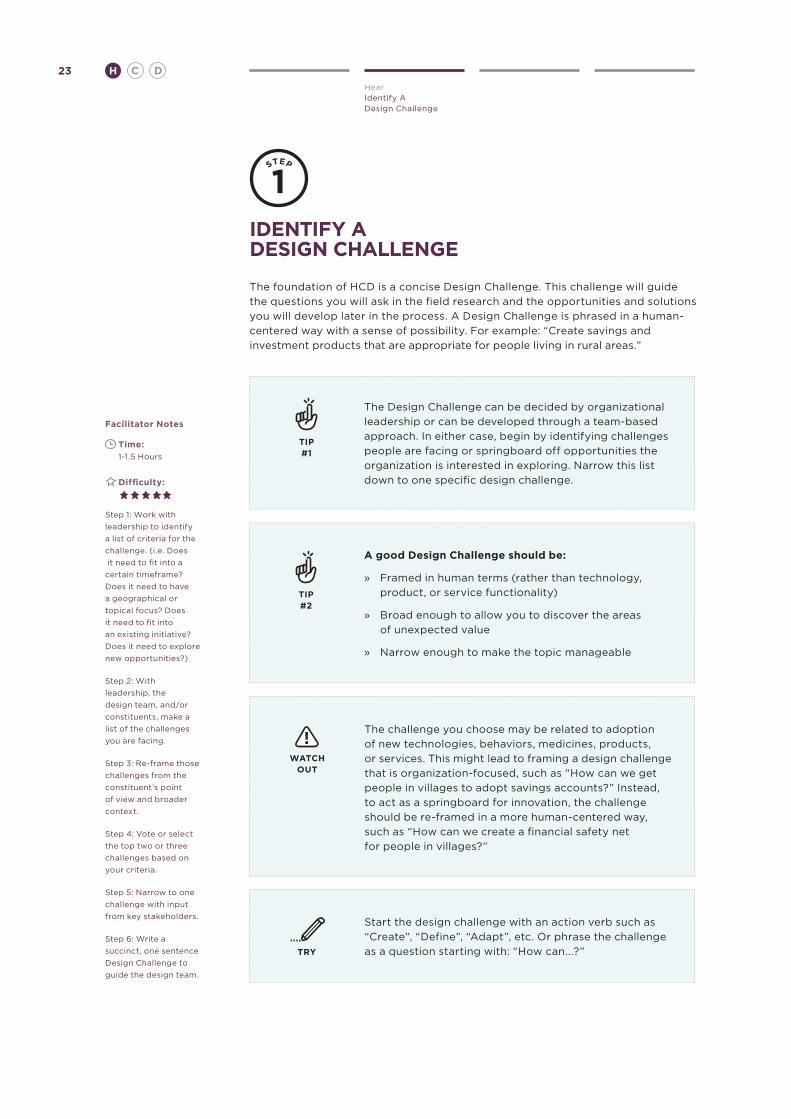
Understand the Challenge
A clearly defined challenge will guide your questions and help you stay on track throughout the process. Spend time with your team to create a com-mon understanding of what you are working toward.
Collect thoughtsAs a team, collect and write down thoughts about your challenge. Start with a broad view: ask yourself why people might need, want, or engage with your topic.
Establish constraints Make a list of criteria and constraints for the chal-lenge. Does it need to fit into a certain timeframe? Can it be integrated with an existing structure or initiative?
Frame the challengeBased on the thoughts you have collected, frame the challenge as one sentence starting with an action verb, such as: “cre-ate,” “define,” or “adapt.”
Or, phrase the challenge as an engaging and imagi-native question starting with: “How might we...?” or “What if…?”
Keep rewriting your statement until it feels approachable, under-standable and actionable to everyone on the team.
Create a visible reminderPost the challenge in a place that everyone on the team can see, to be reminded of your focus throughout the process.
What it gets you A clear design challenge expressed in one sentence.
What to keep in mindA good challenge is phrased with a sense of possibility. Make it broad enough to allow you to discover areas of unex-pected value, and narrow enough to make the topic manageable.
ModeReflective
StepDefine Challenge
DISCOVERY | 1.1
Time TypeContinuous
Time Needed~1-2 hours
Team2-3 People
1. 3. 4.
2.

“How Might We” Questions METHOD
“How might we” (HMW) questions are short questions that launch brainstorms. HMWs fall out of your point-of-view statement or design principles as seeds for your ideation. Create a seed that is broad enough that there are a wide range of solutions but narrow enough that the team has some helpful boundaries. For example, between the too narrow “HMW create a cone to eat ice cream without dripping” and the too broad “HMW redesign dessert” might be the properly scoped “HMW redesign ice cream to be more portable.” It should be noted, the the proper scope of the seed will vary with the project and how much progress you have made in your project work.
Begin with your Point of View (POV) or problem statement. Break that larger challenge up into smaller actionable pieces. Look for aspects of the statement to complete the sentence, “How might we…” It is often helpful to brainstorm the HMW questions before the solutions brainstorm. For example, consider the following POV and resulting HMW statements.
How Might We . . .?
:: 26 ::
PHASE 2:IDEATION- Idea generation to answer chosen issue - Brainstorming for solutions- Tangible solutions to prototype- Identifying audience
:
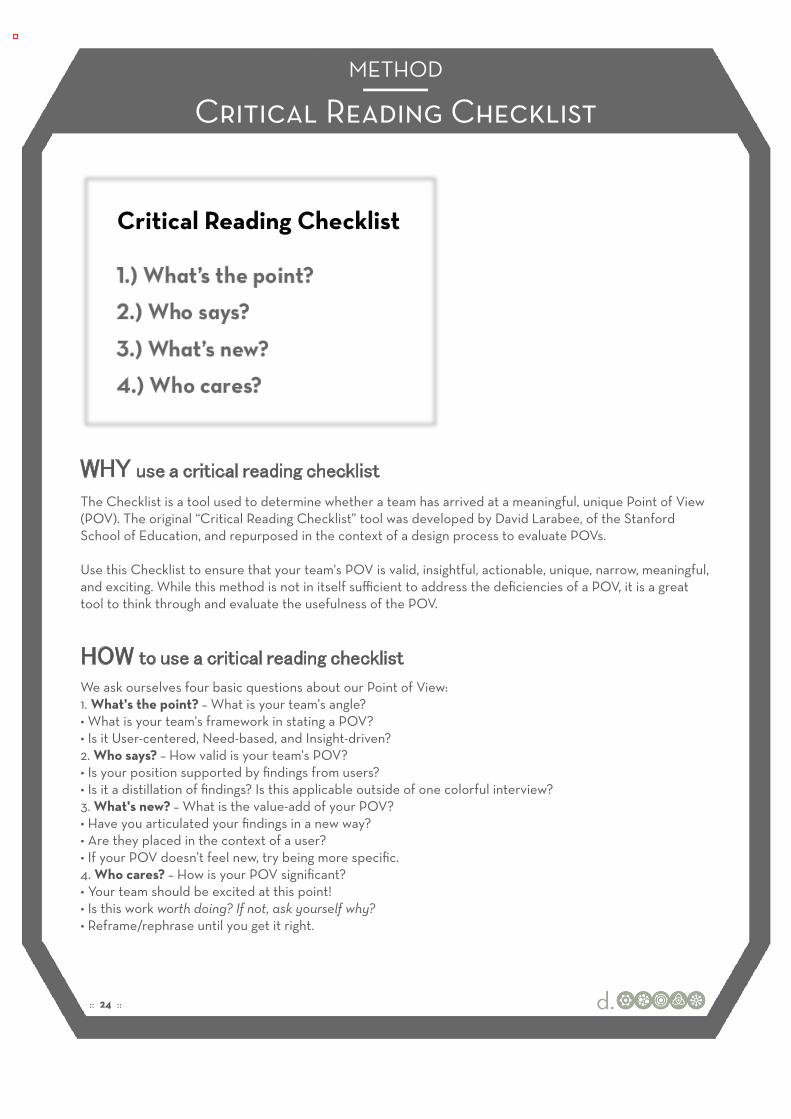
Critical Reading Checklist METHOD
The Checklist is a tool used to determine whether a team has arrived at a meaningful, unique Point of View (POV). The original “Critical Reading Checklist” tool was developed by David Larabee, of the Stanford School of Education, and repurposed in the context of a design process to evaluate POVs.
Use this Checklist to ensure that your team's POV is valid, insightful, actionable, unique, narrow, meaningful, and exciting. While this method is not in itself sufficient to address the deficiencies of a POV, it is a great tool to think through and evaluate the usefulness of the POV.
We ask ourselves four basic questions about our Point of View: 1. What's the point? – What is your team's angle? • What is your team's framework in stating a POV? • Is it User-centered, Need-based, and Insight-driven? 2. Who says? – How valid is your team's POV? • Is your position supported by findings from users? • Is it a distillation of findings? Is this applicable outside of one colorful interview? 3. What's new? – What is the value-add of your POV? • Have you articulated your findings in a new way? • Are they placed in the context of a user? • If your POV doesn’t feel new, try being more specific. 4. Who cares? – How is your POV significant? • Your team should be excited at this point! • Is this work worth doing? If not, ask yourself why? • Reframe/rephrase until you get it right.
Critical Reading Checklist
:: 24 ::
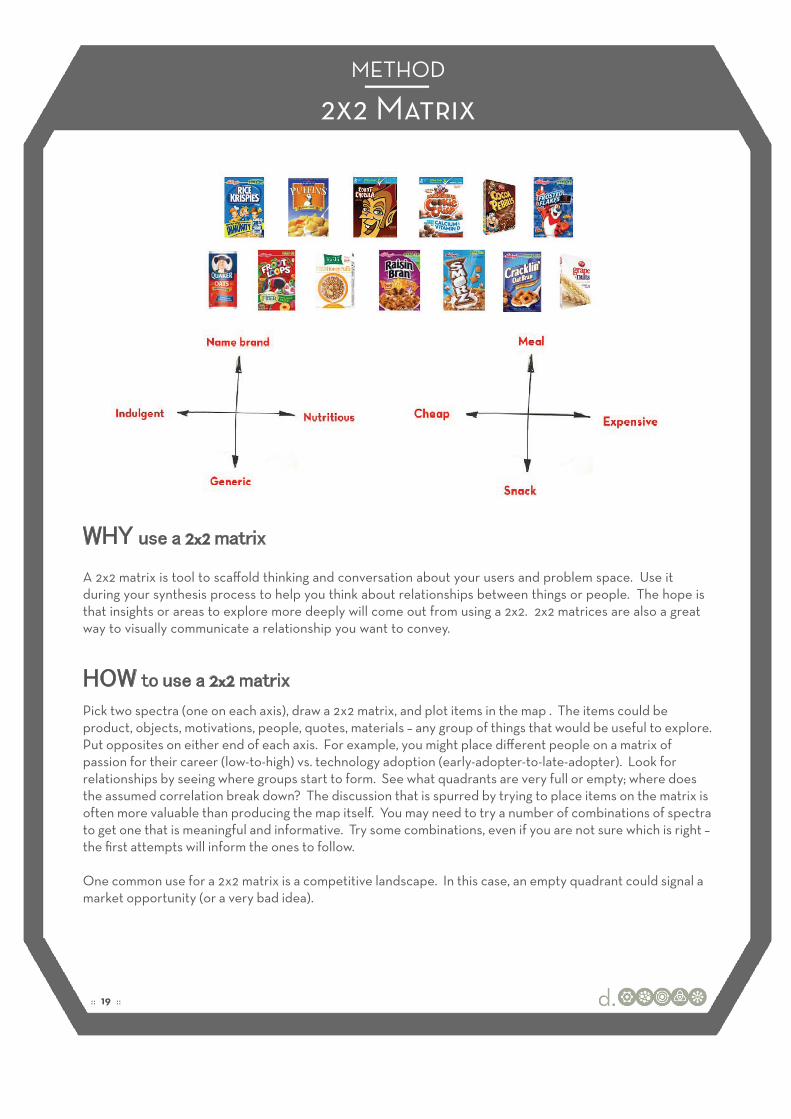
2x2 Matrix METHOD
2x2
2x2
A 2x2 matrix is tool to scaffold thinking and conversation about your users and problem space. Use it during your synthesis process to help you think about relationships between things or people. The hope is that insights or areas to explore more deeply will come out from using a 2x2. 2x2 matrices are also a great way to visually communicate a relationship you want to convey.
Pick two spectra (one on each axis), draw a 2x2 matrix, and plot items in the map . The items could be product, objects, motivations, people, quotes, materials – any group of things that would be useful to explore. Put opposites on either end of each axis. For example, you might place different people on a matrix of passion for their career (low-to-high) vs. technology adoption (early-adopter-to-late-adopter). Look for relationships by seeing where groups start to form. See what quadrants are very full or empty; where does the assumed correlation break down? The discussion that is spurred by trying to place items on the matrix is often more valuable than producing the map itself. You may need to try a number of combinations of spectra to get one that is meaningful and informative. Try some combinations, even if you are not sure which is right – the first attempts will inform the ones to follow.
One common use for a 2x2 matrix is a competitive landscape. In this case, an empty quadrant could signal a market opportunity (or a very bad idea).
:: 19 ::
http://www.servicedesigntools.org/tools/8
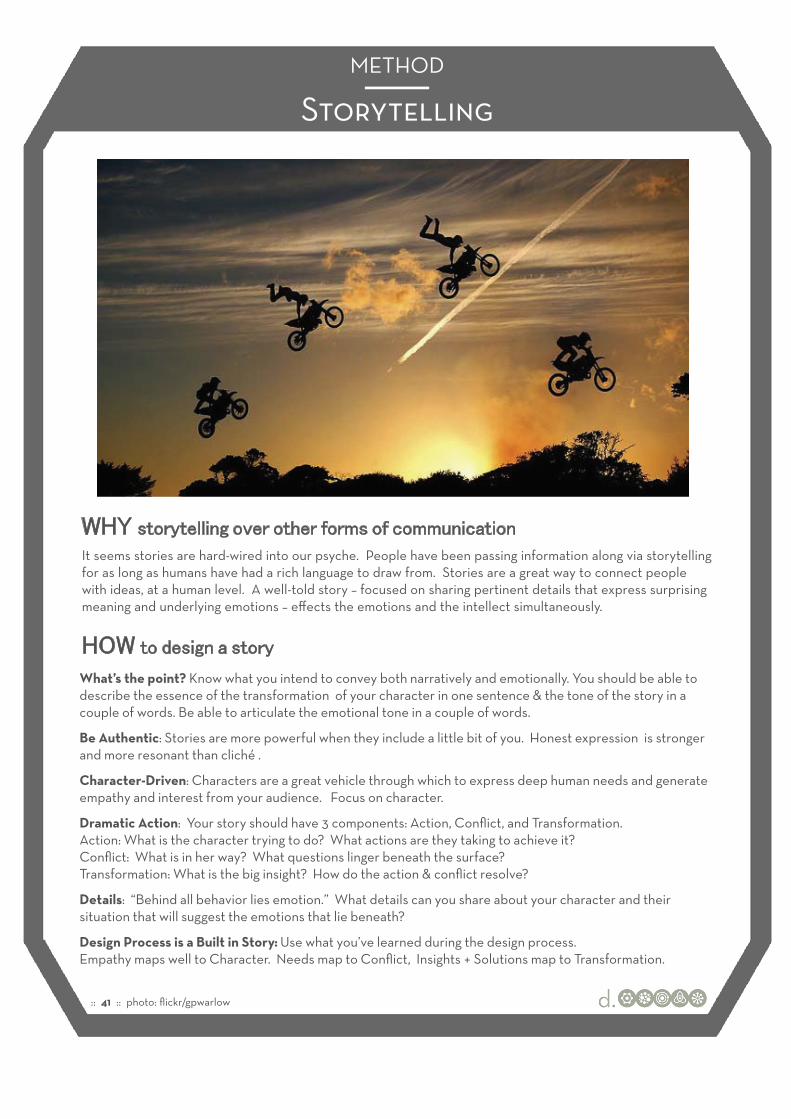
Storytelling METHOD
It seems stories are hard-wired into our psyche. People have been passing information along via storytelling for as long as humans have had a rich language to draw from. Stories are a great way to connect people with ideas, at a human level. A well-told story – focused on sharing pertinent details that express surprising meaning and underlying emotions – effects the emotions and the intellect simultaneously.
What’s the point? Know what you intend to convey both narratively and emotionally. You should be able to describe the essence of the transformation of your character in one sentence & the tone of the story in a couple of words. Be able to articulate the emotional tone in a couple of words.
Be Authentic: Stories are more powerful when they include a little bit of you. Honest expression is stronger and more resonant than cliché .
Character-Driven: Characters are a great vehicle through which to express deep human needs and generate empathy and interest from your audience. Focus on character.
Dramatic Action: Your story should have 3 components: Action, Conflict, and Transformation. Action: What is the character trying to do? What actions are they taking to achieve it? Conflict: What is in her way? What questions linger beneath the surface? Transformation: What is the big insight? How do the action & conflict resolve?
Details: “Behind all behavior lies emotion.” What details can you share about your character and their situation that will suggest the emotions that lie beneath?
Design Process is a Built in Story: Use what you’ve learned during the design process. Empathy maps well to Character. Needs map to Conflict, Insights + Solutions map to Transformation.
:: 41 :: photo: flickr/gpwarlow
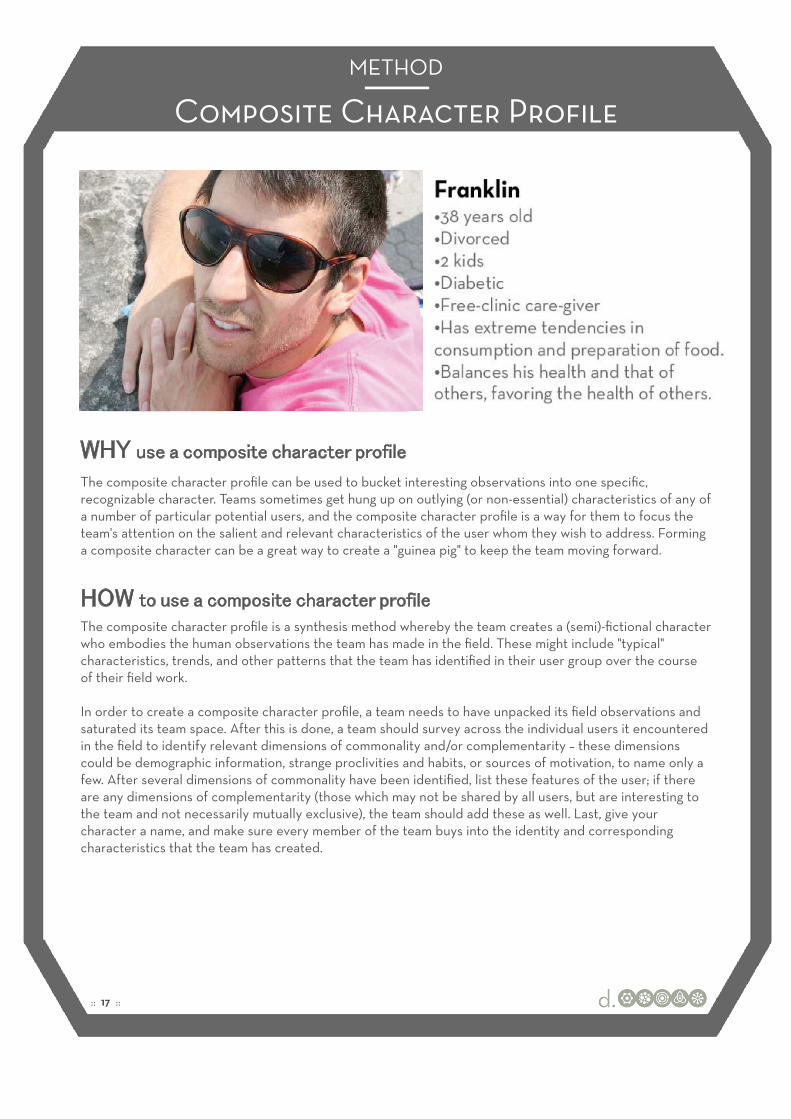
Composite Character Profile METHOD
The composite character profile can be used to bucket interesting observations into one specific, recognizable character. Teams sometimes get hung up on outlying (or non-essential) characteristics of any of a number of particular potential users, and the composite character profile is a way for them to focus the team's attention on the salient and relevant characteristics of the user whom they wish to address. Forming a composite character can be a great way to create a "guinea pig" to keep the team moving forward.
The composite character profile is a synthesis method whereby the team creates a (semi)-fictional character who embodies the human observations the team has made in the field. These might include "typical" characteristics, trends, and other patterns that the team has identified in their user group over the course of their field work.
In order to create a composite character profile, a team needs to have unpacked its field observations and saturated its team space. After this is done, a team should survey across the individual users it encountered in the field to identify relevant dimensions of commonality and/or complementarity – these dimensions could be demographic information, strange proclivities and habits, or sources of motivation, to name only a few. After several dimensions of commonality have been identified, list these features of the user; if there are any dimensions of complementarity (those which may not be shared by all users, but are interesting to the team and not necessarily mutually exclusive), the team should add these as well. Last, give your character a name, and make sure every member of the team buys into the identity and corresponding characteristics that the team has created.
:: 17 ::

PHASE 3:PROTOTYPING- Test solutions- Refine ideas- Understand journey and interaction
DT for Ed | Toolkit
StepMake Prototypes
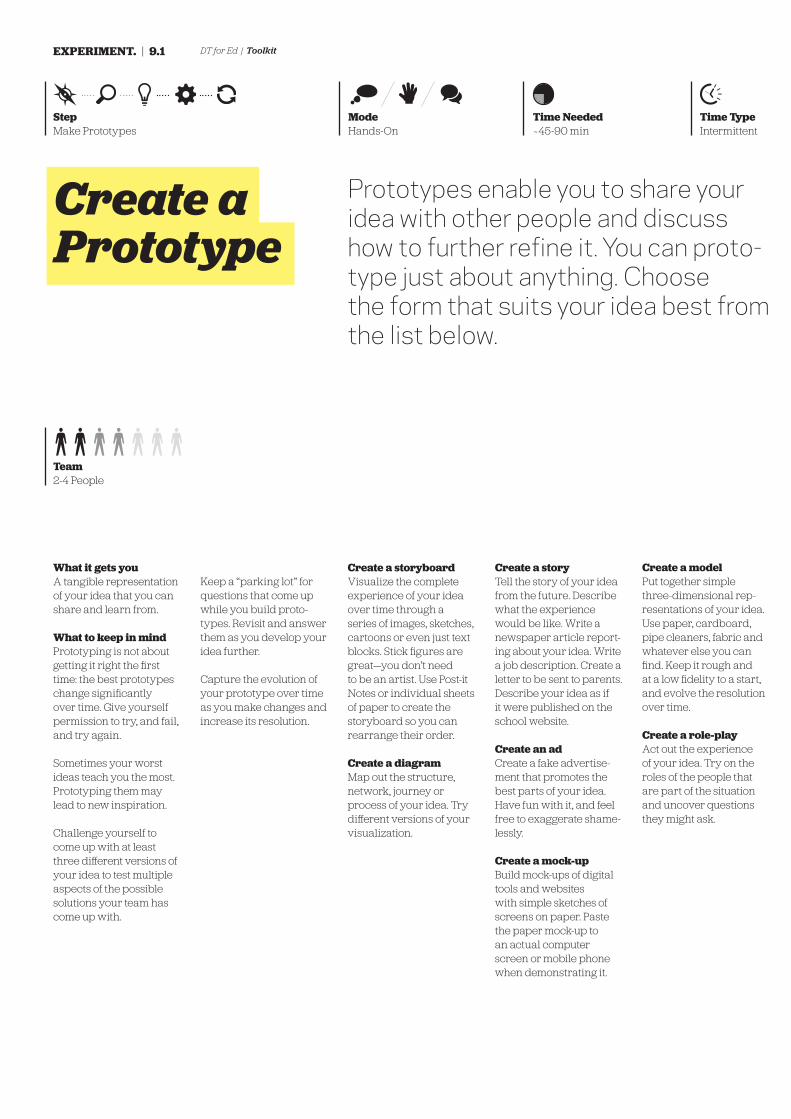
EXPERIMENT. | 9.1
Create a Prototype
ModeHands-On
Time TypeIntermittent
Prototypes enable you to share your idea with other people and discuss how to further refine it. You can proto-type just about anything. Choose the form that suits your idea best from the list below.
What it gets you A tangible representation of your idea that you can share and learn from.
What to keep in mindPrototyping is not about getting it right the first time: the best prototypes change significantly over time. Give yourself permission to try, and fail, and try again.
Sometimes your worst ideas teach you the most. Prototyping them may lead to new inspiration.
Challenge yourself to come up with at least three different versions of your idea to test multiple aspects of the possible solutions your team has come up with.
Keep a “parking lot” for questions that come up while you build proto-types. Revisit and answer them as you develop your idea further.
Capture the evolution of your prototype over time as you make changes and increase its resolution.
Team2-4 People
Create a storyboardVisualize the complete experience of your idea over time through a series of images, sketches, cartoons or even just text blocks. Stick figures are great—you don’t need to be an artist. Use Post-it Notes or individual sheets of paper to create the storyboard so you can rearrange their order.
Create a diagram Map out the structure, network, journey or process of your idea. Try different versions of your visualization.
Create a storyTell the story of your idea from the future. Describe what the experience would be like. Write a newspaper article report-ing about your idea. Write a job description. Create a letter to be sent to parents. Describe your idea as if it were published on the school website.
Create an adCreate a fake advertise-ment that promotes the best parts of your idea. Have fun with it, and feel free to exaggerate shame-lessly.
Create a mock-upBuild mock-ups of digital tools and websites with simple sketches of screens on paper. Paste the paper mock-up to an actual computer screen or mobile phone when demonstrating it.
Create a modelPut together simple three-dimensional rep-resentations of your idea. Use paper, cardboard, pipe cleaners, fabric and whatever else you can find. Keep it rough and at a low fidelity to a start, and evolve the resolution over time.
Create a role-playAct out the experience of your idea. Try on the roles of the people that are part of the situation and uncover questions they might ask.
Time Needed~45-90 min
http://www.servicedesigntools.org/tools/108
http://www.servicedesigntools.org/tools/13

PHASE 4:REFINEMENT- Refine prototypes- Explore alternative areas within solution- Understand life cycle of solution- Refine solution
DT for Ed | Toolkit
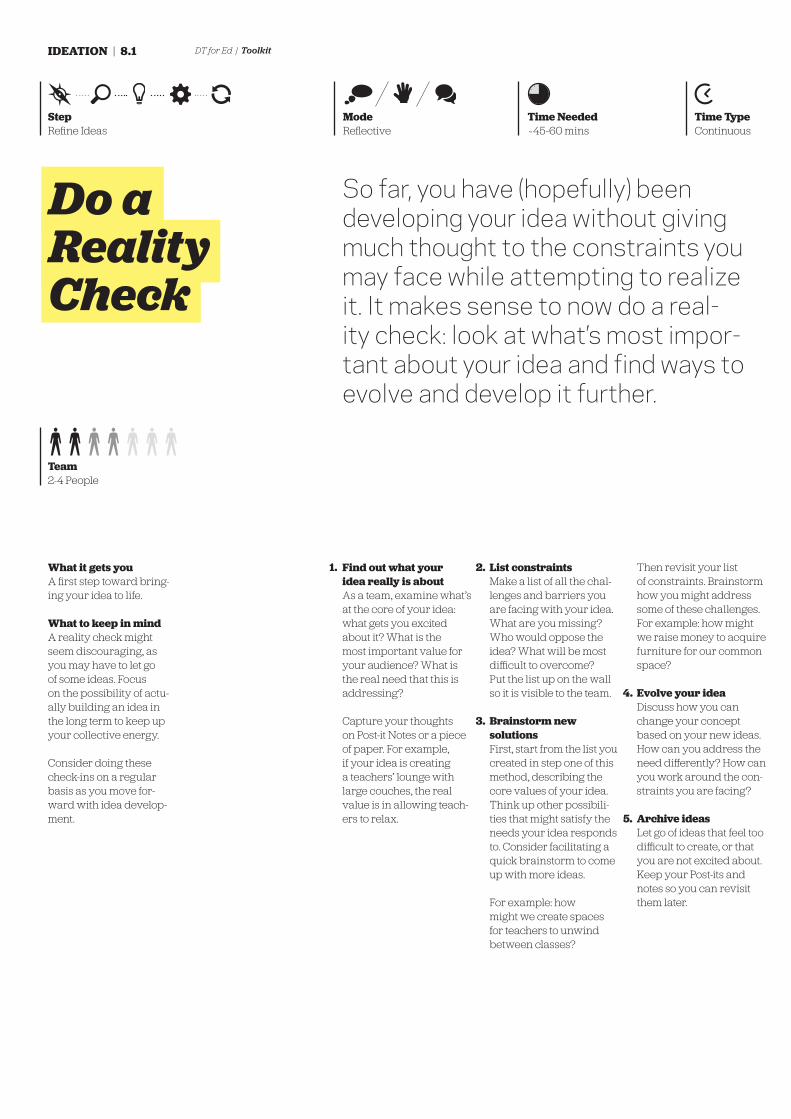
StepRefine Ideas
IDEATION | 8.1
Do a Reality Check
ModeReflective
So far, you have (hopefully) been developing your idea without giving much thought to the constraints you may face while attempting to realize it. It makes sense to now do a real-ity check: look at what’s most impor-tant about your idea and find ways to evolve and develop it further.
What it gets you A first step toward bring-ing your idea to life.
What to keep in mindA reality check might seem discouraging, as you may have to let go of some ideas. Focus on the possibility of actu-ally building an idea in the long term to keep up your collective energy.
Consider doing these check-ins on a regular basis as you move for-ward with idea develop-ment.
Time TypeContinuous
Time Needed~45-60 mins
Team2-4 People
Find out what your idea really is aboutAs a team, examine what’s at the core of your idea: what gets you excited about it? What is the most important value for your audience? What is the real need that this is addressing?
Capture your thoughts on Post-it Notes or a piece of paper. For example, if your idea is creating a teachers’ lounge with large couches, the real value is in allowing teach-ers to relax.
List constraints Make a list of all the chal-lenges and barriers you are facing with your idea. What are you missing? Who would oppose the idea? What will be most difficult to overcome? Put the list up on the wall so it is visible to the team.
Brainstorm new solutionsFirst, start from the list you created in step one of this method, describing the core values of your idea. Think up other possibili-ties that might satisfy the needs your idea responds to. Consider facilitating a quick brainstorm to come up with more ideas.
For example: how might we create spaces for teachers to unwind between classes?
Then revisit your list of constraints. Brainstorm how you might address some of these challenges.For example: how might we raise money to acquire furniture for our common space?
Evolve your ideaDiscuss how you can change your concept based on your new ideas. How can you address the need differently? How can you work around the con-straints you are facing? Archive ideasLet go of ideas that feel too difficult to create, or that you are not excited about. Keep your Post-its and notes so you can revisit them later.
1.
4.
5.
3.
2.
http://www.servicedesigntools.org/tools/38
PHASE 5:PRESENTATION- Tools to present work- Select prototypes for presentation- Prepare to present final outcome
DT for Ed | Toolkit
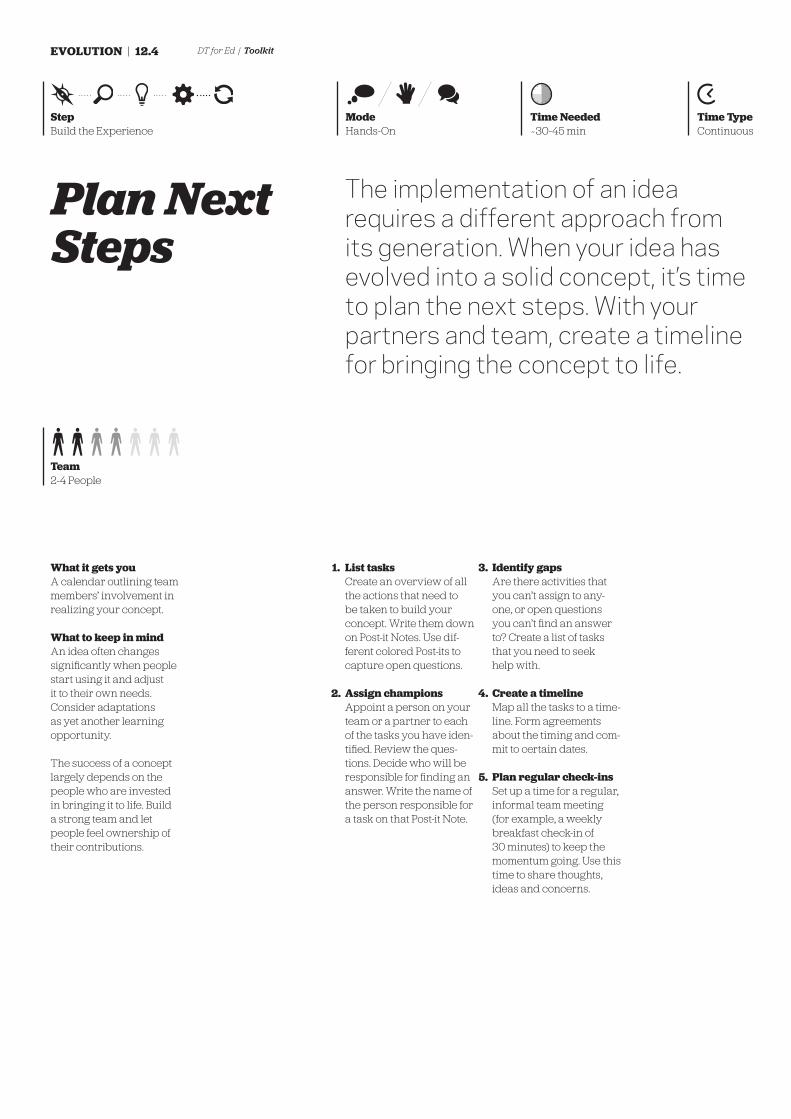
StepBuild the Experience
EVOLUTION | 12.4
Plan Next Steps
ModeHands-On
The implementation of an idea requires a different approach from its generation. When your idea has evolved into a solid concept, it’s time to plan the next steps. With your partners and team, create a timeline for bringing the concept to life.
What it gets you A calendar outlining team members’ involvement in realizing your concept.
What to keep in mindAn idea often changes significantly when people start using it and adjust it to their own needs. Consider adaptations as yet another learning opportunity.
The success of a concept largely depends on the people who are invested in bringing it to life. Build a strong team and let people feel ownership of their contributions.
List tasksCreate an overview of all the actions that need to be taken to build your concept. Write them down on Post-it Notes. Use dif-ferent colored Post-its to capture open questions.
Assign champions Appoint a person on your team or a partner to each of the tasks you have iden-tified. Review the ques-tions. Decide who will be responsible for finding an answer. Write the name of the person responsible for a task on that Post-it Note.
Identify gapsAre there activities that you can’t assign to any-one, or open questions you can’t find an answer to? Create a list of tasks that you need to seek help with.
Create a timelineMap all the tasks to a time-line. Form agreements about the timing and com-mit to certain dates.
Plan regular check-insSet up a time for a regular, informal team meeting (for example, a weekly breakfast check-in of 30 minutes) to keep the momentum going. Use this time to share thoughts, ideas and concerns.
Team2-4 People
1. 3.
5.
4.2.
Time TypeContinuous
Time Needed~30-45 min
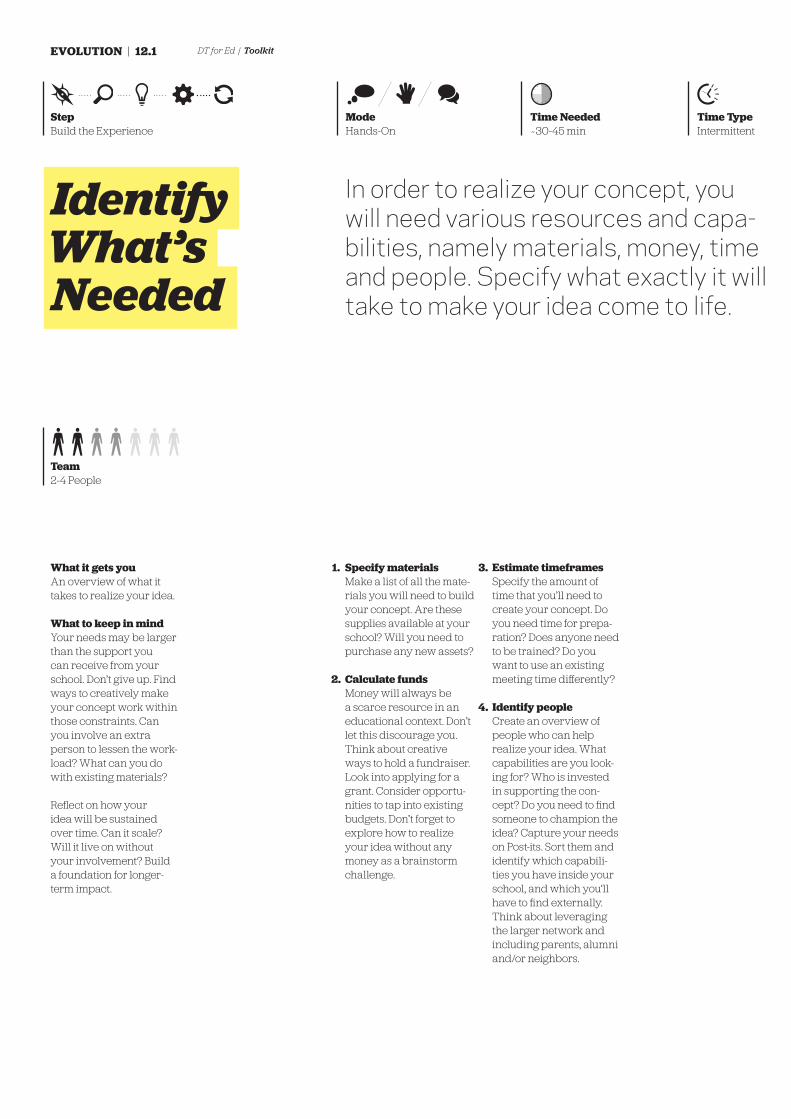
DT for Ed | Toolkit
StepBuild the Experience
EVOLUTION | 12.1
Identify What’s Needed
ModeHands-On
Time TypeIntermittent
Time Needed~30-45 min
In order to realize your concept, you will need various resources and capa-bilities, namely materials, money, time and people. Specify what exactly it will take to make your idea come to life.
What it gets you An overview of what it takes to realize your idea.
What to keep in mindYour needs may be larger than the support you can receive from your school. Don’t give up. Find ways to creatively make your concept work within those constraints. Can you involve an extra person to lessen the work-load? What can you do with existing materials?
Reflect on how your idea will be sustained over time. Can it scale? Will it live on without your involvement? Build a foundation for longer-term impact.
Specify materialsMake a list of all the mate-rials you will need to build your concept. Are these supplies available at your school? Will you need to purchase any new assets?
Calculate funds Money will always be a scarce resource in an educational context. Don’t let this discourage you. Think about creative ways to hold a fundraiser. Look into applying for a grant. Consider opportu-nities to tap into existing budgets. Don’t forget to explore how to realize your idea without any money as a brainstorm challenge.
Estimate timeframesSpecify the amount of time that you’ll need to create your concept. Do you need time for prepa-ration? Does anyone need to be trained? Do you want to use an existing meeting time differently?
Identify peopleCreate an overview of people who can help realize your idea. What capabilities are you look-ing for? Who is invested in supporting the con-cept? Do you need to find someone to champion the idea? Capture your needs on Post-its. Sort them and identify which capabili-ties you have inside your school, and which you‘ll have to find externally. Think about leveraging the larger network and including parents, alumni and/or neighbors.
Team2-4 People
1. 3.
2.
4.

DT for Ed | Toolkit
StepBuild the Experience
EVOLUTION | 12.2
Pitch Your Concept
ModeInteraction
A credible and inspiring story will help convince others to support your concept. Build your pitch to motivate others to help bring the idea to life.
What it gets you A story that can convince potential supporters of your concept’s strength.
What to keep in mindBegin by communicating what excites you the most—talk about the opportunity and the bigger ideas rather than small details. This enables others to see the value and contribute to the concept.
Know your audienceThink about who you are trying to get excited about your idea. Put yourself in the shoes of the listener: what will get them inter-ested in your idea? What will they be motivated by?For example:» For educators: how is it
going to help me do my job? How is it going to help my students suc-ceed?
» For administrators: How does this affect the way our school is viewed?
» For parents: how is this going to help my child succeed in school?
» For students: how is it going to make learning more fun?
» For potential team mem-bers: why would I want to be part of this? What’s in it for me?
Highlight the potentialCreate a provocative statement for your idea. Get your audience excited about the opportunities you see. Frame it as “What if…?”
Build a narrativeTell a brief and engaging story, focusing on the most important aspects of your concept. Describe what inspired your idea, and how it responds to the needs you learned about.
Communicate the valueExplain the value your idea provides for the vari-ous people involved. Be explicit and illustrative in your descriptions.
Be specific about your needsBe clear about what you want from your audience. Draw from your list of needs and communicate what support you need.
Encourage contributionInvite others to join the conversation or help build the concept. Consider engaging your audience in an activity that lets them experience and participate in the design process.
Time TypeContinuous
Team2-4 People
1.
3.
5.
6.
2.
4.
Time Needed~45-60 mins

CREDITSThis toolkit has been collated by Stefanie Di Russo for the Melbourne Sustainability Jam. All content is credited to IDEO, Stanford d.School and Service Design Tools.
Methods collated for this toolkit can be found from the following sites:
D.School Bootcamp Bootleg
http://dschool.typepad.com/news/2010/12/2010-boot-camp-bootleg-is-here.html
IDEO HCD Toolkit
http://www.ideo.com/work/human-centered-design-tool-kit/
IDEO Toolkit for Educators
http://www.ideo.com/work/toolkit-for-educators
Service Design Tools
http://www.servicedesigntools.org/