mckesson radiology radiologist manual radiology radiologist manual mckesson radiology 12.2 produced...
TRANSCRIPT
McKesson Radiology™
Radiologist Manual
Revision 1.0
Document ID: 2016-35625

McKesson Radiology Radiologist Manual
McKesson Radiology 12.2 Produced in Cork, Ireland – Confidential and Proprietary 1.0, 27 June, 2016 Page 3
Table of Contents
Chapter 1 – McKesson Terminology ............................................................................................................................................ 5
Chapter 2 – The McKesson Radiology PACS Dataflow ................................................................................................................. 7
Chapter 3 – Understanding McKesson Radiology ........................................................................................................................ 8
Logging on to McKesson Radiology ......................................................................................................................................... 8
Properties of the Study Lists .................................................................................................................................................... 8
Customizing the Study Lists ................................................................................................................................................... 13
Custom Filters ........................................................................................................................................................................ 14
Chapter 4 – Rad Report ............................................................................................................................................................. 17
What is Rad Report ................................................................................................................................................................ 17
Reporting icons in Rad Station .............................................................................................................................................. 17
Report Life Cycle Icons .......................................................................................................................................................... 17
Chapter 5 – Opening Prior Studies............................................................................................................................................. 18
Chapter 6 – Working with Images Sets ...................................................................................................................................... 19
Linking and Unlinking Series .................................................................................................................................................. 19
Working with Quick and Precise Registration ....................................................................................................................... 20
Quick Registration ................................................................................................................................................................. 20
Perform Precise Registration ................................................................................................................................................. 20
Multi-Planar Reconstruction (MPR) ...................................................................................................................................... 21
Registration Using MPR Crosshairs ....................................................................................................................................... 23
Viewport Layout .................................................................................................................................................................... 24
Annotations ........................................................................................................................................................................... 25
Overlays ................................................................................................................................................................................. 26
Bookmarks ............................................................................................................................................................................. 27
Presentation .......................................................................................................................................................................... 28
Displaying Series .................................................................................................................................................................... 29
Window/Level ....................................................................................................................................................................... 30
Zoom/Pan .............................................................................................................................................................................. 31
Post Processing ...................................................................................................................................................................... 32
Chapter 7 – McKesson Study Share ........................................................................................................................................... 33
Chapter 8 – Print/Export/Send .................................................................................................................................................. 34
Print Images/Studies to a Film Printer .................................................................................................................................. 34
Export/Burn a Study to CD on a PACS Workstation .............................................................................................................. 35
Send Images from PACS to the CD Burner or an After Hours Reading Service ..................................................................... 38

McKesson Radiology Radiologist Manual
McKesson Radiology 12.2 Produced in Cork, Ireland – Confidential and Proprietary 1.0, 27 June, 2016 Page 4
Checking on the Status of the Send Job ................................................................................................................................ 38
Chapter 9 – Display Protocols .................................................................................................................................................... 39
Preparing a Site for Display Protocols ................................................................................................................................... 39
Best Practices for Creating Display Protocols ........................................................................................................................ 40
Creating a New Display Protocol ........................................................................................................................................... 41
Creating a Display Protocol Stage.......................................................................................................................................... 42
Specifying Image and Series placement using the Display Protocol Editor ........................................................................... 43
Updating a Display Protocol .................................................................................................................................................. 47
Copying a Display Protocol .................................................................................................................................................... 48
Frequently Asked Questions.................................................................................................................................................. 50
Troubleshooting Scenarios .................................................................................................................................................... 53
Chapter 10 – User Preferences .................................................................................................................................................. 55
Updating User Preferences ................................................................................................................................................... 55
3D/MPR ................................................................................................................................................................................. 56
Annotations ........................................................................................................................................................................... 57
Appearance ........................................................................................................................................................................... 58
Assign Study .......................................................................................................................................................................... 59
Auto Display .......................................................................................................................................................................... 59
CAD Marks ............................................................................................................................................................................. 60
Confirmation ......................................................................................................................................................................... 60
Dim Auxiliary Monitor ........................................................................................................................................................... 61
Display Protocol ..................................................................................................................................................................... 61
Image Compression ............................................................................................................................................................... 62
Main Tool Bar ........................................................................................................................................................................ 63
MG Historical Images ............................................................................................................................................................ 64
MG Zoom ............................................................................................................................................................................... 65
Notification ............................................................................................................................................................................ 66
Performance .......................................................................................................................................................................... 67
Power Scrolling ...................................................................................................................................................................... 67
Save Presentations ................................................................................................................................................................ 68
Sort Images ............................................................................................................................................................................ 70
Study List ............................................................................................................................................................................... 70
User Interaction ..................................................................................................................................................................... 71
McKesson Radiology Radiologist Manual
McKesson Radiology 12.2 Produced in Cork, Ireland – Confidential and Proprietary 1.0, 27 June, 2016 Page 5
Chapter 1 – McKesson Terminology
The following is a list of terms that radiologists should become familiar with: Anchor Study When a study is open from any list in McKesson Radiology, that study is considered an anchor study. When viewing a study in context, the anchor study is the one that defines the viewing context. Any other studies being viewed in the same context predate the anchor study and belong to the same patient. The anchor study is used to decide which display protocol family is relevant by default, and thus what criteria should be used for identifying relevant prior studies. McKesson Radiology McKesson Radiology is a PACS product produced by McKesson Enterprise Medical Imaging. McKesson Radiology is composed of the back-end and the user interface (front-end). McKesson Radiology Station Radiology Station is an image viewer accessed from an internet browser, from any personal computer that is connected to the Internet and is allowed access to McKesson Radiology. Radiology Station Lite This application is a lightweight alternative to Radiology Station. It has a feature set that is optimized for image-centric referring physicians to view and manipulate images, but does not support advanced workflow such as dictation integration. Radiology Station Lite has a smaller application footprint while still maintaining the look and feel of Radiology Station. Clinical Reference Viewer For referring physicians, Clinical Reference Viewer is an image viewer that enables you to access patient studies stored in the McKesson Radiology database. Using a web browser, you can view and manipulate images, and view study information and patient documentation. Clinical Reference Viewer cannot be used for diagnostic purposes. Radiology Station eJacket Radiology Station eJacket is no longer available with McKesson Radiology 12.2. Customers interested in replacing eJacket may purchase Clinical Reference Viewer. Picture Archiving and Communication System PACS is an acronym for Picture Archiving and Communication System. PACS systems are used to persistently store medical images received from diagnostic scanning devices (e.g. CTs, MRs, US, etc.) and transmit them to radiology workstations and similar medical imaging devices. Radiology Information System (RIS) A Radiology Information System is software used by radiology centers and departments to manage the scheduling, processing, reporting, and billing of patients and their studies. Many RIS products are only capable of unidirectional communication with outside systems like McKesson Radiology. In this situation the RIS will inform McKesson Radiology about the new patients and scheduled studies, and, possibly, about any modifications to previously communicated patients and studies. Most unidirectional RIS products are also be able to push to McKesson Radiology, any reports related to the studies stored on the PACS system. Reference Study This is typically a prior study that may reasonably be thought to contain information relevant to the interpretation of images in the anchor study. Display protocols have criteria for identifying possible relevant prior studies. If configured, McKesson Radiology will display reference studies automatically when an anchor study is opened. Scheduled Study

McKesson Radiology Radiologist Manual
McKesson Radiology 12.2 Produced in Cork, Ireland – Confidential and Proprietary 1.0, 27 June, 2016 Page 6
An unperformed study (an order) containing relevant patient order information as it has been entered into the HIS/RIS. The scheduled study can be viewed in the Scheduled Studies list in McKesson Radiology, which is populated directly by the RIS/HIS. Viewport A viewport is a generic term for a rectangular region within a display area (a monitor) where specific study information can be displayed. The monitor can be set up as one large viewport or set up to contain multiple viewing areas at once. Note that the same information may be presented simultaneously in different viewports, and each viewport can have distinct ways in which they are currently presenting this information.
McKesson Radiology Radiologist Manual
McKesson Radiology 12.2 Produced in Cork, Ireland – Confidential and Proprietary 1.0, 27 June, 2016 Page 7
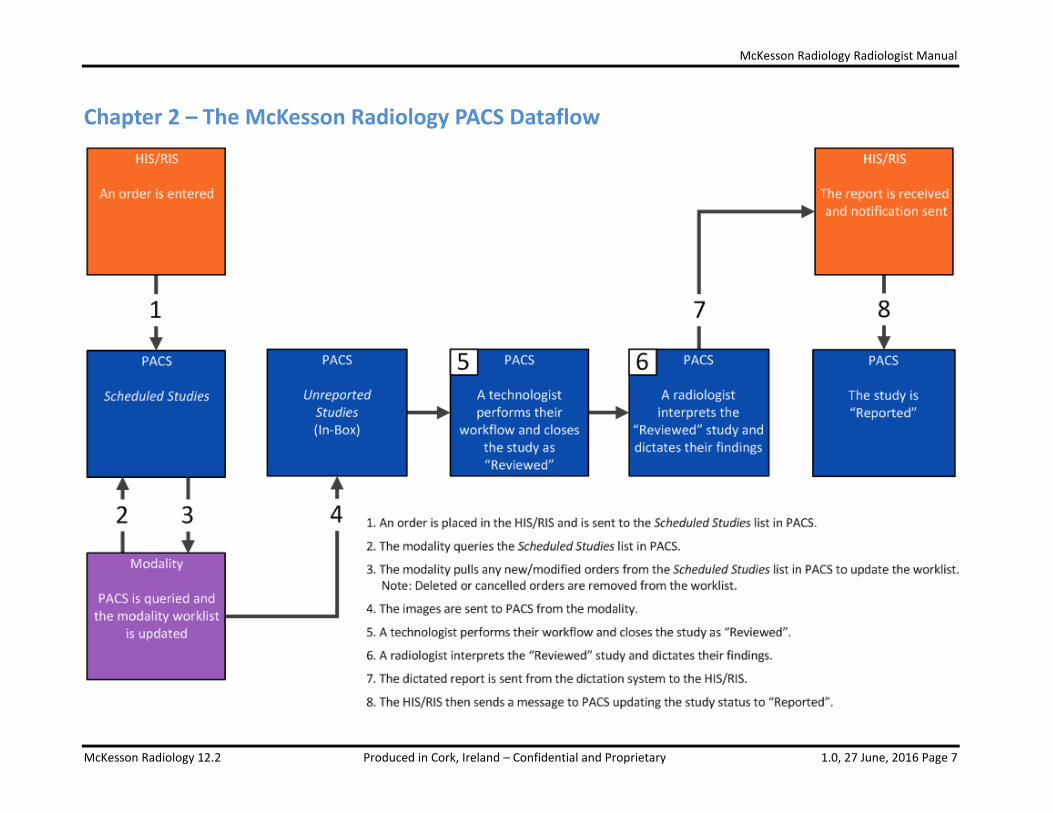
Chapter 2 – The McKesson Radiology PACS Dataflow
McKesson Radiology Radiologist Manual
McKesson Radiology 12.2 Produced in Cork, Ireland – Confidential and Proprietary 1.0, 27 June, 2016 Page 8
Chapter 3 – Understanding McKesson Radiology
Logging on to McKesson Radiology
1. Press Ctrl + Alt + Delete 2. Enter your Username and Password 3. Press Enter 4. McKesson Radiology is started and your default study list is displayed
Properties of the Study Lists
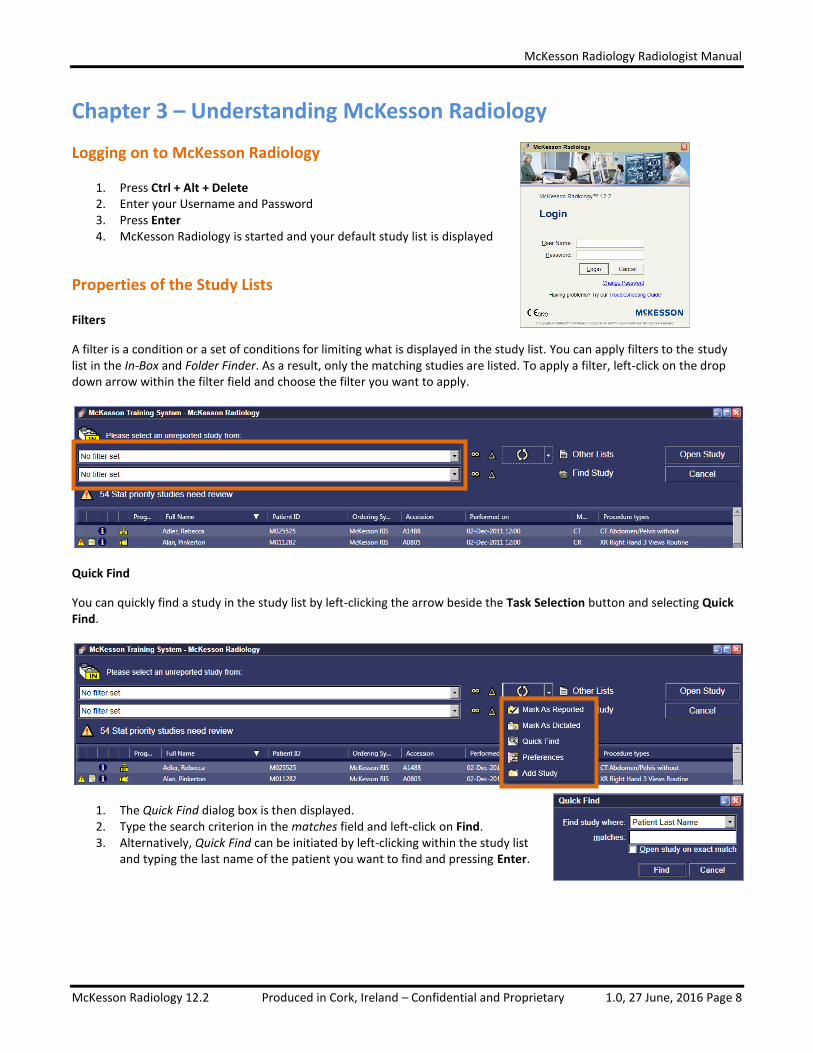
Filters
A filter is a condition or a set of conditions for limiting what is displayed in the study list. You can apply filters to the study list in the In-Box and Folder Finder. As a result, only the matching studies are listed. To apply a filter, left-click on the drop down arrow within the filter field and choose the filter you want to apply.
Quick Find
You can quickly find a study in the study list by left-clicking the arrow beside the Task Selection button and selecting Quick Find.
1. The Quick Find dialog box is then displayed. 2. Type the search criterion in the matches field and left-click on Find. 3. Alternatively, Quick Find can be initiated by left-clicking within the study list
and typing the last name of the patient you want to find and pressing Enter.

McKesson Radiology Radiologist Manual
McKesson Radiology 12.2 Produced in Cork, Ireland – Confidential and Proprietary 1.0, 27 June, 2016 Page 9
Study Lists within McKesson Radiology PACS
Use the In-Box/Unreported Studies List to find and open studies (see types below). To display the different study lists, left-click on the Other Lists button within the In-Box/Unreported Studies List.
Definitions of the different study lists within McKesson Radiology PACS Study Statuses Shown
Scheduled Studies All studies ordered in the RIS that have not yet been performed by the technologist.
Scheduled
Unreported Studies (In-Box) All the un-dictated studies in McKesson Radiology. Technologists mark studies as Reviewed after performing QA checks. This is the default study list for techs and radiologists.
In-Progress, Performed, Reviewed, Needs Over-Read
Recently Performed Combination of Unreported and Reported studies, showing everything sent to McKesson Radiology within a maximum 1 week timeframe. Typically used by ER physicians.
Performed, Reviewed, Needs Over-Read, Dictated,
Reported
Recently Reported When a report is sent from the RIS and matches a study, the study will populate this list. The Recently Reported List shows studies dictated within a maximum 1 week timeframe.
Dictated, Reported
Needing Over-Read Lists studies with the status of Needs Over-Read. The status of Needs Over-Read is generated by radiology residents dictating a preliminary report or by an ER doctor leaving an ER opinion using the ER Discrepancy tool.
Needs Over-Read
Dictated Lists studies with the status of Dictated. Studies in Dictated status have been dictated by a radiologist, but not yet transcribed.
Dictated
Transcribed Lists studies with the status of Transcribed. Studies in Transcribed status have been dictated and transcribed, but not yet finalized by the radiologist.
Transcribed
Recently Opened Lists studies recently opened by the logged in user. By default, up to 30 studies are listed.
Any
Folder Finder A search engine used to find any study performed from any date that has been sent to McKesson Radiology.
Any
McKesson Radiology Radiologist Manual
McKesson Radiology 12.2 Produced in Cork, Ireland – Confidential and Proprietary 1.0, 27 June, 2016 Page 10
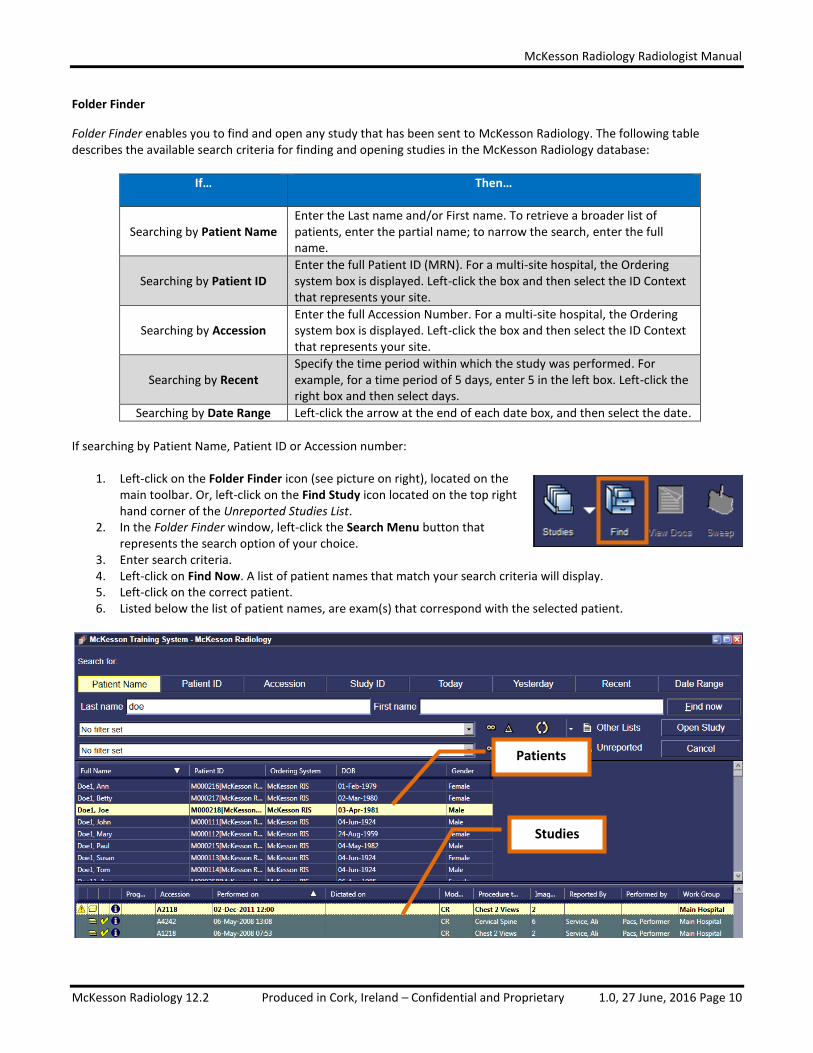
Folder Finder
Folder Finder enables you to find and open any study that has been sent to McKesson Radiology. The following table describes the available search criteria for finding and opening studies in the McKesson Radiology database:
If… Then…
Searching by Patient Name Enter the Last name and/or First name. To retrieve a broader list of patients, enter the partial name; to narrow the search, enter the full name.
Searching by Patient ID Enter the full Patient ID (MRN). For a multi-site hospital, the Ordering system box is displayed. Left-click the box and then select the ID Context that represents your site.
Searching by Accession Enter the full Accession Number. For a multi-site hospital, the Ordering system box is displayed. Left-click the box and then select the ID Context that represents your site.
Searching by Recent Specify the time period within which the study was performed. For example, for a time period of 5 days, enter 5 in the left box. Left-click the right box and then select days.
Searching by Date Range Left-click the arrow at the end of each date box, and then select the date.
If searching by Patient Name, Patient ID or Accession number:
1. Left-click on the Folder Finder icon (see picture on right), located on the main toolbar. Or, left-click on the Find Study icon located on the top right hand corner of the Unreported Studies List.
2. In the Folder Finder window, left-click the Search Menu button that represents the search option of your choice.
3. Enter search criteria. 4. Left-click on Find Now. A list of patient names that match your search criteria will display. 5. Left-click on the correct patient. 6. Listed below the list of patient names, are exam(s) that correspond with the selected patient.
Patients
Studies
McKesson Radiology Radiologist Manual
McKesson Radiology 12.2 Produced in Cork, Ireland – Confidential and Proprietary 1.0, 27 June, 2016 Page 11
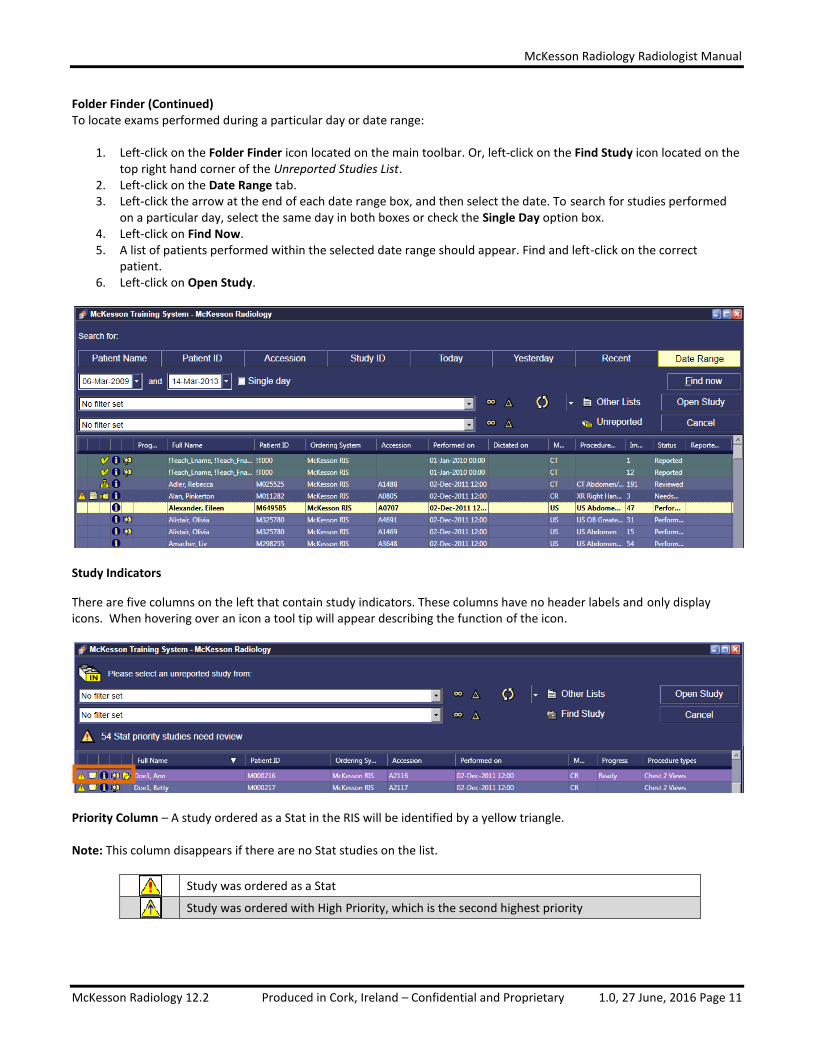
Folder Finder (Continued) To locate exams performed during a particular day or date range:
1. Left-click on the Folder Finder icon located on the main toolbar. Or, left-click on the Find Study icon located on the top right hand corner of the Unreported Studies List.
2. Left-click on the Date Range tab. 3. Left-click the arrow at the end of each date range box, and then select the date. To search for studies performed
on a particular day, select the same day in both boxes or check the Single Day option box. 4. Left-click on Find Now. 5. A list of patients performed within the selected date range should appear. Find and left-click on the correct
patient. 6. Left-click on Open Study.
Study Indicators
There are five columns on the left that contain study indicators. These columns have no header labels and only display icons. When hovering over an icon a tool tip will appear describing the function of the icon.
Priority Column – A study ordered as a Stat in the RIS will be identified by a yellow triangle. Note: This column disappears if there are no Stat studies on the list.
Study was ordered as a Stat
Study was ordered with High Priority, which is the second highest priority
McKesson Radiology Radiologist Manual
McKesson Radiology 12.2 Produced in Cork, Ireland – Confidential and Proprietary 1.0, 27 June, 2016 Page 12
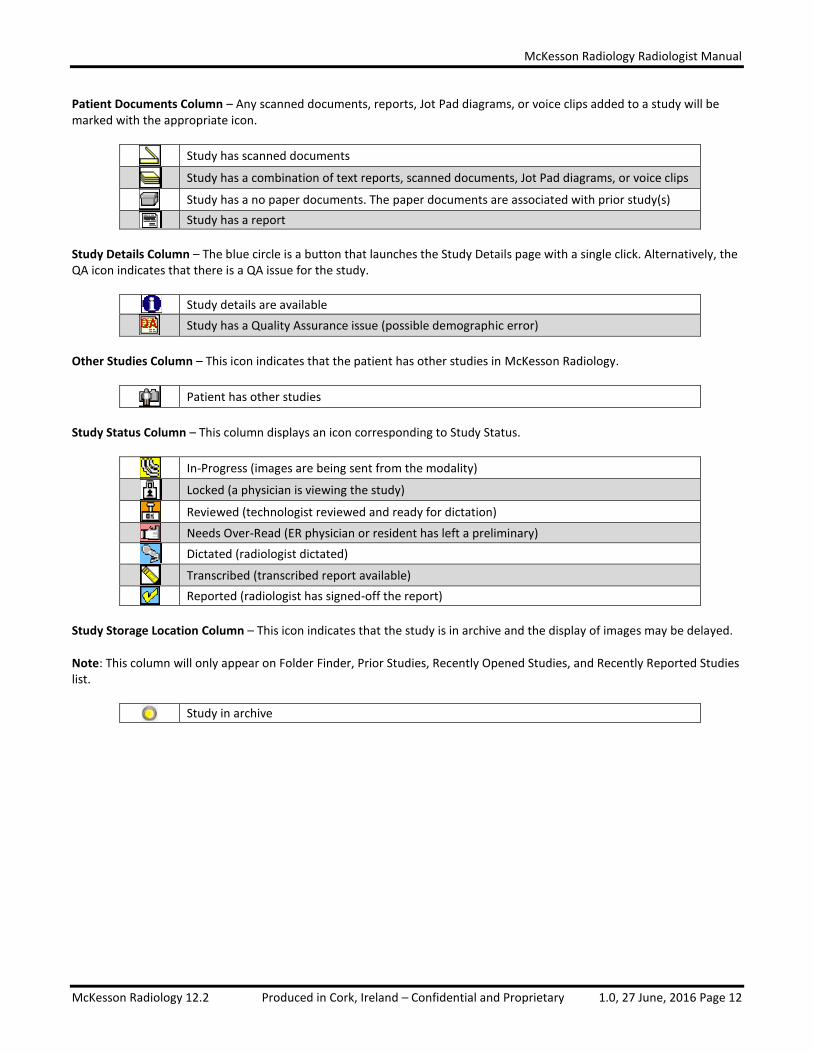
Patient Documents Column – Any scanned documents, reports, Jot Pad diagrams, or voice clips added to a study will be marked with the appropriate icon.
Study has scanned documents
Study has a combination of text reports, scanned documents, Jot Pad diagrams, or voice clips
Study has a no paper documents. The paper documents are associated with prior study(s)
Study has a report
Study Details Column – The blue circle is a button that launches the Study Details page with a single click. Alternatively, the QA icon indicates that there is a QA issue for the study.
Study details are available
Study has a Quality Assurance issue (possible demographic error)
Other Studies Column – This icon indicates that the patient has other studies in McKesson Radiology.
Patient has other studies
Study Status Column – This column displays an icon corresponding to Study Status.
In-Progress (images are being sent from the modality)
Locked (a physician is viewing the study)
Reviewed (technologist reviewed and ready for dictation)
Needs Over-Read (ER physician or resident has left a preliminary)
Dictated (radiologist dictated)
Transcribed (transcribed report available)
Reported (radiologist has signed-off the report)
Study Storage Location Column – This icon indicates that the study is in archive and the display of images may be delayed. Note: This column will only appear on Folder Finder, Prior Studies, Recently Opened Studies, and Recently Reported Studies list.
Study in archive
McKesson Radiology Radiologist Manual
McKesson Radiology 12.2 Produced in Cork, Ireland – Confidential and Proprietary 1.0, 27 June, 2016 Page 13
Customizing the Study Lists
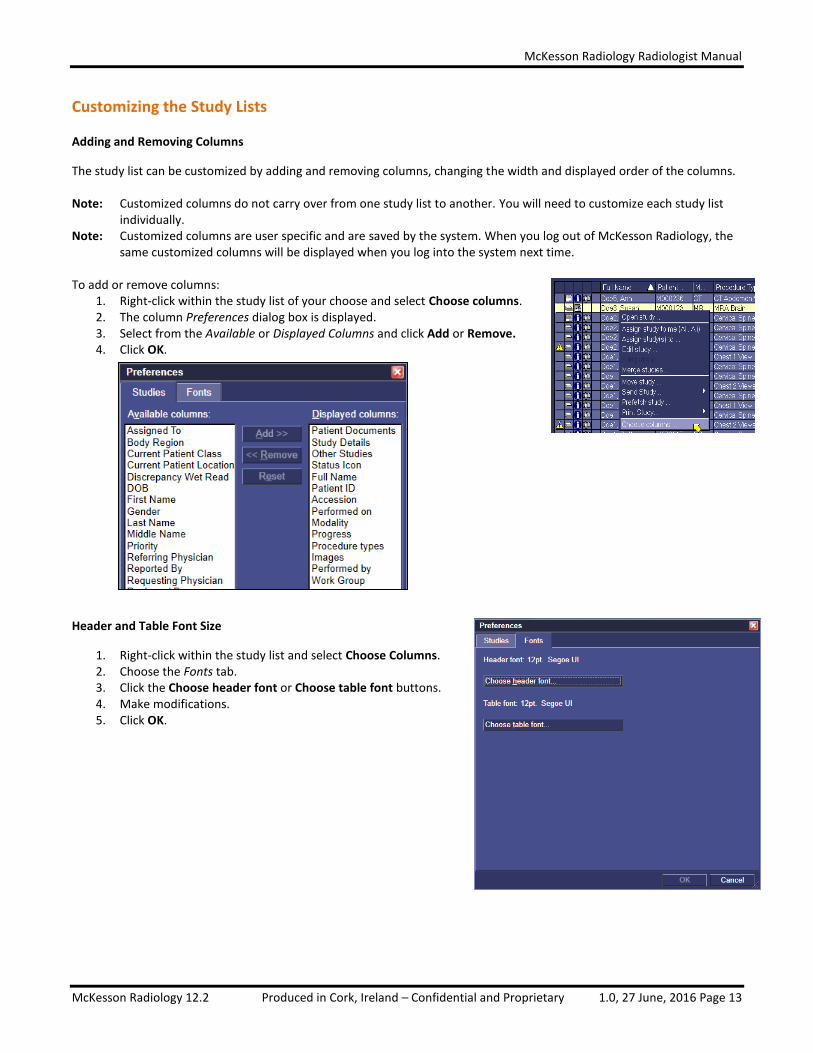
Adding and Removing Columns
The study list can be customized by adding and removing columns, changing the width and displayed order of the columns. Note: Customized columns do not carry over from one study list to another. You will need to customize each study list
individually. Note: Customized columns are user specific and are saved by the system. When you log out of McKesson Radiology, the
same customized columns will be displayed when you log into the system next time. To add or remove columns:
1. Right-click within the study list of your choose and select Choose columns. 2. The column Preferences dialog box is displayed. 3. Select from the Available or Displayed Columns and click Add or Remove. 4. Click OK.
Header and Table Font Size
1. Right-click within the study list and select Choose Columns. 2. Choose the Fonts tab. 3. Click the Choose header font or Choose table font buttons. 4. Make modifications. 5. Click OK.
McKesson Radiology Radiologist Manual
McKesson Radiology 12.2 Produced in Cork, Ireland – Confidential and Proprietary 1.0, 27 June, 2016 Page 14
Custom Filters
Note: Filter sets do not carry over from one study list to another. You will need to create a new filter in each study list individually. Filter sets created in the In-Box will only be available in the In-Box, and filter sets created in the Folder Finder will only be available in the Folder Finder.
Note: Filter sets are user specific and are saved by the system. When you log out of McKesson Radiology, the same filter sets will be applied when you log into the system next time.
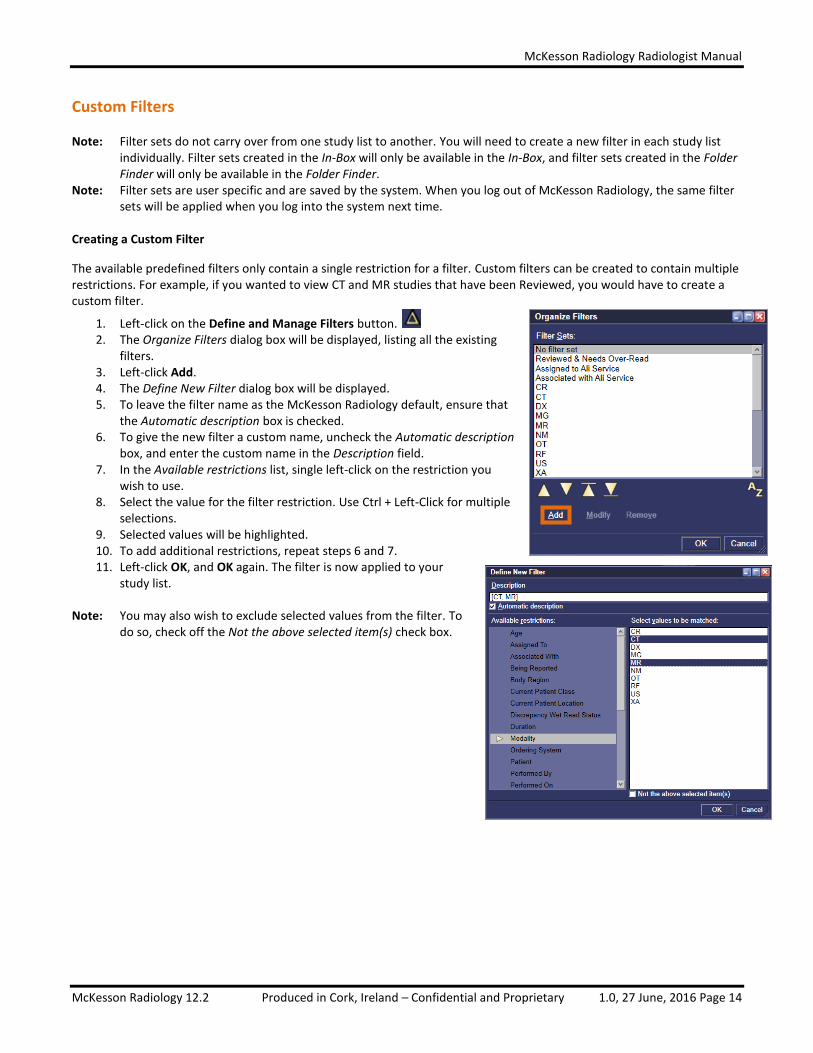
Creating a Custom Filter
The available predefined filters only contain a single restriction for a filter. Custom filters can be created to contain multiple restrictions. For example, if you wanted to view CT and MR studies that have been Reviewed, you would have to create a custom filter.
1. Left-click on the Define and Manage Filters button. 2. The Organize Filters dialog box will be displayed, listing all the existing
filters. 3. Left-click Add. 4. The Define New Filter dialog box will be displayed. 5. To leave the filter name as the McKesson Radiology default, ensure that
the Automatic description box is checked. 6. To give the new filter a custom name, uncheck the Automatic description
box, and enter the custom name in the Description field. 7. In the Available restrictions list, single left-click on the restriction you
wish to use. 8. Select the value for the filter restriction. Use Ctrl + Left-Click for multiple
selections. 9. Selected values will be highlighted. 10. To add additional restrictions, repeat steps 6 and 7. 11. Left-click OK, and OK again. The filter is now applied to your
study list. Note: You may also wish to exclude selected values from the filter. To
do so, check off the Not the above selected item(s) check box.
McKesson Radiology Radiologist Manual
McKesson Radiology 12.2 Produced in Cork, Ireland – Confidential and Proprietary 1.0, 27 June, 2016 Page 15
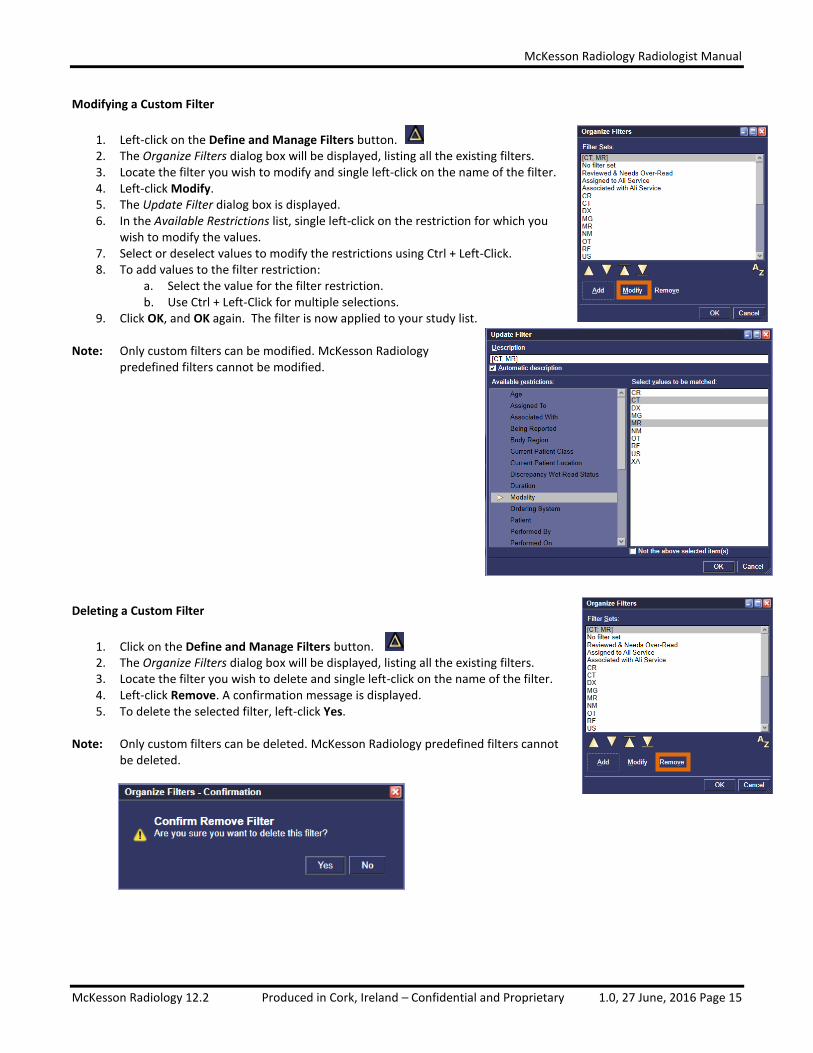
Modifying a Custom Filter
1. Left-click on the Define and Manage Filters button. 2. The Organize Filters dialog box will be displayed, listing all the existing filters. 3. Locate the filter you wish to modify and single left-click on the name of the filter. 4. Left-click Modify. 5. The Update Filter dialog box is displayed. 6. In the Available Restrictions list, single left-click on the restriction for which you
wish to modify the values. 7. Select or deselect values to modify the restrictions using Ctrl + Left-Click. 8. To add values to the filter restriction:
a. Select the value for the filter restriction. b. Use Ctrl + Left-Click for multiple selections.
9. Click OK, and OK again. The filter is now applied to your study list. Note: Only custom filters can be modified. McKesson Radiology
predefined filters cannot be modified. Deleting a Custom Filter
1. Click on the Define and Manage Filters button. 2. The Organize Filters dialog box will be displayed, listing all the existing filters. 3. Locate the filter you wish to delete and single left-click on the name of the filter. 4. Left-click Remove. A confirmation message is displayed. 5. To delete the selected filter, left-click Yes.
Note: Only custom filters can be deleted. McKesson Radiology predefined filters cannot
be deleted.
McKesson Radiology Radiologist Manual
McKesson Radiology 12.2 Produced in Cork, Ireland – Confidential and Proprietary 1.0, 27 June, 2016 Page 16
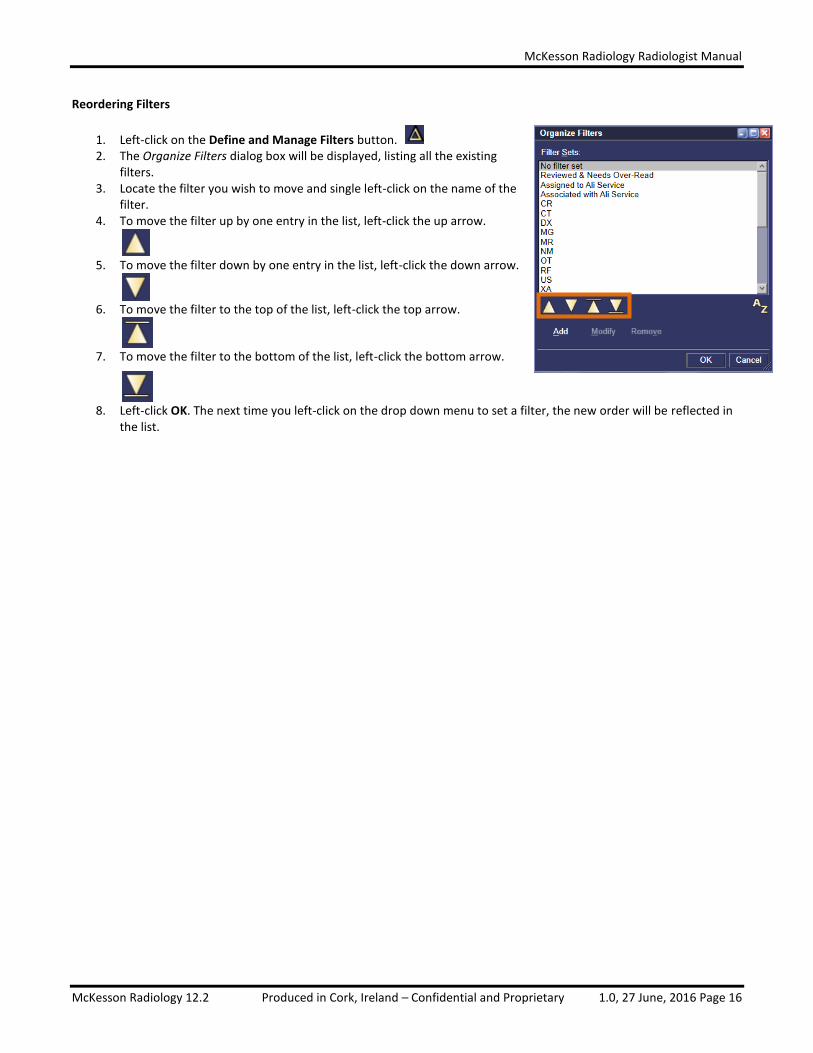
Reordering Filters
1. Left-click on the Define and Manage Filters button. 2. The Organize Filters dialog box will be displayed, listing all the existing
filters. 3. Locate the filter you wish to move and single left-click on the name of the
filter. 4. To move the filter up by one entry in the list, left-click the up arrow.
5. To move the filter down by one entry in the list, left-click the down arrow.
6. To move the filter to the top of the list, left-click the top arrow.
7. To move the filter to the bottom of the list, left-click the bottom arrow.
8. Left-click OK. The next time you left-click on the drop down menu to set a filter, the new order will be reflected in
the list.
McKesson Radiology Radiologist Manual
McKesson Radiology 12.2 Produced in Cork, Ireland – Confidential and Proprietary 1.0, 27 June, 2016 Page 17
Chapter 4 – Rad Report
What is Rad Report
Rad Report is a component of McKesson Radiology that enables users to complete diagnostic imaging reports. In the most basic scenario, it takes only three clicks to complete a report. Rad Report also enables users to view clinical reports, scanned documents, study details, and create and/or play voice clips. Rad Report supports a paperless and filmless environment.
Reporting icons in Rad Station
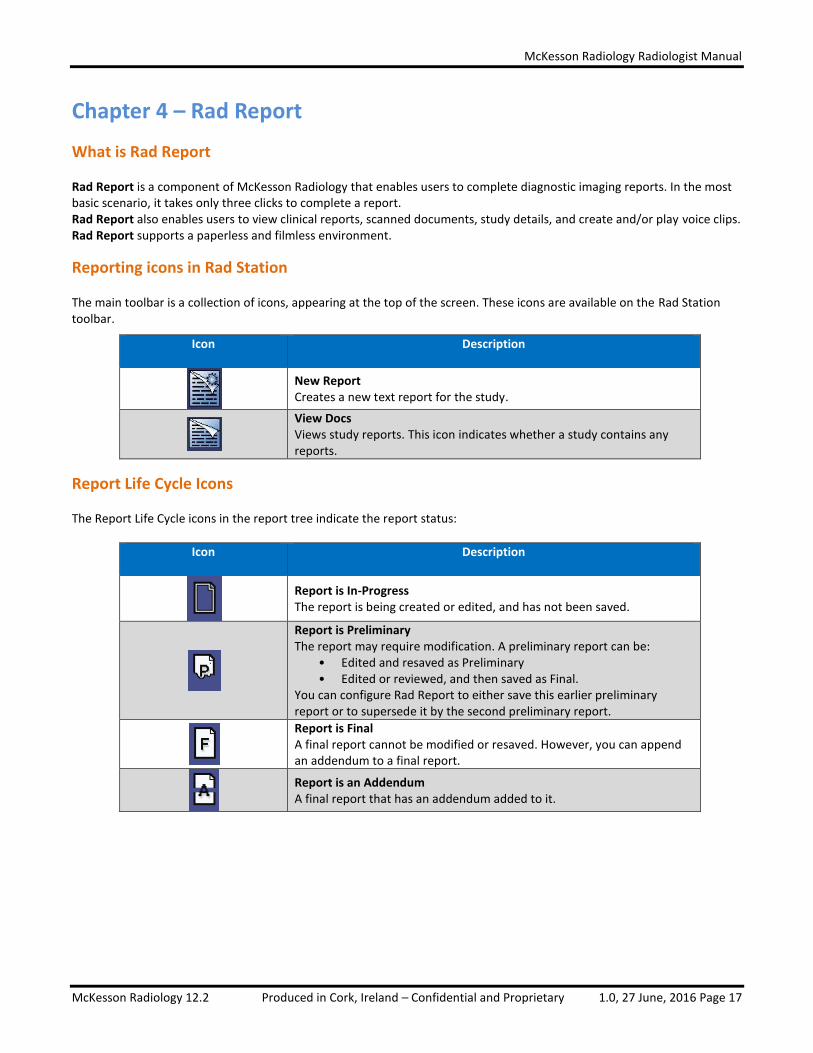
The main toolbar is a collection of icons, appearing at the top of the screen. These icons are available on the Rad Station toolbar.
Icon Description
New Report Creates a new text report for the study.
View Docs Views study reports. This icon indicates whether a study contains any reports.
Report Life Cycle Icons
The Report Life Cycle icons in the report tree indicate the report status:
Icon Description
Report is In-Progress The report is being created or edited, and has not been saved.
Report is Preliminary The report may require modification. A preliminary report can be:
• Edited and resaved as Preliminary • Edited or reviewed, and then saved as Final.
You can configure Rad Report to either save this earlier preliminary report or to supersede it by the second preliminary report.
Report is Final A final report cannot be modified or resaved. However, you can append an addendum to a final report.
Report is an Addendum A final report that has an addendum added to it.
McKesson Radiology Radiologist Manual
McKesson Radiology 12.2 Produced in Cork, Ireland – Confidential and Proprietary 1.0, 27 June, 2016 Page 18
Chapter 5 – Opening Prior Studies
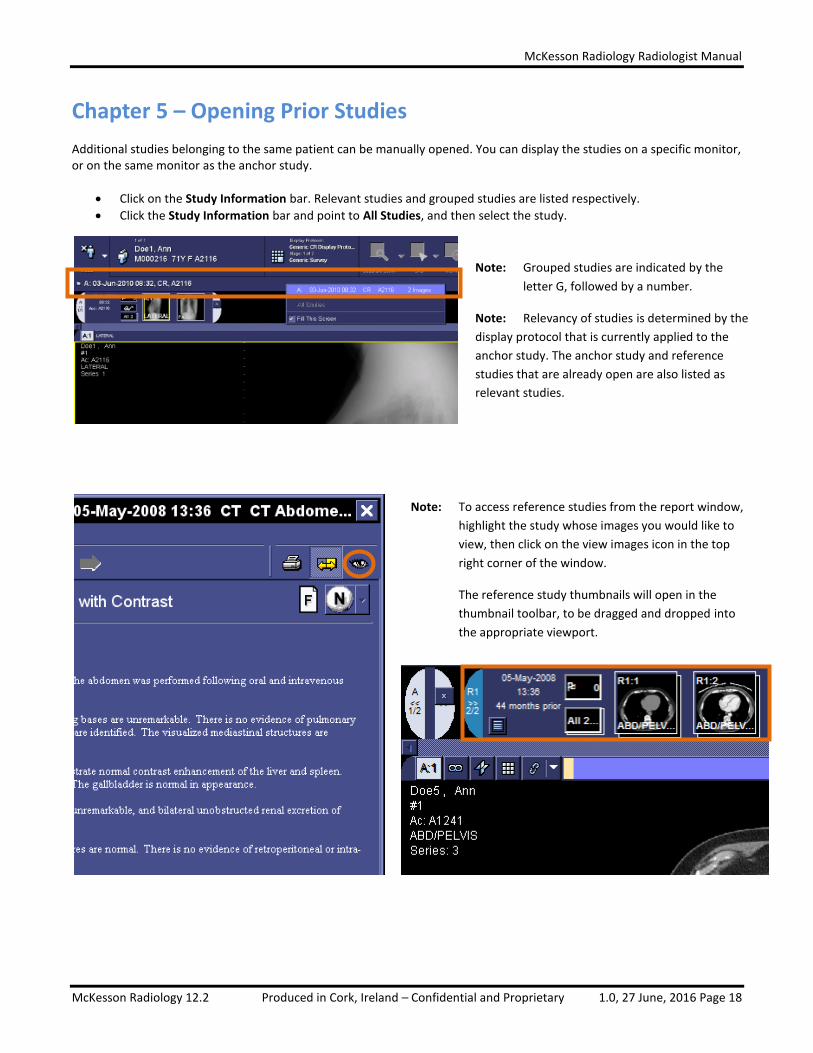
Additional studies belonging to the same patient can be manually opened. You can display the studies on a specific monitor, or on the same monitor as the anchor study.
Click on the Study Information bar. Relevant studies and grouped studies are listed respectively.
Click the Study Information bar and point to All Studies, and then select the study.
Note: Grouped studies are indicated by the
letter G, followed by a number.
Note: Relevancy of studies is determined by the
display protocol that is currently applied to the
anchor study. The anchor study and reference
studies that are already open are also listed as
relevant studies.
Note: To access reference studies from the report window,
highlight the study whose images you would like to
view, then click on the view images icon in the top
right corner of the window.
The reference study thumbnails will open in the
thumbnail toolbar, to be dragged and dropped into
the appropriate viewport.
McKesson Radiology Radiologist Manual
McKesson Radiology 12.2 Produced in Cork, Ireland – Confidential and Proprietary 1.0, 27 June, 2016 Page 19
Chapter 6 – Working with Images Sets
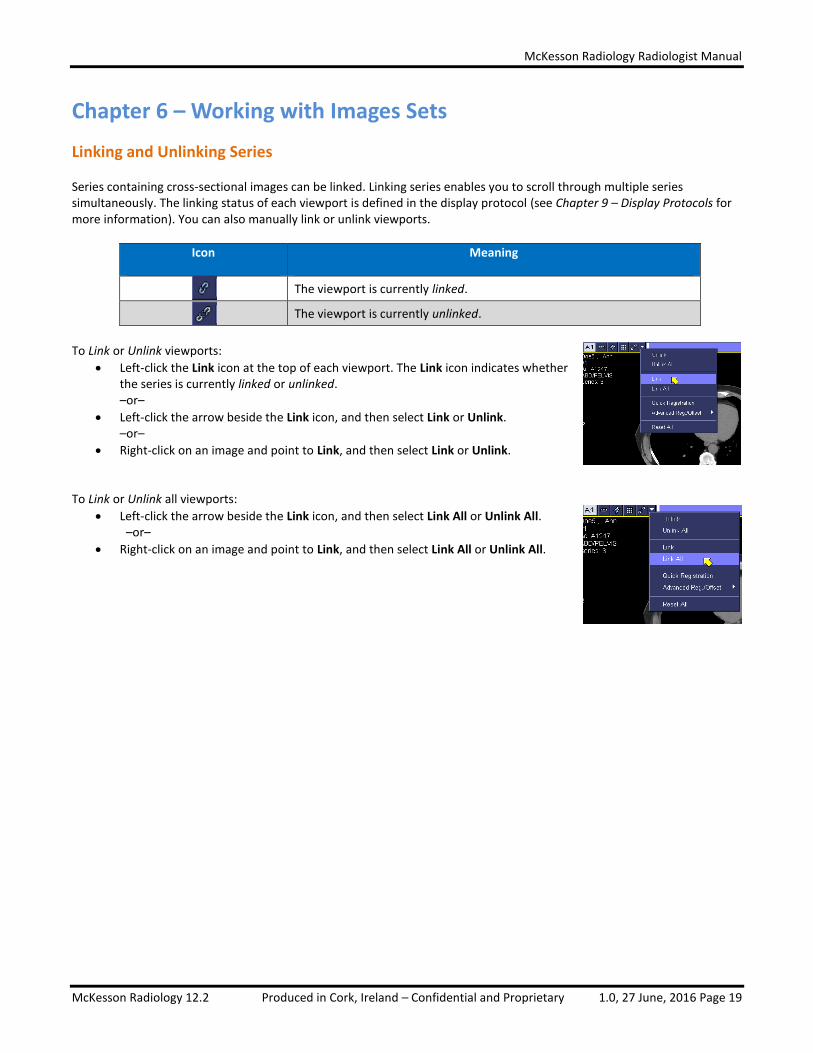
Linking and Unlinking Series
Series containing cross-sectional images can be linked. Linking series enables you to scroll through multiple series simultaneously. The linking status of each viewport is defined in the display protocol (see Chapter 9 – Display Protocols for more information). You can also manually link or unlink viewports.
Icon Meaning
The viewport is currently linked.
The viewport is currently unlinked.
To Link or Unlink viewports:
Left-click the Link icon at the top of each viewport. The Link icon indicates whether the series is currently linked or unlinked. –or–
Left-click the arrow beside the Link icon, and then select Link or Unlink. –or–
Right-click on an image and point to Link, and then select Link or Unlink. To Link or Unlink all viewports:
Left-click the arrow beside the Link icon, and then select Link All or Unlink All. –or–
Right-click on an image and point to Link, and then select Link All or Unlink All.
McKesson Radiology Radiologist Manual
McKesson Radiology 12.2 Produced in Cork, Ireland – Confidential and Proprietary 1.0, 27 June, 2016 Page 20
Working with Quick and Precise Registration
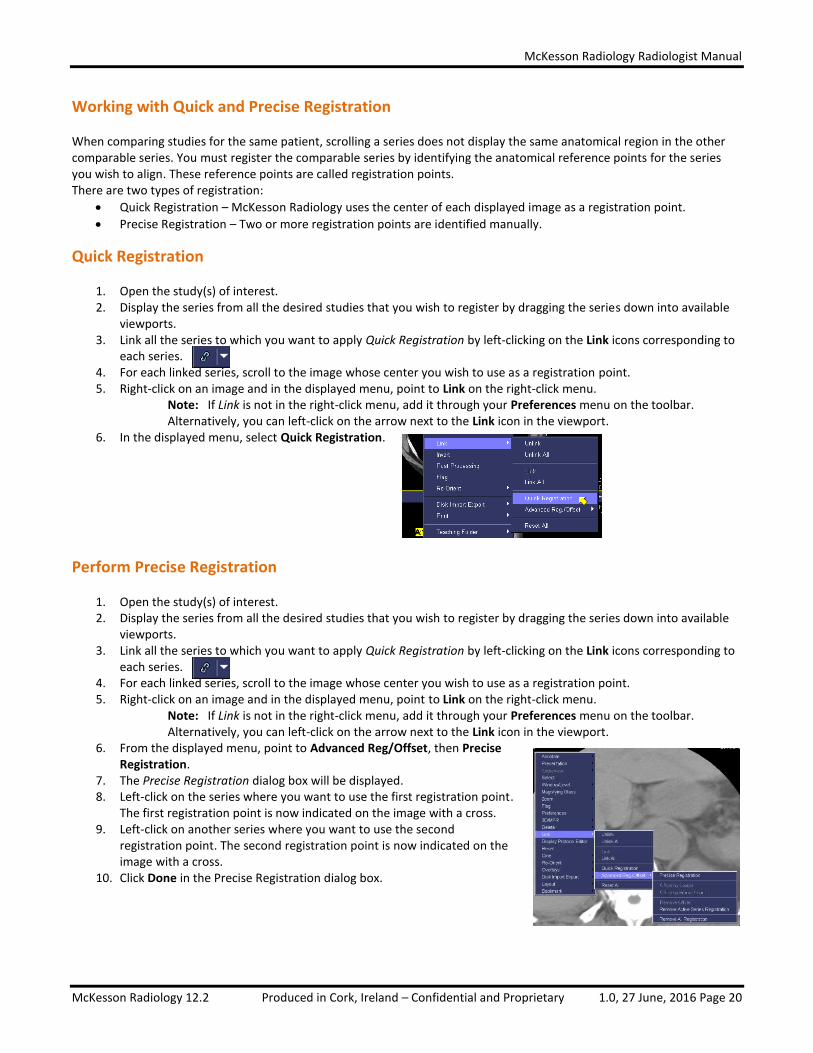
When comparing studies for the same patient, scrolling a series does not display the same anatomical region in the other comparable series. You must register the comparable series by identifying the anatomical reference points for the series you wish to align. These reference points are called registration points. There are two types of registration:
Quick Registration – McKesson Radiology uses the center of each displayed image as a registration point.
Precise Registration – Two or more registration points are identified manually.
Quick Registration
1. Open the study(s) of interest. 2. Display the series from all the desired studies that you wish to register by dragging the series down into available
viewports. 3. Link all the series to which you want to apply Quick Registration by left-clicking on the Link icons corresponding to
each series. 4. For each linked series, scroll to the image whose center you wish to use as a registration point. 5. Right-click on an image and in the displayed menu, point to Link on the right-click menu.
Note: If Link is not in the right-click menu, add it through your Preferences menu on the toolbar. Alternatively, you can left-click on the arrow next to the Link icon in the viewport.
6. In the displayed menu, select Quick Registration.
Perform Precise Registration
1. Open the study(s) of interest. 2. Display the series from all the desired studies that you wish to register by dragging the series down into available
viewports. 3. Link all the series to which you want to apply Quick Registration by left-clicking on the Link icons corresponding to
each series. 4. For each linked series, scroll to the image whose center you wish to use as a registration point. 5. Right-click on an image and in the displayed menu, point to Link on the right-click menu.
Note: If Link is not in the right-click menu, add it through your Preferences menu on the toolbar. Alternatively, you can left-click on the arrow next to the Link icon in the viewport.
6. From the displayed menu, point to Advanced Reg/Offset, then Precise Registration.
7. The Precise Registration dialog box will be displayed. 8. Left-click on the series where you want to use the first registration point.
The first registration point is now indicated on the image with a cross. 9. Left-click on another series where you want to use the second
registration point. The second registration point is now indicated on the image with a cross.
10. Click Done in the Precise Registration dialog box.

McKesson Radiology Radiologist Manual
McKesson Radiology 12.2 Produced in Cork, Ireland – Confidential and Proprietary 1.0, 27 June, 2016 Page 21
Multi-Planar Reconstruction (MPR)
Creating MPR Views
MPR views can be manually created, auto created or created within display protocols. MPR views are not retained when you close a study and must be recreated each time a study is opened. If you want MPR views to be created with every study, then create a display protocol to save your settings. For more details on display protocols, please refer to the Display Protocol chapter in this manual. Selecting an MPR Range
The entire series can be used to create a MPR view or a specified range of images within a series can be chosen. To build a MPR with a select number of images, you must specify a MPR Start and End range. Setting the MPR Start Range:
1. In a regular viewport, display the series for which you want to create a MPR view.
2. Left-click the first image to include in the MPR view. 3. Left-click the MPR icon at the top of the viewport. 4. From the menu that is displayed, point to MPR Range Markers,
and then select Start MPR Range Marker. –or–
To access the same menu using your right-click menu: 1. Left-click on the first image you wish to include in the MPR view. 2. Right-click and point to MPR. 3. Select Start MPR Range Marker.
Setting the MPR End Range:
1. Left-click the last image you want to include in the MPR view. 2. Left-click the MPR icon at the top of the viewport. 3. From the menu that is displayed, point to MPR Range Markers, and then select End MPR Range Marker. –or–
To access the same menu using your right-click menu: 1. Left-click on the last image you wish to include in the MPR view. 2. Right-click and point to MPR. 3. Select End MPR Range Marker.
Creating MPR Views
1. Click on the MPR icon at the top of your viewport. 2. From the menu which is displayed, select the plane you want to view.
McKesson Radiology Radiologist Manual
McKesson Radiology 12.2 Produced in Cork, Ireland – Confidential and Proprietary 1.0, 27 June, 2016 Page 22
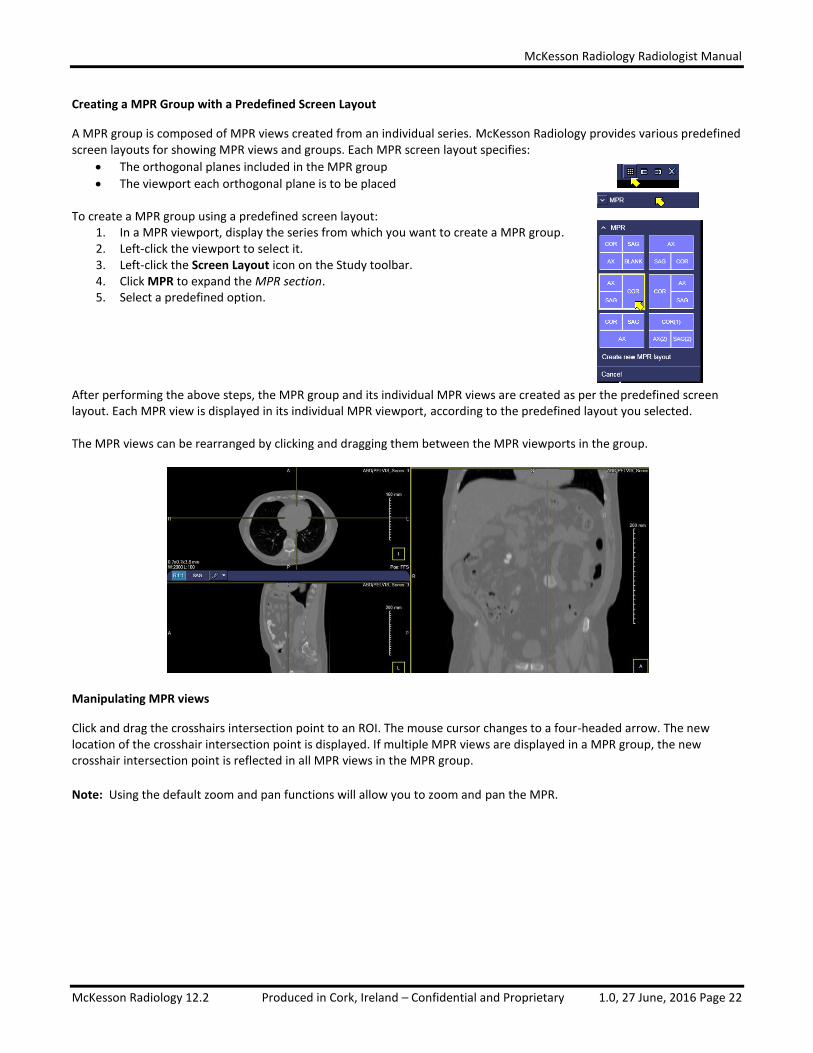
Creating a MPR Group with a Predefined Screen Layout
A MPR group is composed of MPR views created from an individual series. McKesson Radiology provides various predefined screen layouts for showing MPR views and groups. Each MPR screen layout specifies:
The orthogonal planes included in the MPR group
The viewport each orthogonal plane is to be placed To create a MPR group using a predefined screen layout:
1. In a MPR viewport, display the series from which you want to create a MPR group. 2. Left-click the viewport to select it. 3. Left-click the Screen Layout icon on the Study toolbar. 4. Click MPR to expand the MPR section. 5. Select a predefined option.
After performing the above steps, the MPR group and its individual MPR views are created as per the predefined screen layout. Each MPR view is displayed in its individual MPR viewport, according to the predefined layout you selected. The MPR views can be rearranged by clicking and dragging them between the MPR viewports in the group.
Manipulating MPR views
Click and drag the crosshairs intersection point to an ROI. The mouse cursor changes to a four-headed arrow. The new location of the crosshair intersection point is displayed. If multiple MPR views are displayed in a MPR group, the new crosshair intersection point is reflected in all MPR views in the MPR group.
Note: Using the default zoom and pan functions will allow you to zoom and pan the MPR.
McKesson Radiology Radiologist Manual
McKesson Radiology 12.2 Produced in Cork, Ireland – Confidential and Proprietary 1.0, 27 June, 2016 Page 23
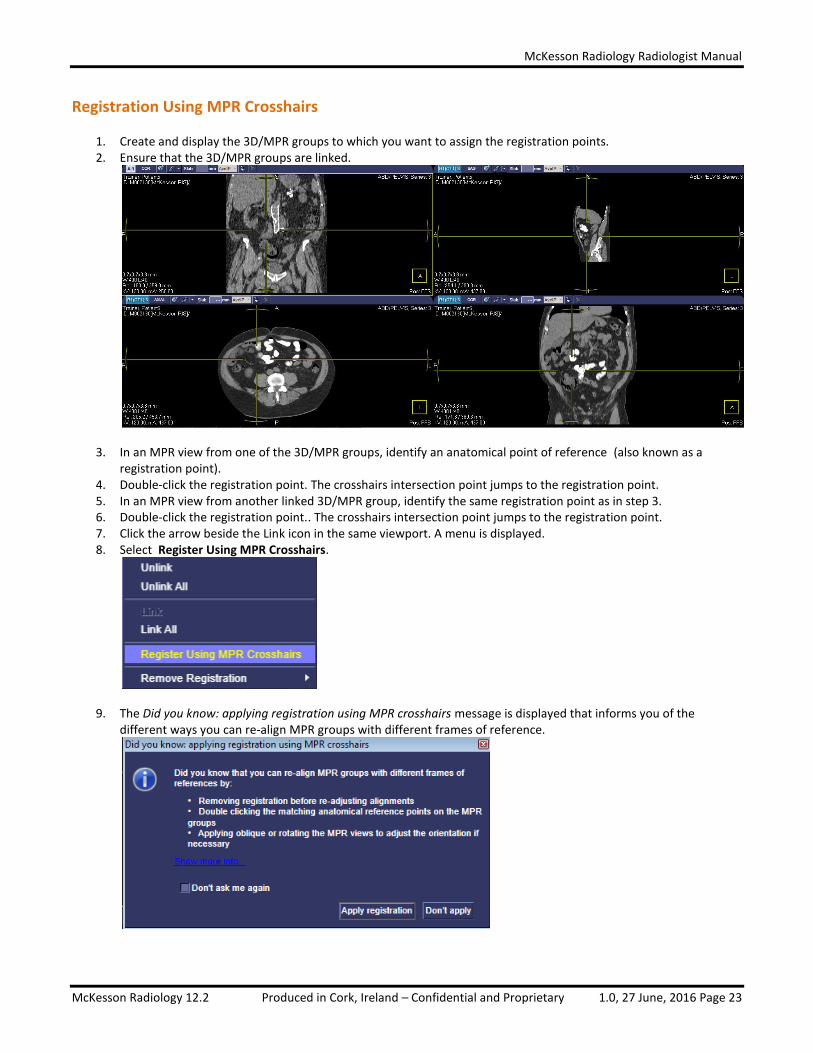
Registration Using MPR Crosshairs
1. Create and display the 3D/MPR groups to which you want to assign the registration points. 2. Ensure that the 3D/MPR groups are linked.
3. In an MPR view from one of the 3D/MPR groups, identify an anatomical point of reference (also known as a registration point).
4. Double-click the registration point. The crosshairs intersection point jumps to the registration point. 5. In an MPR view from another linked 3D/MPR group, identify the same registration point as in step 3. 6. Double-click the registration point.. The crosshairs intersection point jumps to the registration point. 7. Click the arrow beside the Link icon in the same viewport. A menu is displayed. 8. Select Register Using MPR Crosshairs.
9. The Did you know: applying registration using MPR crosshairs message is displayed that informs you of the different ways you can re-align MPR groups with different frames of reference.
McKesson Radiology Radiologist Manual
McKesson Radiology 12.2 Produced in Cork, Ireland – Confidential and Proprietary 1.0, 27 June, 2016 Page 24
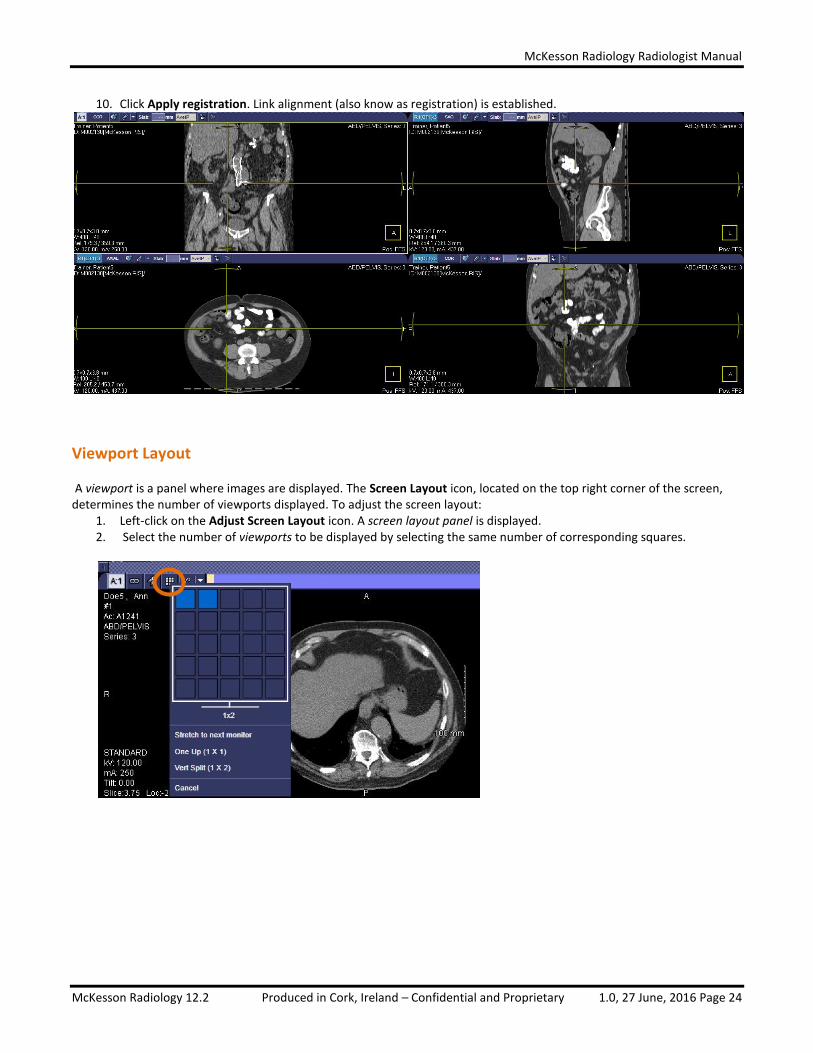
10. Click Apply registration. Link alignment (also know as registration) is established.
Viewport Layout
A viewport is a panel where images are displayed. The Screen Layout icon, located on the top right corner of the screen, determines the number of viewports displayed. To adjust the screen layout:
1. Left-click on the Adjust Screen Layout icon. A screen layout panel is displayed. 2. Select the number of viewports to be displayed by selecting the same number of corresponding squares.
McKesson Radiology Radiologist Manual
McKesson Radiology 12.2 Produced in Cork, Ireland – Confidential and Proprietary 1.0, 27 June, 2016 Page 25
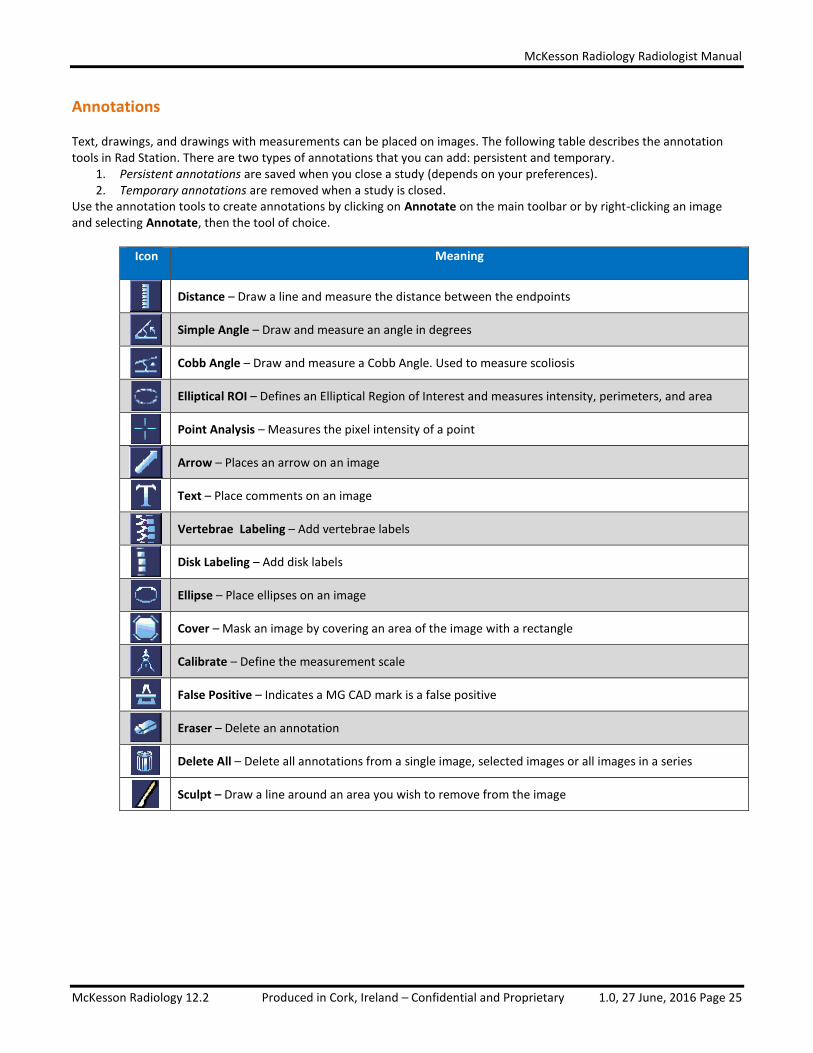
Annotations
Text, drawings, and drawings with measurements can be placed on images. The following table describes the annotation tools in Rad Station. There are two types of annotations that you can add: persistent and temporary.
1. Persistent annotations are saved when you close a study (depends on your preferences). 2. Temporary annotations are removed when a study is closed.
Use the annotation tools to create annotations by clicking on Annotate on the main toolbar or by right-clicking an image and selecting Annotate, then the tool of choice.
Icon Meaning
Distance – Draw a line and measure the distance between the endpoints
Simple Angle – Draw and measure an angle in degrees
Cobb Angle – Draw and measure a Cobb Angle. Used to measure scoliosis
Elliptical ROI – Defines an Elliptical Region of Interest and measures intensity, perimeters, and area
Point Analysis – Measures the pixel intensity of a point
Arrow – Places an arrow on an image
Text – Place comments on an image
Vertebrae Labeling – Add vertebrae labels
Disk Labeling – Add disk labels
Ellipse – Place ellipses on an image
Cover – Mask an image by covering an area of the image with a rectangle
Calibrate – Define the measurement scale
False Positive – Indicates a MG CAD mark is a false positive
Eraser – Delete an annotation
Delete All – Delete all annotations from a single image, selected images or all images in a series
Sculpt – Draw a line around an area you wish to remove from the image

McKesson Radiology Radiologist Manual
McKesson Radiology 12.2 Produced in Cork, Ireland – Confidential and Proprietary 1.0, 27 June, 2016 Page 26
Overlays
Text overlays display details about an image, the study and the patient to which the image belongs. Images can be displayed with or without text overlays. The content and location of text overlays are configured for your site, and may be modality specific. To hide or display text overlays:
1. Left-click the arrow beside the Overlays icon on the main toolbar --or--Right-click on an image and point to Overlays.
2. From the menu that is displayed, select the option of your choice. 3. The check mark indicates the currently selected option.
Note: Whether the Overlays option is displayed on your right-click menu or main toolbar depends on your right-click menu and main toolbar preferences. If Overlays is not listed, add it through your Preferences.
Option Description
Select Full Text Displays all text overlay (as configured site-wide)
Select Minimum Text Displays minimum text overlay (as configured site-wide)
Select None Hides text overlay
McKesson Radiology Radiologist Manual
McKesson Radiology 12.2 Produced in Cork, Ireland – Confidential and Proprietary 1.0, 27 June, 2016 Page 27
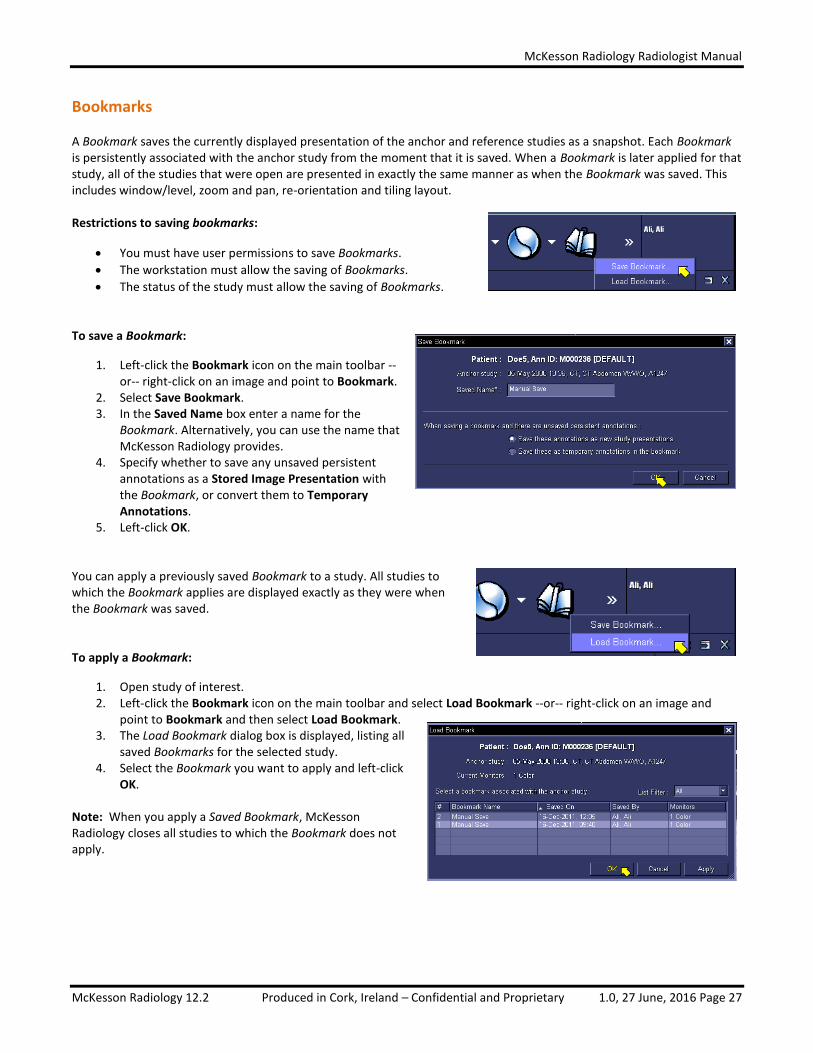
Bookmarks
A Bookmark saves the currently displayed presentation of the anchor and reference studies as a snapshot. Each Bookmark is persistently associated with the anchor study from the moment that it is saved. When a Bookmark is later applied for that study, all of the studies that were open are presented in exactly the same manner as when the Bookmark was saved. This includes window/level, zoom and pan, re-orientation and tiling layout. Restrictions to saving bookmarks:
You must have user permissions to save Bookmarks.
The workstation must allow the saving of Bookmarks.
The status of the study must allow the saving of Bookmarks. To save a Bookmark:
1. Left-click the Bookmark icon on the main toolbar -- or-- right-click on an image and point to Bookmark.
2. Select Save Bookmark. 3. In the Saved Name box enter a name for the
Bookmark. Alternatively, you can use the name that McKesson Radiology provides.
4. Specify whether to save any unsaved persistent annotations as a Stored Image Presentation with the Bookmark, or convert them to Temporary Annotations.
5. Left-click OK. You can apply a previously saved Bookmark to a study. All studies to which the Bookmark applies are displayed exactly as they were when the Bookmark was saved. To apply a Bookmark:
1. Open study of interest. 2. Left-click the Bookmark icon on the main toolbar and select Load Bookmark --or-- right-click on an image and
point to Bookmark and then select Load Bookmark. 3. The Load Bookmark dialog box is displayed, listing all
saved Bookmarks for the selected study. 4. Select the Bookmark you want to apply and left-click
OK. Note: When you apply a Saved Bookmark, McKesson Radiology closes all studies to which the Bookmark does not apply.

McKesson Radiology Radiologist Manual
McKesson Radiology 12.2 Produced in Cork, Ireland – Confidential and Proprietary 1.0, 27 June, 2016 Page 28
Presentation
When a study is closed, McKesson Radiology checks for any unsaved persistent annotations and image style (ROI, window/level, and orientation) changes. You can configure McKesson Radiology to:
Automatically save the image style changes in a Stored Image Presentation.
Display the Save Image Presentation Changes dialog box, which asks you whether to save the image style changes in a Stored Image Presentation, or discard them.
Discard the image style changes.
Saving Presentations
To manually save a presentation:
1. Left-click the Presentation icon on the main toolbar -- or-- right-click on an image and select Presentation.
2. Select Save Presentation. 3. Specify the studies for which you want to save the Stored
Image Presentation, by selecting the check box beside the relevant study indicator.
4. In the Saved Name box, enter the identification name of the Stored Image Presentation –or--, you can use the name McKesson Radiology provides.
5. Specify whether to save the changes to the persistent annotations and/or the current image style (ROI, window/level and orientation).
6. Left-click OK. Loading Presentations
You can manually apply a previously Stored Image Presentation or the Initial Presentation on a case by case basis, for comparison or auditing purposes. To manually apply a Stored Image Presentation or initial presentation:
1. Left-click the Presentation icon on the main toolbar --or-- Right-click on an image and select Presentation.
2. Select Load Presentation. 3. The Load Presentation dialog box is displayed. Under Select
a Presentation, left-click on the Presentation you want to see.
4. Left-click OK.
McKesson Radiology Radiologist Manual
McKesson Radiology 12.2 Produced in Cork, Ireland – Confidential and Proprietary 1.0, 27 June, 2016 Page 29
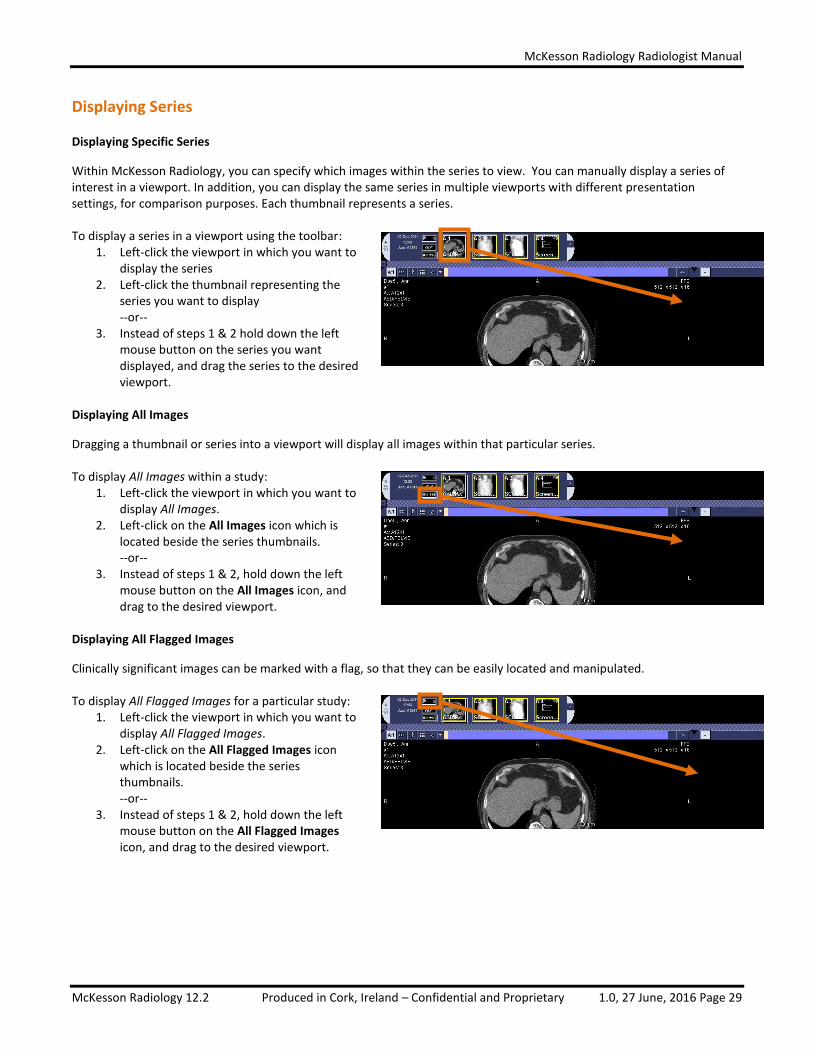
Displaying Series
Displaying Specific Series
Within McKesson Radiology, you can specify which images within the series to view. You can manually display a series of interest in a viewport. In addition, you can display the same series in multiple viewports with different presentation settings, for comparison purposes. Each thumbnail represents a series. To display a series in a viewport using the toolbar:
1. Left-click the viewport in which you want to display the series
2. Left-click the thumbnail representing the series you want to display --or--
3. Instead of steps 1 & 2 hold down the left mouse button on the series you want displayed, and drag the series to the desired viewport.
Displaying All Images
Dragging a thumbnail or series into a viewport will display all images within that particular series. To display All Images within a study:
1. Left-click the viewport in which you want to display All Images.
2. Left-click on the All Images icon which is located beside the series thumbnails. --or--
3. Instead of steps 1 & 2, hold down the left mouse button on the All Images icon, and drag to the desired viewport.
Displaying All Flagged Images
Clinically significant images can be marked with a flag, so that they can be easily located and manipulated. To display All Flagged Images for a particular study:
1. Left-click the viewport in which you want to display All Flagged Images.
2. Left-click on the All Flagged Images icon which is located beside the series thumbnails. --or--
3. Instead of steps 1 & 2, hold down the left mouse button on the All Flagged Images icon, and drag to the desired viewport.
McKesson Radiology Radiologist Manual
McKesson Radiology 12.2 Produced in Cork, Ireland – Confidential and Proprietary 1.0, 27 June, 2016 Page 30
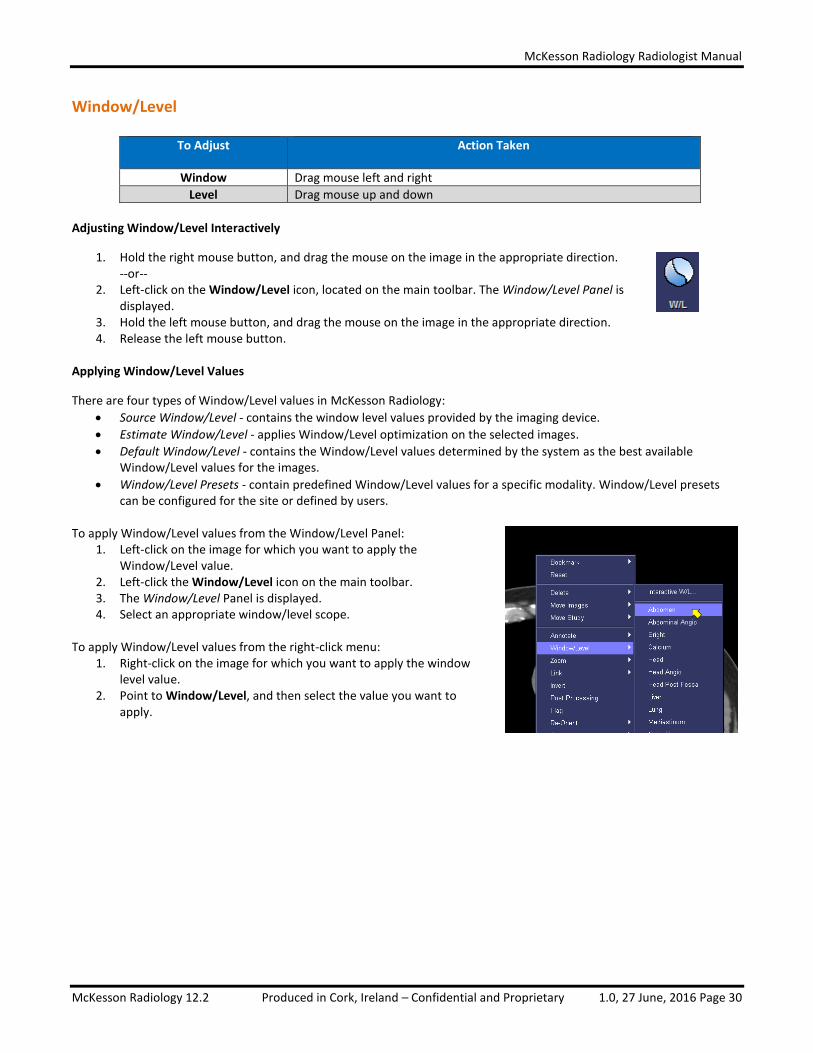
Window/Level
To Adjust Action Taken
Window Drag mouse left and right
Level Drag mouse up and down
Adjusting Window/Level Interactively
1. Hold the right mouse button, and drag the mouse on the image in the appropriate direction. --or--
2. Left-click on the Window/Level icon, located on the main toolbar. The Window/Level Panel is displayed.
3. Hold the left mouse button, and drag the mouse on the image in the appropriate direction. 4. Release the left mouse button.
Applying Window/Level Values
There are four types of Window/Level values in McKesson Radiology:
Source Window/Level - contains the window level values provided by the imaging device.
Estimate Window/Level - applies Window/Level optimization on the selected images.
Default Window/Level - contains the Window/Level values determined by the system as the best available Window/Level values for the images.
Window/Level Presets - contain predefined Window/Level values for a specific modality. Window/Level presets can be configured for the site or defined by users.
To apply Window/Level values from the Window/Level Panel:
1. Left-click on the image for which you want to apply the Window/Level value.
2. Left-click the Window/Level icon on the main toolbar. 3. The Window/Level Panel is displayed. 4. Select an appropriate window/level scope.
To apply Window/Level values from the right-click menu:
1. Right-click on the image for which you want to apply the window level value.
2. Point to Window/Level, and then select the value you want to apply.
McKesson Radiology Radiologist Manual
McKesson Radiology 12.2 Produced in Cork, Ireland – Confidential and Proprietary 1.0, 27 June, 2016 Page 31
Zoom/Pan
Zooming changes the magnification of an image. Panning enables you to move through the zoomed area. The following table describes the available Zoom options:
Zoom Option Meaning
Zoom in 50% Zoom the images to 50% larger than the current size
Zoom out 50% Zoom the images to 50% smaller than the current size
Zoom to Fit Zoom the images to fit the viewport
Zoom to Fit Anatomy Zoom the images to fit anatomy in viewport
Life Size Display the images at their true physical size
50% Display the image at 50% of the original size
100% Display the image at 100% of the original size (“full resolution” 1:1 pixel zoom)
200% Display the image at 200% of the original size
To Zoom images:
1. Left-click on the image you want to zoom. 2. Left-click the Zoom icon on the main toolbar. 3. The Zoom and Pan Panel is displayed. 4. Select the appropriate Zoom option.
--or-- 5. Right-click the image you want to zoom, point to Zoom, and then select the appropriate Zoom option.
To Interactively Zoom:
1. Left-click on the image you want to zoom. 2. Left-click the Zoom icon on the main toolbar. 3. The Zoom and Pan Panel is displayed. 4. Hold the left mouse button down and drag the mouse on the image in the appropriate direction.
--or-- 5. Right-click in the image you would like to zoom. 6. Point to Zoom and then select Interactive Zoom. 7. Hold the left mouse button down and drag the mouse on the image in the appropriate direction.
To Pan images:
To Pan an image from the Zoom and Pan Panel: 1. Left-click on the zoomed image you want to Pan. 2. Left-click the Pan icon on the main toolbar. 3. The Zoom and Pan Panel is displayed. 4. Hold the left mouse button down and drag the mouse on the image to display the new ROI.
--or-- 5. Right-click on the zoomed image you want to Pan. 6. Select Pan. 7. Hold the left mouse button down and drag the mouse on the image to display the new ROI.
McKesson Radiology Radiologist Manual
McKesson Radiology 12.2 Produced in Cork, Ireland – Confidential and Proprietary 1.0, 27 June, 2016 Page 32
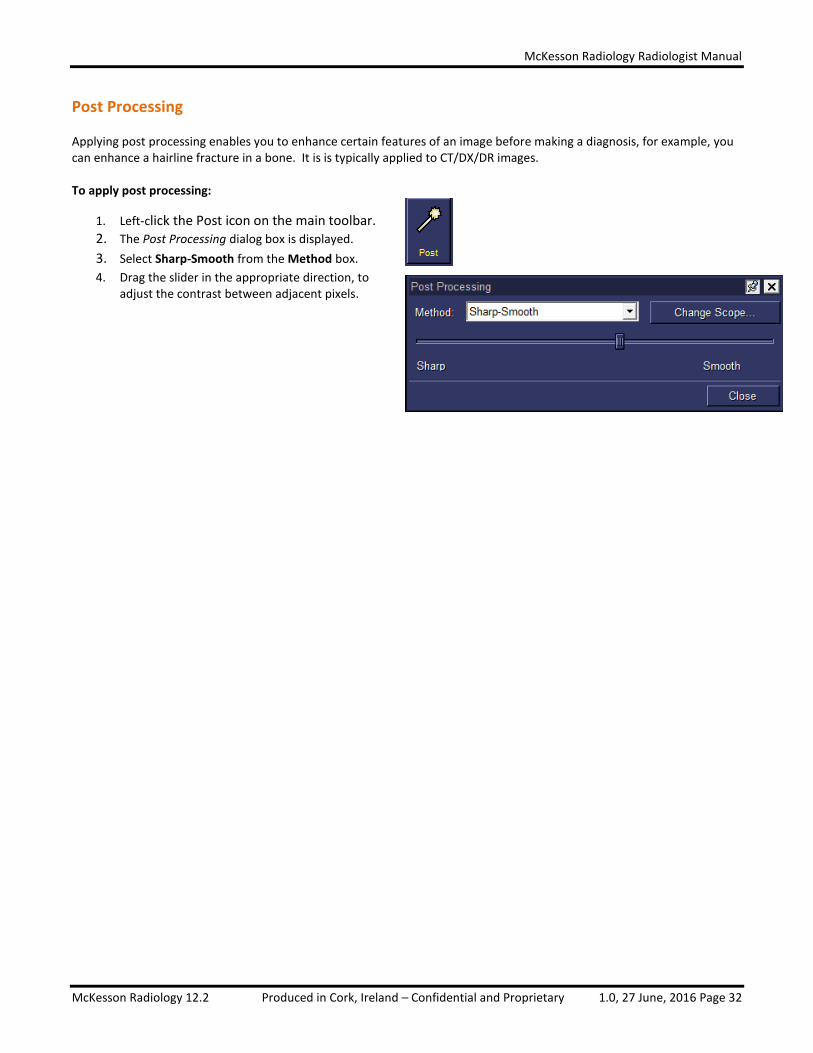
Post Processing
Applying post processing enables you to enhance certain features of an image before making a diagnosis, for example, you can enhance a hairline fracture in a bone. It is is typically applied to CT/DX/DR images. To apply post processing:
1. Left-click the Post icon on the main toolbar. 2. The Post Processing dialog box is displayed.
3. Select Sharp-Smooth from the Method box.
4. Drag the slider in the appropriate direction, to adjust the contrast between adjacent pixels.

McKesson Radiology Radiologist Manual
McKesson Radiology 12.2 Produced in Cork, Ireland – Confidential and Proprietary 1.0, 27 June, 2016 Page 33
Chapter 7 – McKesson Study Share
McKesson Study Share is an application that enables radiologists to store, organize, and share anonymized images and
reference case information with users such as other radiologists and residents. McKesson Study Share may be accessible as
a standalone application for conferences and tumor boards. In order to use McKesson Study Share, a server must be
purchased. To learn more about McKesson Study Share, please see the McKesson Study Share Manual or please speak to
your site administrator for more information.
*Please note that Teaching Files have been removed and replaced with McKesson Study Share.
McKesson Radiology Radiologist Manual
McKesson Radiology 12.2 Produced in Cork, Ireland – Confidential and Proprietary 1.0, 27 June, 2016 Page 34
Chapter 8 – Print/Export/Send
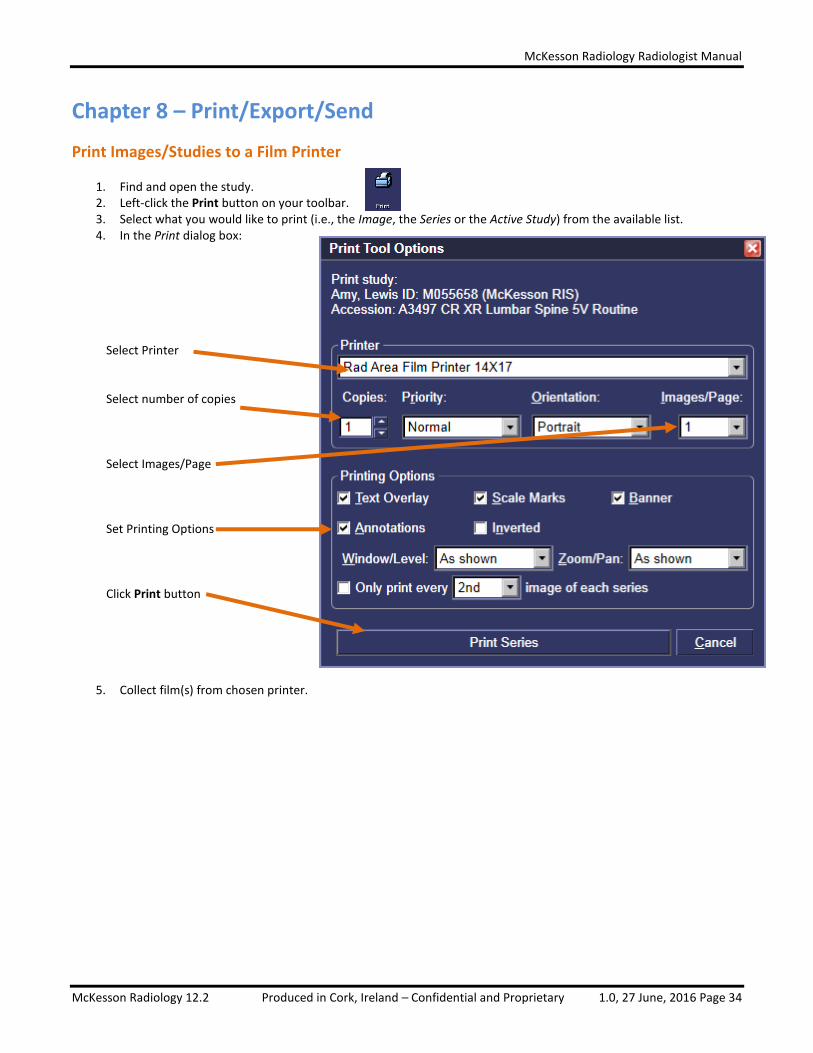
Print Images/Studies to a Film Printer
1. Find and open the study. 2. Left-click the Print button on your toolbar. 3. Select what you would like to print (i.e., the Image, the Series or the Active Study) from the available list. 4. In the Print dialog box:
5. Collect film(s) from chosen printer.
Select Printer Select number of copies Select Images/Page Set Printing Options Click Print button
McKesson Radiology Radiologist Manual
McKesson Radiology 12.2 Produced in Cork, Ireland – Confidential and Proprietary 1.0, 27 June, 2016 Page 35
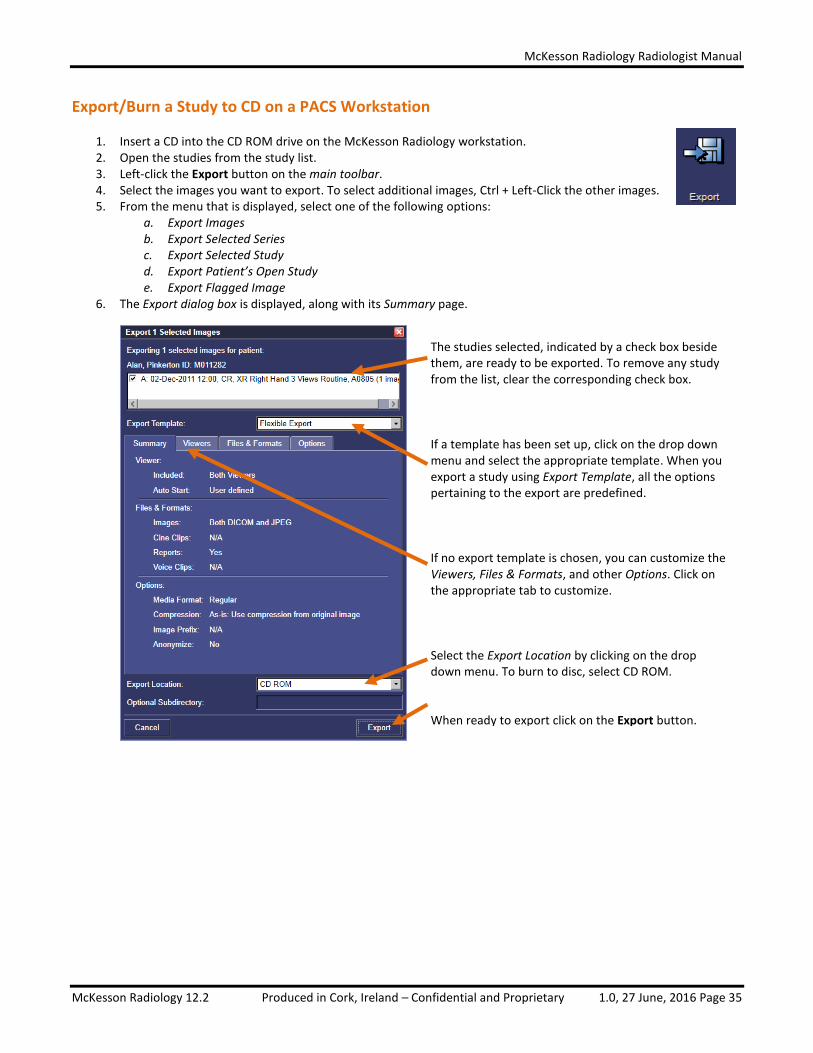
Export/Burn a Study to CD on a PACS Workstation
1. Insert a CD into the CD ROM drive on the McKesson Radiology workstation. 2. Open the studies from the study list. 3. Left-click the Export button on the main toolbar. 4. Select the images you want to export. To select additional images, Ctrl + Left-Click the other images. 5. From the menu that is displayed, select one of the following options:
a. Export Images b. Export Selected Series c. Export Selected Study d. Export Patient’s Open Study e. Export Flagged Image
6. The Export dialog box is displayed, along with its Summary page.
The studies selected, indicated by a check box beside them, are ready to be exported. To remove any study from the list, clear the corresponding check box. If a template has been set up, click on the drop down menu and select the appropriate template. When you export a study using Export Template, all the options pertaining to the export are predefined. If no export template is chosen, you can customize the Viewers, Files & Formats, and other Options. Click on the appropriate tab to customize. Select the Export Location by clicking on the drop down menu. To burn to disc, select CD ROM. When ready to export click on the Export button.
McKesson Radiology Radiologist Manual
McKesson Radiology 12.2 Produced in Cork, Ireland – Confidential and Proprietary 1.0, 27 June, 2016 Page 36
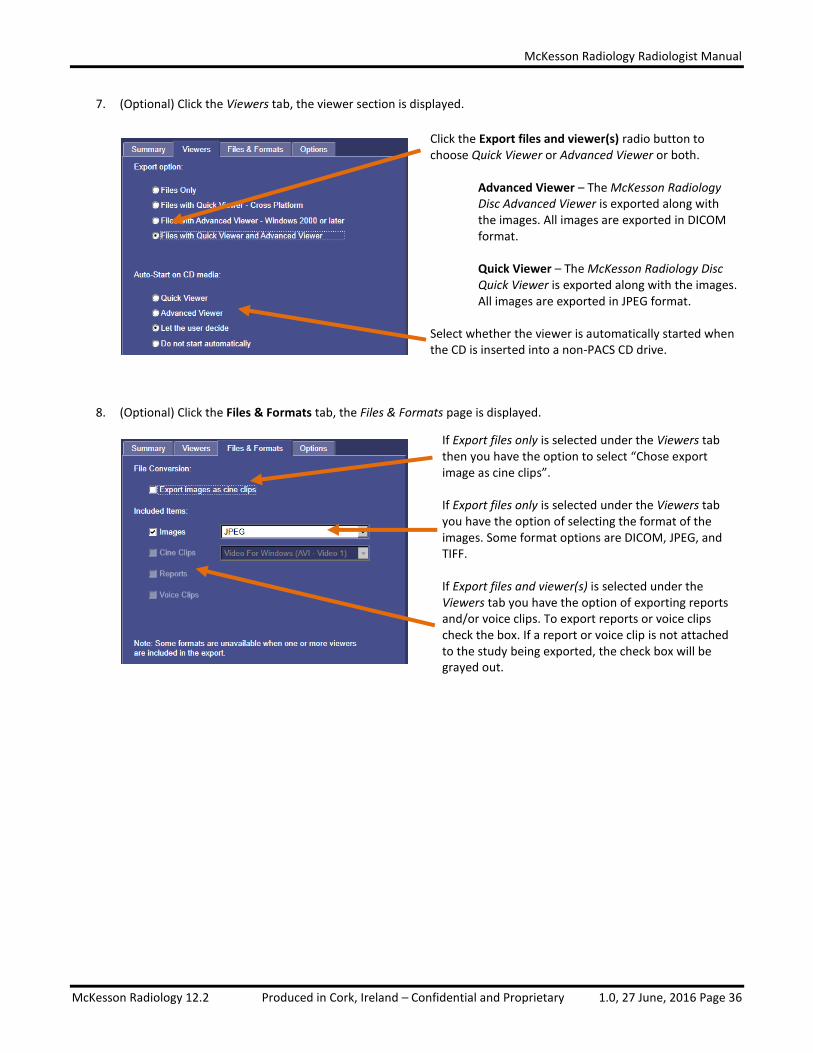
7. (Optional) Click the Viewers tab, the viewer section is displayed.
8. (Optional) Click the Files & Formats tab, the Files & Formats page is displayed.
Click the Export files and viewer(s) radio button to choose Quick Viewer or Advanced Viewer or both.
Advanced Viewer – The McKesson Radiology Disc Advanced Viewer is exported along with the images. All images are exported in DICOM format. Quick Viewer – The McKesson Radiology Disc Quick Viewer is exported along with the images. All images are exported in JPEG format.
Select whether the viewer is automatically started when the CD is inserted into a non-PACS CD drive.
If Export files only is selected under the Viewers tab then you have the option to select “Chose export image as cine clips”. If Export files only is selected under the Viewers tab you have the option of selecting the format of the images. Some format options are DICOM, JPEG, and TIFF. If Export files and viewer(s) is selected under the Viewers tab you have the option of exporting reports and/or voice clips. To export reports or voice clips check the box. If a report or voice clip is not attached to the study being exported, the check box will be grayed out.
McKesson Radiology Radiologist Manual
McKesson Radiology 12.2 Produced in Cork, Ireland – Confidential and Proprietary 1.0, 27 June, 2016 Page 37
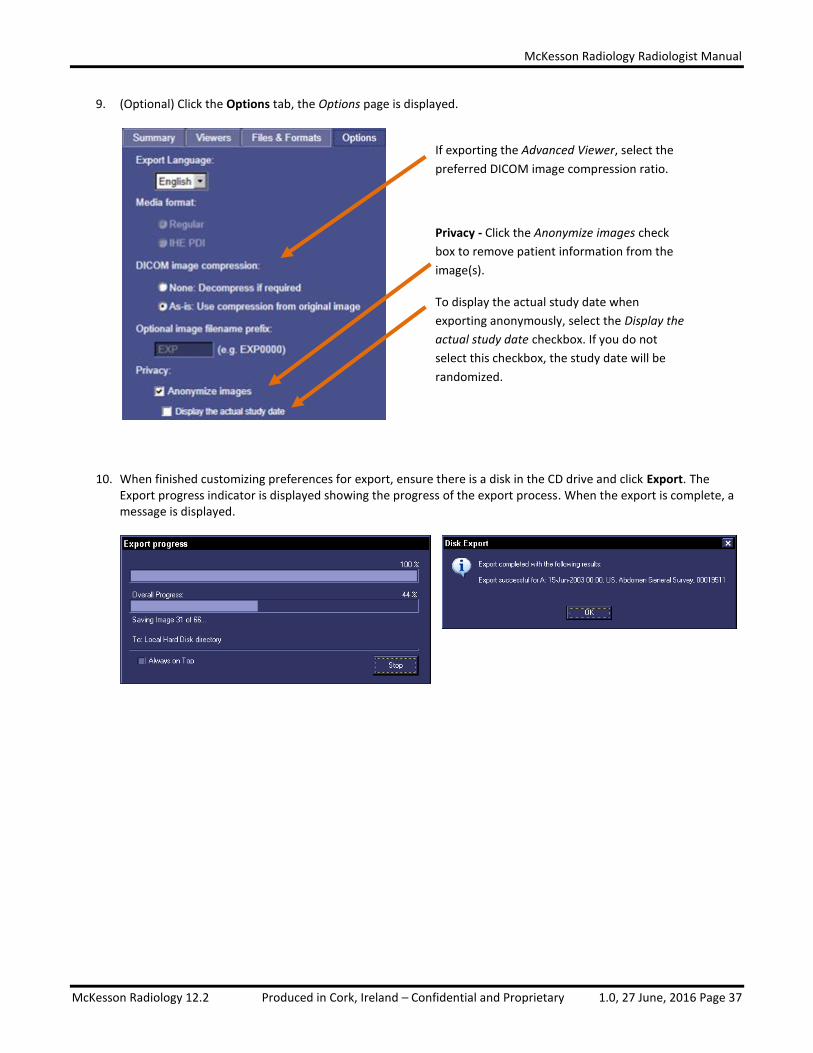
9. (Optional) Click the Options tab, the Options page is displayed.
10. When finished customizing preferences for export, ensure there is a disk in the CD drive and click Export. The Export progress indicator is displayed showing the progress of the export process. When the export is complete, a message is displayed.
If exporting the Advanced Viewer, select the
preferred DICOM image compression ratio.
Privacy - Click the Anonymize images check
box to remove patient information from the
image(s).
To display the actual study date when
exporting anonymously, select the Display the
actual study date checkbox. If you do not
select this checkbox, the study date will be
randomized.
McKesson Radiology Radiologist Manual
McKesson Radiology 12.2 Produced in Cork, Ireland – Confidential and Proprietary 1.0, 27 June, 2016 Page 38
Send Images from PACS to the CD Burner or an After Hours Reading Service
1. Find the study in a study list (e.g. your In-Box or Folder Finder). You can select multiple studies by holding down Ctrl and selecting the desired studies.
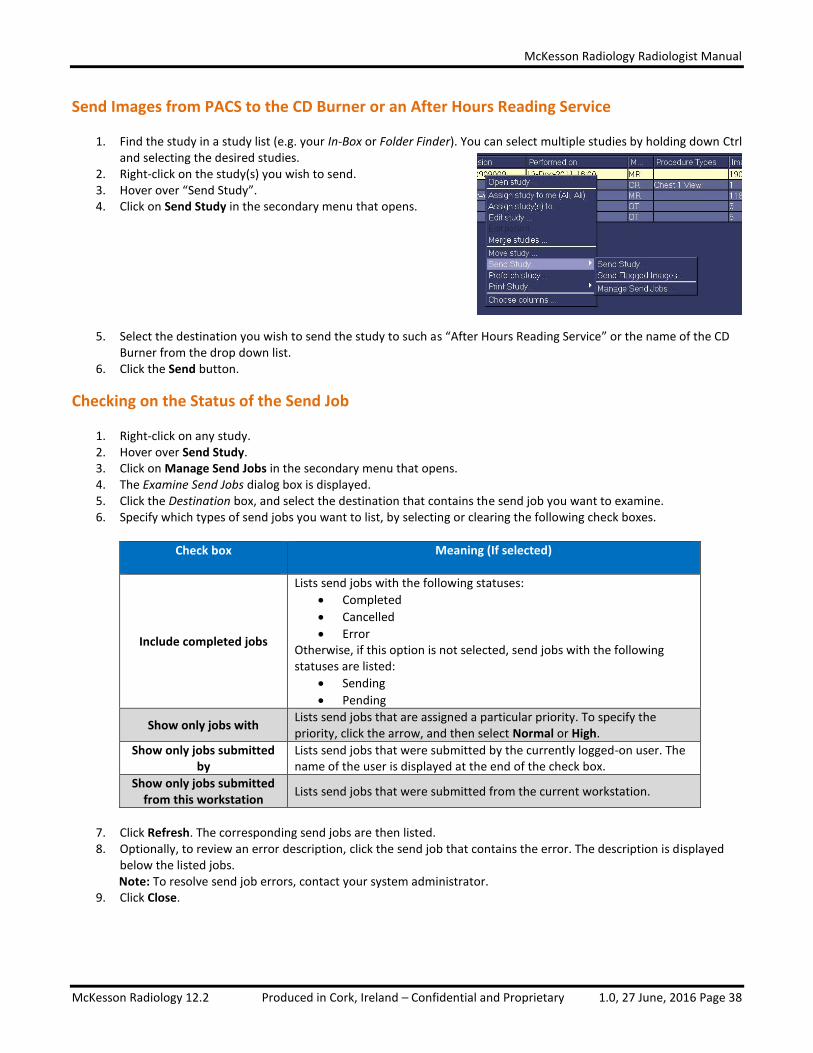
2. Right-click on the study(s) you wish to send. 3. Hover over “Send Study”. 4. Click on Send Study in the secondary menu that opens.
5. Select the destination you wish to send the study to such as “After Hours Reading Service” or the name of the CD Burner from the drop down list.
6. Click the Send button.
Checking on the Status of the Send Job
1. Right-click on any study. 2. Hover over Send Study. 3. Click on Manage Send Jobs in the secondary menu that opens. 4. The Examine Send Jobs dialog box is displayed. 5. Click the Destination box, and select the destination that contains the send job you want to examine. 6. Specify which types of send jobs you want to list, by selecting or clearing the following check boxes.
Check box Meaning (If selected)
Include completed jobs
Lists send jobs with the following statuses:
Completed
Cancelled
Error Otherwise, if this option is not selected, send jobs with the following statuses are listed:
Sending
Pending
Show only jobs with Lists send jobs that are assigned a particular priority. To specify the priority, click the arrow, and then select Normal or High.
Show only jobs submitted by
Lists send jobs that were submitted by the currently logged-on user. The name of the user is displayed at the end of the check box.
Show only jobs submitted from this workstation
Lists send jobs that were submitted from the current workstation.
7. Click Refresh. The corresponding send jobs are then listed. 8. Optionally, to review an error description, click the send job that contains the error. The description is displayed
below the listed jobs. Note: To resolve send job errors, contact your system administrator.
9. Click Close.
McKesson Radiology Radiologist Manual
McKesson Radiology 12.2 Produced in Cork, Ireland – Confidential and Proprietary 1.0, 27 June, 2016 Page 39
Chapter 9 – Display Protocols
Preparing a Site for Display Protocols
Procedure Codes
McKesson Radiology determines which display protocol to apply to a study based on either body region or procedure code, depending on how the display protocol was saved. If the display protocol uses procedure type, then it is critical that procedure types are consistent in the RIS. For example, if a display protocol was saved for a procedure type labeled “CT Chest w/Contrast”, but the order placed is for a “Chest with Contrast”, the display protocol will not be applied to the latter exam. Multiple procedure codes for the same exam can be common at sites that have undergone recent RIS updates or site-wide changes to billing. It is recommended that users only have one choice when ordering a procedure in the RIS.
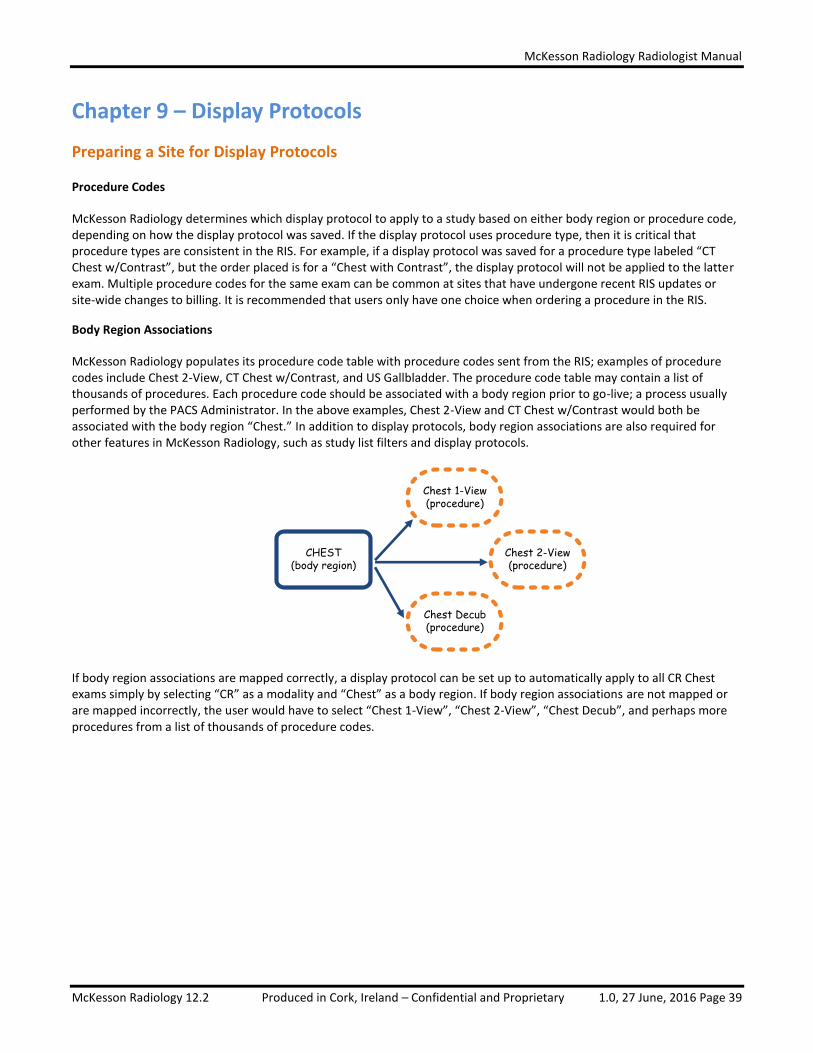
Body Region Associations
McKesson Radiology populates its procedure code table with procedure codes sent from the RIS; examples of procedure codes include Chest 2-View, CT Chest w/Contrast, and US Gallbladder. The procedure code table may contain a list of thousands of procedures. Each procedure code should be associated with a body region prior to go-live; a process usually performed by the PACS Administrator. In the above examples, Chest 2-View and CT Chest w/Contrast would both be associated with the body region “Chest.” In addition to display protocols, body region associations are also required for other features in McKesson Radiology, such as study list filters and display protocols.
CHEST(body region)
Chest 1-View(procedure)
Chest 2-View(procedure)
Chest Decub(procedure)
If body region associations are mapped correctly, a display protocol can be set up to automatically apply to all CR Chest exams simply by selecting “CR” as a modality and “Chest” as a body region. If body region associations are not mapped or are mapped incorrectly, the user would have to select “Chest 1-View”, “Chest 2-View”, “Chest Decub”, and perhaps more procedures from a list of thousands of procedure codes.

McKesson Radiology Radiologist Manual
McKesson Radiology 12.2 Produced in Cork, Ireland – Confidential and Proprietary 1.0, 27 June, 2016 Page 40
Standardizing Modality Series Descriptions
When a display protocol is created, image and series placement are saved based upon DICOM properties in the image and/or series. For example, a CT Chest Axial series may be recognized by the DICOM tags for “Image Type”, “View”, and “Contrast” which is information sent by the modality automatically.
However, under some circumstances, it is possible that these properties are not used, and series description is used instead. In these instances, series description must be consistently and uniquely labeled for each modality of the same type for the entire site. For example, if there are three CT scanners from different vendors, all three scanners must be configured to send the same series description for the CT Chest Axial series mentioned above. The label is arbitrary, but is sensitive to characters and spaces. Common labels would be “Axial” or “AX”; the exact label does not matter as long as all CT scanners use the same labeling consistently.
ROOM 1
Image Type: OriginalView: Axial
Contrast: NoSeries Desc: AX
ROOM 2
Image Type: OriginalView: Axial
Contrast: NoSeries Desc: AX
ROOM 3
Image Type: OriginalView: Axial
Contrast: NoSeries Desc: Lung
Best Practices for Creating Display Protocols
Choose the Right Study
It is important to choose representative studies when building display protocols. It is not recommended to build a display protocol using a trauma study or an abnormal procedure containing images that are not normally captured. It is also important to choose a study captured on a modality that is used regularly. It is not recommended to build a display protocol on a study captured on a mobile unit that makes infrequent visits, or a modality that will be replaced in the near future. Make Changes Starting with a Blank Screen
The recommended first step to creating a new display protocol is to start with a blank screen by dragging all the series
loaded into viewports off the screen. There are several reasons for this:
1. By default, the “Generic Display Protocol” associates the property “Display Any Series” with each viewport. Dragging a series into a viewport from the thumbnails will replace the “Display Any Series” property with the properties for that series. If this step is not performed, the display protocol will not show any changes the next time it is applied.
2. If series are dragged from viewport to viewport (instead of from the thumbnails), the “Display Any Series” property will be swapped. If this display protocol is saved, there will be no change at all to the original presentation.
3. Dragging and dropping a thumbnail into a viewport will replace the “Display Any Series” property with the properties of the dropped series. However, since each viewport may have displayed a series of images to begin with, it is possible to lose track of which viewports are populated with series that were dragged down from the thumbnail bar.

McKesson Radiology Radiologist Manual
McKesson Radiology 12.2 Produced in Cork, Ireland – Confidential and Proprietary 1.0, 27 June, 2016 Page 41
Creating a New Display Protocol
1. Open the study of interest along with any comparison studies you would like to save with the display protocol. Drag and drop the series thumbnails into the viewports of choice, or use the Display Protocol Editor (see Chapter 9 – Specifying Image and Series Placement Using the Display Protocol Editor for more information).
2. Click on the Display Protocol button and select Save as New from the dropdown menu.
3. The Save Display Protocol As window is displayed at the General properties tab. This step determines which type of
studies the display protocol will automatically apply to:
a) In the Name field, enter the name of the display protocol.
b) In the Ownership level options, specify the level of ownership of the display protocol. Only PACS administrators can create site wide display protocols.
c) Specify the applicable rules, which determine which modality, body region, and procedure types the display protocol applies to.
d) Check the Default display for this type of study
check box.
e) Specify which properties to save with the Layout and appearance checkboxes.
4. Click on the Reference Studies tab. This step determines which type of comparison studies to load automatically:
a) Check the Open reference studies automatically check box.
b) Click on the Maximum number of reference studies to open dropdown and specify the maximum number of reference studies that should open.
c) Specify the applicable rules which determine which modality, body region, and procedure type the display protocol will try to open.
Note: Specified body region will load any associated procedure types, eg. If CT is specified for modality and Head; Brain is specified for body region, the protocol will load “Head with contrast”, “Head without contrast”, etc.
d) Specify additional rules if needed to determine whether study statuses or dates should be considered when opening reference studies.
e) Click OK to save the new display protocol.
McKesson Radiology Radiologist Manual
McKesson Radiology 12.2 Produced in Cork, Ireland – Confidential and Proprietary 1.0, 27 June, 2016 Page 42
Creating a Display Protocol Stage
Display protocol stages can display images in different ways. For example, stage 1 may display the anchor study, and stage 2 may display the anchor and reference. The first stage is always applied when an exam is first opened. Types of Display Protocol Stages
Five types of display protocol stages can be defined. Each display protocol stage type represents the context in which the stage is used and how that stage will function. Stages can be skipped if no relevant images or studies are found for a particular Stage Type:
Survey Stage: used for quickly viewing all the images in the anchor study. This stage can be skipped when all
visible viewports are set with the Blank Viewport property.
Comparison Stage: used for viewing images in multiple studies. This stage is for comparing images in the anchor
study and its reference studies. It can be used for same modality comparison, or cross modality comparison. If no
comparison is available, this stage type is skipped.
Review Stage: used for reviewing flagged images in the anchor study. This is useful as an aid for dictating reports.
Unviewed Stage: used for reviewing unviewed images as a set before an interpretation is completed.
Blank Stage: used for dragging and dropping images from the thumbnail bar. All changes to this stage are
discarded when the study is closed.
Other Stage: used for any other purpose not covered by the other types.
Modifying a Display Protocol Stage
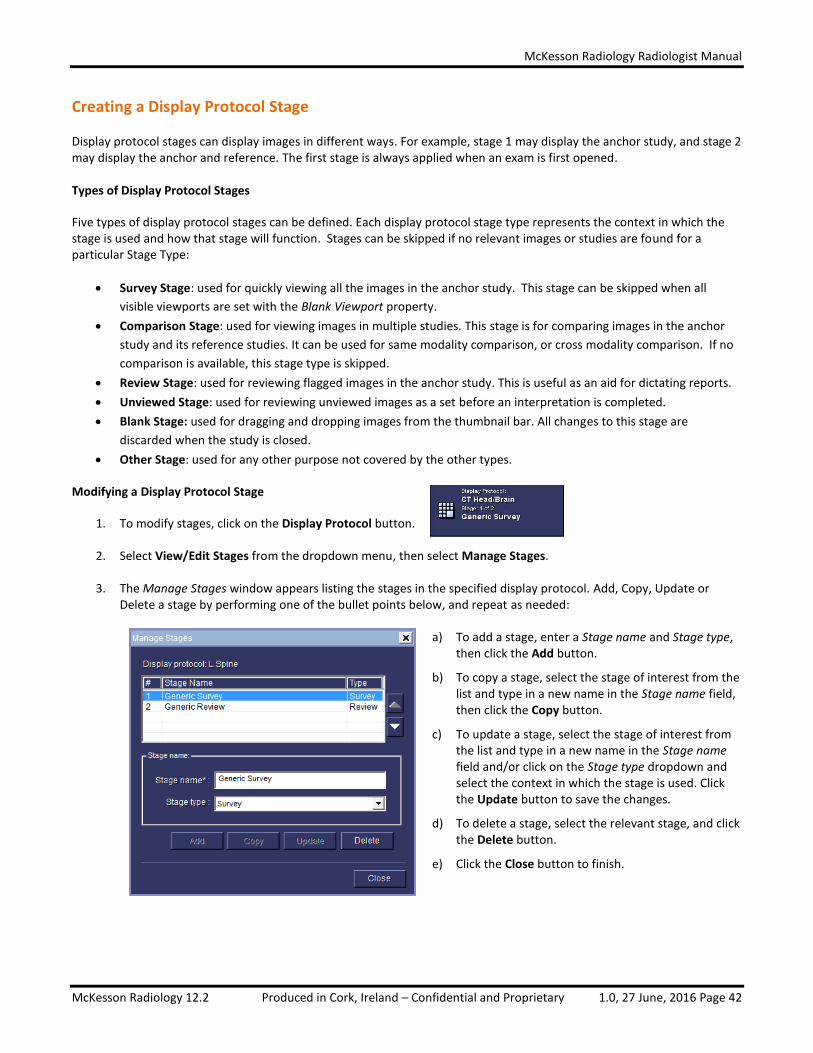
1. To modify stages, click on the Display Protocol button.
2. Select View/Edit Stages from the dropdown menu, then select Manage Stages. 3. The Manage Stages window appears listing the stages in the specified display protocol. Add, Copy, Update or
Delete a stage by performing one of the bullet points below, and repeat as needed:
a) To add a stage, enter a Stage name and Stage type, then click the Add button.
b) To copy a stage, select the stage of interest from the list and type in a new name in the Stage name field, then click the Copy button.
c) To update a stage, select the stage of interest from the list and type in a new name in the Stage name field and/or click on the Stage type dropdown and select the context in which the stage is used. Click the Update button to save the changes.
d) To delete a stage, select the relevant stage, and click the Delete button.
e) Click the Close button to finish.
McKesson Radiology Radiologist Manual
McKesson Radiology 12.2 Produced in Cork, Ireland – Confidential and Proprietary 1.0, 27 June, 2016 Page 43
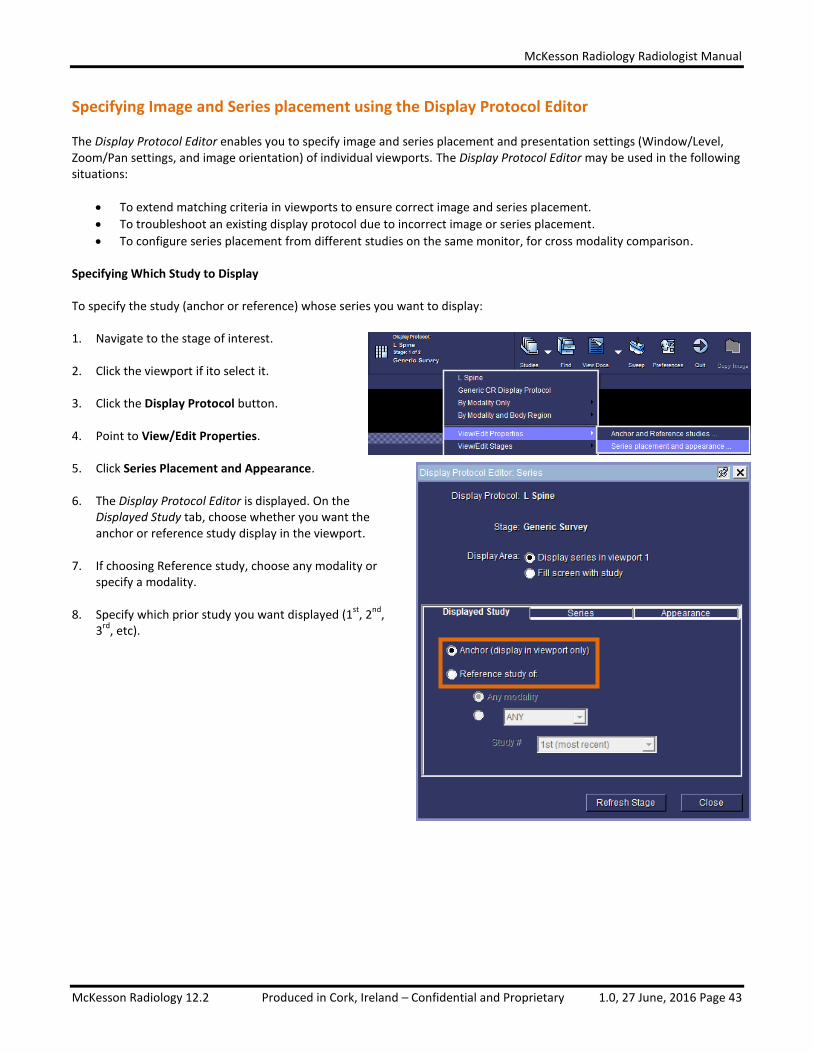
Specifying Image and Series placement using the Display Protocol Editor
The Display Protocol Editor enables you to specify image and series placement and presentation settings (Window/Level, Zoom/Pan settings, and image orientation) of individual viewports. The Display Protocol Editor may be used in the following situations:
To extend matching criteria in viewports to ensure correct image and series placement.
To troubleshoot an existing display protocol due to incorrect image or series placement.
To configure series placement from different studies on the same monitor, for cross modality comparison. Specifying Which Study to Display To specify the study (anchor or reference) whose series you want to display: 1. Navigate to the stage of interest.
2. Click the viewport if ito select it.
3. Click the Display Protocol button.
4. Point to View/Edit Properties.
5. Click Series Placement and Appearance.
6. The Display Protocol Editor is displayed. On the
Displayed Study tab, choose whether you want the anchor or reference study display in the viewport.
7. If choosing Reference study, choose any modality or specify a modality.
8. Specify which prior study you want displayed (1st
, 2nd
, 3
rd, etc).
McKesson Radiology Radiologist Manual
McKesson Radiology 12.2 Produced in Cork, Ireland – Confidential and Proprietary 1.0, 27 June, 2016 Page 44
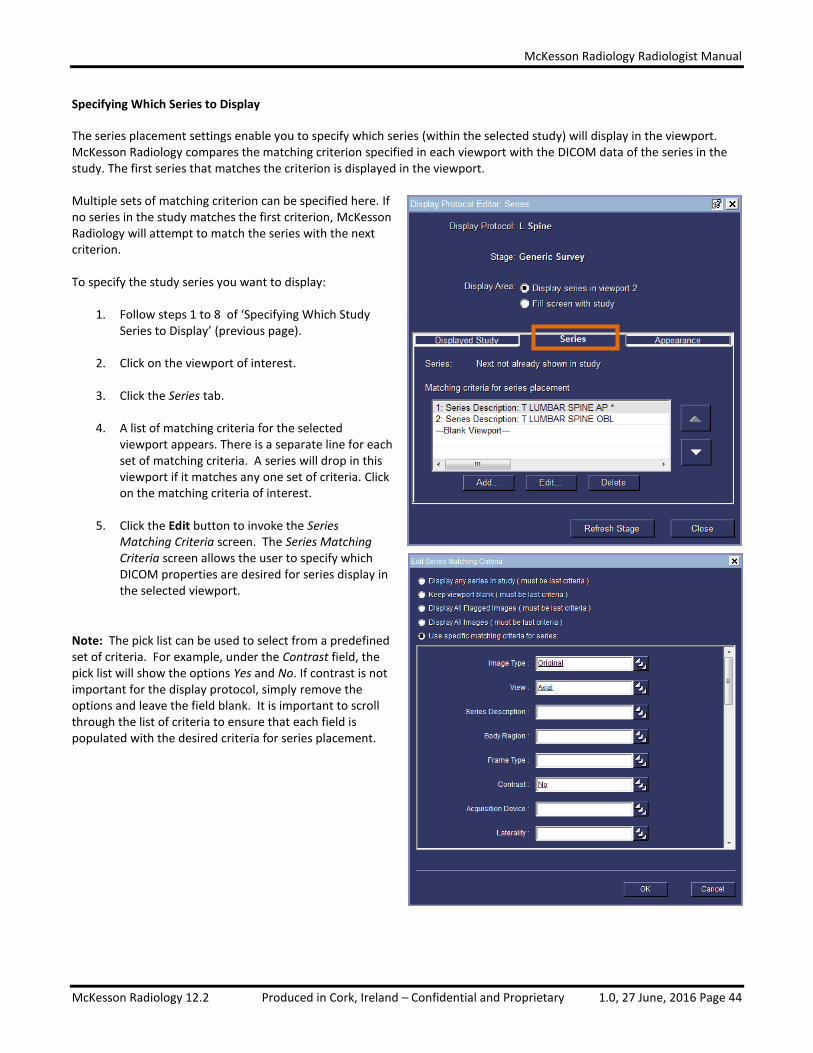
Specifying Which Series to Display
The series placement settings enable you to specify which series (within the selected study) will display in the viewport. McKesson Radiology compares the matching criterion specified in each viewport with the DICOM data of the series in the study. The first series that matches the criterion is displayed in the viewport. Multiple sets of matching criterion can be specified here. If no series in the study matches the first criterion, McKesson Radiology will attempt to match the series with the next criterion. To specify the study series you want to display:
1. Follow steps 1 to 8 of ‘Specifying Which Study Series to Display’ (previous page).
2. Click on the viewport of interest.
3. Click the Series tab.
4. A list of matching criteria for the selected viewport appears. There is a separate line for each set of matching criteria. A series will drop in this viewport if it matches any one set of criteria. Click on the matching criteria of interest.
5. Click the Edit button to invoke the Series
Matching Criteria screen. The Series Matching Criteria screen allows the user to specify which DICOM properties are desired for series display in the selected viewport.
Note: The pick list can be used to select from a predefined set of criteria. For example, under the Contrast field, the pick list will show the options Yes and No. If contrast is not important for the display protocol, simply remove the options and leave the field blank. It is important to scroll through the list of criteria to ensure that each field is populated with the desired criteria for series placement.
McKesson Radiology Radiologist Manual
McKesson Radiology 12.2 Produced in Cork, Ireland – Confidential and Proprietary 1.0, 27 June, 2016 Page 45
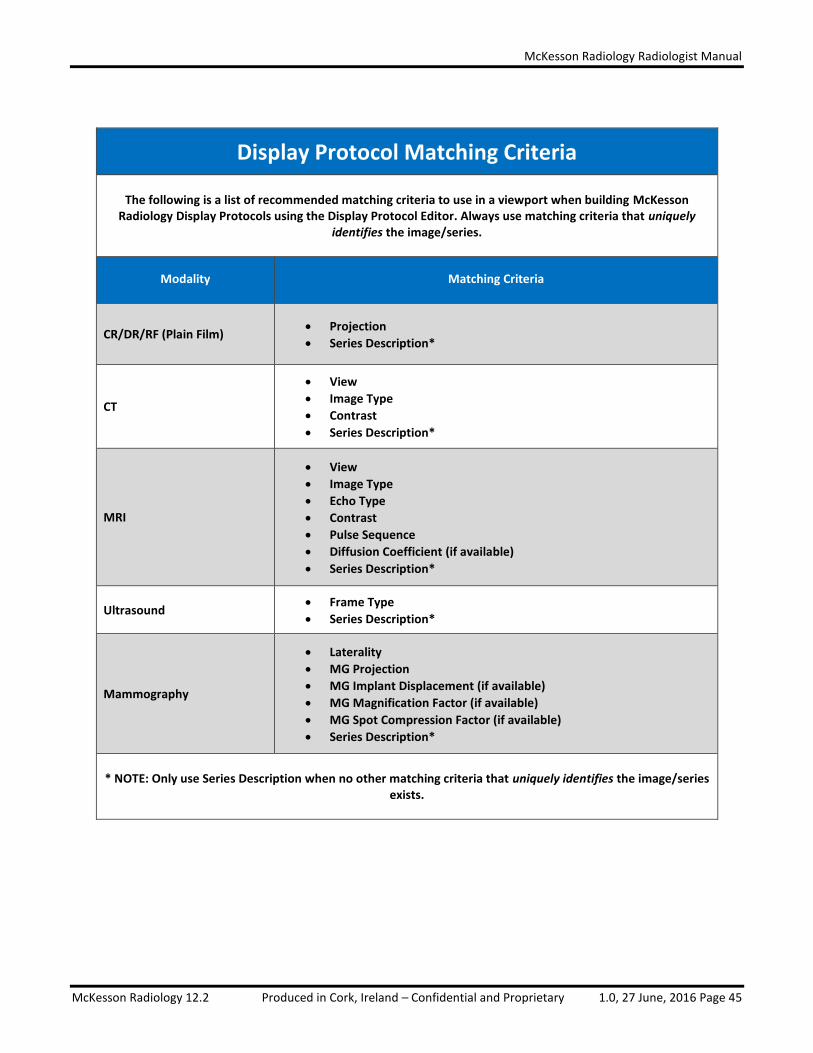
Display Protocol Matching Criteria
The following is a list of recommended matching criteria to use in a viewport when building McKesson Radiology Display Protocols using the Display Protocol Editor. Always use matching criteria that uniquely
identifies the image/series.
Modality Matching Criteria
CR/DR/RF (Plain Film) Projection
Series Description*
CT
View
Image Type
Contrast
Series Description*
MRI
View
Image Type
Echo Type
Contrast
Pulse Sequence
Diffusion Coefficient (if available)
Series Description*
Ultrasound Frame Type
Series Description*
Mammography
Laterality
MG Projection
MG Implant Displacement (if available)
MG Magnification Factor (if available)
MG Spot Compression Factor (if available)
Series Description*
* NOTE: Only use Series Description when no other matching criteria that uniquely identifies the image/series
exists.
McKesson Radiology Radiologist Manual
McKesson Radiology 12.2 Produced in Cork, Ireland – Confidential and Proprietary 1.0, 27 June, 2016 Page 46
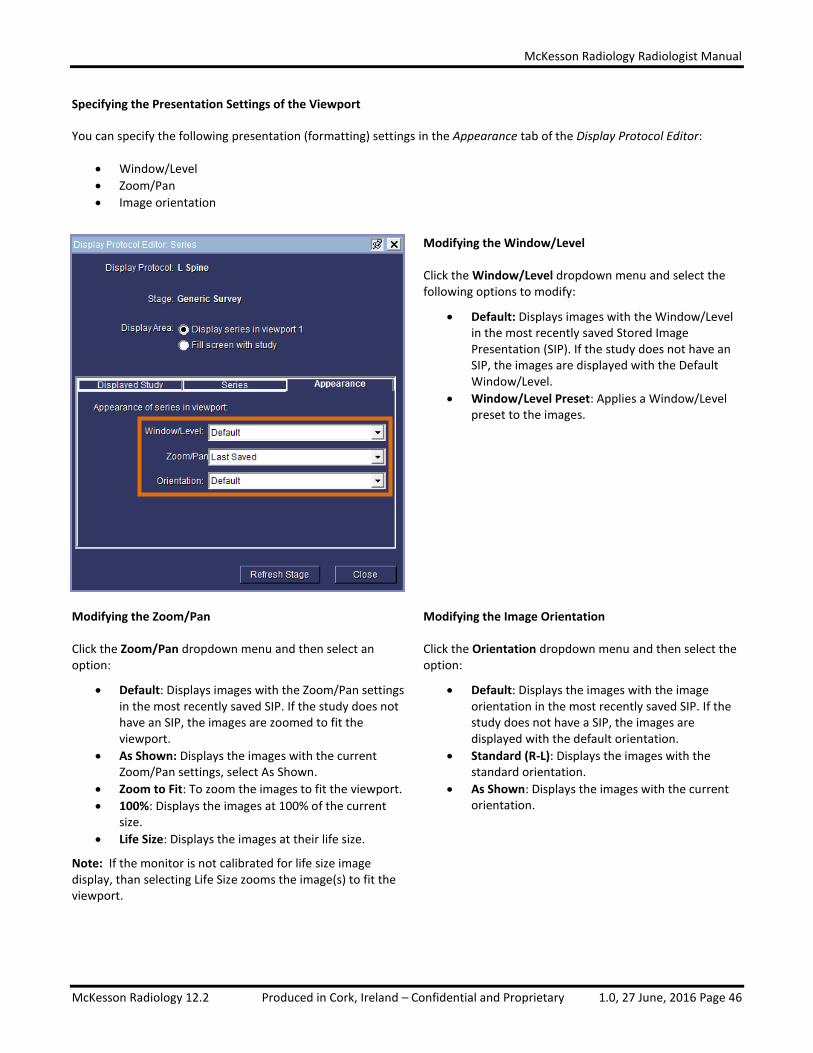
Specifying the Presentation Settings of the Viewport
You can specify the following presentation (formatting) settings in the Appearance tab of the Display Protocol Editor:
Window/Level
Zoom/Pan
Image orientation
Modifying the Window/Level Click the Window/Level dropdown menu and select the following options to modify:
Default: Displays images with the Window/Level in the most recently saved Stored Image Presentation (SIP). If the study does not have an SIP, the images are displayed with the Default Window/Level.
Window/Level Preset: Applies a Window/Level preset to the images.
Modifying the Zoom/Pan Click the Zoom/Pan dropdown menu and then select an option:
Default: Displays images with the Zoom/Pan settings in the most recently saved SIP. If the study does not have an SIP, the images are zoomed to fit the viewport.
As Shown: Displays the images with the current Zoom/Pan settings, select As Shown.
Zoom to Fit: To zoom the images to fit the viewport.
100%: Displays the images at 100% of the current size.
Life Size: Displays the images at their life size.
Note: If the monitor is not calibrated for life size image display, than selecting Life Size zooms the image(s) to fit the viewport.
Modifying the Image Orientation Click the Orientation dropdown menu and then select the option:
Default: Displays the images with the image orientation in the most recently saved SIP. If the study does not have a SIP, the images are displayed with the default orientation.
Standard (R-L): Displays the images with the standard orientation.
As Shown: Displays the images with the current orientation.
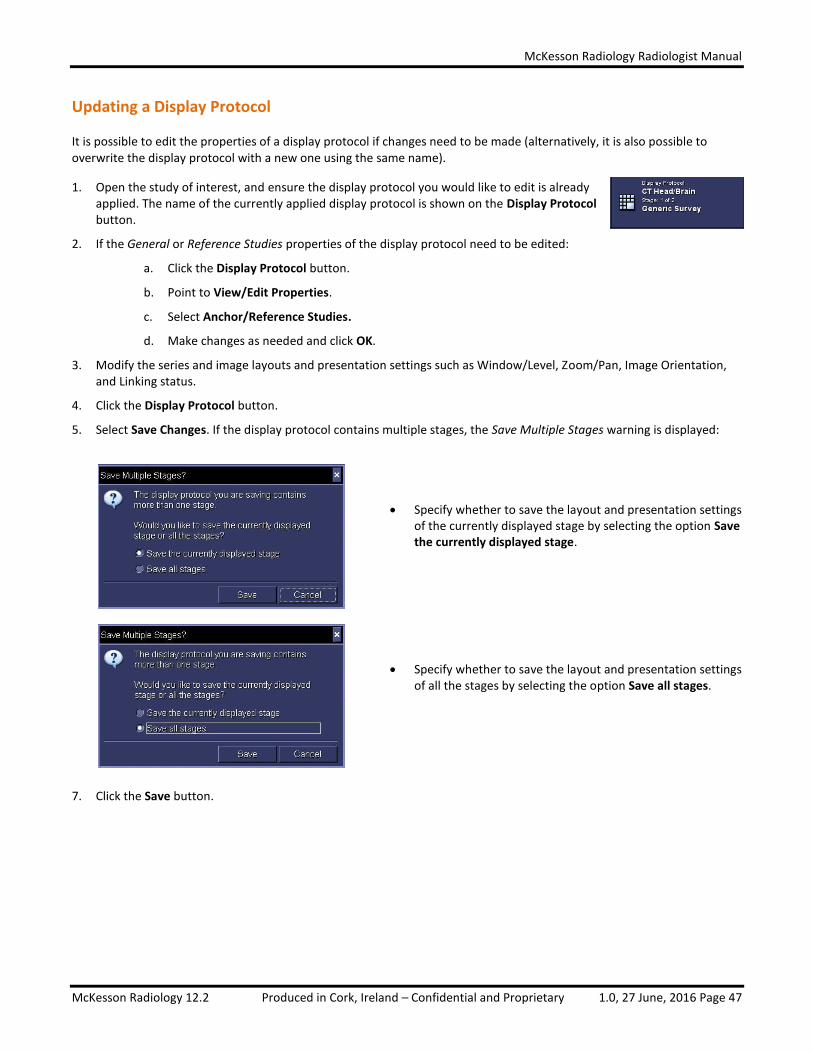
McKesson Radiology Radiologist Manual
McKesson Radiology 12.2 Produced in Cork, Ireland – Confidential and Proprietary 1.0, 27 June, 2016 Page 47
Updating a Display Protocol
It is possible to edit the properties of a display protocol if changes need to be made (alternatively, it is also possible to overwrite the display protocol with a new one using the same name).
1. Open the study of interest, and ensure the display protocol you would like to edit is already applied. The name of the currently applied display protocol is shown on the Display Protocol button.
2. If the General or Reference Studies properties of the display protocol need to be edited:
a. Click the Display Protocol button.
b. Point to View/Edit Properties.
c. Select Anchor/Reference Studies.
d. Make changes as needed and click OK.
3. Modify the series and image layouts and presentation settings such as Window/Level, Zoom/Pan, Image Orientation, and Linking status.
4. Click the Display Protocol button.
5. Select Save Changes. If the display protocol contains multiple stages, the Save Multiple Stages warning is displayed:
Specify whether to save the layout and presentation settings of the currently displayed stage by selecting the option Save the currently displayed stage.
Specify whether to save the layout and presentation settings of all the stages by selecting the option Save all stages.
7. Click the Save button.

McKesson Radiology Radiologist Manual
McKesson Radiology 12.2 Produced in Cork, Ireland – Confidential and Proprietary 1.0, 27 June, 2016 Page 48
Copying a Display Protocol
1. Click on the Display Protocol button.
2. Select Manage Display Protocols from the dropdown menu.
3. The following window appears, displaying the available display protocols.
4. Check the Show Other Folders checkbox.
5. Click the Choose button.
6. The Show Other Folders window appears. Click the pick list button.
7. Select the user from whom you want to copy a display protocol.
8. Click the OK button.
9. Click the OK button to close the Show Other Folders window.
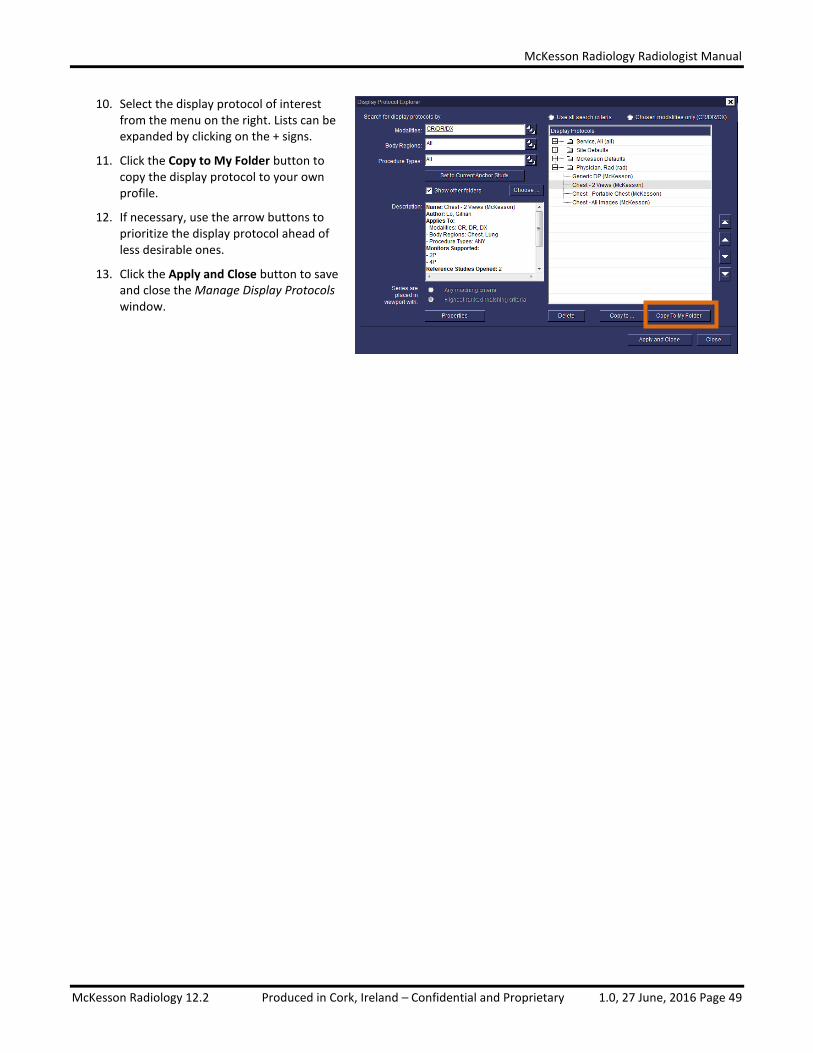
McKesson Radiology Radiologist Manual
McKesson Radiology 12.2 Produced in Cork, Ireland – Confidential and Proprietary 1.0, 27 June, 2016 Page 49
10. Select the display protocol of interest from the menu on the right. Lists can be expanded by clicking on the + signs.
11. Click the Copy to My Folder button to copy the display protocol to your own profile.
12. If necessary, use the arrow buttons to prioritize the display protocol ahead of less desirable ones.
13. Click the Apply and Close button to save and close the Manage Display Protocols window.

McKesson Radiology Radiologist Manual
McKesson Radiology 12.2 Produced in Cork, Ireland – Confidential and Proprietary 1.0, 27 June, 2016 Page 50
Frequently Asked Questions What are the drawbacks of image/series placement using the Drag and Drop Method?
The “drag and drop” method of building display protocols will save matching criteria for the opened study. However, it will likely need to be extended constantly to accommodate for slight variations in matching criteria due to differences in properties from different modality vendors or different acquisition protocols.
The recommended first step to creating a new display protocol using the “drag and drop” method is to start with a blank screen by dragging all the series loaded into viewports off the screen. There are several reasons for this:
By default, the “Generic Display Protocol” associates the property “Display Any Series” with each viewport. Dragging a series into a viewport from the thumbnails will replace the “Display Any Series” property with the properties for that series. If this step is not performed, the display protocol will not show any changes the next time it is applied.
If series are dragged from viewport to viewport (instead of from the thumbnails), the “Display Any Series” property will be swapped. If this display protocol is saved, there will be no change at all to the original presentation.
Dragging and dropping a thumbnail into a viewport will replace the “Display Any Series” property with the properties of the dropped series. However, since each viewport may have displayed a series of images to begin with, it is possible to lose track of which viewports are populated with series that were dragged down from the thumbnail bar.
When hovering, the mouse cursor over a thumbnail, a popup box appears listing the properties of that series. The properties with an asterisk are determined to be the smallest set of criteria that can be used to uniquely identify that series from the others in the study. For each thumbnail, every property is examined to see if all other thumbnails have the same value for this property. If this is the case, the property is ignored; otherwise, it is asterisked. When the thumbnail is dropped into a viewport, those image or series properties that are asterisked will be associated with the viewport. You can verify this by opening the Display Protocol Editor to view the specific matching criteria for that viewport.
After making changes to series and image layout, make any other presentation changes such as Window/Level, Zoom/Pan, Image Orientation, and Series Linking status before continuing. Save the changes.
What does it mean to “extend” a display protocol?
Any series subsequently added into the viewport will add matching criteria to that viewport. For example, if an “Axial Pre” series is dragged into a viewport and saved, then an “Axial Post” is dropped into the viewport and saved again, that viewport will search for both “Axial Pre” and “Axial Post” in the future. This is called “extending” a display protocol, which can be used to accommodate variations in series properties from different modality vendors.
Changes made to the protocol need to be saved by clicking on the Display Protocol button and selecting Save Changes.
When are Series Descriptions used for Series Placement?
When no properties can uniquely identify a series, then series description is used as matching criteria instead. This is apparent when a user hovers over the relevant image thumbnail and the only property asterisked is the series description.
It is recommended to avoid using series description and use matching criteria whenever possible. Series descriptions are subject to differences between vendors and technologist manual entry. If the series description saved in a display protocol differs from the series description sent in subsequent studies, even by a single character or space, the display protocol will not hang images correctly.
How does Rad Station determine which Display Protocol to use when I open a study? When creating a display protocol, you can associate the protocol with up to three properties: modality, body region, and procedure type. Modality should always be assigned. Either body region or procedure type can be assigned; it is not
McKesson Radiology Radiologist Manual
McKesson Radiology 12.2 Produced in Cork, Ireland – Confidential and Proprietary 1.0, 27 June, 2016 Page 51
required to have both. Body region is set up by your administrator and is recommended for simplicity. For example, if a protocol is assigned to “CT” and “Chest”, the display protocol will automatically apply to “CT Chest W/Contrast”, “CT Chest WO/Contrast”, and “CT Chest W & WO/Contrast”. If you desired separate protocols for all three procedure types, then you would ignore body region and assign the protocol to procedure type instead. How are thumbnails placed in viewports? When a display protocol is applied to a study, the thumbnails are evaluated for placement in the same order in which they appear on the bar. For each thumbnail, the first viewport with matching criteria is chosen for placement; this is the first series with all the properties specified as matching criteria for the viewport. Currently, each sequence is placed in the first viewport that satisfies the matching criteria. The ranking of the matching criteria does not play a part in series placement into viewports. What happens when you swap the contents of two viewports? Swapping two viewports swaps the matching criteria associated with each viewport. The results of swapping the contents are dependent on the actions performed prior to the swap. Case #1: The generic protocol is applied and the contents of two viewports are swapped. Results: This action simply results in swapping the same property “Display Any Series”. When the protocol is saved,
the changes made are not noticed. For this reason, this practice should be avoided while creating protocols. Case #2: One of the two viewports involved in the swap had a thumbnail dropped into it. For example, viewport #1
had a thumbnail dropped into it and is now associated with a set of properties, while viewport #2 is still associated with “Display Any Series”.
Results: Swapping these two viewports will swap the properties as expected; saving the protocol and re-applying it
will result in viewport #2 displaying the expected series; though the same is not necessarily true of viewport #1. To avoid confusion, it is best practice to always drop series from the thumbnail bar.
Case #3: Both viewports involved in the swap had a thumbnail dragged into them. Results: This is the best scenario to work with. The set of image properties associated with each viewport are
exchanged. When this protocol is saved and re-applied, the results are as expected (i.e. the series appear in the viewports in which they were expected to appear).
What happens when the same series is dropped into different viewports? The same thumbnail can be dropped into multiple viewports. For example, this may be used for CT where the radiologist wants to see a Chest exam with Abdomen, Lung, and Mediastinum window/levels at the same time. Once multiple viewports are associated, the specific matching criteria for the viewports cannot be updated or deleted. If the viewports are associated with slightly undesirable matching criteria that may not consistently work, simply add a new set of matching criteria to the first viewport of this collection. This association can be removed by clicking on the “Break” button in the “Series” tab of the Display Protocol Editor. How do display protocols work for different monitor configurations? A display protocol can be adapted to behave differently depending on the number of available active monitors. The recommended approach to use this feature is to build the protocol on the configuration with the lowest number of monitors, and then adapt the protocol to configurations with more monitors. When you build a protocol on a 2-monitor
McKesson Radiology Radiologist Manual
McKesson Radiology 12.2 Produced in Cork, Ireland – Confidential and Proprietary 1.0, 27 June, 2016 Page 52
configuration and open it on a 4-monitor workstation, the protocol opens up showing the first two monitors with series placed and the last two monitors with blank viewports. However, when a protocol is built on a 4-monitor workstation and then opened on a 2-monitor workstation, the software will revert to the “Generic Display Protocol” until the custom protocol has been extended for the other configuration. This behavior may be unintuitive to users, as it will appear as though the display protocol is not working. To extend a protocol for a different monitor configuration, apply the display protocol on a different monitor configuration, alter the viewports as desired, and use the “Save Changes” feature to update the protocol. This protocol will now work for both monitor configurations.
McKesson Radiology Radiologist Manual
McKesson Radiology 12.2 Produced in Cork, Ireland – Confidential and Proprietary 1.0, 27 June, 2016 Page 53
Troubleshooting Scenarios
The following section deals with some common scenarios where previously created display protocols fail. As an example, we will use a two monitor display protocol created for a “CR Chest 2-View” (frontal and lateral views) study using the drag and drop method on a perfectly sequenced study. The following are scenarios where this protocol can fail: Missing DICOM properties Description: There is a lateral image on the thumbnail bar but this image does not appear in the viewport as expected.
The empty viewport will list the properties with which it is associated. Explanation: Looking at the DICOM header, you may find that the property “Projection Type” does not exist. This
usually indicates that the projection type was not found anywhere in the DICOM header. Action: Drag down the lateral image and save the display protocol. Take a look through the DICOM header and
see if you find the projection type anywhere. If not, this is a modality problem; keep an eye out to see if all studies from a particular device are like this or if it’s just a rare occurrence. If you do find a projection type value somewhere, inform a member of the McKesson team.
Incorrect DICOM properties Description: As in the previous example, there is a lateral image on the thumbnail bar but this image does not appear
in the viewport as expected. The empty viewport will list the properties with which it is associated. Explanation: Even though the image is visually identified as a lateral image, the DICOM header incorrectly states that
this image is “AP”. Action: An incorrect DICOM tag is typically caused by technologist error or incorrect modality configuration. It is
also possible that the projection is stored correctly in another DICOM tag. A member of the McKesson team should be notified to investigate the problem, but this usually cannot be corrected in PACS.
Variations of expected property values Description: Once again, there is a lateral image on the thumbnail bar but this image does not appear in the viewport
as expected. The empty viewport will list the properties with which it is associated. Explanation: The viewport was saved with the projection type “Lat” which is the most common form of representation,
but for this study, McKesson Radiology extracted “Lateral” or “LL” (short for “Left Lateral”). Action: Verify what value the lateral image has for projection type in its DICOM header. After verifying that it is
just a variation of syntax and not an incorrect value, there are two possible courses of action to take:
a) Drag down the thumbnail to the viewport and “Save Changes”. This viewport will now look for both variations of the value “lateral”.
b) Open the Display Protocol Editor and manually add the variations to the specific matching criteria dialog.
McKesson Radiology Radiologist Manual
McKesson Radiology 12.2 Produced in Cork, Ireland – Confidential and Proprietary 1.0, 27 June, 2016 Page 54
Image with specific properties is not available Description: A viewport remains blank after a display protocol is applied to a study. The empty viewport will list the
properties with which it is associated. Explanation: The viewport expects an image with certain properties but such an image is not found in the study. Action: There are two possibilities for this error: either the image does not exist in the study or the matching
criteria in the viewport is so constrained that none of the images in the study are considered a fit for that viewport. If the former is the case, the image has not been sent to PACS. To troubleshoot the latter, hover the mouse cursor over the thumbnails that have not been placed in a viewport and check to see how the matching criteria of the viewport can be reduced to “fit” the desired image. For example, the viewport may be looking for a body region of “Chest” which was not sent by the modality. This property should be removed from the display protocol using the Display Protocol Editor.
Improper Series Placement Description: The viewport in question was not populated by the expected image. Explanation: There are a few possible causes for this:
The expected image was not acquired or sent to PACS.
Not enough properties were set as matching criteria, so a thumbnail that comes before the expected image is chosen for placement into the viewport.
The expected thumbnail may have been chosen for placement in a previous viewport.
The same image was acquired twice as the patient was not in a favorable position for the first image; in this case, you’ll have two images with identical properties. The first matching image will always be chosen for placement.
The study may have more thumbnails than viewports; by the time the image in question is evaluated for placement, all viewports have been filled.
Owing to mislabeled properties (stemming from incorrect DICOM info), the properties of a thumbnail did not match with the matching criteria of a viewport.
Action: Firstly, determine whether the expected image was sent to PACS. Next, hover over the thumbnail to
determine what the DICOM properties of the image are. Then use the Display Protocol Editor to evaluate whether the series matching criteria of your viewport(s) match the DICOM properties of the image.
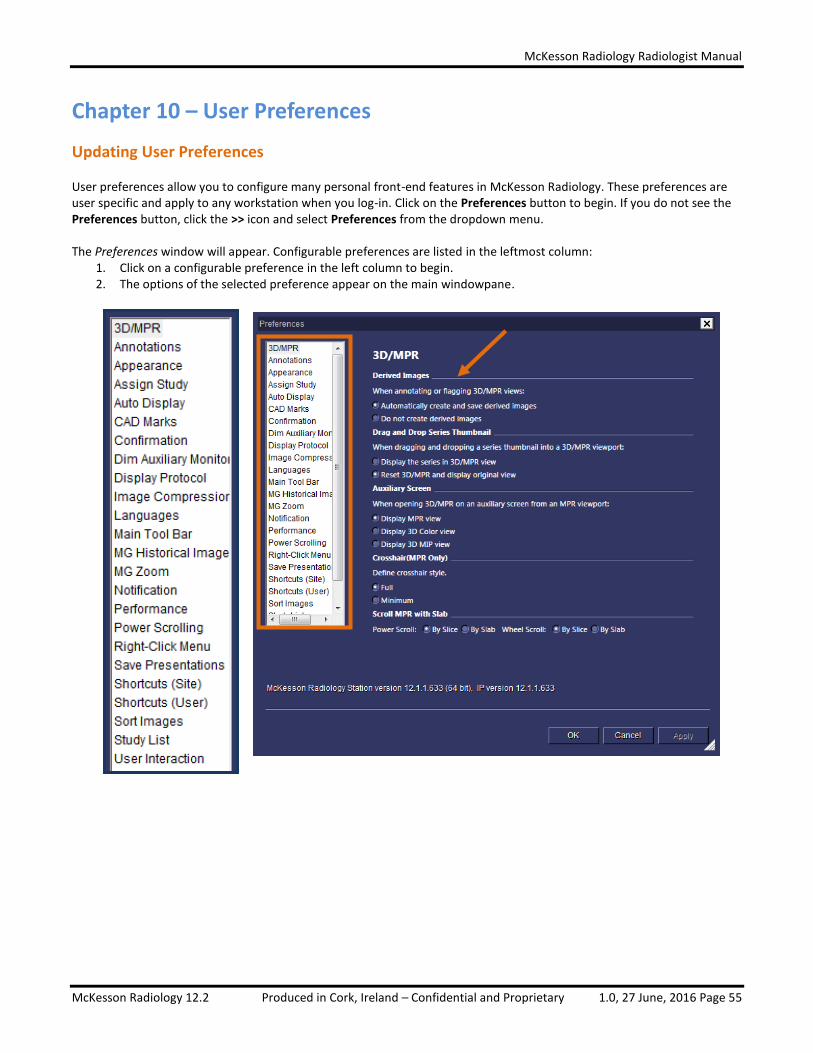
McKesson Radiology Radiologist Manual
McKesson Radiology 12.2 Produced in Cork, Ireland – Confidential and Proprietary 1.0, 27 June, 2016 Page 55
Chapter 10 – User Preferences
Updating User Preferences
User preferences allow you to configure many personal front-end features in McKesson Radiology. These preferences are user specific and apply to any workstation when you log-in. Click on the Preferences button to begin. If you do not see the Preferences button, click the >> icon and select Preferences from the dropdown menu. The Preferences window will appear. Configurable preferences are listed in the leftmost column:
1. Click on a configurable preference in the left column to begin. 2. The options of the selected preference appear on the main windowpane.
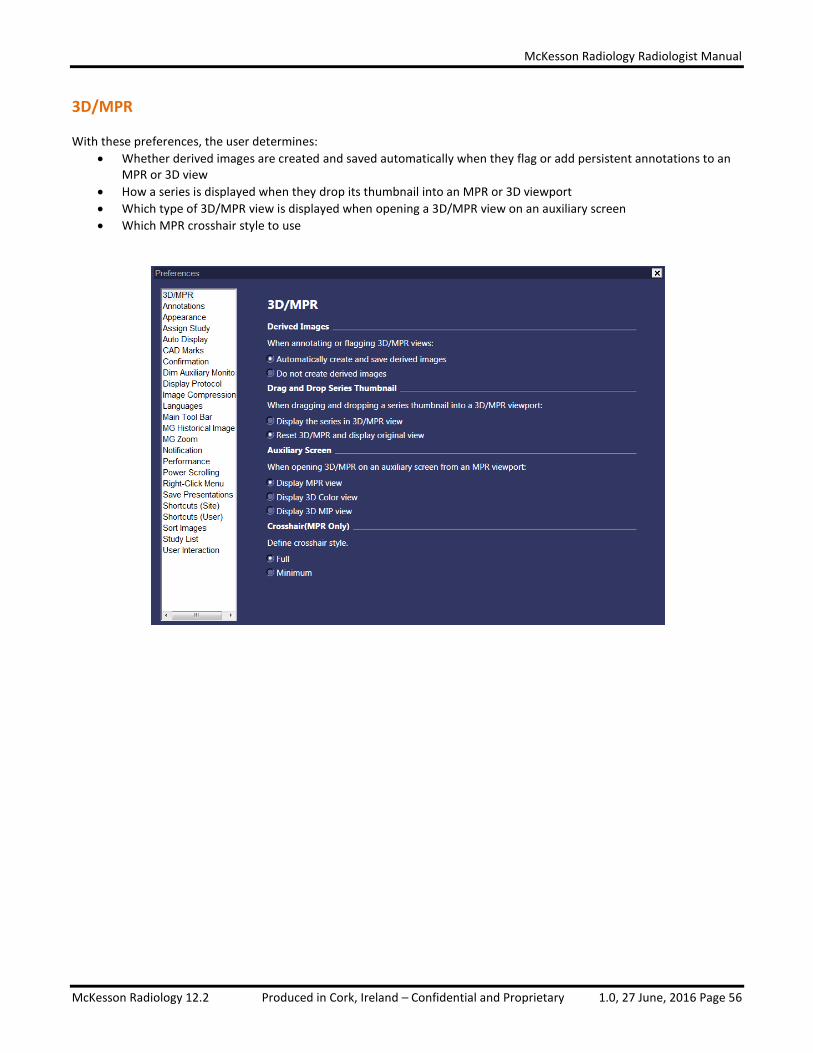
McKesson Radiology Radiologist Manual
McKesson Radiology 12.2 Produced in Cork, Ireland – Confidential and Proprietary 1.0, 27 June, 2016 Page 56
3D/MPR
With these preferences, the user determines:
Whether derived images are created and saved automatically when they flag or add persistent annotations to an MPR or 3D view
How a series is displayed when they drop its thumbnail into an MPR or 3D viewport
Which type of 3D/MPR view is displayed when opening a 3D/MPR view on an auxiliary screen
Which MPR crosshair style to use
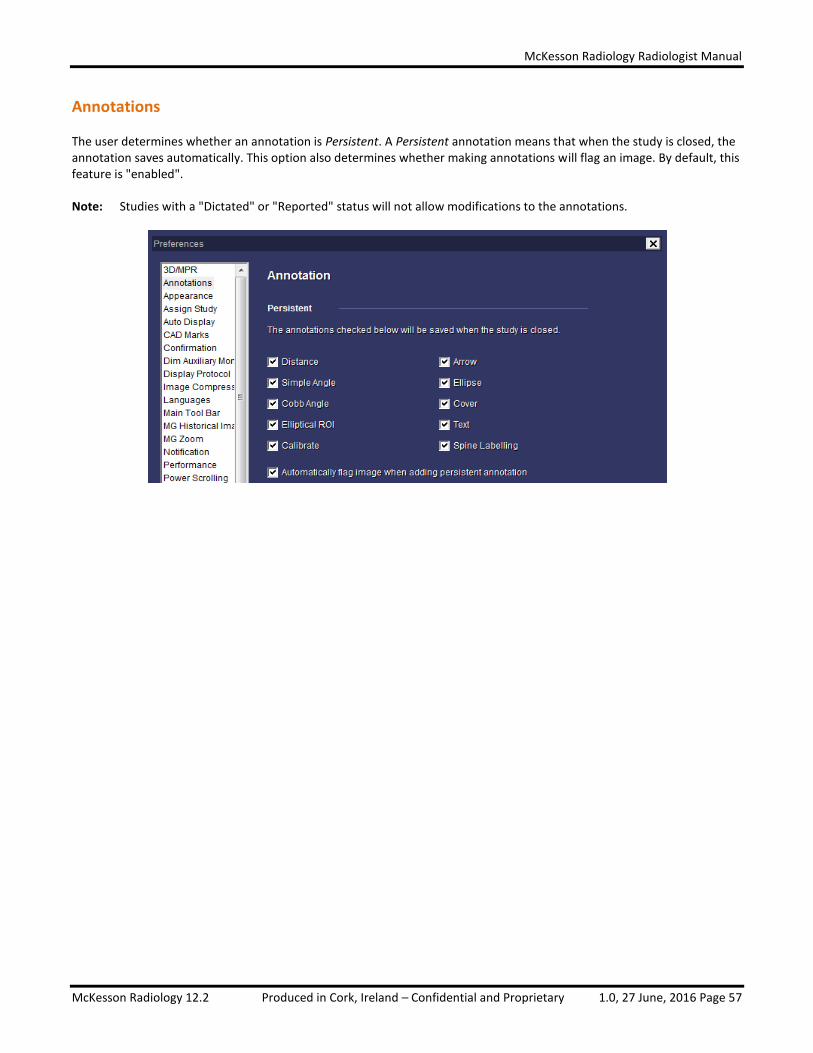
McKesson Radiology Radiologist Manual
McKesson Radiology 12.2 Produced in Cork, Ireland – Confidential and Proprietary 1.0, 27 June, 2016 Page 57
Annotations
The user determines whether an annotation is Persistent. A Persistent annotation means that when the study is closed, the annotation saves automatically. This option also determines whether making annotations will flag an image. By default, this feature is "enabled". Note: Studies with a "Dictated" or "Reported" status will not allow modifications to the annotations.

McKesson Radiology Radiologist Manual
McKesson Radiology 12.2 Produced in Cork, Ireland – Confidential and Proprietary 1.0, 27 June, 2016 Page 58
Appearance
Determines how large the font size is on the main toolbar only. There are two larger font sizes available; however, increasing these will also increase the size of the thumbnails, which results in less space for the actual images. It is also possible to change the color scheme between Night and Dawn modes. Most users prefer Night mode (below) as it has less glare. Users can configure the main tool bar and thumbnail bar to be repeated on all screens or to extend across all screens. By default, the settings are set to extend the tools and thumbnails across all screens. The Study Information Bar can be configured to display either relevant studies or all studies for a patient.

McKesson Radiology Radiologist Manual
McKesson Radiology 12.2 Produced in Cork, Ireland – Confidential and Proprietary 1.0, 27 June, 2016 Page 59
Assign Study
Configures a popup window that appears when a study status changes to Reviewed or Needs Over-Read. The popup allows the user to assign a study to a physician/radiologist. Technologists and residents use this feature.
Auto Display
Use these configurations in order for paper documents, flagged images, and/or US images to automatically open on the auxiliary monitor on a multi-monitor radiologist workstation.
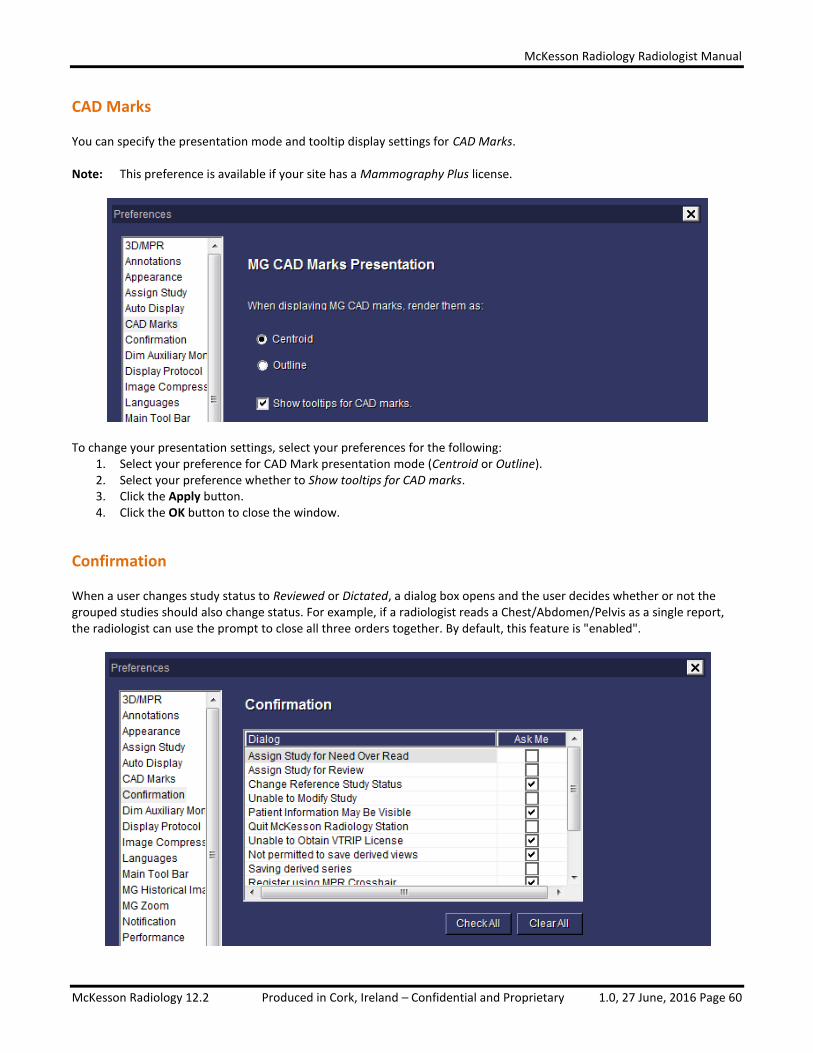
McKesson Radiology Radiologist Manual
McKesson Radiology 12.2 Produced in Cork, Ireland – Confidential and Proprietary 1.0, 27 June, 2016 Page 60
CAD Marks
You can specify the presentation mode and tooltip display settings for CAD Marks. Note: This preference is available if your site has a Mammography Plus license.
To change your presentation settings, select your preferences for the following:
1. Select your preference for CAD Mark presentation mode (Centroid or Outline). 2. Select your preference whether to Show tooltips for CAD marks. 3. Click the Apply button. 4. Click the OK button to close the window.
Confirmation
When a user changes study status to Reviewed or Dictated, a dialog box opens and the user decides whether or not the grouped studies should also change status. For example, if a radiologist reads a Chest/Abdomen/Pelvis as a single report, the radiologist can use the prompt to close all three orders together. By default, this feature is "enabled".
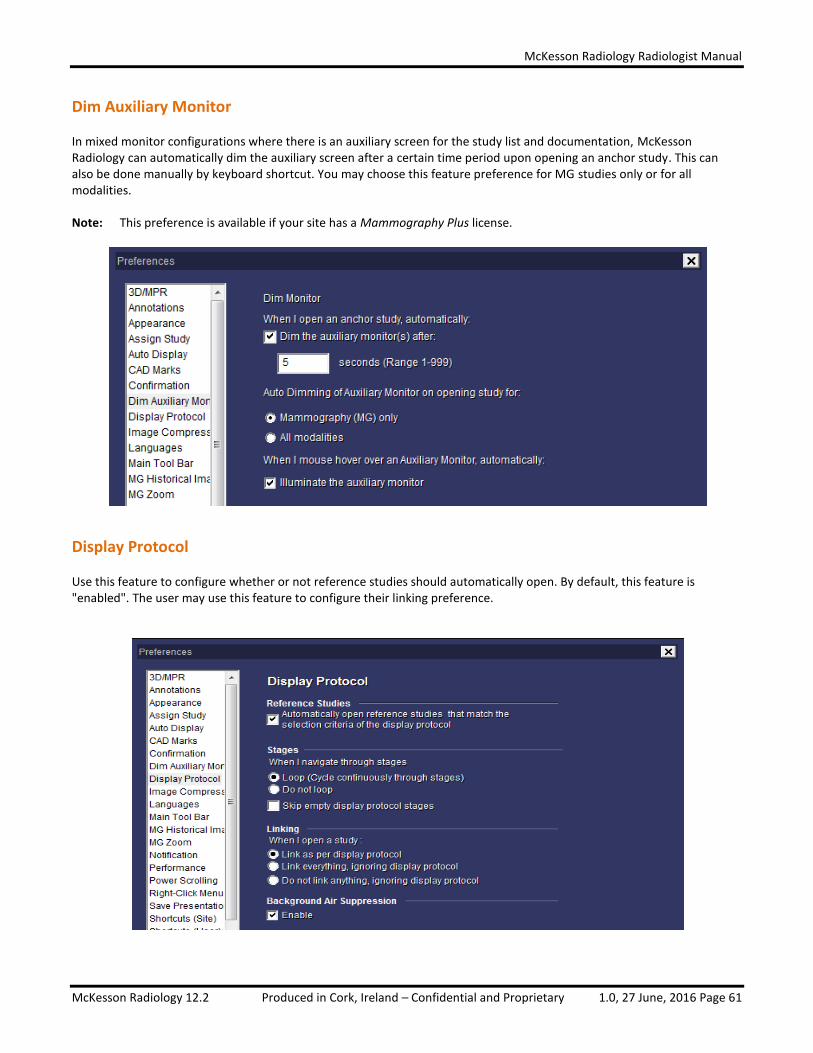
McKesson Radiology Radiologist Manual
McKesson Radiology 12.2 Produced in Cork, Ireland – Confidential and Proprietary 1.0, 27 June, 2016 Page 61
Dim Auxiliary Monitor
In mixed monitor configurations where there is an auxiliary screen for the study list and documentation, McKesson Radiology can automatically dim the auxiliary screen after a certain time period upon opening an anchor study. This can also be done manually by keyboard shortcut. You may choose this feature preference for MG studies only or for all modalities. Note: This preference is available if your site has a Mammography Plus license.
Display Protocol
Use this feature to configure whether or not reference studies should automatically open. By default, this feature is "enabled". The user may use this feature to configure their linking preference.

McKesson Radiology Radiologist Manual
McKesson Radiology 12.2 Produced in Cork, Ireland – Confidential and Proprietary 1.0, 27 June, 2016 Page 62
Image Compression
Use this feature to configure whether non-diagnostic image compression will be used, and if used, the compression ratio per modality type. Enabling non-diagnostic compression will increase the speed of image loading.
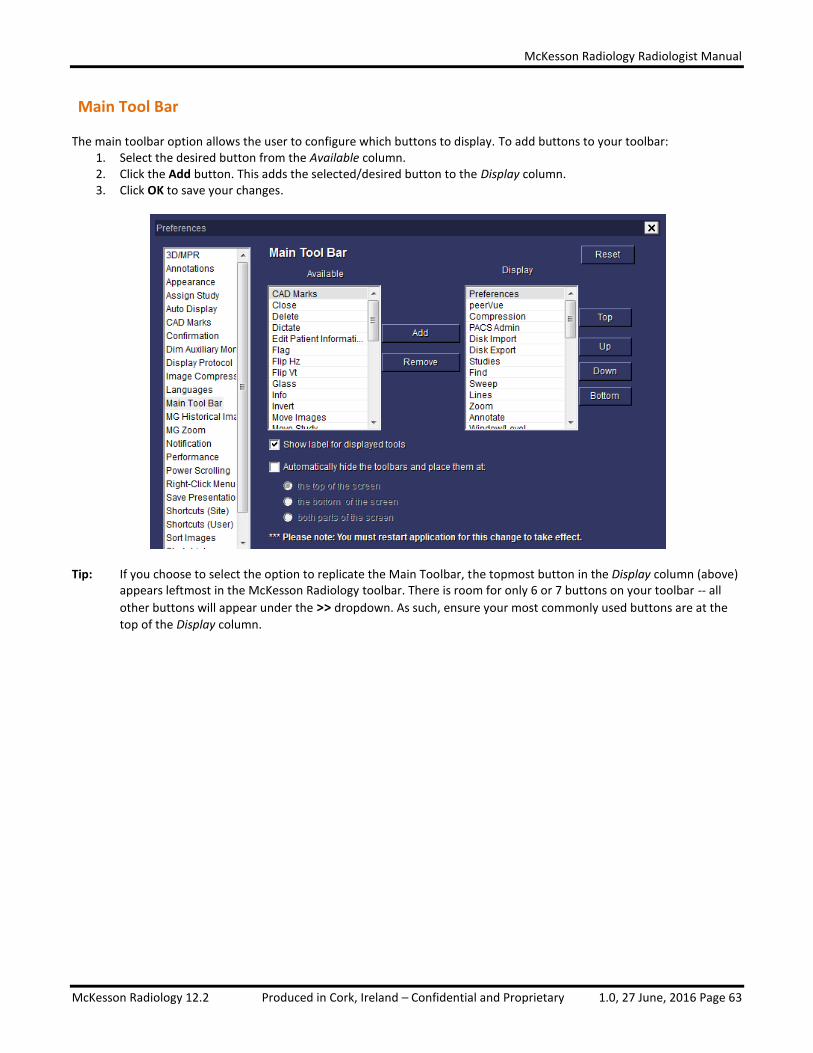
McKesson Radiology Radiologist Manual
McKesson Radiology 12.2 Produced in Cork, Ireland – Confidential and Proprietary 1.0, 27 June, 2016 Page 63
Main Tool Bar
The main toolbar option allows the user to configure which buttons to display. To add buttons to your toolbar: 1. Select the desired button from the Available column. 2. Click the Add button. This adds the selected/desired button to the Display column. 3. Click OK to save your changes.
Tip: If you choose to select the option to replicate the Main Toolbar, the topmost button in the Display column (above) appears leftmost in the McKesson Radiology toolbar. There is room for only 6 or 7 buttons on your toolbar -- all
other buttons will appear under the >> dropdown. As such, ensure your most commonly used buttons are at the
top of the Display column.
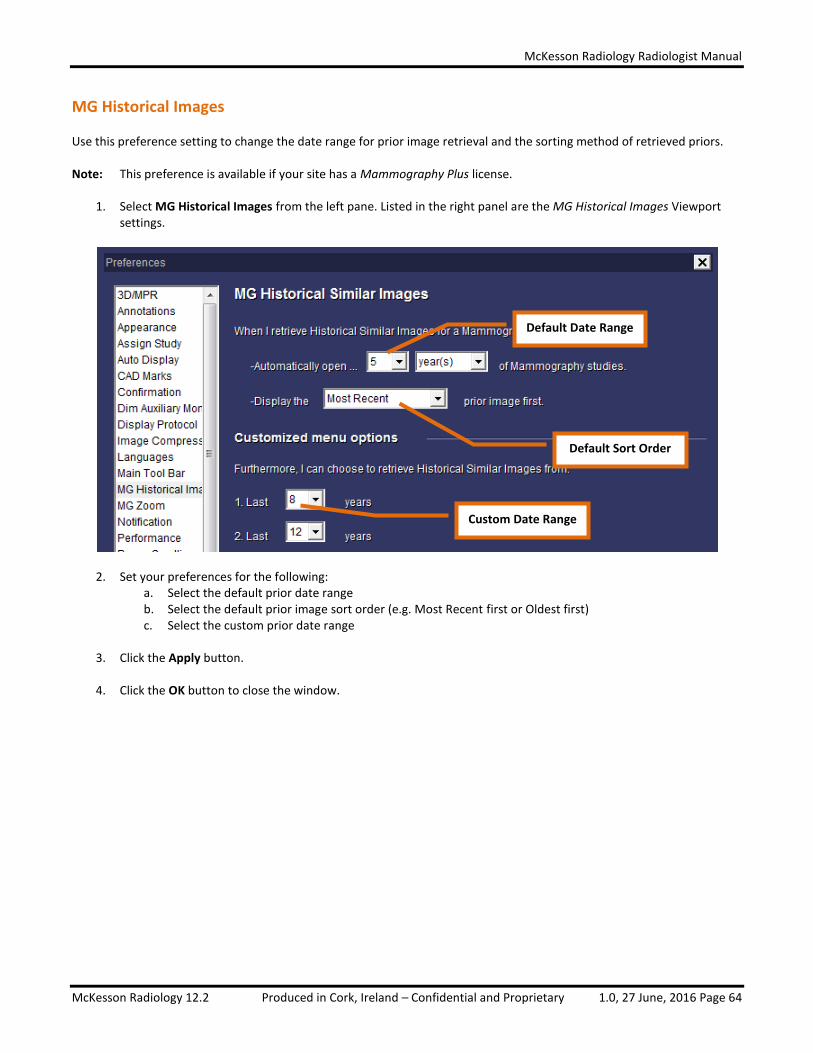
McKesson Radiology Radiologist Manual
McKesson Radiology 12.2 Produced in Cork, Ireland – Confidential and Proprietary 1.0, 27 June, 2016 Page 64
MG Historical Images
Use this preference setting to change the date range for prior image retrieval and the sorting method of retrieved priors. Note: This preference is available if your site has a Mammography Plus license.
1. Select MG Historical Images from the left pane. Listed in the right panel are the MG Historical Images Viewport settings.
2. Set your preferences for the following: a. Select the default prior date range b. Select the default prior image sort order (e.g. Most Recent first or Oldest first) c. Select the custom prior date range
3. Click the Apply button.
4. Click the OK button to close the window.
Default Date Range
Default Sort Order
Custom Date Range
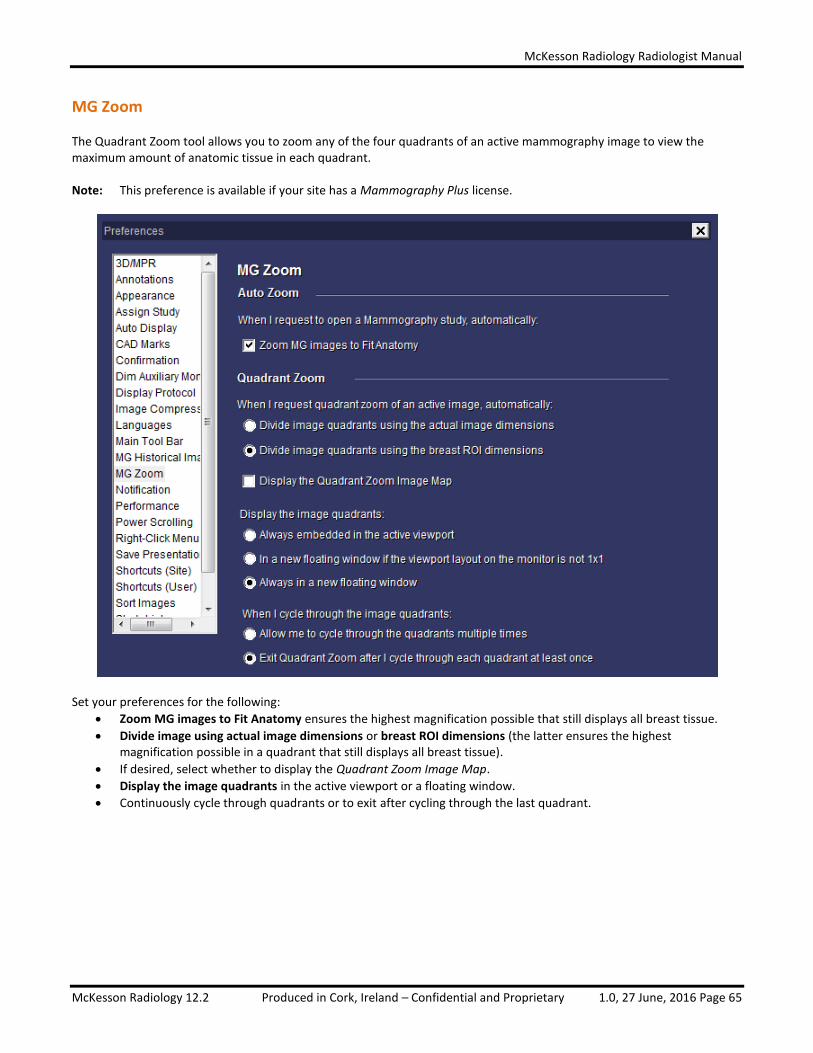
McKesson Radiology Radiologist Manual
McKesson Radiology 12.2 Produced in Cork, Ireland – Confidential and Proprietary 1.0, 27 June, 2016 Page 65
MG Zoom
The Quadrant Zoom tool allows you to zoom any of the four quadrants of an active mammography image to view the maximum amount of anatomic tissue in each quadrant. Note: This preference is available if your site has a Mammography Plus license.
Set your preferences for the following:
Zoom MG images to Fit Anatomy ensures the highest magnification possible that still displays all breast tissue.
Divide image using actual image dimensions or breast ROI dimensions (the latter ensures the highest magnification possible in a quadrant that still displays all breast tissue).
If desired, select whether to display the Quadrant Zoom Image Map.
Display the image quadrants in the active viewport or a floating window.
Continuously cycle through quadrants or to exit after cycling through the last quadrant.

McKesson Radiology Radiologist Manual
McKesson Radiology 12.2 Produced in Cork, Ireland – Confidential and Proprietary 1.0, 27 June, 2016 Page 66
Notification
Enables or disables popup alerts for STAT studies and unviewed images.
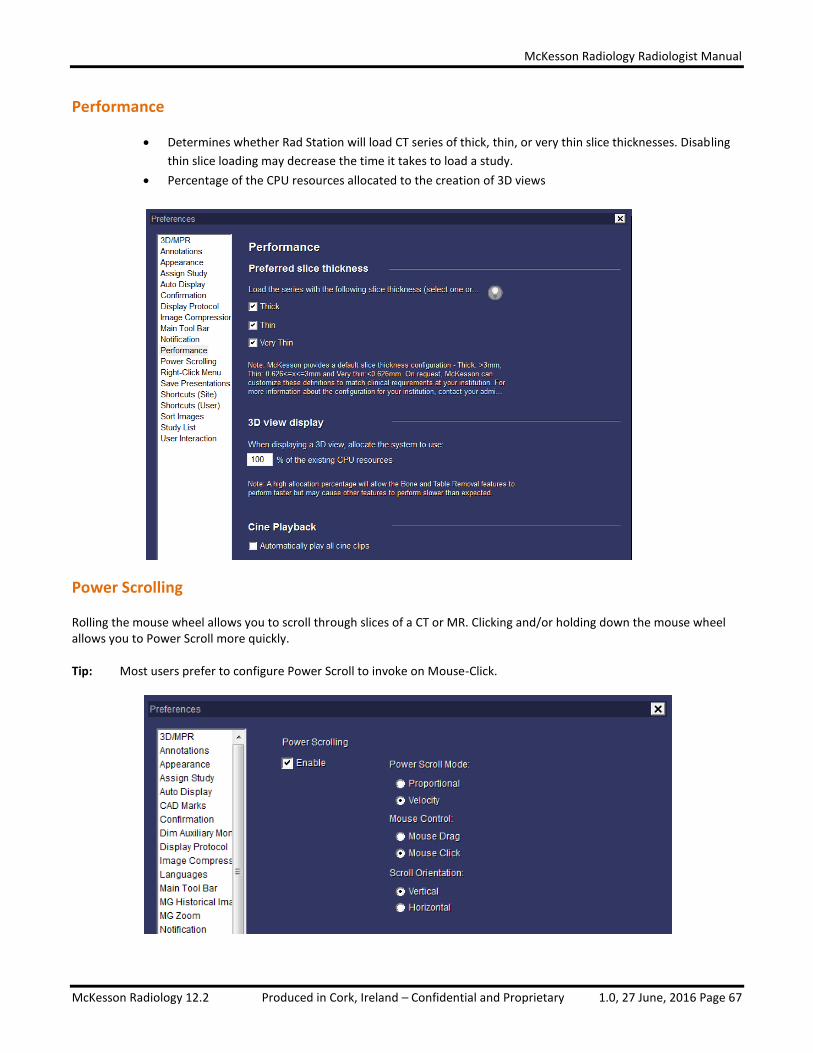
McKesson Radiology Radiologist Manual
McKesson Radiology 12.2 Produced in Cork, Ireland – Confidential and Proprietary 1.0, 27 June, 2016 Page 67
Performance
Determines whether Rad Station will load CT series of thick, thin, or very thin slice thicknesses. Disabling
thin slice loading may decrease the time it takes to load a study.
Percentage of the CPU resources allocated to the creation of 3D views
Power Scrolling
Rolling the mouse wheel allows you to scroll through slices of a CT or MR. Clicking and/or holding down the mouse wheel allows you to Power Scroll more quickly.
Tip: Most users prefer to configure Power Scroll to invoke on Mouse-Click.
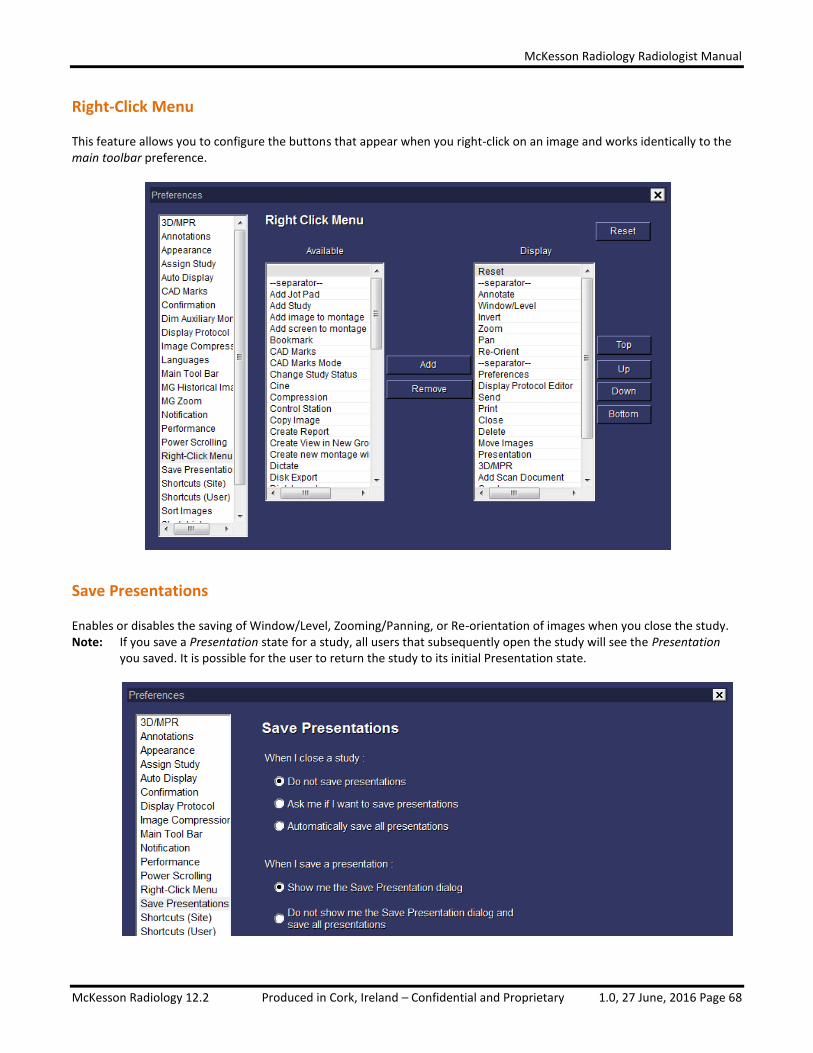
McKesson Radiology Radiologist Manual
McKesson Radiology 12.2 Produced in Cork, Ireland – Confidential and Proprietary 1.0, 27 June, 2016 Page 68
Right-Click Menu
This feature allows you to configure the buttons that appear when you right-click on an image and works identically to the main toolbar preference.
Save Presentations
Enables or disables the saving of Window/Level, Zooming/Panning, or Re-orientation of images when you close the study. Note: If you save a Presentation state for a study, all users that subsequently open the study will see the Presentation
you saved. It is possible for the user to return the study to its initial Presentation state.
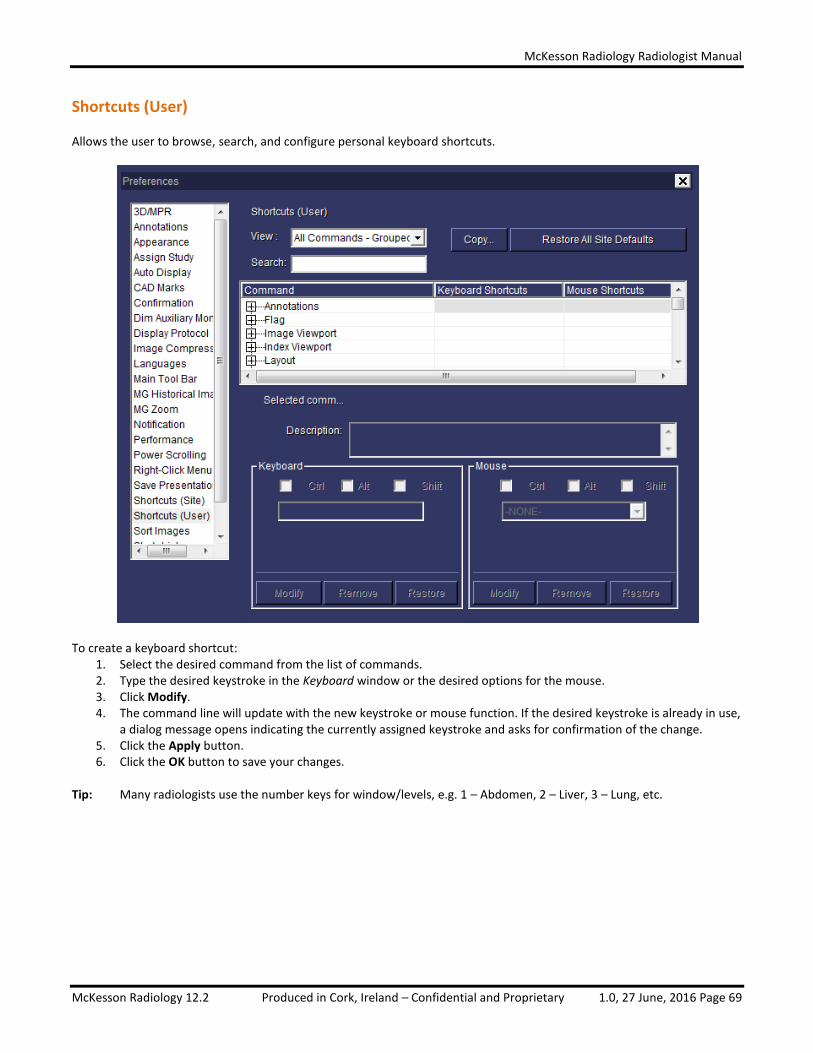
McKesson Radiology Radiologist Manual
McKesson Radiology 12.2 Produced in Cork, Ireland – Confidential and Proprietary 1.0, 27 June, 2016 Page 69
Shortcuts (User)
Allows the user to browse, search, and configure personal keyboard shortcuts.
To create a keyboard shortcut:
1. Select the desired command from the list of commands. 2. Type the desired keystroke in the Keyboard window or the desired options for the mouse. 3. Click Modify. 4. The command line will update with the new keystroke or mouse function. If the desired keystroke is already in use,
a dialog message opens indicating the currently assigned keystroke and asks for confirmation of the change. 5. Click the Apply button. 6. Click the OK button to save your changes.
Tip: Many radiologists use the number keys for window/levels, e.g. 1 – Abdomen, 2 – Liver, 3 – Lung, etc.
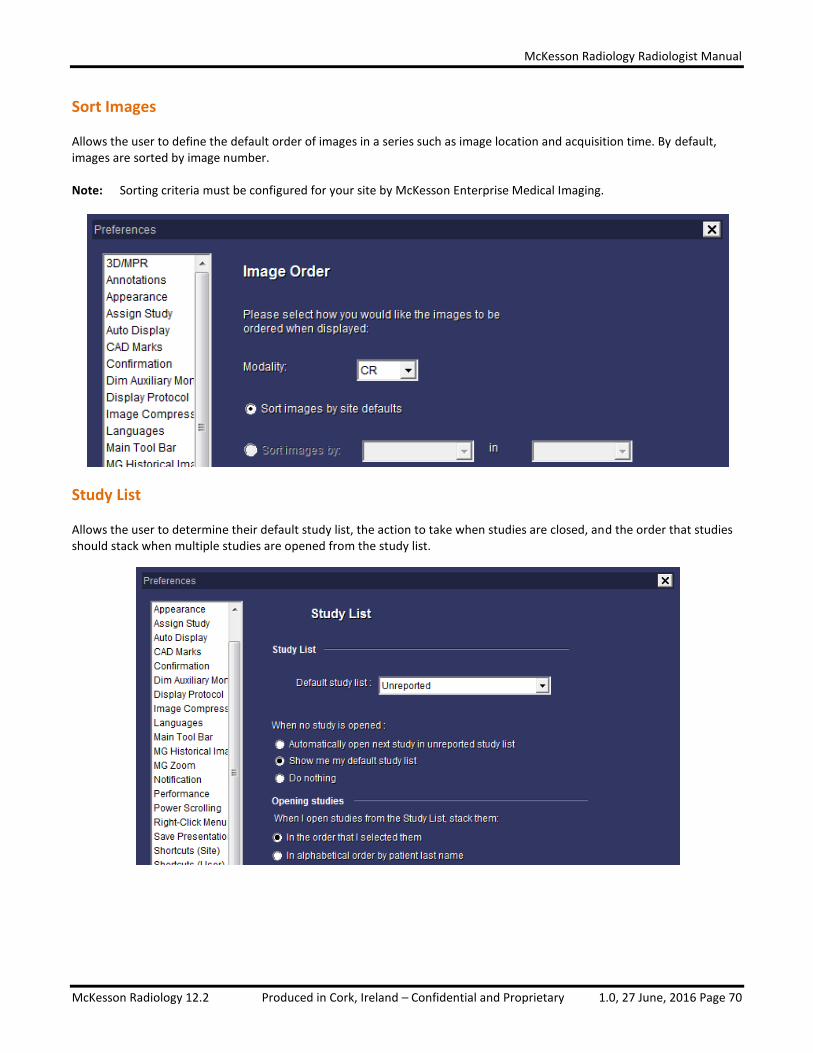
McKesson Radiology Radiologist Manual
McKesson Radiology 12.2 Produced in Cork, Ireland – Confidential and Proprietary 1.0, 27 June, 2016 Page 70
Sort Images
Allows the user to define the default order of images in a series such as image location and acquisition time. By default, images are sorted by image number. Note: Sorting criteria must be configured for your site by McKesson Enterprise Medical Imaging.
Study List
Allows the user to determine their default study list, the action to take when studies are closed, and the order that studies should stack when multiple studies are opened from the study list.
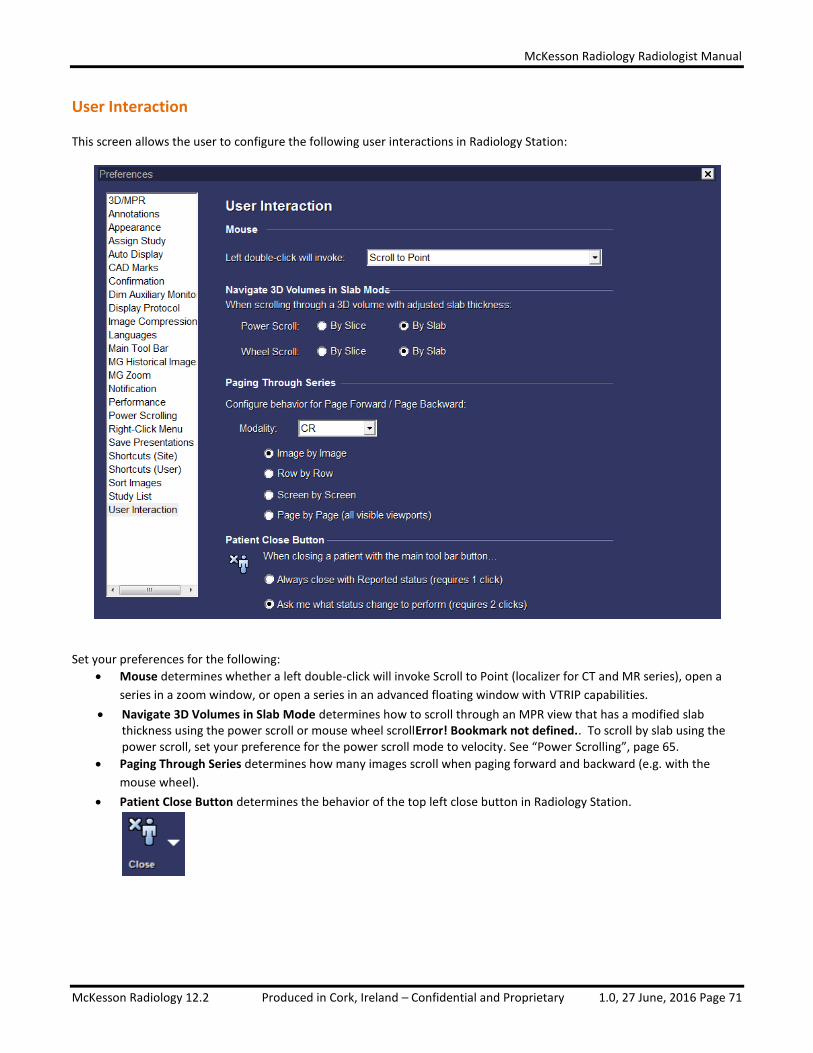
McKesson Radiology Radiologist Manual
McKesson Radiology 12.2 Produced in Cork, Ireland – Confidential and Proprietary 1.0, 27 June, 2016 Page 71
User Interaction
This screen allows the user to configure the following user interactions in Radiology Station:
Set your preferences for the following:
Mouse determines whether a left double-click will invoke Scroll to Point (localizer for CT and MR series), open a
series in a zoom window, or open a series in an advanced floating window with VTRIP capabilities.
Navigate 3D Volumes in Slab Mode determines how to scroll through an MPR view that has a modified slab thickness using the power scroll or mouse wheel scrollError! Bookmark not defined.. To scroll by slab using the power scroll, set your preference for the power scroll mode to velocity. See “Power Scrolling”, page 65.
Paging Through Series determines how many images scroll when paging forward and backward (e.g. with the
mouse wheel).
Patient Close Button determines the behavior of the top left close button in Radiology Station.