manual maquina g2b
DESCRIPTION
fitnessTRANSCRIPT

Body-Solid®
O W N E R ’S M A N U A L&A s s e m b l y I n s t r u c t i o n s
Table of ContentsTotal Body Workout DVD . . . . . . . . . . . . . p. 2Reference Drawings . . . . . . . . . . . . . . . . . p. 3Safety Instructions . . . . . . . . . . . . . . . . . . p. 4Before You Begin . . . . . . . . . . . . . . . . . . . p. 5Dimensions . . . . . . . . . . . . . . . . . . . . . . . . p. 6Safety Guidelines . . . . . . . . . . . . . . . . . . . p. 7Preparations . . . . . . . . . . . . . . . . . . . . . . . p. 8 Assembly Instructions . . . . . . . . . . . . p. 9-27Cable Installations . . . . . . . . . . . . . . p. 28-37Cable Adjustments . . . . . . . . . . . . . . p. 38-39Adjustments . . . . . . . . . . . . . . . . . . . p. 42-45Warning, Safety & Maintenance . . . . p. 46-48Maintenance Schedule . . . . . . . . . . . . . .p. 49Phrases, Terms, Tips & Guidelines . . p. 50-51Nutrition . . . . . . . . . . . . . . . . . . . . . . . . . p. 52Exercise Prescription . . . . . . . . . . . . . . . p. 53Setting Up Your Personal Program . . . . p. 54Determine Your Training Method . . . . . . p. 55Exercise Tips . . . . . . . . . . . . . . . . . . . . . . p. 56Anatomy Chart . . . . . . . . . . . . . . . . . . . . p. 57Fitness Goals . . . . . . . . . . . . . . . . . . . . . p. 58Exercise Logs . . . . . . . . . . . . . . . . . . p. 59-61Stretching & Flexibility . . . . . . . . . . . . . . p. 62Stretching: Warm-Up / Cool-Down . p. 63-67Workout/Exercises . . . . . . . . . . . . . . p. 68-74Weight Ratios . . . . . . . . . . . . . . . . . . . . . p. 77Mainframe Parts List . . . . . . . . . . . . . . . p. 78Hardware Parts List . . . . . . . . . . . . . p. 82-84Hardware Diagrams . . . . . . . . . . . . . p. 82-84Exploded View Diagram . . . . . . . . . . p. 85-86
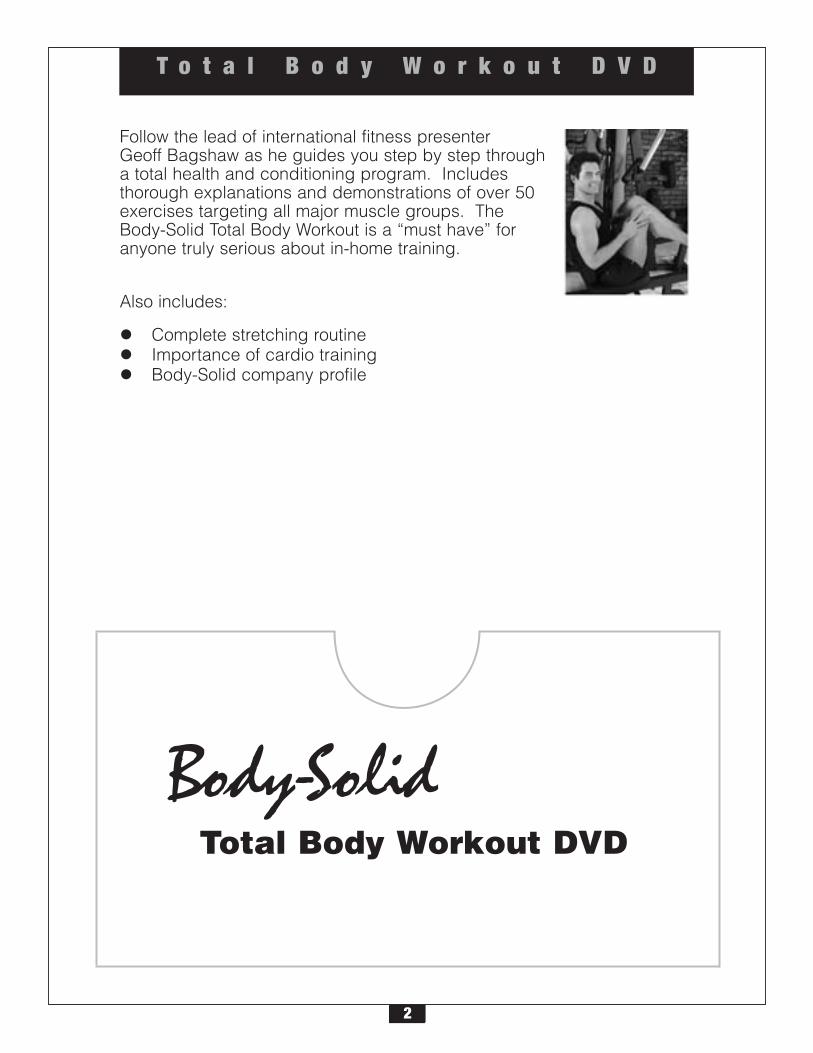
T o t a l B o d y W o r k o u t D V D
2
Follow the lead of international fitness presenterGeoff Bagshaw as he guides you step by step througha total health and conditioning program. Includesthorough explanations and demonstrations of over 50exercises targeting all major muscle groups. TheBody-Solid Total Body Workout is a “must have” foranyone truly serious about in-home training.
Also includes:
l Complete stretching routinel Importance of cardio trainingl Body-Solid company profile
Body-SolidTotal Body Workout DVD
3
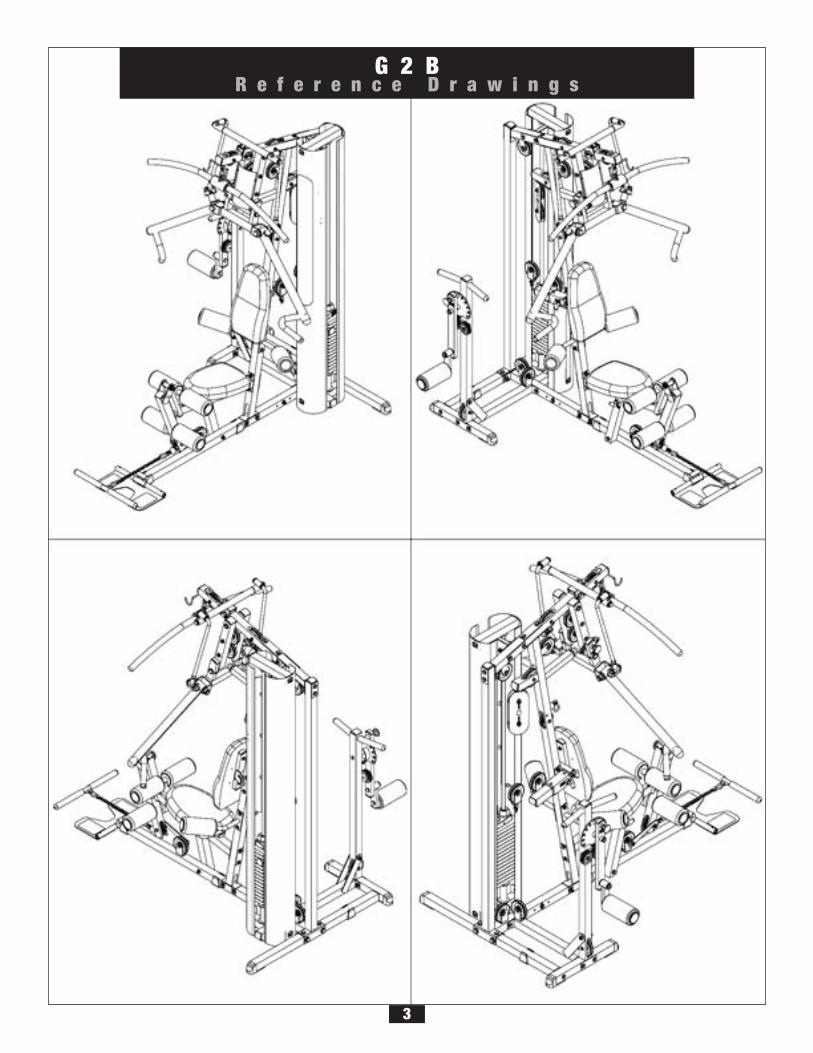
G 2 BR e f e r e n c e D r a w i n g s
I m p o r t a n t S a f e t y I n s t r u c t i o n s
Before beginning any fitness program, you should obtain a complete physical examination from your physician.
Il est conseille de subir un examen medical complet avant d’entreprendre tout programme d’exercise. Si vous avez des etourdissements ou des faiblesses, arretez les exercices immediatement.
Antes de comenzar cualquier programma de ejercicios, deberias tener un examen fisico con su doctor.
When using exercise equipment, youshould always take basic precautions,including the following:
Read all instructions before using the G2B. Theseinstructions are written to ensure your safety and toprotect the unit.
Do not allow children on or near the equipment.
Use the equipment only for its intended purpose asdescribed in this guide. Do not use accessoryattachments that are not recommended by themanufacturer. Such attachments might cause injuries.
Wear proper exercise clothing and shoes for yourworkout, no loose clothing.
Use care when getting on or off the unit.
Do not overexert yourself or work to exhaustion.
If you feel any pain or abnormal symptoms, stop yourworkout immediately and consult your physician.
Never operate unit when it has been dropped ordamaged. Return the equipment to a service centerfor examination and repair.
Never drop or insert objects into any opening in theequipment.
Always check the unit and its cables before eachuse. Make sure that all fasteners and cables aresecure and in good working condition.
Do not use the equipment outdoors or near water.
Personal Safety During Assembly
It is strongly recommended that a qualified dealerassemble the equipment. Assistance is required.
Before beginning assembly, please take the time toread the instructions thoroughly.
Read each step in the assembly instructions andfollow the steps in sequence. Do not skip ahead. Ifyou skip ahead, you may learn later that you have todisassemble components and that you may havedamaged the equipment.
Assemble and operate the G2B on a solid, levelsurface. Locate the unit a few feet from the walls orfurniture to provide easy access.
The G2B is designed for your enjoyment. Byfollowing these precautions and using commonsense, you will have many safe and pleasurable hoursof healthful exercise with your Body-Solid G2B.
After assembly, you should check all functions toensure correct operation. If you experience problems,first recheck the assembly instructions to locate anypossible errors made during assembly. If you are unableto correct the problem, call the dealer from whomyou purchased the machine or call 1-800-556-3113for the dealer nearest you.
Obtaining Service
Please use this Owner’s Manual to make sure that allparts have been included in your shipment. Whenordering parts, you must use the part number anddescription from this Owner’s Manual. Use onlyBody-Solid replacement parts when servicing thismachine. Failure to do so will void your warranty andcould result in personal injury.
For information about product operation or service,check out the official Body-Solid website atwww.bodysolid.com or contact an authorizedBody-Solid dealer or a Body-Solid factory-authorizedservice company or contact Body-Solid customerservice at one of the following:
Toll Free: 1-800-556-3113Phone: 1-708-427-3555 ext. 5Fax: 1-708-427-3598E-mail: [email protected]
Or write to: Body-Solid, Inc.Service Department1900 S. Des Plaines Ave.Forest Park, IL 60130 USA
Retain this Owner’s Manual for futurereference. Part numbers are required whenordering parts.
•
•
•
•
•
•
•
•
•
•
•
•
•
•
•
4

B e f o r e Y o u B e g i n
Thank you for purchasing the G2B. This gym is part of the Body-Solid line of quality strength trainingmachines, which let you target specific muscle groups to achieve better muscle tone and overall bodyconditioning. To maximize your use of the equipment please study this Owner’s Manual thoroughly.
Be careful to assemble all components in thesequence presented in this guide.
If any items are missing, contact the dealer from whomyou purchased the unit or call 1-800-556-3113 forthe dealer nearest you.
5
Unpacking the Equipment
The G2B is carefully tested and inspected beforeshipment. Body-Solid ships the unit in several piecesthat require assembly. Ask for assistance during theassembly process.
Carefully unpack the boxes and lay the pieces onthe floor near the area where you plan to use theequipment.
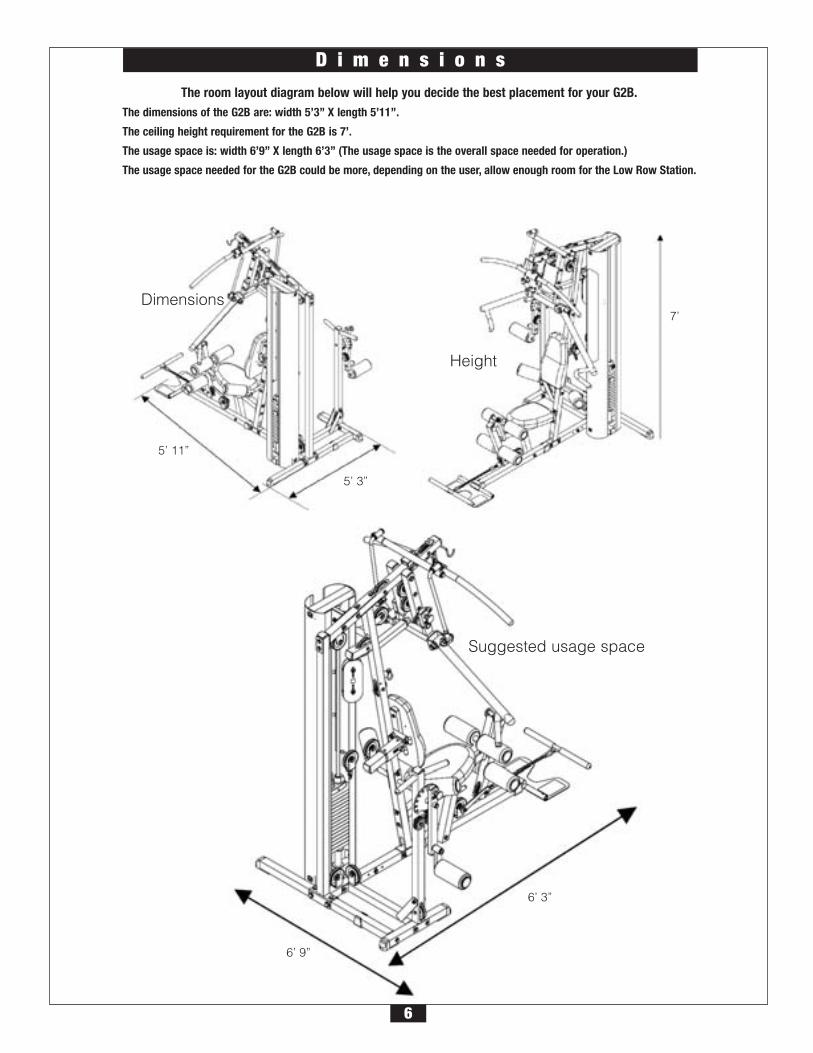
D i m e n s i o n s
The room layout diagram below will help you decide the best placement for your G2B.The dimensions of the G2B are: width 5’3” X length 5’11”.
The ceiling height requirement for the G2B is 7’.
The usage space is: width 6’9” X length 6’3” (The usage space is the overall space needed for operation.)
The usage space needed for the G2B could be more, depending on the user, allow enough room for the Low Row Station.
Dimensions
5’ 11”
5’ 3”
Height
7’
Suggested usage space
6’ 9”
6’ 3”
6
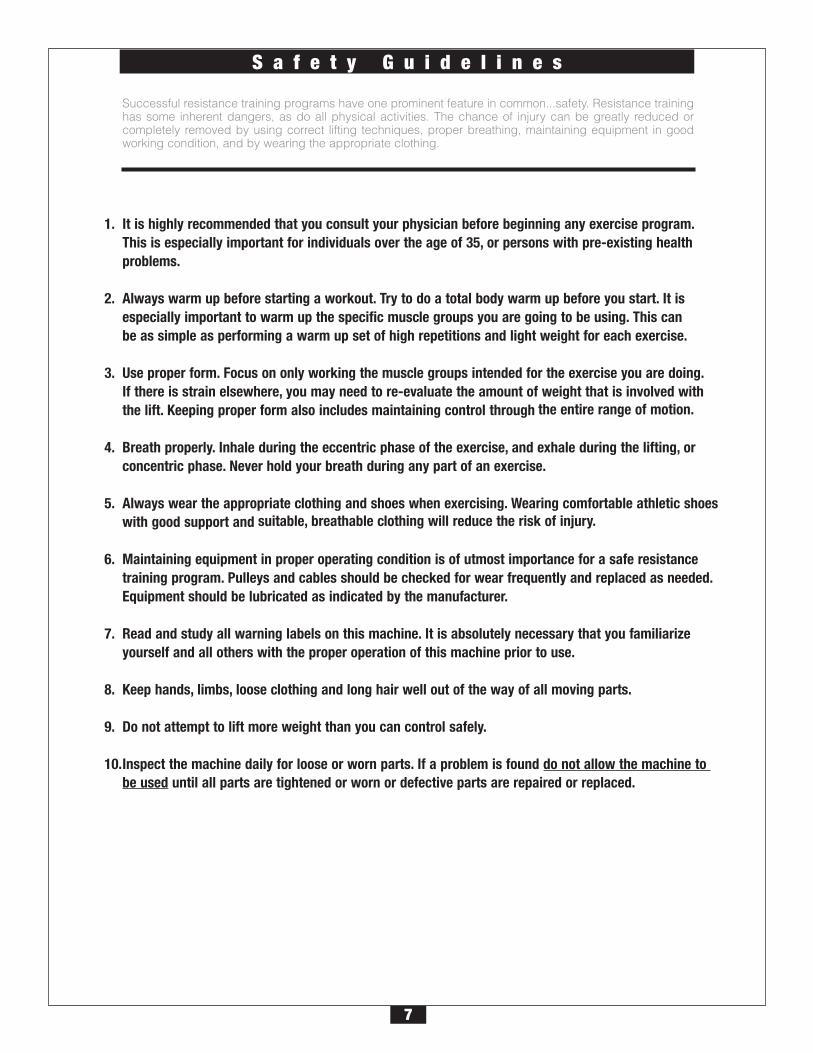
S a f e t y G u i d e l i n e s
Successful resistance training programs have one prominent feature in common...safety. Resistance traininghas some inherent dangers, as do all physical activities. The chance of injury can be greatly reduced orcompletely removed by using correct lifting techniques, proper breathing, maintaining equipment in goodworking condition, and by wearing the appropriate clothing.
1. It is highly recommended that you consult your physician before beginning any exercise program.This is especially important for individuals over the age of 35, or persons with pre-existing health problems.
2. Always warm up before starting a workout. Try to do a total body warm up before you start. It is especially important to warm up the specific muscle groups you are going to be using. This can be as simple as performing a warm up set of high repetitions and light weight for each exercise.
3. Use proper form. Focus on only working the muscle groups intended for the exercise you are doing.If there is strain elsewhere, you may need to re-evaluate the amount of weight that is involved with the lift. Keeping proper form also includes maintaining control through an entire range of motion.
4. Breath properly. Inhale during the eccentric phase of the exercise, and exhale during the lifting, or concentric phase. Never hold your breath during any part of an exercise.
5. Always wear the appropriate clothing and shoes when exercising. Wearing comfortable athletic shoes with good support and loose fitting, breathable clothing will reduce the risk of injury.
6. Maintaining equipment in proper operating condition is of utmost importance for a safe resistance training program. Pulleys and cables should be checked for wear frequently and replaced as needed.Equipment should be lubricated as indicated by the manufacturer.
7. Read and study all warning labels on this machine. It is absolutely necessary that you familiarize yourself and all others with the proper operation of this machine prior to use.
8. Keep hands, limbs, loose clothing and long hair well out of the way of all moving parts.
9. Do not attempt to lift more weight than you can control safely.
10.Inspect the machine daily for loose or worn parts. If a problem is found do not allow the machine to be used until all parts are tightened or worn or defective parts are repaired or replaced.
suitable, breathable clothing will reduce the risk of injury.
the entire range of motion.
7
c
c
c
c
c
c
c
c
c
c
c
c
P r e p a r a t i o n s
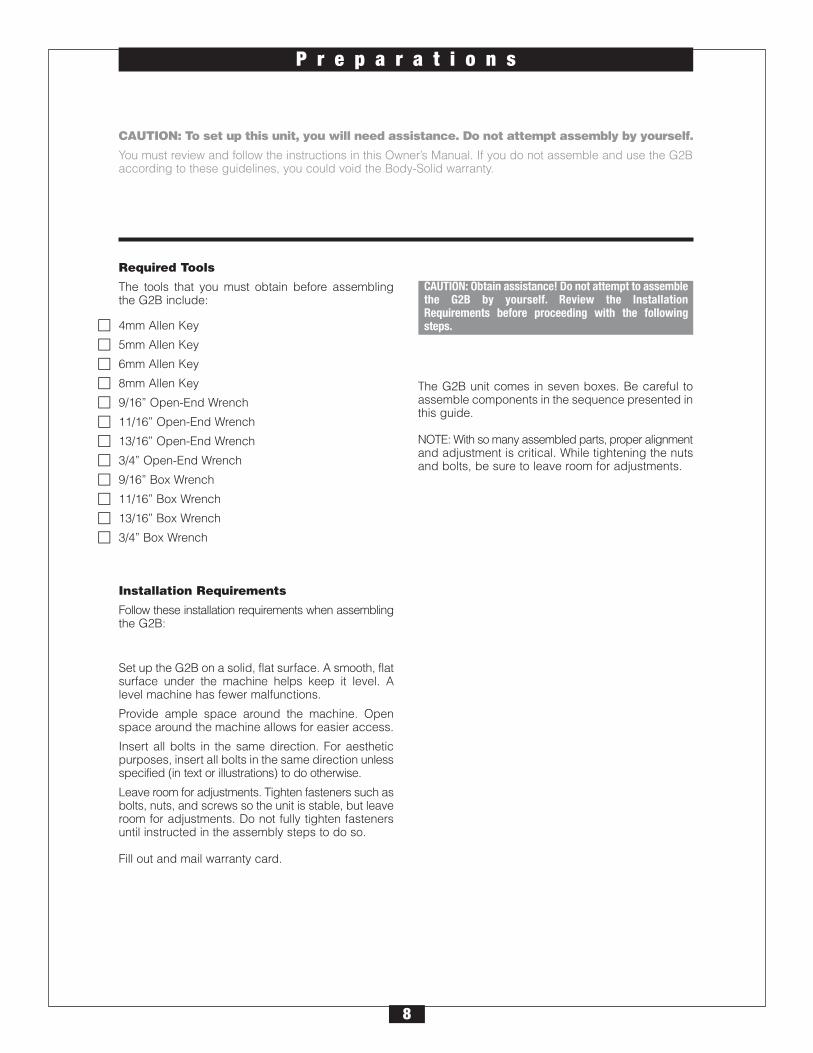
CAUTION: To set up this unit, you will need assistance. Do not attempt assembly by yourself.
You must review and follow the instructions in this Owner’s Manual. If you do not assemble and use the G2Baccording to these guidelines, you could void the Body-Solid warranty.
Required Tools
The tools that you must obtain before assemblingthe G2B include:
4mm Allen Key
5mm Allen Key
6mm Allen Key
8mm Allen Key
9/16” Open-End Wrench
11/16” Open-End Wrench
13/16” Open-End Wrench
3/4” Open-End Wrench
9/16” Box Wrench
11/16” Box Wrench
13/16” Box Wrench
3/4” Box Wrench
Installation Requirements
Follow these installation requirements when assemblingthe G2B:
Set up the G2B on a solid, flat surface. A smooth, flatsurface under the machine helps keep it level. Alevel machine has fewer malfunctions.
Provide ample space around the machine. Openspace around the machine allows for easier access.
Insert all bolts in the same direction. For aestheticpurposes, insert all bolts in the same direction unlessspecified (in text or illustrations) to do otherwise.
Leave room for adjustments. Tighten fasteners such asbolts, nuts, and screws so the unit is stable, but leaveroom for adjustments. Do not fully tighten fastenersuntil instructed in the assembly steps to do so.
Fill out and mail warranty card.
The G2B unit comes in seven boxes. Be careful toassemble components in the sequence presented inthis guide.
NOTE: With so many assembled parts, proper alignmentand adjustment is critical. While tightening the nutsand bolts, be sure to leave room for adjustments.
8
CAUTION: Obtain assistance! Do not attempt to assemblethe G2B by yourself. Review the InstallationRequirements before proceeding with the followingsteps.
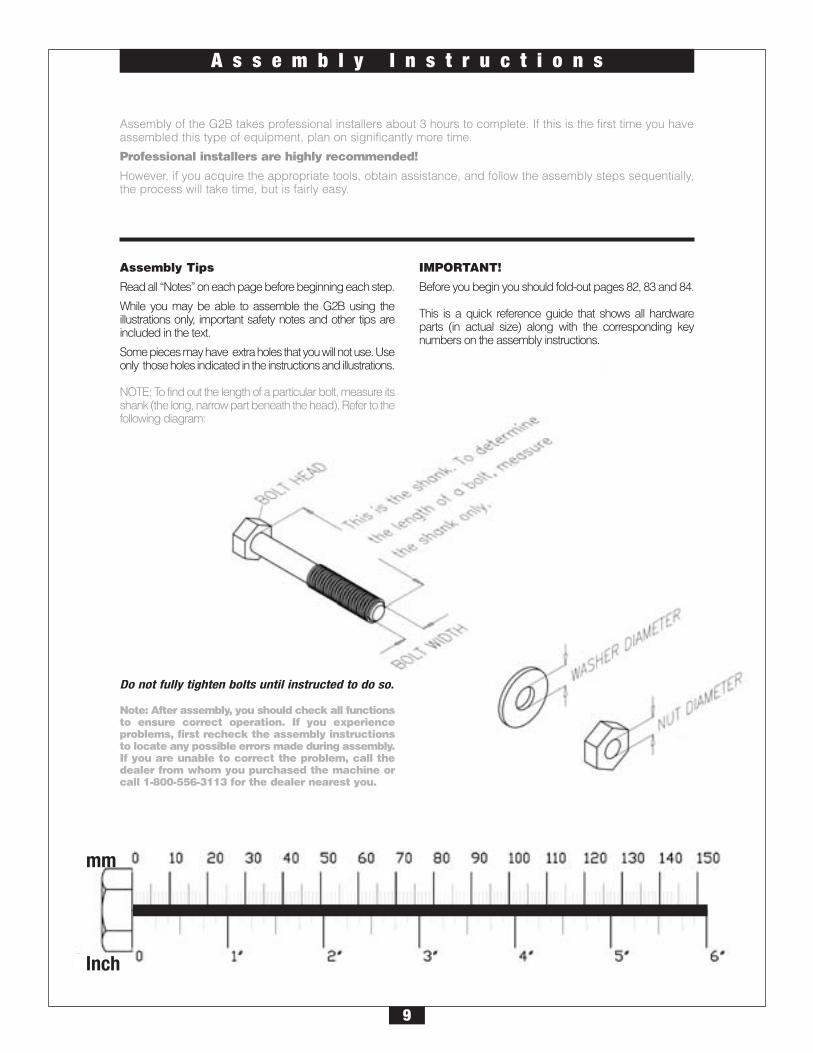
A s s e m b l y I n s t r u c t i o n s
Assembly of the G2B takes professional installers about 3 hours to complete. If this is the first time you haveassembled this type of equipment, plan on significantly more time.
Professional installers are highly recommended!
However, if you acquire the appropriate tools, obtain assistance, and follow the assembly steps sequentially,the process will take time, but is fairly easy.
Assembly Tips
Read all “Notes” on each page before beginning each step.
While you may be able to assemble the G2B using theillustrations only, important safety notes and other tips areincluded in the text.
Some pieces may have extra holes that you will not use. Useonly those holes indicated in the instructions and illustrations.
NOTE: To find out the length of a particular bolt, measure itsshank (the long, narrow part beneath the head). Refer to thefollowing diagram:
Do not fully tighten bolts until instructed to do so.
Note: After assembly, you should check all functionsto ensure correct operation. If you experienceproblems, first recheck the assembly instructionsto locate any possible errors made during assembly.If you are unable to correct the problem, call thedealer from whom you purchased the machine orcall 1-800-556-3113 for the dealer nearest you.
IMPORTANT!
Before you begin you should fold-out pages 82, 83 and 84.
This is a quick reference guide that shows all hardwareparts (in actual size) along with the corresponding keynumbers on the assembly instructions.
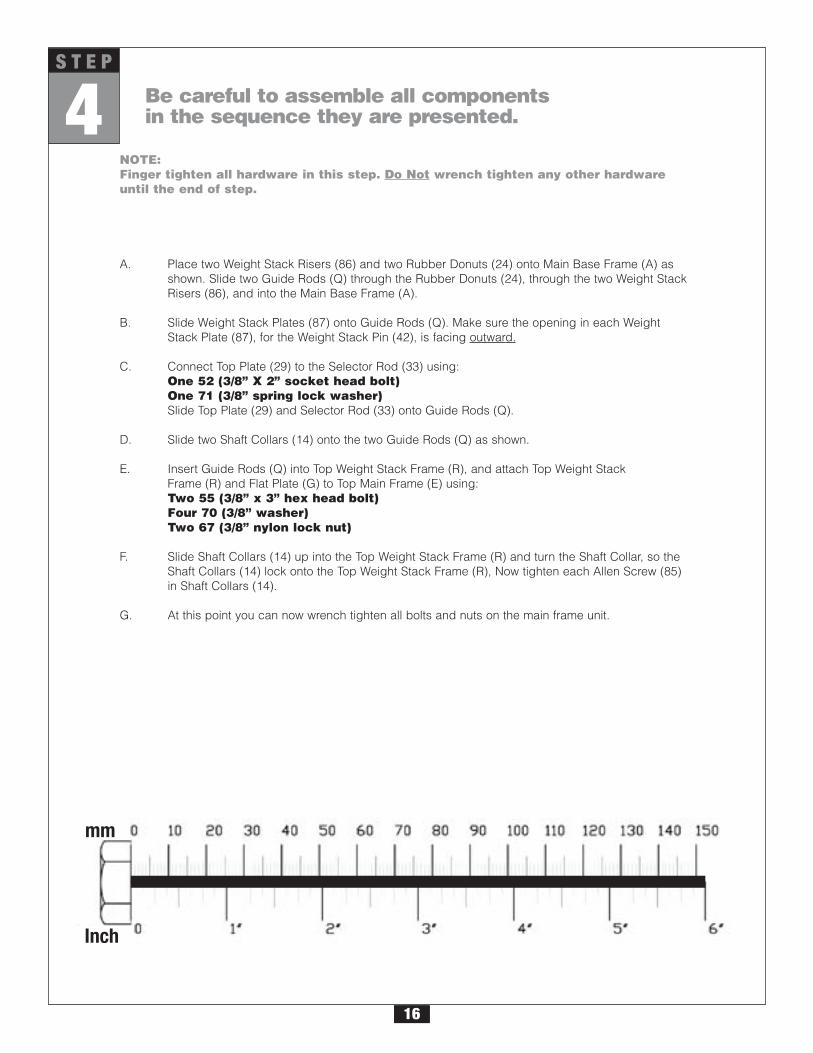
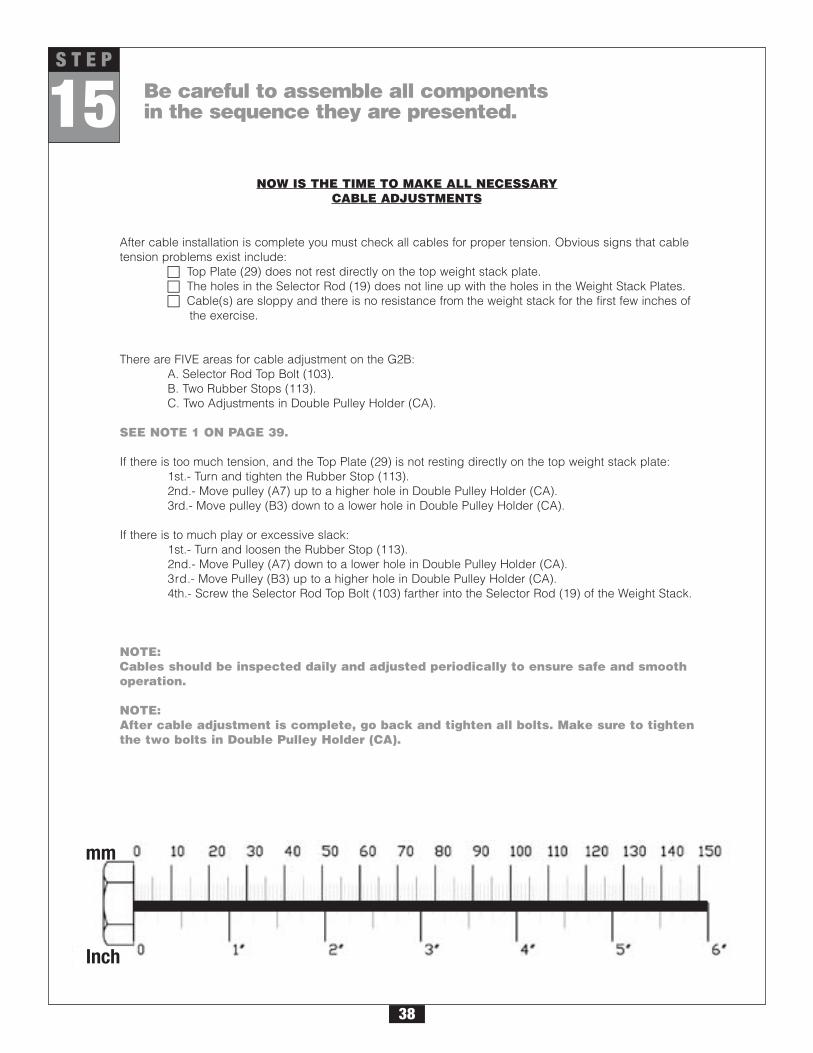
mm
Inch
9

1
mm
Inch
10
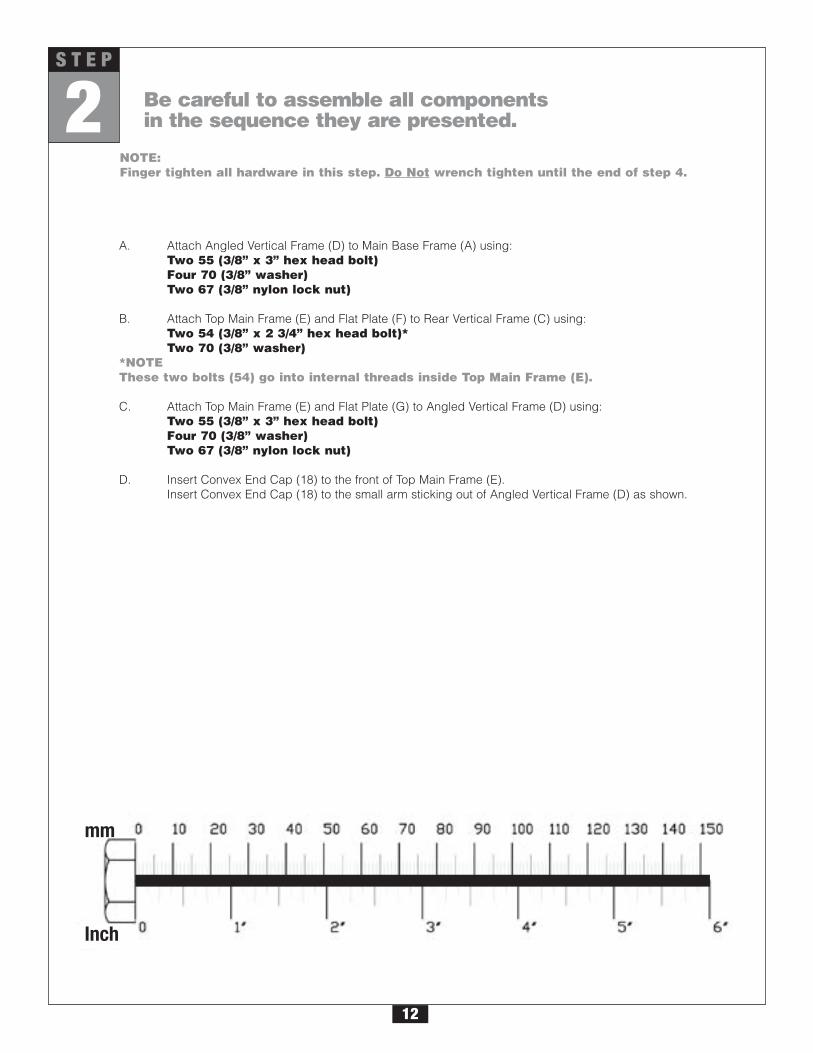
S T E P
Be careful to assemble all componentsin the sequence they are presented.
NOTE:Finger tighten all hardware in this step. Do Not wrench tighten until the end of step 4.
A. Attach three Weight Stack Shims (20) to the bottom of Main Base Frame (A). Insert one Foot Cap (11) into the end of Rear Base Frame (B). Insert one Convex End Cap (17) to Main Base Frame (A) as shown.Attach two Frame Levelers (19) to Main Base Frame (A).Attach one Frame Leveler (19) to Rear Base Frame (B).
B. Attach Main Base Frame (A) to Rear Base Frame (B) and Rear Vertical Frame (C) using: Two 50 (1/2” x 3 1/2” hex head bolt)Four 69 (1/2” washer)Two 66 (1/2” nylon lock nut)Two 61 (5/16” x 3/4” allen bolt)Two 72 (5/16” washer)
C. Insert one Convex End Cap (17) to the top of Rear Vertical Frame (C) as shown.Insert two Round End Caps (9) to the openings in Main Base Frame (A) as shown.
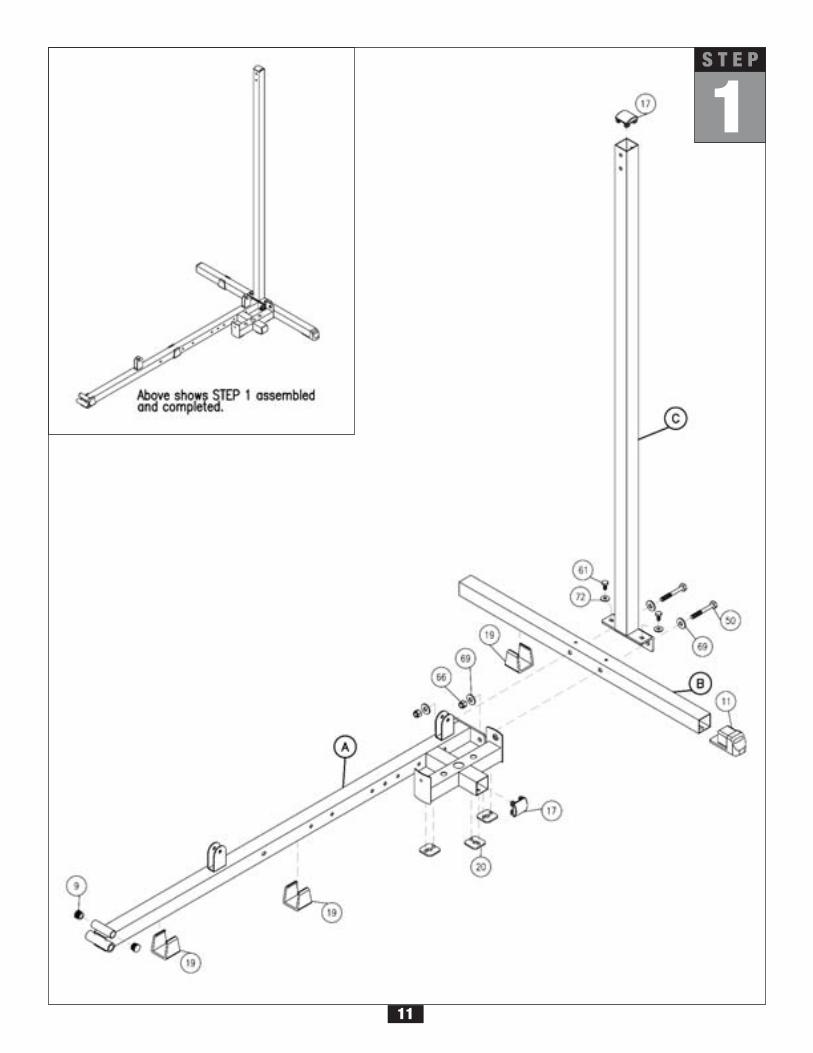
1
11
S T E P
mm
Inch
2 Be careful to assemble all componentsin the sequence they are presented.
12
S T E P
NOTE:Finger tighten all hardware in this step. Do Not wrench tighten until the end of step 4.
A. Attach Angled Vertical Frame (D) to Main Base Frame (A) using:Two 55 (3/8” x 3” hex head bolt)Four 70 (3/8” washer)Two 67 (3/8” nylon lock nut)
B. Attach Top Main Frame (E) and Flat Plate (F) to Rear Vertical Frame (C) using:Two 54 (3/8” x 2 3/4” hex head bolt)*Two 70 (3/8” washer)
*NOTEThese two bolts (54) go into internal threads inside Top Main Frame (E).
C. Attach Top Main Frame (E) and Flat Plate (G) to Angled Vertical Frame (D) using:Two 55 (3/8” x 3” hex head bolt)Four 70 (3/8” washer)Two 67 (3/8” nylon lock nut)
D. Insert Convex End Cap (18) to the front of Top Main Frame (E).Insert Convex End Cap (18) to the small arm sticking out of Angled Vertical Frame (D) as shown.
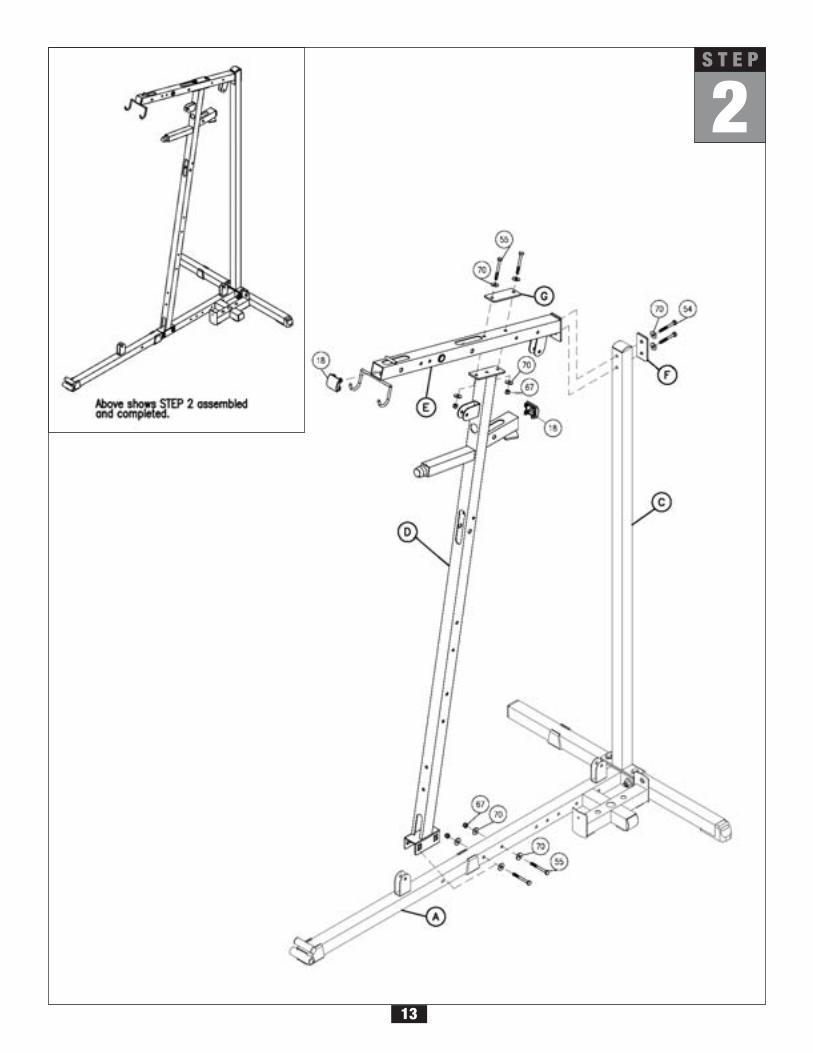
2
13
S T E P
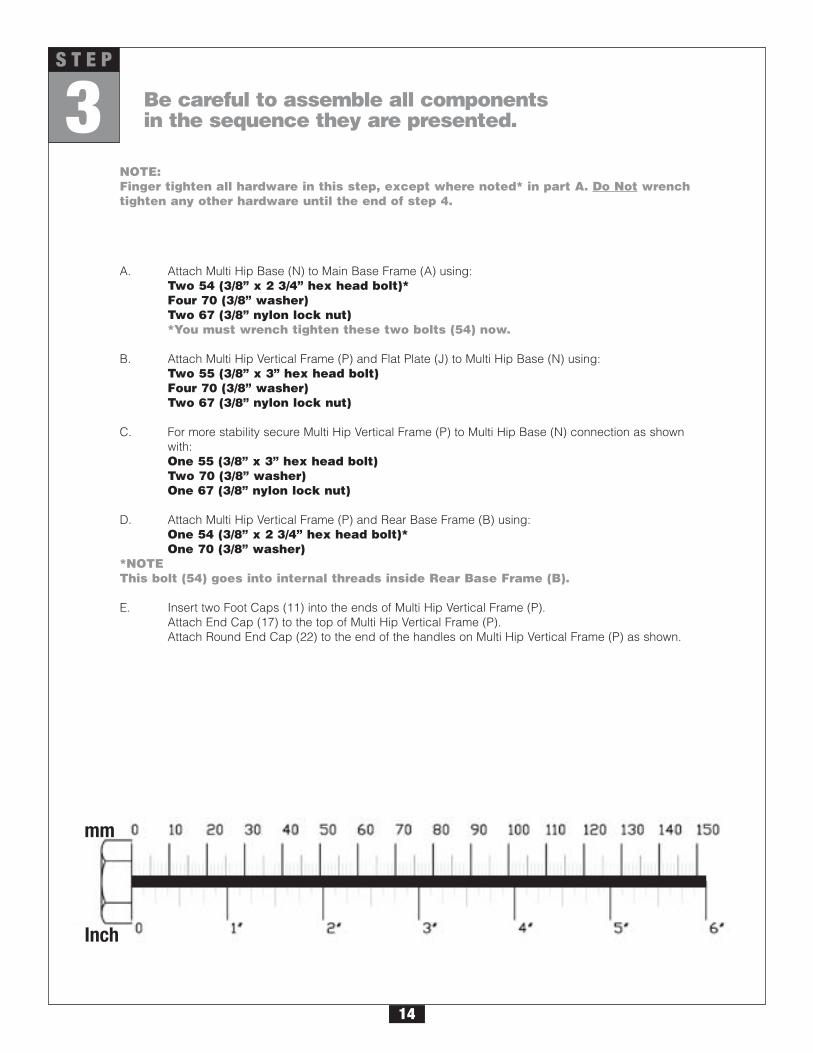
Be careful to assemble all componentsin the sequence they are presented.
mm
Inch
3
14
S T E P
A. Attach Multi Hip Base (N) to Main Base Frame (A) using:Two 54 (3/8” x 2 3/4” hex head bolt)*Four 70 (3/8” washer)Two 67 (3/8” nylon lock nut)*You must wrench tighten these two bolts (54) now.
B. Attach Multi Hip Vertical Frame (P) and Flat Plate (J) to Multi Hip Base (N) using:Two 55 (3/8” x 3” hex head bolt)Four 70 (3/8” washer)Two 67 (3/8” nylon lock nut)
C. For more stability secure Multi Hip Vertical Frame (P) to Multi Hip Base (N) connection as shown with:One 55 (3/8” x 3” hex head bolt)Two 70 (3/8” washer)One 67 (3/8” nylon lock nut)
D. Attach Multi Hip Vertical Frame (P) and Rear Base Frame (B) using:One 54 (3/8” x 2 3/4” hex head bolt)*One 70 (3/8” washer)
*NOTEThis bolt (54) goes into internal threads inside Rear Base Frame (B).
E. Insert two Foot Caps (11) into the ends of Multi Hip Vertical Frame (P).Attach End Cap (17) to the top of Multi Hip Vertical Frame (P).Attach Round End Cap (22) to the end of the handles on Multi Hip Vertical Frame (P) as shown.
NOTE:Finger tighten all hardware in this step, except where noted* in part A. Do Not wrenchtighten any other hardware until the end of step 4.
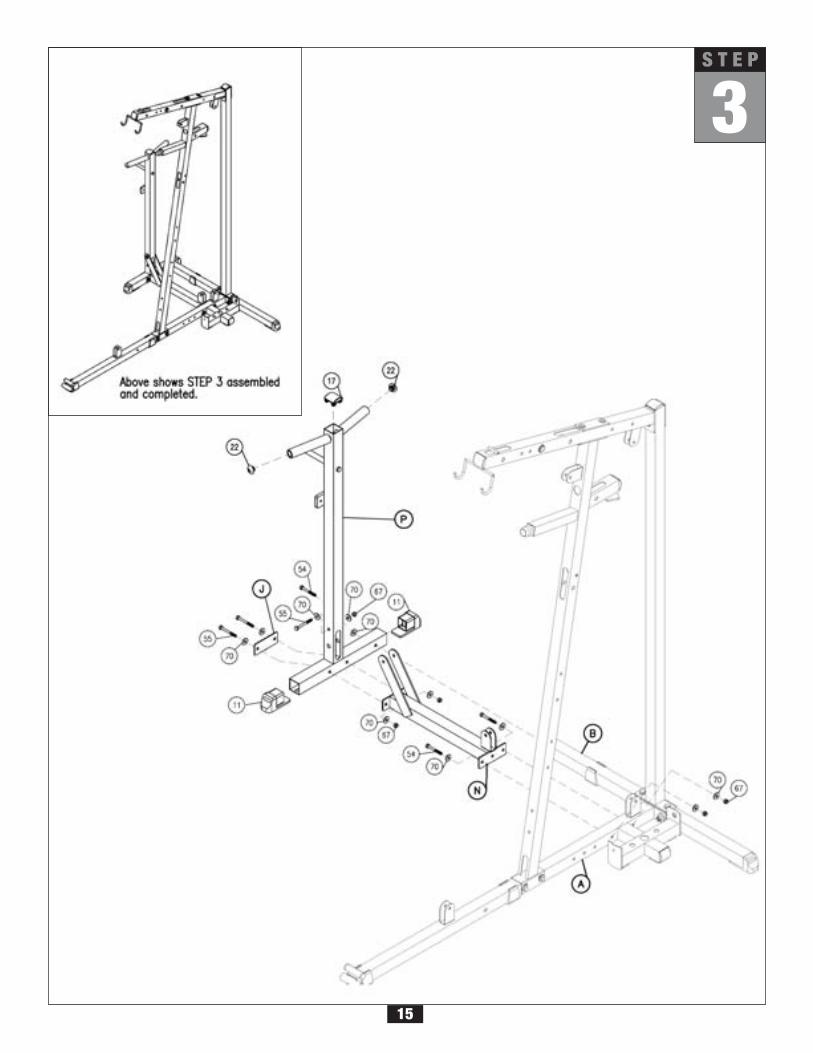
3
15
S T E P
4 Be careful to assemble all componentsin the sequence they are presented.
mm
Inch
16
S T E P
A. Place two Weight Stack Risers (86) and two Rubber Donuts (24) onto Main Base Frame (A) as shown. Slide two Guide Rods (Q) through the Rubber Donuts (24), through the two Weight Stack Risers (86), and into the Main Base Frame (A).
B. Slide Weight Stack Plates (87) onto Guide Rods (Q). Make sure the opening in each Weight Stack Plate (87), for the Weight Stack Pin (42), is facing outward.
C. Connect Top Plate (29) to the Selector Rod (33) using:One 52 (3/8” X 2” socket head bolt)One 71 (3/8” spring lock washer)Slide Top Plate (29) and Selector Rod (33) onto Guide Rods (Q).
D. Slide two Shaft Collars (14) onto the two Guide Rods (Q) as shown.
E. Insert Guide Rods (Q) into Top Weight Stack Frame (R), and attach Top Weight StackFrame (R) and Flat Plate (G) to Top Main Frame (E) using:Two 55 (3/8” x 3” hex head bolt)Four 70 (3/8” washer)Two 67 (3/8” nylon lock nut)
F. Slide Shaft Collars (14) up into the Top Weight Stack Frame (R) and turn the Shaft Collar, so the Shaft Collars (14) lock onto the Top Weight Stack Frame (R), Now tighten each Allen Screw (85) in Shaft Collars (14).
G. At this point you can now wrench tighten all bolts and nuts on the main frame unit.
NOTE:Finger tighten all hardware in this step. Do Not wrench tighten any other hardwareuntil the end of step.
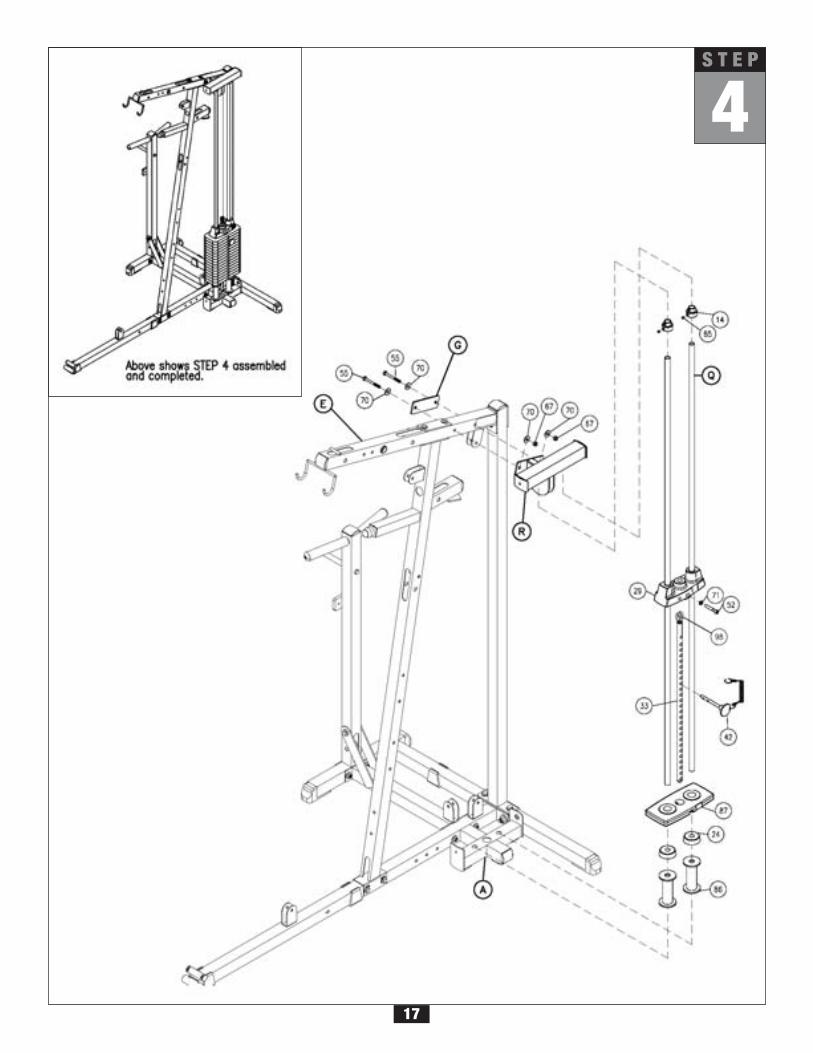
4
17
S T E P
5 Be careful to assemble all componentsin the sequence they are presented.
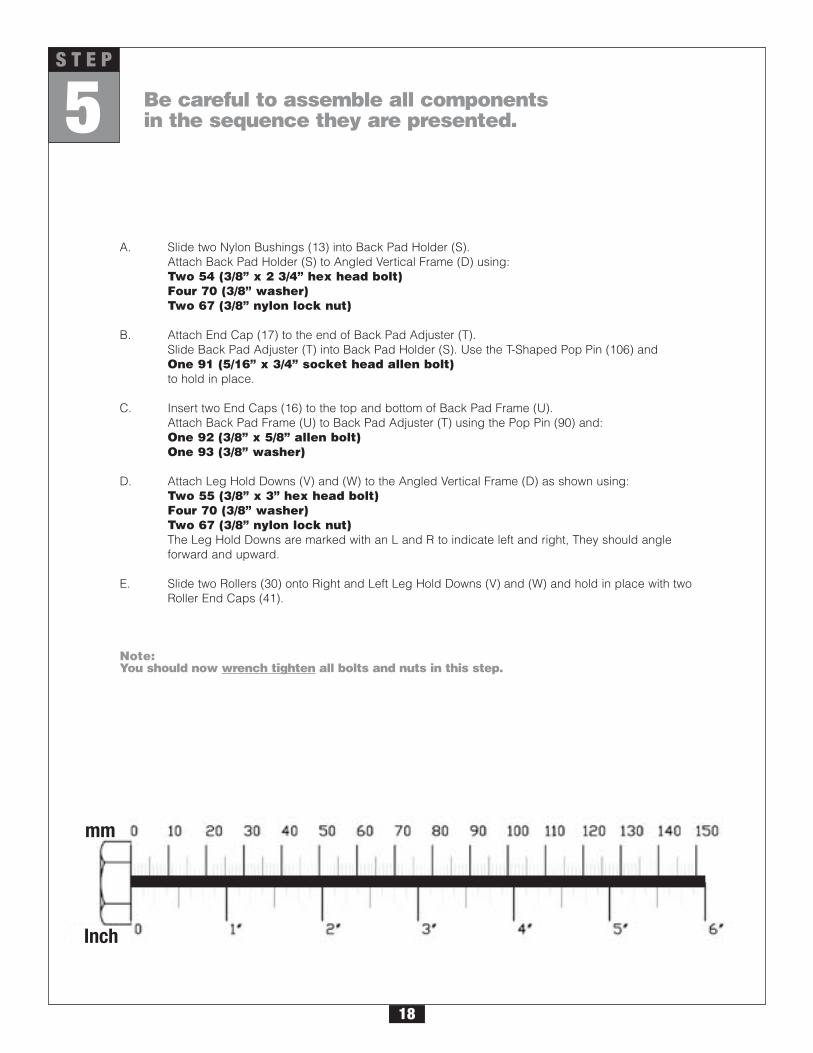
mm
Inch
18
S T E P
A. Slide two Nylon Bushings (13) into Back Pad Holder (S).Attach Back Pad Holder (S) to Angled Vertical Frame (D) using:Two 54 (3/8” x 2 3/4” hex head bolt)Four 70 (3/8” washer)Two 67 (3/8” nylon lock nut)
B. Attach End Cap (17) to the end of Back Pad Adjuster (T).Slide Back Pad Adjuster (T) into Back Pad Holder (S). Use the T-Shaped Pop Pin (106) andOne 91 (5/16” x 3/4” socket head allen bolt)to hold in place.
C. Insert two End Caps (16) to the top and bottom of Back Pad Frame (U).Attach Back Pad Frame (U) to Back Pad Adjuster (T) using the Pop Pin (90) and:One 92 (3/8” x 5/8” allen bolt)One 93 (3/8” washer)
D. Attach Leg Hold Downs (V) and (W) to the Angled Vertical Frame (D) as shown using:Two 55 (3/8” x 3” hex head bolt)Four 70 (3/8” washer)Two 67 (3/8” nylon lock nut)The Leg Hold Downs are marked with an L and R to indicate left and right, They should angle forward and upward.
E. Slide two Rollers (30) onto Right and Left Leg Hold Downs (V) and (W) and hold in place with twoRoller End Caps (41).
Note:You should now wrench tighten all bolts and nuts in this step.
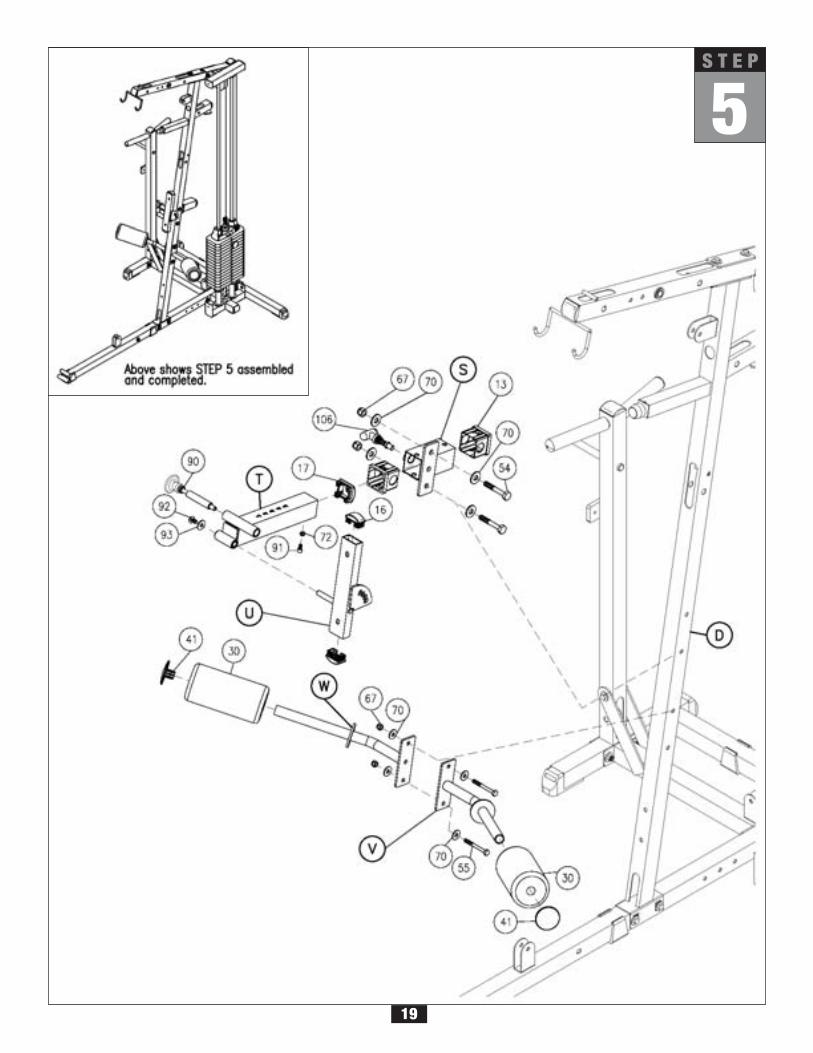
5
19
S T E P
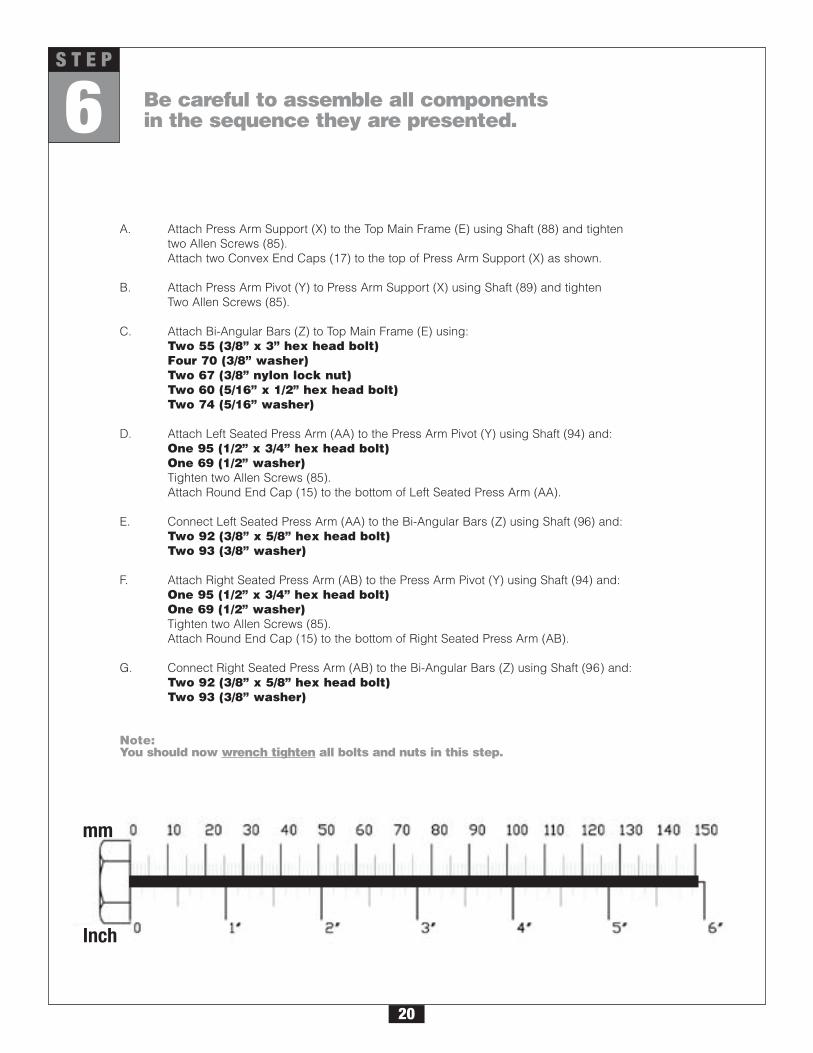
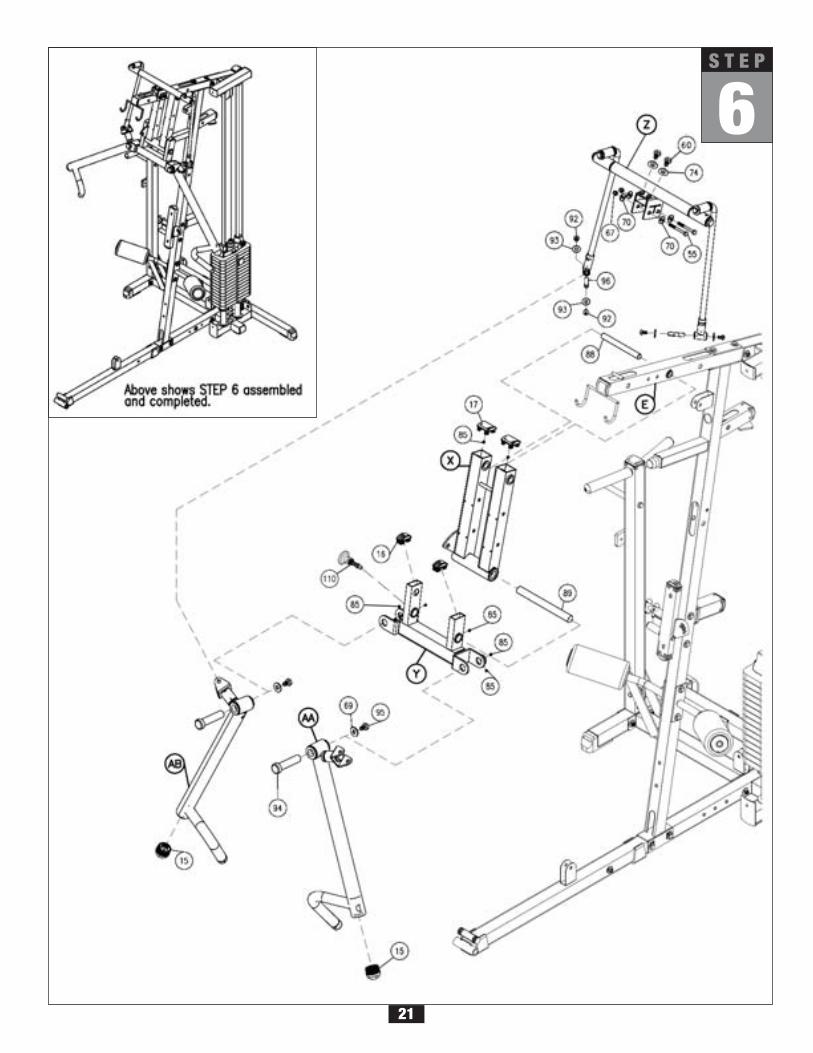
6 Be careful to assemble all componentsin the sequence they are presented.
mm
Inch
20
S T E P
A. Attach Press Arm Support (X) to the Top Main Frame (E) using Shaft (88) and tighten two Allen Screws (85).Attach two Convex End Caps (17) to the top of Press Arm Support (X) as shown.
B. Attach Press Arm Pivot (Y) to Press Arm Support (X) using Shaft (89) and tightenTwo Allen Screws (85).
C. Attach Bi-Angular Bars (Z) to Top Main Frame (E) using:Two 55 (3/8” x 3” hex head bolt)Four 70 (3/8” washer)Two 67 (3/8” nylon lock nut)Two 60 (5/16” x 1/2” hex head bolt)Two 74 (5/16” washer)
D. Attach Left Seated Press Arm (AA) to the Press Arm Pivot (Y) using Shaft (94) and:One 95 (1/2” x 3/4” hex head bolt)One 69 (1/2” washer)Tighten two Allen Screws (85).Attach Round End Cap (15) to the bottom of Left Seated Press Arm (AA).
E. Connect Left Seated Press Arm (AA) to the Bi-Angular Bars (Z) using Shaft (96) and:Two 92 (3/8” x 5/8” hex head bolt)Two 93 (3/8” washer)
F. Attach Right Seated Press Arm (AB) to the Press Arm Pivot (Y) using Shaft (94) and:One 95 (1/2” x 3/4” hex head bolt)One 69 (1/2” washer)Tighten two Allen Screws (85).Attach Round End Cap (15) to the bottom of Right Seated Press Arm (AB).
G. Connect Right Seated Press Arm (AB) to the Bi-Angular Bars (Z) using Shaft (96) and:Two 92 (3/8” x 5/8” hex head bolt)Two 93 (3/8” washer)
Note:You should now wrench tighten all bolts and nuts in this step.
6
21
S T E P
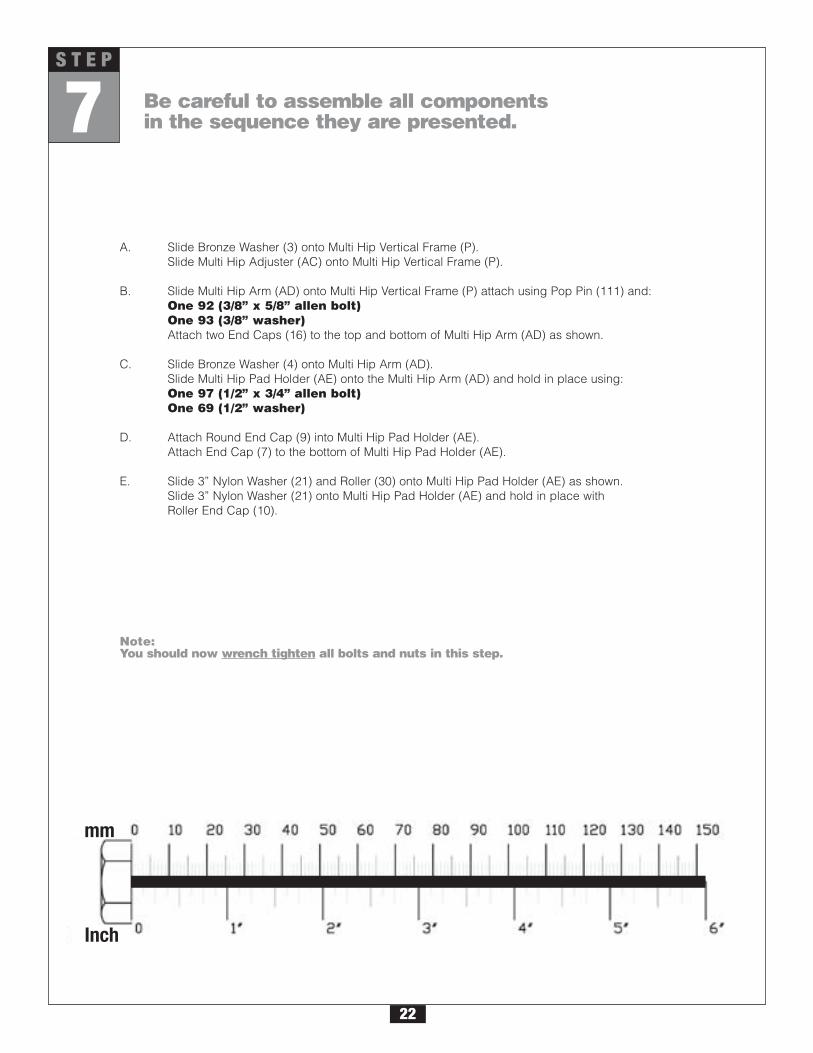
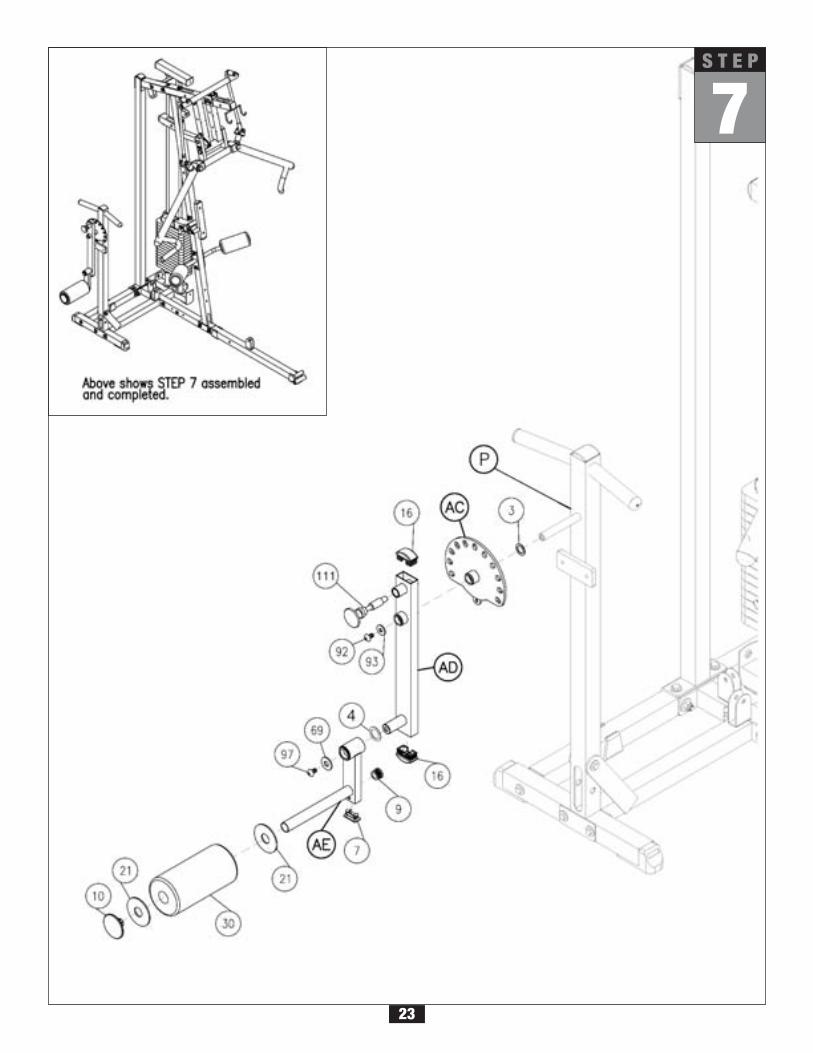
7 Be careful to assemble all componentsin the sequence they are presented.
mm
Inch
22
S T E P
A. Slide Bronze Washer (3) onto Multi Hip Vertical Frame (P).Slide Multi Hip Adjuster (AC) onto Multi Hip Vertical Frame (P).
B. Slide Multi Hip Arm (AD) onto Multi Hip Vertical Frame (P) attach using Pop Pin (111) and:One 92 (3/8” x 5/8” allen bolt)One 93 (3/8” washer)Attach two End Caps (16) to the top and bottom of Multi Hip Arm (AD) as shown.
C. Slide Bronze Washer (4) onto Multi Hip Arm (AD).Slide Multi Hip Pad Holder (AE) onto the Multi Hip Arm (AD) and hold in place using:One 97 (1/2” x 3/4” allen bolt)One 69 (1/2” washer)
D. Attach Round End Cap (9) into Multi Hip Pad Holder (AE).Attach End Cap (7) to the bottom of Multi Hip Pad Holder (AE).
E. Slide 3” Nylon Washer (21) and Roller (30) onto Multi Hip Pad Holder (AE) as shown.Slide 3” Nylon Washer (21) onto Multi Hip Pad Holder (AE) and hold in place with Roller End Cap (10).
Note:You should now wrench tighten all bolts and nuts in this step.
7
23
S T E P
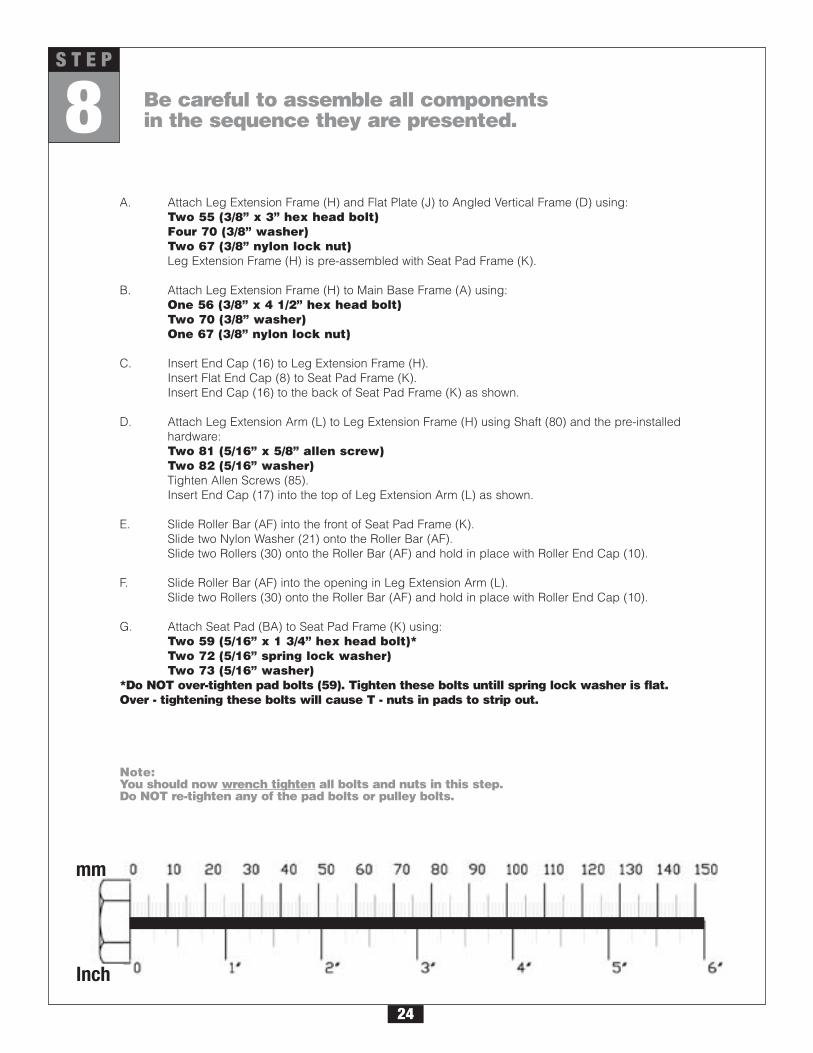
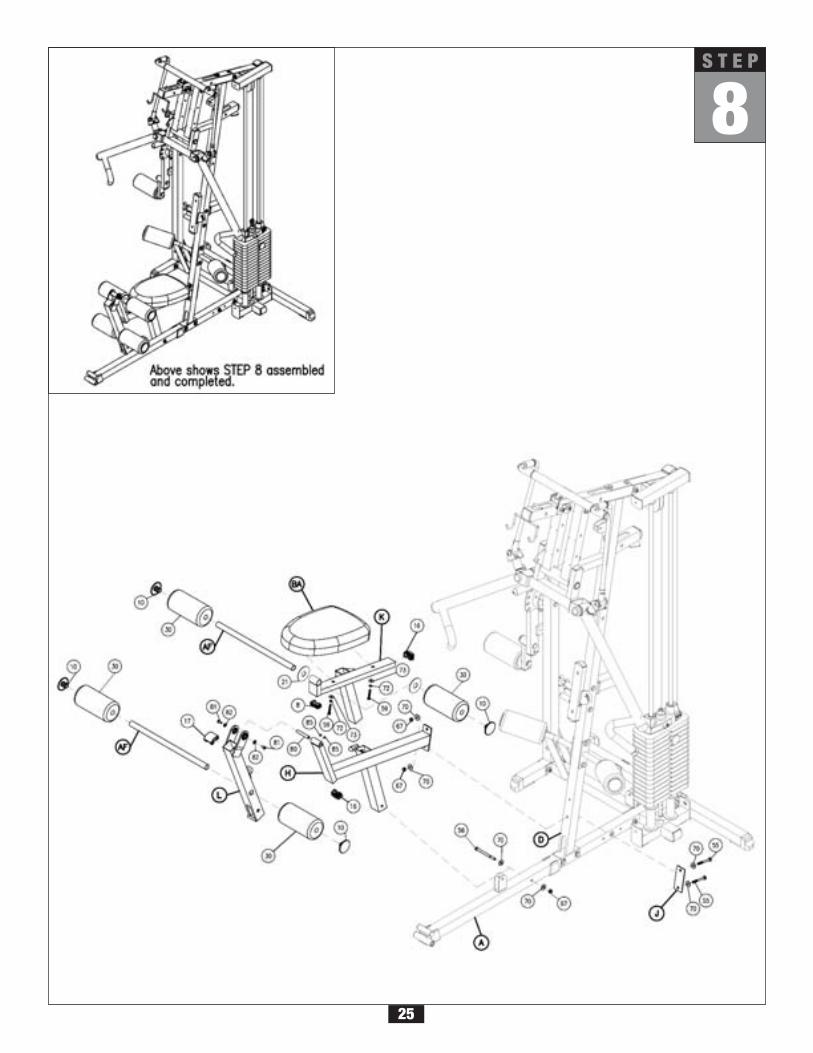
8 Be careful to assemble all componentsin the sequence they are presented.
24
S T E P
mm
Inch
A. Attach Leg Extension Frame (H) and Flat Plate (J) to Angled Vertical Frame (D) using:Two 55 (3/8” x 3” hex head bolt)Four 70 (3/8” washer)Two 67 (3/8” nylon lock nut) Leg Extension Frame (H) is pre-assembled with Seat Pad Frame (K).
B. Attach Leg Extension Frame (H) to Main Base Frame (A) using:One 56 (3/8” x 4 1/2” hex head bolt)Two 70 (3/8” washer)One 67 (3/8” nylon lock nut)
C. Insert End Cap (16) to Leg Extension Frame (H).Insert Flat End Cap (8) to Seat Pad Frame (K).Insert End Cap (16) to the back of Seat Pad Frame (K) as shown.
D. Attach Leg Extension Arm (L) to Leg Extension Frame (H) using Shaft (80) and the pre-installed hardware:Two 81 (5/16” x 5/8” allen screw)Two 82 (5/16” washer)Tighten Allen Screws (85).Insert End Cap (17) into the top of Leg Extension Arm (L) as shown.
E. Slide Roller Bar (AF) into the front of Seat Pad Frame (K).Slide two Nylon Washer (21) onto the Roller Bar (AF).Slide two Rollers (30) onto the Roller Bar (AF) and hold in place with Roller End Cap (10).
F. Slide Roller Bar (AF) into the opening in Leg Extension Arm (L).Slide two Rollers (30) onto the Roller Bar (AF) and hold in place with Roller End Cap (10).
G. Attach Seat Pad (BA) to Seat Pad Frame (K) using:Two 59 (5/16” x 1 3/4” hex head bolt)*Two 72 (5/16” spring lock washer)Two 73 (5/16” washer)
*Do NOT over-tighten pad bolts (59). Tighten these bolts untill spring lock washer is flat. Over - tightening these bolts will cause T - nuts in pads to strip out.
Note:You should now wrench tighten all bolts and nuts in this step.Do NOT re-tighten any of the pad bolts or pulley bolts.
8
25
S T E P
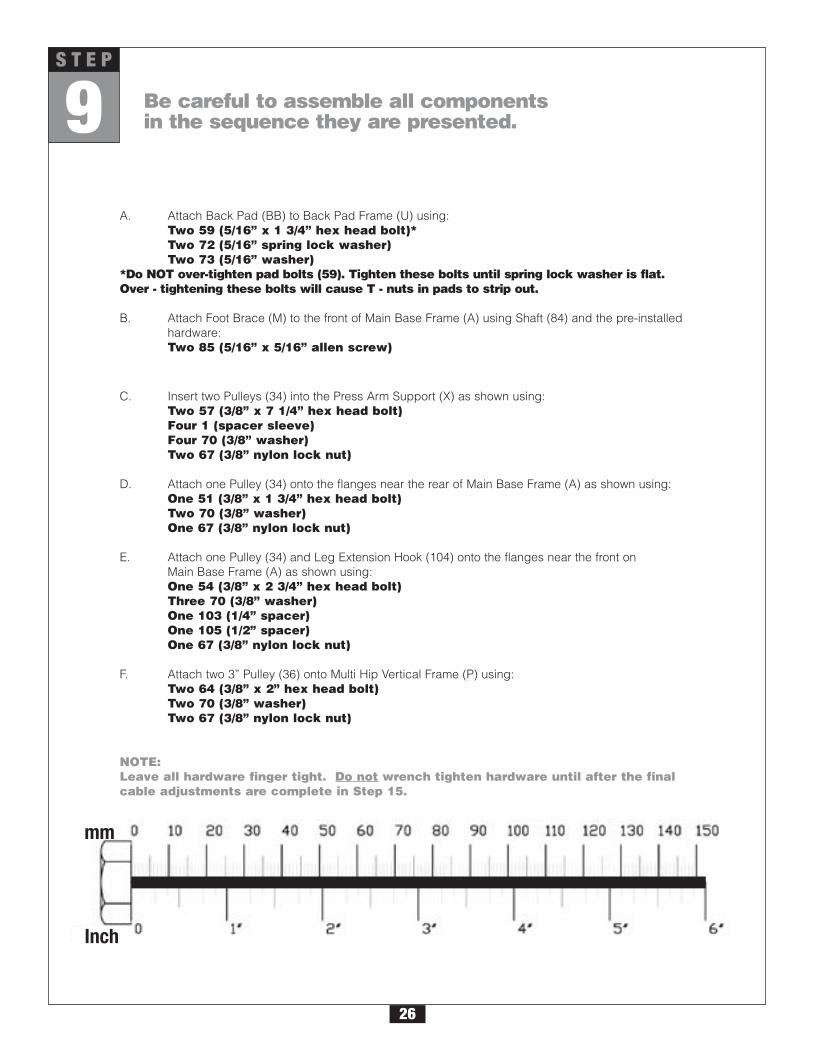
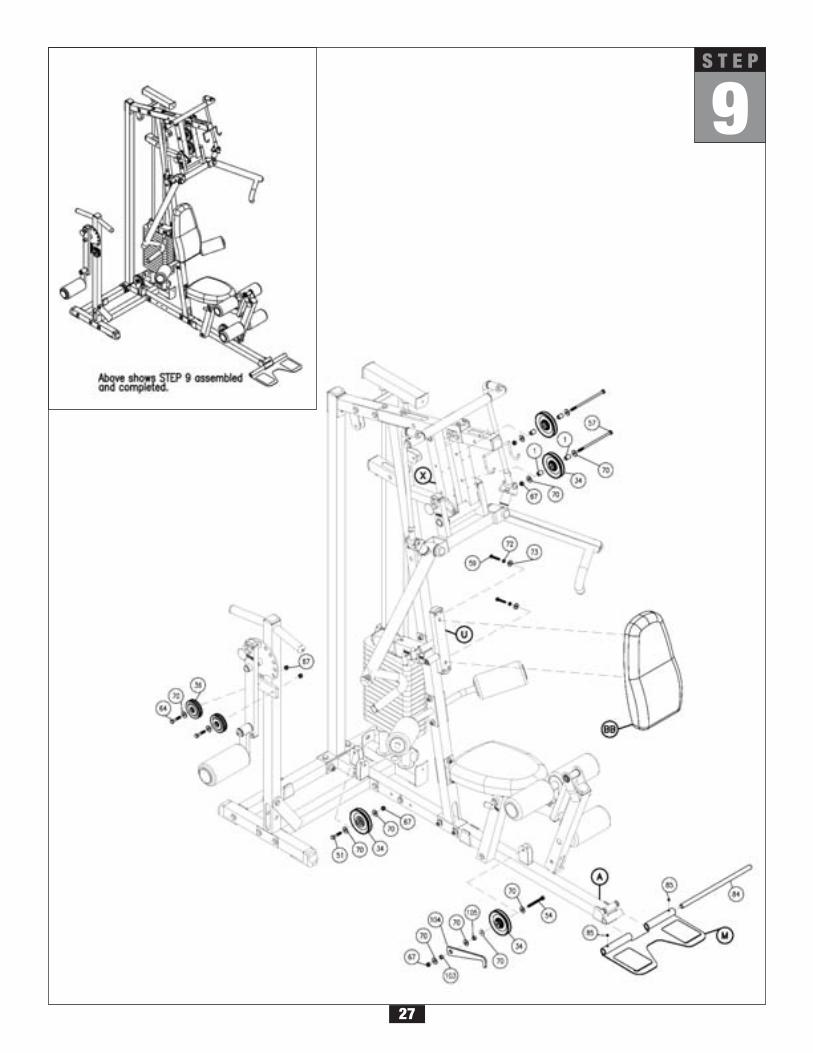
9 Be careful to assemble all componentsin the sequence they are presented.
26
S T E P
mm
Inch
A. Attach Back Pad (BB) to Back Pad Frame (U) using:Two 59 (5/16” x 1 3/4” hex head bolt)*Two 72 (5/16” spring lock washer)Two 73 (5/16” washer)
*Do NOT over-tighten pad bolts (59). Tighten these bolts until spring lock washer is flat. Over - tightening these bolts will cause T - nuts in pads to strip out.
B. Attach Foot Brace (M) to the front of Main Base Frame (A) using Shaft (84) and the pre-installed hardware:Two 85 (5/16” x 5/16” allen screw)
C. Insert two Pulleys (34) into the Press Arm Support (X) as shown using:Two 57 (3/8” x 7 1/4” hex head bolt)Four 1 (spacer sleeve)Four 70 (3/8” washer)Two 67 (3/8” nylon lock nut)
D. Attach one Pulley (34) onto the flanges near the rear of Main Base Frame (A) as shown using:One 51 (3/8” x 1 3/4” hex head bolt)Two 70 (3/8” washer)One 67 (3/8” nylon lock nut)
E. Attach one Pulley (34) and Leg Extension Hook (104) onto the flanges near the front on Main Base Frame (A) as shown using:One 54 (3/8” x 2 3/4” hex head bolt)Three 70 (3/8” washer)One 103 (1/4” spacer)One 105 (1/2” spacer)One 67 (3/8” nylon lock nut)
F. Attach two 3” Pulley (36) onto Multi Hip Vertical Frame (P) using:Two 64 (3/8” x 2” hex head bolt)Two 70 (3/8” washer)Two 67 (3/8” nylon lock nut)
NOTE:Leave all hardware finger tight. Do not wrench tighten hardware until after the finalcable adjustments are complete in Step 15.
9
27
S T E P

10 Be careful to assemble all componentsin the sequence they are presented.
mm
Inch
28
S T E P
Note:All Pulleys in this step are 4 1/4” diameter, except where noted in step 10B*.Leave all pulley bolts hand tight until step 15 is completed.
A. See Diagram 1. Begin at the high pulley station. Route the High Pulley Cable (37) up through the first opening where pulley (A1) will be installed, and out through the top. Route Cable (37) through the opening under the Bi-Angular Bars (Z) and then down through the second opening where pulley (A2) will be installed. Pull the entire length of cable through.
B. See Diagram 2. Insert one Pulley (A1)*, into the first opening in Top Main Frame (E) under Cable (37) and attach using:One 53 (3/8” x 2 1/2” hex head bolt)Two 5 (pulley spacer)One 67 (3/8” nylon lock nut)*For Pulley (A1) use 3 1/2” diameter Pulley (KEY #35 on page 77).
C. See Diagram 2. Insert one Pulley (A2), into the second opening in Top Main Frame (E) under Cable (37) and attach using:One 53 (3/8” x 2 1/2” hex head bolt)Two 5 (pulley spacer)One 67 (3/8” nylon lock nut)
D. See Diagram 1. Route Cable (37) over and around pre-installed Pulley (A3).Route Cable (37) around Pulley (A4) and install Pulley (A4) onto the Angled Vertical Frame (D) as shown in Diagram 2:One 51 (3/8” x 1 3/4” hex head bolt)Two 70 (3/8” washer)One 67 (3/8” nylon lock nut)
E. See Diagram 1. Route Cable (37) over and around pre-installed Pulley (A5).Route Cable (37) around Pulley (A6) and install Pulley (A6) into the Angled Vertical Frame (D) as shown in Diagram 2:One 53 (3/8” x 2 1/2” hex head bolt)Two 5 (pulley spacer)One 60 (3/8” nylon lock nut)
NOTE:Leave all hardware finger tight. Do not wrench tighten hardware until after the finalcable adjustments are complete in Step 15.
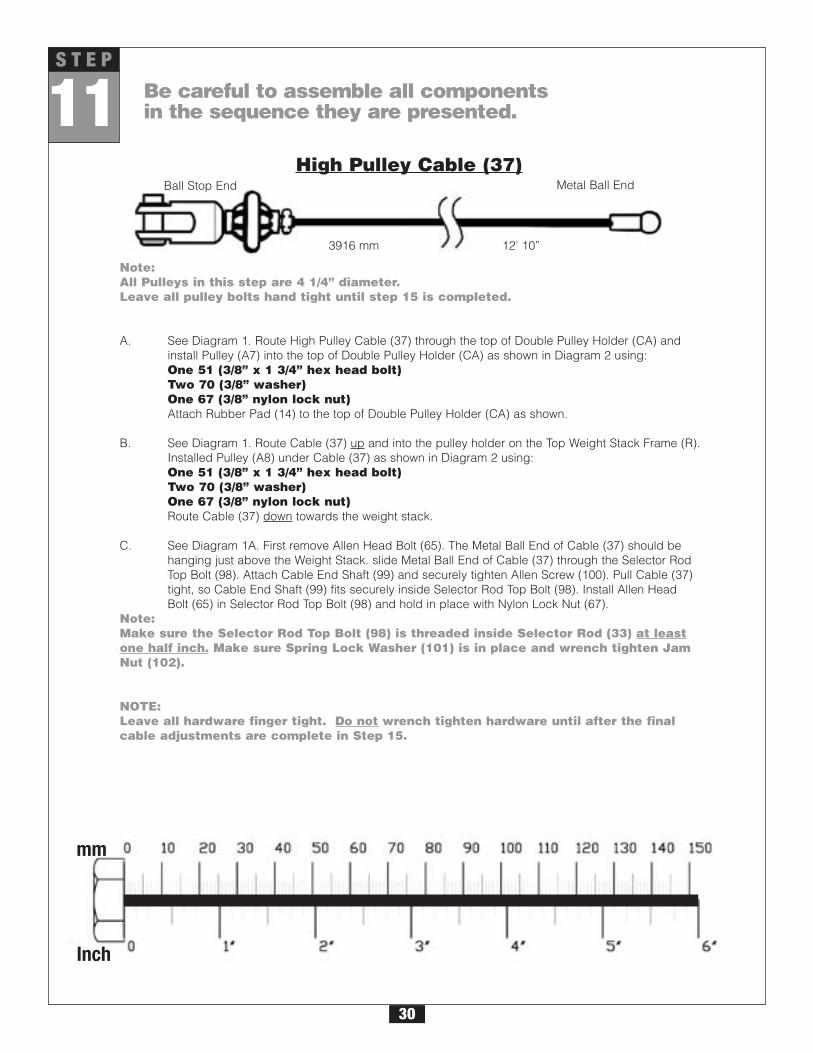
Ball Stop End Metal Ball End
3916 mm 12’ 10”
High Pulley Cable (37)
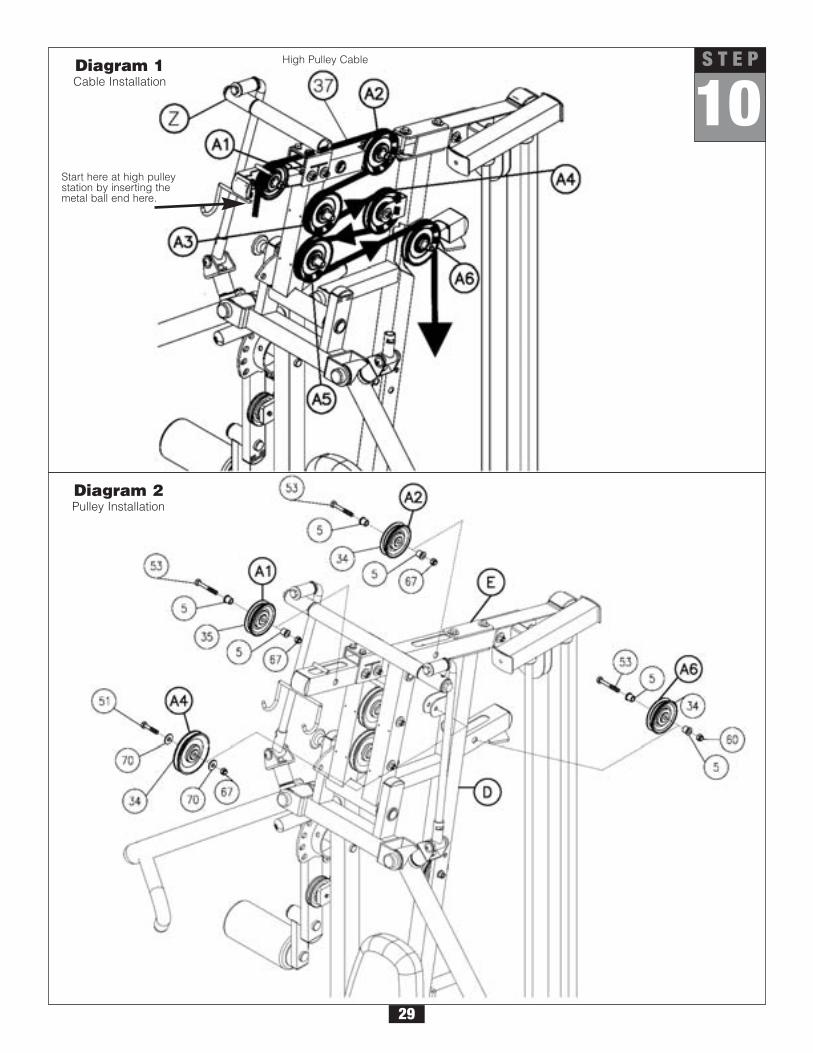
10
29
S T E P
Start here at high pulleystation by inserting themetal ball end here.
High Pulley CableDiagram 1Cable Installation
Diagram 2Pulley Installation
11 Be careful to assemble all componentsin the sequence they are presented.
30
S T E P
mm
Inch
Note:All Pulleys in this step are 4 1/4” diameter.Leave all pulley bolts hand tight until step 15 is completed.
A. See Diagram 1. Route High Pulley Cable (37) through the top of Double Pulley Holder (CA) and install Pulley (A7) into the top of Double Pulley Holder (CA) as shown in Diagram 2 using:One 51 (3/8” x 1 3/4” hex head bolt)Two 70 (3/8” washer)One 67 (3/8” nylon lock nut)Attach Rubber Pad (14) to the top of Double Pulley Holder (CA) as shown.
B. See Diagram 1. Route Cable (37) up and into the pulley holder on the Top Weight Stack Frame (R).Installed Pulley (A8) under Cable (37) as shown in Diagram 2 using:One 51 (3/8” x 1 3/4” hex head bolt)Two 70 (3/8” washer)One 67 (3/8” nylon lock nut)Route Cable (37) down towards the weight stack.
C. See Diagram 1A. First remove Allen Head Bolt (65). The Metal Ball End of Cable (37) should be hanging just above the Weight Stack. slide Metal Ball End of Cable (37) through the Selector Rod Top Bolt (98). Attach Cable End Shaft (99) and securely tighten Allen Screw (100). Pull Cable (37) tight, so Cable End Shaft (99) fits securely inside Selector Rod Top Bolt (98). Install Allen Head Bolt (65) in Selector Rod Top Bolt (98) and hold in place with Nylon Lock Nut (67).
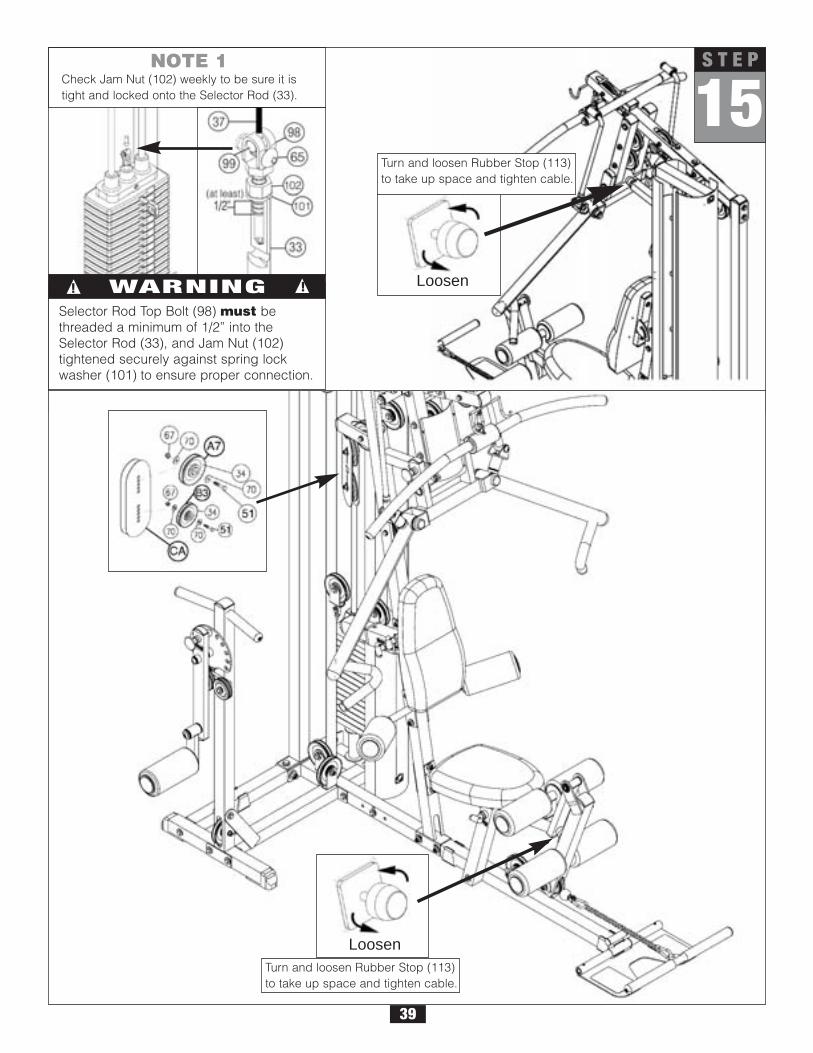
Note:Make sure the Selector Rod Top Bolt (98) is threaded inside Selector Rod (33) at leastone half inch. Make sure Spring Lock Washer (101) is in place and wrench tighten JamNut (102).
NOTE:Leave all hardware finger tight. Do not wrench tighten hardware until after the finalcable adjustments are complete in Step 15.
High Pulley Cable (37)Ball Stop End Metal Ball End
3916 mm 12’ 10”
11S T E P
31
Selector Rod Top Bolt (98) must be threaded aminumum of 1/2” into the Selector Rod (33), andJam Nut (102) tightened securely against springlock washer (101) to ensure proper connection.Check the Jam Nut (102) once a week to makesure it is tight.
WARNING! !
HighPulleyCable
Start here atDouble PulleyHolder (CA) byrouting thecable here.
Diagram 1Cable Installation
Diagram 2Pulley Installation
Diagram 1ACable Installation

12S T E P
Be careful to assemble all componentsin the sequence they are presented.
mm
Inch
32
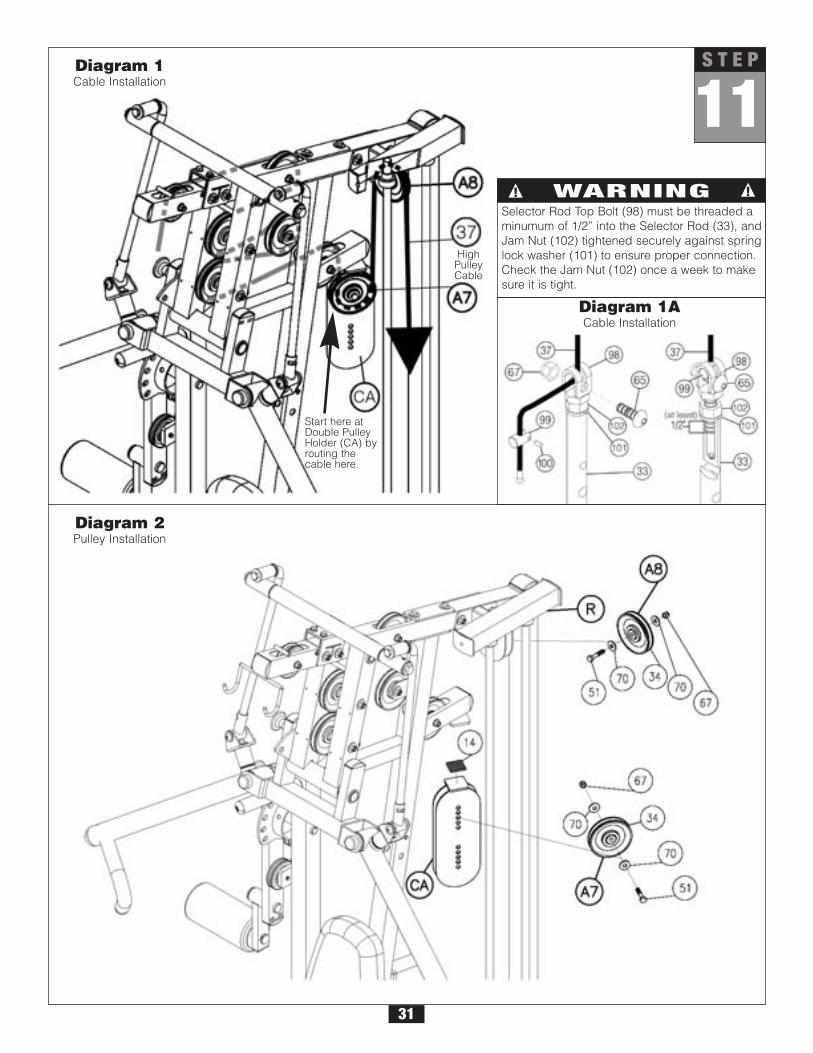
Note:All Pulleys in this step are 4 1/4” diameter, except where noted in step 12B*.Leave all pulley bolts hand tight until step 15 is completed.
A. See Diagram 1. Insert either end of the Ab Crunch Cable (38) into the opening in Angled Vertical Frame (D), above Back Pad (BB), and pull entire length through.
B. Install *3 1/2” Diameter Pulley (B1), under Cable (38) and into Angled Vertical Frame (D) as shown in Diagram 2 using:One 53 (3/8” x 2 1/2” hex head bolt)Two 5 (pulley spacer)One 67 (3/8” nylon lock nut)
C. See Diagram 1. Route Cable (38) through the first Pulley Holder (CB). Hold cable in place by installing Pulley (B2) as shown in Diagram 2 using:One 51 (3/8” x 1 3/4” hex head bolt)Two 70 (3/8” washer)One 67 (3/8” nylon lock nut)
D. See Diagram 1. Route Cable (38) up through the bottom of Double Pulley Holder (CA).Hold cable in place by installing Pulley (B3) as shown in Diagram 2 using:One 51 (3/8” x 1 3/4” hex head bolt)Two 70 (3/8” washer)One 67 (3/8” nylon lock nut)
E. See Diagram 1. Route Cable (38) through the other Pulley Holder (CB). Hold Cable (38) in place by installing Pulley (B4) as shown in Diagram 2 using:One 51 (3/8” x 1 3/4” hex head bolt)Two 70 (3/8” washer)One 67 (3/8” nylon lock nut)
NOTE:Leave all hardware finger tight. Do not wrench tighten hardware until after the finalcable adjustments are complete in Step 15.
Low Pulley Cable (38)
6120 mm 20’ 9”
Small Ball End Small Ball End
12S T E P
33
Start here at the Ab-Crunchstation by inserting eitherend here.
Low Pulley Cable
Diagram 1Cable Installation
Diagram 2Pulley Installation
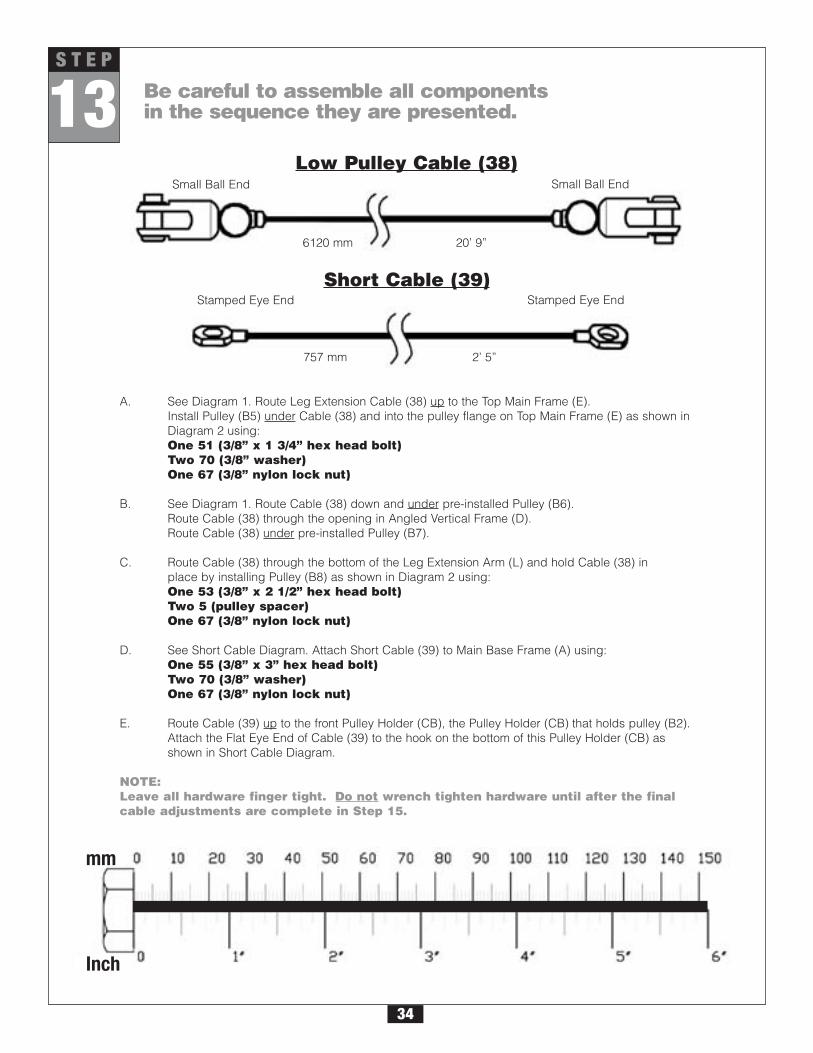
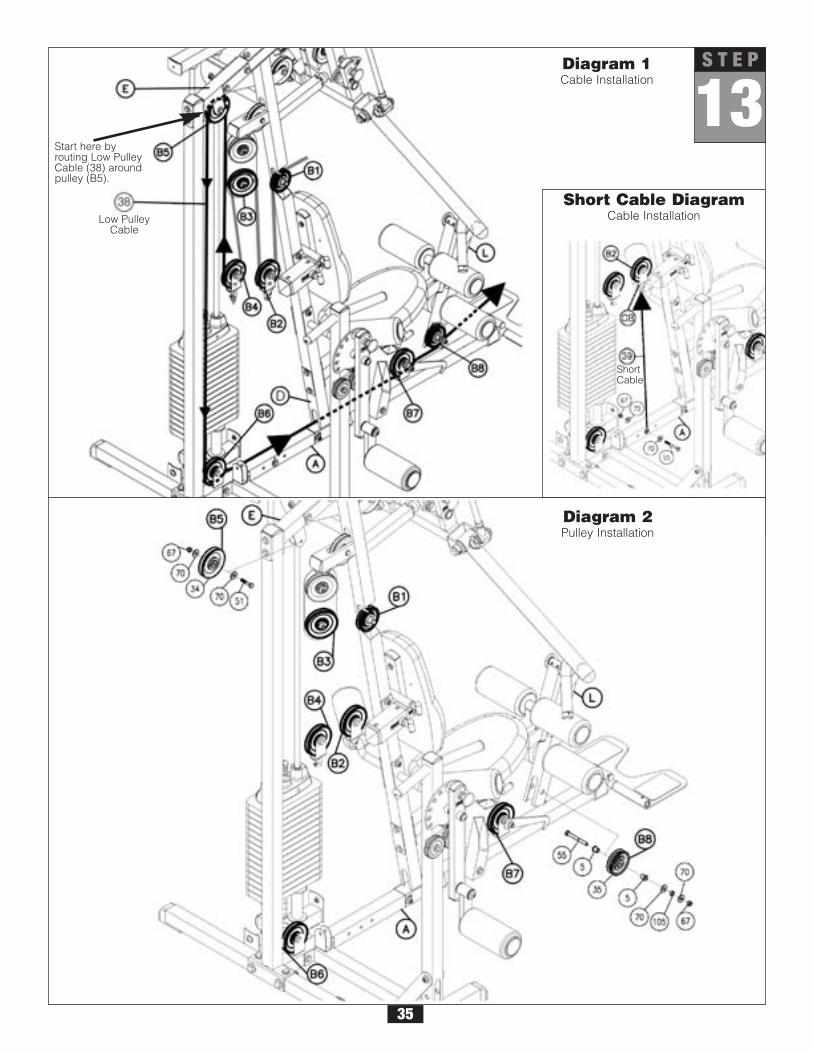
Be careful to assemble all componentsin the sequence they are presented.13
S T E P
mm
Inch
34
A. See Diagram 1. Route Leg Extension Cable (38) up to the Top Main Frame (E).Install Pulley (B5) under Cable (38) and into the pulley flange on Top Main Frame (E) as shown in Diagram 2 using:One 51 (3/8” x 1 3/4” hex head bolt)Two 70 (3/8” washer)One 67 (3/8” nylon lock nut)
B. See Diagram 1. Route Cable (38) down and under pre-installed Pulley (B6).Route Cable (38) through the opening in Angled Vertical Frame (D).Route Cable (38) under pre-installed Pulley (B7).
C. Route Cable (38) through the bottom of the Leg Extension Arm (L) and hold Cable (38) in place by installing Pulley (B8) as shown in Diagram 2 using:One 53 (3/8” x 2 1/2” hex head bolt)Two 5 (pulley spacer)One 67 (3/8” nylon lock nut)
D. See Short Cable Diagram. Attach Short Cable (39) to Main Base Frame (A) using:One 55 (3/8” x 3” hex head bolt)Two 70 (3/8” washer)One 67 (3/8” nylon lock nut)
E. Route Cable (39) up to the front Pulley Holder (CB), the Pulley Holder (CB) that holds pulley (B2). Attach the Flat Eye End of Cable (39) to the hook on the bottom of this Pulley Holder (CB) as shown in Short Cable Diagram.
NOTE:Leave all hardware finger tight. Do not wrench tighten hardware until after the finalcable adjustments are complete in Step 15.
Low Pulley Cable (38)
6120 mm 20’ 9”
Small Ball End Small Ball End
Short Cable (39)Stamped Eye End Stamped Eye End
757 mm 2’ 5”
13S T E P
35
Start here by routing Low PulleyCable (38) aroundpulley (B5).
Low PulleyCable
Diagram 2Pulley Installation
Diagram 1Cable Installation
Short Cable Diagram Cable Installation
ShortCable
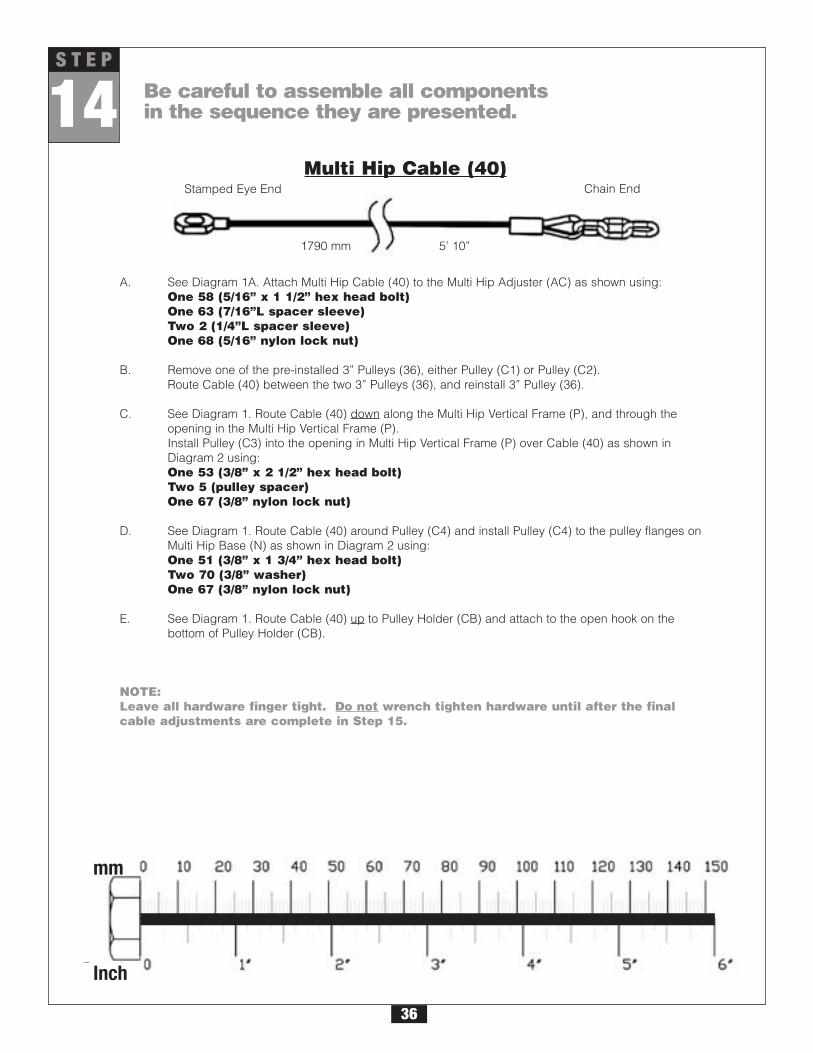
14 Be careful to assemble all componentsin the sequence they are presented.
S T E P
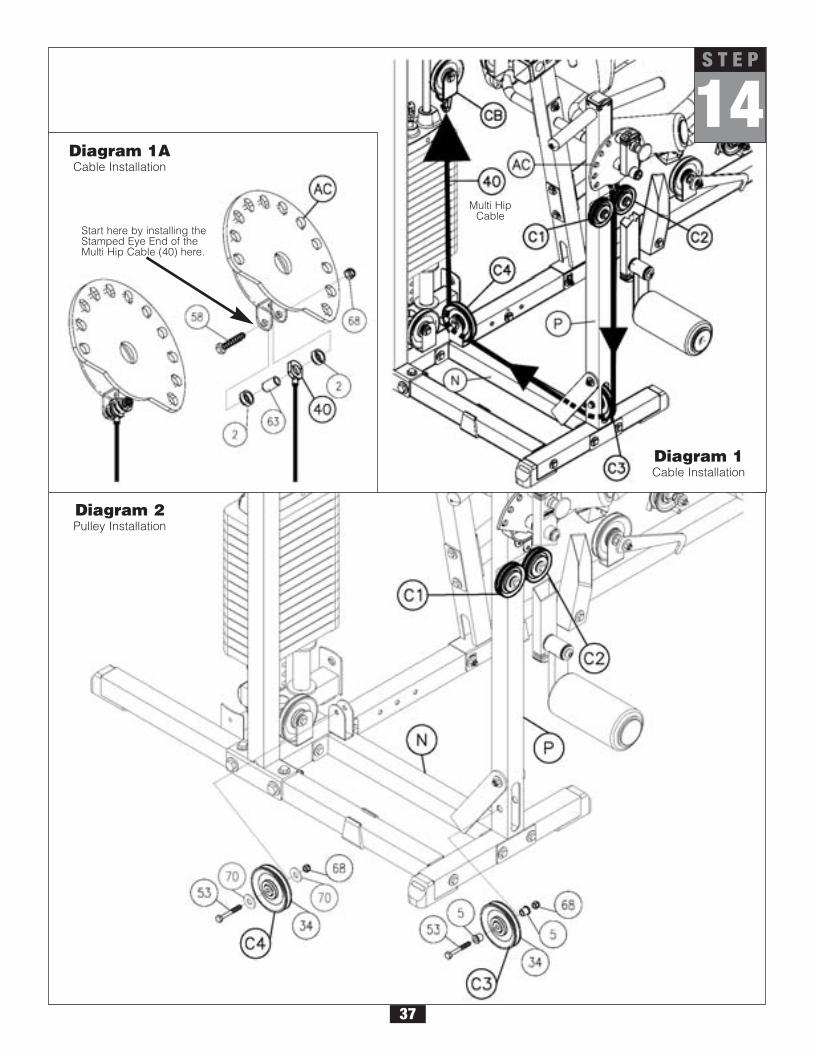
A. See Diagram 1A. Attach Multi Hip Cable (40) to the Multi Hip Adjuster (AC) as shown using:One 58 (5/16” x 1 1/2” hex head bolt)One 63 (7/16”L spacer sleeve)Two 2 (1/4”L spacer sleeve)One 68 (5/16” nylon lock nut)
B. Remove one of the pre-installed 3” Pulleys (36), either Pulley (C1) or Pulley (C2).Route Cable (40) between the two 3” Pulleys (36), and reinstall 3” Pulley (36).
C. See Diagram 1. Route Cable (40) down along the Multi Hip Vertical Frame (P), and through the opening in the Multi Hip Vertical Frame (P).Install Pulley (C3) into the opening in Multi Hip Vertical Frame (P) over Cable (40) as shown in Diagram 2 using:One 53 (3/8” x 2 1/2” hex head bolt)Two 5 (pulley spacer)One 67 (3/8” nylon lock nut)
D. See Diagram 1. Route Cable (40) around Pulley (C4) and install Pulley (C4) to the pulley flanges onMulti Hip Base (N) as shown in Diagram 2 using:One 51 (3/8” x 1 3/4” hex head bolt)Two 70 (3/8” washer)One 67 (3/8” nylon lock nut)
E. See Diagram 1. Route Cable (40) up to Pulley Holder (CB) and attach to the open hook on the bottom of Pulley Holder (CB).
NOTE:Leave all hardware finger tight. Do not wrench tighten hardware until after the finalcable adjustments are complete in Step 15.
mm
Inch
Multi Hip Cable (40)
1790 mm 5’ 10”
Stamped Eye End Chain End
36
14S T E P
37
Start here by installing theStamped Eye End of theMulti Hip Cable (40) here.
Multi HipCable
Diagram 1ACable Installation
Diagram 2Pulley Installation
Diagram 1Cable Installation
38
15 Be careful to assemble all componentsin the sequence they are presented.
S T E P
mm
Inch
NOW IS THE TIME TO MAKE ALL NECESSARYCABLE ADJUSTMENTS
After cable installation is complete you must check all cables for proper tension. Obvious signs that cabletension problems exist include:
c Top Plate (29) does not rest directly on the top weight stack plate.c The holes in the Selector Rod (19) does not line up with the holes in the Weight Stack Plates.c Cable(s) are sloppy and there is no resistance from the weight stack for the first few inches of
the exercise.
There are FIVE areas for cable adjustment on the G2B:A. Selector Rod Top Bolt (103).B. Two Rubber Stops (113).C. Two Adjustments in Double Pulley Holder (CA).
SEE NOTE 1 ON PAGE 39.
If there is too much tension, and the Top Plate (29) is not resting directly on the top weight stack plate:1st.- Turn and tighten the Rubber Stop (113).2nd.- Move pulley (A7) up to a higher hole in Double Pulley Holder (CA).3rd.- Move pulley (B3) down to a lower hole in Double Pulley Holder (CA).
If there is to much play or excessive slack:1st.- Turn and loosen the Rubber Stop (113).2nd.- Move Pulley (A7) down to a lower hole in Double Pulley Holder (CA).3rd.- Move Pulley (B3) up to a higher hole in Double Pulley Holder (CA).4th.- Screw the Selector Rod Top Bolt (103) farther into the Selector Rod (19) of the Weight Stack.
NOTE:Cables should be inspected daily and adjusted periodically to ensure safe and smoothoperation.
NOTE:After cable adjustment is complete, go back and tighten all bolts. Make sure to tightenthe two bolts in Double Pulley Holder (CA).
39
15S T E P
Turn and loosen Rubber Stop (113)to take up space and tighten cable.
WARNING! !
Selector Rod Top Bolt (98) must bethreaded a minimum of 1/2” into theSelector Rod (33), and Jam Nut (102)tightened securely against spring lockwasher (101) to ensure proper connection.
Turn and loosen Rubber Stop (113)to take up space and tighten cable.
Loosen
Loosen
NOTE 1Check Jam Nut (102) weekly to be sure it istight and locked onto the Selector Rod (33).
16 Be careful to assemble all componentsin the sequence they are presented.
S T E P
mm
Inch
40
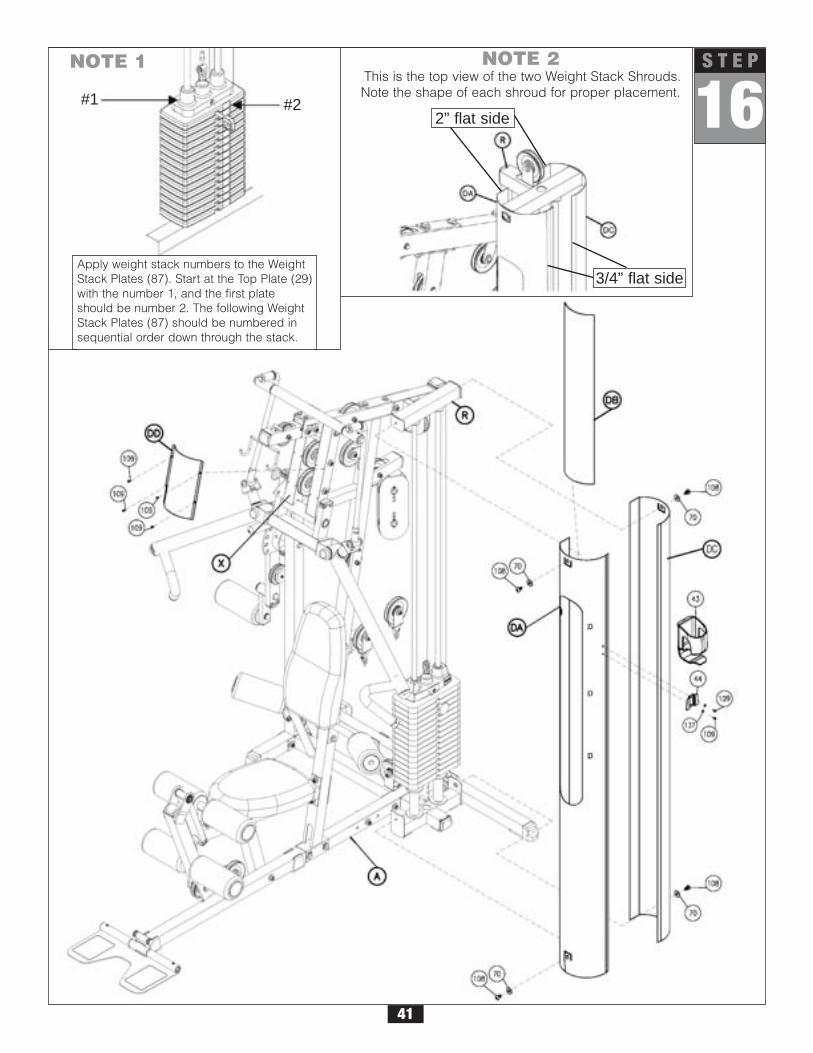
SEE NOTE 1 ON PAGE 41:A. Apply weight stack numbers to weight stack Top Plate (29) and each Weight Stack Plate (87)
as shown.
SEE NOTE 2 ON PAGE 41:B. Front Shroud (DA) is pre-assembled with Shroud Insert (DB).
Attach Front Shroud (DA) to the side of the weight stack as shown.Bolt onto Main Base Frame (A) at the bottom and Top Weight Stack Frame (R) using:Two 108 (3/8” x 5/8” round allen head)Two 70 (3/8” washer)
C. Attach Back Shroud (DC), to the back side of the weight stack, onto the Main Base Frame (A) at the bottom and to the Top Weight Stack Frame (R) as shown using:Two 108 (3/8” x 5/8” round allen head)Two 70 (3/8” washer)
D. Attach Press Arm Shroud (DD) to the Press Arm Support (X) using:Four 109 (1/8” x 3/8” screw)
E. Connect the Water Bottle Bracket (44) to the Weight Stack Shroud (DA) using:Two 137 (1/8” washer)Two 109 (1/8” x 3/8” screw)
F. Slide the Water Bottle Holder (43) onto the Water Bottle Bracket (44) as shown.
16S T E P
41
#1 #2
Apply weight stack numbers to the WeightStack Plates (87). Start at the Top Plate (29)with the number 1, and the first plateshould be number 2. The following WeightStack Plates (87) should be numbered insequential order down through the stack.
NOTE 1 NOTE 2This is the top view of the two Weight Stack Shrouds.Note the shape of each shroud for proper placement.
3/4” flat side
2” flat side
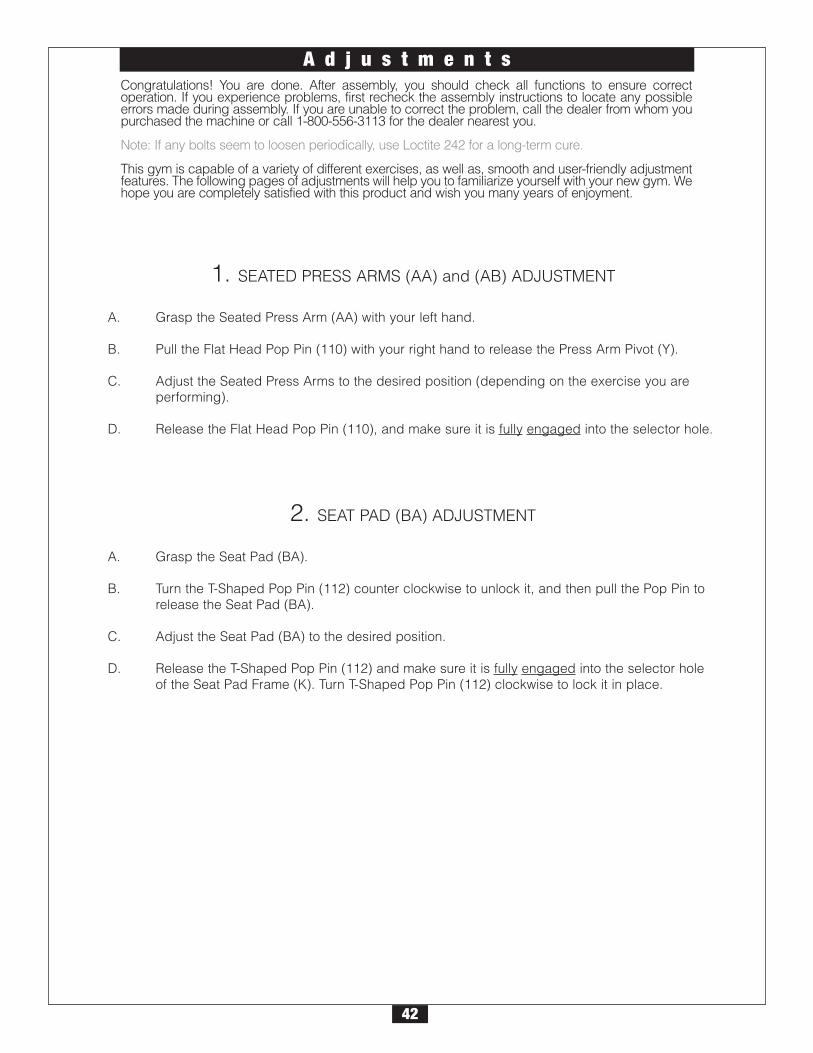
A d j u s t m e n t s
42
Congratulations! You are done. After assembly, you should check all functions to ensure correctoperation. If you experience problems, first recheck the assembly instructions to locate any possibleerrors made during assembly. If you are unable to correct the problem, call the dealer from whom youpurchased the machine or call 1-800-556-3113 for the dealer nearest you.
Note: If any bolts seem to loosen periodically, use Loctite 242 for a long-term cure.
This gym is capable of a variety of different exercises, as well as, smooth and user-friendly adjustmentfeatures. The following pages of adjustments will help you to familiarize yourself with your new gym. Wehope you are completely satisfied with this product and wish you many years of enjoyment.
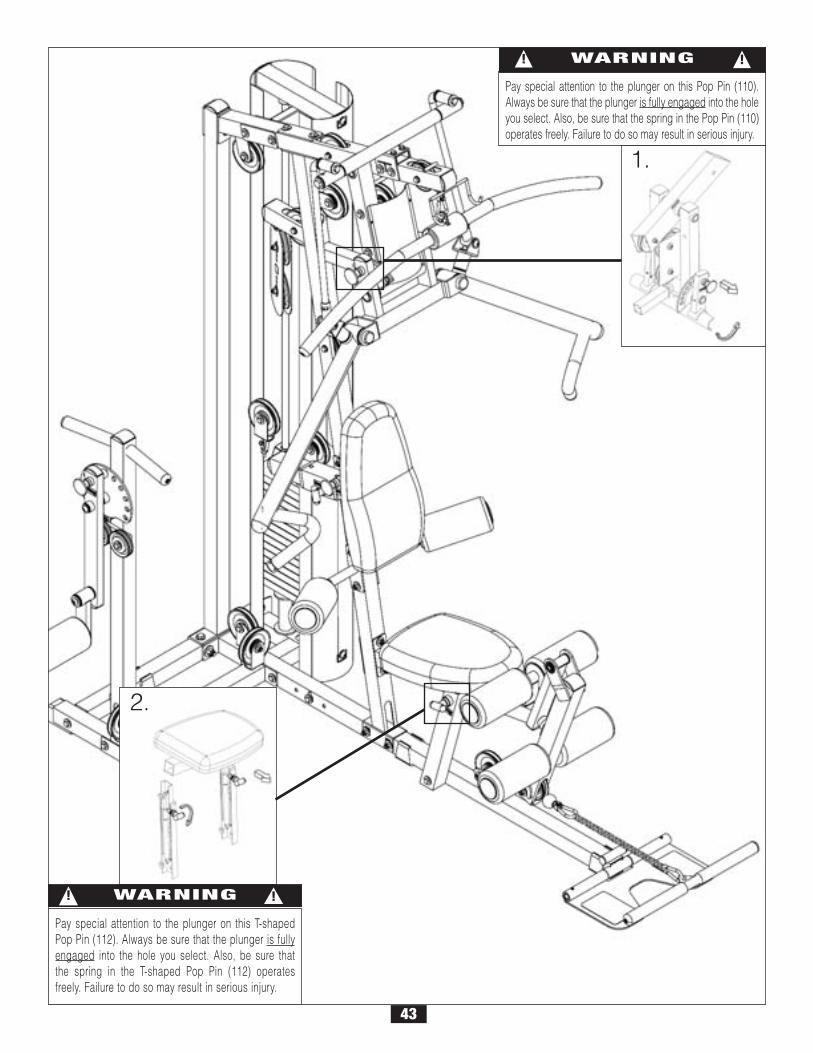
1. SEATED PRESS ARMS (AA) and (AB) ADJUSTMENT
A. Grasp the Seated Press Arm (AA) with your left hand.
B. Pull the Flat Head Pop Pin (110) with your right hand to release the Press Arm Pivot (Y).
C. Adjust the Seated Press Arms to the desired position (depending on the exercise you are performing).
D. Release the Flat Head Pop Pin (110), and make sure it is fully engaged into the selector hole.
2. SEAT PAD (BA) ADJUSTMENT
A. Grasp the Seat Pad (BA).
B. Turn the T-Shaped Pop Pin (112) counter clockwise to unlock it, and then pull the Pop Pin to release the Seat Pad (BA).
C. Adjust the Seat Pad (BA) to the desired position.
D. Release the T-Shaped Pop Pin (112) and make sure it is fully engaged into the selector hole of the Seat Pad Frame (K). Turn T-Shaped Pop Pin (112) clockwise to lock it in place.
43
1.
Pay special attention to the plunger on this Pop Pin (110).Always be sure that the plunger is fully engaged into the holeyou select. Also, be sure that the spring in the Pop Pin (110)operates freely. Failure to do so may result in serious injury.
WARNING !!
2.
Pay special attention to the plunger on this T-shapedPop Pin (112). Always be sure that the plunger is fullyengaged into the hole you select. Also, be sure thatthe spring in the T-shaped Pop Pin (112) operatesfreely. Failure to do so may result in serious injury.
WARNING! !
A d j u s t m e n t s
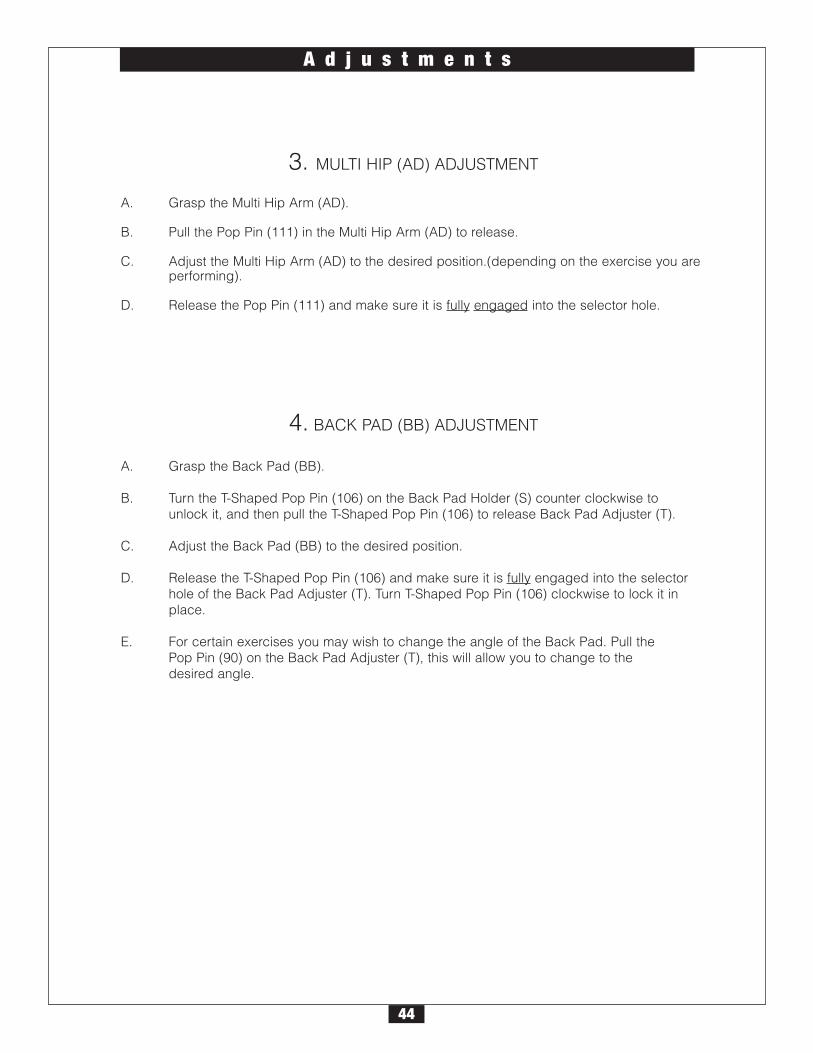
3. MULTI HIP (AD) ADJUSTMENT
A. Grasp the Multi Hip Arm (AD).
B. Pull the Pop Pin (111) in the Multi Hip Arm (AD) to release.
C. Adjust the Multi Hip Arm (AD) to the desired position.(depending on the exercise you are performing).
D. Release the Pop Pin (111) and make sure it is fully engaged into the selector hole.
4. BACK PAD (BB) ADJUSTMENT
A. Grasp the Back Pad (BB).
B. Turn the T-Shaped Pop Pin (106) on the Back Pad Holder (S) counter clockwise to unlock it, and then pull the T-Shaped Pop Pin (106) to release Back Pad Adjuster (T).
C. Adjust the Back Pad (BB) to the desired position.
D. Release the T-Shaped Pop Pin (106) and make sure it is fully engaged into the selector hole of the Back Pad Adjuster (T). Turn T-Shaped Pop Pin (106) clockwise to lock it in place.
E. For certain exercises you may wish to change the angle of the Back Pad. Pull the Pop Pin (90) on the Back Pad Adjuster (T), this will allow you to change to the desired angle.
44
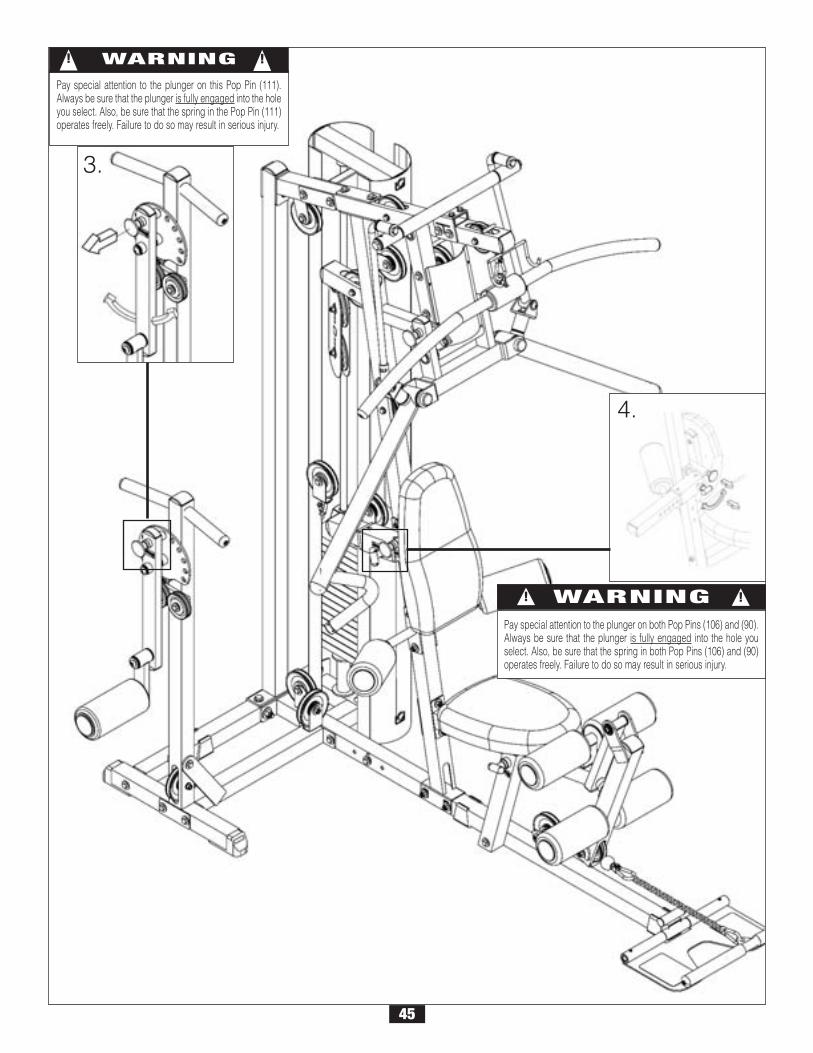
Pay special attention to the plunger on this Pop Pin (111).Always be sure that the plunger is fully engaged into the holeyou select. Also, be sure that the spring in the Pop Pin (111)operates freely. Failure to do so may result in serious injury.
WARNING! !
4.
Pay special attention to the plunger on both Pop Pins (106) and (90).Always be sure that the plunger is fully engaged into the hole youselect. Also, be sure that the spring in both Pop Pins (106) and (90)operates freely. Failure to do so may result in serious injury.
WARNING !!
3.
45
W a r n i n g , S a f e t y & M a i n t e n a n c e
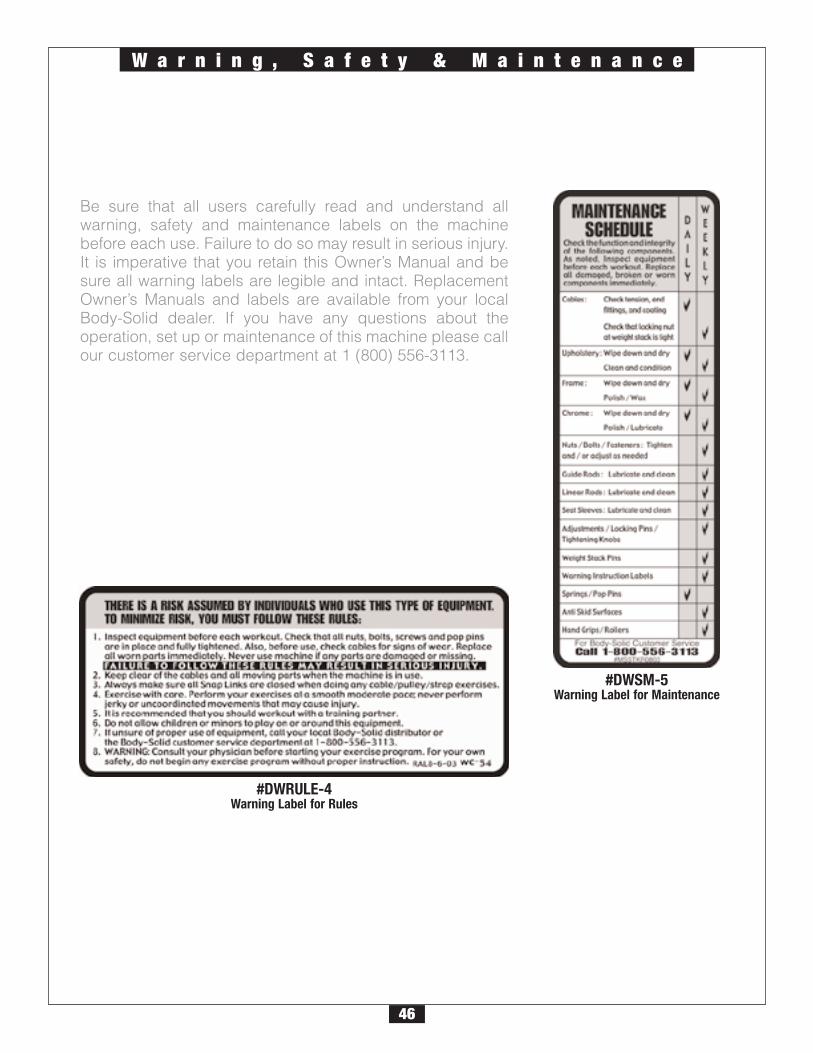
Be sure that all users carefully read and understand allwarning, safety and maintenance labels on the machinebefore each use. Failure to do so may result in serious injury.It is imperative that you retain this Owner’s Manual and besure all warning labels are legible and intact. ReplacementOwner’s Manuals and labels are available from your localBody-Solid dealer. If you have any questions about theoperation, set up or maintenance of this machine please callour customer service department at 1 (800) 556-3113.
#DWRULE-4Warning Label for Rules
#DWSM-5Warning Label for Maintenance
46
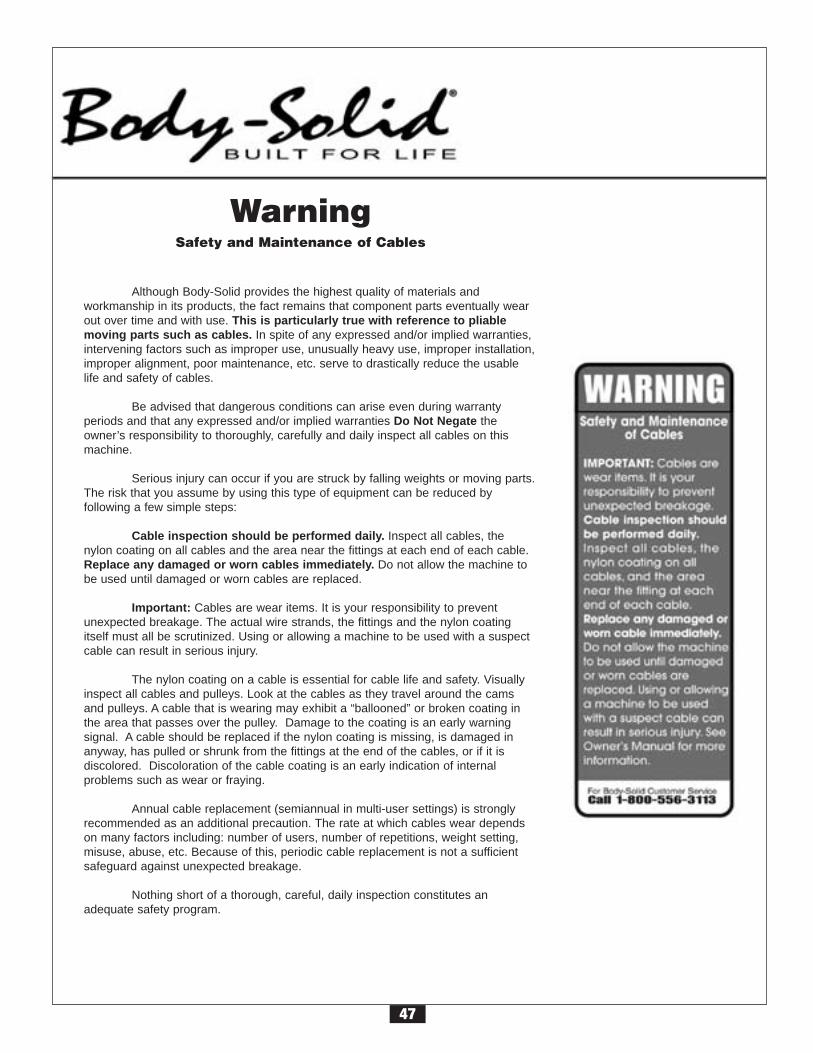
Although Body-Solid provides the highest quality of materials and workmanship in its products, the fact remains that component parts eventually wearout over time and with use. This is particularly true with reference to pliablemoving parts such as cables. In spite of any expressed and/or implied warranties,intervening factors such as improper use, unusually heavy use, improper installation,improper alignment, poor maintenance, etc. serve to drastically reduce the usablelife and safety of cables.
Be advised that dangerous conditions can arise even during warranty periods and that any expressed and/or implied warranties Do Not Negate theowner’s responsibility to thoroughly, carefully and daily inspect all cables on thismachine.
Serious injury can occur if you are struck by falling weights or moving parts.The risk that you assume by using this type of equipment can be reduced byfollowing a few simple steps:
Cable inspection should be performed daily. Inspect all cables, thenylon coating on all cables and the area near the fittings at each end of each cable.Replace any damaged or worn cables immediately. Do not allow the machine tobe used until damaged or worn cables are replaced.
Important: Cables are wear items. It is your responsibility to preventunexpected breakage. The actual wire strands, the fittings and the nylon coatingitself must all be scrutinized. Using or allowing a machine to be used with a suspectcable can result in serious injury.
The nylon coating on a cable is essential for cable life and safety. Visuallyinspect all cables and pulleys. Look at the cables as they travel around the camsand pulleys. A cable that is wearing may exhibit a “ballooned” or broken coating inthe area that passes over the pulley. Damage to the coating is an early warningsignal. A cable should be replaced if the nylon coating is missing, is damaged inanyway, has pulled or shrunk from the fittings at the end of the cables, or if it isdiscolored. Discoloration of the cable coating is an early indication of internalproblems such as wear or fraying.
Annual cable replacement (semiannual in multi-user settings) is stronglyrecommended as an additional precaution. The rate at which cables wear dependson many factors including: number of users, number of repetitions, weight setting,misuse, abuse, etc. Because of this, periodic cable replacement is not a sufficientsafeguard against unexpected breakage.
Nothing short of a thorough, careful, daily inspection constitutes an adequate safety program.
WarningSafety and Maintenance of Cables
47
W a r n i n g , S a f e t y & M a i n t e n a n c e
Precision craftsmanship assures Body-Solid’s ability toconsistently deliver products of the highest standards. Ourproducts have been carefully designed to ensure safe, efficientlong term operation.
However, it must be realized that safe use of this equipmentrequires that owners carefully read and follow the Body-Soliduse recommendations, warnings, and maintenance guidelinesin this Owners Manual.
Routine inspection and maintenance is of critical importance toensure the maximum safety and performance of the G2B.Body-Solid uses the highest quality materials available, but wearis inevitable. Therefore, you must carefully inspect yourequipment as outlined in the Maintenance Schedule on the nextpage.
Be advised that dangerous conditions can arise even during awarranty period. A warranty does not negate the owner’sresponsibility to thoroughly, carefully and daily inspect themachine.
Including maintaning the equipment the owner’s responsibility isalso to:
l Be sure to always provide adequate supervision to all end-users.
l Be sure to instruct all end-users of proper usage.
l Be sure all supervisors and personal trainers who instruct end-users on equipment use are properly trained and know the function and importance of every adjustment and setting. Also, be sure these trainers provide proper instruction to end-users on the fundamentals of strength training.
CABLES:l While the machine is not in use. Carefully run your
fingers along the cable to feel for thinning or bulging areas. Replace cables immediately at the first sign of damage or wear. Do not use equipment until damaged cable has been replaced.
l Visually inspect the cables for fraying, cracking, peeling or discoloration.
l Check slack in cables and re-adjust cable tensionif needed. See pages 38-39.
l Check that the jam nut on the selector rod top bolt is tight.
UPHOLSTERY:l Wipe down after every workout.
l Periodically take the time to use a mild soap or amild vinyl upholstery cleaner. Avoid using any abrasive cleaner not intended for use on vinyl.
l Keep sharp or pointed objects out of your pockets and clear of all upholstery.
NUTS/BOLTS/FASTENERS:l Periodically inspect all nuts and bolts. Tighten if
needed. If bolts seem to loosen periodically, useLoctite 242 for a long-term cure.
l Go through a re-tightening sequence periodicallyto ensure that all hardware is properly tensioned.
GUIDE RODS:l Wipe clean with a dust free rag. Lubricate with a
Silicon or Teflon based lubricant.
ADJUSTMENTS / LOCKING PINS / TIGHTENINGKNOBS:
l Check all pieces for signs of visible wear ordamage.
l Check springs in Snap Links and Pop Pins for proper tension and alignment.
l If the spring sticks or has lost its rigidity, replaceit immediatly.
ANTI-SKID SURFACES:l Replace if they appear worn or become slippery.
WARNING INSTRUCTION LABELS:l Inspect and familiarize yourself with all safety
warnings and other user information on decals.
48

FOR BODY-SOLID CUSTOMER SERVICE:
1-800-556-3113*Make several copies of this page to keep track of your maintenance.
You can print more copies of this page by going to:http://www.bodysolid.com/support/docs.html
MAINTENANCESCHEDULE DAILY WEEKLY LATEST DATE ENTRY
UPHOLSTERY: WIPE DOWN AND DRY
CLEAN AND CONDITION.
FRAME: WIPE DOWN AND DRY
POLISH/WAX
CHROME: WIPE DOWN AND DRY
POLISH/LUBRICATE
NUTS/BOLTS/FASTENERS: TIGHTEN AND/OR ADJUST AS NEEDED
GUIDE RODS: LUBRICATE AND CLEAN
LINEAR RODS:LUBRICATE AND CLEAN
SEAT SLEEVES:LUBRICATE AND CLEAN
ADJUSTMENTS / LOCKING PINS /TIGHTENING KNOBS
WEIGHT STACK PINS
WARNING INSTRUCTION LABELS
SPRINGS / POP PINS
ANTI-SKID SURFACES
HAND GRIPS / ROLLERS
aCABLES: CHECK TENSION, END FITTINGS, ANDCOATING.
CHECK THAT JAM NUTON THE SELECTOR ROD TOPBOLT IS TIGHT.
aa
aa
aa
a
a
a
a
a
a
aa
a
a
a
49
AEROBICExercise that primarily uses oxygen to burn fuel at low to moderate levels of intensity. Runningand jogging are examples of aerobic exercise.
ANAEROBICExercise that primarily uses the body’s stored fuel for energy. Intense weightlifting is anexample of an anaerobic exercise.
ATROPHYDecrease of a muscle caused by the decrease in the size of its cells because of inactivity.
BALLISTIC STRETCHINGA stretching technique that involves a bouncing or bobbing movement during the stretch. Thefinal position is not held. This is not a recommended stretching technique.
BREATHINGNever hold your breath during any part of an exercise. Holding your breath may cause severeintra-thoracic pressure and raise blood pressure leading to dizziness, blackout or othercomplications. The rule of thumb is to exhale on exertion and inhale on the return part of theexercise.
CARDIOVASCULARReferring to the heart, lungs, and other periphery systems involved in the transport of oxygenthroughout the body.
CHALLENGE YOUR MUSCLESAll strength training should progress gradually, using increases in weight until your goals arereached. Then, change your workout to include increased reps or a higher weight resistance.Alter the order of your exercises, perform multiple sets or different exercises to maintainresults or reach new goals.
CHANGE ROUTINEBeginner’s please note: If you want to make changes in the exercise routine that you do,wait until about the six to eight week point. Advanced lifters may want to change routines toavoid plateus in gaining size or strength.
CIRCUIT TRAININGExercise stations that consist of various combinations of weight training, flexibility,calisthenics, and aerobic exercise.
CONCENTRIC MUSCLE ACTIONThe muscle shortens while contracting against resistance.
ECCENTRIC MUSCLE ACTIONThe muscle lengthens while contracting against resistance.
EXERCISE FREQUENCYExercise each muscle group 2-3 times per week. Allow a minimum of 48 hours rest for eachmuscle group worked. If you are doing a total-body workout, three training sessions perweek, performed on every second day, is adequate.
EXERCISE LARGE MUSCLES FIRSTYou should work your large muscle groups first (ie. squat, bench press, lat pulldown) beforeyou exercise your small muscle groups (ie. bicep curls, tricep pressdowns, lateral raises).
EXERCISE PROGRAM DURATIONA weight training routine should take anywhere from 45 minutes to one hour to complete. Addanother 20 to 60 minutes when you include stretching, warm-up, aerobics and cool-down.
GIVE YOUR MUSCLES A RESTYou’ll get the most out of strength training if you give your muscles at least 48 hours rest torecover and rebuild between strength training workouts.
HYPERTROPHYEnlargement of a muscle caused by an increase in the size of its cells in response to weighttraining.
INTENSITYThe degree to which the body is worked during exercise.
ISOKINETIC EXERCISEResistance is given at a fixed velocity of movement with accommodating intensity. A machinethat moves you through an entire range of motion at a preset speed and will not change nomatter how much pressure is put forth by the individual.
ISOMETRIC EXERCISEContracts the muscle statically without changing its length. Example: Attempting to lift aweight heavier than you can handle, but cannot move.
ISOTONIC EXERCISEShortens and lengthens the muscle through a complete range of motion. This defines weighttraining with full range of motion.
MUSCLE FATIGUEFatigue is when you can’t possibly do another rep without sacrificing form.
MUSCULAR ENDURANCEThe ability to perform repetitive muscular contractions against some resistance.
MUSCULAR STRENGTHThe maximum force that can be applied by a muscle during a single maximum contraction.
OSTEOPOROSISA decrease in bone density.
PLYOMETRIC EXERCISEA technique that includes specific exercises which encompass a rapid stretch of a muscleeccentrically, followed immediately by a rapid concentric contraction of that muscle for thepurpose of facilitating and developing a forceful explosive movement over a short period oftime. Examples of these are using medicine balls for upper extremity and depth jumping forlower extremeity.
PHRASES, TERMS, TIPS& GUIDELINESB E G I N N E R ’ S G U I D E L I N E S
• Work out at least two times a week.• Include six to eight exercises that train major muscle groups.• Perform two or three sets of at least eight to 12 repetitions.
50
POWERPower is the rate of performing work. Power during a repetition is defined as the weight lifted times the vertical distance the weight is lifted divided by the time to complete the repetition. Power during a repetition can be increased by lifting the same weight the same vertical distance in a shorter period of time. Power can also be increased by lifting a heavierresistance the same vertical distance in the same period of time as a lighter resistance.
PROGRESS GRADUALLYIncrease reps before increasing resistance. Reduce rest intervals between sets to increaseintensity.
PROGRESSIVE RESISTANCEThe principle of continually adding more weight to a specific exercise as your musclesbecome stronger to adapt to the heavier weights.
PROPER FORMFocus on the proper motion of the exercise and concentrate on the specific muscles beingused. Do not sacrifice proper form to lift heavier weight or to perform more repetitions. Properform also means lifting in a smooth, fluid motion. If you feel strain elsewhere, you shouldre-evaluate the amount of weight you are lifting or have a qualified professional critique yourexercise motion.
PROPER POSTUREMaintaining proper posture will greatly reduce chances of injury and maximize exercisebenefit. When standing always keep your feet shoulder-width apart. Do not lock your knees.Locking your knees can put unnecessary strain on them. Keep your back flat and straight,making sure not to twist or arch it in order to complete a repetition.
PROPER TECHNIQUETo get the most out of strength training and to reduce the chance of injury, use proper weighttraining techniques. These include working your muscles through their full range of motion(but not locking any joints), lifting at a speed at which you can control the weight and stopeasily if necessary.
RANGE OF MOTIONMoving through a complete range of motion (ROM) allows the muscles to stretch beforecontraction and increases the number of muscle fibers being recruited. This producesmaximum contraction and force. By working the full ROM, flexibility will be maintained andpossibly increased.
REPETITIONA repetition is one complete movement of an exercise. It normally consists of two phases: theconcentric muscle action, or lifting of the resistance, and the eccentric muscle action, orlowering of the resistance.
REPETITION MAXIMUM (RM)This is the maximum number of repetitions per set that can be performed at a givenresistance with proper lifting technique. Thus, a set at a certain RM implies the set isperformed to momentary voluntary fatigue. 1RM is the heaviest resistance that can be usedfor one compete repetition of an exercise. 10 RM is a lighter resistance that allows completionof 10 (but not 11) repetitions with proper exercise technique.
REST INTERVALAllow a brief pause between sets to give your muscles a chance to partially recover beforeworking them again. For power and muscle size development allow a 3 to 4 minute restinterval between sets. For muscular endurance and definition allow a 30 second rest interval.For strength training allow a 60 to 90 second rest interval.
RISK SHOULD NOT EXCEED BENEFITIf the risk of a specific exercise exceeds its potential benefit, it is best to stay on theconservative side. There are several ways to work specific muscle groups. Choose those thatprovide minimal risk. Ask a fitness professional for guidance.
ROUTINEThe specific exercises, sets, reps and weight for a specific body part.
SETThis is a group of repetitions performed continuously without stopping. While a set can bemade up of any number of repetitions, sets typically range from 1 to 15 repetitions.
SMALL MUSCLE GROUP EXERCISESingle joint movement and isolation exercises (i.e. bicep curls, tricep pressdowns and legextensions).
SPEED OF MOVEMENTStrength training movements should be slow and controlled. Do not use momentum to completean exercise movement. Momentum puts unnecessary stress on tendons, ligaments and joints.Using momentum in your exercise movements does not develop increased strength.
STATIC STRETCHINGA stretching technique that involves holding a specific muscle or muscle group at a desiredlength for a certain period of time. This type of stretching is highly recommended.
STOP TRAINING IF YOU FEEL PAINIf you feel pain during a specific exercise stop immediately. Any continuation may aggravatean existing injury. Re-evaluate your routine to make sure that you are doing a proper warm up.Decrease the amount of weight you are lifting. Talk to a qualified personal trainer, healthprofessional or your doctor.
STRENGTHStrength is the maximal amount of force a muscle or muscle group can generate in aspecified movement pattern at a specified velocity of movement.
WARM UPThis cannot be stressed enough. Many workout-related injuries can be avoided by a properwarm up routine. Try to do a total body warm up before you start training. A good example ofa total body warm up is using a stationary bike, treadmill, elliptical, rowing or skiing machine.It is especially important to warm up specific muscle groups you are going to be using. Yourmuscles need a 5 to 15 minute warm up as well as a brief cool down. This can be as simpleas performing a warm up set of high repetitions and light weight (25% to 50% of your trainingweight) for each exercise.
WORKOUTThe routine, specific exercises, weights, sets, and reps for one or more body parts.
PHRASES, TERMS, TIPS& GUIDELINESS T A R T I N G R E S I S T A N C E L E V E LIf you begin weight training at too high a level, you risk serious injury. You will also develop poor form,which will hinder your efforts and discourage you. Use this as a guideline: if you cannot lift the weighteight times with proper form, the weight is too heavy. Similarly, don’t choose too light a weight; thelast two or three repetitions of your set should be difficult.
51
Good nutrition is a diet in which foods are eaten inproper quantities and with the needed distribution ofnutrients to maintain good health. Malnutrition, onthe other hand, is the result of a diet in whichthere is an underconsumption, overconsumption, orunbalanced consumption of nutrients that leads todisease or an increased susceptibility to disease.What is stated in the above definitions is the fact thatproper nutrition is essential to good health. A history ofpoor nutritional choices will eventually lead to poorhealth consequences.
There are many substances necessary for the properfunctioning of the body. Nutrients are the substancesthat the body requires for the maintenance of health,growth, and to repair tissues. Nutrients can be dividedinto six classes: carbohydrates, fats, proteins, vitamins,minerals and water. Carbohydrates, or "carbs", arenutrients that are composed of carbon, hydrogen andoxygen, and are essential sources of energy in thebody. Grains, vegetables, and fruits are excellentsources of carbohydrates. It is recommended thatat least 55% to 60% of the total number of caloriesconsumed come from carbohydrates (AmericanDiabetes Association, Diabetes & Exercise, 1990). It isfurther recommended that 10% or less of the totalcalories consumed come from simple sugars like acandy bar.
One of the many benefits of consuming foods that arehigh in complex carbohydrates, such as rice, pasta,and whole grain breads, is that they also typicallycontain dietary fiber. Dietary fiber is a term used whenreferring to substances found in plants that cannot bebroken down by the human digestive system. Althoughfiber cannot be digested, it is important in helping toavoid cancers of the digestive system, hemorrhoids,constipation, and diverticular disease because it helpsfood move quickly and easily through the digestivesystem. It is recommended that people consume20 to 30 grams of fiber per day (American DiabetesAssociation, Diabetes & Exercise, 1990). Excellentsources of dietary fiber are grains, vegetables,legumes, and fruit.
Fats are an essential part of a healthy diet and servevital functions in the human body. Among the functionsperformed by fats are temperature regulation,protection of vital organs, distribution of some vitamins,energy production, and formation of component partsof cell membranes. Like carbohydrates, fats arecomposed of carbon, hydrogen, and oxygen.However, their chemical structure is different.
Both animals and plants provide sources of fat.Saturated fats come primarily from animal sourcesand are typically solid at room temperature. Plantsources of saturated fats are palm oil, coconut oil,and cocoa butter. A high intake of saturated fats is
directly related to increased cardiovascular disease.Unsaturated fats are typically liquid at room temperature.Corn, peanut, canola, and soybean oil are sources ofunsaturated fats. It is recommended that no more than30% of one’s diet be composed of fats. Ten percent orless of the total calories consumed should come fromsaturated fats. One way to reduce saturated fat intakewould be to substitute margarine for butter.
Proteins are substances composed of carbon, hydrogen,oxygen, and nitrogen. Proteins are made by combiningamino acids. Amino acids are nitrogen-containingbuilding blocks for proteins that can be used for energy.Amino acids can combine in innumerable ways to formproteins, and it is estimated that tens of thousands ofdifferent types of proteins exist in the body. It is theordering of the amino acids that provides the uniquestructure and function of proteins.
There are proteins in both meat products and plantproducts. Animal sources of protein such as milk,meat and eggs contain the eight essential aminoacids (amino acids that the body cannot synthesizeand therefore must be ingested). Plant sources ofprotein such as beans, starchy vegetables, nuts, andgrains do not always contain all eight amino acids.Because of this, vegetarians must consume a varietyof protein-containing foods. It is recommended thatproteins make up 10% to 15% of one’s daily calories.This will ensure adequate protein for growth,maintenance, and the repair of cells. Proteinrequirements for adults are not as high as thoserecommended for infants, children, and young adults.Note: individuals who are training intensely will havean increase in their protein requirements.
Vitamins are organic substances that are essential tothe normal functioning of the human body. Althoughvitamins do not contain energy to be used by the body,these substances are essential in the metabolism offats, carbohydrates and proteins. Because of thecritical role vitamins play, it is necessary that they existin proper quantities in the body.
Minerals are inorganic molecules that serve a varietyof functions in the human body. The minerals thatappear in the largest quantities (calcium, phosphorus,potassium, sulfur, sodium, chloride, and magnesium)are often called macrominerals. Other minerals arealso essential to normal functioning of the body, butbecause they exist in smaller quantities (chromium,iron, copper, fluoride, iodine, manganese, molybdenum,selenium, and zinc) they are called microminerals.
A mineral that is often consumed in inadequateamounts by Americans is calcium. Calcium is amineral important in the mineralization of bone,muscle contraction, and the transmission of nerveimpulses. Osteoporosis is a disease characterized by
a decrease in the total amount of bone mineral in thebody and by a decrease in strength of the remainingbone. This condition is most common in the elderlybut may also exist in younger people who have dietsinadequate in calcium or vitamin D or both.
Iron is another mineral that is often underconsumedby Americans. This is especially true of women. Theoxygen-carrying properties of hemoglobin (blood)depend on the presence of iron. Anemia is a conditioncharacterized by a decreased capacity to transportoxygen in the blood, and is also common in thoselacking a sufficient amount of iron intake. Red meatand eggs are excellent sources of iron. Additionallyspinach, lima and navy beans, and prune juice areexcellent vegetarian sources of iron.
Sodium, on the other hand, is a mineral that manyAmericans over-consume. High sodium intake hasbeen linked with hypertension, as well as high bloodpressure. People can substantially reduce theirsodium intake by limiting consumption of processedfoods and decreasing the amount of salt added tofoods when cooking.
In conclusion...don’t forget hydration. Water isconsidered an essential nutrient because of its vitalrole in the normal functioning of the body. Watercontributes approximately 60% of the total bodyweight and is essential in creating an environmentin which all metabolic processes occur. Water isnecessary to regulate temperature and to transportsubstances throughout the body.
FOLLOW THESE BASIC NUTRITIONAL GUIDELINES FOR GAINS IN STRENGTH AND LEAN MUSCLE MASS:
1. Choose your foods carefully. Try getting your carbohydrates from sources such as rice,vegetables, beans, whole grains, pasta and fruit.Good protein sources include fish, chicken, turkey,lean meat and low-fat or nonfat dairy products.
2. Minimize your fat intake.3. Drink a minimum of 10 eight-ounce glasses of
water each day.4. Eat four to six small meals a day, about three
hours apart. Small meals are more easily digested and result in greater nutrition absorption.
5. Avoid eating junk food and fast food.6. Time your protein intake of 40-55 grams
approximately 75 minutes after your workout.7. Immediately following your workout, replenish
your glycogen stores with approximately 50-75 grams of carbohydrates.
For more information on nutrition visit your locallibrary or book store. There are many excellent booksavailable.
NUTRITION
52
SetsSets are defined as a combination of any number of reps of one exercise. The numberof sets used in a workout is directly related to training results. Typically, two to three setsare used by intermediate and advanced lifters to achieve optimum gains in strength.Experts agree that multiple-set systems work best for the development of strength andmuscular endurance. Gains will be made at a faster rate by using a multiple-setsystem than gains achieved through a single-set system. The use of a single set of anexercise is recommended and very effective for individuals who are untrained orjust beginning a resistance training program. One-set programs might also be usedfor simple maintenance once you are in shape. It is important to note that low-volumeset programs will increase strength in untrained individuals, but more complexphysiological adaptations, such as gains in muscle mass, tone, size, and performanceusually requires higher-volume set training for the best results. Multiple sets of anexercise present a more intense training stimulus to the muscles during each set.Once your desired initial fitness level has been achieved, multiple-set performancesof the exercise using the proper resistance (with specific rest periods between sets)will take you to the next level of strength training, endurance, and muscular development.
Resistance UsedThe amount of resistance used for a specific exercise is probably the most importantvariable in resistance training. When designing a resistance training program, a weightfor each exercise must be chosen. The use of repetition maximums (RM): the exactresistance that allows only a specific number of repetitions to be performed, is probablythe easiest method for determining a resistance. Typically, one uses a training RM targetor a RM target zone. Example: If your RM zone is 8 to 12 repetitions and you cannot liftthe weight at least 8 times using proper form, the weight is too heavy. On the otherhand, if you can easily lift the weight 12 times, the weight is too light. In either case, theweight needs to be changed. As the strength level of the lifter changes over time, theresistance is adjusted so a true RM target or target zone resistance is used.
Rest Periods Between Sets and ExercisesOne frequently overlooked variable in exercise prescription is the length of the restperiod between sets and between different exercises. Your desired fitness goals willnormally determine the amount of time you allow your body to rest. Exercisesinvolving high repetitions (15 to 20) and a high number of sets (3 to 4) with short restperiods (30 seconds) between sets will raise metabolic demands. This in turn will burnexcess body fat and increase muscular endurance. Short rest periods are acharacteristic of circuit weight training, and the resistances used are typically lighter.This type of workout is best for trimming body fat and toning muscle. Exercises withheavier resistance and fewer sets usually have a longer resting period between sets.The results of using this method are normally increased muscular strength and mass.If the desired outcome is to gain overall muscle mass, your exercise prescriptionshould lean toward a higher weight resistance doing 2 to 6 repetitions per set, with arest period of 3 to 4 minutes between each set.
Rest Periods Between WorkoutsThe amount of rest between training sessions depends on the recovery ability of theindividual. Most experts agree that three workouts per week with one day of rest betweensessions allows adequate recovery, especially for the beginner. If the resistancetraining is not excessive, only moderate amounts of delayed muscular soreness shouldbe experienced one day after the session. As the lifter advances and his or her bodyis better able to tolerate and recuperate from the resistance exercise sessions, thefrequency of training can be increased. Well-conditioned athletes may be capable of,and need training frequencies of 4 to 5 days in a row to improve significantly andachieve their desired goals. When consecutive-training-day sequences are used, it isusually beneficial to do different exercises for the same muscle groups and use differentresistances for the exercises. When training is performed on consecutive days, it ofteninvolves the use of a split routine (different body parts exercised each day), or a splitprogram (different exercises for the same body part performed each day). There aremany books available at the library or your local book store for the intermediate andadvanced weight training enthusiast. It is also recommended that you work with aqualified personal trainer to achieve your ultimate goals.
Order of ExerciseLeaders in the field of strength and conditioning believe that working the larger musclegroups first (chest, back, legs), should take priority over training the smaller musclegroups (biceps, triceps, deltoids, calves). The reason behind this exercise order is thatthe exercises performed in the beginning of the workout are the ones that are going torequire the greatest amount of muscle mass to perform. Hence, exercising the smallermuscle groups first will deplete the body of the energy necessary to stimulate the largermuscle groups. Arm-to-leg ordering allows for some recovery of the arm muscles whilethe leg muscles are exercised. “Stacking” exercises is a common practice amongbody builders as a way to attempt to bring about muscle hypertrophy. Stacking isloading up different exercises on the same muscle group (ie. standing bicep curls,preacher curls, one arm concentration curls). The exercise order will have a significantimpact on the training stimulus stress level in a training session.
Scheduling TrainingFinding the time to do it is one of the most difficult aspects of a training program. Onceyou have established a time to workout you should plan a training routine based onwhat muscles to involve on which day. As previously discussed, the larger musclegroups such as the chest, back, and legs should take priority over working the smallermuscle groups. Give your muscles at least 48 hours (but no more than 72 hours) ofrest in between sessions.
EXERCISEPRESCRIPTION
53
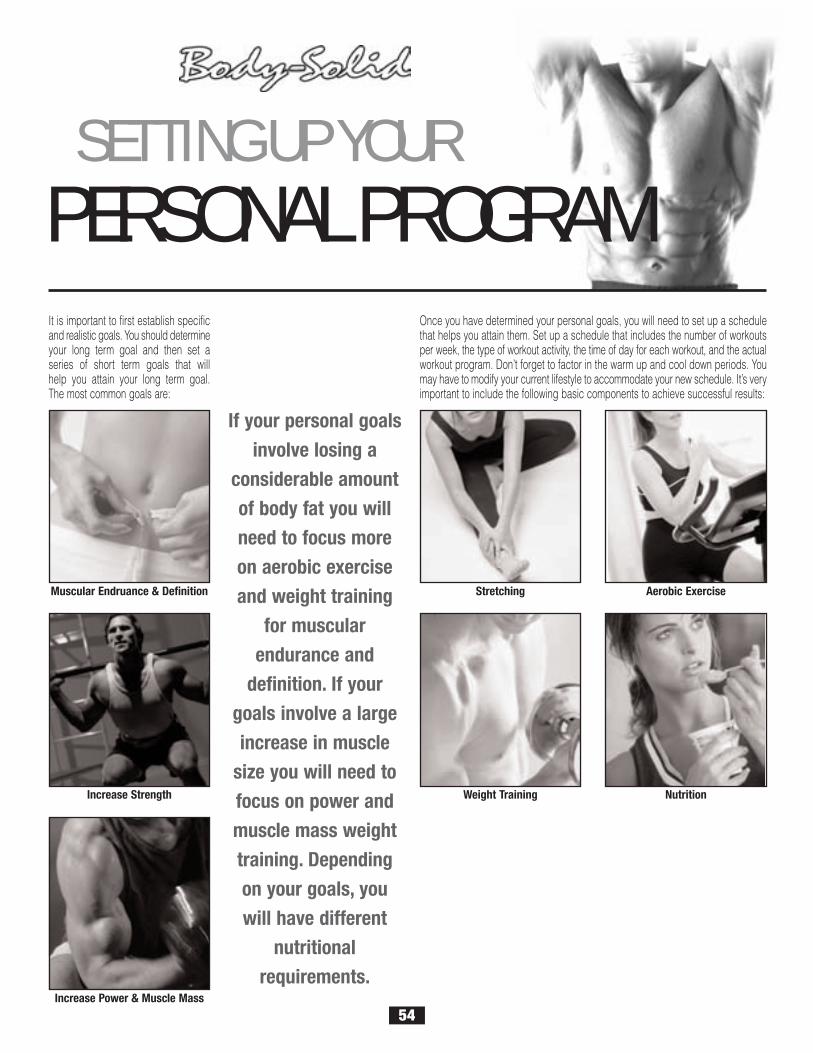
It is important to first establish specificand realistic goals. You should determineyour long term goal and then set aseries of short term goals that willhelp you attain your long term goal.The most common goals are:
Once you have determined your personal goals, you will need to set up a schedulethat helps you attain them. Set up a schedule that includes the number of workoutsper week, the type of workout activity, the time of day for each workout, and the actualworkout program. Don’t forget to factor in the warm up and cool down periods. Youmay have to modify your current lifestyle to accommodate your new schedule. It’s veryimportant to include the following basic components to achieve successful results:
Muscular Endruance & Definition
Increase Power & Muscle Mass
Increase Strength
Stretching
Weight Training
Aerobic Exercise
Nutrition
If your personal goalsinvolve losing a
considerable amountof body fat you willneed to focus moreon aerobic exerciseand weight training
for muscularendurance and
definition. If yourgoals involve a largeincrease in muscle
size you will need tofocus on power andmuscle mass weighttraining. Dependingon your goals, youwill have different
nutritionalrequirements.
SETTING UP YOURPERSONAL PROGRAM
54
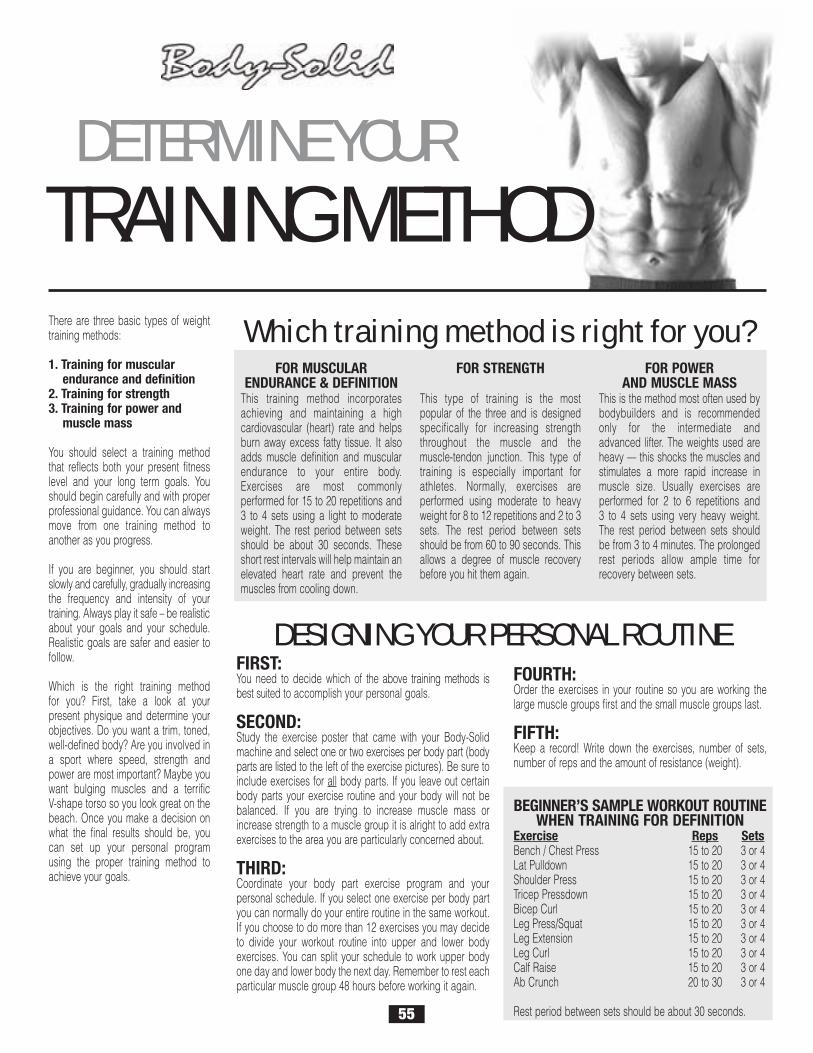
There are three basic types of weighttraining methods:
1. Training for muscular endurance and definition
2. Training for strength3. Training for power and
muscle mass
You should select a training methodthat reflects both your present fitnesslevel and your long term goals. Youshould begin carefully and with properprofessional guidance. You can alwaysmove from one training method toanother as you progress.
If you are beginner, you should startslowly and carefully, gradually increasingthe frequency and intensity of yourtraining. Always play it safe – be realisticabout your goals and your schedule.Realistic goals are safer and easier tofollow.
Which is the right training methodfor you? First, take a look at yourpresent physique and determine yourobjectives. Do you want a trim, toned,well-defined body? Are you involved ina sport where speed, strength andpower are most important? Maybe youwant bulging muscles and a terrificV-shape torso so you look great on thebeach. Once you make a decision onwhat the final results should be, youcan set up your personal programusing the proper training method toachieve your goals.
Which training method is right for you?
DESIGNING YOUR PERSONAL ROUTINE
FOR MUSCULARENDURANCE & DEFINITION
This training method incorporatesachieving and maintaining a highcardiovascular (heart) rate and helpsburn away excess fatty tissue. It alsoadds muscle definition and muscularendurance to your entire body.Exercises are most commonlyperformed for 15 to 20 repetitions and3 to 4 sets using a light to moderateweight. The rest period between setsshould be about 30 seconds. Theseshort rest intervals will help maintain anelevated heart rate and prevent themuscles from cooling down.
FOR STRENGTH
This type of training is the mostpopular of the three and is designedspecifically for increasing strengththroughout the muscle and themuscle-tendon junction. This type oftraining is especially important forathletes. Normally, exercises areperformed using moderate to heavyweight for 8 to 12 repetitions and 2 to 3sets. The rest period between setsshould be from 60 to 90 seconds. Thisallows a degree of muscle recoverybefore you hit them again.
FOR POWERAND MUSCLE MASS
This is the method most often used bybodybuilders and is recommendedonly for the intermediate andadvanced lifter. The weights used areheavy — this shocks the muscles andstimulates a more rapid increase inmuscle size. Usually exercises areperformed for 2 to 6 repetitions and3 to 4 sets using very heavy weight.The rest period between sets shouldbe from 3 to 4 minutes. The prolongedrest periods allow ample time forrecovery between sets.
DETERMINE YOURTRAINING METHOD
FIRST:You need to decide which of the above training methods isbest suited to accomplish your personal goals.
SECOND:Study the exercise poster that came with your Body-Solidmachine and select one or two exercises per body part (bodyparts are listed to the left of the exercise pictures). Be sure toinclude exercises for all body parts. If you leave out certainbody parts your exercise routine and your body will not bebalanced. If you are trying to increase muscle mass orincrease strength to a muscle group it is alright to add extraexercises to the area you are particularly concerned about.
THIRD:Coordinate your body part exercise program and yourpersonal schedule. If you select one exercise per body partyou can normally do your entire routine in the same workout.If you choose to do more than 12 exercises you may decideto divide your workout routine into upper and lower bodyexercises. You can split your schedule to work upper bodyone day and lower body the next day. Remember to rest eachparticular muscle group 48 hours before working it again.
FOURTH:Order the exercises in your routine so you are working thelarge muscle groups first and the small muscle groups last.
FIFTH:Keep a record! Write down the exercises, number of sets,number of reps and the amount of resistance (weight).
BEGINNER’S SAMPLE WORKOUT ROUTINEWHEN TRAINING FOR DEFINITION
Exercise Reps SetsBench / Chest Press 15 to 20 3 or 4Lat Pulldown 15 to 20 3 or 4Shoulder Press 15 to 20 3 or 4Tricep Pressdown 15 to 20 3 or 4Bicep Curl 15 to 20 3 or 4Leg Press/Squat 15 to 20 3 or 4Leg Extension 15 to 20 3 or 4Leg Curl 15 to 20 3 or 4Calf Raise 15 to 20 3 or 4Ab Crunch 20 to 30 3 or 4
Rest period between sets should be about 30 seconds.55
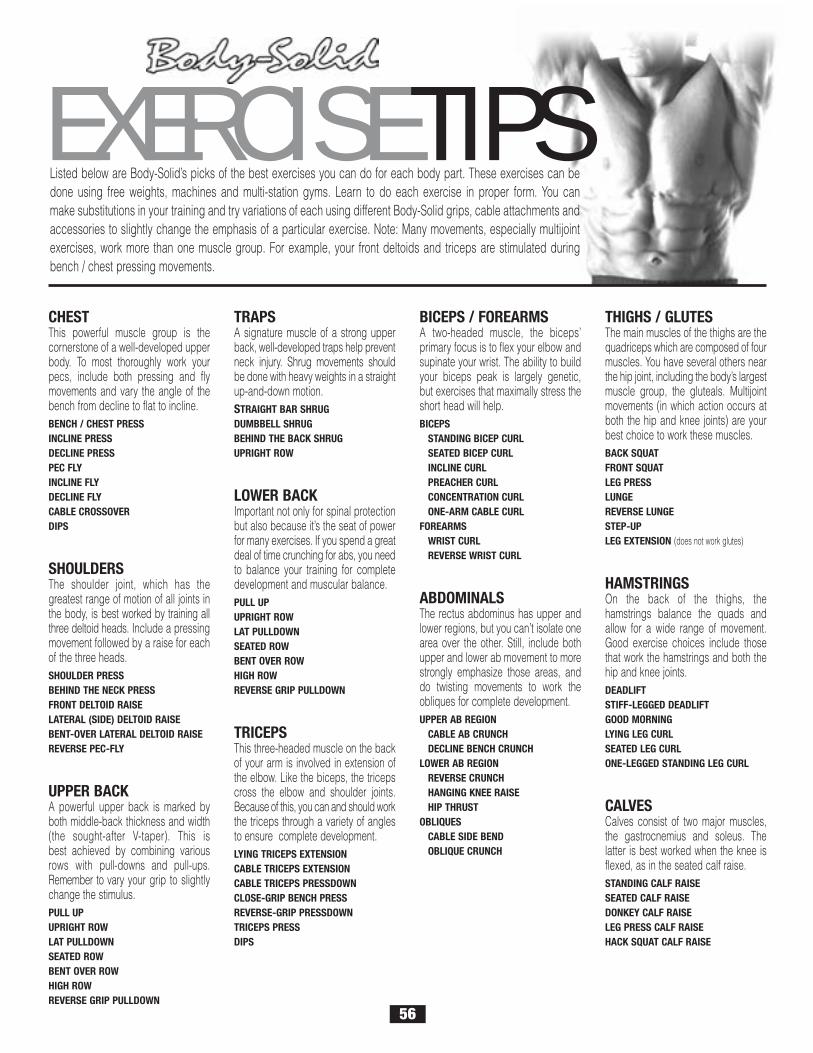
CHESTThis powerful muscle group is thecornerstone of a well-developed upperbody. To most thoroughly work yourpecs, include both pressing and flymovements and vary the angle of thebench from decline to flat to incline.BENCH / CHEST PRESSINCLINE PRESSDECLINE PRESSPEC FLYINCLINE FLYDECLINE FLYCABLE CROSSOVERDIPS
SHOULDERSThe shoulder joint, which has thegreatest range of motion of all joints inthe body, is best worked by training allthree deltoid heads. Include a pressingmovement followed by a raise for eachof the three heads.SHOULDER PRESSBEHIND THE NECK PRESSFRONT DELTOID RAISELATERAL (SIDE) DELTOID RAISEBENT-OVER LATERAL DELTOID RAISEREVERSE PEC-FLY
UPPER BACKA powerful upper back is marked byboth middle-back thickness and width(the sought-after V-taper). This isbest achieved by combining variousrows with pull-downs and pull-ups.Remember to vary your grip to slightlychange the stimulus.PULL UPUPRIGHT ROWLAT PULLDOWNSEATED ROWBENT OVER ROWHIGH ROWREVERSE GRIP PULLDOWN
TRAPSA signature muscle of a strong upperback, well-developed traps help preventneck injury. Shrug movements shouldbe done with heavy weights in a straightup-and-down motion.STRAIGHT BAR SHRUGDUMBBELL SHRUGBEHIND THE BACK SHRUGUPRIGHT ROW
LOWER BACKImportant not only for spinal protectionbut also because it’s the seat of powerfor many exercises. If you spend a greatdeal of time crunching for abs, you needto balance your training for completedevelopment and muscular balance.PULL UPUPRIGHT ROWLAT PULLDOWNSEATED ROWBENT OVER ROWHIGH ROWREVERSE GRIP PULLDOWN
TRICEPSThis three-headed muscle on the backof your arm is involved in extension ofthe elbow. Like the biceps, the tricepscross the elbow and shoulder joints.Because of this, you can and should workthe triceps through a variety of anglesto ensure complete development.LYING TRICEPS EXTENSIONCABLE TRICEPS EXTENSIONCABLE TRICEPS PRESSDOWNCLOSE-GRIP BENCH PRESSREVERSE-GRIP PRESSDOWNTRICEPS PRESSDIPS
BICEPS / FOREARMSA two-headed muscle, the biceps’primary focus is to flex your elbow andsupinate your wrist. The ability to buildyour biceps peak is largely genetic,but exercises that maximally stress theshort head will help.BICEPS
STANDING BICEP CURLSEATED BICEP CURLINCLINE CURLPREACHER CURLCONCENTRATION CURLONE-ARM CABLE CURL
FOREARMSWRIST CURLREVERSE WRIST CURL
ABDOMINALSThe rectus abdominus has upper andlower regions, but you can’t isolate onearea over the other. Still, include bothupper and lower ab movement to morestrongly emphasize those areas, anddo twisting movements to work theobliques for complete development.UPPER AB REGION
CABLE AB CRUNCHDECLINE BENCH CRUNCH
LOWER AB REGIONREVERSE CRUNCHHANGING KNEE RAISEHIP THRUST
OBLIQUESCABLE SIDE BENDOBLIQUE CRUNCH
THIGHS / GLUTESThe main muscles of the thighs are thequadriceps which are composed of fourmuscles. You have several others nearthe hip joint, including the body’s largestmuscle group, the gluteals. Multijointmovements (in which action occurs atboth the hip and knee joints) are yourbest choice to work these muscles.BACK SQUATFRONT SQUATLEG PRESSLUNGEREVERSE LUNGESTEP-UPLEG EXTENSION (does not work glutes)
HAMSTRINGSOn the back of the thighs, thehamstrings balance the quads andallow for a wide range of movement.Good exercise choices include thosethat work the hamstrings and both thehip and knee joints.DEADLIFTSTIFF-LEGGED DEADLIFTGOOD MORNINGLYING LEG CURLSEATED LEG CURLONE-LEGGED STANDING LEG CURL
CALVESCalves consist of two major muscles,the gastrocnemius and soleus. Thelatter is best worked when the knee isflexed, as in the seated calf raise.STANDING CALF RAISESEATED CALF RAISEDONKEY CALF RAISELEG PRESS CALF RAISEHACK SQUAT CALF RAISE
EXERCISETIPSListed below are Body-Solid’s picks of the best exercises you can do for each body part. These exercises can bedone using free weights, machines and multi-station gyms. Learn to do each exercise in proper form. You canmake substitutions in your training and try variations of each using different Body-Solid grips, cable attachments andaccessories to slightly change the emphasis of a particular exercise. Note: Many movements, especially multijointexercises, work more than one muscle group. For example, your front deltoids and triceps are stimulated duringbench / chest pressing movements.
56
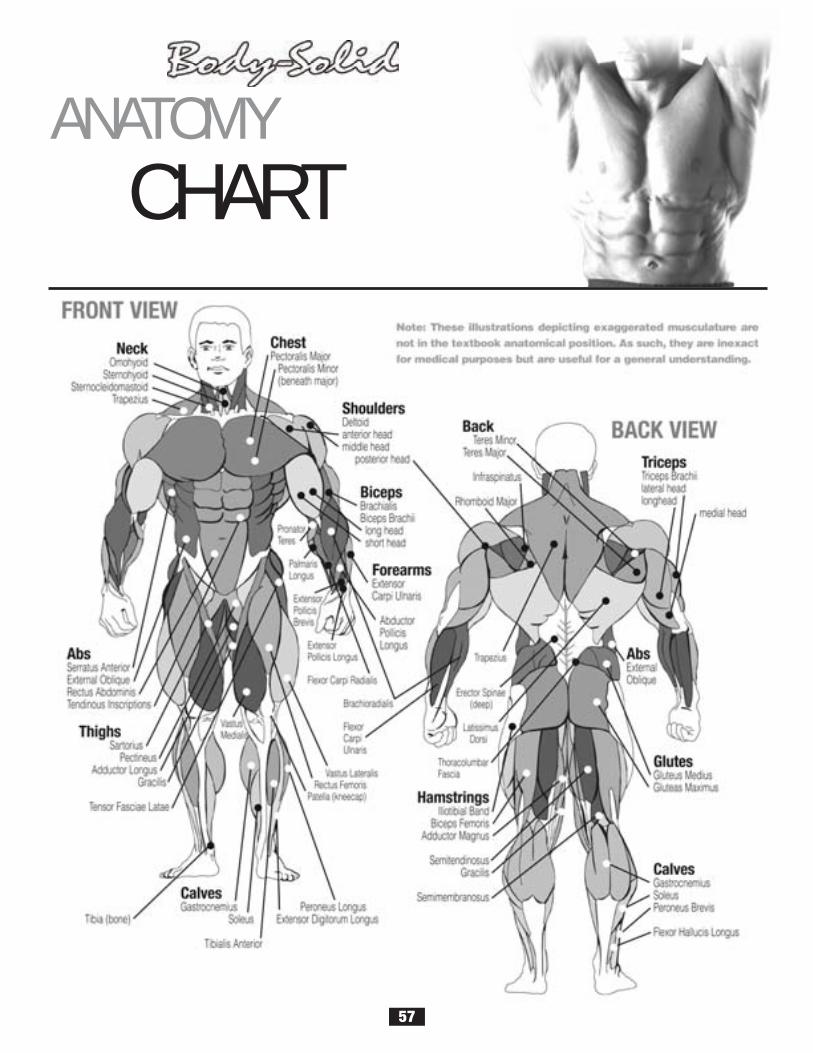
ANATOMYCHART
57

SHORT-TERM GOALSDate Set Date Accomplished
Goal
Reward**
Date Set Date Accomplished
Goal
Reward**
Date Set Date Accomplished
Goal
Reward**
LONG-TERM GOALSGoal
Reward!
* M a k e s e v e r a l c o p i e s o f t h i s p a g e t o k e e p t r a c k o f y o u r g o a l s a n d a c c o m p l i s h m e n t s .Y o u c a n p r i n t m o r e c o p i e s o f t h i s p a g e b y g o i n g t o h t t p : / / w w w . b o d y s o l i d . c o m / s u p p o r t / d o c s . h t m l
* * D o n ’ t f o r g e t t o r e w a r d y o u r s e l f f o r a j o b w e l l - d o n e !
FITNESS GOALS*
58
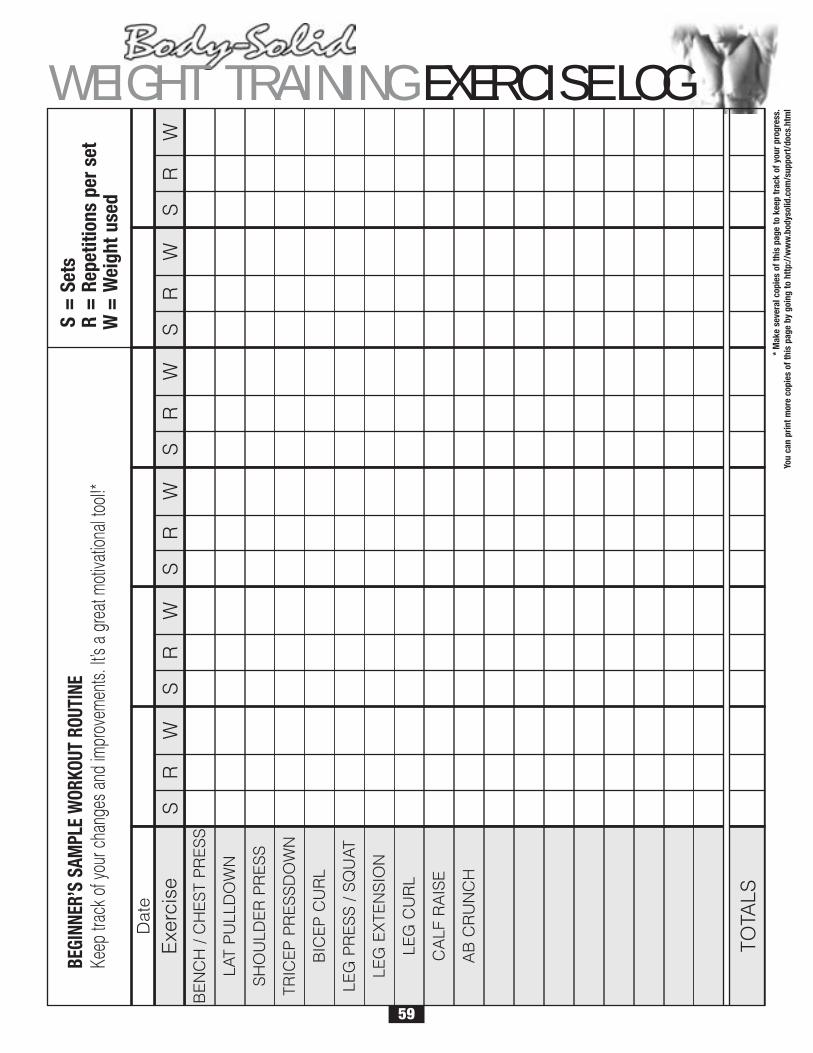
BEGI
NNER
’S S
AMPL
E W
ORKO
UT R
OUTI
NEKe
ep tr
ack o
f you
r cha
nges
and
impr
ovem
ents.
It’s
a gr
eat m
otiva
tiona
l tool!
*
S=
Sets
R=
Repe
titio
ns p
er s
etW
=W
eigh
t use
d
* M
ake
seve
ral c
opie
s of
this
pag
e to
kee
p tr
ack
of y
our
prog
ress
.Yo
u ca
n pr
int m
ore
copi
es o
f thi
s pa
ge b
y go
ing
to h
ttp://
ww
w.b
odys
olid
.com
/sup
port
/doc
s.ht
ml
Dat
e
Exe
rcis
eB
EN
CH
/ C
HE
ST
PR
ES
S
LAT
PU
LLD
OW
N
SH
OU
LDE
R P
RE
SS
TRIC
EP
PR
ES
SD
OW
N
BIC
EP
CU
RL
LEG
PR
ES
S /
SQ
UAT
LEG
EX
TEN
SIO
N
LEG
CU
RL
CA
LF R
AIS
E
AB
CR
UN
CH
TOTA
LS
SR
WS
RW
SR
WS
RW
SR
WS
RW
WEIGHT TRAINING EXERCISE LOG
59
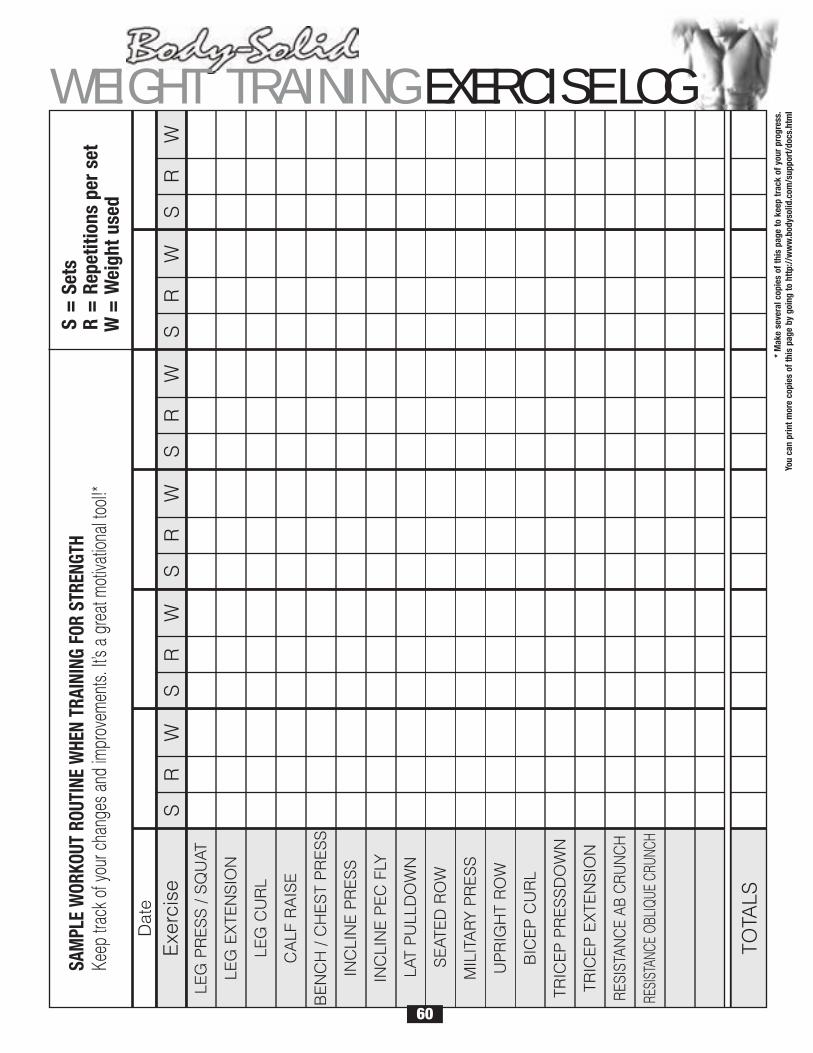
SAM
PLE
WOR
KOUT
ROU
TINE
WHE
N TR
AINI
NG F
OR S
TREN
GTH
Keep
trac
k of y
our c
hang
es a
nd im
prov
emen
ts. It
’s a
grea
t moti
vatio
nal to
ol!*
S=
Sets
R=
Repe
titio
ns p
er s
etW
=W
eigh
t use
d
* M
ake
seve
ral c
opie
s of
this
pag
e to
kee
p tr
ack
of y
our
prog
ress
.Yo
u ca
n pr
int m
ore
copi
es o
f thi
s pa
ge b
y go
ing
to h
ttp://
ww
w.b
odys
olid
.com
/sup
port
/doc
s.ht
ml
Dat
e
Exe
rcis
eLE
G P
RE
SS
/ S
QU
AT
LEG
EX
TEN
SIO
N
LEG
CU
RL
CA
LF R
AIS
E
BE
NC
H /
CH
ES
T P
RE
SS
INC
LIN
E P
RE
SS
INC
LIN
E P
EC
FLY
LAT
PU
LLD
OW
N
SE
ATE
D R
OW
MIL
ITA
RY
PR
ES
S
UP
RIG
HT
RO
W
BIC
EP
CU
RL
TRIC
EP
PR
ES
SD
OW
N
TRIC
EP
EX
TEN
SIO
N
RESI
STAN
CE
AB C
RUN
CH
RESI
STAN
CE O
BLIQ
UE C
RUNC
H
TOTA
LS
SR
WS
RW
SR
WS
RW
SR
WS
RW
WEIGHT TRAINING EXERCISE LOG
60
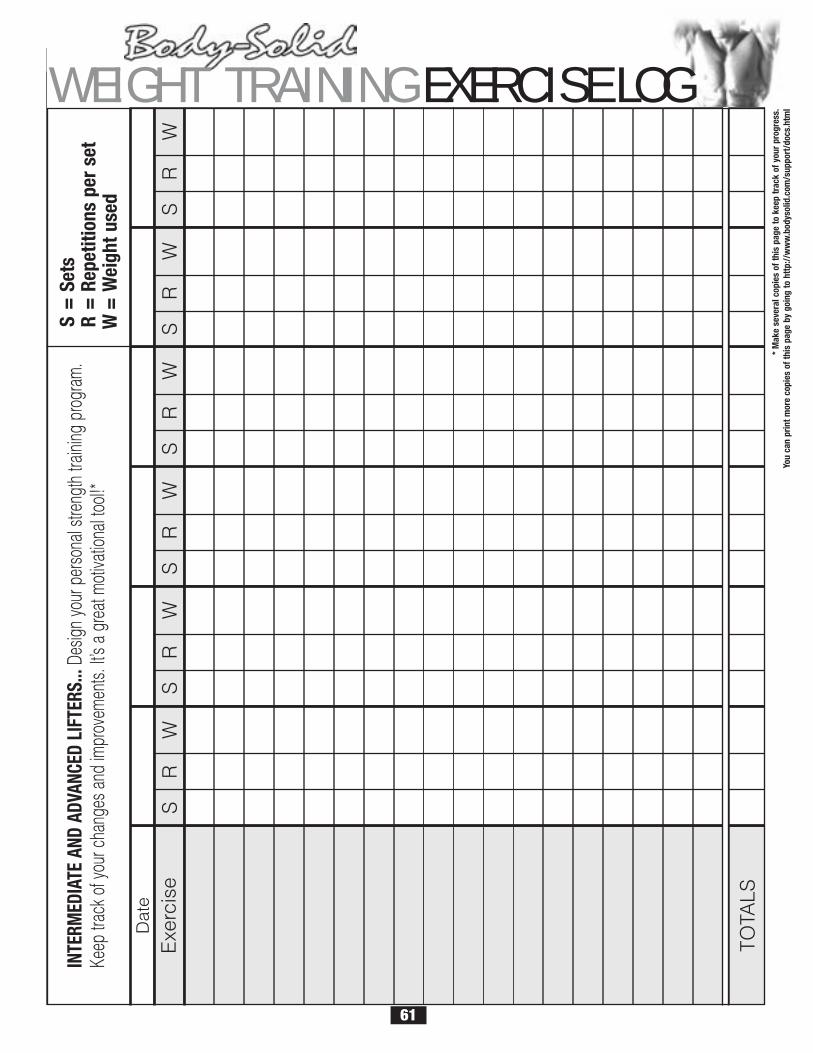
INTE
RMED
IATE
AND
ADV
ANCE
D LI
FTER
S...
Desig
n yo
ur p
erso
nal s
treng
th tra
ining
pro
gram
.Ke
ep tr
ack o
f you
r cha
nges
and
impr
ovem
ents.
It’s
a gr
eat m
otiva
tiona
l tool!
*
S=
Sets
R=
Repe
titio
ns p
er s
etW
=W
eigh
t use
d
* M
ake
seve
ral c
opie
s of
this
pag
e to
kee
p tr
ack
of y
our
prog
ress
.Yo
u ca
n pr
int m
ore
copi
es o
f thi
s pa
ge b
y go
ing
to h
ttp://
ww
w.b
odys
olid
.com
/sup
port
/doc
s.ht
ml
Dat
e
Exe
rcis
e
TOTA
LS
SR
WS
RW
SR
WS
RW
SR
WS
RW
WEIGHT TRAINING EXERCISE LOG
61

STRETCHING& FLEXIBILITY
Flexibility is an important component of physical fitness and needs to be addressedin a resistance training program. The two main purposes for stretching are injuryprevention and a faster rate of recovery from exercise. Stretching should beperformed in both the warm up and cool down phases of a training session. A goodgeneral guideline is that each workout session should be preceded by 5 to 15 minutesof general warm up, followed by 8 to 12 minutes of stretching, and concluded with 4 to 5minutes of post-exercise stretching.
A regular stretching program will loosen muscle tissue, allowing an increased rangeof motion. This helps prevent microtears at the muscle-tendon junction. Almost 90%of all injuries from muscle strain occur at the muscle-tendon junction. Repeatedinjury at this junction can lead to a build-up of scar tissue, which impedes range ofmotion and adds stress to the joints.
Begin by stretching the major muscle groups first. Move in and out of your stretcheswith smooth, slow, controlled motion. Hold the stretch for at least 10 seconds whenyou feel you have reached your muscle’s maximum distance. Do not use fast,hurried or reckless motions when stretching. Fast and bouncy motions will increasethe risk of injury.
The most common and most popular type of stretching is the static stretchingtechnique. This form of stretching involves voluntary, complete relaxation of themuscles while they are elongated. A static stretch is a constant, steady stretch inwhich the end position is held for 10 to 30 seconds. This technique is popularbecause it is easy to learn, effective, and accompanied by minimal soreness withthe least risk of injury.
Ballistic stretching involves a bouncing or bobbing movement during the stretch.The final position in the movement is not held. Ballistic stretching is unpopularbecause of the increased amount of delayed muscle soreness and the possibility ofinjury during the stretching exercise. Ballistic stretching is not recommended.
A dynamic stretch involves flexibility during sport specific movements. Dynamicstretching is similar to ballistic stretching in that it utilizes movement, but dynamicstretching includes movements that may be specific to a sport or movementpattern. Dynamic stretching is most common among track and field athletes, but isalso used in other sports, such as basketball and volleyball. An example of dynamicstretching would be a track sprinter performing high knees with an emphasis onknee height and arm action, not on horizontal speed.
The followingpages showillustrations withdescriptions ofstatic stretchingfor warm up andpost-exercisecool down.Remember...stretch yourlarge musclegroups first anddo all stretchesin a smooth,slow, controlledmanner.
62
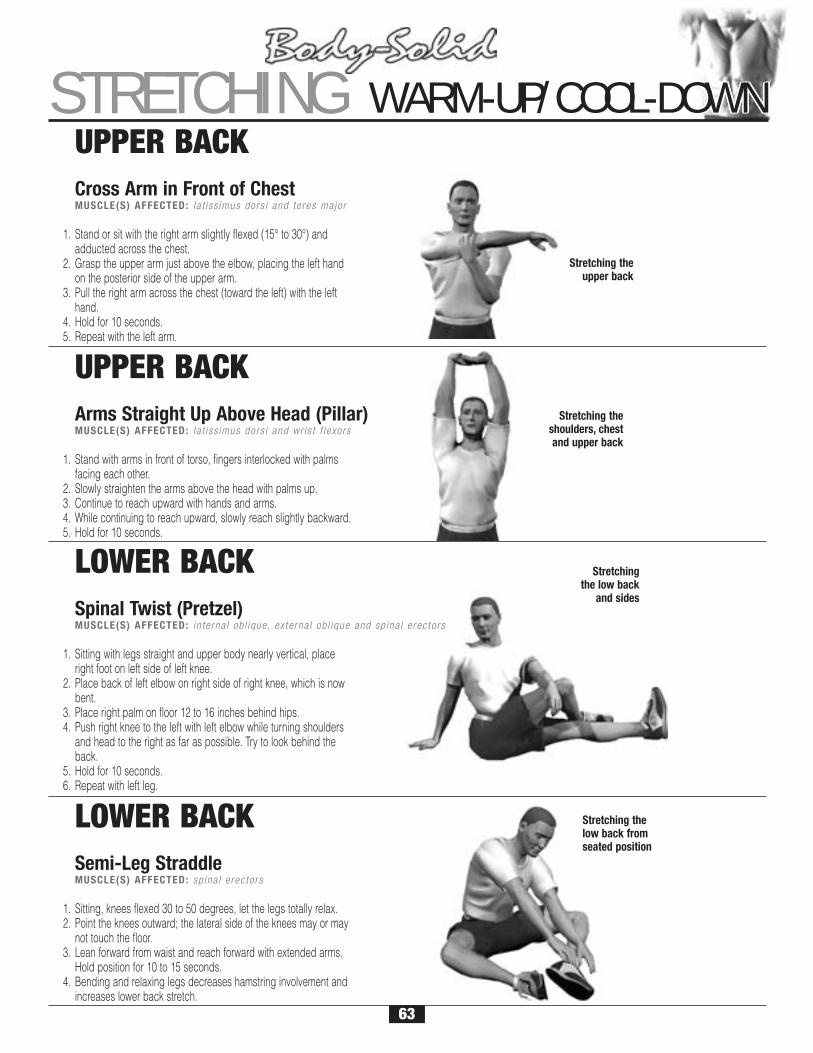
STRETCHING WARM-UP/COOL-DOWNSTRETCHING WARM-UP/COOL-DOWNSTRETCHING WARM-UP/COOL-DOWNSTRETCHING WARM-UP/COOL-DOWNSTRETCHING WARM-UP/COOL-DOWNSTRETCHING WARM-UP/COOL-DOWNSTRETCHING WARM-UP/COOL-DOWNSTRETCHING WARM-UP/COOL-DOWNSTRETCHING WARM-UP/COOL-DOWNUPPER BACKCross Arm in Front of ChestMUSCLE(S) AFFECTED: l a t i ss imus dors i and te res major
1. Stand or sit with the right arm slightly flexed (15° to 30°) andadducted across the chest.
2. Grasp the upper arm just above the elbow, placing the left hand on the posterior side of the upper arm.
3. Pull the right arm across the chest (toward the left) with the left hand.
4. Hold for 10 seconds.5. Repeat with the left arm.
UPPER BACKArms Straight Up Above Head (Pillar)MUSCLE(S) AFFECTED: l a t i ss imus dors i and wr is t f lexors
1. Stand with arms in front of torso, fingers interlocked with palms facing each other.
2. Slowly straighten the arms above the head with palms up.3. Continue to reach upward with hands and arms.4. While continuing to reach upward, slowly reach slightly backward.5. Hold for 10 seconds.
LOWER BACKSpinal Twist (Pretzel)MUSCLE(S) AFFECTED: i n te rna l ob l ique, ex terna l ob l ique and sp ina l e rec tors
1. Sitting with legs straight and upper body nearly vertical, place right foot on left side of left knee.
2. Place back of left elbow on right side of right knee, which is now bent.
3. Place right palm on floor 12 to 16 inches behind hips.4. Push right knee to the left with left elbow while turning shoulders
and head to the right as far as possible. Try to look behind the back.
5. Hold for 10 seconds.6. Repeat with left leg.
Stretching theupper back
Stretching theshoulders, chestand upper back
Stretchingthe low back
and sides
LOWER BACKSemi-Leg StraddleMUSCLE(S) AFFECTED: sp ina l e rec tors
1. Sitting, knees flexed 30 to 50 degrees, let the legs totally relax.2. Point the knees outward; the lateral side of the knees may or may
not touch the floor.3. Lean forward from waist and reach forward with extended arms.
Hold position for 10 to 15 seconds.4. Bending and relaxing legs decreases hamstring involvement and
increases lower back stretch.
Stretching thelow back from seated position
63
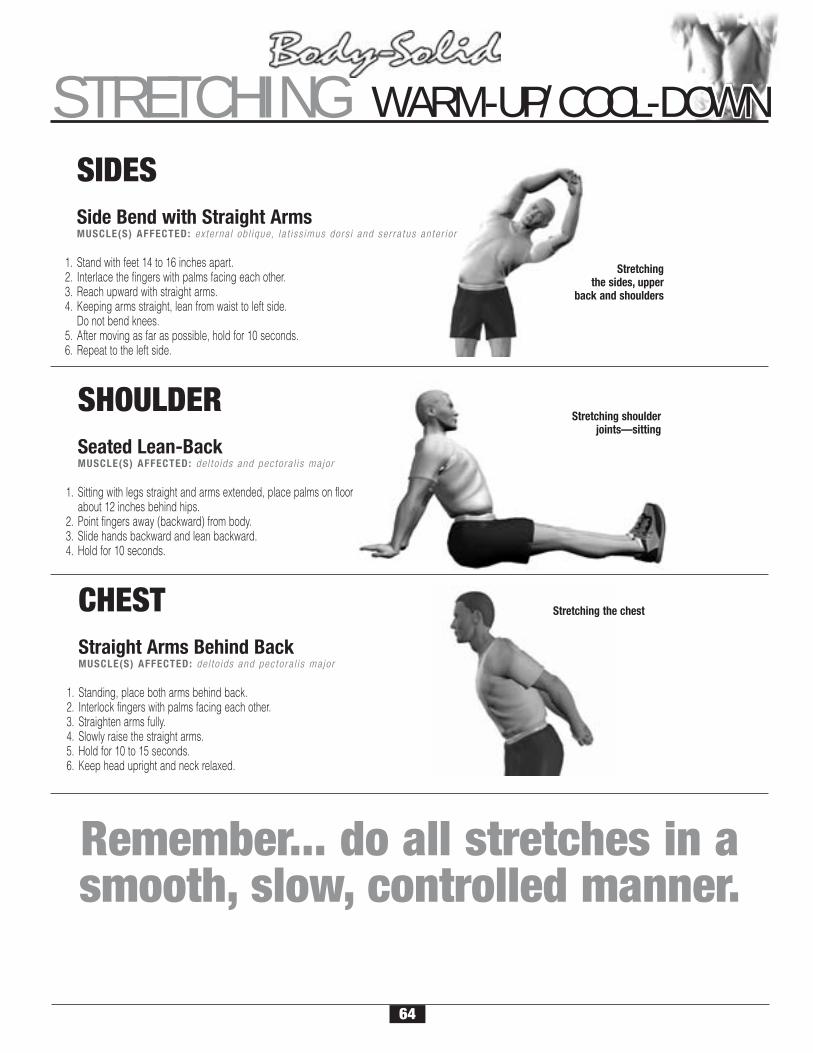
STRETCHING WARM-UP/COOL-DOWNSTRETCHING WARM-UP/COOL-DOWNSTRETCHING WARM-UP/COOL-DOWNSTRETCHING WARM-UP/COOL-DOWNSTRETCHING WARM-UP/COOL-DOWNSTRETCHING WARM-UP/COOL-DOWNSTRETCHING WARM-UP/COOL-DOWNSTRETCHING WARM-UP/COOL-DOWN
SHOULDERSeated Lean-BackMUSCLE(S) AFFECTED: de l to ids and pectora l i s ma jor
1. Sitting with legs straight and arms extended, place palms on floor about 12 inches behind hips.
2. Point fingers away (backward) from body.3. Slide hands backward and lean backward.4. Hold for 10 seconds.
CHESTStraight Arms Behind BackMUSCLE(S) AFFECTED: de l to ids and pectora l i s ma jor
1. Standing, place both arms behind back.2. Interlock fingers with palms facing each other.3. Straighten arms fully.4. Slowly raise the straight arms.5. Hold for 10 to 15 seconds.6. Keep head upright and neck relaxed.
Stretching shoulderjoints—sitting
Stretching the chest
STRETCHING WARM-UP/COOL-DOWNSIDESSide Bend with Straight ArmsMUSCLE(S) AFFECTED: ex terna l ob l ique, la t i ss imus dors i and ser ra tus anter io r
1. Stand with feet 14 to 16 inches apart.2. Interlace the fingers with palms facing each other.3. Reach upward with straight arms.4. Keeping arms straight, lean from waist to left side.
Do not bend knees.5. After moving as far as possible, hold for 10 seconds.6. Repeat to the left side.
Stretchingthe sides, upper
back and shoulders
Remember... do all stretches in asmooth, slow, controlled manner.
64
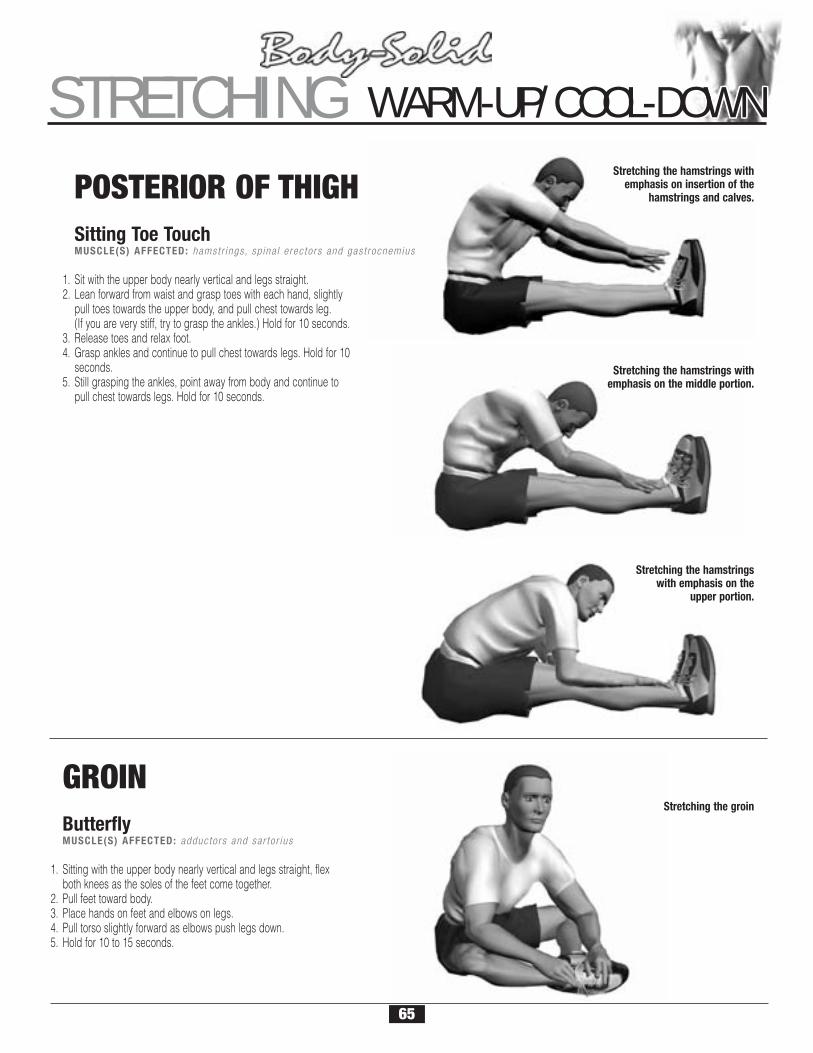
STRETCHING WARM-UP/COOL-DOWNSTRETCHING WARM-UP/COOL-DOWNSTRETCHING WARM-UP/COOL-DOWNSTRETCHING WARM-UP/COOL-DOWNSTRETCHING WARM-UP/COOL-DOWNSTRETCHING WARM-UP/COOL-DOWNSTRETCHING WARM-UP/COOL-DOWNSTRETCHING WARM-UP/COOL-DOWNSTRETCHING WARM-UP/COOL-DOWNStretching the hamstrings with
emphasis on insertion of thehamstrings and calves.
Stretching the hamstrings withemphasis on the middle portion.
Stretching the hamstringswith emphasis on the
upper portion.
POSTERIOR OF THIGHSitting Toe TouchMUSCLE(S) AFFECTED: hamst r ings , sp ina l e rec tors and gas t rocnemius
1. Sit with the upper body nearly vertical and legs straight.2. Lean forward from waist and grasp toes with each hand, slightly
pull toes towards the upper body, and pull chest towards leg.(If you are very stiff, try to grasp the ankles.) Hold for 10 seconds.
3. Release toes and relax foot.4. Grasp ankles and continue to pull chest towards legs. Hold for 10
seconds.5. Still grasping the ankles, point away from body and continue to
pull chest towards legs. Hold for 10 seconds.
GROINButterflyMUSCLE(S) AFFECTED: adductors and sar to r ius
1. Sitting with the upper body nearly vertical and legs straight, flex both knees as the soles of the feet come together.
2. Pull feet toward body.3. Place hands on feet and elbows on legs.4. Pull torso slightly forward as elbows push legs down.5. Hold for 10 to 15 seconds.
Stretching the groin
65
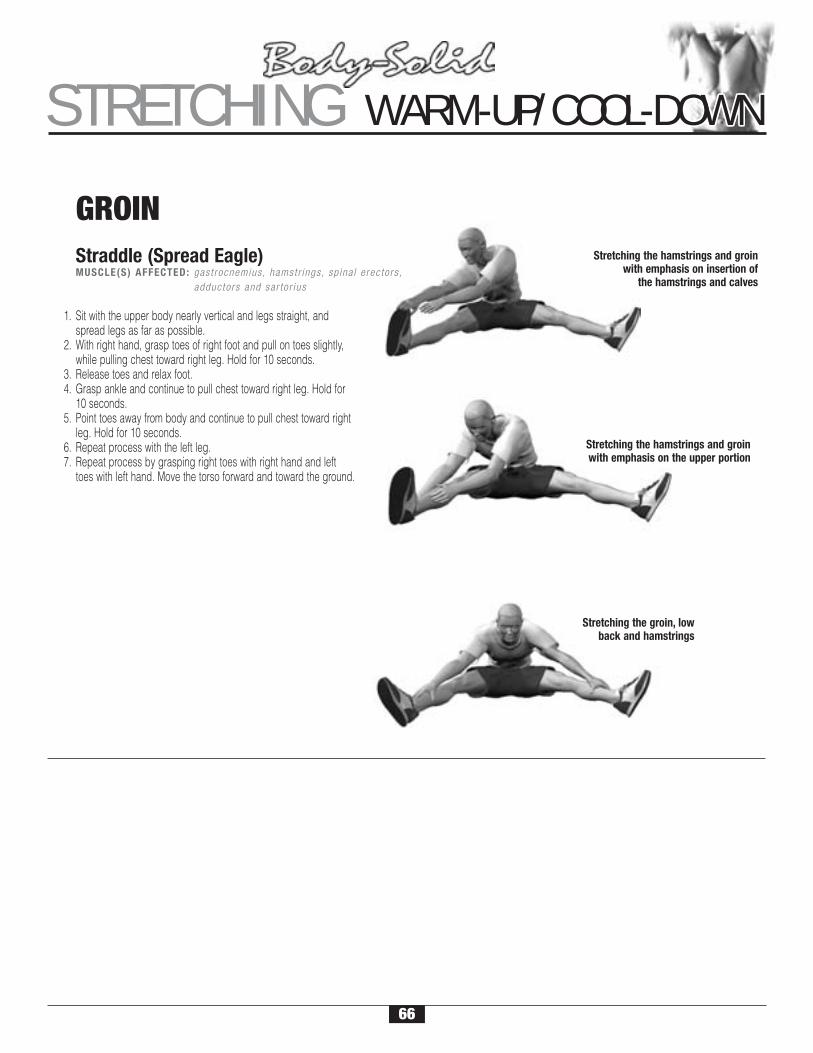
STRETCHING WARM-UP/COOL-DOWNSTRETCHING WARM-UP/COOL-DOWNSTRETCHING WARM-UP/COOL-DOWNSTRETCHING WARM-UP/COOL-DOWNSTRETCHING WARM-UP/COOL-DOWNSTRETCHING WARM-UP/COOL-DOWNSTRETCHING WARM-UP/COOL-DOWNSTRETCHING WARM-UP/COOL-DOWNSTRETCHING WARM-UP/COOL-DOWN
Stretching the hamstrings and groinwith emphasis on insertion of
the hamstrings and calves
GROINStraddle (Spread Eagle)MUSCLE(S) AFFECTED: gast rocnemius , hamst r ings , sp ina l e rec tors ,
adductors and sar to r ius
1. Sit with the upper body nearly vertical and legs straight, and spread legs as far as possible.
2. With right hand, grasp toes of right foot and pull on toes slightly, while pulling chest toward right leg. Hold for 10 seconds.
3. Release toes and relax foot.4. Grasp ankle and continue to pull chest toward right leg. Hold for
10 seconds.5. Point toes away from body and continue to pull chest toward right
leg. Hold for 10 seconds.6. Repeat process with the left leg.7. Repeat process by grasping right toes with right hand and left
toes with left hand. Move the torso forward and toward the ground.
Stretching the hamstrings and groinwith emphasis on the upper portion
Stretching the groin, lowback and hamstrings
66
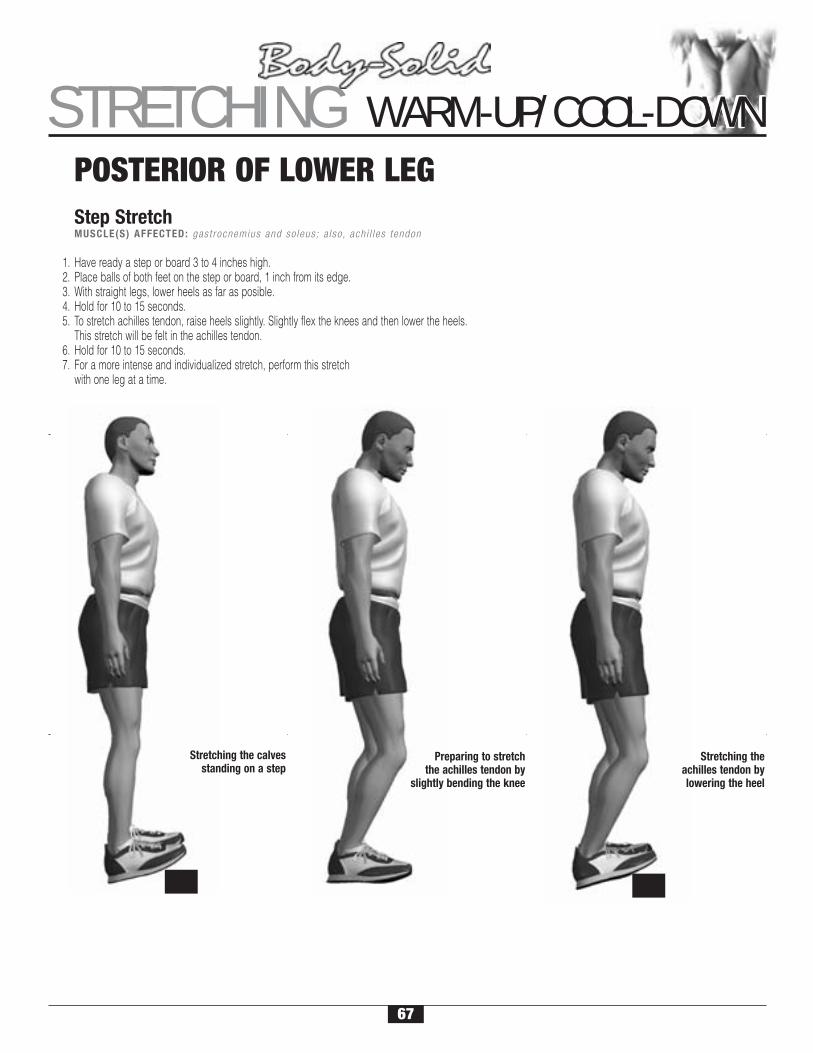
STRETCHING WARM-UP/COOL-DOWNSTRETCHING WARM-UP/COOL-DOWNSTRETCHING WARM-UP/COOL-DOWNSTRETCHING WARM-UP/COOL-DOWNSTRETCHING WARM-UP/COOL-DOWNSTRETCHING WARM-UP/COOL-DOWNSTRETCHING WARM-UP/COOL-DOWNSTRETCHING WARM-UP/COOL-DOWNSTRETCHING WARM-UP/COOL-DOWNPOSTERIOR OF LOWER LEGStep StretchMUSCLE(S) AFFECTED: gast rocnemius and so leus ; a lso , ach i l l es tendon
1. Have ready a step or board 3 to 4 inches high.2. Place balls of both feet on the step or board, 1 inch from its edge.3. With straight legs, lower heels as far as posible.4. Hold for 10 to 15 seconds.5. To stretch achilles tendon, raise heels slightly. Slightly flex the knees and then lower the heels.
This stretch will be felt in the achilles tendon.6. Hold for 10 to 15 seconds.7. For a more intense and individualized stretch, perform this stretch
with one leg at a time.
Stretching the calvesstanding on a step
Preparing to stretchthe achilles tendon by
slightly bending the knee
Stretching theachilles tendon bylowering the heel
67
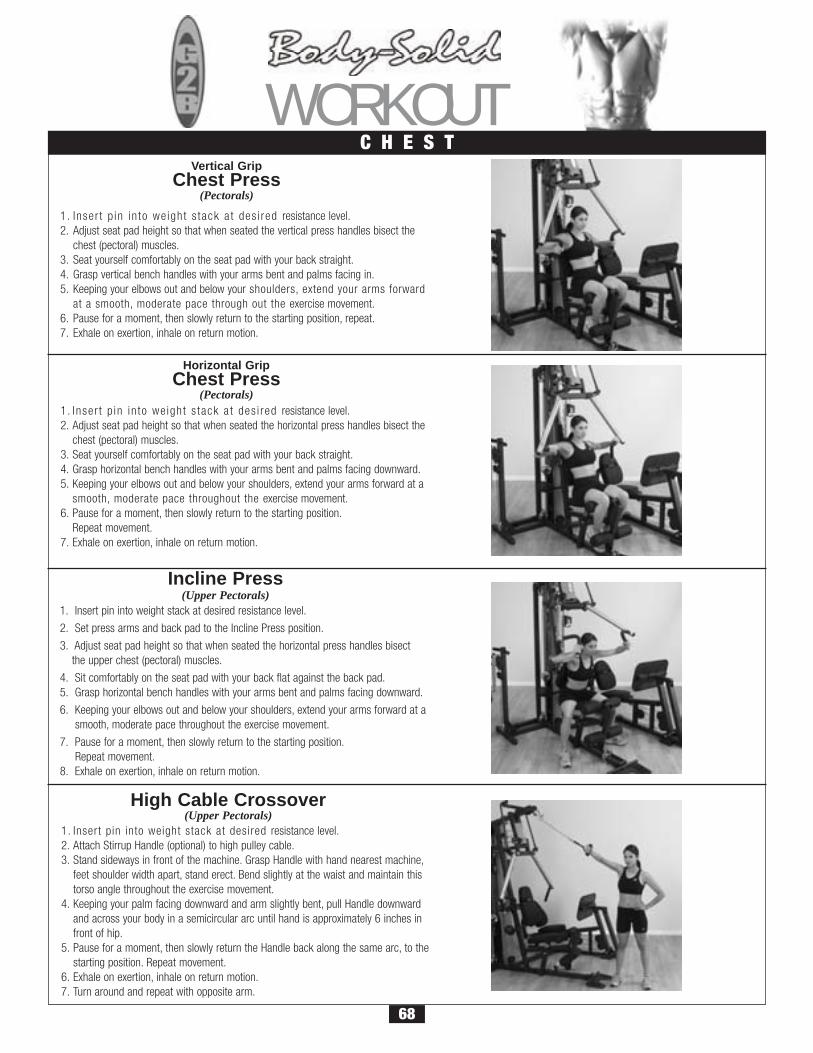
WORKOUT C H E S T
1. Inser t p in in to we ight s tack a t des i red resistance level.2. Adjust seat pad height so that when seated the vertical press handles bisect the
chest (pectoral) muscles.3. Seat yourself comfortably on the seat pad with your back straight.4. Grasp vertical bench handles with your arms bent and palms facing in.5. Keeping your elbows out and below your shoulders, extend your arms forward
at a smooth, moderate pace through out the exercise movement.6. Pause for a moment, then slowly return to the starting position, repeat.7. Exhale on exertion, inhale on return motion.
1 . Inser t p in in to we ight s tack a t des i red resistance level.2. Adjust seat pad height so that when seated the horizontal press handles bisect the
chest (pectoral) muscles.3. Seat yourself comfortably on the seat pad with your back straight.4. Grasp horizontal bench handles with your arms bent and palms facing downward.5. Keeping your elbows out and below your shoulders, extend your arms forward at a
smooth, moderate pace throughout the exercise movement.6. Pause for a moment, then slowly return to the starting position.
Repeat movement.7. Exhale on exertion, inhale on return motion.
1. Insert pin into weight stack at desired resistance level.2. Attach Stirrup Handle (optional) to high pulley cable.3. Stand sideways in front of the machine. Grasp Handle with hand nearest machine,
feet shoulder width apart, stand erect. Bend slightly at the waist and maintain this torso angle throughout the exercise movement.
4. Keeping your palm facing downward and arm slightly bent, pull Handle downward and across your body in a semicircular arc until hand is approximately 6 inches in front of hip.
5. Pause for a moment, then slowly return the Handle back along the same arc, to thestarting position. Repeat movement.
6. Exhale on exertion, inhale on return motion.7. Turn around and repeat with opposite arm.
Vertical GripChest Press
(Pectorals)
High Cable Crossover(Upper Pectorals)
Horizontal GripChest Press
(Pectorals)
Incline Press(Upper Pectorals)
1. Insert pin into weight stack at desired resistance level.
2. Set press arms and back pad to the Incline Press position.
3. Adjust seat pad height so that when seated the horizontal press handles bisect the upper chest (pectoral) muscles.
4. Sit comfortably on the seat pad with your back flat against the back pad.5. Grasp horizontal bench handles with your arms bent and palms facing downward.
6. Keeping your elbows out and below your shoulders, extend your arms forward at a smooth, moderate pace throughout the exercise movement.
7. Pause for a moment, then slowly return to the starting position.Repeat movement.
8. Exhale on exertion, inhale on return motion.
68
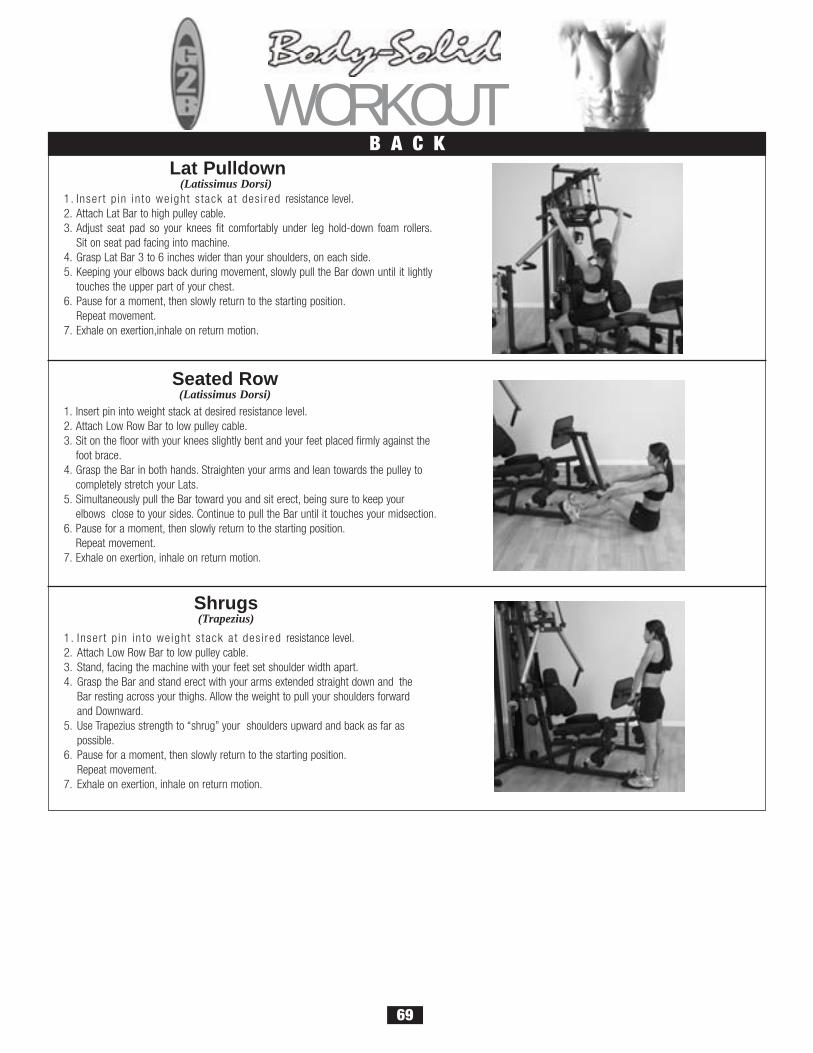
Lat Pulldown(Latissimus Dorsi)
1. Insert pin into weight stack at desired resistance level.2. Attach Low Row Bar to low pulley cable.3. Sit on the floor with your knees slightly bent and your feet placed firmly against the
foot brace.4. Grasp the Bar in both hands. Straighten your arms and lean towards the pulley to
completely stretch your Lats.5. Simultaneously pull the Bar toward you and sit erect, being sure to keep your
elbows close to your sides. Continue to pull the Bar until it touches your midsection.6. Pause for a moment, then slowly return to the starting position.
Repeat movement.7. Exhale on exertion, inhale on return motion.
Seated Row(Latissimus Dorsi)
1. Inser t p in in to we ight s tack a t des i red resistance level.2. Attach Lat Bar to high pulley cable.3. Adjust seat pad so your knees fit comfortably under leg hold-down foam rollers.
Sit on seat pad facing into machine.4. Grasp Lat Bar 3 to 6 inches wider than your shoulders, on each side.5. Keeping your elbows back during movement, slowly pull the Bar down until it lightly
touches the upper part of your chest.6. Pause for a moment, then slowly return to the starting position.
Repeat movement.7. Exhale on exertion,inhale on return motion.
Shrugs(Trapezius)
1. Inser t p in in to we ight s tack a t des i red resistance level.2. Attach Low Row Bar to low pulley cable.3. Stand, facing the machine with your feet set shoulder width apart.4. Grasp the Bar and stand erect with your arms extended straight down and the
Bar resting across your thighs. Allow the weight to pull your shoulders forward and Downward.
5. Use Trapezius strength to “shrug” your shoulders upward and back as far as possible.
6. Pause for a moment, then slowly return to the starting position.Repeat movement.
7. Exhale on exertion, inhale on return motion.
WORKOUT B A C K
69
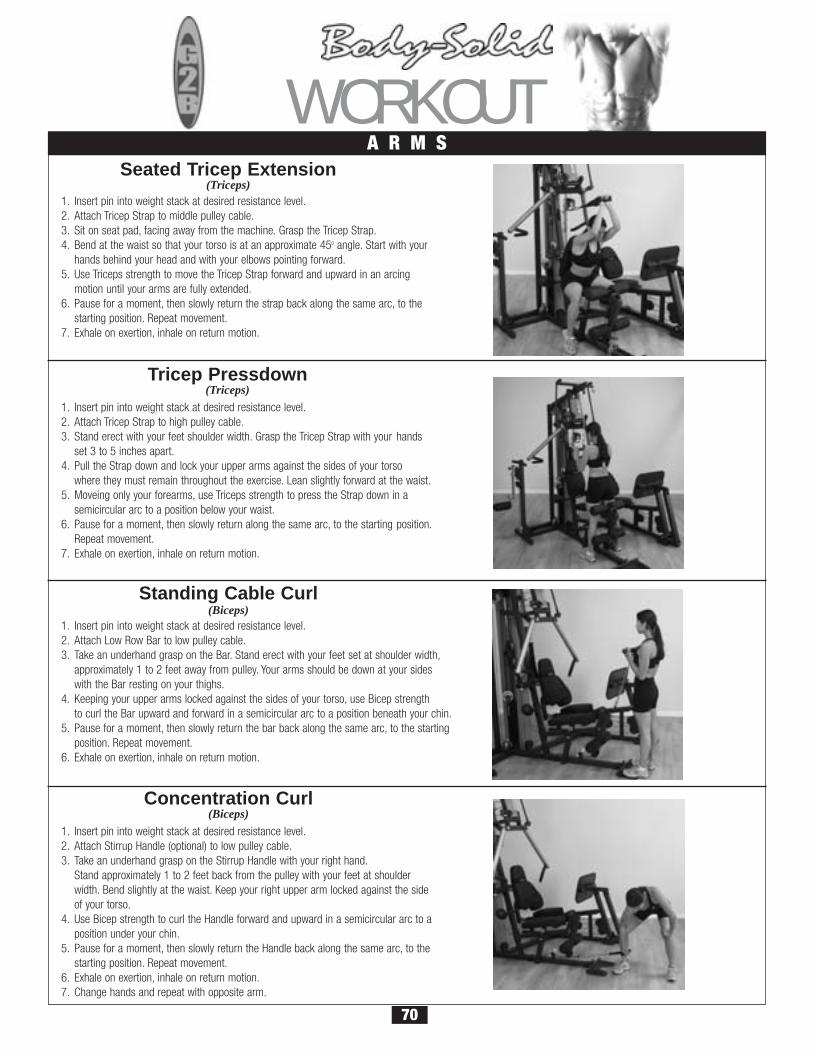
WORKOUTSeated Tricep Extension
(Triceps)1. Insert pin into weight stack at desired resistance level.2. Attach Tricep Strap to middle pulley cable.3. Sit on seat pad, facing away from the machine. Grasp the Tricep Strap.4. Bend at the waist so that your torso is at an approximate 45o angle. Start with your
hands behind your head and with your elbows pointing forward.5. Use Triceps strength to move the Tricep Strap forward and upward in an arcing
motion until your arms are fully extended.6. Pause for a moment, then slowly return the strap back along the same arc, to the
starting position. Repeat movement.7. Exhale on exertion, inhale on return motion.
1. Insert pin into weight stack at desired resistance level.2. Attach Stirrup Handle (optional) to low pulley cable.3. Take an underhand grasp on the Stirrup Handle with your right hand.
Stand approximately 1 to 2 feet back from the pulley with your feet at shoulder width. Bend slightly at the waist. Keep your right upper arm locked against the side of your torso.
4. Use Bicep strength to curl the Handle forward and upward in a semicircular arc to a position under your chin.
5. Pause for a moment, then slowly return the Handle back along the same arc, to the starting position. Repeat movement.
6. Exhale on exertion, inhale on return motion.7. Change hands and repeat with opposite arm.
Concentration Curl(Biceps)
1. Insert pin into weight stack at desired resistance level.2. Attach Low Row Bar to low pulley cable.3. Take an underhand grasp on the Bar. Stand erect with your feet set at shoulder width,
approximately 1 to 2 feet away from pulley. Your arms should be down at your sides with the Bar resting on your thighs.
4. Keeping your upper arms locked against the sides of your torso, use Bicep strength to curl the Bar upward and forward in a semicircular arc to a position beneath your chin.
5. Pause for a moment, then slowly return the bar back along the same arc, to the starting position. Repeat movement.
6. Exhale on exertion, inhale on return motion.
Standing Cable Curl(Biceps)
1. Insert pin into weight stack at desired resistance level.2. Attach Tricep Strap to high pulley cable.3. Stand erect with your feet shoulder width. Grasp the Tricep Strap with your hands
set 3 to 5 inches apart.4. Pull the Strap down and lock your upper arms against the sides of your torso
where they must remain throughout the exercise. Lean slightly forward at the waist.5. Moveing only your forearms, use Triceps strength to press the Strap down in a
semicircular arc to a position below your waist.6. Pause for a moment, then slowly return along the same arc, to the starting position.
Repeat movement.7. Exhale on exertion, inhale on return motion.
Tricep Pressdown(Triceps)
A R M S
70
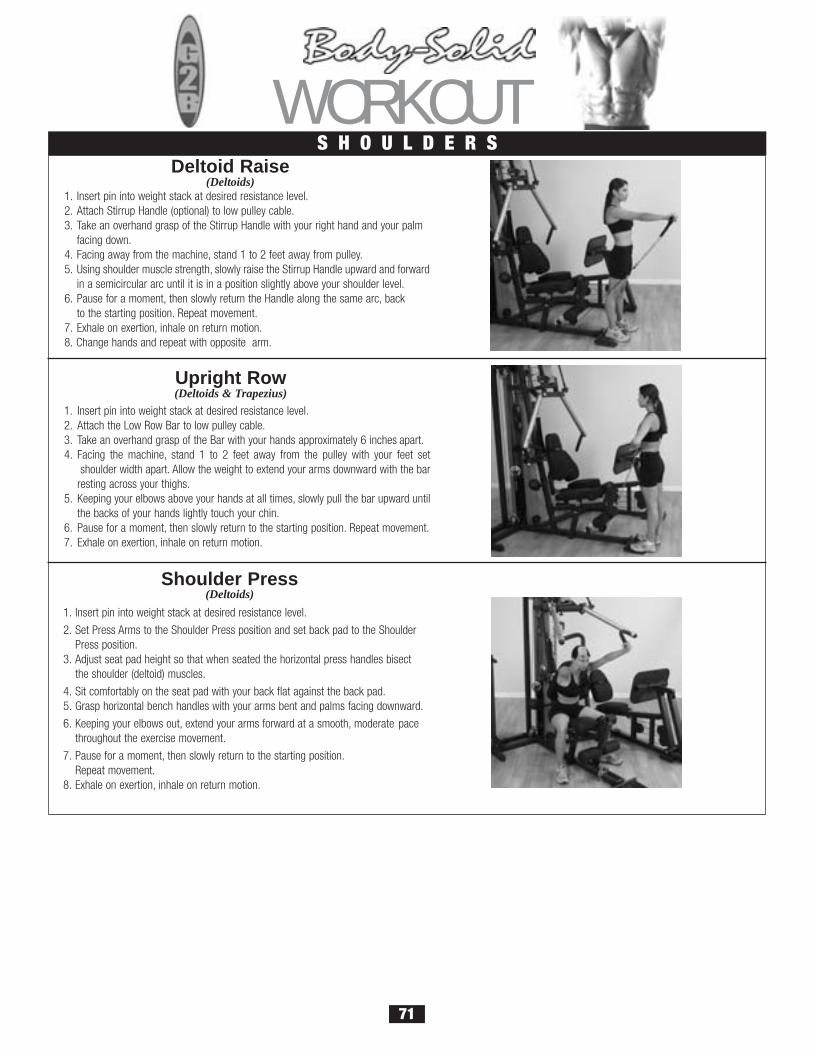
WORKOUT1. Insert pin into weight stack at desired resistance level.2. Attach Stirrup Handle (optional) to low pulley cable.3. Take an overhand grasp of the Stirrup Handle with your right hand and your palm
facing down.4. Facing away from the machine, stand 1 to 2 feet away from pulley.5. Using shoulder muscle strength, slowly raise the Stirrup Handle upward and forward
in a semicircular arc until it is in a position slightly above your shoulder level.6. Pause for a moment, then slowly return the Handle along the same arc, back
to the starting position. Repeat movement.7. Exhale on exertion, inhale on return motion.8. Change hands and repeat with opposite arm.
1. Insert pin into weight stack at desired resistance level.2. Attach the Low Row Bar to low pulley cable.3. Take an overhand grasp of the Bar with your hands approximately 6 inches apart.4. Facing the machine, stand 1 to 2 feet away from the pulley with your feet set
shoulder width apart. Allow the weight to extend your arms downward with the barresting across your thighs.
5. Keeping your elbows above your hands at all times, slowly pull the bar upward untilthe backs of your hands lightly touch your chin.
6. Pause for a moment, then slowly return to the starting position. Repeat movement.7. Exhale on exertion, inhale on return motion.
Deltoid Raise(Deltoids)
Upright Row(Deltoids & Trapezius)
S H O U L D E R S
Shoulder Press(Deltoids)
1. Insert pin into weight stack at desired resistance level.
2. Set Press Arms to the Shoulder Press position and set back pad to the Shoulder Press position.
3. Adjust seat pad height so that when seated the horizontal press handles bisect the shoulder (deltoid) muscles.
4. Sit comfortably on the seat pad with your back flat against the back pad.5. Grasp horizontal bench handles with your arms bent and palms facing downward.
6. Keeping your elbows out, extend your arms forward at a smooth, moderate pace throughout the exercise movement.
7. Pause for a moment, then slowly return to the starting position.Repeat movement.
8. Exhale on exertion, inhale on return motion.
71
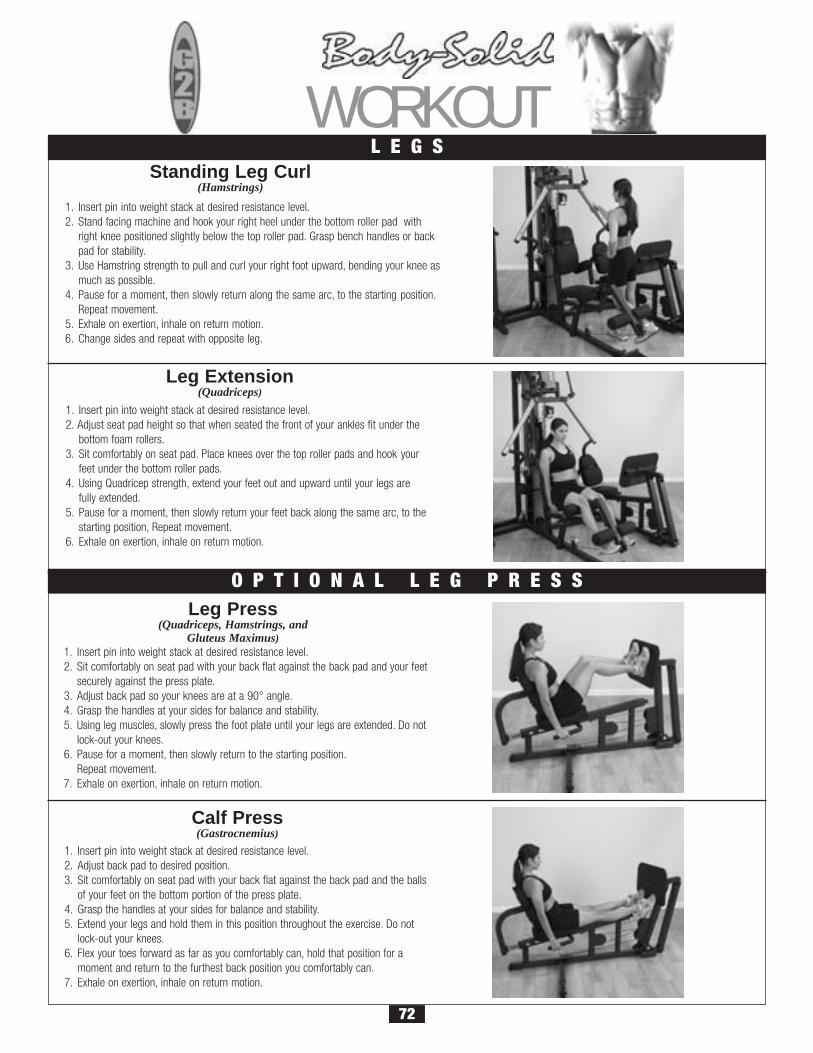
1. Insert pin into weight stack at desired resistance level.2. Stand facing machine and hook your right heel under the bottom roller pad with
right knee positioned slightly below the top roller pad. Grasp bench handles or back pad for stability.
3. Use Hamstring strength to pull and curl your right foot upward, bending your knee asmuch as possible.
4. Pause for a moment, then slowly return along the same arc, to the starting position.Repeat movement.
5. Exhale on exertion, inhale on return motion.6. Change sides and repeat with opposite leg.
WORKOUT
1. Insert pin into weight stack at desired resistance level.2. Adjust seat pad height so that when seated the front of your ankles fit under the
bottom foam rollers.3. Sit comfortably on seat pad. Place knees over the top roller pads and hook your
feet under the bottom roller pads.4. Using Quadricep strength, extend your feet out and upward until your legs are
fully extended.5. Pause for a moment, then slowly return your feet back along the same arc, to the
starting position, Repeat movement.6. Exhale on exertion, inhale on return motion.
Leg Extension(Quadriceps)
Standing Leg Curl(Hamstrings)
L E G S
Leg Press(Quadriceps, Hamstrings, and
Gluteus Maximus)1. Insert pin into weight stack at desired resistance level.2. Sit comfortably on seat pad with your back flat against the back pad and your feet
securely against the press plate.3. Adjust back pad so your knees are at a 90° angle.4. Grasp the handles at your sides for balance and stability.5. Using leg muscles, slowly press the foot plate until your legs are extended. Do not
lock-out your knees.6. Pause for a moment, then slowly return to the starting position.
Repeat movement.7. Exhale on exertion, inhale on return motion.
Calf Press(Gastrocnemius)
1. Insert pin into weight stack at desired resistance level.2. Adjust back pad to desired position.3. Sit comfortably on seat pad with your back flat against the back pad and the balls
of your feet on the bottom portion of the press plate.4. Grasp the handles at your sides for balance and stability.5. Extend your legs and hold them in this position throughout the exercise. Do not
lock-out your knees.6. Flex your toes forward as far as you comfortably can, hold that position for a
moment and return to the furthest back position you comfortably can.7. Exhale on exertion, inhale on return motion.
O P T I O N A L L E G P R E S S
72
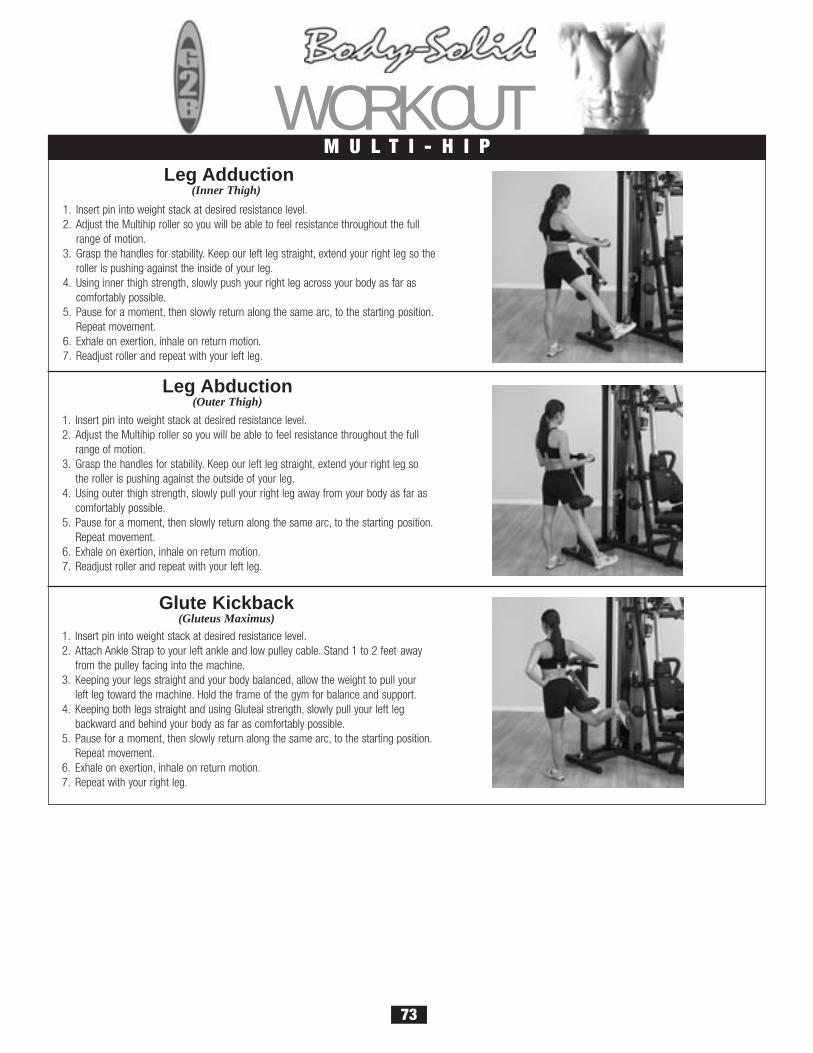
WORKOUTLeg Adduction
(Inner Thigh)
1. Insert pin into weight stack at desired resistance level.2. Adjust the Multihip roller so you will be able to feel resistance throughout the full
range of motion.3. Grasp the handles for stability. Keep our left leg straight, extend your right leg so the
roller is pushing against the inside of your leg.4. Using inner thigh strength, slowly push your right leg across your body as far as
comfortably possible.5. Pause for a moment, then slowly return along the same arc, to the starting position.
Repeat movement.6. Exhale on exertion, inhale on return motion.7. Readjust roller and repeat with your left leg.
Leg Abduction(Outer Thigh)
1. Insert pin into weight stack at desired resistance level.2. Adjust the Multihip roller so you will be able to feel resistance throughout the full
range of motion.3. Grasp the handles for stability. Keep our left leg straight, extend your right leg so
the roller is pushing against the outside of your leg.4. Using outer thigh strength, slowly pull your right leg away from your body as far as
comfortably possible.5. Pause for a moment, then slowly return along the same arc, to the starting position.
Repeat movement.6. Exhale on exertion, inhale on return motion.7. Readjust roller and repeat with your left leg.
Glute Kickback(Gluteus Maximus)
1. Insert pin into weight stack at desired resistance level.2. Attach Ankle Strap to your left ankle and low pulley cable. Stand 1 to 2 feet away
from the pulley facing into the machine.3. Keeping your legs straight and your body balanced, allow the weight to pull your
left leg toward the machine. Hold the frame of the gym for balance and support.4. Keeping both legs straight and using Gluteal strength, slowly pull your left leg
backward and behind your body as far as comfortably possible.5. Pause for a moment, then slowly return along the same arc, to the starting position.
Repeat movement.6. Exhale on exertion, inhale on return motion.7. Repeat with your right leg.
M U L T I - H I P
73
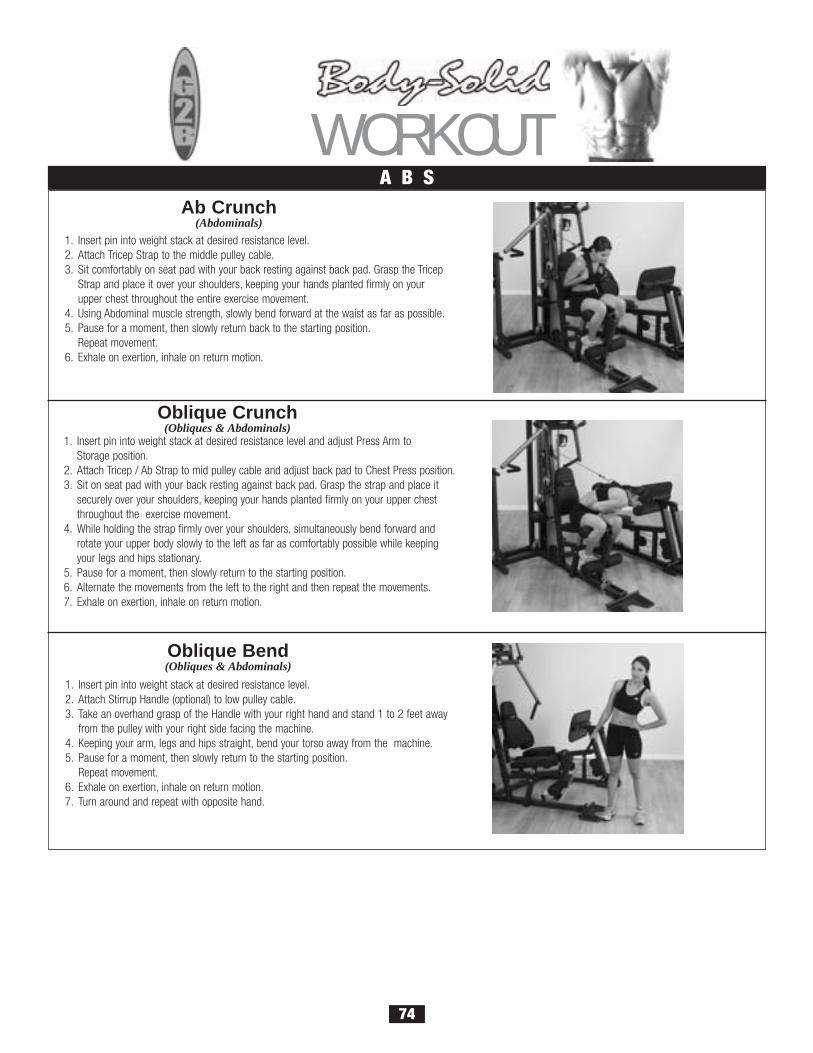
1. Insert pin into weight stack at desired resistance level.2. Attach Tricep Strap to the middle pulley cable.3. Sit comfortably on seat pad with your back resting against back pad. Grasp the Tricep
Strap and place it over your shoulders, keeping your hands planted firmly on your upper chest throughout the entire exercise movement.
4. Using Abdominal muscle strength, slowly bend forward at the waist as far as possible.5. Pause for a moment, then slowly return back to the starting position.
Repeat movement.6. Exhale on exertion, inhale on return motion.
Ab Crunch(Abdominals)
1. Insert pin into weight stack at desired resistance level.2. Attach Stirrup Handle (optional) to low pulley cable.3. Take an overhand grasp of the Handle with your right hand and stand 1 to 2 feet away
from the pulley with your right side facing the machine.4. Keeping your arm, legs and hips straight, bend your torso away from the machine.5. Pause for a moment, then slowly return to the starting position.
Repeat movement.6. Exhale on exertion, inhale on return motion.7. Turn around and repeat with opposite hand.
Oblique Bend(Obliques & Abdominals)
WORKOUT A B S
Oblique Crunch(Obliques & Abdominals)
1. Insert pin into weight stack at desired resistance level and adjust Press Arm to Storage position.
2. Attach Tricep / Ab Strap to mid pulley cable and adjust back pad to Chest Press position.3. Sit on seat pad with your back resting against back pad. Grasp the strap and place it
securely over your shoulders, keeping your hands planted firmly on your upper chest throughout the exercise movement.
4. While holding the strap firmly over your shoulders, simultaneously bend forward and rotate your upper body slowly to the left as far as comfortably possible while keeping your legs and hips stationary.
5. Pause for a moment, then slowly return to the starting position.6. Alternate the movements from the left to the right and then repeat the movements.7. Exhale on exertion, inhale on return motion.
74
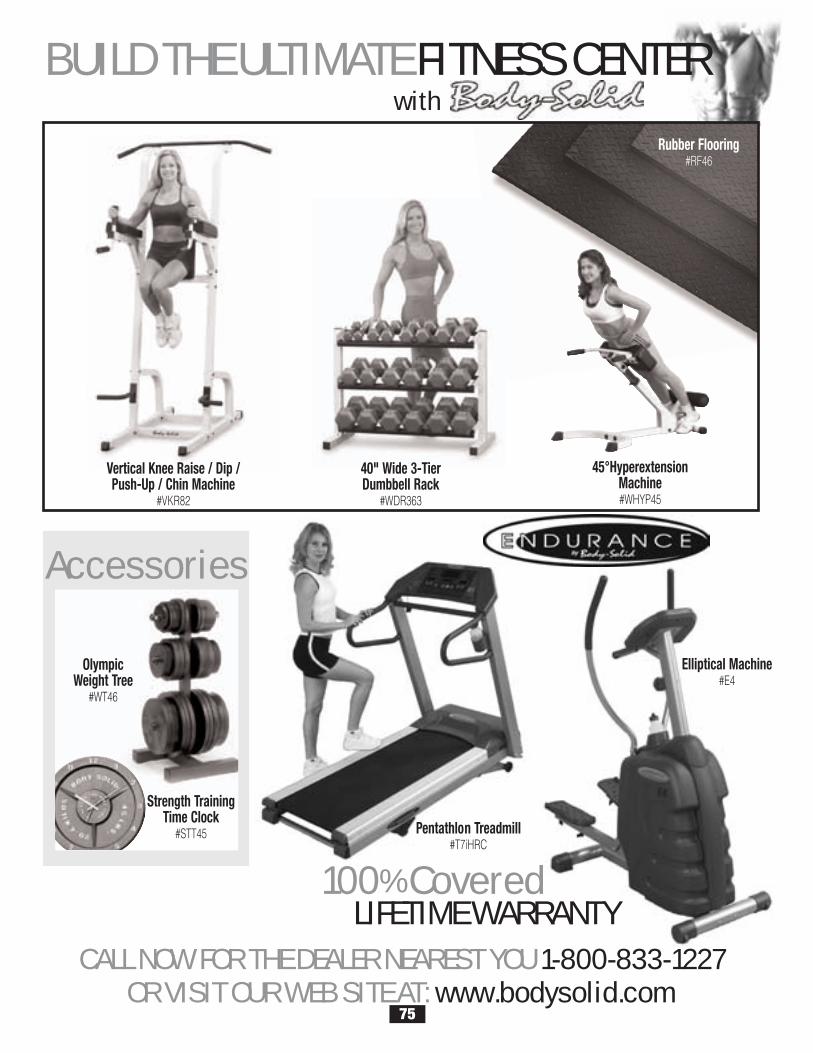
Elliptical Machine#E4
Pentathlon Treadmill#T7iHRC
100% CoveredLIFETIME WARRANTY
Accessories
OlympicWeight Tree
#WT46
Strength TrainingTime Clock
#STT45
CALL NOW FOR THE DEALER NEAREST YOU 1-800-833-1227OR VISIT OUR WEB SITE AT: www.bodysolid.com
Rubber Flooring#RF46
Vertical Knee Raise / Dip /Push-Up / Chin Machine
#VKR82
40" Wide 3-TierDumbbell Rack
#WDR363
45°HyperextensionMachine#WHYP45
BUILD THE ULTIMATE FITNESS CENTERwith
75
S i g n s O f O v e r t r a i n i n g
In the quest for better health and fitness, it is sometimes difficult to quellone’s enthusiasm and take a break from exercise. But if exercise isleaving you more exhausted than energized, you could be suffering froman acute case of overtraining. Individuals who excessively exercise arerisking more than poor performance; they’re risking their health. If yourecognize the following symptoms in yourself or a friend, it is essentialthat you seek professional help.
DECREASED PERFORMANCE.Slower reaction times, reduced speeds and loweredendurance levels are all common signs of overtraining.
AGITATION, MOODINESS, IRRITABILITYOR LACK OF CONCENTRATION.Too much exercise and too little rest can wreak havoc onthe hormones, cause mood swings and create aninability to concentrate.
EXCESSIVE FATIGUE AND MALAISE.A body that never has a chance to fully recover from aprevious workout will continue to feel more and morefatigued. some people describe this feeling as “heavylegs.”
INCREASED PERCEIVED EFFORT DURING NORMAL WORKOUTS.Overtraining takes a toll on the body, and workouts thatwere once a breeze can begin to feel like a grind.
CHRONIC OR NAGGING MUSCLE ACHESOR JOINT PAIN.Overused muscles and joints can cause constant aches,which may go unnoticed until the body is given properrest.
MORE FREQUENT ILLNESSES ANDUPPER-RESPIRATORY INFECTIONS.Too much exercise taxes all of the body’s systems andmakes it more difficult to ward off infections.
INSOMNIA OR RESTLESS SLEEP.During sleep the body has time to rest and repair itself. Anovertrained body, however, is sometimes unable to slowdown and completely relax, making it difficult to recoverbetween workouts.
LOSS OF APPETITE.Overtraining can cause an increase in hormones such asepinephrine and norepinephrine that tend to inhibitappetite. The physical exhaustion and anxiety that oftencomes with overtraining can also have the same effect.
CHRONICALLY ELEVATED HEART RATEAT REST AND DURING EXERCISE.A clear sign of an overworked heart muscle is achronically elevated heart rate. Also, people whoovertrain will often find that it takes longer for their heartrate to return to normal after a workout.
MENSTRUAL CYCLE DISTURBANCES INWOMEN.Exercising excessively and not consuming enoughcalories may disrupt a women’s menstrual cycle. Whilesome may experience irregular periods, others will stopmenstruating altogether.
Here are signs of overtraining:
76
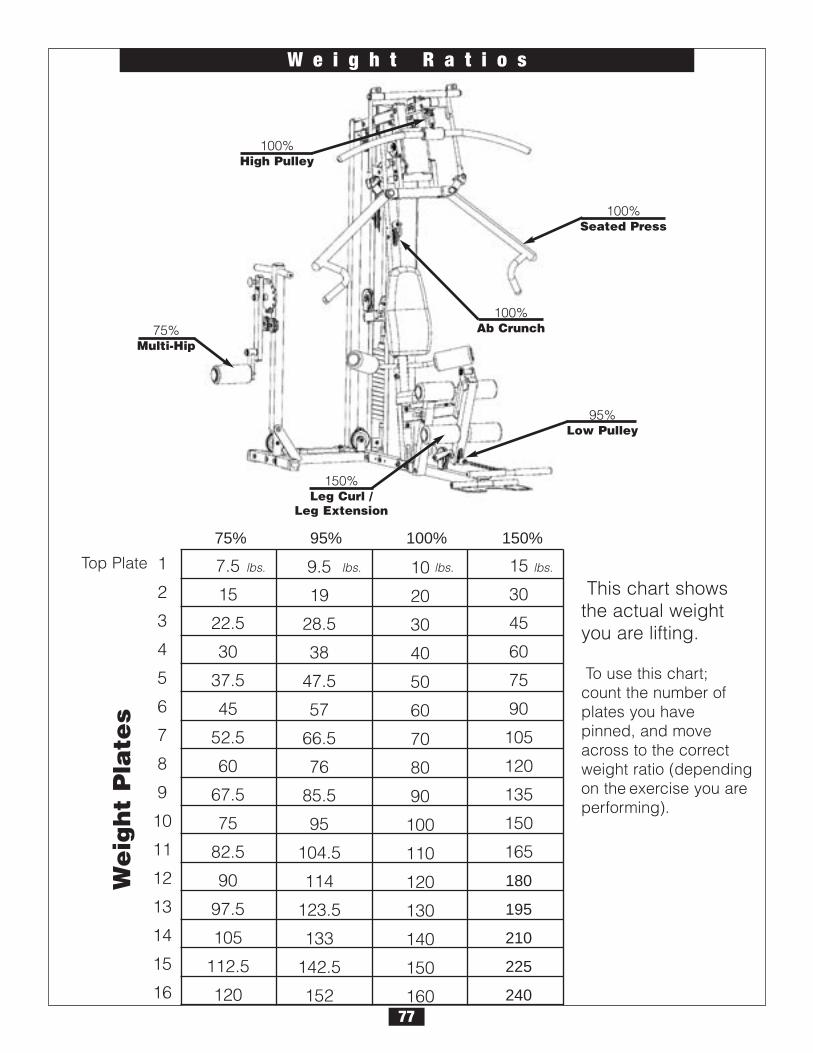
W e i g h t R a t i o s
150%Leg Curl /
Leg Extension
100%High Pulley
95%Low Pulley
75%Multi-Hip
100%Seated Press
75% 95% 100% 150%
1
2
3
4
5
6
7
8
9
10
11
12
13
14
15
16
Top Plate
This chart showsthe actual weightyou are lifting.
To use this chart;count the number ofplates you havepinned, and moveacross to the correctweight ratio (dependingon the exercise you areperforming).
lbs. lbs. lbs. lbs.
We
igh
t P
late
s
9.5
19
28.5
38
47.5
57
66.5
76
85.5
95
104.5
114
123.5
133
142.5
152
7.5
15
22.5
30
37.5
45
52.5
60
67.5
75
82.5
90
97.5
105
112.5
120
100%Ab Crunch
15
30
45
60
75
90
105
120
135
150
165
180
195
210
225
240
10
20
30
40
50
60
70
80
90
100
110
120
130
140
150
16077

Part numbers are required when ordering parts.
G 2 B M a i n f r a m e P a r t s L i s t
KEY# QTY PART# DESCRIPTION
ABCDEFGHJKLMNPQRSTUVWXYZZ1Z2Z3Z4Z5Z6Z7Z8AAA1ABA2ACADAEAF
1111112121111121111111111111111111111112
JG2BMBF-AJG2BRBF-BJG2BRVF-CJG2BAVF-DJG2BTF-EJG2BFP-FJG2BFP-GJG2BLEF-HJG2BFP-JJG2BSPF-KJG2BLEA-LJG2BFB-MJG2BMHB-NJG2BMHVF-PJG2BCGR-QJG2BTWSF-RJG2BBPH-SJG2BBPA-TJG2BBPF-UJG2BLHD-VJG2BLHD-WJG2BPAS-XJG2BPAP-YJG2BBAB-ZJG2BBAS-Z1JG2BBAF-Z2JG2BBARA-Z3JG2BBALA-Z4JG2BBARJ-Z5JG2BBALJ-Z6JG2BBARP-Z7JG2BBALP-Z8JG2BSPA-AAJG2BLPAP-A1JG2BSPA-ABJG2BRPAP-A2JG2BMHA-ACJG2BMHA-ADJG2BMHPH-AEJG2BRB-AF
MAIN BASE FRAMEREAR BASE FRAMEREAR VERTICAL FRAMEANGLED VERTICAL FRAMETOP MAIN FRAMEFLAT PLATE 3 3/4”LFLAT PLATE 5 1/2”LLEG EXTENSION FRAMEFLAT PLATE 4 3/4”LSEAT PAD FRAMELEG EXTENSION ARMFOOT BRACEMULTI HIP BASEMULTI HIP VERTICAL FRAMECHROME GUIDE RODTOP WEIGHT STACK FRAMEBACK PAD HOLDERBACK PAD ADJUSTERBACK PAD FRAMELEG HOLD DOWN (left side)LEG HOLD DOWN (right side)PRESS ARM SUPPORT PRESS ARM PIVOTBI ANGULAR BARBI ANGULAR SHAFTBI ANGULAR FRAMEBI ANGULAR RIGHT ARMBI ANGULAR LEFT ARMBI ANGULAR RIGHT JUNCTIONBI ANGULAR LEFT JUNCTIONBI ANGULAR RIGHT PIVOTBI ANGULAR LEFT PIVOTSEATED PRESS ARM (left side)LEFT PRESS ARM PIVOTSEATED PRESS ARM (right side)RIGHT PRESS ARM PIVOTMULTI HIP ADJUSTERMULTI HIP ARMMULTI HIP PAD HOLDERROLLER BAR
P a d s L i s tKEY# QTY PART# DESCRIPTION
78
SEAT PADBACK PAD
BABB
11
JG2BSP-BAJG2BBP-BB
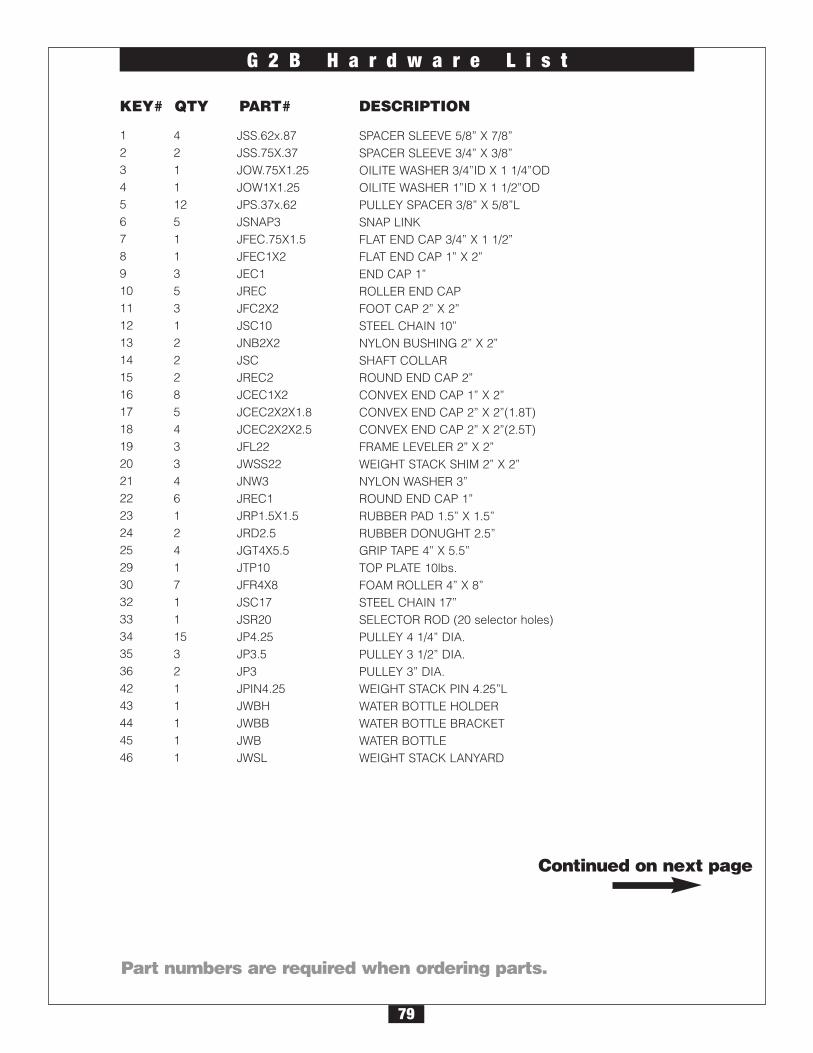
Part numbers are required when ordering parts.
KEY# QTY PART# DESCRIPTION
Continued on next page
G 2 B H a r d w a r e L i s t
SPACER SLEEVE 5/8” X 7/8”SPACER SLEEVE 3/4” X 3/8”OILITE WASHER 3/4”ID X 1 1/4”ODOILITE WASHER 1”ID X 1 1/2”ODPULLEY SPACER 3/8” X 5/8”LSNAP LINK FLAT END CAP 3/4” X 1 1/2”FLAT END CAP 1” X 2”END CAP 1”ROLLER END CAPFOOT CAP 2” X 2”STEEL CHAIN 10”NYLON BUSHING 2” X 2”SHAFT COLLARROUND END CAP 2”CONVEX END CAP 1” X 2”CONVEX END CAP 2” X 2”(1.8T) CONVEX END CAP 2” X 2”(2.5T)FRAME LEVELER 2” X 2”WEIGHT STACK SHIM 2” X 2”NYLON WASHER 3”ROUND END CAP 1”RUBBER PAD 1.5” X 1.5”RUBBER DONUGHT 2.5”GRIP TAPE 4” X 5.5”TOP PLATE 10lbs.FOAM ROLLER 4” X 8”STEEL CHAIN 17”SELECTOR ROD (20 selector holes)PULLEY 4 1/4” DIA.PULLEY 3 1/2” DIA.PULLEY 3” DIA.WEIGHT STACK PIN 4.25”LWATER BOTTLE HOLDERWATER BOTTLE BRACKETWATER BOTTLEWEIGHT STACK LANYARD
JSS.62x.87JSS.75X.37JOW.75X1.25JOW1X1.25JPS.37x.62JSNAP3JFEC.75X1.5JFEC1X2JEC1JRECJFC2X2JSC10JNB2X2JSCJREC2JCEC1X2JCEC2X2X1.8JCEC2X2X2.5JFL22JWSS22JNW3JREC1JRP1.5X1.5JRD2.5JGT4X5.5JTP10JFR4X8JSC17JSR20JP4.25JP3.5JP3JPIN4.25JWBHJWBBJWBJWSL
421112511353122285433461241711153211111
12345678910111213141516171819202122232425293032333435364243444546
79
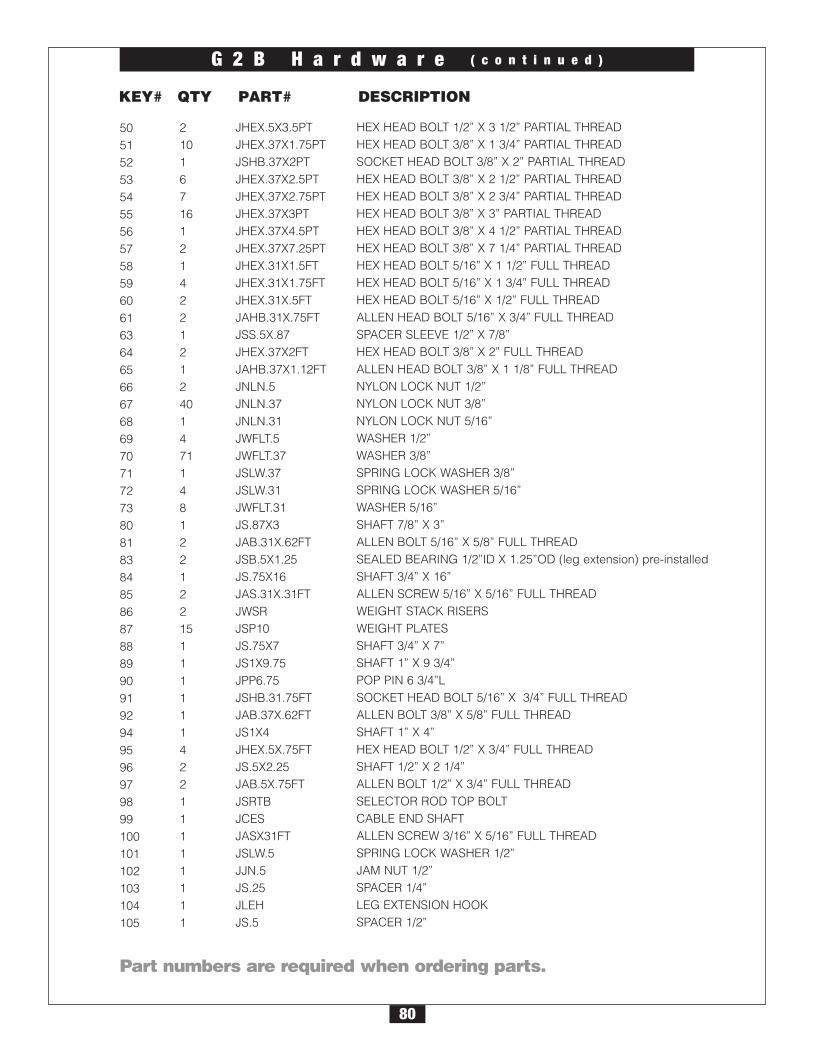
G 2 B H a r d w a r e ( c o n t i n u e d )
KEY# QTY PART# DESCRIPTION
Part numbers are required when ordering parts.
5051525354555657585960616364656667686970717273808183848586878889909192949596979899100101102103104105
2101671612142212124014711481221221511111142211111111
JHEX.5X3.5PTJHEX.37X1.75PTJSHB.37X2PTJHEX.37X2.5PTJHEX.37X2.75PTJHEX.37X3PTJHEX.37X4.5PTJHEX.37X7.25PTJHEX.31X1.5FTJHEX.31X1.75FTJHEX.31X.5FTJAHB.31X.75FTJSS.5X.87JHEX.37X2FTJAHB.37X1.12FTJNLN.5JNLN.37JNLN.31JWFLT.5JWFLT.37JSLW.37JSLW.31JWFLT.31JS.87X3JAB.31X.62FTJSB.5X1.25JS.75X16JAS.31X.31FTJWSRJSP10JS.75X7JS1X9.75JPP6.75JSHB.31.75FTJAB.37X.62FTJS1X4JHEX.5X.75FTJS.5X2.25JAB.5X.75FTJSRTBJCESJASX31FTJSLW.5JJN.5JS.25JLEHJS.5
HEX HEAD BOLT 1/2” X 3 1/2” PARTIAL THREADHEX HEAD BOLT 3/8” X 1 3/4” PARTIAL THREADSOCKET HEAD BOLT 3/8” X 2” PARTIAL THREADHEX HEAD BOLT 3/8” X 2 1/2” PARTIAL THREADHEX HEAD BOLT 3/8” X 2 3/4” PARTIAL THREADHEX HEAD BOLT 3/8” X 3” PARTIAL THREADHEX HEAD BOLT 3/8” X 4 1/2” PARTIAL THREADHEX HEAD BOLT 3/8” X 7 1/4” PARTIAL THREADHEX HEAD BOLT 5/16” X 1 1/2” FULL THREADHEX HEAD BOLT 5/16” X 1 3/4” FULL THREADHEX HEAD BOLT 5/16” X 1/2” FULL THREADALLEN HEAD BOLT 5/16” X 3/4” FULL THREADSPACER SLEEVE 1/2” X 7/8”HEX HEAD BOLT 3/8” X 2” FULL THREADALLEN HEAD BOLT 3/8” X 1 1/8” FULL THREADNYLON LOCK NUT 1/2”NYLON LOCK NUT 3/8”NYLON LOCK NUT 5/16”WASHER 1/2”WASHER 3/8”SPRING LOCK WASHER 3/8”SPRING LOCK WASHER 5/16”WASHER 5/16”SHAFT 7/8” X 3”ALLEN BOLT 5/16” X 5/8” FULL THREADSEALED BEARING 1/2”ID X 1.25”OD (leg extension) pre-installedSHAFT 3/4” X 16”ALLEN SCREW 5/16” X 5/16” FULL THREADWEIGHT STACK RISERSWEIGHT PLATESSHAFT 3/4” X 7”SHAFT 1” X 9 3/4”POP PIN 6 3/4”LSOCKET HEAD BOLT 5/16” X 3/4” FULL THREADALLEN BOLT 3/8” X 5/8” FULL THREADSHAFT 1” X 4”HEX HEAD BOLT 1/2” X 3/4” FULL THREADSHAFT 1/2” X 2 1/4”ALLEN BOLT 1/2” X 3/4” FULL THREADSELECTOR ROD TOP BOLTCABLE END SHAFTALLEN SCREW 3/16” X 5/16” FULL THREADSPRING LOCK WASHER 1/2”JAM NUT 1/2”SPACER 1/4”LEG EXTENSION HOOKSPACER 1/2”
80
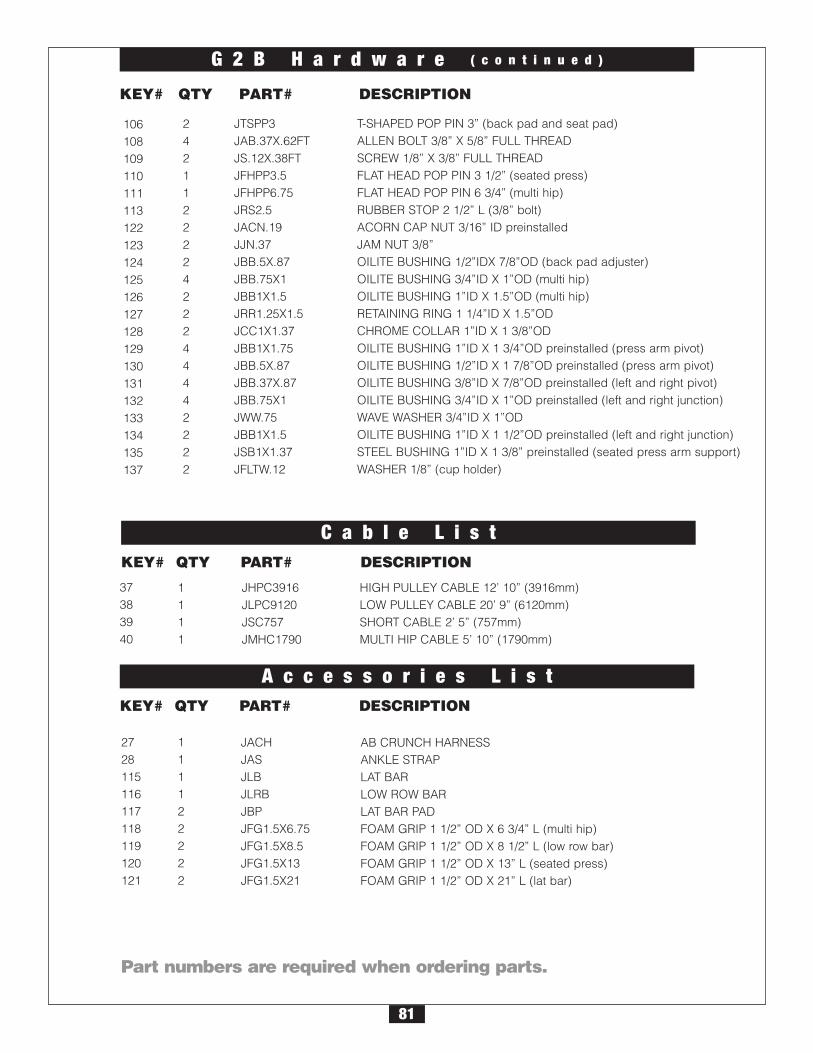
Part numbers are required when ordering parts.
C a b l e L i s t
A c c e s s o r i e s L i s t
KEY# QTY PART# DESCRIPTION
KEY# QTY PART# DESCRIPTION
AB CRUNCH HARNESSANKLE STRAPLAT BARLOW ROW BARLAT BAR PADFOAM GRIP 1 1/2” OD X 6 3/4” L (multi hip) FOAM GRIP 1 1/2” OD X 8 1/2” L (low row bar)FOAM GRIP 1 1/2” OD X 13” L (seated press)FOAM GRIP 1 1/2” OD X 21” L (lat bar)
JACHJASJLBJLRBJBPJFG1.5X6.75JFG1.5X8.5JFG1.5X13JFG1.5X21
2728115116117118119120121
111122222
37383940
1111
JHPC3916JLPC9120JSC757JMHC1790
HIGH PULLEY CABLE 12’ 10” (3916mm)LOW PULLEY CABLE 20’ 9” (6120mm)SHORT CABLE 2’ 5” (757mm)MULTI HIP CABLE 5’ 10” (1790mm)
G 2 B H a r d w a r e ( c o n t i n u e d )
KEY# QTY PART# DESCRIPTION
106108109110111113122123124125126127128129130131132133134135137
242112222422244442222
JTSPP3JAB.37X.62FTJS.12X.38FTJFHPP3.5JFHPP6.75JRS2.5JACN.19JJN.37JBB.5X.87JBB.75X1JBB1X1.5JRR1.25X1.5JCC1X1.37JBB1X1.75JBB.5X.87JBB.37X.87JBB.75X1JWW.75JBB1X1.5JSB1X1.37JFLTW.12
T-SHAPED POP PIN 3” (back pad and seat pad)ALLEN BOLT 3/8” X 5/8” FULL THREADSCREW 1/8” X 3/8” FULL THREADFLAT HEAD POP PIN 3 1/2” (seated press)FLAT HEAD POP PIN 6 3/4” (multi hip)RUBBER STOP 2 1/2” L (3/8” bolt)ACORN CAP NUT 3/16” ID preinstalledJAM NUT 3/8”OILITE BUSHING 1/2”IDX 7/8”OD (back pad adjuster)OILITE BUSHING 3/4”ID X 1”OD (multi hip)OILITE BUSHING 1”ID X 1.5”OD (multi hip)RETAINING RING 1 1/4”ID X 1.5”ODCHROME COLLAR 1”ID X 1 3/8”ODOILITE BUSHING 1”ID X 1 3/4”OD preinstalled (press arm pivot)OILITE BUSHING 1/2”ID X 1 7/8”OD preinstalled (press arm pivot) OILITE BUSHING 3/8”ID X 7/8”OD preinstalled (left and right pivot)OILITE BUSHING 3/4”ID X 1”OD preinstalled (left and right junction)WAVE WASHER 3/4”ID X 1”ODOILITE BUSHING 1”ID X 1 1/2”OD preinstalled (left and right junction)STEEL BUSHING 1”ID X 1 3/8” preinstalled (seated press arm support) WASHER 1/8” (cup holder)
81
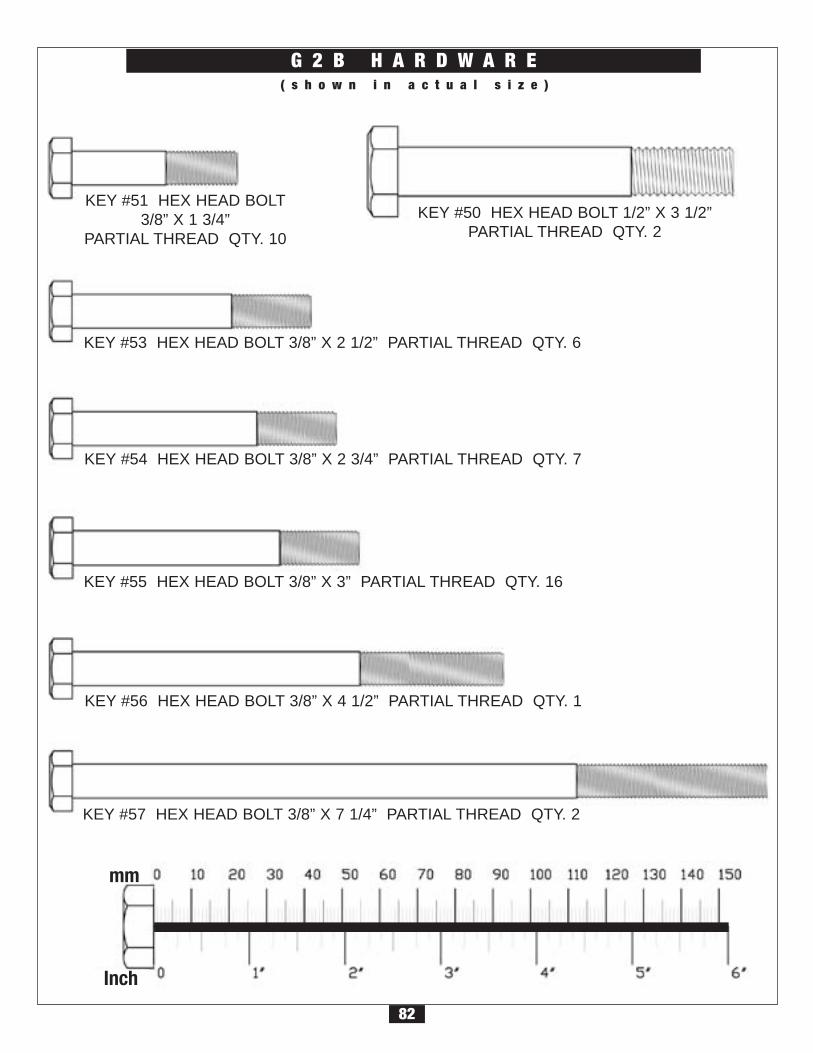
82
( s h o w n i n a c t u a l s i z e )
G 2 B H A R D W A R E
mm
Inch
KEY #50 HEX HEAD BOLT 1/2” X 3 1/2”PARTIAL THREAD QTY. 2
KEY #51 HEX HEAD BOLT3/8” X 1 3/4”
PARTIAL THREAD QTY. 10
KEY #53 HEX HEAD BOLT 3/8” X 2 1/2” PARTIAL THREAD QTY. 6
KEY #54 HEX HEAD BOLT 3/8” X 2 3/4” PARTIAL THREAD QTY. 7
KEY #55 HEX HEAD BOLT 3/8” X 3” PARTIAL THREAD QTY. 16
KEY #56 HEX HEAD BOLT 3/8” X 4 1/2” PARTIAL THREAD QTY. 1
KEY #57 HEX HEAD BOLT 3/8” X 7 1/4” PARTIAL THREAD QTY. 2
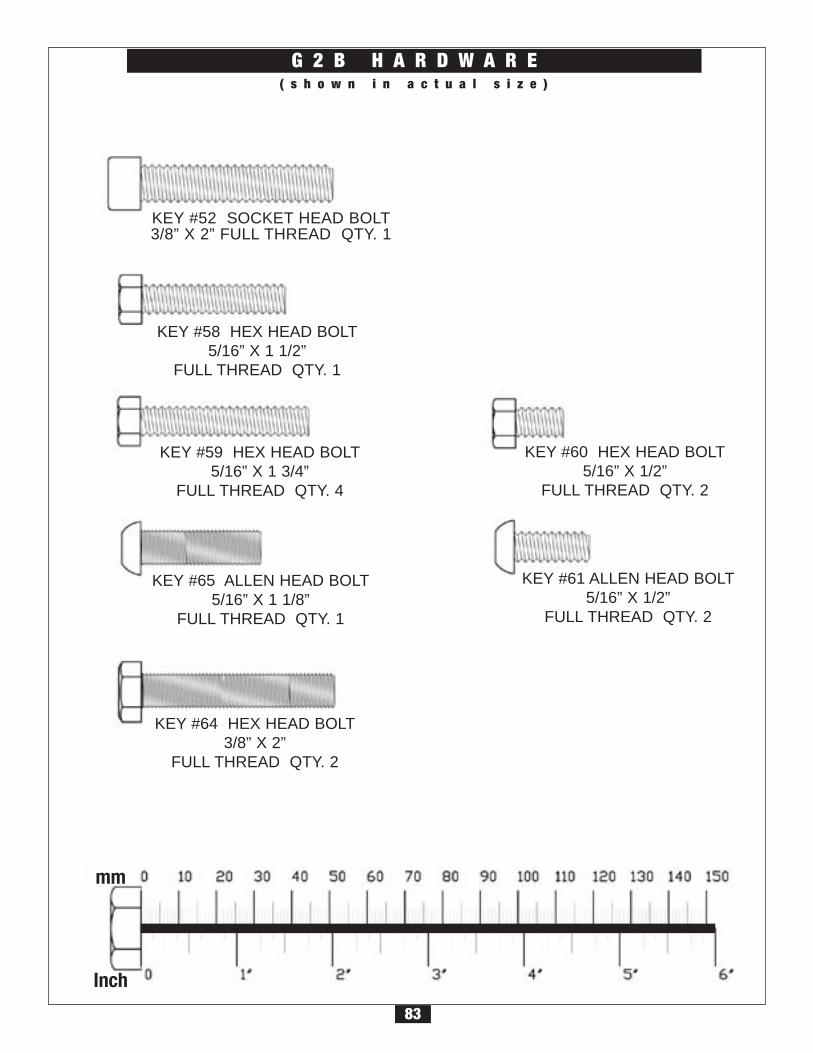
( s h o w n i n a c t u a l s i z e )
G 2 B H A R D W A R E
mm
Inch
KEY #52 SOCKET HEAD BOLT3/8” X 2” FULL THREAD QTY. 1
KEY #58 HEX HEAD BOLT5/16” X 1 1/2”
FULL THREAD QTY. 1
KEY #59 HEX HEAD BOLT5/16” X 1 3/4”
FULL THREAD QTY. 4
KEY #64 HEX HEAD BOLT3/8” X 2”
FULL THREAD QTY. 2
KEY #60 HEX HEAD BOLT5/16” X 1/2”
FULL THREAD QTY. 2
KEY #61 ALLEN HEAD BOLT5/16” X 1/2”
FULL THREAD QTY. 2
KEY #65 ALLEN HEAD BOLT5/16” X 1 1/8”
FULL THREAD QTY. 1
83
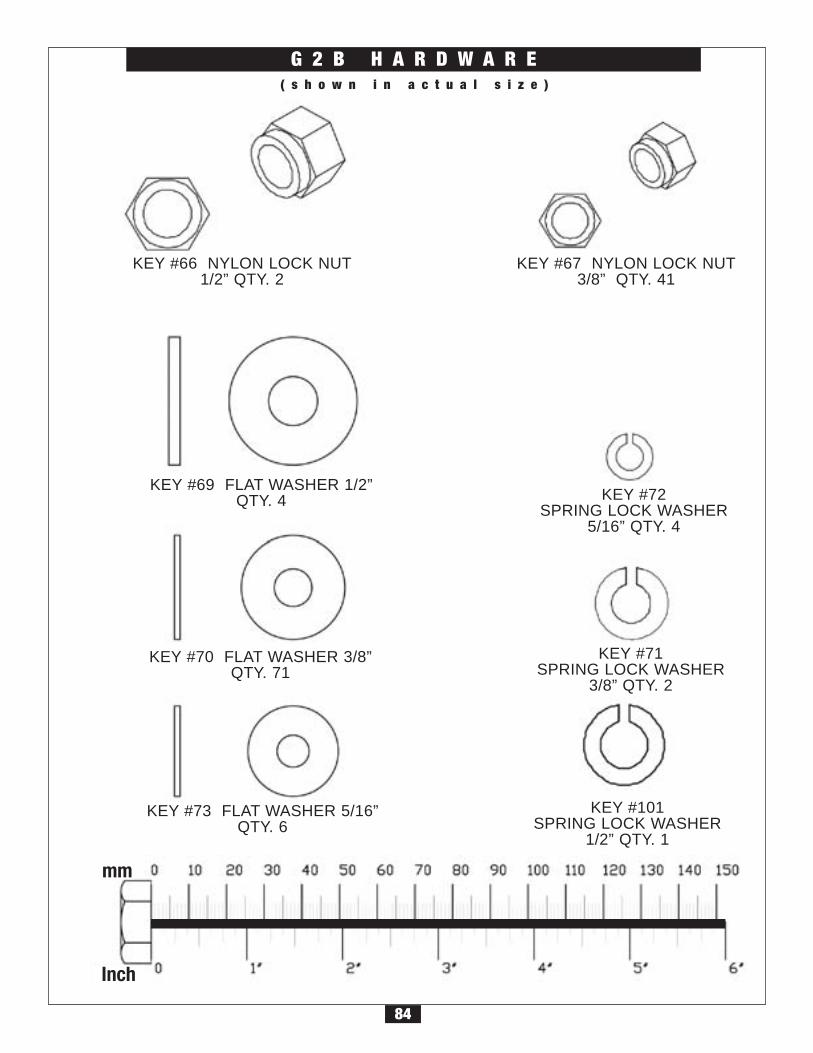
( s h o w n i n a c t u a l s i z e )
G 2 B H A R D W A R E
mm
Inch
KEY #66 NYLON LOCK NUT1/2” QTY. 2
KEY #67 NYLON LOCK NUT3/8” QTY. 41
KEY #69 FLAT WASHER 1/2”QTY. 4
KEY #70 FLAT WASHER 3/8”QTY. 71
KEY #73 FLAT WASHER 5/16”QTY. 6
KEY #71 SPRING LOCK WASHER
3/8” QTY. 2
KEY #72 SPRING LOCK WASHER
5/16” QTY. 4
KEY #101 SPRING LOCK WASHER
1/2” QTY. 1
84
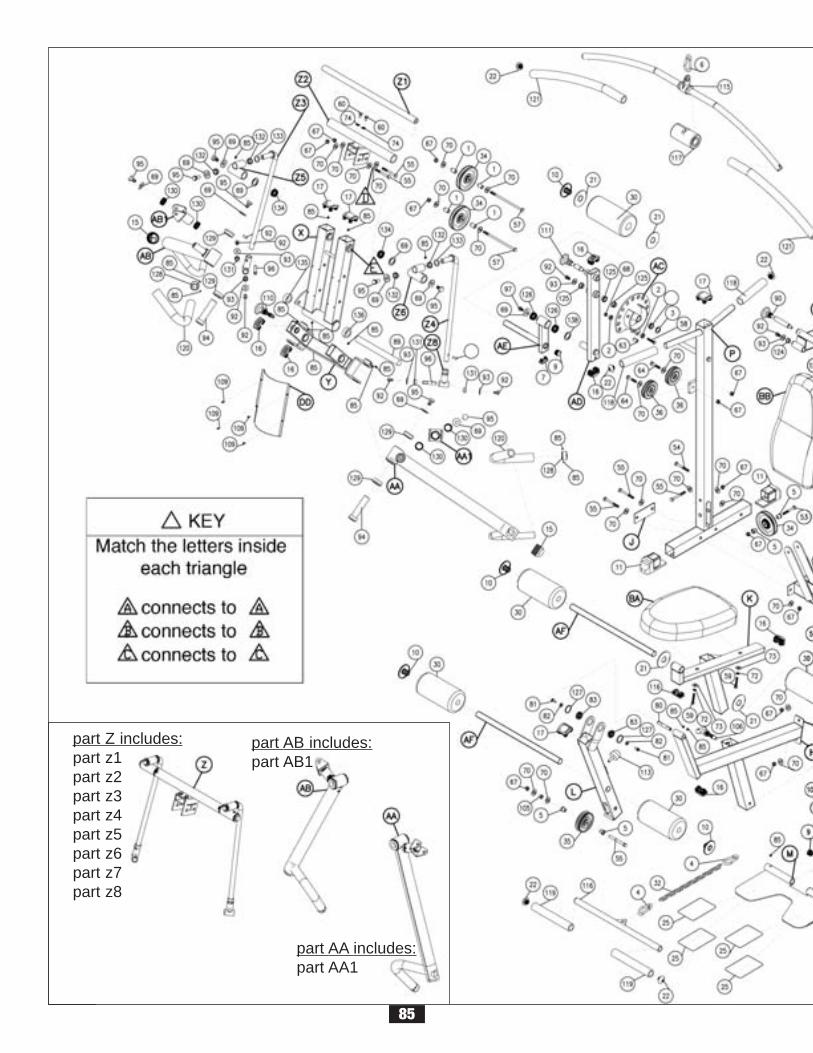
85
part Z includes:part z1part z2part z3part z4part z5part z6part z7part z8
part AB includes:part AB1
part AA includes:part AA1
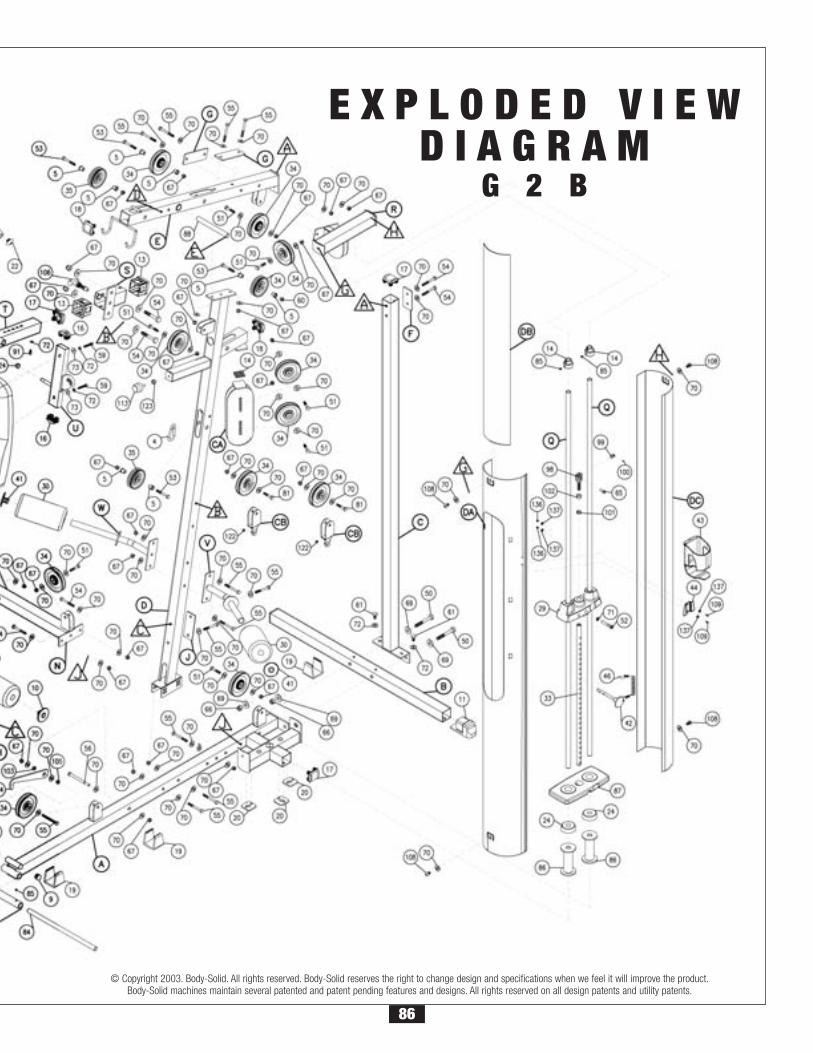
E X P L O D E D V I E WD I A G R A M
G 2 B
© Copyright 2003. Body-Solid. All rights reserved. Body-Solid reserves the right to change design and specifications when we feel it will improve the product.Body-Solid machines maintain several patented and patent pending features and designs. All rights reserved on all design patents and utility patents.
86