management console help - micro focus users ... (web user interface, java gui, or cli), any error...
TRANSCRIPT

Revised 24-March-2015
AccuSync™
Management Console HelpVersion 2015.1

Copyright and TrademarksCopyright © Micro Focus 2015. All rights reserved.
This product incorporates technology that may be covered by one or more of the following patents: U.S. Patent Numbers: 7,437,722; 7,614,038; 8,341,590; 8,473,893; 8,548,967.
AccuRev, AgileCycle, and TimeSafe are registered trademarks of AccuRev, Inc.
AccuBridge, AccuReplica, AccuSync, AccuWork, AccuWorkflow, GitCentric, Kando, and StreamBrowser are trademarks of AccuRev, Inc.
All other trade names, trademarks, and service marks used in this document are the property of their respective owners.

AccuSync™ Management Console Help iii
Table of Contents
Preface......................................................................................................................... ixAdministrator’s Role........................................................................................................................... ixUsing This Book ................................................................................................................................. ixTypographical Conventions ................................................................................................................. xContacting Technical Support.............................................................................................................. x
1. Overview................................................................................................................... 1What is AccuSync™? .......................................................................................................................... 1Synchronization Behavior Defined by the AccuSync Configuration .................................................. 2The Default AccuSync Configuration.................................................................................................. 2
Creating a New Configuration....................................................................................................... 2AccuSync™ Configuration Components............................................................................................. 3Other AccuSync™ Components .......................................................................................................... 4What to Do Next .................................................................................................................................. 4
2. AccuSync™ Quick Start ......................................................................................... 5Overview.............................................................................................................................................. 5Step 1: Configure JIRA for AccuSync................................................................................................. 6
Configure JIRA to Accept Remote API Calls ............................................................................... 6Install the JIRA Plugin for AccuSync™ ....................................................................................... 6
Step 2: Set Up the AccuWork™ Schema ............................................................................................ 8Using the Default AccuWork™ Schema....................................................................................... 8Modifying an Existing AccuWork™ Schema............................................................................... 9Refreshing the AccuSync Configuration..................................................................................... 14
Step 3: Add ITS Project to AccuWork Issue Records ....................................................................... 14Rally Users Only: Specifying Nested Project Names ................................................................. 15
Step 4: Add AccuWork Fields to Your ITS Schema ......................................................................... 16All ITSs: Refresh the AccuSync™ Configuration ...................................................................... 17BMC Remedy Users.................................................................................................................... 17ClearQuest Users ......................................................................................................................... 17Rally Users .................................................................................................................................. 18JIRA Users................................................................................................................................... 19HP QC Users ............................................................................................................................... 21
Step 5: Create the AccuSync User ...................................................................................................... 22Requirements for the AccuSync User ......................................................................................... 23
Step 6: Start the AccuSync Management™ Console......................................................................... 24Before You Begin........................................................................................................................ 24Starting the AccuSync Management Console ............................................................................. 24Troubleshooting AccuSync Management Console Problems ..................................................... 25Stopping the AccuSync™ Management Console ....................................................................... 25
Step 7: Edit the AccuWork™ and ITS Connection Settings ............................................................. 26Before You Begin........................................................................................................................ 26Editing AccuWork™ Connection Settings.................................................................................. 27Editing ITS Connection Settings ................................................................................................. 28

AccuSync™ Management Console Help iv
Step 8: Review the Default Configuration ......................................................................................... 30Next Steps .......................................................................................................................................... 30
3. Working with AccuSync™ Configurations31
Running the Initial Synchronization .................................................................................................. 31Initial Synchronization After Upgrading from AccuBridge™.................................................... 31Initial Synchronization After Upgrading from a Previous AccuSync™ Release........................ 32Initial Synchronization After Installing AccuSync™ with New ITSs ........................................ 32Initial Synchronization After Installing AccuSync™ with Existing ITSs .................................. 33
Running an AccuSync™ Configuration ............................................................................................ 33Restarting an AccuSync™ Configuration.......................................................................................... 34
Example ....................................................................................................................................... 34Running a Synchronization Pattern.................................................................................................... 35Understanding Synchronization Status .............................................................................................. 35
Getting Status Details .................................................................................................................. 36The AccuSync Log ...................................................................................................................... 36
Responding to Errors.......................................................................................................................... 37Types of Errors Recorded by AccuSync ..................................................................................... 37Error Reporting............................................................................................................................ 38Changing Network Settings......................................................................................................... 39Email Notification for AccuSync Events .................................................................................... 40
Setting Watermarks............................................................................................................................ 41Adjusting the AccuWork Watermark .......................................................................................... 43Adjusting the ITS Watermark...................................................................................................... 44
Stopping Configurations and Synchronization Patterns .................................................................... 45Stopping an AccuSync Configuration ......................................................................................... 45Stopping a Synchronization Pattern ............................................................................................ 45
Backing Up and Restoring AccuSync Configurations....................................................................... 45Backing Up an AccuSync Configuration .................................................................................... 46Restoring an AccuSync Configuration ........................................................................................ 47
Using AccuSync™ with AccuRev Workflow ................................................................................... 47Exposing Workflow Transitions to AccuSync™ ........................................................................ 48
Summary of AccuSync Actions and Status Symbols ........................................................................ 49Configurations and Sync Patterns Tables: Action and Status Information ................................. 49Connections Table: Action and Status Information .................................................................... 50
4. Customizing the Default Configuration51
What is a Default Configuration? ...................................................................................................... 51Making Changes to AccuSync™ Configurations .............................................................................. 51Editing Synchronization Patterns....................................................................................................... 52
What to Do Next.......................................................................................................................... 52Editing Mapping Definitions.............................................................................................................. 52
What to Do Next.......................................................................................................................... 53Editing Field Mappings...................................................................................................................... 53
What to Do Next.......................................................................................................................... 54Editing Mapping Groups.................................................................................................................... 54
What to Do Next.......................................................................................................................... 55

AccuSync™ Management Console Help v
Advanced AccuSync™ Configuration Settings................................................................................. 55
5. Creating a New Configuration .............................................................................. 57Before You Begin .............................................................................................................................. 57
Copying an AccuSync™ Configuration...................................................................................... 57Overview of Creating a New Configuration ...................................................................................... 57Creating the AccuWork™ and ITS Connections............................................................................... 57
What to Do Next.......................................................................................................................... 60Creating Mapping Definitions............................................................................................................ 60
Base Mapping Definitions ........................................................................................................... 61Required Field Mappings: Key and Link .................................................................................... 61Creating a Mapping Definition.................................................................................................... 64Copying a Mapping Definition.................................................................................................... 66Creating a Mapping Definition Filter .......................................................................................... 67
Creating Field Mappings.................................................................................................................... 70Required Field Mappings for ClearQuest, HP QC, JIRA, and BMC Remedy............................ 70Mapping Groups .......................................................................................................................... 71Synchronization Types Inherited from Synchronization Pattern ................................................ 72Transformers................................................................................................................................ 72Creating a Mapping Group .......................................................................................................... 75Creating a Field Mapping ............................................................................................................ 76What to Do Next.......................................................................................................................... 78
Creating Synchronization Patterns..................................................................................................... 78Synchronization Types ................................................................................................................ 78Creating a Synchronization Pattern ............................................................................................. 79Running Synchronizations........................................................................................................... 80
A. BMC Remedy Configuration Reference81
Mapping Definitions Summary.......................................................................................................... 81Basic ............................................................................................................................................ 82Incidents....................................................................................................................................... 83
Synchronization Patterns Summary ................................................................................................... 83
B. HP QC Configuration Reference .......................................................................... 85Mapping Definitions Summary.......................................................................................................... 85
basic ............................................................................................................................................. 86basicCpk ...................................................................................................................................... 86DefectMapping ............................................................................................................................ 87DefectCPKMapping .................................................................................................................... 87
Synchronization Patterns Summary ................................................................................................... 87
C. JIRA Configuration Reference ............................................................................. 89Mapping Definitions Summary.......................................................................................................... 89
basic ............................................................................................................................................. 90basicCpk ...................................................................................................................................... 91DefectMapping ............................................................................................................................ 92CpkDefectMapping ..................................................................................................................... 92TaskMapping ............................................................................................................................... 92

AccuSync™ Management Console Help vi
CpkTaskMapping ........................................................................................................................ 93NewFeatureMapping ................................................................................................................... 93CpkNewFeatureMapping............................................................................................................. 93ImprovementMapping ................................................................................................................. 93CpkImprovementMapping........................................................................................................... 94SubTaskMapping......................................................................................................................... 94CpkSubTaskMapping .................................................................................................................. 94
Synchronization Patterns Summary ................................................................................................... 94
D. Rally Configuration Reference ............................................................................. 97Mapping Definitions Summary.......................................................................................................... 97
basic ............................................................................................................................................. 98basicCpk ...................................................................................................................................... 98DefectMapping ............................................................................................................................ 99cpkDefectMapping ...................................................................................................................... 99StoryMapping .............................................................................................................................. 99cpkStoryMapping ........................................................................................................................ 99TaskMapping ............................................................................................................................. 100CpkTaskMapping ...................................................................................................................... 100
Synchronization Patterns Summary ................................................................................................. 100
E. IBM Rational ClearQuest Configuration Reference.......................................... 101Mapping Definitions Summary........................................................................................................ 101
basic ........................................................................................................................................... 102RequestMapping........................................................................................................................ 102TaskMapping ............................................................................................................................. 102
Synchronization Patterns Summary ................................................................................................. 103
F. AccuSync™ Services.......................................................................................... 105Working with the AccuSync™ Server............................................................................................. 105
Starting the AccuSync™ Server................................................................................................ 105Stopping the AccuSync™ Server .............................................................................................. 105
Working with the Tomcat Server for AccuSync™.......................................................................... 106Starting the Tomcat Server for AccuSync™............................................................................. 106Stopping the Tomcat Server for AccuSync™ ........................................................................... 106
G. AccuSync™ ManagementConsole Reference .............................................................................................. 107AccuSync Management Console Page............................................................................................. 107Configuration Page........................................................................................................................... 107
Connections Table ..................................................................................................................... 107Sync Patterns Table ................................................................................................................... 108Mapping Definitions Table........................................................................................................ 108
Mapping Definition Page ................................................................................................................. 108Required Field Mappings .......................................................................................................... 108Field Mappings .......................................................................................................................... 109
Status Page ....................................................................................................................................... 109Errors Table ............................................................................................................................... 109
Admin Details for Configuration Page ............................................................................................ 110

AccuSync™ Management Console Help vii
Mapping Groups Table.............................................................................................................. 110Advanced Settings ..................................................................................................................... 110Mail Settings.............................................................................................................................. 111
New Configuration Dialog Box ....................................................................................................... 111Copy Configuration Dialog Box ...................................................................................................... 111New AccuRev Connection Dialog Box ........................................................................................... 111
Testing the AccuRev Connection .............................................................................................. 112Edit AccuRev Connection Dialog Box ............................................................................................ 113
Testing the AccuRev Connection .............................................................................................. 113New ITS Connection Dialog Box..................................................................................................... 113
Testing the ITS Connection....................................................................................................... 114Edit ITS Connection Dialog Box...................................................................................................... 115
Testing the ITS Connection....................................................................................................... 116New Field Mapping Dialog Box ...................................................................................................... 118Edit Field Mapping Dialog Box....................................................................................................... 119New Group Dialog Box ................................................................................................................... 119New Mapping Value Dialog Box..................................................................................................... 120New Mapping Definition Dialog Box.............................................................................................. 120Copy Mapping Definition Dialog Box............................................................................................. 121Edit Mapping Definition Dialog Box............................................................................................... 121AccuWork Filter Dialog Box ........................................................................................................... 122ITS Filter Dialog Box ....................................................................................................................... 123Filter Record Dialog Box................................................................................................................. 123Specify Issue Key Fields Dialog Box .............................................................................................. 123Specify Issue Link Fields Dialog Box ............................................................................................. 124New Sync Pattern Dialog Box ......................................................................................................... 124Edit Sync Pattern Dialog Box .......................................................................................................... 125Change Watermark Dialog Box ....................................................................................................... 125
Index.......................................................................................................................... 127

AccuSync™ Management Console Help viii

AccuSync™ Management Console Help ix
PrefaceThis book is your guide to configuring, running, and managing AccuSync™. It is intended for the AccuRev® and issue tracking system (ITS) system administrator. Once deployed, AccuSync does not
affect or impose itself on day-to-day usage of AccuRev, AccuWork™, or your ITS. Users of these products should refer to their product documentation for help with any questions.
Administrator’s RoleThe role of the AccuSync administrator is to install, configure, run, and maintain AccuSync. Configuration and maintenance procedures are described in this book. See the AccuSync™ Installation and Release Notes for installation procedures.
Using This BookThis book assumes you are familiar with your operating system and its commands, as well as with AccuRev, AccuWork, and your ITS. The remaining chapters in this book provide an overview of AccuSync and tell you how to create and manage an AccuSync Configuration:
Chapter Description
Chapter 1 Overview Describes AccuSync and how it synchronizes issue records with your ITS.
Chapter 2 AccuSync Quick Start Describes how to use the default AccuSync configuration to get AccuSync up and running as efficiently as possible.
Chapter 3 Working with AccuSync Configurations
Describes administrative procedures like running an AccuSync Configuration, scheduling synchronizations, and setting watermarks.
Chapter 4 Customizing the Default Configuration
Describes how to customize the default AccuSync configuration.
Chapter 5 Creating a New Configuration
Describes how to create a new configuration when the default configuration does not suit your needs.
Appendix A BMC Remedy Configuration Reference
Summarizes the mapping definitions, field mappings, and synchronization patterns required to successfully synchronize AccuRev with BMC Remedy.
Appendix B HP QC Configuration Reference
Summarizes the mapping definitions, field mappings, and synchronization patterns required to successfully synchronize AccuRev with HP QC.
Appendix C JIRA Configuration Reference
Summarizes the mapping definitions, field mappings, and synchronization patterns required to successfully synchronize AccuRev with Atlassian JIRA.
Appendix D Rally Configuration Reference
Summarizes the mapping definitions, field mappings, and synchronization patterns required to successfully synchronize AccuRev with Rally.

x AccuSync™ Management Console Help
Typographical ConventionsThis book uses the following typographical conventions:
Contacting Technical SupportMicro Focus offers a variety of options to meet your technical support needs as summarized in the following table.
When you contact Micro Focus technical support, please include the following information:
• The version of AccuRev and any other AccuRev products you are using (AccuSync or GitCentric, for example).
• Your operating system.
• The version of relevant third-party software (if you are using AccuSync, for example, the version of your ITS).
Appendix E IBM Rational ClearQuest Configuration Reference
Summarizes the mapping definitions, field mappings, and synchronization patterns required to successfully synchronize AccuRev with IBM Rational ClearQuest.
Appendix F AccuSync™ Services Provides procedures for starting and stopping AccuSync services.
Appendix G AccuSync™ Management Console Reference
Provides reference information for the screens and dialog boxes in the AccuSync Management Console.
Convention Description
blue sans-serif Used for sample code or output.
red monospace Used for examples.
bold Used for command names, and button names in the AccuSync Management Console
light italic Used for emphasis, book titles, and for first use of important terms
blue italic Identifies a hyperlink (to a page or Web URL, for example)
For Visit
Information about technical support services http://supportline.microfocus.com/
Information about platforms support http://supportline.microfocus.com/prodavail.aspx
Product downloads and installations http://supportline.microfocus.com/websync/productupdatessearch.aspx
Product documentation http://supportline.microfocus.com/productdoc.aspx
SupportLine phone numbers, listed by country
http://www.microfocus.com/about/contact/support/assistance.aspx
Chapter Description

AccuSync™ Management Console Help xi
• A brief description of the problem you are experiencing. Be sure to include which AccuRev interface you were using (Web user interface, Java GUI, or CLI), any error messages you received, what you were doing when the error occurred, whether the problem is reproducible, and so on.
• A description of any attempts you have made to resolve the issue.
A simple assessment of how the issue affects your organization.

xii AccuSync™ Management Console Help

AccuSync™ Management Console Help 1
1. OverviewThis chapter introduces AccuSync™. It describes how synchronization works and the components that can be included in an AccuSync Configuration.
What is AccuSync™?Accu Sync is a fully bidirectional utility that synchronizes AccuWork™ issues in an AccuRev® depot with issues in one or more projects in your information tracking system (ITS), as shown in the following illustration.
In this example, a new issue, 21700, is created and assigned to Owen in AccuWork; AccuSync automatically creates this issue as defect DE509. When the State of defect DE509 is changed from New to WIP in your ITS, AccuSync automatically synchronizes the changed value with the Status field in the corresponding AccuWork issue. Finally, an ITS user creates a new defect, DE510. This new issue is automatically created as issue 21701 in AccuWork.
Notice that in this example the AccuWork Assigned field corresponds to the Owner field in the ITS schema; similarly, the AccuWork Status field corresponds to the State field in your ITS. As the AccuSync administrator, you decide how to map fields in one system to those in another, ensuring that issue data in one system matches data in the other, regardless of how it is labeled. You also decide the types of issues you want to synchronize, how often you want to synchronize your issue tracking systems, and whether or not you want AccuSync to perform a two-way synchronization. Predefined Accusync configurations help simplify the field mapping process.
AccuSync currently supports these ITSs: Atlassian JIRA, BMC Remedy ITSM, HP Quality Center, IBM Rational ClearQuest, and Rally Enterprise Edition. See the AccuRev web site for more information:
http://www.accurev.com/integrations.html

2 AccuSync™ Management Console Help
Synchronization Behavior Defined by the AccuSync ConfigurationThe details of how AccuSync synchronizes AccuWork issues with issues in an ITS project are described in the AccuSync Configuration. You use a separate AccuSync Configuration for each AccuRev depot you want to synchronize with an ITS project.
The information in an AccuSync Configuration includes:
• Connection settings for the AccuWork and ITS systems that host the issues you want to synchronize.
• The specific fields in these issues whose data you want to synchronize. For example, you might want to map the Comments field in an AccuWork issue to the Description field in an ITS issue, and you might choose not to synchronize a field that is peculiar to one system. You can create a mapping definition, a named group of field mappings, and use it as a building block to create other, more specialized mapping definitions. You might have different mapping definitions for defects and tasks, for example.
• How frequently you want AccuSync to synchronize AccuWork with your ITS. You can perform an initial synchronization of all issues in a depot based on a transaction number or date you specify. After the initial synchronization, you can use a synchronization pattern to schedule synchronization of AccuWork issues and ITS issues at any interval you specify. You can also perform synchronizations manually whenever you choose.
• Whether you want AccuSync to perform two-way synchronization of issue and change package data, or whether you want to use one-way synchronization to capture issue data from your ITS (or vice-versa). Synchronization patterns in the default AccuSync configuration are defined as two-way but you can change them. See Synchronization Types for more information.
• Optional transformers that let you convert values in one system to different values in the other. For example, you can use transformers to strip the @domain_name suffix from user names for inclusion in an AccuWork issue. You can also create custom transformers.
See AccuSync™ Configuration Components for a complete list of the components that can make up an AccuSync Configuration.
The Default AccuSync ConfigurationAccuSync includes a default configuration for supported ITSs that includes the field mappings, mapping groups, mapping definitions, and other information required to synchronize issues in AccuWork and your ITS.
See Chapter 2 AccuSync™ Quick Start to learn how to get started with the default configuration.
Creating a New ConfigurationIn most cases, customizing the default configuration is easier than creating a new configuration from scratch. You might want to create a new configuration if you have heavily modified your AccuWork and ITS schema, for example. See Chapter 5 Creating a New Configuration for more information.
Tip: Before creating a new configuration, review the components in the default configuration to understand whether it might be easier to customize the default configuration.

AccuSync™ Management Console Help 3
AccuSync™ Configuration ComponentsThe following table summarizes the individual components that can comprise an AccuSync Configuration. Note that required components are predefined in default AccuSync Configurations.
To see how AccuSync default configuration components are defined, see the configuration reference appendix for your ITS:
• Appendix A: BMC Remedy Configuration Reference
• Appendix B: HP QC Configuration Reference
• Appendix C: JIRA Configuration Reference
• Appendix D: Rally Configuration Reference
• Appendix E: IBM Rational ClearQuest Configuration Reference
Component Description Required?
Connection Each AccuSync Configuration has two connection components—one for AccuWork, and one for the ITS. In addition to connection properties, the connection component identifies the AccuRev depot and ITS project whose issues the AccuSync Configuration will synchronize.
Yes
Mapping definition
The mapping definition describes which types of issues (defects or tasks, for example) will be synchronized and, for that issue type, which AccuWork and ITS fields will be synchronized.
Yes; typically one for each type of issue being synchronized
Synchronization pattern
The synchronization pattern specifies how often AccuSync will perform the synchronization task specified by the associated mapping definition, and whether that synchronization is one-way or two-way. An AccuSync Configuration can have multiple synchronization patterns.
Yes; typically one for each type of issue being synchronized
Field mapping A field mapping is a matched pair of AccuWork and ITS issue fields that you want to synchronize (Assigned To and Owner, for example). One or more field mappings are organized within a mapping definition.
Yes
Mapping group A mapping group is a table that contains the valid values for the same field in different systems—one system might define the values 1, 2, and 3 for a Priority field, while the other system might use Blocking, Important, and Moderate, for example. Mapping groups are always associated with a field mapping when valid values for a field vary across systems.
No. Required only if valid values for a field differ across systems
Transformers A transformer is a utility AccuSync uses to convert data from one format to another during synchronization.
No
Filters A filter is a utility AccuSync uses to identify which issue records to include in, or omit from, synchronization tasks.
No

4 AccuSync™ Management Console Help
Other AccuSync™ ComponentsIn addition to the AccuSync Configuration, AccuSync consists of these other components:
• The AccuSync Management Console – You use the AccuSync Management Console to create and manage AccuSync Configurations, and to monitor the synchronization activity between the systems represented by each configuration. Examples of the tasks you perform using the AccuSync Management Console include:
• Specifying and running AccuSync Configurations
• Checking the status of an AccuSync Configuration
• Setting watermarks
• Setting up email notification
The AccuSync Management Console main page is the entry point for all tasks associated with creating, maintaining, and running AccuSync Configurations. Other pages of the AccuSync Management Console become accessible once an AccuSync Configuration has been created.
Tip: Clicking the AccuSync logo at the top of any page takes you to the main page.
See Step 6: Start the AccuSync Management™ Console for more information.
• The AccuSync server – The AccuSync server is the engine that performs the synchronization tasks between the AccuRev depot and the ITS project. The AccuSync server is typically started as part of the installation process; it must be running in order for you to start the AccuSync Management Console. See Appendix F: AccuSync™ Services for more information.
What to Do NextWhen you are ready to begin the configuration process, proceed to Chapter 2 AccuSync™ Quick Start.

AccuSync™ Management Console Help 5
2. AccuSync™ Quick StartThis chapter describes how to set up the default configurations that are installed with AccuSync. There are default configurations for all supported ITSs, each with its own field mappings and mapping definitions. See the appendix for your ITS to learn which fields are included in the default configuration. Note that even if the default configuration contains all the field mappings you require, you still need to perform the procedures described in this chapter.
For general information about default configurations, see Chapter 4 Customizing the Default Configuration.
For information about what fields are mapped by default, see the configuration appendix for your ITS.
If you want to create a new AccuSync Configuration, see Chapter 5 Creating a New Configuration.
OverviewSetting up the default ITS configuration involves performing tasks in your ITS, AccuWork, AccuRev, and AccuSync as summarized in the following table. Note that some steps are unique to a particular ITS and that others vary slightly by ITS.
Step Description Where Performed For More Information, See
1 JIRA only: Configure JIRA to enable AccuSync
In JIRA Step 1: Configure JIRA for AccuSync
2 Set up the AccuWork schema In AccuWork Step 2: Set Up the AccuWork™ Schema
3 Add ITS project information to AccuWork issue records
In AccuWork Step 3: Add ITS Project to AccuWork Issue Records
4 Modify your ITS to accommodate record synchronization
In your ITS Step 4: Add AccuWork Fields to Your ITS Schema
5 Create the AccuSync user In AccuRev and in your ITS Step 5: Create the AccuSync User
6 Start the AccuSync Management Console
In AccuSync Step 6: Start the AccuSync Management™ Console
7 Specify the connection settings for AccuWork and your ITS
In AccuSync Step 7: Edit the AccuWork™ and ITS Connection Settings
8 Review the default ITS configuration
In AccuSync Step 8: Review the Default Configuration

6 AccuSync™ Management Console Help
Step 1: Configure JIRA for AccuSyncNote: This step is for JIRA users only. If you are using another ITS, go to Step 2: Set Up the AccuWork™ Schema.
If you are using AccuSync with JIRA, you need to do the following before you can use AccuSync:
• Configure JIRA to accept remote API calls
• Install the JIRA plugin for AccuSync
Configure JIRA to Accept Remote API CallsTo configure JIRA to accept remote API calls:
1. In JIRA, open the Administration tab.
2. Navigate Global Settings > General Configuration.
3. At the bottom of the General Configuration page, click Edit Configuration.
4. Locate the Options section, and ensure that the Accept remote API calls property is set to ON.
5. Click the Update button to save your changes.
Install the JIRA Plugin for AccuSync™
This section describes the JIRA plugin for AccuSync and how to install them. If you already installed the plugin as part of upgrading AccuSync from an earlier version, you can skip this section.
Purpose of the JIRA Plugins for AccuSyncJIRA plugins for AccuSync automatically add the following custom fields to JIRA:
• AccuWorkIssueLink -- Stores the URL that JIRA users can use to open a web browser and display the issue in the AccuRev Web UI.
• AccuWorkKey -- Stores the unique alphanumeric key for each AccuWork issue record.
• AccuWorkChangePackage -- Stores summary AccuWork issue change package information.
• AccuWorkChangePackageHistory -- Stores detailed AccuWork issue change package information.
These fields appear on the JIRA View Custom Fields page only after AccuSync has performed a synchronization task.
Different Plugins for JIRA 4 and JIRA 5Note: Support for JIRA 4.x is deprecated and will be dropped in a future release.
AccuRev provides different plugins for JIRA 4 and JIRA 5, named AccuSyncJiraPlugin4.jar and AccuSyncJiraPlugin5.jar, respectively. These files are installed to the \jiraPlugin directory where you installed AccuSync (c:\Program Files (x86)\AccuSync\jiraPlugin\, for example).
Both plugins are what Atlassian refers to as Version 2 plugins. Version 2 plugins have different installation procedures than Version 1 plugins. For more information, refer to your JIRA documentation:
• For JIRA 4: http://confluence.atlassian.com/display/JIRA040/Managing+JIRA's+Plugins
• For JIRA 5: http://confluence.atlassian.com/display/JIRA050/Managing+JIRA's+Plugins

AccuSync™ Management Console Help 7
JIRA 6 users should use the JIRA 5 plugin.
How to Install the JIRA Plugin for AccuSync1. Stop the AccuSync server if it is running.
In Windows:a. Open the Services window.
For example: Type services.msc in the Windows Start Search box and then press Enter.
b. Select the AccuSync service.
c. Click Stop the service.
In Linux or Solaris:Run shutdown.sh in the /bin directory where you installed AccuSync.
2. Back up any existing AccuSync Configurations.
3. Run the utility to update the AccuSync database.
In Windows:Run update_db.bat in the \bin directory where you installed AccuSync.
In Linux or Solaris:Run update_db.sh in the /bin directory where you installed AccuSync.
4. Follow the instructions in your JIRA documentation for installing plugins:
• For JIRA 4: http://confluence.atlassian.com/display/JIRA040/Managing+JIRA's+Plugins
• For JIRA 5: http://confluence.atlassian.com/display/JIRA050/Managing+JIRA's+Plugins
JIRA 6 users should use the JIRA 5 plugin.
5. Start the AccuSync server:
In Windows:a. Open the Services window.
For example: Type services.msc in the Windows Start Search box and then press Enter.
b. Select the AccuSync service.
c. Click Start the service.
Tip: If you have not already done so, consider changing the Startup Type to Automatic.In Linux or Solaris:Click the AccuSync_Server shortcut on your desktop.
Note: If shortcuts are not available on your desktop, start the AccuSync server manually by running startup.sh in the /bin directory where you installed AccuSync.
8 AccuSync™ Management Console Help
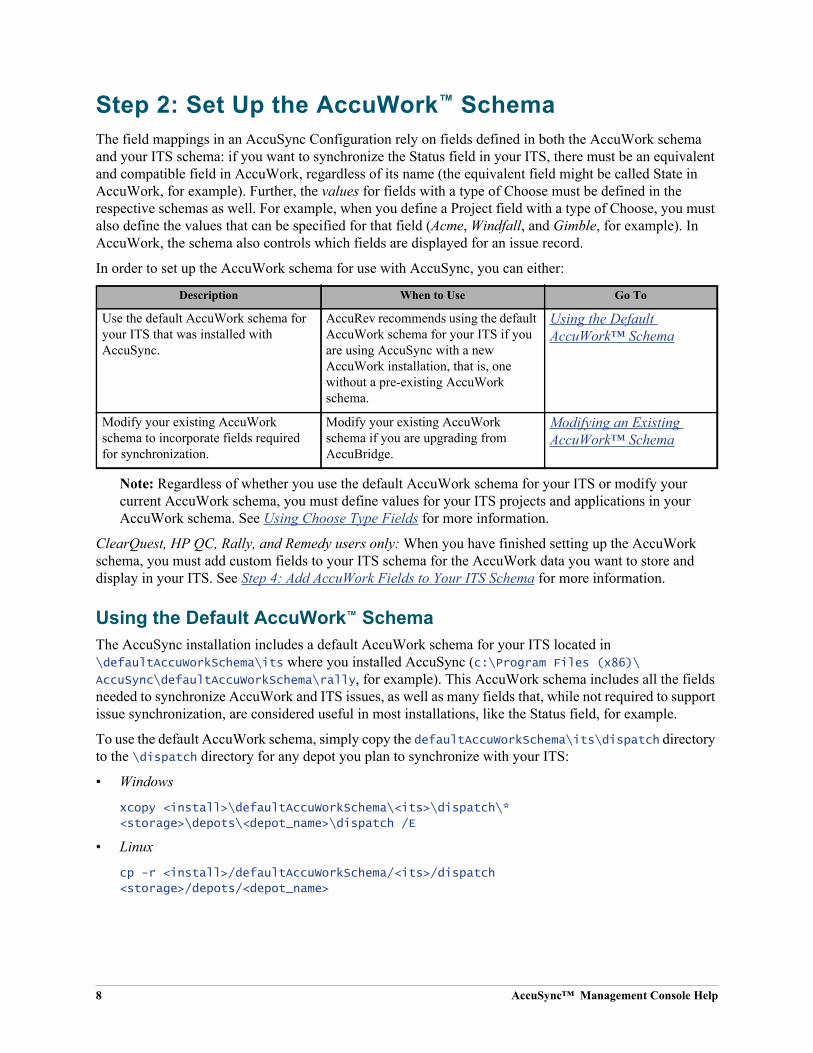
Step 2: Set Up the AccuWork™ SchemaThe field mappings in an AccuSync Configuration rely on fields defined in both the AccuWork schema and your ITS schema: if you want to synchronize the Status field in your ITS, there must be an equivalent and compatible field in AccuWork, regardless of its name (the equivalent field might be called State in AccuWork, for example). Further, the values for fields with a type of Choose must be defined in the respective schemas as well. For example, when you define a Project field with a type of Choose, you must also define the values that can be specified for that field (Acme, Windfall, and Gimble, for example). In AccuWork, the schema also controls which fields are displayed for an issue record.
In order to set up the AccuWork schema for use with AccuSync, you can either:
Note: Regardless of whether you use the default AccuWork schema for your ITS or modify your current AccuWork schema, you must define values for your ITS projects and applications in your AccuWork schema. See Using Choose Type Fields for more information.
ClearQuest, HP QC, Rally, and Remedy users only: When you have finished setting up the AccuWork schema, you must add custom fields to your ITS schema for the AccuWork data you want to store and display in your ITS. See Step 4: Add AccuWork Fields to Your ITS Schema for more information.
Using the Default AccuWork™ SchemaThe AccuSync installation includes a default AccuWork schema for your ITS located in \defaultAccuWorkSchema\its where you installed AccuSync (c:\Program Files (x86)\AccuSync\defaultAccuWorkSchema\rally, for example). This AccuWork schema includes all the fields needed to synchronize AccuWork and ITS issues, as well as many fields that, while not required to support issue synchronization, are considered useful in most installations, like the Status field, for example.
To use the default AccuWork schema, simply copy the defaultAccuWorkSchema\its\dispatch directory to the \dispatch directory for any depot you plan to synchronize with your ITS:
• Windows
xcopy <install>\defaultAccuWorkSchema\<its>\dispatch\* <storage>\depots\<depot_name>\dispatch /E
• Linux
cp -r <install>/defaultAccuWorkSchema/<its>/dispatch <storage>/depots/<depot_name>
Description When to Use Go To
Use the default AccuWork schema for your ITS that was installed with AccuSync.
AccuRev recommends using the default AccuWork schema for your ITS if you are using AccuSync with a new AccuWork installation, that is, one without a pre-existing AccuWork schema.
Using the Default AccuWork™ Schema
Modify your existing AccuWork schema to incorporate fields required for synchronization.
Modify your existing AccuWork schema if you are upgrading from AccuBridge.
Modifying an Existing AccuWork™ Schema

AccuSync™ Management Console Help 9
Where:
• <install> is the AccuSync installation root; c:\Program Files (x86)\AccuSync\, for example
• <its> is the name of your ITS; rally, for example
• <storage> is the AccuRev installation \storage directory; c:\Program Files (x86)\AccuRev\storage, for example
• <depot_name> is the AccuRev depot name; fiesta, for example
Note: Each AccuRev depot has its own AccuWork schema. You must copy the default AccuWork schema to every depot whose issues you plan to synchronize with your ITS.
What to Do NextAfter you have copied the default AccuWork schema to each of the depots whose issues you want to synchronize with those in your ITS, you must create values for your project (or, in the case of Remedy, application) mapping group. Go to Using Choose Type Fields for more information.
Modifying an Existing AccuWork™ SchemaAccuRev recommends that you use the default AccuWork schema for your ITS that is included in your AccuSync installation, as described in Step 2: Set Up the AccuWork™ Schema. However, users upgrading from AccuBridge might prefer to make changes to their existing AccuWork schema, as described in this section.
Required ChangesIf you modify an existing AccuWork schema to support synchronization with your ITS, you need to:
1. Create fields in the AccuWork schema to store ITS data. You create new fields using the Schema tab of the AccuWork Schema Editor. See Create Fields in the AccuWork™ Schema for more information.
2. Add fields to the AccuWork Issue Edit form to display ITS data. You add display fields using the Layout tab of the AccuWork Schema Editor. See Add Fields to the AccuWork™ Issue Edit Form for more information.
For more information on working with the AccuWork schema, including detailed procedures for using the AccuRev Schema Editor, refer to your AccuRev user documentation.

10 AccuSync™ Management Console Help
Create Fields in the AccuWork™ SchemaYou use the Schema tab in the AccuWork Schema Editor to create new fields in the AccuWork issue database:
Refer to your AccuRev user documentation for more information on using the AccuWork Schema Editor.
The following tables summarize the fields you must create in the AccuWork schema for supported ITSs. These are the minimum fields required for AccuSync to synchronize issues with your ITS. Consider creating other fields in the AccuWork schema as needed. For example, you might want to create a state field with a type of Choose whose values are Defined, In-Progress, Completed, and Accepted, for example.
Tip: The Label column has been left empty; consider using it to record the name you plan to use for the field’s label in the AccuWork Issue Edit Form, as described in Add Fields to the AccuWork™ Issue Edit Form. When defining the field Label, consider using the system name with which you are synchronizing as part of the name to remove any ambiguity -- JIRA Issue ID, for example.
ClearQuest. The following table identifies the Rational ClearQuest (ClearQuest) field types and describes how each field is used by AccuSync. New fields must use the name and type shown here.
Field Name Label Type Description
cqKey Text Stores the ClearQuest issue key (SAMPLE00000048, for example) of the request or task associated with the AccuWork issue.Note: If you are currently using AccuBridge, note that the name of the ClearQuest key field has changed.
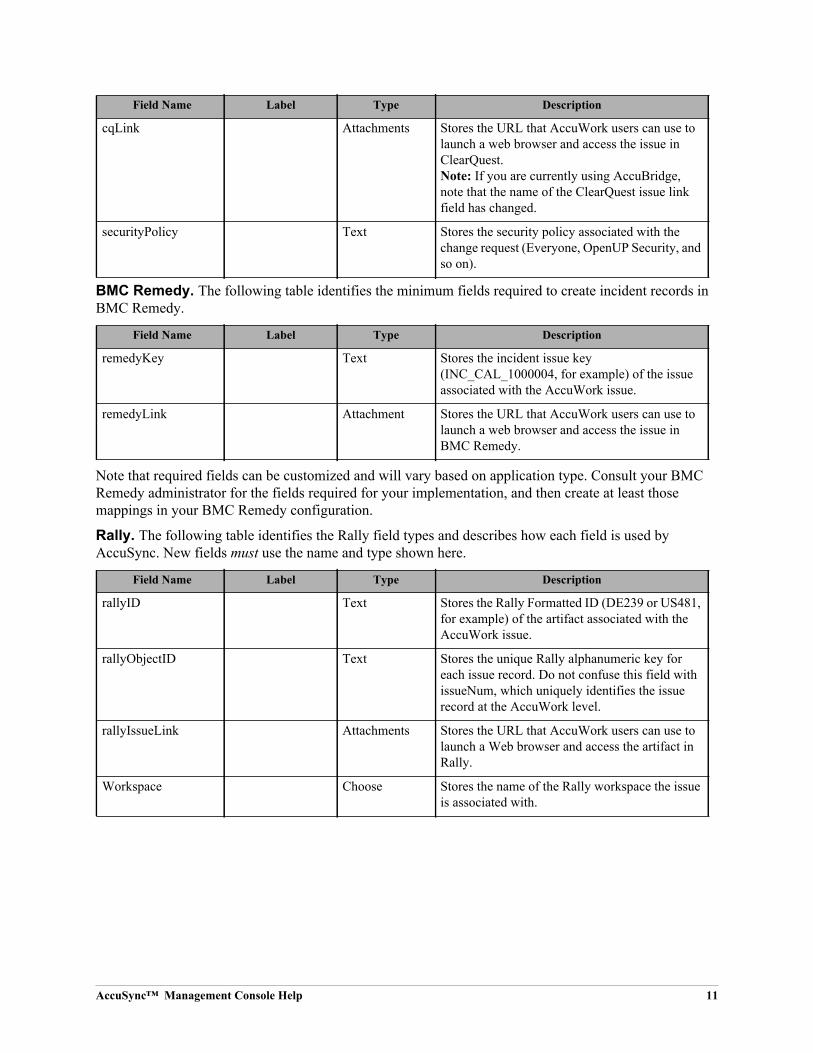
AccuSync™ Management Console Help 11
BMC Remedy. The following table identifies the minimum fields required to create incident records in BMC Remedy.
Note that required fields can be customized and will vary based on application type. Consult your BMC Remedy administrator for the fields required for your implementation, and then create at least those mappings in your BMC Remedy configuration.
Rally. The following table identifies the Rally field types and describes how each field is used by AccuSync. New fields must use the name and type shown here.
cqLink Attachments Stores the URL that AccuWork users can use to launch a web browser and access the issue in ClearQuest.Note: If you are currently using AccuBridge, note that the name of the ClearQuest issue link field has changed.
securityPolicy Text Stores the security policy associated with the change request (Everyone, OpenUP Security, and so on).
Field Name Label Type Description
remedyKey Text Stores the incident issue key (INC_CAL_1000004, for example) of the issue associated with the AccuWork issue.
remedyLink Attachment Stores the URL that AccuWork users can use to launch a web browser and access the issue in BMC Remedy.
Field Name Label Type Description
rallyID Text Stores the Rally Formatted ID (DE239 or US481, for example) of the artifact associated with the AccuWork issue.
rallyObjectID Text Stores the unique Rally alphanumeric key for each issue record. Do not confuse this field with issueNum, which uniquely identifies the issue record at the AccuWork level.
rallyIssueLink Attachments Stores the URL that AccuWork users can use to launch a Web browser and access the artifact in Rally.
Workspace Choose Stores the name of the Rally workspace the issue is associated with.
Field Name Label Type Description

12 AccuSync™ Management Console Help
JIRA. The following table identifies the JIRA field types and describes how each field is used by AccuSync. New fields must use the name and type shown here.
Project Choose Stores the name of the Rally project associated with the Rally workspace.
Note: In Rally, multiple nested projects may have the same name. For example, Project_1 may contain child project Project_ABC and Project_2 may also contain a child project named Project_ABC. For nested projects having the same name as other nested projects, specify the full pathname for the project, using the pipe character.
For example:Project_1|Project_AB CProject_2|Project_AB C
Field Name Label Type Description
jiraKey Text Stores the JIRA issue key (WEB-01, for example) of the issue associated with the AccuWork issue.Note: If you are currently using AccuBridge, note that the name of the JIRA key field has changed.
jiraIssueLink Attachments Stores the URL that AccuWork users can use to launch a web browser and access the issue in JIRA.Note: If you are currently using AccuBridge, note that the name of the JIRA issue link field has changed.
jiraProject Choose Stores the name of the JIRA project associated with the AccuRev depot.Note: Make sure to specify values for your JIRA projects. See Using Choose Type Fields for more information.
type Choose Stores the values of JIRA issue types: Bug, New Feature, Task, and Improvement, for example.Note: If the type field is already defined in your AccuWork Schema, make sure it is of the type Choose and that values for the field have been specified.
Field Name Label Type Description

AccuSync™ Management Console Help 13
HP Quality Center. The following table identifies the HP Quality Center (HP QC) field types and describes how each field is used by AccuSync. New fields must use the name and type shown here.
Using Choose Type FieldsGenerally speaking, it is best to use the Choose type for fields that have pre-defined values, even if those values change from time to time. For example, you might have a Project field whose values change every release cycle -- Acme_2.5, Acme_2.6, Acme_3.0, for example. While you might be inclined to create the Project field using the Text type to avoid periodically updating the AccuWork schema, you should consider using the Choose type to eliminate the opportunity for user error -- acme_2.5 and Acme_2.5 are considered different values because AccuSync is case-sensitive, for example. This recommendation is especially true in environments that take advantage of AccuSync’s two-way synchronization.
When creating a Choose type field -- for Project or Status, for example -- remember to also create the values for those fields.
Refer to your AccuRev user documentation for more information on using the AccuWork Schema Editor.
Add Fields to the AccuWork™ Issue Edit FormAfter you have created fields in the AccuWork schema for your ITS, decide which of these fields you want to display on the AccuWork Issue Edit form. Then, use the Layout tab of the AccuWork Schema Editor to add those fields to the AccuWork Issue Edit Form, as shown in the following illustration:
Refer to your AccuRev user documentation for more information on using the AccuWork Schema Editor.
Field Name Label Type Description
hpKey Text Stores the HP QC issue key (214, for example) of the issue associated with the AccuWork issue.Note: If you are currently using AccuBridge, note that the name of the HP QC key field has changed.
hpLink Attachments Stores the URL that AccuWork users can use to launch a web browser and access the issue in HP QC.Note: If you are currently using AccuBridge, note that the name of the HP QC issue link field has changed.

14 AccuSync™ Management Console Help
What to Do NextAfter you have modified your existing AccuWork schema to support synchronization, you should refresh the AccuSync Configuration to ensure that it is using your changes
Refreshing the AccuSync ConfigurationIf you update the AccuWork schema after you have created an AccuSync Configuration for a depot that uses that schema, you must refresh the AccuSync Configuration to make it aware of those changes. You do this by clicking the Reload Configuration Cache button ( ) on the AccuSync Management Console main page. See Making Changes to AccuSync™ Configurations for more information.
Step 3: Add ITS Project to AccuWork Issue RecordsOnce you have created values for your ITS project names in the AccuWork schema, you need to update your AccuWork issue records with these values as appropriate, as shown in the following illustration.
Assigning an ITS project name to the AccuWork issue record allows AccuSync to successfully synchronize issue records on both systems.
Tip: The AccuRev Web interface (AccuRev Web UI) bulk update feature allows you to change field values for multiple records at one time.
When you run a query, issue records satisfying the query are displayed in the Query Browser Results pane. By default, up to 500 records are displayed at a time. If you want to change the number of records displayed at a time, click the Table Filter button and set a new value in the Items per page field in the Table Filter dialog box, as shown in the following illustration:

AccuSync™ Management Console Help 15
See the AccuRev® Web Interface User’s Guide or Web UI online help for more information on bulk update and Query Browser features.
Rally Users Only: Specifying Nested Project NamesAccuSync supports nested Rally projects for as many levels as are defined in Rally. For example, in Rally, Project_Dev may contain a sub-project, Project_Dev2, and Project_Dev2 may contain a sub-project, Project_Dev2A.
Rally permits multiple projects of the same name within the same Rally workspace. For example, Workspace1 in Rally may contain Project_1 with sub-project Project_ABC and it may also contain Project_2 with another sub-project also named Project_ABC. When multiple projects have the same name, you must define the project name with the full path in the AccuWork schema.
Specifying Rally Project Names in the AccuWork SchemaFor multiple projects having the same name within a workspace, you must specify the full pathname of the project in the AccuWork schema. Use the pipe character (|) to define the pathname (for example, Project_1|Project_ABC).
Note: If the name of a child project is not used by another project, it is not necessary to specify the full pathname.
The following illustration shows several Rally projects specified in the AccuWork schema. The two projects that have the same name (Project_ABC) are defined with their full pathnames. For more information about the AccuWork schema, see the AccuRev User’s Guide.

16 AccuSync™ Management Console Help
Specifying Rally Project Names by End-users in AccuWorkWhen a user enters an issue in AccuWork to be synchronized with Rally, the user selects the Rally Project name in an AccuWork field. The Rally Project name selections shown in the drop-down list are as specified in the AccuWork schema. (See the previous section, Specifying Rally Project Names in the AccuWork Schema.)
For nested Rally Projects that have the same name as other projects in the workspace, the choices for Rally project should show the full pathname for projects as they were set up in the AccuWork schema. Use the pipe character (|) to define the pathname (for example, Project_1|Project_ABC).
If the Rally Project field has been set up as a Text type field (rather than a Choose type field) the end user enters the Rally project name. In this case, the end user should be instructed to enter the full pathname for the Rally project if the project has the same name as another project. Example: Project_1|Project_ABC.
If, during synchronization, AccuSync detects that an issue in AccuWork does not have the necessary full path for a duplicate Rally project name, an error message displays.
Step 4: Add AccuWork Fields to Your ITS SchemaOnce you have modified AccuWork as described in the preceding steps, you need to:
• Add the AccuWork fields in the following table to your ITS schema
• Ensure that these fields are not editable by your ITS users wherever they are displayed
Specific procedures vary from one ITS to another, but they typically involve adding a custom field to the ITS schema and then making that field read-only or hidden in views that allow users to modify other fields

AccuSync™ Management Console Help 17
(like Description or Comment, for example). Custom fields added to your ITS schema must use the field name and type shown here:
Tip: The Label column has been left empty. Consider using this column to record the name you plan to use for the field’s label when displaying issue record data in your ITS.
The following sections describe considerations for each ITS supported by AccuSync.
All ITSs: Refresh the AccuSync™ ConfigurationIf you update your ITS schema or forms after you have created an AccuSync Configuration, you must refresh the AccuSync Configuration. You do this by clicking the Reload Configuration Cache button ( ) on the AccuSync Management Console main page. See Making Changes to AccuSync™ Configurations for more information.
BMC Remedy UsersYou must add the fields in the preceding table to the “create” and “read” forms for whatever Remedy applications you plan to synchronize with AccuWork. For example, if you are synchronizing the Incident Management application, you need to add these fields to the HPD:IncidentInterface_Create and HPD:IncidentInterface forms. Note that the value of the Entry Mode property for the AccuWorkKey field must not be Display on either form.
BMC Remedy users must use BMC Remedy Developer Studio to add required fields to the Remedy schema. Refer to your BMC Remedy Developer Studio documentation for more information.
ClearQuest UsersYou must add the fields in the preceding table to the ClearQuest schema to enable synchronization between AccuWork and ClearQuest. The basic procedure is outlined here. Refer to your Rational ClearQuest documentation for more information.
1. Using the ClearQuest Designer, log in to your schema repository.
2. Check out the ALM schema.
3. Add the fields to the required type (ALMRequest and ALMTask) as needed.
4. Add the fields to the ClearQuest forms as needed.
5. Save your changes, and then validate and check in the schema.
Field Name Label Type Description
AccuWorkKey Text Stores the unique alphanumeric key for each AccuWork issue record.
AccuWorkIssueLink Attachment Stores the URL that your ITS users can use to open a web browser and display the artifact in the AccuRev Web UI.
AccuWorkChangePackage Text Stores summary AccuWork issue change package information.
AccuWorkChangePackageHistory Text Stores detailed AccuWork issue change package information.

18 AccuSync™ Management Console Help
6. Update the ClearQuest database with the new schema.
7. Stop and start these ClearQuest services. For example:
• IBM HTTP Administration for WebSphere ApplicationServerV8.5
• IBM HTTP ServerV8.5
• IBM WAS85 Service
Synchronizing Custom FieldsThe fields described in the preceding table are required for AccuSync to successfully synchronize AccuWork issues with ClearQuest requests and tasks. See Appendix E: IBM Rational ClearQuest Configuration Reference to learn about the fields that are synchronized by the default ClearQuest configuration (Owner, Description, and so on).
In addition to the required and default configuration fields, AccuSync allows you to create and synchronize up to 30 additional fields, called custom fields. You follow the same basic process for adding custom fields that you use for adding required fields, with these exceptions:
• Custom fields have required names. Due to limitations in the ClearQuest API, custom fields must adhere to a strict naming convention in order to be recognized by the synchronization engine. You can name these fields however you like in the AccuWork schema, but in ClearQuest they must be created as “customField1”, “customField2”, “customField3” and so on, and cannot exceed “customField30”. Note that these names are case-sensitive.
• Custom fields must be added to the AccuWork schema. Once you create a custom field in ClearQuest, you need to add the corresponding field to the AccuWork schema and the issue form as described in Modifying an Existing AccuWork™ Schema on page 9. For example, if you add “customField1” to ClearQuest to store a customer name, you might add an “Interested Customer” field to the AccuWork schema to allow this value to be synchronized.
• Custom fields must be added to AccuSync field mappings. The custom fields you create in ClearQuest must be added to an AccySync field mapping, to associate the custom field with a corresponding field in AccuWork. See Editing Field Mappings on page 53 for more information.
Rally UsersIn order to support issue synchronization with Rally, you must add the fields in the preceding table as custom fields. Once you have defined these custom fields, you can choose to display them in the Rally work product as desired, but they should be read-only. You must add these AccuWork fields for each Rally artifact -- defect, task, and story -- you are synchronizing with an AccuWork issue type.

AccuSync™ Management Console Help 19
You use the Work Products & Fields Summary View to modify the Rally work product:
See your Rally documentation for more information on modifying the Rally work product.
JIRA UsersAccuWork fields are automatically added to JIRA when you install the JIRA plugin. They appear on the JIRA View Custom Fields page only after AccuSync has performed a synchronization task. You need to ensure that these fields are not editable. There are a number of ways to accomplish this, including making the fields read-only, hiding the fields, or creating an edit screen that does not display them. This last approach is described here. Refer to your JIRA documentation for more information.
To remove AccuWork fields from the edit screen in JIRA, you need to:
• Create a custom screen that does not include AccuWork fields
• Associate that screen with the JIRA Edit operation
To create a custom screen in JIRA:
1. Log in to JIRA as the JIRA administrator.
2. Click the Administration tab in the top navigation bar, then choose Issue Fields > Screens from the left navigation bar.
The View Screens page appears.
3. Make a copy of the Default Screen:
a. Locate the Default Screen and click Copy in the Operations column.
b. On the Copy Screen page, enter a name for the new screen. (Edit Issue Screen, for example.) You can enter an optional description.

20 AccuSync™ Management Console Help
c. Click Copy to create the new screen.
4. Locate the new Edit Issue Screen and click Configure in the Operations column.
The Configure Screen page appears.

AccuSync™ Management Console Help 21
5. Locate the AccuWork fields, select the Remove check box for those fields, and click the Remove button at the bottom of the form.
Now you are ready to associate the new Edit Issue Screen with the JIRA Edit operation
1. Click the Administration tab in the top navigation bar, then choose Issue Fields > Screen Schemes from the left navigation bar.
The View Screen Schemes page appears.
2. Locate the Default Screen Scheme and click Configure in the Operations column.
The Configure Screen Scheme page appears.
3. Complete the fields in the Add Issue Operation To Screen Association section as follows:
• For the Issue Operation field, choose Edit Issue.
• For the Screen field, choose the edit issue screen you created in the previous procedure.
4. Click Add.
The new screen appears in the Configure Screen Scheme table:
HP QC UsersYou must add the AccuWork fields to your ALM projects as user-defined fields. You can do this using the Quality Center Project Customization.
1. Log in to HP QC as the administrator.
2. Choose Tools > Customize from the Quality Center menu.

22 AccuSync™ Management Console Help
3. Choose Project Entities from the navigation bar.
The Project Entities page appears.
4. Expand the Defect folder and then select the User Fields folder.
5. Click the New Field button.
6. In the Settings tab, specify the values for the field you are adding.
Step 5: Create the AccuSync UserAccuRev recommends that you create a distinct AccuSync user in AccuRev and in your ITS, and that you use this user -- and only this user -- when specifying the connection settings in your AccuSync Configurations. The AccuSync user name you specify is the user AccuWork associates with changes made by AccuSync during synchronization. When a record is updated with changes resulting from synchronization (as when an objectID or issueLink value is created, for example), the AccuSync user name appears in the User column in the Issue History tab for that change, as shown here:

AccuSync™ Management Console Help 23
Requirements for the AccuSync UserIn AccuRev, you create users on the Security tab, as shown here:
When creating the AccuSync user, note the following requirements. The AccuSync user:
• Must have any permissions needed to access the AccuRev depots and ITS projects and applications whose issues you want to synchronize
• Must have any permissions needed to create, edit, and assign issues on both AccuRev and your ITS
• Cannot be the same as the AccuBridge user. (This requirement applies only if you are upgrading from AccuBridge to AccuSync.)
• Should not be used to perform any tasks other than synchronization on either AccuRev or your ITS
Tip: Consider creating different AccuSync user names in AccuRev and your ITS. For example, you might want to create the AccuSync user in AccuRev as accusync_ITS and the AccuSync user in your ITS as accusync_AccuWork. Having different AccuSync user names defined in each system can make it easier to understand which system originated a change when reviewing an issue record’s history.
Refer to your AccuRev and ITS user documentation for more information on creating users.

24 AccuSync™ Management Console Help
Step 6: Start the AccuSync Management™ ConsoleThis section describes how to start and stop the AccuSync Management Console. You use the AccuSync Management Console to edit, run, manage, and maintain AccuSync configurations.
Before You BeginThe AccuSync server and the Apache Tomcat server for AccuSync must both be running before you can start the AccuSync Management Console. These servers are typically started as part of the AccuSync installation process. See Appendix F: AccuSync™ Services if you need to start either one of these servers.
Starting the AccuSync Management ConsoleNote: These procedures assume that you accepted the Shortcut Folder default values during installation.
To start the AccuSync Management Console:
• In Windows:
Click Start > All Programs > AccuSync > AccuSync Management Console Link.
• In Linux:Enter the URL for the AccuSync Management Console in your web browser’s address field and press Enter.
Example: http://localhost:8085/accusync/
The AccuSync Management Console main page appears in the web browser.
Tip: Default configurations are installed for every ITS that AccuSync supports. You might see a different set of default configurations than those shown here.

AccuSync™ Management Console Help 25
Troubleshooting AccuSync Management Console ProblemsFollowing are some problems you might encounter when starting the AccuSync Management Console and the steps to take to avoid and correct them.
AccuSync services are unavailableIf the AccuSync server is not running when you start the AccuSync Management Console, AccuSync displays an error message like the following:
If you see this error, verify that the AccuSync server is running. If necessary, restart the AccuSync server and try starting the AccuSync Management Console again. See Appendix F: AccuSync™ Services for more information.
The AccuRev client has not been detectedIf the AccuRev client has not been installed or if AccuSync cannot find the accurev.exe file in the path you provided in the connection configuration, AccuSync displays an error message like the following:
If you see this error, verify that the AccuRev client is installed. Check the AccuRev connection settings dialog box to ensure that the path provided for accurev.exe is accurate.
Connection failedAccuRev 6.1 introduced support for the Secure Sockets Layer (SSL) protocol to provide encrypted communication between AccuRev clients and the AccuRev server. If you are using AccuRev 6.1 or higher and SSL has been enabled on the AccuRev server, you will be unable to connect to the AccuRev server until you accept the SSL certificate. See “Post-Installation Procedures” in the AccuSync Installation and Release Notes for more information.
Stopping the AccuSync™ Management ConsoleTo stop the AccuSync Management Console, close the web browser in which it is running.
Note: AccuSync Configurations continue to run as scheduled even if you stop the AccuSync Management Console.

26 AccuSync™ Management Console Help
Step 7: Edit the AccuWork™ and ITS Connection SettingsEach default AccuSync Configuration includes partially specified connection settings for AccuWork and your ITS. In addition to connection information, you use the connection settings to specify:
• The AccuRev depot and ITS projects and applications whose issues you want AccuSync to synchronize
• The name of the AccuWork schema field that stores the type of issue (defect or task, for example) that AccuSync will synchronize
This section describes how to edit the default connection settings.
Before You BeginBefore editing the AccuWork and ITS connection settings in AccuSync, make sure the AccuRev Server is running and that your ITS service is available. AccuSync requires a live connection to verify fields and other data.
In addition, AccuRev recommends that you create a copy of the default configuration for your ITS before modifying its connection settings or making any other changes you find necessary. Copied configurations contain all of the settings of the configuration you select as the source. These include AccuWork and ITS connections, mapping definitions, synchronization patterns, and so on.
Note: You cannot copy an AccuSync Configuration if it is running.
How to Copy an AccuSync™ ConfigurationTo copy an AccuSync Configuration:
1. On the AccuSync Management Console main page, click the Copy Configuration button ( ) for the AccuSync Configuration you want to copy.
Tip: The Copy Configuration button is grayed out if the configuration is running.
The Copy Configuration dialog box appears.
2. Enter a name in the New configuration name field and click OK.
The new configuration appears in the Configurations table on the AccuSync Management Console main page.

AccuSync™ Management Console Help 27
Editing AccuWork™ Connection SettingsTo edit the AccuWork connection settings:
1. On the AccuSync Management Console main page, click the Edit button ( ) for the AccuSync Configuration you want to edit.
Alternative: Double-click the AccuSync Configuration.
The Configuration page for the configuration you selected appears.
2. In the Connections table Action column, click the Edit Connection button ( ) for the AccuWork connection.
Note: The Status column displays the stop icon ( ) at this point because the connection has not yet been established. For more information about the connection status icons, see Connections Table: Action and Status Information.
The Edit AccuRev Connection dialog box appears.
3. Specify the values required to connect to AccuWork:
• Host and Port: These are the values that correspond to the AccuRev installation with which you will be synchronizing your ITS.
• Username and Password: Be sure to enter the username and password of the AccuSync user you created specifically for AccuSync. See Step 5: Create the AccuSync User for more information.
• AccuRev executable: Use this field to optionally specify the absolute path of your AccuRev executable (accurev.exe). If you leave this field empty, AccuSync looks for accurev.exe in your systems’s PATH.

28 AccuSync™ Management Console Help
4. Click the Test Connection button.
When the connection succeeds, a new panel appears on the Edit AccuRev Connection dialog box.
5. Complete the remaining fields as follows:
• AccuRev depot: Choose the depot you want to synchronize with your ITS.
Tip: When you select a depot, a default value appears in the AccuWork issue type field name field.
• AccuWork issue type field name: The internal name of the field that displays the issue type (defect, task, and so on) on the AccuWork Issue Edit Form. Unless you have changed the name in the AccuWork schema, the name of this field is type.
Note: The field’s name typically differs from its label. For example, the field named type is displayed on the Issue Edit Form using the label Type.
• Web Interface URL: Enter the URL for the machine hosting the AccuRev Web Interface. For example: http://localhost:8080/accurev/.
6. Click the Save button.
The revised configuration appears in the Configurations table on the AccuSync Management Console main page.
Editing ITS Connection SettingsTo edit your ITS connection settings:
1. On the AccuSync Management Console main page, click the Edit button ( ) for the AccuSync Configuration you want to edit.
Alternative: Double-click the AccuSync Configuration.
The Configuration page for the configuration you want to edit appears.
2. In the Connections table, click the Edit Connection button ( ) for your ITS connection.
The Edit Connection dialog box appears.

AccuSync™ Management Console Help 29
Note: Fields on the Edit Connection dialog box vary based on ITS. The dialog box for JIRA is shown here.
3. Specify the values required to connect to your ITS. See Edit ITS Connection Dialog Box if you need help with this step.
4. Click the Test Connection button.
When the connection succeeds, new panels appear on the Edit Configuration dialog box. Fields on this panel vary based on your ITS. See Testing the ITS Connection for more information.
Note for JIRA users: If the connection to JIRA does not succeed, make sure that the JIRA plugin for AccuSync was installed and that JIRA has been configured to accept remote API calls. See Step 1: Configure JIRA for AccuSync for more information.
Note for Rally Users: You cannot select a Task project without also selecting the corresponding Defect or Story project.
5. Click the Save button.
The revised configuration appears in the Configurations table on the AccuSync Management Console main page.

30 AccuSync™ Management Console Help
Step 8: Review the Default ConfigurationAfter you specify the AccuWork and ITS connection settings, AccuSync validates all of the components defined in the default configuration -- its field mappings, mapping groups, and so on. If AccuSync was unable to validate a component, it displays the component name in red. For example, if a field mapping includes a field that has not been defined in one system’s schema, that field mapping is displayed in red.
Before running the configuration or an individual synchronization pattern, you should review each of the components in your configuration and correct any errors. See Chapter 4 Customizing the Default Configuration to learn how to edit the components in a configuration. When you are ready to run the configuration or one of its synchronization patterns, see Running the Initial Synchronization.
Tip: An invalid configuration is usually caused by field mappings that AccuSync cannot reconcile. Editing Field Mappings describes where to find field mapping definitions in AccuSync and how to change them. Refer to the Configuration Reference appendix for your ITS for a complete listing of field mappings and other configuration components required to synchronize with your ITS.
Next StepsOnce you are satisfied that the configuration has been specified correctly, you are ready to run a synchronization as described in Running the Initial Synchronization on page 31.

AccuSync™ Management Console Help 31
3. Working with AccuSync™ Configurations
This chapter describes administrative tasks associated with managing AccuSync, including running and stopping AccuSync Configurations, addressing errors, and backing up and restoring AccuSync Configurations.
This chapter assumes that you have set up a default AccuSync Configuration as described in Chapter 2 AccuSync™ Quick Start, or have created a new one as described in Chapter 5 Creating a New Configuration.
Running the Initial SynchronizationOnce you have defined an AccuSync Configuration, the process for running a synchronization the first time varies based on whether you have upgraded from an existing AccuBridge™ or AccuSync product, or you have installed AccuSync for the first time. Refer to the following tables for the initial synchronization procedure applicable to your environment.
AccuSync Upgrades
New AccuSync Installations
Initial Synchronization After Upgrading from AccuBridge™
Follow this procedure for running the initial synchronization if you have upgraded from AccuBridge:
1. Turn off the AccuBridge if it is still running. (It should have been turned off as part of the AccuSync installation process.) Refer to your AccuBridge documentation if you need help with this step.
2. In AccuSync, make sure that the Skip Key Validation option is selected for any configuration you plan to run. See Advanced AccuSync™ Configuration Settings if you need help with this step.
If You Have Upgraded From Go To
AccuBridge Initial Synchronization After Upgrading from AccuBridge™
A previous AccuSync release (2011.1, for example) Initial Synchronization After Upgrading from a Previous AccuSync™ Release
If You Have Installed AccuSync And Go To
There are currently no records in either AccuWork or your ITS
Initial Synchronization After Installing AccuSync™ with New ITSs
There are existing records in either or both AccuWork and your ITS
Initial Synchronization After Installing AccuSync™ with Existing ITSs

32 AccuSync™ Management Console Help
3. In AccuSync, set the Synchronization Type to one-way for each synchronization pattern you plan to run; set AccuWork as the master system. See Editing Synchronization Patterns if you need help with this step.
4. Run the synchronization as described in Running an AccuSync™ Configuration and review the results.
5. If the results are what you expect:
• Stop the synchronization.
• Change the Synchronization Type back to two-way.
• Clear the Skip Key Validation option.
• Back up the AccuSync configuration for safekeeping. See Backing Up and Restoring AccuSync Configurations on page 45 for more information.
• Start the synchronization again.
Initial Synchronization After Upgrading from a Previous AccuSync™ ReleaseFollow this procedure for running the initial synchronization if you have upgraded from a previous AccuSync release (AccuSync 2011.1, for example):
1. If you backed up your existing AccuSync Configurations prior to installing the current AccuSync release, restore those configurations if you want to continue using them. See Backing Up and Restoring AccuSync Configurations if you need help with this step.
2. In AccuSync, set the watermark or specify one or more mapping definition filters to limit the sample of issue records that AccuSync will synchronize initially. See Setting Watermarks and Creating a Mapping Definition Filter if you need help with this step.
3. Run the synchronization as described in Running an AccuSync™ Configuration and review the results.
4. If the results are what you expect:
• Stop the synchronization.
• Remove any watermarks or filters you created in Step 2.
• Back up the AccuSync configuration for safekeeping. See Backing Up and Restoring AccuSync Configurations on page 45 for more information.
• Start the synchronization again.
Initial Synchronization After Installing AccuSync™ with New ITSsFollow this procedure for running the initial synchronization if you have installed AccuSync for the first time and are using it with AccuWork and ITS systems that currently contain no issue records.
1. Create one or more issues in both AccuWork and your ITS.
2. In AccuSync, ensure that the Synchronization Type for each synchronization pattern in your configuration is set to two-way. See Editing Synchronization Patterns if you need help with this step.
3. Run the synchronization as described in Running an AccuSync™ Configuration and review the results.
4. If the results are what you expect, back up the AccuSync configuration for safekeeping. See Backing Up and Restoring AccuSync Configurations on page 45 for more information.
AccuSync™ Management Console Help 33
Once the synchronization is running again, issue records will be synchronized as they are added to your ITSs.
Initial Synchronization After Installing AccuSync™ with Existing ITSsFollow this procedure for running the initial synchronization if you have installed AccuSync for the first time and are using it with existing AccuWork and ITS systems, one or both of which contain issue records.
1. In AccuSync, set the watermark or specify one or more mapping definition filters to limit the sample of issue records that AccuSync will synchronize initially. See Setting Watermarks and Creating a Mapping Definition Filter if you need help with this step.
2. If only one system has issue records, set the Synchronization Type to one-way for each synchronization pattern you plan to run; set as the master system the system that currently contains records. See Editing Synchronization Patterns if you need help with this step.
3. Run the synchronization as described in Running an AccuSync™ Configuration and review the results.
4. If the results are what you expect:
• Stop the synchronization.
• Remove any watermarks or filters you created in Step 1.
• If you set the Synchronization Type to one-way in Step 2, set it back to two-way.
• Back up the AccuSync configuration for safekeeping. See Backing Up and Restoring AccuSync Configurations on page 45 for more information.
• Start the synchronization again.
Running an AccuSync™ ConfigurationWhen you run an AccuSync Configuration, AccuSync runs all the synchronization patterns that are defined for that configuration. Synchronization patterns are run serially, one after the other, at whatever frequency has been defined for them. (The default is one minute.) AccuSync performs the synchronization tasks associated with each synchronization pattern; issue records and watermarks on both systems are updated accordingly. If you choose, you can stop individual synchronization patterns within an active AccuSync Configuration. See Stopping Configurations and Synchronization Patterns.
Tip: Before running an AccuSync Configuration for the first time, run each synchronization pattern in that configuration individually. Review the results of each synchronization pattern and verify that they are what you expect; any changes to synchronization components that might be required can be easier to identify this way. See Running a Synchronization Pattern for more information.
To run an AccuSync Configuration:
1. Go to the AccuSync Management Console main page.
Tip: Clicking the AccuSync logo at the top of any page takes you to the main page.
2. Click the Run button ( ) for the configuration you want to run.
AccuSync runs the selected configuration. The Run button is replaced by the Stop button ( ), which allows you to stop the configuration at any time. The status button changes based on whether or not AccuSync encounters any errors when running the configuration. See Understanding Synchronization Status for more information.

34 AccuSync™ Management Console Help
Restarting an AccuSync™ ConfigurationOnce a configuration is running, it continues to run each of the synchronization patterns defined for it according to the frequency you have specified for those synchronization patterns. If the AccuSync server is stopped and restarted, however, configurations remain stopped until they are started again.
You can restart a configuration manually by clicking its Run button ( ), as described in Running an AccuSync™ Configuration on page 33. If you prefer, you can configure AccuSync to restart configurations automatically, as described in the following procedure.
To configure AccuSync to automatically restart configurations when the AccuSync server is restarted:
1. Open the accusync.properties file in a text editor.
This file is located in the \bin folder where you installed AccuSync.
2. Add the following line:accusync.synconstart=true
Note: Other settings in the accusync.properties are for internal use only. Do not delete or edit these settings.
3. Add a line like the following for each ITS whose configurations you want AccuSync to restart automatically:accusync.synconstart.<ITS_name>=<config_name>[,<config_name>,]
where ITS_name is the name of your ITS, and config_name is the name of the configurations you want AccuSync to automatically restart. Note that:
• You must use the following values for ITS_name:
• cq (for IBM ClearQuest)
• hpqc (for HP Quality Center)
• jira (for JIRA)
• rally (for Rally)
• remedy (for BMC Remedy)
• To specify multiple configurations for an ITS, enter each configuration name separated by a comma.
• ITS_name and config_name values are case-sensitive.
Tip: See Example on page 34.
4. Save your changes in the accusync.properties file.
ExampleImagine you had two JIRA configurations, one for synchronizing enhancements (Sync Enhancements) and one for synchronizing defects (Sync Defects), that you wanted AccuSync to restart automatically. Your accusync.properties file would have the following entries:
accusync.synconstart=true
accusync.synconstart.jira=Sync Enhancement,Sync Defects

AccuSync™ Management Console Help 35
Running a Synchronization PatternAccuSync runs all synchronization patterns defined for an AccuSync Configuration when you run the configuration. You can also run synchronization patterns individually, as described here.
To run a synchronization pattern:
1. Go to the AccuSync Management Console main page.
Tip: Clicking the AccuSync logo at the top of any page takes you to the main page.
2. Click the Edit button ( ) for the AccuSync Configuration associated with the synchronization pattern you want to run.
The Configuration page appears.
3. In the Sync Patterns table, click the Run button ( ) for the synchronization pattern you want to run.
AccuSync runs the selected synchronization pattern. The Run button is replaced by the Stop button ( ), which allows you to stop the synchronization pattern at any time. The status button changes based on whether or not AccuSync encounters any errors. See Understanding Synchronization Status for more information.
Understanding Synchronization StatusThe status symbol provides an at-a-glance summary of the synchronization status for both AccuSync Configurations and synchronization patterns, as summarized in the following table:
Symbol Description
The synchronization is running with no errors. Placing the pointer over the button displays the tooltip, Status (no errors).
Note: This symbol is also displayed when the synchronization is idle.
One or more errors occurred during the synchronization. Placing the pointer over the button displays a tooltip that tells you the number of errors, Status (2 errors), for example. For an AccuSync Configuration, this is the summary of errors for all synchronization patterns associated with the configuration; for a synchronization pattern, this number represents the errors for that synchronization pattern only.
See Responding to Errors for more information.
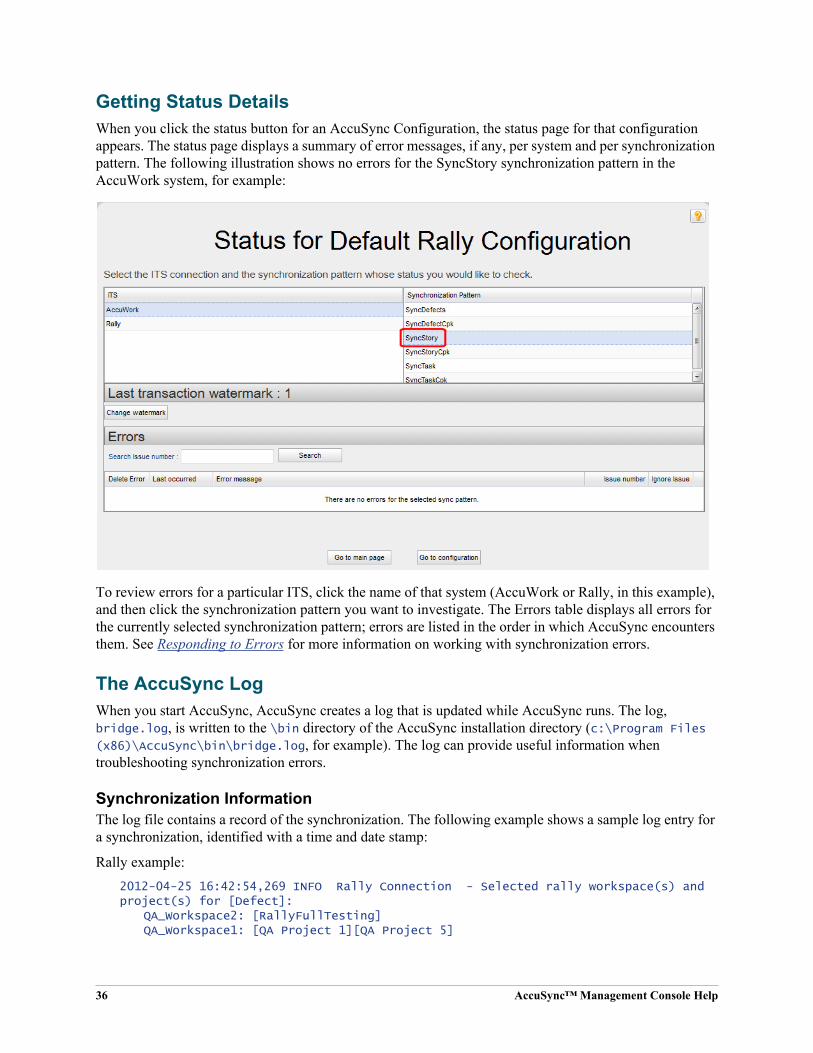
36 AccuSync™ Management Console Help
Getting Status DetailsWhen you click the status button for an AccuSync Configuration, the status page for that configuration appears. The status page displays a summary of error messages, if any, per system and per synchronization pattern. The following illustration shows no errors for the SyncStory synchronization pattern in the AccuWork system, for example:
To review errors for a particular ITS, click the name of that system (AccuWork or Rally, in this example), and then click the synchronization pattern you want to investigate. The Errors table displays all errors for the currently selected synchronization pattern; errors are listed in the order in which AccuSync encounters them. See Responding to Errors for more information on working with synchronization errors.
The AccuSync LogWhen you start AccuSync, AccuSync creates a log that is updated while AccuSync runs. The log, bridge.log, is written to the \bin directory of the AccuSync installation directory (c:\Program Files (x86)\AccuSync\bin\bridge.log, for example). The log can provide useful information when troubleshooting synchronization errors.
Synchronization InformationThe log file contains a record of the synchronization. The following example shows a sample log entry for a synchronization, identified with a time and date stamp:
Rally example:2012-04-25 16:42:54,269 INFO Rally Connection - Selected rally workspace(s) and project(s) for [Defect]:
QA_Workspace2: [RallyFullTesting]QA_Workspace1: [QA Project 1][QA Project 5]

AccuSync™ Management Console Help 37
JIRA example:2012-04-25 17:46:34,706 INFO com.accurev.its.bridge.plugins.jira.JiraITSConnection - Selected jira project(s):
[AutomationProject3][AutomationProject2][AutomationProject1]
Available Memory InformationThe log file contains information about the total system memory, used system memory, and free system memory available to AccuSync after a synchronization takes place. The following example shows a sample log entry:
2012-04-25 17:46:39,007 INFO Synchronizer - Total System memory: 2047 Mb2012-04-25 17:46:39,008 INFO Synchronizer - Used System memory:1290 Mb2012-04-25 17:46:39,009 INFO Synchronizer - Free System memory: 757 Mb
When there is memory available for AccuSync to run another synchronization is low, a warning is included in the log file. The following example shows a sample warning:
2012-04-25 18:03:29,674 INFO Synchronizer - WARNING: POTENTIAL LOW MEMORY. Please check java -Xmx parameter's value in startup.bat, it should be increased to avoid out of memory exception2012-04-25 18:03:29,677 INFO Synchronizer - JVM total memory: 27.000 Mb2012-04-25 18:03:29,695 INFO Synchronizer - JVM used memory: 15.694 Mb2012-04-25 18:03:29,695 INFO Synchronizer - JVM free memory: 11.306 Mb
Responding to ErrorsThis section describes the types of errors recorded by AccuSync and the features you can use to learn about and address them.
Types of Errors Recorded by AccuSyncAccuSync records fatal errors and synchronization errors:
• A fatal error is typically associated with a lost network connection or system failure. In AccuSync, the name of a synchronization pattern that encounters a fatal error is displayed in red; clicking the tab next to the synchronization pattern name displays information about the error.
Tip: If AccuSync encounters a fatal error, consider increasing the network retry count, retry delay, or both. See Changing Network Settings for more information.
• A synchronization error occurs when AccuSync is unable to synchronize issue records. This can happen for a number of reasons, including one or more of the following:
• A field mapping was specified incorrectly (fields with mis-matched types, for example)
• A field value specified for one system does not exist in the other
• The issue record has been deleted from your ITS
If AccuSync encounters a synchronization error, verify that your AccuWork and ITS schema have the necessary fields, and that your mapping definitions and field mappings (including any filters and

38 AccuSync™ Management Console Help
transformers they use) are specified correctly. See Making Changes to AccuSync™ Configurations for more information.
Note that only fatal errors prevent a synchronization from continuing.
Error ReportingWhen AccuSync encounters an error executing a synchronization pattern, it displays the name of the synchronization pattern, and the affected ITS, in red. When you select a synchronization pattern, any errors associated with that synchronization pattern are displayed in the Errors table, as shown in the following illustration:
For each error, the Errors table displays:
• The date the error last occurred
• A brief description of the error
• The number of the issue that caused it
The Errors table also contains a set of controls that let you:
(1) Quickly toggle the Delete Error check box for all issues. (See Deleting Errors for more information on this subject.)
(2) Navigate through pages of errors (when the number of errors requires multiple pages).
Tip: The center field in this set of controls shows the current set of all issues that are currently being displayed (1 to 3, as shown in the preceding illustration, or 1 to 25 of 678, for example).
AccuSync™ Management Console Help 39
(3) Quickly toggle the Ignore Issue check box for all issues. (See Suspending Synchronization for an Issue for more information on this subject.)
Searching for Issues with Synchronization ErrorsRather than scrolling through the errors table to locate an issue with a synchronization error, you can locate the issue directly using the Errors table issue search feature.
To search for an issue with a synchronization error, type the issue number in the Search issue number field and click the Search button.
Deleting ErrorsYou can delete errors from the Errors table. You might want to do this if the table has become crowded with errors that you have no intention of addressing, as might be the case with issues that are no longer active. For example, some ITSs do not allow you to make changes to an issue that has a status of Closed. If you make a change to such a record in AccuWork (adding additional information about the issue’s root cause or fix, for example), AccuSync will encounter a synchronization error when it tries to update the Closed issue on the other ITS.
Note: Deleting an error does not affect whether or not AccuSync tries to synchronize the associated issue; it simply removes the error from the log. AccuSync attempts to synchronize issues associated with deleted errors only if the issue has been modified since the last synchronization. Any associated ITS items and synchronization patterns that are highlighted in red (indicating an error) remain in red until you restart AccuSync.
To delete an error from the Errors table:
1. Select the check box to the left of the error you want to delete.
Tip: To select the delete check box for all errors, click the check box in the Errors table heading.
2. Click the Delete button under the Errors table.
Suspending Synchronization for an IssueUse the Ignore Issue checkbox if you want AccuSync to skip the associated issue during subsequent synchronizations. You might want to suspend synchronization for an issue that is reporting errors while you troubleshoot the cause in order to eliminate repetitive entries in the Errors table (and to suppress email notification, if you have enabled it).
Note that AccuSync will not attempt to synchronize the issue as long as the Ignore Issue checkbox is checked. Once you have identified and addressed the root cause, clear the Ignore Issue checkbox and AccuSync will try to synchronize the issue again.
Tip: The Ignore Issue checkbox is checked by default. Use the Deselect all button to clear this field for all errors.
Email NotificationAccuSync emails errors it encounters if you have enabled email notification. (See Email Notification for AccuSync Events for more information.)

40 AccuSync™ Management Console Help
Changing Network SettingsAccuSync lets you adjust the number of retries and the retry interval that AccuSync should attempt in the event of a network error. You might want to adjust the default values for these network settings if you find AccuSync encountering fatal errors during synchronization.
To change network settings:
1. On the AccuSync Management Console main page, click the Edit button ( ) for the AccuSync Configuration whose network settings you want to change.
The Configuration page appears.
2. Click the Edit Admin Details button.
The Admin Details for Configuration page appears.
3. Click the Advanced Settings tab to expand that section.
4. Increase the values in the Retry count and Retry delay (sec) fields as needed.
5. Click the Save button.
Email Notification for AccuSync EventsIf you want, you can configure AccuSync to send email when a synchronization:
• Encounters an error
• Is started or stopped
You specify this information on the Mail Settings panel of the Admin Details for Configuration page.
Note: AccuSync sends a separate email for each error it encounters each time the synchronization pattern is run. You can suppress repetitive email for any error you choose. See Suspending Synchronization for an Issue for more information.
To enable email notification for AccuSync events:
1. On the AccuSync Management Console main page, click the Edit button ( ) for the AccuSync Configuration for which you want to set up email notification.
The Configuration page appears.
2. Click the Edit Admin Details button.
The Admin Details for Configuration page appears.

AccuSync™ Management Console Help 41
3. Click the Mail Settings tab to expand that section.
4. Select the AccuSync events for which you want email notification:
• Encounters an error
• Is started or stopped
5. Complete the SMTP Host, SMTP Port, SMTP Username, and SMTP Password fields with values that are appropriate for your environment.
6. The value in the Email subject field is used for all AccuSync email notifications, regardless of their type. Change the default value (AccuSync synchronization alert) as needed.
7. Use the Send email to field to specify the email addresses of the individuals you want to receive synchronization alerts. This is typically the email address of the AccuSync or IT system administrator, as appropriate. Use commas to separate multiple email addresses.
8. Click the Save button.
Setting WatermarksA watermark is a value that identifies the most recent transaction in a system. In AccuRev, the watermark is represented by the transaction number in a depot. For example, a watermark of 10979 means that the last recorded transaction for a given depot was number 10979. In Rally and JIRA, the watermark is represented by the timestamp of the most recent transaction. For example, a watermark of 2012-03-29 12:45:33 means that the last transaction occurred at 12:45:33 on March 29.

42 AccuSync™ Management Console Help
The current watermark is displayed on the status page for the AccuSync Configuration for the currently selected system, as shown in the following illustration, which displays the watermark for AccuWork:
Generally speaking, you do not need to adjust the watermark, but there are occasions when you might want to. For example, you might want to adjust the watermark:
• Prior to the initial synchronization. Imagine the current AccuWork transaction number is at 1000 when you install and configure AccuSync. If you want to synchronize with your ITS using an earlier watermark -- either based on transaction number or date -- you can do so. If you do not modify the watermark, AccuSync synchronizes all the issues in your systems, starting with the first transaction/earliest date, that match the mapping definitions you have defined for your synchronization patterns.
• To synchronize a previously skipped issue. Imagine that you make a change to an issue that was skipped by the synchronization process -- perhaps a filter prevented the issue from being synchronized -- and you now want to synchronize the issue. You can redefine the filter to include this issue the next time you synchronize, but because the watermark is now greater than it was when you changed the filter, AccuSync will still not synchronize the issue. In this case, you can set the watermark to a value lower/earlier than the watermark recorded for that issue and then run synchronization again.
You adjust the watermark using the watermark tool.

AccuSync™ Management Console Help 43
The Watermark ToolThe AccuSync watermark tool displays the current watermark for the system you select, and optionally lets you change the watermark. There are separate tools for AccuWork and your ITS, as shown in the following table:
Adjusting the AccuWork WatermarkTo adjust the AccuWork watermark:
1. Click the status button ( or ) for the AccuSync Configuration or any synchronization pattern.
The status page for the AccuSync Configuration appears.
2. Click the Change Watermark button.
The Change Watermark dialog box appears.
The value in the New watermark field reflects the most recent transaction in the depot synchronized by this AccuSync Configuration. The Available range slider indicates the range of transactions for the depot, from 1 to the current transaction level.
AccuWork Watermark Tool Watermark Tool for Supported ITSs

44 AccuSync™ Management Console Help
3. To change the watermark, you can:
• Enter (type or paste, for example) a value in the New watermark field
• Click the spin control in the New watermark field
• Drag the Available range slider (the value in the New watermark field changes as you move the slider)
4. Click OK.
The new watermark is set and will be used by AccuSync the next time you synchronize. After synchronization, the watermark is set to the current transaction number.
Adjusting the ITS WatermarkTo adjust the watermark for your ITS:
1. Click the status button ( or ) for the AccuSync Configuration or any synchronization pattern.
The status page for the AccuSync Configuration appears.
2. Click the tab for your ITS.
3. Click the Change Watermark button.
The Change Watermark dialog box appears.
The calendar and timestamp values reflect the time of the most recent transaction. The timestamp is based on a 24-hour clock (hh:mm:ss).
4. To change the watermark, you can:
• Click a date in the calendar. (Use the arrow buttons on either side of the month name to change the month and year.) The timestamp fields (hh:mm:ss) are set to 00:00:00.
• Click Today to reset the watermark to the current date. The timestamp fields (hh:mm:ss) are set to 00:00:00.

AccuSync™ Management Console Help 45
• Optionally change the timestamp fields individually. If you do not change the timestamp, AccuSync uses the default of 00 for the hour, minute, and second.
5. Click OK.
The new watermark is set and will be used by AccuSync the next time you synchronize. After synchronization, the watermark is set to the current timestamp.
Stopping Configurations and Synchronization PatternsWhen you stop an AccuSync Configuration, AccuSync stops all synchronization patterns associated with that configuration. You can stop synchronization patterns individually if you choose; stopping a synchronization pattern does not affect other synchronization patterns in the same AccuSync Configuration.
Stopping an AccuSync ConfigurationTo stop an AccuSync Configuration:
1. Go to the AccuSync Management Console main page.
Tip: Clicking the AccuSync logo at the top of any page takes you to the main page.
2. Click the Stop button ( ) for the configuration you want to stop.
AccuSync stops the selected configuration and all of the synchronization patterns associated with it. The Stop button is replaced by the Run button ( ), which allows you to run the configuration again.
Stopping a Synchronization PatternTo stop a synchronization pattern:
1. Go to the AccuSync Management Console main page.
Tip: Clicking the AccuSync logo at the top of any page takes you to the main page.
2. Click the Edit button ( ) for the AccuSync Configuration associated with the synchronization pattern you want to stop.
The Configuration page appears.
3. In the Sync Patterns table, click the Stop button ( ) for the synchronization pattern you want to stop.
AccuSync stops the selected synchronization pattern. The Stop button is replaced by the Run button ( ), which allows you to run the synchronization pattern again.
Backing Up and Restoring AccuSync ConfigurationsThe AccuSync Configuration database contains all the information about your AccuSync Configurations -- connection settings, synchronization patterns, mapping definitions, and so on. The AccuSync Configuration database is created in the db directory where you installed AccuSync (c:\Program Files (x86)\AccuSync\db, for example).

46 AccuSync™ Management Console Help
It is important to back up the AccuSync Configuration database using the backup utility that is installed with AccuSync. Backup and restore utilities are located in the bin directory where you installed AccuSync (c:\Program Files (x86)\AccuSync\bin, for example). Utilities are provided for both Windows and Linux operating systems.
Backing Up an AccuSync ConfigurationIMPORTANT: Create a back up of your AccuSync Configuration in these situations:
• After you have performed an initial synchronization and are satisfied that AccuSync is synchronizing your issue records as expected.
• After you make any change to an existing synchronization (changing connection settings or your schema, for example).
• Before upgrading to a newer AccuSync version.
When you back up an AccuSync Configuration, AccuSync creates a backup directory where you installed AccuSync (c:\Program Files (x86)\AccuSync\backup, for example). Each backup is created in its own directory with the name <timestamp>_<name>, using a name you give it. For example, 2011-03-14_13-52.28_acme, where acme is the name you provided to the backup utility. The <timestamp> has the format yyyy-mm-dd_hh-mm.ss.
Note: The backup utility does not back up other AccuSync directories like bin, conf, and transformers.
Running the Backup UtilityNote: The location of the Backup command assumes that you accepted the Shortcut Folder default values during installation.
To run the backup utility:
1. Stop the AccuSync server.
See Stopping the AccuSync™ Server if you need help with this step.
2. Start the backup utility:
• In Windows: Click Start > All Programs > AccuSync > AccuSync Backup.
• In Linux: Click the AccuSync_Backup shortcut on your desktop.
• From the console: Navigate to the bin directory where you installed AccuSync and run the backup.bat (Windows) or backup.sh (Linux) file.
Regardless of how you start the backup utility, AccuSync opens a console that displays a message reminding you to stop the AccuSync server and the following prompt:Do you want to back up the default /db in the AccuSync installation directory? (Y/N):
3. Type y at the prompt and press Enter.
The backup utility displays the prompt:Enter the name for the backup:
4. Type a name for the backup and press Enter to continue.
The backup utility creates the backup directory in the AccuSync backup directory (c:\Program Files (x86)\AccuSync\backup\2011-03-14_13-52.28_acme, for example).

AccuSync™ Management Console Help 47
5. Restart the AccuSync server.
See Starting the AccuSync™ Server if you need help with this step.
Restoring an AccuSync ConfigurationWhen you restore an AccuSync Configuration, AccuSync overwrites the existing \db directory with the database backup you specify.
Running the Restore UtilityNote: The location of the Restore command assumes that you accepted the Shortcut Folder default values during installation.
To run the restore utility:
1. Stop the AccuSync server.
See Stopping the AccuSync™ Server if you need help with this step.
2. Start the restore utility:
• In Windows: Click Start > All Programs > AccuSync > AccuSync Restore.
• In Linux: Click the AccuSync_Restore shortcut on your desktop.
• From the console: Navigate to the bin directory where you installed AccuSync and run the restore.bat (Windows) or restore.sh (Linux) file.
Regardless of how you start the restore utility, AccuSync opens a console that displays a message reminding you to stop the AccuSync server. It then displays all the backups in the AccuSync backup directory in an ordered list (the order in which they were created). The following prompt appears:Select the backup you want to restore:
3. Type the number associated with the backup you want to restore and press Enter.
The db directory is restored to the AccuSync installation directory (c:\Program Files (x86)\AccuSync\db, for example).
4. Restart the AccuSync server.
See Starting the AccuSync™ Server if you need help with this step.
Using AccuSync™ with AccuRev WorkflowAccuRev workflow is AccuRev’s optional application life cycle tool that lets you define workflow stages and the transitions that link those stages. Transitions typically perform some type of action as the issue moves from one workflow stage to another (such as changing the value of an issue record’s Status field from New to WIP, for example). See the AccuRev® Web User Interface User’s Guide for more information on AccuRev workflow.
If you are using AccuRev workflow, you can make workflow transitions available in issue records in your ITS. Users can choose a transition from a list of transitions that you provide, and the next time that record is synchronized with AccuWork:
• Changes made to the issue record in your ITS are made to the issue record in AccuWork
• AccuRev workflow executes the transition on the record in AccuWork

48 AccuSync™ Management Console Help
• Any changes to the issue record in AccuWork resulting from the execution of that transition are also made to the issue record in your ITS as part of the same AccuRev transaction
Transitions can be specified in the ITS only and must be set manually; that is, the value of the Transition field in an issue record in your ITS cannot change as the result of the synchronization process.
Exposing Workflow Transitions to AccuSync™ The following procedure describes how to expose workflow transitions to AccuSync. When you are done, users processing issues will be able to specify a workflow transition for issue records in your ITS, allowing AccuWorkflow to execute the transition the next time that issue record is synchronized.
Before You BeginBefore performing this procedure:
• Fully define and implement your workflows. See the AccuRev® Web User Interface User’s Guide for more information on AccuRev workflow.
• Review the workflows and create a list of all the transitions you want to expose to the AccuSync synchronization process.
How to Expose a Workflow Transition to AccuSync™
To expose a workflow transition to AccuSync:
1. In AccuWork, use the Schema Editor to add a new field to the AccuWork schema. Name the field transition, and give it the type Text.
Note: This field is for internal AccuRev use only. Do not add this field to the issue record’s layout in AccuWork.
2. In your other ITS, add a new custom field. You can name the field anything you want, but consider naming it transition for consistency with the associated field in AccuWork.
Give the field a type that lets users choose from a list of values when modifying the issue record in your other ITS.
3. Using your list of transition names (see Before You Begin), create values for the transition field you created in Step 2. The names you enter must match exactly the transition names as they are defined in the workflow.
4. In AccuSync, create a new field mapping for the AccuWork and ITS transition fields in an existing mapping definition. For example, if you are using a default ITS AccuSync configuration, you might want to add the new transition field mapping to the Basic mapping definition.
Tip: If you decide to create a new mapping definition, make sure you also either create a synchronization pattern that uses that mapping definition, or add that mapping definition to an existing synchronization pattern.
5. In AccuSync, click the Reload Configuration Cache button ( ) to ensure that the configuration incorporates the AccuWork schema changes.

AccuSync™ Management Console Help 49
Summary of AccuSync Actions and Status SymbolsAccuSync Configurations and configuration components like synchronization patterns and field mappings are displayed in tables like the one shown in the following illustration:
Configurations and Sync Patterns Tables: Action and Status InformationThe following tables describe the action and status information that is displayed in the Configurations table and the Sync Patterns table.
Actions:
Button Displayed For Description
Run
AccuSync ConfigurationsSynchronization patterns
Runs the AccuSync Configuration or synchronization pattern. When the configuration or synchronization pattern is running, the Run button changes to the Stop button.Note: The Run button is gray by default. For an AccuSync Configuration, the Run button turns blue only after one or more synchronization patterns have been defined for the configuration. (You cannot run a configuration that does not have at least one synchronization pattern defined for it.)
See Running an AccuSync™ Configuration and Running a Synchronization Pattern for more information.
Stop
AccuSync ConfigurationsSynchronization patterns
Stops the AccuSync Configuration or synchronization pattern. When the configuration or synchronization pattern stops, the Stop button changes to the Run button.
See Stopping Configurations and Synchronization Patterns for more information.
Reload Configuration Cache
AccuSync Configurations Reloads the AccuSync Configuration to recognize changes made to the AccuWork or ITS schema for an existing AccuSync Configuration.
Edit
AccuSync ConfigurationsSynchronization patternsConnectionsMapping definitionsMapping groupsField mappingsRequired field mappings
Allows you to edit the selected AccuSync Configuration or configuration component.
See Making Changes to AccuSync™ Configurations for more information.

50 AccuSync™ Management Console Help
Status:
Connections Table: Action and Status InformationThe Status column in the Connections table indicates the status of the AccuWork connection and the ITS connection.
The following tables describe the action and status information that is displayed in the Connections table.
Action:
Status:
Delete
AccuSync ConfigurationsSynchronization patternsMapping definitionsMapping groupsField mappings
Deletes the selected AccuSync Configuration or configuration component.
See Making Changes to AccuSync™ Configurations for more information.
Symbol Displayed For Description
Running, no errors
AccuSync ConfigurationsSynchronization patterns
Indicates that the AccuSync Configuration or synchronization pattern is running with no errors. Clicking the status button displays a page summarizing errors, if any.
See Understanding Synchronization Status for more information.
Stopped, errors
AccuSync ConfigurationsSynchronization patterns
For an AccuSync Configuration, indicates that AccuSync encountered an error in one or more of the synchronization patterns associated with the AccuSync Configuration. For a synchronization pattern, indicates that a synchronization error occurred.
See Understanding Synchronization Status for more information.
Button Description
Edit
Allows you to edit the selected connection.
Symbol Description
Not Connected
Indicates that the connection is not working.
Connected
Indicates that the connection is working.
In Progress
Initialization of connection is in progress. (Shown when the configuration of the connection is entered for the first time.)
Button Displayed For Description

AccuSync™ Management Console Help 51
4. Customizing the Default Configuration
This chapter describes the procedures for editing the components in the default configuration for your ITS. See Chapter 5 Creating a New Configuration if you want to create a new AccuSync Configuration from scratch.
Note: This chapter assumes you have completed the set up process for default configurations described in Chapter 2 AccuSync™ Quick Start.
What is a Default Configuration?A default configuration is an AccuSync Configuration that has been preconfigured to work with one of the ITSs supported by AccuSync -- there are default configurations for JIRA, Rally, HP QC, ClearQuest, and BMC Remedy for example. Each default configuration contains AccuSync Configuration components -- field mappings, synchronization patterns, and so on -- that are designed to work with the default AccuWork schema installed with AccuSync and the default schema of your ITS.
A default configuration requires little or no modification before you can use it to synchronize AccuWork issues with issues in your ITS. Some changes to individual configuration components might be required if you have modified the default AccuWork schema, the default ITS schema, or both. For example, if you added a custom field to your ITS schema, you might want to add that field to your AccuWork schema and create a field mapping to synchronize the data in that field.
See AccuSync™ Configuration Components for descriptions of the components in an AccuSync Configuration. For information about how these components have been preconfigured in the default configuration for your ITS, see the Configuration Reference appendix for your ITS.
Making Changes to AccuSync™ ConfigurationsYou can make changes to an active AccuSync Configuration -- there is no need to stop a running configuration or to stop the AccuSync server to create a new field mapping, for example. However, after you make a change you need to ensure that AccuSync recognizes those changes as summarized in the following table
If You Change Example You Must
The default configuration or one of its components
Adding a new mapping definition or synchronization pattern
Stop and then run the default configuration (or just the affected synchronization pattern, if applicable) for the change to be recognized by AccuSync.
The AccuWork or ITS schema
Adding a new field or changing the layout
Reload the configuration cache for any configuration affected by the change (click on the AccuSync Management Console main page).

52 AccuSync™ Management Console Help
Note: You cannot copy or delete an AccuSync Configuration or any of its components while it is running.
The following sections summarize the types of editing operations you can perform and where to find more information.
Editing Synchronization PatternsYou can edit and delete synchronization patterns. You cannot rename a synchronization pattern. For detailed information about synchronization patterns, see Creating Synchronization Patterns.
To edit a synchronization pattern:
1. On the AccuSync Management Console main page, click the Edit Configuration button ( ) for the AccuSync Configuration whose synchronization pattern you want to edit.
Alternative: Double-click the AccuSync Configuration.
The Configuration page appears. Synchronization patterns are listed in the Sync Patterns table.
2. If you want to delete the synchronization pattern, click the Delete button ( ). Otherwise, go to Step 3.
3. Click the Edit Sync Pattern button ( ).
Alternative: Double-click the synchronization pattern.
The Edit Sync Pattern dialog box appears.
4. Make any changes as needed.
5. Click the Save button.
What to Do NextAfter you change a synchronization pattern, you should run it to make sure that it performs as expected. See Running a Synchronization Pattern for more information. If you delete a synchronization pattern, you should run any AccuSync Configurations that used it to make sure that they continue to perform as expected. See Running an AccuSync™ Configuration for more information.
Editing Mapping DefinitionsYou can edit, delete, and copy mapping definitions. The types of changes you can make to a mapping definition include:
• Adding or removing a field mapping
• General editing such as renaming the mapping definition, adding or removing filters, changing the AccuWork and ITS issue types, and so on
The procedure varies based on the type of change you want to make.
Editing procedures are described here; to copy a mapping definition, see Copying a Mapping Definition. For detailed information on mapping definitions, see Creating Mapping Definitions.
Note: Changing a mapping definition might affect any synchronization patterns that use it. Be sure to verify that your synchronization patterns behave as expected after editing a mapping definition they use.

AccuSync™ Management Console Help 53
To add or remove a field mapping:
1. On the AccuSync Management Console main page, click the Edit Configuration button ( ) for the AccuSync Configuration whose mapping definitions you want to edit.
Alternative: Double-click the AccuSync Configuration.
The Configuration page appears.
2. In the Mapping Definitions table, click the Edit Mapping Definition button ( ).
Alternative: Double-click the mapping definition.
The Mapping Definition page appears.
3. To add a new field mapping, click the Add New... button. See Creating a Field Mapping for more information.
To delete a field mapping, click its Delete button ( ).
To perform general editing for a mapping definition:
1. On the AccuSync Management Console main page, click the Edit Configuration button ( ) for the AccuSync Configuration whose mapping definitions you want to edit.
Alternative: Double-click the AccuSync Configuration.
The Configuration page appears.
2. In the Mapping Definitions table, click the Edit Mapping Definition button ( ).
Alternative: Double-click the mapping definition.
The Mapping Definition page appears.
3. Click the Advanced Settings button.
The Edit Mapping Definition dialog box appears. See Creating a Mapping Definition Filter for more information.
What to Do NextAfter you change a mapping definition, you should run any synchronization patterns that use it to make sure that your changes provide the results you expect. See Running a Synchronization Pattern for more information.
Editing Field MappingsYou can edit and delete a field mapping. The types of changes you can make to a field mapping include:
• Changing one or both mapped fields
• Changing the synchronization type
• Changing the transformer associated with the field mapping
For detailed information on these and other topics related to field mappings, see Creating Field Mappings.

54 AccuSync™ Management Console Help
To edit a field mapping:
1. On the AccuSync Management Console main page, click the Edit Configuration button ( ) for the AccuSync Configuration whose field mappings you want to edit.
Alternative: Double-click the AccuSync Configuration.
The Configuration page appears.
2. In the Mapping Definitions table, click the Edit Mapping Definition button ( ).
Alternative: Double-click the mapping definition.
The Mapping Definition page appears.
3. To delete a field mapping, click its Delete button ( ).
4. To edit a field mapping, click the Edit Field Mapping button ( ).
The Edit Field Mapping dialog box appears. See Creating a Field Mapping for more information.
What to Do NextAfter you change a field mapping, you should run any synchronization patterns that use the mapping definitions associated with that field mapping to make sure that your changes provide the results you expect. See Running a Synchronization Pattern for more information.
Editing Mapping GroupsYou can add and remove value pairs from a mapping group, but you cannot change the AccuWork or ITS values in a value pair individually: if you want to change an existing value pair, you must delete the pair and then create a new pair with the values you want. If you want to delete a mapping group, you must first delete all of its value pairs.
Note that mapping groups are associated with transformers, which in turn are used by some field mappings. Because of this, changes you make to a mapping group might cause synchronization errors in any mapping definitions that rely on the field mappings that use a mapping group. To learn more about the relationship between field mappings, mapping groups, and transformers, see Creating a Mapping Group.
To edit a mapping group:
1. On the AccuSync Management Console main page, click the Edit Configuration button ( ) for the AccuSync Configuration whose mapping groups you want to edit.
Alternative: Double-click the AccuSync Configuration.
The Configuration page appears.
2. Click the Edit Admin Details button.
The Admin Details for Configuration page appears. The Mapping Groups table displays any existing mapping groups.
3. To delete a mapping group, delete all of its mappings (click the Delete button ( ) for each).
4. To change the value for a value pair, delete the pair, and then add a new pair with the values you want.

AccuSync™ Management Console Help 55
What to Do NextAfter you change a mapping group, you should run any synchronization patterns with mapping definitions that use that mapping group to make sure that your changes provide the results you expect. See Running a Synchronization Pattern for more information.
Advanced AccuSync™ Configuration SettingsAccuSync provides advanced settings that can affect when AccuSync encounters a fatal error, and how AccuSync can alert you to these and other errors when they occur:
• Network retry settings – AccuSync allows you to specify both the number of retries and the retry interval that AccuSync should attempt in the event of a network error. See Types of Errors Recorded by AccuSync for more information.
• Key validation – AccuSync validates AccuWork and ITS issue keys before synchronizing records. In some situations, such as upgrading from AccuBridge™, you might want AccuSync to skip the key validation process. See Running the Initial Synchronization for more information.
• Email configuration – If you want, you can configure AccuSync to email AccuSync Configuration status and error reports to users you specify. See Email Notification for AccuSync Events for more information.

56 AccuSync™ Management Console Help
Advanced settings are displayed on the Admin Details for Configuration page for the current configuration. You display the Admin Details for Configuration page by clicking the Edit Admin Details button on the Configuration page.
See Chapter 3 Working with AccuSync™ Configurations for more information on these and other topics related to running AccuSync Configurations.

AccuSync™ Management Console Help 57
5. Creating a New ConfigurationThis chapter describes how to create a new AccuSync Configuration from scratch. It provides the procedures and information needed to specify all of the components that make up an AccuSync Configuration.
Before You BeginBefore creating a new configuration, you should investigate whether you can customize the default configuration for your ITS. In many cases, the default configuration requires little or no modification before it can be used to synchronize AccuWork and your ITS issues. See Chapter 4 Customizing the Default Configuration for more information.
Copying an AccuSync™ ConfigurationAn alternative to customizing the default configuration is to copy it. Copying an existing configuration allows you to give it a different name and then modify its components as needed. See How to Copy an AccuSync™ Configuration for more information.
Overview of Creating a New ConfigurationThe steps involved in creating a new AccuSync Configuration are summarized in the following table:
Creating the AccuWork™ and ITS ConnectionsThis procedure describes how to create the connection components AccuSync uses to connect to AccuWork and your ITS. In addition to connection information, you use the connection components to specify:
• The AccuRev depot and ITS projects whose issues you want AccuSync to synchronize
• The name of the AccuWork schema field that stores the type of issue (defect or task, for example) AccuSync will synchronize
Step Description For More Information, See
1 Set up AccuSync. Chapter 2 AccuSync™ Quick Start
2 Create a new configuration, and then configure and test the connections to AccuWork and your ITS.
Creating the AccuWork™ and ITS Connections
3 Specify the issue types you want to synchronize (defects or tasks, for example), the fields you want to map, and settings for optional components like filters and transformers.
Creating Mapping Definitions
4 Specify the intervals at which you want AccuSync to synchronize your data, which mapping definition you want to use, and the default synchronization type.
Creating Synchronization Patterns

58 AccuSync™ Management Console Help
To create the AccuRev and ITS connections:
1. Verify that the AccuSync server is running. See Starting the AccuSync™ Server if you need help with this step.
2. Verify that your ITS service is available. Depending on your ITS, this might involve ensuring that a server is running or simply checking that your cloud-based ITS is not down for maintenance, for example.
3. Start the AccuSync Management Console. See Step 6: Start the AccuSync Management™ Console if you need help with this step.
The AccuSync Management Console main page appears. Any existing AccuSync configurations are displayed in the Configurations table.
4. Click the Add new... button.
The New Configuration page appears.
5. Enter a name for the new configuration.
6. Select the system you are synchronizing with AccuWork.

AccuSync™ Management Console Help 59
7. Click the Create button.
The New AccuRev Connection dialog box appears.
8. Specify the values required to connect to AccuWork. Note the following:
• Host and Port: These are the values that correspond to the AccuRev installation with which you will be synchronizing your ITS.
• Username and Password: Be sure to enter the username and password of the AccuSync user you created specifically for AccuSync. See Step 5: Create the AccuSync User for more information.
• AccuRev executable: Use this field to optionally specify the absolute path of your AccuRev executable (accurev.exe). If you leave this field empty, AccuSync looks for accurev.exe in your system’s PATH.
9. Click the Test Connection button.
When the connection succeeds, a new panel appears on the New AccuRev Connection dialog box that allows you to specify the AccuRev depot whose issues you want to synchronize with your ITS projects.
10. Complete the remaining fields as follows:
• AccuRev depot: Choose the depot you want to synchronize with your ITS.
Tip: When you select a depot, a default value appears in the AccuWork Issue Type Field Name field.

60 AccuSync™ Management Console Help
• AccuWork issue type field name: The internal name of the field that displays the issue type (defect, task, and so on) on the AccuWork Issue Edit Form. Unless you have changed the name in the AccuWork schema, the name of this field is type.
Note: The field’s name typically differs from its label. For example, the field named type is displayed on the Issue Edit Form using the label Type.
• Web Interface URL: Enter the URL for the machine hosting the AccuRev Web Interface. For example: http://localhost:8080/accurev/
11. Click the Save button.
The New Connection dialog box appears. You use this dialog box to specify connection settings for your ITS.
Note: Fields on the Edit Connection dialog box vary slightly based on ITS.
12. Specify the values required to connect to your ITS. See New ITS Connection Dialog Box if you need help with this step.
13. Click the Test Connection button.
When the connection succeeds, new panels appear on the New Connection dialog box. Fields on this panel vary slightly based on your ITS. See Testing the ITS Connection for more information.
Note for JIRA users: If the connection to JIRA does not succeed, make sure that the JIRA plugin for AccuSync was installed and that JIRA has been configured to accept remote API calls. See Step 1: Configure JIRA for AccuSync for more information.
Note for Rally Users: You cannot select a Task project without also selecting the corresponding Defect or Story project.
14. Click the Save button.
AccuSync displays a message indicating that the configuration was created successfully.
15. Click OK to clear the message.
The new configuration appears in the Configurations table on the AccuSync Management Console main page.
What to Do NextOnce you have successfully created connections to AccuWork and your ITS, and identified the AccuRev depot and ITS projects whose issues you want to synchronize, you can create mapping definitions as described in the following section.
Creating Mapping DefinitionsA mapping definition is a collection of settings that describes how AccuSync synchronizes AccuWork and ITS issues. Examples of mapping definition settings include:
• The issue type – You create a mapping definition for each issue type you want to synchronize. You might create one mapping definition for defects and another for tasks, for example.
• Field mappings – You use field mappings to specify the AccuWork issue fields and ITS issue fields whose data you want to synchronize. For example, you might want to synchronize the content of the AccuWork issue Assigned To field with the content of the Owner field in your ITS. Depending on the
AccuSync™ Management Console Help 61
allowed values for a given field, and whether those values are the same on both systems, you also might need to create a mapping group. See Creating a Mapping Group for more information.
• Transformers – AccuSync uses transformers to convert values in one system to different values in the other. For example, valid user names in Rally systems are email addresses -- [email protected], for example. AccuRev usernames do not take this form, so AccuSync provides a transformer that strips the @domain_name suffix from Rally user names when synchronizing Rally artifacts with AccuWork issues, and vice versa.
AccuSync includes several predefined transformers, and you can create custom transformers using a Java project installed with AccuSync. See Transformers for more information.
• Synchronization type override – The synchronization type determines whether AccuSync performs a two-way or one-way synchronization. By default, AccuSync uses the synchronization type specified for the synchronization pattern that the mapping definition is associated with. If you want, you can override the synchronization type for individual field mappings. See Synchronization Types for more information.
• Filters – Filters provide a way for you to control which issues, or types of issues, are synchronized. For example you might create a filter that does not synchronize issues filed against a specific subsystem, or issues submitted by a specific user. You can define filters for both AccuWork and your ITS. See Creating a Mapping Definition Filter for more information.
Base Mapping DefinitionsA base mapping definition is a mapping definition that contains a set of field mappings that are common to other mapping definitions. You can use a base mapping definition to speed the mapping definition process by reusing it as the foundation for more specialized mapping definitions, saving you the time and effort of manually redefining the same field mappings for each mapping definition you create.
For example, if your defect and story issues share a number of fields in common (issue number, short description, and comments, for example), you could create a base mapping definition called shared that specified those field mappings. You could then create the defect mapping definition and base it on the shared mapping definition. The defect mapping definition would inherit issue number, short description, and comments field mappings. Then, you could add to the defect mapping definition additional field mappings that are relevant only to defect issues -- such as severity, for example.
You create a base mapping definition as you would any other mapping definition. See Creating a Mapping Definition for more information.
Required Field Mappings: Key and LinkIn order to synchronize AccuWork data with data in your ITS, AccuSync needs to be able to locate an issue record in one system and match it with (or create it in) the corresponding record in the other system. It does this using unique IDs, keys that identify issue records in each system. Unique IDs are also used to specify URLs, links that allow users of one system to access issues in the other.
Each mapping definition must be associated with key and link field mappings:
• The key mapping lets you specify the AccuRev and ITS fields that store the unique ID that identifies each issue record.
• The link mapping lets you specify the AccuRev and ITS fields that store the URL used to access an issue in AccuRev or your ITS.

62 AccuSync™ Management Console Help
There are two ways to include required field mappings with each mapping definition:
• You can create a base mapping definition that includes required key and link field mappings, and use it as the foundation for all other mapping definitions you create. All values defined for a base mapping definition are inherited by any mapping definition that uses it. See Base Mapping Definitions for more information.
• You can create required key and link field mappings individually for each mapping definition. For example, if you create separate mapping definitions for defects and stories, you could specify the key and link mappings for both defect and story mapping definitions.
Regardless of which approach you choose, you always create required field mappings as part of the mapping definition. An abbreviated description of that process is described here. For more details, see Creating a Mapping Definition.
Other Field Mappings Required for ClearQuest, HP QC, JIRA, and BMC RemedyIn addition to key and link field mappings, you must create additional field mappings to satisfy requirements for valid issue records in ClearQuest, HP QC, JIRA, and BMC Remedy. See Creating Field Mappings for more information.
Creating Required Key and Link Field MappingsNote: The values for the key and link fields are based on fields you added to the AccuWork schema; see Step 2: Set Up the AccuWork™ Schema for more information. Your ITS schema must also have been modified to store these values. If you are using JIRA, these changes are made for you by the JIRA plugin for AccuSync; see Step 1: Configure JIRA for AccuSync for more information. If you are using Rally or HP QC, see Step 4: Add AccuWork Fields to Your ITS Schema.
To create required key and link field mappings for a mapping definition:
1. On the AccuSync Management Console main page, double-click the configuration for which you want to define a mapping values group.
Alternative: Select the AccuSync configuration and click the Edit Configuration ( ) button.
The Configuration page appears.

AccuSync™ Management Console Help 63
2. Above the Mapping Definitions table, click the Add new... button.
The New Mapping Definition dialog box appears. The dialog box for JIRA is shown here; the dialog box for other ITSs contain the same fields.
3. In the Name field, enter a name for the mapping definition.
Tip: If you are creating required field mappings as part of a base mapping definition, give it a name such as basic, common, or shared.
4. Click the Create Key field button.
The Specify Issue Key Fields dialog box appears. The dialog box for JIRA is shown here; the dialog box for other ITSs contain the same fields.
5. In the AccuWork field and <ITS_name> field fields, choose the schema values for the unique ID that represents the issue record on each system.

64 AccuSync™ Management Console Help
Tip: If you are using the default AccuWork schema installed with AccuSync, you can use the following mapping:
6. Click OK.
The Specify Issue Key Fields dialog box closes.
7. On the New Mapping Definition dialog box, click the Create Link field button.
The Specify Issue Link Fields dialog box appears. The dialog box for JIRA is shown here; the dialog box for other ITSs contain the same fields.
8. In the AccuWork field and <ITS_name> field fields, choose the schema values for the URLs that will be used to access the issue record on each system.
Tip: If you are using the default AccuWork schema installed with AccuSync, you can use the following mapping:
9. Click OK.
The Specify Issue Link Fields dialog box closes.
10. Specify other values of the mapping definition as needed. See Creating a Mapping Definition.
Creating a Mapping DefinitionUse the following procedure to create a mapping definition.
Tip: You can create a new mapping definition by copying an existing one. See Copying a Mapping Definition for more information.
AccuWork field ITS field
ClearQuest: clearQuestKey HP QC: hpKey JIRA: jiraKey Rally: rallyID Remedy: remedyKey
AccuWorkKey
AccuWork field <ITS_name> field
ClearQuest: clearQuestLink HP QC: hpLink JIRA: jiraIssueLink Rally: rallyIssueLink Remedy: remedyLink
AccuWorkIssueLink

AccuSync™ Management Console Help 65
1. On the AccuSync Management Console main page, double-click the configuration for which you want to define a mapping definition.
Alternative: Select the AccuSync configuration and click the Edit Configuration button ( ).
The Configuration page appears.
2. Above the Mapping Definitions table, click the Add new... button.
The New Mapping Definition dialog box appears. The dialog box for JIRA is shown here; the dialog box for other ITSs contain the same fields.
3. In the Name field, enter a name for the mapping definition.
Tip: Consider naming the mapping definition for the issue type for which it is being created—story or defect, for example. If you are creating a base mapping definition that will be used with multiple mapping definition types, give it a name such as basic, common, or shared.
4. If this mapping definition will be used to synchronize change package information, select the Change package synchronization field.
Note: Change package synchronization is always one-way, from AccuWork to your ITS. Because of this, you should always create the mapping definition for the AccuWork issue type (defect or enhancement, for example) before creating the corresponding mapping definition for the change package. Doing so ensures that your ITS has an issue record to which AccuSync can write the change package information from the corresponding AccuWork issue.
5. Optionally, in the Based on field, choose the mapping definition on which you are basing the mapping definition you are creating. If you specify a base mapping definition, the current mapping definition inherits all base mapping definition field mappings.
6. In the AccuWork type and ITS type fields, choose the issue types that will be synchronized using this mapping definition.
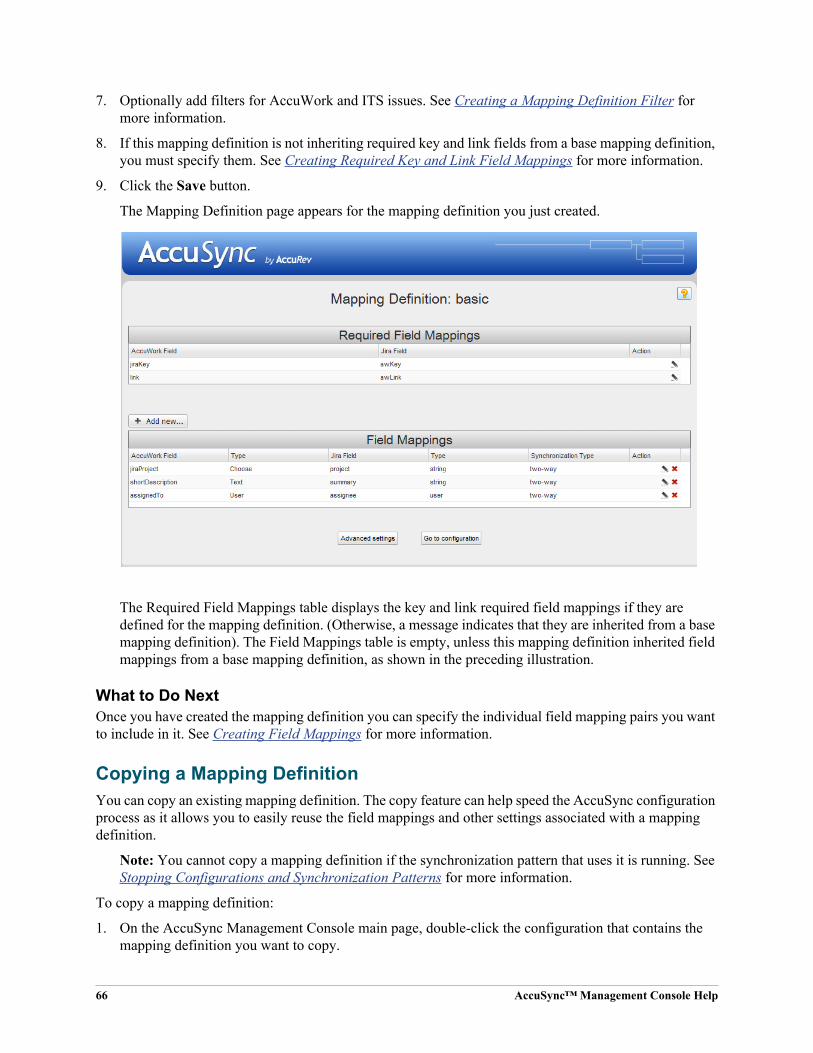
66 AccuSync™ Management Console Help
7. Optionally add filters for AccuWork and ITS issues. See Creating a Mapping Definition Filter for more information.
8. If this mapping definition is not inheriting required key and link fields from a base mapping definition, you must specify them. See Creating Required Key and Link Field Mappings for more information.
9. Click the Save button.
The Mapping Definition page appears for the mapping definition you just created.
The Required Field Mappings table displays the key and link required field mappings if they are defined for the mapping definition. (Otherwise, a message indicates that they are inherited from a base mapping definition). The Field Mappings table is empty, unless this mapping definition inherited field mappings from a base mapping definition, as shown in the preceding illustration.
What to Do NextOnce you have created the mapping definition you can specify the individual field mapping pairs you want to include in it. See Creating Field Mappings for more information.
Copying a Mapping DefinitionYou can copy an existing mapping definition. The copy feature can help speed the AccuSync configuration process as it allows you to easily reuse the field mappings and other settings associated with a mapping definition.
Note: You cannot copy a mapping definition if the synchronization pattern that uses it is running. See Stopping Configurations and Synchronization Patterns for more information.
To copy a mapping definition:
1. On the AccuSync Management Console main page, double-click the configuration that contains the mapping definition you want to copy.
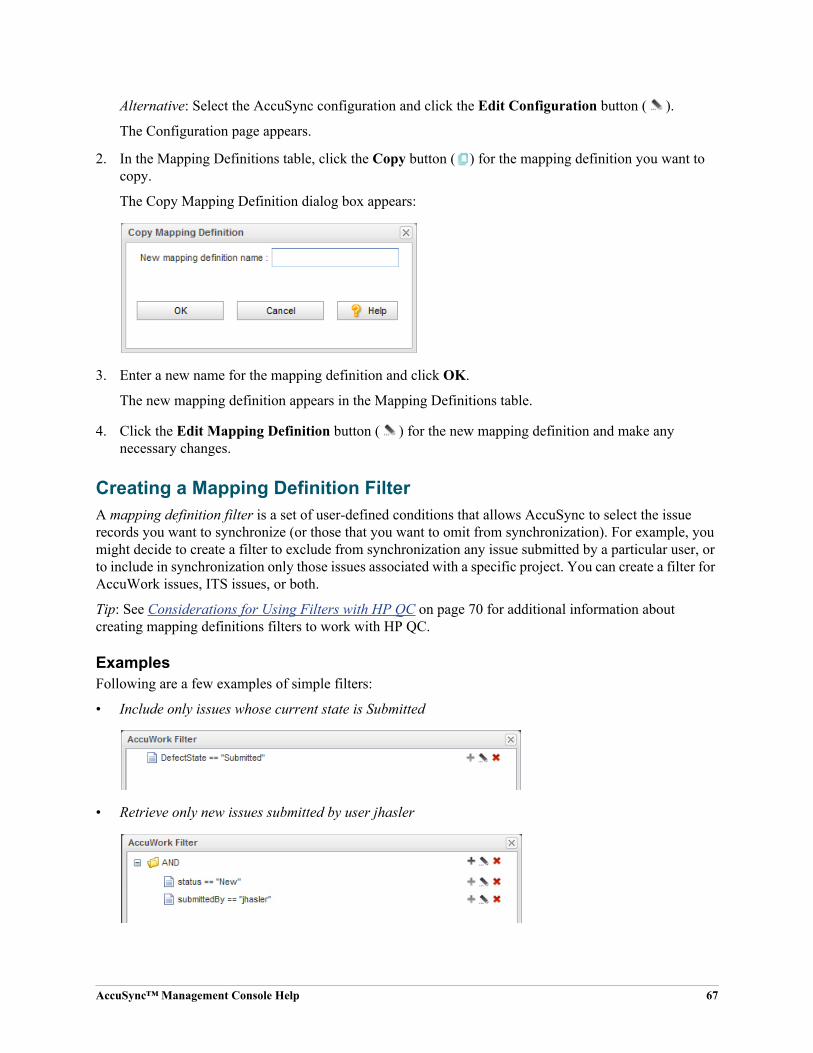
AccuSync™ Management Console Help 67
Alternative: Select the AccuSync configuration and click the Edit Configuration button ( ).
The Configuration page appears.
2. In the Mapping Definitions table, click the Copy button ( ) for the mapping definition you want to copy.
The Copy Mapping Definition dialog box appears:
3. Enter a new name for the mapping definition and click OK.
The new mapping definition appears in the Mapping Definitions table.
4. Click the Edit Mapping Definition button ( ) for the new mapping definition and make any necessary changes.
Creating a Mapping Definition FilterA mapping definition filter is a set of user-defined conditions that allows AccuSync to select the issue records you want to synchronize (or those that you want to omit from synchronization). For example, you might decide to create a filter to exclude from synchronization any issue submitted by a particular user, or to include in synchronization only those issues associated with a specific project. You can create a filter for AccuWork issues, ITS issues, or both.
Tip: See Considerations for Using Filters with HP QC on page 70 for additional information about creating mapping definitions filters to work with HP QC.
ExamplesFollowing are a few examples of simple filters:
• Include only issues whose current state is Submitted
• Retrieve only new issues submitted by user jhasler

68 AccuSync™ Management Console Help
• Exclude all records that were submitted by users oarmstrong or hrondo
• Exclude all issues that are associated with ChildProject1 or ChildProject2
(Rally only: The use of a filter is very helpful for specifying which Rally projects to exclude or include when Rally has nested projects.)
The AccuSync filter editor is similar to the AccuWork Query Editor. See your AccuRev documentation for more information.
How to Create a FilterYou can create a filter at the same time you define the mapping definition, or you can add a filter to an existing mapping definition.
To create a filter:
1. On the New Mapping Definition dialog box (or Edit Mapping Definition dialog box, if you are working with an existing mapping definition), click the Add... button for the AccuWork Filter or ITS Filter Field, as appropriate.
The AccuWork Filter or ITS Filter editor appears. The AccuWork Filter editor is shown in this example.

AccuSync™ Management Console Help 69
2. Click the Add filter button.
The Filter Record dialog box appears.
You use this dialog box to construct the conditions and clauses that define your filter.
3. In the Filter Record Type field, choose condition or the AND or OR clause you want to create.
If you chose condition, go to Step 6.
If you chose AND or OR clause, click OK.
The clause appears in the AccuWork Filter editor. Go to Step 4.
4. Click the New button ( ) associated with the clause you just added.
The Filter Record dialog box appears again.
5. Make sure the File Record Type field is set to condition.
6. In the Specify Condition Details fields, construct the condition.
A condition has the following construction:
field name, condition, valueFor example:
status = new
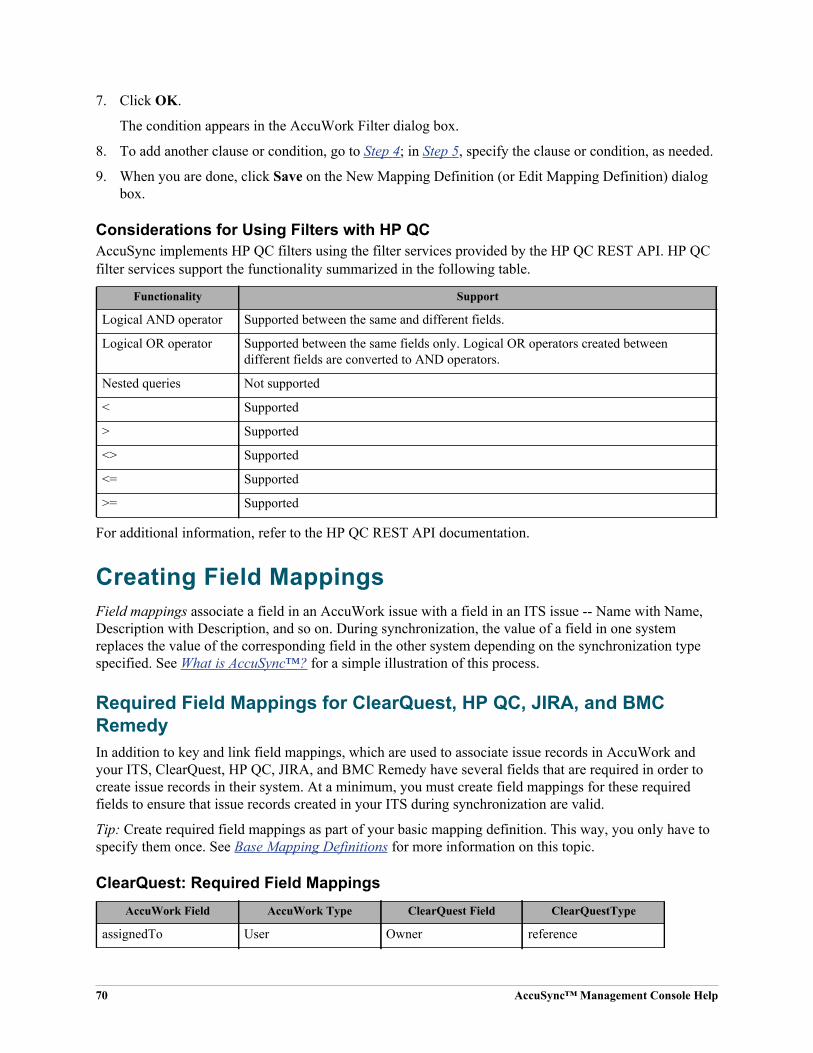
70 AccuSync™ Management Console Help
7. Click OK.
The condition appears in the AccuWork Filter dialog box.
8. To add another clause or condition, go to Step 4; in Step 5, specify the clause or condition, as needed.
9. When you are done, click Save on the New Mapping Definition (or Edit Mapping Definition) dialog box.
Considerations for Using Filters with HP QCAccuSync implements HP QC filters using the filter services provided by the HP QC REST API. HP QC filter services support the functionality summarized in the following table.
For additional information, refer to the HP QC REST API documentation.
Creating Field MappingsField mappings associate a field in an AccuWork issue with a field in an ITS issue -- Name with Name, Description with Description, and so on. During synchronization, the value of a field in one system replaces the value of the corresponding field in the other system depending on the synchronization type specified. See What is AccuSync™? for a simple illustration of this process.
Required Field Mappings for ClearQuest, HP QC, JIRA, and BMC RemedyIn addition to key and link field mappings, which are used to associate issue records in AccuWork and your ITS, ClearQuest, HP QC, JIRA, and BMC Remedy have several fields that are required in order to create issue records in their system. At a minimum, you must create field mappings for these required fields to ensure that issue records created in your ITS during synchronization are valid.
Tip: Create required field mappings as part of your basic mapping definition. This way, you only have to specify them once. See Base Mapping Definitions for more information on this topic.
ClearQuest: Required Field Mappings
Functionality Support
Logical AND operator Supported between the same and different fields.
Logical OR operator Supported between the same fields only. Logical OR operators created between different fields are converted to AND operators.
Nested queries Not supported
< Supported
> Supported
<> Supported
<= Supported
>= Supported
AccuWork Field AccuWork Type ClearQuest Field ClearQuestType
assignedTo User Owner reference

AccuSync™ Management Console Help 71
HP QC: Required Field Mappings
JIRA: Required Field Mappings
BMC Remedy: Required Field MappingsField mappings required by BMC Remedy can be customized and will vary based on application type. Consult your BMC Remedy administrator for the fields required for your implementation, and then create at least those mappings in your BMC Remedy configuration.
Mapping GroupsIn most cases, simply mapping one field to another provides AccuSync with all the information it needs to synchronize the fields’ values -- the issue description you enter in AccuWork can be added, as is, to the issue’s description in your ITS during synchronization, for example.
In some cases, however, your systems might use different values for the same field. Imagine a Severity field, for example. In AccuWork, this field might use values of A, B, and C to describe an issue’s severity. The same field in your ITS, however, might use values of Critical, High, and Moderate. In cases such as this, you need to define a mapping group to provide AccuSync with the information it needs to synchronize fields that use different values (A=Critical, B=High, and C=Moderate, for example).
description Text Description multilineString
project Text project string
securityPolicy Text SecurityPolicy reference
shortDescription Text Headline string
state Choose State string
AccuWork Field AccuWork Type HP QC Field HP QC Type
summary Text Summary String
reporter User Detected By User List
date submitted Timestamp Detected on Date Date
severity Choose Severity Lookup List
AccuWork Field AccuWork Type JIRA Field JIRA Type
summary Text summary string
description Text description string
assignee User assignee user
reporter User reporter user
priority Choose priority string
jiraProject Choose project string
status Choose status string
AccuWork Field AccuWork Type ClearQuest Field ClearQuestType

72 AccuSync™ Management Console Help
Using a Mapping Group in a Field MappingYou choose the mapping group you want to use for a field mapping at the time you create the field mapping. For this reason, you must create the mapping group before you create the field mapping itself. See Creating a Mapping Group for more information.
Note: Mapping groups are created at the AccuSync Configuration level and can be used by the field mappings of any mapping definition defined for the configuration.
Synchronization Types Inherited from Synchronization PatternField mappings inherit the synchronization type (two-way or one-way) from the synchronization pattern associated with their mapping definition. If you want, you can override the synchronization type for individual field mappings. You might want to specify one-way synchronization for a particular field mapping and use two-way synchronization for the remaining field mappings in the mapping definition, for example. See Synchronization Types for more information.
TransformersTransformers are bidirectional AccuSync utilities that convert values when synchronizing fields in one system with fields in the other. Transformers perform these conversions using predefined settings, except in the case of the Special Value Transformer, which uses the mapping group you specify. AccuSync includes several predefined transformers. You can also create custom transformers.
Predefined Transformers for All ITSsAccuSync includes these predefined transformers for all supported ITSs:
• AccuWork Change Package Data to String – Adds new lines to change package information to make the data more legible. For example, the AccuWork Change Package Data to String Transformer converts this change package information:[id=3, type=text, element=/f1/s.txt, version=2/4, basisVersion=3/2] [id=4, type=text, element=/f1/r.txt, version=2/2, basisVersion=3/2] [id=5, type=text, element=/f1/newItem.txt, version=2/2, basisVersion=3/3] [id=6, type=text, element=/f1/123, version=2/1, basisVersion=3/2] [id=9, type=text, element=/f1/1234, version=2/1, basisVersion=3/1] [id=10, type=text, element=/f1/df, version=2/3, basisVersion=0/0] [id=11, type=text, element=/f1/123213123, version=2/1, basisVersion=0/0]
to this:[id=3, type=text, element=/f1/s.txt, version=2/4, basisVersion=3/2][id=4, type=text, element=/f1/r.txt, version=2/2, basisVersion=3/2][id=5, type=text, element=/f1/newItem.txt, version=2/2, basisVersion=3/3][id=6, type=text, element=/f1/123, version=2/1, basisVersion=3/2] [id=9, type=text, element=/f1/1234, version=2/1, basisVersion=3/1] [id=10, type=text, element=/f1/df, version=2/3, basisVersion=0/0] [id=11, type=text, element=/f1/123213123, version=2/1, basisVersion=0/0]
• AccuWork Change Package Promote Data to String – Adds new lines to change package promote information to make the data more legible. See the description of AccuWork Change Package Data to String Transformer for an example.
• Special Values – Uses the mapping group you specify to convert the value of a field in one system to an appropriate value in the other system. See Mapping Groups.
ClearQuest: Predefined TransformersClearQuest does not require special transformers.

AccuSync™ Management Console Help 73
HP QC: Predefined TransformersHP QC does not require special transformers.
JIRA: Predefined TransformersAccuSync includes these predefined transformers for JIRA:
• AccuWork Change Package Data to JIRA Custom Field – Displays change package information in a JIRA custom field as HTML. Information includes element ID, file type, path, and actual and basis version numbers.
• AccuWork Change Package Promote Data to JIRA Custom Field – Displays change package promote information in a JIRA custom field as HTML. Information includes transaction ID; date; user; type; element ID, path, and virtual and real versions; and comments.
• JIRA User to AccuWork User – Uses the email suffix specified in the JIRA connection combined with the AccuRev user name to create the email name required for JIRA users. See Creating the AccuWork™ and ITS Connections for more information.
A mapping group, if specified, can be used to synchronize fields that take user names when the users were created with different names on the two systems (oarmstrong on one and owen.armstrong on the other, for example). See Mapping Groups for more information.
• Special JIRA Values – Uses the mapping group you specify to convert the value of a field in AccuWork to an appropriate value for a JIRA custom field. See Mapping Groups.
Rally: Predefined TransformersAccuSync includes these predefined transformers for Rally:
• Rally Discussion to AccuWork Comments (Text) Transformer – retains any formatting used in Rally Discussion and AccuWork Comments fields.
• Rally Username to AccuWork Username Mapper – for Rally to AccuWork synchronizations, strips the email suffix (specified as part of the Rally connection) from Rally usernames so they can be added to AccuWork. For AccuWork to Rally synchronizations, the email suffix is added to the username before the name is added to Rally.
For example, if @accurev.com is specified as the email suffix, when a Rally issue with the username [email protected] is synchronized with AccuRev, the AccuWork issue is given the user hrondo. See Creating the AccuWork™ and ITS Connections for more information on specifying the email suffix.
Note: You can use a mapping group with this transformer to override its default behavior. You might need to do this if the same user was defined using different usernames on the systems you are synchronizing (jhasler on one, and haslerj on the other, for example). In this case, AccuSync would use the mapping group to ensure that jhasler was synchronized as haslerj, in addition to performing the usual email suffix conversion.
BMC Remedy: Predefined TransformersBMC Remedy does not require special transformers.
Using TransformersYou choose the transformer you want to use for a field mapping in the Transformer field. You can associate a transformer with a field mapping when you create or edit the field mapping:

74 AccuSync™ Management Console Help
Some transformers are selected automatically based on the fields you map if they are specified for your ITS. For example, if you are using JIRA and map the owner field, AccuSync automatically selects the JIRA Username to AccuWork Username transformer.
If the transformer takes an argument, you specify the argument using the Transformer configuration field. Clicking the Configure Properties button displays the Mapping Groups page, which allows you to create a mapping group if one does not exist already.
Creating Custom TransformersAccuRev includes a Java project you can use to create a custom transformer, which you can use to manipulate field mapping data as your needs require. The custom transformer Java project is installed to the userTransformersSampleProject directory where you installed AccuSync (c:\Program Files (x86)\AccuSync\userTransformersSampleProject\, for example).
To create a custom transformer:
1. In Eclipse, import the userTransformersSampleProject.
2. Write the code needed for your custom transformer.
AccuRev includes sample Java programs you can use to model your custom transformer. The programs are in userTransformersSampleProject\src\com\accurev\its\bridge\ where you installed AccuSync.
3. Compile the code.
4. When the code compiles successfully, build the project from the command line using build.xml. This file is in the userTransformersSampleProject directory where you installed AccuSync.
The build process creates a .jar file in the userTransformersSampleProject\build directory where you installed AccuSync.
5. Copy the .jar file to the transformers directory where you installed AccuSync.
The custom transformer is now available and appears in the Transformer drop-down list box on the Field Mapping dialog box.

AccuSync™ Management Console Help 75
Creating a Mapping GroupYou need to create a mapping group for any field whose values differ across the systems you are synchronizing. You specify that mapping group as the argument for the Special Value Transformer when you create the field mapping for that field. See Mapping Groups and Using Transformers for more information.
To create a mapping group:
1. On the AccuSync Management Console main page, double-click the configuration for which you want to define a mapping values group.
Alternative: Select the AccuSync configuration and click the Edit Configuration button ( ).
The Configuration page appears.
2. Click the Edit Admin Details button.
The Admin Details for Configuration page appears.
Any existing mapping groups are displayed in the Mapping Groups table.
3. Click the New Group/Value button.
The New Mapping Value dialog box appears. The dialog box for JIRA is shown here; the dialog box for other ITSs contains the same fields.

76 AccuSync™ Management Console Help
4. Click the New... button to define the new group.
The New Group dialog box appears.
5. In the Group Name field, enter a name for the group you want to create and click OK.
The New Mapping Values dialog box reappears; the name of the group you just created appears in the Group field.
6. In the New Mapping Values dialog box AccuWork value and ITS value fields, enter the value pair for this group. For example, a value of “A” in AccuWork might correspond to a value of “Critical” in your ITS.
7. Click OK.
The new group is created. It appears in the Mapping Groups table with the value pair you specified.
8. To add additional value pairs, click the Add Mapping Group Value button ( ) in the Action column.
The New Mapping Value dialog box appears.
9. Choose the group to which you want to add another value pair from the Group drop-down list.
10. Repeat Step 6 and Step 7 for the next value pair.
11. When you have finished, click OK.
Creating a Field MappingThis procedure describes how to create a field mapping.
Tip: If you are mapping fields whose values differ across the systems you are synchronizing, you must first create a mapping group for that field. See Mapping Groups for more information.
To create a field mapping:
1. On the AccuSync Management Console main page, double-click the configuration for which you want to create a field mapping.
Alternative: Select the AccuSync configuration and click the Edit Configuration button ( ).
The Configuration page appears.

AccuSync™ Management Console Help 77
2. For the mapping definition for which you want to create field mappings, click the Edit Mapping Definition button ( ).
The Mapping Definition page appears.
3. In the Field Mappings table, click the Add new... button.
The New Field Mapping dialog box appears. The dialog box for HP QC is shown here; the dialog box for other ITSs contain the same fields.
4. In the AccuWork field and <ITS_name> field, choose the pair of fields you want to map.
Note: Fields required for your ITS are displayed with an asterisk in the drop-down lists.
5. Optionally, change the synchronization direction.
The default is two-way. If you choose one-way, you must also specify a value for the Master ITS field. The master ITS is the ITS whose data you want to use to update the issue records on the other ITS.
Note: By default, every field mapping inherits the synchronization type specified for the synchronization pattern to which the mapping definition belongs. You can override that synchronization type for an individual field mapping. See Synchronization Types Inherited from Synchronization Pattern for more information.
6. Optionally, choose a transformer from the Transformer drop-down list for this field mapping.
Note: If you use the Special Values Transformer, you must specify the mapping group you want to use. To use an existing mapping group, choose one from the Transformer configuration drop-down list. If you have not already created the mapping group for this field mapping, click the Configure Properties button to open the Mapping Groups page. See Transformers for more information.
7. Click the Map button.
The new field mapping appears in the table at the bottom of the dialog box.

78 AccuSync™ Management Console Help
8. To create another field mapping pair, return to Step 4.
9. When you are done creating field mappings, click OK.
The New Field Mapping dialog box closes and you are returned to the Mapping Definition page. The field mappings you created appear in the Field Mappings table. The table also displays type information for each of the mapped fields, as well as the synchronization type.
What to Do NextOnce you have created the field mappings for a mapping definition, you can define the synchronization pattern that uses the mapping definition. See Creating Synchronization Patterns.
Creating Synchronization PatternsA synchronization pattern is a collection of settings that describes details about a given synchronization. These include:
• The mapping definition AccuSync will use when performing the synchronization. A synchronization pattern is associated with only one mapping definition.
• The type of synchronization you want AccuSync to perform (two-way or one-way).
• How often you want AccuSync to perform the synchronization.
You can define multiple synchronization patterns for a given AccuSync Configuration -- you might create one synchronization pattern for defects and another for tasks, for example.
Synchronization TypesA synchronization pattern can be defined with a one-way or two-way synchronization type. This section describes the differences between these synchronization types and considerations for their use.
One-way SynchronizationIn a one-way synchronization you specify one system -- typically your ITS -- as the master. Changes made to issue records on the master system are reflected on the other system, but not vice versa, when the synchronization is run. For example, if you specify your ITS as the master system, data from the ITS issue records is written to the corresponding issue records in AccuWork. Changes made to issue records in AccuWork are not reflected in your ITS and, in fact, might be overwritten with changes made in the ITS the next time the records are synchronized. If you use AccuWork as the master, change package information, including affected files, version, and basis version information, is also written to your ITS during a one-way synchronization.
The behavior of a synchronization pattern defined with a one-way synchronization type is similar to that of AccuBridge. Typical uses of a one-way synchronization pattern include:
• Overriding the two-way synchronization type specified for a synchronization pattern for individual field mappings for fields whose values you do not want updated.
• Initial population of one issue tracking system with issue records from another.
Two-way SynchronizationThe two-way synchronization type is completely bidirectional: changes made to issue records in one system are updated on the other when the synchronization is run. The most recent data at the time of the

AccuSync™ Management Console Help 79
synchronization is used to update the record on the other system. Change package information is written from AccuWork to your ITS.
Note that any validation logic or constraints that have been defined for a field in one system should also be defined in the other. For example, if you have defined the Assigned To field in your AccuWork schema as a required field, you should ensure that your ITS schema enforces that rule for whatever field you mapped to Assigned To.
Synchronization patterns are defined with a two-way synchronization type by default.
Synchronization Type Can Be OverriddenThe synchronization type specified in the synchronization pattern applies to all the field mappings defined for the mapping definition associated with the synchronization pattern. If you want, you can override the synchronization type for individual field mappings.
See Synchronization Types Inherited from Synchronization Pattern for more information.
Creating a Synchronization PatternTo create a synchronization pattern:
1. On the AccuSync Management Console main page, double-click the configuration for which you want to create a synchronization pattern.
Alternative: Select the AccuSync configuration and click the Edit Configuration button ( ).
The Configuration page appears.
2. In the Sync Patterns table, click the Add new... button.
The New Sync Pattern dialog box appears.
3. In the Sync pattern name field, enter a name for the synchronization pattern.
Tip: Consider using an intuitive name for the synchronization pattern. For example, if you are creating a synchronization pattern to synchronize defect issue types, you might name the synchronization pattern defects.
4. In the Mapping Definition to use field, choose the name of the mapping definition you want to use with this synchronization pattern.

80 AccuSync™ Management Console Help
5. In the Synchronization field, choose the:
• Type -- The type of synchronization you want AccuSync to perform. By default, AccuSync performs a two-way synchronization. See Synchronization Types for more information.
• Frequency -- How often (in minutes) you want AccuSync to perform the synchronization. A value of 1, for example, means AccuSync performs the synchronization every minute.
6. Click the Save button.
The synchronization pattern appears in the Sync Pattern table on the Configuration page.
Running SynchronizationsSee Running an AccuSync™ Configuration and Running a Synchronization Pattern to learn more about how to run synchronizations.

AccuSync™ Management Console Help 81
A. BMC Remedy Configuration ReferenceThis appendix summarizes the mapping definitions, field mappings, and synchronization patterns included in the default configuration for BMC Remedy ITSM (BMC Remedy).
Mapping Definitions SummaryThe following table summarizes the mapping definitions included in the default configuration for BMC Remedy. Details for individual mapping definitions follow this table.
If you create a new AccuSync Configuration (as opposed to using the default configuration for BMC Remedy), you need to create one mapping definition for each type of issue (defect, enhancement, and so on) you want AccuSync to synchronize. Separate mapping definitions must be created to manage change package information for each type.
The basic mapping definition is optional; however, if you choose not to create it, all of the field mappings it defines must be created individually for every mapping definition. See Base Mapping Definitions for more information.
Note that you can name these mapping definitions as you choose, but if you change them, make sure you do so throughout your AccuSync Configuration.
Mapping Definition Name Inherits this Mapping Definition AccuWork Issue Type BMC Remedy Issue Type
Basic -- -- --
Incidents Basic incident incident

82 AccuSync™ Management Console Help
Basic
Required Field Mappings
Field Mappings
AccuWork Field BMC Remedy Field
remedyKey AccuWorkKey
remedyLink AccuWorkIssueLink
AccuWork Field Type BMC Remedy Field Type Synchronization Type
AssignedGroup Text Assigned Group CharacterField two-way
AssignedSupportCompany
Text Assigned Support Company
CharacterField two-way
AssignedSupportOrganization
Text Assigned Support Organization
CharacterField two-way
assignedTo User Assigned To CharacterField two-way
ClientSensitivity Choose Client Sensitivity SelectionField two-way
Company Choose Company SelectionField two-way
ContactCompany Text Contact_Company CharacterField two-way
dateSubmitted Timestamp Detected on Date DateTimeField two-way
description Text Description CharacterField two-way
FirstName Text First Name CharacterField two-way
Impact Choose Impact SelectionField two-way
LastName Text Last_Name CharacterField two-way
PhoneNumber Text Phone_Number CharacterField two-way
priority Choose Priority SelectionField two-way
productName Choose Product Name CharacterField two-way
ReportedSource Choose Reported Source SelectionField two-way
Service_Type Choose Service Type SelectionField two-way
shortDescription Text Summary CharacterField two-way
status Choose Status SelectionField two-way
submittedBy User Submitter CharacterField two-way
Urgency Choose Urgency SelectionField two-way
VIP Text VIP SelectionField two-way

AccuSync™ Management Console Help 83
Incidents
Required Field MappingsInherited from Basic.
Field MappingsInherited from Basic.
Synchronization Patterns SummaryThe following table summarizes the synchronization patterns included in the default configuration for BMC Remedy.
If you create a new AccuSync Configuration (as opposed to using the default configuration for BMC Remedy), you need to create one synchronization pattern for each type of issue you want AccuSync to synchronize (incident, defect, enhancement, and so on). Separate synchronization patterns must be created to manage change package information for each type.
Note that you can name these synchronization patterns as you choose.
AccuWork Issue Type BMC Remedy Issue Type
incident Incident
This Synchronization Pattern Uses This Mapping Definition Type Frequency
SyncIncidents Incidents two-way 1 minute

84 AccuSync™ Management Console Help

AccuSync™ Management Console Help 85
B. HP QC Configuration ReferenceThis appendix summarizes the mapping definitions, field mappings, and synchronization patterns included in the default configuration for HP QC.
Mapping Definitions SummaryThe following table summarizes the mapping definitions included in the default configuration for HP QC. Details for individual mapping definitions follow this table.
If you create a new AccuSync Configuration (as opposed to using the default configuration for HP QC), you need to create one mapping definition for each type of issue (defect, enhancement, and so on) you want AccuSync to synchronize. Separate mapping definitions must be created to manage change package information for each type.
The basic mapping definition is optional; however, if you choose not to create it, all of the field mappings it defines must be created manually for every mapping definition. See Base Mapping Definitions for more information.
Note that you can name these mapping definitions as you choose, but if you change them, make sure you do so throughout your AccuSync Configuration.
Mapping Definition Name Inherits this Mapping Definition AccuWork Issue Type HP QC Issue Type
basic -- -- --
basicCpk -- -- --
DefectMapping basic defect Defect
DefectCPKMapping basicCpk defect Defect

86 AccuSync™ Management Console Help
basic
Required Field Mappings
Field Mappings
basicCpk
Required Field Mappings
Field Mappings
AccuWork Field HP QC Field
hpKey AccuWorkKey
hpLink AccuWorkIssueLink
AccuWork Field Type HP QC Field Type Synchronization Type
assignedTo User Assigned To User List two-way
comments Text Comments Memo two-way
dateClosed Timestamp Closing Date Date two-way
dateSubmitted Timestamp Detected on Date Date two-way
description Text Description Memo two-way
priority Choose Priority Lookup List two-way
severity Choose Severity Lookup List two-way
shortDescription Text Summary String two-way
status Choose Status Lookup List two-way
submittedBy User Detected By User List two-way
AccuWork Field HP QC Field
hpKey AccuWorkKey
hpLink AccuWorkIssueLink
AccuWork Field Type HP QC Field Type Synchronization Type
cpkData changes AccuWorkChangePackage hp_cpk_info (Custom Field)
one-way (AccuWork master)
cpkPromoteData transactions AccuWorkChangePackageHistory
hp_cpk_promote_data (Custom Field)
one-way (AccuWork master)

AccuSync™ Management Console Help 87
DefectMapping
Required Field MappingsInherited from basic.
Field MappingsInherited from basic.
DefectCPKMapping
Required Field MappingsInherited from basicCpk.
Field MappingsInherited from basicCpk.
Synchronization Patterns SummaryThe following table summarizes the synchronization patterns included in the default configuration for HP QC.
If you create a new AccuSync Configuration (as opposed to using the default configuration for HP QC), you need to create one synchronization pattern for each type of issue you want AccuSync to synchronize. Separate synchronization patterns must be created to manage change package information for each type.
Note that you can name these synchronization patterns as you choose.
AccuWork Issue Type HP QC Issue Type
defect Defect
AccuWork Issue Type HP QC Issue Type
defect Defect
This Synchronization Pattern Uses This Mapping Definition Type Frequency
SyncDefects DefectMapping two-way 1 minute
SyncDefectsCPK DefectCPKMapping one-way(AccuWork master)
1 minute

88 AccuSync™ Management Console Help

AccuSync™ Management Console Help 89
C. JIRA Configuration ReferenceThis appendix summarizes the mapping definitions, field mappings, and synchronization patterns included in the default configuration for JIRA.
Mapping Definitions SummaryThe following table summarizes the mapping definitions included in the default configuration for JIRA. Details for individual mapping definitions follow this table.
If you create a new AccuSync Configuration (as opposed to using the default configuration for JIRA), you need to create one mapping definition for each type of issue (defect, enhancement, and so on) you want AccuSync to synchronize. Separate mapping definitions must be created to manage change package information for each type.
The basic mapping definition is optional; however, if you choose not to create it, all of the field mappings it defines must be created manually for every mapping definition. See Base Mapping Definitions for more information.
Note that you can name these mapping definitions as you choose, but if you change them, make sure you do so throughout your AccuSync Configuration.
Mapping Definition Name Inherits this Mapping Definition AccuWork Issue Type JIRA Issue Type
basic -- -- --
basicCpk -- -- --
DefectMapping basic Bug Bug
CpkDefectMapping basicCpk Bug Bug
TaskMapping basic Sub-task Sub-task
CpkTaskMapping basicCpk Sub-task Sub-task
NewFeatureMapping basic New Feature New Feature
CpkNewFeatureMapping basicCpk New Feature New Feature
ImprovementMapping basic Improvement Improvement
CpkImprovementMapping basicCpk Improvement Improvement
SubTaskMapping basic Sub-task Sub-task
CpkSubTaskMapping basicCpk Sub-task Sub-task

90 AccuSync™ Management Console Help
basic
Required Field Mappings
Field Mappings
JIRA Versions FieldThe “versions” field in JIRA is not included in the default mapping definition, but can be set up in your mapping definitions. See Creating Mapping Definitions for more information.
The “versions” field can be defined as Choose or Text type. If the version is a combination of more than one version, the combination should be set up as comma separated in the AccuWork schema as shown in the following example.
AccuWork Field JIRA Field
jiraKey AccuWorkKey
jiraIssuelink AccuWorkIssueLink
AccuWork Field Type JIRA Field Type Synchronization Type
summary Text summary string two-way
description Text description string two-way
assignee User assignee user two-way
reporter User reporter user two-way
priority Choose priority string two-way
jiraProject Choose project string two-way
status Choose status string two-way
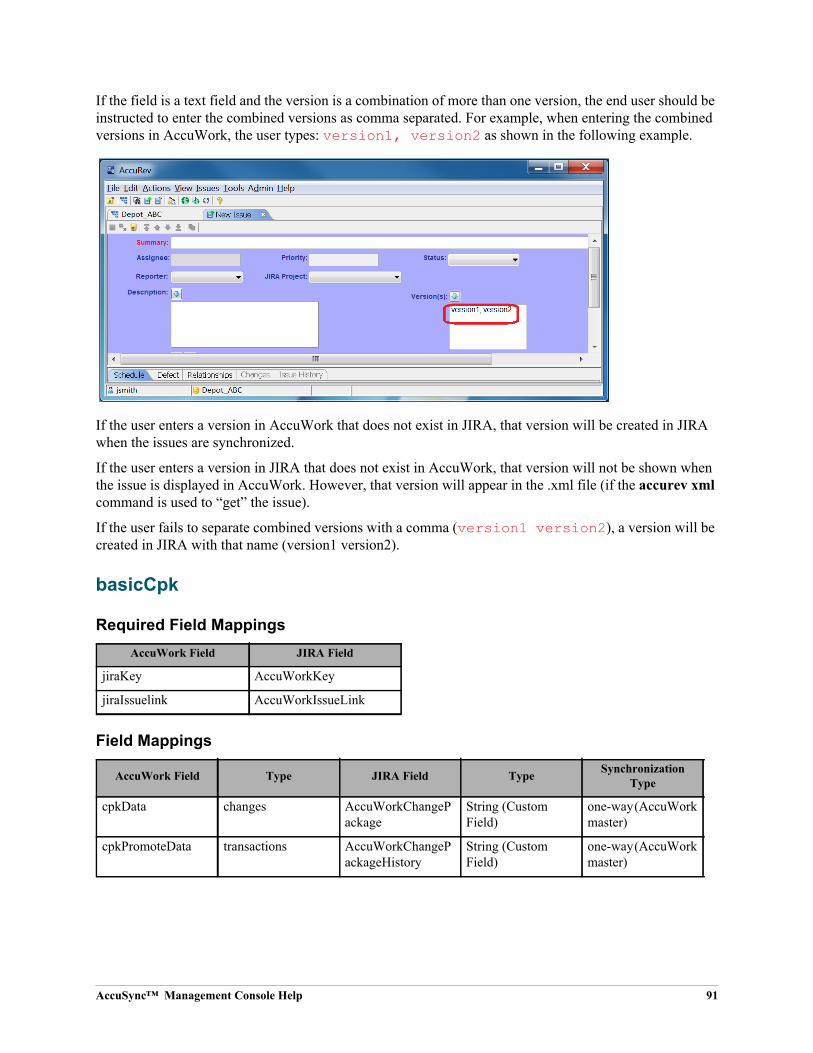
AccuSync™ Management Console Help 91
If the field is a text field and the version is a combination of more than one version, the end user should be instructed to enter the combined versions as comma separated. For example, when entering the combined versions in AccuWork, the user types: version1, version2 as shown in the following example.
If the user enters a version in AccuWork that does not exist in JIRA, that version will be created in JIRA when the issues are synchronized.
If the user enters a version in JIRA that does not exist in AccuWork, that version will not be shown when the issue is displayed in AccuWork. However, that version will appear in the .xml file (if the accurev xml command is used to “get” the issue).
If the user fails to separate combined versions with a comma (version1 version2), a version will be created in JIRA with that name (version1 version2).
basicCpk
Required Field Mappings
Field Mappings
AccuWork Field JIRA Field
jiraKey AccuWorkKey
jiraIssuelink AccuWorkIssueLink
AccuWork Field Type JIRA Field Type Synchronization Type
cpkData changes AccuWorkChangePackage
String (Custom Field)
one-way (AccuWork master)
cpkPromoteData transactions AccuWorkChangePackageHistory
String (Custom Field)
one-way (AccuWork master)

92 AccuSync™ Management Console Help
DefectMapping
Required Field MappingsInherited from basic.
Field MappingsInherited from basic.
CpkDefectMapping
Required Field MappingsInherited from basicCpk.
Field MappingsInherited from basicCpk.
TaskMapping
Required Field MappingsInherited from basic.
Field MappingsInherited from basic.
AccuWork Issue Type JIRA Issue Type
Bug Bug
AccuWork Issue Type JIRA Issue Type
Bug Bug
AccuWork Issue Type JIRA Issue Type
Task Task

AccuSync™ Management Console Help 93
CpkTaskMapping
Required Field MappingsInherited from basicCpk.
Field MappingsInherited from basicCpk.
NewFeatureMapping
Required Field MappingsInherited from basic.
Field MappingsInherited from basic.
CpkNewFeatureMapping
Required Field MappingsInherited from basicCpk.
Field MappingsInherited from basicCpk.
ImprovementMapping
Required Field MappingsInherited from basic.
Field MappingsInherited from basic.
AccuWork Issue Type JIRA Issue Type
Task Task
AccuWork Issue Type JIRA Issue Type
New Feature New Feature
AccuWork Issue Type JIRA Issue Type
New Feature New Feature
AccuWork Issue Type JIRA Issue Type
Improvement Improvement

94 AccuSync™ Management Console Help
CpkImprovementMapping
Required Field MappingsInherited from basicCpk.
Field MappingsInherited from basicCpk.
SubTaskMapping
Required Field MappingsInherited from basic.
Field Mappings
CpkSubTaskMapping
Required Field MappingsInherited from basicCpk.
Field MappingsInherited from basicCpk.
Synchronization Patterns SummaryThe following table summarizes the synchronization patterns included in the default configuration for JIRA.
If you create a new AccuSync Configuration (as opposed to using the default configuration for JIRA), you need to create one synchronization pattern for each type of issue you want AccuSync to synchronize. Separate synchronization patterns must be created to manage change package information for each type.
AccuWork Issue Type JIRA Issue Type
Improvement Improvement
AccuWork Issue Type JIRA Issue Type
Sub-task Sub-task
AccuWork Field Type JIRA Field Type Synchronization Type
subTask Relationship parent string two-way
AccuWork Issue Type JIRA Issue Type
Sub-task Sub-task

AccuSync™ Management Console Help 95
Note that you can name these synchronization patterns as you choose.
This Synchronization Pattern Uses This Mapping Definition Type Frequency
SyncDefects DefectMapping two-way 1 minute
SyncCpkDefects CpkDefectMapping one-way(AccuWork master)
1 minute
SyncNewFeature NewFeatureMapping two-way 1 minute
SyncCpkNewFeature CpkNewFeatureMapping one-way(AccuWork master)
1 minute
SyncTasks TaskMapping two-way 1 minute
SyncCpkTasks CpkTaskMapping one-way(AccuWork master)
1 minute
SyncImprovement ImprovementMapping two-way 1 minute
SyncCpkImprovement CpkImprovementMapping one-way(AccuWork master)
1 minute
SyncSubTasks SubTaskMapping two-way 1 minute
SyncCpkSubTasks CpkSubTaskMapping one-way(AccuWork master)
1 minute

96 AccuSync™ Management Console Help
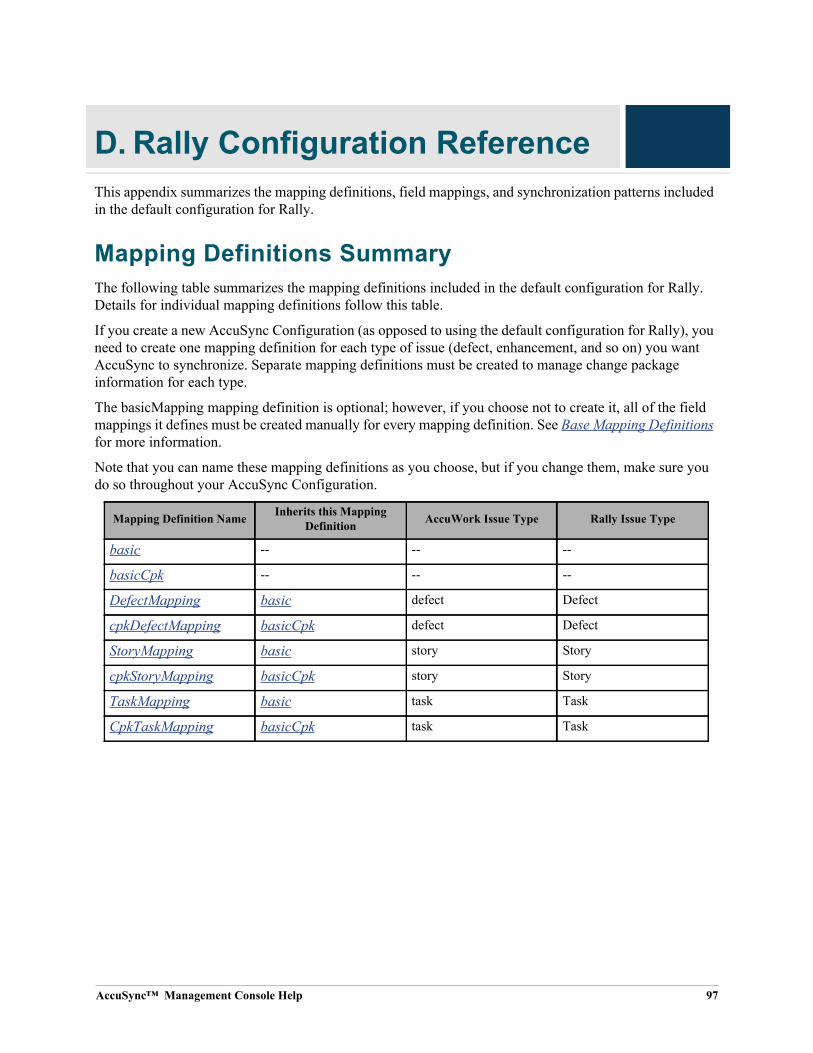
AccuSync™ Management Console Help 97
D. Rally Configuration ReferenceThis appendix summarizes the mapping definitions, field mappings, and synchronization patterns included in the default configuration for Rally.
Mapping Definitions SummaryThe following table summarizes the mapping definitions included in the default configuration for Rally. Details for individual mapping definitions follow this table.
If you create a new AccuSync Configuration (as opposed to using the default configuration for Rally), you need to create one mapping definition for each type of issue (defect, enhancement, and so on) you want AccuSync to synchronize. Separate mapping definitions must be created to manage change package information for each type.
The basicMapping mapping definition is optional; however, if you choose not to create it, all of the field mappings it defines must be created manually for every mapping definition. See Base Mapping Definitions for more information.
Note that you can name these mapping definitions as you choose, but if you change them, make sure you do so throughout your AccuSync Configuration.
Mapping Definition Name Inherits this Mapping Definition AccuWork Issue Type Rally Issue Type
basic -- -- --
basicCpk -- -- --
DefectMapping basic defect Defect
cpkDefectMapping basicCpk defect Defect
StoryMapping basic story Story
cpkStoryMapping basicCpk story Story
TaskMapping basic task Task
CpkTaskMapping basicCpk task Task

98 AccuSync™ Management Console Help
basic
Required Field Mappings
Field Mappings
basicCpk
Required Field Mappings
Field Mappings
AccuWork Field Rally Field
rallyObjectID AccuWorkKey
rallyIssueLink AccuWorkIssueLink
AccuWork Field Type Rally Field Type Synchronization Type
Name Text Name STRING two-way
Description Text Description TEXT two-way
Project Choose Project Project two-way
Workspace Choose Workspace Workspace two-way
Owner User Owner user two-way
rallyID Text FormattedID STRING two-way
Iteration List Iteration Iteration two-way
Release List Release Release two-way
AccuWork Field Rally Field
rallyID AccuWorkKey
rallyIssuelink AccuWorkLink
AccuWork Field Type Rally Field Type Synchronization Type
cpkData changes ChangePackageInfo
TEXT one-way (AccuWork master)
cpkPromoteData transactions CpkPromoteData TEXT one-way (AccuWork master)

AccuSync™ Management Console Help 99
DefectMapping
Required Field MappingsInherited from basic.
Field Mappings
cpkDefectMapping
Required Field MappingsInherited from basicCpk.
StoryMapping
Required Field MappingsInherited from basic.
Field MappingsInherited from basic.
cpkStoryMapping
Required Field MappingsInherited from basicCpk.
Field MappingsInherited from basicCpk.
AccuWork Field Type Rally Field Type Synchronization Type
DefectState Choose State RATING two-way
Priority Choose Priority RATING two-way

100 AccuSync™ Management Console Help
TaskMapping
Required Field MappingsInherited from basic.
Field Mappings
CpkTaskMapping
Required Field MappingsInherited from basicCpk.
Field MappingsInherited from basicCpk.
Synchronization Patterns SummaryThe following table summarizes the synchronization patterns included in the default configuration for Rally. Details for individual mapping definitions follow this table.
If you create a new AccuSync Configuration (as opposed to using the default configuration for Rally), you need to create one synchronization pattern for each type of issue you want AccuSync to synchronize. Separate synchronization patterns must be created to manage change package information for each type.
Note that you can name these synchronization patterns as you choose.
AccuWork Field Type Rally Field Type Synchronization Type
State Choose State STRING two-way
subTask Relationship WorkProduct WorkProduct two-way
Synchronization Pattern Name Mapping Definition Type Frequency
SyncDefects DefectMapping two-way 1 minute
SyncDefectCpk cpkDefectMapping one-way(AccuWork master)
1 minute
SyncStory StoryMapping two-way 1 minute
SyncStoryCpk cpkStoryMapping one-way(AccuWork master)
1 minute
SyncTask TaskMapping two-way 1 minute
SyncTaskCpk CpkTaskMapping one-way(AccuWork master)
1 minute

AccuSync™ Management Console Help 101
E. IBM Rational ClearQuest Configuration ReferenceThis appendix summarizes the mapping definitions, field mappings, and synchronization patterns included in the default configuration for IBM Rational ClearQuest (ClearQuest).
If you want to synchronize other ClearQuest fields with AccuWork, see Synchronizing Custom Fields on page 18 of Chapter 2 AccuSync™ Quick Start.
Mapping Definitions SummaryThe following table summarizes the mapping definitions included in the default configuration for ClearQuest. Details for individual mapping definitions follow this table.
If you create a new AccuSync Configuration (as opposed to using the default configuration for ClearQuest), you need to create one mapping definition for each type of issue (request, task, and so on) you want AccuSync to synchronize. Separate mapping definitions must be created to manage change package information for each type.
The basic mapping definition is optional; however, if you choose not to create it, all of the field mappings it defines must be created manually for every mapping definition. See Base Mapping Definitions for more information.
Note that you can name these mapping definitions as you choose, but if you change them, make sure you do so throughout your AccuSync Configuration.
Mapping Definition Name Inherits this Mapping Definition AccuWork Issue Type ClearQuest Issue Type
basic -- -- --
RequestMapping basic Request ALMRequest
TaskMapping basic Task ALMTask

102 AccuSync™ Management Console Help
basic
Required Field Mappings
Field Mappings
RequestMapping
Required Field MappingsInherited from basic.
Field Mappings
TaskMapping
Required Field MappingsInherited from basic.
Field Mappings
AccuWork Field ClearQuest Field
cqKey AccuWorkKey
cqLink AccuWorkIssueLink
AccuWork Field Type ClearQuest Field Type Synchronization Type
assignedTo User Owner reference two-way
description Text Description multilineString two-way
project Text project string two-way
securityPolicy Text SecurityPolicy reference two-way
shortDescription Text Headline string two-way
state Choose State string two-way
AccuWork Field Type ClearQuest Field Type Synchronization Type
severity Choose Severity reference two-way
AccuWork Field Type ClearQuest Field Type Synchronization Type
priority Choose Priority reference two-way
request Text Request reference two-way

AccuSync™ Management Console Help 103
Synchronization Patterns SummaryThe following table summarizes the synchronization patterns included in the default configuration for ClearQuest. Details for individual mapping definitions follow this table.
If you create a new AccuSync Configuration (as opposed to using the default configuration for ClearQuest), you need to create one synchronization pattern for each type of issue you want AccuSync to synchronize.
Note that you can name these synchronization patterns as you choose.
Synchronization Pattern Name Mapping Definition Type Frequency
SyncRequests RequestMapping two-way 1 minute
SyncTasks TaskMapping two-way 1 minute

104 AccuSync™ Management Console Help
AccuSync™ Management Console Help 105
F. AccuSync™ ServicesThis appendix provides procedures for starting and stopping the AccuSync server and the Apache Tomcat server for AccuSync using Windows services and Linux processes.
Working with the AccuSync™ ServerThis section provides procedures for starting and stopping the AccuSync server. The AccuSync server is typically started as part of the AccuSync installation process and continues to run until you explicitly stop it.
Starting the AccuSync™ ServerTo start the AccuSync server:
In Windows:
1. Open the Services window.
For example: Type services.msc in the Windows Start Search box and then press Enter.
2. Select the AccuSync service.
3. Click Start the service.
Tip: If you have not already done so, consider changing the Startup Type to Automatic.
In Linux:
Click the AccuSync_Server shortcut on your desktop.
Note: If shortcuts are not available on your Linux desktop, start the AccuSync server manually by running startup.sh in the /bin directory where you installed AccuSync.
Stopping the AccuSync™ ServerTo stop the AccuSync server:
In Windows:
1. Open the Services window.
For example: Type services.msc in the Windows Start Search box and then press Enter.
2. Select the AccuSync service.
3. Click Stop the service.
In Linux:
Run shutdown.sh in the /bin directory where you installed AccuSync.
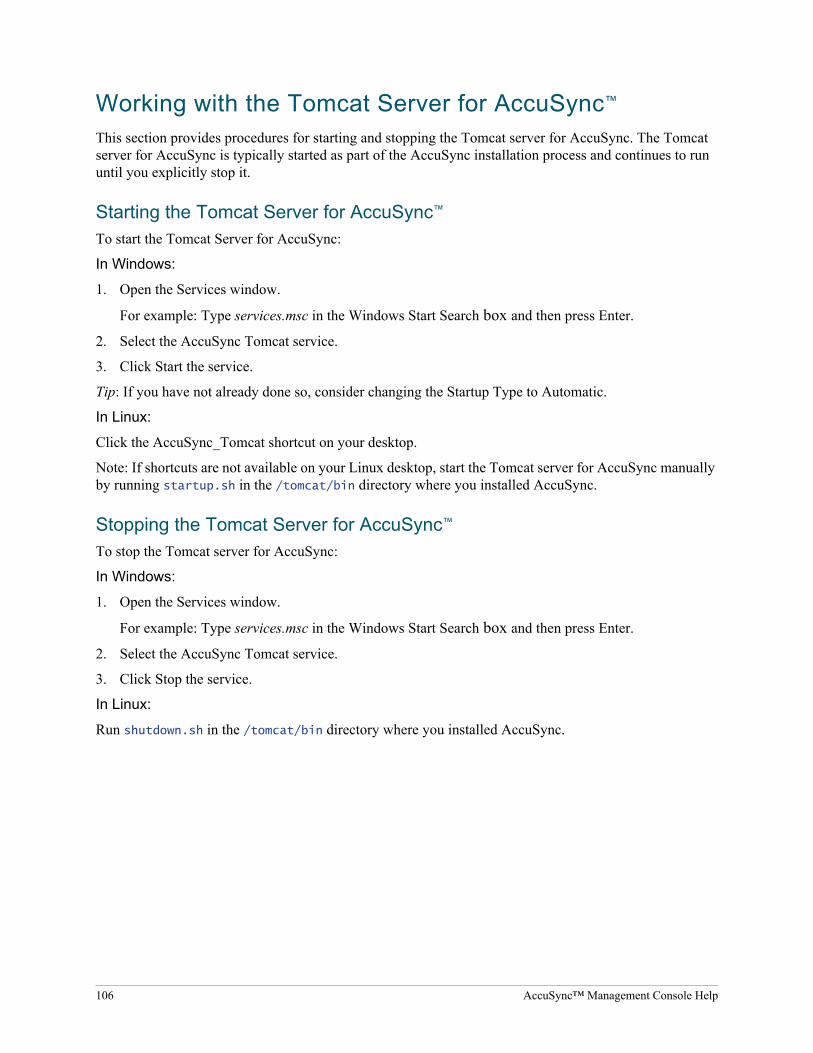
106 AccuSync™ Management Console Help
Working with the Tomcat Server for AccuSync™
This section provides procedures for starting and stopping the Tomcat server for AccuSync. The Tomcat server for AccuSync is typically started as part of the AccuSync installation process and continues to run until you explicitly stop it.
Starting the Tomcat Server for AccuSync™
To start the Tomcat Server for AccuSync:
In Windows:
1. Open the Services window.
For example: Type services.msc in the Windows Start Search box and then press Enter.
2. Select the AccuSync Tomcat service.
3. Click Start the service.
Tip: If you have not already done so, consider changing the Startup Type to Automatic.
In Linux:
Click the AccuSync_Tomcat shortcut on your desktop.
Note: If shortcuts are not available on your Linux desktop, start the Tomcat server for AccuSync manually by running startup.sh in the /tomcat/bin directory where you installed AccuSync.
Stopping the Tomcat Server for AccuSync™
To stop the Tomcat server for AccuSync:
In Windows:
1. Open the Services window.
For example: Type services.msc in the Windows Start Search box and then press Enter.
2. Select the AccuSync Tomcat service.
3. Click Stop the service.
In Linux:
Run shutdown.sh in the /tomcat/bin directory where you installed AccuSync.

AccuSync™ Management Console Help 107
G. AccuSync™ ManagementConsole Reference
This appendix provides reference information for the screens and dialog boxes in the AccuSync Management Console.
AccuSync Management Console PageThe AccuSync Management Console page displays existing AccuSync Configurations, including default configurations for supported issue tracking systems (ITSs).
For more information, seeSummary of AccuSync Actions and Status Symbols
Overview of Creating a New Configuration
Running an AccuSync™ Configuration
Making Changes to AccuSync™ Configurations
Copying an AccuSync™ Configuration
Getting Status Details
Configuration PageThe Configuration page displays summary information for the selected configuration. It is organized using Connections, Sync Patterns, and Mapping Definitions tables, which are described here.
Connections TableDisplays the AccuRev and information tracking system (ITS) connections defined for the current configuration.
For more information, seeMaking Changes to AccuSync™ Configurations
Field Description
Systems The information tracking systems that AccuSync synchronizes using this configuration.
Configuration Name The name of the AccuSync Configuration.
Actions The types of actions you can perform on existing mapping definitions.
Status Indicator of the configuration status. Clicking this button displays the Status Page.

108 AccuSync™ Management Console Help
Sync Patterns TableDisplays the synchronization patterns defined for the current configuration, including the mapping definition associated with the pattern.
For more information, seeCreating Synchronization Patterns
Editing Synchronization Patterns
Running a Synchronization Pattern
Getting Status Details
Mapping Definitions TableDisplays the mapping definitions defined for the selected configuration. The table includes the following fields:
For more information, seeCreating a Mapping Definition
Copying a Mapping Definition
Editing Mapping Definitions
Mapping Definition PageDisplays required and standard field mappings for the current mapping definition. Required and standard field mappings are displayed in their own tables.
Required Field MappingsDisplays required field mappings defined for the current mapping definition.
Field Description
Name The synchronization pattern name.
Mapping Definition The name of the mapping definition used by this synchronization pattern.
Action The types of actions you can perform on existing mapping definitions.
Field Description
Name The mapping definition name.
Inherited Mapping Definition The name of the mapping definition on which this mapping definition is based, if any.
AccuWork Issue Type The type of AccuWork issue this mapping definition is used to synchronize.
ITS Issue Type The type of ITS issue this mapping definition is used to synchronize.
Action The actions you can perform on existing mapping definitions.
Field Description
AccuWork Field The name of the AccuWork field mapped to the field in your ITS issue.

AccuSync™ Management Console Help 109
Field MappingsDisplays standard field mappings defined for the current mapping definition.
For more information, seeCreating a Field Mapping
Editing Field Mappings
Creating a Mapping Definition
Copying a Mapping Definition
Editing Mapping Definitions
Status PageDisplays the status for the selected configuration. The status table includes the following fields:
Errors TableThe Errors table includes the following fields and controls:
ITS Field The name of the field in your ITS that is mapped to the field in AccuWork.
Action You can edit a required field mapping.
Field Description
AccuWork Field The name of the AccuWork field mapped to the field in your ITS issue.
Type The type of the AccuWork field as defined in the AccuWork schema.
ITS Field The name of the field in your ITS that is mapped to the field in AccuWork.
Type The type of the field defined in your ITS schema.
Synchronization Type The synchronization type associated with this field mapping.
Action You can edit or delete a standard field mapping.
Field Description
Server Status Displays the servers associated with the selected configuration. When you select a server, the Last transaction watermark field displays the watermark for the last transaction. You can use the Change Watermark button to change the watermark.
Synchronization Pattern Displays a list of all the synchronization patterns associated with the selected configuration. When you select a synchronization pattern the Errors table displays the errors, if any, associated with that synchronization pattern.
Field Description
Search issue number Allows you to locate an issue directly, rather than scrolling through the Errors table.
Field Description

110 AccuSync™ Management Console Help
For more information, seeSetting Watermarks
Error Reporting
Admin Details for Configuration PageThe Admin Details page displays the mapping groups, if any, associated with the selected configuration. It also provides access to AccuSync advanced settings and settings for email notification.
Mapping Groups TableThe Mapping Groups table includes the following fields:
For more information, seeCreating a Mapping Group
Editing Mapping Groups
Advanced SettingsAdvanced settings allow you to:
• Modify network settings – AccuSync allows you to specify both the number of retries and the retry interval that AccuSync should attempt in the event of a network error. For more information, see Changing Network Settings.
• Turn off issue key validation – AccuSync validates AccuWork and JIRA keys before synchronizing records. In some situations, such as upgrading from AccuBridge™ for JIRA®, you
Delete Error Check box that, when selected, allows you to delete the error. When you delete an error, AccuSync evaluates the associated issue during the next synchronization.
Last Occurred The date AccuSync last encountered this error.
Error Message A brief description of the error AccuSync encountered when running the selected synchronization pattern.
Issue Number The issue number that triggered the error.
Ignore Issue Check box that, when selected, instructs AccuSync to ignore this issue the next time synchronization is run. AccuSync ignores selected issues until you clear this checkbox.
Field Description
Group The group name.
AccuWork The value of the AccuWork field managed by this group.
ITS The value of the ITS field managed by this group.
Action The actions you can perform on a field mapping pair defined for the mapping group.
Field Description

AccuSync™ Management Console Help 111
might want AccuSync to skip the key validation process. For more information, see Running the Initial Synchronization.
Mail SettingsMail settings allow you to enable email notification of synchronization errors.
For more information, seeEmail Notification for AccuSync Events
New Configuration Dialog BoxYou use the New Configuration dialog box to enter a name and specify the issue tracking system (ITS) you want to synchronize with AccuWork when this configuration is run. Once you complete this information and click the Create button, AccuSync displays the New AccuRev Connection Dialog Box.
Fields
For more information, seeOverview of Creating a New Configuration
Copy Configuration Dialog BoxYou use the Copy Configuration dialog box to create a new configuration based on an existing configuration. Copying a configuration is often the easiest way to create a new configuration.
Fields
For more information, seeCopying an AccuSync™ Configuration
Overview of Creating a New Configuration
New AccuRev Connection Dialog BoxYou use the New AccuRev Connection dialog box to specify the connection settings for the AccuRev server. When you save the connection settings, AccuSync displays the dialog box you use to specify the connection settings for the server hosting your issue tracking system (ITS).
Field Description
Configuration name The name you want to give the configuration you are creating.
AccuWork Read-only. Indicates that you are synchronizing your issue tracking system (ITS) with AccuWork.
ITS Drop-down field that lets you specify the ITS you want to synchronize with AccuWork.
Field Description
New configuration name The name you want to give the configuration you are creating.
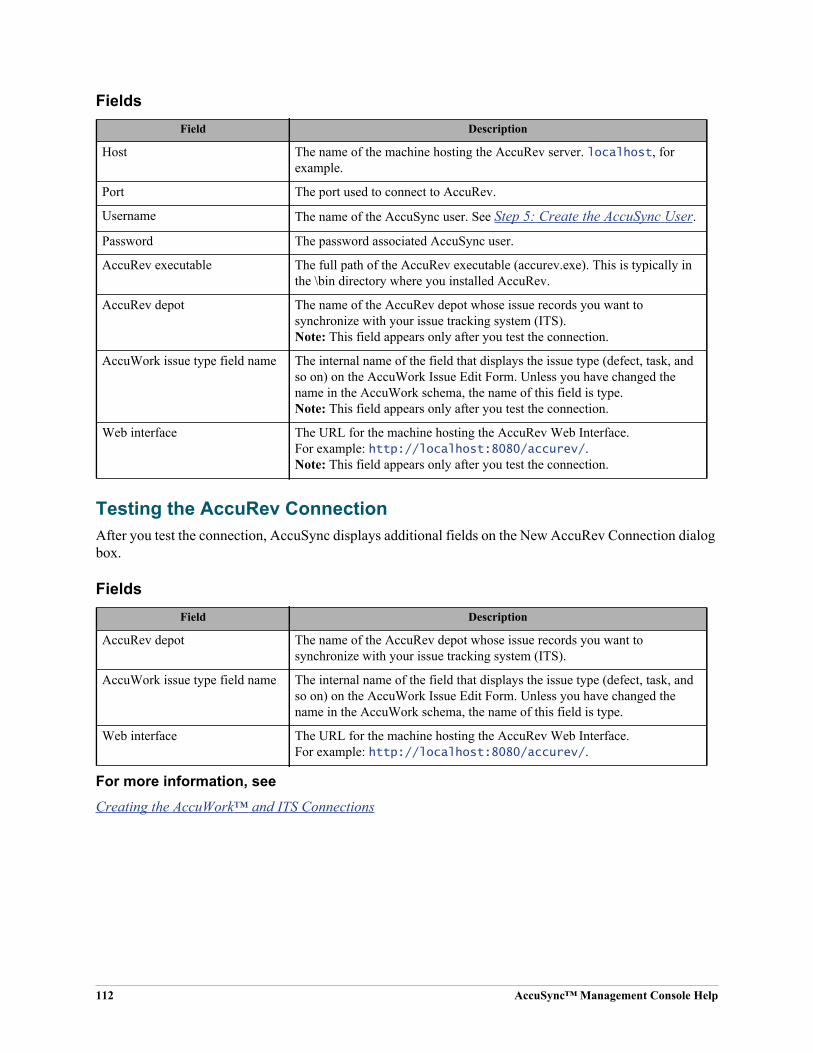
112 AccuSync™ Management Console Help
Fields
Testing the AccuRev ConnectionAfter you test the connection, AccuSync displays additional fields on the New AccuRev Connection dialog box.
Fields
For more information, seeCreating the AccuWork™ and ITS Connections
Field Description
Host The name of the machine hosting the AccuRev server. localhost, for example.
Port The port used to connect to AccuRev.
Username The name of the AccuSync user. See Step 5: Create the AccuSync User.
Password The password associated AccuSync user.
AccuRev executable The full path of the AccuRev executable (accurev.exe). This is typically in the \bin directory where you installed AccuRev.
AccuRev depot The name of the AccuRev depot whose issue records you want to synchronize with your issue tracking system (ITS).Note: This field appears only after you test the connection.
AccuWork issue type field name The internal name of the field that displays the issue type (defect, task, and so on) on the AccuWork Issue Edit Form. Unless you have changed the name in the AccuWork schema, the name of this field is type.Note: This field appears only after you test the connection.
Web interface The URL for the machine hosting the AccuRev Web Interface.For example: http://localhost:8080/accurev/.Note: This field appears only after you test the connection.
Field Description
AccuRev depot The name of the AccuRev depot whose issue records you want to synchronize with your issue tracking system (ITS).
AccuWork issue type field name The internal name of the field that displays the issue type (defect, task, and so on) on the AccuWork Issue Edit Form. Unless you have changed the name in the AccuWork schema, the name of this field is type.
Web interface The URL for the machine hosting the AccuRev Web Interface.For example: http://localhost:8080/accurev/.

AccuSync™ Management Console Help 113
Edit AccuRev Connection Dialog BoxYou use the Edit AccuRev Connection dialog box to make changes to an existing AccuRev connection.
Fields
Testing the AccuRev ConnectionAfter you test the connection, AccuSync displays additional fields on the New AccuRev Connection dialog box.
Fields
For more information, seeStep 7: Edit the AccuWork™ and ITS Connection Settings
Creating the AccuWork™ and ITS Connections
New ITS Connection Dialog BoxYou use the New ITS Connection dialog box to specify the connection settings for your issue tracking system’s server. The fields in the dialog box vary based on the ITS you selected when creating the configuration.
Field Description
Host The name of the machine hosting the AccuRev server. localhost, for example.
Port The port used to connect to AccuRev.
Username The name of the AccuSync user. See Step 5: Create the AccuSync User.
Password The password associated AccuSync user.
AccuRev executable The full path of the AccuRev executable (accurev.exe). This is typically in the \bin directory where you installed AccuRev.
Field Description
AccuRev depot The name of the AccuRev depot whose issue records you want to synchronize with your issue tracking system (ITS).
AccuWork issue type field name The internal name of the field that displays the issue type (defect, task, and so on) on the AccuWork Issue Edit Form. Unless you have changed the name in the AccuWork schema, the name of this field is type.
Web interface The URL for the machine hosting the AccuRev Web Interface.For example: http://localhost:8080/accurev/.

114 AccuSync™ Management Console Help
Fields
Testing the ITS ConnectionAfter you test the connection, AccuSync displays additional fields on the New ITS Connection dialog box. Again, the fields in the dialog box vary based on the ITS you selected when creating the configuration.
Note: No fields are added to the New ITS Connection dialog box after you test the connection.
Field Description
Connection Settings
Protocol JIRA and HP QC onlyLets you specify whether you connect to the JIRA server using the http or https protocol.
Host The name of the machine hosting your ITS server. localhost, for example.
Port The port used to connect to your ITS server.
Username The name of the AccuSync user. See Step 5: Create the AccuSync User.
Password The password associated AccuSync user.
Domain HP QC onlyThe domain associated with the projects you want to synchronize with AccuWork.
Project HP QC onlyThe project you want to synchronize with AccuWork.
Advanced Settings
Email suffix The domain name typically associated with email addresses for your ITS users. AccuSync appends the email suffix to the AccuWork user name when AccuWork users are created in your ITS.
JIRA Path JIRA onlyBy default, JIRA is installed to host_name:port_number/secure/Dashboard.jspa (http://localhost:8086/secure/Dashboard.jspa, for example). You use the JIRA Path field to specify an alternate location on the host machine; AccuSync uses the Host and Port values to build the complete URL. For example, if you installed JIRA in a folder called /its_jira, you would enter its_jira in the JIRA Path field. AccuSync would construct the following URL to access the JIRA server:http://localhost:8086/its_jira/secure/Dashboard.jspa.
Proxy Settings
Host, Port, Username, and Password fields that you need to specify only if you connect to the Internet using a proxy server.

AccuSync™ Management Console Help 115
BMC Remedy Fields
ClearQuest Fields
HP QC Fields
JIRA Fields
Rally Fields
For more information, seeCreating the AccuWork™ and ITS Connections
Overview of Creating a New Configuration
Edit ITS Connection Dialog BoxYou use the Edit ITS Connection dialog box to make changes to an existing connection to your issue tracking system’s server. The fields in the dialog box differ slightly based on the ITS for which the connection is specified.
Field Description
Remedy Application Lets you select the Remedy application (Knowledge Management or Remedy Task Management, for example) you want to synchronize with AccuWork.
Field Description
DB Name The name of ClearQuest database.
Repository The name of the ClearQuest repository.
Field Description
DB Name The name of HP ALM database.
DB Host The name of the server hosting the database.
DB Port The port number of the database server.
DB Username The user name for the user accessing the database.
DB Password The user’s password.
Field Description
Project Name Lets you select the JIRA projects you want to synchronize with AccuWork.
Field Description
Rally Artifact The Rally artifacts you want to synchronize (defects, stories, and task), and the appropriate workspaces and projects for those artifacts.

116 AccuSync™ Management Console Help
Fields
Testing the ITS ConnectionAfter you test the connection, AccuSync displays additional fields on the New ITS Connection dialog box. Again, the fields in the dialog box vary based on the ITS you selected when creating the configuration.
Note: No fields are added to the New ITS Connection dialog box after you test the connection.
Field Description
Connection Settings
Protocol JIRA and HP QC onlyLets you specify whether you connect to the JIRA server using the http or https protocol.
Host The name of the machine hosting your ITS server. localhost, for example.
Port The port used to connect to your ITS server.
Username The name of the AccuSync user. See Step 5: Create the AccuSync User.
Password The password associated AccuSync user.
Domain HP QC onlyThe domain associated with the projects you want to synchronize with AccuWork.
Project HP QC onlyThe project you want to synchronize with AccuWork.
Advanced Settings
Email suffix The domain name typically associated with email addresses for your ITS users. AccuSync appends the email suffix to the AccuWork user name when AccuWork users are created in your ITS.
JIRA Path JIRA onlyBy default, JIRA is installed to host_name:port_number/secure/Dashboard.jspa (http://localhost:8086/secure/Dashboard.jspa, for example). You use the JIRA Path field to specify an alternate location on the host machine; AccuSync uses the Host and Port values to build the complete URL. For example, if you installed JIRA in a folder called /its_jira, you would enter its_jira in the JIRA Path field. AccuSync would construct the following URL to access the JIRA server:http://localhost:8086/its_jira/secure/Dashboard.jspa.
Proxy Settings
Host, Port, Username, and Password fields that you need to specify only if you connect to the Internet using a proxy server.

AccuSync™ Management Console Help 117
BMC Remedy Fields
JIRA Fields
Rally Fields
For more information, seeStep 7: Edit the AccuWork™ and ITS Connection Settings
Creating the AccuWork™ and ITS Connections
Field Description
Remedy Application Lets you select the Remedy application (Knowledge Management or Remedy Task Management, for example) you want to synchronize with AccuWork.
Field Description
Project Name Lets you select the JIRA projects you want to synchronize with AccuWork.
Field Description
Rally Artifact The Rally artifacts you want to synchronize (defects, stories, and task), and the appropriate workspaces and projects for those artifacts.

118 AccuSync™ Management Console Help
New Field Mapping Dialog BoxYou use the New Field Mapping dialog box to specify how you want AccuWork fields mapped to the fields in your ITS issue record, as well as whether you want that synchronization to be two-way or one-way, and whether or not you want field values transformed during synchronization.
Fields
For more information, seeCreating Field Mappings
Transformers
Creating Mapping Definitions
Field Description
AccuWork Field The name of the AccuWork field you want to map to the field in your ITS issue.
ITS Field The name of the field in your ITS that you want to map to the field in AccuWork.
Synchronization direction Whether you want AccuSync to perform a two-way or one-way synchronization on this field. The default is two-way.
Master ITS For one-way synchroniztions, the ITS (AccuRev or your ITS) whose issue record values you want to use to update values in the other system.
Transformer An optional utility that transforms the values in one system so that it is acceptable in the system in which it is being synchronized. For example, you might have a transformer that trims the @company.com suffix from user names for compatibility with AccuRev.
Transformer configuration Allows you to select a mapping group to be used by the transformer. For example, a mapping group would allow you to substitute j.hasler for haslerj if the same user has two equivalent usernames.
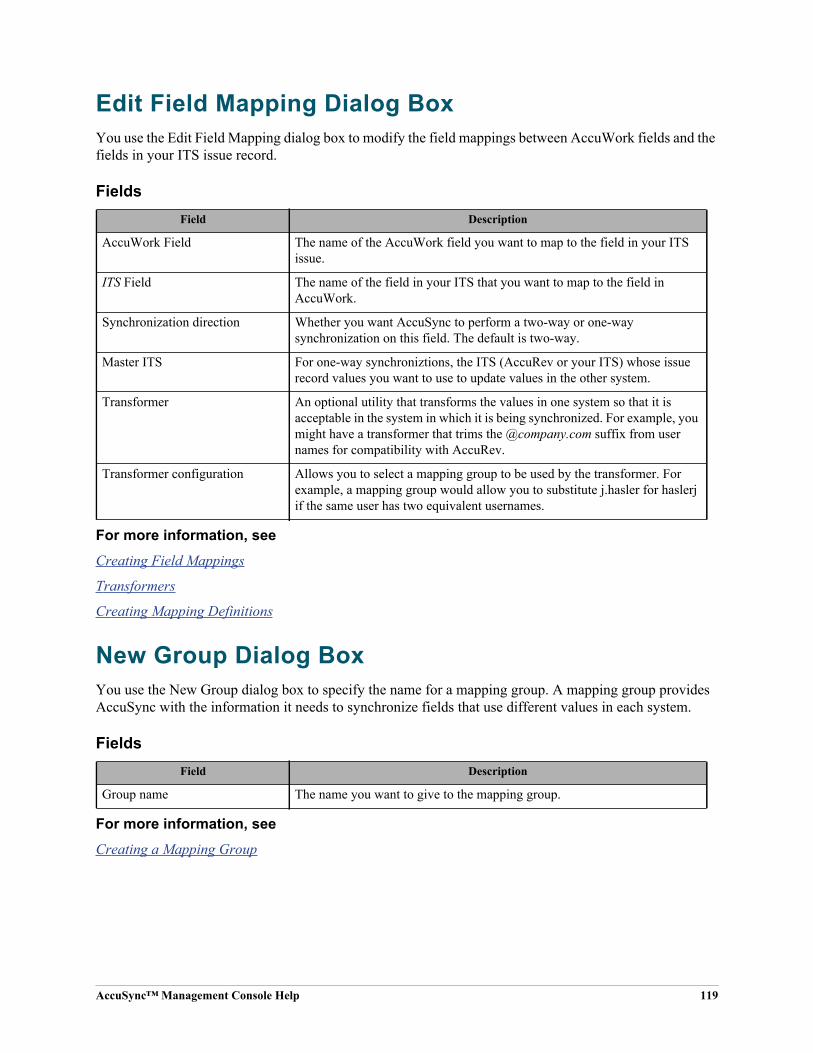
AccuSync™ Management Console Help 119
Edit Field Mapping Dialog BoxYou use the Edit Field Mapping dialog box to modify the field mappings between AccuWork fields and the fields in your ITS issue record.
Fields
For more information, seeCreating Field Mappings
Transformers
Creating Mapping Definitions
New Group Dialog BoxYou use the New Group dialog box to specify the name for a mapping group. A mapping group provides AccuSync with the information it needs to synchronize fields that use different values in each system.
Fields
For more information, seeCreating a Mapping Group
Field Description
AccuWork Field The name of the AccuWork field you want to map to the field in your ITS issue.
ITS Field The name of the field in your ITS that you want to map to the field in AccuWork.
Synchronization direction Whether you want AccuSync to perform a two-way or one-way synchronization on this field. The default is two-way.
Master ITS For one-way synchroniztions, the ITS (AccuRev or your ITS) whose issue record values you want to use to update values in the other system.
Transformer An optional utility that transforms the values in one system so that it is acceptable in the system in which it is being synchronized. For example, you might have a transformer that trims the @company.com suffix from user names for compatibility with AccuRev.
Transformer configuration Allows you to select a mapping group to be used by the transformer. For example, a mapping group would allow you to substitute j.hasler for haslerj if the same user has two equivalent usernames.
Field Description
Group name The name you want to give to the mapping group.

120 AccuSync™ Management Console Help
New Mapping Value Dialog BoxYou use the New Mapping Value dialog box to
• Create a new mapping group
• Add one or more field value pairs to a mapping group
Fields
For more information, seeCreating a Mapping Group
New Mapping Definition Dialog BoxYou use the New Mapping Definition dialog box to create a new mapping definition. A mapping definition is a collection of settings that describes how AccuSync synchronizes AccuWork issues and issues from your ITS.
Note: You must define key and link fields for a new mapping definition unless the mapping definition you are creating uses a base definition for which a key field and link field have been defined.
Fields
Field Description
Group Drop-down list that displays the names of existing mapping groups. You can use the New... button to create a new mapping group.
AccuWork value The value of the field in AccuWork that you want to convert to the corresponding value in your ITS when the systems are synchronized.
ITS value The value of the field in your ITS that you want to convert to the corresponding value in AccuWork when the systems are synchronized.
Field Description
Name The name you want to give to the mapping definition.
Change package synchronization If selected, indicates that this mapping definition will be used to synchronize change package information.
Based on If selected, specifies an existing mapping definition that will be used as the base for the new mapping definition. If you specify a base mapping definition, the current mapping definition inherits all base mapping definition field mappings.
AccuWork issue type The AccuWork issue type that will be synchronized using this mapping definition.
AccuWork filter Allows you to specify a filter for the mapping definition. A mapping definition filter is a set of user-defined conditions that allows AccuSync to select the issue records you want to synchronize (or those that you want to omit from synchronization).
ITS issue The ITS issue type that will be synchronized using this mapping definition.Note: The name of this field varies based on your ITS.

AccuSync™ Management Console Help 121
For more information, seeCreating a Mapping Definition
Copying a Mapping Definition
Creating a Mapping Definition Filter
Required Field Mappings: Key and Link
Base Mapping Definitions
Copy Mapping Definition Dialog BoxYou use the Copy Mapping Definition dialog box to copy an existing mapping definition. A mapping definition is a collection of settings that describes how AccuSync synchronizes AccuWork issues and issues from your ITS.
Fields
For more information, seeCopying a Mapping Definition
Creating a Mapping Definition
Creating a Mapping Definition Filter
Required Field Mappings: Key and Link
Base Mapping Definitions
Edit Mapping Definition Dialog BoxYou use the New Mapping Definition dialog box to create a new mapping definition. A mapping definition is a collection of settings that describes how AccuSync synchronizes AccuWork issues and issues from your ITS.
Note: You must define key and link fields for a new mapping definition unless the mapping definition you are creating uses a base definition for which a key field and link field have been defined.
ITS filter Allows you to specify a filter for the mapping definition. A mapping definition filter is a set of user-defined conditions that allows AccuSync to select the issue records you want to synchronize (or those that you want to omit from synchronization).Note: The name of this field varies based on your ITS.
Field Description
New Mapping Definition Name The name you want to give to the mapping definition.
Field Description

122 AccuSync™ Management Console Help
Fields
For more information, seeEditing Mapping Definitions
Creating a Mapping Definition Filter
Required Field Mappings: Key and Link
Base Mapping Definitions
AccuWork Filter Dialog BoxYou use the AccuWork Filter dialog box to create a filter to associate with a mapping definition. A mapping definition filter is a set of user-defined conditions that allows AccuSync to select the issue records you want to synchronize (or those that you want to omit from synchronization).
For more information, seeHow to Create a Filter
Creating a Mapping Definition Filter
Field Description
Name The name you want to give to the mapping definition.
Change package synchronization If selected, indicates that this mapping definition will be used to synchronize change package information.
Based on If selected, specifies an existing mapping definition that will be used as the base for the new mapping definition. If you specify a base mapping definition, the current mapping definition inherits all base mapping definition field mappings.
AccuWork issue type The AccuWork issue type that will be synchronized using this mapping definition.
AccuWork filter Allows you to specify a filter for the mapping definition. A mapping definition filter is a set of user-defined conditions that allows AccuSync to select the issue records you want to synchronize (or those that you want to omit from synchronization).
ITS issue The ITS issue type that will be synchronized using this mapping definition.Note: The name of this field varies based on your ITS.
ITS filter Allows you to specify a filter for the mapping definition. A mapping definition filter is a set of user-defined conditions that allows AccuSync to select the issue records you want to synchronize (or those that you want to omit from synchronization).Note: The name of this field varies based on your ITS.

AccuSync™ Management Console Help 123
ITS Filter Dialog BoxYou use the ITS dialog box to create a filter to associate with a mapping definition. A mapping definition filter is a set of user-defined conditions that allows AccuSync to select the issue records you want to synchronize (or those that you want to omit from synchronization).
For more information, seeHow to Create a Filter
Creating a Mapping Definition Filter
Filter Record Dialog BoxYou use the Filter Record dialog box to define the conditions an issue record must meet in order to be selected for synchronization.
Fields
For more information, seeHow to Create a Filter
Creating a Mapping Definition Filter
Specify Issue Key Fields Dialog BoxYou use the Specify Issue Key Fields dialog box to specify the AccuRev and ITS fields that store the unique ID that identifies each issue record.
Fields
For more information, seeRequired Field Mappings: Key and Link
Creating a Mapping Definition
Field Description
Filter record type The type of issue record for which this filter is being defined.
Field Description
AccuWork field The name of the field in the AccuWork schema used to store the ITS issue record key.Tip: If you are using the default schema installed with AccuSync, this value is jiraKey (for JIRA) or rallyID (for Rally).
ITS field The name of the field in your ITS schema used to store the AccuWork issue record key. This value is typically AccuWorkKey.Note: If you are using JIRA, this value is created automatically by the JIRA plugin for AccuSync. If you are using Rally, you must manually add this value to the Rally work product.

124 AccuSync™ Management Console Help
Specify Issue Link Fields Dialog BoxYou use the Specify Issue Link Fields dialog box to specify the AccuRev and ITS fields that store the URL used to access an issue in the AccuRev or ITS system.
Fields
For more information, seeRequired Field Mappings: Key and Link
Creating a Mapping Definition
New Sync Pattern Dialog BoxYou use the New Sync Pattern Dialog box to create a new synchronization pattern.
Fields
For more information, seeCreating Synchronization Patterns
Synchronization Types
Running a Synchronization Pattern
Field Description
AccuWork field The name of the field in the AccuWork schema used to store the URL used to access the issue record.Tip: If you are using the default schema installed with AccuSync, this value is jiraIssueLink (for JIRA) or rallyIssueLink (for Rally).
ITS field The name of the field in your ITS schema used to store the URL used to access the issue record. This value is typically AccuWorkIssueLink.Note: If you are using JIRA, this value is created automatically by the JIRA plugin for AccuSync. If you are using Rally, you must manually add this value to the Rally work product.
Field Description
Sync pattern name The name you want to give to the synchronization pattern.
Mapping definition to use The name of the mapping definition you want to associate with this synchronization pattern.
Synchronization type Whether you want AccuSync to perform a two-way (the default) or one-way synchronization when this synchronization pattern is run.
Synchronization frequency How often, in minutes, you want AccuSync to run the synchronization pattern.

AccuSync™ Management Console Help 125
Edit Sync Pattern Dialog BoxYou use the Edit Sync Pattern Dialog box to modify an existing synchronization pattern.
Fields
For more information, seeEditing Synchronization Patterns
Synchronization Types
Running a Synchronization Pattern
Change Watermark Dialog BoxYou use the Change Watermark dialog box to set the current watermark to a previous level. You might want to do this in order to synchronize issue records that were skipped in a previous synchronization.
The style of the Change Watermark dialog box varies based on which server (AccuWork or your ITS) is selected when you click the Change watermark button. There are two styles:
• Transaction – The transaction style Change Watermark dialog box lets you set the watermark based on the AccuRev transaction number. This style is available when you have selected the AccuWork server from the Server Status field on the Status Page.
• Calendar – The calendar style Change Watermark dialog box lets you set the watermark based on the date you select. This style is available when you have selected the ITS server (JIRA or Rally, for example) from the Server Status field on the Status Page.
For more information, seeSetting Watermarks
Field Description
Sync pattern name The synchronization pattern name.
Mapping definition to use The name of the mapping definition you want to associate with this synchronization pattern.
Synchronization type Whether you want AccuSync to perform a two-way (the default) or one-way synchronization when this synchronization pattern is run.
Synchronization frequency How often, in minutes, you want AccuSync to run the synchronization pattern.

126 AccuSync™ Management Console Help

AccuSync™ Management Console Help 127
Index
AAccuRev
configuring AccuSync to work withworkflow 47
creating a connection to the AccuRevserver 26, 57
specifying the depot to synchronize 28, 59AccuSync
backing up and restoring AccuSyncConfigurations 45
components of 4configuring AccuSync to work with
AccuRev workflow 47configuring JIRA for AccuSync 6default configurations for supported ITSs 2description 1email notification for AccuSync events 40error notification 37illustration of synchronization 1logging and 36recommendation for creating an AccuSync
user 22required field mappings 61, 70setting up 5spec i fy ing t he AccuRev depo t t o
synchronize 28, 59SSL-enabled AccuRev servers and 25the AccuSync Configuration and 2the AccuSync server and 4the AccuSync Web Management Console 4
AccuSync ConfigurationsAccuWork schema and 8adding ITS projects to AccuWork issues 14backing up 46backup and restore 45changing configuration components 51components of 3copying 57default configurations for supported ITSs 2description 2email settings for reporting 55network settings for 55overview of 2
overview of the configuration creationprocess 57
parts of 2refreshing after updating the schema 14refreshing after updating the work product
17Reload Configuration Cache button 49restarting 34restoring 47Run button 49running 33running automatically 34running the initial synchronization 31set-up tasks 5Status button 50status notification 55Stop button 49stopping 45synchronization status 35types of errors 37
AccuSync Management Consoledescription 4starting 24stopping 25troubleshooting problems with 25
AccuSync serverdescription 4starting 105stopping 105
AccuWorkadding AccuWork fields
to BMC Remedy 17to ClearQuest 17to HP QC 21to JIRA 19to Rally 18
adding ITS fields to the AccuWork schema10
adjusting the AccuWork watermark 43displaying ITS fields in the Issue Edit Form
13required field mappings 61, 70specifying nested Rally project name 15specifying Rally project name 16
AccuWork Change Package Data to JIRACustom Field Transformer 73

128 AccuSync™ Management Console Help
AccuWork Change Package Data to StringTransformer
description 72AccuWork Change Package Promote Data toJIRA Custom Field Transformer 73AccuWork Change Package Promote Data toString Transformer
description 72AccuWork Issue Edit Form
displaying ITS fields in 13
Bbackups
backing up an AccuSync Configuration 46base mapping definitions
suggested field mappingsfor BMC Remedy 82for ClearQuest 102for HP QC 86for JIRA 90for Rally 98
BMC Remedyadding AccuWork fields to Remedy 17add ing BMC Remedy f i e lds to the
AccuWork schema 10adding projects to AccuWork issues 14adjusting the BMC Remedy watermark 44creating a server connection 26c rea t i ng an AccuSync u se r f o r
synchronization tasks 22default base field mappings 82default configuration for 2default mapping definitions 81default synchronization patterns 83predefined transformers 73required field mappings 61, 70transformers for 73
bridge.log 36
CClearQuest
adding AccuWork fields to ClearQuest 17adding ClearQuest fields to the AccuWork
schema 10adding custom fields 18
adding projects to AccuWork issues 14adjusting the ClearQuest watermark 44creating a server connection 26c r e a t i n g a n A c c u S y n c us e r f o r
synchronization tasks 22custom fields for 18default base field mappings 102default mapping definitions 101default synchronization patterns 103predefined transformers 72required field mapping 61required field mappings 70transformers for 72
components of an AccuSync Configuration 3configurations. See AccuSync Configurationsconfiguring JIRA for AccuSync
enabling remote API calls 6installing the AccuSync plugin 6
contacting technical support xcopying
AccuSync Configurations 57mapping definitions 66
creatingfield mappings 76mapping definition filters 68mapping definitions 64mapping groups 75required field mappings 62server connections 26, 57synchronization patterns 79the AccuRev server connection 57the JIRA Server connection 57the Rally Server connection 57
creating custom transformers 74custom fields
adding custom fields in ClearQuest 18
Ddeleting synchronization errors 39depots
AccuWork schema changes required tosynchronize 10
spec i fy ing t he AccuRev depo t t osynchronize 28, 59

AccuSync™ Management Console Help 129
Eemail
email notification for synchronizationevents 40
errorsdeleting 39email notification for 40emailing error and status reports 55Errors table and 38fatal errors 37ignoring 38network settings and 39notification of 38searching for issues with synchronization
errors 39synchronization errors 37the AccuSync log 36types of errors recorded by AccuSync 37
Ffatal errors
description 37field mappings
creating 70, 76creating key field mappings 62creating link field mappings 62creating required field mappings 62custom transformers for 74mapping definitions and 60mapping groups and 60, 71modifying 53required field mappings 61, 70suggested field mappings
for BMC Remedy 81for ClearQuest 101for HPQC 85for JIRA 89for Rally 97
suggested mappings for base mappingdefinitions
for BMC Remedy 82for ClearQuest 102for HP QC 86for JIRA 90for Rally 98
transformers for 72filters
creating a mapping definition filter 68for HP QC 70mapping definition filters and 67mapping definitions and 61
HHP QC
adding AccuWork fields to HP QC 21adding HP QC fields to the AccuWork
schema 10adding projects to AccuWork issues 14adjusting the HP QC watermark 44creating a connection 26, 57creating a server connection 26c r e a t i n g a n A c c u S y n c us e r f o r
synchronization tasks 22default base field mappings 86default configuration for 2default mapping definitions 85default synchronization patterns 87filters and 70predefined transformers 73required field mappings 61, 70transformers for 73
Iissue types
mapping definitions and 60issues
adjusting the AccuWork watermark 43adjusting the ITS watermark 44converting data across systems 72creating field mappings for 70field mappings required for 61filtering from synchronization 67hiding fields in JIRA view screens 19removing fields in JIRA view screens 19searching for issues with synchronization
errors 39using bulk update to change values 14watermarks and 41

130 AccuSync™ Management Console Help
JJIRA
adding AccuWork fields to JIRA 19adding JIRA fields to the AccuWork
schema 10adding projects to AccuWork issues 14adjusting the JIRA watermark 44configuring JIRA for AccuSync 6creating a server connection 26, 57c rea t i ng an AccuSync u se r f o r
synchronization tasks 22default base field mappings 90default configuration for 2default mapping definitions 89default synchronization patterns 94enabling remote API calls for AccuSync 6hiding fields in view screens 19installing the AccuSync plugin 6predefined transformers 73removing fields in view screens 19required field mappings 61, 70transformers for 73versions field 90
JIRA User to AccuWork User Transformer 73
Llogs
synchronization information 36the AccuSync log 36
Mmapping definitions
about 60base mapping definitions and 61copying 66creating 64defined 60field mappings and 60filters and 61, 67HP QC filters and 70issue types and 60JIRA version field and 90modifying 52reusing 61suggested base mapping definition
for BMC Remedy 82for ClearQuest 102for HP QC 86for JIRA 90for Rally 98
suggested mapping definitionsfor BMC Remedy 81for ClearQuest 101for HPQC 85for JIRA 89for Rally 97
transformers and 61using to override synchronization type 61
mapping groupsabout 71creating a mapping group 75field mappings and 60modifying 54
memory 37
NNested Rally projects 12, 15
RRally
adding AccuWork fields to Rally 18adding projects to AccuWork issues 14adding Rally fields to the AccuWork
schema 10adjusting the Rally watermark 44creating a server connection 26, 57c r e a t i n g a n A c c u S y n c us e r f o r
synchronization tasks 22default base field mappings 98default configuration for 2default mapping definitions 97default synchronization patterns 100predefined transformers 73required field mappings 61specifying nested project names 15specifying project name in AccuWork 16transformers for 73
Rally Discussion to AccuWork Comments(Text) Transformer
description 73

AccuSync™ Management Console Help 131
Rally Username to AccuWork UsernameMapper
description 73Reload Configuration Cache button 49Remedy. See BMC Remedyrestore
restoring an AccuSync Configuration 47Run button
f o r A c c u S y n c C o n f i g u r a t i o n s a n dsynchronization patterns 49
Sschema
adding ITS fields to the AccuWork schema10
default AccuWork schema installed withAccuSync 8
refreshing the AccuSync Configurationafter changing 14
Reload Configuration Cache button and 49setting up the AccuWork schema for
AccuSync 8updating 14
serverscreating an AccuSync user for AccuRev
and ITS servers 22creating connections to AccuRev and HP
QC 26, 57creating connections to AccuRev and ITS
servers 26creating connections to AccuRev and JIRA
servers 57creating connections to AccuRev and Rally
servers 57using AccuSync with an SSL-enabled
AccuRev server 25Special JIRA Values Transformer
description 73Special Value Transformer
description 72SSL
using AccuSync when SSL has beenenabled 25
startingAccuSync Management Console 24AccuSync server 105
Tomcat server for AccuSync 106status
entry in log file 36symbols for configuration status 49symbols for connection status 50symbols for sync pattern status 49symbols for synchronization status 35
Status buttonfo r AccuSync Conf igu ra t i ons and
synchronization patterns 50Stop button
fo r AccuSync Conf igu ra t i ons andsynchronization patterns 49
stoppingAccuSync Management Console 25AccuSync server 105Tomcat server for AccuSync 106
supportcontacting technical support x
synchronization errorsdescription 37
synchronization patternsabout 78creating 79modifying 52Run button 49running 35Status button 50Stop button 49stopping 45suggested synchronization patterns
for BMC Remedy 83for ClearQuest 103for HP QC 87for JIRA 94for Rally 100
synchronization status 35types of errors 37
synchronization typesfield mappings and 72overriding 72synchronization patterns and 78using mapping definitions to override 61
synchronizationsdefault configurations for supported ITSs 2filtering issues from 67

132 AccuSync™ Management Console Help
illustration of 1record in the log file 36restarting an AccuSync Configuration 34running a synchronization pattern 35running an AccuSync Configuration 33running an AccuSync Configuration
automatically 34running the initial synchronization 31status and 35stopping a synchronization pattern 45stopping an AccuSync Configuration 45suggested mapping definitions
for BMC Remedy 81for ClearQuest 101for HP QC 85for JIRA 89for Rally 97
suggested synchronization patternsfor BMC Remedy 83for ClearQuest 103for HP QC 87for JIRA 94for Rally 100
synchronization patterns and 78types of errors 37
Ttechnical support
contacting xTomcat
starting the Tomcat server for AccuSync106
stopping the Tomcat server for AccuSync106
transformersAccuWork Change Package Data to JIRA
Custom Field Transformer 73AccuWork Change Package Data to String
Transformer 72AccuWork Change Package Promote Data
to JIRA Custom Field Transformer73
AccuWork Change Package Promote Datato String Transformer 72
creating custom transformers 74custom transformers 74
description 72for BMC Remedy 73for ClearQuest 72for HP QC 73for JIRA 73for Rally 73JIRA User to AccuWork User Transformer
73mapping definitions and 61Rally Discussion to AccuWork Comments
(Text) Transformer 73Rally Username to AccuWork Username
Mapper 73Special JIRA Values Transformer 73Special Value Transformer 72
troubleshooting problems with AccuSyncManagement Console 25typographical conventions x
Uusers
recommendation for creating an AccuSyncuser 22
Wwatermark tool 43watermarks
adjusting the AccuWork watermark 43adjusting the ITS watermark 44overview 41the watermark tool 43
work productrefreshing the AccuSync Configuration
after changing 17updating 17
workflowconfiguring AccuSync to work with
AccuRev workflow 47