make your own astrolabe - hanging on to my dreams your own astrolabe.pdfmake your own astrolabe the...
TRANSCRIPT

Make Your Own AstrolabeThe mariner’s astrolabe is an ancient navigation instrument for measuring celestial altitude (celestial altitude is the “height” of a star, planet or other celestial object above the horizon). Celestial altitude is important to mariners, because it provides a way to estimate geographic latitude, which is a location’s distance from the equator. Astrolabes were the most popular astronomical instrument for several centuries, but they eventually were replaced by quadrants, which today have been replaced by sextants.
What You Will Do
Make your own astrolabe, and
use it to estimate
the height of a tree, building,
or other vertical object
What You Will Need
❒ Stiff cardboard, file folder, or wood, ap-proximately 8 inches square
❒ Tools for cutting the cardboard or wood❒ Glue❒ Drill with a 3/16 inch drill bit❒ #8 Round head bolt (long enough to go
through both pieces of the astrolabe), #8 nut, and three #8 washers
❒ Rope, string, or twine, about 12 inches long (the diameter of the rope isn’t very impor-tant; about 1/8 inch is ideal)
Warnings
1. Drills and cutting tools are sharp! Get help from an adult and be careful!
2. Power saw blades and drill bits can shatter or throw scraps at high speed, possibly causing serious injury. Be sure to wear eye protection and follow other recom-mended safety precautions before using any power tools!
A mariner using a descendant of the astrolabe called
an “octant.” Courtesy NOAA
EXPLORE THE EARTHSCIENCE | Service | Stewardship
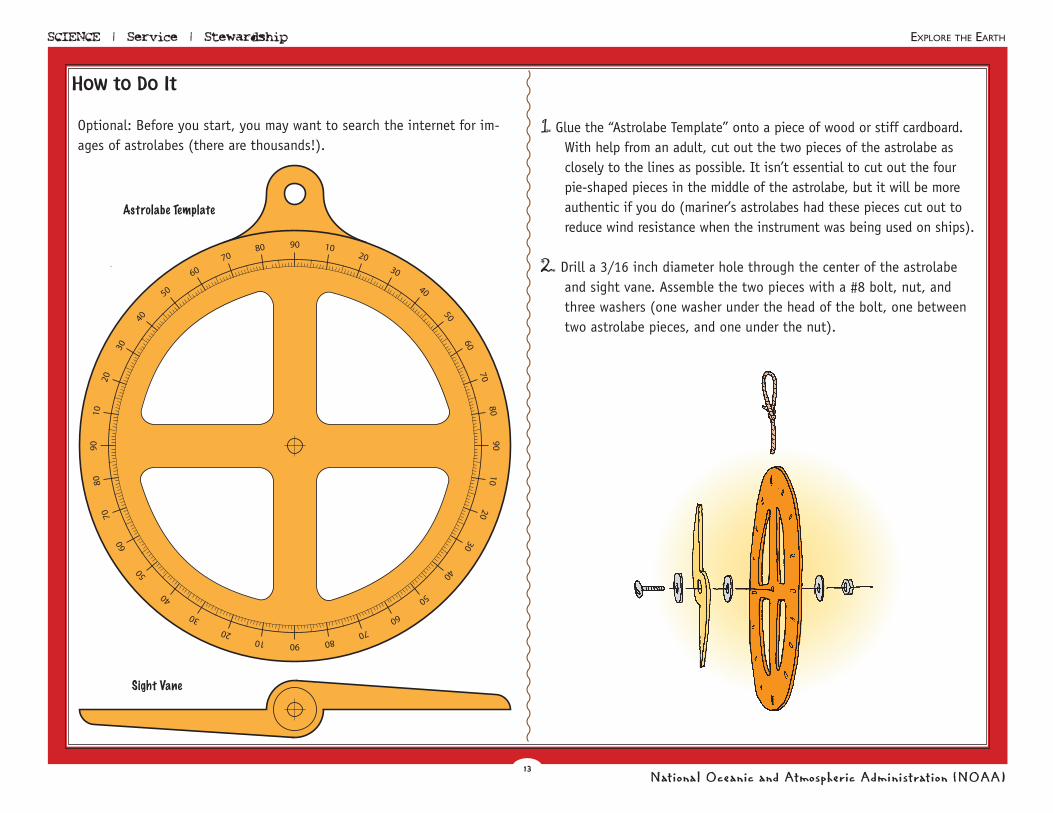
How to Do It
Optional: Before you start, you may want to search the internet for im-ages of astrolabes (there are thousands!).
1. Glue the “Astrolabe Template” onto a piece of wood or stiff cardboard. With help from an adult, cut out the two pieces of the astrolabe as closely to the lines as possible. It isn’t essential to cut out the four pie-shaped pieces in the middle of the astrolabe, but it will be more authentic if you do (mariner’s astrolabes had these pieces cut out to reduce wind resistance when the instrument was being used on ships).
2. Drill a 3/16 inch diameter hole through the center of the astrolabe and sight vane. Assemble the two pieces with a #8 bolt, nut, and three washers (one washer under the head of the bolt, one between two astrolabe pieces, and one under the nut).
90 1020
30
40
50
6070
8090
1020
30
40
50
6070
80901020
30
40
50
6070
8090
1020
30
40
50
6070
80
Astrolabe Template
Sight Vane

3. Tie a loop of rope, string, or twine through the hole at the top of the astrolabe.
4. To use your astrolabe, hold the instrument by the rope so that it hangs vertically. Line up the two ends of the sighting vane with the top of the object whose height you are measuring. Read the altitude of the object in degrees from the upper left or lower right scale on the astrolabe.
[NOTE: Notice that a horizontal object mea-sures 90° on the upper left and lower right scales. This measurement is called “zenith distance” and is used on a mariner’s astro-labe to simplify latitude calculations.]
5. To find the height of a vertical object using your astrolabe:
a. Set the sight vane to 45° on the upper left or lower right scale.
b. Hold the astrolabe so that it hangs vertically, and walk to a position at which the top of the object you want to measure is lined up with the two ends of the sight vane. Measure the height of the astrolabe above the ground.
c. Measure or pace the distance to the base of the object. Add this distance to the height of the astrolabe above the ground. The sum is equal to the height of the object.
Knowing the length of your pace can be useful for many things. Back in the day, a pace meant the distance traveled when you took TWO steps. For most people, this works out to be about 5.25 feet. So 1,000 paces is about equal to one mile. Find the length of your pace by walking 20 steps and mea-suring the distance covered. This distance divided by 10 is the length of your pace.
Want to Do More?
1. Check out http://astrolabes.org/ for examples of astrolabes made by individuals. You may also want to watch the NOVA program, Lost at Sea: The Search for Longitude (available from public libraries and from http://www.pbs.org/wgbh/nova/novastore.html).
2. Sometimes you won’t be able to get far enough away from an object to line up the ends of the sight vane when it is set to 45°. You can still use the astrolabe to find height, but will have to use a little trigo-nometry (don’t worry, it isn’t really very hard). Here are the basic things you need to know:
a. A “right triangle” has two sides that meet at an angle of 90°.
b. The side of the triangle opposite the 90° angle is called the hypotenuse.
45°
45°

EXPLORE THE EARTHSCIENCE | Service | Stewardship
c. The tangent of one of the other angles is defined as the length of the side oppo-site the angle divided by the side closest to the angle (NOT the hypotenuse).
So, in the drawing below, the tangent of angle a is equal to side A divided by side B. A short-hand way to write the last sentence is:tan a = A ÷ B
Now, we can find the height of the flagpole in the drawing to the right. The height of the flagpole is side A plus “H” which is the height of your eyeball above the ground.
The tangent of angle a is equal to side A di-vided by side B. Written in the shorthand way:
tan a = A ÷ B
Suppose angle a is equal to 60° and side B is 50 feet. Then,
tan 60° = A ÷ 50 feet
You can find tangents on many calculators, and in tables from trigonometry books and on the internet. The tangent of 60° is 1.73. So,
1.73 = A ÷ 50 feet
So, A is equal to 1.73 multiplied by 50, which is 86.5 feet
The height of the flagpole is side A plus “H” which is the height of your eyeball above the ground. If H is equal to 4.5 feet, the height of the flagpole is:
86.5 ft + 4.5 ft = 91 feet
a
A
B
hypotenuse
right angle
A
a
B
Using Trigonometry and Your Astrolabe to Find the Height of an Object
H