made simple commercial safety, operation and maintenance...
TRANSCRIPT
Copyright © 2016 Minuteman International, Inc.
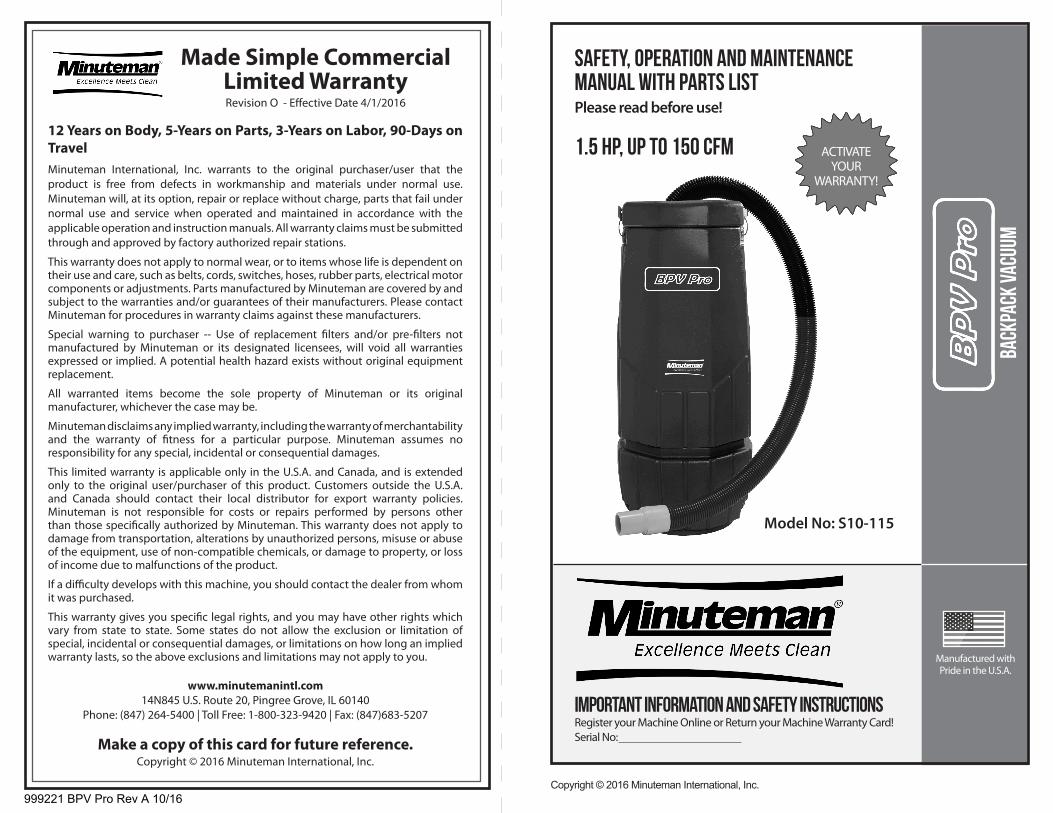
Safety, Operation and Maintenance Manual with Parts ListPlease read before use!
1.5 HP, up to 150 CFM
Important Information and Safety InstructionsRegister your Machine Online or Return your Machine Warranty Card!Serial No:
ACTIVATE YOUR
WARRANTY!
Made Simple Commercial Limited Warranty
12 Years on Body, 5-Years on Parts, 3-Years on Labor, 90-Days on TravelMinuteman International, Inc. warrants to the original purchaser/user that the product is free from defects in workmanship and materials under normal use. Minuteman will, at its option, repair or replace without charge, parts that fail under normal use and service when operated and maintained in accordance with the applicable operation and instruction manuals. All warranty claims must be submitted through and approved by factory authorized repair stations.
This warranty does not apply to normal wear, or to items whose life is dependent on their use and care, such as belts, cords, switches, hoses, rubber parts, electrical motor components or adjustments. Parts manufactured by Minuteman are covered by and subject to the warranties and/or guarantees of their manufacturers. Please contact Minuteman for procedures in warranty claims against these manufacturers.
Special warning to purchaser -- Use of replacement filters and/or pre-filters not manufactured by Minuteman or its designated licensees, will void all warranties expressed or implied. A potential health hazard exists without original equipment replacement.
All warranted items become the sole property of Minuteman or its original manufacturer, whichever the case may be.
Minuteman disclaims any implied warranty, including the warranty of merchantability and the warranty of fitness for a particular purpose. Minuteman assumes no responsibility for any special, incidental or consequential damages.
This limited warranty is applicable only in the U.S.A. and Canada, and is extended only to the original user/purchaser of this product. Customers outside the U.S.A. and Canada should contact their local distributor for export warranty policies. Minuteman is not responsible for costs or repairs performed by persons other than those specifically authorized by Minuteman. This warranty does not apply to damage from transportation, alterations by unauthorized persons, misuse or abuse of the equipment, use of non-compatible chemicals, or damage to property, or loss of income due to malfunctions of the product.
If a difficulty develops with this machine, you should contact the dealer from whom it was purchased.
This warranty gives you specific legal rights, and you may have other rights which vary from state to state. Some states do not allow the exclusion or limitation of special, incidental or consequential damages, or limitations on how long an implied warranty lasts, so the above exclusions and limitations may not apply to you.
Make a copy of this card for future reference.Copyright © 2016 Minuteman International, Inc.
Manufactured withPride in the U.S.A.
www.minutemanintl.com14N845 U.S. Route 20, Pingree Grove, IL 60140
Phone: (847) 264-5400 | Toll Free: 1-800-323-9420 | Fax: (847)683-5207
BACK
PACK
VACU
UM
Revision O - Effective Date 4/1/2016
Model No: S10-115
999221 BPV Pro Rev A 10/16

(2) BPV Pro 10-Quart Backpack Vacuum
Dear Valued Client,Congratulations on the purchase of your BPV Pro 10-Quart Backpack Vacuum! The world of carpet cleaning is becoming more high-tech and competitive and we strive to provide you with the most innovative products. Our backpack vacuum is yet another example of this, bringing a new dimension to carpet and upholstery cleaning with its cutting-edge features, quality and value.
Please review this manual paying careful attention to the Safety Instructions section. Keep in mind that any unnecessary damage, neglect or abuse of this machine will void your warranty. You can be confident that simple maintenance will ensure that your Backpack Vacuum provides quality performance for many years to come.
If warranty questions arise, please consult your manual or contact your distributor. Should you have any questions regarding maintenance, replacing parts or ordering parts, please call an authorized distributor.
Before you begin using your Backpack Vacuum, thoroughly review the Owner’s Manual.
Again, congratulations on the purchase of your BPV Pro 10-Quart Backpack Vacuum!
Questions or Comments?
Minuteman International14N845 U.S. Route 20, Pingree Grove, IL 60140
Phone: (847) 264-5400Toll Free: 1-800-323-9420Fax: (847)683-5207
Visit our website at: www.minutemanintl.com
Mail to:Minuteman International
14N845 U.S. Route 20Pingree Grove, IL 60140
See reverse side for Warranty Information.Make a copy of this card for future reference.
Copyright © 2016 Minuteman International, Inc.
ACTIVATE YOUR WARRANTY!Please take a moment to register your machine. Fill out the information below and mail back to Minuteman International, Inc. immediately.The warranty starts on the purchase date by the original purchaser subject to proof of purchase. This Machine Registration Card must be completed and returned immediately at the time of purchase. If proof of purchase cannot be identified, the warranty start date is ninety (90) days after the inventory stocking date at the distributor’s warehouse.
Machine Model Purchase Date
Motor Type Serial No.
Place of Purchase
Shipped To
Your Name Phone
E-mail Fax
Address Line 1
Address Line 2
City State Zip
Comments:
Please fill out the following information:
Model No:
Serial No:
Distributor Name:
Distributor Phone No:
Date of Purchase:
BPV Pro 10-Quart BACKPACK VACUUMBy Minuteman International
BPV Pro 10-Quart Backpack Vacuum (3)
Table of ContentsReturned Material Authorization (RMA) Procedure ......................................................................4
1.0 Safety Instructions ............................................................................................................................5
2.0 Grounding Instructions ...................................................................................................................6
3.0 Care of your Backpack Vacuum Cleaner ....................................................................................7
4.0 Operation and Assembly Instructions. ......................................................................................8
5.0 Trouble Shooting Guide ............................................................................................................... 10
6.0 Machine Schematic Drawing ..................................................................................................... 11
7.0 Machine Parts List .......................................................................................................................... 12
8.0 5-Piece Tool Kit ................................................................................................................................ 13
9.0 Machine Wiring Diagram ............................................................................................................. 13
Copyright © 2016 Minuteman International, Inc.
BPV Pro 10-Quart Backpack Vacuum (13)(4) BPV Pro 10-Quart Backpack Vacuum
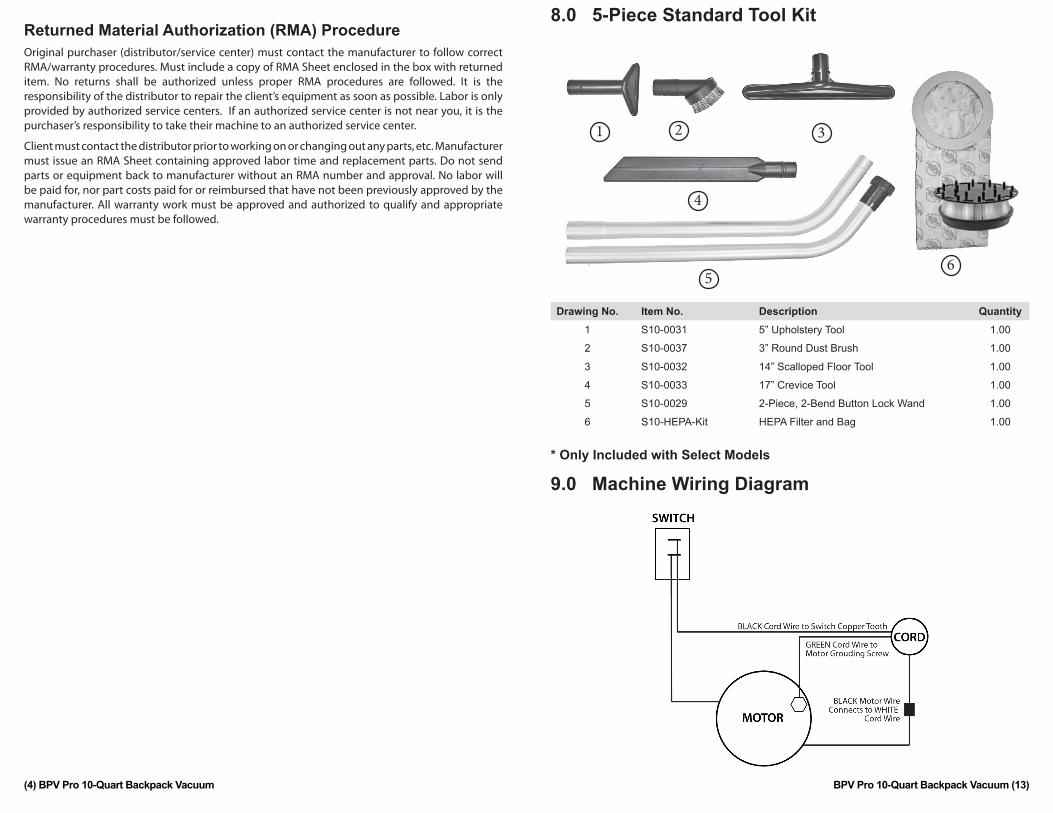
8.0 5-Piece Standard Tool Kit
Drawing No. Item No. Description Quantity1 S10-0031 5” Upholstery Tool 1.00
2 S10-0037 3” Round Dust Brush 1.00
3 S10-0032 14” Scalloped Floor Tool 1.00
4 S10-0033 17” Crevice Tool 1.00
5 S10-0029 2-Piece, 2-Bend Button Lock Wand 1.00
6 S10-HEPA-Kit HEPA Filter and Bag 1.00
* Only Included with Select Models
1 2 3
4
5
9.0 Machine Wiring Diagram
Returned Material Authorization (RMA) ProcedureOriginal purchaser (distributor/service center) must contact the manufacturer to follow correct RMA/warranty procedures. Must include a copy of RMA Sheet enclosed in the box with returned item. No returns shall be authorized unless proper RMA procedures are followed. It is the responsibility of the distributor to repair the client’s equipment as soon as possible. Labor is only provided by authorized service centers. If an authorized service center is not near you, it is the purchaser’s responsibility to take their machine to an authorized service center.
Client must contact the distributor prior to working on or changing out any parts, etc. Manufacturer must issue an RMA Sheet containing approved labor time and replacement parts. Do not send parts or equipment back to manufacturer without an RMA number and approval. No labor will be paid for, nor part costs paid for or reimbursed that have not been previously approved by the manufacturer. All warranty work must be approved and authorized to qualify and appropriate warranty procedures must be followed.
6
(12) BPV Pro 10-Quart Backpack Vacuum BPV Pro 10-Quart Backpack Vacuum (5)
1.0 Safety InstructionsREAD THIS MANUAL BEFORE OPERATING MACHINERY. KNOW THE PROPER SET-UP, OPERATION, CORRECT APPLICATIONS AND THE LIMITATIONS OF THIS EQUIPMENT BEFORE USE.This backpack vacuum will afford you many years of trouble-free operating satisfaction, provided it is given the proper care. All parts have passed rigid quality control standards throughout the assembly process. Prior to packaging, your backpack vacuum was again inspected for assurance of flawless operation.This backpack vacuum is protectively packed to prevent damage in shipment. We recommend that upon delivery, unpack the unit and inspect it for any possible damage. Only a visual inspection will reveal damage that may have occurred.If damage is discovered, immediately notify the transportation company that delivered your vacuum. As a shipper, we are unable to report any claim for damage. You must originate any claim within five (5) days.This manual is for your protection and information. Please read carefully since failure to follow precautions could result in discomfort or injury.
Reduce the Risk of Fire, Electric Shock or InjuryDO NOT USE ON WET SURFACES OR EXPOSE TO RAIN. STORE INDOORS.Use only as described in this safety operating manual. Use only the manufacturer’s recommended attachments, accessories, replacement parts and filters. Replace damaged or worn parts immediately with genuine, original equipment parts to maintain safety and to protect your limited warranty.Always turn OFF the vacuum before connecting, disconnecting or working on the vacuum. This vacuum must be connected to a properly grounded outlet only (see grounding instructions). The extension cord provided with this unit is 50-foot, 16/3-gauge wire and MUST be used with this unit to ensure grounding protection. Turn off all controls before unplugging. Make sure the on/off switch is in the off position. This is not a toy. Close attention is necessary when used around or near children. Use extra care when cleaning on stairs.NOTE: when using the vacuum with a powerhead tool and connection, always turn off the vacuum and nozzle tool before connecting or disconnecting either the hose or power nozzle. Depending on your vacuum model, the hose may contain electrical wires. • DO NOT leave the vacuum when plugged in. Unplug it from the outlet when not in
use and before servicing. • DO NOT use this vacuum with a damaged cord or plug. If the vacuum is not working
as it should because it has been dropped, damaged, left outdoors or dropped into water, etc., contact an authorized service center.
• DO NOT unplug the vacuum by pulling the cord. To unplug, grasp the plug, not the cord. DO NOT pull or carry by the cord, use the cord as a handle, close a door on the cord, or pull the cord around sharp edges or corners. Keep the cord away from heated surfaces.
• DO NOT overstretch the safety power cord between the vacuum and the electrical outlet in the wall.
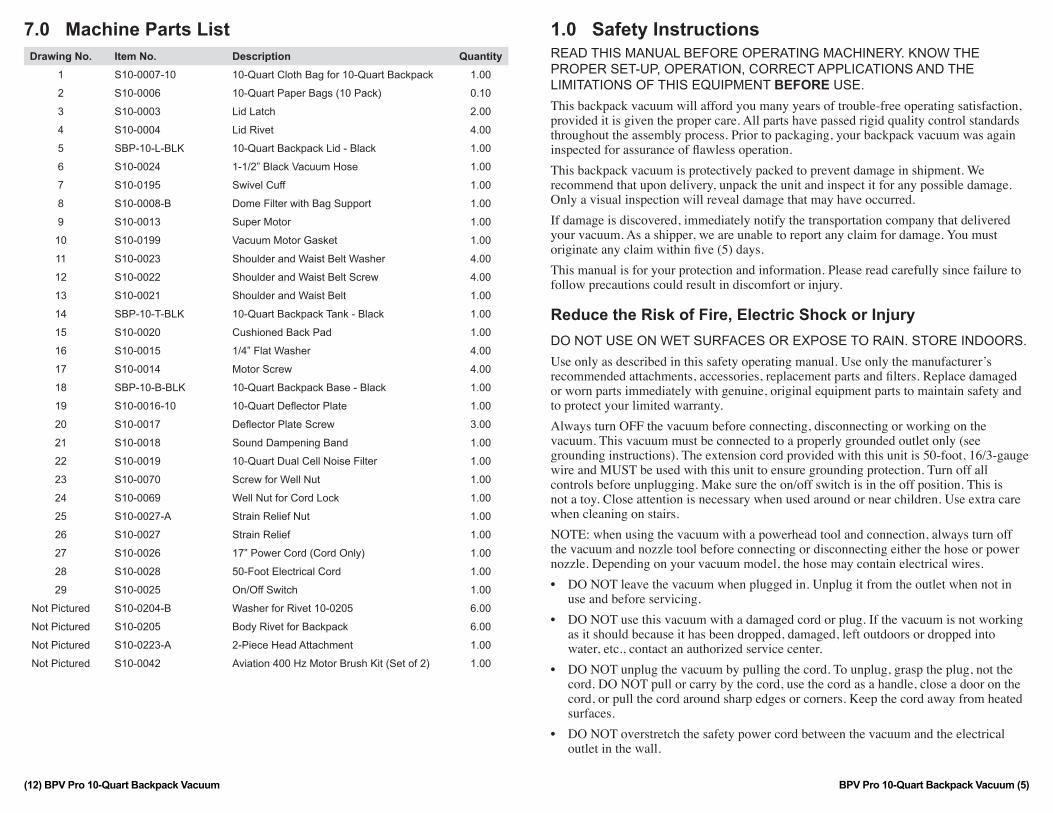
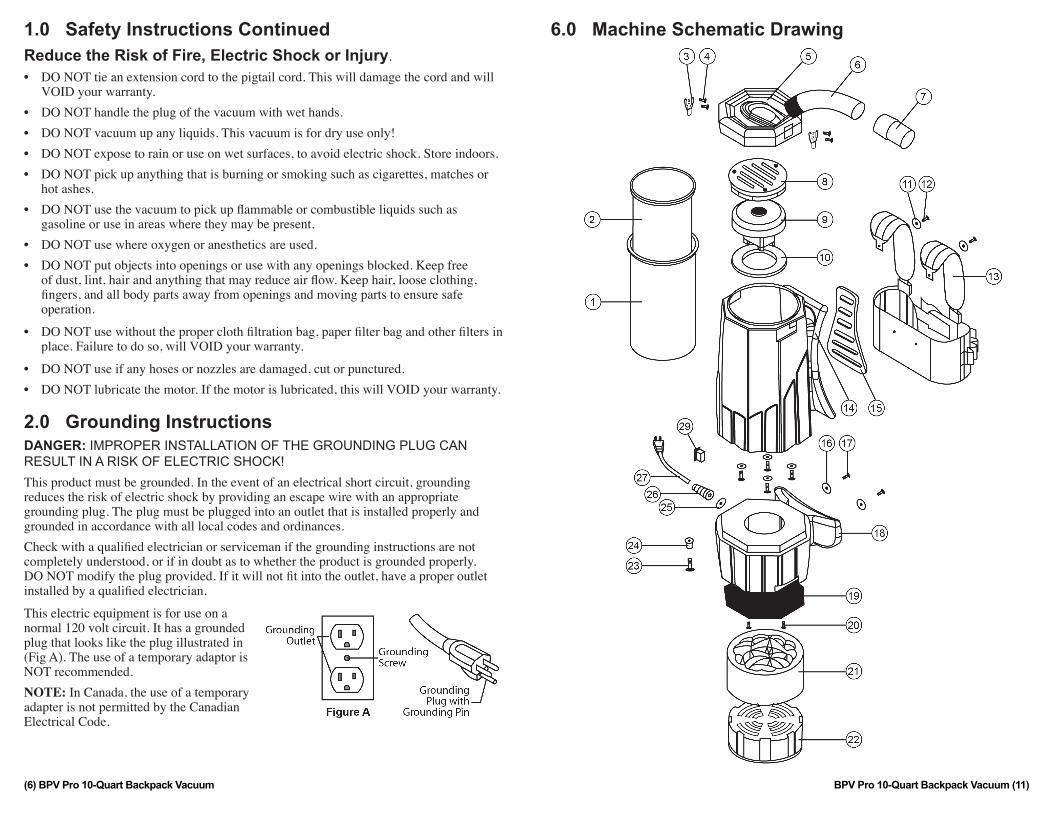
7.0 Machine Parts ListDrawing No. Item No. Description Quantity
1 S10-0007-10 10-Quart Cloth Bag for 10-Quart Backpack 1.00
2 S10-0006 10-Quart Paper Bags (10 Pack) 0.10
3 S10-0003 Lid Latch 2.00
4 S10-0004 Lid Rivet 4.00
5 SBP-10-L-BLK 10-Quart Backpack Lid - Black 1.00
6 S10-0024 1-1/2” Black Vacuum Hose 1.00
7 S10-0195 Swivel Cuff 1.00
8 S10-0008-B Dome Filter with Bag Support 1.00
9 S10-0013 Super Motor 1.00
10 S10-0199 Vacuum Motor Gasket 1.00
11 S10-0023 Shoulder and Waist Belt Washer 4.00
12 S10-0022 Shoulder and Waist Belt Screw 4.00
13 S10-0021 Shoulder and Waist Belt 1.00
14 SBP-10-T-BLK 10-Quart Backpack Tank - Black 1.00
15 S10-0020 Cushioned Back Pad 1.00
16 S10-0015 1/4” Flat Washer 4.00
17 S10-0014 Motor Screw 4.00
18 SBP-10-B-BLK 10-Quart Backpack Base - Black 1.00
19 S10-0016-10 10-Quart Deflector Plate 1.00
20 S10-0017 Deflector Plate Screw 3.00
21 S10-0018 Sound Dampening Band 1.00
22 S10-0019 10-Quart Dual Cell Noise Filter 1.00
23 S10-0070 Screw for Well Nut 1.00
24 S10-0069 Well Nut for Cord Lock 1.00
25 S10-0027-A Strain Relief Nut 1.00
26 S10-0027 Strain Relief 1.00
27 S10-0026 17” Power Cord (Cord Only) 1.00
28 S10-0028 50-Foot Electrical Cord 1.00
29 S10-0025 On/Off Switch 1.00
Not Pictured S10-0204-B Washer for Rivet 10-0205 6.00
Not Pictured S10-0205 Body Rivet for Backpack 6.00
Not Pictured S10-0223-A 2-Piece Head Attachment 1.00
Not Pictured S10-0042 Aviation 400 Hz Motor Brush Kit (Set of 2) 1.00
(6) BPV Pro 10-Quart Backpack Vacuum BPV Pro 10-Quart Backpack Vacuum (11)
1.0 Safety Instructions ContinuedReduce the Risk of Fire, Electric Shock or Injury.• DO NOT tie an extension cord to the pigtail cord. This will damage the cord and will
VOID your warranty.• DO NOT handle the plug of the vacuum with wet hands.• DO NOT vacuum up any liquids. This vacuum is for dry use only! • DO NOT expose to rain or use on wet surfaces, to avoid electric shock. Store indoors. • DO NOT pick up anything that is burning or smoking such as cigarettes, matches or
hot ashes.• DO NOT use the vacuum to pick up flammable or combustible liquids such as
gasoline or use in areas where they may be present.• DO NOT use where oxygen or anesthetics are used. • DO NOT put objects into openings or use with any openings blocked. Keep free
of dust, lint, hair and anything that may reduce air flow. Keep hair, loose clothing, fingers, and all body parts away from openings and moving parts to ensure safe operation.
• DO NOT use without the proper cloth filtration bag, paper filter bag and other filters in place. Failure to do so, will VOID your warranty.
• DO NOT use if any hoses or nozzles are damaged, cut or punctured.• DO NOT lubricate the motor. If the motor is lubricated, this will VOID your warranty.
2.0 Grounding InstructionsDANGER: IMPROPER INSTALLATION OF THE GROUNDING PLUG CAN RESULT IN A RISK OF ELECTRIC SHOCK!This product must be grounded. In the event of an electrical short circuit, grounding reduces the risk of electric shock by providing an escape wire with an appropriate grounding plug. The plug must be plugged into an outlet that is installed properly and grounded in accordance with all local codes and ordinances. Check with a qualified electrician or serviceman if the grounding instructions are not completely understood, or if in doubt as to whether the product is grounded properly. DO NOT modify the plug provided. If it will not fit into the outlet, have a proper outlet installed by a qualified electrician.
This electric equipment is for use on a normal 120 volt circuit. It has a grounded plug that looks like the plug illustrated in (Fig A). The use of a temporary adaptor is NOT recommended. NOTE: In Canada, the use of a temporary adapter is not permitted by the Canadian Electrical Code.
6.0 Machine Schematic Drawing
(10) BPV Pro 10-Quart Backpack Vacuum BPV Pro 10-Quart Backpack Vacuum (7)
3.0 Care of your Backpack VacuumTreat your vacuum as you would any other high grade, precision made product. Dropping, unreasonable bumping across thresholds and other misuses may result in a damaged unit which will not be covered under warranty.When not in use, the power cord should be wrapped around the molded-in cord wrap and stored in a dry area. After each use, wipe the vacuum body, accessories and power cord with a slightly damp cloth.
WARNING: DO NOT use vacuum without the proper cloth filtration bag, paper filter bag and other filters in place. Failure to do so, will VOID your warranty.
If using this vacuum in a paint, sawdust or drywall environment, you must dispose of the paper filter bag and the shakeout cloth filter bag after each use. Failure to do so will cause severe damage to your vacuum and VOID your warranty. Dispose of the paper filter bag in a fireproof container. The combination of urethane and wood, may result in a combustion.
5.0 Troubleshooting GuideCAUTION: Always disconnect power cord before servicing vacuum. WARNING: Repairs should only be performed by an authorized service center. Failure to do so will VOID warranty.
PROBLEM: Loss of vacuumCAUSE SOLUTION
Lid is damaged Inspect and replace if needed
Faulty vacuum motor Call manufacturer or authorized service center
Full paper bag filter Replace paper filter bag
Clogged hose or wand Remove obstruction
Loose or broken fan Call manufacturer or authorized service center
PROBLEM: Motor is not runningCAUSE SOLUTION
Faulty on/off switch Call manufacturer or authorized service center
Power cord defective Call manufacturer or authorized service center
Loose connection or wiring Call manufacturer or authorized service center
Motor defective Call manufacturer or authorized service center
Blown fuse or tripped circuit breaker Replace fuse or reset circuit breaker
PROBLEM: Dust blowing from vacuum when runningCAUSE SOLUTION
Full paper bag Replace filter bag
Paper filter bag not installed properly Reinstall or replace paper filter bag properly
Cloth filter bag is dirty Clean cloth filter bag by shaking and dusting
Cloth or paper filter bag is torn Replace - failure to use a
All filters must be used at all times. Failure to do so will VOID your warranty.
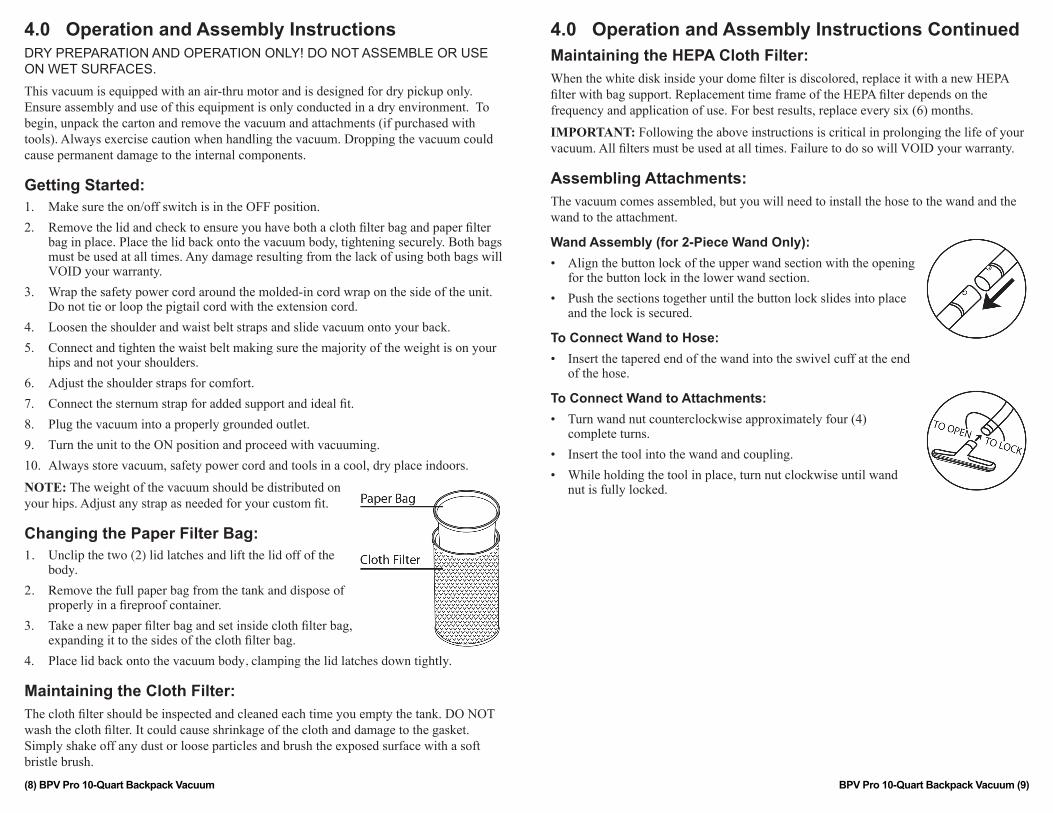
4.0 Operation and Assembly InstructionsDRY PREPARATION AND OPERATION ONLY! DO NOT ASSEMBLE OR USE ON WET SURFACES.This vacuum is equipped with an air-thru motor and is designed for dry pickup only. Ensure assembly and use of this equipment is only conducted in a dry environment. To begin, unpack the carton and remove the vacuum and attachments (if purchased with tools). Always exercise caution when handling the vacuum. Dropping the vacuum could cause permanent damage to the internal components.
Getting Started: 1. Make sure the on/off switch is in the OFF position.2. Remove the lid and check to ensure you have both a cloth filter bag and paper filter
bag in place. Place the lid back onto the vacuum body, tightening securely. Both bags must be used at all times. Any damage resulting from the lack of using both bags will VOID your warranty.
3. Wrap the safety power cord around the molded-in cord wrap on the side of the unit. Do not tie or loop the pigtail cord with the extension cord.
4. Loosen the shoulder and waist belt straps and slide vacuum onto your back.5. Connect and tighten the waist belt making sure the majority of the weight is on your
hips and not your shoulders.6. Adjust the shoulder straps for comfort.7. Connect the sternum strap for added support and ideal fit.8. Plug the vacuum into a properly grounded outlet. 9. Turn the unit to the ON position and proceed with vacuuming.10. Always store vacuum, safety power cord and tools in a cool, dry place indoors.
NOTE: The weight of the vacuum should be distributed on your hips. Adjust any strap as needed for your custom fit.
Changing the Paper Filter Bag:1. Unclip the two (2) lid latches and lift the lid off of the
body.2. Remove the full paper bag from the tank and dispose of
properly in a fireproof container.3. Take a new paper filter bag and set inside cloth filter bag,
expanding it to the sides of the cloth filter bag.4. Place lid back onto the vacuum body, clamping the lid latches down tightly.
Maintaining the Cloth Filter:The cloth filter should be inspected and cleaned each time you empty the tank. DO NOT wash the cloth filter. It could cause shrinkage of the cloth and damage to the gasket. Simply shake off any dust or loose particles and brush the exposed surface with a soft bristle brush.
(8) BPV Pro 10-Quart Backpack Vacuum BPV Pro 10-Quart Backpack Vacuum (9)
4.0 Operation and Assembly Instructions ContinuedMaintaining the HEPA Cloth Filter:When the white disk inside your dome filter is discolored, replace it with a new HEPA filter with bag support. Replacement time frame of the HEPA filter depends on the frequency and application of use. For best results, replace every six (6) months.
IMPORTANT: Following the above instructions is critical in prolonging the life of your vacuum. All filters must be used at all times. Failure to do so will VOID your warranty.
Assembling Attachments:The vacuum comes assembled, but you will need to install the hose to the wand and the wand to the attachment.
Wand Assembly (for 2-Piece Wand Only):• Align the button lock of the upper wand section with the opening
for the button lock in the lower wand section.• Push the sections together until the button lock slides into place
and the lock is secured.
To Connect Wand to Hose:• Insert the tapered end of the wand into the swivel cuff at the end
of the hose.
To Connect Wand to Attachments:• Turn wand nut counterclockwise approximately four (4)
complete turns.• Insert the tool into the wand and coupling.• While holding the tool in place, turn nut clockwise until wand
nut is fully locked.