mad catz product guide - images-na.ssl-images … · ls mode - joystick will emulate left analog...
TRANSCRIPT

03-10-2016
Mad Catz Product Guide Mad Catz® Street Fighter® V Arcade FightStick™ Tournament Edition 2+ for PlayStation®4 & PlayStation®3

03-10-2016
Rise Up to the Challenge!
The official Street Fighter V TE2+ continues the legacy of the world-renowned TE2 FightStick. This all-new version now includes new touchpad controls, L3 and R3 buttons, and LED Lightbar integration while providing a premium arcade stick that's both ready for competition and perfect for customization to make it your very own. The Street Fighter V TE2+ uses the very same parts found in Japanese arcade cabinets. Sanwa Denshi parts are built to last and can endure the abuse dished out during fierce battles. The included Sanwa OBSF-30 action buttons respond with pinpoint accuracy. A VEWLIX-style layout gives you classic ergonomics and full access to an arsenal of moves. The Sanwa JLF ball-top stick is the benchmark for precision character control. The TE2+ features the ability to open its casing, allowing access to its insides and internal storage compartments, an intuitive top panel design for easy artwork customization, foam bottom padding, and much more.
Product Features
Genuine Arcade Layout: This PS4 FightStick uses extremely accurate and durable Sanwa Denshi parts. Vewlix-style design with 8 action buttons to drain your enemy’s life bar.
Easy to Mod: Chassis hinges open for clear access to inner components. Removable bezel and top panel for creating a custom arcade stick with unique artwork. Includes screwdriver with hex and flat heads.
Touchpad Controls: Press and swipe with full touchpad functionality for PlayStation 4 systems. Play all PS4 touchpad-enhanced fighting games with this PS4 FightStick.
Enhanced Mobility: Internal storage compartments holds removable 9.8ft/3m USB ProCable. Our custom arcade stick with official Street Fighter V artwork has metal posts to support a separately available shoulder strap.
Product Includes
Street Fighter® V Arcade FightStick™ TE2+ Removable USB ProCable™ (9.8ft/3m) Screwdriver Tool with Hex and Flat Heads

03-10-2016
PS3/PS4 Switch
A “PS3/PS4” switch on the control module provides the ability to toggle between using the FightStick for the PlayStation 3 or PlayStation 4 console.
Set "PS3/PS4" Switch to desired location before plugging in USB. 1. PS3 Mode - PS, Start, Select Buttons function for PlayStation 3 console 2. PS4 Mode - PS, Options, Share Buttons function for PlayStation 4 console
LS/DP/RS Button
A 3-way button on the control module enables the joystick to function as the left or right analog stick or D-Pad, allowing the FightStick to be compatible with a wide variety of game genres.
Press "LS/DP/RS" Button to toggle between Modes: 1. LS Mode - Joystick will emulate Left Analog Stick of a standard controller 2. DP Mode - Joystick will emulate Directional Pad of a standard controller 3. RS Mode - Joystick will emulate Right Analog Stick of a standard controller In Street Fighter V, Right Analog can be used to cycle through dummy state, guard, recovery, and counter settings, or for controlling the dummy itself in training mode.
Lock/Unlock Button
A Lock button on the control module provides the ability to disable use of Start/Options, Select/Share, and other buttons that could be detrimental to gameplay. No more accidental interruptions or automatic forfeitures in key moments during tournament matches! Press the LOCK/UNLOCK button to toggle between modes. When in Locked Mode, the “PS,” “LS/DP/RS,” “TOUCHPAD,” “L3,” “R3,” “Start/Options,” “Select/Share” Buttons are all disabled.
03-10-2016
NEW! TOUCHPAD Controls With the PS4 DUALSHOCK 4 controller now having a dedicated "Share" button, many PS4 titles have been using the touchpad as a substitute "Select" button to bring up menus or perform shortcut options that would have normally been done with a "Select" button on a PS3 version of the game, and for other special options that can be accessed by swiping or touching different areas of the touchpad. Below are some example usage:
- In Street Fighter V, touchpad can be used to display or hide battle info and resetting
character position to middle, left, or right of the stage in training mode. - In Ultra Street Fighter IV, pressing touchpad lets you do button configuration while on
the character select screen and show button inputs for how to do combos while in challenge modes.
- In Guilty Gear Xrd -SIGN-, pressing touchpad resets character position to the center of stage in practice mode. Holding Left or Right and then pressing the touchpad resets character position to the left or right side of the stage.
- In Mortal Kombat X, touchpad is used to enter chat mode while in an online lobby.
NEW! L3 and R3 Buttons
In addition to the touchpad, some games also use the L3 and R3 buttons for additional supplemental controls. Below are some example usage:
- In Street Fighter V training mode, L3 can be used to reset back to the last applied training setting. R3 can be used to cycle through dummy status options.
- In Ultra Street Fighter IV training mode, R3 can be used to store a memory state, such as right after landing a special attack. Pressing touchpad lets you quickly restore to this memory state so you can practice what to do after certain situations.
- In Guilty Gear Xrd -SIGN-, L3 is used to switch control and record your training dummy's actions and R3 is used to play this training dummy action back, allowing you to practice against recorded sequences.
NEW! LED Lightbar Functionality
In PS3 mode, know exactly which player you are with individual LEDs indicating your number. In PS4 mode, the LEDs lights up different colors for PS4 Lightbar functionality. Often used to assign colors (Blue, Red, Green, Purple) for the different player profiles that are signed into the PS4 console, the Lightbar can change colors depending on status of the game. For example, the Lightbar can shine Green when in good health, Yellow at okay health, and Red when in critical health. This feature will be dependent if the game provides such data.

03-10-2016
Removable ProCable
The TE2+ comes with a removable USB ProCable that can stored in the internal storage compartment when not in use and utilizes a unique design to screw into the back of the FightStick to prevent accidental drop-outs during competitive play compared to simple plug and play USB connections. To install the USB ProCable, please follow the below instructions.
1. Insert the ProCable into the port on top of the FightStick. 2. Screw the locking mechanism in a clockwise direction until the ProCable is firmly in
place. 3. There is only one way to connect the ProCable to the FightStick. Do not over-tighten or
force the ProCable into place. 4. Reverse instructions to remove ProCable.
Heavy Metal Base with Durable Foam Padding This is no cheap plastic toy; the durable metal base increases the FightStick's weight for a solid, secure feel when draining your foe's life bar. Thick non-slip foam padding coincides with where the controller rests on your legs during lap-mounted gameplay. When a match's intensity increases and one final hit determines the victor, the last thing you want to worry about is an uncomfortable gaming weapon.
Internal Access The TE2+ can open up with a hinged chassis design, allowing quick access to inner storage and components. Featuring dedicated storage compartments, you’ll always have room for those extra tools and parts. To open, press the release button at the front of the FightStick. While holding the bottom casing, lift the top casing to open the FightStick. This also opens the door to customization. Please note to disconnect the FightStick USB from the game console before any modification. Modification of PCBs voids warranty.

03-10-2016
Artwork Customization Using the included screwdriver tool – with interchangeable hex and flat heads – the easily removable bezel and clear top panel allow easy customization for artwork. With a unique design with holes that go around the action buttons, you can swap in custom artwork without having to remove buttons or fumble with confusing wires.
1. After opening the FightStick, using the flat head screwdriver tool, hold the bottom of the joystick shaft, and twist off the joystick ball top.
2. Remove the shaft and dust covers from the joystick. 3. Using the hex head screwdriver tool, remove the eight hex screws from the inside of the
top casing. 4. Remove the bezel and the clear top panel. 5. Insert new custom top panel artwork (and new bezel if applicable). 6. Reverse instructions to re-assemble.
Photoshop template for creating your own custom artwork can be found in link below. We recommend printing on 11”x17” paper size: http://madcatz.com/files/PS4_PS3_TE2TemplateRGB.zip
03-10-2016
Joystick and Buttons Customization Artwork may not be the only item you’re interested in customizing. Customization of the joystick and buttons is made simple since you have easy access to the inside of the FightStick and all cables are quick disconnecting wires. The TE2+ will fit most of today’s popular joystick lever options, including SANWA and SEIMITSU.
1. Using the flat head screwdriver tool, hold the bottom of the joystick shaft, and twist off the joystick ball top.
2. Remove the shaft and dust covers from the joystick. 3. Remove the joystick harness from the joystick. 4. Using a Philips screwdriver (not included), remove the four Philips screws and remove
joystick. 5. Insert new joystick. 6. Reverse instructions to re-assemble. An adapter connector harness (not included) may
be necessary. For the buttons, the quick disconnect wires are color coded. A handy button wires chart is provided indicating which color quick disconnect wire should go to which button. The arrangement of this chart is the arrangement of the buttons when looking from the inside of the FightStick.
1. Using the flat head screwdriver tool, push inward on the small inside tabs of the button harness quick disconnects to easily remove them from each of the eight action buttons.
2. Carefully remove the buttons and the clear rings from the buttons. 3. Attach the clear rings onto each of the new 30mm size action buttons. 4. Insert new buttons. 5. Reverse instructions to re-assemble.
For customization of the Start/Options and Select/Share button, you will need to use the hex head screwdriver tool to undo the plastic button cover first. These use 24mm size buttons.

03-10-2016
Optional Parts Similar to what we did with the original Tournament Edition FightStick, an entire range of accessories will be available for customizing your TE2+ FightStick to make it your very own. Below are a few examples and instructions of how to do the customization.
TE2 Bezels The bezel on the TE2+ is interchangeable. For inserting new bezel, please follow the below instructions.
1. After opening the FightStick, using the hex head screwdriver tool, remove the eight hex screws from the inside of the top casing to remove the bezel.
2. Insert new bezel. 3. Reverse instructions to re-assemble.
TE2 Side Panels The side panels on the TE2+ are interchangeable. For inserting new side panels, please follow the below instructions.
1. After opening the FightStick, using the flat head screwdriver tool, remove the four hex screws from the left side panel and the four hex screws from the right side panel.
2. Close the FightStick, and flip it over to view the bottom of the FightStick. 3. Using the hex head screwdriver tool, remove the four hex screws from the bottom of
the right side panel and the four hex screws from the bottom the left side panel. 4. Remove both side panels. 5. Insert new side panels. 6. Reverse instructions to re-assemble.

03-10-2016
TE2 Shoulder Strap
The TE2+ supports shoulder straps (not included). Free your hands from carrying your FightStick while standing and waiting for your next match – It’s also a great way for showing off any custom artwork you may have on your FightStick. With an adjustable length and padded cushioning, it’s a must-have for any mobile warrior.
To attach, simply snap the shoulder strap hooks onto the metal posts found on the rear side of the TE2+.
03-10-2016
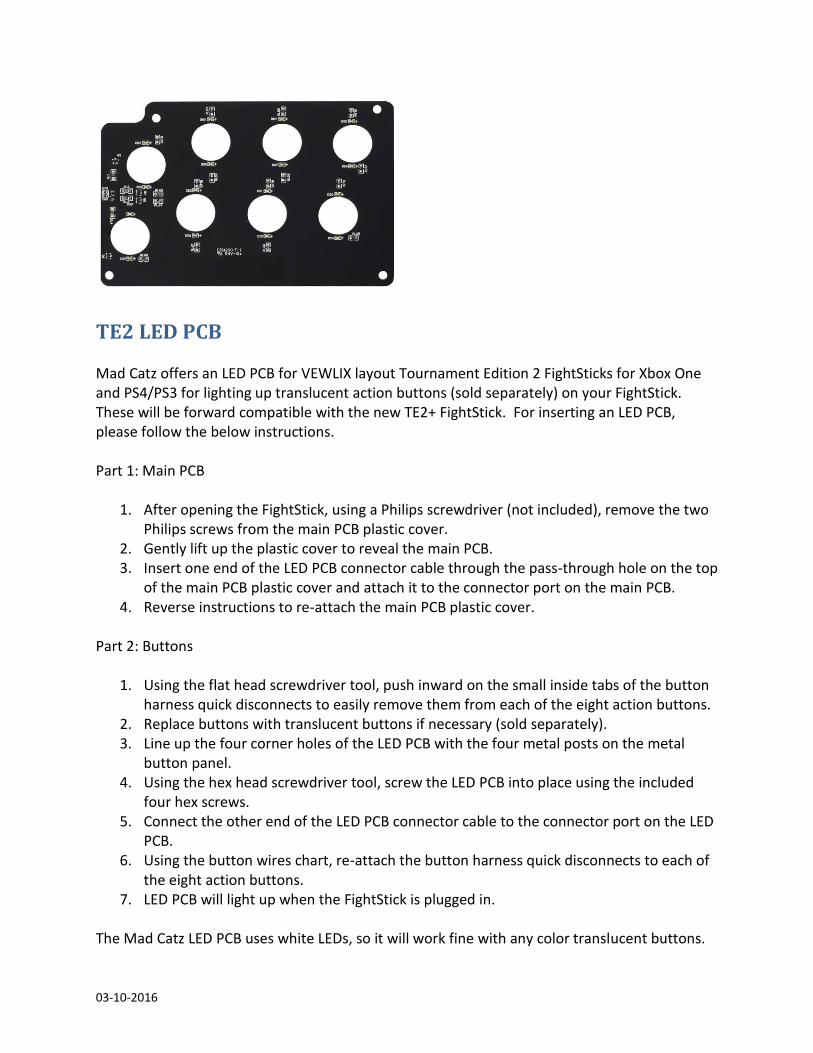
TE2 LED PCB Mad Catz offers an LED PCB for VEWLIX layout Tournament Edition 2 FightSticks for Xbox One and PS4/PS3 for lighting up translucent action buttons (sold separately) on your FightStick. These will be forward compatible with the new TE2+ FightStick. For inserting an LED PCB, please follow the below instructions. Part 1: Main PCB
1. After opening the FightStick, using a Philips screwdriver (not included), remove the two Philips screws from the main PCB plastic cover.
2. Gently lift up the plastic cover to reveal the main PCB. 3. Insert one end of the LED PCB connector cable through the pass-through hole on the top
of the main PCB plastic cover and attach it to the connector port on the main PCB. 4. Reverse instructions to re-attach the main PCB plastic cover.
Part 2: Buttons
1. Using the flat head screwdriver tool, push inward on the small inside tabs of the button harness quick disconnects to easily remove them from each of the eight action buttons.
2. Replace buttons with translucent buttons if necessary (sold separately). 3. Line up the four corner holes of the LED PCB with the four metal posts on the metal
button panel. 4. Using the hex head screwdriver tool, screw the LED PCB into place using the included
four hex screws. 5. Connect the other end of the LED PCB connector cable to the connector port on the LED
PCB. 6. Using the button wires chart, re-attach the button harness quick disconnects to each of
the eight action buttons. 7. LED PCB will light up when the FightStick is plugged in.
The Mad Catz LED PCB uses white LEDs, so it will work fine with any color translucent buttons.

03-10-2016
TE2 Metal Button Panels Different metal button panels will be made available so you can also have different button layouts. To insert new metal button panel, please follow the below instructions.
1. After opening the FightStick, using the flat head screwdriver tool, hold the bottom of the joystick shaft, and twist off the joystick ball top.
2. Remove the shaft and dust covers from the joystick. 3. Using the hex head screwdriver tool, remove the eight hex screws from the inside of the
top casing to remove the bezel. 4. Remove the bezel, clear top panel, and artwork. 5. Remove the joystick harness from the joystick. 6. Remove the button harness quick disconnects from the buttons. 7. Using the hex head screwdriver tool, remove the six hex screws from the top of the
metal button panel. 8. Insert new metal button panel. 9. Insert joystick and buttons into new button panel. 10. Reverse instructions to re-assemble.

03-10-2016
PC Compatibility Update 3/10/2016: Mad Catz PC Drivers enabling X-Input compatibility for our SFV fighting game controllers are now available. Download the appropriate installer file for your controller from our downloads site here: http://madcatz.com/downloads/ The product uses similar solution as DUALSHOCK 4 controllers which is recognizable on PC as DirectInput (D-Input) and will be compatible with any games that support the D-Input interface. For games that use the X-Input interface, third party emulator/wrapper software that translates D-Input to X-Input may be necessary. Third party software such as X360CE can be found online. Search for “directinput to xinput wrapper”. Street Fighter V for PC will launch starting with support for X-Input controllers. Native support for D-Input controllers is planned as a post launch update. Alternatively, keyboard mapping software such as JoyToKey and XPadder that can map the D-Pad/joystick and buttons to keyboard actions that are already recognizable in-game can be used. For these, search for “gamepad keyboard emulator”. For Street Fighter V, the default key mapping for keyboard is as follows: Light Punch = G Med Punch = H Heavy Punch = J Triple Punch = K Light Kick = B Med Kick = N Heavy Kick = M Triple Kick = , Start = ENTER Directional controls can be done with either arrow keys or WASD. For more information regarding controller compatibility with PC version of SFV, visit here: http://steamcommunity.com/app/310950/discussions/0/483368526574345402/ http://steamcommunity.com/app/310950/discussions/ http://steamcommunity.com/app/310950/guides/

03-10-2016
Frequently Asked Questions Q: Does the product have a headset port? A: The product does not feature a headset port. However, there are other means for chatting online on a PS4 while using the product. Below are a few options:
- Chat via Microphones on a PS4 PlayStation Camera - Chat via USB Microphone or Studio Mic - Chat via USB wired headset - Chat via USB wired base station with wireless headset - Chat via Bluetooth wireless headset - Street Fighter V has the ability to authenticate Legacy PS3 USB Controllers for use with
the game. This is done by associating the Legacy PS3 USB Controller with a hosting PS4 controller such as a DUALSHOCK4. An alternative method for achieving PS4 online chat while using the product is to put the product in PS3 Mode, authenticate it as a Legacy PS3 USB Controller, and then chat via a headset connected to the headset port on the hosting DUALSHOCK4.
Q: How much does the product weigh? A: TE2+ FightStick is approx. 7.7 lbs. Q: How big is the product? A: TE2+ FightStick is roughly 15.5"x12"x2.5" with the joystick protruding another 2.25".

03-10-2016
Links/Additional Info WEB: http://madcatz.com STREET FIGHTER V RANGE: http://madcatz.com/StreetFighterV TWITCH: http://twitch.tv/MADCATZ TWITTER: http://twitter.com/MADCATZ FACEBOOK: http://facebook.com/MADCATZ.GLOBAL TECHNICAL SUPPORT: http://support.madcatz.com