m224-hdr28v12-001 hd cctv digital video vandal … cctv digital video vandal dome camera operation...
TRANSCRIPT
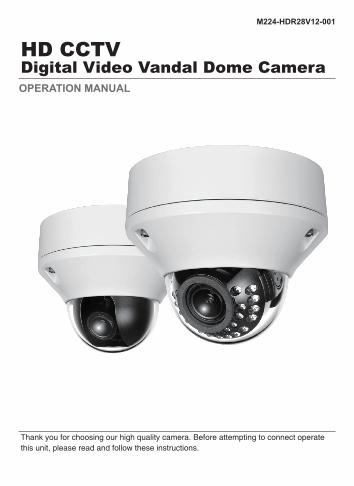
HD CCTVDigital Video Vandal Dome CameraOPERATION MANUAL
Thank you for choosing our high quality camera. Before attempting to connect operatethis unit, please read and follow these instructions.
M224-HDR28V12-001

2
These servicing instructions are for use by qualified service personnel only.To reduce the risk of electric shock do not perform any servicing other than that contained in the operating instructions unless you are qualified to do so.
Use Class 2 Power Supply Only
CAUTION

CONTENTS
1. NOTICES
2. FOR YOUR SAFETY
3. FEATURES
4. EQUIPMENT AND ACCESSORIES
5. OVERVIEW AND FUNCTION
6. INSTALLATION
7. CONNECTION
8. DIMENSIONS
9. SPECIFICATION
10. OSD MENUAL
11. OSD FUNCTION DESCRIPTION
3
4
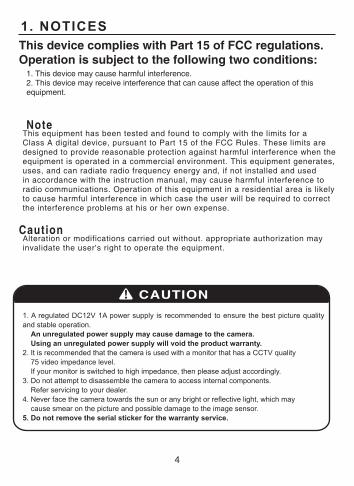
1. NOTICESThis device complies with Part 15 of FCC regulations.Operation is subject to the following two conditions:
1. This device may cause harmful interference.2. This device may receive interference that can cause affect the operation of this equipment.
NoteThis equipment has been tested and found to comply with the limits for a Class A digital device, pursuant to Part 15 of the FCC Rules. These limits are designed to provide reasonable protection against harmful interference when the equipment is operated in a commercial environment. This equipment generates, uses, and can radiate radio frequency energy and, if not installed and used in accordance with the instruction manual, may cause harmful interference to radio communications. Operation of this equipment in a residential area is likely to cause harmful interference in which case the user will be required to correct the interference problems at his or her own expense.
CautionAlteration or modifications carried out without. appropriate authorization may invalidate the user's right to operate the equipment.
1. A regulated DC12V 1A power supply is recommended to ensure the best picture quality and stable operation. An unregulated power supply may cause damage to the camera. Using an unregulated power supply will void the product warranty.2. It is recommended that the camera is used with a monitor that has a CCTV quality 75 video impedance level. If your monitor is switched to high impedance, then please adjust accordingly.3. Do not attempt to disassemble the camera to access internal components. Refer servicing to your dealer.4. Never face the camera towards the sun or any bright or reflective light, which may cause smear on the picture and possible damage to the image sensor.5. Do not remove the serial sticker for the warranty service.
1. NOTICES
5
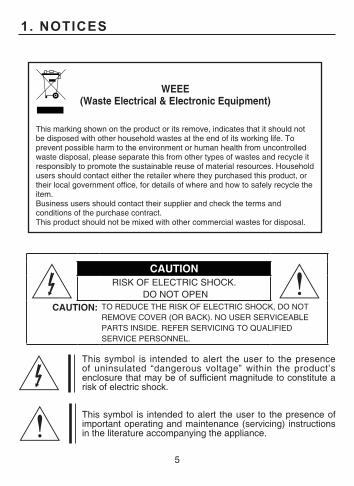
WEEE(Waste Electrical & Electronic Equipment)
This marking shown on the product or its remove, indicates that it should not be disposed with other household wastes at the end of its working life. To prevent possible harm to the environment or human health from uncontrolled waste disposal, please separate this from other types of wastes and recycle it responsibly to promote the sustainable reuse of material resources. Household users should contact either the retailer where they purchased this product, or their local government office, for details of where and how to safely recycle the item.Business users should contact their supplier and check the terms and conditions of the purchase contract.This product should not be mixed with other commercial wastes for disposal.
CAUTIONRISK OF ELECTRIC SHOCK.
DO NOT OPENCAUTION: TO REDUCE THE RISK OF ELECTRIC SHOCK, DO NOT
REMOVE COVER (OR BACK). NO USER SERVICEABLE PARTS INSIDE. REFER SERVICING TO QUALIFIED SERVICE PERSONNEL.
This symbol is intended to alert the user to the presence of uninsulated “dangerous voltage” within the product’s enclosure that may be of sufficient magnitude to constitute a risk of electric shock.
This symbol is intended to alert the user to the presence of important operating and maintenance (servicing) instructions in the literature accompanying the appliance.
2. FOR YOUR SAFETY
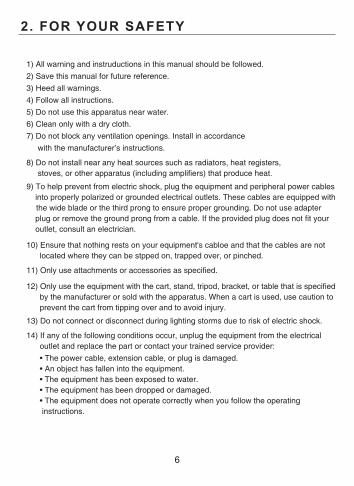
1) All warning and instruductions in this manual should be followed.2) Save this manual for future reference.3) Heed all warnings.4) Follow all instructions.5) Do not use this apparatus near water.6) Clean only with a dry cloth.7) Do not block any ventilation openings. Install in accordance
with the manufacturer’s instructions.
8) Do not install near any heat sources such as radiators, heat registers,stoves, or other apparatus (including amplifiers) that produce heat.
9) To help prevent from electric shock, plug the equipment and peripheral power cables into properly polarized or grounded electrical outlets. These cables are equipped with the wide blade or the third prong to ensure proper grounding. Do not use adapter plug or remove the ground prong from a cable. If the provided plug does not fit your outlet, consult an electrician.
10) Ensure that nothing rests on your equipment's cabloe and that the cables are not located where they can be stpped on, trapped over, or pinched.
11) Only use attachments or accessories as specified.
12) Only use the equipment with the cart, stand, tripod, bracket, or table that is specified by the manufacturer or sold with the apparatus. When a cart is used, use caution to prevent the cart from tipping over and to avoid injury. 13) Do not connect or disconnect during lighting storms due to risk of electric shock.
14) If any of the following conditions occur, unplug the equipment from the electrical outlet and replace the part or contact your trained service provider: • The power cable, extension cable, or plug is damaged. • An object has fallen into the equipment. • The equipment has been exposed to water. • The equipment has been dropped or damaged. • The equipment does not operate correctly when you follow the operating instructions.
6
3. FEATURES
• Service Video output for convenient installation, and ease of service.
• 3-Axis gimbal for convenient wall or ceiling mounting.
• Optional junction box plate.
• High Resolution1/3” 2.1Mega pixel PANASONIC CMOS
• Support various digital video output1080p 30fps / 1080p 25fps, 720p 60fps / 720p 50fps
• OSD menu for setup and configuration
• WDR (Wide Dynamic Range), Digital slow shutter, 3DNR
• 24 Long Life IR illuminations for 0 Lux viewing performance and range to 30m ( 100feet ) ( LED type model only )
• Lens ControlDC Iris
• Power SourceDC 12V / AC24V ( Dual Power Type )DC 12V ( DC Power Type )
• IP68 Waterproof construction
7
8
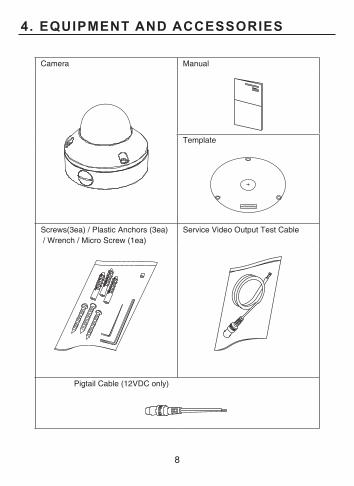
4. EQUIPMENT AND ACCESSORIES
Camera Manual
Template
Screws(3ea) / Plastic Anchors (3ea) / Wrench / Micro Screw (1ea)
Service Video Output Test Cable
Pigtail Cable (12VDC only)
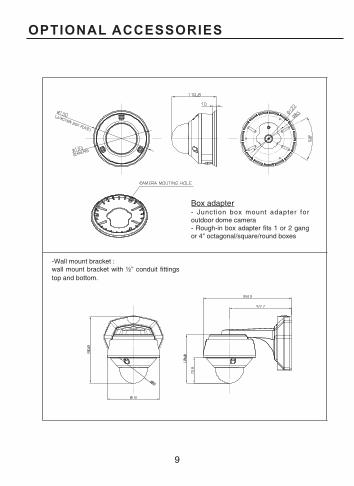
OPTIONAL ACCESSORIES
-Wall mount bracket :wall mount bracket with ½” conduit fittings top and bottom.
9
Box adapter- Junct ion box mount adapter for outdoor dome camera- Rough-in box adapter fits 1 or 2 gang or 4" octagonal/square/round boxes

5. OVERVIEW AND FUNCTION
10
• LED Type
• Standard Type
IR LED
OSD Joystick
OSD Joystick
Service VideoConnector
Service VideoConnector

6. INSTALLATION• LED Type
11
Template
Housing Bottom
Dome Cover
Cover Screws
Shroud
Screws
3-AXIS Gimbal
Plastic Anchors
Lens Zoom Knob
Lens Focus Knob
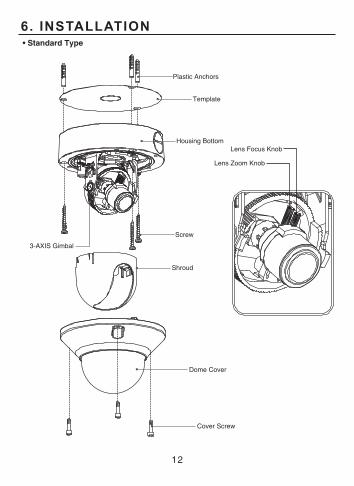
6. INSTALLATION• Standard Type
12
Lens Zoom Knob
Lens Focus KnobHousing Bottom
Dome Cover
Cover Screw
Shroud
Screw
3-AXIS Gimbal
Plastic Anchors
Template
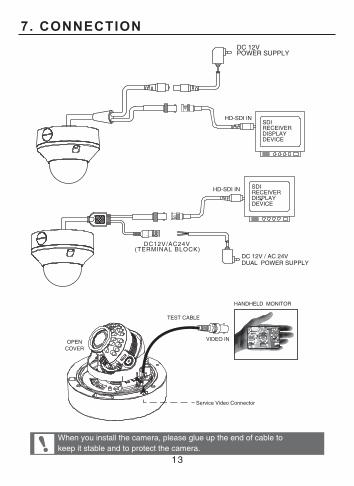
7. CONNECTION
When you install the camera, please glue up the end of cable to keep it stable and to protect the camera.
13
OPENCOVER
Service Video Connector
DC 12V POWER SUPPLY
VIDEO IN
HANDHELD MONITOR
TEST CABLE
DC 12V / AC 24V DUAL POWER SUPPLY
HD-SDI INSDIRECEIVERDISPLAYDEVICE
SDIRECEIVERDISPLAYDEVICE
HD-SDI IN
DC12V/AC24V(TERMINAL BLOCK)

8. DIMENSIONSUnit : mm(inch)
14
Ø133 (5.24")
Ø120 (4.72")
3-120˚
Ø80 (3.15")
67.8
(2.6
7")
111.
8 (4
.4")
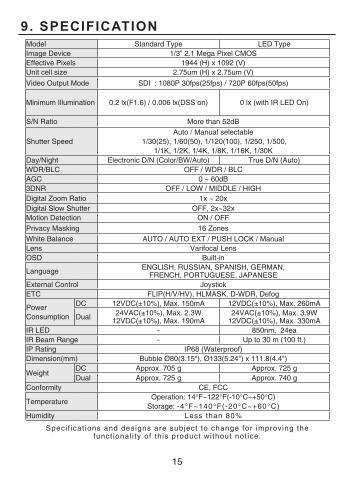
9. SPECIFICATIONModel Standard Type LED TypeImage Device 1/3” 2.1 Mega Pixel CMOSEffective Pixels 1944 (H) x 1092 (V)Unit cell size 2.75um (H) x 2.75um (V)Video Output Mode SDI : 1080P 30fps(25fps) / 720P 60fps(50fps)
Minimum Illumination 0.2 lx(F1.6) / 0.006 lx(DSS on) 0 lx (with IR LED On)
S/N Ratio More than 52dB
Shutter SpeedAuto / Manual selectable
1/30(25), 1/60(50), 1/120(100), 1/250, 1/500, 1/1K, 1/2K, 1/4K, 1/8K, 1/16K, 1/30K
Day/Night Electronic D/N (Color/BW/Auto) True D/N (Auto)WDR/BLC OFF / WDR / BLCAGC 0 ~ 60dB3DNR OFF / LOW / MIDDLE / HIGHDigital Zoom Ratio 1x ~ 20xDigital Slow Shutter OFF, 2x~32xMotion Detection ON / OFFPrivacy Masking 16 ZonesWhite Balance AUTO / AUTO EXT / PUSH LOCK / ManualLens Varifocal LensOSD Built-in
Language ENGLISH, RUSSIAN, SPANISH, GERMAN, FRENCH, PORTUGUESE, JAPANESE
External Control JoystickETC FLIP(H/V/HV), HLMASK, D-WDR, Defog
Power Consumption
DC 12VDC(±10%), Max. 150mA 12VDC(±10%), Max. 260mA
Dual 24VAC(±10%), Max. 2.3W12VDC(±10%), Max. 190mA
24VAC(±10%), Max. 3.9W12VDC(±10%), Max. 330mA
IR LED - 850nm, 24eaIR Beam Range - Up to 30 m (100 ft.)IP Rating IP68 (Waterproof)Dimension(mm) Bubble Ø80(3.15"), Ø133(5.24") x 111.8(4.4")
WeightDC Approx. 705 g Approx. 725 gDual Approx. 725 g Approx. 740 g
Conformity CE, FCC
TemperatureOperation: 14°F~122°F(-10°C~+50°C)
Storage: -4°F~140°F(-20°C~+60°C)Humidity Less than 80%
Speci f icat ions and designs are subject to change for improving the funct ional i ty of th is product wi thout not ice.
15
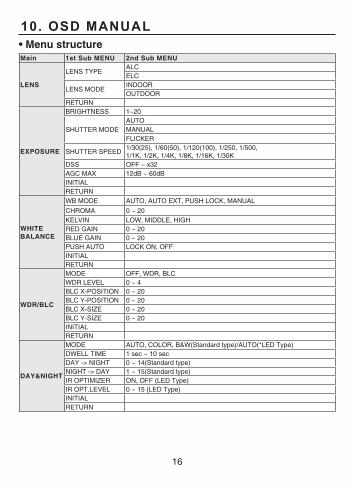
10. OSD MANUAL• Menu structureMain 1st Sub MENU 2nd Sub MENU
LENS
LENS TYPEALCELC
LENS MODEINDOOROUTDOOR
RETURN
EXPOSURE
BRIGHTNESS 1~20
SHUTTER MODEAUTOMANUALFLICKER
SHUTTER SPEED 1/30(25), 1/60(50), 1/120(100), 1/250, 1/500, 1/1K, 1/2K, 1/4K, 1/8K, 1/16K, 1/30K
DSS OFF ~ x32AGC MAX 12dB ~ 60dBINITIALRETURN
WHITE BALANCE
WB MODE AUTO, AUTO EXT, PUSH LOCK, MANUALCHROMA 0 ~ 20KELVIN LOW, MIDDLE, HIGHRED GAIN 0 ~ 20BLUE GAIN 0 ~ 20PUSH AUTO LOCK ON, OFFINITIALRETURN
WDR/BLC
MODE OFF, WDR, BLCWDR LEVEL 0 ~ 4BLC X-POSITION 0 ~ 20BLC Y-POSITION 0 ~ 20BLC X-SIZE 0 ~ 20BLC Y-SIZE 0 ~ 20INITIALRETURN
DAY&NIGHT
MODE AUTO, COLOR, B&W(Standard type)/AUTO(*LED Type)DWELL TIME 1 sec ~ 10 secDAY -> NIGHT 0 ~ 14(Standard type)NIGHT -> DAY 1 ~ 15(Standard type)IR OPTIMIZER ON, OFF (LED Type)IR OPT.LEVEL 0 ~ 15 (LED Type)INITIALRETURN
16
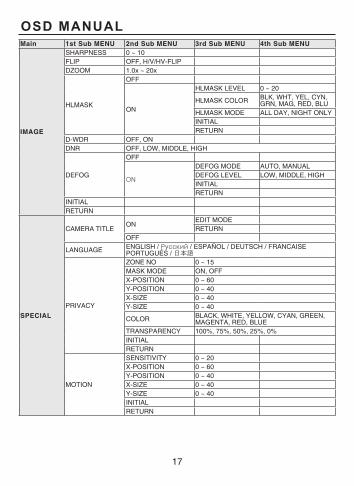
OSD MANUALMain 1st Sub MENU 2nd Sub MENU 3rd Sub MENU 4th Sub MENU
IMAGE
SHARPNESS 0 ~ 10FLIP OFF, H/V/HV-FLIPDZOOM 1.0x ~ 20x
HLMASK
OFF
ON
HLMASK LEVEL 0 ~ 20
HLMASK COLOR BLK, WHT, YEL, CYN, GRN, MAG, RED, BLU
HLMASK MODE ALL DAY, NIGHT ONLYINITIALRETURN
D-WDR OFF, ONDNR OFF, LOW, MIDDLE, HIGH
DEFOG
OFF
ON
DEFOG MODE AUTO, MANUALDEFOG LEVEL LOW, MIDDLE, HIGHINITIALRETURN
INITIALRETURN
SPECIAL
CAMERA TITLEON
EDIT MODERETURN
OFF
LANGUAGE ENGLISH / Русский / ESPAÑOL / DEUTSCH / FRANCAISE PORTUGUÊS / 日本語
PRIVACY
ZONE NO 0 ~ 15MASK MODE ON, OFFX-POSITION 0 ~ 60Y-POSITION 0 ~ 40X-SIZE 0 ~ 40Y-SIZE 0 ~ 40
COLOR BLACK, WHITE, YELLOW, CYAN, GREEN, MAGENTA, RED, BLUE
TRANSPARENCY 100%, 75%, 50%, 25%, 0%INITIALRETURN
MOTION
SENSITIVITY 0 ~ 20X-POSITION 0 ~ 60Y-POSITION 0 ~ 40X-SIZE 0 ~ 40Y-SIZE 0 ~ 40INITIALRETURN
17
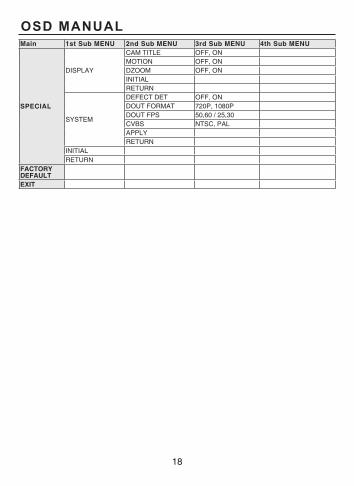
OSD MANUALMain 1st Sub MENU 2nd Sub MENU 3rd Sub MENU 4th Sub MENU
SPECIAL
DISPLAY
CAM TITLE OFF, ONMOTION OFF, ONDZOOM OFF, ONINITIALRETURN
SYSTEM
DEFECT DET OFF, ONDOUT FORMAT 720P, 1080PDOUT FPS 50,60 / 25,30CVBS NTSC, PALAPPLYRETURN
INITIALRETURN
FACTORY DEFAULTEXIT
18
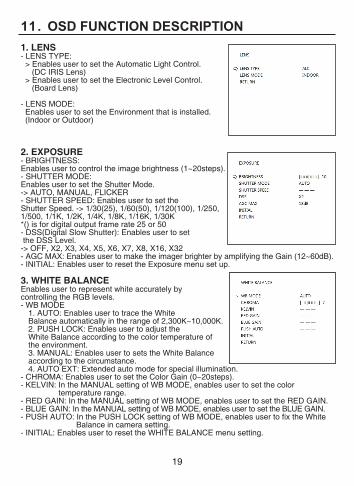
11. OSD FUNCTION DESCRIPTION1. LENS - LENS TYPE: > Enables user to set the Automatic Light Control. (DC IRIS Lens) > Enables user to set the Electronic Level Control. (Board Lens)
- LENS MODE: Enables user to set the Environment that is installed. (Indoor or Outdoor)
2. EXPOSURE- BRIGHTNESS:Enables user to control the image brightness (1~20steps).- SHUTTER MODE: Enables user to set the Shutter Mode. -> AUTO, MANUAL, FLICKER- SHUTTER SPEED: Enables user to set the Shutter Speed. -> 1/30(25), 1/60(50), 1/120(100), 1/250, 1/500, 1/1K, 1/2K, 1/4K, 1/8K, 1/16K, 1/30K*() is for digital output frame rate 25 or 50- DSS(Digital Slow Shutter): Enables user to set the DSS Level. -> OFF, X2, X3, X4, X5, X6, X7, X8, X16, X32- AGC MAX: Enables user to make the imager brighter by amplifying the Gain (12~60dB).- INITIAL: Enables user to reset the Exposure menu set up.
3. WHITE BALANCEEnables user to represent white accurately by controlling the RGB levels.- WB MODE
1. AUTO: Enables user to trace the White Balance automatically in the range of 2,300K~10,000K.2. PUSH LOCK: Enables user to adjust the White Balance according to the color temperature of the environment.3. MANUAL: Enables user to sets the White Balance according to the circumstance.4. AUTO EXT: Extended auto mode for special illumination.
- CHROMA: Enables user to set the Color Gain (0~20steps).- KELVIN: In the MANUAL setting of WB MODE, enables user to set the color temperature range.- RED GAIN: In the MANUAL setting of WB MODE, enables user to set the RED GAIN.- BLUE GAIN: In the MANUAL setting of WB MODE, enables user to set the BLUE GAIN.- PUSH AUTO: In the PUSH LOCK setting of WB MODE, enables user to fix the White Balance in camera setting.- INITIAL: Enables user to reset the WHITE BALANCE menu setting.
19
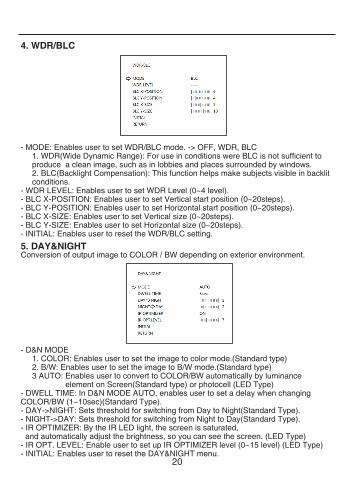
4. WDR/BLC
- MODE: Enables user to set WDR/BLC mode. -> OFF, WDR, BLC1. WDR(Wide Dynamic Range): For use in conditions were BLC is not sufficient to produce a clean image, such as in lobbies and places surrounded by windows.2. BLC(Backlight Compensation): This function helps make subjects visible in backlit conditions.
- WDR LEVEL: Enables user to set WDR Level (0~4 level).- BLC X-POSITION: Enables user to set Vertical start position (0~20steps).- BLC Y-POSITION: Enables user to set Horizontal start position (0~20steps).- BLC X-SIZE: Enables user to set Vertical size (0~20steps).- BLC Y-SIZE: Enables user to set Horizontal size (0~20steps).- INITIAL: Enables user to reset the WDR/BLC setting.
5. DAY&NIGHTConversion of output image to COLOR / BW depending on exterior environment.
- D&N MODE1. COLOR: Enables user to set the image to color mode.(Standard type)2. B/W: Enables user to set the image to B/W mode.(Standard type)3 AUTO: Enables user to convert to COLOR/BW automatically by luminance element on Screen(Standard type) or photocell (LED Type)
- DWELL TIME: In D&N MODE AUTO, enables user to set a delay when changing COLOR/BW (1~10sec)(Standard Type).- DAY->NIGHT: Sets threshold for switching from Day to Night(Standard Type).- NIGHT->DAY: Sets threshold for switching from Night to Day(Standard Type).- IR OPTIMIZER: By the IR LED light, the screen is saturated, and automatically adjust the brightness, so you can see the screen. (LED Type)- IR OPT. LEVEL: Enable user to set up IR OPTIMIZER level (0~15 level) (LED Type)- INITIAL: Enables user to reset the DAY&NIGHT menu.
20
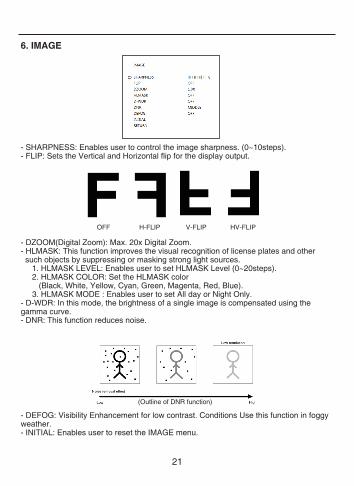
6. IMAGE
- SHARPNESS: Enables user to control the image sharpness. (0~10steps).- FLIP: Sets the Vertical and Horizontal flip for the display output.
- DZOOM(Digital Zoom): Max. 20x Digital Zoom.- HLMASK: This function improves the visual recognition of license plates and other such objects by suppressing or masking strong light sources.
1. HLMASK LEVEL: Enables user to set HLMASK Level (0~20steps).2. HLMASK COLOR: Set the HLMASK color (Black, White, Yellow, Cyan, Green, Magenta, Red, Blue).3. HLMASK MODE : Enables user to set All day or Night Only.
- D-WDR: In this mode, the brightness of a single image is compensated using the gamma curve.- DNR: This function reduces noise.
- DEFOG: Visibility Enhancement for low contrast. Conditions Use this function in foggy weather.- INITIAL: Enables user to reset the IMAGE menu.
21
(Outline of DNR function)
OFF H-FLIP V-FLIP HV-FLIP

7. SPECIAL: For setting up the CAM TITLE, LANGUAGE, MOTION, PRIVACY, DISPLAY, SYSTEM.
- CAM TITLE : Enables user to choose any name for the camera. (10 letter maximum)1. Choose a letter on the screen using the Menu Key2. Move to the next menu by using the Menu KEY in LOCATION.3. By using UP, DOWN, LEFT, RIGHT KEY, the user can choose any letter in LOCATION and go back to the previous step. 4. Finish the letter choose and positioning by using Menu KEY in RETURN.
22
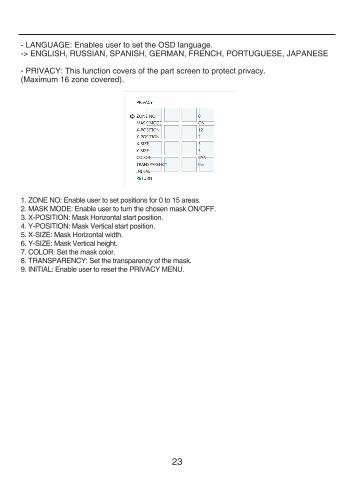
- LANGUAGE: Enables user to set the OSD language.-> ENGLISH, RUSSIAN, SPANISH, GERMAN, FRENCH, PORTUGUESE, JAPANESE
- PRIVACY: This function covers of the part screen to protect privacy. (Maximum 16 zone covered).
1. ZONE NO: Enable user to set positions for 0 to 15 areas.2. MASK MODE: Enable user to turn the chosen mask ON/OFF.3. X-POSITION: Mask Horizontal start position.4. Y-POSITION: Mask Vertical start position.5. X-SIZE: Mask Horizontal width.6. Y-SIZE: Mask Vertical height.7. COLOR: Set the mask color.8. TRANSPARENCY: Set the transparency of the mask.9. INITIAL: Enable user to reset the PRIVACY MENU.
23

- MOTION: Motion detection function.
1. SENSITIVITY: Enables user to set sensitivity.2. X-POSITION : Window Horizontal start position.3. Y-POSITION : Window Vertical start position.4. X-SIZE : Window Horizontal width.5. Y-SIZE : Window Vertical height.6. INITIAL : Enables user to reset the MOTION DETECT.
- DISPLAY : Enables user to set up a screen output for CAM TITLE, MOTION, DZOOM.
1. CAM TITLE: Enables user to display the fixed CAM TITLE on the screen.2. MOTION: Enables user to display the word Motion on the screen when the motion detection function.3. DZOOM: Enables user to display the DZOOM ratio on the screen.4. INITIAL: Enables user to initialize of DISPLAY menu.
24
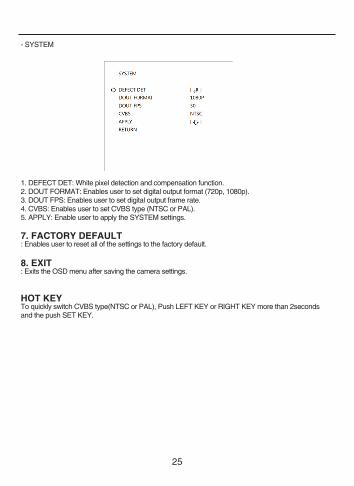
- SYSTEM
1. DEFECT DET: White pixel detection and compensation function.2. DOUT FORMAT: Enables user to set digital output format (720p, 1080p).3. DOUT FPS: Enables user to set digital output frame rate.4. CVBS: Enables user to set CVBS type (NTSC or PAL).5. APPLY: Enable user to apply the SYSTEM settings.
7. FACTORY DEFAULT: Enables user to reset all of the settings to the factory default.
8. EXIT: Exits the OSD menu after saving the camera settings.
HOT KEYTo quickly switch CVBS type(NTSC or PAL), Push LEFT KEY or RIGHT KEY more than 2secondsand the push SET KEY.
25