lotus notes and domino
TRANSCRIPT

ibm.com/redbooks
Domino Designer 6:A Developer’s HandbookTommi TulisaloRune CarlsenAndre GuirardPekka HartikainenGrant McCarthyGustavo PeclyDevelop applications for Notes, Weband Mobile clientsProgramming with DominoDesigner 6New features of Domino 6Front coverDomino Designer 6: A Developer’s HandbookDecember 2002International Technical Support OrganizationSG24-6854-00© Copyright International Business Machines Corporation 2002. All rights reserved.Note to U.S. Government Users Restricted Rights -- Use, duplication or disclosure restricted by GSA ADP ScheduleContract with IBM Corp.First Edition (December 2002)This edition applies to IBM Lotus Domino Designer 6.0 and IBM Lotus Domino 6.0.Note: Before using this information and the product it supports, read the information in“Notices” on page xvii.© Copyright IBM Corp. 2002. All rights reserved. iii

ContentsNotices . . . . . . . . . . . . . . . . . . . . . . . . . . . . . . . . . . . . . . . . . . . . . . . . . . . . . xviiTrademarks . . . . . . . . . . . . . . . . . . . . . . . . . . . . . . . . . . . . . . . . . . . . . . . . . . xviiiPreface . . . . . . . . . . . . . . . . . . . . . . . . . . . . . . . . . . . . . . . . . . . . . . . . . . . . . . xixThe team that wrote this redbook. . . . . . . . . . . . . . . . . . . . . . . . . . . . . . . . . . . xixBecome a published author . . . . . . . . . . . . . . . . . . . . . . . . . . . . . . . . . . . . . . . xxiComments welcome. . . . . . . . . . . . . . . . . . . . . . . . . . . . . . . . . . . . . . . . . . . . . xxiChapter 1. What is Lotus Notes/Domino. . . . . . . . . . . . . . . . . . . . . . . . . . . . 11.1 Domino 6 Server . . . . . . . . . . . . . . . . . . . . . . . . . . . . . . . . . . . . . . . . . . . . . 21.1.1 Domino Messaging Server . . . . . . . . . . . . . . . . . . . . . . . . . . . . . . . . . 21.1.2 Domino Enterprise Server . . . . . . . . . . . . . . . . . . . . . . . . . . . . . . . . . . 21.1.3 Domino Utility Server . . . . . . . . . . . . . . . . . . . . . . . . . . . . . . . . . . . . . 21.1.4 Services offered by Domino Servers. . . . . . . . . . . . . . . . . . . . . . . . . . 21.2 Clients for Domino 6 . . . . . . . . . . . . . . . . . . . . . . . . . . . . . . . . . . . . . . . . . . 51.2.1 Lotus Notes 6 . . . . . . . . . . . . . . . . . . . . . . . . . . . . . . . . . . . . . . . . . . . 51.2.2 Domino Designer 6 . . . . . . . . . . . . . . . . . . . . . . . . . . . . . . . . . . . . . . . 81.2.3 Domino Administrator 6. . . . . . . . . . . . . . . . . . . . . . . . . . . . . . . . . . . . 81.2.4 Mobile clients . . . . . . . . . . . . . . . . . . . . . . . . . . . . . . . . . . . . . . . . . . . 91.2.5 iNotes . . . . . . . . . . . . . . . . . . . . . . . . . . . . . . . . . . . . . . . . . . . . . . . . 10Chapter 2. Lotus Domino Designer . . . . . . . . . . . . . . . . . . . . . . . . . . . . . . . 132.1 Overview . . . . . . . . . . . . . . . . . . . . . . . . . . . . . . . . . . . . . . . . . . . . . . . . . . 142.2 Working in Domino Designer. . . . . . . . . . . . . . . . . . . . . . . . . . . . . . . . . . . 142.2.1 Launching Domino Designer. . . . . . . . . . . . . . . . . . . . . . . . . . . . . . . 142.2.2 The Domino Designer client . . . . . . . . . . . . . . . . . . . . . . . . . . . . . . . 162.2.3 The Design pane. . . . . . . . . . . . . . . . . . . . . . . . . . . . . . . . . . . . . . . . 172.2.4 The tabbed windows . . . . . . . . . . . . . . . . . . . . . . . . . . . . . . . . . . . . . 192.2.5 The Bookmark folders . . . . . . . . . . . . . . . . . . . . . . . . . . . . . . . . . . . . 202.2.6 The Design elements folders . . . . . . . . . . . . . . . . . . . . . . . . . . . . . . 212.2.7 The Properties dialog . . . . . . . . . . . . . . . . . . . . . . . . . . . . . . . . . . . . 222.2.8 Design element locking . . . . . . . . . . . . . . . . . . . . . . . . . . . . . . . . . . . 262.2.9 The Launch buttons . . . . . . . . . . . . . . . . . . . . . . . . . . . . . . . . . . . . . 272.2.10 The Programmer’s Pane . . . . . . . . . . . . . . . . . . . . . . . . . . . . . . . . . 282.3 Domino Design elements . . . . . . . . . . . . . . . . . . . . . . . . . . . . . . . . . . . . . 312.3.1 The Domino database. . . . . . . . . . . . . . . . . . . . . . . . . . . . . . . . . . . . 312.3.2 Frameset . . . . . . . . . . . . . . . . . . . . . . . . . . . . . . . . . . . . . . . . . . . . . . 312.3.3 Pages . . . . . . . . . . . . . . . . . . . . . . . . . . . . . . . . . . . . . . . . . . . . . . . . 322.3.4 Forms . . . . . . . . . . . . . . . . . . . . . . . . . . . . . . . . . . . . . . . . . . . . . . . . 32iv Domino Designer 6: A Developer’s Handbook2.3.5 Views. . . . . . . . . . . . . . . . . . . . . . . . . . . . . . . . . . . . . . . . . . . . . . . . . 332.3.6 Folders . . . . . . . . . . . . . . . . . . . . . . . . . . . . . . . . . . . . . . . . . . . . . . . 332.3.7 Shared code . . . . . . . . . . . . . . . . . . . . . . . . . . . . . . . . . . . . . . . . . . . 332.3.8 Shared resources . . . . . . . . . . . . . . . . . . . . . . . . . . . . . . . . . . . . . . . 342.3.9 Other . . . . . . . . . . . . . . . . . . . . . . . . . . . . . . . . . . . . . . . . . . . . . . . . . 352.4 New elements of Domino Designer 6 . . . . . . . . . . . . . . . . . . . . . . . . . . . . 362.4.1 Cascading style sheet (CSS) . . . . . . . . . . . . . . . . . . . . . . . . . . . . . . 362.4.2 Layers . . . . . . . . . . . . . . . . . . . . . . . . . . . . . . . . . . . . . . . . . . . . . . . . 372.4.3 Shared code and shared resources . . . . . . . . . . . . . . . . . . . . . . . . . 372.4.4 LotusScript, JavaScript and Java libraries . . . . . . . . . . . . . . . . . . . . 372.4.5 Data connections . . . . . . . . . . . . . . . . . . . . . . . . . . . . . . . . . . . . . . . 372.4.6 DXL utilities . . . . . . . . . . . . . . . . . . . . . . . . . . . . . . . . . . . . . . . . . . . . 382.4.7 JSP custom tag libraries . . . . . . . . . . . . . . . . . . . . . . . . . . . . . . . . . . 382.5 Industry Standards support . . . . . . . . . . . . . . . . . . . . . . . . . . . . . . . . . . . . 382.6 Multi-client applications support . . . . . . . . . . . . . . . . . . . . . . . . . . . . . . . . 392.7 Multilingual applications support . . . . . . . . . . . . . . . . . . . . . . . . . . . . . . . . 39

2.8 Easy access to enterprise data and applications . . . . . . . . . . . . . . . . . . . 402.9 Developing for mixed releases of clients. . . . . . . . . . . . . . . . . . . . . . . . . . 412.9.1 On-Disk Structure . . . . . . . . . . . . . . . . . . . . . . . . . . . . . . . . . . . . . . . 42Chapter 3. Domino Design elements: basics . . . . . . . . . . . . . . . . . . . . . . . 473.1 Domino databases . . . . . . . . . . . . . . . . . . . . . . . . . . . . . . . . . . . . . . . . . . 483.1.1 Creating a database . . . . . . . . . . . . . . . . . . . . . . . . . . . . . . . . . . . . . 483.1.2 Changing the database properties . . . . . . . . . . . . . . . . . . . . . . . . . . 593.2 Using Design Synopsis . . . . . . . . . . . . . . . . . . . . . . . . . . . . . . . . . . . . . . . 713.3 Summary . . . . . . . . . . . . . . . . . . . . . . . . . . . . . . . . . . . . . . . . . . . . . . . . . . 74Chapter 4. Domino Design elements: forms. . . . . . . . . . . . . . . . . . . . . . . . 754.1 Forms . . . . . . . . . . . . . . . . . . . . . . . . . . . . . . . . . . . . . . . . . . . . . . . . . . . . 764.1.1 Specifying form properties . . . . . . . . . . . . . . . . . . . . . . . . . . . . . . . . 764.1.2 Giving the form a window title . . . . . . . . . . . . . . . . . . . . . . . . . . . . . . 924.1.3 Form events . . . . . . . . . . . . . . . . . . . . . . . . . . . . . . . . . . . . . . . . . . . 924.2 Creating a field . . . . . . . . . . . . . . . . . . . . . . . . . . . . . . . . . . . . . . . . . . . . . 954.2.1 Performing a test run. . . . . . . . . . . . . . . . . . . . . . . . . . . . . . . . . . . . . 984.2.2 Sharing and reusing a field . . . . . . . . . . . . . . . . . . . . . . . . . . . . . . . 1014.2.3 Field types. . . . . . . . . . . . . . . . . . . . . . . . . . . . . . . . . . . . . . . . . . . . 1024.2.4 Field properties . . . . . . . . . . . . . . . . . . . . . . . . . . . . . . . . . . . . . . . . 1074.2.5 Special fields . . . . . . . . . . . . . . . . . . . . . . . . . . . . . . . . . . . . . . . . . . 1154.2.6 Field events. . . . . . . . . . . . . . . . . . . . . . . . . . . . . . . . . . . . . . . . . . . 1204.2.7 Examples using different field types and events . . . . . . . . . . . . . . . 1224.3 Sharing design elements with subforms . . . . . . . . . . . . . . . . . . . . . . . . . 1254.3.1 Creating a new subform . . . . . . . . . . . . . . . . . . . . . . . . . . . . . . . . . 1264.3.2 Removing subforms . . . . . . . . . . . . . . . . . . . . . . . . . . . . . . . . . . . . 127Contents v4.3.3 Adding subforms to a form . . . . . . . . . . . . . . . . . . . . . . . . . . . . . . . 1274.4 Displaying a different form to Web, Notes, and mobile users . . . . . . . . . 1304.5 Layout regions. . . . . . . . . . . . . . . . . . . . . . . . . . . . . . . . . . . . . . . . . . . . . 1314.6 Working with collapsible sections . . . . . . . . . . . . . . . . . . . . . . . . . . . . . . 1324.6.1 Creating a collapsible section . . . . . . . . . . . . . . . . . . . . . . . . . . . . . 1324.7 Using tables. . . . . . . . . . . . . . . . . . . . . . . . . . . . . . . . . . . . . . . . . . . . . . . 1334.7.1 Creating tables within tables . . . . . . . . . . . . . . . . . . . . . . . . . . . . . . 1334.7.2 Merging and splitting cells. . . . . . . . . . . . . . . . . . . . . . . . . . . . . . . . 1344.7.3 Table properties . . . . . . . . . . . . . . . . . . . . . . . . . . . . . . . . . . . . . . . 1364.8 Actions. . . . . . . . . . . . . . . . . . . . . . . . . . . . . . . . . . . . . . . . . . . . . . . . . . . 1464.8.1 Creating an action . . . . . . . . . . . . . . . . . . . . . . . . . . . . . . . . . . . . . . 1474.8.2 Removing an action . . . . . . . . . . . . . . . . . . . . . . . . . . . . . . . . . . . . 1484.8.3 Action properties . . . . . . . . . . . . . . . . . . . . . . . . . . . . . . . . . . . . . . . 1484.8.4 Action bar properties . . . . . . . . . . . . . . . . . . . . . . . . . . . . . . . . . . . . 1494.9 Embedded elements . . . . . . . . . . . . . . . . . . . . . . . . . . . . . . . . . . . . . . . . 1504.9.1 Embedded editors . . . . . . . . . . . . . . . . . . . . . . . . . . . . . . . . . . . . . . 1514.9.2 Embedded navigators . . . . . . . . . . . . . . . . . . . . . . . . . . . . . . . . . . . 1514.9.3 Embedded date picker . . . . . . . . . . . . . . . . . . . . . . . . . . . . . . . . . . 1524.9.4 Embedded outline control . . . . . . . . . . . . . . . . . . . . . . . . . . . . . . . . 1524.9.5 Embedded view. . . . . . . . . . . . . . . . . . . . . . . . . . . . . . . . . . . . . . . . 1524.9.6 Embedded group scheduling control. . . . . . . . . . . . . . . . . . . . . . . . 1534.9.7 Embedded folder pane . . . . . . . . . . . . . . . . . . . . . . . . . . . . . . . . . . 1534.9.8 Embedded file upload control . . . . . . . . . . . . . . . . . . . . . . . . . . . . . 1554.10 Other features of forms . . . . . . . . . . . . . . . . . . . . . . . . . . . . . . . . . . . . . 1554.10.1 Horizontal rules . . . . . . . . . . . . . . . . . . . . . . . . . . . . . . . . . . . . . . . 1564.10.2 Computed text . . . . . . . . . . . . . . . . . . . . . . . . . . . . . . . . . . . . . . . . 1564.10.3 Buttons, Action bar buttons, and hotspots . . . . . . . . . . . . . . . . . . 1584.11 Images within forms . . . . . . . . . . . . . . . . . . . . . . . . . . . . . . . . . . . . . . . 1614.11.1 Copying images . . . . . . . . . . . . . . . . . . . . . . . . . . . . . . . . . . . . . . 1624.11.2 Importing pictures . . . . . . . . . . . . . . . . . . . . . . . . . . . . . . . . . . . . . 162
4.11.3 Using Image Resource . . . . . . . . . . . . . . . . . . . . . . . . . . . . . . . . . 1624.11.4 Alternate text . . . . . . . . . . . . . . . . . . . . . . . . . . . . . . . . . . . . . . . . . 1634.12 Using CGI variables . . . . . . . . . . . . . . . . . . . . . . . . . . . . . . . . . . . . . . . 1644.12.1 Table of CGI variables supported by Domino . . . . . . . . . . . . . . . . 1644.12.2 Using a field to capture CGI variables. . . . . . . . . . . . . . . . . . . . . . 1674.12.3 Using a LotusScript agent to capture CGI variables . . . . . . . . . . . 1674.13 Profile documents . . . . . . . . . . . . . . . . . . . . . . . . . . . . . . . . . . . . . . . . . 1684.13.1 Creating a profile form. . . . . . . . . . . . . . . . . . . . . . . . . . . . . . . . . . 1694.13.2 Creating and retrieving profile documents using LotusScript . . . . 1694.14 New features in Domino Designer 6 . . . . . . . . . . . . . . . . . . . . . . . . . . . 1714.15 Summary . . . . . . . . . . . . . . . . . . . . . . . . . . . . . . . . . . . . . . . . . . . . . . . . 172Chapter 5. Domino Design elements: pages . . . . . . . . . . . . . . . . . . . . . . 173vi Domino Designer 6: A Developer’s Handbook5.1 What is a page . . . . . . . . . . . . . . . . . . . . . . . . . . . . . . . . . . . . . . . . . . . . 1745.2 Creating a new page . . . . . . . . . . . . . . . . . . . . . . . . . . . . . . . . . . . . . . . . 1745.2.1 Specifying page properties . . . . . . . . . . . . . . . . . . . . . . . . . . . . . . . 1755.3 Page events . . . . . . . . . . . . . . . . . . . . . . . . . . . . . . . . . . . . . . . . . . . . . . 1785.4 Using pages . . . . . . . . . . . . . . . . . . . . . . . . . . . . . . . . . . . . . . . . . . . . . . 1785.4.1 Launching pages. . . . . . . . . . . . . . . . . . . . . . . . . . . . . . . . . . . . . . . 1805.5 New features in Domino Designer 6 . . . . . . . . . . . . . . . . . . . . . . . . . . . . 1815.6 Summary . . . . . . . . . . . . . . . . . . . . . . . . . . . . . . . . . . . . . . . . . . . . . . . . . 181Chapter 6. Domino Design elements: views, folders, and navigators . . 1836.1 Design elements defined. . . . . . . . . . . . . . . . . . . . . . . . . . . . . . . . . . . . . 1846.1.1 What is a view. . . . . . . . . . . . . . . . . . . . . . . . . . . . . . . . . . . . . . . . . 1846.1.2 What is a folder . . . . . . . . . . . . . . . . . . . . . . . . . . . . . . . . . . . . . . . . 1856.1.3 What is an outline . . . . . . . . . . . . . . . . . . . . . . . . . . . . . . . . . . . . . . 1856.1.4 What is a navigator . . . . . . . . . . . . . . . . . . . . . . . . . . . . . . . . . . . . . 1866.2 Creating views. . . . . . . . . . . . . . . . . . . . . . . . . . . . . . . . . . . . . . . . . . . . . 1876.2.1 Working with view properties . . . . . . . . . . . . . . . . . . . . . . . . . . . . . 1906.2.2 Editing View columns . . . . . . . . . . . . . . . . . . . . . . . . . . . . . . . . . . . 2006.2.3 Creating Calendar views . . . . . . . . . . . . . . . . . . . . . . . . . . . . . . . . . 2056.2.4 View summary. . . . . . . . . . . . . . . . . . . . . . . . . . . . . . . . . . . . . . . . . 2086.3 Shared views and private views . . . . . . . . . . . . . . . . . . . . . . . . . . . . . . . 2106.3.1 Shared views. . . . . . . . . . . . . . . . . . . . . . . . . . . . . . . . . . . . . . . . . . 2106.3.2 Shared, Personal-on-first-use views . . . . . . . . . . . . . . . . . . . . . . . . 2106.3.3 Personal views . . . . . . . . . . . . . . . . . . . . . . . . . . . . . . . . . . . . . . . . 2116.4 Creating a button on the Action bar. . . . . . . . . . . . . . . . . . . . . . . . . . . . . 2116.5 Working with views as a developer . . . . . . . . . . . . . . . . . . . . . . . . . . . . . 2136.6 Views and the Web . . . . . . . . . . . . . . . . . . . . . . . . . . . . . . . . . . . . . . . . . 2156.6.1 Using the default display . . . . . . . . . . . . . . . . . . . . . . . . . . . . . . . . . 2156.6.2 Using HTML formatting for views . . . . . . . . . . . . . . . . . . . . . . . . . . 2186.7 Hints and tips on designing views . . . . . . . . . . . . . . . . . . . . . . . . . . . . . . 2236.7.1 Naming views . . . . . . . . . . . . . . . . . . . . . . . . . . . . . . . . . . . . . . . . . 2236.7.2 Overview of styles . . . . . . . . . . . . . . . . . . . . . . . . . . . . . . . . . . . . . . 2246.7.3 Identifying unread documents . . . . . . . . . . . . . . . . . . . . . . . . . . . . . 2276.7.4 Using categories in views . . . . . . . . . . . . . . . . . . . . . . . . . . . . . . . . 2286.7.5 Presenting views to users . . . . . . . . . . . . . . . . . . . . . . . . . . . . . . . . 2296.7.6 Embedding views . . . . . . . . . . . . . . . . . . . . . . . . . . . . . . . . . . . . . . 2306.7.7 Formatting date and time columns . . . . . . . . . . . . . . . . . . . . . . . . . 2336.7.8 Formatting numbers in columns . . . . . . . . . . . . . . . . . . . . . . . . . . . 2356.7.9 Indenting Response documents . . . . . . . . . . . . . . . . . . . . . . . . . . . 2366.7.10 Sorting documents in views . . . . . . . . . . . . . . . . . . . . . . . . . . . . . 2376.8 Designing a folder . . . . . . . . . . . . . . . . . . . . . . . . . . . . . . . . . . . . . . . . . . 2396.9 Managing access to views and folders . . . . . . . . . . . . . . . . . . . . . . . . . . 2406.9.1 Creating a Read access list . . . . . . . . . . . . . . . . . . . . . . . . . . . . . . 240Contents vii

6.9.2 Creating a Write access list. . . . . . . . . . . . . . . . . . . . . . . . . . . . . . . 2416.10 Using navigators . . . . . . . . . . . . . . . . . . . . . . . . . . . . . . . . . . . . . . . . . . 2426.10.1 Navigator objects . . . . . . . . . . . . . . . . . . . . . . . . . . . . . . . . . . . . . 2426.10.2 Navigator actions . . . . . . . . . . . . . . . . . . . . . . . . . . . . . . . . . . . . . 2426.10.3 Creating a navigator . . . . . . . . . . . . . . . . . . . . . . . . . . . . . . . . . . . 2436.10.4 Adding an action to a navigator object . . . . . . . . . . . . . . . . . . . . . 2446.10.5 Adding an action using @Functions or LotusScript . . . . . . . . . . . 2446.10.6 Displaying navigator when a database is opened. . . . . . . . . . . . . 2456.11 New features in Domino 6 . . . . . . . . . . . . . . . . . . . . . . . . . . . . . . . . . . . 2456.12 Summary . . . . . . . . . . . . . . . . . . . . . . . . . . . . . . . . . . . . . . . . . . . . . . . . 245Chapter 7. Domino Design elements: agents . . . . . . . . . . . . . . . . . . . . . . 2477.1 About Domino agents . . . . . . . . . . . . . . . . . . . . . . . . . . . . . . . . . . . . . . . 2487.2 Access to create Domino agents. . . . . . . . . . . . . . . . . . . . . . . . . . . . . . . 2487.2.1 Restricted and unrestricted agents, methods and operations. . . . . 2497.3 Creating an agent . . . . . . . . . . . . . . . . . . . . . . . . . . . . . . . . . . . . . . . . . . 2507.3.1 Naming the agent . . . . . . . . . . . . . . . . . . . . . . . . . . . . . . . . . . . . . . 2517.3.2 Scheduling the agent . . . . . . . . . . . . . . . . . . . . . . . . . . . . . . . . . . . 2537.3.3 Selecting documents to be processed . . . . . . . . . . . . . . . . . . . . . . 2567.3.4 Specifying what an agent should do . . . . . . . . . . . . . . . . . . . . . . . . 2597.3.5 Displaying the pop-up menu of an agent . . . . . . . . . . . . . . . . . . . . 2627.3.6 Signing an agent . . . . . . . . . . . . . . . . . . . . . . . . . . . . . . . . . . . . . . . 2647.4 Testing an agent . . . . . . . . . . . . . . . . . . . . . . . . . . . . . . . . . . . . . . . . . . . 2657.4.1 Testing an agent during development. . . . . . . . . . . . . . . . . . . . . . . 2657.4.2 Testing an agent before copying it to a live database. . . . . . . . . . . 2657.4.3 Checking the Agent Log . . . . . . . . . . . . . . . . . . . . . . . . . . . . . . . . . 2657.4.4 Debugging agents . . . . . . . . . . . . . . . . . . . . . . . . . . . . . . . . . . . . . . 2667.5 Enabling and disabling scheduled agents . . . . . . . . . . . . . . . . . . . . . . . . 2687.5.1 To disable and enable individual agents . . . . . . . . . . . . . . . . . . . . . 2697.5.2 To disable all automated agents in a database. . . . . . . . . . . . . . . . 2707.6 Troubleshooting agents. . . . . . . . . . . . . . . . . . . . . . . . . . . . . . . . . . . . . . 2707.6.1 Agent is not running . . . . . . . . . . . . . . . . . . . . . . . . . . . . . . . . . . . . 2707.6.2 Agent Manager is not working. . . . . . . . . . . . . . . . . . . . . . . . . . . . . 2717.6.3 Agents are running slowly . . . . . . . . . . . . . . . . . . . . . . . . . . . . . . . . 2717.6.4 Agent will not run on a particular server . . . . . . . . . . . . . . . . . . . . . 2717.6.5 Debugging with NOTES.INI settings . . . . . . . . . . . . . . . . . . . . . . . . 2727.6.6 Debugging at the server console . . . . . . . . . . . . . . . . . . . . . . . . . . 2737.7 Agents and the Web . . . . . . . . . . . . . . . . . . . . . . . . . . . . . . . . . . . . . . . . 2747.7.1 The Document Context of a Web agent and CGI variables . . . . . . 2757.7.2 Agent output . . . . . . . . . . . . . . . . . . . . . . . . . . . . . . . . . . . . . . . . . . 2767.7.3 Running multiple instances of an agent . . . . . . . . . . . . . . . . . . . . . 2767.7.4 WebQueryOpen and WebQuerySave agents . . . . . . . . . . . . . . . . . 2777.7.5 Using the @URLOpen command to call agents . . . . . . . . . . . . . . . 278viii Domino Designer 6: A Developer’s Handbook7.8 Using agents (advanced topics) . . . . . . . . . . . . . . . . . . . . . . . . . . . . . . . 2787.9 New features in Domino 6 . . . . . . . . . . . . . . . . . . . . . . . . . . . . . . . . . . . . 2807.10 Summary . . . . . . . . . . . . . . . . . . . . . . . . . . . . . . . . . . . . . . . . . . . . . . . . 281Chapter 8. Domino Design elements: framesets . . . . . . . . . . . . . . . . . . . 2838.1 Framesets . . . . . . . . . . . . . . . . . . . . . . . . . . . . . . . . . . . . . . . . . . . . . . . . 2848.1.1 Specifying frameset properties . . . . . . . . . . . . . . . . . . . . . . . . . . . . 2858.1.2 Specifying frame properties . . . . . . . . . . . . . . . . . . . . . . . . . . . . . . 2868.2 Changing the layout of a frameset . . . . . . . . . . . . . . . . . . . . . . . . . . . . . 2968.3 New features in Domino Designer 6 . . . . . . . . . . . . . . . . . . . . . . . . . . . . 3028.4 Summary . . . . . . . . . . . . . . . . . . . . . . . . . . . . . . . . . . . . . . . . . . . . . . . . . 302Chapter 9. Domino Design elements: outlines. . . . . . . . . . . . . . . . . . . . . 3039.1 Outline Designer . . . . . . . . . . . . . . . . . . . . . . . . . . . . . . . . . . . . . . . . . . . 3049.2 Creating a new outline. . . . . . . . . . . . . . . . . . . . . . . . . . . . . . . . . . . . . . . 307

9.3 Embedded Outline. . . . . . . . . . . . . . . . . . . . . . . . . . . . . . . . . . . . . . . . . . 309Chapter 10. Domino design elements: shared resources . . . . . . . . . . . . 31710.1 Images. . . . . . . . . . . . . . . . . . . . . . . . . . . . . . . . . . . . . . . . . . . . . . . . . . 31810.2 Files. . . . . . . . . . . . . . . . . . . . . . . . . . . . . . . . . . . . . . . . . . . . . . . . . . . . 32210.3 Applets . . . . . . . . . . . . . . . . . . . . . . . . . . . . . . . . . . . . . . . . . . . . . . . . . 32910.4 Style sheets. . . . . . . . . . . . . . . . . . . . . . . . . . . . . . . . . . . . . . . . . . . . . . 33010.5 Data connections. . . . . . . . . . . . . . . . . . . . . . . . . . . . . . . . . . . . . . . . . . 33510.5.1 Create a data source resource . . . . . . . . . . . . . . . . . . . . . . . . . . . 33510.5.2 Create the DCR. . . . . . . . . . . . . . . . . . . . . . . . . . . . . . . . . . . . . . . 33610.5.3 Set a database property . . . . . . . . . . . . . . . . . . . . . . . . . . . . . . . . 33710.5.4 Create fields on a form . . . . . . . . . . . . . . . . . . . . . . . . . . . . . . . . . 338Chapter 11. Developing for multiple clients . . . . . . . . . . . . . . . . . . . . . . . 34111.1 Plan your application . . . . . . . . . . . . . . . . . . . . . . . . . . . . . . . . . . . . . . . 34211.1.1 Security settings . . . . . . . . . . . . . . . . . . . . . . . . . . . . . . . . . . . . . . 34211.1.2 Consider the use of graphics . . . . . . . . . . . . . . . . . . . . . . . . . . . . 34211.1.3 Examine your LotusScript code . . . . . . . . . . . . . . . . . . . . . . . . . . 34311.2 Designing the application . . . . . . . . . . . . . . . . . . . . . . . . . . . . . . . . . . . 34311.2.1 Same or different forms for the Web and Notes . . . . . . . . . . . . . . 34311.2.2 Choosing fields . . . . . . . . . . . . . . . . . . . . . . . . . . . . . . . . . . . . . . . 34411.2.3 Choosing actions. . . . . . . . . . . . . . . . . . . . . . . . . . . . . . . . . . . . . . 34411.2.4 How to deal with the Notes views . . . . . . . . . . . . . . . . . . . . . . . . . 34411.2.5 Need of miscellaneous forms . . . . . . . . . . . . . . . . . . . . . . . . . . . . 34411.2.6 Designing the agents . . . . . . . . . . . . . . . . . . . . . . . . . . . . . . . . . . 34511.2.7 Be aware of multiple lookups . . . . . . . . . . . . . . . . . . . . . . . . . . . . 34511.2.8 Developing for PDA and mobile clients . . . . . . . . . . . . . . . . . . . . . 34611.3 Take advantage of Domino 6 . . . . . . . . . . . . . . . . . . . . . . . . . . . . . . . . 34611.4 Conclusion. . . . . . . . . . . . . . . . . . . . . . . . . . . . . . . . . . . . . . . . . . . . . . . 346Contents ixChapter 12. New features in Domino 6 . . . . . . . . . . . . . . . . . . . . . . . . . . . 34712.1 User interface . . . . . . . . . . . . . . . . . . . . . . . . . . . . . . . . . . . . . . . . . . . . 34812.1.1 New design element navigator . . . . . . . . . . . . . . . . . . . . . . . . . . . 34812.1.2 Bookmarks . . . . . . . . . . . . . . . . . . . . . . . . . . . . . . . . . . . . . . . . . . 35112.1.3 Custom design element folders. . . . . . . . . . . . . . . . . . . . . . . . . . . 35212.1.4 Mouseover information on design elements . . . . . . . . . . . . . . . . . 35412.1.5 Quick scroll . . . . . . . . . . . . . . . . . . . . . . . . . . . . . . . . . . . . . . . . . . 35412.1.6 Plus/minus indicators for the design list . . . . . . . . . . . . . . . . . . . . 35512.1.7 New features in design element views . . . . . . . . . . . . . . . . . . . . . 35612.1.8 Modifying properties for multiple elements . . . . . . . . . . . . . . . . . . 35612.1.9 Design element locking . . . . . . . . . . . . . . . . . . . . . . . . . . . . . . . . . 35812.1.10 Printing enhancements . . . . . . . . . . . . . . . . . . . . . . . . . . . . . . . . 36112.1.11 Shading . . . . . . . . . . . . . . . . . . . . . . . . . . . . . . . . . . . . . . . . . . . . 36212.2 Design Synopsis . . . . . . . . . . . . . . . . . . . . . . . . . . . . . . . . . . . . . . . . . . 36312.3 New Domino 6 design elements . . . . . . . . . . . . . . . . . . . . . . . . . . . . . . 36512.3.1 Shared Resources . . . . . . . . . . . . . . . . . . . . . . . . . . . . . . . . . . . . 36512.3.2 Shared Code . . . . . . . . . . . . . . . . . . . . . . . . . . . . . . . . . . . . . . . . . 36712.4 The event model . . . . . . . . . . . . . . . . . . . . . . . . . . . . . . . . . . . . . . . . . . 36712.4.1 Targeting your code . . . . . . . . . . . . . . . . . . . . . . . . . . . . . . . . . . . 36812.4.2 Removed events . . . . . . . . . . . . . . . . . . . . . . . . . . . . . . . . . . . . . . 36812.4.3 New preferred events . . . . . . . . . . . . . . . . . . . . . . . . . . . . . . . . . . 36812.4.4 New events . . . . . . . . . . . . . . . . . . . . . . . . . . . . . . . . . . . . . . . . . . 36912.5 @functions and @commands . . . . . . . . . . . . . . . . . . . . . . . . . . . . . . . . 37012.5.1 Why use them . . . . . . . . . . . . . . . . . . . . . . . . . . . . . . . . . . . . . . . . 37012.5.2 Limitations . . . . . . . . . . . . . . . . . . . . . . . . . . . . . . . . . . . . . . . . . . . 37012.5.3 New programming features. . . . . . . . . . . . . . . . . . . . . . . . . . . . . . 37112.5.4 New and enhanced @formulas and @commands . . . . . . . . . . . . 37312.5.5 Looping . . . . . . . . . . . . . . . . . . . . . . . . . . . . . . . . . . . . . . . . . . . . . 382

12.5.6 Other enhancements. . . . . . . . . . . . . . . . . . . . . . . . . . . . . . . . . . . 38312.6 LotusScript . . . . . . . . . . . . . . . . . . . . . . . . . . . . . . . . . . . . . . . . . . . . . . 38412.6.1 New classes . . . . . . . . . . . . . . . . . . . . . . . . . . . . . . . . . . . . . . . . . 38412.6.2 Remote debugger . . . . . . . . . . . . . . . . . . . . . . . . . . . . . . . . . . . . . 38712.6.3 Recompile all. . . . . . . . . . . . . . . . . . . . . . . . . . . . . . . . . . . . . . . . . 39312.6.4 LotusScript to Java (LS2J) . . . . . . . . . . . . . . . . . . . . . . . . . . . . . . 39512.6.5 Automatically add Option Declare. . . . . . . . . . . . . . . . . . . . . . . . . 39712.6.6 Language enhancements . . . . . . . . . . . . . . . . . . . . . . . . . . . . . . . 39812.7 Auto complete . . . . . . . . . . . . . . . . . . . . . . . . . . . . . . . . . . . . . . . . . . . . 39912.7.1 LotusScript and auto complete . . . . . . . . . . . . . . . . . . . . . . . . . . . 40112.7.2 HTML and auto complete . . . . . . . . . . . . . . . . . . . . . . . . . . . . . . . 40312.7.3 Formulas and auto complete. . . . . . . . . . . . . . . . . . . . . . . . . . . . . 40312.8 Agent enhancements . . . . . . . . . . . . . . . . . . . . . . . . . . . . . . . . . . . . . . 40412.8.1 New user interface . . . . . . . . . . . . . . . . . . . . . . . . . . . . . . . . . . . . 40412.8.2 Agent restriction list . . . . . . . . . . . . . . . . . . . . . . . . . . . . . . . . . . . . 406x Domino Designer 6: A Developer’s Handbook12.8.3 Access remote servers . . . . . . . . . . . . . . . . . . . . . . . . . . . . . . . . . 40712.8.4 Run on behalf of . . . . . . . . . . . . . . . . . . . . . . . . . . . . . . . . . . . . . . 40812.8.5 Script libraries . . . . . . . . . . . . . . . . . . . . . . . . . . . . . . . . . . . . . . . . 40812.8.6 User activation . . . . . . . . . . . . . . . . . . . . . . . . . . . . . . . . . . . . . . . 40912.8.7 Agent security . . . . . . . . . . . . . . . . . . . . . . . . . . . . . . . . . . . . . . . . 41012.8.8 Converting shared and private agents . . . . . . . . . . . . . . . . . . . . . 41012.8.9 New console commands . . . . . . . . . . . . . . . . . . . . . . . . . . . . . . . . 41112.9 HTML. . . . . . . . . . . . . . . . . . . . . . . . . . . . . . . . . . . . . . . . . . . . . . . . . . . 41212.9.1 Enabling the HTML Pane . . . . . . . . . . . . . . . . . . . . . . . . . . . . . . . 41212.9.2 Adding code using the HTML Pane . . . . . . . . . . . . . . . . . . . . . . . 41412.10 New UI elements . . . . . . . . . . . . . . . . . . . . . . . . . . . . . . . . . . . . . . . . . 41712.10.1 Layers . . . . . . . . . . . . . . . . . . . . . . . . . . . . . . . . . . . . . . . . . . . . . 41712.10.2 New field types . . . . . . . . . . . . . . . . . . . . . . . . . . . . . . . . . . . . . . 42812.10.3 Embedded editor . . . . . . . . . . . . . . . . . . . . . . . . . . . . . . . . . . . . . 43212.11 Outline enhancements . . . . . . . . . . . . . . . . . . . . . . . . . . . . . . . . . . . . 43512.11.1 Computed outlines . . . . . . . . . . . . . . . . . . . . . . . . . . . . . . . . . . . 43512.11.2 Pop-up text . . . . . . . . . . . . . . . . . . . . . . . . . . . . . . . . . . . . . . . . . 43512.11.3 Customizable twisties . . . . . . . . . . . . . . . . . . . . . . . . . . . . . . . . . 43612.11.4 Show folder unread information . . . . . . . . . . . . . . . . . . . . . . . . . 43612.12 Actions enhancements . . . . . . . . . . . . . . . . . . . . . . . . . . . . . . . . . . . . 43812.12.1 General changes. . . . . . . . . . . . . . . . . . . . . . . . . . . . . . . . . . . . . 43812.12.2 Computed labels . . . . . . . . . . . . . . . . . . . . . . . . . . . . . . . . . . . . . 43812.12.3 Menu separator . . . . . . . . . . . . . . . . . . . . . . . . . . . . . . . . . . . . . . 43912.12.4 Checkbox action . . . . . . . . . . . . . . . . . . . . . . . . . . . . . . . . . . . . . 43912.12.5 Sub actions . . . . . . . . . . . . . . . . . . . . . . . . . . . . . . . . . . . . . . . . . 44412.12.6 Other features and enhancements . . . . . . . . . . . . . . . . . . . . . . . 44512.13 View enhancements . . . . . . . . . . . . . . . . . . . . . . . . . . . . . . . . . . . . . . 44512.13.1 Column colors . . . . . . . . . . . . . . . . . . . . . . . . . . . . . . . . . . . . . . . 44512.13.2 Context-sensitive actions . . . . . . . . . . . . . . . . . . . . . . . . . . . . . . 45012.13.3 Customized icons . . . . . . . . . . . . . . . . . . . . . . . . . . . . . . . . . . . . 45112.13.4 Background images/grids . . . . . . . . . . . . . . . . . . . . . . . . . . . . . . 45212.13.5 Customize twisties . . . . . . . . . . . . . . . . . . . . . . . . . . . . . . . . . . . 45312.13.6 User customizations . . . . . . . . . . . . . . . . . . . . . . . . . . . . . . . . . . 45312.13.7 Create document from view . . . . . . . . . . . . . . . . . . . . . . . . . . . . 45412.13.8 Editing a document in a view . . . . . . . . . . . . . . . . . . . . . . . . . . . 45612.13.9 Hide columns on-the-fly . . . . . . . . . . . . . . . . . . . . . . . . . . . . . . . 45912.13.10 Creating views programmatically . . . . . . . . . . . . . . . . . . . . . . . 46012.14 Field enhancements . . . . . . . . . . . . . . . . . . . . . . . . . . . . . . . . . . . . . . 46112.14.1 Field hints . . . . . . . . . . . . . . . . . . . . . . . . . . . . . . . . . . . . . . . . . . 46112.14.2 Size options. . . . . . . . . . . . . . . . . . . . . . . . . . . . . . . . . . . . . . . . . 461

12.14.3 Alignment options . . . . . . . . . . . . . . . . . . . . . . . . . . . . . . . . . . . . 46212.14.4 Border styles . . . . . . . . . . . . . . . . . . . . . . . . . . . . . . . . . . . . . . . . 46312.15 Form enhancements . . . . . . . . . . . . . . . . . . . . . . . . . . . . . . . . . . . . . . 464Contents xi12.15.1 Render pass-through HTML in Notes . . . . . . . . . . . . . . . . . . . . . 46412.16 Paragraph enhancements . . . . . . . . . . . . . . . . . . . . . . . . . . . . . . . . . . 46612.16.1 Language tagging . . . . . . . . . . . . . . . . . . . . . . . . . . . . . . . . . . . . 46612.16.2 Paragraph borders . . . . . . . . . . . . . . . . . . . . . . . . . . . . . . . . . . . 46712.16.3 New section styles . . . . . . . . . . . . . . . . . . . . . . . . . . . . . . . . . . . 46712.17 Embedded element enhancements. . . . . . . . . . . . . . . . . . . . . . . . . . . 46912.17.1 Improved action bar support and enhanced styling . . . . . . . . . . 46912.17.2 Cross-database referencing . . . . . . . . . . . . . . . . . . . . . . . . . . . . 47012.17.3 Multiple embedded views on a page or form . . . . . . . . . . . . . . . 47012.17.4 Deleting documents in an embedded view . . . . . . . . . . . . . . . . . 47012.18 Table enhancements. . . . . . . . . . . . . . . . . . . . . . . . . . . . . . . . . . . . . . 47112.18.1 Autosize width to content . . . . . . . . . . . . . . . . . . . . . . . . . . . . . . 47112.18.2 New options . . . . . . . . . . . . . . . . . . . . . . . . . . . . . . . . . . . . . . . . 47212.18.3 Caption style . . . . . . . . . . . . . . . . . . . . . . . . . . . . . . . . . . . . . . . . 47312.19 Frameset enhancements. . . . . . . . . . . . . . . . . . . . . . . . . . . . . . . . . . . 47512.19.1 Collapsible and captionable frames . . . . . . . . . . . . . . . . . . . . . . 47512.20 Tools menu . . . . . . . . . . . . . . . . . . . . . . . . . . . . . . . . . . . . . . . . . . . . . 47712.20.1 Add a tool . . . . . . . . . . . . . . . . . . . . . . . . . . . . . . . . . . . . . . . . . . 47712.20.2 Customize your tools. . . . . . . . . . . . . . . . . . . . . . . . . . . . . . . . . . 47912.20.3 DXL utilities . . . . . . . . . . . . . . . . . . . . . . . . . . . . . . . . . . . . . . . . . 48712.21 URL enhancements. . . . . . . . . . . . . . . . . . . . . . . . . . . . . . . . . . . . . . . 49012.21.1 New and enhanced URL commands . . . . . . . . . . . . . . . . . . . . . 49012.22 WebDav. . . . . . . . . . . . . . . . . . . . . . . . . . . . . . . . . . . . . . . . . . . . . . . . 49012.23 Summary . . . . . . . . . . . . . . . . . . . . . . . . . . . . . . . . . . . . . . . . . . . . . . . 497Chapter 13. Securing your Domino application . . . . . . . . . . . . . . . . . . . . 49913.1 Overview . . . . . . . . . . . . . . . . . . . . . . . . . . . . . . . . . . . . . . . . . . . . . . . . 50013.2 Controlling access to Domino data . . . . . . . . . . . . . . . . . . . . . . . . . . . . 50113.2.1 Overview of Domino Security architecture . . . . . . . . . . . . . . . . . . 50113.3 Using the Access Control List to control access . . . . . . . . . . . . . . . . . . 50413.3.1 Setting up and refining the ACL . . . . . . . . . . . . . . . . . . . . . . . . . . 50613.3.2 Roles in the ACL . . . . . . . . . . . . . . . . . . . . . . . . . . . . . . . . . . . . . . 51313.3.3 Enforce Consistent ACL . . . . . . . . . . . . . . . . . . . . . . . . . . . . . . . . 51613.3.4 Maximum Internet Name and Password access . . . . . . . . . . . . . . 51713.3.5 Changing the ACL programmatically . . . . . . . . . . . . . . . . . . . . . . 51713.4 Using outline control to hide part of an Domino application . . . . . . . . . 51813.5 Using directory links to control access to a Domino application . . . . . . 51913.6 Controlling access to views and forms . . . . . . . . . . . . . . . . . . . . . . . . . 52013.6.1 Controlling access to forms. . . . . . . . . . . . . . . . . . . . . . . . . . . . . . 52113.6.2 Preventing printing, forwarding, and copying of documents . . . . . 52413.7 Controlling access to documents . . . . . . . . . . . . . . . . . . . . . . . . . . . . . 52413.7.1 Editor access. . . . . . . . . . . . . . . . . . . . . . . . . . . . . . . . . . . . . . . . . 52613.7.2 Combining Readers and Authors fields. . . . . . . . . . . . . . . . . . . . . 527xii Domino Designer 6: A Developer’s Handbook13.7.3 Controlled access sections . . . . . . . . . . . . . . . . . . . . . . . . . . . . . . 52913.7.4 Use of Hide-When formulas . . . . . . . . . . . . . . . . . . . . . . . . . . . . . 53013.7.5 Using encryption for field security . . . . . . . . . . . . . . . . . . . . . . . . . 53013.8 Authentication on the Web . . . . . . . . . . . . . . . . . . . . . . . . . . . . . . . . . . 53313.8.1 HTTP Basic Authentication . . . . . . . . . . . . . . . . . . . . . . . . . . . . . . 53313.8.2 Session-based authentication . . . . . . . . . . . . . . . . . . . . . . . . . . . . 53413.8.3 Secure Sockets Layer (SSL) . . . . . . . . . . . . . . . . . . . . . . . . . . . . . 53513.8.4 Domino and SSL . . . . . . . . . . . . . . . . . . . . . . . . . . . . . . . . . . . . . . 53613.8.5 When to use Internet security . . . . . . . . . . . . . . . . . . . . . . . . . . . . 537

13.8.6 Defining Web users. . . . . . . . . . . . . . . . . . . . . . . . . . . . . . . . . . . . 53713.9 Programming considerations. . . . . . . . . . . . . . . . . . . . . . . . . . . . . . . . . 53813.9.1 Using @UserRoles . . . . . . . . . . . . . . . . . . . . . . . . . . . . . . . . . . . . 53813.9.2 Using @UserName . . . . . . . . . . . . . . . . . . . . . . . . . . . . . . . . . . . . 54013.9.3 Using @ClientType . . . . . . . . . . . . . . . . . . . . . . . . . . . . . . . . . . . . 54013.9.4 Using @UserNameList . . . . . . . . . . . . . . . . . . . . . . . . . . . . . . . . . 54013.9.5 Password field. . . . . . . . . . . . . . . . . . . . . . . . . . . . . . . . . . . . . . . . 54113.9.6 Controlling if users paste documents into the database . . . . . . . . 54113.9.7 Hiding the design of a database . . . . . . . . . . . . . . . . . . . . . . . . . . 54113.10 Other security options and considerations . . . . . . . . . . . . . . . . . . . . . 54213.10.1 Using signatures for security . . . . . . . . . . . . . . . . . . . . . . . . . . . . 54213.10.2 Access control for HTML and other files . . . . . . . . . . . . . . . . . . . 54513.10.3 APIs for customized authentication, encryption, and signing . . . 54713.10.4 Backup and restore . . . . . . . . . . . . . . . . . . . . . . . . . . . . . . . . . . . 54813.11 Developing a plan for securing your application . . . . . . . . . . . . . . . . . 54813.11.1 Key design issues . . . . . . . . . . . . . . . . . . . . . . . . . . . . . . . . . . . . 54913.11.2 Distinguishing true security features . . . . . . . . . . . . . . . . . . . . . . 55213.12 New security features in Domino 6 . . . . . . . . . . . . . . . . . . . . . . . . . . . 55313.13 Summary . . . . . . . . . . . . . . . . . . . . . . . . . . . . . . . . . . . . . . . . . . . . . . . 556Chapter 14. Programming for Domino 6 . . . . . . . . . . . . . . . . . . . . . . . . . . 55714.1 Programming for Domino 6 . . . . . . . . . . . . . . . . . . . . . . . . . . . . . . . . . . 55814.1.1 Choosing a programming language . . . . . . . . . . . . . . . . . . . . . . . 55814.1.2 Simple Actions . . . . . . . . . . . . . . . . . . . . . . . . . . . . . . . . . . . . . . . 55914.1.3 Formula language . . . . . . . . . . . . . . . . . . . . . . . . . . . . . . . . . . . . . 56214.1.4 LotusScript . . . . . . . . . . . . . . . . . . . . . . . . . . . . . . . . . . . . . . . . . . 56314.2 The Domino Object Model. . . . . . . . . . . . . . . . . . . . . . . . . . . . . . . . . . . 56514.2.1 Domino front-end user interface (UI) objects . . . . . . . . . . . . . . . . 56614.2.2 Domino back-end objects . . . . . . . . . . . . . . . . . . . . . . . . . . . . . . . 56614.2.3 Object hierarchy . . . . . . . . . . . . . . . . . . . . . . . . . . . . . . . . . . . . . . 57214.2.4 Using Domino objects from LotusScript . . . . . . . . . . . . . . . . . . . . 57314.2.5 Understanding front-end classes and back-end classes. . . . . . . . 57714.2.6 Using Domino objects from Java . . . . . . . . . . . . . . . . . . . . . . . . . 58114.2.7 Using LS to access Java objects and methods. . . . . . . . . . . . . . . 582Contents xiii14.3 Programming with LotusScript . . . . . . . . . . . . . . . . . . . . . . . . . . . . . . . 58314.3.1 The Event model . . . . . . . . . . . . . . . . . . . . . . . . . . . . . . . . . . . . . . 58314.3.2 Event type and sequence . . . . . . . . . . . . . . . . . . . . . . . . . . . . . . . 58514.3.3 Action object . . . . . . . . . . . . . . . . . . . . . . . . . . . . . . . . . . . . . . . . . 59014.3.4 Using LotusScript in Web applications . . . . . . . . . . . . . . . . . . . . . 59014.3.5 How scripts and formulas are executed . . . . . . . . . . . . . . . . . . . . 59014.4 LotusScript programming tips and considerations . . . . . . . . . . . . . . . . 59614.4.1 General suggestions . . . . . . . . . . . . . . . . . . . . . . . . . . . . . . . . . . . 59614.4.2 Use consistent variable names . . . . . . . . . . . . . . . . . . . . . . . . . . . 59714.4.3 Reserved fields . . . . . . . . . . . . . . . . . . . . . . . . . . . . . . . . . . . . . . . 59814.4.4 Using script libraries . . . . . . . . . . . . . . . . . . . . . . . . . . . . . . . . . . . 60014.4.5 Using the Template database . . . . . . . . . . . . . . . . . . . . . . . . . . . . 60214.4.6 Catching errors at compile time . . . . . . . . . . . . . . . . . . . . . . . . . . 60314.4.7 Improving form performance . . . . . . . . . . . . . . . . . . . . . . . . . . . . . 60314.4.8 When to use formulas and LotusScript . . . . . . . . . . . . . . . . . . . . . 60514.4.9 Using Evaluate to combine LotusScript and formulas. . . . . . . . . . 60714.4.10 Making field value changes effective . . . . . . . . . . . . . . . . . . . . . 60914.4.11 Using validation formulas and QuerySave/onSubmit . . . . . . . . . 60914.4.12 Error handling . . . . . . . . . . . . . . . . . . . . . . . . . . . . . . . . . . . . . . . 61214.4.13 Enabling the Debugger . . . . . . . . . . . . . . . . . . . . . . . . . . . . . . . . 61414.4.14 Tracing programs without a debugger . . . . . . . . . . . . . . . . . . . . 61914.5 Using JavaScript . . . . . . . . . . . . . . . . . . . . . . . . . . . . . . . . . . . . . . . . . . 621

14.5.1 Using JavaScript in Domino Design elements . . . . . . . . . . . . . . . 62114.5.2 Mapping Domino objects to the Document Object Model . . . . . . . 62414.5.3 Examples of adding JavaScript to forms. . . . . . . . . . . . . . . . . . . . 63114.6 LiveConnect - JavaScript access to Domino classes . . . . . . . . . . . . . . 63614.6.1 Accessing an applet from JavaScript . . . . . . . . . . . . . . . . . . . . . . 63714.6.2 Accessing Java/CORBA applets via LiveConnect . . . . . . . . . . . . 63714.7 The API for Domino and Notes . . . . . . . . . . . . . . . . . . . . . . . . . . . . . . . 63914.8 XML . . . . . . . . . . . . . . . . . . . . . . . . . . . . . . . . . . . . . . . . . . . . . . . . . . . . 64014.9 Sametime connectivity . . . . . . . . . . . . . . . . . . . . . . . . . . . . . . . . . . . . . 64114.9.1 What is Sametime . . . . . . . . . . . . . . . . . . . . . . . . . . . . . . . . . . . . . 64114.9.2 What can Sametime do. . . . . . . . . . . . . . . . . . . . . . . . . . . . . . . . . 64114.9.3 Power of Sametime. . . . . . . . . . . . . . . . . . . . . . . . . . . . . . . . . . . . 64114.9.4 Sametime-enabling Domino applications . . . . . . . . . . . . . . . . . . . 64214.10 Integration with Microsoft technologies . . . . . . . . . . . . . . . . . . . . . . . . 64614.10.1 What is COM. . . . . . . . . . . . . . . . . . . . . . . . . . . . . . . . . . . . . . . . 64714.10.2 COM support in Domino . . . . . . . . . . . . . . . . . . . . . . . . . . . . . . . 64814.10.3 New features in Domino 6. . . . . . . . . . . . . . . . . . . . . . . . . . . . . . 66614.11 WebSphere integration . . . . . . . . . . . . . . . . . . . . . . . . . . . . . . . . . . . . 66714.11.1 What is WebSphere . . . . . . . . . . . . . . . . . . . . . . . . . . . . . . . . . . 66714.11.2 Domino and WebSphere defined . . . . . . . . . . . . . . . . . . . . . . . . 66714.12 Java. . . . . . . . . . . . . . . . . . . . . . . . . . . . . . . . . . . . . . . . . . . . . . . . . . . 669xiv Domino Designer 6: A Developer’s Handbook14.12.1 About Java Domino classes . . . . . . . . . . . . . . . . . . . . . . . . . . . . 66914.12.2 Java coding conventions. . . . . . . . . . . . . . . . . . . . . . . . . . . . . . . 66914.12.3 Agents, applets and applications . . . . . . . . . . . . . . . . . . . . . . . . 67114.12.4 Adding CORBA . . . . . . . . . . . . . . . . . . . . . . . . . . . . . . . . . . . . . . 67214.12.5 Benefits of using CORBA . . . . . . . . . . . . . . . . . . . . . . . . . . . . . . 67314.12.6 How and when to use CORBA . . . . . . . . . . . . . . . . . . . . . . . . . . 67314.12.7 Compiling and running a Java program . . . . . . . . . . . . . . . . . . . 67314.12.8 Runtime requirements. . . . . . . . . . . . . . . . . . . . . . . . . . . . . . . . . 67414.12.9 Remote calls to lotus.domino package . . . . . . . . . . . . . . . . . . . . 67514.12.10 Applet calls to lotus.domino package . . . . . . . . . . . . . . . . . . . . 67614.12.11 Creating a Java agent . . . . . . . . . . . . . . . . . . . . . . . . . . . . . . . . 67914.12.12 Java Database Connectivity (DBC). . . . . . . . . . . . . . . . . . . . . . 68314.12.13 Servlets . . . . . . . . . . . . . . . . . . . . . . . . . . . . . . . . . . . . . . . . . . . 68314.12.14 Java Server Page (JSP) . . . . . . . . . . . . . . . . . . . . . . . . . . . . . . 68414.12.15 Script libraries . . . . . . . . . . . . . . . . . . . . . . . . . . . . . . . . . . . . . . 69114.13 Summary . . . . . . . . . . . . . . . . . . . . . . . . . . . . . . . . . . . . . . . . . . . . . . . 695Chapter 15. Rich text programming. . . . . . . . . . . . . . . . . . . . . . . . . . . . . . 69715.1 What is rich text. . . . . . . . . . . . . . . . . . . . . . . . . . . . . . . . . . . . . . . . . . . 69815.2 Summary versus non-summary fields . . . . . . . . . . . . . . . . . . . . . . . . . . 69915.3 Rich text and the Notes APIs . . . . . . . . . . . . . . . . . . . . . . . . . . . . . . . . 69915.4 New rich text capabilities in Notes 6 . . . . . . . . . . . . . . . . . . . . . . . . . . . 70015.5 Rich text in macro language . . . . . . . . . . . . . . . . . . . . . . . . . . . . . . . . . 70115.5.1 Macro language functions to handle rich text . . . . . . . . . . . . . . . . 70115.5.2 Working with rich text in edit mode . . . . . . . . . . . . . . . . . . . . . . . . 70315.5.3 Example application: default value for rich text field . . . . . . . . . . . 70315.6 Working with rich text in LotusScript and Java . . . . . . . . . . . . . . . . . . . 70515.6.1 The LotusScript rich text classes . . . . . . . . . . . . . . . . . . . . . . . . . 70515.6.2 Creating and appending to rich text . . . . . . . . . . . . . . . . . . . . . . . 70615.6.3 Navigating and inserting into rich text . . . . . . . . . . . . . . . . . . . . . . 71715.6.4 Using a NotesRichTextRange to read text or limit a search . . . . . 72815.6.5 Working with rich text in edit mode . . . . . . . . . . . . . . . . . . . . . . . . 73215.7 Using rich text from other apps via COM/OLE . . . . . . . . . . . . . . . . . . . 738Chapter 16. XML . . . . . . . . . . . . . . . . . . . . . . . . . . . . . . . . . . . . . . . . . . . . . 74316.1 What is XML . . . . . . . . . . . . . . . . . . . . . . . . . . . . . . . . . . . . . . . . . . . . . 744

16.2 XML and Domino. . . . . . . . . . . . . . . . . . . . . . . . . . . . . . . . . . . . . . . . . . 74616.3 Basic XML use in Domino Designer . . . . . . . . . . . . . . . . . . . . . . . . . . . 74916.3.1 XML for forms, views, or pages. . . . . . . . . . . . . . . . . . . . . . . . . . . 74916.4 XML tools (DXL Utilities) . . . . . . . . . . . . . . . . . . . . . . . . . . . . . . . . . . . . 76116.4.1 Exporter. . . . . . . . . . . . . . . . . . . . . . . . . . . . . . . . . . . . . . . . . . . . . 76216.4.2 Viewer . . . . . . . . . . . . . . . . . . . . . . . . . . . . . . . . . . . . . . . . . . . . . . 76216.4.3 Transformer. . . . . . . . . . . . . . . . . . . . . . . . . . . . . . . . . . . . . . . . . . 763Contents xv16.5 XML and LotusScript . . . . . . . . . . . . . . . . . . . . . . . . . . . . . . . . . . . . . . . 76316.5.1 LotusScript agents . . . . . . . . . . . . . . . . . . . . . . . . . . . . . . . . . . . . 76416.5.2 New support for DXL. . . . . . . . . . . . . . . . . . . . . . . . . . . . . . . . . . . 76716.6 XML and Java . . . . . . . . . . . . . . . . . . . . . . . . . . . . . . . . . . . . . . . . . . . . 77916.7 Summary . . . . . . . . . . . . . . . . . . . . . . . . . . . . . . . . . . . . . . . . . . . . . . . . 786Chapter 17. Web services in Domino . . . . . . . . . . . . . . . . . . . . . . . . . . . . 78717.1 What is a Web service. . . . . . . . . . . . . . . . . . . . . . . . . . . . . . . . . . . . . . 78817.2 Web services and Domino . . . . . . . . . . . . . . . . . . . . . . . . . . . . . . . . . . 789Appendix A. Domino and connectivity . . . . . . . . . . . . . . . . . . . . . . . . . . . 791CORBA/IIOP . . . . . . . . . . . . . . . . . . . . . . . . . . . . . . . . . . . . . . . . . . . . . . . 792OLE Automation . . . . . . . . . . . . . . . . . . . . . . . . . . . . . . . . . . . . . . . . . . . . 792LSX Toolkit/Lotus Custom Object Toolkit . . . . . . . . . . . . . . . . . . . . . . . . . 792DECS . . . . . . . . . . . . . . . . . . . . . . . . . . . . . . . . . . . . . . . . . . . . . . . . . . . . 793Lotus Enterprise Integrator . . . . . . . . . . . . . . . . . . . . . . . . . . . . . . . . . . . . 793NotesSQL . . . . . . . . . . . . . . . . . . . . . . . . . . . . . . . . . . . . . . . . . . . . . . . . . 794ODBC . . . . . . . . . . . . . . . . . . . . . . . . . . . . . . . . . . . . . . . . . . . . . . . . . . . . 794JDBC. . . . . . . . . . . . . . . . . . . . . . . . . . . . . . . . . . . . . . . . . . . . . . . . . . . . . 795Appendix B. Additional material . . . . . . . . . . . . . . . . . . . . . . . . . . . . . . . . 797Locating the Web material . . . . . . . . . . . . . . . . . . . . . . . . . . . . . . . . . . . . . . . 797Using the Web material . . . . . . . . . . . . . . . . . . . . . . . . . . . . . . . . . . . . . . . . . 797System requirements for downloading the Web material . . . . . . . . . . . . . 798How to use the Web material . . . . . . . . . . . . . . . . . . . . . . . . . . . . . . . . . . 798Related publications . . . . . . . . . . . . . . . . . . . . . . . . . . . . . . . . . . . . . . . . . . 799IBM Redbooks . . . . . . . . . . . . . . . . . . . . . . . . . . . . . . . . . . . . . . . . . . . . . . . . 799Other resources . . . . . . . . . . . . . . . . . . . . . . . . . . . . . . . . . . . . . . . . . . . . 799Referenced Web sites . . . . . . . . . . . . . . . . . . . . . . . . . . . . . . . . . . . . . . . . . . 800How to get IBM Redbooks . . . . . . . . . . . . . . . . . . . . . . . . . . . . . . . . . . . . . . . 800IBM Redbooks collections. . . . . . . . . . . . . . . . . . . . . . . . . . . . . . . . . . . . . 801Index . . . . . . . . . . . . . . . . . . . . . . . . . . . . . . . . . . . . . . . . . . . . . . . . . . . . . . . 803xvi Domino Designer 6: A Developer’s Handbook© Copyright IBM Corp. 2002. All rights reserved. xvii
NoticesThis information was developed for products and services offered in the U.S.A.IBM may not offer the products, services, or features discussed in this document in other countries. Consultyour local IBM representative for information on the products and services currently available in your area.Any reference to an IBM product, program, or service is not intended to state or imply that only that IBMproduct, program, or service may be used. Any functionally equivalent product, program, or service thatdoes not infringe any IBM intellectual property right may be used instead. However, it is the user'sresponsibility to evaluate and verify the operation of any non-IBM product, program, or service.IBM may have patents or pending patent applications covering subject matter described in this document.The furnishing of this document does not give you any license to these patents. You can send licenseinquiries, in writing, to:IBM Director of Licensing, IBM Corporation, North Castle Drive Armonk, NY 10504-1785 U.S.A.The following paragraph does not apply to the United Kingdom or any other country where suchprovisions are inconsistent with local law: INTERNATIONAL BUSINESS MACHINES CORPORATIONPROVIDES THIS PUBLICATION "AS IS" WITHOUT WARRANTY OF ANY KIND, EITHER EXPRESS OR

IMPLIED, INCLUDING, BUT NOT LIMITED TO, THE IMPLIED WARRANTIES OF NON-INFRINGEMENT,MERCHANTABILITY OR FITNESS FOR A PARTICULAR PURPOSE. Some states do not allow disclaimerof express or implied warranties in certain transactions, therefore, this statement may not apply to you.This information could include technical inaccuracies or typographical errors. Changes are periodically madeto the information herein; these changes will be incorporated in new editions of the publication. IBM maymake improvements and/or changes in the product(s) and/or the program(s) described in this publication atany time without notice.Any references in this information to non-IBM Web sites are provided for convenience only and do not in anymanner serve as an endorsement of those Web sites. The materials at those Web sites are not part of thematerials for this IBM product and use of those Web sites is at your own risk.IBM may use or distribute any of the information you supply in any way it believes appropriate withoutincurring any obligation to you.Information concerning non-IBM products was obtained from the suppliers of those products, their publishedannouncements or other publicly available sources. IBM has not tested those products and cannot confirmthe accuracy of performance, compatibility or any other claims related to non-IBM products. Questions onthe capabilities of non-IBM products should be addressed to the suppliers of those products.This information contains examples of data and reports used in daily business operations. To illustrate themas completely as possible, the examples include the names of individuals, companies, brands, and products.All of these names are fictitious and any similarity to the names and addresses used by an actual businessenterprise is entirely coincidental.COPYRIGHT LICENSE:This information contains sample application programs in source language, which illustrates programmingtechniques on various operating platforms. You may copy, modify, and distribute these sample programs inany form without payment to IBM, for the purposes of developing, using, marketing or distributing applicationprograms conforming to the application programming interface for the operating platform for which thesample programs are written. These examples have not been thoroughly tested under all conditions. IBM,therefore, cannot guarantee or imply reliability, serviceability, or function of these programs. You may copy,modify, and distribute these sample programs in any form without payment to IBM for the purposes ofdeveloping, using, marketing, or distributing application programs conforming to IBM's applicationprogramming interfaces.xviii Domino Designer 6: A Developer’s Handbook
TrademarksThe following terms are trademarks of the International Business Machines Corporation in the United States,other countries, or both:CICS®DB2®Everyplace™IBM®IMS™Informix®iSeries™MQSeries®Perform™Redbooks(logo)™SP™Tivoli®VisualAge®WebSphere®The following terms are trademarks of International Business Machines Corporation and Lotus DevelopmentCorporation in the United States, other countries, or both:Approach®Domino Designer®Domino.Doc®Domino™Freelance Graphics®iNotes™Lotus Enterprise Integrator™Lotus Notes®Lotus®Mobile Notes™Notes®

Sametime®SmartSuite®1-2-3®Word Pro®The following terms are trademarks of other companies:ActionMedia, LANDesk, MMX, Pentium and ProShare are trademarks of Intel Corporation in the UnitedStates, other countries, or both.Microsoft, Windows, Windows NT, and the Windows logo are trademarks of Microsoft Corporation in theUnited States, other countries, or both.Java and all Java-based trademarks and logos are trademarks or registered trademarks of SunMicrosystems, Inc. in the United States, other countries, or both.C-bus is a trademark of Corollary, Inc. in the United States, other countries, or both.UNIX is a registered trademark of The Open Group in the United States and other countries.SET, SET Secure Electronic Transaction, and the SET Logo are trademarks owned by SET SecureElectronic Transaction LLC.Other company, product, and service names may be trademarks or service marks of others.© Copyright IBM Corp. 2002. All rights reserved. xix
PrefaceIn this IBM Redbook, we describe how to develop applications with IBMLotusDomino Designer 6. With Domino Designer, you are able to createapplications hosted by a Domino server. These applications can be used bydifferent clients, such as Notes clients, Web browsers or mobile devices.We introduce, and show in detail, how you can use all the design elements ofDomino Designer, such as forms, pages, views, agents, outlines, resources andframesets. Those readers who are familiar with developing applications usingRelease 5 of Lotus Domino may want to start at Chapter 12, which introduces thenew features in Domino 6.0, and continue from there.In the chapters toward the end of the book, we discuss different programminglanguages, @functions, LotusScript, JavaScript, and Java, that can be used inDomino. We describe in detail how to manipulate rich text objects byprogramming, as well as XML, in Domino.This redbook was written for technical specialists, developers and programmers,customers, IBM Business Partners, and the IBM and Lotus community who needtechnical understanding of how to develop applications using IBM Lotus DominoDesigner 6.0.
The team that wrote this redbookThis redbook was produced by a team of specialists from around the worldworking at the International Technical Support Organization, Cambridge Center.Tommi Tulisalo is a project leader for the International Technical SupportOrganization at Cambridge, Massachusetts. He manages projects whoseobjective is to produce Redbooks on all areas of Lotus Software products. Beforejoining the ITSO in 2001, he was an IT Architect for IBM Global Services inFinland, designing solutions for customers, often based on Lotus software.Rune Carlsen is a Senior Consultant for ConCrea as, which is a Norwegiancompany owned by IBM. He specializes in Notes/Domino/Web applicationdevelopment as well as system administration, and provides technical support forcustomers and their system environments. As a Certified Lotus Instructor, Runealso teaches classes, lectures for corporate customers through Lotus AuthorizedEducation Centers, and often speaks at seminars. He is a Lotus Certifiedadministrator and developer for Notes/Domino R4, R5 and 6 at the Principalxx Domino Designer 6: A Developer’s Handbooklevel. He is also the author and the developer of http://www.dominozone.net, anon-commercial resource site for the Notes/Domino community.Andre Guirard is a product developer and consultant on the IBM Lotus SoftwareEnterprise Integration team. He has worked with Notes since version 3.0, and

with other information technologies for some time before that. He has lectured onLotes Notes development, and authored several articles on that subject. Andrecan be reached at [email protected] Hartikainen is an IT Specialist with IBM Finland, currently working on ateam that develops Domino- and WebSphere-based applications for IBMcustomers. He specializes in the development of Web applications based onDomino. Since joining IBM Global Services in 1998, he has been involved indeveloping several business applications, such as browser-based extranetsolutions.Grant McCarthy is an Advisory IT Specialist with IBM South Africa. He hasdeveloped a number of Domino applications for IBM, including the IBM SAOn-line Procedures Manual, for which he was the team leader. He was alsoselected to participate in the WebAhead Partnership Program, and spent threemonths working with the WebAhead team in the USA, whose mission is toaccelerate advanced Internet technology inside IBM. He worked on the Franklinproject, an XML-based content management prototype that is currently beingused by ibm.com.Gustavo Pecly is an IT Director at Cyberlynxx Ltda., an IBM Premier BusinessPartner in Rio de Janeiro, Brazil. He specializes in e-business applicationsdevelopment and enterprise integration systems. He has worked with IBM/Lotustechnologies for more than five years, developing solutions for several industryareas that range from simple Domino applications to e-business and intranetsthat integrate back-end systems (ERP systems, RDBMS, Transaction systems).Gustavo is a Certified Lotus Professional at the Principal level in ApplicationDevelopment, and a Certified Lotus Instructor. His e-mail address [email protected] number of people provided support and guidance to this project, in particularGary Devendorf, Senior Product Manager for Application Development at LotusSofware, and Alan Lepofsky, Offerings Manager for “Grow with Lotus” at LotusSoftware, who contributed numerous samples used throughout the book.Thanks also to the authors of the IBM Redbook Lotus Domino R5: A Developer’sHandbook, SG24-5331-01: Fiona Collins, David Morrison, Søren Peter Nielsen,Sami Serpola, and Reinhard Strobl. We have utilized the material of that redbookthroughout this book.In addition, we would like to thank to following people:Preface xxiBrian Benz, Benz TechnologiesRichard Berube, IBM Westford LabRoy Bowen, Lotus SoftwareKimilee Gile, IBM Westford LabJan Kenney, IBM Westford LabTimothy Kounadis, Lotus SoftwareGeorge LanglaisI, IBM Westford LabSteve Nikopoulos, IBM Westford LabJim Verdibello, IBM Westford LabWai-Ki Yip, IBM Westford LabAlison Chandler, ITSO PoughkeepsieWilliam Tworek, ITSO, CambridgeITSO Poughkeepsie Editing Team
Become a published authorJoin us for a two- to six-week residency program! Help write an IBM Redbookdealing with specific products or solutions, while getting hands-on experiencewith leading-edge technologies. You'll team with IBM technical professionals,Business Partners and/or customers.Your efforts will help increase product acceptance and customer satisfaction. As

a bonus, you'll develop a network of contacts in IBM development labs, andincrease your productivity and marketability.Find out more about the residency program, browse the residency index, andapply online at:ibm.com/redbooks/residencies.htmlComments welcomeYour comments are important to us!xxii Domino Designer 6: A Developer’s HandbookWe want our Redbooks to be as helpful as possible. Send us your commentsabout this or other Redbooks in one of the following ways:_ Use the online Contact us review redbook form found at:ibm.com/redbooks_ Send your comments in an Internet note to:[email protected]_ Mail your comments to:IBM Corporation, International Technical Support OrganizationDept. TQH Mail Station P0992455 Post RoadPoughkeepsie, NY 12601-5400© Copyright IBM Corp. 2002. All rights reserved. 1
Chapter 1. What is Lotus Notes/DominoThe Domino Server family is an integrated messaging and Web applicationsoftware platform for companies that need to improve customer responsivenessand streamline their business processes.Domino 6, the only solution built on an open, unified architecture, is trusted bythe world’s leading companies to deliver secure communication, collaboration,and business applications.In this chapter, we describe the Domino 6 Server Family, the services thatDomino 6 offers, and the clients for Domino 6.
12 Domino Designer 6: A Developer’s Handbook
1.1 Domino 6 ServerThe Domino 6 Server is offered in different packages in order to allow customersto pick the functionality that meets their current requirements, and extend thatfunctionality as their requirements change. In the following sections, we brieflydescribe the three Domino 6 Servers.1.1.1 Domino Messaging ServerDomino Messaging Server is used for messaging, and for calendar & scheduling.It has prebuilt e-mail and collaborative applications including discussions,teamrooms, and personal journals. Domino Messaging combines support for thelatest Internet mail standards with the advanced messaging capabilities andenterprise-scale reliability and performance of Lotus Domino.Note: Domino Messaging Server is used for messaging only. Customers whowant to deploy their own applications on the Domino server should considerDomino Enterprise Server or Domino Utility Server.1.1.2 Domino Enterprise ServerDomino Enterprise Server supports the same e-mail and collaborative

applications as Messaging Server, plus the custom applications created bycustomers or business partners. It also includes clustering capabilities forhigh-availability implementations.This is the Domino server to use if your company uses Domino for messaging,and you want to deploy custom applications.1.1.3 Domino Utility ServerDomino Utility Server is the new member of the Domino Server family. It does notentitle the user of e-mail (specifically, individual user mailboxes), but does includethe custom application entitlement. It includes the clustering capabilities forhigh-availability implementations. Utility Server imposes no CAL requirements; inother words, any user of any software can access the server.This is the Domino server to use if your company does not use Domino formessaging, but you want to deploy custom applications.1.1.4 Services offered by Domino ServersLotus Domino Servers offer a wide range of services. In this section, we brieflydescribe the most important ones.Chapter 1. What is Lotus Notes/Domino 3Object StoreDocuments in a Domino database can contain any number of objects and datatypes, including text, rich text, numerical data, structured data, images, graphics,sound, video, file attachments, embedded objects, and Java™ and ActiveXapplets. A built-in Full text search engine makes it easy to index and searchdocuments. The object store also lets your Domino applications dynamicallypresent information based on variables such as user identity, user preferences,user input, and time.DirectoryA single directory manages all resource directory information for server andnetwork configuration, application management, and security. Domino includesuser account synchronization between Windows NT/Windows 2000 and Domino,and is Light Weight Directory Access Protocol (LDAP)-compliant. The directory isthe foundation for easily managing and securing your Internet and intranetapplications.SecurityThe Domino security model provides user authentication, digital signatures,flexible access control, and encryption. Domino security enables you to extendyour intranet applications to customers and business partners. Refer toChapter 13, “Securing your Domino application” on page 499 for moreinformation.ReplicationBi-directional replication automatically distributes and synchronizes informationand applications across geographically dispersed sites. Replication makes yourbusiness applications available to users around your company or around theworld, regardless of time or location.MessagingAn advanced client/server messaging system with built-in calendaring andscheduling enables individuals and groups to send and share information easily.Message transfer agents (MTAs) seamlessly extend the system to Simple MailTransfer Protocol (SMTP)/Multipurpose Internet Mail Extension (MIME), x.400,and cc:Mail™ messaging environments. The Domino messaging serviceprovides a single server supporting a variety of mail clients: Post Office ProtocolV3 (POP3), Internet Message Access Protocol V4 (IMAP4), Message ApplicationProgramming Interface (MAPI), and Lotus Notes clients.4 Domino Designer 6: A Developer’s Handbook
Web server

Lotus Domino provides an integrated Web application server that can both hostWeb sites that a Web browser, Notes clients, and mobile clients can access, andserve pages that are stored in the file system or in a Domino database.When a Web browser requests a page in a Domino database, Domino translatesthe document into HTML. When a Web browser requests a page in an HTML file,Domino reads the file directly from the file system. Then the Web server uses theHTTP protocol to transfer the information to the Web browser.WorkflowA workflow engine distributes, routes, and tracks documents according to aprocess defined in your applications. Workflow enables you to coordinate andstreamline critical business activities across an organization, and with customers,partners, and suppliers.AgentsAgents enable you to automate frequently performed processes, eliminatingtedious administration tasks and speeding your business applications. Agentscan be triggered by time or events in a business application. Agents can be runon Domino servers or Lotus Notes clients.Development EnvironmentDomino Designer is general-purpose client software featuring an integrateddevelopment environment (IDE) that provides easy access to all features of theDomino server. In this redbook, we focus on the features and functions ofDomino Designer, as well as the Domino Object Model.Domino Object ModelDomino offers a unified model for accessing its objects through back-endclasses, whether you use LotusScript® or Java. This allows you to switchprogramming languages without having to learn new ways to program forDomino. Refer to 14.2, “The Domino Object Model” on page 565, for moreinformation on the Domino Object Model.Live integration with enterprise dataDECS, or Domino Enterprise Connection Services, is part of the Domino Server.It is a Lotus-developed technology, first shipped with NotesPump™ 2.5, thatsupplies an easy-to-use, forms-based interface to achieve deep, integratedconnectivity to external data from Domino applications. This allows developers tomap fields in forms directly to fields in relational database tables, without storingany data within the Domino database.Chapter 1. What is Lotus Notes/Domino 5Scalability and reliabilityDomino Enterprise Server enables you to cluster up to six Domino servers toprovide both scalability and failover protection, in order to maximize theavailability of your groupware and messaging applications. Real-time replicationtechnology keeps the clustered servers synchronized.Note: A Domino server is not the same as a file server. A file server providesaccess to shared resources such as printers and applications, and also managesnetwork activity. Domino is an application-level server process that providesservices necessary for the effective management of communications andapplications.
1.2 Clients for Domino 6As with the previous release of Lotus Domino, Domino 6 continues to focus on its“ease of use” approach. Therefore it has numerous clients available to use, eachone designed to meet specific needs:_ Lotus Notes 6 client_ Domino Designer 6: the developer’s client_ Domino Administrator 6: the system administrator’s client_ Mobile clients (PDAs, Internet-enabled cellular phones)

_ iNotes Web Access_ iNotes for Microsoft Outlook_ Other POP/IMAP clientsMost of the functionality in Lotus Domino can also be accessed from Webbrowsers. The Lotus Domino server includes a Web administration client. In thefollowing section we give a brief overview of the clients.1.2.1 Lotus Notes 6Lotus Notes is the leading integrated e-mail and collaborative software for theInternet. Notes 6 offers an even more open, Web-like, customizable environmentthan was available in Notes R5. You can use Notes to send and receive Internetmail, schedule appointments, browse the Web, contribute to Internetnewsgroups, and take advantage of the Welcome page for tracking all yourimportant daily information. You can also use Notes 6 to create databases andbrowse existing Notes databases, as well to access Notes applications.6 Domino Designer 6: A Developer’s HandbookFollowing are some of the highlights of features that contribute to improvingNotes' ease of use:Welcome PageNotes R5 introduced the Welcome Page, which provides instant, customizableaccess to the things that are most important to you—mail, calendar, to do list,Web pages, whatever you want. For Notes 6, the default Welcome Page hasbeen redesigned to increase ease of use and make more of the featuresaccessible to you. New features include:_ Enhanced Welcome Page options and a new wizard that make it even easierto customize and personalize your Welcome Page_ A Tip of the Day that shows handy information about using the Notes client_ Increased content types, such as Notes database views and access todirectories on the file system_ On framed Welcome Pages, a “switcher” for dynamic switching of framecontent (for example, switching from your Inbox to your calendar within thesame frame)_ Welcome Page action buttons, for example, to create a new mail memo orcalendar entry_ A Preview Pane, similar to regular Notes databases_ The Launch Pad, for quick access to applications, everyday tasks, Noteslinks, and Web links_ Quick Notes, on the right-hand side of the screen, which allow you to createmail, contacts, journal entries, and reminders without having to open therespective databasesBookmarksBookmarks let you create links that point to Notes elements (for example: views,databases, and documents) or to Internet sites (for example: Web pages,newsgroups, and ftp sites). To create a bookmark, all you need to do is to drag adocument link or window tab to the Bookmark bar. Bookmarks in Notes 6 nowalso fully support drag-and-drop, which means that you can bookmark items fromthe file system, including Microsoft Word documents and presentation files, aswell as system folders.Other Notes 6 enhancements include a Startup folder and a History folder.The Startup folder allows you to bookmark databases, Web pages, even otherprograms that you would want to launch when you start your Notes client.Chapter 1. What is Lotus Notes/Domino 7The History folder shows you all the documents, views, databases, Web pages oranything else that you have opened in your client; refer to Figure 1-1 on page 7.Figure 1-1 The History folderThere are many other enhancements to bookmarks in Notes 6, and more

information can be found in the Lotus Notes 6 Help database.Mail, calendar, and schedulingThe Notes Calendar is a view in your mail database that you can use to manageyour time. You can keep track of meetings, appointments, anniversaries,reminders, and events. With Calendar, you can also check other peoples’schedules, invite them to a meeting, track their responses, and even reserve ameeting venue. You also have the option of allowing someone else to manageyour calendar (for example, a secretary).One of the new features in Mail is the unread mail count, which is displayed nextto each of your folders. It is now also much easier to customize your Inbox. Forexample, you can now reorder and sort the columns, as well as move the frame’sand previewpane’s borders. This feature has been applied to all views, not just tothe Inbox.8 Domino Designer 6: A Developer’s HandbookAnother useful feature is the Auto Inbox Refresh, which checks for new e-mailand automatically refreshes the Inbox. For details about all the new features inMail, consult the Notes 6 online help.Calendar views are now presented in a tabbed format to make it easier to switchbetween daily, weekly and monthly calendars. The calendar entry form has beenredesigned to include more tools on one form. All entries in the calendar are nowcolor-coded, so that it must simpler to distinguish between a meeting, anappointment and a reminder. Here are examples of other features included inNotes 6:_ iCalendar (Internet-standard calendaring and scheduling) and vCard(electronic business card) support_ Several new day, week, and month views_ Many new printing options, including the ability to print to a Notes document_ New formatting options for views: Summarize (for all views) and Show TimeSlots (for week and month views)_ Clickable month and year in the date chooser, so you can quickly changeeither the month, the year, or both_ A scroll bar at the bottom of the screen to quickly move to other dates in theview you're inDocument lockingNotes 6 includes a powerful new collaboration tool; you now have the ability tolock and unlock documents. When this feature is enabled on a database, userswith at least Author access are able to lock documents on any replica, preventingothers with the same access from modifying the document, even if they areworking on a different replica. Even managers of a database cannot edit a lockeddocument (although they are able to unlock documents). Database designerscan enable this feature in the Database properties box.1.2.2 Domino Designer 6Domino Designer 6 is used to create Domino applications. We focus on DominoDesigner 6 in this redbook; Chapter 2 is dedicated to an overview of DominoDesigner 6, and in other chapters we examine the various design elements anddescribe in detail how to program with Domino Designer.1.2.3 Domino Administrator 6The Domino Administrator is a powerful tool that allows you to perform all youradministrator tasks from one easy-to-use interface. Domino Administrator’sChapter 1. What is Lotus Notes/Domino 9integrated interface allows you to manage users, files, and servers. This is allpossible without the need to switch tools. The Domino Administrator istask-based. It has different tabs representing the logical grouping of administratortasks. Domino 6 includes a number of administration features that give youpowerful, centralized control over Domino, and reduces your administrative tasks.

Some of these powerful features include:_ Policy-based management_ Automatic client upgrades with Smart Upgrade_ Roaming user support_ Delegated server administration_ ASP administration_ Deployment of corporate Welcome pages_ Client version reporting_ Console innovations and improvements_ Statistics monitoring and analysisFor more details about the features found in Domino Administrator 6, see theonline help.Domino Administrator 6 is not a standalone client, but can be optionally installedwhen installing Notes 6 or Domino Server 6. As a developer, you will needDomino Administrator for certain tasks, such as signing a database. Using theJava-based Web Administrator client is an alternative to Domino Administratorclient. The Web Administrator client is new to Domino 6.1.2.4 Mobile clientsLotus Notes is the leader in mobility solutions. Lotus Mobile Notes is currentlypart of another Lotus Offering called Domino Everyplace. Mobile Notes, togetherwith Domino Everyplace, offers you access to your e-mail, calendars, directoriesand Domino-based applications from wireless devices such as PDAs andInternet-enabled phones.Mobile Notes offers a familiar menu structure, along with unified access to theNotes inbox from multiple clients. It comes with a menu that you can personalizeand customize, along with convenient Notes features, views, and reply optionsthat allow you to work productively while on the go. A feature designed for themobile user to view full or brief memos makes it more convenient and easier toview only the data that's needed. For more detailed information about using10 Domino Designer 6: A Developer’s HandbookDomino with mobile clients, see the IBM Redbook Lotus Mobile and WirelessSolutions, SG24-6525.1.2.5 iNotesiNotes delivers powerful Domino messaging, collaboration, and e-businesscapabilities to Web browser users. Plus, iNotes extends reliable, scalable, secureDomino messaging services to standards-based client and Microsoft Outlookusers. iNotes provides centralized management and deployment—andunmatched offline support. iNotes includes:_ iNotes Web Access_ iNotes Access for Microsoft OutlookiNotes Web AccessiNotes Web Access provides users with browser-based access to Notes Mail,and to Notes Calendar and Scheduling features. iNotes Web Access users cansend and receive mail, view their calendars, invite people to meetings, create todo lists, keep a notebook, and work offline. However, users cannot accessDomino databases other than their mail file.After being set up for iNotes Web Access, a user can use both the standardNotes Client and a Web browser to access their mail files. Because both theNotes Client and iNotes Web Access operate on the same underlying user mailfile, read and unread marks remain up to date, regardless of which Client theuser uses to read the mail. Users can also synchronize information in theirPersonal Address Book with information in their contact list in iNotes WebAccess.Other features include:_ Drag-and-drop to folders

_ Calendar and Scheduling improvements_ Lock down welcome page_ Rich text enhancements_ New UI refreshiNotes Access for Microsoft OutlookThis product simply allows you to connect to your Notes mail file through theMicrosoft Outlook client. The Microsoft Outlook user experience is unchangedwith iNotes Access for Outlook; users simply work with their mail, calendar, andtask data on Domino instead of Microsoft Exchange.Familiar Microsoft Outlook features are supported, including rich text, folders,and integration with Microsoft Office applications. You can now take advantage ofChapter 1. What is Lotus Notes/Domino 11the reliable and scalable Domino Messaging environment and all the valuablefeatures it has to offer.Other POP3/IMAP clientsiNotes 6 caters for most, if not all, Internet messaging standards. This means thatyou can access your e-mail using a third-party standards-based client.12 Domino Designer 6: A Developer’s Handbook© Copyright IBM Corp. 2002. All rights reserved. 13
Chapter 2. Lotus Domino DesignerThe Domino server and Domino Designer provide a world-class developmentplatform for applications, whether the applications will be accessed by Notesclients, Web browsers or mobile devices. In this chapter, we take a closer look atDomino Designer.
214 Domino Designer 6: A Developer’s Handbook
2.1 OverviewDomino enables you to build applications which facilitate the flow of informationbetween your organization’s enterprise systems and front-end businessprocesses.The Domino development environment offers you application services such asworkflow, directory, messaging, and security which can be used to create highvalue business solutions.The Domino Designer is an open application development environment that isintuitive and offers a high degree of developer productivity.In release 6, Notes and Web development experiences have been integrated,bringing native Web technologies to the Notes environment and extending nativeDomino Technologies to the Web environment. With Domino Designer, you writeyour application once to run in both a Web browser and the Notes client. Inaddition, you can write applications in JavaScript which will support both theNotes client and the Web browser.Domino Designer gives you the ability to build international applications withDomino Global WorkBench™ which contains a comprehensive set of tools toeasily create, synchronize, and manage multilingual Domino applications.
2.2 Working in Domino DesignerThis section gives you an overview of the user interface of Domino Designer. Asin Lotus Notes client, the workspace in Domino Designer is made up of severalpages where the Domino databases are displayed as icons. Databases are alsoaccessible through bookmarks, which could be located inside bookmark folders,

on the bookmark bar, or even inside documents.One of the features of the Programmer’s Pane is its sensitivity to context. You arevery often just one mouse-click away from the action you want to perform.2.2.1 Launching Domino DesignerIn order to start application development, you need to open a separate, client,Domino Designer.Chapter 2. Lotus Domino Designer 15There are three ways to start the Domino Designer:_ From an icon in Notes clientWhen you start Lotus Notes, your screen may look like the one shown inFigure 2-1 (unless you have specified Notes to use another Welcome page).In any case, on the left-hand side of the figure in the bookmarks bar, you cansee a highlighted icon. Click the icon to open the Domino Designer.Figure 2-1 Launching Domino Designer from Lotus Notes client_ Or, right-click a database icon in the workspace or window tab and selectDatabase - Open in Designer.This opens the Domino Designer with the specific database open._ Or, select the Windows Start button and then select Programs -> LotusApplication -> Domino Designer (or click the Domino Designer icon on yourWindows desktop).16 Domino Designer 6: A Developer’s Handbook
2.2.2 The Domino Designer clientWhen the Domino Designer is opened, it will show you a Welcome Page. Thefunctionality of the Welcome Page in Designer is similar to the page in the Notesclient. The default Welcome Page has links to most obvious tasks you wouldperform with Designer, such as creating a new database or opening an existingone; the page is shown in Figure 2-2.This page provides you an option to customize the page content. You can changethe content that is shown in the page by selecting one of the values of the Showme field, which is illustrated in Figure 2-2.There are four options that you can choose in the Show me field:_ Quick links for common tasks (the default option)_ Domino Objects for LotusScript and OLE_ Domino Objects for DXL Support_ JavaScript Object ModelThe first option shows the default page with common tasks, and each otherselection will change the page to show the object model of the language youselected on the field.Figure 2-2 Customizing the Welcome Page in DesignerChapter 2. Lotus Domino Designer 17Figure 2-3 shows the Welcome Page with a Domino Object Model. You caneasily see the different Domino classes and relation between them. What reallymakes the page so helpful is that you can click any of the classes displayed andopen the corresponding help document from the Lotus Domino Designer 6 Helpdatabase.Figure 2-3 Domino Object Model in Domino Designer2.2.3 The Design paneThe Design pane gives you easy access to the design elements of the databasesyou have worked on.Clicking the Recent Databases tab in the upper left corner of the Designerbookmarks bar brings the most recently used databases folder in to the Designpane.You can also create a new folder to hold the databases, you want. If you have anapplication that consists of more than one database, you can keep all of thosedatabases easily accessible from one central place by adding them to a Design

pane folder.18 Domino Designer 6: A Developer’s HandbookWithin each database, a Design list shows all the design elements and resourcetypes that a database can contain. A plus sign (+) to the left of a design elementtype (for example, Forms) indicates that it contains design elements.The Design list has the following functionality:_ Clicking the plus sign displays a list of the existing elements in the Design list.Five first elements are listed._ If there are more than five elements, small arrows appear and you can clickthose arrows to scroll the elements list._ Clicking an element type, such as Forms, will load the full list of elements tothe Work pane, which is on the right-hand side of the window._ Clicking a single element either in the Design list or in the Work pane willopen that element in the Work pane.Figure 2-4 shows some of the elements.Figure 2-4 Domino Designer pane overviewChapter 2. Lotus Domino Designer 19Following are some of the enhancements made to the Design pane in DominoDesigner 6:_ The elements list of the database you are working with has a lighterbackground than other databases, which makes it easy to see where you are._ The Design list is reorganized. Some of the design elements now are groupedin Shared Code and Shared Resource._ There are new Object Containers, such as Files, Style Sheets, and DataConnections._ There are new Library Types, such as JavaScript Libraries and Java Libraries.We cover all these new features in Chapter 12, “New features in Domino 6” onpage 347.From here, you can easily go to any of the design elements of an already listeddatabase in the area called the Work pane by simply clicking it.Clicking the push-pin in the upper right corner of the Databases list fixes the listto the screen and stops it from automatically hiding. Clicking the push-pin asecond time will cause the site database list to disappear when you click theprogrammer's pane.2.2.4 The tabbed windowsThe opened windows in Domino Designer are organized in window tabs thattrack where you’ve been.Figure 2-5 Window tabs in Domino DesignerIt’s easy to see what you previously opened, and to return to it quickly and easilyby clicking that tab. Also, because the tabs have text titles, you can easily closethe windows that you don’t want open without having them as the active windowon the desktop. Just click the small x to the right of the tab to close that window.In Designer 6, you can reorder windows by drag and drop. You can also mouseover a tab, which then displays text with the name of the server, location, andname of the database, as well as the type and name of the design element.Note: As soon as you open a Domino database, this database in Designer it isadded to the Recent databases list.20 Domino Designer 6: A Developer’s Handbook
2.2.5 The Bookmark foldersThe Bookmark folders feature lets you create folders and organize projects intothem, so you can quickly access databases. Figure 2-6 shows how to create aBookmark folder. The folders are shown as icons in the Bookmarks bar.Figure 2-6 Create Folder dialog boxTips:_ Using the window tabs is an easy way to cut and paste design elements or

parts of them between applications. You can copy some content from awindow, click to change to another window, and paste the content._ You can also use the keyboard to switch between windows.Using Ctrl+Tab allows you to move from window to window. To go to aspecific window, press Alt+W. Domino Designer then displays a number oneach window tab. Press the number displayed for the tab you want toselect. To select a bookmark icon, press Alt+B and select one of thedisplayed numbers.Chapter 2. Lotus Domino Designer 21You can also drag and drop database bookmarks into folders.2.2.6 The Design elements foldersThe Design elements folder feature lets you group and organize database designelements. In this way, for example, you can group elements the developers areworking on into several folders, one for each developer when a database is beingdeveloped by a team.To create a new Design element folder:1. Click any folder on the Bookmark bar to open it and select Create -> Folder(or, in the Design pane, click the folder icon. If the Design pane is not open,right-click the Recent databases or any other folder on the Bookmark barand select New Folder).2. In the Folder name text box, type a folder name.3. In the Select a location for the new folder list box, select the database in whichyou want to create the folder and click OK.Designer places the folder at the end of the database design element list. Youcan now add with design elements to this folder.To add a bookmark of a design element to a database folder:1. Click a design element icon to expand the design element list.2. From the expanded design element list, drag the design element to adatabase folder, or drag the design element Window tab to a database folder.Figure 2-7 Creating a folder and a folder is displayed in the Design pane22 Domino Designer 6: A Developer’s Handbook
2.2.7 The Properties dialogThe Properties dialog, also called InfoBox, is your most important tool forcontrolling the behavior of design elements.Every design element has at least two dialogs that display and set its properties.1. Properties for the Design Document.This displays properties that are common to all design elements, whetherthey are views, forms, pages, or something else. An example of a propertywould be hiding a design element from a Web browser.2. Each design element also has a dialog giving properties specific to the type ofdesign element (Form properties if the design element is a form, etcetera).Some design elements have additional properties dialogs for objectscontained within them, such as Field properties for a field on a form.To open a properties dialog at any time, press Alt+Enter. This will open a dialogappropriate to the context (for example, if a view column is selected, you’ll seethe view column properties).The dialog contains a drop-down list of all the properties dialogs available at thatpoint (for example, if view Column properties are displayed, you can pull down toselect View or Database properties instead).While the properties box is selected as the active window, pressing F1 or clickingon the question mark icon will open a window with help information related to thatelement.Design Document Properties dialogThe Design Document properties are only available from the work pane when alist of design elements is displayed there, as shown in Figure 2-8 on page 23.

Like the document properties dialog in the Notes client, the properties of thehighlighted design element are displayed (in this case, for a form). The dialog hasfour tabs, as shown in the figure.Chapter 2. Lotus Domino Designer 23Figure 2-8 Design Document propertiesInfo tabThe Info tab, shown in Figure 2-9, displays statistics such as when the designelement was last modified and by whom.Figure 2-9 Info tabFields tabThe Fields tab (triangle icon), shown in Figure 2-10 on page 24, gives the namesand values of the fields that contain the design information. This is internalinformation that a beginning developer will have no need to look at. However,sometimes it is useful to look at the value or the type of a field using this tab.24 Domino Designer 6: A Developer’s HandbookFigure 2-10 Fields tabDesign tabThe design tab (t-square icon) is the only tab containing properties you can set.As described in 3.1.1, “Creating a database” on page 48, when inheriting yourdesign from a template, you can either inherit the entire design, or only individualdesign elements.The design tab, shown in Figure 2-11 on page 25, lets you control the inheritanceof a single design element. You can either enter the template name of a templatefrom which you want to inherit the design of this element, or check the box thatexempts this element from being updated when the design of the database as awhole is updated.This dialog also contains a check box to select that the design element should behidden from Web browsers, the Notes client, or mobile devices. This is usefulwhen creating multiple client applications, which frequently require a differentdesign element for different clients. For instance, you might have three differentforms with the same name, one for Notes clients only, one for the Web only, andone for mobile clients only.The language section at the bottom of this dialog is only visible if you’ve enabledthe Multilingual database property of the database. This lets you select whatlanguage the design element is in. To use this feature, you would have severaldesign elements with the same alias, one for each language your applicationsupports.Notes responds to each user’s language preference in their Notes client by usingthe design element that’s in their selected language. If no design element isavailable in their language, the default language is used.Chapter 2. Lotus Domino Designer 25Figure 2-11 Design tabDocument IDs tabThe Document IDs tab (propeller beanie icon), shown in Figure 2-12, gives thenote ID and universal ID of the design element. Like Notes documents, Notesdesign elements each have these two unique IDs. Ordinarily, you will not needthis information to design applications in Notes.Figure 2-12 ID tabDesign element propertiesTo open the properties dialog (the InfoBox) for the specific type of designelement, you must have that design element open in the work pane, not justselected in the design element view. For instance, Figure 2-13 on page 26 showsthe View properties dialog for a view whose design is being edited. Use one ofthe following options to bring up the properties box._ Press Alt+Enter.

_ Select the appropriate entry from the Design menu (for example, FormProperties... or Field Properties...)._ Right-click the element in the work pane to click the appropriate propertiesmenu entry._ Click the Display InfoBox icon, which is on the left-hand side of the icon bar,by default.26 Domino Designer 6: A Developer’s HandbookEach different type of design element, or object contained in a design element,has a different set of properties associated with it. These are described in thechapters about the specific design elements.Figure 2-13 View properties dialogThe pull-down list at the top of the properties dialog is set to View in this picture.You could instead select Database (which is always available as a choice) or, inthis case, Column, to see the properties of the “Object Title” column which ishighlighted.The options on the list are dependent on where you are in the Designer. Forexample, if you have selected a field on a form, the list contains field, text andform in addition to database. Double-clicking a column heading or other objectthat’s contained in the design element, such as a field on a form, will generallydisplay properties for that object.2.2.8 Design element lockingDesign element locking lets you avoid the problems you might encounter whenmore than one developer works on the same database and with the same designelements.Chapter 2. Lotus Domino Designer 27There are two type of locking you can specify:_ Explicit lock_ Temporary lockExplicit lockIf you work on a team and want to ensure that other designers cannot modifydesign elements that you are working with, you can explicitly lock them. Whenyou have finished working with the design elements and want to release them sothat others can modify them, you can unlock them.Temporary lockA design element that is not explicitly locked is always temporarily locked while itis being edited. If another developer tries to open the same design element, amessage is displayed telling the developer that the element is already open. Afterthe designer has finished editing the design element, the temporary lock isreleased.2.2.9 The Launch buttonsThe Domino Designer 6 interface has a set of Launch buttons in the icon bar, asshown in Figure 2-14.Figure 2-14 .The Launch buttons in Domino DesignerSome of these buttons allow you to easily preview the results of your designchanges. The following tools are available for previewing:_ Notes Client -Click the Notes client button, which is the leftmost button._ Domino Web Browser - Click the Domino Web browser button, which is thesecond leftmost button._ External Web Browser - Click the button showing the symbol of the installedbrowser(s).Note: To be able to set the lock in some database design element, you mustfirst set Allow Design Locking in the Database Properties. To learn how to dothis, refer to 12.1.9, “Design element locking” on page 358.28 Domino Designer 6: A Developer’s HandbookThe button displayed to the left of the preview tools buttons (refer to Figure 2-14)

will launch the InfoBox for the selected design element.2.2.10 The Programmer’s PaneThe Programmer’s Pane is made up of two parts:_ Info list_ Script areaIn the info list you can select one of two views:_ Objects view_ Reference viewThe Objects viewThe Objects view gives you immediate access to any design element in yourapplication and its associated events and attributes.An icon identifies the language supported by each element event. DominoDesigner provides different programmable events to handle both Lotus Notesclient and Web browsers events. When an event icon is an empty figure, it meansthe event doesn’t have any programming code. When an event icon is a fullfigure, it means the event does have some programming code; see Figure 2-15on page 29.When an event is chosen by the developer, the Programmer’s Pane will reflectthese event, showing the appropriate language and supported clients.Note: The symbol shown for the external Web browser depends on theinstalled browser. For example, if you have two browsers installed, you will seetwo buttons for the external browsers.Chapter 2. Lotus Domino Designer 29Figure 2-15 Objects viewYou can easily navigate through the list by clicking the plus (+) sign and minus (-)sign to expand or collapse the displayed list for a design element.The small icon in front of the name of the event indicates the programminglanguage used on that event.The Reference viewThe Reference view, shown in Figure 2-16 on page 30, is similar to the Objectsview. It provides context-sensitive information based on the type of programmingyou are using. For example, if you are programming in LotusScript, theReference view will show information about Domino objects. You can paste thefunction or method into the Script area, in some cases, with the parameters.30 Domino Designer 6: A Developer’s HandbookFigure 2-16 The Reference viewThe Script areaDepending on the selection you make in the Objects view, the appropriate inputwindow is presented in the Script area, as shown in Figure 2-17 on page 31.Using the Design Pane property box, you can adjust the settings to your needs(for example, to change the text formatting for identifiers, keywords, andcomments).Domino 6 has also a new feature, auto complete, which will look up and paste thesyntax elements directly into the Script area as you start to enter your code. See12.7, “Auto complete” on page 399, for information on enabling and using thisfeature.Note: Use the Reference view as a quick way to get programming help.Chapter 2. Lotus Domino Designer 31Figure 2-17 The Script area
2.3 Domino Design elementsAs a developer of Domino applications, you will work with the Domino Designelements to build your application. The following section gives a brief overview ofthe design elements. Most of these elements are covered in their own chapters inthis book; the remaining ones are covered in Chapter 12, “New features in

Domino 6” on page 347.2.3.1 The Domino databaseA Domino database is a collection of related information stored in a single file. ADomino application uses at least one database. It’s a .NSF file (meaning NotesStorage Facility). However, applications of a more complex nature may useseveral databases and may route information between databases on one ormore servers.A database holds information about its design (see the description of the Dominodesign elements below), as well as data. Domino data is organized asdocuments. A document is defined as an object containing text, graphics, video,or audio objects, or any other kind of “rich text” data.2.3.2 FramesetFrameset is a collection of frames that you can use to add structure to your Website or Notes database. The frameset designer provides visual tools and wizardsto easily create multipaned interfaces for Domino applications.32 Domino Designer 6: A Developer’s HandbookFramesets provide a standard way to set up a multipane interface for the user.The Frameset designer enables you to create framesets and then associatespecific pages, views, forms, Java applets, ActiveX components, or any URL witheach frame.2.3.3 PagesA page is a design element that displays information to users. It is similar to aform except that it does not contain fields or subforms. Using the Page designer,you can create or import HTML Web pages. Page designer is a WYSIWYGHTML authoring tool that provides support for a broad range of browsertechnologies including HTML 4, image file formats, Java applets, ActiveXcomponents, and multimedia objects. You can create or edit HTML in the Pagedesigner by using the WYSIWYG editor, by writing HTML source code, or bymixing both in a single page.The Page designer provides you with a much improved level of control over thelayout of your Web pages. You no longer have to work directly in HTML to createsophisticated page design and layout (although working directly in HTML is stillan option).2.3.4 FormsA form is a framework for entering and viewing information in a database. ANotes database contains documents created from one or more forms. A form cancontain:_ Fields that store data._ Text that labels fields or gives instructions._ Subforms that store a collection of form elements that you want to use onmore than one form._ Layout regions that combine graphics and fields in a way that affords greaterdesign flexibility._ Graphics that make forms easier to understand._ Tables that summarize or organize information._ Objects (OLE, Subscriptions, Notes/FX™ fields), file attachments, URLs, andlinks that extend the reach of Notes documents. For more information onthese features, refer to the Domino Designer 6 Help database._ Actions and buttons that perform functions automatically._ Background color and graphics that enhance the look of a document._ Embbeded Elements to include other design elements in a form.Chapter 2. Lotus Domino Designer 33FieldsFields are the individual elements on a form that store data. Fields determine

what data a single document can contain when the document is created with thatform. Each field in a document stores a particular kind of data, such as text,numbers, dates, or user names. Often users can enter and edit field values, butsometimes data is filled in or changed automatically.The contents of a field can be displayed in documents and views, or can beretrieved for use in formulas. A field can be defined for use on a single form, orcan be defined to be shared among multiple forms in a database.2.3.5 ViewsA view is a list of documents in a database. Depending on the selection criteria,you can display all documents of a database, or a subset. The documents maybe grouped or sorted based on their contents. Usually, the most importantinformation contained in a document is shown in a view, too.2.3.6 FoldersFolders are structurally similar to a view. They list documents, but folders do nothave a selection criteria; rather, the user decides on which documents are storedin folders. Folders can be private or shared.2.3.7 Shared codeIn the following sections we introduce the Domino code and design elements thatcan be shared among databases.AgentsAgents allow you to automate many tasks within Domino. They are standaloneprograms that perform a specific task in a database for the user, for example,filing documents, changing field values, sending mail messages, deletingdocuments, or performing more powerful actions, such as interacting withexternal applications.Agents can also be set to run unattended on the server, either on a schedule orwhen certain events occur.OutlinesOutlines, like image maps and navigators, provide a way for users to navigate anapplication. Unlike image maps or navigators, outlines let you maintain anavigational structure in only one place. As your site or application changes, you34 Domino Designer 6: A Developer’s Handbookmake only one change in the source outline. Each navigational structure thatuses that outline source is dynamically updated.You can create an outline that lets users navigate to the views and folders in yourdatabase, perform actions, or link to other elements or URLs outside of yourapplication. You can create an outline that navigates through your entireapplication or site, or through part of it.Once you create the source outline, you embed it on a page or form to create anoutline control. This displays it to users as a site map or navigational structure.Users can click the outline entries to take them where you want them to go.SubformsA subform is a horizontal slice of a form that you can use in more than one form.For example, you might create a corporate letterhead in a subform, and then usethe subform on a variety of business forms. Subforms can contain the sameelements as a regular form. Subforms can be loaded on a form based on aformula.Shared fieldsShared fields behave like fields, but may be used in different forms. If you changethe properties of a shared field, the changes are promoted to all occurrences ofthis field.ActionsAction buttons provide one-click shortcuts for routine tasks, and substitutes for

menu choices. For example, they might allow users to compose, print, delete, orcategorize documents, or to give Web users who don’t have access to the Notesmenus a way to click to edit, save, or close documents.Actions can be shared and used on views, subforms and forms.Script librariesA script library is a central place for storing code to be shared. See 2.4.4,“LotusScript, JavaScript and Java libraries” on page 37, “New library type” onpage 350 and 12.3.2, “Shared Code” on page 367, for more detailed informationabout script libraries and what’s new about them in Domino 6.2.3.8 Shared resourcesShared resources contain design elements that can be shared among databases.Chapter 2. Lotus Domino Designer 35ImagesYou can import any image file to your databases, and then use them throughoutyour applications.FilesYou can import any file to your databases, and then use them throughout theapplications. An example of a file to be imported could be an HTML file.AppletsJava applets are mostly used for providing the user an advanced user interface.They are often used by Web browsers, but you can use applets for the Notesclient, including the applet in a form, document or page. Use your favorite Javaprogramming environment to create the applet, and you can then make theapplet available for your applications by importing it as a shared resourceData connectionsThe data connection resource is a design element where you can define aconnection from a Domino database to a relational database.Style sheetsStyle sheets give you the ability to control many aspects of your interface layout,including headers, links, text, fonts, styles, color, and margins. Create the stylesheet with your favorite editor, import it as a shared resource in DominoDesigner, and it will then be available for use throughout the databases.2.3.9 OtherDesign SynopsisDesign Synopsis is a tool to generate a detailed report on a specific database. Itcovers every component of the application. It can be used, for example, for aarchive proposal (to track database design versions, and to find specificinformation inside some design element).You can set which information you want in the report and what kind of output youwant, as well. This output is customizable and can be displayed in a singledocument or in a database to be used at a later time.NavigatorsNavigators are graphics where you can include programmed areas, or hotspots,that are used for navigation. Hotspots usually direct the user to another part ofthe database or Web site.36 Domino Designer 6: A Developer’s Handbook
IconYou can create an icon for your database to visually represent the purpose of thedatabase. This icon is shown, together with the bookmark, on the Bookmarksbar, workspace and—when you have the database open—on a Window tab. Youcan create the icon in your favorite graphics editor and paste it into the Designer,or create the icon in the Designer. The size of the icon is 32*32 pixels.About This Database and Using This Database documents

These two special documents are meant to be used for providing information forthe user about the database.The About This Database document is used to describe the purpose of adatabase, as well as the target audience of the database. You can specify theAbout document to open automatically when a user opens the database.The Using This Database document is used to give an overview of the database,as well as instructions on how to use the database. It is also useful for providinginstructions and descriptions about forms and views in the database.To display these documents, choose Help - About This Database, or Help -Using This Database.
2.4 New elements of Domino Designer 6There are many enhancements in Domino Designer 6 which both maintain itsplace as an integrated, high level, rapid software development platform for theNotes client and Web browser, and make it an increasingly useful tool fordeveloping applications that target other clients, such as PDAs andInternet-enabled phones, as Domino itself has evolved into a universal enterpriseapplication server.In this section, we briefly describe some new elements of Domino Designer 6. InChapter 12, “New features in Domino 6” on page 347, we provide detailedexplanations of all the new features.2.4.1 Cascading style sheet (CSS)Cascading style sheet (CSS) give you the ability to control many aspects of yourinterface layout, including headers, links, text, fonts, styles, color, and margins.You can browse your local file system for a CSS, turn it into a shared resource,and then insert it into a page, form, or subform.Chapter 2. Lotus Domino Designer 372.4.2 LayersA layer is not a design element you can create on a database level; you create itinside a page, form of subform. Layers let you position overlapping blocks ofcontent on a page, form, or subform. Layers give you design flexibility becauseyou can control the placement, size, and content of information. You can createand stack multiple layers beneath and above one another. Transparent layersreveal layers underneath; opaque layers conceal layers underneath.The content of a layer depends on whether you create a layer on a page or aform. When you create a layer on a page, a layer can contain the same elementsthat a page can contain; for example, you can add text and graphics, and so on.When you create a layer on a form, a layer can contain the same elements that aform can contain; for example, you can add text and graphics, as well ascontrolled-access sections, fields, and subforms.2.4.3 Shared code and shared resourcesEach database can contain its own library of shared code and shared resources,and you can access shared elements in other databases. Sharing elements letsyou reference a resource repeatedly throughout an application, while only havingto maintain in one standard place. For example, if you use your company logo inmany places throughout your application and the design of your logo changes,you need only change it once, in the image resource, and the change will beimplemented everywhere that image is referenced.With shared code and resources, you could also make a database that is centralstorage for certain type of element or elements. Then you can just reference theelements from other database. An example of such a database could be anImage Resources Bank database.2.4.4 LotusScript, JavaScript and Java librariesA script library is a place for storing code that can be shared in the currentapplication using LotusScript, JavaScript, and Java—or in other applications

using JavaScript and Java. Using script libraries allows you to maintain code inone place.2.4.5 Data connectionsData connection resource (DCR) is new to Domino 6. DCR is a design elementwhere you can define a connection from Domino database to a relationaldatabase. This functionality is also available via DECS.38 Domino Designer 6: A Developer’s Handbook
2.4.6 DXL utilitiesThe XML representation of Domino data is known as DXL. DXL describesDomino-specific data and design elements such as embedded views, forms, anddocuments. As XML becomes the standard basis for exchanging information,DXL provides a basis for importing and exporting XML representations of data toand from a Domino application.With DXL utilities, you can view and export your Domino design elements. Youcan also transform to another format using the Transformer utility and a XSL stylesheet file. XSL file contains the formatting for the XML data.2.4.7 JSP custom tag librariesWith JSP technology, developers can create Web pages that have dynamiccontent. This is a quick and efficient way to incorporate complex Javaprogramming into your pages. JSP tag libraries contain JSP tags, which aresimilar HTML tags except that, instead of describing how to present the content,contain a reference to a Java class.JSP Custom Tag Libraries that ship with Domino lets you access Domino objectsfrom Web pages. This means that someone without expert Java or Dominoprogramming could easily add a tag to a Web page which could, for example,display a Domino view for the end user.
2.5 Industry Standards supportEnvironments for developing e-business applications must support the “standard”Web programming and scripting languages including Java, JavaScript, CSS,Servlets, HTML and XML. Domino Designer provides support of these Webstandards.Within the Designer Programmer’s Pane, you have new choices of languages forwriting and compiling code. Java is available for creating Domino agents andScript Libraries, which are server-side applications that are initiated based uponevents or schedules. Designer supports JavaScript in conjunction with a subsetof the Document Object Model, a standard drafted by the World Wide WebConsortium (W3C).In addition, you can code in HTML directly in the Page designer and Formsdesigner, format the interface with CSS, exchange external data with XML,provide dynamic information with JSP Tags and run Servlets in a compliancemode with the J2EE Internet application development standard.Chapter 2. Lotus Domino Designer 39Domino Designer also supports CORBA/IIOP for creating distributedapplications. With Domino CORBA objects, you can write Java applications andJava applets that remotely access Domino services and data. Through thesupport of industry standards in the Domino Web application server and inDomino Designer, you are able to lower your cost of ownership and applicationmaintenance by leveraging your existing developer skills.
2.6 Multi-client applications supportOne benefit of Domino Designer is that you are able to develop a singleapplication that runs in the Notes client, Web browsers, and mobile clients. TheDesigner now supports the latest Web standards including HTML 4.01,JavaScript 1.3, XML, JSP Tags, and Java. In addition, some Domino designelements are available as Java applets. This provides functionality, previously

available only in Notes clients, to Web browsers. Furthermore, the CORBA/IIOPdistributed object technology is supported in Domino, providing an alternative toNotes Remote Procedure Call (RPC) for communicating between clients and theserver.
2.7 Multilingual applications supportWith Domino Global WorkBench, you can create multilingual Web sites right outof the box. The strengths of Domino Global WorkBench reside in better enablingand serving multilingual multinational corporations and Web site developers whoare implementing and rolling out Domino-based multilingual applications for useon the World Wide Web or on a Notes Network. Domino Global WorkBench turnsDomino servers into an intelligent language server for the Web.Domino Global WorkBench lets you localize the Web infrastructure, define theinitial sets of languages supported in the Web site, and define the high level ofsynchronization between forms and pages across languages. By allowing you tolocalize all user-visible elements of an application, including field labels, buttons,bitmaps, and dialog boxes, as well as actual content, an application can beoptimized for each individual user who can select their language of choice at runtime.You can create the design of a Web site in more than one language with DominoGlobal WorkBench by resourcing/localizing Notes design elements and objectsstored in the Notes object store environment, and the development languagesincluding HTML, LotusScript, or JavaScript. Domino Global WorkBenchfacilitates review and approval of localized documents through workflow process40 Domino Designer 6: A Developer’s Handbookand ensures accurate linking and synchronizing of pages available in differentlanguages, enabling content to appear simultaneously to all users worldwide.
2.8 Easy access to enterprise data and applicationsIncorporating back-end data into everyday business processes maximizes thevalue of Domino applications. Domino applications provide core technologies forthe security and control of business processes, forms routing, and approvalsmanagement. With new enterprise integration technologies, Domino applicationsare now able to incorporate traditionally difficult to reach data into thoseapplications, becoming a key component of managed business processes.Domino includes the ability to create Web applications that contain connectors torelational databases (for example, DB/2 and Oracle), Enterprise ResourcePlanning systems (for example, SAP/R3), and transaction systems (for example,CICS, IBM MQSeries, and IMS). You can accomplish this eitherprogrammatically or with visual tools to native database drivers.Domino Enterprise Connection Services (DECS) offers developers a visual tooland high performance server environment used to create Web applications thatprovide live, native access to enterprise data and applications. The visual toolpresents an application wizard and online documentation to assist you to defineexternal data source connections—DB2, Oracle, Sybase, text-based files,EDA/SQL, SAP/R3 and ODBC—and fields within the Domino application that willbe automatically updated with external connector data.New Domino classes for enterprise data access will be available in LotusScriptand Java, such as NotesStream/lotus.domino.Stream andNotesMIMEHeader/lotus.domino.MIMEHeader, respectively LotusScript classand Java class. These classes enable you to customize applications toincorporate information from relational databases, transaction systems, and ERPapplications from Domino according to your business needs.The Domino driver for JDBC, providing standard JDBC access to data in Dominodatabases, is also available. Using this driver, you can write Java applets and

applications that use JDBC to access information in Domino databases.Domino Connectors are modules that provide native connectivity to externalsources such as relational database, ERP, or transaction systems. Theseconnectors can be accessed through the forms-based development tool inDECS, or through the new Domino object classes using LotusScript or Javalanguages.Chapter 2. Lotus Domino Designer 41Data Connection Resources (DCR) is a new feature in Designer 6 that allows youto handle DECS functionality directly in Designer, allowing you to link someNotes fields with external database fields. DCRs are reusable in an applicationand can be shared across applications; see “Data connections” on page 366 formore information.Lotus Enterprise Integrator (LEI), which is available separately, extends DECSfunctionality beyond real-time data sources to include support for high volumedata transfer and synchronization. LEI provides visual tools to manageintegration between data sources without programming, including the capabilityto initiate event-driven or scheduled high volume data transfers between Dominoapplications and relational databases and other enterprise applications. LEI alsosupports programmatic data transfers via LotusScript and Java Classes.The LEI release 6 is an important release of LEI and is closely coupled with therelease of Domino 6. There have been ongoing improvements in “classic” LEI,most of which are available in the last release of LEI 3.2. The exciting part is thenew Virtual Activities, which have long been talked about as virtual views. Thereare three of them: Virtual Fields (“classic” RealTime), Virtual Documents, andVirtual Agents. Back on the “classic” side, there are significant changes in theuser interface, particularly for Replication Activities, that make them easier use.
2.9 Developing for mixed releases of clientsIn this section we describe what you need to consider when you are developingan application which will be used with different releases of Notes clients, forexample with Notes R4.6, Notes R5, and Notes 6.After upgrading a server to Lotus Domino 6, you can upgrade the databases onthat server to the Domino 6 database format and design (template). These twosteps—upgrading database format and upgrading database design—areindependent of each other. Because database format does not replicate, you canleave the design of a database based on a Domino 4.6 or Domino 5 template,and upgrade the database format on that server to the Domino 6 format.If you decide to upgrade the database design to use Domino 6 templates andfeatures, be aware that Notes 4.6 and Notes 5 clients cannot use Notes/Domino6 features. Some Domino 6 features and templates require that a database usethe Domino 6 database format.Note: When using the Domino Designer 6 client to create applications, youshould know who your clients are. Notes/Domino 6 have several new featuresand upgrades, explained in Chapter 12, “New features in Domino 6” onpage 347. If you use these new features, and your client are still on a version42 Domino Designer 6: A Developer’s Handbookprior to Notes/Domino 6 (for example, R5), then part of your application will notwork properly, because their client does not support your features.2.9.1 On-Disk StructureOn-Disk Structure (ODS) is the way data is written to disk storage. Every majorrelease of Notes\Domino has included significant architectural changes to thedatabase structure. These changes to the ODS provide you with significantbenefits (new features) with very low risk.Table 2-1 lists the ODS versions related to Domino releases.Table 2-1 ODS version on different Domino releasesIf your clients use releases of Notes before Notes/Domino 6, and the
Notes/Domino 6 application with ODS 43 is located on a Domino 6 server, thenR4/R5 clients should have no problem accessing this database on the Domino 6Server. If the user replicates this database locally onto their R4/R5 client, thelocal replica will automatically be converted to earlier version. The ODS versiondoes not replicate.Upgrading the database to the new ODS is simple: you compact the database ona Domino 6 server or Notes 6 client and the database ODS will be upgraded. Inaddition, when you create a new replica, a new database or a new databasecopy, the new database will have the new ODS version.If, however, you don’t want to have the database in Domino 6 ODS version forsome reason, you can revert the database to an earlier ODS version. However,Attention: We recommend that you develop the applications with a DominoDesigner version that is on the same level as the oldest client version you haveto support. If you are unable to do that, then at a minimum you should testyour application with that client version thoroughly.Your Domino server should be on the same release version as your Designer.Some of the functionality of your application might not work as desired if theserver is on a release prior to the Designer.Domino release level On-Disk Structure level Server output versionNotes R3.x 17 V3Notes/Domino R4.x 20 V4Notes/Domino R5.x 41 V5Notes/Domino 6 43 V6Chapter 2. Lotus Domino Designer 43by doing this you lose some of the new database features, such as LZ1compression (the new enhanced compression method) or view logging. Some ofthe new features, such as document locking, will still be available. If some of thenew database features are obligatory for you, experiment to see if those are stillavailable after the ODS has been reverted.To revert the ODS version back to the R5 format, you have three options:1. Create a new copy of the database (using the Notes client), and use theextension .ns5 for the database; see Figure 2-18.To force the ODS version to remain on R5 level, you can specify .ns5 as thedatabase extension when you create the database, The extension will onlyaffect the ODS and make it stay at ODS version 41 (R5); it will not affect thenew Domino 6 features (for example, new elements) you are using. So thefeatures used will still be unavailable for earlier versions of Notes, but theyare available for Notes 6 clients.Figure 2-18 New copy with extension .ns5Note: Changing the file extension on the operating system level does notconvert the ODS of the database.44 Domino Designer 6: A Developer’s Handbook2. Alternatively, you can use the Administrator 6 client, and compact thedatabase back to the old ODS version. This is done using a tool found on thefiles tab in the administrator client.Select the Compact tool, as shown in Figure 2-19.Figure 2-19 Compact tool in Administrator clientChapter 2. Lotus Domino Designer 45Then select Keep or revert database back to R5 format. This sequence isshown in Figure 2-20.Figure 2-20 Reverting the ODS version3. The third option is to run a server console command:load compact path/database -r46 Domino Designer 6: A Developer’s Handbook© Copyright IBM Corp. 2002. All rights reserved. 47

Chapter 3. Domino Design elements:basicsIn this chapter, we describe how to create and manage Domino databases. Weinclude a glossary of Domino Design terms that application developers need tounderstand when creating a Domino application.
348 Domino Designer 6: A Developer’s Handbook
3.1 Domino databasesThe term “Domino database” refers to both Domino and Web databases. Whatmakes it a “Web” database is the viewing mechanism—a Web browser instead ofa Notes client, and the fact that it resides on a Domino server running the HTTPserver task.Traditional Web sites consist of different kinds of pages and associatedcompound elements, which are organized in hierarchical directory structures.When an HTTP request is issued to display a page, a new HTML coded file isopened.With Domino, the Web site is structured through Notes databases designed inthe Notes object store format. When an HTTP request is issued to display apage, a Notes element is opened through a Universal Resource Locator (URL)command and Domino translates it for viewing as a Web page.3.1.1 Creating a databaseThere are several different ways to create a database. You can:_ Use an existing template_ Use an existing database_ Create a new databaseOnce the database is created, you can modify most of the settings by using theDatabase InfoBox. We cover these options in 3.1.2, “Changing the databaseproperties” on page 59.Using an existing templateDomino 6 provides a series of written applications that can be used orcustomized for your own needs. Although there are many types of popularapplication templates, they are mainly designed to reveal the underlyingtechnology and development capabilities within Domino 6. Their main intent isnot to be “out-of-the-box” applications.If your application is identical, or similar to, an existing template provided withDomino, the most convenient way to create a new database is to use thattemplate as your starting point. Most of the design work has already been donefor you. The design elements of the individual templates can easily be copiedand pasted into your custom applications.Chapter 3. Domino Design elements: basics 49Following are some of the most useful application templates shipped withDomino 6:_ Discussion - this is a discussion database for both Notes and Web clients,where users can create new discussion topics and others can reply to them.The discussion database template is also often used to create a ClassifiedAds database._ Doc Library - this is a document library for both Notes and Web clients, whichcan be used to store all kind documentation, instructions, manuals or

technical details. It is often used to create a database containing HumanResource information, travel guidelines, or equipment information. Thetemplate also contains Document Review Cycle functionality, which allowsmoving the document from user to user for reviews._ Lotus SmartSuite Library - this is a document library template with LotusSmartSuite integration. Users can create documents using one of theSmartSuite products, like 1-2-3, WordPro, or Freelance Graphics and the filesare saved inside the Domino database._ Microsoft Office Library - this is a document library template with MicrosoftOffice integration. Users can create documents using one of the MS Officeproducts, like Word or Excel, and the files are saved inside the Dominodatabase._ TeamRoom - this is a very useful application for enabling communication andsharing database among the team. Users can utilize the rich set offunctionality the application has, such as discussion, creating and sharingdocuments, creating meeting minutes, assigning action items and teamcalendar.Listing available templatesTo see the list of available templates, follow these steps:1. Choose File -> Database -> New. The list box on the New Database dialogbox lists several templates.2. Click the Show advanced templates check box. The list box at the bottom ofthe list displays additional templates. The templates listed are stored on yourlocal workstation.3. Select any template.4. Click the About button to display the database Help document. It summarizeswhat the database can be used for.Tip: The shortcut is Ctrl+N.50 Domino Designer 6: A Developer’s HandbookTo see additional templates stored on a server, select the server you want toaccess from the Template server drop-down list.Creating the databaseFollow these steps to create the database:1. Decide if the database will reside on your local workstation or on a server.2. In the Title field, specify a meaningful title.3. In the File Name field, specify a file name for the database. You can also takethe file name that Domino provides automatically based on the database title.Figure 3-1 shows an example of a completed New Database dialog box.Figure 3-1 Creating a new database4. You can encrypt local databases to protect confidential data. This is useful ifusers have laptops that will be taken out of their business locations.To specify encryption, click Encryption. Specify the appropriate level ofencryption.Note: The extension for a database file is .NSF (for Notes Storage Facility).The extension for a database template file is .NTF (for Notes TemplateFacility).Chapter 3. Domino Design elements: basics 51Figure 3-2 shows an example of a new Encryption setting.Figure 3-2 New database Encryption settingOnly the user shown in the Encryption window has access to the localdatabase after it is encrypted.You should set the size limit only if you are developing an application for usewith Lotus Notes and Domino 4.x, or if you will be on a Domino 4.x server.The maximum size for database in Domino R4 was 4 GB. In Domino 6, thesize of the database is only limited to what your operating system can

support, up to 64 GB.Note: The size button that was visible in earlier releases of Domino is nowhidden if the file extension is .nsf. If you change the file extension to .nsf4, thesize button will become visible again, as shown in Figure 3-3 on page 52.Note: Although others can’t access the encrypted database locally, theycan still access the database if it is on a server. This also applies to Webusers.If you would like to deny access to other users, use the Access Control List.52 Domino Designer 6: A Developer’s HandbookFigure 3-3 Size limit button visibleClicking this button allows you to set the size limit of the new database; seeFigure 3-4.Figure 3-4 Size limit for new databasesIf you want to set a size limit to a database in Domino 6, use the Set sizequota feature with Domino Administration Client (see the Lotus DominoAdministrator 6 Help for more information).5. If you want your new database design to stay synchronized with the designtemplate, check the option “Inherit future design changes” in the NewDatabase dialog box.Note: “Inherit future design changes” is shaded until you select a templatefrom which your database should inherit design changes.Chapter 3. Domino Design elements: basics 536. For advanced options, click Advanced. Figure 3-5 shows the dialog box thatwill be displayed.Figure 3-5 Advanced Database Options dialog boxLet’s take a closer look at each option:– Don't maintain unread marksMaintaining unread marks in a database slows performance. For somedatabases, such as the Domino Directory or the Domino log file, unreadmarks are not useful. However, in many applications, such as discussiondatabases and document libraries, the unread marks are essentialfunctionality to the application. Your decision regarding this propertyshould be based on what your database is used for.If you do not need to track read and unread documents, consider disablingunread marks in the database to improve performance.– Document Table bitmap optimizationNotes refers to tables of document information to determine whichdocuments appear in an updated view. Selecting this property associatestables with the forms used by documents in each table.During a view update, Notes searches only tables whose views containforms used by documents in that view. While there is a slight performancecost to maintaining this association, this setting significantly speeds54 Domino Designer 6: A Developer’s Handbookupdates of small views in large databases. To enable optimization usingthe table-form association, select this property.When you change this setting, compact the database to enable it. Makesure your system has sufficient disk space, as this compact makes atemporary copy of the database. (You can also use the load compactcommand with the -F or -f switch to enable or disable bitmapoptimization.)– Don't overwrite Free spaceTo prevent unauthorized users from accessing data, Notes overwritesdeleted data in databases, which can reduce database performance. Insome situations, this security feature is not necessary, such as when:• The database is physically secure (for example, on apassword-protected server in a locked room).

• Space in the database is quickly reallocated (for example, in systemdatabases such as MAIL.BOX).• Security is not an issue (for example, in an employee discussiondatabase).• The database is encrypted.– Maintain Last Accessed PropertyDomino databases store the date when a document was last modified orread. By default, the database records only changes to documents—notreads.If you select this property, the database records reads of a document, aswell as changes to the document.Tip: Document Table bitmap optimization will not improve performance unlessthe server can tell, based on the view selection formula, which forms arecandidates for inclusion in a view. The view selection formula must begin withthe test of the form name; for example, use this format:SELECT Form = “Report” & Category = “Done”Do not use this format:SELECT Category = “Done” & Form = “Report”Note: Legal requirements for document retention in your company may be aconsideration in whether you select this property. If you do not overwrite freespace, it may be possible to retrieve deleted information from the database.Chapter 3. Domino Design elements: basics 55If you set the database to delete documents based on intervals withoutactivity (such as, 10 days without being read or modified), then you shouldselect this property—with the understanding that this may negativelyimpact database performance.Otherwise, leave the property deselected for best performance.– Disable transaction LoggingWhen disabled, this property turns off logging of all transactions for allDomino API functions. It also turns off full database integrity andreplacement of Database Fixup on system restart with high speedtransaction roll forward/rollback from transaction logs, along with supportfor backup and recovery APIs.Note: Consult your Domino administrator prior turning on or off thetransaction logging on any databases.– Allow soft deletionsThis property allows deleted documents to remain in the database and notbe permanently removed for a set number of hours. The hours are set bythe database manager in the Advanced tab of the Database Propertiesbox. After the specified time period, the document is permanently deletedfrom the database.This feature is very useful for administrators to use with databases whereregular users have deletion rights. Often users delete documents byaccident or without enough consideration, and usually notice this within acouple of hours from the deletion. As an administrator, you can restorethose documents, if they have not been permanently deleted.If important documents are deleted, but the user does not realize it untilseveral days after the deletion, you can always restore those documentsfrom the backups.– Don't Support specialized response hierarchyDocuments store information about their parent and response documents,which is used only by the @functions @AllChildren and@AllDescendants. In databases that do not use these @functions inviews, select this property to improve database performance.Note: You can still have responses with this option selected, but the@functions do not work.

– Don't allow headline MonitoringUsers can set up their headlines to search databases automatically foritems of interest. If many users do this, database performance can beslow. To prevent a database from being monitored, select this property.56 Domino Designer 6: A Developer’s Handbook– Allow more fields in databaseThis option allows a database to contain up to 23,000 field names. For adatabase without this option selected, all field names when concatenatedcannot exceed 64 kilobytes, which results in a database limit ofapproximately 3,000 fields.– Use LZ1 compression for attachmentsThis is a new feature in Domino 6. With Domino 6, you can compressattachments using the Lempel-Zev class 1 (LZ1) adaptive algorithminstead of the Huffman algorithm, which was the compression methodused in earlier releases of Domino.Because LZ1 compression can save you a considerable amount of diskspace, it is favored over the Huffman method. Be aware, however, that ifyou are working in an environment that uses different versions of clientand server software and you choose this property, the attachments areautomatically recompressed on the server using the Huffman algorithm.This recompression of attachments can add significant extra time to theprocess.– Limit entries in $UpdatedBy fieldsA document stores the name of the user or server that made each changeto it in the $UpdatedBy field. This edit history requires disk space andslows both view updates and replication.If you do not need to maintain a complete edit history, then specify thenumber of changes that the $UpdatedBy field tracks by using this setting.Once the $UpdatedBy field reaches this limit, the next edit causes theoldest entry to be removed from the $UpdatedBy list.The default value is 0, which means that the number of entries is limited to500.Consider limiting the entries in the $UpdatedBy field in databases if thereis no need to record who has edited documents over time. (The reasonscited in the following item are also valid considerations for limiting thenumber entries of this field.)– Limit entries in $Revisions fieldsA document stores the date and time of each change saved to it in the$Revisions field. Domino servers use this field to resolve replication orsave conflicts. The $Revisions field stores up to 500 entries by default.If you do not need to track changes this closely, specify the number ofchanges that the $Revisions field tracks by using this setting. Once the$Revisions field reaches this limit, the next edit causes the oldest entry tobe removed from the $Revisions list.Chapter 3. Domino Design elements: basics 57Consider limiting the entries in $Revisions fields in databases that:• Contain many documents• Replicate often or have no replicas• Contain documents that are rarely edited– Soft delete expire time in hoursThis property allows the database manager to specify the time (in hours)that documents marked for “soft” deletion are held before they arepermanently removed from the database. The value in this field has noeffect unless you check the Allow soft deletions check box (refer to theAllow soft deletions bullet on page 55 for more information).

Copying an existing databaseFirst, locate the database you want to copy. Open it in the Notes client or inDomino Designer, or highlight it in the Workspace window. Then use the menuFile/Database/New Copy to open the copy dialog.As an alternative, locate it in your bookmarks and right-click to bring up thebookmark menu, as shown in Figure 3-6 on page 57.Figure 3-6 Copying an existing database from the bookmark list58 Domino Designer 6: A Developer’s HandbookOnce the Copy Database dialog is open, proceed as follows:1. Select Local as the server name if you want to store the database on yourlocal workstation. Select a server name if you want to store the database on aserver.2. Enter a title for the database.3. Type a file name with the extension .NSF for the new database.4. Select Database Design Only if you do not want to copy the documents thatare stored in the database.5. Deselect Access Control List, because it could prevent you from modifying thedatabase design in the future.Figure 3-7 shows an example of the Copy Database dialog box.Figure 3-7 Copy DatabaseTips:Generally, you will want to customize the design of databases you copy. To dothis, the database design must not be hidden. Check the Design tab of thedatabase properties to find out whether the design is hidden. If so, try to getthe original template from which the database was created.The shortcut to open an existing database is: CTRL+O.Note: Unless you deselect Access Control List, the access that you haveto the copy of the database will be the same as the access you have to theoriginal database.Chapter 3. Domino Design elements: basics 596. To encrypt the database, click Encryption and select the appropriateencryption level. (This is desirable if the database will be stored locally,especially if the database contains confidential data, or if your users havelaptops that they use in public environments.)7. Click OK to start the copy operation.Creating a new databaseIf the template or existing databases do not meet your requirements, you cancreate a completely new database. This means that you will have to create all thedesign elements, such as forms, pages, views, and fields.However, you can always copy existing elements from other databases and pastethem into the new database by using this method:1. Choose File -> Database -> New.2. Type a title in the Title field.3. From the list of available databases displayed at the bottom of the window,choose the -Blank- option.4. Click OK. The new database will be added to your bookmarks.5. Select the database that you just created, click the right mouse button, andselect Open in Designer.Domino Designer and your newly created database will be opened, and you willbe ready to start the design of the database.3.1.2 Changing the database propertiesOne strength of Domino is the fact that it is sensitive to context. You are often justone mouse-click away from the properties of the object you are working on:outlines, fields, embedded elements, Java applets, buttons, forms, attachments,and databases.

Opening the database InfoBoxTo display the database InfoBox:1. Display the database pop-up menu by clicking the right mouse button.2. Select Database Properties; see Figure 3-8 on page 60.Tip: The shortcut is Alt+Enter. You can also click the Properties icon to displaythe database properties InfoBox. If the toolbar bar is not visible, select File ->Preferences -> Toolbar Preferences and go to the Toolbar tab, and then setthe Universal toolbar to: visible.60 Domino Designer 6: A Developer’s HandbookFigure 3-8 PropertiesSpecifying the database type, replication, and encryptionThe Basics tab contains information about the database, such as its title,location, database name, the database type, the replication settings, andreplication history; see Figure 3-9.Figure 3-9 Database properties1. To set the Database type, you can select one of the following values:Standard. This type is used most of the time. Unless you have a specificreason for specifying the database as something else (such as, the databaseis a Domino Directory), the database type should be standard.Library. This type is generally created from the Database library template. It’sused to record and store information about the databases located on aDomino server or on a workstation, which provides an easy way for users tobrowse the list of databases available to them.Chapter 3. Domino Design elements: basics 61Personal Journal. This database type is a place for you to store privatedocuments you don't want to share with others. You can use the personaljournal as a diary, a notebook, or as a holding place to compose documentsbefore they are ready for distribution.Domino Directory. This type creates a database based on the DominoDirectory format.Directory Catalog. This type creates a database based on the DominoDirectory format, but with fewer features than the full Address Book.Multi DB Search. This type is used to specify a database type of SearchThrough Multiple Databases, which uses the SRCHSITE.NTF template. Thistype of database is used to configure searches among databases that havebeen designated to participate in Multi Database indexing by selecting theappropriate option in the Design tab of the database InfoBox.Portfolio. This type allows users to keep a collection of databases that areused frequently, or that are related.IMAP Server Proxy. Internet Message Access Protocol (IMAP) is used tosend and receive electronic mail, using the Internet.News Server Proxy. This type allows users to keep a collection of newsgroup and conversations about news.Subscriptions. This type is used to keep track of user subscriptions tovarious databases, and is used by the headlines databases.Mailbox. This type is used for mailing purposes. Note that this is not a usermail file, with Inbox and Sent folders; instead, it is used by the mail routingprocess to hold mail until it can be delivered to a user.Mail File2. Click the Archive Settings button to display the Archive settings propertybox, as shown in Figure 3-10 on page 62.62 Domino Designer 6: A Developer’s HandbookFigure 3-10 Archive settingsThis option enables you to determine when documents are deleted, andwhere archives of those documents are stored. You can set more specific

settings for archiving (such as creating archiving scenarios where documentsare archived based on when they were created, for example).You can also set up scheduled archiving.3. Click Encryption to display a window that enables you to specify encryptionfor the local version of the database.4. Web Access: Use JavaScript when generating pages. This option allowsthe Domino server to use JavaScript to generate Web pages. For example, byselecting this option, you can use multiple buttons on the form.Some of the @Commands require this option to be set in order to work. Anexample would be @Command([ViewRefreshFiels]), which causes all thefield formulas to recalculate.5. Web Access: Require SSL connection. This option forces users to log in tothe database using Secure Sockets Layer (SSL). SSL securely encrypts thetraffic between client and server. Without SSL, the traffic between the Webbrowser and the Domino server could possible be cached or compromised.6. Web Access: Don't allow URL open. As you design an application whichusers will access with a browser, you may want to restrict browser users fromusing URL commands that would open forms and views in your application.Chapter 3. Domino Design elements: basics 63For example, you can design your application so that a servlet that uses formsor views will only use the forms and views using URL commands.However, if you set this property, it will be impossible for browser users tomanipulate these application components using Domino URL commands.7. Disable background agents for this database. This property can be usedto disable all scheduled agents in a database for debugging ortroubleshooting issues. (Note: Generally, you do not set this option on aproduction database.)8. Allow use of stored forms in this database. This setting applies only whenusing Notes client to view databases. When a form is stored with a document,all the user interface elements and information about how to use them isstored with every document that is created with the form. Because of this,your database could grow substantially.Previously, this option was required to store information entered into OLEobjects embedded on the forms. However, with Domino 6, the OLE object isalways stored as part of the document, not the form, so the main reason forusing stored forms is gone.The benefit of storing the form on a document is that you could send orcopy/paste a document to a database, and that database does not have tocontain the forms to show the documents. Also, storing the form with thedocument might be useful if you have an application with different versions ofdesign—and the old documents should use the design and UI that wascurrent when the document was created.Note: Keep in mind, however, that allowing stored forms causes a potentialsecurity risk; someone could write malicious code and store it in thedocument. When the document is opened, the code could run and dodamage.9. Display images after loading. Properly setting database properties canimprove the performance of an active database. Setting databaseperformance properties on many databases—or on one, large, activedatabase—can also improve server performance. In addition, some of theseproperty settings also help reduce the size of databases.10.Allow document locking. When you set this property, users with Authoraccess or higher can lock documents in that database. Locking a documentprevents editing and replication conflicts by ensuring that the document lockowner has exclusive access to modify the document; others with the sameNote: Users also can specify “Load images: On request” in the Advanced

section of a Location document, in order to display images only when usersclick them. For more information, refer to Lotus Notes 6 Help.64 Domino Designer 6: A Developer’s Handbookaccess cannot modify a locked document at the same time—even if they areworking on a different replica on the same LAN. Managers of a databasecannot edit a locked document. However, Managers can unlock documentsthat are locked.11.Allow connections to external databases using DCRs. In order toestablish a connection to an external data source, you must first enableexternal connections for the database. Once that database property is set,you can then use your data connection resource (DCR) in a form to exchangedata with an external database. For more information about DCRs, refer toChapter 10, “Domino design elements: shared resources” on page 317.Displaying general database information1. Click the Information tab to display general information about the database,such as its size and the number of documents stored.Figure 3-11 shows the Information tab of the property box.Figure 3-11 Database Information2. Click User Detail to display information related to user activity.3. This page also tells you the ODS, or On Disk Structure, version. ODS versiontells you the version of the database, ODS version 43 means that thedatabase is made with Domino 6 or newer.Note: You may want to disable this property while you are designing anapplication, and enable it when you are ready to deploy your application.You must also disable this option when you import existing records from anexternal database into your application.Chapter 3. Domino Design elements: basics 65Viewing this information about a R5 database would show ODS version 41,and for a R4 database, the ODS version is 20.Specifying print options1. Click the Printer tab to specify options related to printing the database.2. You may want to add a header or footer to the pages of the Notes documentsyou print (this is how you add page numbers to printed documents, forexample).Header and footer information can apply to all documents in a database, or beset up for a particular document. The header and footer you create for adatabase prints with all documents in the database, unless you set up adifferent header and footer for the document.Use the icons under the Header and Footer options to define the date, time,tabs and page numbering; see Figure 3-12.Figure 3-12 Database PrintingNotes: Database header and footer information also appears when youprint a list of documents in a folder or view, a Calendar view, or a list ofcalendar entries.Print options are a personal setting; they apply only to the user who setsthem.Tip: Use the Print Preview command to see how headers and footers lookbefore you actually print.66 Domino Designer 6: A Developer’s Handbook3. You can also select the font, size, and style.Specifying Database Design properties1. Click the Design tab to display or specify information concerning the designof the database.The example displayed in the Figure 3-13 on page 67 shows that the designof this database is not hidden. The design of a database can be hidden when

creating the database, or replacing or refreshing the database design from atemplate.2. If you select Inherit design from template, the database automatically inheritsall the changes made to the template if the template this database is basedon is modified in the future.3. You can enable the Design locking feature in the database. First, you mustspecify an Administration (Master lock) server for the database; this is doneusing the Advanced tab of the ACL dialog box.4. If the database you are creating is a template, check the “Database is amaster template” check box and specify a name for the template.5. If appropriate, select that the new template is listed as an advanced template.This indicates that the template should only be used by Domino developers oradministrators, and that it is only visible as an available template when theadvanced check box is checked when creating a new database.6. Deselect “List in Database Catalog and Show” in the Open Database dialog ifthe database is located on a server, contains sensitive data, and you do notwant users to be able to see its name.Note: Printing properties do not take effect if you are printing from theWeb.Note: The DESIGN task on the server updates databases when theirdesign templates change. This generally happens nightly; however, thetask can be disabled by an administrator.You can also refresh a design using File -> Database -> Refresh Designwhile in the database.Note: This is not a security feature, since there are other ways to finddatabases on the server. To keep the contents secure, use the databaseACL and encrypt local replicas.Chapter 3. Domino Design elements: basics 677. If you want the index to be included in Multi Database Search Database sitequeries, then select Include in multi database indexing.8. Enable Multilingual database if your database will be used by multinationalorganizations across time zones, languages, and cultures; see Figure 3-13.– Select the Default language for this database.– Select the Default region for this database.– Select the Default sort order for this database.Using this option lets you create multiple versions of each design element,one for each language your application supports. The Notes client will choosethe appropriate element that matches the language the user has set.Figure 3-13 Database DesignSpecifying Launch options1. Click the Launch tab to define what users will see when they first open thedatabase. The dialog box displays differently, depending on your choice ofactions in the On Database Open drop-down list; see Figure 3-14 on page 68.68 Domino Designer 6: A Developer’s HandbookFigure 3-14 Database Launch2. Select an option from the On Database Open drop-down list; see Figure 3-15.Figure 3-15 Drop-down listA wide variety of options is possible, for example:– If you select Open designated Frameset, then you need to select theframeset that you want to be opened. All available framesets are listed inthe drop-down box.– If you select Open designated Navigator options, another drop-down list isdisplayed, where you can select the kind of navigator that you want toopen. You can choose folders, standard navigator or page. Choosingstandard navigator or page will display a third drop-down list, where youcan select the actual navigators or pages to be used; see Figure 3-16 on

page 69.Chapter 3. Domino Design elements: basics 69Figure 3-16 Open designated Navigator– Select Open designated Navigator in its own window if you want thenavigator to be displayed in a full screen. You would typically choose thisoption if the navigator or page consists of a large map or a workflowsketch.3. You can specify the properties of the preview pane by clicking Preview PaneDefault.... You will be presented with a number of choices. Click the mostappropriate property for the user; see Figure 3-17.Figure 3-17 Preview pane propertiesNote: This is the default value that is used when the user opens thedatabase for the first time. Users can override this choice and Notes willremember their preference when they open the database again.However, this option does not take effect on the Web, because Web usersdo not have the preview pane.70 Domino Designer 6: A Developer’s Handbook4. Select an option from the On Web Open drop-down list for Web usersopening the database. A wide variety of options are possible.Specifying Full-Text indexing1. Click the Full-Text tab to create, update, or delete a full-text index, whichallows for fast retrieval of documents.2. Select the update frequency as required; see Figure 3-18.Figure 3-18 Create Full-Text IndexSpecifying Advanced optionsThe Advanced tab allows you to enable or disable advanced database options,many of which affect the performance of the database. For more detail aboutadvanced options, refer to the explanations listed under item 6 on page 53.Note: You generally do want to full-text index your databases, since thismakes it much faster for users to find information by searching for keywords inthe text. Agents that use full-text selection criteria also execute faster if there isan index.Chapter 3. Domino Design elements: basics 713.2 Using Design SynopsisDesign Synopsis gives you a single location where you can browse or search allof the components and code logic of a database. It provides you with an output ofimportant information about every component of the application, fordocumentation or archival purposes. You may customize the output to yourneeds and display it as a single document, or put it into a database to be used ata later time.The Design Synopsis dialog box allows you to generate a detailed report on aparticular database. In Domino 6, the user interface of the dialog box has beenenhanced to make it easier to use.To create a design synopsis:1. Select the database for which you want a report.2. Choose File -> Database -> Design Synopsis. (Or you can open Designerand select the database for which you want a report, and then click Other ->Design Synopsis).3. Select the design elements (forms, views, shared fields, agents, and so on)that you want in your report. For each design element type you choose, selectthe individual elements that you want in your report.The Add button lets you select the elements of a design and add them one ata time to your report. The Add All button selects all the elements of aparticular design element. The Type drop-down list also includes an -Alloption,which lists all elements in your database.

Restriction: For databases with large amounts of design elements, such asyour mail file, Design Synopsis may fail with an error message.For these cases, you can try creating a separate synopsis for views andforms—or use the Format output tab to select a database for the output.72 Domino Designer 6: A Developer’s HandbookFigure 3-19 Choose Design element4. Click the Choose DB Info tab to select the database information that youwant in the report; see Figure 3-20.Figure 3-20 Choose DB InfoThe following selections can be made:– General Information - this provides information such as the databasetitle, location, and categories.– Space Usage - this calculates the file size, the number of documents, andthe space used by the database.– Replication - this provides information about the replication settings forthe database.Chapter 3. Domino Design elements: basics 73– Access List - this generates a list of users, groups, and servers in theACL, and specifies assigned access levels and access roles for each.5. Click the Define Content tab to select the contents of the report for eachdesign element. Different elements have different options, and the list ofoptions is context-sensitive. Also keep in mind that whether or not you caninclude or exclude subcomponents or certain types of code depends on thetype of element you are creating the report from.Figure 3-21 Define Content6. Click the Output tab to specify the output options. For example, if you want towrite the report to a database, select Direct Output to: Database; seeFigure 3-22.Figure 3-22 Format Output74 Domino Designer 6: A Developer’s Handbook7. Click OK to generate the report; see Figure 3-23 on page 74.Figure 3-23 Database Information
3.3 SummaryThis chapter explains some of the basics related to creating Domino databases,and also provides a glossary of some of the most commonly used designelements in Domino.We walked through different database settings available on different tabs on theInfoBox of databases. We also illustrated how to use Design Synopsis, whichenables you to easily see an overview of the design elements in your database.Note: For more information about Design Synopsis and its new features inDomino 6, refer to 12.2, “Design Synopsis” on page 363.© Copyright IBM Corp. 2002. All rights reserved. 75
Chapter 4. Domino Design elements:formsIn this chapter, we describe Domino forms and explain what they are and how todesign and modify them. We also discuss the basic design elements used whencreating a Domino database.In addition, we show you how to display different information to the Web andNotes, as well as to users with mobile clients such as PDAs and Internet-enabledphones.

476 Domino Designer 6: A Developer’s Handbook
4.1 FormsThis section will guide you through Domino forms; it describes what they are andexplains the different types of forms, and discusses how to create, design, andmodify them. This section also examines the design elements of the form, suchas fields, tables, images, embedded elements, layout regions, and computedtext. We make use of the MyTeamRoom database, which we created from theTeamRoom template as a basis for demonstrating the Domino 6 elements. Youwill find the template for the TeamRoom database on your Domino server.The form is the skeleton provided to users to enable them to enter data, either bytyping or by simply clicking various buttons or hotspots. There is usually at leastone form in a database, although a typical business application will have manyforms, each targeted to the type of information that the user wants to save in thedatabase.The form contains all the design elements; fields to store the user’s information,static text, buttons, sections, images, and subforms that help the user to enter thedata into the database.To create a new form, go to Form Designer and click New Form, or chooseCreate -> Design -> Form. Alternatively, you can copy and paste a form from theDesign Form pane and then customize the form to your needs.4.1.1 Specifying form propertiesThe Form InfoBox contains all of the information related to forms. To look at theform properties, do the following:1. Go to the Form Designer.2. To create a form, click New Form and the new form is displayed; seeFigure 4-1 on page 77.3. Click the Properties icon.4. An InfoBox will be displayed which allows you to set the properties of theform. It consists of seven tabs:– Form Info– Defaults– Launch– Form Background– Header– Printing– SecurityChapter 4. Domino Design elements: forms 77Figure 4-1 To create a form, click New FormUsing the Form Info tabThe Form Info tab stores general information about the form; see Figure 4-2 onpage 78. In the section following the figure, we explain the details of eachselection you can make.78 Domino Designer 6: A Developer’s HandbookFigure 4-2 The form properties box showing the Form Info tagNameIn the Name field, specify a name and an alias for the form.By default, the form name appears as an item in the Create option on the menubar. This is the name that the user sees. Therefore, make it as meaningful aspossible.To specify an alias, enter the vertical bar (|) and the alias after the form name inthe Name field. It is recommended that you create an alias for each form. This is

the name you will use in your code.Specifying an alias enables you to leave your code unmodified if, for example, theuser requests to have the name of the form changed. It is the alias, not the actualname, that is saved in the document created with this form.Chapter 4. Domino Design elements: forms 79Try to keep the first character unique, because Domino will use the first uniquecharacter as a keyboard shortcut under Windows.CommentIn the Comment field, you can enter remarks for the benefit of developers whomaintain the form.TypeSpecify the form type in this field; there are several types to choose from:_ The form we’re creating in the example shown in Figure 4-2 on page 78 is aDocument type, which means that it is a main document._ A Response type means that it is linked to a main document of typeDocument. A Response document cannot exist without a parent._ A Response to Response type adds a third level to the document hierarchy. Itcan be created as a response to any of these three types of document.Note: The alias should uniquely identify the form. It should be different fromevery other form, page and subform name and alias.The exception is for multilingual applications, where you deliberately use thesame alias in multiple forms to show the same document with a different formfor different languages.Note: You also can add the underline character (_) to define a keyboardshortcut.Example: _DocumentThe D is now the keyboard shortcut characterTo put the form in a submenu under the Create menu item, use thebackslash character (\) in the form name; for example: “Requests\Workorders” to create a “Request” submenu.Note: If you want to have a multiple-level hierarchy, as in a discussiondatabase, it is not necessary to define separate Response and Response toResponse forms; only the Response to Response form is needed.80 Domino Designer 6: A Developer’s HandbookDisplay_ Include in menuIf you want to include the form in the Create option on the menu bar, you havetwo options:– If there are only a small number of forms, they can be displayed directly inthe Create Menu list. Up to nine forms can be listed in the Create option.Otherwise, use the “\” character to organize them into submenus asdescribed above. If the list gets too long, you can use Create - Other to getthe complete list of forms.– If there are many different forms, it is best to use the Create - Other dialog.You could add the most commonly used forms to the Create Menu list, andthen put the least used forms under the Create - Other dialog option._ Search BuilderSelect the Search Builder check box to add the Response form to the list offorms that users can use to enter field values for a full-text search._ Include in PrintSelect the Include in Print check box when you want to enable contact printingfor this form. Contact printing, such as label printing, is a special type ofprinting where the form is used for printing multiple documents. See thedocument “Designing a form for contact printing” in the Lotus DominoDesigner 6 help database for further discussion and design guidelines for

contact printing.VersioningIn the Versioning field, specify whether or not you want version control. Thefollowing options are available:_ None_ New versions become responsesUse this when the original version is the most important. The originaldocument is listed first in a view._ Prior versions become responsesUse this when the new version is the most important. The latest version islisted first in a view._ New versions become siblingsNote: Create options are not applicable to Web users, because Webusers do not have the Create menu.Chapter 4. Domino Design elements: forms 81Use this when all versions have equal importance. The original document islisted first in a view. All successive versions follow as additional maindocuments, without introducing the risk of replication or save conflicts._ Create versionsIf you decided to work with versioning, there are two create version options:– Manual-File, New Version creates a new version of the document whenthe user chooses File - Save as New Version.– Automatic-File, Save creates a new version of the document each time theuser saves the document.Options_ Default database formDomino uses a default form to open documents whenever their associatedform has been dropped from the database design. You should select theDefault database form option for the main form of the database._ Store Form in DocumentLeave the Store Form in Document check box deselected.You should only store the form in the document if, for example, a user that hasno access to the database receives a document and has no access to thedesign of the form used to create the document. For Web users, this option issupported in read mode, but do not use it for documents that need to becreated or edited on the Web.Previously, this option was required to store information entered into OLEobjects embedded on the forms. However, with Domino 6, the OLE object isalways stored as part of the document, not the form, so the main reason forusing stored forms is gone._ Disable Field ExchangeThe Disable Field Exchange check box, which is normally left deselected toenable data exchange with Notes/FX-compliant applications, is not supportedon the Web._ Automatically refresh fieldsWith the option Automatically refresh fields selected, Domino recalculatesfields automatically whenever a field value changes. It is not supported on theWeb. In most cases, it is better to use Refresh fields on keyword change,Note: Selecting the Store Form in Document option greatly increases theamount of disk storage required to store each document based on thatform.82 Domino Designer 6: A Developer’s Handbookwhich is a property of a keyword field, such as dialog list, radio button. That isalso supported on the Web._ Anonymous Form

Select the Anonymous Form check box if you want authors or editors toanonymously enter documents into the database based on this form.Use of Anonymous forms is appropriate for employee comment databases,surveys, and suggestion boxes, where users may prefer anonymity._ No Initial Focus/No Focus On F6You can change the focus of a form, as follows:– No Initial Focus - this lets you choose to have no initial focus on the form.– No Focus On F6 - this lets you disable the F6 and Shift+F6 keys. Thesekeys usually give focus to a frame. Use for forms and pages that containno controls or fields or links; this saves time for users of screen readers, asthey do not have to navigate through frames containing information theycan’t use._ Sign Documents that Use This FormAs the developer, you can choose whether you want all documents that arecreated using this form to be signed electronically by selecting the SignDocuments that Use This Form option. This enhances the security of theapplication._ Render pass through HTML in NotesBy choosing the Render pass through HTML in Notes option, thepass-through HTML code entered in the form is also rendered in the Notesclient, not just in the Web browser._ Do not add field names to field indexSelect the Do not add field names to field index option if you want to preventthe field names on this form from appearing in the field index. The field indexNotes:Documents created with an anonymous form do not contain the$UpdatedBy field, but have an $Anonymous field with a value of 1. Youneed to ensure that the author’s or editor’s name does not appear in anyother field of the form.Also, in databases that use anonymous forms, you should turn off usagehistory tracking in the database properties. This ensures that the authorcannot be deduced by comparing the creation time and the usage log.Chapter 4. Domino Design elements: forms 83is used on certain lists, for example when adding Simple Actions thatmanipulate or use fields. You can save some memory by checking this optionon.This is a good choice for forms that are never saved as documents, such as$$ViewTemplate forms. Details about using $$ViewTemplate forms can befound in 6.7.6, “Embedding views” on page 230_ Conflict HandlingAt the Conflict Handling section of the Form Info tab, choose one of thefollowing options for the form:– Create Conflicts - This creates conflicts so that a replication conflictappears as a response document to the main document.– Merge Conflicts - If a replication conflict occurs, the conflicting documentsare merged into a single document by combining the edits of thosedocuments field by field. However, if two users edit the same field in thesame document, Notes saves one document as a main document and theother document as a response document marked as a replication conflict.– Do Not Create Conflicts - No merge occurs. Domino simply chooses onedocument over another. The other document is lost.Using the Defaults tabThe Defaults tab lets you specify details regarding the usage of the form; seeFigure 4-3 on page 84.Tip: Merge Conflicts is a good choice for many forms, and many

companies routinely turn on this option on all forms. It is not appropriateto use the option with strict data validation requirements, where thevalidity of one field may depend on the value on another field.84 Domino Designer 6: A Developer’s HandbookFigure 4-3 The form properties box showing the defaults tagThe Defaults Tab is divided into five sections, which we discuss in detail asfollows:On Create_ Formulas inherit values from selected documentWhen this option is selected, Domino copies the values of the fields in theparent document to the document or response document that is beingcreated. The inherit does not work automatically, unless you specify the fieldname of the parent document in the field’s default value event. Dominosupports this feature for rich text fields, as well as other field types._ Inherit entire selected document into rich text fieldWhen selected, this option defines how the fields of the parent document aredisplayed in the response document. To inherit the parent document, a Webbrowser user must open an existing document before creating the newNote: Inheritance from selected documents is supported on the Web, andas with Notes, it works only between documents that reside in the samedatabase.Chapter 4. Domino Design elements: forms 85document. To enable Web users to create a new document from an opendocument, you must provide a form action.On Open_ Automatically enable Edit ModeWhen selected, this option opens the document in edit mode from either aNotes client or a Web browser._ Show Context PaneWhen selected, this option displays the parent document to end users in thePreview Pane of the Notes client.On Close_ Present mail send dialogWhen selected, this option causes the Mail Send dialog box to appear so thatthe users have the option of mailing, saving, signing, or encrypting adocument.On Web Access_ Content typeChoose the type of content by selecting Notes, HTML, or Other. If you selectHTML, Domino passes all data on the form directly to the browser. If youselect Other, you will need to specify what the content type is. This could beany type of your choice._ Generate HTML for all fields allows the developer to use hidden fields forprogramming in Web applications.Use the three color selections (Active line, Unvisited link, Visited link) todetermine how links will be displayed in a Web browser.Note: You must also have certain fields on the form for this to work.The only mandatory field for this feature to work is SendTo, but you alsoneed a couple of other fields to form the e-mail message. Refer todocument “Reserved fields that control mailing options” in the DominoDesigner 6 Help for more information.Note: These options, which are new with Domino 6, allow you to specify,among other things, the type of content on your form. This will enable you toprogram and control the content of your form without Domino addingDomino-specific tags or other information on your forms.

86 Domino Designer 6: A Developer’s HandbookData Source OptionsData Connection Resources (DCRs) bring the technology of Domino EnterpriseConnector Services (DECS) into Designer so that you can define a connection toan external data source, such as a relational database, and use the connectionto link the fields in a form to fields in the external source. DCRs are reusable inan application and can be shared across applications. Using DCR technology,you can access data in enterprise systems; Figure 4-4 shows the Data SourceOptions properties._ BrowseIf you have already created data connection resources in the database, youcan browse for data resources to use on the form. If you do not have a dataconnection resource set up, this section is greyed out.a. Click the Browse button in the Data Source Options section.A Browse External Data Sources dialog box appears, with a list of dataconnections resources already created in the database.b. Default data connectionSelect a data connection resource and click OK. The resource populatesthe Default data connection field on the Defaults tab of the FormProperties box. The Default metadata object can be a backend databasetable, a view, or a procedure.c. Default metadata objectOnce the user starts to create fields on the form using an external dataresource, the default metadata object can be changed.Figure 4-4 The Data Source Options propertiesUsing the Launch tabThe Launch tab, as shown in Figure 4-5 on page 87, enables you to specify whathappens when the document is opened. It gives you the ability to automaticallyactivate OLE objects and attachments when the document that contains them isopened, or to automatically follow a doclink or URL link instead of opening thedocument.Note: The Auto Launch feature is not available for Web users.Chapter 4. Domino Design elements: forms 87Figure 4-5 The form properties box showing the Launch tagAuto LaunchIn the Auto Launch field, specify the type of action to take place when thedocument is opened. The following options are available:_ None_ First Attachment_ First Document Link_ First OLE Object_ URLAutoFrame_ FramesetThe frameset drop-down list allows you to select a frameset which will openwhen the user opens the form.The frameset option works in the same way in a Notes client as in a Webbrowser._ FrameWhen you have selected a frameset, you have to select a frame within thatframeset where you would like to open the form.Using the Background tabClick the Background tab, shown in Figure 4-6 on page 88, to specify the optionsfor the form background.88 Domino Designer 6: A Developer’s Handbook

Figure 4-6 The form properties box showing the form Background tagColorSpecify the background color for the form using the Color drop-down box.Graphic or Resource_ PasteIf desired, click the Paste Graphic button to paste a graphic image into theform. If the image is smaller than the form, Domino tiles the image to fit thesize of the form._ ImportYou can also import a graphic image into the form by clicking the ImportGraphic button. Select the graphic image and click Import. The supportedgraphic formats are BMP, GIF, JPEG, PCX and TIFF 5.0.Note: If the image does not fill the entire page, it will be tiled automatically.Note: You need to copy an image to the clipboard before you click thebutton.Tips:Domino supports RGB colors, but if you want to insert very high qualitygraphics, select the option to import an image. Keep in mind that thecursor could be difficult to see on some displays if you choose a colorlike gray.It is better to import rather than paste a graphic into the backgroundbecause imported graphics are usually of better quality than pastedgraphics.Chapter 4. Domino Design elements: forms 89_ Allow users to change these propertiesBy selecting this option, users can change the background properties of adocument that uses this form.Using the Header and Footer tabHeaders work only in a Notes client. If you select to use a header on the form,you are able to have part of the form in a separate frame. For example, a maildocument has the header above the body of the document. This header alwaysstays in place when the content of the body is scrolled.Note that where the header ends and the other part of the form begins is definedby where your cursor is on the form when you select the Add a header to formproperty.On the Web, Domino produces a table with the header information rather than aseparate frame.Figure 4-7 An example of a form with a Header90 Domino Designer 6: A Developer’s HandbookFigure 4-8 The form properties box showing the Header tagHeaders can contain any element that a form can contain. The only caveat is thata table cannot be the first element in a header—it must be preceded by a textobject, even if the text object is blank (for example, an empty line would besufficient, with the table placed on the following line).Using the Print tabClick the Print tab to specify the options that relate to printing a document basedon the form; see Figure 4-9. Use the icons listed under the Header and Footeroption buttons to define the date and time, tabs, and page numbering. You canalso select the font, size, and style.Figure 4-9 The form properties box showing the Print tagNote: The printing properties set here do not take effect if you are printingfrom the Web.Chapter 4. Domino Design elements: forms 91Using the Security tabUse the Security tab to define which users or user groups are authorized to use

the form.Figure 4-10 The form properties box showing the Security tag_ All readers and aboveDeselect the All readers and above check box. This activates the blue personbutton to the right of the list. Click the button. A window is displayed thatallows you to select the users and groups from the different address books towhich you have access._ Who can create documents with this formHere you specify who can create documents with this form.The default is All authors and above. If required, deselect the check box, andclick the blue person button to the right of the list. A window is displayed thatallows you to select individual users and groups.Tip: For professional-looking applications, you should always define a printheader and footer for every form that might be printed from the Notes client.Tip: Assign access to forms using Role names rather that groups or individualuser names. This makes your design more reusable and easier to administer.92 Domino Designer 6: A Developer’s Handbook_ Disable printing/forwarding/copying to clipboardIf required, select Disable printing/forwarding/copying to clipboard. Thismakes it more difficult for users to distribute the documents created with thisform to other users. It is recommended that you limit this option to confidentialdata.Note: Selecting this option does not prevent the user from using othersoftware to copy data._ Available to Public Access usersSelect this option, if required. This allows users with No access or Depositoraccess to see specific documents and forms, without giving them readeraccess to the entire database.4.1.2 Giving the form a window titleTo give your application a professional look, always define a window title formula.The title will appear on the Notes title bar when a document is created or edited,based on the form in Notes and on the browser title bar when a document iscreated or edited in browser.Following is an example of a window title that can be used from either a Notesclient or a Web browser:@If(@IsNewDoc;"New Document";"Document: " + Subject + " created by " +DocCreatedBy)Subject is a field of the form, where the document author type is the subject ofthe document. DocCreatedBy is a field of type Computed when composed on theform, with the formula @Name([CN];@UserName). @Name([CN];@UserName)returns the common name part of a user name.If the document is a new document (@IsNewDoc), the title is set to NewDocument. If the document already exists in the database, the title is set toDocument: Subject created by Username.4.1.3 Form eventsTable 4-3 on page 105 lists all form events in Domino 6.Chapter 4. Domino Design elements: forms 93Table 4-1 Form events in Domino 6Events Language Description Notes WebWindow Title Formula Calculates text to display in the title bar of thedocument window.Yes YesHTML HeadContentFormula Contains HTML tags to add to the <HEAD>tag, in addition to those generated

automatically by Domino server.No YesHTML BodyAttributesFormula Contains additional attributes of the HTML<BODY> tag.No YesWebQueryOpen Formula Runs an agent before a Web documentdisplays. The formula must use the followingsyntax: @Command([ToolsRunMacro];“agentname”).Tip: You can also enter different types offormulas here without calling an agent.No YesWebQuerySave Formula Runs an agent after a form is submitted fromthe Web.Must use the syntax:@Command([ToolsRunMacro]; “agentname”).Tip: You can also enter different types offormulas here without calling an agent.No YesTarget Frame Formula The frame pages, views and forms will open ifno default frameset has been specified in thehotspot action propertiesYes YesJS Header JavaScript You can put JavaScript functions in here.Note: In Domino 6, you can enter separatecontent for Notes clients and Web browserTip: It is more efficient to use JavaScriptlibraries than long scripts here.Yes YesonClick JavaScript Runs when an object is selected. Yes YesOnDblClick JavaScript Runs when an object is selected with adouble-click.Yes NoonHelp - Client FormulaLotusScriptJavaScriptOpens a specified page in Help; opens a pageif the user chooses Help or presses F1.Yes NoonHelp - Web JavaScript Runs when help is selected. No YesonKeyDown JavaScript Runs when a key is pressed. No Yes94 Domino Designer 6: A Developer’s HandbookonKeyPress JavaScript Runs when a key is pressed. No YesonKeyUp JavaScript Runs when a key is released. No YesonLoad - Client FormulaJavaScriptLotusScriptRuns when document is finished loading. Yes NoonLoad - Web JavaScript Runs when document is finished loading. No YesonMouseDown JavaScript Runs when a mouse button is pressed. No YesonMouseMove JavaScript Runs when the mouse is moved. No YesonMouseOut JavaScript Runs when the mouse is moved out of anobject.No YesonMouseOver JavaScript Runs when the mouse is moved over anobject.No YesonMouseUp JavaScript Runs when a mouse button is released. No YesonReset JavaScript Runs when document is reset by button.Triggers the form.reset.action.

No YesonSubmit - Client(New forLotusScript)FormulaJavaScriptLotusScriptRuns when document is submitted. Yes NoonSubmit - Web JavaScript Runs when document is submitted. No YesonUnload - Client(New forLotusScript)FormulaJavaScriptLotusScriptRuns when a document is exited. Yes NoonUnload - Web JavaScript Runs when a document is exited. No Yes(Options) LotusScript Applies to all scriptable objects and providesan area for statements (Use, Option, Const,Def).Yes No(Declarations) LotusScript Applies to all scriptable objects and providesan area where all global variables aredeclared.Yes NoQueryopen LotusScript Runs before a document is opened. Yes NoPostopen LotusScript Note: Use is discouraged. Use onLoad - Clientinstead.Yes NoEvents Language Description Notes WebChapter 4. Domino Design elements: forms 954.2 Creating a fieldIn this section we describe how to create a field in a form, and how to change theproperties of the field.We will add a combobox field in the form. This field will demonstrate how to usekeyword fields on the Web. The combobox field will allow you to choose onekeyword.1. To begin, create a new TeamRoom database as described 3.1.1, “Creating adatabase” on page 48.2. Open the Main Document form listed in the View pane.3. Type the static text: Background Color; refer to Figure 4-14, “The TeamRoomdatabase in Notes 6” on page 98.4. Next to the static text, create the field Color. To do so, select Create - Field.Querymodechange LotusScript Runs before a document is changed to Reador Edit mode.Yes NoPostmodechange LotusScript Runs after the user changes the document toRead or Edit mode.Yes NoPostrecalc LotusScript Runs after a document is refreshed (andvalues are recalculated).Yes NoQuerySave LotusScript Note: Use is discouraged. Use onSubmit -Client instead.Yes NoPostSave LotusScript Runs after the document has been saved. Yes NoQueryclose LotusScript Note: Use is discouraged. Use onUnloadinstead.Yes NoInitialize LotusScript Runs when a document is being loaded. Yes No

Terminate LotusScript Runs after the document is closed. Yes NoEvents Language Description Notes WebNote: Whether an event is supported on the Web or not depends on whichbrowser is used. Refer to Domino 6 Designer help section “Table of supportedJavaScript objects for automated components” for more information on whichbrowser supports which events.96 Domino Designer 6: A Developer’s HandbookTip: You can also display a pop-up menu by clicking the right mouse buttonand selecting Create Field.5. On the InfoBox for Field, type a name for the field (for example: Color). Thenew name is now also shown in the Objects view.6. In the Type field, choose Combobox.7. In the field next to Type, keep Editable.8. Enter 1 in the Position in tab order field. This positions the cursor in this fieldwhen the document is opened.Figure 4-11 The field properties for the example9. Switch to the next tab.10.In the Choices field, keep Enter choices (one per line).11.In the Choices list box, type: yellow, green and blue. Separate the values bypressing Enter.12.In the Programmer’s Pane, leave the Default Value empty. The form and fieldsInfoBox should look as shown in Figure 4-12 on page 97.Note: Remember to change the Frameset field in the forms InfoBox launchtab to -Blank-.Chapter 4. Domino Design elements: forms 97Figure 4-12 The Main document form of the Teamroom database opened in Designer13.Make sure that no check boxes are selected on the Paragraph Hide Whentab.Figure 4-13 The Paragraph Hide When properties for the example14.Save the modified form by pressing the Esc key, and confirm that you want tosave the form.15.Close the information box that is displayed.98 Domino Designer 6: A Developer’s Handbook
4.2.1 Performing a test runTo test your modification from a Notes client, follow these steps:1. Open a Notes Client and open the Teamroom database.2. Once the database is open, choose Create -> Main Document.3. In the document, you will see that there is now an additional field; seeFigure 4-14:Figure 4-14 The TeamRoom database in Notes 64. Select a color for the background and type a document title in the Subjectbox.5. On the Action bar, click Save & Close.Tip: You can preview the form in the Notes client by selecting Design ->Preview in Notes... when the form is open in the Designer or when theform is selected on the forms list. Or you can click the Notes preview icon inthe icon bar to preview the form.Chapter 4. Domino Design elements: forms 99To see the document, select the By Date view and the document will appearin the list of documents.To test your modifications from a Web browser interface, you can use thePreview in Web browser option in Notes, which will enable you to previewyour form without creating a document.To do this, choose Design -> Preview in Web browser. If your database is ona Domino Server, Notes will then use the browser specified in your locationdocument to preview the form. If your database is on a local machine, Notes

will start the Local Web Preview Process.Alternatively, you can do the following:1. Start your Web browser.2. Enter the following in the location field:http://Server name/Teamroom.nsf/Main+Document?OpenFormIn the following example, Server name is the current server where thedatabase is located, Teamroom.nsf is the database name, andMain+Document?OpenForm opens the new document so that you can edit it.http://trondheim.lotus.com/Teamroom.nsf/Main+Document?OpenForm3. You should see the new field in your browser; see Figure 4-15 on page 100.100 Domino Designer 6: A Developer’s HandbookFigure 4-15 The form with the new field, previewed in a browser4. Type in the Document title and choose the color for the background.5. After you have completed the form, click Save & Close.Earlier we created a Color field to enable the user to change the backgroundcolor of the form. We will now make some further updates to the form to add newfunctions:1. From the Domino Designer 6, choose the Forms Design view.2. Double-click the Main Document form in the View pane to open it.3. Click the Color field.4. Select the onChange event from the Objects view.5. Type the following JavaScript code:document.bgColor=this.form.Color.options[this.form.Color.selectedIndex].textThe onChange event is a method which occurs when the value in the field ischanged. The object document represents the current Web page, and it has aproperty bgcolor, which is the background color of the page.this.form.Color.selectedIndexChapter 4. Domino Design elements: forms 101This returns an integer specifying the option selected in the field. Now that weknow which option is selected, we can use it to return a text string with:this.form.Color.options[this.form.Color.selectedIndex].text6. After you have entered the code, the design should look as shown inFigure 4-16:Figure 4-16 The Programmer’s Pane showing the JavaScript7. Preview the form in your browser.8. When you select the value in the Color field, the background color of the pageshould change.4.2.2 Sharing and reusing a fieldYou can only reuse fields in the database where the field has been defined as ashared field.1. From Domino Designer 6, choose the Forms Design view. The list of forms isdisplayed in the view pane.2. Double-click the Main Document form. The form is displayed.3. Go to the Color field, created in the previous exercise, and select Design ->Share this field.4. Domino will automatically copy that field to the Resources -> Shared Field ->View pane, where all database shared fields are stored.5. Save and close the form and open a new form.Important: Unlike HTML and LotusScript, JavaScript is case-sensitive.Note: While the Notes client also can execute JavaScript code, not alldynamic HTML features are supported.102 Domino Designer 6: A Developer’s Handbook6. In order to reuse the shared fields, choose the form where you want to addthe field; for example, Event -> Form. Choose Create -> Insert SharedField, and a window will be displayed.

7. Select the Color field and click OK. The field is now added into the form.8. Press the Esc key and save the form; see Figure 4-17.Figure 4-17 The Main Document form with Color field shared4.2.3 Field typesIn this section, we only cover how to create and run keyword fields—but all otherfields work in a similar way. Table 4-2 on page 103 lists the other field types andtheir explanations/declarations.Chapter 4. Domino Design elements: forms 103Table 4-2 The different field typesField type Declarations NoteText A normal text field, where a user can entertext or numbers (if it is an editable field).Text can be of a string or variant type.You can resize the field by using the fieldproperties InfoBox and selecting the Usenative control in the Basic tab, and thenchanging the width and height in theOptions tab.Web doesn’t support this option.The Designer can hide delimiters aroundthe field by choosing the Hide FieldDelimiter property.Date/Time Domino allows you to select different kindsof date and time formats. Time is the datetype. Field controls such as list boxes andcalendar controls are available on forms.Domino supports 4-digit year format, andcan display a 4-character year field. Usingcalendar controls, enable “Use NativeControl.” Insert date and time in separatefields.Number The Number field can count importedvalues. Number can be of an integer, float,or double type.The Designer can change the decimalsymbols by changing On displaypreferences to Custom. The Currencyoption lets you select the right countrycurrency, or you can customize it.Combobox,Listbox,Dialoglist,Check box,RadioButtonThese can be of a string or variant type.Rich TextRich Text Lite(Rich TextLite is new inDomino 6)Domino allows a user to add text,attachments, Java applets, and tables inthis field. Rich text can be of a string orvariant type.Field value can be stored in MIMEformat.Rich text lite fields are rich text fields with ahelper icon and down arrow next to thefield. Clicking the icon gives the user a fastway to add an object into the rich text lite

field. Objects include Pictures, SharedImages, Attachments, Views, DatePicker,Shared Applets, Text, OLE Objects,Calendar, and Inbox.Clicking the down arrow displays adrop-down menu. The elements listed inthe drop-down menu are the only elementsthe user is allowed to insert into the richtext lite field. For more information on theRich Text Lite field, refer to DominoDesigner 6 online help.104 Domino Designer 6: A Developer’s HandbookTable 4-3 on page 105 demonstrates different keyword selection fields and howthey are displayed in a Notes client and Web browser.Author Security field which allows designers tocontrol form access. People, groups andservers who have been added in the fieldcan open and edit documents. Author canbe of a string or variant type.The Choices option does not work on theWeb.Names Helps users enter names correctly in adocument. Provides links to existing lists ofnames.The Choices option does not work on theWeb.Readers Security field which lets designers controlform access. People, groups and serverswho have been added in the field can openand read documents. Readers can be of astring or variant type.The Choices option does not work on theWeb.Password Users can add text. Each character isdisplayed with an asterisk (*).Matches Web functionality.Formula Used for the Subscription feature. Providesa way to programmatically hold a formulathat can be referred to by some otherprocess.Time Zone(New inDomino 6)Lets you display a drop-down list of allavailable time zones in the world, includingthe local time zone.Each time zone listed includes a partial listof the cities or locations found in that timezone.Color(New inDomino 6)Lets you display a color picker on a form. The chosen color is stored in hexadecimalformat.Field type Declarations NoteChapter 4. Domino Design elements: forms 105Table 4-3 How keyword selections are displayedRich Text Field (RTF) appletThis is a good option to use when you want to give Web users opportunities towrite different styles of text. This feature allows you to use italics, bold,color—and most of the features you would find on a word processor—on a Web

page.Keyword Notes Client Web Browser (IE 6.0)Dialog listCheck boxRadio ButtonListboxNote: Width and heightdo not work on the Web.It formats to the width ofthe longest string.ComboboxNote: Width and heightdo not work on the Web.It formats to the width ofthe longest string.Note: Choosing frame type has no effect on the Web.106 Domino Designer 6: A Developer’s HandbookOne example of where this field is very useful is in a feedback form. After theuser has submitted feedback, Domino saves the document in the database.Using the RTF applet, Domino also saves the text format and style, which meansthat the text is stored in exactly the same format and style as when the userentered it. Let’s see how this option works.1. Open the Main Document form.2. Go to the Body field and open the field’s InfoBox. You can see that the field isRichText type and that the Use Applet In The Browser option is enabled.3. When you run the form in Notes, it looks like an ordinary RichText field. Butwhen you run the form in a Web browser, it should look as shown inFigure 4-18:Figure 4-18 The RTF applet in Internet Explorer 64. After the user has submitted the document, if you look at the document usinga Notes client, it should look as shown in Figure 4-19 on page 107:Chapter 4. Domino Design elements: forms 107Figure 4-19 The document viewed in NotesAs you can see, the field contents are stored exactly as the user entered them.4.2.4 Field propertiesNow that you have created a field, we are going to look at some of the propertiesof fields contained in the document form.Let’s first take a look at the Categories Field. We will look at the keyword field andexplain the differences between this field type and other field types.1. From the Domino Designer 6, choose the Forms Design view.108 Domino Designer 6: A Developer’s Handbook2. Double-click the Main Document form in the view pane to open it.Double-click the Categories field. The Field InfoBox is displayed and it looksash shown in Figure 4-20:Figure 4-20 The Field Info properties for CategoriesThe Field Info tabOn the Field Info tab, Domino displays the field format. This field is of typeEditable Dialog list field.There are several different ways of displaying the list of keywords from whichusers can make their selections. In our example, formula is used to calculate thelist of available values by looking up the values from a view column in the samedatabase, a View variable is given the “MissionLookup” view name (which is laterused in @DBColumn), and an @DbColumn formula checks all the documents inthe current database for categories and retrieves them for display in a keywordlist.The Field Info tab also shows how the data is actually put into the field. Thefollowing types of field are available:
_ Editable: The user enters the data, or the data is created when the userselects a button performing a formula or script written by the developer._ Computed: The field is computed each time the document is created, editedand saved._ Computed for display: The field is computed each time the document isopened in browse or edit mode. The contents of the field are only visible whilethe document is open. It is not saved into the database and is not visible in aview.Chapter 4. Domino Design elements: forms 109For example, this type of field is used to display the current time and date orwork variables, such as the server name where the database is stored._ Computed when composed: The field is only computed when the documentis created. This type of field is especially useful for storing the name of theoriginal author of the document, the creation date, or a document referencenumber.There is also a check box to allow multiple values to be selected at once.Tab Order properties allow you to select the “time” when the user comes in to thisfield while editing the document and moves ahead from field to field using the Tabkey.Note: The Tab Order default value is zero (0).Give field default focus: Here you can specify whether the entry field will have theinitial focus when the form is opened. You must specify this option if you want toplace the cursor in an entry field that is not the first one on the form.Control Options tabThe Control Options tab is shown in Figure 4-21:Figure 4-21 The Control properties for Categories110 Domino Designer 6: A Developer’s HandbookThere are a number of check boxes, as follows:_ Show field delimiters. This shows the field delimiters of the field._ Allow values not in list. By choosing this option, you give the user a chanceto enter a value which is not on the list.Note: This feature is not available for Web users._ Display entry helper. This displays the small grey down arrow in the bottomright-hand corner of the field to tell the user that there are multiple options toselect from.Note: This feature is not available for Web users._ Refresh fields on keyword change. This will force the document to refreshits fields if the value in the field is changed. This option should be usedsparingly because if you have a form containing a large number of fields, ittakes some time to recalculate all the formulas, which can often result inusers experiencing a lengthy wait._ Refresh choices on document refresh. This option is used to refresh thevalues in the field (usually based on a formula) if the document is refreshed.Note: This is not applicable for Web browsers, because choices are alwaysrefreshed on page refresh.Note: The content of the Control Options tab, as with some other tabs, variesbased on the field type. For example for a text field, the Show field delimitersis the only visible option.Chapter 4. Domino Design elements: forms 111Advanced tabThe Advanced tab is shown in Figure 4-22.Figure 4-22 The Advanced properties for CategoriesThis tab enables you to specify:_ Help Description: information is shown at the bottom of the Notes clientscreen. Screen reader programs for the visually impaired also may speak this

text; although this is not a required field, it’s good practice to always supply avalue here.Note: Field help is not available for Web users. If you require field help in abrowser application, you could use the JavaScript onFocus event to updateeither the message area of the browser window or a separate field._ Field Hint: text that assists the user to fill in the field. This text disappearswhen the user moves the cursor into the field, and is not saved with thedocument.Note: This is a new feature with Domino 6_ Multi-value separators. You can define what characters define a multi-value ina field. Most common is to use a comma. You can also define what is used todisplay the separate values._ Security options: for example, Enable Encryption for this field.Note: All security options are not available for Web users.Fonts tabThe Fonts tab of the InfoBox lets you specify fonts and colors for the field data; itis shown in Figure 4-23 on page 112.112 Domino Designer 6: A Developer’s HandbookFigure 4-23 The Font properties for CategoriesParagraph Alignment tabThe Alignment tab sllows you to specify the alignment of the paragraphcontaining the field. You should use this option, for example, if you define a fieldto be used as the title.If you choose to align it in the center of the form, it will stay in the centerirrespective of the screen resolution used. The Alignment tab is shown inFigure 4-24.Figure 4-24 The Paragraph Alignment properties for CategoriesRestriction: Web browsers pay no attention to font attributes when adocument is in edit mode.Chapter 4. Domino Design elements: forms 113Paragraph Hide When tabThe Hide When tab is shown in Figure 4-25.Figure 4-25 The Paragraph Hide When properties for CategoriesExample: You can use a formula to restrict a field so that only one group ofpeople can see it:_ Create a Friend group in the server’s Public Address Book._ Select the Hide paragraph if formula is true option and add the followingformula in the formula window:!(@IsMember(“Friends”; @UserNamesList))The @IsMember() formula checks if the Friends group is one of the values in thelist returned by @UserNamesList.Note: The exclamation point character (!) is the logical not operator. Manydevelopers find it easier to write a show when formula rather than a hide when,and then use !( ) to reverse the test, as we have done here.The @UserNamesList formula returns a text list of the current user’s name andall their groups and roles. If the user has been added to the group namedFriends, they can see the field and database.Several check boxes are available to hide the paragraph on predefinedconditions. You can also specify other conditions using an @function.114 Domino Designer 6: A Developer’s Handbook
HTML Properties tabThe HTML Properties tab is shown in Figure 4-26.Figure 4-26 The Field HTML properties for CategoriesThis tab is used not only for fields, but also for many elements that appear informs, pages, and framesets. It lets you specify values to appear as attributes of

the field when the document is rendered in HTML by the Domino web server.These settings have no effect in the Notes client.The Id, Class, Style and Title fields let you specify the values that will appearafter the id=, class=, style= and title= attributes of the HTML tag. You can readabout these attributes in HTML references.Tips:When possible, use the hide check boxes instead of formulas for betterperformance.@UserRoles and @UserNamesList are frequently used in hide formulas, butthey are “expensive” to evaluate. For better performance, create a multi-value“Computed for Display” field and use @UserRoles or @UserNamesList for itsformula; hide formulas can then refer to that field. This way you only have toevaluate the @function onceNotes:The InfoBox of each design element found in a form provides a tab that allowsyou to specify hide when conditions.The paragraph alignment and hide properties apply to the entire paragraphcontaining the field, not just for the field.Chapter 4. Domino Design elements: forms 115Note: The values you enter in these fields should not contain quotes; Domino willinsert those.The Other field lets you enter any additional HTML attributes you want to insertinto the tag for the field. In this case, you supply the entire attribute, including anyquotes required, as shown in the example.4.2.5 Special fieldsThis section describes the use of some of the special fields.The $$Return FieldThe $$Return field is used for creating messages that will be displayed after theuser has submitted a document on the Web. The field should be of type“Computed for display”, whose value formula contains the HTML you want todisplay or the URL you want to go to after the form is accepted. (Without the$$Return field, Domino responds with the default response: Form processed.) Tocustomize this response message, you can include HTML code as part of theformula for the $$Return field.You can also use a $$Return field to run a custom Common Gateway Interface(CGI) program immediately after the user submits the form and Domino hascreated the document. For example, you can run a CGI program that uses theNotes API to further process the input data. The Web client displays the output ofthe CGI program to the user.To run a CGI program, include the URL to the CGI program file and enclose it insquare brackets [ ]. Note that you can pass arguments (for example, values fromfields in the form) to the CGI program, as part of the URL.Returning to another pageYou can display another Web page to the user, once a form has been processed,instead of sending the default message. The following example displays theLotus home page, but you can, for instance, direct the user to the main view ofthe database instead:“[http://www.lotus.com]”The preceding is the formula you would use for the field. You may either use oneset of square brackets, as shown above, or two sets, as shown below:Tip: Screen reader programs for the visually impaired speak the text yousupply in the Title HTML attribute. We definitely suggest you enter a valuehere, even if this is for use in the Notes client.116 Domino Designer 6: A Developer’s Handbook“[[http://www.lotus.com]]”

These variations do slightly different things:_ If you use single square brackets, the Domino server sends the URL to theWeb browser, and the browser goes to that URL._ If you use double square brackets, however, the Domino server does not sendthe URL to the browser. Instead, it fetches the page itself and sends theHTML to the browser, under the “CreateDocument” or “SaveDocument” URLused to submit the document.In cases where the $$Return URL is on the same Domino server, it makes senseto use double square brackets in order to save the extra “round trip” of thebrowser requesting the new URL and the server sending the page. If you knowwhat page the browser will request, you can send the page instead of forcing thebrowser to make that request.Adding a link to another Web pageIn the response message, you can include links to other Web pages. In thefollowing example, an HTML page will be created with a link to the Lotus homepage. The user will see a blank screen with a link to the specified Web page oncethe form has been processed:“<a href=”http://www.lotus.com”>Lotus</a>”Adding links is useful if, for example, you want to provide the user with a choice ofWeb pages to visit once a form has been processed.Personalized messagesYou can create a personalized message for the user who submits a form. Forexample, the following $$Return formula returns the response: Thank you foryour document and appends the user’s name. <h2> </h2> is an HTML tag andmeans that text between those tags is a second level header. <hr> creates ahorizontal rule.Note: One disadvantage of double brackets is that the URL used to submit theform remains the current URL. If users refresh the page, they will be askedwhether to resubmit the document.Tip: If the HTML of your post-submit page is at all complex, you may find iteasier to create a page design element and return the URL to that pageinstead. Pages can contain computed text, so you can still include usernameor other variable info. You also need to worry less about HTML syntax, as youcan use familiar elements to form the page with Domino Designer.Chapter 4. Domino Design elements: forms 117"<h2>Thank you for your document, "+@Name([CN];@UserName) +"! </h2><hr>"Note: In order for the @Name function to work, you need to authenticate with theDomino server when first opening the database; otherwise, you will be classifiedas an Anonymous user of the application.$$Return example from TeamRoom templateThe TeamRoom template has a rather complex $$Return field, but going throughthe code gives you some good examples of how you could use this field. The$$Return field is a shared field and you can open the field by going to the SharedCode - Fields design view and double-clicking the field.You can use the REM command to add a comment for the formula. For example:REM “This $$Return field returns HTML as a result of the successful formsubmittal.”;REM;First, simple strings are assigned to variables to make it easier to write and toread formulas:REM “Variables to translate”;PrevDoc := “Open the page you just submitted”;Another := “Create Another: “;TRreturn := “Return to the TeamRoom”;Done := “Done”;Subteam := “Subteam Profile”;

Participant := “Participant Profile”;Event := “Event Profile”;MainTopic := “TeamRoom topic”;Mission := “Mission Page”;Response := “Response”;IntProfile := “Interest Profile”;ArcProfile := “Archive Profile”;TeamStatus := “Team Status”;SubteamStatus := “Subteam Status”;The formula takes the current user name and adds that and the “Thank You, ”text into the ThankPerson variable:ThankPerson := "Thank you, " + @Name([CN]; @UserName);ThankYou := ThankPerson + ". The following page has been successfullysubmitted: ";REM "End variables to translate";REM "Get the name of this database.";The following formula gets the name of the current database and replaces anyspaces with the plus (+) character and replaces any backslash characters with118 Domino Designer 6: A Developer’s Handbookthe forward slash character (/). @DbName is a function that returns the name ofthe current Domino server and the name and the path of the database. @Subsetwith the -1 parameter returns just the database name and path:DB := @ReplaceSubstring(@ReplaceSubstring(@Subset(@DbName; -1); " "; "+");"\\"; "/");We get the value from the webButtonPressed field:FIELD webButtonPressed := webButtonPressed;As part of the “Thank you” screen, we want to display the document title. Thefield containing the text is different for each form, and the shared field is used byevery form. So, we test which form was just saved and copy the title from theappropriate field for that form.As the $$Return field is a shared field in this database, the formula firstdetermines which form was used:Title := @If(Form = "MainTopic"; MainTopic;Form = "Subteam"; Subteam;Form = "ParticipantProfile"; Participant;Form = "Event"; Event;Form = "Response"; Response;Form = "ResponseToResponse"; response;Form = "Interest Profile"; IntProfile;@Contains(form; "Archive"); ArcProfile;Form = "Mission"; Mission;Form = "Status"; TeamStatus;Form = "SubteamStatus"; SubteamStatus; "");We format the message to return to the user.Thanks := "<h3>" + ThankYou + Title + "</h3><hr>";We create a link so that the user can return to this document.@Text(@DocumentUniqueID) returns the unique ID of this document:existingdoclink := "<b><font size=2><a href=/" + db + "/($All)/" +@Text(@DocumentUniqueID) + "?OpenDocument>" + PrevDoc +"</a></b>   ";The String variable contains a link which returns the user to the WelcomePage:LinkTRReturn := "<a href=/" + db + "/WelcomePage?OpenPage>" + TRReturn +"</a>";Tip: With Domino 6, the @WebDBName function can be used instead of theabove.Chapter 4. Domino Design elements: forms 119We create a button which closes the current window:LinkDoneButton := "<FORM><INPUT TYPE=\"button\" VALUE=" + Done + "onClick=\"window.close(self)\"></FORM>";
The next three string variables contain links to the different forms:LinkCRParticipant := "  <b><font size=2><a href=/" + DB + "/" +"ParticipantProfile?Openform>" + Participant + "</a></b> ";LinkCRSubteam := "  <b><font size=2><a href=/" + DB + "/" +"Subteam?Openform>" + Subteam + "</a></b> ";LinkCREvent := "  <b><font size=2><a href=/" + DB + "/" +"Event?Openform>" + Event + "</a></b> ";The bkgd variable contains a background color (#ffffff = white):bkgd := "<body bgcolor=\"" + "#ffffff" + "\"+ >";We then concatenate the variables into two text strings:REM "Assemble the HTML to be returned";OkMsg := bkgd + Thanks + existingdoclink + LinkTRReturn;CancelMsg := mkgd + Thanks + LinkDoneButton + Another + LinkCRParticipant +LinkCRSubteam + LinkCREvent;Finally, an @If formula checks which of the two strings should be returned as aresponse to the user:REM "Because the Part Profile, Subteam, and Event are created in a smallerwindow, we\'re using a different msg. when they\'re new docs.";@If(webNewDoc = "1"; CancelMsg;OKMsg )Note: You can also use the onSubmit event in the form to control the formssubmit process. To use the onSubmit event, you will need to use JavaScript.Other special fieldsTable 4-4 lists other special fields.Table 4-4 Reserved fields for general useField name Use$VersionOpt Controls version tracking for documents.FolderOptions Puts new documents in folders.SecretEncryptionKeys Encrypts documents with secret, ratherthan public, encryption keys.HTML Passes HTML directly to the browser.120 Domino Designer 6: A Developer’s HandbookThere are still other reserved fields used in more specialized applications; fordetailed information about those fields, refer to the Domino Designer 6 onlinehelp.4.2.6 Field eventsField events are functions that can be implemented using formulas, LotusScript,or JavaScript.Table 4-5 lists all the Fields events.Table 4-5 Field events$$HTMLHead Passes HTML information to be hostedwithin the <HEAD> tag for a document.The passed information might be metadata (using a <META ...> tag) orJavaScript code (using a <SCRIPT ...>tag) or CSS information (using a <STYLE...> tag).Field name UseEvents Language Description Notes WebDefault value Formula When the document is loadedthe contents of the DefaultValue event are displayed.Yes YesInput translations Formula Can be used to modify the dataentered by the user, to trimblanks, and to change users’names into uppercase orpropercase.Yes YesInput validation Formula Tests whether the field contains

a legal value; this formula,evaluated when the user tries tosave the document, returns avalue that either indicatessuccess, or contains amessage to display to the user.Yes YesHTML Attributes Formula Allows you to add extra HTMLattributes to the field tag thatDomino generates.No YesChapter 4. Domino Design elements: forms 121onBlur - Client(New forLotusScript)JavaScriptLotusScriptRuns when user exits the field. Yes NoonBlur - Web JavaScript Runs when user exits the field. No YesonChange JavaScript Runs when the field valuechanges.No YesonClick JavaScript Runs when field is clicked. No YesonDblClick JavaScript Runs when field isdouble-clicked.No YesonFocus - Client(New forLotusScript)JavaScriptLotusScriptRuns when user gives inputfocus to the field.Yes NoonFocus - Web JavaScript Runs when user gives inputfocus to the field.No YesonKeyDown JavaScript Runs when a key is presseddown.No YesonKeyPress JavaScript Runs when a key is pressed. No YesonKeyUp JavaScript Runs when a key is released. No YesonMouseDown JavaScript Runs when a mouse button ispressed.No YesonMouseMove JavaScript Runs when the mouse ismoved.No YesonMouseOut JavaScript Runs when the mouse ismoved out of an object.No YesonMouseOver JavaScript Runs when the mouse ismoved over an object.No YesonMouseUp JavaScript Runs when a mouse button isreleased.No YesonSelect JavaScript Runs when a user selects textin a text field.No Yes(Options) LotusScript Applies to all scriptable objectsand provides an area for statements

(Use, option, Const,Def).Yes No122 Domino Designer 6: A Developer’s HandbookNote: The onFocus event is not triggered if the field gets the initial focus when adocument is opened.4.2.7 Examples using different field types and eventsThis example shows a simple example of the use of fields and their values;Figure 4-27 shows the form in Designer 6.Figure 4-27 Fields in Designer 6The form uses four fields:_ Quote - a text field, computed for display_ FirstName - an editable text field_ Time - a computed date/time field_ DateCreated - a computed when composed date/time field(Declarations) LotusScript Applies to all scriptable objectsand provides an area where allglobal variables are declared.Yes NoEntering LotusScript Note: Use is discouraged. UseonFocus - Client instead.Yes NoExiting LotusScript Note: Use is discouraged. UseonBlur - Client instead.Yes NoInitialize LotusScript When field is being loaded(user clicks the button, forexample).Yes NoTerminate LotusScript When field is being closed. Yes NoChapter 4. Domino Design elements: forms 123Figure 4-28 shows what this form looks like in the Notes 6 client.Figure 4-28 Fields in Notes 6In the Notes 6 client, the fields have different values, based on the formulas andsettings we set for these fields in the Designer:_ Quote - a computed for display field.For this example, it has a computed value getting a random quote for eachtime this form is opened or refreshed:tmpView := "lupQuotes" ;tmpQuote := @DbColumn("Notes" : "NoCache" ; @DbName ; tmpView ; 1) ;@If(@IsError(tmpQuote) ; @Return("") ; "" ) ;elements := @Elements(tmpQuote) ;random := @Round((elements-1) * @Random + 1) ;tmpQuote[random]The code does a lookup in a view containing all “quotes” registered in thedatabase. It performs an error-check to ensure that no error is returned to theend user. If there are any quotes found in the view, the formula returns arandom quote, using a random function and getting this value from thearray/list of quotes returned from the lookup.The value of the field “Quote” is not saved with the document, since this is acomputed for display type of field.Tip: Depending on the type of the field, each field has its own look in theDesigner client. Each field has an icon representing the field type, to avoid theneed to open the property box of each field to check the field type.As you can see in Figure 4-27 on page 122, the Time and DateCreated fieldhave a icon representing a calendar, which again indicates that it is a“Date/Time” field. The Quote and FirstName field has a “T”-icon, whichindicates that it is a “Text” field.

124 Domino Designer 6: A Developer’s Handbook_ FirstName - an editable field, with no default value.The text “Please enter your first name here” shown in Figure 4-28 onpage 123 is not the default value of the field. This is a new feature ofDomino 6 called “Field Hint”, which describes what a user should enter to thisfield.As the user moves the cursor inside this field, the field hint is erased. “FieldHints” are not saved with the document. For more information about fieldhints, refer to 12.14.1, “Field hints” on page 461.The field has a “Input Validation” formula:@If(@ThisValue = "" ; @Failure("You need to enter your first name") ;@Success)If no value is entered in the FirstName field, end users will receive an errortelling them to enter a value in the field.The field FirstName also has an “Input Translation” formula, as follows:@ProperCase(@ThisValue)The “Input Translation” will ensure that the first letter of every word in theFirstName field always will be a propercase._ Time - a computed field that is evaluated for each time the document isopened, refreshed, and saved.The code in the field is:@NowThe field will show current date and time, and the value will be saved to thedocument._ DateCreated - a computed when composed field that is only calculated once,when the document is created.The code in the field is:@Date(@Created)The field will show the date when the document was created, and the valuewill be saved to the document.Note: @ThisValue and the array subscript operator (as in tmpQuote[random])are new features of Domino 6, and are explained in detail in Chapter 12, “Newfeatures in Domino 6” on page 347.Chapter 4. Domino Design elements: forms 1254.3 Sharing design elements with subformsSubforms provide a way to avoid duplicating the design of section of a form. Withsubforms, you can ease the development effort because you can maintain agroup of elements in one place, and use the same subform in many forms.All design elements that are added to forms can also be used in subforms. Theseinclude:_ Static text and pictures_ Fields, whatever their type and format_ Hotspots as buttons or links_ Tables_ Action Bar_ Java applets_ Embedded elements_ Another subformWhen you modify an existing subform, the changes are immediately reflected inall the forms that use the modified subform.Note: You can insert subforms into a table or even into another subform.A subform is provided with the TeamRoom template. You can work with its designin one of the following ways:_ From Domino Designer 6, select the Shared Code -> Subforms design view.The list of subforms is displayed in the view pane. Double-click the Shared

Response Header subform. This subform is used to share hidden fieldswhich are common to both Response and Response To Response forms. TheSubform Builder window is displayed._ Alternatively, you can open the subform directly from the form. To do this,open any form that contains the subform (Response or Response ToResponse). Once the form is open, double-click the subform part of the form.The Subform design element is displayed on its own window.Tip: You might have to scroll through the form to see the subform part. AsFigure 4-29 on page 126 shows, the Subform Builder window is identical tothe Form Builder window.126 Domino Designer 6: A Developer’s HandbookFigure 4-29 The Subform design viewIt contains the following areas:_ The form in the design pane._ The actions linked to the subform in the action pane. When a form and asubform are displayed, the action bars of both the form and the subform areshown._ The field definition in the Programmer’s Pane. In subforms, as in forms,@functions, LotusScript and JavaScript can be used.4.3.1 Creating a new subformTo create a new subform into the database, do the following.1. From Domino Designer 6, select the Shared Code -> Subforms design view.2. Click New Subform; a new subform is created.3. Design the subform content.4. Close the subform, give it a meaningful name, and save it.Note: The subform does not contain all the events that a form has, such asthe Window title, onSubmit, onReset, HTML Head Attributes, HTML BodyAttributes, WebQueryOpen, or WebQuerySave, because the subform isalways linked to a form and the form already contains those events.Chapter 4. Domino Design elements: forms 127To insert the new subform into a form:1. Open a form.2. Select Create -> Resource -> Insert Subform.3. Select the subform you want to insert from the dialog box. (Figure 4-31 onpage 128 shows you an example of an Insert Subform dialog box.)To display the subform properties:1. On the Subform pane, click your right mouse button.2. Select Subform Properties and the InfoBox is shown; see Figure 4-30.Figure 4-30 The Subform properties boxWith Domino Designer 6, more features have been added to the Subform.– The ability to display your Pass Through HTML in Notes.– The option to exclude the field names from the field index.– A security tab on which you can specify who can access this subform3. Close the InfoBox.4. Close the subform.4.3.2 Removing subformsYou can remove subforms from the design of a form, or from the design of adatabase.If the subform is no longer needed in a particular form:1. Open the design of the form.2. Click the subform area.3. Choose Edit -> Delete on the menu bar.4.3.3 Adding subforms to a formYou can add subforms to a form by adding them by yourself, or based on aformula.

128 Domino Designer 6: A Developer’s Handbook1. First, create some subforms (at least two).2. When your subforms are ready, open the Main Topic form.3. Create a subform by choosing Create -> Resource -> Insert Subform.A dialog box is displayed (shown in Figure 4-31).4. Select the subform you want to add and click OK.You can use computed subforms to show different elements to different users.Which subform is loaded is based on a formula, so you can load differentsubforms for different groups. You can also use different subforms for Web usersthan for Notes users. To add a subform by a formula, select Insert Subformbased on formula.Figure 4-31 The Insert Subform dialog boxFigure 4-32 on page 129 shows a computed subform created on the form.Note: In Domino Designer 6, you now have the ability to access SharedCode from other databases. In other words, you can insert a subform froma different database.One example of this could be a standard header for all the forms in yourdatabases, containing for example the company name of logo and someother consistent information.Chapter 4. Domino Design elements: forms 129Figure 4-32 A form with a computed subformYou have to specify a formula in the Programmer’s Pane. The formula returnsa text string which is the name of the subform to be loaded.Looking at a computed subformTo look at a completed subform, follow these steps:1. You should still be in the document form.2. Click the computed subform once.3. Add the following formula in the Computed(subform) - Default Value - EventsProgramming pane:@If(@ClientType="Notes";"NotesSub";"WebSub")@ClientType is a formula that determines whether the user is using a Notesclient or a Web client. The result of the preceding formula is a text string,NotesSub or WebSub. If the user is using a Web client, the WebSub subformis loaded. If the user is using a Notes client, the formula returns the stringNotesSub and the NotesSub subform is loaded.Note: If the formula returns an empty string, no subform is loaded.Using a computed subform is a good way to show some elements only to onetype of client, or to users who have different roles. For example, one user canread information or provide content to the Web site, while another user may havethe authority to approve information for the Web.130 Domino Designer 6: A Developer’s Handbook
4.4 Displaying a different form to Web, Notes, andmobile usersPerhaps the easiest way to show different things to different users is to usedifferent forms. This is most useful when the information you want to show toWeb users, Notes users, and mobile users differs considerably, or where Web ormobile browsers do not support the features used in your forms.To use different forms for Web users, Notes client users, and mobile users, followthese steps:1. You need to create three forms: one for Web users, one for Notes users, andone for mobile users.2. Make sure that all three forms have the same alias part of the name, whichfollows the vertical bar (|); this way, the same value is saved in the Form field.

3. The names of the forms can also be the same, but it’s much more useful togive them different meaningful names. In this way, you can easily determine ifthe form is for use by Web users, Notes users, or mobile users. For example,you could name them as Main Document (Web), Main Document (Notes),and Main Document (Mobile).Note: Even if the names of the forms will be the same, you can tell them apartin the design view by looking at Web, Notes, and Mobile columns on the right.4. After creating the three forms, you need to make them available only for Webusers, Notes users, or mobile users.From the standard navigator, choose Design, then Forms. The list of forms isdisplayed. Click the form and click the Properties icon. The InfoBox isdisplayed. Go to the Design tab, as shown in Figure 4-33.Figure 4-33 The Design Properties for the My Document formChapter 4. Domino Design elements: forms 1315. On the Hide design element from section, select:– Web browsers and Mobile clients if the form is only to be used in Notes, or– Notes R4.6 or later clients and Mobile clients if the form is only to be usedon the Web, or– Web browsers and Notes R4.6 or later clients if the form is only for MobileusersDomino 6 will determine what type of client is accessing the form, and apply thenecessary Hide When formulas. When the user opens a document, whether onthe Web, or in Notes, or from a mobile device, the correct form will then be usedto display the document.
4.5 Layout regionsA layout region was generally used when creating dialog-like forms and in@Dialogboxes in Notes R4. It still supported for backward compatibility.A layout region consists of a 32-bit graphic that contains several kinds of designelements, such as fields (except for rich text, rich text lite, password, formula,dialog, time zone, and color), static text and buttons. However, Java applets,objects, attachments and embedded objects are not allowed.Note: All Domino elements can be hidden from a Web client, Notes client,or a mobile client.Note: Layout regions are not supported for Web browser or mobile clients.We recommend that you do not use layout regions in your applications, asthey are not supported by Web or mobile clients. If you are using layoutregions for absolute positioning reasons, consider using a page or a form witha table and OS-style fields instead. This will enable you to reach the samefunctionality, use the same element for all clients, and use design elementsthat you could not use within layout regions.Another advantage of tables over layout regions is that in most cases, theyautomatically have a sensible tab order of the fields and controls—whereaswith layout regions, it is more difficult to get them in the right order.You can also consider using a new feature in Domino Designer 6, calledLayers, to reach the functionality you want to achieve by using layout regions.More information about Layers can be found in 12.10.1, “Layers” on page 417.132 Domino Designer 6: A Developer’s Handbook
4.6 Working with collapsible sectionsIf the form design includes a long set of fields or fields that contain large amountsof data, it can be annoying for users to have to scroll up and down to find theinformation they are looking for. Collapsible sections can be a good solution tothis problem. Collapsible section are also a good way of grouping informationtogether.4.6.1 Creating a collapsible section

To create a collapsible section within a form, follow these steps:1. Open the design of a form.2. Select the text you want to have inside the section:a. Choose Create > Section -> Standard if you want the section to be seenby all users that have access to the document.b. Alternatively, choose Create -> Section -> Controlled Access if you wantto restrict access of the section to certain users defined in a formula.Figure 4-34 shows the InfoBox for a standard section.Figure 4-34 The properties for a Section3. The Title tab allows you to give a name to the section. You can also useformulas to name sections. Other properties that can be changed here are theborder type and color.4. The Expand/Collapse tab enables you to define expand and collapse ruleswhen the document is previewed, opened for reading, opened for editing, orprinted.5. The Font tab enables you to set the text type and color.6. The Hide properties of a section apply to the section header only. Thecontents of the section may have different hide properties. However, it’s notpossible to manually open a section when the header is hidden. If the sectionis closed and the header is hidden, the contents are effectively hidden.Chapter 4. Domino Design elements: forms 1334.7 Using tablesTables are used for positioning and aligning elements on a page or form. WithDomino 6, you can include fields, graphics, buttons, subforms, hotspots, objects,sections, nested tables, attachments, Java Applets, and embedded elementsinside a Domino table.For basic information about tables and how to create them, see the document“Creating tables” in the Lotus Notes 6 Help database.4.7.1 Creating tables within tablesDomino 6 supports nested tables (up to four levels deep). This is useful fordeveloping tabbed tables both for Notes client users and for Web sites when youwant to be sure that fields and graphics are aligned correctly.To create a nested table, follow these steps:1. Select the table and position the cursor within the cell where you want tocreate a nested table.2. Choose Create -> Table.3. Specify the number of rows in the Rows field.4. Specify the number of columns in the Columns field.The nested table is then created inside the table; refer to Figure 4-35 onpage 134.134 Domino Designer 6: A Developer’s HandbookFigure 4-35 A nested tableTo use this nested table on the Web, highlight the whole table and choose Text ->Pass Thru HTML. This causes Domino to translate the whole table into HTML,so that the nested table will be displayed correctly on the Web.4.7.2 Merging and splitting cellsTable cells can also be merged into one cell. The following exampledemonstrates how to create a table of four cells and then merge two of them intoone:1. Create a blank form by selecting Create -> Design -> Form from the DominoDesigner 6 client.2. Create a table with two rows and two columns.3. Highlight the two leftmost cells.4. Choose Table -> Merge Cells.Note: When you are using tables on the Web, you must insert information in
all the cells (even if it is only a dot); otherwise, the empty cells will not bedisplayed.Chapter 4. Domino Design elements: forms 135You can see that these two cells are now merged into one cell, as shown inFigure 4-36.Figure 4-36 An example of merged cellsLet’s preview the same form on the Web; refer to Figure 4-37.Figure 4-37 The merged cells viewed in Internet Explorer 6.05. To split the cells, click the merged cell and choose Table -> Split Cells.Restriction: You can only split a merged cell. You cannot start with aone-row, two-column table and split the right cell into two rows.136 Domino Designer 6: A Developer’s Handbook
4.7.3 Table propertiesThere are seven available tab options where you can modify tables, as describedin the following sections.Table Layout tabThe Table Layout tab is shown in Figure 4-38.Figure 4-38 The Table Layout tab1. The Width option allows you to specify how the table appears to the user.There are three different ways to show the table:– Fit to window: The table uses the same width definitions as the currentwindow.– Fit with margins: The table size changes when the user changes thewindow size. Fit with margins shows all the table cells at the same time sousers don’t have to use the horizontal scroll bar.– Fixed: The designer can manually determine the size of the table. Thetable width does not change if the user changes the window size.2. If Fixed is selected, then you can select the table’s alignment. Options are left,center, and right of the window.Notes:All of these options are supported on the Web.The cell width can never be reduced to less than the widest element in thatcolumn.Chapter 4. Domino Design elements: forms 1373. Cell width: allows you to set the width of the cell. You may find it helpful to setthe table to “Fixed” temporarily, so that you can type column widths withoutthe table adjusting all columns to fit.4. The Space Between Columns and Space Between Rows options allow you tospecify the distance between the cells or rows.Cell Border tabThe Cell Border tab is shown in Figure 4-39.Figure 4-39 The Cell Border tab_ Cell Border Style allows you to select the style of the cell borders. Availableoptions are Solid, Ridge, and Groove. Web browsers support only Ridge styleor no borders._ Color allows you to select the color of the border lines for the whole table. Notsupported on the Web._ The thickness of the borders can be set from 0 to 10. You can set all theborders of selected cells to 0 (= no border) or to 1 by clicking one of thebuttons at the bottom of the screen. If you have selected more than one cell,you can outline them by clicking the button at the bottom right of the section.The Notes client lets you individually adjust the thickness of each cell wall.However, HTML lets you specify one border thickness that is used for theentire table.Table/Cell Background tab

The Table/Cell Background tab is shown in Figure 4-40 on page 138.Note: For the Web, there are only two options for borders: on or off. This isdetermined by the borders of the top left cell.138 Domino Designer 6: A Developer’s HandbookFigure 4-40 The Table/Cell Background tab1. In the Colors tab, you can choose the background color of the cell. To havethe same background color for the whole table, click Apply to All.2. The Table Style option allows you to select different types of styles for thetable. The style, in this case, refers to the pattern used to color in table cellswith one or two colors you select. The available options are:– None– Solid– Alternating rows– Alternating columns– Left and top– Left– Right and top– Right– TopFigure 4-41 on page 139 shows an example for table style — Left and Top.Chapter 4. Domino Design elements: forms 139Figure 4-41 An example of the Left and Top styleThe Style options give you the opportunity to use a particular color effect inthe cells; refer to Figure 4-42 on page 140.140 Domino Designer 6: A Developer’s HandbookFigure 4-42 Applying a gradient cell fillTo apply the gradient cell fill shown in Figure 4-42, follow these steps:1. Highlight the cells you want to change (in this case, rows 2 through 4 incolumn 1).2. Choose the background color for the cells.3. Select the gradient color.4. For the direction option, choose left to right.Table Border tabThe Table Border tab allows you to specify the width and style of the table border;refer to Figure 4-43 on page 141.Note: The Gradient cell option is not supported on the Web.As shown in the diagram at the bottom of the properties dialog, cell colorsetting override table color settings.Chapter 4. Domino Design elements: forms 141Figure 4-43 The Table Border tabThe Drop Shadow option shows a shadow around the table.Margins tabThe Margins tab enables you to specify the left and right margins for the table.This is the distance the outside edge of the table is intended to be from the edgesof the page. You can use either the percent sign (%) or inches. The Margins tabis shown in Figure 4-44.Figure 4-44 The Table Margins tabThe R4 Spacing option converts the whole table into the R4 form. (It is unlikelyyou will want to use this; it is provided for compatibility with Notes version 4applications.)Table Rows tabThe Table Rows tab allows you to change the table display style betweenstandard, tabbed, and other styles.Note: The Drop Shadow option is not supported on the Web.Note: The Margins option is not supported on the Web.142 Domino Designer 6: A Developer’s Handbook

Figure 4-45 The Table Rows tabSelect the Show only one row at a time option. You can use many differentkinds of features.Figure 4-45 on page 142 shows a small table that we will use to demonstratehow the collapsible features work.Note: Some collapsible features do not work on the Web.Chapter 4. Domino Design elements: forms 143Figure 4-46 The table example to demonstrate collapsible featuresFigure 4-46 shows the table that we set up in order to demonstrate the differenttable display options that we have available._ There is one large table, which contains five rows and two columns._ In the second cell of each of the first four rows there is a nested table.– The first and second nested tables each contain two rows and twocolumns.– The third nested table contains three rows and two columns.– The final nested table in the fourth row contains one row and two columns.Table 4-6 on page 144 shows further examples of these features. (Note that alltable rows in the main table are displayed to users such that they only see onerow at a time.)144 Domino Designer 6: A Developer’s HandbookTable 4-6 Which row to display examplesOption DescriptionUsers pick rows via tabs.Note: You can type the Tablabel and caption, as well asset the Font properties for thelabel and caption.User picks rows via captions.Note: You can type the Tablabel and caption, as well asset the Font properties for thelabel and caption.Switch rows every(n)milliseconds — Advance onClick.Note: You also have the optionof using one of eight effects todisplay the rows.This option allows you to display a single row from the main table thatthe user can cycle through to the next by clicking the table with themouse.Switch rows every(n)milliseconds — Once whenopened.Note: You also have the optionof using one of eight effects todisplay the rowsDomino runs (displays the rows one after another) the table once whenthe form is loaded. Interval option is allowed.Switch rows every(n)milliseconds — Cycle onceon Click.Note: You also have the optionof using one of eight effects todisplay the rowsThis is similar to the Once when opened option, but is activated whenthe user clicks the first row.Chapter 4. Domino Design elements: forms 145Table Programming tab

The Table Programming tab gives you an opportunity to specify options for yourtable; refer to Figure 4-47. Available options are Name/ID, Class, Style, and Title.Apart from the Name/ID field, which is used in controlling the tableprogrammatically, HTML options only take effect on the Web.Figure 4-47 The Table Programming tabSwitch rows every(n)milliseconds — Continually.Note: You also have the optionof using one of eight effects todisplay the rows.This is similar to the Once when opened option, but cycles through eachrow in the table continuously.Switch rows programatically. Allows you to display a single row based on the value stored in specialfield $ table-name where table-name is the value that you give your tablein the Programming tab of the Table in Name/ID field (for exampleMyTable; see Figure 4-17 on page 102).The value required in this field is the name of the tab or the row number(field must be a number type and rows start from zero) you need to havedisplayed.Note: This tab is similar to the generic HTML properties, but the table and theselected cell each have their own properties.146 Domino Designer 6: A Developer’s Handbook
4.8 ActionsActions are used to provide a user interface for users. By clicking a button orselecting an action from the Actions menu, Notes client users can performcertain tasks. An Actions menu is not available for Web users, but button-typeactions are.Actions help you automate tasks in an application. This can speed up repetitivetasks like routing documents, updating document information, performingcalculations, checking for errors or basically nearly anything that can be doneusing LotusScript or @formulas. Users click a button, hotspot, or pick from theAction menu to execute the action.Examples of typical actions:_ Changing the document to edit mode_ Create a new document_ Create a response document_ Saving a document_ Changing a value of a computed field on a form_ Forwarding a documentActions can both be shared and unshared. (Normally, we don’t use the term“unshared” actions; we just speak of these as “Actions”.)You can create an unshared action in a view, folder, form, page, or subform toprovide one-click shortcuts for routine tasks in a view or document. Actionsbecome part of a design element's design and are not stored with individualdocuments.You can also create a shared action in a database that can be used in multipleviews, folders, pages, forms, and subforms. Shared actions are stored as sharedresources in the database. If you make changes to a shared action, then allforms, views, pages or subforms that use this shared action will automatically beupdated with the new/changed code.Important: As mentioned, Web users do not have an Actions menu, nor canthey use many of the shortcuts. Therefore, it is essential that you provide themwith the ability to perform the necessary tasks by providing them with actionbuttons.Tip: You should to provide basic functionality for users with buttons, eventhough some of the functionality could be achieved through other means (such

as using a menu action or shortcuts), because buttons provide a moreuser-friendly user interface.Chapter 4. Domino Design elements: forms 147To build an action, you can use any of the following:_ Simple actions that you select from a list_ Formulas_ LotusScript_ JavaScript_ Common JavaScriptWhen you work with forms, views, pages or subforms, then the way to add,change, or view your actions is the same. If you open one of these designelements, you can view your actions by dragging the right-most corner in theDesigner 6 client to the left, as shown in Figure 4-48.Figure 4-48 Displaying the actionsAnother way to view the action bar is by using the path View -> Action Pane, asshown in Figure 4-49.Figure 4-49 Displaying actions using the menu4.8.1 Creating an actionTo create an action, right-click in the action pane and select Create Action, asshown in Figure 4-50 on page 148.148 Domino Designer 6: A Developer’s HandbookFigure 4-50 Creating an actionYou can create an unshared action by using the path Create -> Action ->Action.4.8.2 Removing an actionTo delete an unshared action, mark the action in the action pane and press theDelete key. Confirm the deletion by responding yes when you are asked whetheryou want to delete the action from the database.4.8.3 Action propertiesUse the different tabs in the action’s properties box to set:_ The name of the actionThis is the name of the action, which is shown on the button for the end user.If “label” is used, “label” is used as the visual name of the button for the enduser._ The label of the actionTo create more user-friendly actions, labels can be set on actions. This is anew feature of Domino 6. A label can programmatically be set to evaluate thevisual name/text on the button based on different values, such as @usernameor values in fields on the document._ The target frame of the actionThis is used to set the target frame where the action should be performed._ Type of actionIn Domino 6, we have both “Button” and “Checkbox” as action types. Thedefault is “Button”. For more information about the Checkbox type of action,refer to 12.12.4, “Checkbox action” on page 439.Note: Checkbox-type actions are not supported on the Web. They behavelike regular actions.Chapter 4. Domino Design elements: forms 149_ How the action should displayThere are various settings for how this action should display and beaccessible. You can decide whether the action should be available throughthe Actions menu, or if it should be included in the Action bar._ Add a icon to the actionEach action, besides those of type “checkbox”, can have a icon associatedwith it. This to give a more visual interface of what exactly will happen when

clicking the action._ Deciding hide/when rules to the actionActions can be hidden based on different rules. For example, you can hide anaction called “Edit Document” if the user did not have the role “Modifier” byadding a hide/when formula as follows:@IsNotMember(“[Modifier]” ; @UserRoles)_ Settings considering NotesFlow PublishingTo access an action’s propertybox, right-click the action and select ActionProperties. You can also access this propertybox using keyboard shortcuts. Allpropertyboxes can be displayed using Alt + Enter, so marking the action andclicking this key combination will show the propertybox.4.8.4 Action bar propertiesAs well as the Action itself, there is also a properties box for the Action bar. TheAction bar is the bar where the actions are shown. One way of accessing thesesettings is by first accessing the action properties box, and then selecting ActionBar from the Actions properties box dropdown list, as shown in Figure 4-51 onpage 150.150 Domino Designer 6: A Developer’s HandbookFigure 4-51 Selecting the Action Bar properties boxThe Action Bar properties box is shown in Figure 4-52.Figure 4-52 Action Bar properties boxBy setting and changing the settings in the Action Bar properties box, you canfully control changing the design of the background of the bar, the text font, sizeand color of the text on the buttons, the buttons styles, border styles, and muchmore. This helps you to create a more user-friendly user interface.
4.9 Embedded elementsUsing Domino Designer 6, you can insert navigators, views, outlines, calendarcontrols, scheduling controls, folder panes, file upload controls and editors.These elements are called embedded elements, and they provide an easy way toenter and show information in both the Notes client and Web browsers.Chapter 4. Domino Design elements: forms 151The Notes client cannot use Embedded Folder Panes or Embedded File UploadControls; only Web users can. Web users cannot use Date Picker.4.9.1 Embedded editorsThis is a new feature that comes in Domino Designer 6. You can now embed aneditor into a form. This functions like an IFRAME on a Web page.There are mainly two situations in which you would use this new feature:_ Embedding one or more forms into an existing form_ Embedding an editor which again links to an embedded viewFor more information about this feature, refer to 12.17, “Embedded elementenhancements” on page 469.4.9.2 Embedded navigatorsAn embedded navigator is an element that provides you with an easy way toshow a Notes navigator. You can have multiple navigators in one form. To insertan embedded navigator into your form, follow these steps:1. From Domino Designer 6, open the MyTeamRoom database.2. Choose the Forms design view and create a new form by pressing the New-> Form button in the Form view pane.3. Create a table containing one row and two columns.4. Go to the first cell in the table and choose Create -> Embedded Element ->Navigator and choose TeamRoom navigator in the dialog box.5. The TeamRoom navigator is now inserted into the table, and you can see inthe Programmer’s Pane that the TeamRoom navigator is highlighted.6. Try to change the embedded navigator by choosing another navigator in the

Programmer’s Pane to see what happens. As you will see, the navigatorchanges in your design pane when you select another navigator.7. You can also embed a navigator based on a formula.Note: You can also use these embedded elements in any page and they willwork as they do in a form.Note: This type of application can also be done with a frameset designelement, where the view is in one frame and the selected document in anotherframe.152 Domino Designer 6: A Developer’s Handbook
4.9.3 Embedded date pickerAn embedded date picker is an element which shows the calendar view of thecurrent month (default) and allows the user to browse other months.Usually you would use a embedded date picker in a frameset and set the targetframe of the embedded date picker to a frame containing a calendar view.Clicking a date in a date picker would result the calendar view to change to thatdate.This feature is not supported on the Web.4.9.4 Embedded outline controlYou can insert an embedded outline control in your form to give more flexibility toyour programming of the navigation pane than navigators provide. Navigatorsappear essentially as static image maps. If you need more flexible andprogrammable navigation, Outline control can be a good option. For moreinformation on this, read the document “Embedding an outline” in the DominoDesigner 6 Help database, and refer to 9.3, “Embedded Outline” on page 309.4.9.5 Embedded viewAn embedded view is an element that provides you with an easy way to show aDomino view for Notes or Web users inside a page or a form. For example, theExpand and Collapse options work fine, and it is not necessary for browsers toreload the site repeatedly, which can be slow. With Domino 6, you can insertmore than one view in a form, subform, or page.To create a new embedded view, follow these steps:1. Go to an empty area of a form (for example, Team Member Profile Form) andchoose Create -> Embedded Element -> View.2. A dialog box is displayed. Choose By Category and then OK.3. The embedded view is inserted into the table and you can see a list of viewsin the Programmer’s Pane.4. By clicking with the right mouse button and selecting Embedded View, youcan display the Embedded Views InfoBox, as shown in Figure 4-53 onpage 153.Chapter 4. Domino Design elements: forms 153Figure 4-53 The Embedded View properties– The Basic tab allows you to specify whether you want to use the view Javaapplet when looking at this form through a browser, and if not, lets youoverride the default number of lines to display as configured in the Dominoserver configuration. It also has the option for you to specify the target ofyour view when clicked once or when it encounters a double click.Youselect which frame to open the view in. This is a new option in DominoDesigner 6.– You can choose the color of the background and the size of the view in theElements tab.– The Fonts tab of the InfoBox lets you specify fonts and colors for theEmbedded View.– The Alignment tab lets you specify the alignment of the view.– The Page Break tab allows you to control the pagination of the view.– The Hide When tab allows you to set when to display and hide the view.

4.9.6 Embedded group scheduling controlThe group scheduling control is similar to the one found in the mail template, andallows you to view the diaries/schedules of multiple people at the same time.4.9.7 Embedded folder paneAn embedded folder pane is an element that provides you with an easy way todisplay a list of Notes views on the Web. You can have only one embedded folderpane within one form.Tip: The view Java applet is not accessible for users with screen readers. Wesuggest you provide an alternate text-only page.154 Domino Designer 6: A Developer’s Handbook1. Open the form that you created earlier and delete the embedded navigatorelement.2. In the same place, choose Create -> Embedded Element -> Folder Pane.After embedding the folder pane element form, the layout will look as shownin Figure 4-54.Figure 4-54 An embedded folder paneYou can view the form in your Web browser by opening the database from theWeb and typing the following address in the location field:http://"server name"/"database name"/"Form Name"?openFormwhere server name is the name of your server, database name is thedatabase name, and Form Name is the name of the form that you want toopen.Chapter 4. Domino Design elements: forms 155Figure 4-55 The embedded folder pane in a Web browserYou can also change the font, font size, color of the text, and alignment of thefolder pane by opening the InfoBox.3. Close the form and return to the standard navigator.4.9.8 Embedded file upload controlA file upload control is an element that provides users with an easy way to uploadfile attachments to the Web. You can have multiple file upload control elements inone form.
4.10 Other features of formsThis section describes some of the features you can use in forms.156 Domino Designer 6: A Developer’s Handbook
4.10.1 Horizontal rulesTo create a horizontal rule, do the following:1. From the standard navigator choose Design -> Forms. A list of forms isdisplayed.2. Open the Main Topic form.3. Click the form where you want to create a horizontal rule.4. Choose Create -> Horizontal Rule.5. A horizontal rule is created on the form. You can change the settings of thehorizontal rule from the Infobox.6. By default, the rule is set to fit to window. You can set the height and color,and either fit the width to the window or specify a width.Note: Domino displays the horizontal rule for Web applications using the HR tag.4.10.2 Computed textComputed text can be used to create text, on the form or in a rich text-type fieldon a document, based on Notes @formulas. Creating computed text is similar tocreating text fields that are computed for display.Computed text is not stored in the document, and it is computed every time thedocument is opened, reloaded or refreshed.Authors who do not have designer privileges can create personalized Web pagesusing computed text. To create computed text in an existing field, do the

following:1. From the Notes client, open the TeamRoom database and create a newdocument by choosing Create -> Main Document.2. Go to the Content field.3. Choose Create -> Computed Text.4. Computed Text is created on the field.Chapter 4. Domino Design elements: forms 157Figure 4-56 Example of using @Text(@Now) as computed text5. When Computed Text is highlighted, click the Programmer’s Pane and typethe desired formula. In this case, the formula is:@Text(@Now)The formula returns the current date stamp.Note: This is useful if you are not a designer but you want to add somefunctionality to the document. You can, for example, also use computed text toshow something to one user that other users will not see.The following formula allows only Paul Revere to see the text; other users will notsee it:Name([CN]; @UserName) = "Paul Revere"; "Hello Paul, This text is shown onlyfor you, other users don't see it";"");Tip: If desired, you can type HTML into Computed Text.Note: The computed text formula must return a single text value, not anumber, date or a list. This means you cannot use formulas like @Now,@Sum or @UserRoles, without converting the return value to text first.Figure 4-56 on page 157 shows the example we used for computed text. Inthis example, we used @Text function to convert the value @Now formulareturn to a text string.158 Domino Designer 6: A Developer’s Handbook
4.10.3 Buttons, Action bar buttons, and hotspotsNote menus are not available to Web users. Therefore, you must providealternatives to perform these functions. Use actions in all your views and forms,or buttons and hotspots on forms.To create multiple buttons that are displayed in a Web browser, perform thefollowing steps:1. The browser must support JavaScript.2. Select the database property Web Access: Use JavaScript WhenGenerating Pages. If this property is not set, Domino recognizes only the firstbutton in a document and treats it, by default, as a Submit button that closesand saves the document. If there are no buttons in the form, Domino places aSubmit button at the bottom of the form.Guidelines for using button formulasNotice the following guidelines and restrictions:_ On the Web Action bar, buttons and hotspots support only a subset of theavailable actions._ You should create only one Submit button per form. You can customize thisbutton, even if you haven’t selected the database property Web Access: UseJavaScript when generating pages._ Formulas on buttons are run when the user clicks the button.Tip: If your browser doesn’t support JavaScript and you don’t want anybuttons on the form, then enter the following HTML code on the bottom of theform: </form>. Remember to mark text as Pass-Thru HTML and hide it fromNotes users.ActionsAction Drop-down menuThe application developer can create a drop-down menu on an action bar. Thefollowing example creates an action button with three sub-actions:

1. From the menu, select Create -> Action -> Action with Sub Action.2. When the Actions properties box is shown, type in the name of the firstsub-action.3. To add further sub-actions, select Create -> Action -> Action while thetop-level action is selected.Tip: To add more top level actions you may need to press “-” to collapsethe list.Chapter 4. Domino Design elements: forms 1594. Remember to name the parent action by selecting it and then clicking n theProperties icon.When all the action buttons are created, save the document and preview theform by choosing Design -> Preview in Notes. The action bar and the actionbutton should look as shown in Figure 4-57.Figure 4-57 A form with sub-actionsAs you can see, the drop-down menu opens when you click the Help button.Note: Using Domino Designer 6, you can add more than one sub-level to adrop-down menu.Action bar InfoBoxThe Action bar InfoBox allows you to modify the properties of the Action bar. TheAction bar InfoBox looks as shown in Figure 4-58.To open the dialog, double-click an action to open the Action Infobox and pulldown the list in the title bar.Figure 4-58 The Action bar properties160 Domino Designer 6: A Developer’s HandbookThe Action bar InfoBox consists of six tabs:1. Action Bar InfoOn this tab you can specify:– The alignment of the buttons.– Whether to use HTML or the Java applet when viewing this page via abrowser.2. Action Bar SizeSelect one or more of the following:– Bar height - choose one of the following:• Default - automatically determines the appropriate height for the actionbar.• Exs - specify the size of the action bar in exs. An ex is equal to the sizeof the lower case of the font that you have chosen.• Fixed - specify an absolute bar height in pixels.– Font, Size, and Style - if you selected Exs, specify the font, the size of thefont, and the style of the font (for example, bold or italic) for the items in theAction Bar.This setting does not affect the text on the action buttons, only the heightof an “Ex” for purposes of determining the button height.3. Action Bar BackgroundThis allows you to change the following:– Color - specify a color for the background of the action bar.– Image - you can also choose to use an image for the background. To usean image, click the folder icon and select the name of a shared imageresource that you have created and stored in the database as a Resource,or click @ and specify a formula (or set of formulas).– Options - lets you choose how to present the background image. Forexample, you can center it, tile it, repeat the image vertically, and so on.4. Action Bar BorderThis contains the settings for the bar’s border– Border style and color - choose the style and color of the action bar border.For example, you can choose a solid line border or a border with a ridge or

no border at all.– Border effects - lets you choose to have a drop shadow border and set itswidth in pixels.– You can also set the thickness of the border (as well as the thickness ofthe outside and inside border, if applicable).Chapter 4. Domino Design elements: forms 1615. Button PropertiesThis tab allows you to modify the properties of buttons.– Button Size - lets you set the height, the width, and the margin for all thebuttons on the action bar. If you choose Fixed size, you can specify thesize in pixels.• If you choose default for the height, for the width, or for the margin, itssize is automatically set. Note that if you have images that are muchtaller than the font, you should not choose a default height, but shouldspecify a fixed height.– Button Options:• Display border - controls when the button border displays. You canchoose to display the button border On Mouse Over, Always, or Never.• Align text - choose whether to have button text aligned center, left, orright.• Internal margins - set the margins within the button in pixels.• Always show drop-down - checking this causes the drop-downcharacter (down caret) to display inside the Action button. If this is notchecked, the drop-down character displays only on mouse over.– Button Background - lets you either select a color for the buttonbackground or use an image for the background. To use an image, clickthe folder icon and select the name of a shared image resource that youhave created and stored in the database as a Resource, or click @ andspecify a formula (or set of formulas).• Note that using an image is not supported on the Web.6. Button FontThis tab allows you to modify the font size and text style on the of the buttons.This controls the actual button font. The font size and style on the action barsize tab is only used for determining the button height.
4.11 Images within formsThere are several ways to add images to your Web pages:_ Copy images through clipboard_ Import pictures_ By using Image ResourceNote: It is possible to create Shared Actions in a database that can be used inmultiple views, folders, pages, forms, and subforms. Shared actions arestored as shared resources in the database.162 Domino Designer 6: A Developer’s Handbook
4.11.1 Copying images1. Copy your desired image to the clipboard.2. Open the form in Design mode.3. Click the form where you want to place the image.4. Choose Edit -> Paste.Figure 4-59 Example of a form with an image pasted into it4.11.2 Importing pictures1. Open the form in Design mode.2. Click the form where you want to place the image.3. Choose Create -> Picture.4. Select the type of file, click the file to import and click OK.
4.11.3 Using Image ResourceAttaching your image files as image resources into your database is therecommended way of storing and using the images you want to use in yourapplication. Images are stored in a central place inside the application, and theyTip: Often the quality of the image is better when the picture is imported ratherthan pasted.Chapter 4. Domino Design elements: forms 163can be replicated together with the application. Note that you can use imagesfrom databases other than the current databases. This means you could have acentral repository for your image resources, thus allowing you to mange yourimages in a single place.1. Create a new image resource by opening the Shared Resources -> Imagesview.2. Click the New Image Resource button, select the type of image file, and thenclick the file to import. Click OK.3. Go to the form and move the cursor to the place where you want to place theimage resource.4. Choose Create -> Image Resource and select the image for Insert ImageResource box. You can also choose images from other databases. If you do,the other database needs to be available to users who use that form.Figure 4-60 The Insert Image Resource dialog box4.11.4 Alternate textAdding alternate text to graphical hotspots allows Web users with text-only Webbrowsers to see text on the form where the graphic should be. Users with Webbrowsers that support graphics will see the alternate text while the Web browseris loading the graphic. Screen reader programs speak this text for the benefits ofthose who cannot see the image.Note: Image Resource also supports animated images.164 Domino Designer 6: A Developer’s HandbookTo add alternate text:1. Select the graphic and choose Picture -> Properties.2. In the Alternate Text box, enter the text to describe the graphic.
4.12 Using CGI variablesCommon Gateway Interface (CGI) is a standard for interfacing externalapplications with HTTP servers. When a Web user saves a document or opensan existing document, the Domino Web server uses CGI variables to collectinformation about the user, including the user’s name, the browser, and the user’sInternet Protocol (IP) address.To capture this information in a Web application, you have two options:_ Create fields with the same names as CGI variables._ Use LotusScript agents.4.12.1 Table of CGI variables supported by DominoTable 4-7 lists all the Common Gateway Interface (CGI) variables that aresupported by Domino.Domino captures the following CGI variables through a field or a LotusScriptagent. You can also capture any CGI variable preceded by HTTP or HTTPS. Forexample, cookies are sent to the server by the browser as HTTP_Cookie.Table 4-7 Table of CGI variables with new variables in boldTip: It is important to provide alternate text for all non-trivial images, especiallyfor the benefit of visually impaired.However, do not add alternate text for spacers, bullets, or other elements thatonly decorate and do not add information, as this just clutters the screen andwastes the time of screen reader users.CGI variable Returns

Auth_Type If the server supports user authentication and thescript is protected, this is the protocol-specificauthentication method used to validate the user.Content_Type For queries that have attached information, such asHTTP POST and PUT, this is the content type of thedata.Chapter 4. Domino Design elements: forms 165Content_Length The length of the specified content as given by theclient.Gateway_Interface The version of the CGI spec with which the servercomplies.HTTP_Accept The MIME types that the client accepts, as specified byHTTP headers.HTTP_Accept_language The languages that the client accepts, as specified byHTTP headers.HTTP_Referer The URL of the page the user used to get here.HTTPS Indicates if SSL mode is enabled for the server.HTTPS_CLIENT_CERT_COMMON_NAMEThe common name on the x.509 certificate.HTTPS_CLIENT_CERT_ISSUER_COMMON_NAMEThe issuer of the x.509 certificate.HTTPS_KEYSIZE The session key during an SSL session. For example,40-bit, 128-bit.HTTP_User_Agent The browser that the client is using to send therequest.Path_Info The extra path information (from the server’s rootHMTL directory), as given by the client. In other words,scripts can be accessed by their virtual path name,followed by extra information that is sent asPATH_INFO.Path_Info_Decoded Returns the same as Path_Info, but decodes the string.For example, if a URL references a view name thatcontains characters that are not allowed a URL, thename is encoded. This CGI variable decodes thestring. Path_Info_Decoded is available to Dominoapplications only.Path_Translated The server provides a translated version ofPATH_INFO, which takes the path and does anyvirtual-to-physical mapping to it.Query_String The information that follows the question mark (?) inthe URL that referenced this script.166 Domino Designer 6: A Developer’s HandbookFor more information about CGI, see:http://hoohoo.ncsa.uiuc.edu/cgi/env.htmlQuery_String_Decoded Returns the same as Query_String, but decodes thestring. For example, if a URL references a view namethat contains characters that are not allowed in a URL,the name is encoded. This CGI variable decodes thatstring. Path_Info_Decoded is available to Dominoapplications only.Remote_Addr The IP address of the remote host making the request.Remote_Host The name of the host making the request.Remote_Ident This variable will be set to the remote user nameretrieved from the server. Use this variable only forlogging.Remote_User Authentication method that returns the authenticateduser name.Request_Content Supported only for agents. Contains the data sent withan HTTP POST request. The data is usually“URLencoded”, consisting of name=value pairs

concatenated by ampersands; for example,FirstName=John&LastName=Doe.Request_Method The method used to make the request. For HTTP, thisis “GET,” “HEAD,” “POST,” and so on.Script_Name A virtual path to the script being executed, used forself-referencing URLs.Server_Name The server’s host name, DNS alias, or IP address as itwould appear in self-referencing URLs.Server_Protocol The name and revision of the information protocolaccompanying this request.Server_Port The port to which the request was sent.Server_Software The name and version of the information serversoftware running the CGI program.Server_URL_Gateway_InterfaceThe version of the CGI spec with which the servercomplies.Chapter 4. Domino Design elements: forms 1674.12.2 Using a field to capture CGI variablesWhen a field has the same name as a CGI variable, Domino copies the fieldvalue from the CGI environment and places it in the field. There are two things tonote:_ You do not have to specify a formula if the field is editable._ Make the field hidden when previewed for editing and opened for editing.For example, you can create a field named HTTP_USER_AGENT. This fieldcaptures information about which browser the user is using. You can use thisfield to see if the user’s browser supports features in your application.The general format of HTTP_USER_AGENT variable is software/versionlibrary/version. The 11 leftmost characters basically tell you the browser version.You can evaluate this in formulas and display different things based on that. Forexample:@Left(HTTP_USER_AGENT;11)="Mozilla 3.0";"Netscape Navigator";@Left(HTTP_USER_AGENT;11)="MSIE 2.0";"Microsoft Internet Explorer";"")Some of the values returned by HTTP_USER_AGENT are listed in Table 4-8.Table 4-8 The returned values for some browsers, using HTTP_USER_AGENT4.12.3 Using a LotusScript agent to capture CGI variablesYou can use the DocumentContext property of the NotesSession class to captureCGI variables. The property returns a Notes document that contains all CGIvariables that are applicable to the session. You can use these values to collector process information for the current session.The following example demonstrates how to access CGI variables:Dim session As New NotesSessionDim doc As NotesDocumentDim CGIValue As StringSet doc = session.DocumentContextCGIValue = doc.HTTP_USER_AGENT(0)Returned value BrowserMSIE Microsoft Internet Explorer 4 or laterMozilla 3.x Netscape Navigator 3.xMozilla 4.x Netscape Navigator 4.xMozilla 5.x Netscape Navigator 6.x168 Domino Designer 6: A Developer’s HandbookThe CGIValue string now has information about a user’s browser.Tip: When submitting a document, CGI variables are calculated twice: oncewhen the form is displayed to the user in the browser, and again when the submitbutton is clicked and the form is posted back to the server.There are occasions when you need to capture the state of a CGI variable whenthe form is first displayed by the Web browser, for example, when using the

HTTP_Referer field to capture the URL the user has just come from so that youcan take them directly back to that point.In this case, you need to create a second field on the form that computes thevalue of the CGI variable: make the field hidden to the HTML form by using theHTML tag’s <TYPE=HIDDEN>.
4.13 Profile documentsProfile forms are useful for collecting user-specific or database-specific values.These values are stored in documents that are called profile documents. Thedifference between documents and profile documents is the way they aredisplayed and how items are accessed. Only one profile document per form canexist for each user of a database. Or, only one profile document can exist for adatabase, if that form is available to all users.Profile documents allow for quick data retrieval, because they are cached whilethe database that stores them is open. Profile documents are like other databasedocuments except they are somewhat invisible.Users create profile documents through an action button or agent you design thatuses LotusScript or the formula language.A database can have a single profile document or multiple profile documents thatmatch a key you specify—for example, an @UserName key that creates oneprofile document for each user of a database, or a key that specifies a differentprofile document for each day of the week.Whether you use one profile document for a database, or use multiple profiledocuments, depends on your design needs. Use multiple profile documents formore customizable settings, such as user preferences. A user must have at leastNote: Profile documents do not display in views and are not included in adocument count for the database. This goes both for the database propertydocument count, and the count method for the LotusScript class,NotesDocumentCollection.Chapter 4. Domino Design elements: forms 169ability to create documents in the access control list (ACL) of a database tocreate a profile document that is available to all users.You can use any form to create a profile document. After creating the form, youcreate a button, action, or agent for the application that uses either@Command([EditProfile]) in a formula or NotesUIWorkspace.EditProfile orNotesDatabase.GetProfileDocument in a LotusScript program to create orretrieve a document. In each case, Notes looks for a profile document with theform name you specify, and creates a profile document if one does not alreadyexist.4.13.1 Creating a profile formFollow these steps to create a profile form for profile documents in yourdatabase:1. Create a form with fields to hold the values you want to store in profiledocuments.2. Choose Design -> Form Properties and deselect: Include in Menu.3. Save the form.4. Create a button, action, or agent that uses either the LotusScriptNotesDatabase.GetProfileDocument method orNotesUIWorkspace.EditProfile, or the Formula language @CommandEditProfile to create or access the document.4.13.2 Creating and retrieving profile documents using LotusScriptYou can create and retrieve profile documents using the GetProfileDocumentmethod in the NotesDocument class. Example 4-1 on page 170 shows the use ofGetProfileDocument.

Note: The form should not be available for users in the “Create”-menu on theclient. This is to ensure that no one can create regular documents with theform.Tip: When using profile documents in Domino Web applications, the Dominoserver process caches the profile. It does not notice changes made in theNotes client or scheduled agents.170 Domino Designer 6: A Developer’s HandbookExample 4-1 Creating a profile document using LotusScriptDim session As New NotesSessionDim db As NotesDatabaseDim docProfile as NotesDocumentSet db = session.CurrentDatabaseSet docProfile = db.GetProfileDocument("Interest Profile", _session.UserName)The first parameter (“Interest profile”) is the “profilename”, which is a string. Thisis the name or an alias of the profile document. The second parameter(session.UserName) is optional, and should be the user name (key) attached tothe profile document. The return value of this example, docProfile, will return theprofile document created or retrieved that matches the given name.You can create or edit a profile document using @Command([EditProfile]),@Command([EditProfileDocument]) or @SetProfileField. Use the SetProfileFieldand GetProfileField commands to set and retrieve field values from a profiledocument. A SetProfileField command also creates a profile document if noneexists.If you prefer scripts to formulas, use LotusScript routines to create and editprofile documents. The EditProfile method of the NotesUIWorkspace classproduces the same result as the @Command([EditProfile]) command used in aformula.To set or retrieve field values for a profile document with a script, use theGetProfileDocument method to get a handle to the document. You can thenretrieve values from the document or set new ones, just as you would with anydocument.Use the IsProfile property for the NotesDocument class to determine if aNotesDocument object is a profile document. Use the NameOfProfile property toretrieve the name of the profile document.Example 4-2 on page 171 shows an example on how you can create, retrieveand modify a profile document. If the profile document (docProfile) is not found, itis created. It then checks for a value on this document (Company field). If thisfield is not set, then it is updated, and saved with the new value. If it is alreadyset, nothing more is done.Important: You cannot delete a profile document using an @command or@function. Use LotusScript if you must delete a profile document.Chapter 4. Domino Design elements: forms 171Example 4-2 Creating/retrieving/modifying profile documentsSub InitializeDim session As New NotesSessionDim db As NotesDatabaseDim docProfile As NotesDocumentDim sAuthor As StringDim itemCompany As NotesItemSet db = session.CurrentDatabaseSet docProfile = db.GetProfileDocument("Profiles", session.UserName)Set itemCompany = docProfile.GetFirstItem("Company")If itemCompany Is Nothing ThendocProfile.Company = "ConCrea"Call docProfile.save(True, False)End IfEnd Sub

4.14 New features in Domino Designer 6One of the new features is that you can create layers. Layers let you positionoverlapping blocks of content on a page, form, or subform. Layers give youdesign flexibility because you can control the placement, size, and content ofinformation. You can create and stack multiple layers beneath and above oneanother. Transparent layers reveal layers underneath; opaque layers conceallayers underneath.Another feature is the ability to embed an editor into the form; this subject iscovered briefly in 4.9.1, “Embedded editors” on page 151.Finally, the embedded scheduler allows you to design a form or subform thatdisplays the schedules of users. For example, you can create a form for users toschedule department meetings. Embedding a scheduler on the form lets userscheck everyone's schedules before planning the meeting time. Also, within theembedded scheduler, users can click a person's name to open that person'scalendar view (provided the user has been given access in the person's mailpreferences). You can program the calendar to open in a separate frame, or in itsown window.These features are explained in greater detail in Chapter 12, “New features inDomino 6” on page 347.172 Domino Designer 6: A Developer’s Handbook
4.15 SummaryThis chapter explained the main features and functions available to theapplication developer when creating forms in a Notes application. It outlinedsome of the areas that application developers need to consider when developingapplications for use by Notes clients, Web browsers, and mobile clients. Newfeatures that are included in Domino Designer 6 were also highlighted.© Copyright IBM Corp. 2002. All rights reserved. 173
Chapter 5. Domino Design elements:pagesIn this chapter, we describe the page design element. We explain the basics ofwhen and how to use pages in a database, and provides an example. We alsomention the new features that have been added in Domino Designer 6.
5174 Domino Designer 6: A Developer’s Handbook
5.1 What is a pageA page in Domino Designer 6 is a design element that is used to displayinformation. Unlike a form that collects information, pages are designed topresent information to the user. For this reason, you cannot create any fields orsubforms on a page. However, you can have text, graphics, or an embeddedcontrol (such as an outline) on a page.Pages provide application developers with a greatly improved level of control overthe layout of Web pages on Domino sites. Application developers not familiar withtraditional Notes development, but with experience designing Web pages, nowhave a WYSIWYG HTML authoring tool that provides support for a broad rangeof browser technologies including HTML 4, image file formats, Java applets,Active X components, and multimedia objects.Pages are best used for static information, or as containers for other elements.

You might use a page as the opening screen of your application, or as the “thankyou” screen after a user submits a document (for more information about thankyou screens, see “The $$Return Field” on page 115), or as a “view template” toprovide the background and surrounding graphics in which a Notes viewappears.
5.2 Creating a new pageYou can create a new page by choosing Create > Design -> Page or by clickingthe New Page button in the Design Page View pane; the new page is shown inFigure 5-1 on page 175:Chapter 5. Domino Design elements: pages 175Figure 5-1 The page design viewExcept for Fields, Layout Region, and Subforms, you can use anything on a pagethat you could use on a form.5.2.1 Specifying page propertiesThe Page InfoBox contains all of the information related to pages.To look at the page properties, do the following:1. Click the Properties icon.Note: Remember to enter a window title for your page. If you don’t want thetitle to evaluate based on a formula, static text needs quotes around it.Using a window title is especially important for Web applications. Even if youthink the page will only be opened in a frameset, users can bookmark theframe contents separately, and search engines can create direct links to it. Inthat case, the window title becomes the text of the bookmark or the page title.176 Domino Designer 6: A Developer’s Handbook2. In the InfoBox displayed, click the triangle in the top middle of the InfoBox andselect Page. An InfoBox is displayed which allows you to set the properties ofthe page. There are four tabs:– Page Info– Background– Launch– SecurityPage Info tabThe Page Info tab stores general information about the page. See “Using theForm Info tab” on page 77 and “Using the Defaults tab” on page 83 for detailsabout the properties on this tab.Figure 5-2 The properties for Page InfoFor more information on the options you can set for a page and the Web Accesssettings, refer to “Using the Form Info tab” on page 77.Background tabThe Background tab allows you to specify the background color for the page. Youcan also paste in a graphic using the clipboard or import a graphics file. Thesesettings are the same as for the form. See “Using the Background tab” onpage 87 for details about the properties on this tab.Chapter 5. Domino Design elements: pages 177Figure 5-3 The properties for BackgroundLaunch tabThe Launch tab specifies what happens when the page is loading. See “Usingthe Launch tab” on page 86 for details about the properties on this tab.Figure 5-4 The properties for LaunchTip: When developing for the Web, you might occasionally need the databaseto launch directly to a form. This is not an option of the launch properties of adatabase.However, you can program a page with the use of meta tags and “HTML HeadContent” to redirect to a form. Setting a database to launch such a page willthen actually launch the form.

178 Domino Designer 6: A Developer’s Handbook
Security tabOn this tab you specify whether this page is available to Public Access users.Refer to “Using the Security tab” on page 91 for details about the properties onthis tab.Figure 5-5 The properties for SecurityMost security screens let you specify a list of users who have access to thedesign element.Note: This option is not available for pages, because they are unlikely to includeany secrets. If the page contains any information from other design elements, thesecurity of those design elements is still in effect. For instance, if a user does nothave access to a given view, the user will be unable to see the view contents bylooking at a page that includes that view as an embedded element.
5.3 Page eventsPage events are just like form events, except that the NotesUIDocument object inthe script events contains no field items, and the events for saving and submittingare not supported because there are no fields to submit. For more informationabout events, see Chapter 4, “Domino Design elements: forms” on page 75.
5.4 Using pagesPages can be used any time you are displaying information to the user. Pagescan contain:_ Layers_ Text_ Computed text_ Tables_ Graphics_ Applets_ Embedded objects such as views_ LinksPages often work in conjunction with framesets to display graphics, sitenavigation, or applets. They are also in previous versions of Domino (beforeChapter 5. Domino Design elements: pages 179Domino 6), and are often used to hold JavaScripts and Cascading style sheets.However, with Domino 6, it is recommended that you use Shared Resources andShared Code instead.In the following example, we look at existing pages in the TeamRoom database tosee how the pages are used in that application, as follows:1. Create a new database, using the TeamRoom template, and call itMyTeamRoom.2. Open this database in Design mode.3. Go to the Pages design collections. The view pane shows all of the pages inthe database.4. Open the TeamRoom Outline page by double-clicking it in the view pane. Thepage should look like Figure 5-6.Figure 5-6 The Team Outline page design view5. To see what you can add to the page, click Create; refer to Figure 5-7 onpage 180.180 Domino Designer 6: A Developer’s HandbookFigure 5-7 The Create menu for pages5.4.1 Launching pagesThere are many options for launching pages, such as the following:_ Inserting the page into a framesetSelect the frame where you want to put the page, and then click the rightmouse button and select Frame Properties. Select the Named Element in

Type option, and from the Kind options, select Page. You can also createlinks to pages from outlines and hotspots, using a similar dialog.Note: You can also select a page from another database._ Using existing framesetsOpen the Pages InfoBox and select the Launch tab. Select the Framesetoption and choose the framesets where you want to insert the page. SelectFrame options and select the page or form that you want to replace._ Linking to the page via URLIn cases where you can’t use the Named Element selection to create a link toyour page, you can specify its location in Web applications by its URL.The URL of a page is the URL for the database, followed by“/ pagename?OpenPage”; see the following example:http://www.mycompany.com/main.nsf/Intro?OpenPageChapter 5. Domino Design elements: pages 181_ When database is openedOpen the database InfoBox and select the Launch tab. Choose OpenDesigned Navigator in the On Database Open dialog list. Next, select thepage from the Type of Navigator dialog list and select the current page namein the next field.Note: In the On Web Open options, select the Use Notes Launch option ifyou want to open that page for Web users as well as Notes client users.
5.5 New features in Domino Designer 6With Domino Designer 6, you can select Style Sheets as a resource. Cascadingstyle sheets (CSS) gives you the ability to control many aspects of your pagelayout, including headers, links, text, fonts, styles, color, and margins. You canbrowse your local file system for a CSS, turn it into a shared resource, and theninsert it into a page, form, or subform.Another feature is that you can create layers. Layers let you position overlappingblocks of content on a page, form, or subform. Layers give you design flexibilitybecause you can control the placement, size, and content of information. You cancreate and stack multiple layers beneath and above one another. Transparentlayers reveal layers underneath; opaque layers conceal layers underneath.The third new feature for pages is the ability to insert an existing JavaScriptlibrary into your page. A JavaScript library is a place for storing and sharingcommon JavaScript programs and code.These features are explained in greater detail in Chapter 12, “New features inDomino 6” on page 347.
5.6 SummaryThis chapter explained the main features and functions available to theapplication developer when creating pages in a Notes application. Itdifferentiated between forms and pages. We described how to create a page andwhat design elements are available to use in a page. We also examined some ofthe new features that are available in Domino Designer 6.Tip: If you need to write a formula to calculate the URL from elsewhere inthe same application, use the @WebBDbName macro function to avoidhardcoding the database path.182 Domino Designer 6: A Developer’s Handbook© Copyright IBM Corp. 2002. All rights reserved. 183
Chapter 6. Domino Design elements:views, folders, and

navigatorsIn this chapter, we describe the view, folder and navigator design elements. Weexplain how to create and modify them, and how to control the information thatthey display.
6184 Domino Designer 6: A Developer’s Handbook
6.1 Design elements definedIn the following sections we explain view, folders and navigator design elements.6.1.1 What is a viewA view lists the documents stored in a Domino database and can be thought ofas a “table of contents” of a database. Each row listed in a view represents datataken from a single document. Each column represents a field or a combinationof fields taken from that document; see Figure 6-1 on page 185.All Domino databases have at least one view, but most of them have more. Aview can display all the documents in the database, or it can display a subset ofthe documents. Documents can be viewed by categories, such as creation dateor author. Views can present documents sorted on different fields (for example,sorted by topic or by creation data).Every view has a view selection formula, which is a rule used to decide whichdocuments will be displayed in that view. The view might contain all documents inthe database, or only those that use a particular form, or only those createdwithin a month, or any other rule you set.Chapter 6. Domino Design elements: views, folders, and navigators 185Figure 6-1 View sample6.1.2 What is a folderFolders enable you to store and manage related documents, without putting theminto a category. Folders are also convenient because you can drag documents tothem. A folder looks and behaves like a view.The main difference between a folder and a view is that a folder does not have aselection formula. It is up to the user to decide which documents are to be storedin a folder. This can also done programmatically.6.1.3 What is an outlineOutlines, like imagemaps and navigators, provide a way for users to navigate anapplication. Unlike imagemaps or navigators, outlines let you maintain anavigational structure in only one place. As your site or application changes, youmake only one change in the source outline. Each navigational structure thatuses that outline source is dynamically updated.You can create an outline that lets users navigate to the views and folders in yourdatabase, perform actions, or link to other elements or URLs outside of your186 Domino Designer 6: A Developer’s Handbookapplication. You can create an outline that navigates through your entireapplication or site or through part of it.6.1.4 What is a navigatorA database navigator is a graphical interface which allows the user to easilyaccess views, Domino data, or other applications. Navigators can include graphicbuttons or hotspots, which are programmed areas that a user clicks to execute anaction.Navigators are supported for backward compatibility, but you should considerusing outlines or a combination of frameset and pages instead of navigators.

Both of them offer more rich functionality than a navigator.Figure 6-2 shows a navigator.Figure 6-2 Navigator sampleChapter 6. Domino Design elements: views, folders, and navigators 1876.2 Creating viewsThere are several ways to create a new view. You can build a view from scratch,or base it on an existing view in the same database.Alternatively, if a useful view exists in a database other than the one you areworking in, you may want to copy this view over to your database and customizeit to your needs.Creating a new viewTo create a new view:1. Open the database in Design mode and switch to the View pane.2. Click the New View button. (You may also choose Create -> View from theaction bar.) The Create View dialog box is displayed; see Figure 6-3.Figure 6-3 Creating a new view3. Change the view name from Untitled to a meaningful name of your choice.You also should provide a view alias at this time by entering the vertical bar(|), followed by the alias name after the view name.4. Select the view type from the pull-down list. The following options areavailable:– Shared– Shared, contains documents not in any folder– Shared, contains deleted documents– Shared, private on first use188 Domino Designer 6: A Developer’s Handbook– Shared, desktop private on first use– Private5. Select where the new view should appear in the View Menu and foldernavigator. Selecting any position other than the top level will create acascaded view.6. Click the Copy From button if you would like the view’s design copied from adifferent view to the one displayed. This will bring up the Copy from dialogbox; see Figure 6-4.Figure 6-4 Copy from dialog boxYou can now select a different view design as the default for your new view.7. Decide if you want to specify the view selection formula using the SearchBuilder or the @function language.Attention: Shared, Private-on-first-use views cannot be maintained by thedesigner of a database.Instead of using these, consider using an embedded view with the property“Show single category” set on. See 6.7.6, “Embedding views” on page 230 formore information.Tip: You can also use the backslash character (\) to separate the levels tocreate a cascaded view.Note: If you are creating a shared view that contains only deleteddocuments, or documents not in any folder, you cannot specify anyselection formula.Chapter 6. Domino Design elements: views, folders, and navigators 1898. To use Search Builder, click the Add Condition button. This brings up theSearch Builder dialog box; see Figure 6-5 on page 189.Figure 6-5 Search Builder9. Build your selection criteria and click the OK button.10.When using the @function language, the layout of the dialog box changes;see Figure 6-6.

Figure 6-6 Creation view - Properties box11.Click the Fields & Functions button if you want to see a list of all the fieldsdefined in the database and all the available @functions, along with their Helpdocuments.Note: The layout and entry fields in this dialog box change, depending onthe condition you choose.190 Domino Designer 6: A Developer’s Handbook12.If you click the Save and Customize button, the Design window of the newview is displayed so that you can start your customization immediately.Otherwise, click the OK button.Copying an existing viewYou can copy an existing view in two ways: by using Copy and Paste, or Drag andDrop.To Copy and Paste:1. Open the database in Designer, and switch to the Views design view.2. In the View pane, select the view you want to copy.3. Choose Edit -> Copy to copy the view to the clipboard.4. Open the database in Design mode where you want the view to be copied.5. Click the View pane, then choose Edit -> Paste to copy the contents of theclipboard. This creates the new view.6.2.1 Working with view propertiesTo display the View InfoBox:1. Open the view in Design mode.2. Click the Properties icon to display the InfoBox. It contains six tabs.Info tab_ you must specify the name of the view. Including backslashes (\) in the namewill cascade the views in the View menu (for example: Marketing\LotusDomino).Tip: You can double-click to copy the field names and @functions from this listinto the formula window.Tip: Clicking the Formula Window button opens an formula input window,where it is easier to enter more complex formulas.Tip: Instead of choosing Edit -> Copy and Edit -> Paste from the Action bar,you may want to use the keyboard shortcuts.Chapter 6. Domino Design elements: views, folders, and navigators 191_ Specify an alias. This is the name you will use in your code if you need to referto the view. The advantage of using an alias is that if the name of the view hasto be changed, you need not change your code each time the view name ismentioned._ Specify a comment. The comment entry field is optional, but useful formaintenance purposes._ Choose a style. You can display the documents in a view as a calendarinstead of a table. For example, a Calendar view can display a date, ameeting or appointment time, a duration, and optional text describing theentry.To display a view as a calendar, the first column must be a Time/Date field.For more information on creating a Calendar view, see 6.2.3, “CreatingCalendar views” on page 205.Options tabThe Options tab is shown in Figure 6-7.Figure 6-7 View Properties - Options tabNote: If you set the name of the view to the reserved word ($All), Domino willdisplay this view with the name All Documents in the View menu.With the exception of the reserved names, ($All), ($Inbox), ($Trash), and($Sent), enclosing a view in parentheses means that the view is hidden and is

used solely for programming purposes. The user will not see it in the list ofviews192 Domino Designer 6: A Developer’s Handbook_ If you select Default when database is first opened, this view open the firsttime. The setting has no effect unless database launch properties are set to“Restore as last viewed”.Figure 6-8 Default view mark_ If you select Default design for new folders and views, this view will be usedas the template when the user creates folders or adds new views to thedatabase._ If you select Collapse all when database is first opened, the view will onlyshow the headings for categorized documents. This only applies when theview is opened for the first time._ If you select Show response documents in a hierarchy, the view will show allresponse documents indented under their parent documents._ If the Show in View menu check box is not selected, the view will be hiddenfrom the View menu in the action bar. It will still be shown in the foldernavigator._ If you select Allow customizations, then users will be allowed to customize aview in a variety of ways, including resizing and reordering columns.Changes that users make are maintained when they close and reopen theview. Because of this, designers will no longer have to “tweak” the viewdesign and either try to satisfy all users with one design, or create severalalmost identical views with different sorting. Instead, the user can change theorder and the visibility of all view columns.If you do not want users to customize a view, then do not select this option onthe Info tab.Note: There can only be one view in a database having the attribute of beingthe default view. In the View pane, such a view is marked with a dark bluearrowNote: The view selection formula still needs to select response documents.Chapter 6. Domino Design elements: views, folders, and navigators 193Note: Deselecting this option does not disable the user menu option (View ->Customize This View...) to customize the view. It does, however, disable allthe options within that dialog except for sorting; sorting is retained as anavailable item for accessibility purposes.Figure 6-9 shows the Customize View dialog box that is available to usersmake their customizations, through the menu View -> Customize this View.Figure 6-9 Customize View dialog box_ A view can have associated actions, and these actions can have someshow/hide formulas. When a view is opened, its action show/hide formulasare evaluated.There may be cases when you want an action to evaluate every time adocument changes in a particular view. For these cases, check the Evaluateactions for every document change option. Be aware that checking this optioncan have a serious impact on the performance of your application._ If you select Creating new documents at view level, then users will be allowedto create documents directly in the view context, without opening a form. Tomake it work you must add some code in the InViewEdit view event, to handlethe document creation. You must use LotusScript for that; 12.13.7, “Createdocument from view” on page 454 discusses how to implement thisfunctionality.194 Domino Designer 6: A Developer’s HandbookFigure 6-10 Creating document from view_ You may specify what happens when the view is opened. For example, youcan set the selection bar of the view to go to the bottom row.

_ You may specify what happens when the documents are changed and theview needs to be refreshed. Generally, you’ll want to display an indicator to letusers know that a view needs to be refreshed instead of refreshingautomatically (as this can have negative impact on the performance of yourserver).Tip: To keep your application accessible, make sure this is not the only wayto create documents.Add some code here tohandle the document creationView displayView Programmer’s paneChapter 6. Domino Design elements: views, folders, and navigators 195The Style tabThe Style tab is shown in Figure 6-11.Figure 6-11 View Properties - Style TabChoose a background color for your view. If you also select an Alternate color,rows will alternate between two colors.You might instead select one of your Image resources and display that behind theview text. The Repeat option lets you select whether the image will be displayedonce, tiled or stretched to fit the available space. Refer to 4.11.3, “Using ImageResource” on page 162 for information about how to use Image resources.Figure 6-12 shows a view with background image; let’s go into more detail onthis.Figure 6-12 View with background image_ Specify a grid to enhance the view display; you can do so by selecting thestyle and color.196 Domino Designer 6: A Developer’s Handbook_ You can choose to have up to five lines of text for the column headings, sothat long column titles can wrap multiple files. In addition, you can specifywhich style and color you can use for it._ As far as rows are concerned, you can also have up to nine lines for eachdocument, to enable you to store a large description. If you select Check boxShrink rows to content, this will eliminate all blank lines for documents that donot require the extra space._ The Don't show empty categories option suppresses the display of categorieswith no documents. Select this option if there are documents with a Readerfield which may hide these documents from the user at runtime.If that is the case and there is no document to be displayed for a specificcategory, the category will also not be displayed to the user.(Without thisoption checked on, part of the content might be compromised despite use ofreader fields.) Refer to 6.7.4, “Using categories in views” on page 228 formore information.Use this option if you want to hide the existence of the categories from userswho do not have access to the documents in it._ The Colorize view icons option colors the pre-defined Domino view icons tomatch the header color._ Color options let you set colors and style for unread documents and forcolumn totals. Red is used in applications that are shipped with Domino forunread documents._ You can set other options, such as Show/Hide the selection margin, marginborder (a line between the margin and the view), and extend last column towindow width._ A new feature in Designer is view margins. You can set it in pixels (1 to 100.)and choose the appropriate color. This draws a rectangular border around thewhole view.Note: Selecting the Don’t show empty categories option is likely to have a

negative impact on your Domino server.Tip: If you allow users access to create views on the server, they can stillsee the category values by creating a view that shows categories.Note: Extend last column will only make the column wider, never narrower.It is generally good idea to use this option if the column is left-aligned.Chapter 6. Domino Design elements: views, folders, and navigators 197Refer to Figure 6-10 on page 194 to see how some of these options are used.The Launch tabYou can set a specific Frameset and Frame that must be used to display the view;see Figure 6-13. Note that this feature for views and folders works only on theWeb. Refer to “Using the Launch tab” on page 86 for more information aboutLaunch options.Figure 6-13 View Properties - Launch tabThe Advanced tabThe Advanced tab provides information on the following topics:_ The index used to build the view; when it should be refreshed and discarded,and Restrict initial index build to designer or manage.Note: A view index is similar to an index in a relational database. Itremembers what documents are in the view and how they are sorted. Thissaves time when opening the view, since Domino must only look atdocuments that were modified since the last time the view was opened, toadd or remove them from the index.This is not the same as a full-text index that supports keyword searching.These advanced options are not often used. The default view indexingbehavior is best for most applications.198 Domino Designer 6: A Developer’s HandbookFigure 6-14 View Properties - Advanced tab_ How users will be notified about documents that were added or modifiedsince they last opened the view; refer to 6.7.3, “Identifying unread documents”on page 227 for more information._ Whether unique keys are built in the view for ODBC._ How this view is displayed when viewed with a Web browser (whether inHTML format or like an Java applet), and if the view documents can beselected.Note: The difference between HTML format and Java applet is that with Javaapplet, the Web application interface is very similar to a Lotus Notes client.Whereas with HTML, you have the flexibility of the HTML language to formatthe view the way you wish._ Include view updates in the transaction log; this is a new feature in release 6.Transaction logging captures all the changes made to a database and writesthem to a transaction log. The logged transactions are then written to adedicated disk in sequential order to be committed into the Domino databaselater. Transaction logs can then be used for backups and backup recovery, torecover from a media failure or system crash.Attention: The view applet is not accessible for screen reader users, soyou should provide an HTML alternative.Chapter 6. Domino Design elements: views, folders, and navigators 199By including view updates in the transaction log, you can avoid most of theview rebuilds. This can save a significant amount of time after a server restart.However, including view updates in the transaction logging can seriouslyimpact your server’s performance. View logging should be turned on only forcomplex system views such as $Users view in the Domino Directory.For more information about Transaction Logging, see Lotus DominoAdministrator 6 Help.The Security tab

In the following example, the view can be used by all users that have access tothe database. If you want to restrict its use to only some users or groups of users,deselect the check box and add the users or groups that will be granted specificaccess.Figure 6-15 View Properties - Security TabYou may also select the Available to Public Access Users option if you wish toenable this view or folder for users with public access read or write privileges inthe access control list for this database.3. Close the InfoBox.Attention: Consult your Domino server administrator before turning thisoption on for any view.200 Domino Designer 6: A Developer’s Handbook
6.2.2 Editing View columnsWe’ll now take a closer look at column properties. To view the column propertiesof a view, open the view in Design mode; you’ll see a window similar toFigure 6-16.Figure 6-16 A view in design modeTo access the properties of a column, double-click the column heading, or selectthe column heading and click the Properties icon. The InfoBox will be displayed.Chapter 6. Domino Design elements: views, folders, and navigators 201The Column Info tabFigure 6-17 Column propertiesOn the Column Info tab, you can specify the following:_ The title of the column to be shown in the column heading_ The width of the column_ If this column is related to a multi-value field, how this field will be displayed_ If the user is allowed to resize the column_ Whether or not the specification of this column is for response documents_ If icons should be displayed in the columnIf this box is checked, the width of the column should be 1. Furthermore, theProgrammer’s Pane must contain a formula which evaluates to a wholenumber. For example, the following formula determines whether a documenthas an attachment and, if so, displays the attachment icon (number 5):@If( @Attachments;5;0)Use 0 to leave the column blank. The formula above returns 0 when thedocument has no attachments, so nothing is displayed. A table of all iconsand their associated numbers is available in the Help database forinformation.Note: You cannot add any icons to the predefined set.Note: The width is shown in “characters”. You can adjust the width moreprecisely by dragging the edge with the mouse.202 Domino Designer 6: A Developer’s HandbookWith Domino 6, you can also add customized icons as part of you column, bytyping the name of the image resource as the value of the column. Refer to12.13, “View enhancements” on page 445 for more information.Example:@If(Status = “Overdue”;”Highlight_Animated.gif;Status=”Done”;82;0)_ If this column content can be edited in the view.If you select this option, you must write LotusScript code to control the editing.Refer to Chapter 12, “New features in Domino 6” on page 347 for moreinformation about setting up view editing._ Select the Use value as color option if the column content should be displayedas color.This feature allows you to programmatically apply an RGB color to columntext. To see an example of this, refer to 12.13, “View enhancements” on

page 445. When this option is checked, “User definable” is available to allowusers to specify colors. This requires an entry in the “Profile document” field,where you should type the name of the profile document. For moreinformation about Profile Documents, refer to 4.13, “Profile documents” onpage 168._ If a twistie will be shown if the row is expandable.A twistie is shown in front of the category in a categorized view, indicating tousers that they can open and close the category. A twistie (a blue triangularicon) is the image shown by default, but you are able to change the image toany of the image resources in your database. The image can be chosendirectly from the Image Resource dialog box or based on formula.A twistie is also shown in a row that may has response documentshierarchically.Note: For the benefit of screen reader users, avoid providing informationonly by means of a view icon.Note: Since a twistie must have an “Open” and “Closed” appearance, yourimages must be a “image well” with two images in it. Make sure the imagesyou use describe an “Open” state and a “Close” state in some sense.Chapter 6. Domino Design elements: views, folders, and navigators 203The Sorting tabFigure 6-18 Sorting a viewOn this tab, you can specify whether or not the documents displayed in the viewshould be sorted based on the values in this column, and if so, what the rules arefor sorting. You do this by making the following selections:_ Select None, Ascending, or Descending as the sorting rule._ Specify Standard or Categorized as the sorting type._ Specify sorting rules for case and accent sensitivity._ Choose options for multiple values and categories.If selected, then the Show multiple values as separate entries option tellsNotes to display the same entry multiple times in the view, if the fielddisplayed in this column contains multiple values._ The Categorized is flat option is greyed out unless the view is categorized. Ifselected, the category heading and the first document in the category arecombined into a single row. This saves screen space._ Select if you want the user to be able to alter the sort order by clicking thecolumn heading._ Select a value from the Totals pull-down menu if you would like to displaysome statistics in the view. You can, for example, summarize values in acolumn, show averages, or show percentage info.Tip: Using the Click on column header to sort option allows the user tospecify a secondary sort column, as well.204 Domino Designer 6: A Developer’s Handbook
The Font and Style tab_ The Font tab lets you set the font and color used when displaying informationin this column._ Use the Number tab to specify the display format of numbers in this column._ Use the Time tab if you are going to display date/time values in this column._ The Title tab allows you to set the font and color of the column title.The Advanced tabFigure 6-19 Advanced settingsOn the Advanced tab, you can specify the following:_ The name of the column for programmatic useYou can also use this name to refer to the column in other columns of thesame view.If you specify the column to show a field, the name of the field will be used for

this value, by default. If you specify a formula or a simple formula, a numericvalue, preceded by a dollar sign ($), will be used for the Name of the column.You are able to change the Name of the column to whatever you want.However, be cautious if you change the name, because if you have referred tothe programmatic name of the column in your code, changing the name willbreak the code.If you change the programmatic name of the column and then change thetype of what is shown in the column, for example from field to formula, thename will be overwritten.Chapter 6. Domino Design elements: views, folders, and navigators 205Designer will not check if the same name was used more than for a column.You will need the programmatic name for the column to program theInViewEdit event that allows users to edit documents from the view._ The conditions to hide the column.A check box is available to hide the column in any condition. You can alsospecify other conditions using an @function._ Use the Advanced tab to force the values in this column to be used asdocument links when this view is displayed in a Web browser.6.2.3 Creating Calendar viewsThere are rules that you must follow in order to create a Calendar view. You startthe creation like any other view described, but on the View Info tab of the InfoBoxyou specify Calendar as the style. This tells Domino to display the documents inthis view using the Calendar Outline.Defining columnsYou must define the first two columns as described here in order for the view tofunction properly:_ The first column must be sorted and has to contain a Time/Date value or a listof Time/Date values. Also, make sure that the Show Multiple Values asSeparate Entries option is selected in the Sorting tab of the InfoBox for thiscolumn. This causes documents containing a Time/Date value list to bedisplayed on more than one day in the calendar which you can use, forexample, for repetitive events.The column may contain dates only, or dates with times, or a mix of the two.Make this column hidden._ The value for the second column must evaluate to a duration in minutes, forexample (EndDateTime - StartDateTime)/60. If the duration is not relevant foryour view, or for the documents being displayed, set the value to zero.Make this column hidden.Note: The hide a column in any condition feature has been relocated to theAdvanced tab (in previous releases, it was located at the Column Info tab).Note: Column headers are not displayed in Calendar views.206 Domino Designer 6: A Developer’s Handbook
Customizing the View layoutUse the Style tab of the View InfoBox to fine-tune your settings. For moreinformation about specifying View style, refer to 6.7.2, “Overview of styles” onpage 224.Figure 6-20 View Properties - Calendar Style tabFor Calendar views, there are extra options in the Style tab to cover all thecalendar features. If you select Show conflict marks, a vertical line is displayed infront of entries for appointments which are scheduled for the same time.Furthermore, you might not want to show the selection column in order to savespace. The selection column will be shown automatically if there are selecteddocuments in the Calendar view.Use the Time/Date tab, shown in Figure 6-21 on page 207, to specify the defaultsfor time slots.

Note: A document marked for deletion will appear with the strike-throughmark.Chapter 6. Domino Design elements: views, folders, and navigators 207Figure 6-21 Time/Date tabA time slot display lists the time of day, along the left edge of the cell, withintervals you specify here. In this example, 8 AM, 9 AM...through 6 PM aredisplayed for each day. Appointments that occur at a particular time are displayedin the appropriate position.You may want to build your own columns for displaying the start and end time ofappointments.Enhancing the functionality of a Calendar viewTo allow the user to easily add entries in the Calendar view, consider associatingthe following LotusScript samples with your view. They allow users to add anappointment by double-clicking in the Date/Time area.Tip: If you do add start and end time columns, include the entire start date andtime, but use time formatting options of the column to display only hours andminutes. This allows Notes to adjust for the user’s local time zone.If you do not do it this way, users in different time zones may see the sametime displayed (for example, they might all see “10:00 AM”) even though theevent is not at 10:00 AM in their time zone.Note: The example assumes that the variables ws and ClickedDate arealready declared. You must change the commands parameters for yourapplication requirements.208 Domino Designer 6: A Developer’s Handbook1. Add the following to the Regiondoubleclick event of the view:Set ws = New NotesUIWorkspaceIf source.CalendarDateTime<>"" ThenCall ws.ComposeDocument("", "", "Appointment")End IfThis code detects when the user double-clicks in a calendar cell and createsan “Appointment” document (if you do not want to use the name“Appointment”, substitute another name).You could also add code to this event to fill in a field or fields on the newdocument with the date and time the user clicked on, or you could do it on theform itself, as described in the next step.2. Add this LotusScript code to the QueryOpen event of the Appointment form:Set ws = New NotesUIWorkspaceClickedDate = ws.CurrentCalendarDateTimews.CurrentDocument.Document.ReplaceItemValue(“StartDateTime”, ClickedDate)ClickedDate is a global variable that is used to set the start date of the newappointment as default.6.2.4 View summaryFollowing is a checklist of the most important things to consider when creating aview.Checking View design_ Is there a default view for the database?_ Is there a view that is displayed by date?If not, you may want to add one._ Do all views appear correctly on the View menu? Are the appropriatekeyboard shortcuts used? Do the views appear in the correct order?If not, verify the names and the Show in view menu selection in the ViewInfoBox.Tip: You may consider numbering your views to arrange the views in theorder you like them to be. This also helps Helpdesk members to identify theview when receiving a telephone call from a user.Chapter 6. Domino Design elements: views, folders, and navigators 209

_ Is the information in the view easy to read?If the view appears cluttered or the columns are too close together, reset thecolumn width and alignment._ Are all the documents that should be in the view displayed, or are too manydocuments displayed?If the view is not displaying the correct documents, check the view selectionformula._ Are response documents indented?If they are not and you want to indent responses, select Show responsedocuments in a hierarchy on the Options tab of the View InfoBox, andcreate a column for responses._ If the view is used for programming purposes, make sure that it is a hiddenview._ Check workstation compatibility. Are all fonts used in this view available (orapproximated) on all workstations? Are column widths sufficient for allworkstations, or too wide for some?_ If needed, does the view have a read access list?To create a read access list, select the Security tab in the View InfoBox._ Keep the view simple, especially if it is designed for Web access. Removingunused columns will provide ease of use and improve performance.Checking columns_ Is the information in each column correct?If not, verify the formulas in the column definitions._ Is each column displaying all the information that is contained in it?If not, you may need to adjust the column width and/or the font used to displaythe column, or set the view properties to allow multiple lines per row, so it willwrap._ Are the contents of columns aligned properly?For example, numbers should be right-aligned; text should be left-aligned orcentered. Verify the alignment for each column._ Are documents in the right order?If not, make sure that you sort on the correct columns, and that you choosethe correct sort order (ascending or descending).If the document sort is out of order, check that the column formula returns avalue of the type it appears to be, for example that number columns havenumber values, not text.210 Domino Designer 6: A Developer’s Handbook
6.3 Shared views and private viewsViews can be either shared views (that is, available to many users), or personalviews (that is, used by one person). You designate the view type when you createit, and you cannot change it later.6.3.1 Shared viewsShared views are available to any user with at least Reader access to thedatabase. Most views that you design for databases are shared views. Onlyusers with Designer or Manager access can create shared views. Users witheditor access can create personal views or folders, when the database managerhas selected Create personal Folders/Views for them in the access control list.6.3.2 Shared, Personal-on-first-use viewsShared, Personal-on-first-use views are a convenient way to distributecustomized personal views to multiple users. You usually create this type of viewby using @UserName to customize the display for each user.After a user creates a Shared-to-personal view, the user’s copy of the view nolonger inherits design changes. For example, if the developer adds a column tothe view, anyone already using a personal version of the view will not see the

new column. To obtain design changes, users must delete their personalversions of the view and open the Shared-to-personal view again.Shared-to-personal views are stored in the database as long as they are shared.After the first use, Domino uses the Create Personal Folders/Views option todetermine where to store the view.If you want the shared-to-private view to be stored in a user's desktop.dsk filerather than in the database, choose Shared, desktop private on first use asthe View Type when you create the view.Note: Shared-to-personal views are not a security measure, because they donot protect data. If you create a Shared-to-personal view that omits certaindocuments, a user can still create a personal view that includes them.Tip: Embedded “Show single category” views can often be used instead ofShared, Personal-on-first-use views. They are more efficient and easier tomaintain. See 6.7.6, “Embedding views” on page 230 for more details aboutembedded views.Chapter 6. Domino Design elements: views, folders, and navigators 2116.3.3 Personal viewsUsers can create personal views to organize documents in personalized ways bychoosing Create > View.If a user has rights to create personal views/folders in the access control list,personal views are stored in the database. If the user does not have the accesscontrol list right to create personal views/folders, then personal views are storedin the user’s personal workspace file.Private views are not supported on the Web.
6.4 Creating a button on the Action barYou can create an Action bar in views and folders, as well as in forms. In general,the actions should do one of the following:_ Affect several documents or all the documents displayed in the view. Youcould store all documents created by your manager in a Manager folder, forexample._ Represent the actions that the user will perform most often (such as: savedocument, edit document, exit from some screen, and so on).There are three types for an Action: Button, Checkbox, and Menu separator. Formore information about these types, refer to 12.12, “Actions enhancements” onpage 438.As in forms, you must make sure that the actions you create will fit in the Actionbar, and you must also consider the screen resolution available to your users.Creating a Document Link using an Action buttonAs an example, we are going to develop an action that creates a Document Linkbetween two documents. The documents do not have a child-parent relationship.To create a button in the Action bar:1. Open the design of the ($All) view in your TeamRoom database.2. Choose Create -> Action. The InfoBox for the Action properties is openedand you now have access to the Programmer’s Pane. Fill in the Informationtab as shown in Figure 6-22 on page 212.212 Domino Designer 6: A Developer’s HandbookFigure 6-22 Create doclink view action in Designer3. Put the following @function statements into the Programmer’s Pane:A doclink to the document selected from the view is copied to the clipboard:@PostedCommand([EditMakeDocLink]);The form Document is created:@PostedCommand([Compose]; ""; "Document");The macro goes to the field Body:@PostedCommand([EditGotoField]; "Body");It pastes the doclink into the RichText field:

@PostedCommand([EditPaste]);It then positions the cursor back at the top entry field:@PostedCommand([EditTop])Chapter 6. Domino Design elements: views, folders, and navigators 213Testing the formulaTo test the formula:1. Select the All Documents view.2. Click one of the documents to highlight it.3. Click the Link Documents button on the Action bar. The document is openedfor creation, the doclink is pasted, and the cursor is positioned in the first entryfield.4. Double-click the doclink to open the document that was selected in the view.The results are shown in Figure 6-23.Figure 6-23 The document is created; has doclink to other documentProperties of Actions and the Action barActions and Action bars have properties that you can display by selecting theaction in the Action pane of the view or folder design window.These properties are identical to the ones found in the Form Action bar.
6.5 Working with views as a developerAs an application developer, you may have additional requirements for a view in adatabase than a regular user. Therefore, you will probably build “administrative”views in order to be able to keep an eye on columns that are hidden to regularusers, for example, create an All Documents view, or a view showing replicationTip: When you use a field name in a view action formula, it refers to that fieldin the currently highlighted document. To get information from the highlighteddocument in a LotusScript view action, use the CaretNoteID property of theNotesUIView class to find out which document that is.214 Domino Designer 6: A Developer’s Handbookand save conflicts (using the $Conflicts field). These views are also a great helpfor administrators when the database is used in the production environment.While you are testing your application, you will probably need to inspect fieldvalues that are hidden on the form. By using the following method, you caninspect a form’s fields and their values without creating special views. To do so,look at the properties of a document:1. Select any one of the documents displayed.2. Click the Properties icon.3. Click the Fields tab to see the list of fields for that document, as well as theirvalues.Figure 6-24 Document PropertiesWhen files are attached to a document, a field called $FILE exists. Scroll downthe right listbox to see the file information. Here you can see the file name andsize and the platform on which it was created. There are also other keywords,such as $Revision, $Links, $UpdatedBy, $Conflicts, and $Anonymous.Tip: Users can see hidden views by holding Ctrl+Shift while selectingView/GoTo, or holding down the Ctrl+Shift keys and double-clicking thedatabase icon. Hiding a view is not a security measure, but simply a designoption.Note: As you can see, all the reserved fields start with a dollar sign ($). Noticealso that the data type of each field is shown; this is a good way to detect fieldsthat are supposed to be date/time or numeric values, but which actuallycontain text values. It also lets you see whether a supposed Readers orAuthors field actually is being used for access control. Refer to the descriptionof the NotesItem class in the Lotus Domino Designer 6 Help for details.Chapter 6. Domino Design elements: views, folders, and navigators 215The field replication mechanism allows for a faster transfer of information across

servers, or between the servers and workstations. An indicator is attached toeach field in all documents: Seq Num (or sequence number).If you have a replica of a server database, compare the values of the sequencenumber for fields of a replicated document. If their values are different, thismeans that the field containing the lower value will be modified at the nextreplication.
6.6 Views and the WebDomino dynamically creates Web pages from the views in a database, includingURL links to the documents in the view. Using a Web browser, a user cannavigate, expand, and collapse the view in much the same way as they can froma Notes client.6.6.1 Using the default displayWhen a browser is used, the view is split into pages with 30 view rows per page.This is to avoid having a view containing hundreds of documents presented asone page with all the documents. Limiting the lines per page in this way improvesperformance and makes navigation of the database more manageable.When Domino generates the HTML page for a view, it maintains the column androw format of standard Domino views. There are, however, a number ofdifferences that you need to be aware of and take into consideration when youdevelop applications for the Web.Tip: To detect often-modified fields, look for high sequence numbers. Ifdesigning for peak performance, you may want to minimize the sizes of thesefields—or try to change them less often.Note: The default of 30 view rows per page can be changed in the HTTPsection of your server document; this affects all the views of the databases onthat server. To modify this by view level, change this in the properties on anembedded view.216 Domino Designer 6: A Developer’s HandbookFigure 6-25 shows an example of a categorized view as seen through a Webbrowser.Figure 6-25 Categorized viewNotice that there is no outline of available views on the left. Domino does notinclude a view outline by default on Web pages. , Domino also ignores any menuactions not supported on the Web.Also note that there is no selection column unless you specify this in the viewoption. To learn more about selection columns, refer to 6.7.2, “Overview of styles”on page 224.Tip: To improve Web performance (and performance on any other view forthat matter), avoid time-sensitive column formulas with @functions such as@Now, @Created, @Modified, and so on.Since the Domino Web server generates Web views as HTML pages on thefly, time-sensitive formulas recalculate every time a Web user works in theview (for example, when they open, scroll, or expand the view). Instead, createa field in the form for that formula and refer to the field in your view.Chapter 6. Domino Design elements: views, folders, and navigators 217As you can see, Domino has automatically created a Web navigation bar at thetop of the screen and, although not shown in Figure 6-25 on page 216, in the endof the page. This navigation bar contains buttons that users click to Expand,Collapse, Scroll, and Search the view.On the Web, users open documents by clicking a document link column ratherthan clicking anywhere in the row, as you do in the Notes client. The applicationdesigner can specify which column(s) should include a URL link to the document.By default, it is the first non-categorized column.Domino displays the width of a column in a view as the length of the longest entryin the column, regardless of what the column width is set to in the Column

InfoBox.To avoid having long columns pushed to the right of the display, use the Style tabin the View InfoBox and specify a number greater than 1 in the Lines Per Headingsetting. This causes the lines to wrap on the Web. If you specify 1, the lines willnot wrap. The same guidelines apply to column headings.You also can use the Java applet option in the view properties. It allows you todisplay a view in a more Domino-like outline. You activate this applet by selectingthe Use Applet in Browser option on the Advanced tab of the View InfoBox.Tip: To force a column to be limited to a certain width when viewed from theWeb, use a column formula to retrieve the field value, for example:@Left(FieldName;50)This formula will set the widest width of the column to 50 characters.218 Domino Designer 6: A Developer’s HandbookFigure 6-26 Java applet for views, in a browserA view served as an applet supports such “Notes-like” features asexpandable/collapsible categories, resizable columns, and multiple documentselection.The view applet is programmable via the following @Commands:@Command([ViewCollapse])@Command([ViewExpand])@Command([ViewRefreshFields])6.6.2 Using HTML formatting for viewsYou can either add single HTML tags to the HTML view the Domino server sendsto the browser, or you can create all the HTML yourself and send it directly to thebrowser without the server adding its own tags.Note: The view applet is not accessible, so you should provide a “text only”alternative for the benefit of screen reader users.Chapter 6. Domino Design elements: views, folders, and navigators 219Enhancing the view display using HTMLYou can also add HTML coding to the view in order to enhance the display on theWeb.HTML embedded in views is a browser-only feature. If you embed HTML in aview, the view is accessible by a Notes client, but the client interface will beunattractive (because of the exposed HTML tags). Although you can see theHTML tags from the Notes client, the features that the HTML coding provides(such as linking) are not available to Notes clients.In this case, you can use hide-when attributes for the column (to handle when theuser is accessing the application from a Notes client or a Web browser) anddisplay the appropriate layout.Unlike forms and documents, there is no pass-thru HTML option in the designinterface. To write HTML in views, you need to include the HTML code in squarebrackets ([ ]). Domino treats everything between the square brackets aspass-thru HTML.Following are examples of how you might want to use HTML in views, and in thefollowing section, we explain how to implement several of these examples._ Insert a blank .GIF file between two columns in order to get a little more spacebetween the columns on the Web_ Add a horizontal ruler spanning the entire view for each document category_ Add a couple of icons and a URL link to the Home Page in the columnheaders_ Include an HTML statement in the formula for a column to display a blinkingtext string if it is a newly created document_ Include a URL in a few documents, and jump directly to the URL from the viewTreating the view contents as HTMLYou can tell Domino to disregard all formatting and column alignment and just

send the text that is in the view columns. That text will have to include anynecessary HTML, since the server will not add any.Note: Domino is actually looking for “[<“ to start the pass-thru and “>]” to endit, but the < and > are part of the HTML.220 Domino Designer 6: A Developer’s HandbookIn a Notes client, the view displays normally. On the Web, the view uses theHTML formatting attributes that you specify in the column formula. You mustinclude HTML that defines all formatting and document linking for the view, asfollows:1. Open the view in Design mode and choose Design -> View Properties.2. Click the Advanced tab and select For Web Access: Treat view contentsas HTML.3. Create a column.4. In the design pane, click Formula and enter the HTML code in the editwindow.Adding a space between columnsTo add space between columns, follow these steps:1. Create a new column between two columns, and set the column width to one(1). Deselect the option Show values in this column as links (if not alreadydone).2. Select Formula in the Programmer’s Pane and insert the following HTMLcode, including the quotation marks (this is a text string):"[<img src=/icons/ecblank.gif alt=\”\” height=1 width =10>]"Note: The “ecblank.gif” icon comes with Domino. It is located in the iconssubdirectory on the Domino server.Adding HTML and icons to column headersYou can use the column Title field in the column properties box to add graphicsand pass-thru HTML to your column headings. The only limitation is that you canonly fit 64 characters into the column title.1. Open the InfoBox of a column for which the resorting property has beenturned on, and in the Title field, add the following line (no quotation marks):Sort [<img src =/icons/vwicn108.gif>]This will add a small green arrow to identify where to click to sort the columnon the Web. Browser users might not be familiar with the little triangle if theyare not familiar with the Notes client.Important: Always use img tags with alt, height, and width parameters—thealt tag is provided for the benefit of screen reader users, and specifying heightand width will prevent screens from “jumping” as they are loaded (when youspecify the height and width, the HTML page will have the correct space forthe image when it is loaded).Chapter 6. Domino Design elements: views, folders, and navigators 2212. Open the InfoBox for any other column. In the Title field, enter the following:[<A HREF="../"><img src=/icons/vwicn069.gif border=0>Home</A>]This will add an icon with a DocLink to the home page from the columnheader.Click the Title tab and select Right Alignment.Adding HTML to column formulas1. Select a categorized column. In the Programmer’s Pane, click the Formulabutton and enter the following formula for the column:Categories + "[<hr>]"This will display the value of the Categories field and then add a horizontalrule. Notice that the plus (+) sign is used to append values.2. Add a column and enter the following formula:@If(@Now>@Adjust(@Created;0;0;7;0;0;0);"";"[<blink><fontcolor=\"Red\"><b> New </b></font></blink>]")

The formula checks to see if the document was created within the last weekand if so, it will display a blinking “New” text string.Creating URL links at view levelYou can add HTML to the document fields displayed in the view columns in thesame way. By adding a URL address to a document, you can display URL links ina view, enabling users to jump directly from the view level to a URL.1. Create a new document and include the following in a field that will bedisplayed in the view, such as the Document title:[<A HREF=http://www.ibm.com>]IBM Corp.[</A>]2. Save your document and create a new one. Enter the following URL:[<A HREF=http://www.lotus.com/ldd>]Lotus Developer Domain[</A>]Notes:Using @Now in a column formula will degrade performance. Considerusing a schedule agent to flag new documents instead.The HTML blink tag is not supported on all browsers.Note: You could also calculate the HTML in the view, which is useful if youwant to use the same document, but different views, for Web browsers andNotes clients.222 Domino Designer 6: A Developer’s Handbook3. Save your document.Both documents take you directly to their respective Web sites.Domino view properties not supported on the WebTable 6-1 lists and explains view and folder features you should avoid using in aWeb application.Table 6-1 Views and folders to avoid using in Web applicationsTable 6-2 lists and explains column features you should avoid using in a Webapplication.Table 6-2 Column features to avoid using in Web applicationsViews and folders ReasonOptions properties This feature is not supported using HTML in a Webbrowser.Show in View menu Web applications do not have a View menu. To excludea view from the folders navigator, use the Design -Design InfoBox to hide the view from Web users, orsurround the view name in parentheses, for example:(HiddenView).On Open: Go To… options This feature is not supported using HTML in a Webbrowser.On Refresh options This feature is not supported using HTML in a Webbrowser.Style propertiesUnread rowsAlternate rowsShow selection marginBeveled column headingsThese features are not supported using HTML in a Webbrowser.Advanced propertiesRefresh index optionsDiscard index optionsThese features are not supported using HTML in a Webbrowser.Views can be re-indexed at a Domino server.Columns ReasonColumn Info properties Most of the features on this tab are not supportedusing HTML in a Web browser; for example, Title isused on Web, as well as Show responses only,.Show twistie when row isexpandable

Triangles are always shown.Chapter 6. Domino Design elements: views, folders, and navigators 2236.7 Hints and tips on designing viewsIn this section we provide hints and tips that you may find useful when designingor changing views.6.7.1 Naming viewsThe name that you choose for a view is visible to Notes client users in the Viewmenu, to Web users in the Views list, and in the Folders pane (unless the view ishidden). The name is case-sensitive and can be any combination of characters,including letters, numbers, spaces, and punctuation. The full name, including allalias names, can be up to 64 characters.Naming tipsViews appear in alphabetical order in menus and lists. To force names to appearin a different order, you should number or letter them. This also enables helpdesk staff to easily identify a view.When possible, assign a name that indicates how the view sorts documents (forexample, By Company Name or All by Category), or specifies which documents itincludes (for example, New Customers).Use consistent names across databases to make it easier for users to recognizeviews.Alias namesAn alias is an internal name for a view. Usually you use this alias forprogramming purposes, for example, in @DbColumn formulas. Aliases follow thesame naming rules as view names.You can append more than one alias name by entering the vertical bar (|)symbol, followed by the alias name. Always keep the original alias as therightmost name.View name | Alias1 | Alias2Changing a view nameYou can edit the view name in the View InfoBox when the view is open in Designmode. If you have designed your view properly, used an alias, and referred to theview by using only the alias name in your code, there is no need to retain the oldview name. However, if you have referred to the name of the view in your code,then copy and paste the previous name into the Alias box to the left of any otheraliases, using the vertical bar (|) as the separator.224 Domino Designer 6: A Developer’s HandbookFor example, suppose a movie database contains a view named By ScreeningDate. The name of this view is going to be changed to By Premiere Date. Here ishow the name will look after it has been changed:By Premiere Date | By Screening Date | DateViewHidden viewsWhen you surround a name with parentheses, for example (All), the view doesnot appear to Notes client users in the Domino view menu, or to Web users orNotes client users in the Folders pane.Cascading viewsTo avoid overwhelming users with long lists, or if you have related views thatshould be grouped together, you can arrange them in a hierarchy so that a groupof related menu items is organized under one item in the navigator pane. A userclicks on the higher-level name to display the cascaded list.If you do not want to specify a cascading view when you create the view, enterthe name you want to appear on the Create menu, followed by a backslash (\),followed by the view name. For example, the Personal Address Book templatehas two views related to servers:Server\Certificates

Server\Connections6.7.2 Overview of stylesTable 6-3 gives an overview of one of the most important view settings - viewstyles.Table 6-3 View stylesTip: If you are unsure about whether you have used the view name in yourcode, you can use the Design Synopsis tool to generate a report of all of yourdesign elements and search the report to see if such references exist. Then itis easy to correct those references to refer to the alias name.View styles Description CommentsColor: Body Determines the background color forthe view.White, light blue, and yellow aregood choices.Image: Body Determines the image used in the viewbackground.Light images should be used.Chapter 6. Domino Design elements: views, folders, and navigators 225Table 6-4 gives an overview of one of the most important view settings - rowstyles.Table 6-4 Row stylesMargins Displays margins in the view. Use “Color” to set a color for theview margin. Useful for offsettinga view with a contrastingbackground color.Collapse all whendatabase is first openedDisplays the top level category incategorized views, or the maindocuments in a hierarchical responsesview. Users click the category to seeindividual documents within thecategory.Useful for large views with manycategories or topics. Notapplicable to Calendar views.Row styles Description CommentsLines per row (1-9) Determines how many lines a row cancontain.“Shrink rows to content” and“Color: Alternate rows” are usefulaccompaniments to multi-linerows.Color: Unread rows Determines the color for unreaddocuments.Red is used for unread documentsin template designs.Color: Alternate rows Determines the color that alternateswith the background color to highlightevery other row.Useful for multi-line rows. Notapplicable to Calendar views.Color: Icons Determines if the column icons shouldbe colorized.It colors the predefined Dominoview icons to match the headercolor.Show selection margin Shows the document selection margin.Deselect for cleaner-looking rows.If you deselect “Show selectionmargin,” users can still select

documents by pressing andholding Shift as they clickdocument names. The selectionmargin appears temporarily whiledocuments are selected, and hidesagain when all documents aredeselected.Shrink rows to content Keeps gaps from appearing below rowsthat are shorter than the number oflines per row you select.226 Domino Designer 6: A Developer’s HandbookTable 6-3 gives an overview of one of the most important view settings - columnstyles.Table 6-5 Column stylesRow spacing (Single,1-1/4, 1-1/2, 1-3/4,Double)Determines how much space there isbetween rows.More space makes each roweasier to read. Less spacecondenses the view contents tomake them useful for reports orWeb users.Show twistie when row isexpandableShows a green triangle or a image nextto a column that displays categories orresponse documents.Not applicable to Calendar views.Extend last column towindow widthFills out the last column to avoid emptyspace in the view.Column styles Description CommentsColumn width Determines how many charactersfit in one row of a column.(Optional) Select “Resizable” to allowusers to change the width as needed.With the view in Design mode, you canalso click the column and drag thecolumn divider line to the width you want.Text style and color:Column titleDetermines the font, size, color,and alignment of an individualcolumn title at the top of the view.Use the “Apply to All” button to changethe text style for all titles in the view.Text style and color:Column valuesDetermines the font, size, color,and alignment of values thatdisplay in this column.Use the “Apply to All” button to changethe text style for all columns that displaytext in the view.Color content Determines the column content isa color.Supply RGB coordinates.Hide column The column title and values do notdisplay to users. It depends on the

formula specified in the hide-whenformula in the column properties.Useful for columns used for sorting thatcontain values users don’t need to see.This is not a security feature.Multi-value separator For any documents that displaymultiple values in the column,separates each value withpunctuation or a new line.Useful for making columns morereadable if they contain several values(usually generated by a multi-value field).Show column headings(Beveled, Simple)Shows a bar at the top of the viewwith column titles with either abeveled or flat look.Beveled-background is gray.Simple-background matches view color.Chapter 6. Domino Design elements: views, folders, and navigators 2276.7.3 Identifying unread documentsTo help users find new or modified documents, display the unread marks(asterisks) next to unread documents in the view. A set of unread marks aremaintained for each user, so even if one person has read a particular document,the asterisk still appears for other users who have not yet read that document.Choosing a style for unread marksThese options are set as a Design property for a view. Open the Advanced tab ofthe View InfoBox and select an “Unread marks” option. You can display unreadmarks as:_ Standard (compute in hierarchy)Displays asterisks for unread Main documents and Response documents,and for any collapsed categories containing unread Main or Responsedocuments._ Unread documents onlyDisplays asterisks only for unread Main or Response documents. Unreadmarks do not appear next to collapsed categories. This choice displays theview faster than the standard display, and is a good compromise betweenshowing unread marks at every level, and not showing them at all.Choosing the option None omits unread marks. Users can still navigate to thenext unread document by using SmartIcons.Choosing a color for unread marksTo change the color of unread documents in the view from the default color red,click the Style tab and select another color for Unread rows. In Domino 6 thereare some new features that let you choose if you want display the unread row in abold format or transparent (for transparent, only an asterisk is displayed in theselection margin; don’t change the row color setting).Disabling unread marks for unread documentsIf the unread status of modified documents is unimportant to users—or if thedatabase resides on a server that users don’t access directly—then turn offunread tracking for all documents in a database to conserve disk processingtime. Click the Design tab of the Database InfoBox and select Do not markLines per heading (1- 5) Determines how many lines acolumn title can wrap.Useful for long column titles orinstructions placed in a column title.Color: Column totals Determines the color of the totalsfor any columns that contain totals.

228 Domino Designer 6: A Developer’s Handbookmodified documents as unread. This setting affects all views in the database.Users see only new documents as unread; modified documents do not appear asunread.Disabling unread marks entirelyThe Advanced tab of the database properties provides the “Do not record unreadmarks.” If you select this option, no documents will be marked as unread.6.7.4 Using categories in viewsA view that displays categories enables users to find related documents. Acategorized view is neat and easy to scan. Users can collapse the categories todisplay only the category names and then expand categories individually, orexpand the whole view.To categorize a view, create a column to display categories and then select theoption type Categorized on the Sorting tab of the column InfoBox. A categorizedcolumn groups documents with matching values, and converts the value to acategory name. The column is usually one that appears on the left side of theview. You may have multiple categorized columns in a view.Setting the following options is recommended:_ Style the column text with a different color and in boldface to make categoriesstand out._ Select the Column Info property Show twisties when row is expandable, todisplay a green triangle or an image that users click in order to seecategorized documents._ Select the Options view property Collapse all when database is first opened,to show only the category names when users open the view for the first time.On subsequent occasions, a category may be open to highlight the currentdocument from the last time the view was opened.Tip: Turning on this option saves space and makes your application faster.Consider always using this option unless there is a real need to show theunread marks.Chapter 6. Domino Design elements: views, folders, and navigators 2296.7.5 Presenting views to usersSeveral options in the view and database InfoBoxes determine the initial displayof a view.Opening to a particular row in a viewTo highlight a particular row when a user opens the view, select one of thefollowing On Open options on the Options tab of the View InfoBox:_ Go to last opened document (the default choice)_ Go to top row_ Go to bottom rowIf you want to jump to a specific document, you can write code in the view’sPostOpen event.Collapsing a view to show only categoriesIf you have a view that displays categories, you can show the view in collapsedform every time users open it by selecting Collapse all when database is firstopened on the Options tab of the View InfoBox. You must also select Go to top orGo to bottom row.Displaying the last-used viewIf you select Restore as last viewed by user (one of the On Database Openchoices on the Launch tab of the Database InfoBox), then Notes client users seethe default view the first time they open a database, and afterwards they see thelast view they opened. This option is not available for views opened by Webbrowser users.Tips:

If the column formula of a categorized column returns multiple values, thedocument will appear multiple times in the view in each of the categories inthe multi-value list. Overuse of this feature can slow your application.The backslash (\) symbol in a category name creates a subcategory; forexample, “Animals\Dogs” creates a top-level category Animals and asubcategory Dogs.230 Domino Designer 6: A Developer’s Handbook
6.7.6 Embedding viewsEmbedded views are the standard way to display a view to browser users. TheDomino server’s default of a view is rarely good enough for a professionalapplication. To redefine its appearance, you can create a form called$$ViewTemplate for XXX, where XXX is the alias name of the view. This form willbe displayed when the view is opened from a Web browser, allowing you to addcustom controls, decorations, and so on. Refer to the Lotus Domino Designer 6Help database for more details about view template forms.To embed a view on a form or a page, do the following:1. Open the form in Design mode.2. Select Create -> Embedded Element -> View. The window shown inFigure 6-27 is displayed.Figure 6-27 Insert Embedded View windowSelect a view from the list (you can also choose a view from other databases),or select Choose a View based on formula (if you want to have a dynamicselection).3. Click OK and the view will appear on your form.4. Click the Properties icon to bring up the InfoBox.Chapter 6. Domino Design elements: views, folders, and navigators 231Figure 6-28 Embedded View properties5. On the Information tab, when a user single-clicks a link in the embedded viewat run time, the link opens in the target frame specified next to the field: (forsingle click). When the user double-clicks the same link at run time, the linkopens in the target frame specified next to the field: (for double click).If you do not specify a frame, documents open in a new window in the Notesclient and in the same window for the Web applications. In addition, you canspecify how this view is displayed through a browser.The Java applet always displays the whole view, with a scrollbar. If you do notuse the applet, you can select how many view rows will be shown per Webpage. User must click the next or previous page to display a new set for viewrows.6. Click the Element tab; Figure 6-29 will be shown.Notes:The view applet is not accessible, so you should provide an HTML versionfor browser users.You can only change the line numbers to be displayed in the browser if youselect the option: Using HTML or the option: Using View’s display property.232 Domino Designer 6: A Developer’s HandbookFigure 6-29 Embedded View properties– Use the Percentage selection to refine your selection. (Otherwise, providea width value for the view.)– Specify the height of the view.– Check the Disable scrollbars option, if it is not to be available to the user.– Check the Show header option, to show column names for the view.– Check the Selection tracks mouse movement option if you want to move aselection box over documents as you mouse-over them.Note: If this option is checked, then the Show selection margin optioncannot be checked. Also, this option is not available when a view is set toallow users to edit document from the view.

– Check the Transparent background option, to overlay the view contents onthe page or form background.– Check the Show entries as Web links option, to display each view entry asa clickable link.– Check the Show Action Bar option, to display the Action bar for the view.– Check the Show selection margin, to add white space around the view.Note: If this option is checked, then the Selection tracks mouse movementoption cannot be checked.– Check the Show Only Current Thread option, to display the parent andresponse documents associated with the current document. This is usefulin a threaded discussion database.Chapter 6. Domino Design elements: views, folders, and navigators 2337. Use the Border, Paragraph Alignment, Paragraph Margins, and ParagraphHide When tabs as you would for any other design element.8. Go to the Object Browser and select Embedded View -> Show SingleCategory, and specify a selection formula. This allows you to display only onecategory based on a formula; see Figure 6-30.Figure 6-30 Embedded view in a form - programming the Show single category event6.7.7 Formatting date and time columnsTo format values that result in a time or date being displayed in a column, select astyle in the Date and Time format tab of the Column InfoBox. This is better thanusing @Text in the view column formula to format the date. Refer to Table 6-6 onpage 234 for a list of the date and column options.Notes:You can embed more than one view in a page or a form.Single category views are a good way to create personalized views for users.Create a view categorized by the name of the user who “owns” the documentor who should see it, then use @Username in the Single category formula toshow only the current user’s documents.Embedded viewPut here your code to specifythe single categoryForm234 Domino Designer 6: A Developer’s HandbookTable 6-6 Date and column options_ You can use the operating system date/time settings, or you can customize itfor your convenience._ Show “today” when appropriate show values resulting in the current date withthe word “Today”. Values resulting in the previous day display “Yesterday”;Note: This information applies to columns whose formula displays a date-timevalue (for example, @Created). Often applications contain dates stored in textfields; Notes doesn’t recognize these as date values, so if you display them inview columns, the setting on this tab do not apply.It is undesirable to store date-time value in text format. Different computersformat dates differently, which could result in inconsistent values in yourdatabase.Option name SelectionsOn Display User settingCustomDisplay Date: Show AllOnly month, day and yearOnly weekday, month and dayOnly month and yearOnly month and dayOnly yearOnly monthOnly day

Only weekdayDisplay Date:SpecialShow “today” when appropriateAlways show 4-digit yearShow 4-digit year for 21st centuryShow year only if not this yearDisplay Date:CalendarGregorianHijriDisplay Time: Show AllHours, minutes and secondsHours and minutesHours onlyDisplay Time: TimezoneAdjust time to local zoneAlways show time zoneShow only if zone not localChapter 6. Domino Design elements: views, folders, and navigators 235otherwise, for the day after, it displays “Tomorrow“. All other values display thedate._ If you have an international date format set in your operating system, thesechoices change to suit the national convention (for example, from month/dayto day/mont)._ If you have an international time format set in your operating system, thesechoices change (for example, from 02:30 to 14:30)._ You have three choices for time zone displays:– “Adjust time to local zone” displays the time relative to the time zone of thereader. A document created at 3:00 P.M. in New York that is read by a userin Los Angeles adjusts to Pacific Standard Time; the creation time isdisplayed as “12:00 PM.”– “Always show time zone” displays the time zone where the document was,for example, created. With this option, the creator’s time zone is alwaysshown. If a document is created in New York at 3:00 P.M., a user in LosAngeles sees the creation time as “3:00 PM EST.” A user in New York alsosees the creation time as “3:00 PM EST.”– “Show only if zone not local” displays the time zone where the documentwas, for example, created only when the document is read by someone ina different time zone. A document created in New York at 3:00 P.M.displays to all users in the U.S. Eastern standard time zone as“3:00 PM.” Users in all other time zones see the creation date as“3:00 PM EST.”6.7.8 Formatting numbers in columnsTo format values that result in a number being displayed in the column, select astyle on the Number tab of the Column InfoBox. The following selections areavailable:_ GeneralFormatting displays numbers as they are entered; zeroes to the right of thedecimal point are suppressed (for example, 6.00 displays as 6)._ FixedFormatting displays numbers with a fixed number of decimal places (forexample, 6 displays as 6.00)._ ScientificFormatting displays numbers using exponential notation (for example, 10,000displays as 1.00E+04).

236 Domino Designer 6: A Developer’s Handbook_ CurrencyFormatting displays values with a currency symbol and two digits after thedecimal symbol (for example, $15.00). The currency symbol and thousandsseparator that appear are based on settings in your operating system.The following formatting options also apply:_ For any formatting type other than General, select a number from 1 to 15 fromthe Decimal Places list._ Select Percentage (value * 100)% to display values as percentages (forexample, to display .10 as 10%)._ Select Parentheses on Negative Numbers to display negative numbersenclosed in parentheses (for example, (5) instead of -5)._ Select Punctuated at thousands to display large numbers with the thousandsseparator (for example, 1,000 in English, or 1.000 in French).6.7.9 Indenting Response documentsIndenting Response documents beneath Main documents is useful whenreaders want to see the progression of a discussion. You can display 32 levels ofresponses, with each level indented three spaces under its parent document.Such a view requires that:_ Response forms are available to users with the types Response andResponse-to-Response._ The Show Response documents in a hierarchy option is selected on theOptions tab of the View InfoBox, and the document selection formula usesSELECT @All, or contains a formula that allows response documents to beincluded, such as:SELECT Form = “Action Item” | @AllDescendants_ The view has a responses-only column._ The responses column is created immediately to the left of the column underwhich responses are to be indented. Leave its title blank, make its width 1,and select Show Responses only on the Information tab of the ColumnNote: As with dates, these settings do not apply to text fields that containnumeric values, only to Number fields.Note: Even if you have no Response form, replication and save conflictdocuments are responses to the original document.Chapter 6. Domino Design elements: views, folders, and navigators 237InfoBox. Enter a column formula that displays information about the responsedocuments shown in the column, such as their authors or creation dates.6.7.10 Sorting documents in viewsEvery view needs a sorting method that organizes documents in a way thatmakes sense to users. For example, a By Date view sorts documents by theircreation dates, and a By Author view sorts documents by author names. Toachieve this effect, designate at least one column as a sorting column. You canthen define it as a user-sorted column, an auto-sorted column, or both.Views that display categories often use sorting methods to sort the categorynames into alphabetical order. If the sort column displays values from amultiple-value list, select Show multiple values as separate entries to show eachvalue as a separate row. If you do not select this option, multiple values displayas one entry and are sorted by the first value.Ascending and descending orderColumns sort documents in either ascending or descending order:_ Ascending order sorts in increasing order (1 precedes 2, A precedes B,earlier dates precede later dates). For example, to display documents fromthe oldest to the newest, create a Date column that uses the Creation Date asits value and sorts documents in Ascending order._ Descending order sorts in decreasing order (2 precedes 1, B precedes A,

later dates precede earlier dates). For example, to display documents fromthe newest to the oldest, create a Date column that uses Creation Date as itsvalue and sorts documents in Descending order.Auto-sorted columnsTo set up a sorting style in advance, select the option Sort: Ascending or Sort:Descending on the Sorting tab of the Column InfoBox. The sorting column isusually the one that appears on the leftmost side of the view.User-sorted columnsUsers see a triangle next to a column title where values can be re-sorted. Usersclick the column and choose a sorting method to see the documents in the orderthat they choose.Note: On a response document row, columns to the right of the “Responsesonly” column are not displayed. The responses only column occupies the restof the line.238 Domino Designer 6: A Developer’s HandbookTo set up a user-sorted column, select the Click column header option to sorton the Sorting tab of the Column InfoBox. Next, select Ascending (orDescending order), or select Both to allow users to cycle between ascendingsort order, descending sort order, and no sort order for the column.Multiple sorting columnsTo create multiple levels of sorting, designate more than one column as a sortingcolumn. For example, if a primary sorting column sorts entries by date, asecondary sorting column might sort entries by author. Then all documentscreated by one person on a particular date are grouped together.Using an auto-sorted column as a secondary sorting columnTo add a secondary sorting column, add a column to the right of the first sortingcolumn and then choose Sort: Ascending or Sort: Descending. Documents andresponses are sorted, then sub-sorted, in column order from left to right.Designating a secondary sorting column for a user-sortedcolumnUser-sorted columns override the sorting built into auto-sorted primary andsecondary columns. If the view has a user-sorted column and you want toinclude secondary sorting, you can associate it with a secondary sorting column.In the Column InfoBox for a user-sorted column, click Secondary Sort Columnand choose the secondary sort column and its sorting order.Character sorting rulesSorting rules are governed by these options:Case-sensitive and accent-sensitive sorting rules for Release 5 and greater differfrom sorting rules in previous releases in the following ways:_ Both case-sensitive sorting and accent-sensitive sorting are turned off bydefault (in previous releases, they were on by default)._ Case-sensitive sorting sorts lowercase letters before uppercase letters (forexample, ab sorts before Aa)._ Accent-sensitive sorting sorts accented characters after non-accentedcharacters (for example, ab sorts before äa).Note: Allowing users to re-sort a view by different columns is convenient forusers, saves space and improves performance of your application comparedto having a separate view for each way you want to sort. Consider turning onthis option for most of the columns in your views.Chapter 6. Domino Design elements: views, folders, and navigators 239Overriding alphabetical sorting with a hidden columnThe sorting column does not need to be visible. Sometimes you may want to usea hidden column that selects documents according to criteria that you specify ina formula as your sorting column. For example, a Service Request form contains

a Priority field, which uses the following keywords list:_ Urgent_ High_ Medium_ LowYou want the By Priority view to sort documents by the value in the Priority field,but you do not want them to appear in ordinary alphabetical order (High, Low,Medium, Urgent). You want users to see Urgent-priority documents at the top ofthe view, High-priority documents next, and so on.To do this, create a column that has the following characteristics:_ Is hidden_ Has no title_ Is one character wide_ Uses this formula:@If(Priority="Urgent";"1";Priority="High";"2";Priority="Medium";"3";"4")_ Is sorted in ascending orderAdd a column to the right of the hidden column that:_ Is not hidden_ Has the title “Priority”_ Is 10 characters wide_ Displays the value of the Priority field
6.8 Designing a folderFolders have the same design elements as views. You design folders in much thesame way as views, using the Create - Design - Folder command.The difference between folders and views is that views always have a documentselection formula that collects and displays documents automatically, whilefolders remain empty until users or programs add documents to the folder.Note: Web users cannot drag documents into folders.240 Domino Designer 6: A Developer’s HandbookWhen you create a folder, its design is automatically based on the design of thedefault view of the current database. You can choose to base the folders designon a different existing view, or to design the folders from scratch.You can keep a folder personal, or share it with other users of a database. Noone else can read or delete your personal folders. To create personal folders in adatabase, you must have at least Reader access to the database. To createshared folders in a database, you must have at least Editor access, and theoption Create shared folders/views must be enabled for you.When you create a personal folder, Domino stores it in one of two places:1. If the Manager of the database has allowed it, your folder is stored in thedatabase, allowing you to use the folder at different workstations.2. If the Manager has not given you the option to create personal folders in thedatabase, Domino stores your folder in your desktop file.
6.9 Managing access to views and foldersIf you only want certain users to see a view or folder, you can create a Readaccess list. Users who are excluded from the access list will no longer see theview or folder on the View menu or in the View element list in Domino Designer.Note that a view or folder Read access list is not a true security measure. Userscan create private views or folders that display the documents shown in yourrestricted view, unless the documents are otherwise protected. For greatersecurity, use a Read access list for a form.You can add users to the Read access list for a view or folder as long as theyalready have at least Reader access in the database access control list.6.9.1 Creating a Read access list

1. Open the view or folder in Design mode.Note: To see whether a database allows you to store personal folders in it,select the database, choose File > Database -> Access Control, selectyour name, and see whether the Create personal folders/views option isenabled.Note: If a folder is stored in your desktop file, you can use the folder onlyfrom your workstation, and you cannot use Full text search in the folder.Chapter 6. Domino Design elements: views, folders, and navigators 2412. Open the InfoBox.3. Click the Key icon (Security tab).4. Deselect: All Readers and Above.5. Click each user, group, server, or access role that you want to include. Acheckmark appears next to each selected name.6. Click the Person icon to add person or group names from a Personal AddressBook or the Domino Directory.7. To remove a name from the list, click the name again to remove thecheckmark.8. Check the option Available to public access users, if you want documents inthis view or folder available to users with public access Read or Writeprivileges in the access control list for this database.9. Save the view or folder.Note: You must provide server access to views that are Read-restricted when adatabase must be replicated.6.9.2 Creating a Write access listTo allow only certain users to add documents to or remove from a folder, create aWrite access list for the folder. You can add users to the Write access list for afolder as long as they already have at least Author access in the databaseaccess control list. To grant access to users, do the following:1. Open the InfoBox.2. Click the Key icon (Security tab).3. In the section labeled Contents can be updated by:, deselect the option: Allauthors and above.4. Click each user, group, server, or access role that you want to include. Acheckmark appears next to each selected name.5. Click the Person icon to add person or group names from a Personal AddressBook or the Domino Directory.Important: Do not create a Read access list for the default view of adatabase.Tip: Use role names, not groups or individual usernames, to control access toviews. This makes it possible for a non-designer to change who has access byupdating the database ACL.242 Domino Designer 6: A Developer’s Handbook6. To remove a name from the list, click the name again to remove thecheckmark.7. Save the folder.
6.10 Using navigatorsA database navigator allows the user to easily access views, Domino data, orother applications. It is like a roadmap that guides the user through theapplication using a graphical interface. Most navigators include graphic buttonsor hotspots, which are programmed areas a user clicks to execute an action. Ahotspot can be text, graphics, or a combination thereof. Refer to Figure 6-2 onpage 186 for an example of a navigator.6.10.1 Navigator objectsYou create a navigator by combining objects. These might include a background

graphic for display only, and some combination of graphic buttons and textobjects. To create navigator objects, import or paste objects from anotherapplication, or use the drawing tools that are supplied by Domino. The drawingtools include hotspot tools that you use to define a clickable area in a navigator.6.10.2 Navigator actionsA navigator action determines what happens when users click an object. You canadd actions to all navigator objects except the graphic background.Domino Designer provides the following Simple Actions that you can attach tonavigators:_ Open another navigator._ Open a view._ Serve as an alias for a folder.Clicking the object displays the contents of the designated folder in the viewpane. Dragging and dropping a document to the folder object adds thedocument to the actual folder.Note: Web users cannot drag documents into folders.Note: You might also consider using framesets, pages and outlines, as theyoffer more flexibility when creating applications for both Notes clients and Webbrowsers. To learn more about framesets, refer to Chapter 8, “Domino Designelements: framesets” on page 283.Chapter 6. Domino Design elements: views, folders, and navigators 243_ Open a database, view, or document link._ Open a URL.In addition, a navigator can perform the following functions:_ It can run an @function formula._ It can run a LotusScript program.6.10.3 Creating a navigatorIn the following section, we describe how to create a simple navigator by creatinga graphic background and adding a button. The button will have an actionassociated with it.You can add a navigator to your database in one of three ways:_ Copy an existing navigator from the same database._ Copy an existing navigator from another database._ Create a new navigator.Whichever way you choose, you need Designer access or higher to thedatabase. In our example, a navigator will be created from scratch.To create a navigator, do the following:1. Open the database where you want to create the navigator in Design mode.2. Go to the navigator pane.3. Click the New Navigator button. This will bring up the Programmer’s Pane fornavigators.Creating a backgroundThere are two options for creating a background image:_ Copy any available graphic image to the clipboard and use Create -> GraphicBackground to paste the graphic in as the background._ Use the File - Import dialog box to import a graphic as a background to yournavigatorNote: You can have only one graphic background for each navigator. It alwayshas its top left corner at the top left corner of the window, so design the graphicwith this in mind.244 Domino Designer 6: A Developer’s Handbook
Creating a graphic buttonCreating a button is done in the same way as creating a background:1. Use cut and paste or the Import dialog box to build the graphic button.

2. Move the button to the desired position by dragging it.3. Choose Design -> Object Properties to display the InfoBox.4. Select Lock size and position.5. Click the Highlight tab. The highlight is a rectangular border that appearsaround the control. You can choose the color, width and when it appears.6. Select Highlight when touched and Highlight when clicked.7. Close the InfoBox.6.10.4 Adding an action to a navigator objectIt is very easy to add a simple action to a navigation object. For example, if youwant to add an action that opens a view, follow these steps:1. Select a graphic button or create a hotspot.2. In the bottom pane, select Simple action(s).3. From the Action drop-down list, choose Open a View or Folder.4. From the drop-down list next to the Action drop-down list, choose a view.5. Save your changes.6.10.5 Adding an action using @Functions or LotusScriptIf you require a more complicated action to be added to a graphic object, you cancreate the action by using an @function or a LotusScript program. You do this inthe same way as for Simple Actions, except that you select the Formula orLotusScript option button in the bottom pane.Tips:Whenever possible, use the File - Import method to create a background,because this gives better color fidelity when the graphic is displayed.To remove a graphic background, choose Design -> Remove GraphicBackground.Chapter 6. Domino Design elements: views, folders, and navigators 2456.10.6 Displaying navigator when a database is openedTo display a navigator when a database is opened, follow these steps:1. Open the database InfoBox.2. Click the Launch tab.3. To display the navigator in the navigation pane, choose Open designatednavigator under On Database Open. (To display the navigator in a full-screenwindow, select Open designated navigator in its own window.)4. From the Navigator drop-down list, select the navigator that you wantdisplayed in the view.5. Close the InfoBox.When the database is opened, the navigator should launch.
6.11 New features in Domino 6There are several new features and enhancements with views in Domino 6,including the following:_ Column colors_ Context-sensitive actions_ Customized column icons_ Background images/grids_ Customized twisties_ User customizations_ Create document from view_ Edit document in viewRefer to 12.13, “View enhancements” on page 445 for more information aboutthe new features and enhancements with Domino 6.
6.12 SummaryViews are the entry point to the data stored in a database. When users open aview, a list of documents in the database is displayed, each row presenting

Note: Make sure that Click is selected in the Event area. This ensures that theLotusScript program is run when the user clicks the object246 Domino Designer 6: A Developer’s Handbookpieces of information from a document. As such, views give users a logical andorganized overview of information available in Domino databases.The dynamic nature of views allows application developers to design highlyflexible entries for databases and Web sites, based on user requirements oraccess levels.© Copyright IBM Corp. 2002. All rights reserved. 247
Chapter 7. Domino Design elements:agentsIn this chapter, we explain and describe Domino agents: what they are, what theydo, where to use them, and how to create them. We also cover Web agents,WebQueryOpen and WebQuerySave, and how to make agents available for Webusers.In addition, we explain how to write agents using LotusScript, how to access CGIvariables, and what access you need in order to run an agent.Finally, we briefly mention some new features in Domino 6. For detailedinformation about these features, refer to Chapter 12, “New features in Domino 6”on page 347.
7248 Domino Designer 6: A Developer’s Handbook
7.1 About Domino agentsAgents allow you to automate many tasks within Domino. They are standaloneprograms that can perform a specific task in a database for the user (for example,filing documents, changing field values, sending mail messages, deletingdocuments) or that can perform more powerful actions (such as interacting withexternal applications). Agents are the most flexible type of automation becausethey can be run by users or in the background, and they are not tied to a specificview or form.Agents can either be private (that is, created by the user and used only by theuser), or shared (that is, created by a designer and used by anybody who hassufficient access to the application). Both private and shared agents are designelements stored in the database for which they are created. They can be runmanually by the user, or run automatically when certain events occur (such asmail arriving or documents being changed or added to the database), orscheduled to run at certain intervals. They can contain Notes Simple Actions,@function formulas, or a LotusScript or Java program.The agents are part of a new design container in Domino 6 called “SharedCode”. This is where all agents, private and shared, are located.
7.2 Access to create Domino agentsTable 7-1 lists the options in the database access control list (ACL) that affectagents.Table 7-1 Access to create agentsType of agent Access neededShared agent To create a shared agent, a user musthave Designer access or higher in theACL.Personal non-LotusScript agent To create a personal non-LotusScript

agent that is stored in a shared database,a user must be assigned the Createpersonal Agents privilege.Shared LotusScript or Java agent To create a shared LotusScript or Javaagent, a user must be assigned the CreateLotusScript Agents option in the AccessControl List, and the user must also beassigned the Create Personal Agentsauthority.Chapter 7. Domino Design elements: agents 249In the Access Control List (ACL) for the database, there is an option to CreatePersonal Agents. Since personal agents on server databases take up server diskspace and processing time, the database manager may deselect this option toprevent users from creating personal agents in the database.When agents run, they automatically check the identity of a Domino user againstany server document or ACL restrictions. Manually run agents run with theidentity of the Domino user; scheduled agents run with the identity of the personwho created or last modified the agent.It is important to draw a distinction between agents run on the user’s workstationand agents run on the server. Server agents include those run on a schedule (forexample, hourly) or when an event occurs (for example, when a document iscreated), as well as those executing in a Domino Web application(WebQueryOpen, WebQuerySave and those run with an OpenAgent URL). Toavoid chaos, rules govern what agents that run on the server are allowed to do,as discussed in the following section.7.2.1 Restricted and unrestricted agents, methods and operationsIn the server document of the Domino Directory, you can determine who can rununrestricted and/or restricted agents on that server. Using unrestricted agents,users have full access to the server’s system.Certain functions will not work for users with restricted access. Be aware,however, that this does not apply on the Web—Web users can run any agent, aslong as the agent is not hidden from Web users.Notes:A Domino administrator can also specify restrictions in the server document toprevent users from running agents on a server. Users denied this serveraccess cannot create personal agents to execute on the server, regardless ofthe ACL setting of the database.Agents run using the Domino “OpenAgent” URL command may be set to runwith either the invoker’s or the author’s privilege.Note: In Domino 6, the Run unrestricted agents field has been changed toRun unrestricted methods and operations. This is basically the same thing,and includes users that can run all kinds of agents without restrictions.250 Domino Designer 6: A Developer’s HandbookLotusScript and Java include operations that have full access to the server’ssystem and can manipulate system time, file I/O, and operating systemcommands. Users or groups with unrestricted access can run an agent thatincludes any of these operations in the LotusScript and Java components. Usersor groups with restricted access can include most operations. The only restrictedcommands are those that allow access to the server’s system.Users with restricted access have limited access to the system. For example,they cannot run LotusScript or Java agents that manipulate system time, file I/O,and operating system commands.
7.3 Creating an agentThere are several ways to create an agent:

1. Create a new agentOpen the database in Design mode, go to the Shared Code section, clickAgents, and then click New Agent.2. Copy an existing agentOpen the database you want to copy from in Design mode, and use cut andpaste.If you choose to create an agent using the first method, the Agent property boxshown in Figure 7-1 on page 251 is displayed.Notes:Server id and Lotus Notes Template Development id will always have the rightto run unrestricted LotusScript/Java agents.Agent restrictions do not apply to code that runs on the user’s workstation (forexample, from the Actions menu). Those agents are limited only by the user’slevel of access to the database and its documents.Chapter 7. Domino Design elements: agents 251Figure 7-1 Designing an agent in Domino Designer 67.3.1 Naming the agentThe first thing to do is to give the agent a name. A descriptive name is especiallyimportant for an agent that you are designing for users to select from the Actionmenu. Also, try to keep the first character unique. This is because, as with formsand views, Domino will use the first unique character as an accelerator key.Alternatively, you can force Domino to use a letter of your choice as anaccelerator key by putting the underline character in front of it.Always give an alias name for your agent. You can append more than one aliasname by entering the vertical bar (|) symbol, followed by the alias name. An aliasis an internal name for a agent. You refer to the agent from your code by usingthe alias name.Note: Figure 7-1 shows a new Domino 6 feature: the property box of an agent.Agents in Domino 6 now have property boxes, like other design elements inDomino.252 Domino Designer 6: A Developer’s HandbookThe names you give to manually run agents appear as choices in the Actionsmenu on the Notes client. To ensure useful and sensible naming of your agents,following are some agent naming tips:_ Choices on the action menu appear in alphabetical order. To force names toappear in a different order you can number or letter your agents._ Use consistent names across databases in order to enable users to recognizeidentical agents._ Use aliases to give your agents another name, or synonym. Using an alias,you can change or translate the name that users see without disabling codethat references the original name._ Use a backslash (\) to list an agent under a submenu of the Actions men (forexample, “Reports\Sales report”).Click Shared/Personal to determine whether the agent may be used by otherusers.To make the agent available for public access, click the “key” tab and check the“Allow public access users to view and run this agent” checkbox. Creating thesekinds of agents, enabled for public access, allows users with No Access orDepositor access to view and use any manually run agents.Tip: When selecting to run from action menu, consider that a user can run anagent from anywhere in the application—and the agent must behaveappropriately even when run from a place you didn’t intend it to run from.Therefore, you might instead consider selecting “Run from Agent list”.Tip: To add an alias, add a vertical bar (|) symbol and the alias name to theright of the original name. Always keep the original name as the leftmost

name.Figure 7-1 on page 251 shows an agent with a original name of“agnRemoveSelectedDocs” with an alias of “1. Remove”.Note: The ability to toggle between Shared/Personal is a new Domino 6feature, and enables developers to change this setting during first timecreation, and also later on.Chapter 7. Domino Design elements: agents 2537.3.2 Scheduling the agentTo decide when agents should run, you choose when it should be triggered.On event options_ Action menu selectionThis is the only choice that allows users to see the agent in the Actions menu.As previously mentioned, keep in mind that the user can run the agent fromanywhere in the application. The agent must also behave appropriately whenit is run from a place you didn’t intend it to ran from._ Agent list selectionUse this option when you do not want to the agent to show up in the Actionsmenu. If the agent is called by another agent (the main agent), the documentselection is ignored. The main agent always determines the documentselection (“Target” listbox). Also use this option to hide the agent for the endusers._ Before new mail arrivesThis option refers to processing mail before it is deposited in the maildatabases (for example, to move incoming mail to a folder). With this option,the agent runs before the message is listed in the database. Therefore, becareful what other options you choose. For example, do not use the MarkDocuments Read simple action, because documents will always be markedunread when they are listed in the database.Note: “Allow public access” does not let users exceed their normal access toother parts of the database. For instance, an agent run by a “Depositor” userwill not be able to look up information in a view unless that view is also publicaccess.Tip: Since the agent runs before the message is listed in the database, youcannot get a handle on the NotesDocument. To get a handle on the documentitself, you need to use “DocumentContext”, which is a property in theNotesSession class, using LotusScript.If you want to accomplish the same with the use of Java, you need an extrastep, and go via the “AgentContext” class in Java and use theDocumentContext through the getDocumentContext.Note: This option is limited to one agent per database.254 Domino Designer 6: A Developer’s Handbook_ After new mail arrivesThis option refers to processing incoming mail: to respond to it, forward it,modify it, delete it, or file it. Interactive functions and functions that read ormodify data external to the current document are ignored when documentsare mailed into the database (for example: @DbColumn, @DbCommand,@DbLookup, @MailSend, @Prompt, @Command, or @PostedCommandare all ignored)._ After documents are created or modifiedThis option refers to workflow tasks where a task is performed based on newor changed documents. This trigger is actually a scheduled agent handled bythe Agent Manager, and can execute either on the local Notes client or on aserver.When you select After documents are created or modified, an Edit settingsbutton appears. If you click the button, the Schedule dialog box appears. Here

you can set a start and end date for the agent, tell the agent not to run onweekends, and either choose a server for the agent to run on or choose thelocal Notes client. You can also specify that the server is chosen when theagent is enabled. The delay time using this agent varies between 5 to 30minutes, depending on the server load._ When documents are pastedThis option refers to documents that are pasted into the database and need tobe modified as they are being pasted. Note that this event requires action bythe user and does not happen in the background. Paste-activated agentscannot use the @Command or @PostedCommand.Tip: This option can be used multiple times within the same database.Note: Each time this agent runs, it processes all documents created ormodified since it last ran—even if it has been inactive for a while because ofnot being run on weekends, for instance.Note: To prevent documents being pasted, use the new QueryPaste event ofthe NotesUIView class. A “when documents have been pasted” agent runs toolate to prevent the paste. It can delete the new documents, but only if the userwho pastes has access to delete.Chapter 7. Domino Design elements: agents 255On schedule options:_ More than once a day_ Daily_ Weekly_ Monthly_ NeverUse the On schedule trigger to schedule agents to run at regular intervals. Whenyou select On schedule, you get a new button called Schedule, that brings up adialog box to schedule the specific run time, as shown in Figure 7-2.Figure 7-2 Scheduling an agentTo set up an interval-scheduled agent:_ Specify Run Once Every in a range between 5 minutes and 11 hours 55minutes._ Specify the start and end time of each day._ Specify the start and end date for the agent to run, and whether it should runon weekends or not._ Specify the server on which the agent is to run.The following options are available:– Running the agent on the original serverTo run the agent on the same server where you create the agent, leave thedefault setting in the Run box.256 Domino Designer 6: A Developer’s Handbook– Running the agent on another serverTo run the agent on another server, select a server in the Run list box orenter a server name.– Running the agent from any serverIf you cannot specify a server in advance, select -Any Server- as theserver name in the Run box. This wildcard entry allows any server to runthe agent. However, be aware that choosing this may result in replicationconflicts if several servers run the same agent and change the samedocuments.– Allowing users to choose which server runs the agentIf you select Choose When Agent is Enabled, users are prompted to selecta server when they enable the agent. This is useful for distributing agentsin ready-to-use applications.7.3.3 Selecting documents to be processed

This selection is set depending on the option selected for scheduling the agent.For example, if the agent is scheduled to run if new mail has arrived, this option isset to Newly Received Mail Documents, and it cannot be changed.You can further narrow down which documents are processed by specifying a“document selection”. For example, if you want to process only documents whichhave a field value of a specific value, click document selection in the agentwindow, and then add condition; see Figure 7-3 on page 257.Tip: If the agent is modifying data in a database, it should run just once on oneserver. The changed data is then replicated to the other replicas of thedatabase.Tip: Test your selection criteria by entering it in the search bar of a view, to seewhether it selects the right documents.Note: An agent that uses document selection criteria will run much faster if thedatabase is full-text indexed.Chapter 7. Domino Design elements: agents 257Figure 7-3 Document Selection1. From the Condition drop-down box, select By Field.2. In the Search for documents area, select a Field.3. Select Contains.4. Type in the search criteria.5. If you have multiple criteria, you must type AND or OR between the searchexpressions, and you may use parentheses for grouping.6. Click OK to save your settings.Tip: You can also use the full-text query syntax to type out the query you want,for example: [State] = “MN”. The Add Condition button might not supportevery query you need to make. You may also “mix and match” Add Conditionentries with typed information.258 Domino Designer 6: A Developer’s HandbookFigure 7-4 Adding conditions to agentsTable 7-2 lists which document options are allowed with which run options.Table 7-2 Run options and document options for agentsNote: Document selection is new in Domino 6, and replaces the searchexpression field and Add search button in earlier versions.Run options Document optionsAction menu selection All documents in database.All new and modified documents since last run.All unread documents in view.All documents in view.All selected documents.None.Agent list selection All documents in database.All new and modified documents since last run.All unread documents in view.All documents in view.Selected documents.Run once.Before new mail arrives Each incoming mail document.Chapter 7. Domino Design elements: agents 2597.3.4 Specifying what an agent should doThere are five ways of specifying what an agent should do: Simple Actions,formulas, LotusScript, imported Java, and Java. Select which one you will usewith the language pull-down at the top of the Programmer’s Pane.Simple ActionsThese are predefined actions that allow you to define a sequence of actionswithout requiring any programming knowledge. They are ideal for the end userwho wishes to automate some routine tasks. (Simple Actions are rarely used byprogrammers as they lack the power of the other choices.)

The Simple Actions available are:_ Copy to Database_ Copy to Folder_ Delete from Database_ Mark Document Read_ Mark Document Unread_ Modify Field_ Modify Fields by Form_ Move to Folder_ Remove from Folder_ Reply to Sender_ Run Agent_ Send Document_ Send Mail Message_ Send Newsletter Summary_ Run @Function FormulaAfter new mail has arrived Newly received mail documents.After documents are created ormodifiedAll new and modified documents.On schedule- More than once a dayAll documents in database.All new and modified documents.On schedule- daily, weekly, monthly, neverAll documents in database.All new and modified documents.Note: You can combine Simple Actions in one agent to build more complexfunctions.260 Domino Designer 6: A Developer’s Handbook
FormulasFormulas can use the full range of @functions available with Domino. You canwrite an @function formula that runs by itself or with a simple action. You cannotcombine an @function formula with a LotusScript program.1_ To write a standalone formula, click Formula in the design pane and type theformula in the panel._ To combine a formula with a simple action, click Simple action(s) and thenclick Add Action. Choose @Function formula from the Action list and typethe formula in the editing window.How many times the formula executes depends on the document options. A “RunOnce” agent will execute its formula just one time. Otherwise, formula-basedagents operate on each of the documents in turn and run the complete formulaon a document before proceeding to the next document. The documents are notprocessed in any particular order.A SELECT statement in the formula further limits the search. If you do notinclude a SELECT statement in the formula, Domino appends a SELECT @Allstatement. Except for SELECT @All, a SELECT statement must be the firststatement in the formula to be effective.For example, if you want to forward documents only if they do not haveattachments, do the following:1. In the Agent Builder window, click the Formula option.2. Enter the following formula in the Programmer’s Pane:@If(@Attachments>0@Return(" ");@MailSend("Rune Carlsen"; " "; " "; Subject; _"Please handle this" + @Newline; "Body" ; " " ) );

LotusScriptAgents can also be written in LotusScript, as follows:1. In the Agent Builder window, select LotusScript as programming language.2. Enter the LotusScript code in the Programmer’s Pane.Attention: Simple Actions refer to the displayed name of design elements.Therefore, changing the name of such an element will cause the agent not towork.1 The Evaluate statement in LotusScript lets you get the value of an @Function expression fromwithin your LotusScript agent, and the Search methods let you specify a macro selection expression.Chapter 7. Domino Design elements: agents 261Script-based agents run once and must therefore process all documentsselected. You supply the search criteria and the processing order through thelanguage constructs. Search criteria applied through the agent interface areeffective only through the UnprocessedDocuments property of theNotesDatabase class. This property contains all documents not yet processed bythe agent, or the result of the search specified to the agent builder, dependingupon how you create the agent.Imported JavaTo attach a Java program to an agent, first write the program in a Javadevelopment environment, like WebSphere Studio Application Developer. InDomino Designer, click Imported Java and then click Import Class Files toimport the files into the agent.JavaAgents can also be written in Java, as follows:1. In the Agent Builder window, select Java as programming language.2. Enter the Java code in the Programmer’s Pane.Notice that some of the code is appended to the Programmer’s Paneautomatically; see Figure 7-5 on page 262. You get, automatically, handles toSession and AgentContext objects. This is very useful, as you will need theseobjects in your agent code.Note: Control is always passed to the agent using the Initialize event, so this iswhere your program should begin.262 Domino Designer 6: A Developer’s HandbookFigure 7-5 A new Java agentJust like LotusScript agents (and unlike macro agents), Java agents do notautomatically repeat when run on a collection of documents. To process thedocuments selected by its selection criteria, the agent must usegetUnprocessedDocuments of the class AgentContext to fetch the set ofdocuments, and will usually contain a loop to fetch and process each documentfrom that collection. Alternatively, it could use a method ofNotesDocumentCollection that acts on all the documents at once, such asstampAll or putAllInFolder.Java agents can also be set to run on no documents, and any agent is free toobtain documents from other sources and perform any operations on them.7.3.5 Displaying the pop-up menu of an agent1. To display the pop-up menu of the agent, click with the right mouse button onthe agent listed in the agents pane. The agent pop-up menu is shown inFigure 7-6 on page 263.Chapter 7. Domino Design elements: agents 263Figure 7-6 Pop-up menu of an agent2. From this menu you can:– Display the Design properties– Cut and copy to the clipboard, and paste from the clipboard– Delete the agent– Edit the agent, which is the same as double-clicking the agent’s name in

the Agent pane, to display the Agent Builder window– Run the agent– Test the agent, which tells you how many documents the agent willprocess– View the agent log– Enable or disable the agentUsing Domino 6, there is a new way of enabling and disabling agents, using anew Agent User Interface. This is also described in Chapter 12, “New features inDomino 6” on page 347.You can now—directly in the list of agents—use action buttons to enable anddisable scheduled agents; see Figure 7-7 on page 264.264 Domino Designer 6: A Developer’s HandbookFigure 7-7 Enabling, disabling, and signing agents7.3.6 Signing an agentA server agent will run with the access given to the signer of the agent. To sign aagent in Domino 6, you have the following options:_ Sign the databaseAn administrator can sign either the whole database or design elementsselectively with a administrative ID file, or another ID file using the DominoAdministration client. The database and all its design elements will be signedwith this ID file, and the agent will run with the access given to this ID._ Edit and re-save the agentTo sign just a single agent, open the agent and then save it. This will sign theagent with the current user’s ID file._ Sign the agentWith Domino 6, you can now sign a single or multiple agent at once, using aaction button in the agent list or from the menu that you can bring up byright-clicking the agent on agents list.Figure 7-7 shows the new buttons as part of the list of agents in the Designer.Pressing this button will sign the marked agent(s) with the current user ID file.Agents that are run by a user will run with the access of that user. For theseagents, signatures are not an issue as far as determining the access rights ofthe agent, except that—as with all Notes code, and depending on the user’sExecution Control List—the agent may not be able to run or perform certainoperations unless signed with the recognized ID.Chapter 7. Domino Design elements: agents 2657.4 Testing an agentIt is important that you, as a developer, test an agent before copying that agent toa production server. Having a test environment is valuable for testing anddeveloping agents.7.4.1 Testing an agent during developmentYou can quickly test an agent by simulating a run without affecting documents.1. Select the database and go to the Shared Code and Agent pane.2. Select the agent and choose Agent -> Test, or right-click on the agent andchoose Test.3. Read the Test Run Agent Log, which describes how many documents wouldbe processed and what action would be taken if the agent were actually run.7.4.2 Testing an agent before copying it to a live databaseFor agents that have multiple steps or complex tasks, split the process intoseveral smaller tasks and create an agent for each. Test and fix each smalleragent first. When everything is working correctly, combine the agents into oneand then test the agent again.1. Choose File -> Database -> New Copy to make a test copy of the databasewith documents. For all agents except those that act on mailed documents,

the test copy can be local.2. If the agent works on mailed documents, the test database must be on aserver, and a Mail-in Database document must exist in the Domino Directory.Mail a few documents to the test database.3. If you do not need to run the agent from a view, select the database and go tothe Shared Code and Agent pane, select the agent you’re testing, and chooseAgent -> Run; otherwise, open the database, select the view, and chooseActions -> <Agent Name>.4. Make any required changes to the agent to fix any problems that the test runshows. If necessary, create a new copy of the database to run the agentagain.5. When the test shows no problems, copy the tested agent to the live database.7.4.3 Checking the Agent LogEvery time an agent runs, it writes a report that includes when it ran, how manydocuments it ran on, and what actions it took on those documents. Each new run266 Domino Designer 6: A Developer’s Handbookof the agent writes over the previous log report. Domino stores the Agent Logwith the database.To view the most recent Agent Log:1. Select the agent whose log you want to check and choose Agent -> Log.2. Click OK to close the Log window.If there is no Log (because the agent has never run), you will see the followingmessage: This agent has never been run before.7.4.4 Debugging agentsTo debug your agents, you can use the debugging features of Domino Designer.However, it is sometimes difficult to debug agents on your workstation whenthese agents are expected to run on a server (background agents) or on theWeb. Use one of the following techniques to debug such agents:_ Include MESSAGEBOX statements to print out statements.MESSAGEBOX statements in your LotusScript agent will write directly to theserver console, and for that reason, also to the server log.nsf file. This methodis convenient, but can clutter the server log if you have many statements orrun the agent repeatedly. To handle this, you either need your own testingserver, or you need permission to populate a server log with debugginginformation._ Use the NotesLog class to write out your statements._ Use On Error statements to trap any errors that occur during execution. Inyour error trap code, use AgentLog or Messagebox to write error informationincluding line number. Note that On error statements do not slow your agentdown, so you can leave this in your production code to help you track downany problems that occur after the application is rolled out._ With Domino 6, there is a new debugging feature called Remote debugger,which enables you to connect to a running agent on the server and debug it.You can also invite other persons to debug it at the same time. This subject iscovered in detail in 12.6.2, “Remote debugger” on page 387.Note: LotusScript agents will only report how many documents matched theirsearch criteria, not how many were actually modified. Use the methodsNotesLog class to log messages into the log.Chapter 7. Domino Design elements: agents 267Example debugging agents using MESSAGEBOXDim session As New NotesSessionDim db As NotesDatabaseOn Error Goto trapSet db = session.currentdatabaseMessagebox “Debugging to console and log.nsf : “ & db.title
...trap:Messagebox “Error “ & Err & “ in Initialize, line “ & Erl & “: “ & ErrorExit SubThe preceding messagebox will be included in the server log.nsf file. If there’sany error event, the error details, including line number, will be recorded in thelog file as well.Example debugging agents using AgentLog classDim session as New NotesSessionDim db as NotesDatabaseDim agentLog As New NotesLog("Agent log")Call agentLog.OpenAgentLogSet db = session.currentdatabaseCall agentLog.LogAction( "DB Title returns: " & db.title)Call agentLog.CloseTip: If you modularize your LotusScript code (which is a useful idea), you canget a stack trace in case of error by trapping errors in each sub or function andadding line number information to the error message. At the top of eachmodule, add the following line:On Error Goto trapAt the end, add the following (where subname is the module name):Exit Sub ‘ or Function...trap:Error Err, Error & “/subname:” & ErlOptionally, you can add values of important variables at the end, also. As theerror gets passed up the stack, each function adds its name and line number.The error trap in the Initialize sub can record the error in the log, along with itsvalue of Erl, so that you can see not only where the error happened, but howthe code got to that point.268 Domino Designer 6: A Developer’s HandbookFigure 7-8 Agent log showing data from debugged agent
7.5 Enabling and disabling scheduled agentsIf you have Designer access or above, you can disable any agents (exceptmanually run agents) in order to prevent servers from running themautomatically. This is useful for debugging a problem with an agent.Designers can still run disabled agents by selecting an agent at the agent pane,and choosing Actions -> Run, or by right-clicking on an agent, and selectingRun. After you re-enable them, scheduled agents resume their schedule.Note: This example logs directly to the agentlog which you can find in theDomino 6 Designer Client. You can also log to separate databases or files,using methods found in the LotusScript class NotesLog.New in Domino 6: As a developer, you can allow agents to be enabled anddisabled by users who have editor access or higher. This allows a scheduledagent on the server to be enabled or disabled, without re-signing the agent;see Figure 7-9 on page 269.Chapter 7. Domino Design elements: agents 269Figure 7-9 User activation7.5.1 To disable and enable individual agents1. Select the database and go to the Shared Code and Agent pane.2. Click the enabled agent and choose Disable from the new Domino 6 userinterface (action buttons in the list of agents). Icons will toggle and show whatstate the agent is in; see Figure 7-10.To enable a disabled agent, click the agent and choose the Enable button.Figure 7-10 Enable and disable agentsTip: If the Allow user activation box is checked and someone enables theagent, the agent is not re-signed. If this box is not checked and someone (with

Designer access or above) enables the agent, the agent is re-signed.270 Domino Designer 6: A Developer’s Handbook
7.5.2 To disable all automated agents in a databaseDisabling all agents is useful for debugging a problem with an agent running on aserver.1. Select the database and choose File -> Database -> Properties.2. Click Disable background agents for this database.Figure 7-11 Disable all automated agents in a database
7.6 Troubleshooting agentsThe Agent Manager runs background agents—scheduled, mail-activated, andchange-activated agents—according to the schedules that you specify in theagent manager section of the server document in the Domino Directory. If anagent is not executing correctly, or if you are experiencing performancedifficulties, there are a number of areas that you can examine to correctproblems, as described in the following sections.7.6.1 Agent is not runningFor this problem, check the access for the agent to make sure that the agent canrun on all specified databases. For example, if you design an agent to copydocuments from database A to database B, but you don’t have access todatabase B, the agent will not be able to execute the task. To check for accessproblems, view the Agent Log after the agent runs, or use other debuggingmethods to capture what is going wrong.Chapter 7. Domino Design elements: agents 271Make sure that the agent is completing its task. If the task exceeds the amount oftime allotted in the Max LotusScript/Java execution time setting in the serverdocument, the Agent Manager terminates the agent before the task is complete.Increase the allotted time for execution, or rewrite the agent as several smalleragents.Also, make sure that the signer of the database or the agent itself has executionrights and access to perform and run the agent on the server, as well as accessto all the involved methods and actions taking place.7.6.2 Agent Manager is not workingFor this problem, make sure that the Agent Manager is scheduled to run whenagents are scheduled. In the Agent Manager section of a server document in theDomino Directory, make sure the Start time and End time parameters are set forDaytime and Nighttime to cover the hours when agents are scheduled to run.Adjust these parameters as necessary.7.6.3 Agents are running slowlyFor this problem, check to see if you have too many agents competing for serverresources. Reschedule agents for the nighttime hours, when system demand islower.Alternatively, allocate additional system resources to the Agent Manager byincreasing the Max concurrent agents setting and the % of polling period settingin the Agent Manager section of the server document. (Be aware, however, thatshifting resources to the Agent Manager might slow down other serverprocesses.)Listed here are some of the reasons why agents might be slow:_ The database is not full-text indexed._ Agents iterate through all documents to find a few to act on, instead of usingselection criteria._ You are using GetNthDocument instead of GetFirstDocument andGetNextDocument._ Agents should use NotesView. AutoUpdate to prevent view re-indexing eachtime a document is modified.

7.6.4 Agent will not run on a particular serverFor this problem, examine the Agent Manager section of the server document inthe Domino Directory to make sure that the user who created the agent has272 Domino Designer 6: A Developer’s Handbookaccess to run the agent on the server. Also, check the access control list for theserver to make sure that the user who creates an agent has access to the server.An agent inherits access rights from its creator, so an agent cannot run on aserver to which the creator does not have access.If the agent cannot access information on another server, check the otherserver’s trust setting on the server document.7.6.5 Debugging with NOTES.INI settingsIf you are unable to determine why your agent is not running by using theseprocedures, you can turn on the debugging flag for the Agent Manager in theNOTES.INI file on the server. To do this, add the following line to the serverNOTES.INI:Debug_AMgr = flagFlag can be one, or a combination, of those listed in Table 7-3.Table 7-3 Debug flagsThe output is written to the server console log and the Notes Log.Additionally, you can turn on agent execution logging. To do this, add thefollowing line to NOTES.INI. (You can also do this in the server configurationdocument in the Domino Directory.)Log_AgentManager = valueFlag Outputc Show output agent control parameterse Information about Agent Manager eventsl Agent loading reportsm Agent memory warningsr Agent execution reportss Information about Agent Manager schedulingv Verbose mode, showing information about agent loading,scheduling, and queues* All of the above information (same as turning on all the flags)Important: Be aware that debugging affects server performance.Chapter 7. Domino Design elements: agents 273The list of values is shown in Table 7-4.Table 7-4 Values for Log_AgentManager parameterThis setting gives you only a subset of information compared to what theDebug_AMgr generates, but it has less of an impact on the performance of theserver.7.6.6 Debugging at the server consoleUse the following server commands to troubleshoot the Agent Manager; in thefollowing sections, we describe their use in more detail._ Tell amgr schedule_ Tell amgr status_ Tell amgr debugTell amgr scheduleIssuing this command on the server console shows the Agent Manager scheduleof all agents scheduled to run for the current day. Use it to see if your agent iswaiting in one of the Agent Manager queues.There are three queues:_ A queue for agents that are eligible to run (E)_ A queue for agents that are scheduled to run (S)When the time they are scheduled to run arrives, they are moved into theEligible to run queue._ A queue for event-triggered agents waiting for their event to occur (V)

Event-triggered agents (new mail and document creation/modification agents)are queued in the Event queue until an event they are waiting for occurs.When the event occurs, the agents move into the Scheduled queue and theninto the Eligible to run queue.Here is an example:E S 09:33 AM Today agent_a TEST.NSFS S 09:54 AM Today agent_b TEST.NSFV U agent_c TEST.NSFValue Output0 No logging1 Show partial and complete success2 Show complete success274 Domino Designer 6: A Developer’s HandbookIn this example, the first column contains the Agent Manager queue type. Thesecond column contains the agent trigger type (S means the agent is scheduled,M represents a new mail-triggered agent, and U represents a new/updateddocument-triggered agent). The following columns show the time that the agentis scheduled to run, the name of the agent, and the database name.Tell amgr statusUse this command to show a snapshot of Agent Manager status. It providesinformation about all settings in effect.Tell amgr debugUse this command to set or change Agent Manager debug settings. You need touse the same debug values as shown above for the Debug_AMgr setting in theNOTES.INI file.
7.7 Agents and the WebAgents are also used in the Web environment to perform several functions. In thissection, we will concentrate on agents that can be activated by a user on a Webbrowser.As an application developer, you will most likely create two sets of agents in orderto perform the same operations from both a Notes client and from a Webbrowser. The main reason for this is the difference in the way in which anapplication interacts with the user in the two environments.In Domino, the applications can interact with users by using message boxes or byprompting information (for example, to change the values in the fields of thecurrently open document).On the Web, however, the only way to show information to users without usingJavaScript is by using HTML to create Web pages. If you want to change thecurrent document on the Web, you can only do it before the document is loaded,using the WebQueryOpen event, or before it is saved, using the WebQuerySaveevent.Agents for Web users are most often written using LotusScript or Java, sinceSimple Actions are not available on the Web and @formulas do not allow you toreturn information to users.Note: It will take up to a minute for an agent to appear in a queue, or to movefrom one queue to another.Chapter 7. Domino Design elements: agents 275Note: Remember, agents cannot run in a browser. They can be activated from abrowser, but they run on the Domino server containing the agent.7.7.1 The Document Context of a Web agent and CGI variablesWhenever a LotusScript agent is run from the Web, theNotesSession.DocumentContext property returns a NotesDocument containinginformation about the Web session, as well as access to all items in thedocument. This document contains the values of all CGI variables associated

with the browser session and with the agent call.If an agent is called in connection with a Web form event (WebQueryOpen orWebQuerySave), DocumentContext gives the document being opened or saved.The CGI variables are also supplied in this document (even though they mightnot appear on the form).Common Gateway Interface (CGI) is a standard for interfacing externalapplications with HTTP servers. When a Web user saves a document, opens anexisting document, or runs an agent using an “?OpenAgent” URL, the DominoWeb server uses CGI variables to collect information about the user, includingthe user’s name, the browser, and the user’s Internet Protocol (IP) address.The following example demonstrates how to access CGI variables:Dim session As New NotesSessionDim context As NotesDocumentDim CGIValue As StringTo create an instance of the DocumentContext:Set context = session.DocumentContextOnce you have access to this object, you can access every CGI variable andstore it in a LotusScript variable; for example:CGIValue = context.HTTP_USER_AGENT(0)CGIValue (string) now has information about the user’s browser.Following are some examples:_ To determine Web identity:Set webUserName = context.remote_user(0)_ To read the arguments passed, that is, the string followed by the ampersand(&) that ends some URLs:Set args = context.query_String(0)276 Domino Designer 6: A Developer’s Handbook
7.7.2 Agent outputThe Domino server captures the output stream of an agent and uses that as theWeb page returned by the agent. In the case of a LotusScript agent, the outputstream is anything output with a Print statement.2There are three types of values the agent might choose to print:_ The actual information to be displayed on the browser (an HTML Web page,generally)_ A URL that the browser should redirect to, in [square brackets]_ A URL that should serve as the new page contents, in [[double squarebrackets]]When redirecting to a URL, it’s generally preferable for performance reasons touse the double brackets, since this saves one “round trip” between the browserand server. This is the preferred option when possible.If your agent prints anything that does not start with square brackets, the outputis assumed to be HTML code. Domino will automatically add an HTML header tothe page. If you prefer to write your own HTML header, or if your output is notHTML, you must supply a header line that tells the content type of the page. Forinstance, if you’re printing HTML information, your first print statement should be:Print "Content-Type:text/html"If your output begins with a Content Type line, Domino will send the rest of youroutput exactly as is. You may specify other content types using the standard typecodes recognized by browsers, so it’s possible for agents to output PDF files, GIFimages, and so on.7.7.3 Running multiple instances of an agentBy default, all agents run serially from the Web, one after the other. This cancause a performance bottleneck on heavily used sites or sites with slow agents.When Domino is being used as a Web server, you can add the following line tothe NOTES.INI file on the Domino server:DominoAsynchronizeAgents=1

2 Messagebox output goes to the server log database, log.nsf.Tip: Rather than use an agent to generate a Web page on the fly, it isgenerally easier and more efficient to create a page (or form) that displays thedesired output, and redirect the browser to that page.Chapter 7. Domino Design elements: agents 277This allows an agent to be run by more than one person at the same time. Bydefault, the Domino server only runs one copy of an agent at a time and queuesother requests.Agent designers will need to make sure their agents are thread-safe. Currently,there is no way to selectively serialize an agent.7.7.4 WebQueryOpen and WebQuerySave agentsThere are two special events in all Domino forms: WebQueryOpen andWebQuerySave.WebQueryOpen eventA WebQueryOpen event runs the agent before Domino converts a document toHTML and sends it to the browser. Domino ignores any output produced by theagent in this context.Examples for using this agent include performing large computations that are notpossible with @commands, or collecting statistics about who opened documentsand when.WebQuerySave eventA WebQuerySave event runs the agent after field validations and before Dominosaves the document in the database. The agent can run any operations withdocument data or modify the document.An example of a WebQuerySave agent could be an agent that creates anotherdocument in the Notes database but does not save the current document.To perform error checking, field validation, and other processing before Webusers open or save documents, create a shared agent that runs manually.Important: Be sure to implement this with caution. There have been problemsregistered using this setting in combination with Domino.Doc and othersituations.This NOTES.INI setting will make all Web-triggered agents runasynchronously; however, before using this setting, you must consider what allthe agents on the Web site are doing so they do not run over each other andcause data corruption.Data corruption could be caused by two or more invocations of the sameagent attempting to modify the same document at the same time. This couldproduce unpredictable results.278 Domino Designer 6: A Developer’s HandbookYou can then write a formula that uses @Command([ToolsRunMacro]) to run theagent and attach it to the WebQueryOpen or WebQuerySave form events. Thissimulates the LotusScript QueryOpen and QuerySave form events that are notsupported on the Web.The best place to do validations in a Web application is normally with JavaScriptcode on the form. Since JavaScript executes in the browser, without the need tosubmit the form to the server, it executes much faster and reduces server load.However, certain validations have to be done on the server because they dependon information that’s only available on the server (for example, a test to see thatthe document title is unique in the database). If a WebQuerySave is used forvalidation, a LotusScript agent can use Print to display an error message and setthe document’s SaveOptions field to zero (“0”) to prevent it from being saved.7.7.5 Using the @URLOpen command to call agentsThe @URLOpen function allows you to reference an agent within a formula. Youcan associate such a formula with a button to invoke agents from a Web browser.These agents run when the user clicks the button. Following is an example

@URLOpen formula to run an agent named UpdateEntries:@URLOpen("/" + @WebDbName + "/UpdateEntries?OpenAgent")7.8 Using agents (advanced topics)Agents are very useful if you need to change the design of a database. They canhelp you to keep the data in the database consistent with the design. Forexample, you can use an agent to update all documents that are affected by aform change. Usually you will create a private agent which selects the documentsaffected by the form changes and run it manually.Tips:It’s inefficient to write an WebQuerySave agent just for the purpose ofdisplaying a Thank you page when a form is submitted. Instead, use the$$Return field on the form to give the URL of a page that displays themessage you want.Macro formulas in form fields or in the WebQueryOpen and WebQuerySaveevents are more efficient than agents. Since formula language now supportslooping, you can do more than you might think about without writing agents.Chapter 7. Domino Design elements: agents 279The following is a list of examples of where agents can be very useful afterchanges are made to the design of a database:Editing and resaving documentsTo save the step of editing and resaving documents manually, create an agentthat uses the following formula:@Command([ToolsRefreshAllDocs])Adding a fieldIf you create a new field, insert the new field into existing documents by creatingan agent that uses the following formula:FIELD New_field_name := value;where New_field_name is the name of the field, and value is the value you wantthe field in these documents to have. The value can be the field default value, aformula that calculates the value, or a null value (“”) that inserts the field into thedocuments, but does not give them any initial value.Removing field data from all documentsIf you delete a field, existing documents continue to store the obsolete field andits values. This unnecessary storage can affect disk space. To remove theobsolete field, create an agent that uses the following formula:FIELD Field_name := @DeleteField;After you run the agent, compact the database to reduce its actual file size.Renaming a fieldIf you rename a field, existing documents continue to refer to the old field name.To update documents to refer to the new name, create an agent that uses thefollowing formula:FIELD New_field_name := Old_field_name;FIELD Old_field_name := @DeleteField;where New_field_name is the new name for the field, and Old_field_name is theoriginal name for the field.Note: This will not succeed with fields assigned by LotusScript event code onthe form.Note: For removing rich text fields, don’t use this technique; LotusScript willgive you better results.280 Domino Designer 6: A Developer’s Handbook
Reassigning documents to another formIf users attempt to open documents created with a form that has since beendeleted, they see a message indicating that the form cannot be found. To preventusers from seeing this message, use these agent options to reassign existingdocuments to another form:

1. Under Which document(s) should it act on, select All Documents inDatabase and click Add Search.2. Select By Form Used, select the name of the obsolete form, and click OK.3. In the design pane, click Formula and enter:FIELD Form := "Reassigned_form_name";where Reassigned_form_name is the name of the form that the documentsshould use.Removing the stored form from documentsSelecting the form property Store Form in Documents is useful for mail-enabledapplications in which users need to see a document and don’t have the originalform stored in their mail databases.This form property is permanently attached to all documents created with theform. To remove the stored form, remove all internal fields connected with thatform by creating an agent that uses the following formula:SELECT $TITLE="Old_form_name";FIELD $TITLE:=@DeleteField;FIELD $INFO:=@DeleteField;FIELD $WINDOWTITLE:=@DeleteField;FIELD $BODY:=@DeleteField;FIELD $ACTIONS:=@DeleteField;FIELD FORM:="New_form_name";This formula removes all internal fields attached to the documents whereOld_form_name is the name of the form used to create the documents. The lastline creates a FORM field where New_form_name is the form that will display thedocuments in the future.After you run the agent, compact the database to reduce its actual file size.
7.9 New features in Domino 6The new features of agents in Domino 6 are covered in Chapter 12, “Newfeatures in Domino 6” on page 347.Chapter 7. Domino Design elements: agents 281The following features of agents are detailed there:_ New agent user interface_ “Run on behalf of”_ User activation_ Converting shared and private agents_ Remote debugging of server agents_ Ability for server agent to access information on other servers
7.10 SummaryAgents allow you to automate many tasks within Domino. They can operate inthe background to perform routine tasks automatically, and in the foregroundwhen called by the user. They can easily be created without programmingknowledge by using Simple Actions, but very complex algorithms can also beimplemented using LotusScript or Java.On the Web, you can also use agents to perform operations before a document isopened or before it is saved. In addition, you are also able to access CGIvariables to capture information about the user.282 Domino Designer 6: A Developer’s Handbook© Copyright IBM Corp. 2002. All rights reserved. 283
Chapter 8. Domino Design elements:framesetsIn this chapter, we describe what Domino framesets are, and how to design andmodify them. We discuss the basic design elements used when creating a

Domino database. We also explain how to show different information to Webusers and Notes users
8284 Domino Designer 6: A Developer’s Handbook
8.1 FramesetsA frameset in a Notes client or in a Web site is a screen that displays multipleindependent pages, each in its own rectangular “frame”. The frameset designerprovides visual tools and wizards to easily create multi-paned interfaces forDomino applications.Framesets provide a standard way to set up a multi-pane interface for the user.The Frameset designer enables you to create framesets and then associatespecific pages, views, forms, Java applets, ActiveX components, or any URL witheach frame. You can also make your framesets dynamic by writing a macroformula to calculate what to display in the frame.We will use the TeamRoom database template as a basis for demonstrating theDomino 6 elements. You will find the template for the TeamRoom database onyour Domino server.To create a new frameset in Domino Designer, open the Framesets design viewand click New Frameset, or choose Create -> Design -> Frameset.A window such as Figure 8-1 will be displayed where you can choose your initialconfiguration. Select the layout you want and click OK.Figure 8-1 Create a new framesetYou are not limited to your selection on this screen; you can add or removeframes later.Chapter 8. Domino Design elements: framesets 2858.1.1 Specifying frameset propertiesThe Frameset InfoBox contains all the information related to framesets. To viewthe frameset properties while you have a frameset open in Designer, useFrame/Frameset Properties.In the InfoBox, click the triangle in the middle of the InfoBox title and selectFrameset. An InfoBox will be displayed which allows you to set the properties ofthe frameset. It contains two tabs:_ Basic_ HTMLUsing the Framesets Basic tabThe Frameset Info tab stores general information about the frameset; seeFigure 8-2.Figure 8-2 Frameset properties1. In the Name field, specify the “display name” of the frame.2. In the Alias field, provide an alias for the frameset. An alias is an internalname for the frameset. Use the alias if you need to refer to the frameset inyour program code. This lets you change the display name without breakingyour code.3. The text in the Comment field is information for developers.4. In the Title field, enter a macro formula that will be the window title of theframeset. Generally this will be a constant string (in quotes), but you can usemost of the @Functions in the Notes macro language, as shown in theexample in Figure 8-3 on page 286.286 Domino Designer 6: A Developer’s HandbookFigure 8-3 Computed title in Designer clientThis would give a more personal look to the application; see Figure 8-4.l

Figure 8-4 Computed title in Notes clientUsing the HTML tabThe HTML tab is the same for frames as it is for various form elements, forconsistency. However, the Class and Style attributes do not apply to frames, sothere is no reason to fill them in.8.1.2 Specifying frame propertiesFrameset is a collection of frames and now we’ll show how to modify theseframes. The Frame Info Tab stores general information about the frame.Tip: Although Title is not a required field, supplying a title makes for a moreuser-friendly application. The user cannot tell which tab is which if they all say“(Untitled)”. This information is also shown on the window title when accessedwith a Web browser or Notes client.Chapter 8. Domino Design elements: framesets 2871. In the InfoBox (property box), click the triangle in the middle of the InfoBox titleand select Frame. An InfoBox will be displayed which allows you to set theproperties of the frame. It consists of five tabs:– Info– Frame size– Frame Border– Advanced– Additional HTMLUsing the Frame Info tab1. In the name field, you specify the frame name. This is the name you woulduse to target other links (for example, when you click a link in frame A, thenew page is displayed in frame B). This field contains the name you will use totell the link which frame to open in.2. In the Type field, you specify what you want the frame to display initially whenthe frameset is opened. You can select three different types:– LinkLink requires that you paste in a link that you've already copied to theClipboard. Click the Paste icon to paste in the link. There are three kinds oflinks you can paste in from the Clipboard: View, Document, or Anchor.– Named ElementA named element is a design element that you have already created andnamed. A named element can be a page, form, frameset, view, folder, ornavigator.When you click Named element, then a new icon called Browse will beavailable in the info tab of the frame property; see Figure 8-5 on page 288.Note: Database links are not supported in framesets.288 Domino Designer 6: A Developer’s HandbookFigure 8-5 Browse named elementsWhen you click this, a window will be displayed allowing you to navigateand easily select the named element you want to link to; see Figure 8-6.Figure 8-6 Locate object windowThe choices you have to verify are:i. Kind of objectChoose the named type of element.ii. DatabaseChoose from which database you want to pick this element.i. Element nameChoose the element itself.Chapter 8. Domino Design elements: framesets 289Instead of selecting a specific design element, type, and database, youalso have the option to calculate these when the frameset is opened. Clickthe button with the at (@) symbol; this will open a formula editing window,

as shown in Figure 8-7. This is useful when you need to display differentinformation depending on the user’s identity, roles, or preferences.Figure 8-7 Frame formulas to display different screens depending on user roles– To put a Web page into a frame, choose URL and enter the full URLspecification (for example, http://www.ibm.com/redbooks). You can alsopaste in a URL or use a formula that evaluates to a URL.When you click a link in a Web page (in the Notes client or in a Webbrowser), the link may open within the same Web page or in a newwindow, depending on the setting for that Web page.Note: The database formula must return the file path of the database in theform server!!pathname (for example, Trondheim!!mail2\rcarlsen.nsf). For localdatabases, use only the pathname.Tip: The URL must include the initial “http://” or “https://”. You may also specifya Notes URL, beginning with “Notes://”. For examples of Notes URLs, explorethe design of the framesets in your bookmark.nsf database.290 Domino Designer 6: A Developer’s Handbook3. Default target for links in frameEnter the target frame for links activated within the current frame.Using the Frame size tabFigure 8-8 shows the Frame size tab. On this tab, you can manually adjust boththe width and height of the frame.Figure 8-8 Frame size1. Switch to the size tab of the InfoBox.The following options are available:– Relative - This means that you specify the width and height relative to theframes in this set. For example, if you have two frames and set the widthfor the first one to 1 and the second to 2, the second frame will be twice aswide as the first.– Pixel - With this selection you provide an absolute value measured inpixels.– Percent - This option allows you to specify the width and height values asa percentage of the window.You can also resize the frames by dragging their edges with a mouse.2. ScrollingIf you choose On, this forces a scroll bar for the frame; if you choose Off, thenno scroll bar will appear. If you choose Auto, the scroll bar appears if it isneeded. The default is Auto.3. Allow ResizingIf you choose Yes, you allow users in the Notes client or Web browser tochange the height and width of frames by dragging their borders. If youchoose No, then users cannot drag borders to resize the frame.Chapter 8. Domino Design elements: framesets 2914. Set Initial FocusChecking this box causes the focus to be on this frame when the frameset islaunched in the Notes client. If this property is enabled for more than oneframe in a frameset, the first frame found is enabled.If this property is enabled on a frame that either has no content or has contentthat cannot be found, there is no frame focus.Using the Frame border tabFigure 8-9 shows the Frame border tab.Figure 8-9 Frame borderThe following options are available:1. 3-D borderThis displays three-dimensional borders between the current frame and itsadjacent frames.Note: When a user drags a frame border, they are really resizing more

than one frame—one gets larger, while another gets smaller. To let theuser resize a frame, all the frames involved must allow resizing.292 Domino Designer 6: A Developer’s Handbook1. Apply to all framesThis adds or removes three-dimensional borders between all frames in theframeset2. Border style– Border width (in pixels) - the default is 7 pixels. Checking Default meansthat the frame displays according to the user's browser settings. Eachbrowser renders design elements differently, so be sure to preview yourwork in each browser if you are choosing this setting.– Border color - choose a color from the drop-down color chart. Click thesystem (monitor) icon at the top of the color chart to get the default color.Click the wheel icon at the top of the color chart to create a custom color.3. Border captionYou can use a caption for frames and turn it collapsible. In this way, you canlabel the frames and allow wide navigation between the collapsible frames,thereby providing more information in the same screen area and displaying itat your convenience.– Caption Formula - enter a formula that translates to a caption that appearsin the border.– Show - you can choose None, Caption only, Arrows only, or Both:• None - shows the default border with no caption or arrows.• Caption only - displays a caption in the border.• Arrows only - displays an arrow in the border. This arrow lets you openand close the frame.• Both - displays both a caption and an arrow in the border.– Align - note the following:• For a caption, choose to align so that the caption appears inside thetop or bottom border of the frame.• For an arrow, choose to align so the arrow appears at the top, bottom,left, or right border of the frame.• For both a caption and an arrow, you can align top or bottom. Note thatthe border appears only where the caption or arrows appear. Forexample, if you choose Top, then the border displays on the top only.Notes:This is a new feature in Domino 6. Refer to 12.19.1, “Collapsible andcaptionable frames” on page 475 for more information.This feature is only supported in the Notes client.Chapter 8. Domino Design elements: framesets 293– Justify - choose to justify the caption or arrows so they appear to the left,right, or center of the border.– Open - choose a size in pixels or as a percent of the frame. This size is thedefault size that the frame opens to when the user clicks the border of aclosed frame.– You can also specify text characteristics for the caption and arrows, suchas font, size, style, and color. In addition, you can specify a backgroundcolor for the border.For an example of how this looks, refer to the default Welcome Page in the Notesclient.Figure 8-10 shows a frame that is expanded.Figure 8-10 Caption on frame and collapsible framesThis frame can be collapsed by clicking the frame border arrow; see Figure 8-11on page 294.Note: You can’t see Align options if you select Show - None.294 Domino Designer 6: A Developer’s Handbook

Figure 8-11 Frame Border tabFigure 8-12 on page 295 illustrates the relationship between Designer settingsand the output.Chapter 8. Domino Design elements: framesets 295Figure 8-12 The relationships between Designer settings and outputUsing the Frame Advanced tabFigure 8-13 shows the Frame Advanced tab.Figure 8-13 Frame AdvancedThe following options are available:1. Frame SpacingThe default is minimal space between frames. You specify spacing betweenframes in pixels.296 Domino Designer 6: A Developer’s HandbookChecking Default means that the frame displays according to the user'sbrowser settings. Each browser renders design elements differently, so besure to preview your work in each browser if you choose this setting.2. Margin Height and Margin WidthThe default is minimal space between the frame border and the framecontent. You specify height and width in pixels.Checking Default means that the frame displays according to the user'sbrowser settings. Each browser renders design elements differently, so besure to preview your work in each browser if you choose this setting.Using the Frame HTML tab1. The HTML tab has the same fields as the HTML tab of framesets.
8.2 Changing the layout of a framesetYou can change the layout of a frameset whenever there is a need to do so.Simply select the frame that you want to alter and select the desired action.By using the buttons shown in Figure 8-14, you can add, delete and alter thecontents of the frame. You can then size the frame by dragging its border, or byspecifying a precise size in the Properties box, as previously described.Figure 8-14 Frame buttonsNote: This property is not supported in the Notes client.Note: This property is not supported in the Notes client.Tip: Most screen reader software will speak the title text of the frame to let theuser know what frame they’re in. To make your application accessible, youshould fill in this field.To learn more about designing accessible applications, see:http://www-3.ibm.com/able/accessr5.htmlChapter 8. Domino Design elements: framesets 297When you are designing frames and framesets, the View menu contains thefollowing commands:_ Refresh allThis refreshes the content of each frame with changes you have made sinceopening the frameset._ Show Frame ContentOnce you have populated the frames, you can use this menu option to vieweither the actual content of the frame, or a short description of the framecontent. For example, instead of an actual Web page appearing in a frame,the frame contains text such as:Content type: URLContent value: http://www.ibm.com/Now we can change some of the layout in the framesets. We use BorderFrameFrameset in the TeamRoom database, as shown in Figure 8-15.1. Open Designer - Framesets - BorderFrame.Figure 8-15 BorderFrame in Designer

– You can preview the frameset in the Notes client by selecting Frame -Preview in Notes, or by using the Toolbar button Notes Preview; seeFigure 8-16 on page 298.298 Domino Designer 6: A Developer’s HandbookFigure 8-16 FrameBorder Frameset in Notes 6 client– You can preview a frameset in a browser by selecting Frame - Preview inWeb Browser and selecting the browser of your choice, or by using theToolbar buttons for each browser.Chapter 8. Domino Design elements: framesets 299Figure 8-17 BorderFrame in Web browser2. Now you can create a new frame in the frameset. In Designer, select theframe you want split.– Click the Split into Row button; now you have the new frame.– Open Frame Properties. Add your frame information (in this example, wewill use a Web page):• Content Type - URL• Content Value - http://www.ibm.com/redbooksFigure 8-18 on page 300 shows the frameset after the split.300 Domino Designer 6: A Developer’s HandbookFigure 8-18 Frameset after splitting a frame in Designer client– You can preview the new frameset in the Notes client by selecting Frame -Preview in Notes, or by using the Toolbar button Preview Notes; seeFigure 8-19 on page 301.Chapter 8. Domino Design elements: framesets 301Figure 8-19 Notes client– You can preview the new frameset in a browser by selecting Frame -Preview in Web Browser and selecting the browser of your choice, or usethe Toolbar button for your preferred browser; see Figure 8-20 onpage 302.Tip: One frame of a frameset may contain another frameset that you designseparately. This can be useful, for instance, if you don’t want the same borderwidth on all frames.302 Domino Designer 6: A Developer’s HandbookFigure 8-20 Web browser
8.3 New features in Domino Designer 6_ Collapsible_ CaptionableThese features are covered in this chapter, as well as in Chapter 12, “Newfeatures in Domino 6” on page 347.
8.4 SummaryThis chapter explains the main features available to application developers whencreating framesets in a Notes/Domino application.© Copyright IBM Corp. 2002. All rights reserved. 303
Chapter 9. Domino Design elements:outlinesIn this chapter, we explain the use of the outline element.Outlines, like imagemaps and navigators, provide a way for users to navigate anapplication. However, unlike imagemaps or navigators, outlines let you maintain anavigational structure in only one place. As your site (or application) changes,you make only one change—in the source outline. Each navigational structurethat uses that outline source will be dynamically updated.

9304 Domino Designer 6: A Developer’s Handbook
9.1 Outline DesignerYou can create an outline that lets users navigate to the views and folders in yourdatabase, perform actions, or link to other elements or URLs outside of yourapplication. You can create an outline that navigates through your entireapplication or site, or through part of it.Once you create the source outline, you embed it on a page or form to create anoutline control. This displays it to users as a site map or navigational structure.Users can click the outline entries to take them where you want them to go.With an outline, you can create a logical structure just once and then use it inmultiple places, specifying the appearance at the place you use it. For instance,the same outline might be displayed on your home page in a verticalconfiguration—or, in other pages—horizontally, across the top.When you create a new outline, the work area looks as shown in Figure 9-1.Figure 9-1 The Outline work paneChapter 9. Domino Design elements: outlines 305The Outline Design work area consists of buttons, the Outline view, and the workarea. We describe each of these items in the following sections.ButtonsNew EntryYou can add a new entry to your outline. When you click this button, the newentry InfoBox is displayed; see Figure 9-2.Figure 9-2 Outline Entry properties boxIn the Info tab, you can set the following:_ The Entry in the Label field. This is shown to users, so make it as descriptiveas possible._ The Popup field. This allows you to type pop-up text that you want to appear.Popup text appears if the window is not wide enough to display the entirelabel and the user moves the mouse over the outline entry._ An Alias for the Outline entry. We recommend that you use alias, because thisis the name you will use, should you need to refer to that outline entry.Specifying an alias enables you to leave your code unmodified if, for example,the user requests having the name of the Outline entry changed—or, in amultilingual application—it enables you to refer to an entry without to knowingwhat language is being used._ The Type field. This allows you to select the Link type. The available optionsare Action, Link, Named Element, and URL.If you select Action as type, an icon will be shown to enter the formula;otherwise, if you select Link or Named Element as type, a new field appears306 Domino Designer 6: A Developer’s Handbookthat allows you to specify in more detail what you are linking (page, form,database, and so on). This field gives you a combobox where all the availableelements are shown._ The Value field. This is only used for online entries of the URL type. In thisfield you type the URL address for this entry (or you can use a formula tocompute it dynamically)._ The target frame in which to display the link. This setting is optional. Ifsupplied, it overrides the default target specified for the frame containing theoutline._ The Image value. This indicates which icon to display to the user, to the left ofthe label value. Images are stored in the Image Resources part of a database.

_ If you select Does not keep selection focus, then after a user clicks an entry,the entry will not remain selected. Instead, the previously selected entry willretain the focus._ If you select Read only, users will only be able to read the outline entry (theywill not be able to edit it).In the Hide When tab, you can programmatically set the Hide When conditionsfor the outline entry.Save OutlineThis saves the outlines.Use OutlineThis creates a page and then displays a dialog list where you can select thecurrent outlines.Generate Default OutlineThis creates a default outline. This outline will be based on the folders and viewsin the current database.Note: In Designer 6, you can now specify the content of an Outline Entrybased on a formula. This is a really useful feature, because you can handledifferent situations in the application while providing the user with theappropriate information and application resources.Tip: It is generally quicker to create a default outline first and then modify it,rather than creating an outline by adding one entry at a time—but it alldepends on the number of entries you want in your outline.Chapter 9. Domino Design elements: outlines 307Indent EntryThis enables you to indent the outlines. Outlines with indented entries can beexpanded and collapsed to drill down into long lists.Outdent EntryThis enables you to outdent the entries.Outline PaneThis is the place where you can modify your outlines by dragging and droppingthe entries from one place to another. You can also change the entry settings andoptions by opening the Entry InfoBox.Programmer’s PaneThis contains the Entries Events, so that you can dynamically generate theirvalues at runtime. The available events are:_ Label - You can name your Entry._ Source - The element name specified in the outline entry._ Frame - The frame name that should open._ Image - The image from the Image Resource that you are using in front of theentry._ Hide When - This defines when the entry is displayed. @Userroles is oftenused in the hide formulas. Use of individual user or group names is notrecommended, for ease of maintenance.
9.2 Creating a new outlineWe now create a new entry that is linked to the page called WelcomePage in theTeamRoom database. To create a new outline, follow these steps:1. Open a database in Design mode.2. Go to the Outline design view and click the New Outline button.3. Click the Generate Default Outline button to generate a default outline,including all views and folders inside the current database. The outline mightlook as shown in Figure 9-3 on page 308.308 Domino Designer 6: A Developer’s HandbookFigure 9-3 Generate Default Outline action results4. Add a new entry by using the New Entry button.

5. Name the entry (for example: Help Page).6. Link the page by selecting Named Element in the Type field, selecting Pagein the Kind field, and adding the page name, HelpMission, in the Value field.7. When you have inserted all of the required information, the entry InfoBoxshould look similar to Figure 9-4 on page 309.Chapter 9. Domino Design elements: outlines 309Figure 9-4 The Outline Entry properties8. Save the outline.To delete the entry, right-click and select Clear, or mark the entry and press yourDelete key.
9.3 Embedded OutlineThe Embedded Outline is one of the embedded elements in Domino Designer,and it allows you to insert the outlines into your form, subform, page, or rich textfield.After you have inserted the outlines into some of these design elements, you donot need to reinsert or modify the current page if you make any changes to theoutlines; Domino already has this capability. This can save time whenmaintaining your application.To insert the outlines, do the following:1. Create a new page, or go to the existing page.2. Move your cursor to where you want to insert the outline.Note: You can always come back and modify each of the entries byopening the InfoBox.310 Domino Designer 6: A Developer’s Handbook3. Choose Create -> Embedded Element -> Outline to insert the outline intothe page.4. Choose an outline in the list, or insert an outline based on a formula; seeFigure 9-5.Figure 9-5 Embedded Outline in a pageEmbedded Outline InfoBoxThe InfoBox is shown in Figure 9-6 on page 311.Note: You can also insert the outline into a table or nested table; this gives youmore control over how the outline should look.You can have tables with captions that show different outlines when thedifferent captions are clicked; this gives you both a more dynamic outline—andenables you to have much more information and navigation in a small area(captionable tables do not take up much place, so by adding outlines insidethese tables, you can have several, large navigation structures in a rathersmall area).Chapter 9. Domino Design elements: outlines 311Figure 9-6 Embedded Outline properties boxLet’s see what outline entries look like in different clients when you change theirappearance. Following are some of the features that you can control from thisInfoBox.Info tabUsing the Info tab, you can identify your outlines by name. Furthermore, you canset the following:_ Type - Tree or Flat. This setting allows you to decide whether or not to showthe hierarchy of the Outline. Tree style shows all of the outline entries in thehierarchy, while Flat shows only one level at a time. Use the Flat styleselection in conjunction with the Title style setting.If you choose Flat Style, you have the option of displaying the outline verticallyor horizontally. Display horizontally displays entries to fit the window across,instead of down._ Title style - Hide or Simple. These settings work in conjunction with the Type:

Flat Style setting. In a Flat style outline, Simple style lets users navigate backup to prior levels by displaying the parent of the current level in a flat outline.Hide style does not display any hierarchy, so once users go down a level inthe outline, they cannot navigate back up._ Target frame - Specify the frame where you want the links in the outline to beopened.312 Domino Designer 6: A Developer’s Handbook_ Twisties - To display a triangle that users click to see outline entries, checkShow twisties. You can specify an twistie image. Click the folder icon to selecta shared image resource. (Optional) Click the @ button to use a formula tocontrol the image display._ Root entry - Defining a root entry will show the children of the specified entryonly. This can be used as a way to restrict users' access to elements in yoursite or database.Specify a root by using the alias of the parent entry. For example, if a parententry has an alias of “Main”, then enter: Main in the Root entry box and onlythat entry's children will display in the outline initially. If the specified entrydoes not have any children, then nothing will display in the outline.If you want to give users a way to navigate back up the hierarchy from the rootentry's children, enable Simple as the Title style for either a Tree or Flatoutline. If you want to limit users' access to those children entries only, set theroot, and do not enable a Title style._ Outline sizeWidth– To specify the width of an embedded outline as a percentage of the parentwindow, choose Fit to window (%).– To specify the width in inches of an embedded outline, choose Fixed(Size).– To allow automatic sizing of an outline based on its content (for example,the number of entries and whether or not the entries are expanded orcollapsed), choose Fit to content.– To specify the width as approximately the specified number of charactersbased on the average character width of the specified font, choose Fixed(Chars).Height– To specify the height in inches of an embedded outline, choose Fixed(Size).– To allow automatic sizing of an outline based on its content (for example,the number of entries and whether or not the entries are expanded orcollapsed), choose Fit to content.– To allow automatic sizing of the height of an outline based on the size ofthe window that the outline is displayed in regardless of its content, chooseFit to window.Chapter 9. Domino Design elements: outlines 313Show scroll bar– To display a scroll bar if the embedded outline entries do not fit on thescreen, check Show scroll bar._ Web access - select HTML or a Java applet to display an embedded outline toWeb users.Figure 9-7 Embedded outline style samplesFont tabThis tab allows you to specify the font type, style, color, and size for the Top-levelfont and the Sub-level font.Background tabThis tab allows you to specify a color or an image to the background of the

Top-level font and Sub-level font of the outline.Layout tabThis tab enables you to customize the spacing and alignment of the outlineentries, images, and background. The Layout tab is shown in Figure 9-8 onpage 314.Note: The Outline Java applet is not accessible for visually impaired usersusing screen reader software. You should provide a page that displays theoutline in HTML as an alternative for screen reader users.Flat style and Tree style and Tree style andTitle style simple Title style hide Title style hide314 Domino Designer 6: A Developer’s HandbookFigure 9-8 Layout tabEach setting has its picture showing what you are changing. There are threemain settings to set:_ Entry– Which is the entry itself, not the content of the outline entry.You can adjust the settings for height and offset._ Entry label– Which is the entry content, the exact label of the outline entry.You can adjust the settings for offset, as well as set the alignment of theoutline entry._ Entry image– Which is the entry image, if the outline entry has this property turned on.You can adjust the settings for offset, as well as set the alignment of theoutline entry.Hide When tabUse this tab to specify the conditions to hide the embedded outline. You canexplicitly hide for some clients (Lotus Notes, web browsers, mobile), or use aformula to do it.Tip: Notice the Top-Level Layout button, as well as the Set All to Same button.You can have different settings for the different levels of your outline entries.Top-Level can have one “offset setting” set, while Sub-Levels can have others.If you want to apply the same setting for all levels, click the Set All to Samebutton.Chapter 9. Domino Design elements: outlines 315Let’s check the final results of an embedded outline in a page, both in the LotusNotes client and in the Web browser. This page, shown in Figure 9-7, is in aframeset.Figure 9-9 Embedded Outline in a page, displayed in a framesetLotus Notes clientWeb browser316 Domino Designer 6: A Developer’s Handbook© Copyright IBM Corp. 2002. All rights reserved. 317
Chapter 10. Domino design elements:shared resourcesIn this chapter, we describe “shared resources”, which are new in Domino 6;what they are, and when and how to use them. In summary, these elements are:_ Images_ Files_ Applets_ Style Sheets_ Data Connections

Shared resources help you control and manage your applications more easilybecause you can store them within resources and then share these elements,rather than copy and paste the images or applets into several different locations.Before reading this chapter, you should be familiar with the functions described inChapter 4, “Domino Design elements: forms” on page 75, where we describehow to create and use various elements in a form. Also see 12.3.1, “SharedResources” on page 365 for more information about shared resources.
10318 Domino Designer 6: A Developer’s Handbook
10.1 ImagesThe image resource allows you to store all of the images that you are using inyour database. This is a very useful feature because the database can nowcontain all the pictures that it needs and you don’t need to worry about sendingall the images along with an application when you send it to another server, forexample.Use an image resource in preference to pasting or importing an image ontoseveral forms or pages. This saves space, improves performance by letting theclient cache the image, and eases maintenance if you need to change it byhaving the picture stored in just one place.Creating an image resourceTo create an image resource:1. Open the database in Design mode.2. From the shared resources design, click New Image Resource in the viewpane.3. Select your image, and click Open.When the image is inserted in the view pane, it should look like Figure 10-1.Figure 10-1 New image resource added to Shared Resources4. You can specify your image by opening the property box of the added imageresource, and entering the alias name and comments for that image.Open an image resource1. In the shared image resources work pane, highlight the image that you wantto open.Note: Domino 6 supports .GIF, .JPEG, and .BMP graphics files.Chapter 10. Domino design elements: shared resources 3192. To allow Designer to select the application for opening the image resource,click Open File.Or:To select the application for opening the image resource, click Open With.3. You can now edit the file.Refresh an image resourceWhen you have edited an image resource, you most probably want to save theupdates to the database as well. An image resource that has been edited but notyet refreshed is identified in two places:_ In the shared images work pane, the file name is preceded by a refresh icon._ In the shared image properties box, the “Needs refresh” check box isselected.To refresh a shared image resource, perform these three steps:1. In the shared images work pane, highlight the image resource that you haveedited.2. Click Refresh.3. In the Open dialog box, select the updated file name and click Open.

The file resource is now refreshed. The refresh icon disappears from the fileswork pane and the "Needs refresh" check box in the File Resource propertiesbox is cleared.Adding the image to your formNext, place the image that you have created onto the form.1. In the database design, go to the Forms design view.2. Click New Forms in the view pane or select an already existing form to addthe image resource to.3. Go to Create - Image Resources in the Main menu or go to Create - InsertResource.Tip: The edited image must still be open in the program where you edited theimage to complete the refresh.320 Domino Designer 6: A Developer’s Handbook4. Select the Image that you want to insert.5. Click OK.6. The image is now inserted into the form.7. Save the form.In some contexts, you need a set of related images. For instance, a buttongraphic might need a normal, mouse-over and clicked state, or an icon may needto appear in three different sizes. To support these uses, image resources let youdefine an “image well” in the properties box of the image resource. You canspecify that your graphic actually contains multiple images across or down, andhow many. Depending on how the image is used, Notes displays only the portionthat applies to the current situation.Creating a horizontal image resource set1. In a graphics program, copy and modify an image to create a series of imagesin different states. All of the images must be the same size.2. In a single GIF, BMP, or JPG file, line up the images horizontally and separatethem with a one-pixel-wide well or line.3. Create an image resource from the graphic file, as described in “Creating animage resource” on page 318.4. Double-click the image resource in the list of image resources in the Workpane.5. On the Basics tab of the Image Resource Properties box, enter the number ofimages across in “Images across”. This is shown in Figure 10-2 on page 321.Note: “Create - Insert Resource” is a new Domino 6 feature that lets youchoose among all the shared resources available, not only shared images.Independent of which method you use, you can now use another newfeature in Domino 6 that enables you to insert shared resources from anydatabase available, not only from the current database.Tip: You can preview the form by choosing Design - Preview in Notes or usingthe toolbar icon for previewing in the Notes client.Chapter 10. Domino design elements: shared resources 321Figure 10-2 Image resource - horizontal setThe number of images corresponds to the number of states you are using.The four images map to the four states as follows:Table 10-1 Image Resource setFigure 10-2 is taken from the bookmark.nsf database. It is used on the Welcomepage when you select and do a mouse-over on the mail icon for opening yourmail file.You can also create a vertical image resource set, similar to the horizontal set.The same rules apply, but they have different targets for using them.When to use horizontal and vertical image resource setsUse a horizontal image set to create an image that appears to change dependingon its state. For example, when a user passes the mouse over an image, you
Images across State Position1 Normal image First position2 Mouse-over image Second position3 Selected image Third position4 Mouse-down image Fourth positionTip: The order of the states is predetermined and cannot be changed.However, if you want to take advantage of only two of the states—for example,if you want to use a different image in the normal state (the first position)only—copy the second image two or three times so that the different image isin the first position.322 Domino Designer 6: A Developer’s Handbookmight want it to appear to light up. To effect this, create a second image in the setand adjust the background color of the graphic. You may also want the image toappear to get darker as the user clicks on it, and dimmer once it has beenclicked.Use a vertical image set for icons you are adding to the bookmark bar on theNotes, Designer, and Administration client. The bookmark bar can display small,medium, or large icons provided that the image resources for those icons arepart of a vertical image set. A vertical image set includes an icon in three differentsizes. To set the size for icons on the bookmark bar, users choose File -> UserPreferences. At the "Bookmark icon size" setting on the Basics page, they canchoose Small, Medium, or Large.For more information on how to create a vertical image resource set, refer to theLotus Domino Designer 6 Help database.
10.2 FilesDesigner allows you to share non-NSF files within and across databases. Thiscapability gives you greater flexibility in designing your application. For example,you might need to reference a shared company logo that is a GIF file, or allapplications in your company might share a Welcome page that is an HTML file,created by and maintained in another tool by a non-Notes developer. Other usesmight be scripting files, such as JSP or CGI.An example is described in “Example of the use of files as shared resources” onpage 324.Create a shared file resource1. On the Design pane, click Shared Resources.2. Click Files.The files work pane opens.3. Click New File Resource.4. Select the file or files you want to share.5. Choose Resource -> Resource Properties to see the properties of the file.Note: This feature is new in Domino 6.Chapter 10. Domino design elements: shared resources 323Using the file resourceThe file resource—just like images, stylesheets and JavaScript—can be includedon a form/subform or a page. This is done by using Create -> Resource ->Insert Resource on the element where you want to include it, and choosing theResource of your choice. This is similar to how we include other sharedresources.Open a shared file resource1. In the files work pane, highlight the file resource that you want to open.2. To allow Designer to select the application to open the file resource, clickOpen File.Or:To select the application for opening the file resource, click Open With.3. You can now edit the file.

Refresh a shared file resourceWhen you have edited a file resource, you most probably want to save theupdates to the database as well. A file resource that has been edited but not yetrefreshed is identified in two places:_ In the files work pane, the file name is preceded by a refresh icon._ In the File Resource properties box, the “Needs refresh” check box is selectedTo refresh a file resource, perform these three steps:1. In the files work pane, highlight the file resource that you have edited.2. Click Refresh.3. In the Open dialog box, select the updated file name and click Open.The file resource is now refreshed. The refresh icon disappears from the fileswork pane and the "Needs refresh" check box in the File Resource propertiesbox is cleared.Note: There is a checkbox named “Needs refresh”. This might be confusing. Itis not a checkbox that you should check. It just tells you that the original filehas been edited, and that your shared resource needs to be refreshed. Thiscan be done using Refresh in the Files view.Note: You can refresh a file resource even if Domino Designer does not think itneeds it.324 Domino Designer 6: A Developer’s Handbook
Exporting shared file resourcesUsing the new Domino 6 feature and action button in the shared file resourceview, you can easily export your resources, as follows:1. Select the resource to be exported.2. Click Export.3. Select a directory to export the resource to, as well as a file name.4. Click Save.Example of the use of files as shared resourcesIn this example, we include an HTML file on a form, and this file is the onlycontent on the form.We insert an HTML file named External HTML File.html in the Files of SharedResources. This will look as in Figure 10-3.Figure 10-3 HTML file as Shared ResourceThe content of this HTML file is shown in Example 10-1.Example 10-1 The HTML file content<html><head><title>This is an external html file</title>Tip: If a shared resource is preceded by a refresh icon, and you don’t want torefresh it, or remove the refresh icon, just uncheck the “Needs refresh” checkbox from the property box of the shared resource.Chapter 10. Domino design elements: shared resources 325</head><body>This is the content of the html file</body></html>So, how can we use this shared resource? One example would be to include thisHTML file on a form and let it be the content of the form.1. Open the form where you want the HTML file included in the Designer client.2. Place the cursor where you want the resource to be included3. Go to Create Resource - Insert Resource or right-click with your mouse, andselect Insert Resource.4. Select the Resource type HTML Files.5. Choose the HTML file External HTML File.html and click OK.6. You will have an icon on your form indicating that a File resource has been

inserted, as shown in Figure 10-4.Figure 10-4 HTML file inserted in a formIf we now preview this form on the Web, the content of the HTML file will be thecontent of what we see on the Web. This is shown in Figure 10-5 on page 326.326 Domino Designer 6: A Developer’s HandbookFigure 10-5 Form with an HTML file shown in a browserLet’s take a look at the source code for this Web page, shown in Figure 10-6 onpage 327.Chapter 10. Domino design elements: shared resources 327Figure 10-6 Source of the form with HTML fileAs we can see in Figure 10-6, Domino generates a lot of HTML code and tags.The HTML file that was inserted into the form is not the only content of the form.If you want the HTML file to be the only content of the form, withoutDomino-generated code, make sure you switch on the form property “Contenttype: HTML” shown in Figure 10-7 on page 328.328 Domino Designer 6: A Developer’s HandbookFigure 10-7 Setting the content type on the formThis tells Domino that it should not generate Domino-specific HTML data, buttreat the form as pure HTML.When previewing the same form for the Web now, it will look the same, as shownin Figure 10-5 on page 326, but the source is different, as shown in Figure 10-8on page 329.Chapter 10. Domino design elements: shared resources 329Figure 10-8 New source with content type HTMLTaking the example one step furtherSo why would we want to include an HTML file as the content, or part of thecontent, on a form or similar design element? Well, there might be severalreasons. One situation could be that you still have a lot of HTML files that youwould like to use, but you would like to use them as part of your existing formsand pages. Using the above example lets you include HTML files as part of alarger form, and have several HTML files create a Web page. And you can alsoinclude other kinds of information on this form/page/subform using other designelements. This could be an embedded view, lookups, and other DominoDesigner elements and technologies.And, with a WebDAV-enabled Domino 6 server, you can also let other peoplemaintain these HTML files, from other application development tools, and savethem directly into the .nsf file on the Domino server. For more information onWebDAV, refer to 12.22, “WebDav” on page 490.
10.3 AppletsJava applets that you are using in many places can be added to a sharedresource. Then, if you make any changes to the applet later, you only need toImportant: If you preview the form with the ?Openform parameter, you will getthe message Error 500 - HTTP Web Server: Application Exception -Documents treated as HTML cannot be edited. Change your URL to use?Readform instead.330 Domino Designer 6: A Developer’s Handbookcopy the revised applet into one place, and applications that use the applet willthen have access to it.
10.4 Style sheetsCSS or cascading style sheets give you the ability to control many aspects ofyour page layout, including headers, links, text, fonts, styles, color, and margins.You can browse your local file system for a CSS, turn it into a shared resource,and then insert it into a page, form, or subform.For more information about cascading style sheets, visit W3.org’s site at:http://www.w3.org/Style/CSS/.

Create a new style sheet resource1. Expand Shared Resources in the Design pane.2. Select Style Sheets from the list of resources; see Figure 10-9 on page 331.3. Click New Style Sheet Resource. The Browse dialog box opens. Only fileswith a CSS extension appear.4. Find and select the cascading style sheet you want to use.5. Click Open to add the style sheet to the list of style sheet resources. TheStyle Sheet Resource Properties box opens, so you can change the name orother properties of the style sheet.Note: This feature is new in Domino 6.Chapter 10. Domino design elements: shared resources 331Figure 10-9 Style Sheets design elementInsert a style sheet resource into a page, form, or subform1. Open a page, form, or subform.2. Place the cursor where you want to add the style sheet.3. Choose Create -> Insert Resource. The Insert Resource dialog boxappears; see Figure 10-10 on page 332 and Figure 10-11 on page 332.332 Domino Designer 6: A Developer’s HandbookFigure 10-10 Inserting a Style sheet into a form directlyFigure 10-11 Choosing the resource to insert4. Select the database containing the style sheet. The default is the currentdatabase.Chapter 10. Domino design elements: shared resources 3335. Because a form can have several resources, like JavaScript and HTML files,you need to select what type of resource to insert. Select Style Sheets.6. In the Available resources section, highlight the style sheet resource to add.7. Click OK.Figure 10-12 Style sheet inserted8. (Optional) To view the name of the inserted style sheet resource or to changeto another style sheet resource, choose Style Sheet -> Style SheetProperties. The Style Sheet Properties box appears with the name of thestyle sheet resource. To select a different style sheet resource, click theLocate Object folder.The use of style sheets on forms and pages does not work directly inpass-through HTML code. Style sheet resources apply styles directly to someNotes elements, and these elements are well documented in Lotus DominoDesigner 6 Help; see “Creating style sheets as shared resources” for details.Notes elements that support style sheet resources are_ Document_ Paragraph_ List item_ Layer_ Table_ Table cell_ ImageFields do not directly support style sheet resources. Field content will inheritstyles for an inheritable property. For Web browsers, these style sheets will applyas usual.Tip: You can also insert the style sheet resource directly into the HTML HeadContent of your form. Select HTML Head Content, right-click in theprogrammer’s pane, and select Insert Resource. Notice that the dialog box iscontext sensitive. Select the style sheet resource to be included, and click OK.334 Domino Designer 6: A Developer’s Handbook
Opening and editing style sheet resourcesYou can open and edit style sheet resources just as you open and edit shared file

resources:_ Select the style sheet resource to be opened and click Open, or optionallyOpen with to select which program to open the resource with.When you have edited a style sheet resource, you most probably want to savethe updates to the database as well. A file resource that has been edited but notyet refreshed is identified in two places:_ In the files work pane, the file name is preceded by a refresh icon._ In the File Resource properties box, the “Needs refresh” check box isselected.To refresh a style sheet resource, follow these three steps:1. In the style sheets work pane, highlight the file resource that you have edited.2. Click Refresh.3. In the Open dialog box, select the updated file name (it is preceded by a tilde(~)), and click Open.The style sheet resource is now refreshed. The refresh icon disappears from thework pane and the "Needs refresh" check box in the style sheet resourceproperties box is cleared.Export style sheet resourcesUsing the new Domino 6 feature and action button in the shared style sheetresource view, you can easily export your resources:1. Select the resource to be exported.2. Click Export.3. Select a directory to export the resource to, as well as a file name.4. Click Save.Note: This gives you the choice to use your favorite style sheet editor whenediting cascading style sheets.Chapter 10. Domino design elements: shared resources 33510.5 Data connectionsMany of the enhancements in Domino Designer 6 extend the properties-boxparadigm to make functions easier and more intuitive. One of the most powerfulis the creation of a Data Connector and linked fields that connect a form to anexternal database. This brings a new ease to integrating Domino and relationaldata sources.Data Connection Resources (DCRs) bring the technology of Domino EnterpriseConnector Services (DECS) into Designer so that you can define a connection toan external data source, such as a relational database, and use the connectionto link the fields in a form to fields in the external source. DCRs are reusable inan application and can be shared across applications. You can use DCRtechnology to access data in enterprise systems and then take advantage of thepower of a Domino application to replicate, share, secure, and manage the data.To create an external connection, you first need to install the DECS serversoftware on your Domino server. The client software for the application you areconnecting to (such as DB2 or ODBC) must also be installed on the Dominoserver. You can develop an application locally, but you will be unable to browsethe external metadata when designing your application.To establish a connection with external resources, follow the steps described inthe topics that follow.10.5.1 Create a data source resourceBefore you can create and use a Data Connection Resource, you must firstcreate a data source server reference to the external application that is using adata source that is defined on the server. For example, to create a data sourcefor a Microsoft Access database on a Windows NT server, you would use theWindows System Tools utility to specify the Microsoft Access table as a datasource and ODBC as the data driver to use for data exchange.

If you do not have access to the server on which the external database resides,work with your system administrator or database manager to make sure the datasource is defined.Note: This feature is new in Domino 6.336 Domino Designer 6: A Developer’s Handbook
10.5.2 Create the DCRA Data Connection Resource (DCR) is a reusable connection between a Dominoapplication and a non-Domino database. You must have a defined data sourceon the server before you can create a DCR.Creating the Data Connection Resource1. Launch Domino Designer.2. In the Design pane, select Shared Resources -> Data Connections. Anyexisting data connections display in the Work pane on the right.3. Click New Data Connection at the top of the Work pane. The DataConnection Properties box appears.4. Enter a name for the connection resource.5. (Optional) Enter an alias to use in place of the name.6. (Optional) Enter a comment describing the connection.7. Select the class of application you are connecting to, that is, the type ofdatabase.8. Select the type of connection. Certain databases, such as DB2 and Oracle,have native drivers that are listed as an available type of connection. If aspecific driver is not available, choose a generic one, such as ODBC or OLEDB. For example, to access an MS Access database, choose OLE DB as theconnection type.9. Enter the username and password you use to access the system you areconnecting to.10.Enter the name of the data source that maps to the external application youplan to access.11.(Sybase only) Enter the name of the server on which the database resides,and the catalog name.12.Select the type of object to connect to: table, view, or procedure.13.Enter the User ID for the owner of the table or view. The owner is the creatorof the database you are connecting to. The owner must supply you with thecorrect owner ID, which is typically in the format ownername.tablename. Inthe case of a procedure, also enter the procedure name for any of thedocument events that will trigger the procedure.14.Enter the name of the table, view, or procedure. You can click BrowseMetadata to browse the external database for the name of the table, view, orprocedure.15.(Optional) Click Options to customize the settings for the DCR.Chapter 10. Domino design elements: shared resources 33710.5.3 Set a database propertyIn order to establish a connection to an external data source, you must firstenable external connections for the database. Once that database property isset, you can then use your DCR in a form to exchange data with an externaldatabase; see Figure 10-13.1. Open the database where you plan to use a data connection and choose File-> Database -> Properties.2. Click Database Basics.3. Select Allow connections to external databases using DCRs. Thisproperty is disabled until you have created at least one DCR in the database.Figure 10-13 Setting the database property4. Close and reopen the database to enable the property.Note: You may want to disable this while you are designing an application, and
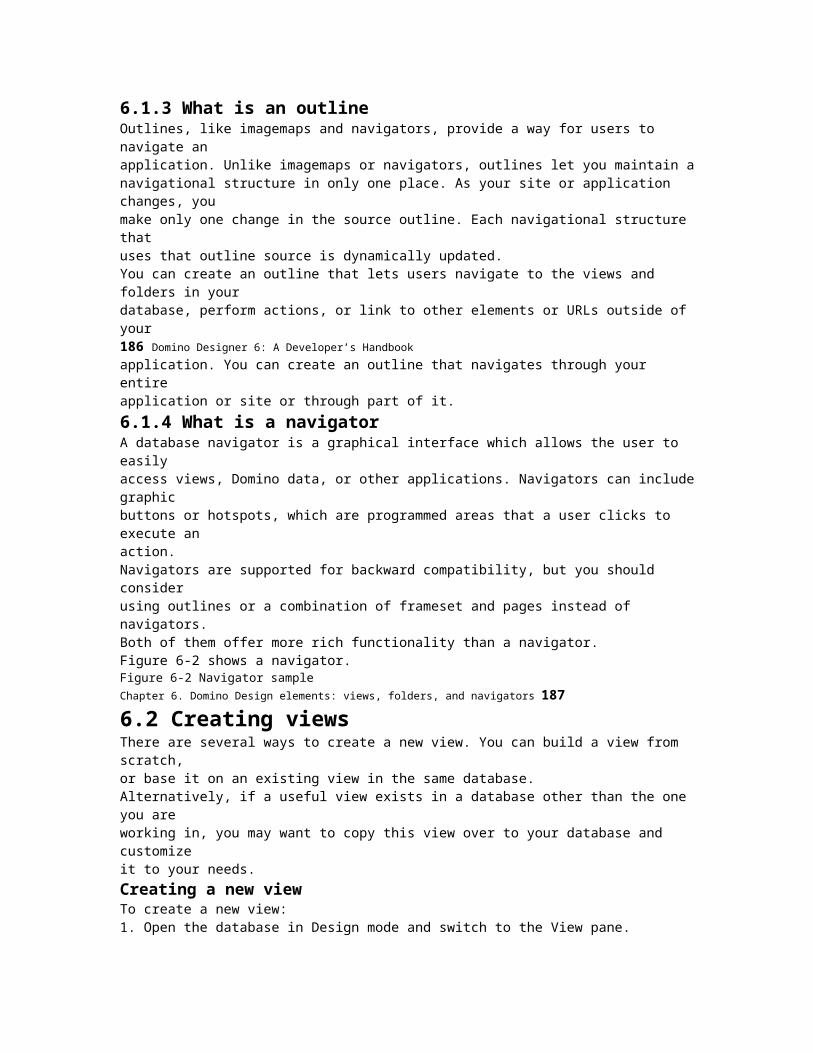
enable it when you are ready to deploy your application.338 Domino Designer 6: A Developer’s Handbook
10.5.4 Create fields on a formIf you are planning to use a DCR in more than one field on a form, you canspecify a default data connection, and, optionally, a default metadata object suchas a table or view. When you create a field for use with an external data source,the default information for the data connection is supplied automatically. You canoverwrite the default DCR with a different DCR if you wish.How to specify a default connection for a form1. Create a form.2. Choose Design -> Form Properties to display the Properties box.3. Click Defaults (second tab).4. In the Data Source Options section, you can browse for a data connectionresource or enter the name in the Default Data Connection field.5. (Optional) Specify a Default metadata object, such as a table or view name,from the external application.How to create fields to connect using the DCR1. Create a field.2. Choose Design -> Field Properties to display the Field Properties box.3. Click the Info tab and select "External data source." If you have specified adefault DCR for the form, the information is applied to the field.Chapter 10. Domino design elements: shared resources 339Figure 10-14 New Domino 6 field properties for data connection4. In the Data Source Options section (Figure 10-14), browse for, or enter, thename for the metadata object and the corresponding external field. The typeof field in the metadata (for example, text or integer) is indicated by an icon.Figure 10-15 Browsing external data sources340 Domino Designer 6: A Developer’s Handbook5. Specify an existing data connection resource.6. Select Key field if this field corresponds to a field in the external application.Every data connection requires a key field—the key field is the link betweenthe form and the backend database or application. Note that key fields arealways stored locally as well as on the backend.7. (Optional)If you want data from fields other than the key field stored locally,mark each of these fields as a Data field and select the Store locally option.For these fields, data will be stored in the Domino database as well as in thebackend database. Changes you make in the Domino database are pushedback to the backend database. If the backend changes, you can manuallyrefresh the Domino database by pressing F9 with the document open or byclosing and opening the document.Important: Note that if you are developing an application locally, you willnot be able to browse external metadata.© Copyright IBM Corp. 2002. All rights reserved. 341
Chapter 11. Developing for multipleclientsWhen you develop in Notes/Domino, it is important to be aware that mostfeatures you develop for the Notes client are directly available and compatible forWeb browsers. You don't need to double your work by coding twice the code.It is, of course, a very common thing to customize certain design elements for theWeb, and for that reason develop and use programming languages for the Web.This chapter is a “best practices” guide for developers developing for multipleclients, with tips and suggestions of what to consider when developing in such

environments.
11342 Lotus Domino 6 Application Development
11.1 Plan your applicationThis is a situation where a little planning goes a long way. Before you startcoding, you should first define your audience and think about how the applicationshould work for both Notes and Web users. Regardless of how simple theapplication is, you don't want to waste time porting a feature that wasn't worthporting to begin with.11.1.1 Security settingsKeep in mind that the ACL is not the only way to control access to a database,when accessing it from the Web. The Basics section of the ACL lists the accesslevels for individual users, groups, and servers. In addition, the Advanced sectionspecifies the maximum level of access allowed from the Web in the "MaximumInternet name & password access" field, which overrides individual levels set inthe ACL. The LotusScript actions in your application may require Manager orDesigner access that is not allowed from the Web—meaning that sometimes notall applications are appropriate for Web access.Some features, such as encryption, are not available for Web or mobile users.This means that you have to plan your application accordingly. For example, youcannot utilize encryption as a means to secure the data using a Web browser. Onthe other hand, data encrypted with Notes is also safe from Web and mobileusers.11.1.2 Consider the use of graphicsWhen designing for the Web, people tend to think of graphics. However, ifperformance is an issue, you might want to sacrifice the fancy graphics in favor ofbetter performance. There are several techniques, both using DHTML and CSS,that can replace a lot of plain graphic elements, which again will increase yourapplication’s performance. Though there are caching features on the Dominoserver to handle the use of graphics and make them faster to access, keep this inmind: graphics might not be the most important thing in your application. The key,in most cases, is the utility value.Also keep in mind that when using graphics, you should use the sharedresources, and not paste graphics directly into a form. This saves space,improves performance by letting the client cache the image, and easesmaintenance by having the picture stored in just one place should you need tochange it.Chapter 11. Developing for multiple clients 34311.1.3 Examine your LotusScript codeIdeally, you should try to share as much code as possible. Then, if you need tomodify the code in the future, you'll be able to make the changes all in one place.(It will also help you keep the size of your application down.) Only the backendclasses are supported on the Web, so avoid using UI classes on your LotusScriptcode and if you do use them, make a separate script library for Notes to accessfrontend classes.
11.2 Designing the applicationThis section offers some guidelines about designing an application that will beused by different clients.11.2.1 Same or different forms for the Web and NotesSince Web browsers and the Notes client are not identical in their capabilities,

you may often need to create different UI elements for the two clients. It might beeasier initially to design two separate forms, but that means that if you changeone form, the other form may also need to change, for consistency, somaintenance is complicated. The situation is further complicated if yourapplication is multilingual, since you then can multiply those two forms by thenumber of languages you plan to support. It's generally worth expending a littleeffort and try to make one form work for both clients. Creative use of hideproperties and subforms, and careful selection of programming languages, canmake this easier.The fact that JavaScript works in both clients means that it makes sense to writeinput translation and validation in JavaScript as opposed to LotusScript or macrolanguage. Macro language field formulas work, but the Web browser doesn'tknow macro language, so it has to submit the form to the server for evaluation.Since JavaScript executes locally, it gives better performance—plus, it's easy toplace the cursor in the offending field, whereas with macro language validationsthe user must view the message and then use the browser Back function toreturn to the form.If you do use separate Notes and Web forms, avoid duplicating business logic byusing JavaScript libraries that you can include both on the Web version and theNotes version of the form (see “New library type” on page 350). Each form cancontain multiple script libraries, so if you are writing a multilingual application, youcan have a separate "message text" JavaScript library for each language, and asingle library of business logic that refers to the messages defined in the"message text" library.344 Lotus Domino 6 Application Development
11.2.2 Choosing fieldsMost of the fields work similarly for Notes and Web browsers. However, there aredifferences. For example, there is no concept of dialog box fields on the Web. Youshould use other types of multiple selection fields, such as check box or dialoglist, instead. Some of the field properties do not work on the Web either, as whenyou want to allow a user to enter new values for a selection field. You have toprovide a way for Web users to do that.11.2.3 Choosing actionsRemember, when developing applications for browsers, they do not have accessto the Notes menu commands. They will not have the chance of forwarding adocument, for example. To Web-enable all buttons in a database as well ascertain @commands, select the database property "Web access: Use JavaScriptwhen generating pages." Without this property set, Domino recognizes only thefirst button in a document and treats it by default as a Submit button that closesand saves the document. Be aware that when you select this Use JavaScriptproperty, Domino displays all buttons, actions, and hotspots—even those thatcontain @commands and @functions that are not supported for Webapplications. These functions are executed by submitting the form to the server,which calculates the resulting Web page.11.2.4 How to deal with the Notes viewsAlthough your Notes views will appear OK on the Web, you will lose theattractive, three-paned layout of the Notes interface. You can translate this layoutto the Web by using the Frameset design element, or by embedding outlines,views and other elements on a form or page.However, another option is that you can embed views, folders, or navigators on aform to create a "frame" effect that helps Web users navigate through yourapplication. The way this works is that you create a form called "$$ViewTemplatefor ViewName." Then, when a user tries to open the view called ViewName,Domino displays the view template instead. If you don't use a $$ViewTemplateform, you may not get the desired display of the view.

11.2.5 Need of miscellaneous formsOne final area to consider when designing forms is that Web users don't haveaccess to standard Notes dialogs, such as error dialogs or help dialogs. The new$$Return pages allow you to design customized pages for returning errors toWeb users. You should also consider the use of the$$ReturnAuthenticationFailure form to display an error message to Web usersChapter 11. Developing for multiple clients 345when there is an authentication failure and the $$ReturnDocumentDeleted formto display sensible error messages to users when the document deletion hasbeen successful. Use $$ReturnGeneralError to display an informative pageinstead of the default error page when an error occurs.11.2.6 Designing the agentsAs with any Notes or Web application, agents do most of the work. The numberof agents in your application should not affect performance. Obviously, adding aWebQueryOpen agent to a form will certainly make it take longer to open thedocument (because Domino must run the agent prior to opening the document).The key is to make the agent perform a few key tasks, and if you need to docomplex processing, use a background agent. In some cases, you might be ableto use existing code in a PostOpen event of a form directly in a WebQueryOpenagent, so the work is minimized. When doing this, make sure that you have thecorrect document context for the Web agent.More specifically, you can get to the existing backend document from aWebQueryOpen or WebQuerySave agent, or by using@Command([ToolsRunMacro]) from a document action by using theNotesSession DocumentContext property. However, if you are executing a Webagent from a hotspot on the form via @URLOpen, you don't have access to thefields on the document (other than CGI fields such as remote_user). Generally,you should use @URLOpen when you need to pass an argument to the agent orwhen you are deleting the current document. The way to get the real backenddocument from the @URLOpen context is to pass the UNID of the document asan argument to the agent, as shown in the following call:UNID:=@Text(@DocumentUniqueID );dbPath := @WebDbName;@URLOpen("/" +dbPath + "/agnWeb?OpenAgent&UNID="+UNID)Then, access the UNID from within the agent:set note = session.documentcontextOriginalUNID = Mid(note.Query_String(0), Instr(note.Query_String(0),"&UNID=")+6, 32)11.2.7 Be aware of multiple lookupsYou usually don't think about multiple lookups when developing in a pureNotes/Domino environment with only Notes clients. Including multiple lookups inyour application may slow it down. Be aware of using lookups like the following:_ Computed subforms_ Embedded views_ Computed fields346 Lotus Domino 6 Application DevelopmentLookups take time, and might slow your application accessing it from a Webbrowser. Often it is very convenient to use subforms, because you benefitdividing the code into "sections", which makes maintenance easier. Complexapplications, with multiple computed lookups, should be used with care. Alsomake sure that you check your lookups for errors. If a lookup fails, make sure youreturn something to the client or tell the lookup to continue, with an empty resultset.11.2.8 Developing for PDA and mobile clientsLotus is the market leader in providing messaging, personal information

management, and collaborative applications in the enterprise. These provide afull range of mobile and wireless solutions for Domino as part of the strategy toprovide users with the most robust and pervasive messaging and collaborativeenvironment. To enable your applications for PDA and mobile clients, refer to theredbook Lotus Mobile and Wireless Solutions.
11.3 Take advantage of Domino 6Domino 6 comes with a lot of new features, and you should be aware of these.For example, while we usually used pages or forms for JavaScript repositories, ormaybe added them directly to the JS header of a form, we can now add ourJavaScripts to the new script library for JavaScript. Then we can add theselibraries directly on to a form or inside the JS header of the form.These JavaScripts can now be rendered and run in the Notes client, as well. Forexample, this allows us to have one set of field validation, only using JavaScript,instead of both JavaScript and @formulas, if desirable. In other words, "writeonce—use in many clients".Another benefit one should consider is the use of another shared resource:cascading style sheets. These can also be rendered and used in Notes clients aswell as Web browsers, and are included and handled in the same way theJavaScript resource is. You can now include it directly on a form, as a sharedresource, and use that resource for multiple clients.
11.4 ConclusionSuch a “best practice” guide could have been a redbook itself, but this shouldhelp you get started. Because each application is unique, you may haveadditional issues when you begin Web-enabling your application.© Copyright IBM Corp. 2002. All rights reserved. 347
Chapter 12. New features in Domino 6This chapter describes the new features in Lotus Domino 6 and DominoDesigner 6. Domino 6 contains several new features for administrators,application developers and end users. This chapter focuses on the new featuresprovided to the application developer.We also offer some tips and tricks based on experience developing in Domino 6.The purpose of many of the new features in Domino Designer 6 is to reduce thetime spent on developing a Domino 6 application.With Domino Designer 6 you can build applications for use with Lotus Notesclients, Web browsers, and Mobile clients.
12348 Domino Designer 6: A Developer’s Handbook
12.1 User interfaceThe user interface of Domino Designer 6 has been greatly improved. The clientnow supports features and includes tools that will reduce your applicationdevelopment time and ease your daily developing tasks.12.1.1 New design element navigatorThe design element navigator, that is, the list of design elements and itsappearance, has been refreshed and reorganized. Figure 12-1 shows what itnow looks like.Figure 12-1 New design navigator in Domino Designer 6ReorganizedThere are several new design elements as well as quite a few reorganizedelements in the navigator. As mentioned in 12.1.6, “Plus/minus indicators for the

design list” on page 355, Domino Designer 6 now includes plus/minus indicatorsto show that there are elements under that design element category.In Figure 12-1, you can see that no folders have been created yet, but there arepages, forms, and views in the database. If we click these plus/minus indicators,they will respectively expand and collapse, and show a list of the createdelements directly in the design element navigator, as explained in 12.1.6,“Plus/minus indicators for the design list” on page 355.Outlines or agents are not design elements that you will find directly in the designelement navigator—in contrast to forms, views, folders, pages and framesets.Outlines are moved out of this list in Domino Designer 6, and moved into a newcontainer called Shared Code, which is explained in more detail in 12.3, “NewDomino 6 design elements” on page 365.Chapter 12. New features in Domino 6 349You can no longer find Navigator as a part of the design element navigator, asthis also is moved. It can be found in Other, which is a container in the designnavigator list. You are not likely to use navigators in your applications.New containersThe two new design element containers in the design element navigator are:_ Shared resources_ Shared rodeThis is rather a development from Domino R5 than a new feature or a new way ofthinking. The thought behind shared resources and shared code is very practical.For example, the shared code container contains all the code that can or shouldbe reused in your application, or by other applications.The Shared Code container contains the following design element types:_ Outlines_ Agents_ Subforms_ Shared fields_ Shared actions_ Script librariesThe attribute these all have in common is that they should or can be reused.Shared resources contain elements that could be described as resources andstatic resource elements. The element types are:_ Images_ Files_ Applets_ Style sheets_ Data connectionsSharing elements lets you reference a resource repeatedly throughout anapplication, while only having to maintain it in one central place. For example, ifyou use your company logo in many places throughout your application and thedesign of your logo changes, you need only change it once, in the imageresource, and the change will be implemented everywhere that image isreferenced. This is common for both shared code and shared resources. Theyare both elements that include resources you can reference throughout anapplication. For more information about these containers, see 12.3, “NewDomino 6 design elements” on page 365.350 Domino Designer 6: A Developer’s Handbook
New library typeThere is one new Script library available in Domino Designer 6: JavaScript.You can now create and select which library you want to add directly from thedesign work pane, by clicking your choice; see Figure 12-2.Figure 12-2 Script libraries in Domino Designer 6Insert a JavaScript library into a page, form or subform

1. Open a page, form, or subform.2. Place the cursor where you want to add the JavaScript.3. Choose Create -> Insert Resource. The Insert Resource dialog boxappears.4. Select the database containing the JavaScript. The default is the currentdatabase.5. Select JavaScript libraries as the resource type.6. In the Available resources section, highlight the JavaScript to add.7. Click OK.Note: There are now three script libraries in Domino 6: LotusScript,JavaScript, and Java Libraries. All of these have their own action button in theScript libraries design element view.Tip: You can also insert the JavaScript directly into the JS Header of yourform. Select JS Header, right-click in the programmer’s pane, and selectInsert Resource. Notice that the dialog box is context sensitive. Select theJavaScript to be included, and click OK.Chapter 12. New features in Domino 6 35112.1.2 BookmarksUsing bookmarks and folders allows you the flexibility to organize your workaccording to your needs, and to easily reorganize your work as your designprogresses.There are several new features and enhancements to bookmark folders inDomino Designer 6 that make it easier to bookmark both applications anddatabases, create folders, manage bookmarks, and even copy single designelements into folders (covered in 12.1.3, “Custom design element folders” onpage 352).Bookmarking an applicationYou can now add your favorite applications or other files, such as HTML pages,text files, or image files, directly on your Bookmark bar. Figure 12-3 shows howMicrosoft Internet Explorer has been added to the Bookmark bar so that it can beeasily launched from there.Figure 12-3 Application as a bookmarkTo create a bookmark to an application on the bookmark bar, drag an applicationshortcut from your desktop or Windows Explorer directly to the bookmark bar.You can also add the bookmark inside a folder by dropping the icon on top of thefolder.Create a bookmark folderThe process of creating a folder in the Domino 6 Designer Client has beenchanged. Click the icon for a new folder, as shown in Figure 12-4 on page 352.352 Domino Designer 6: A Developer’s HandbookFigure 12-4 Creating a new folderWhen using this new feature, you can also decide where this new folder shouldbe located, within your already existing folders; see Figure 12-5.Figure 12-5 Location of a new folderOrganize the bookmarksYou can drag and drop your bookmarks into the folders you want. This featureapplies to drag and drop from the task bar and from folder to folder.12.1.3 Custom design element foldersTo make it even more rapid and easy to access and create database elements inDomino 6, there is a new feature for grouping and managing design elementsfrom custom design element folders; see Figure 12-6 on page 353.Chapter 12. New features in Domino 6 353Figure 12-6 Custom design element foldersAs you can see, there is a custom folder the container of other design elements,called “My recent elements”. The name of the element can be set to whatever

you want. As a database grows, the number of design elements grows as well,and you might be using only a few of these frequently. With custom designelement folders, you can add your most frequently used design elements to acustom folder within your database element listing. This feature is also veryuseful for team database development, enabling the design elements to begrouped in personal folders.Create a custom design element folder1. Ensure that the database is already in a folder or you have added a bookmarkin the Bookmark bar.2. Create a new folder.3. Give the folder a name and select your database of choice in the “Select alocation for the new folder” window.4. Click OK.Note: The database in which you want to create a custom design elementfolder must be located in a folder, or there has to be a bookmark in theBookmark bar for it. You cannot create a custom design element folder to adatabase that is only listed in “Recent databases”.354 Domino Designer 6: A Developer’s Handbook
12.1.4 Mouseover information on design elementsDomino Designer 6 displays text on the window tabs when you mouseover thetab.In previous versions of Domino Designer, when you worked with severalelements and databases at once, you most likely had several window tabs openat the same time. This could get confusing, and it might be hard to locate alreadyopened design elements.With Domino Designer 6, these window tabs have a new feature, displaying textabove them on mouseover. Figure 12-7 shows an example of this. Notice that thepop-up text shows the server, the full path, the name of the database, and thename and type of the element.Figure 12-7 Mouseover shows design element informationUsing this feature makes it a whole lot easier to navigate among lots of windowtabs of design elements, because you can tell the difference between theelements more easily.12.1.5 Quick scrollTo be able to work faster and reduce the time spent on designing applications inDomino 6, several new features were added. One of them is the ability to scrollamong your design elements directly in the list of design elements, withoutopening the list of all design elements; see Figure 12-8 on page 355.Chapter 12. New features in Domino 6 355Figure 12-8 Quick scroll12.1.6 Plus/minus indicators for the design listThere is now a new feature as part of the design element list: plus and minusindicators. Clicking the plus sign expands the list of elements, and if the numberof elements exceeds 5, it also enables the quick scroll. Clicking the minus signcollapses the elements list; see Figure 12-9.Figure 12-9 Plus/minus indicators for design elementsNote: The arrows are only shown when the number of elements in the specificdesign element exceeds 5. The first 5 are directly accessible.356 Domino Designer 6: A Developer’s Handbook
12.1.7 New features in design element viewsIn Domino Designer 6, all the design element views have been changed. You willnow get quite a bit more information displayed directly in the designer, whichmakes it all both faster and easier to work with. You can, among all otherproperties, now see which of your design elements, let us say forms, that shouldprohibit design refresh or replace to modify. You will also see if a design element

has been hidden or made available for different clients directly in these views.The views can also be sorted in different columns, as well as resized.Some of the design element views also have action bars, which enable adeveloper to take action directly on design elements in the design views. This iscovered in detail in 12.8, “Agent enhancements” on page 404.12.1.8 Modifying properties for multiple elementsTo save time, you can select multiple design elements and set their commondesign properties at the same time. For example, you might want to prevent all ofthe forms in your application from inheriting changes from a template, or hide acollection of views from Web users or Mobile users. See Figure 12-10 onpage 357.1. Select a bookmarked database or open a database in Designer.2. In the Design pane, click the name of a design element (for example, Forms).The names of all the design elements of the specified type appear in the Workpane.3. In the Work pane, select the name of a design element that you want tomodify, then hold down the Shift key and select other continuous elementsyou want to modify, or hold down the Ctrl key and select the elements youwant to modify.4. Choose Design -> Design Properties or click the Display Infobox icon on thetoolbar in the upper right corner of the Design pane.Note: Design element types with no plus or minus indicators have noelements inside. In Figure 12-9 on page 355, no framesets or folders havebeen created in the database, while there are several forms, views and pages.Chapter 12. New features in Domino 6 357Figure 12-10 Selecting multiple elements and setting properties5. The Design properties box shows only the properties that you can set for theselected elements. The properties box displays initial values that are thesame for all selected design elements. Properties that are set differently fordifferent design elements display with a gray check.6. Set properties for the selected elements. For example:– Enter a template name to have the selected elements inherit from onetemplate.– Check "Prohibit design refresh or replace to modify" to prevent theselected elements from being modified during a design refresh or replace.– If you use a template to refresh or replace the database design, then toensure that the option “Prohibit design refresh or replace to modify” takeseffect, select this option as well as the option “Propagate this prohibition ofdesign change” in the design properties of the template.358 Domino Designer 6: A Developer’s Handbook– Hide the design elements from Web browsers, Notes clients, or Mobileusers.12.1.9 Design element lockingDesign element locking is a new feature designed to help teams work on a singledatabase. If you work on a team and want to ensure that other designers cannotmodify design elements that you are working with, you can explicitly lock them.When you have finished working with the design elements and want to releasethem so that others can modify them, unlock them.Before you can start locking design elements, you have to enable this on yourspecific database.Enabling design element lockingEnable design element locking when you want to give designers the ability to lockand unlock any of the design elements in a database.1. Choose File -> Database -> Properties and click the Design tab.Important:

_ A design element that is not explicitly locked is always temporarily lockedwhile it is being edited. After the designer has finished editing it, thetemporary lock is released. Locking the element replicates to other serversand also stays locked until it is manually unlocked._ Shared Actions are contained in one design note. Therefore, when you locka Shared Action, you lock all Shared Actions. Likewise, when you unlock aShared Action, you unlock all Shared Actions.Note: You need to specify a Master lock server for the database before settingthe design locking on. This is done by setting the Administration server for thedatabase, which you can set up on the Advanced properties tab of the Accesscontrol list of your database.Chapter 12. New features in Domino 6 359Figure 12-11 Enabling a database for design locking2. Select Allow design locking; see Figure 12-11.Now designers can explicitly lock design elements in the database. Thecolumn next to the design element name indicates the lock status of thedesign element.Locking a design elementLock a design element when you want to ensure that you have exclusiveownership of it and to prevent others from modifying it.1. Highlight the design element or multiple elements in the Work pane.2. Right-click and select Lock; see Figure 12-12 on page 360.Attention: To enable a database for design locking, you need to specify aMaster Lock (Administration) server for the database. If you try to enable adatabase for design locking without having this set, you will receive an errormessage telling you to do this. You can set this setting in the Advanced Panelof the Access Control Dialog.360 Domino Designer 6: A Developer’s HandbookFigure 12-12 Locking a design elementIf the design element was unlocked, a padlock icon appears in the Work paneindicating that you have successfully locked the design element, and amessage appears on the status bar. You now have exclusive access to thedesign element; other designers cannot modify it.If someone else has locked the design element, a lock-and-key icon appearsin the Work pane. If you try to open a locked element, you will not be able tosave your modifications.Unlocking a design elementUnlock a design element when you have finished making changes to it and wantto allow others to be able to modify it. You can only unlock design elements thatyou have locked. Designers with Manager access to the database can unlockany design element.1. Highlight the design element or elements in the Work pane.2. Right-click and select Unlock.Attention: If you work locally or offline and attempt to lock a design element,Designer displays the message Master lock database cannot be reachedand asks if you want to proceed with locking the design element. If you clickYes to proceed, the database applies a provisional lock to the design element.When you connect again and replicate, the database attempts to convert theprovisional lock to a true lock. If it is successful, the database saves the editsthat you made to the design element. If it is unsuccessful, the database sendsyou mail containing the edits that the database could not save; you must applythem manually to the design element.Chapter 12. New features in Domino 6 361If you had locked the design element, the padlock icon disappears in the Workpane indicating that you have successfully unlocked the design element, and

a message appears on the status bar. You no longer have exclusive access tothe design element; other designers can now modify it.Disabling design element lockingDisable design element locking when you want to prevent designers fromexplicitly locking design elements in a database.1. Choose File -> Database -> Properties and click the Design tab.2. Deselect Allow design locking.Now designers cannot explicitly lock design elements in the database.However, a design element that is not explicitly locked is always temporarilylocked while it is being edited. After the designer has finished editing thedesign element, the temporary lock is released.12.1.10 Printing enhancementsThere are new features in Domino 6 related to printing documents, code, andother design element content.Printing source code from the programmer’s paneWhen you are in the programmer’s pane, you can now print your source code,with a few alternatives and options.PrinterSelect the printer of your choice, and set the properties by clicking Printer.ContentWhen you are in the designer client, and in a programmer’s pane, then theseoptions will be available when printing:_ Current sectionThis will print the current section you have in your programmer’s pane._ Current objectsThis will print the current object you are working on, and give you a secondoption to include “All languages” or “Current language”. This means you areable to print all events of the currently selected object._ All objectsThis will print all the code in all the objects on your current design element. Itwill include the name of the objects, as well as the event of the codes.362 Domino Designer 6: A Developer’s HandbookFigure 12-13 Printing code from programmer’s pane12.1.11 ShadingDomino Designer 6 Client now uses shading to make it easier for you as adeveloper to figure out which database the design element you are currentlyworking on belongs to; see Figure 12-14 on page 363.Note: These settings and options are context sensitive. If you try to printsomething from your Notes 6 Client, there will be new options available for theend user as well. Among these is the possibility to select individual frameswhen printing, and printing embedded views.Chapter 12. New features in Domino 6 363Figure 12-14 Use of shading to indicate active databaseAs we can see in Figure 12-14, the active database in the folder (or recentdatabases) is shaded. If the background of a database is not shaded, then that isthe active database you are currently working in. A shaded background indicatesan inactive database.
12.2 Design SynopsisThe basics of this function are covered in 3.2, “Using Design Synopsis” onpage 71.In Designer 6, there are some new features in Design Synopsis:1. Hide-WhenThe Hide-When conditions are supported in Design Synopsis.2. Customized reports

This is not really part of the Design Synopsis tool functionality; it is anothertool that can be used to produce a synopsis-like output. The biggest benefit of364 Domino Designer 6: A Developer’s Handbookit is that you can create customized reports using the DXL Transformer utility.This tool adds to the familiar Design Synopsis function. It allows you to outputall of your database design or selected elements and transform them byapplying a style sheet, and then either send the output to your display or writeit to an HTML file.To open the DXL Transformer utility, select Tools -> DXL Utilities ->Transformer. In this way you can choose the elements to display, the stylesheet you want to apply, and the output format you want. It is shown inFigure 12-15.Figure 12-15 DXL TransformerIn this example, several forms were selected from the left column of the DXLTransformer, and an XSL style sheet named AllLSinForm.xsl, which extracts anyLotusScript code in the forms. When the extracted code is formatted in HTML bya cascading style sheet, the results look like those in Figure 12-16 on page 365.Chapter 12. New features in Domino 6 365Figure 12-16 Extracted code formatted in HTMLThe flexibility of Transformer will make it easy for you to extract, archive, andreuse your code in ways that haven't been possible before with Design Synopsis.
12.3 New Domino 6 design elementsDomino Designer 6 includes several new design elements. Some of these arealready mentioned earlier in the book, but mostly as a reference to this section.12.3.1 Shared ResourcesShared Resources is one of the new design elements in Domino 6, althoughsome of the elements that can be shared existed in prior releases. Sharingelements lets you reference a resource repeatedly throughout an application,while only having to maintain it in one standard place. Shared Resourcesincludes the following elements:_ Images_ Files_ Applets366 Domino Designer 6: A Developer’s Handbook_ Style Sheets_ Data ConnectionsAmong these, the following are new design elements:_ Files_ Style Sheets_ Data ConnectionsFilesDesigner allows you to share non-NSF files within and across databases. Thiscapability gives you greater flexibility in designing your application. For example,you might need to reference a shared company logo that is a GIF file, or allapplications in your company might share a welcome page that is an HTML file,created by and maintained in another tool by a non-Notes developer.For more information about files, and how to create a file resource, refer to 10.2,“Files” on page 322.Style sheetsCascading style sheets (CSS) give you the ability to control many aspects of yourpage layout, including headers, links, text, fonts, styles, color, and margins. Youcan browse your local file system for a CSS, turn it into a shared resource, andthen insert it into a page, form, or subform.For more information about style sheets, how to create them and insert them in

your application, refer to 10.4, “Style sheets” on page 330.Data connectionsMany of the enhancements in Domino Designer 6 extend the properties-boxparadigm to make functions easier and more intuitive. One of the most powerfulis the creation of a Data Connector and linked fields that connect a form to anexternal database. This brings a new ease to integrating Domino and relationaldata sources.Data Connection Resources (DCRs) bring the technology of Domino EnterpriseConnector Services (DECS) into Designer so that you as a developer can definea connection to an external data source, such as a relational database, and usethe connection to link the fields in a form to fields in the external source. DCRsare reusable in an application and can be shared across applications. You canuse DCR technology to access data in enterprise systems and then takeadvantage of the power of a Domino application to replicate, share, secure, andmanage the data.Chapter 12. New features in Domino 6 367To create an external connection, you first need to install the DECS serversoftware on your Domino server. The client software for the application you areconnecting to (such as DB2 or ODBC) must also be installed on the Dominoserver. You can develop an application locally, but you will be unable to browsethe external metadata when designing your application.For more information about data connections, how to create them and includethem in your applications, refer to 10.5, “Data connections” on page 335.12.3.2 Shared CodeShared Code is a new design element in the design element navigator. It is acontainer for other design elements, which is considered code-related, that caneasily be referenced and reused repeatedly throughout an application, while onlyhaving to maintain it in one standard place.The shared code container now includes these design elements:_ Agents_ Outlines_ Subforms_ Fields_ Actions_ Script LibrariesNone of these design elements in the new container is new to Domino Designer6. For more information on each single element, refer to their respectivechapters.
12.4 The event modelThere are fundamental changes in the event model, making it easier and moreefficient to program in Domino.Note: The Script Libraries container has a new type of library that can beadded, JavaScript Libraries, which works like other script libraries. In previousversions, you have one script library from where you selected which kind ofcode it should include (Java or LotusScript). Now there are three possiblelibraries to be added to the Script Libraries container: LotusScript, Java andJavaScript.368 Domino Designer 6: A Developer’s Handbook
12.4.1 Targeting your codeDomino Designer 6 distinguishes between Notes clients and Web browserevents, enabling you to easily write different code for Notes clients and Webbrowsers. The client events permit LotusScript, and in some cases Formula andSimple actions in addition to JavaScript.Figure 12-17 shows how you select which client the selected event should run

on.Figure 12-17 New event model12.4.2 Removed eventsThe event HelpRequest, which could be found on pages and forms in earlierreleases, is removed in Domino 6. Use the onHelp event instead.12.4.3 New preferred eventsIn Domino 6, there are new events that should replace events from previousversions.Table 12-1 New preferred eventsOld event Preferred eventEntering onFocusExiting onBlurPostOpen onLoad for Form and PageQueryClose onUnload for Form and PageQuerySave onSubmit for FormChapter 12. New features in Domino 6 36912.4.4 New eventsThere are several new events in Domino 6. These are shown in Table 12-2.Table 12-2 New events in Domino 6Note: The old events still work, but it is recommended and preferred that thenew events be used, because these are available both for Notes clients andWeb browsers.Event Run Language Object TriggeronBlur Client JavaScriptLotusScriptField Object isdeselected.onChange Client JavaScriptLotusScriptField Contents ofobject change.onFocus Client JavaScriptLotusScriptField Object isselected.onHelp Client FormulaLotusScriptJavaScriptFormPageOccurs afterthe userchooses Helpor presses F1.PostEntryResizeClient FormulaLotusScriptFolderViewAfter a dragoperation in acalendar folderor view.PostSend Client FormulaJavaScriptLotusScriptFormSubformAfter object is

sent.QueryEntryResizeClient LotusScriptFormulaFolderViewBefore a dragoperation in acalendar folderor view.QueryRecalc Client FormulaJavaScriptLotusScriptFormPageSubformBefore objectis refreshed(and valuesarerecalculated).onSubmit(new forLotusScript)Client FormulaJavaScriptLotusScriptFormPageBefore objectis saved.370 Domino Designer 6: A Developer’s Handbook
12.5 @functions and @commandsThe @formulas have been enhanced with Domino 6. There are several newfunctions, commands and formulas. This section covers the new @formulasavailable in Domino 6, and highlights some of the most useful new functions.12.5.1 Why use themWhy should you still use @functions and @commands? Well, the answer is quitesimple: they are easy and fast to use. They have been here since Notes 1.0 andit is the core processing language. The @formulas and @commands executevery fast and are upward compatible. In many cases they can be used where youcannot use other programming languages, as in field, column, and Hide-Whenformulas.12.5.2 LimitationsThere are still some issues with the @formulas, and maybe the most oftenmentioned one is the lack of a debugger.onUnload Client FormulaLotusScriptJavaScriptFormPageBefore objectis unloaded.onFocus(new forLotusScript)Client LotusScriptJavaScript

Field Object isselected.QuerySend Client FormulaJavaScriptLotusScriptFormSubformBefore objectis sent.Tip: InViewEdit will be covered in 12.13.8, “Editing a document in a view” onpage 456.Event Run Language Object TriggerTip: With Domino 6, there is a new @function called @Statusbar, which willhelp you debug your code. It works like the Print method in LotusScript, andprints to the status bar of your Notes/Designer client. It is not a completedebugging feature, but it will help you print out values during your formulacode execution.Chapter 12. New features in Domino 6 371The @formulas are still not a standard language, like LotusScript (BASIC). Youstill need to learn something new. Nor is there support for complex types, andyou cannot write your own functions.Given the ease and power of @functions and @commands, however, theserestrictions are relatively minor.12.5.3 New programming featuresThis section introduces you to some of the new programming features.Curly bracketsThese allow you to delimit strings with quotation marks in them, which makesREM statements much easier:REM { Removed code: days:=”Mon”:”Tue”:”Wed”:”Thu”:”Fri”:”Sat”:”Sun” }Note that there is no need to comment out (add a backslash in front of) thequotation marks in this code. Writing the code shown in Figure 12-18 will raise anerror, because we have not escaped the quotation marks.Figure 12-18 Improper handling of commented-out quotation marksThe correct way in Notes/Domino R5 would be to escape the quotation marks, asshown in Figure 12-19 on page 372.372 Domino Designer 6: A Developer’s HandbookFigure 12-19 Proper handling of commented-out quotation marksWith Notes/Domino 6, this can be done more easily by using curly brackets, asshown in Figure 12-20.Figure 12-20 Using the curly bracketsArray subscript operatorYou can now use a list subscript operator ([ ]) to return one element of a list. Asubscript consists of a numeric value in brackets. The numeric value can be aconstant, variable, or expression. Decimals are truncated to integers. A subscriptfollows the list name. The following example uses a variable subscript to iteratethrough a list:n := 1;@While(n <= @Elements(Categories);@Prompt([OK]; "Category " + @Text(n); Categories[n]);n := n + 1)Tip: The Categories field containing the list must be located above or to theleft of the field containing this code or the formula returns an Array index outof bounds error.Chapter 12. New features in Domino 6 373This example uses @While and looping, which also is a new feature of DominoDesigner 6. Refer to 12.5.5, “Looping” on page 382 for more information aboutthis feature.

Using this subscript operator to return one element of a list reduces the need for@Subset. In previous versions, this was more complex and complicated,especially if you had to pick a middle value in an array.Using Domino Designer 6, it would look like this:dbFileName := @DbName[2]The first element of a list is subscript [1]. A subscript that is less than [1] or that isgreater than the number of elements in the list also returns the Array index outof bounds error.Assignment statementsThere is a new way to assign statements with Domino Designer 6: you don’tneed to declare variables anymore. @Set and @Setfield are more or lessredundant. We can now assign multiple times to the same variable and nestassignments in the functions:@If(Firstname = “Rune” ; FIELD x := “Rune” ; y := “Carlsen”);We can also nest our assignments in an operation. The following exampleassigns "randi" to the variable name as well as the value "RANDI" to thenameUpper variable:nameUpper := @UpperCase(name := “randi”);You can now also use the FIELD reserved word with a nested assignment:FIELD CityUpper := @UpperCase(FIELD City := "London" )12.5.4 New and enhanced @formulas and @commandsIn this section we cover all the @formulas and @commands that are new orenhanced in Domino 6.New @functionsThis is the complete list of new @functions in Domino 6. See “Some exampleswith new @functions” on page 379 for examples.374 Domino Designer 6: A Developer’s HandbookTable 12-3 New @functions in Domino 6@function Comments@AttachmentModifiedTimes Returns the date on which the file attached to thecurrent document was last modified.@BusinessDays Returns the number of business days in one or moredate ranges.@CheckFormulaSyntax Reports compile errors, not runtime errors. A runtimeerror is generated, for example, if a function has aninsufficient number of arguments.@Compare Compares the alphabetic order of the elements in twolists pair-wise.@ConfigFile Returns the file path for the initialization file for LotusNotes (NOTES.INI).@Count Calculates the number of text, number, or time-datevalues in a list. This function always returns a numberto indicate the number of entries in the list.This function is similar to @Elements, except that itreturns the number 1 instead of 0, when the value it isevaluating is not a list or is a null string.@DocLock Locks, unlocks, returns the locked status of thecurrent document, or indicates if a database hasdocument locking enabled.@DocOmittedLength Returns the approximate number of bytes a truncateddocument lost during replication.@DoWhile Executes one or more statements iteratively while acondition remains true. Checks the condition afterexecuting the statements.@Eval At runtime, compiles and runs each element in a textexpression as a formula. Returns the result of the lastformula expression in the list or an error if an error isgenerated by any of the formula expressions in thelist.

@FileDir Returns the directory portion of a path name, that is,the path name minus the file name.@FloatEq @FloatEq is helpful in dealing with the inexactness offloating point operations.Chapter 12. New features in Domino 6 375@For Executes one or more statements iteratively while acondition remains true. Executes an initializationstatement. Checks the condition before executing thestatements and executes an increment statementafter executing the statements.@GetAddressBooks Returns a list of the address books associated with aclient (if the current database is local) or server.@GetCurrentTimeZone Returns the current operating system's time zonesettings in canonical time zone format.@GetField Returns the value of a specified field. @GetField,@ThisName and @ThisValue provide a means towrite portable code. Instead of specifying field namesin formulas, use these @functions to write code thatcan be copied as is from one formula to another.@GetFocusTable Returns the name, current row, or current column ofthe table that is in focus.@GetHTTPHeader In a Web application, returns the value of an HTTPrequest-header field that the browser client sends tothe server. @GetHTTPHeader is useful in formulasthat run in the context of a browser.The Notes client always returns null for this formula.@GetViewInfo Returns a view attribute.There are 3 attributes to get,CalendarViewFormat, ColumnValue andIsCalViewTimeSlotOn.@HashPassword Encodes a string.@IfError Returns a null string ("") or the value of an alternativestatement if a statement returns an error.@IsNull Tests for a null value. This function is useful forchecking for empty fields before using them in otherfunctions in which they might generate errors.@IsVirtualizedDirectory Indicates whether virtualized directories are enabledfor the current server.@LDAPServer Returns the URL and port number of the LDAPlistener in the current domain.@Nothing In an @Transform formula, returns no list element(reducing the return list by one element). In any othercontext, returns null.See @Transform for more info.@function Comments376 Domino Designer 6: A Developer’s Handbook@OrgDir In a Service Provider (xSP) environment, returns thename of the subdirectory for the company with whichthe currently authenticated user is registered. LotusNotes/Domino retrieves this information from theorganization's certifier document.@ReplicaID Returns the replica ID of the current database.@SetHTTPHeaders In a Web application, sets the value of an HTTPresponse-header field, which is passed from theserver to the client.@ServerAccess Checks if a specified user has a specifiedadministrative access level to a server.@ServerName Returns the name of the server containing the currentdatabase. When the database is local, returns theuser name.@SetViewInfo In Standard Outline views, filters a view to display onlydocuments from a specified category. In Calendarviews, filters a view to display only document thatcontain a specified string in a specified column.

@Statusbar Writes a message or messages to the status bar.Similar to the Print method in LotusScript - used fordebugging.@Sort Sorts a list based on keywords as parameters.@ThisName Returns the name of the current field. Very useful invalidation formulas@ThisValue Returns the value of the current field. Very useful invalidation formulas and portable code.@TimeMerge Builds a time-date value from separate date, time, andtime zone values.@TimeToTextInZone Converts a time-date value to a text string,incorporating time zone information.@TimeZoneToText Converts a canonical time zone value to ahuman-readable text string.@ToNumber Converts a value with a data type of text or number toa number value.@ToNumber Converts a value with a data type of text or time to adate-time value.@function CommentsChapter 12. New features in Domino 6 377Enhanced @functionsSeveral @functions have been enhanced in Domino 6. Following is the completelist.Table 12-4 Enhanced @functions@ToTime Converts a value with a data type of text or time to adate-time value.@Transform Applies a formula to each element of a list and returnsthe results in a list.@UpdateFormulaContext Updates the context of a formula to the Notes clientwindow currently being accessed by the code. Forexample, if the code accesses a new form called"Response" by using@Command([Compose]:"Response",@UpdateFormulaContext switches the context of theformula to this new form. Any subsequent functions inthe code execute in the context of the Responsedocument, not the current document.@UrlDecode Decodes a URL string into regular text.@UrlEncode Encodes a string into a URL-safe format.@UrlQueryString In a Web application, returns the current URLcommand and parameters, or the value of one of theparameters.@VerifyPassword Compares two passwords. Use this function to verifywhich password format, @Password or@HashPassword, was used to encode a passwordfield.@WebDbName Returns the name of the current database encodedfor URL inclusion.@While Executes one or more statements iteratively while acondition remains true. Checks the condition beforeexecuting the statements.Enhanced @function Comment@DialogBox Has a new keyword [OkCancelAtBottom].@function Comments378 Domino Designer 6: A Developer’s Handbook@DbColumn(Domino data source)Allows “ReCache” in the first parameter to refresh thecache where ““ (cache) is specified in a previous lookup tothe same data source.@DbColumn

(ODBC data source)Allows “ReCache” in the first parameter to refresh thecache where ““ (cache) is specified in a previous lookup tothe same data source.@DbCommand(Domino data source)Enables you to list folders and display next or previousgroups of documents in a view. This function works inWeb applications only.@DbCommand(ODBC data source)Allows “ReCache” in the first parameter to refresh thecache where ““ (cache) is specified in a previous lookup tothe same data source.@DbLookup(Domino data sourceAllows the keywords [FailSilent], [PartialMatch], and[ReturnDocumentUniqueID] as a new parameter.@DbLookup(Domino data sources)Allows “ReCache” in the first parameter to refresh thecache where ““ (cache) is specified in a previous lookup tothe same data source.@DbLookup(ODBC data sources)Allows “ReCache” in the first parameter to refresh thecache where ““ (cache) is specified in a previous lookup tothe same data source.@Explode Takes a fourth parameter that permits the suppression ofnewlines as separators. Not previously documented is thefact that newlines are treated as separators regardless ofthe specification of the second parameter.@Max With one parameter returns the largest number in a list.@Min With one parameter returns the smallest number in a list.@Name Has new keywords that convert a name from Domino toLDAP format and vice-versa.@Now Takes parameters that allow the time-date to be based onthe server containing the current database or specifiedservers.@SetDocField Can now be used to set the value of a field in the currentdocument.@Text Can now convert rich text.Enhanced @function CommentChapter 12. New features in Domino 6 379Some examples with new @functionsTo emphasize the use and strength of some of the new @functions, and as aguidance for using them, this section shows how you can use the [email protected] validation using Domino 6Field validation on several fields on a form, is much easier in Domino 6, using@ThisField and @ThisValue. Instead of, as earlier, hard coding a name of a fieldin a validation formula, you know use these functions to make them moredynamic:@If(@ThisValue = ““ ; @Failure ; @Success)@IfErrorReturns a null string ("") or the value of an alternative statement if a statementreturns an error. This function can easily replace @If(@IsError(...)) by using@IfError instead.Example: A keyword lookup formula that checks for errors:@IfError(@DBLookup(““;””;”Categories”;Category;Subcategory;”Subcategory”);”No

subcategories defined|”)@StatusbarThis is a great new feature for debugging using @functions. Earlier, we usuallyused message boxes to check values during a long code, now we can writevalues of variables during the code, directly to the status bar, as we do inLotusScript, using the Print method.tmp := @DbName[1] ;@StatusBar(tmp) ;@Prompt([Ok] ; tmp ; tmp)As this code runs, the status bar is updated before the prompt box is. Theexample uses a list subscript operation to get the server name. Refer to 12.5.3,“New programming features” on page 371.@UserAccess Accepts keyword parameters that can return the user'sdatabase access level or test for specific user privilegesfor a database.Enhanced @function Comment380 Domino Designer 6: A Developer’s Handbook@ServernameInstead of using @subset and @dbname to get the server name, we can nowuse @servername instead. It returns the name of the server containing thecurrent database. If the database is local, it returns the user name.The following example displays a server name that reads the format“CN=Trondheim/O=Lotus”:@Prompt([OK] ; “Servername” ; @Servername)The following example displays a server name that reads the format “Trondheim”.@Pormpt([OK] ; “Servername” ; @Name([CN] ; @Servername))Looping using @while and @dowhileRefer to section 12.5.5, “Looping” on page 382.New duplicating @commandsThe following new @commands duplicate the functionality of existing@commands, except that they execute as soon as they are encountered in aformula. The @commands they duplicate execute only after all @functionspresent in the formula have been executed.Table 12-5 List of new, but duplicating, @commands in Domino 6Note: If the database is located locally, @servername returns the usernameof the person running the @formula.@command Duplicates:Clear EditClearCloseWindow FileCloseWindowDatabaseDelete FileDatabaseDeleteEditProfileDocument EditProfileExitNotes FileExitFolderDocuments FolderNavNext NavigateNextNavNextMain NavigateNextMainNavNextSelected NavigateNextSelectedChapter 12. New features in Domino 6 381New @commandsThese @commands are new with Domino 6, and do not duplicate any existingcommands.Table 12-6 New @commands in Domino 6Enhanced @commandsThese @commands have been enhanced in Domino 6.Table 12-7 Enhanced @commands in Domino 6NavNextUnread NavigateNextUnreadNavPrev NavigatePrevNavPrevMain NavigatePrevMainNavPrevSelected NavigatePrevSelected

NavPrevUnread NavigatePrevUnreadRefreshWindow ReloadWindowRunAgent ToolsRunMacroRunScheduledAgents ToolsRunBackgroundMacrosSwitchForm ViewSwitchFormSwitchView ViewChange@command CommentsComposeWithReference Creates a response document containing a reference tothe main document.EditQuoteSelection Makes selected text look like an Internet-style reply.EditRestoreDocument Restores a soft deleted document to the view or folder itwas deleted from.RefreshFrame Refreshes a specified frame in a frameset.@command CommentsMailAddressReplicatorReplicateHigh Does not require the Replicator page to be open.ReplicatorReplicateNext Does not require the Replicator page to be open.@command Duplicates:382 Domino Designer 6: A Developer’s Handbook
12.5.5 LoopingYou can now do looping in Domino Designer 6, using @formulas. @DoWhile,@While, and @For let you execute statements iteratively (in a loop), dependingon whether a condition is True or False. @For initializes, changes, and tests thecondition as part of the @function, and is best used for processing a range ofnumbers such as list subscripts. @While and @DoWhile test the condition;typically you initialize the condition before the @While or @DoWhile statement,and change the condition with one of the @While or @DoWhile statements.@While tests the condition before executing its statements, and @DoWhile testsafter.If you are looping through a field containing a list, be sure the “Allow multiplevalues” check box is selected in the Field Properties box for the list field.ReplicatorReplicateSelected Does not require the Replicator page to be open.ReplicatorReplicateWithServer Does not require the Replicator page to be open.ReplicatorSendMail Does not require the Replicator page to be open.ReplicatorSendReceiveMail Does not require the Replicator page to be open.ReplicatorStart Does not require the Replicator page to be open.ReplicatorStop Does not require the Replicator page to be open.WindowCascade Resizes all open Notes/Domino windows to lessthan 50% of their maximum window size and layersthem in a cascading stack.WindowNext Maximizes the Notes window whose taskbar buttonis to the right of the current window's taskbar buttonor, if the windows are cascaded, moves the nextwindow in the stack to the top of the stack.WindowTile Resizes all open Notes/Domino windows to displaythem all at once. The open windows are tiled acrossthe screen until they fill the background.@command CommentsNote: All of the following examples perform the same operation. Dependingon your preference and your code and what it should do besides looping,choose the best solution for your script.Chapter 12. New features in Domino 6 383The use of @ForFor(n := 1;n <= @Elements(Categories);n := n + 1;@Prompt([OK]; "Category " + @Text(n); Categories[n]))¨The first parameter initializes the variable n to 1 and executes once. The secondparameter tests whether n is less than or equal to the number of elements in

Categories. The third parameter increments n. The fourth parameter is astatement that executes as long as the test remains True.Using this code will prompt for every value in the Categories multivalue field.The use of @Whilen := 1;@While(n <= @Elements(Categories);@Prompt([OK]; "Category " + @Text(n); Categories[n]);n := n + 1)Using this code will prompt for every value in the Categories multivalue field.The use of @DoWhile@DoWhile tests at the bottom of the loop instead of at the top, like @While. Thestatements will always execute at least once.@If(@Elements(Categories) = 0; @Return(0); "");n := 1;@DoWhile(@Prompt([OK]; "Category " + @Text(n); Categories[n]);n := n + 1;n <= @Elements(Categories))Using this code will prompt for every value in the Categories multivalue field.12.5.6 Other enhancementsThere are other enhancements that should be noted, as well:_ The 64 K limit is gone in event codes._ Buttons formulas do not need the main statement.384 Domino Designer 6: A Developer’s Handbook
12.6 LotusScriptIn Domino 6, there are several new enhancements to LotusScript. This sectiononly covers the most important and significant changes, as there are a hugenumber of new methods, properties, and classes. This section covers:_ New classes_ The remote debugger_ Recompile all_ Language enhancements12.6.1 New classesThe new LotusScript classes in Domino 6 are:NotesAdministrationProcessNotesColorObjectNotesDOMAttributeNodeNotesDOMCDATASectionNodeNotesDOMCharacterDataNodeNotesDOMCommentNodeNotesDOMDocumentFragmentNodeNotesDOMDocumentNodeNotesDOMDocumentTypeNodeNotesDOMElementNodeNotesDOMEntityNodeNotesDOMEntityReferenceNodeNotesDOMNamedNodeMapNotesDOMNodeNotesDOMNodeListNotesDOMNotationNodeNotesDOMParserNotesDOMProcessingInstructionNodeNotesDOMXMLDeclNodeNotesDXLExporterNotesDXLImporterNotesMIMEHeaderNotesNoteCollection

NotesReplicationEntryNotesRichTextDocLinkNotesRichTextNavigatorNotesRichTextRangeNotesRichTextSectionNotesRichTextTableNotesSAXAttributeListNotesSAXExceptionNotesSAXParserNotesStreamChapter 12. New features in Domino 6 385NotesUISchedulerNotesXMLProcessorNotesXSLTransformerUse of the new classesMost of these new LotusScript classes are designed to interface with XML data insome way. They support a full set of generalized XML processing functions. Inaddition, Domino has a Notes-specific DTD, which is used to represent Notesdatabase and document information. Domino has its own XML format called DXL(Domino XML Language). DXL represents all designer elements in a XML formatthat conforms to the Domino DTD. The main classes that handle DXL data areNotesDXLImporter, NotesDXLExporter, NotesXSLTransformer,NotesDOMParser, and NotesSAXParser. These classes are covered in greaterdetail in Chapter 16, “XML” on page 743.In addition to XML-related classes, a couple of classes were added to allowbetter manipulation of rich text. See in-depth discussion about rich textprogramming and the new rich text classes in Chapter 15, “Rich textprogramming” on page 697.NotesAdministrationProcessThis is a new LotusScript class with Domino 6 that represents the administrationprocess on a Domino server. In earlier releases of Notes/Domino, there was noway to generate an administration request. This is now possible using the newclass.Example 12-1 on page 386 shows an example of creating an administrationrequest for creating a replica of the database Redbook.nsf onto the serverTrondheim/ITSO, from the source server SourceServer/ITSO.Using the method CreateAdministrationProcess of the NotesSession class, wespecified the name of the server containing the Administration Requestsdatabase (admin4.nsf). An empty string means the local computer. The servermust contain a replica of the Certification Log database. You must have accessprivileges to the Domino Directory on the server for Administration Processrequests that use it. You need author access to the Administration Requestsdatabase to be able to create requests.Tip: Even though it was not possible to generate administration requests inearlier releases, you could always manipulate and generate documentsdirectly in the admin4.nsf database. This required that you really knew whatyou were doing, and knew all the required fields to set on creation.386 Domino Designer 6: A Developer’s HandbookUsing the CreateReplica method of the NotesAdministration class, the documentis generated into the Administration Request database. This method triggers"Check access" and "Create replica" administration process requests.Example 12-1 Creating a replica using the NotesAdministrationProcessSub InitializeDim session As New NotesSessionDim adminp As NotesAdministrationProcessDim sNotesID As String' Creates a new NotesAdministrationProcess object

Set adminp = session.CreateAdministrationProcess("SourceServer/ITSO")' Enters a request in the Administration Requests database.sNotesID = adminp.CreateReplica("SourceServer/ITSO", "Redbook.nsf","Trondheim/ITSO")End SubThe request generated is shown in Figure 12-21.Figure 12-21 The “Check access” request generated using NotesAdministrationProcessNotesStreamThe new NotesStream LotusScript class represents a stream of binary orcharacter data. To create a NotesStream object, use the CreateStream methodin NotesSession. You could use this class to create a stream, and to this streamwrite content or text values of a Body item of selected documents, and later usethis stream to read from.NotesReplicationEntryThe new NotesReplicationEntry LotusScript class extends the NotesReplicationclass, and is contained by NotesReplication class. NotesReplicationEntryrepresents the replication settings for a pair of servers in a database, of whichChapter 12. New features in Domino 6 387one is the source and the other is the destination. By using the GetEntry methodin the NotesReplication class, you can create or get a NotesReplicationEntryobject.NotesColorObjectThe new NotesColorObject LotusScript class represents a color as defined inDomino. Domino defines colors numbered 0 through 240, as reflected in theread-write property NotesColor. Each Domino color maps to RGB (red, green,and blue) values in the range 0-255 and HSL (hue, saturation, and luminance)values in the range 0-240, as reflected in the remaining, read-only properties.NotesColor can be used as the value for the following properties:NotesColor in NotesRichTextStyleBackgroundColor in NotesViewFontColor and HeaderFontColor in NotesViewColumn12.6.2 Remote debuggerIn Domino 6 you can debug any LotusScript agents or script libraries currentlyrunning on the server remotely. You can use the remote debugger to step throughand debug LotusScript agents running on the server. The agent you want todebug must be running when you start the remote debugging tool. This enablesyou, in real time, to debug a script running on a server with the proper access.More than one user can attach to and debug the same agent. However, only oneuser has control to debug it at any given time. A second user may get control byattaching to the same agent. This capability is useful, for instance, if you wanthelp from a coworker in debugging an agent. You can ask the coworker to attachto and debug the server agent and that coworker can do so without having to bein the same physical location.There are several things that must be configured to take advantage of the remotedebugger feature. Both the server and the agent itself must be enabled andconfigured. The reason for this is security. You don't want someone to come inthrough the remote debugger and change the value of your script or to find outinformation through the debugger. Ensure that you configure both your agentsand servers correctly for this feature to be enabled.Tip: If you attempt to continue debugging the server agent after your coworkerhas attached to and begun to debug it, you will get the error Another user hasattached to the agent and taken control. Please try to reconnect forfurther debugging.388 Domino Designer 6: A Developer’s Handbook
Enabling the server for remote debugging

1. Before starting the server, add the following value to the ServerTasks= list inthe server's notes.ini file:RdebugIf the server is already running, to begin the remote debugging task, either:– Restart the server (after having added rdebug to the ServerTasks list in thenotes.ini file)– Or enter load rdebug at the server console.2. Click Server Tasks on the server document, and then select RemoteDebugger Manager and change the value of the “Allow remote debugging ofthis server” to “Enabled”. See Figure 12-22. You must have administrativeaccess to the server to edit this field.Figure 12-22 Enabling remote debugging on the server3. You can also set the limit for running the rdebug task on the server in the“Turnoff Server Debug after” setting.4. Enter a time interval in the “Agent Wait at Start Time” field if you want to forcethe agent to pause before running, giving you time to attach the remotedebugger to the target agent.5. Check the Ports -> Internet Ports -> Remote Debug Manager tab to ensurethat the TCP/IP port status property is set to Enabled. Also, if you are thinkingof enabling remote debugging over the Internet or between servers withfirewalls, make sure that the port number set is open for traffic.6. Make sure you are listed on the server's Security tab as having permission torun agents.Tip: If you set this value to -1, the task can run forever.Chapter 12. New features in Domino 6 389Enabling an agent for remote debuggingTo enable an agent for remote debugging, follow these steps:1. On the Security tab of the Agent Properties box (Figure 12-23), select Allowremote debugging.Figure 12-23 Allow remote debugging2. On the Basics tab of the Agent Properties box, click Schedule.The Agent Schedule dialog box displays (Figure 12-24 on page 390).3. Click Schedule and select the server from the “Run on” list box.390 Domino Designer 6: A Developer’s HandbookFigure 12-24 Run on server4. In the Programming pane, add either of the following code snippets to thebeginning of the Initialize event code in the agent:Print "AgentName is about to start running****************"Sleep(30)This prints a message to the server console when the agent is preparing torun and delays its execution for thirty seconds, giving you time to open theremote debugger and select the agent as a target.Or add the following line at the start of your agent:StopIf you set the “Agent Wait at Start Time” property in the server document toYes, then when Domino encounters the Stop statement it waits for the timeindicated in the time-out value defined in the server document, again givingyou time to open the remote debugger and select the agent as a target.This does not mean that to stop equals to sleep. If the remote debugger is noton, stop is ignored. Sleep however, will always sleep regardless whether theremote debugger is there or not. Also, if the remote debugger is attached,stop behaves like a break point. Sleep will just sleep and continue unless theuser does something to stop it. The stop statement is ignored when the agentisn’t in debug mode.Chapter 12. New features in Domino 6 391Starting the remote debugger

To run a specific agent you want to debug, do one of the following:_ Increase the run frequency of the agent by clicking Schedule on the Basicstab of the Agent Properties box. In the Agent Schedule dialog box, change thehour value of “Run agent every” to zero and the minutes value to 5 or less._ Enter the following command on the server console:tell amgr run databaseName.nsf 'agentName'This tells the agent manager to start the agent named agentname in thedatabase databaseName.nsf.1. While the agent you want to debug is running on the server, choose File ->Tools -> Remote Debugger from the menu.This starts the Lotus Notes Server Agent Debugger window.2. Select File -> Select Debug Target from the menu.The Select Debug Target dialog box displays.3. Choose the server that is running the agent from the Server list box and clickOpen.A list of the databases on the server displays.4. Select the database that contains the agent and click Open.If the agent you want to debug is currently running, it appears in the DebugTarget box; see Figure 12-25 on page 392.5. Select the agent you want to debug from the list of agents currently runningon the database.Tip: Use the Sleep() function in your agent to override the setting set in theserver document, or if the field “Agent Wait at Start Time” in the serverdocument is not set.Tip: The run parameter for “tell amgr” is a new console command of Domino6, and will run the agent specified. Notice that you use a quote (‘) to enclosethe agent name.392 Domino Designer 6: A Developer’s HandbookFigure 12-25 Remote debugger6. Click Open.The Script Debugger window displays.When we now connect to the selected agent, the usual interface for debuggingan agent will be shown. Using the remote debugger allows you to step throughand debug LotusScript agents running on the server. The agent you want todebug must be running when you start the remote debugging tool. This enablesyou, in real time, to debug a script running on a server with the proper access.More than one user can attach to and debug the same agent. However, only oneuser has control to debug it at any given time. A second user may get control byattaching to the same agent.Tip: If you cannot connect or get a list of agents to remote debug, make surethat you have enabled your agent for remote debugging. This is explained in“Enabling an agent for remote debugging” on page 389.Chapter 12. New features in Domino 6 39312.6.3 Recompile allIn Lotus Notes/Domino, script compilation takes place in two phases:_ A partial compilation occurs as you enter the script. Syntax and other per-lineerrors are reported at this time._ A complete compilation occurs when you save the script. All remainingcompile-time errors are reported at this time.If you attempt to save a script with compilation errors, you are given a choice ofediting the script again or exiting without saving your changes.With Domino 6, the new feature “Recompile all” will help you recompile all yourLotusScripts in the current database. This can be very useful when you haveperformed changes in a script library that might affect all your other LotusScripts.Recompile All LotusScript is a menu tool, available through your Tools menu.

As a general rule, the code that calls a script library should have been compiledmore recently than the library. This ensures that all the caller’s references tofunctions and global variables in the library are correct. This menu functiondetermines which code calls which script libraries and recompiles everything inthe right order, from the bottom up.Recompile All LotusScript compiles all design documents in the database, butdoes not modify design elements with script errors. If any errors are found duringthe recompilation, Domino Designer 6 will display a list of all these elements(Figure 12-26 on page 394).Note: If you choose to exit, all changes are lost!394 Domino Designer 6: A Developer’s HandbookFigure 12-26 Recompile All LotusScript showing elements with errorsIf no errors are found, you should see the information displayed in Figure 12-27.Figure 12-27 Recompile all LotusScript run successfullyChapter 12. New features in Domino 6 39512.6.4 LotusScript to Java (LS2J)LotusScript to Java is a new LSX, enabling you to use your LotusScript to:_ Instantiate Java Objects_ Call Java Object Methods_ Read and write to Java Object PropertiesUsing LotusScript and LS2J, you can access Java classes, giving you a powerfulcross-platform extension to LotusScript. Developers can access Java inLotusScript programs as a set of predefined LotusScript objects. This set ofobjects allows LotusScript to use already created Java classes that are availablein script libraries or found using the classpath.The new objects available to manipulate Java are:_ JavaSession_ JavaClass_ JavaObject_ JavaMethod_ JavaMethodCollection_ JavaProperty_ JavaPropertyCollection_ JavaErrorAs mentioned, you can instantiate any Java class, using classes available in Jarfiles on the classpath, or classes available in your Domino Designer Java Library.Using the Designer library will also enable replication of these libraries.By taking advantage of LS2J, you can use extensive API, which is beyond thecapabilities of LotusScript.Enabling a LS2J connectionTo enable the LS2J connection, the following tasks have to be performed._ Initialize Java Virtual Machine (JVM)._ Establish a JVM connection (JavaSession).Note: LSXs are Lotus libraries, like DLLs, that provide external data andsystem access to the Domino LotusScript environment.Note: Domino Designer Java Library is a Script Library available in theDesigner client.396 Domino Designer 6: A Developer’s Handbook_ Find the desired class (JavaClass)._ Get the desired object (JavaObject)._ Access the object’s methods and properties.Let us create an example that takes us through all these steps, and create asimple LS2J agent:1. Initialize Java Virtual Machine (JVM).The first thing to do is to initialize the JVM, which loads the JavaSession. In

LotusScript code, include the following code:uselsx “*javacon”2. Establish a JVM connection (JavaSession).The JavaSession represents a JVM connection, and is the starting point foraccessing Java objects. Example:Dim jsession as New JavaSession3. Find the desired class (JavaClass).JavaClass represents a Java class, and can be included with the followingcode:Dim jclass as JavaClassset jclass = jsession.GetClass(“java/net/InetAddress”)4. Get the desired object.You can get the object you want by creating a new one, calling a static methodor accessing static properties in Java. Example:Dim localhost as JavaObjectset localhost = jclass.getLocalHost()5. Access the object’s methods and properties.You can only access public fields and methods, and dot notation usuallysuffices:msgbox “Name: “ & localhost.getHostName()Using the following code, which calls Java from LotusScript, should enable you toaccess information on your computer—not possible using LotusScript alone:Option Publicuselsx"*javacon"Sub InitializeDim jsession As JavaSessionDim jclass As JavaClassDim localHost As JavaObjectSet jsession = New JavaSessionSet jclass = jsession.GetClass("java/net/InetAddress")Chapter 12. New features in Domino 6 397Set localHost = jclass.getLocalHost()Msgbox "Name: " & localHost.getHostName() & chr(13) & "Address: " &localHost.getHostAddress()End SubRunning this example should give msgboxes like the one shown in Figure 12-28.Figure 12-28 Calling Java from LotusScriptLS2J limitationsBe aware of some limitations in using LS2J:_ You may not delete a Variant containing a JavaClass object._ There are some data type limitations. Refer to the Domino Designer 6 HelpDatabase for more information._ LotusScript property or method names are not case sensitive, but Javaproperty and method names are. If two Java properties are the same exceptfor their case, use the GetProperty and GetValue or SetValue methods toaccess the correct property. Java methods may also be overloaded; that is,they may differ only by parameter type. If two Java methods are the sameexcept for their case, or their parameter type, use the GetMethod and Invokemethods to access the correct method. Java method calls are limited to 12parameters._ LotusScript can access all Java values and classes; however, there is nomechanism for Java to access LotusScript objects directly.12.6.5 Automatically add Option DeclareMany programmers’ customary practice when developing for Domino is the useof “Option Declare” or “Option Explicit”. Leaving this out is a huge source ofTip: For more information on using LS2J and how to invoke methods in Java,refer to the Lotus Domino Designer 6 Help database.

398 Domino Designer 6: A Developer’s Handbookerrors, and for that reason there is a new feature in Domino 6 that enables you toset this to be included as default.When Option Declare is enabled, this forces the developer to declare all thevariables that are used in that module. If you try to use variables withoutdeclaring them first, the compiler gives you an error.The option can be set by enabling Automatically add “Option Declare”, which is aproperty of the programmer’s pane:Figure 12-29 Automatically add Option Declare12.6.6 Language enhancementsAs mentioned earlier in this section, LotusScript has been enhanced a lot, sorefer to the Lotus Domino Designer 6 Help database for the complete list and theaccompanying information. Here are a few of these new functions:_ Implode or JoinResembles the @Implode function. Concatenates all members of an array ofstrings and returns a string. Elements of the array are separated by adelimiter, if provided, or the space character (“ ").Example 12-2 The implode functionSub InitializeDim array(2) As StringTip: Setting and enabling properties on the Programmer’s pane affects yourDomino Designer 6 Client in general, not just for the active database. It meansthat every new object will have the Option Declare by default on its (Options)event.Note that Option Declare is not added to existing objects, only the ones youcreate after setting the option on.Chapter 12. New features in Domino 6 399Dim sArray As Stringarray(0) = "Rune"array(1) = "Peter"array(2) = "Grant"sArray = Implode(array, "&")Msgbox sArrayEnd SubThis code creates a string that concatenates all array values, with a delimiterof “&”. The result of the agent would look like this:Figure 12-30 Result from an implode_ ReplaceResembles the @ReplaceSubstring function. Replaces specific words orphrases in a string with new words or phrases that you specify._ SplitResembles the @Explode function. Returns an array of strings that are thesubstrings of the specified string._ StrTokenResembles the @Word function. Returns a specified word from a text string.
12.7 Auto completeAuto complete is a feature that will both speed up the development and help getthe right formatting done more easily. It will look up and paste the syntaxelements directly into the Programmer’s pane, as you start to enter your code.This code can be LotusScript, @formula, or HTML. The auto completion usestype-ahead functionality to let you quickly find and select the options you wantand need.400 Domino Designer 6: A Developer’s Handbook
Enabling auto completeAuto completion is enabled by default in Domino 6, but you can change thesettings for auto completion to suit your needs.

Options of auto completeBy selecting the options tab on the Programmer’s pane, you can set options onthe auto completion:Figure 12-31 Auto complete optionsThe following settings apply to all languages.Table 12-8 Settings for auto complete in the Programmer’s paneTip: If you decide to disable auto completion, you can still use the menucommands or accelerator keys to display the pop-up lists or boxes. Theaccelerator key for auto completion is Ctrl+Alt+t and the menu command canbe accessed using Edit -> List Members. This menu or shortcut can only beused in the Programmer’s pane.To display a parameter box, if one is applicable in this situation, you can doeither Edit -> Parameter info or by pressing Ctrl+Shift+SpaceOption Description DefaultAuto List Member box A pop-up list of availableoptions automaticallydisplays when you begintyping code.Enabled. Deselect todisable.Auto Parameter PopupboxIf an option has aparameter list, a pop-upbox with a parameterprompt appears when youtype a language-specifictrigger, such as an openparenthesis (( ) [email protected]. Deselect todisable.Chapter 12. New features in Domino 6 40112.7.1 LotusScript and auto completeWhen you add LotusScript in the Programmer’s pane, follow these simpleconventions to use auto completion:1. When declaring an object using the Dim statement, enter the word “As”followed by a space to trigger the pop-up list of available classes, as in thisexample:Dim doc As[SPACE]2. From the pop-up list, you can either type ahead to select the class you need,or scroll through the list and select it. Press Enter to paste the class into theScript area and close the list; see Figure 12-32.Figure 12-32 Auto complete when declaring an object in LotusScript3. To see a list of available properties and methods for a class, enter a period (.)after an object name.Delay box The value is the amount oftime to wait between atrigger keystroke andanother keystroke before apop-up list displays. If youtype a second keystrokebefore the time haselapsed, the pop-up listdoes not appear. Thevalue is in milliseconds.200 milliseconds.Option Description Default402 Domino Designer 6: A Developer’s Handbook
4. From the pop-up list, you can either type ahead to select the element youneed, or scroll through the list and select it. Press Enter to paste the elementinto the Script area and close the list; see Figure 12-33.Figure 12-33 Auto complete of methods on the current object using LotusScript5. If a method has a parameter list, type an open parenthesis (( ) to display apop-up box with the parameter list. The syntax of the first parameter appearsin bold.6. Type a comma (,) after each parameter. The syntax of the next parameter inthe string appears bold.Figure 12-34 Type-ahead of parameters on methods using LotusScript7. Type a closing parenthesis ()) or press Esc to close the pop-up box.Chapter 12. New features in Domino 6 40312.7.2 HTML and auto completeHTML auto completion is now available for HTML pass-through code in formsand pages. To enable and take advantage of this feature for HTML, we need touse another new feature called HTML Pane. This is covered in 12.9, “HTML” onpage 412.12.7.3 Formulas and auto completeAs with LotusScript and HTML, @formulas also support type ahead and autocompletion. In the Programmer's pane, follow these conventions to use autocompletion:1. Both @function and @command auto complete are triggered by pressing theat (@) symbol. A pop-up list of available @functions and @commandsappears.2. From the pop-up list, you can either type ahead to select the function orcommand you need, or scroll through the list and select it. Press Enter topaste the function/command into the Script area.Figure 12-35 Auto complete for @formulas, functions and commands3. If the function has a parameter list, type an opening parenthesis (() to displaya pop-up box with the parameter prompt. The syntax of the first parameterappears in bold.Type a semicolon (;) after each parameter. The syntax of the next parameterin the string appears bold.Type a closing parenthesis ()) or press Esc to close the pop-up box.404 Domino Designer 6: A Developer’s HandbookOr:If the command has a parameter list, type a semicolon (;) to display a pop-upbox with the parameter list. The syntax of the first parameter appears in bold.Type a semicolon (;) after each parameter. The syntax of the next parameterin the string appears bold.Type a closing parenthesis ()) or press Esc to close the pop-up box.
12.8 Agent enhancementsThe agent architecture has been changed in Lotus Notes/Domino 6, and thereare several new security paradigms. While these change the complex andunderlying aspects, there are also some other new features.For more information about agents, refer to Chapter 7, “Domino Designelements: agents” on page 247.12.8.1 New user interfaceThere are three new user interface features:_ New agent builderThe new agent builder is now a property box and makes all previous choices,all well as new ones, easily accessible and consistent with other designelements in Domino Designer. Most of these properties and settings areavailable in previous versions as well, but not as part of an agent builder in aproperty box; see Figure 12-36 on page 405.

Chapter 12. New features in Domino 6 405Figure 12-36 New user interface_ All personal agents are now visible to any Manager.As manager of a database, you can now see all agents created by users asprivate agents in the database (Figure 12-37).Figure 12-37 Personal agents visible to any manager in an agent list_ Enabling and disabling agents.You can now, directly in the list of agents, use action buttons to enable anddisable scheduled agents (Figure 12-38 on page 406).Note: If you, as manager of a database, re-sign this agent by opening it andsaving it, or by signing it with the sign feature of the Designer 6 Client, beaware that the agent will remain personal, but it is now the databasemanager’s personal agent. It will disappear from the list of personal agentsfrom the user who created the agent in the first place.406 Domino Designer 6: A Developer’s HandbookFigure 12-38 Enabling and disabling agents12.8.2 Agent restriction listThe agent restriction list for the current server has been expanded. Agentrestrictions are usually an area that your Domino Administrator takes care of.However, it is very important for you, the developer, to understand how therestrictions work. The restrictions in Domino 6 have a more granular structure.They apply to all kinds of agents (LotusScript, Java, Simple actions, Formula).These are the new agent restriction lists:_ UnrestrictedLists who can run and have all rights to perform all agent operations, includingall programmable languages and interfaces._ OnBehalf of anyoneLists who can and have the rights to create and sign agents that can run onbehalf of someone else, as a scheduled agent._ OnBehalf of invokerLists who can and have the rights to create agents that will be executed onbehalf of the invoker._ Script librariesLists who have the rights to sign script libraries.Chapter 12. New features in Domino 6 407Figure 12-39 Security settings in the server document12.8.3 Access remote serversWith Domino 6, it is possible to access remote servers with your agents. Theremote server’s server document needs to have the server you are using listed inthe Trusted servers field (Figure 12-40). By having a server name in this field theserver assumes that the trusted server has authenticated the user.Figure 12-40 Remote accessNote: These are all settings in the server document and are usuallymaintained by the Domino server administrator.408 Domino Designer 6: A Developer’s HandbookExplanation:_ Remote server B must fully trust server A.This is a new setting in the server document, which must be enabled by theDomino administrator. It is a field called “Trusted servers” and the servertrusts that the servers listed in the fields have been authenticated(Figure 12-41).Figure 12-41 Trusted servers in server document, security section12.8.4 Run on behalf ofLets you specify on whose authority this agent can run. Note that restrictedsigners can run agents only under the same authority as their own (that is, the

restricted signers enter only their own name or else the agent returns an error atruntime). This gives you the possibility to have users who are allowed to signagents that will be executed on anyone else's behalf or on behalf of the invoker.12.8.5 Script librariesIn previous versions of Lotus Notes/Domino, all code in a script library runs underthe agent signer and authority. Now, you can control who is allowed to sign scriptlibraries.When running an agent now, which include a script library, it will enforce a checkif the signer of the agent has rights to access and run the script library. Thischeck will not run, however, if:_ The field “Sign script libraries to run on behalf of someone else” is blank. Youwill find this field in the Security tab of the server document in your Dominodirectory.Note: This defaults to anyone for backwards compatibility.Chapter 12. New features in Domino 6 409_ Agent and script library signers are the same._ The script library signer is Lotus Notes Template Developers._ The script library signer is the server on which the agent is running._ The script library signer is unrestricted.12.8.6 User activationIn previous versions, only designers as determined in the ACL can enable anddisable agents in a database. That is not the case in Domino 6 any more. Youcan now allow non-designers to enable agents.The ideal thing would be to give mail users only editor access to their mail file. Inversion prior to Notes 6 this led to problems with “out of office” functionality, sincethe users needed designer access to enable these agents as well as rights to runLotusScript agents.In Notes 6, users with editor access can activate agents, if that is allowed, usingthe new property “Allow user activation” for the agent. The editor can only enableand disable the agent, not sign the agent.How to configure user activationThese are requirements for user activation to take place:_ “OnBehalf” is set to a user who is an editor._ The “Allow user activation” property enabled._ The agent is signed by an “Unrestricted” or “OnBehalf of anyone” signer.Now, a user can activate an agent with only editor access, and the user is notlisted in the “Run Restricted agents” field.Important: In order to have access to sign and run the script libraries, thescript library signer has to do both of the following:_ Appear in the “Sign script libraries to run on behalf of someone else” field._ Appear in one of the fields that gives the signer unrestricted access (“Signagents to run on behalf of someone else” or “Run unrestricted methodsand operations”).Tip: In the Notes versions before 6, when enabling an agent, you also signedit, and you had to have designer access. In Notes 6, when the “Allow useractivation” is enabled, the user will not sign it with editor access, just run it.However, if the user is a designer, it will be signed and run.410 Domino Designer 6: A Developer’s Handbook
12.8.7 Agent securityBeginning with Domino Designer 6, you can set up basic security for an agent byusing the Security tab of the Agent Properties box. This tab contains the optionslisted in Table 12-9.Table 12-9 Agent security in Domino 612.8.8 Converting shared and private agents

One major enhancement considering agents is that they can now be convertedto shared or private, or vice versa, independent of their previous state.Option DescriptionRun as Web user When enabled, the agent is run with the effectiveuser rights of the Web user.Run OnBehalf of Lets you specify on whose authority this agent canrun. Note that restricted signers can run agents onlyunder the same authority as their own (that is, therestricted signers enter only their own name or elsethe agent returns an error at runtime). Unrestrictedsigners can run agents on behalf of anyone.Whoever you specify in this field has to be includedin the ACL of any database being accessed.Allow remote debugging Checking this enables the agent to be debuggedthrough a remote debugger. Only LotusScript can beremotely debugged; however, you can monitor theexecution of agents written in Java.Restricted operations Lets users who have unrestricted rights specifywhether the agent should run in restricted orunrestricted mode. This option has no effect onusers with restricted rights.Allow user activation Checking this box allows users with ACL editoraccess or higher to enable agents. This allows ascheduled agent on the server to be enabled ordisabled without resigning the agent.Default access for viewing andrunning this agentThe default level for viewing and running the agent is"All readers and above." You can deselect this fieldand choose who you want to have default access forviewing and running the agent.Allow public access users toview and run this agentLets users who have public access to documents ina database view and run the agent.Chapter 12. New features in Domino 6 411Converting agents can be performed using the agent’s property box(Figure 12-42).Figure 12-42 Converting private and shared agents12.8.9 New console commandsThere are a few new console commands that handle agents. These are:_ load amgr -hGives you a help index for the agent manager._ tell amgr run “database name” ‘agent name’Runs an agent in a separate thread._ tell amgr cancel “database name” ‘agent name’Aborts an agent currently running on the server._ show agents [-v] “database name”Shows all agents in a database, and with the verbose format, also scriptlibraries, with additional information; Figure 12-43 on page 412.412 Domino Designer 6: A Developer’s HandbookFigure 12-43 Agent information using “show agents”
12.9 HTMLLotus Notes/Domino has supported HTML and pass-through HTML for ages, andnow in Domino 6 there are new features for editing and rendering HTML.12.9.1 Enabling the HTML PaneWith Domino Designer 6 you can add a new pane into the Designer client—theHTML Pane. To enable this new pane, you need to have some HTML on your
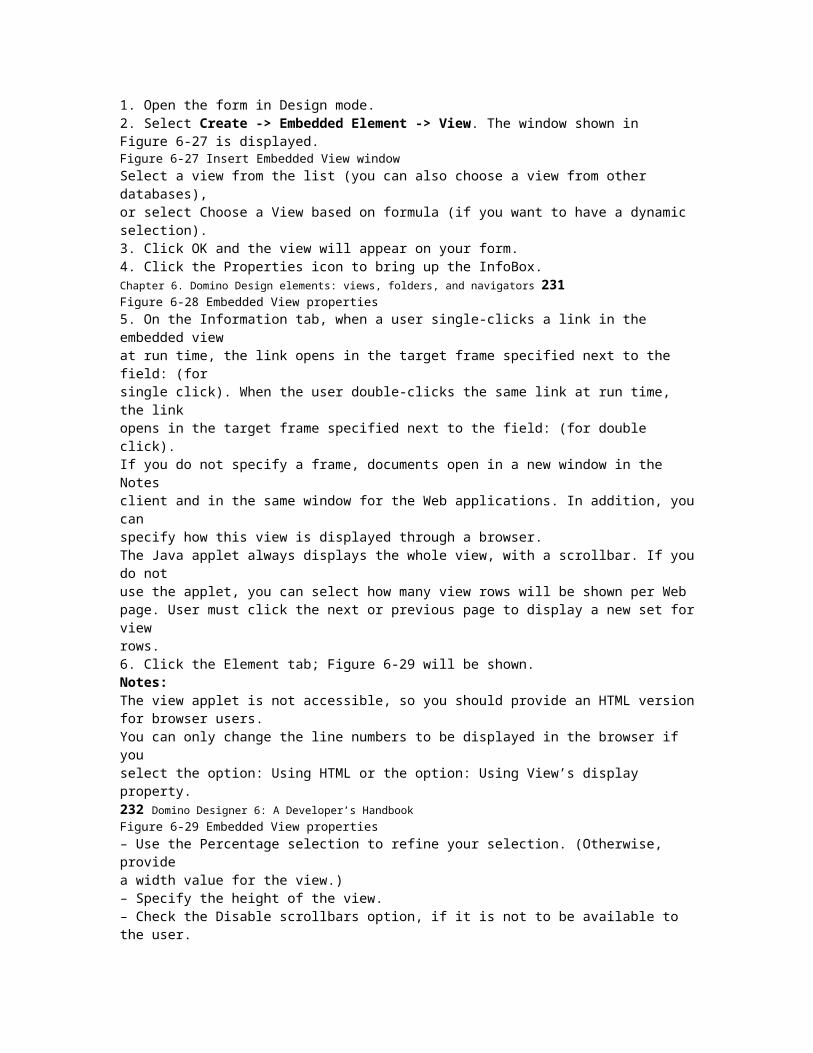
form/page. Without HTML, there is no point having an HTML Pane available, sothis new menu and feature element is context sensitive.1. Type some HTML code in your form.2. Make this code pass-through HTML.To make your code pass-through HTML, mark your code/text and chooseText-Pass-Thru HTML from the menus. Your text/code will now be shaded asshown in Figure 12-44 on page 413.Note: Context sensitive means that elements are available only from wherethey should be available. For the HTML Pane, this means that you will not beable to enable this pane unless you are in a form or page, and that you in factare currently inside a pass-through HTML text.Chapter 12. New features in Domino 6 413Figure 12-44 Pass-through HTML in a form3. Place your cursor somewhere in the HTML code.4. Choose View -> HTML Pane.This gives you a new pane directly in your Domino Designer 6 (Figure 12-45).Figure 12-45 HTML Pane414 Domino Designer 6: A Developer’s HandbookThis is the new HTML Pane. The lower part of the window (similar to theProgrammer’s pane), is where you will add and remove your HTML code. Theupper part of the window is a preview of what your code would look likeviewed through a browser or even a Notes client. Since it is not a live previewwindow, you will need to click Refresh in the upper left corner wheneveryou’ve made some changes to the HTML and want to view the result.5. To go back to your regular form, choose View -> HTML Pane, to deselectyour HTML Pane.12.9.2 Adding code using the HTML PaneWhen you have completed the steps described in 12.9.1, “Enabling the HTMLPane” on page 412, you are ready to add some more code on your form. Thissection explains the HTML Pane’s capabilities and features.With the HTML Pane available, you can edit and change the code of your choicein the pane. All your code is added back to the form when saving and leaving thispane.The HTML Pane supports type-ahead coding. If you want Domino Designer 6 tohelp you and propose and give you type-ahead of the tags and propertiesavailable, make sure this is enabled, as described in “Enabling auto complete” onpage 400. This is enabled by default.As you can see in Figure 12-46 and Figure 12-47 on page 415, HTMLtype-ahead is supported for both tags and properties:Figure 12-46 Type-ahead for HTML tagsChapter 12. New features in Domino 6 415Figure 12-47 Type-ahead for HTML propertiesSo, after adding some code and switching back to the normal form look, youmight have something like Figure 12-48.Figure 12-48 HTML example built with HTML PaneThe example in Figure 12-48 shows simple HTML code, with some <span> tagsand some <table> tags. Previewing this on a Web browser would look like whatFigure 12-49 on page 416 shows.416 Domino Designer 6: A Developer’s HandbookFigure 12-49 HTML in a Web browserNow, with Domino 6, you can also preview the HTML code directly in your Notes6 client. This new feature also applies when including style sheets and otherelements common to HTML. This allows you to use Domino Designer 6 todevelop code that is available and can be rendered in multiple clients(Figure 12-50).Figure 12-50 HTML in a Notes 6 client

In this example, we added styles to the text directly using the “style” tag.Chapter 12. New features in Domino 6 417Using style sheets on form and pagesThe use of style sheets on forms and pages does not work directly inpass-through HTML code. Style Sheet Resources apply styles directly to someNotes elements, and these elements are well documented in the Lotus DominoDesigner 6 Help. Notes elements that support Style Sheet Resources are thedocument, paragraph, list item, layer, table, table cell, and image. Fields do notdirectly support Style Sheet Resources. Field contents inherit styles for aninheritable property. For Web clients, however, these style sheets apply as usual.
12.10 New UI elementsThere are a couple of new UI elements that the designer can utilize in DominoDesigner 6. This section explains and describes these elements and how to usethem.12.10.1 LayersYou can now control and position overlapping blocks of content on a page, form,or subform. With layers you can control your placement, size, and content ofinformation. These layers can both be transparent and opaque, so a stack oflayers can in fact reveal layers underneath and hide others.The content of a layer depends on where you add the layer. If you create it on aform, then you can add text and graphics, controlled-access sections, fields, andsubforms. These are elements that normally can be added to a form. If the layeris created on a page, this layer can only contain the same elements that a pagecan contain, like text and graphics.Use layers for the following:_ Grouping design elements_ Absolute positioning_ Overlapping contentsOnce a layer is created, you can change the following properties of the layer:_ Position_ HTML properties_ Background color and imageCreating a layerFollow these steps to create a layer on your form, page, or subform:1. Open/create a form, page, or subform.418 Domino Designer 6: A Developer’s Handbook2. Choose Create -> Layer.You now get a layer, which is a rectangular element with borders and a LayerAnchor icon in the top left corner; see Figure 12-51.Figure 12-51 New layerPositioning the layerIf you need to, you can change the position of a layer in several dimensions bychanging its properties, as follows:1. Select the layer.2. Choose Layer -> Layer Properties and click the Positioning tab.3. Choose a position and position value, as described in Table 12-10.Table 12-10 Positioning a layerLayer position Description Default valueTop Specifies the location of the topedge of the layer."Auto" aligns the top of thelayer vertically with itsoriginal location (insertionpoint).Chapter 12. New features in Domino 6 419

A layer with a higher Z-Index value (for example, layer A) is located closer to theuser; that is, it is stacked in front of a layer with a lower Z-Index value (forexample, layer B). If the layers overlap and layer A is opaque, the contents oflayer A obscure the contents of layer B. In addition, the contents of layer B cannotbe clicked or selected, even if layer A is transparent.A negative Z-Index is placed behind the parent element's contents (so that itcannot be clicked or selected); a positive Z-Index (>=0) is placed in front of theparent element's contents (and prevents overlapped parent element (form, page,or another layer, for example) content from being clicked or selected)Left Specifies the location of the leftedge of the layer. For example, avalue of 96 units indicates that theleft side of the layer is located 96units from the left edge of theparent element."Auto" aligns the left edgehorizontally with its originallocation (insertion point).Width Specifies the width of the layer, avalue based on the location of itsright edge relative to its left edge.One-third of the width of thewindow or the parentelement, whichever applies.Height Specifies the height of the layer, avalue based on the location of itsbottom edge relative to the topedge.One-third of the height of thewindow or the parentelement, whichever applies.Z-Index Specifies the stacking order of thelayer; that is, how close to or farfrom the front of the parentelement the layer is located.0; that is, in front of theparent element.Tip: You can also position the layer by dragging and dropping it anywhere inthe page or form. This is often much easier than trying to experiment with thepositioning values.You can also select multiple layers and move them simultaneously. To select alayer hold Shift down and click on the layers and move them. You can alsoselect multiple layers by selecting a layer and then selecting Layer -> Select-> All siblings or All children.Layer position Description Default value420 Domino Designer 6: A Developer’s Handbook
Setting HTML propertiesThe layer element is supported for use in Web browsers as well, and if you aredesigning an application for the Web and are using HTML 4.0, the HTML tab letsyou apply some attributes to layers.Follow these steps to set your HTML properties:1. Select a layer.2. Choose Layer -> Layer Properties and click the HTML tab.3. Specify HTML attributes, as described in Table 12-11.Table 12-11 HTML properties for the layer elementHiding a layerYou can hide your layers if you want, and there are basically two ways to hide alayer, depending on the situation:

_ Using Hide-When_ For the current session onlyYou can hide your layers by using the Hide-When properties of the paragraphcontaining the layer anchor, just like any other elements. Hide-When is describedin “Paragraph Hide When tab” on page 113.Note: Do not include quotation marks when you enter the attributes in thevarious HTML tab fields, except in the Other field.Tag DescriptionID The ID attribute. This is the name of the layer object.Class Use the Class attribute to apply a CSS class for adefined object.Style Use the Style attribute to apply a specific CSS style toan object using inline CSS.Title Generally use the Title attribute in Explorer 4.x andlater to provide the user with a tip or prompt.Other Use the Other attribute for additional HTML tagattributes, which must be written as pure HTML code.Note: If a layer anchor is contained in a collapsed section or in a row that isnot currently visible, of a tabbed table, the layer and its contents are not visibleuntil the collapsed section is expanded or until the row is current.Chapter 12. New features in Domino 6 421If you want to hide the layers for the current session only, then use the Layer Treedialog box:1. Open a page or form and create one or more layers.2. Choose Design -> Layer Tree. The Layer Tree dialog box appears listing allthe layers (and their hierarchies) on the page or form.3. Select a layer. Click Hide/Show to hide or show the layer while you edit theform or page in Designer.4. To hide all layers for the current session, click Hide All. To show all layers forthe current session, click Show All.5. Click Close.Example of using layersEarlier in this chapter, we created a layer, shown in Figure 12-52.Figure 12-52 A single layer on a formWe then resized the first layer and inserted another layer to the right of it; seeFigure 12-53 on page 422.Tip: You can easily set many of the settings of a layer to be the same as thoseof some other layer. Select both layers and set desired properties.422 Domino Designer 6: A Developer’s HandbookFigure 12-53 Two layersNow let’s add some information in these two layers, using tables, text and fields;see Figure 12-54 on page 423.Chapter 12. New features in Domino 6 423Figure 12-54 Layers with contentIf we now preview this form with layers in the Notes 6 client; see Figure 12-55 onpage 424.424 Domino Designer 6: A Developer’s HandbookFigure 12-55 Layers in Notes 6 clientIf you want to reorder these layers, and change their location on the screen, thisis easily done, since layers are fully movable and controllable and can be placedanywhere, as shown in Figure 12-56 on page 425.Chapter 12. New features in Domino 6 425Figure 12-56 Overlapping layersAfter completing the move and customization of the placement of the layers, asshown in Figure 12-57 on page 426, it will look as for the Notes 6 client.426 Domino Designer 6: A Developer’s HandbookFigure 12-57 Changed places in Domino Designer 6

Chapter 12. New features in Domino 6 427Figure 12-58 Changed places in Notes 6 clientWeb supportThe layer element is supported for use in Web browsers as well, and if you aredesigning an application for the Web and are using HTML 4.0, the HTML tab letsyou apply some attributes to layers, as explained in “Setting HTML properties” onpage 420.Figure 12-59 on page 428 shows the same form with layers (after some furtherrepositioning) in Internet Explorer.428 Domino Designer 6: A Developer’s HandbookFigure 12-59 Form with layers in Internet Explorer12.10.2 New field typesDomino 6 has three new field types: Color, Rich Text Lite, and Time Zone.ColorA Color field lets you display a color picker on a form. The color you choose isstored in a hexadecimal format. You can use the field, for example, to get inputfrom a user and change a color of the background or text based on that. TheColor field looks as in Figure 12-60 on page 429.Chapter 12. New features in Domino 6 429Figure 12-60 Color fieldRich Text LiteWhen you need to collect, store and display formatted text in a field, embeddedor attached objects and elements, you have a new option in addition to the RichText fields: Rich Text Lite fields.Rich Text Lite fields are Rich Text fields with a helper icon and down arrow next tothe field. Clicking the icon gives the user a fast way to add text, an object, or anelement into the Rich Text Lite field. Clicking the down arrow displays adrop-down menu. The elements listed in the drop-down menu are the onlyelements the user is allowed to insert into the Rich Text Lite field. Any attempt topaste a non-allowed element into this field causes an error message. This is agood way to limit the input from the end user, and restrict what can be added inRich Text fields.You can select or deselect one or more of the following object types (the objecttypes selected have a check next to them):_ Pictures_ Shared Images_ Attachments_ Views_ DatePicker_ Shared Applets_ Text_ OLE Objects430 Domino Designer 6: A Developer’s Handbook_ Calendar_ InboxCreating a Rich Text Lite fieldTo add a Rich Text Lite field to a form, select Rich Text Lite from the field type liston the Field Info tab of the Field Properties box (Figure 12-61).Figure 12-61 Designing and limiting inputs to the fieldAt the Control tab of the Field Properties box, check the object types you want toadd to the drop-down menu that appears when the user clicks the down arrow.Figure 12-62 shows how Rich Text Lite would look to the end user in Notes.Figure 12-62 Rich Text Lite, to an end userNote: If you select only one of these object types, no down arrow appearsbecause there is no need to change types.

Chapter 12. New features in Domino 6 431After a user has selected to show an Inbox, the document looks as shown inFigure 12-63.Figure 12-63 Rich Text Lite, with an inbox insertedTime zoneA time zone field lets you display a drop-down list of all available time zones inthe world, including the local time zone. Each time zone listed includes a partiallist of the cities or locations found in that time zone; see Figure 12-64.Figure 12-64 The Time Zone field432 Domino Designer 6: A Developer’s Handbook
12.10.3 Embedded editorEmbedded editor is a new element that can be embedded in your forms. Thereare two situations in which you would utilize this new feature:_ Embedding one or more forms into an existing form_ Embedding an editor that again links to an embedded viewEmbedding one or more forms into an existing formIn an existing form, you can now embed another form, to be accessed andtreated as a separate form within the existing one.1. Create a form or open an existing form.2. In the form, place the cursor where you want to create the embedded editor.3. Choose Create -> Embedded Element -> Editor.The Insert Embedded Form dialog box appears.You can choose one of the following options:– NoneThis is the first choice under "Choose a form." Choose None if you want topaste a document or anchor link into the embedded editor or if you want touse targeting by linking an embedded editor to an embedded view.– An existing form from the list of formsThe list of forms in the current database appears under "Choose a form."To insert an existing form into the embedded editor, choose one of theforms.To insert a form from another database, select a database from thepull-down list of databases and then choose a form listed under "Choose aform."– Insert form based on formulaTo insert a form based on a formula, check “Insert form based on formula.”4. Choose Element -> Editor Properties to open the Embedded EditorProperties box. At the Info tab, you have the following choices:Note: The data entered in an embedded form is saved with that form, and isnot part of the original form, generating one document for each of the forms.To save content in the embedded forms, however, you need to do the savewhile you are in this embedded form. If you save the main document, you donot automatically create documents for all embedded forms.Chapter 12. New features in Domino 6 433– Name - Enter a name for the embedded editor. Entering a name isnecessary only if you are targeting to an embedded view.– Size - Enter a size in inches for the width and height of the embeddededitor. Alternately, you can check “Fit to window” for the width and for theheight.– Type and Value - These fields are automatically filled out, depending onhow the editor is created. The following values may appear:• LinkLink appears in the Type field if you selected None in the “InsertEmbedded Form” dialog box. The fields next to the Type and Valuefields are both left blank. Link requires that you paste in a link that

you’ve already copied to the Clipboard. Click the Paste icon to paste inthis link. Note that you can paste in only an anchor or a document link.Do not try to paste in a View or a database link.• Named ElementNamed Element appears if you selected an existing form in the “InsertEmbedded Form” dialog box. The field next to Named Element displaysas Form. The Value field contains the name of the form you chose inthe Insert Embedded Form dialog box.– Hide action bar - Checking this causes the action bar of the form youinserted (with the “Insert Embedded Form” dialog box) to be hidden. If it isunchecked, the action bar is displayed.– Disable scroll bars - Checking this causes no scroll bars to appear. If it isunchecked, the embedded editor displays with scroll bars when all of itscontent does not fit on the screen.Preview documents selected from an embedded viewOne of the useful things of this feature is the ability to preview documentsselected from an embedded view into an embedded editor. You can place one ormore embedded views on a form, and then link them to one or more embeddededitors.1. Create a new form.2. Choose Create -> Embedded Element -> Editor.3. Select None in the "Insert Embedded Form" dialog box and click OK.4. Choose Element -> Editor Properties. The Embedded Editor Properties boxopens.5. Specify a name for the embedded editor and close the properties box.434 Domino Designer 6: A Developer’s Handbook6. Choose Create -> Embedded Element -> View. The “Insert EmbeddedView” properties box appears.7. Choose a view and click OK.8. Choose Element -> View Properties. The Embedded View Properties boxopens.9. In the Target Frame (for single click) field, enter the name of the EmbeddedEditor that you want to link to. Close the properties box.10.Save and close the new form.11.Create a new document with the form.12.Highlight a document in the embedded view. The document loads in theembedded editor. You can now edit that document in the embedded editor.You can then switch to another document in the embedded view and continueediting.Figure 12-65 shows the end-user view of this.Figure 12-65 Previewing selected documentsChapter 12. New features in Domino 6 43512.11 Outline enhancementsThere are some new ways and features to handle outlines in Domino 6. Thischapter covers some of these enhancements.12.11.1 Computed outlinesIn Designer 6 it is possible to embed an Outline in a page, form, subform or RichText Field based on formula (Figure 12-66). In this way you can offer a dynamicnavigation context to the user based on some condition. For example, you couldshow different outlines for internal or external users, or based on access rights tothe database.Figure 12-66 Embedding an outline based on a formulaTo learn how to embed an Outline in another Design element, see 9.3,“Embedded Outline” on page 309.

12.11.2 Pop-up textIn some cases you need to specify a label for the Outline entry and there is awindow size limitation for the label that you want to use. In this case, you can useTip: Combining the above with the Domino 6 feature InViewEdit, whichenables the end-user to edit documents directly in a view, makes the featureeven more useful, reducing the need for multiple open windows.436 Domino Designer 6: A Developer’s Handbookthe pop-up text. This new feature lets you specify a text to be displayed when theuser moves the mouse over the outline entry.To learn how to specify a pop-up text, see 9.3, “Embedded Outline” on page 309.12.11.3 Customizable twistiesYou can make the display of the outline more attractive by using figures insteadof triangular twisties. In this way you have more graphical resources to developgood looking interfaces.You can specify the image directly from the Image Resource or choose onebased on formula, handling different contexts and conditions, turning yourapplication interface more dynamic and visually intuitive.The info tab of the outline properties box Figure 12-67.Figure 12-67 Embedded outline12.11.4 Show folder unread informationThis feature displays the number of unread documents in a folder. With thisfeature enabled, users can easily see which folders contain unread documentswithout going through each folder looking for them. The unread count isdisplayed beside the folder’s name, as shown in Figure 12-68 on page 437.Chapter 12. New features in Domino 6 437Figure 12-68 Unread information for a folderTo enable this, you need to set a property on the embedded outline; seeFigure 12-69.Figure 12-69 Enabling unread information for an embedded outline438 Domino Designer 6: A Developer’s Handbook
12.12 Actions enhancementsThere are a lot of new features for actions in Domino Designer 6, and this chaptercovers most of these enhancements.12.12.1 General changes_ System actions are no longer default-added to action bars.System actions are six prebuilt actions related to document handling. Each ofthem runs a system command such as forward, edit or send document. Youcannot modify what the system commands do. System actions are included inthe action menu, but not in the action bar by default. You can change this inthe properties, action by action.System commands must now be inserted if needed, using Create -> Action-> Insert System Actions, as shown in Figure 12-70.Figure 12-70 Including system actions_ Easier handling and maintenance of actions.You can easily drag and drop actions in the action list, to move them around,and reorder them.12.12.2 Computed labelsComputed labels are now possible. These let you, for example, personalizeaction bars and actions, or compute them in ways that meet your needs:Chapter 12. New features in Domino 6 439Figure 12-71 Computed labelsTo make a computed label as described in Figure 12-71, add the followingformula to the computed label window:@Name([CN] ; @UserName) + ", click here to save the document"

12.12.3 Menu separatorThere is a new type of action, the menu separator, that enables and makes iteasier to add separators in your application’s action bars. This action type adds aseparator to the resulting drop-down list, when using “Action with sub action”.Figure 12-72 Menu separatorThe line that separates the actions in the drop-down list is the menu separatoraction. You select this type of action as you design your action in the action pane.12.12.4 Checkbox actionThere is a new type of action, the checkbox, that lets you show the state of anitem (checked or unchecked). If you choose checkbox, you can enter a value in440 Domino Designer 6: A Developer’s Handbookthe Value field (for example, a formula that evaluates to true or false). You canalso highlight the Click event in the Objects list of the Programmer's pane to entera Click value. If you want the action bar's state (checkbox) to be re-evaluatedwhen a different document becomes current, make sure to check the “Evaluateactions for every document change” option in the Options tab of the ViewsProperties box.Example of using the checkbox actionTo understand the complete relation of this example, refer to 14.9, “Sametimeconnectivity” on page 641 for information about Sametime connectivity, and see14.9.3, “Power of Sametime” on page 641.The example in this chapter shows how you can Sametime-enable a Webapplication by adding instant messaging capabilities. Clicking on a listed personon a Web page gives you the possibility to chat directly with the listed person,using Sametime functionality in a Web browser.This example uses a list of hard-coded and predefined users that should beavailable on the Web page. The more optimal solution would be to have a moredynamic and end-user selective solution, letting the end user select whether heor she should be available or not.This solution could be achieved by clicking a button that runs a backgroundagent, and maybe returns a message box, prompting the status of the person.An even better solution would be if the user could actually see the state of thissetting directly, without having to click a button to run some agent that will givethis status as part of a prompt. This can be achieved by using a checkbox action.Let’s see how this can be implemented.Assumptions_ The name of the Web application database is SametimeWebApp.nsf._ A view of all users registered in this database, with their status, is calledlupSametimePeopleStatus.Target_ An action button in the mail file that changes the state of the person’s status_ An action button that shows the state of the status in the Web applicationSolutionFirst, add an action button in the ($Inbox) folder in the mail file, and set this actionbutton to the checkbox type, as shown in Figure 12-73 on page 441.Chapter 12. New features in Domino 6 441Figure 12-73 Checkbox action addedThis adds a checkbox action to the Inbox folder of the mail file, as shown inFigure 12-74.Figure 12-74 Checkbox in the InboxClicking this action should now change the status field in another database(SametimeWebApp.nsf), for the current user. It should also be checked if thestatus is Online, and unchecked if the status is Offline. This will easily let theusers select their status, and visually show whether they are Online or Offline inthe Web application database.

442 Domino Designer 6: A Developer’s HandbookThis checkbox is checked if the value of the action is evaluated as True, andunchecked if the value is evaluated as False. Clicking Value in the actionproperties box, let us specify formula for the checkbox action. By adding the codein Example 12-3, the formula will evaluate as True if the field SametimeStatushas the value Online, and as False if the value is Offline or the field has any othervalue.Example 12-3 Value code of checkbox actiontmpDB := "SametimeWebApp.nsf";tmpView := "lupSametimePeopleStatus" ;tmpUser := @UserName ;tmp := @DbLookup( "Notes" : "NoCache" ; @DbName[1] : tmpDB ; tmpView ; tmpUser;2) ;@If(@IsError(tmp) ; @Return("") ; "" ) ;@If(tmp = "Online" ; @True ; False )To complete this task, the only thing remaining is to change the SametimeStatusfield in the Web application database when clicking the checkbox action. Toachieve this, we added the code in Example 12-4, in the click event of thecheckbox action button.Example 12-4 Click event of the checkbox actionSub Click(Source As Button)Dim session As New NotesSessionDim dbThis As NotesDatabaseDim db As NotesDatabaseDim view As NotesViewDim doc As NotesDocumentDim namUsername As NotesNameDim sUsername As StringSet dbThis = session.CurrentDatabaseSet namUsername = New NotesName(session.username)sUsername = namUsername.CanonicalSet db = session.GetDatabase(dbThis.Server, "SametimeWebApp.nsf")If Not db Is Nothing ThenSet view = db.GetView("lupSametimePeopleStatus")If Not view Is Nothing ThenSet doc = view.GetDocumentByKey(sUsername, True)Note: The view in @DbLookup has two columns. The first one contains theuser name, the second the status.Chapter 12. New features in Domino 6 443If Not doc Is Nothing ThenIf doc.SametimeStatus(0) = "Online" Thendoc.SametimeStatus = "Offline"Elsedoc.SametimeStatus = "Online"End IfCall doc.Save(True, False)End IfEnd IfEnd IfEnd SubExample 12-4 on page 442 uses the username as the key for finding the correctdocument in the SametimeWebApp.nsf database.If the user is offline in the Web application database upon opening his mail file,then the checkbox is not checked, as shown in Figure 12-75.Figure 12-75 Unchecked, not onlineBy clicking the action, the click event is performed, and the action button isre-evaluated and is now checked, because the status in the Web applicationdatabase has been changed to Online. You can see this in Figure 12-76 onpage 444.

Note: This example supposes that the SametimeWebApp.nsf database is onthe same server as the mail file. This is not a requirement.444 Domino Designer 6: A Developer’s HandbookFigure 12-76 Checked, online12.12.5 Sub actionsThere is a new feature called “Create Action with Sub Action”, which allows youto create cascaded actions with sublevels of actions:Figure 12-77 Action pane with sub actionsAs you can see in Figure 12-77, the look and interface of the action pane ischanged as well.How to create Action with Sub ActionThere are two ways to create Action with Sub Action:_ Choose Create Action with Sub Action from the menu.Or:_ Inside your action pane, right-click and select Create Action with SubAction.Note: This example is based on changes in the inbox folder of a mail file.Customizing the mail file is not recommended. The purpose of the example isto highlight the strength of the checkbox action that lets you show the state ofan item.Chapter 12. New features in Domino 6 44512.12.6 Other features and enhancementsThere are several new features with actions and action bars, and without goinginto more detail, here are some of them:_ Hide actions for mobile clients_ Bar height on action bars_ Border styles on action bars_ Border effects on action bars
12.13 View enhancementsMany improvements and new features have been made for views. This sectionhighlights some of these.12.13.1 Column colorsIn Designer 6 you can set colors to be displayed in view columns. With thisenhancement you can represent information visually with colors. You can do thisin two ways:_ By specifying the color, RGB based, directly in the Programmer’s pane for thecolumn._ By pointing the color settings to a profile document.Example of column colorsIn Notes client applications, you can set a column's background color and textcolor programmatically by selecting the “Use value as color” option on the Infotab of the Column Properties box and then supplying RGB coordinates in theProgrammer's pane as the value for the column. To be able to set the color of acolumn, you need to enable the column option “Use value as color” as shown inFigure 12-78 on page 446.Tip: You can now create actions and actions with sub actions by right-clickingin the action pane.446 Domino Designer 6: A Developer’s HandbookFigure 12-78 Enabling column colorIf you specify one set of coordinates (three numbers separated by colons), thisdefines the color of the text. If you specify two sets of coordinates (six numbersseparated by colons), the first set of coordinates defines the background color forthe column, and the second set of coordinates specifies the text color.To add text and background colors, we apply a column value of that column. But

the problem then is, how do we also show some content on that column? Thetrick here is that all the columns to the right of the column where you specify thecolors, will appear in the colors you defined. Hide the column where you definethe colors, because showing those color coordinates to users makes no sense.If you want just one column to be colored, then you have to put a hidden colorcolumn to the left and right of the colored column. In the color column on theright, you should switch back to the normal colors.Let’s see how this would be done. Let’s start with a plain view, with four columns,and no colors, as shown in Figure 12-79.Figure 12-79 A plain view with no colors, in Domino DesignerWhat we want to achieve is to have different columns in a separate backgroundand text colors as follows:_ The first column will remain as the default, black text on white background._ The second column will have black background with white text.Chapter 12. New features in Domino 6 447_ The third column will have a light grey background with red text._ The last column should have the normal background again._ Each column should also have content data as well. To do all this, we need toadd some code for each column.For the first column, there should be no code, since it should have the defaultcolors. So we only add a column value of the content we would like. For thisexample, let’s use Firstname, which is a field in our example documents.For the second column, we also need to add some code. What we could do, is toadd the RBG code as the value of this column, but this wouldn’t give us thepossibility to also add some real content to the column, like Lastname. We add ahidden column to the left of the second column with the “Use value as color”option turned on, and add the RBG code in this column. The column value of the“Black background” column would be the field Lastname. This is shown inFigure 12-80.Figure 12-80 Adding a hidden column with the RGB codeAdding this column adds color to the hidden column as well as all the columns tothe right of it. In the Notes 6 client, this would look as in Figure 12-80.448 Domino Designer 6: A Developer’s HandbookFigure 12-81 Column colorsAs we can see in Figure 12-81, the second column, titled “Black background”, iscolored with black background and white text. But so are all the columns to theright of this column.Now we want to add a different color in the third column, titled “Light greybackground/red text”. But we would also like to have the value of the field Statusin this column. Because of that, we need another hidden column before the “Lightgrey background/red text” column, with the “Use value as color” option turned on.In that column we set the new RGB code, and for the “Light grey background/redtext” column, we add the Status as the column value. This is shown inFigure 12-82.Figure 12-82 Another hidden column with RGB codeChapter 12. New features in Domino 6 449The view would now look like Figure 12-83 in the Notes 6 client (colors may notbe clear in black/grey printout, but you should be able to see the contrasts).Figure 12-83 Column colors in the Notes 6 clientAnd, finally, we want the last column, “Back to normal”, to have the regular colors,as in the first column, and with the text “This is absolute normal” as the columncontent. To do this, we once again add a hidden column with the “Use value ascolor” option turned on; see Figure 12-84.Figure 12-84 Another hidden columnAnd after adding a column value for the last column to “This is absolutelynormal”, our example would look like Figure 12-85 on page 450 in the Notes 6

client.450 Domino Designer 6: A Developer’s HandbookFigure 12-85 Final result of column colors12.13.2 Context-sensitive actionsTo provide an intuitive and attractive application, you can use context-sensitiveactions. In order to use them, you must set Hide-When conditions for thoseactions. Notes always evaluates the Hide-When conditions when the view isopened and you can set the option “Evaluate actions for every document change”in the view’s properties box to evaluate the Hide-When conditions each time adocument changes.Figure 12-86 Context-sensitive actionsExampleConsider an example where you have a database that handles orders, and thedatabase has a view showing orders with different statuses. Then, you cancontrol an action button to be hidden if the marked document has a certain value.For example, if the view contains both approved and pending orders, and youselect an “approved” document, then the action button for “Approve order” shouldnot be visible.Chapter 12. New features in Domino 6 451In Figure 12-87 we have four documents. For the marked document, TerjeWeiseth, you have an action button available: Approve.Figure 12-87 Evaluate actions IIf you select another person, Rune Carlsen, this action button is no longeravailable, because it is hidden based on the value of the field Status (it is alreadyapproved). This can be seen in Figure 12-88.Figure 12-88 Evaluate actions IITo enable your application for this feature, follow these steps:_ Check the “Evaluate actions for every document change” on the view propertyfor the view you want this feature. See Figure 12-86 on page 450._ Add a Hide-When formula for the action in the selected view, for example:Status = “Approved”12.13.3 Customized iconsIn Designer 6 you can choose your own images to be displayed as icons in aview column. These images must be in the Image Resources. You can still usethe standard icons, of course.Caution: Be aware that checking this option can have a serious impact on theperformance of your application.452 Domino Designer 6: A Developer’s HandbookTo set a customized image for an icon in a view column, select the “Displayvalues as icons” option in the Column properties box. Then, in the programmer’spane of this column, point to an image in the Image Resource; see Figure 12-89.Figure 12-89 Customized icons in columns12.13.4 Background images/gridsTo develop a pleasing and user-friendly application you can specify an image tobe the background of a view. You can do this by choosing an image from theImage Resources dialog box or specifying a formula for displaying an imagebased on a certain condition. The formula is evaluated when the view firstdisplays.Another enhancement in Designer 6 is that you can set a grid style for the view.This adds borders for your rows and columns, making it easier to read the views,especially if they have a large amount of data; see Figure 12-90 on page 453.Note: Choose an image with appropriate size and colors that fits well in aview. An image resource can be a GIF, BMP, or JPEG graphic. Therecommended size for a column icon is .2 inches wide and .18 inches high.Chapter 12. New features in Domino 6 453

Figure 12-90 Grids in a viewThe grids can be defined as part of the view property, and have several styles aswell. Choose the one that suits your needs.To learn how to use a background image or to set the grids in a view, seeChapter 6, “Domino Design elements: views, folders, and navigators” onpage 183.12.13.5 Customize twistiesIn Designer 6 you can customize the twistie images. Twisties are very useful inviews, more specifically in categorized columns and documents with responsedocuments.In the previous releases of Lotus Notes, just the standard triangular was availableas the twisties image. Now in Designer 6, You can do it by choosing an imagefrom the Image Resources dialog box or specifying a formula for displaying animage based on a certain condition. The formula evaluates when the view firstdisplays.To learn how to define a twistie image see Chapter 6, “Domino Design elements:views, folders, and navigators” on page 18312.13.6 User customizationsIn Designer 6, the user, by default, can customize a view in a variety of ways,including resizing and reordering columns or setting color options. Changesusers make are maintained when they close and reopen the view. It’s a greatenhancement because the application developer can create a view for differentaudiences, avoiding creation of several views to satisfy all the audience interfaceneeds.454 Domino Designer 6: A Developer’s HandbookTo set this feature, select “Allows customization options” in the views propertiesbox.For more information about View customization, see Chapter 6, “Domino Designelements: views, folders, and navigators” on page 183.12.13.7 Create document from viewThis feature lets the users create documents directly from the view, withoutopening a new window. The users fill the fields in through the view columns. Inthis context, the columns appear in edit mode. To set this feature, do thefollowing:1. Select the “Create new documents at view level” option in the View’sproperties box.2. Select “Editable column” in the Column’s properties box for the columnswhere you want the user to enter data.3. Add code to the view’s InViewEdit event to handle the document creation andvalidation entries. You can program this event only with LotusScript.Example 12-5 shows a sample of programming the view’s InViewEdit event tocreate a document. In this sample database, there is a form with two fields:Firstname and LastName. In the view we just allow the user to fill the Firstnamefield.Example 12-5 Create a document from a viewSub Inviewedit(Source As Notesuiview, Requesttype As Integer, Colprogname AsVariant, Columnvalue As Variant, Continue As Variant)Const QUERY_REQUEST = 1 ' values for RequestTypeConst VALIDATE_REQUEST = 2Const SAVE_REQUEST = 3Const NEWENTRY_REQUEST = 4' Editable columnConst COLUMN_FEATURE = "Firstname" 'programmatic name of columnConst FIELD_FEATURE = "Firstname" 'corresponding field nameDim ws As New NotesUIWorkspaceDim note As NotesDocument

Dim db As NotesDatabaseSet db = ws.CurrentDatabase.DatabaseIf RequestType = NEWENTRY_REQUEST Then'Create a new documentChapter 12. New features in Domino 6 455Set note = db.CreateDocument()note.Form = "frmPersons"' Column Value is an array of items that you edited in place in theviewCall note.ReplaceItemValue (FIELD_FEATURE, ColumnValue(0))Call note.Save(True, True, True)End IfEnd SubExplanationThe InViewEdit event runs several times, depending on the request that is beingperformed._ QueryThis is when the user enters an editable view column entry._ ValidateThis is when the user exits an editable view column entry._ SaveThis is after validation of one or more view column entries in an existingdocument.In the view, use Ctrl-Click here to add a new document in the bottom of the viewto create a document.An editable column appears in which to enter data. Fill this in and press Enter, orclick outside of the editable field to finalize the procedure.A new document is created in the database; see Figure 12-92 on page 459.Note: In the previous sample the code just handles the document creation.456 Domino Designer 6: A Developer’s HandbookFigure 12-91 Create a document from view12.13.8 Editing a document in a viewYou can enable Notes users to edit fields of an existing document directly in aview. The big advantage of this feature is that the document itself does not needto be opened—editing takes place directly in the view. This is especiallybeneficial for documents where users make only minor changes to few fields andtherefore can avoid opening the document in a separate window.For in-view editing, there is a new event for a view, called InViewEdit, and thedevelopers have to enable the column to have this feature, “Editable column”. Toenable a view for this option, follow these steps:1. Select “Editable column” in the Column’s properties box for the columnswhere you want the user to enter data.2. Add code to the view’s InViewEdit event to handle the document creation andvalidation entries. You code this event only with LotusScript.In this new event, we have to add some code that will make sure that the updatehappens, and that validation takes place. Example 12-6 on page 457 shows anChapter 12. New features in Domino 6 457InViewEdit LotusScript that enables InViewEdit to take place, accept all userinputs, and update the document.Example 12-6 Editing a document in a viewSub Inviewedit(Source As Notesuiview, Requesttype As Integer, Colprogname AsVariant, Columnvalue As Variant, Continue As Variant)Const QUERY_REQUEST = 1 ' values for RequestTypeConst VALIDATE_REQUEST = 2Const SAVE_REQUEST = 3Const NEWENTRY_REQUEST = 4' Editable column

Const COLUMN_FEATURE = "Firstname" 'programmatic name of columnConst FIELD_FEATURE = "Firstname" 'corresponding field nameDim ws As New NotesUIWorkspaceDim note As NotesDocumentDim db As NotesDatabaseSet db = ws.CurrentDatabase.DatabaseSet note = db.GetDocumentByID(Source.CaretNoteID)If (note Is Nothing) Then Exit SubIf (RequestType = QUERY_REQUEST) ThenIf(note.HasItem(FIELD_FEATURE)) Then'Get the current (original) value to put in Edit boxColumnvalue(0) = note.GetItemValue(FIELD_FEATURE)Else'This doc does not contain the required field;'ignore itContinue = FalseEnd IfElseif (RequestType = VALIDATE_REQUEST) Then'Accept any user inputContinue = TrueElseif (RequestType = SAVE_REQUEST) ThenCall note.ReplaceItemValue (FIELD_FEATURE, ColumnValue(0))Call note.Save(True, True, True)End IfEnd Sub458 Domino Designer 6: A Developer’s HandbookExplanationThe InViewEdit event runs several times, depending on the request that is beingperformed:_ QueryThis is when the user enters an editable view column entry._ ValidateThis is when the user exits an editable view column entry._ SaveThis is after validation of one or more view column entries in an existingdocument.1. Before we edit the document, no events are influenced.2. We click the document and column value we want to edit. This request is aQuery. This request then checks whether the marked document has the fieldto be edited. If so, it sets a value of the field to a constant. If not, it exits thesub.3. Then, the next request is Validate, which validates the content. We have set itto accept all inputs.4. The next request is the Save request, which actually updates the documentby replacing the current value in the field with the new value and saves it.These sequences are shown in Figure 12-92 on page 459.Tip: CaretNoteID is a new property with Domino 6 that is the Note ID of thecurrently highlighted (that is, at the caret location) document in a view.Chapter 12. New features in Domino 6 459Figure 12-92 InViewEditThis is one example of how you can enable your views for InViewEdit events. Youcan add validation and other routines as well. Refer to the Domino Designer 6Help database for more information.12.13.9 Hide columns on-the-flyAnother improvement in Designer 6 is the feature to hide view columns on-the-fly.It means you can develop a view to serve different audiences, displaying differentcolumns for different users. The feature works both for Notes clients and Webbrowser users.

To learn how to set Hide-When options for columns, see Chapter 6, “DominoDesign elements: views, folders, and navigators” on page 183.Attention: The InViewEdit event is only supported in the Notes client.Note: Hide-When formulas are not a security measure. Users can still getinformation by viewing the document properties. Use this feature as a methodfor controlling the display of information in a view.Because the ability to selectively hide a column based on a formula is new inDesigner 6, columns hidden in this way will display in earlier releases of theclient unless you also check the option Hide in Notes R5 or before.460 Domino Designer 6: A Developer’s Handbook
12.13.10 Creating views programmaticallyLotusScript enables you to programmatically add, customize, and delete views.In Designer 6 there is a new method in the NotesDatabase class, CreateView,where you can programmatically create a view, modify the properties of the viewand even delete a view. In this way you can create views and set their attributes,such as columns, with LotusScript.Example 12-7 Creating a view programmaticallySub InitializeDim session As New NotesSessionDim db As NotesDatabaseDim view As NotesViewDim viewCol As NotesViewColumnSet db = session.CurrentDatabaseSet view = db.CreateView("viewMyNewViewName", |SELECT Form = "myForm"| )Set viewCol = view.CreateColumn(1, "Firstname", "Firstname")viewCol.HeaderAlignment = VC_ALIGN_RIGHTviewCol.HeaderFontStyle = VC_FONT_BOLDEnd SubExplanationExample 12-7 creates a view programmatically with the use of the new method inthe NotesDatabase class, CreateView, and sets some properties of the newcolumn using the NotesViewColumn class. The CreateView method containsseveral possible parameters, though we only used the first two in our example:_ viewNameThis is the name of the new view. It defaults to “untitled” and is created eventhough the name duplicates an existing view._ selectionFormulaThis is the selection formula you want to set for the view to determine whichdocuments are shown in the view. It defaults to Select @All, if none isspecified._ formatNotesViewYou don’t necessarily have to create the new view from scratch. Use thisproperty to specify an existing view, from which the new view is copied. If theexisting view has many of the attributes you need in your view, you can save alot of coding and execution time by using it.Chapter 12. New features in Domino 6 461_ isProhibitDesignRefreshSpecify False to allow the view design to be refreshed. The default is True,which prohibits the view design from being refreshed.To set properties of the created view, use the NotesViewColumn class, whichincludes several properties that can be “get” and “set”, as shown in Example 12-7on page 460.
12.14 Field enhancementsWe can now give field hints in Notes 6, as well as quite a few other good fieldenhancements. This section covers the main enhancements with fields inDomino 6.

12.14.1 Field hintsTo create even more user-friendly user interfaces in Domino 6 applications, wecan now include field hints. These are explanations of each field in theapplication. They are set as part of the field property, and show up as text in thefield. They disappear when the user enters the field; see Figure 12-93.Figure 12-93 Field hints12.14.2 Size optionsThere are some new size options for fields, regarding the size of the field, shownin Table 12-12 on page 462.462 Domino Designer 6: A Developer’s HandbookTable 12-12 New size options12.14.3 Alignment options“Align control’s baseline with paragraph’s” is a new property setting for a field,shown in Figure 12-94.Figure 12-94 Align control’s baselineProperty Choose oneWidth Fixed (Size) - this lets you set a fixed width in inchesFit to window - fits the field to the window as thepercentage you set.Fixed (Characters) - this lets you set a fixed width incharacters.Height Fixed - this lets you set a fixed height in inches.Dynamic - this increases the size of the entry boxdynamically up to 3 lines. If an entry is longer than 3lines, scroll bars display automatically.Proportional - this sets the height proportionally to thewidth.Chapter 12. New features in Domino 6 463If you check “Align control's baseline with paragraph's,” the baseline of thecharacters in the field is aligned with the baseline of the characters in theparagraph containing the field. This setting is especially useful if you have noborder around the field. The text in the borderless field will be on the samebaseline as the text in the paragraph containing the field.Figure 12-95 Align control’s baseline with paragraph’s field propertyFigure 12-95 shows an example of the use of this property. Take a look at the twolines with the text Static text.... The lines are identical, except that the text inthe fields is aligned differently. The field on the first line has the “Align control’sbaseline with paragraph’s” property set on; the second line doesn’t.12.14.4 Border stylesWhen we use “Native OS Style” for fields, we now have new border styles tochoose from; see Figure 12-96.Figure 12-96 Native OS Style now have border styles464 Domino Designer 6: A Developer’s Handbook
12.15 Form enhancementsFor basic information about forms, see Chapter 4, “Domino Design elements:forms” on page 75.12.15.1 Render pass-through HTML in NotesDesigner 6 has a tool for both Notes clients and Web application development,which provides a new feature that enables Notes clients to evaluate HTMLplaced in forms, subforms and pages. In this way it is easier for developers tomake their applications portable for both Notes clients and the Web without a lotof workarounds to support several clients.To allow Notes clients to process HTML, check “Render pass through HTML inNotes” in the Form, Subform or Page Properties box.

Figure 12-97 Form Properties boxChapter 12. New features in Domino 6 465If you do not check "Render pass through HTML in Notes," the HTML appears asplain text. You can hide it using the following formula for "Hide paragraph ifformula is true":@ClientType = "Notes"Or you can use the “Hide paragraph from Notes 4.6 or later” property.Figure 12-98 shows HTML added in the Designer 6 client, as pass-thru HTML,rendered in the Notes 6 client.Figure 12-98 HTML rendered in the Notes clientIf you refer to a field, the JavaScript code must follow the field on the form.You can embed computed fields and computed text in HTML text on a form,subform, or page.You can place JavaScript in a URL using the "javascript:" protocol, for example:<A HREF="javascript:code goes here">prompt</A>You can run JavaScript from an agent by sending it to the browser as HTMLusing print statements. For example, in LotusScript:Print "<SCRIPT LANGUAGE=JavaScript>"Print "code goes here"Print "</SCRIPT>"466 Domino Designer 6: A Developer’s HandbookTo run a Domino agent from JavaScript, set the href property of the locationobject to the URL for opening the agent. The URL can be relative to the currenthost. For example:location.href = "/dbname.nsf/agentname?OpenAgent&arg1=val"12.16 Paragraph enhancementsParagraphs have been enhanced and several new features have been added.Among them is a language tagging feature. This chapter covers the mostrelevant new features and enhancements in paragraphs.12.16.1 Language taggingBeyond Designer, there are a lot of new features for Notes Client 6 as well. Oneof them is that you can mark some text of your document to a specific language.One of the advantages of associating a language to a selection of text is for spellchecking. When you perform a spell check in the document, Notes knows to usethe correct dictionary based on the language tag set for the text. You must, ofcourse, have the language dictionaries installed to use this feature.Figure 12-99 shows how to set a language tag for some selected text in adocument.Figure 12-99 Language taggingNote: The default language for text is Untagged. The spell checker uses yourdefault dictionary to spell check Untagged text. If you want the spell checker toskip particular words in a document, mark the words as Unknown.Chapter 12. New features in Domino 6 46712.16.2 Paragraph bordersThere is a new feature for text paragraphs in Designer 6. In the Text PropertiesBox, an extra tab was added for paragraphs: the Paragraph Border tab.Table 12-13 shows the properties you can set.Table 12-13 Borders for paragraphsFigure 12-100 Text Properties Box - Paragraph borders12.16.3 New section stylesA good way to organize information in documents is by creating sections to grouprelated information, turning the application more intuitive and user-friendly, andwith an unpopulated interface. There are two types of section:_ Standard_ Controlled Access

You can restrict the users who can read and edit the content of the section.You can also, programmatically, change these access control options.You can use sections in forms, subforms, pages, and documents.In Designer 6, there are four new border styles, shown in Figure 12-101 onpage 468.Feature What you can setBorder style Border style and colorBorder effects Border drop shadow and widthInside/Thickness/Outside Border thickness for all borders (top,bottom, left, right)468 Domino Designer 6: A Developer’s HandbookFigure 12-101 Section - new border stylesTo set the section border style, follow these steps:1. Right-click the section name, then click Section Properties.2. The Section Properties Box appears; see Figure 12-102 on page 469.Closed SectionsOpened SectionsChapter 12. New features in Domino 6 469Figure 12-102 Section - Properties Box3. Choose the appropriate border style and its color.
12.17 Embedded element enhancementsThis section highlights some of the enhancements made to the elements you canembed on a page, form or subform.12.17.1 Improved action bar support and enhanced stylingYou can now control the style and how the embedded element should behave, toa considerably greater extent than in previous releases. Several of the embeddedelements have improved property boxes and enhanced styling options. Amongthem are the embedded views and embedded scheduler property boxes; seeFigure 12-103.Figure 12-103 Enhanced styling and control of embedded elements470 Domino Designer 6: A Developer’s Handbook
12.17.2 Cross-database referencingWhen embedding elements, there is no limit, as in previous versions, that thiselement must be in the current database. You can now select andcross-database reference every embedded element by selecting the databasefrom which you want to embed.12.17.3 Multiple embedded views on a page or formPrevious versions did not support multiple embedded views. Though you couldfake this by using complex workarounds, and solve it in a non-supported method,there was no built-in method to solve this. Now, with Domino Designer 6, you canembed as many views as you want on a page, form or subform. This means thatone single form can now contain several embedded views, with differentinformation. In some cases, you can avoid using frame sets and frames byembedding multiple views on a single form.Multiple embedded views work both in the Notes client and Web browsers.Figure 12-104 on page 471 shows an example of multiple embedded views in aNotes client.12.17.4 Deleting documents in an embedded viewWith previous releases of Notes/Domino 6, deleting marked documents in anembedded view was impossible. Embedded views did not have the feature“Show action bar” in R5, and if you had an action button on your form, that actionbutton would not work for the marked document in an embedded view. You canstill not use an action button on the form to delete a document in an embeddedview, which is understandable, but you can use the new feature and property forembedded views, “Show action bar”.

Figure 12-104 on page 471 shows a form in a Notes client with multipleembedded views, and a form view action removing a selected document in oneof these embedded views.Note: The database from which you want to embed an element must be inyour bookmark.nsf database.Tip: @DocumentDelete will not work for this purpose. You would use aformula like the following for your action:@Command([EditClear] );@PostedCommand( [ViewRefreshFields] )Chapter 12. New features in Domino 6 471Figure 12-104 Deleting a document from an embedded view
12.18 Table enhancementsTables have been enhanced and several new features for tables have beenadded in Domino 6.12.18.1 Autosize width to contentNow you can set autosize for the column width. In this way, Notes automaticallyadjusts a column width based on its content. To set this feature, do the following:_ Select a cell or a range of cells, then click Table -> Autosize.Or:_ Right-click the cell. In the list that appears, select Autosize.472 Domino Designer 6: A Developer’s Handbook
12.18.2 New optionsA new enhancement was implemented for tabbed tables to make the displaymore flexible and customizable.Tabs on all sidesNow you can choose where you want to position the table tabs. It can be in thetop, bottom, right or left. You set this in the Table Properties Box; seeFigure 12-105.Figure 12-105 Table properties with new settingsWith this new feature, you can provide tabbed tables in different layouts. Refer toFigure 12-106 on page 473.Chapter 12. New features in Domino 6 473Figure 12-106 New tabbed tablesEqually sized tabsYou can also set equal sizes for the tabs’ size. Lotus Notes automatically adjuststhe size of the tabs based on the longest tab label.12.18.3 Caption styleA table that has collapsible sections is called a table with row captions. Rowcaptions look like maximize and minimize buttons for windows, and are used toexpand and collapse rows. Captions allow you to hide information in one row, butdisplay information in another.Figure 12-107 shows an example of a table with three rows (Caption 1, 2, and 3)and two columns, with the first captioned row expanded.Figure 12-107 Table caption sampleTab on topTab on rightTab on leftTab on bottom474 Domino Designer 6: A Developer’s HandbookTo give your table caption capabilities, set the “Users pick row via caption” optionand label the appropriated captions in the table properties box. SeeFigure 12-108.Figure 12-108 New feature for tablesChapter 12. New features in Domino 6 475

12.19 Frameset enhancementsFramesets and frames have several new features in Domino 6. This sectioncovers the main areas.12.19.1 Collapsible and captionable framesIn Designer 6 you can now use a caption for frames and turn them collapsible. Inthis way, you can label the frames and allow wide navigation between thecollapsible frames, providing more information in the same screen area,displaying it as you like; see Figure 12-109. This feature works only for the Notes6 client.Figure 12-109 Collapsed and expanded framesThe settings to provide such a frameset, with collapsed and expanded frames,are controlled and set by properties of the actual frame, as shown inFigure 12-110 on page 476.476 Domino Designer 6: A Developer’s HandbookFigure 12-110 Frame properties to set to enable collapsible framesThe following explanations apply:_ The border captionThis text can be evaluated by a formula or be hard-coded. This caption isoptional and is used to explain to the end users what will happen if they clickthe text or the arrow. Using the formula to evaluate this gives it all a morepersonalized look._ ShowYou can choose None, Caption only, Arrows only, or Both. None shows thedefault border with no caption or arrows. “Caption only” displays a caption inthe border. “Arrows only” displays an arrow in the border. This arrow lets youopen and close the frame. Both displays have a caption and an arrow in theborder._ AlignFor a caption, choose to align so that the caption appears inside the top orbottom border of the frame. For an arrow, choose to align so the arrowappears at the top, bottom, left, or right border of the frame. For both a captionand an arrow, you can align top or bottom. Note that the border appears onlywhere the caption or arrows appear. For example, if you choose Top, then theborder displays at the top only.Chapter 12. New features in Domino 6 477_ JustifyChoose to justify the caption or arrows so they appear to the left, right, orcenter of the border._ OpenChoose a size in pixels or as a percent of the frame. This size is the defaultsize that the frame opens to when the user clicks on the border of a closedframe.You can also specify text characteristics for the caption and arrows, such as font,size, style, and color. In addition, you can specify a background color for theborder.
12.20 Tools menuWith Domino Designer 6, there is a new menu element called Tools. This is afully customizable and context-sensitive feature, which allows you to includemenu items that launch other applications or your own custom formulas. Forexample, you might want to include a menu item to launch your favorite imageeditor while you are in the list of images, or you might want to add a formula thatyou can launch at any time which automates your design process.To ensure that this list of tools will not be overly complex and difficult to follow,you can specify when you want the tool to be available. You might need some

tools for every phase of your design work, and other tools for use with veryspecific design activities, such as designing a page or a frameset. In this way,you can personalize your application development process throughout yourDesigner desktop, and have a fully context-sensitive tools menu.12.20.1 Add a toolTo add a tool to Domino, do the following:1. Select Tools -> Add Tool; see Figure 12-111 on page 478.Note: To enable this feature, your frame must have the property “Allowresizing” set to Yes. This setting is found in the property box of the frame, onthe second tab.478 Domino Designer 6: A Developer’s HandbookFigure 12-111 Adding a new tool2. Enter the name of the tool (Figure 12-112).Figure 12-112 Setting tool preferences3. Do one of the following:– Select Run program to have a menu item launch a tool from withinDesigner. Enter the path for the executable file or browse to select theexecutable.Tip: To make the tool accessible to users with physical disabilities, or forconvenience, specify a keyboard accelerator key for the tool name by puttingan underscore (_) before the letter you wish to use as the accelerator key.Chapter 12. New features in Domino 6 479– Select Run formula to launch a tool using an @command formula.4. In the Tool Location section, specify one or more contexts when the toolshould be available. That is, if you do not want the tool to always be available,choose the design elements where you might use the tool in your designwork. For example, if you select Form Design, the tool will be available duringform design; if you select Form List, the tool will be available from the toolmenu when you are in the list of forms.5. Click OK.6. The name of the tool appears on the Tools menu for the contexts. That is, ifyou specified that the tool should always be available, it will always be on theTools menu. If you specified the tool should only be available for page design,it will only display when a page has focus in the work pane.12.20.2 Customize your toolsAfter you have added tools to the Tools menu, you can edit the tool names ortheir associated formulas, delete one or more tools, organize tools into submenugroupings, or change the context for a tool.To add a submenu for tools1. Select Tools -> Customize Tools.2. Select a design context and click Add Submenu to add a submenu for thatcontext.3. Enter a name for the submenu and click OK.Figure 12-113 A new tool available with accelerator key480 Domino Designer 6: A Developer’s Handbook4. Use drag and drop or the Copy and Paste buttons to move tools to thesubmenu.To move a tool to another design context1. Select Tools -> Customize Tools. Click the arrow next to a design context todisplay the tools associated with that context.2. Select one or more tools.3. Drag and drop the tools to a new context.To copy, paste, or delete a tool1. Select Tools -> Customize Tools. A dialog box displays the list of designcontexts.

2. Click the arrow next to a context name to display the tools associated with adesign context.3. Select the tool name.4. Click Copy to copy the tool to the clipboard.5. Select the design context where you want to place the tool and click Paste.6. Select a tool and click Cut to remove the tool from its original context.To edit a tool1. Select Tools - Customize Tools.2. Click the arrow next to the name of a design context to display toolsassociated with that design context.3. Select the tool name and click Edit. You can edit the name of the tool and/orthe formula that it executes. Note that if you choose to run an executableprogram from the menu, the action is represented as an@command([Execute]) formula. You can change the name of the executablefile or customize the formula.4. Click OK to confirm your changes.Tip: To make the submenu accessible to users with physical disabilities, orfor convenience, specify a keyboard accelerator key for the submenu nameby putting an underscore (_) before the letter you wish to use as theaccelerator key.Chapter 12. New features in Domino 6 481Distributing tools using the DXL LotusScript classesThe Tools menu is a personal setting that is part of the Domino Designerinstallation. Tools need to be added by each designer on their Domino Designerclient.It is also possible to distribute a set of tools for a group of developers. You mightwant all of your developers or a group of developers to have the following tools,among others:_ Paint Shop Pro_ Notepad_ @Command([ToolsRefreshAllDocs])When you add a tool in your Designer 6 client, these tools are added to anoutline in the personal bookmark.nsf database. This outline is calledDesignTools, as shown in Figure 12-114.Figure 12-114 Outline for toolsAdded tools will be part of this outline, as outline entries, as shown inFigure 12-115 on page 482.482 Domino Designer 6: A Developer’s HandbookFigure 12-115 Outline entries for toolsSo, how can we use this knowledge to create a more dynamic distribution ofthese tools to a set of developers? By adding some knowledge about DXL. Alldesign elements in Domino can be represented in XML, or, more precisely, inDXL (Domino XML). Exporting the DesignTools outline to a DXL file, and creatingan agent that imports this DXL file back into a bookmark.nsf database, adds anew dimension to the process of dynamically adding design elements todatabases.Let’s see how we can do this:1. Exporting the Design Tools outline to DXLSelect the DesignTools in the bookmark.nsf database, using Designer 6Client, and select Tools -> DXL Utilities -> Exporter from the menu, asshown in Figure 12-116 on page 483.Note: If you add a tool for a program, for example Paint Shop Pro, you do notinstall the program, but assume that it is available from the location youspecify. So by distributing tools to programs, you assume that your developershave installed the programs on the same directories as the original client from
where the DXL file was created.Chapter 12. New features in Domino 6 483Figure 12-116 Exporting to DXLThis prompts for location and name of the DXL file. Give it the nameDesignTools.dxl as shown in Figure 12-117.Figure 12-117 Naming the DXL fileClick Save.484 Domino Designer 6: A Developer’s Handbook2. To show how this example works, let’s remove the tools that are available inthe Domino Designer 6 Client. Use the Customize Tools feature found in theTools menu line. In Figure 12-118 we select the tools to be removed, and clickCut to remove them.Figure 12-118 Removing toolsAfter removing these tools, no tools are available in the Designer 6 Client, asshown in Figure 12-119.lFigure 12-119 No tools available3. Importing tools into the Designer Client.By using the new DXL LotusScript classes, we can now import designelements into any database. Because bookmark.nsf is the database holdingthe DesignTools outline, which again is the outline that contains the toolsavailable in the Designer Client, this is the database that should have the DXLfile imported. Example 12-8 on page 485 shows a script that imports thespecified DXL file into the local bookmark.nsf. For this example, let’s createan agent in a database with this code.Chapter 12. New features in Domino 6 485Example 12-8 Importing a DXL file into a databaseSub Initialize' ## Set the directory constant to reflect your settingsConst sDir = "h:\redbook\"Const sFileName = "DesignTools.dxl"Dim session As New NotesSessionDim db As NotesDatabaseDim dbTarget As NotesDatabaseDim stream As NotesStreamDim importer As NotesDXLImporterSet db = session.CurrentDatabaseSet dbTarget = New NotesDatabase("", "bookmark.nsf")' Open the DXL file(s)Set stream = session.CreateStreamIf Not stream.Open(sDir & sFilename) ThenPrint "Could not open: " & sFilenameExit SubEnd If' Check the content of the DXL fileIf stream.Bytes = 0 ThenPrint "File did not exist or was empty: " & sFilenameExit SubEnd If' Import the DXL into the target databaseSet importer = session.CreateDXLImporter(stream, dbTarget)importer.ReplicaRequiredForReplaceOrUpdate = Falseimporter.DesignImportOption = DXLIMPORTOPTION_REPLACE_ELSE_CREATECall importer.ProcessEnd SubRight-clicking the agent in the Designer 6 Client, as shown in Figure 12-120on page 486, imports the DXL file specified in the agent.Note: The agent uses a constant for the directory of the location of the DXLfile. In the above example, this constant, sDir, is set to h:\redbook\. Make sure

you change this to the directory you saved the DXL file in.486 Domino Designer 6: A Developer’s HandbookFigure 12-120 Running the agent/script4. The Tools menu now has the imported DXL file, and the available tools, asshown in Figure 12-121.Figure 12-121 Tools imported using DXLThere is no built-in method to dynamically distribute tools in the Designer Client,but with the new DXL classes and methods you can accomplish this. Thisexample could be extended by putting the DXL file on a shared directory ordistributing it otherwise, and importing it in the background without any userinterference. This could easily be done by adding a script like Example 12-8 onpage 485as part of the PostOpen event of the mail file, or other possiblesolutions.You could also use the InstallShield Tuner for Lotus Notes to customize theDomino Designer Client installation package. You could include the customizedbookmarks.nsf database with the installation package, and when a new userChapter 12. New features in Domino 6 487installs a Domino Designer, the tools would automatically be added to the Toolsmenu. For more information about InstallShield Tuner for Lotus Notes, refer toUpgrading to Notes & Domino 6, SG24-6889.12.20.3 DXL utilitiesIn addition to including XML in a Designer application, you can view all thedesign elements represented in XML using Domino XML (DXL). For a morein-depth discussion about XML and Domino, see Chapter 16, “XML” onpage 743.You can either view the XML in Designer, or you can export the XML to a text file,where you can view it or edit it using your favorite editor.Accessing design elements in XML provides you with the means of accessingthe data in your application and comparing it to, or integrating it with, other datasources that support XML. The DXL utilities can be a very flexible alternative togenerating reports on application elements using the Design Synopsis. You canexamine the DXL for a collection of elements, or you can transform it using anXSL file to apply styles and formats that make your data more meaningful to you.Viewing the XML for a design element1. Check that you are running Internet Explorer version 5.01 or later.2. Check your location document to make sure your Internet Browser field is setto "Notes with Internet Explorer" or "Internet Explorer."3. Select one or more design elements in the design pane.4. Choose Tools -> DXL Utilities -> Viewer, as shown in Figure 12-122.Figure 12-122 How to view XML of a selected design elementDesigner displays the XML for the design elements in the Notes client, as shownin Figure 12-123 on page 488.488 Domino Designer 6: A Developer’s HandbookFigure 12-123 Result of viewing the XML of a design elementExporting the XML for one or more design elements1. Select one or more design elements in the design pane.2. Choose Tools -> DXL Utilities -> Exporter.3. Enter a file name and path for the XML file and click Save.You can open the file in your favorite text editor and view or edit the XML source,as shown in Figure 12-124 on page 489.Chapter 12. New features in Domino 6 489Figure 12-124 XML being edited in NotepadTransforming XML for one or more design elements using XSL1. Select one or more design elements in the design pane.2. Choose Tools -> DXL Utilities -> Transformer.

3. Select the name of an XSL file to use for transforming the XML.4. Choose a type of output. Either select screen for a screen display, or specifyan output file name.For more information about XML and its features in Domino 6, refer toChapter 16, “XML” on page 743.Note: To re-import your changes back to the design element in yourapplication, use the LotusScript class NotesDXLImporter. See Chapter 16,“XML” on page 743 for more information on XML and Domino.Note: XSL is an extensible stylesheet language (XSL) that describes how totransform XML into HTML or into another version of XML. Designer ships withsome sample XSL files that you can select or you can browse the file systemto select another XSL file.490 Domino Designer 6: A Developer’s Handbook
12.21 URL enhancementsThere are a couple of new URL commands in Domino 6 and someenhancements. This section covers these updates.12.21.1 New and enhanced URL commands_ OpenImageResourceThis new URL command allows you to open any graphic resource in anapplication. If you have a image called Image1, then you could access it asfollows:http://www.lotus.com/sample.nsfe/Image1?OpenImageResource_ OpenFileResourceThis new URL command allows you to open a file resource in an application.If you have a file called File1, then you could access it as follows:http://www.lotus.com/sample.nsfe/File1?OpenFileResource_ ReadViewEntriesThis URL command is enhanced in Domino 6, and should be used to accessview data in XML form without appearance attributes such as fonts, listseparators, date formats, HTML settings, view templates and frameredirections.
12.22 WebDavAs you are developing an application, you may want to supplement the toolsprovided with Designer with tools of your own choice. For example, you may havea favorite graphics editor you use to design images for your application, or youmay have a favorite HTML editor that you want to use to design pages. Youlaunch and use third-party tools from within Designer using the new featureTools. Now, with WebDav, you can save your changes directly back into thedatabase. This feature is for certain design elements only.Web Distributed Authoring and Versioning (WebDav) is a new feature that allowsyou or others on your team to edit and manage parts of a database on remoteWeb servers. This enables designers with proper access to a database to openfiles from a WebDav client (such as Internet Explorer or other third-partydevelopment tools), edit these files, and save them back to the database. Bymaking Designer 6 WebDav compliant, the methods with which you display datayou store in a Domino database are extended.Chapter 12. New features in Domino 6 491For example, you may build a page using a favorite HTML editor. Using WindowsExplorer, you can drag that page into an NSF file for inclusion in a Dominoapplication. Similarly, an application designer collaborating on a project mightopen an HTML page using Internet Explorer 5.x, edit the page, and then placethe page back into the database. WebDAV technology gives you much greaterflexibility in the development process as you can use third-party tools andcontribute to application design from remote Web servers.

The following resources can be accessed with a WebDav client:_ File resources_ Images_ Cascading Style Sheets (CSS)Enabling WebDavYour server, or your databases, are not enabled by default for WebDav clients.There are a few steps to be completed to make your applications and serverWebDav enabled.WebDAV must be enabled on the Domino server. Check with your systemadministrator to make sure WebDAV is enabled in the Web Site document, whichcan be found under the Internet Sites view in the Domino Directory. On theconfiguration tab select Enable WebDAV in the Allowed Methods field. Note thatthe HTTP server requires refreshing before the change takes effect.As a developer, these are the steps to be completed to enable your applicationfor WebDav clients:1. Set the ACL– Provide the user with either Designer or Manager access in the databaseAccess Control List (ACL). The user also must have both "Createdocuments" and "Delete documents" privileges enabled in the databaseACL.– On the Advanced tab of the database ACL, set the "The maximum Internetname & password" field to either Designer or Manager access.2. Enable design locking for your application. Refer to 12.1.9, “Design elementlocking” on page 358.3. Disable proxies– If the WebDAV client used to access the database is on a Domino server,then disable the proxy for access to that particular server. For example, ifyou are using either MS Windows Explorer or Internet Explorer 5 (IE5) asa WebDAV client, do the following:492 Domino Designer 6: A Developer’s Handbook• Open Microsoft IE5, go to Tools -> Internet Options -> Connectionstab.• Click LAN settings.• Click Advanced.• In the Exceptions edit box, enter the name of the Domino WebDAVserver, such as: trondheim.lotus.com.4. Disable session authenticationCheck with your server administrator to make sure sessions authentication isdisabled on the Domino Web server. This setting is found in the serverdocument’s “Internet Protocols - Domino Web Engine” settings.5. Start the Web server (http-task) on your Domino server. For more information,see the Domino Administration 6 Help database.System requirementsDomino’s implementation of WebDav in Domino 6 is only supported on WindowsNT and Windows 2000, and at the time of writing, the only WebDav-enabledclients that work with WebDav on a Domino server are:_ Microsoft Internet Explorer 5.0x or 6.0_ Windows Explorer on Windows 98, Windows NT4, Windows 2000 orWindows XP_ Macromedia’s Dreamweaver 4.01_ Microsoft Word 2000Accessing your WebDav-enabled applicationSince Microsoft uses Web Folders to represent their WebDav client, you start offwith creating a connection from the client to the specified Domino server. UsingWindows 2000, this can be done by creating a “Network Place”; see

Figure 12-125 on page 493.Tip: Microsoft uses the term Web Folders to represent their WebDAV clientapplication. Refer to Microsoft's documentation for how to use Web Folders. Atthe time of writing, the document at this URL tells you more about WebFolders:http://msdn.microsoft.com/library/default.asp?url=/library/en-us/off2000/html/pphowAddFolderToWebServer.aspChapter 12. New features in Domino 6 493Figure 12-125 Adding a new Network PlaceClicking this option gives you the new dialog box shown in Figure 12-126.Figure 12-126 Adding the URL of the WebDav server and databaseTo identify the database you want to connect to, use URLs and append $files tothe end of the path to indicate to the WebDav server that this is a WebDavrequest. For example, to open the database on server trondheim.lotus.comnamed rune\runeredbook.nsf as a Web folder from Windows Explorer, enter thepath as follows:http://trondheim.lotus.com/rune/runeredbook.nsf$filesIf Windows can find the WebDav server and identify the database, the dialog boxshown in Figure 12-127 on page 494 completes your installation.494 Domino Designer 6: A Developer’s HandbookFigure 12-127 Successfully completed adding a WebDav network placeOnce you have mapped a database to a WebDAV client, you can use theinterface of the WebDAV client to browse the database and select elementswithin the database to open.Once you have established a connection to a Domino database using a WebDAVclient, you can open a resource, edit it, and save it back to the database. Or youcan add an element that you have created using a third-party editor to thedatabase.Example of editing elements using WebDavFigure 12-128 on page 495 assumes that WebDav is configured and enabled onyour Domino server and that the installation of a network place has beenaccomplished.The file explorer on your computer can be set up to show the content of yourWebDav-enabled Domino server; see Figure 12-128 on page 495.Caution: WebDAV clients do not maintain operating system attributes, suchas a read-only state. For example, if you create an HTML page and flag it asbeing a read-only file in Windows, the page will not be flagged as read-only ifyou add it to a database and view it from Designer.Chapter 12. New features in Domino 6 495Figure 12-128 Explorer showing content of WebDav serverFigure 12-128 shows the content of a WebDav-enabled Domino server, and thethree elements that are available. These are Shared Resources of three types:_ Images (Ch4_forminfobox.gif)_ Files (install.log)_ Style Sheets (myStyleSheet.css)These files can now be opened as any other file, within a supported WebDavclient. If you prefer to edit style sheets in Microsoft Word 2000, open theapplication, edit it as preferred and save it. It will be saved directly back into theDomino application or database, and will update the design element.Figure 12-129 on page 496 shows these elements in Domino 6 Designer.496 Domino Designer 6: A Developer’s HandbookFigure 12-129 Elements available for WebDav clients in Domino Designer 6Important: If the design element has been “locked”, you will not be able tosave and update. You will receive an error message, depending on theapplication you are using.Chapter 12. New features in Domino 6 497

12.23 SummaryDomino 6 contains thousands of new features; covering them all would be toomuch for this book, and is not its purpose. This chapter covered the mostimportant new features that an application developer using the Designer 6 Clientshould be aware of and utilize.498 Domino Designer 6: A Developer’s Handbook© Copyright IBM Corp. 2002. All rights reserved. 499
Chapter 13. Securing your DominoapplicationAs a database designer, you can control who has access to an application youcreate at every level in the application. Domino provides a variety of securitymechanisms to enable you to do this. In this chapter, we help you understandhow these mechanisms fit together to secure your application.
13500 Domino Designer 6: A Developer’s Handbook
13.1 OverviewThe designer of an application, together with the system administrator of thesystem, should define security for an application. Choices made by developersand administrators may have impact on system performance.Even though user authentication and creation are normally administrative tasks,we will briefly discuss them here, as these tasks may have an impact on definingsecurity for different types of clients and users in your application.You may also have to integrate with, or even develop, a user registrationapplication for Web users.For a detailed description of Domino’s system security and authenticationfeatures, refer to the redbook Lotus Notes and Domino R5.0 SecurityInfrastructure Revealed, SG24-5341.This chapter will help you decide how to:_ Set up and manage an access control list (ACL)_ Create roles to manage access for groups of users_ Restrict access to database elements_ Control document access_ Develop a plan that provides the required security for your data andappropriate access for each user_ Utilize new Domino 6 security featuresChapter 13. Securing your Domino application 50113.2 Controlling access to Domino dataThere are a number of ways to control access to Domino data, and there are anumber of ways to approach this access as well. You can secure certain designelements and information so that users cannot access them at all, or you canalternatively hide certain fields and information from the user. In this instance, theinformation is still accessible to the experienced user, but is hidden from thecasual user. This is more a usability issue than a security feature.By using both the database access control list (ACL) and the encryption featuresprovided by Domino, you can achieve true security for your application. Creatingview access lists, hiding design elements, and using such features as computedsubforms, Hide-When features, and collapsible sections allow you to hinder

access and are good usability features, but they are not true security features.13.2.1 Overview of Domino Security architectureThe Domino environment is made up of several components, all of which can besecured. If access is allowed to:_ The network, then server tests are applied._ The server, then database tests are applied._ The database, then design factors are tested._ Documents, encryption and access to individual documents may preventaccess to certain documents and fields.Figure 13-1 on page 502 illustrates the places in the database structure whereaccess tests are applied. These are the elements you will be concerned with insecuring your application at the database level.502 Domino Designer 6: A Developer’s HandbookFigure 13-1 Where access tests are appliedDesign elements for controlling accessSetting up the ACL establishes who has access to the database as a whole. Youcan further restrict access to database elements by using the following Dominodesign elements:_ Access lists for documents, forms, and views_ User roles in the ACL_ Authors and Readers fields in a document_ Hide-when capabilities for fields, actions, sections and outlines_ Controlled access sectionsNote: Underlying all this is the identification of the user, based on their ID fileand encryption keys for their HTTP login.Chapter 13. Securing your Domino application 503To control user access to Domino data, consider the following situations:Table 13-1 Security requirements and solutionsSecurity Requirement SolutionAllow anonymous users access to yoursite.Create an Anonymous entry in the database ACL. See“Anonymous Access to Databases” in this chapter.Define server authentication at theuser level for Web users.Create Web users and passwords in the Domino Directory. Seealso, “Planning for Web user access” on page 551 in thischapter.Restrict access to database elementsto specific users.Create access lists for documents, forms, and views, andconsider creating user roles in the ACL. Start with “Using theAccess Control List to Control Access to an Application” in thischapter.Control Web user access to parts ofyour site.Add a group containing the names of registered Web users tothe ACL. Choose which databases can be accessed by Webusers and what level of access to provide for each database.Authenticate any Web client accessing a Domino server,database, view, or document.Restrict access to specific documents. Create Authors and Readers fields on the form, or create adocument access list.Control display of database elementswithin forms.Use hide-when capabilities for fields, actions, and sections, orcreate a controlled-access section.Secure field information. Apply encryption techniques.

Display different information for Webbrowser, Notes client and Mobile clientusers.For example: Use @ClientType to enable a computed subform,hide elements based on @ClientType, use different forms fordifferent clients.Provide an extra layer of security. Add encryption to HTTP transactions by activating SecureSockets Layer (SSL) at the server. (See the DominoAdministrator’s Help for more information on SSL.)504 Domino Designer 6: A Developer’s Handbook
13.3 Using the Access Control List to control accessEvery database includes an Access Control List (ACL) that Domino uses todetermine the level of access that users and servers have to that database.When a user opens a database, Domino classifies the user into an access levelthat determines privileges. The access level for a user or server may vary indifferent databases.The access level assigned to a user determines the tasks that the user canperform in the database. The access level assigned to a server determines whatinformation the server can replicate within a particular database.Only someone with Manager access can create or modify the ACL of a databaselocated on a server. The Designer and Manager of the database can coordinateto create one or more roles to refine access to particular views, forms, sections,or fields of a database.This section covers:_ Displaying the ACL_ User and server access levelsDisplaying the ACLThe access control list of a database lists all the servers, groups, and users whohave access to the database.To display the access control list of a database:Choose File -> Database -> Access Control and the panel in Figure 13-2 onpage 505 will be displayed.Chapter 13. Securing your Domino application 505Figure 13-2 ACL to Designer 6 HelpUser and server access levelsA database ACL determines the level of access that users, groups, and servershave. Only someone with Manager access to the database can assign levels tothe users, groups, and servers listed in the ACL.With Domino 6 there are seven main levels of access that a databaseadministrator can assign to a person, server, or group, as listed and explained inTable 13-2.Table 13-2 Access for users and serversLevel Users with this access can… Servers with this access can…No Access Not access the database at all. Not access the replica at all.Depositor Create documents, but cannot read, edit, ordelete documents, including those they create.Not receive changes; not relevant forservers.506 Domino Designer 6: A Developer’s HandbookServer access levels are often the cause of databases failing to replicate asexpected. Keep the following points in mind:_ Servers not specified in the ACL have the access level that is assigned to the-Default- group._ Listing a server with Manager access in the ACL lets people know whichserver has Manager access.

_ To allow a replica to receive changes made by people with Author access,assign the server Editor access or higher in the replica ACL.13.3.1 Setting up and refining the ACLWhen you set up the access control list, you can refine the access for users inseveral ways, beyond simply specifying an access level:_ Select User Type to specify Users, Groups, and ServersWhen you enter users in the ACL, you can specify whether they are users,groups, or servers._ Access OptionsAssigning access options allows you to further refine user access.Reader Read documents, but cannot create, edit, ordelete them.Pull changes from the replica but notsend changes to it.Author Create and read documents, but can only edittheir own documents if they are listed in anAuthors field on that document.Replicate new documents.Editor Create, read, and edit all documents unlessthere are restrictions on specific documents.Replicate all documents.Designer Have Editor access to documents, exceptwhere restrictions exist for specific documents,and they can modify the database design, butthey cannot delete the database or modify theACL.Replicate design changes as well as alldocuments, but not ACL changes.Manager Perform all operations on the database,including modifying ACLs and deleting thedatabase.Replicate all changes to the databaseand the ACL.Note: Any server with reader access or above can receive any kind of changeby replication. The list in Table 13-2 on page 505 refers to the ability to sendchanges via replication.Chapter 13. Securing your Domino application 507_ User RolesRoles allow you to define responsibilities in the application and refine accessrights to database elements.Users, groups and serversA group is a list of users and/or servers that have something in common. Using agroup helps simplify many administration tasks. For example:_ A group of users can be given access to a database in the ACL._ A group of servers can be designated as permitted to replicate with adatabase._ A group of users can be denied access to a resource.There are two default server groups in the ACL:_ LocalDomainServers are servers in the local domain._ OtherDomainServers are servers in other domains. These are usually serversin other companies with whom users in your company need to communicate.This type of access needs to be specified and configured by the systemadministrator as well.User typesThe ability to specify user types lets you clearly indicate whether a name is thatof a person, server, or group. Table 13-3 lists descriptions of the available usertypes.

Table 13-3 User typesNote: Groups you specify in the ACL must be listed in the Domino Directory.Groups defined in users’ personal address book do not work for any kind ofaccess control.User type Assign for this type of user Allows you to . . .Person An individual user; this includes auser on a server workstation.Control access for an individual user.Server A single server; this includes aserver console, and serverworkstation.Prevent someone from accessing thedatabase from a Notes workstation using theserver ID.Server Group A group of servers. Identify a group of servers that will hostreplicas of the database.508 Domino Designer 6: A Developer’s Handbook
Assigning user types for additional securityAssigning user types can provide additional security. Specifying names in theACL as a person, server, or server group prevents someone from later creating agroup in the Domino Directory with the same name as a person in the ACL, aswell as adding his or her name to it to access the database through the groupname.Access optionsWhen you add users and groups you can specify individual options that furtherrefine user access. For each ACL entry, you can specify slightly different options,as listed and explained in Table 13-4.Table 13-4 Access optionsPerson Group A group of individual users. Grant the same access to all users in a groupwithout listing each user name in the accesscontrol list.Mixed Group A group of servers and individualusers.Grant the same access to a group of usersand servers.Unspecified In the Advanced Access Control Listwindow, click Lookup User Types for“Unspecified Users.” Notes looks upan unspecified user type in theDomino Directory.If you leave type as Unspecified Domino willnot check whether the access is given to auser or a server.Important: Be aware of the “Unspecified” User Type. Setting a ACL entry to“Unspecified” is not a recommended setting in the long term. The serverhosting the database will not check whether the “Unspecified” user is a serveror a user, and server IDs usually don’t have a password set. This means thatyou in fact can use a server id from a client machine to access the database.In the Advanced Access Control List window, click Lookup User Types for“Unspecified Users.” Notes looks up an unspecified user type in the DominoDirectory.Enable this option… To allow… This option is assigned bydefault to…Create documents Authors to create documents. Managers, Designers,Editors, and DepositorsDelete documents Managers, Designers, Editors, and Authorsto delete documents. Authors can delete onlydocuments they created.No one

Chapter 13. Securing your Domino application 509*Enabling users to read and write public documents lets you give users with NoAccess or Depositor access the ability to access specific forms, views, anddocuments without giving them Reader or Author access in the database. Publicdocuments are useful for calendar applications in which one user might delegatethe ability to read or create appointments on his or her behalf to another user.** New with Lotus Notes/Domino 6You can specify the availability of a database element for public access at thebottom of the Security tab in its Infobox.Documents created with a form where public access is enabled will have the field$PublicAccess with a value of 1 added by Domino.Anonymous access to databasesYou can handle anonymous users in one of the following ways:_ Define an anonymous entry in the ACL and specifically define accessprivileges for anonymous users._ Allow anonymous users the same access as the Default entry in the ACL.Create personal agents Designers, Editors, Authors, or Readers tocreate personal agents.ManagersCreate privatefolders/viewsEditors, Authors, and Readers to createpersonal folders and views in a database ona server.Managers and DesignersCreate sharedfolders/viewsEditors to create shared folders and views. Managers and DesignersCreate LotusScript/Java agentsReaders, Authors, Editors, and Designers tocreate LotusScript and Java agents.ManagersRead public documents* Users to read documents created with forms,and use views and folders, designated as“available for public access user.”Readers and aboveWrite public documents* Users to create and modify documents withforms designated as “available for publicaccess user.”Authors and aboveReplicate or copydocuments **Users to create copies or local replicas of thedatabase.Everyone510 Domino Designer 6: A Developer’s HandbookIf you allow anonymous access to a server, you can still control access todatabases. To control database access for anonymous users, follow these steps:1. Add a user with the name Anonymous in the Add User dialog box of the ACL.2. Click OK.3. In the Access drop-down box, select one of the following:– No Access, to prevent access by anonymous users. This means that whena Web user tries to use the database, the user will be prompted to login.– Reader, to allow access to an information database.– Author, to allow access to an interactive database.Important: If the database ACL does not contain an Anonymous entry, allanonymous users receive the Default access.To protect the databases from unregistered users, you can establish the Default

as No Access. If Default access needs to be higher, create an Anonymous entryin the database ACL and grant it No Access.When granting access to unauthenticated Web clients, you will want to grantanonymous users the least access that still allows them to use the databaseeffectively. For example, you might grant anonymous users:_ Reader access, for an information database_ Author access, for an interactive databaseDifferentiating default and anonymous accessIf Anonymous is not listed in the ACL, Domino grants the user access based onthe default database access level. This may be a higher access level than youwant for anonymous users.Access level definitions:_ Default: a user not specified in the ACL_ Anonymous: a user without a valid Notes ID for that organizationEffective accessEffective access is a new feature in Domino 6 that lets you find the correct andeffective access for a user, group or server. This is helpful when you have peopleTip: Any application that will be deployed on the Web should have anAnonymous entry in the ACL. Assign No access to Anonymous entry unlessyou want to let users access the database without authenticating them first.Chapter 13. Securing your Domino application 511in multiple groups in the same ACL, as well as if they are listed explicitly in theACL.By using this new feature, the Notes client will check by doing a lookup in theDomino Directory, expanding the group members of the groups in the ACL, andcomparing and building an internal list to decide what the effective access is for aspecific user.Figure 13-3 Effective Access in ACLClicking Effective Access, shown in Figure 13-3, gives you a new dialog box,where you can specify who you want to check the access for. The result of thischeck for Rune Carlsen/ITSO is shown in Figure 13-4 on page 512.512 Domino Designer 6: A Developer’s HandbookFigure 13-4 Result of Effective AccessRune Carlsen/ITSO is listed in the ACL both explicit, with Manager access, andas a member of the group Trondheim, with Reader access. Rune’s effectiveaccess will be Manager, since there is no level of “No access” for Rune, andbecause he will get the highest level of access given.The box on the right side shows why Rune Carlsen/ITSO gains this level ofaccess. It is because he is explicitly added in the ACL. If Rune had been givenNo Access in the ACL, and the group Trondheim had been given Reader access,then this box would have looked as shown in Figure 13-5 on page 513.Chapter 13. Securing your Domino application 513Figure 13-5 Effective access with No AccessAs you can see in Figure 13-5, Rune gets a level of No Access, even though thegroup Trondheim has Reader access to the database. It is also indicated to theright that the reason for the level of No Access is the entry in the ACL, which isRune Carlsen/ITSO.13.3.2 Roles in the ACLWhen a group you want to add to the ACL does not exist in the Domino Directory,you may want to create a special group or role for users of the database. The useof roles allows you to define responsibilities in the application and further defineaccess to database elements.Note: As you can see in Figure 13-5, Rune is also given Full AccessAdministrator rights. People listed in the Full Access Administrator field of theserver document can override any security settings of the database. Full

Access Administrator can also see all the documents in the database,regardless of the use of readers fields on those documents.514 Domino Designer 6: A Developer’s Handbook
What a Role isA role is a subset of the ACL that is controlled by the database manager. A rolecan be used almost anywhere that a group or user name can be used, except forthings like e-mail addressing or to control access to design elements.Users and groups are assigned roles to refine access to particular views, forms,sections, or fields of a database. Instead of assigning access to a design elementto users and groups, you assign access to the role.Some advantages of using roles are:_ They provide a flexible method of restricting document access to a specificset of users._ They provide group control if you do not have the authority to create groups inthe Domino Directory, or if you want to create groups just for the database._ They make it easier for you to modify access when users leave or new usersjoin._ They separate the design of your database from the names of the individualsand groups who use it, allowing the design to be reused more easily. (Forexample, if you move the application from one organization to another, youcan simply assign roles to appropriate users and groups in the ACL instead ofcreating new groups in the Domino Directory and assigning users to them ormaking any changes to your application design.)To use a role in an application, assign roles to users and groups in the ACL.Include the role in access lists, just as you do with users and groups (or actuallyinstead of adding specific users and groups).Note, however, that roles cannot extend the access level given in the ACL.Consider an exemplary database where a user has Reader access to a databasein the ACL. The database ACL also contains a role, which is called ModifyDocs,in the ACL, which basically enables a user to modify specific documents createdwith a specific form. The user will not be able to modify them, even though giventhe role. To modify documents, the user would need at least need author accessto the database.Adding roles to the ACLTo add roles to an ACL, follow these steps:1. Open the database ACL.2. Click Roles in the Contents pane; see Figure 13-6 on page 515.Chapter 13. Securing your Domino application 515Figure 13-6 Adding a role3. Click Add. The Add Role dialog box appears (Figure 13-7).Figure 13-7 Adding a role4. Enter a role name (the maximum length is 15 characters) and click OK. Therole name appears in brackets in the Role list, so do not use brackets in thename.Assigning roles to users or groupsTo assign a role to a user:1. Open the database ACL.2. Select the user or group name in the list of people, servers, and groups.Note: You need Manager access to the database to add or modify a role.516 Domino Designer 6: A Developer’s Handbook3. Click one or more role names in the Roles list.4. Confirm roles by highlighting a user. A check mark appears next to the userrole or roles.13.3.3 Enforce Consistent ACLYou can ensure that the ACL of a database remains the same on all replicas. You

do this by selecting the advanced access control list option Enforce a consistentAccess Control List across all replicas of this database. Selecting this optionensures not only that the ACL remains consistent across server replicas, but alsothat the ACL is enforced on replicas of the database made on workstations orlaptops. If you do not select this option, users have Manager access to localreplicas of server databases, which allows them to make changes to their accesslevels on the server replica, although they can’t replicate such changes back tothe server.Enforcing a consistent access control list as it applies to ACLs on workstation orlaptop replicas is not a security feature. Data in the local replica is not secureunless you physically secure the workstation or laptop, or you encrypt thedatabase using the local security feature. Also, a Domino add-in program canbypass an ACL enforced on local workstations.Therefore, be careful when turning on this option, because if you accidentallyomit the rights to access the database, it cannot be bypassed by accessing thedatabase locally. You should make sure you have Manager access to thedatabase prior turning on this option.People listed in the Full Access Administrator field of the server can override anysecurity settings of the database, including Enforce Consistent ACL. Full AccessAdministrator can also see all the documents in the database, regardless of theuse of readers fields on those documents.Note: A user who has access to a database through more than one ACL entry(e.g. is a member in multiple groups listed in the ACL), is a member of a role ifthat role is enabled for any of those ACL entries.Tip: Selecting this option lets you tell whether a user is a member of a role orgroup when they are using a local replica.Chapter 13. Securing your Domino application 51713.3.4 Maximum Internet Name and Password accessWhen working with advanced ACL options, you can also specify a maximumaccess level for users that have been authenticated with the Internet name andpassword setting (browser users). This setting overrides individual settings in theACL. No browser user can get higher access than specified for MaximumInternet Name and Password access.Check this setting to increase the security of your Web applications,guaranteeing that Web browser users cannot damage your database should theymanage to guess the HTTP password of someone with access to your database.13.3.5 Changing the ACL programmaticallyYou can change the ACL programmatically by using these Domino classes.The classes in the Domino Object Model to use when working with the ACL are:_ NotesACL_ NotesACLEntryRefer to the descriptions of the classes in the Domino Designer documentationfor detailed descriptions of the possibilities.Example 13-1 illustrates how to obtain all entries in the ACL that are associatedwith a given role.Example 13-1 Obtain all entries in the ACL associated with a given role'Declare Variable session as a new Notes sessionDim session As New NotesSession'Declare db as a Notes DatabaseDim db As NotesDatabase'Declare acl as the Notes Database ACLDim acl As NotesACL'Declare aclentry as ACL Entry typeDim aclentry As NotesACLEntry'Declare RoleName as type StringDim RoleName As String

'Set db to the currently selected databaseSet db = session.CurrentDatabaseImportant: To keep the ACL the same across all server replicas of adatabase, you must select this setting on a replica whose server has Manageraccess to the other replicas; otherwise, replication will fail because the serverhas inadequate access to replicate the ACL.518 Domino Designer 6: A Developer’s Handbook'Set acl to the ACL of the current databaseSet acl = db.ACL'.....'Get Rolename from somewhereRoleName = "[NewsEditor]"'.....'.....Here You would check that role exists in ACL using'.....'Forall RNames In acl.Roles''.....'Set aclentry to the first name in the ACLSet aclentry = acl.GetFirstEntry'Continue looping until you run out of names in the ACLWhile Not ( aclentry Is Nothing )If ( aclentry.IsRoleEnabled( RoleName ) = True ) Then'If that ACL name is in the selected role'Display that name to the userMessagebox aclentry.NameEnd If'Move to next name in listSet aclentry = acl.GetNextEntry( aclentry )Wend13.4 Using outline control to hide part of an DominoapplicationYou can control which parts of an application are visible to the user depending onwhether they are a Notes user, a Web user or on the role the user has, by usingoutlines.For each outline entry, you can use the InfoBox to specify hide from:_ Notes R4.6 or later_ Web browsers_ Depending on a formula (that, for example, checks on assigned roles)_ Mobile clientsTip: The ability to program ACL lists is useful when automating security tasks.For instance, you could create an agent to periodically check that everydatabase on your Web site has appropriate access restrictions for Anonymoususers.Chapter 13. Securing your Domino application 51913.5 Using directory links to control access to a DominoapplicationThe system administrator can control access to all databases in a given directoryby creating a directory link file. A directory link file must be named in the formatXXX.dir, where XXX is the name that will appear as a directory in the user’s OpenDatabase dialog.The file is a flat text file where the first line holds the path to the actual directoryholding the databases, and the following lines hold the names of the people andgroups that are allowed to access that directory.

ExampleA directory link file called projecta.dir has the following content:d:\projects\projectaProjectAMembers#AdminCN=Rune Carlsen/O=ITSOThis means that the databases the Notes user can see in the projecta directoryare physically stored on the server in the d:\projects\projecta directory. Access tothis directory through Domino is allowed only to people in one of the groupsProjectAMembers and #Admin and the person Rune Carlsen/ITSO.System administrators don’t usually do this manually, as described, but insteaduse the Domino Administrator Client and create this Directory Link using a GUI.This task can be performed using the Files tab and the Tools available underFolder.Notes: Using this method only controls which navigational aid the user isoffered. The underlying objects must also be secured if the user should not beallowed access to them. For example, if you have a view that only Notes usersshould see, then you can hide it from Web users in the outline, but you mustalso limit Read access for the view; otherwise, Web users can access the viewby specifying its exact URL.Some types of outline entries will automatically hide themselves if the currentuser does not have access to the entity they link to. Use the hide attributes ifyou discover that entries are showing up inappropriately.520 Domino Designer 6: A Developer’s Handbook
13.6 Controlling access to views and formsTo control which views each user has access to when the user opens thedatabase, create a View read access list. The list can contain any users, groups,servers, and roles that are in the ACL for the database.Creating a View access listTo create a view read access list:1. Open the view in Design mode.2. Select Design -> B to open the InfoBox for the view.3. Click the Security tab (key icon).4. Deselect the option “All readers and above” (the default). The list in thewindow displays the contents of the ACL (Figure 13-8).Figure 13-8 View access list5. Click one or more of the users, groups, servers, and roles that you want tohave access to the view. A check mark appears next to the names you select.Note: The system administrator can control whether Web browsers areallowed to access databases using directory links through the NOTES.INIvariable A value of zero (0) will allow Web browsers to access directory links,while a value of one (1) prevents it.The group name for administrators, #Admin, starts with the pound symbol (#).This is to make it one of the last entries in a sorted list. When a user brings upan address dialog from the Domino Directory, the list will not be cluttered withsystem groups if they are named so they appear last in the list.Chapter 13. Securing your Domino application 5216. Click the blue person button to add names, roles and groups to the list fromthe Address books that you have access to, and make sure that they areadded to the ACL.To deny access to the view, deselect by clicking the name to remove the checkmark.13.6.1 Controlling access to formsYou can control access to a form in several ways:1. Exclude the form from the Create menu and make it available to a select set
of users with a View action button.2. Create a form access list that specifies who can create documents with theform.3. Create a form for Public Access users with Read or Create rights in the ACL.Making a form available to a list of usersThis method has two parts:_ Exclude the form from the Create menu._ Create a View action button that is available to a select set of users.To prevent a form from appearing on the Create menu:1. Open the form in Design mode.2. Select Design -> Form Properties to open the InfoBox for the form.3. On the Information tab, deselect the Include in: Menu option.To create the action button:1. Open a view that displays the form in Design mode.2. Create a view action using the formula @Command([Compose];"formname").3. Open the Action InfoBox and click the Hide tab.Important: Remember that denying access to a view does not deny access tothe content and data in those views. A user can still create a personal viewand get access to the data by using selection formulas.Tip: Your application will be more flexible and easier to maintain if you useonly roles to control access to design elements, not groups or individualnames.522 Domino Designer 6: A Developer’s Handbook4. Enter a formula to hide the view from everyone except the users and groupsyou specify. (Using roles instead of individual user or group names isrecommended for easier application maintenance.) An example of such aformula is !@IsMember( "[NewsEditor]"; @UserRoles ) This formula hides theform from everyone except users who have a NewsEditor role.Using a form access listForm access lists further refine the access level set in ACL and allow only thoseon the list to access the form or documents created with the form._ A form Create access list allows only those on the list to create documentsusing the form._ A form read access list allows only those on the list to read documentscreated with the form.To create a form Create access list:1. Open the form in Design mode.2. Select Design -> Form Properties to open the InfoBox for the form.3. Click the Security tab (key icon).4. In the Who can create documents with this form section, deselect All Authorsand Above (the default).The list in the window displays the contents of the ACL.5. Click one or more of the users, groups, servers, and roles that you want tohave the ability to create documents with the form. A check mark appearsnext to the names you select.6. Click the blue person button to add names, roles, and groups to the list fromthe Address books that you have access to, and check to see that they areadded to the ACL before you make the database available to users.To deny access to the form, deselect by clicking the name to remove the checkmark.Note: This is not a true security measure, as users might gain access to theform in other ways.Note: A user without access to a restricted form may still be able to createdocuments that look like they have been created with that form by using anagent or by pasting a document from another database.

Chapter 13. Securing your Domino application 523Creating a form for Public Access usersA public access list works with the database ACL to expand user access tospecific views, forms, and documents. Creating forms and views enabled forpublic access allows you to provide users with No Access or Depositor accesswith the ability to view specific documents, forms, and folders without giving themReader access to the entire database. Users who have this access level in thedatabase ACL will see only documents, folders, and views specified as availablefor public access in the form/folder/view InfoBox.Public documents are useful for calendar applications where users mightdelegate the ability to read or create appointments on their behalf to anotheruser.To create a form for public access and let Public Access users create documentswith the form, do the following:1. Choose Design -> Form Properties.2. Click the Security tab.3. Select Available to Public Access users.To let Public Access users read documents created with the document, do thefollowing:1. Create a field and open its InfoBox.2. In the Name field, enter $PublicAccess.3. In the Type field, select Text and Computed when Composed.4. In the Design pane, enter 1 as the default value for the field and click thegreen button to accept the value.5. To hide this field from users, select the Hide tab and specify hide-whenconditions in the Field InfoBox.6. Save the form.Tip: Use roles in the form access lists to ease the maintenance of yourapplication.Note: The views the Public users will use must also be marked for PublicAccess. This is done using the View InfoBox.524 Domino Designer 6: A Developer’s Handbook
13.6.2 Preventing printing, forwarding, and copying of documentsYou can discourage users from printing, forwarding, or copying documentscreated with a form. This feature helps to prevent accidental distribution ofconfidential information, but it is not a true security feature since the settings canbe manipulated with the appropriate Design and Document access rights orcircumvented by using a screen capture program. To set this option, do thefollowing:1. Open the form in Design mode.2. Choose Design -> Form Properties.3. Click the Security tab (the key icon).4. Select Disable printing/forwarding/copying to clipboard.5. Close and save the form.
13.7 Controlling access to documentsIndividual documents can contain sensitive information. Domino securityprovides several mechanisms that can restrict access to a document. You cancontrol both Read and Editor access to documents, as follows:_ Restrict Read access to documents:– Create a Read access list for all documents created with a form.– Use a Readers field._ Restrict Editor access to documents:– To those named in the Authors field.

– Use a Controlled Access section.Read accessIf you want to control read access at the document level, you can do it for alldocuments created with a specific form or you can do it for each document. In thefollowing sections, we describe:_ Controlling Read access to documents based on the form used to createthem_ Controlling Read access to individual documents using a Readers fieldNote: Turning this option on only affects documents created after the optionwas set on. It doesn’t affect existing documents.Chapter 13. Securing your Domino application 525Read access list for a formA read access list for a form refines the ACL by allowing only those named in thelist to read documents created with the form. See “Using a form access list” onpage 522 for detailed steps.Readers fieldA Readers field is a field data type that restricts readership for the document tothose users and servers that are listed in the field. There are two ways to createa Readers field in a document:_ The Designer places a field with the Readers Data Type on a form._ The Author or an Editor of the document opens the document properties andsets the Read access in the Security tab. This automatically creates a$Readers field in the document. The value of the field is the form read accesslist._ Each document that users create with the form contains the $Readers fieldlist of readers. If there is no read access list for the form, the documents donot have a $Readers field.Readers fields have the following characteristics:_ They are an excellent means of restricting replication, as only the documentsfor which a user is listed in the Readers field will be replicated._ If a document contains multiple Readers fields, all entries from all Readersfields have read access to the document._ They restrict reader access to individual documents only; access to eachdocument depends on the contents of its Readers field._ Editable Readers fields allow authors and editors to enter names ofauthorized readers._ If all Readers fields have a null value, anyone with reader access can accessthe document.Note: The Author or an Editor of a document can change the read access listof a document from the document InfoBox by changing the selection in theread access list of the Security tab.526 Domino Designer 6: A Developer’s Handbook
Creating a Readers fieldTo create a Readers field:1. Add a field to a form.2. Select Readers as the field data type.3. Specify readers by using one of the following methods:– Enter user names, roles, or groups directly.– Use a formula to compute user names, roles, or groups.– Make the field editable so Authors and Editors can select and changereaders.13.7.1 Editor accessEditor access to a form can be controlled by Authors fields.Authors field

An Authors field is a Notes reserved field that lets you give users Editor access totheir documents when they have Author access to the database.An Authors field:_ Works only in a database located on a server, or on a local replica when theEnforce a Consistent ACL option has been selected._ Refines the ACL, but does not change it.To allow users with Author access to edit existing documents, includingdocuments they create, you must include them in the documents’ Authors field.Users with Editor access can edit a document even if they are not in the Authorsfield. (Use Readers fields to prevent users with Editor access from reading thedocument, since if Editors cannot read the document, they cannot edit it.)Attention: If you allow users to enter names of authorized readers, youshould also have a separate, hidden, computed Readers field that contains arole for servers that should replicate the document.We recommend that you add a role for replicating servers to a Readers field,and then assign the relevant servers to that role in the ACL. Without that rolein a Readers field, the document will not be replicated.This can also be solved using Authors fields, to be described in 13.6.1,“Controlling access to forms” on page 521.Chapter 13. Securing your Domino application 527Users with No Access, Depositor access or Reader access cannot edit thedocument even if they are listed in the Authors field.If you add only one Authors field to a document and it contains a null value, thenonly an Editor or above can edit the document.Creating an Authors fieldTo create an Authors field:1. Add a field to the form.2. Select Authors as the field data type.3. Specify the authors by using one of the following methods:– Entering user names, roles, or groups.– Using a formula to compute user names, roles, or groups. Use role namenames to ease the administration of your application. Also, consideradding @Username function, to allow access to the current user to editthe document again later.– Making the field editable so that users with author or editor authority canselect and change authors themselves.13.7.2 Combining Readers and Authors fieldsUse Table 13-5 as a quick reference to determine how Readers and Authorsfields can protect your document.Assume that Rune Carlsen and Grant McCarthy both have Author access in theACL and that there is no form Read access list.Table 13-5 Combination of Readers and Authors fieldsNote: You cannot, as an author, edit your own documents automatically. Toedit your own documents in a database, the form from which the documentwas created needs to have an Authors field with your name.Authors fields do not overrule the ACL. You cannot edit a document, eventhough you are part of an Authors field, if you do not have Author access in theACL.Readers field Authors field Who can read Who can editNone None Everyone with ACLReader accessEveryone with ACLEditor access andabove528 Domino Designer 6: A Developer’s HandbookWhen programming with the Domino classes, you cannot use the extended class

method to assign values for Readers and Authors fields as you can whenworking in the formula language. Suppose that you have a Readers field in yourdocument called DocumentReaders, and that you want to assign the value RuneCarlsen/ITSO to this document. Using the formula language, you can do asfollows:FIELD DocumentReaders := "Rune Carlsen/ITSO"You might also expect to be able to do it in a similar way using the Dominoclasses by treating the item name DocumentReaders as a property of aNotesDocument object (assigned to the variable doc in this example):...doc.DocumentReaders = "Rune Carlsen/ITSO"...However, this method will not work because it changes the type of theDocumentReaders field to Text type (instead of Readers type), thereby removingthe read protection from the document. When working with Readers and Authorsfields in the Domino classes, you must use the NotesItem class as follows:...Dim newValues( 1 To 2 ) As StringnewValues( 1 ) = "Rune Carlsen/ITSO"newValues( 2 ) = "[ReplicServers]"None Grant McCarthy Everyone with ACLReader access orabove and GrantMcCarthyGrant McCarthy andeveryone with ACLEditor access andaboveRune Carlsen None Rune Carlsen No oneRune Carlsen Grant McCarthy Rune Carlsen andGrant McCarthyGrant McCarthyNote: Do not hardcode group or people names in Readers and Authors fields,as this makes maintenance harder. Using roles instead allows the databasemanager to assign the desired access to different groups and people byassigning the right role to them in the ACL.Note: This example assumes that the field exists in the document. If you arecreating a new field, use LotusScript instead, as you are not able to set thetype of the field to Readers with formulas. For more information aboutfront-end and back-end coding, refer to 14.2.5, “Understanding front-endclasses and back-end classes” on page 577.Chapter 13. Securing your Domino application 529Dim authorsItem As New NotesItem(doc, "DocumentReaders", _newValues, READERS)...As you can see, the role [ReplicServers] was also added to the Readers field inthe last example. Documents protected by Readers fields should always includeread access to a role that can be assigned in the ACL to the servers that need toreplicate the database. Another way to solve this is by using a role, for example[Admin], and assigning the role to the LocalDomainServers group.Field Editor access security optionIn a database where some users have Editor access while others only haveAuthor access, you can combine the use of Authors fields with the individual fieldsecurity option “Must have at least Editor access to use”. Thus, even though youare giving users with Author rights in the ACL access to a document, by using anAuthors field you can hinder them in editing certain fields by using the Must haveat least Editor access to use field security option.

13.7.3 Controlled access sectionsIn addition to having the same properties as the standard access, controlledaccess sections also have a separate list of allowable editors. To users withEditor access, fields behave as normal editable fields. To users who are not listedas Editors of the section, the fields are read-only.In addition to limiting Editor access to the fields within a section, sections alsoprovide a means of attaching multiple signatures to a document (up to onesignature per section). This is a useful feature for workflow-type applications.When programming a controlled section access formula, it must evaluate to aname or list of names, groups, or roles. Roles are preferred for ease ofmaintenance. A null return value will give general access.Note: The preceding example assumes that the field does not already exist. Ifyou have an existing field and you want to change its value, do so as youwould normally, but do not use AppendItemValue; it creates a new item with aduplicate name, and the new item doesn't have the Readers attribute.Tip: Be sure to test readers/authors security with a user ID that should nothave access to view or edit the documents.530 Domino Designer 6: A Developer’s Handbook
13.7.4 Use of Hide-When formulasYou can control whether an action button, a paragraph or a cell in a table is to beshown to a user by a hide-when formula. Select the object that you want to hideand display its InfoBox. Click the Hide When tab and select Hide Object ifFormula is True. Then enter a formula for when the selected object should behidden.See the Using @UserRoles section later in this chapter for examples ofhide-when formulas.13.7.5 Using encryption for field securityEncryption allows you to secure information at the field level. You can encrypt thecontents of any field so that only users who have the secret encryption key canaccess the message or field.Note the following:_ Users who need to create and save documents with a form must have at leastone of the secret encryption keys you selected in the default secret keys list._ Users who need to read the encrypted fields must also have at least one ofthe secret keys used to encrypt the fields.Note: Sections are not to be used as a security feature. An access-controlledsection does not physically protect data, because a user can modify thesection through a different form. To make a section truly secure, encryptedfields must be used within the section.Sections should be used when documents require multiple signaturesvalidating the Composer or Editor of the data.Important: Hide-when formulas are not a true security feature on the Notesclient, as all hidden fields in a document can be seen through the documentproperty. It is also not secure for a Web client if Generate HTML for all fields isselected in the Form Properties box.Note: Web browser users have no way of using encryption, because thesecret key is held in the Notes ID. This also means that there is no way that aWeb browser user can access encrypted data.Chapter 13. Securing your Domino application 531How encryption works for fieldsEncryption prevents unauthorized access to critical data in selected fields, and isenabled using encryption keys. The system administrator distributes theencryption keys to authorized users when deploying the application by mailingthe key or giving it to users in a file. When users receive an encryption key, they

must merge it with their user ID files. By having this encryption key merged in thepersonal ID file, a user will be able to access the encrypted data.Encryption methodsYou need to choose an encryption method and design for it. There are threeways you can apply encryption:Automatically You can design a form to automatically encrypt all encryptablefields whenever someone saves a document composed withthat form.Manually Authors and Editors can encrypt the document by selecting anencryption key in the document InfoBox.Manually or automaticallyYou can create a field that generates a list of encryption keysfrom which the Author or Editor can choose a key, or youcreate a field that contains a formula that chooses the key.Creating a secret encryption keyA document can be encrypted only if it contains at least one field designated asencryptable.To encrypt a document:1. Create a secret encryption key.2. Enable encryption for a field.To create an encryption key:1. Choose File -> Security -> User Security.2. On the left side of the dialog box, click the Notes data tab and thenDocuments. You see a document encryption dialog.3. Click New Secret Key to create a new key; see Figure 13-9 on page 532.4. Enter a name that describes the purpose of the key.5. (Optional) Enter a comment. Include the names of the database, forms, andfields that use the encryption key in case you need the information later.6. If there are users using non-North American versions of Notes prior to version5.0.4. and they are going to use the key, click Use International Encryption.532 Domino Designer 6: A Developer’s Handbook7. Click OK to create the key.Figure 13-9 Creating a new secret encryption keyProtect the key by specifying a password for the key when you export it. In thisway, only those who know the password can import the key into their user IDs.Additionally, you can specify that a user who receives the encryption key cannotgive it to another user.Enabling encryption for a fieldYou can enable encryption for a field manually or automatically. To allow Editorsand Authors to specify keys to encrypt their documents, you need to manuallyenable encryption on the field.To manually enable encryption on a field:1. Create a field in a form.2. Open the field InfoBox.3. Click the Advanced tab.4. Select Security Options: Enable Encryption for this field.Important: Carefully back up your ID file, as there is no way to recoverencrypted data if the secret key is lost.Chapter 13. Securing your Domino application 533The Editor or Author must then specify which encryption key to use on the Keytab on the InfoBox for the document.To enable automatic field encryption:1. In the form InfoBox, click the Key tab.2. From the Default Encryption Keys list, select one or more encryption keys inyour ID. If you select more than one encryption key, all the encryptable fields

will be encrypted with all the keys.
13.8 Authentication on the WebThis section discusses different authentication methods for Web clients andsecure connections between a Web client and Domino server.13.8.1 HTTP Basic AuthenticationThe communications protocol used by the World Wide Web is the HypertextTransfer Protocol (HTTP). HTTP includes a simple user ID and password- basedauthentication scheme known as Basic Authentication. The implementation ofbasic authentication is server-specific, but in general all servers use it for twopurposes:_ As a mechanism to identify which user is accessing the server_ To limit users to accessing specific pages (identified as Uniform ResourceLocators, or URLs).How Basic Authentication worksBasic Authentication uses a challenge mechanism to prompt users toauthenticate themselves. The user ID and password block is constructed bycreating a string of the form: userID:password, and then encoding it, using thebase64 algorithm.You may wonder why you are not repeatedly prompted for a password every timeyou access a new restricted page. The reason is that the browser caches theuser ID, password, server name, and realm name in memory. In fact, mostNotes: Encrypted fields do not show up in a view, nor would you want them to,since they would not be no longer private. The server, when calculates theview index, doesn’t have the key to decrypt them.You cannot access encrypted data from an agent, if the signer of the agenthas the key. The key is in the ID file, and is not part of a signature.534 Domino Designer 6: A Developer’s Handbookbrowsers go one stage further than this and send a user ID and password for anyURL that is likely to need it.Is Basic Authentication secureThere are two obvious loopholes in HTTP Basic Authentication:_ The user ID and password are included in the packet header, which meansthat they can be captured by anyone with a network sniffer or trace tool at anyplace in the session path._ The user ID and password are cached in the browser, so if you leave themachine unattended, anyone can use your ID to access restrictedinformation.The user ID and password are not encrypted when they are placed in the packetheader, but instead are encoded with base64. Base64 is an algorithm that formspart of the Multipurpose Internet Mail Extensions (MIME) protocol. It is amechanism that turns any bit stream into printable ASCII characters. (It isdescribed in RFC1521.) In fact, the objective of base64 is not to mask data at all,but to provide a method of sending binary data through a mail gateway that canonly handle character data.The result of this is that by capturing the Authorization: Basic header from anHTTP request, an attacker can easily extract the user ID and password.How serious is this exposure? Within a corporate network, it may not be a bigproblem. In fact, base64 offers protection of user IDs and passwords that issuperior to many older protocols that send them as clear text.On the Internet, however, it is a different story: there you have to assume thatsomeone, somewhere, is tracing everything you send. Clearly HTTP BasicAuthentication should not be used as the sole method of protection for anycritical resource.You can make basic authentication more secure by providing an encrypted

connection for it to operate in. SSL is a valuable example of a protocol thatencapsulates HTTP data in this way.13.8.2 Session-based authenticationSession-based name-and-password authentication includes additionalfunctionality that is not available with basic name-and-password authentication. Asession is the time during which a Web client is actively logged onto a server witha cookie. To specify settings that enable and control session authentication, youedit the Web site document or the Server document, depending on yourconfiguration.Chapter 13. Securing your Domino application 535Furthermore, you have two selections for enabling session-based authentication:_ Single server_ Multi-serverThe single server option causes the server to generate a cookie that is honoredonly by the server that generated it, while the multi-server option generates acookie that allows single sign-on with any server that shares the Web SSOconfiguration document.To use session-based authentication, Web clients must use a browser thatsupports cookies. Domino uses cookies to track user sessions.13.8.3 Secure Sockets Layer (SSL)The SSL protocol was originally created by Netscape Inc., but now it isimplemented in World Wide Web browsers and servers from many vendors. SSLmakes use of a number of cryptographic techniques, such as public key andsymmetric key encryption, digital signatures and public key certificates. SSL hastwo main objectives:1. To ensure confidentiality, by encrypting the data that a client and server send.2. To provide authentication of the session partners, using RSA public keymethods. Most current implementations only require the server to beauthenticated in this way, although the protocol does allow for clientauthentication.There are two parts to SSL: The handshake, in which the session partnersintroduce themselves and negotiate session characteristics, and the recordprotocol, in which the session data is exchanged in an encrypted form.SSL and certifying authoritiesAuthentication in SSL depends on the client being able to trust the server’s publickey certificate. A certificate links the description of the owner of a key pair to thepublic part of the key. The validity of a certificate is guaranteed by the fact that itis signed by some trusted third party, the certifying authority (CA).But how does a certifying authority become trusted? In the case of anSSL-capable browser, the certificates of trusted authorities are kept in a keydatabase, sometimes called a key ring file. The list of top-level authorities, forexample VeriSign, is pre-installed when you get the browser.This approach has the benefit of being very simple to set up; a browser canauthenticate any server that obtains a public key certificate from one of the CAsin the list, without any configuration or communication with the CA required.536 Domino Designer 6: A Developer’s Handbook
SSL Client AuthenticationBoth client and server use digital signatures to identify themselves and thosesignatures use public keys that are validated by the existence of a sharedhierarchy of certificate authorities. You may think that SSL could apply a similarapproach to allow Web browsers to authenticate themselves, simply by havingthe client implement a mirror image of the server authentication process. In fact,this is exactly what the SSL protocol specifies, by adding to the handshake aserver challenge that the client must encrypt using its private key.Unfortunately life is not that simple. Notes can support a symmetrical

authentication scheme because you have control over the CA hierarchy andtherefore you can ensure a region of shared trust. On the Web, however, you donot have that luxury. The monolithic certification scheme used by servers is notflexible enough to support the large number of certificates that clientauthentication would require.13.8.4 Domino and SSLDomino Release 4.5 added support for Domino to obtain a certificate from anexternal certificate authority to provide for Domino server authentication andsession encryption (SSL V2).The Domino 4.6 server added support for Internet client authentication (SSL V3),using client certificates obtained from an external certificate authority. The clientcertificate had to be registered in the user’s person record in the Domino Nameand Address book. Domino 4.6 also added support for Domino to be a certificateauthority to issue X.509 certificates for servers (although the Domino CA couldnot yet issue client certificates).The X509 certificate is a standard certificate format for the Internet. Certificatesverify the user’s identity and bind the public key to the user’s name. X.509certificates are used on the Internet/intranet for authentication and encryptedsessions (SSL), and encrypted mail and digital signatures (S/MIME).Domino Release 5.0 added SSL 3 Client Authentication and the ability to createX509 certificates that can be issued to Notes clients, which is the same inDomino 6.Previous Notes clients used their own internal certificates (similar concept toX.509, but different format) and did not support X.509 certificates. The Notes 6client have the ability to request a certificate from any certificate authority,including a Domino certificate authority, and store the X.509 certificate in theNotes ID file. To obtain an X.509 certificate from a Domino CA, Notes users willuse the Domino CA Web site (CA application) just as a browser user does today.The X.509 certificate can be used for encryption and digital signatures betweenChapter 13. Securing your Domino application 537Notes clients and Internet clients using S/MIME and for access to secure Websites using SSL.13.8.5 When to use Internet securityThere are three methods of Internet security that can be used, BasicAuthentication, SSL Server Authentication, and SSL Client Authentication withX509 certificates. Table 13-6 describes when, typically, to use each of theselevels of security in your applications.Table 13-6 Internet security levels and use13.8.6 Defining Web usersYou may register new Web users from scratch, or let existing Notes users haveaccess to the Domino Web server. To create a new Web user follow these steps:1. Open the Domino Directory and select the Person view.2. Select Add Person to display the Person document.3. Enter the required information. The User Name and Internet Password fieldsare the only fields used for Domino Web authentication. The other fields areoptional with the exception of the Last Name field, a required field withoutwhich the form cannot be saved.4. Figure 13-10 on page 538 shows a Person document being created.Security feature When to use itBasic Authentication In a closed network application such as a company intranetwhere the level of risk from outside attack is low.SSL ServerAuthenticationIn an Internet application where the risk of outside attack isgreater and you wish to protect the information and data onyour Web server to a greater extent.

SSL ClientAuthentication with X509certificatesWhen security is at a premium and you are exposed topotential attacks from the Internet.538 Domino Designer 6: A Developer’s HandbookFigure 13-10 A Person document being createdFor more information on Internet Security, see the IBM Redbook Lotus Notes andDomino R5.0 Security Infrastructure Revealed, SG24-5341.
13.9 Programming considerationsDomino provides several @functions that help you control application behaviorbased on the user, or on the client type. We discuss the following functions:_ @UserRoles: returns a list of roles for the current user._ @UserName: returns the user name or server name._ @ClientType: returns a text string to differentiate Notes and Web clients._ @UserNamesList: returns a text list containing the current user name, anygroup names, and any roles.This information is also available from LotusScript, but these are mostly used informula context, especially in hide formulas.13.9.1 Using @UserRolesUse @UserRoles in formulas to either:_ Determine what to do for a particular set of users, without needing to hardcode user names in the code.Chapter 13. Securing your Domino application 539_ Direct one set of users to one page, and another set of users to another pagewhen the user clicks a button.The @UserRoles function has no arguments:@UserRolesIt returns a text list whose value is the role or roles of the current user.Figure 13-11 shows an example of the values returned by @UserRoles. You canadd code to perform an action based on the returned value.ExamplesTo display an action only to people in the NewsEditor role, enter the followinghide-when formula for the action:!@IsMember( "[NewsEditor]"; @UserRoles )Or:@IsNotMember( "[NewsEditor]"; @UserRoles )Figure 13-11 Example of the results of @UserRoles and @UserNamesList functionsNote: @UserRoles only works on a server-based database unless theEnforce a Consistent ACL option is selected in the Advanced section of theACL settings.540 Domino Designer 6: A Developer’s Handbook
13.9.2 Using @UserName@UserName returns the current user name. Using @UserName allows you tomake the current user name available to formulas. You can use it to:_ Restrict the Edit action in documents created with a particular form based onwhether @UserName is equal to the author of the document_ Hide portions of documents in hide-when formulas based on the user nameExampleThe following view selection formula selects only documents created by thecurrent user to display in a private view:SELECT @UserName=Author@UserName has been extended to take a new parameter, index, which returnsthe user name, alternate user name, or server name indicated by the parameter.13.9.3 Using @ClientType

@ClientType returns a text string to differentiate Notes and Web clients. Use@ClientType in formulas for which the outcome is different depending on clienttype.ExampleUsed in a computed subform formula, the following formula inserts the subformWebHead if the form is to be displayed on the Web, and the subform NotesHeadif the form is to be displayed on a Notes client:@If(@ClientType = "Web"; "WebHead"; "NotesHead")13.9.4 Using @UserNameList@UserNamesList returns a text list containing the current user name, any groupnames and any roles. It also works on local databases when the EnforceConsistent ACL option is selected. It returns “” for a local database whereEnforce is not in effect.Attention: You should never use @Username as part of your view selectionformula or in a view column formula, unless the view is Private on First Use. Aworkaround could be to create a categorized view based on a field where yousave the author of the document. Then you can embed this view on a form anduse @Username in the “Show single category” option.Chapter 13. Securing your Domino application 541@UserNamesList will allow you to combine the functionality of @UserRoles and@UserName and, in addition, the group information for the user. Figure 13-11 onpage 539 shows an example of the values returned by @UserNamesList.Example@If(@IsMember("NewsEditors"; @UserNamesList); "Editor Head"; "GenericHead")13.9.5 Password fieldYou can create a Password field that displays only asterisks when a value isentered into the field. This field allows users to enter a password in privacy.13.9.6 Controlling if users paste documents into the databaseYou must also consider whether users should be allowed to paste documentsinto your application database. If this is not controlled, users may be able tocompose a document in another database in a way not allowed in yourapplication and then paste the document into your application database.To control the pasting of documents, use the QueryPaste event of the view. Usingthis event, you can make sure the documents to be pasted meet your criteria.13.9.7 Hiding the design of a databaseThe developer can protect the design of a database by hiding it. However, hidingthe design of a database will not hide the data in that database.Consider carefully before hiding the design of a database. It may be more difficultfor the system administrator to maintain while it is deployed. For example if youhide the design of a database, the Agents view is also hidden and the systemadministrator cannot enable or disable server agents unless you have addedaction buttons or similar functions.Note: Unlike @UserRoles, this function does not append “$$WebClient” to thelist. This is because @ClientType is now available for this purpose, so@UserRoles overloading is no longer necessary.Important: However, you must either make sure that the password is passedon and not saved in the document, or protect it in the document by using aReaders field or an encrypted field to avoid other users seeing the passwordthrough the InfoBox for the document.542 Domino Designer 6: A Developer’s Handbook

13.10 Other security options and considerationsIn the following sections, we discuss other security options and considerations tokeep in mind.13.10.1 Using signatures for securityDomino checks the signatures in design elements for two reasons:_ To allow execution of the application in the Notes client.Signers allowed to execute in the Notes client are listed in the client ExecutionControl List (ECL)._ To allow execution of server-based agents in the application.Signers allowed to execute agents on the server are listed in the Security(Agent Restrictions) section of the server document in the Domino Directory.To make management of Execution Control Lists and the Security section of theserver document easier, it is recommended that you create a common ID for yourdevelopment organization that is used to sign all deliverables before handingthem over to the System Administrator for deployment. Then ensure that this IDis trusted in all users ECL and is part of the Administrative ECL.The following sections will explain:_ Execution Control Lists_ Server-based security for agents, Java and JavaScript_ Signing a database_ Signing an appletExecution Control ListsExecution Control Lists (ECL) have stemmed from the concern that a Notes userdoes not have much control over what a Notes application is doing to theirdocument, database, or system.ECLs are a means by which the Notes user can now specify what level of accessan executing formula or LotusScript program created by another person can haveto their system.By default, no scripts or formulas, whether signed or unsigned, can execute onyour workstation without displaying a warning message.Chapter 13. Securing your Domino application 543ECLs are stored on a user’s workstation. To work with ECLs choose File -Security - User Security. Click the “What others do”. The ECL of the user’sworkstation is now shown:Figure 13-12 Execution Control ListThe dialog is split into two parts. Below the “What others do” there are threeoptions. One for “Using Workstation”, another one for “Using Applets” andanother one for “Using JavaScript”.Depending on your choice among these options, your choices changes for thesettings of your ECL. Common for them all, is that you add, rename, remove andmanage what the different signatures can perform on the current workstation.Based on the developers’ signatures, you can set the level of access thesesignatures should have on your workstation.For example, suppose you are trying to create a document from a design thathas been signed by the ID Rune Carlsen/ITSO. You have specified in your ECLlist that you do not want to give this ID access to your environment variables.When you open up the document and the program tries to perform an@Environment command, a dialog box will appear telling you that the system istrying to access an environment variable when it does not have the authority todo so. If you want to allow the command to continue you can do so. You caneither allow it to run this one time only, or you have the ability to change the ECLNote: This is a new way to access the ECL with Lotus Notes 6.544 Domino Designer 6: A Developer’s Handbook

permanently to give Rune Carlsen/ITSO the ability to access any of yourenvironment variables in the future.Central maintenance of the ECLWhen new Notes clients are installed, a default ECL is pulled from the server.The system administrator also has the option of not allowing users to modify theirECL. The system administrator should set an administrative ECL before installingand configuring clients in his environment. If this is not done, there are variousways to update the client’s ECL with a new administrative ECL._ If the system administrator updates the default ECL, the new settings can bedistributed to existing clients by mailing them a memo that includes a buttonthat executes the function @RefreshECL and asks them to refresh their ECL._ Another possibility is to add the same @RefreshECL function in thePostOpen event of the mail template, so all users will refresh the ECL as theyopen their mail file._ The third and best way is by using the new Domino 6 Administration tools,Security Policy Settings documents. They allow you to apply security settingsfor all your users or group of users, and define how ECL maintenance shouldbe performed.Refer to Lotus Domino Administrator 6 Help for more information on how toconfigure and implement this.A complete list of LotusScript and @functions that are affected by the ECL canbe found in the Notes Help database.Agent, Java and JavaScript security on the serverThe system administrator can decide the access rights for agents and codeutilizing the Domino Object Model based on the ID that the agent/code is signedwith.In the Security part of the server document, there are entries for specifying:_ Agent Restrictions: options to specify who can:– Run personal agents– Run restricted LotusScript/Java agents– Run unrestricted LotusScript/Java agents_ NOI Restrictions: options to specify who can:Note: By default, every template that comes from Lotus is signed by LotusNotes Template Development, which is given full access to your system.Chapter 13. Securing your Domino application 545– Run restricted Java/JavaScript– Run unrestricted Java/JavaScriptHere the system administrator can enter specific IDs; for example:Domino Development/IBMAccess can be given to a whole organization; for example:*/IBMYou can read more about the different levels of restrictions for agents and theDomino object interface in the Domino Administration Help.Signing a databaseYou can sign templates and databases developed by your organization so thatyou can then add the associated name to the Administration ECL, as follows:1. Launch the Domino Administrator client. One way to do this is through themenu; choose File -> Tools -> Server Administration.2. If the ID you want to use to sign is not the current one, switch to the correct ID.3. Click the Files tab.4. Select the server that stores the databases or templates that you want to sign.5. Select the databases or templates that you want to sign by highlighting themin the list box.6. In the Tools pane, expand the list under Database.7. Click Sign. A dialog is displayed.

8. Select which elements to sign. To sign every design element in a database ortemplate, select Sign “All Design Documents”.9. Click Sign. A dialog box shows the number of databases processed and thenumber of errors that occurred (if any). See the log file for details.10.Click OK.13.10.2 Access control for HTML and other filesDomino extends its access control to files in the file system. This is particularlyuseful for HTML and other types of files used in Web sites. When using theDomino native HTTP stack, you will be able to configure access control lists forfiles (HTML, GIFs, etc.) in the file system. This gives you complete security andaccess control for your Domino Web sites, no matter how they are built or wheretheir assets are stored.546 Domino Designer 6: A Developer’s HandbookFile system protection does not apply to CGI scripts, servlets, or agents thataccess files on the system. The scripts, servlets, and agents have full access toany files accessed. File system protection does apply, however, to files thataccess other files (for example, HTML files that open image files). If a user hasaccess to the HTML file, but does not have access to the JPEG file that theHTML file uses, Domino does not display the JPEG file when the user opens theHTML file.A File Protection document needs to be created for each directory that containsfiles that you want to protect. The directory is relative to the HTML directory, setin the Server document or, if you have virtual servers, set in the Virtual Serverdocument. Create the document as follows:1. Open the Domino Directory.2. In the Server/Servers view, highlight the Server document for the server onwhich you want to protect files.3. Choose Actions -> Create File Protection, fill out the fields described inTable 13-7, and save the document.Table 13-7 File protectionsTab Field ValueBasics Applies to If you have virtual servers on this machine, selectwhether you want this setting to apply to all virtualservers on this machine, or only to the virtual serveryou specify.IP Address If you select Virtual Server, enter the IP address of theserver to which the file protection applies.Path Path This is the drive or directory that you want to restrict.The path is relative to the HTML directory specified inthe Server document or, if you have virtual servers, theVirtual Server document. If you want to restrict accessto specific files, enter the name of the file or use thewildcard characters * or ? to specify a group of files.Chapter 13. Securing your Domino application 5474. Create a File Protection document for every path that you want to restrict onthe server.5. At the server console, type tell http restart to refresh the file protectionsettings.6. To display the File Protection document, open the Server\Web Configurationsview. Notes displays the File Protection document as a response to theServer document.13.10.3 APIs for customized authentication, encryption, and signingDomino offers APIs for:_ Authentication of Domino users by another systemThis is part of the Domino Web Server API.
_ Authentication of users for other applicationsCustomizable authentication through domino Web server APIBy using an API provided with Domino (DSAPI), you can create your ownauthentication schemes for Domino that can leverage external directories orsecurity systems. This interface provides you with greater flexibility in integratingDomino into your existing environment and building “single-sign on” log incapabilities. Refer to the Domino documentation and release notes for moreinformation.Common Data Security Architecture (CDSA)Domino provides a common, multivendor interface for managing various securityservices, including a standards-based interface to Domino security forapplication developers. This interface exposes Domino encryption, signing,authentication, and other elements to application developers. CDSA makes theAccessControlCurrentaccess controllistThe users who can access the files you specified andthe type of access they are allowed.To add users to this list, click Set/Modify AccessControl List. Select a user name from the PublicAddress Book in the Name field and selectRead-Execute, Author, or Full access. Read-Executelets the user open files and start programs in thedirectory. Author lets the user create new files in thedirectory in addition to the Read-Execute privileges.Full access lets the user delete files in the directory inaddition to the Author privileges.If users connect to the server using Anonymousaccess, enter Anonymous in the Name field andassign the appropriate access.548 Domino Designer 6: A Developer’s Handbookprocess of adding security to Domino applications easier and provides forinteroperability between different applications that use security. Refer to theDomino documentation for more information.13.10.4 Backup and restoreBackup and restore is also part of securing your application.You need to work with your system administrator on how to implement backupand restore of application data during production. In larger organizations, therewill often be a standard mechanism for these important processes.During development, it is also important that you secure your work against lossthrough user or system error by making a backup of your development databaseson a regular basis.By enabling transaction logging in each application you may be able to improveyour backup capabilities with rollback to an earlier state of the application that’smore current than the last full backup. However, enabling transaction logging mayimpact server performance and require more disks. Work with your Dominoserver administrators to develop a backup plan.
13.11 Developing a plan for securing your applicationSecuring a Domino application is a joint effort. The database designer must workclosely with the system administrator and the database manager to successfullydesign, create and deploy a secure application.Depending on the enterprise, the database designer, the database manager, andthe system administrator may be one person or three separate people. The

system administrator often takes over the responsibility of database Managerwhen the database is launched.Table 13-8 provides a guideline for the tasks that are the normal responsibility ofeach participant in an application.Table 13-8 Planning securityDatabase designer Database manager System administratorDesign a security scenario.Design the access control list (ACL).Implement Design tools for security.Implement Design changes.Implement the ACL.Implement the ACL.Update the ACL.Set up and authorize users and groups.Update the Domino Directory.Manage the server.Propagate replication.Manage user issues.Chapter 13. Securing your Domino application 549Database manager and system administratorSecuring servers and controlling access to a domain is usually the responsibilityof the server administrator. In addition, in a production environment, it will be thesystem administrator who is assigned the role of database manager in the ACLfor purposes of setting up and maintaining the ACL. The database managershould receive the following kinds of information from the designer:_ A list of users, groups, and roles in each database_ A comprehensive security plan for each database, so that it can bemaintained on the server_ All changes that are made in user and group access_ Updates to access levels and restrictionsDatabase designerWhile the designer must design the security plan for the application, it is usuallythe system administrator who has responsibility for implementing andmaintaining the security plan. Therefore, it is essential that you work out yourplan carefully, so that you can document it for the database manager. Designersneed to do the following:_ Work with the server administrator while designing the application so thataccess levels and replication can be set up properly._ Let the server administrator know whether there are any applications thatrequire anonymous access._ Determine which users and groups have access to which parts of theapplication._ Decide what roles need to be added to the ACL for each database in theapplication._ Document design changes for the server administrator so that they canreplicate appropriately.Note: All users and groups must be listed in the Domino Directory before theycan be added to the access control list in a database.13.11.1 Key design issuesBefore setting up the ACL for an application, you need to create an accessscenario. Use the following questions to create the scenario:_ Who is responsible for setting up and maintaining the ACL?550 Domino Designer 6: A Developer’s HandbookThe system administrator usually has overall responsibility for the ACL, andthe designer would document the security mechanisms to be used for theadministrator.

_ Which users need what kind of access?The designer needs to inform the system administrator about which accesslevels to set for users, servers and groups and the sets of privileges controlledby the roles in the ACL._ Can you determine groups of users who need the same kind of access?The system administrator must ensure that the groups are listed in theDomino Directory before adding them to the ACL._ Is there a hub server responsible for replication?If so, you should set up replication so that changes are added to the hubreplica, then the hub adds the changes to other servers._ Will this application be deployed on the Web?If so, it is advisable to always have an Anonymous entry for Web users so thatyou can specify exactly what Web users can do without registering.Note: The backup and restore of application data is part of securing theapplication. You also need to consider this during the design of your application.Server accessServer documents in the Domino Directory contain restrictions that are used tocontrol access to a server. The database access control list refines theserestrictions, but cannot override them.Servers in the database ACLIf there are replicas of a database, add server names and server groups to theACL. Server access levels affect what information can be exchanged betweenthe replica databases.It is important to understand which design changes replicate and which do not,and how the database ACL and other replication settings affect the distribution ofdesign changes:_ Servers need to have Editor access at minimum, so that they can replicatedata changes._ Servers must have Designer access to replicate design changes.Important: You cannot use server lists to control access by Web clients. Theclients are not authenticated until they try to access a database.Chapter 13. Securing your Domino application 551If you share your database via replication with outside agency, it may beappropriate to grant their servers a more limited level of access so they can’tdamage your application by accident.Planning for Web user accessUsers are granted access to the Domino Web server through basicauthentication; the standard for Web security that is based on achallenge/response protocol.The Web user can be challenged upon initial access to the Web site if restricted,or upon request to open any database that is restricted by the default entry in theACL of No Access, or an Anonymous entry in the ACL of No Access.All Web users have access to any database on the server that has a defaultaccess of Reader. If the database is restricted, a Web user must be listed in theDomino Directory with an HTTP password.You can define additional access privileges and refine the ACLs for anauthenticated user for a database, document, and so on.Controlling Web access to Domino dataTo set up Web access to your Domino data, do the following:_ Authenticate any Web client accessing a Domino server, database view, ordocument._ Define server authentication at the user level by creating Web users andpasswords._ Choose which databases can be accessed by Web users and what level ofaccess to provide for each database. It is good practice to create a separate

database for the home page and use ACL restrictions to control access to allother databases._ Determine how to handle anonymous users._ Optionally, add encryption to HTTP transactions by activating Secure SocketsLayer (SSL) at the server.Planning for anonymous usersYou can control the level of access to a database for users who are notrecognized by the system. These include Web users and Notes users who do notshare a certificate in common with the server. Such users are consideredanonymous users.552 Domino Designer 6: A Developer’s Handbook
Anonymous access to serversBefore anonymous users can be granted access to a database from their Notesclient, they must be allowed server access. In the security section of the serverdocument, the Administrator defines the security settings in the following ways:_ If the Compare Notes Public Keys Against Those Stored in the Address Bookoption is:– Yes, then the Notes user must have an entry in the Domino Directory toaccess the server.– No, then the Notes user does not have to exist in the Domino Directory toaccess the server._ If the Allow Anonymous Notes Connections option is:– Yes, then all Notes users in the world can access the server.– No, then only Notes users who have a certificate in common with theserver can access the server.13.11.2 Distinguishing true security featuresAs you probably have gathered from reading this chapter, it is important todistinguish between true security features and features that are used to controlthe User Interface of the application and may only appear to control access. UsetTable 13-9 to distinguish between the security abilities of the different databaseelements.Table 13-9 True security featuresNote: Web users can connect to the server anonymously, unless this hasbeen denied in the server document. In case Web browser users can accessthe server anonymously, you must use database and file restrictions to lockthem out.Is this a true securityfeatureIn Notes… On the Web…ACL Yes YesPublic Access todocumentsYes YesReader Access Lists andReaders fieldsYes YesChapter 13. Securing your Domino application 55313.12 New security features in Domino 6Lotus Notes/Domino 6 has a few new security features for system administratorsand application developers. In this section we cover those that are mainly ofinterest to application developers of Domino 6 databases.Extended access control listAn extended access control list (xACL) is an optional directory access-controlfeature available for a directory created from the PUBNAMES.NTF template—aDomino Directory or an Extended Directory Catalog. Use an extended ACL to

Author name fields Yes, for users that have Authoraccess in the ACL. However, userswith Editor access will be able to editthe document even without being inthe Reader list.Yes, as in NotesField Encryption Yes Not applicableSigning Yes, verifies ownership. Not applicableControlled AccessSectionsNo, users can modify the sectionthrough a different form, butcombined with signing the sectionnon-authorized updates can bediscovered.No. Given the document ID, a Webuser can get around the control ina section (this is not for the casualWeb user, however).View restrictions No, users may create private viewsand will be able to see all documentcontent that isn’t protected byReaders fields or encrypted fields.YesForm restrictions No, users can always seefield content through the DocumentProperties dialog box.It depends:No, when “Generate HTML for allfields” is selected.Yes, when “Generate HTML for allfields” is deselected.Hide-when formulas No, users can always seefield content through the DocumentPropertiesdialog box.It depends:No, when “Generate HTML for allfields” is chosen.Yes, when “Generate HTML for allfields” is deselected.Prevent Copying andForwardingNo No (not applicable)554 Domino Designer 6: A Developer’s Handbookapply restrictions to a user's overall database access granted through thedatabase ACL.Although the security provided by the Readers and Authors fields is similar tothat provided by an extended ACL, Readers and Authors field restrictions applyto all fields associated with a specific form—whereas you can use an extendedACL to restrict access at the field level. Since you must create Readers andAuthors fields separately on each form that requires them, they can be timeconsuming to set up and to track. With this feature, however, you can apply andmanage extended ACL restrictions through one interface and for multiple formsat once.You manage an extended ACL using dialog boxes accessible from the databaseAccess Control List dialog box.Full Access AdministratorA Full Access Administrator is a new super-user access level, which is defined ona server level, in the server document. The people listed here will get the same

rights as administrators, as well as manager access, to all databases on theserver, regardless of the ACL on the database. A Full Access Administrator canoverride any setting of a database, including Enforce Consistent ACL across allreplicas, and can access all documents in the database regardless of the use ofReaders fields.For more information on Full Access Administrator, refer to the Lotus Domino 6Administrator Help database.Effective accessThe “effective” access a person, server, or group has to documents in a databaseis not always apparent. For example, if there are two groups with different levelsof access to documents, and someone is a member of both groups, you maywonder what access the person actually has. Now, however, using LotusNotes/Domino 6, you can determine a person's effective access to thedocuments, as follows:_ Select a database and choose File -> Database -> Access Control._ Click Effective Access._ From the Effective Access dialog box, select the name of the person, server,or group whose effective access you want to determine and then press Enteror click Calculate Access.Note: If you enable an ACL for Extended Access, the ACL history is cleared.The new history gives you far more entries than the 20-line limit. It alsoincludes more details about Extended Access changes.Chapter 13. Securing your Domino application 555_ “Database Access is derived from” in the top left of the dialog box shows theselected name's effective database access, as determined by the databaseACL.The checked boxes on the lower left of the dialog box indicate the accessrights for the selected name.The Groups and Roles boxes on the right of the dialog box show all theindividual and group name entries and roles that could potentially control theselected name's access to the selected document scope. If the person,server, or group is not in the ACL, the Groups box displays the group used todetermine the effective access._ After you review the effective access for the selected name, click Done.New agent security paradigmThe agent architecture and security paradigm has been changed in Domino 6, asfollows:_ Access remote serversWith Domino 6, it is possible to access remote servers with your agents. Theremote server’s server document needs to have the server you are usinglisted in the Trusted servers field. By having a server name in this field, theserver assumes that the trusted server has authenticated the user._ Save agentsIt is now possible to agents to manipulate and save other agents on theserver. With this new feature, your agents are able to enable and disable otheragents on the server._ Allowing editor-level users to run LotusScript and Java agentsA database designer is able to allow users with editor-level access to activateagents._ Setting rights on individual agent levelAn agent signer with unrestricted rights is able to select which level of rightsdoes the agent operate in. By doing this, it is possible to restrict unrestrictedsigner rights on agent-by-agent basis. There are three levels for this setting:– Do not allow restricted operationsLimits the agent to running in restricted mode. The agent will not be

allowed to perform file input/output or signing but will be allowed to doregular LotusScript or Java operations.– Allow restricted operationsMakes the agent run in unrestricted mode. File input/output and signingare allowed.556 Domino Designer 6: A Developer’s Handbook– Allow restricted operations with full administration rightsAllows the agent to perform all operations. The agent can also performfunctions that require administrative rights.Refer to the Lotus Domino Administrator 6 Help and Lotus Domino Designer 6Help databases for full details on the new security features and how to use them.
13.13 SummaryIn this chapter we discussed the various levels of security available to Dominoserver administrators and application developers to secure information within aDomino database. We also discussed how Domino implements standardInternet-based security protocols and how these can be used, and reviewed thenew Domino 6 agent security features.Note: When the agent is created, the default setting is “Do not allowrestricted operations”, which is the safest setting. If you want to performrestricted operations in the agent, you need to set the setting to one of theother options.© Copyright IBM Corp. 2002. All rights reserved. 557
Chapter 14. Programming for Domino 6In this chapter, we cover the methods available for programming in Domino. Webriefly discuss Simple Actions and the Formula language, but our primary focusis on the LotusScript and JavaScript languages. The chapter explains how, when,and where you can use the different programming methods.For information on the new formulas and LotusScript functions, refer toChapter 12, “New features in Domino 6” on page 347.
14558 Domino Designer 6: A Developer’s Handbook
14.1 Programming for Domino 6The following section explains the differences between the existing integralprogramming interfaces to Domino: Simple Actions, LotusScript, Java,Javascript, XML, and the Formula language. It gives a brief overview of SimpleActions, and it compares LotusScript, @functions, and JavaScript. The examplesare written in LotusScript and JavaScript, which are two of the programminglanguages you can use to develop your applications.14.1.1 Choosing a programming languageDomino offers four built-in languages that are appropriate for different situations:macro, LotusScript, JavaScript, and Java.Generally, the best language to use is the one that accomplishes the task withthe least programming. While there are differences in performance, usually thesedifferences are minor compared to the cost of developers' time in creating andmaintaining the application.Macro language is best suited for:_ Operations on the current open document

_ Action buttons that use basic commands (for example, FileSave)_ Agents that make simple changes to many documents in a single databaseOn some cases using the macro language is the only option, for example inhide-when, view column, view selection formulas.LotusScript is the usual best choice for any task you can't do easily with macrolanguage. It works both in the “front end” and “back end”, can be used to accessother Notes databases or non-Notes data sources. In short, it's a full-featuredprogramming language.The disadvantages of LotusScript are:_ Unlike macro language, LotusScript does not automatically know its contextor automatically loop through multiple documents; you have to program thatlogic._ It does not work in Web and mobile applications (except as discussed inChapter 7, “Domino Design elements: agents” on page 247)._ Unlike macro language, its native types are not ideally suited to dealing withNotes field data. For instance, as shown in the front-end/back-end section,dealing with dates can be tricky. You must use special classes for some data,and handle with arrays for multi-values.Chapter 14. Programming for Domino 6 559JavaScript is the tool of choice for programming on Web forms, particularly forform validations. Since it is the only one of these languages that Web browsersknow how to execute, it can be used to create Web forms with built-inintelligence. By writing code that executes in the browser, you save a round trip ofsubmitting the form back to the server, the server doing calculations, and sendingthe modified page back.Of course, JavaScript is only suitable when all the necessary information isavailable locally. For instance, you cannot use it to tell whether a document titleentered on the Web form is unique in the database.Since the Notes client also can execute most JavaScript, use it to write validationcode for dual-client applications also. The same form can use the same code tocheck for correct data entry in Notes and on the Web.Java is a good alternative to LotusScript for agents that access the Notesback-end classes. Use it if you are more comfortable with Java than with BASIC.Also, you can add functionality to your Notes forms and pages by embeddingJava applets in them. These applets can also access Domino data, either locallyor by remote calls from a Web browser, using class libraries supplied by IBM.14.1.2 Simple ActionsSimple Actions are predefined actions that allow you to define a sequence ofactions without requiring any programming knowledge. They are ideal for the enduser who wishes to automate some routine tasksUse Simple Actions with shared and unshared actions, buttons, action hotspots,picture hotspots, and agents. To access a list of Simple Actions, select SimpleActions from the Run pull-down list and click Add Action.The Simple Actions available are:_ Copy to databaseThis copies the selected document to the database you specify. You can copyand paste selected documents within the same database or to anotherdatabase on the same server or another server. They are marked as read inthe target database._ Copy to folderThis copies the selected document to the folder you specify. You must createnew folders before you can select them. Copying a document from one folderto another does not remove the document from the source folder. A duplicateNote: Web applications do not support Simple Actions.560 Domino Designer 6: A Developer’s Handbook

of the document is not created; instead, the document is displayed in a newplace._ Delete from databaseThis deletes the selected documents from the database. If there are replicasof this database on other servers, documents deleted in this database arealso deleted in the replicas unless the option “Do not send deletions made inthis replica to other replicas” is selected in your database replication settings(choose File -> Replication > Settings and click Send to see what thesettings are)._ Mark document readThis marks selected documents as read. Use this action to mark an unreaddocument as read without opening it or for reverting a document that wasmodified back to its read status because it doesn’t actually need to be readagain(for example, if it has been modified by an agent)._ Mark document unreadThis marks selected documents as unread. Use this action for flagging adocument that users want to read again. Modify field_ Modify fields by formThis replaces or appends a single field value with a new text value youspecify. This action replaces only text values for documents in Edit mode. Toreplace a value with something other than text, use an @function formula orLotusScript program. This action can modify the value of a hidden field, if youcan specify the field’s name._ Move to folderThis moves the highlighted document in a view or folder to a different folder.This action removes the document from the source folder and adds it to thespecified folder. The document is not deleted from the database.Note: Do not use this option with an agent that is processing documentswith “Before New Mail Arrives.”Note: The Append Value option does not work for rich text, number, timefields, or for fields that are not available within documents already saved inthe database. Also, Append Value is not available if a database does notcontain any documents (for example, a database template).Chapter 14. Programming for Domino 6 561_ Remove from folderThis moves the highlighted document in a view or folder to a different folder.This action removes the document from the source folder and adds it to thespecified folder. The document is not deleted from the database._ Reply to senderThis sends a reply to a mail memo automatically. Replies are not sent to amail memo that was generated by an agent. The Body field accepts only plaintext. It does not accept styled text, graphics, or attachments._ Run agentThis allows you to chain agents together with other agents or combineLotusScript programs, @function formulas, and Java in one agent. The agentto be run must already exist in the database.The documents that additional agents process are determined by the firstagent. All subsequent agents use the same documents, regardless of theirown settings. The first agent completes its search and actions first and thenpasses that information to the second agent.For example, Agent A searches for all documents with the word “blue,”replaces “blue” with “red,” and then runs Agent B. Agent B launches its ownsearch queries and actions only on the documents that Agent A processed._ Send documentThis mails the current document to the recipients designated in thedocument’s SendTo field. This action works like the @MailSend function.

To predict the recipient, the document must have a SendTo field. If it does nothave a SendTo field, then Notes uses the contents of the internal $UpdatedByfield as the recipient. If the document also contains the CopyTo orBlindCopyTo fields, it is routed to those recipients at the same time.If the document contains the DeliveryPriority, DeliveryReport, orReturnReceipt fields, they control the delivery priority, generation of a deliveryreport, and generation of a return receipt. If the document does not containthese fields, they default to normal priority, no delivery report, and no returnreceipt, respectively._ Send mail messageThis mails the selected document as a whole document or as a link. The Bodyfield accepts only plain text. It does not accept styled text, graphics, orattachments._ Send newsletter summaryThis searches a database for documents matching conditions you specify,then sends a summary document with links to the individual documents.562 Domino Designer 6: A Developer’s HandbookThe summary information includes items such as a one-line description of theDate, Author, and Title columns.The “Gather at least” option does not apply to sending a document summaryfrom a view or folder with an action because the action can act on only thehighlighted document, and “Gather at least” acts on multiple documents._ @Function FormulaThis adds a customized @function formula.14.1.3 Formula languageFormulas are expressions that have program-like attribute; for example, you canassign values to variables and use a limited control logic. The formula languageinterface to Lotus Domino Designer is through calls to @functions [email protected] formula consists of one or more statements that are executed in order.Depending on the object associated with the formula and other criteria, theformula may execute once, or it may execute multiple times on selecteddocuments (one execution per document). Formulas, as part of Domino 6, nowhave language elements for loop iteration.Agent formulas execute multiple times on selected documents, giving the effectof conditional, iterative execution. Data can be processed in lists, giving the sameeffect.All @functions evaluate to a value and can be placed in a formula anywhere avalue of that type can be placed. When the formula executes, the value of theformula takes the place of the formula. Some formulas also have side-effects,that is, they cause actions to occur (for example, @Prompt causes a messagebox to appear).Most @functions can be used in formulas for any Notes object, but some@functions are restricted in their applicability.@Commands are special @functions that perform immediate actions in the userinterface. Most @commands mimic menu commands.Note: Simple Actions only cover basic functions. To implement more complexfunctions, consider using @formulas or a programming language, such asLotusScript or JavaScript.Chapter 14. Programming for Domino 6 563For example, the following formula, if executed from a button, puts the currentdocument in Edit mode and moves the insertion point down twice:@Command([EditDocument]; "1");@Command([EditDown]; "2")You can use @commands in formulas for toolbar buttons, agents that do notspecify target documents, events, button hotspots, and action hotspots. However,
you cannot use @commands in a formula that does not interact with the user.These include replication, form, selection, column, hide action, window title,section title, section access, insert subform, hidden paragraph, default value,input translation, input validation, computed value, and keyword field formulas,and agents other than those that specify no target documents.You also cannot use most @commands in Web applications, since @commandsare based on the Notes workstation user interface. About 30 @commands aresupported, but some behave differently. Refer to the Lotus Domino Designer 6Help database for a overview of programming Domino for Web applications.Domino 6 has many new @functions; you can find information about those@functions in 12.5, “@functions and @commands” on page 370.14.1.4 LotusScriptLotusScript offers the application developer the wide variety of features expectedof a modern, fully object-oriented programming language. Its interface to Dominois through predefined object classes. Domino oversees the compilation andloading of user scripts and automatically includes the Domino object classdefinitions. This allows you to code your programs in an efficient way.Furthermore, the hierarchy of the Domino object classes represents the flow ofcontrol you follow in the user interface if you step down from a database icon to aview, and further on to a document, and to a specific field within this document.For example, if you are coding in LotusScript, you will start with the UIWorkspaceclass and go down to the UIDocument class which represents the currently opendocument. Once you have set this object variable, you have access to the fieldsof the document.The same principle applies if you are working with the back-end classes ofDomino, which represent the objects you might wish to work with that are not inthe user interface. You will start at the NotesSession class and go down throughthe NotesDatabase class to the NotesDocument class. The front-end andback-end classes are described in the section about Domino Object Models.564 Domino Designer 6: A Developer’s HandbookHere is a short summary of the benefits offered by LotusScript:_ Superset of BASICSince LotusScript is a superset of the BASIC language, it is easy to learn,especially for Visual Basic users. You can write sophisticated scripts by usingconditions, branches, subroutines, while loops, and others._ Cross-platformLotusScript is a multi-platform scripting language. You can create just oneapplication, which can be used on any supported platform._ Object-orientedDomino objects are available to LotusScript. You can write scripts to accessand manipulate these objects. The scripts are event-driven, such as by anaction, clicking the object or button, opening a document, or opening a view.You can also create your own classes, and organize your code using anobject model._ Included in Lotus applicationsSince LotusScript is supported by all the Lotus products, these products areable to access Domino objects using a Domino-supplied LotusScriptextension. Another advantage is that you only need to learn one language tobecome proficient in writing scripts in other Lotus products._ OLE/COM supportDomino can be the perfect container for SmartSuite documents and otherOLE-enabled applications, such as Microsoft Office. You can use externalOLE automation objects by scripting them, such as 1-2-3 worksheet objects.Domino registers itself as an OLE2 automation server, supporting both aCOM and an OLE interface. External applications can use these objects in

scripts to create and reference them. LotusScript is able to combine all theparts and provide the means for controlling and manipulating objects.The initial Domino 6.0 release does not include COM server capability, butthis is planned for later releases._ Coexistence with Notes @functionsLotus continues to support @functions. LotusScript can work with them._ Integrated development environmentThe Domino 6 Integrated Development Environment (IDE) provides aneasy-to-use interface to create, edit, and debug scripts, and to browsevariables and properties of the Domino Object Model. This allows you to writemore complex scripts in Domino.Chapter 14. Programming for Domino 6 565_ Extendable through LSXsYou may extend LotusScript by writing your own classes, which are calledLotusScript eXtensions (LSXs) in C or C++, as a Dynamic Link Library (DLL).Creating your own LSXs allows you to expose custom functionality toLotusScript developers in precisely the same way as Domino functionality isexposed. You might use this, for example, if you have customer processinglogic, such as a proprietary pricing process, that you wanted to makeavailable to Domino developers._ Connecting to external databasesYou can connect your application to use another database (for example, DB2)by using the LS:DO. The benefit is that you can use the existing database sothat data is stored in only one place._ LS2J is the interface that allows data to transfer from the Java data type to theLotusScript data type, and allows LotusScript to execute Java objectmethods. LS2J allows LotusScript to create Java objects as if they are nativeto the LotusScript environment.This set of LotusScript objects is implemented by way of a LotusScriptExtension. You can use this LSX in any existing LotusScript implementation,standalone or embedded in another application, such as Enterprise SystemBuilder (ESB), Lotus SmartSuite, or Lotus Notes.LS2J enforces Java security as follows:– Only public methods and fields are available.– LS2J has the same access rights as a Java program which does notcontain a package statement.
14.2 The Domino Object ModelNow we take a look at the Domino Object Model (DOM). Using this model, youhave access to Domino databases and application services. The Domino ObjectModel is mapped to a set of object-oriented classes available for buildingapplications. You can access the Domino Object Model from a broad range oflanguages, including Java, LotusScript, and Visual Basic. In Domino 6, theclasses have also been exposed as XML objects to enable the creation ofdistributed applications. For more highly customized applications, you candirectly access Domino services using the C++ APIs.If you are going to write your own application, you can use the objects, methodsand properties defined in this model to work with Domino objects (for example,databases, views, and forms). Normally, you use the properties of an object toget information about the object; for example, you use the ReplicaID property of566 Domino Designer 6: A Developer’s Handbookthe database object to query the ReplicaID of a database. On the other hand,you use methods to perform actions on an object; for example, theCreateDocument method of the database object creates a document in a givendatabase.Conceptually, there are two types of objects:
_ Front-end user interface (UI) objects_ Back-end (server) objects14.2.1 Domino front-end user interface (UI) objectsFront-end UI objects are used to manipulate the current user interface. They aretypically used for programming events, and give you access to the Domino objectthat the user is currently working on. The following front-end UI objects areavailable:_ NotesUIWorkSpace represents the current Notes workspace window._ NotesUIDatabase represents the currently used database._ NotesUIView represents the currently used view._ NotesUIDocument represents the document that is currently open._ NotesUIScheduler, represents an embedded scheduler in a document.The following objects have only events associated with them:_ Button represents a button._ Field represents a field._ Navigator represents a navigator._ NotesTimer is a programmable timer you can set to execute an event routineat specified intervals.14.2.2 Domino back-end objectsDomino back-end objects are used for manipulating Domino data. They do notsupport any event or user interface interaction.Nevertheless, you can combine back-end objects with front-end objects in UIscripts. For example, the NotesUIDocument object has a property calledDocument which provides access to the underlying document.Chapter 14. Programming for Domino 6 567The following back-end objects exist:_ NotesSessionThis represents the Domino environment of the current script, providingaccess to environment variables, Domino directories, information about thecurrent user, and information about the current Domino platform and releasenumber._ NotesDbDirectoryThis represents the Domino databases on a specific server or local machine._ NotesDatabaseThis represents a Domino database._ NotesACLThis represents the access control list (ACL) of a database._ NotesACLEntryThis represents a single entry in an access control list. An entry may be for aperson, a group, or a server._ NotesAdministrationProcessThis represents the Administration Process. This class is new with Release 6._ NotesAgentThis represents an agent._ NotesViewThis represents a view or folder of a database, and provides access todocuments within it._ NotesViewColumnThis represents a column in a view or folder._ NotesDocumentCollectionThis represents a collection of documents from a database, selectedaccording to specific criteria._ NotesDocumentThis represents a document in a database._ NotesDOMAttributeNode

This represents an attribute in a NotesDOMElementNode object. This class isnew with Release 6.568 Domino Designer 6: A Developer’s Handbook_ NotesDOMCDATASectionNodeThis represents a CDATA section in the XML data source. This class is newwith Release 6._ NotesDOMCharacterDataNodeThis represents character data in a DOC node. This class is new withRelease 6._ NotesDOMCommentNodeThis represents a comment in the XML. This class is new with Release 6._ NotesDOMDocumentFragmentNodeThis represents a document fragment in the XML. This class is new withRelease 6._ NotesDOMDocumentNodeThis represents the entire XML document. This class is new with Release 6._ NotesDOMDocumentTypeNodeThis represents a document type node. This class is new with Release 6._ NotesDOMElementNodeThis represents an element in the XML document. This class is new withRelease 6._ NotesDOMEntityNodeThis represents an entity in the XML document. This class is new withRelease 6._ NotesDOMEntityReferenceNodeThis represents an entity reference in the XML document. This class is newwith Release 6._ NotesDOMNodeA base class representing a single node in a DOM tree. This class is new withRelease 6._ NotesDOMNodeListThis represents a list of the child nodes of an element node. This class is newwith Release 6._ NotesDOMNotationNodeThis represents a notation declared in the DTD. This class is new withRelease 6.Chapter 14. Programming for Domino 6 569_ NotesDOMParserThis processes XML into a standard DOC tree stucture. This class is new withRelease 6._ NotesDOMProcessingInstructionNodeThis represents a processing instruction. This class is new with Release 6._ NotesDOMTextNodeThis represents the textual content of an element or attribute. This class isnew with Release 6._ NotesDOMXMLDeclNodeNodeThis represents the version of XML being used. This class is new withRelease 6._ NotesDXLExporterThis represent sthe conversion of Domino data to DXL (Domino XML) data.This class is new with Release 6._ NotesDXLImporterThis represents the conversion of Domino data to DXL (Domino XML) data.This class is new with Release 6._ NotesItem

This represents a piece of data in a document. All items in a document areaccessible through LotusScript, regardless of what form is used to display thedocument in the user interface._ NotesRichTextItemThis represents an item of type rich text._ NotesRichTextStyleThis represents the rich text field attributes._ NotesEmbeddedObjectThis represents embedded objects, linked objects, and file attachments._ NotesDateTimeThis represents a date and time.It provides a means of translating betweenthe LotusScript date-time format and the Notes format._ NotesDateRangeThis contains a range of NotesDateTime. An object of type NotesDateTimerepresents a given date and time.570 Domino Designer 6: A Developer’s Handbook_ NotesLogThis enables you to record actions and errors that take place during a scriptsexecution. You can record actions and errors in a Notes database, a mailmemo, or a file (for scripts that run locally)._ NotesMIMEEntityThis represents a NotesItem of type MIME. This class is new with Release 6._ NotesMIMEHeaderThis represents a MIME header. This class is new with Release 6._ NotesNewsLetterThis represents a document that contains information from, or doclinks to,several other documents. All of the NotesItem properties and methods canalso be used on a NotesRichTextItem._ NotesNoteCollectionThis represents a summary document thet contains information from, or linksto, several other documents. This class is new with Release 6._ NotesFormThis represents a form in a Notes database._ NotesInternationalThis object contains properties that provide information about theinternational settings (for example, date format) of the environment in whichDomino is running._ NotesNameThe properties of this object contain information about a Domino user name._ NotesTimerObjects represent a timer in Domino._ NotesRegistrationThis represents the creation or administration of an ID file._ NotesOutlineThis represents the Notes Outline attributes._ NotesOutlineEntryThis represents an entry in a Notes Outline._ NotesReplicationThis represents the replication settings of a database.Chapter 14. Programming for Domino 6 571_ NotesReplicationEntryThis represents the replication setting for a pair of servers in a database. Thisclass is new with Release 6._ NotesRichTextDocLinkThis represents a doclink in a rich text item. This class is new with Release 6.

_ NotesRichTextNavigatorThis represents a means of navigator in a rich text item. This class is new withRelease 6._ NotesRichTextParagraphStyleThis represents RichText paragraph attributes._ NotesRichTextRangeThis represents elements in a rich text item. This class is new with Release 6._ NotesRichTextSectionThis represents a collabsible section in a rich text item. This class is new withRelease 6._ NotesRichTextTabThis represents RichText tab attributes._ NotesRichTextTableThis represents a table in a rich text itemsection in a rich text item. This classis new with Release 6._ NotesSAXAttributeListThis represents the attributes of an element. This class is new with Release 6._ NotesSAXExeptionThis represents information about errors that occur during SAX parsing. Thisclass is new with Release 6._ NotesSAXParserThis represents XML as a series of events using a SAX parser. This class isnew with Release 6._ NotesViewEntryThis represents a view entry. A view entry represents a row in a view._ NotesViewEntryCollectionThis represents a collection of view entries, selected according to specificcriteria.572 Domino Designer 6: A Developer’s Handbook_ NotesViewNavigatorThis represents a view navigator. A view navigator provides access to all, or asubset of, the entries in a view._ NotesColorObjectThis represents a color._ NotesXMLProcessorThis contains the properties and methods common to all DXL processes. Thisclass is new with Release 6._ NotesXSLTransformerThis represents the transformation of DXL (Domino XML) through XSLT. Thisclass is new with Release 6.14.2.3 Object hierarchyThere is a hierarchical relationship for Domino objects. Higher hierarchicalobjects contain the lower ones. Figure 14-1 on page 573 shows an example ofthe hierarchical relationship between a few of the Domino objects.Chapter 14. Programming for Domino 6 573Figure 14-1 Object hierarchyEach object has defined members, properties and methods. Using thesemembers, you can access other objects. The relationship of containment andaccess means that the higher object has the property or the method to accessthe lower one.For example, you can see all the views when you open the database. This meansthat the opened database (object) in the workspace includes the views (object).Furthermore, you can see the documents when you select one of the views. Thismeans that your selected view (object) contains the documents (object).This hierarchy is important when using Domino objects. NotesSession is the top
level object in the Domino Object Model. You can work your way to any Dominoobject if you start from NotesSession.14.2.4 Using Domino objects from LotusScriptIn this section, we look at examples of code that use objects in LotusScript.574 Domino Designer 6: A Developer’s Handbook
Example 1: Getting the text of the subject fieldDim session As New NotesSessionDim db As NotesDatabaseDim view As NotesViewDim doc As NotesDocumentDim item As NotesItemSet db = session.CurrentDatabaseSet view = db.GetView( "Main View" )Set doc = view.GetFirstDocumentSet item = doc.GetFirstItem( "Subject" )Messagebox "Subject of first document in Main View is: " + item.Text ‘ oritem.Values(0)First, we declare the variable session as types of NotesSession object, and Newis used to create an instance of that object.We declare the variables:_ db as type of NotesDatabase_ view as type of NotesView_ doc as type of NotesDocument_ item as type of NotesItemTo get the text of the subject field, we need to follow the hierarchical path from thetop to the lower one. In this example, we go from NotesSession object toNotesItem object:NotesSession - NotesDatabase - NotesView - NotesDocument - NotesItemWe initialize the variable db with the property CurrentDatabase of the higher levelobject. We set the object variable view using the GetView method, giving it thename of a view.The next statements are the same as before: we use the methodsGetFirstDocument method to give us the first document from the view, andGetFirstItem to get the subject field from the document. Then we get a handle onthe textvalue of the item by printing this to the client using the “Print”-method.The NotesItem object contains other information about the field besides thevalue, such as the last modified timestamp of the field. If all you want is the value,you can get it using NotesDocument.GetItemValue method, so you don't need todeclare a NotesItem variable.You can also use the syntax doc.fieldname, which is equivalent todoc.GetItemValue("fieldname"). However, this is slightly less efficient.Chapter 14. Programming for Domino 6 575Notice the difference between the Text property of an item, and its Values, whichare always returned as an array. Even if the field contains just a single value, itsvalue is returned as an array with one element.If the field contains numeric or date values, the array elements will be Double orDate/time variants, respectively. A common programming error is to treat the fieldvalue as a scalar, for example:Print "Subject is: " + doc.Subject ' "type mismatch" error on this line.This results in an error because of the attempt to concatenate a string with anarray.Example 2: Disabling a role for a personDim session As New NotesSessionDim db As NotesDatabaseDim acl As NotesACLDim entry As NotesACLEntrySet db = session.CurrentDatabase

Set acl = db.ACLSet entry = acl.GetEntry("Kari Koski")If Not (entry Is Nothing) Then' The ACL entry does exist.Call entry.DisableRole("Auditor")Call acl.SaveEnd IfTo access the personal access control list (ACL) data for a database, you need tofollow the hierarchical path from the top class to the lower one. This examplesteps from the NotesSession object to the NotesACLEntry object:NotesSession - NotesDatabase - NotesACL - NotesACLEntryThe object that you would like to manipulate has methods or properties to handleits own data. The first seven lines of this example are similar to Example 1. Thetenth line uses the DisableRole method of the NotesACLEntry object to disablethe role [Auditor] for “Kari Koski”.Example 3: Getting the subject field of all documentsDim db As New NotesDatabase("Server","db.nsf")Dim dc As NotesDocumentCollectionDim doc As NotesDocumentDim item As NotesItemDim subject As StringSet dc = db.AllDocumentsSet doc = dc.GetFirstDocument()While Not(doc Is Nothing)576 Domino Designer 6: A Developer’s HandbookSet item = doc.GetFirstItem("Subject")subject = item.textSet doc = dc.GetNextDocument(doc)WendThe earlier two examples start at the NotesSession object, but to access anexisting database when you know its server and file name, you can get thedatabase object directly as shown in the first line.This illustrates a unique feature of writing Notes applications in LotusScript, asopposed to the formula language: you can access any database from within ascript, and perform any function upon it.The following sequence is the same as in the earlier examples. TheNotesDatabase object contains the NotesDocumentCollection object, whichcontains NotesDocument:NotesDatabase - NotesDocumentCollection - NotesDocument - NotesItemWe use the AllDocuments property of the NotesDatabase object to get all thedocuments in the database. Next, we use the GetFirstDocument method of theNotesDocumentCollection object to get the first document in a collection.We then use the GetNextDocument method of the NotesDocumentCollectionobject to get the document immediately following the earlier document in acollection. If a document does not exist in a collection, the GetNextDocumentmethod returns Nothing.Example 4: Obtaining a value from a open documentDim ws As New notesUIWorkspace ' the user's current screenDim uidoc As NotesUIDocumentDim doc As NotesDocumentDim subj As VariantSet uidoc = ws.CurrentDocument ' the form displayed on the current screen.Set doc = uidoc.Document ' the document whose values are displayed in theform.subj = doc.GetItemValue("Subject")' subj now contains a one-element array.Print "Subject: " + subj(0)Tip: GetNthDocument can also be used to loop through the douments in a

collection, but in most cases GetFirstDocument and GetNextDocument aremuch faster.Chapter 14. Programming for Domino 6 577This example obtains a value in the current open document by going to theback-end document and reading information from it. First it gets a handle on thecurrent displayed document on the screen; this is done using the“currentdocument” property of the NotesUIWorkspace.Then it gets a handle on the back-end version of this document by using the“Document” property of the NotesUIDocument. For more information andunderstanding of the frond-end and back-end classes, refer to 14.2.5,“Understanding front-end classes and back-end classes” on page 577.14.2.5 Understanding front-end classes and back-end classesFront-end classes are a hierarchy that begins with the NotesUIWorkspace class,and that includes NotesUIDatabase, NotesUIView, NotesUIDocument andNotesUIScheduler. The UI in the names of these classes indicate their function;they deal with the user interface (whatever the user is seeing on their screen atthat moment). These classes can only be used when there is a UI contextavailable; for instance, you cannot use them in a server agent because with aserver agent, there is no user and no screen display.Back-end classes deal with information that is stored in the Notes database,which the user may or may not be viewing at the time. This hierarchy begins withNotesSession; it is pictured, in part, in Figure 14-1 on page 573. These classesmay be used in server agents because they do not assume a user and a screen.There is an interface between front and back end. The front-end classes containproperties that allow you access to the back-end object corresponding to theuser's current display.For instance, if the user is viewing a document, you can useNotesUIWorkspace.CurrentDocument to obtain the NotesUIDocument objectthat represents the current window. Then, use NotesUIDocument.Document toget the NotesDocument object that represents the document that the currentwindow displays.The Domino back-end data modelTo understand how to work with documents in the back end, you must know howDomino stores information in those documents.A document, in Domino, is a container of “items”. The document also has headerinformation that is not stored in items, such as its creation date.Each item has a name, value, and other properties. Notes reserves some itemnames for its own use, and you may not (or should not) modify these. These578 Domino Designer 6: A Developer’s Handbookitems have names that begin with “$” (for example, $UpdatedBy, which containsa list of names of users who have modified the record).Apart from this system information, the association of items to documents isentirely arbitrary. When working with a document in the back end, you may createany number of items with any names and datatypes you like, subject only tosome limits on how much “summary” information may be stored in onedocument.In particular, it is not necessary that the item names match the names of fields ona form. When working with a NotesDocument object, the design of the form istotally irrelevant to what you can and cannot do. There need not even be a form;it is quite possible to create a document entirely on the back end, assign valuesto some items, and save it, without specifying what form would be used to editthe document.If they do happen to match a field on a form, the datatype of an item need notmatch the datatype the field has on any form. For instance, you might have a

numeric field named “Total” on a form, but this does not prevent you from storinga string in a NotesDocument item named “Total” if you choose—even if thedocument was originally created using that same form.That's in theory—in practice, of course, there is generally quite a strongconnection between fields on a form and items stored in a document. While youcould write a program to change the Total field in all your documents from anumber to a text string, it would generally be undesirable to do so.Actually, the main reason you need to know about this is to avoid creating suchinconsistencies accidentally! All too often, developers write back-end code thatimplicitly assumes that the form will reformat the values they supply. In fact, thiswill not happen unless the user is editing the document at the time.Following are examples of this kind of error:_ doc.PublishedDate = publish$ ' - the string is stored as a string, not convertedto a date._ doc.Readers = "[Admin]" ' - creates a plain text field, not a Readers field._ doc.SendTo = "Ralph Jones, Sally Pigeon" ' - the comma-delimited string isnot converted to a multi-value field._ doc.Authors = "Blind Lemon Jefferson/Blues Zone" ' - creates a plain textfield, not an Authors field; also, the name is not stored in canonical form.Example 14-1 on page 579 shows the corrected code.Chapter 14. Programming for Domino 6 579Example 14-1 Manipulating fields in a document with LotusScriptDim pubDate As NotesDateTime(publish$)Set doc.PublishedDate = pubDatedoc.Readers = "[Admin]"doc.GetFirstItem("Readers").IsReaders = TrueDim recipients(0 to 1)recipients(0) = "Ralph Jones"recipients(1) = "Sally Pigeon"doc.SendTo = recipientsDim author = New NotesName("Blind Lemon Jefferson/Blues Zone")doc.Authors = author.Canonicaldoc.GetFirstItem("Authors").IsAuthors = Truedoc.Form = "PublicationRecord" ' when you create a document in the back end,you must add the Form item if you want it associated with a form (and youusually will!)Notice that the corrected code is a lot longer than the original erroneous code;that's because it is doing more work. The business of conversion to the correcttype, reformatting names, splitting delimited strings into multi-values, andflagging items as Readers or Authors fields, is taken care of automatically whenthe user edits a document using a form; the Notes client uses definitions of thefields on the form to decide what values should be manipulated in what way toget the document to match the form.The lazy way to get Notes to do all this work for you is to call theNotesDocument.ComputeWithForm method. This would have fixed all theproblems in the preceding code sample. It also, optionally, evaluates fieldvalidation formulas, so that you can make sure the document contains only legalvalues.The disadvantage is that ComputeWithForm has poor performance compared towriting it yourself. In addition, it does not execute any JavaScript or LotusScriptcode in the form events, so the results may not be the same as editing thedocument.Working with documents in the front eEndSo what happens, exactly, when you open a document in the Notes client? First,Notes decides what form to use to view the document with. There are a fewfactors affecting this (such as whether the view has a form formula), but ingeneral, the form used will be the one whose name or alias appears in the Form

580 Domino Designer 6: A Developer’s Handbookitem of the document. In the preceding example, the PublicationRecord formwould be used.Think of the form as a “window” on the document. The form contains fields; if thedocument contains an item with the same name as the field, its value will bedisplayed there. If the document contains items whose names do not match anyon the form, those values are not displayed—but they are still part of thedocument, so you can use them in the LotusScript back-end objects and inmacro code.The same document might later be viewed with a different form. For an exampleof this, open a calendar entry in your Notes calendar (choose one that has adescription at the end) and select the menu View/Switch Form.... and thenselect Memo in the dialog. You'll see the same document, but viewed “throughthe window” of a different form.The Memo form and the Calendar Entry form both have a Subject and Body field,so you can still see the meeting description that is stored there. But the memoform does not have a field to display the meeting type, location, or start time, sothat information is not visible, although it is still stored in the document.When you recalculate or save a document you are editing, Notes uses the fieldsand formulas of the form that is open on screen to update the values of the itemsin the document. Every item whose name matches the name of a field on theform is set to the appropriate datatype, turned into a list if the field is designatedas multivalued, and changed to canonical form if the field is of Names, Readersor Authors type. Fields that do not appear on the form are not affected by this,unless there are formulas or event code on the form that changes their values.The NotesUIDocument properties and methods concern themselves with whatusers see on the screen. The NotesDocument item values are what will actuallybe stored in the database when the document is saved. The difference can bemost easily shown by keyword fields. Refer to 4.2.3, “Field types” on page 102 fora description of keyword fields; it shows how to specify a different value to bedisplayed on the screen versus stored in the document.For example, suppose this is the list of keyword choices for the fieldRushDelivery:_ Yes|1_ No|0The user will see the choices Yes and No when editing the document, but thevalue 1 or 0 will actually be stored in the document.Chapter 14. Programming for Domino 6 581Therefore, if Yes is selected currently, the following piece of code will output thetext : Yes ---> 1. This represents two different ways of looking at the same field.Dim ws As New NotesUIWorkspaceDim uidoc As NotesUIDocumentDim doc As NotesDocumentSet uidoc = ws.CurrentDocumentSet doc = uidoc.DocumentPrint uidoc.FieldGetText("RushDelivery") + " ---> " + doc.RushDelivery(0)All field values that you can obtain through the NotesUIDocument are text,regardless of the type of the field. These are the actual characters that are in thefield at the moment.If you refer to the field through the NotesDocument item, you will get a value ofthe type specified for that field—number, date, or whatever (or to be precise, anarray of such values), assuming it was possible to convert the value to the correcttype.Refer to the Notes help for NotesUIDocument.AutoReload property for adiscussion of when changes to the back-end document appear on the screen.Also note that rich text fields are handled in a special way, as described in detail

in Chapter 15, “Rich text programming” on page 697.14.2.6 Using Domino objects from JavaYou can also access the Domino back-end objects from Java. This allows you towrite parts of your application in Java. The Java program runs on the machinewhere Domino is installed. For example, Java agents can be written that willmanipulate Domino objectsJava agentThis example shows an agent that runs on newly created and modifieddocuments since the agent was last run. The program works on the unprocesseddocuments, prints the form name of each document, and marks each documentas processed. The first time the agent runs, the agent returns all of theNotes:The Java classes are not a port of the LotusScript classes to Java. Actuallythe same C++ code is executed, only the syntax of the interface is different.LotusScript and Java are about equal in terms of performance. Use theone that best suits your application, or you’re that more comfortable with.582 Domino Designer 6: A Developer’s Handbookdocuments in the database. Thereafter, the agent returns those documents thatupdateProcessedDoc has not touched._ Create an agent:– Name the agent.– Select When should this agent run = Manually from Actions Menu.– Which documents should it act on = All documents in database.– Select Java as your source code and write the agent code.import lotus.domino.*;import java.util.*;public class myagent extends AgentBase{public void NotesMain(){try{Session s = getSession();AgentContext ac = s.getAgentContext();DocumentCollection dc = ac.getUnprocessedDocuments();Document doc;int size = dc.getCount();System.out.println("Count = " + size);doc = dc.getFirstDocument();while (doc != null){System.out.println(" *** " + doc.getItemValue("form"));ac.updateProcessedDoc(doc);doc = dc.getNextDocument(doc);}}catch (Exception e){e.printStackTrace();}}}Save it.14.2.7 Using LS to access Java objects and methodsIn Domino 6, you can use LotusScript to access Java object and methods. Formore information on this, refer to 12.6.4, “LotusScript to Java (LS2J)” on

page 395.Chapter 14. Programming for Domino 6 58314.3 Programming with LotusScriptWhen you program in Domino, you write your LotusScript code to affect Dominoobjects. Your code is executed by the occurrence of an event to the objects (suchas clicking a button, opening a document, closing a document, or entering data ina field). Using the Objects view, you can easily see the events that are availablefor an object.For example, you can write a very simple script for an object such as a button, asfollows:Sub Click( Source As Button )MessageBox( "I'm learning LotusScript!" )End SubThis script just shows a message box when you click the button.14.3.1 The Event modelEach programmable object in Domino has a list of associated events that itresponds to; for example, a button responds to an event called “Click” that isexecuted when the user clicks the button.Another example of this is the “postopen” event of the form, which is triggeredwhen a user displays a document on their screen. The postopen event occursonce all data has been loaded from the back-end database into the form, and justbefore it is displayed to the user.In the following section, we show how to use the postopen event.Example - using the OnLoad eventThis example adds an action to the Form (document) object and uses theOnLoad event.1. After you have created a blank database, open it in Design mode.2. Select the form design view and click New Form. The new form is displayed.3. At the cursor blinking position, enter: CREATOR.4. Choose Create -> Field. The InfoBox used to set the properties of a fieldappears; see Figure 14-2 on page 584.Note: Try the following example by creating a temporary database basedon the Blank template, so as not to corrupt any existing databases.584 Domino Designer 6: A Developer’s HandbookFigure 14-2 Creator field in Domino Designer5. Enter: Creator in the Name: field of the InfoBox and close the box.6. Go to the Untitled (Form) in the Objects view.7. Choose the OnLoadevent.8. Edit the LotusScript so that it looks exactly like the following:Sub Onload(Source As Notesuidocument)Dim session As New NotesSessionIf source.EditMode ThenCall source.FieldSetText("Creator", session.CommonUserName)End IfEnd Sub9. Choose File -> Save.10.Enter: LotusScript1 as the form name and click OK.Note: In Domino R5, you could use PostOpen event, but PostOpen eventuse is discouraged in Domino 6. Use onLoad- Client instead.Chapter 14. Programming for Domino 6 585Running the exampleThere are two options to test the form; you can do either.1. Click Design -> Preview in Notes (or click the icon Notes Preview).Domino opens the current form and shows its contents.Alternatively, you can:

2. Use the Notes client to open the database to which you added the script._ Choose Create -> LotusScript1.The new form LotusScript1 appears and your name is set in the creator field.This script runs after the user opens the document. If the document is new, theCreator field is set to the name of the creator; see Figure 14-3. You can selectany events mentioned earlier and write a script. For example, you can select theQuerySave event to check whether or not every field has a value entered in itbefore the document is saved.Figure 14-3 Creator field in Domino 6 Client14.3.2 Event type and sequenceIn the following sections, we describe the events for some of the objects inDomino.Note: This only lets you run the form you are working on. If you want to testthe whole application, it is better to open the current database.586 Domino Designer 6: A Developer’s Handbook
Field objectThe Field object has the following events where you can write LotusScript. Otherevents are available for JavaScript or Formula:_ (Options) (provided area for LotusScript options)_ (Declarations) (declare all global variables and constants)_ Initialize (when it is being loaded)_ Entering (when the cursor is moved to the field in edit mode)_ Exiting (when the cursor is moved out of the field edit mode)_ erminate (when it is being closed)Example - add action to Field object and use ExitingWe will now add an action to a Field object and use the Exiting event.1. Select the database and then the Form design view. Click New Form in theprogramming view. The form design window is opened and the cursor isblinking at the top left-hand side.2. Enter Last name: at the cursor blinking position.3. Choose Create -> Field. The InfoBox appears.4. Enter LastName in the Name: field of the InfoBox.5. Create one more field. You don’t need to change the name in the InfoBox —you can leave it as Untitled. When we go to this field later, we will exit from theLastName field, which will cause the exiting event to occur. In this example,the field name is FirstName.6. Choose Last name(Field) from the Objects view and choose Exiting event.7. Edit the LotusScript so that it looks exactly like this:Sub Exiting( Source As Field )Dim ws As New NotesUIWorkspaceDim uidoc As NotesUIDocumentSet uidoc = ws.CurrentDocumentLastName = uidoc.FieldGetText("LastName")If LastName = "" ThenWhile LastName = ""LastName = Inputbox("Enter Last name")Note: In the preceding two events, you cannot write executable LotusScriptstatements.Note: Try the following example by creating a temporary database so you donot corrupt any existing databases.Chapter 14. Programming for Domino 6 587WendCall uidoc.FieldSetText("LastName", LastName)End IfEnd SubFigure 14-4 Example LotusSript2

8. Choose File -> Save. Enter LotusScript2 as the form name and click OK.Running the example1. Select the database to which you added the script.2. Choose Create - LotusScript2. The new form LotusScript2 appears.3. Select the second field without entering any data. A message box appearswhich asks you to enter Last name.This script runs when the user exits from the Last name field. The script makessure that the user enters a last name.588 Domino Designer 6: A Developer’s Handbook
Button objectThe Button object has the following events:_ (Options) (provided area for LotusScript options)_ (Declarations) (declare all global variables)_ Initialize (when the form is being loaded)_ Click (when it is selected)_ ObjectExecute (see the following note)_ Terminate (when the form is being closed)Example - add action to Button object and use ClickWe will now add an action to a Button object and use the Click event.1. Select the database and then the Form design view and click New Form.The form design window is opened and the cursor is blinking at the topleft-hand side.2. Enter CHARACTER: at the cursor blinking position.3. Choose Create -> Field. The InfoBox appears.4. Enter Character in the Name field in InfoBox.5. Set the cursor position just to the right side of the Character field.6. Choose Create -> Hotspot -> Button. A button is placed on the form, and theInfoBox for the button appears.7. Inside the InfoBox, enter Clear in the Button label.Note: In the preceding two events, you cannot write executable LotusScriptstatements.Note: The ObjectExecute event is primarily used in external applications,and should not be used in the Notes environment.Note: Try the following example by creating a temporary database so as not tocorrupt any existing databases.Chapter 14. Programming for Domino 6 589Figure 14-5 LotusScript 38. Choose Clear (Button) from the Objects view.9. Edit the sub so that it looks exactly like this:Sub Click(Source As Button )Dim ws As New NotesUIWorkspaceDim uidoc As NotesUIDocumentSet uidoc = ws.CurrentDocumentIf ( uidoc.FieldGetText( "Character" ) <> "" ) ThenCall uidoc.FieldClear("Character")End IfEnd Sub10.Choose File -> Save. You are asked to specify a form name for the new form.11.Enter LotusScript3 as the form name and click OK.590 Domino Designer 6: A Developer’s Handbook
Running the example1. Select Design - Preview in Notes. The new form LotusScript3 appears.2. Enter some characters in the field, then click Clear. The characters youentered are cleared.14.3.3 Action object

The Action object has the following events:_ (Options) (provided area for LotusScript options)_ (Declarations) (declare all global variables)_ Initialize (when it is being loaded)_ Click (when it is selected)_ ObjectExecute (see the following note)_ Terminate (when it is being closed)14.3.4 Using LotusScript in Web applicationsDomino also allows you to run your LotusScript code in Web applications, butthere are a few limitations. Usually you use LotusScript to develop agents whichyou will call from the WebQueryOpen and WebQueryClose events.Note: LotusScript agents can only run on the Domino server, not within the Webbrowser.14.3.5 How scripts and formulas are executedIf your application contains a combination of LotusScript and the formulalanguage, it is useful to know the order in which the events and formulas in a formare executed.Note: In the preceding two events, you cannot write executable LotusScriptstatements.Note: The ObjectExecute event is primarily used in external applications,and should not be used in the Notes environment.Chapter 14. Programming for Domino 6 591The following example lists the order in which LotusScript events and Dominoformulas in a single forms design are executed, during a number of activities. Thelist was generated by embedding message box commands or @prompt formulasinto all the possible events and formulas on a test form containing different fieldtypes.The test form does not include all the possible field types or evaluationcombinations. By studying the results in this example, however, you will be ableto understand the order of execution in the forms of your own application.The test form contains five fields from top to bottom, in the following order:_ Subject - Editable/Text Field - (with Default Value, Input Translation and InputValidation Formulas)._ From - Computed When Composed/ Authors Name Field - (with ValueFormula)._ Counter - Computed/Number Field - (with Value Formula)._ DisplayNum - Computed For Display/Number Field - (with Value Formula)._ Body - Editable/RTF Field - (with Default Value Formula).In Table 14-1 through Table 14-9 on page 594, we list different activities (such ascomposing a document, saving a document and so on), and the order in whichLotusScript events and Domino formulas are executed for each activity.Table 14-1 Composing a documentObject Formula or EventForm Initialize EventForm Window TitleForm Query Open Event/WebQuery Open EventSubject Field Default Value FormulaSubject Field Initialize EventFrom Field Value FormulaFrom Field Initialize EventCounter Field Value FormulaCounter Field Initialize EventDisplayNum Field Value FormulaDisplayNum Field Initialize Event592 Domino Designer 6: A Developer’s HandbookTable 14-2 Saving a Document Using @Command([FileSave]) or File - Save

Table 14-3 Closing the Window using @Command([FileCloseWindow]) or File - CloseTable 14-4 Reopening the Document in Read ModeBody Field Value FormulaBody Field Initialize EventSubject Field Entering EventForm PostOpen EventObject Formula or EventForm QuerySave EventSubject Field Input Translation FormulaCounter Field Value FormulaDisplayNum Field Value FormulaSubject Field Input Validation FormulaObject Formula or EventForm QueryClose Event / WebQuery Close EventForm Terminate EventSubject Field Terminate EventFrom Field Terminate EventCounter Field Terminate EventDisplayNum Field Terminate EventSubject Field Terminate EventObject Formula or EventForm Initialize EventForm Window Title FormulaChapter 14. Programming for Domino 6 593Table 14-5 Toggling from Read Mode to Edit Mode with Document OpenTable 14-6 Toggling from Edit Mode to Read Mode with Document Open (No Changes)Table 14-7 Toggling from Edit Mode to Read Mode with Document Open (SavingChanges)Form Query Open Event / WebQuery Open EventSubject Field Initialize EventFrom Field Initialize EventCounter Field Initialize EventDisplayNum Field Value FormulaDisplayNum Field Initialize EventBody Field Initialize EventForm PostOpen EventObject Formula or EventForm QueryModeChange EventSubject Field Entering Event (depends on cursor)Form PostModeChange EventObject Formula or EventForm QueryModeChange EventForm PostModeChange EventObject Formula or EventForm QueryModeChange EventSame sequence as for saving adocumentForm PostModeChange EventForm QueryClose Event / WebQueryClose Event594 Domino Designer 6: A Developer’s HandbookTable 14-8 Moving Cursor From One Editable Field to AnotherTable 14-9 Refreshing Fields While in Edit Mode (F9)Sequence of events in a complex exampleFigure 14-16 on page 615 illustrates the sequence of events in a form whichcontains a subform.Same sequence as for closing adocumentSame sequence as for reopening adocument in read modeObject Formula or EventFirst field Exiting Event

Second field Entering EventObject Formula or EventSubject Field Input Translation formulaCounter Field Value FormulaDisplayNum Field Value FormulaSubject Field Input Validation FormulaForm PostRecalc EventChapter 14. Programming for Domino 6 595Figure 14-6 Sequence of eventsFollowing is the sequence of events when the document is opened:1. Initialize of Globals2. Initialize of Form3. Queryopen of Form4. Initialize of Field1 (contained in Form)5. Initialize of Subform6. Queryopen of Subform7. Initialize of Field2 (contained in Subform)8. Entering of Field19. Postopen of Form10.Postopen of Subform596 Domino Designer 6: A Developer’s HandbookFollowing is the sequence of events when the document is closed:1. Queryclose Form2. Queryclose Subform3. Terminate Form4. Terminate Field15. Terminate Subform6. Terminate Field27. Terminate Globals
14.4 LotusScript programming tips and considerationsThe following section will give you some help in structuring your LotusScript codefor event programming within Domino.14.4.1 General suggestionsDo any or all of the following to improve your scripts:_ Declare all variables in the global definitions for an object and use the OptionPublic statement. Next, instantiate the variables in the PostOpen event or in asubroutine that you can call from either the QueryOpen event (for an existingdocument), or the PostOpen event (for a new document). Your variables willbe easier to find and maintain, and you’ll be able to use them in any script forthe object._ It is recommended that you use Option Explicit or Option Declare to makecertain that you have declared all variables used in your application. Domino6 has a new feature to ensure that this always is included; refer to 12.6.5,“Automatically add Option Declare” on page 397._ Store subroutines and functions in the global definitions for a form ornavigator. Then you can use the subroutines or functions with any object onthe form or navigator._ To reuse a segment of script in multiple scripts, put the segment into afunction or subroutine or use script libraries (refer to 14.4.4, “Using scriptlibraries” on page 600 for more information on script libraries)._ Avoid too many nested levels of parenthesis in a single statement._ Modularize your code so that each subroutine or function accomplished asingle task that you can describe in a few words. Modules should not beoverly long - 40 lines is getting long.

Chapter 14. Programming for Domino 6 597_ To debug a script that runs on a shared field, insert the field into a temporaryform so that you’ll have a place from which to run the debugger.For complete information on LotusScript, see the online Lotus Notes Helpinformation or the Programmer’s Guide.14.4.2 Use consistent variable namesThe Domino templates use a set of standard variable names, as shown inTable 14-10. For example, in the Domino templates, the variable note alwaysrefers to the current back-end document.Table 14-10 Standard variable namesClass name ObjectvariableCommentsNotesSession sessionNotesDatabase dbNotesView viewNotesViewColumn columnNotesDocument note Refers to the data associated with thecurrent document.parent The parent of the current document.child A child of the current document.profile A profile document from which you areretrieving processing parameters.NotesItem itemNotesRichTextItem rtitemNotesEmbeddedObject embobjNotesDocumentCollection documentsresponses Use if you are working within onecollection of responses to the currentdocument.children An alternative to using the variable nameresponses. Use if you’re using child as theNotesDocument object variable.598 Domino Designer 6: A Developer’s HandbookUsing these names in your own scripts makes them easy to read andunderstand, keeps them consistent, helps you maintain them more easily, andmay help to share the code with other developers.Consider using all lowercase letters for object variables, and a combination oflowercase and uppercase (for example, VariableName) for other variables.When passing values to a subroutine or function, use the same variable namesin the called routine as in the calling routine. For example, don’t call somethingStatusNumber in one and StatNo in the other. Consistent naming ensures thatothers can easily read and understand the script.Note: This approach should not, however, be used as a general rule. If a moduledoes its job of making some code generally available from different locations, it islikely that it will not be called with the same arguments from each, so theparameters cannot match all of the arguments. The parameter names shouldcontribute to the understanding of that module (for example, use “sourceDoc”and “destDoc”, instead of necessarily trying to match the names of the callingarguments).14.4.3 Reserved fieldsThere are reserved fields in Domino that you can use to automatically addfunctionality that you would otherwise need to program yourself.NotesDateTime date1,date2, …Consider using for comparing dates.NotesAcl aclNotesAclEntry aclentry

NotesAgent agentNotesDbDirectory dbdirNotesLog logNotesUiWorkSpace wsNotesUiDocument source Already an argument to the form events —using this name keeps your scriptsconsistent.uidoc To use, set uidoc = source in PostOpen.Then you can use this object variable infield and action scripts in the form.Chapter 14. Programming for Domino 6 599Table 14-11 lists all the reserved fields for mailing documents.Table 14-11 Reserved fields for mailing documentsTable 14-12 lists all reserved fields for general use.Table 14-12 Reserved fields for general useExampleWhen a document with its contents changed is being closed, a dialog box ispresented to the user, asking whether the changes should be saved or not.Reserved field name DescriptionMailOptions Gives users the option of mailing a document.Sign Sign creator’s name to prevent tampering.SaveOptions Controls whether documents are saved when closed.Encrypt Encrypts mail.SendTo Sends mail to users listed in field.CopyTo Sends copy to users listed in field.BlindCopyTo Send blind copy to users which are listed in field.DeliveryPriority Delivers mail high, medium, or low priority.DeliveryReport Returns a report when mail is delivered to recipient.ReturnReceipt Returns a receipt when recipient reads mail.MailFormat Routes mail via cc:Mail.Note: The mail fields items, from SendTo to the bottom of the list, have specialmeaning only if the document is actually mailed—the mere presence of aSendTo field does not cause mail to be sent.Reserved field name DescriptionCategories Categorizes documents.$VersionOpt Controls version tracking for documents.FolderOptions Puts new documents in folders.SecretEncryptionKeys Encrypts documents with secret, rather than public,encryption keys.600 Domino Designer 6: A Developer’s HandbookSetting SaveOptions to “0” before closing the document prevents the dialog frombeing displayed. Thus, the document is closed with all changes discarded.14.4.4 Using script librariesA script library is a place where you can store code segments that you want touse from other scriptable objects. You may code options, declarations, aninitialize subroutine, a terminate subroutine, and user scripts.To create a new Script Library, choose the Shared Code - Script Library designview in Domino Designer and click New LotusScript Library. The newLotusScript Library is created.You can write the code inside the initialize and terminate subroutine, or you cancreate your own subroutines. This code is not usually routines itself, but youdefine additional functionality and call these from outside the library.To create your own subroutines, write a statement such as Function or Suboutside of an existing script. The editor automatically creates a new script andtransfers your code there.Figure 14-7 shows the Discussion Routines script library in the Discussiondatabase, which contains GetDbPath and InstatiateObjects subroutines.Figure 14-7 Discussion Routines script library

To incorporate a script library into a scriptable object, enter a Use statement inthe (Options) script for the object or for the (Globals) object.Chapter 14. Programming for Domino 6 601You can see how script libraries are used in the TeamRoom database by openingthe SendReminder agent:Use "DiscussionRoutines"The name is not case-sensitive and should not contain spaces. Specify the nameas a character literal or named constant.Figure 14-8 shows how the SendReminder agent (ReminderDoneMsgsubroutine) uses the GetDBPath routine of the DiscussionRoutines script library:Figure 14-8 Calling the script library in the agentThe code in the (Options), (Declarations), Initialize, and Terminate scripts of thelibrary becomes available as though it were in the current object’s correspondingscripts. User scripts in the library become available as though they were in thecurrent object.Tip: When doing object-oriented coding, a script library is a great place todefine a class or set of related classes. Class definitions go into the(Declarations) section.602 Domino Designer 6: A Developer’s Handbook
14.4.5 Using the Template databaseWhen you are developing a Domino application, you usually use much of thesame code that you have used before for performing standard procedures. Manydifferent applications contain the same procedures (for example, removing extraspaces in a field, creating a chart in the field, and so on).For this reason, it is very useful to use the Template databases to store the mostcommonly used LotusScript, Java Script and Java code, actions and buttons, andother functions. This is better than using cut and paste because if you need tochange the code (for example, to add new LotusScript code to manipulate afield), then you only need to add the code in one place, and the updated code willbe used in each application that references it.Figure 14-9 illustrates this process diagramatically.Figure 14-9 Template databaseLet’s discuss this diagram in more detail:1. The Template database contains commonly used code, actions, shared fields,and so on. Sub ExtraSpaces is a Script Library code segment that removesall extra spaces in the current field.Chapter 14. Programming for Domino 6 6032. The ExtraSpaces class is used in three databases, and it is copied to eachdatabase.3. The ExtraSpaces Script Library is now stored in each database.Updating the ExtraSpaces subroutineWhen you want to update elements or code segments, you only need to makechanges in the Template databases. For our example, you need to add code intothe ExtraSpaces Script Library.1. Open the Template database and go to the ExtraSpaces code segment.2. Make the required changes and save the ExtraSpaces Script Library.3. If you have selected the Inherit options, and Database1, Database2, andDatabase3 are on the same server as the Template database, then Dominoautomatically runs the inherit program.The server will refresh the databases overnight. (You can also run the refreshcommands manually by selecting the database that you want to refresh andthen selecting File -> Database -> Refresh Design).4. After the refresh, then Database1, Database2, and Database3 will have thenew updated version of the ExtraSpaces Script Library.14.4.6 Catching errors at compile time

Specifying Option Declare or Option Explicit in the (Options) event of the objectforces you to declare variables explicitly. With this option in effect, anyundeclared variables will be flagged during compile time. This is useful if youdesign large applications, and it avoids having to search for typing errors.14.4.7 Improving form performanceA form that performs well is one that Domino can calculate quickly for display, sothat documents created with the form are more likely to open quickly.To improve form performance, do any or all of the following:_ Avoid overusing hide-when formulas on forms. Each formula that Dominomust calculate when opening a form slows the application down.Note: When you use the copy and paste options, Domino automaticallyasks if you want to inherit the changes from the Template database whenthe ExtraSpaces Script Library changes.604 Domino Designer 6: A Developer’s HandbookBefore you use a hide-when formula, try using a computed subform or ahide-when condition, such as “Hide when editing” or “Hide when reading.”_ If you must use hide-when formulas to hide buttons on an Action bar, use@Command([RefreshHideFormulas]) or the LotusScriptRefreshHideFormulas method in the NotesUIDocument in the action formulasor scripts to force calculation of the hide-when formulas.This closely correlates the appearance of different buttons with users’ buttonclicks, and allows each calculation to occur only when needed. In otherwords, if you only recalculate hide formulas, use this instead of a generalrefresh._ If a form has keyword fields (for example, in a layout region), and you wantformulas to calculate based on changes in those fields (for example,hide-when formulas that progressively disclose items in the layout region)select the “Refresh fields on keyword change” field option instead of the “Autorefresh fields” form option.Domino performs more calculations when “Auto refresh fields” is enabled; forexample, it refreshes all formulas every time a user moves between fields,instead of just when values in keyword fields change._ Remove infrequently used items from a form (for example, redesign yourapplication to display infrequently used items in a dialog box)._ Consider limiting, or eliminating entirely, the use of shared fields or subformson any form that must open quickly._ Minimize the number of fields per form, because each field is calculated whena document is opened, refreshed, or saved._ Consider putting field formulas into form events rather than into the fieldsthemselves, so that you can more easily control which formulas are calculatedat each event. Avoid using hidden fields for processing events (unlessrequired)._ Avoid using too many DbLookups in your keyword fields. Avoid using@UserRoles multiple times, or @Dbfunctions and @UserNameList.If your application was created in Release 3.x, it may include forms with hiddenfields containing formulas that process a document when it is opened or saved.To improve the performance of the application, convert the formulas toLotusScript, and use the PostOpen and QuerySave form events.Tip: For consecutive multiple paragraphs that use the same hide/whenformula, calculate the formula just onc, for efficiency.Chapter 14. Programming for Domino 6 60514.4.8 When to use formulas and LotusScriptGenerally speaking, the best language to use is one that accomplishes a taskwith the least programming. While there are differences in performance that mayaffect your choice of programming language, in most cases such differences are

minor compared to the cost of developer’s time in creating and maintaining theapplication.From this standpoint, macro language is ideally suited most operations on thecurrent document. Since the document context is assumed, you do not have towrite code to locate the current document, and @functions automatically handlethe Notes native data types (for instance, to work with a date value, you do notneed a special NotesDateTime object). Macro language is also a good choice formaking simple changes to existing documents in a single database.Use LotusScript for more complex document changes, for tasks involvingchanges to multiple databases, for creating new documents from scratch, or,broadly speaking, if you can’t find a way to do what you want with macrolanguage.In general, formulas are best used for working within the object that the user iscurrently processing (for example, to return a default value to a field or todetermine selection criteria for a view). Scripts are best used for accessingexisting objects (for example, to change a value in one document based onvalues in other documents). Scripts provide capabilities that formulas do not,such as the ability to manipulate RichText fields. However, formulas providebetter performance in some situations, and may be more convenient for simpleapplications.When you’re ready to use both, deciding whether to use LotusScript or theDomino formula language for a given task usually depends on the complexity ofthe task. Consider these questions when making your decision:Do you need to process a quantity of data?A formula that “touches” many databases or documents using @functions mustrely on the Notes user interface to access each document, whereas LotusScriptaccesses the documents more efficiently and quickly.For example, LotusScript is a good tool for creating an agent that scans all thedatabases on your workspace and returns information such as size of database,percent used, number of documents, and so on. LotusScript is also a good toolfor running a full-text search on multiple documents and performing an actionwith the results of the search.606 Domino Designer 6: A Developer’s HandbookAre you using Domino object model front-end or back-end classes?Domino object model (front-end classes) use the same Domino code as theirequivalent @commands, so LotusScript will not perform better than the formulalanguage when you use these classes. The database (back-end) classes,however, use different code, and perform more quickly than the [email protected] example, avoid using the front-end class NotesUIDocument to perform manyfield updates. The back-end class NotesDocument is much faster, and allows youto assign data types (including rich text) and to add new (hidden) fields. Thefront-end class allows you to update only fields that already exist on the form,and it allows you to insert only text in the field, as @Command([EditInsertText])does.In addition, front-end classes will not work in scheduled agents run by a server;they work only in agents run from a user’s workstation (for example, from themenu).Do you need to manipulate the currently selected object?Use the formula language, instead of LotusScript.Do you need to program buttons on an Action bar?Consider using the formula language instead of LotusScript. Button actions areusually simple and perform tasks usually accomplished directly through theNotes user interface, such as saving or closing a document.Do you need to return the default value to a field?

Use the formula language, instead of LotusScript.Do you need to return the title of a window?Use the formula language, instead of LotusScript.Do you need to control a work flow process from a form?LotusScript works best for controlling workflow with form events (especially theQuerySave or onSubmit event, which is preferred in Domino 6) because it canhandle the more complex tasks you may want to accomplish, such as loopingand setting multiple variables.For example, you can require a user to fill out fields on a form in a predeterminedorder by manipulating enter and exit field events, or you can prevent a user fromopening, saving, or editing a form until certain conditions are met.Are you including too many @functions in one formula?If a formula includes many @functions in sequence, try changing the formula toLotusScript. However, formulas that need only a single @function, such asChapter 14. Programming for Domino 6 607@Command[FilePrint], are more efficient and perform better than scripts that dothe same thing.14.4.9 Using Evaluate to combine LotusScript and formulasUse the Evaluate function in LotusScript to combine pieces of formula languagewith LotusScript. This allows you to make your scripts leaner wherever@functions do something in fewer lines than LotusScript does. Keep in mind thatincluding formulas in scripts may make the scripts easier to write, but will notnecessarily improve performance.You can use Evaluate to include any @functions except the ones that directlyinteract with the Notes user interface (such as @Prompt, @DialogBox,@PickList, and @Command). Several particularly useful @functions to combinewith LotusScript are:_ @Name, which lets you manipulate hierarchical names_ @Replace, which pulls a value from a text list without requiring the loopingthat LotusScript would demand_ @Unique, which removes duplicates from a text list_ @Subset, which reads the list from left to rightYou can also combine LotusScript and formulas in an application by using themin different parts of the same form.The Evaluate function in LotusScriptThe Evaluate function executes a LotusScript formula.Syntax:Evaluate(macro [, object])Elements:_ macro(Mandatory) This is a string expression specifying the text of the Notes macro,in the syntax that Domino recognizes. Refer to Domino documentation for thecorrect syntax of the macro._ objectNote: If the macro text is in a constant or string literal, Domino needs to doonly initial processing of the macro once at compile time, while variablestrings incur that processing each time the Evaluate function is called.608 Domino Designer 6: A Developer’s Handbook(Optional) This is a NotesDocument that provides the context for evaluation ofthe formula. If the formula uses a field name, it is referring to the field in thisdocument. Other Lotus products that support LotusScript (for example, 1-2-3)use a different object type here.Example:result = Evaluate("@Sum(Numlist)", doc)

orConst NotesMacro$ = "@Sum(NumList)"result = Evaluate(NotesMacro$, doc)Return valueThe Evaluate function returns a Variant array. The datatype of the array elementsdepends on the type of the formula return value. If the return value is a list, eacharray element contains one list value. If the formula returns a single value, thearray will contain that value at element 0.Sample codeThis script runs when the user exits from the Subject field and changes thecharacters to proper case:Sub Exiting (Source As Field)Dim ws As New NotesUIWorkspaceDim uidoc As NotesUIDocumentDim doc As NotesDocumentDim eval As VariantSet uidoc = ws.CurrentDocumentSet doc = uidoc.Documenteval = Evaluate( "@ProperCase(Subject))", doc)Call doc.ReplaceItemValue("Subject", eval)End SubIn this example, we use the Evaluate function to get @ProperCase carried out.Parameters to the Evaluate function are the string containing the @function andthe field name, as well as the object that contains the field.Note: If the formula returns an error result, this is returned as a scalar value;not an array. Use IsArray to detect this, or use @IsError in the formula toprevent returning an error result.Chapter 14. Programming for Domino 6 60914.4.10 Making field value changes effectiveYou can use the Refresh method of the NotesUIDocument class to makechanges effective on a document that is in edit mode. (This has the same effectas using View/Refresh on the Lotus Notes user interface.)When you modify ReplaceItemValue or remove RemoveItem fields in adocument in your LotusScript program, you need to use the Reload method ofthe NotesUIDocument class to make the changes effective in the Lotus Notesuser interface. The following statements are examples to show the Reloadmethod.Postopen(Source As Notesuidocument)note.RemoveItem("Action")note.RemoveItem("SaveOptions")note.ReplaceItemValue("Action","Approve")source.Reload.....source.AutoReload = FalseFigure 14-10 Field value change14.4.11 Using validation formulas and QuerySave/onSubmitIf you are using Input Translation and Input Validation formulas along withQuerySave (or onSubmit), be sure to do a refresh (source.Refresh) at theTip: Since in the above example, the variable uidoc is only used to get theobject of the next lower class, you may also write Setdoc=ws.CurrentDocument.Document to initialize variable doc.Note: You usually add the following statement at the initialization stage ofyour program to improve performance, as it prevents the screen fromrefreshing each time you update a field. Remember to manually invoke theReload method in your programs when you use this statement.

610 Domino Designer 6: A Developer’s Handbookbeginning of the script for the QuerySave event. Why? Because the QuerySave(or onSubmit) event occurs before Notes refreshes the document when saving.Figure 14-11 shows the field FirstName with a field validation formula.Figure 14-11 Field translationYou want QuerySave (or onSubmit) to have the properly validated data toprocess (for example, you do not want QuerySave (or onSubmit) to process anempty field, because a validation formula that would have flagged the field asempty has not yet run).Refer to Figure 14-15 on page 612; if this code was run—with the field translationshown in Figure 14-11—it would end up in a messagebox, as shown inFigure 14-12.Figure 14-12 onSubmit messagebox - without translated dataAs we can see, the messagebox, or the onSubmit event code, does not have thetranslated data, because the code checks exactly what is in theNotesUIDocument at runtime.Chapter 14. Programming for Domino 6 611The NotesUIDocument and the field FirstName has not been refreshed, and willstill be in lowercase, even though the uppercase function in the Input Translationhas run.To get around this, we need to change the code in the onSubmit (QuerySave)event, as shown in Figure 14-13.Figure 14-13 Refreshing the NotesUIDocument before running rest of codeBy using the Refresh method of the NotesUIDocument, the rest of the code willnow work on translated data. It will reflect that the field value in fact has beentranslated by the Input Translation formula; the result is shown in Figure 14-14.Figure 14-14 NotesUIDocument is refreshed - shows accurate data612 Domino Designer 6: A Developer’s HandbookFigure 14-15 onSubmit on the form14.4.12 Error handlingIdeally, you would not need to write anything to handle run-time errors; however,some errors may occur at run-time, such as running out of disk space or dividingby zero, causing the script to stop unexpectedly. To avoid this situation, you caninclude error-handling procedures in your script.Using On Error and Resume statementsBy using On Error and Resume statements in your script, you can handlerun-time errors that may occur. These statements are built-in functions providedby LotusScript.The script needs the following steps to handle the error:1. Trap the error using an On Error statement and specify where to go to handlethe error.For example, if the error occurs, you can go to the label ERRORPROC:Dim x As Integer, y As Integer, z As Integerx = 3y = 0On Error GoTo ERRORPROCz = x/yExit SubERRORPROC:2. Script the error-handling process. For example, at the ERRORPROC: label:Chapter 14. Programming for Domino 6 613ERRORPROC:MessageBox("Divide error")y = CInt( InputBox("Enter new number") )3. Complete the error-handling process by using a Resume statement to goback to the statement where the error occurred:Dim x As Integer, y As Integer, z As Integer

x = 3y = 0On Error GoTo ERRORPROCz = x/yExit SubERRORPROC:MessageBox("Divide error")y = CInt( InputBox("Enter new number") )ResumeCreating an error handler for debuggingIt is useful to have an error handler to help debug your programs, as theLotusScript debugger ends when errors occur. To prevent this from happening,you can create an error handler like this:On Error Goto ErrorHandlerErrorHandler:Messagebox "Error:" & Error(Err), 0+64, "Error!!"Print "Error No. : " ErrPrint "Description : " Error(Err)Print "Line No. : " ErlResume NextExit SubBe aware of the “Resume Next” statement, and how it works. “Resume Next”specifies that program execution continues with the next statement after thestatement that generates the error. This might cause loops if not handled withcare and caution. Make sure that your error handler handles and avoids possibleloops.While you are writing scripts, you will often find errors that require fixing. Dominorecognizes two kinds of LotusScript errors: compile errors and run-time errors.Let’s discuss these in more detail.Note: If you include the constant definition file (%Include “LSCONST.LSS”,you can use constant symbols (MB_OK, MB_ICONINFORMATION and soon), instead of values 0 and 64 in the Message box statement.614 Domino Designer 6: A Developer’s HandbookCompile errorsCompilation of your script takes place when you save it. Since Domino will notallow you to save a script with compile errors, if compile errors are reported, thenthe script will not be saved. Therefore, you will need to correct all compile errorsfirst.Run-time errorsA run-time error is an error that cannot be detected during compilation. Run-timeerrors are found while Domino is running the script, causing the program to stop.The script may have the correct syntax, but certain operations may not beallowed; for example, as the following run-time error shows, division by zero isnot allowed:Dim x As IntegerDim y As IntegerDim z As Integerx = 5y = 0z = x / yDuring execution of this code, LotusScript will stop and issue an error messagebecause dividing 5 by 0 is not a valid operation.Logical errorsThere is yet another error type, which is a logical error. With logical errors, youmay be able to run your script without errors, but the result is not as intended.The Debugger helps you to detect run-time errors and logical errors.14.4.13 Enabling the Debugger

It is easy to enable debug mode. Before running your script, do the following:1. Choose File -> Tools >- Debug LotusScript.2. To check if the Debugger is enabled, choose File -> Tools. If the Debugger ison, a checkmark will show next to the menu option; refer to Figure 14-16 onpage 615.Chapter 14. Programming for Domino 6 615Figure 14-16 Starting the LotusScript DebuggerIf you click the Debug LotusScript menu again, debug mode is disabled.If the Debugger is enabled when you start running any LotusScript, the Debuggeris launched and the script stops at the first line; see Figure 14-17 on page 616.616 Domino Designer 6: A Developer’s HandbookFigure 14-17 LotusScript DebuggerIn this example, the script is in interrupt mode.Debug modeWhen you run a script in debug mode, the script shows one of three states:_ When a script is interrupted at a breakpoint, the Debugger has control._ When a script is stepping, control passes to the script and then back to theDebugger after a single statement in the script is performed._ When a script is continuing, it runs uninterrupted until a breakpoint or the endof the code is reached, or until a Stop statement is encountered or anunhandled error event occurs.Interrupt modeWhile the script is in interrupt mode, you can do one of the following:_ Inspect the script._ Inspect the value of variables and properties._ Control which is the next statement that will be performed._ Inspect other defined objects, events and the scripts related to them.Chapter 14. Programming for Domino 6 617You can control which statement is the next to be performed in interrupt mode byclicking the following options:_ Continue - to continue until a break point is reached_ Step Into - to perform the current statement and step to the next statement_ Step Over - to perform the current statement and step to the next statement,stepping over the subprogram if the current statement calls a subprogram_ Step Exit - to continue executing the current subprogram and stop in thesubprogram that called it at the line following the callMaking breakpointsIf you find a run-time or logical error, inspect your script and make breakpoints atthe statement (or around it) where you suspect the error is occurring. You canthen run your script, and it will stop at the breakpoint. In interrupt mode, you caninspect the value of important variables and properties.One-step executionDuring one-step execution, only the current statement is performed before thecode is stopped. You can then inspect the values of variables or properties beforeand after performing the statement.Variable inspection1. Click the Variables tab in the bottom pane to access the variables window.The variables defined for the procedure appear in a three-column display,showing the name, data type, and value of each variable.2. To view array or type members, click the plus sign (+) to the left of the variablename.Using the Debugger - a simple exampleHere we illustrate the use of the Debugger on the database we used earlier as anexample for the PostOpen event. Follow these steps:

1. Choose File -> Tools -> Debug LotusScript to enable debug mode.2. Open the database and create a new document. The Debugger window willbe displayed; see Figure 14-18 on page 618. The execution of the script stopsat the first statement.618 Domino Designer 6: A Developer’s HandbookFigure 14-18 Debugger windowThe script added to the form object has been launched by the Postopenevent, and the execution stops at the marked sentence.Now, go through the debugger.3. Double-click or click the statement Call Source.FieldSetText.… and pressF9 in the upper pane. This creates a breakpoint.4. Click the Variables tab. In this pane, you can see the values of your variables.5. Click the + symbol next to Source in the bottom pane. You can see theproperties of the Source instance, which is of type NotesUIDocument. Thisclass represents the document that is currently open in the Notes workspace.6. You can see that the variable session does not yet have values.7. Click the Continue action button.Figure 14-19 Stop in breakpoint8. The script runs and stops at the breakpoint that you made, as shown inFigure 14-19. The session variable now has a value.Note: For objects containing a data structure, the values of the data itemsare also shown on the top level.Chapter 14. Programming for Domino 6 6199. Click Continue to run the script to its end. This will then close the Debugger.This very simple example shows how easy it is to control the execution flow of theprogram, and to inspect variables.Enabling the Debugger LotusScript Server agentDomino 6 has a new, remote Debugger for debugging the LotusScript Serveragent. With it, you can debug any agents or script libraries currently running onthe server remotely. You can use the remote Debugger to step through anddebug LotusScript agents running on the server.To enable debug mode for this new function:_ Choose File -> Tools -> Debug LotusScript Server AgentThe agent you want to debug must be running at the time that you start theremote debugging tool. This enables you to, in real time, debug a script runningon a server with the proper access.More information on the remote Debugger, refer to 12.6.2, “Remote debugger” onpage 387.14.4.14 Tracing programs without a debuggerThere are several ways to trace programs without a debugger, though you willneed to add some statements into the programs to use them. For example, youcan use the PRINT and MESSAGEBOX statements to look at variables in yourprograms.PRINT statementThe Print statement displays constant values, and the contents of variables, onthe status line at the bottom of the Notes interface:Print "Sending Notification"The result of this statement is shown in Figure 14-20.Figure 14-20 Print “Sending Notification”Note: For variables of simple types, you can change their values while theDebugger is paused. Click the variable in the variables tab, and type a newvalue in the field below.620 Domino Designer 6: A Developer’s HandbookWhen you click the status line, you will see the message list box shown inFigure 14-21, which contains the Print message history.
Figure 14-21 Print message history messageboxTo clear the status line, simply issue the Print statement with no arguments. Thisclears the status line. However, you can still click the cleared area to display themessage box.You can also see the messages created by the Print statement by clicking theOutput button when using the Lotus Notes debugger; see Figure 14-22.Figure 14-22 Output message in Lotus Notes DebuggerMessagebox statementThe Messagebox statement displays a dialog box with buttons to showmessages, as shown in the following example (note that the vertical bar (|) is thestring delimiter for multi-line strings):Chapter 14. Programming for Domino 6 621%INCLUDE "LSCONST.LSS"Dim twoLiner As StringtwoLiner = |This messageis on two lines|MessageBox twoLiner, MB_OKCANCEL, "Demo"14.5 Using JavaScriptWith Domino 6, you can use JavaScript to write applications that will support boththe Notes client and the Web browser. All events associated with an object areprogrammable by using JavaScript, LotusScript or even simple @functions, andcan be easily accessed within the Programmer’s Pane.JavaScript allows you to handle events such as onLoad (for a Web page),onClick (for an input button on form), onChange, onBlur, onFocus (for inputfields), and so on. You can use these events to trigger JavaScript functions thatcan also perform some complex operations.In a Web browser, JavaScript functions can access all elements on a Web page(like input fields), as well as properties and methods that control the status andthe behavior of the Web browser window itself.Adding JavaScript to Domino forms and fields is particularly useful, as it allowsyou to create forms with a more dynamic behavior—without adding workload tothe Domino server. For example, with JavaScript, field values can be validatedlocally on the browser, instead of on the Domino server, after submitting.14.5.1 Using JavaScript in Domino Design elementsTo use JavaScript in your application, add JavaScript code to events as you dowith LotusScript. Table 14-13 on page 622 lists some of the supported JavaScriptevents for forms and page.Tip: Server agents write their Print and Messagebox output to the server log(log.nsf, “Misc events” view) and to the server console. This is also very handyfor debugging!622 Domino Designer 6: A Developer’s HandbookTable 14-13 Some supported JavaScript events for forms/pagesNote: Domino supports the standard JavaScript object model. For informationon the JavaScript object model, see the following sites:http://developer.netscape.com/tech/javascripthttp://developer.netscape.com/docs/manuals/js/client/jsguidehttp://msdn.microsoft.com/scriptingBrowser implementation of the object model depends upon the browser. TheNotes client implements the object model, with some exceptions.For information on the Notes implementation, see the Domino 6 ClientDocument Object Model:http://www-10.lotus.com/ldd/docNotes Form event handlers DescriptiononLoad Similar to PostOpen event.onUnLoad Before document is closed.onSubmit Window event, before Document saved.
onReset Window event, before Document reset.onBlur When the forms loses focus.onClick An object on a form is clicked.onDblClick The user double-clicks a form element or a link.onFocus The form receives focus.onHelp Triggered when the user presses the F1-Help key.onKeyDown The user presses a key down.onKeyPress The user presses or holds down a key.onKeyUp The user releases a key.onMouseDown The user presses a mouse button down.onMouseMove The user moves the cursor.onMouseOut The cursor leaves the form or page.onMouseOver The cursor moves over the form or page.onMouseUp The user releases a mouse button.Chapter 14. Programming for Domino 6 623For form elements (for example, fields), you can provide JavaScript for the eventslisted in Table 14-14.Table 14-14 Supported JavaScript events - fieldsIf you want to add JavaScript code for other Window events that are not handledby the Notes client, you can do this in the HTML Body Attributes object for theform. Likewise, if you want to add an event for a form element, you can do it in theHTML Body Attributes Field event.Code in pass-thru HTML and the HTML body attributes fields are passed to thebrowser, but ignored in the Notes client.Note: JavaScript must be enabled in the User Preferences in order to beexecuted by the client.Notes Form elementevent handlersDescriptiononFocus Entering the object.onBlur Exiting the object.onChange When object is changed.onClick When object is selected.Attention: If you enter JavaScript code into a formula, keep the following rulesin mind:1. Within the text string that you are going to put in the formula, every doublequote (“), single quote (‘), and backslash (\) must be preceded by abackslash (\). For example:<a href="http://www.ibm.com"> IBM </a>must become:<a href=\"http://www.ibm.com\"> IBM </a>2. The same text string must be included between two double quotes beforepasting it into the formula. For example:"<a href=\"http://www.ibm.com\"> IBM </a>"624 Domino Designer 6: A Developer’s Handbook
The browser Javascript Object HierarchyThe Javascript Object Hierarchy is shown in Figure 14-23.Note: When you click any of the objects in JavaScript Object Model Hierarchypicture, the corresponding chapter about the JavaScript object will be openedfrom the Lotus Domino Designer 6 Help database.Figure 14-23 Javascript Object Model in Designer14.5.2 Mapping Domino objects to the Document Object ModelIn this section, we illustrate how Domino objects are mapped to the DocumentObject Model as it is used in Web browsers. We show the following for eachDomino object:_ Its type in the Document Object Model

_ The HTML that is generated by Domino_ A JavaScript example using the objectImportant: For running JavaScript programs in the Notes Client, some of theobject relationships illustrated do not make sense; for example, there is onlyone form attached to a document at any time. Furthermore, not all objects areavailable on the Notes clientChapter 14. Programming for Domino 6 625Text fieldDate/Time fieldNumber fieldRich Text fieldDOM type TextHTML <INPUT TYPE="text" NAME=... ...>Example document.forms[0].textField.value ="default";DOM type TextHTML <INPUT TYPE="text" NAME=... ...>Example document.forms[0].dateField.value = "1999/01/01";DOM type TextHTML <INPUT TYPE="text" NAME=... ...>Example document.forms[0].counter.value =parseInt(document.forms[0]. counter.value) + 1;DOM type TextArea or appletHTML <TEXTAREA NAME=... ...> or <APPLET NAME=... ...>Example If the Rich Text field is shipped to a browser as HTML, or is usedwithin the Notes Client, the field is treated as a TextArea.The value of a TextArea is a unicode string.To clear out a field named "richText":document.forms[0].richText.value = "";If the Rich Text field is shipped to a browser as an applet, the<APPLET> tag is used.To set a field named "richText" to be "Please don't!":document.applets.richText.setText("text/html", "Please<B>don't!</B>");626 Domino Designer 6: A Developer’s Handbook
Authors/Names/Readers fieldPasswordHidden fieldFormula fieldDOM type TextHTML <INPUT TYPE="text" NAME=... ...>Example In Notes, extra “helper” buttons willappear to aid in inputting a value. Thesehelper buttons are not accessible toJavaScript.DOM type PasswordHTML <INPUT TYPE="password" NAME=... ...>Example var passwd =document.forms[0].passwordField.value;DOM type Any field, regardless of typeHTML <INPUT TYPE="hidden" NAME=... ...>Example document.forms[0].textField.value = "default";Note: Hidden fields are only sent to the browser if the form property “GenerateHTML for all fields” is selected.DOM type TextHTML <INPUT TYPE="text" NAME=... ...>Example document.forms[0].formulaField.value = "Select @All"Chapter 14. Programming for Domino 6 627

Dialog List, Listbox, Combobox fieldCheckbox fieldDOM type SelectHTML <SELECT><OPTION ...> ... </SELECT>Example In Notes, extra “helper” buttons will appear to aid in inputting a value.These helper buttons aren't accessible to JavaScript. To find outwhich keyword has been selected from a (single valued) keyword listassociated with a field named "Grade":var list = document.forms[0].Grade;alert(list.options[list.selectedIndex].text);Note: If keyword synonym is used, value is the synonym, while text is thedisplay text.DOM type CheckboxHTML <INPUT TYPE="checkbox" NAME=... ...>Example To show each choice selected in a field named "checkboxField":var boxes = document.forms[0].checkboxField;for (var i = 0; i < boxes.length; i++) {var box = boxes[i];if (box.checked) alert(box.value + " is checked");}Note: If keyword synonym is used, value is the synonym, while text is thedisplay text.628 Domino Designer 6: A Developer’s Handbook
Radio Button fieldActionComputed textDOM type RadioHTML <INPUT TYPE="radio" NAME=... ...>Example To display which radio button from the field "radioField" is checked:var result = "--no result--";var buttons = document.forms[0].radioField;for (var i = 0; i < buttons.length; i++) {var button = buttons[i];if (button.checked) {result = button.value;break;}}alert(result);Note: If keyword synonym is used, value is the synonym, while text is thedisplay text.DOM type LinkHTML <A NAME=... onClick=... ...>Example If an Action bar is emitted as an applet to a Web browser, the actionsare inaccessible to JavaScript. To programmatically fire the first actionon a page: document.links[0].click();DOM type SpanHTML <SPAN ID=...> ... </SPAN>Example Accessed as a “Span” in a browser, but is inaccessible within Notes.To change the value of computed text field named "cText":document.all.cText.innerHTML = "new value";Chapter 14. Programming for Domino 6 629Link hotspotText pop-up hotspotButton hotspotFormula pop-up hotspotDOM type Link

HTML <A HREF=... NAME=...>Example To change where a link named “launch” will link to, if clicked:document.links.launch.href = "http://www.lotus.com";DOM type not accessibleHTML inline textExample n/aDOM type ButtonHTML <INPUT TYPE="button" NAME=... ...>Example To change the label of a button named “pushMe”:document.forms[0].pushMe.value = "Go ahead. Push me!";DOM type not accessibleHTML inline textExample n/a630 Domino Designer 6: A Developer’s Handbook
Action hotspotPicture, Image ResourcePicture, Image Resource HotspotJava appletDOM type LinkHTML <A HREF=... NAME=... onClick=...>Example To programmatically perform the action(as determined by the onClick handler)behind the first hotspot on a page:document.links[0].click();DOM type ImageHTML <IMG NAME=... ...>Example To change the image associated with a picture named “effects”:document.images.effects.src ="/db.nsf/RollOver?OpenImageResource";DOM type AreaHTML <AREA NAME=... ...>Example To programmatically leap to the link associated with a hotspot named“hotSpot”: document.images.hotSpot.click();DOM type AppletHTML <APPLET NAME=... ...>Example To call a public method named “setDate” of an applet named“DatePicker”: document.applets.DatePicker.setDate(...supplyparameters...);Chapter 14. Programming for Domino 6 631Form14.5.3 Examples of adding JavaScript to formsThis section lists examples of JavaScript.Using a JavaScript LibraryFor information on how to include a Javascript on a form/page/subform, refer toChapter 12, “New features in Domino 6” on page 347.The following section contains examples of using JavaScript in forms and fields.Each of the following examples illustrates effects that you can implement usingJavaScript.DOM type Window and FormHTML <HTML>...<BODY onLoad=... onUnload=...><FORM NAME=... ... onSubmit=... onReset=...>...</FORM></BODY></HTML>Example Domino's concept of a form maps onto both a Window and a Form in

the DOM world. The onSubmit and onReset handlers are accessedthrough the Form DOM object. All other handlers are hung on theBODY tag in HTML and accessed via the Window DOM object.To programmatically submit a form from a button named“submitButton”, add the following code to submitButton's onClickhandler: this.form.submit();Note: In a browser, when a document is rendered in read mode, all fields aregenerated as inline text and are inaccessible. In Notes, fields in read mode areaccessed exactly as they would be in edit mode:document.forms[0].fieldName. Though you are free to change their values,these new values are not stored in the back-end document.Furthermore, in a browser, computed fields are generated as inline text andare generally inaccessible.632 Domino Designer 6: A Developer’s Handbook
Example 1: Auto-Refresh, Field Validation, and Help fieldsThe form in Figure 14-24 on page 632 allows a user to insert a percentage valuein one of the two fields, and the other field is then computed as a complementarypercentage. For example, if a user inserts 70 in A, the user will see 30 appearingin B immediately after changing the focus.If a number greater than 100 is entered, a JavaScript alert message is displayed.Also, when the user puts the mouse inside a field, a help message is displayedon the bottom bar of the Web browser.To create this form, do the following:1. Create two Numeric Editable fields, PercentA and PercentB.2. In the onBlur event of PercentA, type:if(this.form.PercentA.value<=100){this.form.PercentB.value=100 - this.form.PercentA.value;}else{alert('Invalid Percentage A!');};window.status=''; "3. In the onFocus event of PercentA, type:window.status='Insert Percentage A and look to Percentage B'The onBlur event is triggered each time the focus is moved from a field. Here,it is used to trigger the validation and auto-refresh “procedure” (if()...elseblock) and to set the message bar to blank (window.status= “”).Fields accessed in these procedures are those on the Web form; therefore,you cannot access hidden or computed Domino fields using JavaScript,because these are not fields on the Web page.Figure 14-24 Percentage A + B = 100%Note: All validation operations are performed locally, without calling anyserver tasks.Chapter 14. Programming for Domino 6 633The onFocus event occurs when a user enters an input field, and here it isused to set the status bar message in order to use it as a help field.4. In the onBlur event of PercentB, type:if(this.form.PercentB.value<=100){this.form.PercentA.value=100 - this.form.PercentB.value;}else{alert('Invalid Percentage B!');};

window.status='';5. In the onFocus event of PercentB, type:window.status='Insert Percentage B and look to Percentage A'This JavaScript code mirrors that of step 2, and it does not need furtherexplanation.An alternative to onBlur is to use onChange as a triggering event for thevalidation. This event occurs only when the value of a field is different from theprevious value.In the same way, you can call a procedure defined in the header of the form thatrefreshes fields on that form.Example 2: setting field valuesThe field in Figure 14-25 can be reset to today’s date, by clicking the button.Though this example is very simple, it illustrates a function which could be veryuseful— having a button that resets all the fields on a form to their original values.Again, this action is performed without calling the server. This works in the Weband Notes client.Note: There are many solutions for the problem solved by this example.Another possible solution is to store a unique JavaScript function for thevalidation of the entire form in the header of the Web page, instead of doingthe validation inside each field, and then to call it using the following syntax,for an event such as onChange or onBlur:onBlur="validateForm()"634 Domino Designer 6: A Developer’s HandbookFigure 14-25 Setting the default valueTo create this sample, do the following:1. Create a button on the form and add the following to the onClick event:this.form.Date.value = this.form.DefaultDate.value;The action behind the button assigns the value of the DefaultDate field to theDate field.2. Create an Editable Date field and call it “Date”.3. Create an Editable Date field and call it “DefaultDate”, and put in its defaultformula: @Today.4. In HTML Attributes of DefaultDate, type:"TYPE=\"Hidden\""Example 3: using JavaScript with Keyword fieldsIn this example, the input field is completed automatically when the user selectsa value from a list. Since the selected field is separated by the keyword list, theuser may also introduce a value that is not on the list.Figure 14-26 Choose country from the listTo create this sample, do the following:1. Create Choices as a keyword field. In the onChange event, insert:form.Country.value =form.Choices.options[form.Choices.selectedIndex].text;Important: This field will not appear on the Web but it is defined on theWeb form, so it does exist on the browser. If you use the Dominohide-when formulas instead of TYPE=“Hidden”, the field would not be sentto the browser, so the sample would not work.Chapter 14. Programming for Domino 6 635The onChange event triggers the assignment of the selected value to the fieldnamed Country. SelectedIndex is the number of the selected item of the list.2. Create Country as an Editable Text field.Example 4: changing an image on Mouse-Over or Mouse-OutThe image displayed on the screen can be changed when the mouse floats inand out of it. The following example alternates two different logos, depending onthe position of the mouse pointer.

To create this sample, do the following:1. Create a form and put the following JavaScript in a Javascript library, andinclude it in the JS Header of the form:logoIBM=new Image(100,40);logoIBM.src = "/ChilesDirect/ChilePepperSite.nsf/Banners/IBM/$file/IBM.gif";logoLotus=new Image(100,40);logoLotus.src= "/ChilesDirect/ChilePepperSite.nsf/Banners/Domino/$file/DominoSquareLogo.gif";function showLogo(logoName){logo = eval(logoName+".src");document.images["Banner"].src=logo}The JavaScript will be inside the header of the Web page, so that all objectsof this JavaScript are allocated before other elements on the Web page.– logoIBM and logoLotus are the definitions of two images.– logoIBM.src and logoLotus.src store the URL of the images. You willneed to replace their values with the URL of your sample images.– showLogo() is a function that replaces the content of the “Banner” imagewith that of one of the two defined above; the selection of the imagedepends on the value of logoName, which is a parameter (a string)passed to the function.2. Add the following HTML code to the form, using pass-thru HTML style:<a href=http://www.ibm.comonMouseOver="showLogo('logoIBM'); return true;"onMouseOut="showLogo('logoLotus')"><IMG NAME="Banner" SRC="/ChilePepperSite.nsf/Banners/Entrevision/$file/Note: This only works in a browser, as Domino does not support theonMouseOver or onMouseOut events on the Notes client.636 Domino Designer 6: A Developer’s HandbookEntrevision.gif"></a>Explanation:_ onMouseOver is the event that triggers the function callshowLogo(‘logoIBM’)._ onMouseOut is the event that triggers the function callshowLogo(‘logoLotus’)._ “Banner” is the name of the image that is replaced each time the mouseenters or exits its area.Example 5: updating frames using JavaScriptThis short sample can be used when you need to change the content of twoframes at the same time.1. Add the following Javascript to the JS Header of the form, or create aJavascript library for it, and include it in the JS Header:function changeFramesContent(URL1,URL2){top.Frame1.location=URL1;top.Frame2.location=URL2;}We have named the two frames Frame1 and Frame2.2. Create a new button to update the frames, and in the onClick event add thefollowing:changeFramesContent(URL1,URL2);14.6 LiveConnect - JavaScript access to Dominoclasses

The LiveConnect technology allows JavaScript to initiate applet communicationwithin browsers, and is also implemented in the Notes client.LiveConnect is a proprietary Netscape Technology (since 3.0), and is alsoimplemented within Internet Explorer. It allows applet-script (IE - partial support),script-applet (IE - partial support) and applet-applet communication, but this isnot fully supported in the two browser environments.Chapter 14. Programming for Domino 6 63714.6.1 Accessing an applet from JavaScriptConsider the following applet:<APPLET CODE="Hello.class" NAME="Hi" WIDTH=150 HEIGHT=25> </APPLET>JavaScript can access an applet via the applet name or applets array in theJavaScript document object:_ document.applets.Hi_ document.applets[0] or document.applets[“Hi”]On accessing the applet, JavaScript can also access the Java publicmethods/properties of the applet:_ document.applets.Hi.methodname_ document.applets.Hi.variableObvious advantages include repainting applets with new data at runtime, withoutroundtrips to the server via submits.14.6.2 Accessing Java/CORBA applets via LiveConnectConsider the current Notes Client Programmability model. The Domino ObjectModel (DOM) is accessed by LotusScript in the event handlers. On the Web, thescripting language is JavaScript, which has no interface to the Domino ObjectModel (DOM). Java has an interface to the DOM, but the API’s are remote. Thisis where you can utilize a CORBA applet.A CORBA-enabled applet can access a remote Domino Session object and, incombination with LiveConnect, make this property available to JavaScript via apublic property or method. An HTML page can now have a persistent sessionwith the Domino server via JavaScript and utilize the DOM, without the need tosubmit the page to the server for each transaction.ExampleThe following example illustrates how LiveConnect can be used in the Notesclient. It has been taken from the Lotus Domino Toolkit for Java/CORBA 2.0.The Rich Text field on the document contains a 1-pixel square embedded applet.The applet code is minimal:import lotus.domino.*;public class PinpointApplet extends lotus.domino.AppletBase {public void notesAppletInit(){setLayout(null);638 Domino Designer 6: A Developer’s HandbooksetSize(1,1);}}The important thing is that the applet extends the AppletBase class. This classimplements the method AppletBase.openSession(), which we will use to get aDomino session object.The Rich Text field on the document also has a button that, when clicked, locatesthe applet, passes the openSession() method to it and then accesses theDomino Object Model through JavaScript. You can see all the JavaScript code forthat button.// Sample JavaScript code accessing back-end data via Java// Retrieves the first or second database in the DBDirectory{// Once session is obtained, we can utilize any class

// in the Domino Object Model. Can also// use document.applets[0].openSession(user, pwd);var s = document.applets[0].openSession();if ( s == null ) {window.defaultStatus = "Unable to connect to server";}// Update a field on the formdocument.forms[0].Platform.value = s.getPlatform();var dir = s.getDbDirectory("");// Use introspection to retrieve static constants// such as lotus.domino.DbDirectory.DATABASEvar dirclass = dir.getClass();var dbcode = dirclass.getField("DATABASE").getInt(null);var db = dir.getFirstDatabase(dbcode);// For fun, switch between first and second DB each time// button is clickedif ( document.forms[0].DatabaseTitle.value == db.getTitle() ) {db = dir.getNextDatabase();}db.open();document.forms[0].DatabaseTitle.value = db.getTitle();var server = db.getServer();if ( server == "" ) server = "Local";document.forms[0].DatabasePath.value = db.getFilePath() + " on " +server}Once JavaScript has retrieved the session object reference, it can utilize the fullDomino Object Model in the JavaScript code.In the preceding code, the JavaScript code uses the Session object to access thefollowing data, which is placed into the respective fields on the form.Chapter 14. Programming for Domino 6 639_ Platform of the Domino server_ Title of the first or second database on the Domino Server_ File path of the first or second database on the Domino ServerFrom a performance perspective, the applet initially takes a small amount of timeto load from the server. Once it is loaded and initialized, however, access to theremote session object is fast.The applet and the button with the JavaScript code can be placed in the formdesign, so that every document created automatically contains them. The appletcan be in a hidden paragraph, as users do not need to see it.It is advisable to place complex code into a public method within the applet tocorrectly handle Java Exception conditions.This method could also be used for hiding JavaScript implementation code asJava inside an applet.If the form had many applets, the one session reference could be shared amongthe applets via the InfoBus technology.
14.7 The API for Domino and NotesThe C and C++ API for Domino and Notes allows you to write a program thatprocesses data in a Domino database, or moves data in and out of Domino. TheAPI accesses the Domino database layer, much as the Domino Object Modelitself accesses it. You can also use the API to access the server software, theTools menu in the workstation software, and the File Types list in the File Exportdialog box.Note: Because Domino 6 supports a CORBA/IIOP architecture, you are alsoable to run API programs through the Web. In this case, the client uses the serverAPIs. For more information about CORBA/IIOP architecture, refer to the LotusDomino Release 5.0: A Developer's Handbook, SG24-5331.

You can write an API program to do the following:_ Extract external data, reformat it, and store it in the Domino database.For example, you can retrieve information from SQL records._ Extract Domino data, reformat it, and store it in an external application.Note: Remote access via CORBA must be enabled on the server by anadministrator in order to use Domino data in applets.640 Domino Designer 6: A Developer’s HandbookFor example, you can retrieve Notes workflow status data into a wordprocessor or executive information management (EIS) system._ Add commands to the File - Tools menu.For example, when a user chooses your new command, Domino can launchyour program and pass user context information to it, such as which view isactive, whether the user is editing a document, and which field contains thecursor. Your program can compute new values and enter them into Dominofields._ Implement server add-in tasks.For example, you can implement a task that takes conditional actions beyondNotes background macro capabilities. A server add-in task functions as adaemon. It has no user interface and runs in the background like other servertasks._ Create a custom file export format.For example, when a user selects your new file type in the Notes File Exportdialog box, Domino launches your program and exports data to it.For more information about the API products, refer to the documentationfound at Lotus Developer Domain, Documentation Library pages:http://www.lotus.com/ldd/doc14.8 XMLNotes 6 contains programming tools to let you generate and parse any XMLdata. The classes that were previously available by downloading the Lotus XMLToolkit, have been added to the main product and are now a standard part ofLotusScript (and Java). Chapter 16, “XML” on page 743, discusses the XMLcapabilities in detail.Briefly, the LotusScript classes include:_ XML processors NotesDOMParser and NotesSAXParser, which implementthe two standard models for processing any XML data._ Helper class NotesStream, which represents an input to or output from anXML processor (among other uses).In addition, there are classes to support DXL, the Domino-specific XMLDocument Type Definition. DXL is used to represent and process informationabout Notes documents, databases and design elements. These classes includethe following:_ NotesXSLTransformer transforms DXL through XSLT.Chapter 14. Programming for Domino 6 641_ NotesDXLExporter and NotesDXLImporter convert Domino data to and fromDXL._ NotesNoteCollection lets you select parts of a Notes database to pass to aNotesDXLExporter.Versions of all of these classes are also available in Java.
14.9 Sametime connectivityThis section briefly covers basic information about Sametime and Sametimeconnectivity. For more information, refer to the IBM Redbook Lotus SametimeApplication Development Guide, SG24-5651, and to the other Sametime-relatedredbooks listed in “Related publications” on page 799.14.9.1 What is Sametime

Lotus Sametime is the product that delivers a network-based, real-timecommunication and collaboration solution to today's global business. A pivotalcomponent to achieve the Lotus ideal of collaboration, Sametime establishes avirtual office environment where workers can easily locate and communicate withcolleagues, customers, suppliers, and others.14.9.2 What can Sametime doSametime meets the need for workers to connect and communicate instantly onissues that are critical to business success. Sametime fulfills this need byestablishing an online community and providing these key user capabilities:_ Awareness_ Conversation_ Object sharing14.9.3 Power of SametimeThe unique power of Sametime is its ability to move between asynchronous andreal-time communications while adding value to the user's experience. Let's lookat a business scenario where Sametime demonstrates this power.Suppose you receive an urgent e-mail from a customer with a serious softwaresupport issue. You must provide an immediate and accurate solution to this issueor lose the customer account. Using e-mail, you could exchange endlessmessages with an internal expert seeking answers to the issue. The downtime642 Domino Designer 6: A Developer’s Handbookbetween messages could grow into hours, leaving the customer even moredissatisfied.Using Sametime installed in a Domino environment, you could get much fasterresults than with e-mail. First, with awareness you can quickly locate an internalexpert knowledgeable about the customer issue and determine if that person isavailable for discussion. Seeing that the customer available, you send an instantmessage asking him a few direct questions.During the chat session, you decide to invite another internal expert to help withthe issue. This conference chat leads to a discussion about a document stored inthe Customer Service database.Using Sametime's instant meeting feature, you access that Notes database,open the document, and share it with the experts online. In real-time, the groupreviews the document. Based on the online review, necessary documentchanges are made.You save the document and repost it to the Customer Service database. Inminutes you have created a document that accurately addresses the customer'sspecific needs. You can now forward that document to the customer or discuss itin a phone conversation.14.9.4 Sametime-enabling Domino applicationsDomino applications can be enabled for Sametime, thus taking the power andstrength of what Sametime delivers into the application itself. This can be tosupport a chat service and instant messaging within an application, or you mightenable the application to find out if a specific user is online.Another use would be to check who is within a Domino application at the sametime as you are, and to be able to contact that person. This means that you canhave a team database where you and others might be in the same section, forexample, on the same Web page. Sametime lets you “see” each other as onlinethere, and you can send an instant message right from that indicator, and start ameeting session, if desired.To enable your Domino Web applications for Sametime, refer to the IBMRedbooks Lotus Sametime Application Development Guide, SG24-5651 andWorking with the Sametime Client Toolkits, SG24-6666.The Sametime Links 3.0 Toolkit is available from Lotus Web site:http://www-12.lotus.com/ldd/doc/uafiles.nsf/docs/ST30/$File/stlinkstk.pdf

Chapter 14. Programming for Domino 6 643Example - Sametime-enabled applicationThe following example builds on the Sametime 3.0 server and the SametimeLinks 3.0 Toolkit functionality. It will create a very simple Web page with links topersons online on a Sametime 3.0 server. By clicking the names of these people,you are available to chat directly to them, using the Web-based chat client.Sametime-enabling a Web application with the new Sametime Links 3.0 Toolkit iseasy, and well documented in the Toolkit.Preparing the page for the addition of Sametime links1. Include the necessary files by adding the following HTML code to the HeadHTML section:<LINK REL=STYLESHEET HREF="codebase/stlinks.css" TYPE="text/css"><SCRIPT src="codebase/stlinks.js"></SCRIPT><SCRIPT>setSTLinksURL("codebase");</SCRIPT>The codebase is the URL of the directory where the Sametime Links runtimepackage is installed (http://<sametimeserver>/sametime/stlinks, where<sametimeserver> is your Sametime server host name).2. Add the code that puts the hidden Sametime Links Java™ applet on the page.This code can be put anywhere in the HTML code for your page because theapplet itself is placed on a hidden, zero-size HTML layer.<SCRIPT>writeSTLinksApplet (loginName, key, isByToken);</SCRIPT>Note the following in the writeSTLinksApplet call:_ The loginName argument is the login name of the user._ The key argument is the password or the token. Sametime Links providesthree methods for logging in to a Sametime community: log in by password;log in as anonymous; log in by token._ The isByToken argument is true if you use a token to authenticate, and false ifyou use a password. The default is false.Adding the Sametime linkOnce you have prepared the page for adding Sametime Links, you add aSametime link anywhere in the HTML text by typing the following:<script>writeSametimeLink(userName, displayName, bResolve,options)</script>In the writeSametimeLink call:644 Domino Designer 6: A Developer’s Handbook_ The userName argument is the unique user name. To ensure uniqueness,use the canonical name, or the distinguished name if you are using an LDAPdirectory.Note: The Sametime server 2.5 cannot resolve distinguished names.Therefore, if you are using Sametime server 2.5 with LDAP, use the user’scommon name._ The displayName argument is the display name of the user. This name isdisplayed as the text of the link._ The bResolve argument is true if the Sametime server has to resolve the username. False indicates that the user name is already resolved._ The options argument is a string of semicolon-delimited display options. Eachelement in the list has the format “option:value.” The options allow you tochange the rendering and the behavior of the Sametime link. For example, byspecifying “text:yes;icon:no” you create a Sametime link without a status icon.For more information of writeSametimeLink, check out the Sametime 3.0Toolkit.Sample page

<html><head><LINK REL=STYLESHEET HREF="http://sametimeserver/sametime/stlinks/stlinks.css"TYPE="text/css"><SCRIPT src="http://sametimeserver/sametime/stlinks/stlinks.js"></SCRIPT><SCRIPT>setSTLinksURL("http://sametimeserver/sametime/stlinks", "no");</SCRIPT></head><body bgcolor=#CCD2D0><script>writeSTLinksApplet("","", false);</script><table border=0 width=770><tr><td><span style="font-family:arial; font-size:12pt;font-weight:bold;color:#123456;">Click on a Redbook teammember you want to talkto:</span><br><br><span style="font-family:arial; font-size:10pt;"><script>writeSametimeLink("CN=Rune Carlsen/O=ITSO", "Rune Carlsen",false);</script><br><script>writeSametimeLink("CN=Tommi Tulisalo/O=ITSO", "Tommi Tulisalo",false);</script>Chapter 14. Programming for Domino 6 645<br><br><br></span></td></tr><tr style="font-family:arial;font-size:8pt"><td align=left><imgsrc=”SametimeOnline.gif” border=0> Available <imgsrc=”SametimeBusy.gif” border=0> Busy <imgsrc="SametimeDoNotDisturb.gif" border=0> Do notdisturb <img src="SametimeOffline.gif"border=0> Offline </td></tr></table></body></html>With a Sametime server available and correctly installed, configured, and readyfor Web-based communication, this example would look like Figure 14-27 onpage 645.Figure 14-27 Sametime-enabled Web applicationClicking a person’s name that is online (indicated by an “Available” icon) will starta chat communication directly with that person, as shown in Figure 14-28 onpage 646.646 Domino Designer 6: A Developer’s HandbookFigure 14-28 Sametime chat on WebThis example only describes a basic example of live chat with a predefined set ofusers, hardcoded in the HTML file. This can be more dynamic, depending onhow you prefer to program it.There is also a set of other things to do on Web, such “changing status links”,“place-based awareness”, “place counter” and other useful features. Refer to theSametime 3.0 Toolkit and the Sametime Redbooks for more detailed information.
14.10 Integration with Microsoft technologiesThis section provides information and a brief overview of Microsoft integrationusing the Component Object Modem (COM), and gives both simple andadvanced code examples on how to access the Domino objects using COM.Chapter 14. Programming for Domino 6 647Developers have had access to the Domino Object Model (DOM) through OLEAutomation since Notes R4.0. There are two main reasons why COM support is

needed, as well:_ OLE Automation requires Notes to be running.You cannot use Domino services through OLE Automation without having theNotes client launched in the foreground._ OLE Automation only allows late binding.By using COM, you can choose between early and late binding. Early bindinggives better performance and stability during application execution.On the other hand, if you want to use the Notes client to handle the userinterface or parts of it in your application, you must use OLE Automation. Youcannot control the Notes user interface via COM.For more information about COM and Domino, refer to the IBM Redbook, COMTogether - with Domino, SG24-5670 .14.10.1 What is COMCOM, or the Component Object Model, is an open software componentspecification developed by Microsoft. It allows objects to expose theirfunctionality to other applications. COM defines a specification for developingreusable binary components across multiple software languages and platforms.COM components can be written and called by any language that can callfunctions through pointers, including C, C++, Delphi, and Basic, just to name afew. Because of this flexibility, COM components can be built by differentsoftware vendors and incorporated in endless combinations to createapplications and systems.Tip: The difference between early binding and late binding is like thedifference between speed and flexibility; note the following:_ In early (compile-time) binding, the object definitions are available. Theycan be typed correctly and syntax checking can be performed._ In late (run-time) binding, objects are generic during development. There isan overhead when casting an object to its correct type during run time, andthere is also the danger of syntax errors.Note: The initial 6.0 release, unlike Notes 5.x, lacks COM server capability.This will be restored in a later release. Notes can still act as an COM client.648 Domino Designer 6: A Developer’s HandbookCOM is one of the basic building blocks in newer Windows technology, includingOLE services. You could say that OLE is a standard for one software callinganother software.The COM specification provides:_ Rules for component-to-component interaction_ A mechanism for publishing available functions to other components_ Automatic use tracking to allow components to unload themselves when nolonger needed_ Efficient memory usage_ Transparent versioningWhen it comes to COM components, they also offer an interface to applications.The mechanism to make this interface available to other software objects iscovered by the COM standard. It is up to the COM component developer, though,to decide what the actual interface should look like.The decision of what properties and services (methods) to make available fromthe outside is an important one. Applications using the COM component willdepend on having these methods available throughout the components’ lifetime.The developer can change the internal mechanisms of a COM component, butthe applications using that COM component should never need to know. Theyshould continue working exactly as they always have because the interface to thecomponent did not change.New interfaces can be added to the component, so long as the old ones stillcontinue to function in the same manner. This provides an upgrade path without

causing obsolescence to those components relying on the older interface. If adeveloper wanted to take advantage of the new interface, they could do so, butthey would not have to do in order for their applications to continue functioning.This is a very simple overview of COM. There are many other aspects andimportant things to be aware of, which this section will not cover. For additionalinformation, refer to Lotus Noted/Domino Help databases and to:http://www.microsoft.com/com14.10.2 COM support in DominoIn order to use the COM classes for Domino with Microsoft Office or any otherCOM-supported application, you must have at least one of the following installedon the machine where the code will be running:_ Domino Designer 5.0.2b or later_ Domino Server 5.0.2b or laterChapter 14. Programming for Domino 6 649_ Notes Client 5.0.2b or laterFor Microsoft Office, you will need Microsoft Office 97 or later. Duringdevelopment, you will need to enable the reference to the Domino Objects libraryin the Visual Basic Editor.Domino Object ModelThe Domino Object Model gives you as a developer access to a wide range ofservices (such as object store, directory, security, replication, messaging,workflow, automation through agents, and more) in a consistent way.Through a wide range of Domino objects, methods and properties, you can useall those services from COM-enabled languages like Visual Basic, VB forapplications, VBScript, C++, and LotusScript, as well as from Java™ and otherlanguages that can use Common Object Request Broker Architecture/InternetInter-ORB Protocol (CORBA/IIOP).Note: If you have upgraded Notes or Domino from an earlier release using theincremental upgrade installer, you may have to enable the COM supportmanually.Do this by selecting Run on the Windows Start menu and then executing thefollowing command (substituting c:\lotus\notes with the path where your NotesDomino files are installed):regsvr32 c:\lotus\notes\nlsxbe.dllTip: “COM support” means that anyone with basic programming skills, suchas from using BASIC, C, or C++, could write a program that accesses Dominoobjects.Note: CORBA is an architecture and specification for creating, distributing,and managing distributed program objects in a network. IIOP (or InternetInter-ORB Protocol) is a protocol that makes it possible for distributedprograms written in different programming languages to communicate over theInternet.IIOP is a critical part of a strategic industry standard, CORBA. UsingCORBA's IIOP and related protocols, a company can write programs that willbe able to communicate with their own or other company's existing or futureprograms wherever they are located and without having to understandanything about the program other than its service and a name.650 Domino Designer 6: A Developer’s HandbookThe Lotus Domino object COM components can be thought of as black boxaccess to Domino, as illustrated in Figure 14-29.Figure 14-29 Accessing Domino through Domino objects using COMThe actual mechanism for accessing Domino is hidden from the applicationdeveloper, who relies fully on the interface provided by Lotus. Knowing thisinterface will be your key to success in utilizing the features of Domino, such ascreating workflow applications and creating document archives with integrated

security, as well as all the other functions that Domino is famous for providing.Developers familiar with the Domino Object Model used when programmingLotusScript against Domino will recognize most of the interface classes in theCOM interface.Accessing Domino with COMYou can access Domino using any COM-enabled application.For the following examples, we use Microsoft software (such as MicrosoftInternet Explorer, Excel and Word) to indicate how you can integrate yourexisting Microsoft-based applications with Lotus Notes/Domino using COM.Note: A “COM-enabled application”, in relation to Domino, is an applicationthat accesses the Domino Object Model using the COM interface.Chapter 14. Programming for Domino 6 651Accessing Domino with Microsoft Internet Explorer using COMThe following example illustrates how we can use VBScript to access Domino viathe COM interface, using Microsoft Internet Explorer:<HTML><HEAD><TITLE>Access Domino via COM using IE</TITLE><SCRIPT LANGUAGE="VBScript">Sub testDim sessionSet session = CreateObject("Lotus.NotesSession")session.Initializedocument.write("Your current session name in Lotus Notes is<br><br>")document.write(session.username)End Sub</SCRIPT></HEAD><BODY onLoad="test"></BODY></HTML>When running this example, and depending on your settings in Microsoft InternetExplorer, you may see the dialog box shown in Figure 14-30 appear.Figure 14-30 Internet Explorer warningIf this dialog box appears, click Yes; this example code will do no harm. (Thiswarning most likely appears as a result of security settings in your MicrosoftInternet Explorer; from the application, you are trying to connect and accessother applications, in this case, through a COM interface.)You should now see a screen similar to Figure 14-31 on page 652.652 Domino Designer 6: A Developer’s HandbookFigure 14-31 Information from Domino, inside Internet Explorer, using COMAccessing Domino from Microsoft Word using COMYou can also develop Domino applications using Visual Basic for Applicationsand Microsoft’s Component Object Model (COM) interface. To access Dominofrom Microsoft Word, there are a few steps you need to complete before startingto access Domino from MS Word using the COM interface:1. Launch Microsoft Word, Excel or Access.2. After opening a document, workbook, or database, choose Tools -> Macros-> Visual Basic Editor (Alt + F11).3. Choose Tools -> References. You will see a dialog box, as shown inFigure 14-32 on page 653.Note: If you are not logged in to Notes at the time, you will be prompted totype your Notes password. Why? Because in order for a COM application toaccess Domino objects, you need to authenticate. The COM application usesthe local installation of Notes on the client it is running, and then the currentuser.id file, to authenticate.Chapter 14. Programming for Domino 6 653

Figure 14-32 Enabling Lotus Domino Objects4. Scroll down the selections and choose Lotus Domino Objects (if it has notbeen used recently, the Lotus Domino Objects library will be listedalphabetically).5. Click OK.You will now be able to access the Domino objects from within the application,while you are writing your Domino application.Accessing a Domino database from Microsoft Word using COMIn the following example, we create a button inside Microsoft Word, accessing theDomino Directory, and insert information from this Directory inside the currentdocument in Word.We will need a place to display the names we retrieve from our directory oraddress book, so we will create a form that we can display as a dialog box.The user can then make a selection from the form, which we will use to retrievethe associated data from Domino and place it in the Word document.1. Enable the design mode in the VB Editor by clicking the Design Mode icon onthe toolbar; see Figure 14-33 on page 654.Tip: Deselect any objects (other than the defaults) that you do not need, andmake Lotus Domino Objects high in the priority list for better performance.(There is also a reference called “Lotus Notes Automation Classes”; you willnot be needing it.)654 Domino Designer 6: A Developer’s HandbookFigure 14-33 Buttons to click on the vb editor2. Insert a new user form by clicking the Insert User Form button on the toolbar.3. Your screen should now look similar to Figure 14-34.Figure 14-34 User form added4. In the properties box on the left side of your screen, change the caption toread: Domino Name Lookup.5. Click back on the form itself to make the form toolbox reappear, then selectthe label tool (second from the left, top row).6. Click your form with the label tool and drag to create a label where we willplace instructions for the dialog box.7. Click inside the label and edit the text to read:Select a name from the list below and click OK:Chapter 14. Programming for Domino 6 6558. Click anywhere outside the label box; your screen should now look likeFigure 14-35.Figure 14-35 User form with captions set9. To add a list box to your form, click the ListBox tool (top right button on thetoolbox).10.Click your form below the label text and drag to create the list box (leave roomfor OK and Cancel buttons below the list box).11.Using the CommandButton tool (directly below the ListBox tool), create twoside-by-side buttons for your OK and Cancel buttons.12.Select the first button and change the Caption in the Properties box to OK andmake sure the Default property is True.13.Select the second button and in the Properties box, then change the Cancelproperty to True and change the Caption to Cancel.14.Your dialog box should now look similar to Figure 14-36 on page 656.656 Domino Designer 6: A Developer’s HandbookFigure 14-36 Listbox, lables and buttons addedIf you have not already done so, save your work at this point.Adding the code that does the database lookupNow to create the actual code that powers the dialog box that was built—this iswhere to actually get started using the Domino COM objects. Follow these steps:1. From the Microsoft Visual Basic editor, choose Insert -> Module from the

menu bar. A new code module text box will appear.Since you will be interacting with your form in another part of our project, youwill need a public variable to store the user’s selection from the dialog box.2. You will get the user’s selection from the ListIndex property of our ListBoxobject, so declare a variable in the General Declarations area of the codemodule (which is the default section of the code module now displayed):Public IntPerson as Integer3. Insert the first sub procedure (sub).There are several ways to do this. If you are a LotusScript programmer, youmight be accustomed to just typing Sub subname to start your sub. You can dothe same thing here, or you can choose Insert -> Procedure from the menuand fill out the properties box.Chapter 14. Programming for Domino 6 657Whichever method you choose is fine, in this case. Call your procedurePopulateList so it will match our example, then press OK if you used thedialog box, or simply press Enter if you typed it in the code module text box.4. Declare the variables for this sub, as follows:Dim DomSession As New NotesSessionDim DomDir As NotesDatabaseDim DomContacts As NotesViewDim DomDoc As NotesDocumentDim StrName As StringDim doc As Document ’this will be our reference to the’Word documentDim myRange As RangeDim DomSession As NotesSessionSet DomSession = CreateObject(“Lotus.NotesSession”)Access to Domino objects must always start with the creation of a NotesSessionas shown above.DomDir will hold your Name and Address Book. DomContacts will hold thereference to the People view you will be using for populating your list box anddocument. DomDoc will be the reference to the Domino document (record) weare currently accessing.StrName is a regular VB String, where you will store the composite name thatyou piece together from the FirstName, MiddleInitial, and LastName fields in ourDomino document. The variable doc will be used to reference the current Worddocument. The variable myRange will represent the current insertion range inyour Word document.1. To initialize the Domino (Notes) Session:DomSession.Initialize2. A session to Domino is now set up, and the next thing is to access the objectsof Domino which you want to access, as follows:Set DomDir = DomSession.GetDatabase(““, “redbook\pernames.nsf”)Set DomContacts = DomDir.GetView(“Contacts”)Set DomDoc = DomContacts.GetFirstDocumentSet doc = ActiveDocumentAt this point, you have access and a handle on the first document in the“Contacts” view.3. Add and populate each document into the list box by using a While loop:While Not (DomDoc Is Nothing)StrName = DomDoc.GetItemValue(“LastName”)(0) & “, ” & _DomDoc.GetItemValue(“FirstName”)(0) & “ ” & _DomDoc.GetItemValue(“MiddleInitial”)(0)UserForm1.ListBox1.AddItem (StrName)658 Domino Designer 6: A Developer’s HandbookSet DomDoc = DomContacts.GetNextDocument(DomDoc)WendYou are only retrieving certain items of the domino objects and document,which is the FirstName, LastName and MiddleInitial, and adding these to the

list box using AddItem.4. Once the list box has been populated, you can show it to users so they canmake their selection:UserForm1.Show5. Once the user has responded to the dialog box, you will be returned here andwill continue execution by first checking to see if the user canceled the dialogbox. You can do this by inspecting IntPerson to see if it has been set to thevalue of -1 by the Cancel (CommandButton2) click event. If the user didCancel, you can exit the sub:If IntPerson = -1 Then ’User pressed Cancel (CommandButton2)Exit SubEnd If6. If you get past the Cancel check, you can retrieve the documentcorresponding to the name the user selected from the list box, whichpopulates IntPerson with the number of the selection.Using that value as an index, you can use the GetNthDocument method of theNotesView, DomContacts, to retrieve a reference to the document:Set DomDoc = DomContacts.GetNthDocument(IntPerson)7. Once you have the reference, you can again use the GetItemValue method ofDomDoc to get all the components of the full name, and store the formattedresult in StrName for later inclusion in your document. Since not all recordswill include a middle initial, check to see if there is one before including it:StrName = DomDoc.GetItemValue(“FirstName”)(0) & “ ”If DomDoc.GetItemValue(“MiddleInitial”)(0) <> “” ThenStrName = StrName & DomDoc.GetItemValue(“MiddleInitial”)(0)& “. ”End IfStrName = StrName & DomDoc.GetItemValue(“LastName”)(0)8. Now you are ready to start inserting information into your document. Wordallows you to set a “range” for insertion using x,y coordinates whichcorrespond to the row and character position where you want to start yourrange. The coordinates 0,0 correspond with the first position in the document.Set myRange = ActiveDocument.Range(0, 0)With myRange.InsertAfter (StrName & vbCr).InsertAfter (DomDoc.GetItemValue(“StreetAddress”)(0) & vbCr).InsertAfter (DomDoc.GetItemValue(“City”)(0) & “, ”).InsertAfter (DomDoc.GetItemValue(“State”)(0) & “ ”)Chapter 14. Programming for Domino 6 659.InsertAfter (DomDoc.GetItemValue(“ZIP”)(0) & vbCr & vbCr).InsertAfter (“Dear ” & StrName & “:” & vbCr).InsertAfter (vbCr & vbCr)End WithEnd SubAdding code to the OK and Cancel command buttonsThe easiest way to add code to the command buttons is to switch back to theform itself.1. Use the Window menu in the VB Editor and switch back to the window thatcontains UserForm1 (UserForm). Double-click the OK button; this will positionyou in the UserForm1 Code module in the click event for the OK commandbutton. Add the following code:If ListBox1.ListIndex = -1 ThenMsgBox (“You didn’t make a selection, please select a name and click OK toproceed, or Cancel to quit.”)ElseIntPerson = ListBox1.ListIndex + 1Unload UserForm1End If2. Switch back to UserForm1 (UserForm), double-click the Cancel button, and

insert the following code in the click event of that command button:IntPerson = -1Unload UserForm1Setting IntPerson to -1 will be the signal to your calling module that the usercanceled. Again, unload the form here, because it is no longer needed. Now youjust need to add a toolbar and button to give the user a way to easily access yourlookup macro.Save the document as a Word templateIn order to add a toolbar in the next step, you will need to specify a templatewhere you’ll store the new toolbar. While you could store the toolbar in the defaulttemplate Normal.dot, create instead a new template just for the example, usingthe following steps:1. Switch back to the Word document window by selecting it on the Windowstoolbar.2. From the menu, choose File -> Save As. In the Save As dialog box, scrolldown and choose Document Template (*.dot) from the drop-down list box.3. Name it Domino Name Lookup.dot.Add the toolbar1. Choose Tools -> Customize from the menu and click the Toolbars tab.660 Domino Designer 6: A Developer’s Handbook2. Click New. Name your toolbar Domino Name Lookup. The template shoulddefault to the one you just saved, Domino Name Lookup.dot.3. Click OK. A small toolbar will appear on your screen.4. To add your macro to it, click the Commands tab on the Customize dialogbox.5. Select Macros from the Categories list box.6. Drag the Project1.Module1.PopulateList Macro to the toolbar on the right anddrop it.7. Right-click the toolbar text and choose Name. Name it: Insert Name fromDomino.8. Close the Customize dialog box, save your form, and you’re done!Try your codeNow you can choose File -> New, choose your Domino Name Lookup template,and you’re ready to use your new macro to look up Domino names andaddresses to add to your document. Figure 14-37 shows what a new documentbased on the template should look like.Figure 14-37 New document based on the new templateChapter 14. Programming for Domino 6 661Click the Insert Name from Domino button and your screen should display adialog box showing content from a Domino database (you might be prompted foryour Notes password first).After selecting a name, your document should look similar to Figure 14-38.Figure 14-38 Information from Domino inserted into MS Word documentAccessing Domino with Microsoft Excel using COMYou can just as easily integrate and access Domino objects by using MicrosoftExcel.Note: Depending on how you saved your new toolbar and template, the newbutton might be visible as a floating window as well. Drag this to your toolbarand make it part of the other icons, if desired.Important: Remember to access Domino objects using VBA, or Visual Basicfor Applications, you need to enable the “Lotus Domino Objects” for yourproject (found in the reference settings). This is described in “AccessingDomino from Microsoft Word using COM” on page 652.662 Domino Designer 6: A Developer’s HandbookAccessing Domino from Excel is done using buttons in a spreadsheet or from

icons in the toolbar. In this section, we present several examples of how you canaccess Domino and integrate the two applications.All of the following examples are based on running macros initiated from a buttonin a spreadsheet. We create macros in MS Excel in a similar way to creatingthem in MS Word. The examples will mainly show you the code and explain whatthe examples will do for the end user.Getting the current usernameLet’s start off rather simple and show how, from Microsoft Excel, you can get thecurrent username from the logged-in user in Lotus Notes/Domino:1. Create a new spreadsheet in Excel.2. Create a button somewhere in your spreadsheet.3. Add this code to the button:Sub GetNotesUsername()Dim session As New NotesSessionSet session = CreateObject("Lotus.NotesSession")session.InitializeMsgBox session.UserNameEnd SubClicking a button in MS Excel with this code should give you something likeFigure 14-39.Figure 14-39 Accessing Notes from Excel - receiving the current usernameSending an e-mail through Domino from MS ExcelThis example, through a button in Microsoft Excel, creates an e-mail to be sentand created in the current user’s mailfile, with an attachment of the current Excelspreadsheet, using the COM interface.Sub SendSheetByMail()‘ ** First we declare our variablesDim session As New NotesSessionDim dbdir As NotesDbDirectoryDim db As NotesDatabaseDim doc As NotesDocumentDim rtitem As NotesRichTextItemChapter 14. Programming for Domino 6 663‘ ** Then we initialize the Notes session and get the‘ ** database (mailfile) and create a new document in itsession.Initialize ("")Set dbdir = session.GetDbDirectory("")Set db = dbdir.OpenMailDatabaseSet doc = db.CreateDocument‘ ** Then we set the correct values in the‘ ** sendto and subject field, and create a richtextiten‘ where our attachment will be addedCall doc.ReplaceItemValue("SendTo", session.UserName)Call doc.ReplaceItemValue("Subject", "Mail from MS Excel")Set rtitem = doc.CreateRichTextItem("Body")‘ ** then we get a handle on the current active spreadsheet‘ ** by firstsaving it, and adding the name of the file‘ ** to a variable and then attaching this file to the‘ ** richtextitem in the maildocument created earlier.‘ ** Finaly we send the document.ActiveWorkbook.SaveMyAttachment = ActiveWorkbook.FullNameCall rtitem.EmbedObject(EMBED_ATTACHMENT, "", MyAttachment)Call doc.Save(True, False)Call doc.Send(False)MsgBox "This spreadsheet has been mailed to " & session.CommonUserNameSet s = NothingEnd SubSending an e-mail through Domino with MS Excel content

This example, through a button in Microsoft Excel, creates an e-mail to be sentand created in the current user’s mailfile, with content from the currentspreadsheet, using the COM interface:Sub SendEmailWithContent()Dim session As New NotesSessionDim dbdir As NotesDbDirectoryDim db As NotesDatabaseDim doc As NotesDocumentsession.InitializeSet dbdir = session.GetDbDirectory("")Set db = dbdir.OpenMailDatabaseSet doc = db.CreateDocumentNote: By setting the session to “nothing”, you free up the memory used to runthis routine.664 Domino Designer 6: A Developer’s Handbook‘ ** Mycell is the cell with the data we want to catch and sendMycell = Sheet1.Cells(14, 5)Status = "Data from spreadsheet as of: " & Date & " " & Time & "Content is $" & Mycell & " ."Call doc.ReplaceItemValue("SendTo", session.UserName)Call doc.ReplaceItemValue("Subject", "Excel message")Call doc.ReplaceItemValue("Body", Status)Call doc.Save(True, False)Call doc.Send(False)‘ ** the following line just selects a cellRange("E7").Select‘ ** the following line adds todays date into this cellActiveCell.FormulaR1C1 = DateMsgBox "A document has been created and sent: " & Date & " " & Time &Chr(10) & "containing the value in Cell E14 [ " & Mycell & " ]"‘ ** this line select the cell with the date we earlier addedRange("E7").Select‘ ** and clears the content of the cellSelection.ClearContentsSet session = NothingEnd SubAccessing MS applications from Notes/Domino using COMYou can access any COM-enabled application using Lotus Notes/Domino. Forthe following examples, we use Microsoft Excel to indicate how you can integrateyour existing Lotus Notes/Domino applications using COM.Creating a Microsoft Excel spreadsheet with Domino dataThis example creates a Microsoft Excel spreadsheet with content and data fromthe current notes document. It also creates a chart based on the datatransferred. This example can be included as part of an action on a form, with thecontent that should be produced in Excel:Sub Click(Source As Button)On Error ErrOLECantCreate Goto errhOn Error 207 Goto errhDim xlApp As Variant ' Declare variable to hold the reference.Dim ButtonHide As StringDim workspace As New NotesUIWorkspaceDim uidoc As NotesUIDocumentSet uidoc = workspace.CurrentDocument‘ ** here we create a object for Excel - mind that this might be‘ ** different for different versions of Excel.Set xlApp = CreateObject("excel.application")xlApp.Workbooks.AddxlApp.Visible = TrueChapter 14. Programming for Domino 6 665

‘ ** In the following loop, we add text to excel, from the current‘ ** NotesUIDocument with the content of the Keyword and Count fieldsFor i = 2 To 23xlApp.Range("A" & i).SelectxlApp.ActiveCell.FormulaR1C1 = uidoc.FieldGetText( "Keyword" & (i-1))xlApp.Range("B" & i).SelectxlApp.ActiveCell.FormulaR1C1 = uidoc.FieldGetText( "Count" & (i-1) )Next‘ ** These next lines, will based on the data just added to the cells,‘ ** create a chart and set the location, axis labels and shape‘ ** of the chart.xlApp.Range("A2:B23").SelectCall xlApp.Selection.Sort(xlApp.Range("B2"), 2)xlApp.Charts.AddxlApp.ActiveChart.ChartType = 51 'xlColumnClusteredxlApp.ActiveChart.SetSourceData xlApp.Sheets("Sheet1").Range("A2:B9"), 2xlApp.ActiveChart.SeriesCollection(1).Name = "=""Notes Chart"""xlApp.ActiveChart.Location 2, "Sheet1" 'xlLocationAsObjectWith xlApp.ActiveChart.HasTitle = True.ChartTitle.Characters.Text = uidoc.FieldGetText( "title" ).Axes(1,1).HasTitle = True 'xlCategory, xlPrimary.Axes(1,1).AxisTitle.Characters.Text =uidoc.FieldGetText( "x_axis_label" ).Axes(2,1).HasTitle = True 'xlValue, xlPrimary.Axes(2,1).AxisTitle.Characters.Text =uidoc.FieldGetText( "y_axis_data" ).ApplyDataLabels 2, True ' xlDataLabelsShowValue.HasDataTable = FalseEnd WithxlApp.ActiveSheet.Shapes("Chart 1").ScaleHeight 1.5, 0,0xlApp.ActiveSheet.Shapes("Chart 1").ScaleWidth 1.9, 0,0Exit Suberrh:ButtonHide ="yes"Resume NextEnd SubAdd the following code in the Terminate event of the code:Sub TerminateOn Error Resume NextxlApp.DisplayAlerts = FalsexlApp.Quit ' use the Quit method to closeSet xlApp = Nothing ' release the reference.666 Domino Designer 6: A Developer’s HandbookEnd SubThis example will create and add data to a spreadsheet in Excel, and create achart based on the content of the data in the cells; see Figure 14-40.Figure 14-40 Excel chart created from Notes/Domino14.10.3 New features in Domino 6There are no new enhancements in COM in Domino 6; none of the new classes,methods, or properties added for LotusScript are available in COM in Dominoversion 6.0. Check subsequent maintenance releases of Domino 6 to see if COMsupport for the features is added. However, access via OLE Automation ispossible.Chapter 14. Programming for Domino 6 66714.11 WebSphere integrationIn this section, we provide introductory information about WebSphere integrationwith Domino.

14.11.1 What is WebSphereWebSphere is infrastructure software for dynamic e-business, delivering aproven, secure, and reliable software portfolio.Providing comprehensive e-business leadership, WebSphere evolves to meetthe demands of companies faced with challenging business environments suchas the need for increasing operations efficiencies, strengthening customerloyalty, and integrating disparate systems.Leading customers toward dynamic e-business means WebSphere providesanswers to these challenging business environments. WebSphere is the onlye-business platform that can provide everything you need to build, deploy andintegrate your e-business, including Foundation & Tools, Reach & UserExperience, Business Integration and Transaction Servers & Tools.Together, these facets of the WebSphere software platform close the gapbetween business strategy and information technology, allowing you to createand operate a dynamic e-business.14.11.2 Domino and WebSphere definedLotus Domino and IBM WebSphere are premier applications servers thataddress different parts of the market. Domino is the leading collaborativeapplication server. WebSphere is a definitive Java Web Application Server(WAS), and thus it excels in tasks that require massive scalability, transactionsupport, and pure Java development model.As premier application servers, both platforms support a wide range tasks. Theyenable skilled developers to develop powerful and versatile applications. It ispossible, for example, to create rich applications in Domino 6 that rely almostexclusively on back-end data systems.Similarly, it is possible in WebSphere to create content-intensive applicationsbased on dynamic documents. Examples exist of these application types, and inmany cases, the reason for creating them this way is as simple as having thesoftware or skills in place.Real opportunity comes from utilizing tools in a way that leverages theirfundamental strengths; it is simply quicker, easier, and more robust to do it that668 Domino Designer 6: A Developer’s Handbookway. When you use most tool combinations, it is often simpler to force theapplications to fit one or the other of the tools exclusively, than to invest energyand time in the integration work required to make them work in harmony.Perhaps the best way understand the differences, and leverage the bestcapabilities of each, is to examine the strengths of Domino 6 and WebSphere.Table 14-15 highlights same essential attributes Domino and WebSphere.Table 14-15 Attributes of Domino and WebSphereFor more information about how to use Domino and WebSphere together, refer tothe IBM Redbook Domino and WebSphere Together, SG24-5955.Tip: Understanding these fundamental design points answers the basicquestion: “When do I use what in an application?Primary attribute Domino WebSphereApplication type Collaborative Integrating or TrasactiveContent type Document DataObject type Form, View, Database Servlet, JavaBean, JavaServer Page (JSP),Enterprise JavaBean(EJB)Architecture Integrated object model Java componentsScalability Large MassiveSkills required Moderate HighDevelopment model(s) BASIC, COM/COM+, Java Java (J2EE)Protocol supported HTTP, IIOP, SMTP,NNTP,IMAP/POP3,NRPC, etc.

HTTP, IIOPClients supported Notes, Browsers BrowsersApplication tools Domino Designer WebSphere Studio,VisualAge of JavaChapter 14. Programming for Domino 6 66914.12 JavaJava is one of the most important and more commonly used programminglanguage. It is cross-platform and based on the power of networks. Dominooffers you the option to write your applications in Java. Domino 6 and latersupports Java programs written in JDK 1.3 and JSDK 2.0.None of the new classes, methods, or properties added for LotusScript areavailable for Java in Domino 6.0 version. Check subsequent maintenancereleases of Domino 6 to see if Java support for the features is added.14.12.1 About Java Domino classesJava Notes classes are created by modifying some of the LotusScript Extension(LSX) architecture to include a Java “adapter” to compose the new Java Dominoclasses. The Java Domino classes have similar functions to some of theLotusScript Domino back-end objects.You can use these classes from any Java program, either within the NotesDesigner environment or outside of it, as long as Notes 6 is installed on themachine. Internally, Java Notes classes execute the same C++ code as theLotusScript Domino back-end objects, only the language syntax is different.A Java program is generally made up of a number of files. You must designateone as the Base Class, which is the starting point for the Java program. Forefficiency, typically for improving applet download speeds, you can bundle all ofthe class files and additional resources (for example GIF files) into a singlecompressed Java Archive file. The imported Java files can be of the followingtypes:_ Class - *.class_ Archive - *.jarFor example, when you write a Java agent program, the class you write mustextend the class AgentBase. The code you want to execute when the agent runsis in the NotesMain() method.To work with Java in Domino you need the Lotus Domino Toolkit forJava/CORBA 2.1. To download the toolkit:http://www.lotus.com/ldd14.12.2 Java coding conventionsThere are conventions you should follow to write a Java program, as described inthe following sections.670 Domino Designer 6: A Developer’s Handbook
ClassesThe names of the Java classes are similar to the LotusScript classes, except thatthey begin with the lotus.domino prefix. Table 14-16 illustrates how some of theJava Domino classes correspond to LotusScript objects:Table 14-16 Java classes and corresponding LotusScript objectsNote: The lotus.domino package has the same content as the Release 5lotus.notes package plus new classes, methods, and other enhancements. TheRelease 5 lotus.notes package continues to be supported for backwardscompatibility only. It does not contain the new classes, methods, and otherenhancements.By convention, start your own classes with the first character as upper case.MethodsMethod names are written with the first character being lower case (for example,getFirstDocument). Of course, there are exceptions (such as FTSearch).
PropertiesTo access properties in Java, you also have to use methods. In Java, propertiesare implemented through methods, known as accessors, which use the followingnaming conventions:_ The name of a method used to get the value of a non-boolean property is thename of the property prefixed with “get”.Java class LotusScript objectlotus.domino.Session NotesSessionlotus.domino.DbDirectory NotesDbDirectorylotus.domino.Database NotesDatabaselotus.domino.View NotesViewlotus.domino.Document NotesDocumentlotus.domino.Item NotesItemlotus.domino.RichTextItem NotesRichTextItemlotus.domino.Stream NotesStreamlotus.domino.MIMEHeader NotesMIMEHeaderImportant: Java is case-sensitive; using the wrong case causes an error.Chapter 14. Programming for Domino 6 671_ The name of a method used to set the value of a property is the name of theproperty prefixed with “set”._ The name of a method used to get the value of a boolean property is thename of the property prefixed with “is”.Parameters and return valuesParameter and return values differ from LotusScript as needed to match thedifferent data types in Java.Object Containment HierarchyIn Java, you cannot create lotus.domino objects using the “new” modifier. Alllotus.domino objects must be created with lotus.domino methods emanatingfrom the root Session object.14.12.3 Agents, applets and applicationsJava programs can take one of several forms, each with its own characteristics.The differences between these forms are summarized here.Java agents complement the familiar LotusScript agents and, to a large degree,they can be used interchangeably when dealing with back-end operations.Reasons for choosing Java over LotusScript include existing programmerknowledge, multi-threading, a more fully featured language, extensibility through(non-visual) beans, and so on.Applets allow a Notes developer to create a richer GUI environment for the enduser. Applets will be dynamically downloaded from the server and executed onthe client’s machine, and will work with either Web browsers or Notes clients.The functions of applets can vary widely, from simple news tickers to complexdatabase front-ends. Java applets are subject to the Java Sandbox securitymodel, which prevents unauthorized applets from accessing sensitive machineresources and from performing certain operations. By default, applets will nothave access to the Notes back-end classes. If this is required, then CORBA isneeded.Java applications differ from applets in that they are not dynamically loaded fromthe server; they are similar to traditional executables in this respect. However,Java applications typically run outside the Java “Sandbox” security model andcan thus access machine and network resources denied to an applet. A Javaapplication can be loosely regarded as analogous to a standalone applicationwhich accesses the Notes object model (for example, a C or Visual Basicprogram). By default, applets and applications will not have access to the Notesback-end classes. If this is required, then CORBA is needed.672 Domino Designer 6: A Developer’s HandbookThe model for Java agents differs from Java applets in a number of ways:

_ Java agents are written explicitly for Domino. Applets are often designed beserved up by any Web servers._ Java agents behave in the same way as LotusScript agents, but Java appletsbehave like Java applets in any Web-authoring environment._ Java agents only run within a Domino-supplied Java runtime environment,while Java applets run in both Domino-supplied Java runtimes andbrowser-supplied runtimes._ Java agents are structured in the same way as Java applications (not asapplets). They run within a Domino-supplied context as opposed to appletswhose context is provided in part by the browser and in part by the codebaseparameter specified as part of the applet tag.For agents, CodeBase and DocBase are not meaningful ways of getting holdof additional classes. Instead, as with other Java applications, classes andresources are located within jar files and the class path._ Java agents can access Domino databases directly by using the Java Dominoclasses. Applets can only access Domino objects within Notes using URLs.(Note that nothing precludes a Java agent from using URLs to access Dominoobjects in Notes.)Agents do not have a UI (and consequently do not use resources as much asapplets). Java Agents run in a relaxed security environment like Java applicationsdo. You can wrap an application or agent in a SecurityLoader; typically this wouldbe used in a tightly controlled secure environment when running a semi-trustedapplication. This feature is being built into JDK1.2, but can be achieved in 1.1x.14.12.4 Adding CORBACommon Object Request Broker Architecture (CORBA) is an open standarddefined by the Object Management Group (OMG). CORBA serves asmiddleware for a distributed computing environment whereby clients can invokemethods on remote APIs residing on other computers. CORBA uses InternetInter-ORB Protocol (IIOP) for communication over a TCP/IP network.CORBA/IIOP support enables Domino developers to create applets that can bedownloaded to the client and can be remotely invoked in Domino services (forexample, to initiate a workflow process).In addition, CORBA/ IIOP enables information to be processed efficiently overnetworks within an open standards-based framework and to distribute workeffectively between clients and servers, ultimately lowering the cost of ownership.Chapter 14. Programming for Domino 6 67314.12.5 Benefits of using CORBASome advantages to using CORBA are:_ You can use Domino Object Model (DOM) back-end classes to supportCORBA._ The client does not have to deal with issues such as networking or security._ CORBA allows many different clients to use the same objects (not copies ofthe objects). The latest version of the object is always used._ Client applications can be in different languages from the Server Objects._ Java ORBs and Stubs can be downloaded to the client at runtime, whichmeans:– Users do not have to install the application on the client before running it.– Clients are always working on the most current version of the application.– Network computers are supported as clients, as the application isremoved when the computer is turned off.14.12.6 How and when to use CORBACORBA support can be easily added to Java applets and applications to extendtheir reach into the Domino back end. In order to utilize CORBA, you must makesmall changes to your server and Java programs.A Java program using CORBA has the following requirements:

ServerThe server tasks HTTP and DIIOP must be running. Ensure that the notes.ini filecontains the following line:ServerTasks=<any other tasks>,http,diiopTo enable an applet for CORBA, import your applet into a form and select theappropriate properties from the applet InfoBox. (For performance reasons, whena CORBA-enabled applet is loading in the Notes client, all calls are transparentlymade to the Notes DLLs, rather than the Java classes.)14.12.7 Compiling and running a Java programThe package lotus.domino, which comes with Domino 6.0, supports local andremote calls to the Notes object interface. This package contains the sameclasses and methods as the lotus.notes package shipped with Domino R5, plusnew classes, new methods, and other enhancements.674 Domino Designer 6: A Developer’s HandbookNote: The Domino R5 lotus.notes package is supported forbackward-compatibility only.A Java program using the Domino classes has the following requirements:ServerThe server tasks HTTP and DIIOP must be running. Ensure that the notes.ini filecontains the following line:ServerTasks=<any other tasks>,http,diiopDesignerEnsure that the NOTES.INI file contains the following line:ALLOW_NOTES_PACKAGE_APPLETS=1Include NCSO.jar and Notes.jar in your CLASSPATH environment, for example:set CLASSPATH=<other>;<domino>\java\NCSO.jar;<domino>\Notes.jarNotes.jar contains the high-level lotus.domino package, the lotus.domino.localpackage for local calls, and the old lotus.notes package. NCSO.jar contains thehigh-level lotus.domino package and the lotus.domino.corba package for remotecalls. Strictly speaking, you do not need NCSO.jar if you are not compilingremote calls, and you do not need Notes.jar if you are not compiling local calls orold calls.Your class code must import the high-level lotus.domino package:import lotus.domino.*14.12.8 Runtime requirements_ A machine running a Java application that makes local Notes calls mustcontain Domino 6.0 (Client, Designer, or Server) and must include Notes.jar inthe CLASSPATH._ A machine running a Java application that makes remote Notes calls need notcontain Domino 6.0, but must contain NCSO.jar and must include NCSO.jar inthe CLASSPATH._ A machine running a Domino 6.0 agent that makes Notes (Java) calls mustinclude Notes.jar in the CLASSPATH.Note: A machine running an applet that makes Notes calls needs no Dominosoftware or CLASSPATH assignments.Chapter 14. Programming for Domino 6 675_ The server must be running when remote calls are made.14.12.9 Remote calls to lotus.domino packageIn order for a Java application to have remote runtime access to lotus.domino,you must create a Session with the NotesFactory method createSession (StringIOR, String user, String pwd).The IOR, or initial object reference, parameter is required to access a Dominoserver remotely. It is a string contained in the file diiop_ior.txt in the notesdirectory of the Domino server. The NotesFactory method getIOR(String host)returns the IOR for a given host. Use the createSessionWithIOR methods if you

have another mechanism for getting the IOR.The second and third parameters must be a user name and Internet password inthe Domino directory on the server being accessed. If empty strings arespecified, anonymous access must be permitted by the server.The application must not use the NotesThread method. NotesThread is for localaccess only.This example demonstrates an application using remote calls:import lotus.domino.*; // replaces old lotus.notes packagepublic class platform3 implements Runnable{String host=null, IOR=null, user="", pwd="";public static void main(String argv[]){if(argv.length<1){System.out.println("Supply Notes server name");return;}platform3 t = new platform3(argv);Thread nt = new Thread((Runnable)t);nt.start();}public platform3(String argv[]){host = argv[0];if(argv.length >= 2) user = argv[1];if(argv.length >= 3) pwd = argv[2];}676 Domino Designer 6: A Developer’s Handbookpublic void run(){try{IOR = NotesFactory.getIOR(host);Session s = NotesFactory.createSession(IOR,user,pwd);String p = s.getPlatform();System.out.println("Platform = " + p);}catch (Exception e){e.printStackTrace();}}}14.12.10 Applet calls to lotus.domino packageAn applet intended for run-time access of lotus.domino extends AppletBase andputs its functional code in the methods notesAppletInit(), notesAppletStart(), andnotesAppletStop().You do not have to distinguish between local and remote access. AppletBase willmake local calls if the applet is running on a machine with Domino installed, andremote calls otherwise. Domino will automatically supply the IOR.Here is an example of an applet:import lotus.domino.*;public class platformApplet extends AppletBase{java.awt.TextArea ta;public void notesAppletInit(){setLayout(null);

setSize(100,100);ta = new java.awt.TextArea();ta.setBounds(0,0,98,98);add(ta);ta.setEditable(false);setVisible(true);}public void notesAppletStart(){Session s;Chapter 14. Programming for Domino 6 677try{// Can also do openSession(user, pwd)s = this.openSession();if (s == null) { //not able to make the connection, warn userta.append("Unable to create a session with the server");return;}String p = s.getPlatform();ta.append("Platform = " + p);}catch(Exception e){e.printStackTrace();}finally{// this.closeSession(s);}}}Setting security options for Java appletsYou can now set security options for applets to prevent unauthorized access toyour Notes file system or to Notes Java classes. You create an execution controllist that identifies what people and groups you trust with access to your Notessystem.When an applet runs on your workstation, Notes checks for execution rights ofthe person or group that signed the applet. If an applet is signed by a person orgroup without the correct authorization, Notes alerts you to the illegal operation.You can abort the operation and not run the applet, or trust the signer of theapplet one time, or automatically add the signer to the execution control list.Note that this security model only applies to applets running on the Notes client.Applications running on a Web browser must follow the security model set by thebrowser.To set applet security:1. Choose File -> Security -> User Security.2. Click What Others Do and then either Using Workstation, Using Applets, orUsing JavaScript.3. (Optional) To add an item to the “When n is signed by” list, click Add, enterthe name of the person or organizational certifier, for example /Acme (click678 Domino Designer 6: A Developer’s Handbookthe person icon to choose a name from your Personal Address Book), thenclick OK. You can then decide access for that item.4. (Optional) To edit an item in the “When n is signed by” list, select the item,click Rename to edit the item or enter a new name (or click Remove to deletean item from the list), then click OK.5. Select the person or organizational certifier whose access you want to

specify.6. Enable the types of access you want this person or organizational certifier tohave.Note: The implementation of this applet security system removes the restrictionon using Notes classes in Java applets.Using the NotesThread ClassA standalone program must use the lotus.domino.NotesThread class, whichextends Java.lang.Thread. You can either extend NotesThread, or implement therun-able interface.If you extend NotesThread, the entry point to the functional code must be publicvoid runNotes(). If you implement run-able, the entry point must be public voidrun().Note the following points:_ A Domino or Domino agent program must extend the lotus.notes.AgentBaseclass, which extends lotus.domino.NotesThread. The class that contains theagent code must be public. The entry point to the functional code must bepublic void NotesMain()._ The lotus.domoino.Session class is the root of the Notes back-end objectcontainment hierarchy.– For standalone programs, use one of the NotesFactory.createSessionmethods to create a Session object.– For agents, use the AgentBase method getSession()._ System.exit must not be used to terminate a program using the NotesThreadclass (and by extension the AgentBase class). In an agent, System.exitthrows SecurityException. In a standalone program, System.exit may causecorruption problems._ For foreground agents, System.out and System.err output goes to the Javadebug console. For locally scheduled agents, System.out and System.erroutput goes to the Domino log.Chapter 14. Programming for Domino 6 67914.12.11 Creating a Java agentThe following examples show how to create Java agents.Example 1: Java agentThis example shows an agent that runs on newly created and modifieddocuments since the agent was last run. The program works on the unprocesseddocuments, prints the form name of each document, and marks each documentas processed.The first time the agent runs, it returns all of the documents in the database.Thereafter, the agent returns those documents that updateProcessedDoc hasnot touched._ Create an agent:– Name the agent.– Select When should this agent run = Manually from Actions Menu.– Which documents should it act on = All documents in database.– Select Java as your source code and write the agent code.import lotus.domino.*;import java.util.*;public class myagent extends AgentBase{public void NotesMain(){try{Session s = getSession();AgentContext ac = s.getAgentContext();DocumentCollection dc = ac.getUnprocessedDocuments();

Document doc;int size = dc.getCount();System.out.println("Count = " + size);doc = dc.getFirstDocument();while (doc != null){System.out.println(" *** " + doc.getItemValue("form"));ac.updateProcessedDoc(doc);doc = dc.getNextDocument(doc);}}catch (Exception e){680 Domino Designer 6: A Developer’s Handbooke.printStackTrace();}}}– Save it.Example 2: using Java Notes classesThis sample Java program is from Lotus Technology Learning Center. The Javacode is commented to help you understand how the Java Notes class isimplemented.This program creates an instance of NotesThread, a class which extends theJava Thread class. It allows Notes to properly initialize and terminate per threadin a convenient way for the programmer.This sample program does the follow things:1. Creates a new Notes session.2. Opens a database (in this case, the local Address Book).3. Accesses the People view.4. Searches the People view for the entered name.5. Accesses the document that matches the search criteria.6. Pulls the Spouse field out of the document.7. Prints the Spouse field in a message output.Running this sample1. Add a person John Smith and his spouse Mary Smith into the local AddressBook. John Smith will be used as a parameter to the command to run theJava program.2. Write the following code into a Java program(.java) and set your PATH andCLASSPATH, for example, as follows:PATH = c:\jdk1.1.3\bin;c:\notes\;CLASSPATH = c:\jdk1.1.3\lib\classes.zip;c:\notes\notes.jar;3. Compile the Java program.4. Type the command:Note: We used Java JDK Version 1.1.3 from Sun. You can download itfrom:www.javasoft.comChapter 14. Programming for Domino 6 681javac myjavafile.javaThe output is a file named abe.class.5. Run this class file at a DOS command prompt:C:\jdk1.1.3\bin> java abe.class John SmithExpect output similar to the following:Creating Notes session...User name = CN = John Smith OU=CAM O= LotusSpouse of John is Mary SmithDate Created : 08/15/97 16:00:00 PM EDT

The sample program is listed here for your information:/* Copyright 1997, Iris Associates, Inc.Sample Java program, for illustrative purposes only.*/import lotus.domino.*;import java.lang.*;import java.util.*;class abe implements Runnable{public String g_name;// if you run the class from the command line...public static void main(String argv[])throws Exception{// print out a message, then exit, no args providedif (argv == null || argv.length == 0)System.out.println("Usage: java abe <user name>");else{// create new instance of abeabe t = new abe();// store name to look up in the instancet.g_name = argv[0];// make sure the Notes lsx is loadedNotesThread.load(true);// create a thread instance for running abe, start itNotesThread nt = new NotesThread((Runnable)t);// start the thread, call our runNotes()nt.start();682 Domino Designer 6: A Developer’s Handbook}}// this would get called if we ran it from java.lang.Thread// insteadpublic void run(){runNotes();}public void runNotes(){int i;try{System.out.println("Creating Notes session...");Session s = NotesFactory.createSession();// show off, print the current user's nameSystem.out.println("User name = " + s.getUserName());// get db instance for the name and address dbDatabase db = s.getDatabase("","names.nsf");// find the "People" viewView view = db.getView("People");// search for the name providedview.FTSearch(g_name);// for now, ignore multiple matchesDocument doc = view.getFirstDocument();// look up contents of the "spouse" fieldString name = doc.getItemValueString("Spouse");System.out.println("Spouse of " + g_name + " is " + name);// also print out the date the document was createdSystem.out.println("Date created: " + doc.getCreated());}
catch (Exception e){e.printStackTrace();}}}Chapter 14. Programming for Domino 6 68314.12.12 Java Database Connectivity (DBC)The Domino driver for Java Database Connectivity (JDBC), providing standardJDBC access to data in Domino databases, is also available from the Lotus Website:http://www.lotus.comBy using this driver, you can write Java applets and applications that use JDBCto access information in Domino databases. JDBC classes ship with Domino inthe java.sql classes. These classes may be used when writing Java agents toaccess relational data via standard JDBC drivers.14.12.13 ServletsJava servlets, as their name suggests, only run on the server. A servlet isinvoked by a client request and will respond directly to the client.Typically, a servlet will be used to provide a high performance link to a back-endsystem and format the results back to the client as a HTML document. However,servlets are not restricted to serving just HTTP requests, and may in factconverse directly with any suitable client application (usually an applet)— a looseanalogy can be drawn to the ability in Domino to invoke an agent directly from aHTTP request (myagent?openagent¶m1=value1).Creating a servletTo create a servlet, you need a Java compiler and the servlet API. You can obtainboth from Sun Microsystem's Web site:http://java.sun.comDownload the Java Development Kit (JDK), which includes the compiler andother basic tools, and the Java Servlet Development Kit (JSDK), which includesthe servlet API specification, the servlet .JAR file (jsdk.jar), and example servlets.The Sun site also provides links to other servlet resources on the Web.You can also write servlets using any popular Java development environment,such as IBM Visual Age for Java. As a convenience, a copy of jsdk.jar is includedin the Domino server and Designer installation kits. It is identical to the filesupplied in Sun's JSDK.Sun periodically updates the JDK and JSDK. Lotus Domino Designer Release 6supports JDK 1.3 and JSDK 2.0. Domino quarterly maintenance releases(QMRs) often incorporate Sun's upgrades, so check QMR Release Notes toverify the supported JDK and JSDK versions.684 Domino Designer 6: A Developer’s HandbookYou can create a servlet that accesses Domino through the Common ObjectRequest Broker Architecture (CORBA) interface. If the servlet accesses Dominothrough the CORBA interface, it can specify a Domino user name and Internetpassword. Domino security applies to all CORBA operations.You can control who can access the servlet by using file protection documents inthe Domino Directory.Calling a servletYou can invoke directly by a URL. Domino recognizes two types of servlet URLs:1. A servlet specified by its name (for example:http://acme.com/servlet/SQLDatabaseQuery?month=june).2. A file extension that the Domino administrator has mapped to a servlet (forexample: http://acme.com/sqlquery.esp?month=june).A servlet is loaded once, and it stays loaded until the HTTP server task is shut

down or restarted. This gives servlets a significant performance advantage overagents or CGI programs.However, this also means that the servlet classes can be accessed from manyrequests simultaneously, so you must make sure that the servlet code isthread-safe.14.12.14 Java Server Page (JSP)A JSP is a dynamic HTML Web page that contains code that executesapplication logic to generate on-demand content. The HTML page is created atthe time it is requested.JSP pages are compiled into servlets; the code they contain is processed by theserver, and the result is displayed back for the Web client. For more informationon JSPs, see the Sun Microsystems Web site:http://java.sun.com/products/jsp/JSP language structureJSP technology provides a flexible structure since it supports custom tags, thusmaking this standard more extensible and improving its usability. Its structureseparates the roles of graphic designers and programmers. Based on Javatechnology, JSP is also portable, so you can “write once, run everywhere”.Chapter 14. Programming for Domino 6 685Figure 14-41 JSP code sampleFigure 14-41 illustrates JSP syntax in a simple sample, where we can highlightthe following parts:JSP tagsYou can now retrieve Domino data from an NSF database for use in a JSP tag.Designer 6 includes custom tag libraries that you can include in your Web sitedirectory files. The power of a JSP page is in the tags that it contains. JSP tagsare similar to HTML tags, except they contain a reference to Java implementationclasses rather than to instructions on how to display the tag body. This sectiondefines how to use tag libraries.A JSP tag library is a collection of custom JSP tags. The library definesdeclarative, modular functionality that can be reused by any JSP page. The tagsare defined in XML format in a text file known as the Tag Library Descriptor file orTLD.Syntax DescriptionHTML Standard HTML codeDirectives Command the JSP parserExpression Emit strings into your HTMLScriptlet Blocks of code<%@ page language=”java” %><% String theName = request.getParameter(“name“); %><html><body><h1>Hello, <%=theName%> !</h1></body></html>DirectiveHTMLScriptletExpression686 Domino Designer 6: A Developer’s HandbookIn the TLD, the tag definitions tell the JSP parser how to interpret each tag, itsattributes, and its body content. By grouping the tags into one library file, theycan be shared by several JSPs.The advantage of using Domino JSP tag libraries is that they enable Web pageauthors who are not Java experts, or who are not versed in handling back-endDomino objects, to incorporate complex, server-side Domino data manipulation

into their pages through easy-to-use tags.There are two Domino JSP tag libraries, as shown in the following table. Bothcomply to the JSP 1.1 and Java Servlet 2.2 specifications developed by SunMicrosystems.You can download the JSP 1.1 specification from:http://java.sun.com/products/jsp/download.htmlYou can download the Java Servlet 2.2 specification from:http://java.sun.com/products/servlet/download.htmlUsing Domino JSP tags with a Web application serverThe Domino JSP tag libraries are designed to let you build applications that canrun on any J2EE-compliant Web application server.To use the tags in a Web application:1. Copy the domtags.jar file, which is located in the Notes/Data/domino/javadirectory, to the WEB-INF\lib directory for the Web application.2. Copy the domtags.tld and domutil.tld files, which are also located in theNotes/Data/java directory, to the WEB-INF directory for the Web application.3. In the web.xml file for your application, define the following tag library XMLtags:<taglib><taglib-uri>domtags.tld</taglib-uri><taglib-location>/WEB-INF/domtags.tld</taglib-location></taglib>Tag library name Includesdomtags.tld Collaboration tags for accessing standard,back-end objects in the Domino data repository.domutil.tld Utility tags for performing tasks that are common toall J2EE Web containers.Chapter 14. Programming for Domino 6 687<taglib><taglib-uri>domutil.tld</taglib-uri><taglib-location>/WEB-INF/domutil.tld</taglib-location></taglib>You can also use the web.xml file to set default values for the tags listed in thetopic, “Setting default JSP Attribute values.”4. Add either of the following Domino Objects for Java JAR files to the classpathof the server hosting the Web application:– NOTES.JAR - use this if you are setting up the application for local access(Domino and the Web application server on the same machine.) Note alsothat you must either disable the HTTP task or reassign its port number,since the default for both the HTTP and DIIOPtasks is port 8080.– NCSO.JAR - use this if you are setting up the application for remote(CORBA/DIIOP) access (Domino and the Web application server ondifferent machines.)If you are using WebSphere as the Web application server, use NCSOW.JARinstead. The NCSOW.JAR file does not include the ORB (or Object RequestBroker) implementation; the ORB supplied with WebSphere is used instead toavoid conflicts during the brokering process.Let’s check this sample of using JSP tags to get some information from a Dominodatabase:Example 14-2 JSP file using JSP tags<HTML><HEAD><META http-equiv="Content-Style-Type" content="text/css"><LINK href="theme/Master.css" rel="stylesheet" type="text/css"><TITLE>domview.jsp</TITLE><%@page language="java" session="true" isThreadSafe="true"isErrorPage="false"%><%@taglib uri="WEB-INF/tlds/domtags.tld" prefix="domino"%>

</HEAD><BODY><H2>By Genre</H2><domino:view dbname="cddb2.nsf" viewname="By Genre"><TABLE border="0"><domino:viewloop><domino:ifcategoryentry><TR><TD class="category"><domino:viewitem name="Genre"/></TD></TR></domino:ifcategoryentry><domino:ifdocumententry><TR><TD></TD>688 Domino Designer 6: A Developer’s Handbook<TD><domino:formlink href="multiform.jsp"><domino:viewitemname="Album Title"/></domino:formlink></TD><TD><domino:viewitem name="Artist"/></TD></TR></domino:ifdocumententry></domino:viewloop></TABLE></domino:view><br><form action="multiform.jsp" name="newEntry"><input type="submit" value="Create New Entry"/><br></form></BODY></HTML>This example accesses a Domino database from a JSP file, through jsp tags,and displays the album title and artist name of all viewed documents. Each resultrow is a link for the specified document, and the multiform.jsp file handles theseevents if the user required that for some document. This sample also lets theuser create new documents, through the Create New Entry button.Using Domino JSP tags with WebSphere remotelyThe Domino JSP tag libraries are designed to work with any Web server thatsupports J2EE standards. This section outlines the steps required to run a tagapplication remotely with Domino Release 6 and WebSphere AES or AE (singleserver edition).1. Put the NCSOW.jar file into either:– <websphere dir>/appserver/lib/ext, if you want to run more than oneapplication that uses the custom tags– WEB-INF/lib directory of the applicationRemove Notes.jar; only one JAR file can be installed at a time.2. If you were running WebSphere and Domino from the same machinepreviously, be sure to remove the path to Domino from the machine whereWebSphere is installed.3. Make sure the Domino server is running and that the DIIOP task is running onthe server.By default, the Domino HTTP and DIIOP tasks are both assigned to portnumber 8080. Either disable the HTTP task or reassign one of the tasks to adifferent port number.Chapter 14. Programming for Domino 6 6894. Define the remote host for the tags by either:– Adding a value for the host attribute to any tags in the application that havea host attribute (these include the session, db, form, document, view thedbselect, mailto, and runagent tags).– Updating the web.xml file for the application to include a <context-param>tag that specifies values for the lotus.domino.default.host andlotus.domino.preset.host attributes, as follows:<context-param id="ContextParam_host">

<param-name>lotus.domino.default.host</param-name><param-value>DominoServerName</param-value></context-param>You assign and maintain the connection to a single host (that you define in thehost attribute) for the life of a session.Note: Do not use *webuser as the value for the default or preset user attributes.Specifying *webuser as the value for the user attribute should only be used withcontainer-based authentication and single sign-on. WebSphere AES does notsupport container-based authentication nor single sign-on with Domino.Incorporating the tag library in a JSPA JSP author tells the Java parser where to find the Tag Library Descriptor fileusing a taglib directive. The following taglib directives, when included in a JSPpage, indicate that tag libraries exist and where they are located:<%@ taglib uri="domtags.tld" prefix="domino" %><%@ taglib uri="domutil.tld" prefix="util" %>This code tells the JSP engine how to parse a page before it compiles it into aservlet. Note that the taglib directives have the following two parameters:1. uri - this specifies the name and location of the TLD file.This can be either an absolute or relative URL that refers to the TLD.2. prefix - this indicates the namespace to assign to the library.You then use this namespace in front of the tag names of tag elementsdefined in the TLD. The default namespaces for the domtags.tld anddomutil.tld libraries are domino and util, respectively. Using the defaults, youwould refer to the session tag as domino:session and the switch tag asutil:switch.Incorporating individual JSP tags in a pageJSP tags are defined in the TLD using the Extensible Markup Language (XML)format. Each tag element includes a set of attributes within its opening andclosing tags. The tag element represents a Domino object; its attributes further690 Domino Designer 6: A Developer’s Handbookdefine the object by qualifying what information it should share about itself withthe JSP page.To include a tag, follow these steps:1. In the HTML editor, after the page directives and opening <HTML> and<BODY> tags, enter the opening angle bracket of a tag(<), followed by thenamespace for the TLD containing the custom tag you want to specify(domino or util), a colon(:), then the tag name; for example:<domino:view2. Enter any attribute values you want to set for the tag by entering the attributename, followed by the equals (=) sign, then the value you want to set for theattribute, surrounded by quotation marks. For example, to specify theviewname and max attributes, enter:<domino:view viewname="View Title" max="10"Some tags attributes are required. For example, specifying a value for thename attribute of a form tag is mandatory. See the documentation providedhere to determine which attribute values must be supplied for an individualtag.3. To close the tag:– If other tags are included in the context of this tag, close the opening tagwith a closing angle bracket only (>). This indicates that this tag elementcontains other elements. After you have added the tags contained within atag element to the page, you enter a closing tag for theelement(</domino:viewloop>).This containment hierarchy of the tags helps to define the contextstructure of the data. For example, to display a Domino view element on aJSP, you use the viewloop tag. The viewloop tag contains one or more

viewitem tags within it. (Refer to the following example for the format usedto incorporate the viewloop tag.)– If no other tags are included in the context of this tag, close the tag with aslash, then a closing angle bracket (/>). This indicates that the tag elementcontains no other elements. (Refer to the following example for the formatused to incorporate the viewitem tag.)<domino:viewloop><domino:viewitem name="Customer"/></domino:viewloop>JSP limitsNote the following known limit to JavaServer Pages:_ The size of a Java byte stream cannot exceed 64 K.Chapter 14. Programming for Domino 6 691Be aware of the following point before you start developing JSPs:_ Incorporating a form into a page using the <jsp:include> tag renders anyvalidhref attributes on the form useless. You can define a validhref attribute forthe following tags: form, deletedoc, docnavimg, savedoc, saveclosedoc.14.12.15 Script librariesit’s very efficient to organize and group your code in a unique place such as ascript library, and leave it shared, so it can be used by other design elements. Inthis way you code only in one place, instead of coding in several designelements, thus reducing programming and maintenance time.There are three kind of Script libraries:_ LotusScript_ Java_ JavaScriptIn this section, we focus on the Java and JavaScript Libraries, as LotusScriptlibraries are described elsewhere.Java LibraryTo create a Java Library, follow these steps:1. Open the database in Design mode and switch to the Shared Code\ScriptLibraries pane; see Figure 14-43 on page 692.692 Domino Designer 6: A Developer’s HandbookFigure 14-42 Script libraries2. Click New Java Library. (You may also choose Create -> Design -> ScriptLibrary -> Java Library from the Action bar.) Figure 14-43 will be shown.Figure 14-43 Java script library3. Enter your code and save the library.Chapter 14. Programming for Domino 6 693To include a Java library in a Domino Java agent, do the following:1. Open your agent in design mode2. Click Edit Project (this is shown at the bottom of the Programmer’s Pane inFigure 14-43 on page 692).3. The dialog box shown in Figure 14-44 is displayed.Figure 14-44 Organize Java Agent Files dialog box4. In the Browse field, select Local File System if you want to specify some file inthe File System, or select Shared Java Libraries. The last one displays a listwith the Java libraries for you to choose.5. Select the options required, click Add/Replace File(s), and then click OK.JavaScript libraryTo create a JavaScript Library, follow these steps:1. Open the database in Design mode and switch to the Shared Code\ScriptLibraries pane; see Figure 14-45 on page 694.2. Click the New JavaScript Library button. (You may also choose Create ->Design -> Script Library -> JavaScript Library from the Action bar).
Figure 14-45 on page 694 will be shown.694 Domino Designer 6: A Developer’s HandbookFigure 14-45 JavaScript script library3. Enter your code and save the library.You can include a JavaScript library in some design elements such as Forms,Subforms and Pages. To do that, follow these steps:1. Open a page, form, or subform in Designer.2. Choose Create -> Insert Resource.3. Highlight “JavaScript libraries” and select an available JavaScript library, andthen click OK. Figure 14-46 on page 695 will be shown.Chapter 14. Programming for Domino 6 695Figure 14-46 Inserting a shared resource - javascriptThis can both be added directly on the form, and as part of the “JS Header” of theform, page or subform.
14.13 SummaryIn this chapter, we covered some basic methods for programming the DominoObject Model using LotusScript, JavaScript and Java, as well as for using COMto integrate with Microsoft applications. We also covered accessing Dominoapplications from JSP pages.696 Domino Designer 6: A Developer’s Handbook© Copyright IBM Corp. 2002. All rights reserved. 697
Chapter 15. Rich text programmingIn this chapter, we describe how to copy, create, analyze, and manipulate richtext in Notes documents.Notes and Domino 6.0 contains lots of new functionality to give you more visibilityand control of information in rich text fields than was possible in previousversions. This chapter has several examples of the practical use of these newcapabilities. All the examples presented here are available in a sample database,Notes6RichText.nsf, which is available for download on the Redbooks Web site.See Appendix B, “Additional material” on page 797 for instructions on how toobtain it.
15698 Domino Designer 6: A Developer’s Handbook
15.1 What is rich textRich text fields can contain free-form, “word processor” style information,including images, file attachments, OLE objects, font and color changes, tables,buttons, doc links and URL links, and so forth. If you need something other thanplain text, use a rich text field.For “regular” fields, the font, color, text size, paragraph indentation and spacing,tab stops, and hide settings are controlled by the form that contains the field. Thisformatting information is not stored in the document. If you edit the design of theform, and change the font for a field, when you open a document created with theprevious version of the form, the field will appear in the new font.But rich text fields don’t work that way; with them, the formatting information isstored in the document, as part of the rich text. The form establishes the defaultformatting for the field, but the user can change these settings as they edit adocument, for parts or all of the text. This can happen inadvertently, for instanceif they copy and paste text from another Notes document. When they save thedocument, their formatting is saved too. If you use Domino Designer to changethe form, it won’t affect the way rich text looks in existing documents.1

The text in a rich text field is stored in one or more paragraphs. Paragraphs aredelimited by a paragraph break (pressing the Enter key, if you’re typing). It’spossible to have a line break within a paragraph either because the text wrappedor because the user entered a line break (Shift+Enter). When text is containedwithin a table or section, it’s still composed of paragraphs. A table cell or sectionmay contain more than one paragraph.Figure 15-1 Use View / Show / Hidden Characters to see paragraph end markersIt’s helpful to think of rich text as a series of objects, which may include tables,links, sections, and a great many other things. Text is also treated as an object; asequence of consecutive characters that are in the same paragraph and use the1 Actually, depending how the user edited the text, a change on the form may affect the firstparagraph of the rich text in an existing document.Tip: Don’t hide a rich text field by setting its hide attributes on the form. Richtext has its own hide attributes, which override those on the form. Lotustechnote 179788 gives workarounds.Chapter 15. Rich text programming 699same style is referred to as a text run. Functions that let you work with rich texttend to treat this sequence of characters as a unit. For instance, if you search therich text for a string, you’ll only find the string if all of its characters are in thesame text run.2
15.2 Summary versus non-summary fieldsTo save time and space when compiling view indexes and replicating documents,Notes designates certain fields as summary fields. Only summary fields can beused in views, and the replication settings dialog lets you opt to replicate onlysummary information to your local replica.In general, all non-rich text fields are summary fields, and vice versa. This is howNotes creates the fields by default. You can change this default one document ata time using an agent and the NotesItem.IsSummary property. If rich text isflagged as a summary field, you can use @Abstract to display some of itscontents in a view. However, doing so is likely to impair performance of yourapplication. A more useful application of the IsSummary property is to set a nonrich text field to be non-summary, if you know it’ll frequently contain a lot of textand you don’t need it in views.
15.3 Rich text and the Notes APIsWith the possibility of images inside of tables inside of merged table cells insideof sections, the structures used to represent rich text are necessarily complex.The tools for working with rich text are correspondingly complex. A detaileddiscussion of this topic is beyond the scope of this guide; however, the Notes Cand C++ APIs, which you can download from the Lotus Web site, containdocumentation of the “CD Record” structure of rich text and example programsfor reading and creating rich text values.You can do much more with rich text using the APIs, the C API in particular, thanyou can with LotusScript, Java, or macro language. Some examples of thingsyou would need to use the API for are the following tasks:_ Work with images in a rich text field2 However, it’s possible to strip out the formatting and get just the plain text of the field, so that youcan search the text without text runs being an issue.Restriction: A paragraph of rich text is limited to 64K bytes. Since charactersare stored using a multi-byte character set, this will be much less than 64Kcharacters. Notes will break up too-long paragraphs into multiple paragraphs.700 Domino Designer 6: A Developer’s Handbook_ Create tables with:– Merged cells– Cells with background color or image that differs from the tablebackground color

– Hidden borders– Timing properties (cycle through rows and so forth)_ Add or delete table columns_ Add formula buttons, text pop-ups, URL links, action hotspots, embeddedelements, or computed text_ Use bulleted or numbered lists_ Adjust hide properties and formulas_ Set attributes of a collapsing section to make it automatically open or closedepending on the edit mode_ Create a form and add fields to the form and formulas to the fields (the bodyof a form is a rich text value)There are workarounds for some of this. For instance, you can create the rich textyou want using the Notes user interface, then your program can copy and modifyit as required. This is a great way to create reports in Notes, as the examples inthis chapter show. However, you can’t directly program any and all rich textwithout using the API.
15.4 New rich text capabilities in Notes 6With Notes 6, you can get much more detailed information about the contents ofa rich text field than was previously possible. You can change properties ofexisting elements (for example, change the background color of a table), and editor delete information in the middle of an existing rich text value.In Notes R5 you could create rich text only by adding to the end—you could notinsert in the middle or delete anything that was already there. You could selectfonts, colors, indentation, line spacing, and tab stops; add text, line breaks,paragraph breaks, doclinks, file attachments, and OLE objects. When readingrich text, you could get the text from the field, or scan it for file attachments orOLE objects.With Notes 6, you can also create tables and collapsing sections. You can scanthe rich text for the most common elements—text, paragraphs, font changes,style changes, links, tables, sections, and attachments. You can find outChapter 15. Rich text programming 701information about these elements—for instance, what font is being used or howmany rows are in a table.These capabilities are available in LotusScript using several new classes in theDomino object model. They are described in detail in later sections, along withthe previously existing functionality. The new capabilities are not available in Javaor COM/OLE2 in the initial Notes 6 release; they may be added in a pointrelease.Another new feature that will be helpful in many applications is the Rich Text Litefield type. While a standard rich text field lets the user add any kind of informationthey like, in many applications it’s undesirable to allow that much freedom. Ifthere’s a field where you just mean to have the user attach a single file, or add aphoto, or some other specific thing, you can restrict their input to just that andnothing else. Refer to the online help file for details about this feature.
15.5 Rich text in macro languageMacro language has no datatypes for handling complex data such as appears ina rich text field. You can’t tell, for instance, whether the rich text contains a table.But you can copy out the text and work with that, or copy a rich text value fromone document to another without knowing what’s in it. You can also getinformation about file attachments, though it’s not possible to tell whether a file isattached to a particular rich text field or to the document.3Anything more complex requires using LotusScript or Java. But the simplefunctions available through macro language do have their uses.15.5.1 Macro language functions to handle rich text

Several macro expressions can be used to refer to rich text values. Macrolanguage lacks operators for manipulating the values—you can’t concatenatetwo rich text values together, for instance. However, you can copy rich text fieldsfrom one document to another or get their text. The expressions you can use towork with rich text values include:_ @Abstract: This function produces a compacted, truncated, and abbreviatedversion of the text in a rich text field. Various arguments let you select themaximum length and the degree of compaction and abbreviation desired.@Abstract is handy when you need to use the rich text in a situation that callsfor brevity. For instance, you might use it in an agent to forward e-mail to apager or cell phone.3 An attachment is attached to the document, as opposed to a rich text field, if it’s added from aDomino Web form using the file upload control. This is sometimes called a “V2 style” attachment.702 Domino Designer 6: A Developer’s Handbook@Abstract is also useful if you must summarize rich text information fordisplay in a view column. Recall, however, that rich text by default is anon-summary field, so view formulas cannot read its value. Therecommended way to deal with this, is to create a Computed field on the formthat uses @Abstract to create the rich text synopsis as the document issaved._ @Text: New in Notes 6.0, the @Text function returns the complete text of arich text field (compare to @Abstract, which abbreviates words and reducesthe size of the text to a number of characters you specify). In earlier versions,@Text could not get information from a rich text field. As with @Abstract, youcan’t use this capability in a view column or selection formula, but it’s usefulfor agents and occasionally for form fields._ @GetDocField and @GetField can retrieve a rich text value, which you canthen assign to a different field._ @GetProfileField: If you create a profile form that contains a rich text field,you can use @GetProfileField to retrieve that value, just as you could anyother field type. Read more about profile documents in 4.13, “Profiledocuments” on page 168. This is mainly useful in providing a default value fora rich text field._ @DbLookup: If given the name of a rich text field as the final argument, thisfunction lets you retrieve a rich text value using a view key. This is mainlyuseful in providing a default value for a rich text field._ @Attachments, @AttachmentNames, @AttachmentLengths, and@AttachmentModifiedTimes let you retrieve information about fileattachments and embedded objects, which are generally in a rich text field.One OLE object will appear to be several attachments, according to thesefunctions. These functions do work in a view.You can also refer to a rich text field by name, if it’s in the current document, anduse a FIELD statement to copy the value:FIELD Comment := LongDescription; REM “Create a copy of LongDescription RTF”;A word of caution about using rich text in macro language. Depending what’s inthe rich text item, if you copy it from place to place using macro language, youNote: If you use @Text on too large a field you will get a “User defined error.”@Abstract does not have this problem.Restriction: You can’t copy file attachments, embedded objects, and fonts(other than the Notes default fonts) using macro language. LotusScript doesnot have this problem in version 6.Chapter 15. Rich text programming 703may not get all of it. File attachments and OLE objects, while they are displayedas part of the rich text, are actually stored in a separate item named $FILE. If youcopy the rich text, you’ll copy the icon of an attachment, but not the actual file.Likewise, using fonts other than the Notes default fonts requires storing some

data in a separate item called $Fonts; this will not copy over along with the richtext that uses the fonts, so the copy of the rich text will use a Notes default fontinstead.15.5.2 Working with rich text in edit modeIf you refer to a rich text item—either by name, or using @Text or @Abstract—ina document in edit mode, the information you get won’t reflect recent changesthe user has made in the field. Instead, you’ll get the value the field had when thedocument was opened. Unlike with other field types, Notes normally doesn’t“notice” the user’s edits until they try to save the document. This has to do withthe “front-end/back-end” distinction discussed in 14.2, “The Domino ObjectModel” on page 565.You can force Notes to process the user’s edits by calling the LotusScript methodNotesUIDocument.Refresh(True). This refreshes all the fields, the same as F9 orView/Refresh, and in addition updates the rich text values into the “back end”document. There is no corresponding macro language function; a normalrefresh, for example using @Command([ViewRefreshFields]), will not update richtext.Notes doesn’t let rich text changes move the other way, meaning you can’t makechanges on the “back end” of a document in edit mode and make the user’sdocument display those changes. However, the various [Edit...] @Commands letyou change the contents of the editing field directly.15.5.3 Example application: default value for rich text fieldAlthough a rich text field allows the entry of free-form information, in practice,many applications want users to enter information in a particular format: it mightbe a table that needs to be filled in, or a preferred outline structure for adocument. You can design the desired structure onto the form, but this makes theapplication inflexible. If you want to assist users instead of trying to control them,you can fill in the field with starting information that they can then modify.To do this, create a profile form and add a rich text field to the form. Refer to4.13, “Profile documents” on page 168 for a complete explanation of profile704 Domino Designer 6: A Developer’s Handbookdocuments. We have named our profile form “MasterProfile”—our own choice,not a reserved word.Figure 15-2 MasterProfile form in Domino DesignerEdit the profile document and add the starting field contents. As mentionedpreviously, non-default fonts, file attachments, and OLE objects won’t work here;you can’t copy them when you copy the field that contains them. To prevent this,in our sample database, we’ve added a validation to the Querysave event of theMasterProfile form to check for these types of data and prevent the user fromsaving them.Figure 15-3 Profile document being edited to provide default rich text valueChapter 15. Rich text programming 705In the rich text field on the Document form, use @GetProfileField in the DefaultValue formula to read the rich text field from the profile document.Figure 15-4 Document form in Domino DesignerNow, when a user composes this document, the rich text field will automaticallybe filled in with whatever rich text you’ve entered in the profile document.If you don’t care for profile documents, you can store the default value in aregular Notes document and use @DbLookup in your default formula instead of@GetProfileField. Profile documents give better performance.
15.6 Working with rich text in LotusScript and JavaMost of the new rich text functionality is available through new classes and

methods of the Domino Object Model.Certain “front-end” functions (see discussion about “front-end/back-end” in 14.2,“The Domino Object Model” on page 565) are available only when working ondocuments in edit mode, using the NotesUIDocument class. Since there is noequivalent Java class, these functions aren’t available in Java. In addition, therich text classes, methods, and properties that are new in Notes 6 are notavailable in Java in the 6.0 release. We expect these functions to be available in apoint release.In this section, we discuss the LotusScript implementation of the classes only.For those functions which are also implemented in Java, the method names andoperation are generally the same.15.6.1 The LotusScript rich text classesTable 15-1 on page 706 shows the classes available for working with rich text inthe back end, which means starting with a NotesDocument object as opposed toa NotesUIDocument.706 Domino Designer 6: A Developer’s HandbookTable 15-1 LotusScript classes for handling rich text15.6.2 Creating and appending to rich textTo create a new rich text value from scratch, or to add to an existing one, startwith a NotesDocument object. To create a new rich text item, useNotesDocument.CreateRichTextItem. To work on an existing one, useNotesDocument.FindFirstItem to locate it. If you’re not sure whether the fieldalready exists, use both methods, as shown in the code sample.Example 15-1 Locating or creating a rich text item to append to...Dim rtf As Variant‘ We think it's a NotesRichTextItem, but in case it's not, this avoids a‘ type mismatch.Class name (*=new in Notes 6) RepresentsNotesRichTextItem The entire contents of a rich text field.NotesEmbeddedObject An OLE object or file attachment within the richtext. Note: These objects can also be associatedwith the document, for example, if an attachment isadded via Domino file upload control.NotesRichTextDocLink * A doc link, view link or database link, with either anicon or link text. LotusScript doesn’t contain a wayto work with URL links.NotesRichTextParagraphStyle The settings you can make on a paragraph:indentation, line spacing, tab stops.NotesRichTextTab A single tab stop, including position and alignment.Contained in NotesRichTextParagraphStyle.NotesRichTextStyle The settings you can make on text: font, size, color,effects, and so forth.NotesRichTextTable * A table.NotesRichTextSection * A collapsing section.NotesRichTextNavigator * A position within the rich text; you can think of it asa “cursor” where you can insert or edit items.NotesRichTextRange * A consecutive subset of the rich text contents. Youcan think of it as a “selected area.”NotesColorObject * A color, which can be specified using 256 levels ofred, green and blue, or hue, lightness, andsaturation.Chapter 15. Rich text programming 707Set rtf = doc.GetFirstItem(“Comment”)If rtf Is Nothing Then ‘ the item doesn’t already exist; create it.Set rtf = doc.CreateRichTextItem(“Comment”)End If...We’ve defined the variable rtf as a Variant here, even though we know that it will

contain a NotesRichTextItem object, so that we can use it with GetFirstItem. If thefield is not a rich text field, Set rtf =... line would result in a type mismatcherror at runtime. Refer to the online help of GetFirstItem for details.Once you have the NotesRichTextItem object, you can use the methods ofNotesRichTextItem to add text and elements, and set the properties of thoseelements. The code is easy to understand, but you’re limited to those propertiesdefined in the various objects.If you need to create rich text with some attributes not provided by the classes,the easiest way is to have the rich text elsewhere, load it into your program, andappend it to the item in progress. Refer to “Adding rich text copied fromelsewhere” on page 714 for details.In the meantime, here’s what you can do using just method calls, starting with thesimplest techniques and moving forward to more and fancier rich textconstructions.Adding simple textThe most straightforward operation when appending to rich text is to add sometext to the end of the field. The following methods of NotesRichTextItem are usedfor this:_ AppendText to add text._ AddNewLine to start a new line or paragraph._ AddTab to insert a Tab character._ AddPageBreak to start a new page.The only point about these methods that’s even slightly tricky is withAddNewLine, specifically the distinction between adding a line break (the default)and a paragraph break. This corresponds to using Shift+Enter versus just Enterwhen entering rich text manually.If you’re not using any hanging indents or paragraph spacing, you’re not going tonotice the difference between a line break and a paragraph break when you viewyour output. However, you should still pay attention to which one you’re using,because you can only store 64K bytes of text in a single paragraph, and each708 Domino Designer 6: A Developer’s Handbookcharacter requires multiple bytes. If you don’t start a new paragraph occasionallyyourself, Notes will start one for you, and you might not like where it chooses todo so.The sample database contains an agent, “Rich Text Creation\1. Simple text”,which demonstrates the uses of these methods. The code is in Example 15-2.Example 15-2 Partial code of “Rich Text Creation\1. Simple text” agent...Dim doc As New NotesDocument(db) ' create a new document in memory.Call doc.ReplaceItemValue("Form", "Document")Call doc.ReplaceItemValue("Subject", "Simple rich text")Dim rtf As NotesRichTextItemSet rtf = New NotesRichTextItem(doc, "Body")Call rtf.AppendText("Here’s a new rich text field with just plain text.")Call rtf.AddNewline(1, True)Call rtf.AppendText("The beginning of a new paragraph. Now a line break.")Call rtf.AddNewline(1, False)Call rtf.AppendText("In edit mode, put the cursor on this line and press” _& ” F8. The line above also changes.")Call rtf.AddNewline(1, True)Call rtf.AppendText("A tab:")Call rtf.AddTab(1)Call rtf.AppendText("and more text, then a page break.")Call rtf.AddPageBreak( )Call rtf.AppendText("That's all, folks!")' make Notes complete cached rich text changes.Call rtf.Update( )

Dim ws As New NotesUIWorkspaceCall ws.EditDocument(True, doc)Figure 15-5 Output of “Rich Text Creation\1. Simple text” agentIn this case, the document we’re creating the rich text item in doesn’t exist ondisk. The agent creates it in memory and doesn’t save it. It assigns fields anduses NotesUIWorkspace.EditDocument to open the document in edit mode.Note the use of the NotesRichTextItem.Update method (new in Notes 6). Forefficiency, Notes caches rich text changes; before calling EditDocument, youmust force it to complete any cached updates, or your rich text changes will notChapter 15. Rich text programming 709be visible on screen. You can flush the cache either with Update, or by saving thedocument (NotesDocument.Save), or with NotesDocument.ComputeWithForm.Update is most efficient.4The call to EditDocument opens the document on screen for the user to edit. Youcan do this even though the document has never been saved; the effect is thesame as if you’d composed a new document and filled in fields for the user.EditDocument can also be used to open the document in read-only mode, even ifthe document has never been saved. This is useful for displaying a report, whereyou don’t want to let the user edit the report.Using text stylesNow let’s see how to control the appearance of the characters in your text. To dothis you need another class, NotesRichTextStyle. This class contains settings forall the text attributes, collected together into one tidy package. It was done thisway because you often make character style changes in groups—you don’t justwant italic, you want bold italic 16 point Times Roman, and you want to use thatsame combination of attributes several times. NotesRichTextStyle lets you storeall the properties together in a single variable and apply them all at once.However, if you prefer to change just one text attribute at a time, you can do thatalso. If you assign just a few properties of the style object, when you apply thatstyle, only those text properties will change. Say you want to turn italics on or offwhen you like, while keeping the font, size, or color of the text as they are. Youcould define two styles: one that adds italics to whatever style is currently ineffect, and one that turns off italics.The next example demonstrates both approaches with four style objects:_ header, used to format a section header line in a report_ normal, used for the lines within a section_ italicOn and italicOff to turn italics on and offThese four names are just what we chose to call the object variables—they’re notkeywords. You have to use the NotesRichTextStyle properties to define what theymean.Portions of the code are omitted from Example 15-3 since they are similar to theprevious example. Also, if you compare this to the previous example, you’ll noticethat here we chose to omit the keyword Call and the parenthesis around thearguments. This has no effect on how the program runs; for an explanation of the4 None of these three methods will push back-end rich text changes into a document that’s alreadyopen in edit mode.710 Domino Designer 6: A Developer’s HandbookCall keyword refer to the document “Call statement” in Domino Designer 6 Helpdatabase.Example 15-3 Partial code of “Rich Text Creation\2. Text styles” agent...Dim italicOn As NotesRichTextStyleSet italicOn = ses.CreateRichTextStyle( )italicOn.Italic = TrueDim italicOff As NotesRichTextStyleSet italicOff = ses.CreateRichTextStyle( )italicOff.Italic = False

Dim header As NotesRichTextStyleSet header = ses.CreateRichTextStyle( )Dim color As NotesColorObjectSet color = ses.CreateColorObject' find standard Notes color closest to desired color.Call color.SetRGB(153, 51, 0) ' dark reddish brown.header.Notescolor = color.NotesColorheader.Effects = EFFECTS_SHADOWheader.Fontsize = 20' use the Times New Roman font for headings.header.NotesFont = rtf.GetNotesFont("Times New Roman", True)Dim normal As NotesRichTextStyleSet normal = ses.CreateRichTextStyle( )normal.Bold = Falsenormal.Italic = Falsenormal.NotesFont = FONT_HELV‘ Don’t need GetNotesFont for the default fonts...normal.Notescolor = COLOR_BLACKnormal.FontSize = 10normal.Effects = EFFECTS_NONErtf.AppendStyle headerrtf.AppendText "Introduction"rtf.AddNewline 1, Truertf.AppendStyle normalrtf.AppendText "We are here today to discuss "rtf.AppendStyle italicOnrtf.AppendText "blog"rtf.AppendStyle italicOffrtf.AppendText "."rtf.AddNewline 1, Truertf.AppendStyle headerrtf.AppendText "What is "rtf.AppendStyle italicOnChapter 15. Rich text programming 711rtf.AppendText "blog"rtf.AppendStyle italicOffrtf.AppendText "?"rtf.AddNewline 1, Truertf.AppendStyle normalrtf.AppendText "Opinions vary. Some say it's one thing, some another. “ _& “But everybody agrees it's tasty..."...To set the color of text, use the NotesRichTextStyle.NotesColor property. Youcannot use any color you like; you must choose from among 241 standard colors(numbered from 0 to 240) in the Notes palette.To help you choose among the available colors, LotusScript gives you names forthe 16 “system” colors. For instance, in the example we use COLOR_BLACK toset the text color to black; COLOR_BLACK has value 0. You can find a table ofthese constants in the Domino Designer help database (look upNotesColorObject in the index).If you don’t want one of the 16 system colors, the NotesColorObject class canhelp you choose the palette color that’s closest to what you want. As we did inthis example, you can create a NotesColorObject variable, provide the desiredvalues for red, green, and blue levels, and use the NotesColor property to find thenumber of the palette color that’s closest to that. You can also use theNotesColorObject class to set the exact RGB color for table backgrounds andsection bars.When selecting a font for your text, you also must specify a number. You canselect the system “default” fonts by using the constant FONT_HELV for Default

Sans Serif, FONT_ROMAN for Default Serif, or FONT_COURIER for DefaultMonospace.5 If you want to use a specific font instead, you must useNotesRichTextItem.GetNotesFont to request that font be assigned a numbercode. You can then use that number code to use that font. In this example, weused GetNotesFont to ask that the “Times New Roman” font be given a number.This number will only work for the document it’s requested in. If you write anagent that processes multiple documents and creates rich text in each, you’llneed to call GetNotesFont for each document.5 It’s a little confusing that the constant names don’t match the font names very well. In Notes 4 theymatched, and the old constants were retained for backward compatibility.712 Domino Designer 6: A Developer’s HandbookFigure 15-6 Output of text style exampleSome designers take the approach of having just one NotesRichTextStyle objectand using it every time they want to change the style. The following exampleillustrates this.Example 15-4 Using a single style object for all formattingSet style = ses.CreateRichTextStyle( )style.Bold = Truertf.AppendStyle stylertf.AppendText “Report date: ”style.Bold = Falsertf.AppendStyle stylertf.AppendText Cstr(Today)Either way works; use whichever one seems best to you.Using paragraph stylesAnother style class is used to control paragraph spacing and indentation. TheNotesRichTextParagraphStyle applies to an entire paragraph of text. Because itdoesn’t make sense to apply a paragraph style change in the middle of aparagraph, Notes will automatically insert a paragraph break whenever you callNotesRichTextItem.AppendParagraphStyle. When you switch paragraph styles,use AppendParagraphStyle instead of AddNewLine.For the next example, we took the earlier “blog” example and added twoNotesRichTextParagraphStyle objects; one for section headers and one for thetext within the sections. We also still need the NotesRichTextStyle objects fromthe earlier example, to control the appearance of characters. When changingfrom header to normal text or vice versa, the program calls AppendStyle andAppendParagraphStyle. The order doesn’t matter.Example 15-5 Set paragraph style (from “Rich Text Creation\3. Paragraph styles” agent)...Dim headerPar As NotesRichTextParagraphStyleSet headerPar = ses.CreateRichTextParagraphStyle( )headerPar.SpacingAbove = SPACING_ONE_POINT_50Chapter 15. Rich text programming 713Dim normalPar As NotesRichTextParagraphStyleSet normalPar = ses.CreateRichTextParagraphStyle( )normalPar.LeftMargin = RULER_ONE_INCH * 1.5' indent normal paragraphs an extra half inch.normalPar.FirstLineLeftMargin = RULER_ONE_INCH * 1.5rtf.AppendStyle headerrtf.AppendParagraphStyle headerParrtf.AppendText "Introduction"rtf.AppendParagraphStyle normalParrtf.AppendStyle normalrtf.AppendText "We are here today to discuss "...With this you could produce a nicely formatted report. Using theNotesRichTextParagraphStyle.SetTab method, you could also set tab stops anduse these to line up columns of text.

Figure 15-7 Output of paragraph style exampleAdding doclinksTo insert a link to a Notes document, view, or database, useNotesRichTextItem.AppendDocLink. You can make the link display as an icon, oras text that you specify.There’s no way to programmatically create a URL link, popup text, or otherhotspot.For an example of adding a doclink to your rich text output, refer to , “Example:Scan for invalid doclinks” on page 720.Adding sectionsNew in Notes 6, you can programmatically add a collapsing section to your richtext. There are two calls you must make for each section:NotesRichTextItem.BeginSection and NotesRichTextItem.EndSection. Any other714 Domino Designer 6: A Developer’s Handbookthing you add in between these two calls becomes the contents of the section. Asthe example shows, it’s even possible to nest sections inside other sections.Example 15-6 Partial code of “Rich Text Creation\4. Nested sections” agent...Dim header As NotesRichTextStyleSet header = ses.CreateRichTextStyle( )header.Italic = Trueheader.NotesFont = FONT_ROMANheader.Bold = Trueheader.Fontsize = 12rtf.AppendText "Example of nested section creation"rtf.BeginSection "Dogs", headerrtf.AppendText "Here's what Science knows about dogs. There are two types."rtf.BeginSection "Big Dogs", headerrtf.AppendText "Big dogs are usually friendly."rtf.EndSection ' end of "Big Dogs"rtf.BeginSection "Yippy Dogs", headerrtf.AppendText "Little yippy dogs are aggressive and annoying."rtf.EndSection ' end of "Yippy Dogs"rtf.EndSection ' end of containing section "Dogs"rtf.AppendText "Some text to follow the section."...Figure 15-8 Output of section creation example.There’s no way to specify the indentation of the section header, as you mightwant to do when nesting sections. However, you can use aNotesRichTextParagraphStyle to indent the text inside a section (we didn’t dothat in this example).Adding rich text copied from elsewhereIf you’ve been following along with the examples, it may have occurred to you thatit’s a lot easier to create rich text that looks exactly the way you want it to bytyping it in a Notes client, instead of writing a lot of code.Chapter 15. Rich text programming 715There is a way to fetch rich text from a document or form and append it to the endof the rich text you’re building. This functionality is available in Notes R5 and later.If the rich text can be the same each time you use it, use a field in a profiledocument or other document. Use NotesDocument.GetFirstItem to get the richtext value from the profile, then NotesRichTextItem.AppendRTItem to add it toanother rich text field in a document you’re working on. This might be a good wayto create a static report header, for instance.If you need to have variable data inside the rich text, design a form that looks likewhat you want and place fields at the points where you want to add variable data.Figure 15-9 shows a form designed to serve as one row in a sales report. Tomake use of it:

_ Create a new NotesDocument object in memory. This document will never besaved to disk; it’s just to help you in creating the rich text you want. This isyour “row document;” it should not be the same document as the onecontaining the rich text field you’re writing._ Assign values to the fields that appear on the “row form.”_ Use NotesDocument.RenderToRTItem to take a “snapshot” of the row andappend it to your rich text under construction.Figure 15-9 Form used in generating a report rowThe following example demonstrates both techniques; it reads static informationfrom a profile document for a report header,6 and it uses the form in Figure 15-9repeatedly, once for each row of the report, to fill in the report data. As before,code similar to previous examples is left out.Example 15-7 Partial code of “Rich Text Creation\5 . Sales report” agent.' read report header field from profile document.Dim profile As NotesDocumentDim headerFromProfile As Variant ' rich text itemSet profile = db.GetProfileDocument("MasterProfile")Set headerFromProfile = profile.GetFirstItem("SalesReportHeader")' Insert the static report header into the RTF.rtf.AppendRTItem headerFromProfile6 The term “header” here refers to a banner appearing just once, at the beginning of the report. Printheaders, which appear on every page of a printout, are a property of the form, not part of the rich textof the document.716 Domino Designer 6: A Developer’s HandbookDim rowDoc As notesdocumentSet rowDoc = db.CreateDocument( )' temporary "row document" holds data from one report row at a time.rowDoc.ReplaceItemValue "Form", "SalesReportRow"...For i = 0 To Ubound(reportrows)...' Fill in a temporary "row document" with one row's worth of data.rowDoc.ReplaceItemValue "RegionName", rowArray(0)rowDoc.ReplaceItemValue "Sales", Clng(rowArray(1))rowDoc.ReplaceItemValue "Profitability", Clng(rowArray(2))rowDoc.ReplaceItemValue "Integrity", rowArray(3)rowDoc.ReplaceItemValue "Genius", Cdbl(rowArray(4))' Take a "snapshot" of the row document -- the rich text' representing what it would look like on screen if it were opened.' Add that snapshot to the end of the report.rowDoc.RenderToRTItem rtfNextFigure 15-10 Sales report output screenThis technique gives you a great deal of control over the appearance of your richtext. A side benefit to using this approach, besides having to write less code, isthat it lets a user without Domino Designer edit the profile document to customizethe appearance of the report header. Using advanced techniques described inthe following sections, you can also avoid the use of a “row form” and have theformat of a report row also set in the profile document.Restriction: This technique may not be appropriate for very long reports, asNotes will have trouble displaying a document with more than 1000 tables in it.Chapter 15. Rich text programming 717Adding a tableTo add a table to a rich text item, use NotesRichTextItem.AppendTable. This letsyou specify:_ The number of rows and columns (you can add or remove rows later)._ Optionally, an array of tab labels—one for each row—in case you want tomake a tabbed table._ A left indent setting for the table as a whole.

_ Optionally, an array of paragraph styles, one for each column. The left andright margin settings on these control the cell widths to create a fixed-widthtable.There are some things missing here. There’s no way to select the thickness andstyle of cell borders, nor to merge cells, to name a couple. You can select the cellbackground colors to a limited extent (we’ll see how later). This function isintended for a very basic style of table, something you might use to create areport of data in columns. If you need to get fancy, refer to the previous sectionfor a discussion of creating your table using the Notes or Designer UI andcopying it into your rich text.Adding a table is a good start, but in most cases you’ll also need to add data intothe table cells. That requires a shift from what we’ve been doing, since the newinformation is no longer being added at the end of the rich text value. To create atable and fill in values, we’ll have to reposition the cursor from its default positionat the end of the rich text, to elsewhere within the rich text, so new elements areadded somewhere other than at the end. This brings us to our next topic.15.6.3 Navigating and inserting into rich textAll the functionality discussed in this section is new in Notes 6. Notes 5 doesn’thave any way to insert or revise rich text—only append it. This section shows youhow to locate text and other elements within an existing rich text field, deletethem, change their properties, or insert text or other elements before, after, orinside them.To find elements within the rich text, use two new classes:_ NotesRichTextNavigator lets you position to a particular place in the fieldand search for elements of specified types. Think of it as a bookmark orcursor that keeps track of a spot in the rich text for you. Among other things,Restriction: Tables in Notes are limited to 255 rows. If you need more rows,you will need to create additional tables.718 Domino Designer 6: A Developer’s Handbookyou can use it to set the point in the field where things you add will beinserted._ NotesRichTextRange represents a consecutive subset of the rich text. Thinkof it as a “highlighted” area in the rich text, which you can treat as a group. Forinstance, you can delete everything in the range, or set all of it to a new font,in a single operation. This object also lets you read text from the “selected”area, and find and replace strings.While it’s helpful to think of the navigator as a sort of insertion cursor and a rangeas a selection, there’s one important difference: you can have more than onenavigator and more than one range at the same time in the same piece of richtext, all at different positions within the field.Once you have a navigator, you can use it to scan for “elements” that appear inthe rich text. You can get information about the elements you find—and changetheir attributes—by using one of the classes that describes a particular type ofelement:_ NotesRichTextDoclink describes a document, view, or database link. Itsattributes include the server, view ID, and document ID that the link is to, acomment, and the text the user clicks to activate the link._ NotesRichTextSection describes a collapsing section in the rich text. Usingthis object you can read and set the section title, header style (font, color,etcetera), and bar color._ NotesRichTextTable describes a table. You can read and set the backgroundcolor, an alternate color, and tab labels (for a tabbed table). You can chooseamong several patterns for the background and alternate color (alternatingrows, alternating columns, top row one color and the rest of the table anothercolor, and so forth). You can read the number of rows and columns, and add

and delete rows._ NotesEmbeddedObject represents an OLE object or file attachment.7 Youcan read the OLE object properties and set some of them, and with fileattachments you can detach them to disk. Unlike the other elements listed,you can access these directly from the NotesRichTextItem using theEmbeddedObjects property. The others can only be located through anavigator. You should use a navigator for embedded objects if you need tolocate them in relation to other elements in the rich text, for instance if youwant to make sure that an embedded object is the first thing in the field.Elements not listed above cannot be processed with LotusScript. There are noclasses for images, text pop-ups, URL links, or hotspot buttons, to name just afew. If you need to work with them, you’ll have to either use the API or do XML7 The NotesEmbeddedElement class ia available in Notes 5.0. The new Notes 6 functionality is theability to locate it with a NotesRichTextNavigator.Chapter 15. Rich text programming 719export and import. However, if you don’t need to locate these elements in the richtext or read their properties, but just want to create rich text that includes them,you have other choices, as described in “Adding rich text copied from elsewhere”on page 714 and “Example: Using Import to add a table” on page 737.Finding an element with a navigatorTo locate something you’re interested in within a rich text item—be it text, a table,or whatever—you first need a NotesRichTextNavigator. Use theNotesRichTextItem.CreateNavigator method to get one. A navigator is like acursor: it points somewhere within the rich text. Using its methods, you can tell itwhere you want to point, or get information about the element it’s pointing to.Table 15-2 Methods of the NotesRichTextNavigator class (new in version 6.0)Method name DescriptionFindFirstElement Moves the current position to the first element of a specifiedtype in a rich text item. The type can be one of the fourelements listed previously (doclink, section, table, orOLE/attachment), plus you can search for paragraphs, tablecells, or “text runs” (sequences of characters that share thesame character style).FindLastElement Moves the current position to the last element of a specifiedtype in a rich text item.FindNextElement Moves the current position to the next element of a specifiedtype after the current position.FindNthElement Given a counter n, sets the position to the nth occurrence of thespecified type.FindFirstString Searches for the first occurrence of a string, and positions thenavigator to the beginning of the string.FindNextString Searches for the next occurrence of a string, starting at thecurrent position, and repositions the navigator to the beginningof that string.GetElement Returns the element at the current position. The navigator mustbe positioned on one of the four element object types. Thefunction returns an object of the appropriate type.GetFirstElement Returns the first element of a specified type. This combines thefunctions of FindFirstElement and GetElement. The typespecified must be one of the four element object types.GetLastElement Same as FindLastElement plus GetElement.GetNextElement Same as FindNextElement plus GetElement.720 Domino Designer 6: A Developer’s HandbookUse GetFirstElement and GetNextElement to loop through all the rich textelements of a particular type. GetLastElement is most useful for backing up toinsert elements into a table that you just added to the end of the rich text. Theother methods are useful for positioning the endpoints of a NotesRichTextRange.Using the navigator, you can get complete information about the four objectelement types, and using those objects you can change the properties of those

rich text elements. You need the NotesRichTextRange to read text and textstyles, or find and replace text. This is covered in a later section.Example: Scan for invalid doclinksA website manager wants to be able to regularly scan a Domino database on herwebsite for doclinks that are either broken (meaning they point to something thatno longer exists), or point to servers or databases that Web browser users don’thave access to. The report lists all documents that have problem links, includes adoclink to each document, and lists which links have a problem and what theproblem is.Figure 15-11 Output of Agent “Rich Text Analysis / 1. Check for broken links”GetNthElement Same as FindNthElement plus GetElement.SetPosition Sets the current position to point to a specified element, whichmust be one of the four object element types.SetPositionAtEnd Sets the current position at the end of a specified element in arich text item. The element must be one of the four elementobject types.SetCharOffset Moves the current position forward or backward a specifiednumber of characters.Clone Creates another NotesRichTextNavigator object with the sameposition as the current one. This is different from just copyingthe reference using “Set nav2 = nav1”; the cloned copy is a newobject, not just another reference to the same object. The clonecan be changed to point to a different location from the original.Method name DescriptionChapter 15. Rich text programming 721The sample output shows that the second and third link in one document areincorrect, as is the first link in another document. If you run this agent, you’ll getdifferent results because you don’t have access to the same servers, so all linkswill appear to be broken.Example 15-8 shows how to use a NotesRichTextNavigator to find doclinks in thedocument rich text, and the NotesRichTextDoclink class to get information aboutthe objects. As before, portions of this code that are the same as previousexamples are left out. The code is modular, with two utility functions,FindDatabase and LinkIsValid, defined at the end.Example 15-8 Agent “Rich Text Analysis / 1. Check for broken links”...Dim illegalCount As LongreportTitle = "Invalid Doclink Report for " & Format(Now, "Long Date")reportBody.AppendText reportTitleDim allowedDBIDs, allowedServers' The MasterProfile profile document contains a list of' database IDs of databases to which users are allowed to link,' and a list of servers that may appear in the server hint. Use' these to check each link to determine whether it's legal.Set profile = db.GetProfileDocument("MasterProfile")allowedDBIDs = profile.GetItemValue("AllowedDBIDs")allowedServers = profile.GetItemValue("AllowedServers")Set col = db.UnprocessedDocuments ' = all docs that use the Document form.Set doc = col.GetFirstDocument( )Do Until doc Is Nothing' A link is considered illegal if the server it points to is not in our' list of servers, or if the database replica ID isn't in the' allowed list, or if the element it points to no longer exists.Set body = doc.GetFirstItem("Body")Dim firstNotice As Boolean, message As String, linkCount As LongfirstNotice = TruelinkCount = 0Set rtnav = body.CreateNavigator( )Set link = rtnav.GetFirstElement(RTELEM_TYPE_DOCLINK)

Do Until link Is NothinglinkCount = linkCount + 1message = ""Set link = rtnav.GetElement( )If Not LinkIsValid(link) Thenmessage = ", link is broken"End If' Even if link is broken, still check that it’s a legal server & DB.If Isnull(Arraygetindex(allowedServers, link.ServerHint)) Then722 Domino Designer 6: A Developer’s Handbook' disallowed serverDim tmpName As New NotesName(link.ServerHint)message=message & {, illegal server "} & tmpName.Abbreviated & {"}End IfIf Isnull(Arraygetindex(allowedDBIDs, link.DBReplicaID)) Thenmessage=message & {, illegal database "} & link.DBReplicaID & {"}Dim targetDb As NotesDatabaseSet targetDb = findDatabase(link)If Not targetDb Is Nothing Thenmessage = message & { (} & targetDb.Title & {)}End IfEnd IfIf message <> "" ThenIf firstNotice Then' first message about doc -- doublespace and give link to doc.reportBody.AddNewline 2, TruereportBody.AppendDocLink doc, doc.Subject(0)firstNotice = FalseillegalCount = illegalCount + 1Else' there's already a message about the same doc -- singlespace.reportBody.AddNewline 1, TrueEnd IfreportBody.AddTab 1reportBody.AppendText "#" & linkCount & ": " & Mid$(message, 3)End IfSet link = rtnav.GetNextElement(RTELEM_TYPE_DOCLINK)LoopSet doc = col.GetNextDocument(doc)Loop' finish report by telling how many documents had errors.reportBody.AddNewline 2, TruereportBody.AppendText illegalCount & _" documents contained invalid doclinks."...Function LinkIsValid(link As NotesRichTextDoclink) As Boolean' Given a doclink object, this function uses the properties of the' doclink to find the database, view or document that the doclink' points to. Return True if the element is found, else False.Dim targetDB As NotesDatabaseSet targetDB = FindDatabase(link)If targetDB Is Nothing Then' database was not found.LinkIsValid = FalseElse' found the database. Does the include view and document information?Dim targetDoc As NotesDocumentChapter 15. Rich text programming 723LinkIsValid = True ' until we know it's not.' if the link points to a view, make sure the view exists' (note: even if the link is to a document, it will mention the

' view the document is in and we'll make sure the view's there).On Error Goto noGoodIf link.ViewUnID <> "00000000000000000000000000000000" ThenSet targetDoc = targetdb.GetDocumentByUNID(link.ViewUnID)' will cause an error event if the doc doesn't exist.End IfIf link.DocUnID <> "00000000000000000000000000000000" ThenSet targetDoc = targetDB.GetDocumentByUNID(link.DocUnID)End IfEnd IfExit FunctionnoGood:' error trying to follow a doclink -- link is broken.LinkIsValid = FalseExit FunctionEnd FunctionFunction FindDatabase(link As NotesRichTextDoclink) As NotesDatabase' Given a doclink, find the database it points to.' If no such database, return Nothing.Static databasesById List As notesdatabase' a cache of databases sorted by ID, to not look up the same one twice.Dim key As Stringkey = link.ServerHint + ":" + link.DBReplicaIDIf Iselement(databasesById(key)) ThenSet FindDatabase = databasesById(key)ElseDim targetDB As New NotesDatabase("", "")If targetDB.OpenByReplicaID(link.ServerHint, link.DBReplicaID) ThenSet FindDatabase = targetDBElseSet FindDatabase = NothingEnd IfSet databasesById(key) = FindDatabaseEnd IfEnd FunctionThe list of valid servers and database replica IDs is stored in a profile documentfor ease of maintenance—the database manager can change the list withoutusing Domino Designer.724 Domino Designer 6: A Developer’s HandbookSince the doclink properties are read-write, it’s fairly simple to write an agent toautomatically correct an incorrect link. For instance, an agent could scan fordoclinks that point to a server that’s been retired, and change the “server hint” toa different server name. This is done by just setting the ServerHint property ofthe doclink object, and then saving the document. The sample agent “Rich TextEditing\1. Correct links to wrong server” demonstrates this.Example: Creating a table and filling in dataNow that we know how to create a navigator and set its position, we can create atable and fill in the contents by positioning to each cell in turn. Figure 15-12shows the report we’d like to create.Figure 15-12 Output of agent “Rich Text Editing\1. Fill in table“This table uses different fonts within the table cells, which is easy to do withNotesRichTextStyle. The agent also controls the widths of table columns, and thealignment of data within the cells, by specifying a NotesRichTextParagraphStylefor each column. Since there are four columns, the agent creates a four-elementarray of NotesRichTextParagraphStyle objects. The left and right margin settingscontrol the width of the cell, and you can also specify other properties; in thiscase, we chose to make the three numeric columns right-aligned.As before, portions of the code similar to earlier examples are omitted. The keypoints to note for adding data into a table are:

_ Create a NotesRichTextNavigator so you can control the text insertion point._ Use Find...Element methods to locate each table cell in turn. You can’t useGetElement here because there’s no class corresponding to a table cell, sothere’s nothing to get._ Use NotesRichTextItem.BeginInsert to start entering information into the cell._ Use NotesRichTextItem.EndInsert when done with that cell.Example 15-9 Partial code of agent “Rich Text Creation\1. Fill in table”...Dim rtf As NotesRichTextItem...' Setup text styles used in the document.Dim columnHeaderStyle As NotesRichTextStyleSet columnHeaderStyle = ses.CreateRichTextStyle( )columnHeaderStyle.Bold = TrueChapter 15. Rich text programming 725columnHeaderStyle.Fontsize = 10columnHeaderStyle.NotesFont = rtf.GetNotesFont("Gill Sans", True)Dim dataStyle As NotesRichTextStyleSet dataStyle = ses.CreateRichTextStyle( )dataStyle.Bold = FalsedataStyle.Fontsize = 10dataStyle.NotesFont = FONT_ROMAN' Define an array of paragraph styles, which will' set the width and alignment of each table column.Dim i As IntegerDim columnStyles(0 To 3) As NotesRichTextParagraphStyleFor i = 0 To 3Set columnStyles(i) = ses.CreateRichTextParagraphStylecolumnStyles(i).LeftMargin = 0 ' position relative to cell border.columnStyles(i).FirstLineLeftMargin = 0NextcolumnStyles(0).RightMargin = 3.5 * RULER_ONE_CENTIMETERcolumnStyles(1).RightMargin = 1.5 * RULER_ONE_CENTIMETERcolumnStyles(1).Alignment = ALIGN_RIGHTcolumnStyles(2).RightMargin = 2.5 * RULER_ONE_CENTIMETERcolumnStyles(2).Alignment = ALIGN_RIGHTcolumnStyles(3).RightMargin = 2 * RULER_ONE_CENTIMETERcolumnStyles(3).Alignment = ALIGN_RIGHTDim headerColor As NotesColorObjectDim dataColor As NotesColorObjectSet headerColor = ses.CreateColorObjectCall headerColor.SetRGB(198,255,148)Set dataColor = ses.CreateColorObjectCall dataColor.SetRGB(207,243,255)' fetch the fake data to use in the report....' create an empty table, 1+the number of data rows, 4 columns,' of fixed widths defined in the columnStyles array.Call rtf.AppendTable( 2 + Ubound(sampleData), 4, , , columnStyles)' create navigator to position the text insertion point within table cells.Dim nav As NotesRichTextNavigatorSet nav = rtf.CreateNavigator( )' Get an object describing the table.Dim table As NotesRichTextTablenav.FindLastElement RTELEM_TYPE_TABLESet table = nav.GetElement726 Domino Designer 6: A Developer’s Handbook' Set table to use different color for the top and left column.table.Style = TABLESTYLE_LEFTTOPtable.SetColor headerColor

table.SetAlternateColor dataColorrtf.AppendStyle columnHeaderStyle ' this will be in effect until changed.nav.FindNextElement RTELEM_TYPE_TABLECELLrtf.BeginInsert navrtf.AppendText "Sample ID"rtf.EndInsertnav.FindNextElement ' defaults to last thing searched forrtf.BeginInsert navrtf.AppendText "Density"rtf.EndInsertnav.FindNextElementrtf.BeginInsert navrtf.AppendText "Melting Point"rtf.EndInsertnav.FindNextElementrtf.BeginInsert navrtf.AppendText "Hardness"rtf.EndInsert' Next, place the data into the cells.Dim columnrtf.AppendStyle dataStyleFor i = 0 To Ubound(sampleData)column = Split(sampleData(i), ",")For k = 0 To 3nav.FindNextElementrtf.BeginInsert navrtf.AppendText(column(k))rtf.EndInsertNextNext...In an earlier example, we used a NotesColorObject to find out what Notessystem color was closest to a desired color. Here, we’re using NotesColorObjectto set the table background colors. Unlike with text, we do not have to choose acolor from the Notes palette; the table background colors are the exact RGBvalues we specified.There’s not a way to select cells and merge them, as you can in the Notes UI.However, you can “nest” a table inside of a table cell. Once you call BeginInsert,you can insert anything, including another table, in the cell. Or, you could copythe table from a profile document, as shown in the previous example “Adding richtext copied from elsewhere” on page 714, and add rows to make it the size youChapter 15. Rich text programming 727want. The sample agent “Rich Text Creation\2. Fill in copied table” demonstratesthis approach (we won’t describe it in greater detail here).Example: File attachment size limitConsider the case where a database administrator wants to limit the size of fileattachments on the Document form to 200K bytes, wants to limit attachments toa maximum of one per document, and wants to prohibit any OLE objects. Theuser will get an error when trying to save the document if they break these rules.Unlike previous examples, this is not done with an agent, but with the formQuerysave event. If not for the OLE object test, it could be done by using@AttachmentLengths in a field’s Input Validation formula.8 Using LotusScript letsus check for OLE objects, and put the cursor in the rich text field if there’s aproblem with an attachment.Figure 15-13 Output of Querysave to test file attachment sizeThe NotesRichTextItem.EmbeddedObjects property returns an array listing allattachments, OLE objects, and OLE links. The elements of this array areNotesEmbeddedObject objects. This functionality is available in Notes R5 also.Example 15-10 Querysave code on Document form.

Sub Querysave(Source As Notesuidocument, Continue As Variant)On Error Goto trapSource.Refresh True ' update rich text items in memory.Dim doc As NotesDocumentDim body As VariantDim nav As NotesRichTextNavigatorSet doc = Source.DocumentSet body = doc.GetFirstItem("Body")' The next statement will cause an error if there are no attachments.' That's OK because we trap the error and exit, allowing the save.Forall object In body.EmbeddedObjects8 Not in the Body field, however, since rich text fields don’t have validation formulas; you would haveto put it in a different field.728 Domino Designer 6: A Developer’s HandbookIf object.Type <> EMBED_ATTACHMENT ThenMsgbox "No OLE objects allowed.", 0, "Validation Failure"Continue = FalseElseif object.FileSize > 200000 ThenMsgbox "File attachment may not exceed 200KB.", 0, _"Validation Failure"Continue = FalseEnd IfEnd ForallIf Ubound(body.EmbeddedObjects) > 0 ThenMsgbox "Only one attachment per document, please.", 0, _"Validation Failure"Continue = FalseEnd IfIf Not Continue Then' put the cursor in the rich text field if it's not already there.If Source.CurrentField <> "Body" Then Source.GotoField "Body"End IfExit Subtrap: ' if validation error; Notes already printed a message, so exit.' if there are no attachments, saving is OK, so exit.Exit SubEnd SubInstead of the EmbeddedObjects property, you could use aNotesRichTextNavigator to loop through all the embedded objects andattachments. This is what we did with doclinks in the previous section. However,when working with OLE objects and attachments, using EmbeddedObjects isgenerally simpler.You have to use the NotesRichTextNavigator to locate attachments if you careabout the position of the attachment relative to other parts of the rich text. Forinstance, if you wanted to test whether an attachment was inside of a table cell,you would use a NotesRichTextRange and NotesRichTextNavigator to search thetable for it.15.6.4 Using a NotesRichTextRange to read text or limit a searchThe NotesRichTextNavigator class is useful for finding “things” within the richtext—tables, sections, attachments, and doclinks. But, to read or modify text andtext styles in the document, you need a NotesRichTextRange object. Create aNotesRichTextRange using the NotesItem.CreateRichTextRange method. Thefollowing tables list the methods and properties of the range object.Chapter 15. Rich text programming 729Table 15-3 Properties of the NotesRichTextRange class (new in version 6.0)Table 15-4 Methods of the NotesRichTextRange class (new in version 6.0)Property DescriptionType

IntegerA numeric code indicating the type of object that’sat the beginning of the range.Type returns 0 (unknown) for the “default” range(the entire field). You can’t use this to tell what’s thefirst thing in the field.StyleNotesRichTextStyleA description of how the first text in the range isformatted.TextRunStringThe text at the beginning of the range, up to the firsttext style change or paragraph break.TextParagraphStringThe text at the beginning of the range, up to the firstparagraph break.NavigatorNotesRichTextNavigatorA navigator that’s restricted to the range begin andend points. This is useful in narrowing the scope ofa search to less than the entire field.Method name DescriptionClone Make a copy of the range; returns a new NotesRichTextRangewhich you can assign to another variable. This is different frommerely copying the variable with an “=” assignment; a copymade with Clone can have different begin and end points thanthe original, whereas “=” just makes another reference to thesame object.FindAndReplace Search for text and replace it with other text. Flags let youselect case and accent sensitivity, and “replace one” versus“replace all”.Remove Deletes everything in the range.Reset Restores the range to its default start and end points (theentire rich text item).SetBegin Set the beginning point of the range to an element ornavigator.SetEnd Set the end point of the range to just before a given elementor navigator.SetStyle Change the text style of everything in the range. There’s not away to change the paragraph style of existing text.730 Domino Designer 6: A Developer’s HandbookYou don’t need a range to just test whether the rich text contains a particularword. For that, use NotesRichTextItem.GetFormattedText and search for theword you want. You also don’t need it to insert new data within the rich text, as wesaw in “Example: Creating a table and filling in data” on page 724.You do need to use a range to remove or change existing text, or to read textfrom a particular location within the field.For instance, suppose you want to find a word and replace it with a differentword, but only if it appears in a table. Use a navigator to locate the beginning ofthe table (using FindFirstElement or FindNextElement method, for instance). UseSetBegin to make that the beginning of the range. Use the navigator to locate theend of the table (SetPositionAtEnd). Use SetEnd to make that the end of therange. Then use FindAndReplace to swap one word for another.When you use NotesRichTextItem.CreateRange to create a new range, or whenyou “reset” the range with the Reset method, the range refers to the entire richtext item. However, this range doesn’t behave quite the same as a range whosebegin and end points have been specified using SetBegin and SetEnd. The Typeproperty is 0 (“range not explicitly defined”). There’s no way to get the first

element in such a range; you can only get the first element of a type that youspecify; the first text, first table, etcetera. Without any idea what’s in the field, youcannot process the contents of the entire field from front to end.Example: Search and replace textThe agent “Rich Text Editing\3 - Find and Replace Text” asks the user to enter asearch string and a replacement string, and select whether the search is case-,accent-, or pitch-sensitive. (Pitch marks are used with some Asian languages toindicate vocal tone.)Figure 15-14 Dialog from “Rich Text Editing\3 - Find and Replace Text” agentChapter 15. Rich text programming 731The agent changes all occurrences of the search string to the replacement stringin the Body field of the selected documents.Example 15-11 Agent “Rich Text Editing\3.Find and Replace Text“...Dim ses As New NotesSessionDim ws As New NotesUIWorkspaceDim db As NotesDatabaseDim dialogdoc As notesdocumentDim searchFor As String, replaceWith As String, flags As LongDim result As Integer, count As IntegerDim col As NotesDocumentCollectionDim doc As NotesDocumentDim body As NotesRichTextItemDim range As NotesRichTextRangeSet db = ses.CurrentDatabaseSet dialogdoc = db.CreateDocument( )' Display a dialog for user to enter search string and replacement string.result = ws.DialogBox("FindAndReplace", True, True, False, False, False, _False, "Search and Replace Selected Docs", dialogDoc, True)If result Then ' user pressed OK in the dialog.searchFor = dialogDoc.GetItemValue("SearchString")(0)replaceWith = dialogDoc.GetItemValue("ReplaceString")(0)flags = dialogDoc.GetItemValue("Flags")(0) Or RT_REPL_ALL' RT_REPL_ALL replaces all; default replaces only first occurrence.Set col = db.UnprocessedDocumentsSet doc = col.GetFirstDocumentDo Until doc Is NothingSet body = GetRichTextField(doc, "Body")Set range = body.CreateRangecount = range.FindAndReplace(searchFor, replaceWith, flags)If count <> 0 Then' a replacement was made.doc.Save False, False, FalseEnd IfSet doc = col.GetNextDocument(doc)LoopEnd IfExample: Change text style of certain paragraphsConsider a manual that has been stored as documents in a Notes database, andnow the content manager wants to find all the paragraphs that begin with “Note:”and italicize them.732 Domino Designer 6: A Developer’s HandbookThe agent to accomplish this task (“Rich Text Editing\4. Highlight NoteParagraphs”) uses a NotesRichTextNavigator to scan the rich text field paragraphby paragraph, finding those that begin with “Note:”. When one is found, the agentcreates a range that includes only that paragraph. It then uses SetStyle on therange to change the text to italics (leaving its other attributes unchanged).Example 15-12 Partial code of “Rich Text Editing\4. Highlight Note Paragraphs” agentDim italicsOn As NotesRichTextStyle

Set italicsOn = ses.CreateRichTextStyleitalicsOn.Italic = True...Set body = doc.GetFirstItem("Body")found = FalseSet range = body.CreateRangeSet nav = body.CreateNavigatorSet nextPar = nav.Cloneflag = nav.FindFirstElement(RTELEM_TYPE_TEXTPARAGRAPH)While flagrange.SetBegin navnextPar.SetPosition navflag = nextPar.FindNextElement(RTELEM_TYPE_TEXTPARAGRAPH)If Left(range.TextParagraph, 5) = "Note:" Thenfound = TrueIf Not flag Then' this is the last paragraph. Let our range go to the end.Set range = body.CreateRangerange.SetBegin navElse' Not the last paragraph. Set range to end at next paragraph.range.SetEnd nextParEnd Ifrange.SetStyle italicsOnEnd Ifnav.SetPosition nextParWendIf found Then doc.Save False, False, False...15.6.5 Working with rich text in edit modeAs already noted, the classes in the previous sections work only in the back end.If a document is open in edit mode, you can’t use these classes to fill in thedocument’s rich text because there’s no way to make Notes recognize that theback end rich text has changed and update it in the front end.Chapter 15. Rich text programming 733Actually, there is one way: you can save the document, close it, make yourchanges, and re-open the document in edit mode. You generally don’t want to dothis because the user might have made changes they’re not ready to save, or lefta required field blank.You can read information in edit mode using the back-end classes. To do this,you have to first tell Notes to “refresh” the rich text fields usingNotesUIDocument.Refresh(True). Refer to “Example: File attachment size limit”on page 727 for an example of this. This also has drawbacks. Refreshing adocument may make other fields change because their formulas arerecalculated, and also it will evaluate validation formulas and display validationmessages—for instance, that the user has left a required field blank—eventhough they’re not trying to save the document. You can get around this bycarefully writing your validation formulas so that they only report an error whenthe user is trying to save a document. For example, the following input validationtests whether a field is blank, but doesn’t cause a failure if the document is onlybeing recalculated. The input validation formula is for a text field on a form, not fora rich text field. You cannot write an input validation formula for a rich text field.Example 15-13 Input Validation formula that only reports errors during save@If(@IsDocBeingSaved & @ThisValue = ““;@Failure(“You must enter a value for Rate of Plummet.”);@Success)So what can you do in the front end to update rich text in a document the user is

editing? The NotesUIDocument class provides several methods that will helpwith this; shown in Table 15-5. This is not a complete list of NotesUIDocumentmethods—only those that have some use in working with rich text are shown.None of these methods are new in version 6.0.Table 15-5 Methods of NotesUIDocument (partial list)Method name DescriptionClear Erase the contents of the current field.Copy Copy the current selection to the clipboard.CreateObject Create an OLE object of a specified type.Cut Cut the current selection to the clipboard.DeselectAll Deselect the current selection.FieldAppendText Add text to the end of a specified field.734 Domino Designer 6: A Developer’s HandbookFieldClear Erase the contents of a specified field.FieldContains Test whether a specified field contains a certain string.FieldGetText Return the text that’s in a specified field.FieldSetText Replace a field’s contents with text you provide. This is notespecially good with a rich text field because you don’t get toformat the text at all, and you overwrite any formatting,tables, or other objects that were there before.FindString Find the next occurrence of a string you provide, and makesthat the current selection.GetObject If the rich text field contains an OLE object, this returns ahandle to the object. You can use this handle to send OLEcommands to the object. (Windows only)GetSelectedText Returns the text in the selected area.GotoBottom Moves the cursor to the bottom of the form. This is one wayto move the cursor to the end of your rich text field, if it’s thelast thing on the form.GotoField Move the cursor into a specified field. The cursor ends up atthe beginning of the field.Import Does the same thing as File / Import in the menu. You canspecify the type of file and filename to import. The newinformation is inserted at the current cursor position.There’s a long list of files types you can choose from, but thefollowing are especially useful for rich text:_ HTML File_ GIF Image_ JPEG Image_ Other Image formats, which are used less oftenInsertText Add text at the current cursor position.Paste Paste from clipboard.Refresh Used with an argument of True, this method copies updatedrich text information from the “front end” and makes itavailable on the “back end”.SelectAll Selects the entire contents of the current field. This willcause an error if the field is empty, which you can trap withan On Error statement.Method name DescriptionChapter 15. Rich text programming 735Of special importance are the Import, Copy, and Paste methods. These methodslet you create complex rich text information elsewhere and insert it into the richtext field in the document being edited. The other methods only let you add orchange text. The following examples address this.In addition to the LotusScript methods identified in the table, there are severalmacro commands and functions that are useful in working with rich text on thefront end. Many of them are just macro versions of the LotusScript methods.However, here are some commands that do things for which there is nocorresponding LotusScript:_ @Command( [EditInsertFileAttachment] )

_ @Command( [EditInsertPageBreak] )_ @Command( [EditInsertPopup] ) Note: You can’t supply the text of thepop-up; the user is prompted to enter it with a dialog._ @Command( [EditInsertTable] ) Note: You can’t specify the size of thetable; the user is prompted._ @Command( [EditLeft] ; count )_ @Command( [EditRight] ; count )_ @Command( [EditUp] ; count )_ @Command( [EditDown] ; count )_ @Command( [TextBold] )_ @Command( [TextItalic] )_ @Command( [TextUnderline] )_ @Command( [TextBullet] ; onOff ) makes a bullet list_ @Command( [TextNumbers] ; onOff ) makes a numbered list_ @Command( [TextCycleSpacing] )_ @Command( [TextAlign...] ) Center, Left, Right, Full, None_ @Command( [TextOutdent] )_ @Command( [TextSetFontColor] ; [ color ] )_ @Command( [TextSetFontFace] ; typeface )_ @Command( [TextSetFontSize]; size )_ @Command( [TextEnlargeFont] )_ @Command( [TextReduceFont] )_ @Command( [TextSpacing...] ) Single, Double, OneAndAHalf_ @Command( [TextNormal] )_ @FontList Provides a list of fonts available on the Notes client. You can usethis function in LotusScript with an Evaluate statement.Using these @Commands, you can write macro code that generates almostanything you want in terms of formatted text. If you can get an empty table in yourrich text, you can also use the cursor movement commands (EditLeft and therest) to place the cursor inside the table cells, then use the other @Commands toadd your text.736 Domino Designer 6: A Developer’s Handbook
Example: Using Import to add an imageThe NotesUIDocument.Import method accepts two string arguments: the filetype and file path. The “Add Picture” action on the Document form places thecursor in the rich text field and imports a “gif” image.It’s easy to import a file if you already have the file. The challenge in using theImport method is how to get the file. In this case, we created an “Image Library”view and documents in the sample database. Each document in this viewcontains a file attachment, which must be a GIF or JPEG file. When the userasks to add an image to their document, they get to choose from the image titlesdisplayed in the view.The LotusScript code then has to extract the selected image file to the user’slocal hard disk. There’s no way to directly grab an attachment and place it intothe document the user is editing; to do anything with it, you have to first store it todisk.Once it’s detached into a local file, the code uses Import to insert it at the currentposition within the rich text. It then calls “Kill” to delete the file from disk.Except for Import, there’s no way to add an image to a rich text field unless theimage was already in a rich text field waiting to be copied, or on a form that youcan convert to rich text using RenderToRTItem.Example 15-14 Code for “Import picture” actionDim ses As New NotesSessionDim ws As New NotesUIWorkspaceDim db As NotesDatabaseDim profile As NotesDocument

Dim tmppath$Dim rtf As Variant ' NotesRichTextItemDim uidoc As NotesUIDocumentSet uidoc = ws.CurrentDocumentIf uidoc.CurrentField <> "Body" ThenMsgbox "You must place the cursor in a rich text field first.", 0, _"Import picture"Exit SubEnd If' Locate profile document containing the image to import,' and the RTF that contains the file attachment.Set db = ses.CurrentDatabaseSet profile = db.GetProfileDocument("MasterProfile")Set rtf = profile.GetFirstItem("ImageAttachment")If rtf Is Nothing ThenMsgbox "Error: profile document is not initialized.", 0, "Import picture"Chapter 15. Rich text programming 737Elseif Not Isarray(rtf.EmbeddedObjects) ThenMsgbox "Error: profile document is not initialized.", 0, "Import picture"Else' There's at least one file attachment in the field.Dim attach As NotesEmbeddedObjectSet attach = rtf.EmbeddedObjects(0)' Make up a filename in the user's temp directory.tmppath = Environ("Temp") & {\} & attach.Source' Save the file attachment to temp disk file.Call attach.ExtractFile(tmppath)' Gring it into the document being edited.If Lcase(Right$(attach.Source, 4)) = ".gif" ThenCall uidoc.Import("GIF Image", tmppath)ElseCall uidoc.Import("JPEG Image", tmppath)End If' the temp file is no longer needed; delete it.Kill tmppathEnd IfExample: Using Import to add a tableIn the previous example, Import was used to bring in an existing file—we justcopied it from where it was stored as a file attachment.When you import HTML into rich text, you may sometimes have the samesituation. For instance, the Notes mail application uses Import to add your HTMLsignature file to the end of your e-mail message, if you’ve enabled this function.However, it’s often useful to create your own HTML. LotusScript has commandsto create and write to files, so you can write code to construct the HTML youneed when you need it. You write the HTML to a file, and then import the file tocreate the rich text you want.To try the example, use Create/Squeegee Report in the sample database. Thisform uses Import to display a table of randomly generated data. The tableheadings are buttons that you can click to re-sort the table according to the datain that column.Except for Import, there’s no way to add a button to a rich text field unless thebutton was already in a rich text field or on a form somewhere waiting to becopied. By importing HTML, you can create JavaScript buttons; the Notes clientcan execute JavaScript code. As in the case of this form, if you can’t do what youwant to do using just JavaScript, the JavaScript can “click” a macro code orLotusScript button on the form.738 Domino Designer 6: A Developer’s HandbookA more in-depth treatment of this technique can be found in “Rich TextProgrammability for Notes R5 Applications” published in The View magazine,

May/June 2000 issue.Example: Using Copy and Paste to add rich textAs we’ve seen in several examples in the preceding sections, you can use themethods of NotesRichTextItem, NotesRichTextNavigator andNotesRichTextRange to create some rich text in the back end. You can then usethe EditDocument method and a form such as the Report form to display that richtext to the user. However, there’s not a LotusScript command to display theback-end rich text you create in a document that’s already open in edit mode.What you can do, however, is use the clipboard to copy information from a reportand paste it into your document. The “Insert Sales Report” action in theDocument form uses macro language @PostedCommand9 to run an agent thatgenerates the desired output in a new window. The action then selects thecontents of the report window, copies to clipboard, closes the report window, andthen pastes the output into the rich text field (it assumes the cursor is already inthe field).Example 15-15 Code for “Insert Sales Report” action@PostedCommand([ToolsRunMacro]; "SalesReport");@PostedCommand([EditSelectAll]);@PostedCommand([EditCopy]);@PostedCommand([FileCloseWindow]);@PostedCommand([EditPaste])There is a disadvantage to this technique: it wipes out whatever was in theclipboard before.
15.7 Using rich text from other apps via COM/OLENotes has a COM API and an OLE API, which means that other MicrosoftWindows applications can call Notes functions to make Notes find documents,write documents, open new windows, and so on.Refer to the Domino Designer help for general information about programmingNotes using COM and OLE. For the purposes of working with rich text, the COMAPI is the same as the LotusScript classes, with one important exception: the9 We use @PostedCommand instead of @Command to make the agent run before the othercommands execute.Chapter 15. Rich text programming 739new functionality of Notes 6 will not be available via COM in the initial 6.0release. This functionality might be available in a future release of Notes 6.The OLE interface does implement the new rich text functions, however. In thefollowing Visual Basic example, we use OLE automation to locate the user’s mailfile, create a new memo, fill in the fields, add a rich text body that includes atabbed table with more tables nested inside it, and open the memo for the user toedit on-screen and send if they choose.Figure 15-15 Output of OLE memo exampleExample 15-16 Visual Basic code of OLE memo exampleSub NotesMailExample()Dim notesOLE As ObjectDim maildb As Object ' NotesDatabaseDim memo As Object ' NotesDocumentDim body As Object ' NotesRichTextItemDim tabTable As Object ' NotesRichTextTableDim nav As Object ' NotesRichTextNavigatorOn Error GoTo trapSet notesOLE = CreateObject("Notes.NotesSession")740 Domino Designer 6: A Developer’s Handbook' Lotus.NotesSession if we want to use COM.Set maildb = notesOLE.GetDatabase("", "", False)maildb.OpenMail ' locate the user’s mail database.Set memo = maildb.createDocument()

memo.ReplaceItemValue "Form", "Memo"memo.ReplaceItemValue "Subject", "Tournament Score Report: " & Format(Date,"Long Date")memo.ReplaceItemValue "BlindCopyTo", "Scores Mailing List"Set body = memo.CreateRichTextItem("Body")body.AppendText "Here are your up to the minute tournament scores!"Dim games(0 To 3) As Stringgames(0) = "Chess"games(1) = "Checkers"games(2) = "Mahjongg"games(3) = "Jacks"' Create a tabbed table with the above as the tabs.Call body.AppendTable(4, 1, games)body.UpdateSet nav = body.CreateNavigator()nav.FindFirstElement 1 ' tableDim i%, k%, n%For i = 1 To 4' find the next row of the tabbed table.nav.FindNextElement 7 ' table cellbody.BeginInsert nav ' insert text inside the table cell.body.AppendText games(i - 1) & " Scores:"' add a table inside the tabbed table.body.AppendTable 4, 4body.EndInsertnav.FindLastElement 1 ' table we just inserted.For k = 1 To 4For n = 1 To 4nav.FindNextElement 7 ' table cellbody.BeginInsert navbody.AppendText "row " & k & " col " & nbody.EndInsertNextNext' Nav position is in the last cell of the inner table.' FindNext table cell at top of loop will position to' next cell of containing tabbed table.NextDim ws As ObjectSet ws = CreateObject("Notes.NotesUIWorkspace")body.Update' open memo for user editing.ws.editdocument True, memo, FalseChapter 15. Rich text programming 741' bring new Notes window to foreground.AppActivate "Tournament Score Report"finish:Set body = NothingSet nav = NothingSet tabTable = NothingSet memo = NothingSet maildb = NothingSet ws = NothingSet ses = NothingExit Subtrap:Msgbox “Error “ & err & “ line “ & erl & “: “ & errorResume finishEnd SubIn this case, we chose to open the document on-screen. It’s also possible tocreate memos and other documents totally in the back end and send or save

them using the NotesDocument methods, without the user ever seeing them.742 Domino Designer 6: A Developer’s Handbook© Copyright IBM Corp. 2002. All rights reserved. 743
Chapter 16. XMLIn this chapter, we describe what XML is, and how Domino Designer 6 supportsXML. We also look at the ways in which you can use DXL utilities, LotusScript,and Java to handle XML in Domino applications.The purpose of this chapter is to introduce the new features available in DominoDesigner 6 relating to XML. It will not, however, cover programming for XML ingreat detail. The IBM Redbook XML Powered by Domino - How to use XML withLotus Domino, SG24-6207, presents the topic in great detail, and includesnumerous examples in LotusScript and Java.
16744 Domino Designer 6: A Developer’s Handbook
16.1 What is XMLXML stands for eXtensible Markup Language. It is similar to HTML, but unlikeHTML, which uses tags to display data, XML uses tags to describe data. InHTML, all the tags are predefined, such as <HTML>,<HEAD> and <TABLE>.XML allows you to define your own tags and your own document structure. Hereis a simple example:Example 16-1 A phonebook entry in XML<phonebook><contact><lastname>Doe</lastname><firstname>John</firstname><address>1 Medical Street, Boston, MA, 02110</address><telephone>1-555-123-4567</telephone></contact></phonebook>There are some important differences between HTML and XML. Thesedifferences are listed in Table 16-1. For XML, these are also known as rules.Table 16-1 Major differences between HTML and XMLHTML XMLTags are not case sensitive. Elements names (tags) are casesensitive.In some cases, the end tag is notrequired. For example: <P>A start tag and an end tag must bepresent. For example: <P>...</P>A tag without a slash suffices for an emptyelement. For example: <BR>Empty elements require a slash before theright bracket. For example: <BR/>Attribute values do not need to be inquotes. For example: <FONT SIZE=12>All attribute values must be in quotes. Forexample: <FONT SIZE=”12”>White space is mostly discarded whenformatting content in a browser.White space is preserved as part of thecontent, unless explicitly told not to.Tags are allowed to overlap. For example:<B>some <i>text</B></i>

Elements are not allowed to overlap. Forexample: <B>some <i>text</i></B>Isolated markup characters may be used.For example: <formula>x > y</formula>Isolated markup characters may not beused. For example:<formula> x > y</formula>Chapter 16. XML 745The rules for XML need to be strictly adhered to if you wish to generatewell-formed XML. A well-formed XML document is one that satisfies all the XMLrules, and is able to be read by an XML parser. This ensures that all XML datafollows a strict standard, and is particularly useful when integrating XML datafrom a different application.XML documents can be created with or without a document type definition(DTD). Without a DTD, XML processors can still determine whether a documentis well-formed syntactically. However, if you make use of a DTD, it is possible todetermine whether the XML document is valid or not.A valid XML document is one that has elements that conform to a specification,which it obtains from a DTD. A DTD defines the data structure of each XMLdocument. It defines the names of elements and attributes, the tree structure ofthe data, the number of elements, and any rules related to the data structure. Weusually use DTDs when we exchange data with other systems. This ensures aconsistency between two different sets of data, and allows for an easierinterpretation of the data.One of the main benefits of XML is that it can be used as a universal data format.This means that we can exchange information between systems over intranetsand the internet, making use of browsers and Java.XSL and XSLTXML itself only describes the structure of the data. When you open an XML file,the data itself is presented to you in plain text. It would be much more useful ifyou could manipulate the data and change the format of its presentation. There isan XML-based language available that allows you to change the presentation ofXML and display it in various media (for example, a Web page). It is called XSL(eXtensible Stylesheet Language). Included in XSL is XSLT (XSLTransformation). XSLT is the engine that you use to do the actual transformationfrom XML to a more presentable format.Figure 16-1 The way XML is transformed into HTMLWe can also make use of other tools to manipulate the data. XML parsersprovide application programming interfaces (APIs) to work with XML data. Themost common APIs are DOM and SAX.746 Domino Designer 6: A Developer’s Handbook
DOM APIThe Document Object Model (DOM) is an API that is used to access XML files.DOM is particularly useful when it comes to handling XML because it breaksdown the XML data and represents it as a tree object model. The root element ofthe XML data forms the root node of the tree. The remaining elements are linkedto the root, or to each other as other nodes, according to their relationship withone another. This creates a hierarchy which is easy to navigate through.SAX APISimple API for XML (SAX) is another API that can be used when working withXML files. SAX does not create a document tree; it is event driven. Each elementof the XML triggers certain events, and passes these to the event handler.SAX_StartDocument, SAX_EndDocument, SAX_StartElement, andSAX_EndElement are examples for events generated by an XML file.
16.2 XML and Domino

Domino is already a superb environment for data integration. Notes and Dominohave a very similar architecture to that of XML. They both have separate dataand presentation parts. For example, Domino stores data in structureddocuments, separate from its presentation. It retrieves a form, and the structurewithin a form, to display the document to you, with the form structure used as thepresentation part.Lotus has developed an XML language for representing Domino data. It is calledDomino XML Language (DXL). This language contains a set of elements (tags)and attributes to describe Notes documents, views, rich text, and any otherelements that can be stored in a .nsf file. DXL allows you to describe both dataand design elements.Domino Designer 6 includes some powerful tools for handling XML. These areknown as DXL Utilities. The three tools are:_ Exporter - Converts any Domino Design Element into DXL._ Viewer - Domino will display the element to you in the DXL format._ Transformer - Transformer allows you to output all of your database design orselected elements, transform them by applying a style sheet, and either sendthe output to your display screen or write it to an HTML file.These tools are available from the Tools -> DXL Utilities menu.Chapter 16. XML 747For programmers, Domino Designer 6 has included new LotusScript classes thatcan be used when working with DXL. They are:_ NotesDXLExporter class_ NotesDXLImporter class_ NotesXSLTransformer class_ NotesDOMParser class_ NotesSAXParser class_ NotesDOMAttributeNode class_ NotesDOMCDATASectionNode class_ NotesDOMCharacterDataNode_ NotesDOMCommentNode class_ NotesDOMDocumentFragmentNode class_ NotesDOMDocumentTypeNode class_ NotesDOMDocumentNode class_ NotesDOMElementNode class_ NotesDOMEntityNode class_ NotesDOMEntityReferenceNode class_ NotesDOMNamedNodeMap class_ NotesDOMNode class_ NotesDOMNodeList class_ NotesDOMNotationNode class_ NotesDOMProcessingInstructionNode class_ NotesDOMTextNode class_ NotesDOMXMLDeclNode class_ NotesNoteCollection class_ NotesSAXAttributeList class_ NotesSAXException class_ NotesStream class_ NotesXMLProcessor classImportant: To make use of the DXL utilities, you ,ust be +running InternetExplorer 5.01 or later. Check your location document to make sure yourInternet Browser field is set to “Notes with Internet Explorer” or “InternetExplorer.”748 Domino Designer 6: A Developer’s HandbookFigure 16-2 Domino objects for DXL support

Most of the existing LotusScript classes have also been enhanced with newmethods which assist in working with XML objects. These new classes areexplained in detail, with examples, later on in this chapter.You would most likely use DXL in one of three ways:1. To export XML data from Domino databases into other applications ordatabases2. To modify data in a Domino database by exporting DXL, making changes,and then reimporting the data back into Domino3. To import XML data from external databases or applications into DominodatabasesLotus Domino Designer includes the LotusXSL processor in the product so youcan parse and transform XML data without a separate download.To create and process Domino data expressed as DXL, use:_ NotesDXLExporter to generate DXL_ NotesDXLImporter to process DXL dataUse industry-standard tools to:_ Transform DXL data through XSLT with the NotesXSLTransformer classChapter 16. XML 749_ Parse XML data into a standard DOM tree structure with theNotesDOMParser class_ Parse XML data as a series of events with the NotesSAXParser classThe XML Processor class is a base class that contains the properties andmethods common to all XML processing classes.Use these “helper” classes to:_ Stream XML to or from a memory buffer or file with the NotesStream class._ Build subsets of notes to export with the NotesNoteCollection class inconjunction with NotesDXLExporter.
16.3 Basic XML use in Domino DesignerDomino, by nature, is an excellent tool for storing documents of structured andunstructured information; the security, directory, and application developmentfeatures found in Domino make it a very effective tool for storing and generatingXML.There are some very simple ways of developing Domino elements that displayXML. However, as with most simple methods, there are certain disadvantages tousing them. The main disadvantage is inflexibility, since your XML will be hardcoded into your forms, views, or pages. This would be relatively difficult tochange.16.3.1 XML for forms, views, or pagesFormsA relatively easy method of transforming Domino data to XML is to create a formthat contains fields you want to convert to XML data, then add tags on either sideof the field that will be interpreted as XML.750 Domino Designer 6: A Developer’s HandbookFigure 16-3 A simple form containing XML tagsFigure 16-4 The settings required for forms containing XMLNote: In order for the form to be recognized as XML in your browser, theform’s Default property - Content type must be set to HTML, and the “Renderpass through HTML in Notes” option on the Form info tab must be selected.Otherwise the form will be rendered incorrectly! Figure 16-4 shows thepertinent settings.Chapter 16. XML 751The main disadvantage of using this method is the future inflexibility andmaintenance that you would be faced with. Since the XML elements arehard-coded and directly associated with field names on the form, changing thefield name on the form or associating a field with another XML element becomes

confusing and difficult, especially if you're using a large number of forms togenerate XML.A more flexible solution is to build agents that run on a regular schedule or whena form is opened via the form WebQueryOpen event to generate XML on the fly.While this requires more work on the front-end, the agents themselves canprovide automatic XML generation tools based on form data. These agents canbe written in LotusScript or Java, as seen in examples later on in this chapter.Views and pagesThere are occasions when we must be able to represent many documents inXML. In Domino there are many ways to generate representations of multipledocuments. The easiest way is to create a view that contains the documents thatyou want to generate as XML. Once the view is created, there are several waysto create XML data out of the view columns. We examine these ways in thissection.The easiest way to convert your view into XML is to use the built-in?ReadViewEntries URL command. This requires no programming. This optionhowever, is the least flexible, and will only be meaningful if an XML parser is usedto receive the data. Parsers are described in more detail later on in this chapter.To use this command, simply type the following in your Web browser:http://your_server/your_database.nsf/view_name?ReadViewEntries752 Domino Designer 6: A Developer’s HandbookFigure 16-5 The ?ReadViewEntries URL commandThe ?ReadViewEntries URL command also has a number of useful argumentsthat we can append to the URL if required. These arguments are:_ Collapse= n_ CollapseView_ Expand= n_ ExpandView_ KeyType= text|time_ PreFormat_ ResortAscending= column number_ ResortDescending= column number_ RestrictToCategory= category_ Start= n_ StartKey= string_ UntilKey= stringChapter 16. XML 753For example, the following URL displays only the second entry:http://127.0.0.1/phonebook.nsf/XML?ReadViewEntries&Start=2For more information on the use of these commands, as well as severalexamples, refer to the Domino Designer online help.Another method of producing XML using a view, is to map the XML tags to thecolumns in the view. Once you have created a view and mapped the XML tags toit, you embed the view into a page. A view embedded into a page maintains thesame functionality on the Web as a view in a Notes client application, and allowsyou to control the size and appearance of the view display. For views displayingXML, the page contains the XML declaration and root element.To map XML to a view, do the following:1. Create a view and open it.2. Select Edit -> Properties to open the View Properties box.3. Click the Advanced tab.4. In the Web Access section, select “Treat view contents as HTML.” Dominogenerates HTML for the contents of a view if this property is not selected. Inaddition, the content of a view that is embedded into a page is not visible ifthis property is not selected. The correct setting is shown in Figure 16-6.Figure 16-6 The Advanced properties for a view

5. Click “View Selection” on the Objects tab and add a selection formula todefine which documents will be included in the view. For our example,documents are selected for the view using the following formula:SELECT @All754 Domino Designer 6: A Developer’s Handbook6. Click “Form Formula” on the Objects tab and enter a formula that selects yourtemplate form.SELECT Form = "XML"7. Add columns to the view.8. Click the first column of the view.9. Enter a formula for Column Value in the Script area using the following syntax:"<PARENT><CHILD>"+fieldname+"<\CHILD>"Our example looked like this:"<contact><lastname>"+lastname+"</lastname>"If you have more than one element for any column, add a semicolon (;) at theend of the first column formula and add the column formula for the nextelement below it."<PARENT><CHILD>"+fieldname+"<\CHILD>";"<CHILD>"+fieldname+"<\CHILD>";"<CHILD>"+fieldname+"<\CHILD>"Tip: Use the following syntax to make a field an attribute of an element:"<CHILD attributeName=\""+fieldname+"\">"+fieldname2+"</CHILD>10.Click the second column and type a column formula into the Script area usingthe following syntax:"<CHILD>"+fieldname+"<\CHILD>"For example:"<firstname>"+firstname+"</firstname>"11.Repeat Step 10 for each XML element except the last one.12.For the last child element, use the following syntax:"<LASTCHILD>"+fieldname+"<\LASTCHILD></PARENT>"For example:"<telephone>"+telephone+"</telephone></contact>"Once you have set up your view, you have to create a page into which you willembed the view.1. Open or create a page.2. Select Design -> Page Properties.3. Click the Page Info tab.4. In Web Access, select “Treat page contents as HTML,” and close the Pageproperties box. See Figure 16-7.Chapter 16. XML 755Figure 16-7 The Page info properties for our XML page5. Type an XML declaration above the place where you want the embedded viewto display, for example:<?xml version=”1.0” encoding=”UTF-8” ?>6. Type the root tag below the XML declaration, for example:<phonebook>7. Place the cursor where you want the embedded view to display.8. Select Create -> Embedded Element -> View.9. (Optional) If you don't want to display the same view in all circumstances, click“Choose a View based on a formula.” When you click OK to close the dialogbox, write a formula in the Programmer's pane to display the appropriate view.10.Choose the view you wish to embed and click OK to embed it.11.Click the embedded view and select Element -> View Properties. On the Infotab, ensure that under Web access, “Using View’s display property” isselected. See Figure 16-8. If you wish to change the alignment or style, orhide the element under certain conditions, change the relevant Pageproperties.

Figure 16-8 The Embedded View properties756 Domino Designer 6: A Developer’s Handbook12.Type a close root tag below the view, for example:</phonebook>Once these steps have been followed, your view in Internet Explorer should looklike the screen shown in Figure 16-9.Figure 16-9 The page displaying XML from a viewStyle sheetsSince the XML file only describes the data, we need to apply a stylesheet todisplay the data in a more meaningful format. In Domino, we can use either XSLor CSS (Cascading Style Sheets) to transform the data. Example 16-2 is anexample of an XSL stylesheet.Example 16-2 A simple XSL stylesheet<?xml version="1.0"?><!--This line is for IE only--><xsl:stylesheet xmlns:xsl="http://www.w3.org/TR/WD-xsl">Note: A second contact has been added to the example to better illustrate theview.Chapter 16. XML 757<!--root node--><xsl:template match="/" ><!--This line sets the table border to 3 pixels, inset, black--><TABLE STYLE="border:3px inset black"><!--The first row of the table. The font of the text in this row is set 10point, boldface, Verdana, and the background color of the row to light grey.--><TR STYLE="font-size:10pt; background-color: lightgrey; font-family:Verdana;font-weight:bold"><!--This is the text that will appear in the first cell of the first row of thetable. All of the cells in this row will have the attributes defined in theline above.--><TD>Last Name</TD><!--This is the text that will appear in the second cell of the first row ofthe table--><TD>First Name</TD><!--This is the text that will appear in the third cell of the first row of thetable.--><TD>Address</TD><!--This is the text that will appear in the fourth cell of the first row ofthe table.--><TD>Telephone</TD><!--The end of the first row in the table.--></TR><!--This line applies the defined style to the data in each child elementcontained by the root element <phonebook> and the parent element <contact>,then puts it in the table in order by part name. Note that order-by is not thefield name, but the XML tag that is associated with the field.--><xsl:for-each select="phonebook/contact"><!--The second row and subsequent rows of the table. The font is set toVerdana, 10 point. The cell padding is set to 0 pixels and 6 pixels.--><TR STYLE="font-family:Verdana; font-size:10pt; padding:0px 6px"><!--The data contained by the <lastname> tag will be placed in the firstcolumn.--><TD><xsl:value-of select="lastname" /></TD><!--The data contained by the <firstname> tag will be placed in the secondcolumn.--><TD><xsl:value-of select="firstname" /></TD>758 Domino Designer 6: A Developer’s Handbook<!--The data contained by the <address> tag will be placed in the thirdcolumn.--><TD><xsl:value-of select="address" /></TD>

<!--The data contained by the <telephone> tag will be placed in the fourthcolumn.--><TD><xsl:value-of select="telephone" /></TD><!--This line ends each row of the table. Note that a third row, fourth row,and so on will be created until all of the data has been rendered.--></TR></xsl:for-each></TABLE></xsl:template></xsl:stylesheet>To use an XSL stylesheet in a Domino application:1. Create a new page.2. Choose Design -> Page Properties.3. Enter a name with the extension XSL in the Name field, for example:phonebookentries.xsl4. Ensure that under Web Access, Content type is set to HTML.5. Write your own stylesheet, or copy the phonebookentries code inExample 16-2 into the XML Example database.6. Save the page with an XSL extension.7. Create a LotusScript or JavaScript agent to access the XML and apply thestylesheet programmatically.Applying a stylesheet using JavaScriptIn order to access the XSL we created, we use LotusScript or JavaScript. Thenext example shows how to access the XSL stylesheet to access XML withclient-side JavaScript:1. Create a new page.2. Choose Design -> Page Properties.Chapter 16. XML 7593. Type JavaScriptXML in the Name field.4. Click the Page Info tab and verify that "Web Access: Content type: HTML" isnot selected.5. Type the following division tags on the page where you want your data todisplay:<div id="HTMLresults"></div>6. Highlight the <div id="HTMLresults"></div> tags and click Text -> Pass-ThruHTML. The tags will appear with a grey background indicating that they aremarked as pass-thru HTML.7. Optionally, add HTML Head Content.8. Click JSHeader and type or paste the JavaScript in Example 16-3 into theScript area.Example 16-3 JavaScript example to access XML in Dominovar HTMLresults;var source;var style;//Defines loadXML() as a function.function loadXML() {//Creates a new ActiveXObject called source which is the//Microsoft.XMLDOM parser.source = new ActiveXObject("Microsoft.XMLDOM");//Creates a new ActiveXObject called style which is the//Microsoft.XMLDOM parser that is installed with IE 5.5.//This object will be used to apply the stylesheet to the XML.style = new ActiveXObject("Microsoft.XMLDOM");source.async = false;style.async = false;//Sets the validateOnParse property to false.source.validateOnParse = false;//Loads the GetParts page into the parser using

//the openPage URL command.source.load("http://localhost/phonebook.nsf/Xpage?openPage");Note: HTMLresults is an attribute that is used in the JSHeader objectdescribed below.760 Domino Designer 6: A Developer’s Handbook//Loads the phonebookentries.xsl stylesheet into the//parser using the openPage URL command.style.load("http://localhost/phonebook.nsf/phonebookentries.xsl?OpenPage");//Error handler. If there is an error, call the//showError() function.if(source.parseError.errorCode != 0) {showError();}//If there is no error, call the doTransform() function.doTransform();}//Defines doTransform() as a function.function doTransform() {//If the getReadyState() function returns true,//then transform the node using the//stylesheet and put the results inside the tags with//the HTMLresults attribute.if (getReadyState()){resulting = source.transformNode(style);document.all.item("HTMLresults").innerHTML = resulting;}//If the getReadyState() function doesn't return//true, then refresh.self.refresh;}//Defines the getReadyState function.function getReadyState() {alert("ready state: " + source.readyState);if (source.readyState == 4) {return true;}setTimeout("getReadyState()", 100);}//Defines the showError() function.function showError() {var strError = new String;var err = source.parseError;strError = 'Error!\n' +'file url: '+err.url +' \n'+'line no.:'+err.line +'\n'+'char: '+ err.linepos + '\n' +'source: '+err.srcText+'\n'+'code: '+err.errorCode+'\n'+Chapter 16. XML 761'description: '+err.reason+'\n';document.all.item("HTMLresults").innerHTML = strError;}9. In the OnLoad event, type or paste the following JavaScript://Calls the loadXML() function when the page is//loaded into the browser.loadXML();10.Save the page.11.Choose Design -> Preview In Web Browser -> Internet Explorer.The XSL file should have transformed your XML data to look like Figure 16-10.Figure 16-10 XML data transformed by the XSL stylesheet

16.4 XML tools (DXL Utilities)Domino Designer 6 now has an easy way to work with XML in your applications.The DXL Utilities are available from the Tools menu in Designer. Using thesetools, you can simply choose the elements you wish to export, view, or transformwith only a few clicks of your mouse. Domino then handles the elementsaccording to your selection.Note: You are able to preview this page directly in Internet Explorer 5.5because the XML in the GetParts page is being accessed programmaticallyvia JavaScript.762 Domino Designer 6: A Developer’s Handbook
16.4.1 ExporterPossibly the easiest way to transform a Domino Designer element into DXL is touse the Export utility. To use this, you need to have Domino Designer 6 open.1. Select one or more design elements in the design pane.2. Choose Tools -> DXL Utilities -> Exporter. The dialog box in Figure 16-11 isdisplayed.Figure 16-11 DXL Exporter dialog box3. Enter a file name and path for the XML file and click Save. You can save youfile either as an XML file or as a DXL file.You can now go to the file that was created and edit or view the contents with anytext editor.16.4.2 ViewerThe Viewer allows you to see any element that you select in the DXL format.Toview the Design elements as DXL, do the following:1. Check your location document to make sure your Internet Browser field is setto “Notes with Internet Explorer” or “Internet Explorer.”2. Select one or more design element in the design pane.3. Choose Tools -> DXL Utilities -> Viewer.Note: Using these features requires Internet Explorer version 5.01 or later.Chapter 16. XML 763The DXL will be displayed in your Notes client or in Internet Explorer, dependingon your Notes browser setting.16.4.3 TransformerThe Transformer utility allows you to take an existing DXL file and transform itusing an XSL file. This gives you the ability to apply styles and formats tocustomize the data so that it will be more meaningful to you.Before you can transform your DXL, you will need to have an XSL file availablewhich contains the tags that make up a design element.1. Select one or more design elements in the design pane.2. Choose Tools -> DXL Utilities -> Transformer.3. Select the name of an XSL file to use for transforming the XML.Designer ships with some sample XSL files that you can select, or you canbrowse the file system to select another XSL file.4. Choose a type of output. Either select screen for a screen display, or specifyan output file name.Figure 16-12 The DXL Transformer dialog box
16.5 XML and LotusScriptAs we mentioned earlier, one of the biggest disadvantages of hard-coding XMLin Domino is its inflexibility. However, we can get the same results764 Domino Designer 6: A Developer’s Handbookprogrammatically. Agents can be set to run on a schedule, based on an event, orin response to a URL command. This kind of flexibility is necessary to createautomated XML applications.

16.5.1 LotusScript agentsExample 16-4 is an agent that retrieves each document in a view called XML,creates XML from the content, and prints the output when opened in a browser.Example 16-4 LotusScript that converts a view to XMLDim s As New NotesSessionDim db As NotesDatabaseDim doc As NotesDocumentDim view As NotesViewSet db = s.currentDatabaseSet view = db.GetView( "XML" )Set doc = view.GetFirstDocumentPrint "Content-type: text/xml"'Prevents Domino from sending default headers.Print "<phonebook>"'phonebook is the root element of the XML document.While Not ( doc Is Nothing )'Loop as long as there are document objects available.Print "<contact>"'Send the parent element for each book document.Print "<lastname>"+doc.lastname(0)+"</lastname>"Print "<firstname>"+doc.firstname(0)+"</firstname>"Print "<address>"+doc.address(0)+"</address>"Print "<telephone>"+doc.telephone(0)+"</telephone>"Print "</contact>"'Close the contact element tag.Set doc = view.GetNextDocument( doc )'Get the next document in the view.WendPrint "</phonebook>"'Closes the root element.The results of running the LotusScript in Example 16-4 are displayed inFigure 16-13.Chapter 16. XML 765Figure 16-13 Using a LotusScript agent to display XML from a viewThere are times when it would be preferable to generate your XML tags on the fly.This means that to add a new element to a form or remove an existing elementfrom a form, the developer would only have to add or delete a field. The agent inExample 16-5 will take the form, and automatically generate XML tags for eachfield on the form.Example 16-5 An agent that creates XML tags on the flySub InitializeDim session As NotesSessionSet session = New NotesSessionDim doc As NotesDocumentSet doc = session.DocumentContextAllFields_LotusScript=""Forall i In doc.ItemsIf ( Instr( i.name, "$" ) = 0 ) ThenAllFields_LotusScript = AllFields_LotusScript + "<" + i.name+">"+i.text + "</" + i.name+">"+Chr(13)End IfEnd Foralldoc.AllFields_LotusScript=AllFields_LotusScriptEnd SubThis agent also removes the $ character from any field names since thischaracter is not allowed in XML element names.766 Domino Designer 6: A Developer’s HandbookYou are also required to hide the actual fields from the Web, and the declarationand root element should be hidden from Notes.

Figure 16-14 The form and settings required to generate XML correctlyCalling this agent from the WebQueryOpen event for your form, you should getthe results shown in Figure 16-15 when the document is opened via yourbrowser.Note: Remember to have the form’s content type set to HTML.SeeFigure 16-4 on page 750.This should be hiddenfrom Notes R4.6 or later.This must be hidden fromWeb browsers.Ensure that you hide therelevant fields from thedifferent clients.Chapter 16. XML 767Figure 16-15 XML that was generated on the fly16.5.2 New support for DXLDomino Designer 6 now comes with built-in support for DXLs. In this section wediscuss the new classes for LotusScript that are included, and give an example ofhow each of the main classes is used.Domino Designer 6 also allows pipelining when using NotesDXLExporter,NotesDXLImporter, and NotesXSLTransformer. You construct a pipeline byspecifying one object as the input to another object, which can be the input to athird object, and so on. The Process method of the first object in the pipelineinitiates processing for all the objects. The following pipeline segments areallowed:_ NotesDXLExporter to NotesXSLTransformer_ NotesDXLExporter to NotesDXLImporter_ NotesXSLTransformer to NotesXSLTransformer_ NotesXSLTransformer to NotesDXLExporterExample 16-6 is a simple example.768 Domino Designer 6: A Developer’s HandbookExample 16-6 A pipelining exampleSet exporter = session.CreateDXLExporter(inputDoc) 1Set importer = session.CreateDXLImporter(exporter) 2exporter.Process 31 The XML “pipe” feature makes it unnecessary to specify the SAX parser as theoutput object here.2 Specifying the exporter as the input to the SAX parser makes the SAX parserthe output of the exporter.3 This initiates both the export and the SAX-parsing operations.NotesDXLExporter classConverting a Designer element to DXL programmatically is much easier nowusing the new NotesDXLExporter class for LotusScript. This class is used in thefollowing way:1. Use CreateDXLExporter in NotesSession to create a NotesDXLExporterobject.2. If you do not specify the input parameter, use SetInput to specify the inputDomino data. If you do not specify the output parameter, use SetOutput tospecify the output DXL data. You can also use these methods to override theCreateDXLExporter parameters.3. Finally, call Process to initiate a conversion.The following example creates an agent that is accessible via the Notes clientthat will convert any select documents to DXL. This can be especially useful ifyou need to convert numerous documents at once. In order for this example towork correctly, a couple of steps need to taken beforehand:1. Create a directory on your C:\ drive called DXL (you may also change the

filename$ value in the agent’s code to reflect a different directory).2. Create an empty text file with the name your_database.xml. For example, wecreated phonebook.xml.This can be done using NotePad or any other texteditor.3. Copy the Domino DTD file (called domino.dtd) from your Notes directory tothe C:\DXL directory (or whatever you chose to call your directory).Chapter 16. XML 769Figure 16-16 Directory structure for the DXL example4. Create an agent in that database that will contain the LotusScript inExample 16-7.Example 16-7 Converting documents to DXL using NotesDXLExporterSub InitializeDim session As New NotesSessionDim db As NotesDatabaseSet db = session.CurrentDatabaseREM Open xml file named after current databaseDim stream As NotesStreamSet stream = session.CreateStreamfilename$ = "c:\dxl\" & Left(db.FileName, Len(db.FileName) - 3) & "xml"If Not stream.Open(filename$) ThenMessagebox "Cannot open " & filename$,, "Error"Exit SubEnd IfCall stream.TruncateREM Export current database as DXLDim exporter As NotesDXLExporterSet exporter = session.CreateDXLExporterCall exporter.SetInput(db)Call exporter.SetOutput(stream)Call exporter.ProcessEnd Sub5. Once you have created the agent, you can open the database from yourNotes client and choose a view. In the view, select which documents youwould like to convert to DXL, and then choose the agent from the Tools menu.It will populate the XML file you created with the DXL of the documents youselected.The output should look similar to Figure 16-17.770 Domino Designer 6: A Developer’s HandbookFigure 16-17 The DXL output for the Phonebook databaseNotesXSLTransformer classDomino Designer 6 gives you many options when it comes to transforming XMLor DXL files. Previously in this chapter, we explained how to use the DXL UtilitiesTransformer feature. Using the NotesXSLTransformer and LotusScript gives, ineffect, the same result. With this class, you can transform DXL data throughXSLT.1. Use CreateXSLTransformer in NotesSession to create aNotesXSLTransformer object.2. If you do not specify the input parameter, use SetInput to specify the inputDXL data. If you do not specify the styleSheet parameter, use SetStyleSheetto specify the XSL style sheet. If you do not specify the output parameter, useNote: You can also use NotesDOMParser and NotesSAXParser to parseand transform DXL (or XML) data. These are be discussed in more detail laterin this chapter.Chapter 16. XML 771SetOutput to specify the output DXL data. You can also use these methods tooverride the CreateXSLTransformer parameters.3. Call Process to initiate the conversion.NotesDOMParser class

Using the DOM API, you can access any individual node of the tree. DominoDesigner 6 has the NotesDOMParser class, which you use to access andmanipulate the nodes in a XML file.1. Use CreateDOMParser in NotesSession to create a NotesDOMParser object.2. If you do not specify the input parameter, use SetInput to specify the inputXML data. If you do not specify the output parameter, use SetOutput tospecify the output XML data. You can also use these methods to override theCreateDOMParser parameters.3. Call Process to parse the input XML into a DOM tree and raise thePostDOMParse event.The following example demonstrates how to use this class to parse an XML file,examine the nodes, and create a report displaying all the nodes contained in theXML file.Example 16-8 An example of how the NotesDOMParser class is used(Declarations)Dim domParser As NotesDOMParserDim LF As StringSub InitializeDim session As NotesSessionDim db As NotesDatabaseDim inputStream As NotesStream, outputStream As NotesStreamDim docNode As NotesDOMDocumentNodeDim origXML As String, outputFile As StringorigXML = "c:\dxl\xmldom.xml"outputFile = "c:\dxl\DOMtree.txt"Dim header As Stringheader = "Walk Tree agent"LF = Chr(13)+Chr(10)On Error Goto errhSet session = New NotesSessionSet db = session.CurrentDatabase'create the output fileSet outputStream =session.CreateStream772 Domino Designer 6: A Developer’s HandbookoutputStream.Open (outputFile)outputStream.Truncate'write report titleoutputStream.WriteText ("DOM Parser Report - " )outputStream.WriteText (header+LF)'open the XML fileSet inputStream = session.CreateStreaminputStream.Open (origXML)If inputStream.Bytes = 0 ThenoutputStream.WriteText (origXML+" is empty"+LF)Goto resultsEnd If'create DOM parser and processSet domParser=session.CreateDOMParser(inputStream, outputStream)domParser.Process'get the document nodeSet docNode = domParser.DocumentCall walkTree(docNode)results:Call outputStream.CloseExit Suberrh:outputStream.WriteText ("errh: "+Cstr(Err)+": "+Error+LF)Resume resultsEnd SubSub walkTree ( node As notesdomnode)

Dim child As notesdomnodeDim elt As notesdomnodeDim attrs As notesdomnamednodemapDim a As notesdomattributenodeDim piNode As NotesdomprocessinginstructionnodeLF = Chr(13)+Chr(10)If Not node.IsNull ThenSelect Case node.NodeTypeCase DOMNODETYPE_DOCUMENT_NODE: ' If it is a Document nodedomParser.Output( "Document node: "+node.Nodename )Set child = node.FirstChild ' Get the first nodeDim numChildNodes As IntegernumChildNodes = node.NumberOfChildNodesdomParser.Output(" has "+Cstr(numChildNodes)+" Child Nodes"+LF)While numChildNodes > 0Chapter 16. XML 773Set child = child.NextSibling ' Get next nodenumChildNodes = numChildNodes - 1Call walkTree(child)WendCase DOMNODETYPE_DOCUMENTTYPE_NODE: ' It is a <!DOCTYPE> tagdomParser.Output("Document Type node: "+ node.NodeName+LF)Case DOMNODETYPE_TEXT_NODE: ' Plain text nodedomParser.Output("Text node: "+node.NodeValue+LF)Case DOMNODETYPE_ELEMENT_NODE: ' Most nodes are ElementsdomParser.Output("Element node: "+node.NodeName )Set elt = nodeDim numAttributes As Integer, numChildren As IntegernumAttributes = elt.attributes.numberofentriesdomParser.Output(" has "+Cstr(numAttributes)+" Attributes"+LF)Set attrs = elt.Attributes ' Get attributesDim i As IntegerFor i = 1 To numAttributes ' Loop through themSet a = attrs.GetItem(i)' Print attr. name & valuedomParser.Output("Attribute "+a.NodeName+": "+a.NodeValue+LF)NextnumChildren = elt.NumberOfChildNodesSet child = elt.FirstChild ' Get childWhile numChildren > 0Call walkTree(child)Set child = child.NextSibling ' Get next childnumChildren = numChildren - 1WenddomParser.Output( elt.nodeName+LF)Case DOMNODETYPE_COMMENT_NODE: ' CommentsdomParser.Output("Comment node: "+node.NodeValue+LF)Case DOMNODETYPE_PROCESSINGINSTRUCTION_NODE: ' Handle PI nodesSet piNode = nodedomParser.Output("Processing Instruction node: " )domParser.Output(" with Target "+piNode.Target+_" and Data "+piNode.Data+LF)Case DOMNODETYPE_CDATASECTION_NODE: ' CDATA sectionsdomParser.Output("CDATA Section node: "+node.NodeName)domParser.Output(" has value of "+node.NodeValue+LF)774 Domino Designer 6: A Developer’s HandbookCase DOMNODETYPE_ENTITYREFERENCE_NODE: ' Handle entitiesdomParser.Output("Entity Reference node: "+node.NodeName+LF)Case Else:domParser.Output("Ignoring node: "+Cstr(node.NodeType)+LF)End Select 'node.NodeType

End If 'Not node.IsNullEnd SubFigure 16-18 shows the text file that was generated by our agent, using theNotesDOMParser class.Figure 16-18 The output from the NotesDOMParser exampleNotesSAXParser classThe NotesSAXParser class is used as follows:1. Use CreateSAXParser in NotesSession to create a NotesSAXParser object.Chapter 16. XML 7752. If you do not specify the input parameter, use SetInput to specify the inputXML data. If you do not specify the output parameter, use SetOutput tospecify the output XML data. You can also use these methods to override theCreateSAXParser parameters.3. Call Process to initiate the data conversion process by triggering a series ofevent handlers.In Example 16-9, we read an XML file and display each event in a message box.Errors and warnings are written to a file.For this example, we have used the two entries in the phonebook.nsf database,created an XML file called phonebookentries.xml, and copied it to the C:\dxldirectory.Example 16-9 The NotesSAXParser class(Options)%INCLUDE "lsconst.lss"Sub InitializeDim session As New NotesSessionDim saxParser As NotesSAXParserDim xml_in As NotesStreamfilename$ = "c:\dxl\phonebookentries.xml" ' open input fileSet xml_in=session.CreateStreamIf Not xml_in.Open(filename$) ThenMessagebox "Cannot open " & filename$,, "XML file error"Exit SubEnd IfIf xml_in.Bytes = 0 ThenMessagebox filename$ & " is empty",, "XML file error"Exit SubEnd IfDim xml_out As NotesStreamfilename$ = "c:\dxl\saxparser.txt" ' create output fileSet xml_out=session.CreateStreamIf Not xml_out.Open(filename$) ThenMessagebox "Cannot create " & filename$,, "TXT file error"Exit SubEnd Ifxml_out.TruncateSet saxParser=session.CreateSAXParser(xml_in, xml_out)On Event SAX_Characters From saxParser Call SAXCharacters776 Domino Designer 6: A Developer’s HandbookOn Event SAX_EndDocument From saxParser Call SAXEndDocumentOn Event SAX_EndElement From saxParser Call SAXEndElementOn Event SAX_Error From saxParser Call SAXErrorOn Event SAX_FatalError From saxParser Call SAXFatalErrorOn Event SAX_IgnorableWhitespace From saxParser _Call SAXIgnorableWhitespaceOn Event SAX_NotationDecl From saxParser Call SAXNotationDeclOn Event SAX_ProcessingInstruction From saxParser _Call SAXProcessingInstructionOn Event SAX_StartDocument From saxParser Call SAXStartDocumentOn Event SAX_StartElement From saxParser Call SAXStartElement

On Event SAX_UnparsedEntityDecl From saxParser Call SAXUnparsedEntityDeclOn Event SAX_Warning From saxParser Call SAXWarningsaxParser.Process ' initiate parsingEnd SubSub SAXStartDocument (Source As Notessaxparser)Messagebox "Start reading Document", MB_ICONINFORMATIONEnd SubSub SAXEndDocument (Source As Notessaxparser)Messagebox "End of Document", MB_ICONINFORMATIONEnd SubSub SAXCharacters (Source As Notessaxparser, Byval Characters As String, _Count As Long)Messagebox "Characters found", MB_ICONINFORMATIONSource.Output (Characters)End SubSub SAXEndElement (Source As Notessaxparser, Byval ElementName As String)Messagebox "End of Element", MB_ICONINFORMATIONEnd SubSub SAXError (Source As Notessaxparser, Exception As NotesSaxException )Messagebox "Error - "+Exception.Message, MB_ICONINFORMATIONSource.Output ("Error - "+Exception.Message)End SubSub SAXFatalError (Source As Notessaxparser, Exception As NotesSaxException)Messagebox "FatalError - "+Exception.Message, MB_ICONINFORMATIONSource.Output ("FatalError - "+Exception.Message)End SubSub SAXIgnorableWhitespace (Source As Notessaxparser,_Byval characters As String, Count As Long)Messagebox "Ignorable Whitespace found", MB_ICONINFORMATIONChapter 16. XML 777End SubSub SAXNotationDecl (Source As Notessaxparser,_Byval NotationName As String, Byval publicid As String,_Byval systemid As String)Messagebox "Notation Declaration found", MB_ICONINFORMATIONEnd SubSub SAXProcessingInstruction (Source As Notessaxparser,_Byval target As String, Byval PIData As String)Messagebox "Processing Instruction found", MB_ICONINFORMATIONEnd SubSub SAXStartElement (Source As Notessaxparser,_Byval elementname As String, Attributes As NotesSaxAttributeList)Dim i As IntegerMessagebox "Start reading Element name = "+elementname, MB_ICONINFORMATIONIf Attributes.Length > 0 ThenDim attrname As StringFor i = 1 To Attributes.Lengthattrname = Attributes.GetName(i)' test GetValue and GetType args two ways _' - by attribute name and by attribute indexMessagebox "Attribute "+attrname+" = "_+Attributes.GetValue(attrname)+",_type = "+Attributes.GetType(attrname), MB_ICONINFORMATIONMessagebox "Attribute "+attrname+" = "+Attributes.GetValue(i)+",_type = "+Attributes.GetType(i), MB_ICONINFORMATIONSource.Output("Attribute "+attrname+_" = "+Attributes.GetValue(attrname)+",_type = "+Attributes.GetType(attrname))NextEnd IfEnd Sub

Sub SAXUnParsedEntityDecl (Source As Notessaxparser,_Byval Entityname As String, Byval publicid As String,_Byval systemid As String, Byval notationname As String)Messagebox "Unparsed Entity Declaration found", MB_ICONINFORMATIONEnd SubSub SAXWarning (Source As Notessaxparser, Exception As NotesSaxException)Messagebox "Warning - "+Exception.Message, MB_ICONINFORMATIONSource.Output("Warning - "+Exception.Message)End Sub778 Domino Designer 6: A Developer’s HandbookFigure 16-19 shows one of the message boxes that was generated by runningExample 16-9.Figure 16-19 A message box displayed during the exampleNotesDXLImporter classThis class allows you to import any DXL file into a Domino database. Onceimported, you will see the new element that was imported in the databasedesign.In this instance, you can use CreateDXLImporter in NotesSession to create aNotesDXLImporter object. If you do not specify the input parameter, use SetInputto specify the input DXL data. If you do not specify the output parameter, useSetOutput to specify the output Domino data. You can also use these methods tooverride the CreateDXLImporter parameters.Use ACLImportOption, DesignImportOption, and DocumentImportOption toindicate whether you want to create additional elements in the output databasefrom the incoming DXL, ignore incoming elements, replace existing elements, orupdate existing elements.Call Process to initiate a conversion.Example 16-10 is an agent that was created to import a DXL file from the filesystem into an existing database.You need to have the following in place if this example is to work:_ A DXL file generated from an element in your existing database (using theTools -> DXL Utilities -> Exporter in Designer). Name this fileyour_database.dxl and saved in the C:\DXL directory (you may also changethe filename$ value in the agent’s code to reflect a different directory). Forexample:C:\DXL\phonebook.dxl_ An existing database in your Notes\Data directory that does not alreadycontain the element that you wish to import. For example:newphonebook.nsfWe run this agent from the source database.Chapter 16. XML 779Example 16-10 NotesDXLImporter exampleSub InitializeDim session As New NotesSessionDim db As NotesDatabaseDim dbCopy As NotesDatabaseSet db = session.CurrentDatabasefilename$ = Left(db.FileName, Len(db.FileName) - 4)REM Open dxl file named after current databaseDim stream As NotesStreamSet stream = session.CreateStreamIf Not stream.Open("c:\dxl\" & filename$ & ".dxl") ThenMessagebox "Cannot open " & filename$,, "Error"Exit SubEnd IfIf stream.Bytes = 0 ThenMessagebox "File did not exist or was empty",, filename$Exit Sub

End IfREM Create new database named current database + "Copy"Set dbCopy = New NotesDatabase("", "")Call dbCopy.Open("","new" & filename$ )REM Import DXL into new databaseDim importer As NotesDXLImporterSet importer = session.CreateDXLImporter(stream, dbCopy)Call importer.ProcessEnd SubOnce this agent is run, it will have created the Design element that you previouslyexported into your existing database in your Data directory callednew your_database.nsf (for example: phonebookCopy.nsf). You should be able toopen the new database and see the imported element.
16.6 XML and JavaJava is probably the most common language used outside of Domino to exploitXML. This is mainly because of the powerful classes that have been provided toJava developers that allow them to manipulate XML in many different ways.Domino Designer 6 now includes the XML4J parser and LotusXSL processor,which allows you to parse and transform XML data.780 Domino Designer 6: A Developer’s HandbookTable 16-2 Back-end Java classes provided by DominoAnother Java class, the XSLTResultTarget class, is a wrapper class in thecom.lotus.xsl package that contains the result of a transformation made using theLotusXSL processor. An instance of this class serves as a container for the XSLTResult tree.With the generateXML, parseXML, and transformXML methods, you have thesame functionality as you do when you use LotusScript.generateXMLYou can use a Java agent to generate XML for you from a Domino document.Using the generateXML method, you can generate an XML representation of adocument to the Writer. Following is an example of code using generateXML toconvert a Notes document to XML.Example 16-11 Java code to convert a Notes document to XML//The XmlWriter class writes data as XML to a java.io.Writer object.// This class handles the low-level tasks of writing character data properly// as XML, including Domino datetimes and Domino documents.import java.io.Writer;import lotus.domino.Document;public class XmlWriter {// This is the base Writerprivate Writer w;// To construct a Writer object, specify where you want the data to go.public XmlWriter(Writer writer) {w = writer;Class Properties MethodDocument none generateXMLEmbeddedObject InputSource, InputStream, Reader parseXML, transformXMLItem InputSource, InputStream, Reader parseXML, transformXMLMIMEEntity InputSource, InputStream, Reader parseXML, transformXMLRichTextItem InputSource, InputStream, Reader parseXML, transformXMLNote: You must include the XML4j.jar file in your classpath even if you onlyneed to use the transformXML methods.Chapter 16. XML 781}// WriteContentTypeHeader() writes out the content type// HTTP header that tells the browser that XML is coming.public void WriteContentTypeHeader()throws java.io.IOException

{w.write("Content-Type: text/xml\n");}// WriteXMLDeclaration() writes out the XML declaration// that starts all XML streams.public void WriteXmlDeclaration()throws java.io.IOException{w.write("<?xml version='1.0'?>\n");}// Write a processing instruction that links the XML to a stylesheet.public void UseStylesheet(String href, String type)throws java.io.IOException{w.write("<?xml-stylesheet type='" + type + "' href='" + href + "'?>\n");}// Write a Domino document out as DXL.public void WriteDocument(Document doc)throws java.io.IOException, lotus.domino.NotesException{doc.generateXML(w);w.flush();}}// end of class XmlWriterTo access this Java agent, all you need to do is type the URL into your browser:http://Your_server/your_database.nsf/agentName?OpenAgent&db=your_database.nsf&unid=documentUNIDtransformXMLThis method transforms the data from an input source according to a specifiedstylesheet.782 Domino Designer 6: A Developer’s HandbookThe next example uses the transformXML method to take XML data and convertit to a text file, which is written to your hard drive.First, you need to create a form. This form will store the XML data as well as theXSL stylesheet. Use Figure 16-20 to assist you in creating your form.Figure 16-20 The XMLTransform form that converts XML to textThe form consists of 3 text fields and an action button. Name the fields:_ rawXML_ XSLStylesheet_ TransResultNext, create an agent called JavaXSLconverter. In the agent properties, in theRuntime section, select “Agent list selection” from the drop-down list. Ensure thatthe Trigger is set to “On event”. This agent uses the Java code in Example 16-12.Example 16-12 Java code for the JavaXSLConverter agentimport lotus.domino.*;import java.io.*;import org.xml.sax.*;public class TransformPrimer extends AgentBase {public void NotesMain() {try {Session s = getSession();AgentContext ac = s.getAgentContext();Database db = ac.getCurrentDatabase();Chapter 16. XML 783Document doc = ac.getDocumentContext();// assign object variables to the fields that have the XML and XSLT code inthemItem xmlItem = doc.getFirstItem("RawXML");

Item xslItem = doc.getFirstItem("XSLStylesheet");//create an inputsource out of the value from the XSLT fieldString sc = doc.getItemValueString("XSLStylesheet");InputSource style = xslItem.getInputSource();// create a File Writer, transform the xml and write it to the following file.FileWriter fw = new FileWriter("C:\\DXL\\javaoutput.txt");XSLTResultTarget result = new XSLTResultTarget(fw);xmlItem.transformXML(style, result);// create a StringWriter and write the same results to the results field in thecurrent documentstyle = new InputSource(new StringReader(sc));StringWriter rw = new StringWriter();result = new XSLTResultTarget(rw);xmlItem.transformXML(style, result);doc.replaceItemValue("TransResult" , rw.toString() );doc.save(true,true);} catch(Exception e) {e.printStackTrace();}}}On your XSLTranform form, add an action and label it “Transform XML”. Then addthe following formula to your Transform XML button:@Command([ToolsRunMacro];"(JavaXSLConverter)");@Command([FileCloseWindow]);@Prompt([Ok];"Transformation Complete";"The Transformation is complete.Review text file or Document contents")Any documents you create using this form will contain both the XML data and thestylesheet. To demonstrate the XML transformation, create a new XMLTransformdocument. In the rawXML field, add the following XML file:<?xml version="1.0" encoding="UTF-8" ?><phonebook><contact><lastname>Doe</lastname><firstname>John</firstname><address>1 Medical Avenue, Boston, MA, 02110</address><telephone>1-555-123-4567</telephone></contact><contact><lastname>Pretty</lastname>784 Domino Designer 6: A Developer’s Handbook<firstname>Lee</firstname><address>28 Augustus Avenue, Flushing, NY, 10001</address><telephone>1-555-110-1010</telephone></contact></phonebook>In the XSLStylesheet field, add the following simple stylesheet:<?xml version="1.0" ?><xsl:stylesheet version="1.0"xmlns:xsl="http://www.w3.org/1999/XSL/Transform"></xsl:stylesheet>Now click the Transform XML button. Once the Java agent has run, the form willclose and the output will be written to C:\DXL\Javaoutput.txt. The text file shouldlook like Figure 16-21.Figure 16-21 The text output from the Java agentparseXMLTo convert XML data into a format that can be processed, you will need to sendthe data to a parser. There are two APIs that will do this for you: the DOM APIand the SAX API.The following example shows how to use the parseXML method of the

RichTextItem class to parse the XML and return an instance of a w3 document inthe form of a Document Object Model (DOM) tree.Again, you will need to create a form that will contain the XML.Note: It is possible to create a Java agent that can download an XML file (forexample, daily stock prices) on a scheduled basis, that will populate a field ona form. This field can be parsed at a later stage.Chapter 16. XML 785Create a form that contains a rich text field to contain your XML data. It shouldresemble the form in Figure 16-22.Figure 16-22 The form required to parse XMLNext, create a Java agent called ParseXML. In the agent properties, in theRuntime section, select “Agent list selection” from the drop-down list. Ensure thatthe Trigger is set to “On event”. This agent uses the code shown inExample 16-13.Example 16-13 Java code for the ParseXML agentimport lotus.domino.*;import org.w3c.dom.*;public class JavaAgent extends AgentBase {public void NotesMain() {int i;try {Session ns = getSession();AgentContext ac = ns.getAgentContext();lotus.domino.Document doc = ac.getDocumentContext();Item rawXML = doc.getFirstItem("XMLDATA");org.w3c.dom.Document xDoc = rawXML.parseXML(false);Element el = xDoc.getDocumentElement();String rootTag = el.getTagName();System.out.println("The Root Element is " + rootTag);NodeList nl = xDoc.getElementsByTagName(rootTag);System.out.println("There is " + nl.getLength() + " node in the RootNode List");786 Domino Designer 6: A Developer’s HandbookNode n = nl.item(0);nl = n.getChildNodes();System.out.println("The " + rootTag + " Root Tag has " + nl.getLength()+ " child nodes");int limit = nl.getLength();for (i =0 ;i<limit ;i++) {n=nl.item(i);if (n.getNodeType() == n.ELEMENT_NODE) {System.out.println("Node Name is:" + n.getNodeName());System.out.println("Node Value is: " + n.getNodeValue());System.out.println("Node Value is: " + n.getNodeType());System.out.println("This node has child nodes: " +n.hasChildNodes());}}} catch(Exception e) {e.printStackTrace();}}}After you have saved your agent, create a button on your xmldata form. Thisbutton will perform a simple action, which is “Run agent”. Select (ParseXML)from the drop-down list of available agents. Save the form and then open it inyour Notes client. Use the XML data from the previous example and paste it inthe XMLDATA field. Save the document and select File -> Tools -> Show JavaDebug Console. Click the Parse XML button and the DOM should be displayed in

the Java Console.
16.7 SummaryIn this chapter we introduced XML. We described how we transform XML intodifferent formats that are more meaningful to us. Next, we explained how Dominosupports the XML technology. We defined what DXL is and introduced the newLotusScript classes that are provided with Domino Designer 6. Domino canhandle XML data both basically (directly in forms, pages, and views) as well asprogrammatically, using LotusScript or Java. It is possible to export Domino datainto a XML format. We can also transform existing XML data in Domino intodifferent formats using stylesheets. Finally we saw how to import a DXL file into aDomino database as a new design element.© Copyright IBM Corp. 2002. All rights reserved. 787
Chapter 17. Web services in DominoIn this chapter, we briefly discuss what a Web service is and how it relates toDomino 6.For a more detailed look at Web services and how to develop Web serviceapplications, see Domino Web Service Application Development for iSeries,SG24-6862, and the following Lotus and IBM Web services Web sites:http://www.lotus.com/home.nsf/welcome/webserviceshttp://www.ibm.com/software/solutions/webservices/
17788 Domino Designer 6: A Developer’s Handbook
17.1 What is a Web serviceA Web service can be defined as an application that has exposed an API, in orderto integrate itself with other applications. Its main function is to provideprocess-to-process interaction, without the need for a user interface. This meansthat you can invoke this application remotely, by interfacing with the API.Applications that invoke this service are known as clients. XML lies at the core ofWeb services, and provides a common language for describing RemoteProcedure Calls, Web services, and Web service directories.The phrase “Web service” can sometimes be misleading, as it implies the use ofa Web browser. However, this is not always the case. There are many differentways of invoking the Web service: an HTTP request or an e-mail from anotherapplication are just a few examples.One of the most common ways to invoke a Web service is by sending an HTTPGet request to the API. Accessing the API via the Internet has many advantages:_ The API can be accessed by any client worldwide that has the address of theWeb service._ A change in the Web service application needs to be made only at the source._ Web services can be written in any language and on any platform, as long asthose Web services are accessible according to the Web services standards.To enable interoperability, the Web services platform must provide a standardsystem that will interface with systems that are using different platforms and/orprogramming languages. A Web service platform needs to describe the Webservice and provide the information other applications need in order to invoke thisWeb service.The main technologies that make up the Web services platform are:_ XML - This is the basic format for representing data on the Web servicesplatform._ SOAP - (Simple Object Access Protocol) - The remote procedure call (RPC)

facility for Web services. SOAP is a transport protocol that transportsmethods using HTTP POST requests. The response returned is an XMLdocument._ WDSL - Web Service Description Language is an XML-based grammar fordescribing Web services, their functions, parameters, and return values._ UDDI - (Universal Description, Discovery, and Integration) is an XML-baseddirectory, which represents a technical specification for publishing and findingbusinesses and Web services.Chapter 17. Web services in Domino 789Figure 17-1 A simple Web service application
17.2 Web services and DominoDomino 6 is an ideal application for either hosting or using Web services. SinceWeb services are comprised mainly of XML data, Domino 6 is especially capableof exploiting Web services. This is due to the fact that Domino 6 now has manymore LotusScript classes that are designed to work specifically with XML. Formore information about these new LotusScript classes, see Chapter 16, “XML”on page 743.There are also tools available that provide additional support for Web services inDomino. They are:_ SOAPConnect for LotusScript - This contains a LotusScript library that allowsyou use and host Web services._ MS SOAP toolkit - This toolkit is provided by Microsoft and allows Domino toeither use or host a Web service on a Windows platform._ .NET (“Dot Net”) - A collection of tools from Microsoft that let you both useand host a Web service. This set of tools is accessed from LotusNotes/Domino through the Common Object Model (COM) interface. For moreinformation on the COM interface, see 14.10, “Integration with Microsofttechnologies” on page 646.Web ServiceClient, forexample: abrowserSearch (UDDI)Publish (WSDL)Requests andresponses (SOAP)Web Service Host orApplication790 Domino Designer 6: A Developer’s Handbook© Copyright IBM Corp. 2002. All rights reserved. 791
Appendix A. Domino and connectivityIn this appendix, we introduce and list some of the connectivity tools andtechniques available for Domino, such as OLE, LSX toolkit, ODBC, JDBC,NotesSQL, DECS, LEI.For most of these tools and techniques, we recommend that you to refer to theIBM Redbook Lotus Domino R5.0: A Developer's Handbook, SG24-5331, whichcontains an in-depth discussion about connecting to other sources.
A792 Domino Designer 6: A Developer’s Handbook
CORBA/IIOP

Domino uses an architecture called Common Object Request BrokerArchitecture (CORBA). This is an open standard defined by the ObjectManagement Group (OMG). CORBA serves as middleware for a distributedcomputing environment whereby remote clients can invoke methods on remoteAPIs residing on other computers. CORBA uses Internet Inter-ORB Protocol(IIOP) for communication over a TCP/IP network. CORBA/IIOP support enablesDomino developers to create applets that can be downloaded to the client andcan be remotely invoked in Domino services, for example, to initiate a workflowprocess. In addition, CORBA/IIOP enables information to be processedefficiently over networks within an open standards-based framework and todistribute work effectively between clients and servers, ultimately lowering thecost of ownership.See the Domino R5 developers handbook for more details; for Domino 6 thereare mainly minor improvements and bug fixes.OLE AutomationOLE (Object Linking Embedding) is a feature of Windows and is also supportedon the Macintosh. The OLE object model is used by developers to expose theobjects of one product to another. OLE Automation is an OLE service forintegrating applications. Two key elements of OLE Automation are the OLEAutomation Server and OLE Automation Controller or Client. OLE AutomationServers expose applications' functionality as objects to other applications. Theseobjects have properties (data) and methods (functions). OLE AutomationControllers can control objects in OLE Automation Servers through theirproperties and methods. Simply put, OLE Automation is the process in which anOLE Automation Controller sends instructions to an OLE Automation Server. Youcan call upon an OLE Automation Server object's code to perform a variety oftasks that you do not want to, or cannot, perform in your own code.Domino can act both as an OLE Automation Server providing functionality toother applications, and as an OLE Automation Controller where a Dominoapplication integrates with functionality offered by an external OLE AutomationServer application (for example, a spreadsheet).Changes from the support in R5 are mainly bug fixes.LSX Toolkit/Lotus Custom Object ToolkitAn LSX (Lotus Software eXtension) is a dynamic library of objects (or classes)written in the C++ programming language. You can use these objects fromlanguages and language interfaces like Java, CORBA, OLE, and LotusScript.Appendix A. Domino and connectivity 793You can treat LSX objects just like any other Domino objects. For example, youcan create new objects from their classes, invoke methods, and get theirproperties.The source programming language of LSX is C++, which enables you to useAPIs of some other applications. After an LSX is loaded by Domino, the LSXregisters its C++ class definitions as corresponding LotusScript classes. Thismeans an LSX extends the functionality of LotusScript running in Dominobecause it enables any Domino application to connect to resources andfunctionality of external applications.An LSX is the same as an LCO, since the LSX Toolkit name was changed fromthe Lotus Custom Object Toolkit.For Domino 6, there are mainly minor bugs that have been fixed.DECSDomino Enterprise Connectivity Services (DECS) is a Domino server task thatallows application developers to link their Lotus Domino databases to relationaldatabases and access data from them in real time. DECS works by capturingcertain Lotus Domino database events on the server, such as opening a formand triggering a predefined action on the relational database. DECS is a visual

tool and high performance server environment you can use to create Webapplications that provide live, native access to enterprise data and applications.The visual tool includes an application wizard and online Help to assist you todefine external data source connections—for example, DB2, Oracle, Sybase,File directory, EDA/SQL, or ODBC—and fields within your application thatautomatically contain external connector data.Beyond the support already included in R5, Domino 6 includes mainly bug fixes.Lotus Enterprise IntegratorLotus Enterprise Integrator (LEI), a module previously called Lotus NotesPump,extends DECS functionality beyond real-time data sources to include support forhigh volume data transfer and synchronization. Lotus Enterprise Integratorprovides visual tools to manage integration between data sources withoutNote: In Domino 6, some of the functionality provided by DECS is availabledirectly in the Domino Designer. To learn more about this see 10.5, “Dataconnections” on page 335, which describes how to use the new dataconnection resources to connect to a relational database from your Dominoapplication.794 Domino Designer 6: A Developer’s Handbookprogramming, including the capability to initiate event-driven or scheduled highvolume data transfers between Domino applications and relational databasesand other enterprise applications. This programming API is available for both LEIand DECS.For more information on Lotus Enterprise Integrator, see the Lotus Web site at:http://www.lotus.com/dominoeiNotesSQLNotesSQL is an ODBC (Open Database Connectivity) driver for Notes andDomino. It allows ODBC-enabled data reporting tools, database tools, andapplication development tools to read, report, and update information that isstored in Domino databases (.nsf files). With NotesSQL, end users andapplication developers can integrate Domino data with their applications usingtools such as Crystal Decisions Crystal Reports, Microsoft Visual Basic, Access,Brio, and Lotus Approach. Even Internet application development tools thatsupport ODBC can access Domino data. IT professionals can enable theirexisting ODBC-enabled applications to access data stored in a Dominodatabase.A Domino database is not relational, but with NotesSQL a Domino databaselooks like a relational data source to an OBDC-enabled tool. This allowsrelational database management systems (RDBMS) such as Oracle or DB2 toissue SQL (Structured Query Language) statements to Domino.For more information on NotesSQL in Domino, refer to the Domino R5developer's handbook and the Lotus/IBM website. These resources cover whento use NotesSQL, requirements, installation, examples, latest versions,configuration and other meaningful information.ODBCThe Open Database Connectivity (ODBC) standard is a set of functionsdeveloped by Microsoft to access Relational Database Management Systems(RDBMS) like Oracle, DB/2, Informix, and others. There are two softwarecomponents required to use ODBC:_ ODBC Driver Manager is a set of APIs in the ODBC dynamic link library.Those APIs are called by client programs like LS:DO, NotesSQL, and so on,in order to access an RDBMS via ODBC.Note: Lotus Enterprise Integrator version is a new release of the LEI and hasmany new features and enhanced functionality.Appendix A. Domino and connectivity 795_ RDBMS ODBC driver is the driver for specific RDBMSs like NotesSQL, DB2,

Oracle, and so forth. The ODBC driver allows you to issue any SQLstatements in Data Definition Language (DDL), Data Control Language(DCL), and Data Manipulation Language (DML) using SQLExecute orSQLExecDirect with the ODBC API. In addition, other ODBC Drivers enableyou to get information about columns attributes, index, privileges of column,drivers, foreign keys of tables, and other RDBMS entities.When you develop a Notes/Domino application, you often need to implementdata integration between Notes and other data resources, such as RDBMS,spreadsheet data, and ASCII delimited text files. If you need to do this usingODBC, these are your possibilities:_ LS:DO (LotusScript:Data Object)This is a LotusScript Extension (LSX) which provides additional LotusScriptclasses for accessing other data resources via ODBC._ DBLookup, @DBColumn using ODBCThese are @functions for ODBC data access. The functions @DBLookupand @DBColumn are frequently used to access Notes databases, as well asODBC-compliant databases.For more information about the use of these database access facilities, refer tothe Domino R5 developer's guide.JDBCJDBC is an object interface that allows Java applications and applets to retrieveand manipulate data in database management systems using SQL. Theinterface allows a single application to connect to many different types ofdatabases through a standard protocol. JDBC handles details for such tasks asconnecting to a database, fetching query results, committing or rolling backtransactions, and converting SQL types to and from Java program variables.JDBC is implemented as a driver manager with multiple drivers. Each driver linksthe application to a specific type of database.JDBC was first introduced in the Java Development Kit (JDK) 1.1 from SunMicrosystems. The JDBC classes and interfaces are part of the java.sql package.The major components of JDBC are the JDBC driver manager and theunderlying drivers. JDBC uses the driver manager to handle finding and loadinga driver. A JDBC data source consists of the data the user application wants toaccess and its associated parameters. Each JDBC driver processes JDBCmethod invocations, sends SQL statements to a specific data source, andreturns results to the application.796 Domino Designer 6: A Developer’s HandbookJDBC drivers generally fit into one of four types:1. The JDBC-ODBC bridge provides JDBC access via ODBC drivers. NotesSQL(the Domino/Notes ODBC driver) may be used with the JDBC-ODBC bridge.2. A native-API, partly-Java driver converts JDBC calls into calls on the clientAPI for the DBMS in question. This style of driver requires that some binarycode be loaded on the client machine. Domino Driver for JDBC is a Type 2driver.3. A net-protocol, all-Java driver translates JDBC calls into aDBMS-independent net protocol which is then translated to a DBMS protocolby a server. This net server middleware is able to connect its all-Java clientsto many different databases. This is the most flexible Java alternative.4. A native-protocol, all-Java driver converts JDBC calls into the networkprotocol used by DBMSs directly. This allows a direct call from the clientmachine to the DBMS server and is a practical solution for Internet access.For more information about the use of JDBC, refer to the redbook Lotus DominoR5.0: A Developer's Handbook, SG24-5331.Note: From a functionality and SQL syntax viewpoint, the JDBC driver forDomino is the same as NotesSQL.

Note: You can now use methods that support JDBC 2.0 in the Domino Javaagents because the JVM in Domino 6 has been updated to version 1.3.© Copyright IBM Corp. 2002. All rights reserved. 797
Appendix B. Additional materialThis redbook refers to additional material that can be downloaded from theInternet as described below.
Locating the Web materialThe Web material associated with this redbook is available in softcopy on theInternet from the IBM Redbooks Web server. Point your Web browser to:ftp://www.redbooks.ibm.com/redbooks/SG246854Alternatively, you can go to the IBM Redbooks Web site at:ibm.com/redbooksSelect the Additional materials and open the directory that corresponds withthe redbook form number, SG246854.
Using the Web materialThe additional Web material that accompanies this redbook includes thefollowing files:
B798 Domino Designer 6: A Developer’s HandbookFile name DescriptionNotes6RichText.zip Zipped Notes6RichText.nsf database, containing samplesused in Chapter 15, “Rich text programming” onpage 697.System requirements for downloading the Web materialThe following system configuration is recommended:Hard disk space: 10 MB mininumOperating System: Any, which is supported for Notes & Domino 6How to use the Web materialCreate a subdirectory (folder) on your workstation, and unzip the contents of theWeb material zip file into this folder. Then copy the Notes6RichText.nsf Dominodatabase into your Notes/Domino data directory, for example c:\notes\data onyour local workstation or on your Domino Server.© Copyright IBM Corp. 2002. All rights reserved. 799
Related publicationsThe publications listed in this section are considered particularly suitable for amore detailed discussion of the topics covered in this redbook.
IBM RedbooksFor information on ordering these publications, see “How to get IBM Redbooks”on page 800._ Upgrading to Notes and Domino 6, SG24-6889_ Lotus Domino Release 5.0: A Developer's Handbook, SG24-5331_ Domino and WebSphere Together Second Edition, SG24-5955_ Lotus Domino R5.0 Enterprise Integration: Architecture and Products,SG24-5593_ COM Together - with Domino, SG24-5670_ Lotus Mobile and Wireless Solutions, SG24-6525_ XML Powered by Domino How to use XML with Lotus Domino, SG24-6207

_ Lotus Notes and Domino R5.0 Security Infrastructure Revealed, SG24-5341_ Performance Considerations for Domino Applications, SG24-5602_ Working with the Sametime Client Toolkits, SG24-6666_ Working with the Sametime Community Server Toolkit , SG24-6667_ Lotus Sametime Application Development Guide, SG24-5651Other resourcesThese publications and resources are also relevant as further informationsources:_ Tamura, Randall A. and Tamura, Randy Domino 5 Web Programming withXML, Java, and JavaScript. Que, 2000, ISBN 0789722755_ LotusScriptors Plain Simple Guide to the Lotus Notes C++ API. Lee Powell,UK, 2002, ISBN 0954315901_ Flanagan, David JAVA in a Nutshell. O’Reilly & Associates, UK, 2002, ISBN119900040X800 Domino Designer 6: A Developer’s Handbook_ Dietel, Harvey M. and Dietel, Paul J. Java, How to Program (Fourth Edition).Prentice Hall, 2001, ISBN 0130341517_ Bergsten, Hans JavaServer Pages (Second Edition). O’Reilly & Associates,UK, 2002, ISBN 059600317X
Referenced Web sitesThese Web sites are also relevant as further information sources:_ IBM Redbooks W_ Web site, Lotus Redbooks domainhttp://publib-b.boulder.ibm.com/redbooks.nsf/portals/Lotus_ Sametime Links 3.0 Toolkithttp://www-12.lotus.com/ldd/doc/uafiles.nsf/docs/ST30/$File/stlinkstk.pdfA guide to enable Web pages and applications with Sametime awareness andreal-time collaboration._ Lotus Developer Domainhttp://www.lotus.com/lddThe Lotus Web site for developers. Includes discussion forums, technicaljournal, articles, interviews, sample applications, documentation, downloadsand more._ Dominozonehttp://www.dominozone.netA non-profit Web site for developers interested in Domino. Includesdiscussion forums, articles, interviews, sample applications, downloads._ IBM developerWorkshttp://www-106.ibm.com/developerworks/IBM Web site for developers. Includes discussion forums, articles, tutorials,online courses, sample code and applications, downloads. The site containstechnology zones, such as Java, XML and Web services, as well as productdomains for WebSphere, Tivoli, DB2, Lotus and others. Be sure to subscribeto the weekly newsletters!
How to get IBM RedbooksYou can order hardcopy Redbooks, as well as view, download, or search forRedbooks at the following Web site:Related publications 801ibm.com/redbooksYou can also download additional materials (code samples or diskette/CD-ROMimages) from that site.IBM Redbooks collectionsRedbooks are also available on CD-ROMs. Click the CD-ROMs button on theRedbooks Web site for information about all the CD-ROMs offered, as well as

updates and formats.802 Domino Designer 6: A Developer’s Handbook© Copyright IBM Corp. 2002. All rights reserved. 803
IndexSymbols$$Return field 115link to Web pages 116$$Return field example 117$$ReturnAuthenticationFailure 344$$ReturnDocumentDeleted 345$$ReturnGeneralError 345$$ViewTemplate form 344$Anonymous 82, 214$Conflicts 214$Links 214$Revisions 56, 214$UpdatedBy field 56, 82, 214($All) view name 191($Inbox) view name 191($Sent) view name 191($Trash) view name 191(Declarations) 94for fields 122(Options) 94for fields 121) 169, 279.NSF file 31.NTF file 48, 602@Abstract 701@Attachments 702@ClientType 540@CommandToolsRunMacro 278@commandssupported objects 563@DbLookup 702@DoWhile 382@For 382@Functions 564, 590, 605@GetDocField 702@GetField 702@GetProfileField 702@Text 702@UserName 210, 540@UserNameList 540@UserRoles 538@While 382Aabsolute positioning 417access control 91, 104, 178, 240, 248, 501@ClientType 540@UserName 540@UserNameList 540@UserRoles 538Authors Field 526Combining Readers and Authors Fields 527controlled access sections 529Documents 524ECL 542

files 545for HTML and Other Files 545Forms 521hide when formulas 530hiding the design of a database 541HTML files 545password field 541Pasting Documents into Database 541programming considerations 538Using Encryption for Field Security 530using signatures for security 542Web access 551workstation security 542Access Control List 58example 575settings for creating agents 249access list for views and folders 240accessibility 115, 194, 202, 218, 220, 286, 313, 478Accessing external data sources 40accessing resources with WebDAV clients 491accessing XSL 758ACL 58access levels 505access levels for servers 506access options 508agents 508Anonymous Access 509basics 504changing programmatically 517Changing the ACL Programmatically 517create documents 508delete documents 508804 Domino Designer 6: A Developer’s Handbookdisplaying 504effective access 510, 554Enforce Consistent ACL 516groups 507manager 506Maximum Internet Name and Password Access517modifying 506no access 505public documents 509roles 513servers 507setting up 506User and Server Access Levels 505user types 507users 507xACL 553action bar 159, 469background 160buttons 158properties 160size 160action bars 211action object 590actions 146, 158adding to navigators 244automating tasks 146checkbox 440computed labels 438

context sensitive 450creating 147hiding based on field values 450in Actions menu 148in navigators 242menu separator 439name 148removing 148shared 146sub actions 444system actions 438type 148typical 146administration process 385adminp 385Advanced database options 53advanced templates 49, 66agent log 265Agent Manager 271AgentBase class 669AgentContext class 262agents 4, 248access control 248, 410access to operating system 250accessing remote servers 407acting on mail 253acting on modified documents 254acting on new documents 254acting on pasted documents 254alias name 251allow remote debugging 410background 63, 248, 590background, disabling 63builder 404capturing CGI variables 275changing documents 279changing type of 410creating 250debugging 266debugging examples 267debugging, Notes.ini 272debugging, server console 273designing for multiple clients 345disabling 263, 268, 405disabling all background agents 270enabling 263, 268, 405enabling by users 268execution rights 271for Web applications 249formulas 260imported Java 261Java 261, 581log 263, 265LotusScript 260maximum execution time 271naming 251output 276outputting files 276personal 248, 252private 410redirecting 276remote debugging 266

removing data from documents 279renaming a field 279restricted 249restricted operations 410restrictions 250, 406rights to create 248run by a user 264Index 805run options 258running 263running an agent on different servers 255running as a Web user 410running multiple instances 276running on behalf of someone else 406running programmatically 278scheduled 255scheduled, disabling 268scheduled, enabling 268scheduling 253security 406, 410, 555selecting documents 256server-based 542serving a new page 276shared 248, 252, 410signing 263–264, 405Simple Actions 259simple actions 259slow 271testing 263, 265triggered by programs 253triggering 253triggers 258troubleshooting 270unrestricted 249user activated 409user activation 268user triggered 253Web 274, 345WebQueryClose 590WebQueryOpen 249, 274, 277, 590WebQuerySave 249, 274, 277aliasof form 78aligningparagraph 112tables 136AllDocuments property 576Allowing connections to external databases 64Allowing headline monitoring 55Alt + W 20alternate texthotspots 163anonymous access 509, 552anonymous form 82API 699for Notes 639appletsadding CORBA 673calls to lotus.domino package 676DIIOP 673rich text field 105application design 343

application structure 304application templates 48archivingdocuments 62asynchronous agents 276Attachment compression 56authentication 535authentication, basic 533authentication, customizing 547authentication, session-based 534Authors Field 526auto complete 30, 399auto launch 87auto refresh a field 632AutoReload property 581awareness 641Bback-end classes 577, 606background agents 63, 248background colorforms 88background graphicin navigators 242backup 548Backup and Restore 548Backup considerations 55BASIC 564bookmark folder 351bookmarking an application 351bookmarks 351borderof cells 137borderstables 140breakpoints 617built-in functions 612Button class 566button formulas 158button object 588buttonsaction bar 158in navigators 242806 Domino Designer 6: A Developer’s Handbook
Ccalendar views 191, 205conflict marks 206creating 205calling Java objects from LotusScript 395CaretNoteID property 213Cascading style sheets 36, 179cascading style sheets (CSS) 330categorizing a view 228cellsborder of 137colors 137cells in tables 134CGI 115, 275chat 641checking for errors 379Click eventexample 588Clients 5

administrator 8detemining the type of client 540Domino Designer 16mixed releases 41multiple 24, 341Notes 5separate forms 130code, printing 361code, recompiling 393collaboration 641collapsible sections 132color 387colorsfor fields 111of cells 137unread documents 227columnsreordering 453using colors 445COM 646accessing Domino objects 648, 650benefits over OLE 647defined 647enabling Lotus Domino Objects 653Common Data Security Architecture (CDSA) 547Common Gateway Interface 164table of variables 164using 115Compacting a database 64compile errors 613Compressing attachments 56computed subforms 127computed text 156ComputeWithForm method 579connecting to databases 37, 40, 335containment hierarchy 572controlled access section 529controlling access 501conversation 641Copy Database dialog box 58copyingviews 190Copying an existing database 57CORBA 637, 672create Java agent 582, 679CreateView method 460creatinga navigator 243agents 249background in navigators 243buttons 211calendar views 205collapsible section 132computed subform 128folders 239forms 76, 284nested tables 133new database 59pages 174tables 133views 187Creating a database 48

creating a new outline 307creating a replica of a database 386creating a view 460Creating documents 32creating documents at view level 193creating documents from view 454CSS 36, 330, 342Ctrl - Tab 20CurrentDatabase property 574custom design element folders 352custom JSP tags 685Customized Authentication, Encryption, SigningAPIs 547customizing twisties 453Index 807Ddata 566Data Connection Resourcecreating 336data connection resources 41, 86, 335data source 335data source options 339default connection 338enabling 337key field 340type 336Data connections 40Database 31, 47$Revisions field 56$UpdatedBy field 56advanced options 53allow soft deletions 55allowing headline monitoring 55allowing more fields in the database 56compacting 64copying 57creating new 48, 50, 59design information 71design, inherit 66Directory Catalog 61Domino Directory 61encryption 50hidden design 58information 64Last Accessed property 54Multi DB Search 61ODS 64properties 59replica ID 64size 64specialized response hierarchy 55templates 48title 50type 60usage details 64using a template 48database 49Database Catalog 66Database icon 36Database information 35Database version 42databases

database manager 549enabling data connections 337hiding the design 541use JavaScript when generating pages 344Date Pickerembedded 152Date/Time values in views 233DB2 335DCRSee Data Connection Resourcesdebug mode 616debugger 613enabling 614debugging 266, 613remote 387debugging agents 266DECS 4, 40, 335default form 81default outline 306default valuefor fields 120default view 192delimiting strings 371Design Document 22design element locking 26, 66, 358disabling 361enabling 358explicit lock 360master lock server 358provisional lock 360unlocking 360Design element properties 25Design elementsdatabase 47Forms 75design elements 31absolute positioning 131, 133hiding 530information 354locking 358–359modifying properties 356not allowed in layout regions 131script libraries 631, 691supported in frames 287supported in pages 175, 178supported in subforms 125supported in tables 133unlocking 360design elements folder 21design guidelines 209, 223, 241, 317, 341, 513,596808 Domino Designer 6: A Developer’s HandbookDesign pane 17Design properties 66Design refresh 66Design synopsis 35, 71, 363creating 71creating the report 72customized reports 363DXL utilities 363specifying content 73using database for output 72

Design synopsis tool 224Design upgrade 41determining access level 510Developing for multiple clients 24DHTML 342DIIOP 673Directory 3directory links 519DisableRole method 575disabling agents 268disabling all background agents 270Disabling background agents 63disabling design element locking 361disabling the debugger 615distributing tools 481Document ID 25Document locking 8, 63document retrieval 70DocumentContext 253, 275Documentsarchiving 62documentsaccess control 524authors fields 526changing associated form 280creating from view 454creating with a form 578creating without a form 578editor access 526form used 580read access 524read access list 525readers fields 524–525sorting in views 237stored in the database 577viewing with different forms 580Dominoaccessing WebSphere 667clients 5clustering 5connecting to databases 4database 3features 5Object Model 4reliability 5replication 3scalability 5Server 2services 2Web application server 4Domino Administrator 8features 8Domino Application Server 2Domino Connectors 40Domino Database 31Domino database 47Domino design elements 31Domino Designer 14adding tools 477auto complete 400basics 14bookmark folders 20

custom design element folders 352customizing the welcome page 16Data Connection Resources 41design element locking 358design element navigator 348design element views 356design elements 31Design elements folder 21Design list 17, 19Design pane 17design pane 17developing for mixed releases of clients 41embedded elements 150enabling applications with Sametime 642expanding element lists 355hiding a design element 24InfoBox 22inheriting the design 24launch buttons 27launching 14layers 37, 131layout 284, 417LotusXSL processor 748multilingual application 24new elements 36organizing applications 351Index 809organizing databases 20–21overview 14previewing the design 98Programmer’s pane 28properties box 22Sametime enabling applications 440scrolling elements 354shared code 349shared resources 349starting 14templates 24tools 477Tools menu 481type-ahead 399WebDAV 490Welcome page 16window tabs 19Work pane 19Domino Enterprise Connector Services 335Domino Enterprise Server 2Domino Global WorkBench 39Domino Mail Server 2Domino Object Model 4, 565Domino objectsevents 586Domino security architecture 501Domino Server Family 1Domino Server Services 2Domino Web Server API 547DominoAsynchronizeAgents 276Don't show empty categories 196Downgrading the database ODS version 42DSAPI 547DXL 38, 385, 481tools 481

DXL Transformer Utility 364DXL utilities 487, 746Exporter 746, 762Transformer 746, 763Viewer 746, 762EECL 264See Execution Control Listediting a document in a view 456functions@Command( 169effective access 510, 554embeddedDate Picker 152file upload control 155folder pane 153navigators 151outline 309outline control 152scheduling control 153view 152embedded elements 150date picker 152editor 432embedded editor 151file upload control 155folder pane 153group scheduling control 153navigator 151outline control 152referring from another database 470view 152embedded outlineshiding 314root entry 312sizing 312target frame 311types 311embedded viewsdeleting documents 470displaying for browser users 230properties 232targeting 231embeddingviews 230embedding an editor 151emdedded editors 432empty categories 196enabling application with Sametime 642enabling design element locking 358enabling the debugger 614Encrypting databases 62encryption 530automatically 531creating a secret key 531field security 530manually 531Enforce Consistent ACL 516Entering eventfor fields 122Entering information 32810 Domino Designer 6: A Developer’s Handbook

enterprise integration technologies 40ERP 40error handler 613Evaluate function 260, 607events 586action object 590button object 588Click 588Entering 368Exiting 368, 586for field object 586for fields 120Initialize 95InViewEdit 370not available for subforms 126OnBlur 369onBlur 368OnChange 369onClick 93OnDblClick 93OnFocus 369onFocus 368, 370OnHelp 369onHelp 93onKeyDown 93onKeyPress 94onKeyUp 94onLoad 94, 368onMouseDown 94onMouseMove 94onMouseOut 94onMouseOver 94onMouseUp 94onReset 94onSubmit 94, 369onUnload 94, 370PostEntryResize 369Postmodechange 95PostOpen 368Postopen 94, 583Postrecalc 95PostSave 95PostSend 369QueryClose 368Queryclose 95QueryEntryResize 369Querymodechange 95Queryopen 94QueryRecalc 369QuerySave 95, 368Querysave 609QuerySend 370sequence of 590, 594Terminate 95WebQueryOpen 93WebQuerySave 93events in Notes 583exampleJava agent 581, 679JavaScript 632, 634–636using Java Notes classes 680examples

accessing a field 575accessing an ACLEntry 575Click event 583, 588Evaluate function 608Exiting event 586Messagebox statement 620Postopen event 583Print statement 619Execution Control List 264, 542maintaining 544Exiting eventexample 586for fields 122Explicit lock 26exporting files 324extended access control list 553Extending Notes with other productsNotes API 639FField class 566field events 120field object 586field validation 379fields 33$$Return 115(Declarations) 122(Options) 121aligning with baseline 462allow values not in list 110authors 104, 526Color 104color 428colors 111computed 108, 122Index 811computed for display 108, 122computed when composed 109, 122connecting to external data source 338creating 95data types, stored 578date/time 103, 123default value 120deleting 279editable 108, 122enabling encryption 532Entering event 122examples of using 122excluding from field index 127Exiting event 122field hint 111, 124field hints 461fonts 111giving a name 96help 111help information 111hide delimiters 110hide-when 97, 113HTML attributes 120Initialize event 122input translation 120, 124input validation 120, 124keyword lists 103–104

manipulating with LotusScript 578multi-value separator 111names 104native OS style 463new types 428not supported on Web 344number 103onBlur event 121onChange event 121onClick event 121onFocus event 121onKeyDown event 121onKeyPress event 121onKeyUp event 121onMouseDown event 121onMouseMove event 121onMouseOut event 121onMouseOver event 121onMouseUp event 121onSelect event 121OS style 131password 104, 541properties 107readers 104, 525refresh on keyword change 110refreshing choices 110renaming 279reserved 214, 598rich text 103rich text lite 429security 111shared 101showing in views 699sizing 461special 115, 120specifying properties 96summary vs. non-summary 699tab order 109Terminate event 122text 103, 123time zone 104, 431types 102file repository 322file resourcescreating 323exporting 324opening 323previewing 326refreshing 323using 323file upload controlembedded 155folder paneembedded 153folders 33, 239, 351access list 240creating 239description 185personal 240shared 240write access 241fonts

for fields 111footer 65forcing to declare variables 397forms 32, 76$$ReturnAuthenticationFailure 344$$ReturnDocumentDeleted 345$$ReturnGeneralError 345$$ViewTemplate 344$Anonymous field 82812 Domino Designer 6: A Developer’s Handbook$UpdatedBy field 82access control 520alias 78alias name 130anonymous form 82assigning to documents 580auto launch 87automatically enabling edit mode 85background color 88background properties 88computed text 156converting data to XML 749Create dialog 80Create menu 80creating 76, 284creating a header 89customized error messages 344Data Connection Resources 86default data connection 338default form 81disable printing, forwarding and copying to clipboard92elements 76embedding forms 432embedding views 152entering data into a database 76events 92focus 82frameset option 87generate HTML for all fields 85header and footer 89hiding 130hierarchical structure 79horizontal rule 156HTML in Notes client 464HTML type of content 327importing graphics 88inherit entire document 84inherit values 84inserting embedded editor 432keyboard shortcut 79layers 171, 417limiting access 91multilingual applications 79multiple views 470naming 78previewing 98printing properties 90profile 168profile, creating 169properties 76providing comments 79

public access users 523refresh fields automatically 81Render pass through HTML in Notes 82render pass through HTML in Notes 464replication conflicts 83response 79response to response 79save conflicts 83sections 467security 91select for display 130settings required for XML 751sharing elements 125signing documents 82special forms 344store form in document 81stored 63title 92type of content 85using different for each client 343using resources 319version control 80versioning 80formulas 590hide-when 603formulas, looping 382formulas, using in agents 260framesadding a Web page 289adding an object 288borders 291elements 287naming 287scrolling 290sizing 290frameset 31for forms 87framesetsbasics tab 285displaying views in 344layout 296naming 285previewing 297properties 285–286sizing 290window title 285Index 813front-end classes 566, 577, 606full access administrators 513Full text search engine 3Full-text index 70full-text index 70, 256full-text search 70functions 370, 562, 596@Abstract 701@AllDescendants 236@ClientType 129, 538@Created 124, 234@Date 124@DBColumn 108, 123@DbName 373@dbname 380

@DocumentUniqueID 118@DoWhile 382@Elements 123@Environment 543@For 382@If 119@IsError 123@IsMember 113@ProperCase 124@RefreshECL 544@Return 123@Round 123@Servername 380@Set 373@Setfield 373@Statusbar 379@Subset 373@subset 380@Text 118, 702@ThisValue 124@URLOpen 278@UserName 538@UserNamesList 538@UserRoles 538@WebBDbName 181@WebDBName 118@While 373, 382arrays 372auto complete 403list of new @functions 373looping 382new @commands 381referring to array elements 372Ggenerate HTML for all fields 85generateXML method 780GetFirstDocument method 574, 576GetFirstItem method 574GetNextDocument method 576getUnprocessedDocuments 262GetView method 574grouping design elements 353, 417Hheader 65header and footer 89help 36field hint 111, 124for fields 111Hidden design 58hide when formulas 530hide-when formulas 603hidingviews 191Hiding a design element 24hiding design elements 131hiding paragraphs 113horizontal rules 156hotspots 158alternate text 163HTML 412adding code using HTML Pane 414

auto complete 403HTML body attributes 93HTML head attributes 93HTML pane 412in Notes client 464–465pass-thru HTML 412properties 114rendering pass through HTML in Notes 127HTML attributes for body field 120HTML body attributes 93HTML content 327HTML files 322, 325HTML head attributes 93HTML header 276HTTP Basic Authentication 533IIDE 564image resources 161814 Domino Designer 6: A Developer’s Handbookrefreshing 319images 161as a shared resources 318creating 318guidelines 342image wells 320replacing with other techniques 342supported formats 318importing graphicsinto forms 88importing pictures 162Improving performance 53–54, 56indexing, full-text 70Info List 28InfoBox 22Information about document usage 54inherit entire document 84Inherit future design changes 52inherit values 84Inheriting the design 24Initialize event 95for fields 122iNotes Access for Microsoft Outlook 10iNotes Web Access 10input from Web in rich text 105input translation 609input translation for fields 120input validation 609input validation for fields 120instant messaging 641Integrated Development Environment 564Internet AuthenticationWhen to Use Internet Security 537Interoperability 41InViewEdit 455InViewEdit event 193iterating 382JJava 4, 253, 261, 274, 581, 669accessing from LotusScript 582adding CORBA support to applets 673agents 671applets 671

applications 671calling from LotusScript 395CORBA 672differences between agents and applets 672JSP 684Notes class implementation 669servlets 683using in agents 261XML 779Java agent 582, 672, 679creating a agent 679Java applet 672Java files 669Java Notes classes 678, 680Java program 673Java programming 38Java Server Pages 684JavaScript 179, 274, 278, 343, 346, 621add to form or field 631Domino object model 624Example4 635examples 633–634, 636in Notes client 465JS Header 93Library 631LiveConnect 636onBlur 622–623onChange 100, 621, 623, 633–635onClick 622–623onDblClick 622onFocus 622–623onHelp 622onKeyDown 622onKeyPress 622onKeyUp 622onLoad 94, 622onMouseDown 622onMouseMove 622onMouseOut 622onMouseOver 622onMouseUp 622onReset 94, 622onSubmit 94, 119, 622onUnLoad 622onUnload 94JavaScript function 632JavaScript libraries 343, 350, 367inserting into JS Header 350Javascript Object Hierarchy 624JDBC 40JS Header 93JSP 38, 684JSP custom tag libraries 38Index 815JSP files 322JSP tags 685accessing Domino databases 688using in Domino 686Kkeyboard shortcutforms 79Llanguage tagging 466

Last Accessed property 54Launch Buttons 27Launch options 67Launching a frameset automatically 68Launching Pages 180layers 37, 131, 171, 181, 417adding elements 423creating 417example 421hiding 420HTML properties 420Layer Tree 421on the Web 427overlapping 425positioning 418, 424size 419stacking order 419Z-Index 419layout 284, 417layout regions 131LDAP 3LEI 41listing documents 33, 184localizing applications 39Lock documents 8Locking 26locking a design element 359logging 265logical errors 614looping 382Lotus Enterprise Integrator 41Lotus Notes 6 client 5Lotus Sametime 641LotusScript 4, 253, 274, 343, 384, 395, 563, 583,590, 605, 670(Declarations) 94(Options) 94accessing a field 576accessing Java objects 395auto complete 401back-end 577benefits of 564connecting to Java 565cross-platform 564declaring variables 574DocumentContext property 275front-end 577functions 596initializing variables 574looping 576LS2J 565onLoad 94onUnload 94performance 596programming tips 596subroutines 596using Domino objects 573using front-end classes 577using in agents 260using in navigators 244using methods 574working with arrays 398

XML 763LotusScript to Java 395LS2J 582accessing methods 396enabling 395finding a class 396getting an object 396JVM 396limitations 397making a connection 396LSX 565LZ1 compression 56Mmarginstables 141maximum Internet name & password access 342Merging conflict documents 83Messagebox statement 620Messaging 3Mixed releases of clients 41Mobile clients 9modifying properties for multiple elements 356816 Domino Designer 6: A Developer’s Handbookmouseover 354Multilingual applications 24, 39, 67Multilingual database 67multi-pane interface 284Multiple clients 39multiple views on a page or form 470multi-value separatorfor fields 111Nnaminga form 78an agent 251naming views 223navigating 304Navigator class 566navigators 35, 242actions 242description 186elements to be used instead of 242embedded 151objects 242nested tables 133creating 133new @commands 381new @functions 373New Database dialog box 50new features 347New Features of Domino Designer 36new LotusScript classes 384new users 537Not 505Notesbookmarks 6calendaring & scheduling 7customizing 7customizing mail 7document locking 8features 5–8

histoty folder 6mail 7portal 6startup folder 6usability 6welcome page 6Notes API 639Notes classes 564, 583Button 566, 583Field 566hierarchical relation 572Navigator 566NotesACL 567NotesACLEntry 567, 575NotesAdministrationProcess 567NotesAgent 567NotesColorObject 572NotesDatabase 567, 576NotesDateRange 569NotesDateTime 569NotesDbDirectory 567NotesDocument 567, 576NotesDocumentCollection 567, 576NotesDOMDocumentNode 568NotesDOMElementNode 568NotesDOMNode 568NotesDOMNodeList 568NotesDOMParser 640NotesDXLExporter 569, 641, 748NotesDXLImporter 569, 641, 748NotesEmbeddedObject 569NotesForm 570NotesInternational 570NotesItem 569NotesLog 570NotesMIMEEntity 570NotesMIMEHeader 40, 570NotesName 570NotesNewsLetter 570NotesNoteCollection 570, 641NotesReplicationEntry 571NotesRichTextDocLink 571NotesRichTextItem 569NotesRichTextNavigator 571NotesRichTextRange 571NotesRichTextSection 571NotesRichTextStyle 569NotesRichTextTable 571NotesSAXParser 640NotesSession 567, 574–575NotesStream 40, 640NotesTimer 566, 570NotesUIDatabase 566NotesUIDocument 566NotesUIScheduler 566NotesUIView 566NotesUIWorkspace 566NotesView 567Index 817NotesViewColumn 567NotesXMLProcessor 572NotesXSLTransformer 572, 640, 748

Notes URL 289Notes/FX 81NotesACL class 517, 567NotesACLEntry class 517, 567, 575NotesAdministrationProcess class 385NotesAgent class 567NotesColorObject class 387, 706, 726to set rich text color 711NotesDatabase class 261, 460, 563, 567, 576NotesDateRange class 569NotesDateTime class 569NotesDbDirectory class 567NotesDocument class 563, 567, 576NotesDocumentCollection class 262, 567, 576NotesDOMParser class 385, 771NotesDXLExporter class 385NotesDXLImporter class 385, 778NotesEmbeddedObject class 569, 706, 718NotesFactory method 675NotesForm class 570NotesInternational class 570NotesItem class 569NotesLog class 266, 570NotesMain method 669NotesMIMEHeader class 40NotesName class 570NotesNewsLetter class 570NotesOutline 570NotesOutlineEntry 570NotesRegistration 570NotesReplication 570NotesReplicationEntry class 386NotesRichTextDocLink class 706, 718NotesRichTextItem class 569, 706NotesRichTextNavigator class 706, 717NotesRichTextParagraphStyle 571NotesRichTextParagraphStyle class 706, 712NotesRichTextRange class 706, 718, 728NotesRichTextSection class 706, 718NotesRichTextStyle class 706, 709NotesRichTextTab class 571, 706NotesRichTextTable class 706, 718NotesSAXParser class 385, 774NotesSession class 253, 275, 563, 567, 574–575NotesStream class 40, 386NotesThread Class 678NotesTimer class 570NotesUIDatabase class 566NotesUIDocument class 566NotesUIView class 254, 566NotesUIWorkSpace class 566NotesView class 567NotesViewColumn class 567NotesViewEntry 571NotesViewEntryCollection 571NotesViewNavigator 572NotesXSLTransformer class 385, 770Nothing, special value 576NSF file 31NTF file 48, 602numbers in views 235O

object events 368object sharing 641Object store 3, 31object-oriented programming language 563Objects View 28ODBC 198, 335ODS 42, 64ODS versions 42OLE 564, 647On Error 266On Error statement 612onBlur 633onBlur eventfor fields 121onChange eventfor fields 121onChangeIndex#633onClick event 93for fields 121OnDblClick event 93On-Disk StructureSee ODSonFocus eventfor fields 121not triggered 122onHelp event 93onKeyDown event 93for fields 121onKeyPress event 94818 Domino Designer 6: A Developer’s Handbookfor fields 121onKeyUp event 94for fields 121onLoad event 94onMouseDown event 94for fields 121onMouseMove event 94for fields 121onMouseOut event 94for fields 121onMouseOver event 94for fields 121onMouseUp event 94for fields 121onResetJavaScript 94onReset event 94onSelect eventfor fields 121onSubmit 94, 368onSubmit event 94, 119onUnload 94, 368onUnload event 94OpenFileResource 490OpenImageResource 490Option Declare 600Option Public 596, 600Organizing databases 20–21outlinecreating 307

default, generating 306outline controlembedded 152outline entryalias name 305indenting 307naming 305outdent 307target frame 306type 305outlines 304adding entries 305background 313computed 435customizing 436DesignTools 482embedded 309, 311embedding 309inserting based on a formula 435Java applet 313naming an entry 305show folder unread count 436Ppages 32, 174background 176creating 174designing 179displaying information 174events 178home page 174inside a frameset 180launch properties 177launching 180launching automatically 181layers 181, 417limiting access 178linking 180multiple views 470naming 176properties 175response messages 174sections 467security 178title 175using XML 751Web 174window title 175paragraphsaligning 112pass through HTML 127Pass-Thru-HTML in views 219Password Field 541pasting documents 541Perfomance 53performance 198, 216, 604, 609of forms 603of LotusScript 596performing administrations tasks 385performing tasks 248personal views 210personal-on-first-use views 210pictures 161

positioning design elements 37, 417Postmodechange event 95Postopen event 94example 583Index 819Postrecalc event 95PostSave event 95preventing printing, forwarding and copying documents524previewin Notes client 98in Web browser 99Preview pane 69previewing documents in embedded editor 433Previewing in Notes 27Previewing with Web browsers 27print options 65Print preview 65Print statement 276, 278, 619printing code 361private agents 410private views 187profile documents 168, 703, 715accessing 168–169creating 169deleting 170Programmer’s Pane 28Programmers Pane 28Programming 38programming@commands 562@functions 562accessing Domino objects 565accessing field values 581accessing items 578accessing stored data 577ACL 517back-end classes 566choosing a language 558COM 646creating views 460different languages 558Domino Object Model 565errors 603for Web 563forcing to declare variables 596formula language 562Java 581JavaScript 343LotusScript 563open documents 580rich text fields 581run-time errors 612Simple Actions 559using a template database 602XML 640, 764programming a Java program 678Propertiesof databases 59propertiesfields 107forms 76

Properties dialog 22Public Accessviews 199Public Access Users 523Public Access users 92putAllInFolder 262QQueryclose event 95Querymodechange event 95Queryopen event 94QueryOpen form event 278QueryPaste event 254QuerySave event 95QuerySave form event 278RR4 41, 51R5 41Read Access ListForm 525ReadViewEntries 490recompile all 393recompiling code 393Redbooks Web site 800Contact us xxiiredirecting 519Reference View 29Refresh design 66refresh fields automaticallyin forms 81Refresh method 609registering users 537Relational databases 40relational databases, connecting to 335Reload method 609remote debugger 387, 619remote debuggingallowing 388connecting to an agent 392820 Domino Designer 6: A Developer’s Handbookenabling an agent 389enabling on the server 388enabling TCP/IP port 388permission to run agents 388remote debugger manager 388security 388starting 391turning of automatically 388render pass through HTML in Notes 82Replication 3replication conflicts 213Requiring SSL connection 62reserved fields 214reserved namesfor views 191response documentsindenting in views 192, 236Response forms 79response message to Web users 115response messages 278Response to Response 79response to responseforms 79

restore 548restricted agents 249Resume statement 613returning to another page 115returning user groups 540returning user name 540returning user roles 538, 540Rich text 697@functions 701AddNewLine method 707AddPageBreak method 707AddTab method 707appending 706AppendRTItem method 715AppendTable method 717AppendText method 707copying to a document 714creating 706default value 703defined 698doclinks 713, 720file attachments 727File attachments, copying 703front-end vs. back-end 703, 705, 732GetFirstItem and 707GetNotesFont method 711hide attributes 698import an image 736locating inside rich text 719Notes C and C++ APIs 699paragraph size limit 699paragraph styles 712search and replace 730sections 713table, background colors 726tables, filling in data 724text styles 709rich text fieldapplet 105Roles 91roles 241, 513, 539adding 514assigning to users 515defined 514on local replicas 516restricting access 514run-time errors 612–613SSametime 440, 641enabling applications 643integration example 643Sametime enabling applications 642Sametime link 643save conflicts 213SaveOptions 278scheduled agents 255scheduling controlembedded 153Script Area 30Script libraries 34, 37script libraries 600signing 408

search 70Search Builderviews 189section styles 467Secure Sockets Layer 535Securing the connection 62security 3, 51, 54, 66, 178, 199, 342, 499access control 91, 104, 199, 248, 501–502Access Control List 58access control list 501, 504access levels 505Index 821access to forms 520access to public documents 509access to views 520ACL 58, 501–502, 504agents 544, 555anonymous access 503, 509, 552authentication 533, 535certificate authority 535controlling document pasteing 541customizing authentication 547design issues 549determining access level 510directory links 519effective access 554encrypting connection 535encryption 51, 530File Protection document. 546for fields 111form access list 522forms 91full access administrators 513, 516hiding elements 518Java 544JavaScript 544maximum Internet name and password access517overriding 513overview 501password 533plan 548preventing printing, forwarding and copying 524Public Access users 92roles 91, 513, 549server-based agents 542session-based authentication 534signing 82SSL 62stored forms 63true security features 552user name 533using outlines 518view access list 520Web user access 551workstation 542server console 273, 411Server tasksdesign 66servlets 683invoking 684running in Domino 684

settingwindow title 93Setting a size limit for a database 52setting field values 373Setting properties 22Setup information 168shared agents 410Shared Code 33, 37, 367agents 33design elements 349outlines 33script libraries 34shared fields 34subforms 34, 125shared fielddebugging 597Shared fields 34, 101shared resources 34, 37, 365accessing with WebDAV clients 491applets 34, 329creating a new image 318data connections 34, 335, 366design elements 349files 34, 322horizontal image sets 321images 34, 161, 318, 342inserting on a form 320inserting on a page 320opening 318style sheets 34, 330, 366vertical image sets 321shared views 187, 210Sharing code 37sharing design elements 125, 349sharing files 322sharing program code 349sharing resources 349Signatures 542Signing a Database 545signing a database 264signing an agent 264Simple Actionsexamples 559simple actions, using in agents 259Size limit 51–52sizing framesets 290Soft deletions 55specifying content language 466822 Domino Designer 6: A Developer’s HandbookSSLSee Secure Sockets LayerstampAll 262Standards 38starting the remote debugger 391store form in document 81stored form, removing 280Stored forms 63, 81storingdocuments in databases 577Storing data 32Storing the form on a document 63style sheet resources 330

creating 330editing 334exporting 334inserting into a form 331inserting into a page 331opening 334pass-through HTML 417refreshing 334supported Notes elements 333using on forms and pages 417subforms 125available elements 125computed 127creating 125–126properties 127removing 127Web 346Submit button 158subroutines 596Summary fields 699Supporting older releases 41Ttables 131, 133autosizing 471borders 140caption styles 473collapsible 143margins 141merger cells 134split cells 134style 138switching rows programmatically 145tabbed 141tabs 472Target Frame 93tasks, running periodically 248Team development 26team development 26, 353, 358, 387, 490tell amgr commands 273Templates 24templates 48, 602advanced 66Temporary lock 27Terminate event 95for fields 122Testing applications 27The Event Model 583There 373titleof forms 92To 391tools 477, 481, 490adding 478customizing 479DXL utilities 746, 761submenu 479functions@Command( 279transaction logging 55, 548transforming XML 364, 489transformXML method 781Translating applications 39troubleshooting 270

trusted servers 407twisties, customizing 453type 79type-ahead 399UUDDI 788UIDocument class 563UIWorkspace class 563Unlock documents 8unlocking a design element 360UnprocessedDocuments 261unread documents 227styles 227views 227unread marks 53disabling 227unrestricted agents 249Upgrade path 41Index 823Upgrading 41Upgrading the database ODS version 42URL open, disallowing 62URLs 490Use JavaScript when generating pages 62Use statement 600user activity 64user customized views 453user interface 146, 284, 304user registration 537user scripts 563, 600User-specific information 168using 88using colors in view columns 445using other development tools 490using pages 178using the debugger 617–618Vvalidating field values 379validating input 278variablesdeclaration of 596, 600naming of 597version control 80forms 80viewembedded 152InViewEdit event 193resizing columns 192View Access List 520view applet 198view columnsHTML in column formulas 221HTML in headers 220icons in headers 220numbers 235styles 226time/date columns 233view index 197view logging 198View templatesmenu actions 222Viewing information 33

views 33access control 520access list 240actions 193addind actions 213adding HTML to 221Advanced tab 197alias 191, 223background 195background images 452backup 198calendar 191calendar type 205cascading 188, 224categorized 203, 228changing the name 223collapsing on open 229colors 196column colors 445column properties 200context sensitive actions 450copying 190creating 187creating documents 454creating documents at view level 193creating programmatically 460customized icons 451customizing 192, 201default 192default Web layout 216description 184design 213designing 208displaying different columns to users 459displaying for Web browsers 344don’t show empty categories 196editing documents 456editing documents in view 202embedded 230embedding 230flat 203formatting Date/Time values 233formatting numbers 235grid 195, 452hiding 191, 224hiding columns 459HTML 218indenting response documents 236index 197InfoBasic tab 190inspecting form fields 214InViewEdit 456Java applet 198824 Domino Designer 6: A Developer’s HandbookJava applet for display 217launch properties 197layout 206margins 196multiple lines per row 225naming 187, 223ODBC 198open as last-used 229

Option tab 191Pass-Thru-HTML 219performance 216, 221personal 211presenting documents in XML 751presenting to users 229private 187, 210programmatic use 204properties 190properties not supported on the Web 222Public Access 199re-evaluating 193refreshing 194reordering columns 192reserved names 191response documents 236response hiearchy 236Search Builder 189Security tab 199selection formula 188shared 187, 210show single category 210, 233showing data as XML 490showing icons in columns 201showing response documents 192sorted, automatically 237sorted, by user 237sorting 203, 237, 239sorting documents 237sorting rules 238sorting, by multiple columns 238Style tab 195styles 224sub-categories 229transaction logging 198twisties 202, 453type of 187unread documents 196, 227unread marks 225user customizations 192, 453using categories 228using on the Web 215Web navigation 222Web, contents as HTML 220Web, HTML 219Web, icons 219Web, spacing 219Virtual Activities 41Virtual Agents 41Virtual Documents 41Virtual Fields 41Visual Basic 564WWebagents 345CGI 115defining users 537entering rich text 105events 368features not available 342images 342LotusScript 590

personalized message 116providing user interface 344response message 115–116subforms 346user interface 284using agents 274using dedicated forms 343validating data 278view navigation 218views 344Web Administration 8Web application server 667Web server 4Web servicedefined 788Domino 789invoking 788UDDI 788WSDL 788XML 788Web services 787Web sitemultilingual 39WebDAV 329, 490accessing resources 492clients 491Index 825design locking 491disable session authentication 492editing elements 494enabling 491enabling databases 491enabling on a server 491system requirements 492Web server 492Web Site document 491WebQueryClose 590WebQueryOpen 277, 590WebQueryOpen event 93WebQuerySave 277WebQuerySave event 93WebSphere 667, 688WebSphere Application Server 667Welcome page 16customizing 16Domino objects 16JavaScript Object Model 16Recent Databases tab 17what is new in Domino 6 347Window Tabs 19window title 93Work pane 19Workflow 4workflow 254working with open documents 580WSDL 788WYSIWYG 174XXLS 489XML 38, 364, 385, 744compared to HTML 744creating programmatically 764

defined 744describing the presentation 745describing the structure of the data 745document type definition 745DOM API 746Domino objects for DXL 748DXL 746exporting data 748exporting for elements 488for design elements 487importing data 748in Domino 746Java 779LotusScript 763modifying data in Domino database 748presenting data 746SAX API 746showing view data 490style sheets 756transforming 489, 745using a XSL stylesheet in Domino 758using in Domino Designer 749XSL 745XSLT 745XML tools 761XSL 364826 Domino Designer 6: A Developer’s Handbook(1.5” spine)1.5”<-> 1.998”789 <->1051 pages
Domino Designer 6:A Developer’s Handbook
®SG24-6854-00 ISBN 073842658X
INTERNATIONALTECHNICALSUPPORTORGANIZATIONBUILDING TECHNICALINFORMATION BASED ONPRACTICAL EXPERIENCEIBM Redbooks are developed bythe IBM International TechnicalSupport Organization. Experts

from IBM, Customers andPartners from around the worldcreate timely technicalinformation based on realisticscenarios. Specificrecommendations are providedto help you implement ITsolutions more effectively inyour environment.For more information:ibm.com/redbooks
Domino Designer 6:A Developer’s HandbookDevelop applicationsfor Notes, Web andMobile clientsProgramming withDomino Designer 6New features ofDomino 6In this IBM Redbook, we describe how to develop applicationswith IBM Lotus Domino Designer 6. With Domino Designer,you are able to create applications hosted by a Domino server.These applications can be used by different clients, such asNotes clients, Web browsers or mobile devices.We introduce, and show in detail, how you can use all thedesign elements of Domino Designer, such as forms, pages,views, agents, outlines, resources and framesets. Readerswho are familiar with developing applications using Release 5of Lotus Domino may want to start at Chapter 12, whichintroduces the new features in Domino 6.0, and continue fromthere.In the chapters towards the end of the book, we discussdifferent programming languages, @functions, LotusScript,JavaScript, and Java, that can be used in Domino. Wedescribe in detail how to manipulate rich text objects byprogramming, as well as XML, in Domino.This redbook was written for technical specialists, developersand programmers, customers, IBM Business Partners, andthe IBM and Lotus community who need technicalunderstanding of how to develop applications using IBM LotusDomino Designer 6.0.
Back cover