lesson 2 inding azards - mdcp's science home...
TRANSCRIPT


Lesson 2: Finding Hazards
Youth@Work—Talking Safety Miami-Dade County Public Schools 37
Lesson PlanHelp students identify a variety of health and safety hazards at typical worksites where young people find employment.
Step 1
Define the term “job hazard.”10 minutes
Brainstorming, class discussion
Step 2
Identify workplace health and safety hazards on typical teen job sites.
15 minutes
Find the Hazards activity, class discussion
Step 3
Examine the hazards in a typical teen workplace.
25 minutes
Hazard Mapping activity*, small group work, class discussion
* For students with cognitive disabilities or limited English proficiency, you may wish to teach an expanded version of the Find the Hazards activity in lieu of using the Hazard Mapping activity.
Step 4
Review and summarize the main points of the lesson.
5 minutes
Mini lecture

Lesson 2: Finding Hazards
38 Youth@Work—Talking Safety Miami-Dade County Public Schools
Student ObjectivesBy the end of the lesson, students will be able to:
See hazards that exist in workplaces and predict the harm they may cause.
Understand the differences between various categories (types) of workplace hazards.
Identify ways to get information about chemicals used at work.
Explain that some workplace hazards are obvious, but others are not.
Construct a detailed hazard map of a hypothetical workplace or visually identify the health and safety hazards in an example hazard map.
Organize hazards by category.
Analyze and rank hazards with regard to (1) potential risk of injury from hazard, and (2) potential severity of injury from hazard.
Talking Safety Core Competencies: 2, 3, 7
National Health Education Standards (NHES): #1, #7, #8 (refer to the Appendix on page 195 for more information).
Lesson 2: Finding Hazards
Youth@Work—Talking Safety Miami-Dade County Public Schools 39
Key Points to Keep in MindSome job hazards are more obvious than others. This means that some hazards can be easily seen (e.g. a sharp blade) while others can’t (e.g. stress). Some hazards can hurt you now (e.g. hot grease), while others may cause health problems in the future (e.g. noise).
Your students should know how to identify different types of hazards on a variety of worksites. This will help them to better protect themselves against possible injury on any job.
Teens should understand concepts of “susceptibility” (how likely is it that this can hurt me?) and “severity” (if this hurts me, how bad could it be?). Knowing these concepts makes them more likely to pay attention to job hazards and to work safer.
Talking about potential risks and severity of injuries from a variety of hazards can help raise awareness and shape constructive beliefs about the value of workplace safety and health.
Whether a student works in an office, on a farm, in a retail shop, or in a restaurant, all workplaces have hazards that can be identified and corrected.
Students should be aware of hazards on the job so that they can recognize potential health and safety problems. In recognizing these problems, workplace injuries and illnesses can be predicted and prevented.
In the Find the Hazards activity in this lesson, students often bring up the concept of customer safety and workplace training that some young people receive—especially in food service jobs—that pertains to this issue.
Although customer safety is important, the focus of this lesson—and of the curriculum—is on the safety and health of the worker.

Lesson 2: Finding Hazards
40 Youth@Work—Talking Safety Miami-Dade County Public Schools
Preparation
Read
Teacher Background Notes Section A and Section B at the end of this lesson (on pages 51–53)
Set Up
A PowerPoint presentation for slides 17–26 on a computer (with projector)
Preview
PowerPoint slides 17–26
Obtain
A flipchart and markers, or use a whiteboard and markers
A set of colored markers or pens (black, red, green, blue, orange) for each small group of three or four students (Hazard Mapping activity)
Choose
One of the four Find the Hazards pictures (Student Handouts 3–6, on pages 163–169). You will have time to complete only one.
Photocopy
The Find the Hazards picture you selected (from Student Handouts 3–6: Fast Food Restaurant, Grocery Store, Office, Gas Station). Have one copy for each student.

Lesson 2: Finding Hazards
Youth@Work—Talking Safety Miami-Dade County Public Schools 41
Instructor Notes: Step 1Define the term “job hazard.”15 minutes
Introduce the lesson using PowerPoint slide 17.
Remind the class that a job hazard is anything at work that can hurt you, either physically or mentally.
Explain that some job hazards are obvious, but others are not. This means that some hazards can be easily seen (e.g. a sharp blade) while others can’t (e.g. stress). Some hazards can hurt you now (e.g. hot grease), while others may cause health problems in the future (e.g. noise). In order to be better prepared to be safe on the job, it is necessary to understand how to identify different types of hazards.
Show PowerPoint slides 18 and 19.
Inform the class that hazards can be divided into four categories. Write these as column headings on a flipchart page or whiteboard.
Explain:
Safety hazards, such as hot surfaces or slippery floors, which can cause immediate accidents and injuries.
Chemical hazards, which are gases, vapors, liquids, or dusts that can harm your body. Examples include cleaning products and pesticides.
Biological hazards, which are living things that can cause conditions such as flu, HIV/AIDS, hepatitis, Lyme disease, and tuberculosis (TB). Examples include bacteria, viruses, and molds. In the workplace, you can be exposed through contact with used needles, sick children, or sick animals, for example.
Other health hazards, which are other harmful things that can injure you or make you sick. Examples include noise and repetitive movements.
Lesson 2: Finding Hazards
42 Youth@Work—Talking Safety Miami-Dade County Public Schools
Ask students to think about places they have worked or about familiar workplaces (such as restaurants, stores, theaters, offices).
Have students call out possible job hazards and say whether each one is a safety hazard, chemical hazard, biological hazard, or other health hazard.
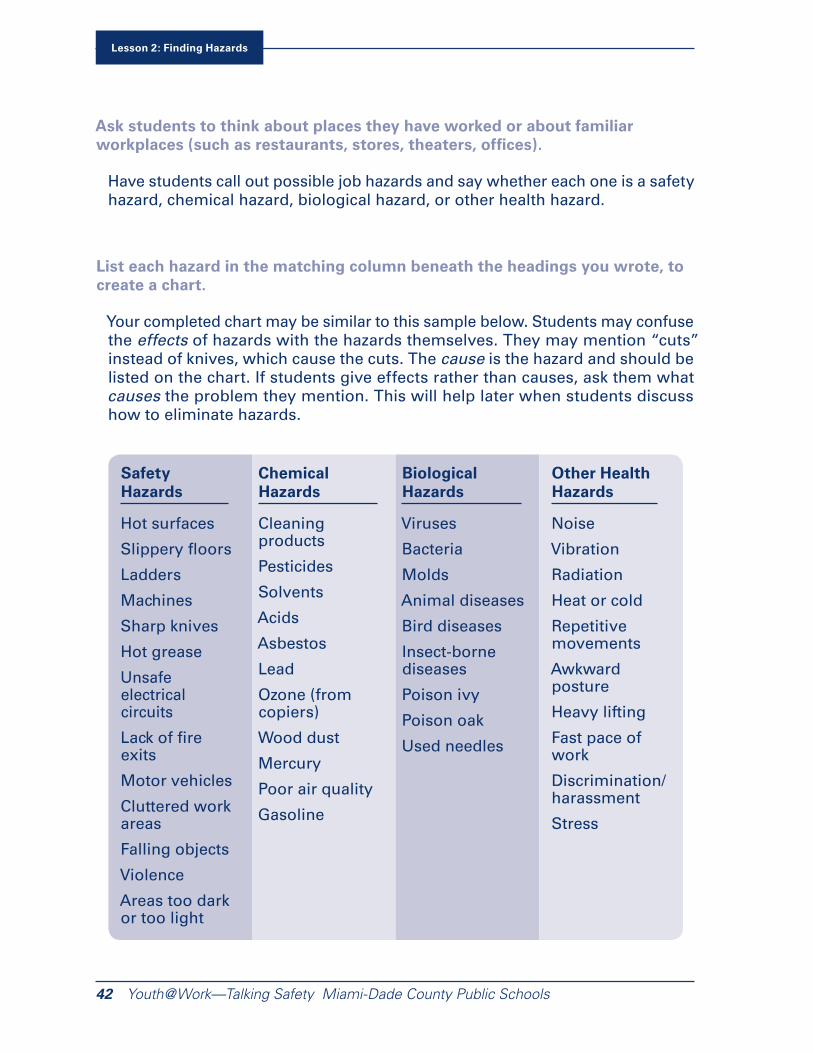
List each hazard in the matching column beneath the headings you wrote, to create a chart.
Your completed chart may be similar to this sample below. Students may confuse the effects of hazards with the hazards themselves. They may mention “cuts” instead of knives, which cause the cuts. The cause is the hazard and should be listed on the chart. If students give effects rather than causes, ask them what causes the problem they mention. This will help later when students discuss how to eliminate hazards.
Safety Hazards
Hot surfaces
Slippery floors
Ladders
Machines
Sharp knives
Hot grease
Unsafe electrical circuits
Lack of fire exits
Motor vehicles
Cluttered work areas
Falling objects
Violence
Areas too dark or too light
Chemical Hazards
Cleaning products
Pesticides
Solvents
Acids
Asbestos
Lead
Ozone (from copiers)
Wood dust
Mercury
Poor air quality
Gasoline
Biological Hazards
Viruses
Bacteria
Molds
Animal diseases
Bird diseases
Insect-borne diseases
Poison ivy
Poison oak
Used needles
Other Health Hazards
Noise
Vibration
Radiation
Heat or cold
Repetitive movements
Awkward posture
Heavy lifting
Fast pace of work
Discrimination/harassment
Stress
Lesson 2: Finding Hazards
Youth@Work—Talking Safety Miami-Dade County Public Schools 43
Talk more about chemicals. Ask the class the following questions to prompt discussion:
“ How can chemicals get inside your body?”
Answer: Chemicals can get inside your body when you breathe them in, swallow them, or get them on your skin.
“How can chemicals harm you?”
Answer: Chemicals can cause many different kinds of symptoms, such as skin rashes and irritation, dizziness, and breathing problems. They can also have health effects such as burns, increase the chances of serious diseases such as cancer, or cause failure of a vital organ such as the liver. Some chemicals may cause symptoms right away and other health problems that show up later in life. This is especially likely if you use certain chemicals for a long time.
“What are some ways to find out how a chemical product might harm you and how to protect yourself from it?”
Answer: When you use a product that contains chemicals (such as a cleaning solution or a pesticide), it’s important to know what kinds of health effects the chemical can cause and how to protect yourself. If you already have asthma or some other health problem, this information can be especially important.

Lesson 2: Finding Hazards
44 Youth@Work—Talking Safety Miami-Dade County Public Schools
To find out more about the chemicals in a product, you can do the following:
• Check the label.
• Ask your supervisor.
• Get training.
• Call a resource agency or check its website.
• Look at the Safety Data Sheet (SDS) for the product.
Show slide 20.
Explain to the class that SDSs are information sheets that manufacturers must send to companies along with their chemical products. They tell you what is in the product, how it can harm you, and how to protect yourself.
SDSs are meant for workers, not consumers. An SDS reflects the hazards of working with a chemical product in a workplace. For example, an SDS for paint is not as important to someone who uses a can of paint once a year, but it is extremely important to someone who paints in a confined space for 40 hours a week. The formats of SDSs can vary, but they convey the same basic information.
Instructor Note: See OSHA’s website for more information on Safety Data Sheets (SDSs): http://go.usa.gov/jjpd
Ask the class:
“Who are SDSs for?”
Listen to the students’ responses. Make sure the following points are discussed. SDSs are meant for:
• Employees who may be exposed to a chemical hazard at work.
• Employers who need to know the proper methods for storage and use of hazardous chemicals.
• Emergency responders such as firefighters, hazardous material crews, emergency medical technicians, and emergency room personnel.
Lesson 2: Finding Hazards
Youth@Work—Talking Safety Miami-Dade County Public Schools 45
Explain to the class:
The Occupational Safety and Health Administration (OSHA) is the federal government agency that enforces worker health and safety laws. Some states also have state OSHA programs.
Visit the OSHA website to see if your state has its own program. https://www.osha.gov/dcsp/osp/index.html
OSHA says that workers have a right to get information about the chemicals used in their workplace. Employers must train workers in how to use those chemicals safely and what to do if there is a chemical spill or other chemical emergency. The Environmental Protection Agency (EPA) also regulates the use of chemicals. They enforce the laws that protect our air, water, and soil from contamination.
OSHA requires employers to let their workers see and copy Safety Data Sheets (SDSs) for every chemical used or stored at the workplace. (Teacher Background Notes Section A, page 51, provides more information on SDSs.)

Lesson 2: Finding Hazards
46 Youth@Work—Talking Safety Miami-Dade County Public Schools
Instructor Notes: Step 2Identify workplace health and safety hazards on typical teen job sites (Find the Hazards activity).10 minutes
Hand out materials. Pass out the Find the Hazards picture you selected (from Student Handouts 3–6). You will have time to complete only one picture. Also give students a colored marker, highlighter, or pen.
Explain the activity. Students should look at the workplace shown in the handout. They should try to find and circle as many safety or health hazards as they can.
Give students a couple of minutes to find hazards in the picture. Tell them they also should think about how each hazard could harm them if they were working at this job site. They will be asked about this later.
Show PowerPoint slides 21–24, which correspond with the picture that students looked at on their handouts.
Have student volunteers list the hazards they saw in the picture.
List the hazards on the board or on a flipchart.
Ask the students if they can think of other hazards that the volunteers didn’t find. Or are there possible hazards in the workplace that are not shown in the picture? As students answer, add these additional hazards to the list. If the class misses any hazards, point them out.
Teacher Background Notes Section B, on pages 52–53, contains a list of possible hazards in each of the four workplaces depicted. Alternatively, you can select workplaces specifically relevant to your program or the experiences of your students.

Lesson 2: Finding Hazards
Youth@Work—Talking Safety Miami-Dade County Public Schools 47
Instructor Notes: Step 3See the hazards in a typical teen workplace (Hazard Mapping activity).25 minutes
(Teacher note: For students with cognitive disabilities or limited English proficiency, the Find the Hazards activity may be more appropriate than the Hazard Mapping activity. Thus, instead of Hazard Mapping, you might have your class complete all four pictures provided in Student Handouts 3–6.)
Show PowerPoint slide 25.
Divide the class into groups of three or four students. Tell students that they will work with their group to draw hazard maps. Each group will choose or be assigned a different type of workplace and will draw a simple floor plan showing a typical workplace of that type. They will mark the location and type of hazards that may be found in that workplace. You and your students can choose places where young people often work, such as fast food restaurants, grocery stores, offices, gas stations, swimming pools, and coffee shops.
Assign or have the groups select the type of workplace they will draw.
Give each group a large sheet of flipchart paper and five colored markers (black, red, green, orange, blue).
Explain that groups should draw their floor plans with a black marker. The floor plan should show rooms, work areas, furniture, equipment, work processes, doors, and windows. Explain that the floor plan can be very simple.

Lesson 2: Finding Hazards
48 Youth@Work—Talking Safety Miami-Dade County Public Schools
Ask each group to mark the location of various hazards on their floor plans.
Using the following color code can help reinforce the categories of hazards. It’s not necessary to color code the categories if it seems too complicated. Slide 25 provides a sample of a finished map.
Red to show safety hazards
Green to show chemical hazards
Orange to show biological hazards
Blue to show other health hazards
Ask the groups to show how dangerous each hazard is.
They can highlight hazards they consider especially serious or severe by coloring them more prominently or marking them with a symbol.
Ask that each group choose someone to present the map to the entire class later.
The presenters should prepare to explain to the class what they think are the major hazards in this workplace.
Answer any questions, and let the groups begin work.
Circulate among the groups.
Ask questions, and make suggestions as appropriate. Challenge the students to think beyond obvious hazards. After about 10 minutes, bring the class back together.
Have each group’s presenter explain the group’s map, including what they see as the most serious hazard in each category (red, green, orange, blue).
List any hazards people mention that were not previously listed on the chart created during the Introduction.

Lesson 2: Finding Hazards
Youth@Work—Talking Safety Miami-Dade County Public Schools 49
Instructor Notes: Step 4Review the main points of the lesson.5 minutes
Conclude Lesson 2 by reminding students about these main points:
• All workplaces have hazards. A job hazard is anything at work that can hurt you, either physically or mentally.
• Some job hazards are obvious (easily seen), but others are not. Some hazards can hurt you now, while others may cause health problems in the future.
• To be safe on the job, you must be able to identify different types of hazards, which include safety, chemical, biological and other hazards. It’s important to remember that the cause (of a work injury) is the hazard; the effect of the hazard is the injury itself. For example a meat slicer is the cause (hazard) and a cut is the effect (injury).
• People have a right to know about chemicals and other hazardous substances used in their workplaces! When using a new chemical, it’s important to read labels and check the SDS (Safety Data Sheet) for the product.
• An SDS tells you what is in a chemical product, how it can harm you, and how to protect yourself.

Lesson 2: Finding Hazards
50 Youth@Work—Talking Safety Miami-Dade County Public Schools
Homework
Give students photocopies of the three Find the Hazards pictures (Student Handouts 3–6) that you did not use in class. Ask the students to take them home and circle the hazards in each picture (following the color model you used in class). Students should think about the hazards they found in each scene and how serious each hazard is.
Ask students to choose a picture they can use to create a safety campaign for young workers. They can make a poster warning teen employees of possible job hazards (at that location). As an alternative, students can create a poem, case study, or other activity that they see relevant to advocating for a safer workplace for young people.

Lesson 2: Finding Hazards
Youth@Work—Talking Safety Miami-Dade County Public Schools 51
Teacher Background Notes: Section ASDSs in depth
Teachers who wish to explore the topic of SDSs in depth with students may refer to the Massachusetts Department of Public Health’s Food Service Safety Curriculum, Student Handout 2, available through the website below. After going to this website scroll down to the second page for the information.
http://go.usa.gov/jWnR
Student Handout 2 provides a step-by-step guide on how to read an SDS, as well as an example of an actual SDS (for ethanol). You may wish to go through some of the key points on the SDS with students and see if they can identify ethanol as alcohol.

Lesson 2: Finding Hazards
52 Youth@Work—Talking Safety Miami-Dade County Public Schools
Teacher Background Notes: Section BBelow are lists of hazards present in each illustrated workplace:
Fast Food Restaurant
Pictured
Hot grill or ovenSteamFireHot food or liquidsHot greaseKnivesHeavy liftingSlippery floorCleaning chemicalsPressure to work fastNoiseRepetitive movementsAngry customer (potential violence, abuse)
Not pictured:
StressElectrical hazardsSexual harassmentBiological hazards (viruses, bacteria, mold)Robbery/violence
Grocery Store
Pictured
Heavy liftingBox cutterMeat slicerCleaning chemicals/unmarked chemicalsRepetitive motionBending or reachingStanding a lotStress
Not pictured:
Sexual harassmentBiological hazards (viruses, bacteria, mold)Robbery/violence (angry customers, co-workers)

Lesson 2: Finding Hazards
Youth@Work—Talking Safety Miami-Dade County Public Schools 53
Office
Not pictured:
Sexual harassmentIndoor air qualityViolence (angry customer, co-worker)
Gas Station
Pictured
Gasoline/fumesOther chemicals (like solvents)Tools and equipmentWorking in dark areasStressMoving vehiclesWorking alone at night (robbery)Repetitive movements
Not pictured:
Heavy liftingHeat or cold Sexual harassmentViolence (angry customer, co-worker)
Pictured
Repetitive use of keyboardCluttered workplaceAwkward posture at deskCopier and other chemicalsStressEye strainPaper cutter/scissorsHot liquidsElectrical cordImproper chair

Your Notes for Lesson 2: Finding Hazards
54 Youth@Work—Talking Safety Miami-Dade County Public Schools