lego crickit rover - cdn-learn.adafruit.com · lego mindstorms ( components and accessories are...
TRANSCRIPT

LEGO Crickit RoverCreated by Ruiz Brothers
Last updated on 2018-10-15 06:33:58 PM UTC
2444455667777
889
101010101011
1111
1313131414141515151616
171717171718
19191920202021
Guide Contents
Guide ContentsOverview
Prototyping RoboticsBuilding LEGO robotics without LEGO Mindstorms NXTWhat's a CRICKIT?Base Plate Design for CRICKITProgramming Robots3D Printed PartsElectronics
Adafruit CRICKIT for Circuit Playground ExpressCircuit Playground ExpressDC Gearbox Motor - "TT Motor" - 200RPM - 3 to 6VDCMicro Servo - MG90S High Torque Metal Gear
HardwarePowerPrerequisite Guides
3D PrintingMounts & Plates3D Printed Parts ListCURA SlicingWhat If I Don't Have A 3D Printer?
Ultimaker 2+ 3D Printer
Download STLsDesign Source Files
SoftwareMakeCode for CRICKIT // Circuit Playground ExpressSetup Circuit Playground Express for MakeCodeInstall CRICKIT Extension for MakeCodeUpload and Test CodeOn Start & ForeverCrickit Code BlocksUsing FunctionsTank Motors Code BlockServo Control & RepeatLights & Sounds
Base Plate AssemblyBase PlateInstall Standoffs to PlateInstall Circuit Playground Express to CRICKITInstall CRICKIT to PlateAssembled CRICKIT and Plate
Motor AssemblyMotor PartsAssembly Motor MountMotor HardwareInstall Motor MountWheel SubassemblyInstall Wheel to Motor
© Adafruit Industries https://learn.adafruit.com/lego-crickit-rover Page 2 of 26

212222232323
24242424252525
262626
Motor Wheel AssembliesInstall WheelsLEGO Cast WheelCaster Wheel AssemblyInstall Caster WheelPrep for Battery
Install BatteryBattery BricksSecure BatterySecure CrickitConnect Motor WiresDC Power ConnectBattery Installed
Servo AssemblyGlue Servo Mount PartsInstall Servo
© Adafruit Industries https://learn.adafruit.com/lego-crickit-rover Page 3 of 26

Overview
Prototyping Robotics
Build a CRICKIT (https://adafru.it/BD7) powered rover robot using LEGO pieces and 3D printed mounts! Learn how touse the Circuit Playground Express (https://adafru.it/adafruit-cpx) and the LEGO brick system to build a two wheeledrobot. Use Microsoft MakeCode (https://adafru.it/wpC) to program movements with interactive lights and sounds. LEGOis the breadboard equivalent to mechanical design. It's modularity makes it perfect for prototyping robotics. With justtwo motors, an Adafruit CRICKIT (https://adafru.it/BD7) and Circuit Playground Express (https://adafru.it/adafruit-cpx)board, you can quickly make a moving robot. It's expandable and completely customizable with 3D printing!
Building LEGO robotics without LEGOMindstorms NXTStandard "off-the-shelf" components such as motors and
servos are fairly inexpensive and widely available. The
LEGO Mindstorms (https://adafru.it/BOJ) components
and accessories are pretty expensive and commonly
included in a larger kit that will set you back about $350
USD. With 3D printing and low cost DIY electronics, you
can make custom mounts and parts to adapt those off-
the-shelf components into LEGO compatible modules.
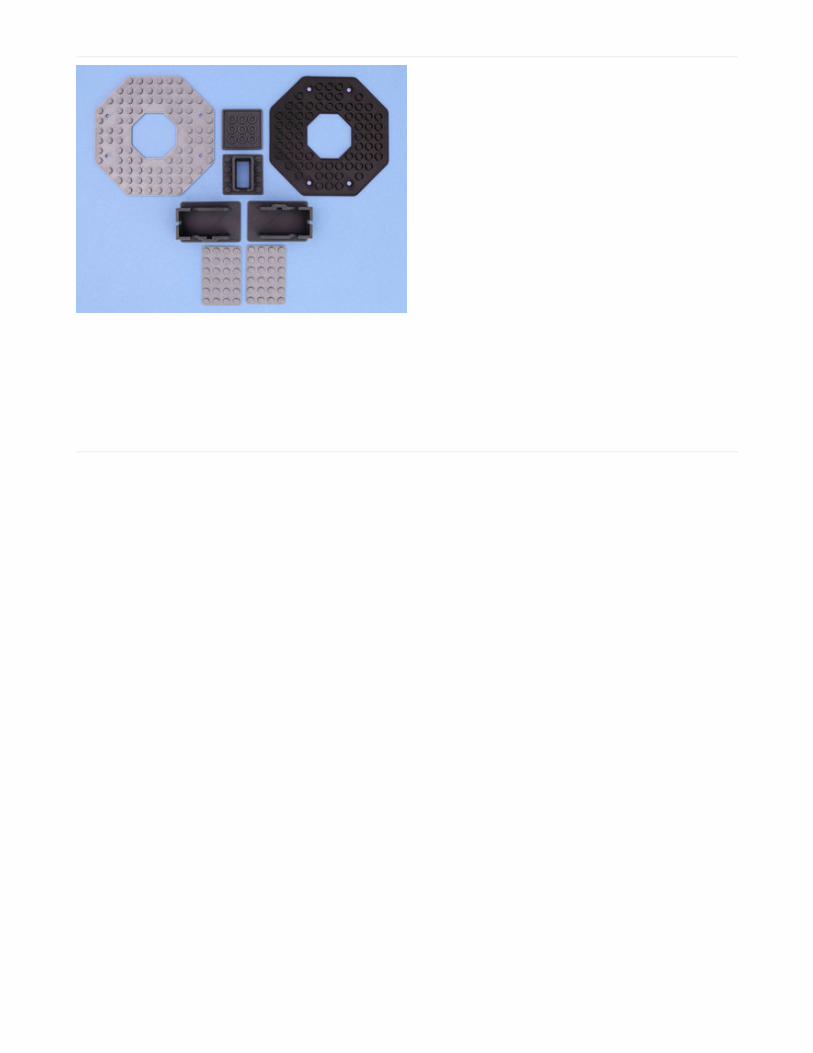
What's a CRICKIT?
With the Adafruit CRICKIT (https://adafru.it/BD7) robotics platform, you can control and program a bunch of cool stufffrom motors to servos and even RGB LEDs and sound effects. No soldering required, you just plug stuff in and use thescrew block terminals to keep everything together. This makes prototyping projects super easy and more importantly,
© Adafruit Industries https://learn.adafruit.com/lego-crickit-rover Page 4 of 26

fast and fun! Program CRICKIT over a USB cable using Microsoft MakeCode (https://adafru.it/wmd), a drag and dropcoding language that runs in the Google Chrome web browser.
Base Plate Design for CRICKIT
The base plate serves as the rovers chaises and provides structural support. It features compatible elements like thestubs and tubes you'd find on a typical LEGO brick. It's octagonal shape follows the outline of Crickit PCB and matchesup nicely. Using the LEGO system allows for easy to assemble prototyping and a plethora of parts, components andpieces available from LEGO.
Programming RobotsThe movements of the rover are programmed using
Microsoft MakeCode (https://adafru.it/wmd), a drag-and-
drop block based coding language. The CRICKIT
extension in MakeCode allows quick and easy
programming of motors, servos, lights and sounds. You
can create sequential animations or more interactive
movements using the on-board sensors. Use the
example demo code to get started and modify it to
make it your own!
© Adafruit Industries https://learn.adafruit.com/lego-crickit-rover Page 5 of 26
3D Printed PartsMounts and connecting parts are 3D printed in PLA
filament on FDM type 3D printers. These parts are
optimized to print without any support materials. They
feature tight tolerances that allow parts to snap fit
together. Mounting holes are also used to secure
subassemblies together.
Electronics
Here's a list of components used to build this project. The Adafruit Crickit requires an Adafruit Circuit PlaygroundExpress, these are sold separately. The CRICKIT includes with M3 hardware screws and standoffs for bolting onto theAdafruit Circuit Playground Express.
© Adafruit Industries https://learn.adafruit.com/lego-crickit-rover Page 6 of 26
Adafruit CRICKIT for Circuit Playground Express
$29.95IN STOCK
ADD TO CART
Your browser does not support the video tag. Circuit Playground Express
$24.95IN STOCK
ADD TO CART
DC Gearbox Motor - "TT Motor" - 200RPM - 3 to 6VDC
$2.95IN STOCK
ADD TO CART
Micro Servo - MG90S High Torque Metal Gear
$9.95IN STOCK
ADD TO CART
© Adafruit Industries https://learn.adafruit.com/lego-crickit-rover Page 7 of 26

Hardware You'll need some extra hardware like machine screws,
nuts and hex standoffs to assemble this project. They're
linked below, but feel free to source them from your
favorite supplier.
6 x M3 x 12mm standoffsBrass Hex Metric Standoffs
ADD TO CART
12 x m3 x 6mm machine screwsM3 Phillips Button Head Metric Machine Screws
BUY NOW
4 x M3 x 30mm StandoffsM3 Brass Hex Metric Standoffs
BUY NOW
1 x M3 Standoffs Assortment KitM3 Brass Hex Metric Standoffs
BUY NOW
4 x M3 x 0.5 x 1.55mm Hex NutsMetric Sized Hex Jam Nuts
BUY NOW
4 x M3 x 8mm machine screwsM3 Phillips Pan Head Metric Machine Screws
BUY NOW
4 x m3 x 12mm machine screwsM3 Phillips Flat Head Metric Machine Screws
BUY NOW
Power
We'll need just a 4xAA battery packs to power our CRICKIT rover. We recommend NiMH rechargeables. For one, theyhave less waste, but they also perform better than alkalines in high-current draw robotics. So if you can, please useNiMH!
© Adafruit Industries https://learn.adafruit.com/lego-crickit-rover Page 8 of 26

1 x 4 x AA Battery HolderBattery Pack with 2.1mm Plug
OUT OF STOCK
1 x AA Rechargeable Batteries1.3V AA NiMH batteries
BUY NOW
Prerequisite Guides
There's resources in these guides that go beyond what's covered in this tutorial. MakeCode guide is all about settingup your Circuit Playground Express board. TheCircuit Playground Express introduction guide walks you through all ofthe pinouts, sensors and everything you need to know.
MakeCode for Circuit Playground Express (https://adafru.it/wWd)Introducing Circuit Playground Express (https://adafru.it/adafruit-cpx)Introducing CRICKIT (https://adafru.it/BD7)
© Adafruit Industries https://learn.adafruit.com/lego-crickit-rover Page 9 of 26

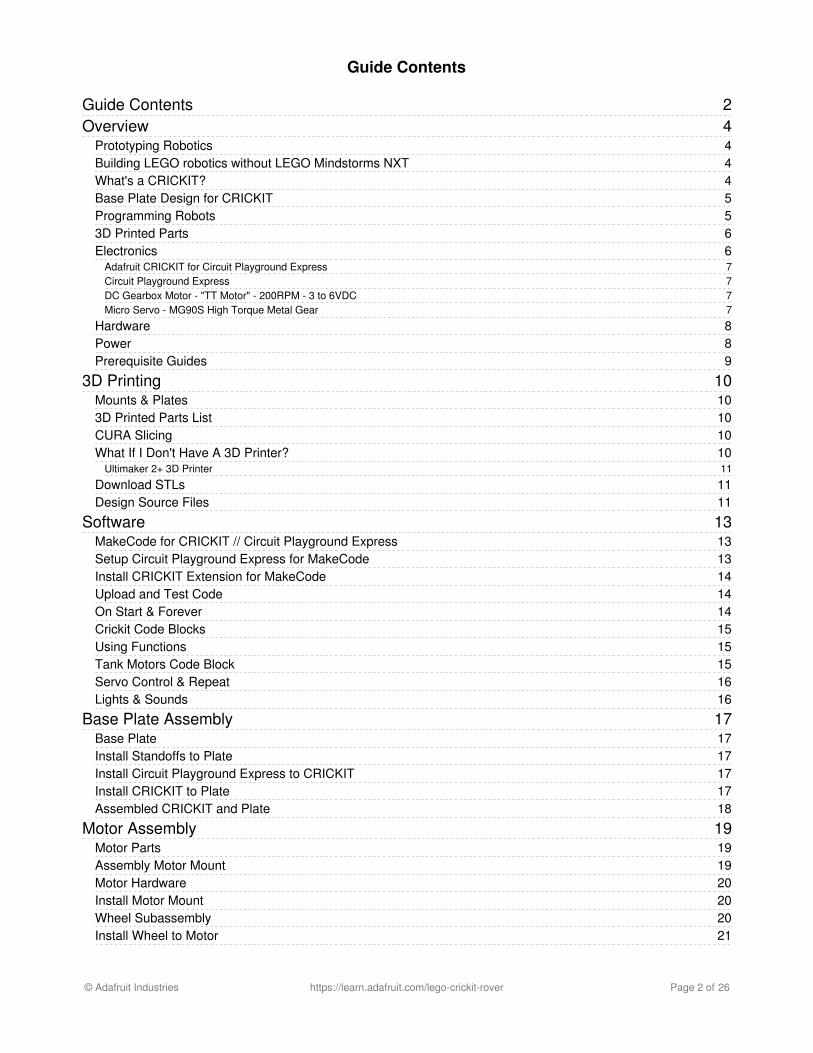
3D Printing
Mounts & PlatesThe various mounting parts and plates are designed to
3D print with FDM style machines using PLA filament.
These parts require very precise tolerances and should
be printed with a well calibrated machine. Fittings may
vary depending on slice settings.
3D Printed Parts List
Models are oriented to print as is and do not require any support material. The lego studs and tubes needs to betested before printing the full plates. I suggest test printing the lego-motor-studs part first and see how the fittings feel.Bricks ought to have a tight fit but still be able to remove.
lego-base-plate-tubes.stllego-base-plate-studs.stllego-motor-studs.stllego-motor-box.stllego-motor-axle.stllego-servo-tubes.stllego-servo-box.stl
CURA SlicingUse the slice settings as reference. Settings may need
to be adjust for tolerances. Print parts independently for
best results. Test fit parts before full assembly. Parts
tested with PLA filament using Ultimaker 3.
0.25mm nozzle for fine quality
0.10mm layer height for LEGO studs/tubes
0.38mm line width / 2 wall line count
60mm/s printing speeds
What If I Don't Have A 3D Printer?
Not to worry! You can use a 3D printing service such
© Adafruit Industries https://learn.adafruit.com/lego-crickit-rover Page 10 of 26

as 3DHubs (https://adafru.it/jNb) or MakeXYZ (https://adafru.it/veh) to have a local 3D printer operator 3D print and shipyou parts to you. This is a great way to get your parts 3D printed by local makers. You could also try checking out yourlocal Library or search for a Maker Space.
Download STLs
You'll need an STL file to 3D print the mount for the circuit playground express. Click the button below to downloadthe STL from your choice of repo site.
https://adafru.it/BW7
https://adafru.it/BW7
https://adafru.it/BWu
https://adafru.it/BWu
https://adafru.it/BWv
https://adafru.it/BWv
Design Source FilesThe enclosure assembly was designed in Fusion
360. This can be downloaded in different formats like
STEP, SAT and more. Electronic components like the
board, displays, connectors and more can be
downloaded from our Fusion 360 CAD parts github
repo (https://adafru.it/AW8).
https://adafru.it/BW8
Ultimaker 2+ 3D Printer
$2,499.00IN STOCK
ADD TO CART
© Adafruit Industries https://learn.adafruit.com/lego-crickit-rover Page 11 of 26

https://adafru.it/BW8
https://adafru.it/BT5
https://adafru.it/BT5
https://adafru.it/AW8
https://adafru.it/AW8
© Adafruit Industries https://learn.adafruit.com/lego-crickit-rover Page 12 of 26

Software
MakeCode for CRICKIT // Circuit Playground Express
MakeCode is this programming editor that runs in the Google Chrome web browser. It’s has an intuitive interface that’sboth block based and text editor.
It works with Adafruit's CRICKIT and Circuit Playground Express so you can make interactive projects with the on-board sensors and components. You can drag & drop blocks to make interactive programs using lights and soundswithout having to solder or learning a new syntax.
You can upload code directly to the Circuit Playground Express with WebUSB, see this guidepage (https://adafru.it/CLO) for that option.
Setup Circuit Playground Express for MakeCode
To get started, we'll need to head over to the Adafruit MakeCode (https://adafru.it/Bct) website and follow the stepsbelow.
1. Plug in your Circuit Playground Express with a USB Cable2. Press the RESET button. Green light means you're ready to MakeCode3. Download the UF2 file and drop it onto CPLAYBOOT.
https://adafru.it/Bct
https://adafru.it/Bct
© Adafruit Industries https://learn.adafruit.com/lego-crickit-rover Page 13 of 26

Install CRICKIT Extension for MakeCode
On the MakeCode site, click on New Project. In the list
of blocks, select ADVANCED and then
EXTENSIONS. Click on the Crickit block that shows up
and install Crickit support! You will now have a new
CRICKIT bin of blocks you can use! Continue on to learn
how to use these blocks. Read the full guide here for
more info (https://adafru.it/BKC).
https://adafru.it/BW9
https://adafru.it/BW9
Upload and Test Code
Once you have your CPX setup with the MakeCode UF2, try testing it out by uploading the code to the board. Click thelink below to open up the program in makecode. Click on the pink edit icon near the top of the title to open the code.This will create a project in MakeCode and allow you to edit, modify and upload the code to the board.
On Start & Forever
Let's focus on the on start and forever code blocks.
Anything in the forever block will continuously run,
looping forever. Stuff placed in the on start code block
will run first, in the beginning of boot up. This is
generally used for initial setups such as NeoPixel
brightness or speaker volume. In this project, we have
several function blocks that are labeled and represent a
single motion. Each of these functions contain several
code blocks that tell the motors how to move.
© Adafruit Industries https://learn.adafruit.com/lego-crickit-rover Page 14 of 26
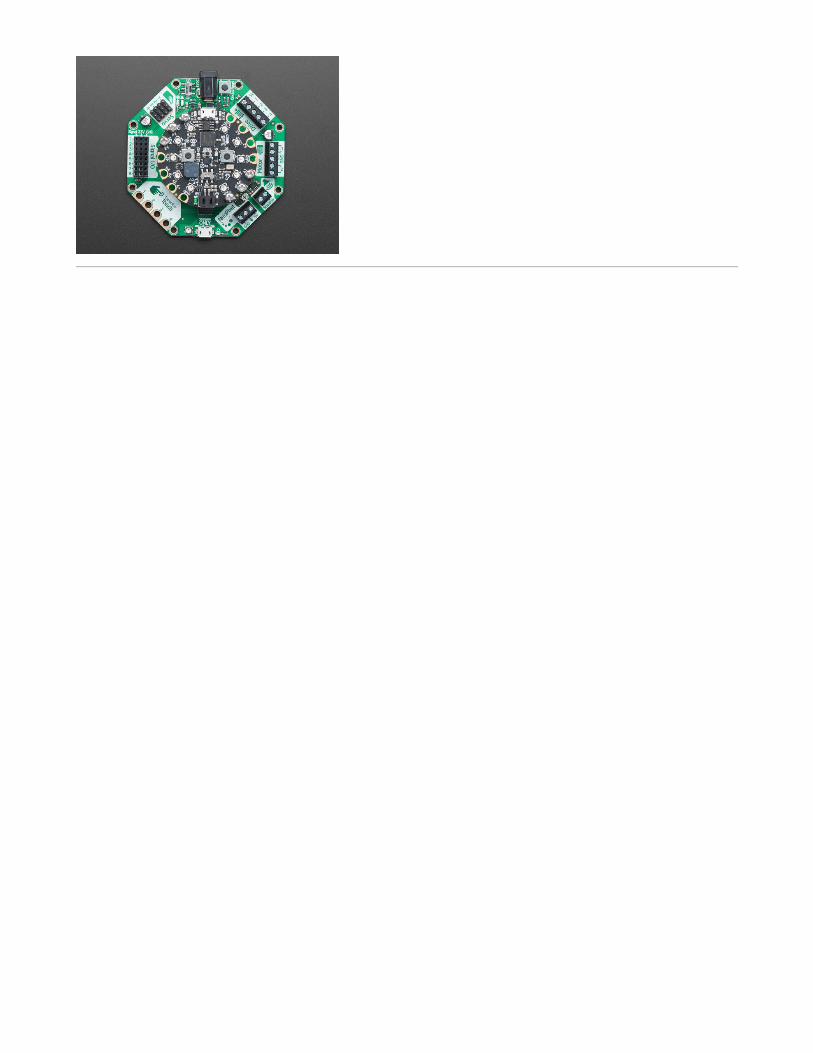
Crickit Code Blocks
Each code block is grouped into a section that pertains
to the type of component. Here we have blocks for
controlling servos, motors, NeoPixels and more. For this
project, we'll only focus on motors and servos. We'll use
the code blocks in the LIGHT category to control the
NeoPixels on-board the Circuit Playground Express.
Read through the various blocks and hover over on
them to see a tool tip with description of what they do.
Using Functions
Each function contains several code blocks that tell the
motors what to do. You can create custom functions by
clicking on the Make buttons in the functions category.
To create forward motion using two motors, we can use
the crickit tank motors code block. Using several
functions allows for quick rearrangement of movements.
This can aid in the creation of sequential rover
movements.
© Adafruit Industries https://learn.adafruit.com/lego-crickit-rover Page 15 of 26
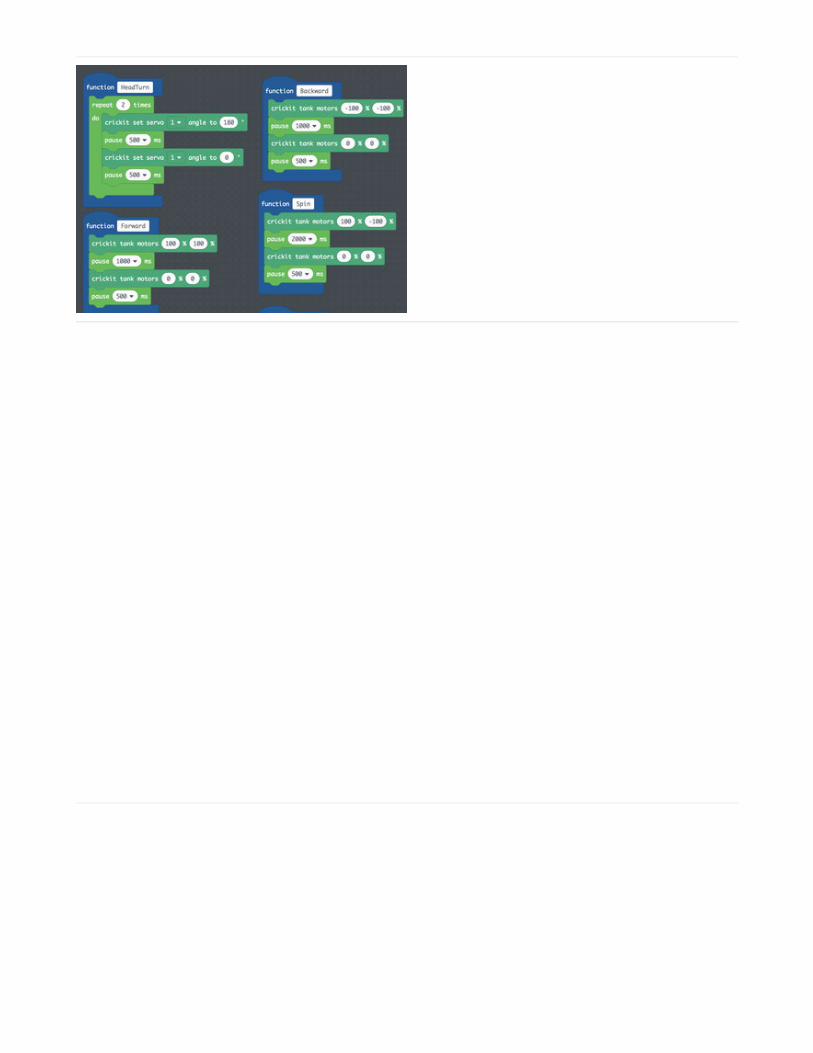
Tank Motors Code Block
This single block can control both motors by assigning a
numerical value from -100 to 100. The value 0 is a full
stop. A positive value of 100 is full speed. 50 for half
speed. A negative value will make the motor turn in
reverse. To create rotational movements, set one motor
to -100 and the other to 100. This will also result in
spinning movement. Use a pause block in between
motor blocks to create duration between movements.
500ms - 1000ms should be a good starting point.
Servo Control & Repeat
Program servos using the crickit set servo code block.
Choose a servo number and assign a value to the angle.
0-180 will give you the available range of rotation from
the servo. Use a pause block to create duration
between the movements. A repeat block, found in the
loops block category, can be used to create repetitive
movements.
© Adafruit Industries https://learn.adafruit.com/lego-crickit-rover Page 16 of 26

Lights & Sounds
Display dazzling NeoPixels using the show animation
code block in the LIGHT category. Use the set
brightness block to change the intensity. Create colored
patterns using the show ring block. Create a custom
function and place it in between motor movements.
Music notes can be generated with the on-board
speaker. Choose notes from a piano keyboard and write
a custom jingle. Playback canned effects from the play
sound code block.
© Adafruit Industries https://learn.adafruit.com/lego-crickit-rover Page 17 of 26

Base Plate Assembly
Base PlateThe base plate is split into two separate pieces that are
joined together with screws. The plate with tubes
connects to LEGO studs. Join the two pieces together at
the flat sides. While holding them together, insert and
fasten an M3 x 12mm (flat head) screw. The screws
heads needs to be flush with the surface of the base
plate. The mounting holes are chamfered and designed
to recess the screws. Repeat this progress for the four
mounting holes.
Install Standoffs to Plate
While holding the base plate, insert one of the long standoffs and twist to fasten onto one of the screws. Tighten thestandoffs by hand for each of the four screws.
Install Circuit Playground Express to CRICKIT
If you haven't put these two together yet, now is the time to do so! Grab the pcbs, screws and standoffs that came withyour crickit. Insert a screw through the bottom of the CIRCKIT board. While holding the screw with your finger, flip theboard over and twist a standoff onto the threading of the screw. Twist until tightened. Repeat the process for all sixmounting holes. When your done, place the CPX over the standoffs and line up the pins. Be sure they're in the correctspot with matching labels! Insert and fasten the machine screws on top to secure the CPX.
Install CRICKIT to Plate
© Adafruit Industries https://learn.adafruit.com/lego-crickit-rover Page 18 of 26

Install CRICKIT to Plate
Place the Crickit PCB over the standoffs and line up the mounting holes. Either set of four holes can be secured to thestandoffs. Pick your orientation and insert machine screws through the mounting holes. Fasten the screws until tight.
Assembled CRICKIT and Plate
Now the base plate is ready for adding LEGO bricks! To make our rover, we'll need to assemble some wheels using TTmotors. We'll also need a wheel assembly and an axle connector.
© Adafruit Industries https://learn.adafruit.com/lego-crickit-rover Page 19 of 26

Motor Assembly
Motor Parts
Here's a parts list of the individual parts needed to make the wheel assembly.
LEGO wheels 56x26DC Gearbox TT Motor to LEGO and Compatible Cross Axle3D Printed Motor Mount3D printed Lego Adapter for Motor4x M3 x 25mm Phillips Pan Head Metric Machine Screws4x M3 x 1.55mm Metric Hex Nuts
Assembly Motor Mount
The motor mount is separated into two pieces. The first piece houses the geared DC motor while the other is a LEGObase plate adapter. These two will need to be glued together. A few lines of super glue will permanently bond the twopieces together. Be sure to make their as square as possible.
© Adafruit Industries https://learn.adafruit.com/lego-crickit-rover Page 20 of 26

Motor HardwareNext we'll need to gather our screws and nuts for
securing the motor to the mount. Each motor will need
two M3 x 25mm long metric machine screws and M3
hex nuts.
Install Motor Mount
Orient the motor and the motor mount so the features line up. The shaft and mounting tabs should line up with thecutouts in the mount. Insert the motor into the mount carefully. Press the two together until the motor is fully seated.Insert and fasten the screws through the motor body and motor mount. Use the hexnuts to secure the motor bytightening.
Wheel SubassemblyWe'll use a few LEGO parts to create our wheel sub-
assembly. Here I'm using a LEGO rim / tire thats
56x26mm. We also have a motor cross axle LEGO
adapter and an extra axle connector.
© Adafruit Industries https://learn.adafruit.com/lego-crickit-rover Page 21 of 26

Install Wheel to Motor
Insert the motor axle LEGO adapter through the center of the LEGO rim. Press to fully seat the wheel. Press fit an extraaxle connector for secure placement. Line up the hub end of the motor axle adapter with the shaft of the motor. Then,press the motor axle adapter into the shaft of the motor until it's fully seated. Rotate the tire to test out theconnectivity.
Motor Wheel Assemblies Test out the fitting and ensure everything has been fully
pressed and connected together. Note the orientation
of the wheels. It doesn't matter which side they go, so
you can flip them if needed. The motor mounts are not
mirrored because the movement would be inverted
when programming.
Install WheelsNow we can attach the motor mounts to the base plate.
You can choose where you think well work best in your
project. The orientation can be in either direction, so
there's no wrong way to put it! However, you will have to
counter balance it using a caster wheel. We'll go over
that next.
© Adafruit Industries https://learn.adafruit.com/lego-crickit-rover Page 22 of 26

LEGO Cast WheelThere's lots of different ways to build a caster wheel
using lego pieces and this one isn't anything special.
You'll need the following lego bits to create a swiveling
wheel with double tires.
Aeroplane Wheel Hub
Circular brick with female connector in center
2x4 brick with male connector in center
Caster Wheel AssemblySnap the aeroplane wheel hub onto the bottom of the
2x4 brick with the male connector in the center. Fit the
circular piece into the brick with the male connector.
The wheel hub should swivel and rotate freely.
Install Caster Wheel
Place the caster wheel assembly onto the bottom of the base plate. I put them near the front center of the plate tocounter balance the motors. Experiment with different placements, depending on your bricks, you may need to wedgeone or two more bricks to level out the rover.
© Adafruit Industries https://learn.adafruit.com/lego-crickit-rover Page 23 of 26

Prep for Battery
Next we'll need to sort out where the battery pack will go. In this project, we'll place in the between the CRICKIT andbase plate. TO do that we'll need to temporarily remove the PCB from the stand offs. We'll fashion ourselves a holderfor the battery pack out of LEGO bricks, naturally!
© Adafruit Industries https://learn.adafruit.com/lego-crickit-rover Page 24 of 26

Install Battery
Battery BricksWe need to fit the battery pack onto the rover
somehow. I placed it in the center of the base plate. To
keep it held in place, I used two 1x6 bricks to line the
edges of the battery pack. This way it has less room to
rock around. Use as many bricks as you'd like.
Secure BatteryIf bricks aren't enough, try double sided foam tape or
mounting tack. Next we need to secure the CRICKIT
back onto the base plate. Before we do, it's a good idea
to note wheel positions and best wire placement. We
need the wires to reach, so plan out where the need to
be.
Secure CrickitPlace the Crick PCB over the battery pack. Line up the
mounting holes with the standoffs and orient the PCB to
your preference. While holding in place, insert and
fasten M3 screws to secure the PCB to the standoffs.
© Adafruit Industries https://learn.adafruit.com/lego-crickit-rover Page 25 of 26

Connect Motor WiresInsert the jumper wires from the motors into the screw
terminal blocks. The CRICKIT has the motors labeled on
the PCB. Reference the photo for correct polarity. If you
find the wires lengthly, try wrapping them or routing
them around the battery pack and or standoffs.
DC Power ConnectNow it's time to plug in the battery into the DC barrel
jack. Make sure the power switch on the CRICKIT is set
to off! You don't want the rover falling off the table.
Battery InstalledThe battery pack should be fairly sturdy in between the
base plate and CRICKIT PCB. There's extra room of
more wires and perhaps other modules and
components. The bottom of the Crickit PCB has sharp
points that could potentially scratch or puncture, so be
aware and cautious.
© Adafruit Industries Last Updated: 2018-10-15 06:33:57 PM UTC Page 26 of 26

Servo Assembly
Glue Servo Mount Parts
The servo mount is separated into two pieces in order to 3D print without support material. These two parts need tobe glued together. The bottom surface should be flat and even. Join them together with CA glue and allow time tofully cure and set.
Install Servo
The body of the micro servo can be inserted into the servo box with the wiring fitting through the slit on the side. Theservo box should be able to attached on top of LEGO bricks. Experiment with different placements, gears andmechanisms! PLug in the cable from the servo to one of the available headers in the SERVO section of the CRICKITboard.