learn to make a quilt from start to...
TRANSCRIPT

A N N I E ’ S O N L I N E V I D E O C L A S S E S
Pantone uncoated (below)
Logo over stacked tagline
Logo next to stacked tagline
Logo alone
Minimum allowed sizes
Pantone uncoated (below)
Pantone uncoated (below)
4 color process (below)
4 color process (below)
4 color process (below)
Black (below)
Black (below)
Black (below)
White (below)
White (below)
White (below)
Annie’s Logo Purple: Pantone: 268C, GOE Medium Purple UCMYK: C82, M100, K12RGB: R82, G43, B133Hexadecimal: 522b85
Annie’s Logo Gray: Pantone: Cool Gray 9 UCMYK: 60KRGB: R130, G131, B134Hexadecimal: 828386
Color specifications:
Note: Symbols such as ®, ©, and ™ are never to appear as less than 5 pt. in size. If, in the event of reducing art to fit a space the symbol appears too small, that symbol must be reset to the minimum 5 pt. type size.
A art, pantone uncoated (below)
Pantone uncoated (below)
4 color process (below)
Black (below)
White (below)
Annie’s official logo, created 8/12(You must be familiar with the DRG corporate logo standards before any usage attempt.)
CraftsAnniesOnlineClasses.com
Learn to Make a Quilt From Start to Finish Instructor Nancy McNally
In this online video class, you’ll learn:
• How to choose the perfect fabrics for your quilt
• Which quilting tools are your “best buys”
• How to cut and piece each quilt block
• How to get a perfect ¼-inch seam allowance every time
• Time-saving tips like chain piecing, marking, pinning and more
• How to assemble a quilt sandwich
QDV11 Learn to Make a Quilt From Start to Finish
Learn to Make a Quilt From Start to Finish
This exclusive quilt project
is included as part of the class
curriculum
Bric & Stones Quilt
e-PatternsCentral.comCopyright 2007 The Needlecraft Shop, 306 East Parr Road, Berne, IN 46711Reproducing or transmitting this pattern by any means for any purpose other than for personal use constitutes a violation of copyright law.
ENS0045
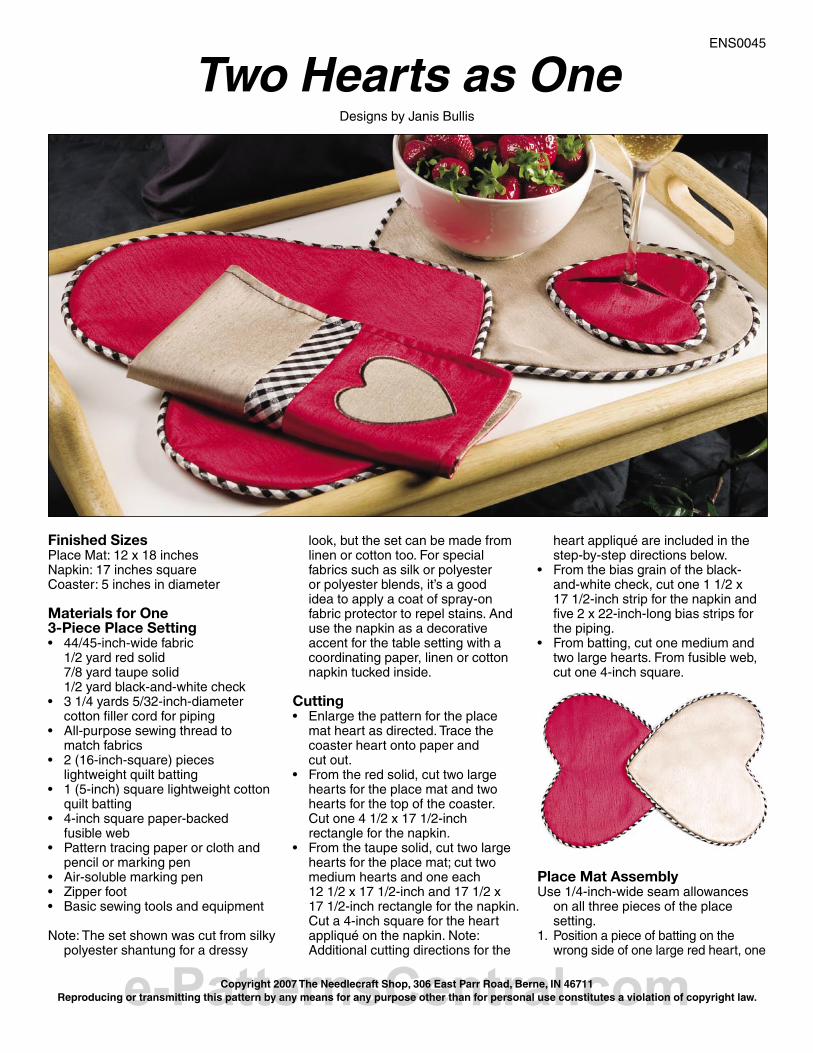
Two Hearts as OneDesigns by Janis Bullis
Finished SizesPlace Mat: 12 x 18 inchesNapkin: 17 inches squareCoaster: 5 inches in diameter
Materials for One 3-Piece Place Setting• 44/45-inch-wide fabric 1/2 yard red solid 7/8 yard taupe solid 1/2 yard black-and-white check• 3 1/4 yards 5/32-inch-diameter
cotton filler cord for piping• All-purpose sewing thread to
match fabrics• 2 (16-inch-square) pieces
lightweight quilt batting• 1 (5-inch) square lightweight cotton
quilt batting• 4-inch square paper-backed
fusible web• Pattern tracing paper or cloth and
pencil or marking pen• Air-soluble marking pen• Zipper foot• Basic sewing tools and equipment
Note: The set shown was cut from silky polyester shantung for a dressy
look, but the set can be made from linen or cotton too. For special fabrics such as silk or polyester or polyester blends, it’s a good idea to apply a coat of spray-on fabric protector to repel stains. And use the napkin as a decorative accent for the table setting with a coordinating paper, linen or cotton napkin tucked inside.
Cutting• Enlarge the pattern for the place
mat heart as directed. Trace the coaster heart onto paper and cut out.
• From the red solid, cut two large hearts for the place mat and two hearts for the top of the coaster. Cut one 4 1/2 x 17 1/2-inch rectangle for the napkin.
• From the taupe solid, cut two large hearts for the place mat; cut two medium hearts and one each 12 1/2 x 17 1/2-inch and 17 1/2 x 17 1/2-inch rectangle for the napkin. Cut a 4-inch square for the heart appliqué on the napkin. Note: Additional cutting directions for the
heart appliqué are included in the step-by-step directions below.
• From the bias grain of the black-and-white check, cut one 1 1/2 x 17 1/2-inch strip for the napkin and five 2 x 22-inch-long bias strips for the piping.
• From batting, cut one medium and two large hearts. From fusible web, cut one 4-inch square.
Place Mat AssemblyUse 1/4-inch-wide seam allowances
on all three pieces of the place setting.
1. Position a piece of batting on the wrong side of one large red heart, one

e-PatternsCentral.comCopyright 2007 The Needlecraft Shop, 306 East Parr Road, Berne, IN 46711Reproducing or transmitting this pattern by any means for any purpose other than for personal use constitutes a violation of copyright law.
Coaster Assembly1. On wrong side of one medium-size
red heart, mark a centerline from the upper cleft to the point. Mark the 3-inch center for the opening as shown in Figure 5. With right sides facing, pin the two red hearts together along the marked line. Stitch the hearts together along the line, leaving the marked center section open. Backstitch at the beginning and end of each stitched section (Figure 5).
2. Open the hearts to expose the center opening and press. Machine-baste a scant 1/4 inch from the raw edges to secure the layers (Figure 6).
3. Apply the remaining short length of piping prepared earlier to the outer edge of the red heart.
4. Place the medium batting heart between the wrong sides of the two taupe hearts; machine-baste a scant 1/4 inch from the raw edges.
5. With raw edges even and the piping between the red and taupe hearts, stitch the layers together using the zipper foot as described for the
5. With the zipper foot still attached and the right sides facing, sew each large heart to its matching heart with the piping. Position under the zipper foot at the machine with the piped heart on top so you can see the basting. Stitch just inside the basting, crowding the piping cord for a snug fit and leaving an opening on one long edge for turning (Figure 3). Turn right side out and slipstitch the opening closed. Press if needed.
6. Overlap the pointed ends of the two hearts approximately 5 inches and stitch together by hand or machine along piping edge (Figure 4).
Figure 3Sew hearts together.
5"
Clip.
Figure 4Overlap points and stitch in ditchof piping seam along the point.
Figure 5Sew hearts together
leaving center opening.
3"
Figure 6Press hearts and basteouter edges together.
large taupe heart and one medium taupe heart. Machine-baste a scant 1/4 inch from the raw edges. Set the medium heart aside for the coaster.
2. Join two pairs of bias strips with a bias seam to make one long piece and press the seam open. Repeat with two of the remaining bias strips.
3. Cut two lengths of filler cord, each approximately 44 inches long. Attach the zipper foot and encase one cotton filler cord inside one of the long strips as shown in Figure 1. Machine-baste close to the cord. Repeat with the remaining long bias strip. Encase a 22-inch length of cord in the remaining 22-inch bias strip for the coaster piping and set aside.
4. Refer to Figure 2. With raw edges even and beginning near the center of a straight edge, pin and machine-baste the piping to the right side of the batting-backed large red and taupe hearts. To turn the curves and corners, clip the piping seam allowance as needed. Leave a few inches of overlap where the piping ends meet. Cut one end of the piping and filler straight and even. Cut the other end so it overlaps the first by about 2 inches. Remove 2 1/2 inches of the basting in the long end so you can turn the piping fabric back on itself. Trim the exposed cord so that it butts up against the end of the covered cord. Wrap the fabric over both cord ends, turning under the raw edge to finish. Pin in place and complete basting the piping to the heart.
Figure 1Make piping.
Figure 1Make piping.
Figure 2Joining Piping Ends
Figure 2Joining Piping Ends

e-PatternsCentral.comCopyright 2007 The Needlecraft Shop, 306 East Parr Road, Berne, IN 46711Reproducing or transmitting this pattern by any means for any purpose other than for personal use constitutes a violation of copyright law.
place mats in step 5. Clip the cleft and point as needed and turn right side out through the center opening. Press.
Napkin Assembly1. Refer to Figure 7 for steps 1–4.
Trace the small heart pattern onto the paper backing of the 4-inch square of fusible web. Following the manufacturer’s directions, fuse the square to the wrong side of the taupe square. Cut out the heart along the traced line.
Figure 7Sew napkin pieces together.
2. Remove paper backing and fuse the heart to the right side of the red rectangle, positioning it 1 inch from the two long and the right short end.
3. Adjust your machine for a satin stitch with a medium to wide width setting and a very short stitch length. Beginning along one side of the heart in the straight area, satin-stitch over the raw edge of the heart. When you reach the point, end with the needle in the fabric to the right of the heart, lift the presser foot, pivot and continue stitching. When you reach the curved areas, stop every few stitches with the needle at the edge of the heart and pivot slightly to stitch smooth
curves. Overlap the beginning with only a few stitches and clip the threads, allowing enough to pull to the underside and tie off securely.
4. Arrange the taupe, checked and red rectangles and sew together (Figure 7). Press the seams open.
5. With right sides facing and raw edges even, pin and stitch the napkin front to the taupe square. Leave a 4-inch-long opening for turning. Turn right side out and press flat along all four edges, turning in the opening edges. Slipstitch the opening edges together, and then topstitch 1/4 inch from all edges. Press again if needed.

e-PatternsCentral.comCopyright 2007 The Needlecraft Shop, 306 East Parr Road, Berne, IN 46711Reproducing or transmitting this pattern by any means for any purpose other than for personal use constitutes a violation of copyright law.
Two Hearts as One
Place Mat PatternEnlarge 200%.
NapkinActual Size
CoasterActual Size

Table ToppersSeasonal
20 Quick-to-Stitch Projects
Order today at AnniesCatalog.comFind Us
• Easy for beginners, fun for the experienced
• Change your table decor for every season
NEW! From
Annie’s
151056$14.95