ldap configuration guide - xcalar ldap-config-guide.pdftitle: ldap configuration guide author:...
TRANSCRIPT
Copyright © 2017 Xcalar, Inc. All rights reserved.
LDAP Configuration GuidePublication date: 11/8/2017
www.xcalar.com
Copyright © 2017 Xcalar, Inc. All rights reserved. 2
Table of Contents
About this guide 3
Configuring LDAP 4
Before you start 5
Configuring and starting a new LDAP connection 6
Adding users 10
Adding users to the LDAP administrators group 15
Creating additional Xcalar admin users 17
Removing users 18
Copyright and trademark information 20
Copyright © 2017 Xcalar, Inc. All rights reserved. 3
About this guide
This guide is intended for the Xcalar administrator who has used the Xcalar Wizard to installXcalar.
If you use the Lightweight Directory Access Protocol (LDAP) server deployed by Xcalar, followthe instructions in this guide to perform these tasks:
l Configure the LDAP server so that you can manage user accounts on it.
l Create user accounts on the LDAP server so that users can log in to Xcalar.
l Add users to the LDAP administrators group if you want multiple users to haveadministrator privileges on the LDAP server.
l Create additional Xcalar administrator accounts if you (or other users) want to log in toXcalar with administrator privileges by using a login name other than admin.
Copyright © 2017 Xcalar, Inc. All rights reserved. 4
Configuring LDAP
You must configure the LDAP server before you can create and manage user accounts on it. (Ifyou choose to use LDAP for user authentication, Xcalar users must have accounts on the LDAPserver.) This section describes how to configure the LDAP server deployed by Xcalar on yourXcalar cluster.
This section assumes that you have successfully completed these tasks:
l Installing the OpenLDAP server on the first node (node 0) by using the Xcalar Wizard.
l Downloading and installing the latest version of Apache Directory Studio, which is anLDAP directory client, on a computer that can access node 0 of the Xcalar cluster. ApacheDirectory Studio is available at this website:
https://directory.apache.org/studio/downloads.html
NOTE: The screenshots in this document are from a Windows-based computer.The exact screens depend on the operating system of your computer runningApache Directory Studio.
Copyright © 2017 Xcalar, Inc. All rights reserved. 5
Before you startGather the following information:
l Fully qualified domain name (FQDN) or IP address of node 0 of the cluster. Thisinformation is used by Apache Directory Studio.
If you want to access node 0 through a private host name or address, you can find thename or address by entering the following commands on node 0:
cd /mnt/xcalar/config
head -n1 privHosts.txt
l Password entered in Step 4 of the Xcalar Wizard.
l Domain name entered in Step 4 of the Xcalar Wizard.
The following screenshot shows Step 4 of the Xcalar Wizard, in which the password and domainname are entered:
Copyright © 2017 Xcalar, Inc. All rights reserved. 6
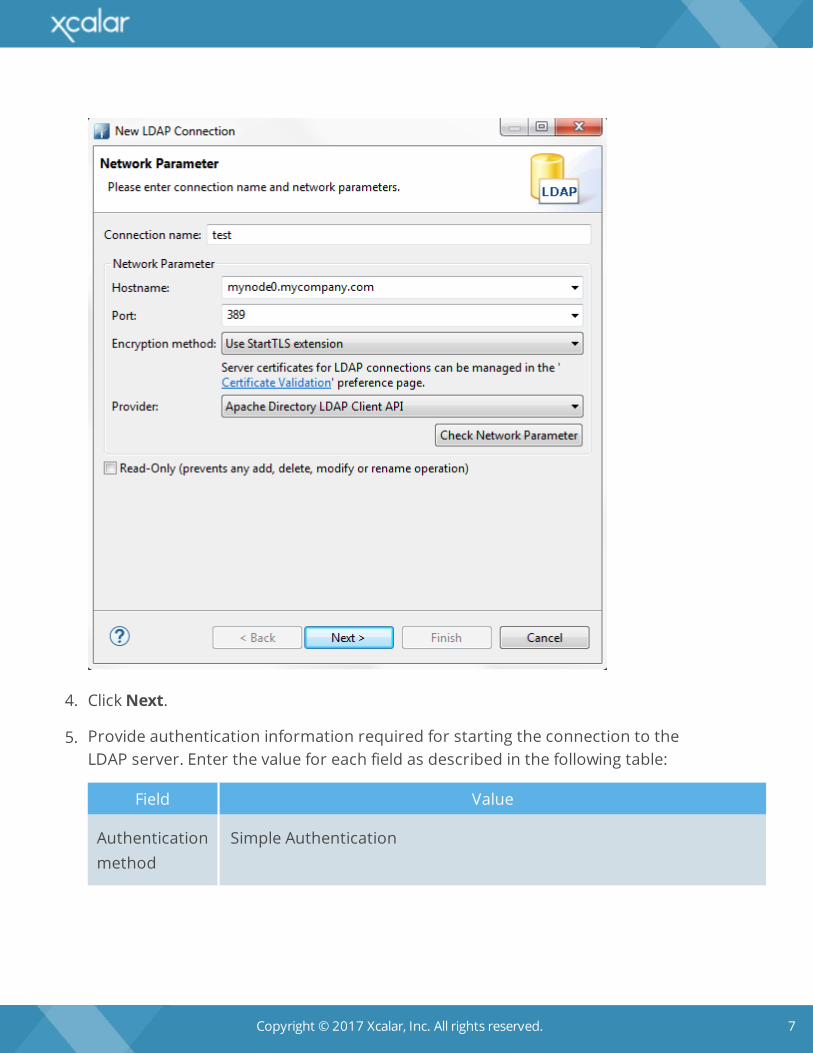
Configuring and starting a new LDAP connectionFollow these steps to configure and start a new LDAP connection:
1. Start Apache Directory Studio.
2. In the top menu, select clicking LDAP > New Connection…. The New LDAP Connectionwindow is displayed.
3. Enter the value for each field in the window as described in the following table:
Field Value
Connection name Any name to help you identify this connection
Hostname Either:
l FQDN or IP address of node 0
l private host name or IP address of node 0
Port 389 (default)
Encryption method Use StartTLS extension (recommended)
Provider Apache Directory LDAP Client API
IMPORTANT: Do not click the check box for Read-Only.
The following screenshot shows the Network Parameter section of the NewLDAP Connection window with sample configuration information.
Copyright © 2017 Xcalar, Inc. All rights reserved. 7
4. ClickNext.
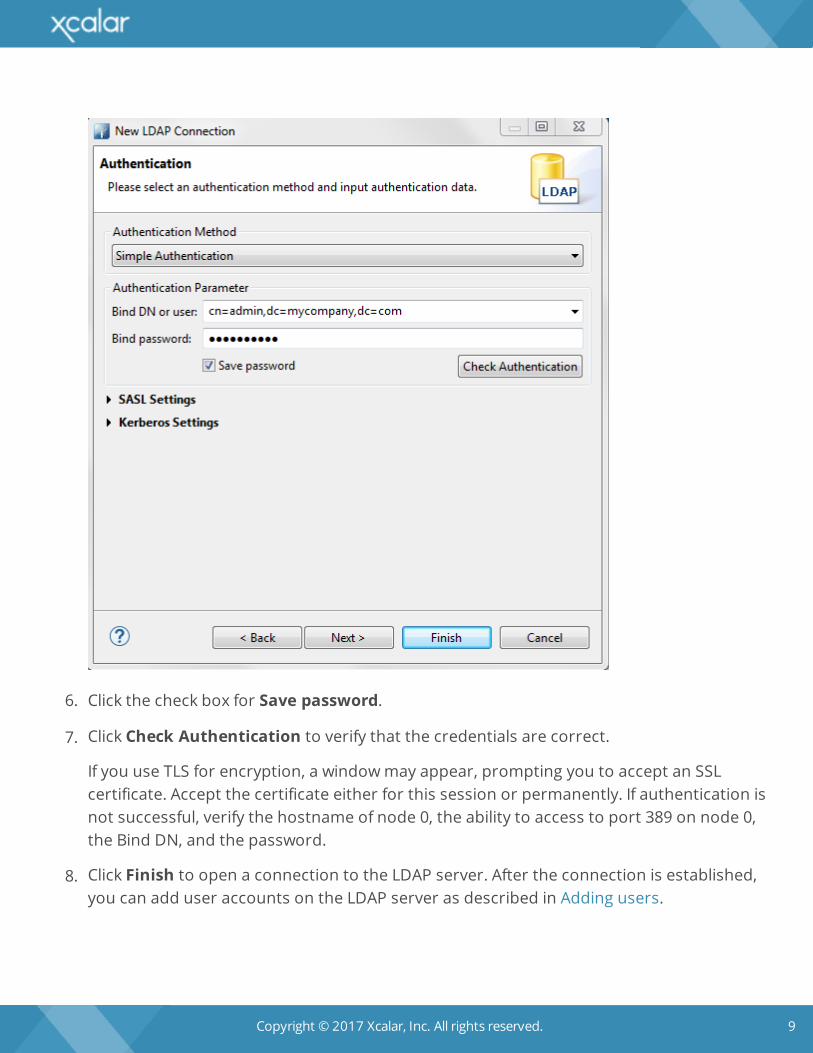
5. Provide authentication information required for starting the connection to theLDAP server. Enter the value for each field as described in the following table:
Field Value
Authenticationmethod
Simple Authentication
Copyright © 2017 Xcalar, Inc. All rights reserved. 8
Field Value
Bind DN oruser
The value depends on how you set up your domain name in Step 4 ofthe Xcalar Wizard:
l If the domain name is in the form of companyname.com, enter thefollowing information in this field:
cn=admin,dc=companyname,dc=com
l If the domain name is in the form of word1.word2.word3.word4,enter the following information in this field:
cn=admin,dc=word1,dc=word2,dc=word3,dc=word4
Bind password The password entered in Step 4 of the Xcalar Wizard
The following screenshot shows the Authentication section of the NewLDAP Connection window with sample configuration information.
Copyright © 2017 Xcalar, Inc. All rights reserved. 9
6. Click the check box for Save password.
7. Click Check Authentication to verify that the credentials are correct.
If you use TLS for encryption, a windowmay appear, prompting you to accept an SSLcertificate. Accept the certificate either for this session or permanently. If authentication isnot successful, verify the hostname of node 0, the ability to access to port 389 on node 0,the Bind DN, and the password.
8. Click Finish to open a connection to the LDAP server. After the connection is established,you can add user accounts on the LDAP server as described in Adding users.

Copyright © 2017 Xcalar, Inc. All rights reserved. 10
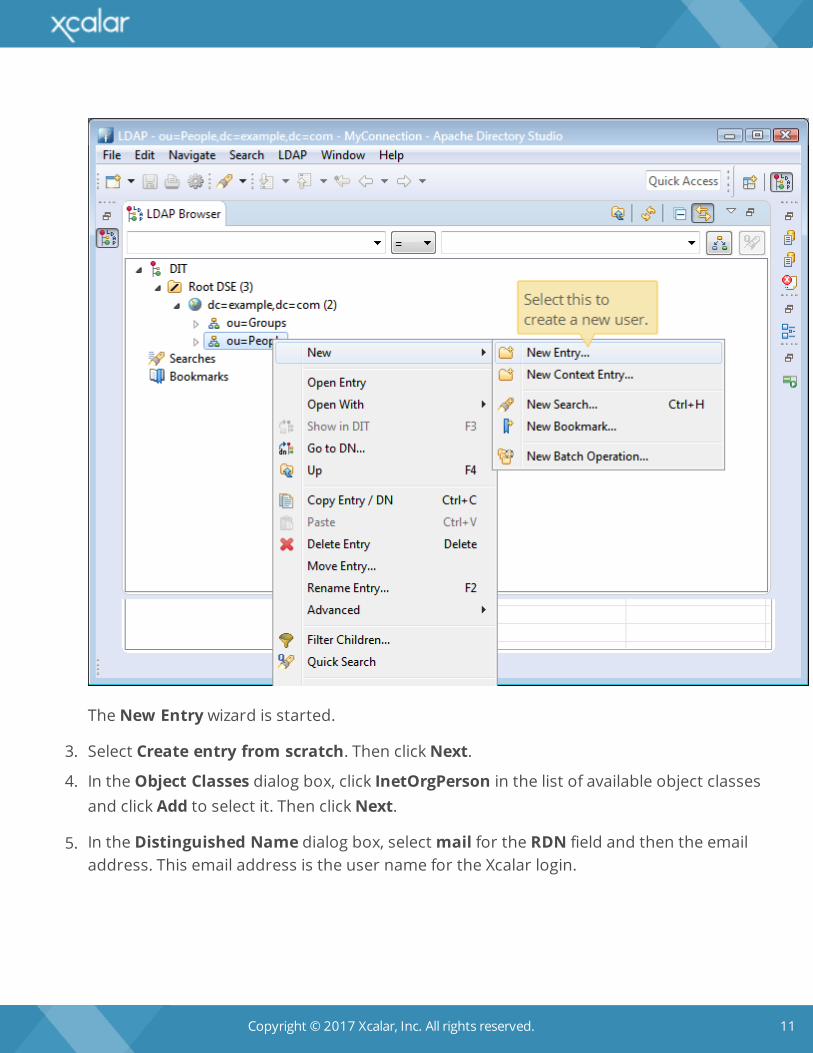
Adding users
Follow these steps for adding each user:
1. In the LDAP Browser pane, locate DIT (Directory Information Tree) for your connection. Ifit is not displayed, click the connection name as shown in the following screenshot:
2. under DIT (Directory Information Tree), right click the ou=People entry to create a newentry for the organization unit, as shown in the following screenshot:
Copyright © 2017 Xcalar, Inc. All rights reserved. 11
The New Entry wizard is started.
3. Select Create entry from scratch. Then clickNext.
4. In the Object Classes dialog box, click InetOrgPerson in the list of available object classesand click Add to select it. Then clickNext.
5. In the Distinguished Name dialog box, selectmail for the RDN field and then the emailaddress. This email address is the user name for the Xcalar login.

Copyright © 2017 Xcalar, Inc. All rights reserved. 12
The following screenshot illustrates how to enter the information for a user whose username is [email protected].
6. (Optional) Copy the information in the DN Preview field to your computer's clipboard sothat you can paste the information later in this procedure.
7. ClickNext.
8. In the Attribute dialog box, type the user's first name in the cn field and the user's lastname in the sn field. Then click Finish. The user account is created.
9. To create a user password, add a new attribute, as shown in the following screenshot:
Copyright © 2017 Xcalar, Inc. All rights reserved. 13
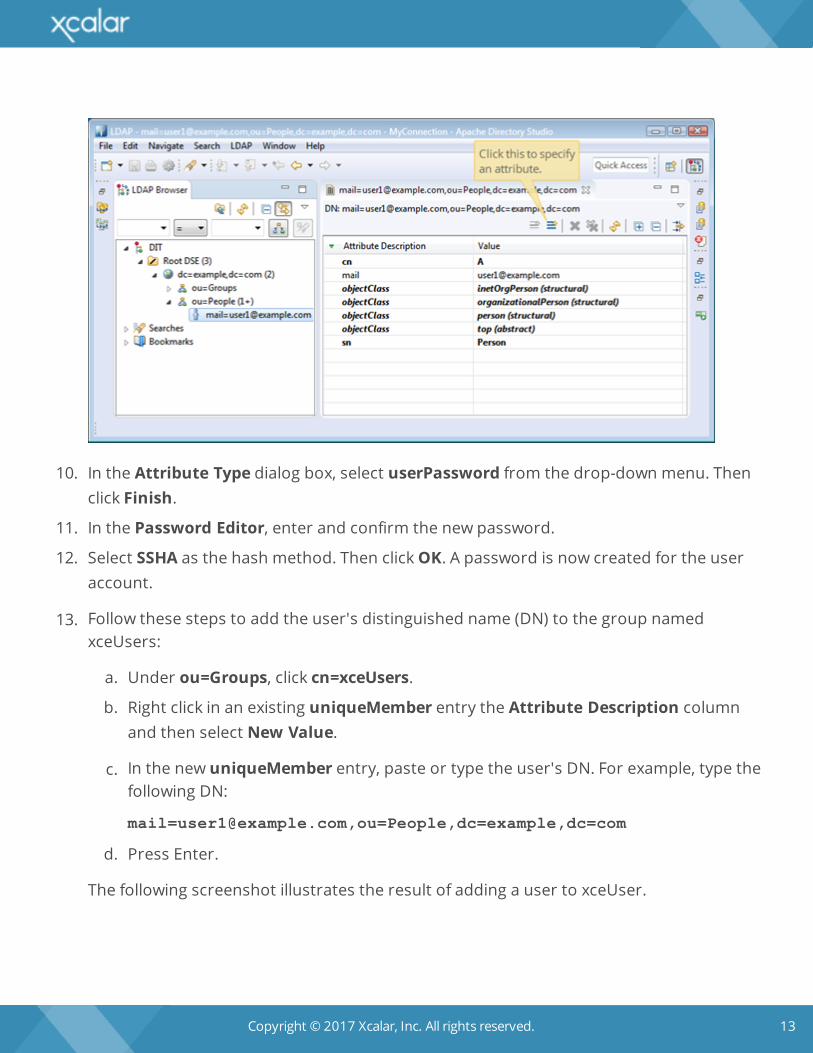
10. In the Attribute Type dialog box, select userPassword from the drop-down menu. Thenclick Finish.
11. In the Password Editor, enter and confirm the new password.
12. Select SSHA as the hash method. Then clickOK. A password is now created for the useraccount.
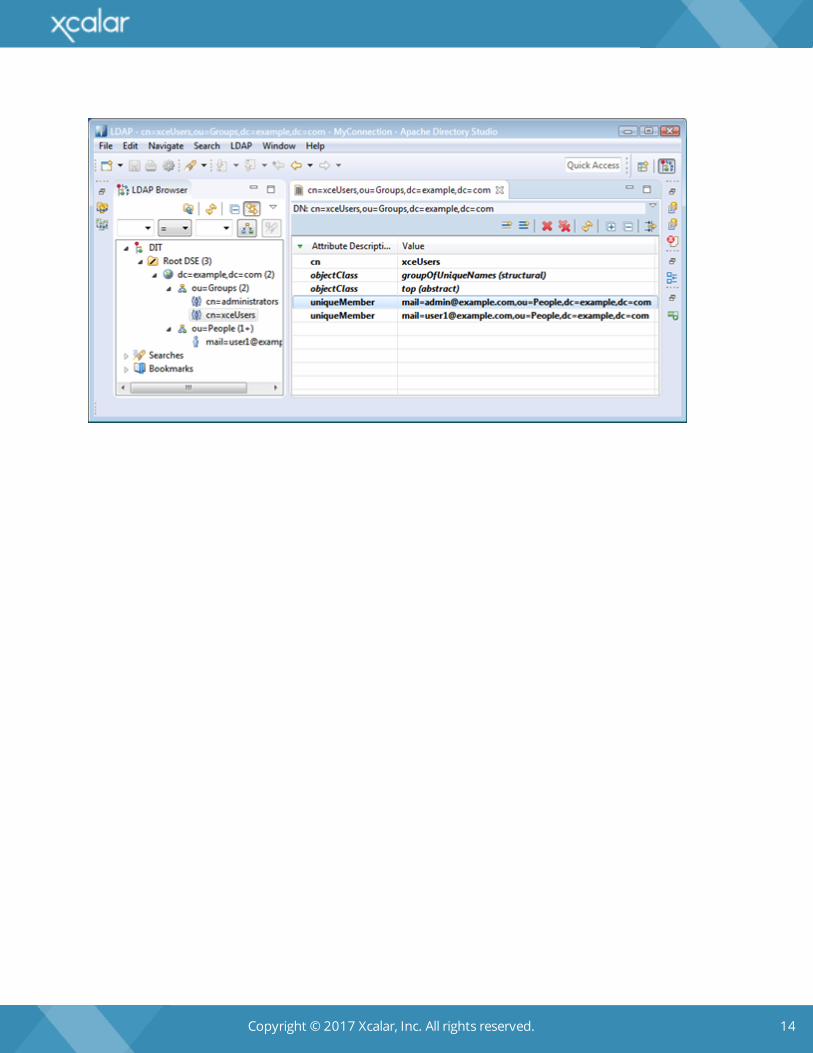
13. Follow these steps to add the user's distinguished name (DN) to the group namedxceUsers:
a. Under ou=Groups, click cn=xceUsers.
b. Right click in an existing uniqueMember entry the Attribute Description columnand then select New Value.
c. In the new uniqueMember entry, paste or type the user's DN. For example, type thefollowing DN:
[email protected],ou=People,dc=example,dc=com
d. Press Enter.
The following screenshot illustrates the result of adding a user to xceUser.
Copyright © 2017 Xcalar, Inc. All rights reserved. 14
Copyright © 2017 Xcalar, Inc. All rights reserved. 15
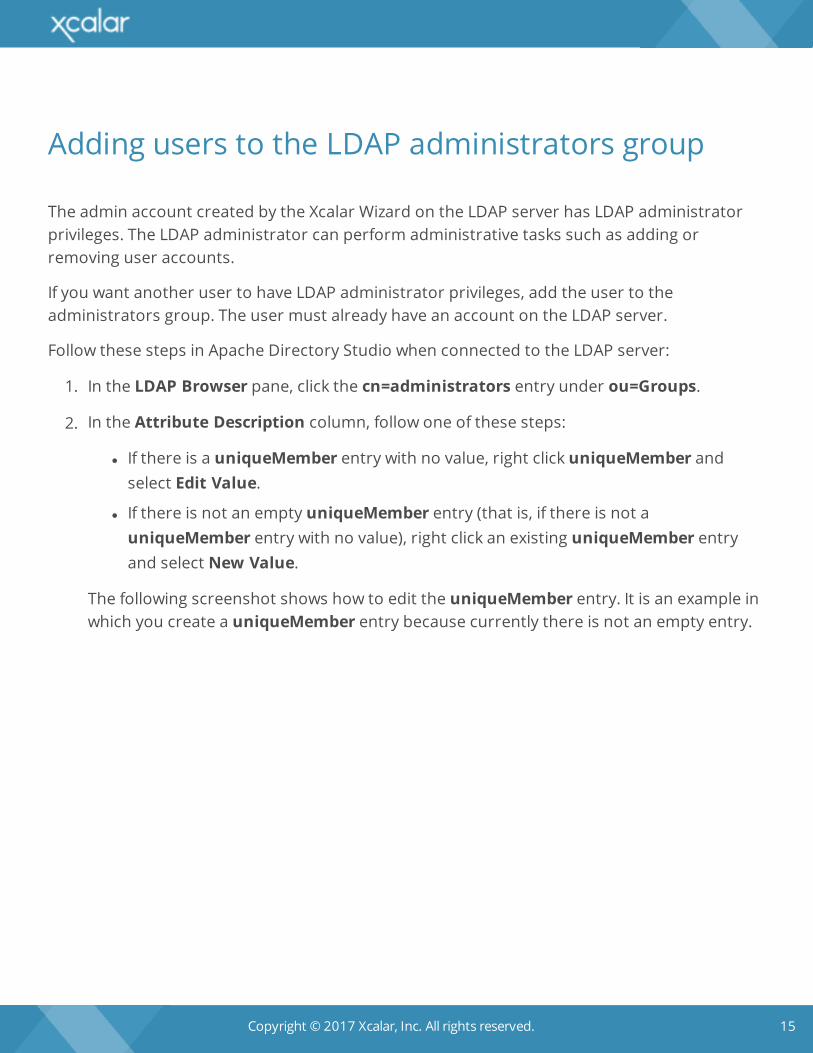
Adding users to the LDAP administrators group
The admin account created by the Xcalar Wizard on the LDAP server has LDAP administratorprivileges. The LDAP administrator can perform administrative tasks such as adding orremoving user accounts.
If you want another user to have LDAP administrator privileges, add the user to theadministrators group. The user must already have an account on the LDAP server.
Follow these steps in Apache Directory Studio when connected to the LDAP server:
1. In the LDAP Browser pane, click the cn=administrators entry under ou=Groups.
2. In the Attribute Description column, follow one of these steps:
l If there is a uniqueMember entry with no value, right click uniqueMember andselect Edit Value.
l If there is not an empty uniqueMember entry (that is, if there is not auniqueMember entry with no value), right click an existing uniqueMember entryand select New Value.
The following screenshot shows how to edit the uniqueMember entry. It is an example inwhich you create a uniqueMember entry because currently there is not an empty entry.
Copyright © 2017 Xcalar, Inc. All rights reserved. 16
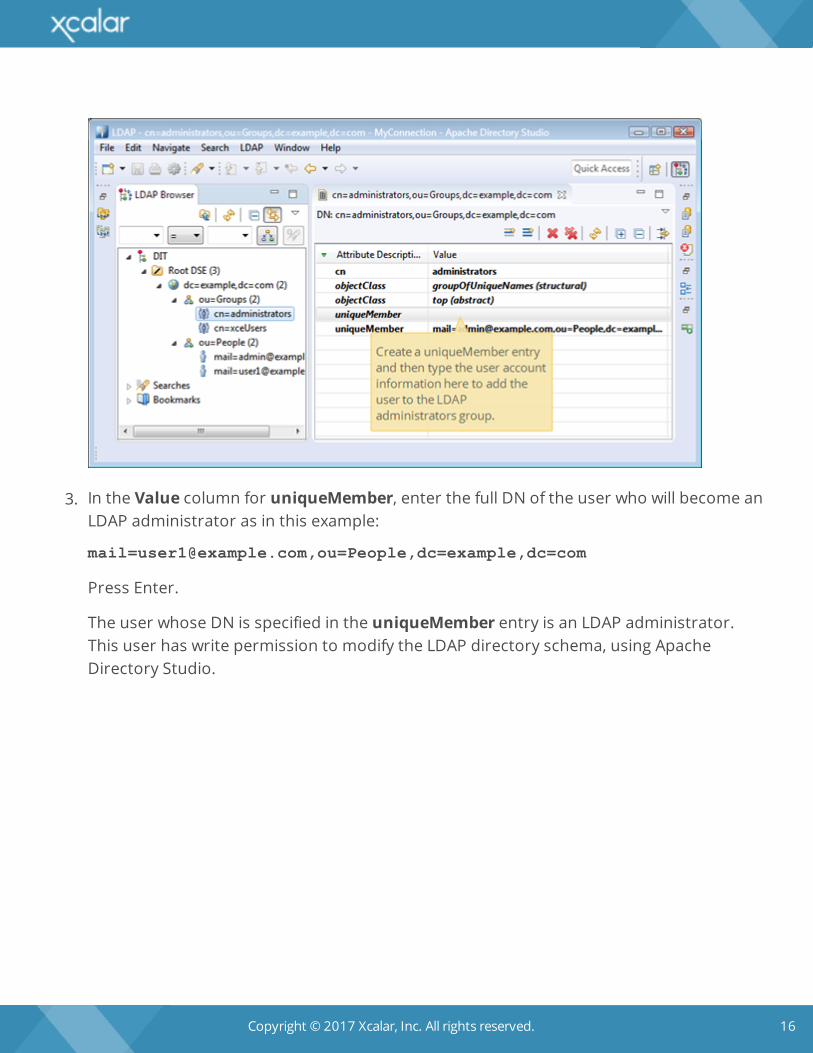
3. In the Value column for uniqueMember, enter the full DN of the user who will become anLDAP administrator as in this example:
[email protected],ou=People,dc=example,dc=com
Press Enter.
The user whose DN is specified in the uniqueMember entry is an LDAP administrator.This user has write permission to modify the LDAP directory schema, using ApacheDirectory Studio.
Copyright © 2017 Xcalar, Inc. All rights reserved. 17
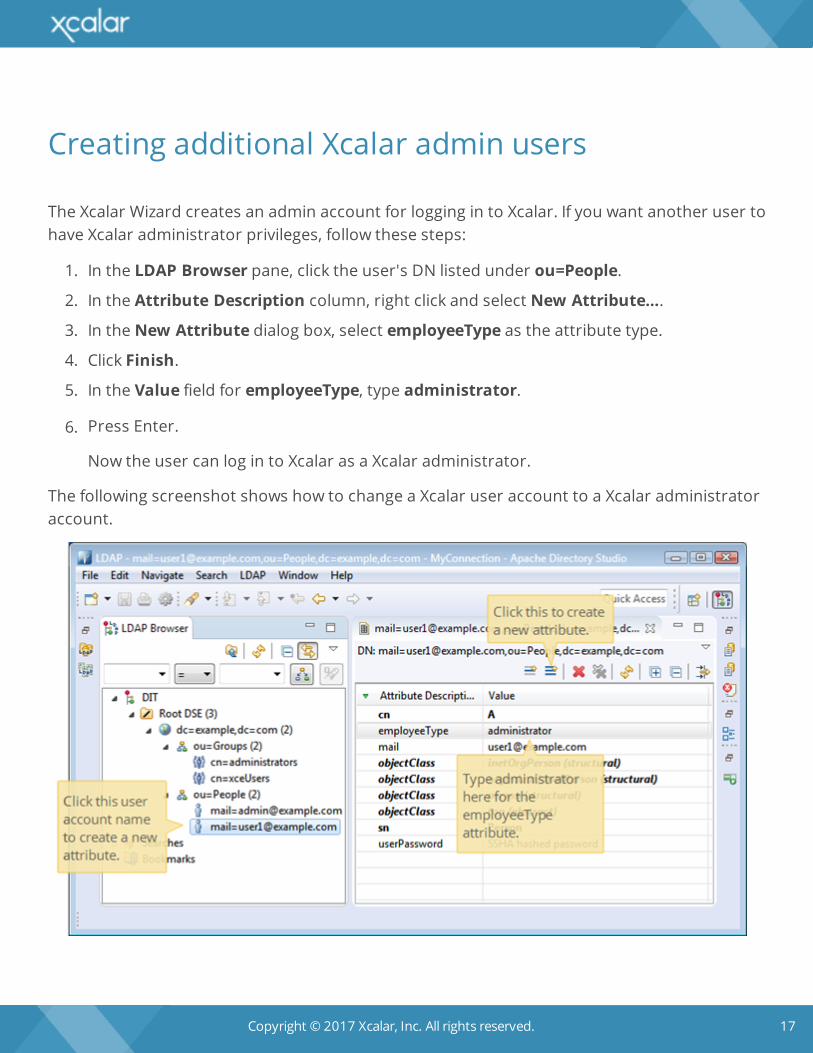
Creating additional Xcalar admin users
The Xcalar Wizard creates an admin account for logging in to Xcalar. If you want another user tohave Xcalar administrator privileges, follow these steps:
1. In the LDAP Browser pane, click the user's DN listed under ou=People.
2. In the Attribute Description column, right click and select New Attribute….
3. In the New Attribute dialog box, select employeeType as the attribute type.
4. Click Finish.
5. In the Value field for employeeType, type administrator.
6. Press Enter.
Now the user can log in to Xcalar as a Xcalar administrator.
The following screenshot shows how to change a Xcalar user account to a Xcalar administratoraccount.
Copyright © 2017 Xcalar, Inc. All rights reserved. 18
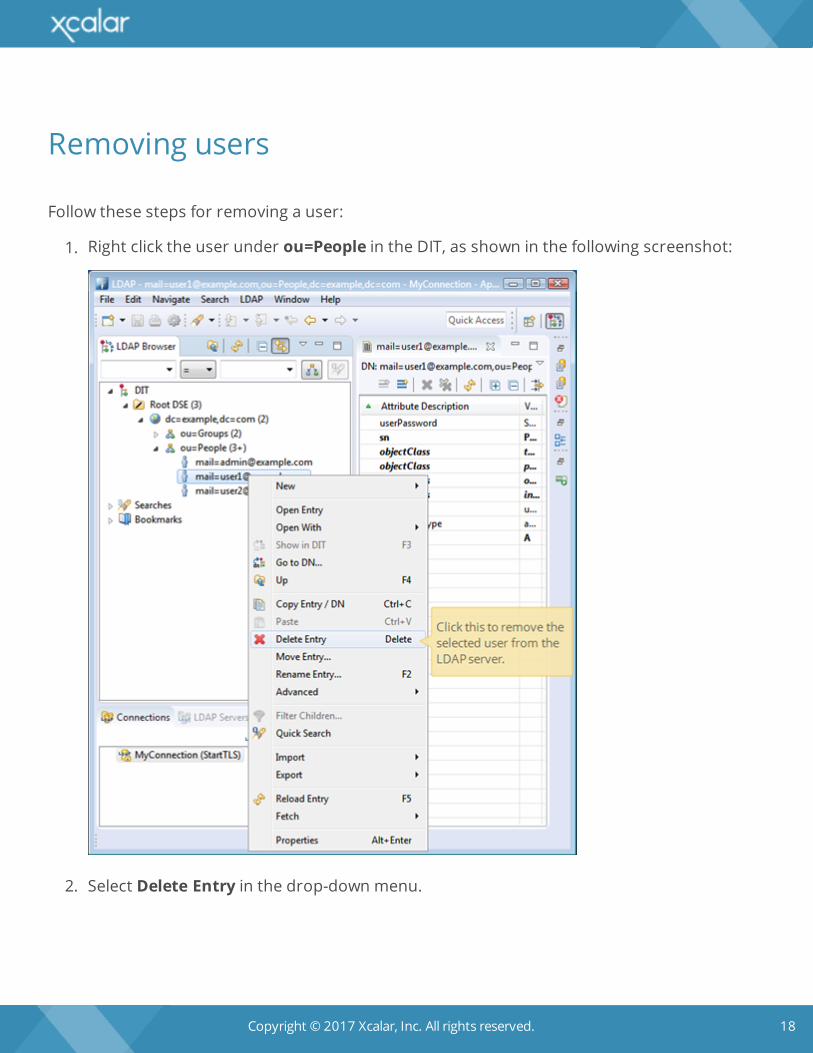
Removing users
Follow these steps for removing a user:
1. Right click the user under ou=People in the DIT, as shown in the following screenshot:
2. Select Delete Entry in the drop-down menu.
Copyright © 2017 Xcalar, Inc. All rights reserved. 19
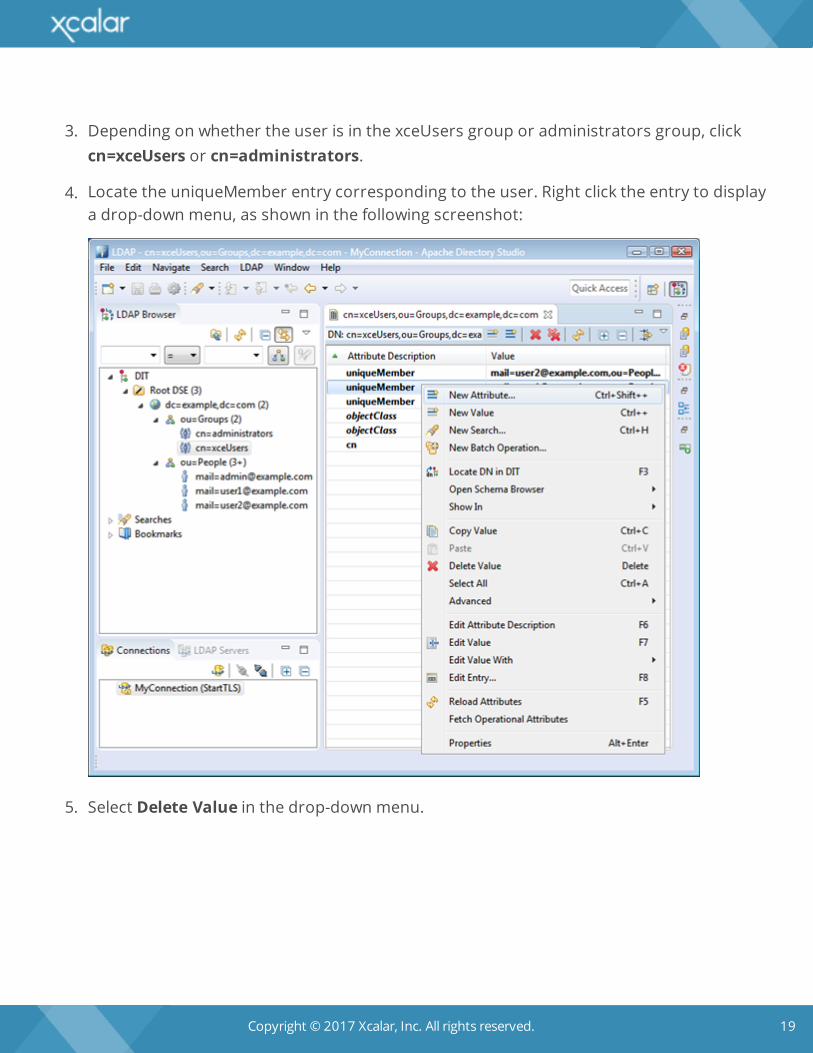
3. Depending on whether the user is in the xceUsers group or administrators group, clickcn=xceUsers or cn=administrators.
4. Locate the uniqueMember entry corresponding to the user. Right click the entry to displaya drop-down menu, as shown in the following screenshot:
5. Select Delete Value in the drop-down menu.
Copyright © 2017 Xcalar, Inc. All rights reserved. 20
Copyright and trademark information
© 2017 Xcalar, Inc. All rights reserved. Xcalar is a registered trademark of Xcalar, Inc.
No part of this document covered by copyright may be reproduced in any form or by anymeans—graphic, electronic, or mechanical, including photocopying, recording, taping, orstorage in an electronic retrieval system—without prior written permission of the copyrightowner.
The Xcalar logo, Fundamental Discovery, True Data in Place, Xcalar Compute Engine, XcalarData Prep, Xcalar Data Science, Xcalar Design, Xcalar Operational Analysis, Xcalar TeraRow, andXcalar Virtual Data Warehouse are trademarks of Xcalar, Inc.