laser shot lbp1210 service manual
TRANSCRIPT
Laser Beam Printer
User's Guide
LBP-1210 Laser Printer
User’s Guide
IMPORTANT:
Read this manual carefully. Use this manual when you need quick reference help.
CopyrightCopyright ©2002 Canon Inc.
All information in this manual is copyrighted. No part of this publication may be reproduced, transmitted, transcribed, stored in a retrieval system, or translated into any language or computer language, in any form or by any means, electronic, mechanical, magnetic, optical, chemical, manual, or otherwise, without prior written consent from Canon.
NoticeCanon makes no guarantees of any kind with regard to this manual. Canon is not liable for errors contained herein or for consequential or incidental damages incurred as a result of acting on information contained in the manual. The information contained herein shall not be reproduced in whole or in part without prior written consent from Canon.
TrademarksLBP, Canon, LASER SHOT, and the Canon Logo are trademarks of Canon Inc.Microsoft®, Windows®, and Windows NT® are either registered trademarks or trademarks of Microsoft Corporation in the United States and/or in other countries.Other brand and product names are trademarks or registered trademarks of their respective companies.In this manual, Microsoft®, Microsoft® Windows®, and Microsoft® Windows NT® are referred to as Microsoft, Windows, and Windows NT respectively.
ii
About this GuideThe following lists the information included in this guide:
❏ Chapter 1: Introduction. Introduces you to the printer features and describes the parts.
❏ Chapter 2: Paper Handling. Explains the types of paper and sizes you can use, how to load paper, and describes how paper moves through the printer.
❏ Chapter 3: Using the Canon Advanced Printing Technology. Describes the Canon Advanced Printing Technology and how to install and use the software, as well as how to check on the status of a print job.
❏ Chapter 4: Troubleshooting. Contains helpful information on how to solve printing problems.
❏ Chapter 5: Maintenance. Explains how to clean and handle the printer, and how to replace the EP-25 cartridge.
❏ Appendix A. Lists the specifications for the printer.
❏ Appendix B. Describes how to connect the printer using the optional network adapter.
❏ Glossary. Includes definitions for terminology used in this guide.
ConventionsThis guide uses the following conventions:
CAUTION:Indicates precautions that must be observed to prevent possible injury.
Indicates that neglecting the suggested procedure or practice could result in damage to the printer.
Indicates notes and memos containing useful tips or detailed information.
iii
Safety Information
FCC Notice (110–127 V model)Laser Beam Printer, Model L10721A
This device complies with Part 15 of the FCC Rules. Operation is subject to the following two conditions: (1) This device may not cause harmful interference, and (2) this device must accept any interference received, including interference that may cause undesired operation.
Note: This equipment has been tested and found to comply with the limits for a Class B digital device, pursuant to Part 15 of the FCC Rules. These limits are designed to provide reasonable protection against harmful interference in a residential installation. This equipment generates, uses and can radiate radio frequency energy and, if not installed and used in accordance with the instructions, may cause harmful interference to radio communications. However, there is no guarantee that interference will not occur in a particular installation. If this equipment does cause harmful interference to radio or television reception, which can be determined by turning the equipment off and on, the user is encouraged to try to correct the interference by one or more of the following measures:
❏ Reorient or relocate the receiving antenna.
❏ Increase the separation between the equipment and receiver.
❏ Connect the equipment to an outlet on a circuit different from that to which the receiver is connected.
❏ Consult the dealer or an experienced radio/TV technician for help.
Use of shielded cable is required to comply with class B limits in Subpart B of Part 15 of FCC Rules.
Do not make any changes or modifications to the equipment unless otherwise specified in the manual. If such changes or modifications should be made, you could be required to stop operation of the equipment.
iv
FCC Notice (220–240 V model)This equipment has been tested and found to comply with the limits for a Class A digital device, pursuant to Part 15 of the FCC Rules. These limits are designed to provide reasonable protection against harmful interference when the equipment is operated in a commercial environment. This equipment generates, uses, and can radiate radio frequency energy and if not installed and used in accordance with the instruction manual, may cause harmful interference to radio communications. Operation of this equipment in a residential area is likely to cause harmful interference, in which case the user will be required to correct the interference at his own expense.
• Use of shielded cable is required to comply with Class A limits in Subpart B of Part 15 of FCC Rules.
Do not make any changes or modifications to the equipment unless otherwise specified in this guide. If such changes or modifications should be made, you could be required to stop operation of the equipment.
Notice for EMC Directive (220–240 V model)“This equipment has been tested in a typical system to comply with the technical requirements of EMC Directive.”
• Use of shielded cable is necessary to comply with the technical requirements of EMC Directive.
International ENERGY STAR Office Equipment ProgramAs an ENERGY STAR partner, Canon Inc. has determined that this product meets the ENERGY STAR guidelines for energy efficiency.
The International ENERGY STAR Office Equipment Program is an international program that promotes energy saving through the use of computers and other office equipment. The program backs the development and dissemination of products with functions that effectively reduce energy consumption. It is an open system in which business proprietors can participate voluntarily. The targeted products are office equipment such as computers, monitors, printers, fax machines, and copiers. Their standards and logos are uniform among the participating nations.
v
Laser Safety (110–127 V / 220–240 V models)Laser radiation could be hazardous to the human body. For this reason, laser radiation emitted inside this printer is hermetically sealed within the protective housing and external cover. In the normal operation of the product by the user, no radiation can leak from the machine.
This printer is classified as a Class 1 laser product under EN60825-1:1994, and in the USA, it is classified as Class 1 under the code of Federal Regulations, §1040.10 of Title 21.
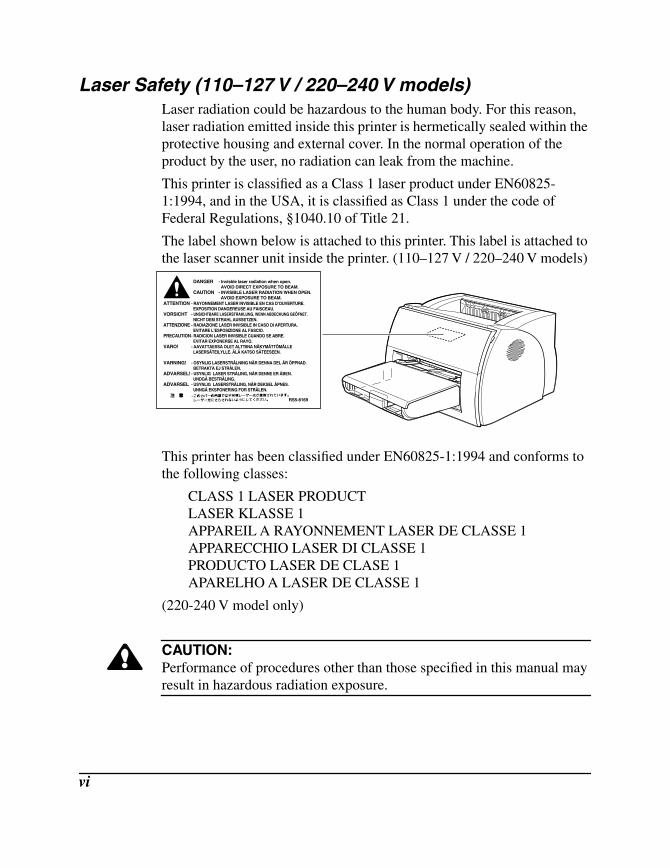
The label shown below is attached to this printer. This label is attached to the laser scanner unit inside the printer. (110–127 V / 220–240 V models)
This printer has been classified under EN60825-1:1994 and conforms to the following classes:
CLASS 1 LASER PRODUCTLASER KLASSE 1APPAREIL A RAYONNEMENT LASER DE CLASSE 1APPARECCHIO LASER DI CLASSE 1PRODUCTO LASER DE CLASE 1APARELHO A LASER DE CLASSE 1
(220-240 V model only)
CAUTION:Performance of procedures other than those specified in this manual may result in hazardous radiation exposure.
vi
Important Safety Instructions
CAUTION:This printer is a high-precision electronic device. Before operation, be sure to read the following instructions to handle the printer properly.
❏ Read the manual carefully before operation.
❏ Do not dispose of these instructions. Save them for future reference.
❏ Follow all warnings and instructions on the printer and consumables.
❏ Do not place the printer on an unstable cart, stand, or table.
❏ When installing the printer, carefully observe the location requirements described in this guide.
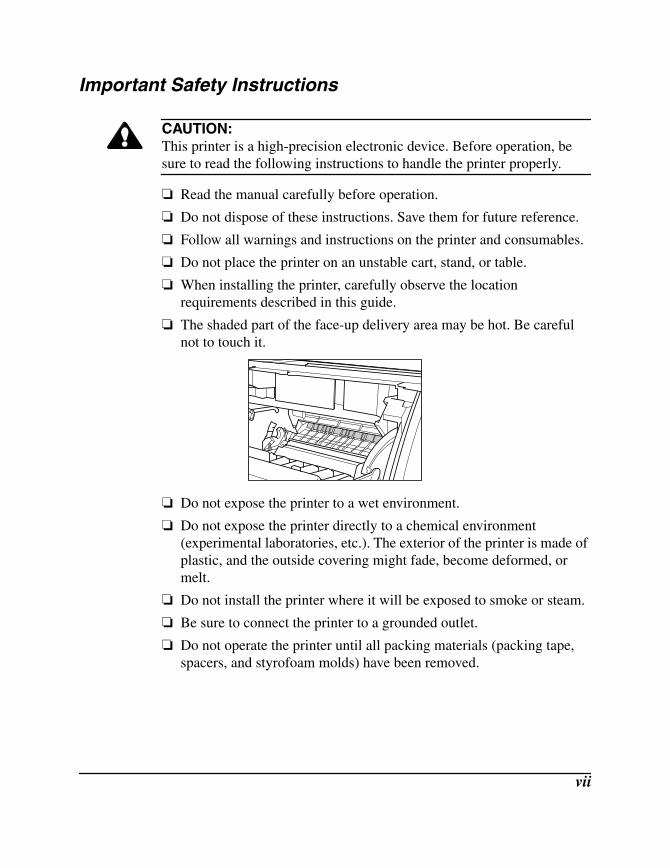
❏ The shaded part of the face-up delivery area may be hot. Be careful not to touch it.
❏ Do not expose the printer to a wet environment.
❏ Do not expose the printer directly to a chemical environment (experimental laboratories, etc.). The exterior of the printer is made of plastic, and the outside covering might fade, become deformed, or melt.
❏ Do not install the printer where it will be exposed to smoke or steam.
❏ Be sure to connect the printer to a grounded outlet.
❏ Do not operate the printer until all packing materials (packing tape, spacers, and styrofoam molds) have been removed.
vii
❏ 110–127 V model only:This product is equipped with a 3-wire grounding type plug, a plug that has a third (grounding) pin. As a safety feature, this plug fits only into a grounding-type power outlet. If you are unable to insert the plug into the outlet, contact an electrician to replace your obsolete outlet. Do not defeat the purpose of the grounding-type plug.
❏ 220–240 V model only:A certified power supply cord is to be used with this equipment. For a rated current up to 6 A, a type not lighter than H05VV-F 3G 0.75 mm2 or H05VVH2-F 3G 0.75 mm2 shall be used.
❏ Be sure to turn off the power before unplugging or plugging in the printer power cord or interface cable.
❏ When moving the printer, be sure to turn off the power before unplugging the power cord.
❏ Be sure to unravel the power cord prior to plugging it in; otherwise it may lead to damage, overheating, short-circuit, or result in fire.
❏ Be sure to plug the power cord firmly into the power outlet, as any flammable material caught between an opening might result in fire.
❏ Avoid using an extension cord. If you must use an extension cord, be sure to take the following precautions. Failure to do this might lead to overheating, result in fire, or cause flickering due to a drop in voltage.
• Be sure not to exceed the allowed rating current of the extension cord.
• Use a short extension cord. Do not connect several extension cords together.
• Make sure that the total ampere rating of the products plugged into the extension cord does not exceed the extension cord ampere rating.
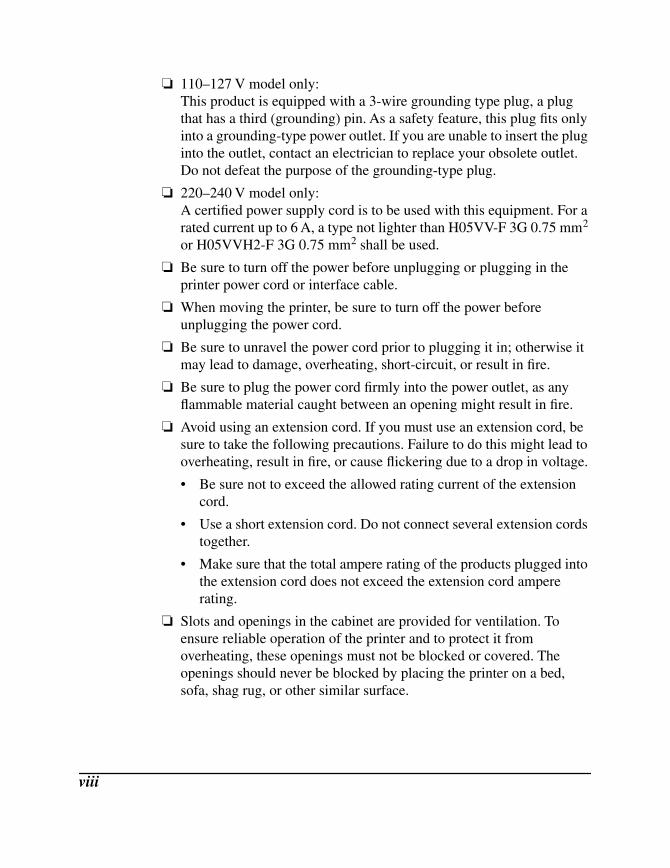
❏ Slots and openings in the cabinet are provided for ventilation. To ensure reliable operation of the printer and to protect it from overheating, these openings must not be blocked or covered. The openings should never be blocked by placing the printer on a bed, sofa, shag rug, or other similar surface.
viii
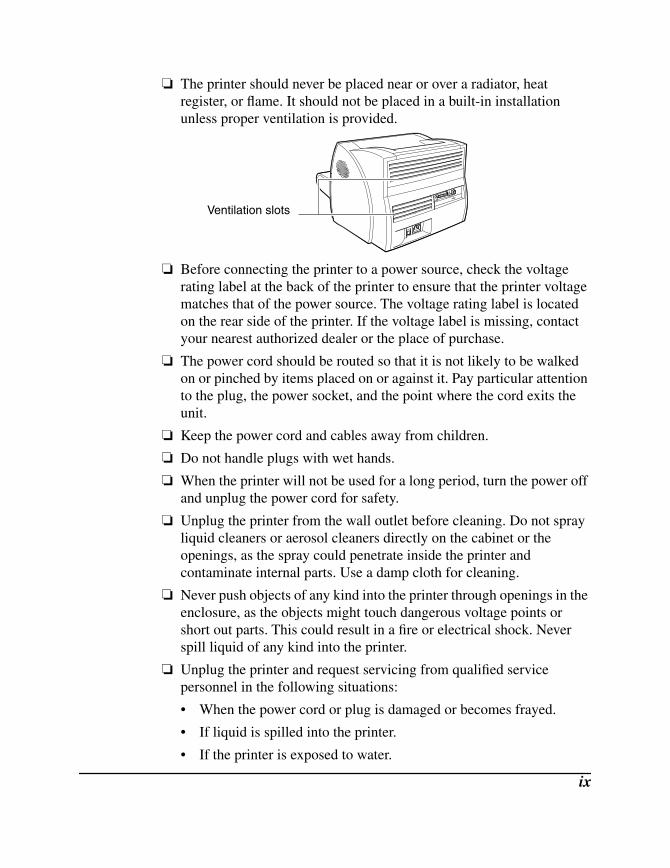
❏ The printer should never be placed near or over a radiator, heat register, or flame. It should not be placed in a built-in installation unless proper ventilation is provided.
❏ Before connecting the printer to a power source, check the voltage rating label at the back of the printer to ensure that the printer voltage matches that of the power source. The voltage rating label is located on the rear side of the printer. If the voltage label is missing, contact your nearest authorized dealer or the place of purchase.
❏ The power cord should be routed so that it is not likely to be walked on or pinched by items placed on or against it. Pay particular attention to the plug, the power socket, and the point where the cord exits the unit.
❏ Keep the power cord and cables away from children.
❏ Do not handle plugs with wet hands.
❏ When the printer will not be used for a long period, turn the power off and unplug the power cord for safety.
❏ Unplug the printer from the wall outlet before cleaning. Do not spray liquid cleaners or aerosol cleaners directly on the cabinet or the openings, as the spray could penetrate inside the printer and contaminate internal parts. Use a damp cloth for cleaning.
❏ Never push objects of any kind into the printer through openings in the enclosure, as the objects might touch dangerous voltage points or short out parts. This could result in a fire or electrical shock. Never spill liquid of any kind into the printer.
❏ Unplug the printer and request servicing from qualified service personnel in the following situations:
• When the power cord or plug is damaged or becomes frayed.
• If liquid is spilled into the printer.
• If the printer is exposed to water.
Ventilation slots
ix
• If the printer does not operate normally when the operating instructions are followed. Adjust only those controls that are covered by the operating instructions, since improper adjustment of other controls may damage the printer and may require extensive work by a qualified technician to restore the product to normal operation.
• If the printer is dropped or the cabinet is damaged.
• If the printer exhibits a distinct change in performance, indicating a need for servicing.
• If the printer produces smoke, odor, or excessive noise.
❏ The outlet should always be free from any obstacles so as to allow easy access.
❏ When unplugging the printer, always disconnect the power cord by pulling on the plug, not the cord itself.
❏ Any misuse of electrical equipment is hazardous. Do not allow children to handle power cords or cables.
❏ Do not attempt to service this printer yourself, except as instructed in this guide. Opening or removing covers that are intended to be removed only by qualified service personnel may expose you to dangerous voltage points or other risks. Refer all servicing in those compartments to qualified service personnel.
❏ Do not attempt to modify the printer.
❏ Do not remove the warning or instruction labels on the printer.
x
Operating Environment
When selecting a location for the printer, check the following guidelines:
• Make sure the location is flat and sturdy.
• When power is on (printer plugged into an AC outlet):Temperature: 7.5˚C-35˚C (45.5˚F-95˚F)Relative humidity: 5-90% RH with no condensation
• Make sure the surrounding area is well ventilated.
• The printer must not be in a direct draft.
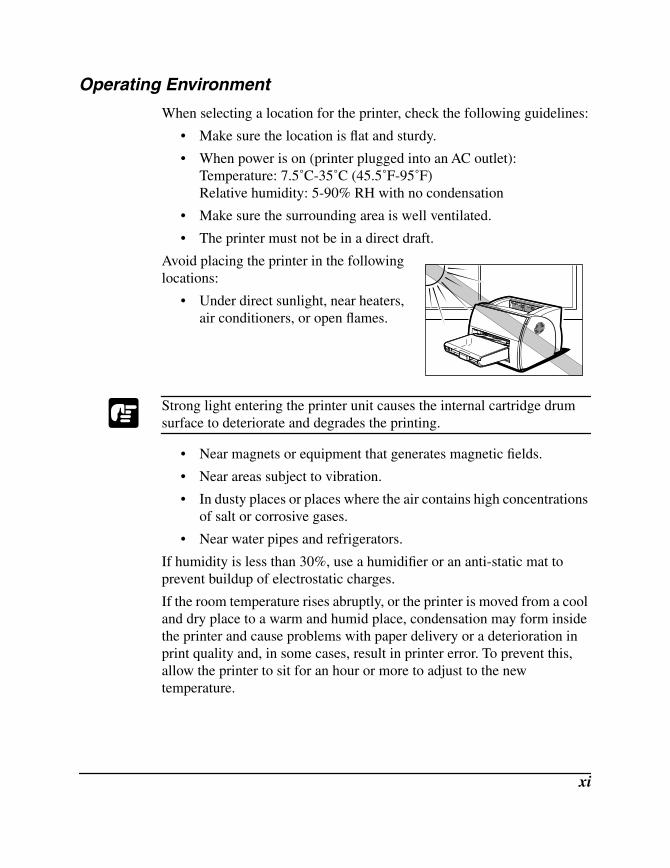
Avoid placing the printer in the following locations:
• Under direct sunlight, near heaters, air conditioners, or open flames.
Strong light entering the printer unit causes the internal cartridge drum surface to deteriorate and degrades the printing.
• Near magnets or equipment that generates magnetic fields.
• Near areas subject to vibration.
• In dusty places or places where the air contains high concentrations of salt or corrosive gases.
• Near water pipes and refrigerators.
If humidity is less than 30%, use a humidifier or an anti-static mat to prevent buildup of electrostatic charges.
If the room temperature rises abruptly, or the printer is moved from a cool and dry place to a warm and humid place, condensation may form inside the printer and cause problems with paper delivery or a deterioration in print quality and, in some cases, result in printer error. To prevent this, allow the printer to sit for an hour or more to adjust to the new temperature.
xi
Observe the following requirements when the power is off (printer unplugged from the AC outlet):
• Temperature: 0˚C-35˚C (32˚F-95˚F).
• Relative Humidity: 35-85% RH with no condensation.
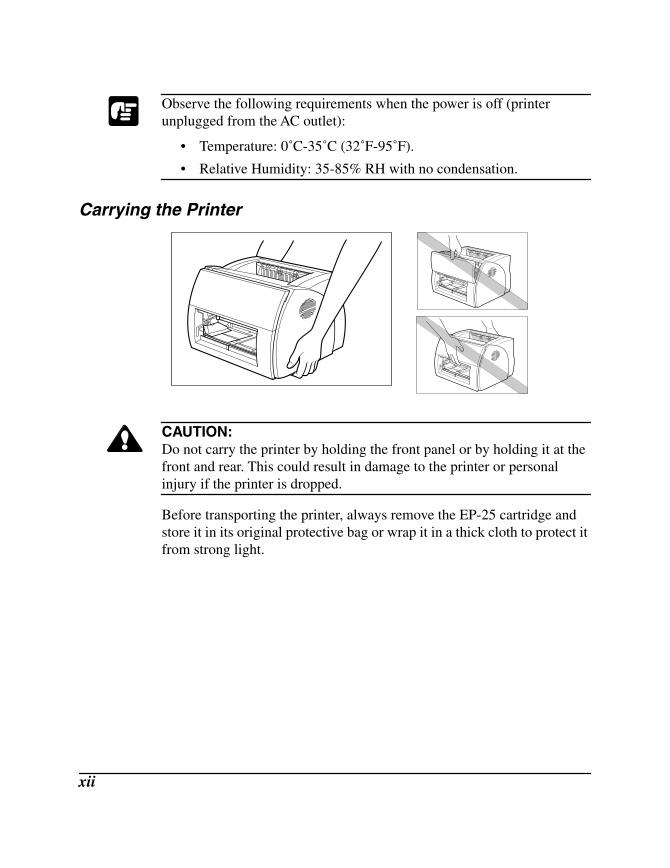
Carrying the Printer
CAUTION:Do not carry the printer by holding the front panel or by holding it at the front and rear. This could result in damage to the printer or personal injury if the printer is dropped.
Before transporting the printer, always remove the EP-25 cartridge and store it in its original protective bag or wrap it in a thick cloth to protect it from strong light.
xii
Contents
Chapter 1 Introduction .......................................................................................... 1Printer Features....................................................................................... 2Parts of the Printer .................................................................................. 4
Front View..................................................................................... 4Rear View...................................................................................... 4Inside the Printer ........................................................................... 5
Chapter 2 Paper Handling ..................................................................................... 7Paper Requirements ................................................................................ 8
Plain Paper..................................................................................... 9Transparencies............................................................................... 9Labels ............................................................................................ 9Envelopes .................................................................................... 10Postcards...................................................................................... 11
Storing Paper ........................................................................................ 11Paper Path ............................................................................................. 12Selecting Paper Delivery ...................................................................... 13
Face-down Delivery .................................................................... 13Face-up Delivery ......................................................................... 14
Loading Paper into the Cassette ........................................................... 15Loading Envelopes into the Cassette........................................... 18
Loading Paper Manually ...................................................................... 23Chapter 3 Using the Canon Advanced Printing Technology ............................ 25
Installing the CAPT.............................................................................. 26Windows 95/98/Me .............................................................................. 26
Plug and Play............................................................................... 26Add Printer Wizard ..................................................................... 30
Windows NT 4.0/2000/XP ................................................................... 35Windows 2000 Plug and Play ..................................................... 35Windows XP Plug and Play ........................................................ 38Windows NT 4.0 Add Printer Wizard......................................... 41Windows 2000 Add Printer Wizard ............................................ 45Windows XP Add Printer Wizard ............................................... 51
Connecting to the LBP-1210 Already on Your Network ..................... 57Network Download ..................................................................... 57Windows 95/98/Me Add Printer Wizard..................................... 58Windows NT 4.0 Add Printer Wizard......................................... 59
xiii
Windows 2000 Add Printer Wizard ............................................ 59Windows XP Add Printer Wizard ............................................... 60
Printer Sharing...................................................................................... 61Connecting the LBP-1210 as a Network Printer ......................... 61Status Display.............................................................................. 63
Canon LASER SHOT LBP-1210 Group.............................................. 64Printing with the CAPT ........................................................................ 65
Windows 95/98/Me Printer Properties ........................................ 66Windows NT 4.0/2000/XP Printer Properties and Default Document Properties* ................................................................. 79
Checking the Status of a Print Job........................................................ 93Opening the Status Window........................................................ 94Using the LBP-1210 Status Window .......................................... 95Network Printer Status .............................................................. 106The Status Window Icon ........................................................... 107Closing the Status Window ....................................................... 108Messages ................................................................................... 108
Chapter 4 Troubleshooting ................................................................................ 111Finding Information............................................................................ 111Paper Jams .......................................................................................... 113
Locating Paper Jams.................................................................. 113Removing Paper Jams ............................................................... 117
Print Quality Problems ....................................................................... 124Printout Has Vertical White Streaks ......................................... 124Printout Has Black Specks ........................................................ 125Printout Too Light ..................................................................... 125Printout Too Dark...................................................................... 125
Printer Problems ................................................................................. 126CAPT Problems.................................................................................. 129CAPT Messages ................................................................................. 132Using the Trouble Shooter.................................................................. 134Uninstalling the CAPT ....................................................................... 136
Chapter 5 Maintenance ...................................................................................... 137Handling and Cleaning the Printer ..................................................... 137
Handling the Printer .................................................................. 137Cleaning the Printer................................................................... 138
EP-25 Cartridge .................................................................................. 138Storage Guidelines .................................................................... 139Handling Guidelines.................................................................. 140Replacing the EP-25 Cartridge.................................................. 141
xiv

Cleaning..................................................................................... 143Appendix A Printer Specifications ....................................................................... 145Appendix B Network Adapter: AXIS 1610 ......................................................... 147
Connecting Directly From Clients...................................................... 148Connecting Through A Print Server ................................................... 149Protocols ............................................................................................. 149Using NetPilot To Configure Your Network Adapter........................ 149
Installing the Network Print Monitor ........................................ 149Specifications...................................................................................... 150
Glossary ............................................................................................................. 151Index ............................................................................................................. 163
xv

xvi
Intr
od
uct
ion
Chapter 1Introduction
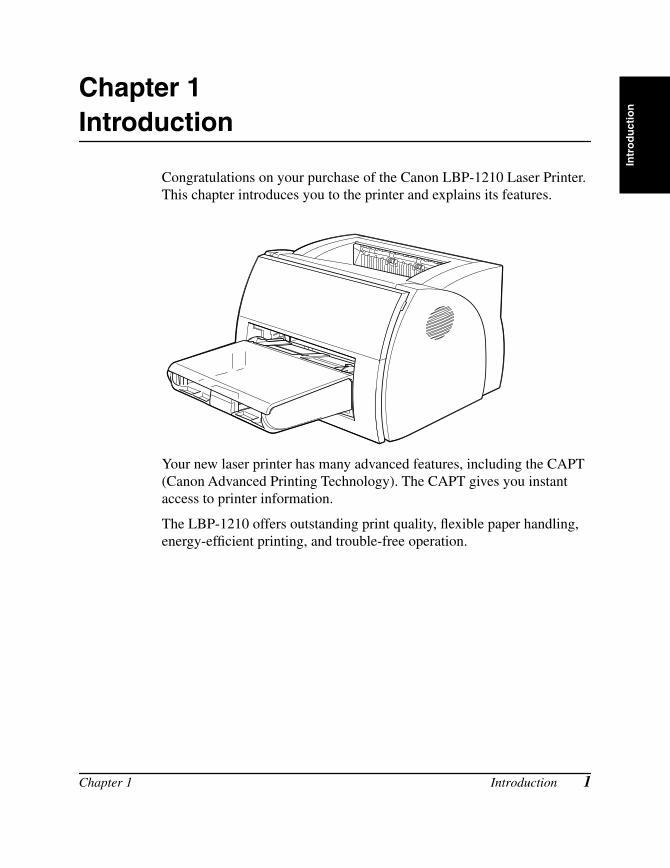
Congratulations on your purchase of the Canon LBP-1210 Laser Printer. This chapter introduces you to the printer and explains its features.
Your new laser printer has many advanced features, including the CAPT (Canon Advanced Printing Technology). The CAPT gives you instant access to printer information.
The LBP-1210 offers outstanding print quality, flexible paper handling, energy-efficient printing, and trouble-free operation.
Chapter 1 Introduction 1
Printer FeaturesThe LBP-1210 combines the following features to form a versatile printing system:
Quick startupThe printer is ready to print in less than 8 seconds after it is turned on (start-up time), and has a first print time of less than 10 seconds. This means that you can print documents quickly and efficiently.
Impressive outputThanks to the CAPT (Canon Advanced Printing Technology), the 600 dpi resolution gives you crisp, clean, laser-sharp output at 14 pages per minute.
Low power consumptionThe printer comes with an efficient power management system. Power consumption is very low, particularly when idle.
Stylish, compact designThe printer provides compact, lightweight, easy-to-use functionality in a smooth, stylish design. The small footprint gives you more work space to help you meet your needs.
CAPT Printing SoftwareThe CAPT is easy to install, and with it you can set custom paper sizes, overlay bitmaps on documents (for example, you can print your logo on each page), tile up to nine pages on one sheet of paper, and switch easily between complicated setups using user-defined profiles. The Status Window gives you written and spoken feedback about your print jobs, even over a network.
2 Introduction Chapter 1
Intr
od
uct
ion
Quiet operationIts quiet operation makes this printer an ideal output device, even in an open-office environment.
Flexible paper handlingBoth the cassette and the manual feeding slot accept plain paper of various sizes—Letter, A4, B5, or Executive—as well as transparencies, labels, envelopes, postcards and other special paper. The cassette handles up to 250 sheets of 64 g/m2 plain paper with a maximum stack height of 25 mm. For manual feeding, sheets are fed one at a time. Delivery can be face down or face up.
Direct Network ConnectionWith the optional network adapter, you can connect directly to the LBP-1210 over a network, without having to go through a server.
Chapter 1 Introduction 3

Parts of the Printer
Front View
Rear View
Paper guides
Cassette
Face-down delivery slot
Manual feed slot
Delivery selectioncover
Front cover
Power lamp
USB port interface connector
Power socket
Parallel port interface connector
Power switch
4 Introduction Chapter 1

Intr
od
uct
ion
Inside the Printer
For more information about setting up the printer, see the Getting Started Guide.
Transfer roller
Fixing assembly
Chapter 1 Introduction 5

6 Introduction Chapter 1
Pap
er H
and
ling
Chapter 2Paper Handling
This chapter describes how to select the different types of paper you can use with your printer and how to load them. It includes the following information:
❏ Paper Requirements
❏ Storing Paper
❏ Paper Path
❏ Selecting Paper Delivery
❏ Loading Paper into the Cassette
❏ Loading Paper Manually
Chapter 2 Paper Handling 7
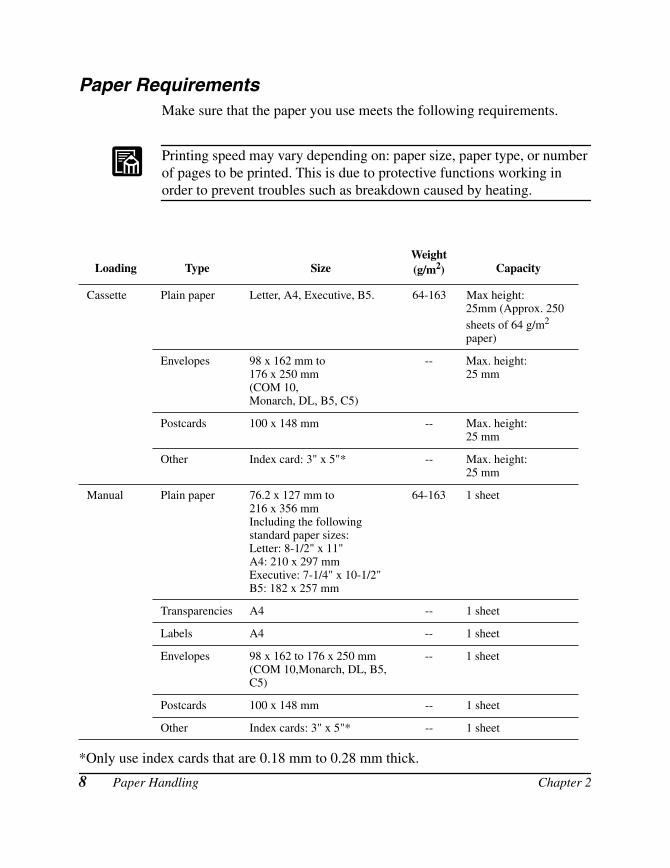
Paper RequirementsMake sure that the paper you use meets the following requirements.
Printing speed may vary depending on: paper size, paper type, or number of pages to be printed. This is due to protective functions working in order to prevent troubles such as breakdown caused by heating.
*Only use index cards that are 0.18 mm to 0.28 mm thick.
Loading Type SizeWeight (g/m2) Capacity
Cassette Plain paper Letter, A4, Executive, B5. 64-163 Max height:25mm (Approx. 250 sheets of 64 g/m2 paper)
Envelopes 98 x 162 mm to176 x 250 mm(COM 10,Monarch, DL, B5, C5)
-- Max. height:25 mm
Postcards 100 x 148 mm -- Max. height:25 mm
Other Index card: 3" x 5"* -- Max. height:25 mm
Manual Plain paper 76.2 x 127 mm to216 x 356 mm Including the following standard paper sizes:Letter: 8-1/2" x 11"A4: 210 x 297 mmExecutive: 7-1/4" x 10-1/2"B5: 182 x 257 mm
64-163 1 sheet
Transparencies A4 -- 1 sheet
Labels A4 -- 1 sheet
Envelopes 98 x 162 to 176 x 250 mm (COM 10,Monarch, DL, B5, C5)
-- 1 sheet
Postcards 100 x 148 mm -- 1 sheet
Other Index cards: 3" x 5"* -- 1 sheet
8 Paper Handling Chapter 2
Pap
er H
and
ling
Plain PaperFollow these guidelines when selecting paper:
❏ Paper that is too thick or too thin, or that has irregular shapes, cutouts, or perforations should not be used.
❏ Never use paper that is wet, highly textured, rough, torn, wrinkled, or damaged.
❏ Extremely smooth paper or paper with special coatings does not print well.
❏ The laser printing process uses high temperatures to fuse toner to the paper. Use paper that will not melt, vaporize, offset, discolor, or emit dangerous fumes at about 190˚ C (374˚ F).
❏ Do not use thermal or carbon paper, or paper with glue, staples, clips, or ribbons.
For colored paper, use colors that are not damaged by the heat of the printer’s fixing assembly (about 190˚ C or 374˚ F).
TransparenciesThe acceptable size is A4. The transparencies must be able to withstand the heat generated by the fixing assembly (about 190˚ C or 374˚ F) without damage.
LabelsLabels are paper with pressure-sensitive adhesive. Acceptable size is A4.
Note the following conditions when choosing a label sheet:
❏ The label print face (top, or face sheet) must be made of ordinary, matte-finish paper similar to copy paper.
❏ The paper backing must be able to withstand the heat generated by the fixing assembly (about 190˚ C or 374˚ F). The backing must not be made of easily removable coated paper.
Chapter 2 Paper Handling 9
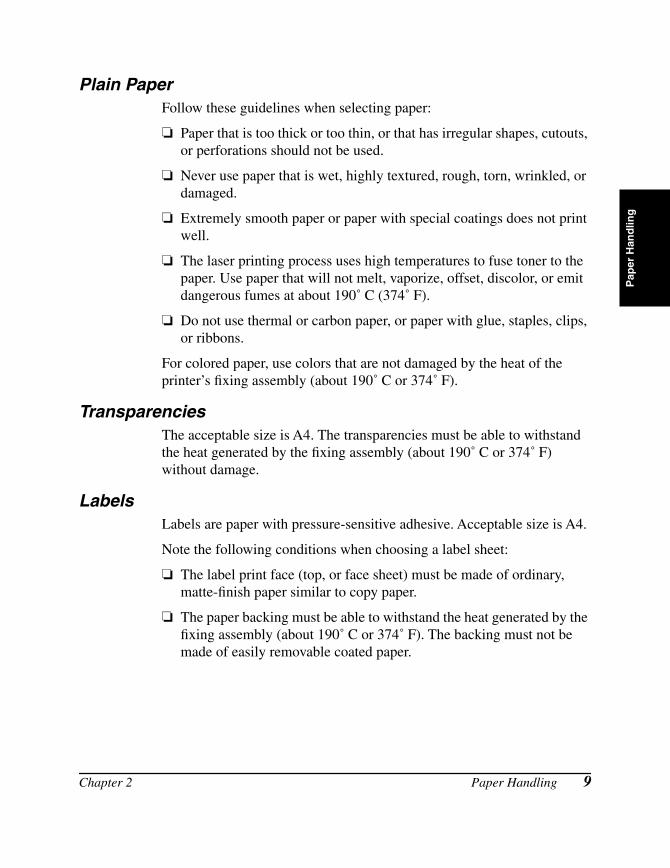
❏ Do not use labels with exposed adhesive, which may stick to the EP-25 cartridge or the fixing roller, causing the labels to peel off and serious paper jams to occur.
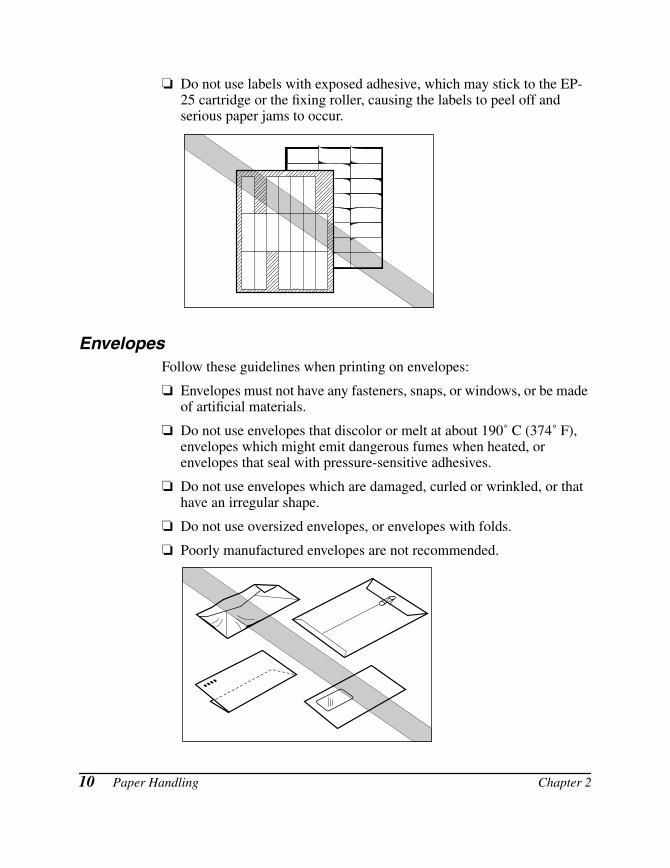
EnvelopesFollow these guidelines when printing on envelopes:
❏ Envelopes must not have any fasteners, snaps, or windows, or be made of artificial materials.
❏ Do not use envelopes that discolor or melt at about 190˚ C (374˚ F), envelopes which might emit dangerous fumes when heated, or envelopes that seal with pressure-sensitive adhesives.
❏ Do not use envelopes which are damaged, curled or wrinkled, or that have an irregular shape.
❏ Do not use oversized envelopes, or envelopes with folds.
❏ Poorly manufactured envelopes are not recommended.
10 Paper Handling Chapter 2

Pap
er H
and
ling
PostcardsFollow these guidelines when printing on postcards:
❏ Postcards should not be greater than 0.28 mm in thickness.
❏ Postcards should be free of glue, clips, and staples.
❏ Do not use postcards that are damaged or curled, or that have special coatings or an irregular shape.
Storing PaperImproper paper storage might cause a deterioration of print quality and paper performance. Therefore, note the following when storing paper:
❏ Store unused paper in its wrapping to protect against humidity.
❏ Do not store paper directly on the floor as the floor is usually humid.
❏ If you must store paper in a very humid place, use a specially designed storage box.
❏ Keep paper on a flat surface to prevent excessive in-ream paper curl.
❏ Do not stack paper too high to prevent excessive in-ream paper curl.
❏ Do not subject paper to direct sunlight or a humid environment.
If paper is moved to a place with a very different temperature, leave it there for about one day before using it; otherwise it could curl or develop wrinkles.
Chapter 2 Paper Handling 11
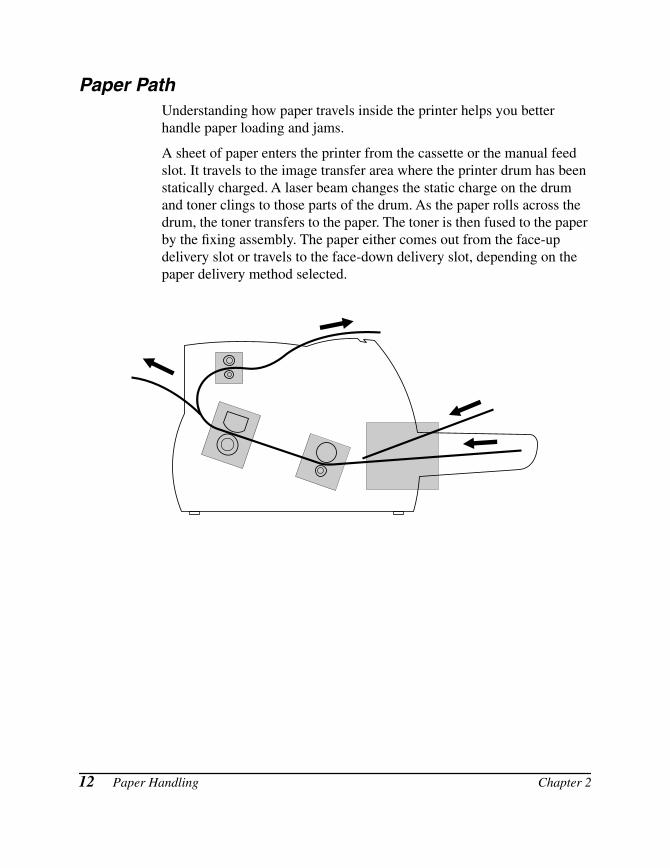
Paper PathUnderstanding how paper travels inside the printer helps you better handle paper loading and jams.
A sheet of paper enters the printer from the cassette or the manual feed slot. It travels to the image transfer area where the printer drum has been statically charged. A laser beam changes the static charge on the drum and toner clings to those parts of the drum. As the paper rolls across the drum, the toner transfers to the paper. The toner is then fused to the paper by the fixing assembly. The paper either comes out from the face-up delivery slot or travels to the face-down delivery slot, depending on the paper delivery method selected.
12 Paper Handling Chapter 2
Pap
er H
and
ling
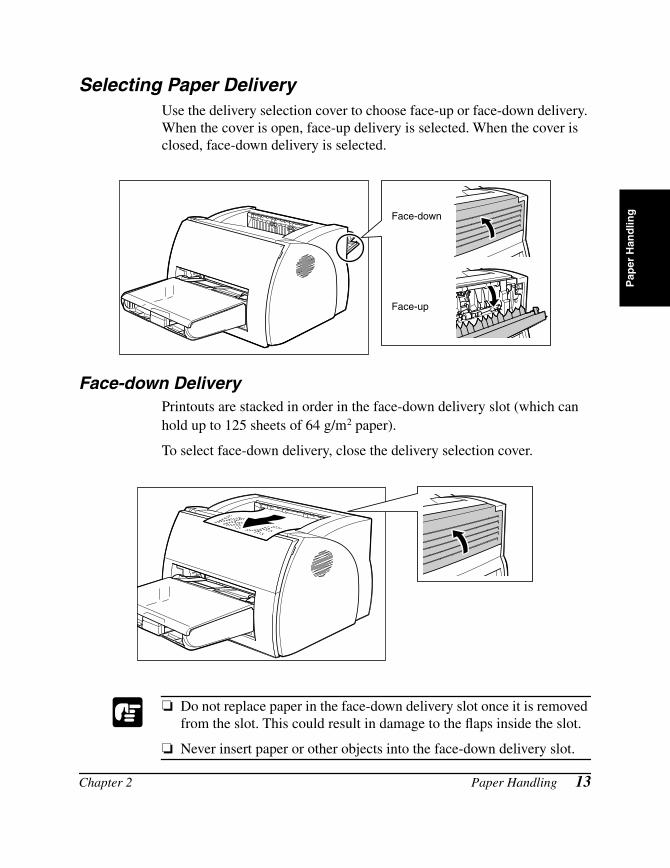
Selecting Paper DeliveryUse the delivery selection cover to choose face-up or face-down delivery. When the cover is open, face-up delivery is selected. When the cover is closed, face-down delivery is selected.
Face-down DeliveryPrintouts are stacked in order in the face-down delivery slot (which can hold up to 125 sheets of 64 g/m2 paper).
To select face-down delivery, close the delivery selection cover.
❏ Do not replace paper in the face-down delivery slot once it is removed from the slot. This could result in damage to the flaps inside the slot.
❏ Never insert paper or other objects into the face-down delivery slot.
Face-up
Face-down
Chapter 2 Paper Handling 13
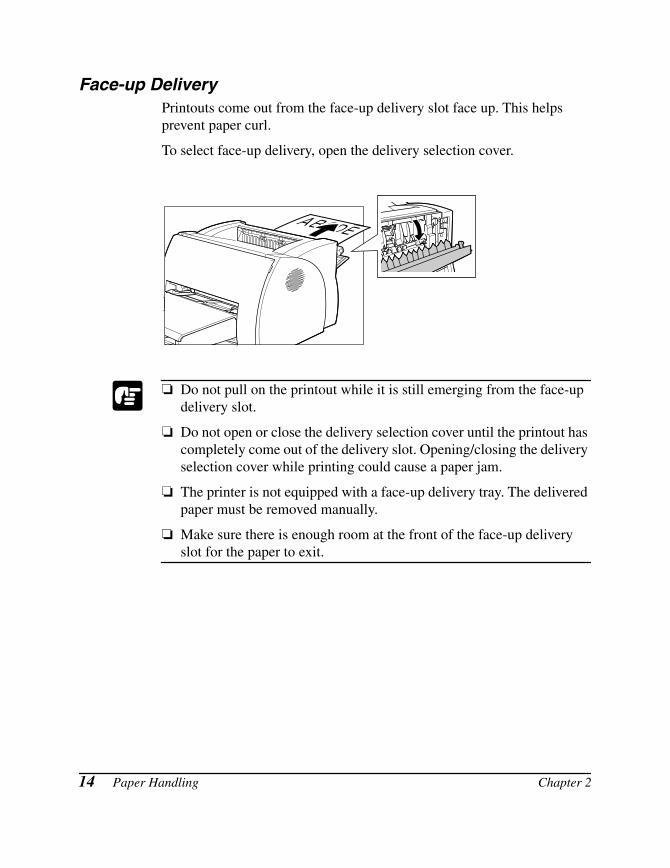
Face-up DeliveryPrintouts come out from the face-up delivery slot face up. This helps prevent paper curl.
To select face-up delivery, open the delivery selection cover.
❏ Do not pull on the printout while it is still emerging from the face-up delivery slot.
❏ Do not open or close the delivery selection cover until the printout has completely come out of the delivery slot. Opening/closing the delivery selection cover while printing could cause a paper jam.
❏ The printer is not equipped with a face-up delivery tray. The delivered paper must be removed manually.
❏ Make sure there is enough room at the front of the face-up delivery slot for the paper to exit.
14 Paper Handling Chapter 2

Pap
er H
and
ling
Loading Paper into the CassetteThe cassette can hold up to approximately 250 sheets of 64 g/m2 paper for high-volume printing. Acceptable paper sizes are Letter, A4, Executive, and B5. It also accepts envelopes, postcards, or special paper with a maximum height of 25 mm.
Before loading paper on the cassette, first select the paper delivery. For more details, see “Selecting Paper Delivery” on page 13.
Follow the steps below to load a stack of paper.
1. Prepare a stack of paper and tap it on a flat surface to properly align the edges.
Fan the stack of paper well. If not, printing problems might occur.
Chapter 2 Paper Handling 15
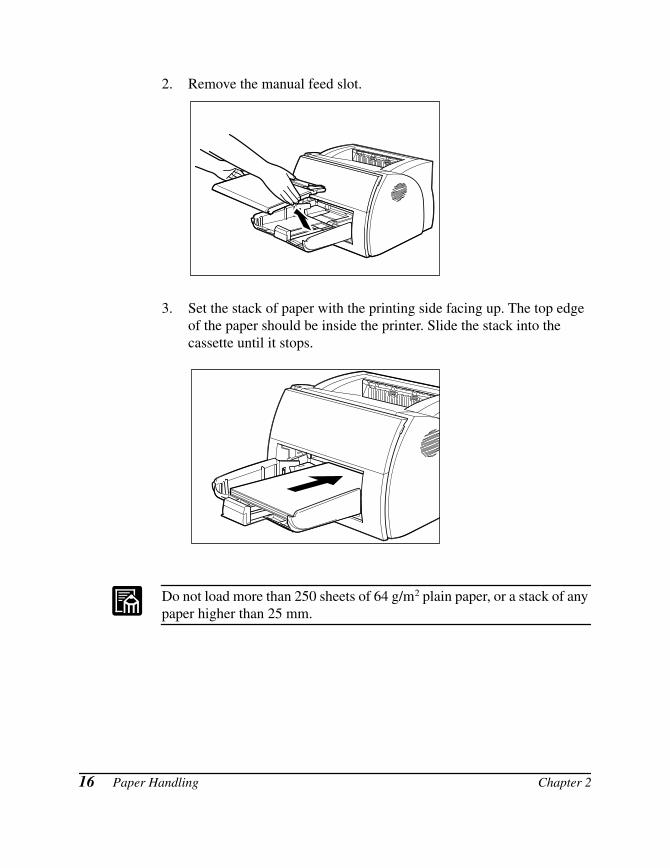
2. Remove the manual feed slot.
3. Set the stack of paper with the printing side facing up. The top edge of the paper should be inside the printer. Slide the stack into the cassette until it stops.
Do not load more than 250 sheets of 64 g/m2 plain paper, or a stack of any paper higher than 25 mm.
16 Paper Handling Chapter 2
Pap
er H
and
ling
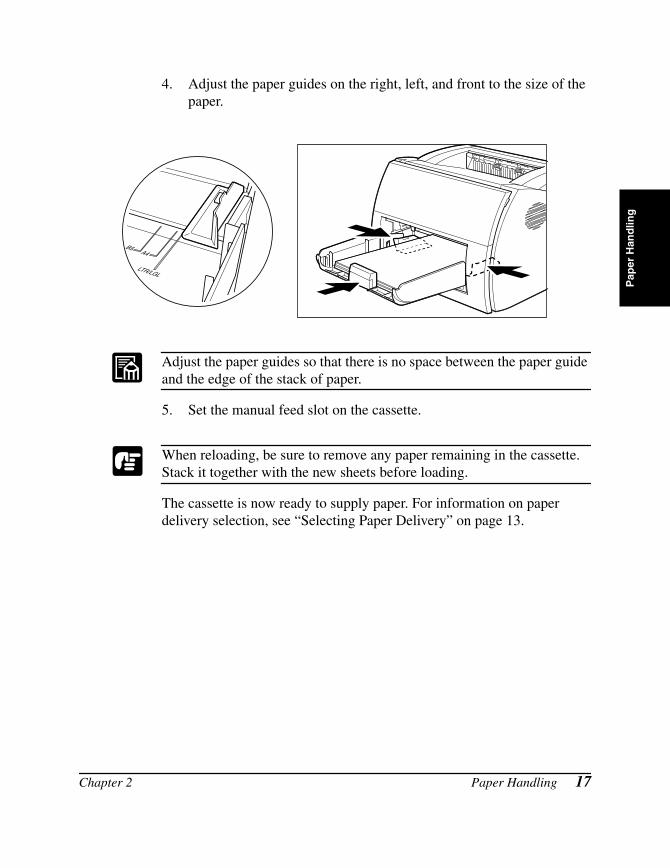
4. Adjust the paper guides on the right, left, and front to the size of the paper.
Adjust the paper guides so that there is no space between the paper guide and the edge of the stack of paper.
5. Set the manual feed slot on the cassette.
When reloading, be sure to remove any paper remaining in the cassette. Stack it together with the new sheets before loading.
The cassette is now ready to supply paper. For information on paper delivery selection, see “Selecting Paper Delivery” on page 13.
LTR/LGL
B5A4
Chapter 2 Paper Handling 17
Loading Envelopes into the Cassette
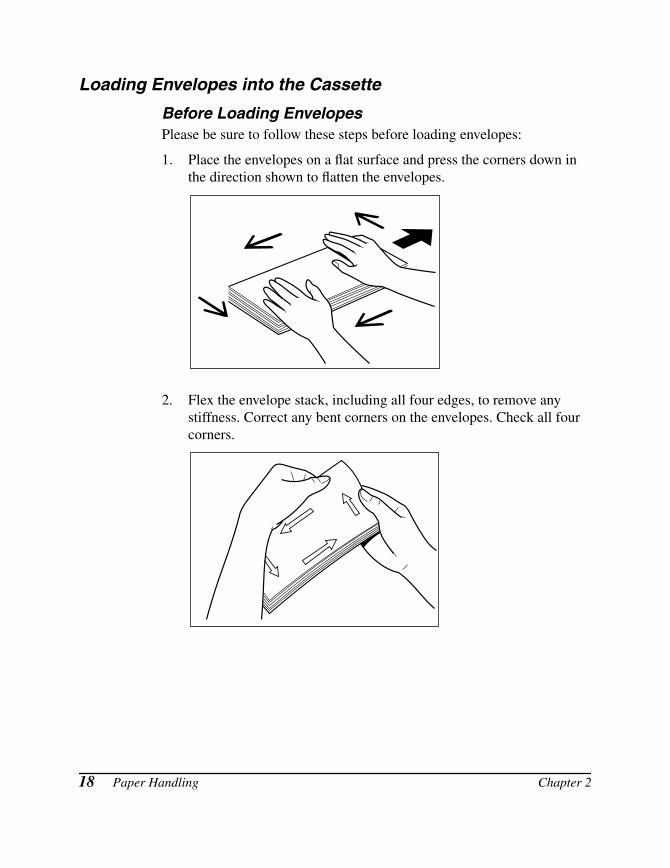
Before Loading EnvelopesPlease be sure to follow these steps before loading envelopes:
1. Place the envelopes on a flat surface and press the corners down in the direction shown to flatten the envelopes.
2. Flex the envelope stack, including all four edges, to remove any stiffness. Correct any bent corners on the envelopes. Check all four corners.
18 Paper Handling Chapter 2

Pap
er H
and
ling
3. Align the stack of envelopes by tapping them on a flat surface.
Loading Envelopes1. Set the paper with the printing side facing up so that the flap is on the
left. The top edge of the envelope should be inside the printer. Slide the stack into the cassette until it stops.
Chapter 2 Paper Handling 19
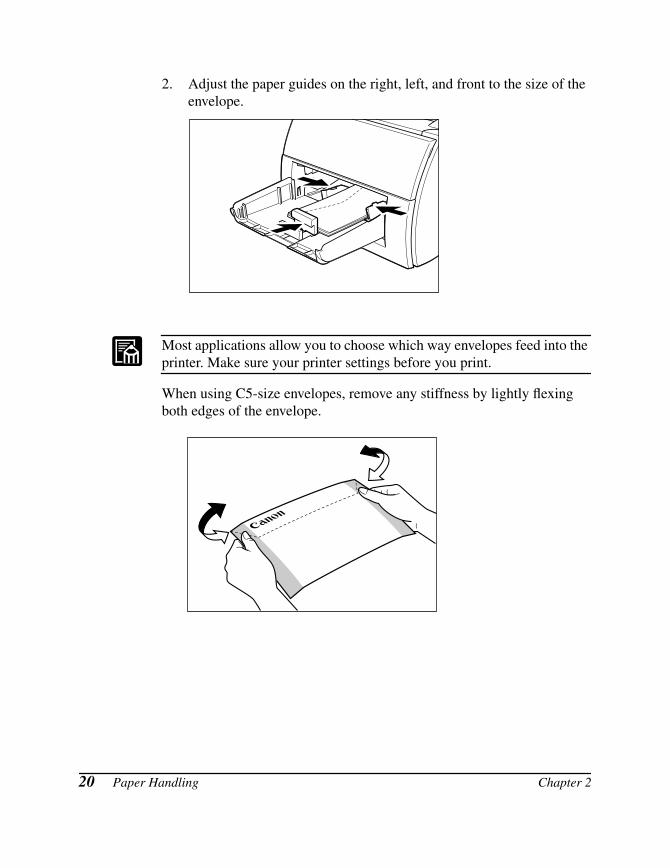
2. Adjust the paper guides on the right, left, and front to the size of the envelope.
Most applications allow you to choose which way envelopes feed into the printer. Make sure your printer settings before you print.
When using C5-size envelopes, remove any stiffness by lightly flexing both edges of the envelope.
20 Paper Handling Chapter 2
Pap
er H
and
ling
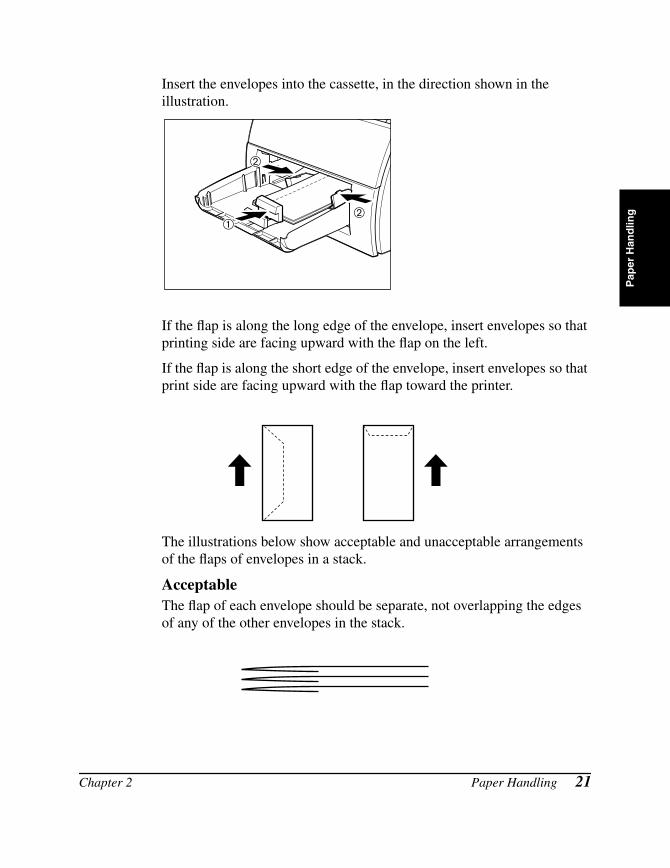
Insert the envelopes into the cassette, in the direction shown in the illustration.
If the flap is along the long edge of the envelope, insert envelopes so that printing side are facing upward with the flap on the left.
If the flap is along the short edge of the envelope, insert envelopes so that print side are facing upward with the flap toward the printer.
The illustrations below show acceptable and unacceptable arrangements of the flaps of envelopes in a stack.
AcceptableThe flap of each envelope should be separate, not overlapping the edges of any of the other envelopes in the stack.
➀
➁
➁
Chapter 2 Paper Handling 21

Not AcceptableIf the flap of any of the envelopes overlaps the edges of other envelopes in the stack, like those in the examples below, paper jams or misfeeds will occur.
Flaps overlapping
Top flap overlaps the envelopes underneath
Flaps overlapping the envelopes underneath
22 Paper Handling Chapter 2
Pap
er H
and
ling
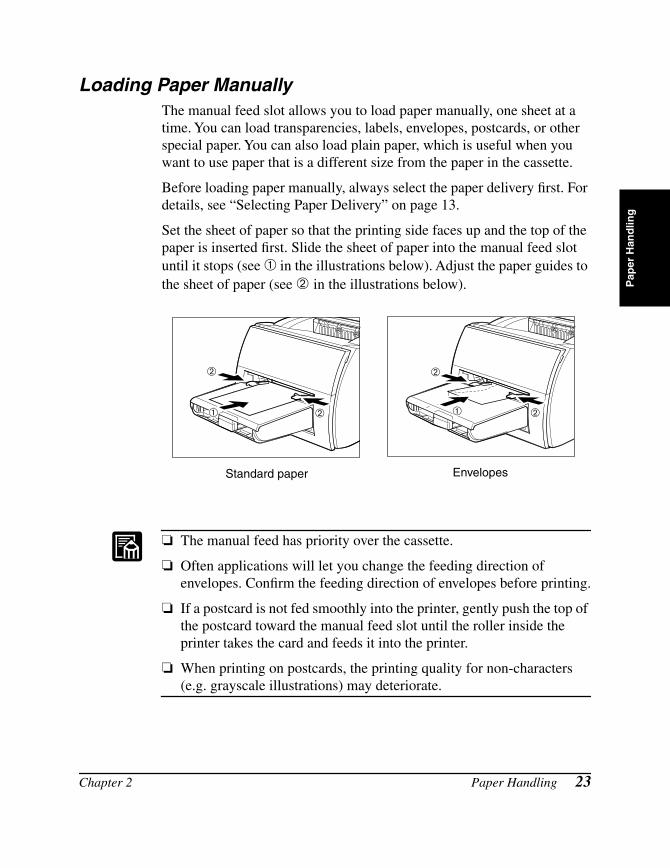
Loading Paper ManuallyThe manual feed slot allows you to load paper manually, one sheet at a time. You can load transparencies, labels, envelopes, postcards, or other special paper. You can also load plain paper, which is useful when you want to use paper that is a different size from the paper in the cassette.
Before loading paper manually, always select the paper delivery first. For details, see “Selecting Paper Delivery” on page 13.
Set the sheet of paper so that the printing side faces up and the top of the paper is inserted first. Slide the sheet of paper into the manual feed slot until it stops (see ➀ in the illustrations below). Adjust the paper guides to the sheet of paper (see ➁ in the illustrations below).
❏ The manual feed has priority over the cassette.
❏ Often applications will let you change the feeding direction of envelopes. Confirm the feeding direction of envelopes before printing.
❏ If a postcard is not fed smoothly into the printer, gently push the top of the postcard toward the manual feed slot until the roller inside the printer takes the card and feeds it into the printer.
❏ When printing on postcards, the printing quality for non-characters (e.g. grayscale illustrations) may deteriorate.
➀
➁
➁
Standard paper
➁➀
➁
Envelopes
Chapter 2 Paper Handling 23
❏ Do not force the paper into the printer or printing problems might result.
❏ For continuous manual feed, insert a new sheet only when the previous sheet has come out completely from the delivery slot. If a new sheet is inserted before the previous sheet has been delivered, a paper jam may occur.
24 Paper Handling Chapter 2
Usi
ng
th
e C
ano
n
Ad
van
ced
Pri
nti
ng
T
ech
no
log
y
Chapter 3Using the Canon Advanced Printing Technology
This chapter describes the CAPT (Canon Advanced Printing Technology). It includes the following information:
❏ Installing the CAPT
❏ Printing with the CAPT
❏ Checking the Status of a Print Job
Chapter 3 Using the Canon Advanced Printing Technology 25
Installing the CAPTIf you are using the LBP-1210 as a local printer (connected directly to your computer), follow the steps below. If the LBP-1210 is already on your network, and you want to start using it, follow the steps in “Connecting to the LBP-1210 Already on Your Network” on page 57. If you want to install the LBP-1210 as a network printer, follow the steps in “Connecting the LBP-1210 as a Network Printer” on page 61.
Windows 95/98/MeFor installation instructions using the CD-ROM menu, please see the Getting Started Guide.
Plug and Play Following is the installation procedure of plug and play for “Using USB and Parallel Port” under Windows 95/98/Me.
Before you install the software, make sure you do the following:
❏ Start Windows 95, 98 or Me.
❏ Connect the printer to your computer (For details, see the Getting Started Guide).
❏ Turn on the printer (For details, see the Getting Started Guide).
26 Using the Canon Advanced Printing Technology Chapter 3
Usi
ng
th
e C
ano
n
Ad
van
ced
Pri
nti
ng
T
ech
no
log
y
If you are using Windows 95 OSR2.1 or later, an error may occur while trying to install using plug and play. If you get an error, install the software using the CD-ROM. To check which version of Windows 95 you are using, open the System window in Control Panel and look at the version number in the General tab. 4.00.950 B or 4.00.950 C means you are using OSR2.1 or later.
Using USB Port (USB Cable)
In order to use the printer via USB, the following requirements need to be satisfied.
❏ Your computer must be equipped with a USB port and it is necessary that its operation is approved by the manufacturer.
❏ Windows 95 is not available for USB.
The following procedure only applies to the installation under Windows 98.
The first time you start Windows with the LBP-1210 attached to your computer, the New Hardware Found dialog box appears, then click Next >.
When using parallel port, go to Step 3.
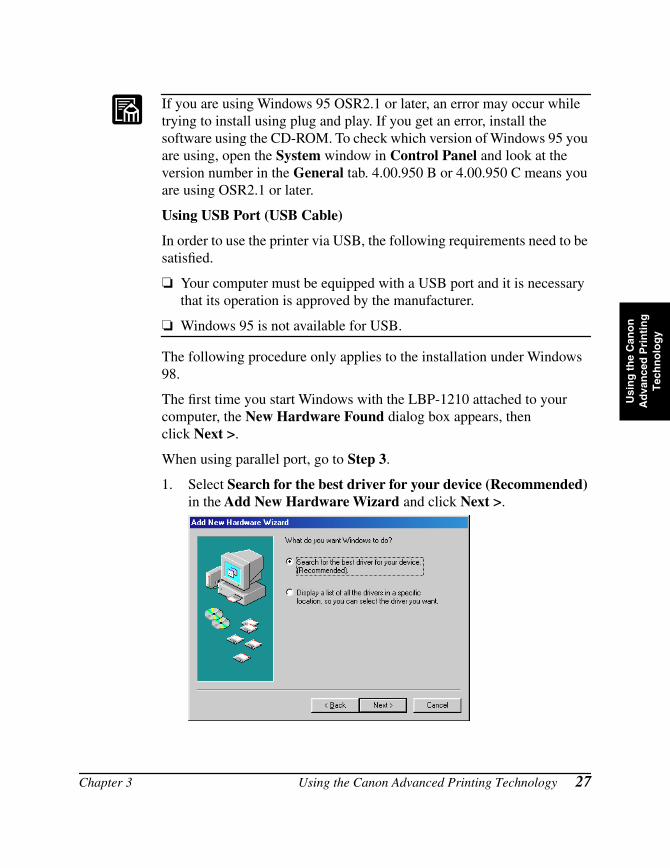
1. Select Search for the best driver for your device (Recommended) in the Add New Hardware Wizard and click Next >.
Chapter 3 Using the Canon Advanced Printing Technology 27
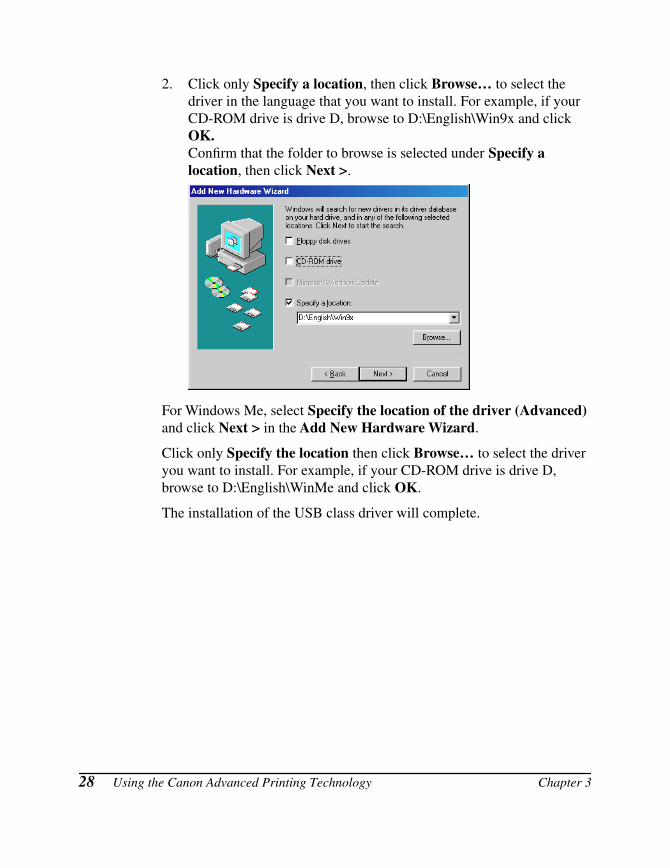
2. Click only Specify a location, then click Browse… to select the driver in the language that you want to install. For example, if your CD-ROM drive is drive D, browse to D:\English\Win9x and click OK.Confirm that the folder to browse is selected under Specify a location, then click Next >.
For Windows Me, select Specify the location of the driver (Advanced) and click Next > in the Add New Hardware Wizard.
Click only Specify the location then click Browse… to select the driver you want to install. For example, if your CD-ROM drive is drive D, browse to D:\English\WinMe and click OK.
The installation of the USB class driver will complete.
28 Using the Canon Advanced Printing Technology Chapter 3
Usi
ng
th
e C
ano
n
Ad
van
ced
Pri
nti
ng
T
ech
no
log
y
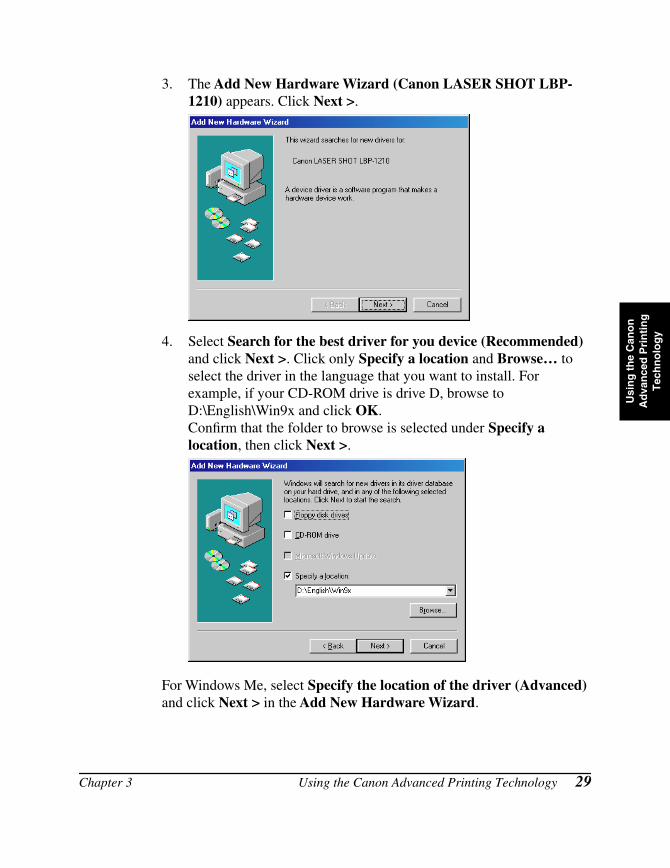
3. The Add New Hardware Wizard (Canon LASER SHOT LBP-1210) appears. Click Next >.
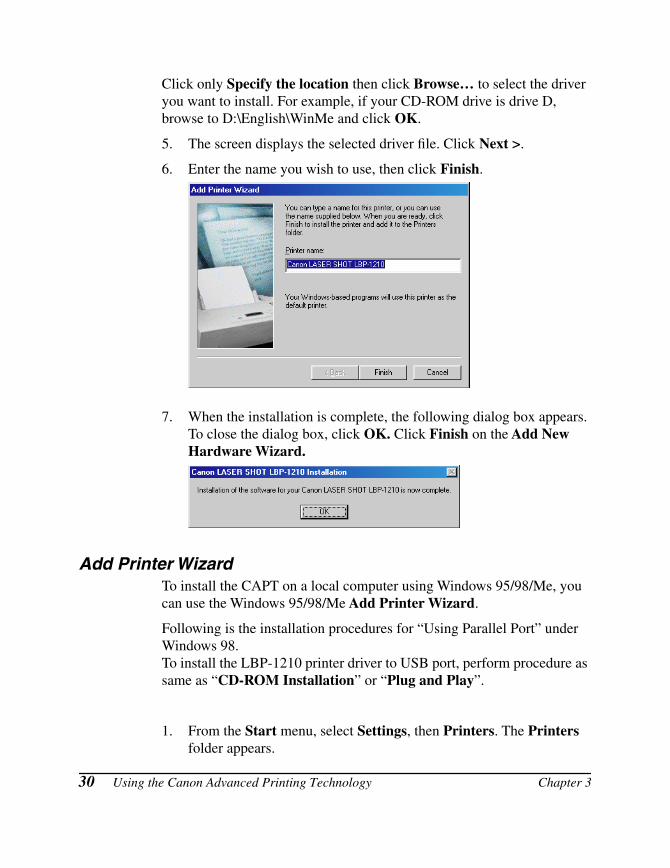
4. Select Search for the best driver for you device (Recommended) and click Next >. Click only Specify a location and Browse… to select the driver in the language that you want to install. For example, if your CD-ROM drive is drive D, browse to D:\English\Win9x and click OK.Confirm that the folder to browse is selected under Specify a location, then click Next >.
For Windows Me, select Specify the location of the driver (Advanced) and click Next > in the Add New Hardware Wizard.
Chapter 3 Using the Canon Advanced Printing Technology 29
Click only Specify the location then click Browse… to select the driver you want to install. For example, if your CD-ROM drive is drive D, browse to D:\English\WinMe and click OK.
5. The screen displays the selected driver file. Click Next >.
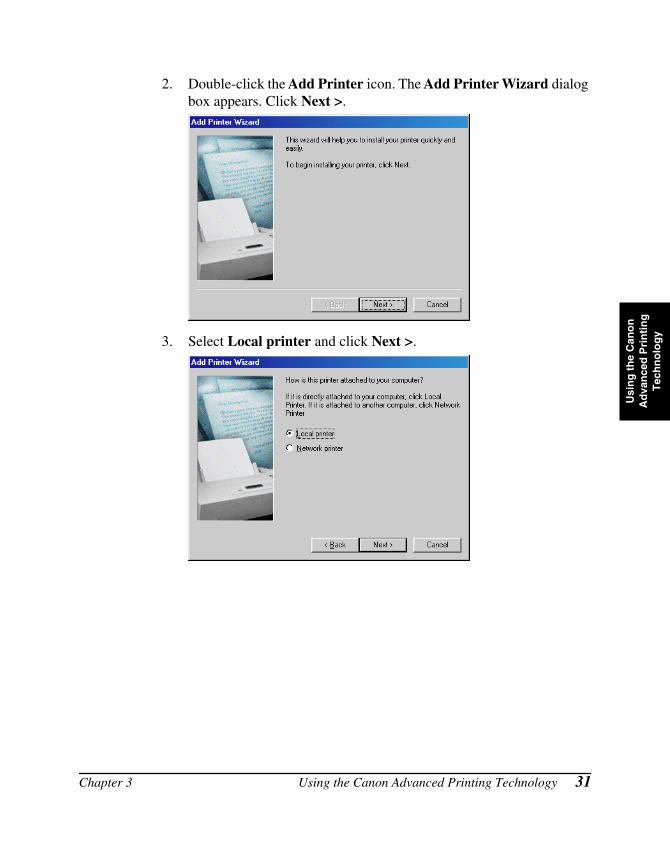
6. Enter the name you wish to use, then click Finish.
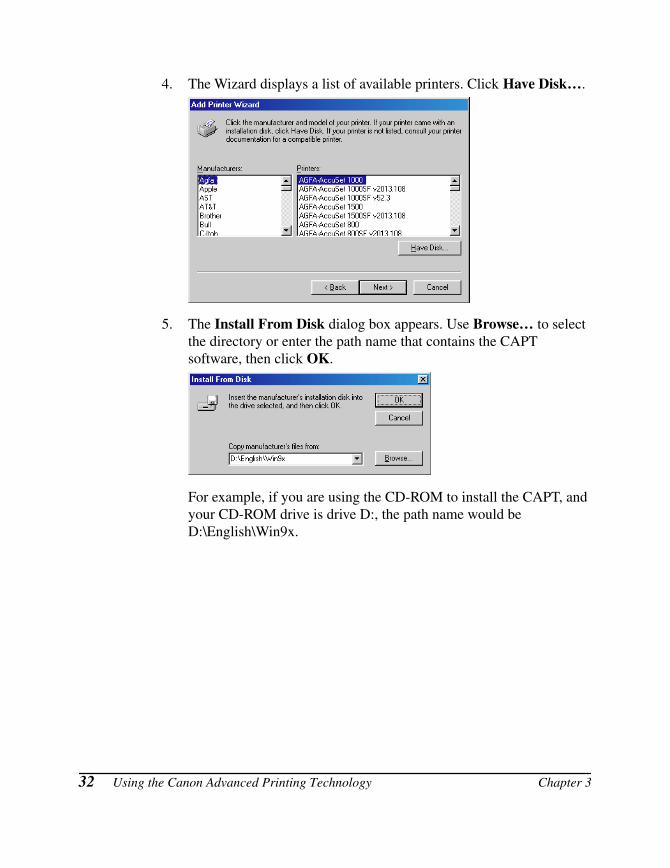
7. When the installation is complete, the following dialog box appears. To close the dialog box, click OK. Click Finish on the Add New Hardware Wizard.
Add Printer Wizard To install the CAPT on a local computer using Windows 95/98/Me, you can use the Windows 95/98/Me Add Printer Wizard.
Following is the installation procedures for “Using Parallel Port” under Windows 98.To install the LBP-1210 printer driver to USB port, perform procedure as same as “CD-ROM Installation” or “Plug and Play”.
1. From the Start menu, select Settings, then Printers. The Printers folder appears.
30 Using the Canon Advanced Printing Technology Chapter 3
Usi
ng
th
e C
ano
n
Ad
van
ced
Pri
nti
ng
T
ech
no
log
y
2. Double-click the Add Printer icon. The Add Printer Wizard dialog box appears. Click Next >.
3. Select Local printer and click Next >.
Chapter 3 Using the Canon Advanced Printing Technology 31
4. The Wizard displays a list of available printers. Click Have Disk….
5. The Install From Disk dialog box appears. Use Browse… to select the directory or enter the path name that contains the CAPT software, then click OK.
For example, if you are using the CD-ROM to install the CAPT, and your CD-ROM drive is drive D:, the path name would be D:\English\Win9x.
32 Using the Canon Advanced Printing Technology Chapter 3
Usi
ng
th
e C
ano
n
Ad
van
ced
Pri
nti
ng
T
ech
no
log
y
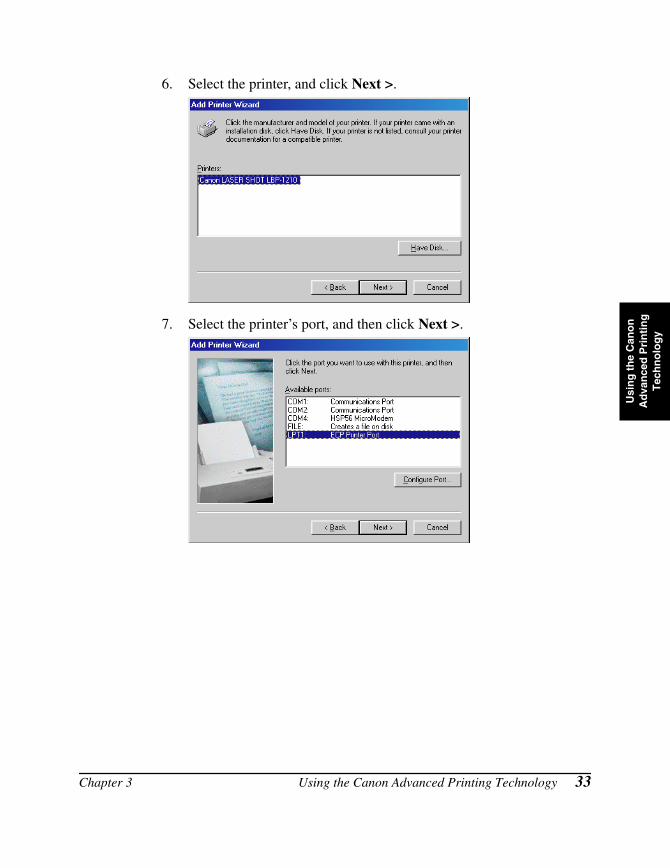
6. Select the printer, and click Next >.
7. Select the printer’s port, and then click Next >.
Chapter 3 Using the Canon Advanced Printing Technology 33

8. Enter the name you wish to use, then click Finish.
9. When the installation is complete, the following dialog box appears. To close the dialog box, click OK.
34 Using the Canon Advanced Printing Technology Chapter 3
Usi
ng
th
e C
ano
n
Ad
van
ced
Pri
nti
ng
T
ech
no
log
y
Windows NT 4.0/2000/XP
Windows 2000 Plug and PlayFollowing is the installation procedure of plug and play for “Using USB and Parallel Port” under Windows 2000.
Before you install the software, make sure you do the following:
❏ Connect the printer to your computer (For details, see the Getting Started Guide).
❏ Turn on the printer (For details, see the Getting Started Guide).
❏ Start up Windows 2000.
Using USB Port (USB Cable)
In order to use the printer via USB, the following requirements need to be satisfied.
❏ Your computer must be equipped with a USB port and it is necessary that its operation is approved by the manufacturer.
❏ Windows NT 4.0 is not available for USB.
When using parallel port, go to Step 2.
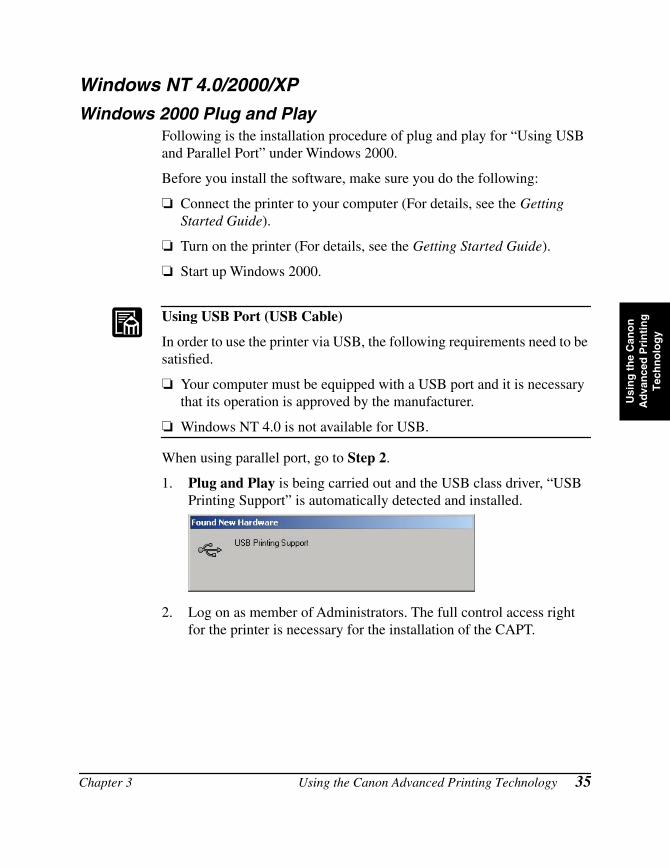
1. Plug and Play is being carried out and the USB class driver, “USB Printing Support” is automatically detected and installed.
2. Log on as member of Administrators. The full control access right for the printer is necessary for the installation of the CAPT.
Chapter 3 Using the Canon Advanced Printing Technology 35
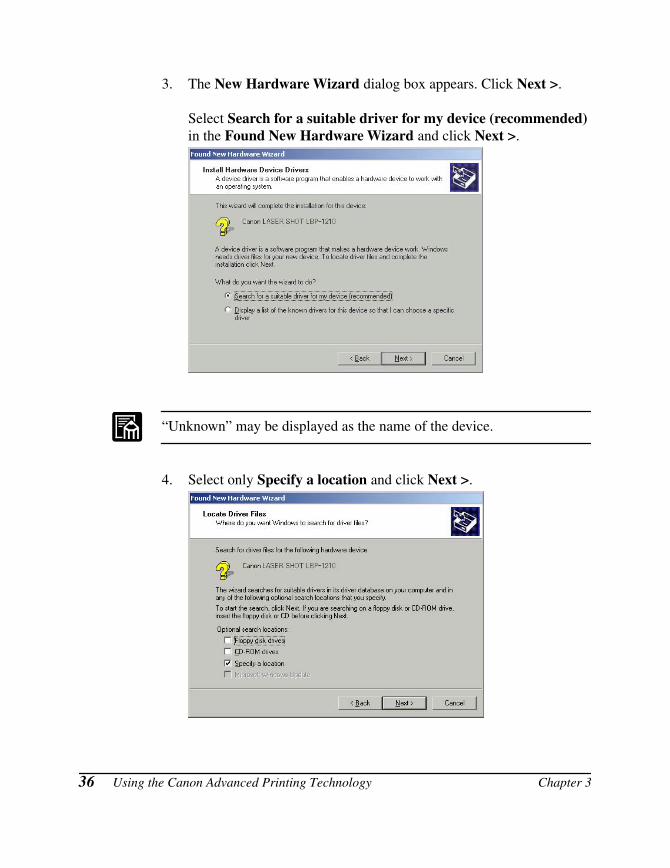
3. The New Hardware Wizard dialog box appears. Click Next >.
Select Search for a suitable driver for my device (recommended) in the Found New Hardware Wizard and click Next >.
“Unknown” may be displayed as the name of the device.
4. Select only Specify a location and click Next >.
36 Using the Canon Advanced Printing Technology Chapter 3
Usi
ng
th
e C
ano
n
Ad
van
ced
Pri
nti
ng
T
ech
no
log
y
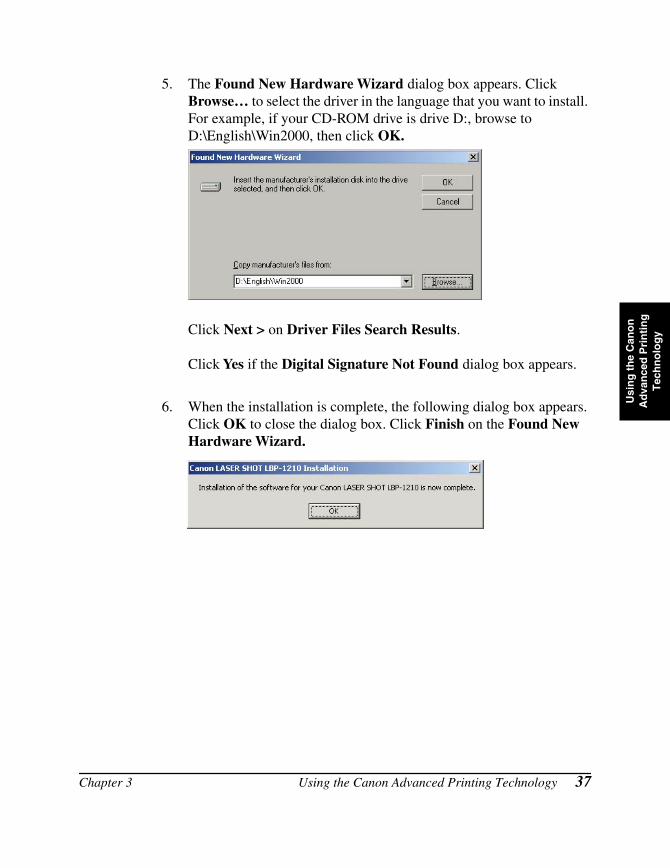
5. The Found New Hardware Wizard dialog box appears. Click Browse… to select the driver in the language that you want to install. For example, if your CD-ROM drive is drive D:, browse to D:\English\Win2000, then click OK.
Click Next > on Driver Files Search Results.
Click Yes if the Digital Signature Not Found dialog box appears.
6. When the installation is complete, the following dialog box appears. Click OK to close the dialog box. Click Finish on the Found New Hardware Wizard.
Chapter 3 Using the Canon Advanced Printing Technology 37

Windows XP Plug and PlayFollowing is the installation procedure of plug and play for “Using USB and Parallel Port” under Windows XP.
Before you install the software, make sure you do the following:
❏ Connect the printer to your computer (For details, see the Getting Started Guide).
❏ Turn on the printer (For details, see the Getting Started Guide).
❏ Start up Windows XP.
Using USB Port (USB Cable)
In order to use the printer via USB, the following requirements need to be satisfied.
❏ Your computer must be equipped with a USB port and it is necessary that its operation is approved by the manufacturer.
❏ Windows NT 4.0 is not available for USB.
When using parallel port, go to Step 2.
1. Plug and Play is being carried out and the USB class driver, “USB Printing Support” is automatically detected and installed.
2. Log on as member of Administrators. The full control access right for the printer is necessary for the installation of the CAPT.
38 Using the Canon Advanced Printing Technology Chapter 3
Usi
ng
th
e C
ano
n
Ad
van
ced
Pri
nti
ng
T
ech
no
log
y
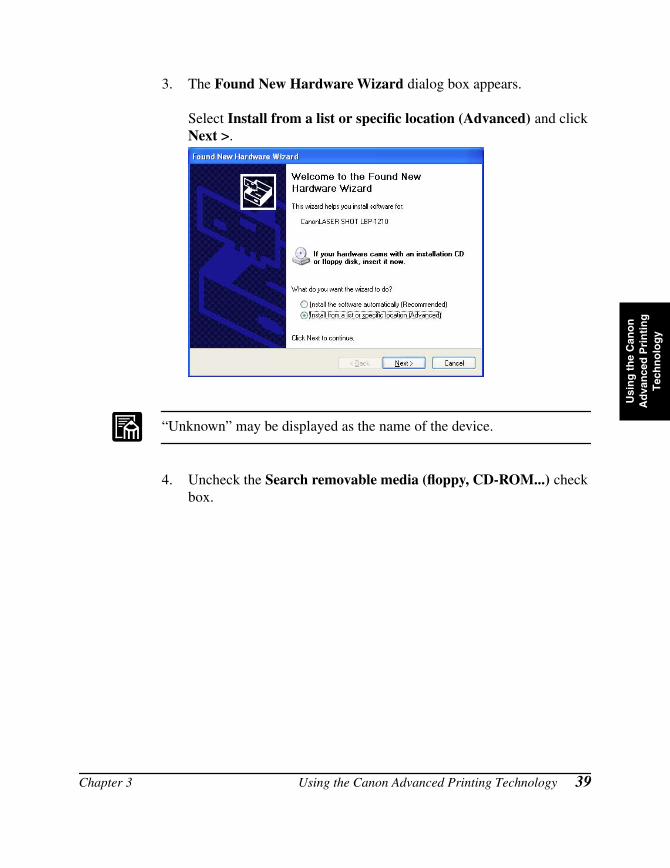
3. The Found New Hardware Wizard dialog box appears.
Select Install from a list or specific location (Advanced) and click Next >.
“Unknown” may be displayed as the name of the device.
4. Uncheck the Search removable media (floppy, CD-ROM...) check box.
Chapter 3 Using the Canon Advanced Printing Technology 39
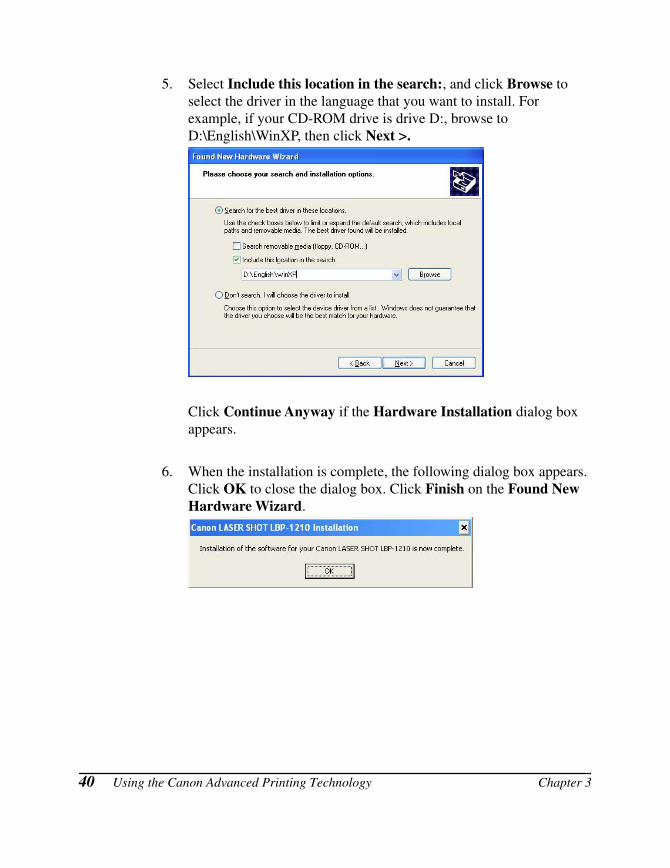
5. Select Include this location in the search:, and click Browse to select the driver in the language that you want to install. For example, if your CD-ROM drive is drive D:, browse to D:\English\WinXP, then click Next >.
Click Continue Anyway if the Hardware Installation dialog box appears.
6. When the installation is complete, the following dialog box appears. Click OK to close the dialog box. Click Finish on the Found New Hardware Wizard.
40 Using the Canon Advanced Printing Technology Chapter 3

Usi
ng
th
e C
ano
n
Ad
van
ced
Pri
nti
ng
T
ech
no
log
y
Windows NT 4.0 Add Printer WizardTo install the CAPT on a local computer using Windows NT 4.0, you can use the Windows NT Add Printer Wizard.
1. Log on as member of Administrators. The full control access right for the printer is necessary for the installation of the CAPT.
2. From the Start menu, select Settings, then Printers. The Printers folder appears.
3. Double-click the Add Printer icon. The Add Printer Wizard dialog box appears.
4. Select My Computer, then click Next >.
5. Select the printer port you want to use, then click Next >.
Chapter 3 Using the Canon Advanced Printing Technology 41
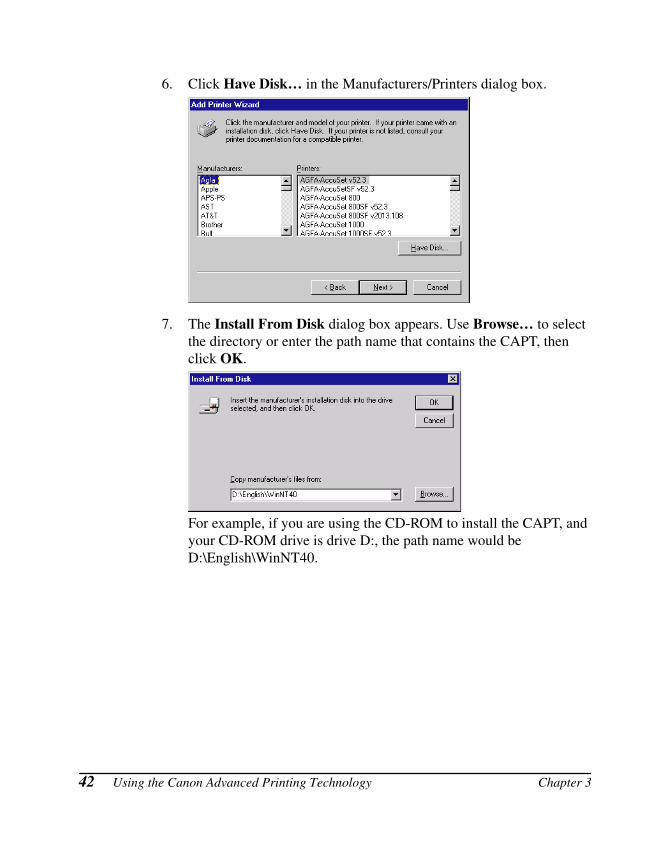
6. Click Have Disk… in the Manufacturers/Printers dialog box.
7. The Install From Disk dialog box appears. Use Browse… to select the directory or enter the path name that contains the CAPT, then click OK.
For example, if you are using the CD-ROM to install the CAPT, and your CD-ROM drive is drive D:, the path name would be D:\English\WinNT40.
42 Using the Canon Advanced Printing Technology Chapter 3
Usi
ng
th
e C
ano
n
Ad
van
ced
Pri
nti
ng
T
ech
no
log
y
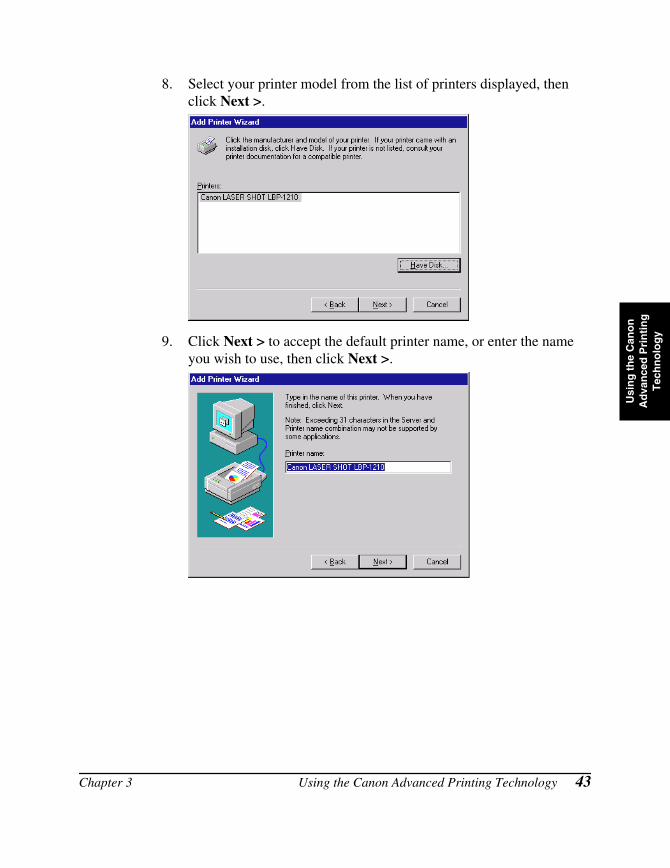
8. Select your printer model from the list of printers displayed, then click Next >.
9. Click Next > to accept the default printer name, or enter the name you wish to use, then click Next >.
Chapter 3 Using the Canon Advanced Printing Technology 43
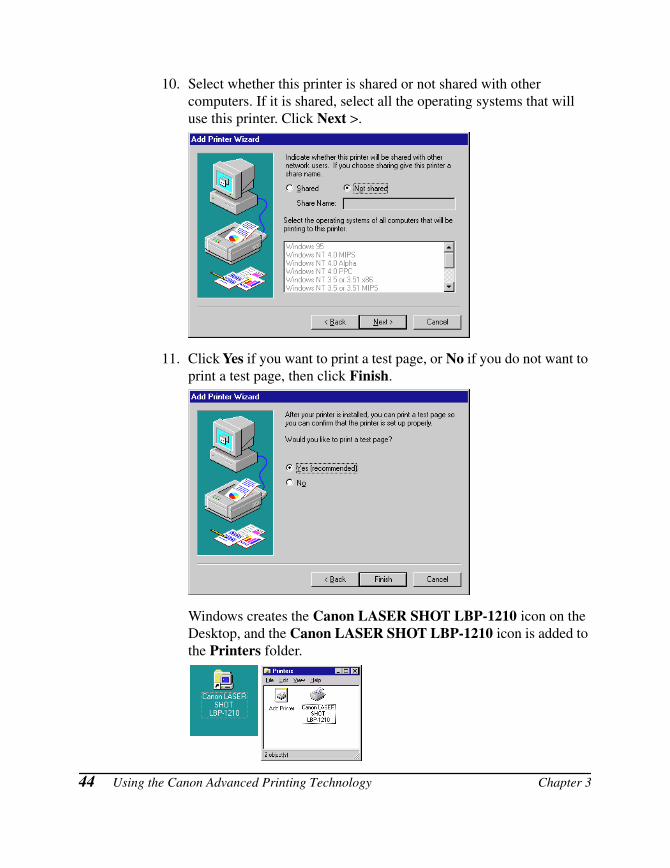
10. Select whether this printer is shared or not shared with other computers. If it is shared, select all the operating systems that will use this printer. Click Next >.
11. Click Yes if you want to print a test page, or No if you do not want to print a test page, then click Finish.
Windows creates the Canon LASER SHOT LBP-1210 icon on the Desktop, and the Canon LASER SHOT LBP-1210 icon is added to the Printers folder.
44 Using the Canon Advanced Printing Technology Chapter 3
Usi
ng
th
e C
ano
n
Ad
van
ced
Pri
nti
ng
T
ech
no
log
y
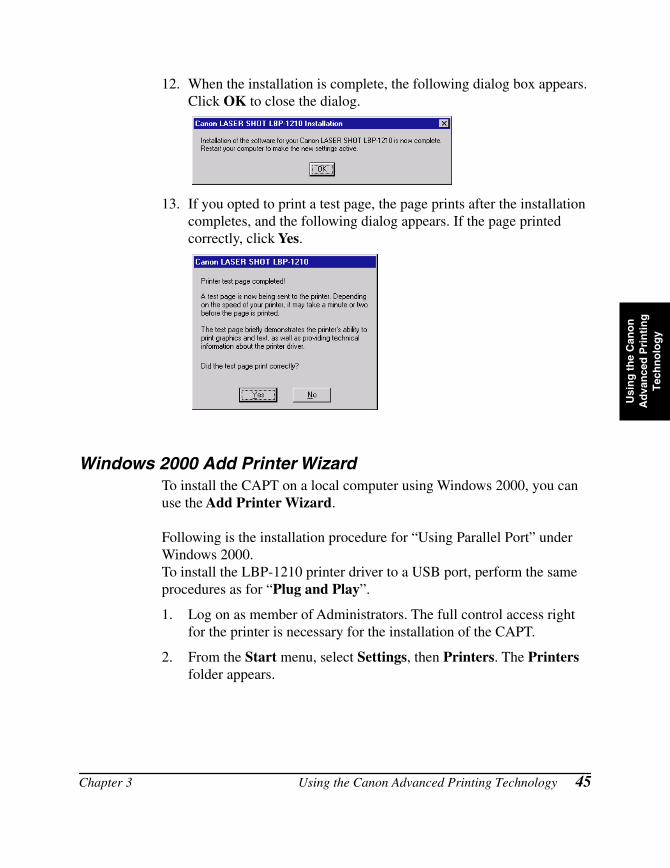
12. When the installation is complete, the following dialog box appears. Click OK to close the dialog.
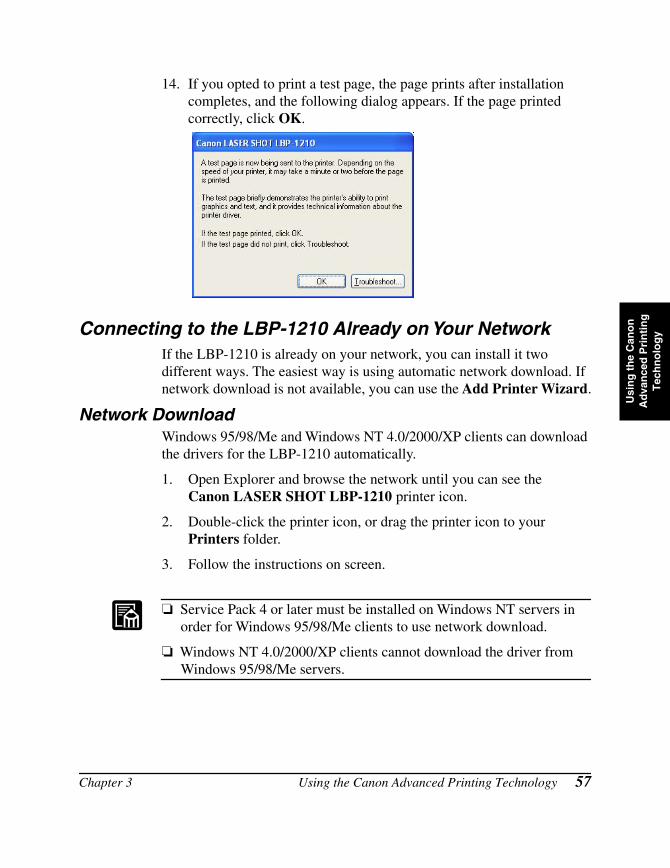
13. If you opted to print a test page, the page prints after the installation completes, and the following dialog appears. If the page printed correctly, click Yes.
Windows 2000 Add Printer WizardTo install the CAPT on a local computer using Windows 2000, you can use the Add Printer Wizard.
Following is the installation procedure for “Using Parallel Port” under Windows 2000.To install the LBP-1210 printer driver to a USB port, perform the same procedures as for “Plug and Play”.
1. Log on as member of Administrators. The full control access right for the printer is necessary for the installation of the CAPT.
2. From the Start menu, select Settings, then Printers. The Printers folder appears.
Chapter 3 Using the Canon Advanced Printing Technology 45
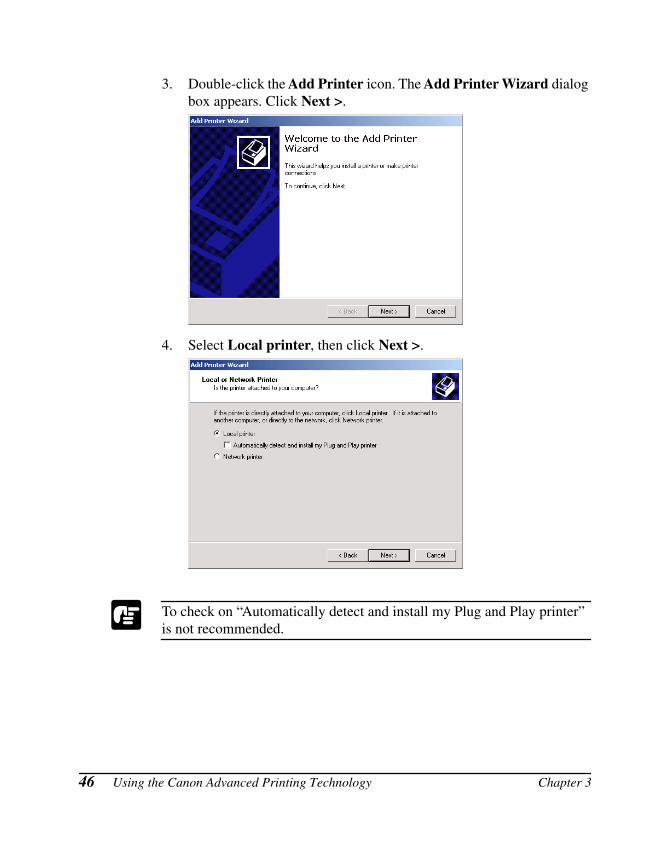
3. Double-click the Add Printer icon. The Add Printer Wizard dialog box appears. Click Next >.
4. Select Local printer, then click Next >.
To check on “Automatically detect and install my Plug and Play printer” is not recommended.
46 Using the Canon Advanced Printing Technology Chapter 3

Usi
ng
th
e C
ano
n
Ad
van
ced
Pri
nti
ng
T
ech
no
log
y
5. Select the printer port you want to use, then click Next >.
6. Click Have Disk… in the Manufacturers/Printers dialog box.
Chapter 3 Using the Canon Advanced Printing Technology 47
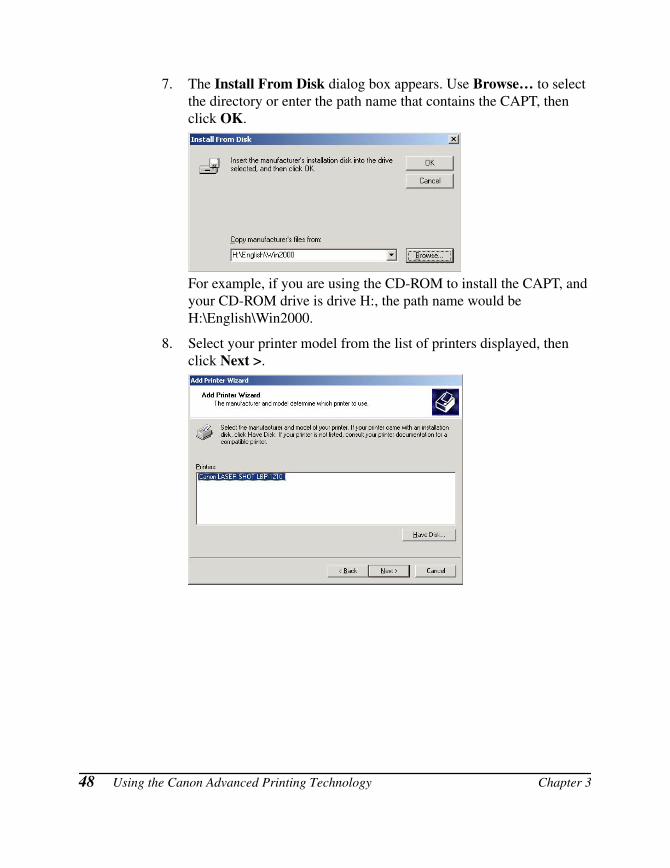
7. The Install From Disk dialog box appears. Use Browse… to select the directory or enter the path name that contains the CAPT, then click OK.
For example, if you are using the CD-ROM to install the CAPT, and your CD-ROM drive is drive H:, the path name would be H:\English\Win2000.
8. Select your printer model from the list of printers displayed, then click Next >.
48 Using the Canon Advanced Printing Technology Chapter 3
Usi
ng
th
e C
ano
n
Ad
van
ced
Pri
nti
ng
T
ech
no
log
y
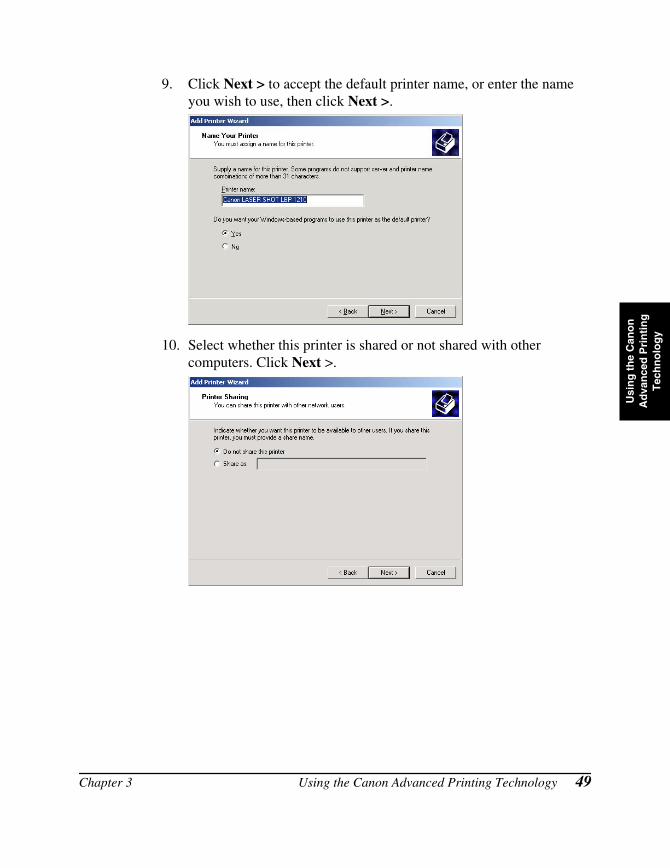
9. Click Next > to accept the default printer name, or enter the name you wish to use, then click Next >.
10. Select whether this printer is shared or not shared with other computers. Click Next >.
Chapter 3 Using the Canon Advanced Printing Technology 49
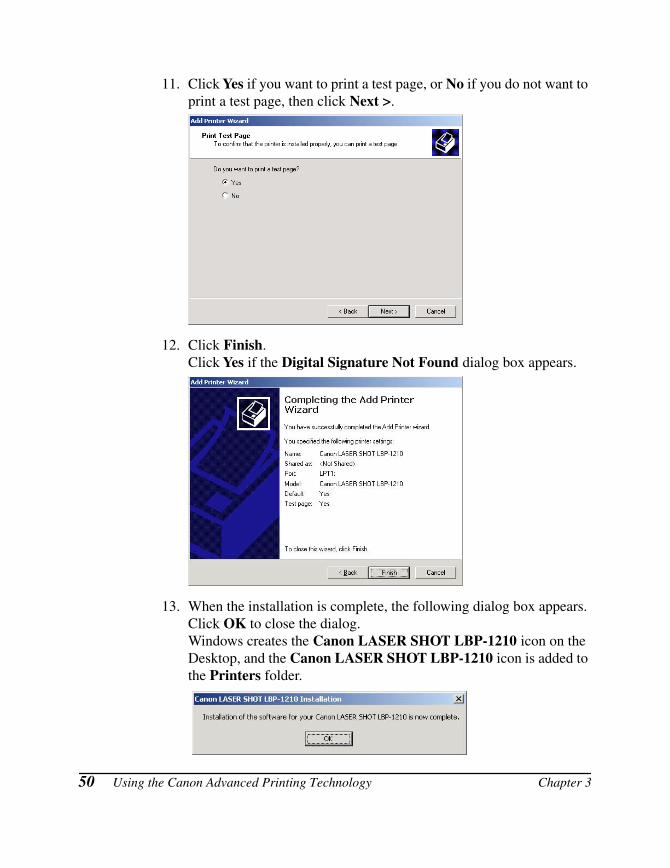
11. Click Yes if you want to print a test page, or No if you do not want to print a test page, then click Next >.
12. Click Finish.Click Yes if the Digital Signature Not Found dialog box appears.
13. When the installation is complete, the following dialog box appears. Click OK to close the dialog.Windows creates the Canon LASER SHOT LBP-1210 icon on the Desktop, and the Canon LASER SHOT LBP-1210 icon is added to the Printers folder.
50 Using the Canon Advanced Printing Technology Chapter 3
Usi
ng
th
e C
ano
n
Ad
van
ced
Pri
nti
ng
T
ech
no
log
y
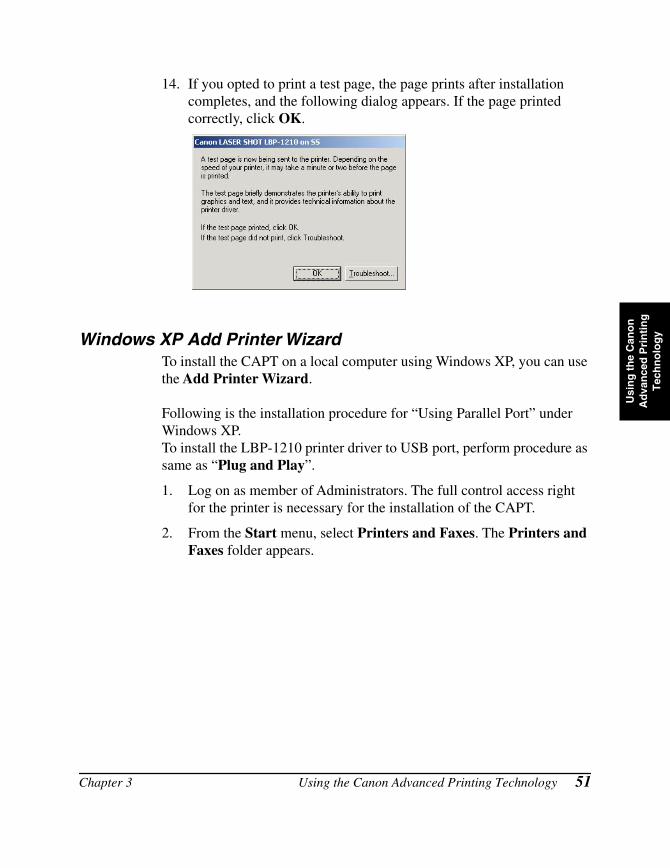
14. If you opted to print a test page, the page prints after installation completes, and the following dialog appears. If the page printed correctly, click OK.
Windows XP Add Printer WizardTo install the CAPT on a local computer using Windows XP, you can use the Add Printer Wizard.
Following is the installation procedure for “Using Parallel Port” under Windows XP.To install the LBP-1210 printer driver to USB port, perform procedure as same as “Plug and Play”.
1. Log on as member of Administrators. The full control access right for the printer is necessary for the installation of the CAPT.
2. From the Start menu, select Printers and Faxes. The Printers and Faxes folder appears.
Chapter 3 Using the Canon Advanced Printing Technology 51
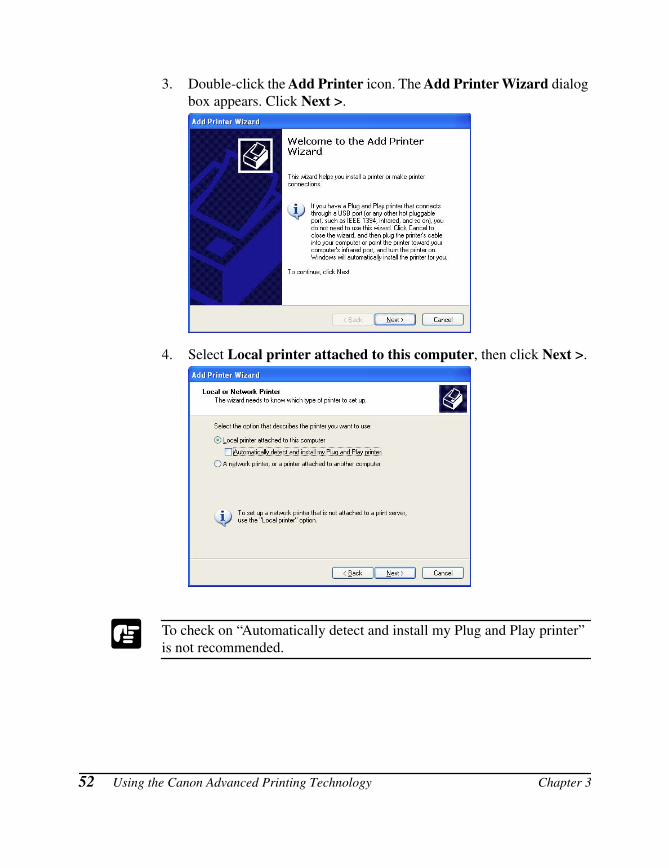
3. Double-click the Add Printer icon. The Add Printer Wizard dialog box appears. Click Next >.
4. Select Local printer attached to this computer, then click Next >.
To check on “Automatically detect and install my Plug and Play printer” is not recommended.
52 Using the Canon Advanced Printing Technology Chapter 3
Usi
ng
th
e C
ano
n
Ad
van
ced
Pri
nti
ng
T
ech
no
log
y
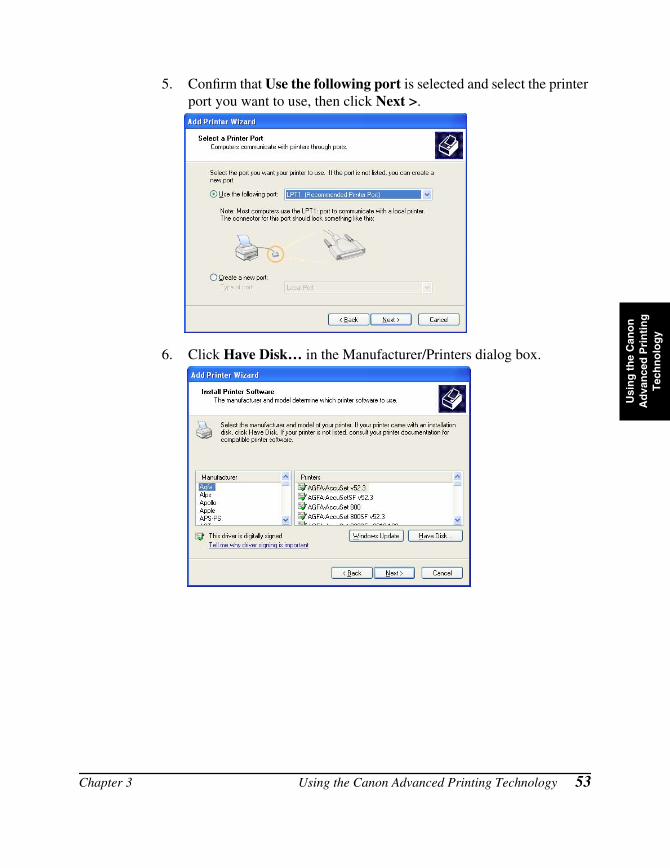
5. Confirm that Use the following port is selected and select the printer port you want to use, then click Next >.
6. Click Have Disk… in the Manufacturer/Printers dialog box.
Chapter 3 Using the Canon Advanced Printing Technology 53
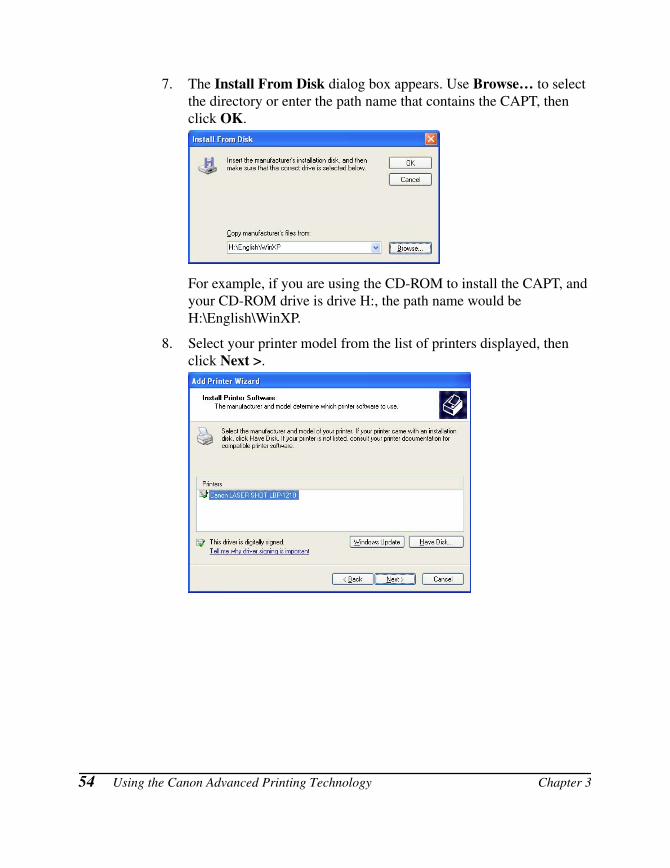
7. The Install From Disk dialog box appears. Use Browse… to select the directory or enter the path name that contains the CAPT, then click OK.
For example, if you are using the CD-ROM to install the CAPT, and your CD-ROM drive is drive H:, the path name would be H:\English\WinXP.
8. Select your printer model from the list of printers displayed, then click Next >.
54 Using the Canon Advanced Printing Technology Chapter 3
Usi
ng
th
e C
ano
n
Ad
van
ced
Pri
nti
ng
T
ech
no
log
y
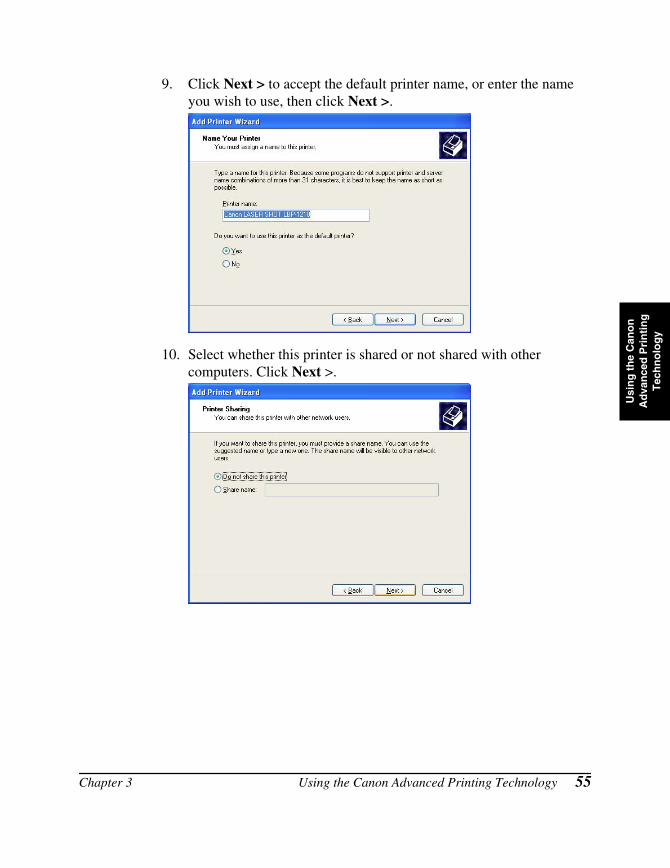
9. Click Next > to accept the default printer name, or enter the name you wish to use, then click Next >.
10. Select whether this printer is shared or not shared with other computers. Click Next >.
Chapter 3 Using the Canon Advanced Printing Technology 55

11. Click Yes if you want to print a test page, or No if you do not want to print a test page, then click Next >.
12. Click Finish.Click Continue Anyway if the Hardware Installation dialog box appears. Windows creates the Canon LASER SHOT LBP-1210 icon on the Desktop, and the Canon LASER SHOT LBP-1210 icon is added to the Printers and Faxes folder.
13. When the installation is complete, the following dialog box appears. Click OK to close the dialog.
56 Using the Canon Advanced Printing Technology Chapter 3
Usi
ng
th
e C
ano
n
Ad
van
ced
Pri
nti
ng
T
ech
no
log
y
14. If you opted to print a test page, the page prints after installation completes, and the following dialog appears. If the page printed correctly, click OK.
Connecting to the LBP-1210 Already on Your NetworkIf the LBP-1210 is already on your network, you can install it two different ways. The easiest way is using automatic network download. If network download is not available, you can use the Add Printer Wizard.
Network DownloadWindows 95/98/Me and Windows NT 4.0/2000/XP clients can download the drivers for the LBP-1210 automatically.
1. Open Explorer and browse the network until you can see the Canon LASER SHOT LBP-1210 printer icon.
2. Double-click the printer icon, or drag the printer icon to your Printers folder.
3. Follow the instructions on screen.
❏ Service Pack 4 or later must be installed on Windows NT servers in order for Windows 95/98/Me clients to use network download.
❏ Windows NT 4.0/2000/XP clients cannot download the driver from Windows 95/98/Me servers.
Chapter 3 Using the Canon Advanced Printing Technology 57
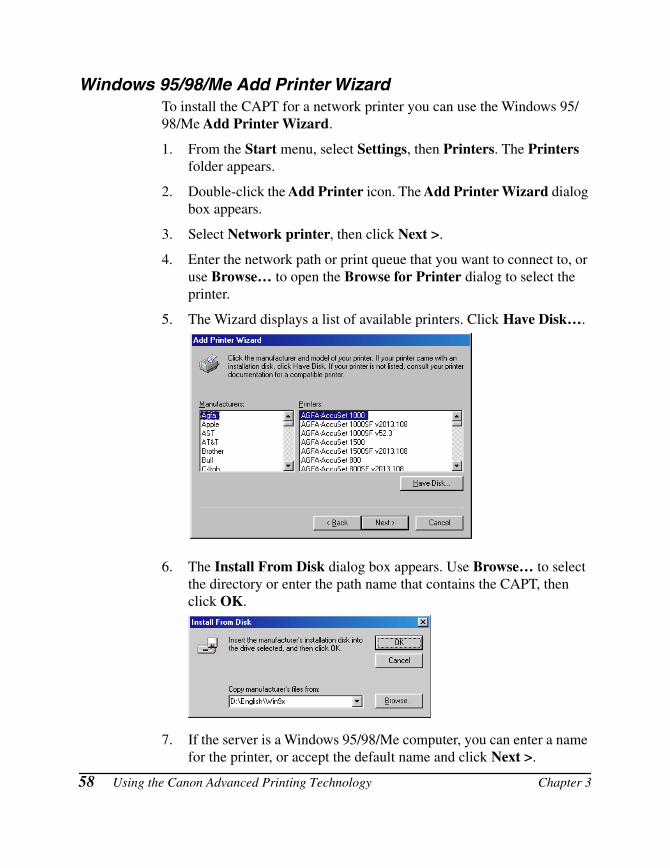
Windows 95/98/Me Add Printer WizardTo install the CAPT for a network printer you can use the Windows 95/98/Me Add Printer Wizard.
1. From the Start menu, select Settings, then Printers. The Printers folder appears.
2. Double-click the Add Printer icon. The Add Printer Wizard dialog box appears.
3. Select Network printer, then click Next >.
4. Enter the network path or print queue that you want to connect to, or use Browse… to open the Browse for Printer dialog to select the printer.
5. The Wizard displays a list of available printers. Click Have Disk….
6. The Install From Disk dialog box appears. Use Browse… to select the directory or enter the path name that contains the CAPT, then click OK.
7. If the server is a Windows 95/98/Me computer, you can enter a name for the printer, or accept the default name and click Next >.
58 Using the Canon Advanced Printing Technology Chapter 3
Usi
ng
th
e C
ano
n
Ad
van
ced
Pri
nti
ng
T
ech
no
log
y
If the connection fails, you will be able to install the printer but you will not be able to use the printer until it comes back online.
8. Follow the instructions on screen to finish the installation.
Windows NT 4.0 Add Printer WizardTo install the CAPT for a network printer you can use the Windows NT 4.0 Add Printer Wizard.
1. Log on as member of Administrators. The full control access right for the printer is necessary for the installation of the CAPT.
2. From the Start menu, select Settings, then Printers. The Printers folder appears.
3. Double-click the Add Printer icon. The Add Printer Wizard dialog box appears.
4. Select Network printer server, then click Next >. The Connect to Printer dialog appears.
5. Select the printer you want to connect to, then click OK. If the printer name is invalid, it means the client could not connect to the network printer specified. If a suitable driver is not found, it probably means the server is a Windows 95/98/Me computer.
6. Follow the instructions on screen to complete installation.
Windows 2000 Add Printer WizardTo install the CAPT for a network printer you can use the Windows 2000 Add Printer Wizard.
1. Log on as member of Administrators. The full control access right for the printer is necessary for the installation of the CAPT.
2. From the Start menu, select Settings, then Printers. The Printers folder appears.
3. Double-click the Add Printer icon. The Add Printer Wizard dialog box appears. Click Next >.
4. Select Network printer, then click Next >.
5. Follow the instructions on screen to complete installation.
Chapter 3 Using the Canon Advanced Printing Technology 59
Windows XP Add Printer WizardTo install the CAPT for a network printer you can use the Windows XP Add Printer Wizard.
1. Log on as member of Administrators. The full control access right for the printer is necessary for the installation of the CAPT.
2. From the Start menu, select Printers and Faxes. The Printers and Faxes folder appears.
3. Click Add a printer. The Add Printer Wizard dialog box appears. Click Next >.
4. Select A Network printer, or a printer attached to another computer, then click Next >. The Specify a Printer dialog appears.
5. Click Next >, or enter the network path or print queue that you want to connect to.
6. Follow the instructions on screen to complete installation.
60 Using the Canon Advanced Printing Technology Chapter 3
Usi
ng
th
e C
ano
n
Ad
van
ced
Pri
nti
ng
T
ech
no
log
y
Printer SharingPrinter sharing enables printing from network clients. Printer sharing with the LBP-1210 printer requires that both the print server and the client devices are using Windows 95 or later, or Windows NT 4.0 or later. The print server and client do not need to use the same operating system, and it is possible to print from a Windows 95/98/Me client to a Windows NT 4.0/2000/XP print server, or vice versa.
You can start printing simply by starting the server, even if the server was not running when the client was started.
If the server is running on Windows NT 4.0/2000/XP, you can print, even if no one is logged into the server. Please note that there is no status display on the server when no one is logged in. The status display is shown on the client.
Connecting the LBP-1210 as a Network PrinterIf you plan to share the LBP-1210 on a network, install the print server locally, then make the following settings. See your print server system documentation for more information.
Windows 95/98/Me Server Settings
Network Settings1. Double-click the Network icon in the Control Panel.
2. Select the Configuration tab, then click Add.
3. Select Service, then click Add.
4. Select Microsoft in the Manufacturers list box.
5. Select File and printer sharing for Microsoft Networks in the Network Services box, then click OK.
6. Click File and Print Sharing.
Be sure there is a check by “I want to be able to allow others to print to my printer(s).”
7. Select the Access Control tab and check either “Share-level access control” or “User-level access control.”
8. Click OK and then restart Windows.
Chapter 3 Using the Canon Advanced Printing Technology 61
Printer SettingsShare-level Access Control
1. Open the Canon LASER SHOT LBP-1210 Properties window, then check “Shared As” in the Sharing tab.
2. Enter the Share Name, Comments, and Password as needed.
3. Click OK.
User-level Access Control
1. Open the Canon LASER SHOT LBP-1210 Properties window, then check “Shared As” in the Sharing tab.
2. Enter the Share Name and Comments, as needed.
3. Click Add, and select the users allowed to access the printer.
4. Click OK when you are done adding users.
5. Click OK again.
Do not enter space or special character in the Share Name.
Windows NT 4.0/2000/XP Server Settings
Add Server Service (Windows NT 4.0)1. Double-click the Network icon from the Control Panel.
2. Select the Services tab, and if the Server is not shown, click Add.
3. Select the Server, and click OK.
4. Restart Windows.
Add Server Service (Windows 2000)1. From the Start menu, select Settings, then Network and Dial-up
Connections.The Network and Dial-up Connections folder appears.
2. Right-click the Local Area Connection icon, then select Properties from the pop-up menu.The Local Area Connection Properties dialog box appears.
62 Using the Canon Advanced Printing Technology Chapter 3
Usi
ng
th
e C
ano
n
Ad
van
ced
Pri
nti
ng
T
ech
no
log
y
3. Select File and Printer Sharing for Microsoft Networks, then click OK.
Add Server Service (Windows XP)1. Click Network and Internet Connections icon in the Control
Panel.
2. Click Network Connections.
3. Right-click the Local Area Connection icon, then select Properties from the menu.The Local Area Connection Properties dialog box appears.
4. If File and Printer Sharing for Microsoft Networks exists in the list, click OK. Otherwise, click Install.
5. Select Service, then click Add.
6. Select File and Printer Sharing for Microsoft Networks in the Network Services box, then click OK.
7. Click Close.
Printer Sharing Settings1. Open the Canon LASER SHOT LBP-1210 Properties window,
then check “Shared” in the Sharing tab.
2. Enter the Share Name as needed.
3. Click OK. The printer icon changes to indicate sharing.
Sharing settings may also be made during installation.
Status DisplayThe status of a shared printer displays on both the print server and client computer, and job operations can execute from either.
Status display requires status exchanges between the print server and client using TCP/IP or NetBEUI protocols. Status display is not supported if IPX/SPX is the only protocol used.
Chapter 3 Using the Canon Advanced Printing Technology 63
Canon LASER SHOT LBP-1210 GroupWhen you install the CAPT, the Canon LASER SHOT LBP-1210 icon is created in the Printer folder, and the Canon LASER SHOT LBP 1210 group folder is created on the Desktop. The Canon LASER SHOT LBP-1210 group is also added in the Programs of the Start menu.
When you double click on the Canon LASER SHOT LBP-1210 folder, icons of the Canon LASER SHOT LBP-1210 group are displayed.
You can select the following from the Canon LASER SHOT LBP-1210 group:
❏ Canon LASER SHOT LBP-1210 HelpSelects the Canon LBP-1210 Help file for the CAPT.
❏ Canon LASER SHOT LBP-1210 Status WindowDisplays the LBP-1210 Status Window.
❏ Canon LASER SHOT LBP-1210 Trouble ShooterStarts the Trouble Shooter program for the CAPT. It helps you solve printing problems in Windows 95/98/Me or NT 4.0/2000/XP. For details, see Chapter 4, Troubleshooting.
❏ Canon LASER SHOT LBP-1210 UninstallationStarts the uninstall program for the CAPT. If the CAPT is not working properly, it might help to uninstall and then install it again. For details, see Chapter 4, Troubleshooting.
These programs can be launched by selecting Start, Programs, then Canon LASER SHOT LBP-1210.
64 Using the Canon Advanced Printing Technology Chapter 3
Usi
ng
th
e C
ano
n
Ad
van
ced
Pri
nti
ng
T
ech
no
log
y
Printing with the CAPTThe CAPT offers bi-directional communication between the computer and printer. To take advantage of the bi-directional communication, one end of a bi-directional parallel cable connects to the printer and the other end connects directly to your computer.
You must use a bi-directional cable for proper operation.
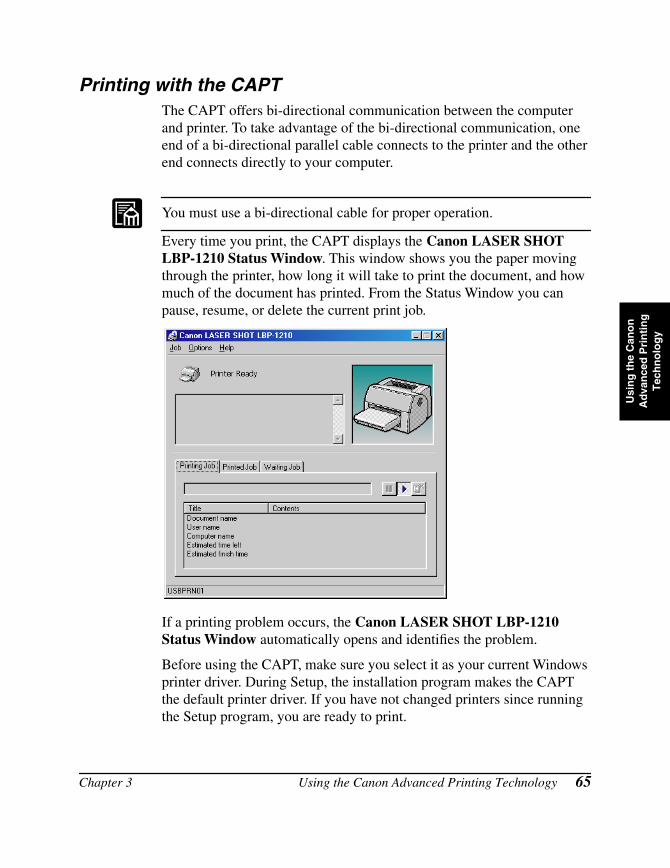
Every time you print, the CAPT displays the Canon LASER SHOT LBP-1210 Status Window. This window shows you the paper moving through the printer, how long it will take to print the document, and how much of the document has printed. From the Status Window you can pause, resume, or delete the current print job.
If a printing problem occurs, the Canon LASER SHOT LBP-1210 Status Window automatically opens and identifies the problem.
Before using the CAPT, make sure you select it as your current Windows printer driver. During Setup, the installation program makes the CAPT the default printer driver. If you have not changed printers since running the Setup program, you are ready to print.
Chapter 3 Using the Canon Advanced Printing Technology 65
Windows 95/98/Me Printer PropertiesWith the CAPT, you initiate printing as you normally would from a Windows application. From the Print dialog box, usually accessed from an application’s File menu, you can select Properties to proceed to the Canon LASER SHOT LBP-1210 Properties dialog box and its printing options.
❏ You can open the Properties dialog box from the Printers folder. The number of tabs displayed in the Properties dialog box depends on how you have your system set up. Screens examples use Windows 98.
❏ The way you get to the dialog boxes determines how long the printing options remain in effect:
• If you start from an application’s Print... command, your choices apply only to that print job. They will not be stored when you close the application.
• If you start from the Printers folder, the settings apply to all Windows applications and remain in effect until you change those settings.
❏ For more information about the following features, see the online Help. To display the online Help, select the item you want more infor-mation about and press F1, or click ? in the title bar and then select the item of interest.
66 Using the Canon Advanced Printing Technology Chapter 3
Usi
ng
th
e C
ano
n
Ad
van
ced
Pri
nti
ng
T
ech
no
log
y
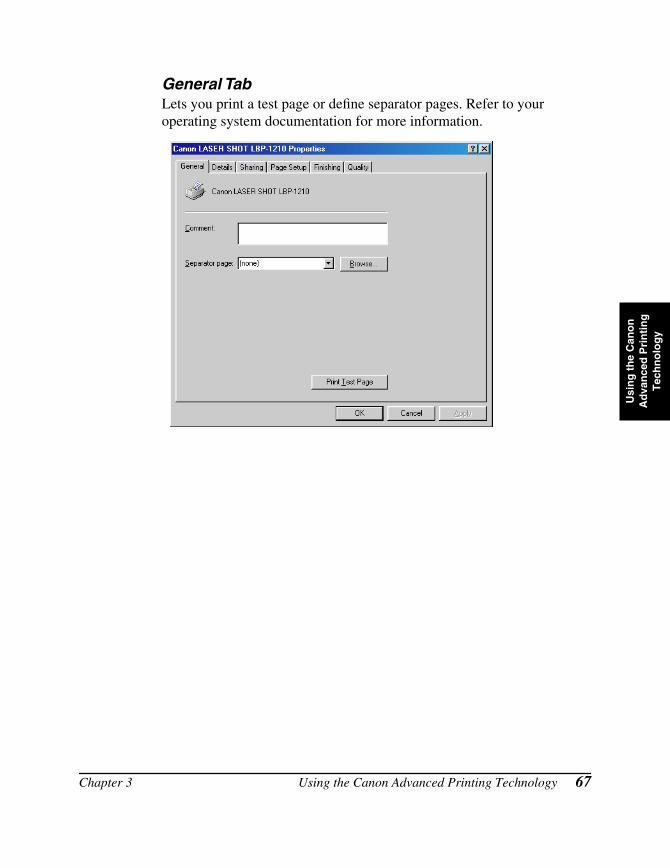
General TabLets you print a test page or define separator pages. Refer to your operating system documentation for more information.
Chapter 3 Using the Canon Advanced Printing Technology 67
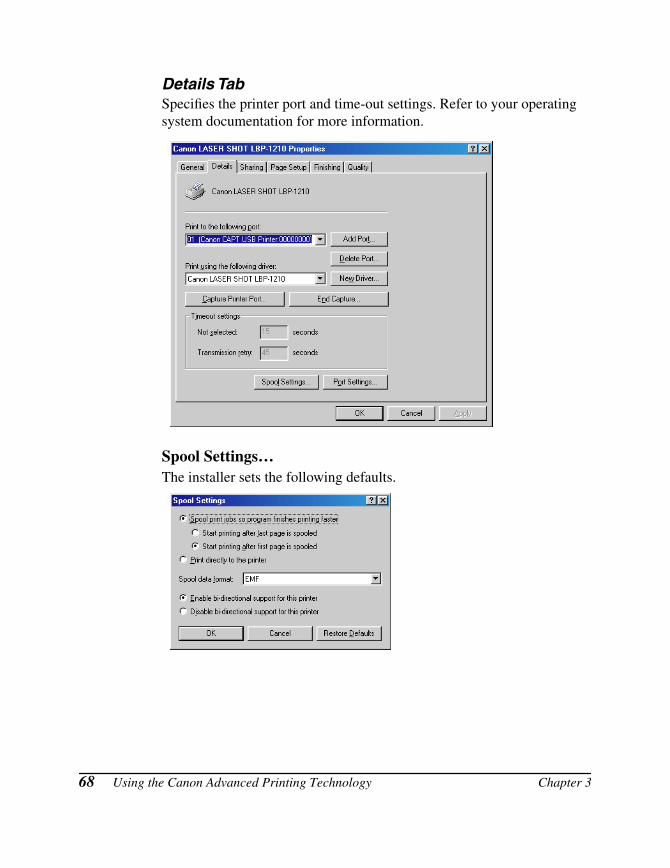
Details TabSpecifies the printer port and time-out settings. Refer to your operating system documentation for more information.
Spool Settings…The installer sets the following defaults.
68 Using the Canon Advanced Printing Technology Chapter 3
Usi
ng
th
e C
ano
n
Ad
van
ced
Pri
nti
ng
T
ech
no
log
y
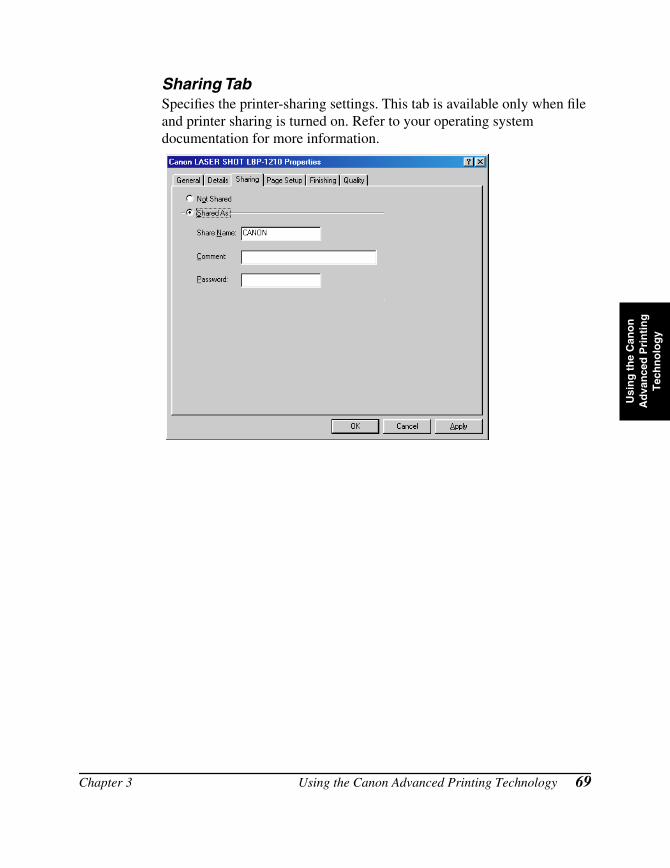
Sharing TabSpecifies the printer-sharing settings. This tab is available only when file and printer sharing is turned on. Refer to your operating system documentation for more information.
Chapter 3 Using the Canon Advanced Printing Technology 69
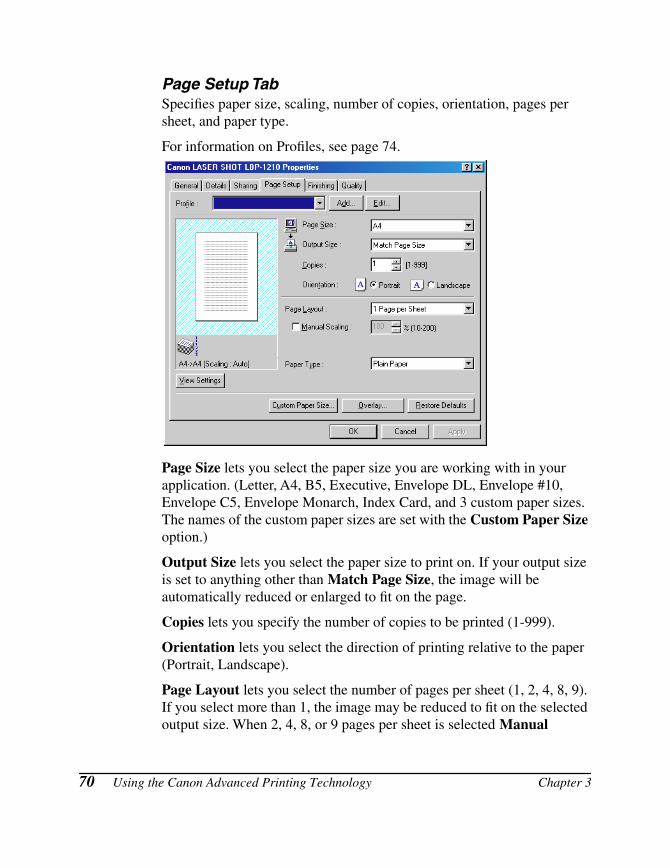
Page Setup TabSpecifies paper size, scaling, number of copies, orientation, pages per sheet, and paper type.
For information on Profiles, see page 74.
Page Size lets you select the paper size you are working with in your application. (Letter, A4, B5, Executive, Envelope DL, Envelope #10, Envelope C5, Envelope Monarch, Index Card, and 3 custom paper sizes. The names of the custom paper sizes are set with the Custom Paper Size option.)
Output Size lets you select the paper size to print on. If your output size is set to anything other than Match Page Size, the image will be automatically reduced or enlarged to fit on the page.
Copies lets you specify the number of copies to be printed (1-999).
Orientation lets you select the direction of printing relative to the paper (Portrait, Landscape).
Page Layout lets you select the number of pages per sheet (1, 2, 4, 8, 9). If you select more than 1, the image may be reduced to fit on the selected output size. When 2, 4, 8, or 9 pages per sheet is selected Manual
70 Using the Canon Advanced Printing Technology Chapter 3
Usi
ng
th
e C
ano
n
Ad
van
ced
Pri
nti
ng
T
ech
no
log
y
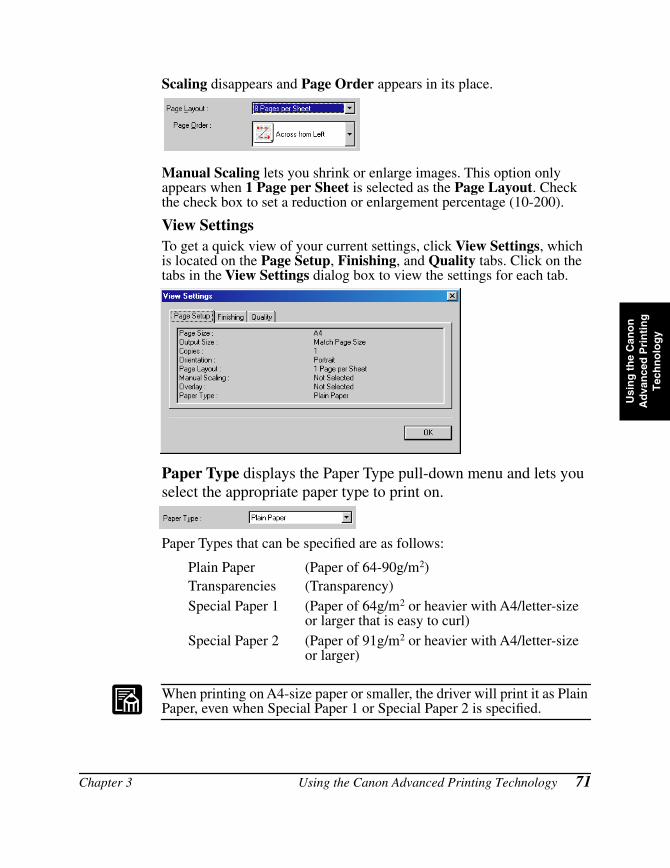
Scaling disappears and Page Order appears in its place.
Manual Scaling lets you shrink or enlarge images. This option only appears when 1 Page per Sheet is selected as the Page Layout. Check the check box to set a reduction or enlargement percentage (10-200).
View SettingsTo get a quick view of your current settings, click View Settings, which is located on the Page Setup, Finishing, and Quality tabs. Click on the tabs in the View Settings dialog box to view the settings for each tab.
Paper Type displays the Paper Type pull-down menu and lets you select the appropriate paper type to print on.
Paper Types that can be specified are as follows:
Plain Paper (Paper of 64-90g/m2)Transparencies (Transparency)Special Paper 1 (Paper of 64g/m2 or heavier with A4/letter-size
or larger that is easy to curl)Special Paper 2 (Paper of 91g/m2 or heavier with A4/letter-size
or larger)
When printing on A4-size paper or smaller, the driver will print it as Plain Paper, even when Special Paper 1 or Special Paper 2 is specified.
Chapter 3 Using the Canon Advanced Printing Technology 71
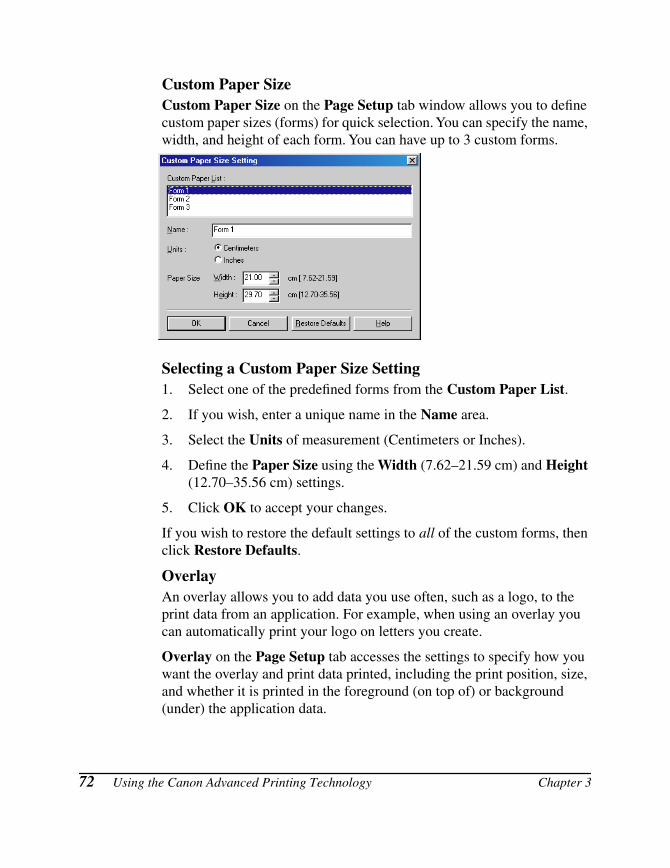
Custom Paper SizeCustom Paper Size on the Page Setup tab window allows you to define custom paper sizes (forms) for quick selection. You can specify the name, width, and height of each form. You can have up to 3 custom forms.
Selecting a Custom Paper Size Setting1. Select one of the predefined forms from the Custom Paper List.
2. If you wish, enter a unique name in the Name area.
3. Select the Units of measurement (Centimeters or Inches).
4. Define the Paper Size using the Width (7.62–21.59 cm) and Height (12.70–35.56 cm) settings.
5. Click OK to accept your changes.
If you wish to restore the default settings to all of the custom forms, then click Restore Defaults.
OverlayAn overlay allows you to add data you use often, such as a logo, to the print data from an application. For example, when using an overlay you can automatically print your logo on letters you create.
Overlay on the Page Setup tab accesses the settings to specify how you want the overlay and print data printed, including the print position, size, and whether it is printed in the foreground (on top of) or background (under) the application data.
72 Using the Canon Advanced Printing Technology Chapter 3
Usi
ng
th
e C
ano
n
Ad
van
ced
Pri
nti
ng
T
ech
no
log
y
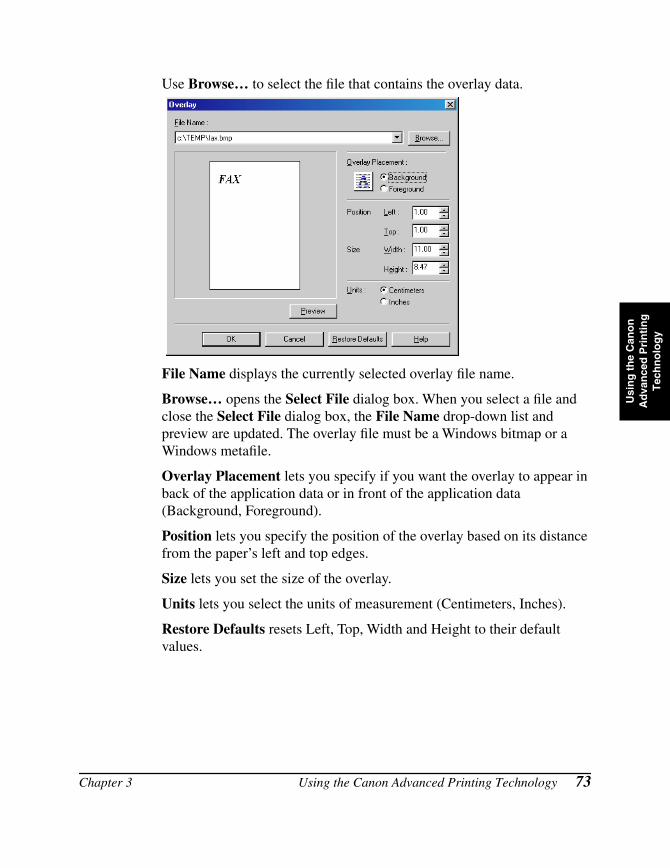
Use Browse… to select the file that contains the overlay data.
File Name displays the currently selected overlay file name.
Browse… opens the Select File dialog box. When you select a file and close the Select File dialog box, the File Name drop-down list and preview are updated. The overlay file must be a Windows bitmap or a Windows metafile.
Overlay Placement lets you specify if you want the overlay to appear in back of the application data or in front of the application data (Background, Foreground).
Position lets you specify the position of the overlay based on its distance from the paper’s left and top edges.
Size lets you set the size of the overlay.
Units lets you select the units of measurement (Centimeters, Inches).
Restore Defaults resets Left, Top, Width and Height to their default values.
Chapter 3 Using the Canon Advanced Printing Technology 73
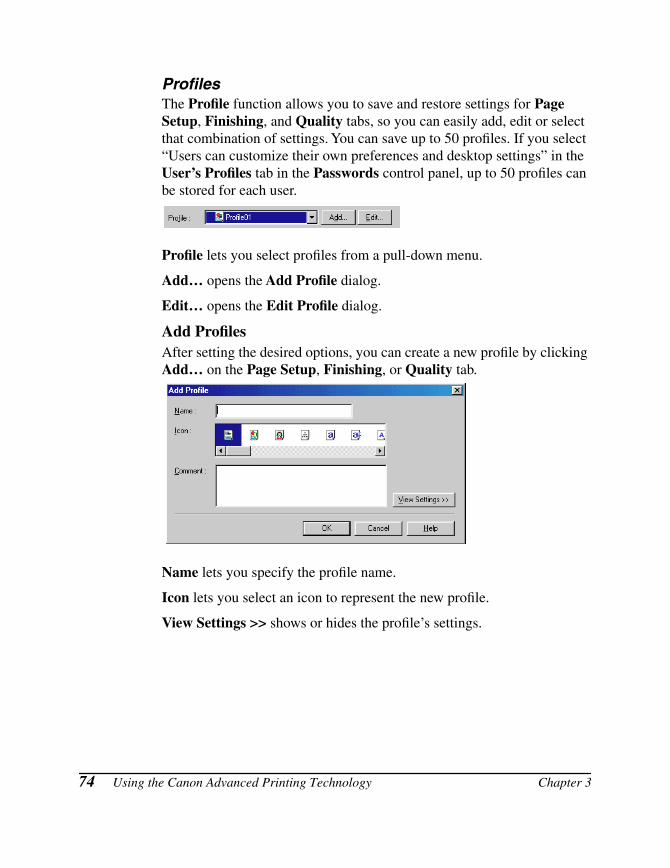
ProfilesThe Profile function allows you to save and restore settings for Page Setup, Finishing, and Quality tabs, so you can easily add, edit or select that combination of settings. You can save up to 50 profiles. If you select “Users can customize their own preferences and desktop settings” in the User’s Profiles tab in the Passwords control panel, up to 50 profiles can be stored for each user.
Profile lets you select profiles from a pull-down menu.
Add… opens the Add Profile dialog.
Edit… opens the Edit Profile dialog.
Add ProfilesAfter setting the desired options, you can create a new profile by clicking Add… on the Page Setup, Finishing, or Quality tab.
Name lets you specify the profile name.
Icon lets you select an icon to represent the new profile.
View Settings >> shows or hides the profile’s settings.
74 Using the Canon Advanced Printing Technology Chapter 3
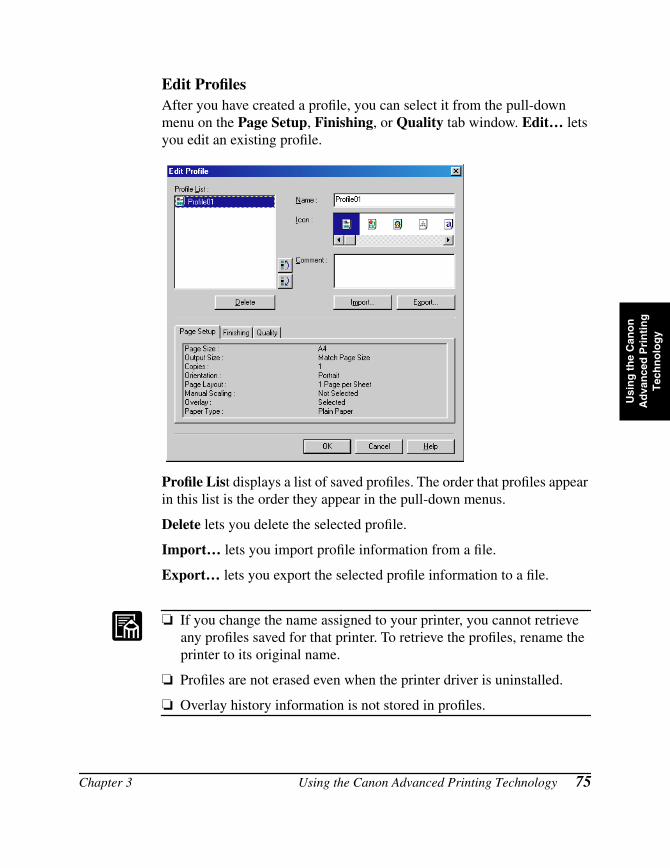
Usi
ng
th
e C
ano
n
Ad
van
ced
Pri
nti
ng
T
ech
no
log
y
Edit ProfilesAfter you have created a profile, you can select it from the pull-down menu on the Page Setup, Finishing, or Quality tab window. Edit… lets you edit an existing profile.
Profile List displays a list of saved profiles. The order that profiles appear in this list is the order they appear in the pull-down menus.
Delete lets you delete the selected profile.
Import… lets you import profile information from a file.
Export… lets you export the selected profile information to a file.
❏ If you change the name assigned to your printer, you cannot retrieve any profiles saved for that printer. To retrieve the profiles, rename the printer to its original name.
❏ Profiles are not erased even when the printer driver is uninstalled.
❏ Overlay history information is not stored in profiles.
Chapter 3 Using the Canon Advanced Printing Technology 75
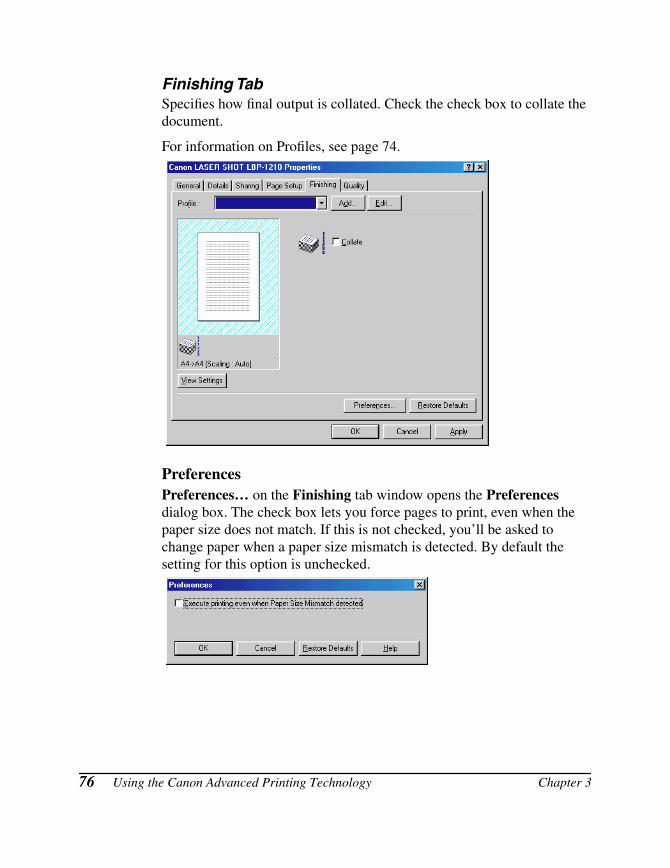
Finishing TabSpecifies how final output is collated. Check the check box to collate the document.
For information on Profiles, see page 74.
PreferencesPreferences… on the Finishing tab window opens the Preferences dialog box. The check box lets you force pages to print, even when the paper size does not match. If this is not checked, you’ll be asked to change paper when a paper size mismatch is detected. By default the setting for this option is unchecked.
76 Using the Canon Advanced Printing Technology Chapter 3
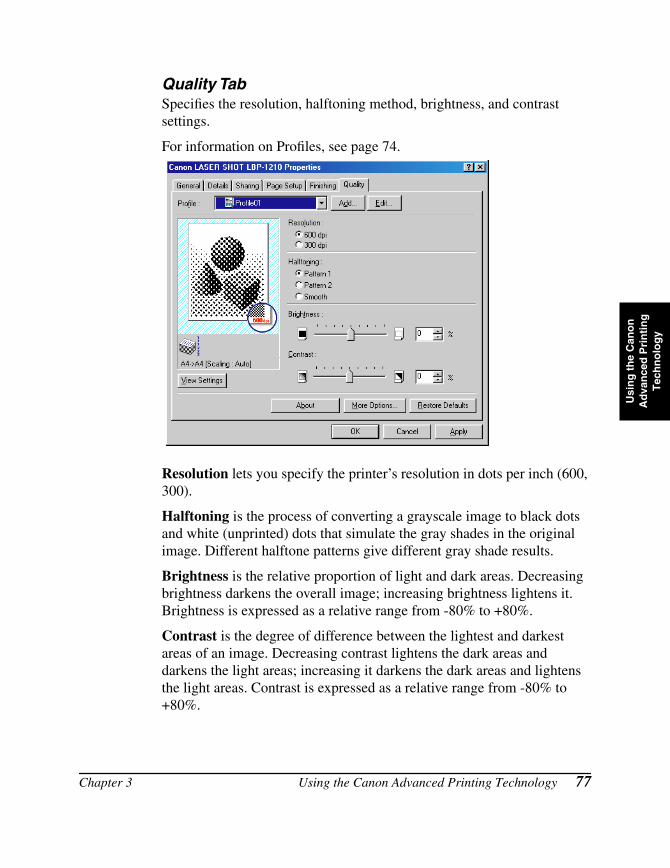
Usi
ng
th
e C
ano
n
Ad
van
ced
Pri
nti
ng
T
ech
no
log
y
Quality TabSpecifies the resolution, halftoning method, brightness, and contrast settings.
For information on Profiles, see page 74.
Resolution lets you specify the printer’s resolution in dots per inch (600, 300).
Halftoning is the process of converting a grayscale image to black dots and white (unprinted) dots that simulate the gray shades in the original image. Different halftone patterns give different gray shade results.
Brightness is the relative proportion of light and dark areas. Decreasing brightness darkens the overall image; increasing brightness lightens it. Brightness is expressed as a relative range from -80% to +80%.
Contrast is the degree of difference between the lightest and darkest areas of an image. Decreasing contrast lightens the dark areas and darkens the light areas; increasing it darkens the dark areas and lightens the light areas. Contrast is expressed as a relative range from -80% to +80%.
Chapter 3 Using the Canon Advanced Printing Technology 77
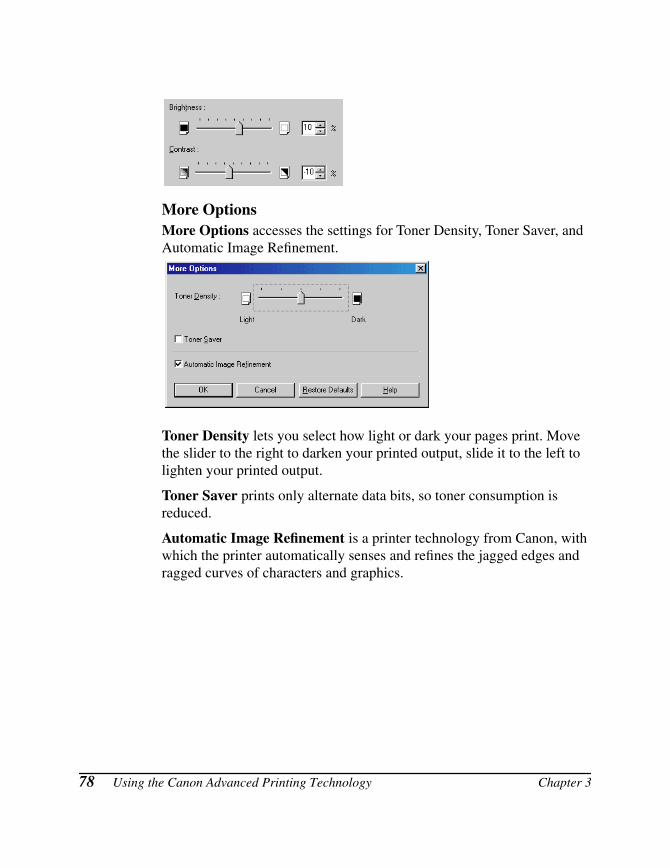
More OptionsMore Options accesses the settings for Toner Density, Toner Saver, and Automatic Image Refinement.
Toner Density lets you select how light or dark your pages print. Move the slider to the right to darken your printed output, slide it to the left to lighten your printed output.
Toner Saver prints only alternate data bits, so toner consumption is reduced.
Automatic Image Refinement is a printer technology from Canon, with which the printer automatically senses and refines the jagged edges and ragged curves of characters and graphics.
78 Using the Canon Advanced Printing Technology Chapter 3
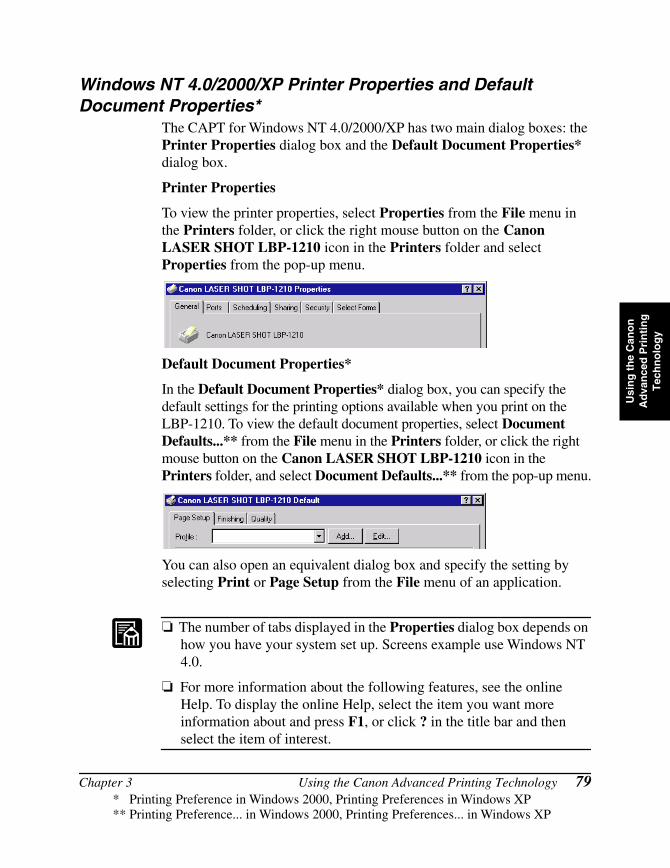
Usi
ng
th
e C
ano
n
Ad
van
ced
Pri
nti
ng
T
ech
no
log
y
Windows NT 4.0/2000/XP Printer Properties and Default Document Properties*
The CAPT for Windows NT 4.0/2000/XP has two main dialog boxes: the Printer Properties dialog box and the Default Document Properties* dialog box.
Printer Properties
To view the printer properties, select Properties from the File menu in the Printers folder, or click the right mouse button on the Canon LASER SHOT LBP-1210 icon in the Printers folder and select Properties from the pop-up menu.
Default Document Properties*
In the Default Document Properties* dialog box, you can specify the default settings for the printing options available when you print on the LBP-1210. To view the default document properties, select Document Defaults...** from the File menu in the Printers folder, or click the right mouse button on the Canon LASER SHOT LBP-1210 icon in the Printers folder, and select Document Defaults...** from the pop-up menu.
You can also open an equivalent dialog box and specify the setting by selecting Print or Page Setup from the File menu of an application.
❏ The number of tabs displayed in the Properties dialog box depends on how you have your system set up. Screens example use Windows NT 4.0.
❏ For more information about the following features, see the online Help. To display the online Help, select the item you want more information about and press F1, or click ? in the title bar and then select the item of interest.
Chapter 3 Using the Canon Advanced Printing Technology 79* Printing Preference in Windows 2000, Printing Preferences in Windows XP** Printing Preference... in Windows 2000, Printing Preferences... in Windows XP
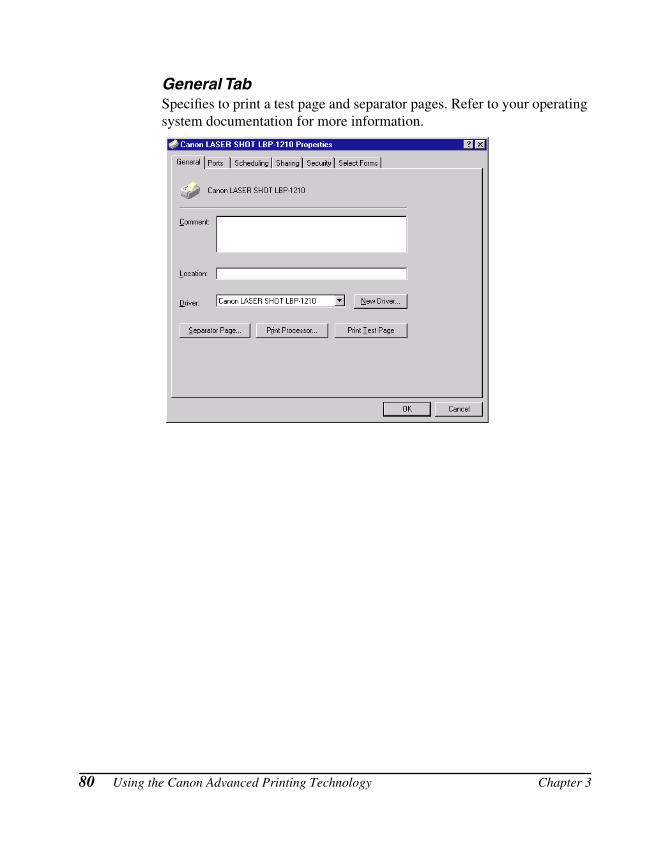
General TabSpecifies to print a test page and separator pages. Refer to your operating system documentation for more information.
80 Using the Canon Advanced Printing Technology Chapter 3
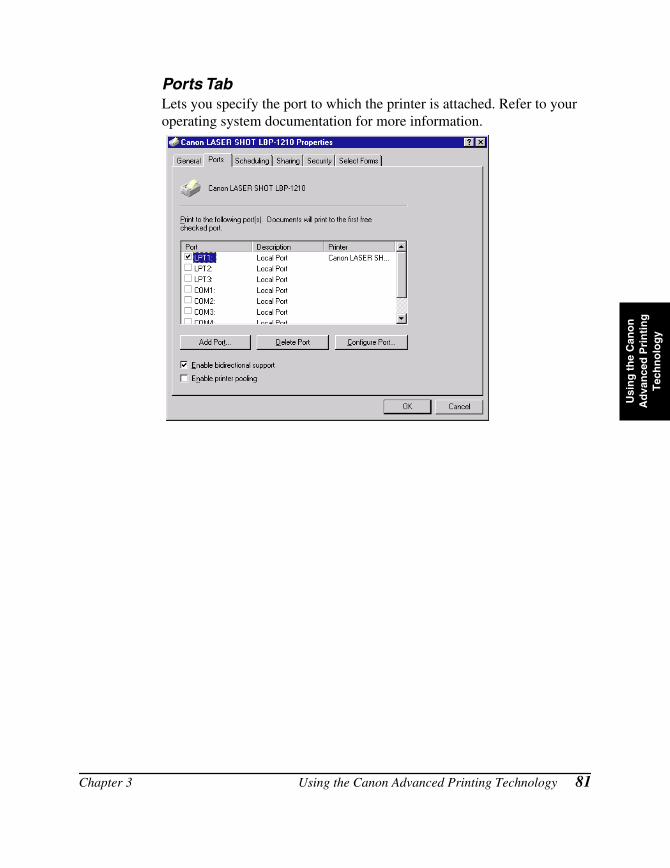
Usi
ng
th
e C
ano
n
Ad
van
ced
Pri
nti
ng
T
ech
no
log
y
Ports TabLets you specify the port to which the printer is attached. Refer to your operating system documentation for more information.
Chapter 3 Using the Canon Advanced Printing Technology 81
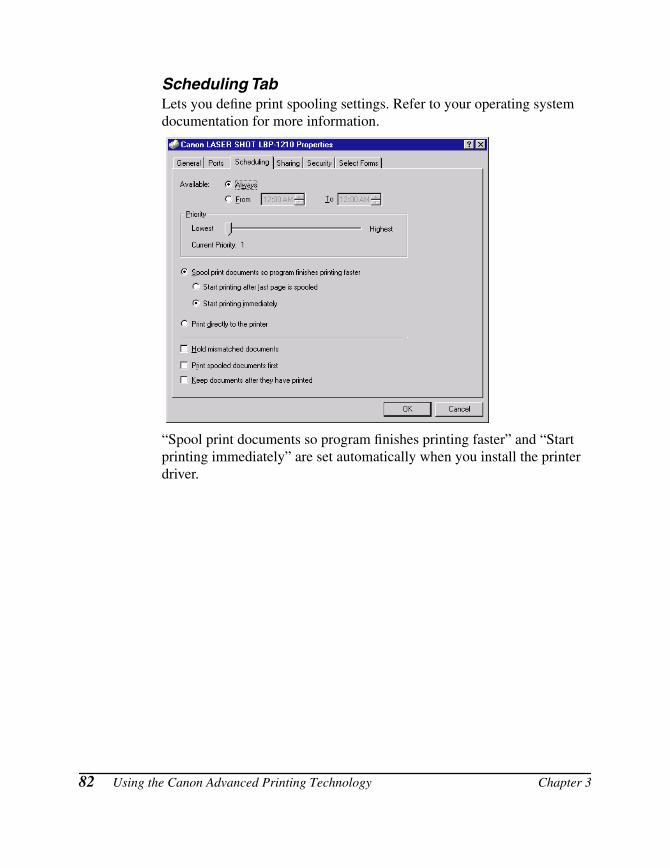
Scheduling TabLets you define print spooling settings. Refer to your operating system documentation for more information.
“Spool print documents so program finishes printing faster” and “Start printing immediately” are set automatically when you install the printer driver.
82 Using the Canon Advanced Printing Technology Chapter 3
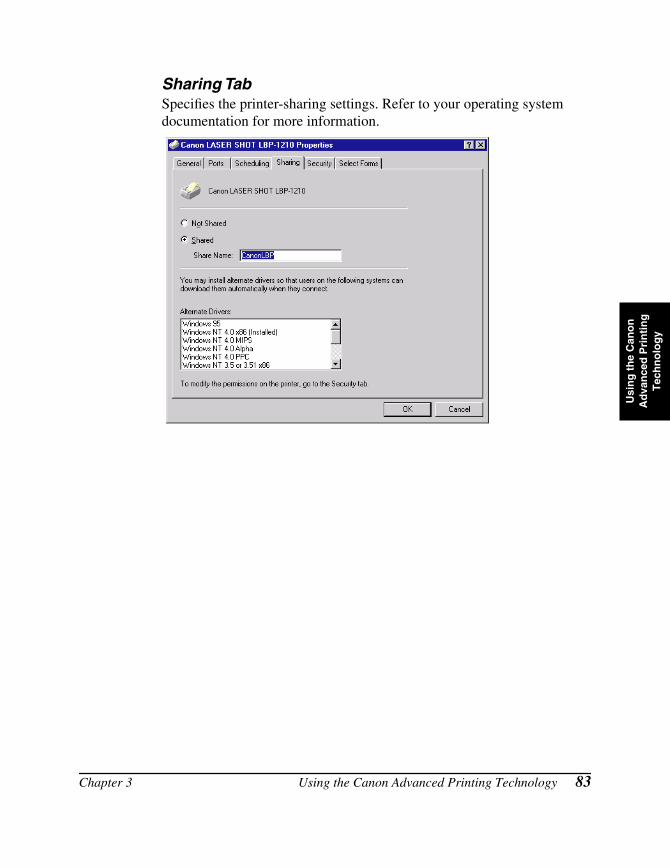
Usi
ng
th
e C
ano
n
Ad
van
ced
Pri
nti
ng
T
ech
no
log
y
Sharing TabSpecifies the printer-sharing settings. Refer to your operating system documentation for more information.
Chapter 3 Using the Canon Advanced Printing Technology 83
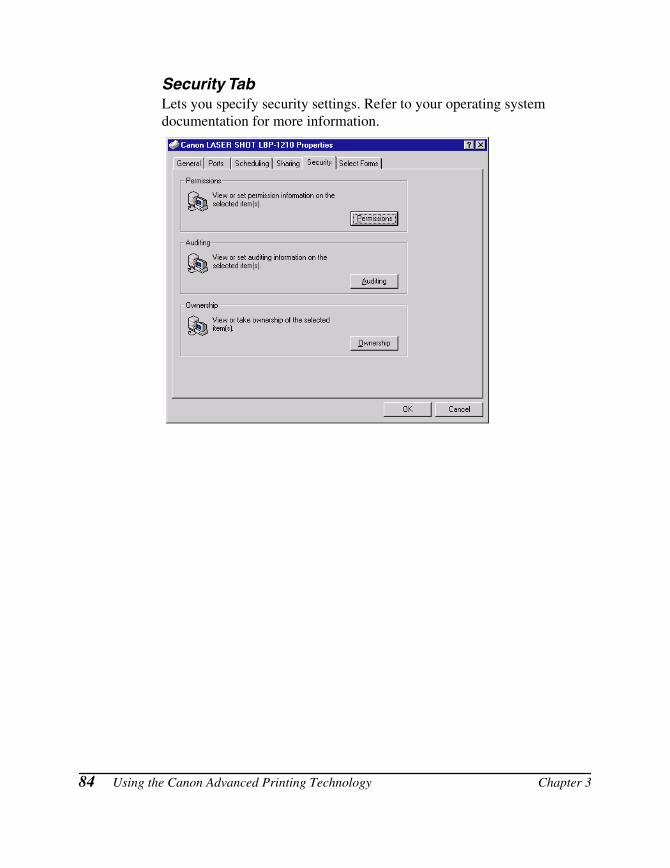
Security TabLets you specify security settings. Refer to your operating system documentation for more information.
84 Using the Canon Advanced Printing Technology Chapter 3
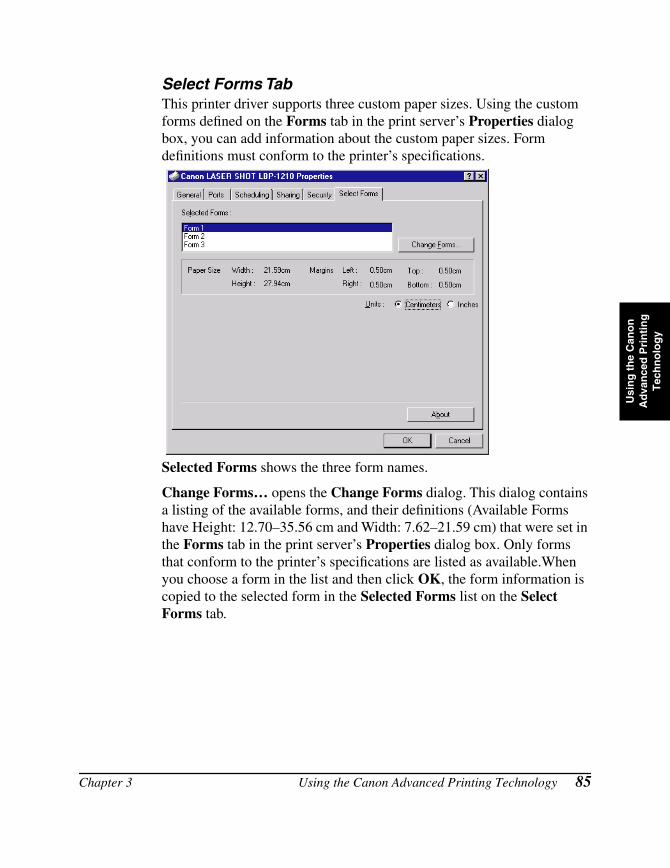
Usi
ng
th
e C
ano
n
Ad
van
ced
Pri
nti
ng
T
ech
no
log
y
Select Forms TabThis printer driver supports three custom paper sizes. Using the custom forms defined on the Forms tab in the print server’s Properties dialog box, you can add information about the custom paper sizes. Form definitions must conform to the printer’s specifications.
Selected Forms shows the three form names.
Change Forms… opens the Change Forms dialog. This dialog contains a listing of the available forms, and their definitions (Available Forms have Height: 12.70–35.56 cm and Width: 7.62–21.59 cm) that were set in the Forms tab in the print server’s Properties dialog box. Only forms that conform to the printer’s specifications are listed as available.When you choose a form in the list and then click OK, the form information is copied to the selected form in the Selected Forms list on the Select Forms tab.
Chapter 3 Using the Canon Advanced Printing Technology 85
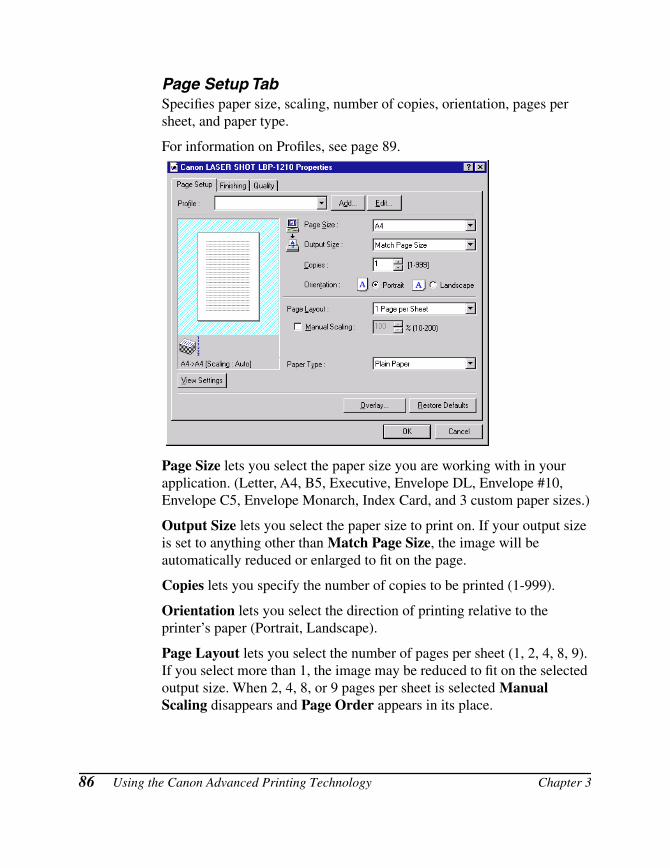
Page Setup TabSpecifies paper size, scaling, number of copies, orientation, pages per sheet, and paper type.
For information on Profiles, see page 89.
Page Size lets you select the paper size you are working with in your application. (Letter, A4, B5, Executive, Envelope DL, Envelope #10, Envelope C5, Envelope Monarch, Index Card, and 3 custom paper sizes.)
Output Size lets you select the paper size to print on. If your output size is set to anything other than Match Page Size, the image will be automatically reduced or enlarged to fit on the page.
Copies lets you specify the number of copies to be printed (1-999).
Orientation lets you select the direction of printing relative to the printer’s paper (Portrait, Landscape).
Page Layout lets you select the number of pages per sheet (1, 2, 4, 8, 9). If you select more than 1, the image may be reduced to fit on the selected output size. When 2, 4, 8, or 9 pages per sheet is selected Manual Scaling disappears and Page Order appears in its place.
86 Using the Canon Advanced Printing Technology Chapter 3
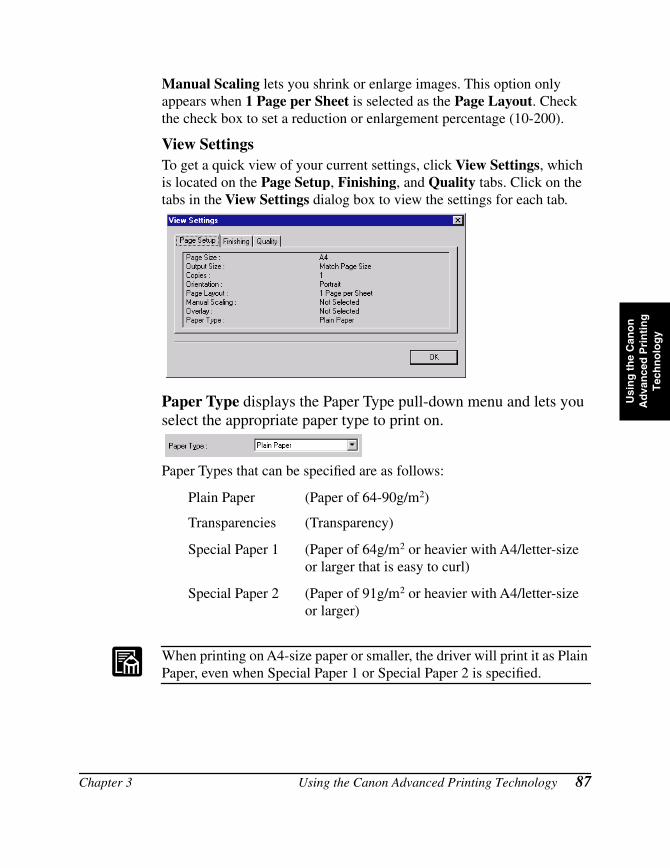
Usi
ng
th
e C
ano
n
Ad
van
ced
Pri
nti
ng
T
ech
no
log
y
Manual Scaling lets you shrink or enlarge images. This option only appears when 1 Page per Sheet is selected as the Page Layout. Check the check box to set a reduction or enlargement percentage (10-200).
View SettingsTo get a quick view of your current settings, click View Settings, which is located on the Page Setup, Finishing, and Quality tabs. Click on the tabs in the View Settings dialog box to view the settings for each tab.
Paper Type displays the Paper Type pull-down menu and lets you select the appropriate paper type to print on.
Paper Types that can be specified are as follows:
Plain Paper (Paper of 64-90g/m2)
Transparencies (Transparency)
Special Paper 1 (Paper of 64g/m2 or heavier with A4/letter-size or larger that is easy to curl)
Special Paper 2 (Paper of 91g/m2 or heavier with A4/letter-size or larger)
When printing on A4-size paper or smaller, the driver will print it as Plain Paper, even when Special Paper 1 or Special Paper 2 is specified.
Chapter 3 Using the Canon Advanced Printing Technology 87
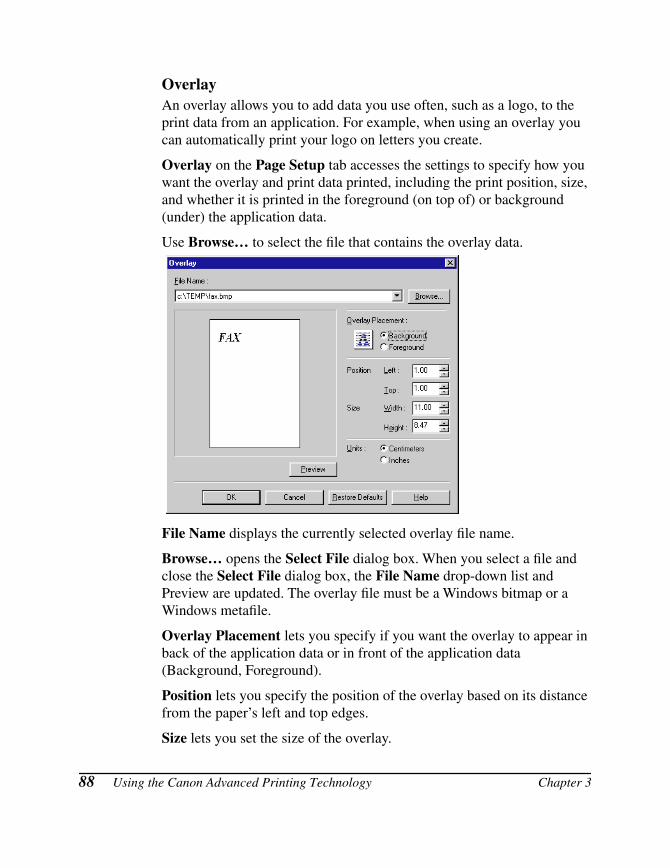
OverlayAn overlay allows you to add data you use often, such as a logo, to the print data from an application. For example, when using an overlay you can automatically print your logo on letters you create.
Overlay on the Page Setup tab accesses the settings to specify how you want the overlay and print data printed, including the print position, size, and whether it is printed in the foreground (on top of) or background (under) the application data.
Use Browse… to select the file that contains the overlay data.
File Name displays the currently selected overlay file name.
Browse… opens the Select File dialog box. When you select a file and close the Select File dialog box, the File Name drop-down list and Preview are updated. The overlay file must be a Windows bitmap or a Windows metafile.
Overlay Placement lets you specify if you want the overlay to appear in back of the application data or in front of the application data (Background, Foreground).
Position lets you specify the position of the overlay based on its distance from the paper’s left and top edges.
Size lets you set the size of the overlay.
88 Using the Canon Advanced Printing Technology Chapter 3
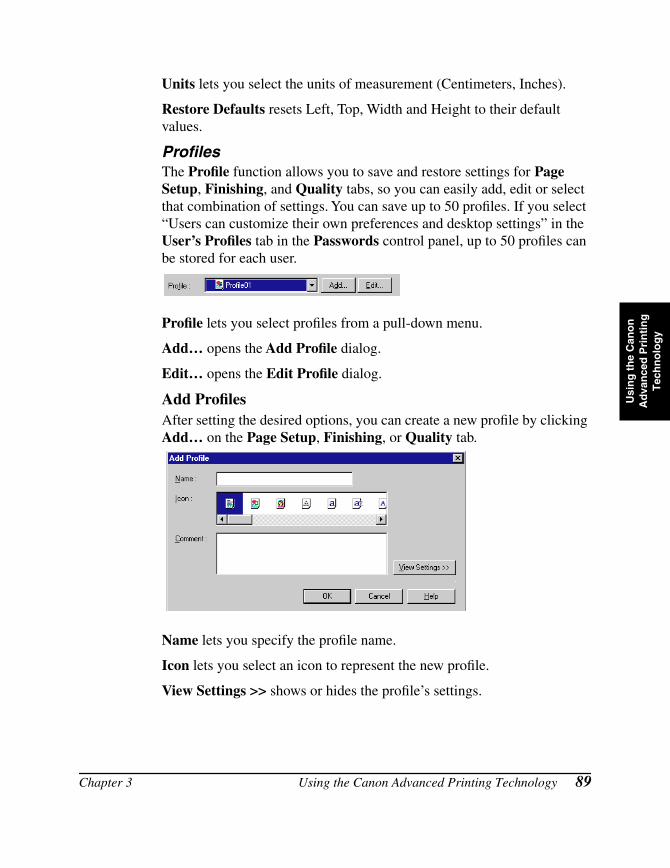
Usi
ng
th
e C
ano
n
Ad
van
ced
Pri
nti
ng
T
ech
no
log
y
Units lets you select the units of measurement (Centimeters, Inches).
Restore Defaults resets Left, Top, Width and Height to their default values.
ProfilesThe Profile function allows you to save and restore settings for Page Setup, Finishing, and Quality tabs, so you can easily add, edit or select that combination of settings. You can save up to 50 profiles. If you select “Users can customize their own preferences and desktop settings” in the User’s Profiles tab in the Passwords control panel, up to 50 profiles can be stored for each user.
Profile lets you select profiles from a pull-down menu.
Add… opens the Add Profile dialog.
Edit… opens the Edit Profile dialog.
Add ProfilesAfter setting the desired options, you can create a new profile by clicking Add… on the Page Setup, Finishing, or Quality tab.
Name lets you specify the profile name.
Icon lets you select an icon to represent the new profile.
View Settings >> shows or hides the profile’s settings.
Chapter 3 Using the Canon Advanced Printing Technology 89
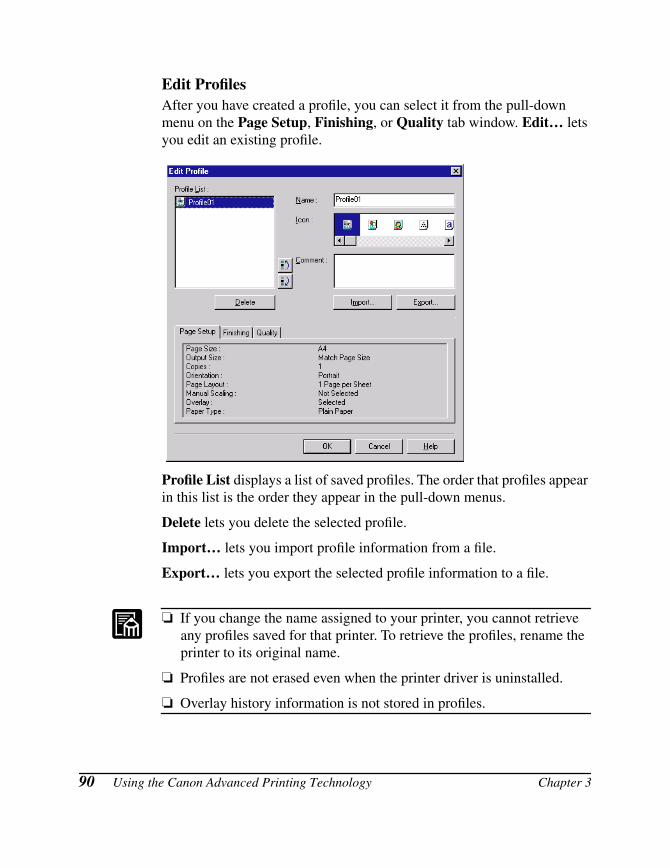
Edit ProfilesAfter you have created a profile, you can select it from the pull-down menu on the Page Setup, Finishing, or Quality tab window. Edit… lets you edit an existing profile.
Profile List displays a list of saved profiles. The order that profiles appear in this list is the order they appear in the pull-down menus.
Delete lets you delete the selected profile.
Import… lets you import profile information from a file.
Export… lets you export the selected profile information to a file.
❏ If you change the name assigned to your printer, you cannot retrieve any profiles saved for that printer. To retrieve the profiles, rename the printer to its original name.
❏ Profiles are not erased even when the printer driver is uninstalled.
❏ Overlay history information is not stored in profiles.
90 Using the Canon Advanced Printing Technology Chapter 3

Usi
ng
th
e C
ano
n
Ad
van
ced
Pri
nti
ng
T
ech
no
log
y
Finishing TabSpecifies how final output is collated. Check the check box to collate the document.
For information on Profiles, see page 89.
PreferencesPreferences... on the Finishing tab window opens the Preferences dialog box. The first check box lets you force pages to print, even when the paper size does not match. If this is not checked, you will be asked to change paper when a paper size mismatch is detected. The second check box lets you turn EMF Spooling on. If this is not checked, EMF Spooling will be off. These settings are unchecked by default.
Chapter 3 Using the Canon Advanced Printing Technology 91
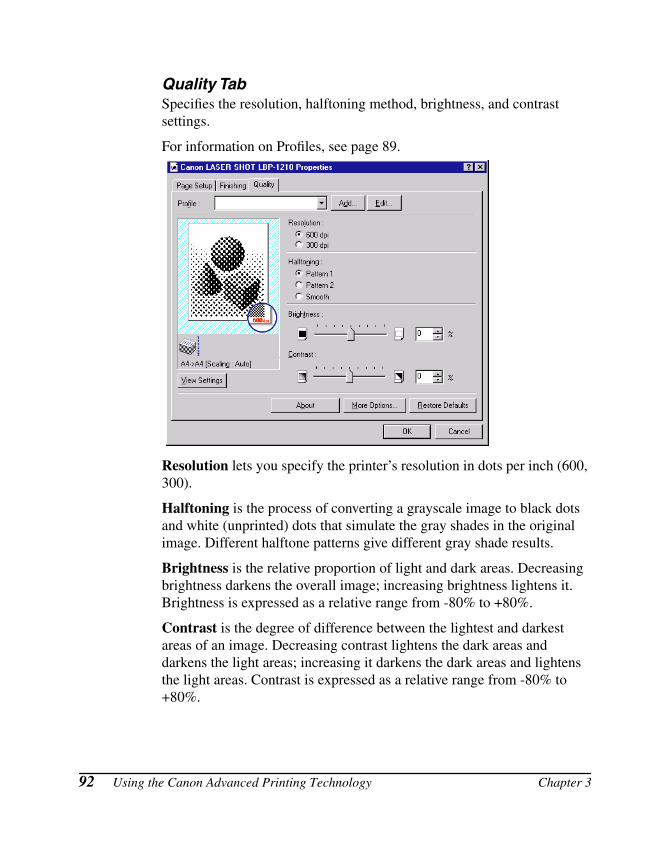
Quality TabSpecifies the resolution, halftoning method, brightness, and contrast settings.
For information on Profiles, see page 89.
Resolution lets you specify the printer’s resolution in dots per inch (600, 300).
Halftoning is the process of converting a grayscale image to black dots and white (unprinted) dots that simulate the gray shades in the original image. Different halftone patterns give different gray shade results.
Brightness is the relative proportion of light and dark areas. Decreasing brightness darkens the overall image; increasing brightness lightens it. Brightness is expressed as a relative range from -80% to +80%.
Contrast is the degree of difference between the lightest and darkest areas of an image. Decreasing contrast lightens the dark areas and darkens the light areas; increasing it darkens the dark areas and lightens the light areas. Contrast is expressed as a relative range from -80% to +80%.
92 Using the Canon Advanced Printing Technology Chapter 3
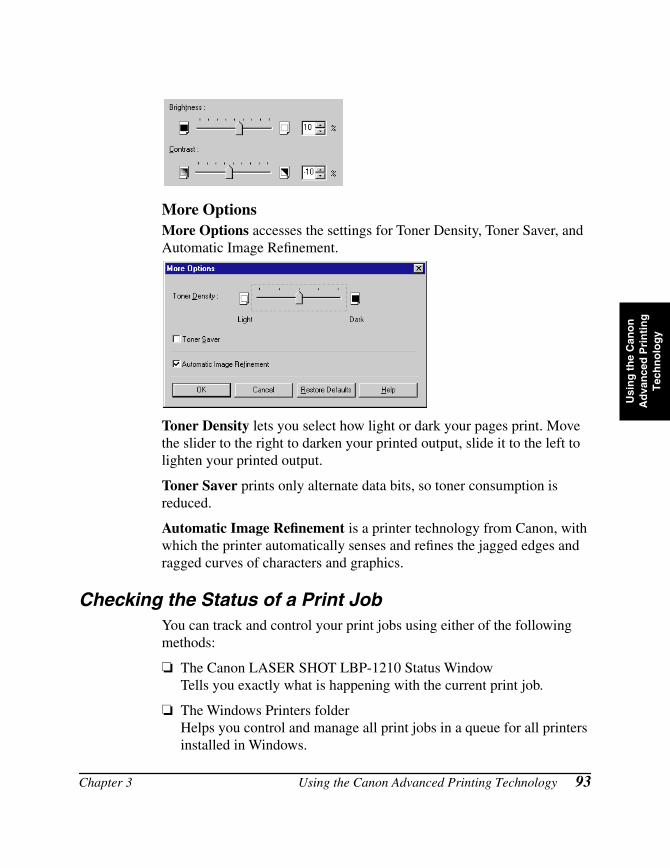
Usi
ng
th
e C
ano
n
Ad
van
ced
Pri
nti
ng
T
ech
no
log
y
More OptionsMore Options accesses the settings for Toner Density, Toner Saver, and Automatic Image Refinement.
Toner Density lets you select how light or dark your pages print. Move the slider to the right to darken your printed output, slide it to the left to lighten your printed output.
Toner Saver prints only alternate data bits, so toner consumption is reduced.
Automatic Image Refinement is a printer technology from Canon, with which the printer automatically senses and refines the jagged edges and ragged curves of characters and graphics.
Checking the Status of a Print JobYou can track and control your print jobs using either of the following methods:
❏ The Canon LASER SHOT LBP-1210 Status WindowTells you exactly what is happening with the current print job.
❏ The Windows Printers folderHelps you control and manage all print jobs in a queue for all printers installed in Windows.
Chapter 3 Using the Canon Advanced Printing Technology 93
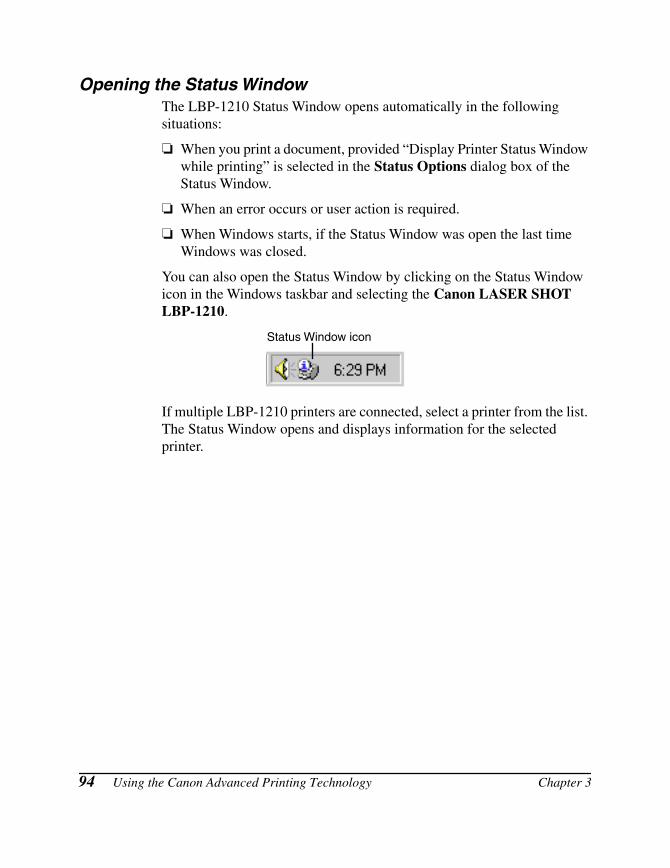
Opening the Status WindowThe LBP-1210 Status Window opens automatically in the following situations:
❏ When you print a document, provided “Display Printer Status Window while printing” is selected in the Status Options dialog box of the Status Window.
❏ When an error occurs or user action is required.
❏ When Windows starts, if the Status Window was open the last time Windows was closed.
You can also open the Status Window by clicking on the Status Window icon in the Windows taskbar and selecting the Canon LASER SHOT LBP-1210.
If multiple LBP-1210 printers are connected, select a printer from the list. The Status Window opens and displays information for the selected printer.
Status Window icon
94 Using the Canon Advanced Printing Technology Chapter 3
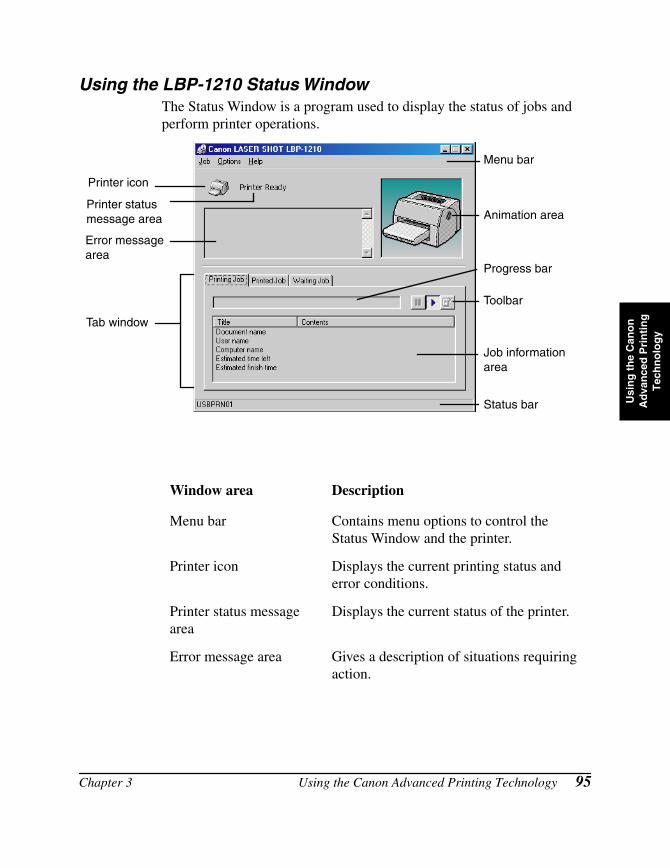
Usi
ng
th
e C
ano
n
Ad
van
ced
Pri
nti
ng
T
ech
no
log
y
Using the LBP-1210 Status WindowThe Status Window is a program used to display the status of jobs and perform printer operations.
Window area Description
Menu bar Contains menu options to control the Status Window and the printer.
Printer icon Displays the current printing status and error conditions.
Printer status message area
Displays the current status of the printer.
Error message area Gives a description of situations requiring action.
Toolbar
Menu bar
Progress bar
Job informationarea
Error message area
Printer status message area
Status bar
Animation area
Tab window
Printer icon
Chapter 3 Using the Canon Advanced Printing Technology 95
Animation area Shows an animated graphic indicating the current printer status. The graphic background changes from blue (normal) to orange when user action is required, or to red when a warning is issued.
Progress bar Indicates the progress of the current job.
Tool bar Use to pause, delete, or resume printing.
Job information area Displays information related to print jobs. The type of information displayed changes with the selected tab.
Status bar Displays the name of the printer port and describes menu options as you move your mouse over them.
Window area Description
96 Using the Canon Advanced Printing Technology Chapter 3
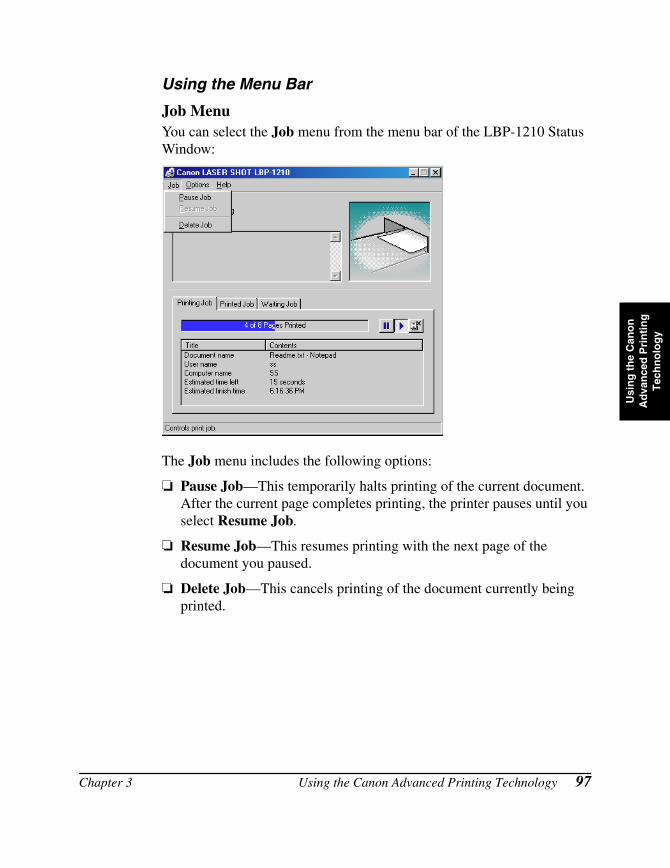
Usi
ng
th
e C
ano
n
Ad
van
ced
Pri
nti
ng
T
ech
no
log
y
Using the Menu Bar
Job MenuYou can select the Job menu from the menu bar of the LBP-1210 Status Window:
The Job menu includes the following options:
❏ Pause Job—This temporarily halts printing of the current document. After the current page completes printing, the printer pauses until you select Resume Job.
❏ Resume Job—This resumes printing with the next page of the document you paused.
❏ Delete Job—This cancels printing of the document currently being printed.
Chapter 3 Using the Canon Advanced Printing Technology 97
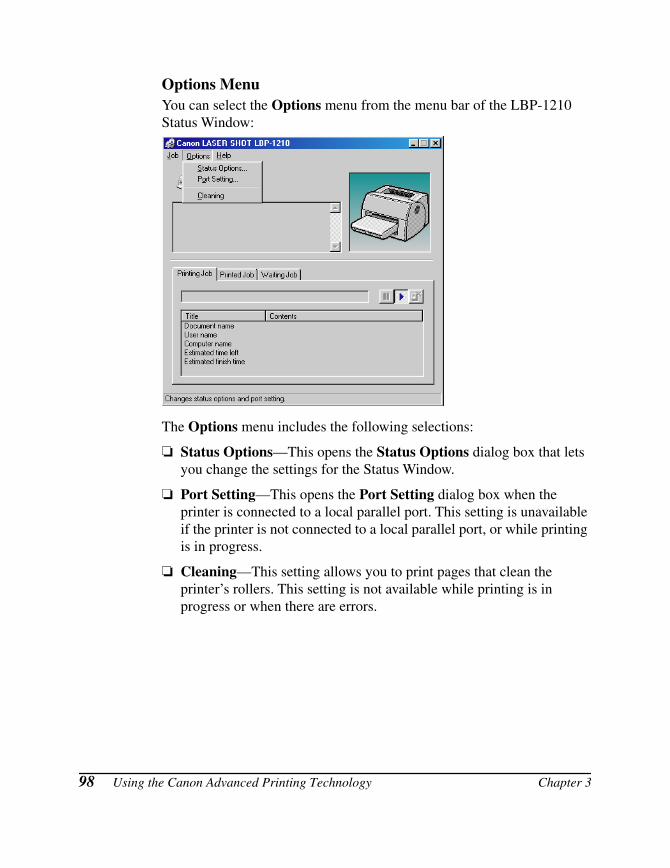
Options MenuYou can select the Options menu from the menu bar of the LBP-1210 Status Window:
The Options menu includes the following selections:
❏ Status Options—This opens the Status Options dialog box that lets you change the settings for the Status Window.
❏ Port Setting—This opens the Port Setting dialog box when the printer is connected to a local parallel port. This setting is unavailable if the printer is not connected to a local parallel port, or while printing is in progress.
❏ Cleaning—This setting allows you to print pages that clean the printer’s rollers. This setting is not available while printing is in progress or when there are errors.
98 Using the Canon Advanced Printing Technology Chapter 3
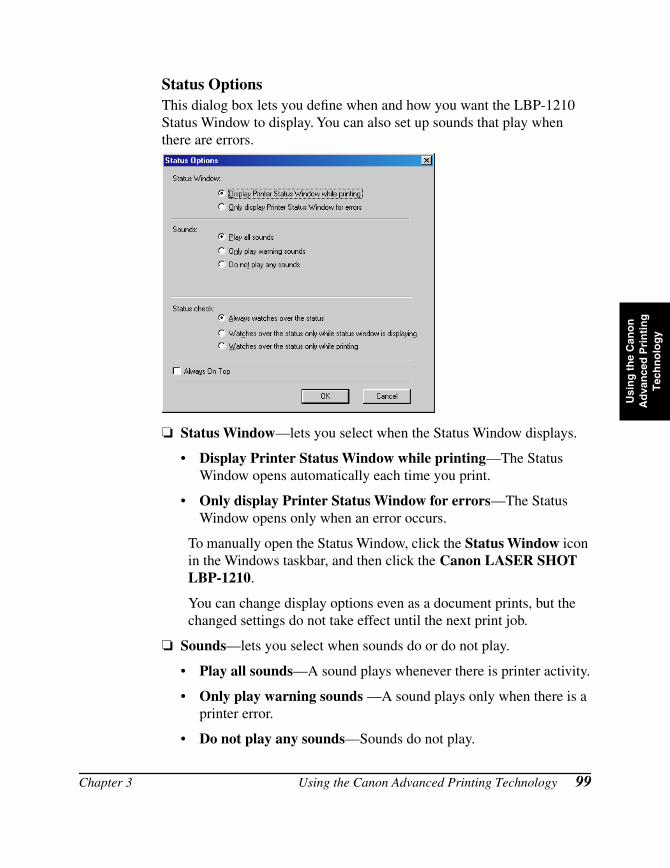
Usi
ng
th
e C
ano
n
Ad
van
ced
Pri
nti
ng
T
ech
no
log
y
Status OptionsThis dialog box lets you define when and how you want the LBP-1210 Status Window to display. You can also set up sounds that play when there are errors.
❏ Status Window—lets you select when the Status Window displays.
• Display Printer Status Window while printing—The Status Window opens automatically each time you print.
• Only display Printer Status Window for errors—The Status Window opens only when an error occurs.
To manually open the Status Window, click the Status Window icon in the Windows taskbar, and then click the Canon LASER SHOT LBP-1210.
You can change display options even as a document prints, but the changed settings do not take effect until the next print job.
❏ Sounds—lets you select when sounds do or do not play.
• Play all sounds—A sound plays whenever there is printer activity.
• Only play warning sounds —A sound plays only when there is a printer error.
• Do not play any sounds—Sounds do not play.
Chapter 3 Using the Canon Advanced Printing Technology 99
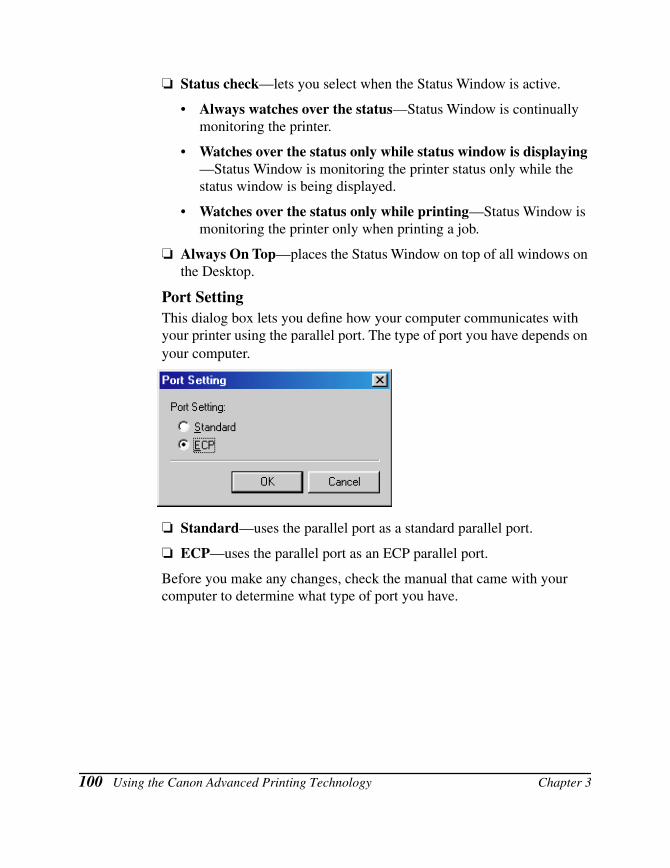
❏ Status check—lets you select when the Status Window is active.
• Always watches over the status—Status Window is continually monitoring the printer.
• Watches over the status only while status window is displaying —Status Window is monitoring the printer status only while the status window is being displayed.
• Watches over the status only while printing—Status Window is monitoring the printer only when printing a job.
❏ Always On Top—places the Status Window on top of all windows on the Desktop.
Port SettingThis dialog box lets you define how your computer communicates with your printer using the parallel port. The type of port you have depends on your computer.
❏ Standard—uses the parallel port as a standard parallel port.
❏ ECP—uses the parallel port as an ECP parallel port.
Before you make any changes, check the manual that came with your computer to determine what type of port you have.
100 Using the Canon Advanced Printing Technology Chapter 3
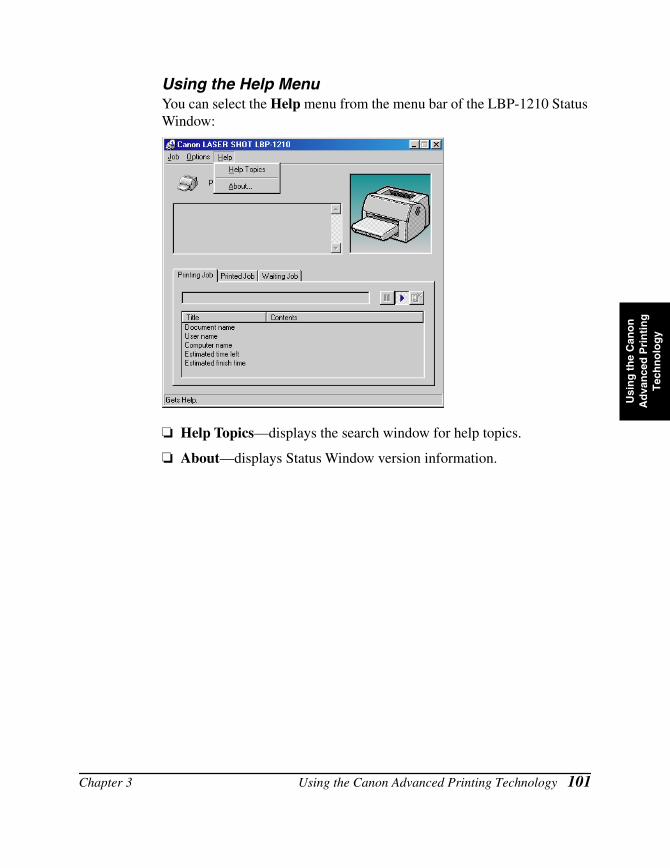
Usi
ng
th
e C
ano
n
Ad
van
ced
Pri
nti
ng
T
ech
no
log
y
Using the Help MenuYou can select the Help menu from the menu bar of the LBP-1210 Status Window:
❏ Help Topics—displays the search window for help topics.
❏ About—displays Status Window version information.
Chapter 3 Using the Canon Advanced Printing Technology 101
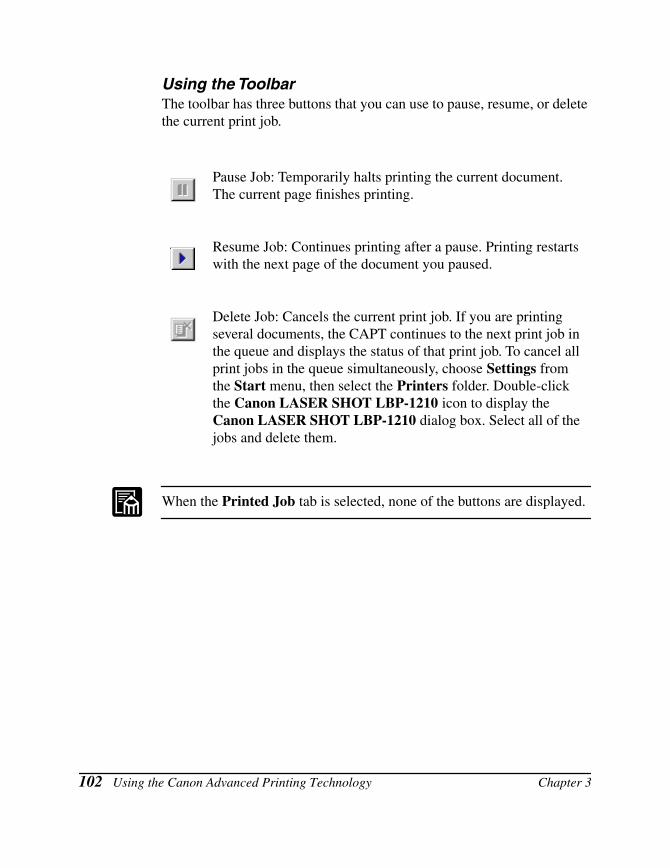
Using the ToolbarThe toolbar has three buttons that you can use to pause, resume, or delete the current print job.
When the Printed Job tab is selected, none of the buttons are displayed.
Pause Job: Temporarily halts printing the current document. The current page finishes printing.
Resume Job: Continues printing after a pause. Printing restarts with the next page of the document you paused.
Delete Job: Cancels the current print job. If you are printing several documents, the CAPT continues to the next print job in the queue and displays the status of that print job. To cancel all print jobs in the queue simultaneously, choose Settings from the Start menu, then select the Printers folder. Double-click the Canon LASER SHOT LBP-1210 icon to display the Canon LASER SHOT LBP-1210 dialog box. Select all of the jobs and delete them.
102 Using the Canon Advanced Printing Technology Chapter 3

Usi
ng
th
e C
ano
n
Ad
van
ced
Pri
nti
ng
T
ech
no
log
y
Using the Tab Window
Printing Job
This tab shows information related to the job that is currently printing. The following types of information are displayed:
❏ Document name
❏ User name
❏ Computer name
❏ Estimated time left
❏ Estimated finish time
Some of this information may not be displayed, depending on the printer status.
Chapter 3 Using the Canon Advanced Printing Technology 103
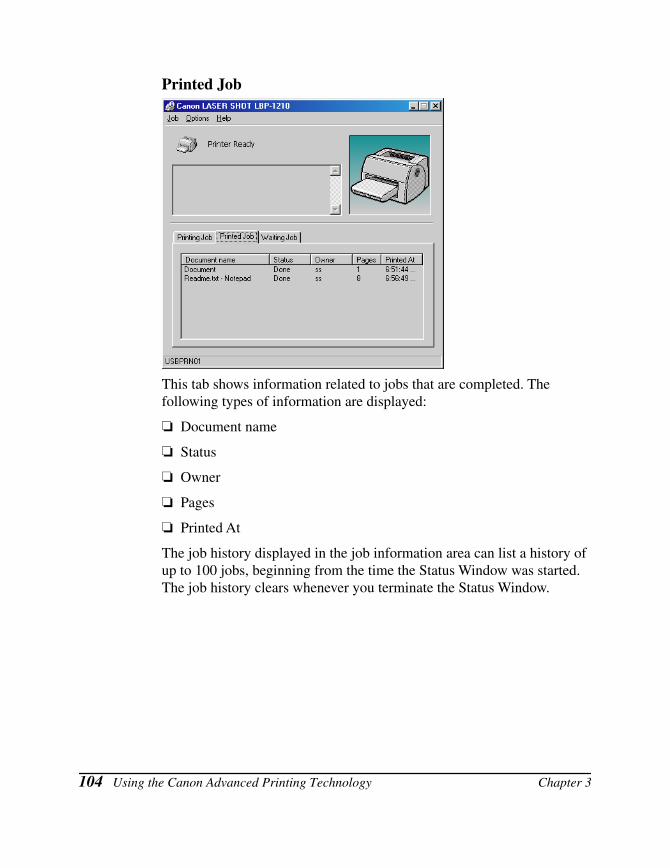
Printed Job
This tab shows information related to jobs that are completed. The following types of information are displayed:
❏ Document name
❏ Status
❏ Owner
❏ Pages
❏ Printed At
The job history displayed in the job information area can list a history of up to 100 jobs, beginning from the time the Status Window was started. The job history clears whenever you terminate the Status Window.
104 Using the Canon Advanced Printing Technology Chapter 3
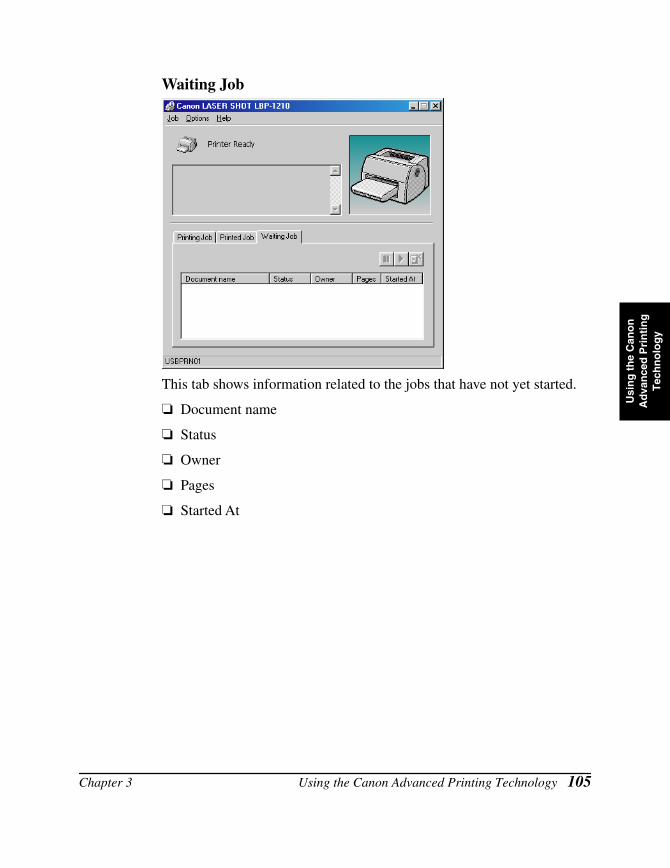
Usi
ng
th
e C
ano
n
Ad
van
ced
Pri
nti
ng
T
ech
no
log
y
Waiting Job
This tab shows information related to the jobs that have not yet started.
❏ Document name
❏ Status
❏ Owner
❏ Pages
❏ Started At
Chapter 3 Using the Canon Advanced Printing Technology 105
Network Printer Status
Viewing the print statusThe status of a network printer can be viewed on the print server as well as the client.
For job status to be displayed in the client’s Status Window, the print server’s Status Window must be running.
If the status option “Display Printer Status Window while printing,” has been selected on the client, the client’s Status Window opens automatically once printing from the server starts.
If an error occurs on the server, the client’s Status Window for that job opens automatically.
If the client’s Status Window opens automatically, it closes automatically when printing completes or the error is canceled, unless the user interacted with the window or its menus.
Performing print job operationsPrint job operations (pause, resume, delete) may be performed from either the print server or the client for that job. After a client performs a print operation, no other operations are allowed until the server confirms that the operation has been accepted.
In Windows 95/98/Me, print job operations cannot be selected on any other screen except the print server or client for that job. In Windows NT 4.0/2000/XP any authorized user can perform print job operations.
If the print server’s Status Window is not running, you cannot perform job operations on the client. The client’s Status Window displays the message “Check Print Server.”
Audio messages for jobs play on the client and on the print server.
106 Using the Canon Advanced Printing Technology Chapter 3
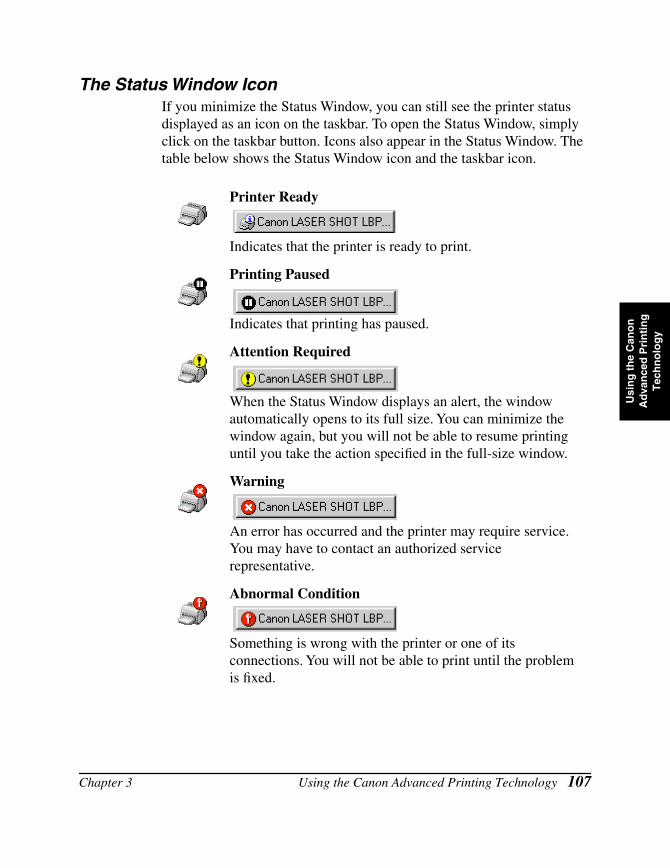
Usi
ng
th
e C
ano
n
Ad
van
ced
Pri
nti
ng
T
ech
no
log
y
The Status Window IconIf you minimize the Status Window, you can still see the printer status displayed as an icon on the taskbar. To open the Status Window, simply click on the taskbar button. Icons also appear in the Status Window. The table below shows the Status Window icon and the taskbar icon.
Printer Ready
Indicates that the printer is ready to print.
Printing Paused
Indicates that printing has paused.
Attention Required
When the Status Window displays an alert, the window automatically opens to its full size. You can minimize the window again, but you will not be able to resume printing until you take the action specified in the full-size window.
Warning
An error has occurred and the printer may require service. You may have to contact an authorized service representative.
Abnormal Condition
Something is wrong with the printer or one of its connections. You will not be able to print until the problem is fixed.
Chapter 3 Using the Canon Advanced Printing Technology 107
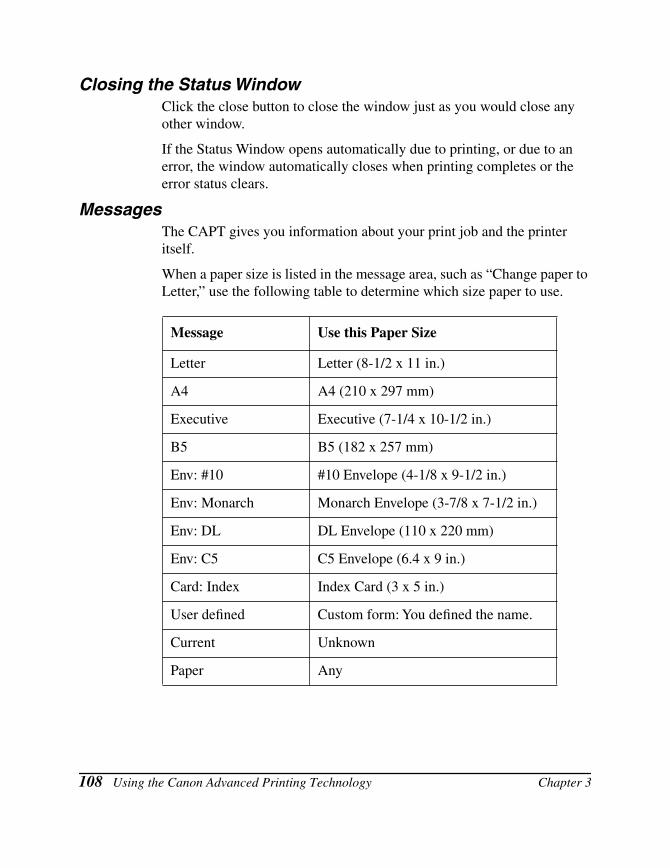
Closing the Status WindowClick the close button to close the window just as you would close any other window.
If the Status Window opens automatically due to printing, or due to an error, the window automatically closes when printing completes or the error status clears.
MessagesThe CAPT gives you information about your print job and the printer itself.
When a paper size is listed in the message area, such as “Change paper to Letter,” use the following table to determine which size paper to use.
Message Use this Paper Size
Letter Letter (8-1/2 x 11 in.)
A4 A4 (210 x 297 mm)
Executive Executive (7-1/4 x 10-1/2 in.)
B5 B5 (182 x 257 mm)
Env: #10 #10 Envelope (4-1/8 x 9-1/2 in.)
Env: Monarch Monarch Envelope (3-7/8 x 7-1/2 in.)
Env: DL DL Envelope (110 x 220 mm)
Env: C5 C5 Envelope (6.4 x 9 in.)
Card: Index Index Card (3 x 5 in.)
User defined Custom form: You defined the name.
Current Unknown
Paper Any
108 Using the Canon Advanced Printing Technology Chapter 3
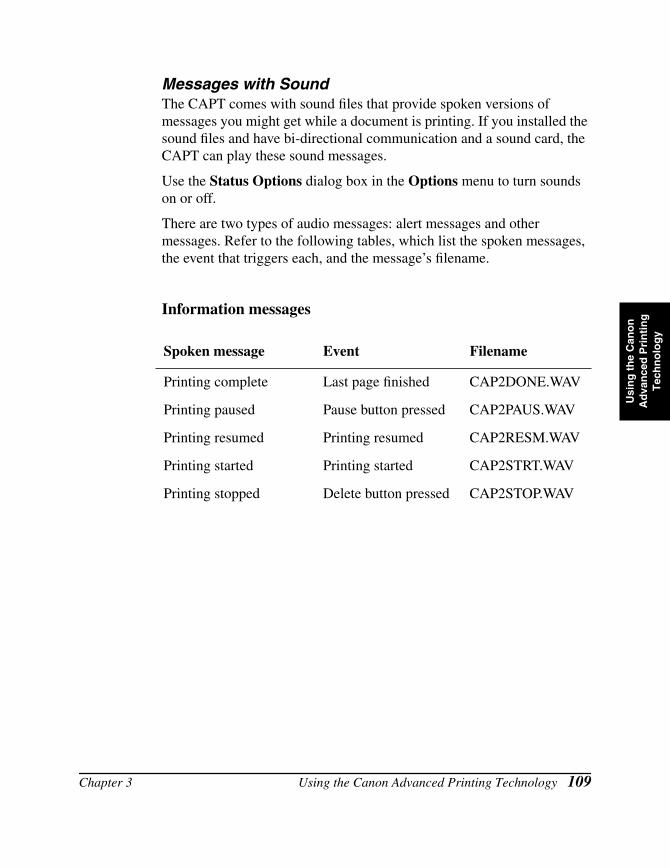
Usi
ng
th
e C
ano
n
Ad
van
ced
Pri
nti
ng
T
ech
no
log
y
Messages with SoundThe CAPT comes with sound files that provide spoken versions of messages you might get while a document is printing. If you installed the sound files and have bi-directional communication and a sound card, the CAPT can play these sound messages.
Use the Status Options dialog box in the Options menu to turn sounds on or off.
There are two types of audio messages: alert messages and other messages. Refer to the following tables, which list the spoken messages, the event that triggers each, and the message’s filename.
Information messages
Spoken message Event Filename
Printing complete Last page finished CAP2DONE.WAV
Printing paused Pause button pressed CAP2PAUS.WAV
Printing resumed Printing resumed CAP2RESM.WAV
Printing started Printing started CAP2STRT.WAV
Printing stopped Delete button pressed CAP2STOP.WAV
Chapter 3 Using the Canon Advanced Printing Technology 109
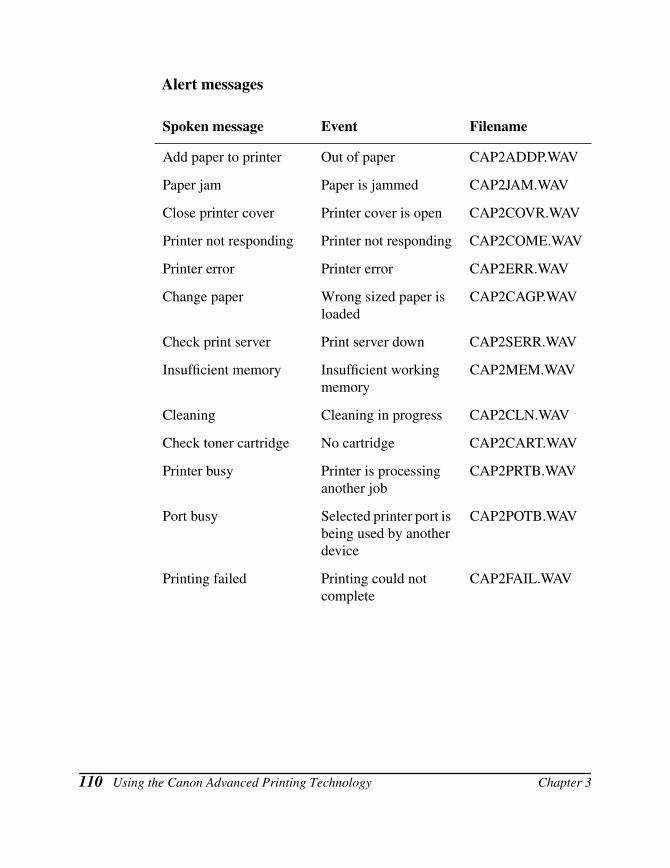
Alert messages
Spoken message Event Filename
Add paper to printer Out of paper CAP2ADDP.WAV
Paper jam Paper is jammed CAP2JAM.WAV
Close printer cover Printer cover is open CAP2COVR.WAV
Printer not responding Printer not responding CAP2COME.WAV
Printer error Printer error CAP2ERR.WAV
Change paper Wrong sized paper is loaded
CAP2CAGP.WAV
Check print server Print server down CAP2SERR.WAV
Insufficient memory Insufficient working memory
CAP2MEM.WAV
Cleaning Cleaning in progress CAP2CLN.WAV
Check toner cartridge No cartridge CAP2CART.WAV
Printer busy Printer is processing another job
CAP2PRTB.WAV
Port busy Selected printer port is being used by another device
CAP2POTB.WAV
Printing failed Printing could not complete
CAP2FAIL.WAV
110 Using the Canon Advanced Printing Technology Chapter 3
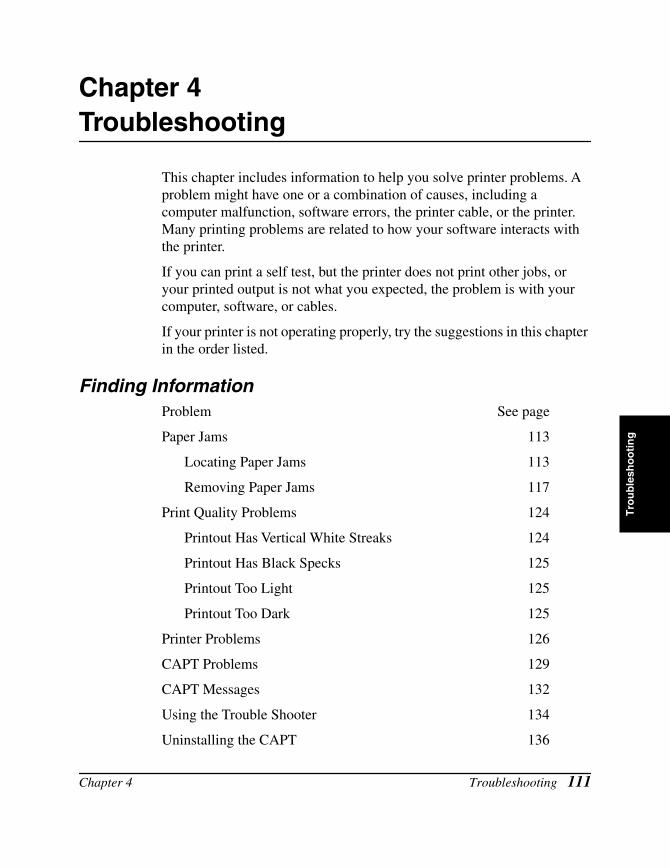
Tro
ub
lesh
oo
tin
g
Chapter 4Troubleshooting
This chapter includes information to help you solve printer problems. A problem might have one or a combination of causes, including a computer malfunction, software errors, the printer cable, or the printer. Many printing problems are related to how your software interacts with the printer.
If you can print a self test, but the printer does not print other jobs, or your printed output is not what you expected, the problem is with your computer, software, or cables.
If your printer is not operating properly, try the suggestions in this chapter in the order listed.
Finding InformationProblem See page
Paper Jams 113
Locating Paper Jams 113
Removing Paper Jams 117
Print Quality Problems 124
Printout Has Vertical White Streaks 124
Printout Has Black Specks 125
Printout Too Light 125
Printout Too Dark 125
Printer Problems 126
CAPT Problems 129
CAPT Messages 132
Using the Trouble Shooter 134
Uninstalling the CAPT 136
Chapter 4 Troubleshooting 111
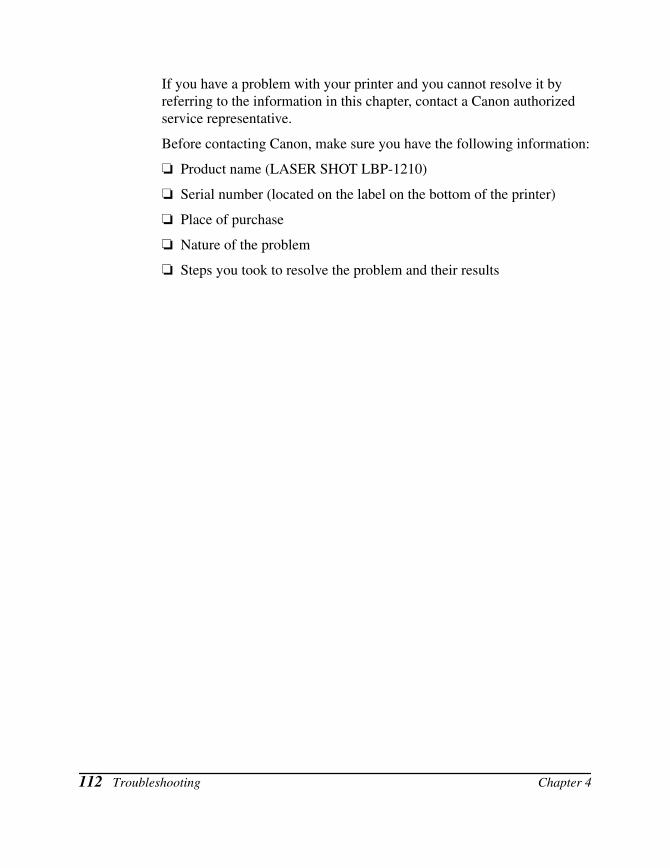
If you have a problem with your printer and you cannot resolve it by referring to the information in this chapter, contact a Canon authorized service representative.
Before contacting Canon, make sure you have the following information:
❏ Product name (LASER SHOT LBP-1210)
❏ Serial number (located on the label on the bottom of the printer)
❏ Place of purchase
❏ Nature of the problem
❏ Steps you took to resolve the problem and their results
112 Troubleshooting Chapter 4
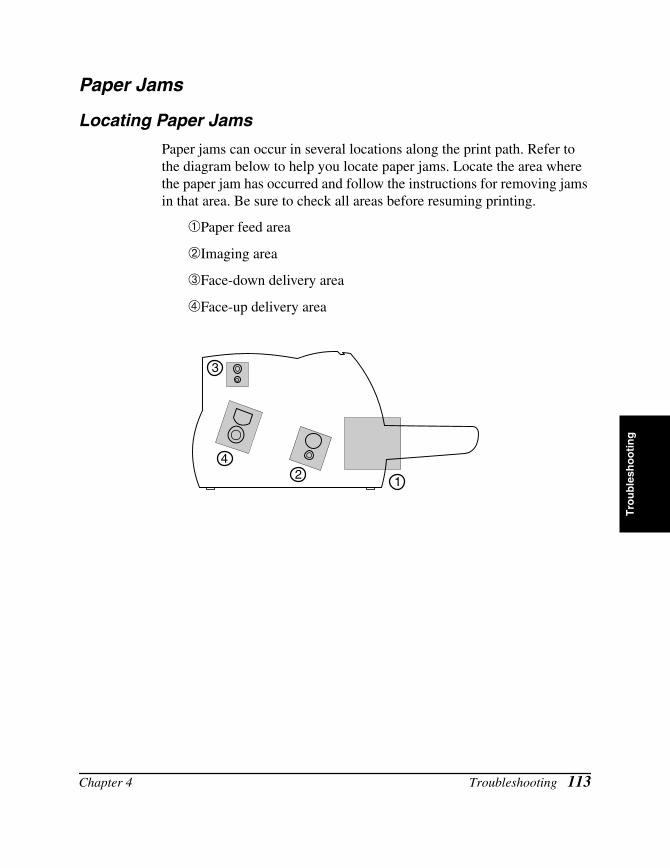
Tro
ub
lesh
oo
tin
g
Paper Jams
Locating Paper Jams
Paper jams can occur in several locations along the print path. Refer to the diagram below to help you locate paper jams. Locate the area where the paper jam has occurred and follow the instructions for removing jams in that area. Be sure to check all areas before resuming printing.
➀Paper feed area
➁Imaging area
➂Face-down delivery area
➃Face-up delivery area
1
3
42
Chapter 4 Troubleshooting 113
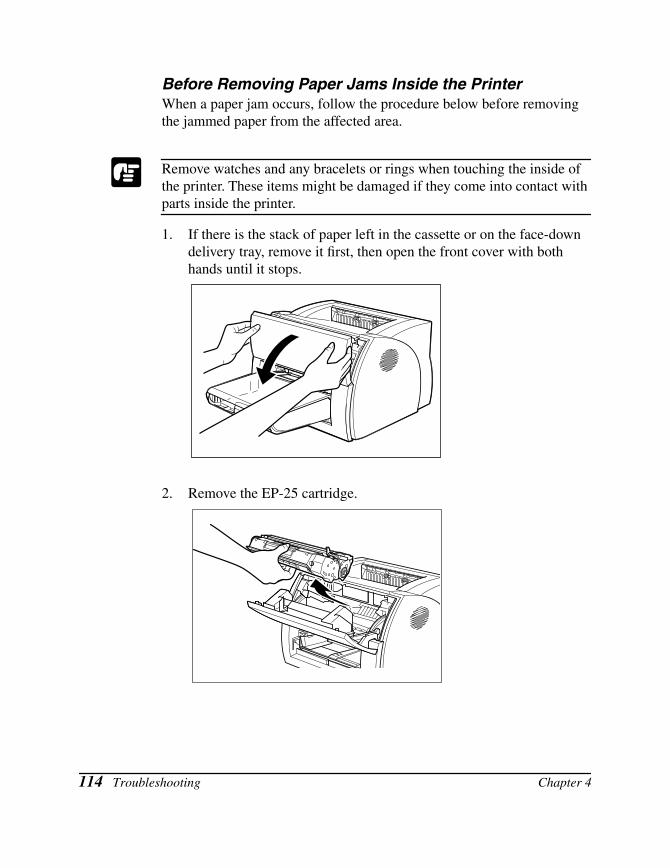
Before Removing Paper Jams Inside the PrinterWhen a paper jam occurs, follow the procedure below before removing the jammed paper from the affected area.
Remove watches and any bracelets or rings when touching the inside of the printer. These items might be damaged if they come into contact with parts inside the printer.
1. If there is the stack of paper left in the cassette or on the face-down delivery tray, remove it first, then open the front cover with both hands until it stops.
2. Remove the EP-25 cartridge.
114 Troubleshooting Chapter 4
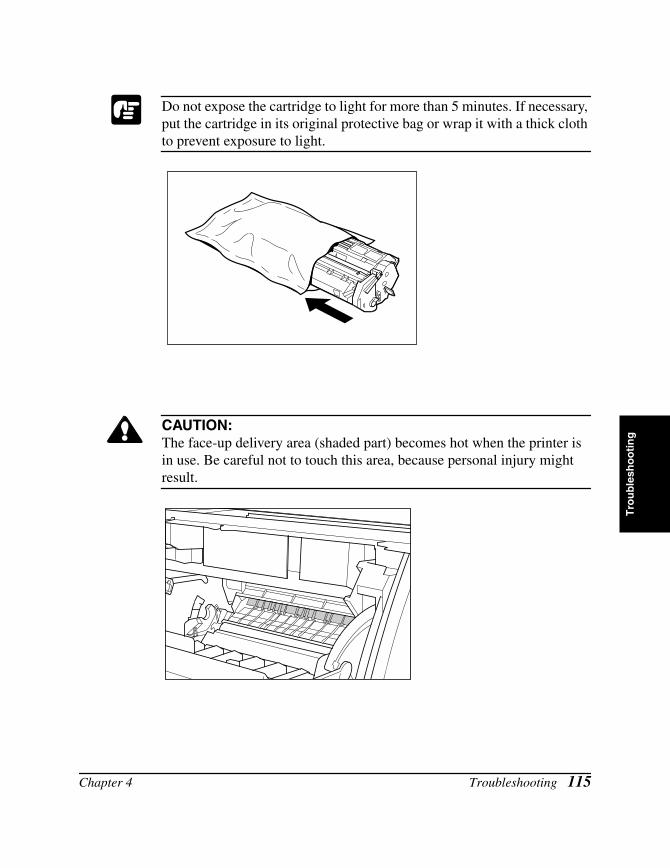
Tro
ub
lesh
oo
tin
g
Do not expose the cartridge to light for more than 5 minutes. If necessary, put the cartridge in its original protective bag or wrap it with a thick cloth to prevent exposure to light.
CAUTION:The face-up delivery area (shaded part) becomes hot when the printer is in use. Be careful not to touch this area, because personal injury might result.
Chapter 4 Troubleshooting 115
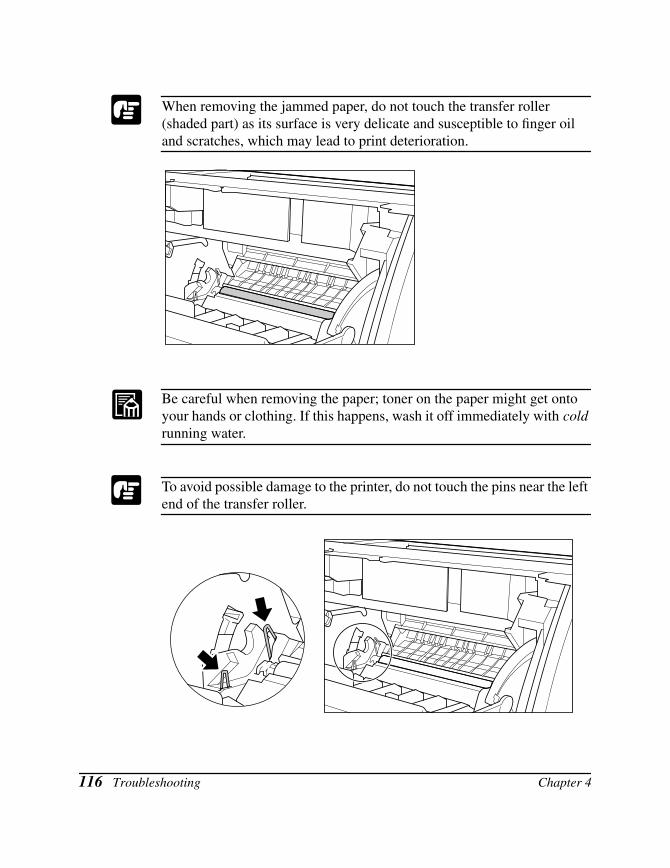
When removing the jammed paper, do not touch the transfer roller (shaded part) as its surface is very delicate and susceptible to finger oil and scratches, which may lead to print deterioration.
Be careful when removing the paper; toner on the paper might get onto your hands or clothing. If this happens, wash it off immediately with cold running water.
To avoid possible damage to the printer, do not touch the pins near the left end of the transfer roller.
116 Troubleshooting Chapter 4
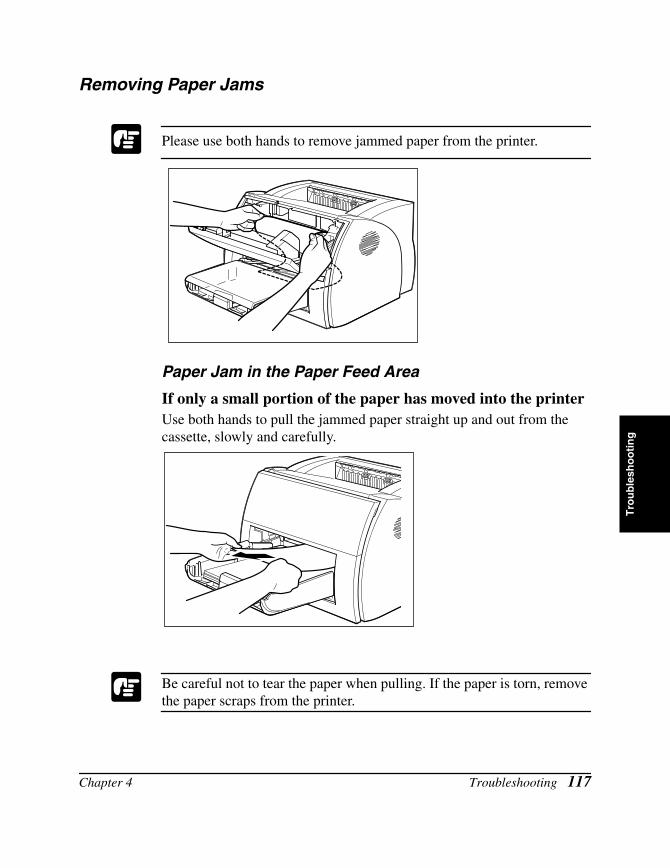
Tro
ub
lesh
oo
tin
g
Removing Paper Jams
Please use both hands to remove jammed paper from the printer.
Paper Jam in the Paper Feed Area
If only a small portion of the paper has moved into the printerUse both hands to pull the jammed paper straight up and out from the cassette, slowly and carefully.
Be careful not to tear the paper when pulling. If the paper is torn, remove the paper scraps from the printer.
Chapter 4 Troubleshooting 117
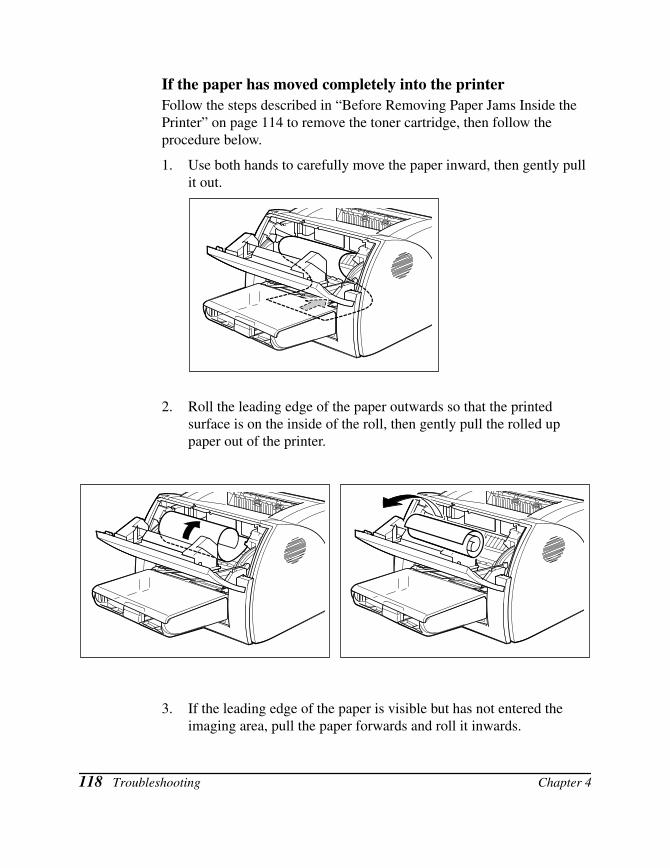
If the paper has moved completely into the printerFollow the steps described in “Before Removing Paper Jams Inside the Printer” on page 114 to remove the toner cartridge, then follow the procedure below.
1. Use both hands to carefully move the paper inward, then gently pull it out.
2. Roll the leading edge of the paper outwards so that the printed surface is on the inside of the roll, then gently pull the rolled up paper out of the printer.
3. If the leading edge of the paper is visible but has not entered the imaging area, pull the paper forwards and roll it inwards.
118 Troubleshooting Chapter 4
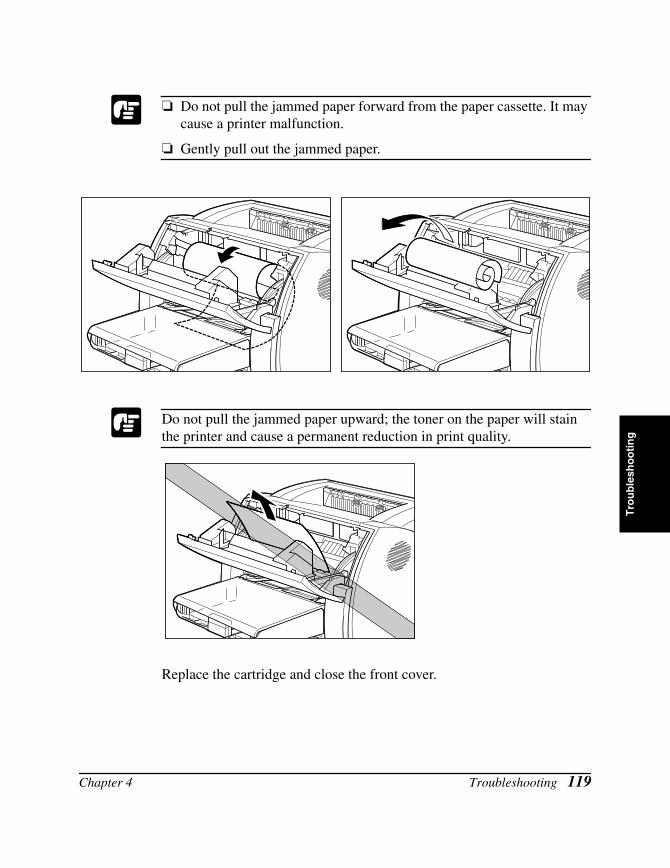
Tro
ub
lesh
oo
tin
g
❏ Do not pull the jammed paper forward from the paper cassette. It may cause a printer malfunction.
❏ Gently pull out the jammed paper.
Do not pull the jammed paper upward; the toner on the paper will stain the printer and cause a permanent reduction in print quality.
Replace the cartridge and close the front cover.
Chapter 4 Troubleshooting 119
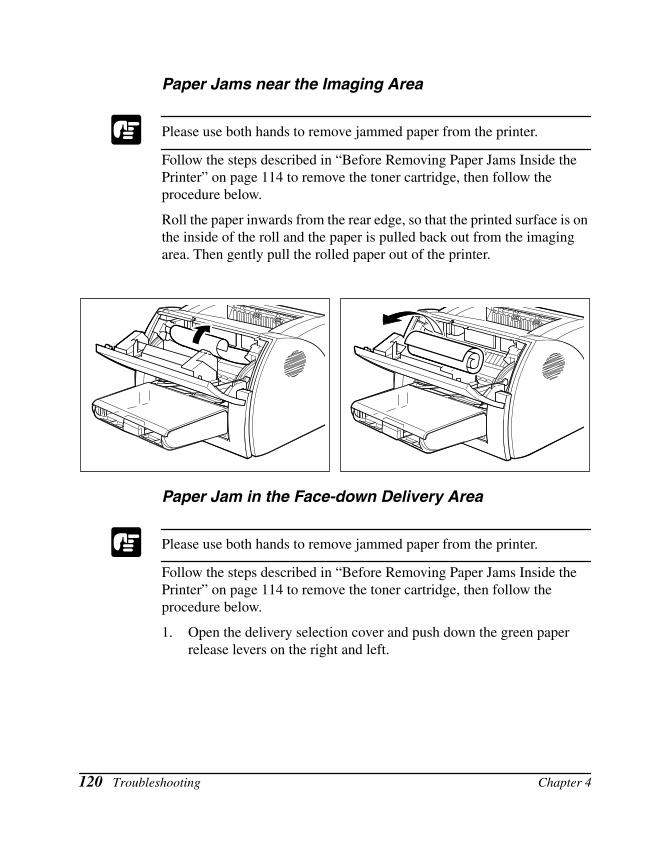
Paper Jams near the Imaging Area
Please use both hands to remove jammed paper from the printer.
Follow the steps described in “Before Removing Paper Jams Inside the Printer” on page 114 to remove the toner cartridge, then follow the procedure below.
Roll the paper inwards from the rear edge, so that the printed surface is on the inside of the roll and the paper is pulled back out from the imaging area. Then gently pull the rolled paper out of the printer.
Paper Jam in the Face-down Delivery Area
Please use both hands to remove jammed paper from the printer.
Follow the steps described in “Before Removing Paper Jams Inside the Printer” on page 114 to remove the toner cartridge, then follow the procedure below.
1. Open the delivery selection cover and push down the green paper release levers on the right and left.
120 Troubleshooting Chapter 4
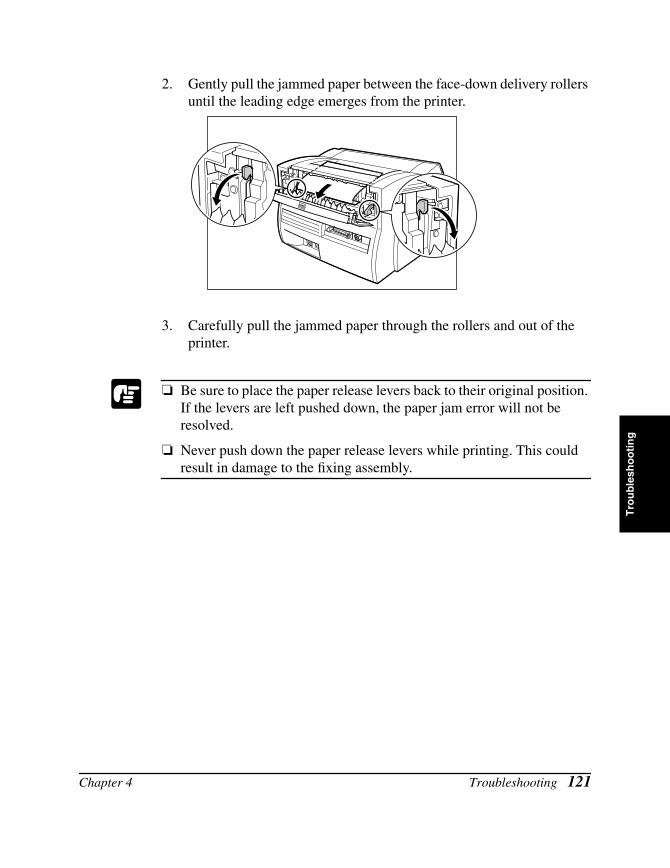
Tro
ub
lesh
oo
tin
g
2. Gently pull the jammed paper between the face-down delivery rollers until the leading edge emerges from the printer.
3. Carefully pull the jammed paper through the rollers and out of the printer.
❏ Be sure to place the paper release levers back to their original position. If the levers are left pushed down, the paper jam error will not be resolved.
❏ Never push down the paper release levers while printing. This could result in damage to the fixing assembly.
Chapter 4 Troubleshooting 121
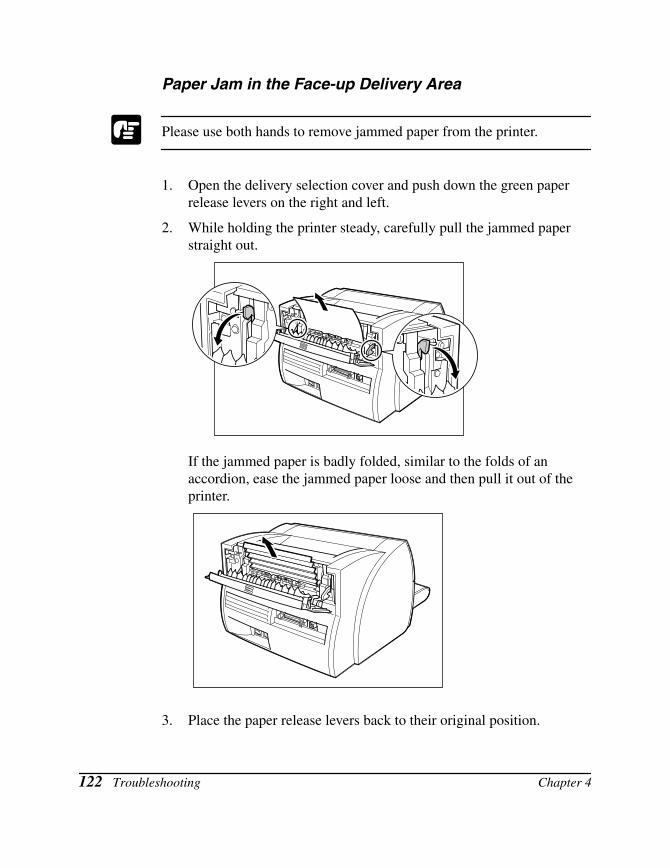
Paper Jam in the Face-up Delivery Area
Please use both hands to remove jammed paper from the printer.
1. Open the delivery selection cover and push down the green paper release levers on the right and left.
2. While holding the printer steady, carefully pull the jammed paper straight out.
If the jammed paper is badly folded, similar to the folds of an accordion, ease the jammed paper loose and then pull it out of the printer.
3. Place the paper release levers back to their original position.
122 Troubleshooting Chapter 4
Tro
ub
lesh
oo
tin
g
❏ After you replace the cartridge and close the front cover, the printer should be ready for printing. If the printer returns to the ready state for printing, troubleshooting has been successful. If the printer does not return to the ready state for printing, confirm that the paper release levers are placed back to their original position, and check to see that paper is not left in the printer.
❏ While removing the jammed paper, some toner might stain the inside of the printer which will make the first few printouts dirty when printing resumes.
Chapter 4 Troubleshooting 123
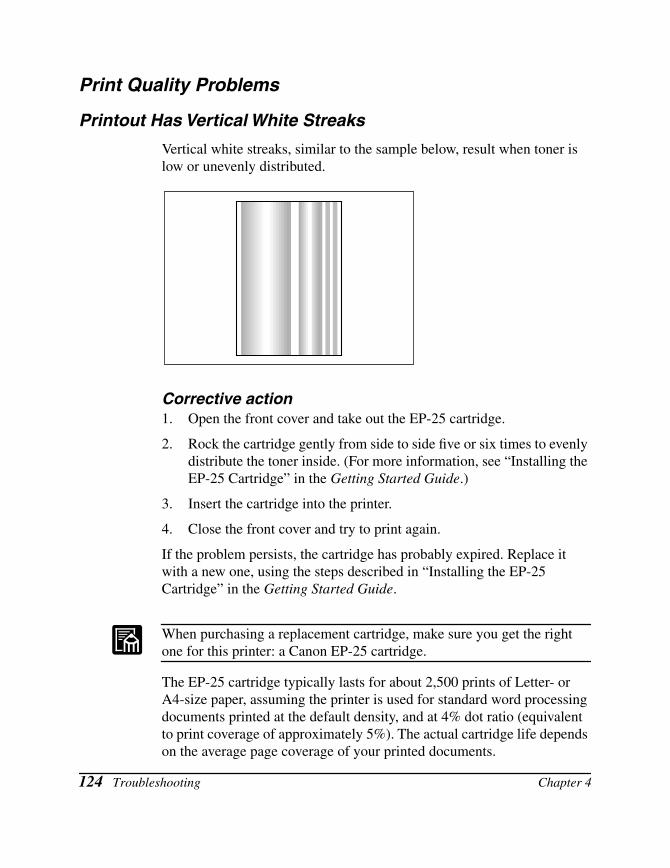
Print Quality Problems
Printout Has Vertical White Streaks
Vertical white streaks, similar to the sample below, result when toner is low or unevenly distributed.
Corrective action1. Open the front cover and take out the EP-25 cartridge.
2. Rock the cartridge gently from side to side five or six times to evenly distribute the toner inside. (For more information, see “Installing the EP-25 Cartridge” in the Getting Started Guide.)
3. Insert the cartridge into the printer.
4. Close the front cover and try to print again.
If the problem persists, the cartridge has probably expired. Replace it with a new one, using the steps described in “Installing the EP-25Cartridge” in the Getting Started Guide.
When purchasing a replacement cartridge, make sure you get the right one for this printer: a Canon EP-25 cartridge.
The EP-25 cartridge typically lasts for about 2,500 prints of Letter- or A4-size paper, assuming the printer is used for standard word processing documents printed at the default density, and at 4% dot ratio (equivalent to print coverage of approximately 5%). The actual cartridge life depends on the average page coverage of your printed documents.
124 Troubleshooting Chapter 4
Tro
ub
lesh
oo
tin
g
Printout Has Black Specks
If toner powder adheres to the pressure roller, black specks 1 mm in diameter or larger might appear on the front or back of the printed paper.
Corrective action1. Use the Options menu in the Status Window to print the cleaning
page on a blank sheet of paper.
2. If there are no black specks on the cleaning page, the pressure roller is clean.
3. If there are black specks on the cleaning page, repeat step 1 until there are no black specks on the cleaning page. You may repeat this procedure several times with no adverse effect on the printer.
Printout Too Light
This occurs with high-volume printing in a hot environment.
Corrective action1. Increase the printing density.
2. If this has no effect, replace the EP-25 cartridge.
Printout Too Dark
If there is a strong light source near the printer, the prints may be too dark.
Corrective action1. Check whether the density adjustment is correct. If not, adjust the
density.
2. Check whether there is a strong light source near the printer. If there is, move the printer or the light source.
Chapter 4 Troubleshooting 125
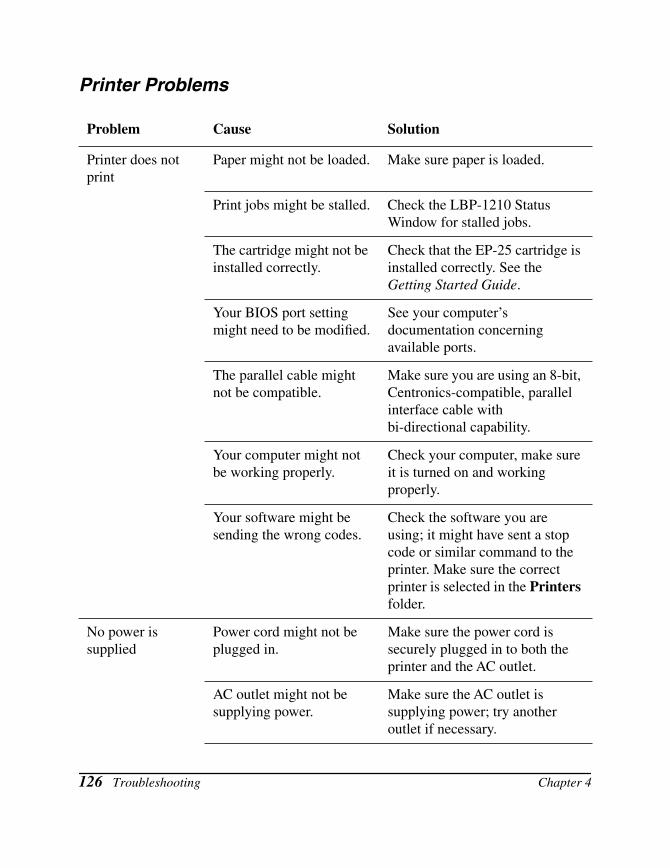
Printer Problems
Problem Cause Solution
Printer does not print
Paper might not be loaded. Make sure paper is loaded.
Print jobs might be stalled. Check the LBP-1210 Status Window for stalled jobs.
The cartridge might not be installed correctly.
Check that the EP-25 cartridge is installed correctly. See the Getting Started Guide.
Your BIOS port setting might need to be modified.
See your computer’s documentation concerning available ports.
The parallel cable might not be compatible.
Make sure you are using an 8-bit, Centronics-compatible, parallel interface cable with bi-directional capability.
Your computer might not be working properly.
Check your computer, make sure it is turned on and working properly.
Your software might be sending the wrong codes.
Check the software you are using; it might have sent a stop code or similar command to the printer. Make sure the correct printer is selected in the Printers folder.
No power is supplied
Power cord might not be plugged in.
Make sure the power cord is securely plugged in to both the printer and the AC outlet.
AC outlet might not be supplying power.
Make sure the AC outlet is supplying power; try another outlet if necessary.
126 Troubleshooting Chapter 4

Tro
ub
lesh
oo
tin
g
AC voltage might not match printer.
Make sure the voltage of the AC outlet matches the ratings on the printer.
Printer stops printing
Your interface cable might be loose.
Check your computer and your cable.
You might be working on an application in the foreground, in which case printing performance might slow down.
Printer performance improves if you give your print job priority.
Printout is wrong There might be a communications problem between the printer and your computer.
Make sure your cable connections are secure.Make sure your interface cable is less than 6.6 feet (2.0 m) long.Make sure you are not using a switch box.Check that you have selected the correct printer driver in Windows.
The wrong printer is selected in the Printers folder.
Make sure the LBP-1210 is selected in the Printers folder.
You might need to modify your BIOS setup.
See your computer’s documentation for details. Try changing the parallel port mode or the parallel port address to see if this solves the problem.
Problem Cause Solution
Chapter 4 Troubleshooting 127

Printer locks up system
Your system setup might be a problem.
Verify that you have a high-quality shielded interface cable.The problem might be your BIOS. Verify that your BIOS setup is correct. (See your computer’s documentation for details.)Verify that your physical memory is working correctly.If you have a Toshiba laptop, change this line in your CONFIG.SYS file:c:\winutils\mxtime.exeto:REM c:\winutils\mxtime.exe
Computer indicates a device time-out
Your computer is sending data to the printer but the printer is not responding. The printer might be off, offline, or not connected to the computer.
Make sure the printer is not paused.Check that the printer’s interface cable is securely connected to both the printer and the computer.Make sure paper is properly loaded in the cassette.Reset the printer and computer.Try the print operation again.Try a different cable.
Problem Cause Solution
128 Troubleshooting Chapter 4
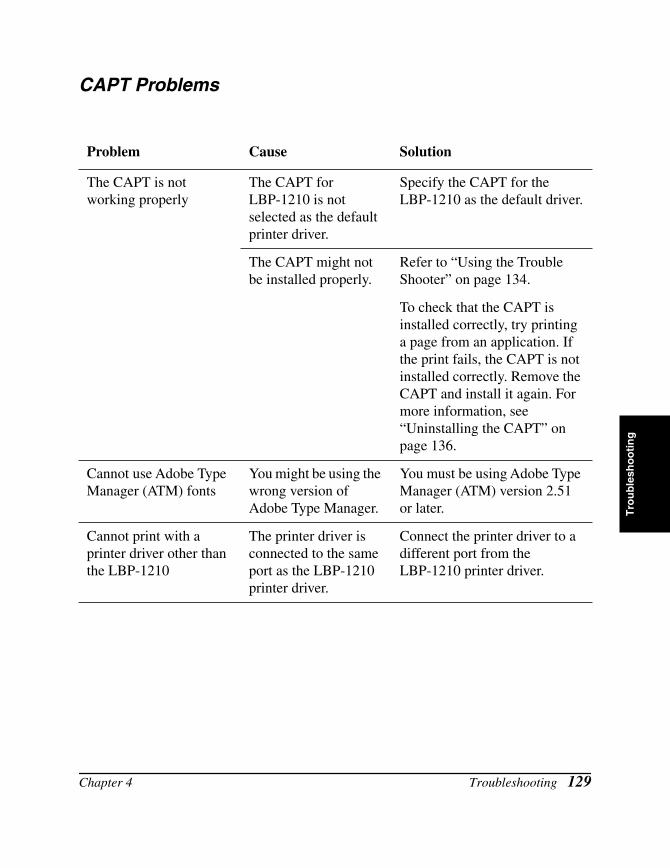
Tro
ub
lesh
oo
tin
g
CAPT Problems
Problem Cause Solution
The CAPT is not working properly
The CAPT for LBP-1210 is not selected as the default printer driver.
Specify the CAPT for the LBP-1210 as the default driver.
The CAPT might not be installed properly.
Refer to “Using the Trouble Shooter” on page 134.
To check that the CAPT is installed correctly, try printing a page from an application. If the print fails, the CAPT is not installed correctly. Remove the CAPT and install it again. For more information, see “Uninstalling the CAPT” on page 136.
Cannot use Adobe Type Manager (ATM) fonts
You might be using the wrong version of Adobe Type Manager.
You must be using Adobe Type Manager (ATM) version 2.51 or later.
Cannot print with a printer driver other than the LBP-1210
The printer driver is connected to the same port as the LBP-1210 printer driver.
Connect the printer driver to a different port from theLBP-1210 printer driver.
Chapter 4 Troubleshooting 129
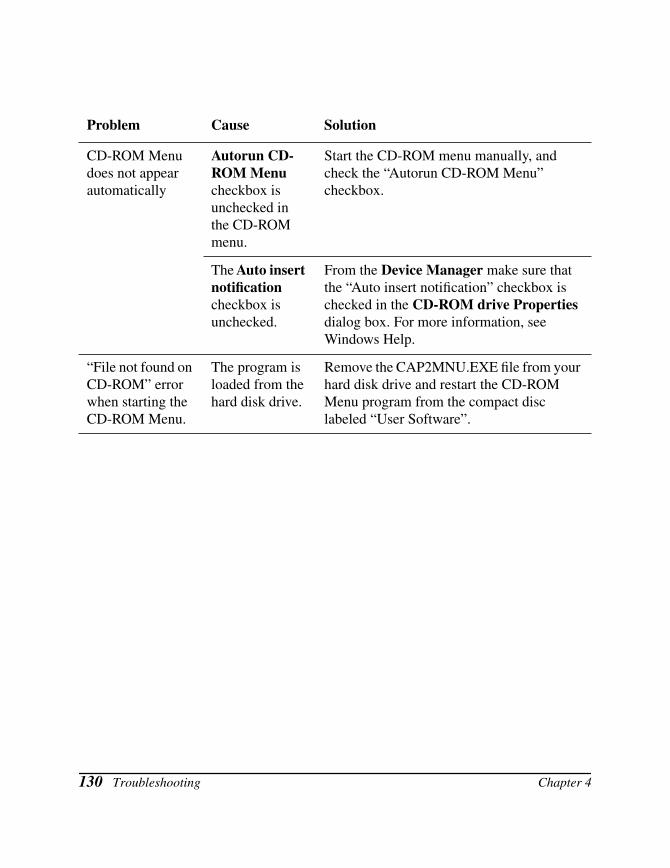
Problem Cause Solution
CD-ROM Menu does not appear automatically
Autorun CD-ROM Menu checkbox is unchecked in the CD-ROM menu.
Start the CD-ROM menu manually, and check the “Autorun CD-ROM Menu” checkbox.
The Auto insert notification checkbox is unchecked.
From the Device Manager make sure that the “Auto insert notification” checkbox is checked in the CD-ROM drive Properties dialog box. For more information, see Windows Help.
“File not found on CD-ROM” error when starting the CD-ROM Menu.
The program is loaded from the hard disk drive.
Remove the CAP2MNU.EXE file from your hard disk drive and restart the CD-ROM Menu program from the compact disc labeled “User Software”.
130 Troubleshooting Chapter 4
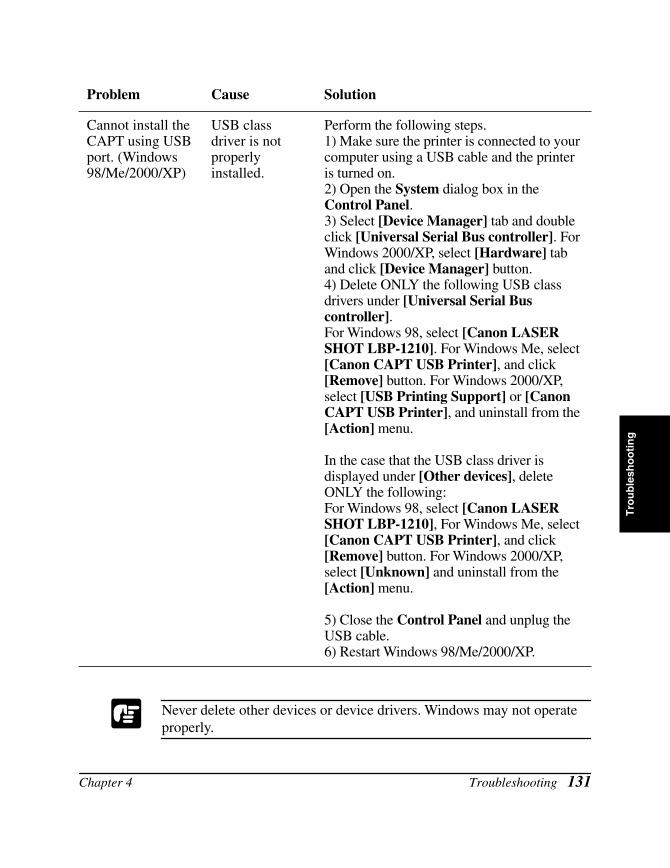
Tro
ub
lesh
oo
tin
g
Never delete other devices or device drivers. Windows may not operate properly.
Problem Cause Solution
Cannot install the CAPT using USB port. (Windows 98/Me/2000/XP)
USB class driver is not properly installed.
Perform the following steps.1) Make sure the printer is connected to your computer using a USB cable and the printer is turned on.2) Open the System dialog box in the Control Panel.3) Select [Device Manager] tab and double click [Universal Serial Bus controller]. For Windows 2000/XP, select [Hardware] tab and click [Device Manager] button.4) Delete ONLY the following USB class drivers under [Universal Serial Bus controller].For Windows 98, select [Canon LASER SHOT LBP-1210]. For Windows Me, select [Canon CAPT USB Printer], and click [Remove] button. For Windows 2000/XP, select [USB Printing Support] or [Canon CAPT USB Printer], and uninstall from the [Action] menu.
In the case that the USB class driver is displayed under [Other devices], delete ONLY the following:For Windows 98, select [Canon LASER SHOT LBP-1210], For Windows Me, select [Canon CAPT USB Printer], and click [Remove] button. For Windows 2000/XP, select [Unknown] and uninstall from the [Action] menu.
5) Close the Control Panel and unplug the USB cable.6) Restart Windows 98/Me/2000/XP.
Chapter 4 Troubleshooting 131
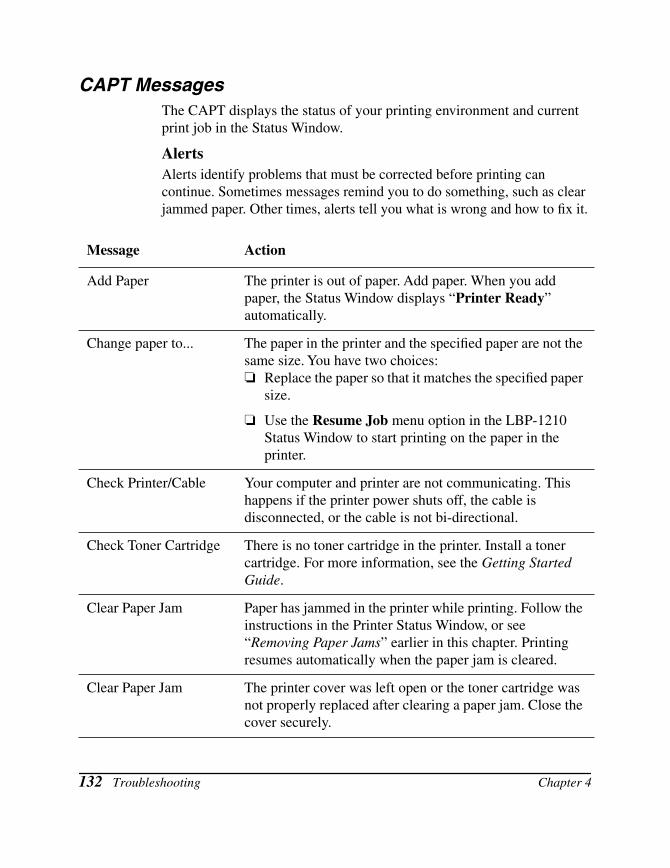
CAPT MessagesThe CAPT displays the status of your printing environment and current print job in the Status Window.
AlertsAlerts identify problems that must be corrected before printing can continue. Sometimes messages remind you to do something, such as clear jammed paper. Other times, alerts tell you what is wrong and how to fix it.
Message Action
Add Paper The printer is out of paper. Add paper. When you add paper, the Status Window displays “Printer Ready” automatically.
Change paper to... The paper in the printer and the specified paper are not the same size. You have two choices:❏ Replace the paper so that it matches the specified paper
size.
❏ Use the Resume Job menu option in the LBP-1210 Status Window to start printing on the paper in the printer.
Check Printer/Cable Your computer and printer are not communicating. This happens if the printer power shuts off, the cable is disconnected, or the cable is not bi-directional.
Check Toner Cartridge There is no toner cartridge in the printer. Install a toner cartridge. For more information, see the Getting Started Guide.
Clear Paper Jam Paper has jammed in the printer while printing. Follow the instructions in the Printer Status Window, or see “Removing Paper Jams” earlier in this chapter. Printing resumes automatically when the paper jam is cleared.
Clear Paper Jam The printer cover was left open or the toner cartridge was not properly replaced after clearing a paper jam. Close the cover securely.
132 Troubleshooting Chapter 4

Tro
ub
lesh
oo
tin
g
Close Printer Cover The printer’s front cover is open. To resume printing, close the cover.
Insufficient Memory The print job was too complex for available memory. Try one or more of the following:❏ Close other applications while printing this job.
❏ Print the job in smaller sections.
❏ Try reprinting the job with a lower resolution, such as 300 dpi.
❏ Reformat the most complicated pages in the print job to reduce graphics and other complex formatting.
Network Adapter Error The network adapter power is not on, or the network adapter is not connected.
Port Busy The printer port is being used by other equipment.
Printing Failed The print job was too complex to be sent to the printer. Try one or more of the following:❏ Try reprinting the job with a lower resolution, such as
300 dpi.
❏ Reform the most complicated pages in the print job to reduce graphics and other complex formatting.
❏ Try reprinting only the page on which the error has occurred.
Service Error The Canon Advanced Printing Technology has detected an internal problem in the LBP-1210 engine.1 Turn off and unplug the printer.
2 Open the front cover and remove the EP-25 cartridge.
3 Reinsert the cartridge properly. Use both hands to close the front cover completely.
4 Plug in and turn on your printer.
5 If the error persists, contact your Canon authorized service representative.
Message Action
Chapter 4 Troubleshooting 133
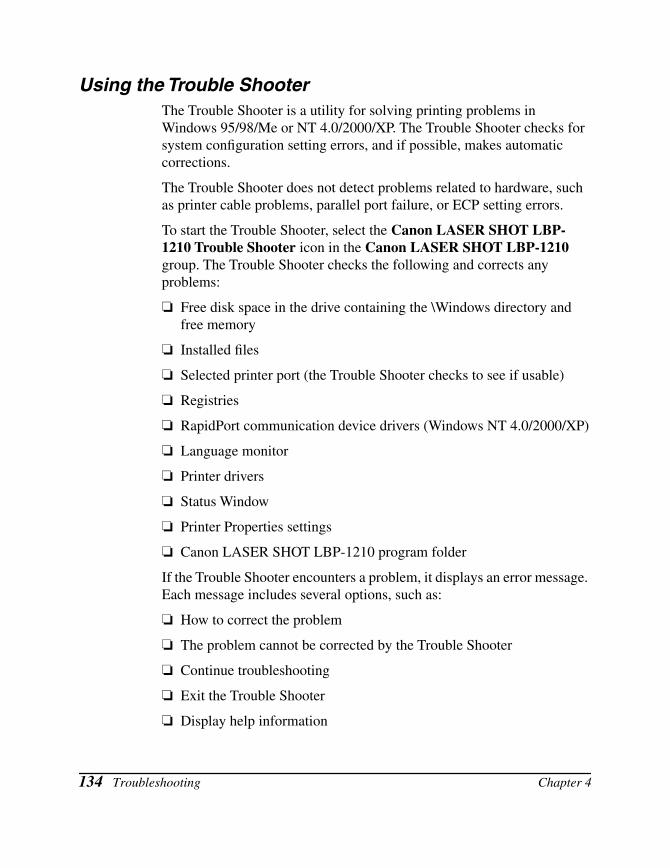
Using the Trouble ShooterThe Trouble Shooter is a utility for solving printing problems in Windows 95/98/Me or NT 4.0/2000/XP. The Trouble Shooter checks for system configuration setting errors, and if possible, makes automatic corrections.
The Trouble Shooter does not detect problems related to hardware, such as printer cable problems, parallel port failure, or ECP setting errors.
To start the Trouble Shooter, select the Canon LASER SHOT LBP-1210 Trouble Shooter icon in the Canon LASER SHOT LBP-1210 group. The Trouble Shooter checks the following and corrects any problems:
❏ Free disk space in the drive containing the \Windows directory and free memory
❏ Installed files
❏ Selected printer port (the Trouble Shooter checks to see if usable)
❏ Registries
❏ RapidPort communication device drivers (Windows NT 4.0/2000/XP)
❏ Language monitor
❏ Printer drivers
❏ Status Window
❏ Printer Properties settings
❏ Canon LASER SHOT LBP-1210 program folder
If the Trouble Shooter encounters a problem, it displays an error message. Each message includes several options, such as:
❏ How to correct the problem
❏ The problem cannot be corrected by the Trouble Shooter
❏ Continue troubleshooting
❏ Exit the Trouble Shooter
❏ Display help information
134 Troubleshooting Chapter 4
Tro
ub
lesh
oo
tin
g
If the Trouble Shooter is used on a network printer client, it performs network-related checks.
Windows NT 4.0/2000/XP Trouble Shooter checks whether Spooler service has started and if not, displays a dialog box and does not run.
When the Trouble Shooter is done checking your files, it displays a dialog box similar to the one below.
While the Trouble Shooter is running, it saves a log file with the name tshooter.tmp in your system temp directory, such as \windows\temp or \temp.
In the Exit dialog box, the Trouble Shooter prompts if you want to save the results as a text file. Check the Save Result check box and enter the desired filename. The file saves with the extension of.log.
When you click OK in the above dialog box, the Windows Restart dialog box appears. You must restart Windows for corrections made by the Trouble Shooter to take effect.
Chapter 4 Troubleshooting 135
Uninstalling the CAPTIf the CAPT is not working properly, it might help to remove it and install it again. Before you begin, be sure you have the installation software available for installation.
Before uninstalling the CAPT, make sure you close all running applications.
To uninstall:
1. Click the Start button, then point to Programs.
2. Point to Canon LASER SHOT LBP-1210.
3. Click Canon LASER SHOT LBP-1210 Uninstallation.
4. Follow the on-screen instructions.
5. Windows 95/98/Me: Click OK and your system restarts.Windows NT 4.0/2000/XP: Click OK (recommended) to restart your system.
In Windows NT 4.0/2000/XP, you cannot uninstall the Canon Advanced Printing Technology unless you have administrative privileges.
136 Troubleshooting Chapter 4
Mai
nte
nan
ce
Chapter 5Maintenance
This chapter describes how to care for and maintain your printer. Regular care and maintenance helps keep your printer in good working order.
This chapter includes the following information:
❏ Handling and Cleaning the Printer
❏ EP-25 Cartridge
Handling and Cleaning the Printer
Handling the Printer
Note the following points when handling the printer:
❏ Do not place any heavy objects on the printer.
❏ Do not insert paper or other objects into the face-down delivery slot.
❏ When the printer is printing, do not rock or move the printer, and do not open the front cover. If you do, the printer might be damaged.
❏ Do not subject the manual feeding slot area to direct sunlight or other strong light.
❏ After unplugging it from the AC outlet, wait until the printer has cooled off completely before covering it with a dust cover.
❏ If you are not going to use the printer for an extended period of time, unplug it from the AC outlet.
❏ Never attempt to disassemble the printer.
Chapter 5 Maintenance 137
Cleaning the Printer
Clean the printer cabinet regularly to keep the printer in its best condition. To clean the printer, use a soft cloth slightly moistened with water or a mild detergent solution. Avoid using any other type of solvents, such as alcohol or benzine, which might damage the surface. When finished cleaning, wipe the cabinet with a dry cloth.
Before cleaning the printer, always unplug it from the AC outlet.Do not spill water or detergent into the printer. Otherwise the printer will be damaged and electric shock may even occur.
Do not lubricate the printer. This printer does not require lubrication.
EP-25 CartridgeThe EP-25 cartridge contains a photosensitive part called a “drum” which has characteristics similar to photo film. It also contains black carbon powder called “toner.” The drum is extremely sensitive to light and might deteriorate if exposed to light. Also, poor print quality can result if toner becomes caked or unevenly distributed inside the cartridge.
Please adhere to the following guidelines when storing or handling the cartridge.
138 Maintenance Chapter 5
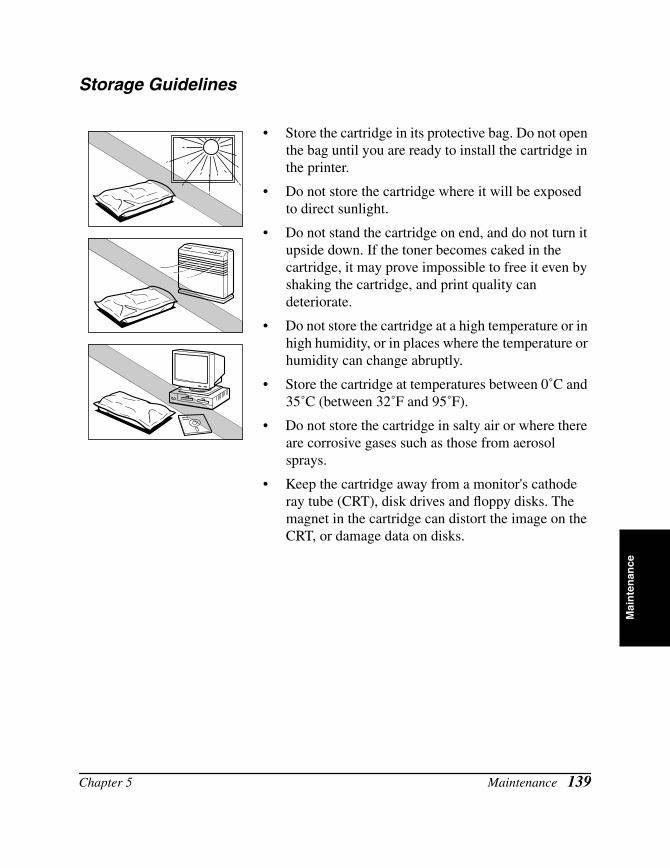
Mai
nte
nan
ce
Storage Guidelines
• Store the cartridge in its protective bag. Do not open the bag until you are ready to install the cartridge in the printer.
• Do not store the cartridge where it will be exposed to direct sunlight.
• Do not stand the cartridge on end, and do not turn it upside down. If the toner becomes caked in the cartridge, it may prove impossible to free it even by shaking the cartridge, and print quality can deteriorate.
• Do not store the cartridge at a high temperature or in high humidity, or in places where the temperature or humidity can change abruptly.
• Store the cartridge at temperatures between 0˚C and 35˚C (between 32˚F and 95˚F).
• Do not store the cartridge in salty air or where there are corrosive gases such as those from aerosol sprays.
• Keep the cartridge away from a monitor's cathode ray tube (CRT), disk drives and floppy disks. The magnet in the cartridge can distort the image on the CRT, or damage data on disks.
Chapter 5 Maintenance 139
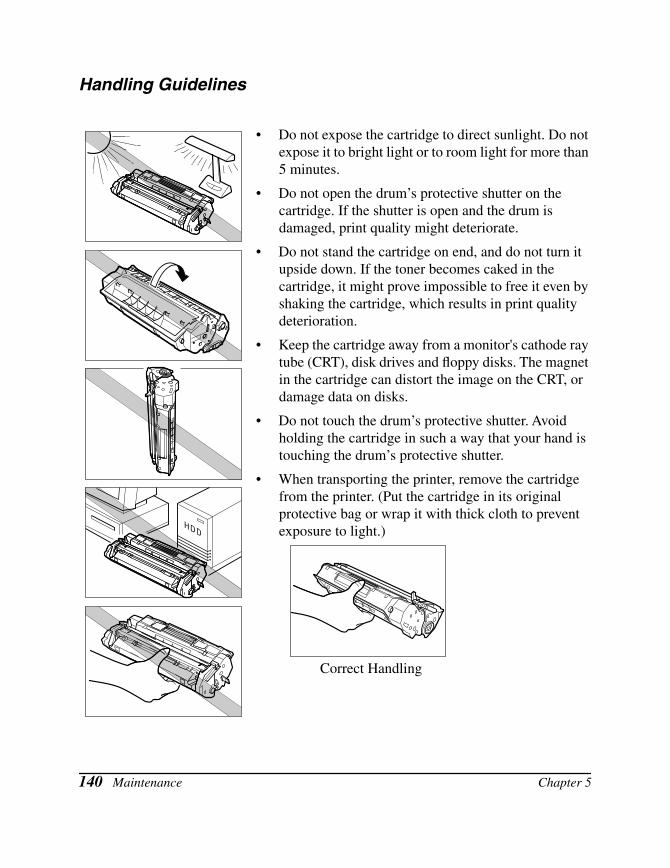
Handling Guidelines
• Do not expose the cartridge to direct sunlight. Do not expose it to bright light or to room light for more than 5 minutes.
• Do not open the drum’s protective shutter on the cartridge. If the shutter is open and the drum is damaged, print quality might deteriorate.
• Do not stand the cartridge on end, and do not turn it upside down. If the toner becomes caked in the cartridge, it might prove impossible to free it even by shaking the cartridge, which results in print quality deterioration.
• Keep the cartridge away from a monitor's cathode ray tube (CRT), disk drives and floppy disks. The magnet in the cartridge can distort the image on the CRT, or damage data on disks.
• Do not touch the drum’s protective shutter. Avoid holding the cartridge in such a way that your hand is touching the drum’s protective shutter.
• When transporting the printer, remove the cartridge from the printer. (Put the cartridge in its original protective bag or wrap it with thick cloth to prevent exposure to light.)
Correct Handling
140 Maintenance Chapter 5
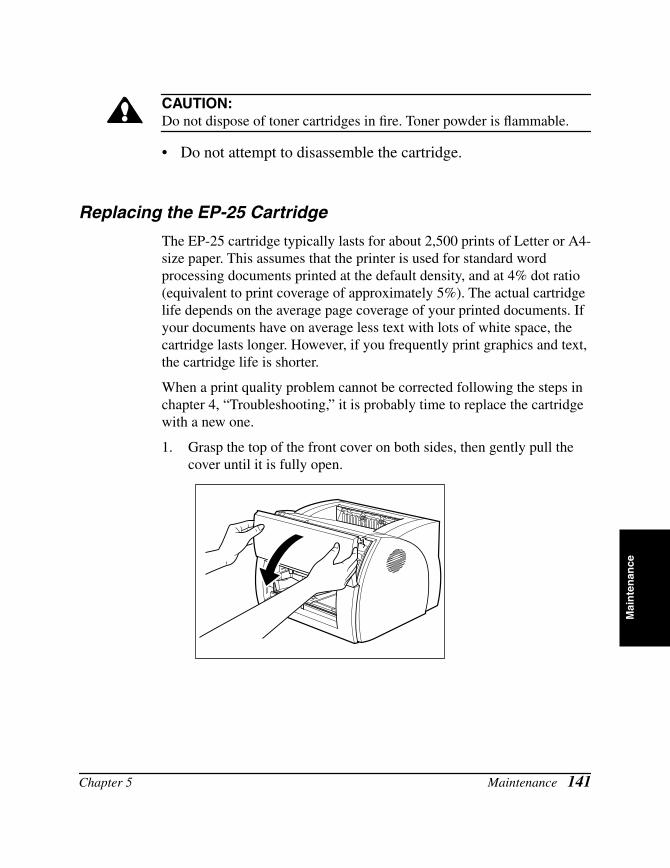
Mai
nte
nan
ce
CAUTION:Do not dispose of toner cartridges in fire. Toner powder is flammable.
• Do not attempt to disassemble the cartridge.
Replacing the EP-25 Cartridge
The EP-25 cartridge typically lasts for about 2,500 prints of Letter or A4-size paper. This assumes that the printer is used for standard word processing documents printed at the default density, and at 4% dot ratio (equivalent to print coverage of approximately 5%). The actual cartridge life depends on the average page coverage of your printed documents. If your documents have on average less text with lots of white space, the cartridge lasts longer. However, if you frequently print graphics and text, the cartridge life is shorter.
When a print quality problem cannot be corrected following the steps in chapter 4, “Troubleshooting,” it is probably time to replace the cartridge with a new one.
1. Grasp the top of the front cover on both sides, then gently pull the cover until it is fully open.
Chapter 5 Maintenance 141
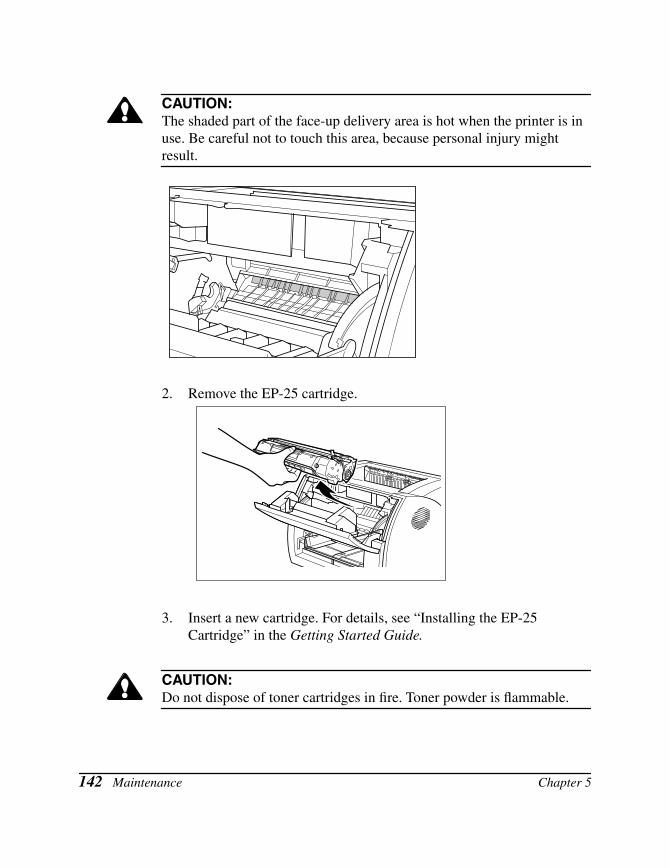
CAUTION:The shaded part of the face-up delivery area is hot when the printer is in use. Be careful not to touch this area, because personal injury might result.
2. Remove the EP-25 cartridge.
3. Insert a new cartridge. For details, see “Installing the EP-25Cartridge” in the Getting Started Guide.
CAUTION:Do not dispose of toner cartridges in fire. Toner powder is flammable.
142 Maintenance Chapter 5
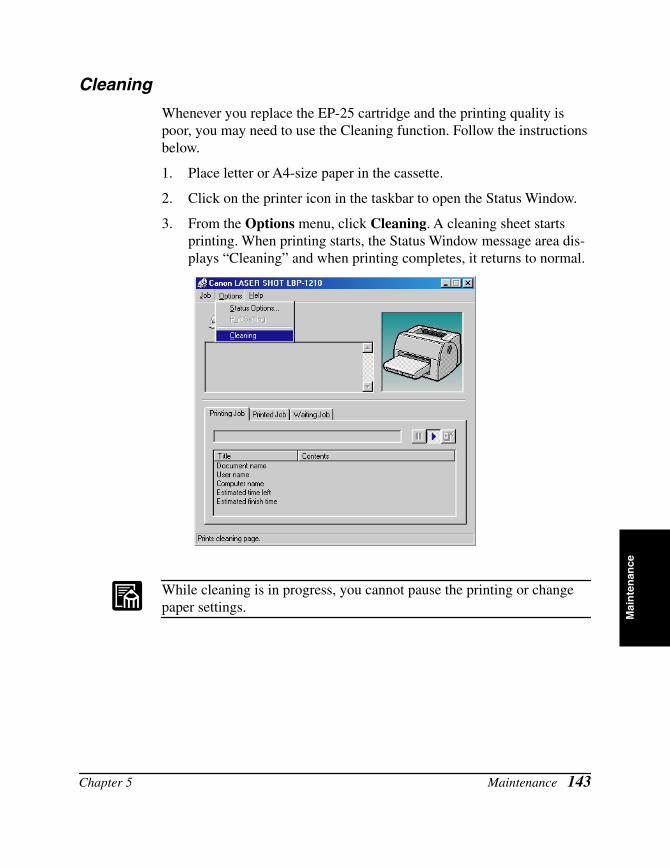
Mai
nte
nan
ce
Cleaning
Whenever you replace the EP-25 cartridge and the printing quality is poor, you may need to use the Cleaning function. Follow the instructions below.
1. Place letter or A4-size paper in the cassette.
2. Click on the printer icon in the taskbar to open the Status Window.
3. From the Options menu, click Cleaning. A cleaning sheet starts printing. When printing starts, the Status Window message area dis-plays “Cleaning” and when printing completes, it returns to normal.
While cleaning is in progress, you cannot pause the printing or change paper settings.
Chapter 5 Maintenance 143

144 Maintenance Chapter 5
Pri
nte
r S
pec
ific
atio
ns
Appendix APrinter Specifications
Model: Desktop page printer
Printing method: Electrophotographic printing using laser beamscanning
Resolution: 600 dpi
Printing speed: 14 pages per minute (A4-size paper)
Paper sizes: cassette
manual loading
76.2x127 to 216x356 mm (3”x5” to 8-1/2”x14”)Plain paper (A4, Letter, Executive, B5)
Maximum capacity: 25 mm (Approx. 250 sheetsof 64 g/m2 paper)
Special paper (envelopes, postcards, index cards, colored paper)
Maximum capacity: 25 mm stack height(except envelopes)Envelope capacity: 20 envelopes
Plain paper, special paper (transparencies, labels, envelopes, postcards, index cards, colored paper)
Maximum capacity: 1 sheet (64 g/m2 paper)
Paper delivery: Face-down: Maximum capacity: 125 sheets (64 g/m2 paper)Face-up: 1 sheet (Remove printed sheets one at a time since there is no delivery tray.)
Startup time: Less than 8 seconds at 20˚ C (68˚ F)(Number of seconds from when the printer is plugged into an AC outlet until it is ready for printing.)
Appendix Appendix A Printer Specifications 145
First print: Face-down delivery: Less than 10 secondsFace-up delivery: Less than 9.4 secondsFor printing on A4-size paper using the cassette at 20˚ C (68˚ F)
Toner cartridge: EP-25 cartridge
Power requirements: 110-127V (±10%) 50/60Hz (±2Hz)220-240V (±10%) 50Hz (±2Hz)
Power consumption: 110-127V During printing: approximately 249 W (Average) During standby: approximately 6 W220-240V During printing: approximately 268 W (Average) During standby: approximately 6 W
Noise level: Sound Power Level During printing: Max. 6.2 Bels During standby: Background noise levelSound Pressure Level (Bystander positions) During printing: Max. 48 dB (A) During standby: Background noise levelDeclared Noise Emissions in accordance withISO 9296
Operating environment: (Printer plugged into an AC outlet)Temperature: 7.5˚ C to 35˚ C (45.5˚ F to 95˚ F)Humidity: 5 to 90% RH (no condensation)
Storage environment: (Printer unplugged from the AC outlet)Temperature: 0˚ C to 35˚ C (32˚ F to 95˚ F)Humidity: 35 to 85% RH (no condensation)
Dimensions: 388 x 524 x 254 mm (W x D x H)(15-1/4” x 20-3/5” x 10”)
Weight: Approx. 7.8 kg (17-1/5 lbs.), cartridge excludedCartridge only: approx. 610 g (1-3/10 lbs.)
146 Printer Specifications Appendix Appendix A
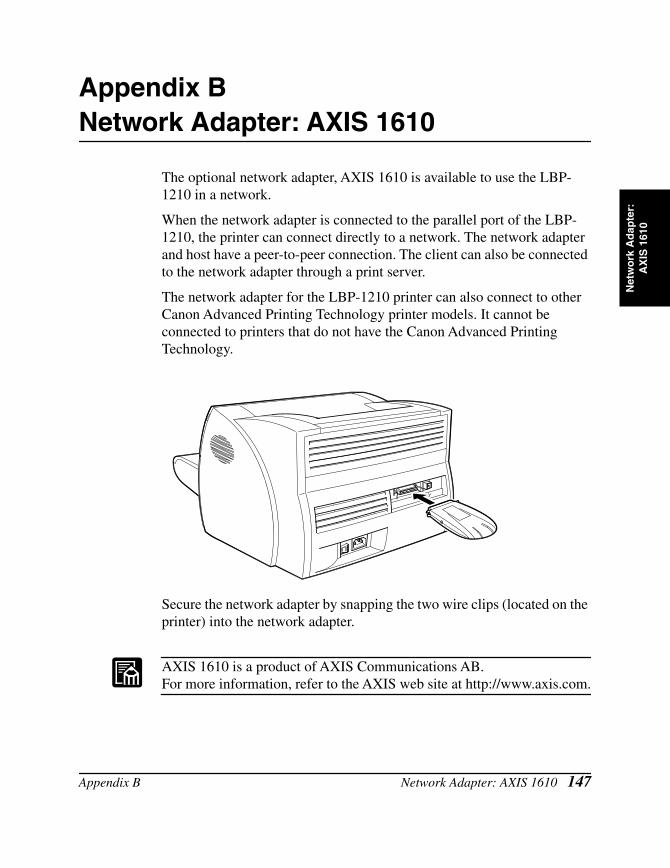
Net
wo
rk A
dap
ter:
A
XIS
161
0
Appendix BNetwork Adapter: AXIS 1610
The optional network adapter, AXIS 1610 is available to use the LBP-1210 in a network.
When the network adapter is connected to the parallel port of the LBP-1210, the printer can connect directly to a network. The network adapter and host have a peer-to-peer connection. The client can also be connected to the network adapter through a print server.
The network adapter for the LBP-1210 printer can also connect to other Canon Advanced Printing Technology printer models. It cannot be connected to printers that do not have the Canon Advanced PrintingTechnology.
Secure the network adapter by snapping the two wire clips (located on the printer) into the network adapter.
AXIS 1610 is a product of AXIS Communications AB. For more information, refer to the AXIS web site at http://www.axis.com.
Appendix B Network Adapter: AXIS 1610 147
Connecting Directly From ClientsCentralized control of print jobs is not available because print queues are distributed among all clients.
When multiple jobs compete, jobs print in the order of arrival at the network adapter.
Jobs may not arrive in the order they were sent. For example, if client 1 enters jobs A and B, and then client 2 enters job C, the print order might be A, C, then B, if job B did not arrive at the network adapter until job A was completed.
You must install the Print Monitor for the network adapter on each client.
When using the Add Printer Wizard, you must connect directly to the network.
Since the printer port is treated as a local port, choose “AXIS CAPT Port” in the port settings dialog box.
148 Network Adapter: AXIS 1610 Appendix B
Net
wo
rk A
dap
ter:
A
XIS
161
0
Connecting Through A Print ServerUsing a print server, you can control print jobs (for example, change printing order, cancel jobs, etc.) centrally.
When multiple jobs compete, they print in the order in which the jobs are entered.
The Print Monitor for the network adapter needs to be installed only on the printer server. It is not necessary to install it on each of the clients.
You can install the printer from the server unless you are using a Windows 95/98/Me server and a Windows NT 4.0/2000/XP client.
ProtocolsThe Network Print Monitor uses NetBIOS/NetBEUI or TCP/IP to communicate with the printer.
Windows XP supports only the TCP/IP protocol.
Using NetPilot To Configure Your Network Adapter1. Install NetPilot and the Print Monitor.
2. Start NetPilot.
3. Select the network adapter from the displayed list.
4. Enter the network adapter settings.
NetPilot runs on Windows 95/98/Me and Windows NT 4.0/2000.
Installing the Network Print Monitor
1. Connect the network adapter to the network.
2. Install the Network Print Monitor. The installation automatically uses an available port. For more information, see the network adapter manual.
When the optional network adapter is connected to your printer, the NetSpot utility can be used. The NetSpot utility provides easy network management of your printers by allowing you to set up the printers and display their printer status and features.
Appendix B Network Adapter: AXIS 1610 149
Specifications
For more information about connecting and using the external network adapter, see the documentation that came with your adapter.
Model AXIS 1610
Type External type, connects to printer parallel port
Network interface Both 10Base-T/100Base-TX
Protocols NetBIOS/NetBEUI, TCP/IP
Printer interface Bi-directional parallel (ECP)
Power supply External AC adapter
RAM 2 MB
ROM Flash EPROM, 1 MB
Flash method Safe flash
Compatible MIB Some Canon MIBs, some printer MIBs, some TCP/IP MIBs, some host MIBs
Compatible host utilities
NetSpot, NetPilot
Compatible printers Canon Advanced Printing Technology printers only
Software included Installer, Print Monitor, NetPilot
150 Network Adapter: AXIS 1610 Appendix B
Glo
ssar
y
Glossary
A
AC
Alternating Current. The type of electrical current typically available from household wall outlets.
Adapter
An optional device that allows you to connect your printer directly to a network. See also Peer-to-peer connection.
Alert
A message displayed in the Printer Status Window when a problem or condition caused the Canon Advanced Printing Technology to pause printing. You must follow the on-screen instructions before printing resumes.
Audio messages
Audio messages notify the user of the printer operations shown in the Status Window.
Automatic Image Refinement
A printer technology from Canon, with which the printer automatically senses and refines the jagged edges and ragged curves of characters and graphics.
B
Bi-directional communications
Allows information to pass back and forth between the Canon Advanced Printing Technology software and a local printer.
Bold
A characteristic of a printed character that indicates wider, darker representation. Also referred to as emphasized or double-strike printing.
Glossary 151
Brightness
The relative proportion of light and dark areas. Decreasing brightness darkens the overall image; increasing brightness lightens it.
C
Canon Advanced Printing Technology (CAPT)
Software that extends the power of the Windows operating system to a printer to speed up and simplify printing. The Canon Advanced Printing Technology provides more printing control and bi-directional communication between the printer and a computer running a Windows application.
Centronics interface
An interface standard for parallel data transmission. This printer uses a Centronics-type parallel interface with bi-directional capability. See also Interface port and Parallel interface.
Client
A computer that is connected to the printer over a network. A client does not control the printer directly. It interacts with the printer through a server. See also Server.
Collate
To print multiple copies of a multi-page document in sequential page order.
Command
An instruction that tells the printer to perform a certain function. Commands are sent from the computer to the printer via the interface cable when the printer is ready.
Contrast
The degree of difference between the lightest and darkest areas of an image. Decreasing contrast lightens the dark areas and darkens the light areas; increasing it darkens the dark areas and lightens the light areas.
152 Glossary
Glo
ssar
y
Control Panels
The set of Windows programs you can use to change system, hardware, software, and Windows settings.
D
Default setting
A setting that is automatically used if no other setting is specified.
Desktop
The entire Windows screen that represents your work area in Windows. Icons, windows, and the taskbar are displayed on the Windows desktop.
dpi
Dots per inch. A unit of measurement for indicating a printer’s resolution. The LBP-1210 prints at a resolution of 600 dpi.
Driver
A program that controls how the computer and an external device interact. The printer driver supplies Windows with information such as descriptions of the fonts and features of the installed printer. When you print with the Canon Advanced Printing Technology, you are using its printer driver.
E
ECP
Abbreviation for Extended Capabilities Port. A bi-directional communication mode that enables high-speed data transmission to printers and other devices.
F
Fixing assembly
The device used during the print process to fix the toner onto the paper (or other media) through applying heat and pressure. The assembly, located inside the printer, gets extremely hot (374˚F/190˚C) during operation.
Glossary 153
Folder
A container in which documents, program files, and other folders are stored on your disks. Formerly referred to as a directory.
Font
A complete set of characters of the same size and style, for example, 12-point Courier bold.
Form
A custom paper size, with width and height defined by the user.
G
Grayscale image
A bitmap image that stores data for each dot as a shade of gray, rather than as black or white.
H
Halftone
The process of converting a grayscale image to black dots and white (unprinted) dots that simulate the gray shades in the original image.
I
Interface
The connection between two devices through which they communicate with each other. The LBP-1210 printer features USB and parallel interface, which makes it compatible with IBM and similar personal computers.
Interface cable
The cable, with bi-directional capability, used to create the interface between a printer and a computer.
Interface port
The port through which the printer communicates with the computer. The LBP-1210 have a USB port and a Centronics, 8-bit, parallel interface port, located on the back of the printer. See also Parallel or USB interface.
154 Glossary
Glo
ssar
y
Italic
A font style distinguished by slanted characters (the upright strokes of the characters are at an angle to the vertical axis).
J
Jam
A situation created when paper becomes caught along the paper path. You must remove jammed paper before you can continue printing.
K
Kilobyte (KB)
A unit of measurement, representing the binary number 1024, used to describe printer or computer memory size in thousand-byte units.
L
Landscape
The printing of text and graphics along the length of the page.
Local printer
A printer that is directly connected to your computer, using a parallel cable.
M
Megabyte (MB)
A unit of measurement, representing one million bytes, used to describe printer or computer memory size.
My Computer
The Windows program that you can use to browse through your computer’s filing system, and to open drives, folders, and files. You can also use My Computer to manage your files and your filing system, by moving, copying, renaming, and deleting items.
Glossary 155
N
NetPilot
This utility is used to control network printers.
Network
A group of computers connected by cables or other means and using software that enables them to share equipment (such as printers) and exchange information.
Network Adapter
An optional device that allows you to connect your printer directly to a network. See also Peer-to-peer connection.
O
Orientation
The printing of text either along the width (portrait) or length (landscape) of the page.
Overlay
Refers to printing in which data that is common to all the pages, such as a logo, titles or table structure, is overlaid with the print data from the application.
P
Paper feed
The act of guiding a sheet of paper into the printer’s paper path.
Paper jam
A situation created when paper becomes caught along the paper path. You must remove jammed paper before you can continue printing.
Paper path
The route that paper travels through the printer.
156 Glossary
Glo
ssar
y
Parallel interface
An interface that transmits multiple bits simultaneously (usually in one-byte segments). Your printer has a built-in, Centronics-type parallel interface. See also Centronics interface.
Parallel interface cable
A bi-directional cable, usually less than six feet long, that transfers multiple bits of information to the printer simultaneously, speeding the transfer. Parallel interface cables are also referred to as Centronics interface cables.
Stands for Portable Document Format. A widely used format for transmitting and viewing documents on computers. PDF documents can be read or printed out with Adobe’s Acrobat Reader program.
Peer-to-peer connection
A network connection between a computer and a printer (or other device) that does not go through a server. See also Server, Client.
Physical RAM
Random access memory (RAM) that is physically present in the computer in the form of memory chips, as opposed to virtual memory. See also Virtual Memory.
Point size
Character height is defined in points: one point is 1/72 of an inch.
Portrait
The printing of text along the width (short edge) of the page.
Print job
A document that a Windows application has processed and sent to the Spooler to be added to the print queue or directly to the printer.
Print Monitor
The Network Adapter Print Monitor is software that prints through the network adapter.
Glossary 157

Print queue
A list of files that are either waiting to be printed or are currently printing. Once a file has been printed, it is removed from the print queue.
Printer driver
A program that controls how the computer and printer interact. The printer driver supplies Windows with information such as descriptions of fonts and features of the installed printer. When you print with the Canon Advanced Printing Technology, you are using its printer driver.
Printers folder
The container in which your printer information is stored.
Profile
A profile is a file that stores the printer’s settings, so those settings can be recreated simply by selecting the profile from a menu.
Progress bar
In the Status Window or its icon, a horizontal bar that graphically indicates the percentage of the print job that has actually printed.
Properties dialog box
The dialog box that contains information about a particular device, such as your printer.
Proportional spacing
The spacing of characters according to the width of each character. This variable spacing between each character closes up awkward space and makes text easier to read.
Q
Queue
A list of files that are either waiting to be printed or are currently printing. Once a file has been printed, it is removed from the print queue.
158 Glossary

Glo
ssar
y
R
Random Access Memory (RAM)
The working memory of the computer in which programs and data are temporarily stored while you use them. Resetting or shutting off the computer clears all information from RAM. Printing very complicated documents might require closing other running programs or adding more RAM to the computer. See also Physical RAM, Virtual memory.
Resolution
The density of dots for any given output device, expressed in terms of dots per inch (dpi). Low resolution causes font characters and graphics to have a jagged appearance, but prints faster than higher resolutions. Higher resolution provides smoother curves and angles as well as a better match to traditional typeface designs, but prints more slowly. This printer can produce output with 300 or 600 dpi resolution. Resolution values are represented by horizontal data and vertical data, for example, 600 x 600 dpi.
S
Scalable fonts
Scalable fonts allow characters to be printed in various sizes and rotation angles. This is different from bitmap fonts, which are printed in fixed sizes and angles.
Scaling
Enlarging or reducing the printed image.
SCoA
ScoA is an original Canon print data compressor and forwarding technology, which utilizes the full potential of your computer to make CAPT high speed printing a reality. Further, as compression and forwarding are efficient, only a small amount of memory is used, and regardless of how much data you send, you do not need to increase RAM.
Separator page
Optional pages printed at the beginning of each document to help separate one print job from another.
Glossary 159
Server
A network computer that is directly attached to the printer. The server controls the printer and handles print jobs sent from the clients. See also Client.
Shielded
A type of cable that contains a metallic sheath over the conductor material to protect the data passing through the cable from electromagnetic interference. You need to use a double-shielded interface cable with this printer.
Sound file
A file containing audio information that can be played by a sound driver. The Canon Advanced Printing Technology includes sound files that play to indicate printing conditions.
Spooling
A process by which an application sends a document to the Spooler, rather than directly to the printer, thus freeing the computer and application for other tasks. Spooled documents are printed in the order they are received.
Start menu
The menu that presents commands that are a starting point for all work you do on your computer, such as starting a program, opening a document, finding a file, and getting help. You open the Start menu by clicking the Start button displayed on the Desktop.
Status options
Settings which determine when the Printer Status Window opens and whether sounds play with messages.
Status Window
A window that the Canon Advanced Printing Technology uses to display messages about the current print job, as well as to graphically show the print job’s progress from computer to printer.
160 Glossary
Glo
ssar
y
T
Title bar
The horizontal bar that contains the title of a window or dialog box. On many windows, the title bar contains the Control menu box and Maximize and Minimize buttons.
Toner
A black, resin-coated powder contained in the EP-25 cartridge. The printer applies the toner to the surface of the photosensitive drum inside the printer via an electrophotographic mechanism.
Toner saver
Because only alternate data bits are printed, toner consumption is reduced.
Toolbar
In the Status Window, the area in the tab window that includes buttons for pausing, resuming, and deleting the current print job.
Transfer roller
Presses the paper against the drum, to aid the transfer of toner to the paper.
Trouble Shooter
A program that helps you solve printing problems. The Trouble Shooter checks the Windows configuration settings, and if possible corrects any errors that it finds.
TrueType fonts
Scalable fonts used for both screen display and printing. TrueType fonts can be sized to any height, and print exactly as they appear on the screen, but with higher resolution.
Glossary 161
U
Universal Serial Bus (USB) interface
These are new serial interface standards. This bus automatically recognizes connections (Plug and Play) to allow plugging and unplugging connectors with the power still turned on to the PC or peripheral equipment.
V
Virtual Memory
Space on the hard disk that Windows uses for temporary data storage as if it were actually random access memory (RAM). Windows does this by means of a swap file. This provides Windows with more usable memory, but reduces speed of access to it when the swap file must be used. See also Physical RAM.
W
WebNetSpot
This utility is used to control network printers.
Weight
Refers to the thickness of a font: light, medium, or bold. Also refers to the thickness of paper.
Windows Explorer
The Windows program you can use to browse through, open, and manage the disk drives, folders, and files on your computer in a network system. You can also use Windows Explorer to view and open shared folders on other computers on the network. You can use Windows Explorer to manage your files by moving, copying, renaming, and deleting files.
WYSIWYG
Pronounced wizzy-wig, an acronym for “what you see is what you get.” For example, when you format a paragraph, the line breaks that appear on the printed page are exactly the same as they are on the screen.
162 Glossary
Index
Ind
ex
Numerics600 dpi 2, 145
AA4 paper 8, 15, 108, 124, 141, 145Abnormal condition icon 107AC 151Add Paper 132Add Printer Wizard
Windows 2000 45–51Windows 95/98/Me 30–34Windows NT 4.0 41–45Windows XP 51–57
Adobe Type Manager fonts, cannot use 129
Alert messages 110Attention required icon 107Audio messages 151Automatic Image Refinement 78, 93, 151
BB5 paper 8, 15, 108, 145Bi-directional
communications 151parallel cable 65
Black specks 125Brightness 77, 92, 152
CC5 envelopes 20, 108Cancel, print job 102Canon Advanced Printing Technology
Canon LASER SHOT LBP-1210 group 64
CAPT Problems 129–131installing 26–63messages 108–110, 132–133not working properly 129
Index
printing with 65–93uninstalling 136using 25–110
Canon Advanced Printing Technology (CAPT) 152
Canon LASER SHOT LBP-1210Help 64Parts 4–5Status Window 64Trouble Shooter 64Uninstallation 64
Canon LASER SHOT LBP-1210 group 64
using 64Cassette 4, 145
loading envelopes 18–22loading paper 15–17
CD-ROM Menu, doesn’t open 130Centronics interface 126, 152Change paper to... 132Check Printer/Cable 132Check Toner Cartridge 132Checking
status of print job 93Cleaning
printer 98, 138toner cartridge 143
Clear Paper Jam 132Clearing paper jams 113–123Client 152Close Printer Cover 133Closing, Status Window 108Collate 152Contacting Canon Inc. 112Contrast 77, 92, 152Control Panels 153Cover, printer 4
163
Custom paper size 72selecting 72
DDefault setting 153Delete job 97Delete print job button 102Delivery selection cover 4, 13Density
too dark 125too light 125
Details tab, Windows 95/98/Me 68Device time-out 128Dialog boxes
Windows 95/98/Me printer properties 66–78
Windows NT 4.0/2000/XP printer properties 79–93
Dimensions, printer 146Dots per inch 153dpi 153Driver, See Printer driver
EECP 100, 153Envelopes 8, 10, 23
loading 18–22Environments, specifications 146EP toner cartridge
See Toner cartridgeExecutive paper 3, 8, 15, 108, 145
FFace-down delivery 13Face-down delivery slot 4Face-up delivery 14Features, printer 2File not found on CD-ROM 130Finishing tab
preferences 76Windows 95/98/Me 76
164
Windows NT 4.0/2000/XP 91First print time 146Fixing assembly 5, 9, 12, 153Font 154Form 154Front cover 4
GGeneral tab
Windows 95/98/Me 67Windows NT 4.0/2000/XP 80
Glossary 151–162Grayscale image 154Guidelines
printer 137toner cartridge 139–140
HHalftoning 77, 92, 154Help menu, using 101Humidity 11, 146
IIcons, Status Window 107Image
too dark 125too light 125
Index cards 8Installing, Canon Advanced Printing
Technology 26–57Insufficient Memory 133Interface 154Interface cable 154Interface port 4, 154
JJob menu, using 97
LLabels 9
loading manually 23–24Landscape 155
Index
Ind
ex
Letter paper 8, 15, 145Loading
envelopes 19–22paper 15–17
Local printer 26–57, 155
MMaintaining, printer 137–144Manual feed 23
continuous 24slot 4, 12, 23
Megabyte 155Memory, Insufficient 133Menu bar
Status Window 95using 97–101
Messages 108–110, 132–133alert 110with sound 109–110
Minimizing, Status Window 107More options button 78, 93
NNetPilot 149, 156
network adapter 149Network Adapter 147–150, 156
connecting from clients 148connecting through a print server 149protocols 149specifications 150
Network Adapter Error 133Network printer 61–63No power supplied 126Noise level 146
OOpening, Status Window 94Operating environment 146Options menu, using 98–100Orientation 156Overlay 72, 88, 156
Index
PPage setup tab
custom paper size 72Windows 95/98/Me 70Windows NT 4.0/2000/XP 86
Pages per minute 145Paper 156
delivery 13, 145handling 7–24loading 15–17path 12requirement 8storing 11
Paper feed 156Paper guides 4Paper handling 7–24Paper jams, clearing 113–123, 156Paper path 12, 156Paper size 145
custom 72Paper, weight 146Parallel interface 157
cable 65connector 4
Parallel interface cable 157Parallel port, connector 4Pause Job button 102Pause printing 97PDF 157Peer-to-peer 157Plain paper 9, 145Plug and Play, Windows 2000 35–37Plug and Play, Windows 95/98/Me 26–30Plug and Play, Windows XP 38–40Port Busy 133Portrait 157Ports tab, Windows NT 4.0/2000/XP 81Postcards 11
165
Powerconsumption 146lamp 4not supplied 126requirements 146socket 4switch 4
Precautionsprinter 137–138toner cartridge 140–141
Preferences, Finishing tab 76Print job, status 93Print Monitor 157Print Monitor, installing 149Print quality, problems 124–125Print queue 158Printed image
black specks 125streaks 124too dark 125too light 125
Printed job tab 104Printer
cleaning 138dimensions 146does not print 126features 2handling 137locks up 128maintaining 137–144network status 106parts 4–5problems 126–128sharing 61specifications 145–146speed 145stops printing 127toner cartridge 138weight 146
Printer animation, status window 95
166
Printer driver 129, 158Printer icon 95Printer properties
Windows 95/98/Me dialog boxes 66–78
Windows NT 4.0/2000/XP dialog boxes 79–93
Printer ready icon 107Printer sharing settings 63Printing
Canon Advanced Printing Technology 65–93
speed 145Printing Failed 133Printing job tab 103Printing paused icon 107Printing speed 145Printout is wrong 127Problems
paper jams 113–123print quality 124–125printer 126–128
Profile 158Progress bar 95, 158Progress bar, status window 95Protocols 149
QQuality tab
Windows 95/98/Me 77Windows NT 4.0/2000/XP 92
Queue 158
RRandom Access Memory 159Removing, Canon Advanced Printing
Technology 136Replacing, toner cartridge 141Resolution 145, 159Resume job button 102
Index
Ind
ex
Resume printing 97
SScaling 159Scheduling tab, Windows NT 4.0/2000/
XP 82Security tab, Windows NT 4.0/2000/XP
84Select forms tab, Windows NT 4.0/2000/
XP 85Selecting
custom paper size 72paper 8paper delivery 13
Server 160Server settings
Windows NT 4.0/2000/XP 62Service Error 133Settings, printer sharing 63Sharing tab
Windows 95/98/Me 69Windows NT 4.0/2000/XP 83
Sharing, printer 61Shielded 160Sound file 160Specifications, printer 145–146Speed, printing 145Spooling 160Startup time 145Status
network 106print job 93
Status bar, status window 95Status Window 160
closing 108icon 107menu bar 95opening 94printer animation 95printer icon 95
Index
progress bar 95status bar 95tool bar 95using 95–110
Storage environment 146Storing
paper 11toner cartridge 139
Streaks, vertical white 124
TTab window
printed job 104printing job 103using 103waiting job 105
Temperature 146Time-out, device 128Toner 161
saver 161Toner cartridge 138, 146
cleaning 143handling 140replacing 141storing 139
Toolbar 161status window 95using 102
Transfer roller 5, 116, 161Transparencies 9, 145Trouble Shooter 64, 134–135, 161Troubleshooting 111–136
clearing paper jams 113–123print quality problems 124–125printer problems 126–128removing Canon Advanced Printing
Technology (Uninstallation) 136USB class driver is not properly
installed 131
167
UUninstallation 136USB
cable 27, 35, 38connector 4interface 4, 162port 4, 27, 35, 38
UsingStatus Window 95–110Trouble Shooter 134–135USB Port (USB Cable) 27, 35, 38
VVertical white streaks 124
WWaiting job tab 105Warm-up time 145Warning icon 107WebNetSpot 162Weight, paper 8, 145, 162Weight, printer 146Windows 95/98/Me 26
details tab 68finishing tab 76general tab 67page setup tab 70printer properties 66–78quality tab 77sharing tab 69
Windows NT 4.0/2000/XP 35default document properties 79–93finishing tab 91general tab 80page setup tab 86ports tab 81printer properties 79–93quality tab 92scheduling tab 82security tab 84
168
select forms tab 85server settings 62sharing tab 83
WYSIWYG 162
Index
CANON INC.30-2, Shimomaruko 3-chome, Ohta-ku, Tokyo 146-8501, JapanCANON U.S.A., INC.One Canon Plaza, Lake Success, NY 11042, U.S.A.CANON CANADA INC.6390 Dixie Road Mississauga, Ontario L5T 1P7, CanadaCANON EUROPA N.V.Bovenkerkerweg 59-61 P.O. Box 2262, 1180 EG Amstelveen, The NetherlandsCANON COMMUNICATION & IMAGE FRANCE S.A.102, avenue du Général de Gaulle 92257 La Garenne-Colombes Cedex, FranceCANON (U.K.) LTD.Woodhatch, Reigate, Surrey, RH2 8BF, United KingdomCANON DEUTSCHLAND GmbHEuropark Fichtenhain A10, 47807 Krefeld, GermanyCANON ITALIA S.p.A.Palazzo L Strada 6 20089 Milanofiori Rozzano (MI) ItalyCANON LATIN AMERICA, INC.703 Waterford Way Suite 400 Miami, Florida 33126 U.S.A.CANON AUSTRALIA PTY. LTD1 Thomas Holt Drive, North Ryde, Sydney, N.S.W. 2113, AustraliaCANON SINGAPORE PTE. LTD.79 Anson Road #09-01/06, Singapore 079906CANON HONGKONG CO., LTD9/F, The Hong Kong Club Building, 3A Chater Road, Central, Hong Kong
XX2001SZXXC CANON INC. 2002 MADE IN JAPAN