landscaping details
TRANSCRIPT
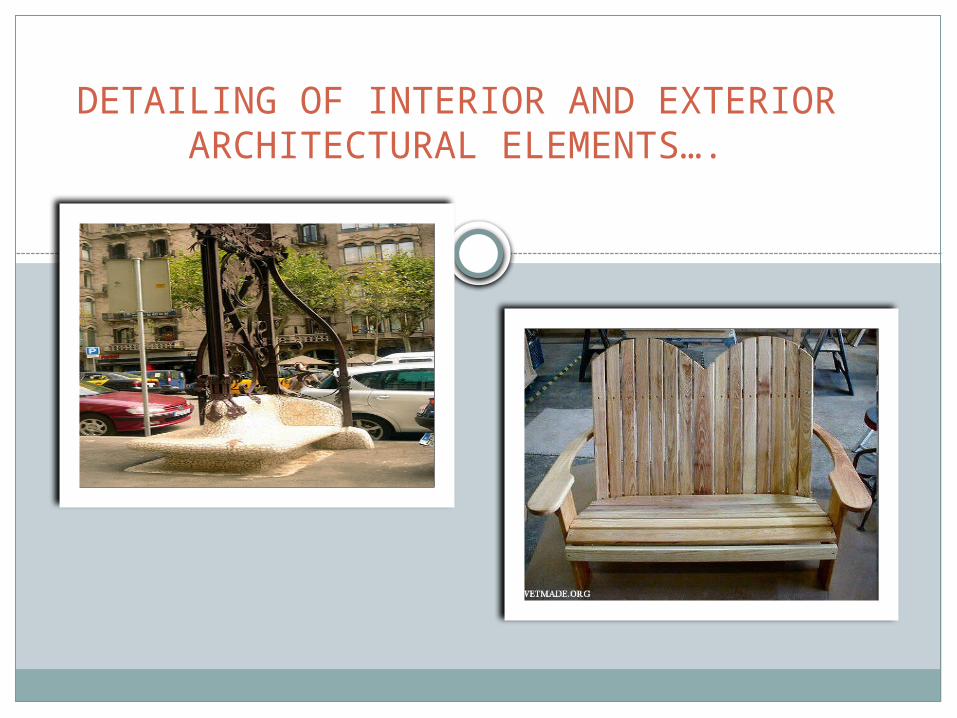
DETAILING OF INTERIOR AND EXTERIOR ARCHITECTURAL ELEMENTS….
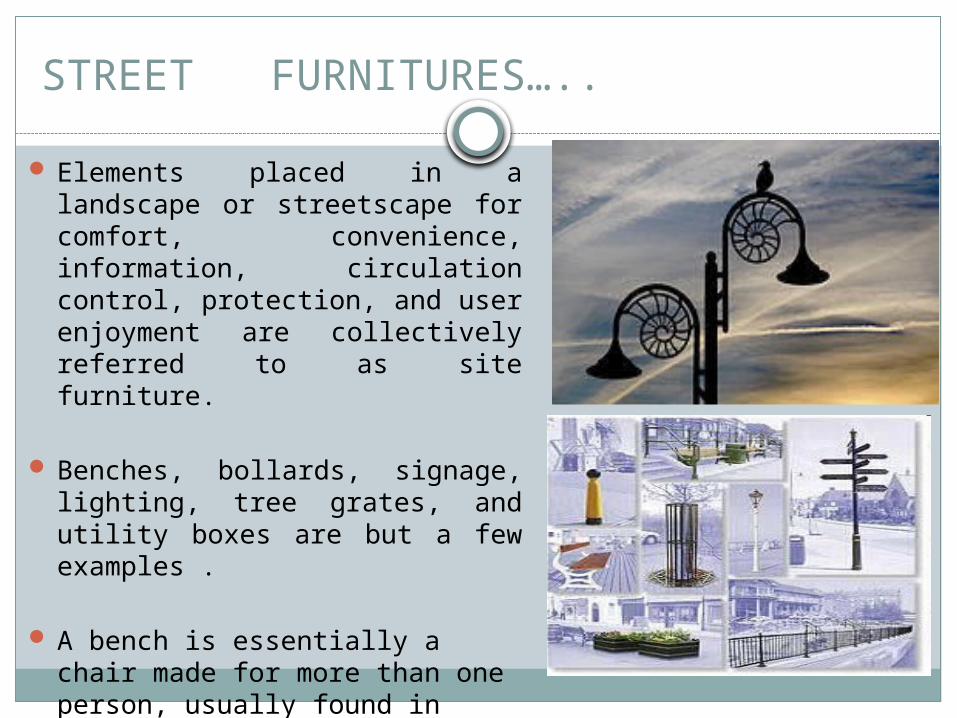
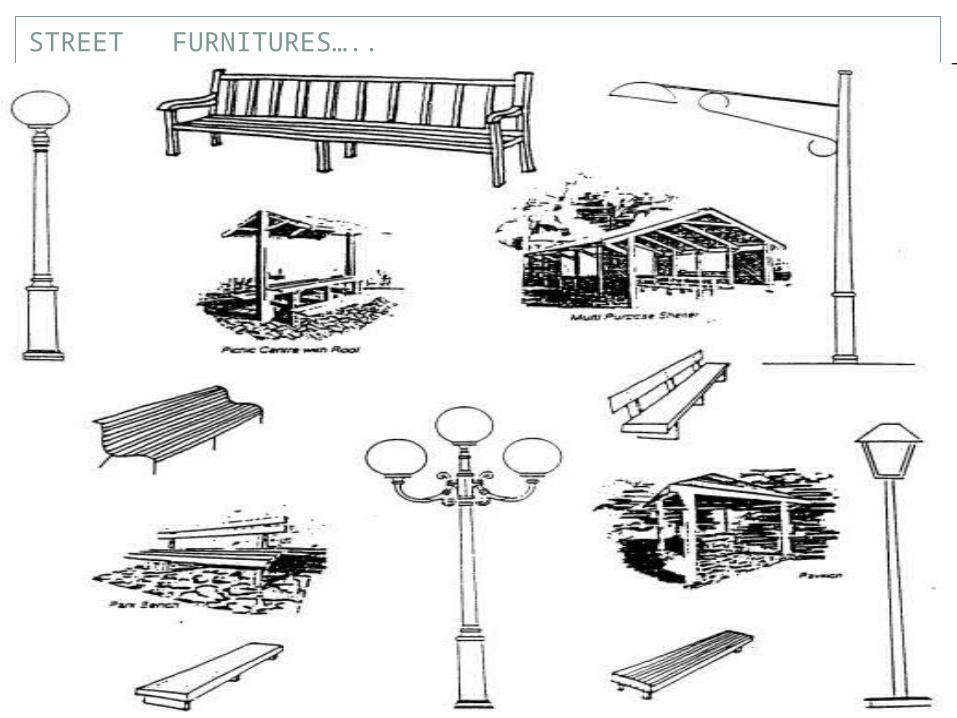
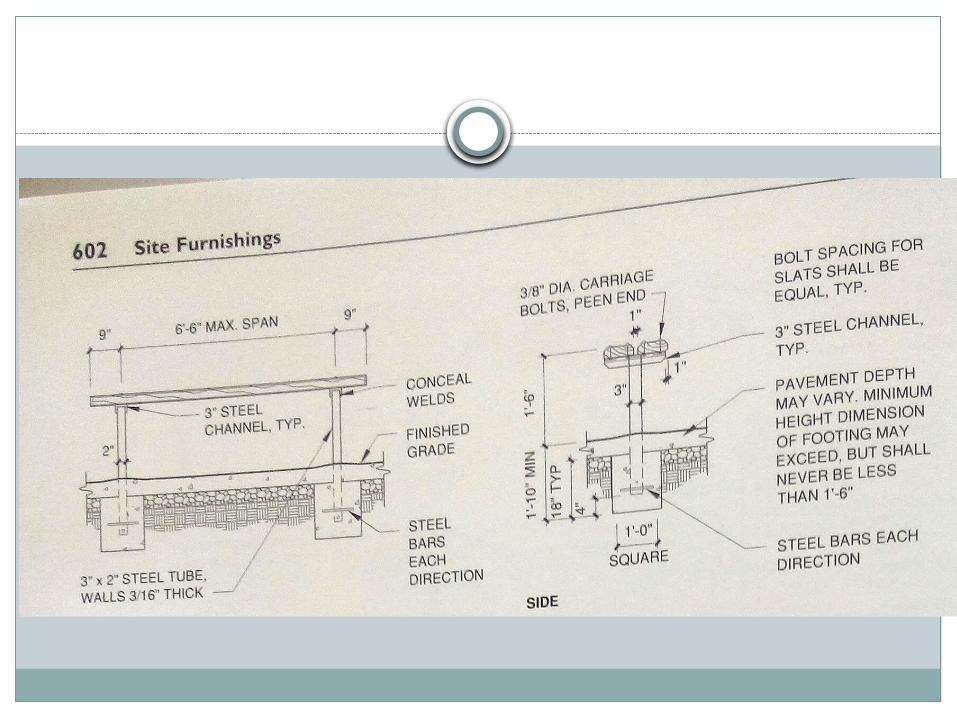
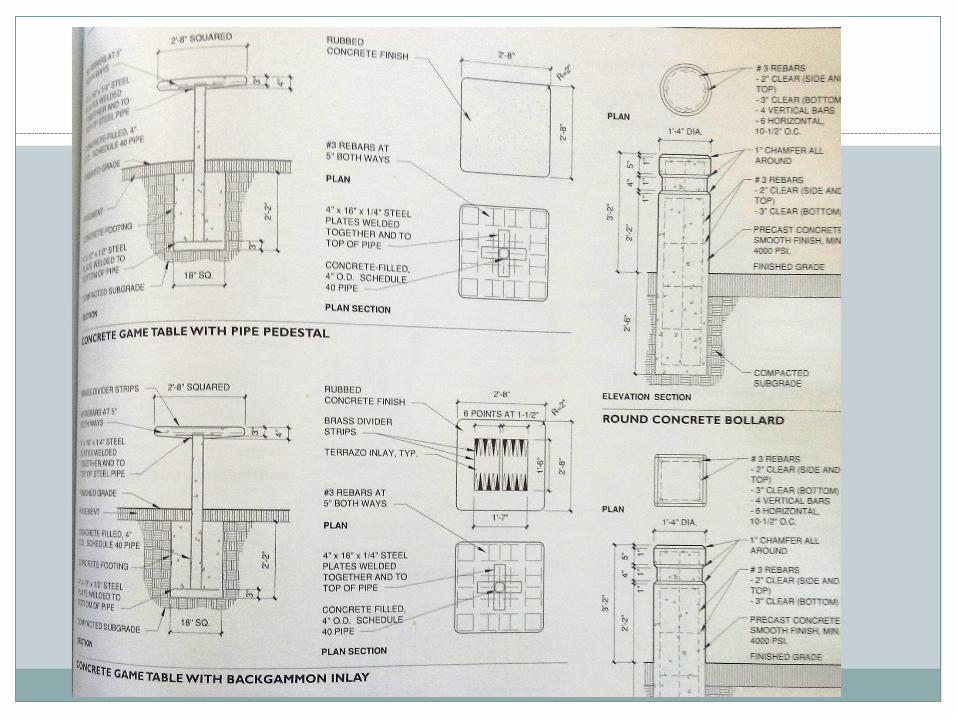
STREET FURNITURES…..
Elements placed in a landscape or streetscape for comfort, convenience, information, circulation control, protection, and user enjoyment are collectively referred to as site furniture.
Benches, bollards, signage, lighting, tree grates, and utility boxes are but a few examples .
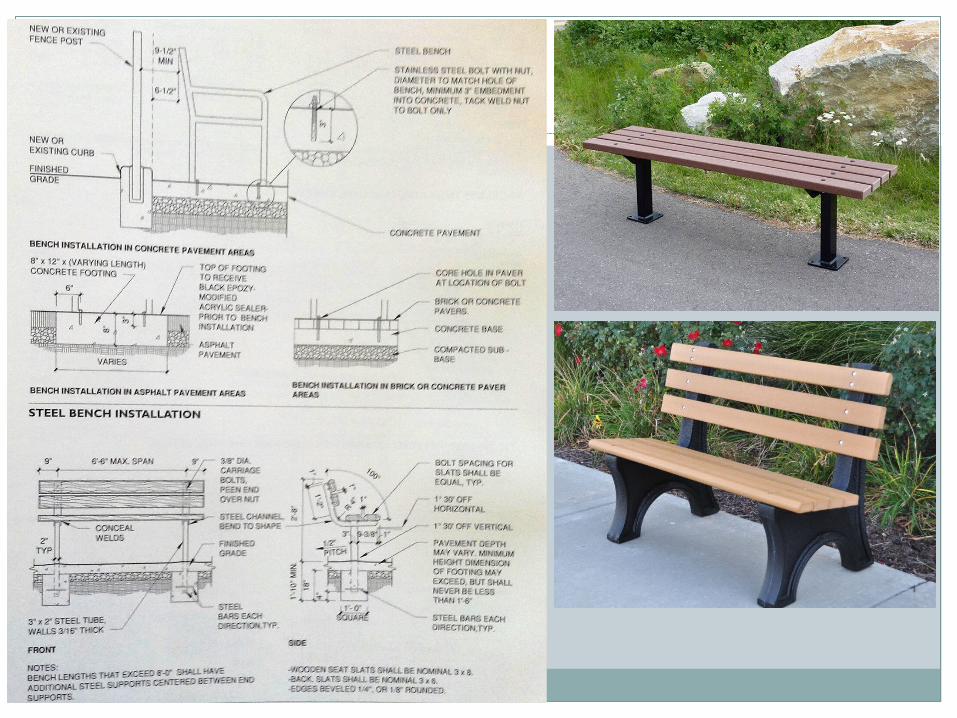
A bench is essentially a chair made for more than one person, usually found in central parts of settlements (such as plazas and parks).
STREET FURNITURES…..
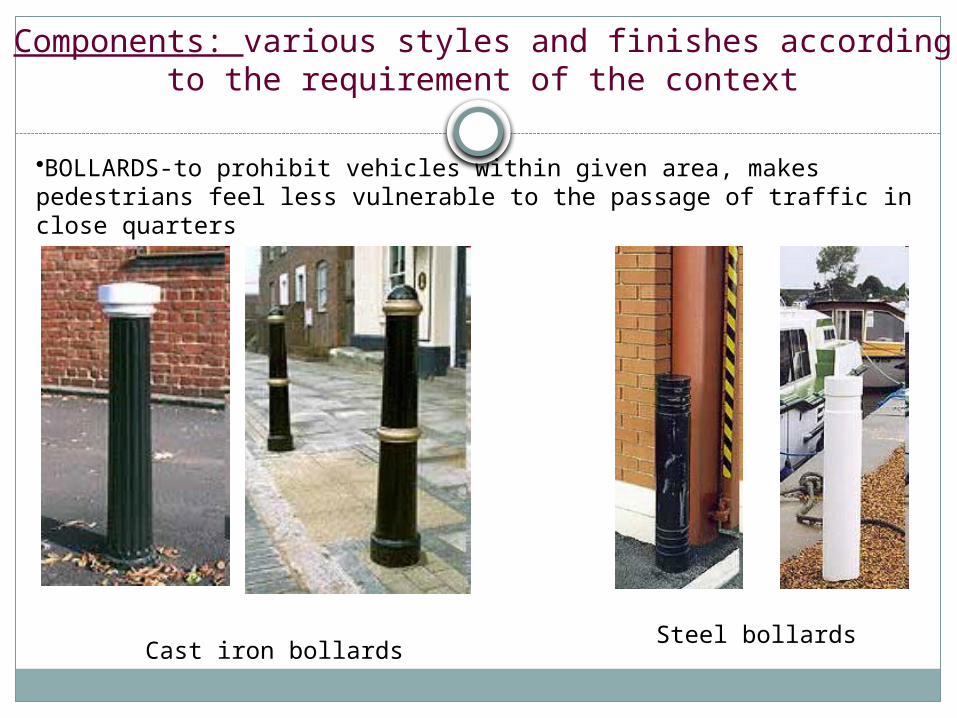
Components: various styles and finishes according to the requirement of the context
•BOLLARDS-to prohibit vehicles within given area, makes pedestrians feel less vulnerable to the passage of traffic in close quarters
Cast iron bollardsSteel bollards
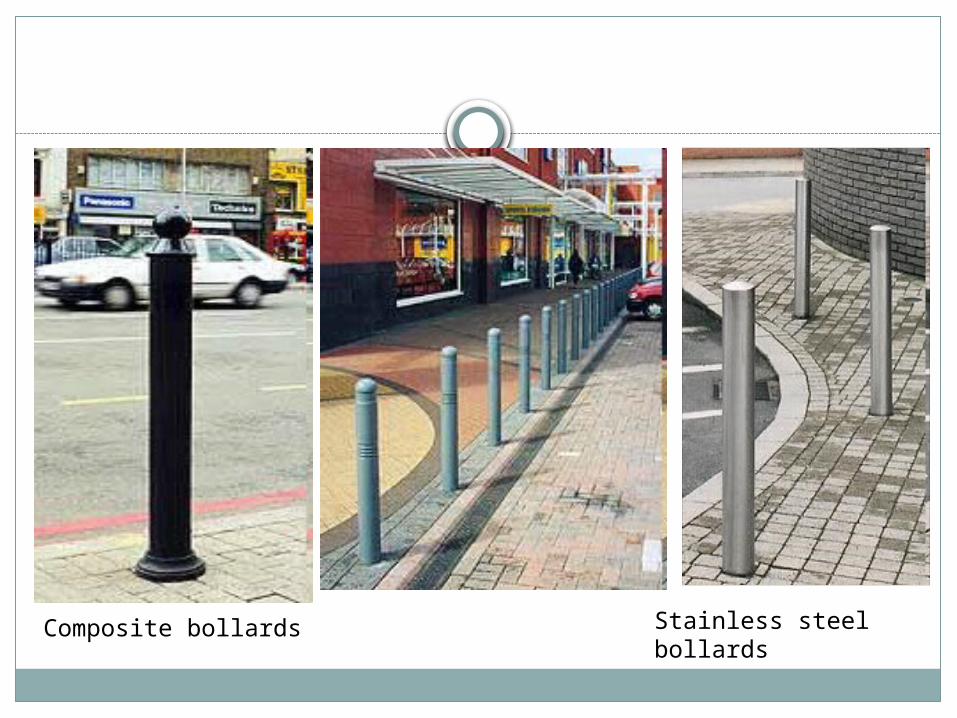
Composite bollards Stainless steel bollards
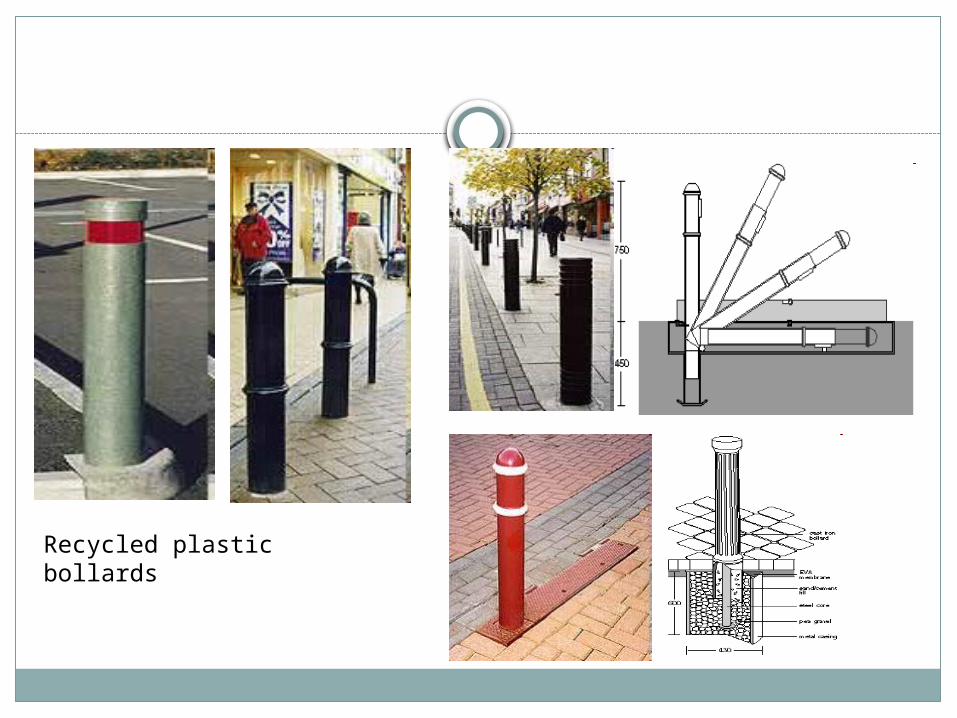
Recycled plastic bollards
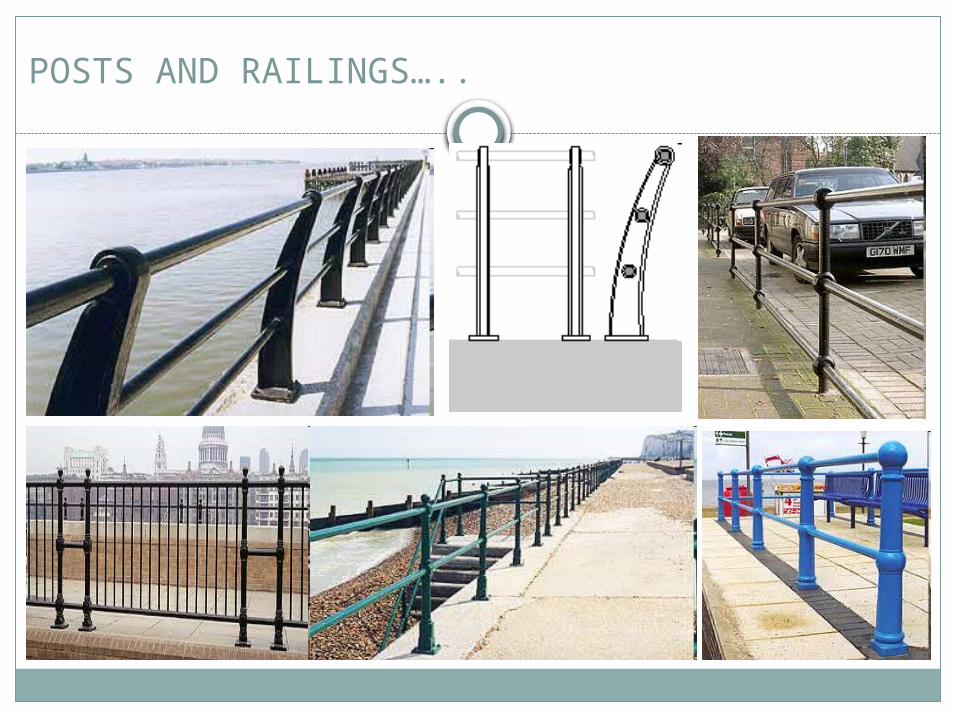
POSTS AND RAILINGS…..
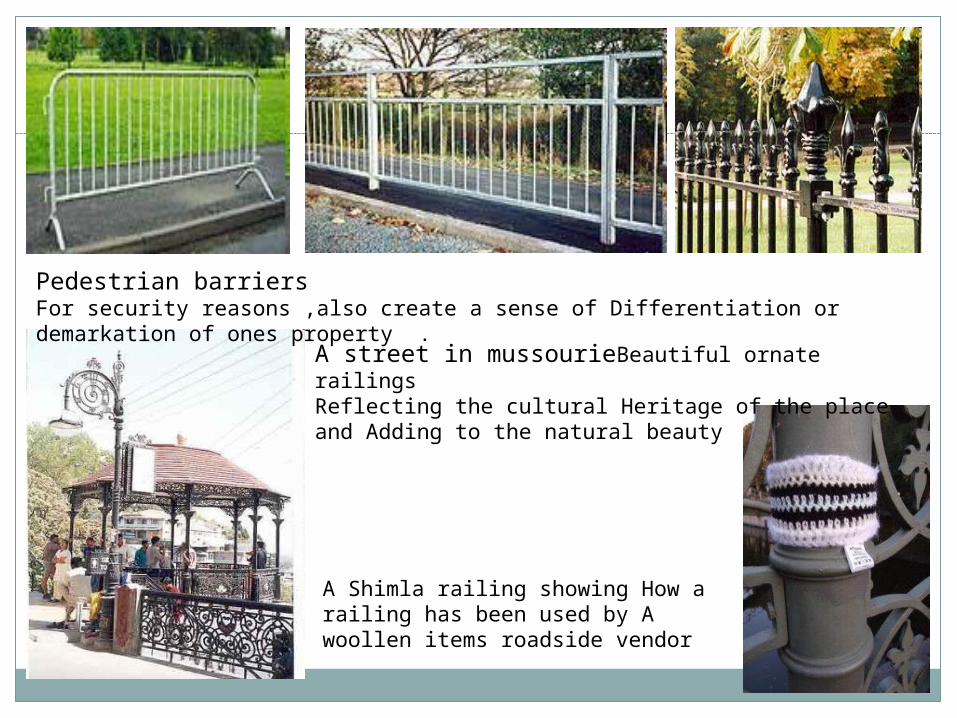
Pedestrian barriersFor security reasons ,also create a sense of Differentiation or demarkation of ones property .
A street in mussourieBeautiful ornate railingsReflecting the cultural Heritage of the place and Adding to the natural beauty
A Shimla railing showing How a railing has been used by A woollen items roadside vendor
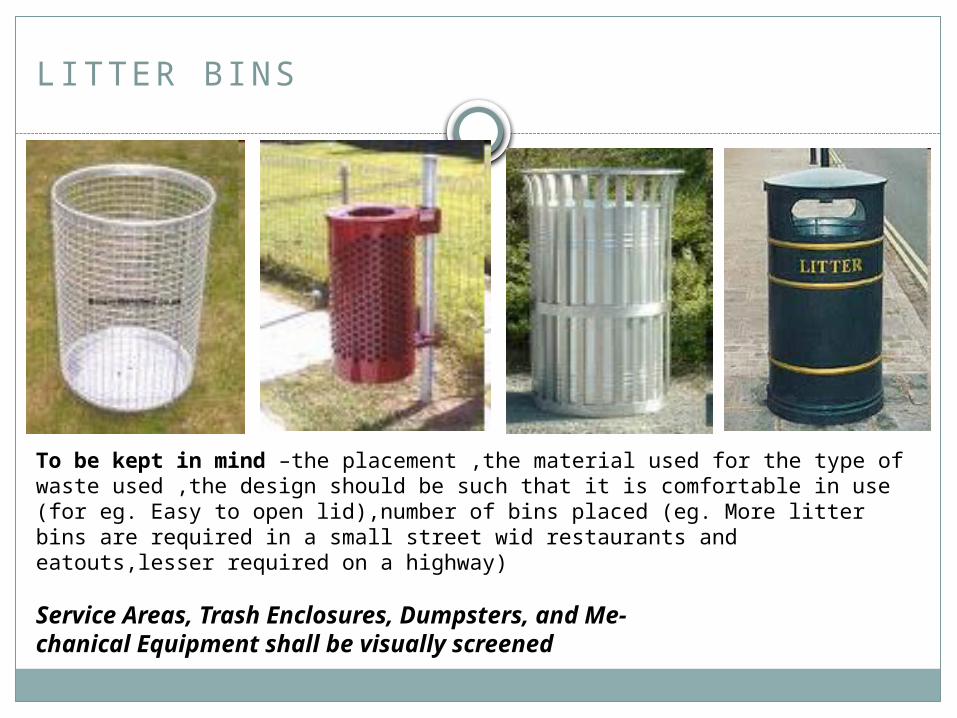
LITTER BINS
To be kept in mind –the placement ,the material used for the type of waste used ,the design should be such that it is comfortable in use (for eg. Easy to open lid),number of bins placed (eg. More litter bins are required in a small street wid restaurants and eatouts,lesser required on a highway)
Service Areas, Trash Enclosures, Dumpsters, and Me-chanical Equipment shall be visually screened
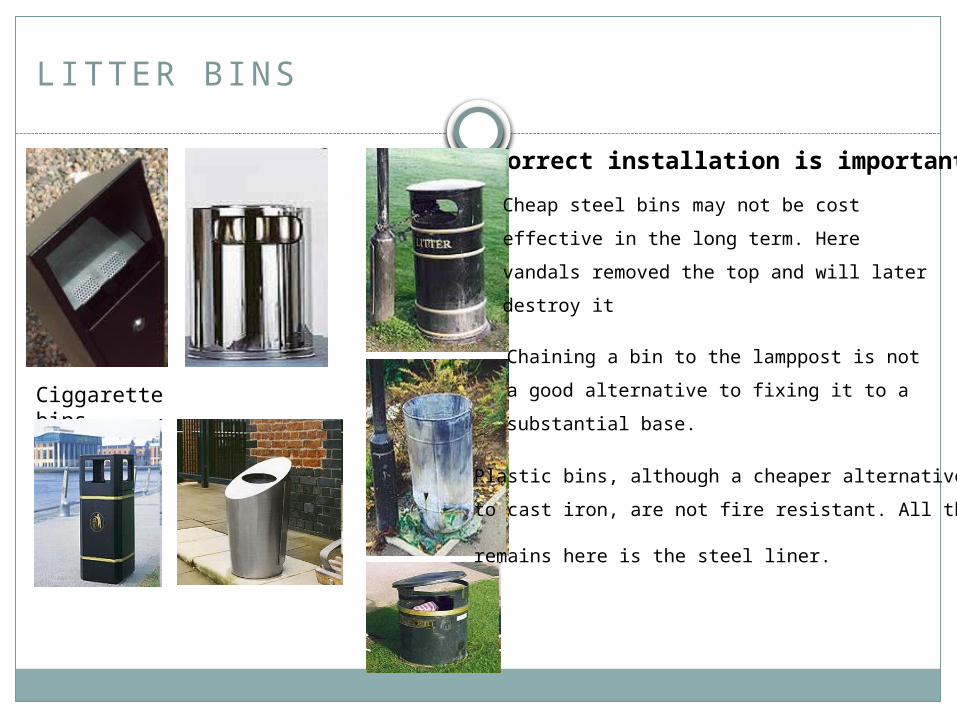
Ciggarette bins
Correct installation is important
Cheap steel bins may not be cost
effective in the long term. Here
vandals removed the top and will later
destroy it
Chaining a bin to the lamppost is not
a good alternative to fixing it to a
substantial base.
Plastic bins, although a cheaper alternative
to cast iron, are not fire resistant. All that
remains here is the steel liner.
LITTER BINS

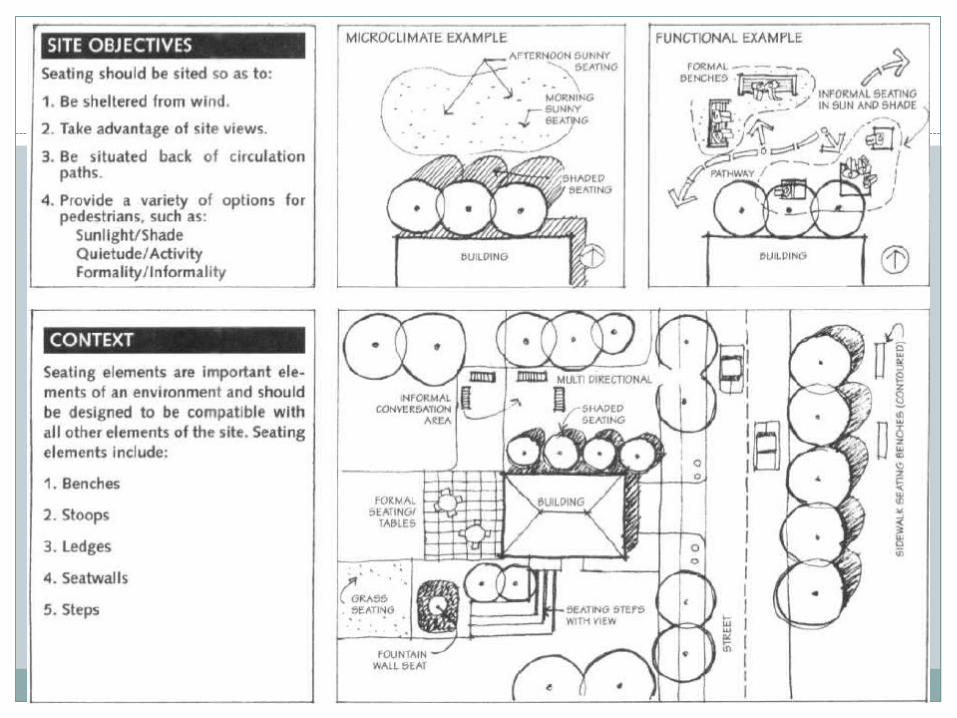
SEATING
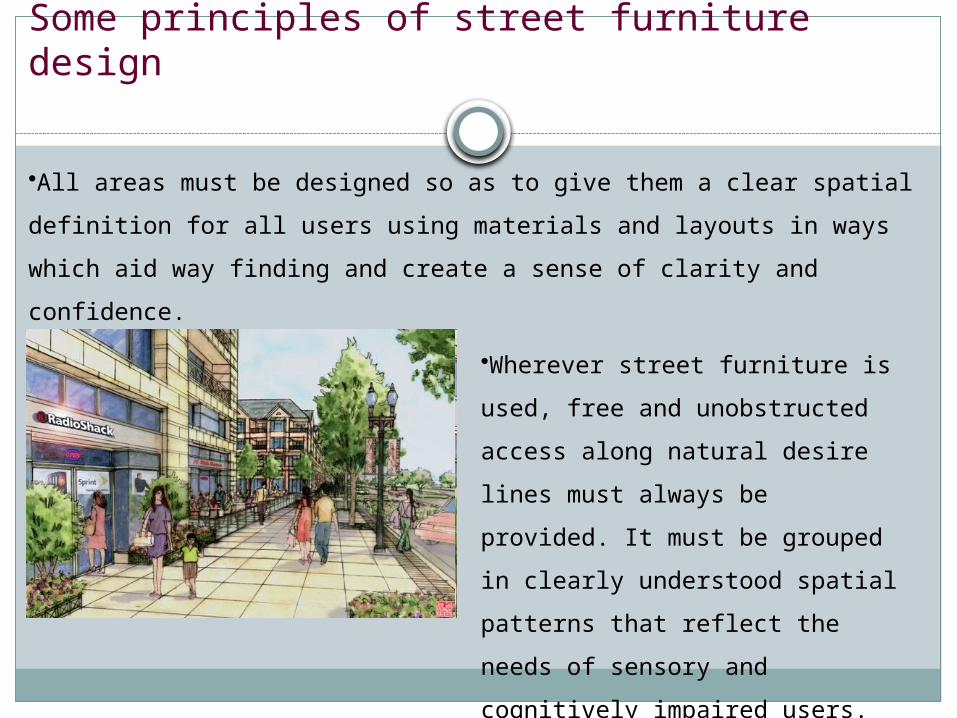
Some principles of street furniture design
•All areas must be designed so as to give them a clear spatial definition
for all users using materials and layouts in ways which aid way finding
and create a sense of clarity and confidence.
•Wherever street furniture is used,
free and unobstructed access
along natural desire lines must
always be provided. It must be
grouped in clearly understood
spatial patterns that reflect the
needs of sensory and cognitively
impaired users.
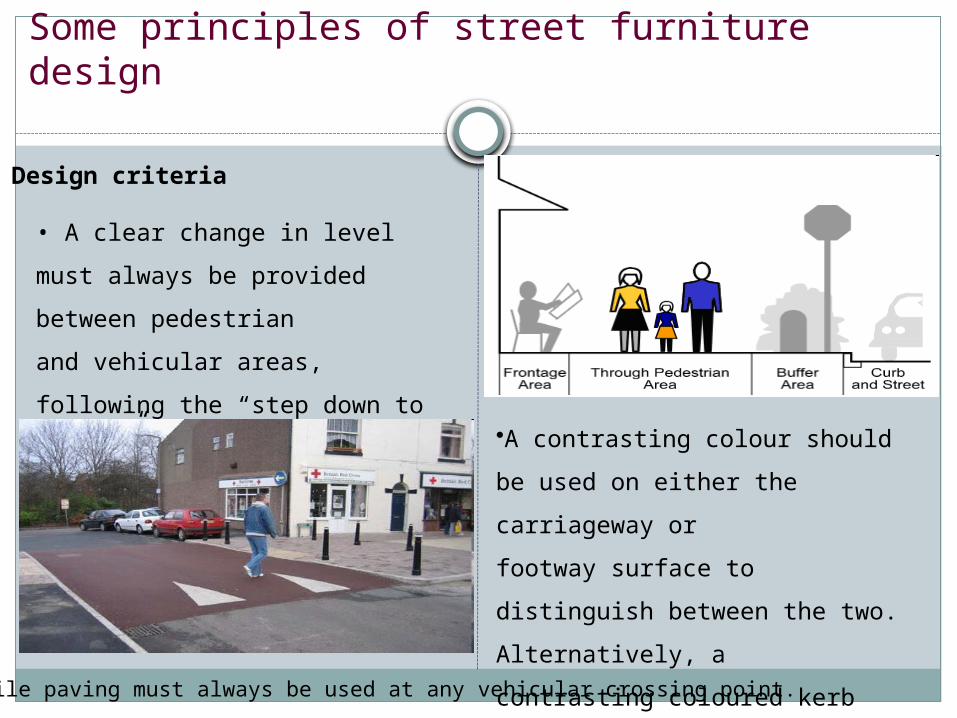
Design criteria
• A clear change in level must
always be provided between
pedestrian
and vehicular areas, following the
“step down to danger” principle.•A contrasting colour should be
used on either the carriageway
or
footway surface to distinguish
between the two. Alternatively, a
contrasting coloured kerb may
be considered.• Tactile paving must always be used at any vehicular crossing point.
Some principles of street furniture design
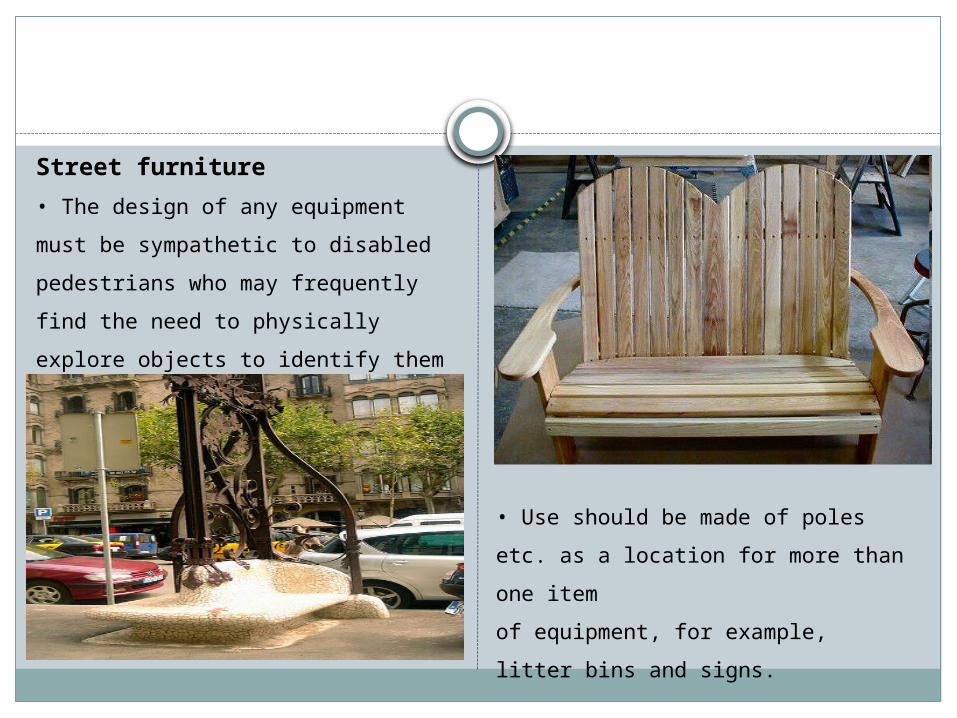
Street furniture
• The design of any equipment must be
sympathetic to disabled pedestrians
who may frequently find the need to
physically explore objects to identify
them or who may inadvertently come
into contact with them
• Use should be made of poles etc. as
a location for more than one item
of equipment, for example, litter bins
and signs.
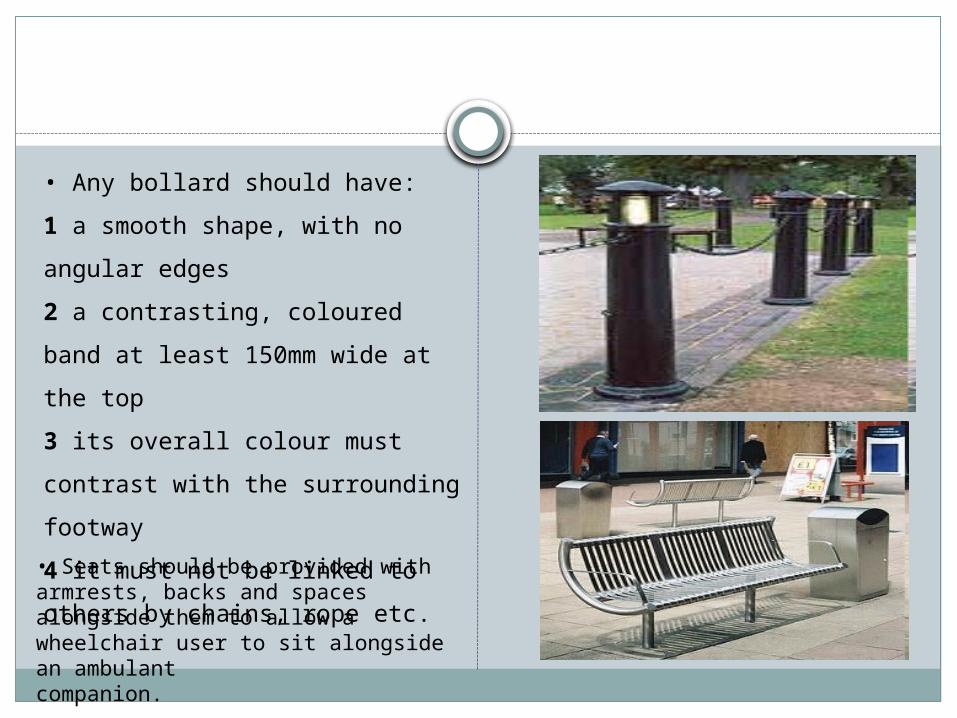
• Any bollard should have:
1 a smooth shape, with no angular
edges
2 a contrasting, coloured band at
least 150mm wide at the top
3 its overall colour must contrast
with the surrounding footway
4 it must not be linked to others
by chains, rope etc.
• Seats should be provided with armrests, backs and spaces alongside them to allow a wheelchair user to sit alongside an ambulantcompanion.
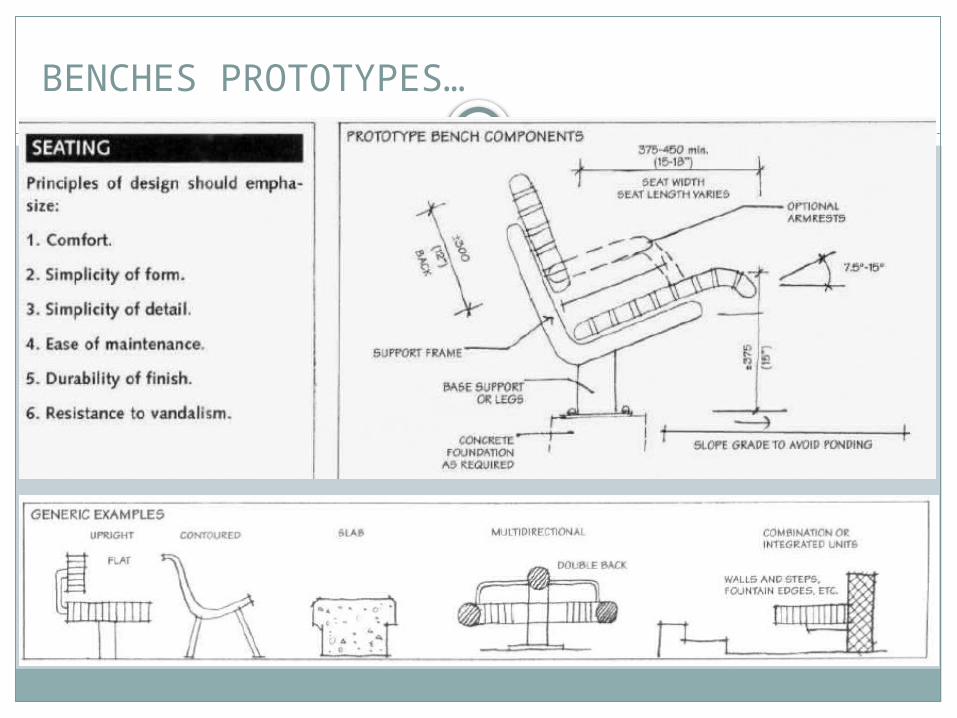
BENCHES PROTOTYPES…
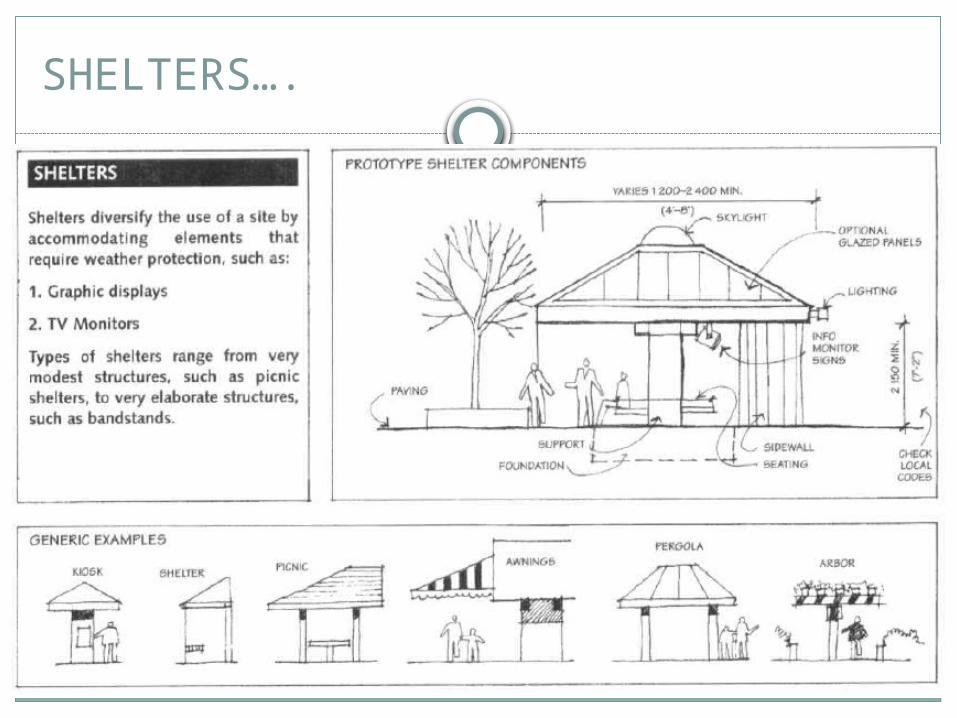
SHELTERS….
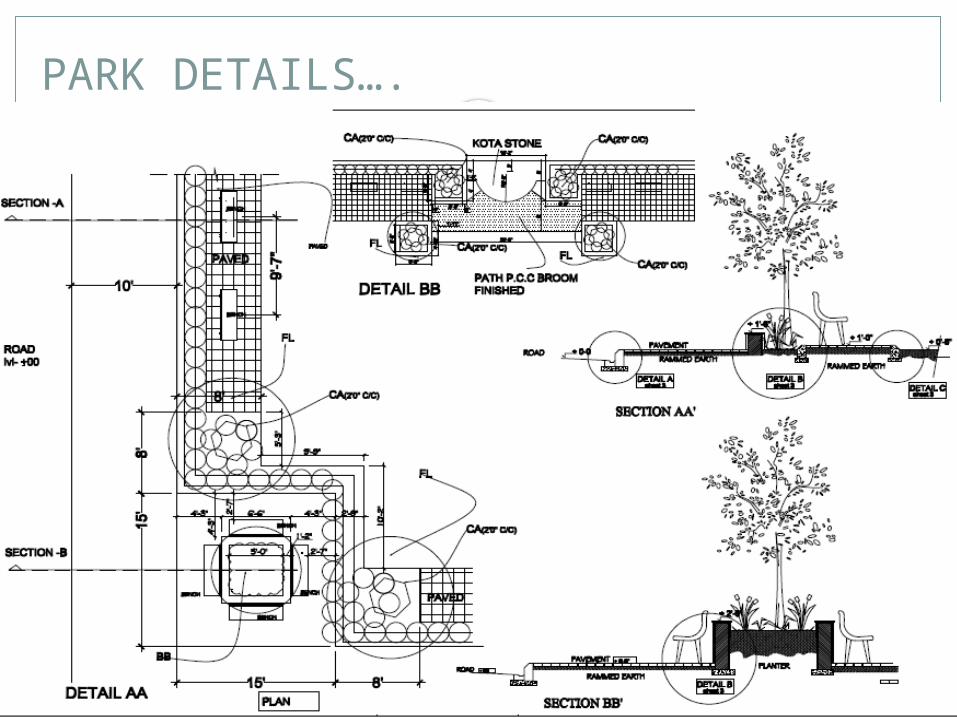
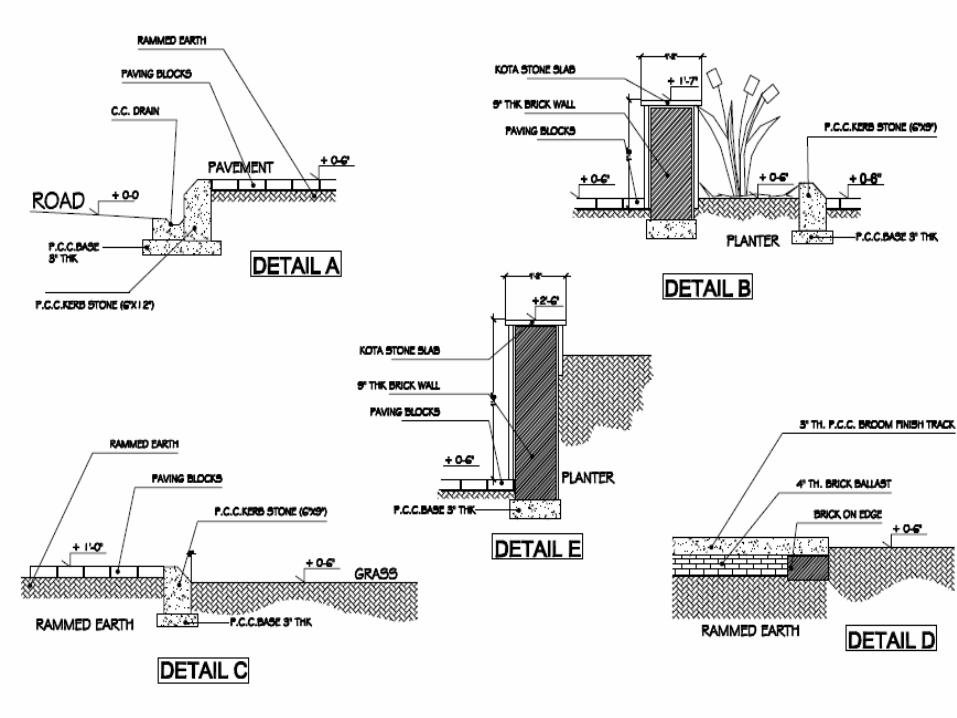
PARK DETAILS….
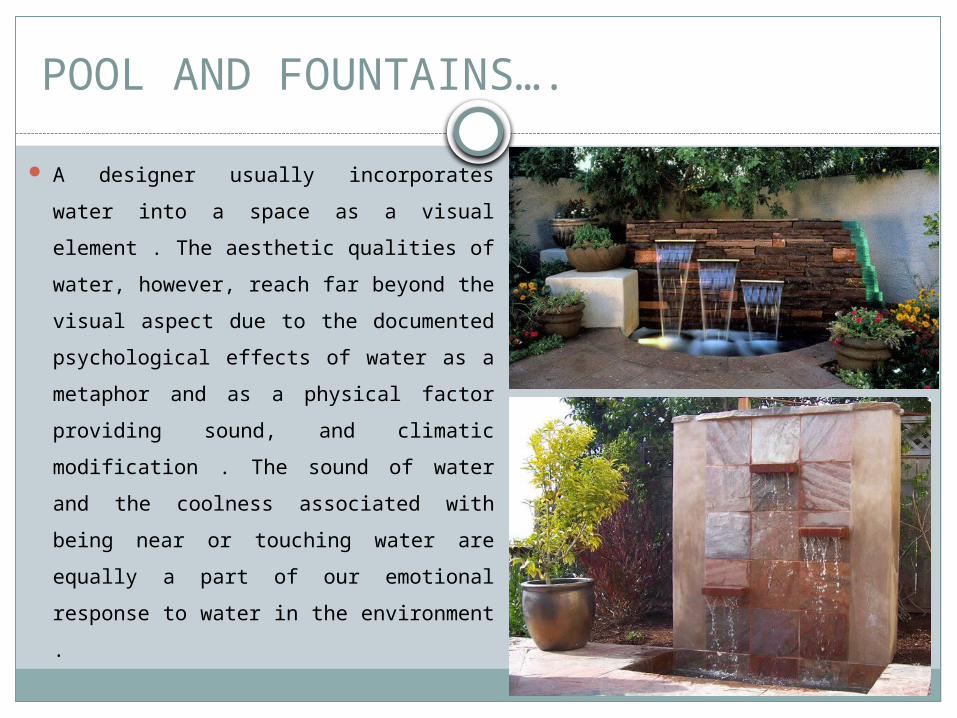
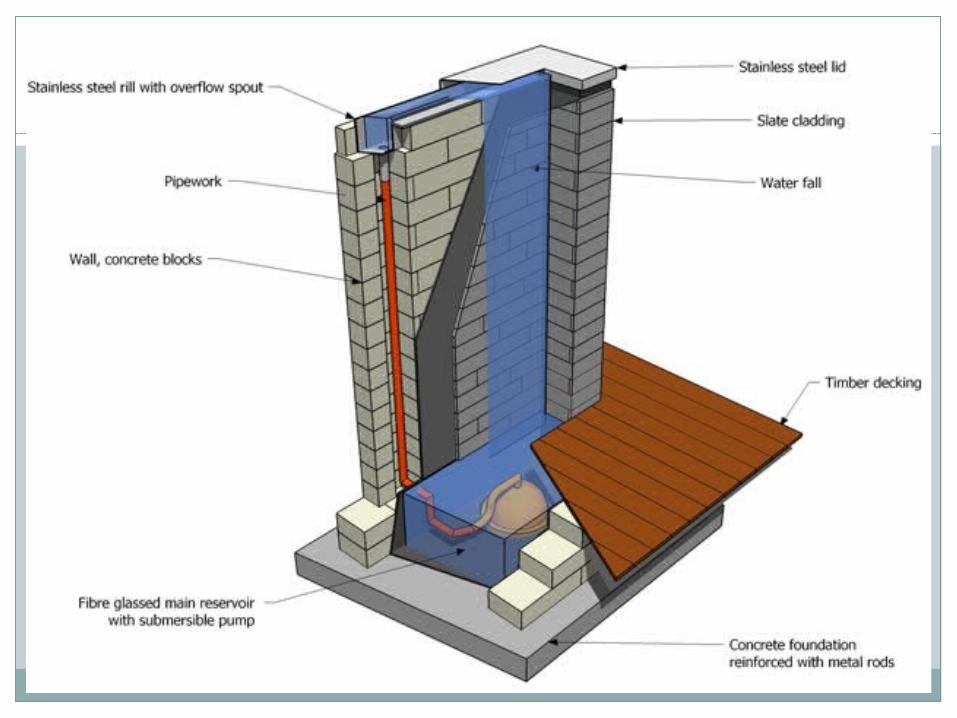
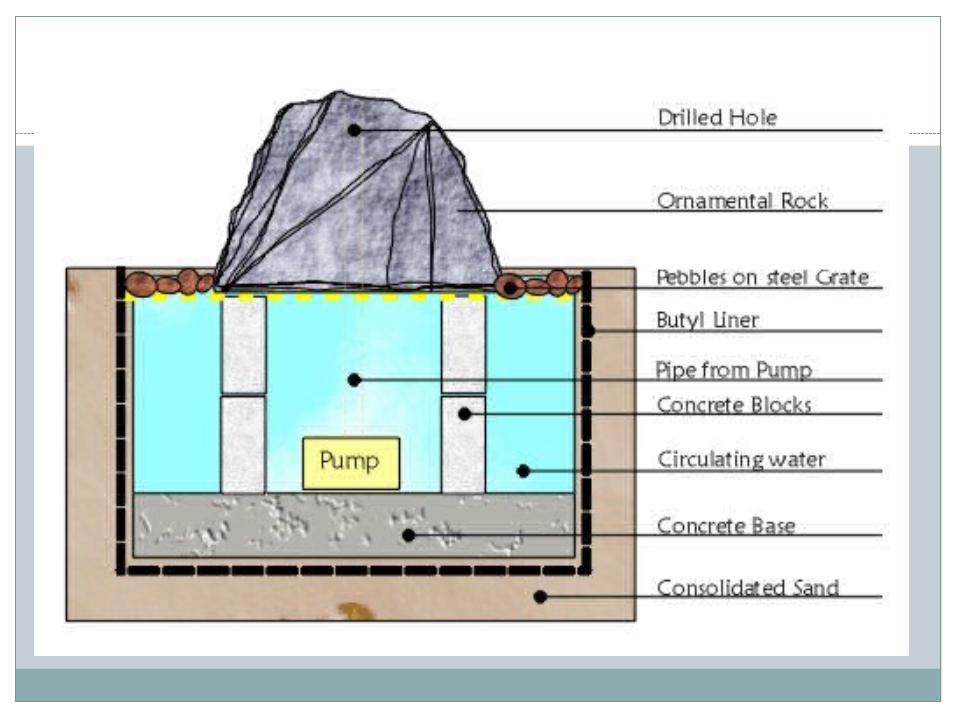
POOL AND FOUNTAINS….
A designer usually incorporates water
into a space as a visual element . The
aesthetic qualities of water, however,
reach far beyond the visual aspect due
to the documented psychological
effects of water as a metaphor and as
a physical factor providing sound, and
climatic modification . The sound of
water and the coolness associated
with being near or touching water are
equally a part of our emotional
response to water in the environment .
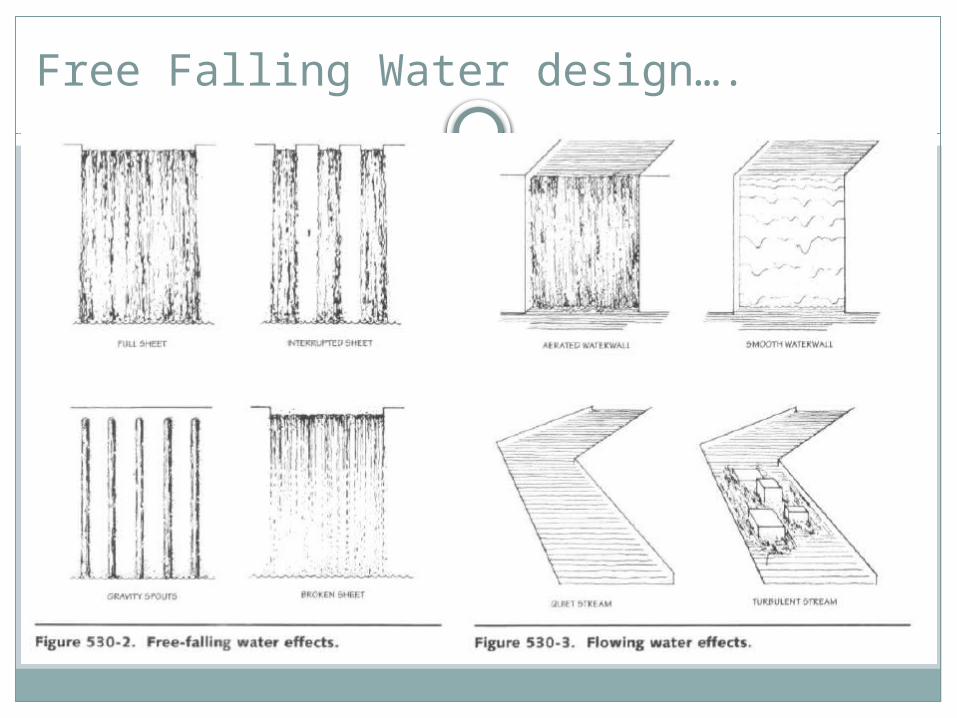
Free Falling Water design….
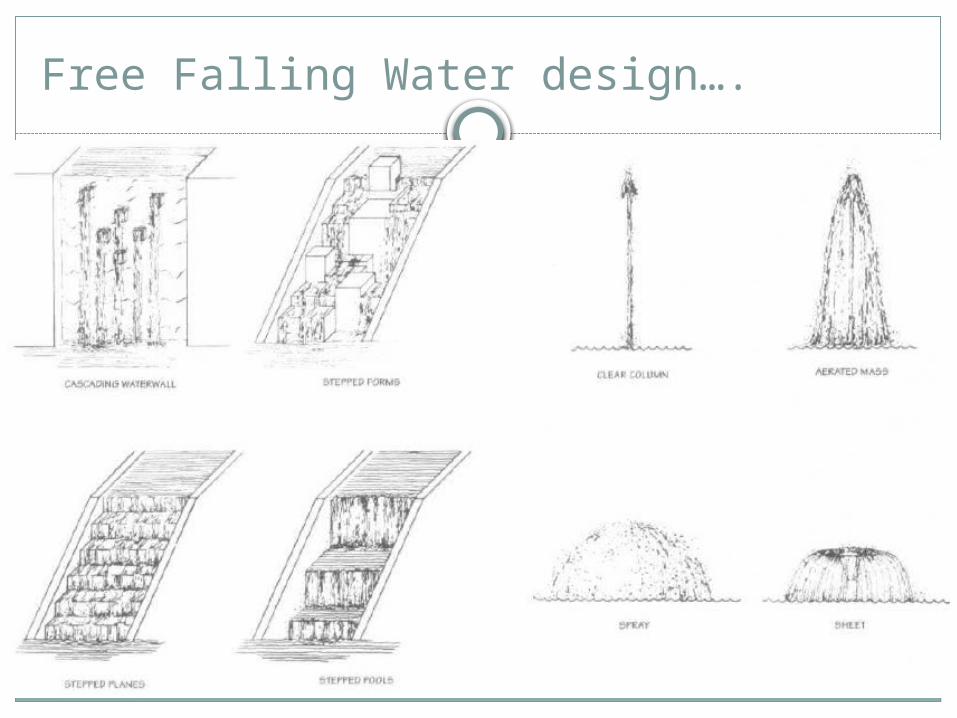
Free Falling Water design….
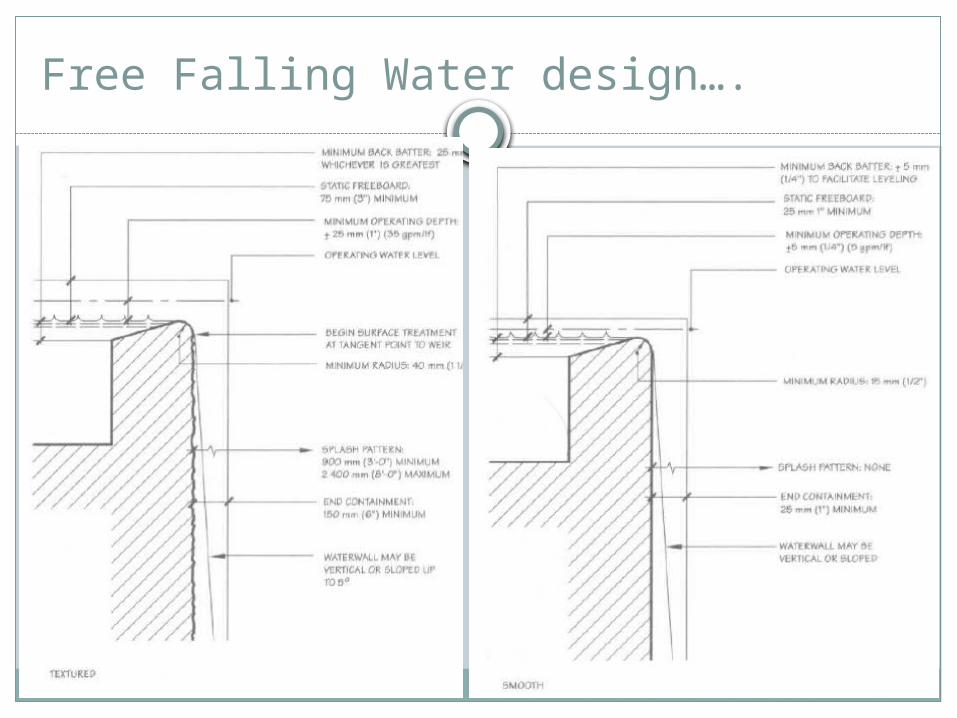
Free Falling Water design….

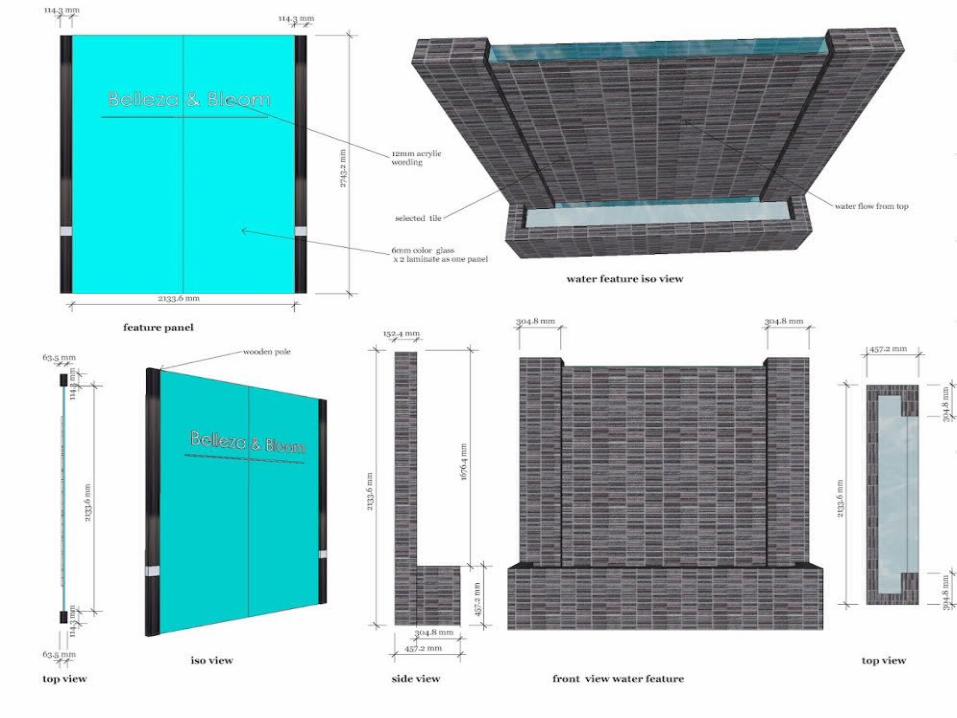
FOUNTAIN DETAILS…..
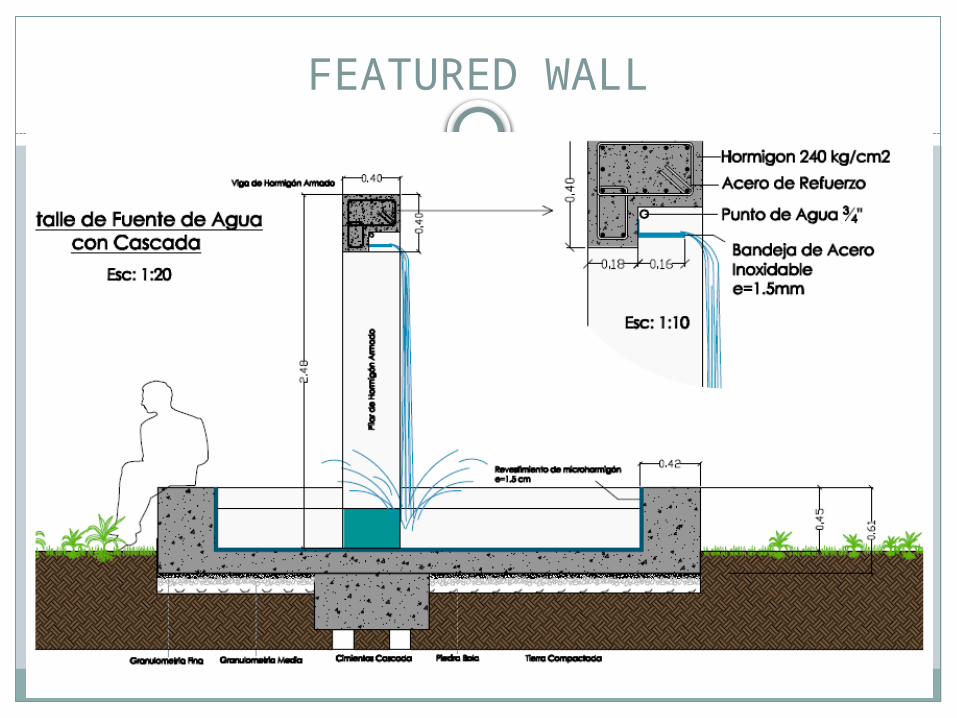
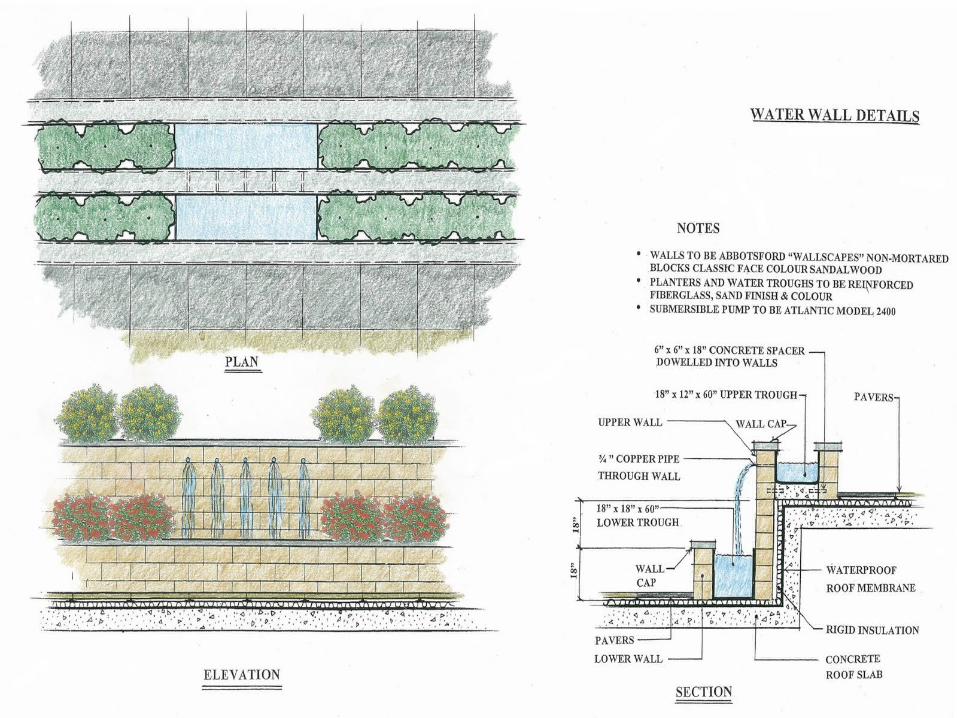
FEATURED WALL
WATER PROOFING
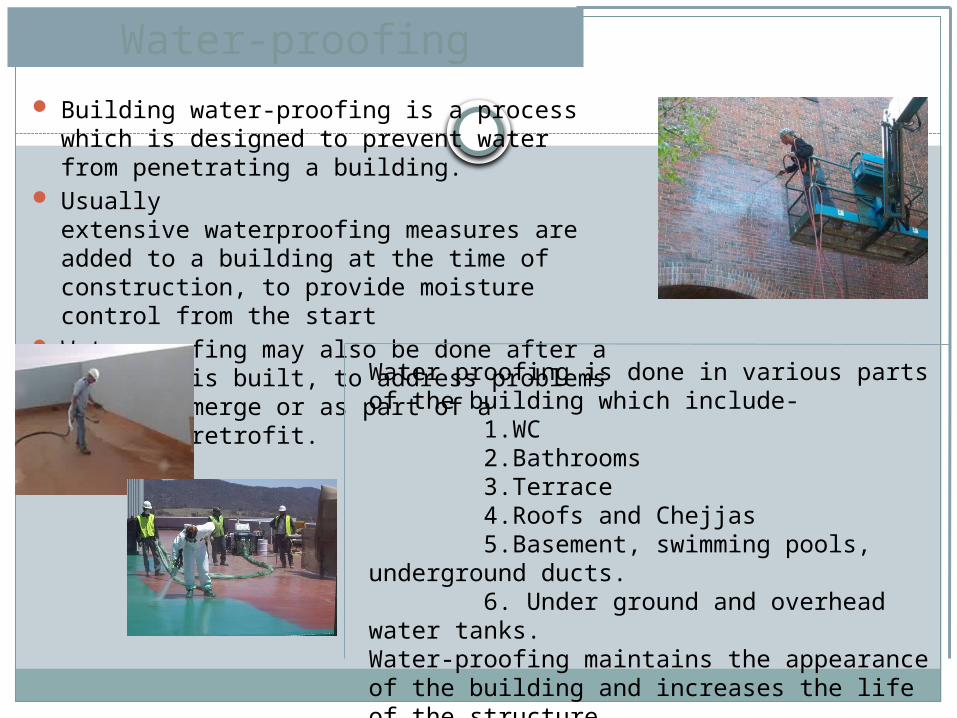
Water-proofing Building water-proofing is a process which is
designed to prevent water from penetrating a building.
Usually extensive waterproofing measures are added to a building at the time of construction, to provide moisture control from the start
Waterproofing may also be done after a building is built, to address problems as they emerge or as part of a building retrofit.Water proofing is done in various parts of the
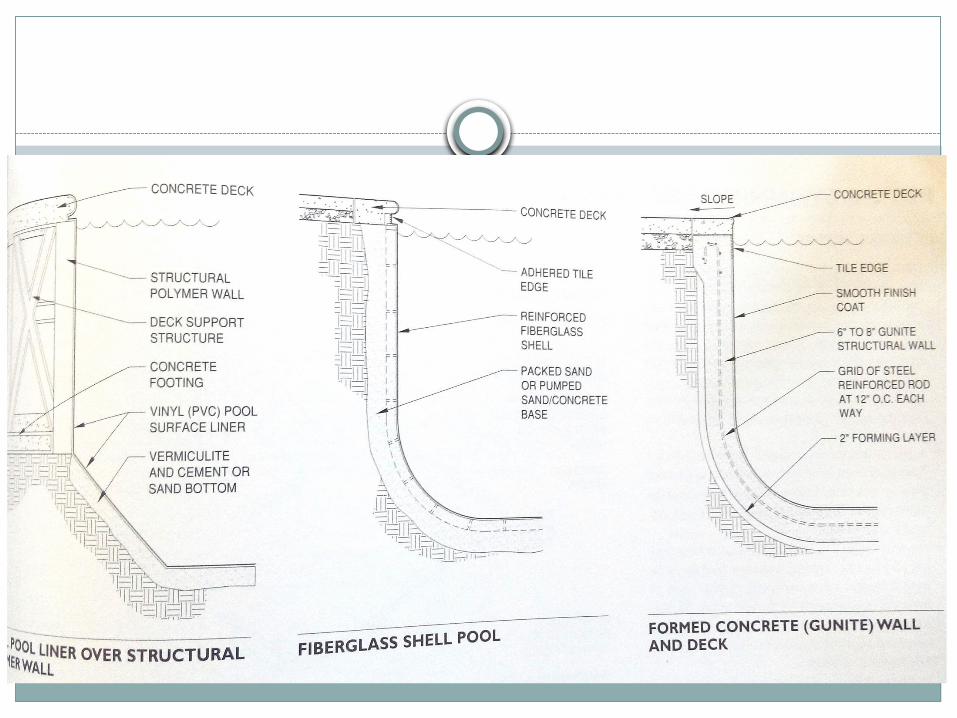
building which include- 1.WC 2.Bathrooms 3.Terrace 4.Roofs and Chejjas 5.Basement, swimming pools, underground ducts. 6. Under ground and overhead water tanks.Water-proofing maintains the appearance of the building and increases the life of the structure.
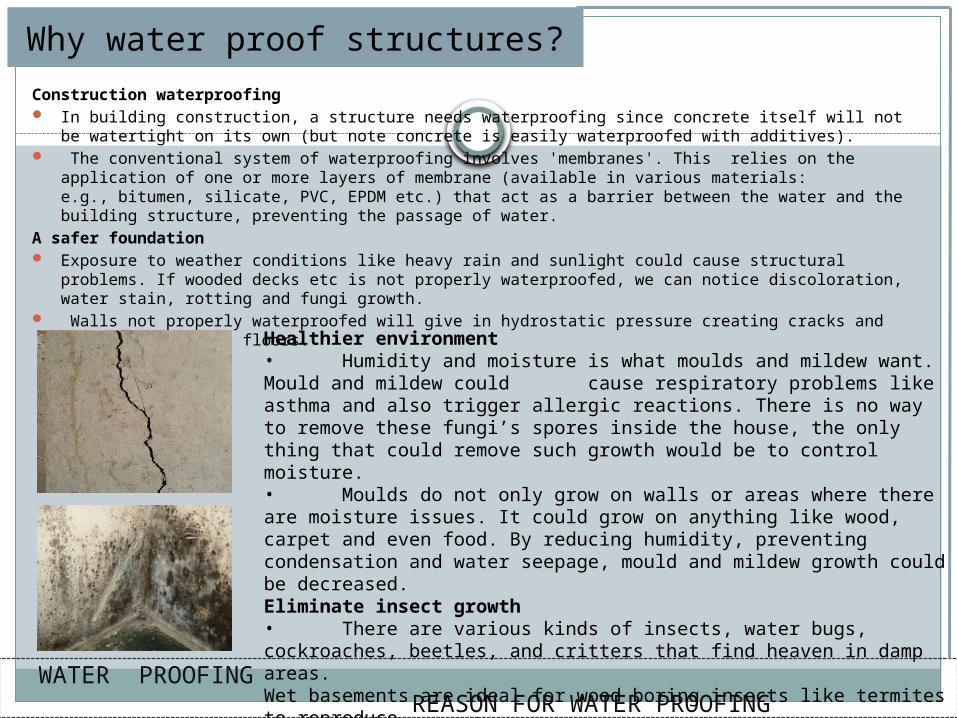
Construction waterproofing In building construction, a structure needs waterproofing since concrete itself will not be watertight on
its own (but note concrete is easily waterproofed with additives). The conventional system of waterproofing involves 'membranes'. This relies on the application of one
or more layers of membrane (available in various materials: e.g., bitumen, silicate, PVC, EPDM etc.) that act as a barrier between the water and the building structure, preventing the passage of water.
A safer foundation Exposure to weather conditions like heavy rain and sunlight could cause structural problems. If wooded
decks etc is not properly waterproofed, we can notice discoloration, water stain, rotting and fungi growth.
Walls not properly waterproofed will give in hydrostatic pressure creating cracks and leaks on walls and floors.
Why water proof structures?
WATER PROOFING REASON FOR WATER PROOFING
Healthier environment• Humidity and moisture is what moulds and mildew want. Mould and mildew could cause respiratory problems like asthma and also trigger allergic reactions. There is no way to remove these fungi’s spores inside the house, the only thing that could remove such growth would be to control moisture.• Moulds do not only grow on walls or areas where there are moisture issues. It could grow on anything like wood, carpet and even food. By reducing humidity, preventing condensation and water seepage, mould and mildew growth could be decreased.Eliminate insect growth• There are various kinds of insects, water bugs, cockroaches, beetles, and critters that find heaven in damp areas. Wet basements are ideal for wood boring insects like termites to reproduce. • These insects could cause damage not only to the foundation but also to important things stored in the room.
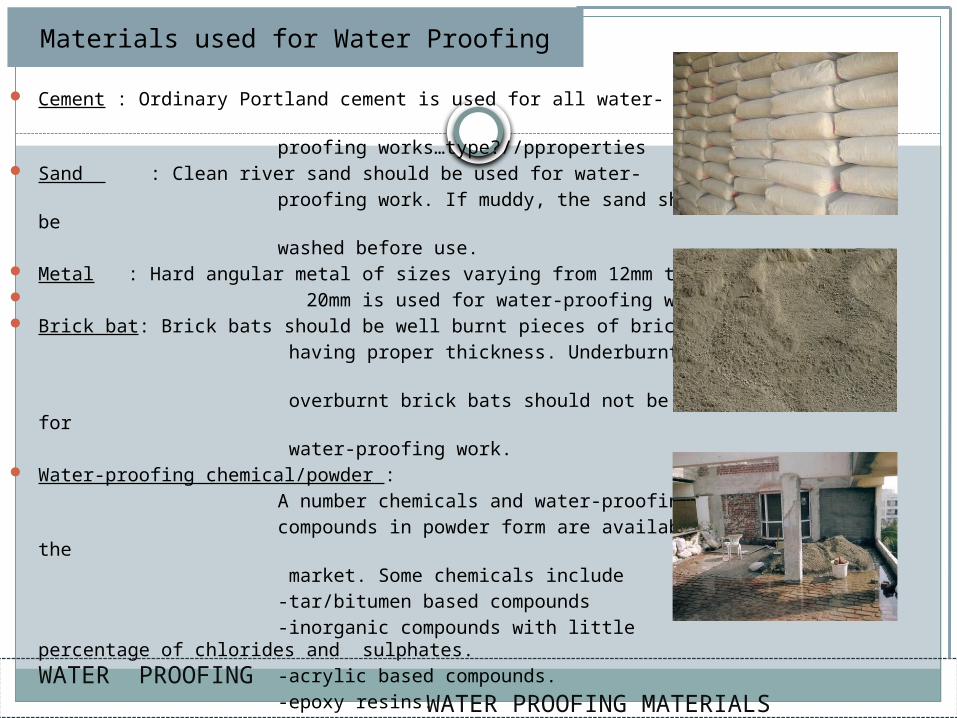
Cement : Ordinary Portland cement is used for all water- proofing works…type?//pproperties Sand : Clean river sand should be used for water- proofing work. If muddy, the sand should be washed before use. Metal : Hard angular metal of sizes varying from 12mm to 20mm is used for water-proofing works. Brick bat: Brick bats should be well burnt pieces of bricks having proper thickness. Underburnt or overburnt brick bats should not be used for water-proofing work. Water-proofing chemical/powder : A number chemicals and water-proofing compounds in powder form are available in the market. Some chemicals include -tar/bitumen based compounds -inorganic compounds with little percentage of chlorides and
sulphates. -acrylic based compounds. -epoxy resins. -silicones. -polysulphides and polyurethanes.
Materials used for Water Proofing
WATER PROOFING WATER PROOFING MATERIALS
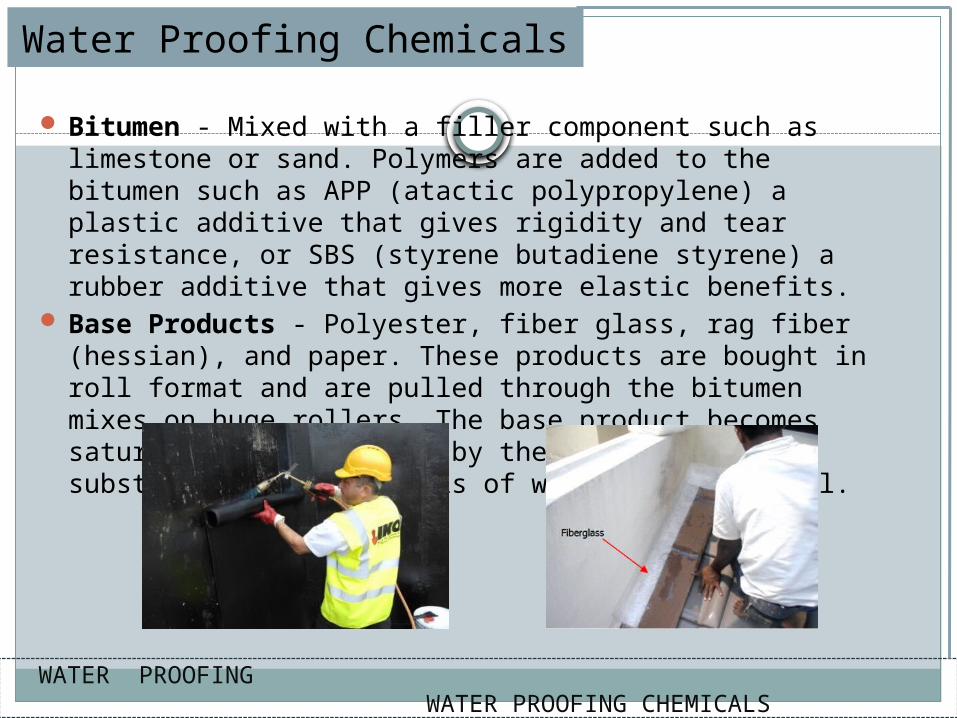
Bitumen - Mixed with a filler component such as limestone or sand. Polymers are added to the bitumen such as APP (atactic polypropylene) a plastic additive that gives rigidity and tear resistance, or SBS (styrene butadiene styrene) a rubber additive that gives more elastic benefits.
Base Products - Polyester, fiber glass, rag fiber (hessian), and paper. These products are bought in roll format and are pulled through the bitumen mixes on huge rollers. The base product becomes saturated in huge tanks by the tar like bitumen substance, creating rolls of waterproof material.
Water Proofing Chemicals
WATER PROOFING WATER PROOFING CHEMICALS
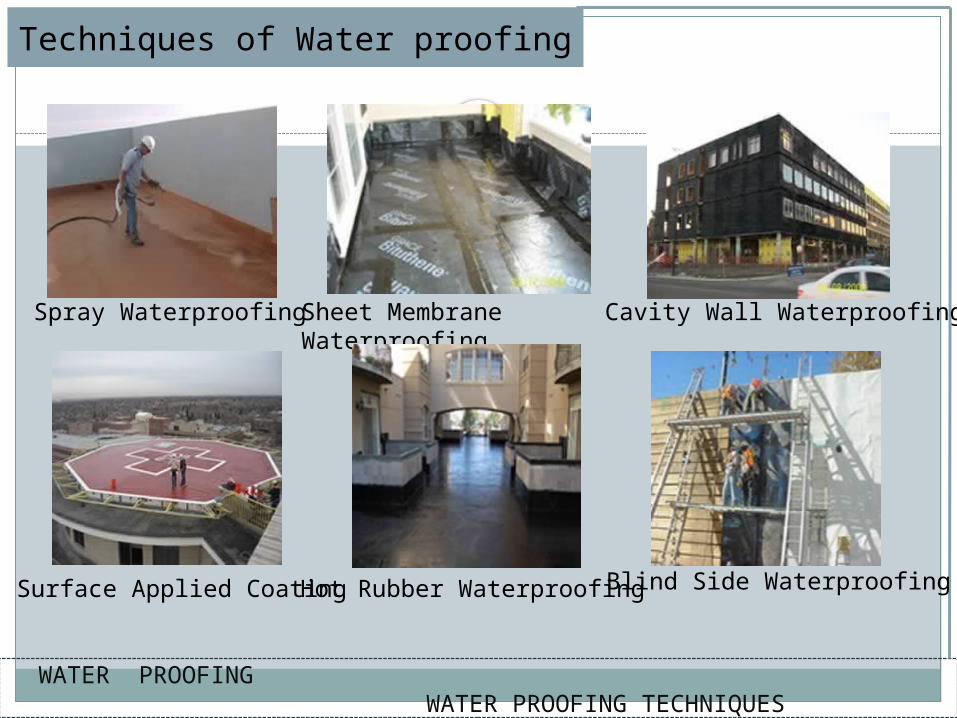
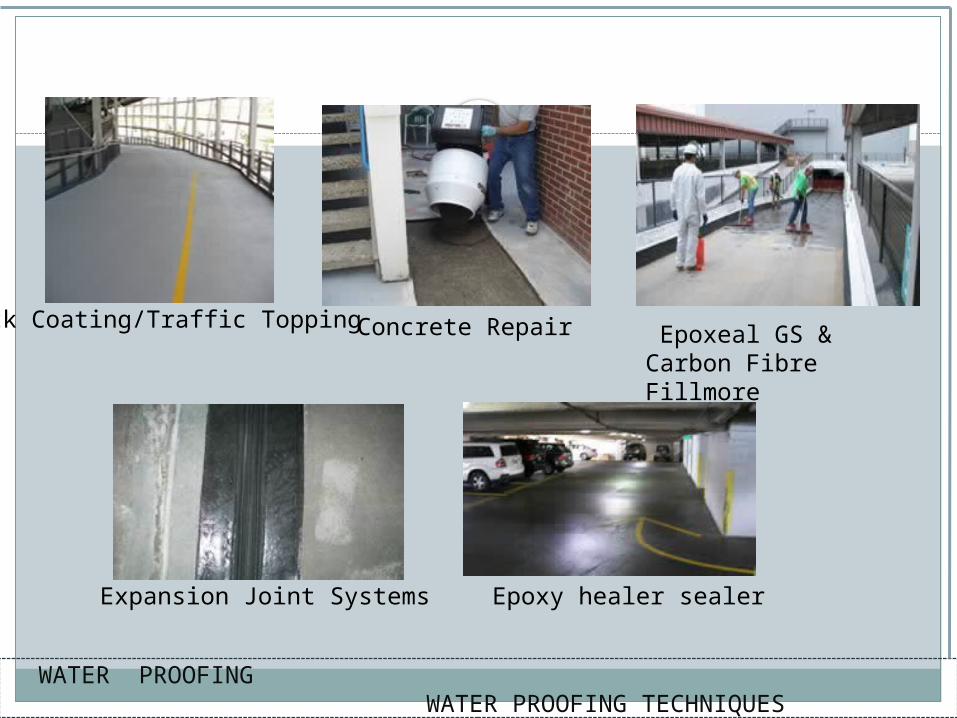
Techniques of Water proofing
WATER PROOFING WATER PROOFING TECHNIQUES
Spray Waterproofing Cavity Wall WaterproofingSheet Membrane Waterproofing
Surface Applied Coating Hot Rubber Waterproofing Blind Side Waterproofing
WATER PROOFING WATER PROOFING TECHNIQUES
Concrete Repair Deck Coating/Traffic Topping Epoxeal GS & Carbon Fibre Fillmore
Expansion Joint Systems Epoxy healer sealer
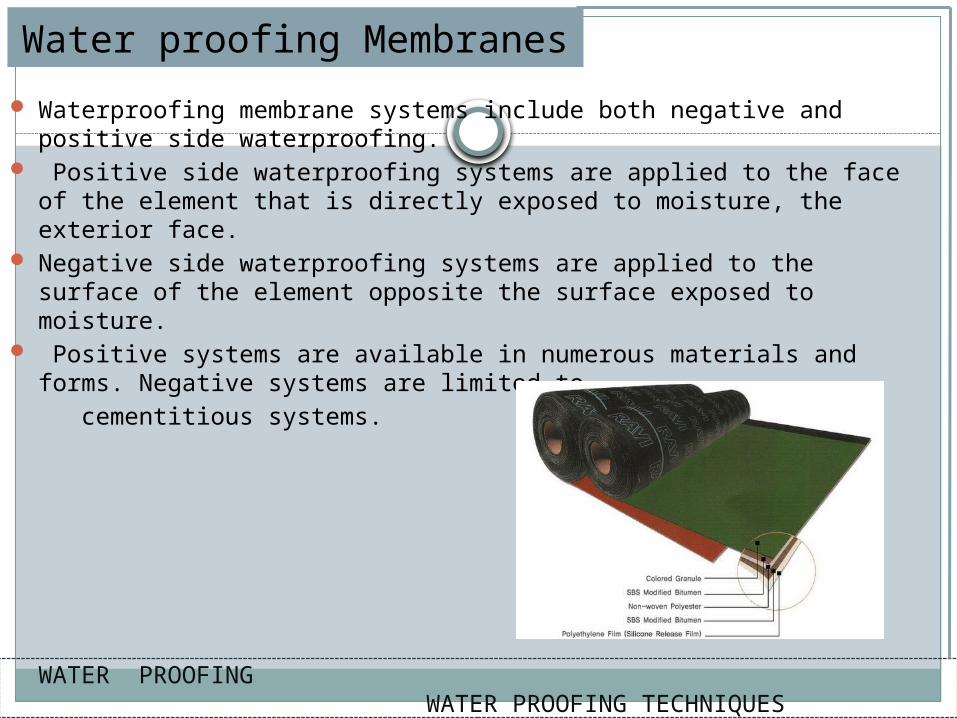
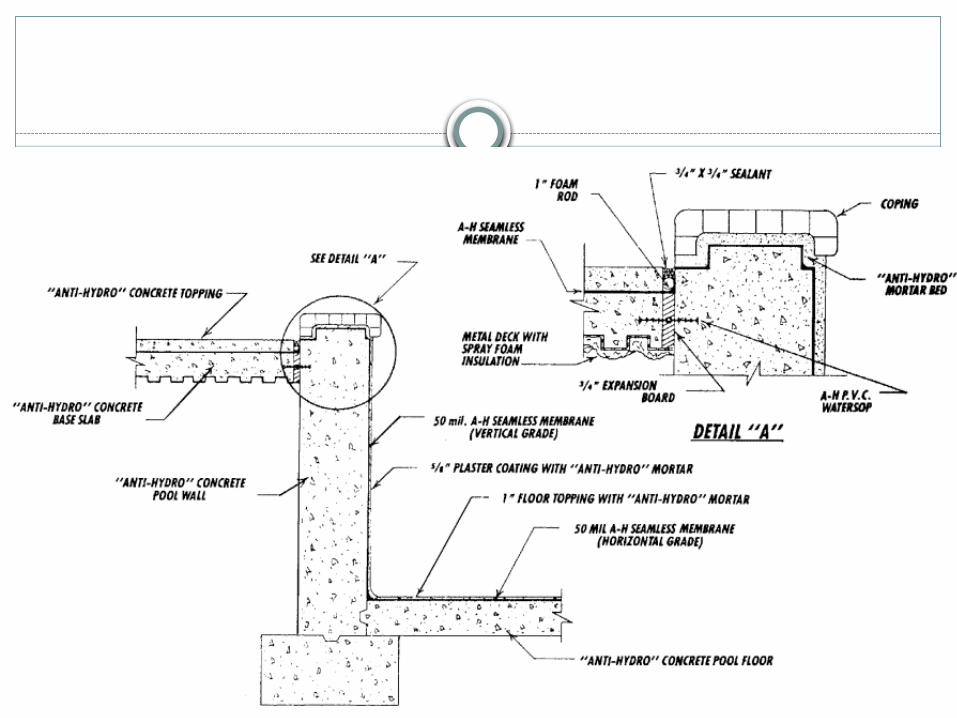
Waterproofing membrane systems include both negative and positive side waterproofing.
Positive side waterproofing systems are applied to the face of the element that is directly exposed to moisture, the exterior face.
Negative side waterproofing systems are applied to the surface of the element opposite the surface exposed to moisture.
Positive systems are available in numerous materials and forms. Negative systems are limited to
cementitious systems.
Water proofing Membranes
WATER PROOFING WATER PROOFING TECHNIQUES
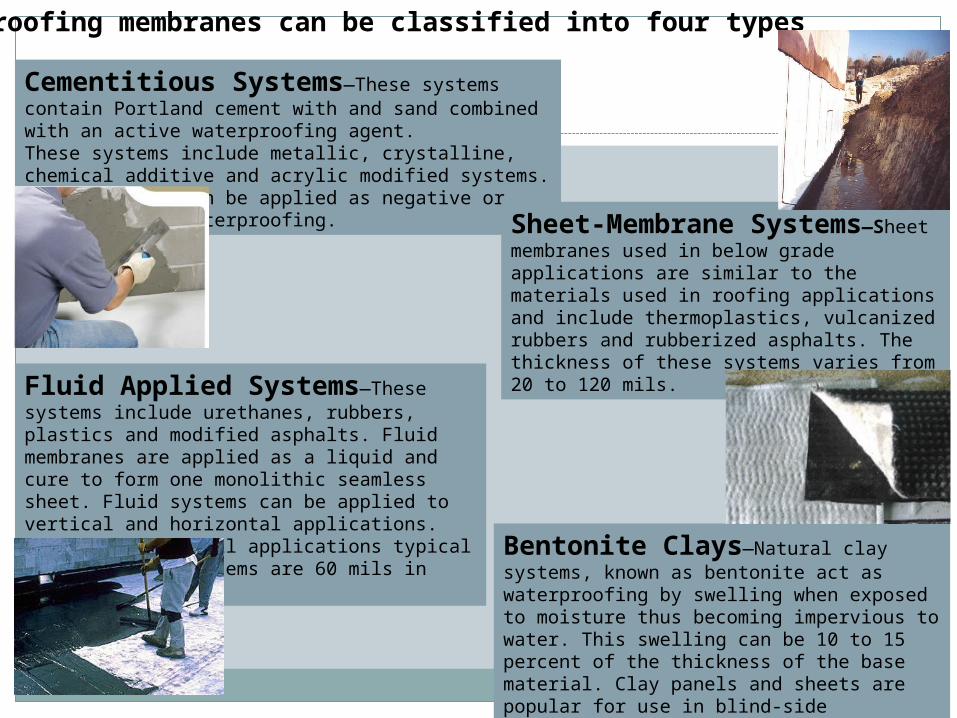
Water Proofing membranes can be classified into four types
Cementitious Systems—These systems contain Portland cement with and sand combined with an active waterproofing agent. These systems include metallic, crystalline, chemical additive and acrylic modified systems. These systems can be applied as negative or positive side waterproofing. Sheet-Membrane Systems—
Sheet membranes used in below grade applications are similar to the materials used in roofing applications and include thermoplastics, vulcanized rubbers and rubberized asphalts. The thickness of these systems varies from 20 to 120 mils.
Fluid Applied Systems—These systems include urethanes, rubbers, plastics and modified asphalts. Fluid membranes are applied as a liquid and cure to form one monolithic seamless sheet. Fluid systems can be applied to vertical and horizontal applications. For foundation wall applications typical fluid applied systems are 60 mils in thickness.
Bentonite Clays—Natural clay systems, known as bentonite act as waterproofing by swelling when exposed to moisture thus becoming impervious to water. This swelling can be 10 to 15 percent of the thickness of the base material. Clay panels and sheets are popular for use in blind-side waterproofing applications such as on retaining earth systems and elevator and sump pits
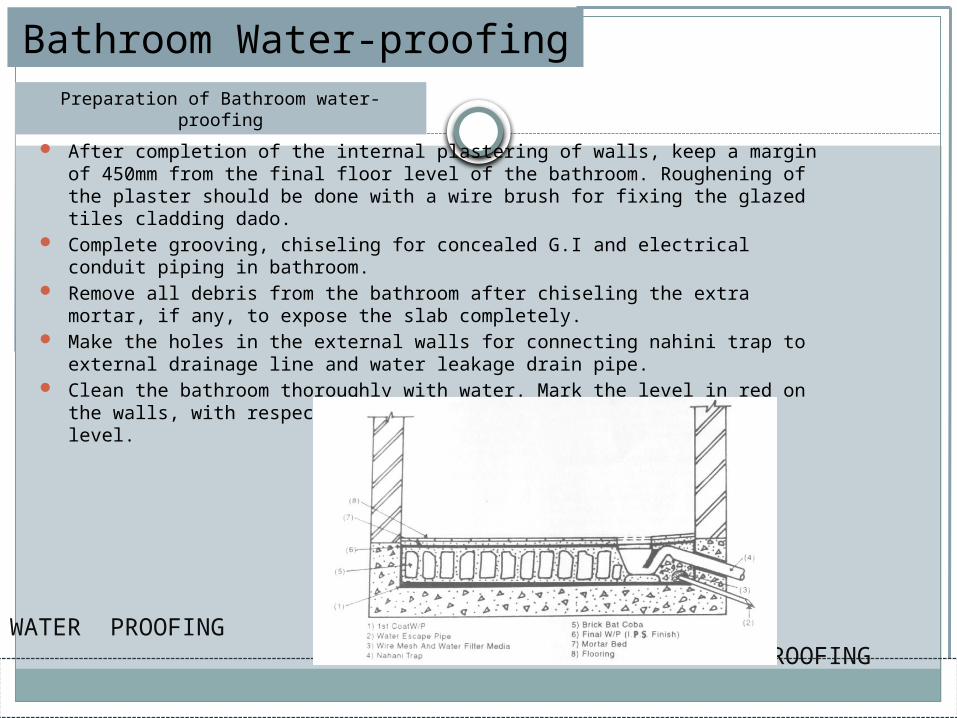
After completion of the internal plastering of walls, keep a margin of 450mm from the final floor level of the bathroom. Roughening of the plaster should be done with a wire brush for fixing the glazed tiles cladding dado.
Complete grooving, chiseling for concealed G.I and electrical conduit piping in bathroom.
Remove all debris from the bathroom after chiseling the extra mortar, if any, to expose the slab completely.
Make the holes in the external walls for connecting nahini trap to external drainage line and water leakage drain pipe.
Clean the bathroom thoroughly with water. Mark the level in red on the walls, with respect to the floor level, to set up the trap level.
Preparation of Bathroom water-proofing
Bathroom Water-proofing
WATER PROOFING WC WATER PROOFING
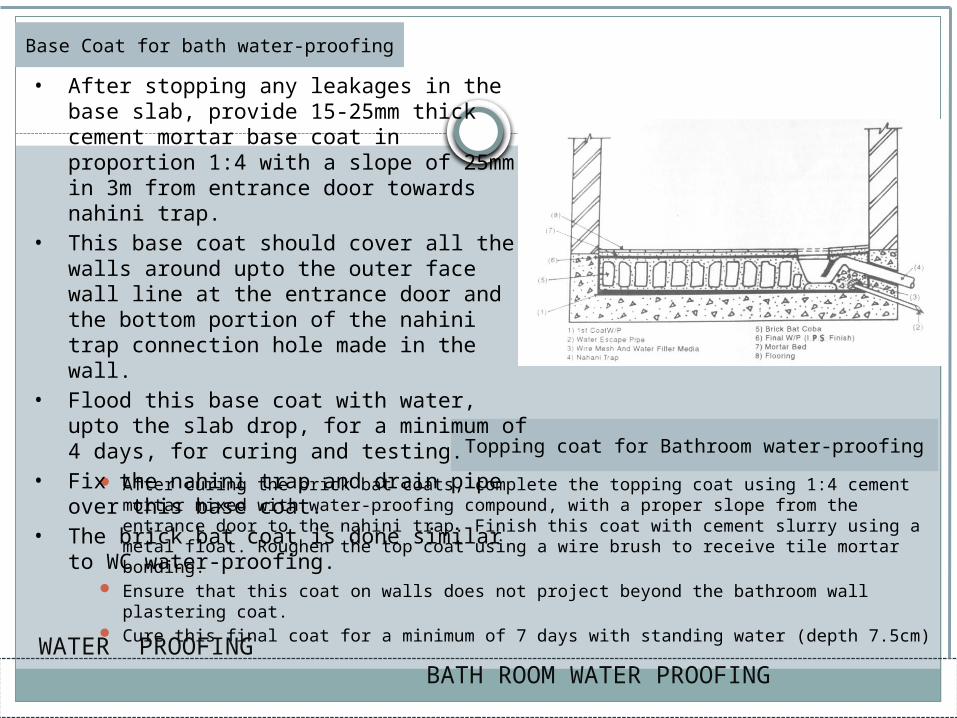
After curing the brick bat coats, complete the topping coat using 1:4 cement mortar mixed with water-proofing compound, with a proper slope from the entrance door to the nahini trap. Finish this coat with cement slurry using a metal float. Roughen the top coat using a wire brush to receive tile mortar bonding.
Ensure that this coat on walls does not project beyond the bathroom wall plastering coat.
Cure this final coat for a minimum of 7 days with standing water (depth 7.5cm)
Topping coat for Bathroom water-proofing
WATER PROOFING BATH ROOM WATER PROOFING
Base Coat for bath water-proofing
• After stopping any leakages in the base slab, provide 15-25mm thick cement mortar base coat in proportion 1:4 with a slope of 25mm in 3m from entrance door towards nahini trap.
• This base coat should cover all the walls around upto the outer face wall line at the entrance door and the bottom portion of the nahini trap connection hole made in the wall.
• Flood this base coat with water, upto the slab drop, for a minimum of 4 days, for curing and testing.
• Fix the nahini trap and drain pipe over this base coat.
• The brick bat coat is done similar to WC water-proofing.
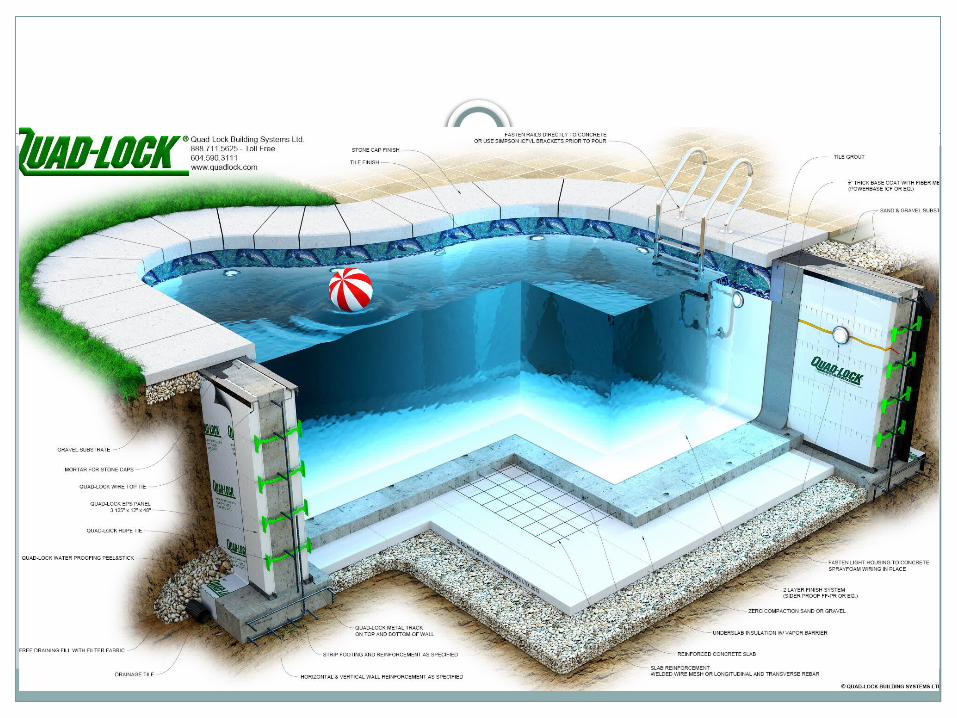
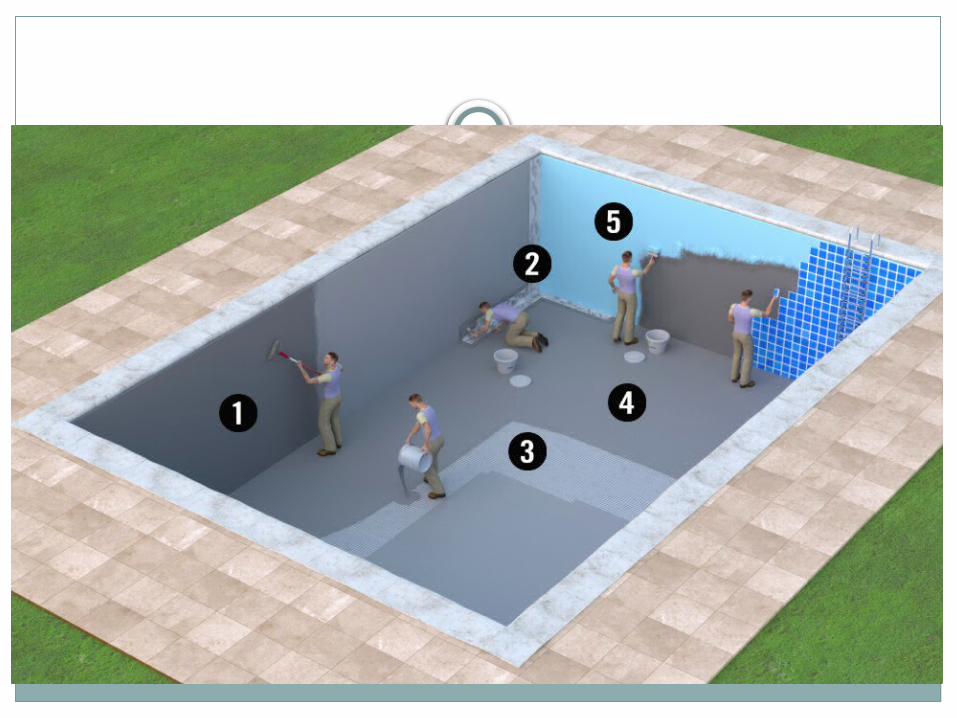
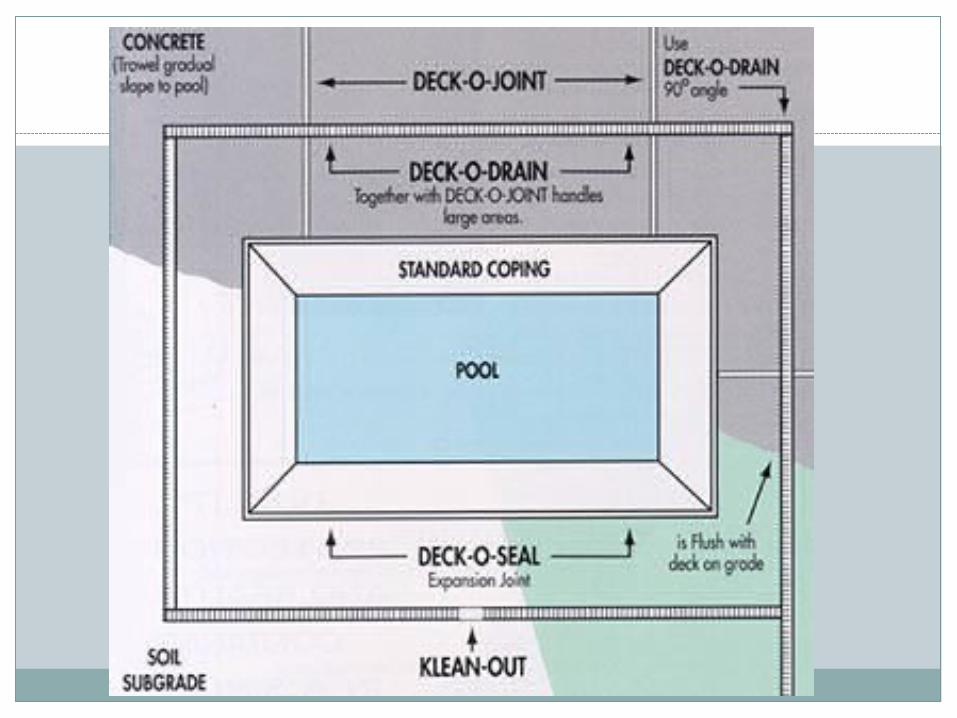
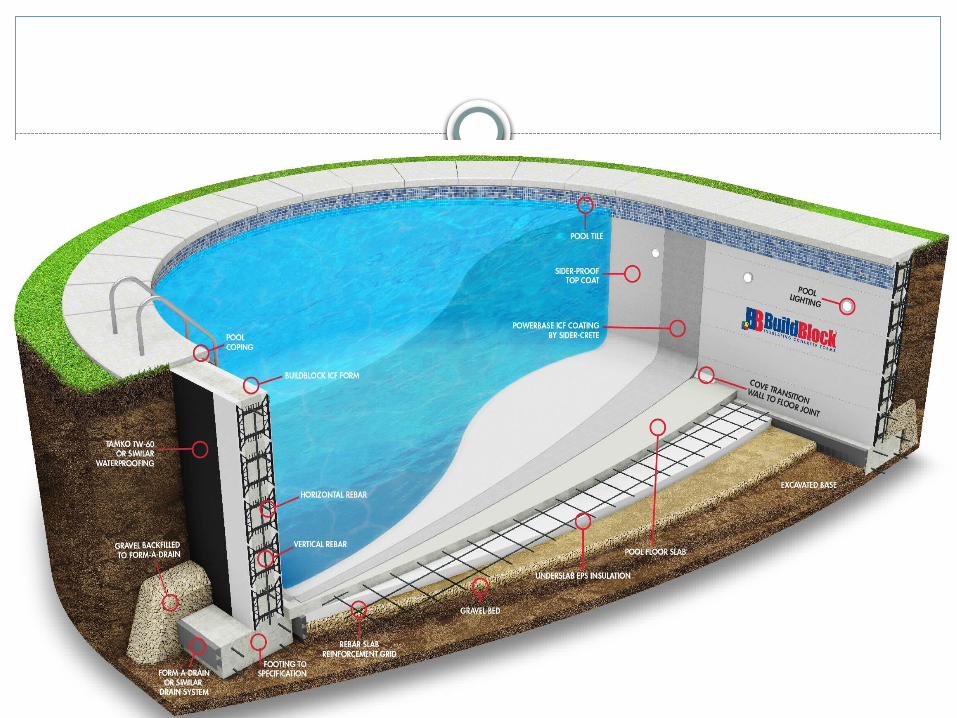
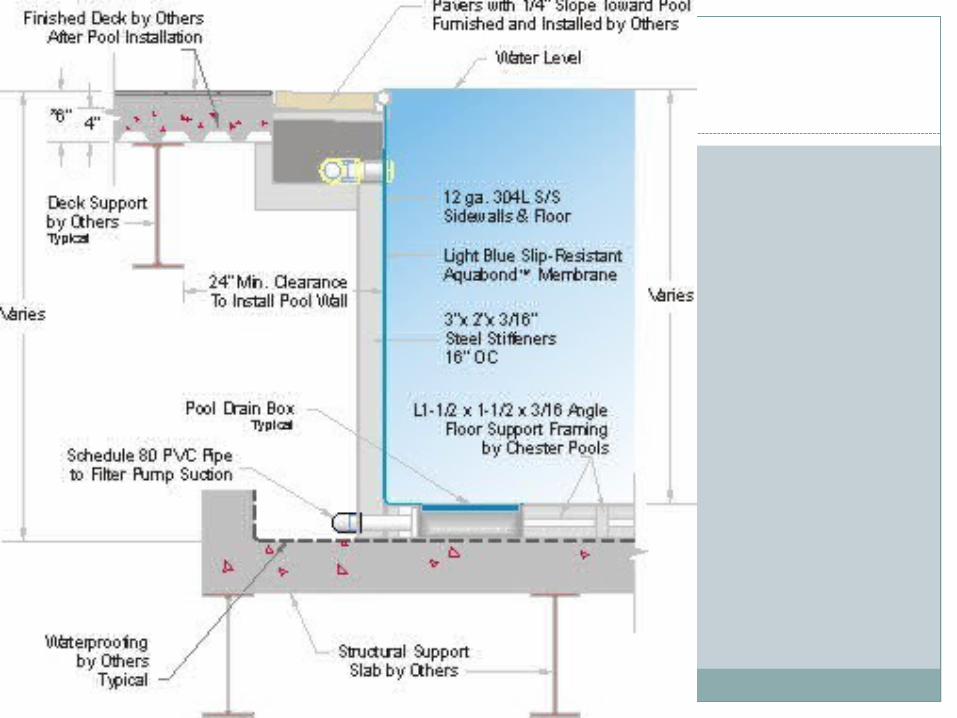
For basements, swimming pools and underground ducts such as lift pits, the water-proofing has to withstand the water pressure in addition to its basic stress.
Basement/Swimming pool and underground duct water proofing
WATER PROOFING BASEMENT, DUCT AND SWIMMING POOL WATER PROOFING
• Carry out the work of PCC bed and provide a cement mix 1:4 base coat with water-proofing compound and above this fix rough shahabad tiles.
• Maintain the break joint pattern while fixing the tile for base.• After fixing the tiles, grout the joints with cement slurry completely.• Apply a jointless layer of cement mortar 1:3 25mm thick and cure it for 7
days.• For basement, provision of gutter and sump is made in PCC itself and
shahabad base is also prepared in the same fashion. Gutter is given proper slope towards the sump. This is done as a preventive measure against occasional entry of rain water into basement.
• After curing, provide the final jointless water-proof plaster coat in cement mortar 1:4 over the rough shahabad tiles.
Work procedure