labview profibus visa driver...
TRANSCRIPT

LabVIEW PROFIBUS VISA Driver DP-Master Getting Started
V1.29
25.09.2007
Project No.: 5303 Doc-ID.: LabVIEW PROFIBUS VISA Driver
COMSOFT

d:\windoc\icp\doku\os\lv-visa\version 1.29\gettingstarted_win_dp-master_e.doc
Revision History
Version Date Description V1.23 03.08.2006 Configurator II Download and Monitor/Modify V1.22 17.07.2006 Link to Configurator II changed V1.21 13.01.2006 Download tool upgrade V1.2 28.07.2005 Driver modification / Example update V1.1 01.06.2005 Express-VI modification / VI-Library update V1.0 14.12.2004 Initial Version
Approval
Version Quality Manager / Date Project Manager / Date
V1.29 (L. Merz)
(J. Kurpat)
COMSOFT GmbH Wachhausstraße 5a 76227 Karlsruhe, Germany Phone +49 721 9497 - 0 Fax +49 721 9497 - 129 Copyright 2007 by COMSOFT GmbH This document is protected by copyright. Reproduction, duplication, publishing, transfer or disclosure of the contents of this document are only permitted after prior written agreement has been obtained from COMSOFT GmbH.

ContentsLabVIEW PROFIBUS VISA Driver - Getting Started
COMSOFT V1.29 / 25.09.2007 i
Contents
1 Introduction .................................................................................................................. 1
1.1 Prerequisites: ....................................................................................................... 1
2 Installation.................................................................................................................... 1
3 PROFIBUS-DP configuration ....................................................................................... 3
3.1 PROFIBUS-DP configuration download.............................................................. 4 3.2 Configurator II Monitor/Modify mode ................................................................. 6
4 PROFIBUS-DP menu and example............................................................................... 7
4.1 PROFIBUS-DP-Master menu .............................................................................. 7
4.2 PROFIBUS-DP-Master example.......................................................................... 9
5 PROFIBUS-DP-Master Express VI............................................................................. 10
6 PROFIBUS-DPV1...................................................................................................... 13
6.1 Stand alone operation of the DF PROFI II board as DP Master Class 2 .............. 13
6.2 Initiate_Req ....................................................................................................... 14 6.3 Read_Req .......................................................................................................... 15
6.4 Write_Req ......................................................................................................... 17 6.5 Abort_Req ......................................................................................................... 18

List of Figures LabVIEW PROFIBUS VISA Driver - Getting Started
ii V1.29 / 25.09.2007 COMSOFT
List of Figures
Figure 1: Driver installation ................................................................................................... 1 Figure 2: Driver directory....................................................................................................... 2
Figure 3: Measurement and Automation explorer ................................................................... 2 Figure 4: Comsoft Configurator II.......................................................................................... 3
Figure 5: PROFIBUS-DP-Master menu ................................................................................. 7 Figure 6: PROFIBUS-DPV1 Services menu........................................................................... 7
Figure 7: PROFIBUS-DP-Master Express menu .................................................................... 8 Figure 8: PROFIBUS-DP-Master example front panel ........................................................... 9
Figure 9: PROFIBUS-DP-Master example block diagram...................................................... 9 Figure 10: DP-Master Express PROFIBUS .......................................................................... 10
Figure 11: DP-Master Express Monitor/Modify ................................................................... 11 Figure 12: DP-Master Express Diagnostic ............................................................................ 12
Figure 13: DP-Master Express VI ........................................................................................ 12 Figure 14: DPV1 Initiate_Req front panel ............................................................................ 14
Figure 15: DPV1 Read_Req front panel ............................................................................... 15 Figure 16: DPV1 Read_Req Success Tab front panel ........................................................... 16
Figure 17: DPV1 Write_Req front panel .............................................................................. 17 Figure 18: DPV1 Abort_Req front panel .............................................................................. 18

LabVIEW PROFIBUS VISA Driver - Getting Started
Introduction
COMSOFT V1.29 / 25.09.2007 1
1 Introduction This document describes the set into operation procedure of the DF PROFI II board as DP-Master.
1.1 Prerequisites: • A COMSOFT DF PROFI II and COMSOFT LabVIEW VISA driver for
Windows 2000/XP on CD.
• The National Instruments LabVIEW Development System installed on the Windows PC.
• Installed NI-VISA standard driver on the Windows-System.
2 Installation • Install the DF PROFI II board in the PC-System. • Switch on the PC-System. • Start the Setup from the COMSOFT driver CD delivered with the package. • Install the board driver software via the Windows “New hardware”- dialog which is
popped up automatically after the board was installed. Select the option to install the driver from the specify directory:
Figure 1: Driver installation

Installation LabVIEW PROFIBUS VISA Driver - Getting Started
2 V1.29 / 25.09.2007 COMSOFT
• Select the install directory of the driver software:
Figure 2: Driver directory
• Check by the NI MAX (Measurement & Automation explorer) the proper installation of the DF PROFI II board:
Figure 3: Measurement and Automation explorer
LabVIEW PROFIBUS VISA Driver - Getting Started
PROFIBUS-DP configuration
COMSOFT V1.29 / 25.09.2007 3
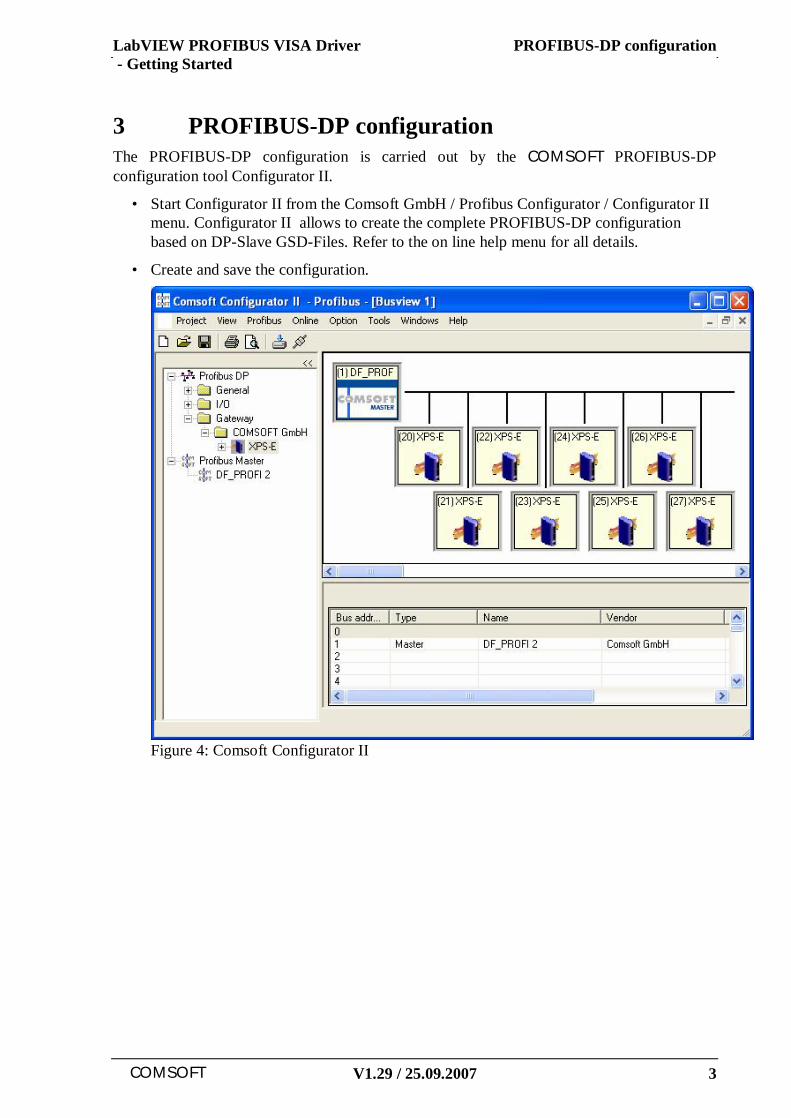
3 PROFIBUS-DP configuration The PROFIBUS-DP configuration is carried out by the COMSOFT PROFIBUS-DP configuration tool Configurator II.
• Start Configurator II from the Comsoft GmbH / Profibus Configurator / Configurator II menu. Configurator II allows to create the complete PROFIBUS-DP configuration based on DP-Slave GSD-Files. Refer to the on line help menu for all details.
• Create and save the configuration.
Figure 4: Comsoft Configurator II
PROFIBUS-DP configuration LabVIEW PROFIBUS VISA Driver - Getting Started
4 V1.29 / 25.09.2007 COMSOFT
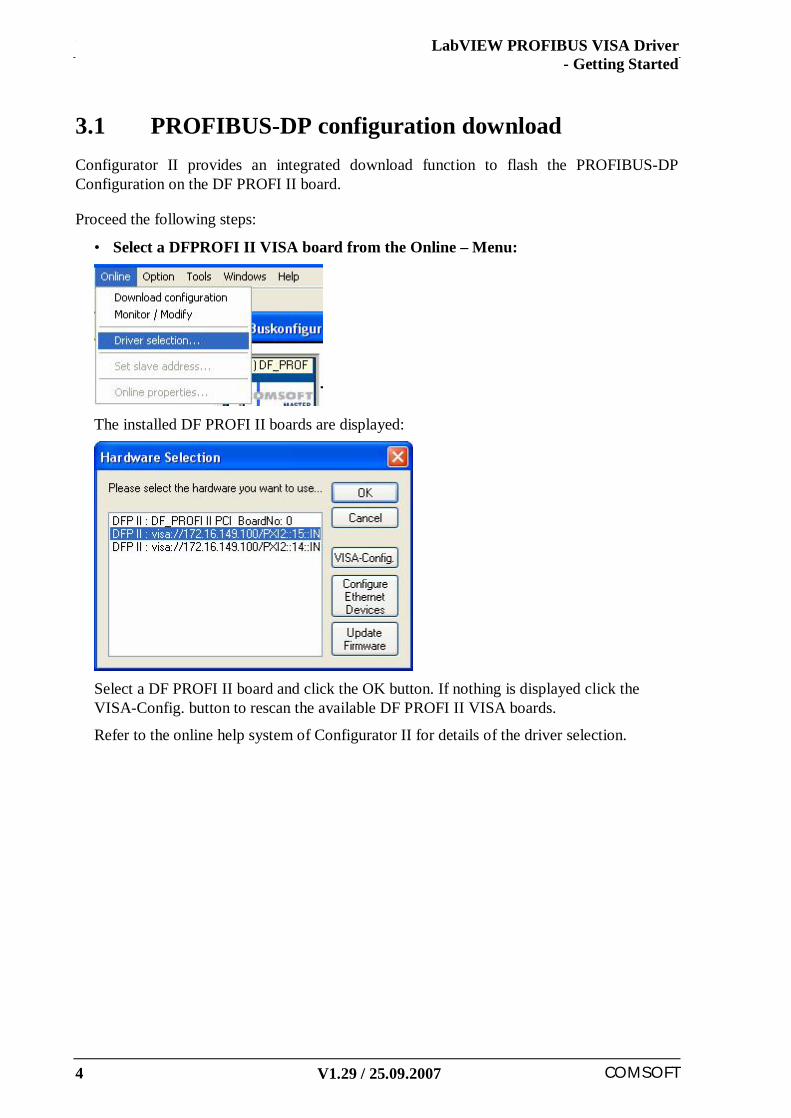
3.1 PROFIBUS-DP configuration download Configurator II provides an integrated download function to flash the PROFIBUS-DP Configuration on the DF PROFI II board.
Proceed the following steps:
• Select a DFPROFI II VISA board from the Online – Menu:
The installed DF PROFI II boards are displayed:
Select a DF PROFI II board and click the OK button. If nothing is displayed click the VISA-Config. button to rescan the available DF PROFI II VISA boards.
Refer to the online help system of Configurator II for details of the driver selection.

LabVIEW PROFIBUS VISA Driver - Getting Started
PROFIBUS-DP configuration
COMSOFT V1.29 / 25.09.2007 5
• Download the PROFIBUS-DP configuration
Click the Download Symbol in the tool bar of Configurator II :
The PROFIBUS-DP configuration is downloaded to the DF PROFI II board:

PROFIBUS-DP configuration LabVIEW PROFIBUS VISA Driver - Getting Started
6 V1.29 / 25.09.2007 COMSOFT
3.2 Configurator II Monitor/Modify mode With the Monitor/Modify mode of the Configurator II the flashed PROFIBUS-DP configuration can be tested immediately. Please note that the configured DP-Slaves must be connected to the DF PROFI II board.
Click the Monitor/Modify symbol of the Toolbar of Configurator II:
Configurator II displays the PROFIBUS-Network in Online mode:
Configurator II displays the status of every DP-Slave (coloured frame) and allows to monitor and modify the I/O data by clicking the DP-Slaves. For further details please refer to the online help system of Configurator II.

LabVIEW PROFIBUS VISA Driver - Getting Started
PROFIBUS-DP menu and example
COMSOFT V1.29 / 25.09.2007 7
4 PROFIBUS-DP menu and example The delivery package includes standard VIs to initialize the PROFIBUS and to access the DP-Slaves I/O and diagnostic data. For a successful communication see the PROFIBUS example program. Refer to the LabVIEW Context Help for details.
4.1 PROFIBUS-DP-Master menu The COMSOFT DF PROFI II menu is located in:
Ø User Libraries
Ø COMSOFT Library
Ø PROFIBUS VISA Driver
Ø DF PROFI II DP-Master
Figure 5: PROFIBUS-DP-Master menu
Ø DF PROFI II DPV1 Services
Figure 6: PROFIBUS-DPV1 Services menu

PROFIBUS-DP menu and example LabVIEW PROFIBUS VISA Driver - Getting Started
8 V1.29 / 25.09.2007 COMSOFT
For an easy access to a single DP-Slave a DP-Master Express VI is available. The Express VI can be found in the COMSOFT DF PROFI II menu under:
Ø DP-Master Express
Figure 7: PROFIBUS-DP-Master Express menu

LabVIEW PROFIBUS VISA Driver - Getting Started
PROFIBUS-DP menu and example
COMSOFT V1.29 / 25.09.2007 9
4.2 PROFIBUS-DP-Master example The DFP2_DP-MasterExample program shows all configured DP-Slaves, their communication state, the I/O-data and the diagnostic data:
Figure 8: PROFIBUS-DP-Master example front panel
The VIs block diagram shows the simple steps how to access the DP-Slaves.
Figure 9: PROFIBUS-DP-Master example block diagram

PROFIBUS-DP-Master Express VI LabVIEW PROFIBUS VISA Driver - Getting Started
10 V1.29 / 25.09.2007 COMSOFT
5 PROFIBUS-DP-Master Express VI
For an easy access to a single DP-Slave a PROFIBUS-DP-Master Express VI is available. If dropping the Express-VI to the block diagram a configuration dialog opens to enter the DF PROFI II board and the PROFIBUS address of the DP-Slave:
Figure 10: DP-Master Express PROFIBUS
LabVIEW PROFIBUS VISA Driver - Getting Started
PROFIBUS-DP-Master Express VI
COMSOFT V1.29 / 25.09.2007 11
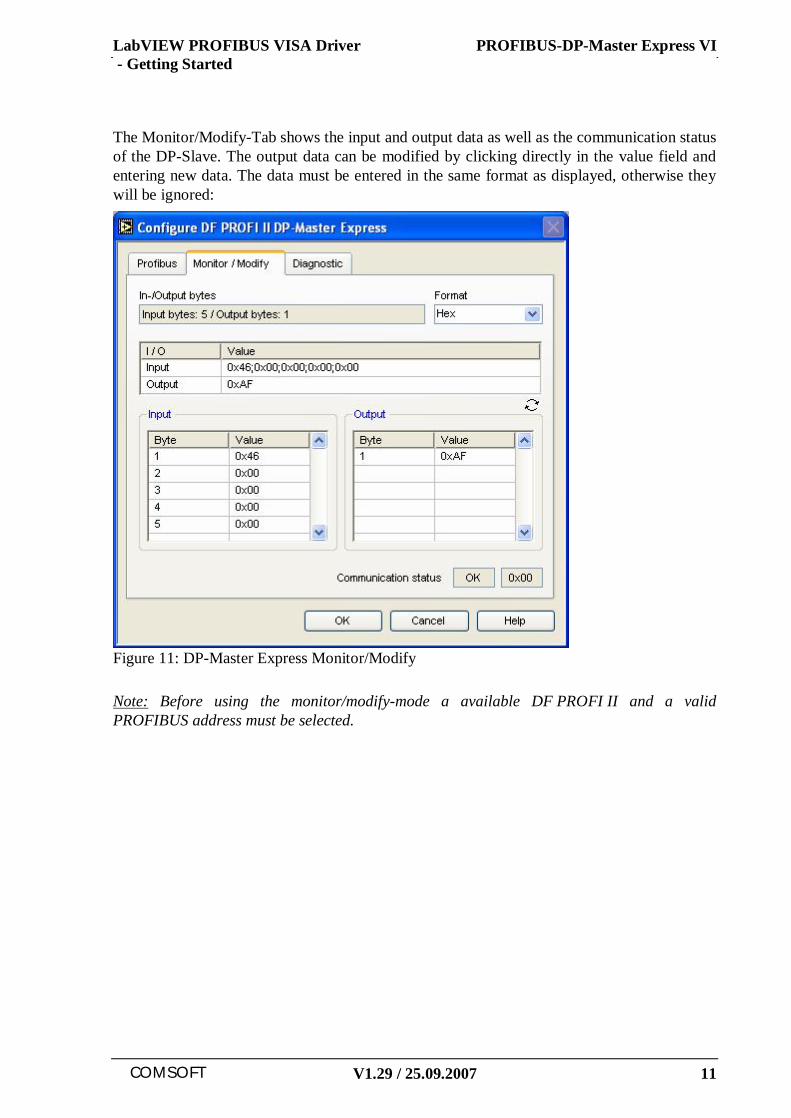
The Monitor/Modify-Tab shows the input and output data as well as the communication status of the DP-Slave. The output data can be modified by clicking directly in the value field and entering new data. The data must be entered in the same format as displayed, otherwise they will be ignored:
Figure 11: DP-Master Express Monitor/Modify
Note: Before using the monitor/modify-mode a available DF PROFI II and a valid PROFIBUS address must be selected.

PROFIBUS-DP-Master Express VI LabVIEW PROFIBUS VISA Driver - Getting Started
12 V1.29 / 25.09.2007 COMSOFT
The Diagnostic-Tab shows the diagnostic data transmitted by the DP-Slave. The data are displayed in clear text for the standard PROFIBUS diagnostic data and in hexadecimal format for the extended diagnostic data:
Figure 12: DP-Master Express Diagnostic
After configuration the PROFIBUS Express VI provides all necessary DP-Slave data:
Figure 13: DP-Master Express VI
To change the properties double click the Express VI

LabVIEW PROFIBUS VISA Driver - Getting Started
PROFIBUS-DPV1
COMSOFT V1.29 / 25.09.2007 13
6 PROFIBUS-DPV1 To access the DPV1 variables of a DP Slave the DF PROFI II board supports the acyclic DPV1 protocol as Master Class 2. To exchange acyclic data with a DP Slave the following steps are necessary:
• Start the cyclic data traffic with the DP Slaves
• Establish a DPV1 connection to the DP Slave (Initiate_Req)
• Read or Write acyclic DPV1 data (Read_req, Write_Req)
• Abort the DPV1 connection to the DP Slave
For the DPV1 data structure of the DP Slave refer to users guide of the DP Slave.
6.1 Stand alone operation of the DF PROFI II board as DP Master Class 2
The actual version of the PROFIBUS VISA driver board does still not support a stand alone operation as DPV1 Master Class 2. If the DF PROFI II board shall be used as DPV1 Master Class II a DPV0 configuration must be downloaded storing the correct DP Master configuration with one dummy DP Slave that is not existent.

PROFIBUS-DPV1 LabVIEW PROFIBUS VISA Driver - Getting Started
14 V1.29 / 25.09.2007 COMSOFT
6.2 Initiate_Req Establishes a DPV1 connection to the DP Slave.
Figure 14: DPV1 Initiate_Req front panel
• Select the DFP2 resource name and the PROFIBUS address of the DP Slave.
• Enter the value 1000 for the parameter Send timeout. Send timeout sets the internal timers for the connection monitoring and the response timeout. The Send timeout value is assigned in multiples of 10 mS, 1000 means 10000 mS or 10 s.
• Leave all other parameters unchanged.
• Run the VI. After the VI terminated, the status value in the Error out block must be set to a value of 87, what means that the DPV1 connection was successfully established to the DP Slave.

LabVIEW PROFIBUS VISA Driver - Getting Started
PROFIBUS-DPV1
COMSOFT V1.29 / 25.09.2007 15
6.3 Read_Req Reads a variable of a DP Slave DPV1.
The DPV1 variables of a DP Slave are selected by the parameters Slot number and Index. Refer to the documentation of the DP Slave for a detailed description of all available variables.
Figure 15: DPV1 Read_Req front panel
• Select the DFP2 resource name.
• Enter the identical value (1) for Communication ref as used for Initate_Req.
• Enter the Slot Number, Index and Length for the DPV1 variable to be read. To enter the DP Slave address is not necessary, this is decoded via the Communication ref parameter, which was assigned as 1 during connection setup.
• Run the VI. After the VI has terminated, the status value in the ErrorOut block must be set to a value of 94, what means that Data have been successfully read from the DP Slave.

PROFIBUS-DPV1 LabVIEW PROFIBUS VISA Driver - Getting Started
16 V1.29 / 25.09.2007 COMSOFT
• If you check the Data section in the Success tab the data read from the DP Slave are displayed.
Figure 16: DPV1 Read_Req Success Tab front panel

LabVIEW PROFIBUS VISA Driver - Getting Started
PROFIBUS-DPV1
COMSOFT V1.29 / 25.09.2007 17
6.4 Write_Req Writes a variable to a DP Slave DPV1.
The DPV1 variables of a DP Slave are selected by the parameters Slot number and Index. Refer to the DP Slave's documentation for a detailed description of all available DPV1 variables.
Figure 17: DPV1 Write_Req front panel
• Select the DFP2 resource name.
• Enter the identical value (1) for Communication ref as used for Initate_Req.
• Enter the Slot Number, Index and Length for the DPV1 variable to be written. To enter the DP Slave address is not necessary, this is decoded via the Communication ref parameter, which was assigned as 1 during connection setup.
• Enter the data to be written in the Data field. The length is automatically adjusted according to the entered data.
• Run the VI. After the VI has terminated, the status value in the Error out block must be set to a value of 95, what means that Data have been successfully written to the DP Slave.

PROFIBUS-DPV1 LabVIEW PROFIBUS VISA Driver - Getting Started
18 V1.29 / 25.09.2007 COMSOFT
6.5 Abort_Req Terminates the connection with a DP Slave.
Figure 18: DPV1 Abort_Req front panel
• Select the DFP2 resource name.
• Enter the identical value (1) for Communication ref as used for Initate_Req. To enter the DP Slave address is not necessary, this is decoded via the Communication ref parameter, which was assigned as 1 during connection setup.
• Leave all other parameters unchanged.
• Run the VI. After the VI has terminated, the status value in the ErrorOut block must be set to a value of 130, what means that the DP Slave is successfully disconnected.