kaeser compressor
DESCRIPTION
...TRANSCRIPT
, SERVICE MANUAL E
Screw Compressor
Model: SM 11/7,5 bar GL-Nr.: BA-SM11.L-1.9B23.80100-00 Index: 000215
Part No.: Serial No.:
Manufacturer:
KAESER KOMPRESSOREN GmbH
D-96410 Coburg' Postfach 2143 • Tel. (09561) 640-0 • Fax.(09561) 640-130
I I
I I I

II
I :1 "
Table of Contents Chapter - Page
1 Technical Specification ........................................ .
1.1 Compressor Package ................................................ . 1.2 Sound Pressure Level . ............................................... .
1.3 Motor ................................... ··· .. ················ .. · .. ·· 1.4 Power Supply ....................................................... .
1.5 Pressure Relief Valve' ................................................. . 1.6 Installation Req uirements ............................................. .
1.7 Oil Capacities ......... , .............................................. . 1.8 Recommended Coolant .............................................. .
1.9 Maintenance Interval for the Electric Motor .............................. .
1.10 Dimensional Drawing ................................................ .
2 Safety Regulations ............................................ .
2.1 Explanation of Symbols and References ................................ . 2.2 General Safety Instructions ........................................... . 2.3 Electrical Safety ..................................................... .
2.4 Spare Parts .................................................... : .... .
2.5 Compressed Air Installation ........................................... . 2.6 Environmental Protection ............................................. .
3 General ................. ..................................... .
3.1 Correct use ......................................................... . 3.2 Incorrect use ........................................................ . 3.3 Compressed Air Treatment ........................................... .
3.4 Copyright. ......................................................... ..
4 Transport ..................................................... .
4.1
4.2
Transport Instructions ................................................ .
Packaging .............................. ···························· .
5 Technical Description ......................................... .
5.1 Principle of Compression ............................................. . 5.2 Short Description .................................................... .
5.3 Pipe and Instrument Flow Diagram (P & I Diagram) ...................... .
5.4 DUAL Control ....................................................... . 5.5 QUADRO Control .................................................... .
5.6 VARIO Control Mode ................................................. .
6 Installation ................................................... .
6.1 Installation Requirements ............................................. . 6.2 Connection of the Compressed Air Supply .............................. . 6.3 Electrical Connection ................................................ .
1 - 1 1 - 1
1 - 1 1 - 1 1 - 2 1-2
1-2
1 - 2 1 - 3
1 - 3
1 - 3
2-5
2-5 2-5 2-6
2-6 2-7 2-7
3-8 3-8
3-8 3-8 3-8
4-9 4-9
4-9
5 -10
5 - 10 5 - 10
5 - 10
5 - 13
5 - 14 5 - 15
6 -16
6 - 16
6 - 17 6 - 17
i I ,
I ,.
I

7
Table of Contents Chapter - Page
Initial Start .................................................... 7 - 18
7.1
7.2
7.3
7.4
7.5
7.6
Points to be Observed before Initial Start ................................ 7 - 18
Points to be Observed before Starting the Compressor Package: ........... 7 - 18
Door Interlock Switch Check ........................................... 7 - 19
Direction of Rotation Check. . . . . . . . . . . . . . . . . . . . . . . . . . . . . . . . . . . . . . . . . . .. 7 - 21
Setting up the Motor Overload Trip ..................................... 7 - 21
Setting the Air Main Pressure Threshold . . . . . . . . . . . . . . . . . . . . . . . . . . . . . . . .. 7 - 21
7.7 Measures to be taken before Initial Start. . . . . . . . . . . . . . . . . . . . . . . . . . . . . . . .. 7 - 22
7.7.1 Pour a small quantity of oil into the air inlet port. . . . . . . . . . . . . . . . . . . . . . . . . .. 7 - 22
7.7.2 Running the compressor package in idle ................................ 7 - 22
7.8 Checklist. . . . . . . . . . . . . . . . . . . . . . . . . . . . . . . . . . . . . . . . . . . . . . . . . . . . . . . . . . .. 7 - 23
8 Operation............................ . . . . . . . . . . . . . . . . . . . . . . . .. 8 - 24
8.1 Control Panel ........................................................ 8 - 24
8.2 SIGMA controller ..................................................... 8 - 24
8.3 Emergency Stop Pushbutton ........................................... 8 - 24
8.3.1 Function keys .. . . . . . . . . . . . . . . . . . . . . . . . . . . . . . . . . . .. . . . . . . . . . . . . . . . . . .. 8 - 25
8.3.2 Light emitting diodes and plain text display .............................. 8 - 25
8.4 Compressor Package ON/OFF ........ . . . . . . . . . . . . . . . . . . . . . . . . . . . . . . . .. 8 - 26
8.5 Acknowledgement of Alarms. . . . . . . . . . . . . . . . . . . . . . . . . . . . . . . . . . . . . . . . . .. 8 - 26
8.6 Acknowledgement of Service Messages. . . . . . . . . . . . . . . . . . . . . . . . . . . . . . . .. 8 - 27
9 Maintenance .................................................. 9 - 28
9.1 Observe the following during all Maintenance and Servicing Work .......... 9 - 28
9.2 Regular Maintenance ................................................. 9 - 29
9.3 . Opening and Closing the Compressor Cabinet. . . . . . . . . . . . . . . . . . . . . . . . . .. 9 - 30
9.4
9.5
9.6
Checking the Tension of the V-belts .................................... 9 - 30
Changing the V belts. . . . . . . . . . . . . . . . . . . . . . . . . . . . . . . . . . . . . . . . . . . . . . . . .. 9 - 31
Cleaning or Renewing the Filter Mat .................................... 9 - 32
9.7 Cleaning or Renewing the Air Filter ..................................... 9 - 32
9.8 Servicing the Electric Motor. . . . . . . . . . . . . . . . . . . . . . . . . . . . . . . . . . . . . . . . . . .. 9 - 33
9.9 Checking the Pressure Relief Valve on the Oil Separator Tank. . . . . . . . . . . . .. 9 - 33
9.10 Venting the Compressor Package ...................................... 9 - 34
9.11 Oil Filter Change ..................................................... 9 - 35
9.11.1 Removal and replacement of the oil filter ................................ 9 - 35
9.12 Oil Top Up ........................................................... 9 - 36
9.13 Cleaning the Oil Cooler and Air Cooler .................................. 9 - 38
9.13.1 Removing and cleaning the oil/air cooler ................................ 9 - 38
9.14 Oil Change (Oil Separator and Oil Cooler) ............................... 9 - 40
9.14.1 Draining the oil using external pressure source ........................ · .. 9 - 41
9.14.2 Adding oil ........................................................... 9 - 42
9.14.3 Draining the all using own compressed air ............................... 9 - 42
9.14.4 Measures for putting back into operation ................................ 9 - 43
9.15 Changing the Oil Separator Cartridge .............................. . . . .. 9 - 43
ii
F ,
Table of Contents Chapter - Page
10 Spare Parts and After Sales Service ... . . . . . . . . . . . . . . . . . . . . . . . . .. 10 - 46
10.1 Service parts and expendable parts. . . . . . . . . . . . . . . . . . . . . . . . . . . . . . . . . . . .. 10 - 46 10.2 Service and Maintenance Agreement ................................... 10 - 47
11 Appendix ............................................ ·········· 11 - 48
11.1 Electrical Diag ram .................................................... 11 - 48
11.2 Record of Maintenance Work 11 - 64
.. ~
J'< ~ : I , :-",-
II iii I' ,
'II ,

1
1.1
1.2
1.3
Technical Specification
Technical Specification
Compressor Package
Model ........................................... SM 11
Permissible gauge working pressure ................... 7,5 bar
Operating temperature, approx ................... 75 - 100°C (related to the gauge working pressure and climatic conditions such as humidity in the air and ambient temperature).
Weight ............................................. 170 kg
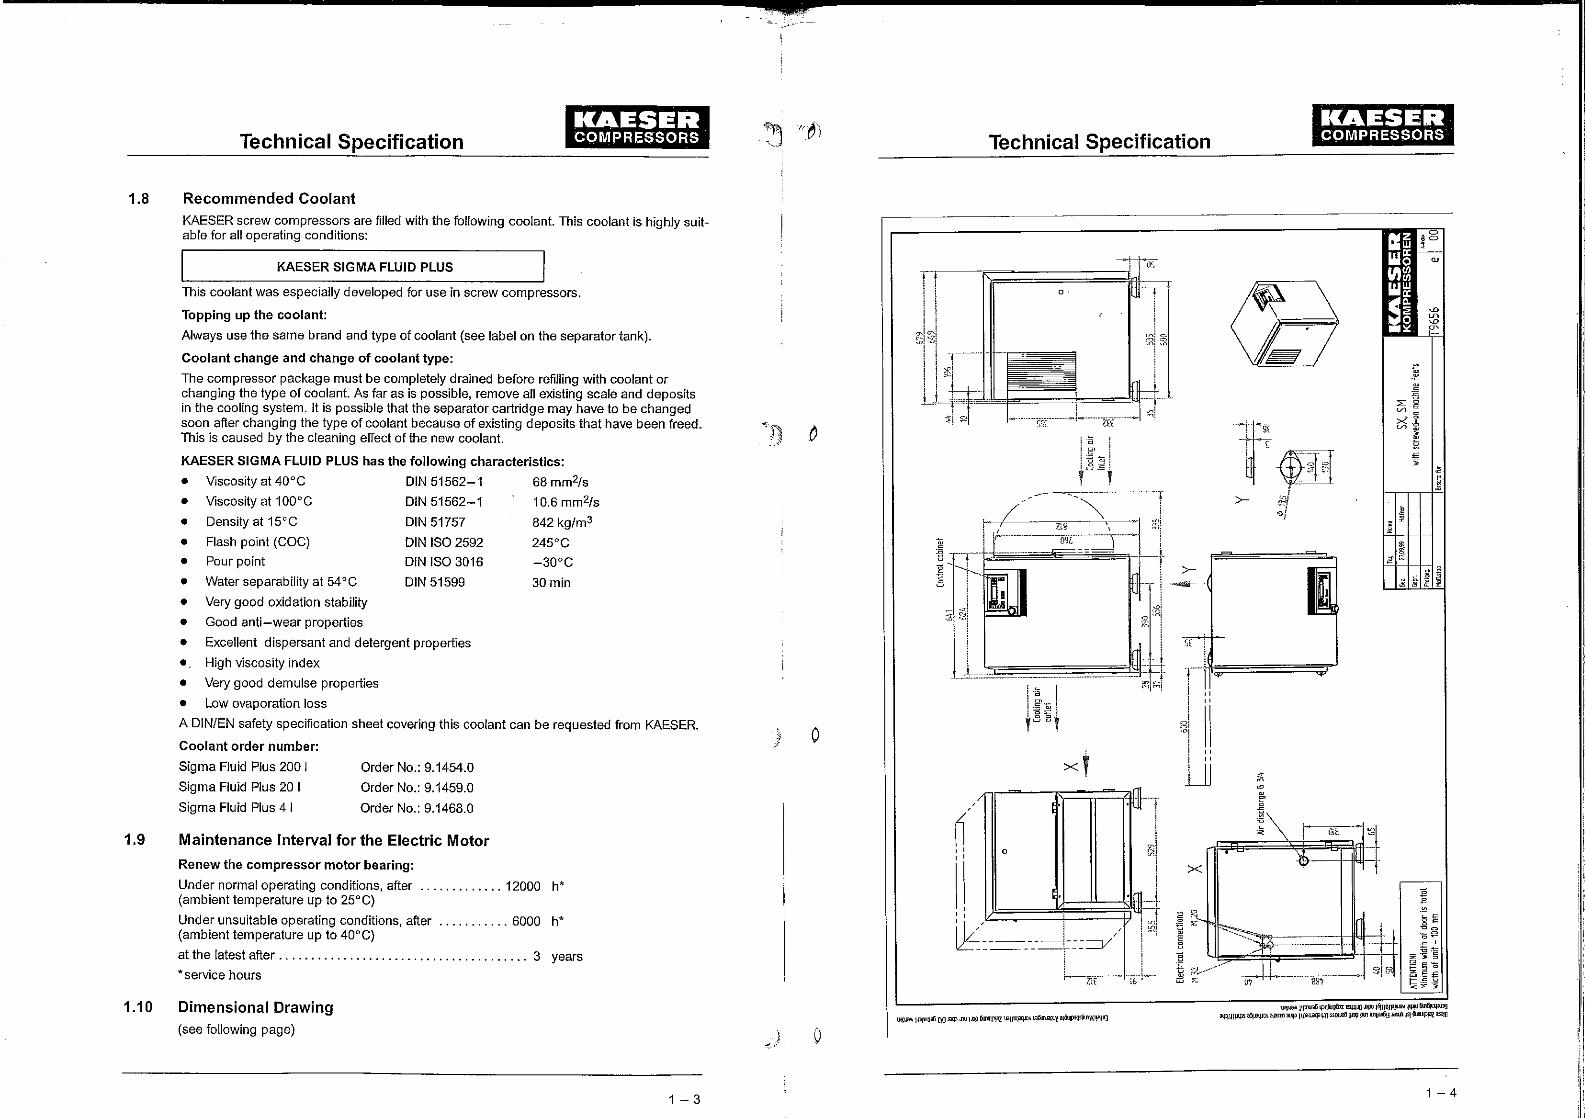
Drawings:
Dimensional drawing .............................. T 9656
P & I fiow diagram .................. FSM11STL-00018.00 (Pipework and instrument fiow diagram)
Electrical diagram ................... ···· SSM11-01021.00
Sound Pressure Level
Operational state of the compressor unit:
Full load, the compressor unit runs at: rated speed, rated pressure, rated capacity.
Setting up conditions:
Free field measurement
Measurement to CAGI/PNEUROP PN8 NTC 2.3:
Sound Pressure Level ................................. 69 dB (A)
Motor
Drive motor:
Rated power ........................................ 7,5 kW
Rated speed ....................................... 3600 min-1
Protection class .................................... IP 54
V-belt set:
Par! number. . . . . . . . . . . . . . . . . . . . . . . . . . . . . . . . . . .. 6.2510.0
1 - 1
It"
1.4
1.5
1.6
1.7
Technical Specification
Power Supply
(see chapter 6.3 for further details)
Mains voltage ....................................... 460 V 3~/PE
Freq uency ........................................... 60 Hz
Max. mains fusing (slowblow or gl class) ................ 20 A
Power supply cable cross-section .................. 4 x 2,5 mm2
(CU multicore cable)
Current flow. . . . . . . . . . . . . . . . . . . . . . . . . . . . . . . . . . . . . . . . .. 15 A
Pressure Relief Valve
Activating pressure ............................... , ....
Installation Requirements
9 bar
Max. height above sea level ......................... 1000 m
Min. ambient temperature ........... , ............ , .. , .. 3 °C
Max. ambient temperature ................... , ......... 40°C
Min. cooling air/inlet air temperature ..................... 3 °C
Max. cooling air/inlet air temperature .................... 40°C
Air inlet opening , ...................... , ............ . 0,2 m2
Exhaust air for solution A (see chapter 6.1):
Forced ventilation with exhaust fan .................... 2500 m3/h at 100 Pa
Exhaust air for solution B (see chapter 6.1):
Exhaust air used for space heating: Heating duct w x h . . . . . . . . . . . . . . . . . . . . . . . . . . . .. 200 x 355 mm
Oil Capacities Total oil capacity . . . . . . . . . . . . . . . . . . . . . . . . . . . . . . . . . . . .. .. 5 I
After oil change or after long period of storage
Amount required to top up the airend .................. 0,1 I
1- 2
Technical Specification
1.8 Recommended Coolant
1.9
1.10
KAESER screw compressors are filled with the following coolant. This coolant is highly suitable for all operating conditions:
KAESER SIGMA FLUID PLUS
This coolant was especially developed for use in screw compressors.
Topping up the coolant:
Always use the same brand and type of coolant (see label on the separator tank).
Coolant change and change of coolant type:
The compressor package must be completely drained before refilling with coolant or changing the type of coolant. As far as is possible, remove all existing scale and deposits in the cooling system. It is possible that the separator cartridge may have to be changed soon after changing the type of coolant because of existing deposits that have been freed. This is caused by the cleaning effect of the new coolant.
KAESER SIGMA FLUID PLUS has the following characteristics:
• Viscosity at 40°C DIN 51562-1 68 mm2/s
• Viscosity at 100 ° C DIN 51562-1 10.6 mm2/s
• Density at 15°C DIN 51757 842 kg/m3
• Flash point (COC) DIN ISO 2592 245°C
• Pour point DIN ISO 3016 -30°C
• Water separability at 54°C DIN 51599 30 min
• Very good oxidation stability
• Good anti-wear properties
• Excellent dispersant and detergent properties
• High viscosity index
• Very good demulse properties
• Low evaporation loss
A DIN/EN safety specification sheet covering this coolant can be requested from KAESER.
Coolant order number:
Sigma Fluid Plus 200 I
Sigma Fluid Plus 20 I
Sigma Fluid Plus 4 I
Order No.: 9.1454.0
Order No.: 9.1459.0
Order No.: 9.1468.0
Maintenance Interval for the Electric Motor
Renew the compressor motor bearing:
Under normal operating conditions, after ............. 12000 h* (ambient temperature up to 25°C)
Under unsuitable operating conditions, after ........... 6000 h* (ambient temperature up to 40°C)
at the latest after. . . . . . . . . . . . . . . . . . . . . . . . . . . . . . . . . . . . . .. 3 years
1< service hours
Dimensional Drawing (see following page)
1 - 3
o
o
Technical Specification
o
>---- i ~-
_-oi ~.f<'
!
J====___________ .. __ . ____ .cc - -I
><
/lll~---r;;:::=:::;;:::~·~--T fi' ! II ! I I a ~,i , '
!
, "
" "
\.1
II.
1 - 4

2
2.1
2.2
Safety
Safety Regulations
Read this service manual carefully and observe cautionary references before putting this compressor package into operation and before carrying out any maintenance.
Explanation of Symbols and References
I Attention! I
•
This symbol is placed before all references to safety where danger to life and limb can occur. It is especially important that these regulations are observed and that extreme care is taken. For their own protection, all other users must be informed of these safety regulations. Observe general safety and accident prevention regulations as well as the safety regulations laid down in this service manual.
This symbol is placed by text where considerable attention must be paid so that recommendations, regulations, references and correct sequence of work are adhered to and that damage andlor destruction of the compressor package andlor other equipment is prevented.
This symbol identifies environmental protection measures.
This symbol indicates operations to be carried out by the user.
This bullet identifies listings .
General Safety Instructions
I Attention! I
Work on power driven systems may only be carried out by trained or specialized personnel.
Work on electrical equipment in the compressor package may only be carried out by a trained electrician or trained personnel under the supervision of a trained electrician according to electrical engineering regulations.
Before work is carried out on electrical systems, carry out the following measures in the sequence shown.
1. Switch off the main switch
2. Ensure the main switch cannot be switched on again
3. Check that no voltage is present
Pipework under pressure should be vented or shut off if not stated otherwise in the service manual.
Any modification or conversion carried out without prior consultation with KAESER and without KAESER's prior written consent will invalidate the warranty.
Euro.pean Standards must be observed during installation, operation, maintenance and repair of the compressor package.
2-5
"';i\ , }
••
, 1 ~./
2.3
2.4
Safety
Valid national safety regulations must be complied with if the corresponding European Standards are nor yet incorporated into national legislation.
Users of compressor packages located outside the jurisdiction of European Standards are obliged to comply with the safety and accident prevention regulations concerning the compressor package that are valid in the country of use. If necessary, corresponding measures must be taken to ensure compliance with these national regulations before the compressor package is put into operation.
We also recommend observation of the following:
• •
• •
• • •
• •
Allow no open flame and flying sparks in the place of installation.
During any necessary welding on or near the compressor package ensure that sparks or high temperatures cannot cause fire or explosion.
Ensure that clean air without damaging impurities is fed to the compressor package.
Do not allow the maximum ambient temperature to be exceeded (see chapter 1.6), otherwise special measures must be agreed between the manufacturer and the customer.
Carry out oil changes according to the service manual.
Do not mix oils of different types.
Maintain and monitor the operating temperature to manufacturer's specifications to avoid build-up of condensate in the oil circulation.
Use only oils recommended by the manufacturer.
If maintenance work is carried out on any part of the oil circulation system, top up the oil in the oil separator tank to the maximum level, run the compressor and keep it under constant observation for a short period. Check the oil level again and top up with oil to replace the oil taken up by the piping and the cooling system.
• Change the filter cartridge in the oil separator tank as soon as the pressure drop across the cartridge reaches 1 bar. Check constantly.
Electrical Safety The electrical installati~n of the compressor package must conform to the requirements of European Standards EN 1012-1 and EN 60204-1. The regulations of the local electricity authority must also be complied with.
For this reason, the following measures must be carried out by the user to ensure the safe operation of the compressor package:
• Compressor packages fitted with a drive motor of 3 kW or above and a current rating of 16 amperes or above must be fitted with with a lockable main switch (see EN 60204-1, P 5.3) and mains fuses.
• The type of main switch used is dependent on the power consumption of the drive motor (see chapter 1.4 for value).
• The type of protective circuit breaker used is dependent on the starting characteristic of the drive motor.
• See chapter 1.4 for recommended cable cross-sections and fuses.
Spare Parts Original KAESER parts are designed and matched to meet the technical requirements of the air system. Only the use of original KAESER spare parts and KAESER SIGMA cooling oil guarantees safe and reliable operation.
2-6

2.5
2.6
Safety
Compressed Air Installation
If a compressed air installation is extended or changed, check the blowoff pressure of the pressure relief valves on the air receiver tanks and in the pipework before the new compressor package is installed.
If the blowoff pressure is too low, fit a pressure relief valve with correspondingly higher blowoff pressure.
Environmental Protection
Condensate drainage
The condensate accumulating during compression must be fed via a suitable drainage system into special canisters and disposed of according to environmental regulations.
Lubricants I consumable materials I replacement parts
Ensure that all lubricants, consumable materials and replacement parts accumulating during operation and servicing of the compressor package are disposed of according to environmental'regulations.
The following points must be observed when handling lubricating and cooling materials:
Avoid contact with skin and eyes. Do not inhale vapours and oil mist. Do not eat or drink when handling such materials. Fire, open flame and smoking are strictly forbidden.
2-7
;
3
3.1
3.2
3.3
3.4
o
General
Correct use
General
The service manual must always be available for use at the location of the compressor package.
The compressor package is intended solely for the purpose of generatin~ compressed air, Any other use is considered incorrect. The manufacturer cannot accept ~Iability for any consequential damage caused by such incorrect use; the user alone IS liable for any risks
ioou~. , II' d' Correct use of the compressor also encompasses adherence to the Insta alian, Isassem-bly, commissioning, operational and maintenance conditions laid down by the manufac-
turer.
This compressor package may only be used for industrial purposes.
Incorrect use
Never direct compressed air toward persons. Compres~ed air is a concentrated form of energy and as such is dangerous to hfe.
Compressed Air Treatment
Copyright
Never use compressed air from oil injected compressor ~ackag,:s for breathing purposes and production methods where the .alr has ~I~ect contact with food, without subjecting the compressed air to additional
treatment.
All rights reserved. No part of this publication may be reproduced or utilized in any form or by any mea~s~ , electronic or mechanical, including photocopying and microfilm, Without prior permission In writing from KAESER COMPRESSORS.
3-8
]

4
4.1
4.2
Transport
Transport
Transport Instructions
We recommend a fork lift truck or lifting equipment for transporting the compressor package to avoid damage to the cabinet and framework.
c;-
"'- A 1
f®
Packaging
min. 800mm
Attention: Do not exert any side forces on the compressor unit when transporting with lifting equipment!
A factor deciding the type of packaging is the transport route. The packaging conforms to regulations laid down by the German Federal Association of Wood, Pallet and Export Packaging (HPE), and by the German Machinery and Plant Association (VDMA), if not otherwise contractually agreed.
Dispose of packaging according to environmental regulations and recycle where possible.
4-9
i 'Iij)
5
5.1
5.2
5.3
o
Construction and Operation
Technical Description
Principle of Compression The stationary compressor package is fitted with a single stage, oil-injected airend. Two rotors the driven male rotor and the female rotor, both mounted in roller bearings, are fitted ;'n the airend. As the rotors rotate, air is drawn into the upper side through the inlet port and is compressed on the,lower side. The oil that is injected into the lower side absorbs heat generated by compression, prevents metallic contact between the rotors, seals the rotors and the housing from each other and also lubricates the roller bearings. The compressed air and oil mixture leaves the airend via the discharge port.
1
1 Drive shaft 2 Oil injection 3 Discharge port
2
Short Description
o
3
4 Male rotor 5 Female rotor 6 Air inlet port
The compressor block is driven via V-belts from an electric motor.
6
4 5
An oil separator cartridge is fitted into the oil separator tank allowing practically oil free
compressed air supply. The regulation of the compressor package ensures that compressed air is generated within set pressure limits.
A safety function protects the compressor package against failure of important systems through automatic shut-down.
The fan ensures ventilation of the compressor package and also sufficient cooling air for the air-cooled oil and air cooler.
Pipe and Instrument Flow Diagram (P & I Diagram)
(see following pages)
5 - 10

(]I
I ~ ~
(]I
I .~
'"
=
Dot... ,>:04.19'l9 a. ... b. Plau Gellf'. I'\;rtin
AodoNng 10.h.. I N ..... I No,",
2
2.1
3
4
4.1
4.2
5.2
6
6.1
6.2
6.3
6.6
6.9
1
Air inlet
G
--! 0 I
---------7-~--~
@ ! i ____________ :
0) 0) --.. --=---~ ~ ~----~ I I
o
@
o -<b
9
E/' ... t. durch, o ... t. rlit,
C>
J
Air filter
Inlet valve
Oil filler w'lth plug
Drive motor
Airend
Strainer
Pressure switch - Wrong direction of rotation
PT100 sensor
OiL separator tank
Pressure gauge
Hose coupling (oil end)
Hose coupling (air endl
Shut-off valve - Oil drain
Oil level sight glass: minimum/maximum oil level
Pressure relief valve
Compressed air outlet
Pi-I Diagram SM 11
9
10
11
12
13
16
17
18/19
20
21
59.1
L ____ _
@
FSM11STL-00018.00
,
~: '. __ .-d
...
O"il separator cartridge
Oil temperature controller
Oil fitter
Oil cooler
Minimum pressure check valve
Air cooler
Dirt trap
Nozzle
Combined control/vent valve
18 Control valve
19 Vent valve
Shut-off valve - Vent line
Silencer
Pressure measuring transducer Air main pressure
Blatt'
P+I OialJam le~end
~::. ~~u4.11'99 SM 11 FSM11STL-00018.00 Blatt z Gop,. Morrin ,.
And.rung O.tum N.... No,.. Er .. ~ dur<h, fro.I, fu~
(") o ::l II) -... t: (') ~ o ::l CI ::l C.
o "0 (1)
~ o ::l
""'" 'ill /~ __ J~
.,; .~
(') o ::l II) ... ... t: a 0' ::l CI ::l C.
o "0 (1)
a 0' ::l
J .~--~-.~.-~-.-= ... ~===,..,..,."....=~~====""""=====~ ==---'-_-C==-'=_ • __ .
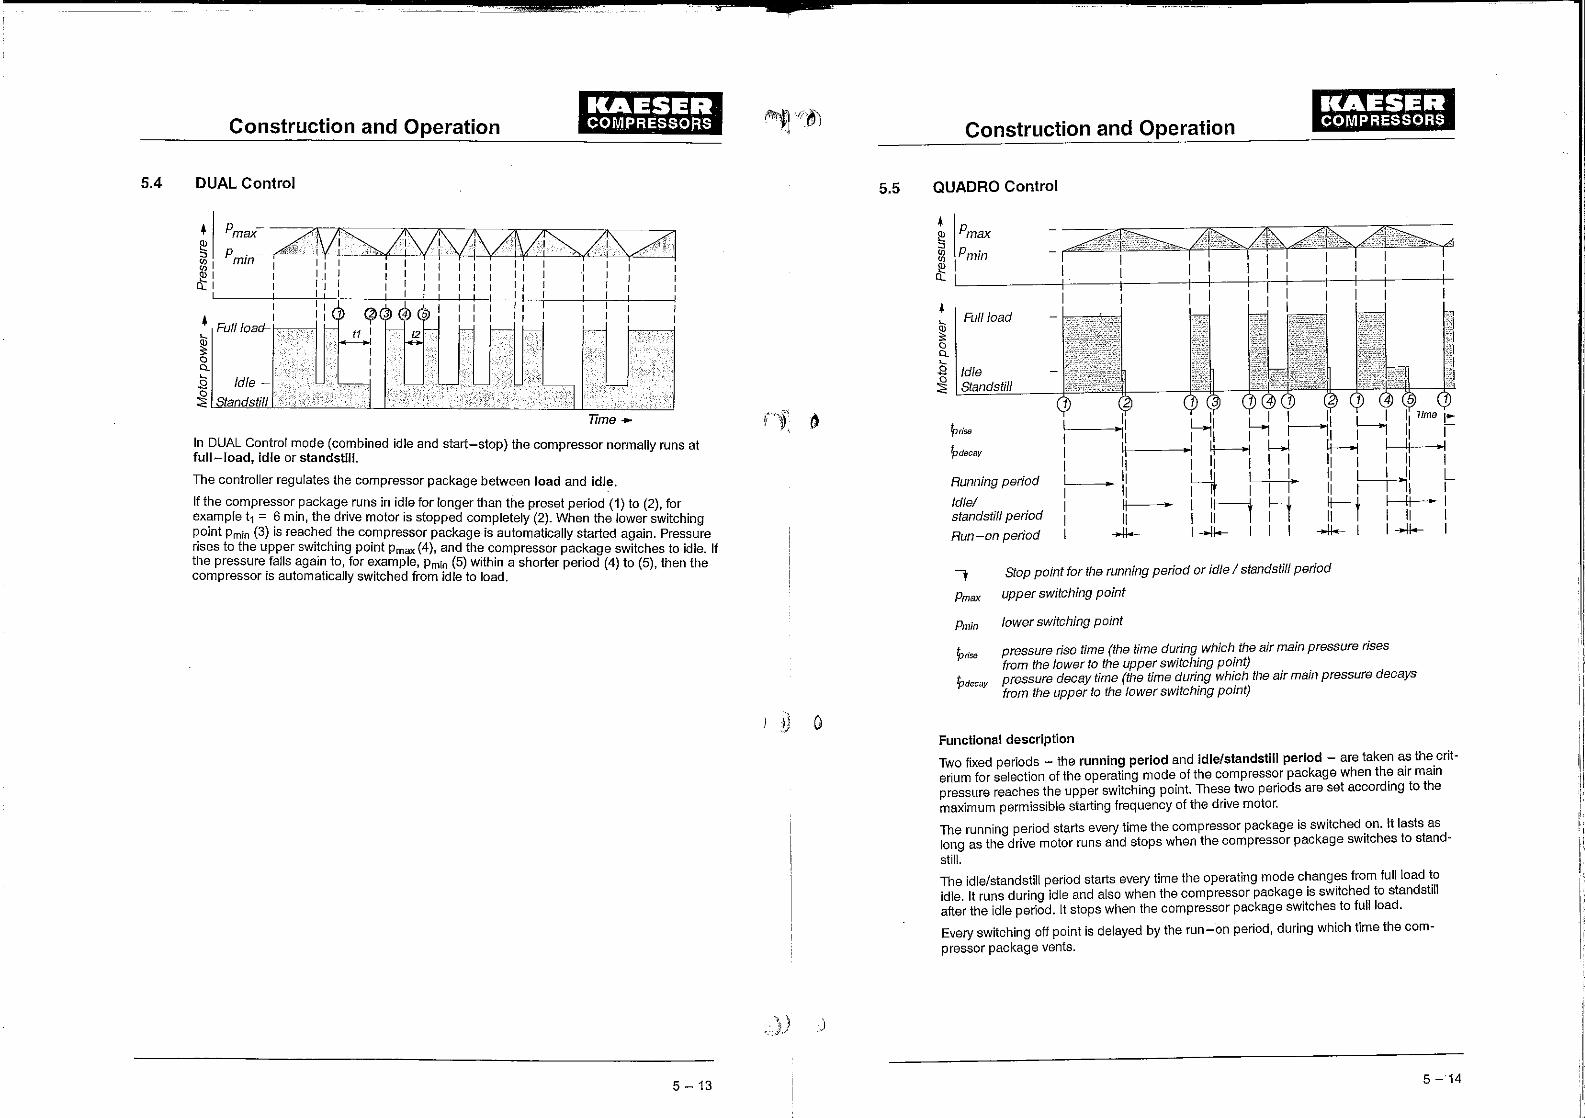
5.4
Construction and Operation
DUAL Control
~ :::= i£M~I1\Zf\IMK2l~/t\AI ~ I I : I : I I I I I I I " I .1 I I I ~ I ! 1.1 I I I I I I I I I, J I I J I Cl I I I I I I I I I I I I I I I I I
I I I, I ! I I I ! I I I I r I r I , I : I I I I I I I I I I I
• I I I I I I I I I I I Full load-~~-i
~ o Q
.8 Idle ~ . o
::?: Standstill Time ..
In DUAL Control mode (combined idle and start-stop) the compressor normally runs at full-load, idle or standstill.
The controller regulates the compressor package between load and idle.
If the compressorpackag~ runs in idle for longer than the preset period (1) to (2), for ex~mple t1 = 6 min, the drive motor IS stopped completely (2). When the lower switching ~olnt Pm!n (3) IS reached the compressor package is automatically started again. Pressure rises to the upper switching point Pmax (4), and the compressor package switches to idle. If the pressure falls again to, for example, Pm!n (5) within a shorter period (4) to (5) then the compressor is automatically switched from idle to load. '
5 - 13
5.5
-',
1)
Construction and Operation
QUADRO Control
• Pmax ~ :;, Pmin ~
~ I Cl I
Full load
Idle Standstill
~rise I TIme I_ I
~deCay I I
Running period I
• I I Idlel I I standstill period I I
Run -on period I --+l+- --+l+-
Stop point for the running period or idle I standstill period
Pmax upper switching point
Pmin lower switching point
~rise
ipdeCay
pressure rise time (the time during which the air main pressure rises from the lower to the upper switching point) pressure decay time (the time during which the air main pressure decays from the upper to the lower switching point)
Functional description
I I I L I I I I
Two fixed periods - the running period and idle/standstill period - are taken a~ the.criterium for selection of the operating mode of the compressor package when the air main pressure reaches the upper switching point. These two periods are set according to the maximum permissible starting frequency of the drive motor.
The running period starts every time the compressor package is switched .on. It lasts as long as the drive motor runs and stops when the compressor package sWitches to stand-
still.
The idle/standstill period starts every time the operating mode changes from full load to idle. It runs during idle and also when the compressor package is switched to standstill after the idle period. It stops when the compressor package switches to full load.
Every switching off point is delayed by the run-on period, during which time the compressor package vents.
5 -14 ., :.1' , .
I' I'

5.6
Construction and Operation
The following switching cycles are possible:
• If the air main pressure decays to the lower switching point, the compressor package switches to full load (1) irrespective of its previous operating mode. If the drive motor was at a standstill the opening of the inlet valve is delayed to allow an unloaded compressor package start.
• If the air main pressure rises to the upper switching point and the running period has already expired, the compressor package is switched off after the run-on period has expired (2).
• If the air main pressure rises to the upper switching point before the running period has expired then the pressure decay time of the previous switching cycle is taken as the criterium for the selection of the operating mode:
- If the pressure decay time tpd"ay was longer than the period set for the idle/standstill period, the compressor package is switched to standstill after the run-on period has expired (3).
- If the pressure decay time tpd"ay was shorter than the period set for the idle / standstill period, the idle mode is selected (4), that is, the inlet valve closes and the compressor is vented with running motor. When the running period expires the compressor package switches to standstill only after the run-on period has also expired (5).
VARIO Control Mode
Functional description:
The idle period is automatically lengthened or shortened by the variable idle control in relation to the number of motor starts. The number of motor starts during the preceding hour are measured.
A high switching frequency leads to longer idle periods. A low switching frequency leads to shorter idle periods.
5 - 15
6
6.1
Installation
Installation
Installation Requirements
I Attention! I Ensure that the compressor package is level. . . The floor must be solid with good loading characteristics. See chapter 1,. 1 for the weight of the compressor package.
Safe operation of the compressor package is only ensured if the ambient temperature remains within the limits stated in chapter 1.6).
If the compressor package is used in the open, take care that it is protected against the direct rays of the sun and against the ingress of dust and rain.
Install the compressor package as detailed in the following diagram. Keep to the minimum distances shown to allow free access to the compressor package.
Adequate ventilation of the compressor space is ensured only if the minimum values (see chapter 1.6) are adhered to.
Exhaust duct
1t B
h
B
Jt b
* Exhaust ventilator '- A
--- L - -- ..... -- '" a
CO
700 624
A a Ql
- . -- - 0')
--- ~ F
r-,-I "- min. , I \ 500 I \ I \
800
min. 2200
a a 1;: .s E
Air inlet opening
"""'-
....r:-8 1;: .s E
Meas urements in mm
6 - 16

6.2
6.3
Installation
Solution A: forced ventilation
The exhaust fan fitted in the compressor space must provide adequate ventilation relative to the size of the compressor package (see chapter 1.6).
Solution B: exhaust air used for space heating
The hot air is forced through a duct into the room to be heated.
I Attention! I The choice of exhaust air ducling, length of ducling and number of bends can affect the compressor cooling system and must be approved by the manufacturer.
Reliable, safe operation of the compressor package is only warranted if the temperature limits (see chapter 1.6) of the air in the compressor space are kept to.
Connection of the Compressed Air Supply
The unit is set up ready to operate. Connect the discharge outlet to the user pipework using a flexible connection hose.
Electrical Connection
The connection to the main power supply and the protective measures required are to be carried out by an authorized electrician to the requirements of European Standard EN 1012-1 and EN 60204-1 and to the regulations of the local electricity authority.
The compressor package is wired ready for connection to the main power supply as detailed In the electncal diagram. Feed the supply cable through the PG fitting on the base frame and the control cabinet (see chapter 1.10).
I Attenlion! I
I Attention! I
The user of a compressor is obliged to carry out the following measures:
Compressor packages fitted with a drive motor greater than 3 kWand a current rating greater than 16 ampere must be installed with a lockable main isolating switch and main fuses.
The type of main switch used is dependent on the power consumption of the drive motor (see chapter 1.4 for the value).
The type of protective power circuit breaker used is dependent on the starting characteristic of the drive motor.
~he cross-section of the supply cable and the fuse ratings are specified to DIN VDE 0100 part 430 and 523 for an ambient temperature of 30 'C. For other operating conditions, e.g. higher ambient temperatures or longer supply lines (over 50 m) check and determine the cross-section of the cable and the fuse ratings according to DIN VDE 0100 and local electricity authority regulations.
See chapter 1.4 for recommended cable cross-sections and fuses.
6 - 17
p~k/ti) ·-1 -
7
7.1
7_2
"l -:1<) 0
'T' I ).1 .' , f V
I nitial Start
Initial Start
Points to be Observed before Initial Start
Every compressor package is given a test run in the factory and carefully checked before shipment. The test run confirms that the compressor package conforms to the specification data and runs perfectly. However, independent of the checks made at the factory, the compressor package could be damaged during transport. For this reason, we recommend that the compressor package' is examined for such possible damage. Observe the compressor package carefully during the first hours of operation for any possible malfunction.
I Attention! I Important functional components in the compressor package (such as minimum pressure/check valve, pressure relief valve, inlet valve and combination valve) are adjusted and fitted to precise setting up regulations. Alterations to these components are not allowed without previous consultation with the manufacturer.
The minimum pressure/check valve, pressure relief valve and inlet valve are spring biased.
Points to be Observed before Starting the Compressor Package:
10"
•
• • •
•
•
•
NON-OBSERVANCE OF THESE OR OTHER INSTRUCTIONS (WARNING, ATTENTION) CAN LEAD TO ACCIDENTS CAUSING INJURY TO PERSONS OR DAMAGE TO EQUIPMENT.
The compressor package starts automatically after a power failure if the air main pressure is lower than the pressure set on SIGMA CONTROL.
Do not operate the compressor with open access doors as injury to persons could occur through the drive belts and electrical equipment.
Remove all packaging materials, tools and transport securing devices on and in the compressor package.
It is expected that the operator employs safe working techniques and that all lawful operating and safety regulations are followed when operating this compressor pack-age.
The user of this compressor package is responsible for its safe operating condition.
Do not operate this compressor package in spaces where very dusty conditions, toxic or inflammable gases could exist.
Do not connect the compressor package to a supply voltage other than that stated on the nameplate.
Do not install the compressor package in a space subject to freezing temperatures. The air temperature conditions at the air-intake must be complied with (see chapter 1.6).
If an exhaust air duct is installed, the cross section of the duct must be equal to or larger than the cooling air outlet of the compressor package and may not exceed the permitted pressure loss prescribed by the compressor manufacturer.
During installation of the compressor package, ensure that a distance of at least 0.5 m is kept between the air intake of the package and any wall.
7 - 18
I
I i
, I I
I I , I ~ i I !
I
I I
, I
I,

7.3
Initial Start
0" Check the oil level in the oil separator tank (see chapter 9.12).
• Check that the air end rotates in the correct direction (see chapter 7.4).
0" Check the tension olthe V-belts (see chapter 9.4).
0" The shut-off valve (6.6, see chapter 5.3) must be closed.
0" The shut-off valve (20, see chapter 5.3) must be open.
Carry out the following work only when power is removed from the compressor package.
Check ali screws on the electrical connections for tightness (carry out this check again after 50 operating hours).
• This compressor package is fitted with a running -in oil filter. Replace the filter after the running-in period 01200 hours has elapsed (see chapter 9.11).
Door Interlock Switch Check
1
Ii /;
1 I t
It is not permitted to operate the compressor package without a correctly functioning door interlock switch.
~
1
Door inter/ock switch
7 - 19
I])
Initial Start
Visual door interlock switch check
0" Check that the interlock switch operates smoothly by opening and closing the lefthand access door.
I Attention! I If the actuator (3) at the door interlock is incorrectly aligned, inadvertent shutdown of the compressor package can occur.
The actuator (3) should align with the door interlock switch (1) without binding against the sides of the interlock switch when the access door is closed. '
If necessary, re-align the actuator (3).
0" Loosen the bolts (4).
0" Align the actuator (3) so that it glides smoothly into the interlock switch (1).
0" If necessary, use shims to help align the actuator (3) with the interlock switch (1).
0" lighten the bolts (4) again.
1 Door inter/ock switch 2 Clamping nut 3 Actuating element
Functional check of the interlock switch
.~
4 Bolt 5 Frame 6 Access door
6
2
2 3
4
4 ~
5
1
I Attention! I A functional check of the door interlock switch must be made after initial start.
0" Start the compressor package (see chapter 8.4).
0" Open the left-hand access door - the compressor package will shut down immediately if the door interlock switch functions correctly.
0" Close the left-hand access door.
0" Reset the alarm message by pressing the acknowledge (reset) key (11, see chapter 8.3.1) on SIGMA CONTROL.
The compressor package is now ready to start again.
7 - 20
I I. , I.
I I
I
I I
1
,I II ., 'I il !I I
I: i
:1
II' i' . , .1

7.4
7.5
7.6
Initial Start
Direction of Rotation Check
I Attention! I The compressor package is wired for connection to a clockwise phase sequence.
A check of the direction of rotation can be made by testing the phase sequence.
Arrows showing the direction of rotation are located on the motorand on the air end housing.
If the direction of rotation is incorrect. change over the supply conductors L 1 and L2.
I Attention! I If the air end rotates in the wrong direction, the compressor package is automatically shut down by the pressure switch (4.2, see chapter 5.3).
Setting up the Motor Overload Trip
Disconnect the supply voltage to the compressor package by switching off and locking out the main switch before any adjustments are carried out on the compressor package. See chapter 2.3 for the main switch.
The trip is set to the standard adjustment at the factory.
Compressor motor: star- delta start
In the star-delta configuration the phase current is fed via the motor overload trip. This phase current is 0.58 times the rated motor current.
See motor nameplate for the rated motor current.
Value:
To prevent the overload circuit breaker from triggering (because of voltage fluctuations, temperature influences or component tolerances), the set value can be up to 15% higher than the arithmetical phase current.
1
2
1 Motor phase current adjustment 2 Reset button
Setting the Air Main Pressure Threshold
The air main pressure threshold is preset at the factory. It can be changed in SIGMA CONTROL to match customer's operational requirements if the password is known. For further details, consult the SIGMA CONTROL service manual.
7 - 21
1
7.7
7.7.1
r,)~ ~ ;
I
7.7.2
Initial Start
Measures to be taken before Initial Start
Take the following measures before initial start, after an oil change or a shutdown period of three months or longer:
Pour a small quantity of oil into the air inlet port.
Switch off and lock out the main switch.
Do not add oil unless the compressor package is completely vented.
See chapter 9.10 to vent the compressor.
u Unscrew the filler plug (1) on the inlet valve (2) and pour the prescribed quantity of oil (see chapter 1.7) into the airend.
u Turn the airend counterclockwise by hand using the belt pulley.
u Screw the plug back in again.
I Attention! I This oil must be of the same type as used to run the compressor {see label near the oil filler plug on the oil separator tank}.
If no additional oil is available then remove the required amount of oil from the oil separator tank. See chapter 9.14 for this procedure.
If the compressor package was shut down for longer than 12 months, further measures must be taken before putting it back into operation. Consult the manufacturer first.
u Open the shut-off valve between the compressor package and the air main.
1 Rller plug 2 Inlet valve
Running the compressor package in idle
At initial start run the compressor package in idle for 20 seconds by pressing the load/idle key (5, see chapter 8.3.1).
This measure ensures that the compressor package has sufficient time to flood the oil circulation.
7 -22 !

7.8
---I
Initial Start
Checklist
u Is the floor at the place of installation solid and level?
OyesOno
u Is the space large enough for the compressor package or its components?
o yes 0 no
u Are inlet and exhaust air apertures available in sufficient size and number?
o yes 0 no
u Are all components of the compressor package easily accessible?
o yes 0 no
u Is the power supply cable of sufficient cross-section? (have electrical connection carried out by qualified electrician or company familiar with local conditions)
o yes 0 no
u Is a shut off valve fitted by the user?
o yes 0 no
u Is a flexible connecting hose or axial compensator fitted between the compressor package and the air main?
o yes 0 no
u Have all screws, bolts and electrical connections been checked for tightness?
o yes 0 no
u Has the oil level in the oil separator been checked?
OyesOno
u Is a main switch fitted (suited to the motor starting characteristics)?
o yes 0 no
u Has the setting of the drive motor overload current trip been checked?
OyesO no
u Have you ensured that there are no other air components located in the exhaust air flow of the compressor package?
o yes 0 no
u Have service personnel been instructed on safety regulations?
o yes 0 no
7 - 23
I
8
8.1
8.2
8.3
Operation
Operation
Control Panel
1
2
1 SIGMA CONTROL 2 EMERGENCY STOP pushbutton
SIGMA controller
The SIGMA controller (1) is fitted in the control cabinet in the compressor package and serves as the control panel. It has 11 keys and 9 LEDs. Operation of the compressor package is determined by the settings programmed into the controller.
Further details on individual function keys, LEDs and plain text display relating to possible alarms and service messages, display of events, etc. are given in the service manual supplied for the SIGMA CONTROL controller.
Emergency Stop Pushbutton
The Emergency Stop pushbutton shuts down the compressor package immediately.
If the Emergency Stop pushbutton is pressed because of an existing hazard, then this must be eliminated before the compressor package is reset. To accomplish this the following procedure must be carried out:
u Unlatch the Emergency Stop pushbutton by turning in the direction of the arrows.
u Acknowledge the alarm message on the controller by pressing the acknowledge (reset) key. (function keys see chapter 8.3.1.)
8 - 24
'I
II II ,! ;1
i: !! 'i I
I
I ~ I i I
II I I
I 'I '! !:
I
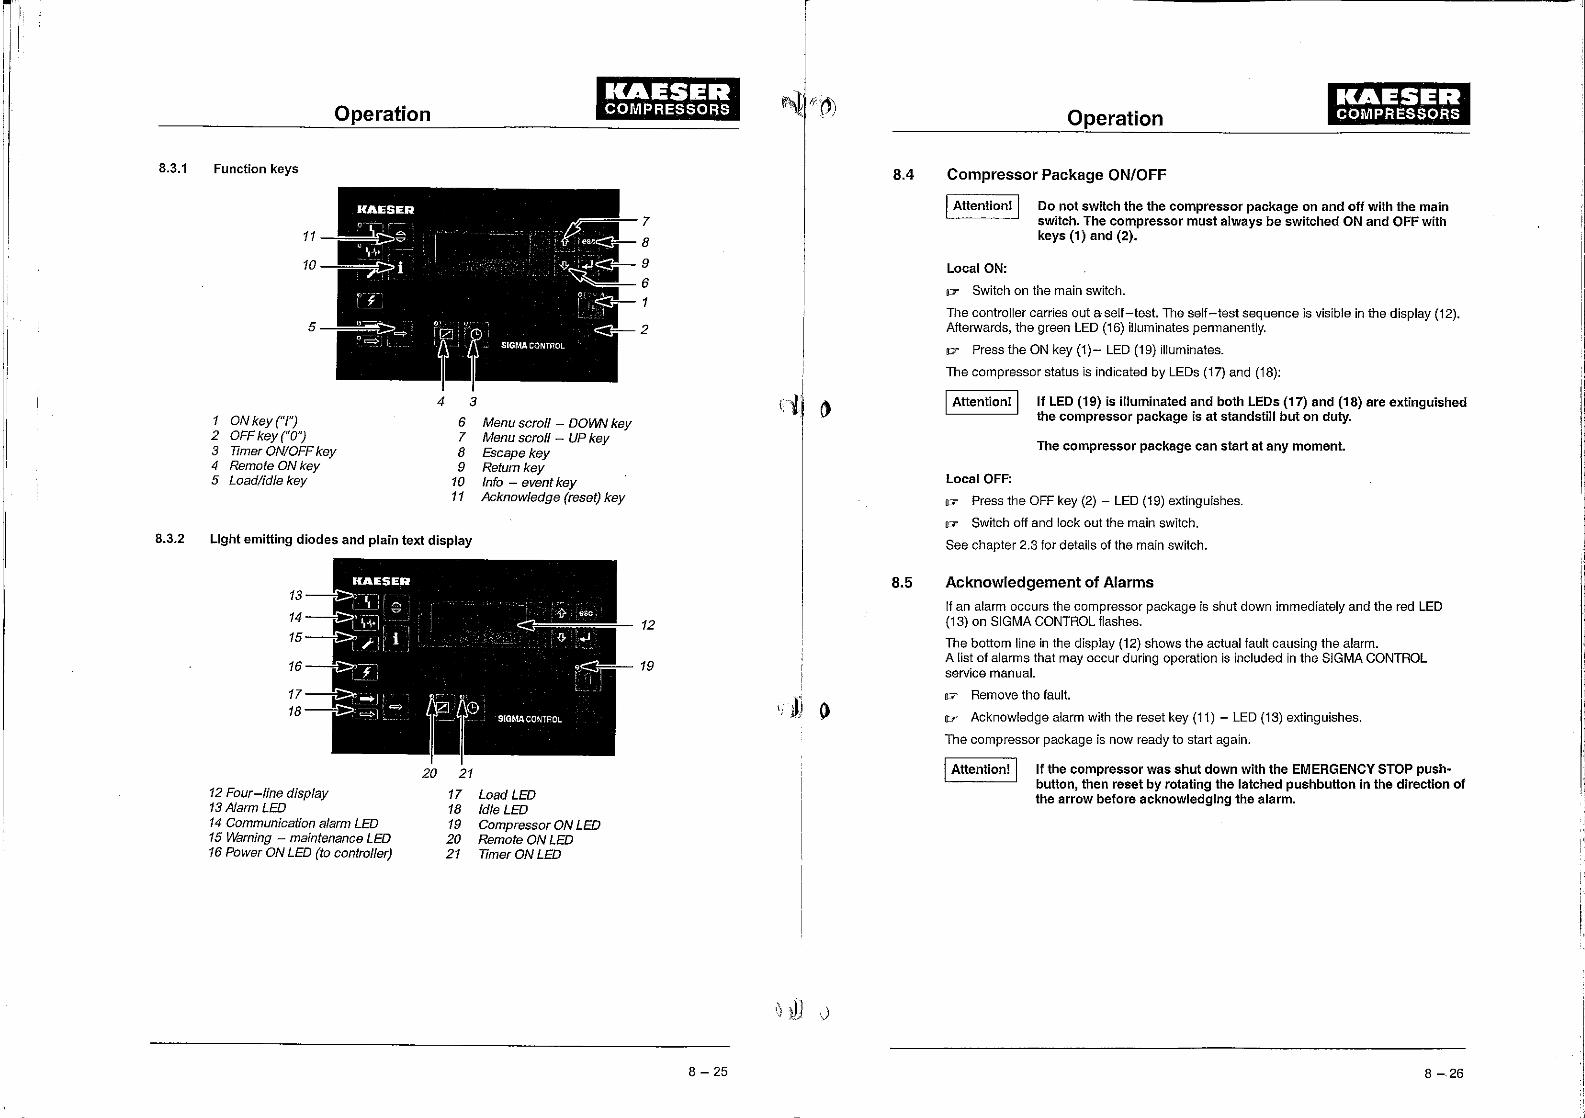
8.3.1
8.3.2
Function keys
11
10
5
Operation
4 3
1 ON key ("I"') 6 2 OFF key ("0") 7 3 TImer ON/OFF key 8 4 Remote ON key 9 5 Load/idle key 10
11
Light emitting diodes and plain text display
13
14 15
16
17 18
20 21
Menu scroll - DOVVN key Menu scroll - UP key Escape key Return key Info - event key Acknowledge (reset) key
12 Four-line display 13 Alarm LED
17 Load LED 18 Idle LED
14 Communication alarm LED 15 Warning - maintenance LED 16 Power ON LED (to controller)
19 Compressor ON LED 20 Remote ON LED 21 TImer ON LED
7
8
9
6
1
2
12
19
8.4
8.5
I;J) ()
J
8 - 25
Operation
Compressor Package ON/OFF
I Attention! I Do not switch the the compressor package on and off with the main switch. The compressor must always be switched ON and OFF with keys (1) and (2).
Local ON:
u Switch on the main switch.
The controller carries out a sell-test. The sell-test sequence is visible in the display (12). Afterwards, the green LED (16) illuminates permanently.
u Press the ON key (1)- LED (19) illuminates.
The compressor status is indicated by LEDs (17) and (18):
I Attention! I If LED (19) is illuminated and both LEOs (17) and (18) are extinguished the compressor package is at standstill but on duty.
The compressor package can start at any moment.
Local OFF:
u Press the OFF key (2) - LED (19) extinguishes.
u Switch off and lock out the main switch.
See chapter 2.3 lor details 01 the main switch.
Acknowledgement of Alarms
II an alarm occurs the compressor package is shut down immediately and the red LED (13) on SIGMA CONTROL flashes.
The bottom line in the display (12) shows the actual lault causing the alarm. A list 01 alarms that may occur during operation is included in the SIGMA CONTROL service manual.
u Remove the lault.
u Acknowledge alarm with the reset key (11) - LED (13) extinguishes.
The compressor package is now ready to start again.
I Attention! I If the compressor was shut down with the EMERGENCY STOP pushbutton, then reset by rotating the latched pushbutton in the direction of the arrow before acknowledging the alarm.
8 -,26
I ,I I·
II I , ,
I 'i
I
'I I
I ! 'I II I !
i; ,i "
i.1
i
I'
I 'I! .:, " :i
.11

8.6
Operation
Acknowledgement of Service Messages
When maintenance is due the yellow LED (15) on SIGMA CONTROL flashes.
I Atlention! I Before any maintenance is due an initial warning is displayed to allow coordination of service and maintenance personnel and provision of necessary servicing materials. (lubricants, spare parts, etc.).
Maintenance due is shown in the display (12). A list of service messages that may occur during operation is included in the SIGMA CONTROL service manual.
P" Carry out the maintenance work.
P" Acknowledge service message with the reset key (11) - LED (15) extinguishes.
I Atlention! I When the respective maintenance has been carried out, the remaining interval period (programmed interval until the next maintenance is due) must be reset.
Detailed information on resetting service counters is to be found in the service manual for SIGMA CONTROL.
8 - 27
9
9.1
o
o
Maintenance
Maintenance
Observe the following during all Maintenance and Servicing Work
I Attention! I
Work On power driven systems may only be carried out by trained or specialized personnel.
Work on electrical equipment may only be carried out by a qualified electrician or trained personnel under the supervision of a qualified electrician according to electrical engineering regulations.
The compressor package restarts automatically after a power failure (standard setting). Condition: the air main pressure is lower than the pressure set on the SIGMA CONTROL.
Switch off and lock out the main switch before attempting any maintenance work (see chapter 2.3 for the main switch).
Ensure that no maintenance personnel are working on 'the compressor package, that all panels are screwed back on again and that all access doors are closed before starting the compressor.
See chapter 8.4 to start the compressor package.
The venting nozzle required to vent the oil separator tank (for maintenance work such as topping up the oil, oil change and filter change) is fitted to the hose coupling (3, see chapter 9.10).
Carry out a visual and functional check of the door interlock switch after any maintenance and servicing work.
See chapter 7.3 for details.
The following points must be observed when handling lubricating and cooling materials:
Avoid contact with skin and eyes. Do not inhale vapours and oil mist. Do not eat or drink when handling such materials. Fire, open flame and smoking are strictly forbidden.
Ensure that all lubricants, consumable materials and replacement parts accumulating during operation and servicing of the compressor pa"ckage are disposed of according to environmental regulations.
9 - 28
I Iii ii I' , I I

9.2
Maintenance
Regular Maintenance
Interval Work to be done See chapter
24 h after initial start Check the tension of the V-belts 9.4
50 h after initial start . Check all electrical connections for tightness
200 h after initial start Change the oil filter 9.11
Weekly Check the oil level 9.12
Check the filter mats for clogging 9.6
500 h Check the tension of the V-belts 9.4
Clean the air filter' 9.7
1000 h Check the oil cooler and air cooler for clogging 9.13
Clean or renew the filter mats' 9.6
2000 to 3000 h or an- Change the oil filter' 9.11 nually at the latest
Change the air filter' . 9.7
8000 to 9000 h" Change the oil' 9.14
Change the oil separator cartridge' 9.15
Annually Check all electrical connections for tightness
Check the pressure relief valve 9.9
6000/12000 hours or Have the compressor motor bearings renewed 9.8 after three years at the by the KAESER Service' latest
• The maintenance period can vary depending on the motor switching frequency and environmental conditions .
•• Only applies to Sigma Fluid Plus (see label on oil separator). If other oils are used contact an authorized KAESER service agency. National regulations concerning oil changes must be strictly adhered to.
We urgently recommend that a record is kept of all servicing done (see chapter 11.2) and that the compressor package - especially safety devices - are checked annually by an authorized KAESER service agency.
9 - 29
9.3
o
9.4
\)
Maintenance
Opening and Closing the Compressor Cabinet
To open:
It>" Open the access door (1).
It>" Pull the locking lever (3, photo A) outwards, turn 90' in the direction of the arrow and latch onto the frame.
It>" Lift the panel (2) and remove.
To close:
It>" Turn the locking lever (3) to its initial position.
It>" Attach the panel (2) making sure that it latches.
It>" Close the access door (1).
Close all access doors and panels correctly before starting the compressor package.
1 Access door 2 Cover panel 3 Unlocking lever
Checking the Tension of the V-belts
3
It>" Switch off the compressor package (see chapter 8.4).
A
Switch off and lock out the main switch to prevent accidents during maintenance.
Check the tension of the V-belts after the first 24 hours of operation and then every 500 hours of operation.
9 - 30
, ,I ~

9.5
Maintenance
~~~+--2
1 Hexagonal nut 2 Hexagonal nut 3 Marking pin
1
ol-c:--- 3
The V-belt tension is automatically adjusted within a limited range by the pressure spring of the belt tensioning device.
Re-tension the V-belts if they have stretched to the point where the marking pin (3) is located at the top end of its indicator slot.
D' Loosen the hex nut (2).
OJ Re-tension the V-belts with the hex nut (1) until the marking pin (3) is located at the bottom end of its slot.
D' lighten the hex nut (2).
Changing the V belts
D' Switch off the compressor package (see chapter 8.4).
Switch off and lock out the main switch to prevent accidents during maintenance.
D' Loosen the hex nut of the swing frame adjustment (2, see chapter 9.4)
D' Screw the hex nut (1, see chapter 9.4) until the V-belts are loose.
D' Remove the V-belts.
I Attentionl I It is essential that replacement belts are all precisely the same length (each set) and absolutely oil- proof. For this reason we recommend that only original KAESER drive belts are used.
[>" Place the new V-belts over the motor and compressor pulleys without straining them.
D' Set the V-belt tension (see chapter 9.4).
I Attentionl I Check the V-belt tension after two hours of operation and then again after 24 hours of operation, as experience shows that the belts stretch mostly during this period.
9 - 31
9.6
Of)
u
9.7
Maintenance
Cleaning or Renewing the Filter Mat
Check the filter mat weekly for clogging and clean, or renew if necessary as detailed in the regular maintenance table (see chapter 9.2) .
D' Switch off the compressor package (see chapter 8.4).
Switch off and lock out the main switch to prevent an accidental compressor run.
~--1
'---- 2
1 Riter mat 2 Holding frame
D' Remove the holding frame.
D' Open and close with a screwdriver.
D' The clamping frame sits securely after turning the snap fasteners by a 14 turn.
Cleaning:
Rinse the mat in water of approximately 40°C, if necessary with a mild washing powder. The mat can also be tapped with the palm of the hand, cleaned with a vacuum cleaner or blown out with compressed air. Rinse out oily dust with warm water using a mild solvent additive.
I Attention! I If the mat is heavily soiled or has been cleaned often (max. 5 times), replace it.
Cleaning or Renewing the Air Filter
Clean the air filter after every 500 service hours.
D' Stop the compressor unit (see chapter B.4).
Switch off and lock out the main switch to prevent an accidental compressor run.
9 - 32

9.8
Maintenance
1 Air filter 2 Air filter cap 3 VWng nut for opening air filter housing 4 Air filter cartridge
To open the air filter housing:
[7 Unscrew the wing nut (3) and remove the air filter cap (2) and the filter cartridge (4).
[7 Clean the air filter cap and sealing surfaces.
Cleaning the air filter cartridge (4) by tapping:
[7 Tap the air filter cartridge several times on the front with the ball of the hand.
I Attention! I Do not use force otherwise the air filter cartridge may be damaged.
[7 Clean all sealing surfaces.
Cleaning the air filter cartridge with compressed air:
[7 Blow dry compressed air at a pressure of not more than 5 bar at a slant from the inside to the outside of the air filter cartridge surfaces.
I Attention! I Do not clean the air filter cartridge with fluids. If the air filter cartridge is heavily contaminated or was already cleaned several times (max. five times). renew.
To close the filter housing:
[7 Insert the filter cartridge (4) and replace the air filter cap (2).
[7 Screw on the wing nut (3) tightly.
Servicing the Electric Motor
Compressor motor:
The electrical motor bearings are permanently greased.
I Attention! I Have the motor bearings replaced using the KAESER Service in accordance with the maintenance schedule (see chapter 1.9).
9.9 Checking the Pressure Relief Valve on the Oil Separator Tank To check the operating pressure of the pressure relief valve the final pressure of the compressor package must be increased above the pressure parameter entered in the controller.
See chapter 1.5 for the operating pressure of the pressure relief valve.
I Attentionl I The pressure relief valve must be checked by an authorized KAESER service agency when the interval quoted in the regular maintenance table (see chapter 9.2) has expired.
Detailed information is to be found in the service manual for SIGMA CONTROL.
9 - 33
9.10
o
Maintenance
Venting the Compressor Package
[7 Shut down the compressor package (see chapter 8.4).
Switch off and lock out the main switch to prevent an accidental compressor run.
[7 Close the shut-off valve between the compressor package and the air main.
The oil circulation vents automatically.
Venting the oil separator tank:
2
3
4
1
5
9
7
10
11
6
1 Shut - off valve 4 Filler plug 8 Screwed sealing plug A shut (oil top - up) (oil cooler) Bopen 5 Oil separator tank 9 Shut -off valve - oil drain
2 Pressure gauge 6 Plug - in nipple 10 Hose coupling 3 Hose coupling 7 Oil level mini -/maximum 11 External pressurization
[7 The pressure gauge on the oil separator tank must indicate zero bar.
Oil mist can escape when the oil separator tank is vented.
[7 Insert the nipple (6) in the hose coupling (3) on the oil separator tank (the residual pressure in the oil separator tank escapes).
[7 Remove the nipple (6) from the hose coupling (3).
9 - 34
, .1

! i
9.11
Maintenance
Venting the air-cooler:
When the compressor package is vented, the air-cooler and the pipework up to the minimum pressure check valve are still under pressure. For this reason the compressor package must be isolated from the air main (close the user's shut-off valve). If a shut-off valve is not available, vent the air main completely.
u Carefully remove the pipe fitting (4, see chapter 9.13). The air-cooler vents.
u TIghten the pipe fitting again.
Close all access doors and panels correctly before starting the compressor package.
Oil Filter Change
Hot oil; beware of scalding.
During the running in period. a running-in oil filter cartridge is fitted to clean the oil sys-tem. .
I Atlention! I Replace the running - in oil filter cartridge with a standard oil filter cartridge after approximately 200 operating hours.
A further filter change is recommended after the interval quoted in the regular maintenance table (see chapter 9.2) or when the corresponding service message is displayed on SIGMA CONTROL (see chapter 8.1). The filter must be changed after every oil change.
9.11.1 Removal and replacement of the oil filter
u Shut down the compressor package under full load (see chapter 8.4).
Switch off and lock out the main switch to prevent an accidental compressor run.
Before opening or removing pressurized components (pipes, hoses, tanks, etc.) it is imperative that the compressor package is completely depressurized.
u Venting the compressor package (see chapter 9.10).
1
2
1 Oil filter cartridge 2 Turn in this direction to unscrew the cartridge
9 - 35
o
9.12
o
Maintenance
u Spin off the used or contaminated oil filter counter-clockwise and catch escaping oil in a suitable container.
Dispose of the used filter and used oil carefully according to environmental regulations.
u Clean the sealing faces carefully with lint free cloth.
u Lightly oil the gasket of the new oil filter before screwing into position.
u Spin on the new oil filter clockwise by hand until the gasket fits tightly.
I Atlention! I ,
Do not use a tool as this may cause damage to the oii filter and the gasket.
u Check the oil level (see chapter 9.12).
u Open the shut-off valve between the compressor package and the air main.
Oil Top Up
Carry out a trial run.
When the operating temperature is reached (see chapter 1.1) shut down the compressor package (see chapter 8.4) and lock out the main switch to prevent an accidental compressor run.
Carry out a visual check for leaks.
Check the oil level weekly with the oil level sight gauge when the compressor unit is shut down. If necessary, top up the oil to the maximum level. To do this, it is imperative that the compressor unit is switched off under full load conditions and that the oil level is allowed to settle for five minutes. Do not exceed the maximum level.
u Shut down the compressor package under full load (see chapter 8.4).
Switch off and lock out the main switch to prevent an accidental compressor run.
Before opening or removing pressurized components (pipes, hoses, tanks, etc.) it is imperative that the compressor package is completely depressurized.
u Venting the compressor package (see chapter 9.10).
9 - 3(3

-,-, --
Maintenance
1 Shut - off valve A shut Bopen
.2 Pressure gauge 3 Hose coupling
2
3
4
1
5
9
7
-Ic--- 10
4 Filler plug (oil top - up)
5 Oil separator tank 6 Plug - in nipple 7 Oil level mini -I maximum
u Unscrew the oil filler plug (4) on the oil separator tank.
u Top up the oil to the maximum mark.
8
11
6
8 Screwed sealing plug (oil cooler)
9 Shut-off valve - oil drain 10 Hose coupling 11 External pressurization
u Check the sealing ring of the filler plug (4) for damage and then replace the filler plug (4).
u Open the shut-off valve between the compressor package and the air main.
I Attentionl I After carrying out the oil change or oil cooler cleaning (with removal of the oil cooler) run the compressor package up to operating temperature to ensure that the combination valve closes and that the oil cooler is flooded with oil.
I Attention! I
Afterwards, repeat the procedures "Venting the Compressor Package" (chapter 9.10) and "Topping up the Oil" (chapter 9.12).
Always use the same brand and type of oil when topping up (see label on the oil separator tank).
If the type of oil is changed, drain the old oil completely and renew the oil filter.
Never use different types of oil.
9 - 37
L;' ()
9.13
9.13.1
Maintenance
Cleaning the Oil Cooler and Air Cooler The oil cooler and air cooler must be checked for clogging regularly. Heavy clogging may cause high temperatures in the oil circulation.
See regular maintenance table for cooler service interval (chapter 9.2).
u Switch off the compressor unit under full load (see chapter 8.4).
Switch off and lock out the main switch to prevent an accidental compressor start.
Before opening or removing pressurized components (pipes, hoses, tanks, etc.) it is imperative that the compressor package is completely depressurized.
u Venting the compressor package (see chapter 9.10).
Removing and cleaning the oil/air cooler
1
Ilfli'IIil!---=-~ 1
= ~---2
4 -_-./'
3
1 Allen screw 2 Hose screw fitting 3 Pipe screw fitting 4 Pipe screw fitting
u Unscrew the hose connector (2) and the pipe connector (3) from the combination valve.
u Unscrew the hex socket head screws (1) on the air cooler.
u Remove and check the O-ring on the air cooler.
u Close up the pipes and openings on the combination valve and air cooler.
9 -38
I II
i
I I! I!
! i I
'.'

Maintenance
6
6
5 Hexagonal nut 6 Nlen screw
07 Unscrew the hex bolt (5).
The hex socket head bolts (6) are located behind two protective caps.
I Attention! I Before unscrewing the two hex socket head bolts (6) prop up the airl oil cooler.
07 Remove the protective caps and unscrew the two hex socket head bolls (6).
07 Take out the airloil cooler.
Do not direct compressed air, water or steam jets at persons. These jets represent contained energy and as such are dangerous to lifel
Clean the soiled cooler with water or steam jet in washing areas that that are suitable for such cleaning work and provided with an oil separator!
07 Clean the cooler cells with compressed air, water or steam jet.
07 Reassemble in the reverse order.
I Attentionl I Seat the 0 rings correctly in the compressed air inlet of the air cooler during reassembly.
07 See chapter 9.12 for topping up the oil.
07 Open the shut -off valve between the compressor package and the air main.
Carry out a trial run.
When the operating temperature is reached (see chapter 1.1) shut down the compressor package (see chapter 8.4) and lock out the main switch to prevent an accidental compressor run.
Carry out a visual check for leaks.
9 - 39
9.14
LI U
Maintenance
Oil Change (Oil Separator and Oil Cooler) Carry out the oil change with the compressor at operating temperature.
Hot oil; beware of scalding!
The oil change interval is dependent on the degree 01 cooling air contamination and on the ambient temperature.
II the compressor package is operated close to the maximum permissible ambient temperature (see chapter 1.6), the oil must be changed more often, il necessary, the interval should be halved.
See regular maintenance table (chapter 9.2) lor oil change interval.
I Attention! I Drain the oil out of the separator tank, cooler and the pipework completely. See chapter 9.14.4 for putting back into operation.
07 Shut down the compressor package under lull load (see chapter 8.4).
Switch off and lock out the main switch to prevent an accidental compressor run.
1 Shut - off valve A shut Bopen
2 Pressure gauge 3 Hose coupling
2
3
4
1
A F~ B~~~
5
9
7
10
4 Filler plug (oil top - up)
5 Oil separator tank 6 Plug - in nipple 7 Oil level mini -Imaximum
8
11
6
8 Screwed sealing plug (oil cooler)
9 Shut -off valve - oil drain 10 Hose coupling 11 External pressurization
9 - 40
I, I "
I,' .. ,
I

r >,
Maintenance
Before opening or removing pressurized components (pipes, hoses, tanks, etc.) it is imperative that the compressor package is completely depressurized.
10" Venting the compressor package (see chapter 9.10).
9.14.1 Draining the oil using external pressure source
10" Close the shut-off valve (1).
10" Insert the nipple (6) in the hose coupling (3) on the oil separator tank (5).
10" Apply external pressure source to the nipple until the pressure gauge (2) on the oil separator tank (5) indicates approximately 3 bar.
10" Remove the nipple (6) from the hose coupling (3) on the oil separator tank (5).
Draining the oil at the oil separator tank:
10" Prepare a container to catch escaping oil.
I Attention! I The container must be large enough to hold the total oil content of the compressor package (see chapter 1.7).
10" Hang the oil drain hose (10) in the canister and secure.
10" Slowly open the shut -off valve (9) (the remaining pressure in the oil circuit forces out the oil). Close the shut -off valve (9) immediately when flir escapes.
Before opening or removing pressurized components (pipes, hoses, tanks, etc.) it is imperative that the compressor package is completely depressurized.
10" Venting the compressor package (see chapter 9.10).
Drain the oil from the oil cooler:
10" Prepare an oil container to catch the oil.
10" Slowly unscrew the oil drain plug (1). The oil drains out under the force of gravity.
10" Screw the oil drain plug (1) back in tightly.
Dispose of the old oil according to environmental regulations.
1
1 Oil drain plug (oil cooler)
9 - 41
, \ \)
Maintenance
9.14.2 Adding oil
u Unscrew the oil filler plug (4) on the oil separator tank.
I Attention! I Always use the same brand and type of oil when topping up the oil. (see label on the oil separator tank).
If a different type of oil is used drain the old oil completely and always renew the oil filter.
Never mix different types of oil.
u Top up the oil to the maximum mark.
For oil quantity see chapter 1.7.
10" Check the sealing ring on the oil filler plug (4) for damage and then screw in the oil filler plug.
9.14.3 Draining the oil using own compressed air
u Shut down the compressor package under full load (see chapter 8.4).
Switch off and lock out the main switch to prevent an accidental compressor run.
u Close the shut-off valve between the compressor package and the air main.
The compressor oil circulation vents automatically.
u The pressure gauge on the oil separator tank must indicate zero bar.
10" Close the shut-off valve (1).
Close all access doors and panels correctly before starting the compressor package.
u Start the compressor package (see chapter 8.4) and allow to run for approximately 30 seconds.
10" Shut down the compressor package under full load (see chapter 8.4).
Switch off and lock out the main switch to prevent an accidental compressor run.
u Check the actual pressure on the pressure gauge (2). Open the shut-off valve (1), let the pressure on the pressure gauge (2) sink to approximately 3 bar and then close the shut-off valve (1) again.
u Drain the oil from the oil separator tank and the oil cooler. Proceed as detailed in chap-ter9.14.1.
u Open the shut-off valve (1).
u Top up with oil as described in chapter 9.14.2.
u Close all access doors and fit all cover panels.
9 - 42

, ' , I' : I !
i , , '
I I
Maintenance
9.14.4 Measures for putting back into operation
9.15
o:r Carry out measures detailed in "Pouring a small quantity of oil into the air inlet port" see chapter 7.7.1.
o:r Carry out measures detailed in "Running the compressor package in idle" see chapter 7.7.2.
o:r Carry out the measures detailed in "Venting the compressor package" see chapter 9.10.
o:r Top up with oil, see chapter 9.14.2.
o:r Open the shut-off valve between the compressor package and the air main.
o:r Switch on the compressor package, see chapter 8.4, and allow to run until the operating temperature is reached, see chapter 1.1.
o:r Top up the oil again, see chapter 9.12.
Carry out a trial run.
When the operating temperature is reached (see chapter 1.1) shut down the compressor package (see chapter 8.4) and lock out the main switch to prevent an accidental compressor run.
Carry out a visual check for leaks.
Changing the Oil Separator Cartridge
The service life of the oil separator cartridge is strongly influenced by the degree of contamination of inlet air and on strict adherence to the recommended maintenance intervals of the air and oil filters.
We recommend that the oil separator cartridge is changed with the oil or when the relevant service message is displayed on SIGMA CONTROL (see chapter 8.1).
'o:r Shut down the compressor package under full load (see chapter 8.4),
Switch off and lock out the main switch to prevent an accidental compressor run.
Before opening or removing pressurized components (pipes, hoses, tanks, etc.) it is imperative that the compressor package is completely depressurized.
o:r Venting the compressor package (see chapter 9.10).
9 - 43
!)
1 Spring 2 Hose coupling 3 Pressure gauge 4 Hexagonal nut 5 Cover
Maintenance
1
3
2
4
5
5
6 a-Ring (dia.BOxB) 7 Groove B Oil separating car1ridge 9 a-Ring (dia.80x3,5) 10 Groove
~-B
.--9
7
10
11 Dir1 trap screen filter 12 Bbow fitting 13 Contro/line
13
11
12
Earthing the oil separator cartridge is by means of a spring, inset and clamped in the separator cover (5).
Care must be taken when changing the separator cartridge, not to damage this spring as earthing can only be ensured when it is in perfect condition.
o:r Unscrew the hexagonal bolts (4) and remove the cover plate (5).
o:r Take out the old oil separator cartridge (8) with the 0 ring (6) and 0 ring (9) and dis-pose of according to environmental regulations.
o:r Clean the sealing surfaces of the oil separator tank.
I Attention! I The oil separating cartridge is disposable and cannot be cleaned.
o:r Insert the new 0 ring (9) into the groove (10) in the oil separator tank.
o:r Insert the new oil separator cartridge (8) and then insert the new 0 ring (6) into the groove (7).
o:r Fit the cover plate (5) and tighten down with the hexagonal bolts (4).
o:r Unscrew the union nut of the elbow fitting (12) and pull out the control air pipe (13).
o:r Unscrew and remove the elbow fitting (12) from the oil separator tank together with the dirt trap screen filter (11).
o:r Replace the old dirt trap screen filter with a new one.
9 - 44

Maintenance
117 Wrap teflon tape around the outside thread of the elbow fitting (12) and screw back into the oil separator tank.
117 Insert the control air pipe (13) into the elbow fitting (12) and tighten up the union nut.
117 Open the shut-off valve between the compressor package and the air main.
Carry out a trial run.
When the operating temperature is reached (see chapter 1.1) shut down the compressor package (see chapter 8.4) and lock out the main switch to prevent an accidental compressor run.
Carry out a visual check for leaks.
9 - 45
10
10.1
L} )
Spare Parts and After Sales Service
Spare Parts and After Sales Service
Service parts and expendable parts
Description No. off Order No.
Oil filter 1 6.1876.1 (Operating temperature <ga°C) <
Oil filter 1 6.1876.10020 (Operating temperature ~9O°C e.g. South-East-Asia)
Air filter cartridge 1 6.0215.0
Filter mat 1 6.1891.0
Oil separator cartridge Complete set 1 6.2024.0
Comprising: Separating cartridge 1 o Ring 2 Dirt trap screen filter 1
Hose pipe from the minimum pressure check valve to the air/oil cooler
1 8.1190.1
Hose pipe from the air/oil 1 8.1181.0 cooler to the compressor air end
See chapter 1.3 for details of the V-belt set.
I~.~lia.~~d KAESER KOMPRESSOREN GmbH D-'36~1O Coburg, Postfach 2143 Germany, Tel.: (09561) 640-0 «(: Fm(.: 109561) 640-130
I Model I I I Port No. I I I Serial No. I I I Year I I I Rated power I kWI I Rated motor speed I mln·11
I r Permlss. gouge working press. I I barl
Important for all queries:
117 Enter the data on your compressor's nameplate in the nameplate shown above.
Always quote the data on the nameplate when making a query or ordering spares.
I Attention! I Always order original spares from the compressor manufacturer to avoid lowering the quality of your compressor package.
10 --46
i , .1 ,,[
II ,I I
I

l'---
Spare Parts and After Sales Service
10.2 Service and Maintenance Agreement
We recommend that you take out a service and maintenance agreement with an authorized KAESER service agency, This is your best guarantee of reliable air supplies.
10 - 47
~"" ''/\ <._ ~ J.
",- Appendix
11 Appendix
11.1 Electrical Diagram
11 -A8

~--
.... .-.-.. ~ - - -- -
1 2 I 1 4 5 6 I J e
Electrical diagrams
Compressor SM 11
440-460-480V SO/60Hz
Manufacturer: Kaeser Kompressoren GmbH Postfach 2143 96410 Coburg
, Datum 29.05.2000 E b Bearb. Oberender KAESER Cover page . , Gepr. Fischer KOMPRESSOREN Compressor SM 11 A Anderung Oatum Name "". Ersah durch, Ersah fUr: Ursprung, AMS010S1.00 Sigma Control T DSM11-01021.00 Blatt 1
,= Bl. ~,
',.~" .?J iSff ... -. ~ :5 - , , ~ --
lfd. Nr. Benermung Zeicnnungsnummer (Kunde) Zeichnungsnummer (Hers~eller) Blatt Ani a genkenn zeic hen
N,. Name Dra .... ing No. (customer) Drawing No. (manufacturer! Page Unit designation
1 (over page DSM11-01021.00 1
2 List of contents ZSM'1-01021.00 1
1 Block diagram USM1'-01Q21.00 1
4 (irtuit diagram Power switching SSM11-01021.00 1
5 Circuit diagram (ontrol voltage tapping SSM11-01021.OC 2
6 Circuit diagram Power supply unit SSMll-01021.00 l , Circuit diagram motne:r board/Inputs SSM11-01021.00 4
e Circuit diagram mother board/Inputs SSM11-01021.00 5 9 Circuit diagram mothe:r board/Inputs SSM11·01021.0Q 6
10 CirCuit diagram mother beard/Outputs SSMll-0l021.00 , 11 Circuit diagram mother bDard/Outputs SSM11-01021.00 8
12 Electrical equipment identification SSM11-01021.00 9
13 Equipment parts list Control Cl;lbinet GSM11·01021.00 , 14 Terminal schedule Terminal strip -X11 KSM11-01021.0Q 1
'5 Component l<!yout Mounting plate ASMll-0l021.00 1 "
Compressor SM 11
. __ .~~ ___ c_===~=============.,.",."=~""""" ........ """",,, ........ """""'!

1 1
Power switching r-- - --- -- - --- ------ --- --- -- - ----
1 ,
~i ~ :~ PE 0---- -----;
4
activation Compressor motor
7
W19
Power uni~
4 ~
EI A-interface ,- -- --- --- --- ---- -- --- --- --- ----24V to sensors and outputs
Adapter 1 /
[QGJ lX32
lliIl ~ @DJ ~ ~ ~>:'3_' ____ 2X3S _E~_2X_4_' _~x~
G¥PGfJ l T ) L ___ --t----t~-----------
W8\ W8) W81
2 10 4 1\
r-- Sigma Control
I o-V"-
EMERGENCY STOF
: ----------;x-;------- ---I i ' , >' mother board 1-
~1
1 lX2 [ L ____________ ._. ___ .--l WB7
1\ --- --- ---- -- - -- ---- ----------
activation (ompressor motor
L_. _____ _ ~___ _ ___ _ _ _ __ __ _ _ _ __ __ _ _ _ USl:lr's connection --- --- ------ --- -- -. --- -- -___________________ -.J M 3- l
Compressor motor
~ \ I Ditom 129.05.2000 b 8earb. Oberender
a I I I I Ge~r. I FisCber C Anderung Datum Name Norm
rs . :~4~
1 ,
Er5at~ dun:h,
)
KAESER KOMPRESSOREN
Ersatz fur, Ursprung, AM5010S1,QO
""" "~-
4
Block diagram Compressor SM 11
\
v _/
6 I 7
USM11-01021.00
B
~ ~~
,'..$ \J
5.
L 1 12.1
L2 12.1 Ll
----------------,--1-~--.-----------------------------------------~ I _ I -X11 ~PE
H07V_K
I I k-<--V 2.5mm' black
I I I H01V-K
I 2,Smm' black ---
-K3M [11 I'- I'--j'- I --
-X11 5 :; i~~ -K1M 1 ) \ I -K2M 1 ) \
1 1 1 /B.3 -,_. /8,5 - -, /8_4 .• -'
I I I I , 4 , i , , , , 4 ,
H07V-K I I 1 1 k----L---- 2,5mm' black I I I I
\ -f'91 1 ."-'
I I I I -F2 1 )
fvH--\ : . ~~ ~ . 6-B,5A 6 ]698] , 1 , , 4
1 , 1 , 1 ~ i
Main switch, 1 1 , 1 NYSl YO-J
fuse supplied 1 1 1 i.
, h1,Smm'
by user 1 1 , , 1O.m U , i'-
1 PE 1 1 , 1 W1 V,
1 , , , V1 M \u, 1 1 1 , u-,-, 3- jW, 1 1 1 , 1 1 , 1 -M1 1 1 , 1 1 1 , 1 A HENTiON !!1
7,5 kW
1 , , 1 Lll2l3PE
Control transformer connections for
440-460-480V/3/PE/50/60Hz 41,.0V: 440 and 0
See service manual for 460V: 1,.40 and .ZOV
supply cable cross-section 480V: 500 and -lOV
Fumtlon: Compressor morer I Group of fun,tlons.: Main power supply I Power switching 1 , Datum 29.05.2000 KAESER Circuit diagram b Searb. Oberen~er Compressor SM 11 • Gepr • fisther KQMPRESSQREN
I o Anderung O~tum Power switching SSM11-01021.00
.. ~ Harne Norm Er5at~ dUTch, Er~at: fur, Uu~rung: Ar1S010$1.00 BI.
- ------'-lj

• Ll ;Q
I
Ho7v-K 2.5mm" black ____
-00
ffi~' f •••••
. , - I» t •• I O,ZS-O,I.A ~:
r-
~
-FO" lA"
-T1===~~~ 20Q~S10I2x11SV ro---mI ro---mI I
160VA I ~ l...----...J nov ATTENTION !!!
[Imtrol transformer connedions tor 1.40V: 440 and 0
460V: 440 and .. lOV 48DV; 500 and -lOY
-Xll~
-xll1:E
4
-X11_,
connedion s,b.c, 10VA
,
-Xll.,
-53 ~' o-.i.. ----IS 2 EMERGENCY STOP 1Z 1 .
-Xll !,
6
LO'. /~
-Xll ,
-S10 h t' Door safety interlock switch f-- --
left 12
4"/5.3
-Xll AJ
L02 .- 1 '0.
Secondary side is earthed .
L-____________ ~ -X11,\, N01 /3.1
• If the shorting link
is removed, insul .. tion monitoring must be installed
EN 60204-1
Control cabinet wiring: AU non-designated conductors 230V AC: lmm' red HOSV_K
24V DC: O.15mm' blue HOSV_K
F~lIdicn: 230V/t-/S0/60Hz Grau~ at tunctlons, Control voltage tapping
Datum Z9.0S.Z000 Bearb. Oberender Gepr. Fischer
o I Ande~ I O;;tum I Name I Norm
" .. -.-~
1 ,
I2.B LOi
-Gl
l
N
!Z.8 N01 NG1 1a.1
Fun,tlcn:
Ersatz durch,
I;':: 230V-
24V=
1,3A short tiHuit prQ~f
24V DC
Er$~tz f.Qr,
'''''.-~./
J I
b-• M -Xll PE
~ 1 -Xll "'
Group of f~netlons, (ontrol vOltage tapping T , Datu .. 29.05 ... 000
b B~arb. Oberender , Gepr. fischer
o Anderung Datum N~l1Ie Norm Er5atz durch, Ersatz fun
EMERGENCY STOP
KAESER KOMPRESSOREN
Safety chain
Circuit diagram Compressor 5M 11
Ursprung, AMS010StOO Con~rol vol~age ~appiug
,df
4 5
-2X20 )9 -2X020 9
-A 10.0
-2X020 too
."'']"
Adapter 1
KAESER Circuit diagram Compressor SM 11 KOMPRESSOREN
Ursprung, AMS010StDO Power supply uni~
Door safety interlock switch
B!<Jtt 2 --Bl. 1 SSMll-01021.00
., ""~ r:::;
j
6 I 1 , 24V DC lL .. IS.l 24V DC 2L .. IS.l
'. 0 81 188 0 0 0 D 0
-AiD,' 14.1 } 0 ODD Sigma (ontrol D
RS 485 -lX8 RS 232 -lX7 Profibus -lX9 I ~ ~cl. O-Sub I I I 1 9 pol. O-Sub I
.u;o;;I;;U;;a. • I • • Itt I I AUMX;O:;t.
1M 14.1
2M 11.1
I SSMll-0l021.00 ~ BI.

-.-_._-_.-
, I l I 4 5 ,
-81 Airend discharge temperature
Air main pressure ~ -811 J
-Al0.l \
PT laO H
12 11 PE
ct::1J ct-----------t) -----------
-2X041A,' A,' -2X41 , ,
-2X043 AI' -2X043 At -2X43 , -2X43 , t
-2Xl A" -2Xl "" -2Xl A" -2Xl "''' -2Xl ",10 -2Xl A" -2Xl All -2Xl "'" -2Xl ",24 -2Xl "'" -2Xl ""5 -2Xll,
~~~11;~~~~; l'_~~011 ~O~2_X·~11 ~~2_:_'~:: 1'_' -': =-:""'1=-:""'_1;' :'''' I; _-'''' I;; _ -''''I' I I-lxo~" 1, I" -1" 10 L II t t t t t,
..L -1X1 -21 -9 -20 -22 -'0 ..... '1 ..... 23 ..... 12 ..... 24 -13 ..... 25 ..... 7 )
1 ___ ~ ____ GNO' ____ ...!!! ___ _ .2J....2 _ ___ ~D1 __ _ ~D_l ____ AI 1 __ _ .:.......E.NE_' ____ A~ 4 _________________ !1~ AI 1 AI 2 AI 3 AI 4
/3.8 -AlO.' } m,th" bw'
/ - 'OP"" AI , Air mdin pressure All
AI 3 Airenc discharge temperature _Al0.2/ S.2
AI4
-------. .... ----. -~J
<t
:t~ ~
/3.8 1M '" 1M /7.1
I Fu~tlion, I Group of fun~tion~,
<t~
/3.B .1!:..:. /3.B 1..!:.:
Datul
Searb.
Pressure control
<;;;.. . ..,.
-2X3! 5 -2X31 .' -2X03 Ys -2X031r
12.5--~~~-7.' -510 11 /2.1"4-----
l " I"
KAESER . ---- _.-
4
-F2 195 /1.3 -l1;
196
_J
Circuit diagram [omoresc:.nr ,M 11
-2X32 -2X032 ~l
-82 I' IEJ--
0,7-1,2bar !2
-2X03 A' -2X031,1" -2X020 A, -2X032 A,
I <; <;M"_0 1021.0 0
'--.~
, I
-2X3 1' -2X31 1' -2X20 l' -2X32l'
-2Xl , -2Xl , -2Xl l -2Xl 4 -2Xl "'5 -2Xl ""
~~l ____ ~'~~ _____ -2:~~ _____ -~: ~----"1--- "ll -Al0.2 '\ -1X1 -, -2 -3 -4 -5 -6 \
1 __ ~ _______ ~ ________ or~ _______ DI: _______ D~5_-_____ ~_'_, 10.0 10.1 10.2 1003 10.4 10.5
function:
Grou~ of functions,
o Ander~nq Datum Name
mother board Inputs
Datu .. 29.D5.2000 S~~rb. Oberender
Gepr. Finher Norm Ersatz dureh: Er5atz lur:
I 0.0 EMERGENCY STOP pushbutton I 0.3 Direction of rotation
I 0.1 Door safety interlock switch I 0.4
I 0.2 Compressor motor overload protection I 0.5
Alarm/maintenance indications
KAESER KOMPRESSOREN
Ur$~rung, AMS010S1.CO
Circuit diagram
Compressor SM 11 mother board/Inputs
-Al0.3 /6.2
1 SSM11-01021.00
tJ ~
£/6.1
I!::.!.../6.1
Blatt 5 BI.

· I 4 6
/S.B ll~ -Xl1 P1 -X11 P1 -X11 f2
-
X11r I a a
/S.6 2L·
-2X35 12
-K1M I" 1'-' \
14
-X11 " -X11 12 -X11 13 -X11 14 -X11 15
-2X020
1A2 -2X020 All -2X020
1A4 p-2X020 As -2X020 AI' -2X020 AI'
-2X20 2 -2X20 l -2X20 4 -2X35 1 -2X20 5 -2X20 , -2X20 ,
-2X1 14 -2X1 15 -2X1 " -2X1 " -2X1 1B -2X1 19
~~~11'~ ____ ~~~1!~ _____ -~:_" _____ -:X01 ~ ____ ~2X01y; _____ -2XO~l'; _I
1-1xo~t -1" " " ~ t--Al0.3 \ -lX1D~;4 D~~5 D~~6 , D~~7 O~~B D~r.;1;9;--ri--'
1 ______ ---------------------------------------,
Funetiol'l'.
Group Df funtlions:
.'~
'C., ,
15.1 -A1D.3
10.6 10.7 11.0 11.1 11.2 11.3
mother board Inputs
I Ersat£ .~
I 0.6 Answerback signal Mains (on tact or 11.1 -A1D.4 11.2 }
I 0.1 load/idling exl'ernal I 1.2 ALARM external .u
I to Remote ON/OFF I 1.3 Maintenance e~tl!rnal
u default setting can be changed through the user interface
~ indications
KAESER
4
I Circuit diagram Compressor SM 11 mother board/Inputs
~"9r
:.;;)
6
Remove the link when an <Jtarm serlsor i5 connected.
I SSM11-01021,00
.... default seHing
can be changed
2l .. 17.1
TBiatT6 ~ I~"-~' ;.; -" ~
----',
/5.8.l!:! through the user interface
-A10,4 ,'------------------------------------------------------------------------------------------,
Furn:tion:
/6.1 -Al0.4
mother board
Power supply unit
o 0.6 o 0.7
o 0.6
Control valve TImer ..
o 0.7 ~-lrn----_m4---------~O~-----------------~.-,-
I -1X311 14 12 13
c~l---J~------J~-----------f~ -2X03 ),1
-2X3 1,
-2X03 ),4
-2X3 14
-2X03 ),2
-2X3 12
-2X37
-2X037 "'1
-Y1 9--Z
\\
-2X03 ),l
-2X3 13
-;~~~~ I': -X11 16
__ r-- _ ~DS·~
i 8]' i ! 9--Z \\ ! 1 1 " , --~----
14' 1M 1 -2X037 A2 13:' 2M -2X37 ! 2 -X11 HI r
Inlet/ Venting Condensate drain. User's tonnedion GNlup of fundicns: mother boarl:l
D~tum 29.Q5.2000
Burb. Oberender
6epr. Fis(h~r
o Anderunq Carum Name lIIorm
KAESER KOMPRESSOREN
Ersatz durch: EtS~!'l fUr: Ur~prung, AHS0105tcO
Circuit diagram
Compressor SM 11 mother board/Outputs
-A1O.5 1'.2 )
L·
1 SSM11-01021.00 ~ SI,
-~,'
1::
.. ______ ~ ____ ._._ _~ ______ . ___ . _____ ._ _ ___ . ___ ~~ _____ ~___________ iii

, "
00
c • C _ . " -• u - . < -e g " u
.~ .e ,,~
~ . . ~
~-5 -::;~ " 0
x ,
a a .-' N
~ a , >: Vl Vl
· < Q, /----'--1
· · :Z '0 >
( 0:0 ..... ..... ....
,_,:+-"-" i !ll! r-lr--r--r--r--r--r--tf6:t:-t~~~1!"t--t--~~i-t--t--t--t--t--t~~~-t[~~-t~~i-tg~~~I~~~~;-~:-~~o;:~,~~~~~;-~~~;-~I~~~~~~N~~~~~'~>~ !~~fj~~c: [_~< __ .i "<'~[.,,i' ~m ' :; . ,0' ~ -[a ~~~.~ -~ ! -~~ ~~' ~ ~. li.. ~~H " " - " ." ',~."~ _ ~ .3_"'C ~IU ~ :",' [ ",' ' g' if • m~ g ;: !, ~
u'" { ~ ,
~ ~ .~
c: :--' :--' i ~ ?
o
-
c ~ n

c----------------------------------------c--------------~--__ --------------------
1
, b
• I A~deMJng
/'--'
'-
n ~'
Oatum B@~rb,
Gapr. O~tum Name Norm
-Al0
-A 10.1...-A 10.5
-FO -Gl
-K1M
-K2M
2 I l
/ ;---- -K3H f----
- -
"
29.~5.2000
Ob~reMer
fis,her Ers~tz ~urch,
,-
Sigma Control
mother board, Inputs/Outputs
Cut-out Control secondary
Power unit
Mains contactor
Oelta contactor
-K2M f---
f---
E,sat~ fur:
..
-K3M Star contactor
-Ml
-00
-53
-510
-T1 -Xll
-lX1...-1X3
-lX7 ... -1X9
-lXOl..-1X03
-2Xl. -2X3.-2X20
-2X01, -2X03,-2X020
-2X31...-2X43
-2X031...-2X043
-Yl
Datum Searb.
• Gepr • EIAnderung Datum Name NDrm
Compressor motor
Overload protection switch, (ontro! transformer
EMERGENCY STOP pushbutton
Door safety interlock switch
(antral transformer
Terminal strip, Control
connector strip Sigma Control, mother board
connector strip Sigma Control, interface
Connector plug, Sigma [ontrol
connector strip Adapter 1, internal
Connector plug Adapter 1, internal
connector strip Adapter 1, external
Connector plug Adapter 1. external
Control valve
29.05.2000 Oberender Fischer
I Ersatz durch, I Ersatz fUr:
4
--FO
-
-K1M f---
f---
-'2
470
KAESER KOMPRESSOREN
Ursprung: AMS010SI.OO
4 I
-F2 -82
-Bll
-81
KAESER KOMPRESSOREN
Ursprung, AMS01051.CO
5 6
-00 -01 f--- -71
---
-X11
(ompotlent l<:iyout
Compressor SM 11 Mounting plate
~""""" ., 6
Faul t indicator
Compressor motor overload protection
Direction of rotation pressure switch
Temperature probe
Airend discharge temperature
Pressure transducer, Air main pressure
Ele[trical equipment identification
Compressor SM 11
1
J
0 ~
~
I
8
I"
ASM11-01021.00 ~ Bl. '
I
}
-::: . ~,
8
Shutdown function
and Indicating function
} Indicating function
r, 55M11-01021.00 Blatt 9 -- Bt.

I , "
~ " -
8;><;
i ~» e:rn , :;:V>
~ lijrn ~;o
" •
--< ~ ~ ro a ~ ~ 3 [ 3~ -'~
" rn . ~~ ~ J
~ 0 . 0 ~ ~ c :2. VI ii" ~3: , ~
-
" V>
~ , '" o
:::
~.
'" '"
(able identification
g
~~=
0 " > · 5" r 0 > , .. ~ c: " i ~ · · · · · · , · · ~ , · · · : :
'" ~ • ~ 0 z , 0
'l:
:
i J · j , 0
J · ~ · J · •
c 'iii , · , o~ f
· · ~ · I ~ 0'
il' g
~ ~ < P. J
~ · , • ii 3
X X X X
X X
" 41 11 11
31 41
11
"
Oestination external
n n 0 0
t 5 l'!. 0' ,
~ , c
0-, i
-M1 P' supply supply supply supply
-510 11
-510 12
Terminal strip
!l ~ ~
~
[ 3
~ , ~ g. • , 1l
Terminal
PE PE U1 V1
W1
1
3 4
4
o o PE PE
total
, I •
P1 ,
P1 I
31
P1 ....
P1 11
12 13 14 •••
" 16 M1 • M1
11 11 13 14
15
16 PE • PE
'" r 0
~. . ~ ~r
strip, -XII Terminals
11.4
11.2
11.2
11.2
11.2
12.4
12.5
12.5 12.7
12J IB.3 IB.4
12.2
12.4
12.2
13.1.
16.3
16.4
16.6
16.7
163
16.4
16.6
16.6
16.1
11.6
17.6
13.1 18.5
18.6
IB.6 18.1
18.1
I ..
Oestination internal
n 0 0
.g , , 0 . , ~ ~r
~ i! 0-
i ,
-M1 P' ountin9 plat~
-K2M 1 -K2M 3 -K2M 5 -FO 1
-53 11
-S3 12
-lX2 1 -1X2 3 -1X2 5
-n 0 -K1H A1
-n PE -., M -., . -K1M 13
-2X20 3 -2X1O 4 -2X20 5 -2X20 6 -2X20 , -2X20 , -2X20 10 -., M
-1X2 , -lX2 , -lX2 9 -lX2 10
-lX2 11
-lXl 12
(able identification
::: Z -< ~ -< o.
"-~
0
'" 3 3.
X X X X X X X
~ ~
z -< ~ -< r: ~ 3 3.
X X
X X X
X X X x X X
11.2
Appendix
Record of Maintenance Work
Serial number of the unit:
Date Description of work Service hours Signature
,
11-"64
\ I
II i
I ,
I I
I: II Ii
1 I, !
I II
J