isupplier purchase orders training guide - 2019 draft purchase ord… · page 5 of 70 create an...
TRANSCRIPT

ORACLE® ISUPPLIER
PURCHASE ORDERS
TRAINING GUIDE
Name: _______________________________________________
Phone: _______________________________________________
eMail: _______________________________________________

Page 2 of 70
DOCUMENT INFORMATION AND APPROVALS
Version # Date Revised By Reason for change
1.0 4/26/2019 LaCynda Brown Creation of Document

Page 3 of 70
TABLE OF CONTENTS
Document Information and Approvals ....................................................................................................2
Table of Contents .........................................................................................................................................3
Contact Information .....................................................................................................................................4
Create an Invoice Using a Purchase Order ............................................................................................5
Create a Credit Memo Invoice Using a Purchase Order .....................................................................30
View Purchase Orders .................................................................................................................................53
View Invoices .................................................................................................................................................59
Frequently Asked Questions .....................................................................................................................69
Troubleshooting............................................................................................................................................70

Page 4 of 70
CONTACT INFORMATION
ISUPPLIER TECHNICAL
SUPPORT
EMAIL [email protected]
MONDAY – THURSDAY 7:00AM TO 5:00PM (HOUSTON TIME)
FRIDAY 7:00AM TO 11:00AM (HOUSTON TIME)
PLEASE INCLUDE IN THE EMAIL A SCREEN SHOT FOR
THE ISSUE OR ERROR YOU ARE RECEIVING
Page 5 of 70
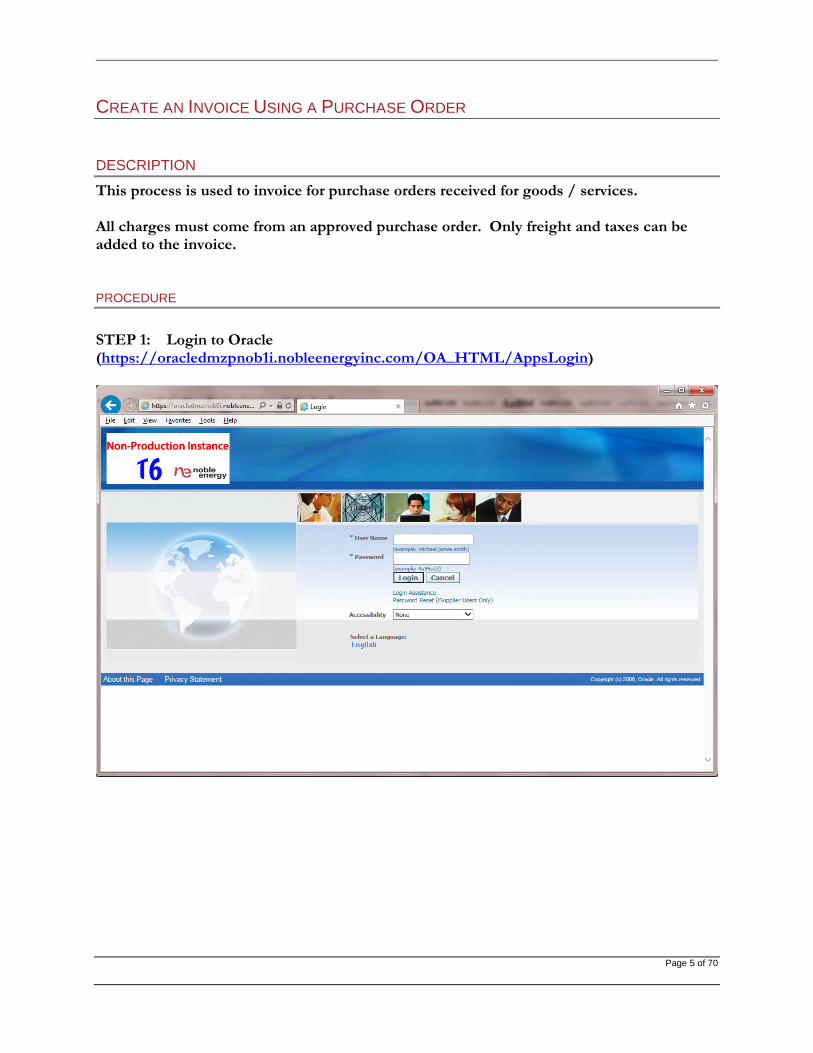
CREATE AN INVOICE USING A PURCHASE ORDER
DESCRIPTION
This process is used to invoice for purchase orders received for goods / services.
All charges must come from an approved purchase order. Only freight and taxes can beadded to the invoice.
PROCEDURE
STEP 1: Login to Oracle(https://oracledmzpnob1i.nobleenergyinc.com/OA_HTML/AppsLogin)

Page 6 of 70
STEP 2: Click the Finance tab.

Page 7 of 70
STEP 3: Click the Go button next to Create Invoice With a PO.

Page 8 of 70
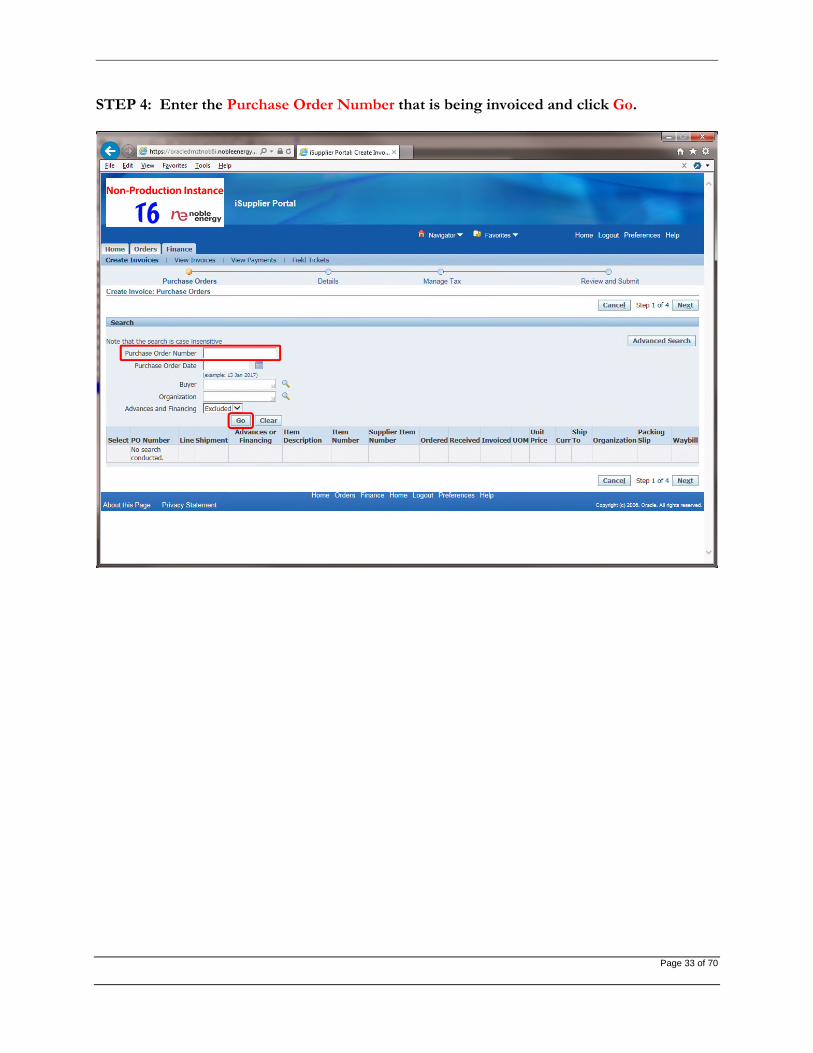
STEP 4: Enter only the Purchase Order Number that is being invoiced and click Go.

Page 9 of 70
STEP 5: Review the purchase order line(s).

Page 10 of 70
STEP 6: Choose the line(s) to be invoiced by checking the Select Box then click the Nextbutton to continue.
Note: If many lines need to be selected, you can use the Select All link to select alllines at once.
Page 11 of 70
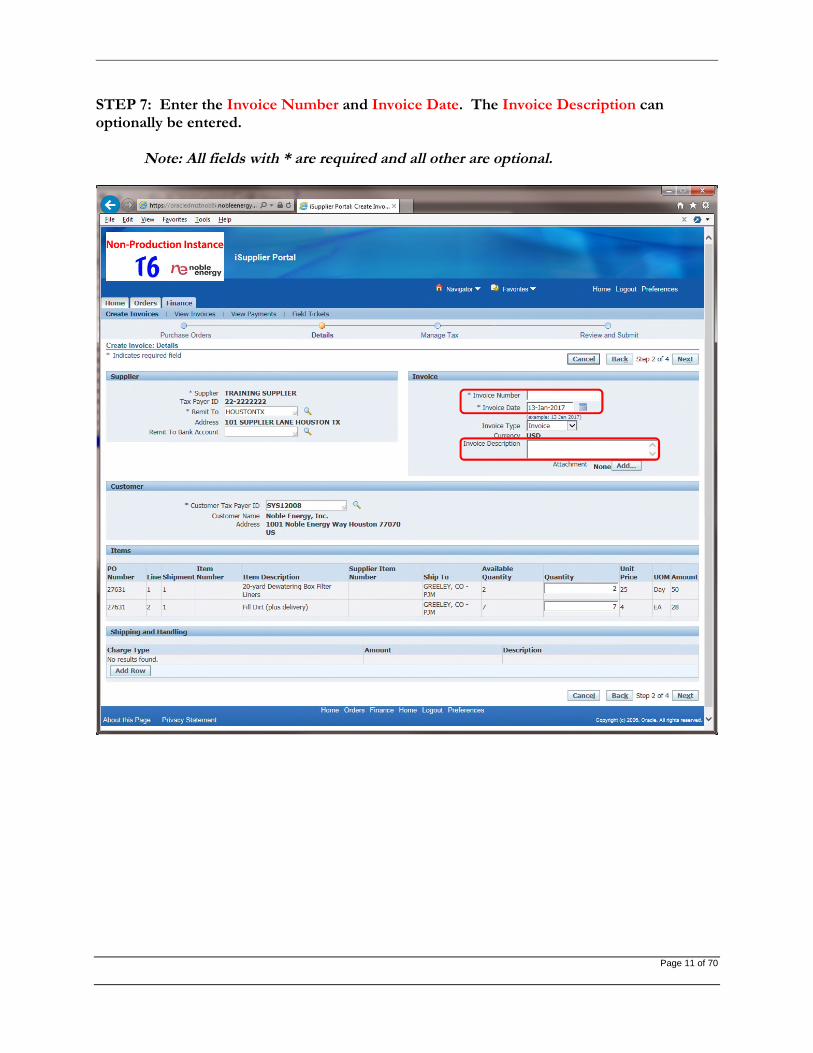
STEP 7: Enter the Invoice Number and Invoice Date. The Invoice Description canoptionally be entered.
Note: All fields with * are required and all other are optional.

Page 12 of 70
STEP 8: Attach a copy of the invoice and any other supporting documentation. Click theAdd… button next to Attachment.
Note: Even though there is no *, the Invoice Attachment is still
required. You will receive an error message in the next step if
the attachment is not added.

Page 13 of 70
STEP 9: Enter the Title and Description of the attachment.

Page 14 of 70
STEP 10: Click the Browse… button to search your computer to add the invoice attachmentfile.

Page 15 of 70
STEP 11: Select file to attach and click Open.

Page 16 of 70
STEP 12: Click Apply to attach the file to the invoice.

Page 17 of 70
STEP 13: A Confirmation note will display once attached.
Page 18 of 70
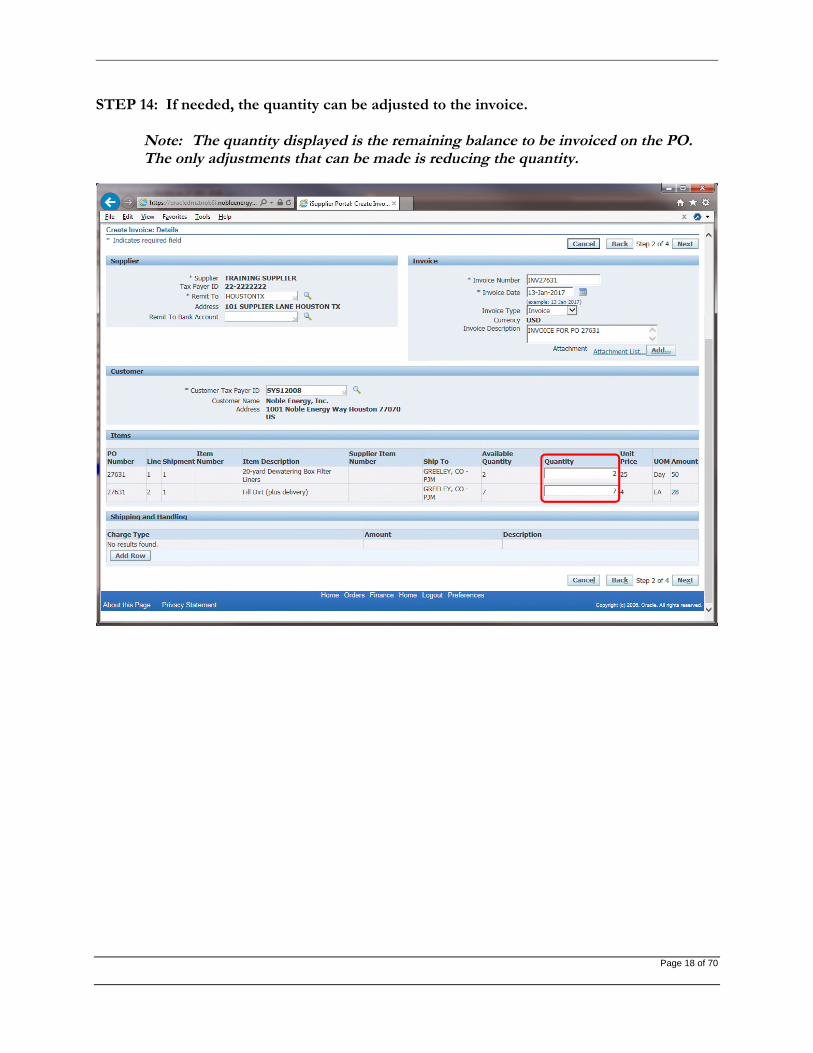
STEP 14: If needed, the quantity can be adjusted to the invoice.
Note: The quantity displayed is the remaining balance to be invoiced on the PO.The only adjustments that can be made is reducing the quantity.

Page 19 of 70
STEP 15: Click Add Row button to add any freight charges on the invoice.
Note: Only freight charges can be added here. Any additional line items to chargemust be added to the PO or another PO.

Page 20 of 70
STEP 16: Enter the Freight Amount.

Page 21 of 70
STEP 17: Enter the Description of the freight charge.

Page 22 of 70
STEP 18: Click Next to continue.
Note: If additional freight lines need to be added, click the Add Row button.

Page 23 of 70
STEP 19: The default Tax Amount is 0. If tax is required, follow the steps 20 - 22 to addtax. If there are no taxes, you can leave the default tax amount of 0 and continue at Step 23.

Page 24 of 70
STEP 20: Update Tax Amount to be the full tax amount of the invoice.
Note: If there are multiple tax rates for different percentages, the total amount of alltax lines should be entered here.

Page 25 of 70
STEP 21: Once the full tax amount has been entered in the Tax Amount field, click theCalculate button.

Page 26 of 70
STEP 22: Click the Recalculate Total button.
Note: After clicking Recalculate Total verify the Total invoice amount matches theattached invoice.

Page 27 of 70
STEP 23: Click the Next button to continue.
Note: If tax was entered, it will display in lower right corner.

Page 28 of 70
STEP 24: Review all information entered to ensure accuracy. Once reviewed, click Submit.
Note: Please review all information for accuracy because once an invoice issubmitted it cannot be revised or deleted.

Page 29 of 70
STEP 25: A confirmation message is received that the invoice has been submitted.

Page 30 of 70
CREATE A CREDIT MEMO INVOICE USING A PURCHASE ORDER
DESCRIPTION
The following steps will show you how to enter a credit memo in iSupplier.
PROCEDURE
STEP 1: Login to Oracle(https://oracledmzpnob1i.nobleenergyinc.com/OA_HTML/AppsLogin)

Page 31 of 70
STEP 2: Click the Finance tab.

Page 32 of 70
STEP 3: Click the Go button next to Create Invoice With a PO.
Page 33 of 70
STEP 4: Enter the Purchase Order Number that is being invoiced and click Go.

Page 34 of 70
STEP 5: Review the purchase order line(s).
Note: The Invoiced columns have values as there was an invoice created againstthese PO lines.

Page 35 of 70
STEP 6: Choose the line(s) to be invoiced by checking the Select Box then click the Nextbutton to continue.
Note: If there are multiple lines to select at once, click the Select All to select alllines.

Page 36 of 70
STEP 7: Enter Invoice Number and Invoice Date.

Page 37 of 70
STEP 8: Select Credit Memo for the Invoice Type and enter an Invoice Description.

Page 38 of 70
STEP 9: Attach a copy of the invoice and any other supporting documentation. Click theAdd… button next to Attachment.
Note: Even though there is no *, the Invoice Attachment is still
required. You will receive an error message in the next step if
the attachment is not added.

Page 39 of 70
STEP 10: Enter the Title and Description of the attachment.

Page 40 of 70
STEP 11: Click the Browse… button to search your computer to add the invoice attachmentfile.

Page 41 of 70
STEP 12: Select file to attach and click Open.

Page 42 of 70
STEP 13: Click Apply to attach the file to the invoice.

Page 43 of 70
STEP 14: A Confirmation note will display once attached.

Page 44 of 70
STEP 15: Enter the quantities to be returned in the Quantity field.
Note: The number entered must be negative since this is a credit memo.

Page 45 of 70
STEP 16: Click Next to continue.

Page 46 of 70
STEP 17: The default Tax Amount is 0. If tax is required, follow steps 18 - 20 to add tax. Ifthere are no taxes, you can leave the default tax amount of 0 and continue at Step 21.

Page 47 of 70
STEP 18: Update Tax Amount to be the full tax amount of the invoice.
Note: If there are multiple tax rates for different percentages, the total amount of alltax lines should be entered here.

Page 48 of 70
STEP 19: Once the full tax amount has been entered in the Tax Amount field, click theCalculate button.

Page 49 of 70
STEP 20: Click the Recalculate Total button.

Page 50 of 70
STEP 21: Click the Next button to continue.
Note: If tax was entered, it will display in lower right corner.

Page 51 of 70
STEP 22: Review all information entered to ensure accuracy. Once reviewed, click Submit.
Note: Please review all information for accuracy because once an invoice issubmitted it cannot be revised or deleted.

Page 52 of 70
STEP 23: A confirmation message is received that the invoice has been submitted.

Page 53 of 70
VIEW PURCHASE ORDERS
DESCRIPTION
The following steps will show you how to inquire on purchase orders.
If you still have questions, please email [email protected].
PROCEDURE
STEP 1: Login to Oracle(https://oracledmzpnob1i.nobleenergyinc.com/OA_HTML/AppsLogin).

Page 54 of 70
STEP 2: Click the Orders tab.

Page 55 of 70
STEP 3: Click the PO Number hyperlink to see additional details.
Note: To limit the search to more specific PO’s, click the Advanced Search button.

Page 56 of 70
STEP 4: Click the drop down menu next to Actions.

Page 57 of 70
STEP 5: Select View PDF from the drop down and click Go.

Page 58 of 70
STEP 6: Click Open to view the PDF.

Page 59 of 70
VIEW INVOICES
DESCRIPTION
The following steps will show you how to inquire on previously created invoices.
PROCEDURE
STEP 1: Login to Oracle(https://oracledmzpnob1i.nobleenergyinc.com/OA_HTML/AppsLogin).
Page 60 of 70
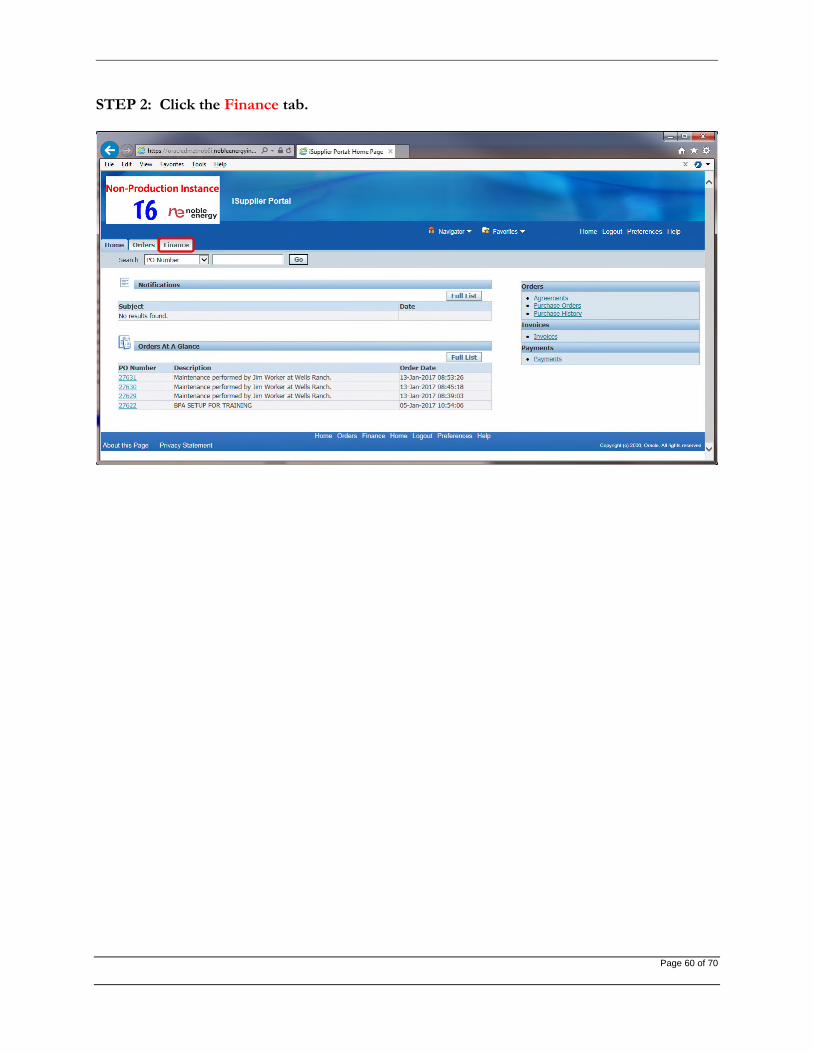
STEP 2: Click the Finance tab.

Page 61 of 70
STEP 3: Click the View Invoices link.

Page 62 of 70
STEP 4: Search for invoices by using any one of the fields shown.
Note: To limit the search to more specific invoice, click the Advanced Search button.

Page 63 of 70
STEP 5: Click the Go button to execute search.

Page 64 of 70
STEP 6: Review Invoice information from search. Click on Invoice 101895 to see additionaldetails for this example.
Note: Any columns with hyperlinks can be clicked on to view additionalinformation.

Page 65 of 70
STEP 7: Review invoice lines details. Click on PO Number 21743 to see PO information forthis example.

Page 66 of 70
STEP 8: Review PO details. Once review is complete, click on the Finance: View Invoiceslink.
Note: When the PO is received, the invoice has been submitted against the PO, or apayment has been made, you’ll see a hyperlink next to each. You can click on thehyperlink to view additional details.

Page 67 of 70
STEP 9: To view invoice attachments (Invoice PDF) click on the Attachments icon.

Page 68 of 70
STEP 10: To view PDF attachment, click on the hyperlink under Title Invoice # INV27631.

Page 69 of 70
FREQUENTLY ASKED QUESTIONS
1. WHO DO I CONTACT TO ADD A USER AND/OR REMOVE A USER?
EMAIL [email protected] IF A USER NEEDS ACCESS REMOVED OR IF AN
ADDITIONAL USER(S) NEED TO BE SETUP.
2. WILL I RECEIVE PAYMENT INFORMATION FOR INVOICES?
PAYMENT INFORMATION WILL CONTINUE TO BE RECEIVED FOR ISUPPLIER INVOICES IF YOU
CURRENTLY ARE RECEIVING REMITTANCE INFORMATION. IF YOU HAVE NOT BEEN RECEIVING
REMITTANCE INFORMATION CONTACT ISUPPLIERSUPPORT.
3. HOW DO I UPDATE AN INVOICE AFTER IT HAS BEEN SAVED?
A SAVED INVOICE WILL HAVE AN “UNSUBMITTED” STATUS. TO RETURN TO THE SAVED INVOICE
CLICK THE FINANCE TAB, ENTER A SEARCH PARAMETER, AND CLICK GO. CLICK THE PENCIL
ICON TO UPDATE AND SUBMIT THE INVOICE.

Page 70 of 70
TROUBLESHOOTING
Forgot your password
From the Login screen click the Password Reset (Suppliers only – iSupplier Users) hyperlink
Trying to search but nothing happens when clicking the magnifying glass
Change the web browsers pop-up blocker to always allow pop-ups from this website
Have not received the registration email with username and temporary password
Check the Junk/Spam mail folder or with the IT department
Website error message “Unable to authenticate site”
Try opening website in another browser i.e. Google Chrome or Internet Explorer
Unable to locate PO number when creating an invoice
Search for the PO number by clicking the Orders tab. Confirm that the PO number hasStandard PO listed in the document type column. A PO number that has GlobalBlanket Agreement listed as the document type is the Blanket Agreement that canONLY be used to create field tickets.