issued : 1.02.07 | revised : 1.20 - steelrock roof · pdf fileprepare the roof deck by...
TRANSCRIPT

Issued : 1.02.07 | RevIsed : 1.20.15
© SteelROCK Roof Products 2006-2010 page 2
Battenless Panel InstallatIon
IntRoductIon - LIabILItyThese install instructions are provided as a basic guide for installers of the SteelROCK Roofing Products. They describe suggested install techniques only developed by SteelROCK for its product lines. The methods shown are not the only way to install SteelROCK products, but have been chosen as a clear reference standard for new installers of our products. SteelROCK has no control over the installation of its products by independent contractors and therefore assumes no responsibility for incorrect installation or personal injury that may occur from installing these products.
codes - safetyThese install instructions should not be substituted for any local or national building code specifications. Some areas may dictate local construction practices be followed to address unique climatic conditions.
MateRIaLsSteelROCK panels and accessories are manufactured from 26-gauge Galvalume® steel and press-formed into each respective panel profile. The top surface of each panel, trim cap and select accessory is coated with a stone granule finish.
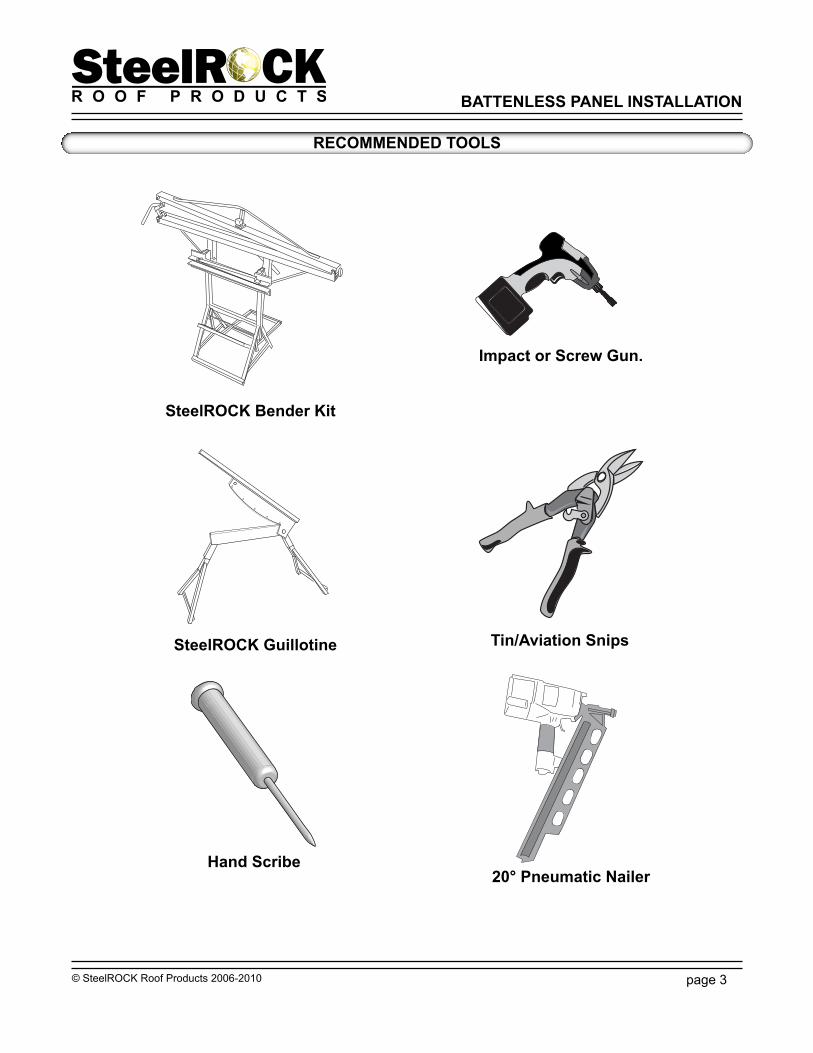
tooLsSteelROCK roofing products are installed with standard construction tools. The panels may be cut with tin-snips, or the Guillotine (cutter) supplied as part of the SteelROCK installation kit that consists of; 1- Guillotine (cutter), 1- Foot Bender, 1-Top Bender Attachment & 2-Batten Spacers.
PaneLsAll SteelROCK panels are constructed of 26-gauge steel, coated with a corrosion resistant aluminum-zinc alloy finish.
Roof sLoPeAlthough an underlayment is recommended for most installations, the steel panels described in these instructions may be installed on roof slopes of 3:12 and greater without an underlayment. For slopes less than 3:12 refer to the I.C.C. Report (formerly I.C.B.O.).
decK PRePaRatIon
new constructionPrepare roof deck to meet local building codes.
Roof-tear-off (solid deck)If tearing off old roof, clean and prepare deck to meet local building codes.
Re-Roof-tear-off (skip/space sheathing)There are two options available when skip/space sheathing is encountered. Either use counter battens(1x4) & battens(2x2) without filling (as detailed in Batten installation manual) or fill as necessary and install direct to deck.
Re-Roof over even surfacePrepare the decking by cutting back all asphalt shingles flush with fascia and gable/rake as needed and removing existing hip and ridge. Also, cut any blisters or irregular high spots to ensure a level roofing surface.
Re-Roof over Irregular surfaces (over wood shake or wood shingles)(Use counter battens(1x4) to obtain a level surface for battens when installing over an irregular surface.) Additionally, some codes require specified underlayments when reroofing over wood shakes. Prepare the roof deck by removing all existing hip and ridge. Cut the existing overhang back as needed to install battens(2x2) and accommodate flashings. These details are covered in further detail in the batten installation manual.
cold WeatherSteelRock panels have been installed in some of the coldest climates on the planet and performed exceptionally.
Care should be taken during the installation process when the ambient temperature drops at or below freezing. It is recommended that screws be used in lieu of nails to reduce impact to the coating.
Warming the panels may benecessary at or below freezing temperature. Contact SteelROCK if you find yourself in these conditions when installing for more information.
IntRoductIon
© SteelROCK Roof Products 2006-2010 page 3
Battenless Panel InstallatIon
steelRocK bender Kit
steelRocK Guillotine
Hand scribe
RecoMMended tooLs
Impact or screw Gun.
tin/aviation snips
20° Pneumatic nailer

© SteelROCK Roof Products 2006-2010 page 4
Battenless Panel InstallatIon
A 1”x4” Fascia support batten gets installed flush with the fascia. This helps to create a straight course, and allows the first course to have the same pitch as subsequent rows.
Install 1”X4” battens on both sides of hip and ridge as shown (fig 2.D).
Underlayment is recommended for most installa-tions. However, the steel panels described in these instructions may be installed on roof slopes of 3:12 and greater without any underlayment. For slopes less than 3:12, refer to the I.C.C. report (formerly I.C.B.O.).
In cold climates, ice and water shield is recom-mended in the valleys, overhangs and perimeter or as required by local codes.
1.A
fascIa suPPoRt batten
undeRLayMent
2.a
2.b 2.c
2.d
© SteelROCK Roof Products 2006-2010 page 5
Battenless Panel InstallatIon
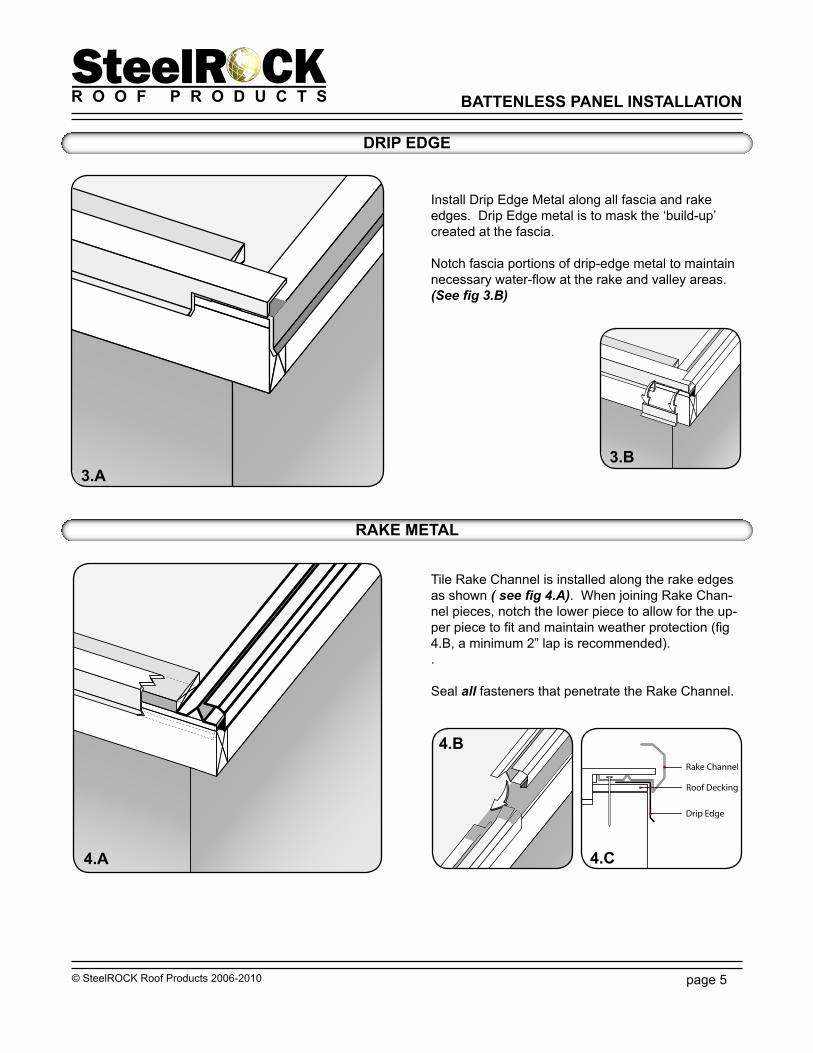
dRIP edGe
RaKe MetaL
Install Drip Edge Metal along all fascia and rake edges. Drip Edge metal is to mask the ‘build-up’ created at the fascia.
Notch fascia portions of drip-edge metal to maintain necessary water-flow at the rake and valley areas. (See fig 3.B)
Tile Rake Channel is installed along the rake edges as shown ( see fig 4.A). When joining Rake Chan-nel pieces, notch the lower piece to allow for the up-per piece to fit and maintain weather protection (fig 4.B, a minimum 2” lap is recommended)..
Seal all fasteners that penetrate the Rake Channel.
3.b3.a
4.a
4.b
4.c
© SteelROCK Roof Products 2006-2010 page 6
Battenless Panel InstallatIon
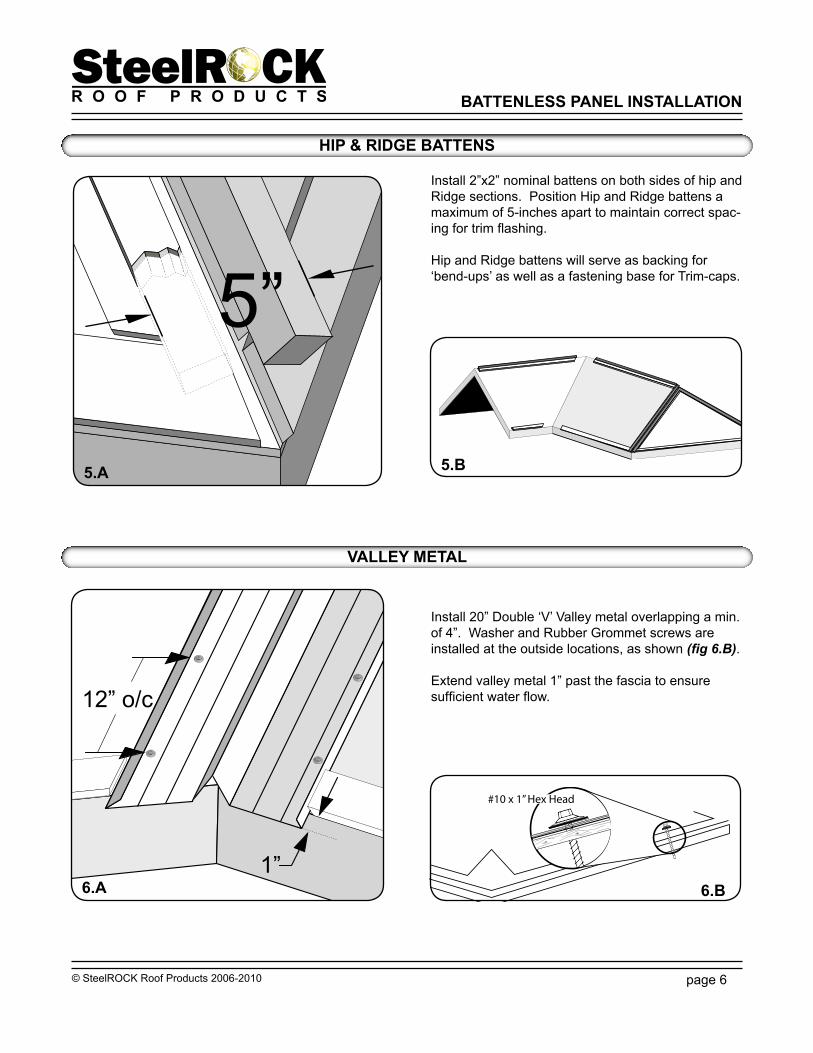
vaLLey MetaL
HIP & RIdGe battens
Install 20” Double ‘V’ Valley metal overlapping a min. of 4”. Washer and Rubber Grommet screws are installed at the outside locations, as shown (fig 6.B).
Extend valley metal 1” past the fascia to ensure sufficient water flow.
Install 2”x2” nominal battens on both sides of hip and Ridge sections. Position Hip and Ridge battens a maximum of 5-inches apart to maintain correct spac-ing for trim flashing.
Hip and Ridge battens will serve as backing for ‘bend-ups’ as well as a fastening base for Trim-caps.
5.a 5.b
6.a 6.b
© SteelROCK Roof Products 2006-2010 page 7
Battenless Panel InstallatIon
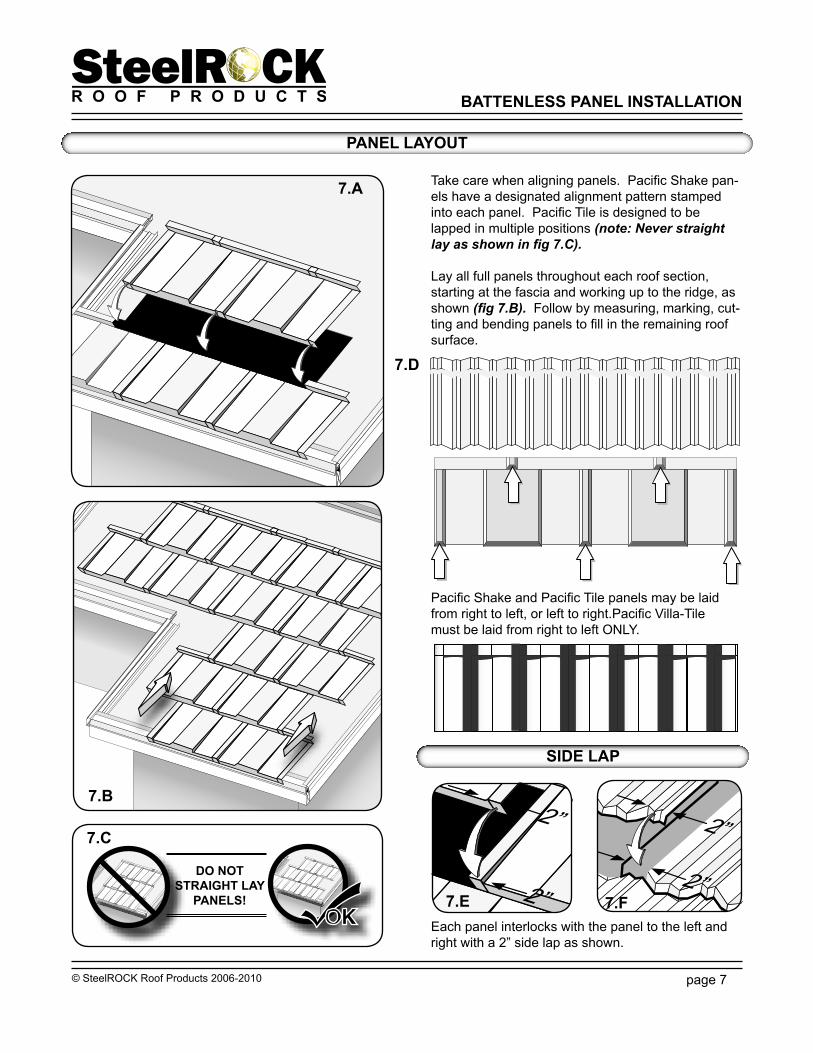
PaneL Layout
Take care when aligning panels. Pacific Shake pan-els have a designated alignment pattern stamped into each panel. Pacific Tile is designed to be lapped in multiple positions (note: Never straight lay as shown in fig 7.C).
Lay all full panels throughout each roof section, starting at the fascia and working up to the ridge, as shown (fig 7.B). Follow by measuring, marking, cut-ting and bending panels to fill in the remaining roof surface.
Pacific Shake and Pacific Tile panels may be laid from right to left, or left to right.Pacific Villa-Tile must be laid from right to left ONLY.
Each panel interlocks with the panel to the left and right with a 2” side lap as shown.
sIde LaP
7.a
7.b
7.c
7.d
7.e 7.f
© SteelROCK Roof Products 2006-2010 page 8
Battenless Panel InstallatIon
PaneL fastenInG
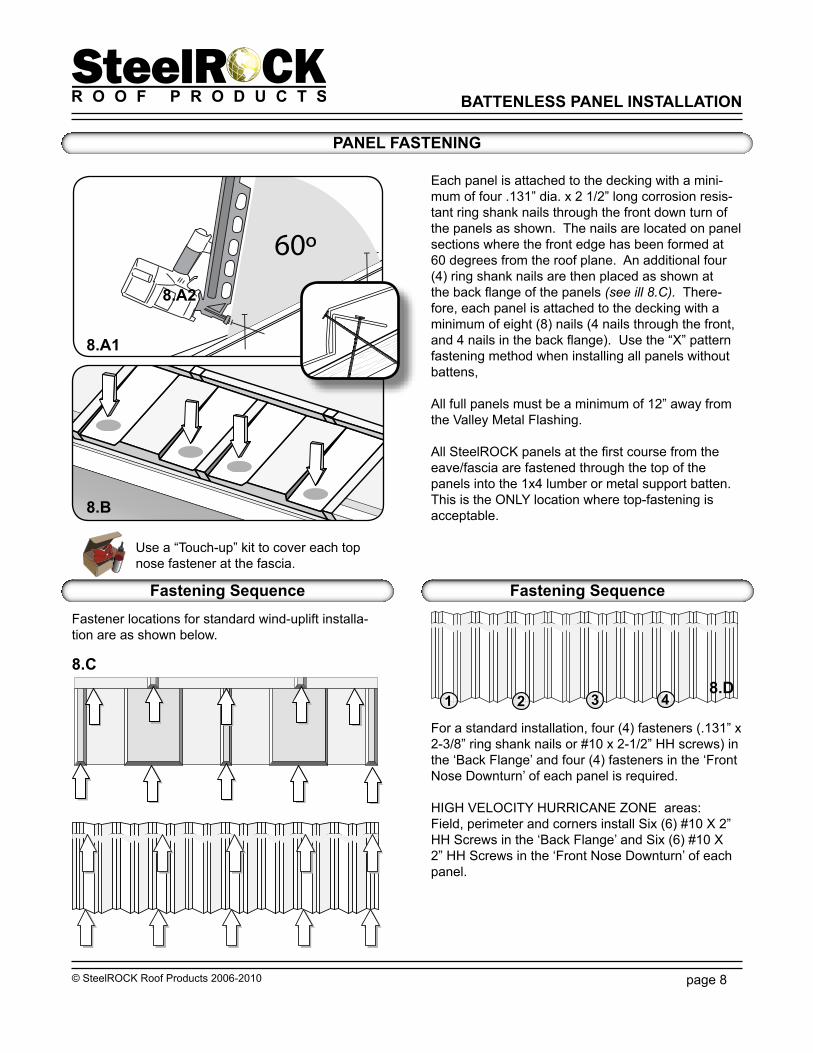
For a standard installation, four (4) fasteners (.131” x 2-3/8” ring shank nails or #10 x 2-1/2” HH screws) in the ‘Back Flange’ and four (4) fasteners in the ‘Front Nose Downturn’ of each panel is required.
HIGH VELOCITY HURRICANE ZONE areas:Field, perimeter and corners install Six (6) #10 X 2” HH Screws in the ‘Back Flange’ and Six (6) #10 X 2” HH Screws in the ‘Front Nose Downturn’ of each panel.
fastening sequencefastening sequenceFastener locations for standard wind-uplift installa-tion are as shown below.
Each panel is attached to the decking with a mini-mum of four .131” dia. x 2 1/2” long corrosion resis-tant ring shank nails through the front down turn of the panels as shown. The nails are located on panel sections where the front edge has been formed at 60 degrees from the roof plane. An additional four (4) ring shank nails are then placed as shown at the back flange of the panels (see ill 8.C). There-fore, each panel is attached to the decking with a minimum of eight (8) nails (4 nails through the front, and 4 nails in the back flange). Use the “X” pattern fastening method when installing all panels without battens,
All full panels must be a minimum of 12” away from the Valley Metal Flashing.
All SteelROCK panels at the first course from the eave/fascia are fastened through the top of the panels into the 1x4 lumber or metal support batten. This is the ONLY location where top-fastening is acceptable.
Use a “Touch-up” kit to cover each top nose fastener at the fascia.
8.a1
8.b
8.c8.d
8.a2

© SteelROCK Roof Products 2006-2010 page 9
Battenless Panel InstallatIon
HIP PaneLs
Cut LineBend Line
Measure, mark, cut and bend panels up to fit tightly against hip battens. Install same as field panels. Also fasten into hip build-up (2”x2”) working from eave pieces to ridge pieces.
vaLLey PaneLs
Cut line Bend line
Valley’s are bent down as shown.
Measure, mark, cut and bend panels down to fit tightly against valley center as shown. Working from eave pieces to ridge pieces, bend down 3/4” into valley pan.
9.a
9.b
10.a
10.b
10.c

© SteelROCK Roof Products 2006-2010 page 10
Battenless Panel InstallatIon
cHIMney/sKy-LIGHt/Head-WaLL
Any square cornered protrusion is treated in the same manner as outlined above (fig .A-F). Install sections at lower side of object first, then follow up and around each side as shown. Finish with the saddle/diverter. Install next full course over diverter as shown. Apply sealant as necessary.
11.a 11.b
11.c
11.d 11.e 11.f
© SteelROCK Roof Products 2006-2010 page 11
Battenless Panel InstallatIon
sHoRt couRse/stePPed fascIa
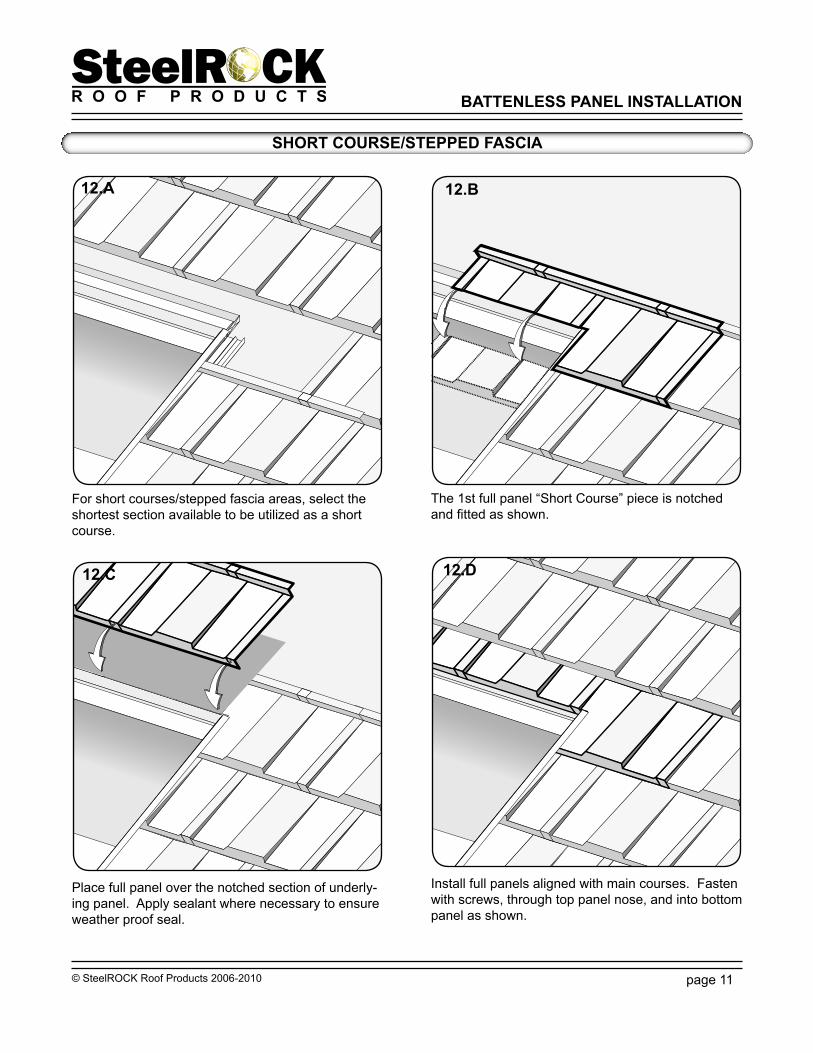
For short courses/stepped fascia areas, select the shortest section available to be utilized as a short course.
The 1st full panel “Short Course” piece is notched and fitted as shown.
Place full panel over the notched section of underly-ing panel. Apply sealant where necessary to ensure weather proof seal.
Install full panels aligned with main courses. Fasten with screws, through top panel nose, and into bottom panel as shown.
12.a 12.b
12.c 12.d

© SteelROCK Roof Products 2006-2010 page 12
Battenless Panel InstallatIon
QuIcK vent
SteelROCK Tile and Shake Quickvents are used in place of regular panels where ventilation is required. The vents are installed similar to panels after cutting ventilation hole in decking (approximately 8” x 30”). A SteelROCK Tile and Shake Quickvent provides approximately 82sq inches of Net Free Vent Area (NFVA). Care should be taken to adequately ventilate the building. Building codes require a minimum NFVA of 1/300 the area of the space to be ventilated (attic).
RIdGe PaneLs
Cut Line
Bend Line
2”
Always bend the ridge panels before cutting as they deform slightly. Deduct ½” from mea surements. Mark both bend and cut lines for each panel prior to cutting or bending.
Ridge, cut & bent panels are fitted at the last course at the ridge. This “Short-Course” must always be bent FIRST, and then the excess cut off, as this will prevent excessive distortion of the panel.
13.b 13.c13.a
14.a 14.b
© SteelROCK Roof Products 2006-2010 page 13
Battenless Panel InstallatIon
standaRd PIPe fLasHInG
CaulkingCaulking
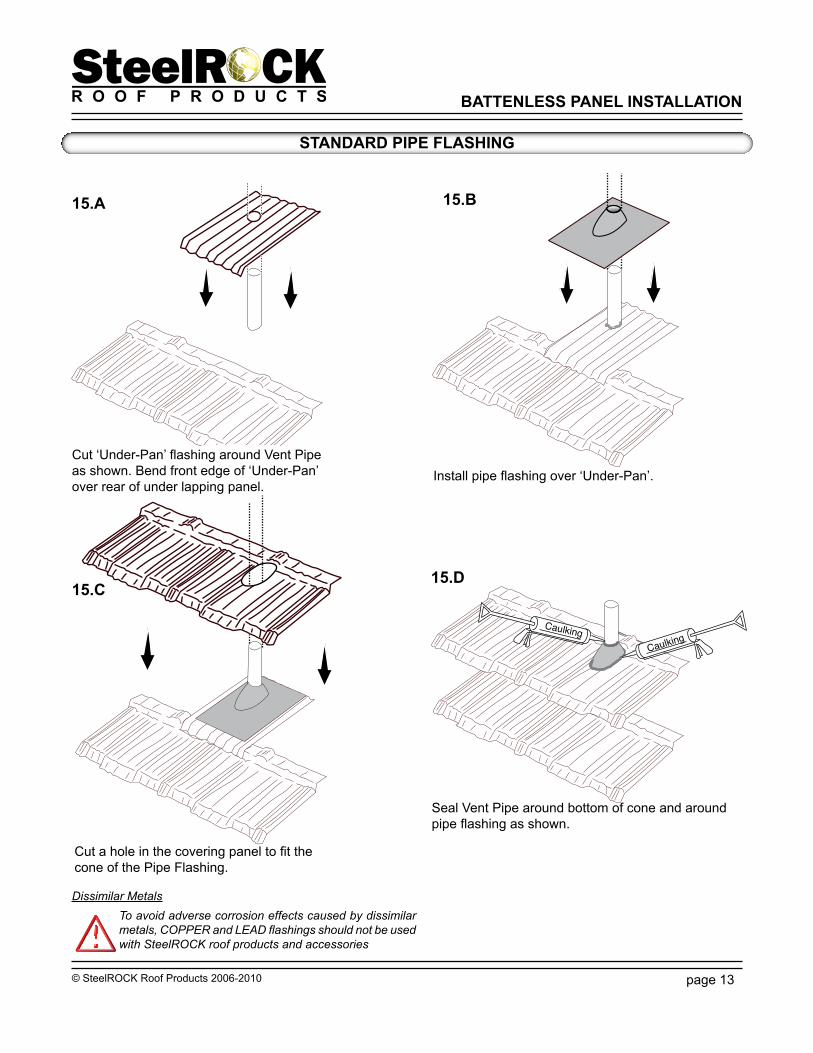
Seal Vent Pipe around bottom of cone and around pipe flashing as shown.
Cut ‘Under-Pan’ flashing around Vent Pipe as shown. Bend front edge of ‘Under-Pan’ over rear of under lapping panel.
Install pipe flashing over ‘Under-Pan’.
Cut a hole in the covering panel to fit the cone of the Pipe Flashing.
To avoid adverse corrosion effects caused by dissimilar metals, COPPER and LEAD flashings should not be used with SteelROCK roof products and accessories
Dissimilar Metals
15.a
15.c15.d
15.b
© SteelROCK Roof Products 2006-2010 page 14
Battenless Panel InstallatIon
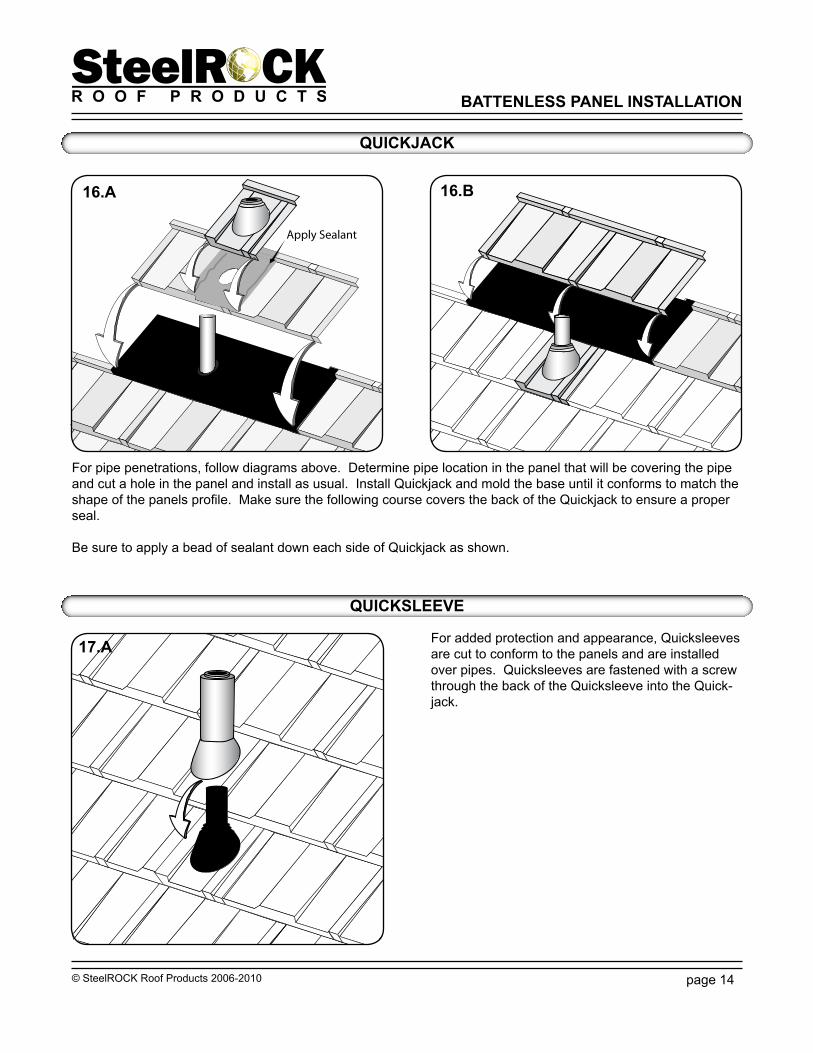
QuIcKJacK
QuIcKsLeeve
For added protection and appearance, Quicksleeves are cut to conform to the panels and are installed over pipes. Quicksleeves are fastened with a screw through the back of the Quicksleeve into the Quick-jack.
For pipe penetrations, follow diagrams above. Determine pipe location in the panel that will be covering the pipe and cut a hole in the panel and install as usual. Install Quickjack and mold the base until it conforms to match the shape of the panels profile. Make sure the following course covers the back of the Quickjack to ensure a proper seal.
Be sure to apply a bead of sealant down each side of Quickjack as shown.
17.a
16.b16.a

© SteelROCK Roof Products 2006-2010 page 15
Battenless Panel InstallatIon
tRIM caPs
tRIM 1 tRIM 2
tRIM 3 tRIM 4
© SteelROCK Roof Products 2006-2010 page 16
Batten InstallatIon appendIx
batten InstaLL aPPendIX

© SteelROCK Roof Products 2006-2010 page 17
Batten InstallatIon appendIx
2X2 fascIa buILduP
2X2 batten Layout
Buildup thickness is determined by thickness of roof being covered
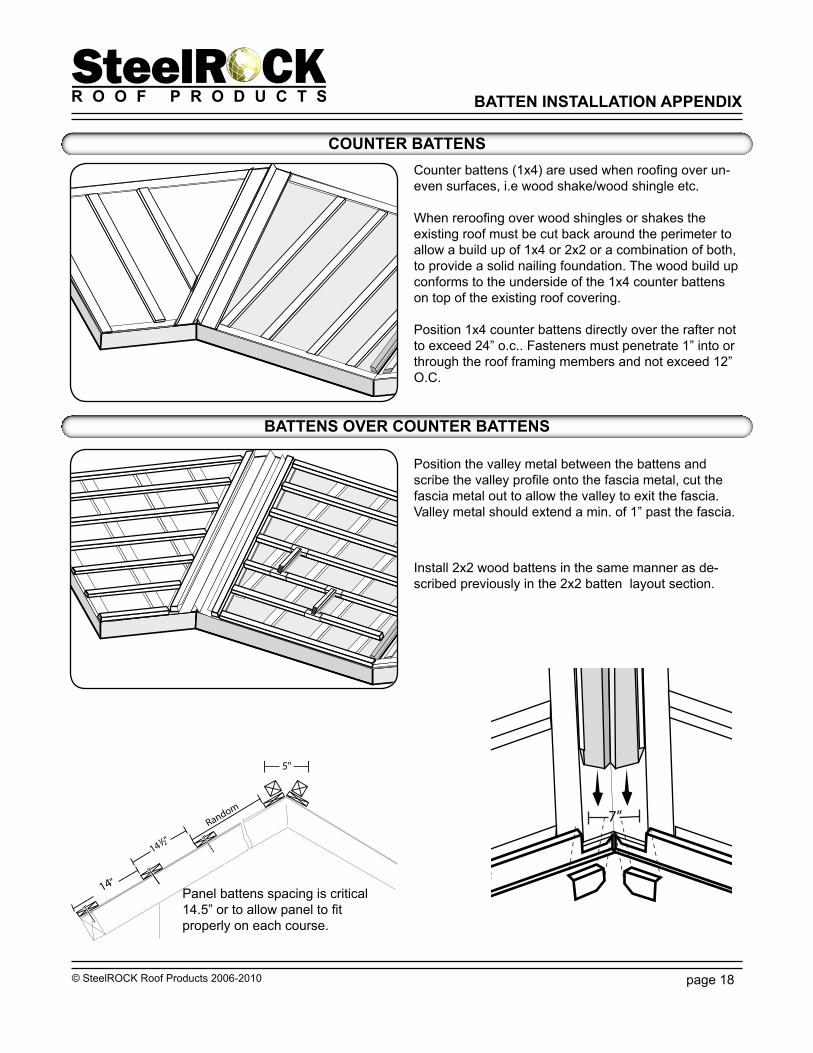
Panel Batten spacing is critical. The rear of each SteelROCK panel must fit snuggly against the batten. Use SteelROCK batten spacers to ensure proper bat-ten spacing.
Panel Battens are installed parallel to the ridge/ fascia spaced 14.5” on center, position the first batten flush with the facia or at end of the roof. The second batten is positioned at 14” to allow adequate overhang at the fascia for gutter/water shed from the roof. (Refer to diagram below for Batten spacing)Facia metal is available in either 3.5” or 5” face width and is used to conceal the build up lumber at the facia and to act as a metal drip edge.
Wood panel battens can be 2x2, 1x3 or 1x4. Consult SteelROCK regarding steel purloin sections.
Facia Metal
14.5”
14.5”
14.5”
14”
© SteelROCK Roof Products 2006-2010 page 18
Batten InstallatIon appendIx
counteR battens
battens oveR counteR battens
Counter battens (1x4) are used when roofing over un-even surfaces, i.e wood shake/wood shingle etc.
Position the valley metal between the battens and scribe the valley profile onto the fascia metal, cut the fascia metal out to allow the valley to exit the fascia. Valley metal should extend a min. of 1” past the fascia.
Panel battens spacing is critical14.5” or to allow panel to fitproperly on each course.
Install 2x2 wood battens in the same manner as de-scribed previously in the 2x2 batten layout section.
When reroofing over wood shingles or shakes the existing roof must be cut back around the perimeter to allow a build up of 1x4 or 2x2 or a combination of both, to provide a solid nailing foundation. The wood build up conforms to the underside of the 1x4 counter battens on top of the existing roof covering.
Position 1x4 counter battens directly over the rafter not to exceed 24” o.c.. Fasteners must penetrate 1” into or through the roof framing members and not exceed 12” O.C.
© SteelROCK Roof Products 2006-2010 page 19
Batten InstallatIon appendIx
PaneL Layout
PaneL fastenInG
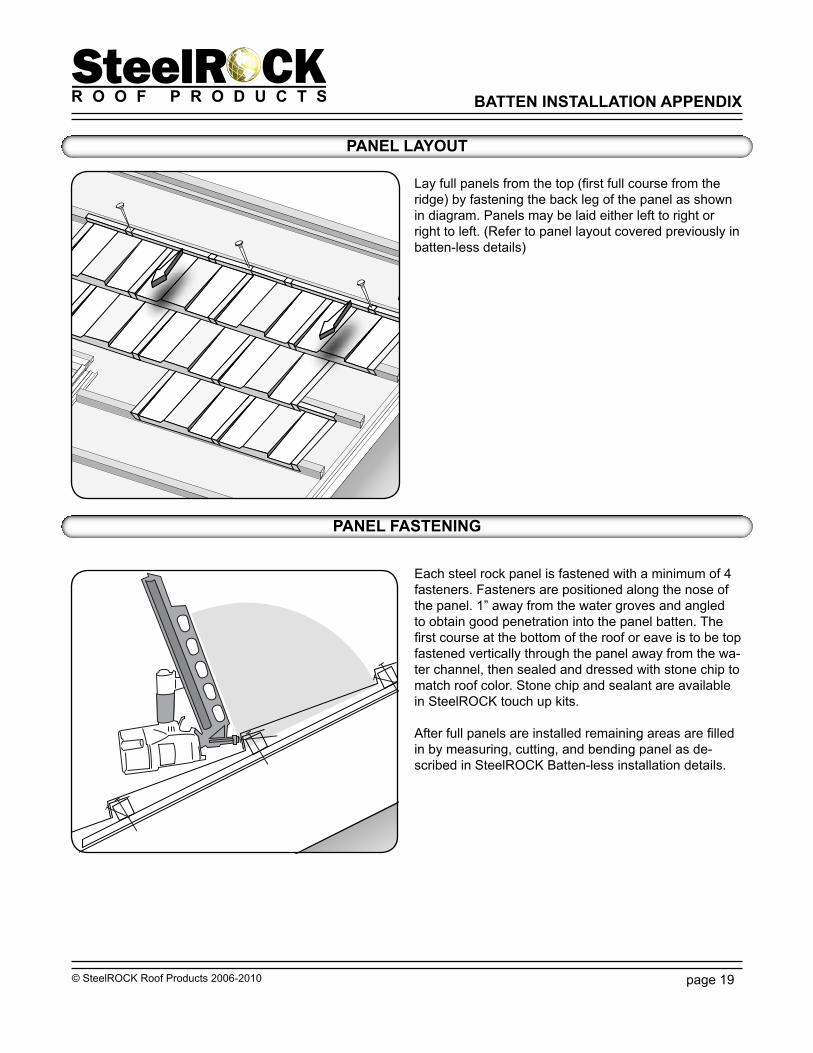
Lay full panels from the top (first full course from the ridge) by fastening the back leg of the panel as shown in diagram. Panels may be laid either left to right or right to left. (Refer to panel layout covered previously in batten-less details)
Each steel rock panel is fastened with a minimum of 4 fasteners. Fasteners are positioned along the nose of the panel. 1” away from the water groves and angled to obtain good penetration into the panel batten. The first course at the bottom of the roof or eave is to be top fastened vertically through the panel away from the wa-ter channel, then sealed and dressed with stone chip to match roof color. Stone chip and sealant are available in SteelROCK touch up kits.
After full panels are installed remaining areas are filled in by measuring, cutting, and bending panel as de-scribed in SteelROCK Batten-less installation details.

© SteelROCK Roof Products 2006-2010 page 20
Batten InstallatIon appendIx
HIP & RIdGe buILd-uP
Ridge and hip build up not to exceed 5” to accommo-date ridge and hip caps.
2x2 battenswith 1x4 counter battens
RaKe WItH tRIM caPs
2x2 battens
1x4 battens
Fasten
Fasten
This detail can be modified to accommodate varying re- roof applications (for example over wood shakes) keep in mind the panel bend up is recommended.
Barrel Trim (stone-coated)
2X2 Rake Batten
1x4 Support Batten
Solid or Spaced Sheathing
3 1/2" or 5" Fascia (stone-coated)
Tile Rake Metal(optional)
Bend Up
© SteelROCK Roof Products 2006-2010 page 21
Batten InstallatIon appendIx
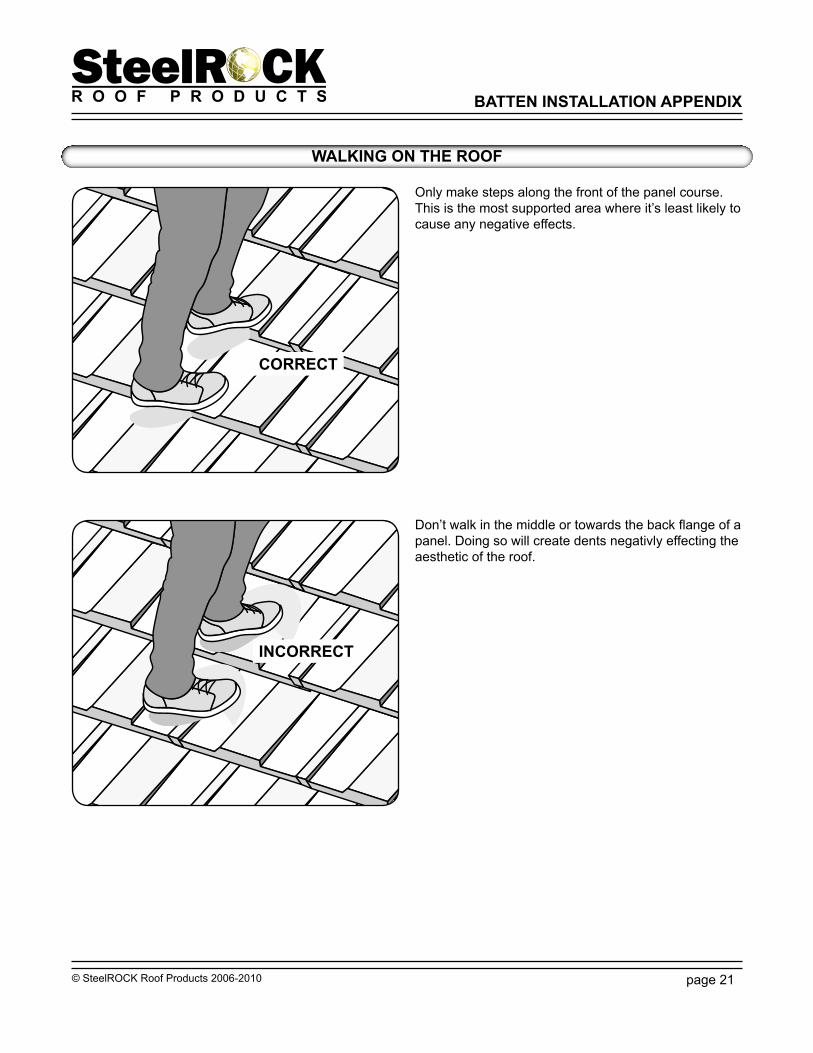
WaLKInG on tHe Roof
Only make steps along the front of the panel course. This is the most supported area where it’s least likely to cause any negative effects.
Don’t walk in the middle or towards the back flange of a panel. Doing so will create dents negativly effecting the aesthetic of the roof.
coRRect
IncoRRect

© SteelROCK Roof Products 2006-2010 page 22
Battenless Panel InstallatIon
PRoduct sPecIfIcatIons - sHaKe
SteelROCK PacIfIc sHaKe PaneL Part No. 1155-XX (XX = color) 400-pcs./plt.INCHES METRIC
Length 49-3/4” 1265 mmCover 47-1/4” 1200 mmPitch 14-1/2” 368 mmPanels /Sq 21-pcs.Weight 5.5 lbs 2.5 kg
SteelROCK sHaKe v-tRIM caP Part No. 2121-XX (XX = color) 60-pcs./boxINCHES METRIC
Length 15” 381 mmCover 14-1/2” 368 mmWidth 6” 152 mmHeight 3-1/2” 89 mmWeight .98 lbs .45 kg
SteelROCK caP end sIdc Part No. 2192-XX (XX = color) 1-pcs./ea.INCHES METRIC
Size 6” 152 mmWeight .18 lbs .08 kg
SteelROCK 3-1/2” fascIa MetaL part No. 3101-XX (XX = color) 10-pcs./packINCHES METRIC
Length 79” 2006 mmCover 75” 1905 mmFace 3-1/2” 89 mmWeight 3.75 lbs 1.13 kg
SteelROCK 5” fascIa MetaL Part No. 3111-XX (XX = color) 10-pcs./packINCHES METRIC
Length 79” 2006 mmCover 75” 1905 mmFace 5” 125 mmWeight 3.75 lbs 1.70 kg
SteelROCK RaKe cHanneL Part No. 3191-XX (XX = color) 6-pcs./packINCHES METRIC
Length 79” 2006 mmCover 75” 1905 mmFace 3-1/2” 125 mmWeight 3.00 lbs 1.36 kg
SteelROCK Z-baR MetaL (Small) Part No. 3128-XX (XX = color) 10-pcs./packINCHES METRIC
Length 79” 2006 mmCover 75” 1905 mmWidth Step 1/2” 12 mmFace 2” 50 mmWeight 3.00 lbs 1.36 kg

© SteelROCK Roof Products 2006-2010 page 23
Battenless Panel InstallatIon
SteelROCK Head-WaLL MetaL Part No. 3113-XX (XX = color) 10-pcs./packINCHES METRIC
Length 79” 2006 mmCover 75” 368 mmDepth 2-1/2” 64 mmHeight 2-1/2” 64 mmWeight 3.3 lbs 1.5 kg
SteelROCK QuIcKvent Part No. 3176-XX (XX = color) 1-pcs./ea.INCHES METRIC
Length 52” 1320 mmCover 50” 1270 mmHeight 3-1/2” 89”Weight 9 lbs. 4.09 kg
SteelROCK RIseR MetaL part No. 3133-XX (XX = color) 10-pcs./packINCHES METRIC
Length 79” 2006 mmCover 79” 2006 mmFace Height 1” 25 mmWeight 2 lbs .90 kg
SteelROCK 20” vaLLey MetaL Part No. 3219-XX (XX = color) 1-pcs./ea.INCHES METRIC
Length 120” 3048 mmCover 116” 2947 mmWidth 20” 508 mmWeight 12.5 lbs. 5.68 kg.
SteelROCK 7” vaLLey MetaL Part No. 3222-XX (XX = color) 1-pcs./ea.INCHES METRIC
Length 120” 3048 mmCover 116” 2947 mmSide-wall 1-1/4” 32 mmDiverter 3/4” 20 mmWeight 6.2 lbs. 2.8 kg
SteelROCK dRIP edGe MetaL Part No. 3215-XX (XX = color) 1-pcs./ea.INCHES METRIC
Length 120” 3048 mmCover 116” 2947 mmFace depth 1-1/2” 38 mmWeight 1.6 lbs .72 kg
PRoduct sPecIfIcatIons - sHaKe
SteelROCK fL-dRIP edGe MetaL Part No. 3241-XX (XX = color) 1-pcs./ea.INCHES METRIC
Length 120” 3048 mmCover 116” 2947 mmFace Depth 2-1/2” 64 mmWeight 1.8 lbs. .81 kgWeight 5.5 lbs 2.5 kg
2”
2-1/2”

© SteelROCK Roof Products 2006-2010 page 24
Battenless Panel InstallatIon
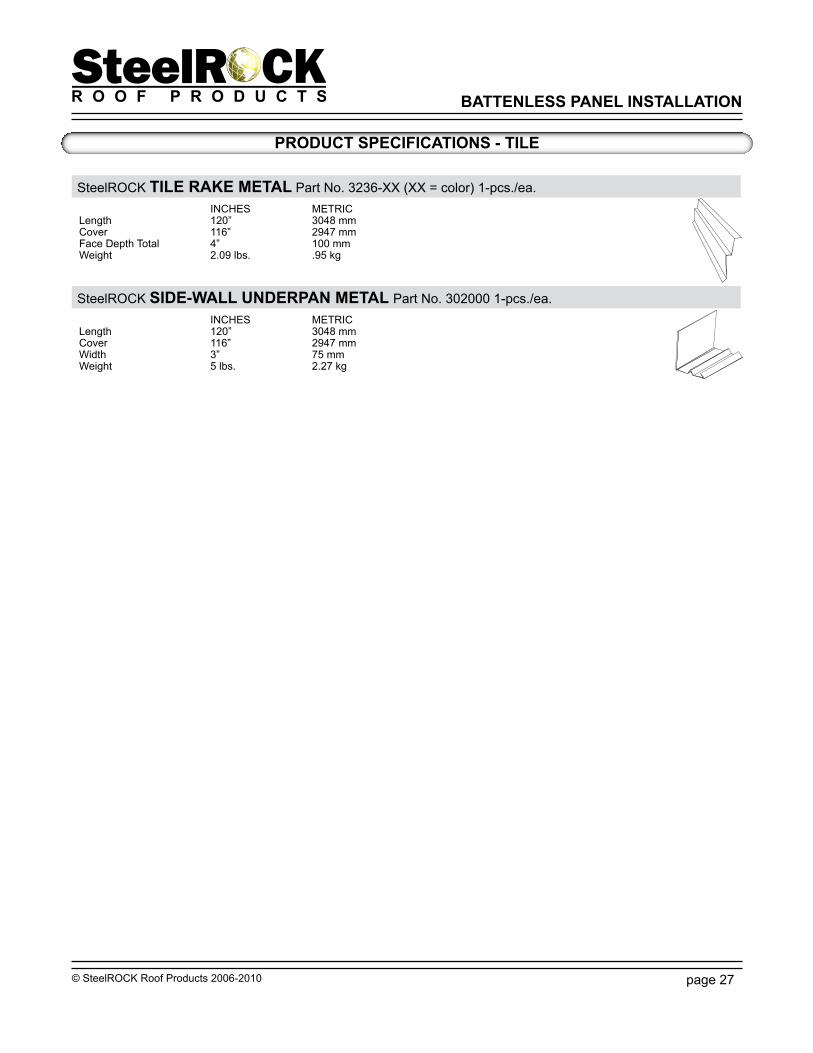
SteelROCK tILe RaKe MetaL Part No. 3236-XX (XX = color) 1-pcs./ea.INCHES METRIC
Length 120” 3048 mmCover 116” 2947 mmFace Depth Total 4” 100 mmWeight 2.09 lbs. .95 kg
SteelROCK sIde-WaLL undeRPan MetaL Part No. 302000 1-pcs./ea.INCHES METRIC
Length 120” 3048 mmCover 116” 2947 mmWidth 3” 75 mmWeight 5 lbs. 2.27 kg
PRoduct sPecIfIcatIons - sHaKe

© SteelROCK Roof Products 2006-2010 page 25
Battenless Panel InstallatIon
PRoduct sPecIfIcatIons - tILe
SteelROCK PacIfIc tILe PaneL Part No. 1155-XX (XX = color) 400-pcs./plt.INCHES METRIC
Length 52” 1320 mmCover 50” 1270 mmPitch 14-1/2” 368 mmPanels /Sq 20-pcs.Weight 5.5 lbs. 2.5 kg
SteelROCK tILe v-tRIM caP Part No. 2121-XX (XX = color) 60-pcs./boxINCHES METRIC
Length 15” 381 mmCover 14-1/2” 368 mmWidth 6” 152 mmHeight 3-1/2” 89 mmWeight .98 lbs. .45 kg
SteelROCK caP end sIdc Part No. 2192-XX (XX = color) 1-pcs./ea.INCHES METRIC
Size 6” 152 mmWeight .18 lbs. .08 kg
SteelROCK 3-1/2” fascIa MetaL part No. 3101-XX (XX = color) 10-pcs./packINCHES METRIC
Length 79” 2006 mmCover 75” 1905 mmFace 3-1/2” 89 mmWeight 3.75 lbs. 1.13 kg
SteelROCK 5” fascIa MetaL Part No. 3111-XX (XX = color) 10-pcs./packINCHES METRIC
Length 79” 2006 mmCover 75” 1905 mmFace 5” 125 mmWeight 3.75 lbs. 1.70 kg
SteelROCK RaKe cHanneL Part No. 3191-XX (XX = color) 6-pcs./packINCHES METRIC
Length 79” 2006 mmCover 75” 1905 mmFace 3-1/2” 125 mmWeight 3.00 lbs. 1.36 kg
SteelROCK Z-baR MetaL (Small) Part No. 3128-XX (XX = color) 10-pcs./packINCHES METRIC
Length 79” 2006 mmCover 75” 1905 mmWidth Step 1/2” 12 mmFace 2” 50 mmWeight 3.00 lbs. 1.36 kg

© SteelROCK Roof Products 2006-2010 page 26
Battenless Panel InstallatIon
2”
2-1/2”
SteelROCK Head-WaLL MetaL Part No. 3113-XX (XX = color) 10-pcs./packINCHES METRIC
Length 79” 2006 mmCover 75” 368 mmDepth 2-1/2” 64 mmHeight 2-1/2” 64 mmWeight 3.3 lbs. 1.5 kg
SteelROCK QuIcKvent Part No. 3176-XX (XX = color) 1-pcs./ea.INCHES METRIC
Length 52” 1320 mmCover 50” 1270 mmHeight 3-1/2” 89”Weight 9 lbs. 4.09 kg
SteelROCK RIseR MetaL part No. 3133-XX (XX = color) 10-pcs./packINCHES METRIC
Length 79” 2006 mmCover 79” 2006 mmFace Height 1” 25 mmWeight 2 lbs. .90 kg
SteelROCK 20” vaLLey MetaL Part No. 3219-XX (XX = color) 1-pcs./ea.INCHES METRIC
Length 120” 3048 mmCover 116” 2947 mmWidth 20” 508 mmWeight 12.5 lbs. 5.68 kg.
SteelROCK 7” vaLLey MetaL Part No. 3222-XX (XX = color) 1-pcs./ea.INCHES METRIC
Length 120” 3048 mmCover 116” 2947 mmSide-wall 1-1/4” 32 mmDiverter 3/4” 20 mmWeight 6.2 l bs. 2.8 kg
SteelROCK dRIP edGe MetaL Part No. 3215-XX (XX = color) 1-pcs./ea.INCHES METRIC
Length 120” 3048 mmCover 116” 2947 mmFace depth 1-1/2” 38 mmWeight 1.6 lbs .72 kg
SteelROCK fL-dRIP edGe MetaL Part No. 3241-XX (XX = color) 1-pcs./ea.INCHES METRIC
Length 120” 3048 mmCover 116” 2947 mmFace Depth 2-1/2” 64 mmWeight 1.8 lbs. .81 kgWeight 5.5 lbs 2.5 kg
PRoduct sPecIfIcatIons - tILe
© SteelROCK Roof Products 2006-2010 page 27
Battenless Panel InstallatIon
SteelROCK tILe RaKe MetaL Part No. 3236-XX (XX = color) 1-pcs./ea.INCHES METRIC
Length 120” 3048 mmCover 116” 2947 mmFace Depth Total 4” 100 mmWeight 2.09 lbs. .95 kg
SteelROCK sIde-WaLL undeRPan MetaL Part No. 302000 1-pcs./ea.INCHES METRIC
Length 120” 3048 mmCover 116” 2947 mmWidth 3” 75 mmWeight 5 lbs. 2.27 kg
PRoduct sPecIfIcatIons - tILe
© SteelROCK Roof Products 2006-2010 page 28
Battenless Panel InstallatIon
notes

© SteelROCK Roof Products 2006-2010 page 29
Battenless Panel InstallatIon
A
B
Panel 1A:_______B:_______
Panel 2A:_______B:_______
Panel 3A:_______B:_______
Panel 4A:_______B:_______
Panel 5A:_______B:_______
Panel 6A:_______B:_______
Panel 7A:_______B:_______
Panel 8A:_______B:_______
Panel 9A:_______B:_______
Panel 10A:_______B:_______
Panel 11A:_______B:_______
Panel 12A:_______B:_______
MeasuReMent WoRKsHeet