irisdocument server 9 - irislink.com 3 irisdocument server modules ... server 2008 (32 and 64 bits),...
TRANSCRIPT
IRISDocumentTM Server 9.5
User Guide

IRISDocumentTM Server 9.5 – User Guide
iii
Table of Contents
Copyrights ........................................................................................... 7
Chapter 1 Introducing IRISDocument Server ....................... 9
Chapter 2 Installing IRISDocument Server ......................... 13
System requirements ....................................................... 13
Software installation ....................................................... 14
Software registration ....................................................... 16
Uninstalling the software ................................................ 16
Product Support .............................................................. 17
Chapter 3 IRISDocument Server Modules ........................... 19
The Batch OCR module .................................................. 19
The Watched Folders module ......................................... 21
Watched Folders as a Windows service .......................... 25
Chapter 4 Input Source .......................................................... 27
Batch OCR image folder ................................................. 27
Watched image folder ..................................................... 30
Defining a Workgroup of users ....................................... 37
Sharing folders ................................................................ 42
Chapter 5 Image Enhancement .............................................. 47
Chapter 6 Barcode Reading ................................................... 51
Table of Contents
iv
Chapter 7 Character Recognition .......................................... 55
Chapter 8 Image Compression ............................................... 63
Chapter 9 Document Separation ............................................ 67
Chapter 10 XML Indexing ..................................................... 69
Chapter 11 Output Folder ...................................................... 71
Chapter 12 Document Names ................................................. 73
Chapter 13 Output Formats ................................................... 77
Supported output formats ................................................ 77
PDF documents ............................................................... 78
PDF Document types ........................................................................ 78
PDF Options ...................................................................................... 81
Password-protected PDF ................................................................... 83
Digitally signed PDF ......................................................................... 84
PDF/A ............................................................................................... 86
PDF - iHQC ...................................................................................... 87
XPS documents ............................................................... 89
XPS Document types ........................................................................ 89
XPS Options ...................................................................................... 91
XPS - iHQC ...................................................................................... 92
Text-based output formats .............................................. 93
Word, WordML, RTF and OpenDocument Text .............................. 93
Layout and other options ................................................................... 94
IRISDocumentTM Server 9.5 – User Guide
v
Other output formats ....................................................... 98
SpreadsheetML documents ............................................................... 98
(Unicode) Text documents .............................................................. 101
HTML documents ........................................................................... 101
XML documents ............................................................................. 102
Image files .................................................................... 103
Chapter 14 Export Features ................................................. 105
Export application ......................................................... 106
Export to SharePoint ..................................................... 107
Export to Therefore ....................................................... 111
Export to E-mail addresses ........................................... 114
Export to FTP folders .................................................... 117
Export to personal folders ............................................. 120
Chapter 15 IRISDocument Golden Rules ........................... 123
Index .................................................................................. 125

IRISDocumentTM Server 9.5 – User Guide
7
Copyrights
IRISDocumentServer9.5-dgi-100510-03
Copyrights © 2002 - 2010 I.R.I.S. All Rights Reserved.
I.R.I.S. owns the copyrights to the IRISDocument software, to the online help system and to this publication.
The information contained in this document is the property of I.R.I.S. Its content is subject to change without notice and does not represent a commitment on the part of I.R.I.S. The software described in this document is furnished under a license agreement which states the terms of use of this product. The software may be used or copied only in accordance with the terms of that agreement. No part of this publication may be reproduced, transmitted, stored in a retrieval system, or translated into another language without the prior written consent of I.R.I.S.
This User Guide utilizes fictitious names for purposes of demonstration; references to actual persons, companies, or organizations are strictly coincidental.
Trademarks
The I.R.I.S. logo, IRISDocument, IRISPowerscan and IRISDocument Server are trademarks of Image Recognition Integrated Systems S.A. OCR ("Optical Character Recognition") technology, MICR ("Magnetic Ink Character Recognition") and barcode reading technology by I.R.I.S. AutoFormat, ClearView, Connectionist, Linguistic and WID technology by I.R.I.S. iHQC technology by I.R.I.S.: patent pending. XML parser developed by Apache. This product includes software developed by the Apache Software Foundation.
All other products mentioned in this User Guide are trademarks or registered trademarks of their respective owners.


IRISDocumentTM Server 9.5 – User Guide
9
CHAPTER 1 INTRODUCING IRISDOCUMENT
SERVER
IRISDocument Server is a powerful, high-productivity document recognition server. It is designed to optimize, structure, index and compress large volumes of image and PDF files and to convert them into text-searchable and editable output files.
To process image files, IRISDocument Server uses I.R.I.S.' proprietary OCR technology (Optical Character Recognition), which supports as many as 137 languages. All American and European languages are supported, including the Central-European, Baltic and Cyrillic languages as well as Greek and Turkish.
A wide range of output formats are available: IRISDocument converts image files into text-searchable PDF and XPS files and into both text-searchable and editable Text, RTF, Word, OpenDocument Text, HTML, XML, WordML and SpreadsheetML files.
The PDF files you generate can be password-protected and digitally signed. Also the PDF/A format, the standard format for long-term archiving, is supported.
IRISDocument can also generate hyper-compressed PDF and XPS documents. By means of iHQC, which stands for intelligent High-Quality Compression, PDF documents can be compressed up to 200 times without loss of image quality. XPS documents can be compressed up to 5 times. Three levels of iHQC are available for PDF documents, and one level for XPS documents. iHQC Level I -
Chapter 1 – Introducing IRISDocument Server
10
Good Quality is available for both PDF and XPS documents in the standard version of IRISDocument Server. To make full use of the iHQC technology, an iHQC add-on is required.
Besides text recognition, IRISDocument offers powerful barcode recognition for document structuring purposes. Barcodes in image files can be used as separators to indicate where new documents begin.
The IRISDocument Server Modules
IRISDocument Server consists of two main modules: Batch OCR and Watched Folders.
The Batch OCR module allows you to process batches of documents that are stored in a certain folder. One folder can be processed at a time. Once the documents have been processed, they are sent to an output folder.
In the Watched Folders module, IRISDocument Server continuously monitors one or more folders, to which you can add as many image files as you want. Each time new images are added, IRISDocument will notice this and process them. IRISDocument is designed for non-stop, around-the-clock processing. That's why the Watched Folders module can also run as a Windows service. That way, it can run unobtrusively in the background without a user interface being displayed.
The IRISDocument Export features
The documents that are processed can be exported to other applications by means of the Export feature. This export feature can be boosted by means of the Workgroup add-on. By means of this add-on you can define a workgroup of users who will be using IRISDocument and export processed documents to their corresponding e-mail addresses, personal folders and FTP folders. Optionally, you can also export documents to Microsoft SharePoint
IRISDocumentTM Server 9.5 – User Guide
11
websites via the Export to SharePoint add-on, and export them to Therefore document solutions via the Export to Therefore add-on.
Using IRISDocument in combination with Canon imageRUNNERS with iSend functionality and Canon imageRUNNERS Advance
The Watched Folders module of IRISDocument can be used in combination with Canon imageRUNNERS with iSend functionality and Canon imageRUNNERS Advance. Users can scan their documents on these MFP's and send them to the watched folder(s) of IRISDocument. From there they can be processed and exported via the Workgroup add-on.
Overview of the IRISDocument Server add-ons
iHQC add-ons are available to hyper-compress PDF and XPS documents.
Three language add-ons are available:
o An Asian OCR add-on, which recognizes Traditional and Simplified Chinese, Japanese and Korean documents.
o An Arabic OCR add-on, which recognizes Arabic and Farsi documents.
o A Hebrew OCR add-on, which recognizes Hebrew documents.
A Multi-CPU add-on is available. This add-on boosts the processing speed of IRISDocument Server. IRISDocument Server no longer processes OCR tasks one by one, but covers up to 4 tasks simultaneously on PC's equipped with a multicore processor or multiple CPU's.
An Export to SharePoint add-on is available. By means of this add-on, you can publish processed documents on Microsoft SharePoint websites.
Chapter 1 – Introducing IRISDocument Server
12
A an Export to Therefore add-on is available. By means of this add-on you can export processed documents to Therefore document solutions.
A Workgroup add-on is available. By means of this add-on you can export processed documents to the e-mail addresses, personal folders and FTP folders of all the users who belong to the workgroup(s) you define in IRISDocument.
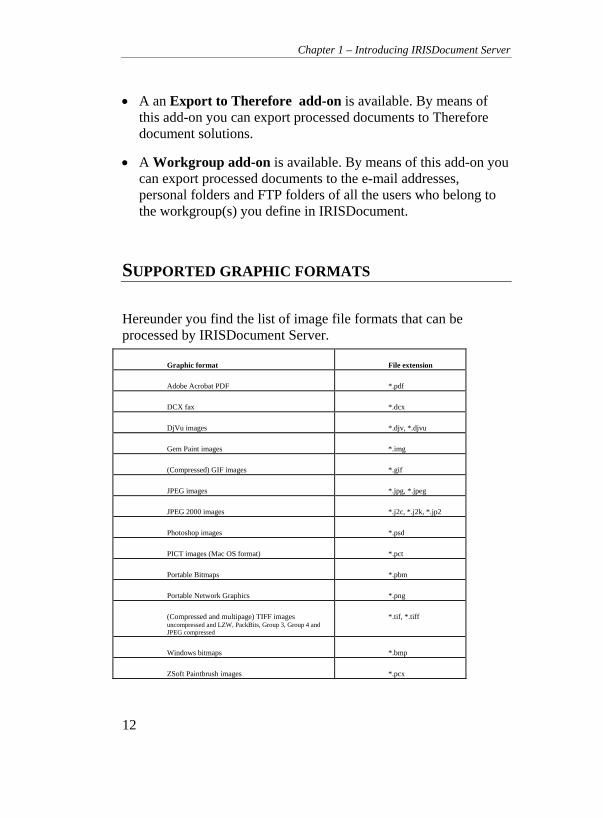
SUPPORTED GRAPHIC FORMATS
Hereunder you find the list of image file formats that can be processed by IRISDocument Server.
Graphic format File extension
Adobe Acrobat PDF *.pdf
DCX fax *.dcx
DjVu images *.djv, *.djvu
Gem Paint images *.img
(Compressed) GIF images *.gif
JPEG images *.jpg, *.jpeg
JPEG 2000 images *.j2c, *.j2k, *.jp2
Photoshop images *.psd
PICT images (Mac OS format) *.pct
Portable Bitmaps *.pbm
Portable Network Graphics *.png
(Compressed and multipage) TIFF images uncompressed and LZW, PackBits, Group 3, Group 4 and JPEG compressed
*.tif, *.tiff
Windows bitmaps *.bmp
ZSoft Paintbrush images *.pcx
IRISDocumentTM Server 9.5 – User Guide
13
CHAPTER 2 INSTALLING
IRISDOCUMENT SERVER
SYSTEM REQUIREMENTS
The minimal system requirements to run IRISDocument Server are a Pentium III 500 MHz PC with 512 MB RAM memory and 500 MB available disk space.
The recommended system requirements for optimal operation are a Pentium IV 2 GHz with 1 GB RAM memory and 2 GB available disk space.
The recommended system requirements for optimal operation with a Multi-CPU add-on are a Pentium Dual Core with 4 GB RAM memory and 2 GB available disk space.
The following platforms are supported: Windows 7, Windows Server 2008 (32 and 64 bits), Windows Vista (32 and 64 bits), Windows Server 2003 (32 and 64 bits) and Windows XP (32 and 64 bits).
Depending on the number of pages and the types of documents IRISDocument is to process, different requirements apply. Refer to the ReadMe file for specific system requirements.
Chapter 2 – Installing IRISDocument Server
14
IRISDocument Server is compatible with all Canon imageRUNNERS with iSend functionality and all Canon imageRUNNERS Advance.
SOFTWARE INSTALLATION
The IRISDocument software and its software options are delivered on an auto-running CD-ROM, in combination with a dongle.
Note in case you are using a Canon imageRUNNER to scan documents to IRISDocument:
In order for IRISDocument and your Canon imageRUNNER to interact successfully, both need to be installed on the same network.
If the Canon imageRUNNER has not been installed on the network yet, please do so. If necessary, refer to the Canon documentation that was delivered with it.
Once the Canon imageRUNNER has been installed, you are ready to install IRISDocument.
To install the software:
Insert the CD-ROM and wait for the installation screen to appear.
Or run the setup program setup.exe from the CD-ROM to install the software. Make sure you have the administration rights to the PC you install IRISDocument Server on.
Follow the on-screen instructions to install IRISDocument.
IRISDocumentTM Server 9.5 – User Guide
15
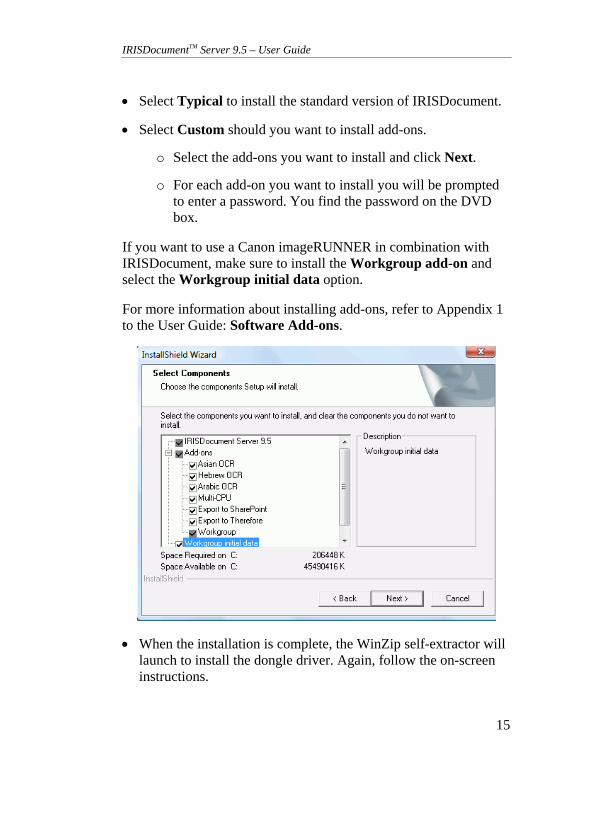
Select Typical to install the standard version of IRISDocument.
Select Custom should you want to install add-ons.
o Select the add-ons you want to install and click Next.
o For each add-on you want to install you will be prompted to enter a password. You find the password on the DVD box.
If you want to use a Canon imageRUNNER in combination with IRISDocument, make sure to install the Workgroup add-on and select the Workgroup initial data option.
For more information about installing add-ons, refer to Appendix 1 to the User Guide: Software Add-ons.
When the installation is complete, the WinZip self-extractor will launch to install the dongle driver. Again, follow the on-screen instructions.
Chapter 2 – Installing IRISDocument Server
16
Insert the dongle in a free USB port and launch the Batch OCR or Watched Folders module of IRISDocument from the Windows Programs menu.
SOFTWARE REGISTRATION
IRISDocument Server is protected by a software key. To obtain this software key, you are required to register.
To register IRISDocument Server:
From the Windows Start menu, point to All programs, and then click IRISDocument Server 9.5.
Click Batch OCR or Watched Folders to open either module.
On the Help menu, click Register this product.
Make sure the dongle is plugged in.
Fill out the required fields and follow the on-screen instructions.
Note: by registering one module, you also register the other.
Note that each add-on you install must be registered too. Otherwise, you will not be able to use it.
UNINSTALLING THE SOFTWARE
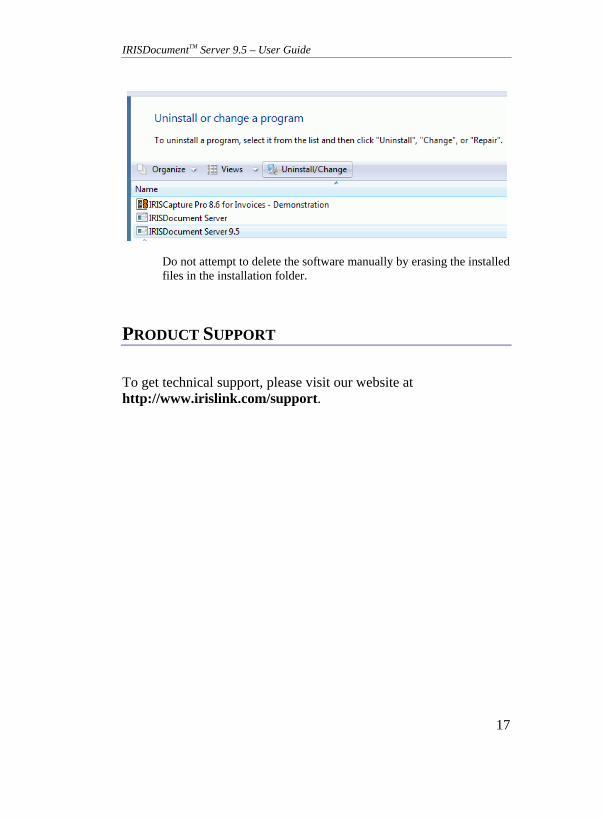
To uninstall the IRISDocument software, use the uninstall utility in the Windows Control Panel, under Programs > Programs and Features.
IRISDocumentTM Server 9.5 – User Guide
17
Do not attempt to delete the software manually by erasing the installed files in the installation folder.
PRODUCT SUPPORT
To get technical support, please visit our website at http://www.irislink.com/support.

IRISDocumentTM Server 9.5 – User Guide
19
CHAPTER 3 IRISDOCUMENT SERVER
MODULES
THE BATCH OCR MODULE
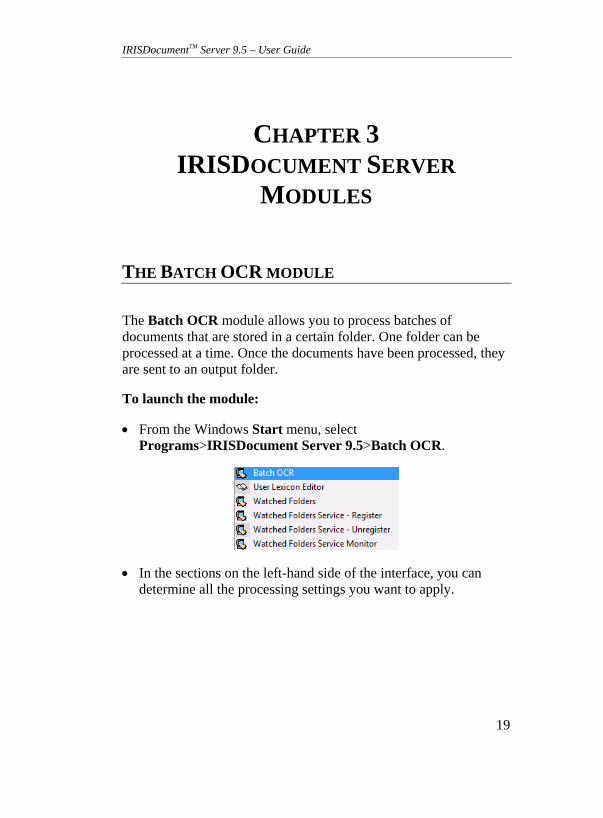
The Batch OCR module allows you to process batches of documents that are stored in a certain folder. One folder can be processed at a time. Once the documents have been processed, they are sent to an output folder.
To launch the module:
From the Windows Start menu, select Programs>IRISDocument Server 9.5>Batch OCR.
In the sections on the left-hand side of the interface, you can determine all the processing settings you want to apply.
Chapter 3 – IRISDocument Server Modules
20
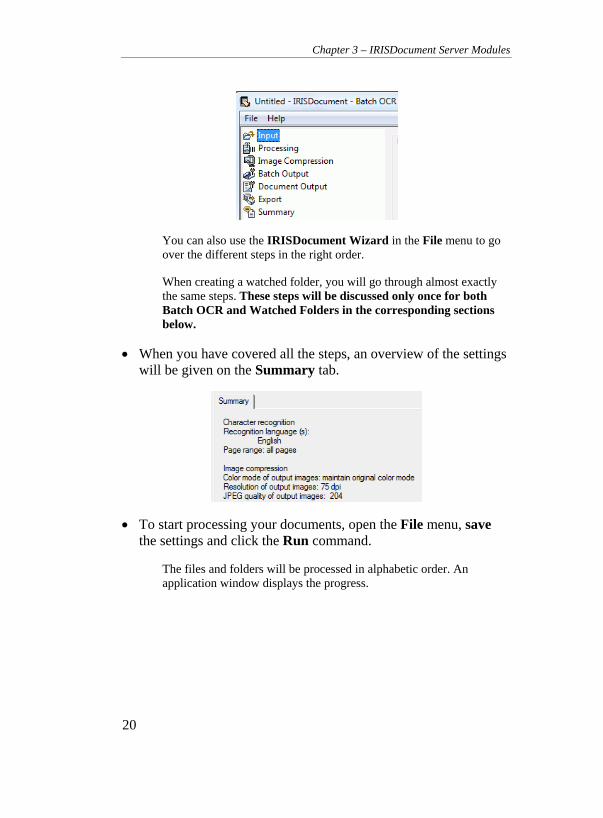
You can also use the IRISDocument Wizard in the File menu to go over the different steps in the right order.
When creating a watched folder, you will go through almost exactly the same steps. These steps will be discussed only once for both Batch OCR and Watched Folders in the corresponding sections below.
When you have covered all the steps, an overview of the settings will be given on the Summary tab.
To start processing your documents, open the File menu, save the settings and click the Run command.
The files and folders will be processed in alphabetic order. An application window displays the progress.

IRISDocumentTM Server 9.5 – User Guide
21
As soon as the batch OCR process is completed, the lower part of the application window displays a batch report.
More information about the OCR process is available in the automatically generated log files, xml index files and confidence files, which are located in the output folder. See the section XML indexing.
THE WATCHED FOLDERS MODULE
In the Watched Folders module, IRISDocument acts as an OCR server. IRISDocument Server continuously monitors one or more folders, to which you can add as many image files as you want. Each time new images are added, IRISDocument will notice this and process them.
The Watched Folders module is designed for non-stop, around-the-clock processing.
It is recommended not to use more than 10 watched folders.
Chapter 3 – IRISDocument Server Modules
22
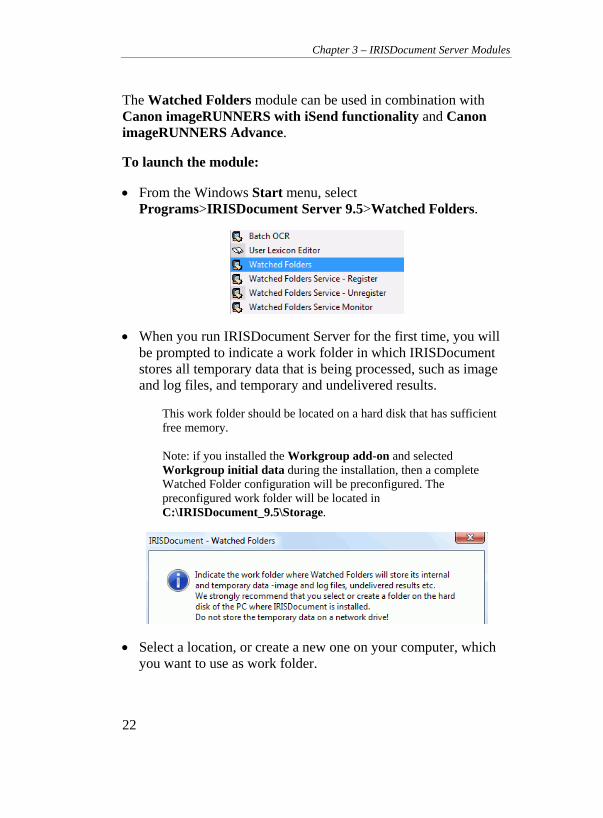
The Watched Folders module can be used in combination with Canon imageRUNNERS with iSend functionality and Canon imageRUNNERS Advance.
To launch the module:
From the Windows Start menu, select Programs>IRISDocument Server 9.5>Watched Folders.
When you run IRISDocument Server for the first time, you will be prompted to indicate a work folder in which IRISDocument stores all temporary data that is being processed, such as image and log files, and temporary and undelivered results.
This work folder should be located on a hard disk that has sufficient free memory. Note: if you installed the Workgroup add-on and selected Workgroup initial data during the installation, then a complete Watched Folder configuration will be preconfigured. The preconfigured work folder will be located in C:\IRISDocument_9.5\Storage.
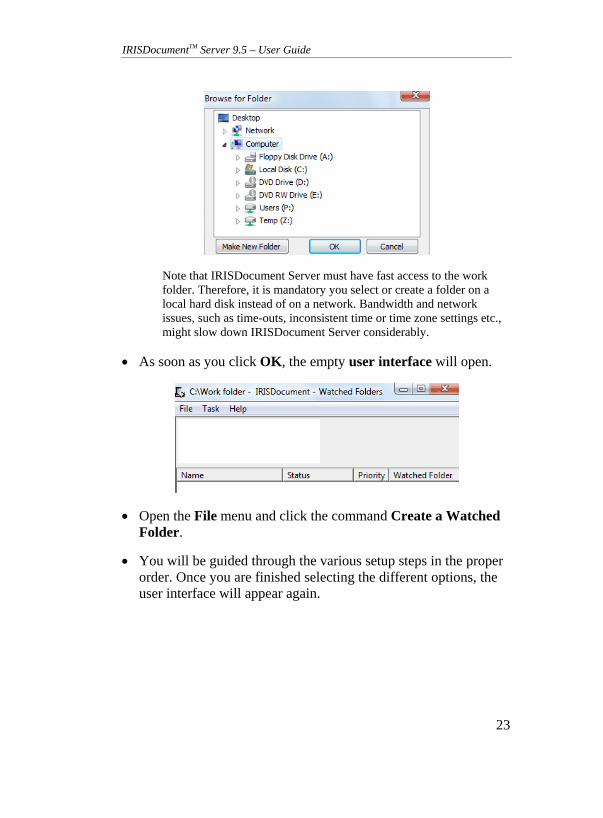
Select a location, or create a new one on your computer, which you want to use as work folder.
IRISDocumentTM Server 9.5 – User Guide
23
Note that IRISDocument Server must have fast access to the work folder. Therefore, it is mandatory you select or create a folder on a local hard disk instead of on a network. Bandwidth and network issues, such as time-outs, inconsistent time or time zone settings etc., might slow down IRISDocument Server considerably.
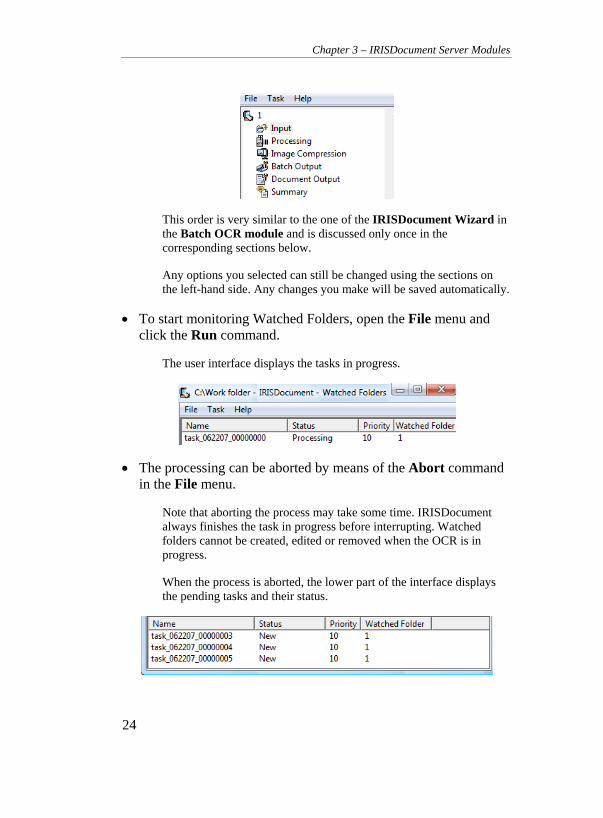
As soon as you click OK, the empty user interface will open.
Open the File menu and click the command Create a Watched Folder.
You will be guided through the various setup steps in the proper order. Once you are finished selecting the different options, the user interface will appear again.
Chapter 3 – IRISDocument Server Modules
24
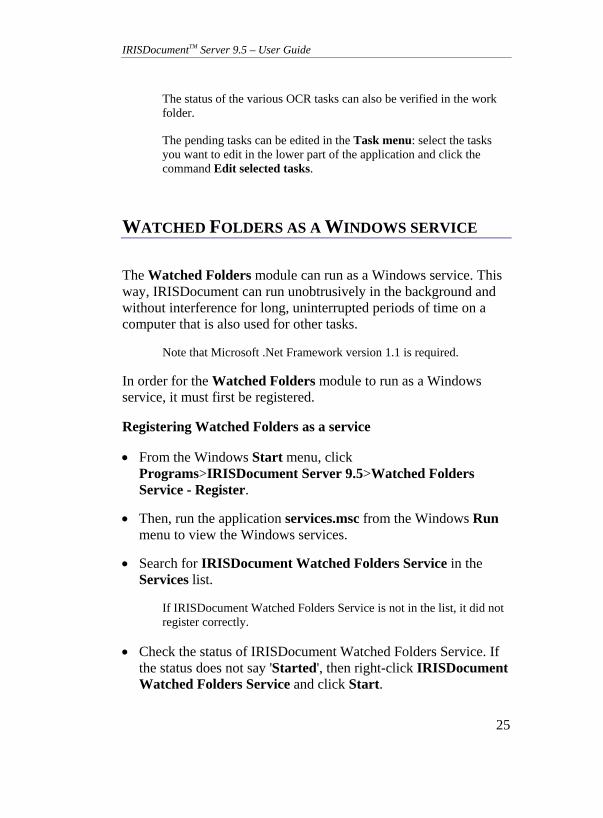
This order is very similar to the one of the IRISDocument Wizard in the Batch OCR module and is discussed only once in the corresponding sections below.
Any options you selected can still be changed using the sections on the left-hand side. Any changes you make will be saved automatically.
To start monitoring Watched Folders, open the File menu and click the Run command.
The user interface displays the tasks in progress.
The processing can be aborted by means of the Abort command in the File menu.
Note that aborting the process may take some time. IRISDocument always finishes the task in progress before interrupting. Watched folders cannot be created, edited or removed when the OCR is in progress.
When the process is aborted, the lower part of the interface displays the pending tasks and their status.
IRISDocumentTM Server 9.5 – User Guide
25
The status of the various OCR tasks can also be verified in the work folder.
The pending tasks can be edited in the Task menu: select the tasks you want to edit in the lower part of the application and click the command Edit selected tasks.
WATCHED FOLDERS AS A WINDOWS SERVICE
The Watched Folders module can run as a Windows service. This way, IRISDocument can run unobtrusively in the background and without interference for long, uninterrupted periods of time on a computer that is also used for other tasks.
Note that Microsoft .Net Framework version 1.1 is required.
In order for the Watched Folders module to run as a Windows service, it must first be registered.
Registering Watched Folders as a service
From the Windows Start menu, click Programs>IRISDocument Server 9.5>Watched Folders Service - Register.
Then, run the application services.msc from the Windows Run menu to view the Windows services.
Search for IRISDocument Watched Folders Service in the Services list.
If IRISDocument Watched Folders Service is not in the list, it did not register correctly.
Check the status of IRISDocument Watched Folders Service. If the status does not say 'Started', then right-click IRISDocument Watched Folders Service and click Start.
Chapter 3 – IRISDocument Server Modules
26
Monitoring Watched Folders as a service
To monitor Watched Folders as a service, select Watched Folders Service Monitor from the Windows Programs menu.
If you started the service in the Service list during the previous step, then the Start button will be disabled and the service is already running. If the Start button is still enabled, click it to start the service.
IRISDocument Watched Folders Service uses the settings you determined in the Watched Folders module.
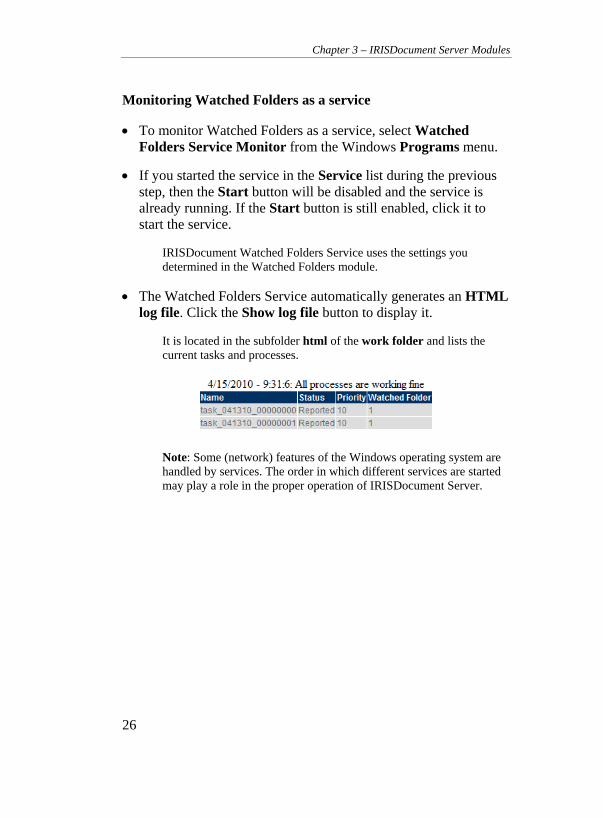
The Watched Folders Service automatically generates an HTML log file. Click the Show log file button to display it.
It is located in the subfolder html of the work folder and lists the current tasks and processes.
Note: Some (network) features of the Windows operating system are handled by services. The order in which different services are started may play a role in the proper operation of IRISDocument Server.
IRISDocumentTM Server 9.5 – User Guide
27
CHAPTER 4 INPUT SOURCE
BATCH OCR IMAGE FOLDER
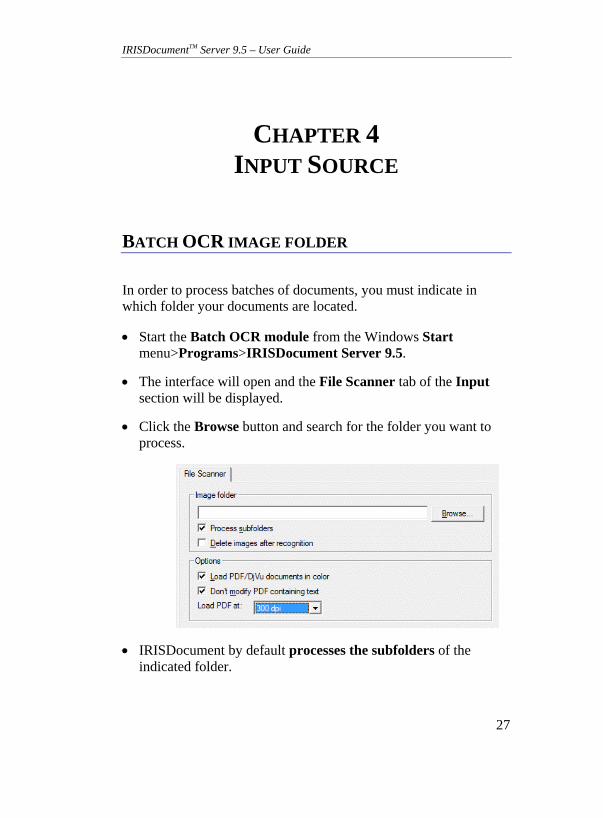
In order to process batches of documents, you must indicate in which folder your documents are located.
Start the Batch OCR module from the Windows Start menu>Programs>IRISDocument Server 9.5.
The interface will open and the File Scanner tab of the Input section will be displayed.
Click the Browse button and search for the folder you want to process.
IRISDocument by default processes the subfolders of the indicated folder.
Chapter 4 – Input Source
28
IRISDocument does not delete the images from the image folder by default, but you can choose to delete them after recognition.
It is recommended to use a local hard disk as image folder, rather than a network volume. The recognition is faster and bandwidth and network issues are avoided.
Options
IRISDocument by default loads PDF and DjVu documents in color. Should you want to load these documents in black-and-white to reduce the processing time, then clear this option.
When you need to process many PDF documents from different sources, among which PDF documents that already contain text, and you want to generate PDF Image-Text output documents, it is useful to select the option Don't modify PDF containing text. By selecting this option, IRISDocument Server will not convert the PDF files that already contain text into PDF Image-Text files. Instead, IRISDocument will simply copy the original files to the output folder. This way, unnecessary processing is avoided. So this option is useful if your batches of input documents contain PDF files of which you do not know the content (text, images, or both?). IRISDocument considers a PDF file to contain text when there are more than 10 characters per page.
Important note: the option Don't modify PDF containing text is not compatible with options that require modifying the input PDF (e.g. password protection, document structuring). That's why the following number of parameters need to be configured:
The selected output format must be PDF Image-Text (in the Output section, on the PDF tab)
In the Processing section, on the Barcode Reading tab: Enable barcode reading must not be selected (not selected by default).
IRISDocumentTM Server 9.5 – User Guide
29
In the Batch Output section, on the Separation tab:
Select Create one document per input file.
Do not select Use blank pages to separate documents.
Make sure Keep blank pages is selected (default option).
In the Batch Output section, on the XML Indexing tab:
Deselect XML Indexing (default option).
Deselect Include recognized text (default option).
In the Document Output section, on the PDF tab:
Do not select Create PDF/A compliant files.
Do not apply Password security.
Do not select Signature to apply.
In the Document Output section, on the PDF-iHQC tab:
Do not select Create PDF/A compliant files.
Do not apply Password security.
Do not select Signature to apply.
In the Document Output section, on the Document Names tab: do not select the option Use first sentence of recognized text.
Also note that when you select other output formats besides PDF Image-Text, the input PDF will be processed and converted into those required output formats.
When processing PDF documents, IRISDocument first converts them into image files (This process is called rasterization). The image files are then processed and converted into output documents.
Chapter 4 – Input Source
30
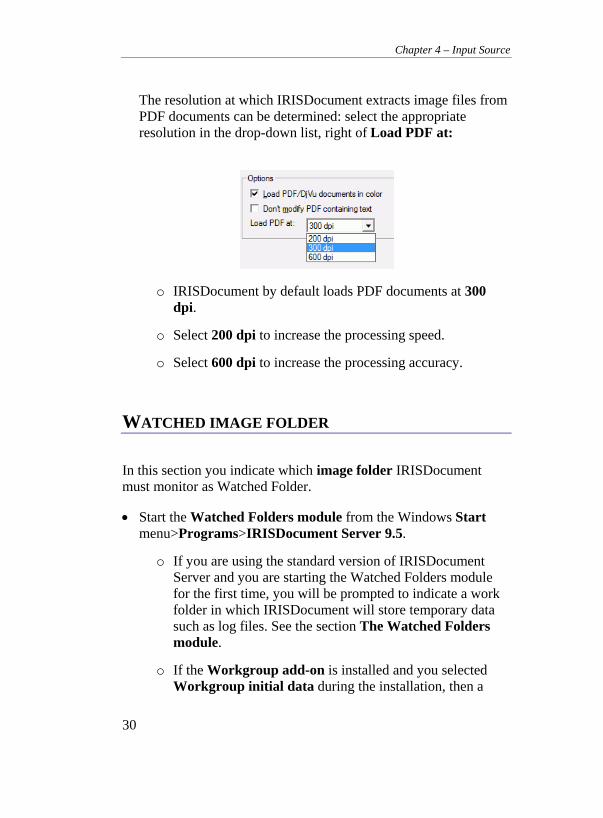
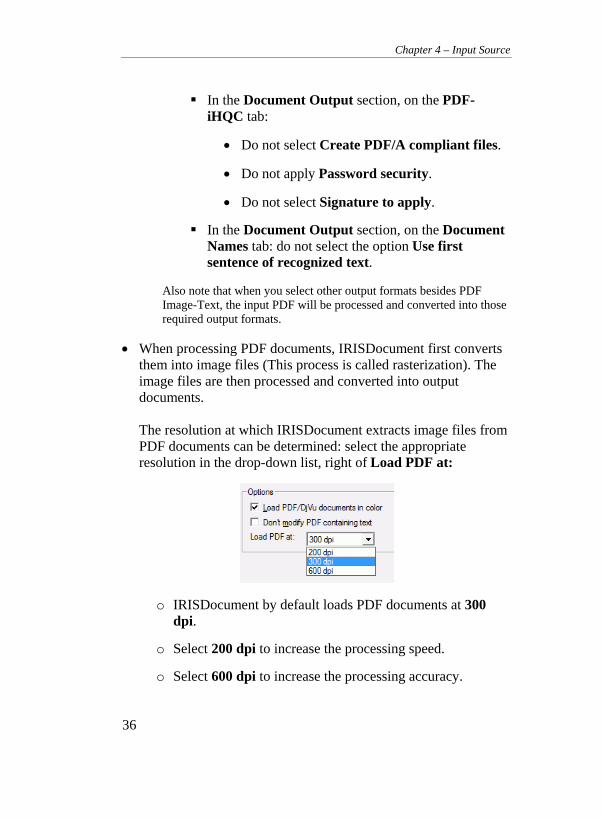
The resolution at which IRISDocument extracts image files from PDF documents can be determined: select the appropriate resolution in the drop-down list, right of Load PDF at:
o IRISDocument by default loads PDF documents at 300 dpi.
o Select 200 dpi to increase the processing speed.
o Select 600 dpi to increase the processing accuracy.
WATCHED IMAGE FOLDER
In this section you indicate which image folder IRISDocument must monitor as Watched Folder.
Start the Watched Folders module from the Windows Start menu>Programs>IRISDocument Server 9.5.
o If you are using the standard version of IRISDocument Server and you are starting the Watched Folders module for the first time, you will be prompted to indicate a work folder in which IRISDocument will store temporary data such as log files. See the section The Watched Folders module.
o If the Workgroup add-on is installed and you selected Workgroup initial data during the installation, then a
IRISDocumentTM Server 9.5 – User Guide
31
complete Watched Folder configuration will be pre-configured and the interface will open immediately. In case you want to use a Canon imageRUNNER to send documents to IRISDocument, make sure you install the Workgroup add-on and select the Workgroup initial data option. You are recommended not to change the pre-configured settings that are applied (except for the Watched Folder location should you want to change this). The pre-configured image folder of the Watched Folder is C:\IRISDocument_9.5\WatchedFolder01\Input. When configuring the Canon imageRUNNER, you will need to enter the name of the Watched Folder. In this case: \Input. Refer to the sections Configuring a Canon imageRUNNER with iSend functionality or Configuring a Canon imageRUNNER Advance for more information. When creating additional Watched Folders, make sure to apply the same settings as in the pre-configured one. Note: the Canon imageRUNNER must have reading and writing rights to the Watched Folder in order to be able to send documents to it. If the user account that is used to configure the Canon imageRUNNER (in the remainder of this documentation referred to as the MFP administrator) is not the same as the user account on which IRISDocument is installed and configured, then the Watched Folder must be shared with the MFP administrator. Refer to the section Sharing folders for more information on how to share folders.
Chapter 4 – Input Source
32
To create a new Watched Folder, open the File menu and click Create a Watched Folder.
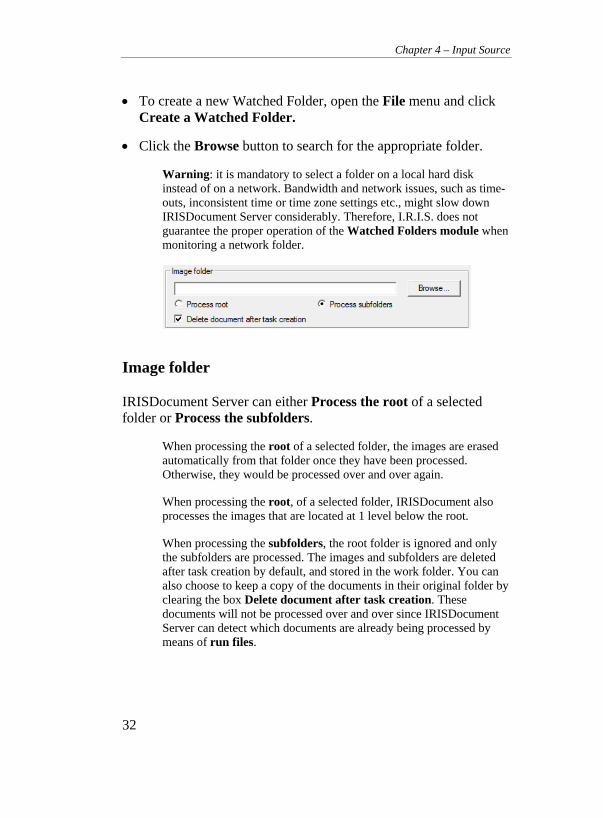
Click the Browse button to search for the appropriate folder.
Warning: it is mandatory to select a folder on a local hard disk instead of on a network. Bandwidth and network issues, such as time-outs, inconsistent time or time zone settings etc., might slow down IRISDocument Server considerably. Therefore, I.R.I.S. does not guarantee the proper operation of the Watched Folders module when monitoring a network folder.
Image folder
IRISDocument Server can either Process the root of a selected folder or Process the subfolders.
When processing the root of a selected folder, the images are erased automatically from that folder once they have been processed. Otherwise, they would be processed over and over again.
When processing the root, of a selected folder, IRISDocument also processes the images that are located at 1 level below the root.
When processing the subfolders, the root folder is ignored and only the subfolders are processed. The images and subfolders are deleted after task creation by default, and stored in the work folder. You can also choose to keep a copy of the documents in their original folder by clearing the box Delete document after task creation. These documents will not be processed over and over since IRISDocument Server can detect which documents are already being processed by means of run files.
IRISDocumentTM Server 9.5 – User Guide
33
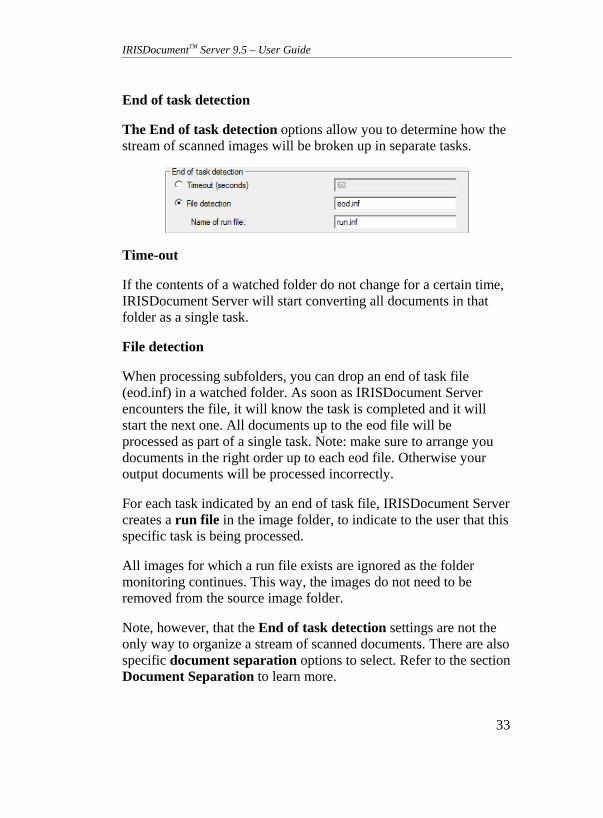
End of task detection
The End of task detection options allow you to determine how the stream of scanned images will be broken up in separate tasks.
Time-out
If the contents of a watched folder do not change for a certain time, IRISDocument Server will start converting all documents in that folder as a single task.
File detection
When processing subfolders, you can drop an end of task file (eod.inf) in a watched folder. As soon as IRISDocument Server encounters the file, it will know the task is completed and it will start the next one. All documents up to the eod file will be processed as part of a single task. Note: make sure to arrange you documents in the right order up to each eod file. Otherwise your output documents will be processed incorrectly.
For each task indicated by an end of task file, IRISDocument Server creates a run file in the image folder, to indicate to the user that this specific task is being processed.
All images for which a run file exists are ignored as the folder monitoring continues. This way, the images do not need to be removed from the source image folder.
Note, however, that the End of task detection settings are not the only way to organize a stream of scanned documents. There are also specific document separation options to select. Refer to the section Document Separation to learn more.
Chapter 4 – Input Source
34
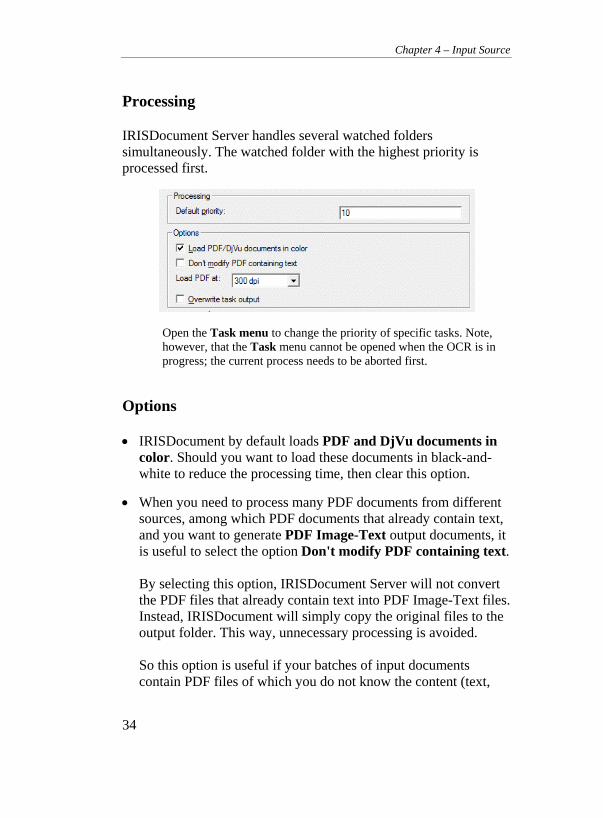
Processing
IRISDocument Server handles several watched folders simultaneously. The watched folder with the highest priority is processed first.
Open the Task menu to change the priority of specific tasks. Note, however, that the Task menu cannot be opened when the OCR is in progress; the current process needs to be aborted first.
Options
IRISDocument by default loads PDF and DjVu documents in color. Should you want to load these documents in black-and-white to reduce the processing time, then clear this option.
When you need to process many PDF documents from different sources, among which PDF documents that already contain text, and you want to generate PDF Image-Text output documents, it is useful to select the option Don't modify PDF containing text. By selecting this option, IRISDocument Server will not convert the PDF files that already contain text into PDF Image-Text files. Instead, IRISDocument will simply copy the original files to the output folder. This way, unnecessary processing is avoided. So this option is useful if your batches of input documents contain PDF files of which you do not know the content (text,
IRISDocumentTM Server 9.5 – User Guide
35
images, or both?). IRISDocument considers a PDF file to contain text when there are more than 10 characters per page.
Important note: the option Don't modify PDF containing text is not compatible with options that require modifying the input PDF (e.g. password protection, document structuring). That's why the following number of parameters need to be configured:
The selected output format must be PDF Image-Text (in the Output section, on the PDF tab)
In the Processing section, on the Barcode Reading tab: Enable barcode reading must not be selected (not selected by default).
In the Batch Output section, on the Separation tab:
Select Create one document per input file.
Do not select Use blank pages to separate documents.
Make sure Keep blank pages is selected (default option).
In the Batch Output section, on the Indexing tab:
Deselect XML Indexing (default option).
Deselect Include recognized text (default option).
In the Document Output section, on the PDF tab:
Do not select Create PDF/A compliant files.
Do not apply Password security.
Do not select Signature to apply.
Chapter 4 – Input Source
36
In the Document Output section, on the PDF-iHQC tab:
Do not select Create PDF/A compliant files.
Do not apply Password security.
Do not select Signature to apply.
In the Document Output section, on the Document Names tab: do not select the option Use first sentence of recognized text.
Also note that when you select other output formats besides PDF Image-Text, the input PDF will be processed and converted into those required output formats.
When processing PDF documents, IRISDocument first converts them into image files (This process is called rasterization). The image files are then processed and converted into output documents. The resolution at which IRISDocument extracts image files from PDF documents can be determined: select the appropriate resolution in the drop-down list, right of Load PDF at:
o IRISDocument by default loads PDF documents at 300 dpi.
o Select 200 dpi to increase the processing speed.
o Select 600 dpi to increase the processing accuracy.
IRISDocumentTM Server 9.5 – User Guide
37
Select overwrite task output in case you want to overwrite the documents that are left in the output folder when starting another task.
DEFINING A WORKGROUP OF USERS
(This section only applies to the Watched Folders module when the Workgroup add-on has been installed)
If you installed the Workgroup add-on as part of your IRISDocument Server configuration, then the Workgroup tab will be available in the Input section of the Watched Folders module.
Note that the Workgroup add-on only applies to the Watched Folders module.
Via the Workgroup tab you can define workgroups of users who will be using IRISDocument to process documents (possibly via a Canon imageRUNNER).
For each user you create a profile, containing the user's identifier and the e-mail address, personal folder and FTP folder to which the documents must be exported after processing. These profiles are stored in a Workgroup XML file. By default, this file is located in C:\IRISDocument_9.5\Storage\system.
The default workgroup file can be edited and new workgroup files can be added by means of the Workgroup Editor.
To define a workgroup of users:
Open the Input section and click the Workgroup tab.
Chapter 4 – Input Source
38
When you are using Watched Folders for the first time, refer to the section The Watched Folders module.
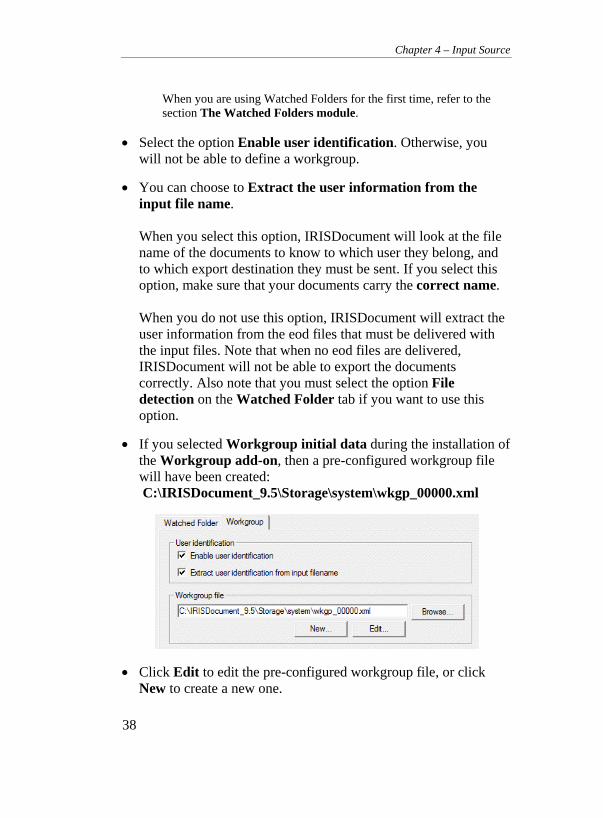
Select the option Enable user identification. Otherwise, you will not be able to define a workgroup.
You can choose to Extract the user information from the input file name. When you select this option, IRISDocument will look at the file name of the documents to know to which user they belong, and to which export destination they must be sent. If you select this option, make sure that your documents carry the correct name. When you do not use this option, IRISDocument will extract the user information from the eod files that must be delivered with the input files. Note that when no eod files are delivered, IRISDocument will not be able to export the documents correctly. Also note that you must select the option File detection on the Watched Folder tab if you want to use this option.
If you selected Workgroup initial data during the installation of the Workgroup add-on, then a pre-configured workgroup file will have been created: C:\IRISDocument_9.5\Storage\system\wkgp_00000.xml
Click Edit to edit the pre-configured workgroup file, or click New to create a new one.
IRISDocumentTM Server 9.5 – User Guide
39
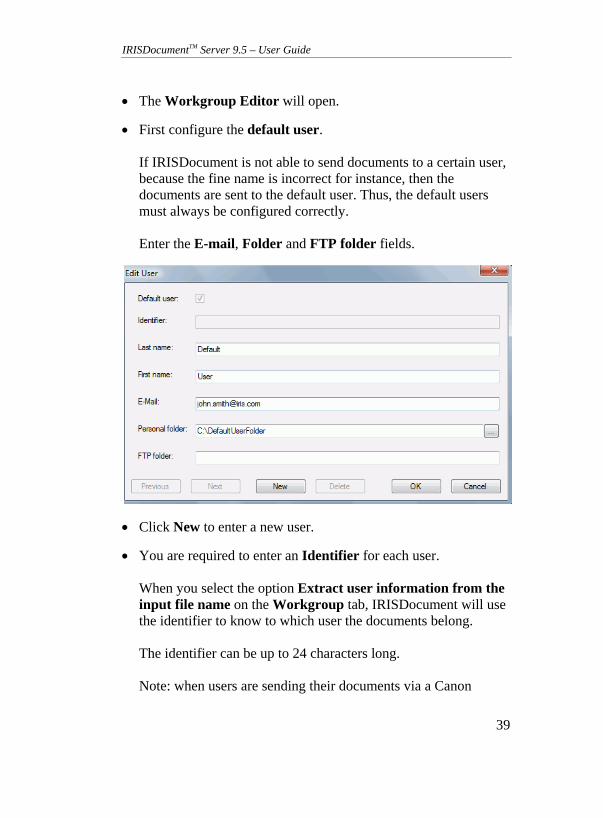
The Workgroup Editor will open.
First configure the default user. If IRISDocument is not able to send documents to a certain user, because the fine name is incorrect for instance, then the documents are sent to the default user. Thus, the default users must always be configured correctly. Enter the E-mail, Folder and FTP folder fields.
Click New to enter a new user.
You are required to enter an Identifier for each user. When you select the option Extract user information from the input file name on the Workgroup tab, IRISDocument will use the identifier to know to which user the documents belong. The identifier can be up to 24 characters long. Note: when users are sending their documents via a Canon
Chapter 4 – Input Source
40
imageRUNNER to IRISDocument, they must enter the identifier as document name (or this can be configured by the MFP Administrator in case of the imageRUNNER Advance). Based on the Identifier, IRISDocument knows to which destination the processed documents must be exported. Refer to the appendix Configuring Canon imageRUNNERS to run with IRISDocument for more information.
Then enter the Last name, First name, E-mail address, Personal folder and/or FTP folder for the user.
Important: IRISDocument must have reading and writing access to each user's personal folder. Otherwise IRISDocument will not be able to export the processed documents to that folder. In other words, each user's personal folder must be shared with the IRISDocument Administrator.
To apply the correct sharing settings, refer to the section Sharing folders.
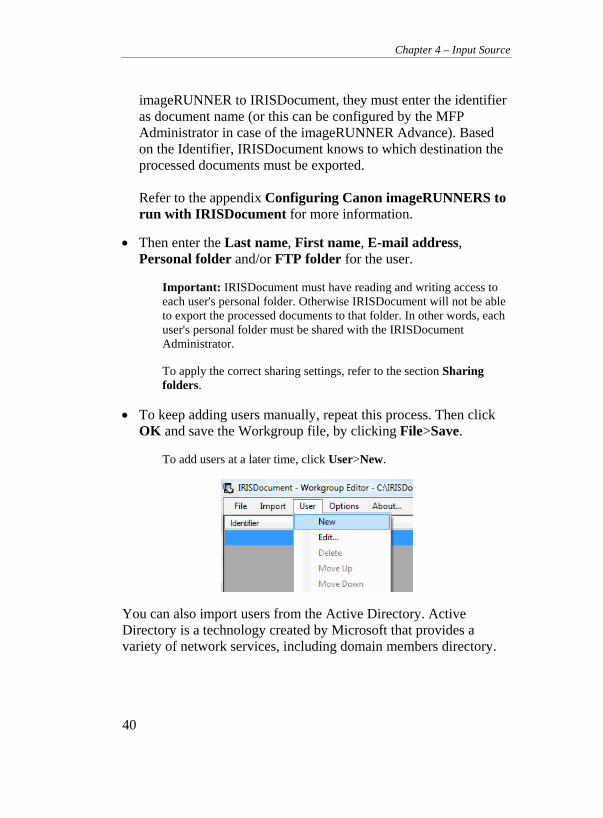
To keep adding users manually, repeat this process. Then click OK and save the Workgroup file, by clicking File>Save.
To add users at a later time, click User>New.
You can also import users from the Active Directory. Active Directory is a technology created by Microsoft that provides a variety of network services, including domain members directory.

IRISDocumentTM Server 9.5 – User Guide
41
To import Active Directory Users:
Click Import>Active Directory Users.
Enter the server on which the Active Directory is located.
Enter the User, Password and Domain to establish the connection and then click OK.
Select the users you want to import.
You can choose which field to use as user identifier.
Click Import to import the users.
Chapter 4 – Input Source
42
Then save the workgroup file by clicking File>Save. Note for each Watched Folder you configure you can create a different workgroup file if necessary.
To activate the export to the user's e-mail addresses, personal folders and FTP folders, click the corresponding tabs in the Export section. For information on how to configure the export, refer to the sections Export to E-mail addresses, Export to FTP folders and Export to personal folders.
SHARING FOLDERS
(This section applies to the Watched Folders module when the Workgroup add-on has been installed.)
In order for users to be able to drop their documents in a Watched Folder of IRISDocument, they must have writing access to that folder.
Similarly, IRISDocument needs to have reading and writing access to users' personal folders if it is to export them via the Workgroup add-on.
Thus it is important for these folders to be shared.
Note that FTP folders must not be shared.
Sharing a folder on a Windows XP-based computer:
Locate the folder you want to share via Windows Explorer.
Right-click the folder and then click Sharing and Security.
IRISDocumentTM Server 9.5 – User Guide
43
Click the Sharing tab.
Select Share this folder.
To change the name of the shared folder, type a new name in the Share name box. Other users will see this new share name when they connect to this folder. The actual name of the folder does not change. Adding a share name is recommended when you are using IRISDocument in combination with Canon imageRUNNERS.
Then, click the Permissions button.
Click Add and type in the name of the user you want to share the folder with.
Then click Check Names and click OK.
The name of the user you selected appears in the list of people you want to share the folder with.
Check the Allow box next to Full Control.
This way, the user in question will be allowed to view, change, add and delete files in the shared folder.
Then click Apply to apply the settings.
When the folder has been shared, send a link to the shared folder to the user in question.
Sharing a folder on a Windows Vista-based computer
Locate the folder you want to share via Windows Explorer.
Click the folder you want to share, and then, on the toolbar, click Share.
Chapter 4 – Input Source
44
In the File Sharing dialog box, click the arrow right of the text box, and then click Find. Type the name of the user you want to share the folder with, click Check Names, and then click OK.
The name of the user you selected appears in the list of people you want to share the folder with.
Under Permission Level, click the arrow and then select Co-owner.
This way, the user in question will be allowed to view, change, add and delete files in the shared folder.
When you are finished, click Share.
When you receive confirmation that your folder is shared, you should send a link to the shared folder to the user's e-mail address. To do so, click E-mail link to automatically open a Windows Mail e-mail message with the link to the shared folder.
Note: you can give a shared folder a share name that makes it easier for someone else to find it on your computer. Adding a share name is recommended when you are using IRISDocument in combination with Canon imageRUNNERS.
To add a share name:
Right-click a folder you have already shared, click Properties, click the Sharing tab and then click Advanced sharing. (You might be prompted for an administrator password or confirmation).
Select Share this folder.
Then enter the Share name and click Apply to confirm.
To share the Watched Folder on a Windows 7-based computer:
Locate the folder you want to share via Windows Explorer.
IRISDocumentTM Server 9.5 – User Guide
45
Click the folder you want to share, and then, on the toolbar, click Share with.
Then select Specific people.
In the File Sharing dialog box, click the arrow to the right of the text box, and then click Find people. Type the name of the user you want to share the folder with, click Check Names, and then click OK.
The name of the user that you selected appears in the list of people you want to share the folder with.
Under Permission level, click the arrow and then select Read/Write.
This way, the user in question will be allowed to view, change, add and delete files in the shared folder.
When you are finished, click Share.
When you receive confirmation that your folder is shared, you should send a link to the shared folder to the user's e-mail address. To do so, click E-mail link to automatically open a Windows Mail e-mail message with the link to the shared folder.
Note: you can give a shared folder a share name that makes it easier for someone else to find it on your computer. Adding a share name is recommended when you are using IRISDocument in combination with Canon imageRUNNERS.
To add a share name:
Right-click a folder you have already shared, click Properties, click the Sharing tab and then click Advanced sharing. (You might be prompted for an administrator password or confirmation).
Select Share this folder.

Chapter 4 – Input Source
46
Then enter the Share name and click Apply to confirm.
IRISDocumentTM Server 9.5 – User Guide
47
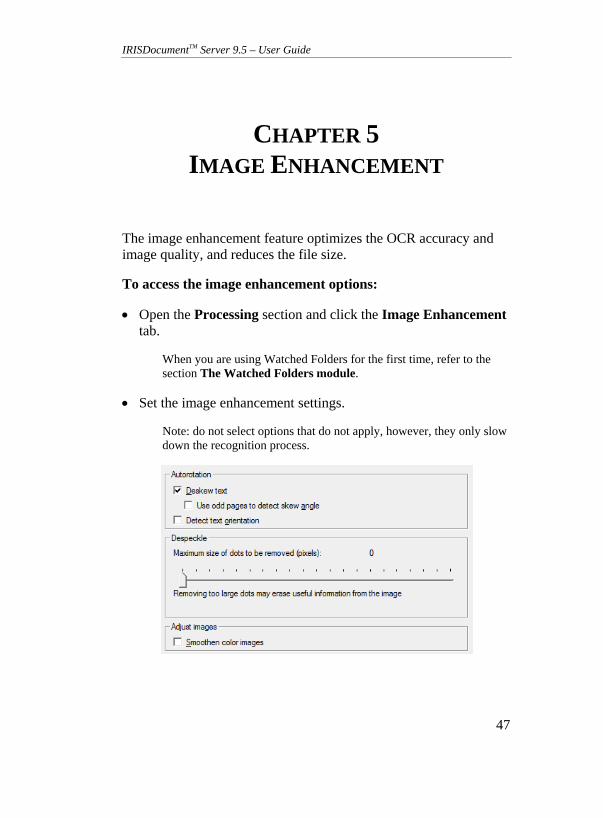
CHAPTER 5 IMAGE ENHANCEMENT
The image enhancement feature optimizes the OCR accuracy and image quality, and reduces the file size.
To access the image enhancement options:
Open the Processing section and click the Image Enhancement tab.
When you are using Watched Folders for the first time, refer to the section The Watched Folders module.
Set the image enhancement settings.
Note: do not select options that do not apply, however, they only slow down the recognition process.
Chapter 5 – Image Enhancement
48
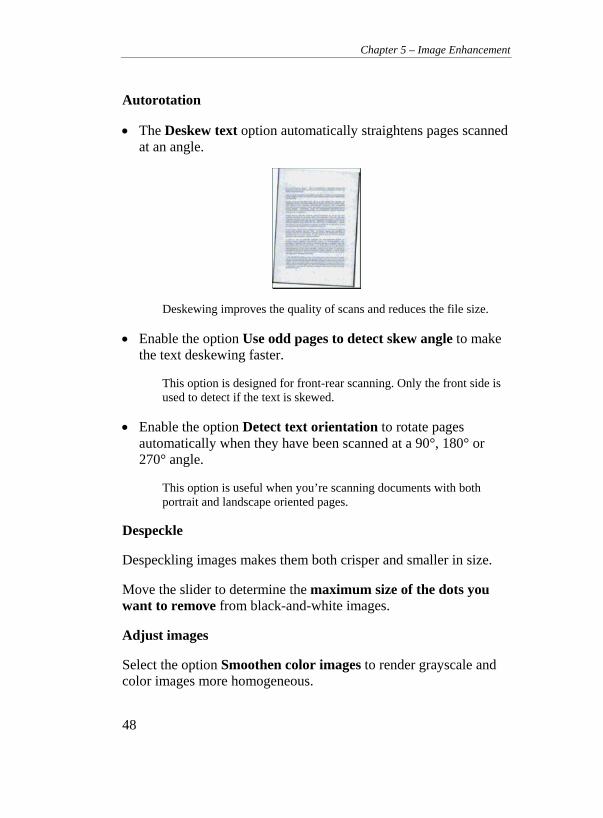
Autorotation
The Deskew text option automatically straightens pages scanned at an angle.
Deskewing improves the quality of scans and reduces the file size.
Enable the option Use odd pages to detect skew angle to make the text deskewing faster.
This option is designed for front-rear scanning. Only the front side is used to detect if the text is skewed.
Enable the option Detect text orientation to rotate pages automatically when they have been scanned at a 90°, 180° or 270° angle.
This option is useful when you’re scanning documents with both portrait and landscape oriented pages.
Despeckle
Despeckling images makes them both crisper and smaller in size.
Move the slider to determine the maximum size of the dots you want to remove from black-and-white images.
Adjust images
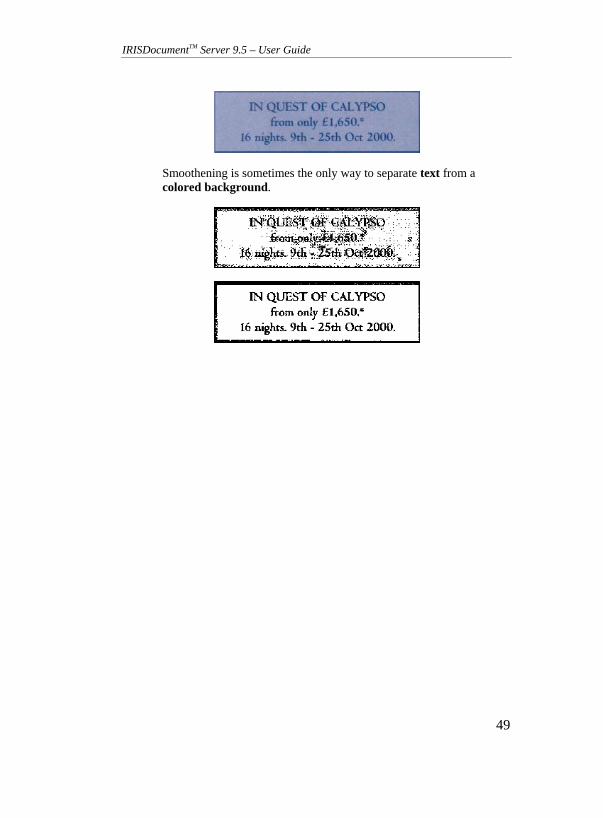
Select the option Smoothen color images to render grayscale and color images more homogeneous.
IRISDocumentTM Server 9.5 – User Guide
49
Smoothening is sometimes the only way to separate text from a colored background.

IRISDocumentTM Server 9.5 – User Guide
51
CHAPTER 6 BARCODE READING
Next to optical character recognition of up to 137 languages, IRISDocument also offers barcode reading. Barcodes can be used to provide indexing data, to name documents and to separate documents within a batch.
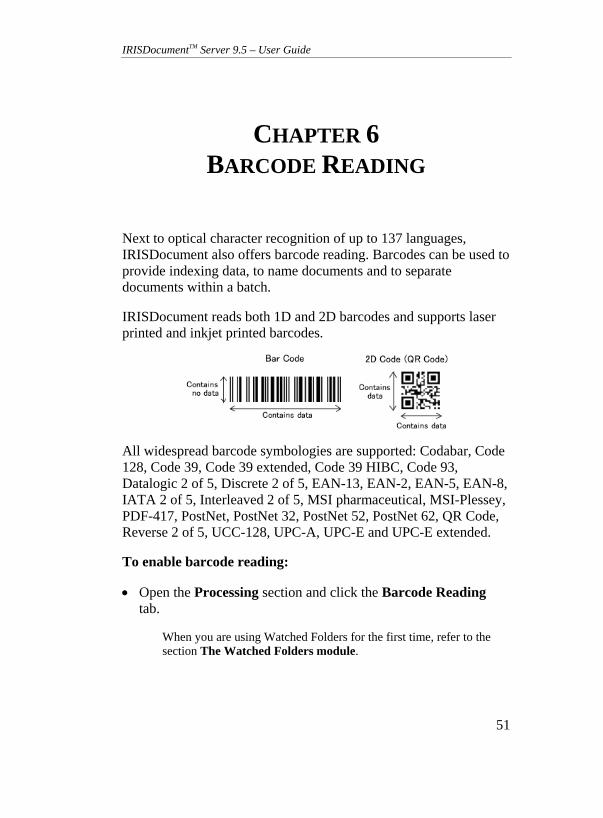
IRISDocument reads both 1D and 2D barcodes and supports laser printed and inkjet printed barcodes.
All widespread barcode symbologies are supported: Codabar, Code 128, Code 39, Code 39 extended, Code 39 HIBC, Code 93, Datalogic 2 of 5, Discrete 2 of 5, EAN-13, EAN-2, EAN-5, EAN-8, IATA 2 of 5, Interleaved 2 of 5, MSI pharmaceutical, MSI-Plessey, PDF-417, PostNet, PostNet 32, PostNet 52, PostNet 62, QR Code, Reverse 2 of 5, UCC-128, UPC-A, UPC-E and UPC-E extended.
To enable barcode reading:
Open the Processing section and click the Barcode Reading tab.
When you are using Watched Folders for the first time, refer to the section The Watched Folders module.

Chapter 6 – Barcode Reading
52
Check the box Enable barcode reading and select the desired barcodes.
Do not select barcodes that do not apply: the bigger the barcode set, the slower the recognition and the higher the risk of OCR errors will be.
Select the options you want to apply:
Recognition
Move the slider to determine the appropriate recognition speed and accuracy.
Barcode height and Barcode length
Fill in the desired minimal and maximal height and length in the respective fields.
Note that many symbologies limit the number of symbols that can be encoded. Use this option for those symbologies that do not put strict limits on the length of barcodes.
IRISDocumentTM Server 9.5 – User Guide
53
Advanced features
As barcodes can be used to separate various documents in a batch, IRISDocument allows you to remove them from the output documents.
Barcodes are always placed on the front side of a document. Therefore, IRISDocument can limit barcode reading to front pages when scanning double-sided documents.
For more information, refer to the appendix on Barcode reading.

IRISDocumentTM Server 9.5 – User Guide
55
CHAPTER 7 CHARACTER RECOGNITION
The accuracy of the OCR process depends on many factors, such as the selected language, the document characteristics, etc.
To access the character recognition options:
Open the Processing section and click the Character Recognition tab.
When you are using Watched Folders for the first time, refer to the section The Watched Folders module.
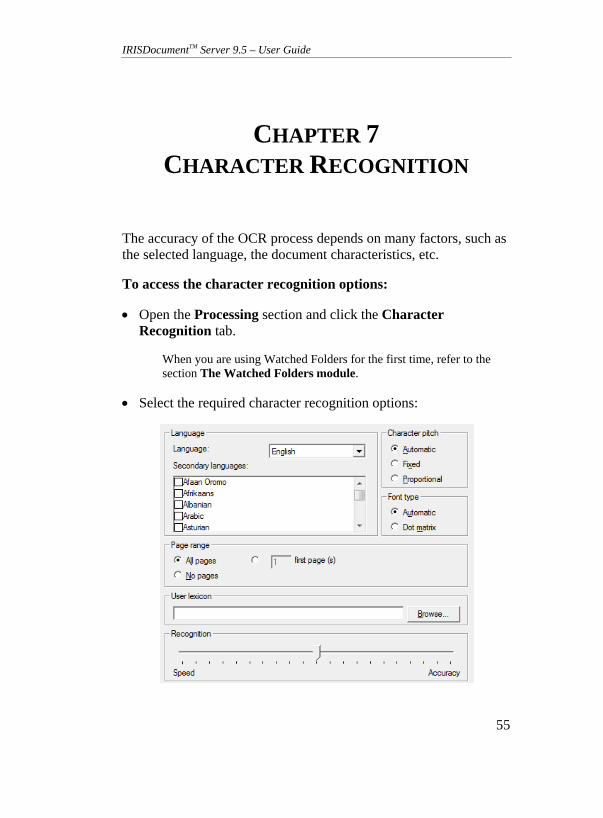
Select the required character recognition options:
Chapter 7 – Character Recognition
56
Language
In order to recognize documents, the document language must be specified. Based on the language selection, the software knows which symbol sets to recognize.
Select the language of your choice in the Language drop-down list.
IRISDocument supports up to 137 languages. IRISDocument can optionally recognize four Asian languages (Traditional and Simplified Chinese, Japanese and Korean), Arabic and Farsi, and Hebrew.
IRISDocument also recognizes barcodes and banking fonts. Refer to the appendices to the User Guide for more information on barcodes and banking fonts.
Note that the character recognition can also be limited to numeric digits.
Secondary languages
Next to the primary language, IRISDocument allows you to select up to 4 secondary languages.
This way, IRISDocument uses mixed character sets, enabling it to recognize Western words that occur in Greek, Cyrillic and optionally Asian, Arabic or Hebrew documents.
Select the required secondary languages in the list.
Note that if you select multiple secondary languages they must be of the same language group. Languages that do not belong to the same group will be disabled automatically.
Do not select languages that do not apply: the bigger the character set, the slower the recognition and the higher the risk of OCR errors.
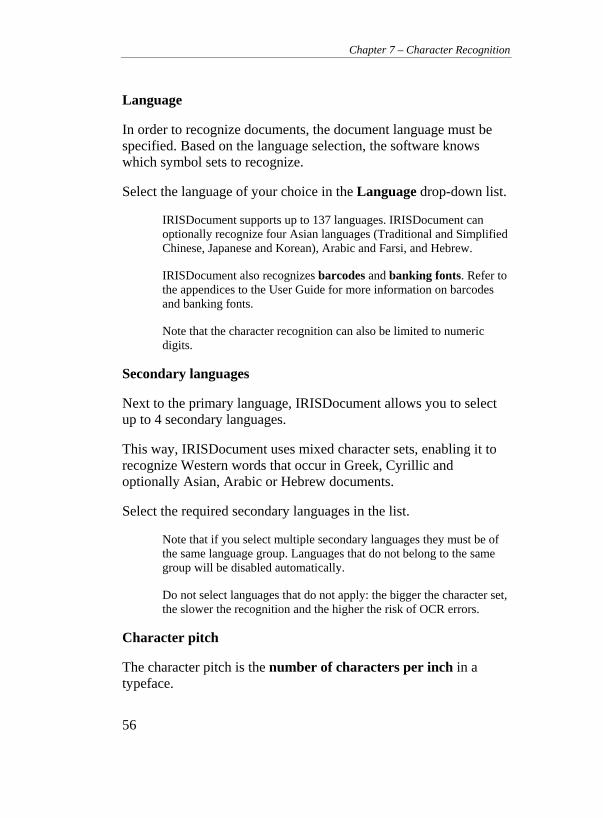
Character pitch
The character pitch is the number of characters per inch in a typeface.
IRISDocumentTM Server 9.5 – User Guide
57
Select fixed pitch if all characters of the typeface have the same width. This is often the case in old typewriter documents.
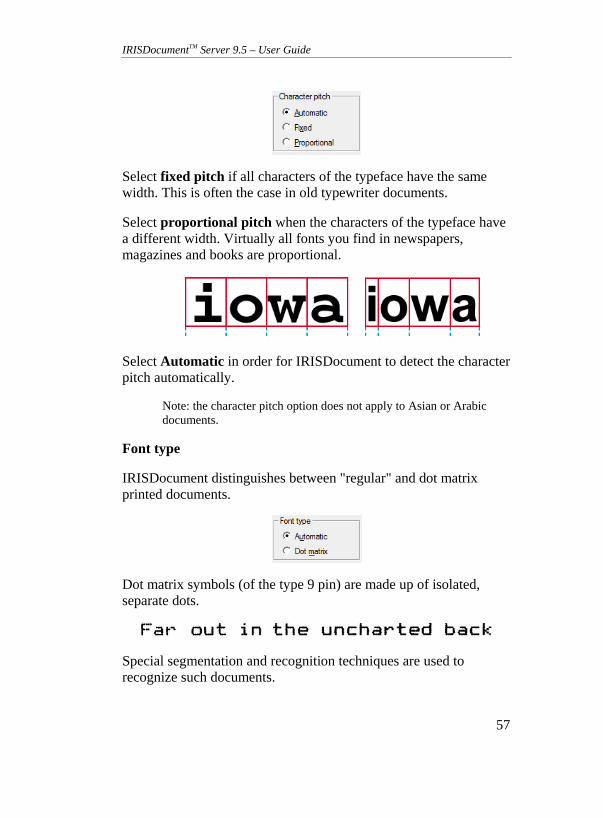
Select proportional pitch when the characters of the typeface have a different width. Virtually all fonts you find in newspapers, magazines and books are proportional.
Select Automatic in order for IRISDocument to detect the character pitch automatically.
Note: the character pitch option does not apply to Asian or Arabic documents.
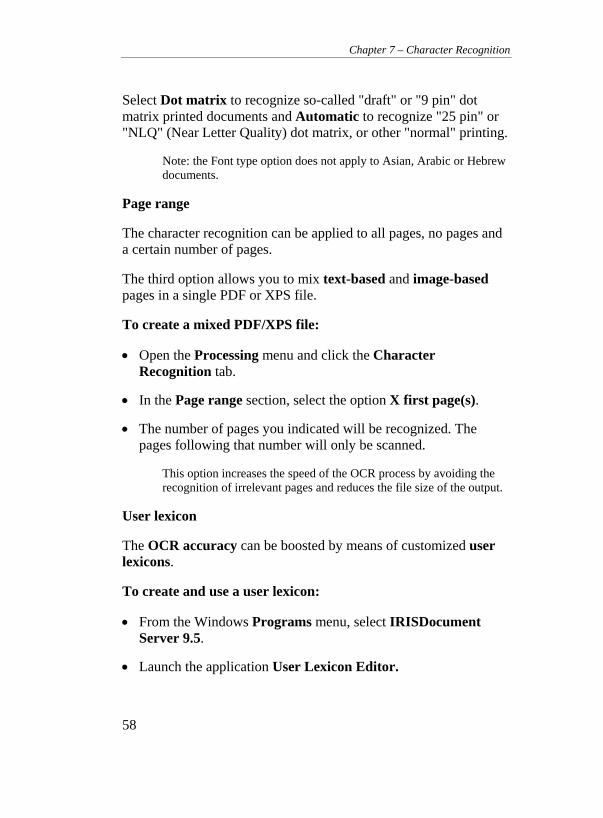
Font type
IRISDocument distinguishes between "regular" and dot matrix printed documents.
Dot matrix symbols (of the type 9 pin) are made up of isolated, separate dots.
Special segmentation and recognition techniques are used to recognize such documents.
Chapter 7 – Character Recognition
58
Select Dot matrix to recognize so-called "draft" or "9 pin" dot matrix printed documents and Automatic to recognize "25 pin" or "NLQ" (Near Letter Quality) dot matrix, or other "normal" printing.
Note: the Font type option does not apply to Asian, Arabic or Hebrew documents.
Page range
The character recognition can be applied to all pages, no pages and a certain number of pages.
The third option allows you to mix text-based and image-based pages in a single PDF or XPS file.
To create a mixed PDF/XPS file:
Open the Processing menu and click the Character Recognition tab.
In the Page range section, select the option X first page(s).
The number of pages you indicated will be recognized. The pages following that number will only be scanned.
This option increases the speed of the OCR process by avoiding the recognition of irrelevant pages and reduces the file size of the output.
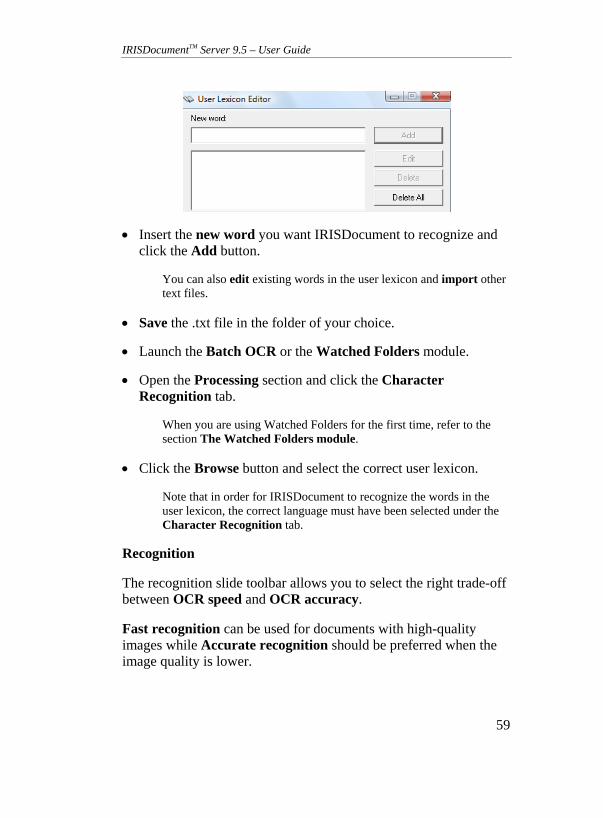
User lexicon
The OCR accuracy can be boosted by means of customized user lexicons.
To create and use a user lexicon:
From the Windows Programs menu, select IRISDocument Server 9.5.
Launch the application User Lexicon Editor.
IRISDocumentTM Server 9.5 – User Guide
59
Insert the new word you want IRISDocument to recognize and click the Add button.
You can also edit existing words in the user lexicon and import other text files.
Save the .txt file in the folder of your choice.
Launch the Batch OCR or the Watched Folders module.
Open the Processing section and click the Character Recognition tab.
When you are using Watched Folders for the first time, refer to the section The Watched Folders module.
Click the Browse button and select the correct user lexicon.
Note that in order for IRISDocument to recognize the words in the user lexicon, the correct language must have been selected under the Character Recognition tab.
Recognition
The recognition slide toolbar allows you to select the right trade-off between OCR speed and OCR accuracy.
Fast recognition can be used for documents with high-quality images while Accurate recognition should be preferred when the image quality is lower.
Chapter 7 – Character Recognition
60
The confidence level of the OCR process can be checked in the log file IRISDOCUMENT.HTML.
This trade-off between speed and accuracy is available for the Latin, Cyrillic and Greek alphabets.
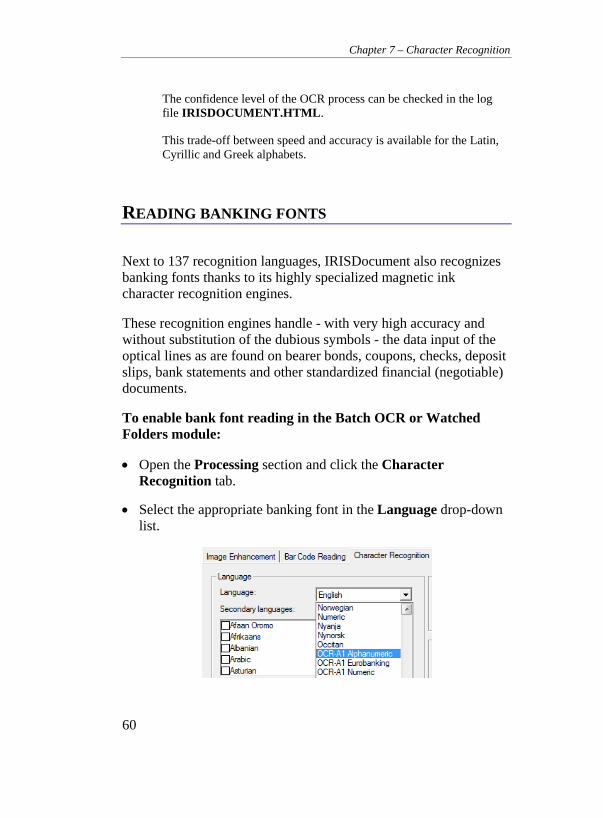
READING BANKING FONTS
Next to 137 recognition languages, IRISDocument also recognizes banking fonts thanks to its highly specialized magnetic ink character recognition engines.
These recognition engines handle - with very high accuracy and without substitution of the dubious symbols - the data input of the optical lines as are found on bearer bonds, coupons, checks, deposit slips, bank statements and other standardized financial (negotiable) documents.
To enable bank font reading in the Batch OCR or Watched Folders module:
Open the Processing section and click the Character Recognition tab.
Select the appropriate banking font in the Language drop-down list.

IRISDocumentTM Server 9.5 – User Guide
61
IRISDocument Server supports OCR-A, OCR-B, E13B and CMC7 bank fonts.
Refer to the appendix on Banking Fonts for more information.

IRISDocumentTM Server 9.5 – User Guide
63
CHAPTER 8 IMAGE COMPRESSION
GENERAL IMAGE COMPRESSION
IRISDocument allows you to generate compact images. The images in scanned documents can be compressed and their color mode and output resolution changed by means of extensive image compression options.
To access these options:
Open the Image Compression section and click the General tab.
When you are using Watched Folders for the first time, refer to the section The Watched Folders module.
Select the appropriate image compression options:
Note: take your storage limitations into account when selecting these options.
Chapter 8 – Image Compression
64
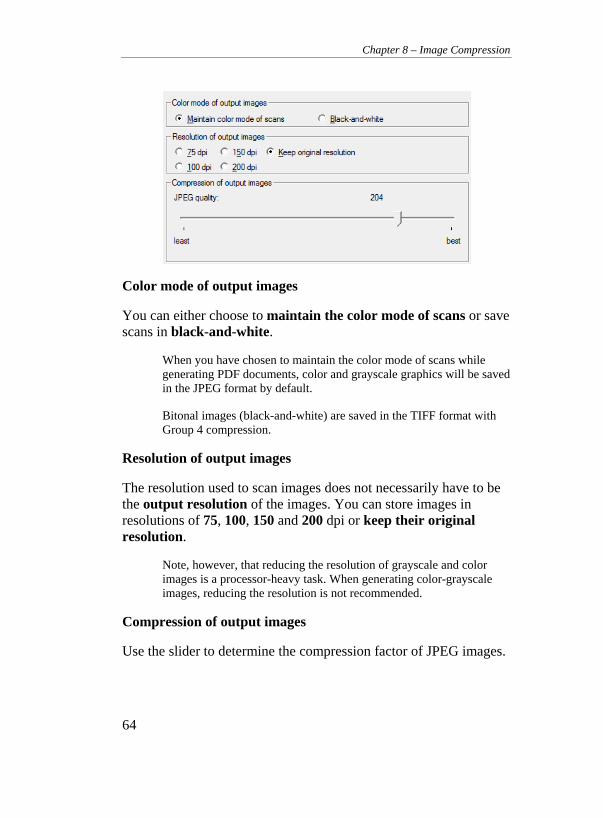
Color mode of output images
You can either choose to maintain the color mode of scans or save scans in black-and-white.
When you have chosen to maintain the color mode of scans while generating PDF documents, color and grayscale graphics will be saved in the JPEG format by default.
Bitonal images (black-and-white) are saved in the TIFF format with Group 4 compression.
Resolution of output images
The resolution used to scan images does not necessarily have to be the output resolution of the images. You can store images in resolutions of 75, 100, 150 and 200 dpi or keep their original resolution.
Note, however, that reducing the resolution of grayscale and color images is a processor-heavy task. When generating color-grayscale images, reducing the resolution is not recommended.
Compression of output images
Use the slider to determine the compression factor of JPEG images.
IRISDocumentTM Server 9.5 – User Guide
65
Note that the settings determined under the General tab apply to all graphics generated by IRISDocument.
JPEG 2000 COMPRESSION
Next to the general image compression options, IRISDocument allows you to apply JPEG 2000 compression to color and grayscale images.
Note that JPEG 2000 compression does not apply to iHQC documents as iHQC is 15 times more efficient.
To access the JPEG 2000 compression options:
Open the Image Compression section and click the JPEG 2000 tab.
When you are using Watched Folders for the first time, refer to the section The Watched Folders module.
Select the options of your choice:
Chapter 8 – Image Compression
66
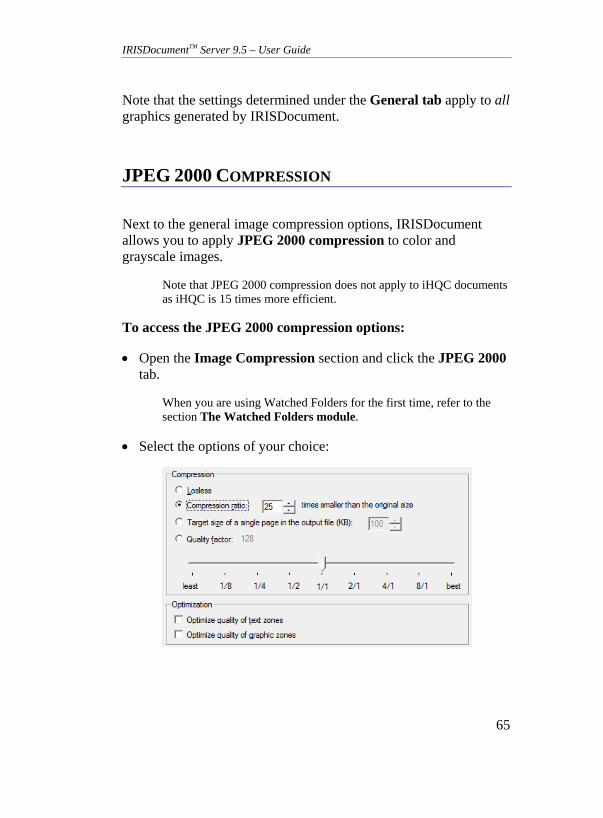
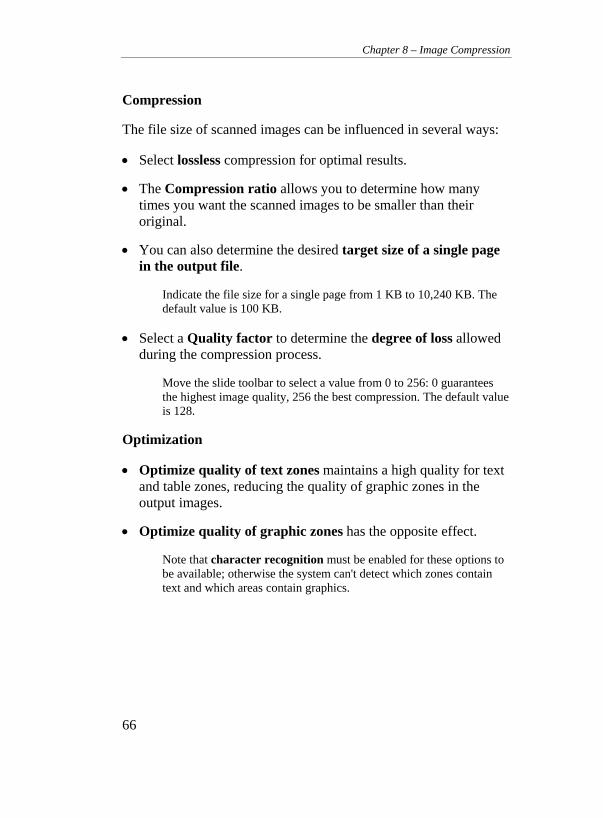
Compression
The file size of scanned images can be influenced in several ways:
Select lossless compression for optimal results.
The Compression ratio allows you to determine how many times you want the scanned images to be smaller than their original.
You can also determine the desired target size of a single page in the output file.
Indicate the file size for a single page from 1 KB to 10,240 KB. The default value is 100 KB.
Select a Quality factor to determine the degree of loss allowed during the compression process.
Move the slide toolbar to select a value from 0 to 256: 0 guarantees the highest image quality, 256 the best compression. The default value is 128.
Optimization
Optimize quality of text zones maintains a high quality for text and table zones, reducing the quality of graphic zones in the output images.
Optimize quality of graphic zones has the opposite effect.
Note that character recognition must be enabled for these options to be available; otherwise the system can't detect which zones contain text and which areas contain graphics.
IRISDocumentTM Server 9.5 – User Guide
67
CHAPTER 9 DOCUMENT SEPARATION
IRISDocument Server scans and monitors large batches composed of many documents without interruption
The output of the scanned batches can be neatly organized in separate files: IRISDocument can create one output file per batch, image folder and input file.
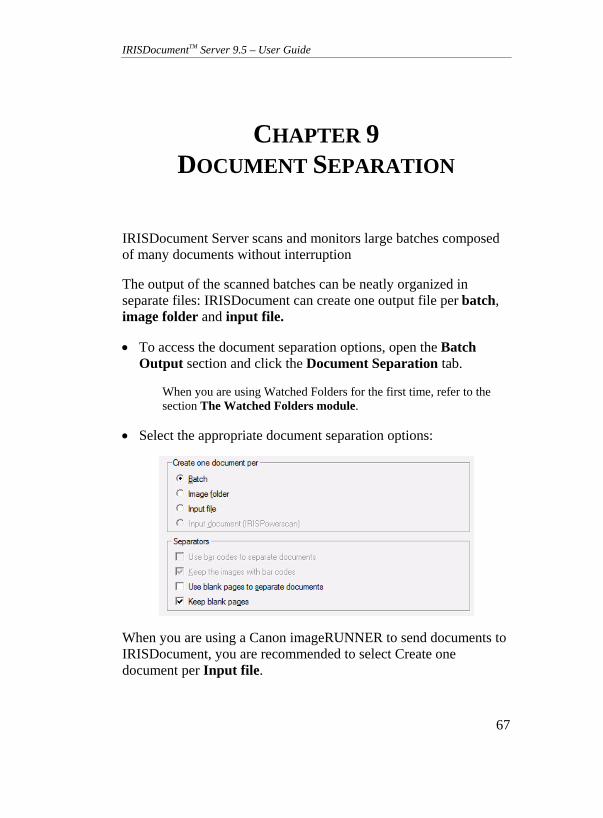
To access the document separation options, open the Batch Output section and click the Document Separation tab.
When you are using Watched Folders for the first time, refer to the section The Watched Folders module.
Select the appropriate document separation options:
When you are using a Canon imageRUNNER to send documents to IRISDocument, you are recommended to select Create one document per Input file.

Chapter 9 – Document Separation
68
If you installed the Workgroup add-on and selected Workgroup initial data during the installation, the Input file option will be selected by default.
Note that input files may contain multiple pages.
Separators
IRISDocument can create a new document each time it encounters a blank page or barcode..
Note that barcode reading must be enabled in order to use barcodes as separators.
A page is blank to IRISDocument when no text, barcodes or graphics are recognized. A blank page only contains noise.
Blank pages and pages containing barcodes can either be maintained in or removed from the output documents.
IRISDocumentTM Server 9.5 – User Guide
69
CHAPTER 10 XML INDEXING
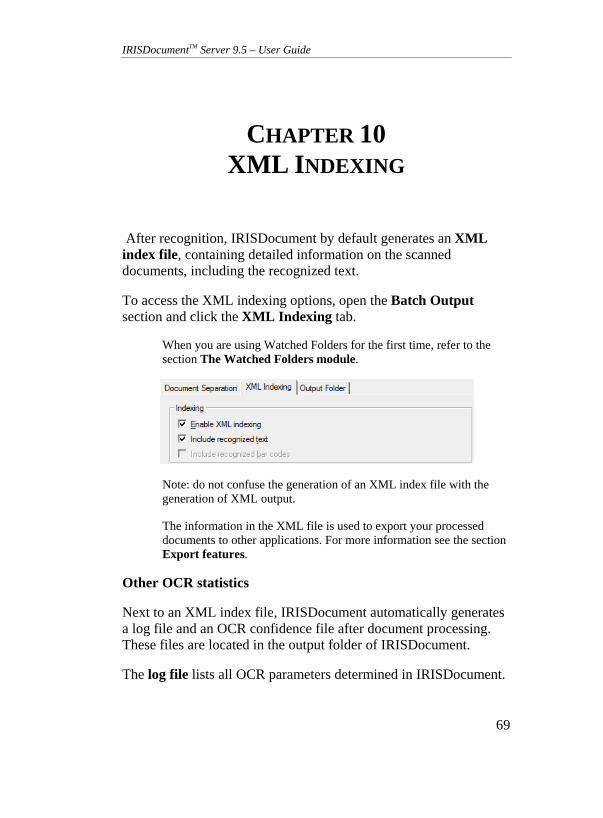
After recognition, IRISDocument by default generates an XML index file, containing detailed information on the scanned documents, including the recognized text.
To access the XML indexing options, open the Batch Output section and click the XML Indexing tab.
When you are using Watched Folders for the first time, refer to the section The Watched Folders module.
Note: do not confuse the generation of an XML index file with the generation of XML output.
The information in the XML file is used to export your processed documents to other applications. For more information see the section Export features.
Other OCR statistics
Next to an XML index file, IRISDocument automatically generates a log file and an OCR confidence file after document processing. These files are located in the output folder of IRISDocument.
The log file lists all OCR parameters determined in IRISDocument.

Chapter 10 – XML Indexing
70
In the Batch OCR module, one log file is created per batch.
In the Watched Folders module, one log file is created per task.
The OCR confidence file allows you to monitor the confidence of the OCR process by means of two charts providing word-based and character-based statistics.
Should the confidence level not be satisfactory, ask yourself the right questions. E.g. Have the settings been determined correctly? Do the scanned documents have a sufficiently high resolution? Has the correct language been selected?
IRISDocumentTM Server 9.5 – User Guide
71
CHAPTER 11 OUTPUT FOLDER
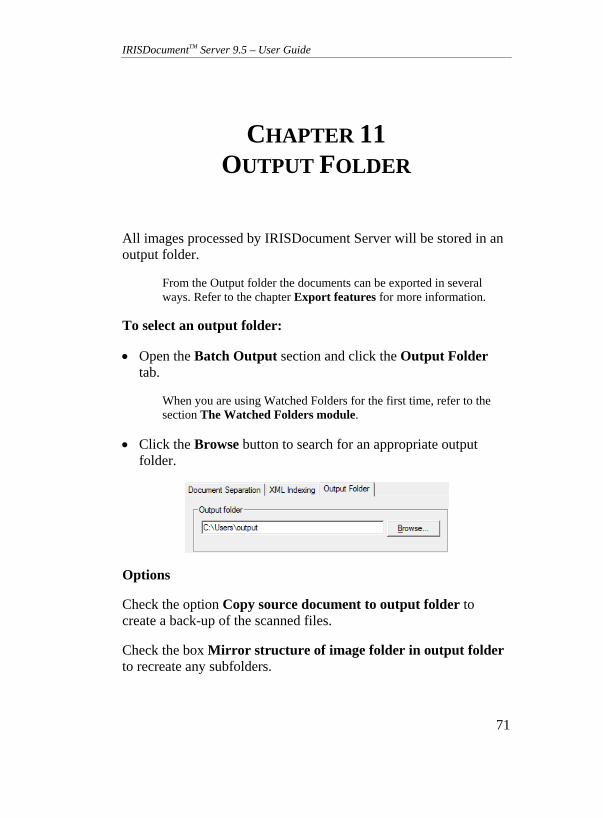
All images processed by IRISDocument Server will be stored in an output folder.
From the Output folder the documents can be exported in several ways. Refer to the chapter Export features for more information.
To select an output folder:
Open the Batch Output section and click the Output Folder tab.
When you are using Watched Folders for the first time, refer to the section The Watched Folders module.
Click the Browse button to search for an appropriate output folder.
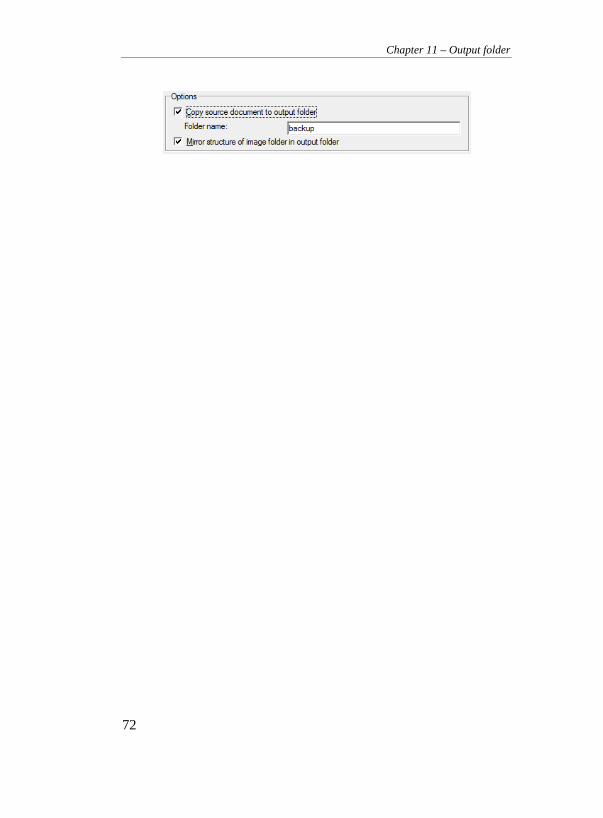
Options
Check the option Copy source document to output folder to create a back-up of the scanned files.
Check the box Mirror structure of image folder in output folder to recreate any subfolders.
Chapter 11 – Output folder
72
IRISDocumentTM Server 9.5 – User Guide
73
CHAPTER 12 DOCUMENT NAMES
The documents generated by IRISDocument are named automatically by default: IRISDocument uses 8-digit names, starting from 00000000.
To access the document naming options:
Open the Document Output section and click the tab Document Names.
When you are using Watched Folders for the first time, refer to the section The Watched Folders module.
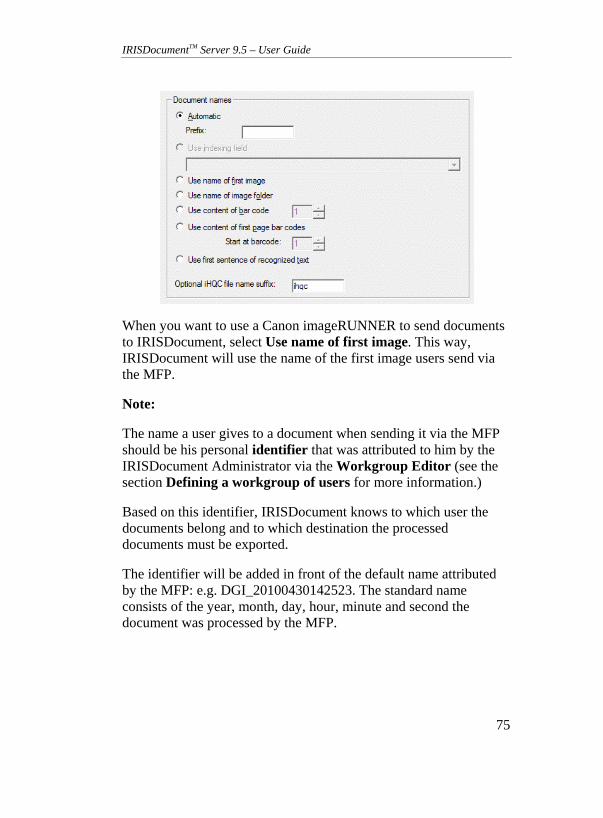
Select the appropriate document naming options:
o The Automatic naming option is selected by default. The documents that are processed are given an 8-digit serial number, starting with 00000000, 00000001, ... Any prefix can be added in front of this sequential name.
o The naming option Use indexing fields only applies to IRISDocument Server for IRISPowerscan. In order to use an index field as document name, you must first create index fields in IRISPowerscan.
o When you select Use Name of first image, all your output documents will start with the name of the first input file in the batch or watched folder that was processed by IRISDocument. E.g. SampleDocument, SampelDocument0, SampleDocument01, ...
Chapter 12 – Document Naming
74
o When you are processing multiple image folders each containing image files that belong together, select the naming option Use name of image folder. Your output documents will be named ImageFolder0, ImageFolder1 for instance.
o You can also use the content of a specific barcode in your document as document name. Select the option Use content of barcode and indicate which barcode in the document must be used as document name.
o Or you can use the content of the barcodes on the first page as document name. Select the option Use content of first-page barcodes and indicate at which barcode IRISDocument must start.
o The first sentence of the recognized text can also be used as naming option.
o When generating PDF and PDF-iHQC output files at the same time, or XPS and XPS-iHQC output files at the same time, a suffix is added to the document name by default: e.g. document.ihqc.pdf. This way a clear distinction is made between regular PDF and XPS documents and their iHQC-compressed counterparts. This suffix can be changed to your liking. Note: when you are only generating PDF-iHQC output files, and no 'regular' PDF files, no suffix is added to the files. The same goes for XPS-iHQC files.
IRISDocumentTM Server 9.5 – User Guide
75
When you want to use a Canon imageRUNNER to send documents to IRISDocument, select Use name of first image. This way, IRISDocument will use the name of the first image users send via the MFP.
Note:
The name a user gives to a document when sending it via the MFP should be his personal identifier that was attributed to him by the IRISDocument Administrator via the Workgroup Editor (see the section Defining a workgroup of users for more information.)
Based on this identifier, IRISDocument knows to which user the documents belong and to which destination the processed documents must be exported.
The identifier will be added in front of the default name attributed by the MFP: e.g. DGI_20100430142523. The standard name consists of the year, month, day, hour, minute and second the document was processed by the MFP.

IRISDocumentTM Server 9.5 – User Guide
77
CHAPTER 13 OUTPUT FORMATS
SUPPORTED OUTPUT FORMATS
IRISDocument supports a wide range of output formats: PDF, PDF-iHQC, PDF/A, PDF/A-iHQC, XPS, XPS-iHQC, Word, RTF, WordML, OpenDocument Text, XML, HTML, Text, SpreadsheetML and several types of image files.
Note that all output formats are disabled by default, however.
To generate output files:
Open the Document Output section and click on the tabs of the desired output formats.
When you are using Watched Folders for the first time, refer to the section The Watched Folders module.
Select the output formats you want IRISDocument to generate and determine their layout and other options.
Note that all output formats can be enabled simultaneously.
Chapter 13 – Output Formats
78
PDF DOCUMENTS
PDF Document types
IRISDocument generates four types of PDF files: Text, Text-Image, Image-Text and Image.
IRISDocument also generates both password-protected and digitally signed PDF output and offers PDF/A output for long-time preservation.
IRISDocument can also apply iHQC compression to reduce the file size of PDF output to a minimum.
To generate PDF output:
Open the Document output section and click the PDF tab.
When you are using Watched Folders for the first time, refer to the section The Watched Folders module.
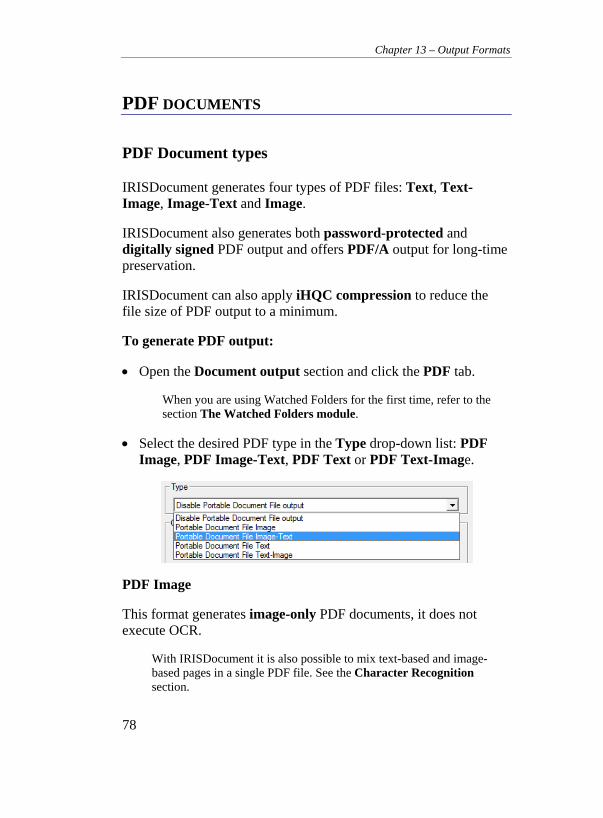
Select the desired PDF type in the Type drop-down list: PDF Image, PDF Image-Text, PDF Text or PDF Text-Image.
PDF Image
This format generates image-only PDF documents, it does not execute OCR.
With IRISDocument it is also possible to mix text-based and image-based pages in a single PDF file. See the Character Recognition section.
IRISDocumentTM Server 9.5 – User Guide
79
PDF Image-Text
IRISDocument recognizes text and creates searchable PDF files that contain the page image and the recognized text.
The page image is placed on top of the text.
With this format you can search words inside documents and view their true image as it was scanned.
Tip: use the graphics options in the Image Compression section to determine the color mode, resolution and JPEG quality of the graphics stored inside PDF files.
Tip: use the image enhancement options in the Processing section to improve the image quality and reduce the file size of PDF Image and Image-Text files.
Note that iHQC compression is available for PDF Image and Image-Text.
PDF Text
IRISDocument recognizes text and creates searchable PDF files.
The page image is not contained in these single-layered PDF files.
Tip: use text-only PDF files to save disk space.
PDF Text-Image
IRISDocument recognizes text and creates searchable PDF documents that contain the page image and the recognized text.
The page image is contained beneath the text.
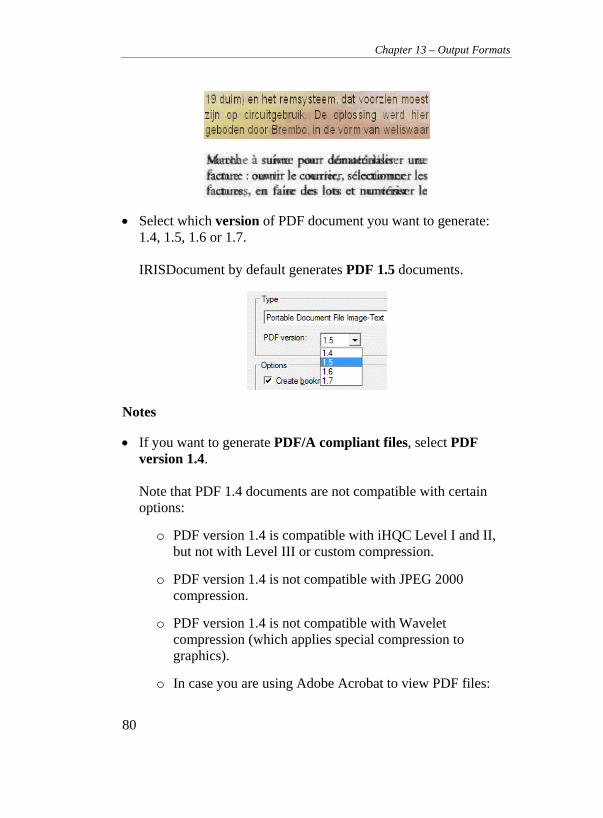
The pixels of the recognized text are erased to create a legible document. Otherwise, the text would have a heavy shadow as illustrated below:
Chapter 13 – Output Formats
80
Select which version of PDF document you want to generate: 1.4, 1.5, 1.6 or 1.7. IRISDocument by default generates PDF 1.5 documents.
Notes
If you want to generate PDF/A compliant files, select PDF version 1.4. Note that PDF 1.4 documents are not compatible with certain options:
o PDF version 1.4 is compatible with iHQC Level I and II, but not with Level III or custom compression.
o PDF version 1.4 is not compatible with JPEG 2000 compression.
o PDF version 1.4 is not compatible with Wavelet compression (which applies special compression to graphics).
o In case you are using Adobe Acrobat to view PDF files:
IRISDocumentTM Server 9.5 – User Guide
81
o It takes Adobe Acrobat 5.0 and higher to open PDF 1.4 documents.
o It takes Adobe Acrobat 6.0 and higher to open PDF 1.5 documents.
o It takes Adobe Acrobat 7.0 and higher to open PDF 1.6 documents.
o It takes Adobe Acrobat 8.0 and higher to open PDF 1.7 documents.
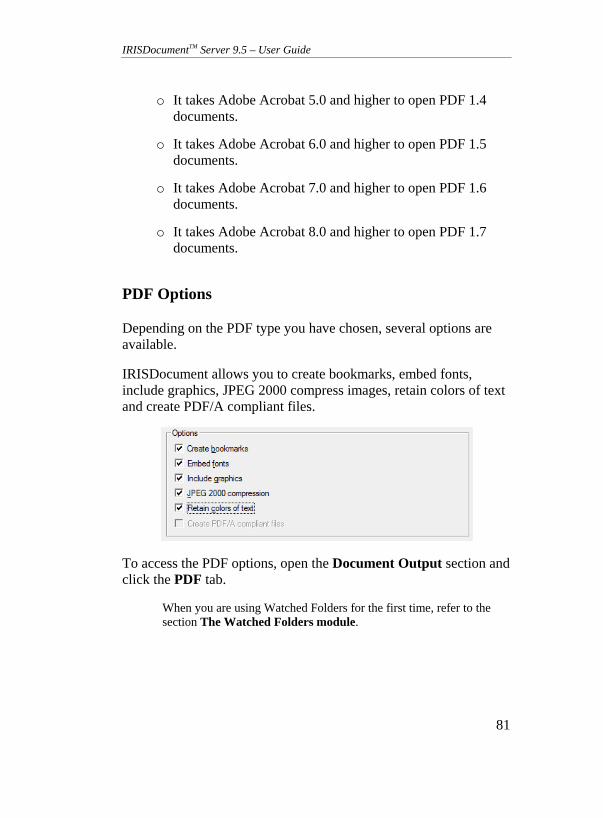
PDF Options
Depending on the PDF type you have chosen, several options are available.
IRISDocument allows you to create bookmarks, embed fonts, include graphics, JPEG 2000 compress images, retain colors of text and create PDF/A compliant files.
To access the PDF options, open the Document Output section and click the PDF tab.
When you are using Watched Folders for the first time, refer to the section The Watched Folders module.
Chapter 13 – Output Formats
82
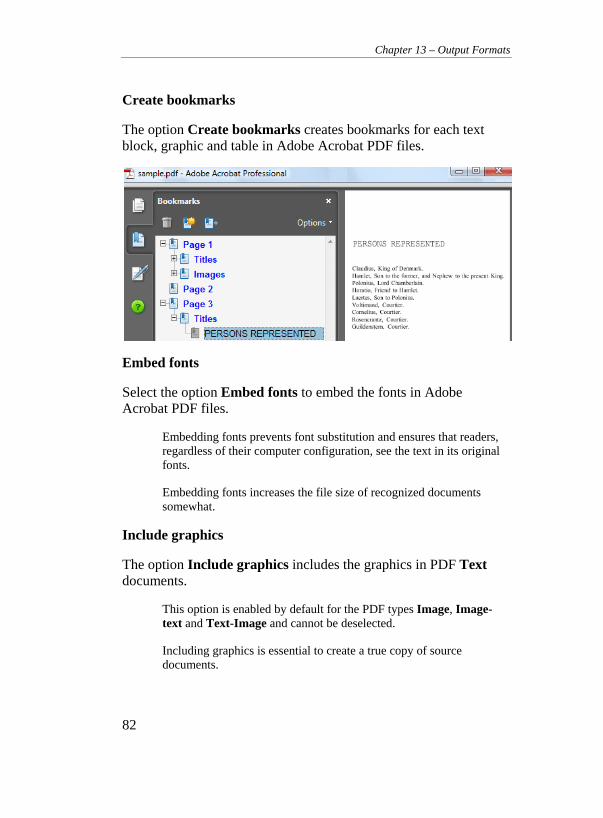
Create bookmarks
The option Create bookmarks creates bookmarks for each text block, graphic and table in Adobe Acrobat PDF files.
Embed fonts
Select the option Embed fonts to embed the fonts in Adobe Acrobat PDF files.
Embedding fonts prevents font substitution and ensures that readers, regardless of their computer configuration, see the text in its original fonts.
Embedding fonts increases the file size of recognized documents somewhat.
Include graphics
The option Include graphics includes the graphics in PDF Text documents.
This option is enabled by default for the PDF types Image, Image-text and Text-Image and cannot be deselected.
Including graphics is essential to create a true copy of source documents.
IRISDocumentTM Server 9.5 – User Guide
83
JPEG 2000 compression
By default, IRISDocument JPEG 2000 compresses grayscale and color images in PDF documents.
These settings apply to all graphics inside PDF files.
Note that JPEG 2000 compression is not available for PDF/A and PDF-iHQC output.
Retaining colors of text
The option Retain colors of text maintains the original colors of the text across the recognition.
This option is always enabled for PDF Text-Image output and can be selected when you have chosen PDF Text.
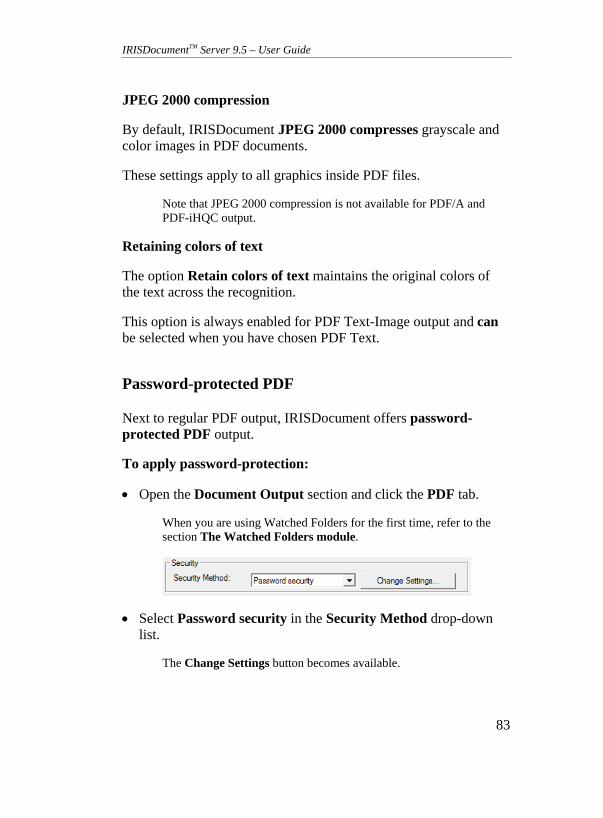
Password-protected PDF
Next to regular PDF output, IRISDocument offers password-protected PDF output.
To apply password-protection:
Open the Document Output section and click the PDF tab.
When you are using Watched Folders for the first time, refer to the section The Watched Folders module.
Select Password security in the Security Method drop-down list.
The Change Settings button becomes available.
Chapter 13 – Output Formats
84
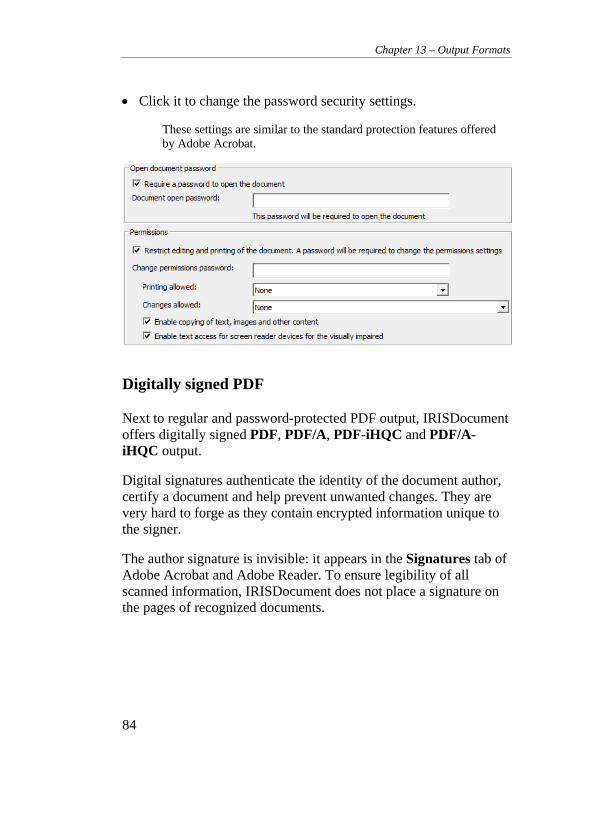
Click it to change the password security settings.
These settings are similar to the standard protection features offered by Adobe Acrobat.
Digitally signed PDF
Next to regular and password-protected PDF output, IRISDocument offers digitally signed PDF, PDF/A, PDF-iHQC and PDF/A-iHQC output.
Digital signatures authenticate the identity of the document author, certify a document and help prevent unwanted changes. They are very hard to forge as they contain encrypted information unique to the signer.
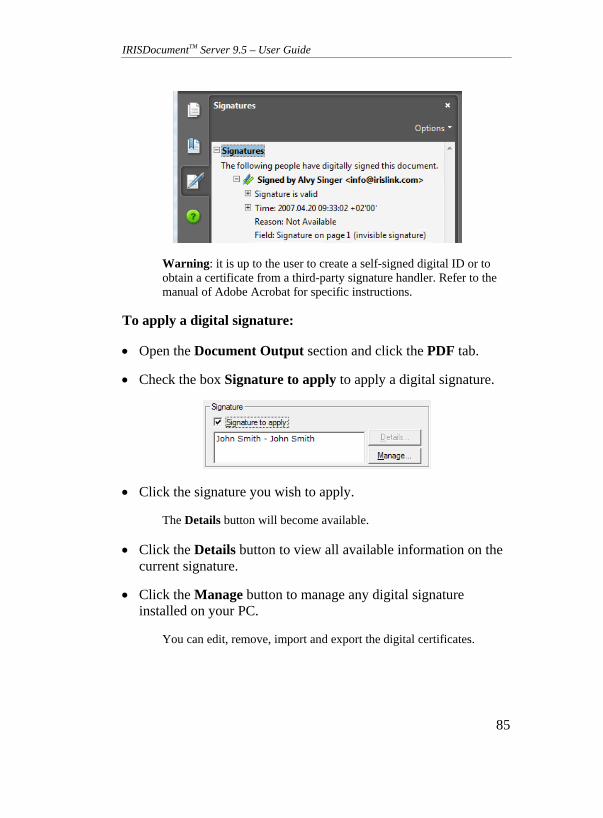
The author signature is invisible: it appears in the Signatures tab of Adobe Acrobat and Adobe Reader. To ensure legibility of all scanned information, IRISDocument does not place a signature on the pages of recognized documents.
IRISDocumentTM Server 9.5 – User Guide
85
Warning: it is up to the user to create a self-signed digital ID or to obtain a certificate from a third-party signature handler. Refer to the manual of Adobe Acrobat for specific instructions.
To apply a digital signature:
Open the Document Output section and click the PDF tab.
Check the box Signature to apply to apply a digital signature.
Click the signature you wish to apply.
The Details button will become available.
Click the Details button to view all available information on the current signature.
Click the Manage button to manage any digital signature installed on your PC.
You can edit, remove, import and export the digital certificates.
Chapter 13 – Output Formats
86
PDF/A
Next to regular PDF documents, IRISDocument offers PDF/A and PDF/A-iHQC output.
PDF/A files are used for long-term archiving and contain only what is strictly needed for opening and viewing files during their expected lifetime.
The PDF/A files generated by IRISDocument are ISO standard (ISO 19005-1:2005) and PDF/A-1b compliant.
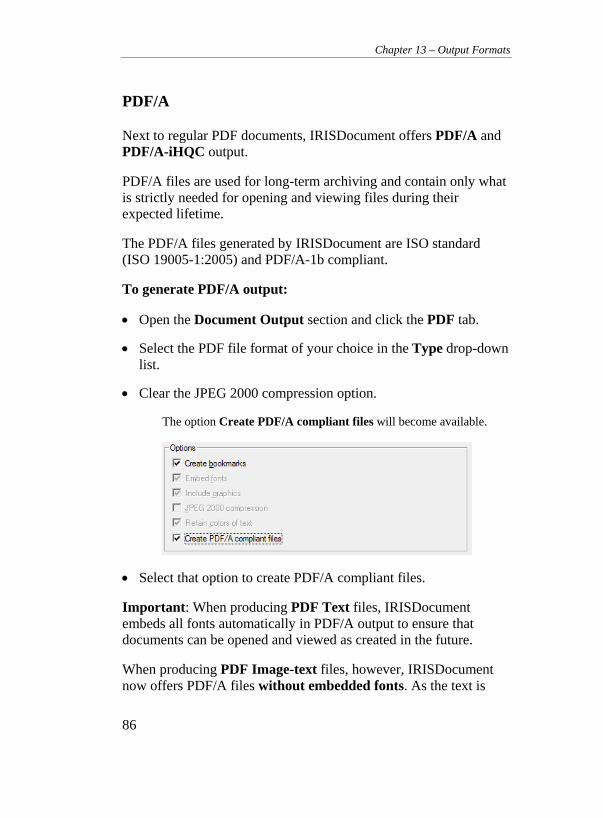
To generate PDF/A output:
Open the Document Output section and click the PDF tab.
Select the PDF file format of your choice in the Type drop-down list.
Clear the JPEG 2000 compression option.
The option Create PDF/A compliant files will become available.
Select that option to create PDF/A compliant files.
Important: When producing PDF Text files, IRISDocument embeds all fonts automatically in PDF/A output to ensure that documents can be opened and viewed as created in the future.
When producing PDF Image-text files, however, IRISDocument now offers PDF/A files without embedded fonts. As the text is
IRISDocumentTM Server 9.5 – User Guide
87
placed beneath the image, no font embedding is necessary. This way, IRISDocument produces more compact PDF/A output while the document text is still searchable and copyable.
Notes:
To avoid data loss, PDF/A files cannot be password-protected.
PDF/A compliant files do not support JPEG 2000 compression.
PDF/A compliant files are not compatible with iHQC Level III or with custom compression.
PDF/A compliant output is currently not available for Asian languages.
It takes Adobe Acrobat 5.0 (or Adobe Acrobat Reader 5.0) or higher to generate and open PDF/A files.
PDF - iHQC
Next to four types of regular PDF files, IRISDocument also offers two types of PDF-iHQC output: PDF Image-text and PDF Image.
iHQC stands for intelligent High-Quality Compression, I.R.I.S.' proprietary, efficient compression technology. iHQC is to images what MP3 is to music and what DivX is to movies.
Level I Good Quality is provided for free with IRISDocument. Level I compressed files are about 100 times smaller than uncompressed images. To make full use of this compression technology, the iHQC add-on is required.
Note that Adobe Acrobat 8 is recommended for viewing PDF-iHQC documents.
To generate PDF - iHQC output:
Chapter 13 – Output Formats
88
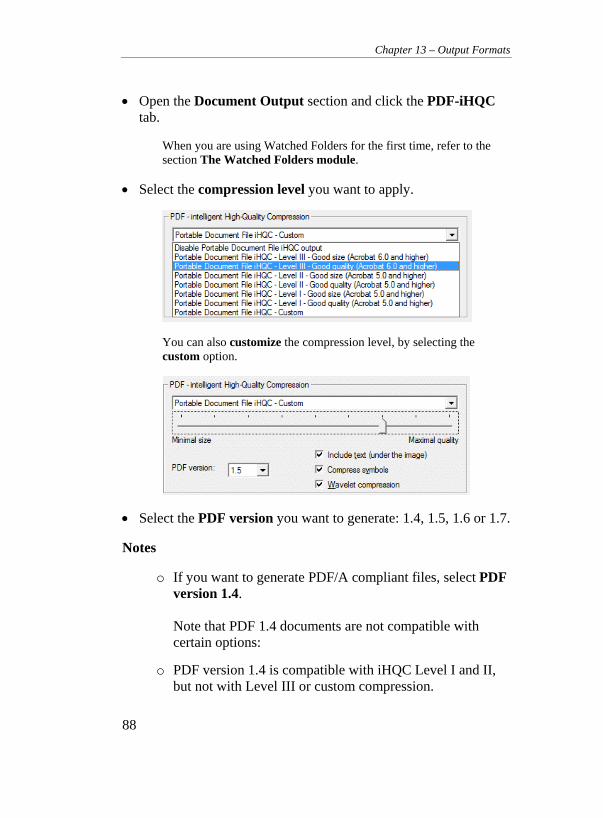
Open the Document Output section and click the PDF-iHQC tab.
When you are using Watched Folders for the first time, refer to the section The Watched Folders module.
Select the compression level you want to apply.
You can also customize the compression level, by selecting the custom option.
Select the PDF version you want to generate: 1.4, 1.5, 1.6 or 1.7.
Notes
o If you want to generate PDF/A compliant files, select PDF version 1.4. Note that PDF 1.4 documents are not compatible with certain options:
o PDF version 1.4 is compatible with iHQC Level I and II, but not with Level III or custom compression.
IRISDocumentTM Server 9.5 – User Guide
89
o PDF version 1.4 is not compatible with JPEG 2000 compression.
o PDF version 1.4 is not compatible with Wavelet compression (which applies special compression to graphics).
In case you are using Adobe Acrobat to view PDF files:
o It takes Adobe Acrobat 5.0 and higher to open PDF 1.4 documents.
o It takes Adobe Acrobat 6.0 and higher to open PDF 1.5 documents.
o It takes Adobe Acrobat 7.0 and higher to open PDF 1.6 documents.
o It takes Adobe Acrobat 8.0 and higher to open PDF 1.7 documents.
Options
IRISDocument offers the same options for PDF-iHQC and regular PDF output. Refer to the section PDF Options.
XPS DOCUMENTS
XPS Document types
IRISDocument generates four types of XPS files: Text, Text-Image, Image-Text and Image.
IRISDocument can also apply iHQC compression (intelligent High-Quality Compression) to maximally reduce the file size of the XPS output.
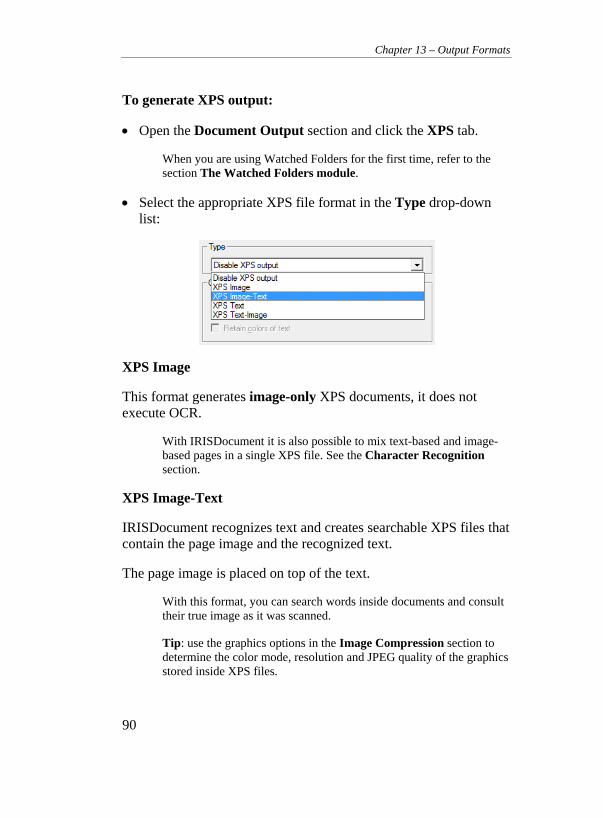
Chapter 13 – Output Formats
90
To generate XPS output:
Open the Document Output section and click the XPS tab.
When you are using Watched Folders for the first time, refer to the section The Watched Folders module.
Select the appropriate XPS file format in the Type drop-down list:
XPS Image
This format generates image-only XPS documents, it does not execute OCR.
With IRISDocument it is also possible to mix text-based and image-based pages in a single XPS file. See the Character Recognition section.
XPS Image-Text
IRISDocument recognizes text and creates searchable XPS files that contain the page image and the recognized text.
The page image is placed on top of the text.
With this format, you can search words inside documents and consult their true image as it was scanned.
Tip: use the graphics options in the Image Compression section to determine the color mode, resolution and JPEG quality of the graphics stored inside XPS files.

IRISDocumentTM Server 9.5 – User Guide
91
Tip: use the image enhancement options in the Processing section to improve the image quality and reduce the file size of PDF Image and Image-Text files.
Note that iHQC compression is available for these XPS types.
XPS Text
IRISDocument recognizes text and creates searchable XPS files.
The page image is not contained in the XPS files.
Use text-only XPS files to save disk space.
XPS Text-Image
IRISDocument recognizes text and creates searchable XPS documents that contain the page image and the recognized text.
The page image is contained beneath the text.
The pixels of the recognized text are erased to create a legible document. Otherwise, the text would have a heavy shadow as illustrated below:
XPS Options
Depending on the XPS type you have chosen, several options are available.
If necessary, refer to the section XPS Document types to learn how to activate XPS output.
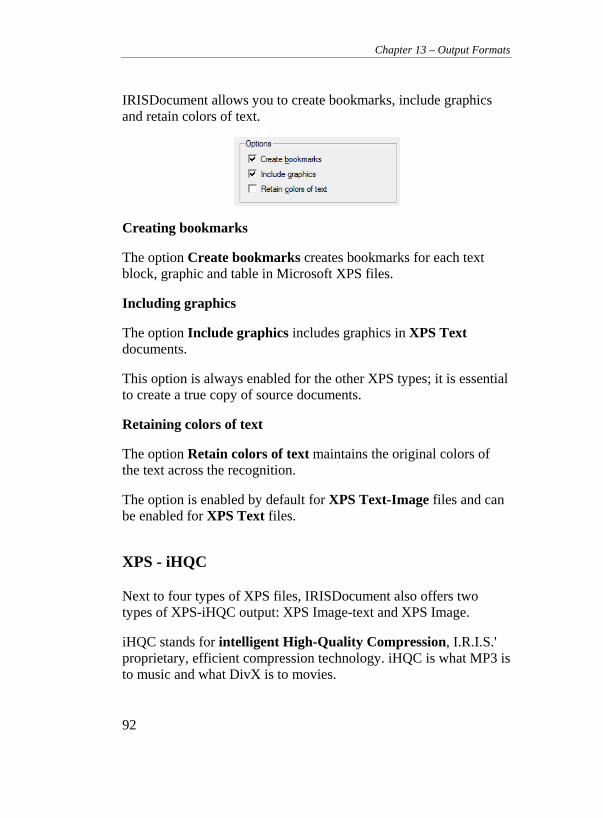
Chapter 13 – Output Formats
92
IRISDocument allows you to create bookmarks, include graphics and retain colors of text.
Creating bookmarks
The option Create bookmarks creates bookmarks for each text block, graphic and table in Microsoft XPS files.
Including graphics
The option Include graphics includes graphics in XPS Text documents.
This option is always enabled for the other XPS types; it is essential to create a true copy of source documents.
Retaining colors of text
The option Retain colors of text maintains the original colors of the text across the recognition.
The option is enabled by default for XPS Text-Image files and can be enabled for XPS Text files.
XPS - iHQC
Next to four types of XPS files, IRISDocument also offers two types of XPS-iHQC output: XPS Image-text and XPS Image.
iHQC stands for intelligent High-Quality Compression, I.R.I.S.' proprietary, efficient compression technology. iHQC is what MP3 is to music and what DivX is to movies.
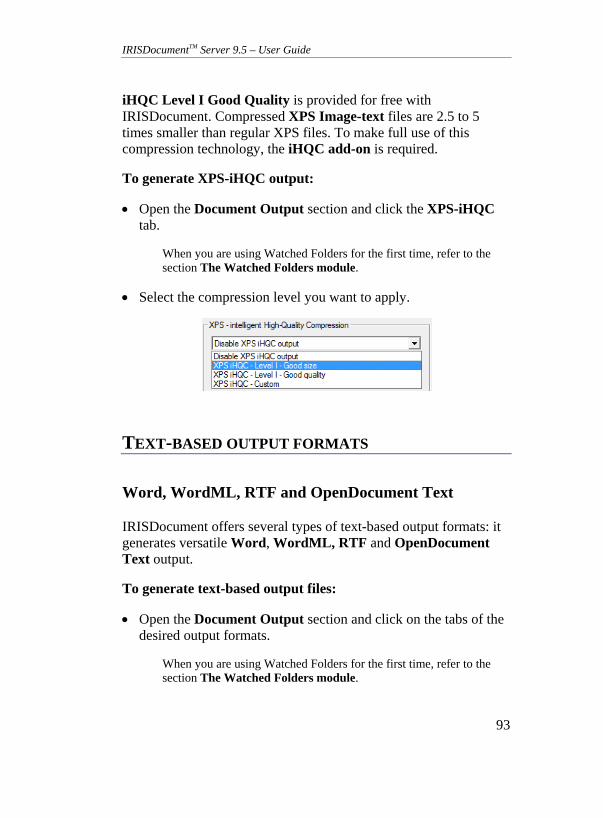
IRISDocumentTM Server 9.5 – User Guide
93
iHQC Level I Good Quality is provided for free with IRISDocument. Compressed XPS Image-text files are 2.5 to 5 times smaller than regular XPS files. To make full use of this compression technology, the iHQC add-on is required.
To generate XPS-iHQC output:
Open the Document Output section and click the XPS-iHQC tab.
When you are using Watched Folders for the first time, refer to the section The Watched Folders module.
Select the compression level you want to apply.
TEXT-BASED OUTPUT FORMATS
Word, WordML, RTF and OpenDocument Text
IRISDocument offers several types of text-based output formats: it generates versatile Word, WordML, RTF and OpenDocument Text output.
To generate text-based output files:
Open the Document Output section and click on the tabs of the desired output formats.
When you are using Watched Folders for the first time, refer to the section The Watched Folders module.
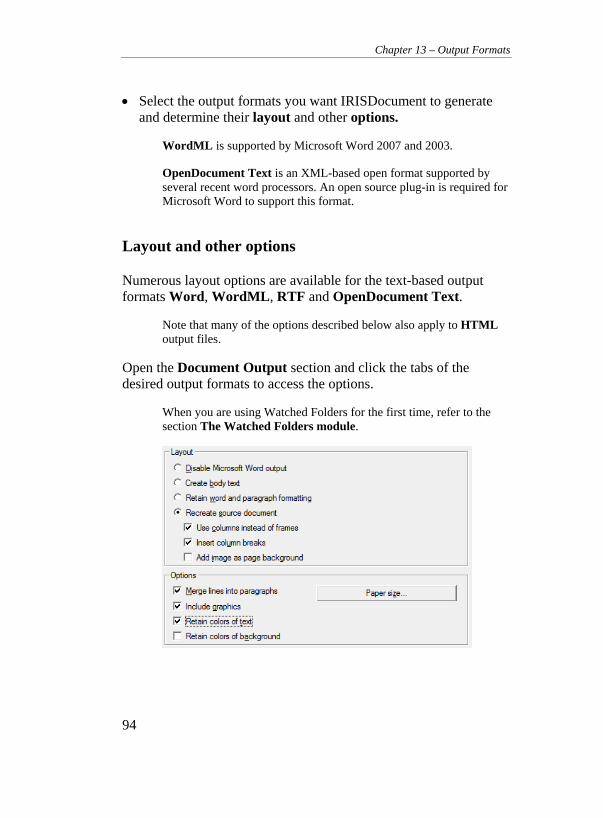
Chapter 13 – Output Formats
94
Select the output formats you want IRISDocument to generate and determine their layout and other options.
WordML is supported by Microsoft Word 2007 and 2003.
OpenDocument Text is an XML-based open format supported by several recent word processors. An open source plug-in is required for Microsoft Word to support this format.
Layout and other options
Numerous layout options are available for the text-based output formats Word, WordML, RTF and OpenDocument Text.
Note that many of the options described below also apply to HTML output files.
Open the Document Output section and click the tabs of the desired output formats to access the options.
When you are using Watched Folders for the first time, refer to the section The Watched Folders module.
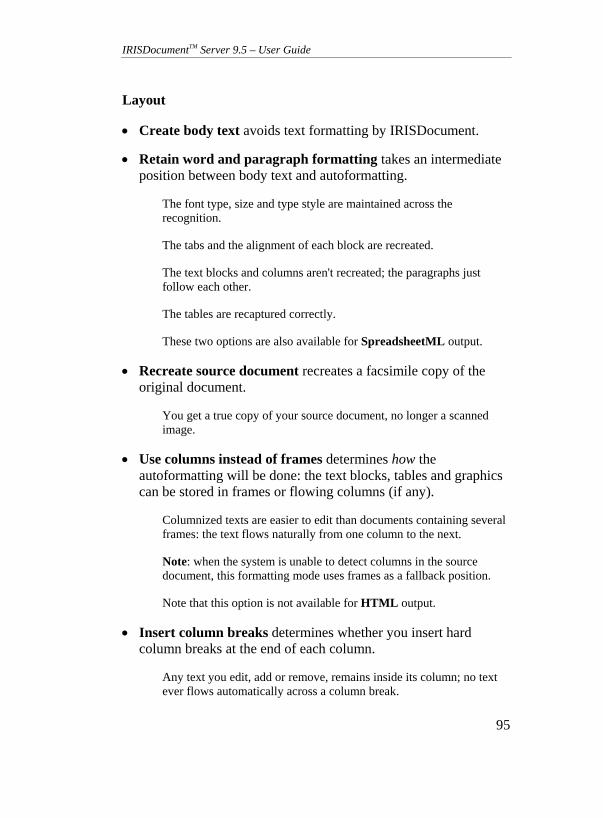
IRISDocumentTM Server 9.5 – User Guide
95
Layout
Create body text avoids text formatting by IRISDocument.
Retain word and paragraph formatting takes an intermediate position between body text and autoformatting.
The font type, size and type style are maintained across the recognition.
The tabs and the alignment of each block are recreated.
The text blocks and columns aren't recreated; the paragraphs just follow each other.
The tables are recaptured correctly.
These two options are also available for SpreadsheetML output.
Recreate source document recreates a facsimile copy of the original document.
You get a true copy of your source document, no longer a scanned image.
Use columns instead of frames determines how the autoformatting will be done: the text blocks, tables and graphics can be stored in frames or flowing columns (if any).
Columnized texts are easier to edit than documents containing several frames: the text flows naturally from one column to the next.
Note: when the system is unable to detect columns in the source document, this formatting mode uses frames as a fallback position.
Note that this option is not available for HTML output.
Insert column breaks determines whether you insert hard column breaks at the end of each column.
Any text you edit, add or remove, remains inside its column; no text ever flows automatically across a column break.
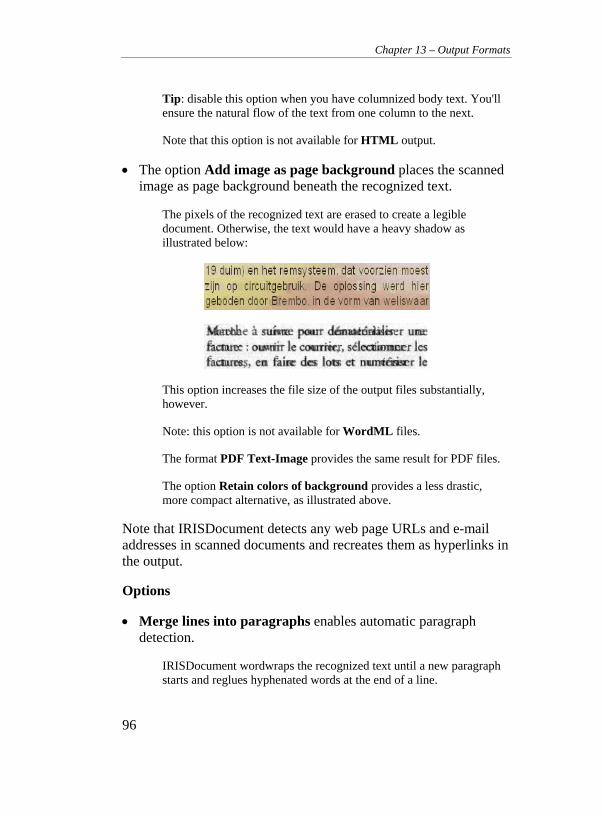
Chapter 13 – Output Formats
96
Tip: disable this option when you have columnized body text. You'll ensure the natural flow of the text from one column to the next.
Note that this option is not available for HTML output.
The option Add image as page background places the scanned image as page background beneath the recognized text.
The pixels of the recognized text are erased to create a legible document. Otherwise, the text would have a heavy shadow as illustrated below:
This option increases the file size of the output files substantially, however.
Note: this option is not available for WordML files.
The format PDF Text-Image provides the same result for PDF files.
The option Retain colors of background provides a less drastic, more compact alternative, as illustrated above.
Note that IRISDocument detects any web page URLs and e-mail addresses in scanned documents and recreates them as hyperlinks in the output.
Options
Merge lines into paragraphs enables automatic paragraph detection.
IRISDocument wordwraps the recognized text until a new paragraph starts and reglues hyphenated words at the end of a line.
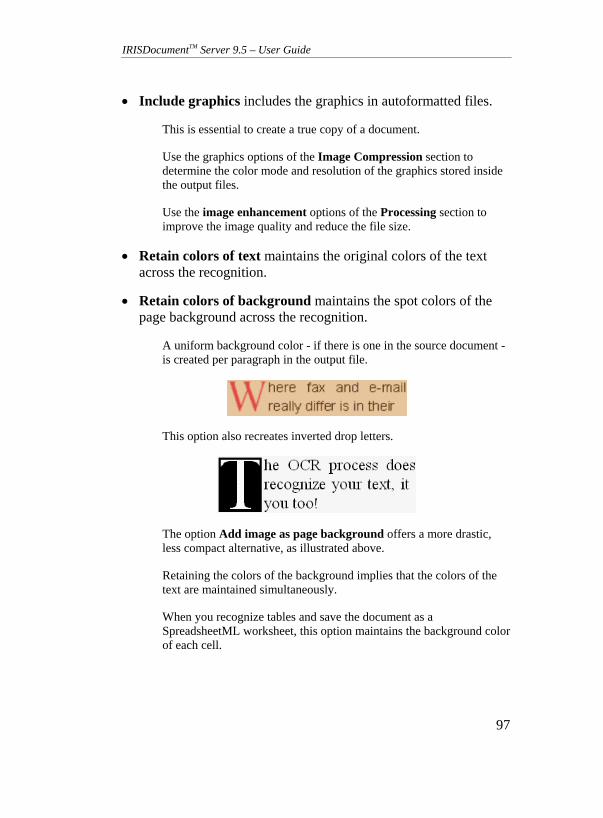
IRISDocumentTM Server 9.5 – User Guide
97
Include graphics includes the graphics in autoformatted files.
This is essential to create a true copy of a document.
Use the graphics options of the Image Compression section to determine the color mode and resolution of the graphics stored inside the output files.
Use the image enhancement options of the Processing section to improve the image quality and reduce the file size.
Retain colors of text maintains the original colors of the text across the recognition.
Retain colors of background maintains the spot colors of the page background across the recognition.
A uniform background color - if there is one in the source document - is created per paragraph in the output file.
This option also recreates inverted drop letters.
The option Add image as page background offers a more drastic, less compact alternative, as illustrated above.
Retaining the colors of the background implies that the colors of the text are maintained simultaneously.
When you recognize tables and save the document as a SpreadsheetML worksheet, this option maintains the background color of each cell.

Chapter 13 – Output Formats
98
Preferred paper sizes
When you are exporting Word, WordML, RTF or OpenDocument Text documents, you can select preferred paper sizes.
IRISDocument will go through the active paper sizes in the indicated order and uses the first paper size that is sufficiently large to hold the scanned document.
OTHER OUTPUT FORMATS
SpreadsheetML documents
IRISDocument offers SpreadsheetML output. This format is supported by Microsoft Excel 2007, 2003 and 2002.
As documents often contain more than only tables, it is useful to activate SpreadsheetML as a "secondary" format alongside (an)other format(s). It is only used for those pages that contain tables, for all other pages the SpreadsheetML output format is disabled.
To generate SpreadsheetML Output:
Open the Document Output section and click the SpreadsheetML tab.
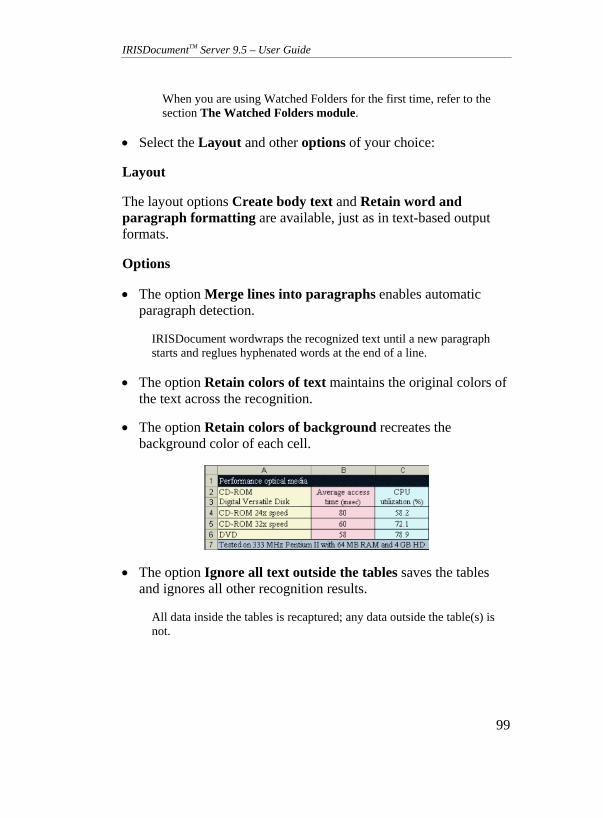
IRISDocumentTM Server 9.5 – User Guide
99
When you are using Watched Folders for the first time, refer to the section The Watched Folders module.
Select the Layout and other options of your choice:
Layout
The layout options Create body text and Retain word and paragraph formatting are available, just as in text-based output formats.
Options
The option Merge lines into paragraphs enables automatic paragraph detection.
IRISDocument wordwraps the recognized text until a new paragraph starts and reglues hyphenated words at the end of a line.
The option Retain colors of text maintains the original colors of the text across the recognition.
The option Retain colors of background recreates the background color of each cell.
The option Ignore all text outside the tables saves the tables and ignores all other recognition results.
All data inside the tables is recaptured; any data outside the table(s) is not.
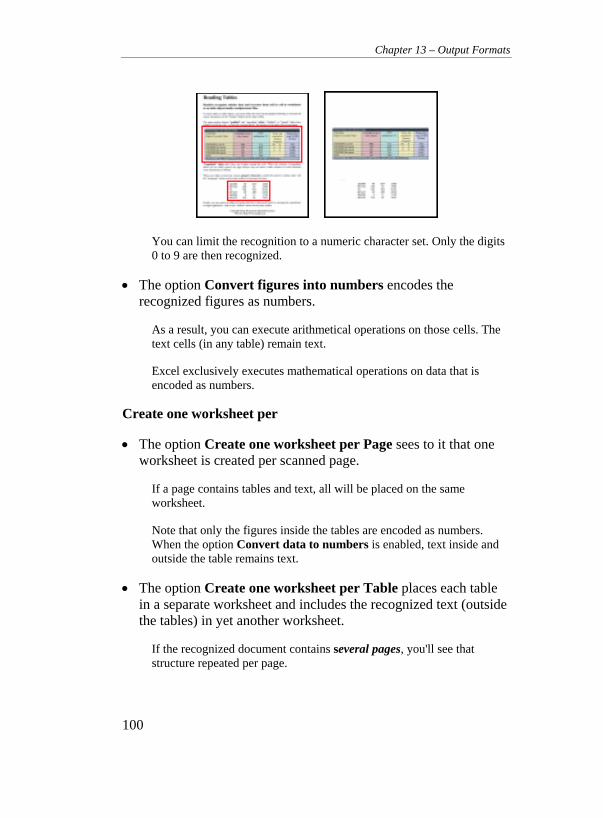
Chapter 13 – Output Formats
100
You can limit the recognition to a numeric character set. Only the digits 0 to 9 are then recognized.
The option Convert figures into numbers encodes the recognized figures as numbers.
As a result, you can execute arithmetical operations on those cells. The text cells (in any table) remain text.
Excel exclusively executes mathematical operations on data that is encoded as numbers.
Create one worksheet per
The option Create one worksheet per Page sees to it that one worksheet is created per scanned page.
If a page contains tables and text, all will be placed on the same worksheet.
Note that only the figures inside the tables are encoded as numbers. When the option Convert data to numbers is enabled, text inside and outside the table remains text.
The option Create one worksheet per Table places each table in a separate worksheet and includes the recognized text (outside the tables) in yet another worksheet.
If the recognized document contains several pages, you'll see that structure repeated per page.
IRISDocumentTM Server 9.5 – User Guide
101
(Unicode) Text documents
IRISDocument offers unicode Text output.
To generate Text output:
Open the Document Output section and click the Text tab.
Select the file type of your choice:
o Use the option Unicode Text to generate Unicode text output.
The advantage of Unicode is that you can encode any language - and view and edit the result with the proper word processor (Word 2007, 2003, 2000).
o Use the option Unicode UTF-8 to generate Unicode UTF-8 output.
Unicode UTF-8 is a web-based text format.
Option
Merge lines into paragraphs enables automatic paragraph detection.
IRISDocument wordwraps the recognized text until a new paragraph starts and reglues hyphenated words at the end of a line.
HTML documents
IRISDocument offers HTML output.
Chapter 13 – Output Formats
102
To generate HTML output:
Open the Document Output section and click the HTML tab.
When you are using Watched Folders for the first time, refer to the section The Watched Folders module.
Select the appropriate layout and other options.
These options are highly similar to the ones available for text-based output files. Refer to the section Layout and other options.
XML documents
IRISDocument offers XML output.
Do not confuse XML output with XML indexing.
To generate XML output:
Open the Document Output section and click the XML/WordML tab.
When you are using Watched Folders for the first time, refer to the section The Watched Folders module.
Select the file type of your choice:
o Compact XML creates the smallest XML documents.
The text is legible to the human eye as it is stored line by line, block by block.
Any application capable of parsing XML files (e.g. Internet Explorer) can be used to study the OCR results.
Any XML parser can be used to edit and parse the XML documents.
o Detailed XML adds much detail to the recognized text.
IRISDocumentTM Server 9.5 – User Guide
103
The text is not legible to the human eye because the XML document contains detailed formatting information (type styles, position of each character on the page etc.). The text is stored character by character, word by word.
It takes an XML parser to make sense of the XML output.
IMAGE FILES
Alongside several text formats, IRISDocument offers image output.
Images can be exported as BMP, JPEG, JPEG 2000 and TIFF files.
To generate image output:
Open the Document Output section and click the Image files tab.
Select the appropriate file format in the drop-down lists to generate bitonal and/or color-grayscale images:
o The following graphic formats are supported for bitonal images: TIFF and multipage TIFF (both with Group 4 compression) and Windows bitmaps.
o The following graphic formats are supported for color-grayscale images: JPEG, JPEG 2000, TIFF and multipage TIFF (both with JPEG and JPEG 2000 compression) and Windows bitmaps.
Tip: use the image enhancement options in the Processing section to improve the image quality.
Warning: Windows bitmaps do not offer any compression. A single A4 color page may take some 25 MB disk space on your hard disk.
Chapter 13 – Output Formats
104
Note that you can also generate image-only PDF, and PDF-iHQC, XPS and XPS-iHQC files.
Also note that scanned images can be saved in black-and-white and color-grayscale mode simultaneously.

IRISDocumentTM Server 9.5 – User Guide
105
CHAPTER 14 EXPORT FEATURES
The documents you process with IRISDocument Server can be exported in several ways.
In the standard version of IRISDocument Server, you can indicate which application you want to run after IRISDocument has processed your documents to process them further.
When the Workgroup add-on is installed, you can define a workgroup of users to whose e-mail address, personal folder and/or FTP folder the documents must sent.
For information on how to define a workgroup of users, refer to the section Defining a Workgroup of users.
Optionally, documents can also be exported to Microsoft SharePoint, by means of the Export to SharePoint add-on.
Document can also be exported to Therefore document solutions by means of the Export to Therefore add-on.
Refer to the sections below for more information about these export features.
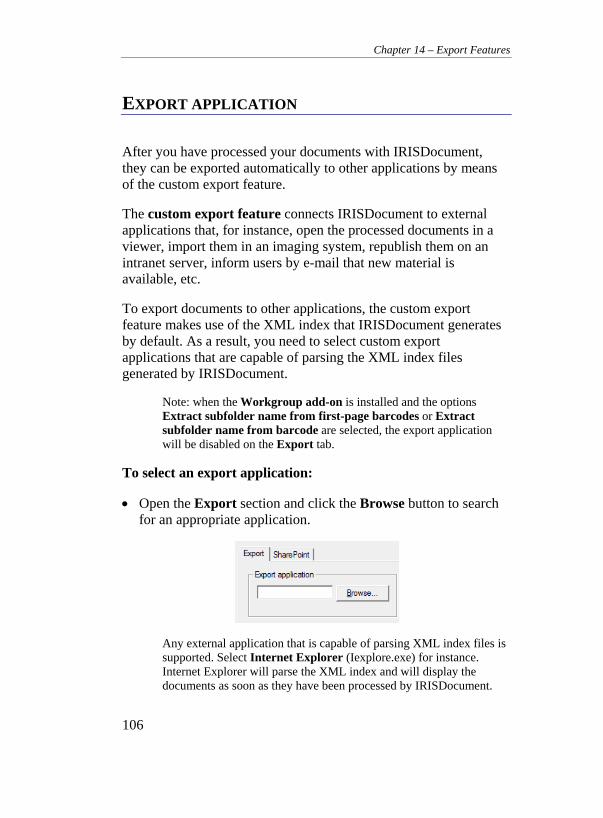
Chapter 14 – Export Features
106
EXPORT APPLICATION
After you have processed your documents with IRISDocument, they can be exported automatically to other applications by means of the custom export feature.
The custom export feature connects IRISDocument to external applications that, for instance, open the processed documents in a viewer, import them in an imaging system, republish them on an intranet server, inform users by e-mail that new material is available, etc.
To export documents to other applications, the custom export feature makes use of the XML index that IRISDocument generates by default. As a result, you need to select custom export applications that are capable of parsing the XML index files generated by IRISDocument.
Note: when the Workgroup add-on is installed and the options Extract subfolder name from first-page barcodes or Extract subfolder name from barcode are selected, the export application will be disabled on the Export tab.
To select an export application:
Open the Export section and click the Browse button to search for an appropriate application.
Any external application that is capable of parsing XML index files is supported. Select Internet Explorer (Iexplore.exe) for instance. Internet Explorer will parse the XML index and will display the documents as soon as they have been processed by IRISDocument.
IRISDocumentTM Server 9.5 – User Guide
107
Make sure you did not clear the option Enable XML indexing on the XML indexing tab in the Batch Output section.
Note that you can develop custom export applications that parse the XML index and execute additional tasks on your documents.
When you are using the Watched Folders module, you can select a separate export application for each watched folder.
This way, your documents can be exported to multiple export applications at the same time.
When you are using Watched Folders for the first time, refer to the section The Watched Folders module.
Click the Run command on the File menu to process and export your documents.
IRISDocument will process the documents and transfer the file name of the XML index to the external program on the command line.
EXPORT TO SHAREPOINT
When the Export to SharePoint add-on is installed as part of your IRISDocument Server configuration, IRISDocument is able to export processed documents to Microsoft SharePoint.
Microsoft SharePoint allows you to manage, repurpose and share business data effectively without divulging confidential information.
Operation
Start the Batch OCR or Watched Folders module from the Windows Start menu>Programs>IRISDocument Server 9.5.
Click the Export section and then click the SharePoint tab.
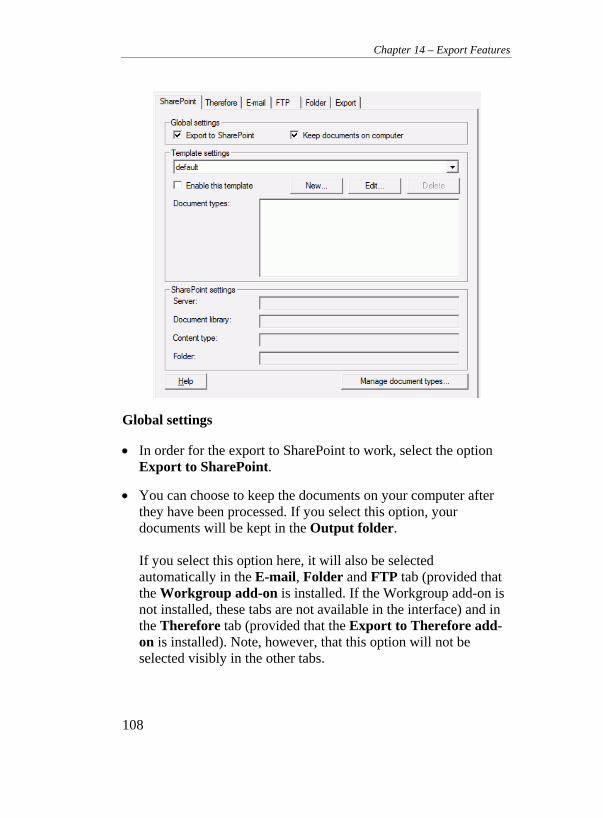
Chapter 14 – Export Features
108
Global settings
In order for the export to SharePoint to work, select the option Export to SharePoint.
You can choose to keep the documents on your computer after they have been processed. If you select this option, your documents will be kept in the Output folder. If you select this option here, it will also be selected automatically in the E-mail, Folder and FTP tab (provided that the Workgroup add-on is installed. If the Workgroup add-on is not installed, these tabs are not available in the interface) and in the Therefore tab (provided that the Export to Therefore add-on is installed). Note, however, that this option will not be selected visibly in the other tabs.
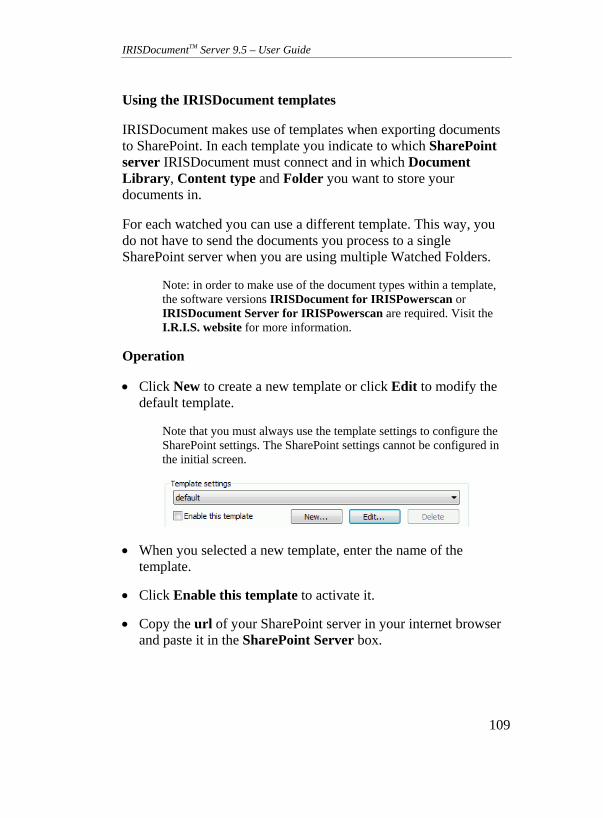
IRISDocumentTM Server 9.5 – User Guide
109
Using the IRISDocument templates
IRISDocument makes use of templates when exporting documents to SharePoint. In each template you indicate to which SharePoint server IRISDocument must connect and in which Document Library, Content type and Folder you want to store your documents in.
For each watched you can use a different template. This way, you do not have to send the documents you process to a single SharePoint server when you are using multiple Watched Folders.
Note: in order to make use of the document types within a template, the software versions IRISDocument for IRISPowerscan or IRISDocument Server for IRISPowerscan are required. Visit the I.R.I.S. website for more information.
Operation
Click New to create a new template or click Edit to modify the default template.
Note that you must always use the template settings to configure the SharePoint settings. The SharePoint settings cannot be configured in the initial screen.
When you selected a new template, enter the name of the template.
Click Enable this template to activate it.
Copy the url of your SharePoint server in your internet browser and paste it in the SharePoint Server box.
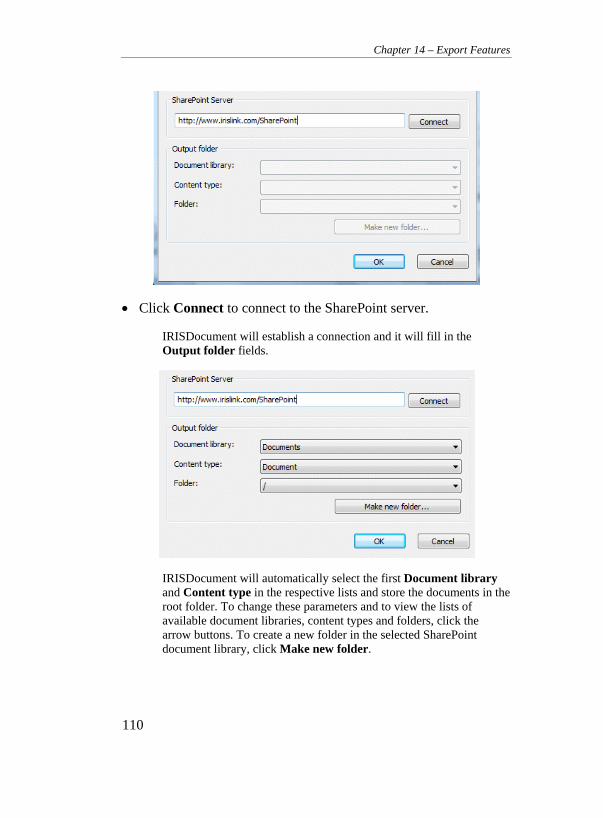
Chapter 14 – Export Features
110
Click Connect to connect to the SharePoint server.
IRISDocument will establish a connection and it will fill in the Output folder fields.
IRISDocument will automatically select the first Document library and Content type in the respective lists and store the documents in the root folder. To change these parameters and to view the lists of available document libraries, content types and folders, click the arrow buttons. To create a new folder in the selected SharePoint document library, click Make new folder.
IRISDocumentTM Server 9.5 – User Guide
111
The button Define field mappings only applies to the software version IRISDocument Server for IRISPowerscan.
Click OK to close the template settings. The next time you process your documents, they will be sent to the selected SharePoint server(s).
EXPORT TO THEREFORE
When the Export to Therefore add-on is installed as part of your IRIDocument Server configuration, IRISDocument is able to export processed documents to Therefore document solutions.
Operation
Start the Batch OCR or Watched Folders module from the Windows Start menu>Programs>IRISDocument Server 9.5.
Click the Export section and then click the Therefore tab.

Chapter 14 – Export Features
112
Global settings
In order for the export to Therefore to work, select the option Export to Therefore.
You can choose to keep the documents on your computer after they have been processed. If you select this option, your documents will be kept in the Output folder. If you select this option here, it will also be selected automatically in the E-mail, Folder and FTP tab (provided that the Workgroup add-on is installed. If the Workgroup add-on is not installed, these tabs are not available in the interface) and in the SharePoint tab (provided that the Export to SharePoint add-on is installed). Note, however, that this option will not be selected visibly in the other tabs.
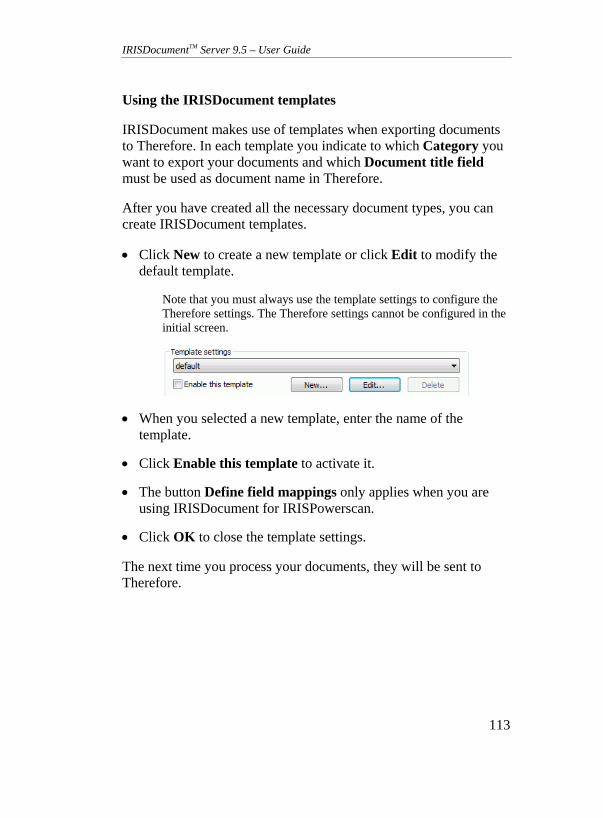
IRISDocumentTM Server 9.5 – User Guide
113
Using the IRISDocument templates
IRISDocument makes use of templates when exporting documents to Therefore. In each template you indicate to which Category you want to export your documents and which Document title field must be used as document name in Therefore.
After you have created all the necessary document types, you can create IRISDocument templates.
Click New to create a new template or click Edit to modify the default template.
Note that you must always use the template settings to configure the Therefore settings. The Therefore settings cannot be configured in the initial screen.
When you selected a new template, enter the name of the template.
Click Enable this template to activate it.
The button Define field mappings only applies when you are using IRISDocument for IRISPowerscan.
Click OK to close the template settings.
The next time you process your documents, they will be sent to Therefore.
Chapter 14 – Export Features
114
EXPORT TO E-MAIL ADDRESSES
(This section only applies to the Watched Folders module when the Workgroup add-on is installed)
If the Workgroup add-on is installed as part of your IRISDocument Server configuration, the E-mail tab will be available in the Export section of the Watched Folders module.
The settings on this tab allow you export documents to e-mail addresses after processing. You can either send documents to e-mail addresses belonging to the different users of the workgroup, or to a fixed e-mail address.
Note that in order for the export to users' e-mail addresses to work, the workgroup file must be configured correctly and the documents must contain the correct name. Refer to the section Defining a Workgroup of users to learn how to configure the workgroup file correctly.
Operation
Start the Watched Folders module from the Windows Start menu>Programs>IRISDocument Server 9.5.
Click the Export section and then click the E-mail tab.
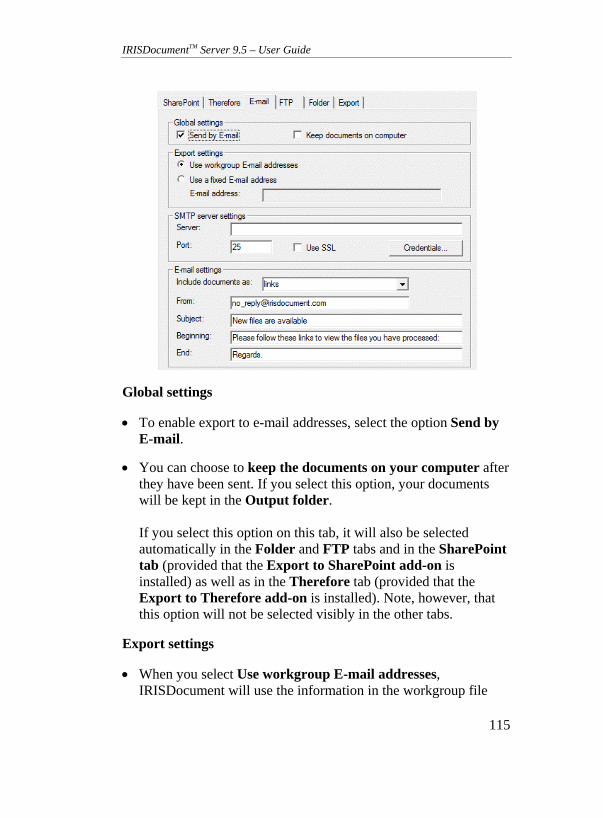
IRISDocumentTM Server 9.5 – User Guide
115
Global settings
To enable export to e-mail addresses, select the option Send by E-mail.
You can choose to keep the documents on your computer after they have been sent. If you select this option, your documents will be kept in the Output folder. If you select this option on this tab, it will also be selected automatically in the Folder and FTP tabs and in the SharePoint tab (provided that the Export to SharePoint add-on is installed) as well as in the Therefore tab (provided that the Export to Therefore add-on is installed). Note, however, that this option will not be selected visibly in the other tabs.
Export settings
When you select Use workgroup E-mail addresses, IRISDocument will use the information in the workgroup file
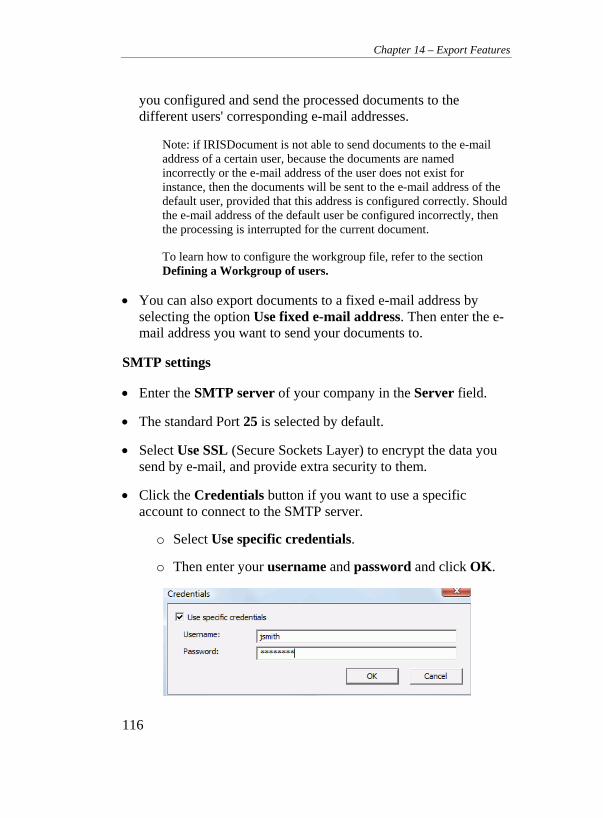
Chapter 14 – Export Features
116
you configured and send the processed documents to the different users' corresponding e-mail addresses.
Note: if IRISDocument is not able to send documents to the e-mail address of a certain user, because the documents are named incorrectly or the e-mail address of the user does not exist for instance, then the documents will be sent to the e-mail address of the default user, provided that this address is configured correctly. Should the e-mail address of the default user be configured incorrectly, then the processing is interrupted for the current document.
To learn how to configure the workgroup file, refer to the section Defining a Workgroup of users.
You can also export documents to a fixed e-mail address by selecting the option Use fixed e-mail address. Then enter the e-mail address you want to send your documents to.
SMTP settings
Enter the SMTP server of your company in the Server field.
The standard Port 25 is selected by default.
Select Use SSL (Secure Sockets Layer) to encrypt the data you send by e-mail, and provide extra security to them.
Click the Credentials button if you want to use a specific account to connect to the SMTP server.
o Select Use specific credentials.
o Then enter your username and password and click OK.
IRISDocumentTM Server 9.5 – User Guide
117
E-mail settings
The documents you send can either be included as links in your e-mail messages or as attachments.
The content of the automatically generated e-mail messages can be changed to your liking.
EXPORT TO FTP FOLDERS
(This section only applies to the Watched Folders module when that the Workgroup add-on is installed)
If the Workgroup add-on is installed as part of your IRISDocument Server configuration, the FTP tab will be available in the Export section of the Watched Folders module.
The settings on this tab allow you to export documents to an FTP folder. You can either export documents to FTP folders belonging to the different users of the workgroup, or export documents to a fixed FTP folder.
Note that in order for the export to users' FTP folders to work, the workgroup file must be configured correctly and the documents must contain the correct name. Refer to the section Defining a Workgroup of users to learn how to configure the workgroup file correctly.
Operation
Start the Watched Folders module from the Windows Start menu>Programs>IRISDocument Server 9.5.
Click the Export section and then click the FTP tab.
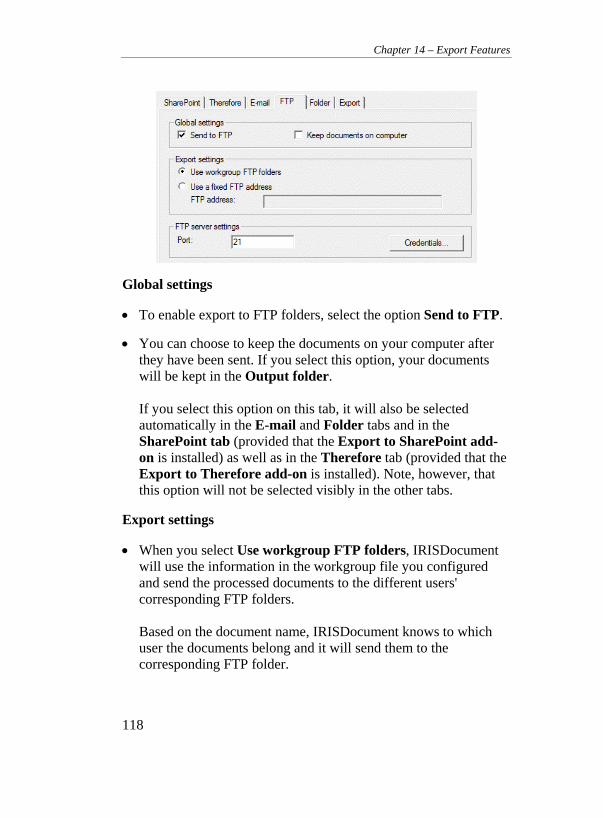
Chapter 14 – Export Features
118
Global settings
To enable export to FTP folders, select the option Send to FTP.
You can choose to keep the documents on your computer after they have been sent. If you select this option, your documents will be kept in the Output folder. If you select this option on this tab, it will also be selected automatically in the E-mail and Folder tabs and in the SharePoint tab (provided that the Export to SharePoint add-on is installed) as well as in the Therefore tab (provided that the Export to Therefore add-on is installed). Note, however, that this option will not be selected visibly in the other tabs.
Export settings
When you select Use workgroup FTP folders, IRISDocument will use the information in the workgroup file you configured and send the processed documents to the different users' corresponding FTP folders. Based on the document name, IRISDocument knows to which user the documents belong and it will send them to the corresponding FTP folder.

IRISDocumentTM Server 9.5 – User Guide
119
Note: if IRISDocument is not able to send documents to the FTP folder of a certain user, because they are named incorrectly or the FRP folder of the user does not exist for instance, then they will be sent to the FTP folder of the default user, provided that this folder is configured correctly. Should the FTP folder of the default user be configured incorrectly, then the processing is interrupted for the current document.
To learn how to configure the workgroup file, refer to the section Defining a Workgroup of users.
You can also export documents to a fixed FTP folder by selecting the option Use FTP address. Then enter the FTP address you want to send your documents to.
FTP server settings
The FTP server's standard command port 21 is selected by default.
Click the Credentials button if you want to use a specific account to connect to the FTP server.
o Select Use specific credentials.
o Then enter your username and password and click OK.
Chapter 14 – Export Features
120
EXPORT TO PERSONAL FOLDERS
(This section only applies to the Watched Folders when the Workgroup add-on is installed)
If the Workgroup add-on is installed as part of your IRISDocument Server configuration, the Folder tab will be available in the Export section of the Watched Folders module.
The settings on this tab allow you to export documents to personal folders after they have been processed. You can either export documents to personal folders belonging to the different users of the workgroup, or you can create personal folders based on barcodes.
Note that in order for the export to users' personal folders to work, the workgroup file must be configured correctly and the documents must contain the correct name. Refer to the section Defining a Workgroup of users to learn how to configure the workgroup file correctly.
Also note that:
In order for the 'barcode' options to be available, the option Barcode Reading must be selected in the Processing section on the Barcode Reading tab.
In order to generate personal folders based on barcodes, the documents you process need to contain barcodes, which in turn, need to contain the full path where the personal folders must be created. E.g. C:\IRISDocument\PersonalFolder01.
Operation
Start the Watched Folders module from the Windows Start menu>Programs>IRISDocument Server 9.5.
Click the Export section and then click the Folder tab.
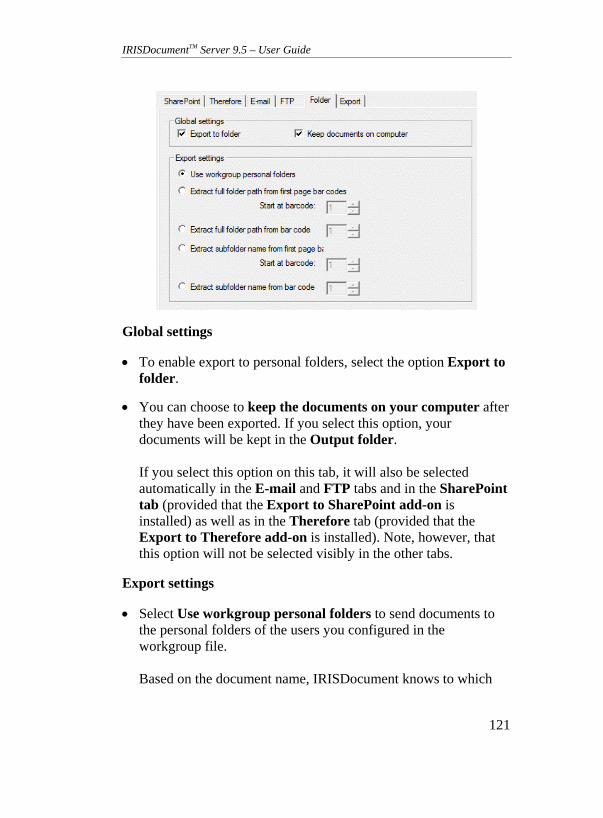
IRISDocumentTM Server 9.5 – User Guide
121
Global settings
To enable export to personal folders, select the option Export to folder.
You can choose to keep the documents on your computer after they have been exported. If you select this option, your documents will be kept in the Output folder. If you select this option on this tab, it will also be selected automatically in the E-mail and FTP tabs and in the SharePoint tab (provided that the Export to SharePoint add-on is installed) as well as in the Therefore tab (provided that the Export to Therefore add-on is installed). Note, however, that this option will not be selected visibly in the other tabs.
Export settings
Select Use workgroup personal folders to send documents to the personal folders of the users you configured in the workgroup file. Based on the document name, IRISDocument knows to which
Chapter 14 – Export Features
122
user the documents belong and it will send them to the corresponding personal folder.
Note: if IRISDocument is not able to send documents to the personal folder of a certain user, because they are named incorrectly or the personal folder of the user does not exist, they will be sent to the personal folder of the default user, provided that this folder is configured correctly. Should the personal folder of the default user be configured incorrectly, then the processing is interrupted for the current document.
To learn how to configure the workgroup file, refer to the section Defining a Workgroup of users.
Or select one of the 'barcode' options to generate personal folders based on the barcodes in your documents: If the folder path is spread across multiple barcodes on the first page of your document, select Extract full folder path from first page barcodes. If the folder path is contained in a specific barcode, select Extract full folder path from barcode and indicate which barcode in your document contains the folder path. If you want to create subfolders to an existing folder, then select one of the two 'extract subfolder' options.
Note: if the barcodes you indicate do not contain a valid path, no personal folder will be created and the processed documents will not be removed from the output folder. An error message will be added to the log file.

IRISDocumentTM Server 9.5 – User Guide
123
CHAPTER 15 IRISDOCUMENT GOLDEN RULES
To conclude this User Guide, here is a list of golden rules for using IRISDocument Server.
Please follow these rules to ensure optimal use of IRISDocument:
Use a dedicated PC with a good processor and a lot of RAM.
Refer to the ReadMe file for recommended system requirements.
Use the Watched Folders module whenever possible instead of the Batch OCR module.
The Watched Folders module has extra error handling functionalities, meaning the application will not stop even if an error is encountered. The problem will be noted and IRISDocument will continue working on the other tasks.
Do not select a network folder as input, output or storage folder.
The input, output and storage folders may be shared but MUST be located locally, on the same machine as IRISDocument Server. Otherwise IRISDocument Server will be susceptible to network errors.
Tip: if, for any reason, you still decide to use network paths*, define them as UNC paths. (*) No product support offered in this case.
Provide sufficient disk space.
Chapter 15 – IRISDocument Golden Rules
124
The Watched Folders module uses a lot of temporary files and stores uncompressed copies of the images for OCRing and document creation, which may take up to 25MB per page.
IRISDocument stores temporary files both in the IRISDocument work folder and the Windows temporary area.
Tip: defragment your pc's hard disk once in a while.
Other tips for using the Watched Folders module.
o Avoid selecting superfluous options.
Not only do they slow down the recognition process, they also increase the risk of OCR errors.
o Limit the number of Watched Folders to 10.
The more Watch Folders you have the more time is needed for IRISDocument to check for content changes.
o The Watched Folders Tasks must be of reasonable size.
Prefer more tasks to bigger tasks.
o Do not use a single folder as input and output folder.
o Do not use the work folder as input folder.
o Make sure IRISDocument Server does not reboot automatically, e.g. after automatic Windows updates.
IRISDocumentTM Server 9.5 – User Guide
125
INDEX
A
Abort monitoring ..................... 24
B
Banking fonts ........................... 60
Barcode reading ....................... 51
Batch OCR ............................... 19
Batch OCR image folder .......... 27
Batch report ............................. 21
Bitmaps .................................. 103
Bitonal images ....................... 103
Black-and-white images ......... 103
Blank pages .............................. 68
C
Character pitch ......................... 56
Character recognition ............... 55
Color images .......................... 103
Confidence file ......................... 69
D
Deskew ..................................... 48
Despeckle ................................. 48
Detect text orientation .............. 48
Digitally signed PDF ................ 84
Document naming .................... 73
Document output ...................... 77
Document separation ................ 67
E
Embedded fonts ........................ 87
End of task file ......................... 33
Export application .................. 106
Export to e-mail ...................... 114
Export to FTP folders ............. 117
Export to personal folders ....... 120
Export to SharePoint ............... 107
Export to Therefore ................ 111
Chapter 15 – IRISDocument Golden Rules
126
F
Font type .................................. 57
G
General image compression ..... 63
golden rules ............................ 123
Grayscale images ................... 103
H
HTML .................................... 101
HTML log file .......................... 26
I
Image compression ............ 63, 65
Image enhancement ................. 47
Image files ............................. 103
Index file .................................. 69
Installation ............................... 14
IRISDocument Wizard ............. 20
J
JPEG ...................................... 103
JPEG 2000 ............................... 65
L
Languages ................................ 56
Layout options ......................... 94
Lexicon ..................................... 58
Log file ..................................... 70
M
Microsoft .Net Framework ....... 25
Microsoft SharePoint .............. 107
Mixed character set ................... 56
Multipage TIFF ...................... 103
O
OCR .......................................... 56
OpenDocument Text ................ 93
Output folder ............................ 71
P
Page range ................................ 58
Password-protected PDF .......... 83
PDF document types ................. 78
PDF options .............................. 81
PDF/A ...................................... 86
PDF-iHQC ................................ 87
Pitch .......................................... 56
Product support ......................... 17
R
Registration .............................. 16

IRISDocumentTM Server 9.5 – User Guide
127
RTF .......................................... 93
Run file .................................... 33
S
Secondary languages ................ 56
Separators ................................ 68
sharing folders.......................... 42
Smoothen color images ............ 48
Software installation ................ 14
Software registration ................ 16
SpreadsheetML ........................ 98
Statistics ................................... 69
Supported graphics and file extensions ................................ 12
Supported languages ................ 56
Supported output formats ......... 77
System requirements ................ 13
T
Task menu ................................ 25
Text ........................................ 101
Text-based output formats ....... 93
Therefore ................................ 111
TIFF ........................................ 103
Timeout .................................... 33
U
Uninstalling .............................. 16
User lexicon .............................. 58
W
Watched Folders ....................... 21
Watched Folders Service .......... 25
Watched image folder ............... 30
Windows services ..................... 25
Word ......................................... 93
WordML ................................... 93
Workgroup ............................... 37
X
XML ....................................... 102
XML indexing .......................... 69
XPS document types ........... 89, 92
XPS options .............................. 91
XPS-iHQC ................................ 92