ips (intrusion prevention system)
TRANSCRIPT
IPS (Intrusion Prevention System)
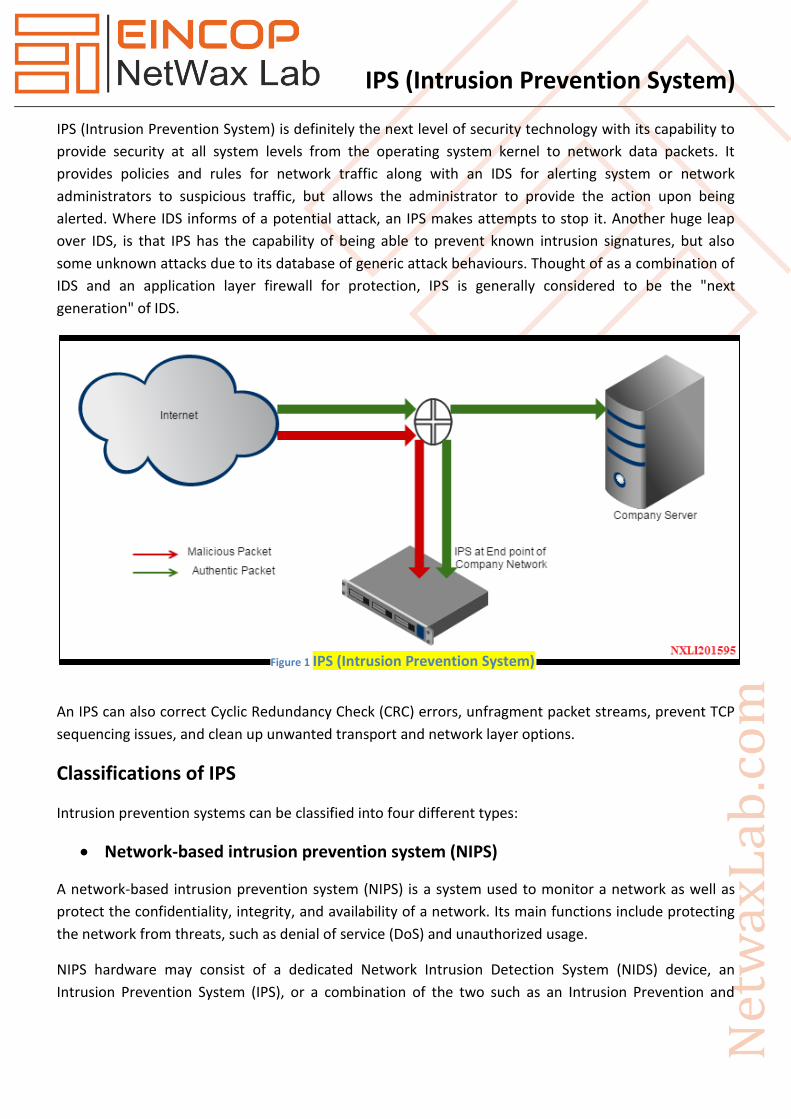
IPS (Intrusion Prevention System) is definitely the next level of security technology with its capability to
provide security at all system levels from the operating system kernel to network data packets. It
provides policies and rules for network traffic along with an IDS for alerting system or network
administrators to suspicious traffic, but allows the administrator to provide the action upon being
alerted. Where IDS informs of a potential attack, an IPS makes attempts to stop it. Another huge leap
over IDS, is that IPS has the capability of being able to prevent known intrusion signatures, but also
some unknown attacks due to its database of generic attack behaviours. Thought of as a combination of
IDS and an application layer firewall for protection, IPS is generally considered to be the "next
generation" of IDS.
An IPS can also correct Cyclic Redundancy Check (CRC) errors, unfragment packet streams, prevent TCP
sequencing issues, and clean up unwanted transport and network layer options.
Classifications of IPS
Intrusion prevention systems can be classified into four different types:
Network-based intrusion prevention system (NIPS)
A network-based intrusion prevention system (NIPS) is a system used to monitor a network as well as
protect the confidentiality, integrity, and availability of a network. Its main functions include protecting
the network from threats, such as denial of service (DoS) and unauthorized usage.
NIPS hardware may consist of a dedicated Network Intrusion Detection System (NIDS) device, an
Intrusion Prevention System (IPS), or a combination of the two such as an Intrusion Prevention and
Figure 1 IPS (Intrusion Prevention System)

IPS (Intrusion Prevention System)
Detection System (IPDS). Note that while an NIDS can only detect intrusions, an IPS can pro-actively stop
an attack by following established rules, such as changing firewall settings, blocking particular Internet
protocol (IP) addresses or dropping certain packets entirely. The software components of an NIPS
consists of various firewall, sniffer and antivirus tools in addition to dashboards and other data
visualization tools.
Wireless Intrusion Prevention Systems (WIPS)
A wireless intrusion prevention system (WIPS) is a dedicated security device or integrated software
application that monitors a wireless LAN network's radio spectrum for rogue access points and other
wireless threats.
The following types of threats can be prevented by a good WIPS:
1. Rogue AP – WIPS should understand the difference between Rogue AP and External (neighbor’s)
AP
2. Mis-configured AP
3. Client Mis-association
4. Unauthorized association
5. Man in the Middle Attack
6. Ad hoc Networks
7. MAC-Spoofing
8. Honeypot / Evil Twin Attack
9. Denial of Service (DoS) Attack
WIPS configurations consist of three components:
1. Sensors: These devices contain antennas and radios that scan the wireless spectrum for packets
and are installed throughout areas to be protected
2. Server: The WIPS server centrally analyzes packets captured by sensors
3. Console: The console provides the primary user interface into the system for administration and
reporting
Network behavior analysis (NBA)
Network behavior analysis (NBA) is a way to enhance the security of a proprietary network by
monitoring traffic and noting unusual actions or departures from normal operation. Conventional
intrusion prevention system solutions defend a network's perimeter by using packet inspection,
signature detection and real-time blocking. NBA solutions watch what's happening inside the network,
aggregating data from many points to support offline analysis.
After establishing a benchmark for normal traffic, the NBA program passively monitors network activity
and flags unknown, new or unusual patterns that might indicate the presence of a threat. The program

IPS (Intrusion Prevention System)
can also monitor and record trends in bandwidth and protocol use. Network behavior analysis is
particularly good for spotting new malware and zero day exploits.
Host-based intrusion prevention system (HIPS)
A host-based intrusion prevention system (HIPS) is a system or a program employed to protect critical
computer systems containing crucial data against viruses and other Internet malware. Starting from the
network layer all the way up to the application layer, HIPS protects from known and unknown malicious
attacks. HIPS regularly checks the characteristics of a single host and the various events that occur
within the host for suspicious activities.
HIPS can be implemented on various types of machines, including servers, workstations, and computers.
The list is far from complete, but more like a bare minimum of what your HIPS should be guarding:
1. Take control of other programs. For example sending a mail using the default mail client or
sending your browser to a certain site to download more malware.
2. Trying to change important registry keys, so that the program starts at certain events.
3. Ending other programs. For example your virus scanner.
4. Installing devices or drivers, so that they get started before other programs
5. Interprocess memory access, so it can inject malicious code into a trusted program.
Detection Methods
The majority of intrusion prevention systems utilize one of three detection methods: signature-based,
statistical anomaly-based and stateful protocol analysis.
1. Signature-Based Detection: Signature based IDS monitor packets in the Network and compares
with pre-configured and pre-determined attack patterns known as signatures.
2. Statistical Anomaly-Based Detection: A statistical anomaly-based IDS determines the normal
network activity like what sort of bandwidth is generally used, what protocols are used, what
ports and devices generally connect to each other- and alert the administrator or user when
traffic is detected which is anomalous (not normal).
3. Stateful Protocol Analysis Detection: This method identifies deviations of protocol states by
comparing observed events with “predetermined profiles of generally accepted definitions of
benign activity.
IPS Techniques to defend against Attacks
Intrusion prevention sensors look at header and data portions of the traffic looking for suspicious traffic
that indicate malicious activity.
IPS/IDS solution have the ability to detect threats using a database of signatures, using anomaly
detection techniques looking for abnormal behaviour within protocols and can also use or integrate with
IPS (Intrusion Prevention System)
anti-virus for malware detection. Anomaly detection systems target traffic that isn't necessarily bad but
used with bad intentions such as lots of traffic to overwhelm a system. TCP Syn Flood attack is an
example.
IPS have the ability to take actions on defined policies such as blocking a connection, providing alerts,
logging the event, quarantining the host or a combination of these. Policies define the rules that specify
what should be detected and type of response required. Policies will include both signature based rules
and anomaly detection rules for learning typical network traffic and setting thresholds for these. DOS
and reconnaissance rules are based on traffic statistics.
IPS solutions also provide logging and alerting on recent attacks so it should be easy to understand and
trace an attack, and provide supporting tools that would aid in blocking attacks. Also clicking the attack
should provide detailed information about the attack and what can be done to resolve such an attack.
IPS and IDS systems have the ability to search for attacks using different characteristics of an attack such
as by attack name, impacted applications, attack ID and so on.
IPS and IDS systems should be configured to only use signatures they require and to protect the assets
required as using all signatures and pointing it to protect everything will use up much more resources
such as CPU, memory and bandwidth. So if it were web server that required protection then only
signatures for web servers should be utilised and protecting only the DMZ where web servers are
located. This can also be further defined to be protocols such as HTTP, RDP, or systems like Unix,
Windows or applications such as IIS and Adobe.
Attacks should have a severity level that ties to a response such as block, quarantine, log, notify or a
combination of these.
User Roles
The CLI supports four user roles: administrator, operator, viewer, and service. The privilege levels for
each role are different; therefore, the menus and available commands vary for each role.
Administrator: This user role has the highest level of privileges. Administrators have
unrestricted view access and can perform the following functions:
1. Add users and assign passwords
2. Enable and disable control of physical interfaces and virtual sensors
3. Assign physical sensing interfaces to a virtual sensor
4. Modify the list of hosts allowed to connect to the sensor as a configuring or viewing agent
5. Modify sensor address configuration
6. Tune signatures
7. Assign configuration to a virtual sensor
8. Manage routers
IPS (Intrusion Prevention System)
Operator: This user role has the second highest level of privileges. Operators have unrestricted
view access and can perform the following functions:
1. Modify their passwords
2. Tune signatures
3. Manage routers
4. Assign configuration to a virtual sensor
Viewer: This user role has the lowest level of privileges. Viewers can view configuration and
event data and can modify their passwords.
Service: This user role does not have direct access to the CLI. Service account users are logged
directly into a bash shell. Use this account for support and troubleshooting purposes only.
Unauthorized modifications are not supported and require the device to be reimaged to
guarantee proper operation. You can create only one user with the service role.
When you log in to the service account, you receive the following warning:
*******************************WARNING************************************
UNAUTHORIZED ACCESS TO THIS NETWORK DEVICE IS PROHIBITED.
This account is intended to be used for support and troubleshooting purposes only.
Unauthorized modifications are not supported and will require this device to be re-imaged to
guarantee proper operation.
***************************************************************************
IPS Deployment
IPS can be deployed in either span\tap mode, inline or IPS on a stick. In span\tap mode an IPS sensor
receives a copy of every packet and can alert on attacks but cannot block them. This is good for when
initially testing the system and fine tuning policies before deploying it in inline mode. Inline is where it
sits inline with the network and is able to block and alert on attacks. If you are using a Cisco
infrastructure then IPS on a stick can be deployed where packets can be forwarded to multiple IPS
sensors using Cisco Ethernet Channel technology.
Some IPS solutions can be segregated in virtual IPS sensors that are an option for shared environments
or MSSP's.
Bets practice would be to create multiple policies for different resources. define policies for a network
segment or for an interface or sub interface for VLANS. Also defining the traffic direction so you are only
protecting a targeted area such as inbound from the internet to the DMZ.
IPS (Intrusion Prevention System)
Firewall vs. IDS vs. IPS
Firewall: A device or application that analyses packet headers and enforces policy based on
protocol type, source address, destination address, source port, and/or destination port. Packets
that do not match policy are rejected.
Intrusion Detection System: A device or application that analyses whole packets, both
header and payload, looking for known events. When a known event is detected a log message is
generated detailing the event.
Intrusion Prevention System: A device or application that analyses whole packets, both
header and payload, looking for known events. When a known event is detected the packet is
rejected.
Cisco IOS IPS Configuration Commands
Create a rule name (This will be used on an interface to enable IPS).
ip ips name <rule name> < optional ACL>
router#configure terminal
router(config)# ip ips name iosips
You can specify an optional extended or standard access control list (ACL) to filter the traffic that will be
scanned by this rule name. All traffic that is permitted by the ACL is subject to inspection by the IPS.
Traffic that is denied by the ACL is not inspected by the IPS.
router(config)#ip ips name ips list ?
<1-199> Numbered access list
WORD Named access list
Configure IPS signature storage location.
ip ips config location flash:<directory name>
router(config)#ip ips config location flash:ips
Enable IPS SDEE event notification.
ip ips notify sdee
router(config)#ip ips notify sdee
To use SDEE, the HTTP server must be enabled (via the ‘ip http server’ command). If the HTTP server is
not enabled, the router cannot respond to the SDEE clients because it cannot see the requests. SDEE
notification is disabled by default and must be explicitly enabled.
IPS (Intrusion Prevention System)
IOS IPS also supports the use syslog to send event notification. SDEE and syslog can be used
independently or enabled at the same time to send IOS IPS event notification. Syslog notification is
enabled by default. If logging console is enabled, you will see IPS syslog messages. To enable syslog if it
is not enabled:
router(config)#ip ips notify log
Configure IOS IPS to use one of the pre-defined signature categories.
IOS IPS with Cisco 5.x format signatures operates with signature categories, just like Cisco IPS appliances
do. All signatures are pre-grouped into categories and the categories are hierarchical. This is so to help
classifying signatures for easy grouping and tuning.
In the following example, we first retire all the signatures in the “all” category, and then unretire the
“IOS IPS Basic” category.
router(config)#ip ips signature-category
router(config-ips-category)# category all
router(config-ips-category-action)# retired true
router(config-ips-category-action)# exit
router(config-ips-category)# category ios_ips basic
router(config-ips-category-action)# retired false
router(config-ips-category-action)# exit
router(config-ips-category)# exit
Do you want to accept these changes? [confirm]y
router(config)#
Enable IPS rule on the desired interface and specify the direction the rule will be applied to.
interface <interface name>
ip ips <rule name> <in | out>
router(config)#interface GigabitEthernet 0/1
router(config-if)#ip ips iosips in
router(config-if)#exit
router(config)#exit
The direction ‘in’ means only traffic going into the interface will be inspected by IPS, and similarly ‘out’
means only traffic going out the interface will be inspected by IPS. To enable IPS to inspect both in and
out traffic of the interface, enter the IPS rule name for ‘in’ and ‘out’ separately on the same interface:
router(config)#interface GigabitEthernet 0/1
router(config-if)#ip ips iosips in
router(config-if)#ip ips iosips out
IPS (Intrusion Prevention System)
router(config-if)#exit
router(config)#exit
All Available Commands on Cisco IOS IPS
Cisco IPS 7.0 commands listed. It contains the following sections:
anomaly-detection load
To set the KB file as the current KB for the specified virtual sensor, use the anomaly-detection load
command in EXEC mode.
anomaly-detection virtual-sensor load [initial | file name]
anomaly-detection save
To retrieve the current anomaly detection KB file and save it locally, use the anomaly-detection save
command in EXEC mode.
anomaly-detection virtual-sensor save [new-name]
attemptLimit
To lock accounts so that users cannot keep trying to log in after a certain number of failed attempts, use
the attemptLimit number command in authentication submode. The default is 0, which indicates
unlimited authentication attempts. For security purposes, you should change this number.
attemptLimit number
banner login
To create a banner message to display on the terminal screen, use the banner login command in global
configuration mode. To delete the login banner, use the no form of this command. The banner message
appears when a user accesses the CLI and is displayed before the username and password prompts.
banner login
no banner login
block host
To block a host, use the block host command in EXEC mode. To remove the block on a host, use the no
form of this command.
block host ip-address [timeout minutes]
no block host ip-address
IPS (Intrusion Prevention System)
block network
To block a network, use the block network command in EXEC mode. To remove the block on a network,
use the no form of this command.
block network ip-address/netmask [timeout minutes]
no block network ip-address/netmask
block connection
To block a connection, use the block connection command in EXEC mode. To remove a connection
block, use the no form of this command.
block connection source-ip-address destination-ip-address [port port-number] [protocol type] [timeout
minutes]
no block connection source-ip-address
clear database
To clear the nodes, alerts, inspectors, or the entire database for a given virtual sensor, use the clear
database command in EXEC mode.
Use the clear database nodes commands to clear the overall packet database elements, including the
packet nodes, TCP session information, and inspector lists. Use the clear database inspectors command
to clear the inspectors lists contained within the nodes, which does not clear TCP session information or
nodes. The inspector lists represent the packet work and observations collected during the sensor
uptime. Use the clear database alerts command to clear alert database information, including the alerts
nodes, Meta inspector information, summary state, and event count structures. This command discards
summary alerts.
clear database [virtual-sensor] all | nodes | alerts | inspectors
clear denied-attackers
To delete the current list of denied IP addresses, use the clear denied-attackers command in EXEC
mode.
clear denied-attackers [virtual-sensor] [ip-address ip-address]
clear events
To clear the Event Store, use the clear events command in EXEC mode.
clear line
To terminate another CLI session, use the clear line command in EXEC mode.
IPS (Intrusion Prevention System)
clear line cli-id [message]
clear os-identification
To delete OS ID associations with IP addresses that were learned by the sensor through passive analysis,
use the clear os-identification command in EXEC mode.
clear os-identification [virtual-sensor] learned [ip-address]
clock set
To manually set the system clock on the appliance, use the clock set command in EXEC mode.
clock set hh:mm[:ss] month day year
configure
To enter global configuration mode, use the configure terminal command in EXEC mode.
configure terminal
copy
To copy iplogs and configuration files, use the copy command in EXEC mode.
copy [/erase] source-url destination-url
copy iplog log-id destination-url
copy ad-knowledge-base
To copy a KB file, use the copy ad-knowledge-base command in EXEC mode.
copy ad-knowledge-base virtual-sensor [current | initial | file name] destination-url
copy ad-knowledge-base virtual-sensor source-url new-name
copy instance
To copy a configuration instance, use the copy instance command in EXEC mode.
copy [anomaly-detection | event-action-rules | signature-definition] source destination
deny attacker
To add a single deny attacker IP address to the current list of denied attackers, use the deny attacker
command in EXEC mode. To delete an attacker from the current denied attackers list, use the no form of
this command.
IPS (Intrusion Prevention System)
deny attacker [virtual-sensor name] ip-address attacker-ip-address [victim victim-ip-address | port port-
number]
no deny attacker [name] ip-address attacker-ip-address [victim victim-ip-address | port port-number]
display serial
To direct all output to the serial connection, use the display serial command in global configuration
mode. Use the no display-serial command to reset the output to the local terminal.
display-serial
no display-serial
downgrade
To remove the last applied signature update or service pack, use the downgrade command in global
configuration mode.
end
To exit configuration mode, or any of the configuration submodes, use the end command in global
configuration mode. This command exits to the top level EXEC menu.
erase
To delete a logical file, use the erase command in EXEC mode.
erase {backup-config | current-config | packet-file}
erase ad-knowledge-base
To remove a KB from the sensor, use the erase ad-knowledge-base command in EXEC mode.
erase ad-knowledge-base [virtual-sensor [name]]
erase license-key
To remove a license key from the sensor, use the erase license-key command in EXEC mode.
exit
To exit a configuration mode or close an active terminal session and terminate privileged EXEC mode,
use the exit command.
IPS (Intrusion Prevention System)
iplog
To start IP logging on a virtual sensor, use the iplog command in EXEC mode. Use the no form of this
command to disable all logging sessions on a virtual sensor, a particular logging session based on log-id,
or all logging sessions.
iplog name ip-address [duration minutes] [packets numPackets] [bytes numBytes]
no iplog [log-id log-id | name name]
iplog-status
To display a description of the available IP log contents, use the iplog-status command in EXEC mode.
iplog-status [log-id log-id] [brief] [reverse] [|{begin regular-expression | exclude regular-expression |
include regular-expression | redirect destination-url}]
list component-configurations
To display the existing configuration instances for a component, use the list component-configurations
command in EXEC mode.
list [anomaly-detection-configurations | event-action-rules-configurations | signature-definition-
configurations]
more
To display the contents of a logical file, use the more command in EXEC mode.
more keyword
more begin
To search the output of any more command, use the more begin command in EXEC mode. This
command begins unfiltered output of the more command with the first line that contains the regular
expression specified.
more keyword | begin regular-expression
more exclude
To filter the more command output so that it excludes lines that contain a particular regular expression,
use the more exclude command in EXEC mode.
more keyword | exclude regular-expression
IPS (Intrusion Prevention System)
more include
To filter the more command output so that it displays only lines that contain a particular regular
expression, use the more include command in EXEC mode.
more keyword | include regular-expression
packet
To display or capture live traffic on an interface, use the packet command in EXEC mode. Use the display
option to dump live traffic or a previously captured file output directly to the screen. Use the capture
option to capture the libpcap output into a local file. There is only one local file storage location,
subsequent capture requests overwrite the existing file. You can copy the local file off the machine using
the copy command with the packet-file keyword. You can view the local file using the display packet-file
option. Use the info option to display information about the local file, if any. You can use the packet
display iplog id [verbose] [expression expression] to display iplogs.
packet display interface-name [snaplen length] [count count] [verbose] [expression expression]
packet display packet-file [verbose] [expression expression]
packet display iplog id [verbose] [expression expression] vlan and
packet capture interface-name [snaplen length] [count count] [expression expression]
packet display file-info
password
To update your password on the local sensor, use the password command in global configuration mode.
The administrator can also use the password command to change the password for an existing user. The
administrator can use the no form of the command to disable a user account.
password
Administrator syntax: password [name [newPassword]]
no password name
ping
To diagnose basic network connectivity, use the ping command in EXEC mode.
ping address [count]
privilege
To modify the privilege level for an existing user, use the privilege command in global configuration
mode. You can also specify the privilege while creating a user with the username command.
privilege user name [administrator | operator | viewer]
IPS (Intrusion Prevention System)
recover
To reimage the application partition with the application image stored on the recovery partition, use the
recover command in privileged EXEC mode. The sensor is rebooted multiple times and most of the
configuration—except for network, access list, and time parameters—is reset to the default settings.
More specifically, the following settings are maintained after a local recovery using the recover
application-partition command: Network Settings (IP Address, Netmask, Default Gateway, Hostname,
and Telnet (enabled/disabled)); Access List Entries/ACL0 Settings (IP Address and Netmask); and Time
Settings (Offset and Standard Time Zone Name); the rest of the parameters are reset to the default
settings.
recover application-partition
rename ad-knowledge-base
To rename an existing KB file, use the rename ad-knowledge-base command in EXEC mode.
rename ad-knowledge-base virtual-sensor [current | file name] new-name
reset
To shut down the applications running on the sensor and reboot the appliance, use the reset command
in EXEC mode. If the powerdown option is included, the appliance is powered off if possible or left in a
state where the power can be turned off.
reset [powerdown]
service
To enter configuration menus for various sensor services, use the service command in global
configuration mode. Use the default form of the command to reset the entire configuration for the
application back to factory defaults.
service {aaa | analysis-engine | anomaly-detection | authentication | event-action-rules | external-
product-interface | global-correlation | health-monitor | host | interface | logger | network-access |
notification | signature-definitions | ssh-known-hosts | trusted-certificate | web-server}
default service {aaa | analysis-engine | anomaly-detection | authentication | event-action-rules |
external-product-interface | global-correlation | health-monitor | host | interface | logger | network-
access | notification | signature-definitions | ssh-known-hosts | trusted-certificate | web-server}
To enter configuration mode for a logically named event action rules configuration, use the service
event-action-rules name command in global configuration mode. The default keyword resets the
IPS (Intrusion Prevention System)
configuration to factory settings. The no keyword removes the event action rules configuration from the
sensor. This command only succeeds if the configuration is not assigned to a virtual sensor.
service event-action-rules name
default service event-action-rules name
no service event-action-rules name
To enter configuration mode for a logically named signature definition configuration, use the service
signature-definition name command in global configuration mode. The default keyword resets the
configuration to factory settings. The no keyword removes the signature definition configuration from
the sensor. This command only succeeds if the configuration is not assigned to a virtual sensor.
service signature-definition name
default service signature-definition name
no service signature-definition name
To enter configuration mode for a logically named anomaly-detection configuration, use the service
anomaly-detection name command in global configuration mode. The default keyword resets the
configuration to factory settings. The no keyword removes the anomaly detection configuration from
the sensor. This command only succeeds if the configuration is not assigned to a virtual sensor.
service anomaly-detection name
default anomaly-detection name
no service anomaly-detection name
setup
To configure basic sensor configuration, use the setup command in EXEC mode.
show ad-knowledge-base diff
To display the difference between two KBs, use the show ad-knowledge-base diff command in EXEC
mode.
show ad-knowledge-base virtual-sensor diff [current | initial | file name1][current | initial | file name2]
diff-percentage
show ad-knowledge-base files
To display the anomaly detection KB files available for a virtual sensor, use the show ad-knowledge-base
files command in EXEC mode.
show ad-knowledge-base virtual-sensor files
IPS (Intrusion Prevention System)
show ad-knowledge-base thresholds
To display the thresholds for a KB, use the show ad-knowledge-base thresholds command in EXEC mode.
show ad-knowledge-base virtual-sensor thresholds {current | initial | file name} [zone {external | illegal
| internal}] {[protocol {tcp | udp}] [dst-port port] | [protocol other] [number protocol-number]}
show begin
To search the output of certain show commands, use the show begin command in EXEC mode. This
command begins unfiltered output of the show command with the first line that contains the regular
expression specified.
show [configuration | events | settings | tech-support] | begin regular-expression
show clock
To display the system clock, use the show clock command in EXEC mode.
show clock [detail]
show configuration
See the more current-config command under the more command.
show events
To display the local event log contents, use the show events command in EXEC mode.
show events [{alert [informational] [low] [medium] [high] [include-traits traits] [exclude-traits traits]
[min-threat-rating min-rr] [max-threat-rating max-rr | error [warning] [error] [fatal] | NAC | status}]
[hh:mm:ss [month day [year]] | past hh:mm:ss]
show exclude
To filter the show command output so that it excludes lines that contain a particular regular expression,
use the show exclude command in EXEC mode.
show [configuration | events | settings | tech-support] | exclude regular-expression
show health
To display the health and security status of the IPS, use the show health command in EXEC mode.
show history
To list the commands you have entered in the current menu, use the show history command in all
modes.
IPS (Intrusion Prevention System)
show include
To filter the show command output so that it displays only lines that contain a particular regular
expression, use the show include command in EXEC mode.
show [configuration | events | settings | tech-support] | include regular-expression
show inspection-load
To show a timestamp of the current time and last current inspection load percentage, use the show
inspection-load command. Use the history keyword to show three histograms of the historical values of
the inspection load percentage.
show inspection-load [history]
show interfaces
To display statistics for all system interfaces, use the show interfaces command in EXEC mode. This
command displays show interfaces management, show interfaces fastethernet, and show interface
gigabitethernet.
show interfaces [clear] [brief]
show interfaces {FastEthernet | GigabitEthernet | Management} [slot/port]
show inventory
To display PEP information, use the show inventory command in EXEC mode. This command displays the
UDI information that consists of PID, VID and SN of the sensor.
show os-identification
To display OS IDs associated with IP addresses learned by the sensor through passive analysis, use the
show os-identification command in EXEC mode.
show os-identification [name] learned [ip-address]
show privilege
To display your current level of privilege, use the show privilege command in EXEC mode.
show settings
To display the contents of the configuration contained in the current submode, use the show settings
command in any service command mode.
IPS (Intrusion Prevention System)
show ssh authorized-keys
To display the public RSA keys for the current user, use the show ssh authorized-keys command in EXEC
mode.
show ssh authorized-keys [id]
show ssh server-key
To display the SSH server host key and host key fingerprint, use the show ssh server-key command in
EXEC mode.
show ssh host-keys
To display the known hosts table containing the public keys of remote SSH servers with which the sensor
can connect, use the show ssh host-keys in EXEC mode.
show ssh host-keys [ipaddress]
show statistics
To display the requested statistics, use the show statistics command in EXEC mode.
show statistics {analysis-engine | anomaly-detection | authentication | denied-attackers | event-server
| event-store | external-product-interface | global-correlation | host | logger | network-access |
notification | os-identification | sdee-server | transaction-server | virtual-sensor | web-server} [clear]
The show statistics anomaly-detection, denied-attackers, virtual-sensor, and os-identification commands
display statistics for all the virtual sensors contained in the sensor. If you provide the optional name, the
statistics for that virtual sensor are displayed.
show statistics {anomaly-detection | denied-attackers | os-identification | virtual-sensor} [name] [clear]
show tech-support
To display the current system status, use the show tech-support command in EXEC mode.
show tech-support [page] [destination-url destination url]
show tls fingerprint
To display the TLS certificate fingerprint of the server, use the show tls fingerprint in EXEC mode.
show tls trusted-hosts
To display the sensor's trusted hosts, use the show tls trusted-hosts command in EXEC mode.
show tls trusted-hosts [id]
IPS (Intrusion Prevention System)
show users
To display information about users currently logged in to the CLI, use the show users command in EXEC
mode:
show users [all]
show version
To display the version information for all installed OS packages, signature packages, and IPS processes
running on the system, use the show version command in EXEC mode.
ssh authorized-key
To add a public key to the current user for a client allowed to use RSA authentication to log in to the
local SSH server, use the ssh authorized-key command in global configuration mode. Use the no form of
this command to remove an authorized key from the system.
ssh authorized-key id key-modulus-length public-exponent public-modulus
no ssh authorized-key id
ssh generate-key
To change the server host key used by the SSH server on the sensor, use the ssh generate-key command
in EXEC mode.
ssh host-key
To add an entry to the known hosts table, use the ssh host-key command in global configuration mode.
If the modulus, exponent, and length are not provided, the system displays the MD5 fingerprint and
bubble babble for the requested IP address and allows you to add the key to the table. Use the no form
of this command to remove an entry from the known hosts table.
ssh host-key ipaddress [key-modulus-length public-exponent public-modulus]
no ssh host-key ipaddress
terminal
To modify terminal properties for a login session, use the terminal command in EXEC mode.
terminal [length screen-length]
tls generate-key
To regenerate the server's self-signed X.509 certificate, use the tls generate-key in EXEC mode. An error
is returned if the host is not using a self-signed certificate.
IPS (Intrusion Prevention System)
tls trusted-host
To add a trusted host to the system, use the tls trusted-host command in global configuration mode.
Use the no form of the command to remove a trusted host certificate.
tls trusted-host ip-address ip-address [port port]
no tls trusted-host ip-address ip-address [port port]
no tls trusted-host id id
trace
To display the route an IP packet takes to a destination, use the trace command in EXEC mode.
trace address [count]
upgrade
To apply a service pack, signature update, or image upgrade, use the upgrade command in global
configuration mode.
upgrade source-url
unlock user
To unlock local and RADIUS accounts after users have been locked out after a certain number of failed
attempts, use the unlock user username command in global configuration mode. You must be
administrator to unlock user accounts.
unlock user username
username
To create users on the local sensor, use the username command in global configuration mode. You must
be administrator to create users. Use the no form of the command to remove a user from the sensor.
This removes the users from both CLI and web access.
username name [password password] [privilege privilege]
no username name