introduction to query - · pdf file©2015 interchange university 9 4. in the final tab,...
TRANSCRIPT
Introduction to Query
Manual
The Salvation Army Southern Territorial Headquarters ©2015 InterChange University
InterChange

Introduction to Query 4.0
©2015 InterChange University
1
Table of Contents 4: Introduction to Query ....................................................................................................................................................... 3
A Query Overview ................................................................................................................................................................... 4
The Information Library ......................................................................................................................... 5
The Query Designer ................................................................................................................................. 6
Donor Services Queries ....................................................................................................................................................... 10
ITQ My Appeal Totals: Overview of The Filters .................................................................................. 11
My Appeal Totals: Changing and Editing the Filters........................................................................... 13
ITQ Revenue Batched by Vendor: Overview of Filters ....................................................................... 16
ITQ Revenue Batched by Vendor: Changing the Filters ..................................................................... 17
ITQ Donations 100+: Overview of the Filters ..................................................................................... 18
ITQ Donations 100+: Changing the Filters .......................................................................................... 19
ITQ New Donors: Overview of The Filters........................................................................................... 20
ITQ New Donors: Changing the Filters ................................................................................................ 21
ITQ Donors by Zip: Overview of the Filters ......................................................................................... 22
ITQ Donors by Zip: Changing the Filters ............................................................................................. 23
Fundraiser Queries ............................................................................................................................................................... 24
ITQ My Prospects: Overview of the Filters .......................................................................................... 24
ITQ My Prospects: Changing the Filters .............................................................................................. 26
ITQ My Potential Prospects: Overview of the Filters ......................................................................... 26
ITQ My Potential Prospects: Changing the Filters .............................................................................. 28
ITQ My Accepted Opps: Overview of the Filters ................................................................................. 29
ITQ My Accepted Opps: Changing the Filters ...................................................................................... 30
ITQ My Area Donors: Overview of the Filters ..................................................................................... 31
ITQ My Area Donors: Changing the Filters .......................................................................................... 32
Exporting queries into external documents ............................................................................................................... 33
Donor List Smart Query: Overview of the Parameters ....................................................................... 34
Introduction to Query 4.0
©2015 InterChange University
2
Exercises-Donor Services…………………………………………………………………………………………………………39
Exercises-Fundraisers……………………………………………………………………………………...…………………..……40
Queries, Selections and Smart Fields ............................................................................................................................ 41
Job Aids-Introduction to Query ....................................................................................................................................... 48
Introduction to Query 4.0
©2015 InterChange University
3
4: Introduction to Query
Overview:
Donor Services and Fundraising Professionals can use the query function in InterChange to
find and report on essential information relevant to the respective goals of their fields. In
this intermediate class, users will learn how to locate and edit the 5 most commonly used
queries for their profession, save these pre-written queries as new queries and run reports
from them.
Assumptions:
The exercises in this manual are intended to be used for practice after
one completes Introduction to Query class.
These exercises are to be performed in, and assume you have access to,
the InterChange Sandbox.
Lesson Objectives:
o Understand the five most common queries used for your profession and be able to explain the information each query generates
o Locate these five queries within the Information Library o Edit, modify and then save pre-written ad-hoc queries as new queries o Run your saved queries and generate required reports from these
queries
Introduction to Query 4.0
©2015 InterChange University
4
A Query Overview
A query is a question that we ask InterChange about certain types of information in the system. The
answers we obtain from our queries give us the information we’re looking for and can be exported
into external documents (like Excel). There are two types of queries that we use:
1. Ad-hoc= this is a basic query that can gather information from any fields within
InterChange. It is the one used most often by our users. As InterChange has a huge amount
of data, we use this query to specify the types of information we’re searching for in the
system.
2. Smart= This query is a bit more complex than an ad-hoc query, as it takes information that
has already been predefined (usually in an ad-hoc query) and is then able to refine and sort
this targeted data even further. We use this query when we want to gather a set of very
specific and narrowly defined information in InterChange.
Two other terms you should be familiar with in the world of query are selections and smart fields.
A selection is a query that has been written and saved with the intent of using it in another query.
It is, essentially, a query to be used within another query. More information, details and
instructions about selections are included in the Query 101 class.
Smart fields are pre-written filters used to give you quick access to specific information that would
otherwise require time and the writing of queries to access. For example, we often want to know
how much constituents have donated to our corps in the last year. Rather than write a query to
show us this (which you can do, but think of all the time and effort that you have to put in just to
create and write that query!) you can, instead, use a smart field and then add other filters (such as
your geocode) to get this information faster. More information, details and instructions about smart
fields are included in the Query 101 class.

Introduction to Query 4.0
©2015 InterChange University
5
The Information Library
1. Queries are located inside of the Information Library. To get to the Information Library, go
to the functional area Analysis, and then click on Information Library. *You may see a pop-
up box pointing you in the correct direction if this is the first time you’ve logged into the
Information Library.*
2. Go to the list of Folders located on the left-hand side of the Information Library. Locate
either the Donor Services folder or the Fundraisers folder, based on your professional
designation. You will find the queries you need inside of their respective folders.

Introduction to Query 4.0
©2015 InterChange University
6
3. Once you click on the folder you need to access (ITQ Donor Services or ITQ Fundraisers),
the list of queries inside of that folder will appear as a list of blue hyperlinks. Just click on
the title of the query you wish to edit and that query’s home page will appear.
4. From the query’s home page, you can see and edit the filters used by the query by clicking
on the Edit definition button.
The Query Designer
Once you click on the Edit definition button, the Query Designer will appear. The Query Designer
shows you the filters that were used to write the query and also the output filters, which is the way
the author decided to display the results. Before we go into detail about what each query does and
what the filters for each query mean, first let’s get comfortable with the Query Designer. There are
four essential tabs in the Query Designer:
Introduction to Query 4.0
©2015 InterChange University
7
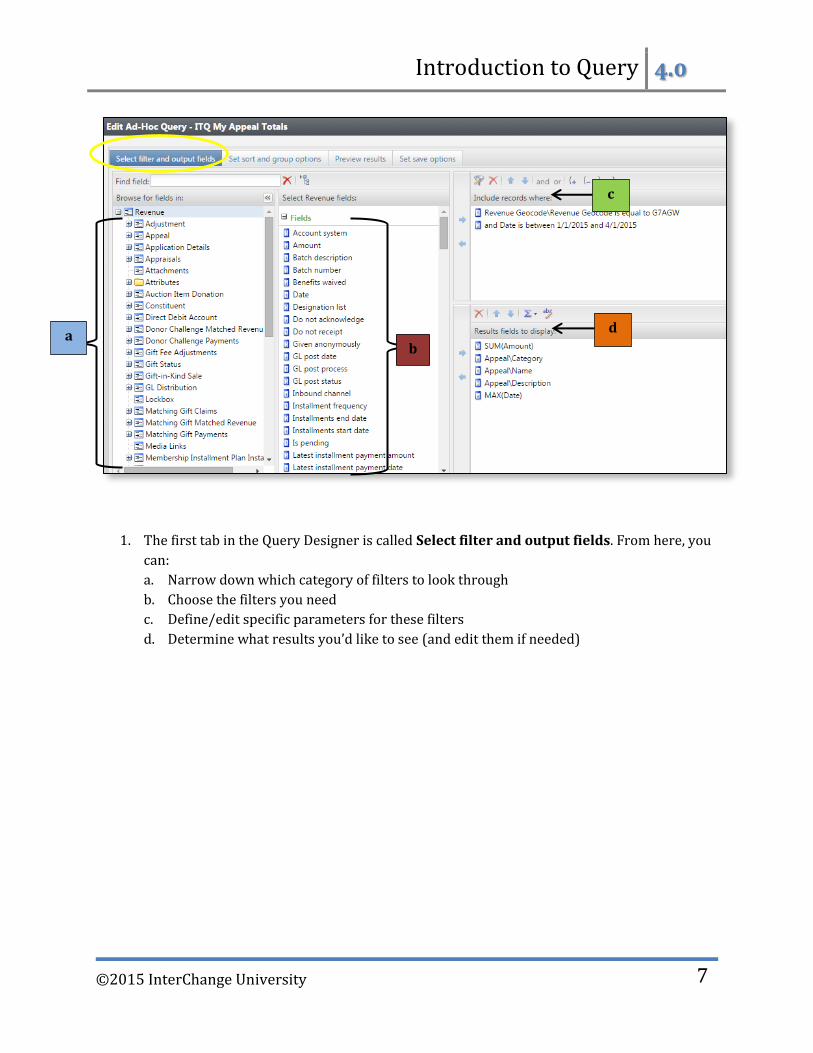
1. The first tab in the Query Designer is called Select filter and output fields. From here, you
can:
a. Narrow down which category of filters to look through
b. Choose the filters you need
c. Define/edit specific parameters for these filters
d. Determine what results you’d like to see (and edit them if needed)
a b
c
d

Introduction to Query 4.0
©2015 InterChange University
8
2. The second tab in the Query Designer is called Set sort and group options. From here, you
can take any of the filters you inserted into the “Results fields to display” box and sort them
further. You probably won’t use this tab too often but it’s good to know what it does in case
you need it in the future.
3. The third tab, Preview Results, allows you to preview the results of the query you edited.
From here, you can tell whether or not you’ve put the correct filters into your query before
you save it. If there are multiple pages of results, you can scroll to different pages using the
arrows on the bottom of the screen.

Introduction to Query 4.0
©2015 InterChange University
9
4. In the final tab, Set save options, you can do several things:
a. You will be able to give your query a new name, write/edit a description about it, and
choose a category, site and folder for it, too.
b. Here you can save it as a selection (choose dynamic or static), and choose whether you
want the selection to show up as in the Query Designer box in the future as a possible
filter you can use. *There are some limitations and restrictions as to which selections
will actually be allowed to be displayed inside of the Query Designer*
c. You can choose where to place this query (i.e.: Favorites folder, Mobile Query)
d. You can set permissions for this query and determine if you want anyone else to be able
to run and edit it.
a
b c
d
Introduction to Query 4.0
©2015 InterChange University
10
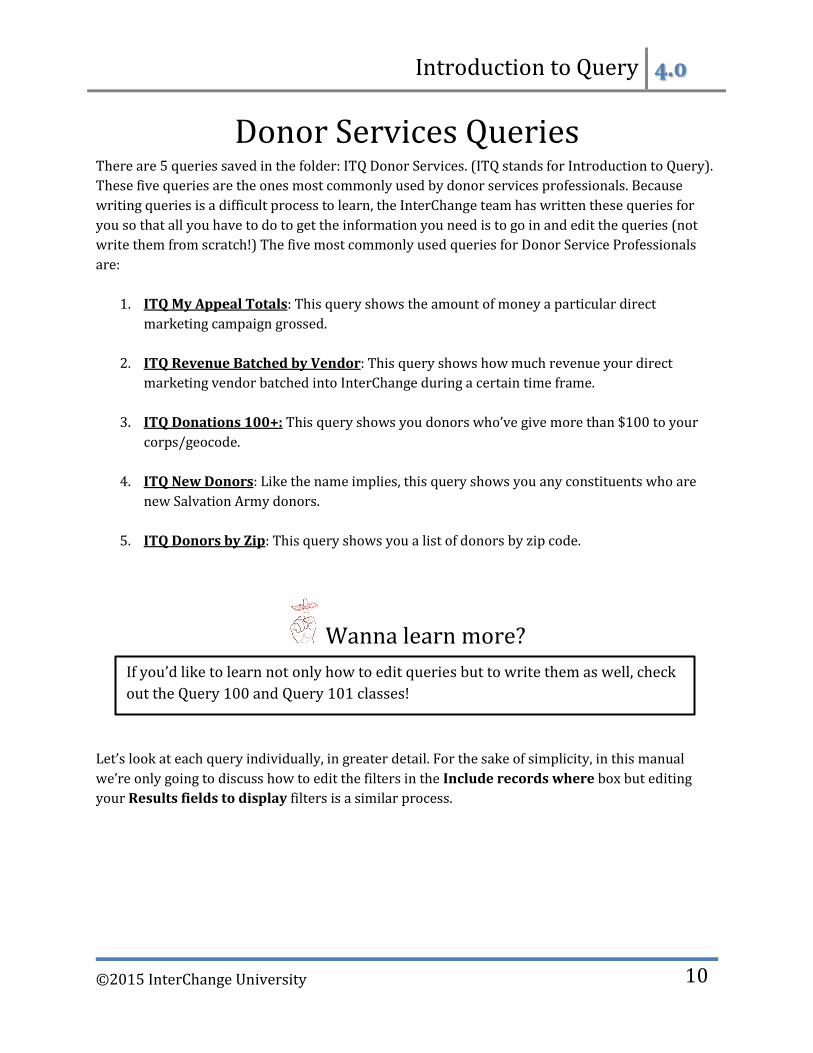
Donor Services Queries There are 5 queries saved in the folder: ITQ Donor Services. (ITQ stands for Introduction to Query).
These five queries are the ones most commonly used by donor services professionals. Because
writing queries is a difficult process to learn, the InterChange team has written these queries for
you so that all you have to do to get the information you need is to go in and edit the queries (not
write them from scratch!) The five most commonly used queries for Donor Service Professionals
are:
1. ITQ My Appeal Totals: This query shows the amount of money a particular direct
marketing campaign grossed.
2. ITQ Revenue Batched by Vendor: This query shows how much revenue your direct
marketing vendor batched into InterChange during a certain time frame.
3. ITQ Donations 100+: This query shows you donors who’ve give more than $100 to your
corps/geocode.
4. ITQ New Donors: Like the name implies, this query shows you any constituents who are
new Salvation Army donors.
5. ITQ Donors by Zip: This query shows you a list of donors by zip code.
Wanna learn more?
Let’s look at each query individually, in greater detail. For the sake of simplicity, in this manual
we’re only going to discuss how to edit the filters in the Include records where box but editing
your Results fields to display filters is a similar process.
If you’d like to learn not only how to edit queries but to write them as well, check
out the Query 100 and Query 101 classes!

Introduction to Query 4.0
©2015 InterChange University
11
ITQ My Appeal Totals: Overview of The Filters
In this query, there are two filters you’ll want to edit to make this query your own:
1. Revenue Geocode is equal to: This filter asks InterChange to search for records that have a
specific revenue geocode.
2. Date is between: This filter asks InterChange to search for these records within a date
range.
The filters you see inside of the Include records where box where the filters the original owner set
up when she wrote this query.

Introduction to Query 4.0
©2015 InterChange University
12
In the Results fields to display box (also known as your Output filters), you will see the way the
writer of this query choose to display the results. Many times, you will probably leave these filters
as they have been written, however, sometimes you may need to edit them (for example, if there
was an additional piece of information you’d like to show on your report.) The filters in this box
relate to the following:
1. Sum (Amount): A total of the amount of money
2. Appeal/Category: The category of the appeal
3. Appeal/Name: The name of the appeal
4. Appeal/Designation: The designation of the appeal
5. Max (Date): The maximum date, or last date, that a gift was received

Introduction to Query 4.0
©2015 InterChange University
13
My Appeal Totals: Changing and Editing the Filters To make this query your own, to make it search InterChange for the information you need, you’re
going to have to change the filters in the Include records where box.
1. Double-click on the filter “Revenue Geocode is equal to X”.
2. The “Apply Criteria” box will open up. There are two fields within this box:
a. A drop-down menu (dark blue circle)
b. A value field (light blue circle).
To edit this filter, most likely all you will do is erase the geocode that is in the value field, change it
to your geocode and click OK. You may also need to choose another operator from the drop-down
menu if you need this filter to include more than one geocode.

Introduction to Query 4.0
©2015 InterChange University
14
3. Once you click OK, you will then see your edited filter appear in the Include records where
box.
4. To edit the date range, click on the filter entitled “Date is between”.
5. Now you will see the Date criteria fields appear. Here you can choose a date range from the
drop-down menu (dark blue circle) and then set the specific dates within the fields (light
blue circles). Click Ok when you’re done.
Introduction to Query 4.0
©2015 InterChange University
15
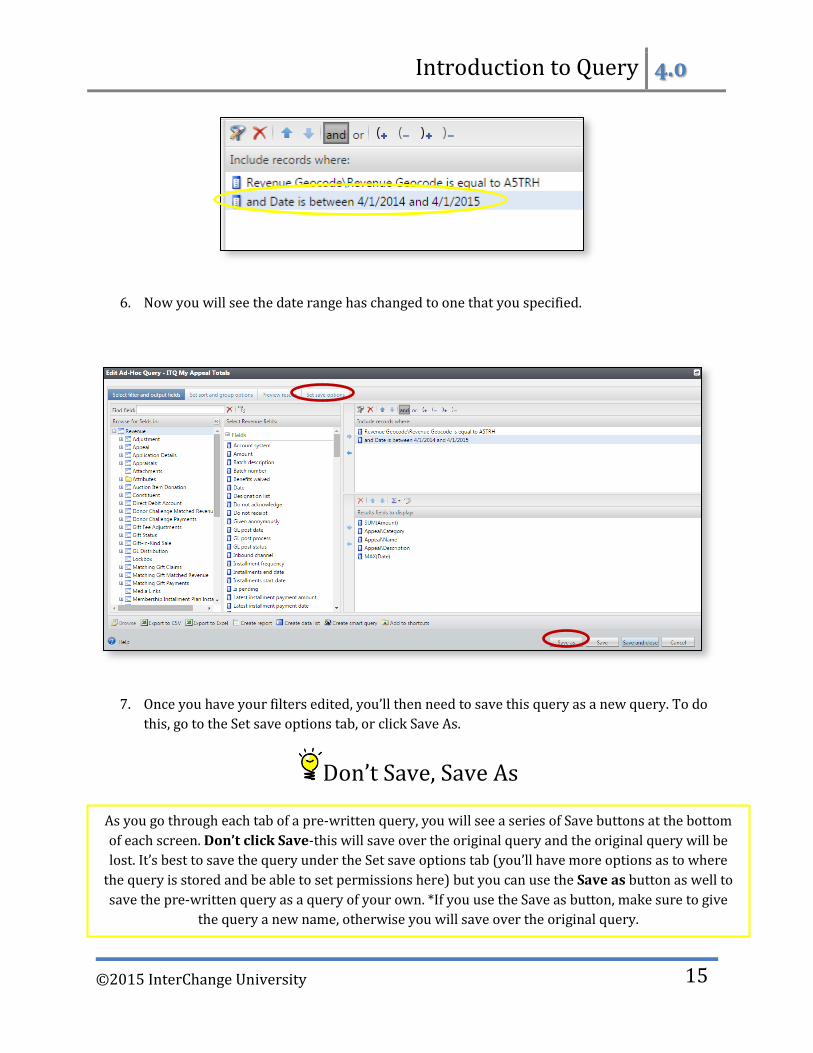
6. Now you will see the date range has changed to one that you specified.
7. Once you have your filters edited, you’ll then need to save this query as a new query. To do
this, go to the Set save options tab, or click Save As.
Don’t Save, Save As
1.
As you go through each tab of a pre-written query, you will see a series of Save buttons at the bottom
of each screen. Don’t click Save-this will save over the original query and the original query will be
lost. It’s best to save the query under the Set save options tab (you’ll have more options as to where
the query is stored and be able to set permissions here) but you can use the Save as button as well to
save the pre-written query as a query of your own. *If you use the Save as button, make sure to give
the query a new name, otherwise you will save over the original query.
Introduction to Query 4.0
©2015 InterChange University
16
8. Under the Set save options tab, you will be able to not only change the name of the query
and save it as a new query but set other options (such as permissions) as well. See page 8
for more detailed information on what each part of the Set save options screen pertains to.
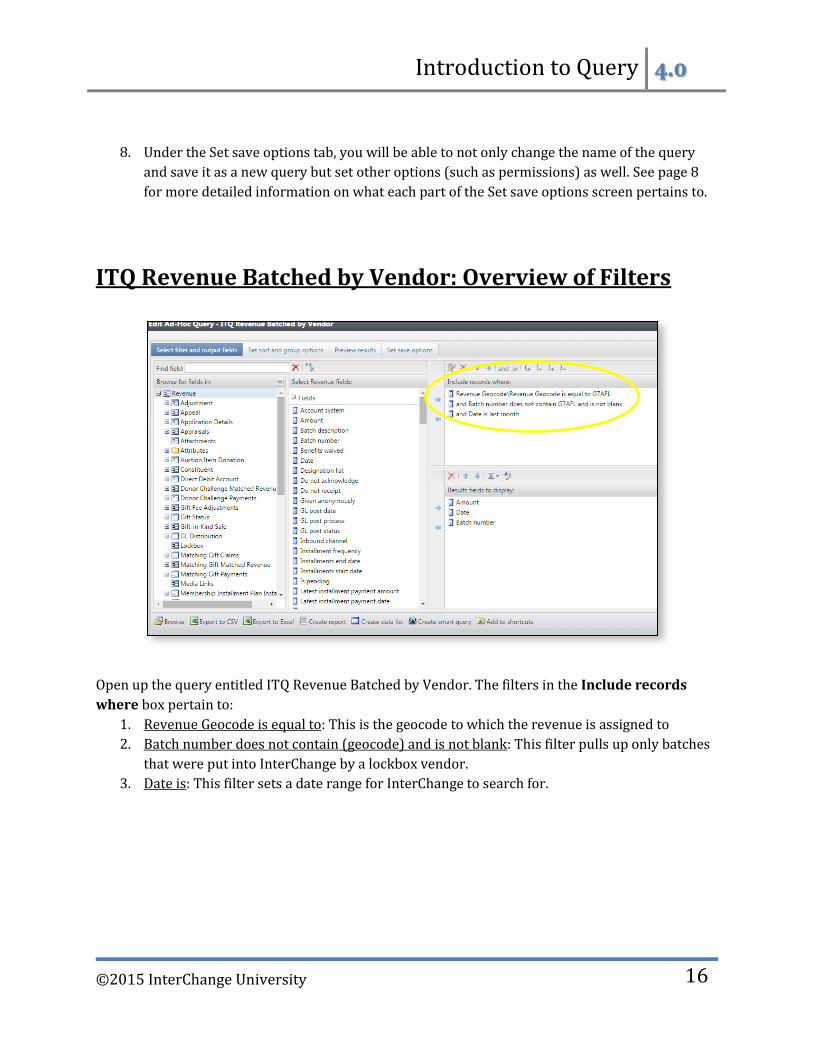
ITQ Revenue Batched by Vendor: Overview of Filters
Open up the query entitled ITQ Revenue Batched by Vendor. The filters in the Include records
where box pertain to:
1. Revenue Geocode is equal to: This is the geocode to which the revenue is assigned to
2. Batch number does not contain (geocode) and is not blank: This filter pulls up only batches
that were put into InterChange by a lockbox vendor.
3. Date is: This filter sets a date range for InterChange to search for.
Introduction to Query 4.0
©2015 InterChange University
17
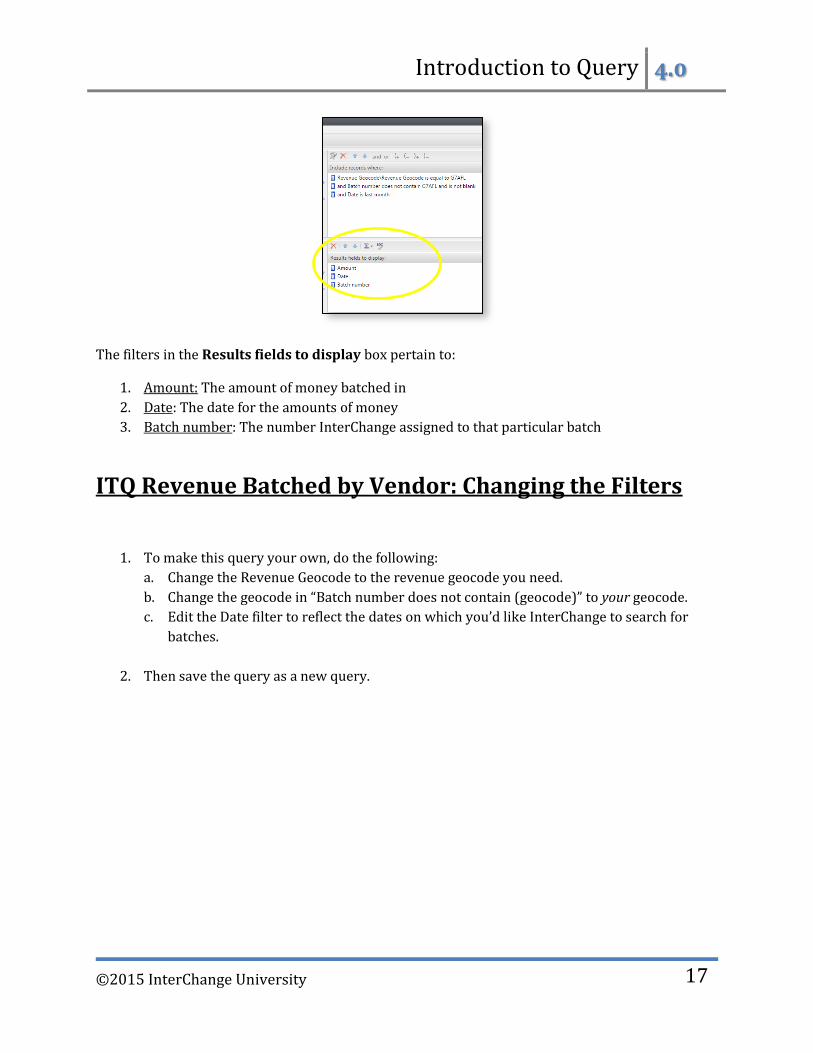
The filters in the Results fields to display box pertain to:
1. Amount: The amount of money batched in
2. Date: The date for the amounts of money
3. Batch number: The number InterChange assigned to that particular batch
ITQ Revenue Batched by Vendor: Changing the Filters
1. To make this query your own, do the following:
a. Change the Revenue Geocode to the revenue geocode you need.
b. Change the geocode in “Batch number does not contain (geocode)” to your geocode.
c. Edit the Date filter to reflect the dates on which you’d like InterChange to search for
batches.
2. Then save the query as a new query.

Introduction to Query 4.0
©2015 InterChange University
18
ITQ Donations 100+: Overview of the Filters
Open up the query entitled ITQ Revenue Batched by Vendor. The filters in the Include records
where box pertain to:
1. Revenue Geocode is equal to: This is the geocode to where the donation goes.
2. Amount is greater than or equal to: This filter asks InterChange to search for donors who’ve
given over a set amount of $ (in this query, it’s $100)
3. Appeal/Date added is: This filter sets a date range for InterChange to search for appeals
within.

Introduction to Query 4.0
©2015 InterChange University
19
The filters in the Results fields to display box pertain to:
1. Amount: The amount of money of the donation.
2. Date: The date the donation was received.
3. Constituent\Lookup ID: The Lookup ID of the constituent
4. Constituent\Name: The name of the donor
5. Constituent\Address (Primary)\Address: The donor’s street number and name
6. Constituent\Address (Primary)\City: The donor’s city
7. Constituent\Address (Primary)\State: The donor’s state
8. Constituent\Address (Primary)\ZIP: The donor’s zip code
ITQ Donations 100+: Changing the Filters
1. To make this query your own, do the following:
a. Change the Revenue Geocode to the revenue geocode you need.
b. If you want to search for donors who’ve given more than $100, you can just leave this
filter as it is. If you want to search for donors who’ve given more than another amount,
enter that amount into the value field.
c. Edit the Appeal\Date filter to reflect the date range in which you’d like to search
InterChange for these donations.
3. Then save the query as a new query.
Introduction to Query 4.0
©2015 InterChange University
20
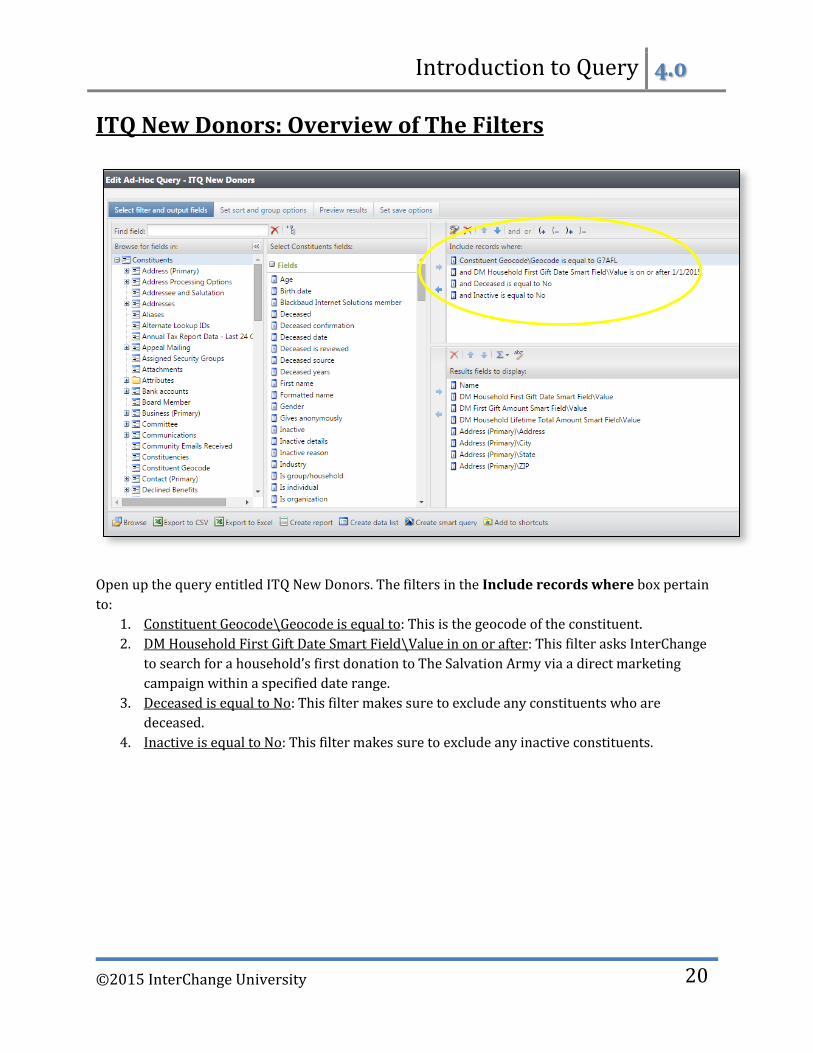
ITQ New Donors: Overview of The Filters
Open up the query entitled ITQ New Donors. The filters in the Include records where box pertain
to:
1. Constituent Geocode\Geocode is equal to: This is the geocode of the constituent.
2. DM Household First Gift Date Smart Field\Value in on or after: This filter asks InterChange
to search for a household’s first donation to The Salvation Army via a direct marketing
campaign within a specified date range.
3. Deceased is equal to No: This filter makes sure to exclude any constituents who are
deceased.
4. Inactive is equal to No: This filter makes sure to exclude any inactive constituents.
Introduction to Query 4.0
©2015 InterChange University
21
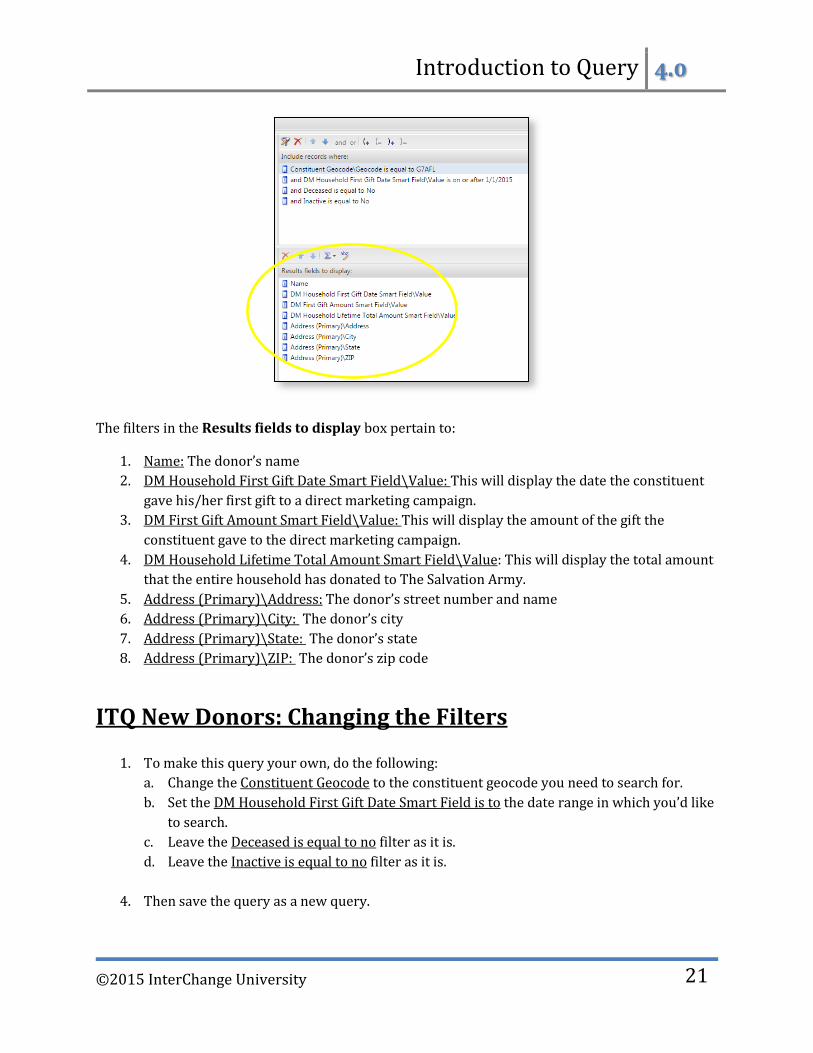
The filters in the Results fields to display box pertain to:
1. Name: The donor’s name
2. DM Household First Gift Date Smart Field\Value: This will display the date the constituent
gave his/her first gift to a direct marketing campaign.
3. DM First Gift Amount Smart Field\Value: This will display the amount of the gift the
constituent gave to the direct marketing campaign.
4. DM Household Lifetime Total Amount Smart Field\Value: This will display the total amount
that the entire household has donated to The Salvation Army.
5. Address (Primary)\Address: The donor’s street number and name
6. Address (Primary)\City: The donor’s city
7. Address (Primary)\State: The donor’s state
8. Address (Primary)\ZIP: The donor’s zip code
ITQ New Donors: Changing the Filters
1. To make this query your own, do the following:
a. Change the Constituent Geocode to the constituent geocode you need to search for.
b. Set the DM Household First Gift Date Smart Field is to the date range in which you’d like
to search.
c. Leave the Deceased is equal to no filter as it is.
d. Leave the Inactive is equal to no filter as it is.
4. Then save the query as a new query.
Introduction to Query 4.0
©2015 InterChange University
22
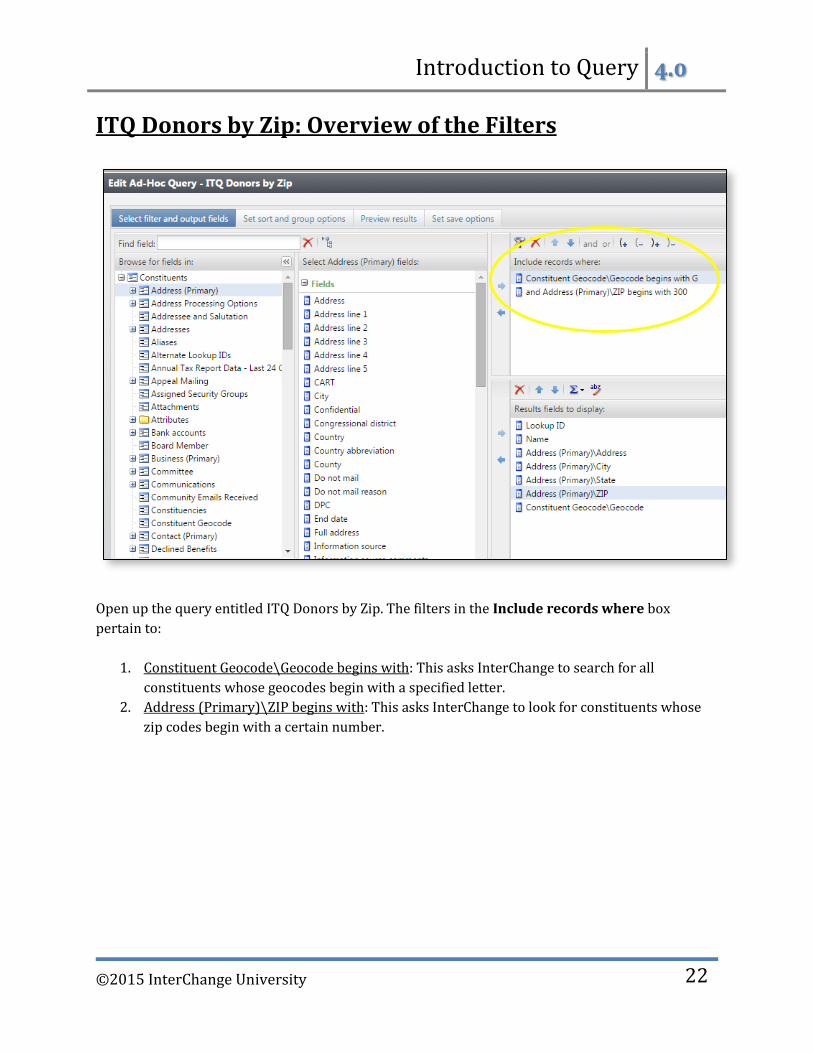
ITQ Donors by Zip: Overview of the Filters
Open up the query entitled ITQ Donors by Zip. The filters in the Include records where box
pertain to:
1. Constituent Geocode\Geocode begins with: This asks InterChange to search for all
constituents whose geocodes begin with a specified letter.
2. Address (Primary)\ZIP begins with: This asks InterChange to look for constituents whose
zip codes begin with a certain number.
Introduction to Query 4.0
©2015 InterChange University
23
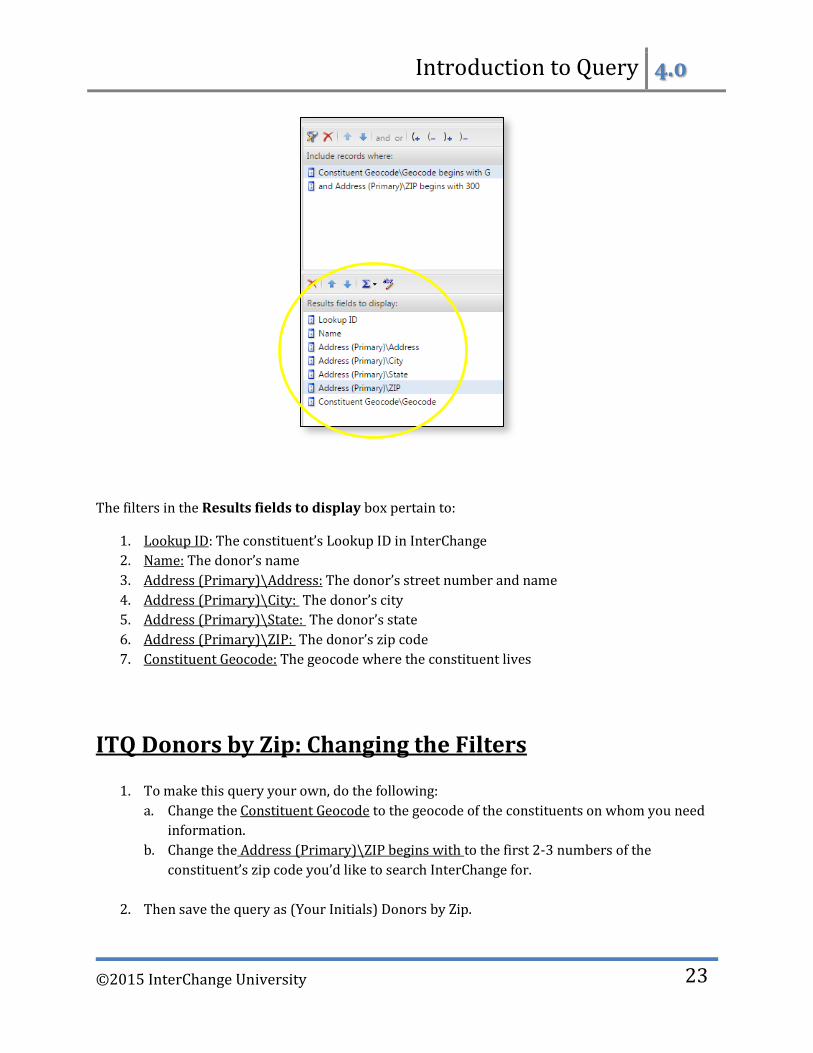
The filters in the Results fields to display box pertain to:
1. Lookup ID: The constituent’s Lookup ID in InterChange
2. Name: The donor’s name
3. Address (Primary)\Address: The donor’s street number and name
4. Address (Primary)\City: The donor’s city
5. Address (Primary)\State: The donor’s state
6. Address (Primary)\ZIP: The donor’s zip code
7. Constituent Geocode: The geocode where the constituent lives
ITQ Donors by Zip: Changing the Filters
1. To make this query your own, do the following:
a. Change the Constituent Geocode to the geocode of the constituents on whom you need
information.
b. Change the Address (Primary)\ZIP begins with to the first 2-3 numbers of the
constituent’s zip code you’d like to search InterChange for.
2. Then save the query as (Your Initials) Donors by Zip.
Introduction to Query 4.0
©2015 InterChange University
24
Fundraiser Queries
ITQ My Prospects: Overview of the Filters
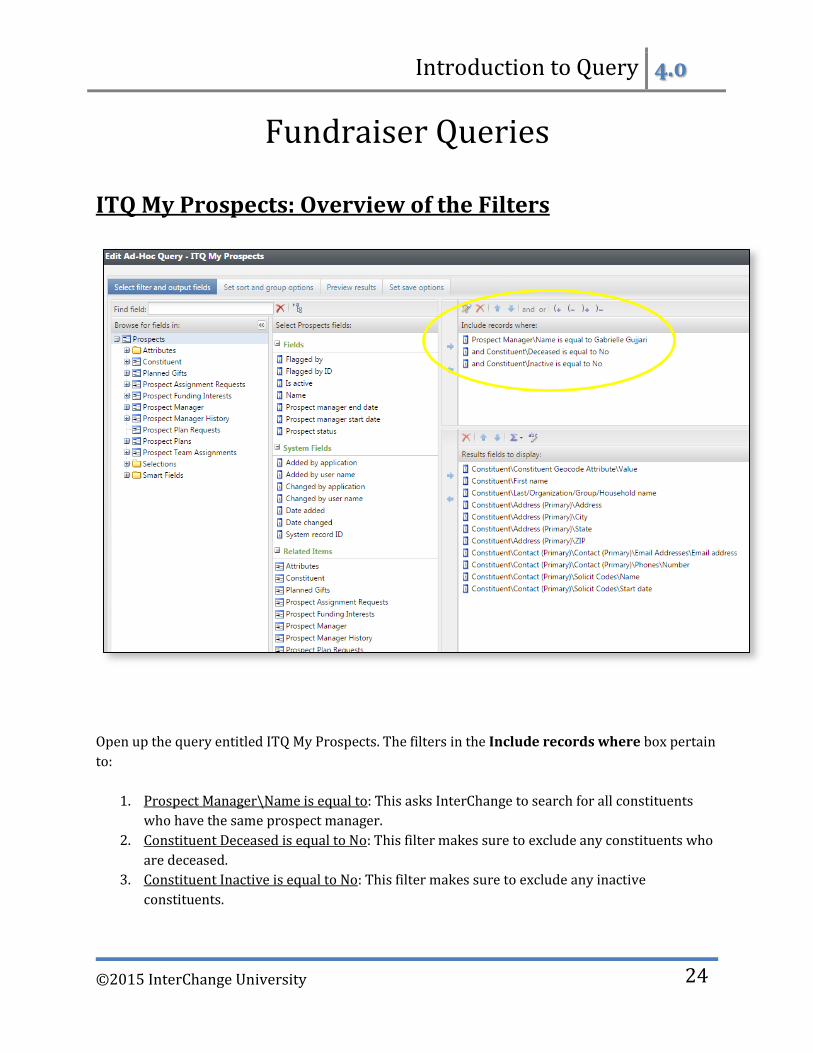
Open up the query entitled ITQ My Prospects. The filters in the Include records where box pertain
to:
1. Prospect Manager\Name is equal to: This asks InterChange to search for all constituents
who have the same prospect manager.
2. Constituent Deceased is equal to No: This filter makes sure to exclude any constituents who
are deceased.
3. Constituent Inactive is equal to No: This filter makes sure to exclude any inactive
constituents.

Introduction to Query 4.0
©2015 InterChange University
25
The filters in the Results fields to display box pertain to:
1. Constituent\Constituent Geocode Attribute\Value: The geocode where the prospect lives
2. Constituent\First name: The prospect’s first name
3. Constituent\Last\Organization\Group\Household name: The last name of the prospect
4. Constituent\Address (Primary)\Address: The prospect’s street number and name
5. Constituent\Address (Primary)\City: The prospect’s city
6. Constituent\Address (Primary)\State: The prospect’s state
7. Constituent\Address (Primary)\ZIP: The prospect’s zip code
8. Constituent\Contact (Primary)\Contact (Primary)\Email Addresses\Email Address: The
prospect’s email address
9. Constituent\Contact (Primary)\Contact (Primary)\Phones\Number: The prospect’s phone
number
10. Constituent\Contact (Primary)\Solicit Codes\Name: If the prospect has any solicit codes on
his/her record, they will be listed
11. Constituent\Contact (Primary)\Solicit Codes\Start date: If the prospect has any solicit
codes on his/her record, the date the prospect requested the solicit code begins will be
listed
Introduction to Query 4.0
©2015 InterChange University
26
ITQ My Prospects: Changing the Filters
1. To make this query your own, do the following:
a. Prospect Manager\Name is equal to: Change the name to your name.
b. Constituent Deceased is equal to No: This filter makes sure to exclude any
constituents who are deceased so don’t change it.
c. Constituent Inactive is equal to No: This filter makes sure to exclude any inactive
constituents so don’t change it.
2. Then save the query as (Your Initials) My Prospects.
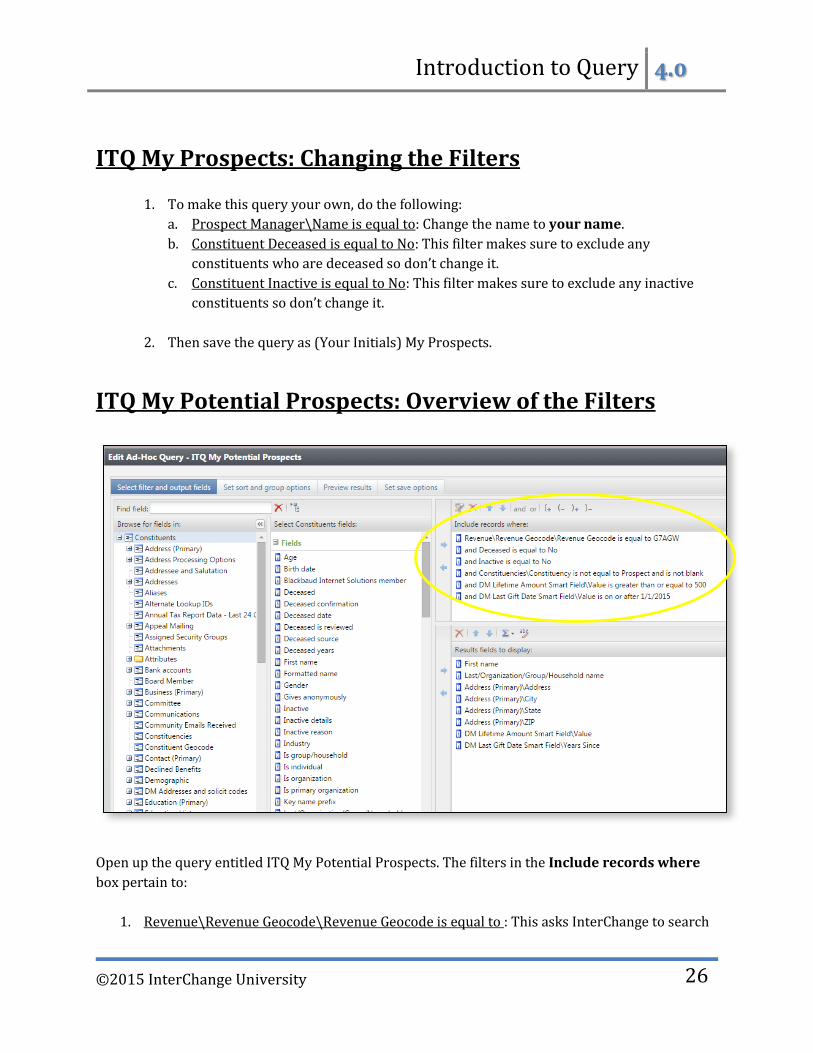
ITQ My Potential Prospects: Overview of the Filters
Open up the query entitled ITQ My Potential Prospects. The filters in the Include records where
box pertain to:
1. Revenue\Revenue Geocode\Revenue Geocode is equal to : This asks InterChange to search

Introduction to Query 4.0
©2015 InterChange University
27
for all constituents who have donated to a specific revenue geocode.
2. Deceased is equal to No: This filter makes sure to exclude any constituents who are
deceased.
3. Inactive is equal to No: This filter makes sure to exclude any inactive constituents.
4. Constituencies\Constituency is not equal to Prospect and is not blank: This makes sure
InterChange only looks for constituents who are not already someone else’s prospects
5. DM Lifetime Amount Smart Field\Value is greater than or equal to: This filter searches for
the total amount of money the constituent has given to TSA over his/her lifetime.
6. DM Last Gift Date Smart Field\Value in on or after: This will choose the date range in which
to search for the constituent’s most recent (last) gift to TSA.
The filters in the Results fields to display box pertain to:
1. First name: The constituent’s first name
2. Last\Organization\Group\Household name: The last name of the constituent
3. Address (Primary)\Address: The constituent’s street number and name
4. Address (Primary)\City: The constituent’s city
5. Address (Primary)\State: The constituent’s state
6. Address (Primary)\ZIP: The constituent’s zip code
7. DM Lifetime Amount Smart Field\Value: This filter shows how much money total the
constituent has given to TSA over his/her lifetime.
8. DM Last Gift Date Smart Field\Years Since: This will show how many years it has been since
the constituent made a gift to TSA.

Introduction to Query 4.0
©2015 InterChange University
28
ITQ My Potential Prospects: Changing the Filters
1. To make this query your own, do the following:
a. Revenue\Revenue Geocode\Revenue Geocode is equal to: Change this geocode
to the revenue geocode you need.
b. Deceased is equal to No: This filter makes sure to exclude any constituents who
are deceased so leave it as is.
c. Inactive is equal to No: This filter makes sure to exclude any inactive
constituents so leave it as is.
d. Constituencies\Constituency is not equal to Prospect and is not blank: This
makes sure InterChange only looks for constituents who are not already
someone else’s prospects so don’t change this filer.
e. DM Lifetime Amount Smart Field\Value is greater than or equal to: Change the
amount to the constituent’s lifetime total giving amount you’d like InterChange
to search for.
f. DM Last Gift Date Smart Field\Value in on or after: Choose the date range in
which you’d like InterChange to search.
2. Then save the query as (Your Initials) My Potential Prospects.
Introduction to Query 4.0
©2015 InterChange University
29
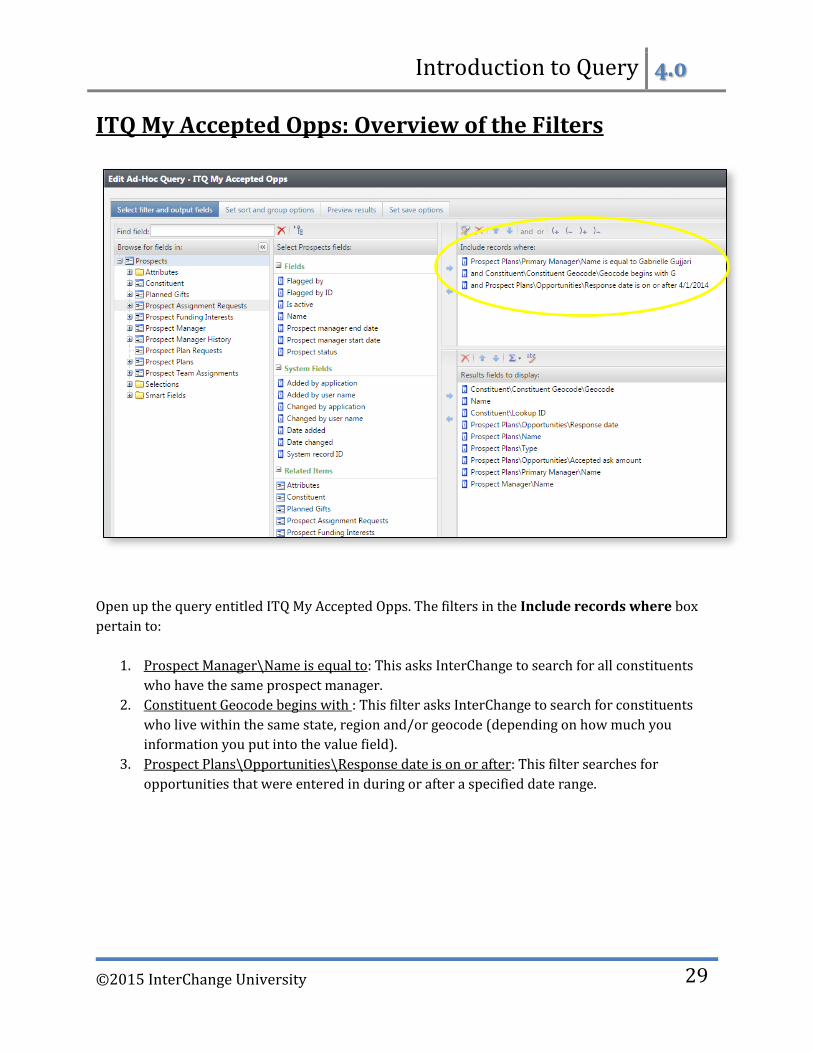
ITQ My Accepted Opps: Overview of the Filters
Open up the query entitled ITQ My Accepted Opps. The filters in the Include records where box
pertain to:
1. Prospect Manager\Name is equal to: This asks InterChange to search for all constituents
who have the same prospect manager.
2. Constituent Geocode begins with : This filter asks InterChange to search for constituents
who live within the same state, region and/or geocode (depending on how much you
information you put into the value field).
3. Prospect Plans\Opportunities\Response date is on or after: This filter searches for
opportunities that were entered in during or after a specified date range.
Introduction to Query 4.0
©2015 InterChange University
30
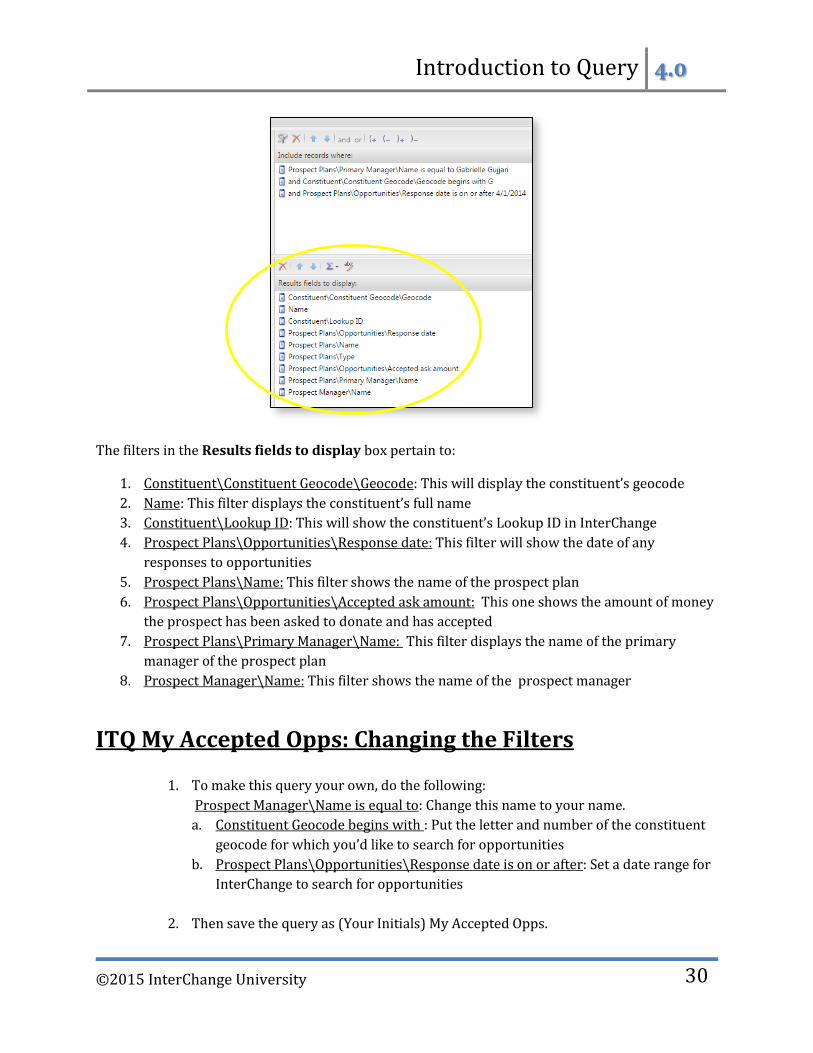
The filters in the Results fields to display box pertain to:
1. Constituent\Constituent Geocode\Geocode: This will display the constituent’s geocode
2. Name: This filter displays the constituent’s full name
3. Constituent\Lookup ID: This will show the constituent’s Lookup ID in InterChange
4. Prospect Plans\Opportunities\Response date: This filter will show the date of any
responses to opportunities
5. Prospect Plans\Name: This filter shows the name of the prospect plan
6. Prospect Plans\Opportunities\Accepted ask amount: This one shows the amount of money
the prospect has been asked to donate and has accepted
7. Prospect Plans\Primary Manager\Name: This filter displays the name of the primary
manager of the prospect plan
8. Prospect Manager\Name: This filter shows the name of the prospect manager
ITQ My Accepted Opps: Changing the Filters
1. To make this query your own, do the following:
Prospect Manager\Name is equal to: Change this name to your name.
a. Constituent Geocode begins with : Put the letter and number of the constituent
geocode for which you’d like to search for opportunities
b. Prospect Plans\Opportunities\Response date is on or after: Set a date range for
InterChange to search for opportunities
2. Then save the query as (Your Initials) My Accepted Opps.

Introduction to Query 4.0
©2015 InterChange University
31
ITQ My Area Donors: Overview of the Filters
Open up the query entitled ITQ My Area Donors. The filters in the Include records where box
pertain to:
1. Constituent Geocode is equal to : This filter asks InterChange to search for constituents
within a specific geocode.
2. Deceased is equal to No: This filter makes sure to exclude any constituents who are
deceased.
3. Inactive is equal to No: This filter makes sure to exclude any inactive constituents.
Introduction to Query 4.0
©2015 InterChange University
32
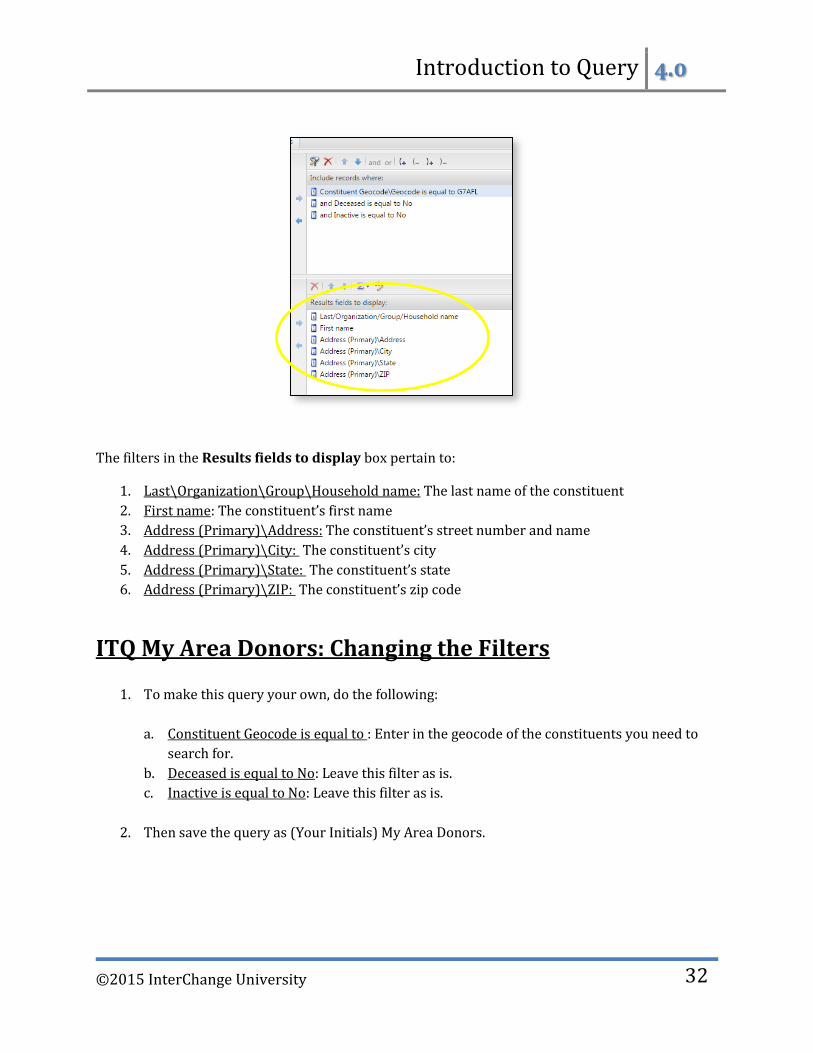
The filters in the Results fields to display box pertain to:
1. Last\Organization\Group\Household name: The last name of the constituent
2. First name: The constituent’s first name
3. Address (Primary)\Address: The constituent’s street number and name
4. Address (Primary)\City: The constituent’s city
5. Address (Primary)\State: The constituent’s state
6. Address (Primary)\ZIP: The constituent’s zip code
ITQ My Area Donors: Changing the Filters
1. To make this query your own, do the following:
a. Constituent Geocode is equal to : Enter in the geocode of the constituents you need to
search for.
b. Deceased is equal to No: Leave this filter as is.
c. Inactive is equal to No: Leave this filter as is.
2. Then save the query as (Your Initials) My Area Donors.
Introduction to Query 4.0
©2015 InterChange University
33
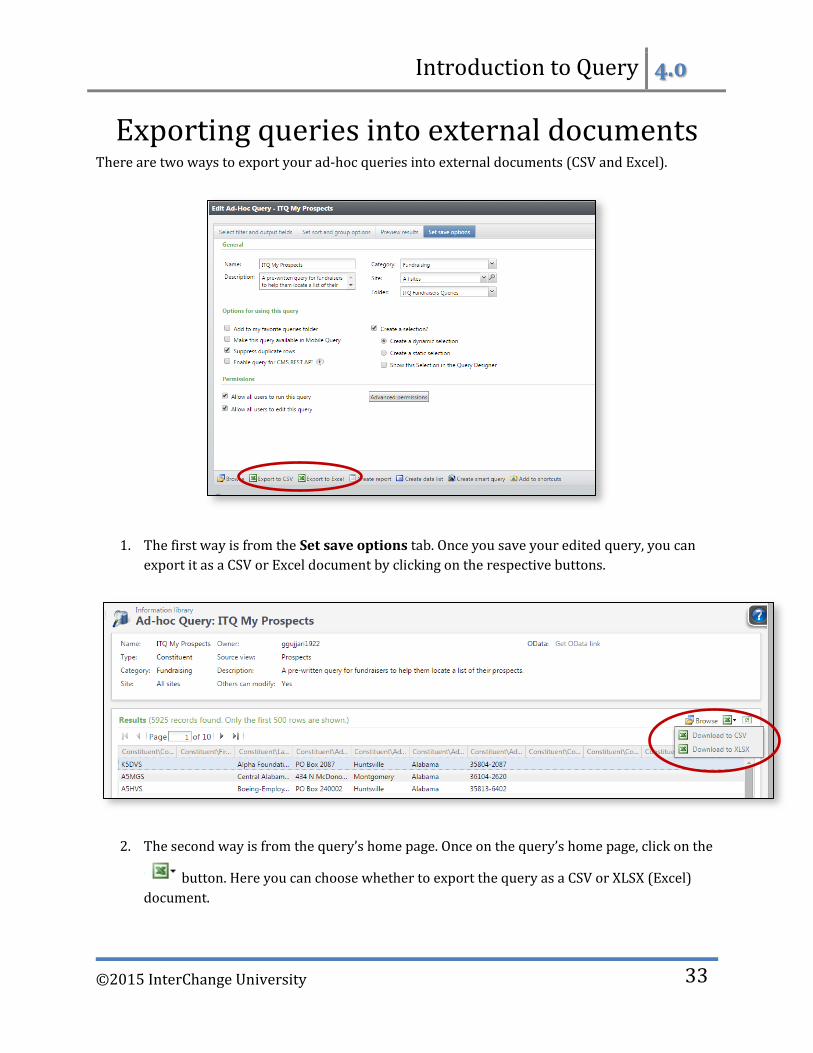
Exporting queries into external documents There are two ways to export your ad-hoc queries into external documents (CSV and Excel).
1. The first way is from the Set save options tab. Once you save your edited query, you can
export it as a CSV or Excel document by clicking on the respective buttons.
2. The second way is from the query’s home page. Once on the query’s home page, click on the
button. Here you can choose whether to export the query as a CSV or XLSX (Excel)
document.

Introduction to Query 4.0
©2015 InterChange University
34
Donor List Smart Query: Overview of the Parameters
All of the fundraiser queries discussed in this manual thus far have been ad-hoc queries. There is,
however, one smart query that fundraisers use often and that is the Donor List Smart Query. Editing
the parameters of this query are a bit different from editing the filters in an ad-hoc query but aren’t
too difficult nonetheless.
1. To find this smart query, first go to the Information Library. Then click on the Add a smart
query button.
2. Next, a list of smart query definitions will open up in the Smart Query Definition box. Click
on the one entitled, “Donor List” and then click OK.

Introduction to Query 4.0
©2015 InterChange University
35
3. The “New Smart Query” box will then open up. Here is where you set up the parameters for
your query. Instead of editing filters (like you do in an ad-hoc query), in a smart query you
choose the parameters for which you’d like to search InterChange.
In the Donor list smart query you can choose:
a. The Designation you’d like to search for
b. The Campaign you’d like to search for
c. The Appeal in which you’d like to search for information
d. Selected constituents*Remember if you choose to add an ad-query in this field that your
query is updated with your filters.
e. To search within a specific time period in which a donation was given
f. For certain total amounts donated
g. To search for the top donors, a top number of donors and the top percent of donors
a
b
c
d
e
f
g
Introduction to Query 4.0
©2015 InterChange University
36
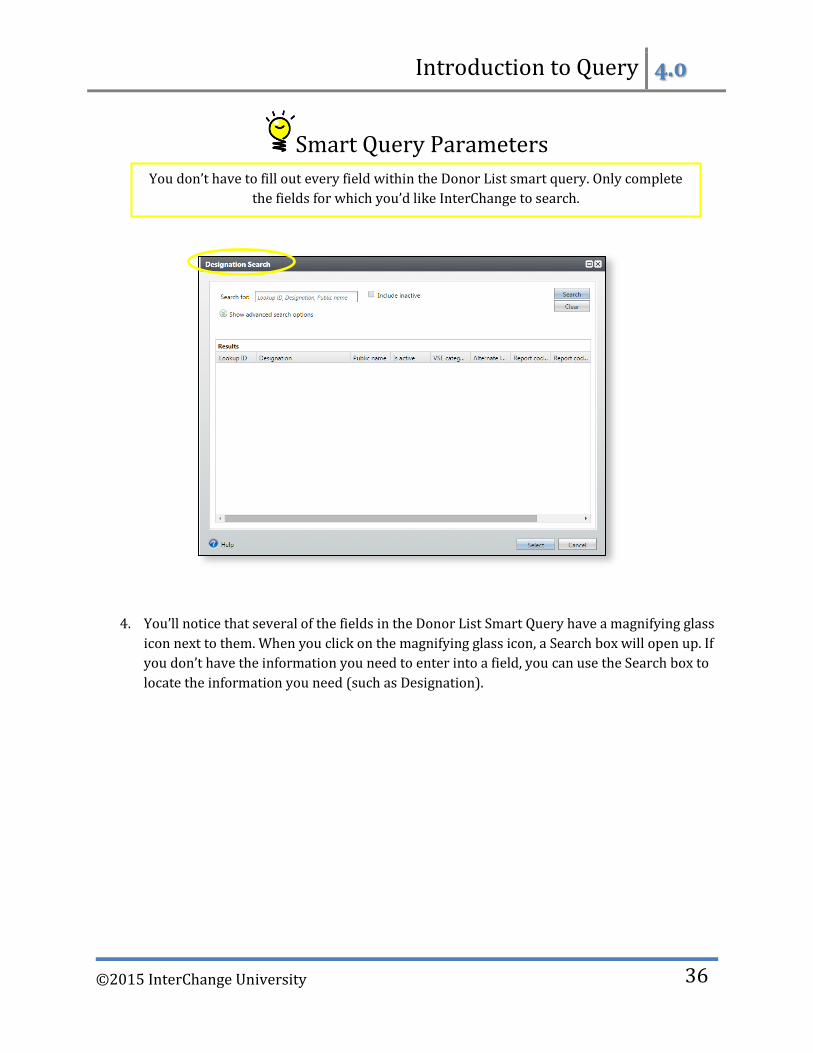
Smart Query Parameters
4. You’ll notice that several of the fields in the Donor List Smart Query have a magnifying glass
icon next to them. When you click on the magnifying glass icon, a Search box will open up. If
you don’t have the information you need to enter into a field, you can use the Search box to
locate the information you need (such as Designation).
You don’t have to fill out every field within the Donor List smart query. Only complete
the fields for which you’d like InterChange to search.
Introduction to Query 4.0
©2015 InterChange University
37
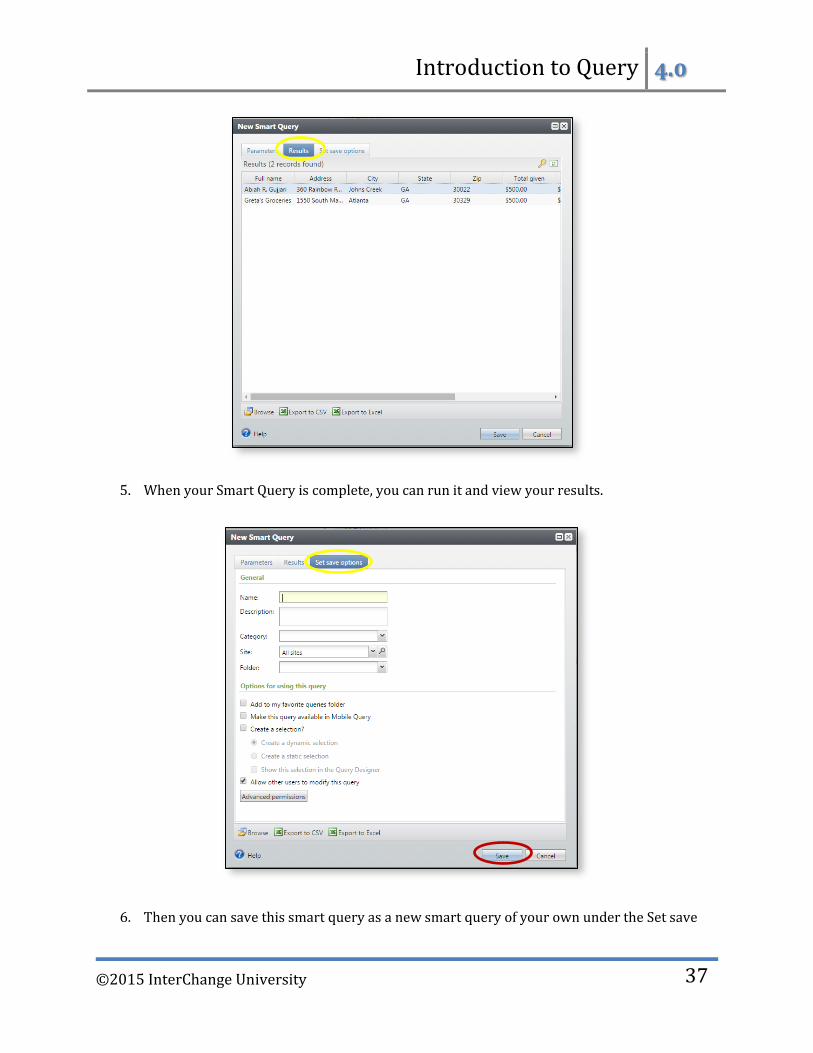
5. When your Smart Query is complete, you can run it and view your results.
6. Then you can save this smart query as a new smart query of your own under the Set save

Introduction to Query 4.0
©2015 InterChange University
38
options tab. Remember to click Save to save this query.
Saving a Smart Query
7. To export your smart query results into a CSV or Excel document, just click on the
respective buttons.
Unlike an ad-hoc query, you cannot save over a smart query. If you try to save a smart
query at any point in this process, you will be automatically directed to the Set save
options tab, where you will be asked to type in a new name for the smart query.

Introduction to Query 4.0
©2015 InterChange University
39
Exercises: Introduction to Query-Donor Services
Go to the Information Library, and open up the folder ITQ Donor Services. You should see 5 queries
inside this folder. Follow the instructions for how to edit each query below.
1. Open up the query entitled: ITQ My Appeal Totals. Change the following:
a. Revenue Geocode: Change to G5TYL
b. Date is between: Change to 1/15/2015 to 3/15/2015.
2. Save the query as: (Your Initials) My Appeal Totals.
3. Open up the query entitled: ITQ Revenue Batched by Vendor. Change the
following:
a. Revenue Geocode: Change to A5HJL
b. Date is between: Change to 1/01/2013 to 2/01/2015.
4. Save the query as: (Your Initials) Revenue Batched by Vendor.
5. Open up the query entitled: ITQ Donations 100+. Change the following:
a. Revenue Geocode: Change to A5SHS
b. Amount is: Change to Greater than $500
c. Date added is: Change to On or before 4/15/2015.
6. Save the query as: (Your Initials) Donations 100+.
7. Open up the query entitled: ITQ New Donors. Change the following:
a. Constituent Geocode: Change to F5OCS
b. DM Household First Gift Date Smart Field\Value is: Change to before or
after 1/1/14.
c. Leave the Inactive and Deceased filters as is.
8. Save the query as: (Your Initials) New Donors.
9. Open up the query entitled: ITQ Donors by Zip. Change the following:
a. Address Zip begins with : Change to 33101.
b. Constituent Geocode begins with: Change to G.
10. Save the query as: (Your Initials) Donors by Zip.
Introduction to Query 4.0
©2015 InterChange University
40
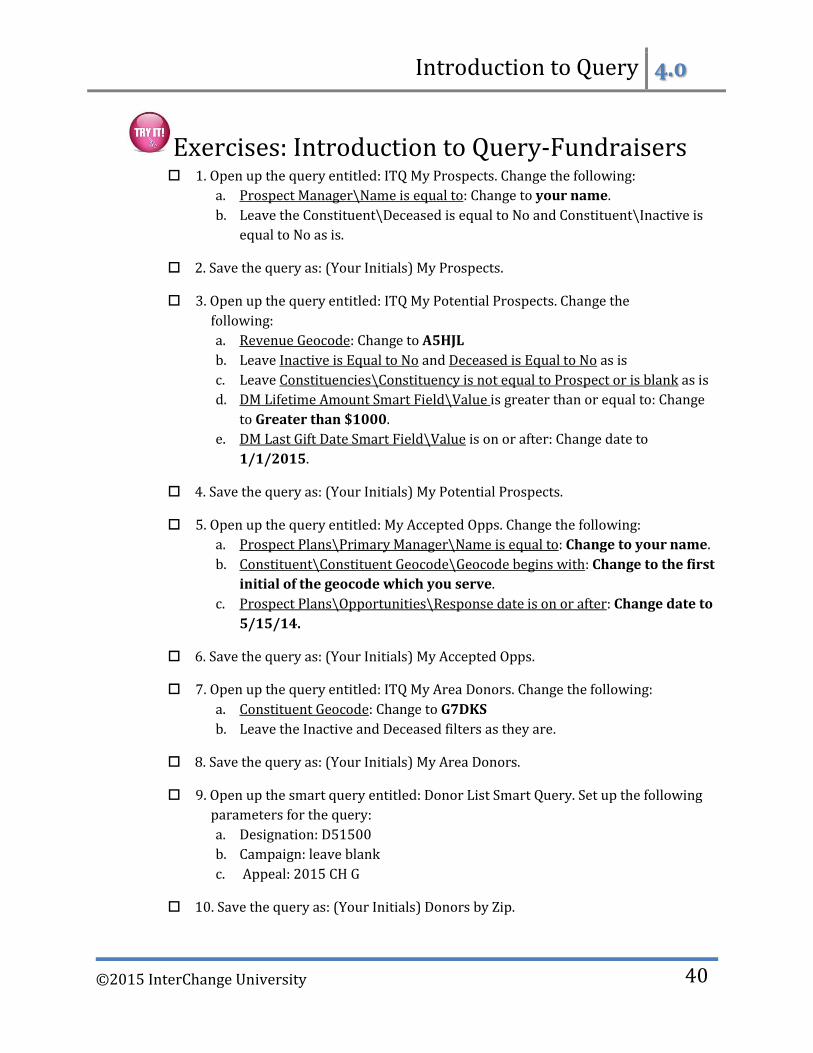
Exercises: Introduction to Query-Fundraisers 1. Open up the query entitled: ITQ My Prospects. Change the following:
a. Prospect Manager\Name is equal to: Change to your name.
b. Leave the Constituent\Deceased is equal to No and Constituent\Inactive is
equal to No as is.
2. Save the query as: (Your Initials) My Prospects.
3. Open up the query entitled: ITQ My Potential Prospects. Change the
following:
a. Revenue Geocode: Change to A5HJL
b. Leave Inactive is Equal to No and Deceased is Equal to No as is
c. Leave Constituencies\Constituency is not equal to Prospect or is blank as is
d. DM Lifetime Amount Smart Field\Value is greater than or equal to: Change
to Greater than $1000.
e. DM Last Gift Date Smart Field\Value is on or after: Change date to
1/1/2015.
4. Save the query as: (Your Initials) My Potential Prospects.
5. Open up the query entitled: My Accepted Opps. Change the following:
a. Prospect Plans\Primary Manager\Name is equal to: Change to your name.
b. Constituent\Constituent Geocode\Geocode begins with: Change to the first
initial of the geocode which you serve.
c. Prospect Plans\Opportunities\Response date is on or after: Change date to
5/15/14.
6. Save the query as: (Your Initials) My Accepted Opps.
7. Open up the query entitled: ITQ My Area Donors. Change the following:
a. Constituent Geocode: Change to G7DKS
b. Leave the Inactive and Deceased filters as they are.
8. Save the query as: (Your Initials) My Area Donors.
9. Open up the smart query entitled: Donor List Smart Query. Set up the following
parameters for the query:
a. Designation: D51500
b. Campaign: leave blank
c. Appeal: 2015 CH G
10. Save the query as: (Your Initials) Donors by Zip.
Introduction to Query 4.0
©2015 InterChange University
41
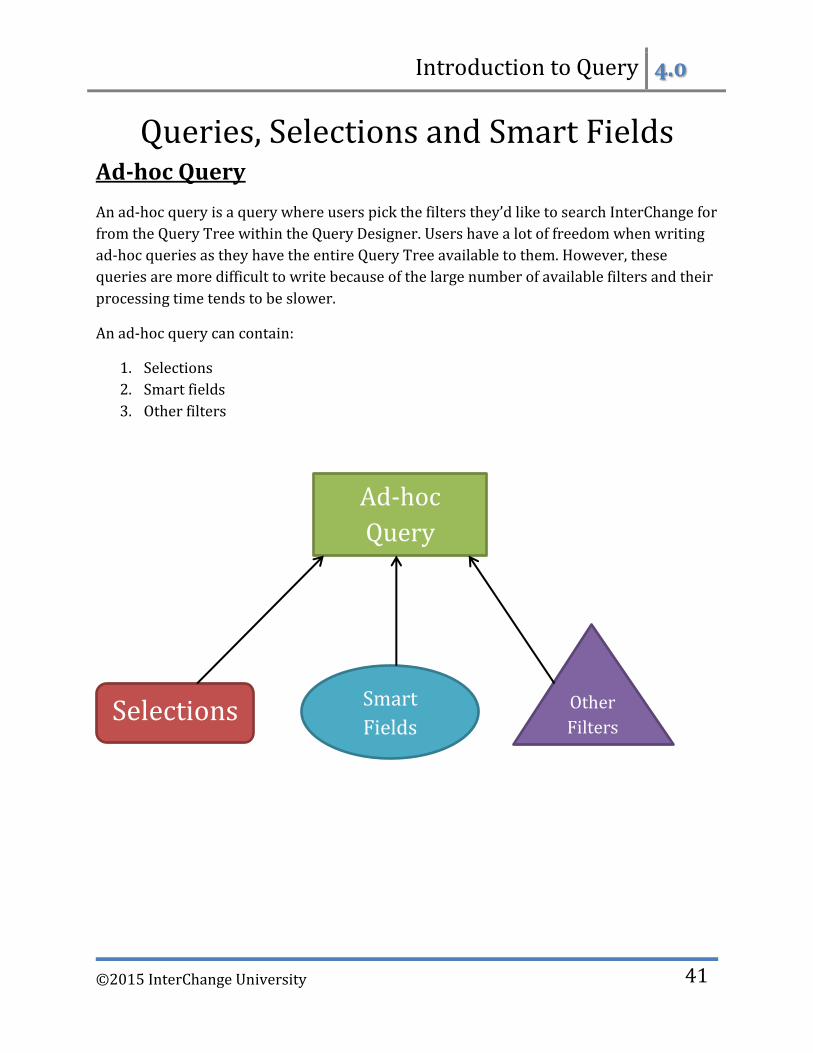
Queries, Selections and Smart Fields Ad-hoc Query
An ad-hoc query is a query where users pick the filters they’d like to search InterChange for
from the Query Tree within the Query Designer. Users have a lot of freedom when writing
ad-hoc queries as they have the entire Query Tree available to them. However, these
queries are more difficult to write because of the large number of available filters and their
processing time tends to be slower.
An ad-hoc query can contain:
1. Selections
2. Smart fields
3. Other filters
Ad-hoc
Query
Selections Smart
Fields Other
Filters
Introduction to Query 4.0
©2015 InterChange University
42
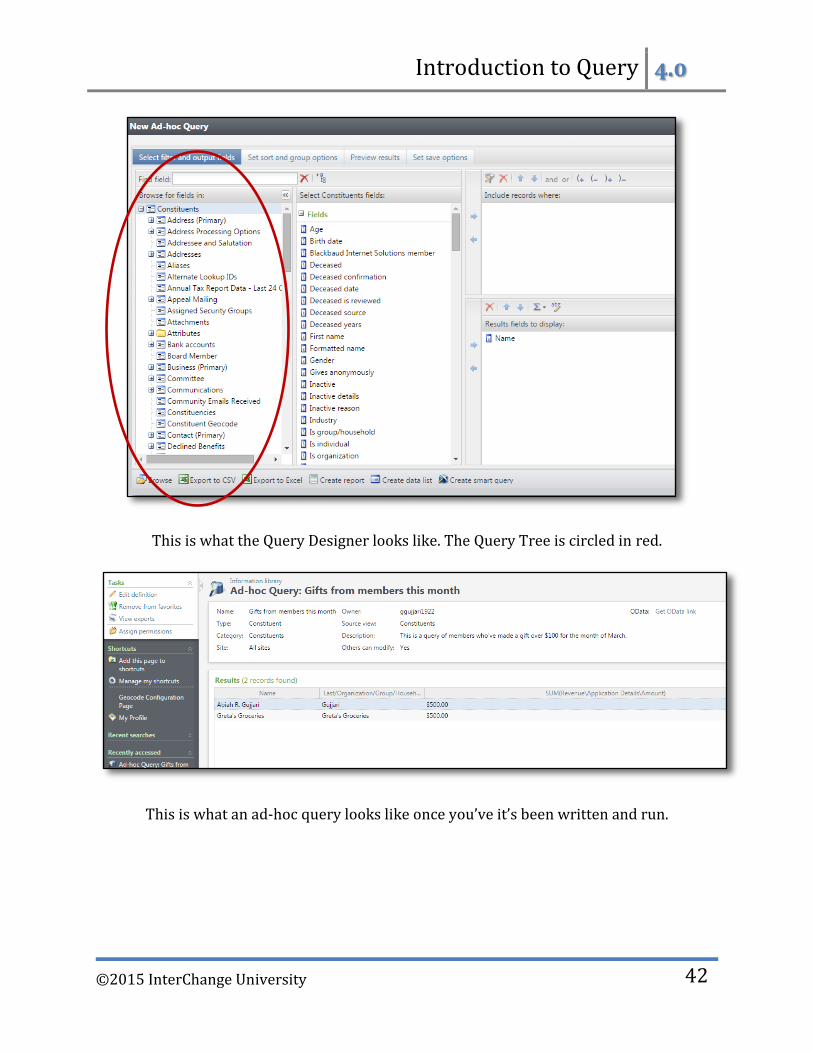
This is what the Query Designer looks like. The Query Tree is circled in red.
This is what an ad-hoc query looks like once you’ve it’s been written and run.

Introduction to Query 4.0
©2015 InterChange University
43
Smart Query
A smart query is a query that has already had its main parameters written and established
by another query writer. Most smart queries are created from ad-hoc queries. Users do not
add or remove filters from a smart query, rather they choose which information to search
InterChange for from drop-down menus or from a search field. Smart queries usually run
much faster than ad-hoc queries but because they already have pre-defined parameters,
users are limited as to what they can search for and see in the results.
This is what the Smart Query Designer box looks like. The author gets to determine
which fields to make visible and which to make filters that users can choose from.
Smart
Query
Ad-hoc
Query
Introduction to Query 4.0
©2015 InterChange University
44
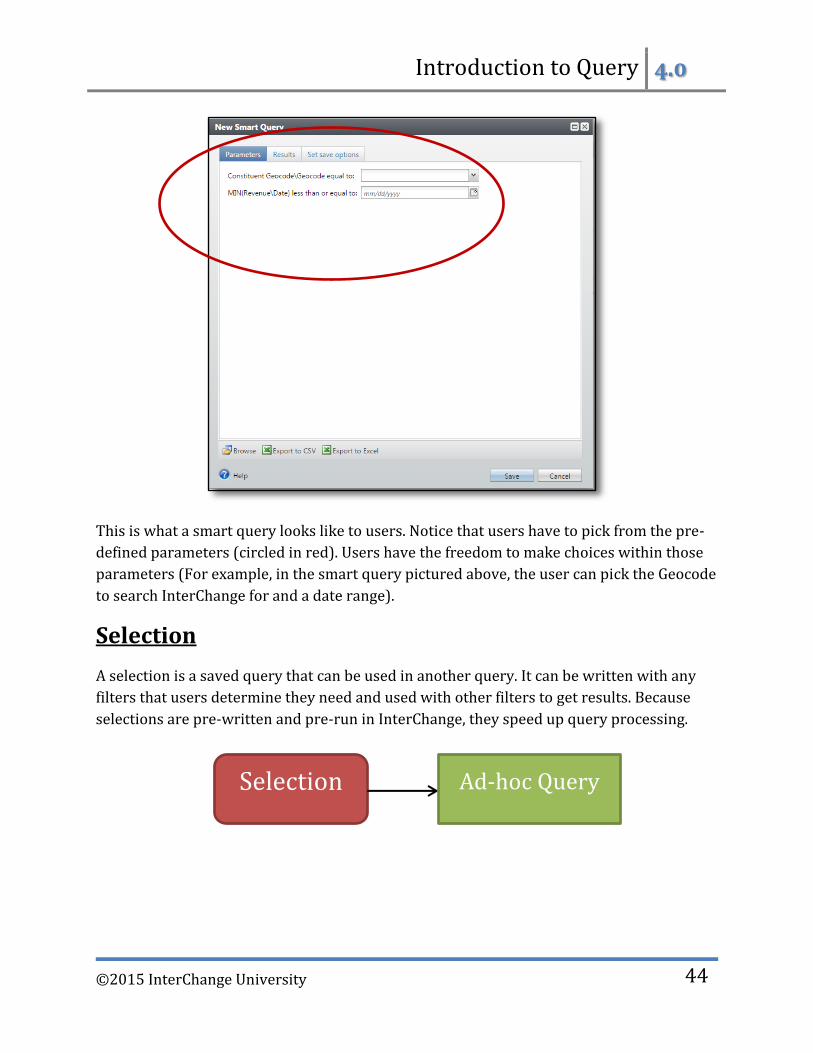
This is what a smart query looks like to users. Notice that users have to pick from the pre-
defined parameters (circled in red). Users have the freedom to make choices within those
parameters (For example, in the smart query pictured above, the user can pick the Geocode
to search InterChange for and a date range).
Selection
A selection is a saved query that can be used in another query. It can be written with any
filters that users determine they need and used with other filters to get results. Because
selections are pre-written and pre-run in InterChange, they speed up query processing.
Selection Ad-hoc Query

Introduction to Query 4.0
©2015 InterChange University
45
This is what selections look like in the Query Designer (circled in red).
This is what it looks like when you make a selection a filter (circled in red).
Introduction to Query 4.0
©2015 InterChange University
46
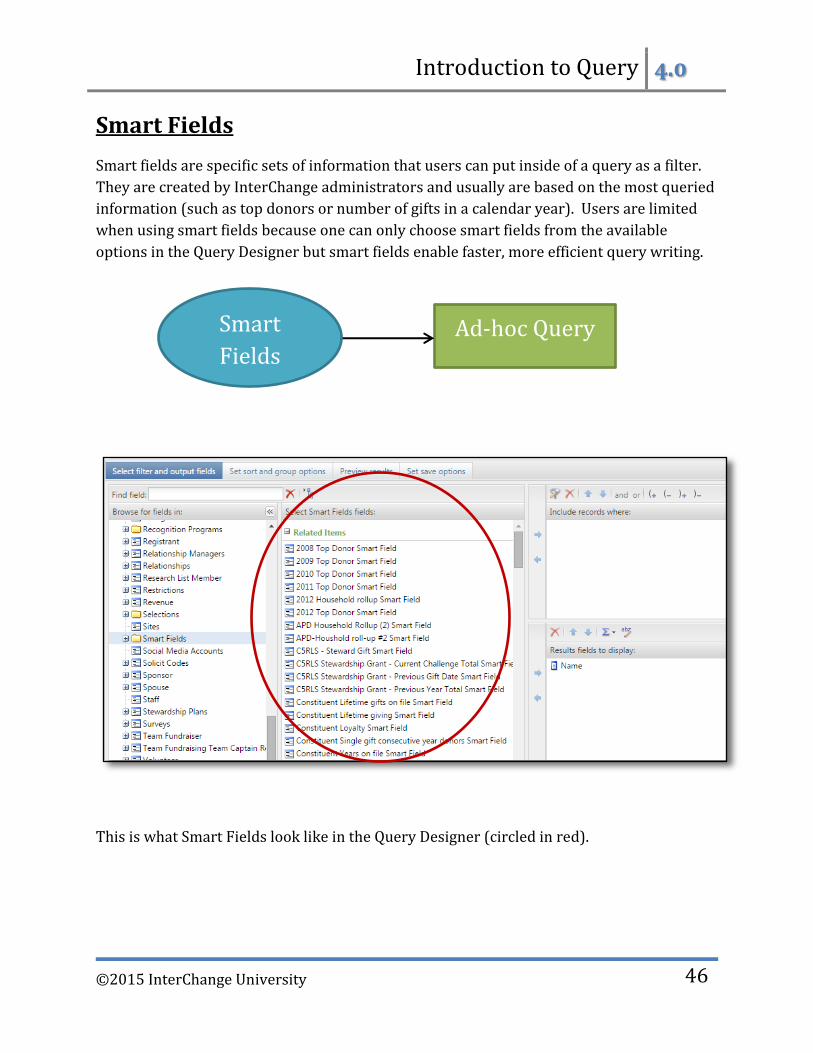
Smart Fields
Smart fields are specific sets of information that users can put inside of a query as a filter.
They are created by InterChange administrators and usually are based on the most queried
information (such as top donors or number of gifts in a calendar year). Users are limited
when using smart fields because one can only choose smart fields from the available
options in the Query Designer but smart fields enable faster, more efficient query writing.
This is what Smart Fields look like in the Query Designer (circled in red).
Ad-hoc Query Smart
Fields

Introduction to Query 4.0
©2015 InterChange University
47
This is what it looks like when you use a Smart Field as a filter (circled in red).

Introduction to Query 4.0
©2015 InterChange University
48
Job Aids-Introduction to Query
How to edit filters in an Ad-hoc Query 1. Go to the Information Library.
2. Find the folder ITQ-Donor Services or ITQ-Fundraisers. Once you click on the
folder, you should see the queries inside of it.
3. Click on the query you need to edit, and then click Edit Definition.
4. When the Query Designer box opens up, go to the Select filters and output fields tab.
Change the filters you need to in the “Include records where” box.
5. Preview the results to make sure the query has been edited correctly.
6. Go to the Set save options tab and save the query under a new name.
How to edit the Donor List Smart Query 1. Go to the Information Library.
2. Click the “Add a smart query” button.
3. From the menu box that appears, click on “Donor List” then click OK.
4. Under the Parameters tab, define your parameters.
5. Go to the Results tab to make sure the smart query results are correct.
6. Go to the Set save options tab and save the smart query under a new name.