introduction playing the piano music menu -...
TRANSCRIPT
CA58Owner’s Manual
Introduction
Playing the Piano
Music Menu
Recorder
Settings
Appendix
About this Owner’s Manual
Before attempting to play this instrument, please read the Introduction section from page 10 of this owner’s manual. This section explains the name and function of each part, how to connect the power cable, and how to turn on the power.
The Playing the Piano section (page 16) provides an overview of the instrument’s commonly used functions, allowing the CA58 digital piano to be enjoyed almost immediately after being connected, while the Music Menu section (page 36) includes information regarding the built-in demonstration songs, Piano Music pieces, Lesson and Finger Exercise features, and Concert Magic function.
The Recorder section (page 48) provides instructions on how to record and play back pieces stored both in the instrument’s internal memory, and also MP3/WAV audio files saved to a USB memory device. The Settings section (page 63) details the various options and settings that can be used to adjust the sound and operation of the instrument.
Finally, the Appendix section (page 124) includes lists for all internal sounds, songs, and drum rhythms, assembly instructions for the CA58 model, MIDI reference information, and full specification details.
Thank you for purchasing this Kawai Concert Artist CA58 digital piano.
This owner’s manual contains important information regarding the instrument’s usage and operation.
Please read all sections carefully, keeping this manual handy for future reference.
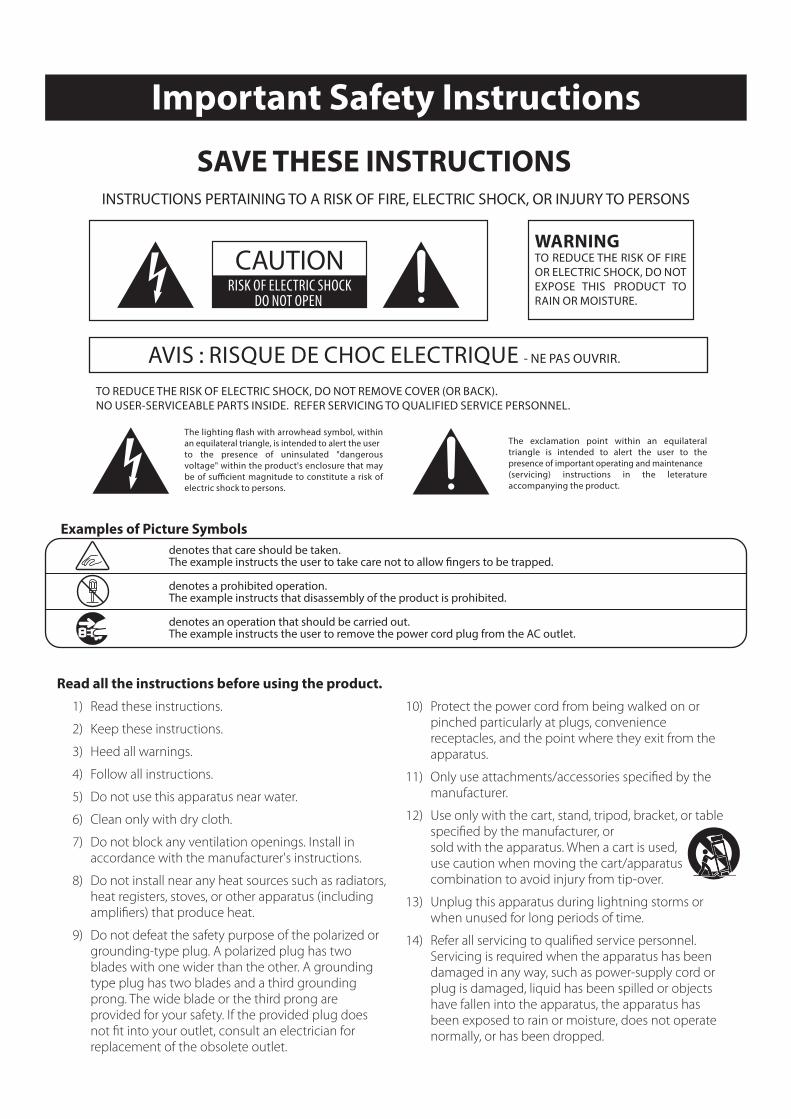
Important Safety Instructions
denotes that care should be taken.The example instructs the user to take care not to allow �ngers to be trapped.
denotes a prohibited operation.The example instructs that disassembly of the product is prohibited.
denotes an operation that should be carried out.The example instructs the user to remove the power cord plug from the AC outlet.
Examples of Picture Symbols
Read all the instructions before using the product.
CAUTIONRISK OF ELECTRIC SHOCK
DO NOT OPEN
AVIS : RISQUE DE CHOC ELECTRIQUE - NE PAS OUVRIR.
TO REDUCE THE RISK OF ELECTRIC SHOCK, DO NOT REMOVE COVER (OR BACK).NO USER-SERVICEABLE PARTS INSIDE. REFER SERVICING TO QUALIFIED SERVICE PERSONNEL.
The lighting �ash with arrowhead symbol, within an equilateral triangle, is intended to alert the user to the presence of uninsulated "dangerous voltage" within the product's enclosure that may be of su�cient magnitude to constitute a risk of electric shock to persons.
The exclamation point within an equilateral triangle is intended to alert the user to the presence of important operating and maintenance (servicing) instructions in the leterature accompanying the product.
WARNINGTO REDUCE THE RISK OF FIRE OR ELECTRIC SHOCK, DO NOT EXPOSE THIS PRODUCT TO RAIN OR MOISTURE.
INSTRUCTIONS PERTAINING TO A RISK OF FIRE, ELECTRIC SHOCK, OR INJURY TO PERSONS
SAVE THESE INSTRUCTIONS
1) Read these instructions.
2) Keep these instructions.
3) Heed all warnings.
4) Follow all instructions.
5) Do not use this apparatus near water.
6) Clean only with dry cloth.
7) Do not block any ventilation openings. Install in accordance with the manufacturer's instructions.
8) Do not install near any heat sources such as radiators, heat registers, stoves, or other apparatus (including ampli�ers) that produce heat.
9) Do not defeat the safety purpose of the polarized or grounding-type plug. A polarized plug has two blades with one wider than the other. A grounding type plug has two blades and a third grounding prong. The wide blade or the third prong are provided for your safety. If the provided plug does not �t into your outlet, consult an electrician for replacement of the obsolete outlet.
10) Protect the power cord from being walked on or pinched particularly at plugs, convenience receptacles, and the point where they exit from the apparatus.
11) Only use attachments/accessories speci�ed by the manufacturer.
12) Use only with the cart, stand, tripod, bracket, or table speci�ed by the manufacturer, or sold with the apparatus. When a cart is used, use caution when moving the cart/apparatus combination to avoid injury from tip-over.
13) Unplug this apparatus during lightning storms or when unused for long periods of time.
14) Refer all servicing to quali�ed service personnel. Servicing is required when the apparatus has been damaged in any way, such as power-supply cord or plug is damaged, liquid has been spilled or objects have fallen into the apparatus, the apparatus has been exposed to rain or moisture, does not operate normally, or has been dropped.

Indique que des précautions doivent être prises.L’exemple indique à l’utilisateur qu’il doit faire attention à ne pas se faire coincer les doigts.
Indique une manipulation interdite.L’exemple indique que le démontage de l’appareil est interdit.
Indique qu’une manipulation doit être effectuée.L’exemple indique à l’utilisateur qu’il doit débrancher le câble d’alimentation de la prise secteur.
Exemples de symboles graphiques
Le symbole de l’éclair avec une pointe de flèche à l’intérieur d’un triangle équilatéral met en garde l’utilisateur contre la présence de tension dangereuse, non isolée, à l’intérieur de l’appareil, dont l’amplitude peut être suffisante pour induire un risque d’électrocution d’une personne.
Le point d’exclamation à l’intérieur d’un triangle équilatéral alerte l’utilisateur de la présence de règles d’utilisation et d’entretien importantes dans la notice qui accompagne l’appareil.
CAUTIONRISK OF ELECTRIC SHOCK
DO NOT OPEN
AVIS : RISQUE DE CHOC ELECTRIQUE - NE PAS OUVRIR.
POUR REDUIRE LES RISQUES D’INCENDIE OU D’ELECTROCUTION, NE DEMONTEZ PAS LE COUVERCLE(OU L’ARRIERE). A L’INTERIEUR, AUCUNE PARTIE N’EST REPARABLE PAR L’UTILISATEUR.POUR LA MAINTENANCE, ADRESSEZ-VOUS A DU PERSONNEL QUALIFIE.
AVERTISSEMENTPOUR REDUIRE LES RISQUESD’INCENDIE OU D’ELECTROCUTION,PROTEGEZ CET APPAREIL DE LAPLUIE OU DE L’HUMIDITE.
CONSERVEZ CES INSTRUCTIONS
Règles de sécurité (Supplémentairespour le Canada)
AVERTISSEMENTIndique un risque potentiel qui peut entraînerla mort, ou de graves lésions, si l’appareil n’est pas manipulé correctement.
L’introduction d’eau, d’aiguilles ou d’épingles à cheveux, peut provoquer une panne ou un court-circuit. Ce produit doit être mis à l’abri des écoulements ou projections d’eau. Ne jamais placer sur le produit des objets contenant des liquides, tels que des vases ou autres récipients.
Faite attention de ne pas introduire un produit étranger à l’intérieur de l’appareil.
Il est recommandé de placer l’instrument à proximité de la prise de courant et de positionner le câble d’alimentation secteur de sorte qu’il puisse être débranché rapidement en cas d’urgence, le courant électrique étant toujoursprésent tant que la prise est branchée même si le bouton de mise en marche est en position Arrêt.
INSTRUCTIONS DE MISE À LA TERRE
Si vous ne le faisiez pas la foudre pourrait provoquer un incendie.Si vous ne le faisiez pas, la surchauffe de l’appareil pourrait provoquer un incendie.
Ce produit n’est pas totalement déconnecté du circuit électrique lorsqu’il est mis hors tension par le bouton d’arrêt. Si l’appareil ne doit pas être utilisé pendant une longue période, débranchezle câble d’alimentation de la prise secteur.
Ce produit doit être mis à la terre. En cas de défaillance matérielle ou de panne, la mise à la terre fournit un chemin de moindrerésistance au courant électrique afin de réduire le risque d’électrocution. Ce produit est équipé d’un câble avec un conducteur deprotection et une fiche de mise à la terre. La fiche doit être branchée dans une prise appropriée correctement installée et mise à laterre conformément à tous les codes et règlements locaux.
DANGER - La connexion incorrecte du conducteur de protection peut présenter un risque d’électrocution.Consultez un électricien ou un réparateur qualifié si vous avez des doutes en ce qui concerne la mise à la terre du produit. Nemodifiez pas la fiche fournie avec le produit – si elle n’est pas adaptée à la prise, faites installer une prise correcte par un électricienqualifié.
[Seuls les produits avec 3P fiche]
PRECAUTIONIndique un risque potentiel qui peut entraîner la détérioration, ou des dommages, pour l’appareil ou ses propriétés, si celui-ci n’est pas manipulé correctement.
Votre piano doit être placé à un endroit tel que sa position n’altère pas sa propre ventilation. Gardez une distance minimum de 5 cm autour de l’instrument pour une aération suffisante.
Description de la l'emplacement de la reference (Le cas échéant): Anglais phrase: The nameplate label is located on the underside of the instruments, as indicated below.Français phrase: La reference commerciale est inscrite sur une etiquette en dessous de votre instrument, conformementa l’indication ci-dessous.
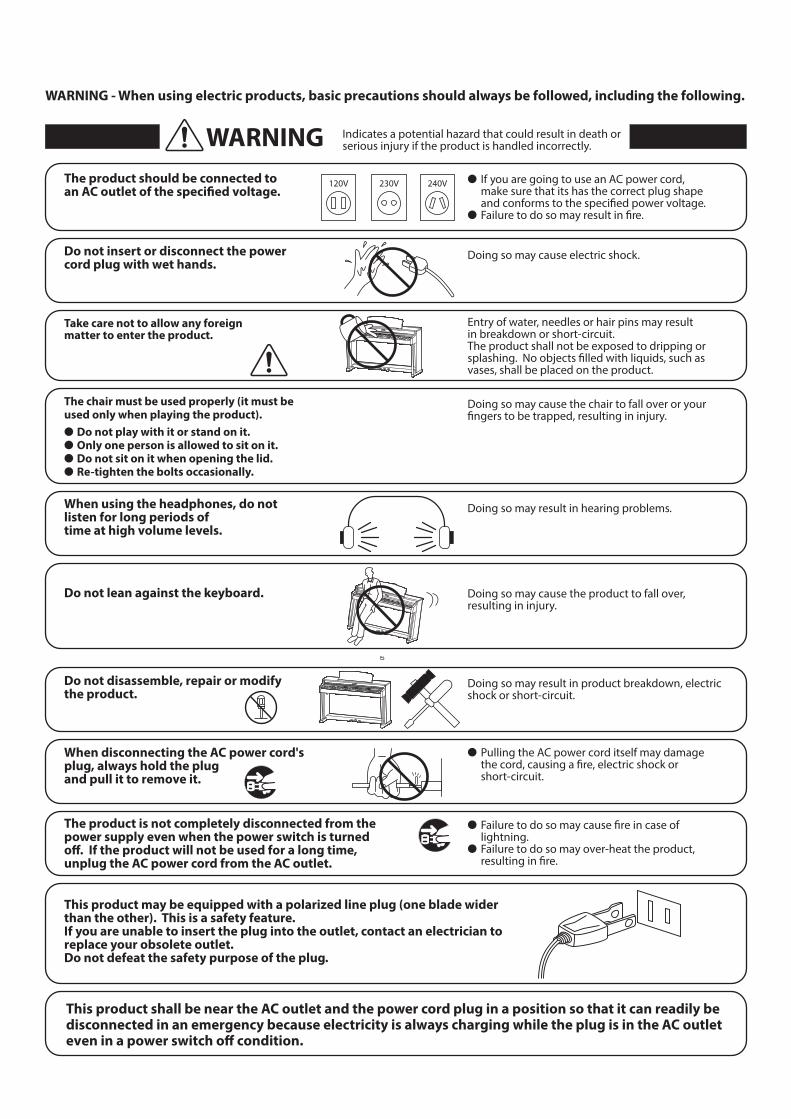
WARNING Indicates a potential hazard that could result in death or serious injury if the product is handled incorrectly.
This product shall be near the AC outlet and the power cord plug in a position so that it can readily be disconnected in an emergency because electricity is always charging while the plug is in the AC outlet even in a power switch o� condition.
This product may be equipped with a polarized line plug (one blade wider than the other). This is a safety feature. If you are unable to insert the plug into the outlet, contact an electrician to replace your obsolete outlet.Do not defeat the safety purpose of the plug.
� Failure to do so may cause �re in case of lightning.� Failure to do so may over-heat the product, resulting in �re.
The product is not completely disconnected from the power supply even when the power switch is turned o�. If the product will not be used for a long time, unplug the AC power cord from the AC outlet.
When disconnecting the AC power cord's plug, always hold the plug and pull it to remove it.
� Pulling the AC power cord itself may damage the cord, causing a �re, electric shock or short-circuit.
Do not disassemble, repair or modify the product.
Doing so may result in product breakdown, electric shock or short-circuit.
When using the headphones, do not listen for long periods of time at high volume levels.
Doing so may result in hearing problems.
The chair must be used properly (it must be used only when playing the product).� Do not play with it or stand on it.� Only one person is allowed to sit on it.� Do not sit on it when opening the lid.� Re-tighten the bolts occasionally.
Doing so may cause the chair to fall over or your �ngers to be trapped, resulting in injury.
Do not insert or disconnect the powercord plug with wet hands.
Doing so may cause electric shock.
The product should be connected to an AC outlet of the speci�ed voltage.
� If you are going to use an AC power cord, make sure that its has the correct plug shape and conforms to the speci�ed power voltage.� Failure to do so may result in �re.
120V 240V230V
Doing so may cause the product to fall over, resulting in injury.
Do not lean against the keyboard.
Entry of water, needles or hair pins may result in breakdown or short-circuit.The product shall not be exposed to dripping or splashing. No objects �lled with liquids, such as vases, shall be placed on the product.
Take care not to allow any foreign matter to enter the product.
WARNING - When using electric products, basic precautions should always be followed, including the following.
� Doing so may result in discoloration or deformation of the product.� When cleaning the product, put a soft cloth in lukewarm water, squeeze it well, then wipe the product.
Do not wipe the product with benzene or thinner.
Failure to do so may damage them, resulting in �re, electric shock or short-circuit.
When connecting the AC power cord and other cords, take care not to get them tangled.
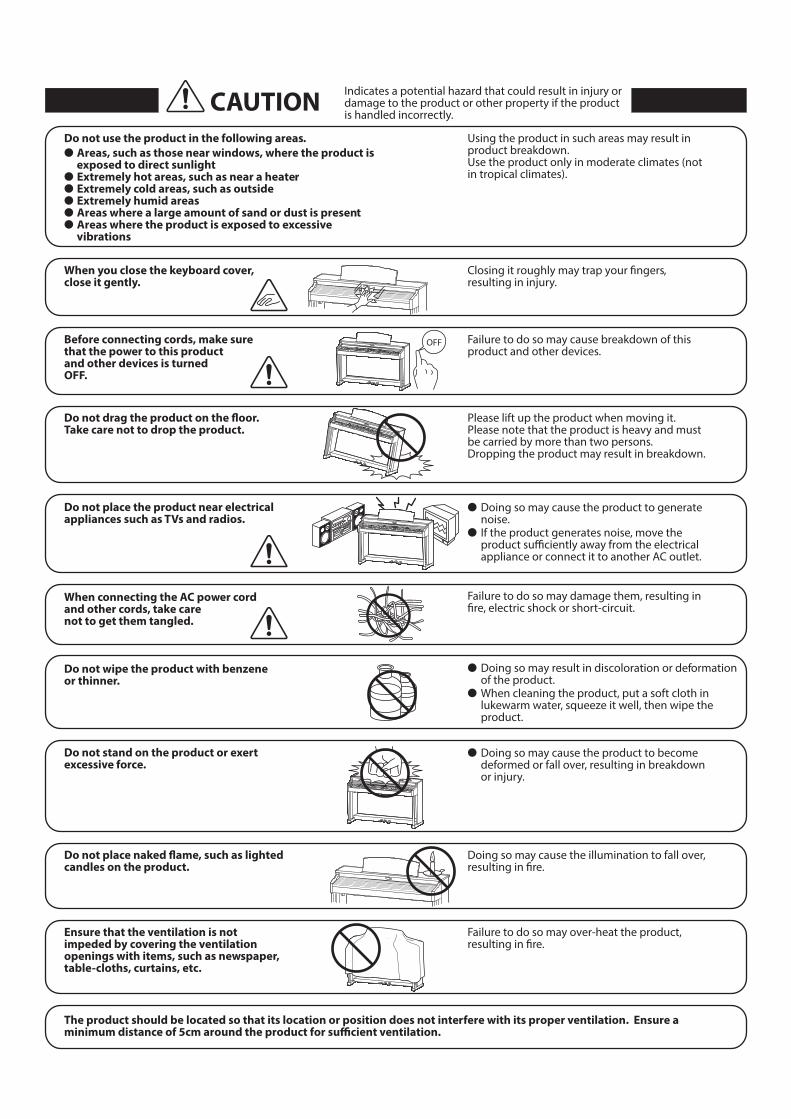
CAUTION Indicates a potential hazard that could result in injury or damage to the product or other property if the product is handled incorrectly.
The product should be located so that its location or position does not interfere with its proper ventilation. Ensure a minimum distance of 5cm around the product for su�cient ventilation.
Failure to do so may cause breakdown of this product and other devices.
Before connecting cords, make sure that the power to this product and other devices is turned OFF.
OFF
� Doing so may cause the product to generate noise.� If the product generates noise, move the product su�ciently away from the electrical appliance or connect it to another AC outlet.
Do not place the product near electricalappliances such as TVs and radios.
Failure to do so may over-heat the product, resulting in �re.
Ensure that the ventilation is not impeded by covering the ventilation openings with items, such as newspaper, table-cloths, curtains, etc.
� Doing so may cause the product to become deformed or fall over, resulting in breakdown or injury.
Do not stand on the product or exertexcessive force.
Please lift up the product when moving it.Please note that the product is heavy and must be carried by more than two persons.Dropping the product may result in breakdown.
Do not drag the product on the �oor.Take care not to drop the product.
Closing it roughly may trap your �ngers, resulting in injury.
When you close the keyboard cover,close it gently.
Using the product in such areas may result in product breakdown.Use the product only in moderate climates (not in tropical climates).
Do not use the product in the following areas.� Areas, such as those near windows, where the product is exposed to direct sunlight� Extremely hot areas, such as near a heater� Extremely cold areas, such as outside� Extremely humid areas� Areas where a large amount of sand or dust is present� Areas where the product is exposed to excessive vibrations
Doing so may cause the illumination to fall over, resulting in �re.
Do not place naked �ame, such as lighted candles on the product.
The product should be serviced by quali�ed service personnel when:� The power supply cord or the plug has been damaged.� Objects have fallen, or liquid has been spilled into the product.� The product has been exposed to rain.� The product does not appear to operate normally or exhibits a marked change in performance.�The product has been dropped, or the enclosure damaged.
Notes on RepairShould an abnormality occur in the product, immediately turn the power OFF, disconnect the power cord plug, and then contact the shop from which the product was purchased.CAUTION:To prevent electric shock, match wide blade of plug to wide slot, fully insert.ATTENTION:Pour éviter les chocs électriques, introduire la lame la plus large de la �che dans la borne correspondante de la prise et pousser jusqu'au fond.
An information on Disposal for usersIf your product is marked with this recycling symbol it means that, at the end of its life, you must dispose of it separately by taking it to an appropriate collection point.You should not mix it with general household waste. Disposing of this product correctly will prevent potential negative e�ects on the environment and human health which could otherwise arise due to inappropriate waste handling.For further details, please contact your local authority. (European Union only)
Instruction for AC power cord (U.K.)IMPORTANTTHE WIRES IN THIS MAINS LEAD ARE COLOURED IN ACCORDANCE WITH THE FOLLOWING CODE.
BLUE : NEUTRALBROWN : LIVE
As the colours of the wires in the mains lead of this apparatus may not correspond with the coloured markings identifying the terminals in your plug, proceed as follows:The wire which is coloured BLUE must be connected to the terminal which is marked with the letter N or coloured BLACK.The wire which is coloured BROWN must be connected to the terminal which is marked with the letter L or coloured RED.Do not plug either terminal of the power cord to the ground of AC outlet on the wall.
FCC Information (U.S.A)CAUTION : Changes or modi�cations not expressly approved by the party responsible for compliance could void the user’s authority to operate the equipment.
NOTE : This equipment has been tested and found to comply with the limits for a Class B digital device, pursuant to Part 15 of the FCC Rules. These limits are designed to provide reasonable protection against harmful interference in a residential installation. This equipment generates, uses and can radiate radio frequency energy and, if not installed and used in accordance with the instructions, may cause harmful interference to radio communications. However, there is no guarantee that interference will not occur in a particular installation. If this equipment does cause harmful interference to radio or television reception, which can be determined by turning the equipment o� and on, the user is encouraged to try to correct the interference by one or more of the following measures:
• Reorient or relocate the receiving antenna.• Increase the separation between the equipment and receiver.• Connect the equipment into an outlet on a circuit di�erent from that to which the receiver is connected.• Consult the dealer or an experienced radio/TV technician for help.
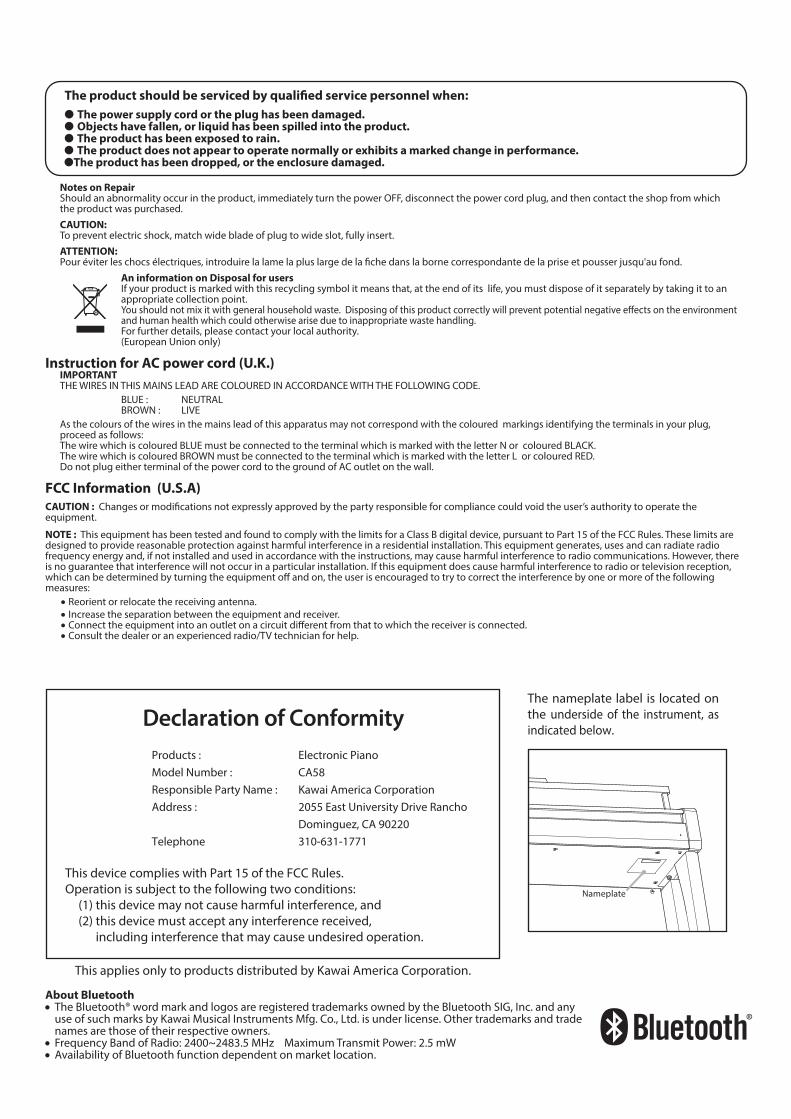
The nameplate label is located on the underside of the instrument, as indicated below.
Declaration of Conformity Products : Electronic Piano Model Number : CA58 Responsible Party Name : Kawai America Corporation Address : 2055 East University Drive Rancho Dominguez, CA 90220 Telephone 310-631-1771
This device complies with Part 15 of the FCC Rules.Operation is subject to the following two conditions:
(1) this device may not cause harmful interference, and(2) this device must accept any interference received,
including interference that may cause undesired operation.
This applies only to products distributed by Kawai America Corporation.
About Bluetooth• The Bluetooth® word mark and logos are registered trademarks owned by the Bluetooth SIG, Inc. and any
use of such marks by Kawai Musical Instruments Mfg. Co., Ltd. is under license. Other trademarks and trade names are those of their respective owners.
• Frequency Band of Radio: 2400~2483.5 MHz Maximum Transmit Power: 2.5 mW• Availability of Bluetooth function dependent on market location.
Nameplate
8
Table of Contents
Important Safety Instructions . . . . . . . . . . . . . . . . . . . . . . . . . . . 3
Table of Contents . . . . . . . . . . . . . . . . . . . . . . . . . . . . . . . . . . . . . . 8
Introduction
Welcome to the Concert Artist . . . . . . . . . . . . . . . . . . . . . . . . . 10
1. Feature Highlights . . . . . . . . . . . . . . . . . . . . . . . . . . . . . . 10
2. Owner’s Manual Conventions . . . . . . . . . . . . . . . . . . . . 11
Part Names and Functions . . . . . . . . . . . . . . . . . . . . . . . . . . . . . 12
Setting Up the Piano . . . . . . . . . . . . . . . . . . . . . . . . . . . . . . . . . . 14
Adjusting the Volume / Using Headphones . . . . . . . . . . . . . 15
Playing the Piano
Using the Pedals . . . . . . . . . . . . . . . . . . . . . . . . . . . . . . . . . . . . . . 16
Selecting Sounds . . . . . . . . . . . . . . . . . . . . . . . . . . . . . . . . . . . . . . 17
Dual Mode . . . . . . . . . . . . . . . . . . . . . . . . . . . . . . . . . . . . . . . . . . . . 18
Split Mode . . . . . . . . . . . . . . . . . . . . . . . . . . . . . . . . . . . . . . . . . . . . 20
Four Hands Mode . . . . . . . . . . . . . . . . . . . . . . . . . . . . . . . . . . . . . 22
Reverb . . . . . . . . . . . . . . . . . . . . . . . . . . . . . . . . . . . . . . . . . . . . . . . . 24
Effects . . . . . . . . . . . . . . . . . . . . . . . . . . . . . . . . . . . . . . . . . . . . . . . . 26
Virtual Technician . . . . . . . . . . . . . . . . . . . . . . . . . . . . . . . . . . . . . 28
1. Smart Mode . . . . . . . . . . . . . . . . . . . . . . . . . . . . . . . . . . . . 28
2. Advanced Mode . . . . . . . . . . . . . . . . . . . . . . . . . . . . . . . . 29
Metronome / Drum Rhythms . . . . . . . . . . . . . . . . . . . . . . . . . . 30
Registration Memories . . . . . . . . . . . . . . . . . . . . . . . . . . . . . . . . 32
1. Selecting a Registration memory . . . . . . . . . . . . . . . . . 32
2. Storing a Registration memory . . . . . . . . . . . . . . . . . . . 33
3. Registration Edit menu . . . . . . . . . . . . . . . . . . . . . . . . . . 34
Panel Lock . . . . . . . . . . . . . . . . . . . . . . . . . . . . . . . . . . . . . . . . . . . . 35
Music Menu
Demo Songs . . . . . . . . . . . . . . . . . . . . . . . . . . . . . . . . . . . . . . . . . . 36
Piano Music . . . . . . . . . . . . . . . . . . . . . . . . . . . . . . . . . . . . . . . . . . . 37
Lesson Function . . . . . . . . . . . . . . . . . . . . . . . . . . . . . . . . . . . . . . . 38
1. Selecting a lesson book/song . . . . . . . . . . . . . . . . . . . . 38
2. Listening to the selected lesson song . . . . . . . . . . . . . 39
3. Lesson Function settings . . . . . . . . . . . . . . . . . . . . . . . . 40
4. Repeating sections of a lesson song . . . . . . . . . . . . . . 41
5. Recording a lesson song practice . . . . . . . . . . . . . . . . 42
6. Finger Exercises . . . . . . . . . . . . . . . . . . . . . . . . . . . . . . . . . 43
Music Menus (cont.)
Concert Magic . . . . . . . . . . . . . . . . . . . . . . . . . . . . . . . . . . . . . . . . 44
1. Performing a Concert Magic song . . . . . . . . . . . . . . . . 44
2. Concert Magic demo mode . . . . . . . . . . . . . . . . . . . . . . 45
3. Concert Magic settings . . . . . . . . . . . . . . . . . . . . . . . . . . 46
4. Concert Magic song arrangement types . . . . . . . . . . 47
Recorder
Song Recorder (Internal Memory) . . . . . . . . . . . . . . . . . . . . . . . . . . . 48
1. Recording a song . . . . . . . . . . . . . . . . . . . . . . . . . . . . . . . 48
2. Playing a song . . . . . . . . . . . . . . . . . . . . . . . . . . . . . . . . . . 50
3. Internal Recorder Edit menu . . . . . . . . . . . . . . . . . . . . . 51
4. Erasing a part/song . . . . . . . . . . . . . . . . . . . . . . . . . . . . . 52
5. Converting a song to an audio file . . . . . . . . . . . . . . . . 53
Audio Record/Playback (USB Memory) . . . . . . . . . . . . . . . . . . . . . 54
1. Recording a MP3/WAV audio file . . . . . . . . . . . . . . . . . 54
2. Playing an MP3/WAV audio file . . . . . . . . . . . . . . . . . . . 56
3. Playing a MIDI song file . . . . . . . . . . . . . . . . . . . . . . . . . . 58
4. USB Recorder Edit menu . . . . . . . . . . . . . . . . . . . . . . . . . 60
5. Converting a MIDI song file to an MP3/WAV audio file . . . . . . . . . . . . . . . . . . . . . . . . 61
6. Overdubbing a MP3/WAV audio file . . . . . . . . . . . . . . 62
Settings
Function menus . . . . . . . . . . . . . . . . . . . . . . . . . . . . . . . . . . . . . . . 63
Basic Settings . . . . . . . . . . . . . . . . . . . . . . . . . . . . . . . . . . . . . . . . . 64
1. Key Transpose . . . . . . . . . . . . . . . . . . . . . . . . . . . . . . . . . . 65
2. Song Transpose . . . . . . . . . . . . . . . . . . . . . . . . . . . . . . . . . 66
3. Tone Control . . . . . . . . . . . . . . . . . . . . . . . . . . . . . . . . . . . 67
User Tone Control . . . . . . . . . . . . . . . . . . . . . . . . . . . . . . . 68
4. Speaker Volume . . . . . . . . . . . . . . . . . . . . . . . . . . . . . . . . 69
5. Line In Level . . . . . . . . . . . . . . . . . . . . . . . . . . . . . . . . . . . . 70
6. Tuning . . . . . . . . . . . . . . . . . . . . . . . . . . . . . . . . . . . . . . . . . 71
7. Damper Hold . . . . . . . . . . . . . . . . . . . . . . . . . . . . . . . . . . . 72
8. Split . . . . . . . . . . . . . . . . . . . . . . . . . . . . . . . . . . . . . . . . . . . 73
9. Four Hands . . . . . . . . . . . . . . . . . . . . . . . . . . . . . . . . . . . . . 74
10. Bluetooth® MIDI . . . . . . . . . . . . . . . . . . . . . . . . . . . . . . . . 75
11. LCD Contrast . . . . . . . . . . . . . . . . . . . . . . . . . . . . . . . . . . . 76
12. Startup Setting . . . . . . . . . . . . . . . . . . . . . . . . . . . . . . . . . 77
13. Factory Reset . . . . . . . . . . . . . . . . . . . . . . . . . . . . . . . . . . . 78
14. Auto Power Off . . . . . . . . . . . . . . . . . . . . . . . . . . . . . . . . . 79
9
Settings (cont.)
Virtual Technician Settings . . . . . . . . . . . . . . . . . . . . . . . . . . . . 80
1. Touch Curve . . . . . . . . . . . . . . . . . . . . . . . . . . . . . . . . . . . . 82
User Touch Curve . . . . . . . . . . . . . . . . . . . . . . . . . . . . . . . 83
2. Voicing . . . . . . . . . . . . . . . . . . . . . . . . . . . . . . . . . . . . . . . . . 84
User Voicing . . . . . . . . . . . . . . . . . . . . . . . . . . . . . . . . . . . . 85
3. Damper Resonance . . . . . . . . . . . . . . . . . . . . . . . . . . . . . 86
4. Damper Noise . . . . . . . . . . . . . . . . . . . . . . . . . . . . . . . . . . 87
5. String Resonance . . . . . . . . . . . . . . . . . . . . . . . . . . . . . . . 88
6. Undamped String Resonance . . . . . . . . . . . . . . . . . . . . 89
7. Cabinet Resonance . . . . . . . . . . . . . . . . . . . . . . . . . . . . . 90
8. Key-off Effect . . . . . . . . . . . . . . . . . . . . . . . . . . . . . . . . . . . 91
9. Fall-back Noise . . . . . . . . . . . . . . . . . . . . . . . . . . . . . . . . . 92
10. Hammer Delay . . . . . . . . . . . . . . . . . . . . . . . . . . . . . . . . . . 93
11. Topboard Simulation . . . . . . . . . . . . . . . . . . . . . . . . . . . . 94
12. Decay Time . . . . . . . . . . . . . . . . . . . . . . . . . . . . . . . . . . . . . 95
13. Minimum Touch . . . . . . . . . . . . . . . . . . . . . . . . . . . . . . . . 96
14. Stretch Tuning . . . . . . . . . . . . . . . . . . . . . . . . . . . . . . . . . . 97
User Tuning . . . . . . . . . . . . . . . . . . . . . . . . . . . . . . . . . . . . 98
15. Temperament . . . . . . . . . . . . . . . . . . . . . . . . . . . . . . . . . . 99
User Temperament . . . . . . . . . . . . . . . . . . . . . . . . . . . . . 100
16. Temperament Key . . . . . . . . . . . . . . . . . . . . . . . . . . . . . 101
17. Key Volume . . . . . . . . . . . . . . . . . . . . . . . . . . . . . . . . . . . . 102
User Key Volume . . . . . . . . . . . . . . . . . . . . . . . . . . . . . . . 103
18. Half-Pedal Adjust . . . . . . . . . . . . . . . . . . . . . . . . . . . . . . 104
19. Soft Pedal Depth . . . . . . . . . . . . . . . . . . . . . . . . . . . . . . . 105
Phones Settings . . . . . . . . . . . . . . . . . . . . . . . . . . . . . . . . . . . . . . 106
1. SHS Mode . . . . . . . . . . . . . . . . . . . . . . . . . . . . . . . . . . . . . 107
2. Phones Type . . . . . . . . . . . . . . . . . . . . . . . . . . . . . . . . . . . 108
3. Phones Volume . . . . . . . . . . . . . . . . . . . . . . . . . . . . . . . . 109
USB MIDI (USB to Host connector) . . . . . . . . . . . . . . . . . . . . . . . . . . . 110
USB Menu . . . . . . . . . . . . . . . . . . . . . . . . . . . . . . . . . . . . . . . . . . . 111
1. Load Song . . . . . . . . . . . . . . . . . . . . . . . . . . . . . . . . . . . . . 112
2. Load Registration All . . . . . . . . . . . . . . . . . . . . . . . . . . . 113
3. Load Registration Single . . . . . . . . . . . . . . . . . . . . . . . . 114
4. Load Startup Setting . . . . . . . . . . . . . . . . . . . . . . . . . . . 115
5. Save Internal Song . . . . . . . . . . . . . . . . . . . . . . . . . . . . . 116
6. Save SMF Song . . . . . . . . . . . . . . . . . . . . . . . . . . . . . . . . 117
7. Save Registration All . . . . . . . . . . . . . . . . . . . . . . . . . . . 118
Settings (cont.)
8. Save Registration Single . . . . . . . . . . . . . . . . . . . . . . . . 119
9. Save Startup Setting . . . . . . . . . . . . . . . . . . . . . . . . . . . 120
10. Rename File . . . . . . . . . . . . . . . . . . . . . . . . . . . . . . . . . . . 121
11. Delete File . . . . . . . . . . . . . . . . . . . . . . . . . . . . . . . . . . . . . 122
12. Format USB . . . . . . . . . . . . . . . . . . . . . . . . . . . . . . . . . . . . 123
Appendix
Assembly Instructions . . . . . . . . . . . . . . . . . . . . . . . . . . . . . . . . 124
Connecting to Other Devices . . . . . . . . . . . . . . . . . . . . . . . . . 128
Jack Panel . . . . . . . . . . . . . . . . . . . . . . . . . . . . . . . . . . . . . . . . . 129
Headphone Panel . . . . . . . . . . . . . . . . . . . . . . . . . . . . . . . . . . 129
Troubleshooting . . . . . . . . . . . . . . . . . . . . . . . . . . . . . . . . . . . . . 130
Demo Song List . . . . . . . . . . . . . . . . . . . . . . . . . . . . . . . . . . . . . . 133
Sound and Program Change Number List . . . . . . . . . . . . . 134
Drum Rhythm List . . . . . . . . . . . . . . . . . . . . . . . . . . . . . . . . . . . . 135
Specifications . . . . . . . . . . . . . . . . . . . . . . . . . . . . . . . . . . . . . . . . 136
Table of Contents
10
Intr
oduc
tion
1 Feature Highlights
Grand Feel Compact wooden-key action with Ivory Touch key surfaces and ‘Let-Off’ mechanism
The CA58 digital piano utilises Kawai’s latest Grand Feel Compact keyboard action, which draws upon 90 years of acoustic piano craftsmanship to provide an exceptionally realistic playing experience. All 88 black and white keys are crafted entirely from long pieces of wood, with finely textured Ivory Touch key surfaces applied to assist playing control.
As with an acoustic grand piano action, the keys rest on a metal balance pin and move with a smooth seesaw-like motion, while the extended pivot length ensures a consistent, evenly-balanced touch weight – even when playing towards the back of the key. The Grand Feel Compact action also incorporates grade-weighted hammers, bass region counterweights, and let-off simulation for added authenticity, while its accurate triple-sensor key detection system allows rapidly repeated notes such as trills to be performed smoothly, without unnatural breaks in sound.
Shigeru Kawai SK-EX and Kawai EX instruments reproduced with Harmonic Imaging sound technology
The CA58 digital piano captures the magnificent tone of Kawai’s flagship Shigeru Kawai SK-EX full concert grand piano. Widely regarded as the ‘premier pianos of Japan’, Shigeru Kawai instruments grace the stages of concert halls and musical institutions throughout the world, and are prized for their exceptional tonal clarity. In addition, the CA58 also features the distinctive sound of Kawai’s highly acclaimed EX concert grand piano, which has frequently been selected by professional pianists in such prestigious events as the Chopin, Tchaikovsky, and Rubinstein international piano competitions, among others.
Both instruments have been carefully recorded, meticulously analysed, and faithfully reproduced with full 88-key sampling using Harmonic Imaging™ sound technology. This unique process accurately recreates the broad dynamic range of the original grand pianos, affording pianists an extraordinary level of expressiveness ranging from the softest pianissimo to the strongest, boldest fortissimo.
Strong selection of additional instrument sounds
Supplementing the realistic acoustic piano voices, the CA58 digital piano also features an excellent selection of additional instrument sounds, ranging from electric pianos and drawbar and church organs, to strings, human choirs, and even guitar sounds, inviting musicians to add greater variety to their performances.
Furthermore, the Dual playing mode also allows two different sounds, such as grand piano and strings, to be layered together, while the Split and Four Hands modes divide the keyboard into two independent sections. The volume balances for each playing mode can also be adjusted quickly and easily using the real-time panel controls.
Virtual Technician adjustments to personalise the instrument’s character
The CA58 digital piano’s Virtual Technician feature allows various characteristics of the selected acoustic piano, electric piano, or harpsichord sound to be shaped at the touch of a button, with settings to adjust voicing and regulation, string, damper, and cabinet resonances, and subtle hammer, damper, and key release noises. It is even possible to adjust the precise tuning and volume of individual notes, before storing one’s personalised instrument configuration to memory.
USB to Device functionality, with MP3/WAV file recording and playback
The CA58 digital piano is equipped with USB connectors that not only allow the instrument to be connected to a computer for MIDI use, but also to load and save data to USB memory devices directly. This ‘USB to Device’ feature allows instrument settings or recorded songs stored in internal memory to be saved to USB for posterity, or standard MIDI files (SMF) downloaded from the internet to be conveniently played back without additional hardware.
USB memory devices can also be used to play back MP3 or WAV audio files, allowing musicians to learn the chords or melody for a new piece, or to simply play along with their favourite songs. It is even possible to save performances as MP3 or WAV files for emailing to friends and family, listening to on the move, or for further editing using an audio workstation.
Integrated Bluetooth® MIDI connectivity
In addition to standard MIDI jacks for connecting to other instruments, the CA58 digital piano also boasts integrated Bluetooth MIDI technology that allows the instrument to communicate with supported smart devices wirelessly. Once connected to a phone, tablet, or laptop, CA58 digital piano owners can enjoy a wide variety of exciting music-related apps that enhance their learning and playing experience without additional cables.
* Availability of Bluetooth function dependent on market location.
Welcome to the Concert Artist
11
Intr
oduc
tion
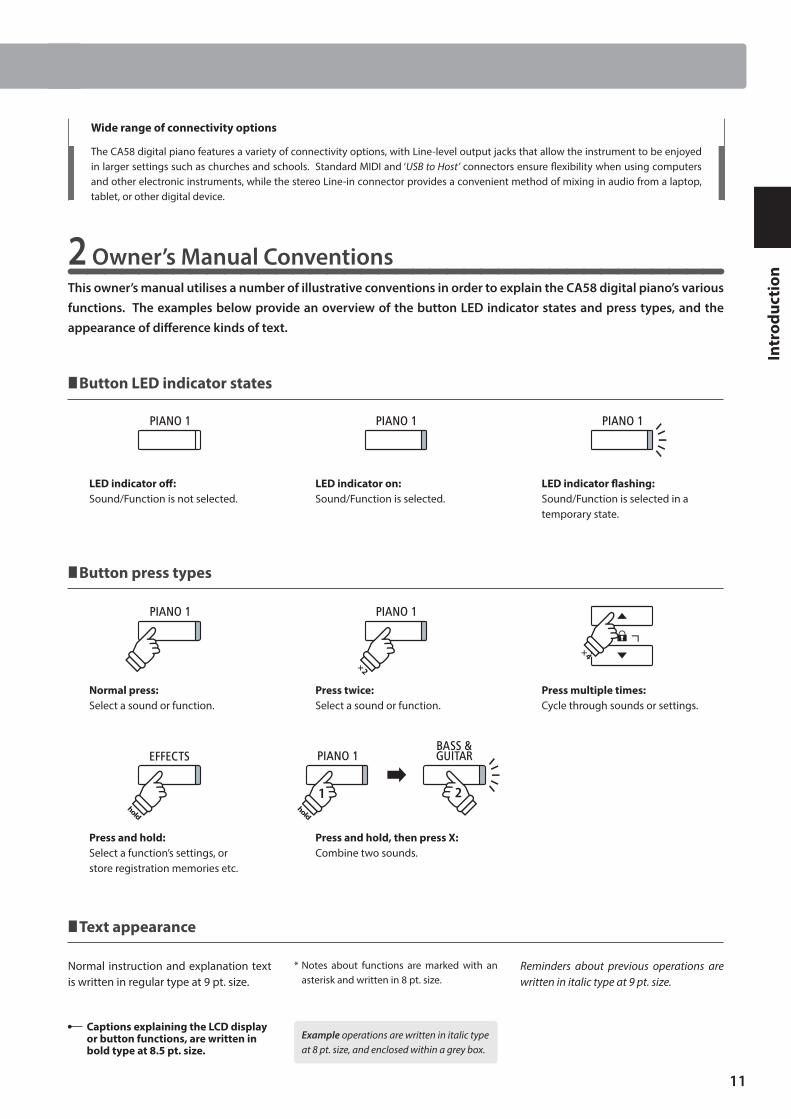
2 Owner’s Manual ConventionsThis owner’s manual utilises a number of illustrative conventions in order to explain the CA58 digital piano’s various functions. The examples below provide an overview of the button LED indicator states and press types, and the appearance of difference kinds of text.
Button LED indicator states
LED indicator off:Sound/Function is not selected.
LED indicator on:Sound/Function is selected.
LED indicator flashing:Sound/Function is selected in a temporary state.
Button press types
Normal press:Select a sound or function.
Press twice:Select a sound or function.
Press multiple times:Cycle through sounds or settings.
× 2
× 4
Press and hold:Select a function’s settings, or store registration memories etc.
Press and hold, then press X:Combine two sounds.
holdhold
Text appearance
Normal instruction and explanation text is written in regular type at 9 pt. size.
* Notes about functions are marked with an asterisk and written in 8 pt. size.
Reminders about previous operations are written in italic type at 9 pt. size.
Captions explaining the LCD display or button functions, are written in bold type at 8.5 pt. size.
Example operations are written in italic type at 8 pt. size, and enclosed within a grey box.
Wide range of connectivity options
The CA58 digital piano features a variety of connectivity options, with Line-level output jacks that allow the instrument to be enjoyed in larger settings such as churches and schools. Standard MIDI and ‘USB to Host’ connectors ensure flexibility when using computers and other electronic instruments, while the stereo Line-in connector provides a convenient method of mixing in audio from a laptop, tablet, or other digital device.
Welcome to the Concert Artist
12
Intr
oduc
tion
Part Names and Functions
CA58
f
hi
j
k
l
m
o p q r
n
g
e
d
c
a
b
13
Intr
oduc
tion
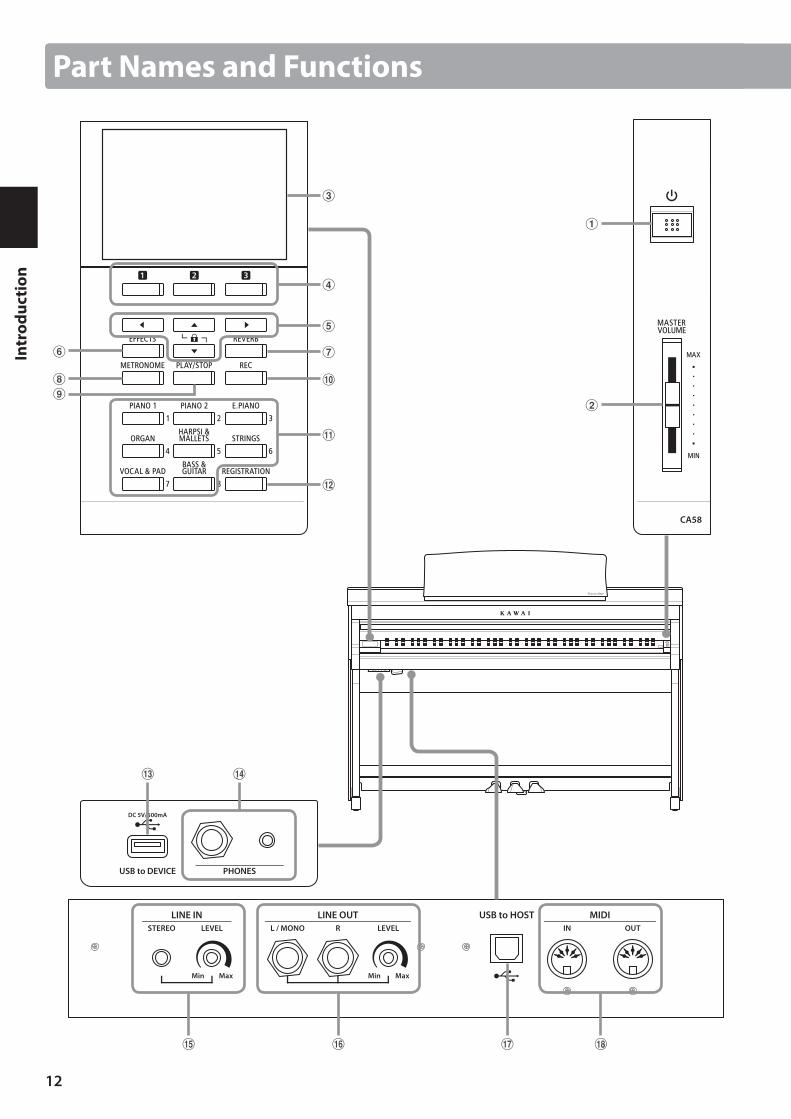
a POWER switchThis switch is used to turn the instrument on/off. Be sure to turn off the instrument after playing.
* The CA58 digital piano features a power saving mode that can turn off the instrument automatically after a specified period of inactivity. For more information, please refer to the ‘Auto Power Off’ setting on page 79.
b MASTER VOLUME sliderThis slider controls the master volume level of the instrument’s built-in speakers or headphones, if connected.
* The MASTER VOLUME slider will not affect the volume level of the LINE OUT connectors.
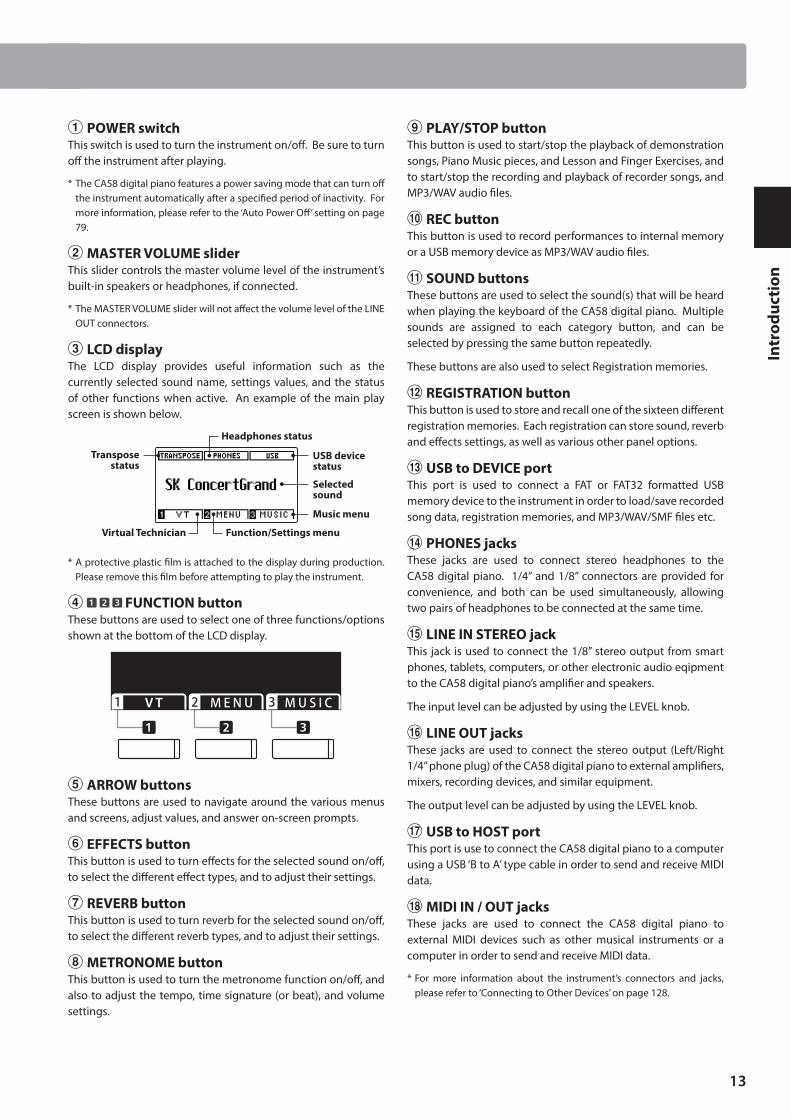
c LCD displayThe LCD display provides useful information such as the currently selected sound name, settings values, and the status of other functions when active. An example of the main play screen is shown below.
USB device status
Transpose status
Headphones status
Selected sound
Music menu
Function/Settings menuVirtual Technician
* A protective plastic film is attached to the display during production. Please remove this film before attempting to play the instrument.
d FUNCTION buttonThese buttons are used to select one of three functions/options shown at the bottom of the LCD display.
e ARROW buttonsThese buttons are used to navigate around the various menus and screens, adjust values, and answer on-screen prompts.
f EFFECTS buttonThis button is used to turn effects for the selected sound on/off, to select the different effect types, and to adjust their settings.
g REVERB buttonThis button is used to turn reverb for the selected sound on/off, to select the different reverb types, and to adjust their settings.
h METRONOME buttonThis button is used to turn the metronome function on/off, and also to adjust the tempo, time signature (or beat), and volume settings.
i PLAY/STOP buttonThis button is used to start/stop the playback of demonstration songs, Piano Music pieces, and Lesson and Finger Exercises, and to start/stop the recording and playback of recorder songs, and MP3/WAV audio files.
j REC buttonThis button is used to record performances to internal memory or a USB memory device as MP3/WAV audio files.
k SOUND buttonsThese buttons are used to select the sound(s) that will be heard when playing the keyboard of the CA58 digital piano. Multiple sounds are assigned to each category button, and can be selected by pressing the same button repeatedly.
These buttons are also used to select Registration memories.
l REGISTRATION buttonThis button is used to store and recall one of the sixteen different registration memories. Each registration can store sound, reverb and effects settings, as well as various other panel options.
m USB to DEVICE portThis port is used to connect a FAT or FAT32 formatted USB memory device to the instrument in order to load/save recorded song data, registration memories, and MP3/WAV/SMF files etc.
n PHONES jacksThese jacks are used to connect stereo headphones to the CA58 digital piano. 1/4” and 1/8” connectors are provided for convenience, and both can be used simultaneously, allowing two pairs of headphones to be connected at the same time.
o LINE IN STEREO jackThis jack is used to connect the 1/8” stereo output from smart phones, tablets, computers, or other electronic audio eqipment to the CA58 digital piano’s amplifier and speakers.
The input level can be adjusted by using the LEVEL knob.
p LINE OUT jacksThese jacks are used to connect the stereo output (Left/Right 1/4” phone plug) of the CA58 digital piano to external amplifiers, mixers, recording devices, and similar equipment.
The output level can be adjusted by using the LEVEL knob.
q USB to HOST portThis port is use to connect the CA58 digital piano to a computer using a USB ‘B to A’ type cable in order to send and receive MIDI data.
r MIDI IN / OUT jacksThese jacks are used to connect the CA58 digital piano to external MIDI devices such as other musical instruments or a computer in order to send and receive MIDI data.
* For more information about the instrument’s connectors and jacks, please refer to ‘Connecting to Other Devices’ on page 128.
Part Names and Functions
14
Intr
oduc
tion
Setting Up the Piano
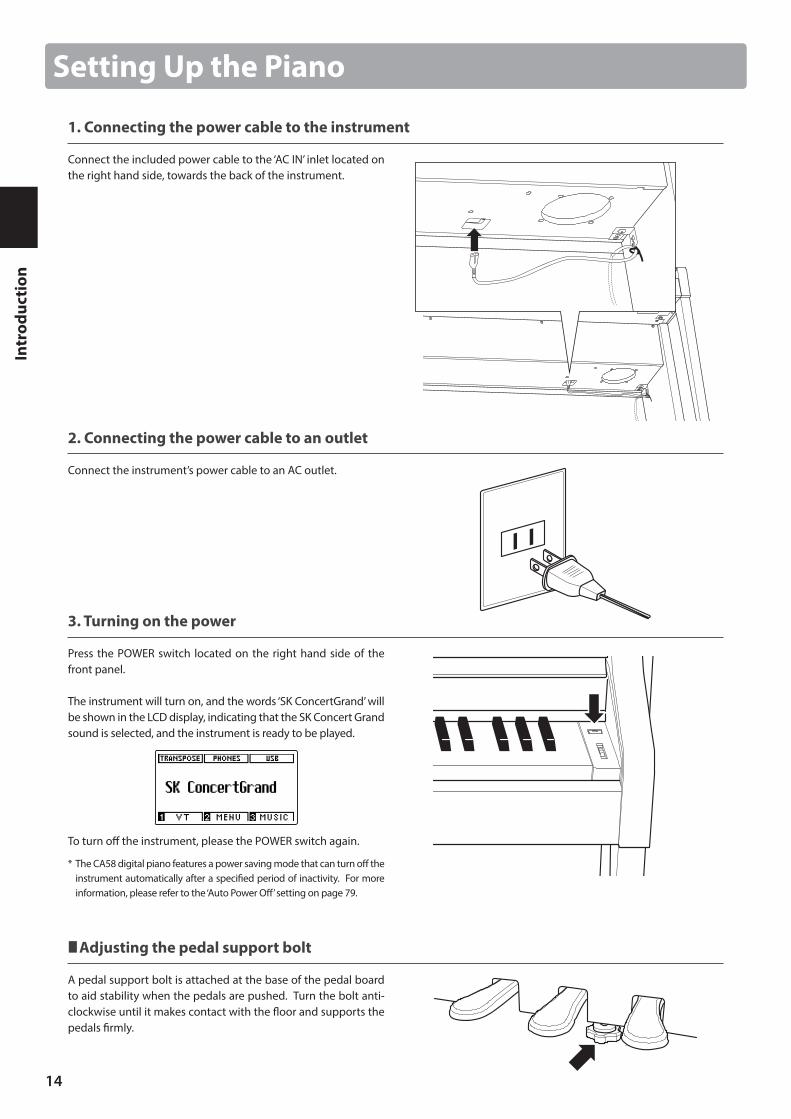
1. Connecting the power cable to the instrument
Connect the included power cable to the ‘AC IN’ inlet located on the right hand side, towards the back of the instrument.
2. Connecting the power cable to an outlet
Connect the instrument’s power cable to an AC outlet.
3. Turning on the power
Press the POWER switch located on the right hand side of the front panel.
The instrument will turn on, and the words ‘SK ConcertGrand’ will be shown in the LCD display, indicating that the SK Concert Grand sound is selected, and the instrument is ready to be played.
To turn off the instrument, please the POWER switch again.
* The CA58 digital piano features a power saving mode that can turn off the instrument automatically after a specified period of inactivity. For more information, please refer to the ‘Auto Power Off’ setting on page 79.
Adjusting the pedal support bolt
A pedal support bolt is attached at the base of the pedal board to aid stability when the pedals are pushed. Turn the bolt anti-clockwise until it makes contact with the floor and supports the pedals firmly.
15
Intr
oduc
tion
Adjusting the Volume / Using Headphones
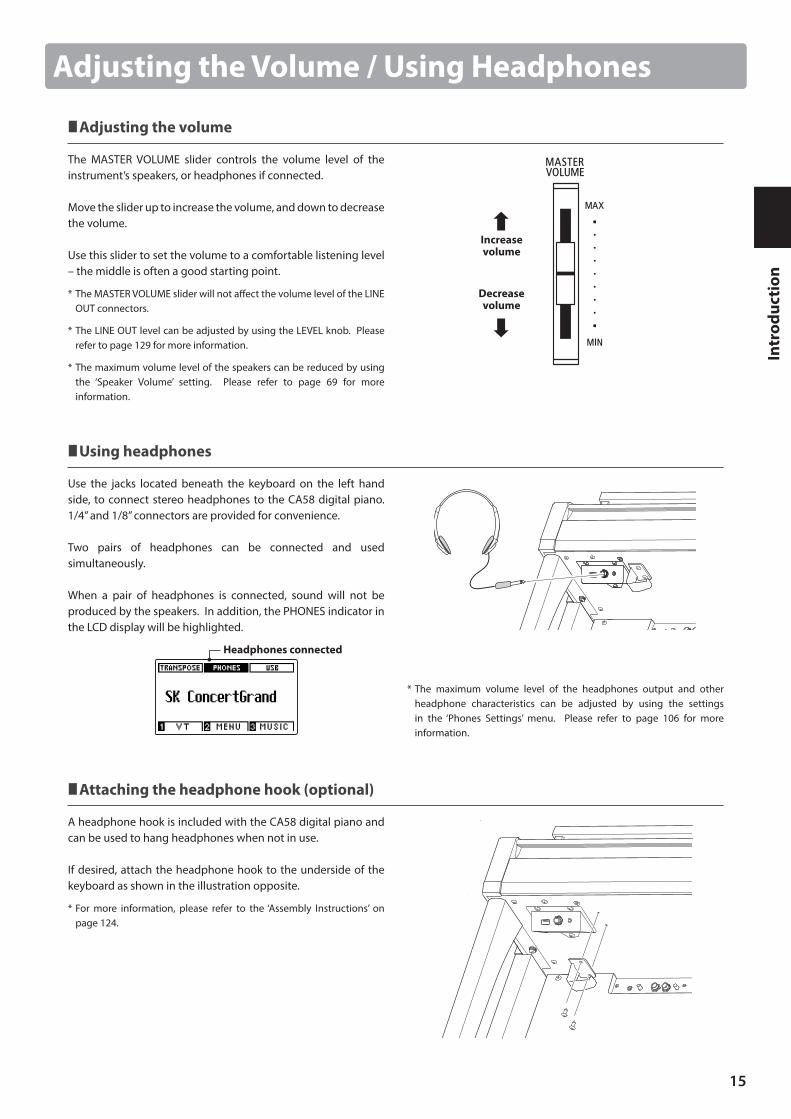
Adjusting the volume
The MASTER VOLUME slider controls the volume level of the instrument’s speakers, or headphones if connected.
Move the slider up to increase the volume, and down to decrease the volume.
Use this slider to set the volume to a comfortable listening level – the middle is often a good starting point.
* The MASTER VOLUME slider will not affect the volume level of the LINE OUT connectors.
* The LINE OUT level can be adjusted by using the LEVEL knob. Please refer to page 129 for more information.
* The maximum volume level of the speakers can be reduced by using the ‘Speaker Volume’ setting. Please refer to page 69 for more information.
Using headphones
Use the jacks located beneath the keyboard on the left hand side, to connect stereo headphones to the CA58 digital piano. 1/4” and 1/8” connectors are provided for convenience.
Two pairs of headphones can be connected and used simultaneously.
When a pair of headphones is connected, sound will not be produced by the speakers. In addition, the PHONES indicator in the LCD display will be highlighted.
Headphones connected
Attaching the headphone hook (optional)
A headphone hook is included with the CA58 digital piano and can be used to hang headphones when not in use.
If desired, attach the headphone hook to the underside of the keyboard as shown in the illustration opposite.
* For more information, please refer to the ‘Assembly Instructions’ on page 124.
Increase volume
Decrease volume
* The maximum volume level of the headphones output and other headphone characteristics can be adjusted by using the settings in the ‘Phones Settings’ menu. Please refer to page 106 for more information.
16
Play
ing
the
Pian
o
Using the Pedals
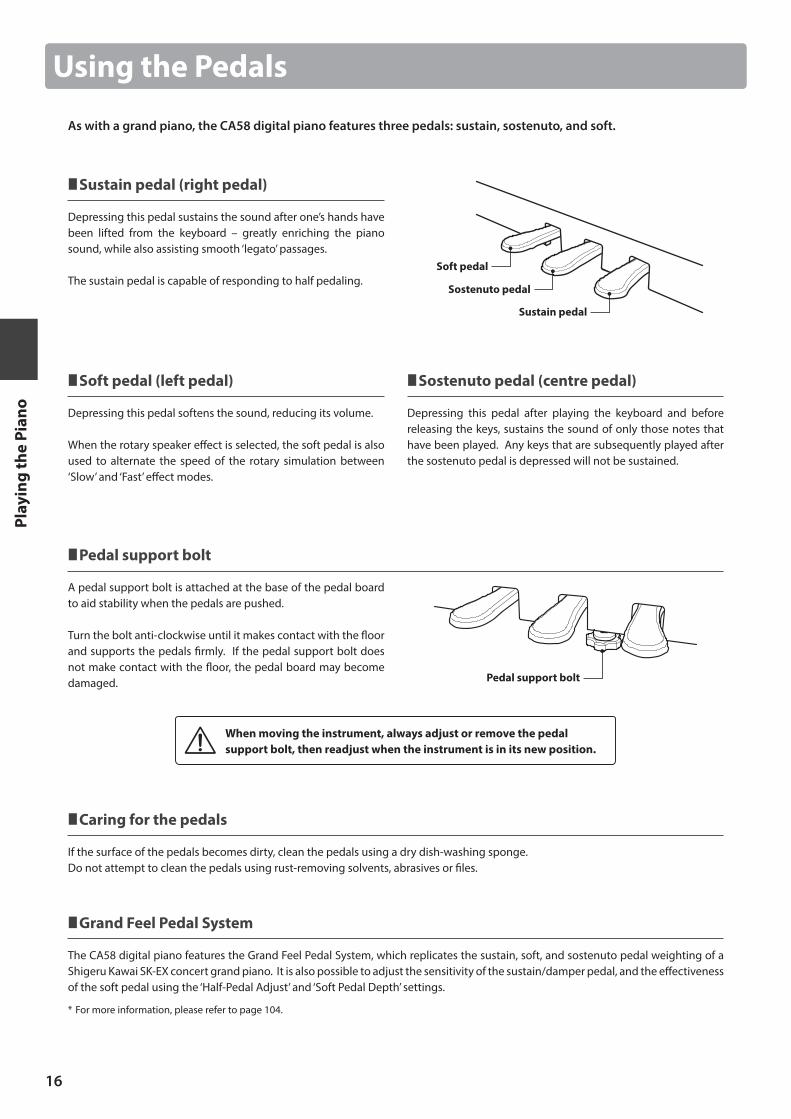
As with a grand piano, the CA58 digital piano features three pedals: sustain, sostenuto, and soft.
Sustain pedal (right pedal)
Depressing this pedal sustains the sound after one’s hands have been lifted from the keyboard – greatly enriching the piano sound, while also assisting smooth ‘legato’ passages.
The sustain pedal is capable of responding to half pedaling.Soft pedal
Sostenuto pedal
Sustain pedal
Soft pedal (left pedal)
Depressing this pedal softens the sound, reducing its volume.
When the rotary speaker effect is selected, the soft pedal is also used to alternate the speed of the rotary simulation between ‘Slow’ and ‘Fast’ effect modes.
Sostenuto pedal (centre pedal)
Depressing this pedal after playing the keyboard and before releasing the keys, sustains the sound of only those notes that have been played. Any keys that are subsequently played after the sostenuto pedal is depressed will not be sustained.
Pedal support bolt
A pedal support bolt is attached at the base of the pedal board to aid stability when the pedals are pushed.
Turn the bolt anti-clockwise until it makes contact with the floor and supports the pedals firmly. If the pedal support bolt does not make contact with the floor, the pedal board may become damaged.
When moving the instrument, always adjust or remove the pedal support bolt, then readjust when the instrument is in its new position.
Caring for the pedals
If the surface of the pedals becomes dirty, clean the pedals using a dry dish-washing sponge.Do not attempt to clean the pedals using rust-removing solvents, abrasives or files.
Grand Feel Pedal System
The CA58 digital piano features the Grand Feel Pedal System, which replicates the sustain, soft, and sostenuto pedal weighting of a Shigeru Kawai SK-EX concert grand piano. It is also possible to adjust the sensitivity of the sustain/damper pedal, and the effectiveness of the soft pedal using the ‘Half-Pedal Adjust’ and ‘Soft Pedal Depth’ settings.
* For more information, please refer to page 104.
Pedal support bolt
17
Play
ing
the
Pian
o
The CA58 digital piano features a wide selection of realistic instrument sounds suitable for various musical styles. Sounds are arranged into eight categories, with several sounds assigned to each category button. For a complete listing of available instrument sounds, please refer to page 134 of this owner’s manual.
By default, the ‘SK Concert Grand’ sound will be selected automatically when the instrument is turned on.
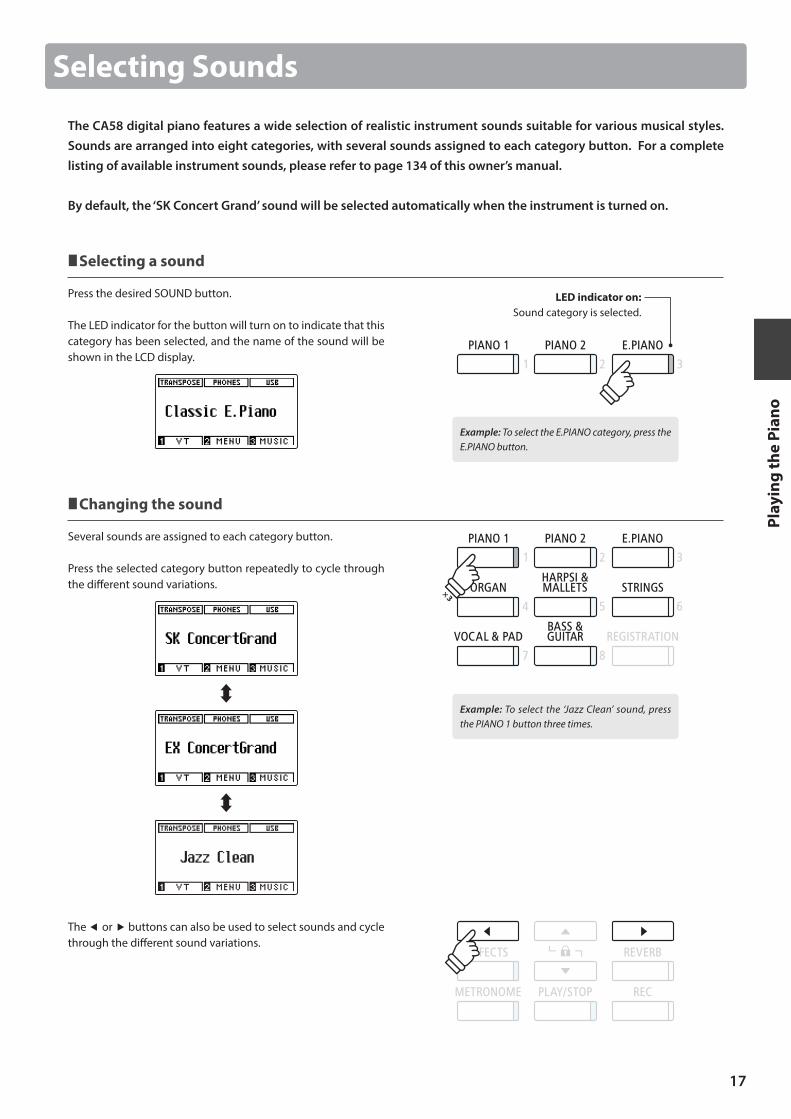
Selecting a sound
Press the desired SOUND button.
The LED indicator for the button will turn on to indicate that this category has been selected, and the name of the sound will be shown in the LCD display.
Changing the sound
Several sounds are assigned to each category button.
Press the selected category button repeatedly to cycle through the different sound variations.
The or buttons can also be used to select sounds and cycle through the different sound variations.
Selecting Sounds
Example: To select the E.PIANO category, press the E.PIANO button.
LED indicator on:Sound category is selected.
Example: To select the ‘Jazz Clean’ sound, press the PIANO 1 button three times.
× 3
18
Play
ing
the
Pian
o
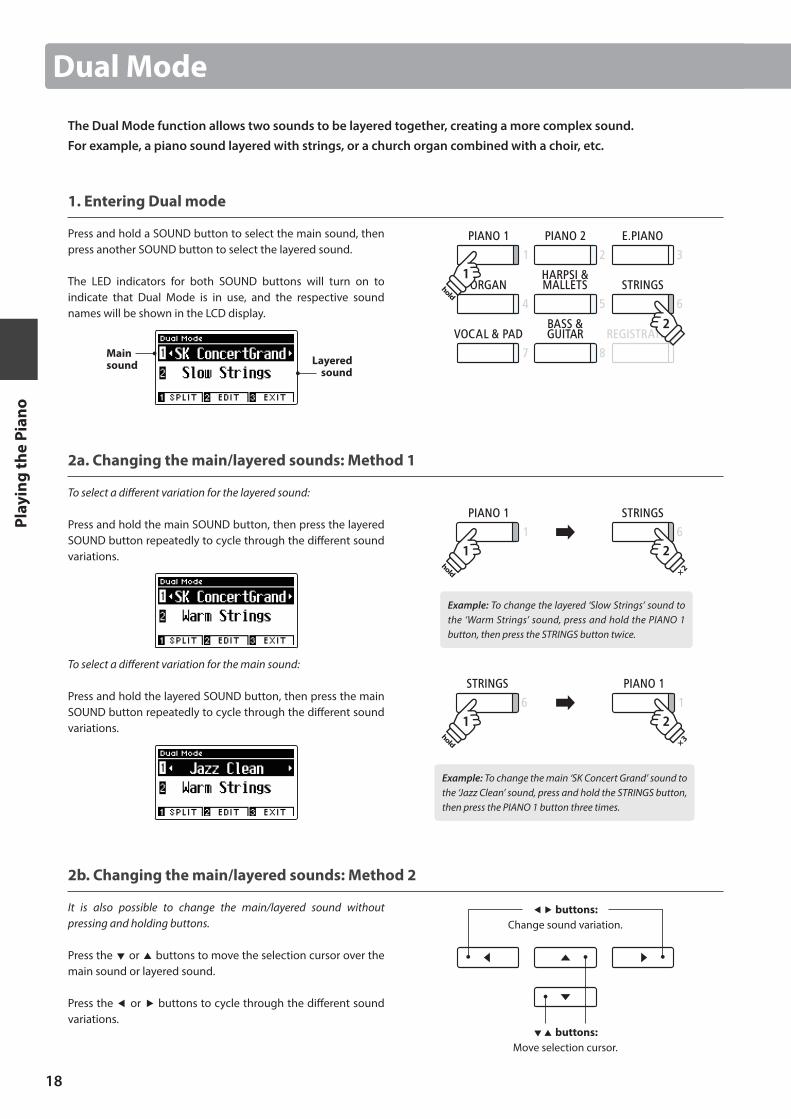
The Dual Mode function allows two sounds to be layered together, creating a more complex sound.For example, a piano sound layered with strings, or a church organ combined with a choir, etc.
1. Entering Dual mode
Press and hold a SOUND button to select the main sound, then press another SOUND button to select the layered sound.
The LED indicators for both SOUND buttons will turn on to indicate that Dual Mode is in use, and the respective sound names will be shown in the LCD display.
Layered sound
Main sound
2a. Changing the main/layered sounds: Method 1
To select a different variation for the layered sound:
Press and hold the main SOUND button, then press the layered SOUND button repeatedly to cycle through the different sound variations.
To select a different variation for the main sound:
Press and hold the layered SOUND button, then press the main SOUND button repeatedly to cycle through the different sound variations.
2b. Changing the main/layered sounds: Method 2
It is also possible to change the main/layered sound without pressing and holding buttons.
Press the or buttons to move the selection cursor over the main sound or layered sound.
Press the or buttons to cycle through the different sound variations.
Dual Mode
Example: To change the main ‘SK Concert Grand’ sound to the ‘Jazz Clean’ sound, press and hold the STRINGS button, then press the PIANO 1 button three times.
hold
hold × 2
Example: To change the layered ‘Slow Strings’ sound to the ‘Warm Strings’ sound, press and hold the PIANO 1 button, then press the STRINGS button twice.
hold × 3
buttons:Move selection cursor.
buttons:Change sound variation.
19
Play
ing
the
Pian
o
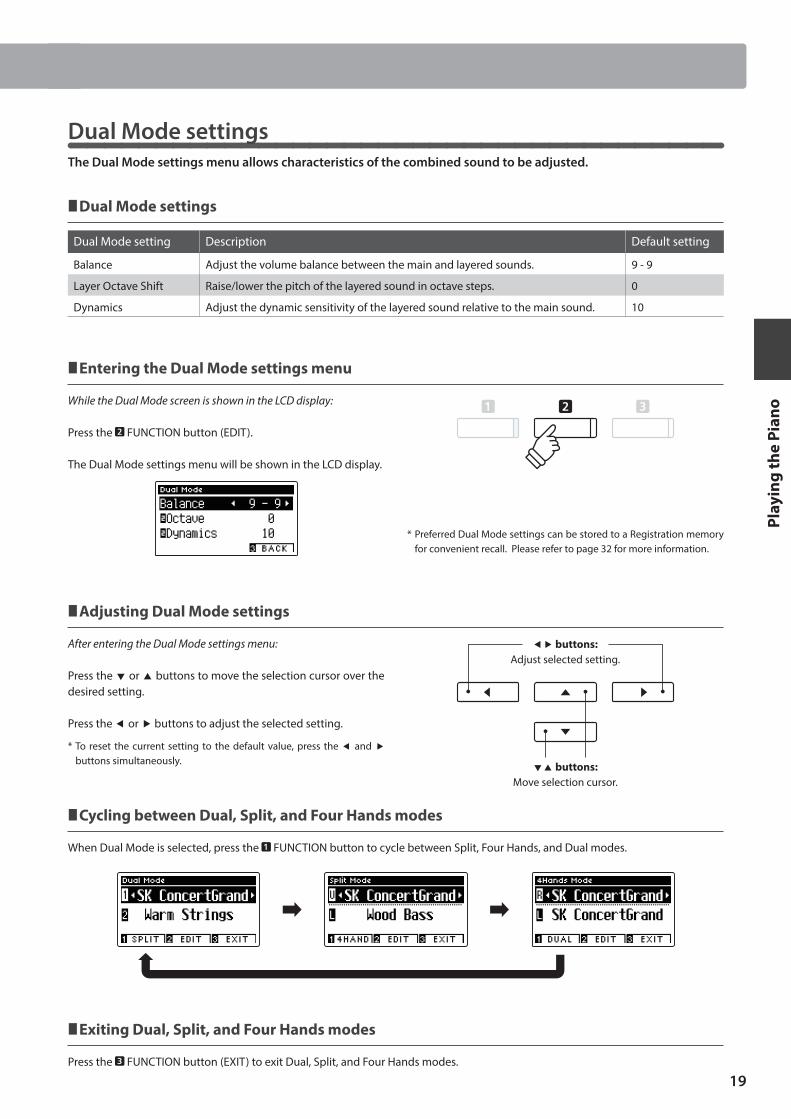
Dual Mode settingsThe Dual Mode settings menu allows characteristics of the combined sound to be adjusted.
Dual Mode settings
Dual Mode setting Description Default setting
Balance Adjust the volume balance between the main and layered sounds. 9 - 9
Layer Octave Shift Raise/lower the pitch of the layered sound in octave steps. 0
Dynamics Adjust the dynamic sensitivity of the layered sound relative to the main sound. 10
Entering the Dual Mode settings menu
While the Dual Mode screen is shown in the LCD display:
Press the FUNCTION button (EDIT).
The Dual Mode settings menu will be shown in the LCD display.
Adjusting Dual Mode settings
After entering the Dual Mode settings menu:
Press the or buttons to move the selection cursor over the desired setting.
Press the or buttons to adjust the selected setting.
* To reset the current setting to the default value, press the and buttons simultaneously.
Cycling between Dual, Split, and Four Hands modes
When Dual Mode is selected, press the FUNCTION button to cycle between Split, Four Hands, and Dual modes.
Exiting Dual, Split, and Four Hands modes
Press the FUNCTION button (EXIT) to exit Dual, Split, and Four Hands modes.
buttons:Move selection cursor.
buttons:Adjust selected setting.
* Preferred Dual Mode settings can be stored to a Registration memory for convenient recall. Please refer to page 32 for more information.
Dual Mode

20
Play
ing
the
Pian
o
Split Mode
The Split Mode function divides the keyboard into two sections, allowing each section to be played with a different sound. For example, a bass sound in the lower section, and a piano sound in the upper section.
1. Entering Split mode
After entering Dual Mode (page 18):
Press the FUNCTION button (SPLIT).
The Split Mode screen will be shown in the LCD display.
* The default split point is set between keys B3 and C4.
The upper section and lower section sound names will be shown in the LCD display. The LED indicator for the upper section sound button will turn on, and the LED indicator for the lower section sound button will start to flash.
Lower section
sound
Upper section sound
* By default, the lower section will be set to the ‘Wood Bass’ sound.
2a. Changing the upper/lower section sounds: Method 1
To select a different sound for the upper section:
Press the desired SOUND button.
Example: To select the ‘Blues Organ' sound for the upper section, press the ORGAN button twice.
× 2
* Preferred Split Mode upper/lower section sound combinations can be stored to a Registration memory for convenient recall. Please refer to page 32 for more information.
2b. Changing the upper/lower section sounds: Method 2
It is also possible to change the upper/lower section sound without pressing and holding buttons.
Press the or buttons to move the selection cursor over the upper section or lower section sound.
Press the or buttons to cycle through the different sound variations.
To select a different sound for the lower section:
Press and hold the FUNCTION button (4HAND), then press the desired SOUND button.
hold × 3
Example: To select the ‘W. Bass & Ride’ sound for the lower section, press and hold the 1 FUNCTION button, then press the BASS & GUITAR button three times.
LED indicator on:Upper section sound.
LED indicator flashing:Lower section sound.
buttons:Move selection cursor.
buttons:Change sound variation.
21
Play
ing
the
Pian
o
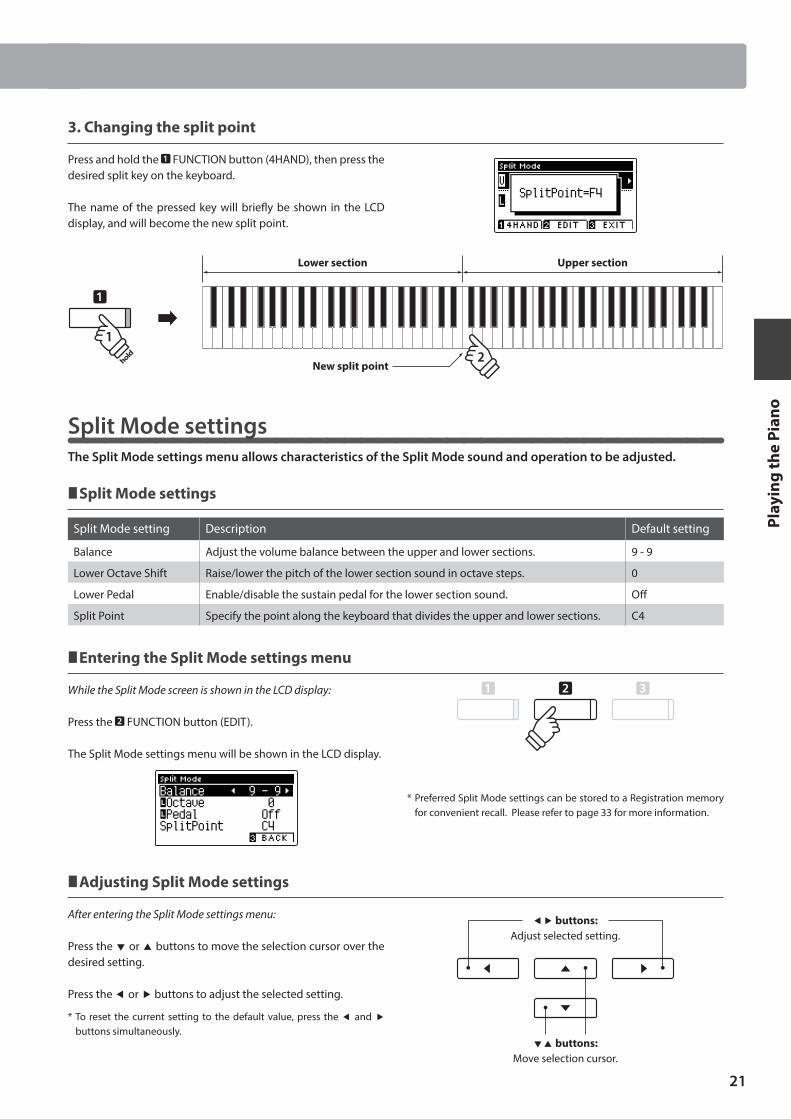
3. Changing the split point
Press and hold the FUNCTION button (4HAND), then press the desired split key on the keyboard.
The name of the pressed key will briefly be shown in the LCD display, and will become the new split point.
hold
Upper sectionLower section
New split point
Split Mode settingsThe Split Mode settings menu allows characteristics of the Split Mode sound and operation to be adjusted.
Split Mode settings
Split Mode setting Description Default setting
Balance Adjust the volume balance between the upper and lower sections. 9 - 9
Lower Octave Shift Raise/lower the pitch of the lower section sound in octave steps. 0
Lower Pedal Enable/disable the sustain pedal for the lower section sound. Off
Split Point Specify the point along the keyboard that divides the upper and lower sections. C4
Entering the Split Mode settings menu
While the Split Mode screen is shown in the LCD display:
Press the FUNCTION button (EDIT).
The Split Mode settings menu will be shown in the LCD display.
Adjusting Split Mode settings
After entering the Split Mode settings menu:
Press the or buttons to move the selection cursor over the desired setting.
Press the or buttons to adjust the selected setting.
* To reset the current setting to the default value, press the and buttons simultaneously.
buttons:Move selection cursor.
buttons:Adjust selected setting.
* Preferred Split Mode settings can be stored to a Registration memory for convenient recall. Please refer to page 33 for more information.
Split Mode
22
Play
ing
the
Pian
o
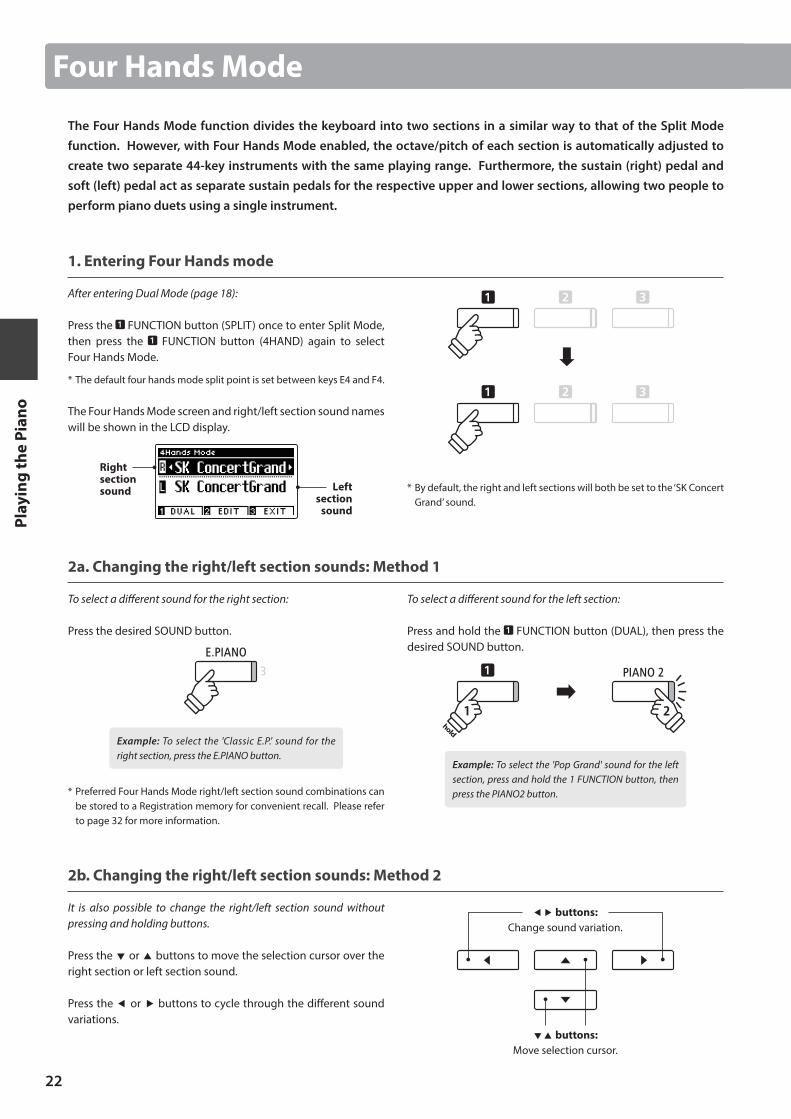
Four Hands Mode
The Four Hands Mode function divides the keyboard into two sections in a similar way to that of the Split Mode function. However, with Four Hands Mode enabled, the octave/pitch of each section is automatically adjusted to create two separate 44-key instruments with the same playing range. Furthermore, the sustain (right) pedal and soft (left) pedal act as separate sustain pedals for the respective upper and lower sections, allowing two people to perform piano duets using a single instrument.
1. Entering Four Hands mode
After entering Dual Mode (page 18):
Press the FUNCTION button (SPLIT) once to enter Split Mode, then press the FUNCTION button (4HAND) again to select Four Hands Mode.
* The default four hands mode split point is set between keys E4 and F4.
The Four Hands Mode screen and right/left section sound names will be shown in the LCD display.
Left section
sound
Right section sound
2a. Changing the right/left section sounds: Method 1
To select a different sound for the right section:
Press the desired SOUND button.
Example: To select the 'Classic E.P.' sound for the right section, press the E.PIANO button.
* Preferred Four Hands Mode right/left section sound combinations can be stored to a Registration memory for convenient recall. Please refer to page 32 for more information.
2b. Changing the right/left section sounds: Method 2
It is also possible to change the right/left section sound without pressing and holding buttons.
Press the or buttons to move the selection cursor over the right section or left section sound.
Press the or buttons to cycle through the different sound variations.
To select a different sound for the left section:
Press and hold the FUNCTION button (DUAL), then press the desired SOUND button.
hold
Example: To select the 'Pop Grand' sound for the left section, press and hold the 1 FUNCTION button, then press the PIANO2 button.
buttons:Move selection cursor.
buttons:Change sound variation.
* By default, the right and left sections will both be set to the ‘SK Concert Grand’ sound.

23
Play
ing
the
Pian
o
3. Changing the Four Hands mode split point
Press and hold the FUNCTION button (DUAL), then press the desired split key on the keyboard.
The name of the pressed key will briefly be shown in the LCD display, and will become the new split point.
hold
Right sectionLeft section
New split point
Four Hands Mode settingsThe Four Hands Mode settings menu allows characteristics of the Four Hands Mode sound to be adjusted.
Four Hands Mode settings
Four Hands Mode setting Description Default setting
Balance Adjust the volume balance between the right and left sections. 9 - 9
Right Octave Shift Raise/lower the pitch of the right section sound in octave steps. – 2
Left Octave Shift Raise/lower the pitch of the left section sound in octave steps. + 2
Split Point Specify the point along the keyboard that divides the right and left sections. F4
Entering the Four Hands Mode settings menu
While the Four Hands Mode screen is shown in the LCD display:
Press the FUNCTION button (EDIT).
The Four Hands Mode settings menu will be shown in the LCD display.
Adjusting Four Hands Mode settings
After entering the Four Hands Mode settings menu:
Press the or buttons to move the selection cursor over the desired setting.
Press the or buttons to adjust the selected setting.
* To reset the current setting to the default value, press the and buttons simultaneously.
buttons:Move selection cursor.
buttons:Adjust selected setting.
* Changes made to the Four Hands Mode settings will not affect the Split Mode settings, and vice versa.
* Preferred Four Hands Mode settings can be stored to a Registration memory for convenient recall. Please refer to page 33 for more information.
Four Hands Mode
24
Play
ing
the
Pian
o
Reverb
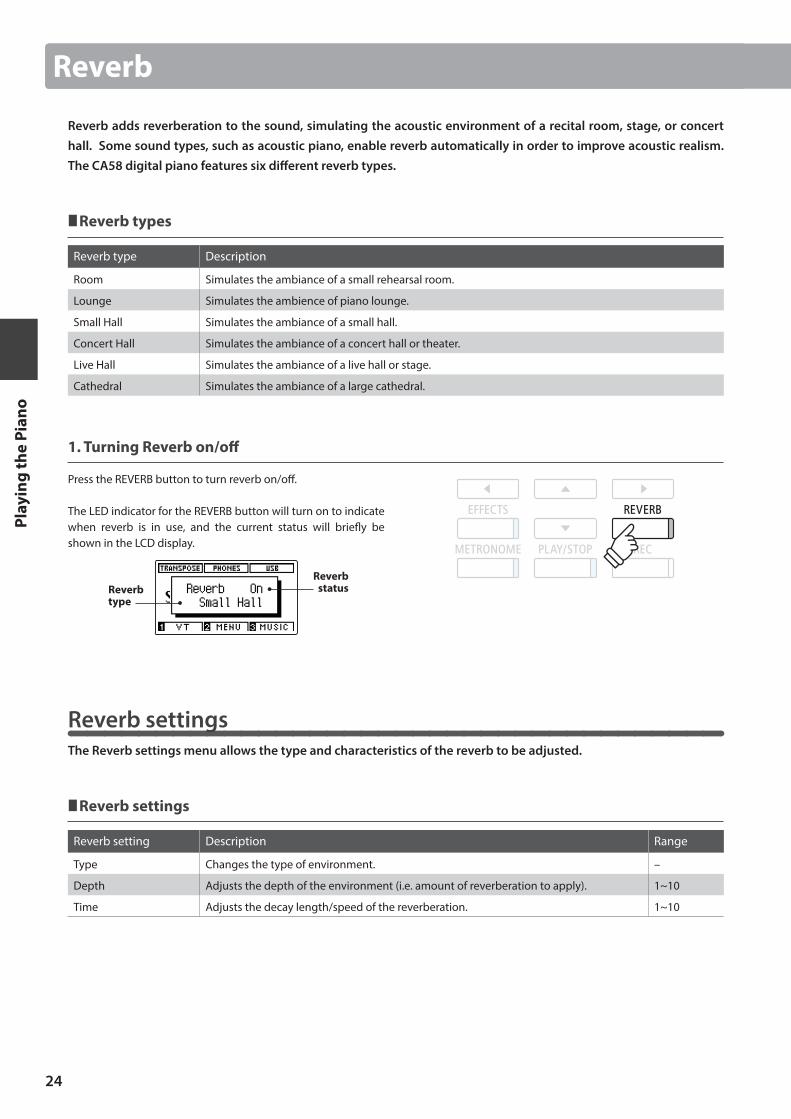
Reverb adds reverberation to the sound, simulating the acoustic environment of a recital room, stage, or concert hall. Some sound types, such as acoustic piano, enable reverb automatically in order to improve acoustic realism. The CA58 digital piano features six different reverb types.
Reverb types
Reverb type Description
Room Simulates the ambiance of a small rehearsal room.
Lounge Simulates the ambience of piano lounge.
Small Hall Simulates the ambiance of a small hall.
Concert Hall Simulates the ambiance of a concert hall or theater.
Live Hall Simulates the ambiance of a live hall or stage.
Cathedral Simulates the ambiance of a large cathedral.
1. Turning Reverb on/off
Press the REVERB button to turn reverb on/off.
The LED indicator for the REVERB button will turn on to indicate when reverb is in use, and the current status will briefly be shown in the LCD display.
Reverb statusReverb
type
Reverb settingsThe Reverb settings menu allows the type and characteristics of the reverb to be adjusted.
Reverb settings
Reverb setting Description Range
Type Changes the type of environment. –
Depth Adjusts the depth of the environment (i.e. amount of reverberation to apply). 1~10
Time Adjusts the decay length/speed of the reverberation. 1~10
25
Play
ing
the
Pian
o
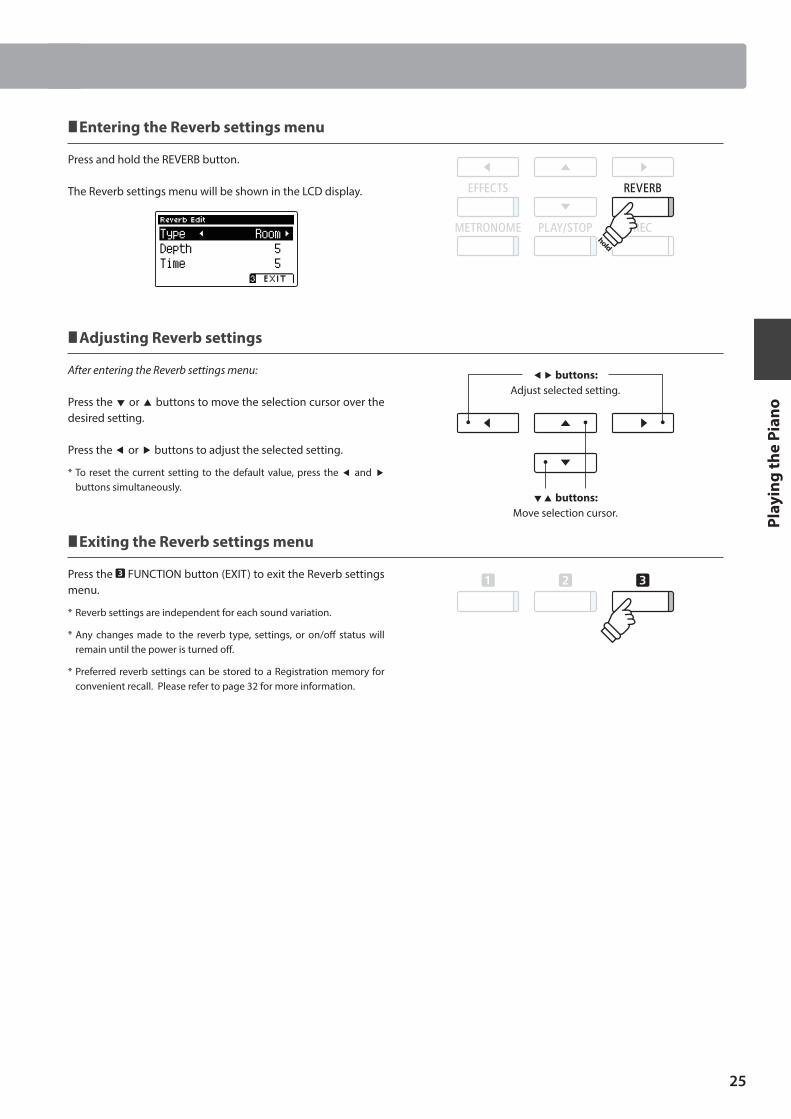
Entering the Reverb settings menu
Press and hold the REVERB button.
The Reverb settings menu will be shown in the LCD display.
Adjusting Reverb settings
After entering the Reverb settings menu:
Press the or buttons to move the selection cursor over the desired setting.
Press the or buttons to adjust the selected setting.
* To reset the current setting to the default value, press the and buttons simultaneously.
Exiting the Reverb settings menu
Press the FUNCTION button (EXIT) to exit the Reverb settings menu.
* Reverb settings are independent for each sound variation.
* Any changes made to the reverb type, settings, or on/off status will remain until the power is turned off.
* Preferred reverb settings can be stored to a Registration memory for convenient recall. Please refer to page 32 for more information.
buttons:Move selection cursor.
buttons:Adjust selected setting.
hold
Reverb
26
Play
ing
the
Pian
o
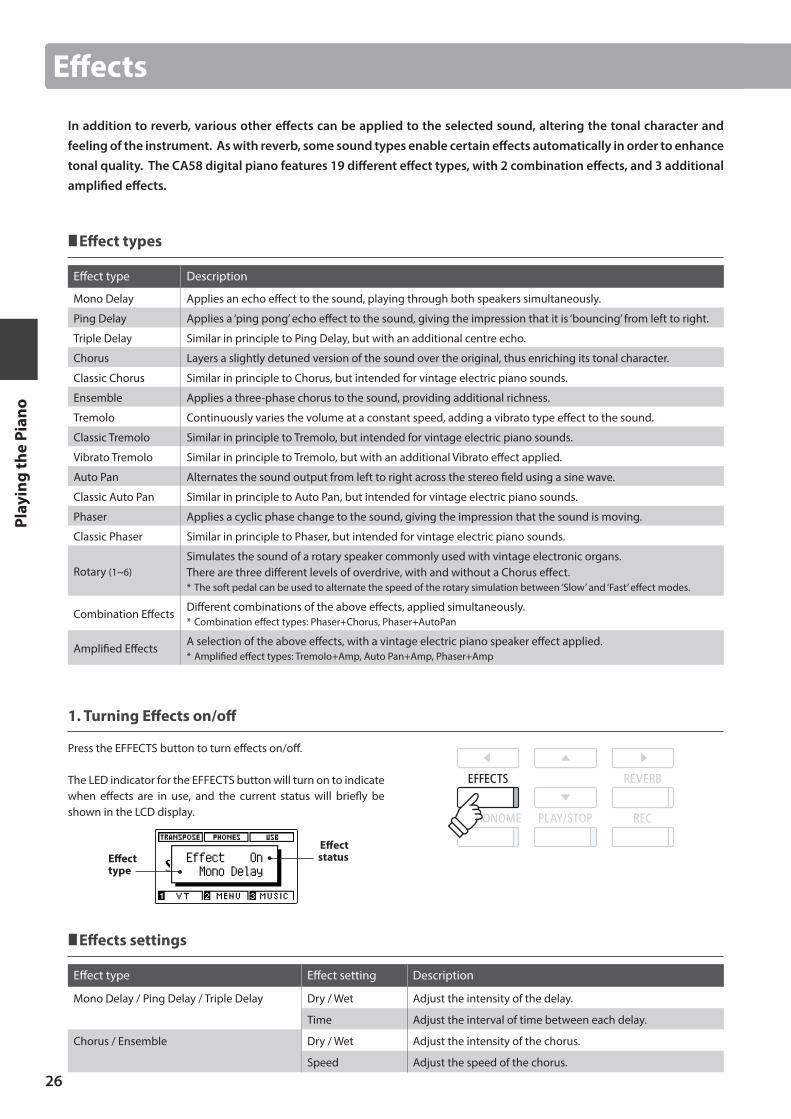
In addition to reverb, various other effects can be applied to the selected sound, altering the tonal character and feeling of the instrument. As with reverb, some sound types enable certain effects automatically in order to enhance tonal quality. The CA58 digital piano features 19 different effect types, with 2 combination effects, and 3 additional amplified effects.
Effect types
Effect type Description
Mono Delay Applies an echo effect to the sound, playing through both speakers simultaneously.
Ping Delay Applies a ‘ping pong’ echo effect to the sound, giving the impression that it is ‘bouncing’ from left to right.
Triple Delay Similar in principle to Ping Delay, but with an additional centre echo.
Chorus Layers a slightly detuned version of the sound over the original, thus enriching its tonal character.
Classic Chorus Similar in principle to Chorus, but intended for vintage electric piano sounds.
Ensemble Applies a three-phase chorus to the sound, providing additional richness.
Tremolo Continuously varies the volume at a constant speed, adding a vibrato type effect to the sound.
Classic Tremolo Similar in principle to Tremolo, but intended for vintage electric piano sounds.
Vibrato Tremolo Similar in principle to Tremolo, but with an additional Vibrato effect applied.
Auto Pan Alternates the sound output from left to right across the stereo field using a sine wave.
Classic Auto Pan Similar in principle to Auto Pan, but intended for vintage electric piano sounds.
Phaser Applies a cyclic phase change to the sound, giving the impression that the sound is moving.
Classic Phaser Similar in principle to Phaser, but intended for vintage electric piano sounds.
Rotary (1~6)Simulates the sound of a rotary speaker commonly used with vintage electronic organs.There are three different levels of overdrive, with and without a Chorus effect.* The soft pedal can be used to alternate the speed of the rotary simulation between ‘Slow’ and ‘Fast’ effect modes.
Combination EffectsDifferent combinations of the above effects, applied simultaneously.* Combination effect types: Phaser+Chorus, Phaser+AutoPan
Amplified EffectsA selection of the above effects, with a vintage electric piano speaker effect applied.* Amplified effect types: Tremolo+Amp, Auto Pan+Amp, Phaser+Amp
1. Turning Effects on/off
Press the EFFECTS button to turn effects on/off.
The LED indicator for the EFFECTS button will turn on to indicate when effects are in use, and the current status will briefly be shown in the LCD display.
Effect statusEffect
type
Effects settings
Effect type Effect setting Description
Mono Delay / Ping Delay / Triple Delay Dry / Wet Adjust the intensity of the delay.
Time Adjust the interval of time between each delay.
Chorus / Ensemble Dry / Wet Adjust the intensity of the chorus.
Speed Adjust the speed of the chorus.
Effects
27
Play
ing
the
Pian
o
Effects settings (cont.)
Effect type Effect setting Description
Classic Chorus Mono / Stereo Toggle between a Mono or Stereo effect.
Speed Adjust the speed of the chorus.
Tremolo / Classic Tremolo / Vibrato Tremolo Dry / Wet Adjust the intensity of the tremolo.
Speed Adjust the speed of the tremolo.
Auto Pan / Classic Auto Pan Dry / Wet Adjust the intensity of the pan.
Speed Adjust the speed of the pan.
Phaser / Classic Phaser Dry / Wet Adjust the intensity of the phaser.
Speed Adjust the speed of the phaser.
Rotary Accel. Speed Adjust the acceleration speed between slow and fast modes.
Rotary Speed Adjust the speed of the rotary speaker.
Combination Effects / Amplified Effects Dry / Wet Adjust the intensity of the effects.
Speed Adjust the speed of the effects.
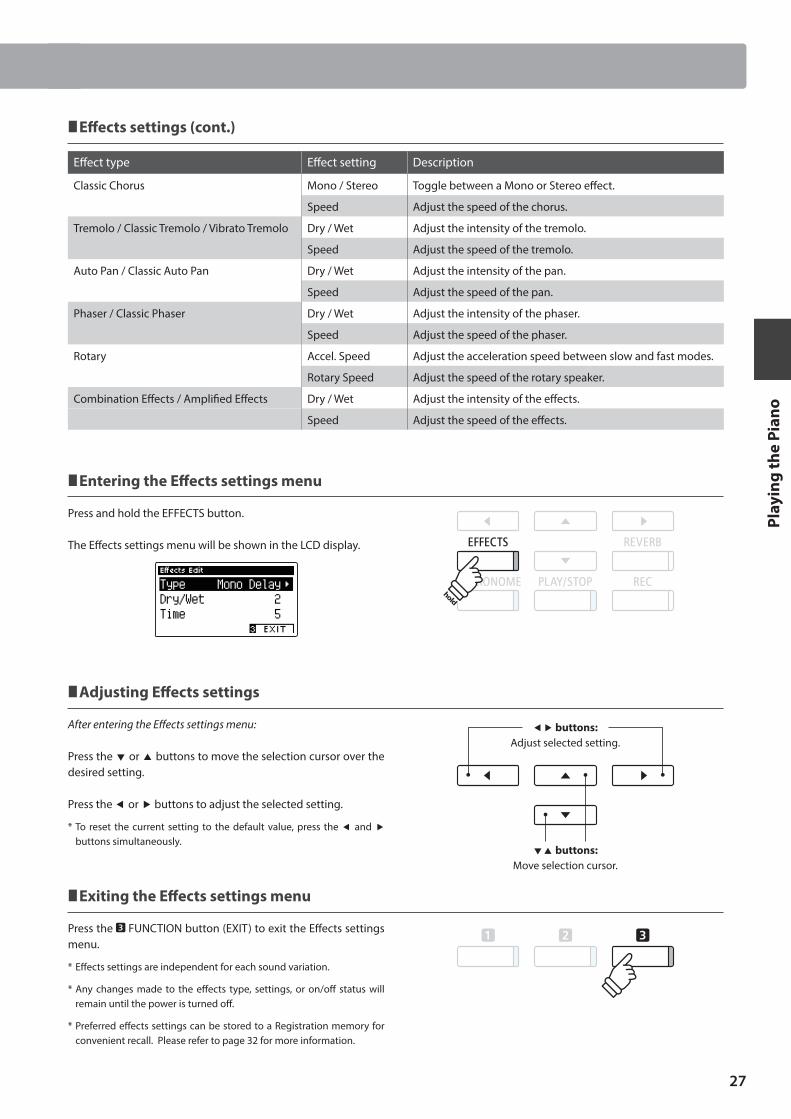
Entering the Effects settings menu
Press and hold the EFFECTS button.
The Effects settings menu will be shown in the LCD display.
Adjusting Effects settings
After entering the Effects settings menu:
Press the or buttons to move the selection cursor over the desired setting.
Press the or buttons to adjust the selected setting.
* To reset the current setting to the default value, press the and buttons simultaneously.
Exiting the Effects settings menu
Press the FUNCTION button (EXIT) to exit the Effects settings menu.
* Effects settings are independent for each sound variation.
* Any changes made to the effects type, settings, or on/off status will remain until the power is turned off.
* Preferred effects settings can be stored to a Registration memory for convenient recall. Please refer to page 32 for more information.
buttons:Move selection cursor.
buttons:Adjust selected setting.
hold
Effects
28
Play
ing
the
Pian
o
Virtual Technician
In addition to the reverb and effects functions, the overall character of the CA58 acoustic piano sounds can also be dramatically adjusted using the instrument’s Virtual Technician feature. There are two methods of using the Virtual Technician: Smart Mode and Advanced Mode.
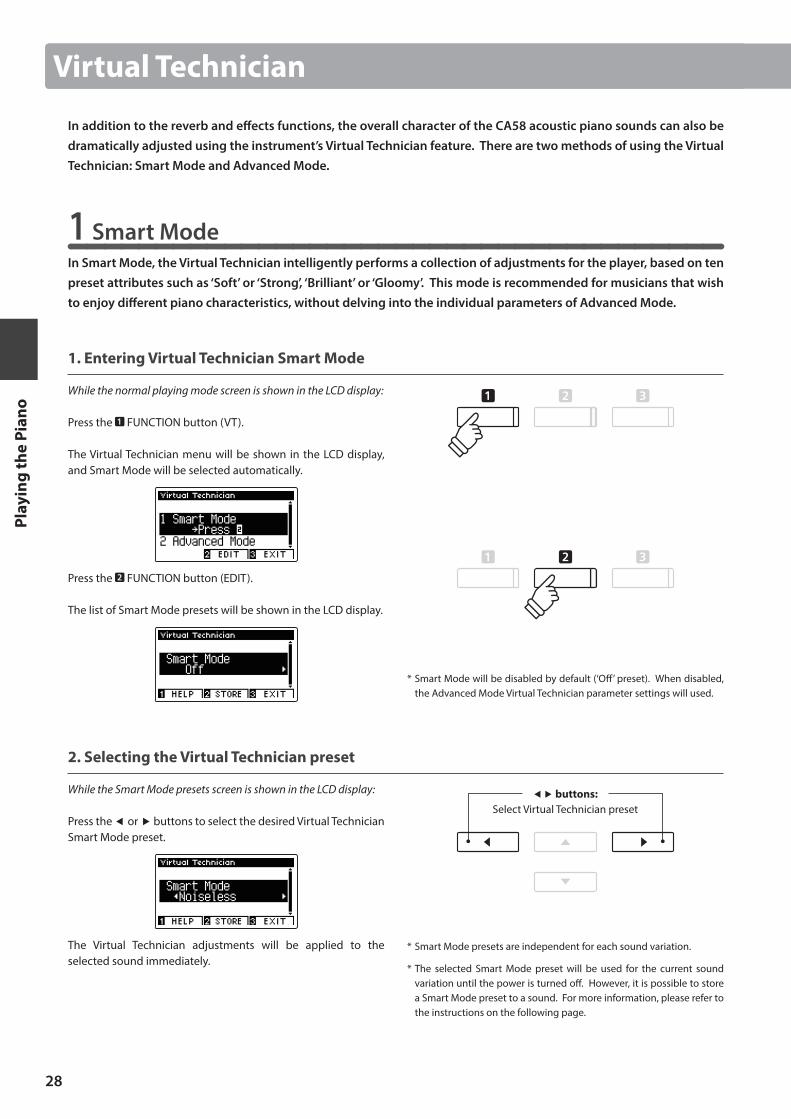
1 Smart ModeIn Smart Mode, the Virtual Technician intelligently performs a collection of adjustments for the player, based on ten preset attributes such as ‘Soft’ or ‘Strong’, ‘Brilliant’ or ‘Gloomy’. This mode is recommended for musicians that wish to enjoy different piano characteristics, without delving into the individual parameters of Advanced Mode.
1. Entering Virtual Technician Smart Mode
While the normal playing mode screen is shown in the LCD display:
Press the FUNCTION button (VT).
The Virtual Technician menu will be shown in the LCD display, and Smart Mode will be selected automatically.
Press the FUNCTION button (EDIT).
The list of Smart Mode presets will be shown in the LCD display.
2. Selecting the Virtual Technician preset
While the Smart Mode presets screen is shown in the LCD display:
Press the or buttons to select the desired Virtual Technician Smart Mode preset.
The Virtual Technician adjustments will be applied to the selected sound immediately.
buttons:Select Virtual Technician preset
* Smart Mode presets are independent for each sound variation.
* The selected Smart Mode preset will be used for the current sound variation until the power is turned off. However, it is possible to store a Smart Mode preset to a sound. For more information, please refer to the instructions on the following page.
* Smart Mode will be disabled by default (‘Off’ preset). When disabled, the Advanced Mode Virtual Technician parameter settings will used.
29
Play
ing
the
Pian
o
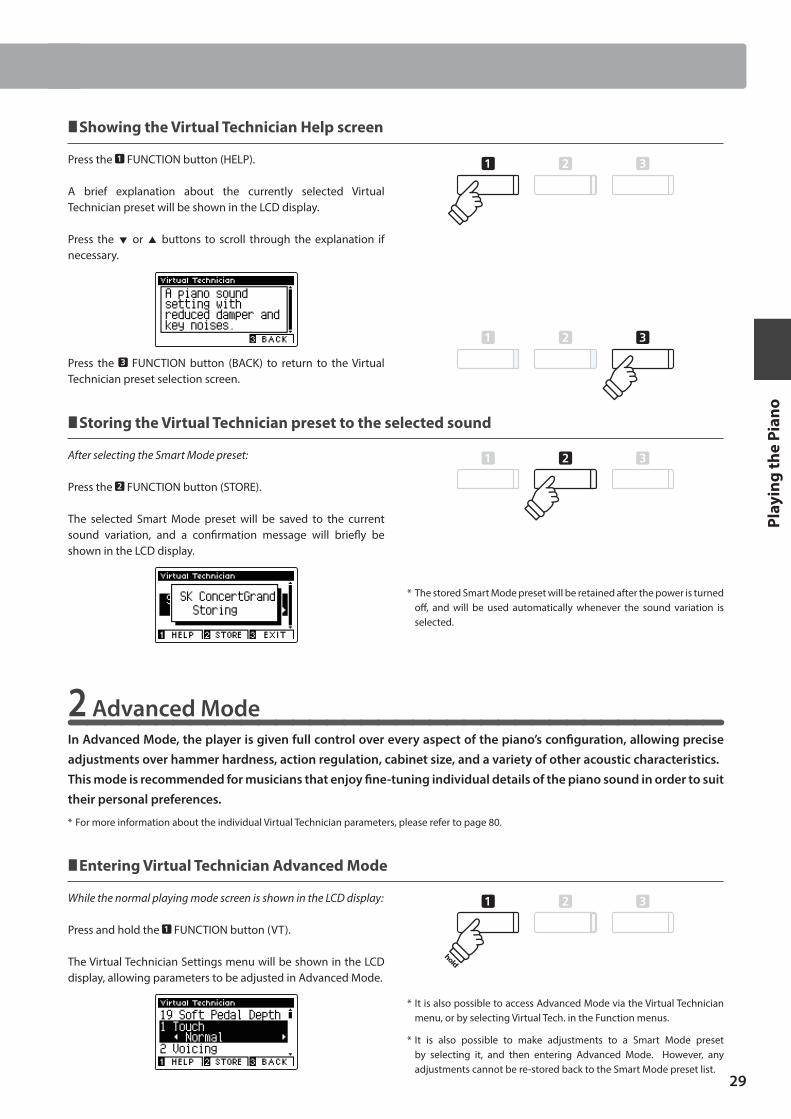
Showing the Virtual Technician Help screen
Press the FUNCTION button (HELP).
A brief explanation about the currently selected Virtual Technician preset will be shown in the LCD display.
Press the or buttons to scroll through the explanation if necessary.
Press the FUNCTION button (BACK) to return to the Virtual Technician preset selection screen.
Storing the Virtual Technician preset to the selected sound
After selecting the Smart Mode preset:
Press the FUNCTION button (STORE).
The selected Smart Mode preset will be saved to the current sound variation, and a confirmation message will briefly be shown in the LCD display.
2 Advanced ModeIn Advanced Mode, the player is given full control over every aspect of the piano’s configuration, allowing precise adjustments over hammer hardness, action regulation, cabinet size, and a variety of other acoustic characteristics.This mode is recommended for musicians that enjoy fine-tuning individual details of the piano sound in order to suit their personal preferences.
* For more information about the individual Virtual Technician parameters, please refer to page 80.
Entering Virtual Technician Advanced Mode
While the normal playing mode screen is shown in the LCD display:
Press and hold the FUNCTION button (VT).
The Virtual Technician Settings menu will be shown in the LCD display, allowing parameters to be adjusted in Advanced Mode.
* The stored Smart Mode preset will be retained after the power is turned off, and will be used automatically whenever the sound variation is selected.
hold
* It is also possible to access Advanced Mode via the Virtual Technician menu, or by selecting Virtual Tech. in the Function menus.
* It is also possible to make adjustments to a Smart Mode preset by selecting it, and then entering Advanced Mode. However, any adjustments cannot be re-stored back to the Smart Mode preset list.
Virtual Technician
30
Play
ing
the
Pian
o
Metronome / Drum Rhythms
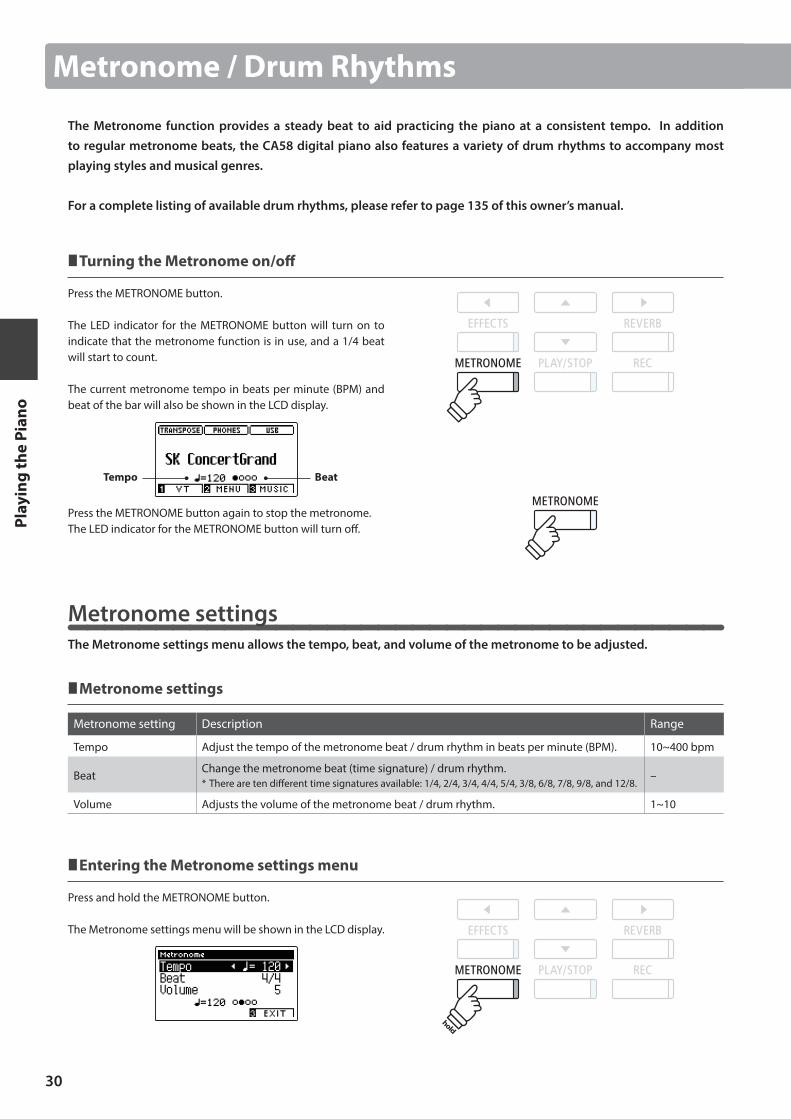
The Metronome function provides a steady beat to aid practicing the piano at a consistent tempo. In addition to regular metronome beats, the CA58 digital piano also features a variety of drum rhythms to accompany most playing styles and musical genres.
For a complete listing of available drum rhythms, please refer to page 135 of this owner’s manual.
Turning the Metronome on/off
Press the METRONOME button.
The LED indicator for the METRONOME button will turn on to indicate that the metronome function is in use, and a 1/4 beat will start to count.
The current metronome tempo in beats per minute (BPM) and beat of the bar will also be shown in the LCD display.
BeatTempo
Press the METRONOME button again to stop the metronome.The LED indicator for the METRONOME button will turn off.
Metronome settingsThe Metronome settings menu allows the tempo, beat, and volume of the metronome to be adjusted.
Metronome settings
Metronome setting Description Range
Tempo Adjust the tempo of the metronome beat / drum rhythm in beats per minute (BPM). 10~400 bpm
BeatChange the metronome beat (time signature) / drum rhythm.* There are ten different time signatures available: 1/4, 2/4, 3/4, 4/4, 5/4, 3/8, 6/8, 7/8, 9/8, and 12/8.
–
Volume Adjusts the volume of the metronome beat / drum rhythm. 1~10
Entering the Metronome settings menu
Press and hold the METRONOME button.
The Metronome settings menu will be shown in the LCD display.
hold
31
Play
ing
the
Pian
o
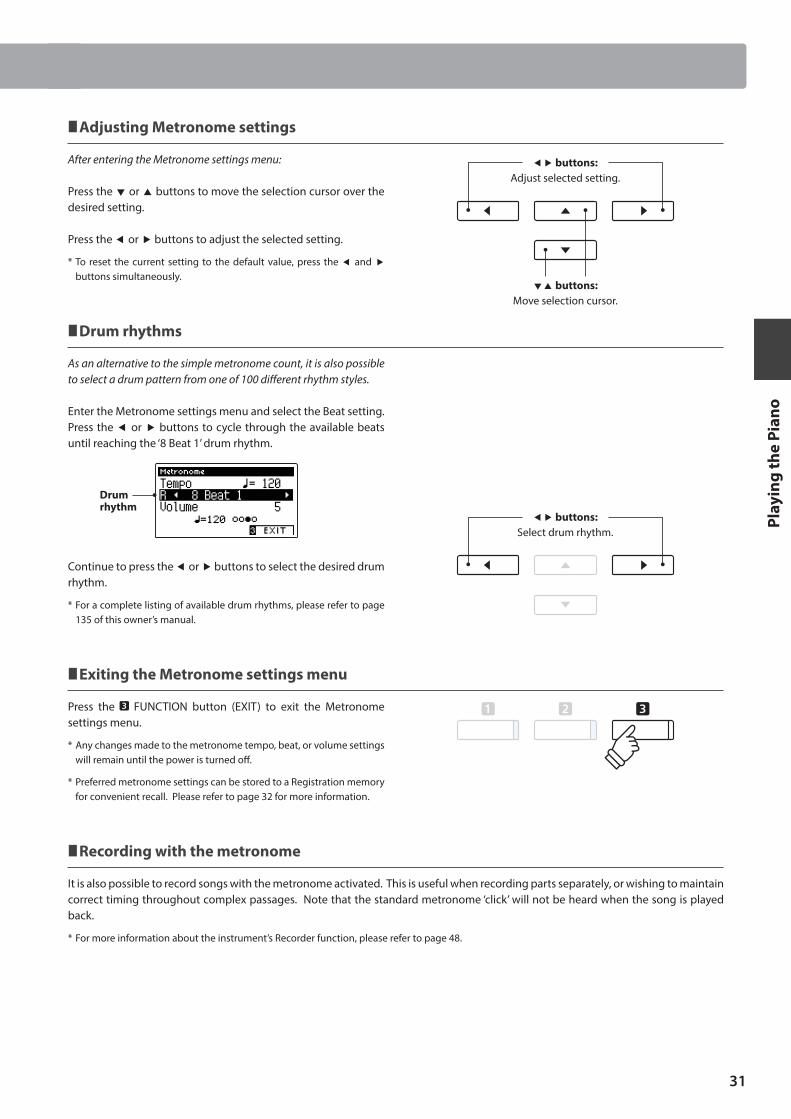
Adjusting Metronome settings
After entering the Metronome settings menu:
Press the or buttons to move the selection cursor over the desired setting.
Press the or buttons to adjust the selected setting.
* To reset the current setting to the default value, press the and buttons simultaneously.
Drum rhythms
As an alternative to the simple metronome count, it is also possible to select a drum pattern from one of 100 different rhythm styles.
Enter the Metronome settings menu and select the Beat setting. Press the or buttons to cycle through the available beats until reaching the ‘8 Beat 1’ drum rhythm.
Drum rhythm
Continue to press the or buttons to select the desired drum rhythm.
* For a complete listing of available drum rhythms, please refer to page 135 of this owner’s manual.
Exiting the Metronome settings menu
Press the FUNCTION button (EXIT) to exit the Metronome settings menu.
* Any changes made to the metronome tempo, beat, or volume settings will remain until the power is turned off.
* Preferred metronome settings can be stored to a Registration memory for convenient recall. Please refer to page 32 for more information.
Recording with the metronome
It is also possible to record songs with the metronome activated. This is useful when recording parts separately, or wishing to maintain correct timing throughout complex passages. Note that the standard metronome ‘click’ will not be heard when the song is played back.
* For more information about the instrument’s Recorder function, please refer to page 48.
buttons:Move selection cursor.
buttons:Adjust selected setting.
buttons:Select drum rhythm.
Metronome / Drum Rhythms
32
Play
ing
the
Pian
o
Registration Memories
The Registration function allows the current instrument setup (sound selections, split point, reverb and effect settings, and various other panel options) to be stored to a memory and conveniently recalled at the touch of a button. There are two banks (‘A’ and ‘B’) for each registration button, allowing up to 16 different registration memories to be stored.
Registrations can also be loaded/saved to a USB memory device. Please refer to pages 114/119 for more information.
Functions and Settings stored in Registration memories
Functions Settings
Selected sound (including primary sound for each category) Basic Settings (Tone Control, Tuning, Damper Hold)
Dual Mode / Split Mode / Four Hands Mode (including settings) Virtual Technician Settings
Reverb, Effects (Type, Settings) MIDI Settings
Metronome (Beat, Tempo, Volume)* Changes made to the Auto Power Off setting will be stored to the
Startup Setting Memory automatically.
1 Selecting a Registration memory
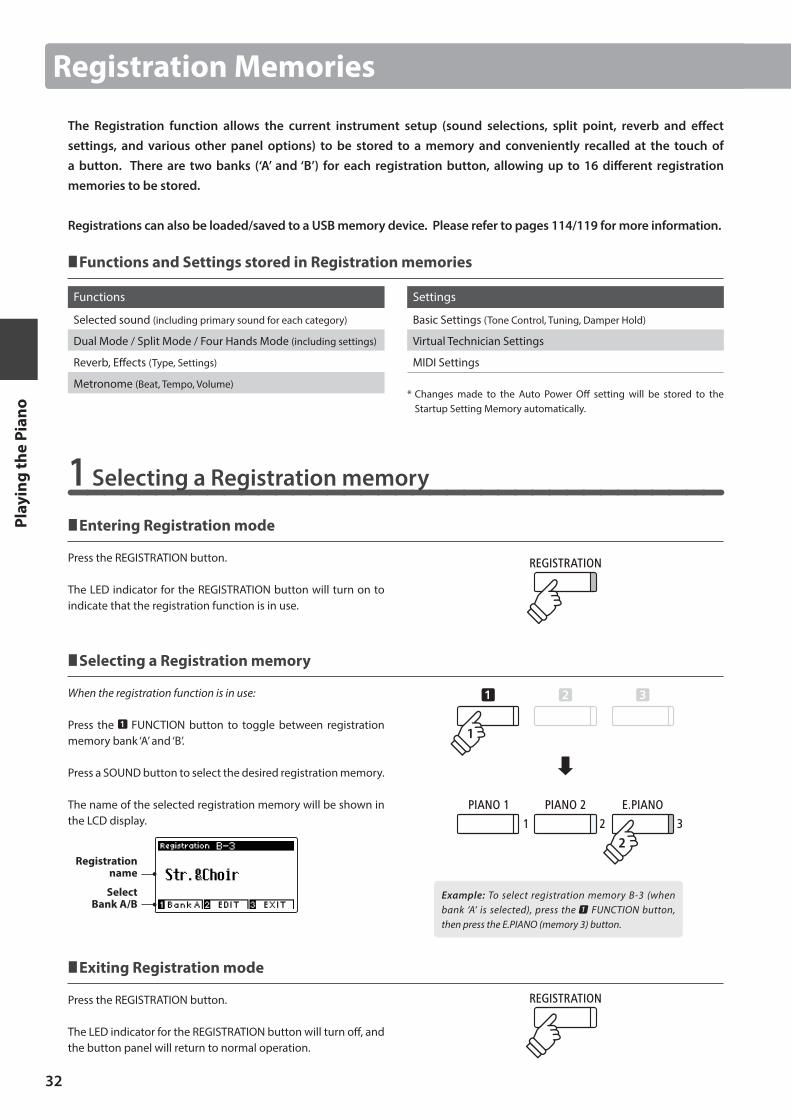
Entering Registration mode
Press the REGISTRATION button.
The LED indicator for the REGISTRATION button will turn on to indicate that the registration function is in use.
Selecting a Registration memory
When the registration function is in use:
Press the FUNCTION button to toggle between registration memory bank ‘A’ and ‘B’.
Press a SOUND button to select the desired registration memory.
The name of the selected registration memory will be shown in the LCD display.
Registration name
SelectBank A/B
Exiting Registration mode
Press the REGISTRATION button.
The LED indicator for the REGISTRATION button will turn off, and the button panel will return to normal operation.
Example: To select registration memory B-3 (when bank ‘A’ is selected), press the FUNCTION button, then press the E.PIANO (memory 3) button.
33
Play
ing
the
Pian
o
2 Storing a Registration memory
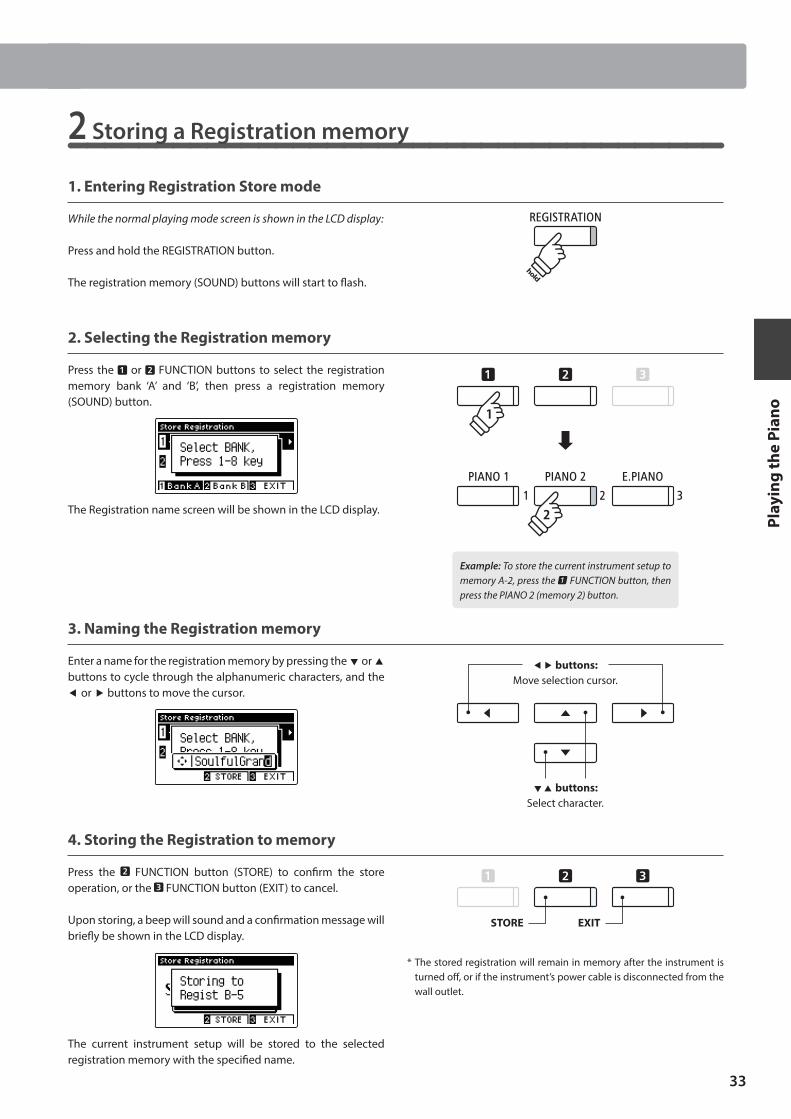
1. Entering Registration Store mode
While the normal playing mode screen is shown in the LCD display:
Press and hold the REGISTRATION button.
The registration memory (SOUND) buttons will start to flash.
2. Selecting the Registration memory
Press the or FUNCTION buttons to select the registration memory bank ‘A’ and ‘B’, then press a registration memory (SOUND) button.
The Registration name screen will be shown in the LCD display.
3. Naming the Registration memory
Enter a name for the registration memory by pressing the or buttons to cycle through the alphanumeric characters, and the or buttons to move the cursor.
4. Storing the Registration to memory
Press the FUNCTION button (STORE) to confirm the store operation, or the FUNCTION button (EXIT) to cancel.
Upon storing, a beep will sound and a confirmation message will briefly be shown in the LCD display.
The current instrument setup will be stored to the selected registration memory with the specified name.
Example: To store the current instrument setup to memory A-2, press the FUNCTION button, then press the PIANO 2 (memory 2) button.
hold
buttons:Select character.
buttons:Move selection cursor.
STORE EXIT
* The stored registration will remain in memory after the instrument is turned off, or if the instrument’s power cable is disconnected from the wall outlet.
Registration Memories
34
Play
ing
the
Pian
o
Registration Memories
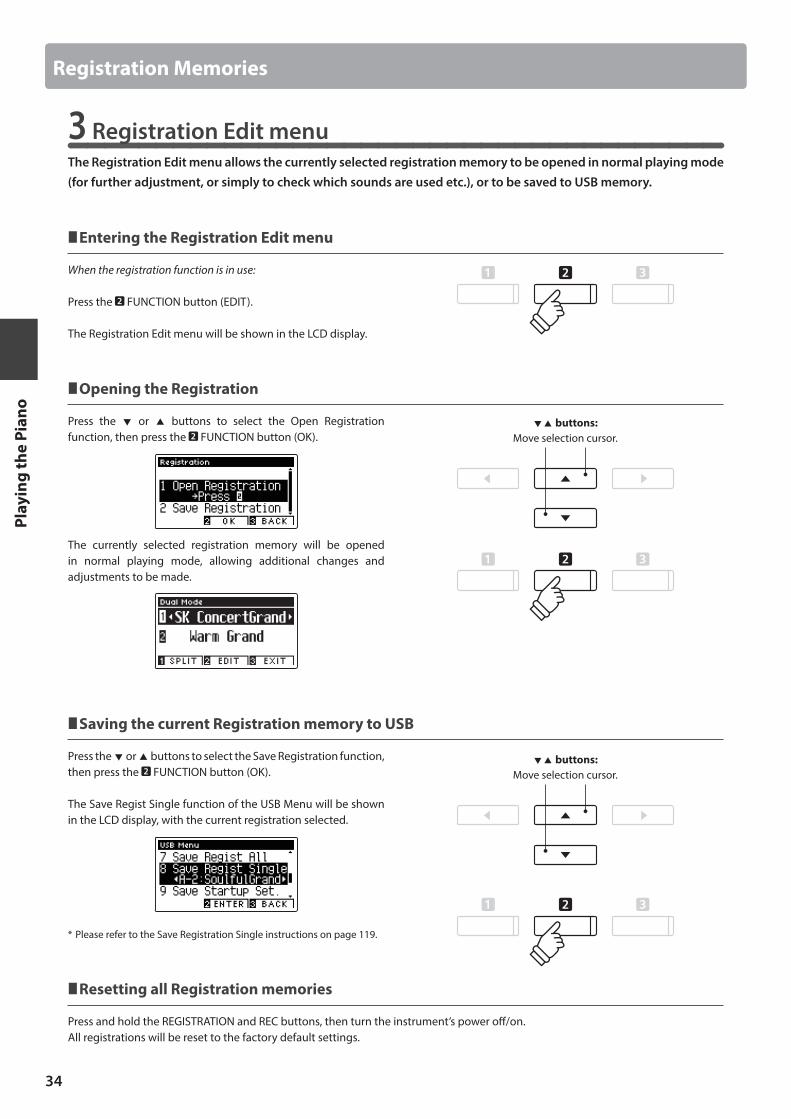
3 Registration Edit menuThe Registration Edit menu allows the currently selected registration memory to be opened in normal playing mode (for further adjustment, or simply to check which sounds are used etc.), or to be saved to USB memory.
Entering the Registration Edit menu
When the registration function is in use:
Press the FUNCTION button (EDIT).
The Registration Edit menu will be shown in the LCD display.
Opening the Registration
Press the or buttons to select the Open Registration function, then press the FUNCTION button (OK).
The currently selected registration memory will be opened in normal playing mode, allowing additional changes and adjustments to be made.
Saving the current Registration memory to USB
Press the or buttons to select the Save Registration function, then press the FUNCTION button (OK).
The Save Regist Single function of the USB Menu will be shown in the LCD display, with the current registration selected.
* Please refer to the Save Registration Single instructions on page 119.
Resetting all Registration memories
Press and hold the REGISTRATION and REC buttons, then turn the instrument’s power off/on.All registrations will be reset to the factory default settings.
buttons:Move selection cursor.
buttons:Move selection cursor.
35
Play
ing
the
Pian
o
The Panel Lock function allows the state of all panel buttons to be temporarily locked, preventing sounds and other settings from being changed. This function may prove useful in teaching environments, ensuring that students are not distracted by changing sounds etc.
1. Activating the Panel Lock
Press the and buttons simultaneously.
The Panel Lock screen will be shown in the LCD display, and the instrument will stop responding to panel button presses.
2. Deactivating the Panel Lock
While the Panel Lock is activated:
Press and hold the FUNCTION button (UNLOCK).
A message will be shown in the LCD display to indicate that the Panel Lock has been deactivated, and the instrument will resume responding to panel button presses as normal.
* When activated, the Panel Lock will remain until the power is turned off.
* While Panel Lock is activated, the LED indicators for all buttons will turn off.
* The Panel Lock can only be activated when the normal playing mode screen is shown in the LCD display.
Panel Lock

36
Mus
ic M
enu
Demo Songs
The Demo function provides an excellent introduction to the varied capabilities of CA58 digital piano. There are over 30 different demonstration songs available, highlighting the instruments’ rich selection of high quality sounds and its power speaker system.
For a complete listing of demonstration songs, please refer to page 133 of this owner’s manual.
Entering Demo mode
Press the FUNCTION button (MUSIC).
The Music Menu will be shown in the LCD display. Demo mode will be selected automatically.
Press the FUNCTION (ENTER) or PLAY/STOP buttons.
The LED indicator for the PIANO 1 button will start to flash, and the ‘SK Concert Grand’ demo song will start to play.
Selecting a demo song
While Demo mode is selected:
Press a SOUND button to select a sound category.The first demo song of the sound category will start to play.
Press the or buttons to cycle through the demo songs in the selected sound category, and the or buttons to cycle through the different sound categories.
* When the selected song has finished, the next demo song in the category will begin to play automatically.
Stopping the demo song and exiting Demo mode
Press the FUNCTION (BACK) or PLAY/STOP buttons while the song demo is playing.
The LED indicator for the selected SOUND button will stop flashing, and the song demo will stop playing.
Press the FUNCTION (EXIT) button to exit the Music Menu.
or
buttons:Select sound category
buttons:Select demo song
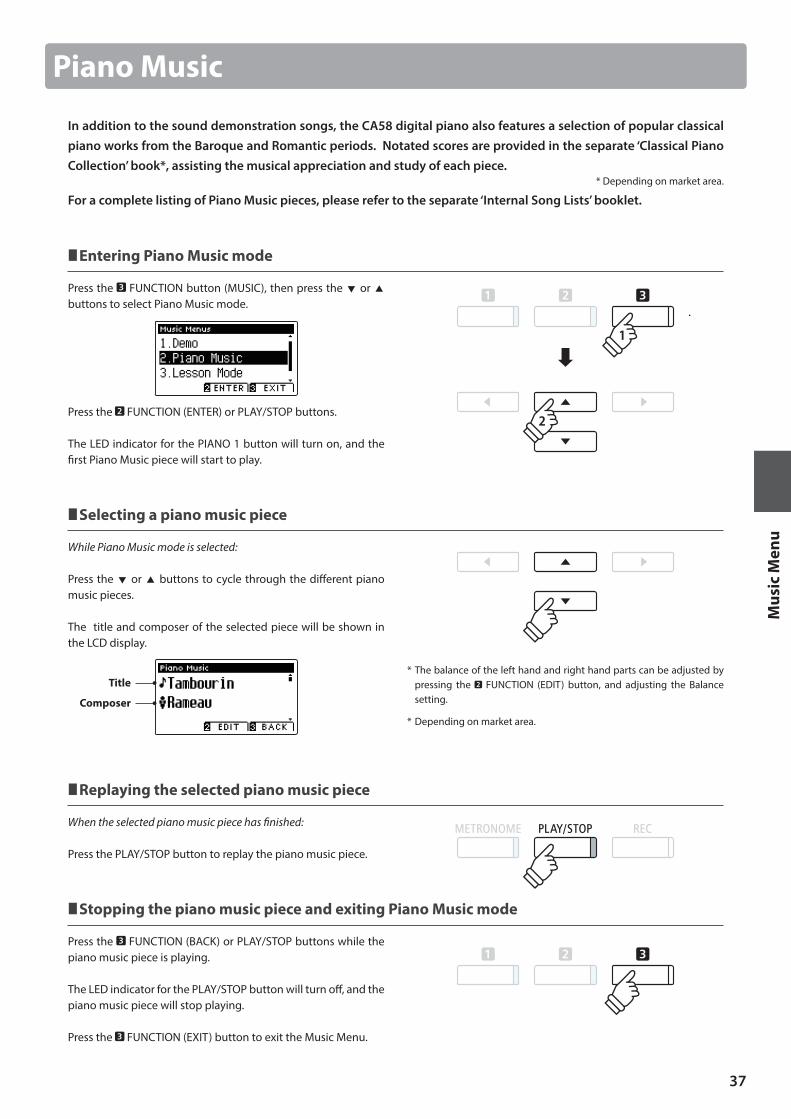
37
Mus
ic M
enu
In addition to the sound demonstration songs, the CA58 digital piano also features a selection of popular classical piano works from the Baroque and Romantic periods. Notated scores are provided in the separate ‘Classical Piano Collection’ book*, assisting the musical appreciation and study of each piece.
* Depending on market area.
For a complete listing of Piano Music pieces, please refer to the separate ‘Internal Song Lists’ booklet.
Entering Piano Music mode
Press the FUNCTION button (MUSIC), then press the or buttons to select Piano Music mode.
Press the FUNCTION (ENTER) or PLAY/STOP buttons.
The LED indicator for the PIANO 1 button will turn on, and the first Piano Music piece will start to play.
Selecting a piano music piece
While Piano Music mode is selected:
Press the or buttons to cycle through the different piano music pieces.
The title and composer of the selected piece will be shown in the LCD display.
Title
Composer
Replaying the selected piano music piece
When the selected piano music piece has finished:
Press the PLAY/STOP button to replay the piano music piece.
Stopping the piano music piece and exiting Piano Music mode
Press the FUNCTION (BACK) or PLAY/STOP buttons while the piano music piece is playing.
The LED indicator for the PLAY/STOP button will turn off, and the piano music piece will stop playing.
Press the FUNCTION (EXIT) button to exit the Music Menu.
Piano Music
* The balance of the left hand and right hand parts can be adjusted by pressing the FUNCTION (EDIT) button, and adjusting the Balance setting.
* Depending on market area.
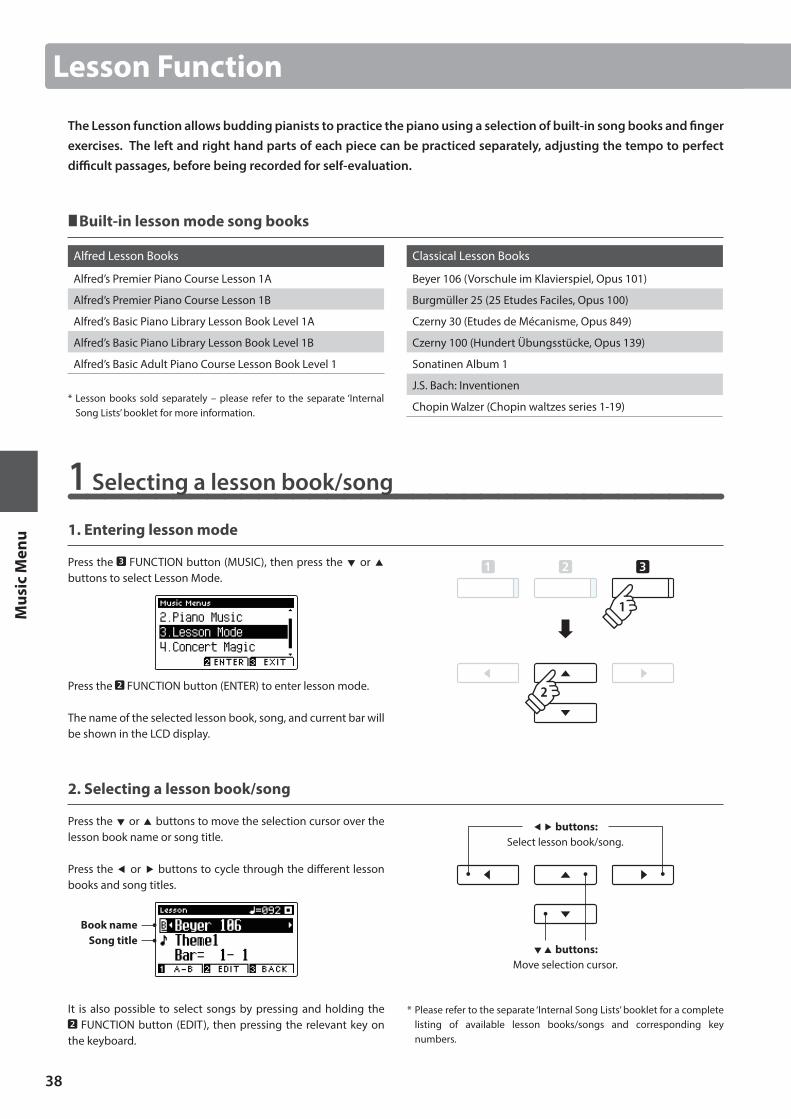
38
Mus
ic M
enu
Lesson Function
The Lesson function allows budding pianists to practice the piano using a selection of built-in song books and finger exercises. The left and right hand parts of each piece can be practiced separately, adjusting the tempo to perfect difficult passages, before being recorded for self-evaluation.
Built-in lesson mode song books
Alfred Lesson Books Classical Lesson Books
Alfred’s Premier Piano Course Lesson 1A Beyer 106 (Vorschule im Klavierspiel, Opus 101)
Alfred’s Premier Piano Course Lesson 1B Burgmüller 25 (25 Etudes Faciles, Opus 100)
Alfred’s Basic Piano Library Lesson Book Level 1A Czerny 30 (Etudes de Mécanisme, Opus 849)
Alfred’s Basic Piano Library Lesson Book Level 1B Czerny 100 (Hundert Übungsstücke, Opus 139)
Alfred’s Basic Adult Piano Course Lesson Book Level 1 Sonatinen Album 1
* Lesson books sold separately – please refer to the separate ‘Internal Song Lists’ booklet for more information.
J.S. Bach: Inventionen
Chopin Walzer (Chopin waltzes series 1-19)
1 Selecting a lesson book/song
1. Entering lesson mode
Press the FUNCTION button (MUSIC), then press the or buttons to select Lesson Mode.
Press the FUNCTION button (ENTER) to enter lesson mode.
The name of the selected lesson book, song, and current bar will be shown in the LCD display.
2. Selecting a lesson book/song
Press the or buttons to move the selection cursor over the lesson book name or song title.
Press the or buttons to cycle through the different lesson books and song titles.
Book nameSong title
It is also possible to select songs by pressing and holding the FUNCTION button (EDIT), then pressing the relevant key on
the keyboard.
buttons:Move selection cursor.
buttons:Select lesson book/song.
* Please refer to the separate ‘Internal Song Lists’ booklet for a complete listing of available lesson books/songs and corresponding key numbers.
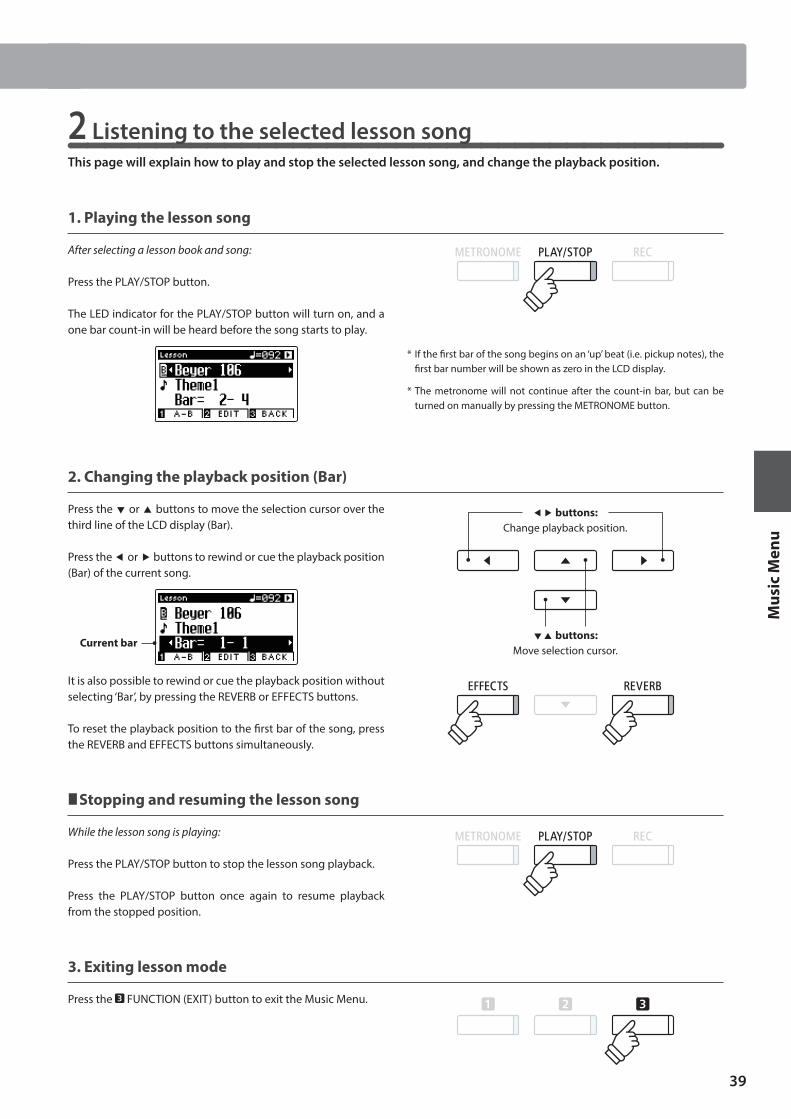
39
Mus
ic M
enu
2 Listening to the selected lesson songThis page will explain how to play and stop the selected lesson song, and change the playback position.
1. Playing the lesson song
After selecting a lesson book and song:
Press the PLAY/STOP button.
The LED indicator for the PLAY/STOP button will turn on, and a one bar count-in will be heard before the song starts to play.
2. Changing the playback position (Bar)
Press the or buttons to move the selection cursor over the third line of the LCD display (Bar).
Press the or buttons to rewind or cue the playback position (Bar) of the current song.
Current bar
It is also possible to rewind or cue the playback position without selecting ‘Bar’, by pressing the REVERB or EFFECTS buttons.
To reset the playback position to the first bar of the song, press the REVERB and EFFECTS buttons simultaneously.
Stopping and resuming the lesson song
While the lesson song is playing:
Press the PLAY/STOP button to stop the lesson song playback.
Press the PLAY/STOP button once again to resume playback from the stopped position.
3. Exiting lesson mode
Press the FUNCTION (EXIT) button to exit the Music Menu.
* If the first bar of the song begins on an ‘up’ beat (i.e. pickup notes), the first bar number will be shown as zero in the LCD display.
* The metronome will not continue after the count-in bar, but can be turned on manually by pressing the METRONOME button.
buttons:Move selection cursor.
buttons:Change playback position.
Lesson Function
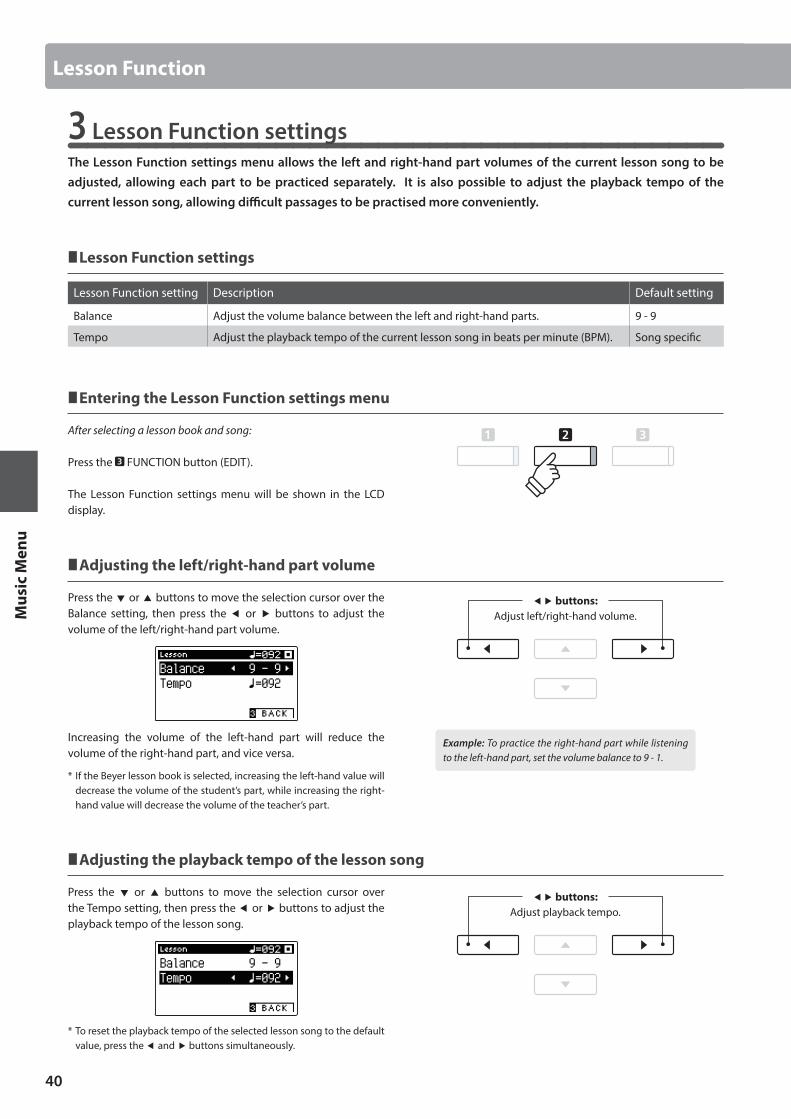
40
Mus
ic M
enu
3 Lesson Function settingsThe Lesson Function settings menu allows the left and right-hand part volumes of the current lesson song to be adjusted, allowing each part to be practiced separately. It is also possible to adjust the playback tempo of the current lesson song, allowing difficult passages to be practised more conveniently.
Lesson Function settings
Lesson Function setting Description Default setting
Balance Adjust the volume balance between the left and right-hand parts. 9 - 9
Tempo Adjust the playback tempo of the current lesson song in beats per minute (BPM). Song specific
Entering the Lesson Function settings menu
After selecting a lesson book and song:
Press the FUNCTION button (EDIT).
The Lesson Function settings menu will be shown in the LCD display.
Adjusting the left/right-hand part volume
Press the or buttons to move the selection cursor over the Balance setting, then press the or buttons to adjust the volume of the left/right-hand part volume.
Increasing the volume of the left-hand part will reduce the volume of the right-hand part, and vice versa.
* If the Beyer lesson book is selected, increasing the left-hand value will decrease the volume of the student’s part, while increasing the right-hand value will decrease the volume of the teacher’s part.
Adjusting the playback tempo of the lesson song
Press the or buttons to move the selection cursor over the Tempo setting, then press the or buttons to adjust the playback tempo of the lesson song.
* To reset the playback tempo of the selected lesson song to the default value, press the and buttons simultaneously.
Lesson Function
buttons:Adjust left/right-hand volume.
Example: To practice the right-hand part while listening to the left-hand part, set the volume balance to 9 - 1.
buttons:Adjust playback tempo.
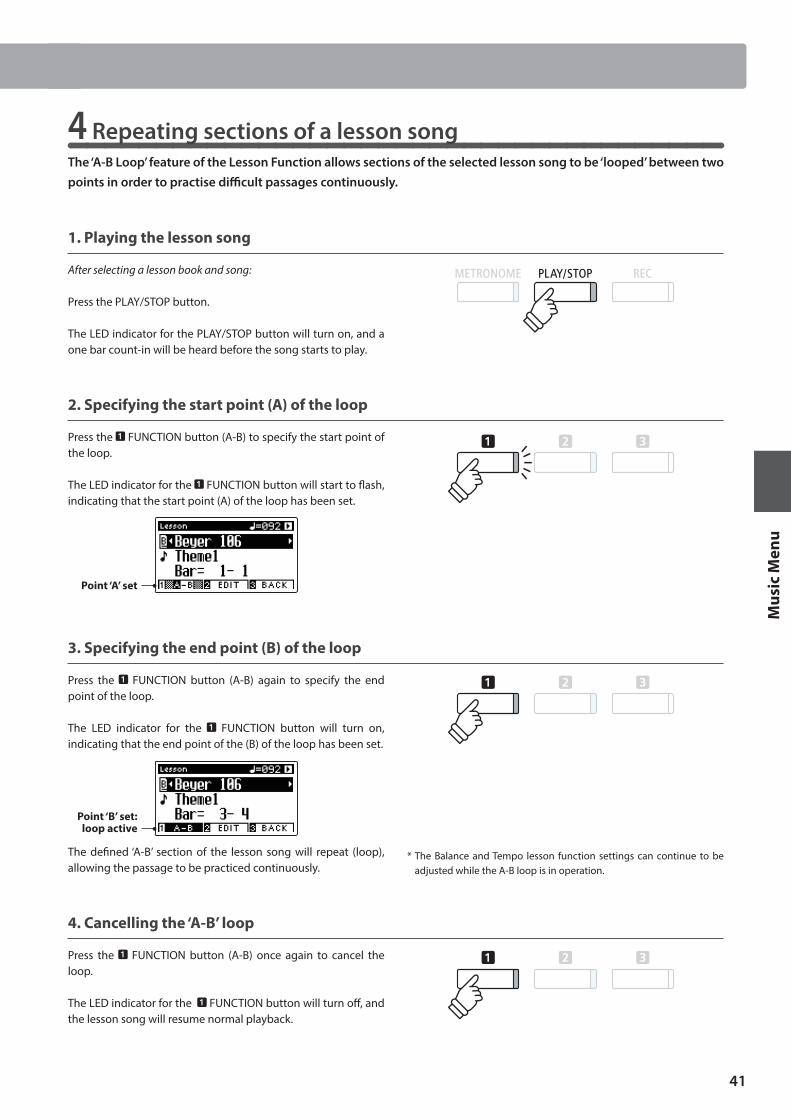
41
Mus
ic M
enu
4 Repeating sections of a lesson songThe ‘A-B Loop’ feature of the Lesson Function allows sections of the selected lesson song to be ‘looped’ between two points in order to practise difficult passages continuously.
1. Playing the lesson song
After selecting a lesson book and song:
Press the PLAY/STOP button.
The LED indicator for the PLAY/STOP button will turn on, and a one bar count-in will be heard before the song starts to play.
2. Specifying the start point (A) of the loop
Press the FUNCTION button (A-B) to specify the start point of the loop.
The LED indicator for the FUNCTION button will start to flash, indicating that the start point (A) of the loop has been set.
Point ‘A’ set
3. Specifying the end point (B) of the loop
Press the FUNCTION button (A-B) again to specify the end point of the loop.
The LED indicator for the FUNCTION button will turn on, indicating that the end point of the (B) of the loop has been set.
Point ‘B’ set:loop active
The defined ‘A-B’ section of the lesson song will repeat (loop), allowing the passage to be practiced continuously.
4. Cancelling the ‘A-B’ loop
Press the FUNCTION button (A-B) once again to cancel the loop.
The LED indicator for the FUNCTION button will turn off, and the lesson song will resume normal playback.
* The Balance and Tempo lesson function settings can continue to be adjusted while the A-B loop is in operation.
Lesson Function
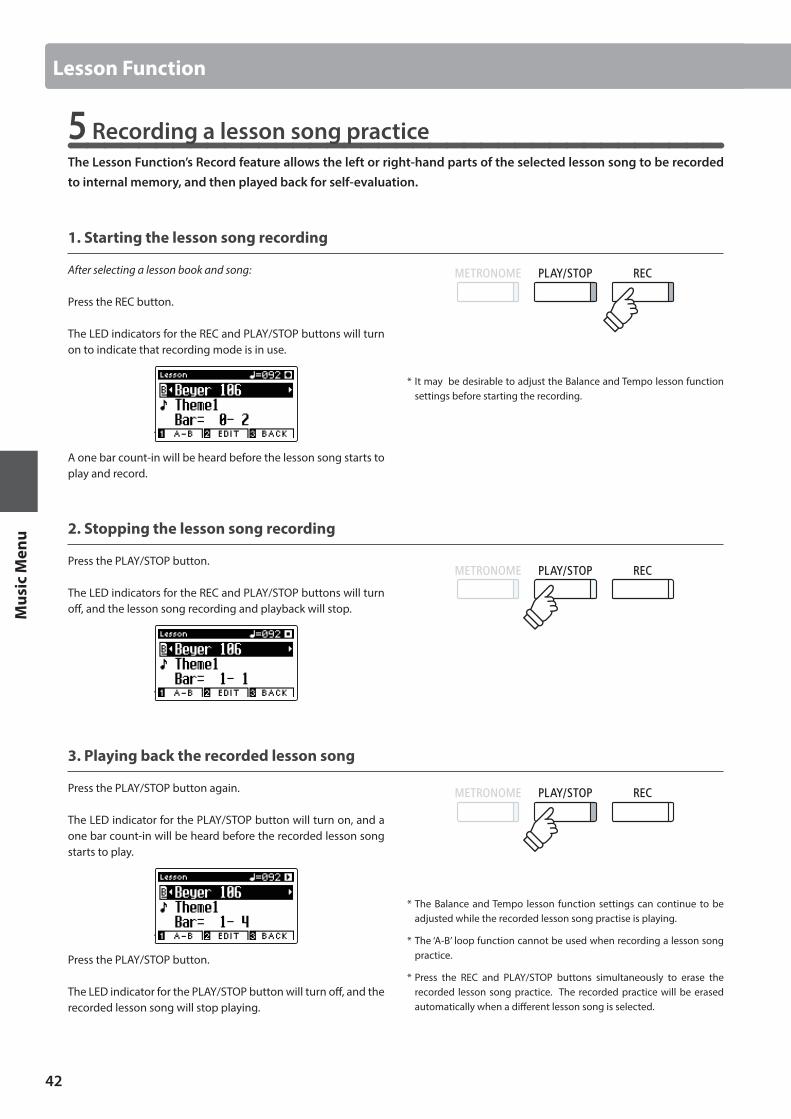
42
Mus
ic M
enu
5 Recording a lesson song practiceThe Lesson Function’s Record feature allows the left or right-hand parts of the selected lesson song to be recorded to internal memory, and then played back for self-evaluation.
1. Starting the lesson song recording
After selecting a lesson book and song:
Press the REC button.
The LED indicators for the REC and PLAY/STOP buttons will turn on to indicate that recording mode is in use.
A one bar count-in will be heard before the lesson song starts to play and record.
2. Stopping the lesson song recording
Press the PLAY/STOP button.
The LED indicators for the REC and PLAY/STOP buttons will turn off, and the lesson song recording and playback will stop.
3. Playing back the recorded lesson song
Press the PLAY/STOP button again.
The LED indicator for the PLAY/STOP button will turn on, and a one bar count-in will be heard before the recorded lesson song starts to play.
Press the PLAY/STOP button.
The LED indicator for the PLAY/STOP button will turn off, and the recorded lesson song will stop playing.
Lesson Function
* It may be desirable to adjust the Balance and Tempo lesson function settings before starting the recording.
* The Balance and Tempo lesson function settings can continue to be adjusted while the recorded lesson song practise is playing.
* The ‘A-B’ loop function cannot be used when recording a lesson song practice.
* Press the REC and PLAY/STOP buttons simultaneously to erase the recorded lesson song practice. The recorded practice will be erased automatically when a different lesson song is selected.
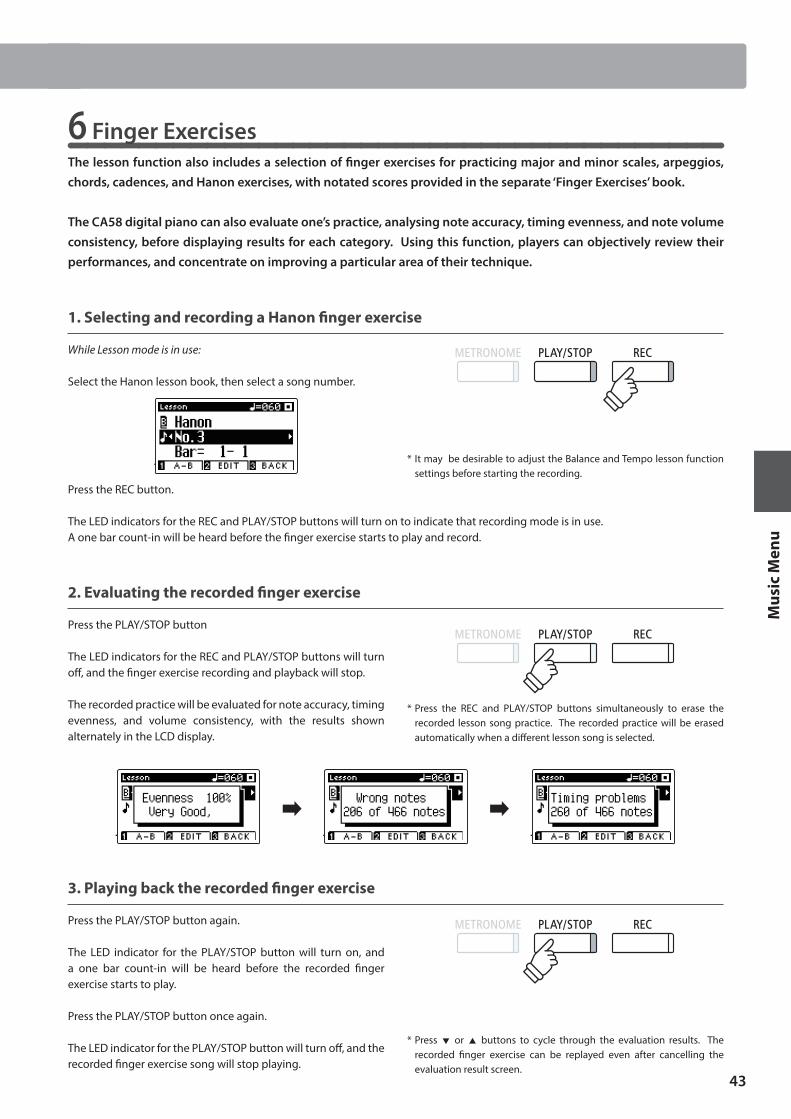
43
Mus
ic M
enu
6 Finger ExercisesThe lesson function also includes a selection of finger exercises for practicing major and minor scales, arpeggios, chords, cadences, and Hanon exercises, with notated scores provided in the separate ‘Finger Exercises’ book.
The CA58 digital piano can also evaluate one’s practice, analysing note accuracy, timing evenness, and note volume consistency, before displaying results for each category. Using this function, players can objectively review their performances, and concentrate on improving a particular area of their technique.
1. Selecting and recording a Hanon finger exercise
While Lesson mode is in use:
Select the Hanon lesson book, then select a song number.
Press the REC button.
The LED indicators for the REC and PLAY/STOP buttons will turn on to indicate that recording mode is in use.A one bar count-in will be heard before the finger exercise starts to play and record.
2. Evaluating the recorded finger exercise
Press the PLAY/STOP button
The LED indicators for the REC and PLAY/STOP buttons will turn off, and the finger exercise recording and playback will stop.
The recorded practice will be evaluated for note accuracy, timing evenness, and volume consistency, with the results shown alternately in the LCD display.
3. Playing back the recorded finger exercise
Press the PLAY/STOP button again.
The LED indicator for the PLAY/STOP button will turn on, and a one bar count-in will be heard before the recorded finger exercise starts to play.
Press the PLAY/STOP button once again.
The LED indicator for the PLAY/STOP button will turn off, and the recorded finger exercise song will stop playing.
* It may be desirable to adjust the Balance and Tempo lesson function settings before starting the recording.
* Press the REC and PLAY/STOP buttons simultaneously to erase the recorded lesson song practice. The recorded practice will be erased automatically when a different lesson song is selected.
* Press or buttons to cycle through the evaluation results. The recorded finger exercise can be replayed even after cancelling the evaluation result screen.
Lesson Function
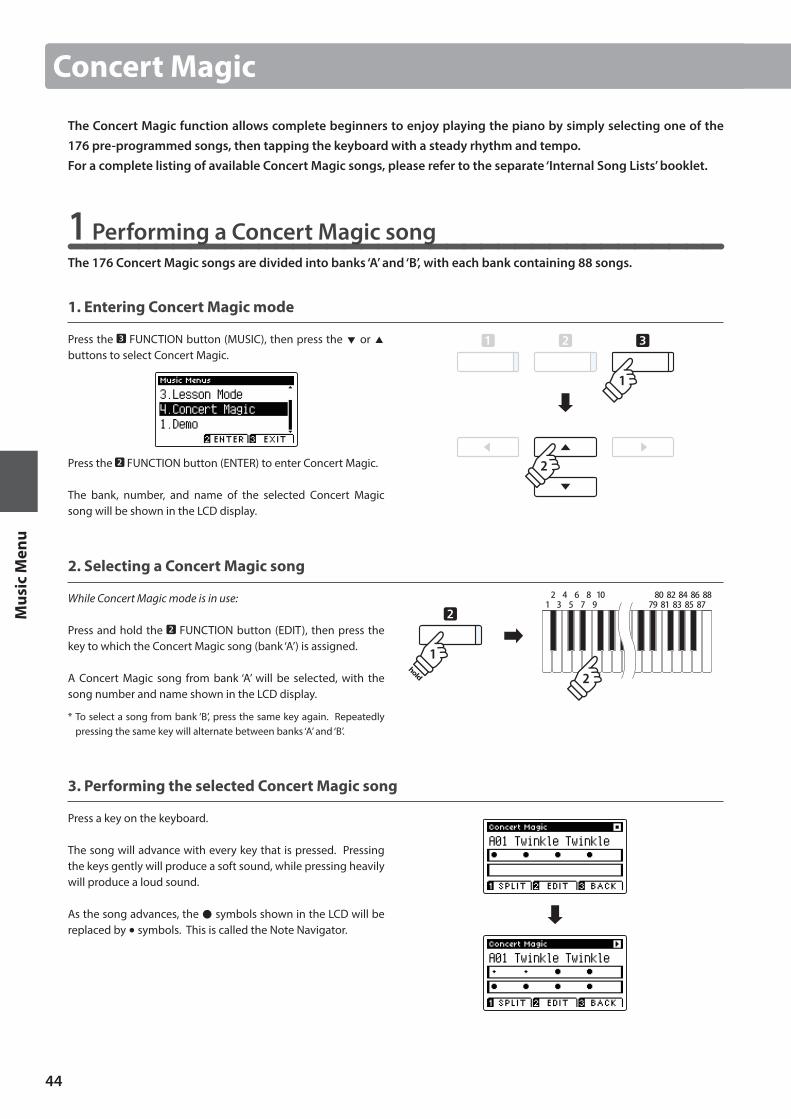
44
Mus
ic M
enu
Concert Magic
The Concert Magic function allows complete beginners to enjoy playing the piano by simply selecting one of the 176 pre-programmed songs, then tapping the keyboard with a steady rhythm and tempo.For a complete listing of available Concert Magic songs, please refer to the separate ‘Internal Song Lists’ booklet.
1 Performing a Concert Magic songThe 176 Concert Magic songs are divided into banks ‘A’ and ‘B’, with each bank containing 88 songs.
1. Entering Concert Magic mode
Press the FUNCTION button (MUSIC), then press the or buttons to select Concert Magic.
Press the FUNCTION button (ENTER) to enter Concert Magic.
The bank, number, and name of the selected Concert Magic song will be shown in the LCD display.
2. Selecting a Concert Magic song
While Concert Magic mode is in use:
Press and hold the FUNCTION button (EDIT), then press the key to which the Concert Magic song (bank ‘A’) is assigned.
A Concert Magic song from bank ‘A’ will be selected, with the song number and name shown in the LCD display.
* To select a song from bank ‘B’, press the same key again. Repeatedly pressing the same key will alternate between banks ‘A’ and ‘B’.
3. Performing the selected Concert Magic song
Press a key on the keyboard.
The song will advance with every key that is pressed. Pressing the keys gently will produce a soft sound, while pressing heavily will produce a loud sound.
As the song advances, the symbols shown in the LCD will be replaced by symbols. This is called the Note Navigator.
hold
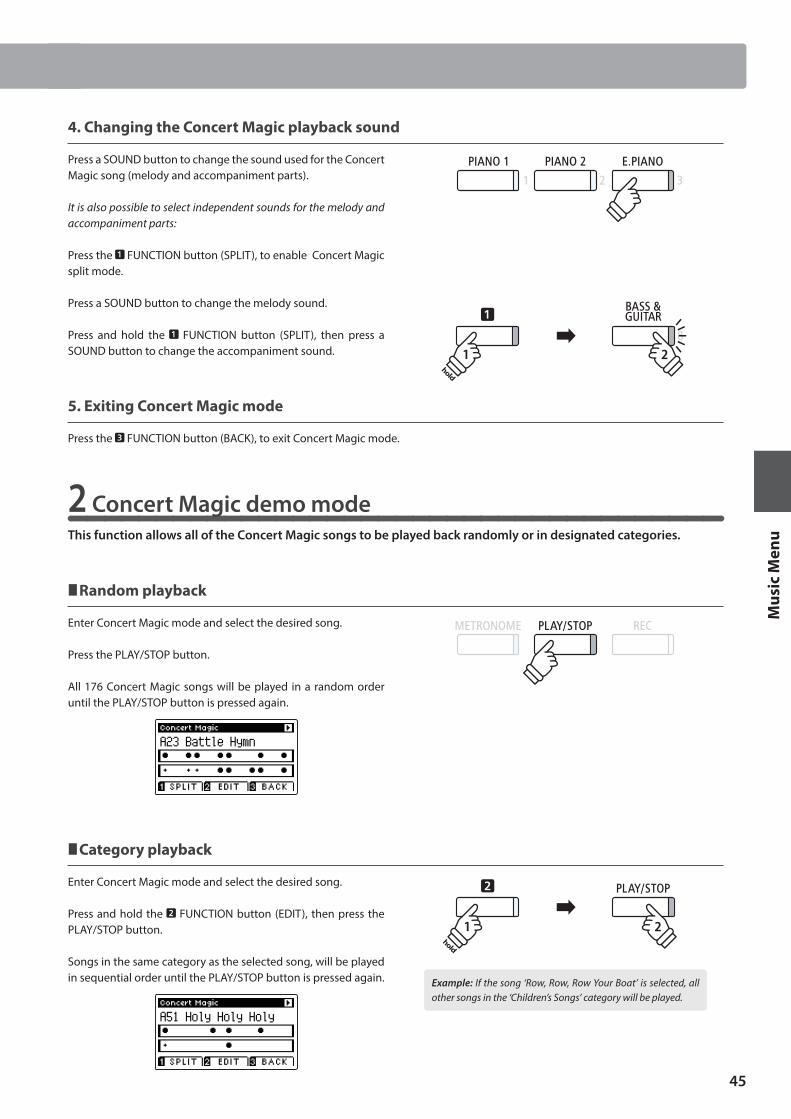
45
Mus
ic M
enu
4. Changing the Concert Magic playback sound
Press a SOUND button to change the sound used for the Concert Magic song (melody and accompaniment parts).
It is also possible to select independent sounds for the melody and accompaniment parts:
Press the FUNCTION button (SPLIT), to enable Concert Magic split mode.
Press a SOUND button to change the melody sound.
Press and hold the FUNCTION button (SPLIT), then press a SOUND button to change the accompaniment sound.
5. Exiting Concert Magic mode
Press the FUNCTION button (BACK), to exit Concert Magic mode.
2 Concert Magic demo modeThis function allows all of the Concert Magic songs to be played back randomly or in designated categories.
Random playback
Enter Concert Magic mode and select the desired song.
Press the PLAY/STOP button.
All 176 Concert Magic songs will be played in a random order until the PLAY/STOP button is pressed again.
Category playback
Enter Concert Magic mode and select the desired song.
Press and hold the FUNCTION button (EDIT), then press the PLAY/STOP button.
Songs in the same category as the selected song, will be played in sequential order until the PLAY/STOP button is pressed again. Example: If the song ‘Row, Row, Row Your Boat’ is selected, all
other songs in the ‘Children’s Songs’ category will be played.
hold
hold
Concert Magic

46
Mus
ic M
enu
Concert Magic
3 Concert Magic settingsThe Concert Magic settings menu allows the playback tempo, playing mode, and volume balance to be adjusted.
Concert Magic settings
Concert Magic setting Description Default setting
Tempo Adjust the playback tempo of the Concert Magic song in beats per minute (BPM). Song specific
Mode Change the Concert Magic playing mode (see below). Normal
Balance Adjust the volume balance between the melody and accompaniment parts. 9 - 9
Entering the Concert Magic settings menu
While Concert Magic mode is in use:
Press the FUNCTION button (EDIT).
The Concert Magic settings menu will be shown in the LCD display.
Adjusting Concert Magic settings
After entering the Concert Magic settings menu:
Press the or buttons to move the selection cursor over the desired setting.
Press the or buttons to adjust the selected setting.
* To reset the current setting to the default value, press the and buttons simultaneously.
Steady Beat modeSteady Beat mode allows all Concert Magic songs to be played by simply tapping any key with a constant steady beat, regardless of the song arrangement type.
buttons:Move selection cursor.
buttons:Adjust selected setting.
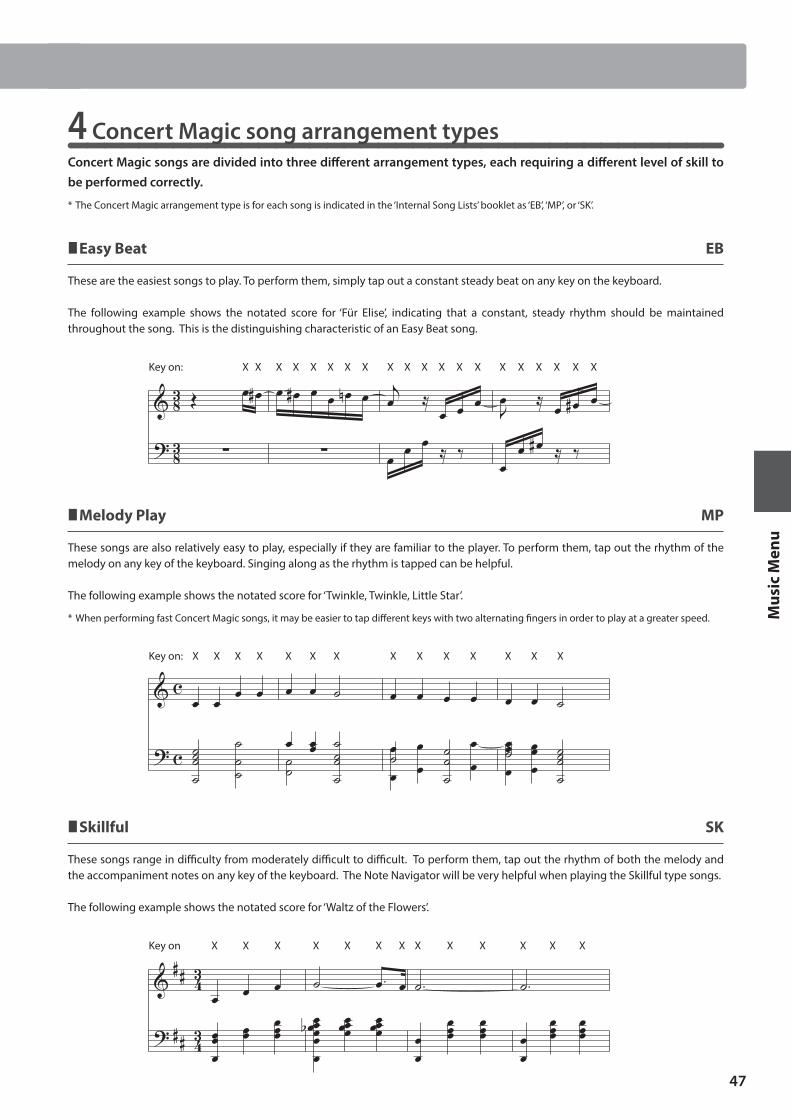
47
Mus
ic M
enu
4 Concert Magic song arrangement typesConcert Magic songs are divided into three different arrangement types, each requiring a different level of skill to be performed correctly.
* The Concert Magic arrangement type is for each song is indicated in the ‘Internal Song Lists’ booklet as ‘EB’, ‘MP’, or ‘SK’.
Easy Beat EB
These are the easiest songs to play. To perform them, simply tap out a constant steady beat on any key on the keyboard.
The following example shows the notated score for ‘Für Elise’, indicating that a constant, steady rhythm should be maintained throughout the song. This is the distinguishing characteristic of an Easy Beat song.
Key on: X X X X X X X X X XX X X X X X X X X X
Melody Play MP
These songs are also relatively easy to play, especially if they are familiar to the player. To perform them, tap out the rhythm of the melody on any key of the keyboard. Singing along as the rhythm is tapped can be helpful.
The following example shows the notated score for ‘Twinkle, Twinkle, Little Star’.
* When performing fast Concert Magic songs, it may be easier to tap different keys with two alternating fingers in order to play at a greater speed.
Key on: X X X X X X X X X X X X X X
Skillful SK
These songs range in difficulty from moderately difficult to difficult. To perform them, tap out the rhythm of both the melody and the accompaniment notes on any key of the keyboard. The Note Navigator will be very helpful when playing the Skillful type songs.
The following example shows the notated score for ‘Waltz of the Flowers’.
Key on X X X X X X X X X X X X X
Concert Magic
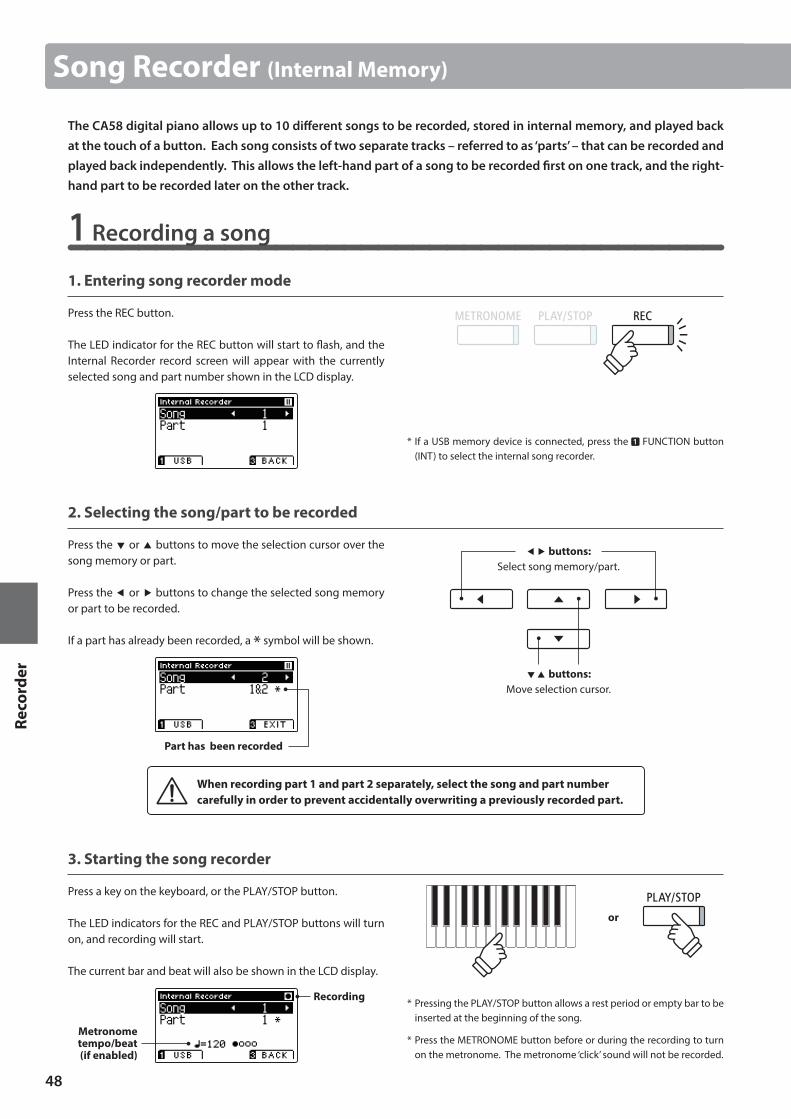
48
Reco
rder
Song Recorder (Internal Memory)
The CA58 digital piano allows up to 10 different songs to be recorded, stored in internal memory, and played back at the touch of a button. Each song consists of two separate tracks – referred to as ‘parts’ – that can be recorded and played back independently. This allows the left-hand part of a song to be recorded first on one track, and the right-hand part to be recorded later on the other track.
1 Recording a song
1. Entering song recorder mode
Press the REC button.
The LED indicator for the REC button will start to flash, and the Internal Recorder record screen will appear with the currently selected song and part number shown in the LCD display.
2. Selecting the song/part to be recorded
Press the or buttons to move the selection cursor over the song memory or part.
Press the or buttons to change the selected song memory or part to be recorded.
If a part has already been recorded, a * symbol will be shown.
Part has been recorded
When recording part 1 and part 2 separately, select the song and part number carefully in order to prevent accidentally overwriting a previously recorded part.
3. Starting the song recorder
Press a key on the keyboard, or the PLAY/STOP button.
The LED indicators for the REC and PLAY/STOP buttons will turn on, and recording will start.
The current bar and beat will also be shown in the LCD display.
Metronome tempo/beat (if enabled)
Recording
buttons:Move selection cursor.
buttons:Select song memory/part.
* If a USB memory device is connected, press the FUNCTION button (INT) to select the internal song recorder.
or
* Pressing the PLAY/STOP button allows a rest period or empty bar to be inserted at the beginning of the song.
* Press the METRONOME button before or during the recording to turn on the metronome. The metronome ‘click’ sound will not be recorded.
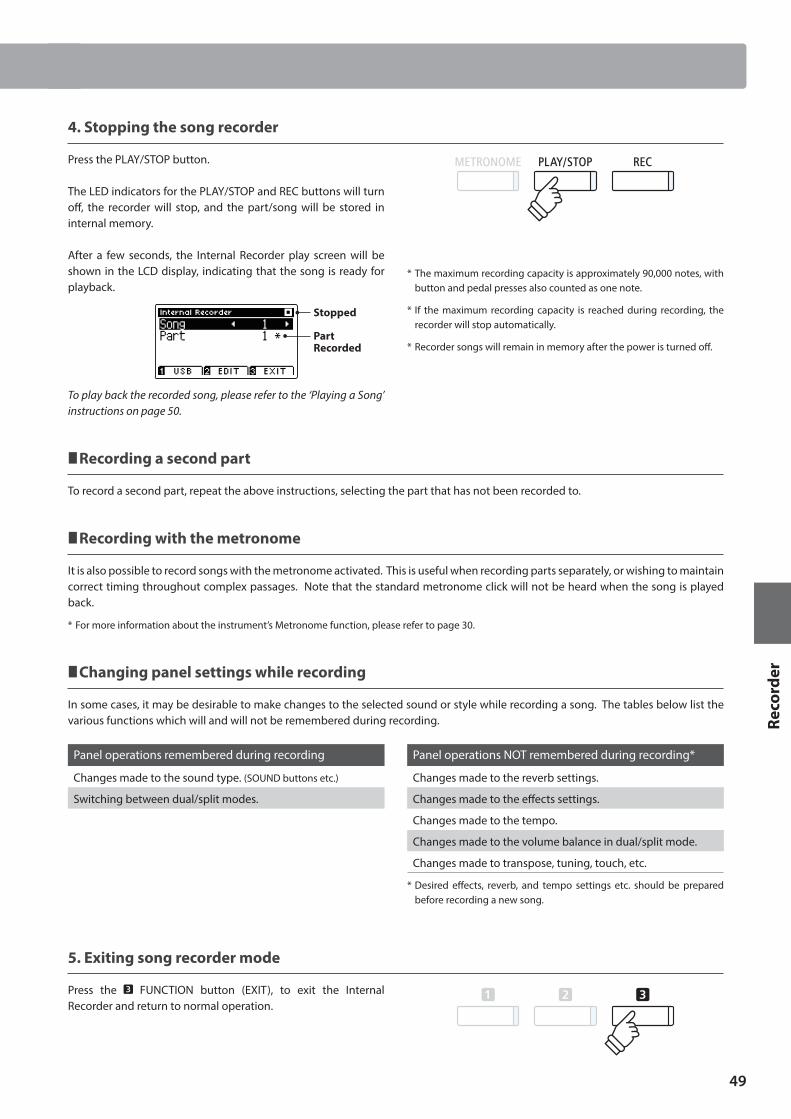
49
Reco
rder
4. Stopping the song recorder
Press the PLAY/STOP button.
The LED indicators for the PLAY/STOP and REC buttons will turn off, the recorder will stop, and the part/song will be stored in internal memory.
After a few seconds, the Internal Recorder play screen will be shown in the LCD display, indicating that the song is ready for playback.
Stopped
PartRecorded
To play back the recorded song, please refer to the ‘Playing a Song’ instructions on page 50.
Recording a second part
To record a second part, repeat the above instructions, selecting the part that has not been recorded to.
Recording with the metronome
It is also possible to record songs with the metronome activated. This is useful when recording parts separately, or wishing to maintain correct timing throughout complex passages. Note that the standard metronome click will not be heard when the song is played back.
* For more information about the instrument’s Metronome function, please refer to page 30.
Changing panel settings while recording
In some cases, it may be desirable to make changes to the selected sound or style while recording a song. The tables below list the various functions which will and will not be remembered during recording.
Panel operations remembered during recording Panel operations NOT remembered during recording*
Changes made to the sound type. (SOUND buttons etc.) Changes made to the reverb settings.
Switching between dual/split modes. Changes made to the effects settings.
Changes made to the tempo.
Changes made to the volume balance in dual/split mode.
Changes made to transpose, tuning, touch, etc.
* Desired effects, reverb, and tempo settings etc. should be prepared before recording a new song.
5. Exiting song recorder mode
Press the FUNCTION button (EXIT), to exit the Internal Recorder and return to normal operation.
* The maximum recording capacity is approximately 90,000 notes, with button and pedal presses also counted as one note.
* If the maximum recording capacity is reached during recording, the recorder will stop automatically.
* Recorder songs will remain in memory after the power is turned off.
Song Recorder (Internal Memory)
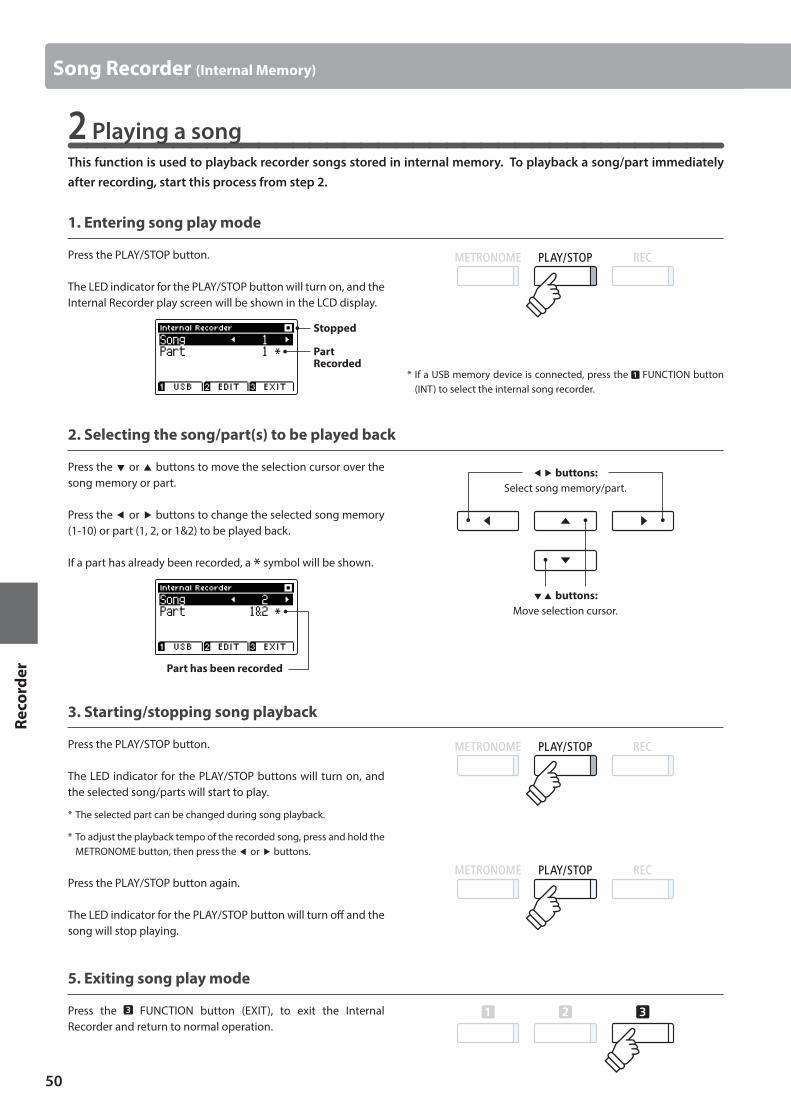
50
Reco
rder
2 Playing a songThis function is used to playback recorder songs stored in internal memory. To playback a song/part immediately after recording, start this process from step 2.
1. Entering song play mode
Press the PLAY/STOP button.
The LED indicator for the PLAY/STOP button will turn on, and the Internal Recorder play screen will be shown in the LCD display.
Stopped
PartRecorded
2. Selecting the song/part(s) to be played back
Press the or buttons to move the selection cursor over the song memory or part.
Press the or buttons to change the selected song memory (1-10) or part (1, 2, or 1&2) to be played back.
If a part has already been recorded, a * symbol will be shown.
Part has been recorded
3. Starting/stopping song playback
Press the PLAY/STOP button.
The LED indicator for the PLAY/STOP buttons will turn on, and the selected song/parts will start to play.
* The selected part can be changed during song playback.
* To adjust the playback tempo of the recorded song, press and hold the METRONOME button, then press the or buttons.
Press the PLAY/STOP button again.
The LED indicator for the PLAY/STOP button will turn off and the song will stop playing.
5. Exiting song play mode
Press the FUNCTION button (EXIT), to exit the Internal Recorder and return to normal operation.
Song Recorder (Internal Memory)
* If a USB memory device is connected, press the FUNCTION button (INT) to select the internal song recorder.
buttons:Move selection cursor.
buttons:Select song memory/part.
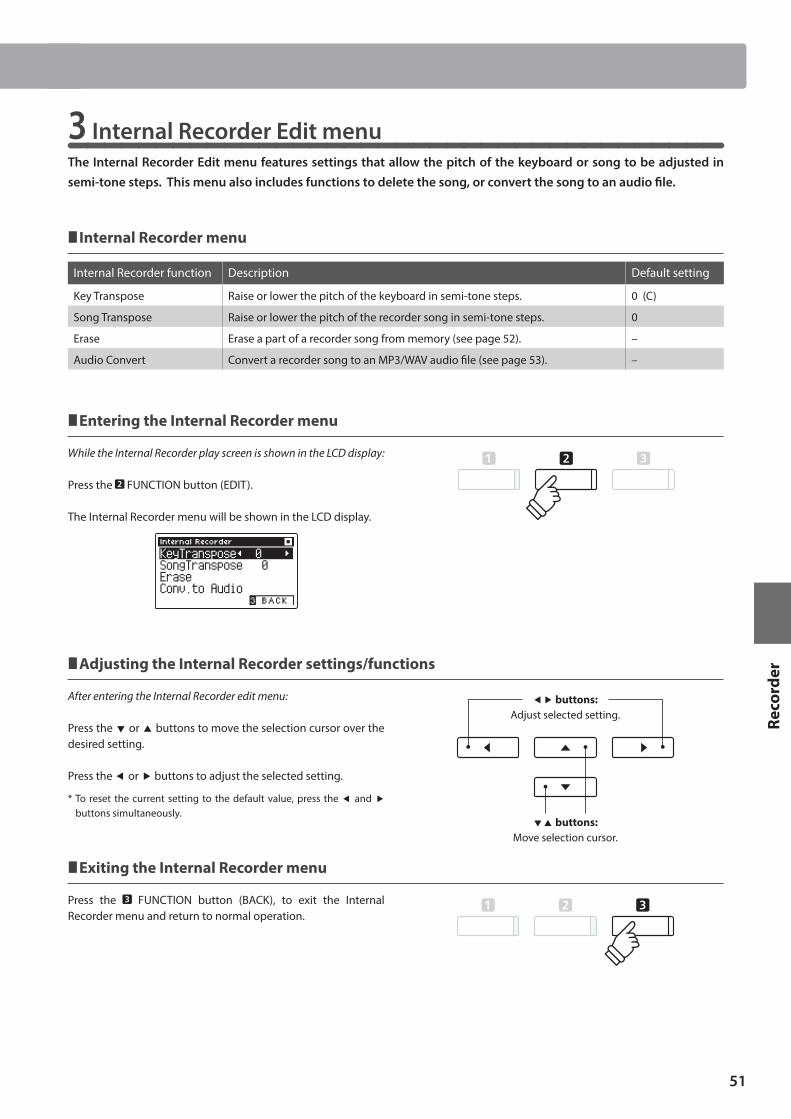
51
Reco
rder
3 Internal Recorder Edit menuThe Internal Recorder Edit menu features settings that allow the pitch of the keyboard or song to be adjusted in semi-tone steps. This menu also includes functions to delete the song, or convert the song to an audio file.
Internal Recorder menu
Internal Recorder function Description Default setting
Key Transpose Raise or lower the pitch of the keyboard in semi-tone steps. 0 (C)
Song Transpose Raise or lower the pitch of the recorder song in semi-tone steps. 0
Erase Erase a part of a recorder song from memory (see page 52). –
Audio Convert Convert a recorder song to an MP3/WAV audio file (see page 53). –
Entering the Internal Recorder menu
While the Internal Recorder play screen is shown in the LCD display:
Press the FUNCTION button (EDIT).
The Internal Recorder menu will be shown in the LCD display.
Adjusting the Internal Recorder settings/functions
After entering the Internal Recorder edit menu:
Press the or buttons to move the selection cursor over the desired setting.
Press the or buttons to adjust the selected setting.
* To reset the current setting to the default value, press the and buttons simultaneously.
Exiting the Internal Recorder menu
Press the FUNCTION button (BACK), to exit the Internal Recorder menu and return to normal operation.
buttons:Move selection cursor.
buttons:Adjust selected setting.
Song Recorder (Internal Memory)
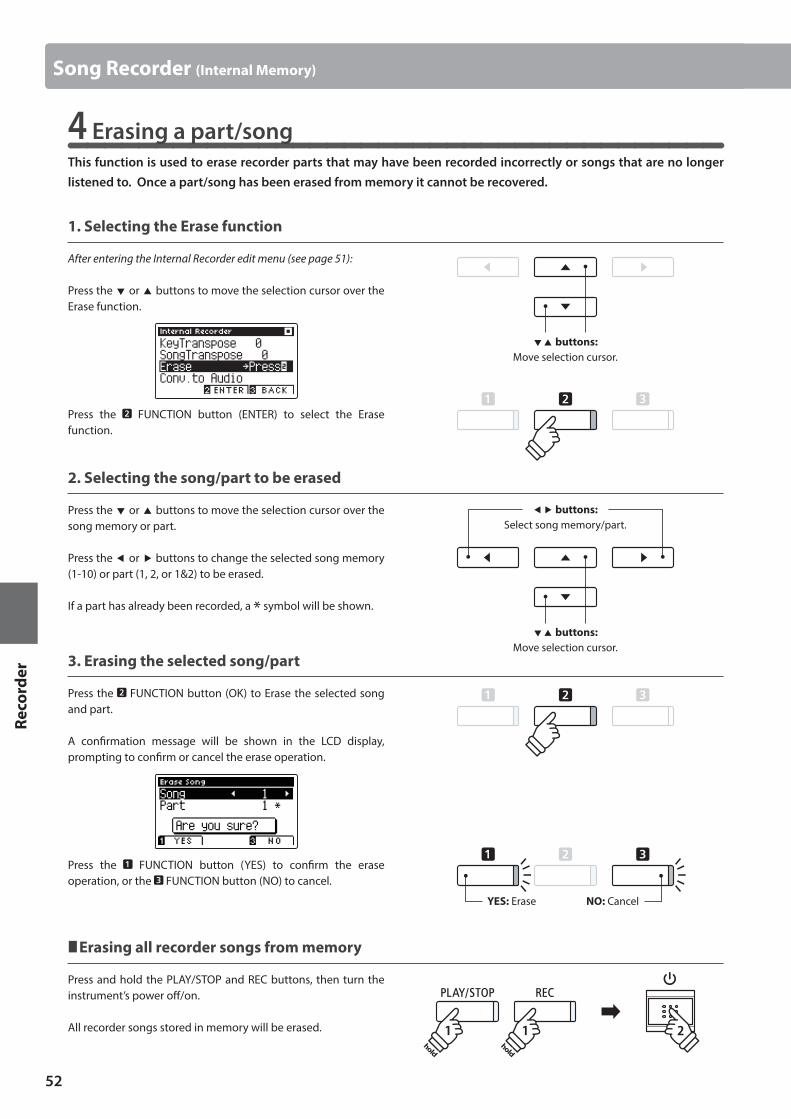
52
Reco
rder
Song Recorder (Internal Memory)
4 Erasing a part/songThis function is used to erase recorder parts that may have been recorded incorrectly or songs that are no longer listened to. Once a part/song has been erased from memory it cannot be recovered.
1. Selecting the Erase function
After entering the Internal Recorder edit menu (see page 51):
Press the or buttons to move the selection cursor over the Erase function.
Press the FUNCTION button (ENTER) to select the Erase function.
2. Selecting the song/part to be erased
Press the or buttons to move the selection cursor over the song memory or part.
Press the or buttons to change the selected song memory (1-10) or part (1, 2, or 1&2) to be erased.
If a part has already been recorded, a * symbol will be shown.
3. Erasing the selected song/part
Press the FUNCTION button (OK) to Erase the selected song and part.
A confirmation message will be shown in the LCD display, prompting to confirm or cancel the erase operation.
Press the FUNCTION button (YES) to confirm the erase operation, or the FUNCTION button (NO) to cancel.
Erasing all recorder songs from memory
Press and hold the PLAY/STOP and REC buttons, then turn the instrument’s power off/on.
All recorder songs stored in memory will be erased.
buttons:Move selection cursor.
buttons:Move selection cursor.
buttons:Select song memory/part.
holdhold
YES: Erase NO: Cancel
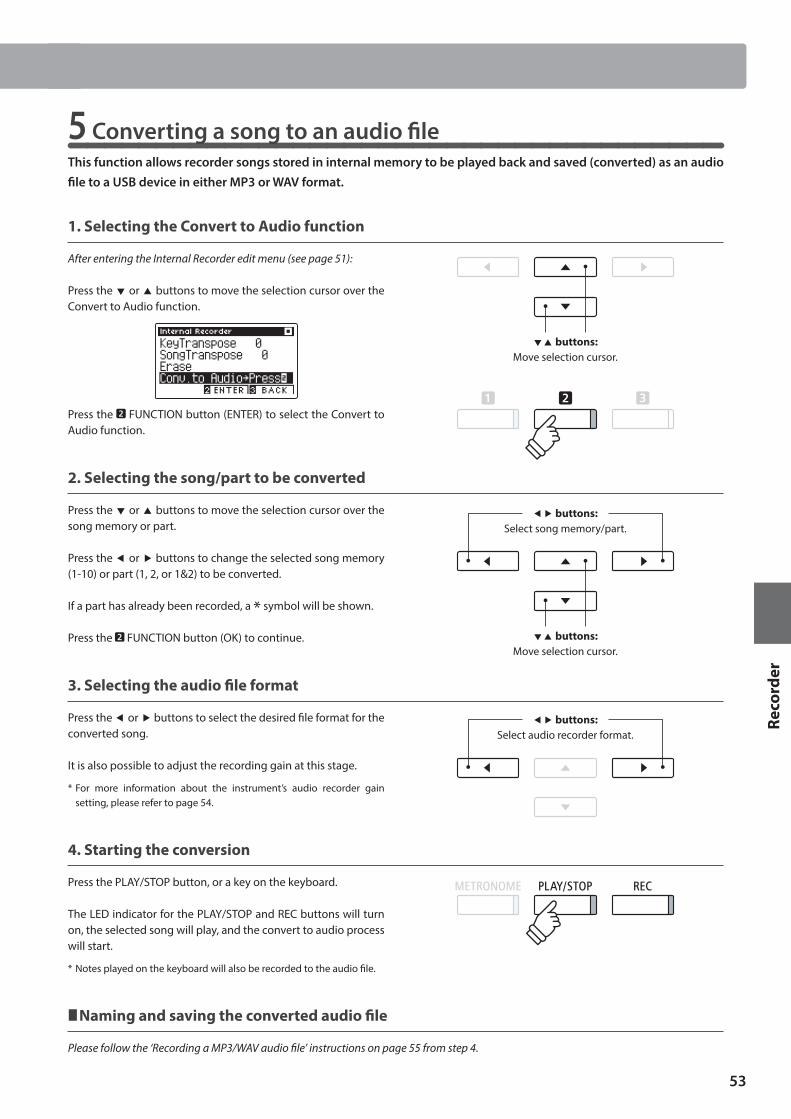
53
Reco
rder
5 Converting a song to an audio fileThis function allows recorder songs stored in internal memory to be played back and saved (converted) as an audio file to a USB device in either MP3 or WAV format.
1. Selecting the Convert to Audio function
After entering the Internal Recorder edit menu (see page 51):
Press the or buttons to move the selection cursor over the Convert to Audio function.
Press the FUNCTION button (ENTER) to select the Convert to Audio function.
2. Selecting the song/part to be converted
Press the or buttons to move the selection cursor over the song memory or part.
Press the or buttons to change the selected song memory (1-10) or part (1, 2, or 1&2) to be converted.
If a part has already been recorded, a * symbol will be shown.
Press the FUNCTION button (OK) to continue.
3. Selecting the audio file format
Press the or buttons to select the desired file format for the converted song.
It is also possible to adjust the recording gain at this stage.
* For more information about the instrument’s audio recorder gain setting, please refer to page 54.
4. Starting the conversion
Press the PLAY/STOP button, or a key on the keyboard.
The LED indicator for the PLAY/STOP and REC buttons will turn on, the selected song will play, and the convert to audio process will start.
* Notes played on the keyboard will also be recorded to the audio file.
Naming and saving the converted audio file
Please follow the ‘Recording a MP3/WAV audio file’ instructions on page 55 from step 4.
buttons:Move selection cursor.
buttons:Move selection cursor.
buttons:Select song memory/part.
buttons:Select audio recorder format.
Song Recorder (Internal Memory)
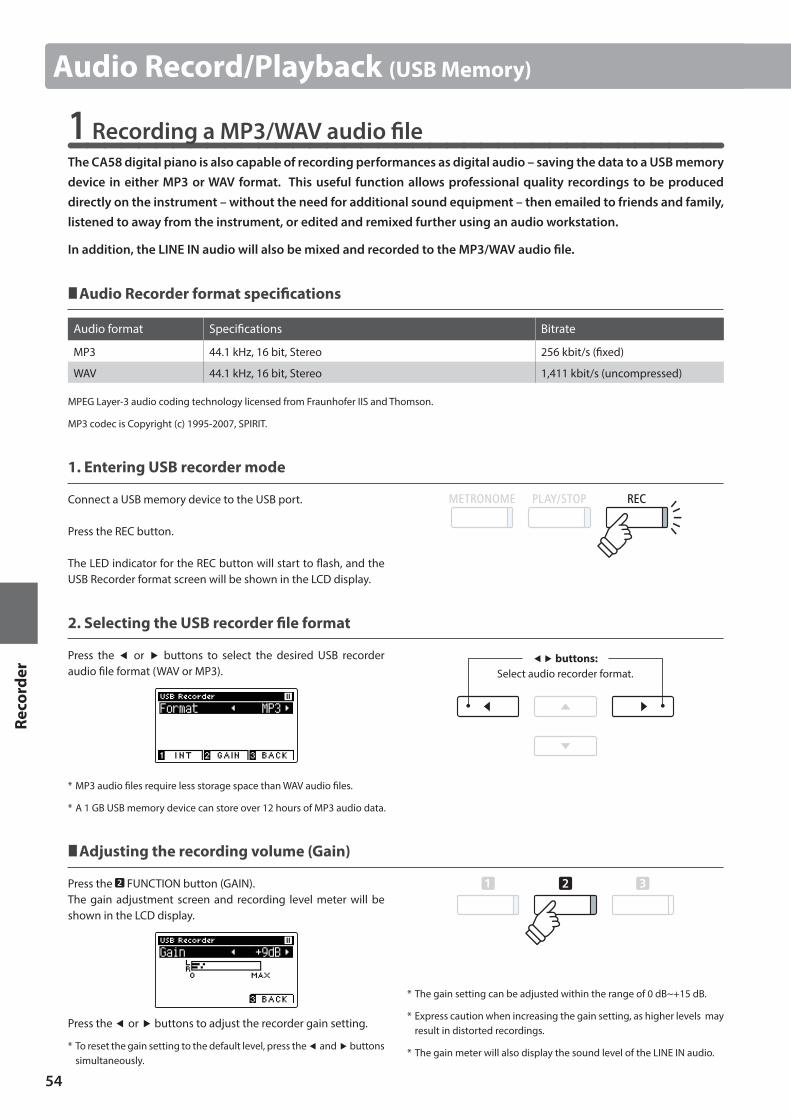
54
Reco
rder
Audio Record/Playback (USB Memory)
1 Recording a MP3/WAV audio fileThe CA58 digital piano is also capable of recording performances as digital audio – saving the data to a USB memory device in either MP3 or WAV format. This useful function allows professional quality recordings to be produced directly on the instrument – without the need for additional sound equipment – then emailed to friends and family, listened to away from the instrument, or edited and remixed further using an audio workstation.
In addition, the LINE IN audio will also be mixed and recorded to the MP3/WAV audio file.
Audio Recorder format specifications
Audio format Specifications Bitrate
MP3 44.1 kHz, 16 bit, Stereo 256 kbit/s (fixed)
WAV 44.1 kHz, 16 bit, Stereo 1,411 kbit/s (uncompressed)
MPEG Layer-3 audio coding technology licensed from Fraunhofer IIS and Thomson.
MP3 codec is Copyright (c) 1995-2007, SPIRIT.
1. Entering USB recorder mode
Connect a USB memory device to the USB port.
Press the REC button.
The LED indicator for the REC button will start to flash, and the USB Recorder format screen will be shown in the LCD display.
2. Selecting the USB recorder file format
Press the or buttons to select the desired USB recorder audio file format (WAV or MP3).
* MP3 audio files require less storage space than WAV audio files.
* A 1 GB USB memory device can store over 12 hours of MP3 audio data.
Adjusting the recording volume (Gain)
Press the FUNCTION button (GAIN).The gain adjustment screen and recording level meter will be shown in the LCD display.
Press the or buttons to adjust the recorder gain setting.
* To reset the gain setting to the default level, press the and buttons simultaneously.
buttons:Select audio recorder format.
* The gain setting can be adjusted within the range of 0 dB~+15 dB.
* Express caution when increasing the gain setting, as higher levels may result in distorted recordings.
* The gain meter will also display the sound level of the LINE IN audio.
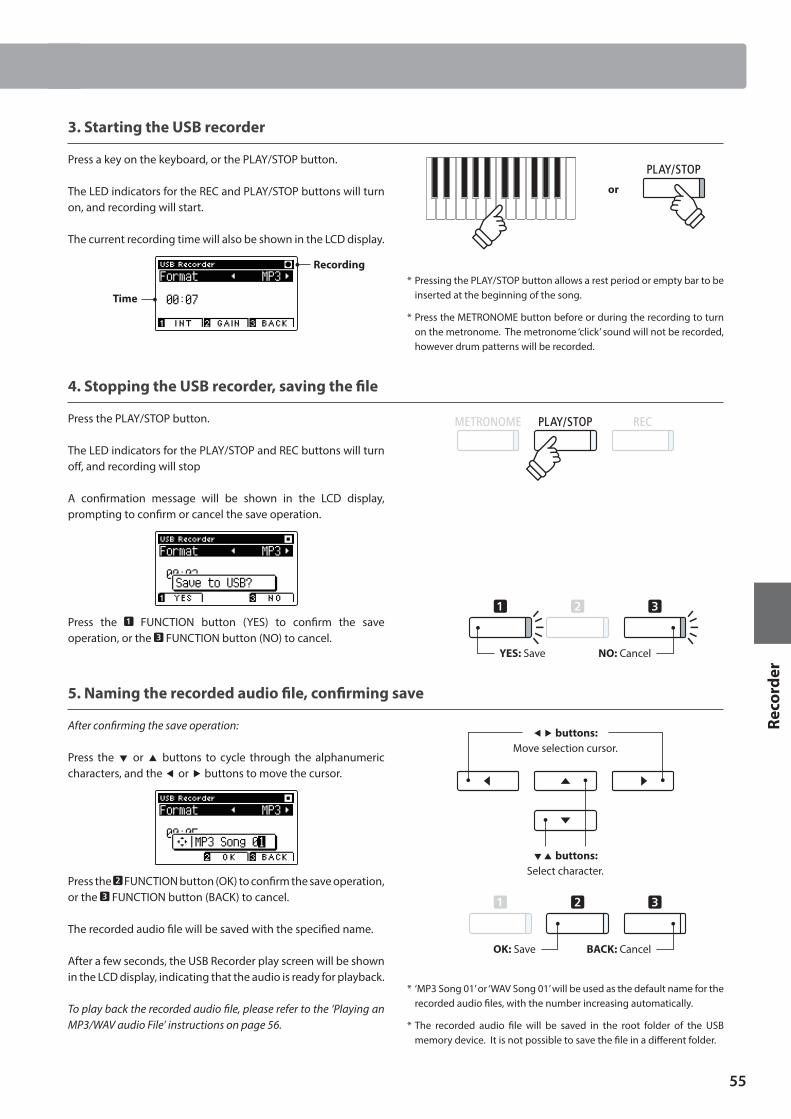
55
Reco
rder
3. Starting the USB recorder
Press a key on the keyboard, or the PLAY/STOP button.
The LED indicators for the REC and PLAY/STOP buttons will turn on, and recording will start.
The current recording time will also be shown in the LCD display.
Time
Recording
4. Stopping the USB recorder, saving the file
Press the PLAY/STOP button.
The LED indicators for the PLAY/STOP and REC buttons will turn off, and recording will stop
A confirmation message will be shown in the LCD display, prompting to confirm or cancel the save operation.
Press the FUNCTION button (YES) to confirm the save operation, or the FUNCTION button (NO) to cancel.
5. Naming the recorded audio file, confirming save
After confirming the save operation:
Press the or buttons to cycle through the alphanumeric characters, and the or buttons to move the cursor.
Press the FUNCTION button (OK) to confirm the save operation, or the FUNCTION button (BACK) to cancel.
The recorded audio file will be saved with the specified name.
After a few seconds, the USB Recorder play screen will be shown in the LCD display, indicating that the audio is ready for playback.
To play back the recorded audio file, please refer to the ‘Playing an MP3/WAV audio File’ instructions on page 56.
YES: Save NO: Cancel
buttons:Select character.
buttons:Move selection cursor.
OK: Save BACK: Cancel
* ‘MP3 Song 01’ or ‘WAV Song 01’ will be used as the default name for the recorded audio files, with the number increasing automatically.
* The recorded audio file will be saved in the root folder of the USB memory device. It is not possible to save the file in a different folder.
* Pressing the PLAY/STOP button allows a rest period or empty bar to be inserted at the beginning of the song.
* Press the METRONOME button before or during the recording to turn on the metronome. The metronome ‘click’ sound will not be recorded, however drum patterns will be recorded.
or
Audio Record/Playback (USB Memory)
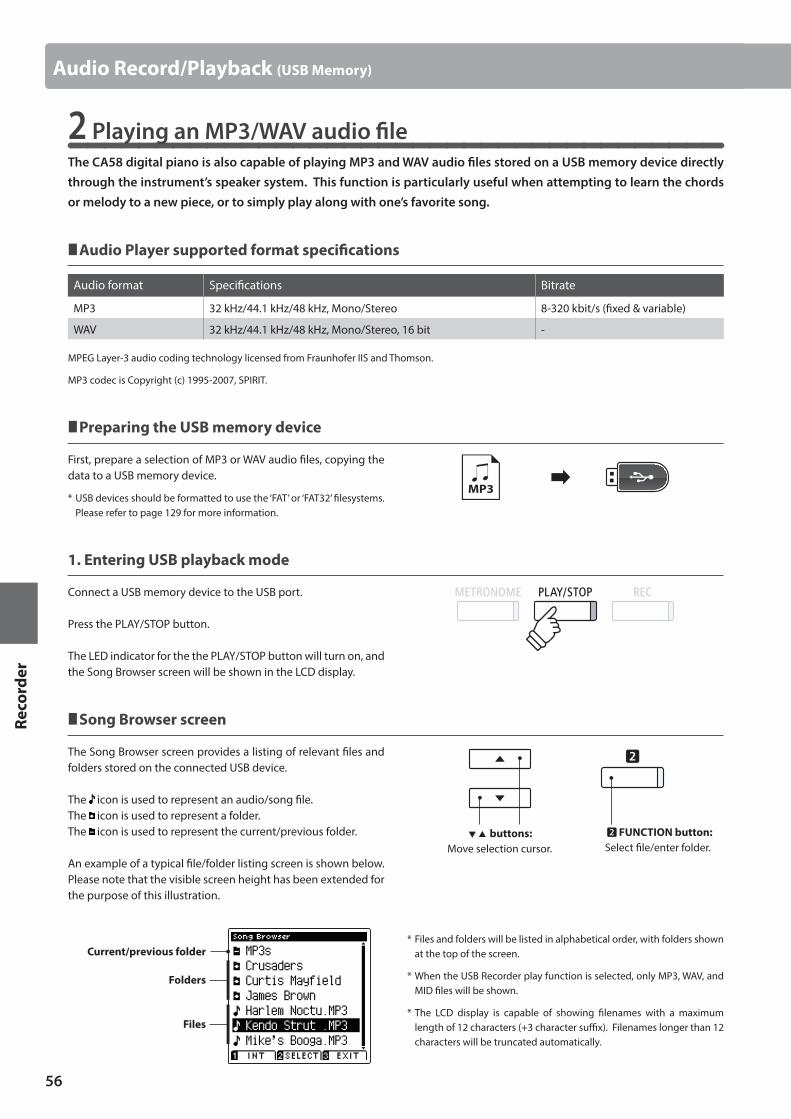
56
Reco
rder
Audio Record/Playback (USB Memory)
2 Playing an MP3/WAV audio fileThe CA58 digital piano is also capable of playing MP3 and WAV audio files stored on a USB memory device directly through the instrument’s speaker system. This function is particularly useful when attempting to learn the chords or melody to a new piece, or to simply play along with one’s favorite song.
Audio Player supported format specifications
Audio format Specifications Bitrate
MP3 32 kHz/44.1 kHz/48 kHz, Mono/Stereo 8-320 kbit/s (fixed & variable)
WAV 32 kHz/44.1 kHz/48 kHz, Mono/Stereo, 16 bit -
MPEG Layer-3 audio coding technology licensed from Fraunhofer IIS and Thomson.
MP3 codec is Copyright (c) 1995-2007, SPIRIT.
Preparing the USB memory device
First, prepare a selection of MP3 or WAV audio files, copying the data to a USB memory device.
* USB devices should be formatted to use the ‘FAT’ or ‘FAT32’ filesystems. Please refer to page 129 for more information.
1. Entering USB playback mode
Connect a USB memory device to the USB port.
Press the PLAY/STOP button.
The LED indicator for the the PLAY/STOP button will turn on, and the Song Browser screen will be shown in the LCD display.
Song Browser screen
The Song Browser screen provides a listing of relevant files and folders stored on the connected USB device.
The icon is used to represent an audio/song file.The icon is used to represent a folder.The icon is used to represent the current/previous folder.
An example of a typical file/folder listing screen is shown below. Please note that the visible screen height has been extended for the purpose of this illustration.
Current/previous folder
Folders
Files
* Files and folders will be listed in alphabetical order, with folders shown at the top of the screen.
* When the USB Recorder play function is selected, only MP3, WAV, and MID files will be shown.
* The LCD display is capable of showing filenames with a maximum length of 12 characters (+3 character suffix). Filenames longer than 12 characters will be truncated automatically.
buttons:Move selection cursor.
FUNCTION button:Select file/enter folder.
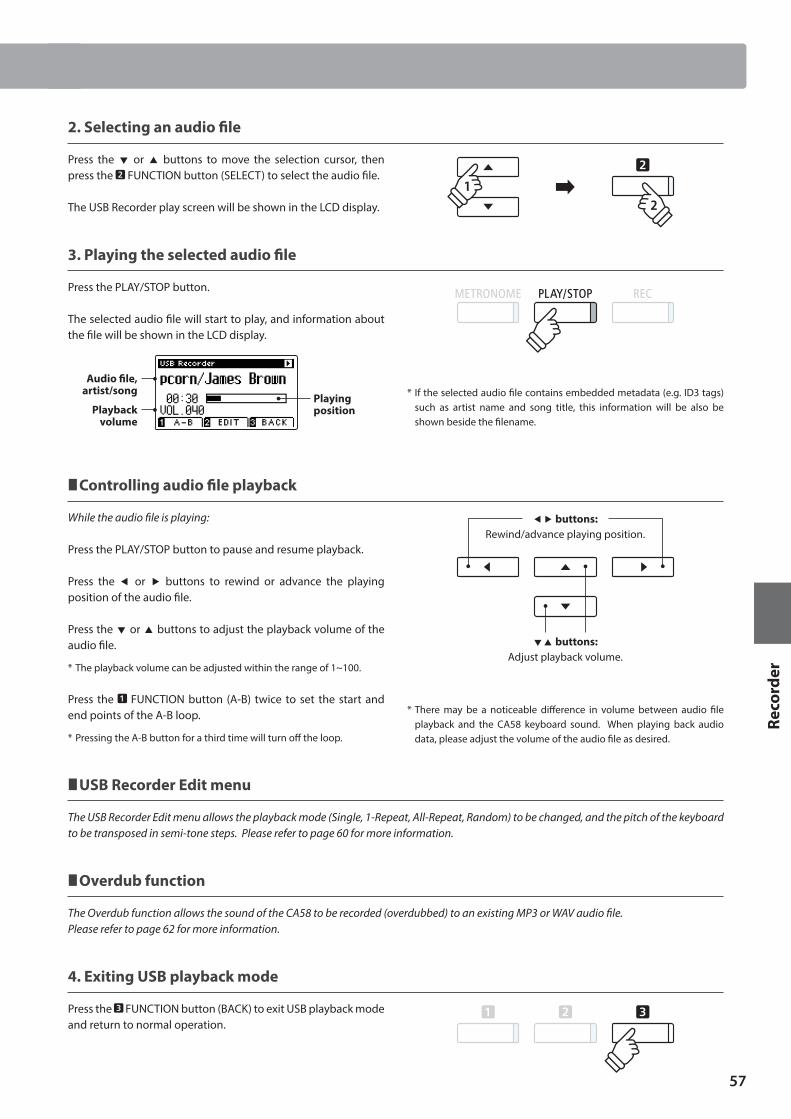
57
Reco
rder
2. Selecting an audio file
Press the or buttons to move the selection cursor, then press the FUNCTION button (SELECT) to select the audio file.
The USB Recorder play screen will be shown in the LCD display.
3. Playing the selected audio file
Press the PLAY/STOP button.
The selected audio file will start to play, and information about the file will be shown in the LCD display.
Audio file, artist/song
Playback volume
Playing position
Controlling audio file playback
While the audio file is playing:
Press the PLAY/STOP button to pause and resume playback.
Press the or buttons to rewind or advance the playing position of the audio file.
Press the or buttons to adjust the playback volume of the audio file.
* The playback volume can be adjusted within the range of 1~100.
Press the FUNCTION button (A-B) twice to set the start and end points of the A-B loop.
* Pressing the A-B button for a third time will turn off the loop.
USB Recorder Edit menu
The USB Recorder Edit menu allows the playback mode (Single, 1-Repeat, All-Repeat, Random) to be changed, and the pitch of the keyboard to be transposed in semi-tone steps. Please refer to page 60 for more information.
Overdub function
The Overdub function allows the sound of the CA58 to be recorded (overdubbed) to an existing MP3 or WAV audio file.Please refer to page 62 for more information.
4. Exiting USB playback mode
Press the FUNCTION button (BACK) to exit USB playback mode and return to normal operation.
* If the selected audio file contains embedded metadata (e.g. ID3 tags) such as artist name and song title, this information will be also be shown beside the filename.
buttons:Adjust playback volume.
buttons:Rewind/advance playing position.
* There may be a noticeable difference in volume between audio file playback and the CA58 keyboard sound. When playing back audio data, please adjust the volume of the audio file as desired.
Audio Record/Playback (USB Memory)
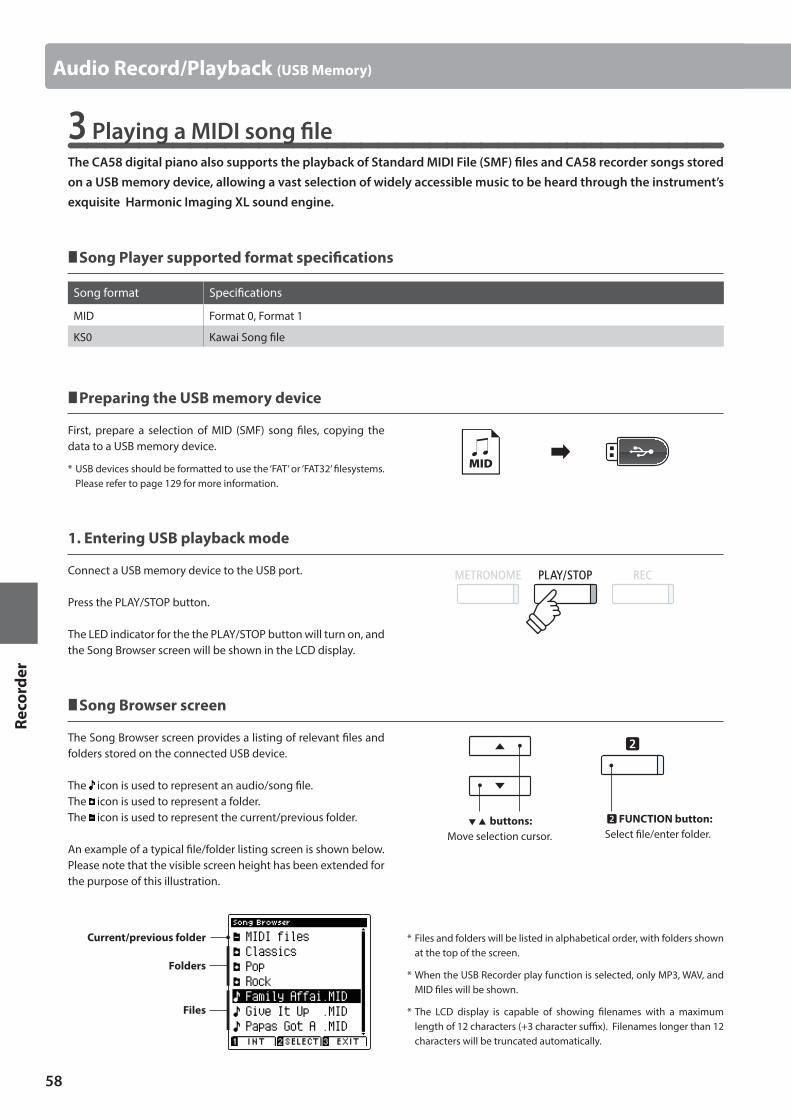
58
Reco
rder
3 Playing a MIDI song fileThe CA58 digital piano also supports the playback of Standard MIDI File (SMF) files and CA58 recorder songs stored on a USB memory device, allowing a vast selection of widely accessible music to be heard through the instrument’s exquisite Harmonic Imaging XL sound engine.
Song Player supported format specifications
Song format Specifications
MID Format 0, Format 1
KS0 Kawai Song file
Preparing the USB memory device
First, prepare a selection of MID (SMF) song files, copying the data to a USB memory device.
* USB devices should be formatted to use the ‘FAT’ or ‘FAT32’ filesystems. Please refer to page 129 for more information.
1. Entering USB playback mode
Connect a USB memory device to the USB port.
Press the PLAY/STOP button.
The LED indicator for the the PLAY/STOP button will turn on, and the Song Browser screen will be shown in the LCD display.
Song Browser screen
The Song Browser screen provides a listing of relevant files and folders stored on the connected USB device.
The icon is used to represent an audio/song file.The icon is used to represent a folder.The icon is used to represent the current/previous folder.
An example of a typical file/folder listing screen is shown below. Please note that the visible screen height has been extended for the purpose of this illustration.
Current/previous folder
Folders
Files
Audio Record/Playback (USB Memory)
buttons:Move selection cursor.
FUNCTION button:Select file/enter folder.
* Files and folders will be listed in alphabetical order, with folders shown at the top of the screen.
* When the USB Recorder play function is selected, only MP3, WAV, and MID files will be shown.
* The LCD display is capable of showing filenames with a maximum length of 12 characters (+3 character suffix). Filenames longer than 12 characters will be truncated automatically.
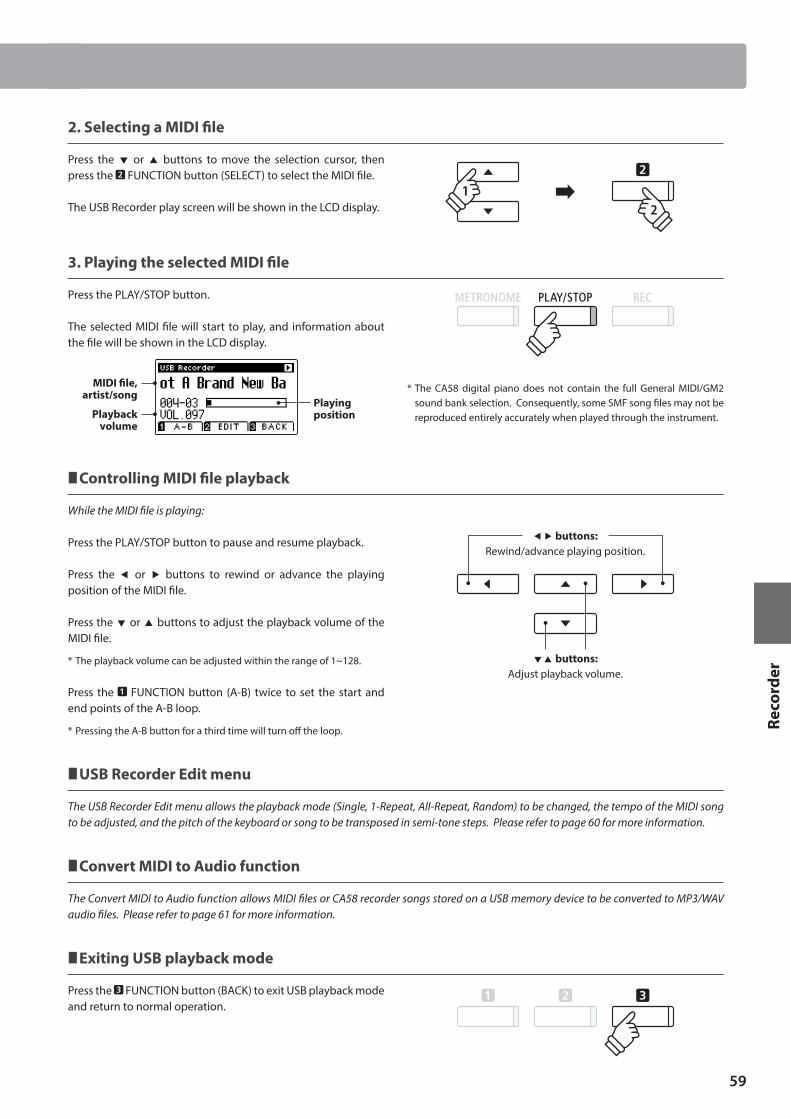
59
Reco
rder
2. Selecting a MIDI file
Press the or buttons to move the selection cursor, then press the FUNCTION button (SELECT) to select the MIDI file.
The USB Recorder play screen will be shown in the LCD display.
3. Playing the selected MIDI file
Press the PLAY/STOP button.
The selected MIDI file will start to play, and information about the file will be shown in the LCD display.
MIDI file, artist/song
Playback volume
Playing position
Controlling MIDI file playback
While the MIDI file is playing:
Press the PLAY/STOP button to pause and resume playback.
Press the or buttons to rewind or advance the playing position of the MIDI file.
Press the or buttons to adjust the playback volume of the MIDI file.
* The playback volume can be adjusted within the range of 1~128.
Press the FUNCTION button (A-B) twice to set the start and end points of the A-B loop.
* Pressing the A-B button for a third time will turn off the loop.
USB Recorder Edit menu
The USB Recorder Edit menu allows the playback mode (Single, 1-Repeat, All-Repeat, Random) to be changed, the tempo of the MIDI song to be adjusted, and the pitch of the keyboard or song to be transposed in semi-tone steps. Please refer to page 60 for more information.
Convert MIDI to Audio function
The Convert MIDI to Audio function allows MIDI files or CA58 recorder songs stored on a USB memory device to be converted to MP3/WAV audio files. Please refer to page 61 for more information.
Exiting USB playback mode
Press the FUNCTION button (BACK) to exit USB playback mode and return to normal operation.
* The CA58 digital piano does not contain the full General MIDI/GM2 sound bank selection. Consequently, some SMF song files may not be reproduced entirely accurately when played through the instrument.
buttons:Adjust playback volume.
buttons:Rewind/advance playing position.
Audio Record/Playback (USB Memory)
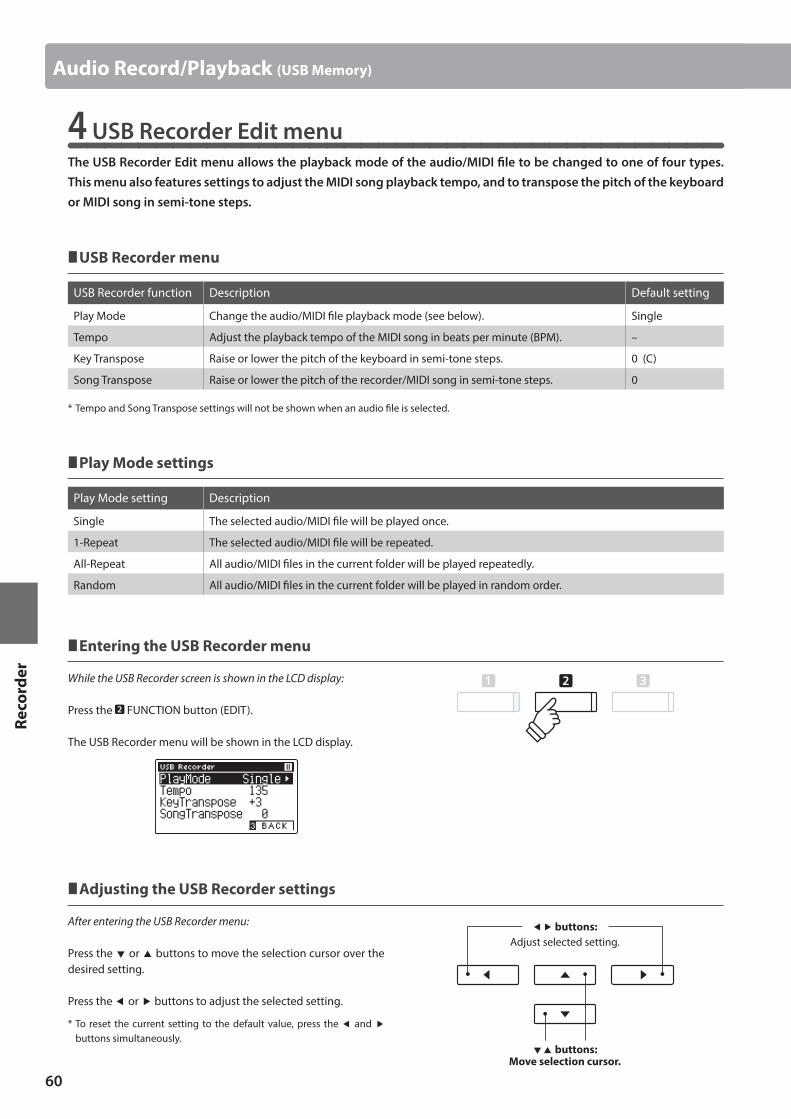
60
Reco
rder
4 USB Recorder Edit menuThe USB Recorder Edit menu allows the playback mode of the audio/MIDI file to be changed to one of four types. This menu also features settings to adjust the MIDI song playback tempo, and to transpose the pitch of the keyboard or MIDI song in semi-tone steps.
USB Recorder menu
USB Recorder function Description Default setting
Play Mode Change the audio/MIDI file playback mode (see below). Single
Tempo Adjust the playback tempo of the MIDI song in beats per minute (BPM). –
Key Transpose Raise or lower the pitch of the keyboard in semi-tone steps. 0 (C)
Song Transpose Raise or lower the pitch of the recorder/MIDI song in semi-tone steps. 0
* Tempo and Song Transpose settings will not be shown when an audio file is selected.
Play Mode settings
Play Mode setting Description
Single The selected audio/MIDI file will be played once.
1-Repeat The selected audio/MIDI file will be repeated.
All-Repeat All audio/MIDI files in the current folder will be played repeatedly.
Random All audio/MIDI files in the current folder will be played in random order.
Entering the USB Recorder menu
While the USB Recorder screen is shown in the LCD display:
Press the FUNCTION button (EDIT).
The USB Recorder menu will be shown in the LCD display.
Adjusting the USB Recorder settings
After entering the USB Recorder menu:
Press the or buttons to move the selection cursor over the desired setting.
Press the or buttons to adjust the selected setting.
* To reset the current setting to the default value, press the and buttons simultaneously.
Audio Record/Playback (USB Memory)
buttons:Move selection cursor.
buttons:Adjust selected setting.
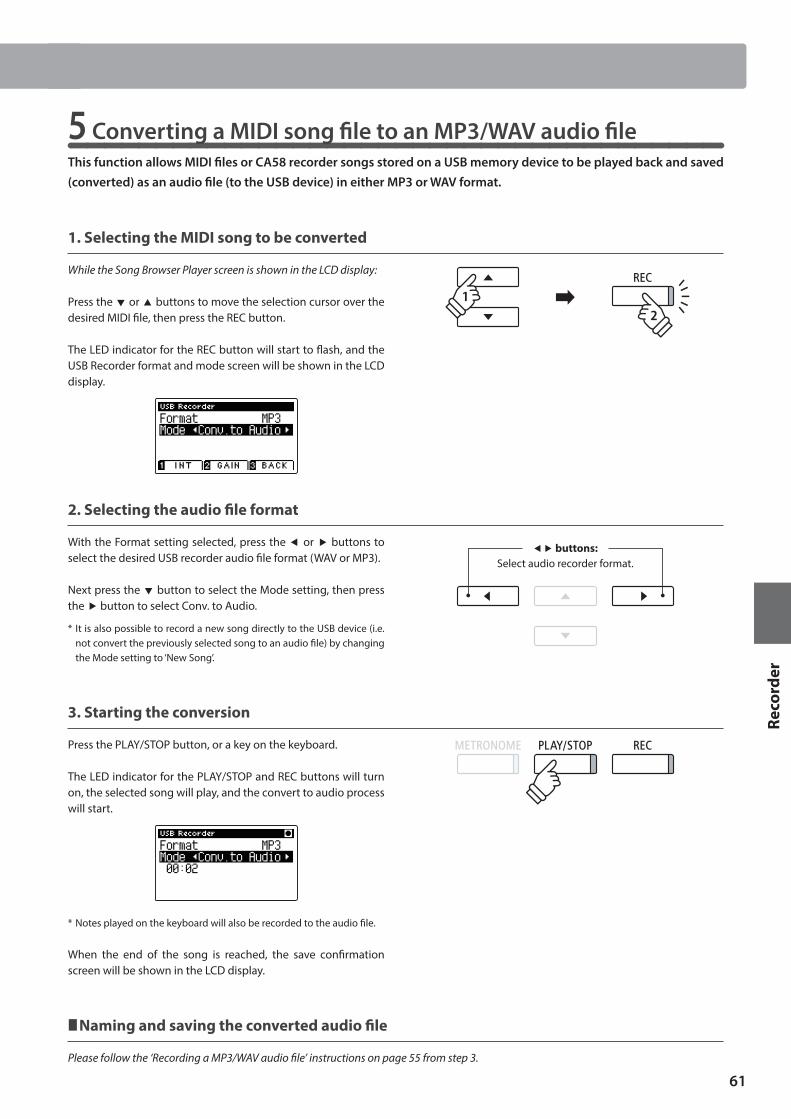
61
Reco
rder
5 Converting a MIDI song file to an MP3/WAV audio fileThis function allows MIDI files or CA58 recorder songs stored on a USB memory device to be played back and saved (converted) as an audio file (to the USB device) in either MP3 or WAV format.
1. Selecting the MIDI song to be converted
While the Song Browser Player screen is shown in the LCD display:
Press the or buttons to move the selection cursor over the desired MIDI file, then press the REC button.
The LED indicator for the REC button will start to flash, and the USB Recorder format and mode screen will be shown in the LCD display.
2. Selecting the audio file format
With the Format setting selected, press the or buttons to select the desired USB recorder audio file format (WAV or MP3).
Next press the button to select the Mode setting, then press the button to select Conv. to Audio.
* It is also possible to record a new song directly to the USB device (i.e. not convert the previously selected song to an audio file) by changing the Mode setting to ‘New Song’.
3. Starting the conversion
Press the PLAY/STOP button, or a key on the keyboard.
The LED indicator for the PLAY/STOP and REC buttons will turn on, the selected song will play, and the convert to audio process will start.
* Notes played on the keyboard will also be recorded to the audio file.
When the end of the song is reached, the save confirmation screen will be shown in the LCD display.
Naming and saving the converted audio file
Please follow the ‘Recording a MP3/WAV audio file’ instructions on page 55 from step 3.
buttons:Select audio recorder format.
Audio Record/Playback (USB Memory)
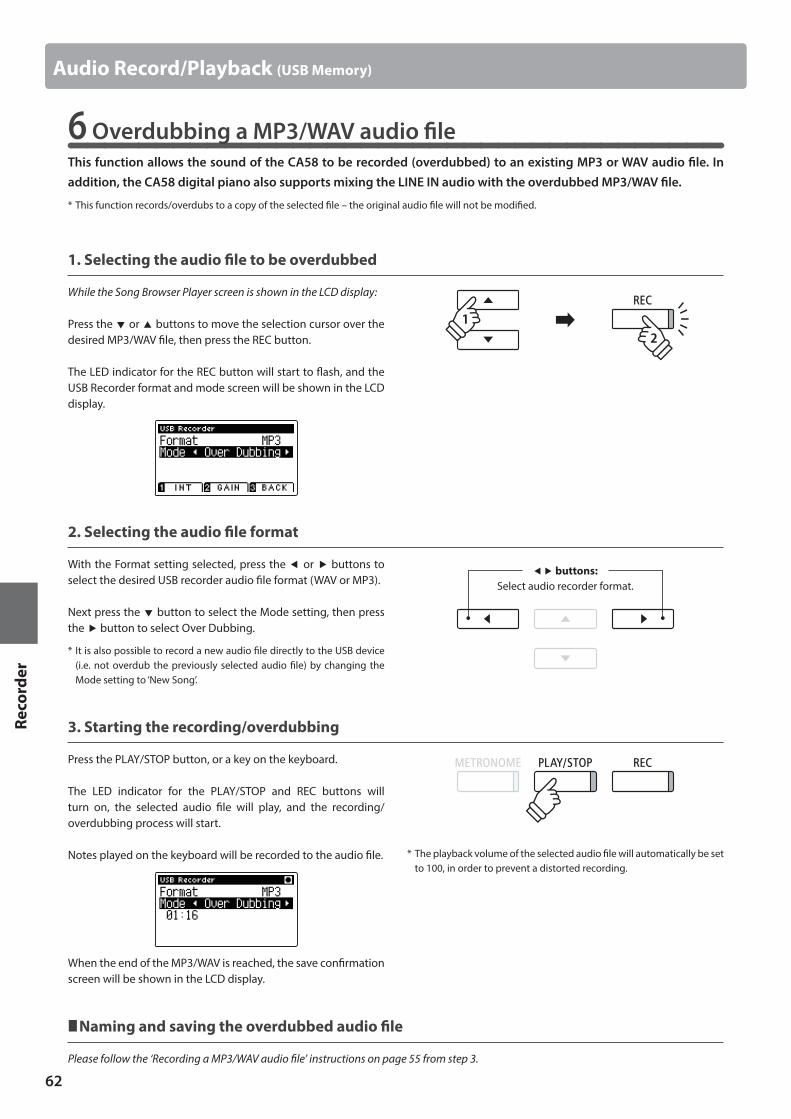
62
Reco
rder
6 Overdubbing a MP3/WAV audio fileThis function allows the sound of the CA58 to be recorded (overdubbed) to an existing MP3 or WAV audio file. In addition, the CA58 digital piano also supports mixing the LINE IN audio with the overdubbed MP3/WAV file.
* This function records/overdubs to a copy of the selected file – the original audio file will not be modified.
1. Selecting the audio file to be overdubbed
While the Song Browser Player screen is shown in the LCD display:
Press the or buttons to move the selection cursor over the desired MP3/WAV file, then press the REC button.
The LED indicator for the REC button will start to flash, and the USB Recorder format and mode screen will be shown in the LCD display.
2. Selecting the audio file format
With the Format setting selected, press the or buttons to select the desired USB recorder audio file format (WAV or MP3).
Next press the button to select the Mode setting, then press the button to select Over Dubbing.
* It is also possible to record a new audio file directly to the USB device (i.e. not overdub the previously selected audio file) by changing the Mode setting to ‘New Song’.
3. Starting the recording/overdubbing
Press the PLAY/STOP button, or a key on the keyboard.
The LED indicator for the PLAY/STOP and REC buttons will turn on, the selected audio file will play, and the recording/overdubbing process will start.
Notes played on the keyboard will be recorded to the audio file.
When the end of the MP3/WAV is reached, the save confirmation screen will be shown in the LCD display.
Naming and saving the overdubbed audio file
Please follow the ‘Recording a MP3/WAV audio file’ instructions on page 55 from step 3.
buttons:Select audio recorder format.
Audio Record/Playback (USB Memory)
* The playback volume of the selected audio file will automatically be set to 100, in order to prevent a distorted recording.
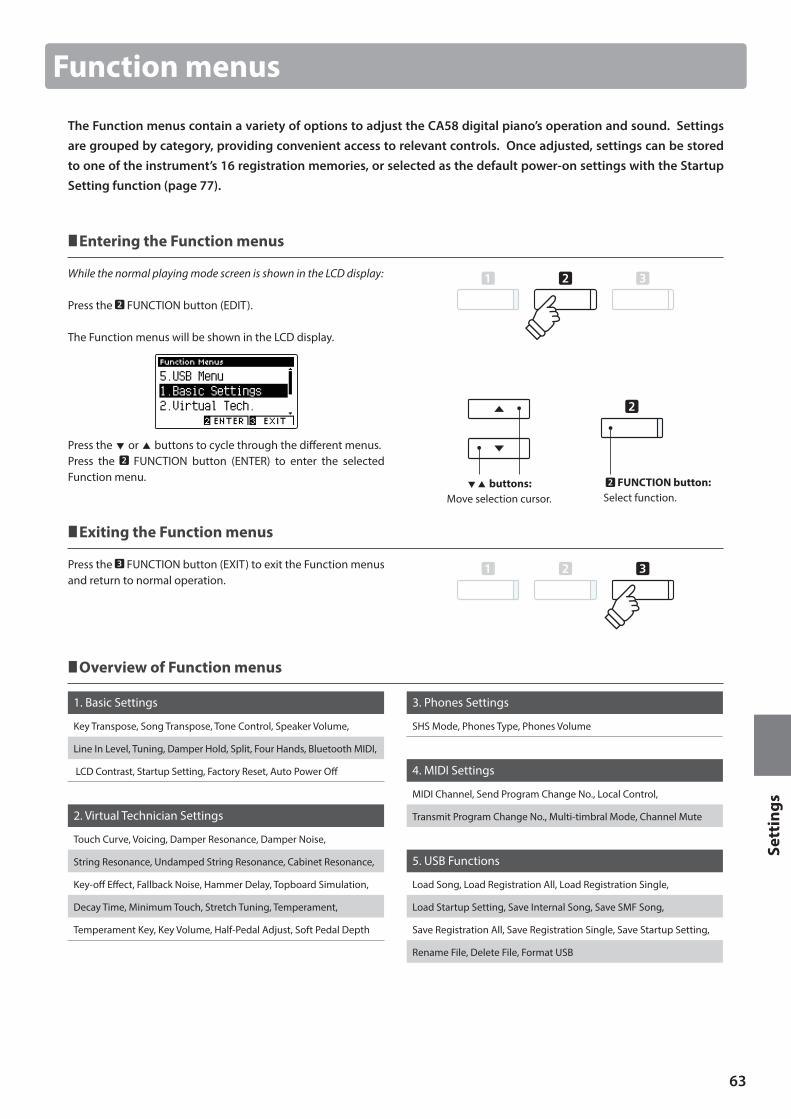
63
Sett
ings
Function menus
The Function menus contain a variety of options to adjust the CA58 digital piano’s operation and sound. Settings are grouped by category, providing convenient access to relevant controls. Once adjusted, settings can be stored to one of the instrument’s 16 registration memories, or selected as the default power-on settings with the Startup Setting function (page 77).
Entering the Function menus
While the normal playing mode screen is shown in the LCD display:
Press the FUNCTION button (EDIT).
The Function menus will be shown in the LCD display.
Press the or buttons to cycle through the different menus.Press the FUNCTION button (ENTER) to enter the selected Function menu.
Exiting the Function menus
Press the FUNCTION button (EXIT) to exit the Function menus and return to normal operation.
Overview of Function menus
1. Basic Settings 3. Phones Settings
Key Transpose, Song Transpose, Tone Control, Speaker Volume, SHS Mode, Phones Type, Phones Volume
Line In Level, Tuning, Damper Hold, Split, Four Hands, Bluetooth MIDI,
LCD Contrast, Startup Setting, Factory Reset, Auto Power Off 4. MIDI Settings
MIDI Channel, Send Program Change No., Local Control,
2. Virtual Technician Settings Transmit Program Change No., Multi-timbral Mode, Channel Mute
Touch Curve, Voicing, Damper Resonance, Damper Noise,
String Resonance, Undamped String Resonance, Cabinet Resonance, 5. USB Functions
Key-off Effect, Fallback Noise, Hammer Delay, Topboard Simulation, Load Song, Load Registration All, Load Registration Single,
Decay Time, Minimum Touch, Stretch Tuning, Temperament, Load Startup Setting, Save Internal Song, Save SMF Song,
Temperament Key, Key Volume, Half-Pedal Adjust, Soft Pedal Depth Save Registration All, Save Registration Single, Save Startup Setting,
Rename File, Delete File, Format USB
buttons:Move selection cursor.
FUNCTION button:Select function.
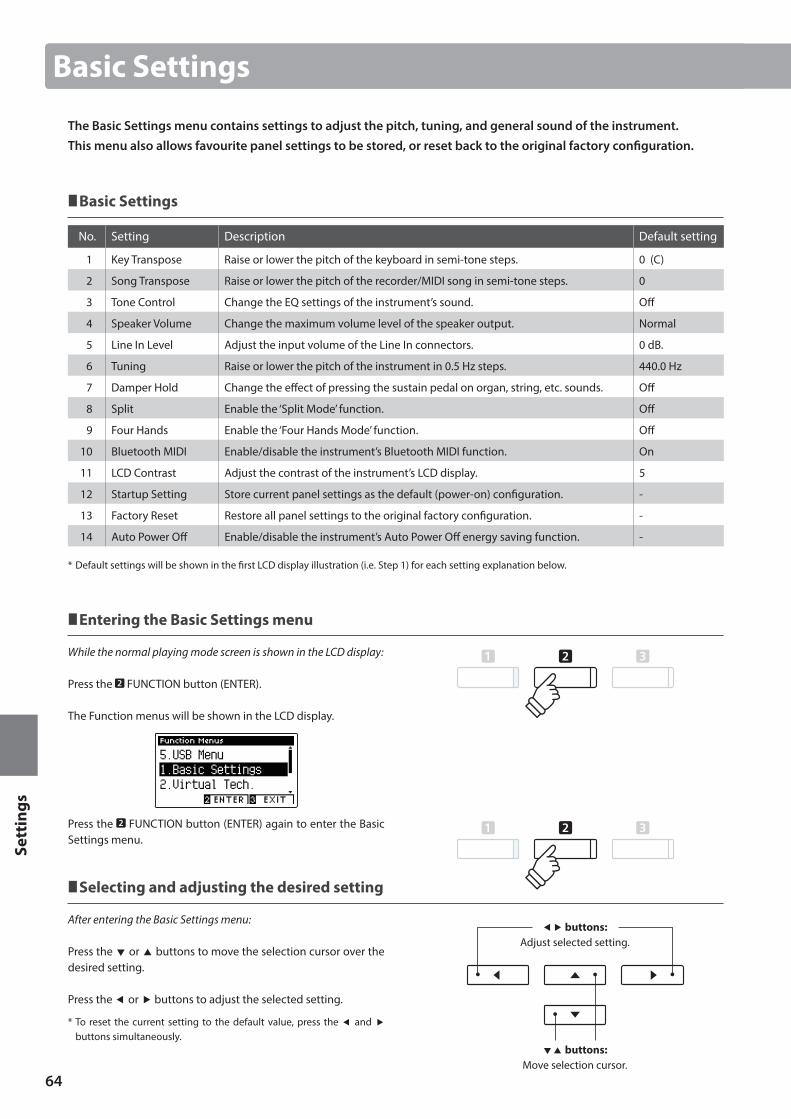
64
Sett
ings
Basic Settings
The Basic Settings menu contains settings to adjust the pitch, tuning, and general sound of the instrument.This menu also allows favourite panel settings to be stored, or reset back to the original factory configuration.
Basic Settings
No. Setting Description Default setting
1 Key Transpose Raise or lower the pitch of the keyboard in semi-tone steps. 0 (C)
2 Song Transpose Raise or lower the pitch of the recorder/MIDI song in semi-tone steps. 0
3 Tone Control Change the EQ settings of the instrument’s sound. Off
4 Speaker Volume Change the maximum volume level of the speaker output. Normal
5 Line In Level Adjust the input volume of the Line In connectors. 0 dB.
6 Tuning Raise or lower the pitch of the instrument in 0.5 Hz steps. 440.0 Hz
7 Damper Hold Change the effect of pressing the sustain pedal on organ, string, etc. sounds. Off
8 Split Enable the ‘Split Mode’ function. Off
9 Four Hands Enable the ‘Four Hands Mode’ function. Off
10 Bluetooth MIDI Enable/disable the instrument’s Bluetooth MIDI function. On
11 LCD Contrast Adjust the contrast of the instrument’s LCD display. 5
12 Startup Setting Store current panel settings as the default (power-on) configuration. -
13 Factory Reset Restore all panel settings to the original factory configuration. -
14 Auto Power Off Enable/disable the instrument’s Auto Power Off energy saving function. -
* Default settings will be shown in the first LCD display illustration (i.e. Step 1) for each setting explanation below.
Entering the Basic Settings menu
While the normal playing mode screen is shown in the LCD display:
Press the FUNCTION button (ENTER).
The Function menus will be shown in the LCD display.
Press the FUNCTION button (ENTER) again to enter the Basic Settings menu.
Selecting and adjusting the desired setting
After entering the Basic Settings menu:
Press the or buttons to move the selection cursor over the desired setting.
Press the or buttons to adjust the selected setting.
* To reset the current setting to the default value, press the and buttons simultaneously.
buttons:Move selection cursor.
buttons:Adjust selected setting.
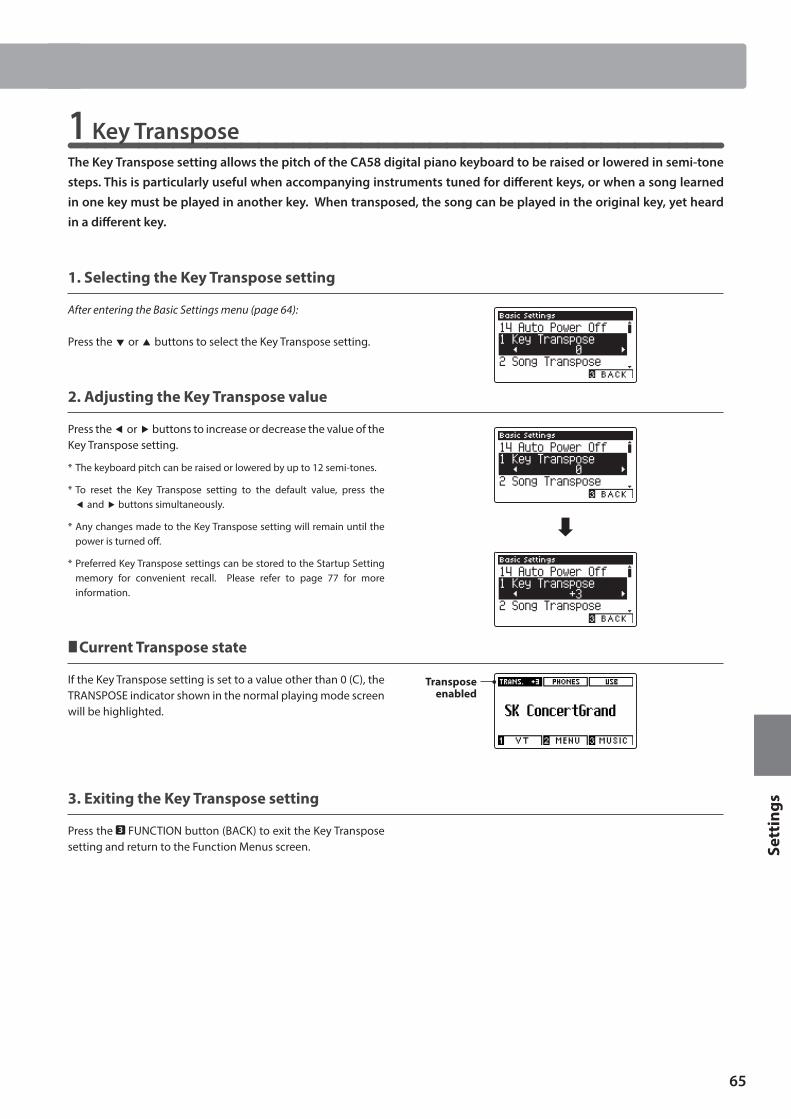
65
Sett
ings
1 Key TransposeThe Key Transpose setting allows the pitch of the CA58 digital piano keyboard to be raised or lowered in semi-tone steps. This is particularly useful when accompanying instruments tuned for different keys, or when a song learned in one key must be played in another key. When transposed, the song can be played in the original key, yet heard in a different key.
1. Selecting the Key Transpose setting
After entering the Basic Settings menu (page 64):
Press the or buttons to select the Key Transpose setting.
2. Adjusting the Key Transpose value
Press the or buttons to increase or decrease the value of the Key Transpose setting.
* The keyboard pitch can be raised or lowered by up to 12 semi-tones.
* To reset the Key Transpose setting to the default value, press the and buttons simultaneously.
* Any changes made to the Key Transpose setting will remain until the power is turned off.
* Preferred Key Transpose settings can be stored to the Startup Setting memory for convenient recall. Please refer to page 77 for more information.
Current Transpose state
If the Key Transpose setting is set to a value other than 0 (C), the TRANSPOSE indicator shown in the normal playing mode screen will be highlighted.
3. Exiting the Key Transpose setting
Press the FUNCTION button (BACK) to exit the Key Transpose setting and return to the Function Menus screen.
Transpose enabled
Basic Settings
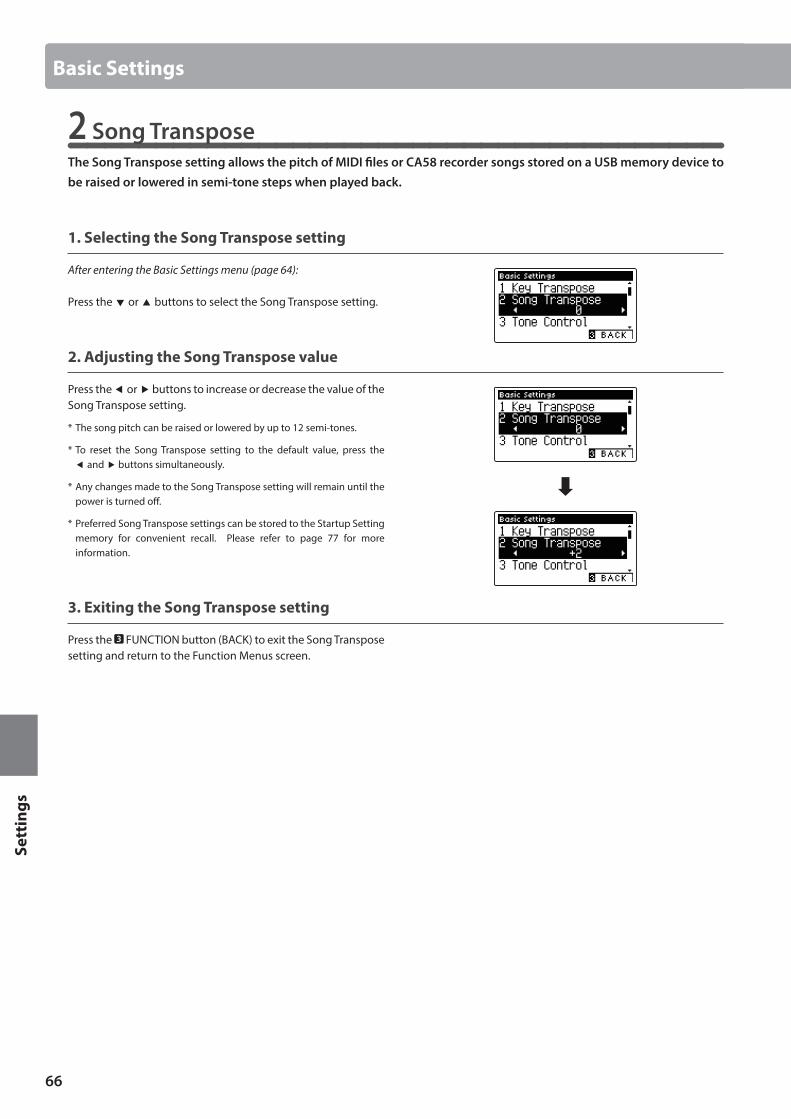
66
Sett
ings
2 Song TransposeThe Song Transpose setting allows the pitch of MIDI files or CA58 recorder songs stored on a USB memory device to be raised or lowered in semi-tone steps when played back.
1. Selecting the Song Transpose setting
After entering the Basic Settings menu (page 64):
Press the or buttons to select the Song Transpose setting.
2. Adjusting the Song Transpose value
Press the or buttons to increase or decrease the value of the Song Transpose setting.
* The song pitch can be raised or lowered by up to 12 semi-tones.
* To reset the Song Transpose setting to the default value, press the and buttons simultaneously.
* Any changes made to the Song Transpose setting will remain until the power is turned off.
* Preferred Song Transpose settings can be stored to the Startup Setting memory for convenient recall. Please refer to page 77 for more information.
3. Exiting the Song Transpose setting
Press the FUNCTION button (BACK) to exit the Song Transpose setting and return to the Function Menus screen.
Basic Settings
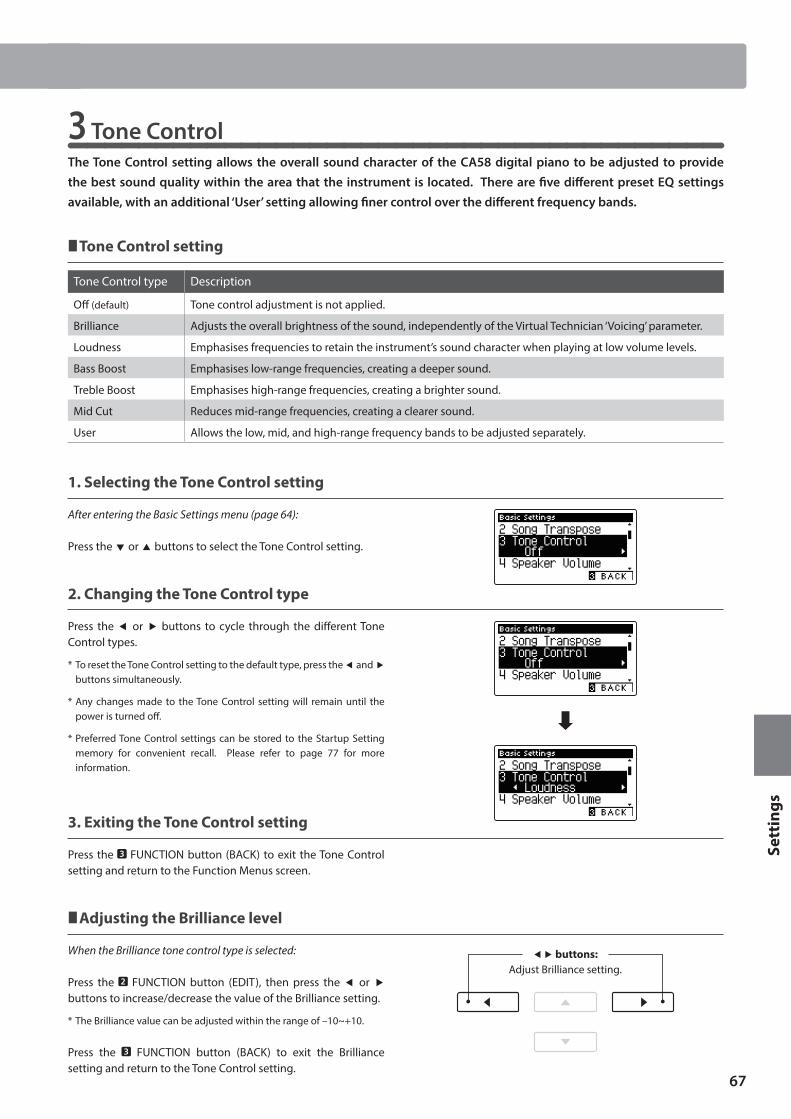
67
Sett
ings
3 Tone ControlThe Tone Control setting allows the overall sound character of the CA58 digital piano to be adjusted to provide the best sound quality within the area that the instrument is located. There are five different preset EQ settings available, with an additional ‘User’ setting allowing finer control over the different frequency bands.
Tone Control setting
Tone Control type Description
Off (default) Tone control adjustment is not applied.
Brilliance Adjusts the overall brightness of the sound, independently of the Virtual Technician ‘Voicing’ parameter.
Loudness Emphasises frequencies to retain the instrument’s sound character when playing at low volume levels.
Bass Boost Emphasises low-range frequencies, creating a deeper sound.
Treble Boost Emphasises high-range frequencies, creating a brighter sound.
Mid Cut Reduces mid-range frequencies, creating a clearer sound.
User Allows the low, mid, and high-range frequency bands to be adjusted separately.
1. Selecting the Tone Control setting
After entering the Basic Settings menu (page 64):
Press the or buttons to select the Tone Control setting.
2. Changing the Tone Control type
Press the or buttons to cycle through the different Tone Control types.
* To reset the Tone Control setting to the default type, press the and buttons simultaneously.
* Any changes made to the Tone Control setting will remain until the power is turned off.
* Preferred Tone Control settings can be stored to the Startup Setting memory for convenient recall. Please refer to page 77 for more information.
3. Exiting the Tone Control setting
Press the FUNCTION button (BACK) to exit the Tone Control setting and return to the Function Menus screen.
Adjusting the Brilliance level
When the Brilliance tone control type is selected:
Press the FUNCTION button (EDIT), then press the or buttons to increase/decrease the value of the Brilliance setting.
* The Brilliance value can be adjusted within the range of –10~+10.
Press the FUNCTION button (BACK) to exit the Brilliance setting and return to the Tone Control setting.
buttons:Adjust Brilliance setting.
Basic Settings
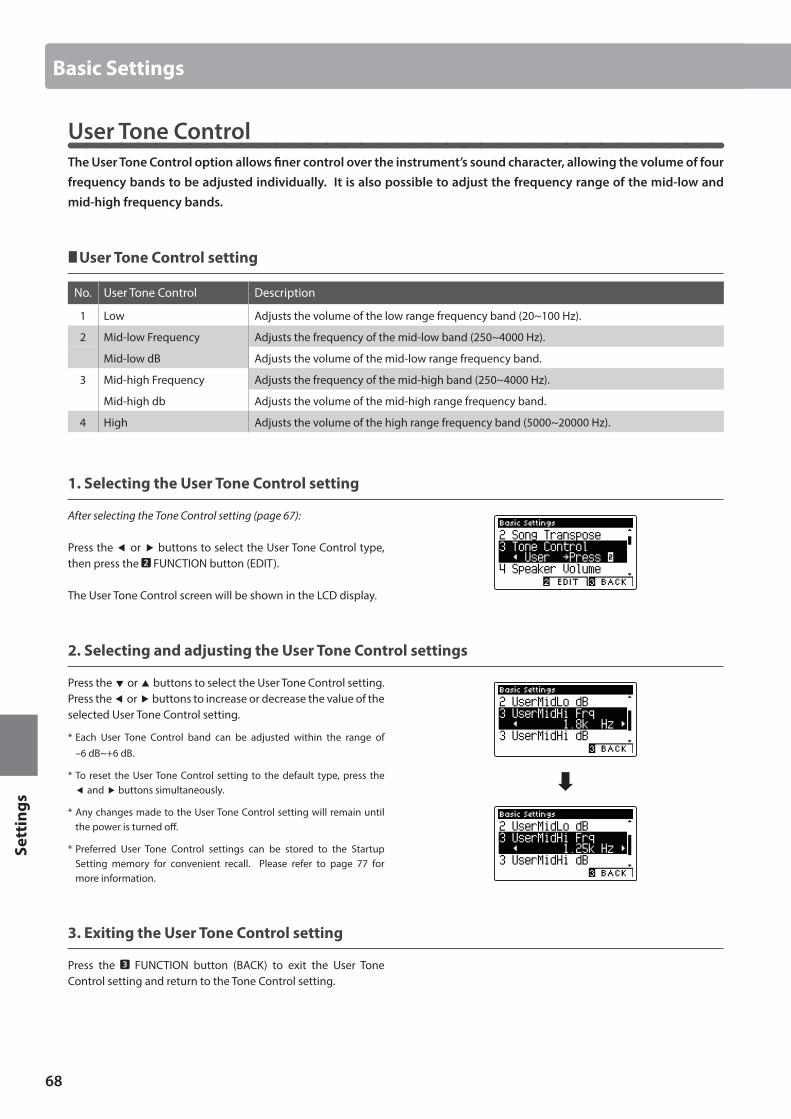
68
Sett
ings
User Tone ControlThe User Tone Control option allows finer control over the instrument’s sound character, allowing the volume of four frequency bands to be adjusted individually. It is also possible to adjust the frequency range of the mid-low and mid-high frequency bands.
User Tone Control setting
No. User Tone Control Description
1 Low Adjusts the volume of the low range frequency band (20~100 Hz).
2 Mid-low Frequency Adjusts the frequency of the mid-low band (250~4000 Hz).
Mid-low dB Adjusts the volume of the mid-low range frequency band.
3 Mid-high Frequency Adjusts the frequency of the mid-high band (250~4000 Hz).
Mid-high db Adjusts the volume of the mid-high range frequency band.
4 High Adjusts the volume of the high range frequency band (5000~20000 Hz).
1. Selecting the User Tone Control setting
After selecting the Tone Control setting (page 67):
Press the or buttons to select the User Tone Control type, then press the FUNCTION button (EDIT).
The User Tone Control screen will be shown in the LCD display.
2. Selecting and adjusting the User Tone Control settings
Press the or buttons to select the User Tone Control setting.Press the or buttons to increase or decrease the value of the selected User Tone Control setting.
* Each User Tone Control band can be adjusted within the range of –6 dB~+6 dB.
* To reset the User Tone Control setting to the default type, press the and buttons simultaneously.
* Any changes made to the User Tone Control setting will remain until the power is turned off.
* Preferred User Tone Control settings can be stored to the Startup Setting memory for convenient recall. Please refer to page 77 for more information.
3. Exiting the User Tone Control setting
Press the FUNCTION button (BACK) to exit the User Tone Control setting and return to the Tone Control setting.
Basic Settings
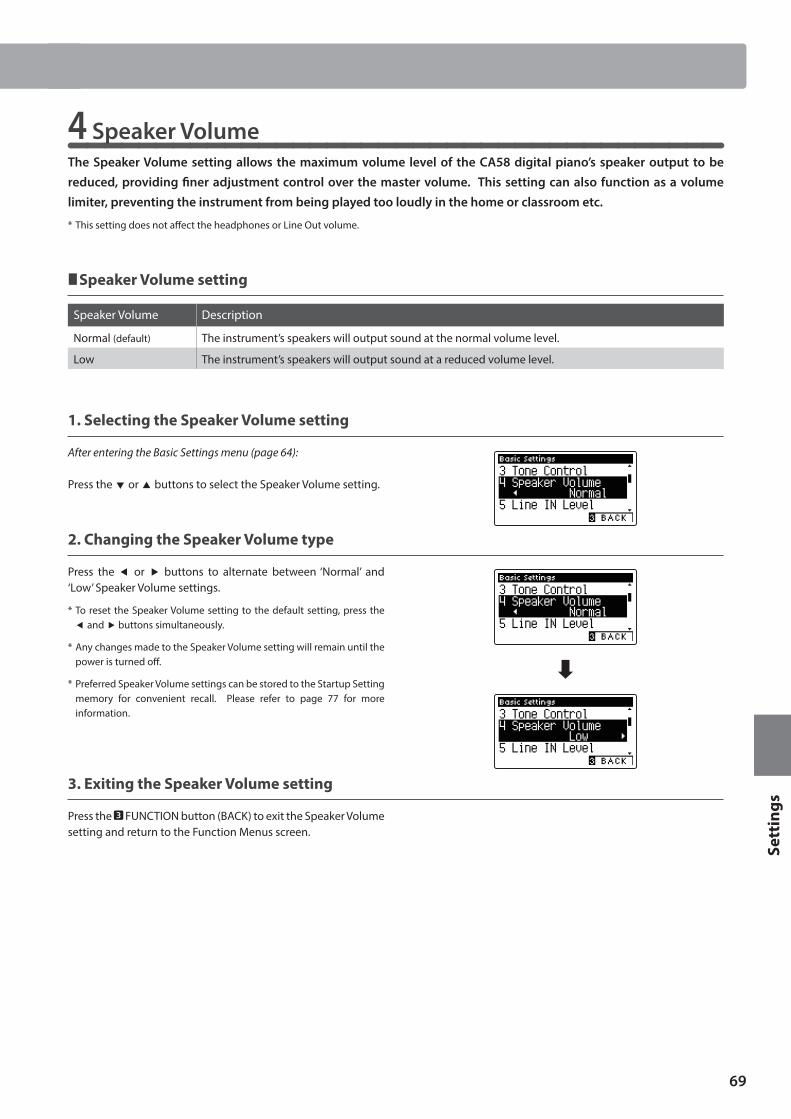
69
Sett
ings
4 Speaker VolumeThe Speaker Volume setting allows the maximum volume level of the CA58 digital piano’s speaker output to be reduced, providing finer adjustment control over the master volume. This setting can also function as a volume limiter, preventing the instrument from being played too loudly in the home or classroom etc.
* This setting does not affect the headphones or Line Out volume.
Speaker Volume setting
Speaker Volume Description
Normal (default) The instrument’s speakers will output sound at the normal volume level.
Low The instrument’s speakers will output sound at a reduced volume level.
1. Selecting the Speaker Volume setting
After entering the Basic Settings menu (page 64):
Press the or buttons to select the Speaker Volume setting.
2. Changing the Speaker Volume type
Press the or buttons to alternate between ‘Normal’ and ‘Low’ Speaker Volume settings.
* To reset the Speaker Volume setting to the default setting, press the and buttons simultaneously.
* Any changes made to the Speaker Volume setting will remain until the power is turned off.
* Preferred Speaker Volume settings can be stored to the Startup Setting memory for convenient recall. Please refer to page 77 for more information.
3. Exiting the Speaker Volume setting
Press the FUNCTION button (BACK) to exit the Speaker Volume setting and return to the Function Menus screen.
Basic Settings

70
Sett
ings
5 Line In LevelThe Line In Level setting allows the volume level of the instrument’s Line In input jacks to be adjusted digitally. This setting may be useful when using the USB Recorder function and attempting to balance an external audio source with the instrument’s sound.
* The Line In Level can also be adjusted by using the LEVEL knob, located on the jack panel. Please refer to page 129 for more information.
1. Selecting the Line In Level setting
After entering the Basic Settings menu (page 64):
Press the or buttons to select the Line In Level setting.
2. Adjusting the Line In Level value
Press the or buttons to increase or decrease the value of the Line In Level setting.
* The Line In Level can be adjusted within the range of –10 dB~+10 dB.
* To reset the Line In Level setting to the default value, press the and buttons simultaneously.
* Any changes made to the Line In Level setting will remain until the power is turned off.
* Preferred Line In Level settings can be stored to the Startup Setting memory for convenient recall. Please refer to page 77 for more information.
3. Exiting the Line In Level setting
Press the FUNCTION button (BACK) to exit the Line In Level setting and return to the Function Menus screen.
Line In Level setting vs Line In LEVEL knob
The CA58 digital piano provides two methods of adjusting the level of the Line In audio: the Line In LEVEL knob (located beside the Line In jacks on the jack panel), and the Line In Level setting. The LEVEL knob is used to adjust the analogue volume of the sound entering the instrument, while the Line In Level setting adjusts the digital volume of the sound once it is ‘inside’ the instrument.
To ensure the Line In audio is of a high quality, it is recommended to set the volume of the external audio device (for example a tablet) to a high level, then adjust the instrument’s Line In LEVEL knob to a comfortable level, without distortion. If it is necessary to further increase or decrease the volume of the external audio, the Line In Level setting can then be used as desired.
Basic Settings
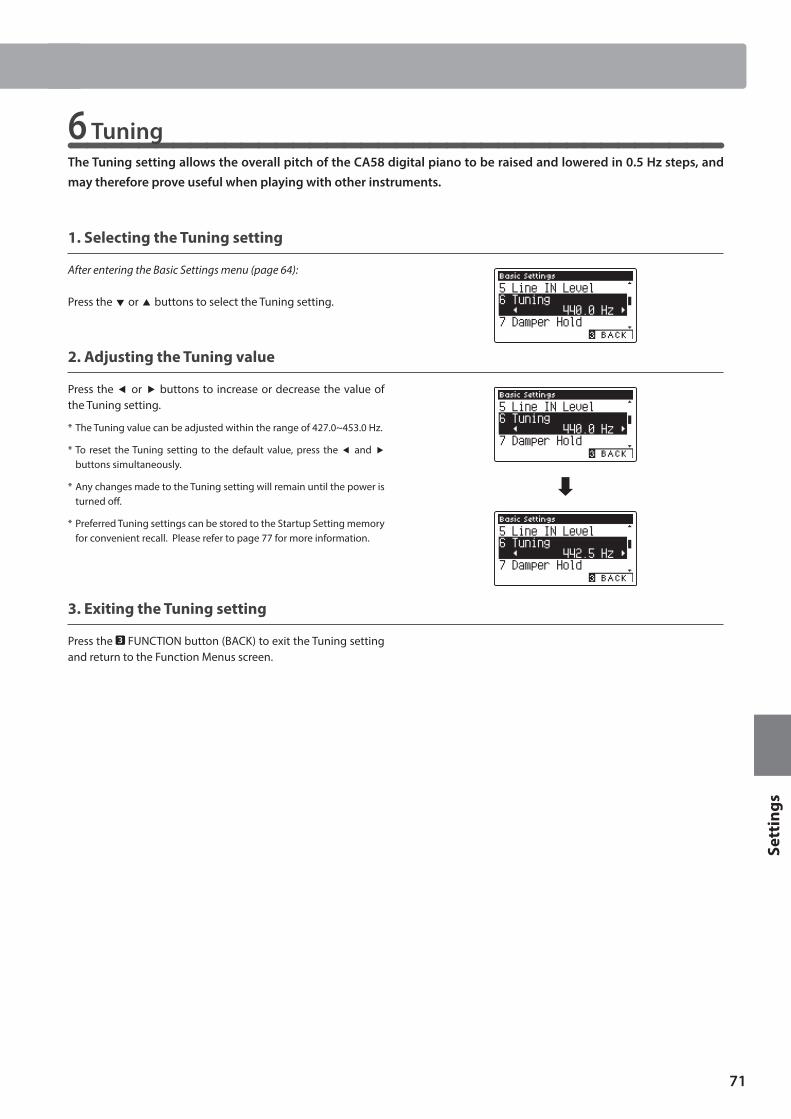
71
Sett
ings
Basic Settings
6 TuningThe Tuning setting allows the overall pitch of the CA58 digital piano to be raised and lowered in 0.5 Hz steps, and may therefore prove useful when playing with other instruments.
1. Selecting the Tuning setting
After entering the Basic Settings menu (page 64):
Press the or buttons to select the Tuning setting.
2. Adjusting the Tuning value
Press the or buttons to increase or decrease the value of the Tuning setting.
* The Tuning value can be adjusted within the range of 427.0~453.0 Hz.
* To reset the Tuning setting to the default value, press the and buttons simultaneously.
* Any changes made to the Tuning setting will remain until the power is turned off.
* Preferred Tuning settings can be stored to the Startup Setting memory for convenient recall. Please refer to page 77 for more information.
3. Exiting the Tuning setting
Press the FUNCTION button (BACK) to exit the Tuning setting and return to the Function Menus screen.
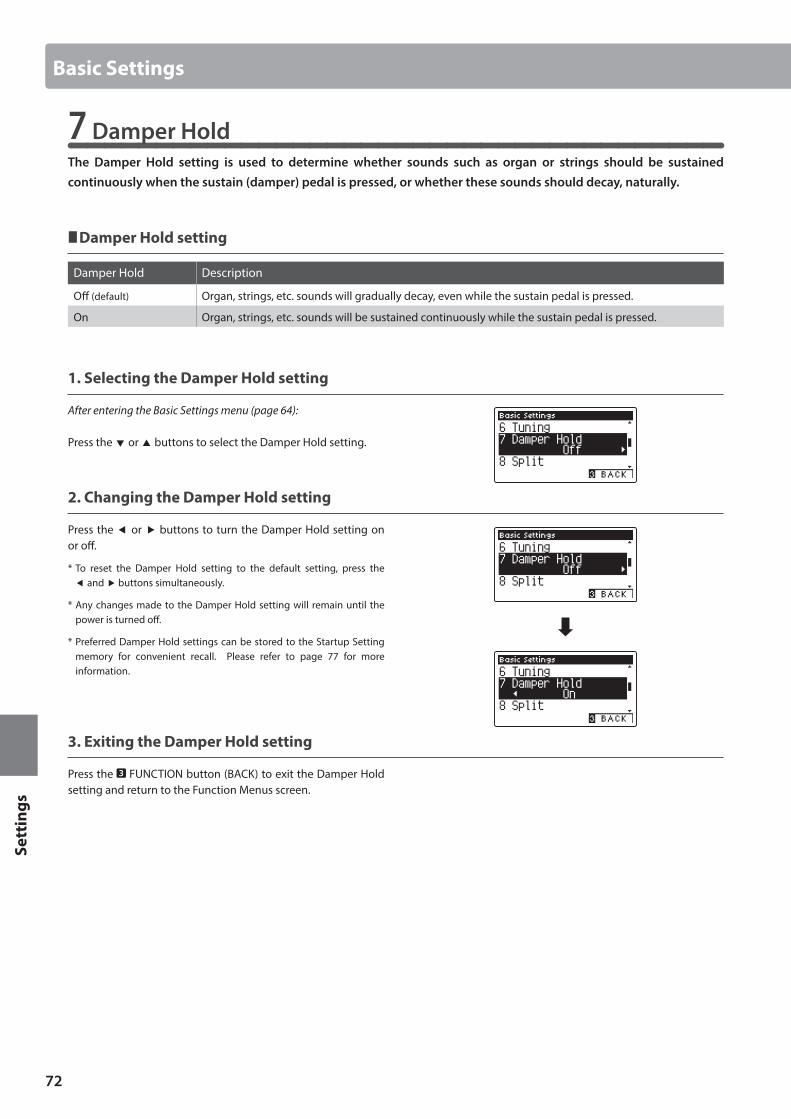
72
Sett
ings
Basic Settings
7 Damper HoldThe Damper Hold setting is used to determine whether sounds such as organ or strings should be sustained continuously when the sustain (damper) pedal is pressed, or whether these sounds should decay, naturally.
Damper Hold setting
Damper Hold Description
Off (default) Organ, strings, etc. sounds will gradually decay, even while the sustain pedal is pressed.
On Organ, strings, etc. sounds will be sustained continuously while the sustain pedal is pressed.
1. Selecting the Damper Hold setting
After entering the Basic Settings menu (page 64):
Press the or buttons to select the Damper Hold setting.
2. Changing the Damper Hold setting
Press the or buttons to turn the Damper Hold setting on or off.
* To reset the Damper Hold setting to the default setting, press the and buttons simultaneously.
* Any changes made to the Damper Hold setting will remain until the power is turned off.
* Preferred Damper Hold settings can be stored to the Startup Setting memory for convenient recall. Please refer to page 77 for more information.
3. Exiting the Damper Hold setting
Press the FUNCTION button (BACK) to exit the Damper Hold setting and return to the Function Menus screen.
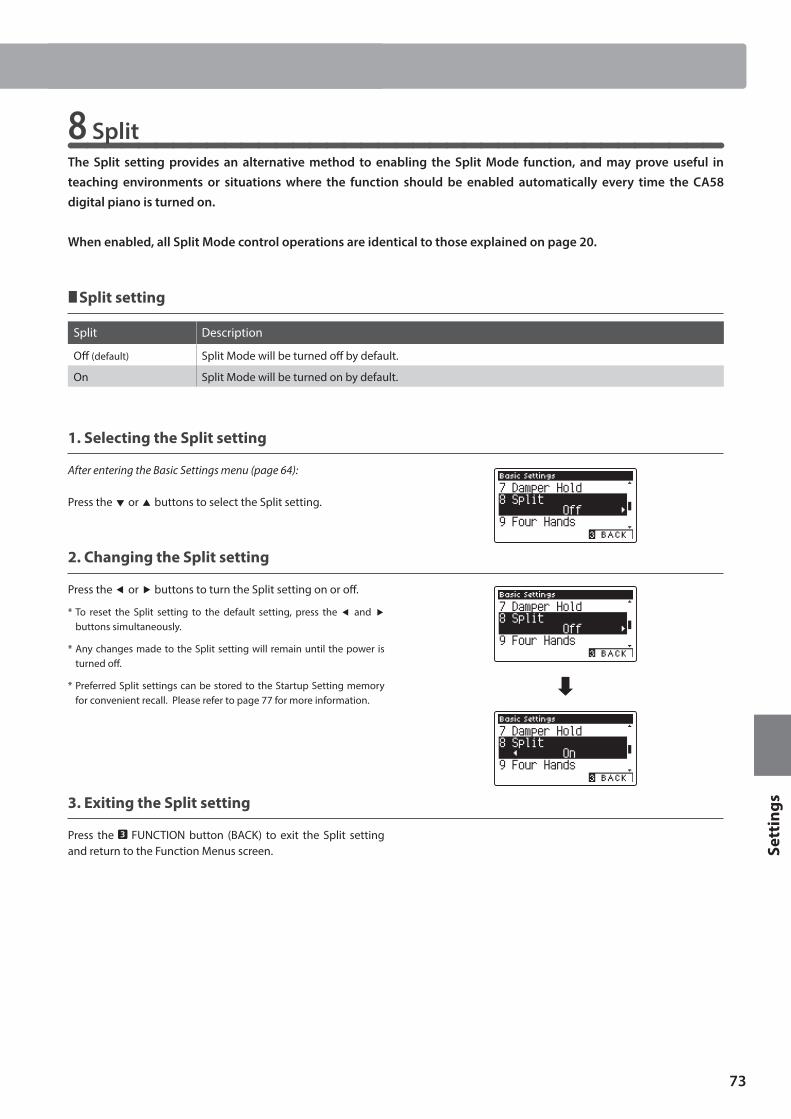
73
Sett
ings
Basic Settings
8 SplitThe Split setting provides an alternative method to enabling the Split Mode function, and may prove useful in teaching environments or situations where the function should be enabled automatically every time the CA58 digital piano is turned on.
When enabled, all Split Mode control operations are identical to those explained on page 20.
Split setting
Split Description
Off (default) Split Mode will be turned off by default.
On Split Mode will be turned on by default.
1. Selecting the Split setting
After entering the Basic Settings menu (page 64):
Press the or buttons to select the Split setting.
2. Changing the Split setting
Press the or buttons to turn the Split setting on or off.
* To reset the Split setting to the default setting, press the and buttons simultaneously.
* Any changes made to the Split setting will remain until the power is turned off.
* Preferred Split settings can be stored to the Startup Setting memory for convenient recall. Please refer to page 77 for more information.
3. Exiting the Split setting
Press the FUNCTION button (BACK) to exit the Split setting and return to the Function Menus screen.
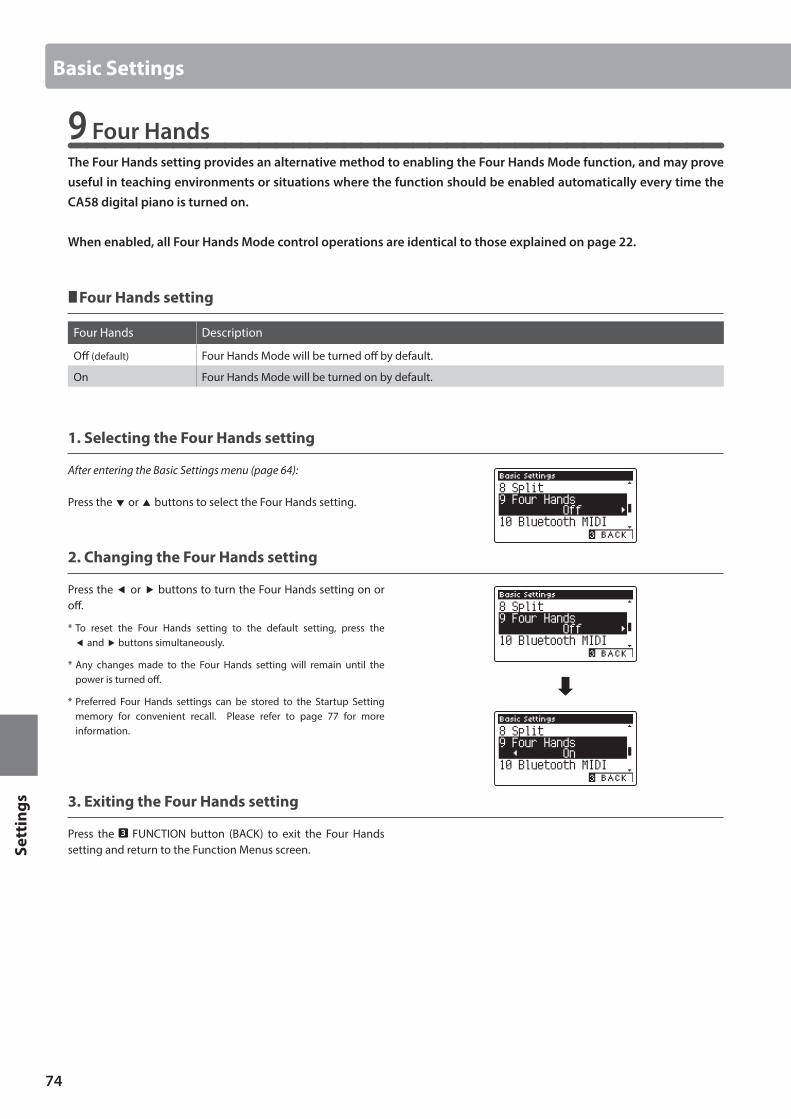
74
Sett
ings
Basic Settings
9 Four HandsThe Four Hands setting provides an alternative method to enabling the Four Hands Mode function, and may prove useful in teaching environments or situations where the function should be enabled automatically every time the CA58 digital piano is turned on.
When enabled, all Four Hands Mode control operations are identical to those explained on page 22.
Four Hands setting
Four Hands Description
Off (default) Four Hands Mode will be turned off by default.
On Four Hands Mode will be turned on by default.
1. Selecting the Four Hands setting
After entering the Basic Settings menu (page 64):
Press the or buttons to select the Four Hands setting.
2. Changing the Four Hands setting
Press the or buttons to turn the Four Hands setting on or off.
* To reset the Four Hands setting to the default setting, press the and buttons simultaneously.
* Any changes made to the Four Hands setting will remain until the power is turned off.
* Preferred Four Hands settings can be stored to the Startup Setting memory for convenient recall. Please refer to page 77 for more information.
3. Exiting the Four Hands setting
Press the FUNCTION button (BACK) to exit the Four Hands setting and return to the Function Menus screen.
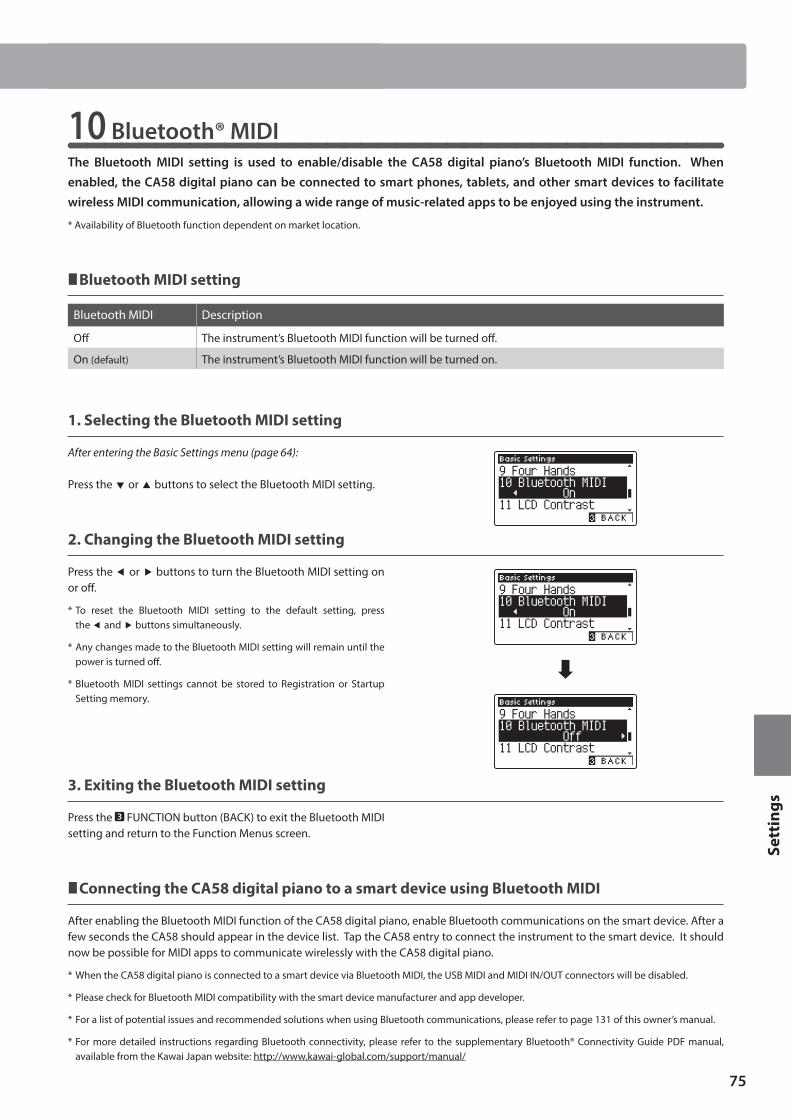
75
Sett
ings
Basic Settings
10 Bluetooth® MIDIThe Bluetooth MIDI setting is used to enable/disable the CA58 digital piano’s Bluetooth MIDI function. When enabled, the CA58 digital piano can be connected to smart phones, tablets, and other smart devices to facilitate wireless MIDI communication, allowing a wide range of music-related apps to be enjoyed using the instrument.
* Availability of Bluetooth function dependent on market location.
Bluetooth MIDI setting
Bluetooth MIDI Description
Off The instrument’s Bluetooth MIDI function will be turned off.
On (default) The instrument’s Bluetooth MIDI function will be turned on.
1. Selecting the Bluetooth MIDI setting
After entering the Basic Settings menu (page 64):
Press the or buttons to select the Bluetooth MIDI setting.
2. Changing the Bluetooth MIDI setting
Press the or buttons to turn the Bluetooth MIDI setting on or off.
* To reset the Bluetooth MIDI setting to the default setting, press the and buttons simultaneously.
* Any changes made to the Bluetooth MIDI setting will remain until the power is turned off.
* Bluetooth MIDI settings cannot be stored to Registration or Startup Setting memory.
3. Exiting the Bluetooth MIDI setting
Press the FUNCTION button (BACK) to exit the Bluetooth MIDI setting and return to the Function Menus screen.
Connecting the CA58 digital piano to a smart device using Bluetooth MIDI
After enabling the Bluetooth MIDI function of the CA58 digital piano, enable Bluetooth communications on the smart device. After a few seconds the CA58 should appear in the device list. Tap the CA58 entry to connect the instrument to the smart device. It should now be possible for MIDI apps to communicate wirelessly with the CA58 digital piano.
* When the CA58 digital piano is connected to a smart device via Bluetooth MIDI, the USB MIDI and MIDI IN/OUT connectors will be disabled.
* Please check for Bluetooth MIDI compatibility with the smart device manufacturer and app developer.
* For a list of potential issues and recommended solutions when using Bluetooth communications, please refer to page 131 of this owner’s manual.
* For more detailed instructions regarding Bluetooth connectivity, please refer to the supplementary Bluetooth® Connectivity Guide PDF manual, available from the Kawai Japan website: http://www.kawai-global.com/support/manual/
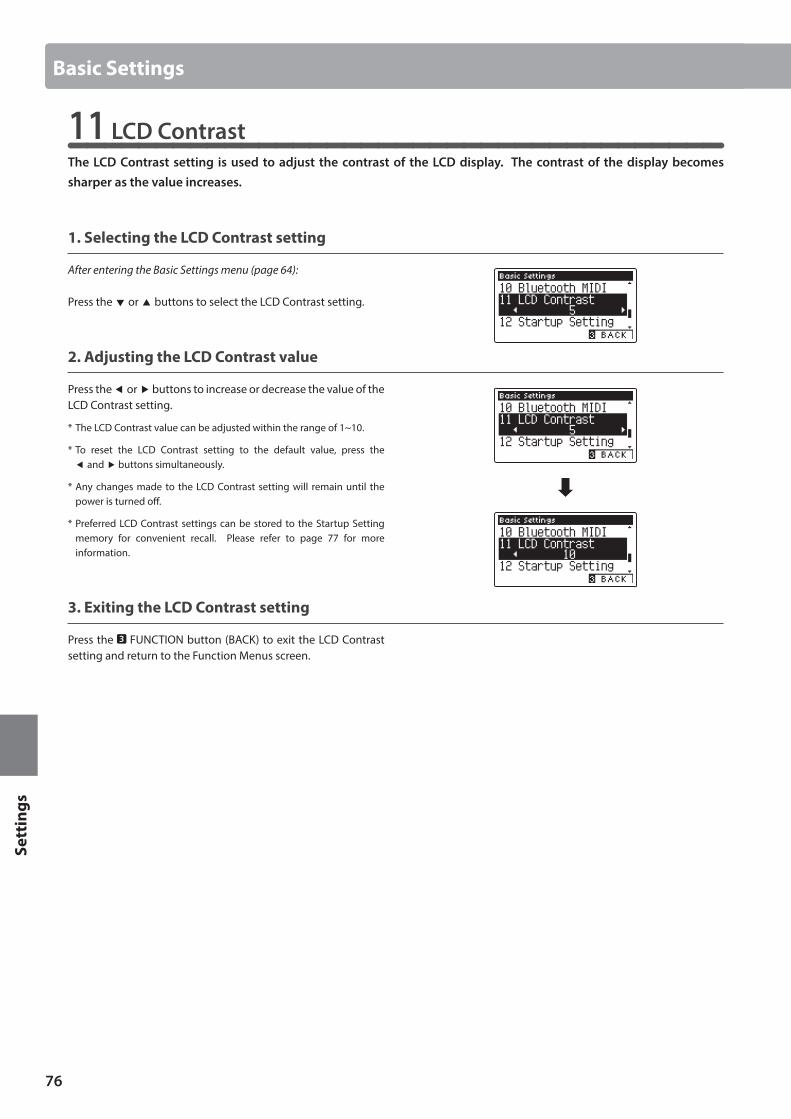
76
Sett
ings
11 LCD ContrastThe LCD Contrast setting is used to adjust the contrast of the LCD display. The contrast of the display becomes sharper as the value increases.
1. Selecting the LCD Contrast setting
After entering the Basic Settings menu (page 64):
Press the or buttons to select the LCD Contrast setting.
2. Adjusting the LCD Contrast value
Press the or buttons to increase or decrease the value of the LCD Contrast setting.
* The LCD Contrast value can be adjusted within the range of 1~10.
* To reset the LCD Contrast setting to the default value, press the and buttons simultaneously.
* Any changes made to the LCD Contrast setting will remain until the power is turned off.
* Preferred LCD Contrast settings can be stored to the Startup Setting memory for convenient recall. Please refer to page 77 for more information.
3. Exiting the LCD Contrast setting
Press the FUNCTION button (BACK) to exit the LCD Contrast setting and return to the Function Menus screen.
Basic Settings
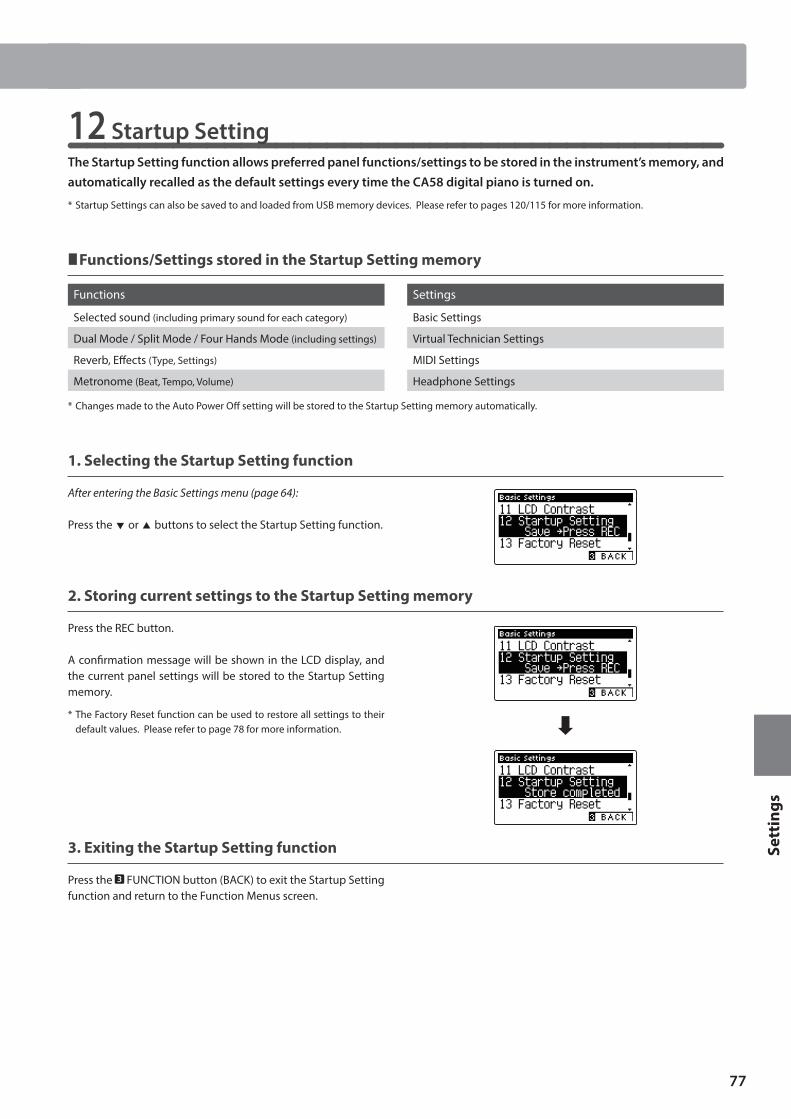
77
Sett
ings
Basic Settings
12 Startup SettingThe Startup Setting function allows preferred panel functions/settings to be stored in the instrument’s memory, and automatically recalled as the default settings every time the CA58 digital piano is turned on.
* Startup Settings can also be saved to and loaded from USB memory devices. Please refer to pages 120/115 for more information.
Functions/Settings stored in the Startup Setting memory
Functions Settings
Selected sound (including primary sound for each category) Basic Settings
Dual Mode / Split Mode / Four Hands Mode (including settings) Virtual Technician Settings
Reverb, Effects (Type, Settings) MIDI Settings
Metronome (Beat, Tempo, Volume) Headphone Settings
* Changes made to the Auto Power Off setting will be stored to the Startup Setting memory automatically.
1. Selecting the Startup Setting function
After entering the Basic Settings menu (page 64):
Press the or buttons to select the Startup Setting function.
2. Storing current settings to the Startup Setting memory
Press the REC button.
A confirmation message will be shown in the LCD display, and the current panel settings will be stored to the Startup Setting memory.
* The Factory Reset function can be used to restore all settings to their default values. Please refer to page 78 for more information.
3. Exiting the Startup Setting function
Press the FUNCTION button (BACK) to exit the Startup Setting function and return to the Function Menus screen.

78
Sett
ings
13 Factory ResetThe Factory Reset function clears any settings stored using the Startup Setting function, restoring the CA58 digital piano to its factory default settings.
* This function will not clear registration memories or recorder songs stored in internal memory.
1. Selecting the Factory Reset function
After entering the Basic Settings menu (page 64):
Press the or buttons to select the Factory Reset setting.
2. Restoring factory settings
Press the REC button.
A confirmation message will be shown in the LCD display, and the all settings will be restored to their default values.
3. Exiting the Factory Reset function
Press the FUNCTION button (BACK) to exit the Factory Reset function and return to the Function Menus screen.
Basic Settings
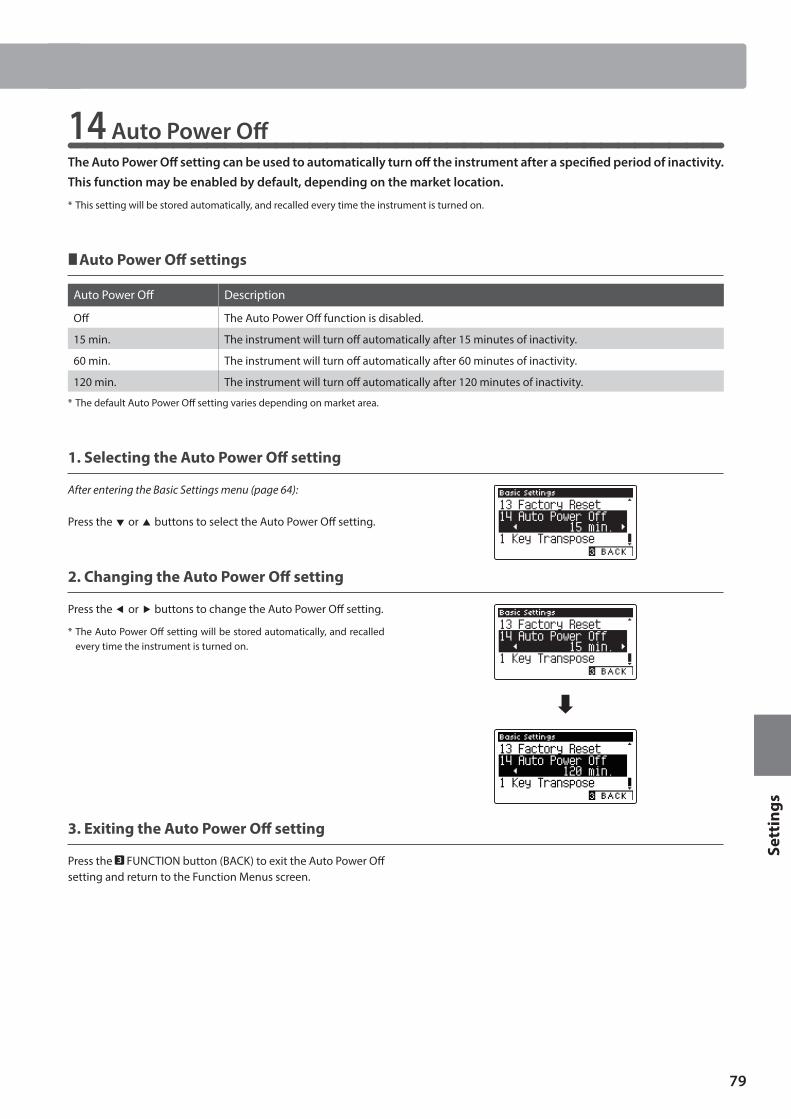
79
Sett
ings
Basic Settings
14 Auto Power OffThe Auto Power Off setting can be used to automatically turn off the instrument after a specified period of inactivity. This function may be enabled by default, depending on the market location.
* This setting will be stored automatically, and recalled every time the instrument is turned on.
Auto Power Off settings
Auto Power Off Description
Off The Auto Power Off function is disabled.
15 min. The instrument will turn off automatically after 15 minutes of inactivity.
60 min. The instrument will turn off automatically after 60 minutes of inactivity.
120 min. The instrument will turn off automatically after 120 minutes of inactivity.
* The default Auto Power Off setting varies depending on market area.
1. Selecting the Auto Power Off setting
After entering the Basic Settings menu (page 64):
Press the or buttons to select the Auto Power Off setting.
2. Changing the Auto Power Off setting
Press the or buttons to change the Auto Power Off setting.
* The Auto Power Off setting will be stored automatically, and recalled every time the instrument is turned on.
3. Exiting the Auto Power Off setting
Press the FUNCTION button (BACK) to exit the Auto Power Off setting and return to the Function Menus screen.

80
Sett
ings
Virtual Technician Settings
The Virtual Technician settings of the CA58 digital piano allow the player to adjust advanced parameters such as hammer hardness, action regulation, cabinet size, and a variety of other acoustic characteristics, in order to suit their personal preferences. Virtual Technician settings are adjusted and stored independently for each sound, variation, allowing flexible control over the characteristics of each piano voice.
* The table below indicates which Virtual Technician settings affect to all sounds, or acoustic piano and electric piano sounds only.
Virtual Technician Settings
No. Setting Description All AP EP Default
1 Touch Curve Adjust the touch sensitivity of the keyboard. Normal
2 Voicing Adjust the tonal character of the instrument. Normal
User Voicing Adjust the individual voicing of each of the 88 keys. –
3 Damper Resonance Adjust the resonance that is heard when pressing the damper pedal. 5
4 Damper Noise Adjust the sound that is heard when pressing the damper pedal. 5
5 String Resonance Adjust the resonance that is heard when notes are held. 5
6 Undamped Str. Res. Adjust the resonance produced by the topmost undamped strings. 5
7 Cabinet Resonance Adjust the resonance produced by the piano cabinet itself. 1
8 Key-off Effect Adjust the sound that is heard when keys are released. 5
9 Fall-back Noise Adjust the sound that is heard when the key action falls back. 5
10 Hammer Delay Adjust the delay of the hammer striking strings when playing pianissimo. Off
11 Topboard Simulation Adjust the position of the grand piano topboard. Open 3
12 Decay Time Adjust the decay time of the piano sound while the keys are pressed. 5
13 Minimum Touch Adjust the minimum key velocity required to produce a sound. 1
14 Stretch Tuning Adjust the level of stretch tuning for equal temperaments. Normal:AP, Off:Other
User Tuning Adjust the individual tuning of each of the 88 keys. –
15 Temperament Adjust the tuning system to suit Renaissance and Baroque periods etc. Equal Temp.
User Temperament Adjust the tuning of each note in the scale to a custom temperament. –
16 Temperament Key Adjust the key of the selected tuning system. C
17 Key Volume Adjust the volume balance of the keyboard. Normal
User Key Volume Adjust the individual volume of each of the 88 keys. –
18 Half-Pedal Adjust Adjust the point at which the damper pedal begins to sustain the sounds. 5
19 Soft Pedal Depth Adjust the depth/effectiveness of the soft pedal. 3
* Default settings will be shown in the first LCD display illustration (i.e. Step 1) for each setting explanation below.
Entering the Virtual Technician menu
While the normal playing mode screen is shown in the LCD display:
Press the FUNCTION button (EDIT).
The Function menus will be shown in the LCD display.
Press the or buttons to select the Virtual Technician menu.
Press the FUNCTION button (ENTER) again to enter the Virtual Technician menu.
buttons:Move selection cursor.
* It is also possible to enter the Virtual Technician menu by pressing and holding the FUNCTION button (VT) on the normal playing screen.
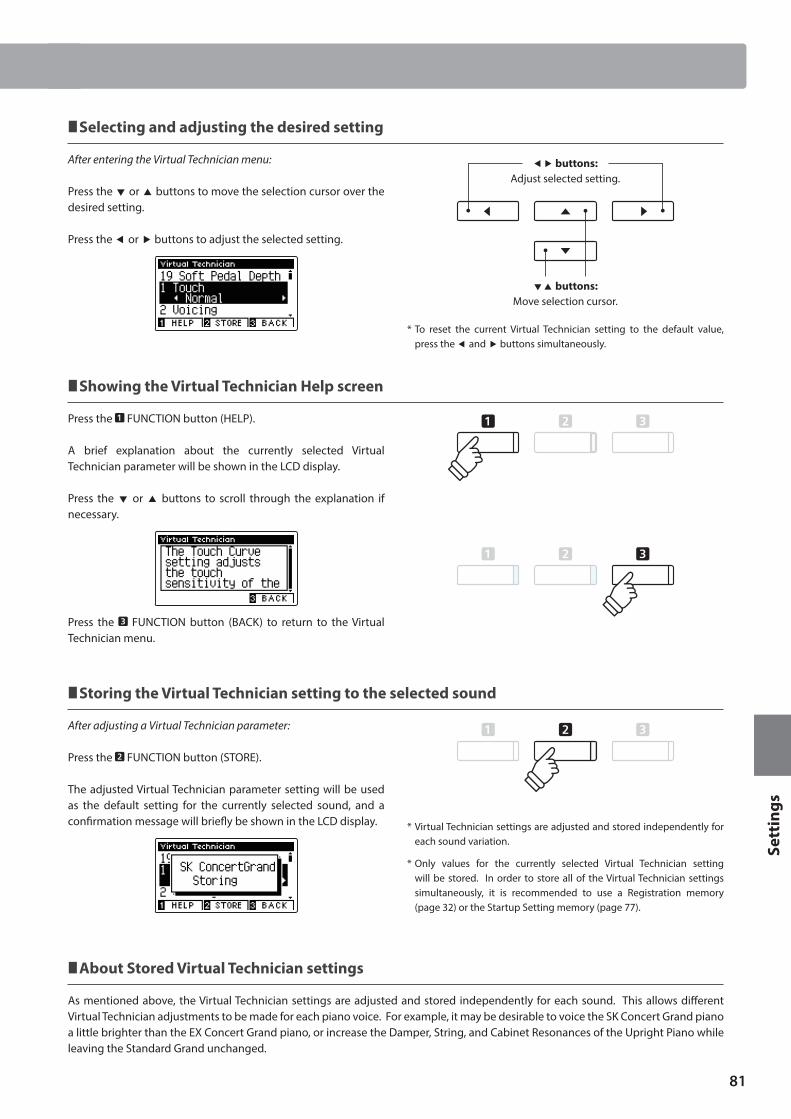
81
Sett
ings
Virtual Technician Settings
Selecting and adjusting the desired setting
After entering the Virtual Technician menu:
Press the or buttons to move the selection cursor over the desired setting.
Press the or buttons to adjust the selected setting.
Showing the Virtual Technician Help screen
Press the FUNCTION button (HELP).
A brief explanation about the currently selected Virtual Technician parameter will be shown in the LCD display.
Press the or buttons to scroll through the explanation if necessary.
Press the FUNCTION button (BACK) to return to the Virtual Technician menu.
Storing the Virtual Technician setting to the selected sound
After adjusting a Virtual Technician parameter:
Press the FUNCTION button (STORE).
The adjusted Virtual Technician parameter setting will be used as the default setting for the currently selected sound, and a confirmation message will briefly be shown in the LCD display.
About Stored Virtual Technician settings
As mentioned above, the Virtual Technician settings are adjusted and stored independently for each sound. This allows different Virtual Technician adjustments to be made for each piano voice. For example, it may be desirable to voice the SK Concert Grand piano a little brighter than the EX Concert Grand piano, or increase the Damper, String, and Cabinet Resonances of the Upright Piano while leaving the Standard Grand unchanged.
* Virtual Technician settings are adjusted and stored independently for each sound variation.
* Only values for the currently selected Virtual Technician setting will be stored. In order to store all of the Virtual Technician settings simultaneously, it is recommended to use a Registration memory (page 32) or the Startup Setting memory (page 77).
buttons:Move selection cursor.
buttons:Adjust selected setting.
* To reset the current Virtual Technician setting to the default value, press the and buttons simultaneously.
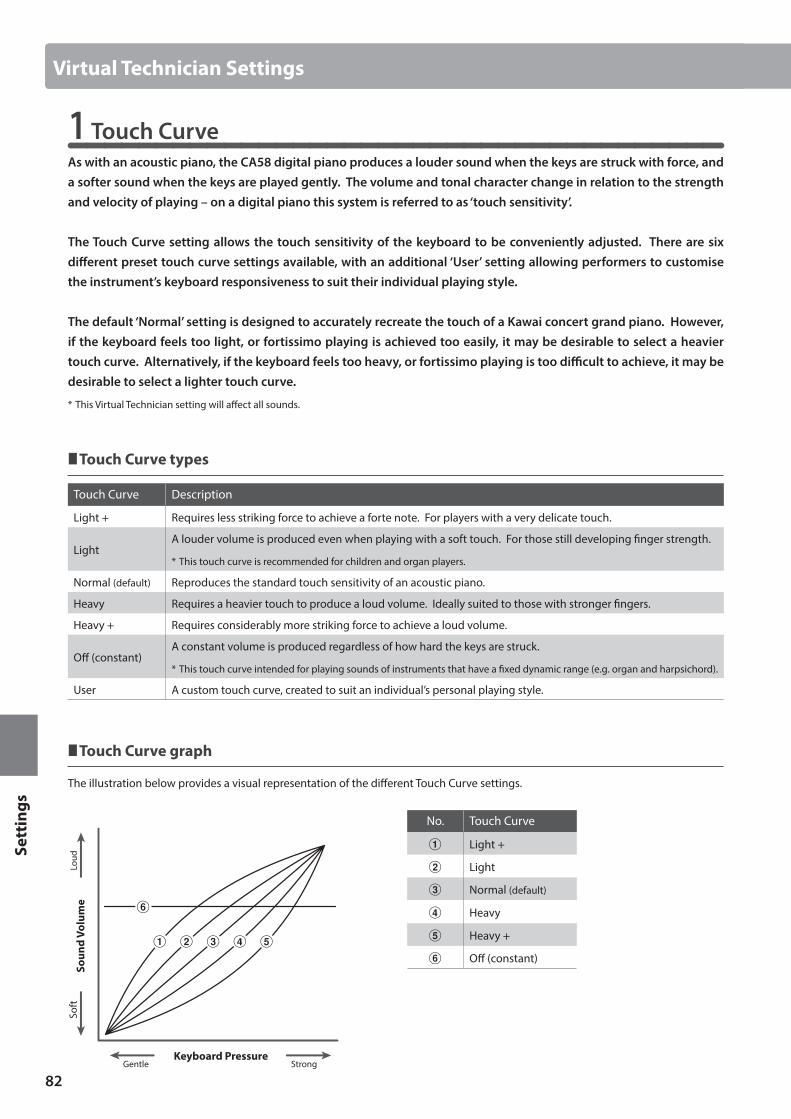
82
Sett
ings
1 Touch CurveAs with an acoustic piano, the CA58 digital piano produces a louder sound when the keys are struck with force, and a softer sound when the keys are played gently. The volume and tonal character change in relation to the strength and velocity of playing – on a digital piano this system is referred to as ‘touch sensitivity’.
The Touch Curve setting allows the touch sensitivity of the keyboard to be conveniently adjusted. There are six different preset touch curve settings available, with an additional ‘User’ setting allowing performers to customise the instrument’s keyboard responsiveness to suit their individual playing style.
The default ‘Normal’ setting is designed to accurately recreate the touch of a Kawai concert grand piano. However, if the keyboard feels too light, or fortissimo playing is achieved too easily, it may be desirable to select a heavier touch curve. Alternatively, if the keyboard feels too heavy, or fortissimo playing is too difficult to achieve, it may be desirable to select a lighter touch curve.
* This Virtual Technician setting will affect all sounds.
Touch Curve types
Touch Curve Description
Light + Requires less striking force to achieve a forte note. For players with a very delicate touch.
LightA louder volume is produced even when playing with a soft touch. For those still developing finger strength.
* This touch curve is recommended for children and organ players.
Normal (default) Reproduces the standard touch sensitivity of an acoustic piano.
Heavy Requires a heavier touch to produce a loud volume. Ideally suited to those with stronger fingers.
Heavy + Requires considerably more striking force to achieve a loud volume.
Off (constant)A constant volume is produced regardless of how hard the keys are struck.
* This touch curve intended for playing sounds of instruments that have a fixed dynamic range (e.g. organ and harpsichord).
User A custom touch curve, created to suit an individual’s personal playing style.
Touch Curve graph
The illustration below provides a visual representation of the different Touch Curve settings.
Loud
Soft
Gentle StrongKeyboard Pressure
b d e
f
ca
Soun
d Vo
lum
e
No. Touch Curve
a Light +
b Light
c Normal (default)
d Heavy
e Heavy +
f Off (constant)
Virtual Technician Settings
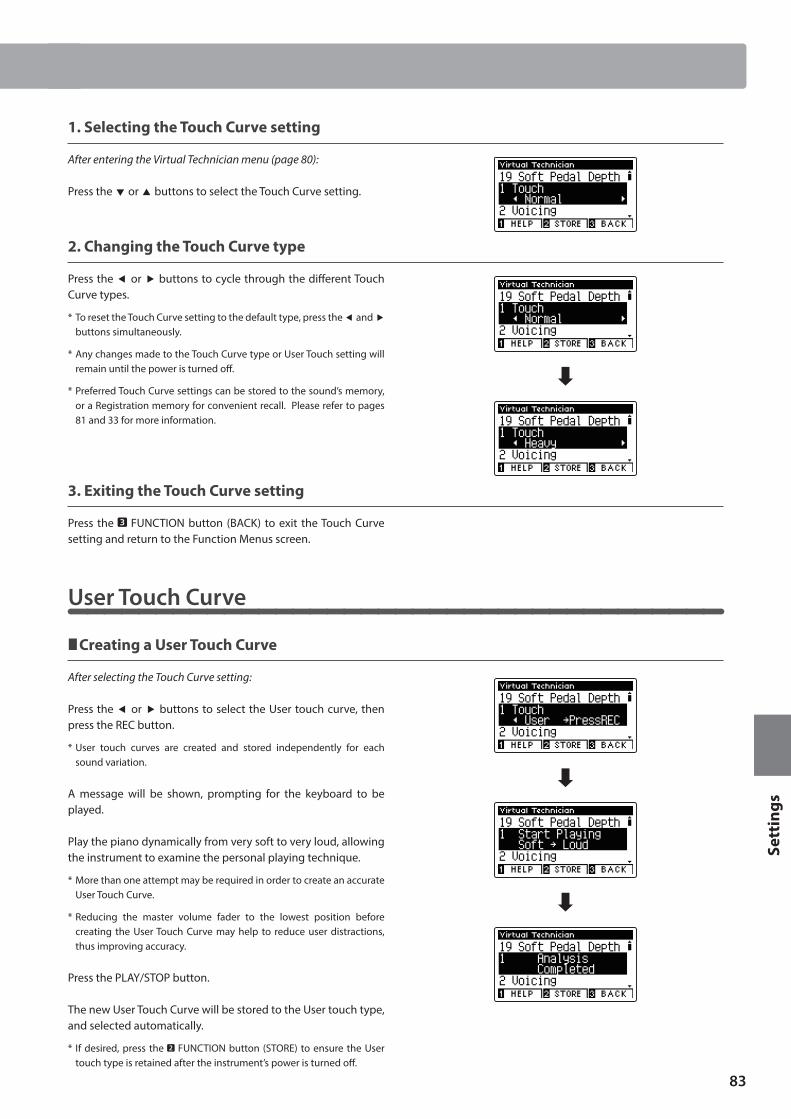
83
Sett
ings
Virtual Technician Settings
1. Selecting the Touch Curve setting
After entering the Virtual Technician menu (page 80):
Press the or buttons to select the Touch Curve setting.
2. Changing the Touch Curve type
Press the or buttons to cycle through the different Touch Curve types.
* To reset the Touch Curve setting to the default type, press the and buttons simultaneously.
* Any changes made to the Touch Curve type or User Touch setting will remain until the power is turned off.
* Preferred Touch Curve settings can be stored to the sound’s memory, or a Registration memory for convenient recall. Please refer to pages 81 and 33 for more information.
3. Exiting the Touch Curve setting
Press the FUNCTION button (BACK) to exit the Touch Curve setting and return to the Function Menus screen.
User Touch Curve
Creating a User Touch Curve
After selecting the Touch Curve setting:
Press the or buttons to select the User touch curve, then press the REC button.
* User touch curves are created and stored independently for each sound variation.
A message will be shown, prompting for the keyboard to be played.
Play the piano dynamically from very soft to very loud, allowing the instrument to examine the personal playing technique.
* More than one attempt may be required in order to create an accurate User Touch Curve.
* Reducing the master volume fader to the lowest position before creating the User Touch Curve may help to reduce user distractions, thus improving accuracy.
Press the PLAY/STOP button.
The new User Touch Curve will be stored to the User touch type, and selected automatically.
* If desired, press the FUNCTION button (STORE) to ensure the User touch type is retained after the instrument’s power is turned off.
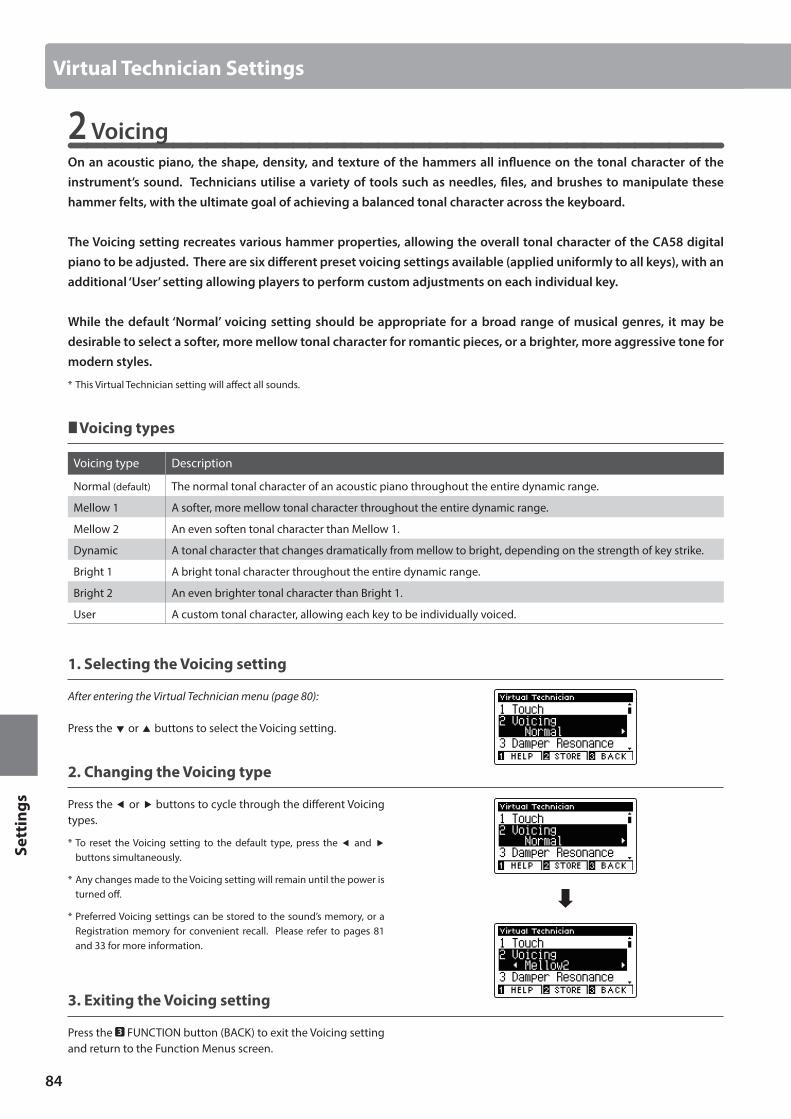
84
Sett
ings
2 VoicingOn an acoustic piano, the shape, density, and texture of the hammers all influence on the tonal character of the instrument’s sound. Technicians utilise a variety of tools such as needles, files, and brushes to manipulate these hammer felts, with the ultimate goal of achieving a balanced tonal character across the keyboard.
The Voicing setting recreates various hammer properties, allowing the overall tonal character of the CA58 digital piano to be adjusted. There are six different preset voicing settings available (applied uniformly to all keys), with an additional ‘User’ setting allowing players to perform custom adjustments on each individual key.
While the default ‘Normal’ voicing setting should be appropriate for a broad range of musical genres, it may be desirable to select a softer, more mellow tonal character for romantic pieces, or a brighter, more aggressive tone for modern styles.
* This Virtual Technician setting will affect all sounds.
Voicing types
Voicing type Description
Normal (default) The normal tonal character of an acoustic piano throughout the entire dynamic range.
Mellow 1 A softer, more mellow tonal character throughout the entire dynamic range.
Mellow 2 An even soften tonal character than Mellow 1.
Dynamic A tonal character that changes dramatically from mellow to bright, depending on the strength of key strike.
Bright 1 A bright tonal character throughout the entire dynamic range.
Bright 2 An even brighter tonal character than Bright 1.
User A custom tonal character, allowing each key to be individually voiced.
1. Selecting the Voicing setting
After entering the Virtual Technician menu (page 80):
Press the or buttons to select the Voicing setting.
2. Changing the Voicing type
Press the or buttons to cycle through the different Voicing types.
* To reset the Voicing setting to the default type, press the and buttons simultaneously.
* Any changes made to the Voicing setting will remain until the power is turned off.
* Preferred Voicing settings can be stored to the sound’s memory, or a Registration memory for convenient recall. Please refer to pages 81 and 33 for more information.
3. Exiting the Voicing setting
Press the FUNCTION button (BACK) to exit the Voicing setting and return to the Function Menus screen.
Virtual Technician Settings
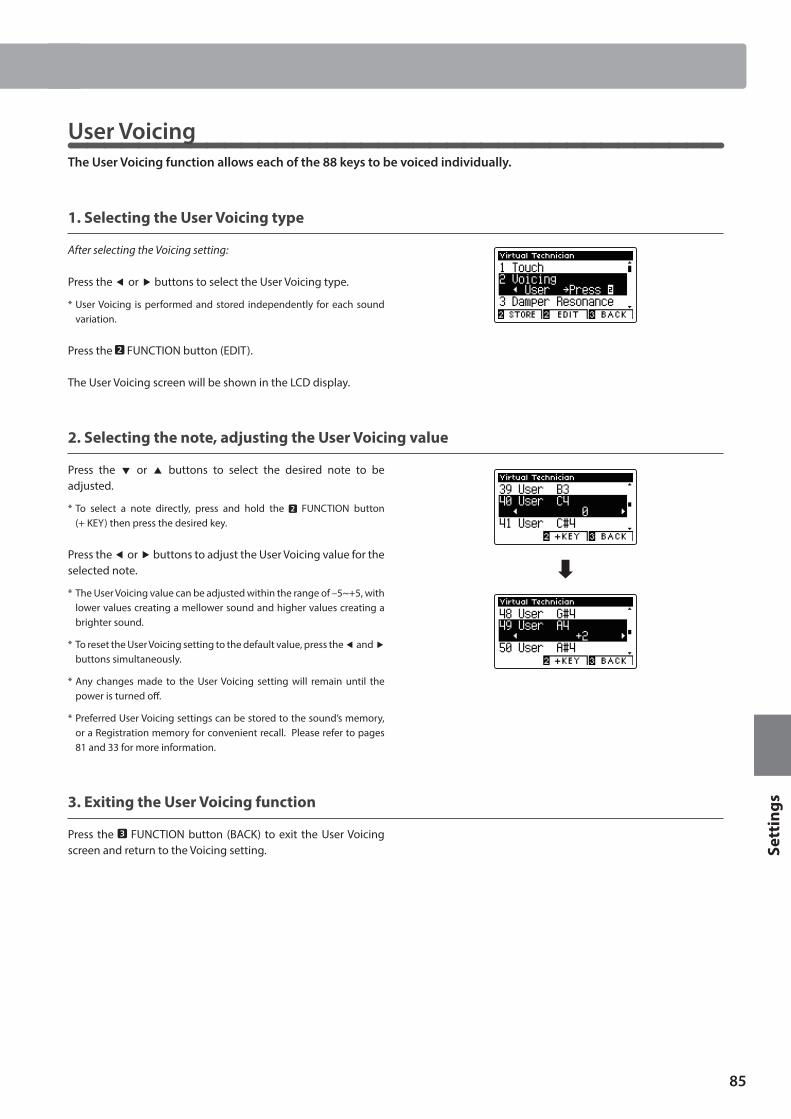
85
Sett
ings
Virtual Technician Settings
User VoicingThe User Voicing function allows each of the 88 keys to be voiced individually.
1. Selecting the User Voicing type
After selecting the Voicing setting:
Press the or buttons to select the User Voicing type.
* User Voicing is performed and stored independently for each sound variation.
Press the FUNCTION button (EDIT).
The User Voicing screen will be shown in the LCD display.
2. Selecting the note, adjusting the User Voicing value
Press the or buttons to select the desired note to be adjusted.
* To select a note directly, press and hold the FUNCTION button (+ KEY) then press the desired key.
Press the or buttons to adjust the User Voicing value for the selected note.
* The User Voicing value can be adjusted within the range of –5~+5, with lower values creating a mellower sound and higher values creating a brighter sound.
* To reset the User Voicing setting to the default value, press the and buttons simultaneously.
* Any changes made to the User Voicing setting will remain until the power is turned off.
* Preferred User Voicing settings can be stored to the sound’s memory, or a Registration memory for convenient recall. Please refer to pages 81 and 33 for more information.
3. Exiting the User Voicing function
Press the FUNCTION button (BACK) to exit the User Voicing screen and return to the Voicing setting.
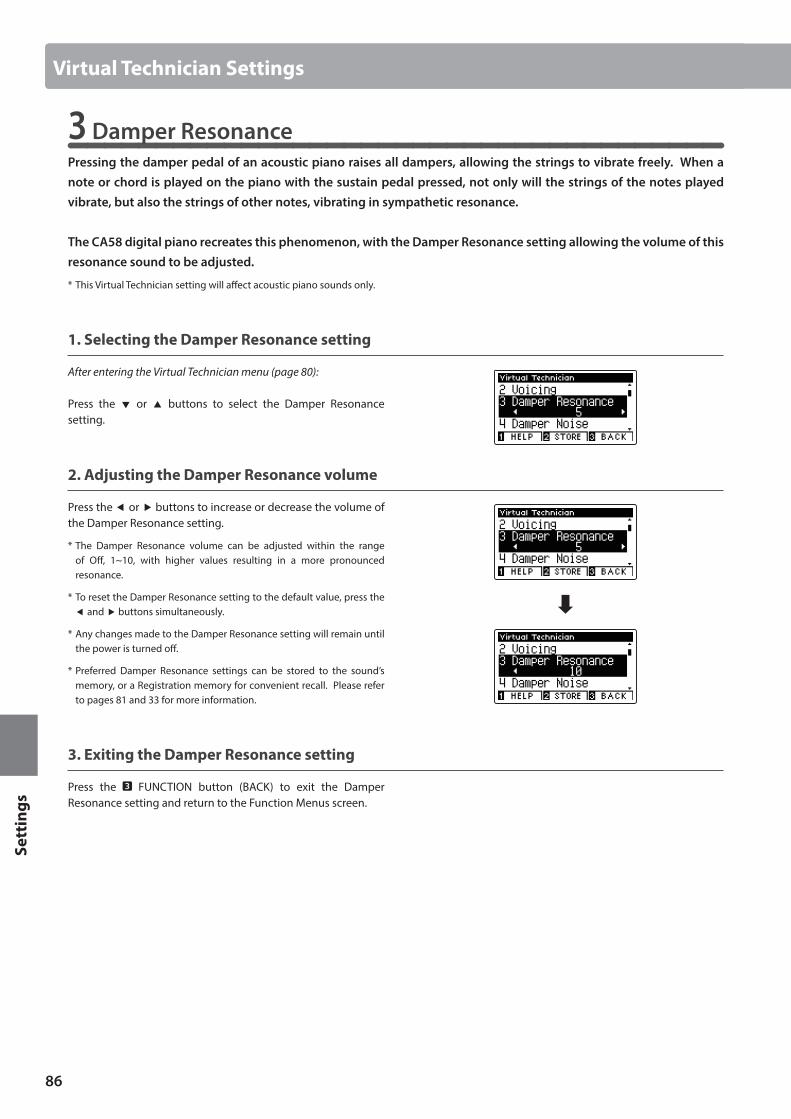
86
Sett
ings
Virtual Technician Settings
3 Damper ResonancePressing the damper pedal of an acoustic piano raises all dampers, allowing the strings to vibrate freely. When a note or chord is played on the piano with the sustain pedal pressed, not only will the strings of the notes played vibrate, but also the strings of other notes, vibrating in sympathetic resonance.
The CA58 digital piano recreates this phenomenon, with the Damper Resonance setting allowing the volume of this resonance sound to be adjusted.
* This Virtual Technician setting will affect acoustic piano sounds only.
1. Selecting the Damper Resonance setting
After entering the Virtual Technician menu (page 80):
Press the or buttons to select the Damper Resonance setting.
2. Adjusting the Damper Resonance volume
Press the or buttons to increase or decrease the volume of the Damper Resonance setting.
* The Damper Resonance volume can be adjusted within the range of Off, 1~10, with higher values resulting in a more pronounced resonance.
* To reset the Damper Resonance setting to the default value, press the and buttons simultaneously.
* Any changes made to the Damper Resonance setting will remain until the power is turned off.
* Preferred Damper Resonance settings can be stored to the sound’s memory, or a Registration memory for convenient recall. Please refer to pages 81 and 33 for more information.
3. Exiting the Damper Resonance setting
Press the FUNCTION button (BACK) to exit the Damper Resonance setting and return to the Function Menus screen.
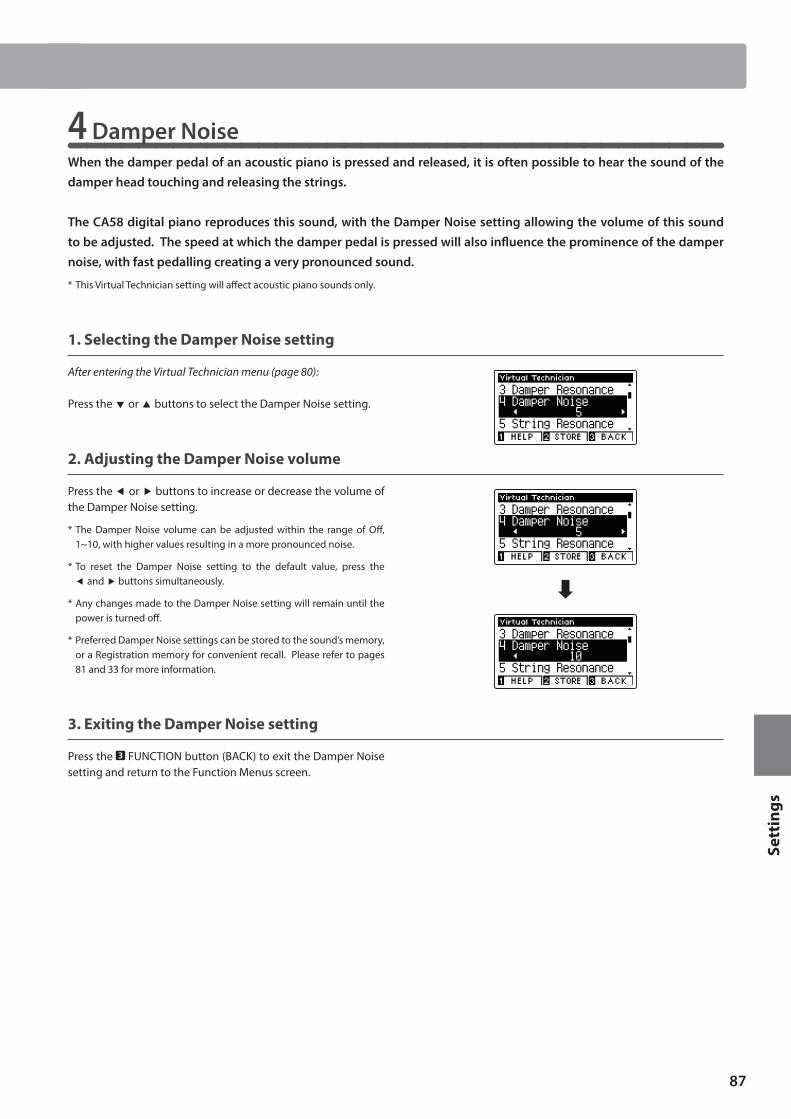
87
Sett
ings
Virtual Technician Settings
4 Damper NoiseWhen the damper pedal of an acoustic piano is pressed and released, it is often possible to hear the sound of the damper head touching and releasing the strings.
The CA58 digital piano reproduces this sound, with the Damper Noise setting allowing the volume of this sound to be adjusted. The speed at which the damper pedal is pressed will also influence the prominence of the damper noise, with fast pedalling creating a very pronounced sound.
* This Virtual Technician setting will affect acoustic piano sounds only.
1. Selecting the Damper Noise setting
After entering the Virtual Technician menu (page 80):
Press the or buttons to select the Damper Noise setting.
2. Adjusting the Damper Noise volume
Press the or buttons to increase or decrease the volume of the Damper Noise setting.
* The Damper Noise volume can be adjusted within the range of Off, 1~10, with higher values resulting in a more pronounced noise.
* To reset the Damper Noise setting to the default value, press the and buttons simultaneously.
* Any changes made to the Damper Noise setting will remain until the power is turned off.
* Preferred Damper Noise settings can be stored to the sound’s memory, or a Registration memory for convenient recall. Please refer to pages 81 and 33 for more information.
3. Exiting the Damper Noise setting
Press the FUNCTION button (BACK) to exit the Damper Noise setting and return to the Function Menus screen.
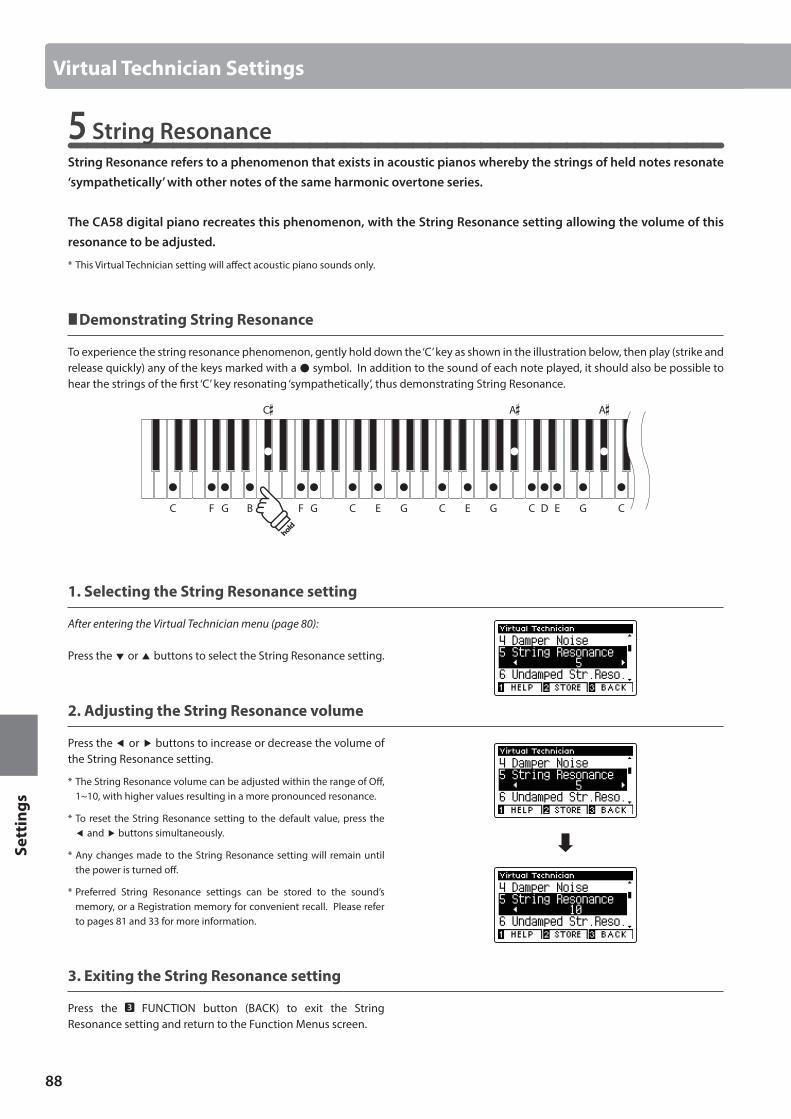
88
Sett
ings
Virtual Technician Settings
5 String ResonanceString Resonance refers to a phenomenon that exists in acoustic pianos whereby the strings of held notes resonate ‘sympathetically’ with other notes of the same harmonic overtone series.
The CA58 digital piano recreates this phenomenon, with the String Resonance setting allowing the volume of this resonance to be adjusted.
* This Virtual Technician setting will affect acoustic piano sounds only.
Demonstrating String Resonance
To experience the string resonance phenomenon, gently hold down the ‘C’ key as shown in the illustration below, then play (strike and release quickly) any of the keys marked with a symbol. In addition to the sound of each note played, it should also be possible to hear the strings of the first ‘C’ key resonating ‘sympathetically’, thus demonstrating String Resonance.
F GC B F G C G C E G C D E G C
C A A
E
hold
1. Selecting the String Resonance setting
After entering the Virtual Technician menu (page 80):
Press the or buttons to select the String Resonance setting.
2. Adjusting the String Resonance volume
Press the or buttons to increase or decrease the volume of the String Resonance setting.
* The String Resonance volume can be adjusted within the range of Off, 1~10, with higher values resulting in a more pronounced resonance.
* To reset the String Resonance setting to the default value, press the and buttons simultaneously.
* Any changes made to the String Resonance setting will remain until the power is turned off.
* Preferred String Resonance settings can be stored to the sound’s memory, or a Registration memory for convenient recall. Please refer to pages 81 and 33 for more information.
3. Exiting the String Resonance setting
Press the FUNCTION button (BACK) to exit the String Resonance setting and return to the Function Menus screen.
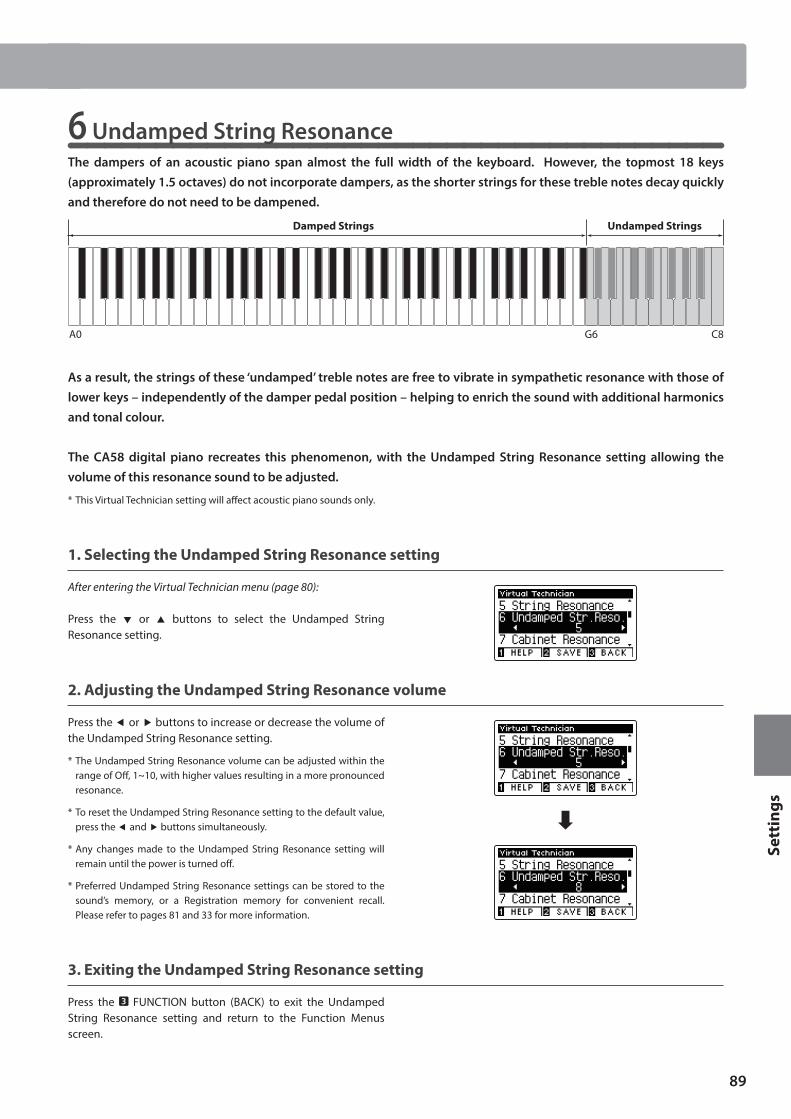
89
Sett
ings
Virtual Technician Settings
6 Undamped String ResonanceThe dampers of an acoustic piano span almost the full width of the keyboard. However, the topmost 18 keys (approximately 1.5 octaves) do not incorporate dampers, as the shorter strings for these treble notes decay quickly and therefore do not need to be dampened.
Undamped StringsDamped Strings
A0 C8G6
As a result, the strings of these ‘undamped’ treble notes are free to vibrate in sympathetic resonance with those of lower keys – independently of the damper pedal position – helping to enrich the sound with additional harmonics and tonal colour.
The CA58 digital piano recreates this phenomenon, with the Undamped String Resonance setting allowing the volume of this resonance sound to be adjusted.
* This Virtual Technician setting will affect acoustic piano sounds only.
1. Selecting the Undamped String Resonance setting
After entering the Virtual Technician menu (page 80):
Press the or buttons to select the Undamped String Resonance setting.
2. Adjusting the Undamped String Resonance volume
Press the or buttons to increase or decrease the volume of the Undamped String Resonance setting.
* The Undamped String Resonance volume can be adjusted within the range of Off, 1~10, with higher values resulting in a more pronounced resonance.
* To reset the Undamped String Resonance setting to the default value, press the and buttons simultaneously.
* Any changes made to the Undamped String Resonance setting will remain until the power is turned off.
* Preferred Undamped String Resonance settings can be stored to the sound’s memory, or a Registration memory for convenient recall. Please refer to pages 81 and 33 for more information.
3. Exiting the Undamped String Resonance setting
Press the FUNCTION button (BACK) to exit the Undamped String Resonance setting and return to the Function Menus screen.
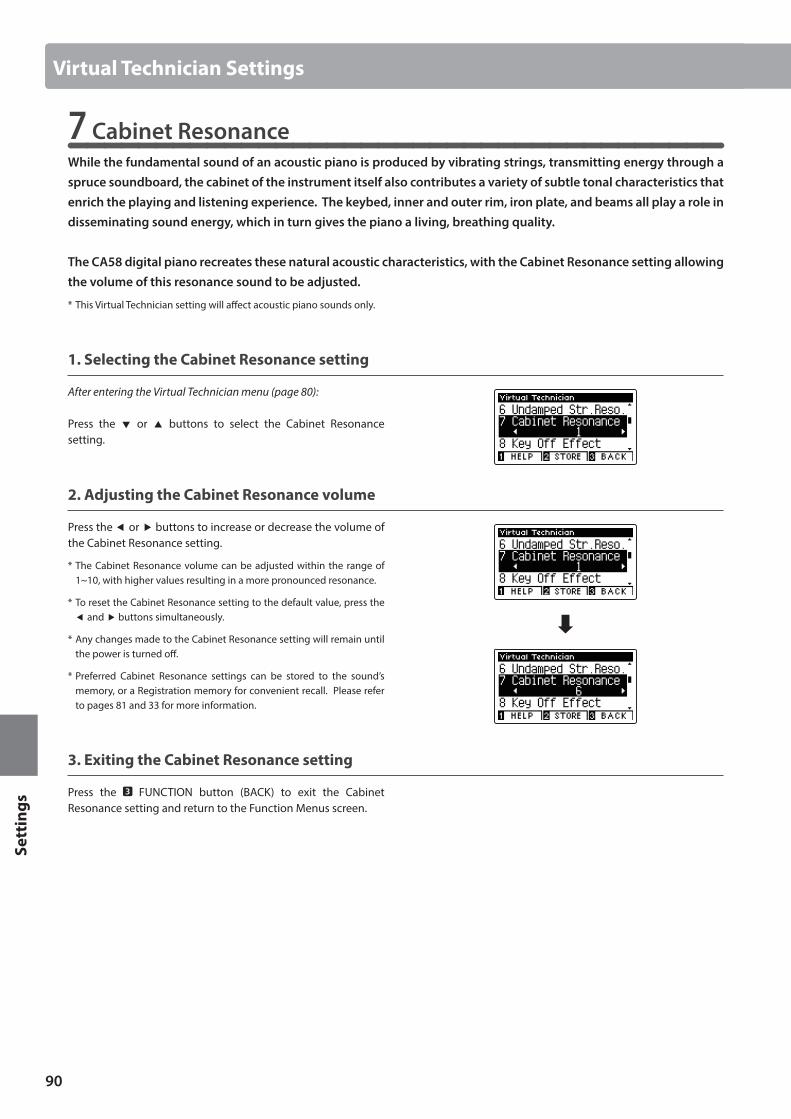
90
Sett
ings
7 Cabinet ResonanceWhile the fundamental sound of an acoustic piano is produced by vibrating strings, transmitting energy through a spruce soundboard, the cabinet of the instrument itself also contributes a variety of subtle tonal characteristics that enrich the playing and listening experience. The keybed, inner and outer rim, iron plate, and beams all play a role in disseminating sound energy, which in turn gives the piano a living, breathing quality.
The CA58 digital piano recreates these natural acoustic characteristics, with the Cabinet Resonance setting allowing the volume of this resonance sound to be adjusted.
* This Virtual Technician setting will affect acoustic piano sounds only.
1. Selecting the Cabinet Resonance setting
After entering the Virtual Technician menu (page 80):
Press the or buttons to select the Cabinet Resonance setting.
2. Adjusting the Cabinet Resonance volume
Press the or buttons to increase or decrease the volume of the Cabinet Resonance setting.
* The Cabinet Resonance volume can be adjusted within the range of 1~10, with higher values resulting in a more pronounced resonance.
* To reset the Cabinet Resonance setting to the default value, press the and buttons simultaneously.
* Any changes made to the Cabinet Resonance setting will remain until the power is turned off.
* Preferred Cabinet Resonance settings can be stored to the sound’s memory, or a Registration memory for convenient recall. Please refer to pages 81 and 33 for more information.
3. Exiting the Cabinet Resonance setting
Press the FUNCTION button (BACK) to exit the Cabinet Resonance setting and return to the Function Menus screen.
Virtual Technician Settings
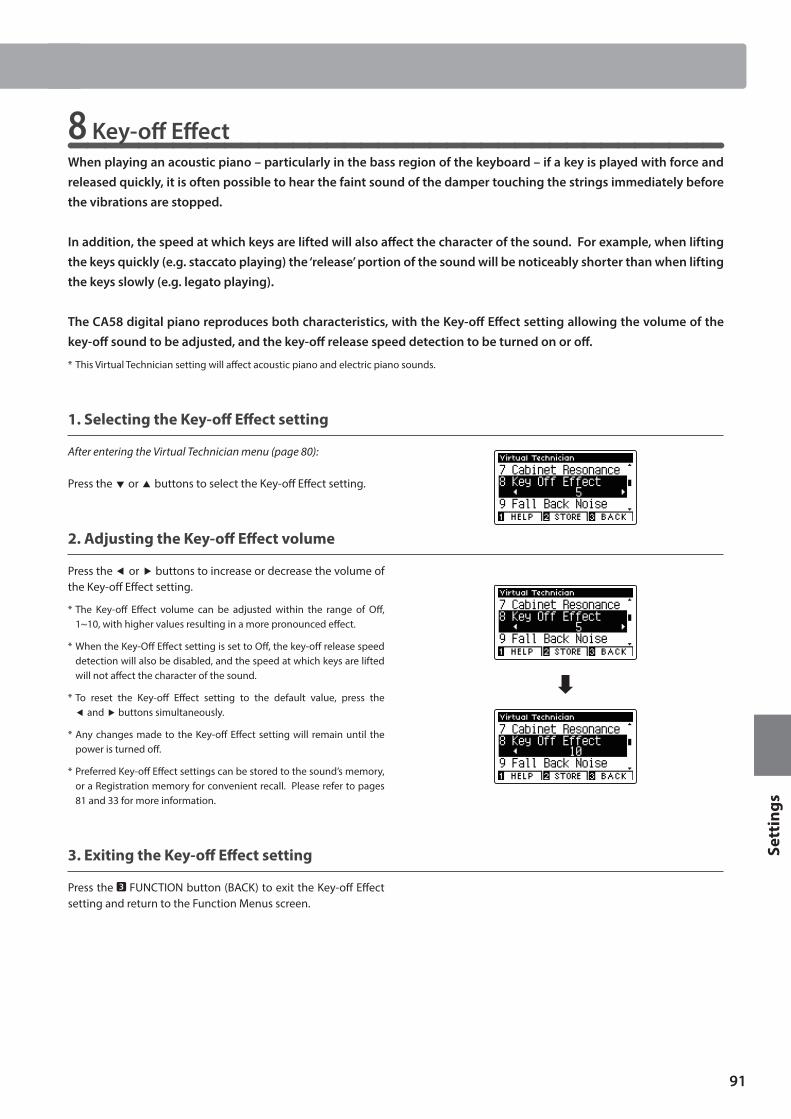
91
Sett
ings
Virtual Technician Settings
8 Key-off EffectWhen playing an acoustic piano – particularly in the bass region of the keyboard – if a key is played with force and released quickly, it is often possible to hear the faint sound of the damper touching the strings immediately before the vibrations are stopped.
In addition, the speed at which keys are lifted will also affect the character of the sound. For example, when lifting the keys quickly (e.g. staccato playing) the ‘release’ portion of the sound will be noticeably shorter than when lifting the keys slowly (e.g. legato playing).
The CA58 digital piano reproduces both characteristics, with the Key-off Effect setting allowing the volume of the key-off sound to be adjusted, and the key-off release speed detection to be turned on or off.
* This Virtual Technician setting will affect acoustic piano and electric piano sounds.
1. Selecting the Key-off Effect setting
After entering the Virtual Technician menu (page 80):
Press the or buttons to select the Key-off Effect setting.
2. Adjusting the Key-off Effect volume
Press the or buttons to increase or decrease the volume of the Key-off Effect setting.
* The Key-off Effect volume can be adjusted within the range of Off, 1~10, with higher values resulting in a more pronounced effect.
* When the Key-Off Effect setting is set to Off, the key-off release speed detection will also be disabled, and the speed at which keys are lifted will not affect the character of the sound.
* To reset the Key-off Effect setting to the default value, press the and buttons simultaneously.
* Any changes made to the Key-off Effect setting will remain until the power is turned off.
* Preferred Key-off Effect settings can be stored to the sound’s memory, or a Registration memory for convenient recall. Please refer to pages 81 and 33 for more information.
3. Exiting the Key-off Effect setting
Press the FUNCTION button (BACK) to exit the Key-off Effect setting and return to the Function Menus screen.
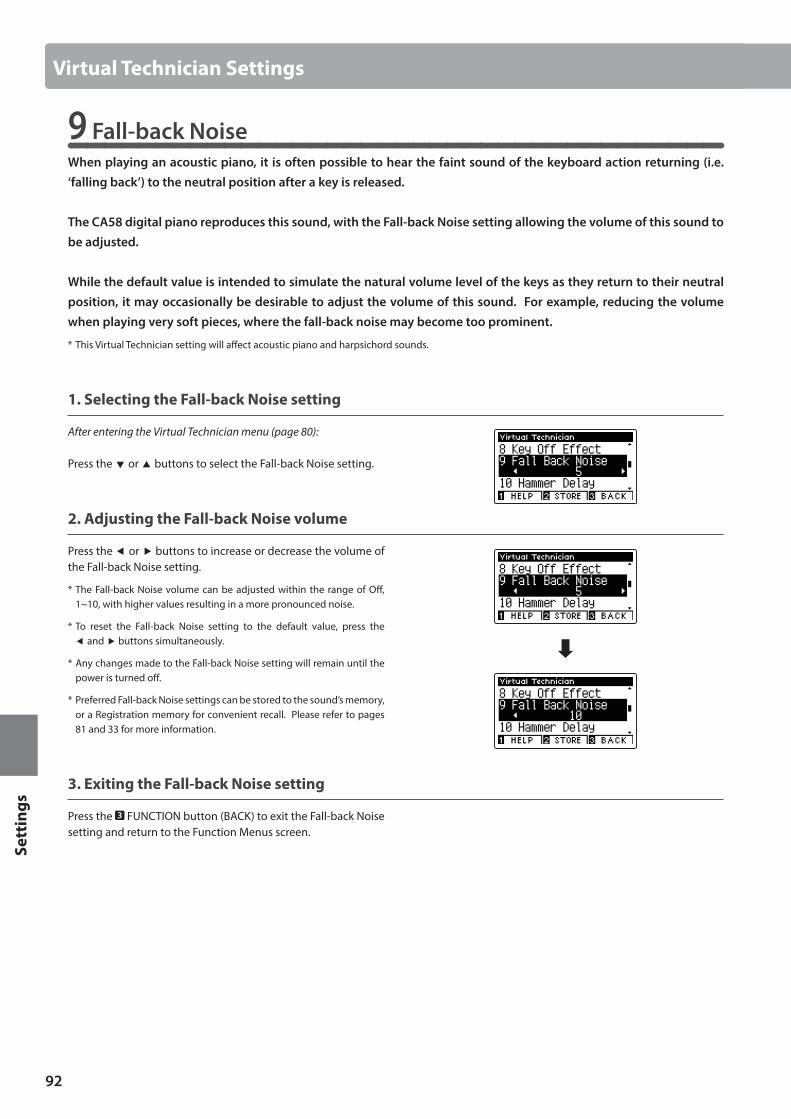
92
Sett
ings
Virtual Technician Settings
9 Fall-back NoiseWhen playing an acoustic piano, it is often possible to hear the faint sound of the keyboard action returning (i.e. ‘falling back’) to the neutral position after a key is released.
The CA58 digital piano reproduces this sound, with the Fall-back Noise setting allowing the volume of this sound to be adjusted.
While the default value is intended to simulate the natural volume level of the keys as they return to their neutral position, it may occasionally be desirable to adjust the volume of this sound. For example, reducing the volume when playing very soft pieces, where the fall-back noise may become too prominent.
* This Virtual Technician setting will affect acoustic piano and harpsichord sounds.
1. Selecting the Fall-back Noise setting
After entering the Virtual Technician menu (page 80):
Press the or buttons to select the Fall-back Noise setting.
2. Adjusting the Fall-back Noise volume
Press the or buttons to increase or decrease the volume of the Fall-back Noise setting.
* The Fall-back Noise volume can be adjusted within the range of Off, 1~10, with higher values resulting in a more pronounced noise.
* To reset the Fall-back Noise setting to the default value, press the and buttons simultaneously.
* Any changes made to the Fall-back Noise setting will remain until the power is turned off.
* Preferred Fall-back Noise settings can be stored to the sound’s memory, or a Registration memory for convenient recall. Please refer to pages 81 and 33 for more information.
3. Exiting the Fall-back Noise setting
Press the FUNCTION button (BACK) to exit the Fall-back Noise setting and return to the Function Menus screen.
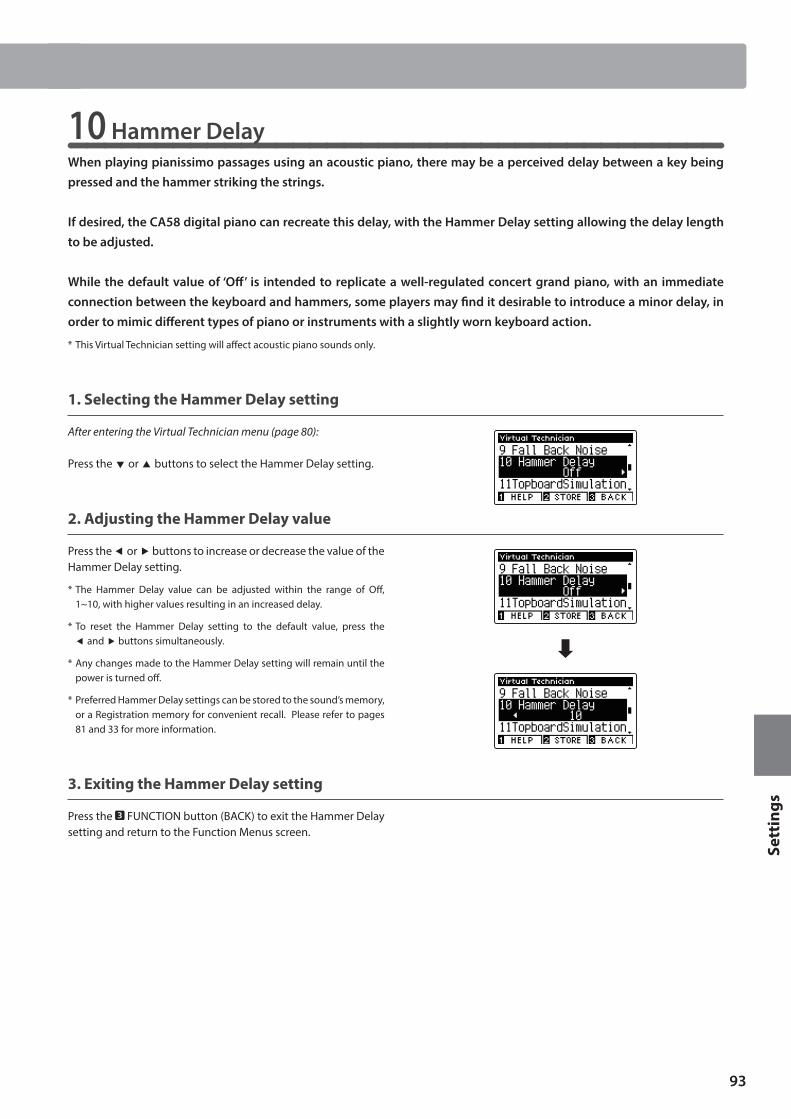
93
Sett
ings
Virtual Technician Settings
10 Hammer DelayWhen playing pianissimo passages using an acoustic piano, there may be a perceived delay between a key being pressed and the hammer striking the strings.
If desired, the CA58 digital piano can recreate this delay, with the Hammer Delay setting allowing the delay length to be adjusted.
While the default value of ‘Off’ is intended to replicate a well-regulated concert grand piano, with an immediate connection between the keyboard and hammers, some players may find it desirable to introduce a minor delay, in order to mimic different types of piano or instruments with a slightly worn keyboard action.
* This Virtual Technician setting will affect acoustic piano sounds only.
1. Selecting the Hammer Delay setting
After entering the Virtual Technician menu (page 80):
Press the or buttons to select the Hammer Delay setting.
2. Adjusting the Hammer Delay value
Press the or buttons to increase or decrease the value of the Hammer Delay setting.
* The Hammer Delay value can be adjusted within the range of Off, 1~10, with higher values resulting in an increased delay.
* To reset the Hammer Delay setting to the default value, press the and buttons simultaneously.
* Any changes made to the Hammer Delay setting will remain until the power is turned off.
* Preferred Hammer Delay settings can be stored to the sound’s memory, or a Registration memory for convenient recall. Please refer to pages 81 and 33 for more information.
3. Exiting the Hammer Delay setting
Press the FUNCTION button (BACK) to exit the Hammer Delay setting and return to the Function Menus screen.
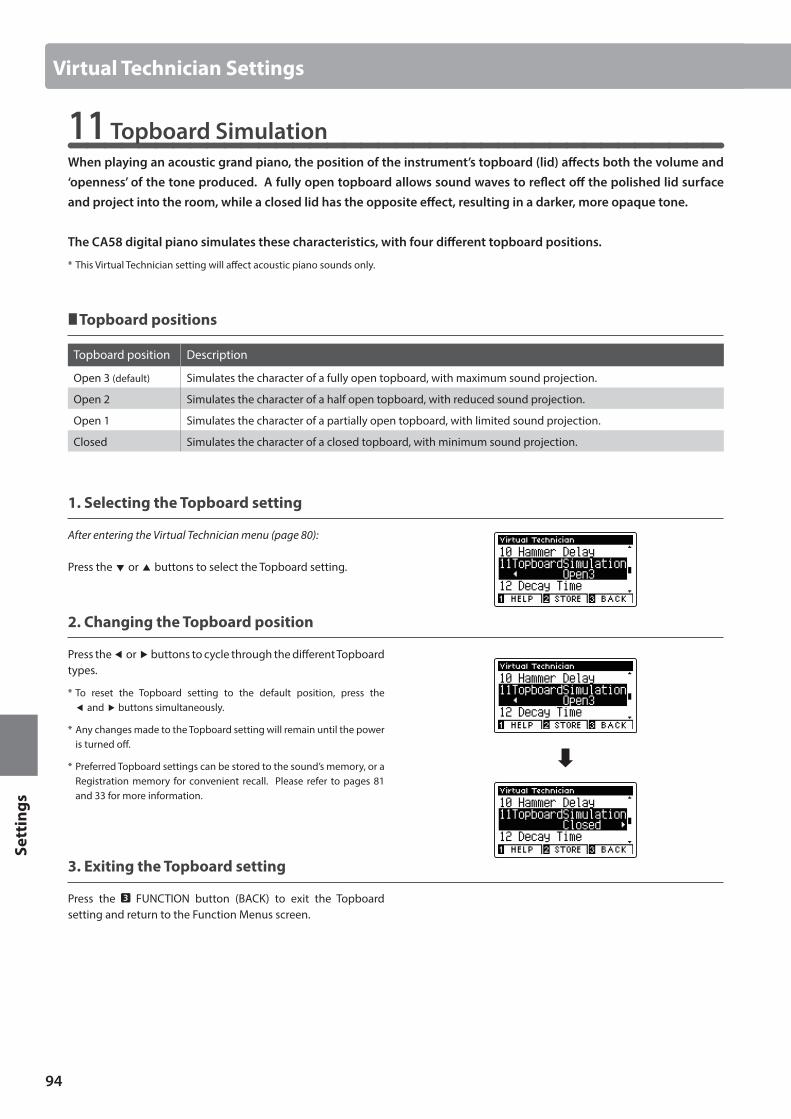
94
Sett
ings
11 Topboard SimulationWhen playing an acoustic grand piano, the position of the instrument’s topboard (lid) affects both the volume and ‘openness’ of the tone produced. A fully open topboard allows sound waves to reflect off the polished lid surface and project into the room, while a closed lid has the opposite effect, resulting in a darker, more opaque tone.
The CA58 digital piano simulates these characteristics, with four different topboard positions.
* This Virtual Technician setting will affect acoustic piano sounds only.
Topboard positions
Topboard position Description
Open 3 (default) Simulates the character of a fully open topboard, with maximum sound projection.
Open 2 Simulates the character of a half open topboard, with reduced sound projection.
Open 1 Simulates the character of a partially open topboard, with limited sound projection.
Closed Simulates the character of a closed topboard, with minimum sound projection.
1. Selecting the Topboard setting
After entering the Virtual Technician menu (page 80):
Press the or buttons to select the Topboard setting.
2. Changing the Topboard position
Press the or buttons to cycle through the different Topboard types.
* To reset the Topboard setting to the default position, press the and buttons simultaneously.
* Any changes made to the Topboard setting will remain until the power is turned off.
* Preferred Topboard settings can be stored to the sound’s memory, or a Registration memory for convenient recall. Please refer to pages 81 and 33 for more information.
3. Exiting the Topboard setting
Press the FUNCTION button (BACK) to exit the Topboard setting and return to the Function Menus screen.
Virtual Technician Settings
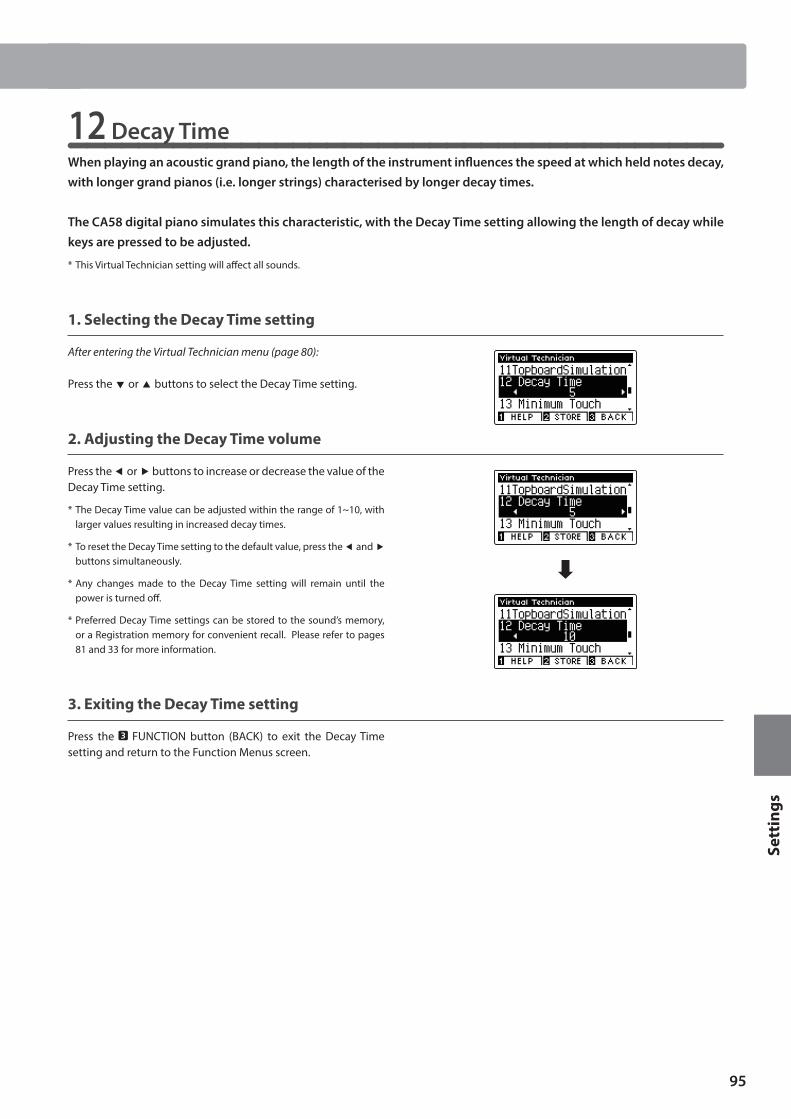
95
Sett
ings
Virtual Technician Settings
12 Decay TimeWhen playing an acoustic grand piano, the length of the instrument influences the speed at which held notes decay, with longer grand pianos (i.e. longer strings) characterised by longer decay times.
The CA58 digital piano simulates this characteristic, with the Decay Time setting allowing the length of decay while keys are pressed to be adjusted.
* This Virtual Technician setting will affect all sounds.
1. Selecting the Decay Time setting
After entering the Virtual Technician menu (page 80):
Press the or buttons to select the Decay Time setting.
2. Adjusting the Decay Time volume
Press the or buttons to increase or decrease the value of the Decay Time setting.
* The Decay Time value can be adjusted within the range of 1~10, with larger values resulting in increased decay times.
* To reset the Decay Time setting to the default value, press the and buttons simultaneously.
* Any changes made to the Decay Time setting will remain until the power is turned off.
* Preferred Decay Time settings can be stored to the sound’s memory, or a Registration memory for convenient recall. Please refer to pages 81 and 33 for more information.
3. Exiting the Decay Time setting
Press the FUNCTION button (BACK) to exit the Decay Time setting and return to the Function Menus screen.
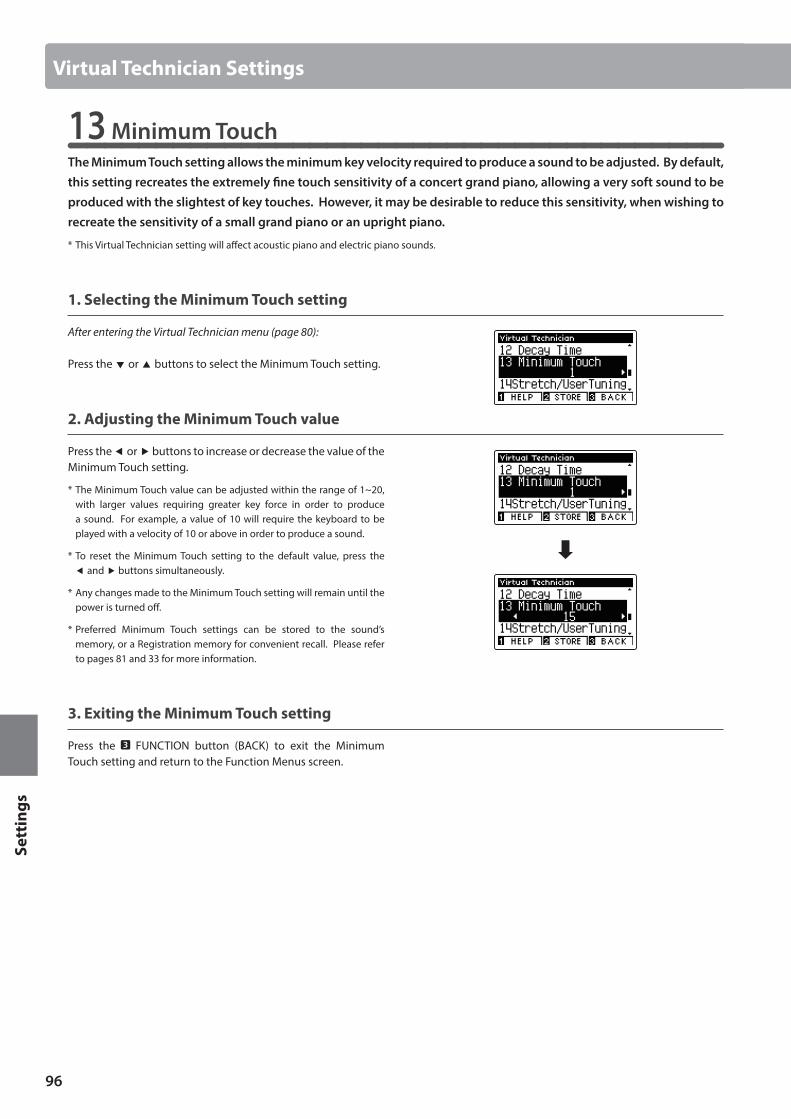
96
Sett
ings
Virtual Technician Settings
13 Minimum TouchThe Minimum Touch setting allows the minimum key velocity required to produce a sound to be adjusted. By default, this setting recreates the extremely fine touch sensitivity of a concert grand piano, allowing a very soft sound to be produced with the slightest of key touches. However, it may be desirable to reduce this sensitivity, when wishing to recreate the sensitivity of a small grand piano or an upright piano.
* This Virtual Technician setting will affect acoustic piano and electric piano sounds.
1. Selecting the Minimum Touch setting
After entering the Virtual Technician menu (page 80):
Press the or buttons to select the Minimum Touch setting.
2. Adjusting the Minimum Touch value
Press the or buttons to increase or decrease the value of the Minimum Touch setting.
* The Minimum Touch value can be adjusted within the range of 1~20, with larger values requiring greater key force in order to produce a sound. For example, a value of 10 will require the keyboard to be played with a velocity of 10 or above in order to produce a sound.
* To reset the Minimum Touch setting to the default value, press the and buttons simultaneously.
* Any changes made to the Minimum Touch setting will remain until the power is turned off.
* Preferred Minimum Touch settings can be stored to the sound’s memory, or a Registration memory for convenient recall. Please refer to pages 81 and 33 for more information.
3. Exiting the Minimum Touch setting
Press the FUNCTION button (BACK) to exit the Minimum Touch setting and return to the Function Menus screen.
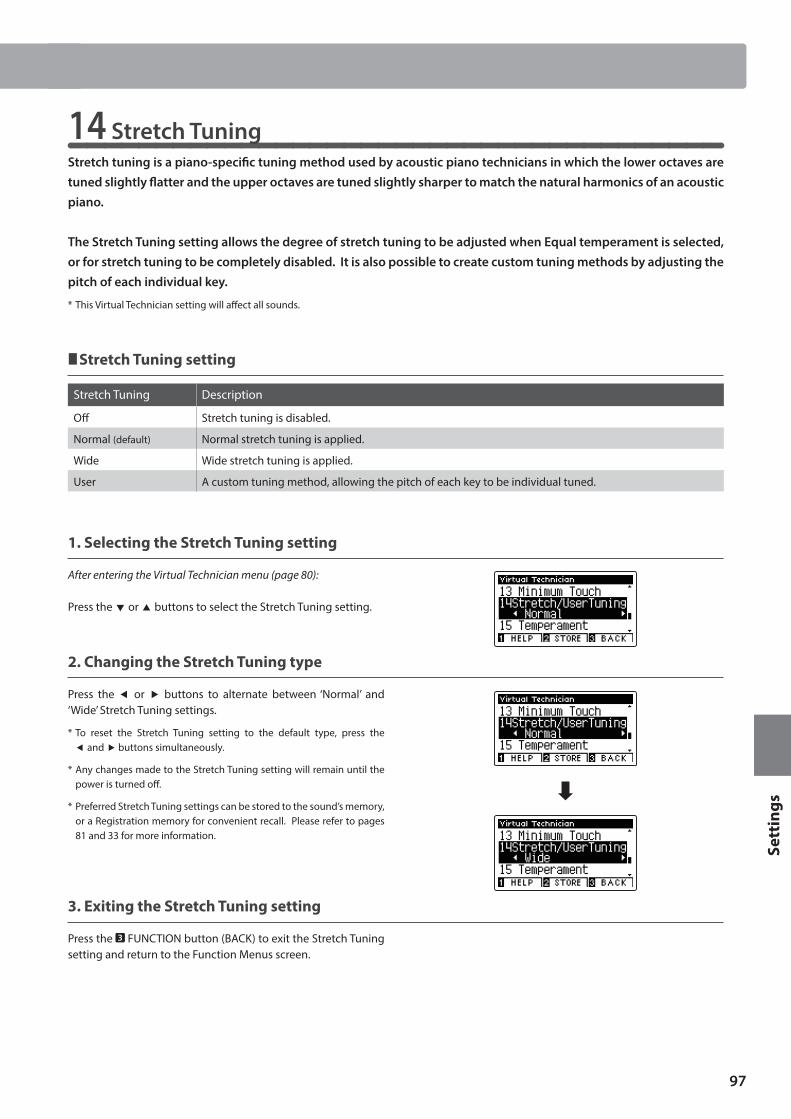
97
Sett
ings
Virtual Technician Settings
14 Stretch TuningStretch tuning is a piano-specific tuning method used by acoustic piano technicians in which the lower octaves are tuned slightly flatter and the upper octaves are tuned slightly sharper to match the natural harmonics of an acoustic piano.
The Stretch Tuning setting allows the degree of stretch tuning to be adjusted when Equal temperament is selected, or for stretch tuning to be completely disabled. It is also possible to create custom tuning methods by adjusting the pitch of each individual key.
* This Virtual Technician setting will affect all sounds.
Stretch Tuning setting
Stretch Tuning Description
Off Stretch tuning is disabled.
Normal (default) Normal stretch tuning is applied.
Wide Wide stretch tuning is applied.
User A custom tuning method, allowing the pitch of each key to be individual tuned.
1. Selecting the Stretch Tuning setting
After entering the Virtual Technician menu (page 80):
Press the or buttons to select the Stretch Tuning setting.
2. Changing the Stretch Tuning type
Press the or buttons to alternate between ‘Normal’ and ‘Wide’ Stretch Tuning settings.
* To reset the Stretch Tuning setting to the default type, press the and buttons simultaneously.
* Any changes made to the Stretch Tuning setting will remain until the power is turned off.
* Preferred Stretch Tuning settings can be stored to the sound’s memory, or a Registration memory for convenient recall. Please refer to pages 81 and 33 for more information.
3. Exiting the Stretch Tuning setting
Press the FUNCTION button (BACK) to exit the Stretch Tuning setting and return to the Function Menus screen.
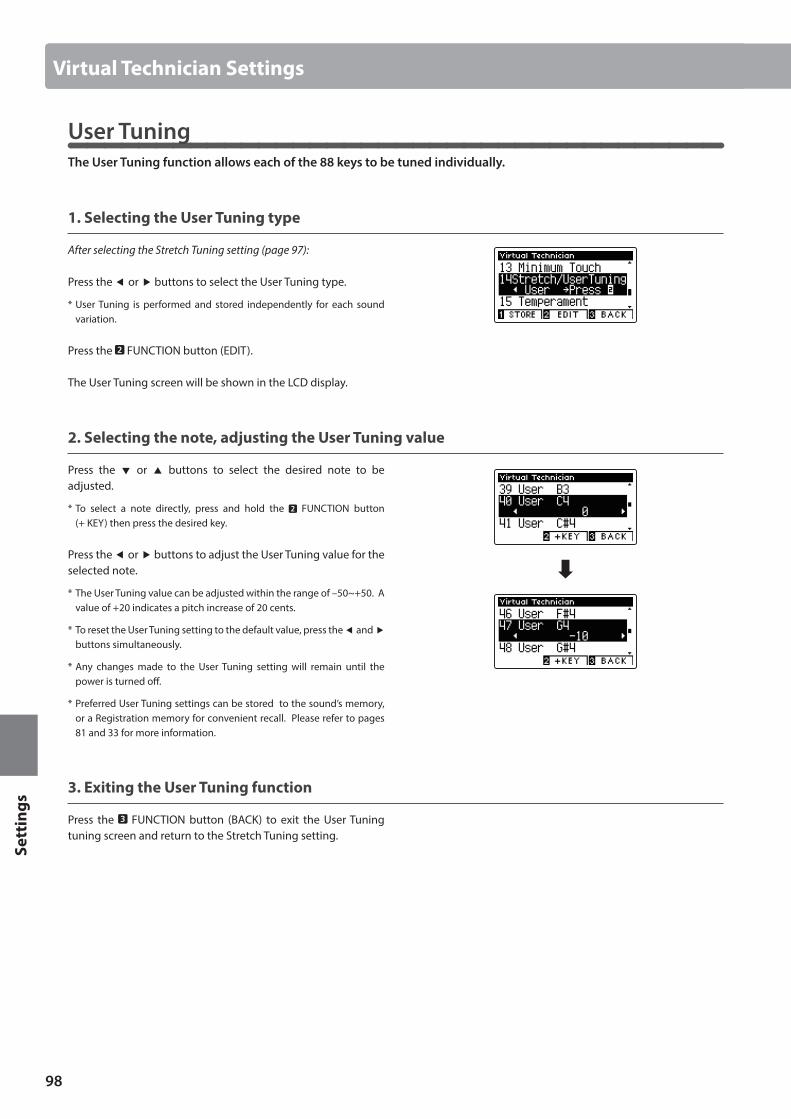
98
Sett
ings
User TuningThe User Tuning function allows each of the 88 keys to be tuned individually.
1. Selecting the User Tuning type
After selecting the Stretch Tuning setting (page 97):
Press the or buttons to select the User Tuning type.
* User Tuning is performed and stored independently for each sound variation.
Press the FUNCTION button (EDIT).
The User Tuning screen will be shown in the LCD display.
2. Selecting the note, adjusting the User Tuning value
Press the or buttons to select the desired note to be adjusted.
* To select a note directly, press and hold the FUNCTION button (+ KEY) then press the desired key.
Press the or buttons to adjust the User Tuning value for the selected note.
* The User Tuning value can be adjusted within the range of –50~+50. A value of +20 indicates a pitch increase of 20 cents.
* To reset the User Tuning setting to the default value, press the and buttons simultaneously.
* Any changes made to the User Tuning setting will remain until the power is turned off.
* Preferred User Tuning settings can be stored to the sound’s memory, or a Registration memory for convenient recall. Please refer to pages 81 and 33 for more information.
3. Exiting the User Tuning function
Press the FUNCTION button (BACK) to exit the User Tuning tuning screen and return to the Stretch Tuning setting.
Virtual Technician Settings

99
Sett
ings
Virtual Technician Settings
15 TemperamentThe Temperament setting allows the tuning system used by the CA58 digital piano to be changed from the modern ‘Equal Temperament’ standard to one of the various temperaments popularised during the Renaissance and Baroque periods. It is also possible to create customised temperaments using the User Temperament function.
* This Virtual Technician setting will affect all sounds.
Temperament types
Temperament type Description
Equal Temperament (default)(Equal)
This temperament is the most popular tuning method, and divides the scale into twelve equal semi-tones. This produces the same chordal intervals in all twelve keys, and has the advantage of limitless modulation of the key. However, the tonality of each key becomes less characteristic and no chord is in pure consonance.
Pure Temperament(Pure Major/Pure Minor)
This temperament, which eliminates dissonances for thirds and fifths, is still popular in choral music because of its perfect harmony. Any key modulation will result in dissonances.* The key of the temperament, and major/minor setting must be correctly matched.
Pythagorean Temperament(Pythagorean)
This temperament, which uses mathematical ratios to eliminate dissonance for fifths, is very limited for use with chords, but produces very characteristic melodic lines.
Meantone Temperament(Meantone)
This temperament, which uses a mean between a major and minor whole tone to eliminate dissonance for thirds, was devised to eliminate the lack of consonances experienced with certain fifths for the Mersenne pure temperament.It produces chords that are more beautiful than those played with equal temperament.
Werckmeister Temperament(Werckmeister)Kirnberger Temperament(Kirnberger)
These two temperaments are placed in between Meantone and Pythagorean. For music with few accidentals, this temperament produces the beautiful chords of the mean tone, but as accidentals increase, the temperament produces the characteristic melodies of the Pythagorean temperament.It is used primarily for classical music written in the Baroque era to revive the original characteristics.
User Temperament(User)
A custom temperament, created by raising or lowering the pitch of each note in the scale.
1. Selecting the Temperament setting
After entering the Virtual Technician menu (page 80):
Press the or buttons to select the Temperament setting.
2. Changing the Temperament type
Press the or buttons to cycle through the different Temperament types.
* To reset the Temperament setting to the default type, press the and buttons simultaneously.
* Any changes made to the Temperament setting will remain until the power is turned off.
* Preferred Temperament settings can be stored to the sound’s memory, or a Registration memory for convenient recall. Please refer to pages 81 and 33 for more information.
3. Exiting the Temperament setting
Press the FUNCTION button (BACK) to exit the Temperament setting and return to the Function Menus screen.
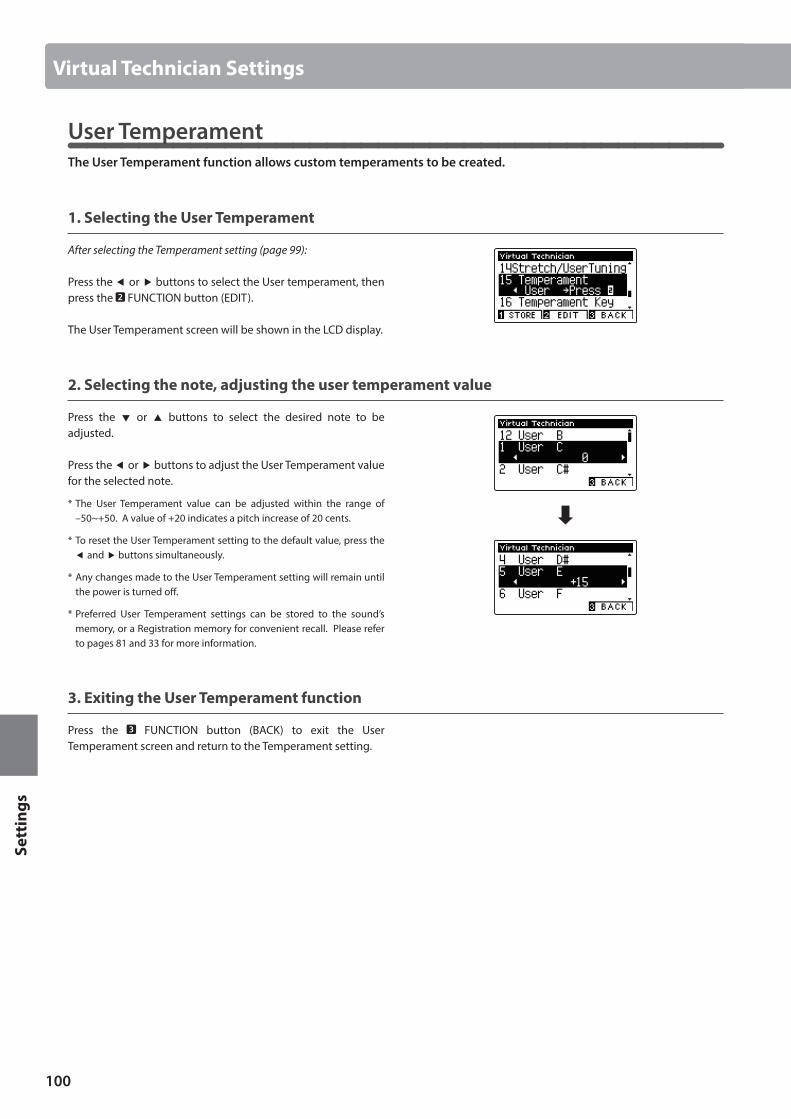
100
Sett
ings
Virtual Technician Settings
User TemperamentThe User Temperament function allows custom temperaments to be created.
1. Selecting the User Temperament
After selecting the Temperament setting (page 99):
Press the or buttons to select the User temperament, then press the FUNCTION button (EDIT).
The User Temperament screen will be shown in the LCD display.
2. Selecting the note, adjusting the user temperament value
Press the or buttons to select the desired note to be adjusted.
Press the or buttons to adjust the User Temperament value for the selected note.
* The User Temperament value can be adjusted within the range of –50~+50. A value of +20 indicates a pitch increase of 20 cents.
* To reset the User Temperament setting to the default value, press the and buttons simultaneously.
* Any changes made to the User Temperament setting will remain until the power is turned off.
* Preferred User Temperament settings can be stored to the sound’s memory, or a Registration memory for convenient recall. Please refer to pages 81 and 33 for more information.
3. Exiting the User Temperament function
Press the FUNCTION button (BACK) to exit the User Temperament screen and return to the Temperament setting.
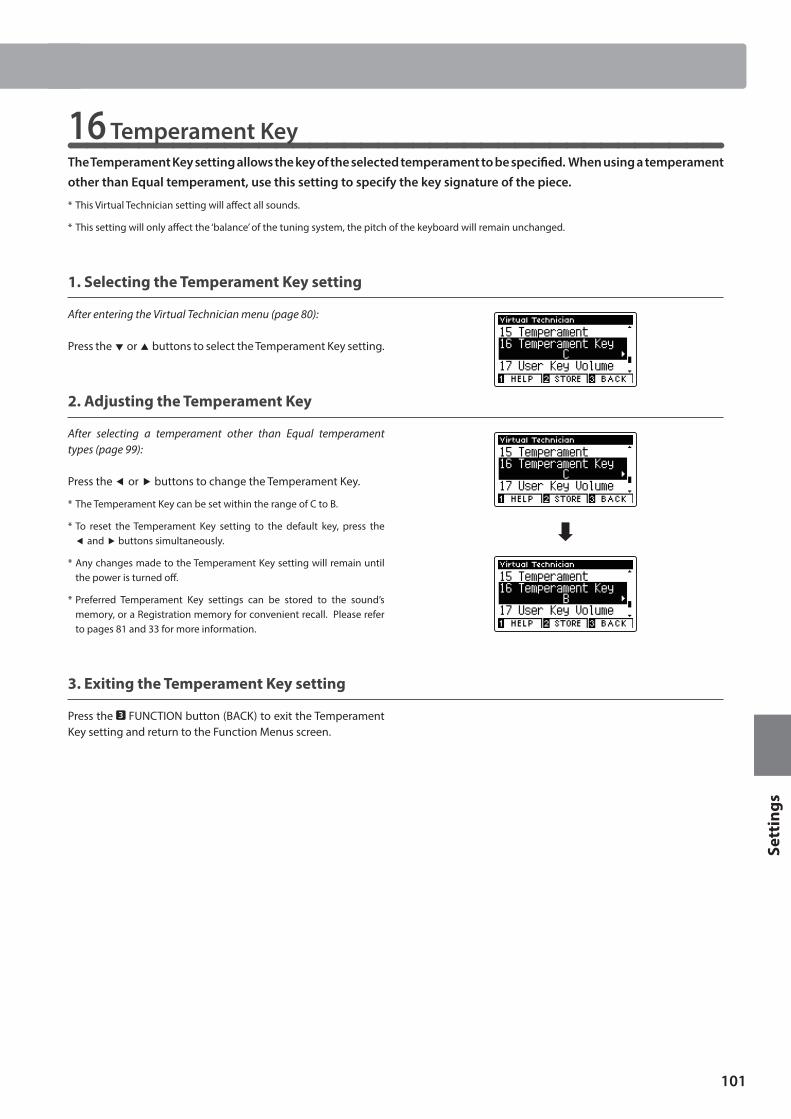
101
Sett
ings
Virtual Technician Settings
16 Temperament KeyThe Temperament Key setting allows the key of the selected temperament to be specified. When using a temperament other than Equal temperament, use this setting to specify the key signature of the piece.
* This Virtual Technician setting will affect all sounds.
* This setting will only affect the ‘balance’ of the tuning system, the pitch of the keyboard will remain unchanged.
1. Selecting the Temperament Key setting
After entering the Virtual Technician menu (page 80):
Press the or buttons to select the Temperament Key setting.
2. Adjusting the Temperament Key
After selecting a temperament other than Equal temperament types (page 99):
Press the or buttons to change the Temperament Key.
* The Temperament Key can be set within the range of C to B.
* To reset the Temperament Key setting to the default key, press the and buttons simultaneously.
* Any changes made to the Temperament Key setting will remain until the power is turned off.
* Preferred Temperament Key settings can be stored to the sound’s memory, or a Registration memory for convenient recall. Please refer to pages 81 and 33 for more information.
3. Exiting the Temperament Key setting
Press the FUNCTION button (BACK) to exit the Temperament Key setting and return to the Function Menus screen.
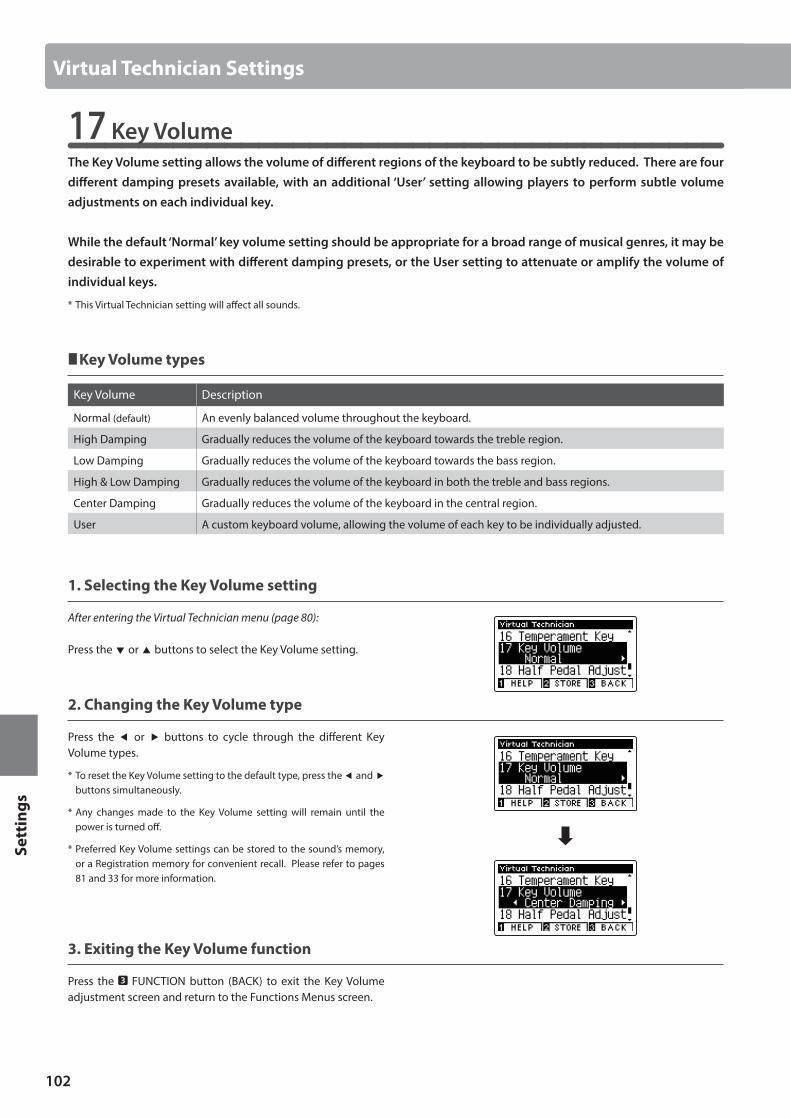
102
Sett
ings
Virtual Technician Settings
17 Key VolumeThe Key Volume setting allows the volume of different regions of the keyboard to be subtly reduced. There are four different damping presets available, with an additional ‘User’ setting allowing players to perform subtle volume adjustments on each individual key.
While the default ‘Normal’ key volume setting should be appropriate for a broad range of musical genres, it may be desirable to experiment with different damping presets, or the User setting to attenuate or amplify the volume of individual keys.
* This Virtual Technician setting will affect all sounds.
Key Volume types
Key Volume Description
Normal (default) An evenly balanced volume throughout the keyboard.
High Damping Gradually reduces the volume of the keyboard towards the treble region.
Low Damping Gradually reduces the volume of the keyboard towards the bass region.
High & Low Damping Gradually reduces the volume of the keyboard in both the treble and bass regions.
Center Damping Gradually reduces the volume of the keyboard in the central region.
User A custom keyboard volume, allowing the volume of each key to be individually adjusted.
1. Selecting the Key Volume setting
After entering the Virtual Technician menu (page 80):
Press the or buttons to select the Key Volume setting.
2. Changing the Key Volume type
Press the or buttons to cycle through the different Key Volume types.
* To reset the Key Volume setting to the default type, press the and buttons simultaneously.
* Any changes made to the Key Volume setting will remain until the power is turned off.
* Preferred Key Volume settings can be stored to the sound’s memory, or a Registration memory for convenient recall. Please refer to pages 81 and 33 for more information.
3. Exiting the Key Volume function
Press the FUNCTION button (BACK) to exit the Key Volume adjustment screen and return to the Functions Menus screen.
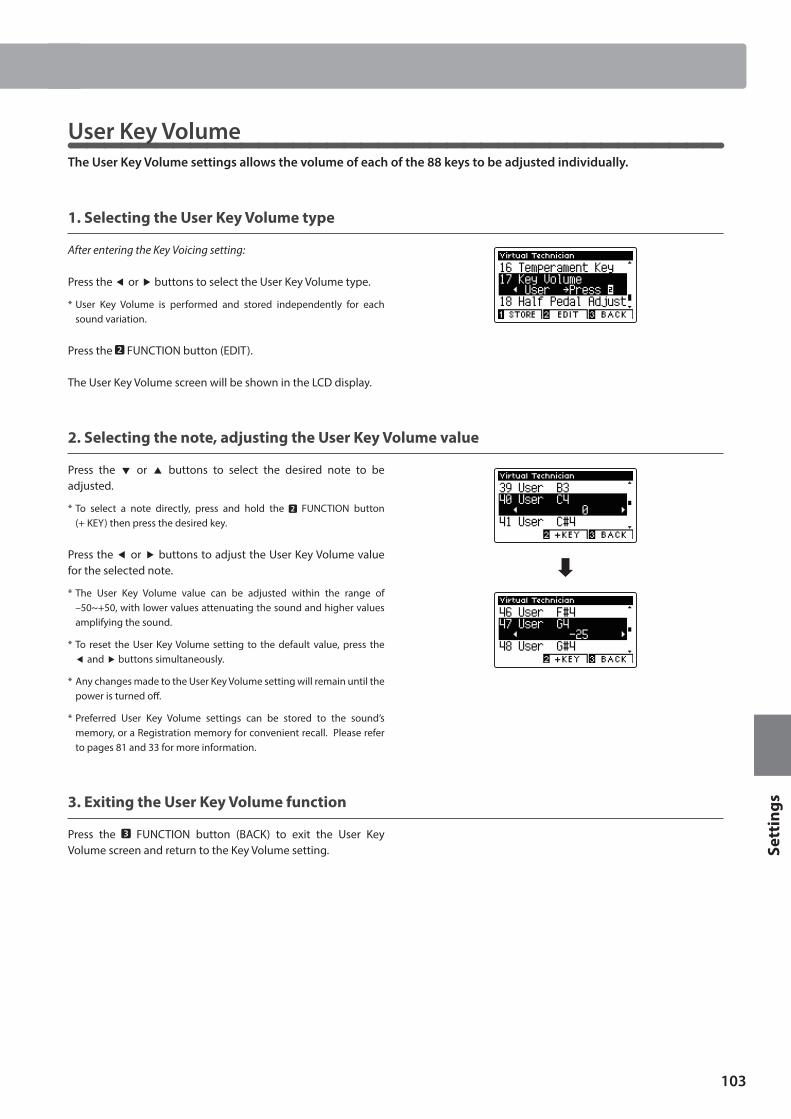
103
Sett
ings
Virtual Technician Settings
User Key VolumeThe User Key Volume settings allows the volume of each of the 88 keys to be adjusted individually.
1. Selecting the User Key Volume type
After entering the Key Voicing setting:
Press the or buttons to select the User Key Volume type.
* User Key Volume is performed and stored independently for each sound variation.
Press the FUNCTION button (EDIT).
The User Key Volume screen will be shown in the LCD display.
2. Selecting the note, adjusting the User Key Volume value
Press the or buttons to select the desired note to be adjusted.
* To select a note directly, press and hold the FUNCTION button (+ KEY) then press the desired key.
Press the or buttons to adjust the User Key Volume value for the selected note.
* The User Key Volume value can be adjusted within the range of –50~+50, with lower values attenuating the sound and higher values amplifying the sound.
* To reset the User Key Volume setting to the default value, press the and buttons simultaneously.
* Any changes made to the User Key Volume setting will remain until the power is turned off.
* Preferred User Key Volume settings can be stored to the sound’s memory, or a Registration memory for convenient recall. Please refer to pages 81 and 33 for more information.
3. Exiting the User Key Volume function
Press the FUNCTION button (BACK) to exit the User Key Volume screen and return to the Key Volume setting.
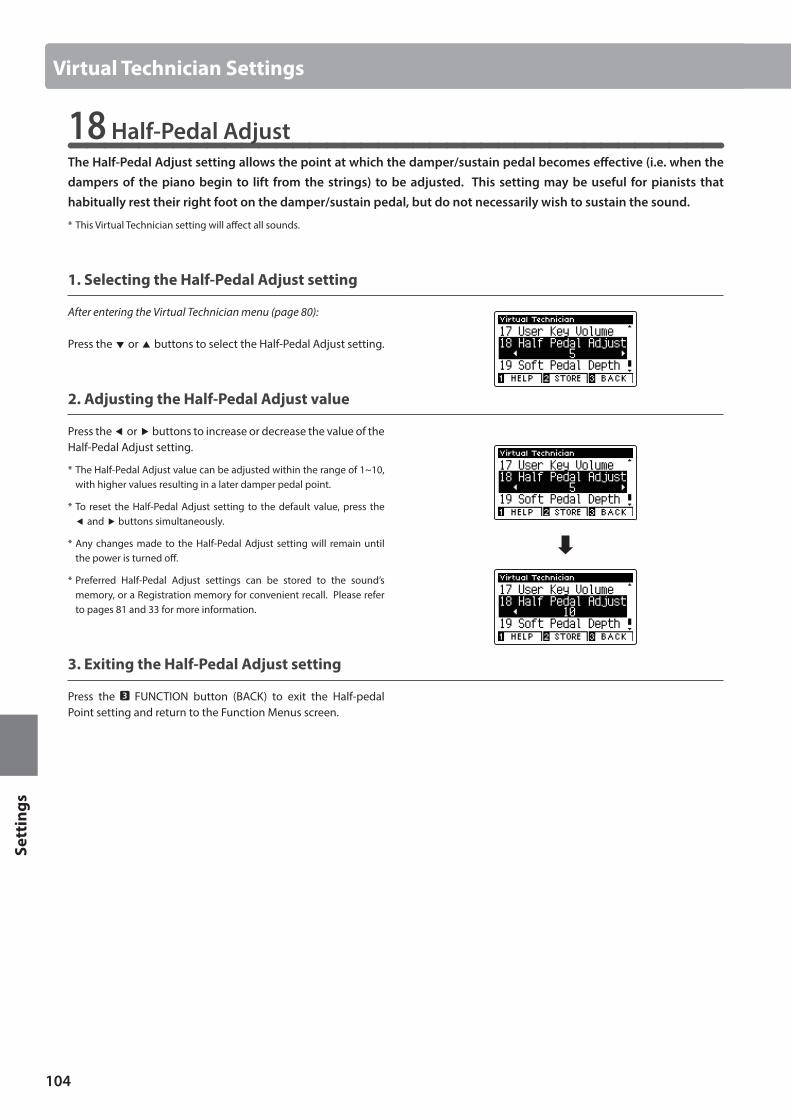
104
Sett
ings
18 Half-Pedal AdjustThe Half-Pedal Adjust setting allows the point at which the damper/sustain pedal becomes effective (i.e. when the dampers of the piano begin to lift from the strings) to be adjusted. This setting may be useful for pianists that habitually rest their right foot on the damper/sustain pedal, but do not necessarily wish to sustain the sound.
* This Virtual Technician setting will affect all sounds.
1. Selecting the Half-Pedal Adjust setting
After entering the Virtual Technician menu (page 80):
Press the or buttons to select the Half-Pedal Adjust setting.
2. Adjusting the Half-Pedal Adjust value
Press the or buttons to increase or decrease the value of the Half-Pedal Adjust setting.
* The Half-Pedal Adjust value can be adjusted within the range of 1~10, with higher values resulting in a later damper pedal point.
* To reset the Half-Pedal Adjust setting to the default value, press the and buttons simultaneously.
* Any changes made to the Half-Pedal Adjust setting will remain until the power is turned off.
* Preferred Half-Pedal Adjust settings can be stored to the sound’s memory, or a Registration memory for convenient recall. Please refer to pages 81 and 33 for more information.
3. Exiting the Half-Pedal Adjust setting
Press the FUNCTION button (BACK) to exit the Half-pedal Point setting and return to the Function Menus screen.
Virtual Technician Settings
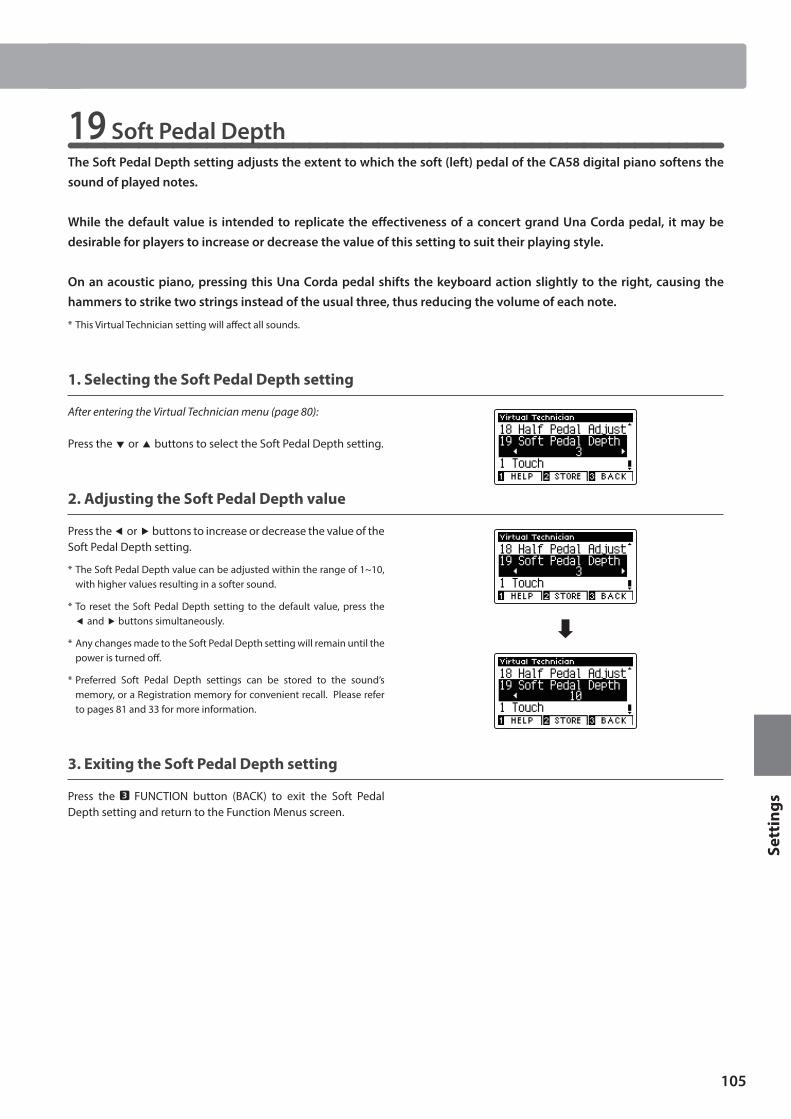
105
Sett
ings
Virtual Technician Settings
19 Soft Pedal DepthThe Soft Pedal Depth setting adjusts the extent to which the soft (left) pedal of the CA58 digital piano softens the sound of played notes.
While the default value is intended to replicate the effectiveness of a concert grand Una Corda pedal, it may be desirable for players to increase or decrease the value of this setting to suit their playing style.
On an acoustic piano, pressing this Una Corda pedal shifts the keyboard action slightly to the right, causing the hammers to strike two strings instead of the usual three, thus reducing the volume of each note.
* This Virtual Technician setting will affect all sounds.
1. Selecting the Soft Pedal Depth setting
After entering the Virtual Technician menu (page 80):
Press the or buttons to select the Soft Pedal Depth setting.
2. Adjusting the Soft Pedal Depth value
Press the or buttons to increase or decrease the value of the Soft Pedal Depth setting.
* The Soft Pedal Depth value can be adjusted within the range of 1~10, with higher values resulting in a softer sound.
* To reset the Soft Pedal Depth setting to the default value, press the and buttons simultaneously.
* Any changes made to the Soft Pedal Depth setting will remain until the power is turned off.
* Preferred Soft Pedal Depth settings can be stored to the sound’s memory, or a Registration memory for convenient recall. Please refer to pages 81 and 33 for more information.
3. Exiting the Soft Pedal Depth setting
Press the FUNCTION button (BACK) to exit the Soft Pedal Depth setting and return to the Function Menus screen.
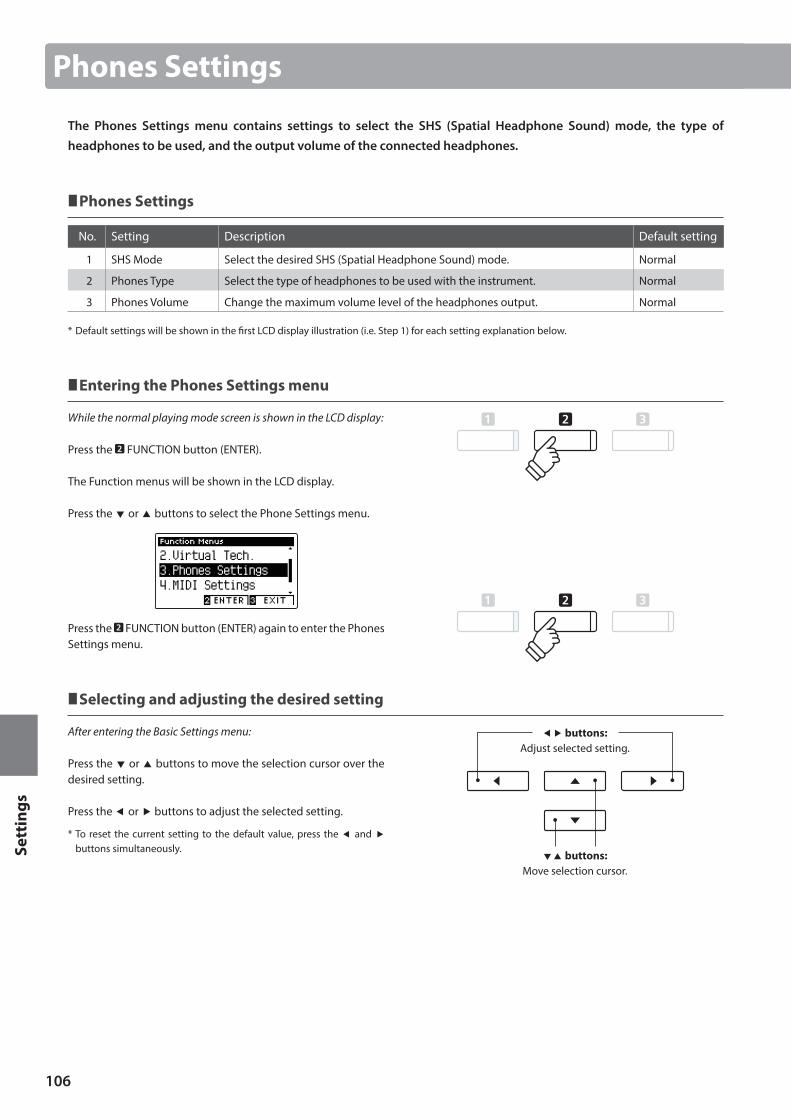
106
Sett
ings
The Phones Settings menu contains settings to select the SHS (Spatial Headphone Sound) mode, the type of headphones to be used, and the output volume of the connected headphones.
Phones Settings
No. Setting Description Default setting
1 SHS Mode Select the desired SHS (Spatial Headphone Sound) mode. Normal
2 Phones Type Select the type of headphones to be used with the instrument. Normal
3 Phones Volume Change the maximum volume level of the headphones output. Normal
* Default settings will be shown in the first LCD display illustration (i.e. Step 1) for each setting explanation below.
Entering the Phones Settings menu
While the normal playing mode screen is shown in the LCD display:
Press the FUNCTION button (ENTER).
The Function menus will be shown in the LCD display.
Press the or buttons to select the Phone Settings menu.
Press the FUNCTION button (ENTER) again to enter the Phones Settings menu.
Selecting and adjusting the desired setting
After entering the Basic Settings menu:
Press the or buttons to move the selection cursor over the desired setting.
Press the or buttons to adjust the selected setting.
* To reset the current setting to the default value, press the and buttons simultaneously.
buttons:Move selection cursor.
buttons:Adjust selected setting.
Phones Settings
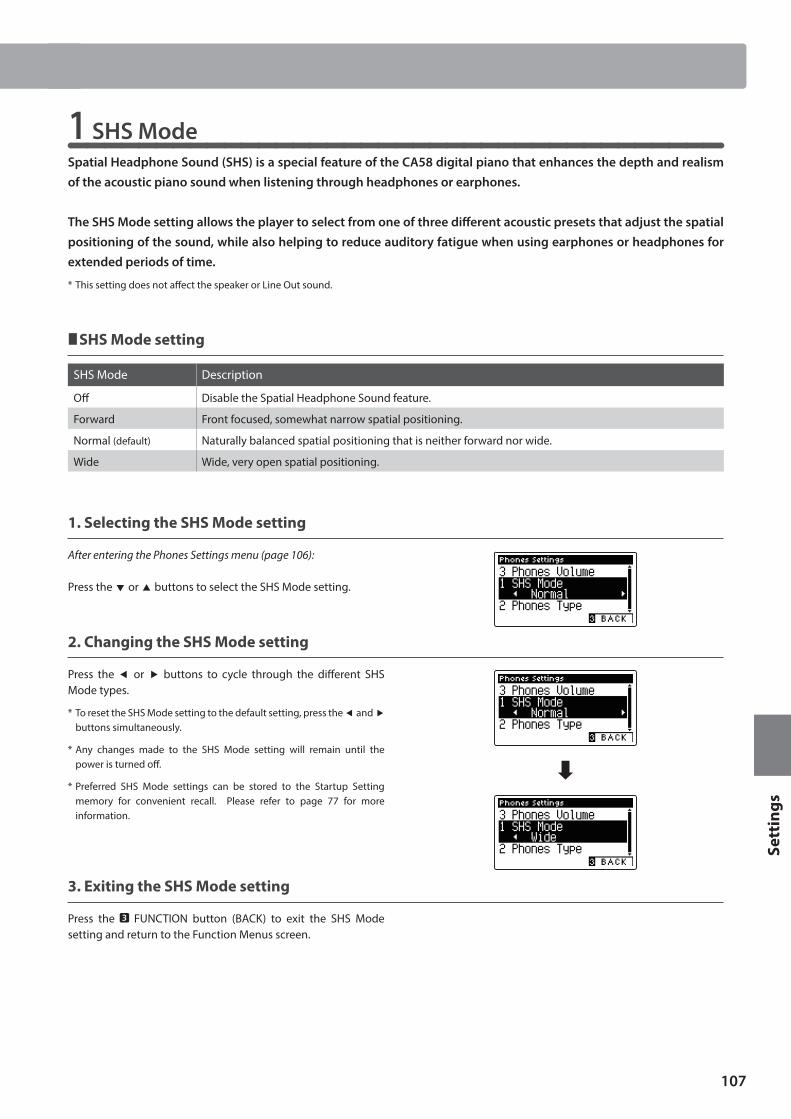
107
Sett
ings
Phones Settings
1 SHS ModeSpatial Headphone Sound (SHS) is a special feature of the CA58 digital piano that enhances the depth and realism of the acoustic piano sound when listening through headphones or earphones.
The SHS Mode setting allows the player to select from one of three different acoustic presets that adjust the spatial positioning of the sound, while also helping to reduce auditory fatigue when using earphones or headphones for extended periods of time.
* This setting does not affect the speaker or Line Out sound.
SHS Mode setting
SHS Mode Description
Off Disable the Spatial Headphone Sound feature.
Forward Front focused, somewhat narrow spatial positioning.
Normal (default) Naturally balanced spatial positioning that is neither forward nor wide.
Wide Wide, very open spatial positioning.
1. Selecting the SHS Mode setting
After entering the Phones Settings menu (page 106):
Press the or buttons to select the SHS Mode setting.
2. Changing the SHS Mode setting
Press the or buttons to cycle through the different SHS Mode types.
* To reset the SHS Mode setting to the default setting, press the and buttons simultaneously.
* Any changes made to the SHS Mode setting will remain until the power is turned off.
* Preferred SHS Mode settings can be stored to the Startup Setting memory for convenient recall. Please refer to page 77 for more information.
3. Exiting the SHS Mode setting
Press the FUNCTION button (BACK) to exit the SHS Mode setting and return to the Function Menus screen.
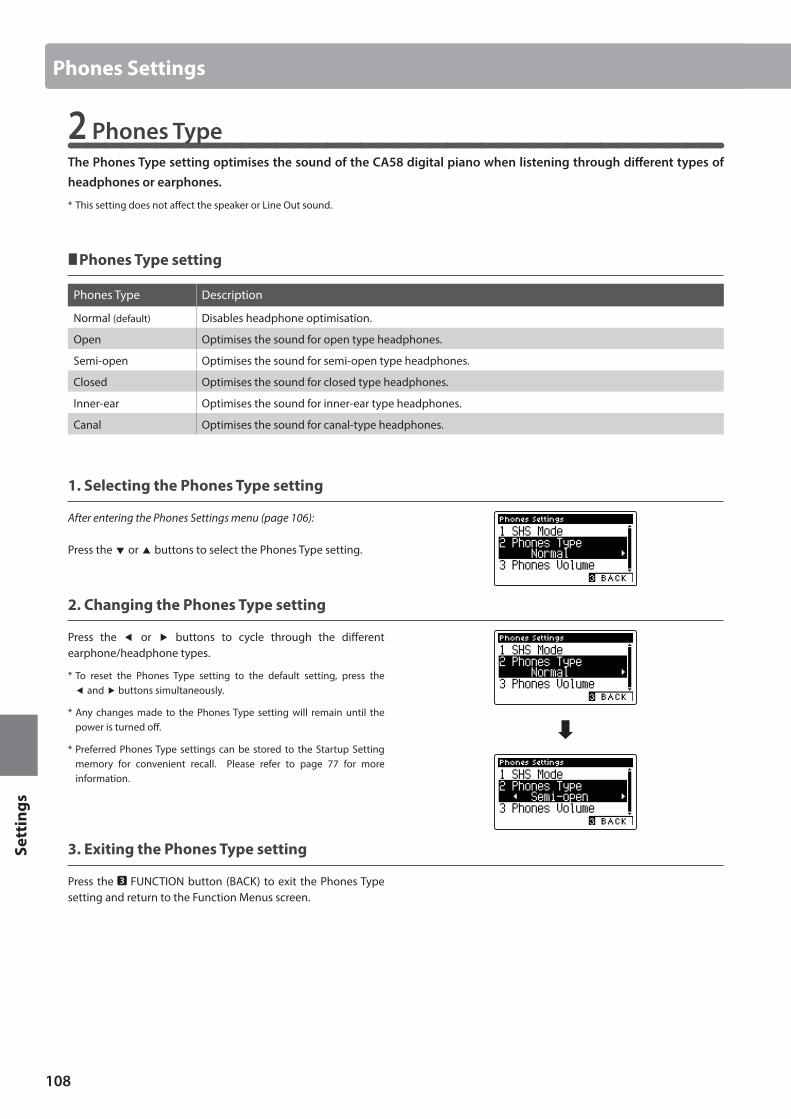
108
Sett
ings
2 Phones TypeThe Phones Type setting optimises the sound of the CA58 digital piano when listening through different types of headphones or earphones.
* This setting does not affect the speaker or Line Out sound.
Phones Type setting
Phones Type Description
Normal (default) Disables headphone optimisation.
Open Optimises the sound for open type headphones.
Semi-open Optimises the sound for semi-open type headphones.
Closed Optimises the sound for closed type headphones.
Inner-ear Optimises the sound for inner-ear type headphones.
Canal Optimises the sound for canal-type headphones.
1. Selecting the Phones Type setting
After entering the Phones Settings menu (page 106):
Press the or buttons to select the Phones Type setting.
2. Changing the Phones Type setting
Press the or buttons to cycle through the different earphone/headphone types.
* To reset the Phones Type setting to the default setting, press the and buttons simultaneously.
* Any changes made to the Phones Type setting will remain until the power is turned off.
* Preferred Phones Type settings can be stored to the Startup Setting memory for convenient recall. Please refer to page 77 for more information.
3. Exiting the Phones Type setting
Press the FUNCTION button (BACK) to exit the Phones Type setting and return to the Function Menus screen.
Phones Settings
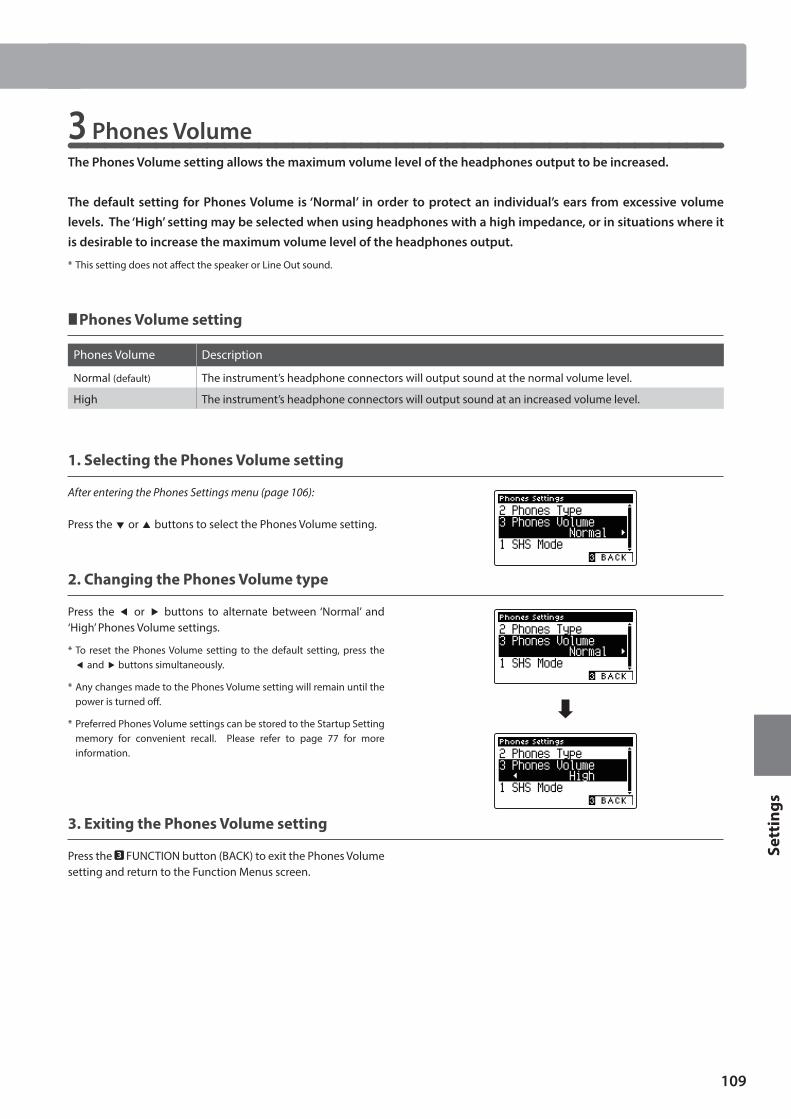
109
Sett
ings
Phones Settings
3 Phones VolumeThe Phones Volume setting allows the maximum volume level of the headphones output to be increased.
The default setting for Phones Volume is ‘Normal’ in order to protect an individual’s ears from excessive volume levels. The ‘High’ setting may be selected when using headphones with a high impedance, or in situations where it is desirable to increase the maximum volume level of the headphones output.
* This setting does not affect the speaker or Line Out sound.
Phones Volume setting
Phones Volume Description
Normal (default) The instrument’s headphone connectors will output sound at the normal volume level.
High The instrument’s headphone connectors will output sound at an increased volume level.
1. Selecting the Phones Volume setting
After entering the Phones Settings menu (page 106):
Press the or buttons to select the Phones Volume setting.
2. Changing the Phones Volume type
Press the or buttons to alternate between ‘Normal’ and ‘High’ Phones Volume settings.
* To reset the Phones Volume setting to the default setting, press the and buttons simultaneously.
* Any changes made to the Phones Volume setting will remain until the power is turned off.
* Preferred Phones Volume settings can be stored to the Startup Setting memory for convenient recall. Please refer to page 77 for more information.
3. Exiting the Phones Volume setting
Press the FUNCTION button (BACK) to exit the Phones Volume setting and return to the Function Menus screen.
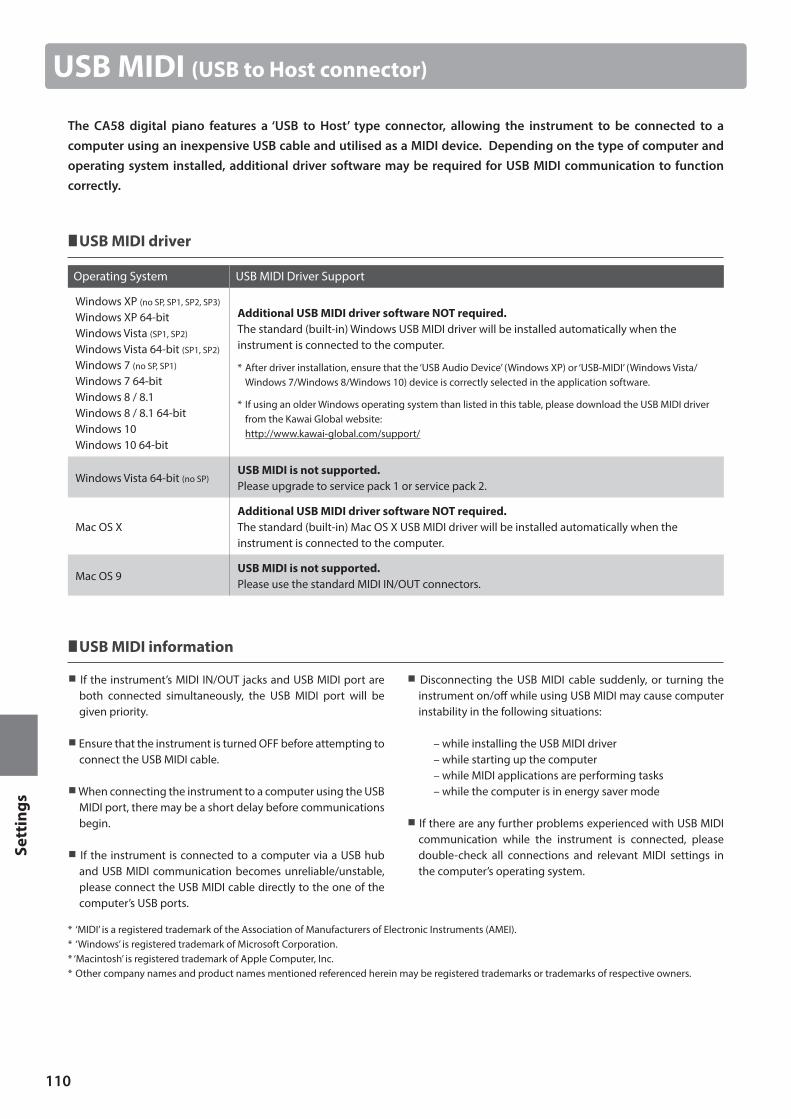
110
Sett
ings
The CA58 digital piano features a ‘USB to Host’ type connector, allowing the instrument to be connected to a computer using an inexpensive USB cable and utilised as a MIDI device. Depending on the type of computer and operating system installed, additional driver software may be required for USB MIDI communication to function correctly.
USB MIDI driver
Operating System USB MIDI Driver Support
Windows XP (no SP, SP1, SP2, SP3)
Windows XP 64-bitWindows Vista (SP1, SP2)
Windows Vista 64-bit (SP1, SP2)
Windows 7 (no SP, SP1)
Windows 7 64-bitWindows 8 / 8.1 Windows 8 / 8.1 64-bitWindows 10Windows 10 64-bit
Additional USB MIDI driver software NOT required.The standard (built-in) Windows USB MIDI driver will be installed automatically when the instrument is connected to the computer.
* After driver installation, ensure that the ‘USB Audio Device’ (Windows XP) or ‘USB-MIDI’ (Windows Vista/Windows 7/Windows 8/Windows 10) device is correctly selected in the application software.
* If using an older Windows operating system than listed in this table, please download the USB MIDI driver from the Kawai Global website: http://www.kawai-global.com/support/
Windows Vista 64-bit (no SP)USB MIDI is not supported.Please upgrade to service pack 1 or service pack 2.
Mac OS XAdditional USB MIDI driver software NOT required.The standard (built-in) Mac OS X USB MIDI driver will be installed automatically when the instrument is connected to the computer.
Mac OS 9USB MIDI is not supported.Please use the standard MIDI IN/OUT connectors.
USB MIDI information
If the instrument’s MIDI IN/OUT jacks and USB MIDI port are both connected simultaneously, the USB MIDI port will be given priority.
Ensure that the instrument is turned OFF before attempting to connect the USB MIDI cable.
When connecting the instrument to a computer using the USB MIDI port, there may be a short delay before communications begin.
If the instrument is connected to a computer via a USB hub and USB MIDI communication becomes unreliable/unstable, please connect the USB MIDI cable directly to the one of the computer’s USB ports.
Disconnecting the USB MIDI cable suddenly, or turning the instrument on/off while using USB MIDI may cause computer instability in the following situations:
– while installing the USB MIDI driver– while starting up the computer– while MIDI applications are performing tasks– while the computer is in energy saver mode
If there are any further problems experienced with USB MIDI communication while the instrument is connected, please double-check all connections and relevant MIDI settings in the computer’s operating system.
* ‘MIDI’ is a registered trademark of the Association of Manufacturers of Electronic Instruments (AMEI).* ‘Windows’ is registered trademark of Microsoft Corporation. * ‘Macintosh’ is registered trademark of Apple Computer, Inc. * Other company names and product names mentioned referenced herein may be registered trademarks or trademarks of respective owners.
USB MIDI (USB to Host connector)
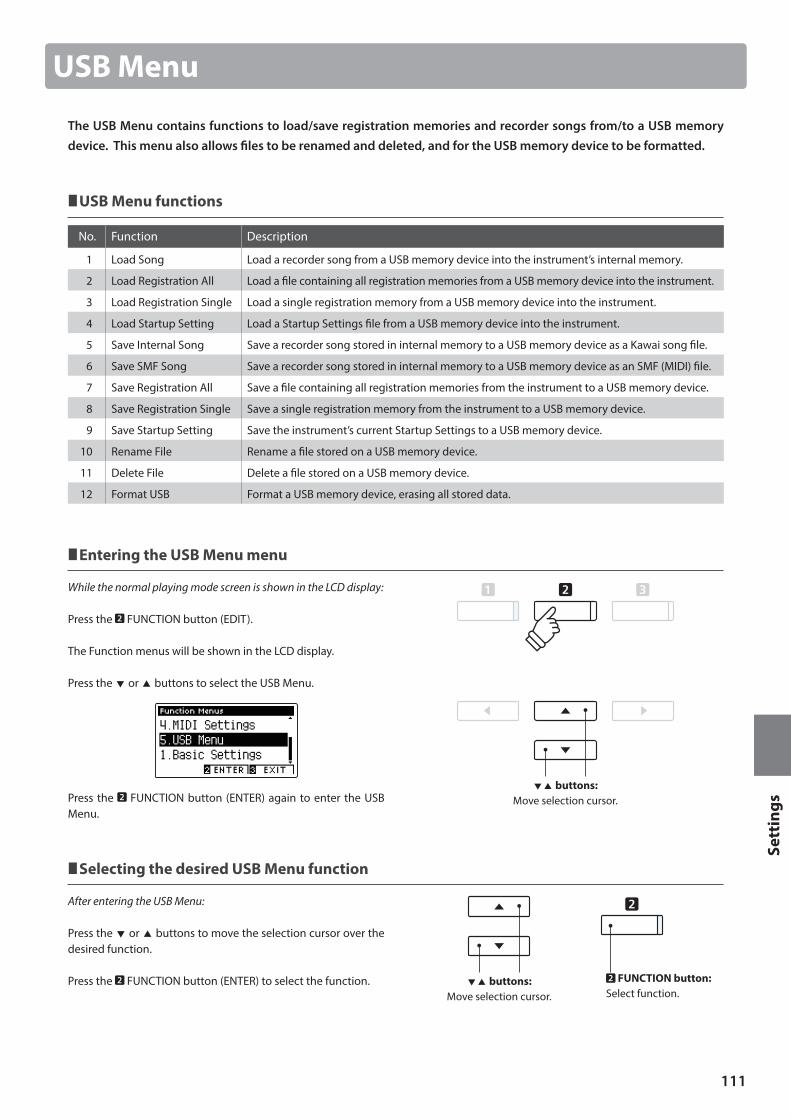
111
Sett
ings
The USB Menu contains functions to load/save registration memories and recorder songs from/to a USB memory device. This menu also allows files to be renamed and deleted, and for the USB memory device to be formatted.
USB Menu functions
No. Function Description
1 Load Song Load a recorder song from a USB memory device into the instrument’s internal memory.
2 Load Registration All Load a file containing all registration memories from a USB memory device into the instrument.
3 Load Registration Single Load a single registration memory from a USB memory device into the instrument.
4 Load Startup Setting Load a Startup Settings file from a USB memory device into the instrument.
5 Save Internal Song Save a recorder song stored in internal memory to a USB memory device as a Kawai song file.
6 Save SMF Song Save a recorder song stored in internal memory to a USB memory device as an SMF (MIDI) file.
7 Save Registration All Save a file containing all registration memories from the instrument to a USB memory device.
8 Save Registration Single Save a single registration memory from the instrument to a USB memory device.
9 Save Startup Setting Save the instrument’s current Startup Settings to a USB memory device.
10 Rename File Rename a file stored on a USB memory device.
11 Delete File Delete a file stored on a USB memory device.
12 Format USB Format a USB memory device, erasing all stored data.
Entering the USB Menu menu
While the normal playing mode screen is shown in the LCD display:
Press the FUNCTION button (EDIT).
The Function menus will be shown in the LCD display.
Press the or buttons to select the USB Menu.
Press the FUNCTION button (ENTER) again to enter the USB Menu.
Selecting the desired USB Menu function
After entering the USB Menu:
Press the or buttons to move the selection cursor over the desired function.
Press the FUNCTION button (ENTER) to select the function. buttons:Move selection cursor.
FUNCTION button:Select function.
buttons:Move selection cursor.
USB Menu
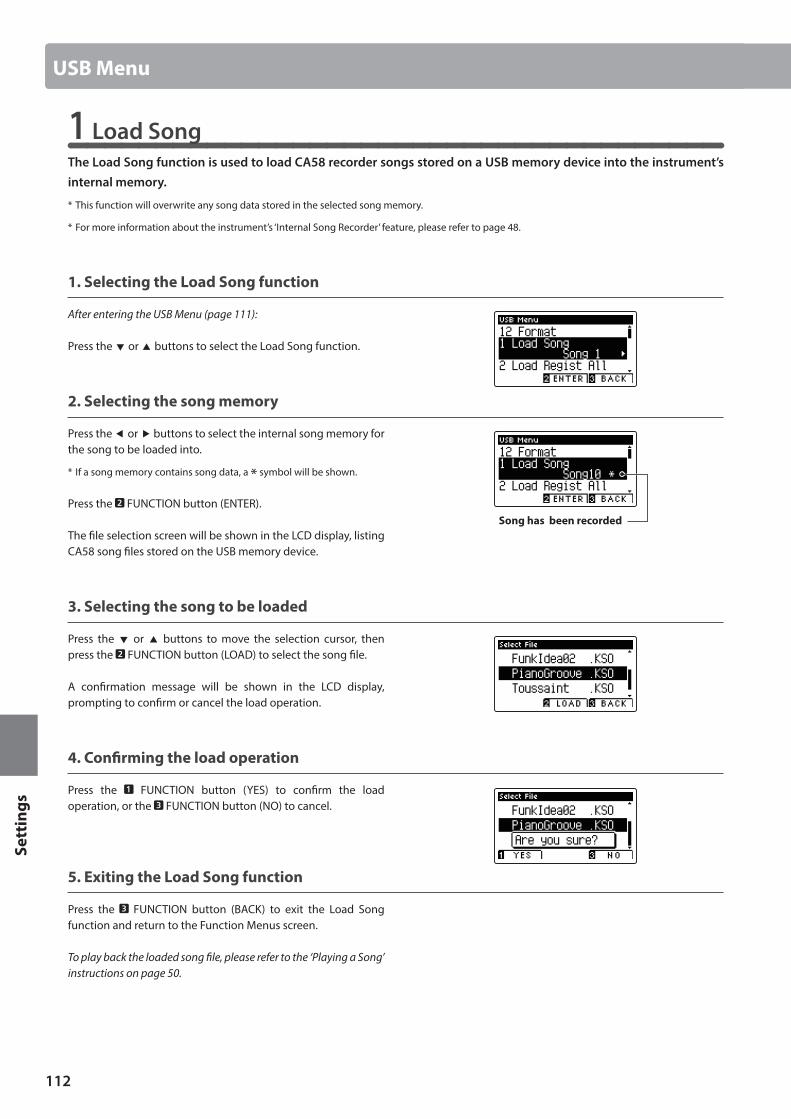
112
Sett
ings
1 Load SongThe Load Song function is used to load CA58 recorder songs stored on a USB memory device into the instrument’s internal memory.
* This function will overwrite any song data stored in the selected song memory.
* For more information about the instrument’s ‘Internal Song Recorder’ feature, please refer to page 48.
1. Selecting the Load Song function
After entering the USB Menu (page 111):
Press the or buttons to select the Load Song function.
2. Selecting the song memory
Press the or buttons to select the internal song memory for the song to be loaded into.
* If a song memory contains song data, a * symbol will be shown.
Press the FUNCTION button (ENTER).
The file selection screen will be shown in the LCD display, listing CA58 song files stored on the USB memory device.
3. Selecting the song to be loaded
Press the or buttons to move the selection cursor, then press the FUNCTION button (LOAD) to select the song file.
A confirmation message will be shown in the LCD display, prompting to confirm or cancel the load operation.
4. Confirming the load operation
Press the FUNCTION button (YES) to confirm the load operation, or the FUNCTION button (NO) to cancel.
5. Exiting the Load Song function
Press the FUNCTION button (BACK) to exit the Load Song function and return to the Function Menus screen.
To play back the loaded song file, please refer to the ‘Playing a Song’ instructions on page 50.
Song has been recorded
USB Menu
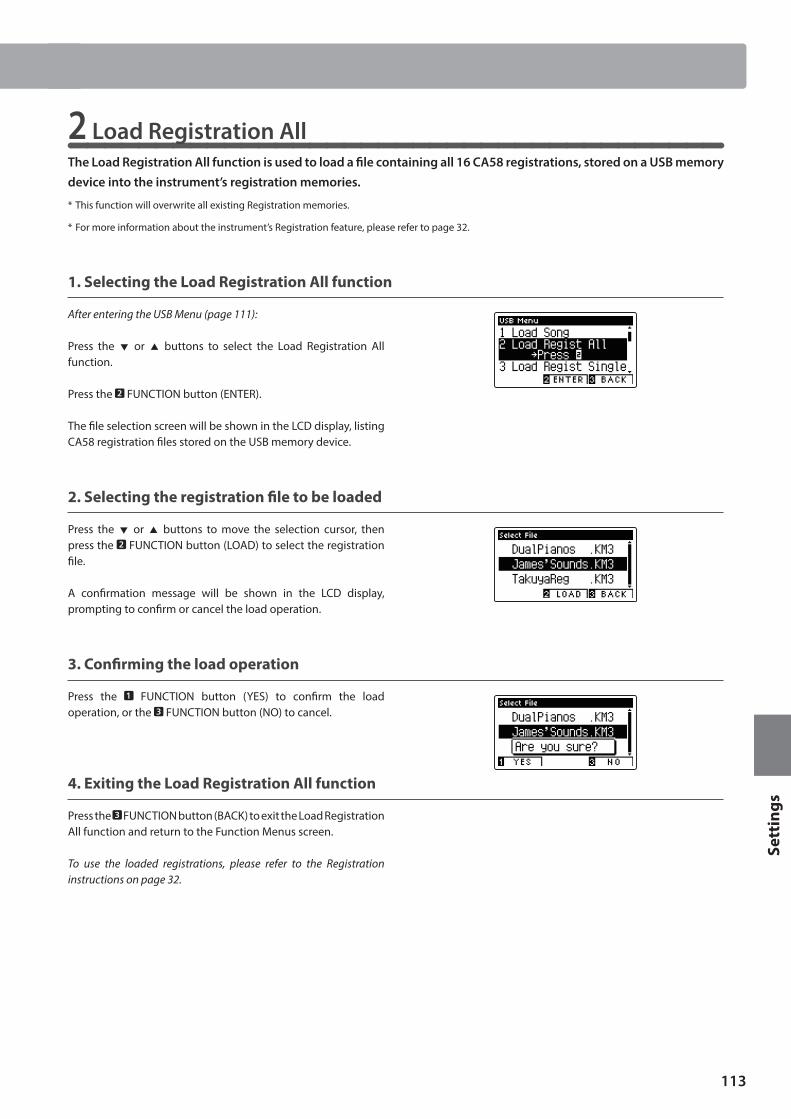
113
Sett
ings
USB Menu
2 Load Registration AllThe Load Registration All function is used to load a file containing all 16 CA58 registrations, stored on a USB memory device into the instrument’s registration memories.
* This function will overwrite all existing Registration memories.
* For more information about the instrument’s Registration feature, please refer to page 32.
1. Selecting the Load Registration All function
After entering the USB Menu (page 111):
Press the or buttons to select the Load Registration All function.
Press the FUNCTION button (ENTER).
The file selection screen will be shown in the LCD display, listing CA58 registration files stored on the USB memory device.
2. Selecting the registration file to be loaded
Press the or buttons to move the selection cursor, then press the FUNCTION button (LOAD) to select the registration file.
A confirmation message will be shown in the LCD display, prompting to confirm or cancel the load operation.
3. Confirming the load operation
Press the FUNCTION button (YES) to confirm the load operation, or the FUNCTION button (NO) to cancel.
4. Exiting the Load Registration All function
Press the FUNCTION button (BACK) to exit the Load Registration All function and return to the Function Menus screen.
To use the loaded registrations, please refer to the Registration instructions on page 32.
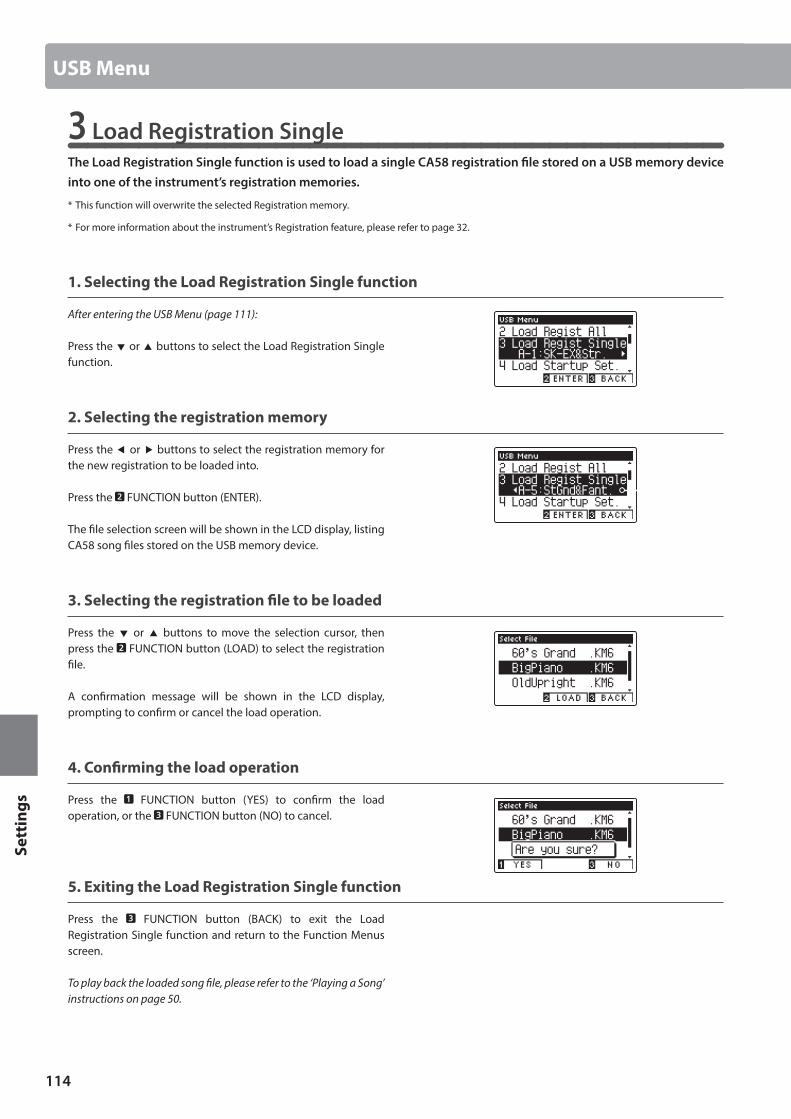
114
Sett
ings
3 Load Registration SingleThe Load Registration Single function is used to load a single CA58 registration file stored on a USB memory device into one of the instrument’s registration memories.
* This function will overwrite the selected Registration memory.
* For more information about the instrument’s Registration feature, please refer to page 32.
1. Selecting the Load Registration Single function
After entering the USB Menu (page 111):
Press the or buttons to select the Load Registration Single function.
2. Selecting the registration memory
Press the or buttons to select the registration memory for the new registration to be loaded into.
Press the FUNCTION button (ENTER).
The file selection screen will be shown in the LCD display, listing CA58 song files stored on the USB memory device.
3. Selecting the registration file to be loaded
Press the or buttons to move the selection cursor, then press the FUNCTION button (LOAD) to select the registration file.
A confirmation message will be shown in the LCD display, prompting to confirm or cancel the load operation.
4. Confirming the load operation
Press the FUNCTION button (YES) to confirm the load operation, or the FUNCTION button (NO) to cancel.
5. Exiting the Load Registration Single function
Press the FUNCTION button (BACK) to exit the Load Registration Single function and return to the Function Menus screen.
To play back the loaded song file, please refer to the ‘Playing a Song’ instructions on page 50.
USB Menu
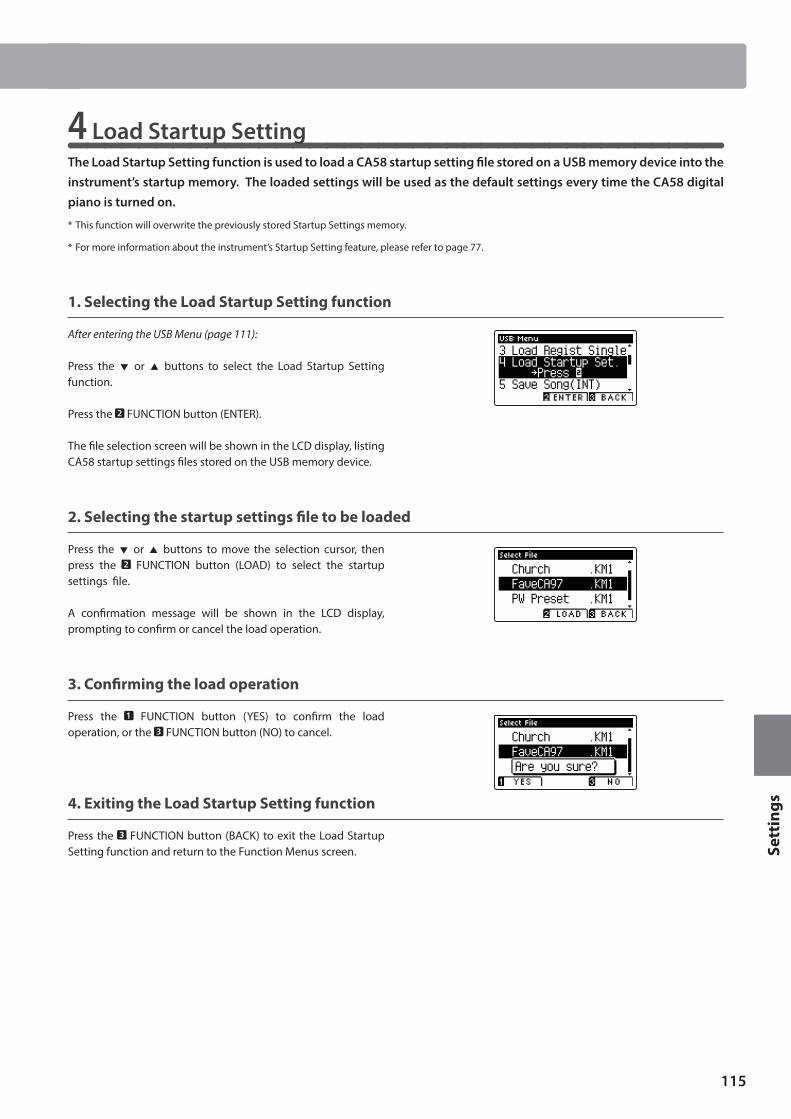
115
Sett
ings
USB Menu
4 Load Startup SettingThe Load Startup Setting function is used to load a CA58 startup setting file stored on a USB memory device into the instrument’s startup memory. The loaded settings will be used as the default settings every time the CA58 digital piano is turned on.
* This function will overwrite the previously stored Startup Settings memory.
* For more information about the instrument’s Startup Setting feature, please refer to page 77.
1. Selecting the Load Startup Setting function
After entering the USB Menu (page 111):
Press the or buttons to select the Load Startup Setting function.
Press the FUNCTION button (ENTER).
The file selection screen will be shown in the LCD display, listing CA58 startup settings files stored on the USB memory device.
2. Selecting the startup settings file to be loaded
Press the or buttons to move the selection cursor, then press the FUNCTION button (LOAD) to select the startup settings file.
A confirmation message will be shown in the LCD display, prompting to confirm or cancel the load operation.
3. Confirming the load operation
Press the FUNCTION button (YES) to confirm the load operation, or the FUNCTION button (NO) to cancel.
4. Exiting the Load Startup Setting function
Press the FUNCTION button (BACK) to exit the Load Startup Setting function and return to the Function Menus screen.
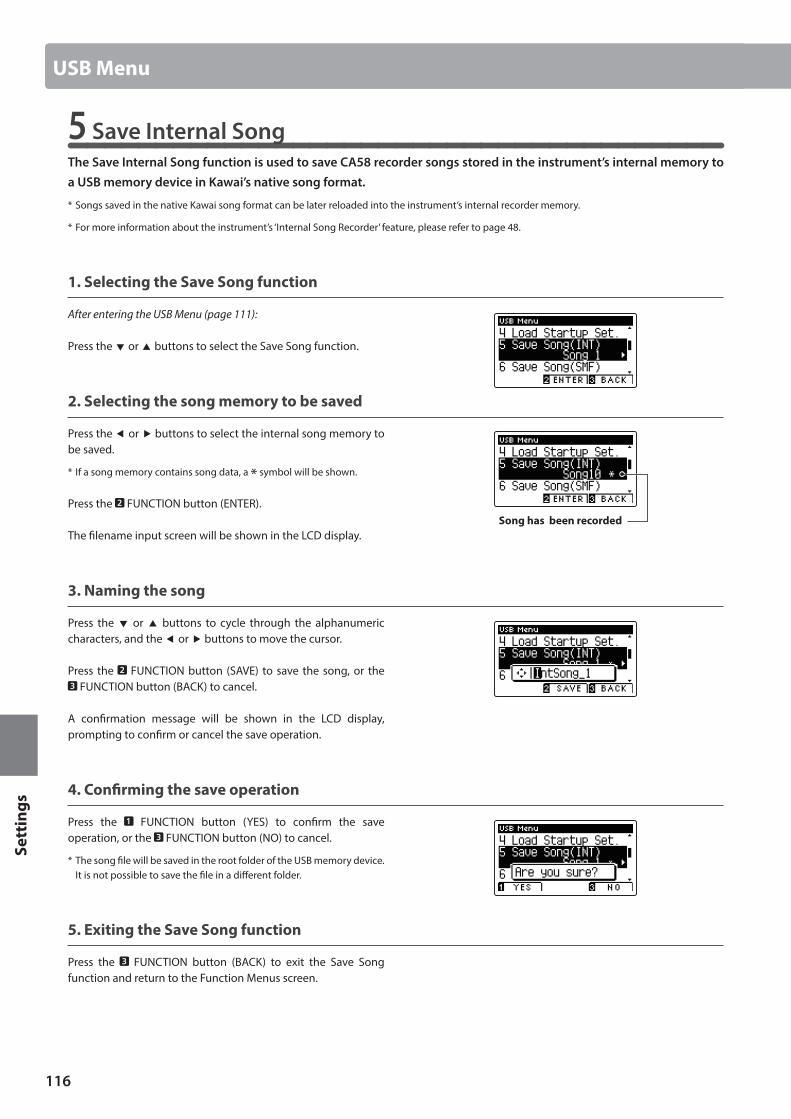
116
Sett
ings
5 Save Internal SongThe Save Internal Song function is used to save CA58 recorder songs stored in the instrument’s internal memory to a USB memory device in Kawai’s native song format.
* Songs saved in the native Kawai song format can be later reloaded into the instrument’s internal recorder memory.
* For more information about the instrument’s ‘Internal Song Recorder’ feature, please refer to page 48.
1. Selecting the Save Song function
After entering the USB Menu (page 111):
Press the or buttons to select the Save Song function.
2. Selecting the song memory to be saved
Press the or buttons to select the internal song memory to be saved.
* If a song memory contains song data, a * symbol will be shown.
Press the FUNCTION button (ENTER).
The filename input screen will be shown in the LCD display.
3. Naming the song
Press the or buttons to cycle through the alphanumeric characters, and the or buttons to move the cursor.
Press the FUNCTION button (SAVE) to save the song, or the FUNCTION button (BACK) to cancel.
A confirmation message will be shown in the LCD display, prompting to confirm or cancel the save operation.
4. Confirming the save operation
Press the FUNCTION button (YES) to confirm the save operation, or the FUNCTION button (NO) to cancel.
* The song file will be saved in the root folder of the USB memory device. It is not possible to save the file in a different folder.
5. Exiting the Save Song function
Press the FUNCTION button (BACK) to exit the Save Song function and return to the Function Menus screen.
Song has been recorded
USB Menu
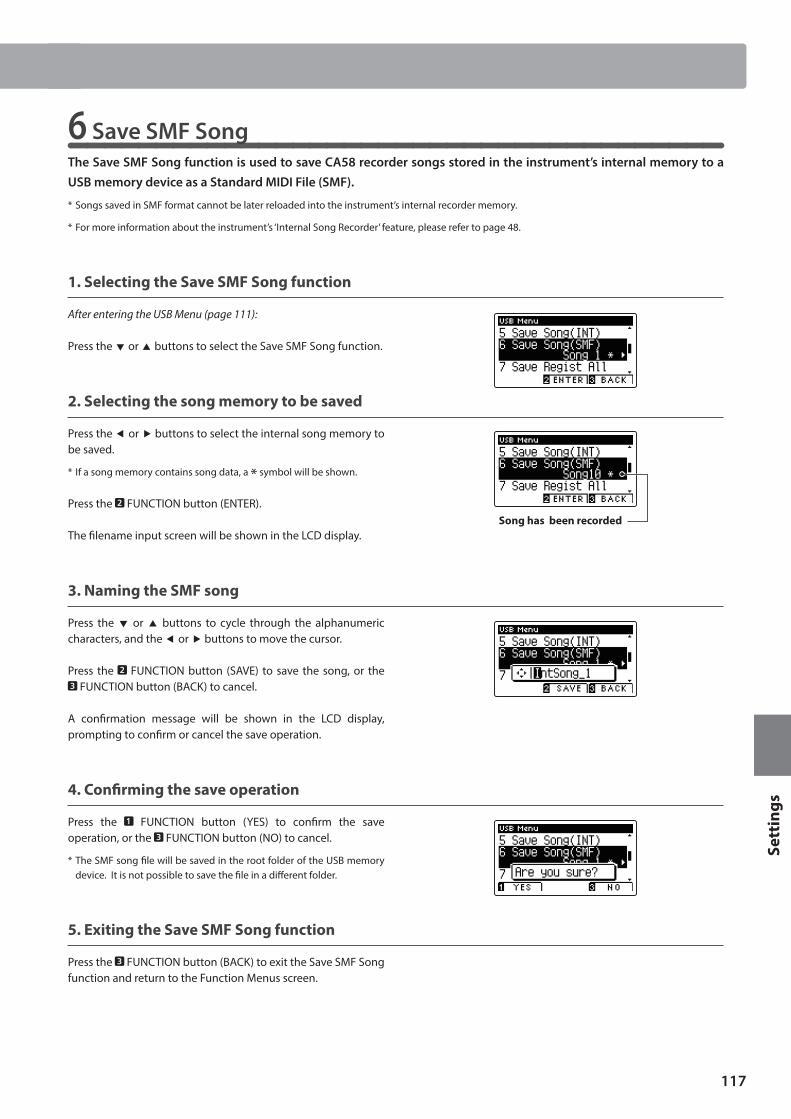
117
Sett
ings
USB Menu
6 Save SMF SongThe Save SMF Song function is used to save CA58 recorder songs stored in the instrument’s internal memory to a USB memory device as a Standard MIDI File (SMF).
* Songs saved in SMF format cannot be later reloaded into the instrument’s internal recorder memory.
* For more information about the instrument’s ‘Internal Song Recorder’ feature, please refer to page 48.
1. Selecting the Save SMF Song function
After entering the USB Menu (page 111):
Press the or buttons to select the Save SMF Song function.
2. Selecting the song memory to be saved
Press the or buttons to select the internal song memory to be saved.
* If a song memory contains song data, a * symbol will be shown.
Press the FUNCTION button (ENTER).
The filename input screen will be shown in the LCD display.
3. Naming the SMF song
Press the or buttons to cycle through the alphanumeric characters, and the or buttons to move the cursor.
Press the FUNCTION button (SAVE) to save the song, or the FUNCTION button (BACK) to cancel.
A confirmation message will be shown in the LCD display, prompting to confirm or cancel the save operation.
4. Confirming the save operation
Press the FUNCTION button (YES) to confirm the save operation, or the FUNCTION button (NO) to cancel.
* The SMF song file will be saved in the root folder of the USB memory device. It is not possible to save the file in a different folder.
5. Exiting the Save SMF Song function
Press the FUNCTION button (BACK) to exit the Save SMF Song function and return to the Function Menus screen.
Song has been recorded
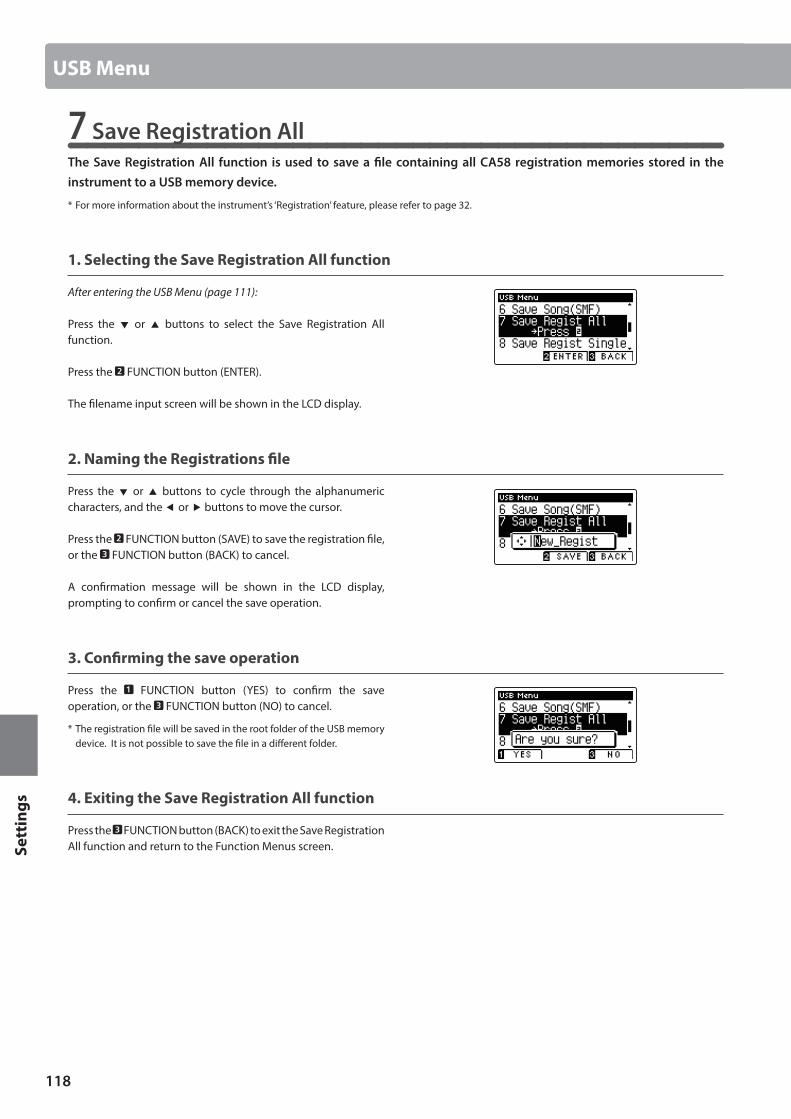
118
Sett
ings
USB Menu
7 Save Registration AllThe Save Registration All function is used to save a file containing all CA58 registration memories stored in the instrument to a USB memory device.
* For more information about the instrument’s ‘Registration’ feature, please refer to page 32.
1. Selecting the Save Registration All function
After entering the USB Menu (page 111):
Press the or buttons to select the Save Registration All function.
Press the FUNCTION button (ENTER).
The filename input screen will be shown in the LCD display.
2. Naming the Registrations file
Press the or buttons to cycle through the alphanumeric characters, and the or buttons to move the cursor.
Press the FUNCTION button (SAVE) to save the registration file, or the FUNCTION button (BACK) to cancel.
A confirmation message will be shown in the LCD display, prompting to confirm or cancel the save operation.
3. Confirming the save operation
Press the FUNCTION button (YES) to confirm the save operation, or the FUNCTION button (NO) to cancel.
* The registration file will be saved in the root folder of the USB memory device. It is not possible to save the file in a different folder.
4. Exiting the Save Registration All function
Press the FUNCTION button (BACK) to exit the Save Registration All function and return to the Function Menus screen.
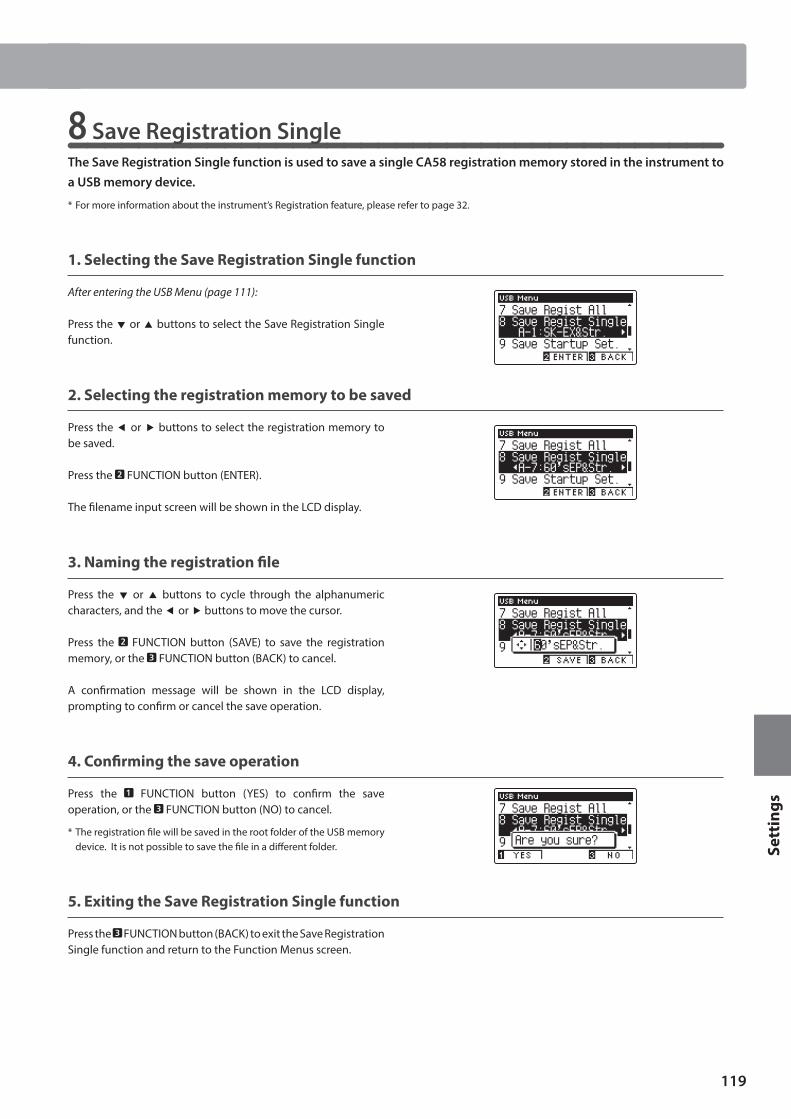
119
Sett
ings
USB Menu
8 Save Registration SingleThe Save Registration Single function is used to save a single CA58 registration memory stored in the instrument to a USB memory device.
* For more information about the instrument’s Registration feature, please refer to page 32.
1. Selecting the Save Registration Single function
After entering the USB Menu (page 111):
Press the or buttons to select the Save Registration Single function.
2. Selecting the registration memory to be saved
Press the or buttons to select the registration memory to be saved.
Press the FUNCTION button (ENTER).
The filename input screen will be shown in the LCD display.
3. Naming the registration file
Press the or buttons to cycle through the alphanumeric characters, and the or buttons to move the cursor.
Press the FUNCTION button (SAVE) to save the registration memory, or the FUNCTION button (BACK) to cancel.
A confirmation message will be shown in the LCD display, prompting to confirm or cancel the save operation.
4. Confirming the save operation
Press the FUNCTION button (YES) to confirm the save operation, or the FUNCTION button (NO) to cancel.
* The registration file will be saved in the root folder of the USB memory device. It is not possible to save the file in a different folder.
5. Exiting the Save Registration Single function
Press the FUNCTION button (BACK) to exit the Save Registration Single function and return to the Function Menus screen.
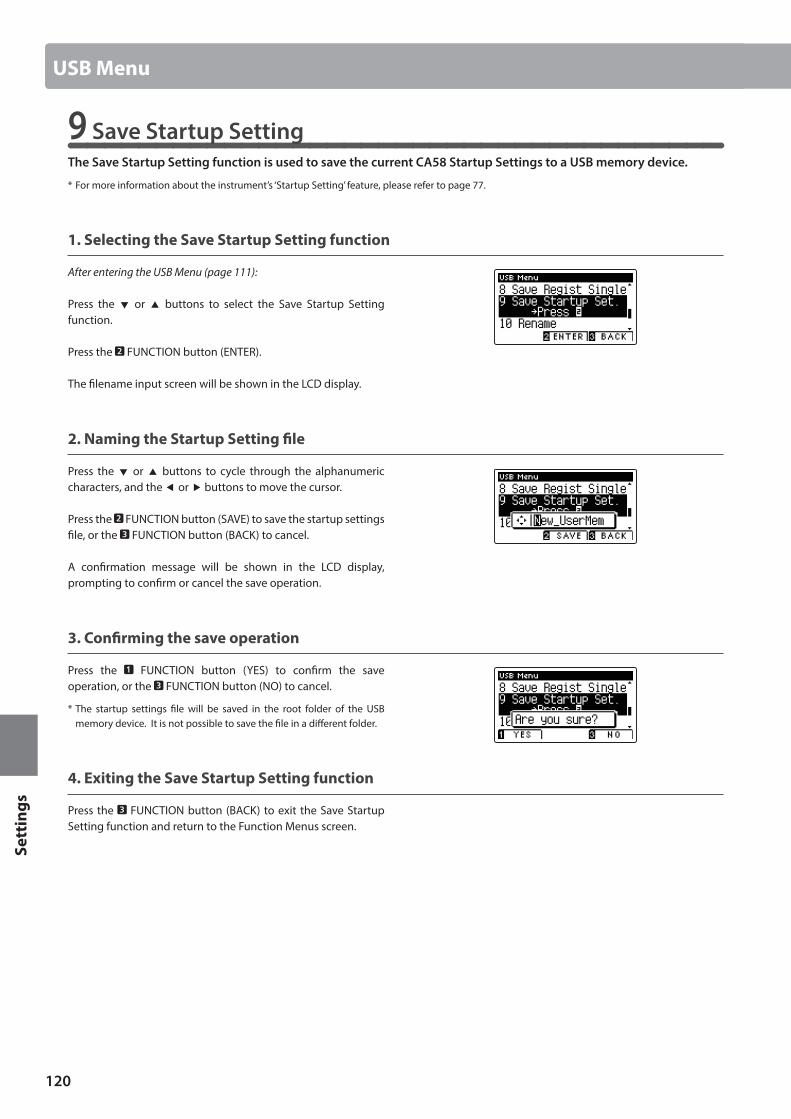
120
Sett
ings
9 Save Startup SettingThe Save Startup Setting function is used to save the current CA58 Startup Settings to a USB memory device.
* For more information about the instrument’s ‘Startup Setting’ feature, please refer to page 77.
1. Selecting the Save Startup Setting function
After entering the USB Menu (page 111):
Press the or buttons to select the Save Startup Setting function.
Press the FUNCTION button (ENTER).
The filename input screen will be shown in the LCD display.
2. Naming the Startup Setting file
Press the or buttons to cycle through the alphanumeric characters, and the or buttons to move the cursor.
Press the FUNCTION button (SAVE) to save the startup settings file, or the FUNCTION button (BACK) to cancel.
A confirmation message will be shown in the LCD display, prompting to confirm or cancel the save operation.
3. Confirming the save operation
Press the FUNCTION button (YES) to confirm the save operation, or the FUNCTION button (NO) to cancel.
* The startup settings file will be saved in the root folder of the USB memory device. It is not possible to save the file in a different folder.
4. Exiting the Save Startup Setting function
Press the FUNCTION button (BACK) to exit the Save Startup Setting function and return to the Function Menus screen.
USB Menu
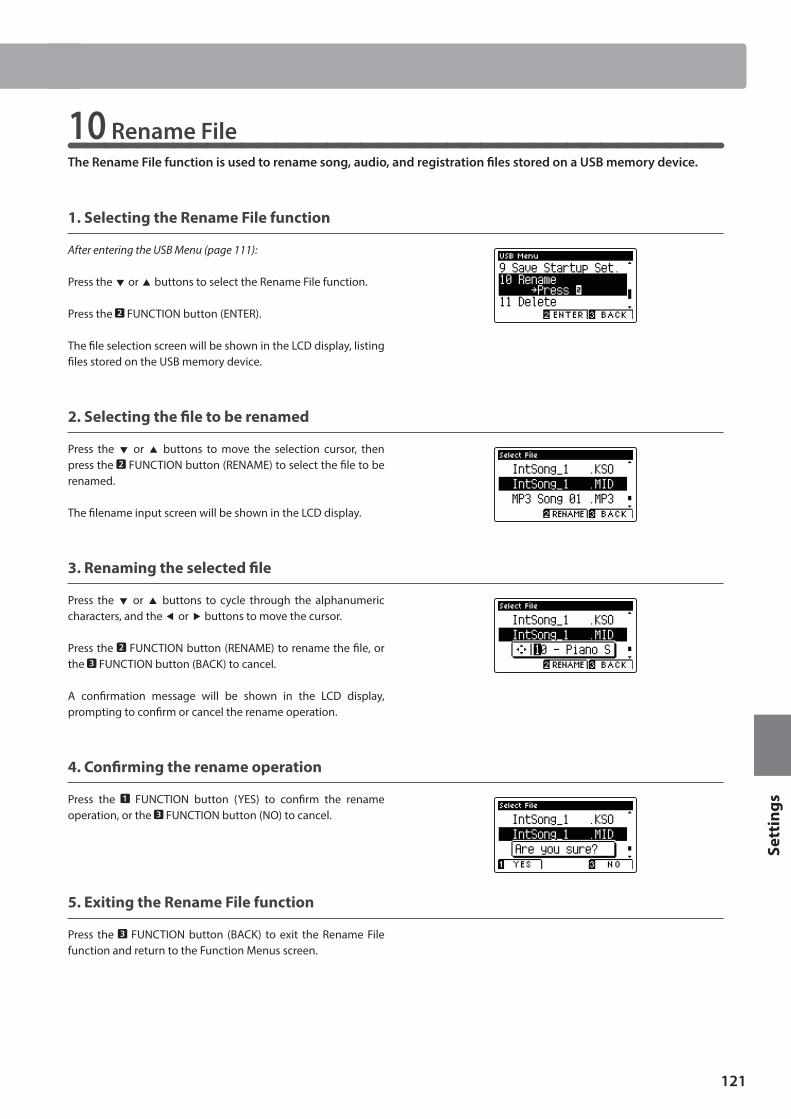
121
Sett
ings
USB Menu
10 Rename FileThe Rename File function is used to rename song, audio, and registration files stored on a USB memory device.
1. Selecting the Rename File function
After entering the USB Menu (page 111):
Press the or buttons to select the Rename File function.
Press the FUNCTION button (ENTER).
The file selection screen will be shown in the LCD display, listing files stored on the USB memory device.
2. Selecting the file to be renamed
Press the or buttons to move the selection cursor, then press the FUNCTION button (RENAME) to select the file to be renamed.
The filename input screen will be shown in the LCD display.
3. Renaming the selected file
Press the or buttons to cycle through the alphanumeric characters, and the or buttons to move the cursor.
Press the FUNCTION button (RENAME) to rename the file, or the FUNCTION button (BACK) to cancel.
A confirmation message will be shown in the LCD display, prompting to confirm or cancel the rename operation.
4. Confirming the rename operation
Press the FUNCTION button (YES) to confirm the rename operation, or the FUNCTION button (NO) to cancel.
5. Exiting the Rename File function
Press the FUNCTION button (BACK) to exit the Rename File function and return to the Function Menus screen.
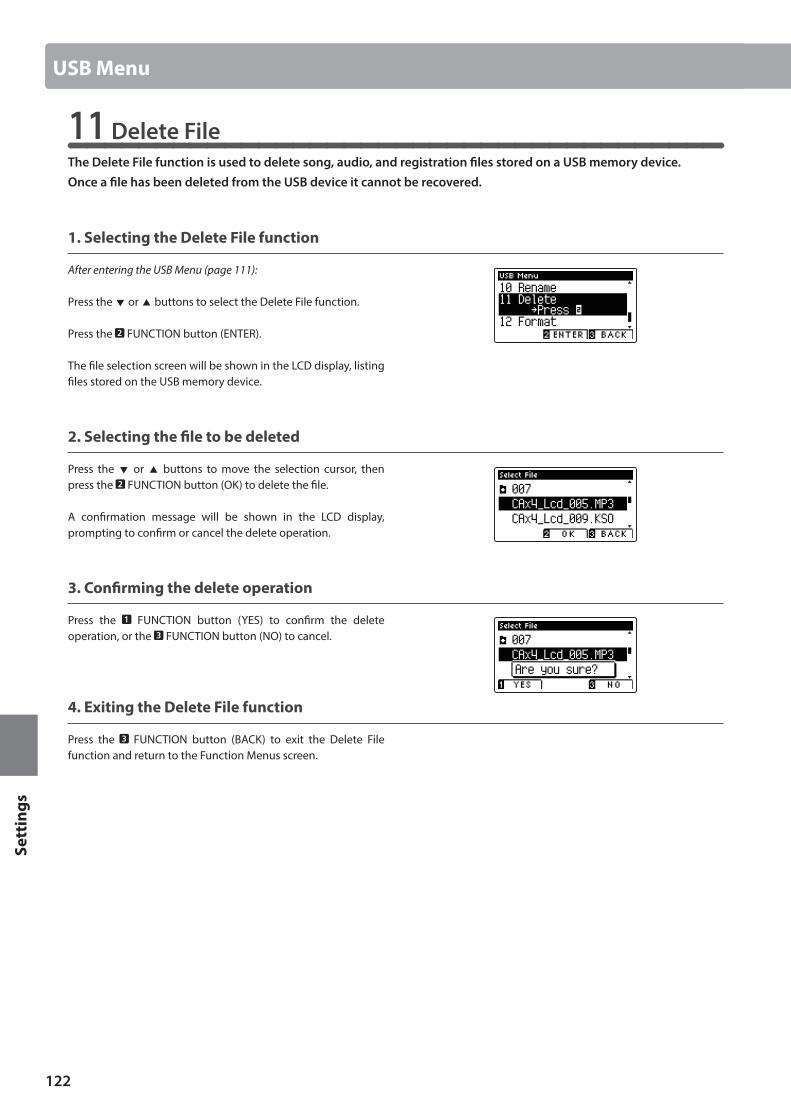
122
Sett
ings
11 Delete FileThe Delete File function is used to delete song, audio, and registration files stored on a USB memory device.Once a file has been deleted from the USB device it cannot be recovered.
1. Selecting the Delete File function
After entering the USB Menu (page 111):
Press the or buttons to select the Delete File function.
Press the FUNCTION button (ENTER).
The file selection screen will be shown in the LCD display, listing files stored on the USB memory device.
2. Selecting the file to be deleted
Press the or buttons to move the selection cursor, then press the FUNCTION button (OK) to delete the file.
A confirmation message will be shown in the LCD display, prompting to confirm or cancel the delete operation.
3. Confirming the delete operation
Press the FUNCTION button (YES) to confirm the delete operation, or the FUNCTION button (NO) to cancel.
4. Exiting the Delete File function
Press the FUNCTION button (BACK) to exit the Delete File function and return to the Function Menus screen.
USB Menu

123
Sett
ings
USB Menu
12 Format USBThe Format USB function is used to format the connected USB memory device, erasing all stored data.
The USB Format function will erase all data stored on the connected USB memory device.Exercise caution when using this function in order to prevent accidental data loss.
1. Selecting the Format USB function
After entering the USB Menu (page 111):
Press the or buttons to select the Format USB function.
Press the FUNCTION button (ENTER).
A confirmation message will be shown in the LCD display, prompting to confirm or cancel the format operation.
2. Confirming the format operation
Press the FUNCTION button (YES) to confirm the format operation, or the FUNCTION button (NO) to cancel.
3. Exiting the Format USB function
Press the FUNCTION button (BACK) to exit the Format USB function and return to the Function Menus screen.
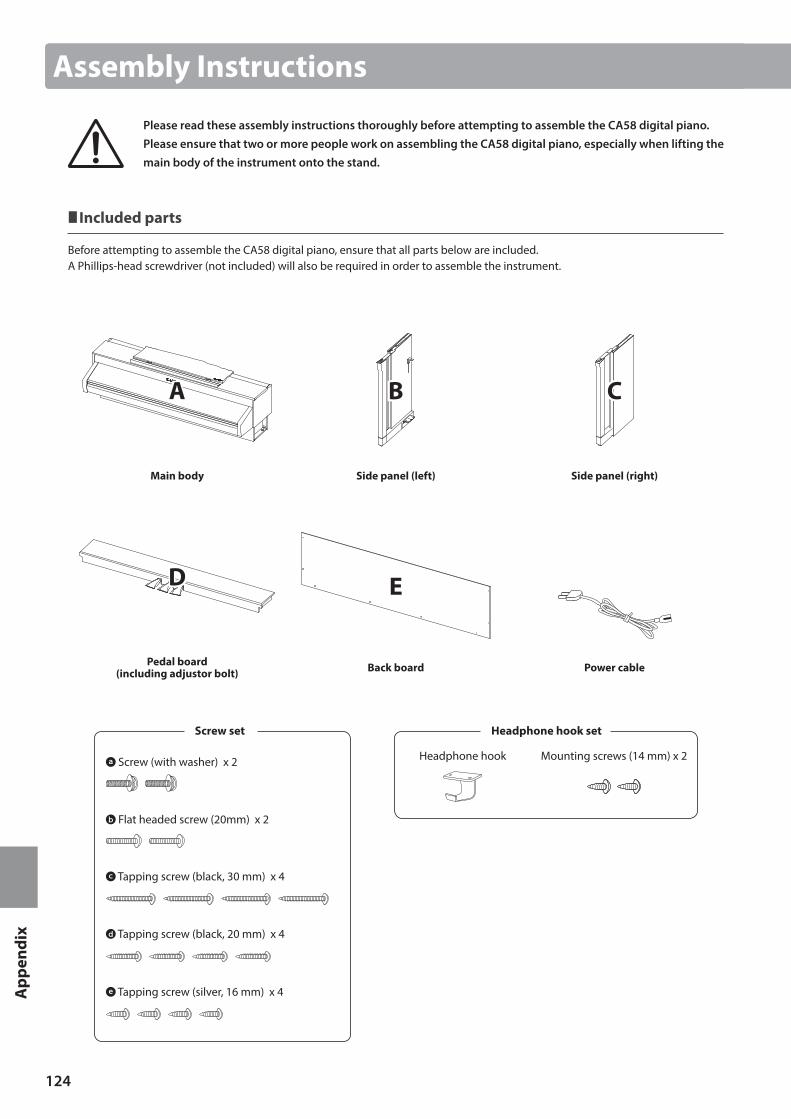
124
App
endi
x
Please read these assembly instructions thoroughly before attempting to assemble the CA58 digital piano. Please ensure that two or more people work on assembling the CA58 digital piano, especially when lifting the main body of the instrument onto the stand.
Included parts
Before attempting to assemble the CA58 digital piano, ensure that all parts below are included.A Phillips-head screwdriver (not included) will also be required in order to assemble the instrument.
Main body
A
Side panel (left)
B
Side panel (right)
C
Pedal board(including adjustor bolt)
D
Back board
E
Power cable
Assembly Instructions
Screw set
Screw (with washer) x 2
Flat headed screw (20mm) x 2
Tapping screw (black, 30 mm) x 4
Tapping screw (black, 20 mm) x 4
Tapping screw (silver, 16 mm) x 4
Headphone hook set
Headphone hook Mounting screws (14 mm) x 2
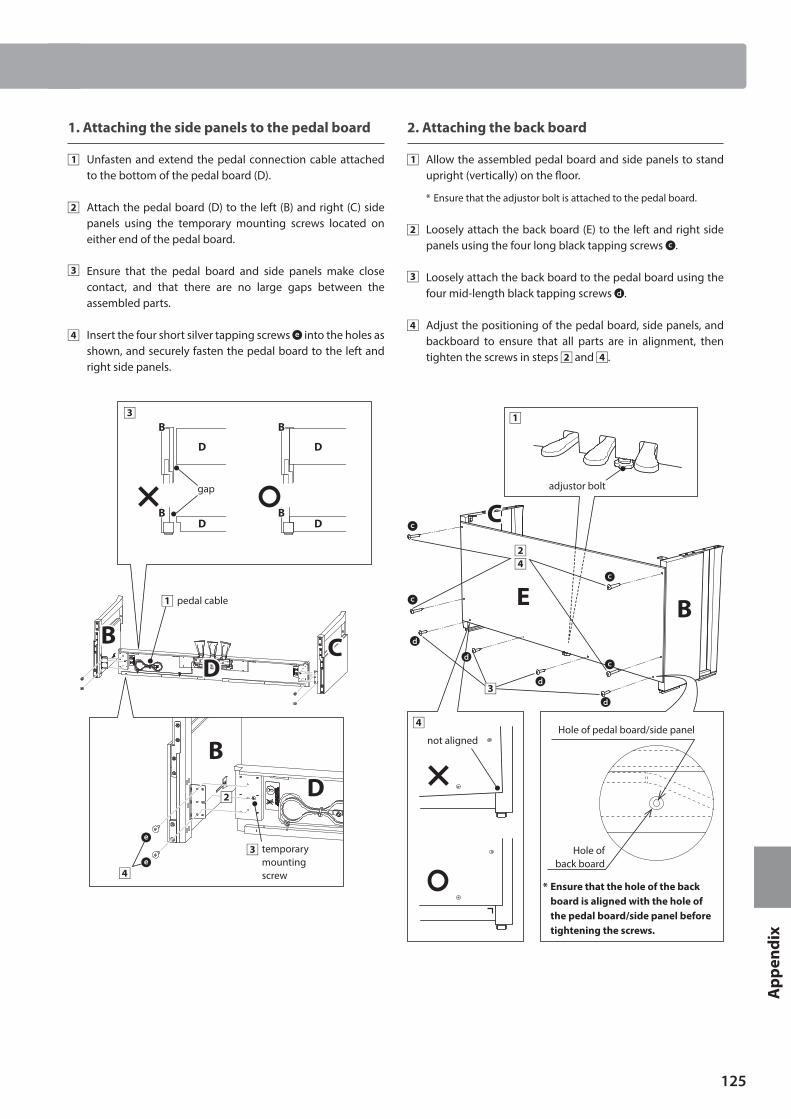
125
App
endi
x
Assembly Instructions
1. Attaching the side panels to the pedal board
Unfasten and extend the pedal connection cable attached to the bottom of the pedal board (D).
Attach the pedal board (D) to the left (B) and right (C) side panels using the temporary mounting screws located on either end of the pedal board.
Ensure that the pedal board and side panels make close contact, and that there are no large gaps between the assembled parts.
Insert the four short silver tapping screws into the holes as shown, and securely fasten the pedal board to the left and right side panels.
B
B C
D
D
DD
DD
BB
B B
gap
pedal cable
temporary mounting screw
2. Attaching the back board
Allow the assembled pedal board and side panels to stand upright (vertically) on the floor.
* Ensure that the adjustor bolt is attached to the pedal board.
Loosely attach the back board (E) to the left and right side panels using the four long black tapping screws .
Loosely attach the back board to the pedal board using the four mid-length black tapping screws .
Adjust the positioning of the pedal board, side panels, and backboard to ensure that all parts are in alignment, then tighten the screws in steps and .
B
C
E
adjustor bolt
not aligned
Hole ofback board
Hole of pedal board/side panel
* Ensure that the hole of the back board is aligned with the hole of the pedal board/side panel before tightening the screws.
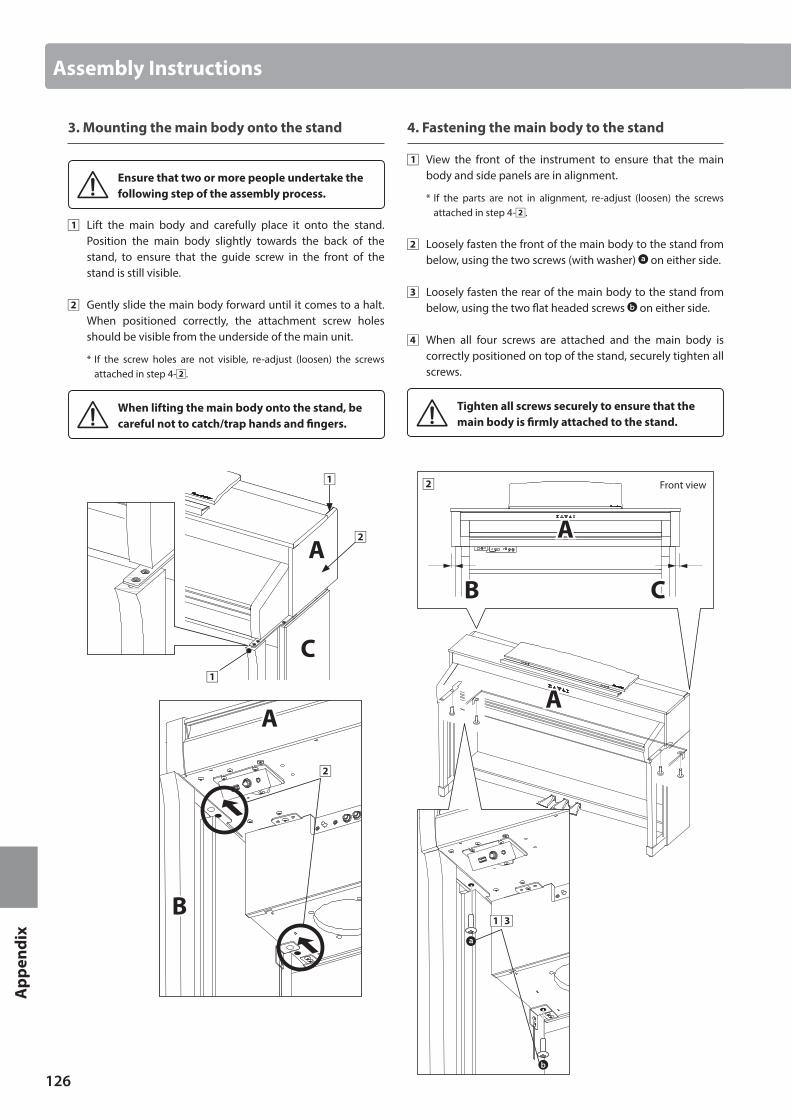
126
App
endi
x
Assembly Instructions
3. Mounting the main body onto the stand
Ensure that two or more people undertake the following step of the assembly process.
Lift the main body and carefully place it onto the stand. Position the main body slightly towards the back of the stand, to ensure that the guide screw in the front of the stand is still visible.
Gently slide the main body forward until it comes to a halt. When positioned correctly, the attachment screw holes should be visible from the underside of the main unit.
* If the screw holes are not visible, re-adjust (loosen) the screws attached in step 4- .
When lifting the main body onto the stand, be careful not to catch/trap hands and fingers.
A
A
B
C
4. Fastening the main body to the stand
View the front of the instrument to ensure that the main body and side panels are in alignment.
* If the parts are not in alignment, re-adjust (loosen) the screws attached in step 4- .
Loosely fasten the front of the main body to the stand from below, using the two screws (with washer) on either side.
Loosely fasten the rear of the main body to the stand from below, using the two flat headed screws on either side.
When all four screws are attached and the main body is correctly positioned on top of the stand, securely tighten all screws.
Tighten all screws securely to ensure that the main body is firmly attached to the stand.
Front view
A
A
B C
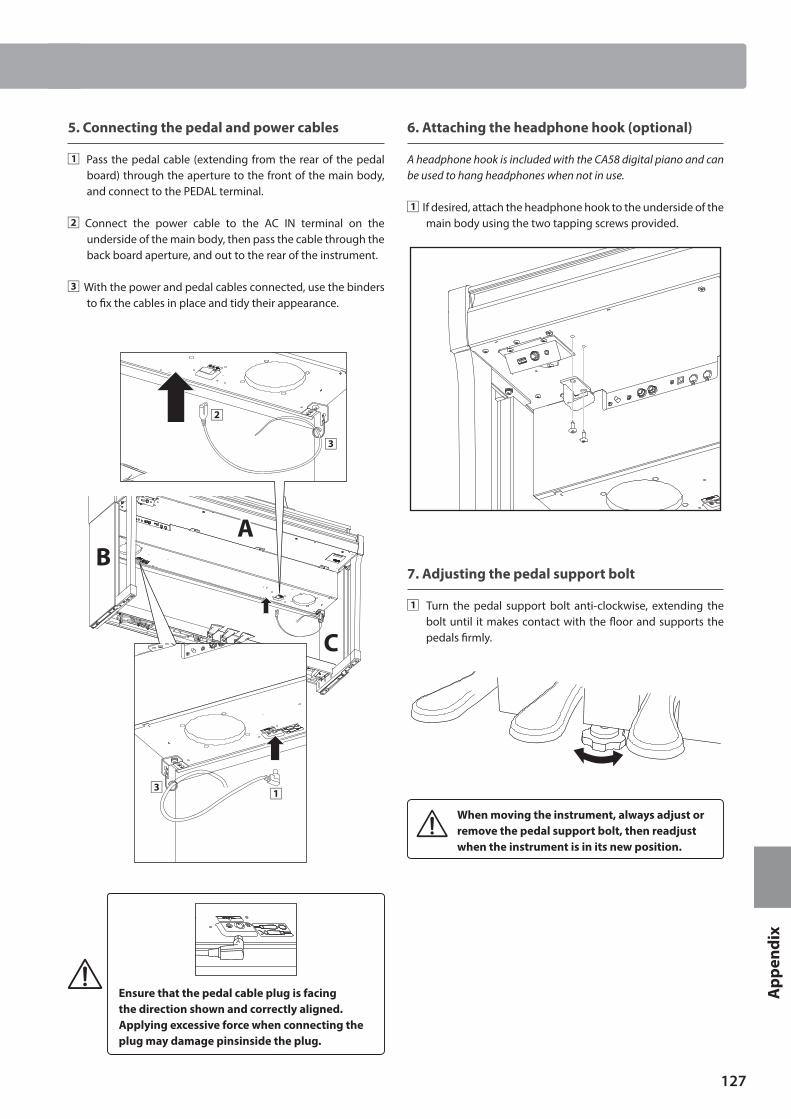
127
App
endi
x
Assembly Instructions
5. Connecting the pedal and power cables
Pass the pedal cable (extending from the rear of the pedal board) through the aperture to the front of the main body, and connect to the PEDAL terminal.
Connect the power cable to the AC IN terminal on the underside of the main body, then pass the cable through the back board aperture, and out to the rear of the instrument.
With the power and pedal cables connected, use the binders to fix the cables in place and tidy their appearance.
AB
C
Ensure that the pedal cable plug is facing the direction shown and correctly aligned. Applying excessive force when connecting the plug may damage pinsinside the plug.
6. Attaching the headphone hook (optional)
A headphone hook is included with the CA58 digital piano and can be used to hang headphones when not in use.
If desired, attach the headphone hook to the underside of the main body using the two tapping screws provided.
7. Adjusting the pedal support bolt
Turn the pedal support bolt anti-clockwise, extending the bolt until it makes contact with the floor and supports the pedals firmly.
When moving the instrument, always adjust or remove the pedal support bolt, then readjust when the instrument is in its new position.
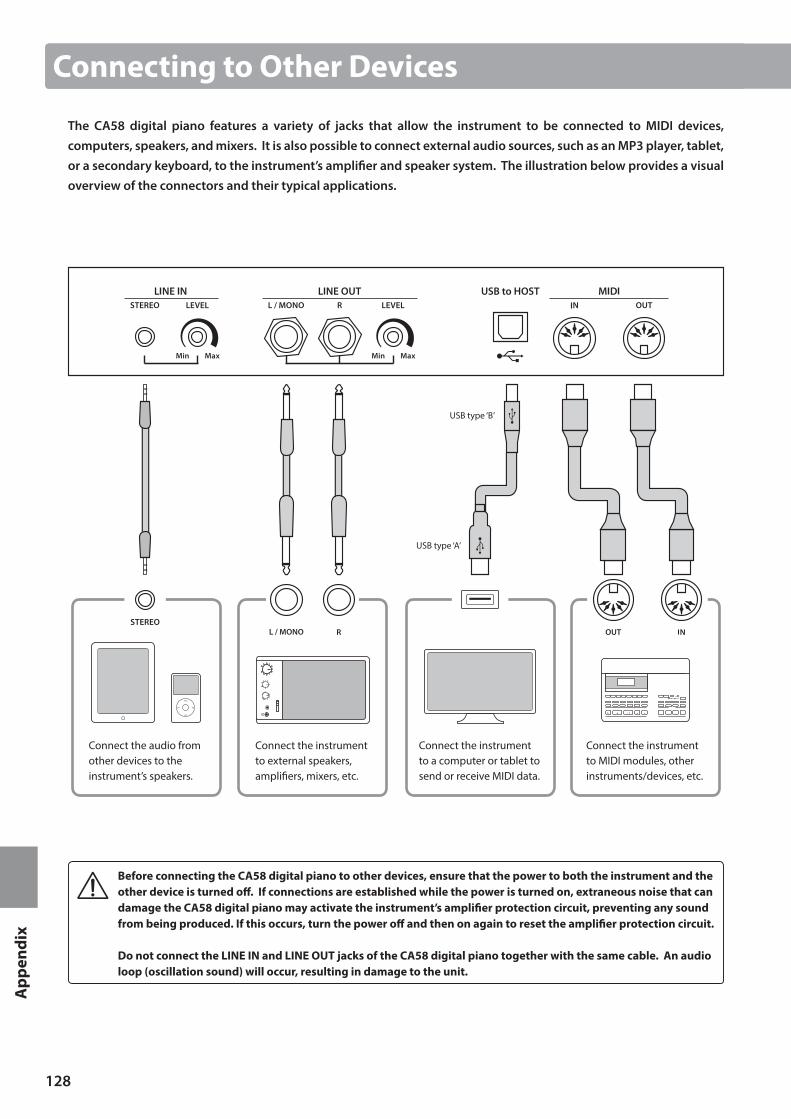
128
App
endi
x
Connecting to Other Devices
The CA58 digital piano features a variety of jacks that allow the instrument to be connected to MIDI devices, computers, speakers, and mixers. It is also possible to connect external audio sources, such as an MP3 player, tablet, or a secondary keyboard, to the instrument’s amplifier and speaker system. The illustration below provides a visual overview of the connectors and their typical applications.
Connect the instrument to external speakers, amplifiers, mixers, etc.
Connect the instrument to MIDI modules, other instruments/devices, etc.
Connect the instrument to a computer or tablet to send or receive MIDI data.
Connect the audio from other devices to the instrument’s speakers.
USB type ‘B’
USB type ‘A’
Before connecting the CA58 digital piano to other devices, ensure that the power to both the instrument and the other device is turned off. If connections are established while the power is turned on, extraneous noise that can damage the CA58 digital piano may activate the instrument’s amplifier protection circuit, preventing any sound from being produced. If this occurs, turn the power off and then on again to reset the amplifier protection circuit.
Do not connect the LINE IN and LINE OUT jacks of the CA58 digital piano together with the same cable. An audio loop (oscillation sound) will occur, resulting in damage to the unit.
129
App
endi
x
Connecting to Other Devices
Jack Panel
LINE IN STEREO jack (1/8” phone jack)
This jack is used to connect the 1/8” stereo outputs from smart phones, tablets, computers, or other electronic audio equipment to the CA58 digital piano’s amplifier and speakers. The input level can be adjusted using the LEVEL knob, or by adjusting the volume of the connected device.
When using the USB audio recorder function, this LINE in audio will also be mixed with the instrument’s internal sound and recorded to the MP3/WAV file.
* The ‘Line In Level’ setting can also be used to adjust the level of the LINE IN signal. Please refer to page 70 for more information.
USB to Host port (‘B’ type)
This USB port is used to connect the CA58 digital piano to a computer using an inexpensive USB cable. When connected, the instrument can be used as a standard MIDI device, allowing it to send a receive MIDI data. Connect a ‘B’ type USB connector to the instrument, and an ‘A’ type USB connector to the computer.
* Please refer to page 110 for more information about USB MIDI.
With additional conversion adaptors, this port may also be used to connect the CA58 digital piano to tablets such as the Apple iPad and other mobile devices.
LINE OUT jacks (1/4” phone jack)
These jacks are used to connect the stereo output of the CA58 digital piano’s sound to external speakers, amplifiers, mixers, recording devices, and similar equipment.
To output a mono signal, connect a single cable to the L/MONO jack.
The output level can be adjusted using the LEVEL knob. The MASTER VOLUME slider does not affect the LINE OUT level.
MIDI IN/OUT jacks
These jacks are used to connect the CA58 digital piano to external MIDI devices, or to a computer (using a USB-MIDI interface) as an alternative to the ‘USB to Host’ port.
* Please refer to page 1 of the “CA58 MIDI Settings Manual” for more information about MIDI.
* When the CA58 digital piano is connected to a smart device using Bluetooth MIDI, the MIDI IN/OUT jacks and USB to Host port will be disabled.
Headphone Panel
PHONES jacks (1/4” & 1/8” phone jacks)
These jacks are used to connect stereo headphones to the CA58 digital piano. Two pairs of headphones can be connected and used simultaneously. When a pair of headphones is connected, sound will not be produced by the speakers.
USB to Device port (‘A’ type)
This USB port is used to connect a USB memory device to the CA58 digital piano. This allows MP3/WAV audio files, and SMF song files to be played directly. It is also possible to record performances to MP3/WAV audio files, and save recorder songs stored in internal memory for posterity.
USB device information
The ‘USB to Device’ functionality of the CA58 digital piano conforms to USB2.0 Hi-Speed standards. Older USB devices can still be used, however data transfer speed will be limited to the maximum transfer speed of the device.
The ‘USB to Device’ port is intended for connecting USB memory devices, however USB floppy drive devices can also be used to save recorder songs stored in internal memory, or play SMF song files.
It may be necessary to format the USB memory device before it can be used with the CA58 digital piano. If so, please refer to the USB Format function instructions on page 123. Formatting the device will erase all data.
Avoid removing the USB memory device while data is being loaded or saved, files are being renamed or deleted, or the device is being formatted.
Other USB devices, such as computer mice, keyboards, or battery chargers etc. cannot be used with this instrument.
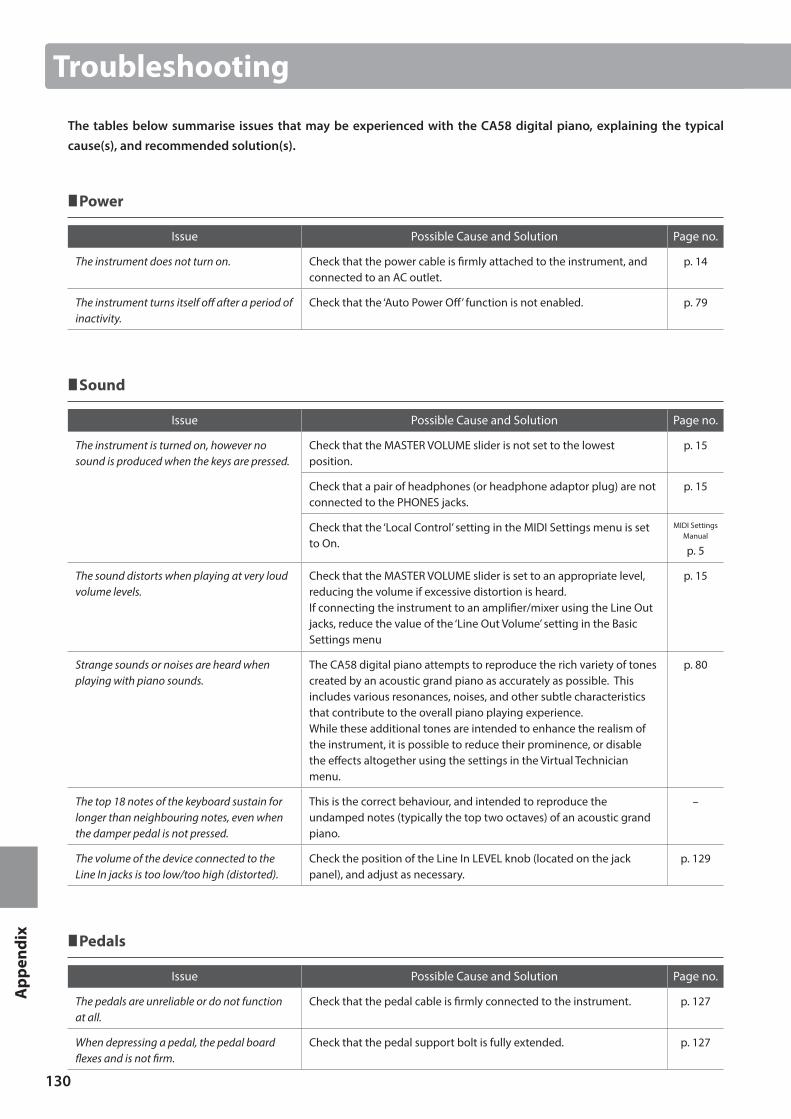
130
App
endi
x
Troubleshooting
The tables below summarise issues that may be experienced with the CA58 digital piano, explaining the typical cause(s), and recommended solution(s).
Power
Issue Possible Cause and Solution Page no.
The instrument does not turn on. Check that the power cable is firmly attached to the instrument, and connected to an AC outlet.
p. 14
The instrument turns itself off after a period of inactivity.
Check that the ‘Auto Power Off’ function is not enabled. p. 79
Sound
Issue Possible Cause and Solution Page no.
The instrument is turned on, however no sound is produced when the keys are pressed.
Check that the MASTER VOLUME slider is not set to the lowest position.
p. 15
Check that a pair of headphones (or headphone adaptor plug) are not connected to the PHONES jacks.
p. 15
Check that the ‘Local Control’ setting in the MIDI Settings menu is set to On.
MIDI SettingsManual
p. 5
The sound distorts when playing at very loud volume levels.
Check that the MASTER VOLUME slider is set to an appropriate level, reducing the volume if excessive distortion is heard.If connecting the instrument to an amplifier/mixer using the Line Out jacks, reduce the value of the ‘Line Out Volume’ setting in the Basic Settings menu
p. 15
Strange sounds or noises are heard when playing with piano sounds.
The CA58 digital piano attempts to reproduce the rich variety of tones created by an acoustic grand piano as accurately as possible. This includes various resonances, noises, and other subtle characteristics that contribute to the overall piano playing experience. While these additional tones are intended to enhance the realism of the instrument, it is possible to reduce their prominence, or disable the effects altogether using the settings in the Virtual Technician menu.
p. 80
The top 18 notes of the keyboard sustain for longer than neighbouring notes, even when the damper pedal is not pressed.
This is the correct behaviour, and intended to reproduce the undamped notes (typically the top two octaves) of an acoustic grand piano.
–
The volume of the device connected to the Line In jacks is too low/too high (distorted).
Check the position of the Line In LEVEL knob (located on the jack panel), and adjust as necessary.
p. 129
Pedals
Issue Possible Cause and Solution Page no.
The pedals are unreliable or do not function at all.
Check that the pedal cable is firmly connected to the instrument. p. 127
When depressing a pedal, the pedal board flexes and is not firm.
Check that the pedal support bolt is fully extended. p. 127
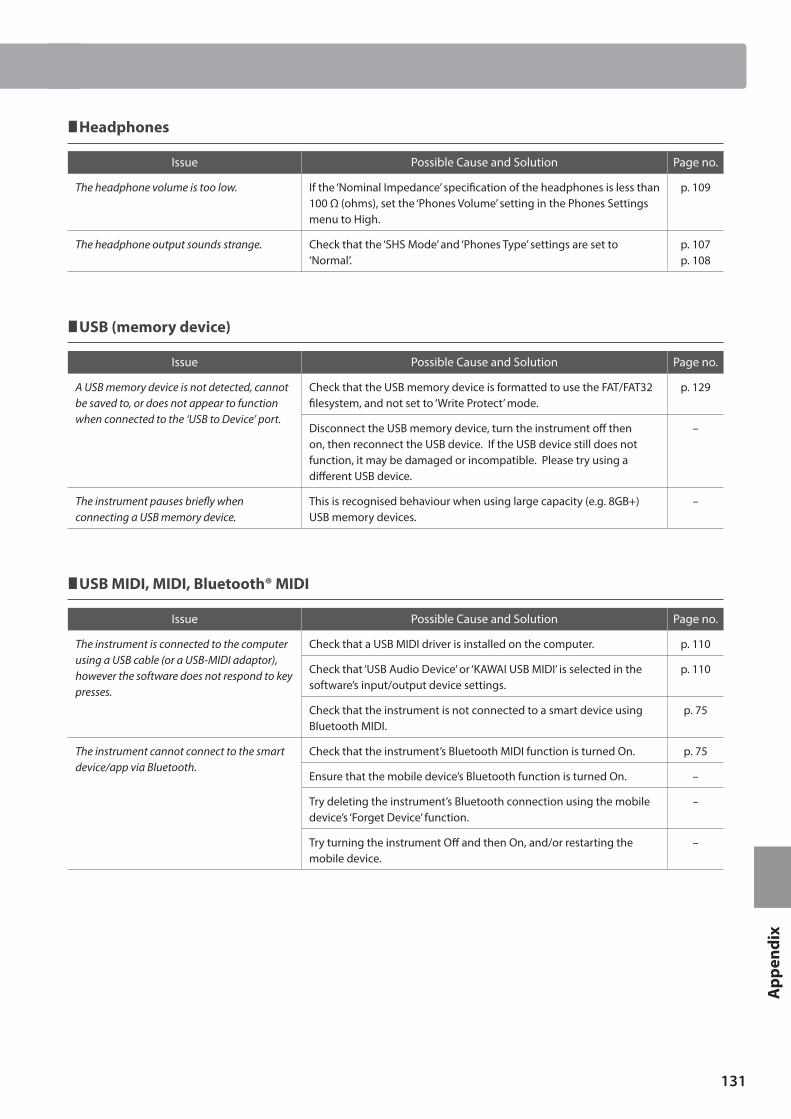
131
App
endi
x
Troubleshooting
Headphones
Issue Possible Cause and Solution Page no.
The headphone volume is too low. If the ‘Nominal Impedance’ specification of the headphones is less than 100 Ω (ohms), set the ‘Phones Volume’ setting in the Phones Settings menu to High.
p. 109
The headphone output sounds strange. Check that the ‘SHS Mode’ and ‘Phones Type’ settings are set to ‘Normal’.
p. 107p. 108
USB (memory device)
Issue Possible Cause and Solution Page no.
A USB memory device is not detected, cannot be saved to, or does not appear to function when connected to the ‘USB to Device’ port.
Check that the USB memory device is formatted to use the FAT/FAT32 filesystem, and not set to ‘Write Protect’ mode.
p. 129
Disconnect the USB memory device, turn the instrument off then on, then reconnect the USB device. If the USB device still does not function, it may be damaged or incompatible. Please try using a different USB device.
–
The instrument pauses briefly when connecting a USB memory device.
This is recognised behaviour when using large capacity (e.g. 8GB+) USB memory devices.
–
USB MIDI, MIDI, Bluetooth® MIDI
Issue Possible Cause and Solution Page no.
The instrument is connected to the computer using a USB cable (or a USB-MIDI adaptor), however the software does not respond to key presses.
Check that a USB MIDI driver is installed on the computer. p. 110
Check that ‘USB Audio Device’ or ‘KAWAI USB MIDI’ is selected in the software’s input/output device settings.
p. 110
Check that the instrument is not connected to a smart device using Bluetooth MIDI.
p. 75
The instrument cannot connect to the smart device/app via Bluetooth.
Check that the instrument’s Bluetooth MIDI function is turned On. p. 75
Ensure that the mobile device’s Bluetooth function is turned On. –
Try deleting the instrument’s Bluetooth connection using the mobile device’s ‘Forget Device’ function.
–
Try turning the instrument Off and then On, and/or restarting the mobile device.
–
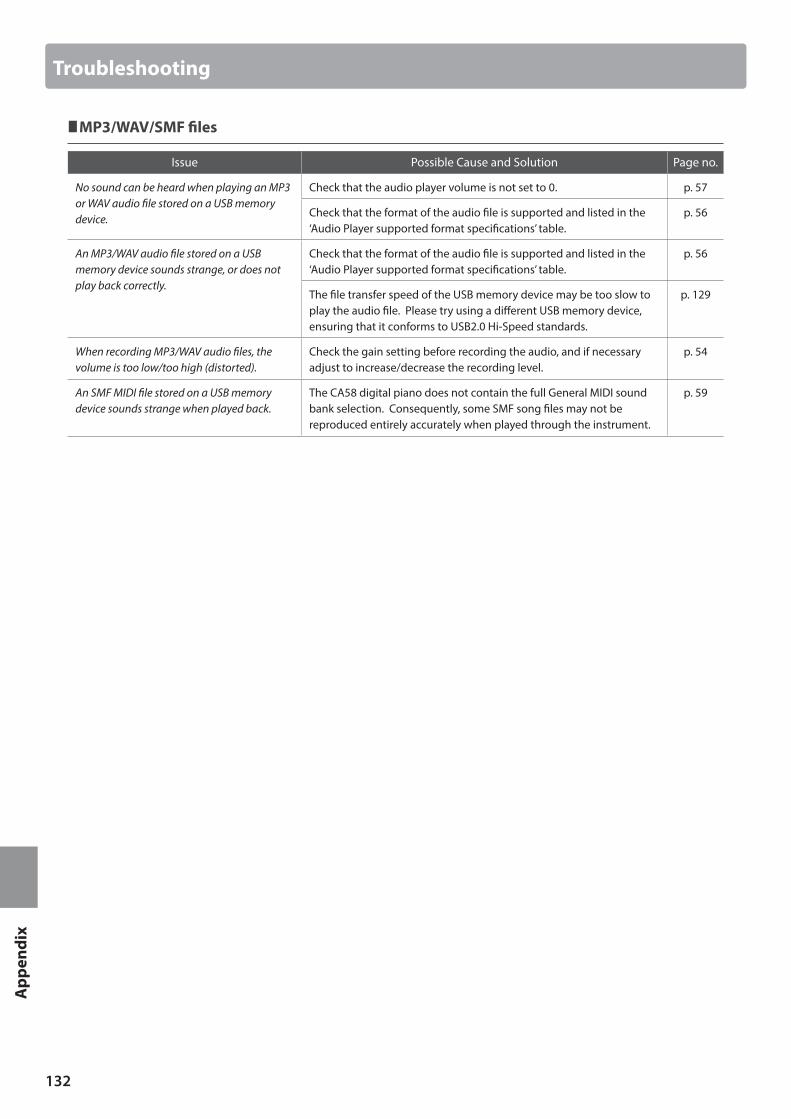
132
App
endi
x
Troubleshooting
MP3/WAV/SMF files
Issue Possible Cause and Solution Page no.
No sound can be heard when playing an MP3 or WAV audio file stored on a USB memory device.
Check that the audio player volume is not set to 0. p. 57
Check that the format of the audio file is supported and listed in the ‘Audio Player supported format specifications’ table.
p. 56
An MP3/WAV audio file stored on a USB memory device sounds strange, or does not play back correctly.
Check that the format of the audio file is supported and listed in the ‘Audio Player supported format specifications’ table.
p. 56
The file transfer speed of the USB memory device may be too slow to play the audio file. Please try using a different USB memory device, ensuring that it conforms to USB2.0 Hi-Speed standards.
p. 129
When recording MP3/WAV audio files, the volume is too low/too high (distorted).
Check the gain setting before recording the audio, and if necessary adjust to increase/decrease the recording level.
p. 54
An SMF MIDI file stored on a USB memory device sounds strange when played back.
The CA58 digital piano does not contain the full General MIDI sound bank selection. Consequently, some SMF song files may not be reproduced entirely accurately when played through the instrument.
p. 59
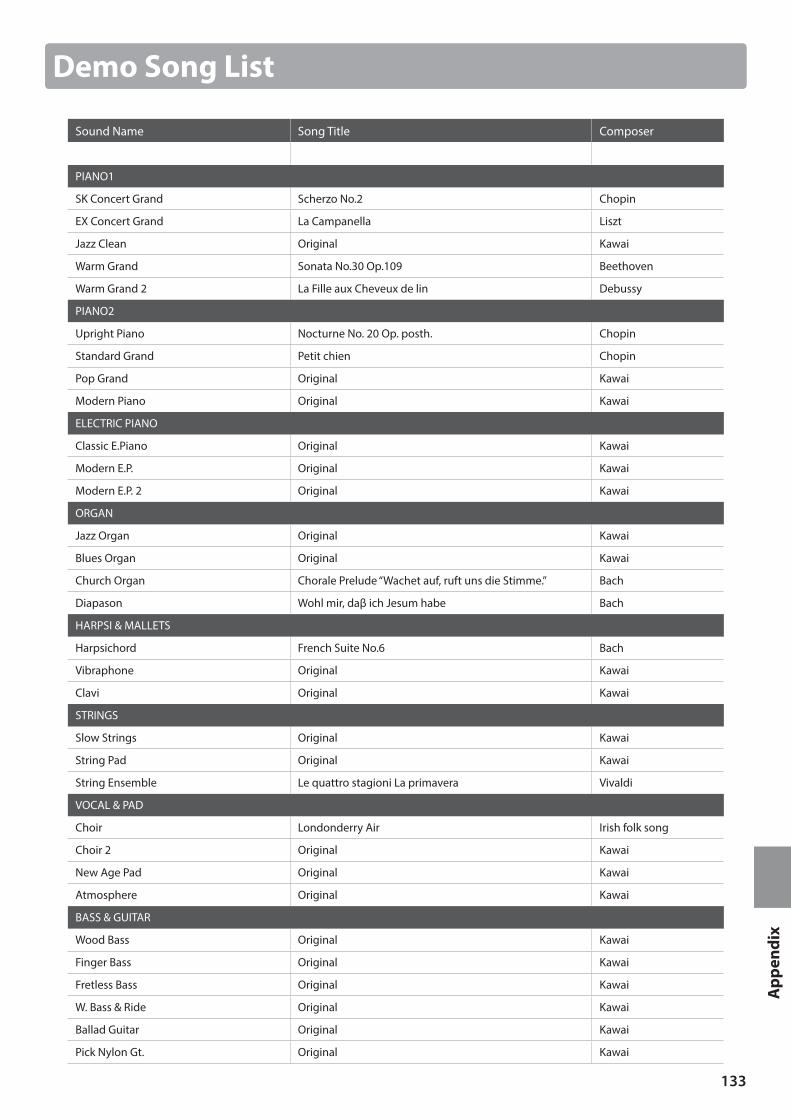
133
App
endi
x
Demo Song List
Sound Name Song Title Composer
PIANO1
SK Concert Grand Scherzo No.2 Chopin
EX Concert Grand La Campanella Liszt
Jazz Clean Original Kawai
Warm Grand Sonata No.30 Op.109 Beethoven
Warm Grand 2 La Fille aux Cheveux de lin Debussy
PIANO2
Upright Piano Nocturne No. 20 Op. posth. Chopin
Standard Grand Petit chien Chopin
Pop Grand Original Kawai
Modern Piano Original Kawai
ELECTRIC PIANO
Classic E.Piano Original Kawai
Modern E.P. Original Kawai
Modern E.P. 2 Original Kawai
ORGAN
Jazz Organ Original Kawai
Blues Organ Original Kawai
Church Organ Chorale Prelude “Wachet auf, ruft uns die Stimme.” Bach
Diapason Wohl mir, daβ ich Jesum habe Bach
HARPSI & MALLETS
Harpsichord French Suite No.6 Bach
Vibraphone Original Kawai
Clavi Original Kawai
STRINGS
Slow Strings Original Kawai
String Pad Original Kawai
String Ensemble Le quattro stagioni La primavera Vivaldi
VOCAL & PAD
Choir Londonderry Air Irish folk song
Choir 2 Original Kawai
New Age Pad Original Kawai
Atmosphere Original Kawai
BASS & GUITAR
Wood Bass Original Kawai
Finger Bass Original Kawai
Fretless Bass Original Kawai
W. Bass & Ride Original Kawai
Ballad Guitar Original Kawai
Pick Nylon Gt. Original Kawai
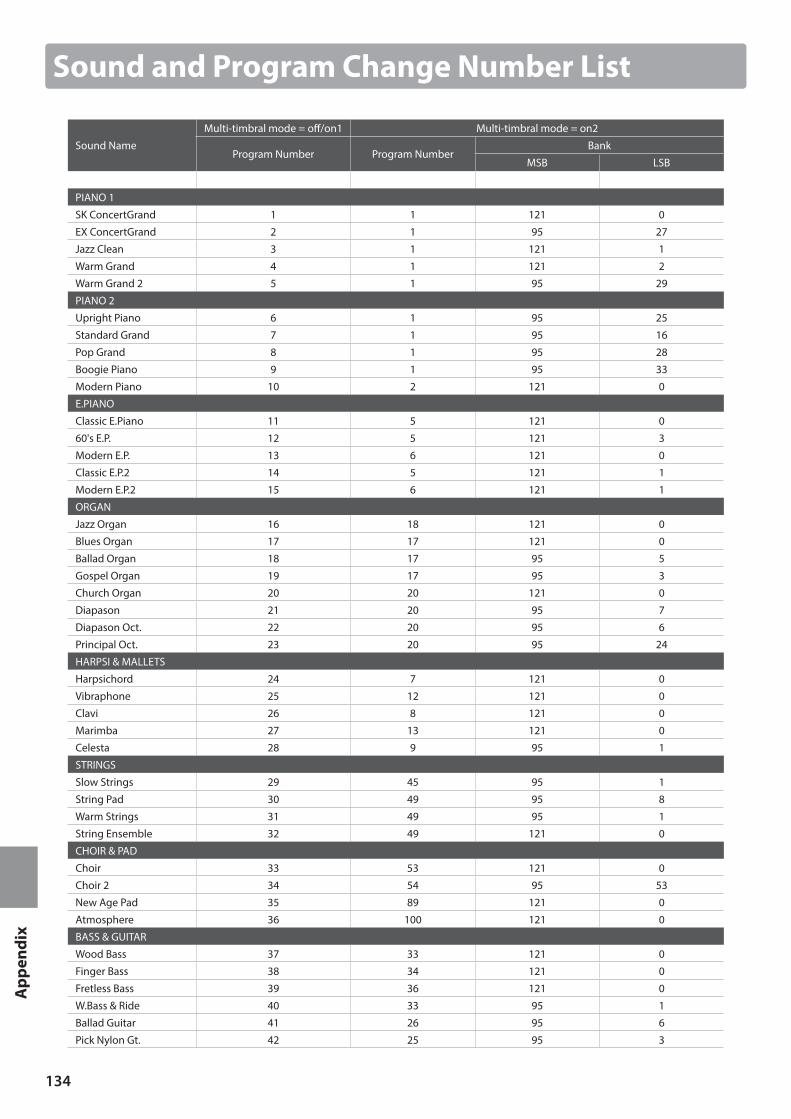
134
App
endi
x
Sound and Program Change Number List
Sound Name
Multi-timbral mode = off/on1 Multi-timbral mode = on2
Program Number Program NumberBank
MSB LSB
PIANO 1
SK ConcertGrand 1 1 121 0
EX ConcertGrand 2 1 95 27
Jazz Clean 3 1 121 1
Warm Grand 4 1 121 2
Warm Grand 2 5 1 95 29
PIANO 2
Upright Piano 6 1 95 25
Standard Grand 7 1 95 16
Pop Grand 8 1 95 28
Boogie Piano 9 1 95 33
Modern Piano 10 2 121 0
E.PIANO
Classic E.Piano 11 5 121 0
60's E.P. 12 5 121 3
Modern E.P. 13 6 121 0
Classic E.P.2 14 5 121 1
Modern E.P.2 15 6 121 1
ORGAN
Jazz Organ 16 18 121 0
Blues Organ 17 17 121 0
Ballad Organ 18 17 95 5
Gospel Organ 19 17 95 3
Church Organ 20 20 121 0
Diapason 21 20 95 7
Diapason Oct. 22 20 95 6
Principal Oct. 23 20 95 24
HARPSI & MALLETS
Harpsichord 24 7 121 0
Vibraphone 25 12 121 0
Clavi 26 8 121 0
Marimba 27 13 121 0
Celesta 28 9 95 1
STRINGS
Slow Strings 29 45 95 1
String Pad 30 49 95 8
Warm Strings 31 49 95 1
String Ensemble 32 49 121 0
CHOIR & PAD
Choir 33 53 121 0
Choir 2 34 54 95 53
New Age Pad 35 89 121 0
Atmosphere 36 100 121 0
BASS & GUITAR
Wood Bass 37 33 121 0
Finger Bass 38 34 121 0
Fretless Bass 39 36 121 0
W.Bass & Ride 40 33 95 1
Ballad Guitar 41 26 95 6
Pick Nylon Gt. 42 25 95 3
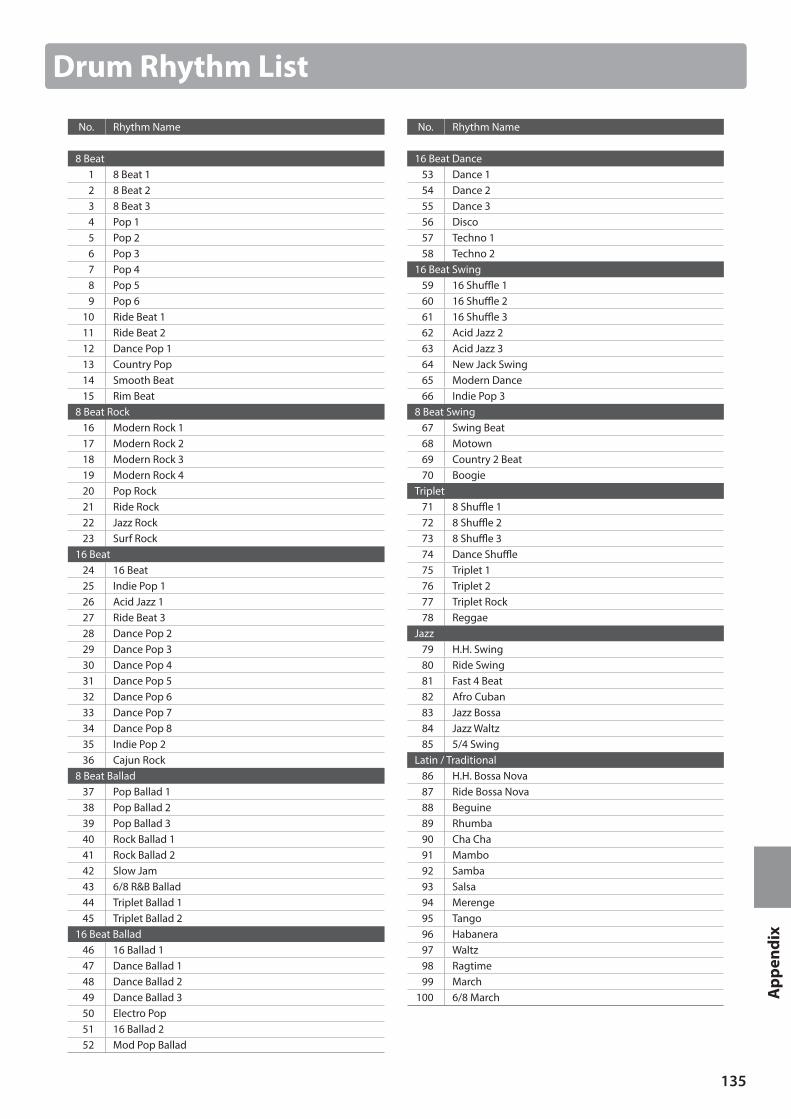
135
App
endi
x
Drum Rhythm List
No. Rhythm Name
8 Beat1 8 Beat 12 8 Beat 23 8 Beat 34 Pop 15 Pop 26 Pop 37 Pop 48 Pop 59 Pop 6
10 Ride Beat 111 Ride Beat 212 Dance Pop 113 Country Pop14 Smooth Beat15 Rim Beat
8 Beat Rock16 Modern Rock 117 Modern Rock 218 Modern Rock 319 Modern Rock 420 Pop Rock21 Ride Rock22 Jazz Rock23 Surf Rock
16 Beat24 16 Beat25 Indie Pop 126 Acid Jazz 127 Ride Beat 328 Dance Pop 229 Dance Pop 330 Dance Pop 431 Dance Pop 532 Dance Pop 633 Dance Pop 734 Dance Pop 835 Indie Pop 236 Cajun Rock
8 Beat Ballad37 Pop Ballad 138 Pop Ballad 239 Pop Ballad 340 Rock Ballad 141 Rock Ballad 242 Slow Jam43 6/8 R&B Ballad44 Triplet Ballad 145 Triplet Ballad 2
16 Beat Ballad46 16 Ballad 147 Dance Ballad 148 Dance Ballad 249 Dance Ballad 350 Electro Pop51 16 Ballad 252 Mod Pop Ballad
No. Rhythm Name
16 Beat Dance53 Dance 154 Dance 255 Dance 356 Disco57 Techno 158 Techno 2
16 Beat Swing59 16 Shuffle 160 16 Shuffle 261 16 Shuffle 362 Acid Jazz 263 Acid Jazz 364 New Jack Swing65 Modern Dance66 Indie Pop 3
8 Beat Swing67 Swing Beat68 Motown69 Country 2 Beat70 Boogie
Triplet71 8 Shuffle 172 8 Shuffle 273 8 Shuffle 374 Dance Shuffle75 Triplet 176 Triplet 277 Triplet Rock78 Reggae
Jazz79 H.H. Swing80 Ride Swing81 Fast 4 Beat82 Afro Cuban83 Jazz Bossa84 Jazz Waltz85 5/4 Swing
Latin / Traditional86 H.H. Bossa Nova87 Ride Bossa Nova88 Beguine89 Rhumba90 Cha Cha91 Mambo92 Samba93 Salsa94 Merenge95 Tango96 Habanera97 Waltz98 Ragtime99 March
100 6/8 March
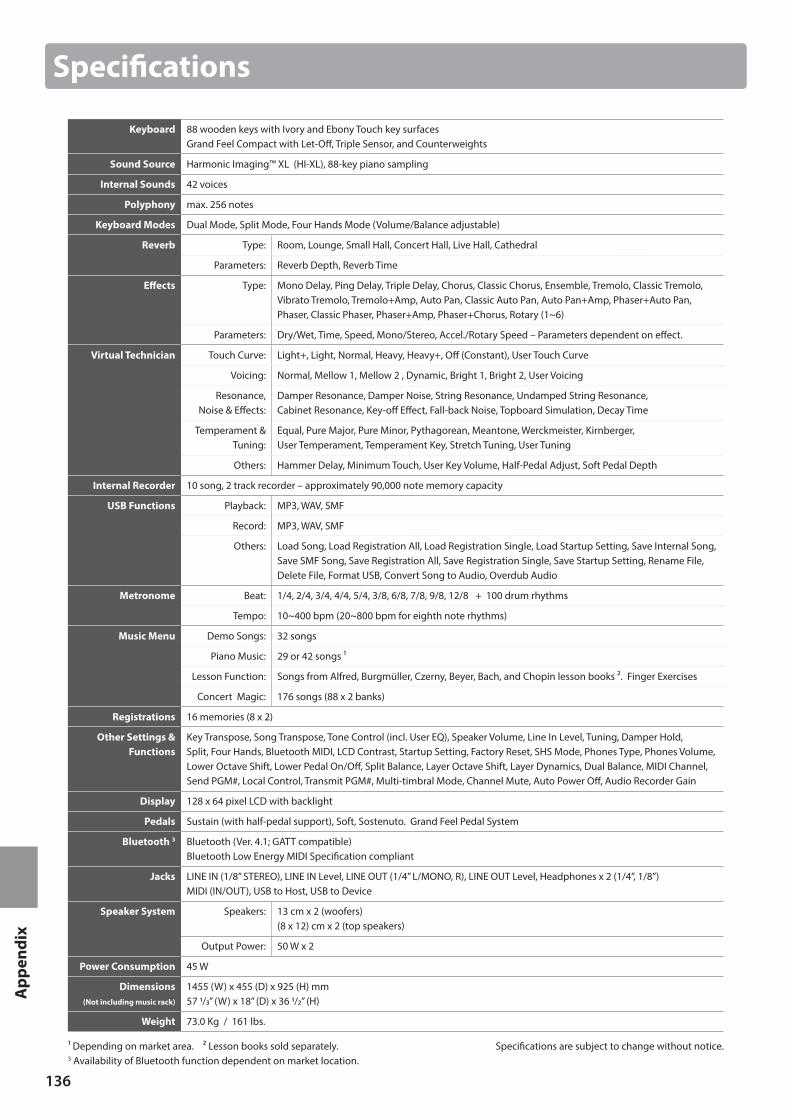
136
App
endi
x
Specifications
Keyboard 88 wooden keys with Ivory and Ebony Touch key surfacesGrand Feel Compact with Let-Off, Triple Sensor, and Counterweights
Sound Source Harmonic Imaging™ XL (HI-XL), 88-key piano sampling
Internal Sounds 42 voices
Polyphony max. 256 notes
Keyboard Modes Dual Mode, Split Mode, Four Hands Mode (Volume/Balance adjustable)
Reverb Type: Room, Lounge, Small Hall, Concert Hall, Live Hall, Cathedral
Parameters: Reverb Depth, Reverb Time
Effects Type: Mono Delay, Ping Delay, Triple Delay, Chorus, Classic Chorus, Ensemble, Tremolo, Classic Tremolo, Vibrato Tremolo, Tremolo+Amp, Auto Pan, Classic Auto Pan, Auto Pan+Amp, Phaser+Auto Pan, Phaser, Classic Phaser, Phaser+Amp, Phaser+Chorus, Rotary (1~6)
Parameters: Dry/Wet, Time, Speed, Mono/Stereo, Accel./Rotary Speed – Parameters dependent on effect.
Virtual Technician Touch Curve: Light+, Light, Normal, Heavy, Heavy+, Off (Constant), User Touch Curve
Voicing: Normal, Mellow 1, Mellow 2 , Dynamic, Bright 1, Bright 2, User Voicing
Resonance, Noise & Effects:
Damper Resonance, Damper Noise, String Resonance, Undamped String Resonance, Cabinet Resonance, Key-off Effect, Fall-back Noise, Topboard Simulation, Decay Time
Temperament & Tuning:
Equal, Pure Major, Pure Minor, Pythagorean, Meantone, Werckmeister, Kirnberger, User Temperament, Temperament Key, Stretch Tuning, User Tuning
Others: Hammer Delay, Minimum Touch, User Key Volume, Half-Pedal Adjust, Soft Pedal Depth
Internal Recorder 10 song, 2 track recorder – approximately 90,000 note memory capacity
USB Functions Playback: MP3, WAV, SMF
Record: MP3, WAV, SMF
Others: Load Song, Load Registration All, Load Registration Single, Load Startup Setting, Save Internal Song, Save SMF Song, Save Registration All, Save Registration Single, Save Startup Setting, Rename File, Delete File, Format USB, Convert Song to Audio, Overdub Audio
Metronome Beat: 1/4, 2/4, 3/4, 4/4, 5/4, 3/8, 6/8, 7/8, 9/8, 12/8 + 100 drum rhythms
Tempo: 10~400 bpm (20~800 bpm for eighth note rhythms)
Music Menu Demo Songs: 32 songs
Piano Music: 29 or 42 songs ¹
Lesson Function: Songs from Alfred, Burgmüller, Czerny, Beyer, Bach, and Chopin lesson books ². Finger Exercises
Concert Magic: 176 songs (88 x 2 banks)
Registrations 16 memories (8 x 2)
Other Settings & Functions
Key Transpose, Song Transpose, Tone Control (incl. User EQ), Speaker Volume, Line In Level, Tuning, Damper Hold, Split, Four Hands, Bluetooth MIDI, LCD Contrast, Startup Setting, Factory Reset, SHS Mode, Phones Type, Phones Volume, Lower Octave Shift, Lower Pedal On/Off, Split Balance, Layer Octave Shift, Layer Dynamics, Dual Balance, MIDI Channel, Send PGM#, Local Control, Transmit PGM#, Multi-timbral Mode, Channel Mute, Auto Power Off, Audio Recorder Gain
Display 128 x 64 pixel LCD with backlight
Pedals Sustain (with half-pedal support), Soft, Sostenuto. Grand Feel Pedal System
Bluetooth 3 Bluetooth (Ver. 4.1; GATT compatible)Bluetooth Low Energy MIDI Specification compliant
Jacks LINE IN (1/8” STEREO), LINE IN Level, LINE OUT (1/4” L/MONO, R), LINE OUT Level, Headphones x 2 (1/4”, 1/8”)MIDI (IN/OUT), USB to Host, USB to Device
Speaker System Speakers: 13 cm x 2 (woofers)(8 x 12) cm x 2 (top speakers)
Output Power: 50 W x 2
Power Consumption 45 W
Dimensions(Not including music rack)
1455 (W) x 455 (D) x 925 (H) mm57 1/3” (W) x 18” (D) x 36 1/2” (H)
Weight 73.0 Kg / 161 lbs.
Specifications are subject to change without notice.¹ Depending on market area. ² Lesson books sold separately.3 Availability of Bluetooth function dependent on market location.
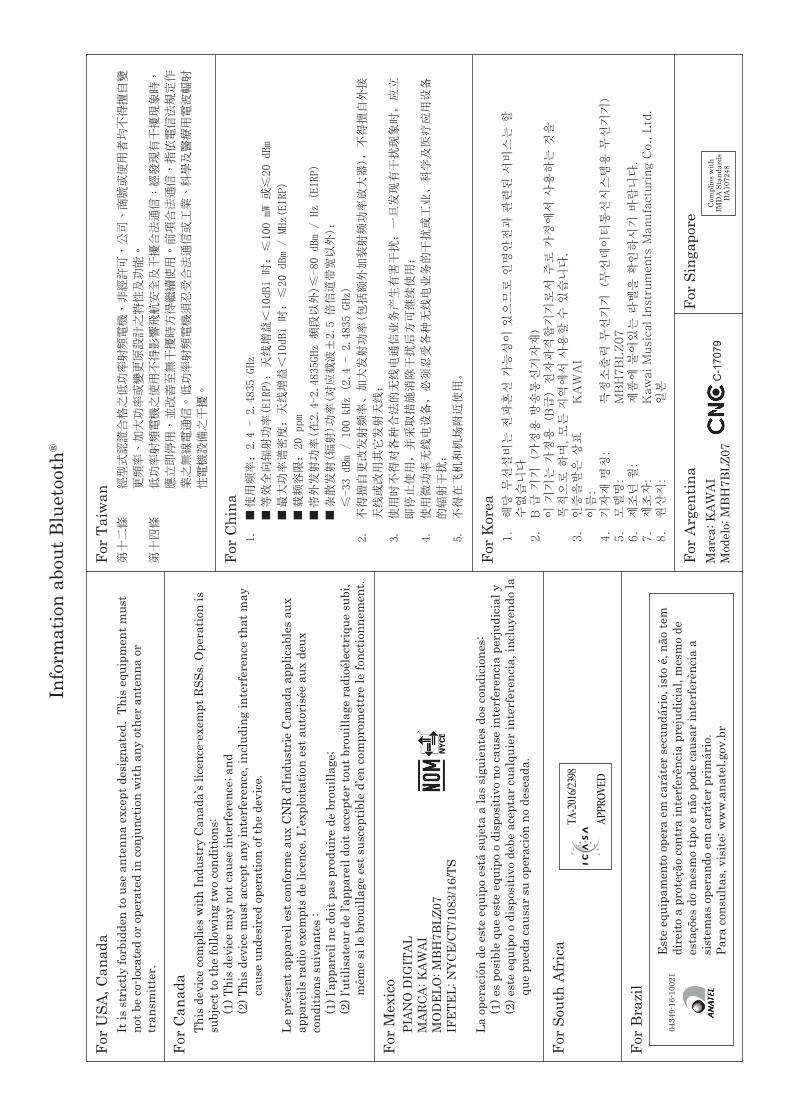
It is
str
ictly
forb
idde
n to
use
ant
enna
exc
ept d
esig
nate
d. T
his
equi
pmen
t mus
t no
t be
co-lo
cate
d or
ope
rate
d in
con
junc
tion
with
any
oth
er a
nten
na o
r tr
ansm
itter
.
PIA
NO
DIG
ITAL
MAR
CA: K
AW
AIM
OD
ELO
: MBH
7BLZ
07IF
ETE
L: N
YCE/
CT/1
083/
16/T
S
La o
pera
ción
de
este
equ
ipo
está
suj
eta
a la
s si
guie
ntes
dos
con
dici
ones
:(1
) es
posi
ble
que
este
equ
ipo
o di
spos
itivo
no
caus
e in
terf
eren
cia
perj
udic
ial y
(2) e
ste
equi
po o
dis
posi
tivo
debe
ace
ptar
cual
quie
r in
terf
eren
cia,
incl
uyen
do la
qu
e pu
eda
caus
ar s
u op
erac
ión
no d
esea
da.
This
dev
ice
com
plie
s w
ith In
dust
ry C
anad
a’s
licen
ce-e
xem
pt R
SSs.
Ope
ratio
n is
su
bjec
t to
the
follo
win
g tw
o co
nditi
ons:
(1) T
his
devi
ce m
ay n
ot ca
use
inte
rfer
ence
; and
(2) T
his
devi
ce m
ust a
ccep
t any
inte
rfer
ence
, inc
ludi
ng in
terf
eren
ce th
at m
ay
caus
e un
desi
red
oper
atio
n of
the
devi
ce.
Le p
rése
nt a
ppar
eil e
st co
nfor
me
aux
CNR
d’In
dust
rie
Cana
da a
pplic
able
s au
x ap
pare
ils ra
dio
exem
pts
de li
cenc
e. L
’expl
oita
tion
est a
utor
isée
aux
deu
x co
nditi
ons
suiv
ante
s :
(1) l
’app
arei
l ne
doit
pas
prod
uire
de
brou
illag
e;(2
) l’u
tilis
ateu
r de
l’app
arei
l doi
t acc
epte
r tou
t bro
uilla
ge r
adio
élec
triq
ue s
ubi,
mêm
e si
le b
roui
llage
est
sus
cept
ible
d’en
com
prom
ettr
e le
fonc
tionn
emen
t.
TA-2016/2398
APPR
OVED
For S
outh
Afr
ica
For B
razi
l
0434
9-16
-100
21Es
te e
quip
amen
to o
pera
em
car
áter
sec
undá
rio,
isto
é, n
ão te
m
dire
ito a
pro
teçã
o co
ntra
inte
rfer
ênci
a pr
ejud
icia
l, m
esm
o de
es
taçõ
es d
o m
esm
o tip
o e
não
pode
caus
ar in
terf
erên
cia
a si
stem
as o
pera
ndo
em ca
ráte
r pri
már
io.
Para
con
sulta
s, v
isite
: ww
w.a
nate
l.gov
.br
For U
SA, C
anad
aFo
r Ta
iwan
For
Chin
a
For
Kor
ea
For
Arge
ntin
aFo
r Sin
gapo
re
For C
anad
a
For M
exic
o
Info
rmat
ion
abou
t Blu
etoo
th®
第十
二條
經
型式
認證
合格
之低
功率
射頻
電機
,非
經許
可,
公司
、商
號或
使用
者均
不得
擅自
變
更頻
率、
加大
功率
或變
更原
設計
之特
性及
功能
。
第十
四條
低
功率
射頻
電機
之使
用不
得影
響飛
航安
全及
干擾
合法
通信
;經
發現
有干
擾現
象時
,
應立
即停
用,
並改
善至
無干
擾時
方得
繼續
使用
。前
項合
法通
信,
指依
電信
法規
定作
業之
無線
電通
信。
低功
率射
頻電
機須
忍受
合法
通信
或工
業、
科學
及醫
療用
電波
輻射
性電
機設
備之
干擾
。
1. ■ 使
用频率:2.4 - 2.4835 GHz
■ 等
效全向辐射功率(EIRP):天线增益<10dBi 时:≤100 mW 或
≤20 dBm
■ 最
大功率谱密度:天线增益<10dBi 时:≤20 dBm / MHz(EIRP)
■ 载
频容限:20 ppm
■ 帯
外发射功率(在
2.4-2.4835GHz 頻段以外)≤
-80 dBm / Hz (EIRP)
■ 杂
散发射(辐
射)功
率(对
应载波±2.5 倍信道带宽以外):
≤-33 dBm / 100 kHz (2.4 - 2.4835 GHz)
2. 不得擅自更改发射频率、加大发射功率(包
括额外加装射频功率放大器),
不得擅自外接
天线或改用其它发射天线;
3. 使用时不得对各种合法的无线电通信业务产生有害干扰;一旦发现有干扰现象时,应立
即停止使用,并采取措施消除干扰后方可继续使用;
4. 使用微功率无线电设备,必须忍受各种无线电业务的干扰或工业、科学及医疗应用设备
的辐射干扰;
5. 不得在飞机和机场附近使用。
1.
해당
무선
설비
는 전
파혼
신 가
능성
이 있
으므
로 인
명안
전과
관련
된 서
비스
는 할
수
없습
니다
2.
B 급
기기
(가
정용
방송
통신
기자
재)
이
기기
는 가
정용
(B
급)
전자
파적
합기
기로
서 주
로 가
정에
서 사
용하
는 것
을
목적
으로
하며
, 모
든 지
역에
서 사
용할
수 있
습니
다.
3.
인증
을받
은 상
표
KA
WA
I
이름
:4.
기자
재 명
칭:
특정
소출
력 무
선기
기(
무선
데이
터통
신시
스템
용 무
선기
기)
5.
모델
명:
MB
H7B
LZ
07
6.
제조
년 월
: 제
품에
붙어
있는
라벨
을 확
인하
시기
바랍
니다
.7.
제조
자:
Kaw
ai M
usic
al In
str
um
ents
Manufa
ctu
ring C
o., L
td.
8.
원산
지:
일본
C-1
7079
Com
plie
s w
ithIM
DA
Sta
ndar
dsD
A10
7248
Mar
ca: K
AWAI
Mod
elo:
MBH
7BLZ
07


CA58 Owner’s Manual818901KPSZ-0985 R101OW1115E-S1712Printed in IndonesiaCopyright © 2017 Kawai Musical Instruments Mfg. Co.,Ltd. All Rights Reserved.