interspire bigcommerce (Знакомство с системой)
TRANSCRIPT
INTERSPIRE SHOPPING CART
Interspire Pty. Ltd.
User’s GuideEdition 1.0December 2008

3
About This User’s Guide
How to Use This User’s GuideThis user’s guide describes Interspire Shopping Cart’s Graphical User Interface (GUI). It shows you how to use each screen in the GUI.
• Use the Introduction to get a basic overview of Interspire Shopping Cart. See page 31.
• Use the Getting Started chapter to start setting up and using your store right away. See page 37.
• Use the Table of Contents (page 5), List of Figures (page 15) and List of Tables (page 25) to find information about a particular screen in the GUI.
• Use the Index to find information on a specific keyword. See page 395.
• Use the Troubleshooting chapter to diagnose and solve specific problems. See page 391.
• Use the rest of the user’s guide to see in‐depth descriptions of Interspire Shopping Cart’s features.
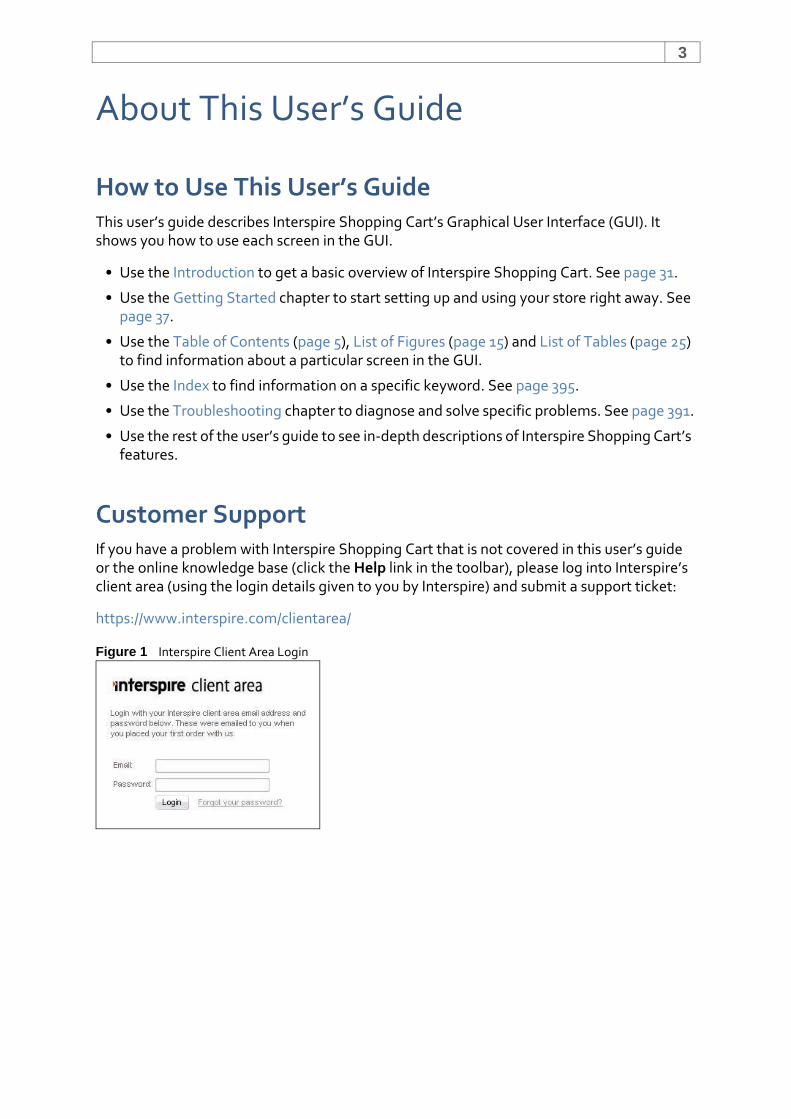
Customer SupportIf you have a problem with Interspire Shopping Cart that is not covered in this user’s guide or the online knowledge base (click the Help link in the toolbar), please log into Interspire’s client area (using the login details given to you by Interspire) and submit a support ticket:
https://www.interspire.com/clientarea/
Figure 1 Interspire Client Area Login
ABOUT THIS USER’S GUIDE4
Written by Rick Carlile.
Copyright 2008 Interspire Pty. Ltd. (ACN 107 422 631); www.interspire.com.
All rights reserved. All trademarks and registered trademarks used are the properties of their respective owners.
DISCLAIMER: The information in this user’s guide is accurate at the time of writing. This user’s guide is provided “as is” without express or implied warranty of any kind. Neither Interspire Pty. Ltd. nor its agents assume any liability for inaccuracies in this user’s guide, or losses incurred by use or misuse of the information in this user’s guide.
5
Table of Contents
About This User’s Guide.................................................................... 3
How to Use This User’s Guide ............................................................................ 3Customer Support ............................................................................................. 3
Table of Contents............................................................................. 5
List of Figures ................................................................................ 15
List of Tables ................................................................................. 25
I: Introduction.........................................................29
Introduction .................................................................................. 31
Welcome to Interspire Shopping Cart .............................................................. 31Interspire Shopping Cart Overview .................................................................. 31
Customers ............................................................................................................33Customer Groups ............................................................................................33
Orders ...................................................................................................................33Shipments and Returns ...................................................................................33
Products ...............................................................................................................34Brands ............................................................................................................34Categories ......................................................................................................34Variations .......................................................................................................34Product Reviews .............................................................................................34Inventory Tracking ..........................................................................................34
Your Store’s Website ............................................................................................35Store Design ...................................................................................................35Web Pages ......................................................................................................35News Items, etc. .............................................................................................35Promotions .....................................................................................................35
Store Settings .......................................................................................................35Payment Methods ..........................................................................................36
Backups ................................................................................................................36
Getting Started...............................................................................37
TABLE OF CONTENTS6
Logging In to Interspire Shopping Cart .............................................39
The Interspire Shopping Cart Interface .............................................41
The Interspire Shopping Cart Interface at a Glance ......................................... 41Tooltips ................................................................................................................ 41Sorting Lists .........................................................................................................42Navigating Lists ....................................................................................................42Required Fields .....................................................................................................42Confirmation Notices ........................................................................................... 43
The Toolbar .................................................................................................... 43The Navigation Bar ......................................................................................... 44
The Home Screen ...........................................................................47
Using the Home Screen ...................................................................................47
Using Views................................................................................... 49
Creating a New View ....................................................................................... 49
II: Designing Your Store .......................................... 51
Store Design...................................................................................53
Store Design Overview ....................................................................................53Selecting a Store Design ..................................................................................53Editing a Store Design .................................................................................... 55Ordering a Custom Store Design ..................................................................... 56Downloading New Store Designs .....................................................................57Configuring Your Logo .....................................................................................57Downloading New Logos ................................................................................ 59Activating or Deactivating Design Mode ......................................................... 60Designing Emails ............................................................................................ 60
Using Design Mode .........................................................................63
Identifying a Page Element ............................................................................. 64Saving Changes and Exiting Design Mode ....................................................... 65Editing Your Store’s Layout ............................................................................ 65Editing Your Store’s Text ................................................................................ 66
TABLE OF CONTENTS 7
Editing Your Store’s HTML .............................................................................. 67
Using the Store Editor .................................................................... 69
Store Editor Overview .....................................................................................69Tools ............................................................................................................... 70Supporting Files .............................................................................................. 70Template Files ................................................................................................. 71Code ............................................................................................................... 71
The HTML Editor.............................................................................73
Using the HTML Editor .................................................................................... 73HTML Editor Overview .......................................................................................... 73Using Design Tools ...............................................................................................74
Adding a Link to Your Store ............................................................................78Creating and Editing Hyperlinks ..................................................................... 82Uploading Files to the Interspire Shopping Cart Server .................................. 84Creating and Editing Email Links ....................................................................85Inserting and Editing Images .......................................................................... 86Inserting and Editing Flash Animations .......................................................... 90Inserting and Editing Other Media ................................................................. 94Creating and Editing Tables ........................................................................... 96Inserting and Editing Forms ..........................................................................100
Using the Editing Window ................................................................................... 107Composing and Editing Text ......................................................................... 107Manipulating Images, Flash and Other Media ............................................... 107Manipulating Tables .....................................................................................109Composing and Editing HTML ...................................................................... 110Previewing Your HTML Document ................................................................ 110
Using Tabs .......................................................................................................... 111Simple and Complete Modes ........................................................................ 111
III: Managing Your Store........................................ 113
Creating and Managing User Accounts............................................115
User Account Overview ................................................................................. 115User Privileges .................................................................................................... 115
Managing User Accounts ............................................................................... 115Creating and Editing User Accounts .................................................................... 115Configuring User Account Settings .....................................................................116
TABLE OF CONTENTS8
Deleting User Accounts ...................................................................................... 121
Orders.......................................................................................... 123
Orders Overview ............................................................................................123Shipments .......................................................................................................... 124Tracking Numbers .............................................................................................. 124
Viewing and Managing Orders .......................................................................125Viewing and Sending Order Messages ................................................................ 129
Sending a Message ....................................................................................... 130Printing Invoices ..................................................................................................131Printing Packing Slips ..........................................................................................131Viewing Notes .................................................................................................... 132Creating a Shipment ............................................................................................133Exporting Orders ................................................................................................ 134
Adding and Editing Orders .............................................................................135Adding an Order From a New Customer ............................................................. 135Adding an Order From an Existing Customer ...................................................... 142Adding an Order From an Anonymous Customer ............................................... 143
Searching Orders ...........................................................................................145Quick Order Search ............................................................................................ 145Advanced Order Search ...................................................................................... 145
Viewing Shipments ........................................................................................147Searching Shipments .......................................................................................... 148
Quick Shipment Search ................................................................................ 149Advanced Shipment Search ......................................................................... 149
Exporting Shipments .......................................................................................... 151
Viewing and Managing Return Requests ........................................................152Searching Return Requests ................................................................................. 153
Quick Return Request Search ....................................................................... 154Advanced Return Request Search ................................................................. 154
Importing Tracking Numbers .........................................................................155
Customers....................................................................................161
Customers Overview ......................................................................................161Customer Groups ............................................................................................... 162
Viewing and Managing Customers .................................................................163Exporting Customers’ Details ............................................................................. 166Viewing Notes .................................................................................................... 167
Adding and Editing Customers ...................................................................... 168Customer Details ................................................................................................ 168Customer Address Book ..................................................................................... 169
Adding an Address ....................................................................................... 170
TABLE OF CONTENTS 9
Viewing and Managing Customer Groups ...................................................... 172Creating Customer Groups ............................................................................ 172Searching Customer Records .........................................................................175
Quick Customer Search ....................................................................................... 175Advanced Customer Search ................................................................................ 176
Importing Customers .....................................................................................177
Products.......................................................................................183
Products Overview ........................................................................................ 183Product Types .....................................................................................................184Product Variations ..............................................................................................184Product Categories .............................................................................................185Product Brands ...................................................................................................185Inventory Management .......................................................................................185Product Reviews .................................................................................................185
Viewing and Managing Products ................................................................... 186Exporting Products’ Details .................................................................................188Bulk Editing Products ..........................................................................................189
Adding and Editing Products ......................................................................... 191Tabs Overview ....................................................................................................192Product Details ...................................................................................................193Product Files .......................................................................................................196Related Products .................................................................................................198Inventory Tracking ..............................................................................................199Product Variations ..............................................................................................199Custom and Configurable Fields ..........................................................................201Custom and Configurable Fields Example .......................................................... 202Other Details ......................................................................................................203
Custom Product Templates ......................................................................... 206Discount Rules ....................................................................................................207
Viewing and Managing Product Categories ...................................................208Adding and Editing Product Categories .........................................................209
Custom Category Templates ...............................................................................211
Viewing and Managing Product Variations .................................................... 212Adding and Editing Product Variations .......................................................... 213Searching Product Details ............................................................................. 214
Quick Product Search .........................................................................................215Advanced Product Search ...................................................................................215
Importing Products’ Details ........................................................................... 217Viewing and Approving Product Reviews ......................................................222Editing Product Reviews ................................................................................ 223Viewing and Managing Product Brands .........................................................224
TABLE OF CONTENTS10
Adding New Product Brands ...............................................................................224Editing Product Brands ....................................................................................... 225
Website Content........................................................................... 227
Website Content Overview ............................................................................227Viewing and Managing News Items .............................................................. 228Creating and Editing News Items .................................................................. 229Viewing and Managing Web Pages ............................................................... 230Creating and Editing Web Pages ....................................................................231
Normal Web Page .............................................................................................. 231Website Link Page .............................................................................................. 233Syndicated Content Page ................................................................................... 234Contact Form Page ............................................................................................. 235Custom Page Templates ..................................................................................... 237
Promotions ..................................................................................239
Promotions Overview ................................................................................... 239Banners .............................................................................................................. 239Coupons .............................................................................................................240Gift Certificates .................................................................................................. 241Email Newsletter Support ................................................................................... 241Google Products .................................................................................................242Google AdWords ................................................................................................242
Viewing and Managing Banners .................................................................... 243Creating and Editing Banners ........................................................................ 244Viewing and Managing Coupon Codes .......................................................... 245Creating and Editing Coupon Codes ...............................................................247Viewing and Managing Gift Certificates ........................................................ 249
Searching Gift Certificates .................................................................................. 251Advanced Gift Certificate Search .................................................................. 251
Exporting Email Subscriber Details ................................................................253Exporting a Google Products Feed ................................................................ 254Creating and Exporting Google AdWords .......................................................255
Statistics...................................................................................... 259
Statistics Overview ....................................................................................... 259Defining a Date Range ........................................................................................260Using Statistical Graphs ......................................................................................260
Graph Labels ................................................................................................260Using Statistical Pie Charts ................................................................................. 261Deleting Statistics ..............................................................................................262
TABLE OF CONTENTS 11
Viewing General Store Statistics ...................................................................262Store Snapshot .................................................................................................. 262Top 20 Customers ...............................................................................................263Best Selling Products ......................................................................................... 264Order Locations ..................................................................................................265
Viewing Order Statistics ................................................................................ 267Orders Overview .................................................................................................267Orders By Items Sold ......................................................................................... 269Orders By Revenue .............................................................................................270
Viewing Product Statistics ............................................................................. 270Products Overview .............................................................................................. 271Popular Products ................................................................................................272Inventory Report ................................................................................................. 273
Viewing Customer Statistics .......................................................................... 274Customers By Date .............................................................................................274Revenue Per Customer ........................................................................................276
Viewing Search Statistics ...............................................................................277Overview ............................................................................................................ 277Keywords With Results .......................................................................................278Keywords Without Results ..................................................................................278Best Performing Keywords .................................................................................278Worst Performing Keywords ...............................................................................279Search Term Corrections .....................................................................................279
Addons.........................................................................................281
Addons Overview .......................................................................................... 281Viewing Addons ............................................................................................ 281Configuring Addons ......................................................................................282
IV: Interspire Shopping Cart Tools .......................... 285
Backups........................................................................................287
Backups Overview ......................................................................................... 287Creating Backups .......................................................................................... 287Viewing Local Backups ..................................................................................288
Importing and Exporting Stores .....................................................291
Store Import and Export Overview ................................................................ 291Importing a Store .......................................................................................... 291
TABLE OF CONTENTS12
Exporting a Store .......................................................................................... 292
Logs ............................................................................................295
Logs Overview .............................................................................................. 295Viewing System Log ..................................................................................... 296Viewing Staff Action Logs ..............................................................................297
Viewing System Information .........................................................299
System Information Overview ...................................................................... 299Viewing Basic System Information ................................................................ 299Viewing Advanced System Information .........................................................301
V: Interspire Shopping Cart Settings .......................303
Managing Store Settings............................................................... 305
Store Settings Overview ................................................................................305SSL, TLS and Secure Web Pages ........................................................................ 306Public Key Encryption ......................................................................................... 307Cron ................................................................................................................... 308
Locating the Automatic Backup Cron Command .......................................... 308Configuring Cron Support on Your Server ..................................................... 309
Configuring Website Settings ........................................................................312Configuring Localization Settings ..................................................................316Configuring Display Settings ..........................................................................318Configuring Backup Settings ..........................................................................323Configuring Logging Settings ........................................................................325Configuring Miscellaneous Settings ...............................................................327
Managing Shipping Settings.......................................................... 329
Configuring Your Store’s Location ................................................................ 329Configuring Shipping Zones ...........................................................................330
Adding a Shipping Zone ......................................................................................331Zone Settings ................................................................................................331Zone Methods .............................................................................................. 334
Managing Tax Rates ..................................................................... 339
TABLE OF CONTENTS 13
Configuring Tax Settings ............................................................................... 339
Managing Currency Settings ..........................................................343
Configuring Supported Currencies ................................................................ 343Adding or Editing a Currency ..............................................................................344
Configuring Exchange Rate Settings ............................................................. 346
Managing Checkout Settings ........................................................ 349
Configuring General Checkout Settings ......................................................... 349Configuring Built‐In Payment Methods ...............................................................352
Managing Accounting Settings ......................................................355
Configuring General Accounting Settings ...................................................... 355
Managing Gift Certificate Settings..................................................357
Gift Certificate Overview ................................................................................357Configuring Gift Certificate Settings .............................................................. 358
Managing Analytics Settings..........................................................361
Configuring General Analytics Settings ......................................................... 361
Managing Affiliate Settings ...........................................................363
Configuring Affiliate Settings ........................................................................ 363
Managing Notification Settings......................................................365
Configuring General Notification Settings ..................................................... 365Configuring Email Notification Settings ........................................................ 366Configuring MSN Messenger Settings ........................................................... 366Configuring SMS Text Message Settings ....................................................... 367
Managing Live Chat Settings ........................................................ 369
Configuring General Live Chat Settings ......................................................... 369Configuring LivePerson Settings ................................................................... 370Configuring Other Chat Service Settings ........................................................373
Managing Returns Settings............................................................375
TABLE OF CONTENTS14
Configuring Returns Settings ......................................................................... 375
Managing Gift Wrapping Settings .................................................. 379
Viewing and Managing Gift Wrapping Options ..............................................379Adding and Editing Gift Wrapping Options ................................................... 380
Managing Email Marketer Settings ................................................ 383
Integrating Interspire Shopping Cart With Interspire Email Marketer .............383
Managing Knowledge Manager Integration Settings ....................... 385
Integrating Interspire Shopping Cart With Interspire Knowledge Manager .....385Linking Interspire Shopping Cart to Knowledge Manager ................................... 386Integrating Knowledge Manager’s Active Response System ............................... 386
VI: Troubleshooting and Index............................... 389
Troubleshooting ........................................................................... 391
Index ........................................................................................... 395
15
List of FiguresFigure 1: Interspire Client Area Login ............................................................................ 3Figure 1: Interspire Shopping Cart Overview ............................................................... 32Figure 2: Login Screen ................................................................................................ 39Figure 3: Introductory Screen ......................................................................................40Figure 4: The Interspire Shopping Cart Interface at a Glance ....................................... 41Figure 5: Tooltips ........................................................................................................42Figure 6: Knowledge Base Links ..................................................................................42Figure 7: Navigating Lists ............................................................................................42Figure 8: Required Field and Warning ......................................................................... 43Figure 9: Confirmation Notice ..................................................................................... 43Figure 10: The Toolbar ................................................................................................ 43Figure 11: The Navigation Bar .....................................................................................44Figure 12: The Home Link ........................................................................................... 47Figure 13: The Home Screen .......................................................................................48Figure 14: View Menu Example ...................................................................................49Figure 15: Create a New View Example .......................................................................50Figure 16: The Store Design Link ................................................................................ 53Figure 17: Store Design ...............................................................................................54Figure 18: Example Store Preview ............................................................................... 55Figure 19: Select a Design ........................................................................................... 55Figure 20: Design Successfully Applied ....................................................................... 55Figure 21: Check for Updated Store Designs ...............................................................56Figure 22: Order Custom Store Design ........................................................................56Figure 23: Download Store Designs ............................................................................ 57Figure 24: Logo Settings .............................................................................................58Figure 25: Logo Text ...................................................................................................58Figure 26: Specify Logo Text .......................................................................................58Figure 27: Logo Options ..............................................................................................59Figure 28: Artistic Text Logo .......................................................................................59Figure 29: Logo Upload ...............................................................................................59Figure 30: Download Store Designs ............................................................................60Figure 31: Activating Design Mode ..............................................................................60Figure 32: Designing Emails ........................................................................................ 61Figure 33: Editing an Email .........................................................................................62Figure 34: View Store in Design Mode .........................................................................64Figure 35: Identifying a Page Element .........................................................................64Figure 36: Design Mode Toolbar .................................................................................65Figure 37: Four‐Pointed Drag‐and‐Drop Mouse Pointer ..............................................65
LIST OF FIGURES16
Figure 38: Drag Page Element .................................................................................... 65Figure 39: Click to Edit ................................................................................................ 66Figure 40: Editing Display Text ................................................................................... 66Figure 41: New Text .................................................................................................... 67Figure 42: Right‐Click in Design Mode ........................................................................ 67Figure 43: The Store Editor ......................................................................................... 69Figure 44: Store Editor Tools .......................................................................................70Figure 45: File Successfully Updated ............................................................................70Figure 46: Store Editor Supporting Files ......................................................................70Figure 47: Store Editor Template Files .........................................................................71Figure 48: Store Editor Code .......................................................................................71Figure 49: HTML Editor Overview ................................................................................73Figure 50: HTML Design Tools .....................................................................................74Figure 51: The Find/Replace Window ...........................................................................75Figure 52: Check Spelling ........................................................................................... 76Figure 53: Link to Store: Link to Product ..................................................................... 79Figure 54: Link to Store: Link to Category ................................................................... 80Figure 55: Link to Store: Link to Brand ........................................................................ 81Figure 56: Link to Store: Link to Page ......................................................................... 82Figure 57: The Link Screen .......................................................................................... 83Figure 58: The Email Link Screen ................................................................................ 86Figure 59: Images Screen: Images ...............................................................................87Figure 60: Modify Flash Properties ............................................................................. 91Figure 61: Images Screen: Flash .................................................................................. 91Figure 62: Modify Media Properties ............................................................................ 94Figure 63: Images Screen: Media ................................................................................ 95Figure 64: Insert Table ................................................................................................ 96Figure 65: Modifying Table Properties ........................................................................ 97Figure 66: Modifying Cell Properties ........................................................................... 98Figure 67: Insert Form ............................................................................................... 100Figure 68: Insert Text Field ........................................................................................102Figure 69: Insert Text Area ........................................................................................102Figure 70: Insert Hidden Field ....................................................................................103Figure 71: Insert Button .............................................................................................103Figure 72: Insert Checkbox ........................................................................................ 104Figure 73: Insert Radio Button ....................................................................................105Figure 74: Insert List Box .......................................................................................... 106Figure 75: Right‐Click (Text) ......................................................................................107Figure 76: Right‐Click (Image, Flash and Other Media) ............................................. 108Figure 77: Resizing Images, Flash Animations, or Other Media ................................. 108Figure 78: Right‐Click (Table) .................................................................................... 109
LIST OF FIGURES 17
Figure 79: Table Icons ............................................................................................... 109Figure 80: Cell Icons .................................................................................................. 110Figure 81: Editing HTML ........................................................................................... 110Figure 82: Previewing an HTML Document ................................................................111Figure 83: HTML Editor Tabs ......................................................................................111Figure 84: Simple and Complete Mode Link ...............................................................111Figure 85: Simple Design Tools ..................................................................................111Figure 86: Complete Design Tools ............................................................................ 112Figure 87: The User Accounts Link ............................................................................ 115Figure 88: Viewing User Accounts ............................................................................. 116Figure 89: Configuring User Account Settings ............................................................117Figure 90: Delete a User Account .............................................................................. 121Figure 91: The Orders Menu ...................................................................................... 123Figure 92: Example Tracking Report ......................................................................... 125Figure 93: Viewing Orders ......................................................................................... 126Figure 94: Expanded Order ....................................................................................... 127Figure 96: View Order Messages ............................................................................... 129Figure 95: Possible Fraudulent Order ........................................................................ 129Figure 97: Send a New Message ................................................................................ 130Figure 98: Printing an Invoice .....................................................................................131Figure 99: Printing a Packing Slip .............................................................................. 132Figure 100: Viewing Notes .........................................................................................133Figure 101: Create a Shipment ...................................................................................133Figure 102: Export Orders ......................................................................................... 134Figure 103: Export Orders Dialog .............................................................................. 135Figure 104: Add Order: New Customer ..................................................................... 136Figure 105: Search Product List ................................................................................. 138Figure 106: Select Product ........................................................................................ 139Figure 107: Order Shipping & Handling ..................................................................... 140Figure 108: Use Custom Shipping Method ................................................................ 140Figure 109: Apply Coupon and Gift Certificate .......................................................... 140Figure 110: Payment Method Example: Credit Card (Manual) ................................... 141Figure 111: Add Order: Existing Customer ................................................................. 142Figure 112: Add Order: Search for Customer ............................................................. 143Figure 113: Add Order: Anonymous Customer .......................................................... 144Figure 114: Searching Orders .................................................................................... 145Figure 115: Advanced Orders Search ......................................................................... 146Figure 116: View Shipments ...................................................................................... 147Figure 117: Expanded Shipment ................................................................................ 148Figure 118: Searching Shipments .............................................................................. 149Figure 119: Advanced Shipment Search .................................................................... 150
LIST OF FIGURES18
Figure 120: Search by Date: Custom ..........................................................................150Figure 121: Export Shipments ....................................................................................151Figure 122: Export Shipments Dialog .........................................................................151Figure 123: View Return Requests ..............................................................................152Figure 124: Expanded Request ..................................................................................153Figure 125: Searching Return Requests ......................................................................154Figure 126: Advanced Return Request Search ...........................................................154Figure 127: Search by Date: Custom ..........................................................................155Figure 128: Example Tracking Number CSV File ........................................................156Figure 129: Import Tracking Numbers .......................................................................156Figure 130: Import Tracking Numbers: Map Fields ..................................................... 157Figure 131: Import Tracking Numbers: Ready to Import ............................................. 157Figure 132: Import Tracking Numbers: In Progress ....................................................158Figure 133: Import Tracking Numbers: Report ...........................................................158Figure 134: Import Tracking Numbers: Error ..............................................................158Figure 135: Import Tracking Numbers: Error Report ..................................................159Figure 136: Import Tracking Numbers: Import Successful ..........................................159Figure 137: The Customers Menu ...............................................................................161Figure 138: View Customers ..................................................................................... 164Figure 139: Expanded Customer Details ....................................................................165Figure 140: Export Customers ................................................................................... 166Figure 141: Export Customers Dialog .........................................................................167Figure 142: Viewing Notes .........................................................................................167Figure 143: Add a Customer: Customer Details ......................................................... 168Figure 144: Add a Customer: Customer Address Book ...............................................170Figure 145: Add a Customer: Add an Address ............................................................ 171Figure 146: Customer Groups ....................................................................................172Figure 147: Create a Customer Group ........................................................................ 173Figure 148: Select Visible Categories ......................................................................... 173Figure 149: Category Level Discount Configuration ...................................................174Figure 150: Product Level Discount Configuration .....................................................174Figure 151: Product Level Discount: Select Products ..................................................174Figure 152: Searching Customer List ......................................................................... 175Figure 153: Advanced Customer Search .....................................................................176Figure 154: Search by Date: Custom .......................................................................... 177Figure 155: Example Customer Information CSV File .................................................178Figure 156: Import Customer Details .........................................................................179Figure 157: Import Customer Details: Map Fields ...................................................... 180Figure 158: Import Customer Details: Ready to Import ............................................. 180Figure 159: Import Customer Details: In Progress ..................................................... 180Figure 160: Import Customer Details: Report .............................................................181
LIST OF FIGURES 19
Figure 161: Import Customer Details: Error ............................................................... 181Figure 162: Import Customer Details: Error Report ................................................... 181Figure 163: Import Customer Details: Import Successful ........................................... 182Figure 164: The Products Menu ................................................................................. 183Figure 165: View Products ......................................................................................... 187Figure 166: Available Products .................................................................................. 188Figure 167: Export Products ...................................................................................... 189Figure 168: Export Products Dialog ........................................................................... 189Figure 169: Bulk Edit Products .................................................................................. 190Figure 170: Change All Prices .................................................................................... 190Figure 171: Expand Categories List ............................................................................ 190Figure 172: Change All Brand Names ........................................................................ 191Figure 173: Add a Product: Product Details ............................................................... 194Figure 174: More Price Options ................................................................................. 195Figure 175: Call For Pricing ........................................................................................ 195Figure 176: Currently Used Image Filename .............................................................. 196Figure 177: Add a Product: Product Files ................................................................... 197Figure 178: Add a Product: Related Products ............................................................ 198Figure 179: Add a Product: Related Products: Extra Fields ......................................... 198Figure 180: Add a Product: Inventory Tracking .......................................................... 199Figure 181: Add a Product: Inventory Tracking: Extra Fields ...................................... 199Figure 182: Add a Product: Product Variations ..........................................................200Figure 183: Add a Product: Product Variations: Extra Fields ......................................200Figure 184: Add a Product: Product Variations: Variation Combinations ...................200Figure 185: Add a Product: Custom and Configurable Fields ..................................... 201Figure 186: Example Custom and Configurable Tab Configuration ............................202Figure 187: Example Custom Field Display ................................................................202Figure 188: Example Configurable Field Display ........................................................ 203Figure 189: Add a Product: Other Details ..................................................................204Figure 190: Add a Product: Select Gift Wrapping ...................................................... 205Figure 191: Example Default Products Template HTML File ...................................... 207Figure 192: Add a Product: Discount Rules ................................................................ 207Figure 193: View Product Categories .........................................................................208Figure 194: Create or Edit Category .......................................................................... 210Figure 195: Example Default Category Template HTML File ..................................... 212Figure 196: View Product Variations ......................................................................... 213Figure 197: Add a Product Variation .......................................................................... 214Figure 198: Searching Product List ............................................................................ 215Figure 199: Advanced Product Search ....................................................................... 216Figure 200: Example Product Information CSV File ................................................... 218Figure 201: Import Product Details ........................................................................... 219
LIST OF FIGURES20
Figure 202: Import Product Details: Map Fields ........................................................ 220Figure 203: Map Fields to Multiple Category Levels ...................................................221Figure 204: Import Product Details: Ready to Import .................................................221Figure 205: Import Product Details: In Progress .........................................................221Figure 206: Import Product Details: Report ...............................................................221Figure 207: Import Product Details: Error ..................................................................221Figure 208: Import Product Details: Error Report ...................................................... 222Figure 209: Import Product Details: Import Successful ............................................. 222Figure 210: View Submitted Product Reviews ........................................................... 222Figure 211: Edit Product Review ............................................................................... 223Figure 212: View Brands ........................................................................................... 224Figure 213: Add Brands ............................................................................................. 225Figure 214: Edit a Brand ........................................................................................... 225Figure 215: The Website Content Menu .....................................................................227Figure 216: Example News Items ...............................................................................227Figure 217: Page and Sub‐Page Navigation Example ................................................ 228Figure 218: View News Items .................................................................................... 228Figure 219: Create a News Item ................................................................................ 229Figure 220: View Web Pages .................................................................................... 230Figure 221: Create a Normal Web Page .................................................................... 232Figure 222: Create a Website Link Page .................................................................... 234Figure 223: Create a Syndicated Content Web Page ..................................................235Figure 224: Create a Contact Form Web Page .......................................................... 236Figure 225: Example Default Page Template HTML File ............................................237Figure 226: The Promotions Menu ........................................................................... 239Figure 227: Example Banner Display ......................................................................... 240Figure 228: Example Coupon / Gift Certificate Code Entry ........................................ 240Figure 229: Example Gift Certificate ......................................................................... 241Figure 230: Example Newsletter Signup Fields ......................................................... 241Figure 231: Example Google Products Search Results ............................................... 242Figure 232: Example AdSense Adverts ..................................................................... 243Figure 233: View Banners .......................................................................................... 243Figure 234: Create a Banner ..................................................................................... 244Figure 235: Banner Display Dates ............................................................................. 245Figure 236: View Coupon Codes ............................................................................... 246Figure 237: Create New Coupon Code ....................................................................... 248Figure 238: View Gift Certificates ............................................................................. 250Figure 239: Expanded Gift Certificate ....................................................................... 250Figure 240: Search Gift Certificates .......................................................................... 252Figure 241: Export Email Subscriber Details ...............................................................253Figure 242: Export Email Subscriber Details: Number of Subscribers .........................253
LIST OF FIGURES 21
Figure 243: Export Email Subscriber Details Dialog ................................................... 254Figure 244: Export Google Products Feed ................................................................. 254Figure 245: Export Google Products Feed: Download ............................................... 254Figure 246: Export Google Products Feed: Dialog ..................................................... 255Figure 247: Create Google AdWords ......................................................................... 255Figure 248: Google AdWord Output Format ............................................................. 256Figure 249: Export Google AdWords: Dialog ............................................................. 257Figure 250: The Statistics Menu ................................................................................259Figure 251: Date Range Menu ...................................................................................260Figure 252: Custom Date Range ...............................................................................260Figure 253: Graph Labels ........................................................................................... 261Figure 254: Graph Toggle Controls ........................................................................... 261Figure 255: Pie Chart Details .....................................................................................262Figure 256: Store Statistics: Store snapshot .............................................................. 263Figure 257: Store Statistics: Top 20 Customers .........................................................264Figure 258: Store Statistics: Best Selling Products .................................................... 265Figure 259: Store Statistics: Order Locations ............................................................266Figure 260: Customer Information ............................................................................266Figure 261: Order Statistics: Orders Overview ..........................................................268Figure 262: Order Statistics: Orders By Items Sold ....................................................269Figure 263: Order Statistics: Orders By Revenue ....................................................... 270Figure 264: Product Statistics: Products Overview ................................................... 271Figure 265: Product Statistics: Popular Products ...................................................... 272Figure 266: Product Statistics: Inventory Report ...................................................... 273Figure 267: Customer Statistics: Customers By Date ................................................ 275Figure 268: Customer Statistics: Revenue Per Customer .......................................... 276Figure 269: Search Statistics: Overview .....................................................................277Figure 270: Search Statistics: Keywords With Results ............................................... 278Figure 271: Search Statistics: Keywords Without Results .......................................... 278Figure 272: Search Statistics: Best‐Performing Keywords ........................................ 279Figure 273: Search Statistics: Worst‐Performing Keywords ...................................... 279Figure 274: Search Statistics: Search Term Corrections ............................................280Figure 275: The Addons Menu ................................................................................... 281Figure 276: View Addons ..........................................................................................282Figure 277: Configure Addons ................................................................................... 283Figure 278: The Tools > Backups Option ................................................................... 287Figure 279: Create a Backup ......................................................................................288Figure 280: Viewing Local Backups ...........................................................................289Figure 281: The Tools > Store Importer and Store Exporter Options ......................... 291Figure 282: Importing a Store: Step 1 ........................................................................292Figure 283: Importing a Store: Step 2 ........................................................................292
LIST OF FIGURES22
Figure 284: Store Import Warning ............................................................................ 292Figure 285: Exporting a Store: Step 1 ........................................................................ 293Figure 286: Exporting a Store: Step 2 ....................................................................... 293Figure 287: Store Import Warning ............................................................................. 293Figure 288: The Tools > Store Logs Option ............................................................... 295Figure 289: View System Logs .................................................................................. 296Figure 290: Expanded System Log ........................................................................... 296Figure 291: View Staff Action Log ............................................................................. 298Figure 292: The Tools > Store Logs Option ............................................................... 299Figure 293: Basic System Information ...................................................................... 300Figure 294: Full System Information ..........................................................................301Figure 295: The Settings > Store Settings Option ......................................................305Figure 296: Example SSL Transaction ........................................................................307Figure 297: Cron Path ............................................................................................... 309Figure 298: Cron Timing Configuration ......................................................................310Figure 299: cPanel: Advanced ...................................................................................310Figure 300: cPanel: Standard or Advanced Cron Mode .............................................. 311Figure 301: cPanel: Standard Cron Setup ................................................................... 311Figure 302: cPanel: Advanced Cron Setup .................................................................312Figure 303: Store Settings: Website Settings ............................................................. 313Figure 304: Website Settings: SMTP Server Details ...................................................315Figure 305: Store Settings: Localization Settings ....................................................... 317Figure 306: Store Settings: Display Settings ..............................................................319Figure 307: Store Settings: Backup Settings ............................................................. 324Figure 308: Remote FTP Backups ............................................................................. 324Figure 309: Automatic Backups .................................................................................325Figure 310: Store Settings: Logging Settings ............................................................ 326Figure 311: Store Settings: Miscellaneous Settings ....................................................327Figure 312: The Settings > Shipping Settings Option ................................................ 329Figure 313: Shipping Settings: Store Location ........................................................... 329Figure 314: Shipping Settings: Store Location ...........................................................330Figure 315: Zone Settings ..........................................................................................332Figure 316: Country‐based Shipping Zone .................................................................332Figure 317: Country and State/Province‐based Shipping Zone ...................................332Figure 318: ZIP/Post Code Based Shipping Zone ........................................................ 333Figure 319: Free Shipping Minimum Order Value ....................................................... 333Figure 320: Flat Handling Fee For a Shipping Zone ....................................................334Figure 321: Zone Methods .........................................................................................334Figure 322: Add a Shipping Method ...........................................................................334Figure 323: Flat Rate Per Item ....................................................................................336Figure 324: Ship By Weight ........................................................................................336
LIST OF FIGURES 23
Figure 325: Ship By Order Total ................................................................................ 336Figure 326: Flat Rate Per Order ................................................................................. 336Figure 327: Shipping Method Setup Completed .........................................................337Figure 328: The Settings > Tax Settings Option ......................................................... 339Figure 329: Shipping Settings: Tax Settings .............................................................. 339Figure 330: Flat Tax Rate ........................................................................................... 340Figure 331: Tax in the Checkout Page ........................................................................ 340Figure 332: Tax Options ............................................................................................ 341Figure 333: Tax Rate Details ...................................................................................... 341Figure 334: Tax Options Completed .......................................................................... 342Figure 335: The Settings > Currency Settings Option ................................................ 343Figure 336: Currency Options .................................................................................... 343Figure 337: Add a Currency ........................................................................................ 345Figure 338: Currency Converter ................................................................................. 345Figure 339: Exchange Rate Settings .......................................................................... 347Figure 340: The Settings > Checkout Settings Option ............................................... 349Figure 341: General Checkout Settings ..................................................................... 350Figure 342: Built‐In Payment Methods ...................................................................... 353Figure 343: The Settings > Accounting Settings Option ............................................. 355Figure 344: Accounting Settings ............................................................................... 355Figure 345: The Settings > Gift Certificate Settings Option ........................................357Figure 346: Gift Certificate Settings .......................................................................... 358Figure 347: Specified Gift Certificate Amounts .......................................................... 358Figure 348: Certificate Expiry Date ............................................................................ 359Figure 349: The Settings > Analytics Settings Option ................................................ 361Figure 350: Settings: Analytics Settings .................................................................... 361Figure 351: The Settings > Affiliate Settings Option .................................................. 363Figure 352: Settings: Affiliate Settings ...................................................................... 364Figure 353: The Settings > Notification Settings Option ............................................ 365Figure 354: Settings: Notification Settings ................................................................ 365Figure 355: Settings: Notification Settings: Email ..................................................... 366Figure 356: Settings: Notification Settings: MSN ...................................................... 367Figure 357: Settings: Notification Settings: SMS ....................................................... 368Figure 358: The Settings > Live Chat Settings Option ................................................ 369Figure 359: Settings: Live Chat Settings .................................................................... 369Figure 360: Settings: Live Chat Settings: LivePerson ................................................. 370Figure 361: Create a LivePerson Account ...................................................................371Figure 362: LivePerson Wizard .................................................................................. 372Figure 363: LivePerson Configuration Settings ...........................................................373Figure 364: Settings: Live CHat Settings: Other Chat Service .....................................373Figure 365: Configuring The Settings > Returns Settings Option ................................375
LIST OF FIGURES24
Figure 366: Settings: Return Settings ........................................................................376Figure 367: Configuring The Settings > Gift Wrapping Settings Option ......................379Figure 368: Settings: Gift Wrapping Settings ............................................................ 380Figure 369: Add a New Gift Wrapping Option ............................................................381Figure 370: The Settings > Email Marketer Settings Option .......................................383Figure 371: Email Marketer: Enable XMP API ............................................................ 384Figure 372: The Settings > Knowledge Manager Option ............................................385Figure 373: Knowledge Manager: Template .............................................................. 386Figure 374: Settings: Knowledge Manager .................................................................387Figure 375: Integrate Knowledge Manager Into Contact Page ....................................387
25
List of TablesTable 1: Navigating Lists ............................................................................................42Table 2: The Toolbar .................................................................................................. 43Table 3: The Navigation Bar .......................................................................................45Table 4: The Home Screen .........................................................................................48Table 5: Logo Settings ...............................................................................................58Table 6: Email Types .................................................................................................. 61Table 7: Store Editor Tools ......................................................................................... 70Table 8: HTML Design Tools ...................................................................................... 74Table 9: The Link Screen: Common Fields .................................................................. 83Table 10: The Link Screen: Target Window Options ................................................... 83Table 11: Link and Images Screens: Uploading Files and Images ................................84Table 12: Images Screen: Images ............................................................................... 87Table 13: Images Screen: Flash ................................................................................... 91Table 14: Images Screen: Media .................................................................................95Table 15: Viewing User Accounts .............................................................................. 116Table 16: Configuring User Account Settings ............................................................117Table 17: Viewing Orders .......................................................................................... 126Table 18: View Order Messages ............................................................................... 129Table 19: Add Order: New Customer .........................................................................137Table 20: Add Order: Existing Customer .................................................................. 143Table 21: Add Order: Anonymous Customer ............................................................ 145Table 22: Advanced Order Search ............................................................................ 146Table 23: View Shipments ........................................................................................ 147Table 24: Advanced Shipment Search ...................................................................... 150Table 25: View Return Requests ............................................................................... 152Table 26: Advanced Return Request Search ............................................................. 154Table 27: Example Store Categories ......................................................................... 162Table 28: View Customers ........................................................................................ 164Table 29: Add a Customer: Customer Details ........................................................... 168Table 30: Add a Customer: Customer Address Book ................................................. 170Table 31: Adding a Customer: Add an Address ..........................................................171Table 32: Customer Groups ...................................................................................... 172Table 33: Advanced Customer Search ...................................................................... 176Table 34: View Products ........................................................................................... 187Table 35: Bulk Edit Products ..................................................................................... 190Table 36: Add a Product: Product Details ................................................................. 194Table 37: Add a Product: Product Files ..................................................................... 197Table 38: Add a Product: Product Variations: Variation Combinations .....................200
LIST OF TABLES26
Table 39: Add a Product: Other Details .................................................................... 204Table 40: View Product Categories .......................................................................... 208Table 41: Create or Edit Category .............................................................................210Table 42: View Product Variations ............................................................................213Table 43: Add a Product Variation ............................................................................ 214Table 44: Advanced Customer Search ..................................................................... 216Table 45: View Submitted Product Reviews ............................................................. 222Table 46: View Brands ............................................................................................. 224Table 47: View News Items ...................................................................................... 228Table 48: View Web Page ........................................................................................ 230Table 49: Create a Normal Web Page ...................................................................... 232Table 50: Create a Website Link Page ...................................................................... 234Table 51: Create a Website Syndicated Content Page ...............................................235Table 52: Create a Website Contact Form Page ....................................................... 236Table 53: View Banners ............................................................................................ 243Table 54: Create a Banner ........................................................................................ 244Table 55: View Coupon Codes .................................................................................. 246Table 56: Create New Coupon Code ........................................................................ 248Table 57: View Gift Certificates ................................................................................ 250Table 58: Search Gift Certificates ............................................................................. 252Table 59: Store Statistics: Top 20 Customers ........................................................... 264Table 60: Store Statistics: Best Selling Products ...................................................... 265Table 61: Order Statistics: Orders Overview ............................................................ 268Table 62: Order Statistics: Orders By Items Sold ...................................................... 269Table 63: Order Statistics: Orders By Revenue ..........................................................270Table 64: Product Statistics: Products Overview .......................................................271Table 65: Product Statistics: Popular Products ..........................................................272Table 66: Product Statistics: Inventory Report ..........................................................273Table 67: Customer Statistics: Customers By Date ....................................................275Table 68: Customer Statistics: Revenue Per Customer ..............................................276Table 69: Search Statistics: Keywords With Results ..................................................278Table 70: Search Statistics: Keywords Without Results .............................................278Table 71: Search Statistics: Best‐Performing Keywords ............................................279Table 72: Search Statistics: Best‐Performing Keywords ............................................279Table 73: Search Statistics: Search Term Corrections ............................................... 280Table 74: Create a Backup ........................................................................................ 288Table 75: Viewing Local Backups ............................................................................. 289Table 76: View System Logs .................................................................................... 296Table 77: View System Log ...................................................................................... 298Table 78: Basic System Information ......................................................................... 300Table 79: Store Settings: Website Settings ............................................................... 313
LIST OF TABLES 27
Table 80: Store Settings: Localization Settings .........................................................317Table 81: Store Settings: Display Settings ................................................................ 320Table 82: Store Settings: Backup Settings ................................................................ 324Table 83: Store Settings: Logging Settings ............................................................... 326Table 84: Store Settings: Miscellaneous Settings ..................................................... 327Table 85: Shipping Settings: Store Location ............................................................. 329Table 86: Shipping Settings: Store Location ............................................................. 330Table 87: Supported Real‐Time Shipping Quote Providers’ Websites ....................... 335Table 88: Shipping Methods ......................................................................................337Table 89: Tax Options .............................................................................................. 342Table 90: Currency Options ...................................................................................... 343Table 91: Settings: Gift Wrapping Settings ............................................................... 380

LIST OF TABLES28
29
IINTRODUCTION
This section contains the following chapters:
Introduction (31)
Getting Started (37)
Logging In to Interspire Shopping Cart (39)
The Interspire Shopping Cart Interface (41)
The Home Screen (47)
Using Views (49)

30
31
Introduction
Welcome to Interspire Shopping CartCongratulations on your purchase of Interspire Shopping Cart! Interspire Shopping Cart allows you to quickly and easily set up a fully‐featured Internet store and market your products. Interspire Shopping Cart integrates seamlessly with a variety of other systems and Interspire products to give you the optimum online selling platform available.
Note: If you want to start setting up Interspire Shopping Cart right away, see Getting Started on page 37.
Interspire Shopping Cart OverviewHere’s an overview of how Interspire Shopping Cart works. The figure below shows how Interspire Shopping Cart’s most important components interact. The rest of this chapter describes the components in this figure.
Note: Please bear in mind that this is a simplified depiction and description of Interspire Shopping Cart’s many features. See How to Use This User’s Guide on page 3 for information on finding detailed information on these and other features.
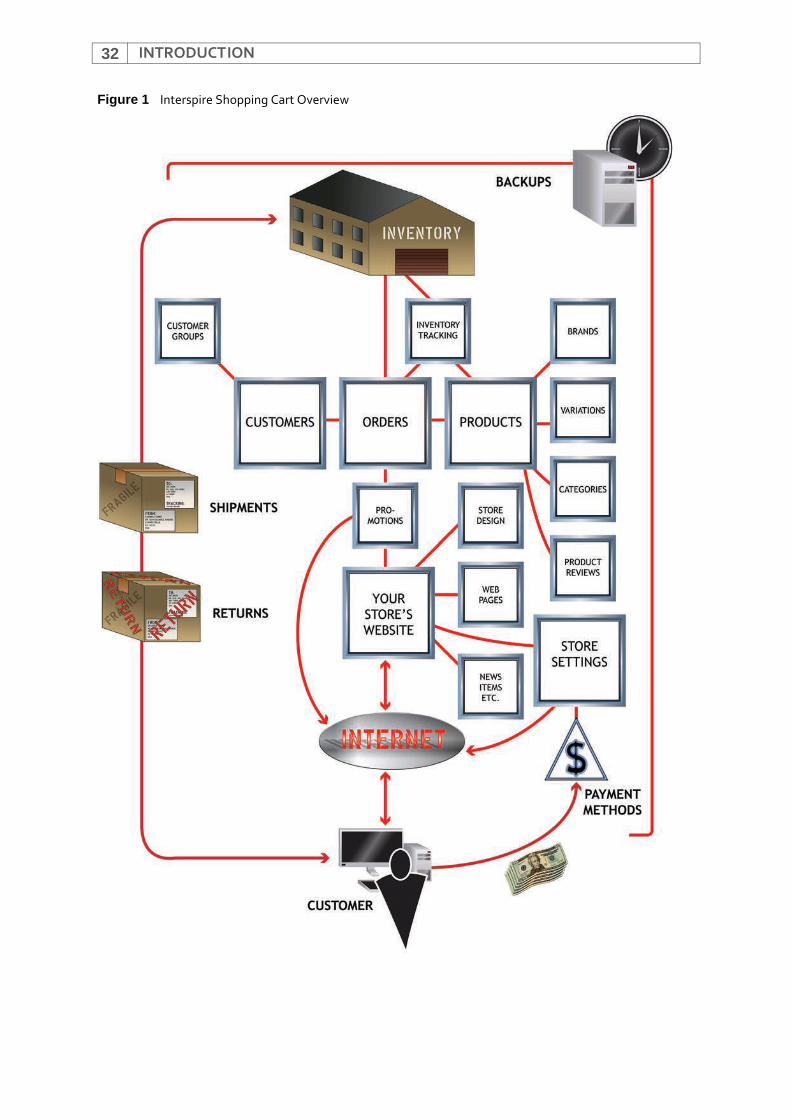
INTRODUCTION32
Figure 1 Interspire Shopping Cart Overview
INTRODUCTION 33
CustomersCustomers are the people who visit your store’s website and purchase goods. Usually, customers create customer accounts with your store, although you can enable “guest checkout,” which allows customers to place orders without creating an account. An account with your store helps a customer to make subsequent purchases more quickly, since Interspire Shopping Cart stores billing and shipping address details. You can also give customers with accounts discounts or other special offers in order to encourage customer sign‐up and retention.
When a customer creates an account (or a Interspire Shopping Cart administrator creates an account for a customer) you can track the customer’s purchasing habits, see lists of purchased products and view customer statistics. You can also give customers store credit (this is one method of providing refunds).
Note: You can export customer information in XML (eXtensible Markup Language) or CSV (Comma‐Separated Values) format.
Customer GroupsYou can assign customers to customer groups. These groups allow you to provide discounts to the customers in the group, or to make certain product lines available only to selected customers. For example, you might want to offer a store‐wide discount to your best customers, or a discount on certain items to wholesale customers.
OrdersWhenever a customer purchases goods from your store, an entry in the orders list is created. The orders list contains a variety of information about each order, including a status value which Interspire Shopping Cart administrators can update when the order is sent, or its circumstances change for other reasons (it is paid for or cancelled, for example).
Shipments and ReturnsWhen you ship an item, an entry is created in the shipments list. This list contains all the orders that have successfully left your store.
You can integrate your orders system with your shipping provider’s tracking system by entering tracking numbers in your orders list. The tracking number appears on the invoice sent to the customer, and in the customer’s “Order status” page in your store’s website.
Note: You can export order and shipment information in XML or CSV format.
If you allow your customers to return products, you can specify the acceptable reasons (a problem with the product, damaged goods, ordered the wrong product by accident, and so on) and also specify the actions a customer can request (replace the item, refund the money, give store credit, and so on).
INTRODUCTION34
ProductsEach item for sale in your store, whether a physical object or a downloadable file, has an entry in the products list. Each product has its own individual product page in your store’s website. Products can be categorized by brand or category in order to allow customers to locate them easily.
BrandsYou can arrange products by brand (manufacturer) and then display them all on a single “brand” page (in addition to a “category” page, if required). For example, if you sell jeans you can create a “Levi’s” page and a “Wrangler” page.
CategoriesYou can arrange products by category (type) and then display them all on a single “category” page (in addition to a “brand” page, if required). You can also create sub‐categories. For example, if you sell footwear, you can create a “boots” category, and “men’s boots” and “ladies’ boots” sub‐categories.
VariationsProduct variations allow you to sell products with minor differences from a single product page. If you sell products with different colors, sizes, capacities, or other such variables, this allows the customer to simply select the required variation from a list when ordering the product.
Product ReviewsYou can allow your customers to submit reviews of your store’s products. These reviews display on each product’s individual product page. You can also configure the review system so that only reviews that you manually approve are added to your store.
Inventory TrackingInterspire Shopping Cart allows you to manage your store’s inventory (stock levels). When you activate inventory tracking in Interspire Shopping Cart, you can enter the number of a product in stock, and set a “low stock value”. Interspire Shopping Cart updates the inventory each time a customer purchases the product. You can see stock levels at a glance, and configure Interspire Shopping Cart to send you an email whenever a product’s inventory level drops below its “low” value.
If you already use a stock management system that uses SKU (Stock Keeping Unit) codes, or other such alphanumeric codes, you can integrate this system with Interspire Shopping Cart by entering each product’s code in the products list.
Note: You can also import SKU codes in bulk via a CSV file.
INTRODUCTION 35
Your Store’s WebsiteYour customers interact with you and your store through your store’s website. Much of your store’s website is created automatically by Interspire Shopping Cart. However, you can make top‐level configuration changes (such as the design template your store uses), and changes to individual pages (either by modifying the design, or by configuring the text that displays when a customer performs specific actions, such as requesting a return or selecting payment by check when placing an order). You can also create new pages for your store, for which a link displays automatically in your store’s other pages, and add other pieces of information (such as news items).
Store DesignUse Interspire Shopping Cart’s built‐in store templates and the powerful drag‐and‐drop store designer to create your stores look and feel quickly and efficiently.
Web PagesInterspire Shopping Cart provides you with a built‐in, fully‐featured WYSIWYG (What You See Is What You Get) HTML editor that lets you create new website pages (which also use the general store template). Build pages for your store that contain shipping, payment and returns information, help and FAQ pages, RSS feed pages, or links to other pages on the Internet (ideal for linking your store with a customer forum, or an online knowledge base).
News Items, etc.You can create news articles, which display as headlines on your store’s main page. Customers can click on the headlines to see the full article. You can also populate your front page with product lists of interest to your customers, such as new products, featured products and best sellers.
PromotionsAs well as offering discounts or special products to certain customer groups, you can create coupon codes that customers enter in your store’s checkout page in order to take advantage of a discount that you specify. Include the coupon codes in your emails and product promotional material in order to build your store’s traffic and orders. Interspire Shopping Cart also supports gift certificates, which work in a similar way to coupon codes, but are purchased by one customer to give to another.
You can integrate Interspire Shopping Cart with online marketing tools such as Google Products and Google AdWords. Interspire Shopping Cart also supports integration with online affiliate marketing systems.
Store SettingsInterspire Shopping Cart’s store settings allow you a great degree of freedom in the way that your store works, and how it works together with other online and offline systems including affiliate marketing programs, accounting applications, shipping quotation and tracking systems, analytics packages, live chat services, email marketing, online knowledge bases and notification methods such as MSN messenger and SMS (text messaging).
INTRODUCTION36
Payment MethodsInterspire Shopping Cart provides a wide variety of ways in which customers can pay for their goods, including built‐in methods (such as cash on delivery (CoD), check, bank deposit, and so on) and supports integration with numerous third‐party payment systems (such as Amazon Simple Pay, Google Checkout and PayPal, for example). You can also configure the tax rates that you want to apply to your products for each region in the world, if required.
BackupsYou can back up your store’s data manually or automatically, to a local destination on your store’s server or via FTP to any other server on the Internet.
If you want to use automatic periodic data backups, you must configure Cron on your server. Cron (an abbreviation of “chronograph”) is a program that activates other programs, commands and processes at pre‐determined times and intervals. It is a way of scheduling tasks to happen automatically.
37
Getting StartedUse this chapter if you want to set up your store straight away.
Note: Interspire Shopping Cart should already be set up and configured on your server. If you are in doubt, check with your system administrator or whoever is in charge of the server.
Steps marked with a red asterisk (*) are necessary. The other steps are not necessary, but allow you to perform additional, useful tasks.
Follow the links to other parts of this user’s guide for information on how to complete each step.
1 Log in to Interspire Shopping Cart. * Use your username and password to access Interspire Shopping Cart.
See Logging In to Interspire Shopping Cart on page 39.
2 Configure your store’s basic information and security settings *Use the Store settings screen’s Website settings tab to configure your store’s general information, and the details of its location on the Internet.
See Configuring Website Settings on page 312.
3 Design your store’s layout *Configure how your store displays, its look and feel.
See Store Design on page 53.
4 Add products to your store *Include information about the products you want to sell in your store.
See Adding and Editing Products on page 191 for information on adding individual products, or adding multiple products from a file.
See Importing Products’ Details on page 217 for information on adding multiple product by importing a store from another commerce application.
5 Configure shipping methods
Specify how you’re going to send your products to your customers.
See Managing Shipping Settings on page 329.
Note: Skip this step if you don’t intend to sell physical products.
6 Configure checkout methods *Define how you want to accept payments.
See Managing Checkout Settings on page 349.
7 Configure order notification methods
Specify how you want to be notified when customers place orders.
See Managing Notification Settings on page 365.
GETTING STARTED38
Note: Skip this step if you don’t want to be notified when customers place orders.
8 Choose how tax will be applied
Specify the tax rates you want to apply to store products, and the circumstances under which you want to apply them.
See Managing Tax Rates on page 339.
Note: Skip this step if you do not need to apply taxes to the products you sell.
9 Choose how currencies will be applied
Interspire Shopping Cart can allow customers to choose the currency they want to use when they browse your store. Specify the currencies the customer can choose from, and how you want to calculate the exchange rates.
See Managing Currency Settings on page 343.
Note: Skip this step if you want customers to be able to use US dollars only (the default currency).
10 Add pages to your site
Design and include some extra HTML pages; for example “About this Store”, “Terms and Conditions” or “Contact us.”
See Creating and Editing Web Pages on page 231.
Note: Skip this step if you don’t want to add any other pages.
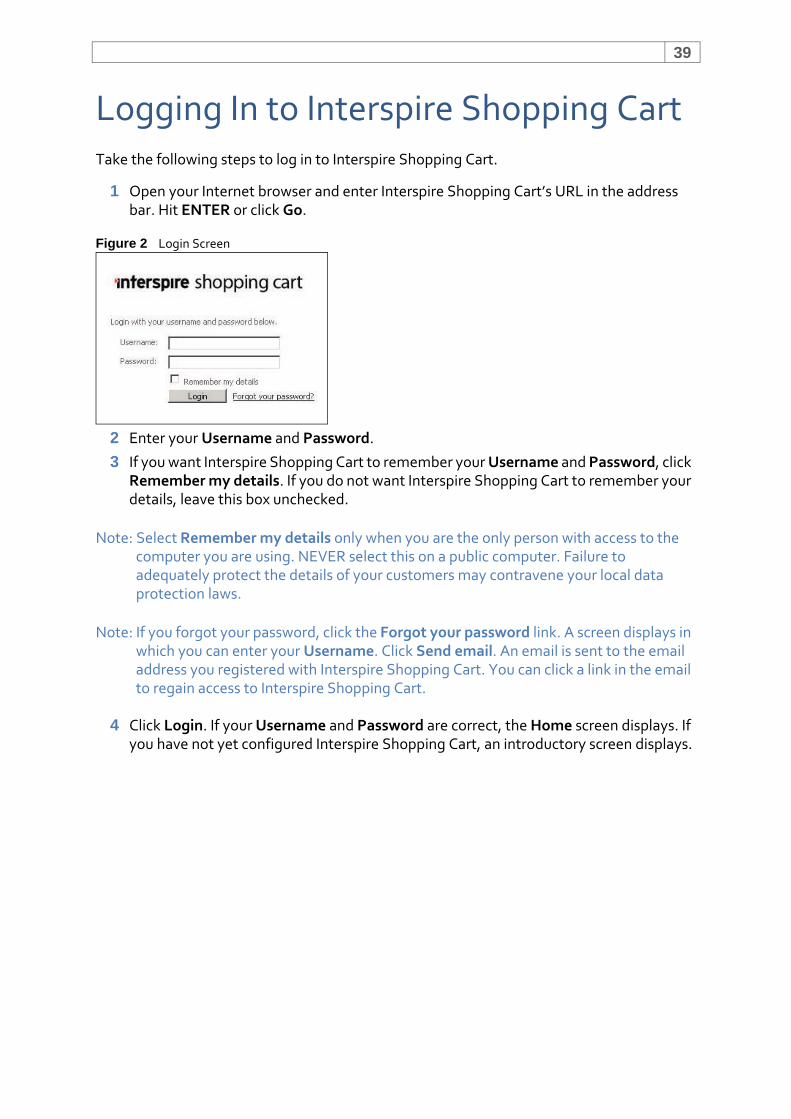
39
Logging In to Interspire Shopping CartTake the following steps to log in to Interspire Shopping Cart.
1 Open your Internet browser and enter Interspire Shopping Cart’s URL in the address bar. Hit ENTER or click Go.
Figure 2 Login Screen
2 Enter your Username and Password.
3 If you want Interspire Shopping Cart to remember your Username and Password, click Remember my details. If you do not want Interspire Shopping Cart to remember your details, leave this box unchecked.
Note: Select Remember my details only when you are the only person with access to the computer you are using. NEVER select this on a public computer. Failure to adequately protect the details of your customers may contravene your local data protection laws.
Note: If you forgot your password, click the Forgot your password link. A screen displays in which you can enter your Username. Click Send email. An email is sent to the email address you registered with Interspire Shopping Cart. You can click a link in the email to regain access to Interspire Shopping Cart.
4 Click Login. If your Username and Password are correct, the Home screen displays. If you have not yet configured Interspire Shopping Cart, an introductory screen displays.
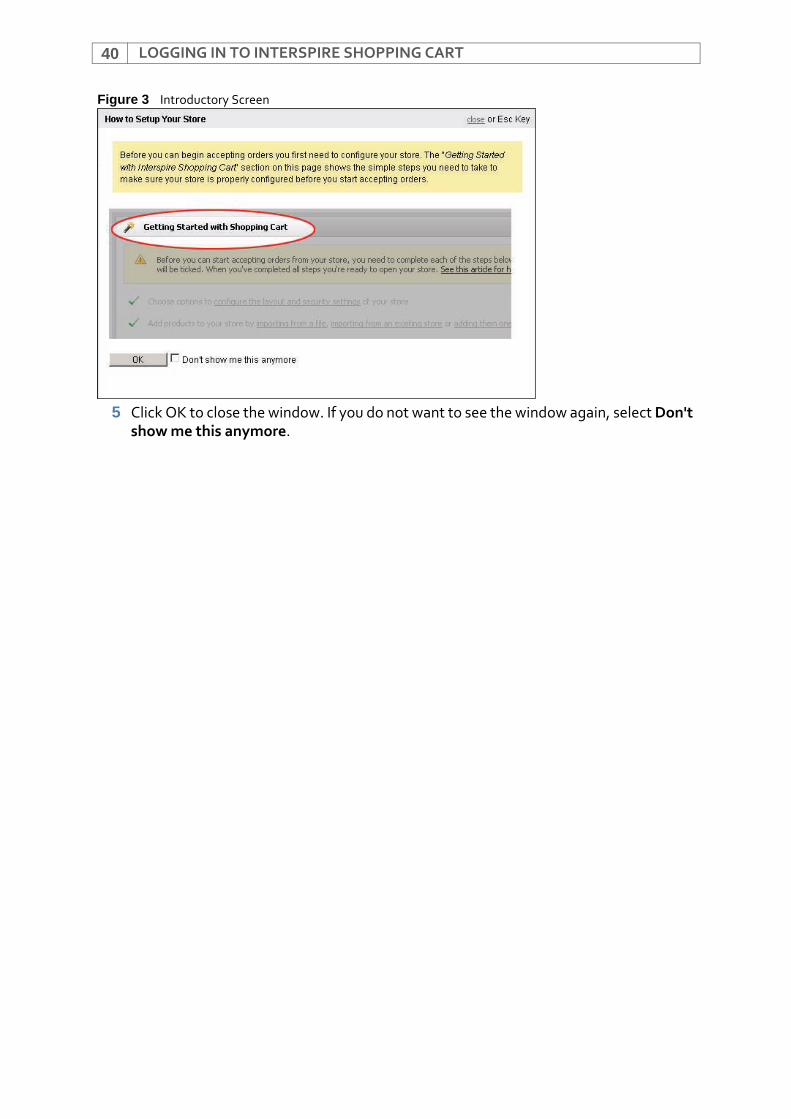
LOGGING IN TO INTERSPIRE SHOPPING CART40
Figure 3 Introductory Screen
5 Click OK to close the window. If you do not want to see the window again, select Don't show me this anymore.
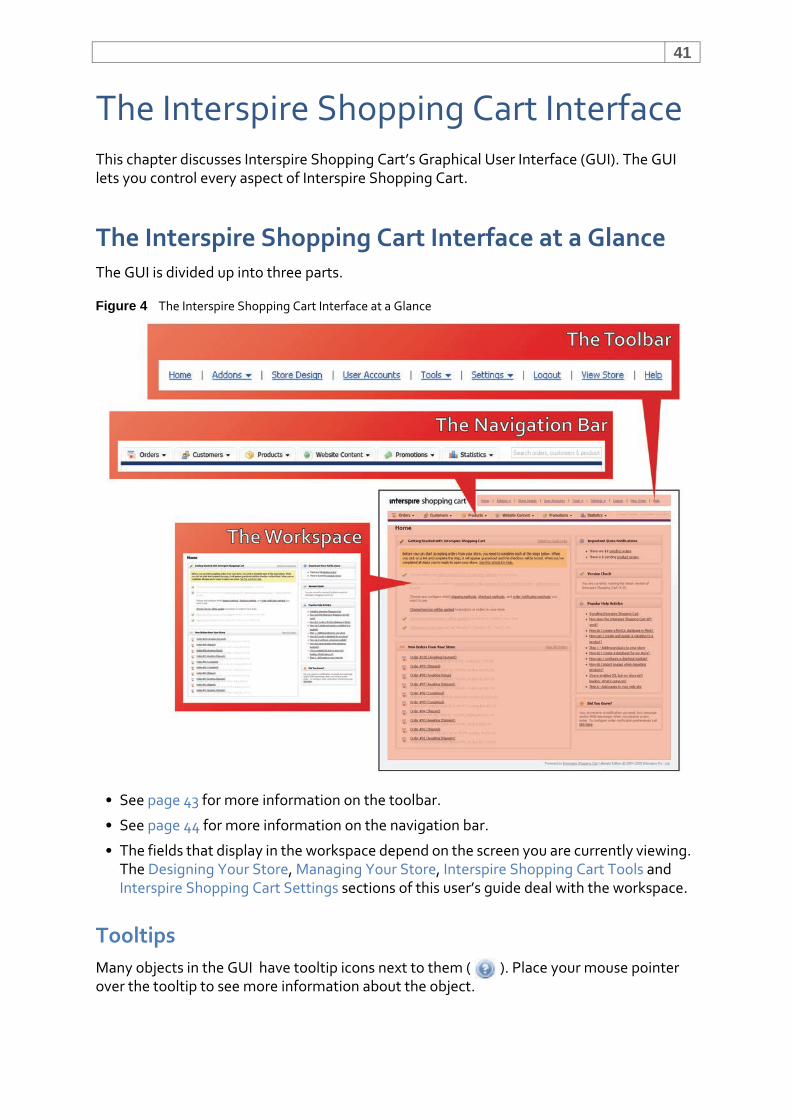
41
The Interspire Shopping Cart InterfaceThis chapter discusses Interspire Shopping Cart’s Graphical User Interface (GUI). The GUI lets you control every aspect of Interspire Shopping Cart.
The Interspire Shopping Cart Interface at a GlanceThe GUI is divided up into three parts.
Figure 4 The Interspire Shopping Cart Interface at a Glance
• See page 43 for more information on the toolbar.
• See page 44 for more information on the navigation bar.
• The fields that display in the workspace depend on the screen you are currently viewing. The Designing Your Store, Managing Your Store, Interspire Shopping Cart Tools and Interspire Shopping Cart Settings sections of this user’s guide deal with the workspace.
TooltipsMany objects in the GUI have tooltip icons next to them ( ). Place your mouse pointer over the tooltip to see more information about the object.
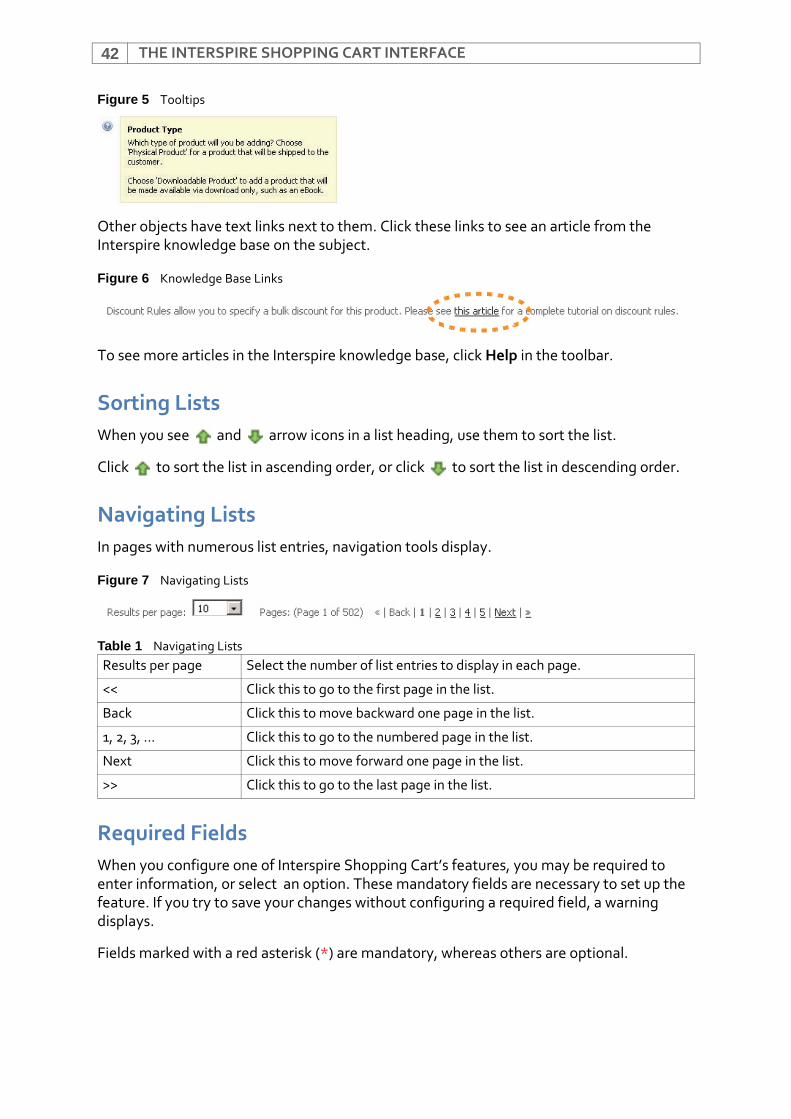
THE INTERSPIRE SHOPPING CART INTERFACE42
Figure 5 Tooltips
Other objects have text links next to them. Click these links to see an article from the Interspire knowledge base on the subject.
Figure 6 Knowledge Base Links
To see more articles in the Interspire knowledge base, click Help in the toolbar.
Sorting ListsWhen you see and arrow icons in a list heading, use them to sort the list.
Click to sort the list in ascending order, or click to sort the list in descending order.
Navigating ListsIn pages with numerous list entries, navigation tools display.
Figure 7 Navigating Lists
Required FieldsWhen you configure one of Interspire Shopping Cart’s features, you may be required to enter information, or select an option. These mandatory fields are necessary to set up the feature. If you try to save your changes without configuring a required field, a warning displays.
Fields marked with a red asterisk (*) are mandatory, whereas others are optional.
Table 1 Navigating ListsResults per page Select the number of list entries to display in each page.
<< Click this to go to the first page in the list.
Back Click this to move backward one page in the list.
1, 2, 3, ... Click this to go to the numbered page in the list.
Next Click this to move forward one page in the list.
>> Click this to go to the last page in the list.
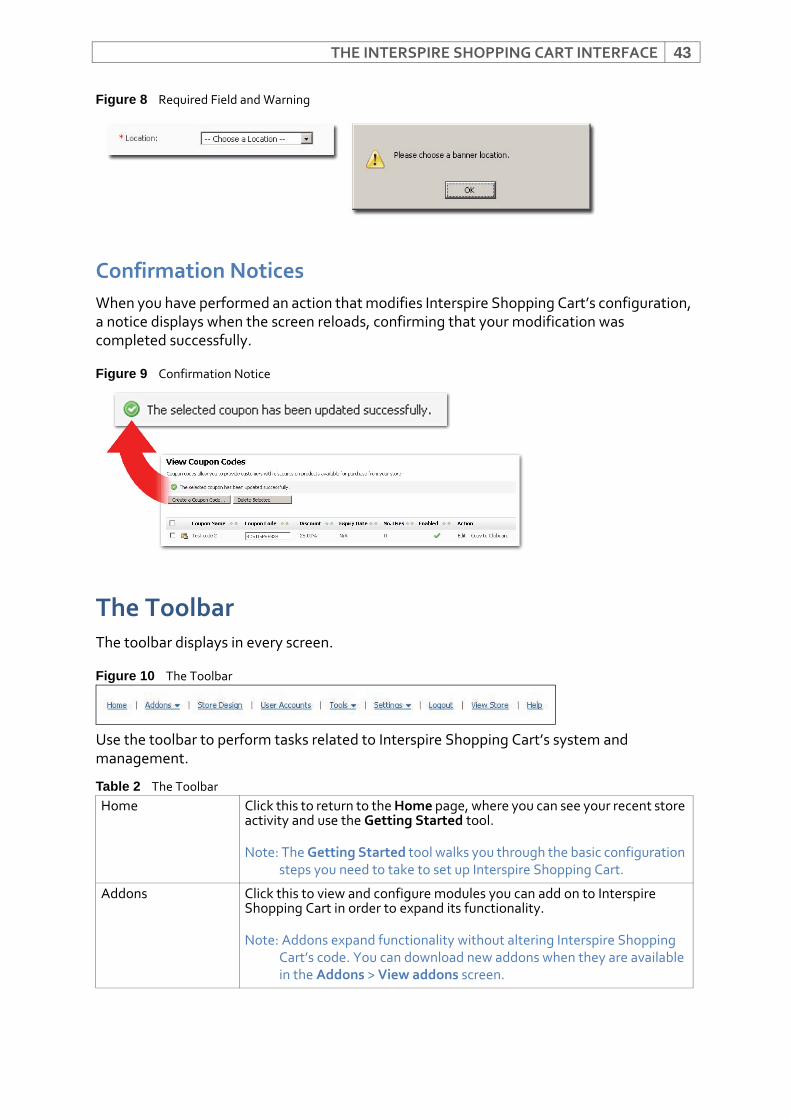
THE INTERSPIRE SHOPPING CART INTERFACE 43
Figure 8 Required Field and Warning
Confirmation NoticesWhen you have performed an action that modifies Interspire Shopping Cart’s configuration, a notice displays when the screen reloads, confirming that your modification was completed successfully.
Figure 9 Confirmation Notice
The ToolbarThe toolbar displays in every screen.
Figure 10 The Toolbar
Use the toolbar to perform tasks related to Interspire Shopping Cart’s system and management.
Table 2 The Toolbar Home Click this to return to the Home page, where you can see your recent store
activity and use the Getting Started tool.
Note: The Getting Started tool walks you through the basic configuration steps you need to take to set up Interspire Shopping Cart.
Addons Click this to view and configure modules you can add on to Interspire Shopping Cart in order to expand its functionality.
Note: Addons expand functionality without altering Interspire Shopping Cart’s code. You can download new addons when they are available in the Addons > View addons screen.
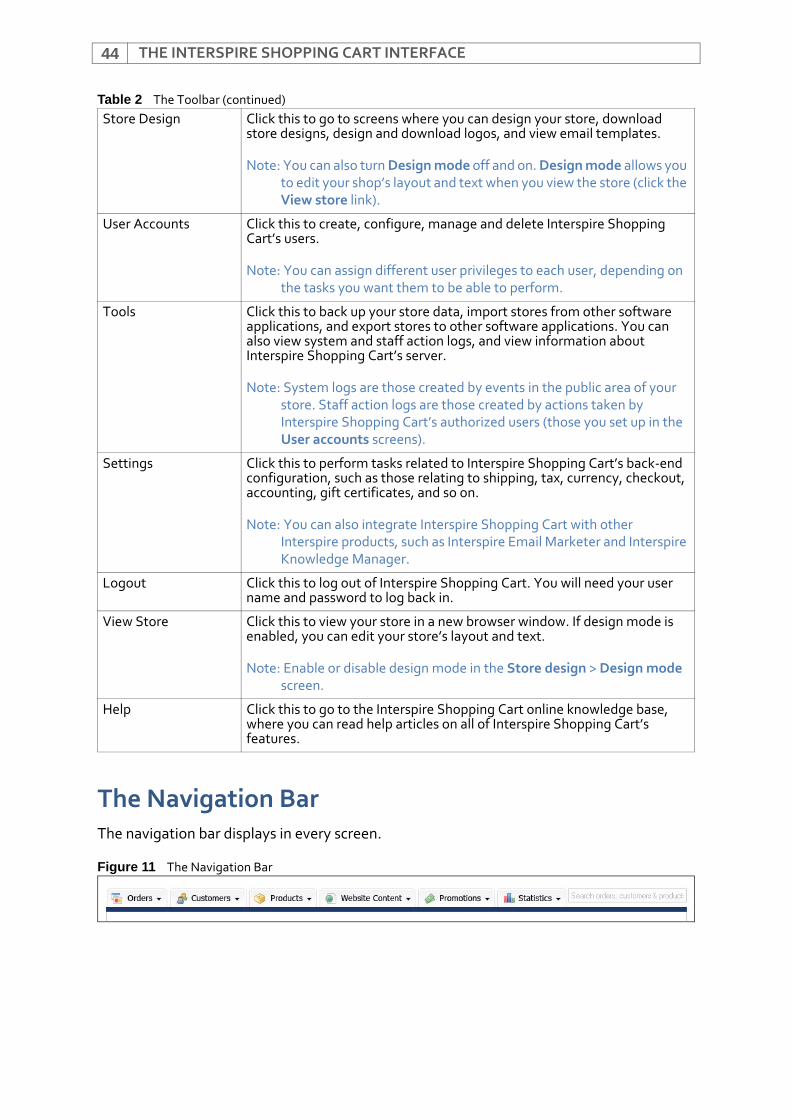
THE INTERSPIRE SHOPPING CART INTERFACE44
The Navigation BarThe navigation bar displays in every screen.
Figure 11 The Navigation Bar
Store Design Click this to go to screens where you can design your store, download store designs, design and download logos, and view email templates.
Note: You can also turn Design mode off and on. Design mode allows you to edit your shop’s layout and text when you view the store (click the View store link).
User Accounts Click this to create, configure, manage and delete Interspire Shopping Cart’s users.
Note: You can assign different user privileges to each user, depending on the tasks you want them to be able to perform.
Tools Click this to back up your store data, import stores from other software applications, and export stores to other software applications. You can also view system and staff action logs, and view information about Interspire Shopping Cart’s server.
Note: System logs are those created by events in the public area of your store. Staff action logs are those created by actions taken by Interspire Shopping Cart’s authorized users (those you set up in the User accounts screens).
Settings Click this to perform tasks related to Interspire Shopping Cart’s back‐end configuration, such as those relating to shipping, tax, currency, checkout, accounting, gift certificates, and so on.
Note: You can also integrate Interspire Shopping Cart with other Interspire products, such as Interspire Email Marketer and Interspire Knowledge Manager.
Logout Click this to log out of Interspire Shopping Cart. You will need your user name and password to log back in.
View Store Click this to view your store in a new browser window. If design mode is enabled, you can edit your store’s layout and text.
Note: Enable or disable design mode in the Store design > Design mode screen.
Help Click this to go to the Interspire Shopping Cart online knowledge base, where you can read help articles on all of Interspire Shopping Cart’s features.
Table 2 The Toolbar (continued)
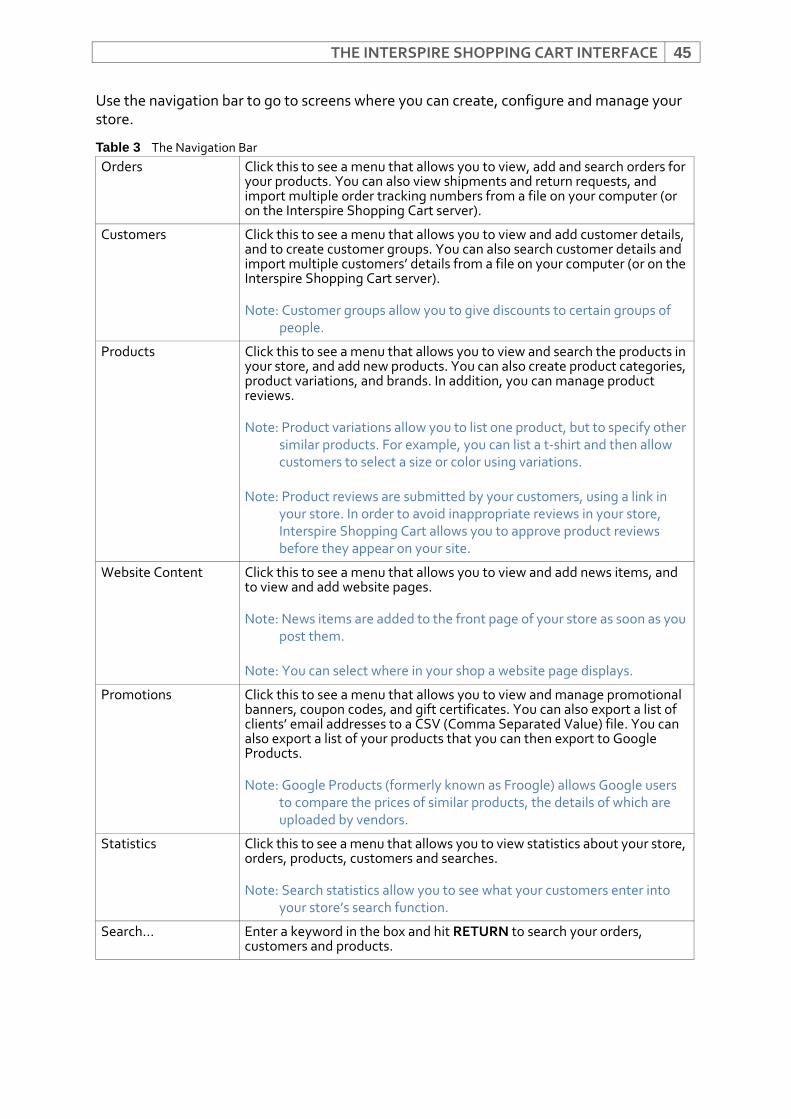
THE INTERSPIRE SHOPPING CART INTERFACE 45
Use the navigation bar to go to screens where you can create, configure and manage your store.
Table 3 The Navigation BarOrders Click this to see a menu that allows you to view, add and search orders for
your products. You can also view shipments and return requests, and import multiple order tracking numbers from a file on your computer (or on the Interspire Shopping Cart server).
Customers Click this to see a menu that allows you to view and add customer details, and to create customer groups. You can also search customer details and import multiple customers’ details from a file on your computer (or on the Interspire Shopping Cart server).
Note: Customer groups allow you to give discounts to certain groups of people.
Products Click this to see a menu that allows you to view and search the products in your store, and add new products. You can also create product categories, product variations, and brands. In addition, you can manage product reviews.
Note: Product variations allow you to list one product, but to specify other similar products. For example, you can list a t‐shirt and then allow customers to select a size or color using variations.
Note: Product reviews are submitted by your customers, using a link in your store. In order to avoid inappropriate reviews in your store, Interspire Shopping Cart allows you to approve product reviews before they appear on your site.
Website Content Click this to see a menu that allows you to view and add news items, and to view and add website pages.
Note: News items are added to the front page of your store as soon as you post them.
Note: You can select where in your shop a website page displays.
Promotions Click this to see a menu that allows you to view and manage promotional banners, coupon codes, and gift certificates. You can also export a list of clients’ email addresses to a CSV (Comma Separated Value) file. You can also export a list of your products that you can then export to Google Products.
Note: Google Products (formerly known as Froogle) allows Google users to compare the prices of similar products, the details of which are uploaded by vendors.
Statistics Click this to see a menu that allows you to view statistics about your store, orders, products, customers and searches.
Note: Search statistics allow you to see what your customers enter into your store’s search function.
Search... Enter a keyword in the box and hit RETURN to search your orders, customers and products.

THE INTERSPIRE SHOPPING CART INTERFACE46
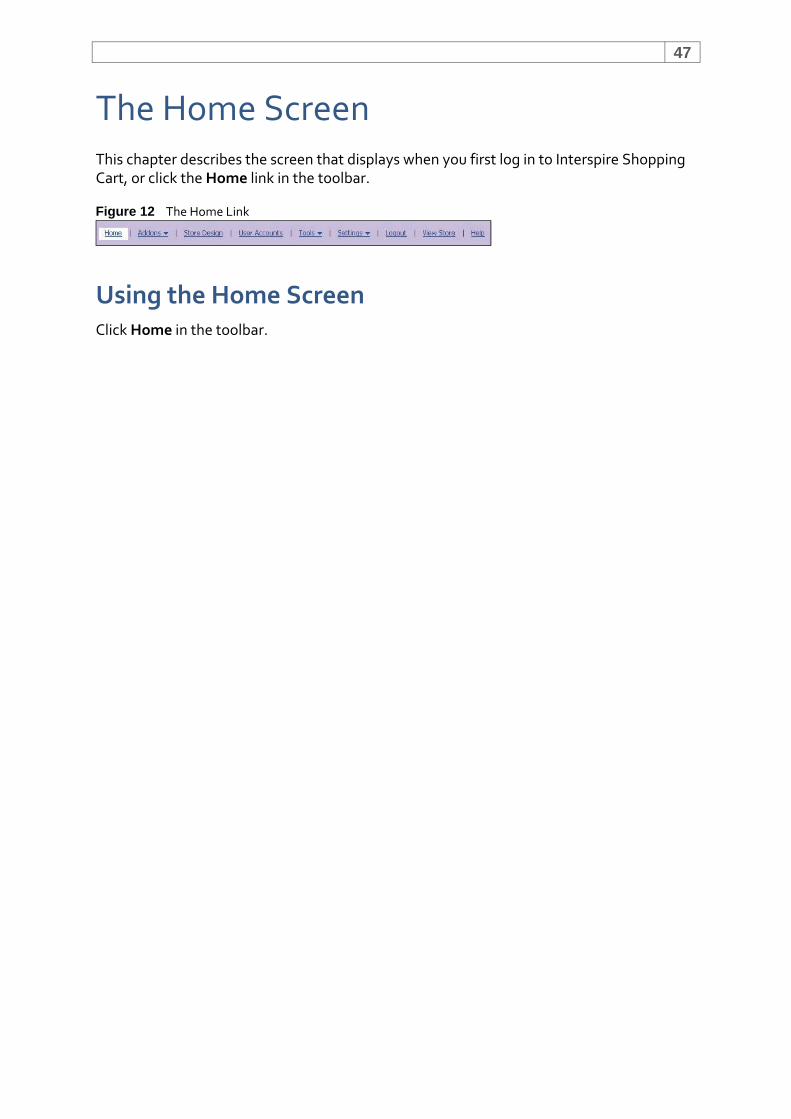
47
The Home ScreenThis chapter describes the screen that displays when you first log in to Interspire Shopping Cart, or click the Home link in the toolbar.
Figure 12 The Home Link
Using the Home ScreenClick Home in the toolbar.

THE HOME SCREEN48
Figure 13 The Home Screen
Table 4 The Home ScreenGetting started with Interspire Shopping Cart
This section displays a list of tasks that you can take to start working with Interspire Shopping Cart quickly and easily. Starting at the top of the list, click the links and follow the instructions.If this screen does not display, click Switch to getting started links.
I would like to This section displays links to some common Interspire Shopping Cart tasks. If this section does not display, click Switch to quick links.
Important store notifications
This section displays information about recent activity in your store, such as orders and submitted reviews.
Version This section displays the version number of the Interspire Shopping Cart software you are using, and lets you know if a more recent version is available.
Popular help articles This section displays links to some useful articles answering common questions about Interspire Shopping Cart.
New orders from your store
This section displays the most recent orders from your Interspire Shopping Cart store. Click an order’s link to see detailed information about the order (see Viewing and Managing Orders on page 125).
Did you know This section displays a useful tip about using Interspire Shopping Cart or fine‐tuning your store.
Note: Reload the screen to see a new tip.
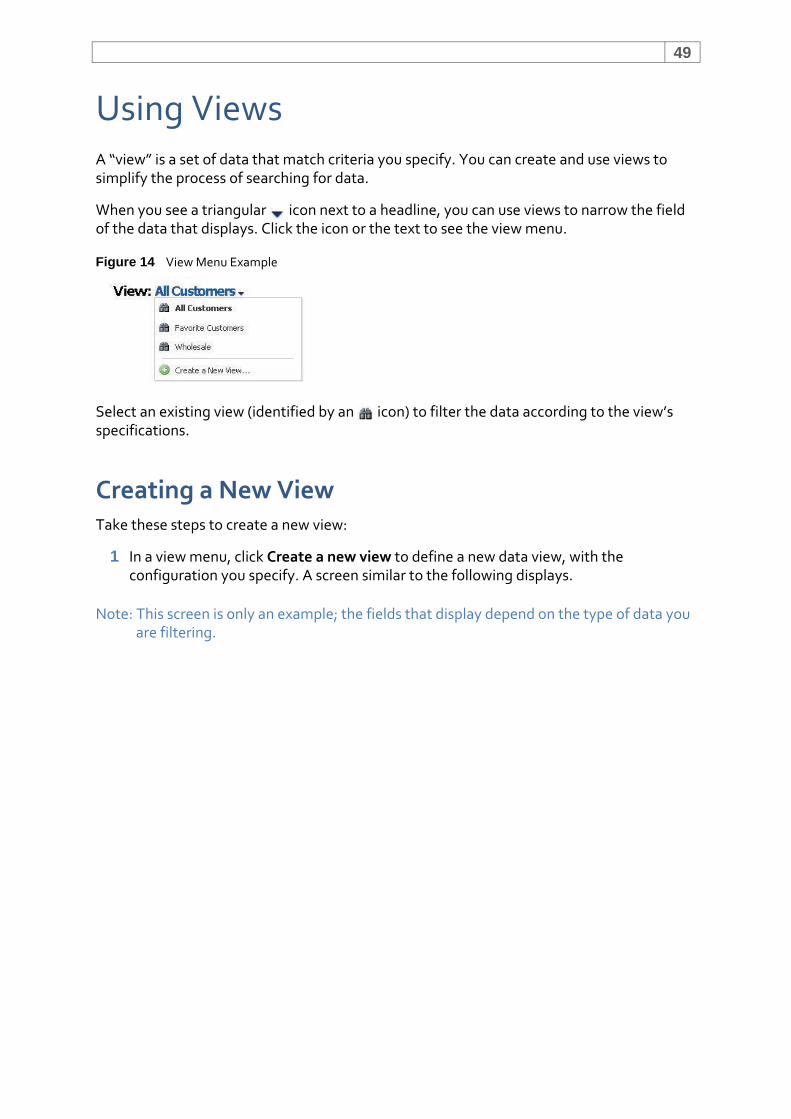
49
Using ViewsA “view” is a set of data that match criteria you specify. You can create and use views to simplify the process of searching for data.
When you see a triangular icon next to a headline, you can use views to narrow the field of the data that displays. Click the icon or the text to see the view menu.
Figure 14 View Menu Example
Select an existing view (identified by an icon) to filter the data according to the view’s specifications.
Creating a New ViewTake these steps to create a new view:
1 In a view menu, click Create a new view to define a new data view, with the configuration you specify. A screen similar to the following displays.
Note: This screen is only an example; the fields that display depend on the type of data you are filtering.
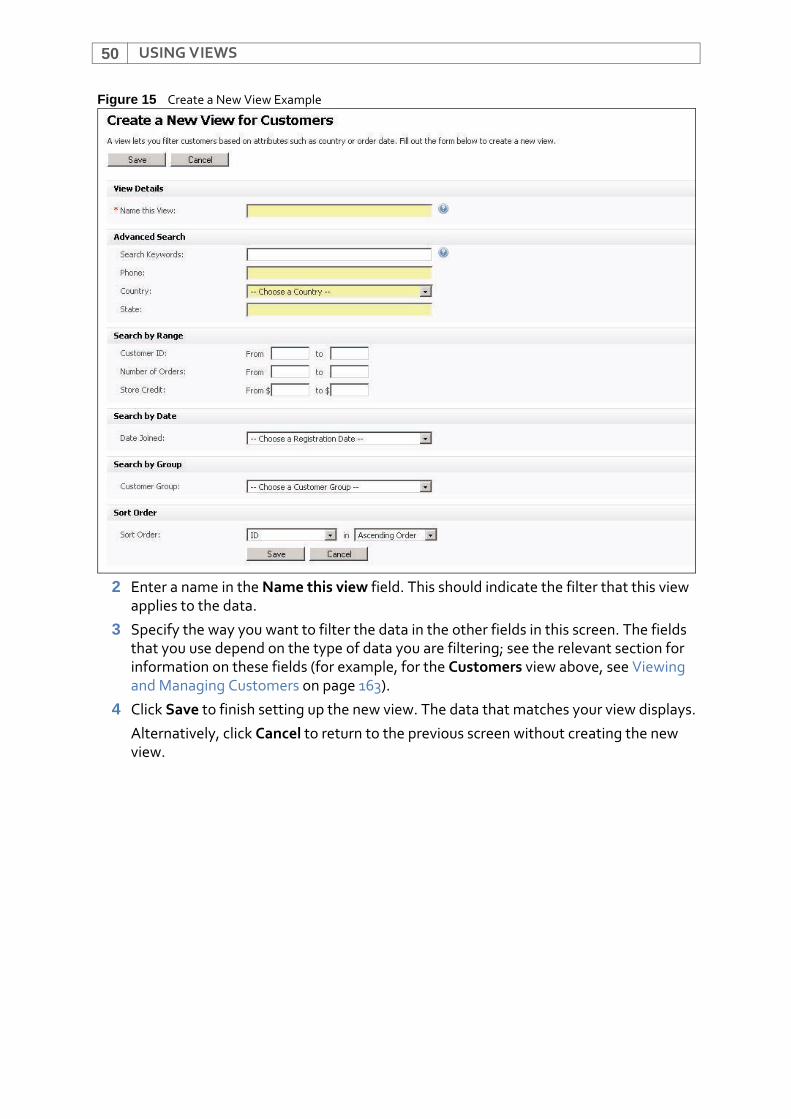
USING VIEWS50
Figure 15 Create a New View Example
2 Enter a name in the Name this view field. This should indicate the filter that this view applies to the data.
3 Specify the way you want to filter the data in the other fields in this screen. The fields that you use depend on the type of data you are filtering; see the relevant section for information on these fields (for example, for the Customers view above, see Viewing and Managing Customers on page 163).
4 Click Save to finish setting up the new view. The data that matches your view displays.
Alternatively, click Cancel to return to the previous screen without creating the new view.
51
IIDESIGNING YOUR STORE
This section contains the following chapters:
Store Design (53)
Using Design Mode (63)
Using the Store Editor (69)
The HTML Editor (73)

52
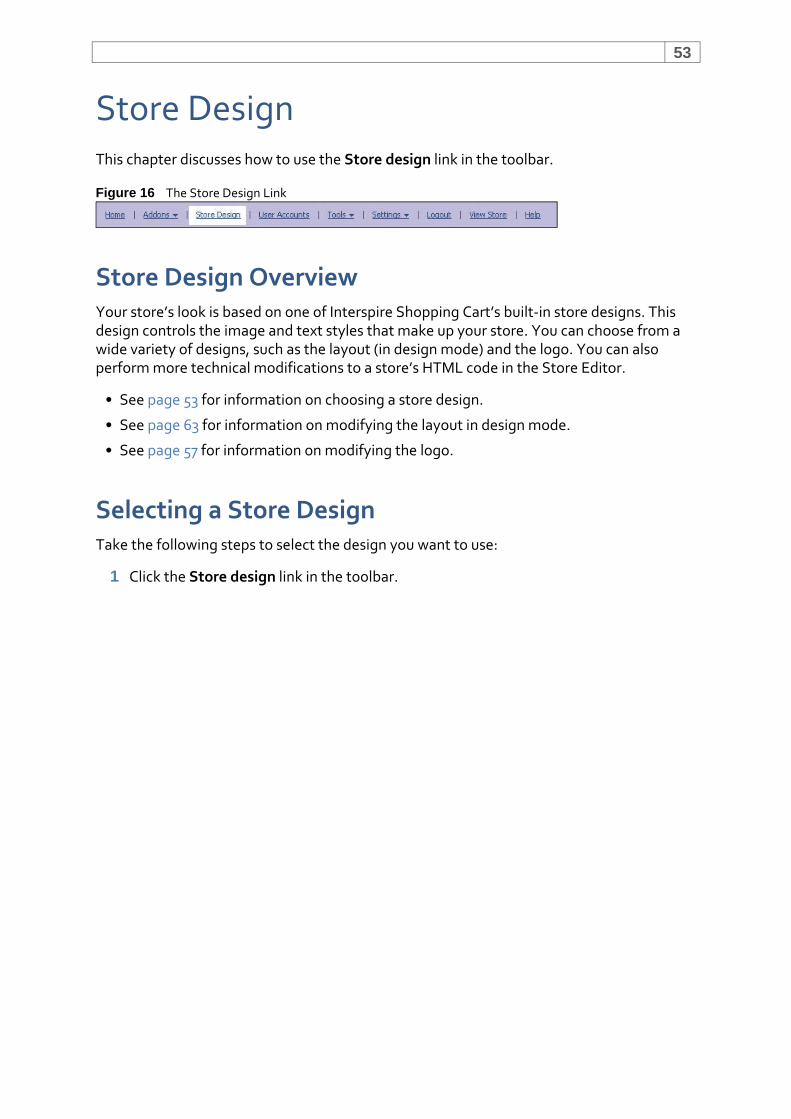
53
Store DesignThis chapter discusses how to use the Store design link in the toolbar.
Figure 16 The Store Design Link
Store Design OverviewYour store’s look is based on one of Interspire Shopping Cart’s built‐in store designs. This design controls the image and text styles that make up your store. You can choose from a wide variety of designs, such as the layout (in design mode) and the logo. You can also perform more technical modifications to a store’s HTML code in the Store Editor.
• See page 53 for information on choosing a store design.
• See page 63 for information on modifying the layout in design mode.
• See page 57 for information on modifying the logo.
Selecting a Store DesignTake the following steps to select the design you want to use:
1 Click the Store design link in the toolbar.
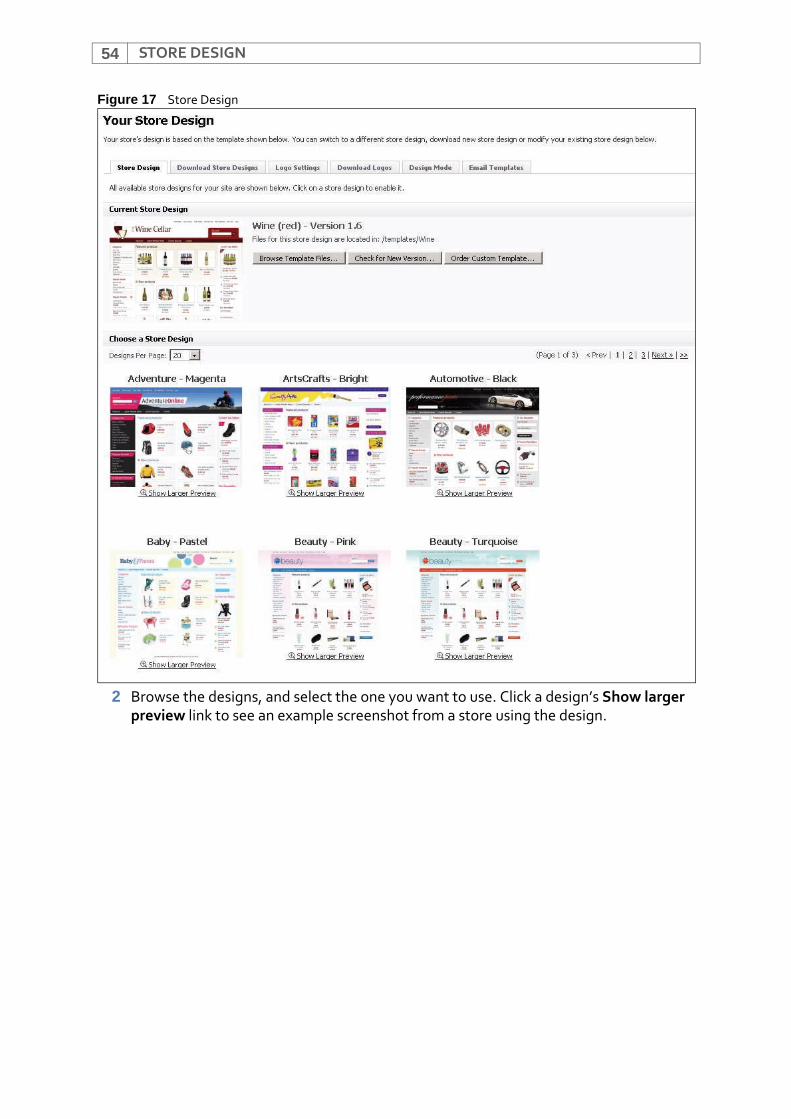
STORE DESIGN54
Figure 17 Store Design
2 Browse the designs, and select the one you want to use. Click a design’s Show larger preview link to see an example screenshot from a store using the design.
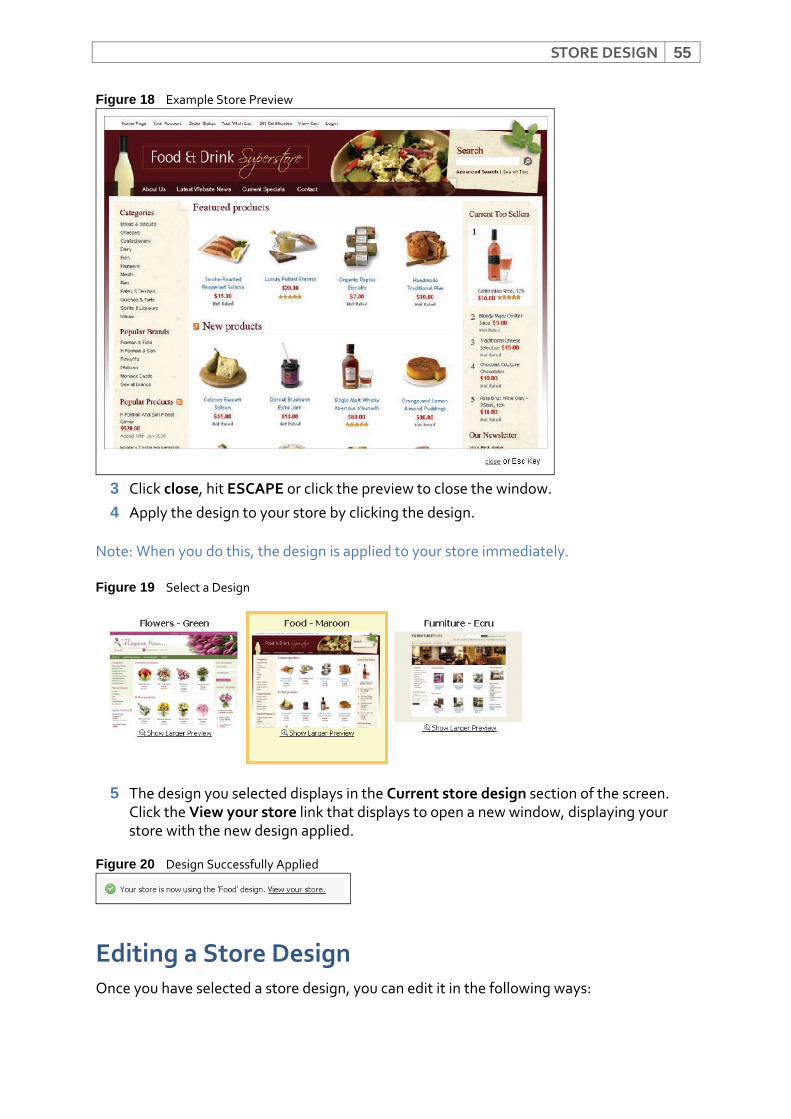
STORE DESIGN 55
Figure 18 Example Store Preview
3 Click close, hit ESCAPE or click the preview to close the window.
4 Apply the design to your store by clicking the design.
Note: When you do this, the design is applied to your store immediately.
Figure 19 Select a Design
5 The design you selected displays in the Current store design section of the screen. Click the View your store link that displays to open a new window, displaying your store with the new design applied.
Figure 20 Design Successfully Applied
Editing a Store DesignOnce you have selected a store design, you can edit it in the following ways:

STORE DESIGN56
• Design or upload a logo for the store’s header. See Configuring Your Logo on page 57.
• With design mode active (see Activating or Deactivating Design Mode on page 60), click View store in the toolbar. Edit text, drag‐and‐drop store elements, and access the store editor (see Using the Store Editor on page 69).
• Configure how your store’s items display by clicking Settings in the toolbar, then Store settings and then the Display tab. See Configuring Display Settings on page 318.
• Edit your store’s files, HTML code and CSS styles. See Using the Store Editor on page 69.
• Check whether a newer version of the store is available from Interspire. In the Select a design screen, click the Check for new version button. If an updated version is available, it displays. If not, a message displays indicating the you are already using the latest version.
Figure 21 Check for Updated Store Designs
Ordering a Custom Store DesignYou can order a customized store design from Interspire. These designs are search‐engine optimized, XHTML and CSS, created to your specifications.
To order a custom store design:
1 Click Store design in the toolbar.
2 In the Store design tab, click Order custom template.
Figure 22 Order Custom Store Design
3 Follow the instructions in the screen that displays.
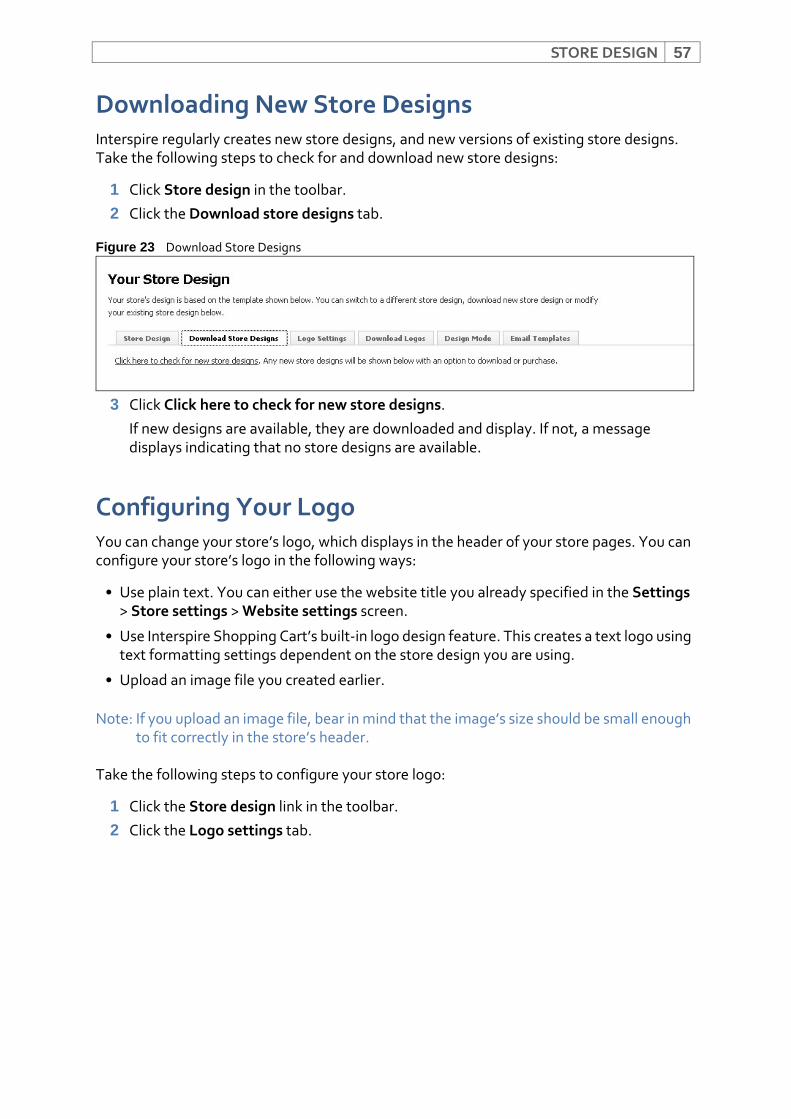
STORE DESIGN 57
Downloading New Store DesignsInterspire regularly creates new store designs, and new versions of existing store designs. Take the following steps to check for and download new store designs:
1 Click Store design in the toolbar.
2 Click the Download store designs tab.
Figure 23 Download Store Designs
3 Click Click here to check for new store designs.
If new designs are available, they are downloaded and display. If not, a message displays indicating that no store designs are available.
Configuring Your LogoYou can change your store’s logo, which displays in the header of your store pages. You can configure your store’s logo in the following ways:
• Use plain text. You can either use the website title you already specified in the Settings > Store settings > Website settings screen.
• Use Interspire Shopping Cart’s built‐in logo design feature. This creates a text logo using text formatting settings dependent on the store design you are using.
• Upload an image file you created earlier.
Note: If you upload an image file, bear in mind that the image’s size should be small enough to fit correctly in the store’s header.
Take the following steps to configure your store logo:
1 Click the Store design link in the toolbar.
2 Click the Logo settings tab.
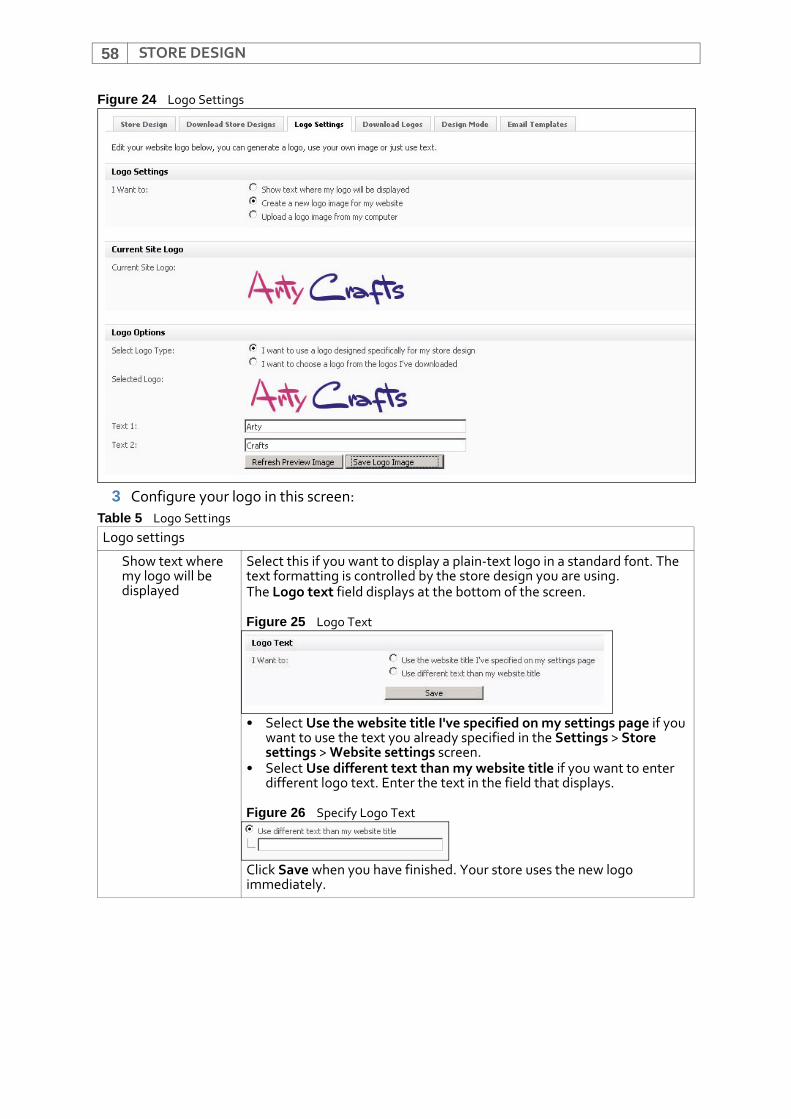
STORE DESIGN58
Figure 24 Logo Settings
3 Configure your logo in this screen:Table 5 Logo SettingsLogo settings
Show text where my logo will be displayed
Select this if you want to display a plain‐text logo in a standard font. The text formatting is controlled by the store design you are using.The Logo text field displays at the bottom of the screen.
Figure 25 Logo Text
• Select Use the website title I've specified on my settings page if you want to use the text you already specified in the Settings > Store settings > Website settings screen.
• Select Use different text than my website title if you want to enter different logo text. Enter the text in the field that displays.
Figure 26 Specify Logo Text
Click Save when you have finished. Your store uses the new logo immediately.
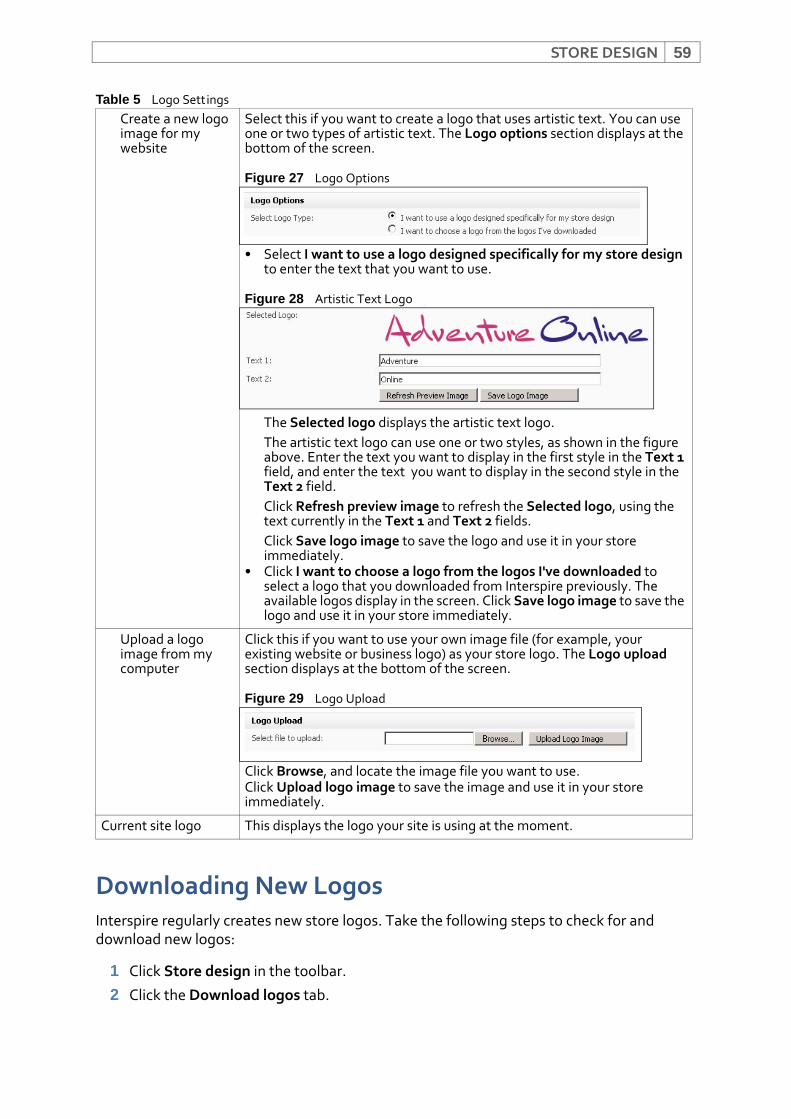
STORE DESIGN 59
Downloading New LogosInterspire regularly creates new store logos. Take the following steps to check for and download new logos:
1 Click Store design in the toolbar.
2 Click the Download logos tab.
Create a new logo image for my website
Select this if you want to create a logo that uses artistic text. You can use one or two types of artistic text. The Logo options section displays at the bottom of the screen.
Figure 27 Logo Options
• Select I want to use a logo designed specifically for my store design to enter the text that you want to use.
Figure 28 Artistic Text Logo
The Selected logo displays the artistic text logo.The artistic text logo can use one or two styles, as shown in the figure above. Enter the text you want to display in the first style in the Text 1 field, and enter the text you want to display in the second style in the Text 2 field.Click Refresh preview image to refresh the Selected logo, using the text currently in the Text 1 and Text 2 fields.Click Save logo image to save the logo and use it in your store immediately.
• Click I want to choose a logo from the logos I've downloaded to select a logo that you downloaded from Interspire previously. The available logos display in the screen. Click Save logo image to save the logo and use it in your store immediately.
Upload a logo image from my computer
Click this if you want to use your own image file (for example, your existing website or business logo) as your store logo. The Logo upload section displays at the bottom of the screen.
Figure 29 Logo Upload
Click Browse, and locate the image file you want to use.Click Upload logo image to save the image and use it in your store immediately.
Current site logo This displays the logo your site is using at the moment.
Table 5 Logo Settings
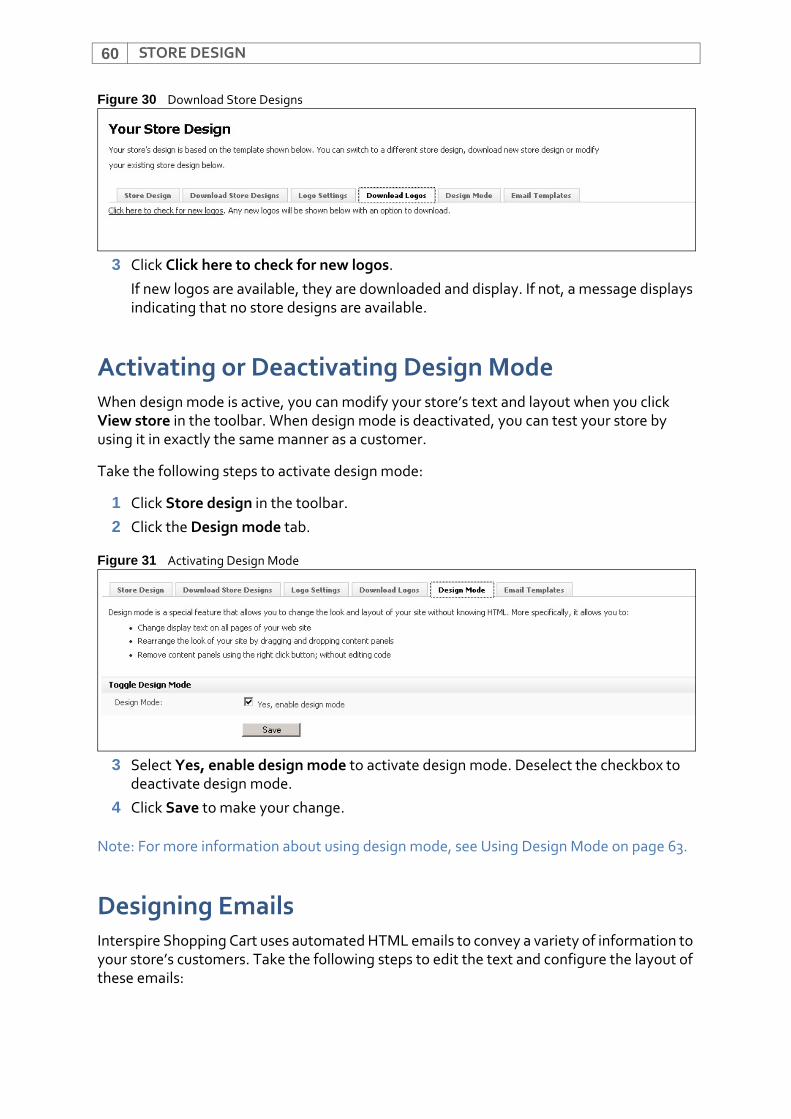
STORE DESIGN60
Figure 30 Download Store Designs
3 Click Click here to check for new logos.
If new logos are available, they are downloaded and display. If not, a message displays indicating that no store designs are available.
Activating or Deactivating Design ModeWhen design mode is active, you can modify your store’s text and layout when you click View store in the toolbar. When design mode is deactivated, you can test your store by using it in exactly the same manner as a customer.
Take the following steps to activate design mode:
1 Click Store design in the toolbar.
2 Click the Design mode tab.
Figure 31 Activating Design Mode
3 Select Yes, enable design mode to activate design mode. Deselect the checkbox to deactivate design mode.
4 Click Save to make your change.
Note: For more information about using design mode, see Using Design Mode on page 63.
Designing EmailsInterspire Shopping Cart uses automated HTML emails to convey a variety of information to your store’s customers. Take the following steps to edit the text and configure the layout of these emails:
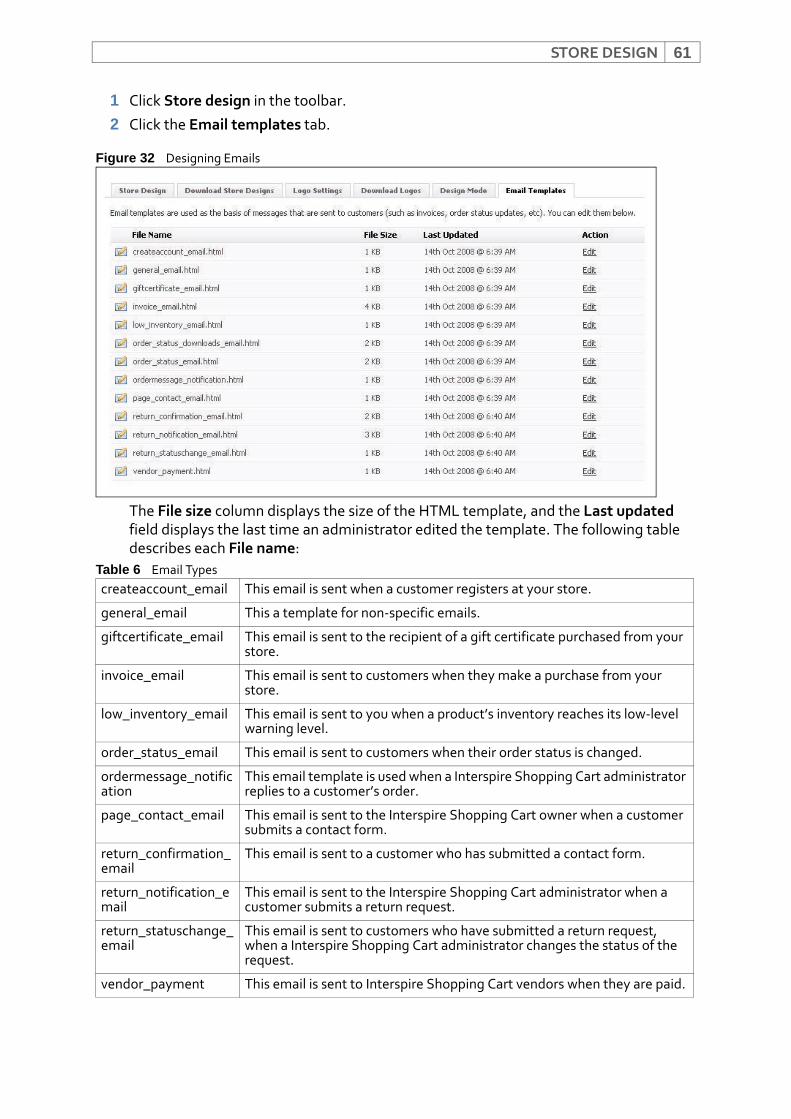
STORE DESIGN 61
1 Click Store design in the toolbar.
2 Click the Email templates tab.
Figure 32 Designing Emails
The File size column displays the size of the HTML template, and the Last updated field displays the last time an administrator edited the template. The following table describes each File name:
Table 6 Email Typescreateaccount_email This email is sent when a customer registers at your store.
general_email This a template for non‐specific emails.
giftcertificate_email This email is sent to the recipient of a gift certificate purchased from your store.
invoice_email This email is sent to customers when they make a purchase from your store.
low_inventory_email This email is sent to you when a product’s inventory reaches its low‐level warning level.
order_status_email This email is sent to customers when their order status is changed.
ordermessage_notification
This email template is used when a Interspire Shopping Cart administrator replies to a customer’s order.
page_contact_email This email is sent to the Interspire Shopping Cart owner when a customer submits a contact form.
return_confirmation_email
This email is sent to a customer who has submitted a contact form.
return_notification_email
This email is sent to the Interspire Shopping Cart administrator when a customer submits a return request.
return_statuschange_email
This email is sent to customers who have submitted a return request, when a Interspire Shopping Cart administrator changes the status of the request.
vendor_payment This email is sent to Interspire Shopping Cart vendors when they are paid.
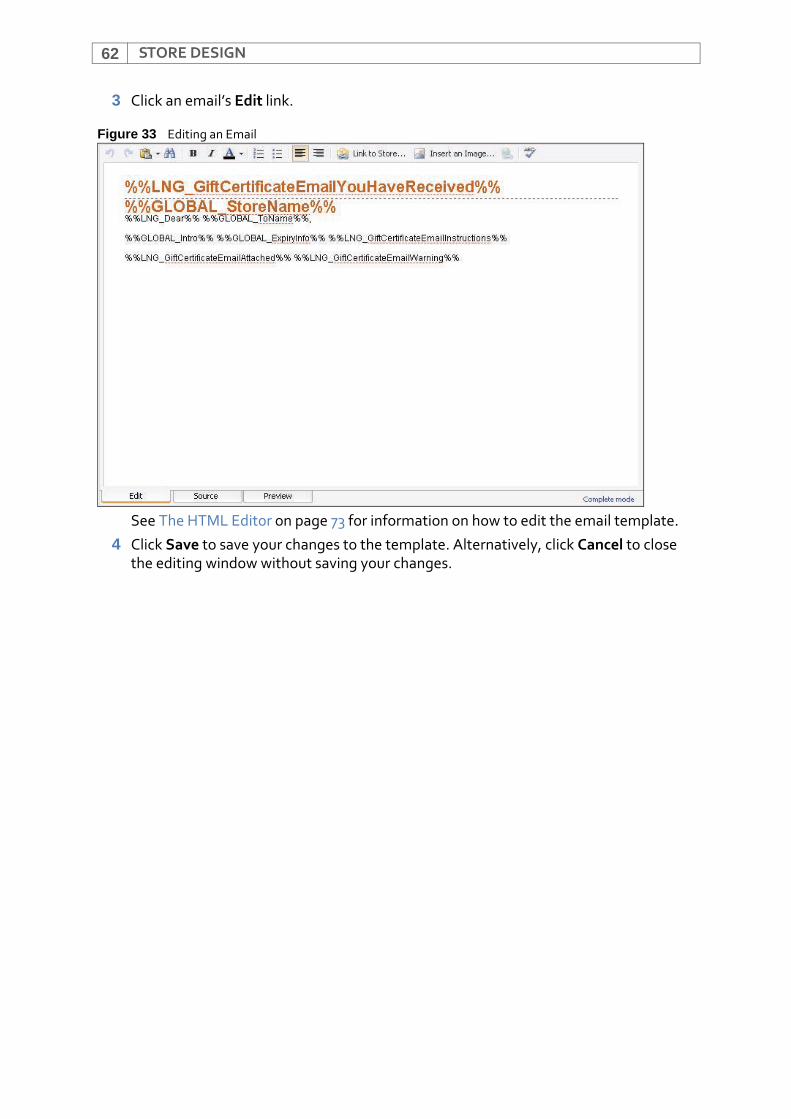
STORE DESIGN62
3 Click an email’s Edit link.
Figure 33 Editing an Email
See The HTML Editor on page 73 for information on how to edit the email template.
4 Click Save to save your changes to the template. Alternatively, click Cancel to close the editing window without saving your changes.
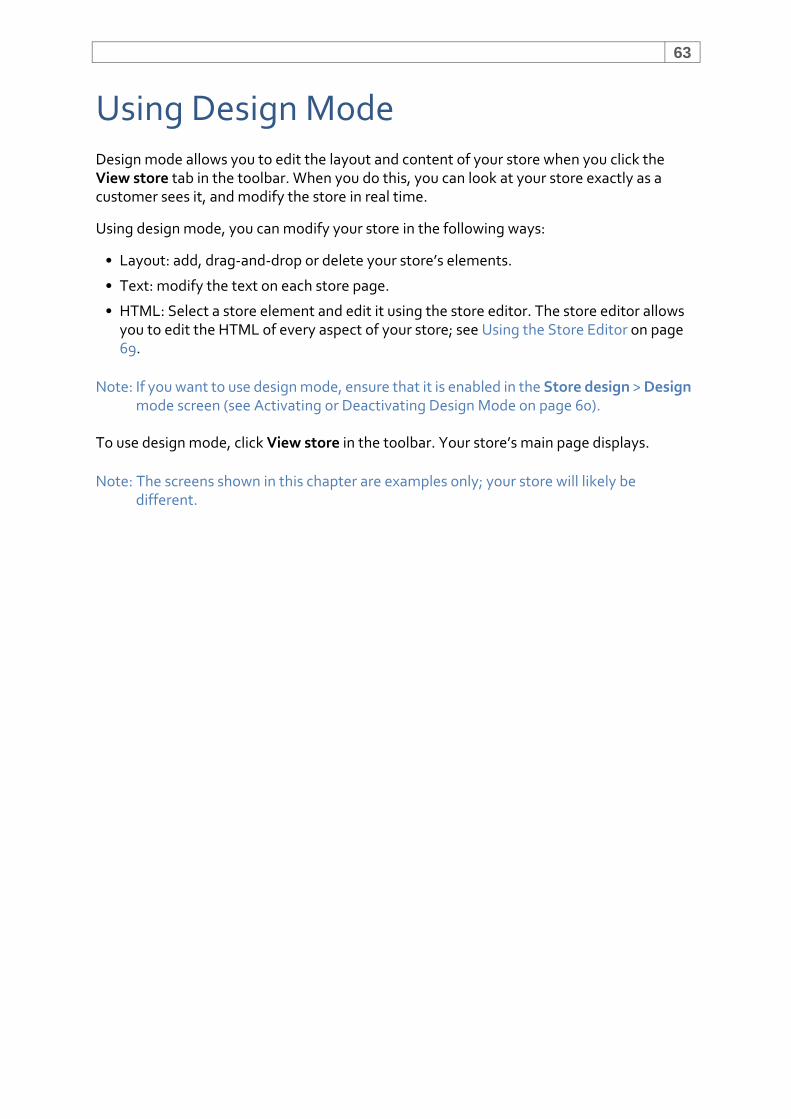
63
Using Design ModeDesign mode allows you to edit the layout and content of your store when you click the View store tab in the toolbar. When you do this, you can look at your store exactly as a customer sees it, and modify the store in real time.
Using design mode, you can modify your store in the following ways:
• Layout: add, drag‐and‐drop or delete your store’s elements.
• Text: modify the text on each store page.
• HTML: Select a store element and edit it using the store editor. The store editor allows you to edit the HTML of every aspect of your store; see Using the Store Editor on page 69.
Note: If you want to use design mode, ensure that it is enabled in the Store design > Design mode screen (see Activating or Deactivating Design Mode on page 60).
To use design mode, click View store in the toolbar. Your store’s main page displays.
Note: The screens shown in this chapter are examples only; your store will likely be different.
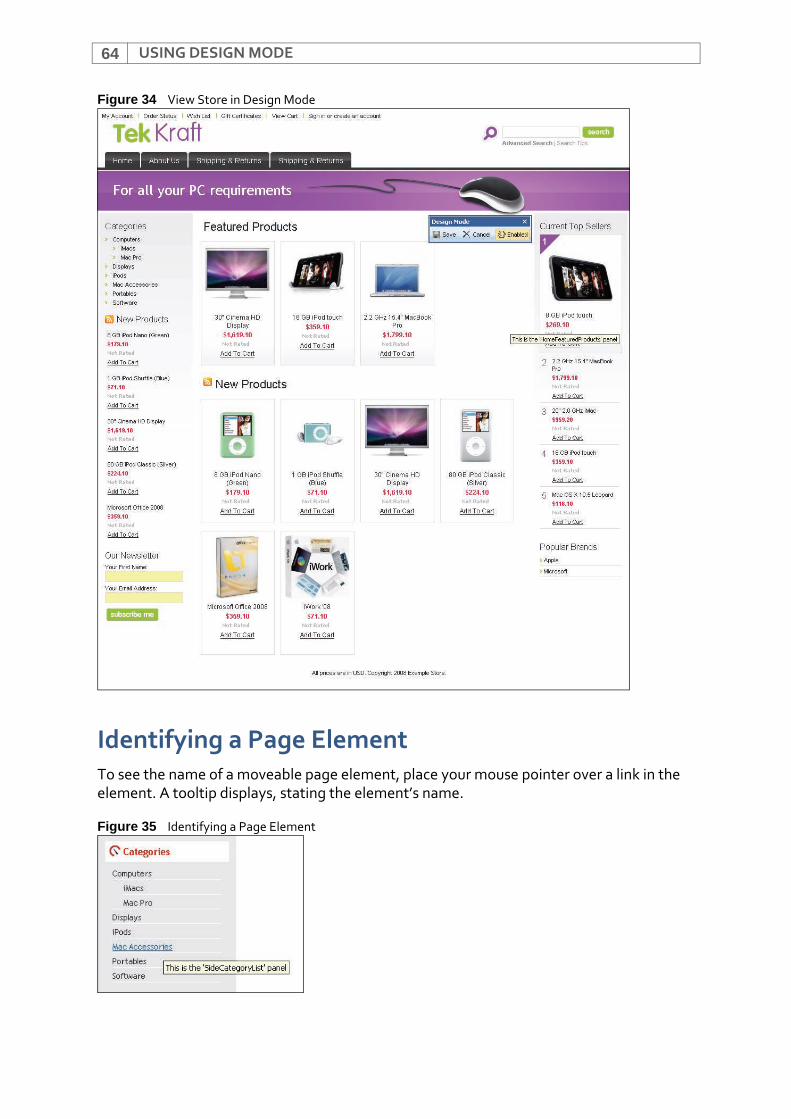
USING DESIGN MODE64
Figure 34 View Store in Design Mode
Identifying a Page ElementTo see the name of a moveable page element, place your mouse pointer over a link in the element. A tooltip displays, stating the element’s name.
Figure 35 Identifying a Page Element
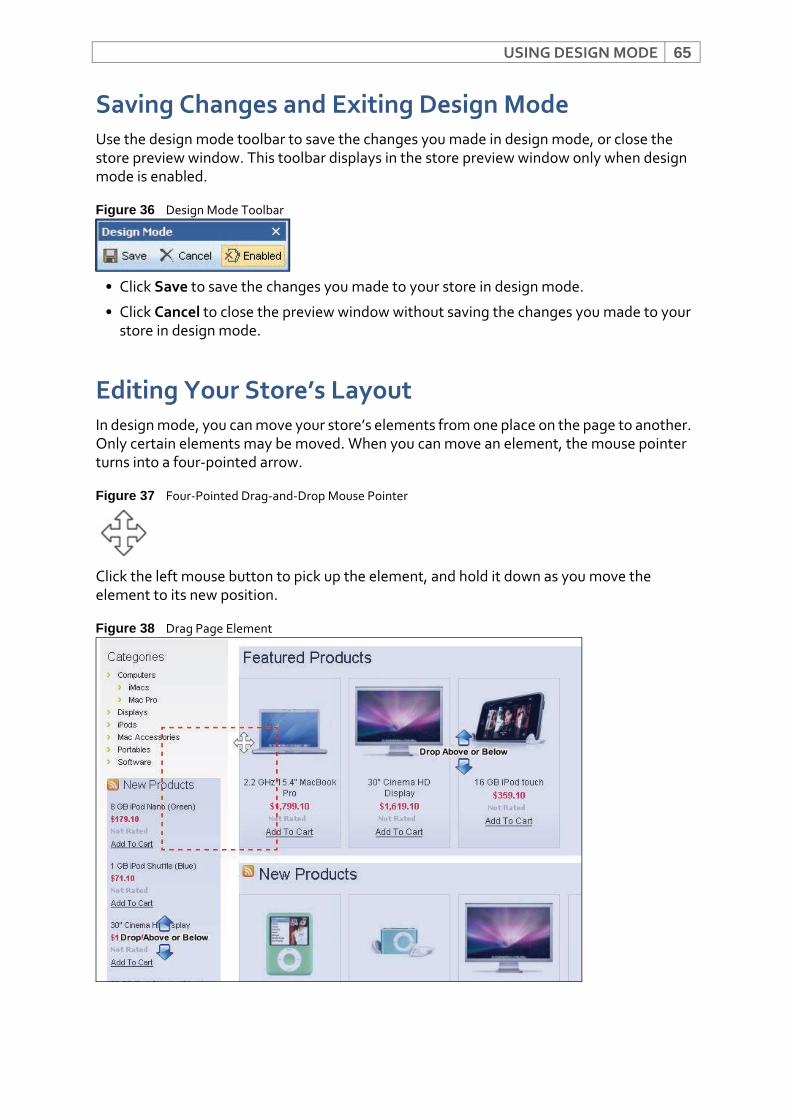
USING DESIGN MODE 65
Saving Changes and Exiting Design ModeUse the design mode toolbar to save the changes you made in design mode, or close the store preview window. This toolbar displays in the store preview window only when design mode is enabled.
Figure 36 Design Mode Toolbar
• Click Save to save the changes you made to your store in design mode.
• Click Cancel to close the preview window without saving the changes you made to your store in design mode.
Editing Your Store’s LayoutIn design mode, you can move your store’s elements from one place on the page to another. Only certain elements may be moved. When you can move an element, the mouse pointer turns into a four‐pointed arrow.
Figure 37 Four‐Pointed Drag‐and‐Drop Mouse Pointer
Click the left mouse button to pick up the element, and hold it down as you move the element to its new position.
Figure 38 Drag Page Element
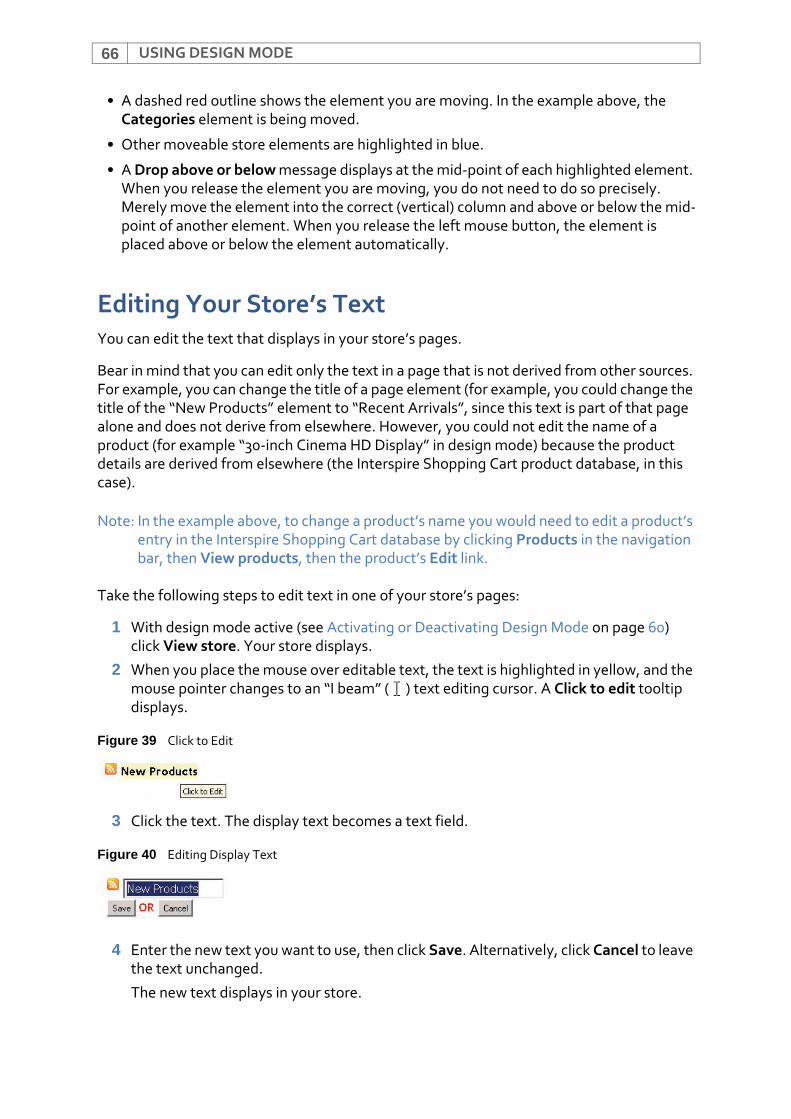
USING DESIGN MODE66
• A dashed red outline shows the element you are moving. In the example above, the Categories element is being moved.
• Other moveable store elements are highlighted in blue.
• A Drop above or below message displays at the mid‐point of each highlighted element. When you release the element you are moving, you do not need to do so precisely. Merely move the element into the correct (vertical) column and above or below the mid‐point of another element. When you release the left mouse button, the element is placed above or below the element automatically.
Editing Your Store’s TextYou can edit the text that displays in your store’s pages.
Bear in mind that you can edit only the text in a page that is not derived from other sources. For example, you can change the title of a page element (for example, you could change the title of the “New Products” element to “Recent Arrivals”, since this text is part of that page alone and does not derive from elsewhere. However, you could not edit the name of a product (for example “30‐inch Cinema HD Display” in design mode) because the product details are derived from elsewhere (the Interspire Shopping Cart product database, in this case).
Note: In the example above, to change a product’s name you would need to edit a product’s entry in the Interspire Shopping Cart database by clicking Products in the navigation bar, then View products, then the product’s Edit link.
Take the following steps to edit text in one of your store’s pages:
1 With design mode active (see Activating or Deactivating Design Mode on page 60) click View store. Your store displays.
2 When you place the mouse over editable text, the text is highlighted in yellow, and the mouse pointer changes to an “I beam” ( ) text editing cursor. A Click to edit tooltip displays.
Figure 39 Click to Edit
3 Click the text. The display text becomes a text field.
Figure 40 Editing Display Text
4 Enter the new text you want to use, then click Save. Alternatively, click Cancel to leave the text unchanged.
The new text displays in your store.
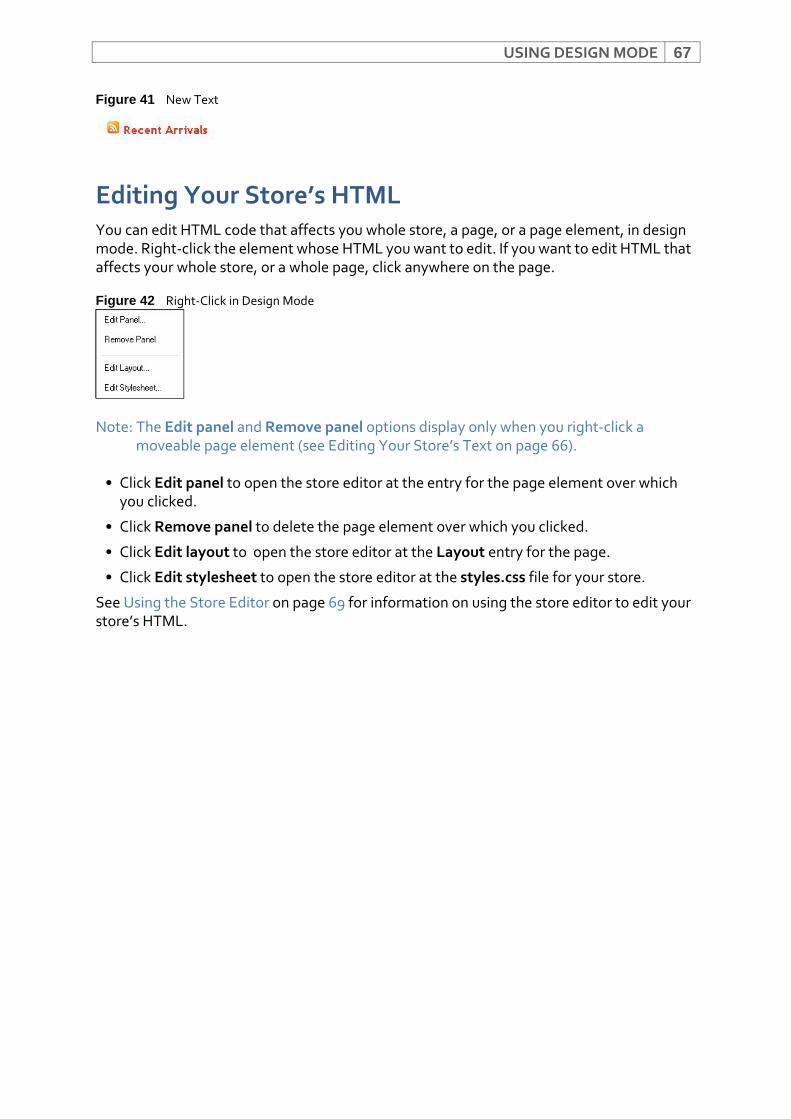
USING DESIGN MODE 67
Figure 41 New Text
Editing Your Store’s HTMLYou can edit HTML code that affects you whole store, a page, or a page element, in design mode. Right‐click the element whose HTML you want to edit. If you want to edit HTML that affects your whole store, or a whole page, click anywhere on the page.
Figure 42 Right‐Click in Design Mode
Note: The Edit panel and Remove panel options display only when you right‐click a moveable page element (see Editing Your Store’s Text on page 66).
• Click Edit panel to open the store editor at the entry for the page element over which you clicked.
• Click Remove panel to delete the page element over which you clicked.
• Click Edit layout to open the store editor at the Layout entry for the page.
• Click Edit stylesheet to open the store editor at the styles.css file for your store.
See Using the Store Editor on page 69 for information on using the store editor to edit your store’s HTML.

USING DESIGN MODE68
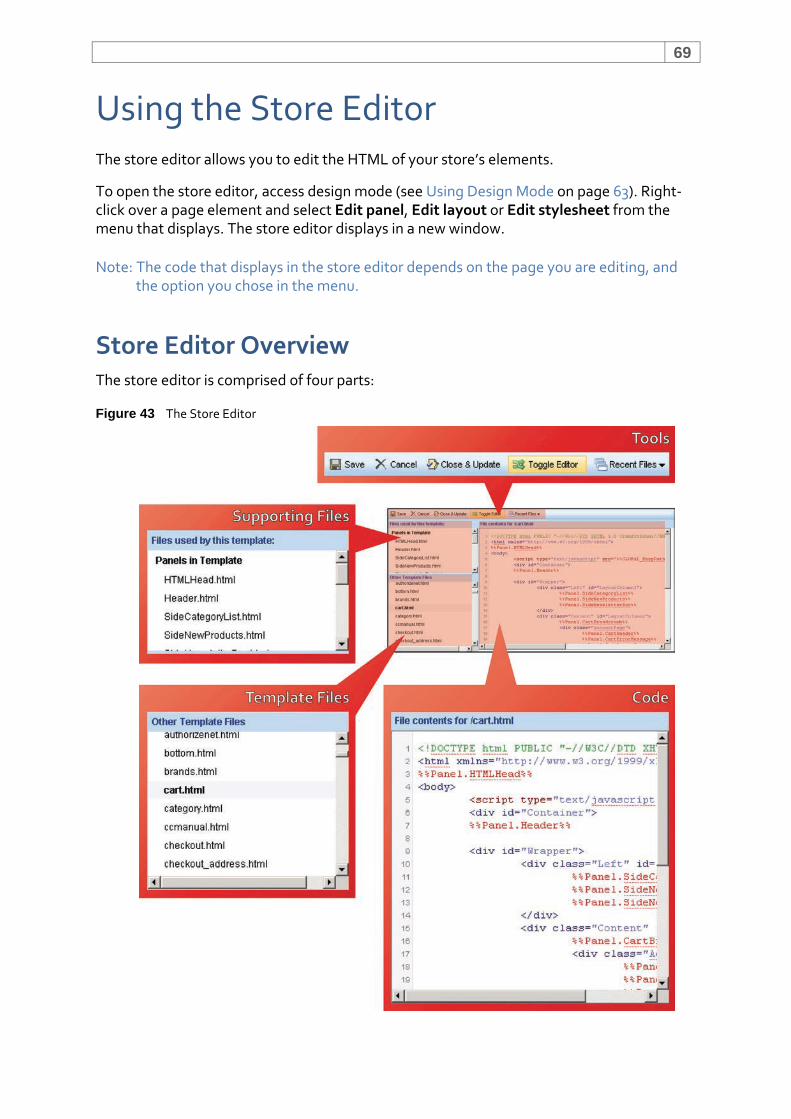
69
Using the Store EditorThe store editor allows you to edit the HTML of your store’s elements.
To open the store editor, access design mode (see Using Design Mode on page 63). Right‐click over a page element and select Edit panel, Edit layout or Edit stylesheet from the menu that displays. The store editor displays in a new window.
Note: The code that displays in the store editor depends on the page you are editing, and the option you chose in the menu.
Store Editor OverviewThe store editor is comprised of four parts:
Figure 43 The Store Editor
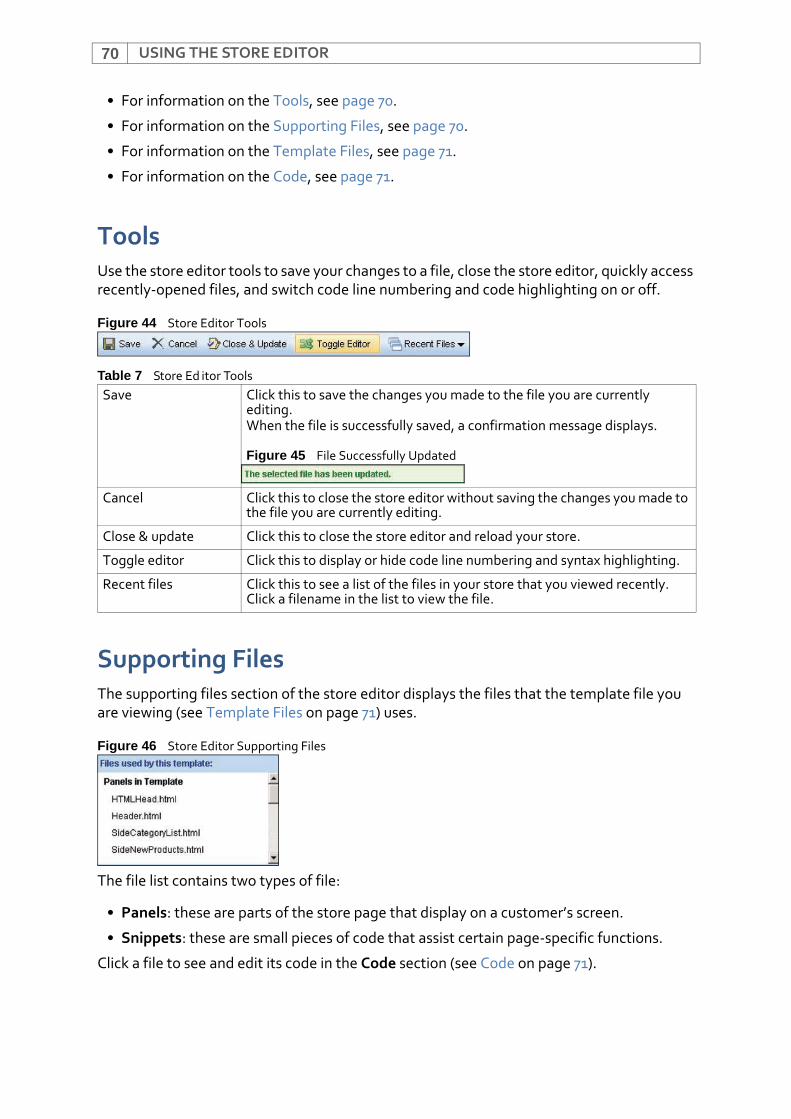
USING THE STORE EDITOR70
• For information on the Tools, see page 70.
• For information on the Supporting Files, see page 70.
• For information on the Template Files, see page 71.
• For information on the Code, see page 71.
ToolsUse the store editor tools to save your changes to a file, close the store editor, quickly access recently‐opened files, and switch code line numbering and code highlighting on or off.
Figure 44 Store Editor Tools
Supporting FilesThe supporting files section of the store editor displays the files that the template file you are viewing (see Template Files on page 71) uses.
Figure 46 Store Editor Supporting Files
The file list contains two types of file:
• Panels: these are parts of the store page that display on a customer’s screen.
• Snippets: these are small pieces of code that assist certain page‐specific functions.
Click a file to see and edit its code in the Code section (see Code on page 71).
Table 7 Store Ed itor ToolsSave Click this to save the changes you made to the file you are currently
editing.When the file is successfully saved, a confirmation message displays.
Figure 45 File Successfully Updated
Cancel Click this to close the store editor without saving the changes you made to the file you are currently editing.
Close & update Click this to close the store editor and reload your store.
Toggle editor Click this to display or hide code line numbering and syntax highlighting.
Recent files Click this to see a list of the files in your store that you viewed recently. Click a filename in the list to view the file.
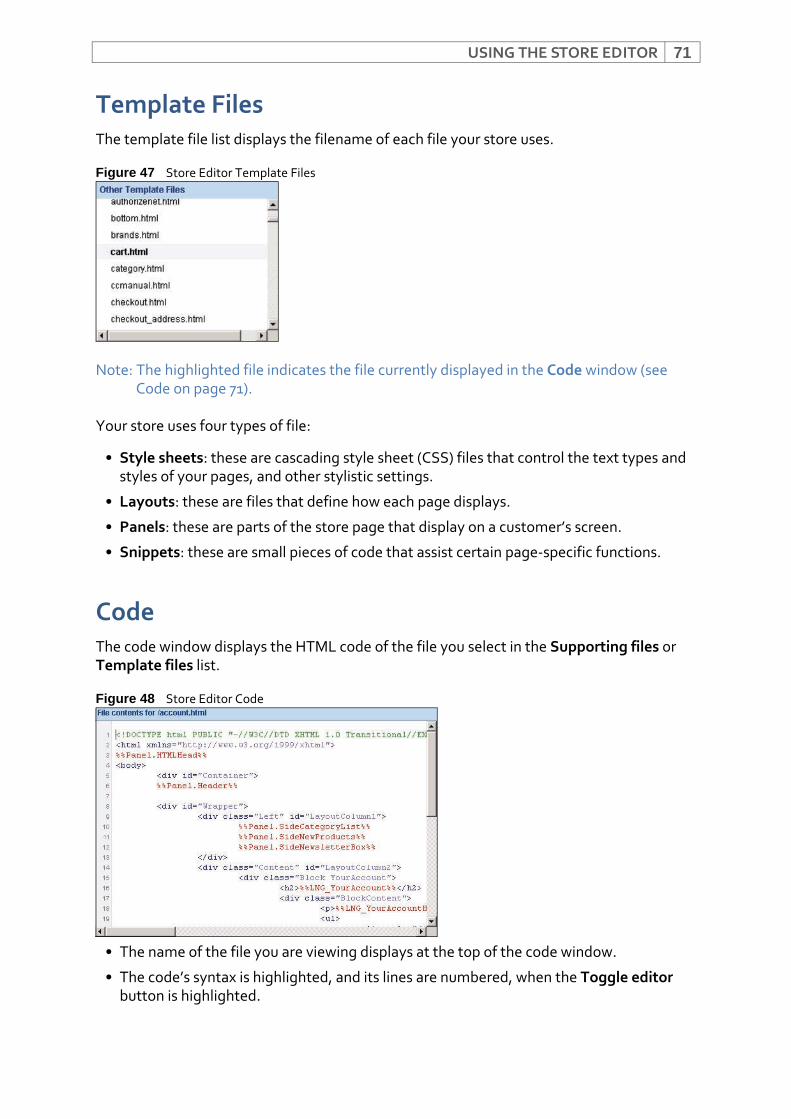
USING THE STORE EDITOR 71
Template FilesThe template file list displays the filename of each file your store uses.
Figure 47 Store Editor Template Files
Note: The highlighted file indicates the file currently displayed in the Code window (see Code on page 71).
Your store uses four types of file:
• Style sheets: these are cascading style sheet (CSS) files that control the text types and styles of your pages, and other stylistic settings.
• Layouts: these are files that define how each page displays.
• Panels: these are parts of the store page that display on a customer’s screen.
• Snippets: these are small pieces of code that assist certain page‐specific functions.
CodeThe code window displays the HTML code of the file you select in the Supporting files or Template files list.
Figure 48 Store Editor Code
• The name of the file you are viewing displays at the top of the code window.
• The code’s syntax is highlighted, and its lines are numbered, when the Toggle editor button is highlighted.
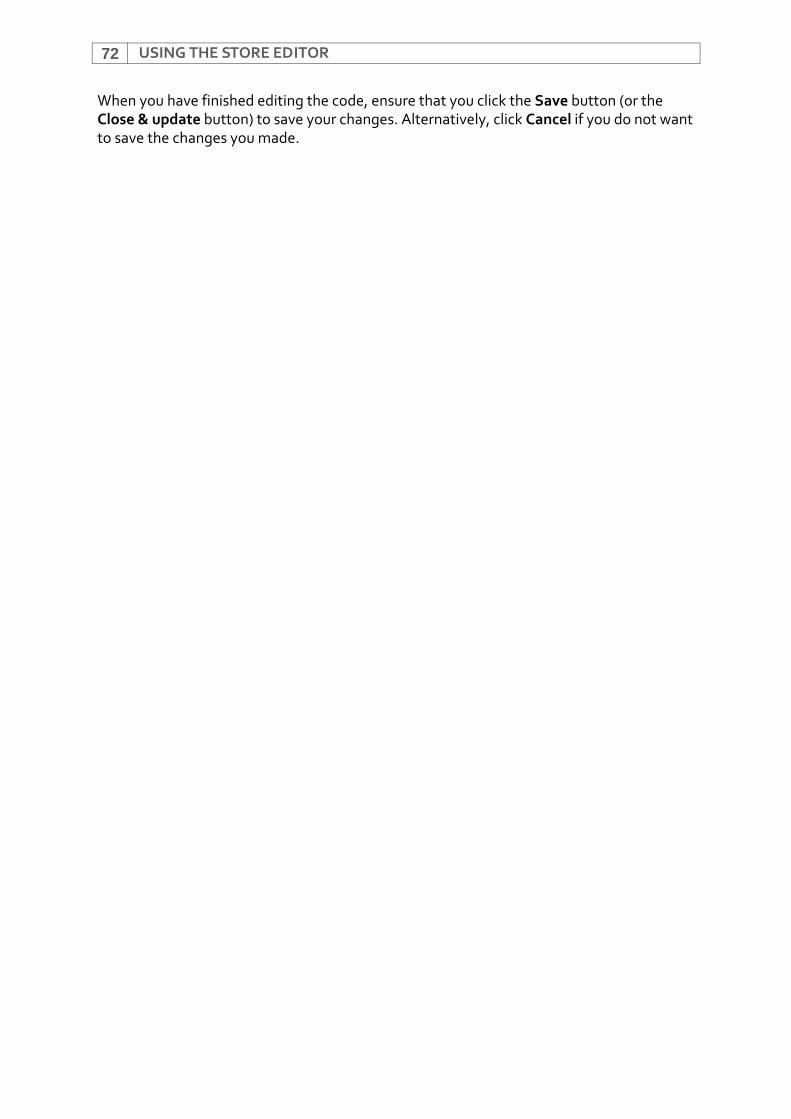
USING THE STORE EDITOR72
When you have finished editing the code, ensure that you click the Save button (or the Close & update button) to save your changes. Alternatively, click Cancel if you do not want to save the changes you made.
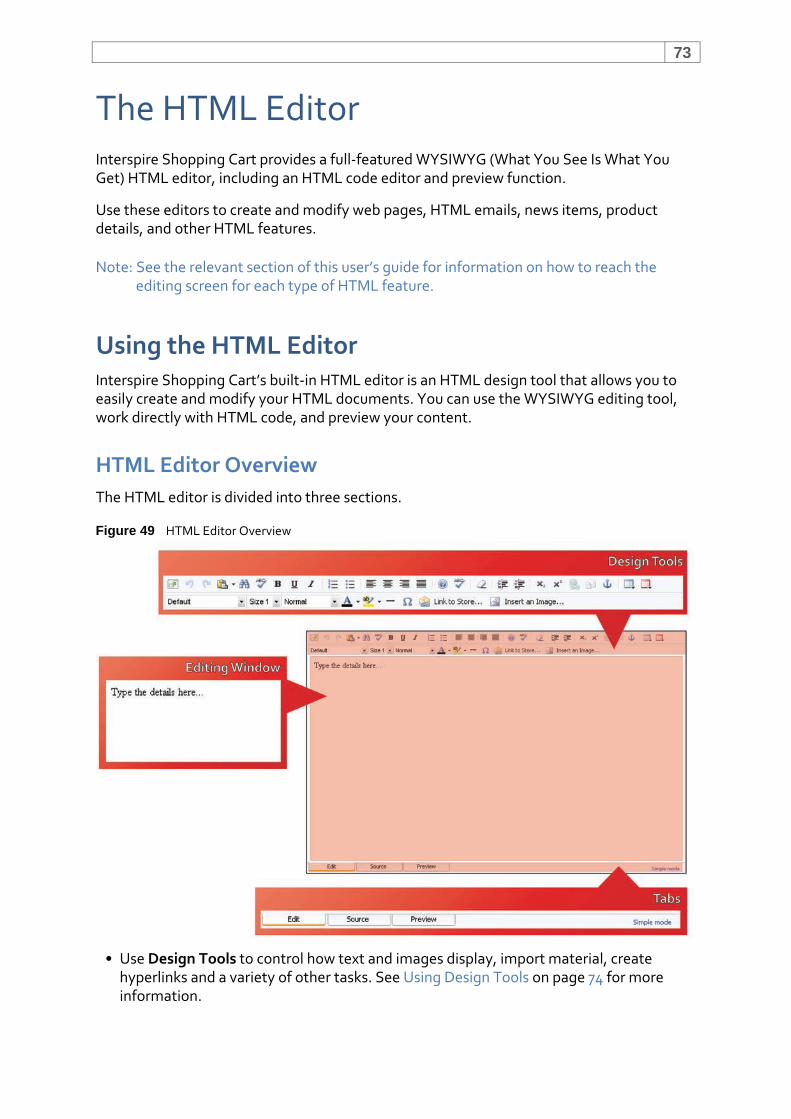
73
The HTML EditorInterspire Shopping Cart provides a full‐featured WYSIWYG (What You See Is What You Get) HTML editor, including an HTML code editor and preview function.
Use these editors to create and modify web pages, HTML emails, news items, product details, and other HTML features.
Note: See the relevant section of this user’s guide for information on how to reach the editing screen for each type of HTML feature.
Using the HTML EditorInterspire Shopping Cart’s built‐in HTML editor is an HTML design tool that allows you to easily create and modify your HTML documents. You can use the WYSIWYG editing tool, work directly with HTML code, and preview your content.
HTML Editor OverviewThe HTML editor is divided into three sections.
Figure 49 HTML Editor Overview
• Use Design Tools to control how text and images display, import material, create hyperlinks and a variety of other tasks. See Using Design Tools on page 74 for more information.
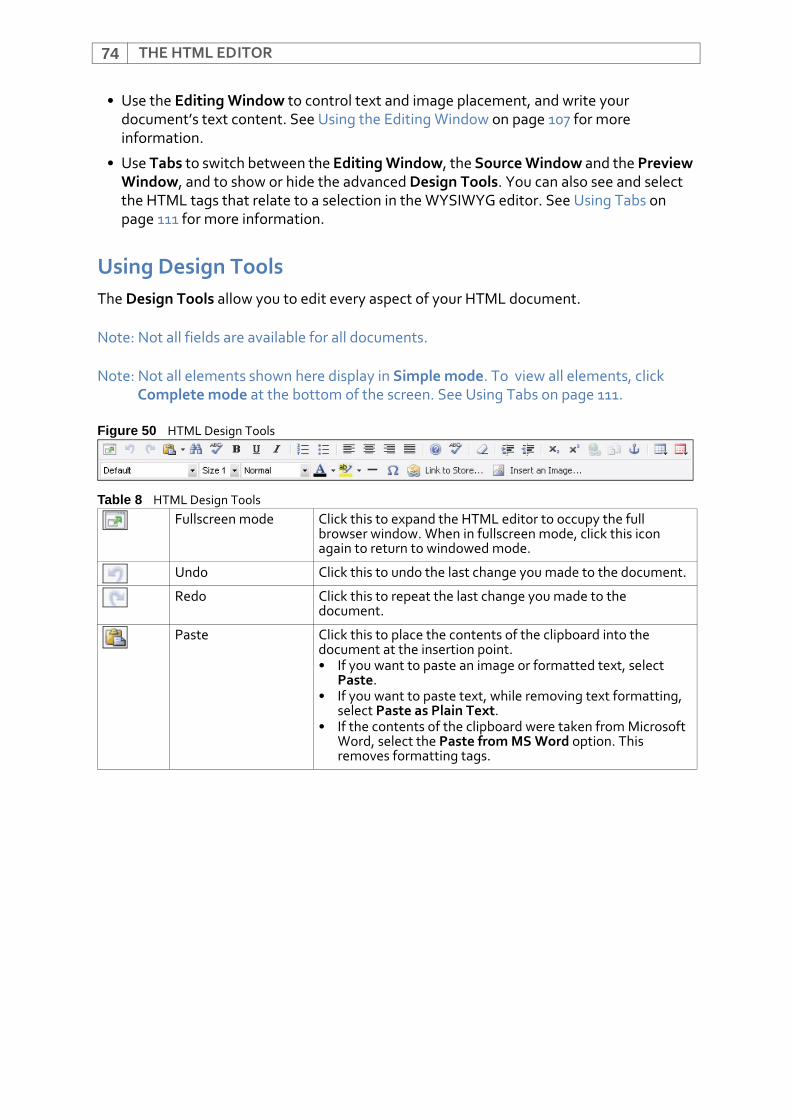
THE HTML EDITOR74
• Use the Editing Window to control text and image placement, and write your document’s text content. See Using the Editing Window on page 107 for more information.
• Use Tabs to switch between the Editing Window, the Source Window and the Preview Window, and to show or hide the advanced Design Tools. You can also see and select the HTML tags that relate to a selection in the WYSIWYG editor. See Using Tabs on page 111 for more information.
Using Design ToolsThe Design Tools allow you to edit every aspect of your HTML document.
Note: Not all fields are available for all documents.
Note: Not all elements shown here display in Simple mode. To view all elements, click Complete mode at the bottom of the screen. See Using Tabs on page 111.
Figure 50 HTML Design Tools
Table 8 HTML Design Tools Fullscreen mode Click this to expand the HTML editor to occupy the full
browser window. When in fullscreen mode, click this icon again to return to windowed mode.
Undo Click this to undo the last change you made to the document.
Redo Click this to repeat the last change you made to the document.
Paste Click this to place the contents of the clipboard into the document at the insertion point.• If you want to paste an image or formatted text, select
Paste.• If you want to paste text, while removing text formatting,
select Paste as Plain Text.• If the contents of the clipboard were taken from Microsoft
Word, select the Paste from MS Word option. This removes formatting tags.
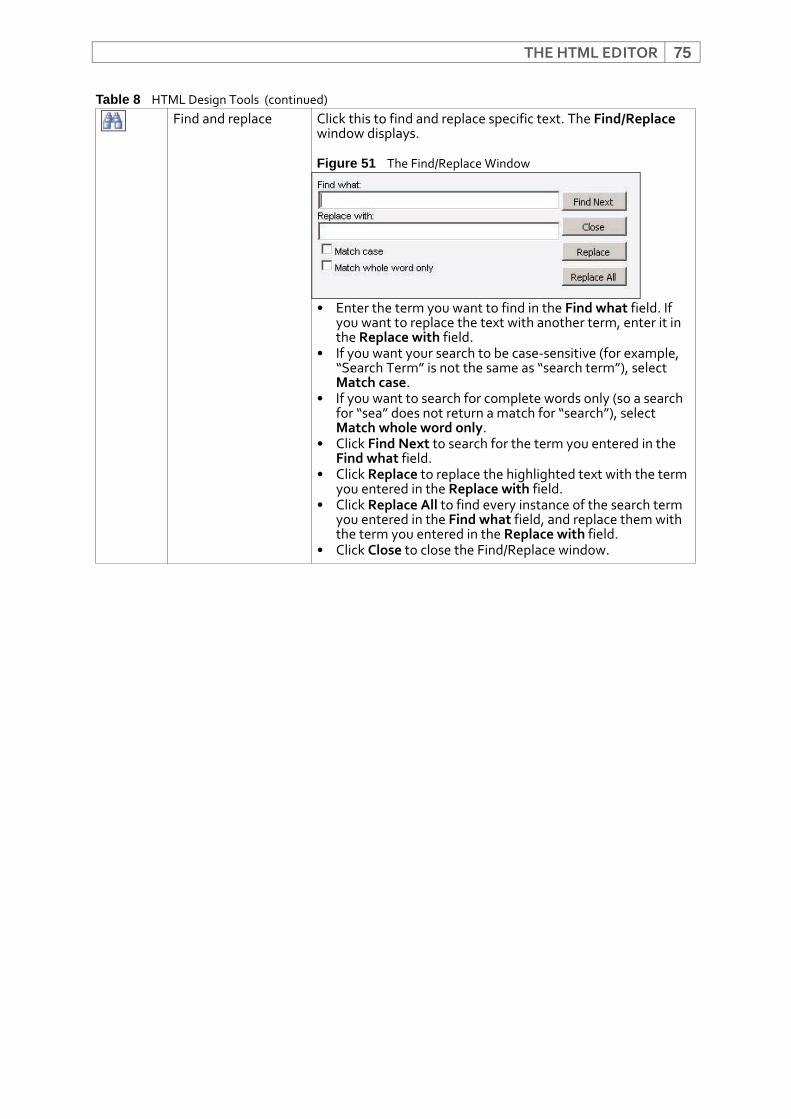
THE HTML EDITOR 75
Find and replace Click this to find and replace specific text. The Find/Replace window displays.
Figure 51 The Find/Replace Window
• Enter the term you want to find in the Find what field. If you want to replace the text with another term, enter it in the Replace with field.
• If you want your search to be case‐sensitive (for example, “Search Term” is not the same as “search term”), select Match case.
• If you want to search for complete words only (so a search for “sea” does not return a match for “search”), select Match whole word only.
• Click Find Next to search for the term you entered in the Find what field.
• Click Replace to replace the highlighted text with the term you entered in the Replace with field.
• Click Replace All to find every instance of the search term you entered in the Find what field, and replace them with the term you entered in the Replace with field.
• Click Close to close the Find/Replace window.
Table 8 HTML Design Tools (continued)
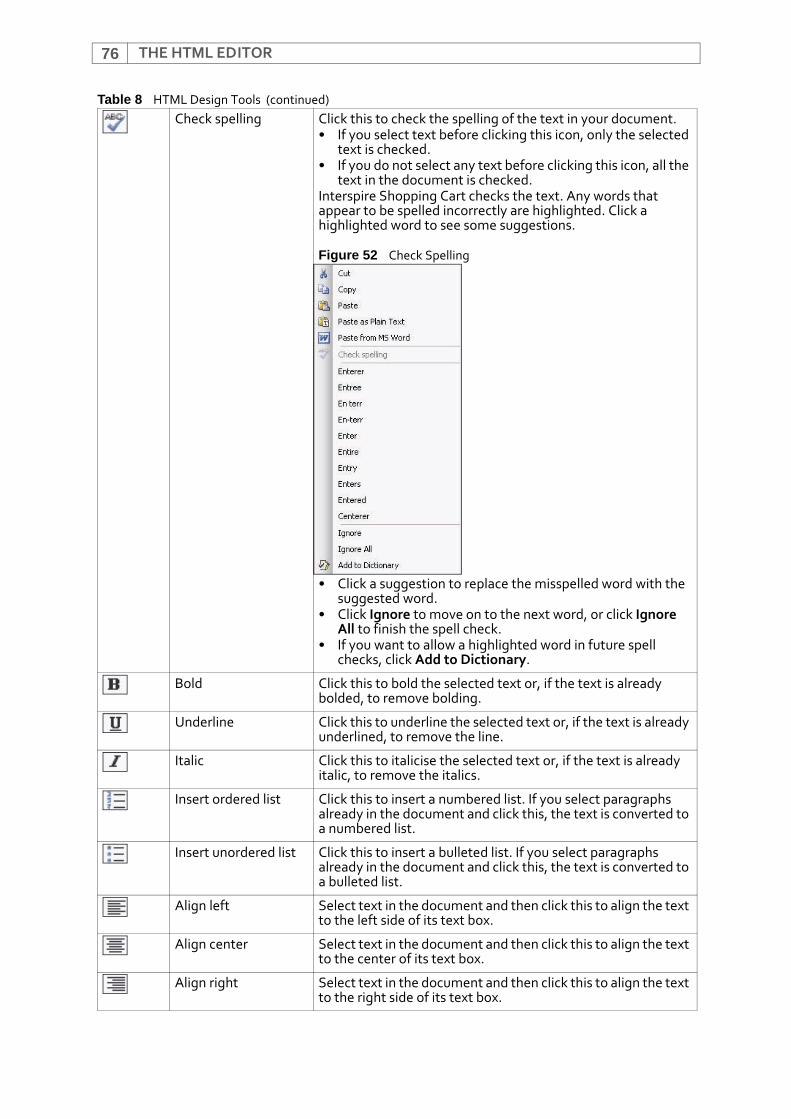
THE HTML EDITOR76
Check spelling Click this to check the spelling of the text in your document. • If you select text before clicking this icon, only the selected
text is checked. • If you do not select any text before clicking this icon, all the
text in the document is checked.Interspire Shopping Cart checks the text. Any words that appear to be spelled incorrectly are highlighted. Click a highlighted word to see some suggestions.
Figure 52 Check Spelling
• Click a suggestion to replace the misspelled word with the suggested word.
• Click Ignore to move on to the next word, or click Ignore All to finish the spell check.
• If you want to allow a highlighted word in future spell checks, click Add to Dictionary.
Bold Click this to bold the selected text or, if the text is already bolded, to remove bolding.
Underline Click this to underline the selected text or, if the text is already underlined, to remove the line.
Italic Click this to italicise the selected text or, if the text is already italic, to remove the italics.
Insert ordered list Click this to insert a numbered list. If you select paragraphs already in the document and click this, the text is converted to a numbered list.
Insert unordered list Click this to insert a bulleted list. If you select paragraphs already in the document and click this, the text is converted to a bulleted list.
Align left Select text in the document and then click this to align the text to the left side of its text box.
Align center Select text in the document and then click this to align the text to the center of its text box.
Align right Select text in the document and then click this to align the text to the right side of its text box.
Table 8 HTML Design Tools (continued)
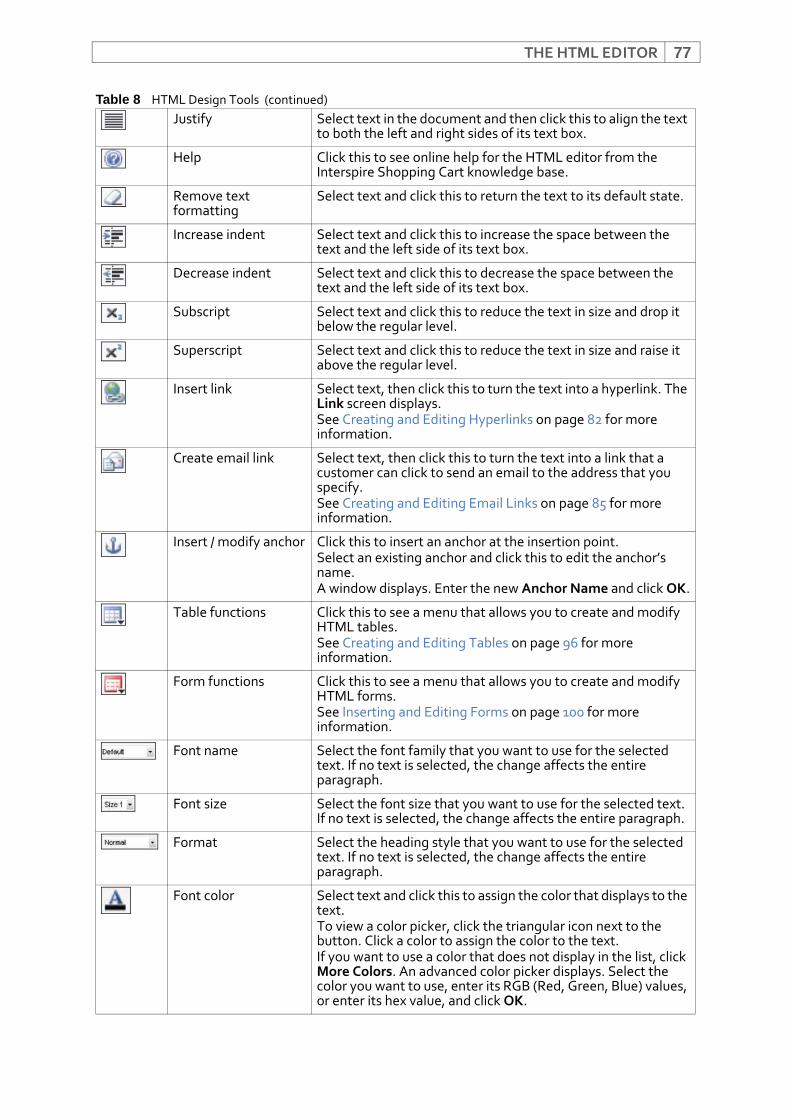
THE HTML EDITOR 77
Justify Select text in the document and then click this to align the text to both the left and right sides of its text box.
Help Click this to see online help for the HTML editor from the Interspire Shopping Cart knowledge base.
Remove text formatting
Select text and click this to return the text to its default state.
Increase indent Select text and click this to increase the space between the text and the left side of its text box.
Decrease indent Select text and click this to decrease the space between the text and the left side of its text box.
Subscript Select text and click this to reduce the text in size and drop it below the regular level.
Superscript Select text and click this to reduce the text in size and raise it above the regular level.
Insert link Select text, then click this to turn the text into a hyperlink. The Link screen displays. See Creating and Editing Hyperlinks on page 82 for more information.
Create email link Select text, then click this to turn the text into a link that a customer can click to send an email to the address that you specify. See Creating and Editing Email Links on page 85 for more information.
Insert / modify anchor Click this to insert an anchor at the insertion point. Select an existing anchor and click this to edit the anchor’s name. A window displays. Enter the new Anchor Name and click OK.
Table functions Click this to see a menu that allows you to create and modify HTML tables. See Creating and Editing Tables on page 96 for more information.
Form functions Click this to see a menu that allows you to create and modify HTML forms. See Inserting and Editing Forms on page 100 for more information.
Font name Select the font family that you want to use for the selected text. If no text is selected, the change affects the entire paragraph.
Font size Select the font size that you want to use for the selected text. If no text is selected, the change affects the entire paragraph.
Format Select the heading style that you want to use for the selected text. If no text is selected, the change affects the entire paragraph.
Font color Select text and click this to assign the color that displays to the text. To view a color picker, click the triangular icon next to the button. Click a color to assign the color to the text.If you want to use a color that does not display in the list, click More Colors. An advanced color picker displays. Select the color you want to use, enter its RGB (Red, Green, Blue) values, or enter its hex value, and click OK.
Table 8 HTML Design Tools (continued)
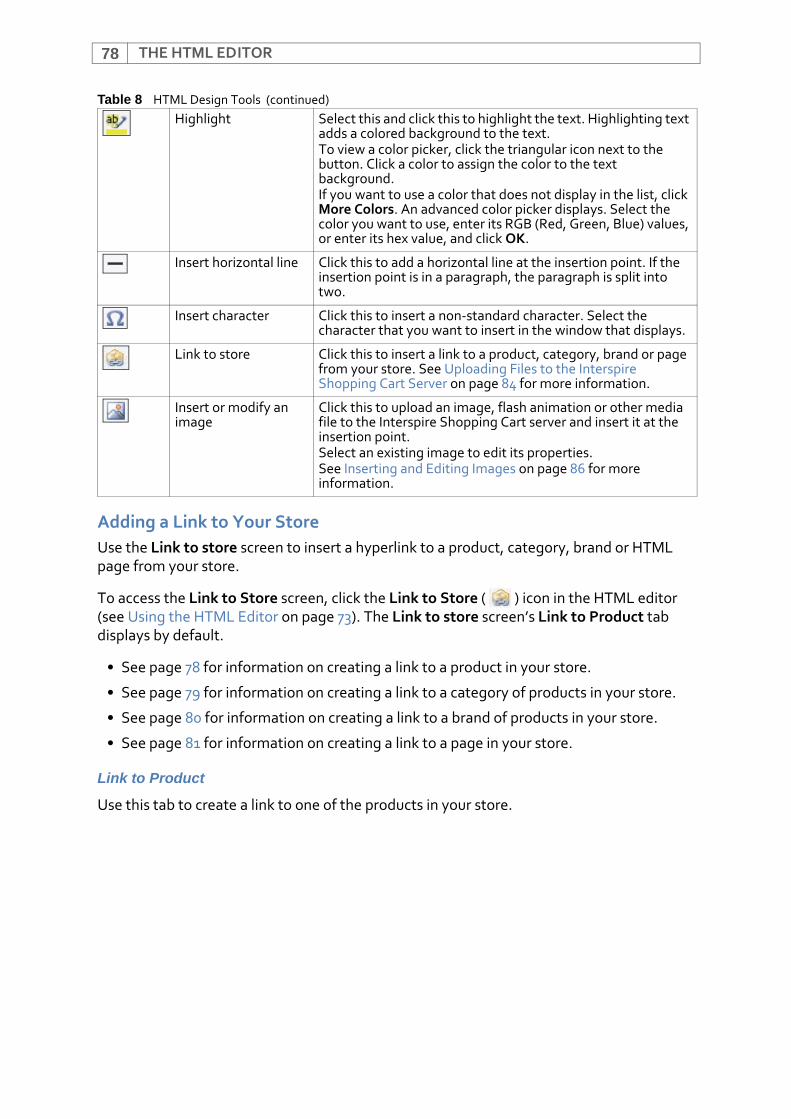
THE HTML EDITOR78
Adding a Link to Your StoreUse the Link to store screen to insert a hyperlink to a product, category, brand or HTML page from your store.
To access the Link to Store screen, click the Link to Store ( ) icon in the HTML editor (see Using the HTML Editor on page 73). The Link to store screen’s Link to Product tab displays by default.
• See page 78 for information on creating a link to a product in your store.
• See page 79 for information on creating a link to a category of products in your store.
• See page 80 for information on creating a link to a brand of products in your store.
• See page 81 for information on creating a link to a page in your store.
Link to Product
Use this tab to create a link to one of the products in your store.
Highlight Select this and click this to highlight the text. Highlighting text adds a colored background to the text.To view a color picker, click the triangular icon next to the button. Click a color to assign the color to the text background.If you want to use a color that does not display in the list, click More Colors. An advanced color picker displays. Select the color you want to use, enter its RGB (Red, Green, Blue) values, or enter its hex value, and click OK.
Insert horizontal line Click this to add a horizontal line at the insertion point. If the insertion point is in a paragraph, the paragraph is split into two.
Insert character Click this to insert a non‐standard character. Select the character that you want to insert in the window that displays.
Link to store Click this to insert a link to a product, category, brand or page from your store. See Uploading Files to the Interspire Shopping Cart Server on page 84 for more information.
Insert or modify an image
Click this to upload an image, flash animation or other media file to the Interspire Shopping Cart server and insert it at the insertion point.Select an existing image to edit its properties.See Inserting and Editing Images on page 86 for more information.
Table 8 HTML Design Tools (continued)
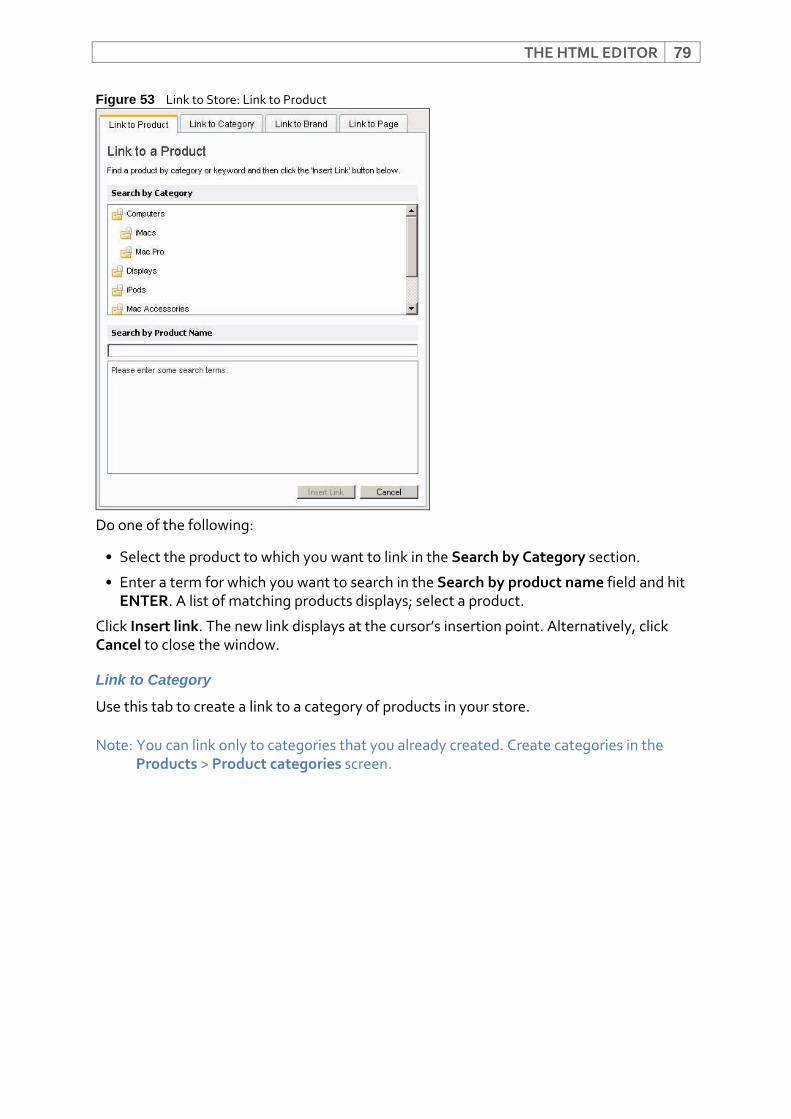
THE HTML EDITOR 79
Figure 53 Link to Store: Link to Product
Do one of the following:
• Select the product to which you want to link in the Search by Category section.
• Enter a term for which you want to search in the Search by product name field and hit ENTER. A list of matching products displays; select a product.
Click Insert link. The new link displays at the cursor’s insertion point. Alternatively, click Cancel to close the window.
Link to Category
Use this tab to create a link to a category of products in your store.
Note: You can link only to categories that you already created. Create categories in the Products > Product categories screen.

THE HTML EDITOR80
Figure 54 Link to Store: Link to Category
All the product categories you set up in Interspire Shopping Cart display. Select a category and click Insert link. The new link displays at the cursor’s insertion point. Alternatively, click Cancel to close the window.
Link to Brand
Use this tab to create a link to a list of all products belonging to the same brand in your store.
Note: You can link only to brands that you already configured. Configure brands in the Products > View brands screen.
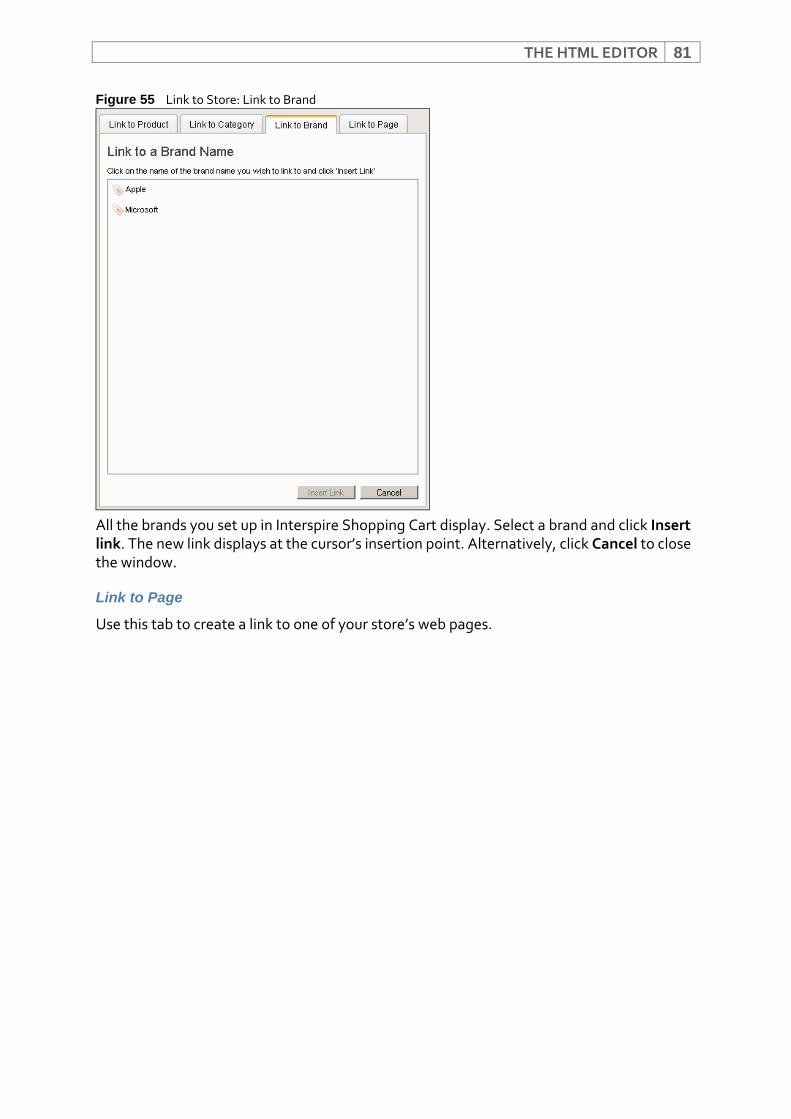
THE HTML EDITOR 81
Figure 55 Link to Store: Link to Brand
All the brands you set up in Interspire Shopping Cart display. Select a brand and click Insert link. The new link displays at the cursor’s insertion point. Alternatively, click Cancel to close the window.
Link to Page
Use this tab to create a link to one of your store’s web pages.
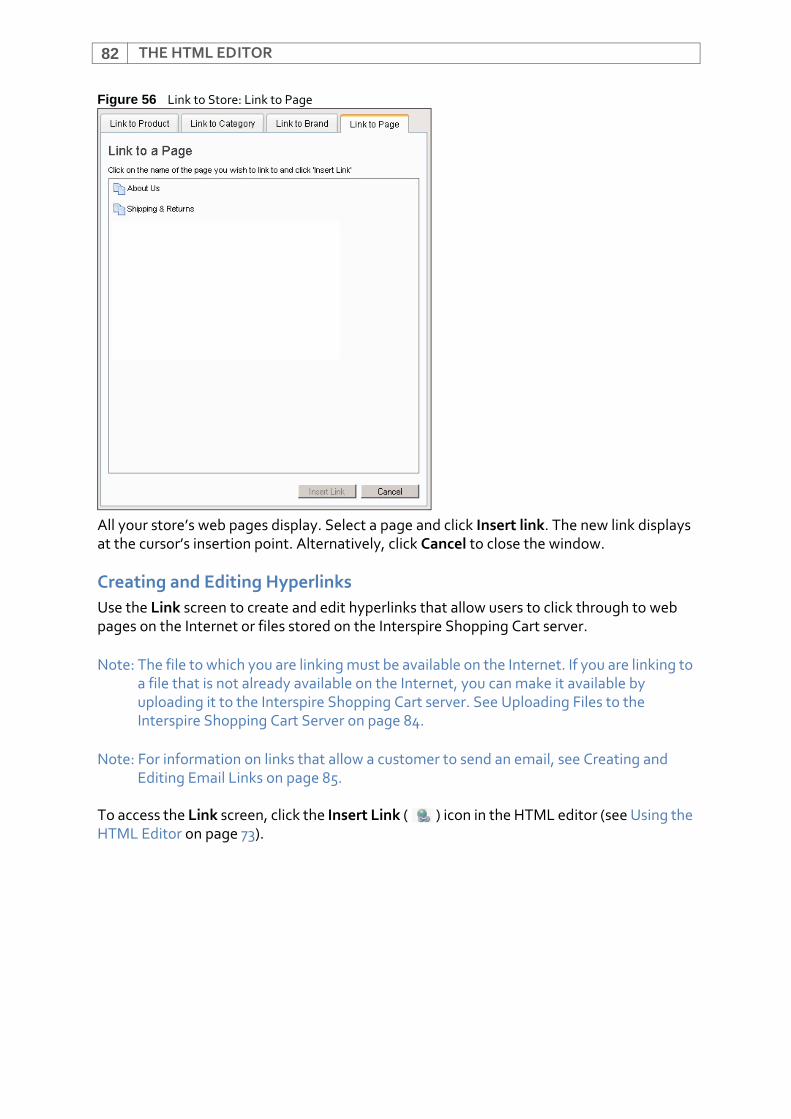
THE HTML EDITOR82
Figure 56 Link to Store: Link to Page
All your store’s web pages display. Select a page and click Insert link. The new link displays at the cursor’s insertion point. Alternatively, click Cancel to close the window.
Creating and Editing HyperlinksUse the Link screen to create and edit hyperlinks that allow users to click through to web pages on the Internet or files stored on the Interspire Shopping Cart server.
Note: The file to which you are linking must be available on the Internet. If you are linking to a file that is not already available on the Internet, you can make it available by uploading it to the Interspire Shopping Cart server. See Uploading Files to the Interspire Shopping Cart Server on page 84.
Note: For information on links that allow a customer to send an email, see Creating and Editing Email Links on page 85.
To access the Link screen, click the Insert Link ( ) icon in the HTML editor (see Using the HTML Editor on page 73).
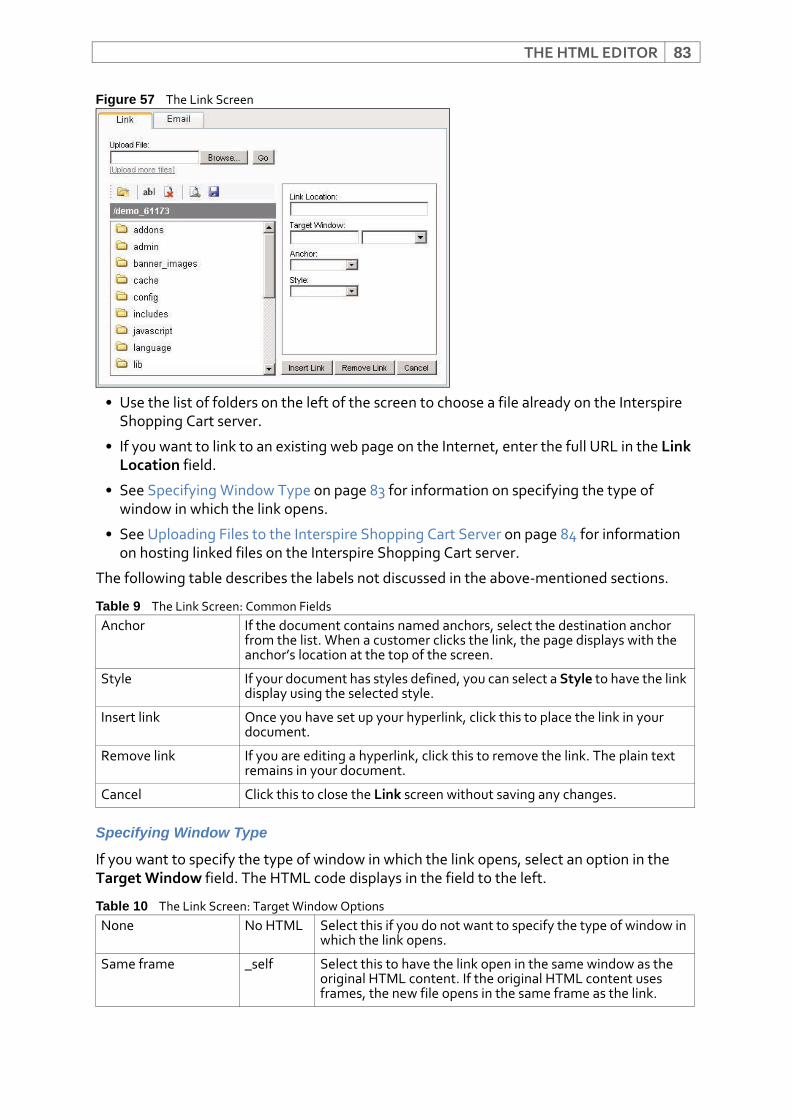
THE HTML EDITOR 83
Figure 57 The Link Screen
• Use the list of folders on the left of the screen to choose a file already on the Interspire Shopping Cart server.
• If you want to link to an existing web page on the Internet, enter the full URL in the Link Location field.
• See Specifying Window Type on page 83 for information on specifying the type of window in which the link opens.
• See Uploading Files to the Interspire Shopping Cart Server on page 84 for information on hosting linked files on the Interspire Shopping Cart server.
The following table describes the labels not discussed in the above‐mentioned sections.
Specifying Window Type
If you want to specify the type of window in which the link opens, select an option in the Target Window field. The HTML code displays in the field to the left.
Table 9 The Link Screen: Common FieldsAnchor If the document contains named anchors, select the destination anchor
from the list. When a customer clicks the link, the page displays with the anchor’s location at the top of the screen.
Style If your document has styles defined, you can select a Style to have the link display using the selected style.
Insert link Once you have set up your hyperlink, click this to place the link in your document.
Remove link If you are editing a hyperlink, click this to remove the link. The plain text remains in your document.
Cancel Click this to close the Link screen without saving any changes.
Table 10 The Link Screen: Target Window OptionsNone No HTML Select this if you do not want to specify the type of window in
which the link opens.
Same frame _self Select this to have the link open in the same window as the original HTML content. If the original HTML content uses frames, the new file opens in the same frame as the link.

THE HTML EDITOR84
Uploading Files to the Interspire Shopping Cart ServerIf you want to link to or embed a file that is not already available on the Internet (such as an image, a flash animation or an HTML file on your computer), use the file list on the left of the Links, Images, Flash or Media screen. When you upload a file from your computer to this list it is automatically hosted on the Interspire Shopping Cart server, and can be accessed over the Internet.
• Use the Links screen to upload files you want a customer to access via a hyperlink. See Creating and Editing Hyperlinks on page 82.
• Use the Images, Flash or Media screen to upload images, flash or other media files you want to embed in your document. See Inserting and Editing Images on page 86.
• For information on inserting and editing images, see page 86.
• For information on inserting and editing flash (.swf) animations, see page 90.
• For information on inserting and editing other media files, see page 94.
Whole page _top Select this to have the link open in the whole page of the original HTML content. If the original HTML content uses frames, the new file removes the frames.
New window _blank Select this to have the link open in a new browser window.
Parent frame _parent Select this to have the link open in the parent frameset. Use this option when the original HTML content uses multiple framesets.
Table 11 Link and Images Screens: Uploading Files and ImagesUpload File Enter the filepath of the file on your computer that you
want to upload to the Interspire Shopping Cart server. Alternatively, use the Browse button to locate the file.
Browse Click this to locate a file you want to upload to the Interspire Shopping Cart server. A File Upload window displays. Locate the file and click Open. Then, click Go to upload the file.
Go Once you have selected a file to upload (the filepath displays in the Upload File field) click this to upload the file.
Upload more files Click this to see two more fields where you can upload more files. Click each field’s Browse button to select the file you want to upload.
New folder Click this to create a new folder for uploaded files on the Interspire Shopping Cart server. The current directory path displays above the list.A window displays in which you can name the new folder. Enter the new name and click OK.
Rename selected file/folder
Select a file or folder and click this to rename the file or folder.
Note: Click a folder’s icon to select it.
A window displays in which you can rename the folder. Enter the new name and click OK.
Table 10 The Link Screen: Target Window Options
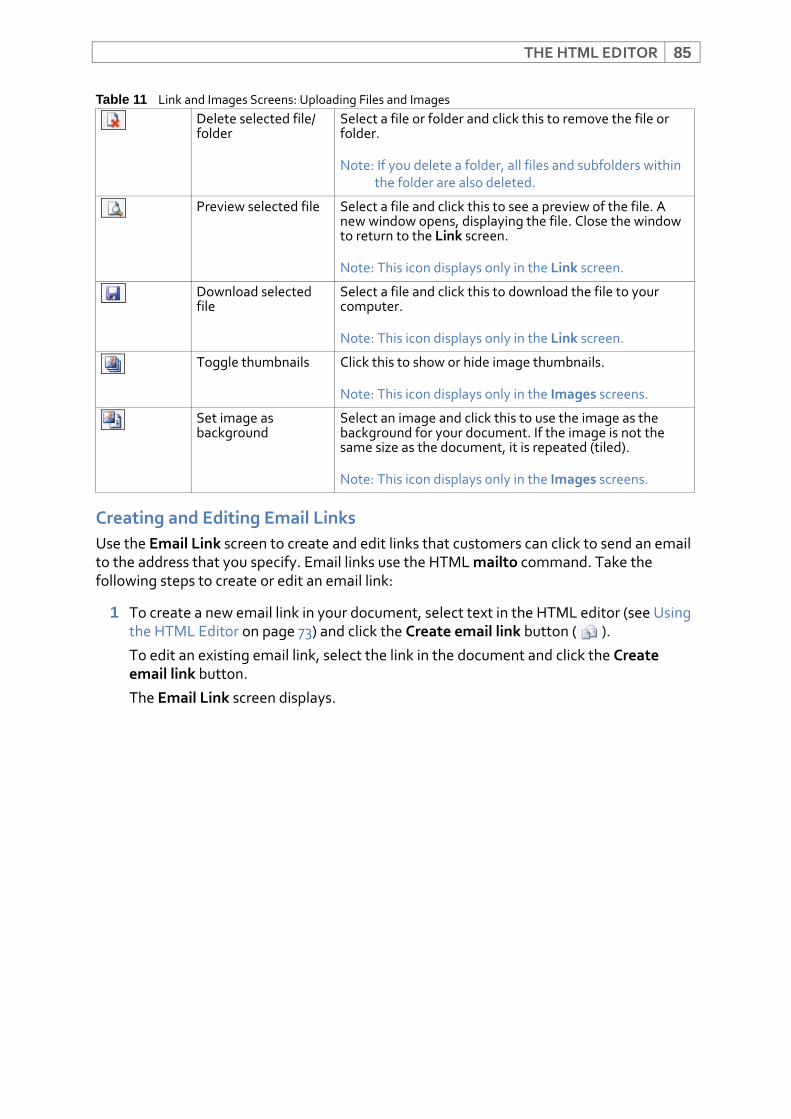
THE HTML EDITOR 85
Creating and Editing Email LinksUse the Email Link screen to create and edit links that customers can click to send an email to the address that you specify. Email links use the HTML mailto command. Take the following steps to create or edit an email link:
1 To create a new email link in your document, select text in the HTML editor (see Using the HTML Editor on page 73) and click the Create email link button ( ).
To edit an existing email link, select the link in the document and click the Create email link button.
The Email Link screen displays.
Delete selected file/folder
Select a file or folder and click this to remove the file or folder.
Note: If you delete a folder, all files and subfolders within the folder are also deleted.
Preview selected file Select a file and click this to see a preview of the file. A new window opens, displaying the file. Close the window to return to the Link screen.
Note: This icon displays only in the Link screen.
Download selected file
Select a file and click this to download the file to your computer.
Note: This icon displays only in the Link screen.
Toggle thumbnails Click this to show or hide image thumbnails.
Note: This icon displays only in the Images screens.
Set image as background
Select an image and click this to use the image as the background for your document. If the image is not the same size as the document, it is repeated (tiled).
Note: This icon displays only in the Images screens.
Table 11 Link and Images Screens: Uploading Files and Images
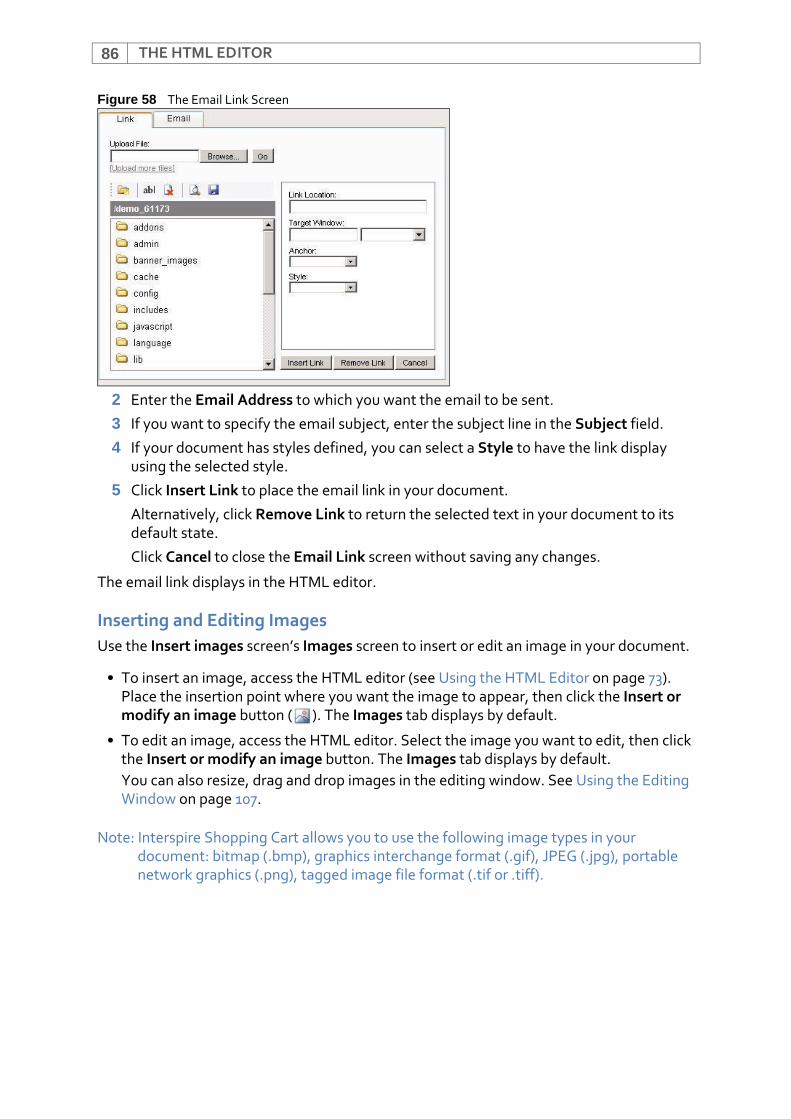
THE HTML EDITOR86
Figure 58 The Email Link Screen
2 Enter the Email Address to which you want the email to be sent.
3 If you want to specify the email subject, enter the subject line in the Subject field.
4 If your document has styles defined, you can select a Style to have the link display using the selected style.
5 Click Insert Link to place the email link in your document.
Alternatively, click Remove Link to return the selected text in your document to its default state.
Click Cancel to close the Email Link screen without saving any changes.
The email link displays in the HTML editor.
Inserting and Editing ImagesUse the Insert images screen’s Images screen to insert or edit an image in your document.
• To insert an image, access the HTML editor (see Using the HTML Editor on page 73). Place the insertion point where you want the image to appear, then click the Insert or modify an image button ( ). The Images tab displays by default.
• To edit an image, access the HTML editor. Select the image you want to edit, then click the Insert or modify an image button. The Images tab displays by default.You can also resize, drag and drop images in the editing window. See Using the Editing Window on page 107.
Note: Interspire Shopping Cart allows you to use the following image types in your document: bitmap (.bmp), graphics interchange format (.gif), JPEG (.jpg), portable network graphics (.png), tagged image file format (.tif or .tiff).
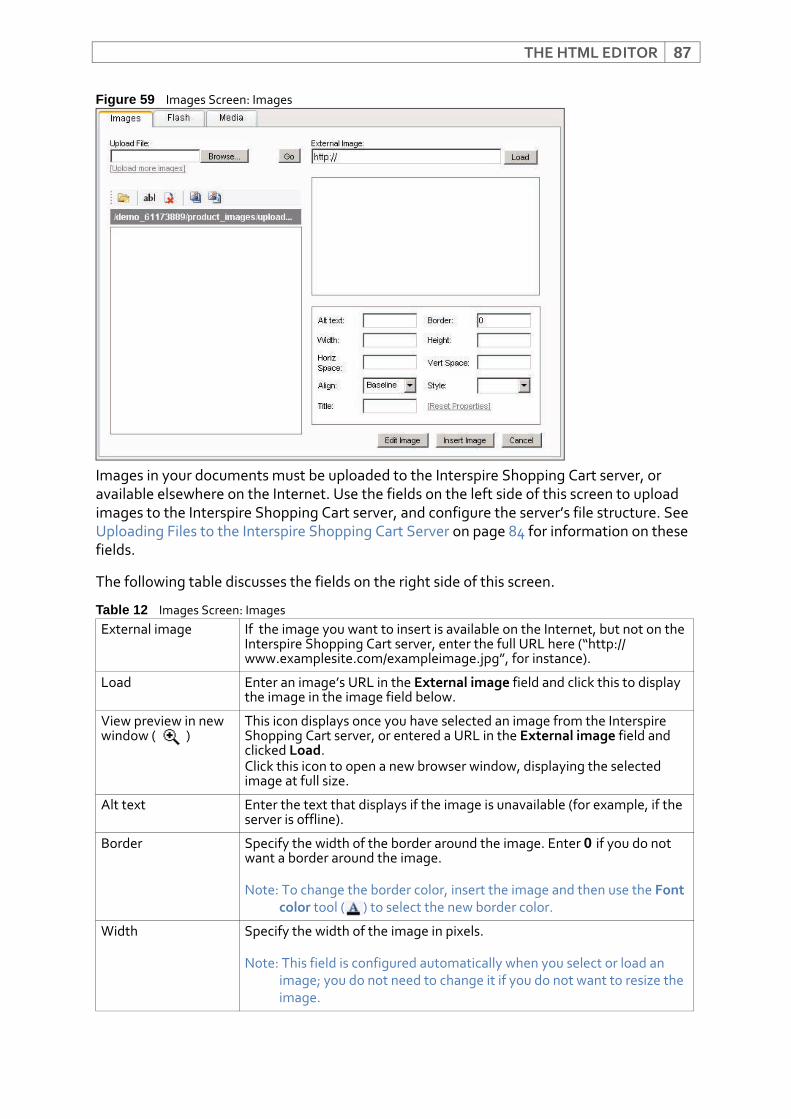
THE HTML EDITOR 87
Figure 59 Images Screen: Images
Images in your documents must be uploaded to the Interspire Shopping Cart server, or available elsewhere on the Internet. Use the fields on the left side of this screen to upload images to the Interspire Shopping Cart server, and configure the server’s file structure. See Uploading Files to the Interspire Shopping Cart Server on page 84 for information on these fields.
The following table discusses the fields on the right side of this screen.
Table 12 Images Screen: Images External image If the image you want to insert is available on the Internet, but not on the
Interspire Shopping Cart server, enter the full URL here (“http://www.examplesite.com/exampleimage.jpg”, for instance).
Load Enter an image’s URL in the External image field and click this to display the image in the image field below.
View preview in new window ( )
This icon displays once you have selected an image from the Interspire Shopping Cart server, or entered a URL in the External image field and clicked Load.Click this icon to open a new browser window, displaying the selected image at full size.
Alt text Enter the text that displays if the image is unavailable (for example, if the server is offline).
Border Specify the width of the border around the image. Enter 0 if you do not want a border around the image.
Note: To change the border color, insert the image and then use the Font color tool ( ) to select the new border color.
Width Specify the width of the image in pixels.
Note: This field is configured automatically when you select or load an image; you do not need to change it if you do not want to resize the image.
THE HTML EDITOR88
Height Specify the height of the image in pixels.
Note: This field is configured automatically when you select or load an image; you do not need to change it if you do not want to resize the image.
Horiz space Enter the amount of empty space to left and right of the image in pixels.
Vert space Enter the amount of empty space above and below the image in pixels.
Table 12 Images Screen: Images (continued)
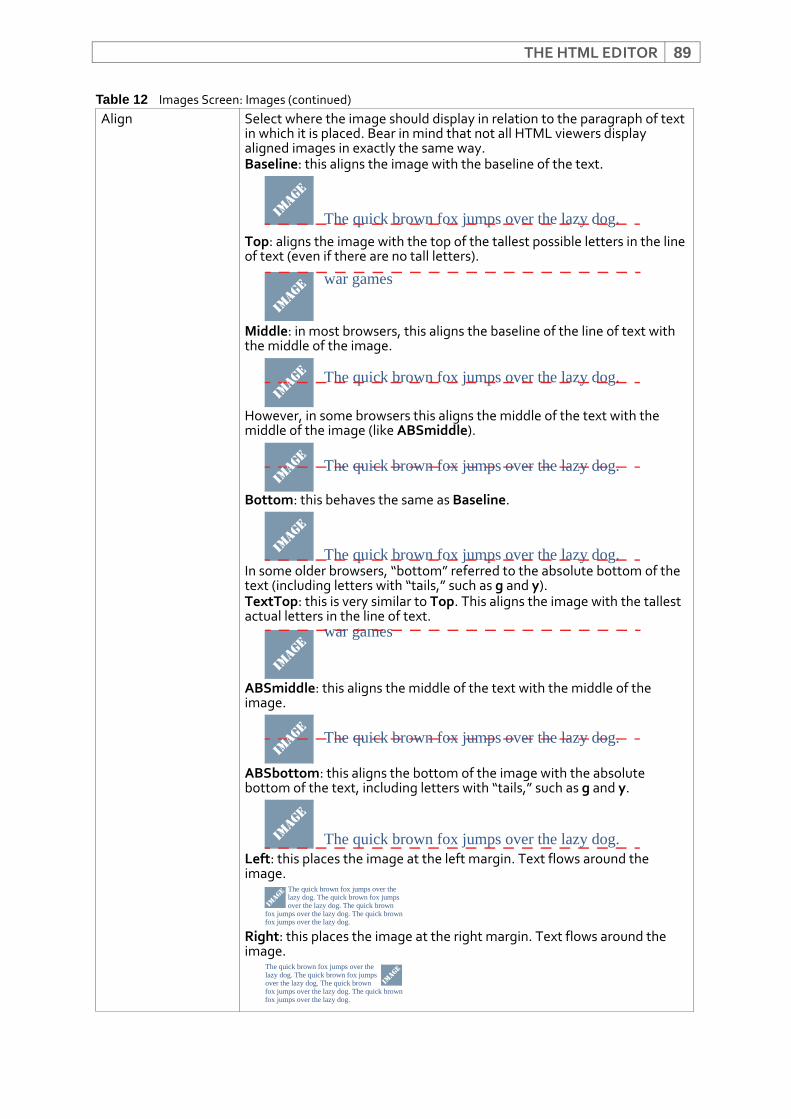
THE HTML EDITOR 89
Align Select where the image should display in relation to the paragraph of text in which it is placed. Bear in mind that not all HTML viewers display aligned images in exactly the same way.Baseline: this aligns the image with the baseline of the text.
Top: aligns the image with the top of the tallest possible letters in the line of text (even if there are no tall letters).
Middle: in most browsers, this aligns the baseline of the line of text with the middle of the image.
However, in some browsers this aligns the middle of the text with the middle of the image (like ABSmiddle).
Bottom: this behaves the same as Baseline.
In some older browsers, “bottom” referred to the absolute bottom of the text (including letters with “tails,” such as g and y).TextTop: this is very similar to Top. This aligns the image with the tallest actual letters in the line of text.
ABSmiddle: this aligns the middle of the text with the middle of the image.
ABSbottom: this aligns the bottom of the image with the absolute bottom of the text, including letters with “tails,” such as g and y.
Left: this places the image at the left margin. Text flows around the image.
Right: this places the image at the right margin. Text flows around the image.
Table 12 Images Screen: Images (continued)
IMAG
E
The quick brown fox jumps over the lazy dog.
IMAG
E war games
The quick brown fox jumps over the lazy dog.IM
AGE
IMAG
E The quick brown fox jumps over the lazy dog.
IMAG
E
The quick brown fox jumps over the lazy dog.
IMAG
Ewar games
IMAG
E The quick brown fox jumps over the lazy dog.
IMAG
E
The quick brown fox jumps over the lazy dog.
IMAG
E The quick brown fox jumps over the lazy dog. The quick brown fox jumpsover the lazy dog. The quick brown
fox jumps over the lazy dog. The quick brown fox jumps over the lazy dog.
The quick brown fox jumps over the lazy dog. The quick brown fox jumps over the lazy dog. The quick brown fox jumps over the lazy dog. The quick brown fox jumps over the lazy dog.
IMAG
E
THE HTML EDITOR90
Inserting and Editing Flash AnimationsUse the Insert images screen’s Flash tab to insert or edit a flash animation in your document.
• To insert a flash animation, access the HTML editor (see Using the HTML Editor on page 73). Place the insertion point where you want the animation to appear, then click the Insert or modify an image button ( ). Click the Flash tab.
• To edit a flash animation, access the HTML editor. Select the animation you want to edit, then right‐click the animation. Select Modify flash properties.
Style If your document has styles defined, you can select a Style to have the image display using the selected style.
Title Enter a title for the image. In most HTML viewers, this displays when the customer places the mouse pointer over the image.
Note: If you want nothing to display when the customer places the mouse pointer over the image, leave this blank.
Reset properties Click this to return the image properties to their default values.The image’s Width and Height return to their full size values.Any information in the following fields is deleted: Alt text, Border, Horiz space, Vert space, Align, Style and Title.
Edit image Click this to open the image in a new window and edit it using the Snipshot online image editing tool.At the time of writing, this tool allows you to:• Resize the image.• Crop the image.• Enhance the image.• Adjust the image’s aspect ratio, tilt (horizontal angle), exposure,
contrast, saturation, hue and sharpness.• Rotate the image.• Turn a color image to greyscale. See www.snipshot.com for more information.
Note: This field displays only when you are inserting a new image.
Insert image Click this to place the image into your document at the insertion point.
Note: This field displays only when you are inserting a new image.
Modify image Click this to save your changes to the image and return to the HTML editor.
Note: This field displays only when you are editing an existing image in your document.
Cancel Click this to close this window and return to the HTML editor without saving your changes.
Table 12 Images Screen: Images (continued)
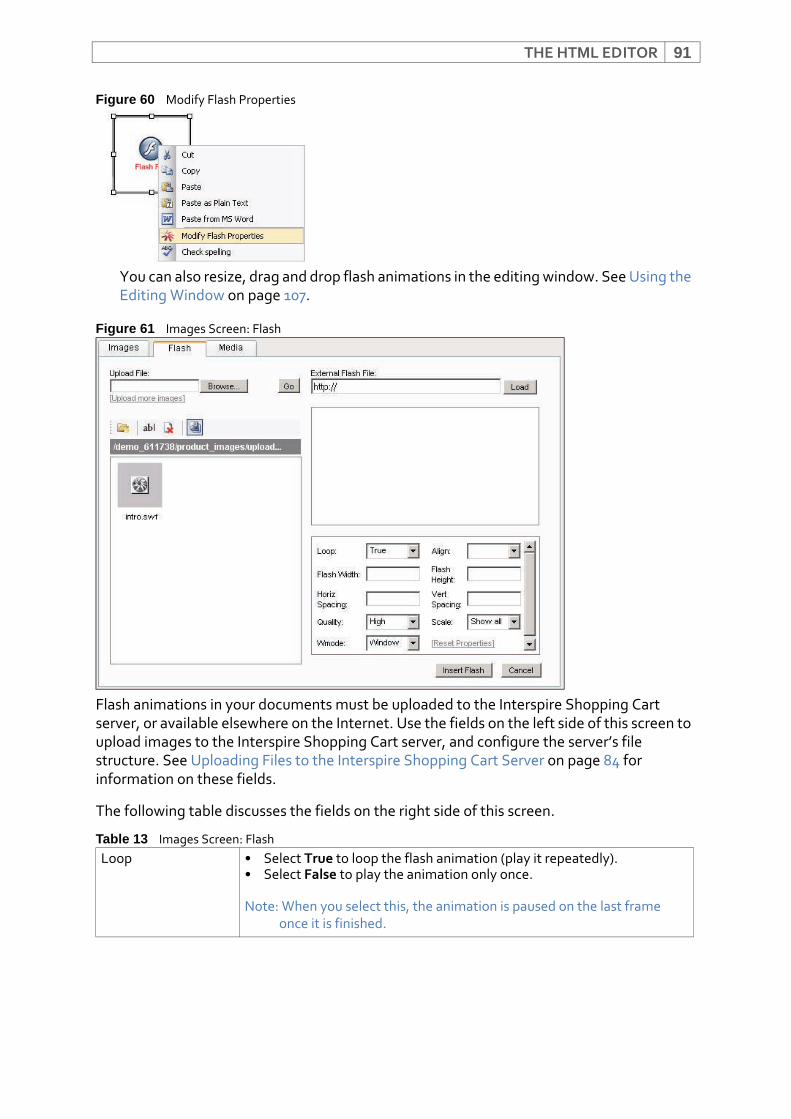
THE HTML EDITOR 91
Figure 60 Modify Flash Properties
You can also resize, drag and drop flash animations in the editing window. See Using the Editing Window on page 107.
Figure 61 Images Screen: Flash
Flash animations in your documents must be uploaded to the Interspire Shopping Cart server, or available elsewhere on the Internet. Use the fields on the left side of this screen to upload images to the Interspire Shopping Cart server, and configure the server’s file structure. See Uploading Files to the Interspire Shopping Cart Server on page 84 for information on these fields.
The following table discusses the fields on the right side of this screen.
Table 13 Images Screen: Flash Loop • Select True to loop the flash animation (play it repeatedly).
• Select False to play the animation only once.
Note: When you select this, the animation is paused on the last frame once it is finished.
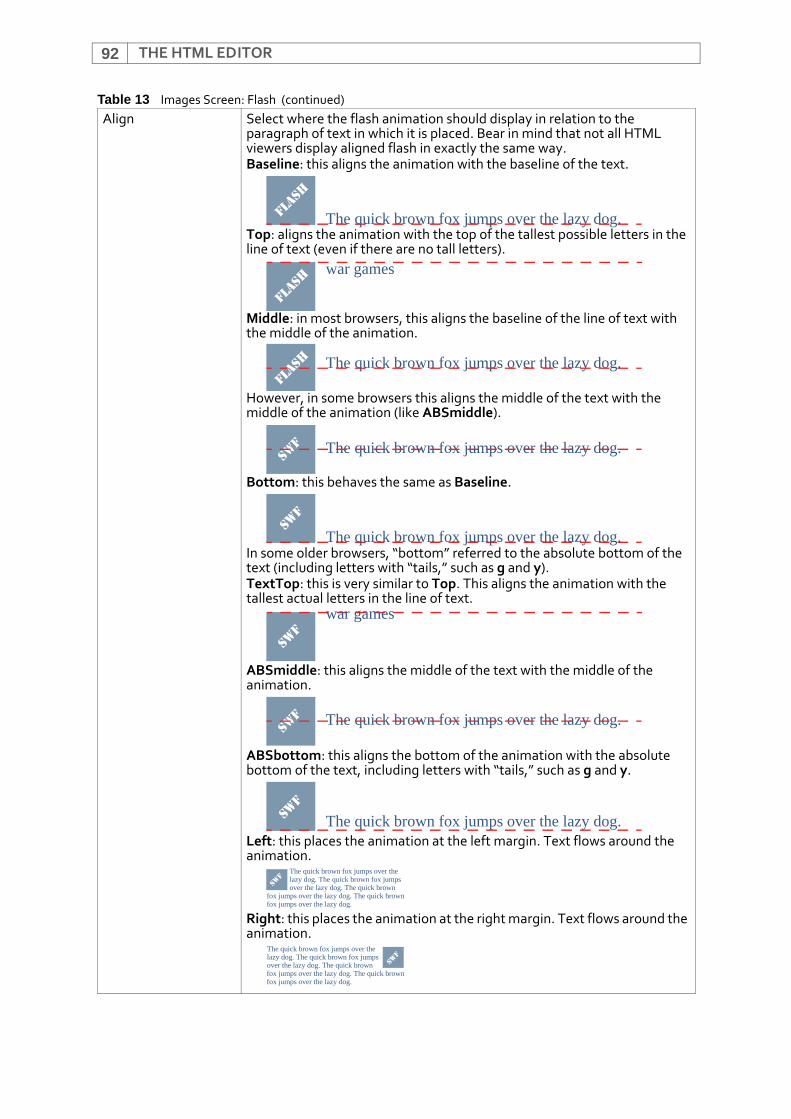
THE HTML EDITOR92
Align Select where the flash animation should display in relation to the paragraph of text in which it is placed. Bear in mind that not all HTML viewers display aligned flash in exactly the same way.Baseline: this aligns the animation with the baseline of the text.
Top: aligns the animation with the top of the tallest possible letters in the line of text (even if there are no tall letters).
Middle: in most browsers, this aligns the baseline of the line of text with the middle of the animation.
However, in some browsers this aligns the middle of the text with the middle of the animation (like ABSmiddle).
Bottom: this behaves the same as Baseline.
In some older browsers, “bottom” referred to the absolute bottom of the text (including letters with “tails,” such as g and y).TextTop: this is very similar to Top. This aligns the animation with the tallest actual letters in the line of text.
ABSmiddle: this aligns the middle of the text with the middle of the animation.
ABSbottom: this aligns the bottom of the animation with the absolute bottom of the text, including letters with “tails,” such as g and y.
Left: this places the animation at the left margin. Text flows around the animation.
Right: this places the animation at the right margin. Text flows around the animation.
Table 13 Images Screen: Flash (continued)
FLAS
H
The quick brown fox jumps over the lazy dog.
FLAS
H war games
The quick brown fox jumps over the lazy dog.FL
ASH
SWF The quick brown fox jumps over the lazy dog.
SWF
The quick brown fox jumps over the lazy dog.
SWF
war games
swf The quick brown fox jumps over the lazy dog.
SWF
The quick brown fox jumps over the lazy dog.
SWF
The quick brown fox jumps over the lazy dog. The quick brown fox jumpsover the lazy dog. The quick brown
fox jumps over the lazy dog. The quick brown fox jumps over the lazy dog.
The quick brown fox jumps over the lazy dog. The quick brown fox jumps over the lazy dog. The quick brown fox jumps over the lazy dog. The quick brown fox jumps over the lazy dog.
SWF
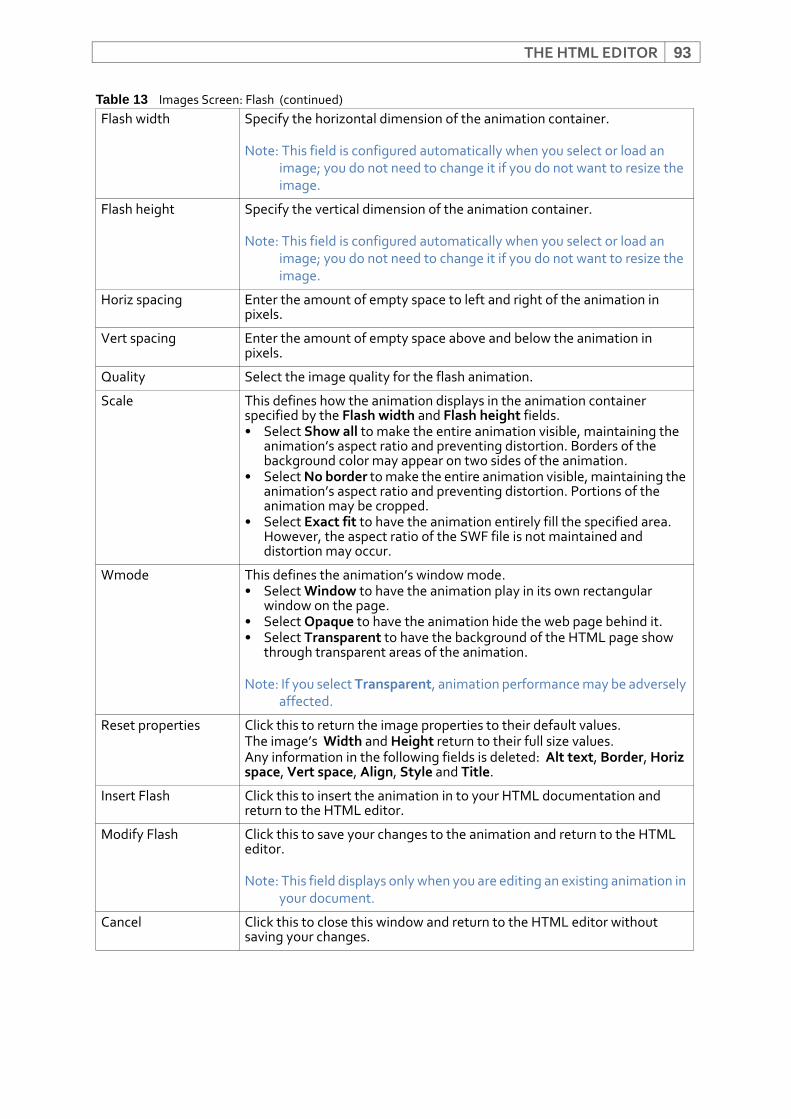
THE HTML EDITOR 93
Flash width Specify the horizontal dimension of the animation container.
Note: This field is configured automatically when you select or load an image; you do not need to change it if you do not want to resize the image.
Flash height Specify the vertical dimension of the animation container.
Note: This field is configured automatically when you select or load an image; you do not need to change it if you do not want to resize the image.
Horiz spacing Enter the amount of empty space to left and right of the animation in pixels.
Vert spacing Enter the amount of empty space above and below the animation in pixels.
Quality Select the image quality for the flash animation.
Scale This defines how the animation displays in the animation container specified by the Flash width and Flash height fields.• Select Show all to make the entire animation visible, maintaining the
animation’s aspect ratio and preventing distortion. Borders of the background color may appear on two sides of the animation.
• Select No border to make the entire animation visible, maintaining the animation’s aspect ratio and preventing distortion. Portions of the animation may be cropped.
• Select Exact fit to have the animation entirely fill the specified area. However, the aspect ratio of the SWF file is not maintained and distortion may occur.
Wmode This defines the animation’s window mode. • Select Window to have the animation play in its own rectangular
window on the page.• Select Opaque to have the animation hide the web page behind it.• Select Transparent to have the background of the HTML page show
through transparent areas of the animation.
Note: If you select Transparent, animation performance may be adversely affected.
Reset properties Click this to return the image properties to their default values.The image’s Width and Height return to their full size values.Any information in the following fields is deleted: Alt text, Border, Horiz space, Vert space, Align, Style and Title.
Insert Flash Click this to insert the animation in to your HTML documentation and return to the HTML editor.
Modify Flash Click this to save your changes to the animation and return to the HTML editor.
Note: This field displays only when you are editing an existing animation in your document.
Cancel Click this to close this window and return to the HTML editor without saving your changes.
Table 13 Images Screen: Flash (continued)
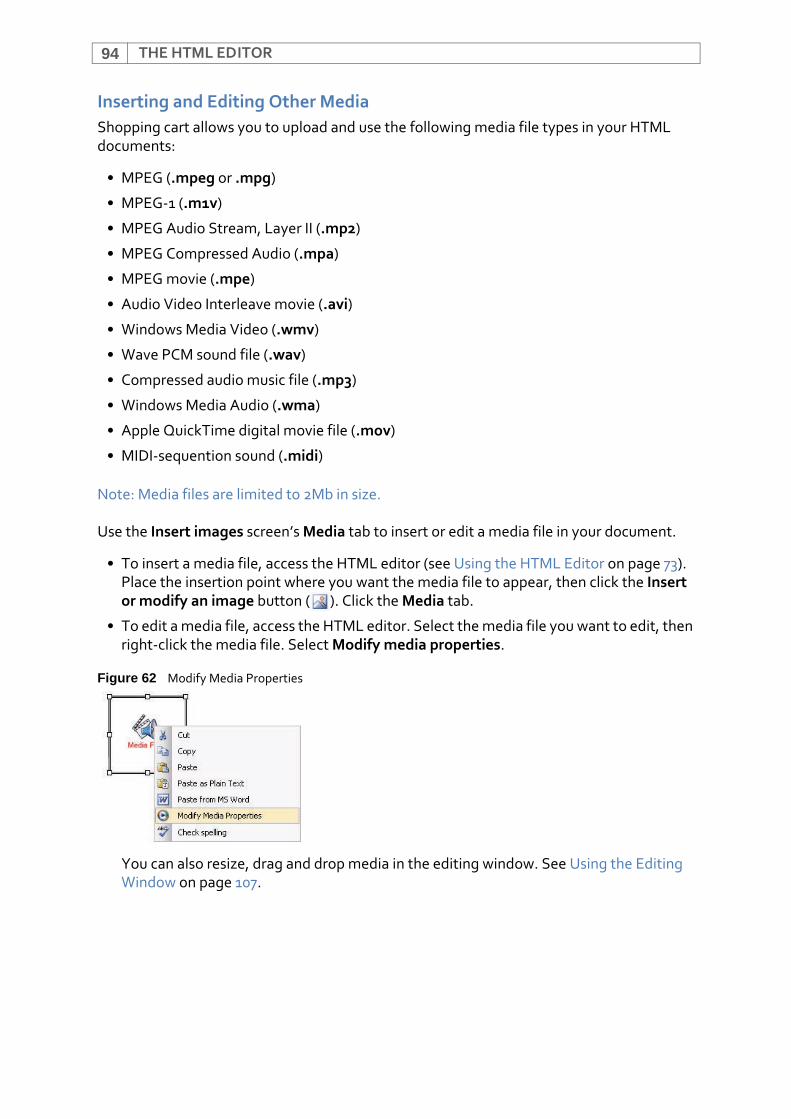
THE HTML EDITOR94
Inserting and Editing Other MediaShopping cart allows you to upload and use the following media file types in your HTML documents:
• MPEG (.mpeg or .mpg)
• MPEG‐1 (.m1v)
• MPEG Audio Stream, Layer II (.mp2)
• MPEG Compressed Audio (.mpa)
• MPEG movie (.mpe)
• Audio Video Interleave movie (.avi)
• Windows Media Video (.wmv)
• Wave PCM sound file (.wav)
• Compressed audio music file (.mp3)
• Windows Media Audio (.wma)
• Apple QuickTime digital movie file (.mov)
• MIDI‐sequention sound (.midi)
Note: Media files are limited to 2Mb in size.
Use the Insert images screen’s Media tab to insert or edit a media file in your document.
• To insert a media file, access the HTML editor (see Using the HTML Editor on page 73). Place the insertion point where you want the media file to appear, then click the Insert or modify an image button ( ). Click the Media tab.
• To edit a media file, access the HTML editor. Select the media file you want to edit, then right‐click the media file. Select Modify media properties.
Figure 62 Modify Media Properties
You can also resize, drag and drop media in the editing window. See Using the Editing Window on page 107.
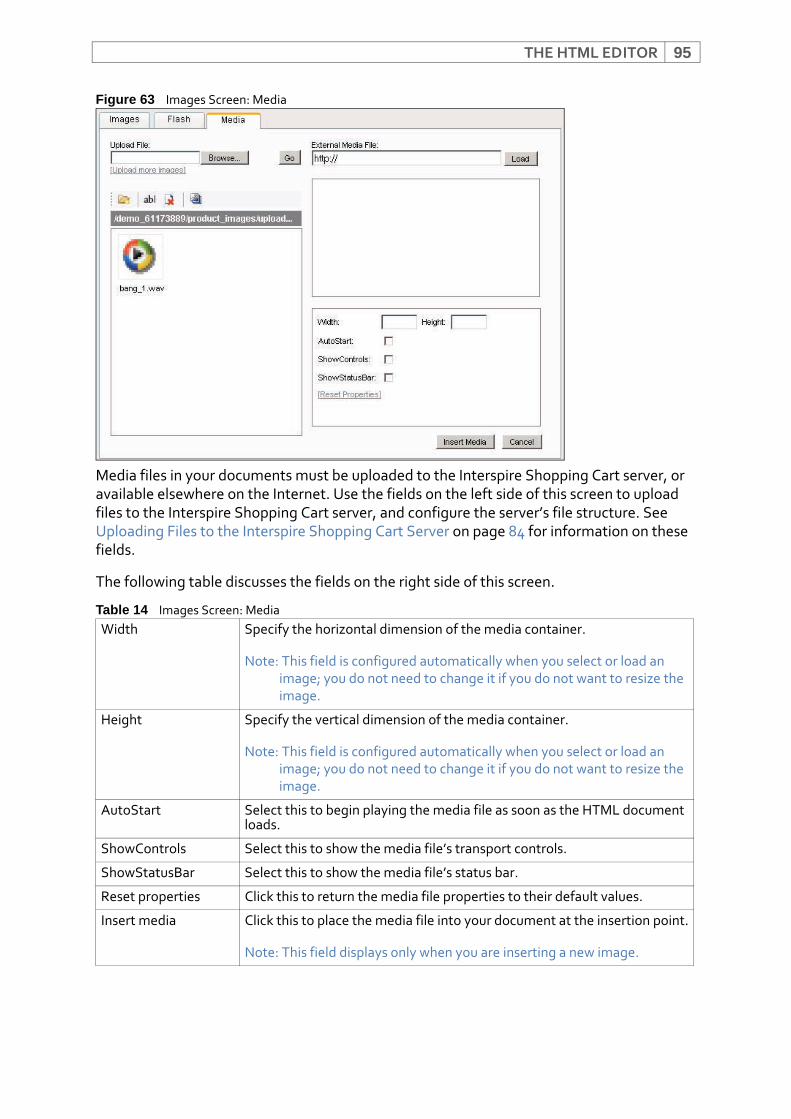
THE HTML EDITOR 95
Figure 63 Images Screen: Media
Media files in your documents must be uploaded to the Interspire Shopping Cart server, or available elsewhere on the Internet. Use the fields on the left side of this screen to upload files to the Interspire Shopping Cart server, and configure the server’s file structure. See Uploading Files to the Interspire Shopping Cart Server on page 84 for information on these fields.
The following table discusses the fields on the right side of this screen.
Table 14 Images Screen: Media Width Specify the horizontal dimension of the media container.
Note: This field is configured automatically when you select or load an image; you do not need to change it if you do not want to resize the image.
Height Specify the vertical dimension of the media container.
Note: This field is configured automatically when you select or load an image; you do not need to change it if you do not want to resize the image.
AutoStart Select this to begin playing the media file as soon as the HTML document loads.
ShowControls Select this to show the media file’s transport controls.
ShowStatusBar Select this to show the media file’s status bar.
Reset properties Click this to return the media file properties to their default values.
Insert media Click this to place the media file into your document at the insertion point.
Note: This field displays only when you are inserting a new image.

THE HTML EDITOR96
Creating and Editing TablesIn HTML, tables allow you to arrange information in horizontal rows and vertical columns.
• To insert a table, access the HTML editor (see Using the HTML Editor on page 73). Place the insertion point where you want the table to appear, then click the Table functions button ( ) and select Insert table. The Insert table screen displays (see Inserting a Table on page 96).
• To edit a table, access the HTML editor. Select the table you want to edit, then click the Table Functions button. You can also resize tables, and add rows and columns, in the editing window. See Using the Editing Window on page 107.
Inserting a Table
Take the following steps to insert a table in a document:
1 In the HTML editor, click the Table functions button ( ) and select Insert table. The Insert table window displays.
Figure 64 Insert Table
2 Enter the number of horizontal Rows and vertical Columns you want your table to have.
3 Enter the number of Cell Padding pixels you want to give your table. Cell padding inserts space between the edges of each table cell and the text inside the cell.
4 Enter the number of Cell Spacing pixels you want to give your table. Cell spacing inserts space between the cells in your table.
5 Define the Width of your table. You can define the table width in pixels by entering an integer (for example, “150”), or as a percentage of the customer’s browser window by entering a percentage (for example, “75%”).
Modify media Click this to save your changes to the media file and return to the HTML editor.
Note: This field displays only when you are editing an existing image in your document.
Cancel Click this to close this window and return to the HTML editor without saving your changes.
Table 14 Images Screen: Media (continued)
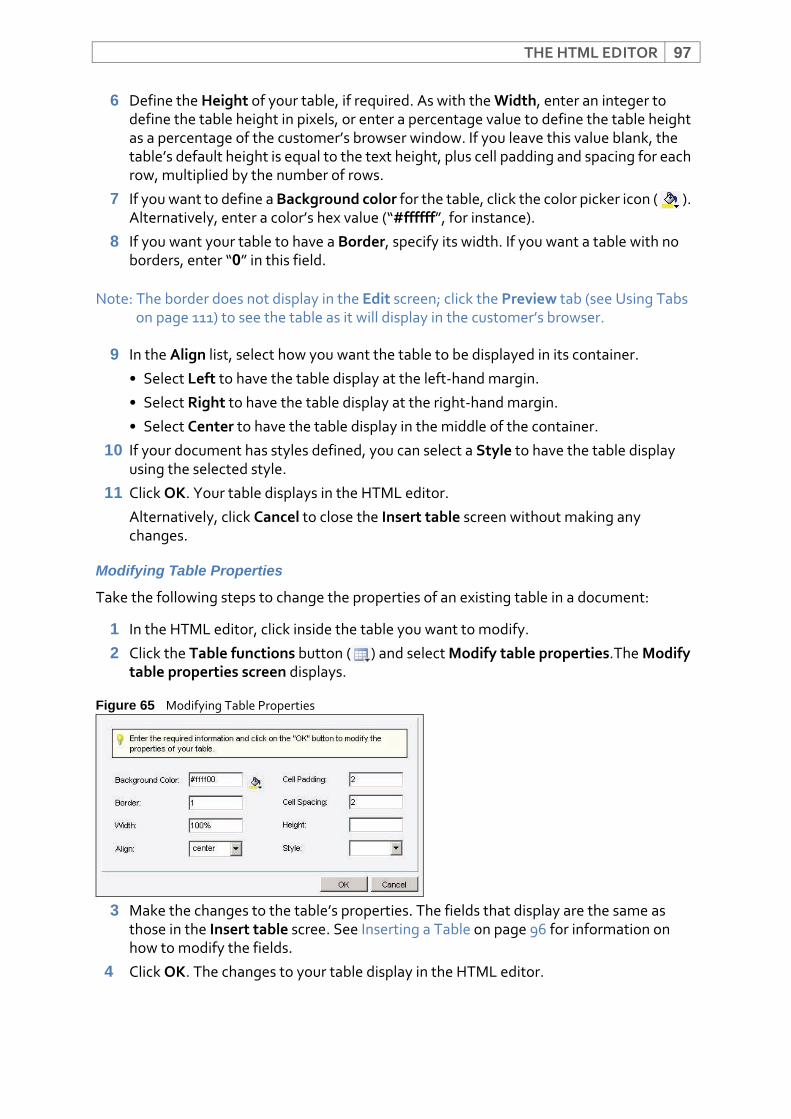
THE HTML EDITOR 97
6 Define the Height of your table, if required. As with the Width, enter an integer to define the table height in pixels, or enter a percentage value to define the table height as a percentage of the customer’s browser window. If you leave this value blank, the table’s default height is equal to the text height, plus cell padding and spacing for each row, multiplied by the number of rows.
7 If you want to define a Background color for the table, click the color picker icon ( ). Alternatively, enter a color’s hex value (“#ffffff”, for instance).
8 If you want your table to have a Border, specify its width. If you want a table with no borders, enter “0” in this field.
Note: The border does not display in the Edit screen; click the Preview tab (see Using Tabs on page 111) to see the table as it will display in the customer’s browser.
9 In the Align list, select how you want the table to be displayed in its container.
• Select Left to have the table display at the left‐hand margin.
• Select Right to have the table display at the right‐hand margin.
• Select Center to have the table display in the middle of the container.
10 If your document has styles defined, you can select a Style to have the table display using the selected style.
11 Click OK. Your table displays in the HTML editor.
Alternatively, click Cancel to close the Insert table screen without making any changes.
Modifying Table Properties
Take the following steps to change the properties of an existing table in a document:
1 In the HTML editor, click inside the table you want to modify.
2 Click the Table functions button ( ) and select Modify table properties.The Modify table properties screen displays.
Figure 65 Modifying Table Properties
3 Make the changes to the table’s properties. The fields that display are the same as those in the Insert table scree. See Inserting a Table on page 96 for information on how to modify the fields.
4 Click OK. The changes to your table display in the HTML editor.
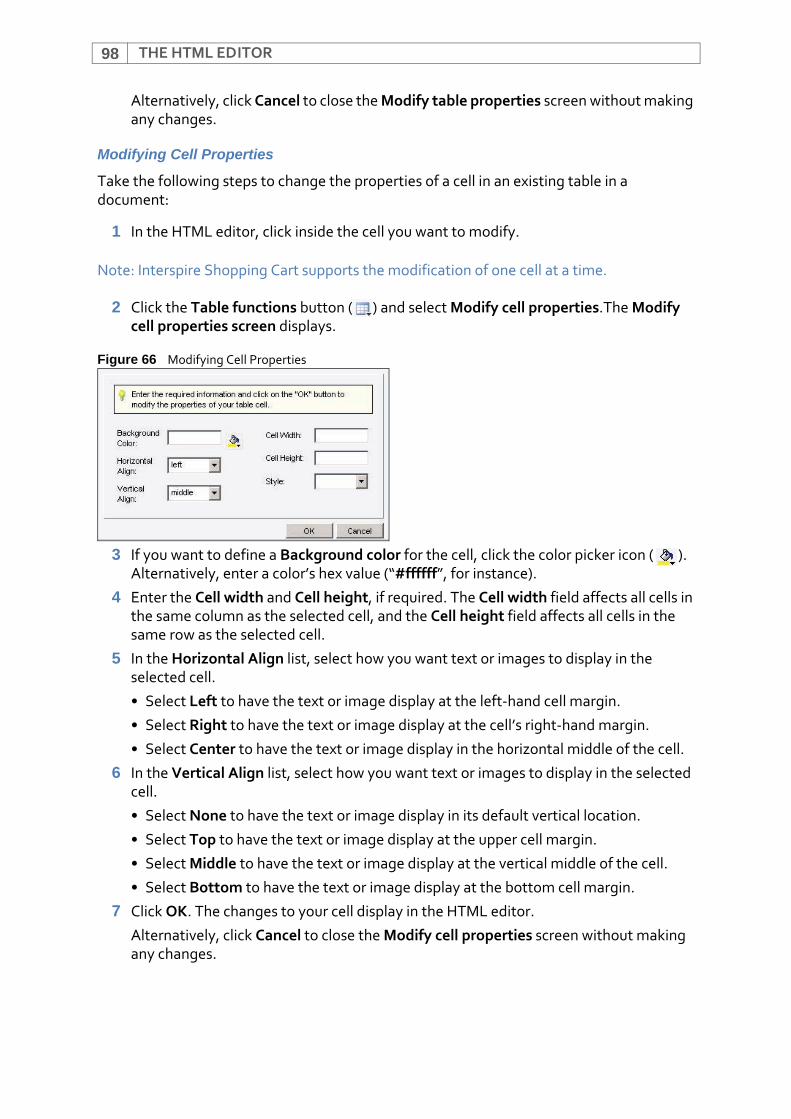
THE HTML EDITOR98
Alternatively, click Cancel to close the Modify table properties screen without making any changes.
Modifying Cell Properties
Take the following steps to change the properties of a cell in an existing table in a document:
1 In the HTML editor, click inside the cell you want to modify.
Note: Interspire Shopping Cart supports the modification of one cell at a time.
2 Click the Table functions button ( ) and select Modify cell properties.The Modify cell properties screen displays.
Figure 66 Modifying Cell Properties
3 If you want to define a Background color for the cell, click the color picker icon ( ). Alternatively, enter a color’s hex value (“#ffffff”, for instance).
4 Enter the Cell width and Cell height, if required. The Cell width field affects all cells in the same column as the selected cell, and the Cell height field affects all cells in the same row as the selected cell.
5 In the Horizontal Align list, select how you want text or images to display in the selected cell.
• Select Left to have the text or image display at the left‐hand cell margin.
• Select Right to have the text or image display at the cell’s right‐hand margin.
• Select Center to have the text or image display in the horizontal middle of the cell.
6 In the Vertical Align list, select how you want text or images to display in the selected cell.
• Select None to have the text or image display in its default vertical location.
• Select Top to have the text or image display at the upper cell margin.
• Select Middle to have the text or image display at the vertical middle of the cell.
• Select Bottom to have the text or image display at the bottom cell margin.
7 Click OK. The changes to your cell display in the HTML editor.
Alternatively, click Cancel to close the Modify cell properties screen without making any changes.
THE HTML EDITOR 99
Inserting and Deleting Columns
Take the following steps to add a column to a table in a document:
1 In the HTML editor, select a table cell next to which you want to add a column.
2 Click the Table functions button ( ). Select Insert column to the right or Insert column to the left.
The new column displays in the HTML editor.
Take the following steps to delete a column from a table in the HTML editor:
1 In the HTML editor, select a table cell in the column you want to delete.
2 Click the Table functions button ( ). Select Delete column.
The column is deleted from the table.
Inserting and Deleting Rows
Take the following steps to add a row to a table in a document:
1 In the HTML editor, select a table cell above or below which you want to add a row.
2 Click the Table functions button ( ). Select Insert row above or Insert row below.
The new row displays in the HTML editor.
Take the following steps to delete a row from a table in a document:
1 In the HTML editor, select a table cell in the row you want to delete.
2 Click the Table functions button ( ). Select Delete row.
The row is deleted from the table.
Increasing and Decreasing Column Span
Take the following steps to merge a table cell into the column to its immediate right (increase column span) or split a table cell from a cell with which it was previously combined (decrease column span):
Note: A cell can be split down to a single column width, and no further.
1 In the HTML editor, select a table cell in the column you want to modify.
2 Click the Table functions button ( ).
3 Select Increase column span to merge the cell with the cell to its right, or select Decrease column span to split a multi‐column cell from its rightmost section.
The cell displays in the HTML editor at its modified width.
Increasing and Decreasing Row Span
Take the following steps to merge a table cell into the row beneath it (increase row span) or split a table cell from a cell with which it was previously combined (decrease column span):
Note: A cell can be split down to a single row height, and no further.
1 In the HTML editor, select a table cell in the column you want to modify.
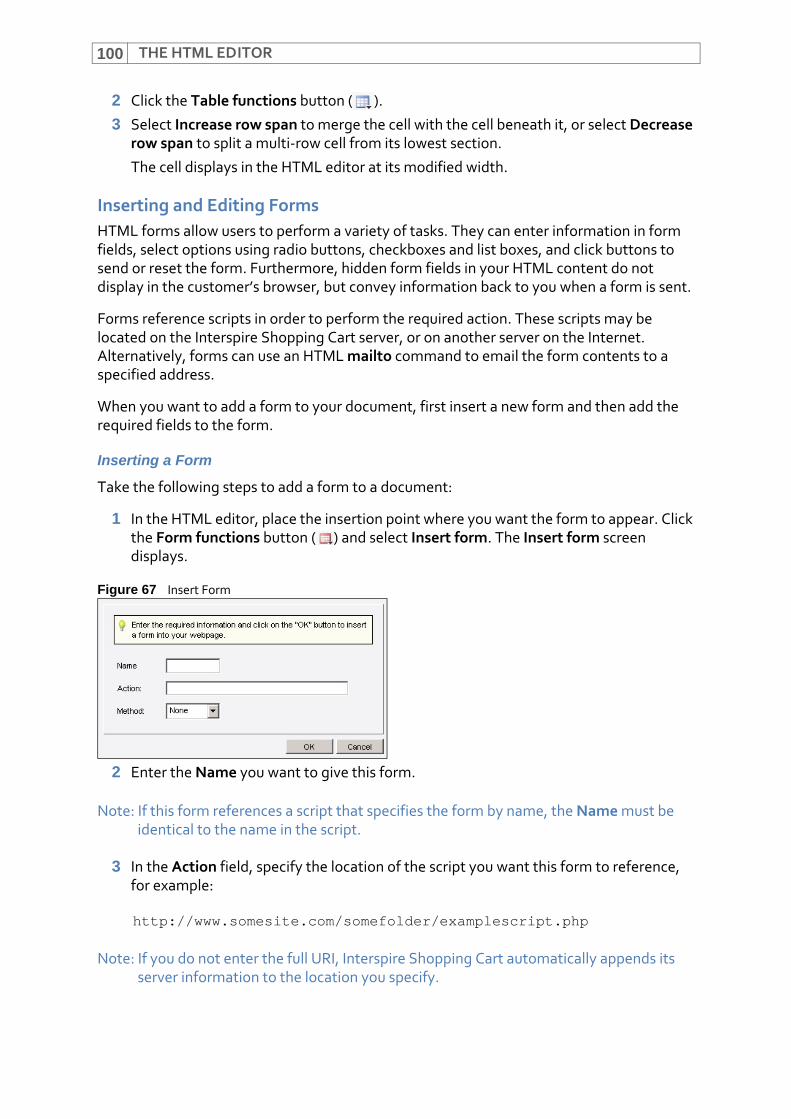
THE HTML EDITOR100
2 Click the Table functions button ( ).
3 Select Increase row span to merge the cell with the cell beneath it, or select Decrease row span to split a multi‐row cell from its lowest section.
The cell displays in the HTML editor at its modified width.
Inserting and Editing FormsHTML forms allow users to perform a variety of tasks. They can enter information in form fields, select options using radio buttons, checkboxes and list boxes, and click buttons to send or reset the form. Furthermore, hidden form fields in your HTML content do not display in the customer’s browser, but convey information back to you when a form is sent.
Forms reference scripts in order to perform the required action. These scripts may be located on the Interspire Shopping Cart server, or on another server on the Internet. Alternatively, forms can use an HTML mailto command to email the form contents to a specified address.
When you want to add a form to your document, first insert a new form and then add the required fields to the form.
Inserting a Form
Take the following steps to add a form to a document:
1 In the HTML editor, place the insertion point where you want the form to appear. Click the Form functions button ( ) and select Insert form. The Insert form screen displays.
Figure 67 Insert Form
2 Enter the Name you want to give this form.
Note: If this form references a script that specifies the form by name, the Name must be identical to the name in the script.
3 In the Action field, specify the location of the script you want this form to reference, for example:
http://www.somesite.com/somefolder/examplescript.php
Note: If you do not enter the full URI, Interspire Shopping Cart automatically appends its server information to the location you specify.
THE HTML EDITOR 101
Alternatively, you can specify an email address to which to send the form’s content; use the following format:
mailto:[email protected]
4 Select the Method this form uses.
• Select None if you do not want to specify the form submission method.
• Select Get if you want the form content to be transmitted as a URI. The form content is added to the URI specified in the Action field, using a question mark (“?”) as a separator. For example:
http://www.somesite.com/somefolder/examplescript.php?name=value
• Select Post if you want the form content to be transmitted as a message (using an HTTP POST operation) to the URI specified in the Action field. The message contains the form content in the following format:
name1=value1&name2=value2&name3=value3
5 Click OK to insert the form, or click Cancel to close the Insert form window without saving any changes. See Inserting and Modifying Form Fields on page 101 for information on adding the form fields you require.
Modifying Form Properties
Take the following steps to change the properties of an existing form in a document:
1 In the HTML editor, select the form you want to modify. Click the Form functions button ( ) and select Modify form properties. The Modify form properties screen displays.
2 Make your changes to the form. The fields that display in this screen are the same as those in the Insert form screen; see Inserting a Form on page 100.
3 Click OK to modify the form, or click Cancel to close the Modify form properties window without saving any changes.
Inserting and Modifying Form Fields
Once you have created a form in your HTML document (see Inserting a Form on page 100) you can insert the form fields you require.
Click the Form functions button ( ). Select one of the options from the list that displays:
• Inserting a Text Field on page 102
• Inserting a Text Area on page 102
• Inserting a Hidden Field on page 103
• Inserting a Button on page 103
• Inserting a Checkbox on page 104
• Inserting a Radio Button on page 104
• Inserting a List Box on page 105
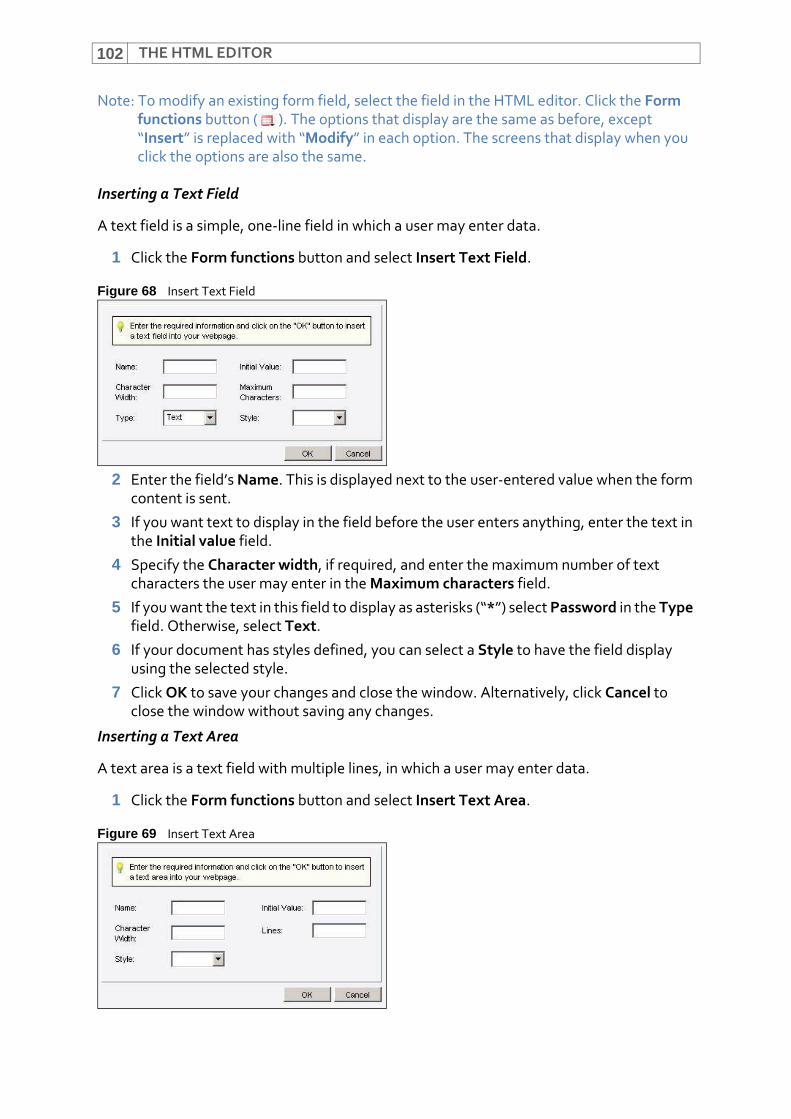
THE HTML EDITOR102
Note: To modify an existing form field, select the field in the HTML editor. Click the Form functions button ( ). The options that display are the same as before, except “Insert” is replaced with “Modify” in each option. The screens that display when you click the options are also the same.
Inserting a Text Field
A text field is a simple, one‐line field in which a user may enter data.
1 Click the Form functions button and select Insert Text Field.
Figure 68 Insert Text Field
2 Enter the field’s Name. This is displayed next to the user‐entered value when the form content is sent.
3 If you want text to display in the field before the user enters anything, enter the text in the Initial value field.
4 Specify the Character width, if required, and enter the maximum number of text characters the user may enter in the Maximum characters field.
5 If you want the text in this field to display as asterisks (“*”) select Password in the Type field. Otherwise, select Text.
6 If your document has styles defined, you can select a Style to have the field display using the selected style.
7 Click OK to save your changes and close the window. Alternatively, click Cancel to close the window without saving any changes.
Inserting a Text Area
A text area is a text field with multiple lines, in which a user may enter data.
1 Click the Form functions button and select Insert Text Area.
Figure 69 Insert Text Area

THE HTML EDITOR 103
2 Enter the field’s Name. This is displayed next to the user‐entered value when the form content is returned.
3 If you want text to display in the field before the user enters anything, enter the text in the Initial value field.
4 Specify the Character width, if required.
5 Enter the number of lines of text to display (the text area’s height) in the Lines field.
6 If your document has styles defined, you can select a Style to have the field display using the selected style.
7 Click OK to save your changes and close the window. Alternatively, click Cancel to close the window without saving any changes.
Inserting a Hidden Field
A hidden field is a form field that does not display on the screen, but contains data to be sent as part of the form content when the form is returned.
1 Click the Form functions button and select Insert Hidden Field.
Figure 70 Insert Hidden Field
2 Enter the field’s Name. This is displayed next to the initial value when the form content is sent.
3 Enter the field value in the Initial value field. Since this is a hidden field, there is no opportunity for the user to change this value.
4 Click OK to save your changes and close the window. Alternatively, click Cancel to close the window without saving any changes.
Inserting a Button
Use buttons to allow the user to submit (send) or reset (clear) the form in which they appear, or to include the button’s value in the form content.
1 Click the Form functions button and select Insert Button.
Figure 71 Insert Button
2 Enter the button’s Name.
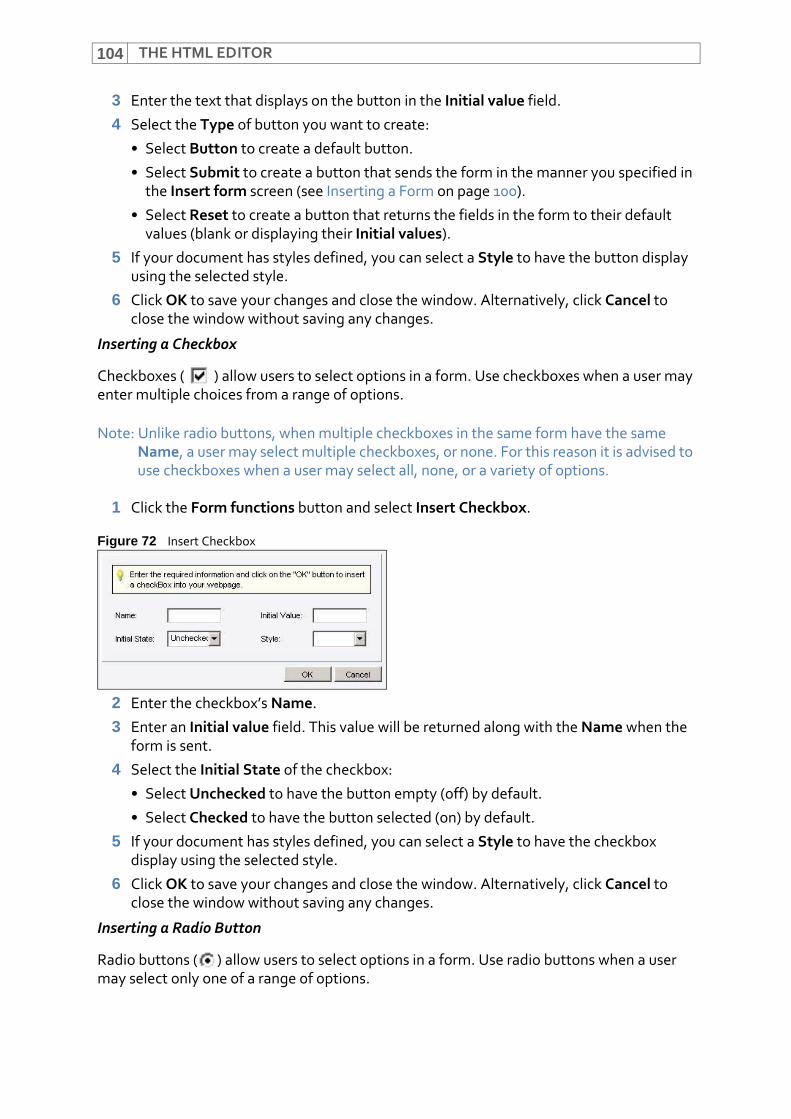
THE HTML EDITOR104
3 Enter the text that displays on the button in the Initial value field.
4 Select the Type of button you want to create:
• Select Button to create a default button.
• Select Submit to create a button that sends the form in the manner you specified in the Insert form screen (see Inserting a Form on page 100).
• Select Reset to create a button that returns the fields in the form to their default values (blank or displaying their Initial values).
5 If your document has styles defined, you can select a Style to have the button display using the selected style.
6 Click OK to save your changes and close the window. Alternatively, click Cancel to close the window without saving any changes.
Inserting a Checkbox
Checkboxes ( ) allow users to select options in a form. Use checkboxes when a user may enter multiple choices from a range of options.
Note: Unlike radio buttons, when multiple checkboxes in the same form have the same Name, a user may select multiple checkboxes, or none. For this reason it is advised to use checkboxes when a user may select all, none, or a variety of options.
1 Click the Form functions button and select Insert Checkbox.
Figure 72 Insert Checkbox
2 Enter the checkbox’s Name.
3 Enter an Initial value field. This value will be returned along with the Name when the form is sent.
4 Select the Initial State of the checkbox:
• Select Unchecked to have the button empty (off) by default.
• Select Checked to have the button selected (on) by default.
5 If your document has styles defined, you can select a Style to have the checkbox display using the selected style.
6 Click OK to save your changes and close the window. Alternatively, click Cancel to close the window without saving any changes.
Inserting a Radio Button
Radio buttons ( ) allow users to select options in a form. Use radio buttons when a user may select only one of a range of options.
THE HTML EDITOR 105
When multiple radio buttons in a form have the same Name, only one may be checked at a time.
Note: Unlike checkboxes, radio buttons cannot be “unchecked” (deselected) by clicking on them a second time. The only way to deselect a radio button is to select another radio button in the form with the same Name. For this reason, it is advised to use radio buttons when the user must select one option or another (for example, “Yes, I want to receive updates” or “No, I don’t want to receive updates”) and to specify one of the radio buttons as selected by default (use the Initial state list).
1 Click the Form functions button and select Insert Radio Button.
Figure 73 Insert Radio Button
2 Enter the radio button’s Name. Give all radio buttons in the same options list the same Name.
3 Enter an Initial value field. This value will be returned along with the Name when the form is returned.
4 Select the Initial State of the radio button:
• Select Unchecked to have the radio button empty (off) by default.
• Select Checked to have the radio button selected (on) by default.
5 If your document has styles defined, you can select a Style to have the radio button display using the selected style.
6 Click OK to save your changes and close the window. Alternatively, click Cancel to close the window without saving any changes.
Inserting a List Box
List boxes, also known as select fields, allow users to select an option from a drop‐down or static list.
1 Click the Form functions button and select Insert Select Field.
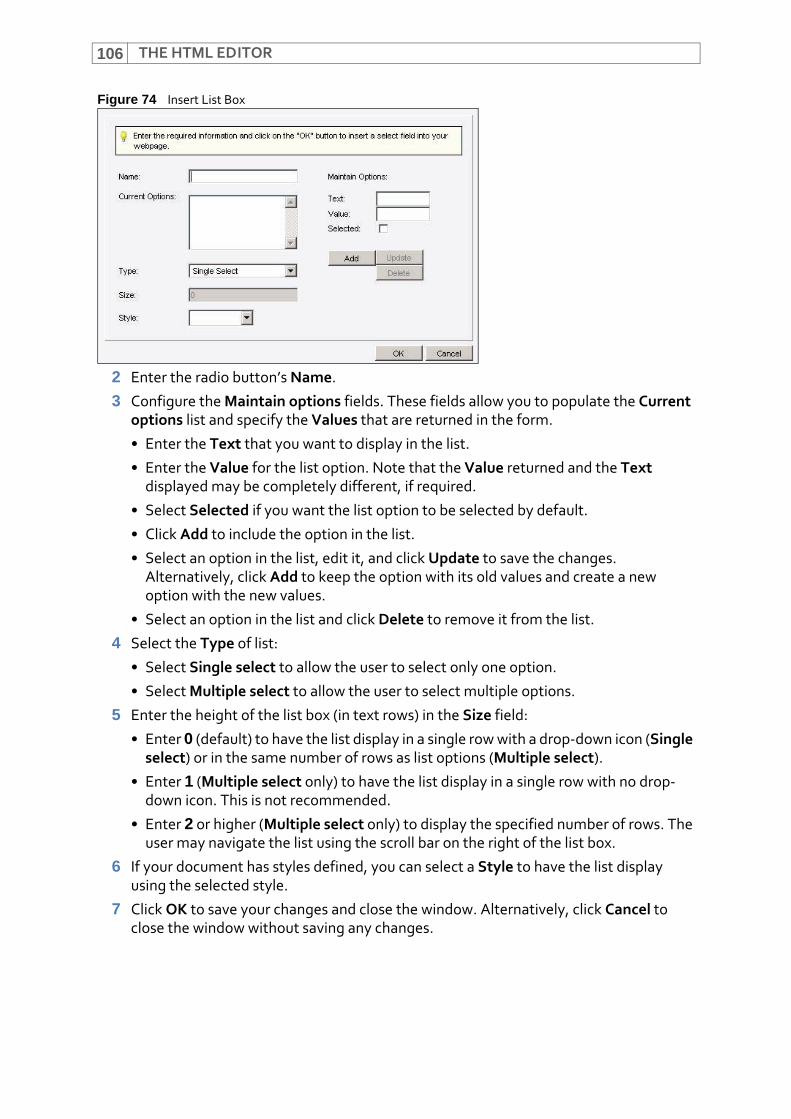
THE HTML EDITOR106
Figure 74 Insert List Box
2 Enter the radio button’s Name.
3 Configure the Maintain options fields. These fields allow you to populate the Current options list and specify the Values that are returned in the form.
• Enter the Text that you want to display in the list.
• Enter the Value for the list option. Note that the Value returned and the Text displayed may be completely different, if required.
• Select Selected if you want the list option to be selected by default.
• Click Add to include the option in the list.
• Select an option in the list, edit it, and click Update to save the changes. Alternatively, click Add to keep the option with its old values and create a new option with the new values.
• Select an option in the list and click Delete to remove it from the list.
4 Select the Type of list:
• Select Single select to allow the user to select only one option.
• Select Multiple select to allow the user to select multiple options.
5 Enter the height of the list box (in text rows) in the Size field:
• Enter 0 (default) to have the list display in a single row with a drop‐down icon (Single select) or in the same number of rows as list options (Multiple select).
• Enter 1 (Multiple select only) to have the list display in a single row with no drop‐down icon. This is not recommended.
• Enter 2 or higher (Multiple select only) to display the specified number of rows. The user may navigate the list using the scroll bar on the right of the list box.
6 If your document has styles defined, you can select a Style to have the list display using the selected style.
7 Click OK to save your changes and close the window. Alternatively, click Cancel to close the window without saving any changes.
THE HTML EDITOR 107
Using the Editing WindowUse the editing window in the HTML editor to:
• Compose and edit text (see page 107).
• Manipulate images, flash animations and other media (see page 107).
• Manipulate text and image containers (see page 109).
• Compose and edit HTML (see page 110).
• Preview your document (see page 110).
Composing and Editing TextYou can use the HTML editor’s Edit tab to compose and edit text directly, in the same way as you would with a standard word processor or standalone web authoring tool.
Place the insertion point where you want to create, edit or paste text. Use the text‐related tools in the Design tools section of the editor to control the text formatting.
You can also right‐click over text to display shortcuts to text‐related design tools (see Using Design Tools on page 74).
Figure 75 Right‐Click (Text)
Manipulating Images, Flash and Other MediaThe HTML editor’s Edit tab allows you to drag‐and‐drop images, and change their size and aspect ratio.
You can also right‐click over an image to display shortcuts to design tools allowing you to modify the image, flash or other media file (see Using Design Tools on page 74).
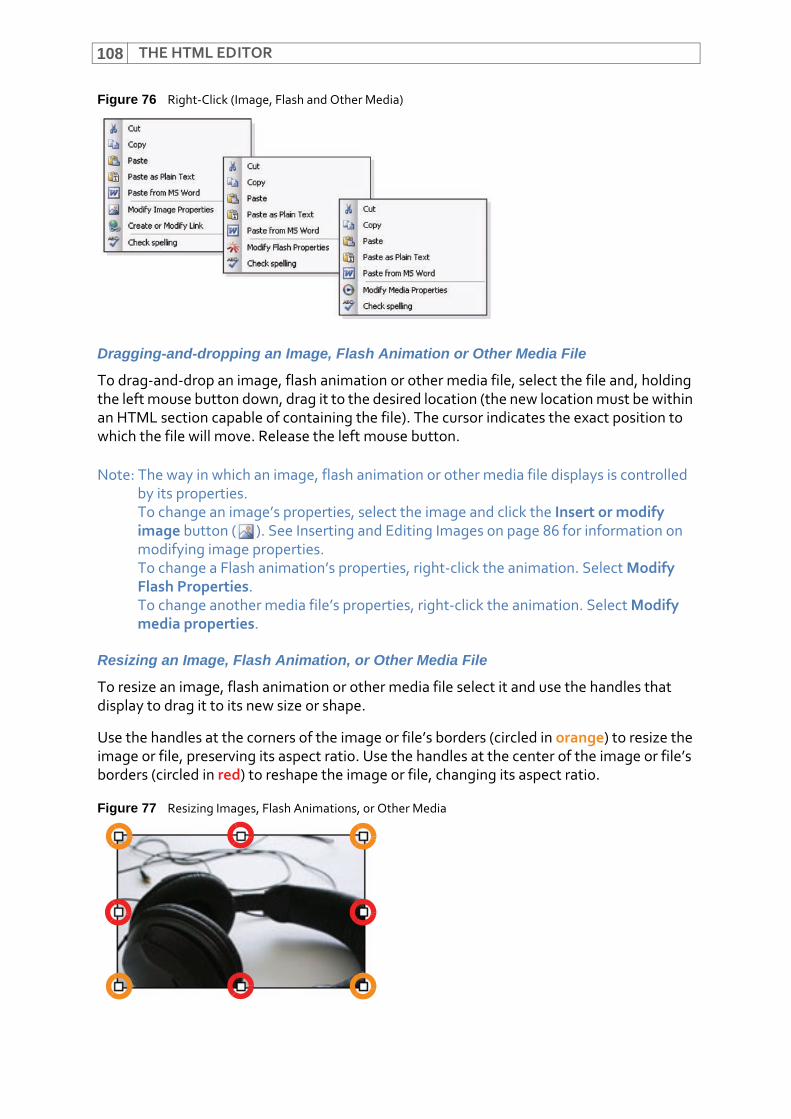
THE HTML EDITOR108
Figure 76 Right‐Click (Image, Flash and Other Media)
Dragging-and-dropping an Image, Flash Animation or Other Media File
To drag‐and‐drop an image, flash animation or other media file, select the file and, holding the left mouse button down, drag it to the desired location (the new location must be within an HTML section capable of containing the file). The cursor indicates the exact position to which the file will move. Release the left mouse button.
Note: The way in which an image, flash animation or other media file displays is controlled by its properties. To change an image’s properties, select the image and click the Insert or modify image button ( ). See Inserting and Editing Images on page 86 for information on modifying image properties. To change a Flash animation’s properties, right‐click the animation. Select Modify Flash Properties. To change another media file’s properties, right‐click the animation. Select Modify media properties.
Resizing an Image, Flash Animation, or Other Media File
To resize an image, flash animation or other media file select it and use the handles that display to drag it to its new size or shape.
Use the handles at the corners of the image or file’s borders (circled in orange) to resize the image or file, preserving its aspect ratio. Use the handles at the center of the image or file’s borders (circled in red) to reshape the image or file, changing its aspect ratio.
Figure 77 Resizing Images, Flash Animations, or Other Media
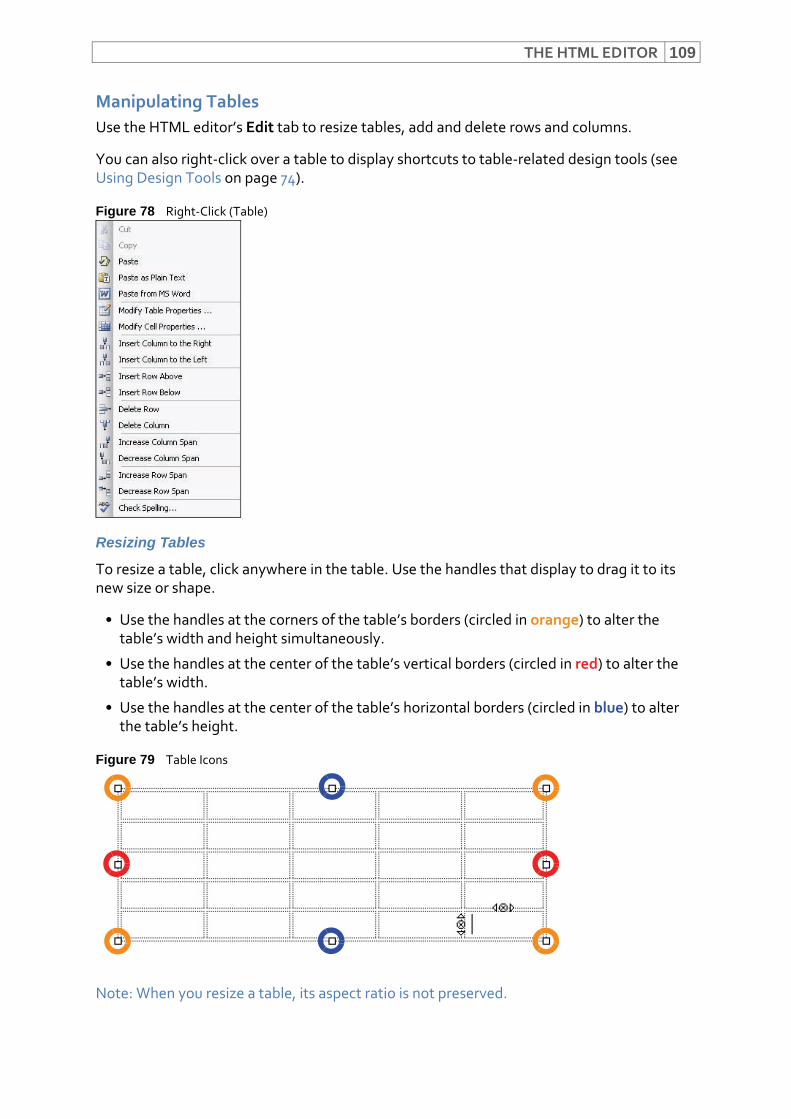
THE HTML EDITOR 109
Manipulating TablesUse the HTML editor’s Edit tab to resize tables, add and delete rows and columns.
You can also right‐click over a table to display shortcuts to table‐related design tools (see Using Design Tools on page 74).
Figure 78 Right‐Click (Table)
Resizing Tables
To resize a table, click anywhere in the table. Use the handles that display to drag it to its new size or shape.
• Use the handles at the corners of the table’s borders (circled in orange) to alter the table’s width and height simultaneously.
• Use the handles at the center of the table’s vertical borders (circled in red) to alter the table’s width.
• Use the handles at the center of the table’s horizontal borders (circled in blue) to alter the table’s height.
Figure 79 Table Icons
Note: When you resize a table, its aspect ratio is not preserved.
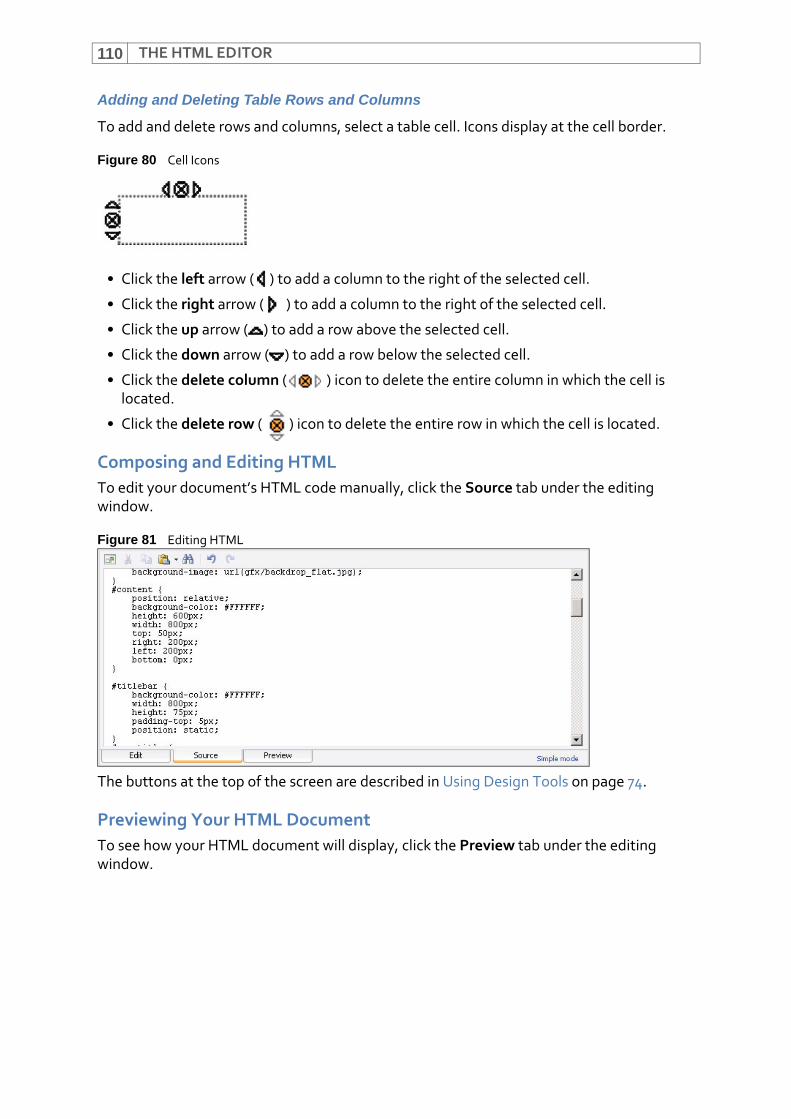
THE HTML EDITOR110
Adding and Deleting Table Rows and Columns
To add and delete rows and columns, select a table cell. Icons display at the cell border.
Figure 80 Cell Icons
• Click the left arrow ( ) to add a column to the right of the selected cell.
• Click the right arrow ( ) to add a column to the right of the selected cell.
• Click the up arrow ( ) to add a row above the selected cell.
• Click the down arrow ( ) to add a row below the selected cell.
• Click the delete column ( ) icon to delete the entire column in which the cell is located.
• Click the delete row ( ) icon to delete the entire row in which the cell is located.
Composing and Editing HTMLTo edit your document’s HTML code manually, click the Source tab under the editing window.
Figure 81 Editing HTML
The buttons at the top of the screen are described in Using Design Tools on page 74.
Previewing Your HTML DocumentTo see how your HTML document will display, click the Preview tab under the editing window.
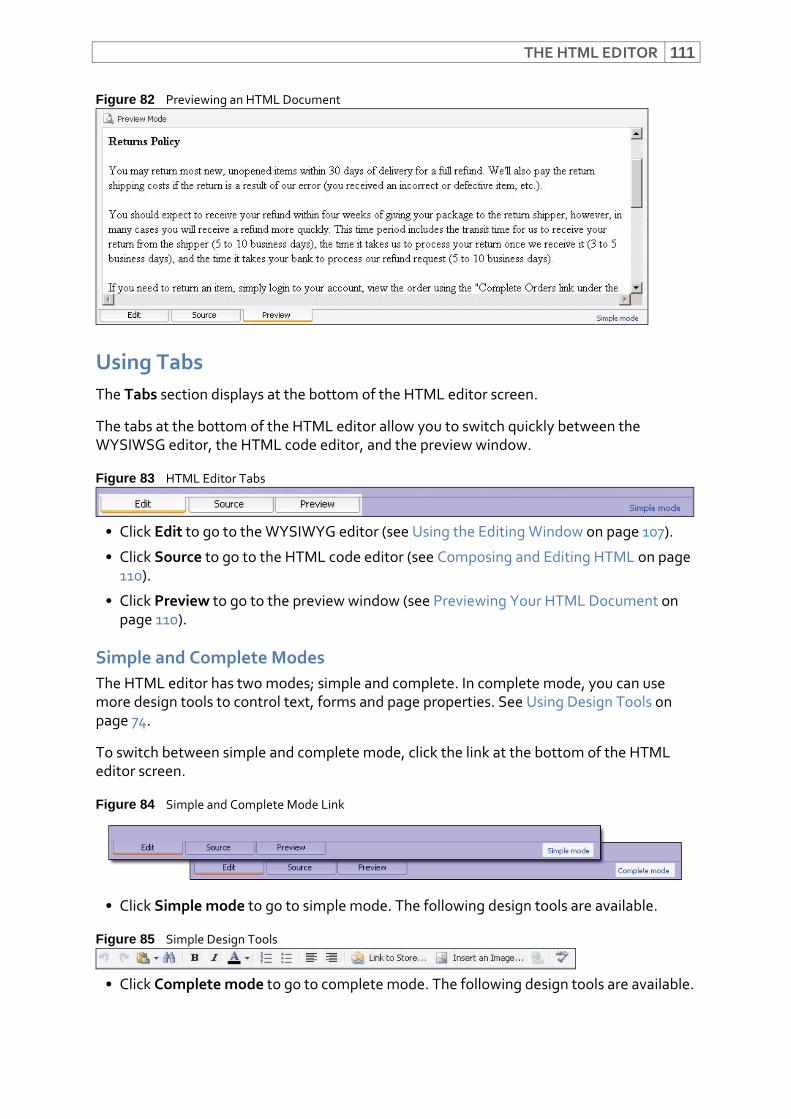
THE HTML EDITOR 111
Figure 82 Previewing an HTML Document
Using TabsThe Tabs section displays at the bottom of the HTML editor screen.
The tabs at the bottom of the HTML editor allow you to switch quickly between the WYSIWSG editor, the HTML code editor, and the preview window.
Figure 83 HTML Editor Tabs
• Click Edit to go to the WYSIWYG editor (see Using the Editing Window on page 107).
• Click Source to go to the HTML code editor (see Composing and Editing HTML on page 110).
• Click Preview to go to the preview window (see Previewing Your HTML Document on page 110).
Simple and Complete ModesThe HTML editor has two modes; simple and complete. In complete mode, you can use more design tools to control text, forms and page properties. See Using Design Tools on page 74.
To switch between simple and complete mode, click the link at the bottom of the HTML editor screen.
Figure 84 Simple and Complete Mode Link
• Click Simple mode to go to simple mode. The following design tools are available.
Figure 85 Simple Design Tools
• Click Complete mode to go to complete mode. The following design tools are available.

THE HTML EDITOR112
Figure 86 Complete Design Tools
113
IIIMANAGING YOUR STORE
This section contains the following chapters:
Creating and Managing User Accounts (115)
Orders (123)
Customers (161)
Products (183)
Website Content (227)
Promotions (239)
Statistics (259)
Addons (281)

114
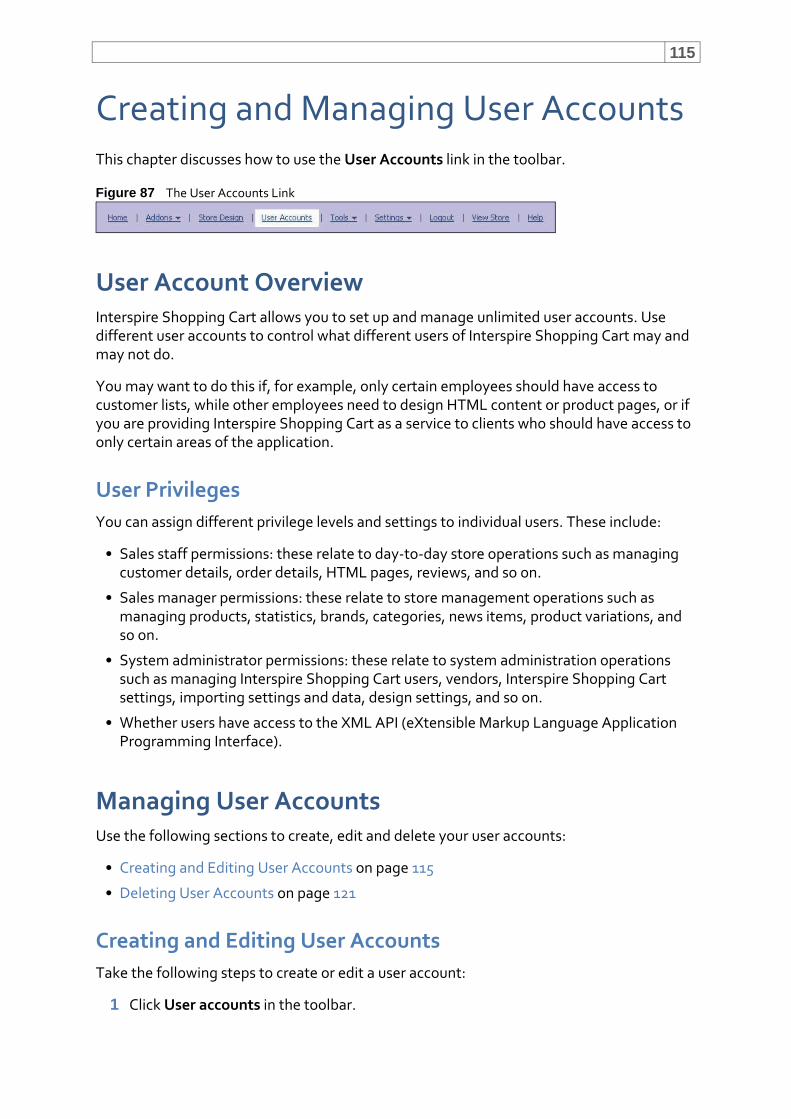
115
Creating and Managing User AccountsThis chapter discusses how to use the User Accounts link in the toolbar.
Figure 87 The User Accounts Link
User Account OverviewInterspire Shopping Cart allows you to set up and manage unlimited user accounts. Use different user accounts to control what different users of Interspire Shopping Cart may and may not do.
You may want to do this if, for example, only certain employees should have access to customer lists, while other employees need to design HTML content or product pages, or if you are providing Interspire Shopping Cart as a service to clients who should have access to only certain areas of the application.
User PrivilegesYou can assign different privilege levels and settings to individual users. These include:
• Sales staff permissions: these relate to day‐to‐day store operations such as managing customer details, order details, HTML pages, reviews, and so on.
• Sales manager permissions: these relate to store management operations such as managing products, statistics, brands, categories, news items, product variations, and so on.
• System administrator permissions: these relate to system administration operations such as managing Interspire Shopping Cart users, vendors, Interspire Shopping Cart settings, importing settings and data, design settings, and so on.
• Whether users have access to the XML API (eXtensible Markup Language Application Programming Interface).
Managing User AccountsUse the following sections to create, edit and delete your user accounts:
• Creating and Editing User Accounts on page 115
• Deleting User Accounts on page 121
Creating and Editing User AccountsTake the following steps to create or edit a user account:
1 Click User accounts in the toolbar.
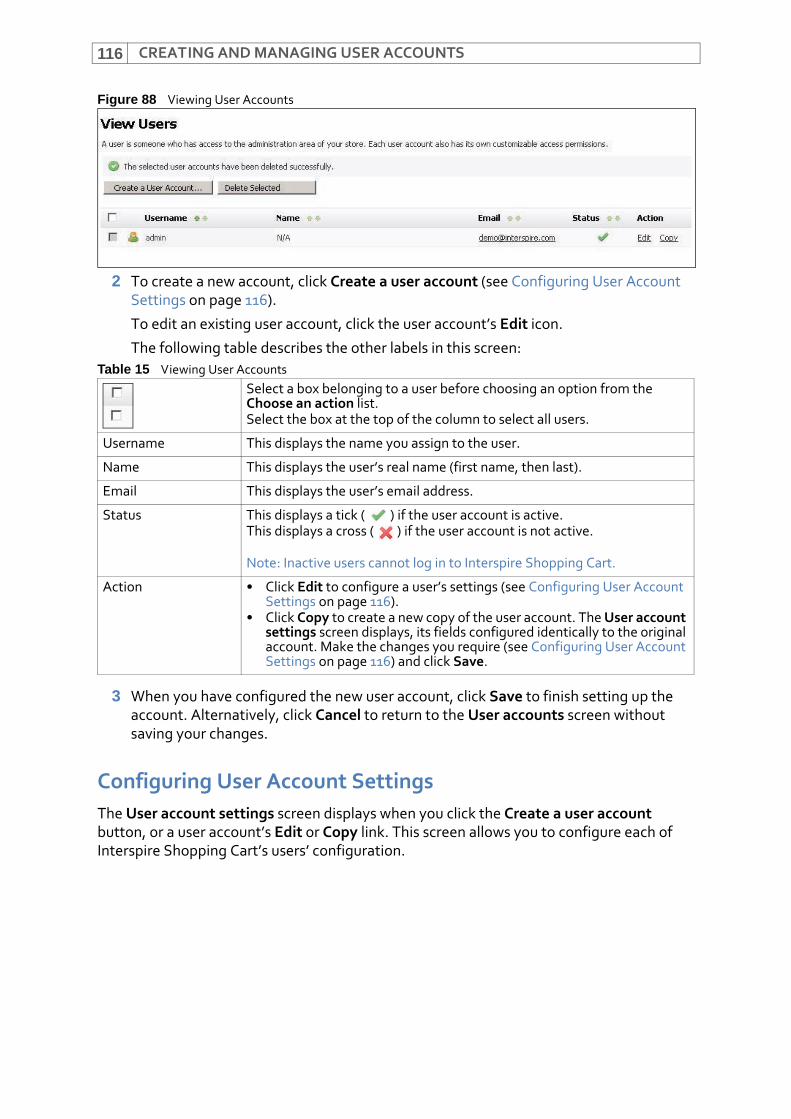
CREATING AND MANAGING USER ACCOUNTS116
Figure 88 Viewing User Accounts
2 To create a new account, click Create a user account (see Configuring User Account Settings on page 116).
To edit an existing user account, click the user account’s Edit icon.
The following table describes the other labels in this screen:
3 When you have configured the new user account, click Save to finish setting up the account. Alternatively, click Cancel to return to the User accounts screen without saving your changes.
Configuring User Account SettingsThe User account settings screen displays when you click the Create a user account button, or a user account’s Edit or Copy link. This screen allows you to configure each of Interspire Shopping Cart’s users’ configuration.
Table 15 Viewing User AccountsSelect a box belonging to a user before choosing an option from the Choose an action list.Select the box at the top of the column to select all users.
Username This displays the name you assign to the user.
Name This displays the user’s real name (first name, then last).
Email This displays the user’s email address.
Status This displays a tick ( ) if the user account is active.This displays a cross ( ) if the user account is not active.
Note: Inactive users cannot log in to Interspire Shopping Cart.
Action • Click Edit to configure a user’s settings (see Configuring User Account Settings on page 116).
• Click Copy to create a new copy of the user account. The User account settings screen displays, its fields configured identically to the original account. Make the changes you require (see Configuring User Account Settings on page 116) and click Save.
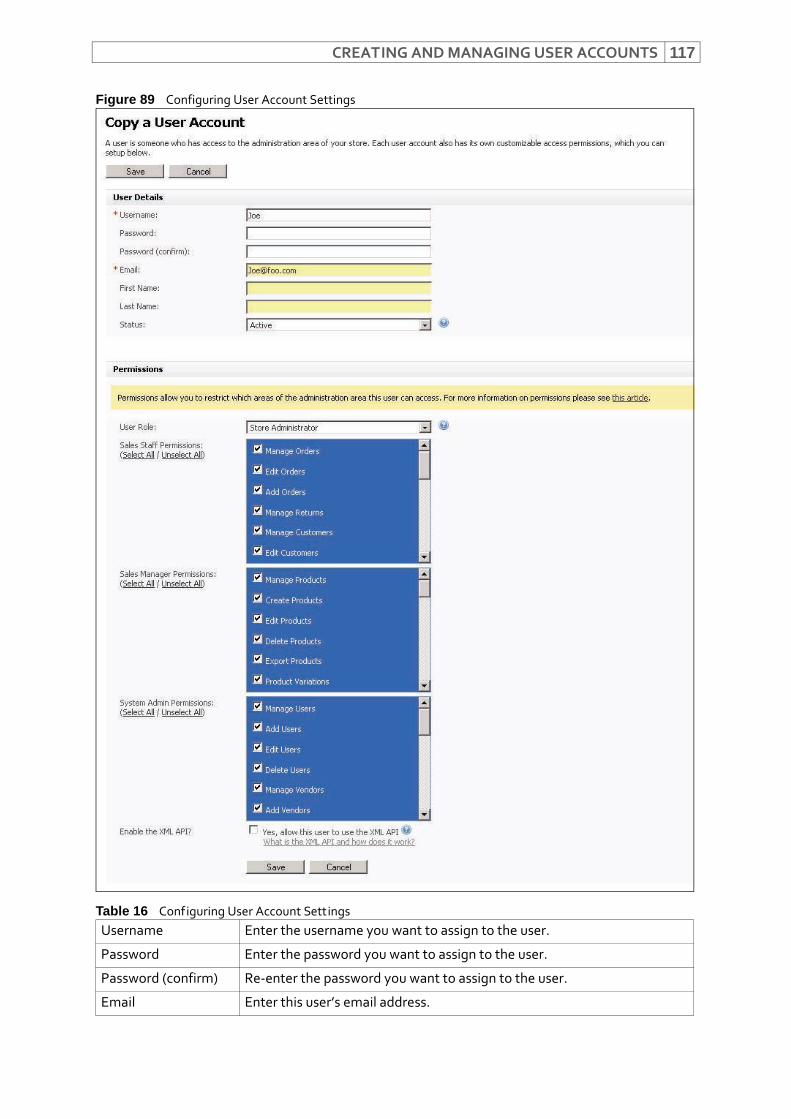
CREATING AND MANAGING USER ACCOUNTS 117
Figure 89 Configuring User Account Settings
Table 16 Configuring User Account Settings Username Enter the username you want to assign to the user.
Password Enter the password you want to assign to the user.
Password (confirm) Re‐enter the password you want to assign to the user.
Email Enter this user’s email address.

CREATING AND MANAGING USER ACCOUNTS118
First Name Enter this user’s first name.
Last Name Enter this user’s surname.
Status • Select Active if you want this user to be able to sign in to Interspire Shopping Cart.
• Select Inactive if you do not want this user to be able to sign in to Interspire Shopping Cart.
User role Select the type of user you want to create.
Note: By default, each type of user has all the privileges available in the relevant section of this screen, as well as all less‐privileges user types. You can then fine‐tune the user’s privileges by selecting and deselecting individual options.
• Select Sales staff to select the boxes in the Sales staff permissions list.
• Select Sales manager to select the boxes in the Sales staff permissions list and the Sales manager permissions list.
• Select Store administrator to select the boxes in the Sales staff permissions list, the Sales manager permissions list and the System admin permissions list.
• Select Custom to deselect all options in this screen.
Sales staff permissions
Manage orders Select this to allow the user to view order status settings.
Edit orders Select this to allow the user to make changes to customers’ orders.
Add orders Select this to allow the user to add orders to your store’s order list.
Manage returns Select this to allow the user to view product return status settings.
Manage customers
Select this to allow the user to view customer settings.
Edit customers Select this to allow the user to edit customers’ details.
Product reviews Select this to allow the user to change product review settings.
Edit reviews Select this to allow the user to make changes to customers’ product reviews.
Delete reviews Select this to allow the user to remove customers’ product reviews.
Approve selected Select this to allow the user to approve customers’ product reviews for inclusion in your store.
Manage coupons Select this to allow the user to view your store’s promotional coupons.
Edit coupons Select this to allow the user to change the details of your store’s promotional coupon settings.
Add coupons Select this to allow the user to create new promotional coupons.
Delete coupons Select this to allow the user to remove promotional coupons from your store.
Manage pages Select this to allow the user to make view your store’s website page settings.
Create pages Select this to allow the user to add new website pages to your store.
Edit pages Select this to allow the user to make changes to your store’s website pages.
Table 16 Configuring User Account Settings (continued)
CREATING AND MANAGING USER ACCOUNTS 119
Delete pages Select this to allow the user to remove website pages from your store.
Manage banners Select this to allow the user to view your store’s web promotional banner settings.
Manage gift certificates
Select this to allow the user to view settings relating to the gift certificates you provide to customers.
Sales manager permissions
Manage products Select this to allow the user to view your store’s product settings.
Create products Select this to allow the user to add new products to your store.
Edit products Select this to allow the user to make changes to your store’s product details.
Delete products Select this to allow the user to remove products from your store.
Export products Select this to allow the user to export a list of your store’s products to a file.
Product variations Select this to allow the user to create new product variations.
Managing categories
Select this to allow the user to view your store’s product category settings.
Create categories Select this to allow the user to create new product categories.
Edit categories Select this to allow the user to make changes to your store’s product categories.
Delete categories Select this to allow the user to delete product categories from your store.
Export orders Select this to allow the user to export a list of your orders to a file.
Delete orders Select this to allow the user to delete orders from Interspire Shopping Cart.
Order messages Select this to allow the user to send order messages to customers from your store.
Add customers Select this to allow the user to add a customer record to your store’s database.
Delete customers Select this to allow the user to remove a customer record from your store’s database.
Export customers Select this to allow the user to export a list of customer records to a file.
Manage news Select this to allow the user to view your store’s news item settings.
Add a news item Select this to allow the user to create news items for your store.
Edit news Select this to allow the user to modify existing news items.
Approve news Select this to allow the user to permit news items to be added to your store’s front page.
Delete news Select this to allow the user to remove news items from your store.
Google products feed
Select this to allow the user to manage the file of your store’s products that you export from Interspire Shopping Cart and submit to Google.
Manage brands Select this to allow the user to view your store’s product brand settings.
Add brands Select this to allow the user to create new product brands in your store.
Edit brands Select this to allow the user to modify your store’s product brands.
Delete brands Select this to allow the user to remove product brands from your store.
Table 16 Configuring User Account Settings (continued)
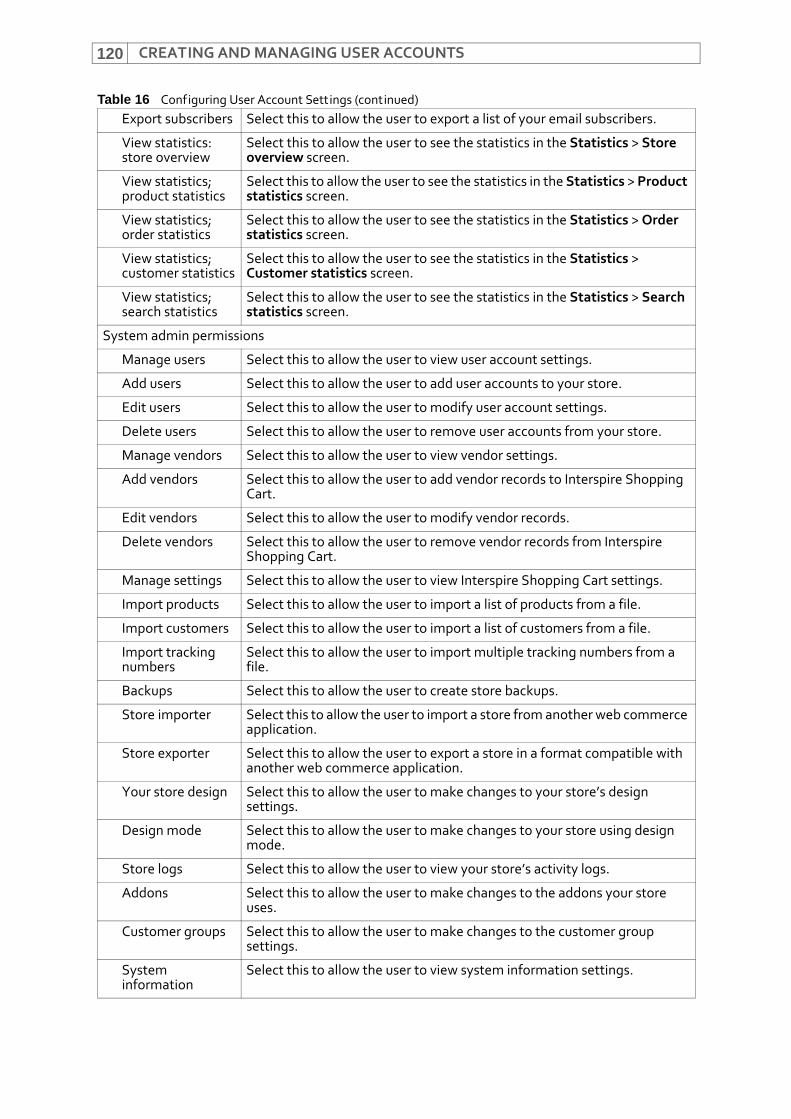
CREATING AND MANAGING USER ACCOUNTS120
Export subscribers Select this to allow the user to export a list of your email subscribers.
View statistics: store overview
Select this to allow the user to see the statistics in the Statistics > Store overview screen.
View statistics; product statistics
Select this to allow the user to see the statistics in the Statistics > Product statistics screen.
View statistics; order statistics
Select this to allow the user to see the statistics in the Statistics > Order statistics screen.
View statistics; customer statistics
Select this to allow the user to see the statistics in the Statistics > Customer statistics screen.
View statistics; search statistics
Select this to allow the user to see the statistics in the Statistics > Search statistics screen.
System admin permissions
Manage users Select this to allow the user to view user account settings.
Add users Select this to allow the user to add user accounts to your store.
Edit users Select this to allow the user to modify user account settings.
Delete users Select this to allow the user to remove user accounts from your store.
Manage vendors Select this to allow the user to view vendor settings.
Add vendors Select this to allow the user to add vendor records to Interspire Shopping Cart.
Edit vendors Select this to allow the user to modify vendor records.
Delete vendors Select this to allow the user to remove vendor records from Interspire Shopping Cart.
Manage settings Select this to allow the user to view Interspire Shopping Cart settings.
Import products Select this to allow the user to import a list of products from a file.
Import customers Select this to allow the user to import a list of customers from a file.
Import tracking numbers
Select this to allow the user to import multiple tracking numbers from a file.
Backups Select this to allow the user to create store backups.
Store importer Select this to allow the user to import a store from another web commerce application.
Store exporter Select this to allow the user to export a store in a format compatible with another web commerce application.
Your store design Select this to allow the user to make changes to your store’s design settings.
Design mode Select this to allow the user to make changes to your store using design mode.
Store logs Select this to allow the user to view your store’s activity logs.
Addons Select this to allow the user to make changes to the addons your store uses.
Customer groups Select this to allow the user to make changes to the customer group settings.
System information
Select this to allow the user to view system information settings.
Table 16 Configuring User Account Settings (continued)

CREATING AND MANAGING USER ACCOUNTS 121
Deleting User AccountsTake the following steps to remove a user account from Interspire Shopping Cart.
1 Click User accounts in the toolbar.
Figure 90 Delete a User Account
Note: You cannot delete Interspire Shopping Cart’s admin account.
2 Do one of the following:
• Select the checkbox to the left of the user account’s Username and click Delete selected.
• Click the Delete link in the Action column.
Enable the XML API? Select this to allow the user to use the XML API (eXtensible Markup Language Application Programming Interface).
Save Click this to save your settings to the user account
Cancel Click this to return to the View users screen.
Table 16 Configuring User Account Settings (continued)

CREATING AND MANAGING USER ACCOUNTS122
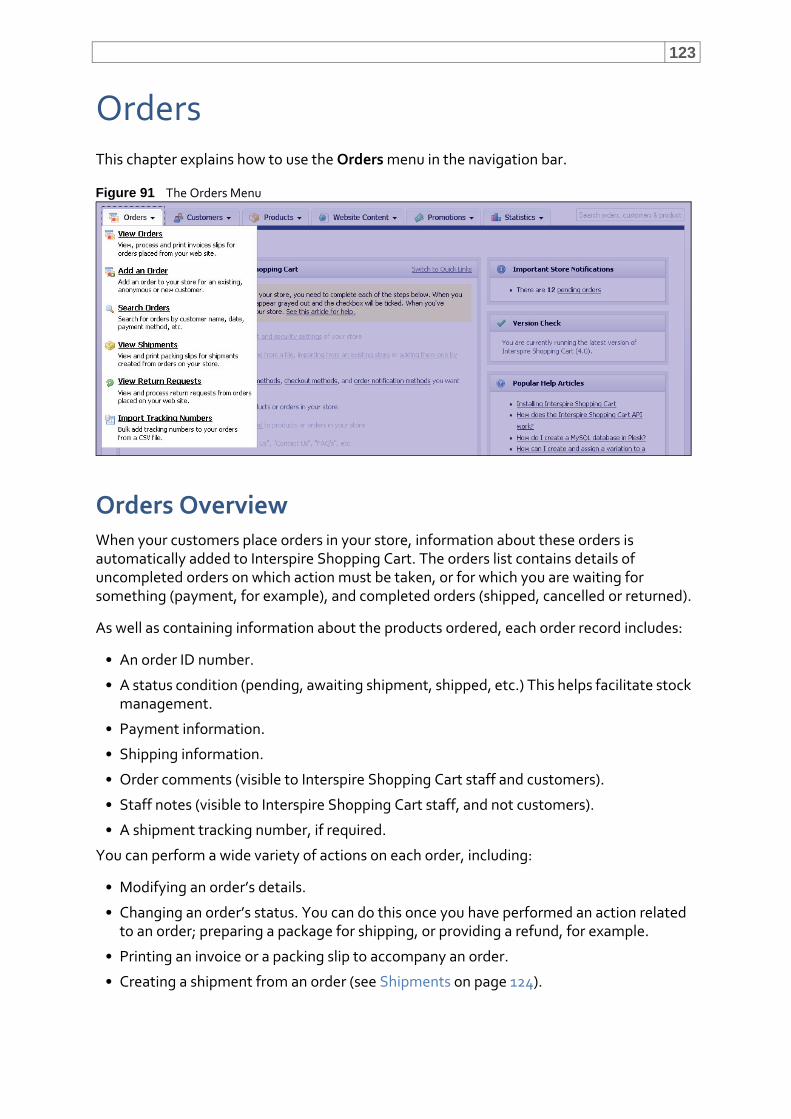
123
OrdersThis chapter explains how to use the Orders menu in the navigation bar.
Figure 91 The Orders Menu
Orders OverviewWhen your customers place orders in your store, information about these orders is automatically added to Interspire Shopping Cart. The orders list contains details of uncompleted orders on which action must be taken, or for which you are waiting for something (payment, for example), and completed orders (shipped, cancelled or returned).
As well as containing information about the products ordered, each order record includes:
• An order ID number.
• A status condition (pending, awaiting shipment, shipped, etc.) This helps facilitate stock management.
• Payment information.
• Shipping information.
• Order comments (visible to Interspire Shopping Cart staff and customers).
• Staff notes (visible to Interspire Shopping Cart staff, and not customers).
• A shipment tracking number, if required.
You can perform a wide variety of actions on each order, including:
• Modifying an order’s details.
• Changing an order’s status. You can do this once you have performed an action related to an order; preparing a package for shipping, or providing a refund, for example.
• Printing an invoice or a packing slip to accompany an order.
• Creating a shipment from an order (see Shipments on page 124).
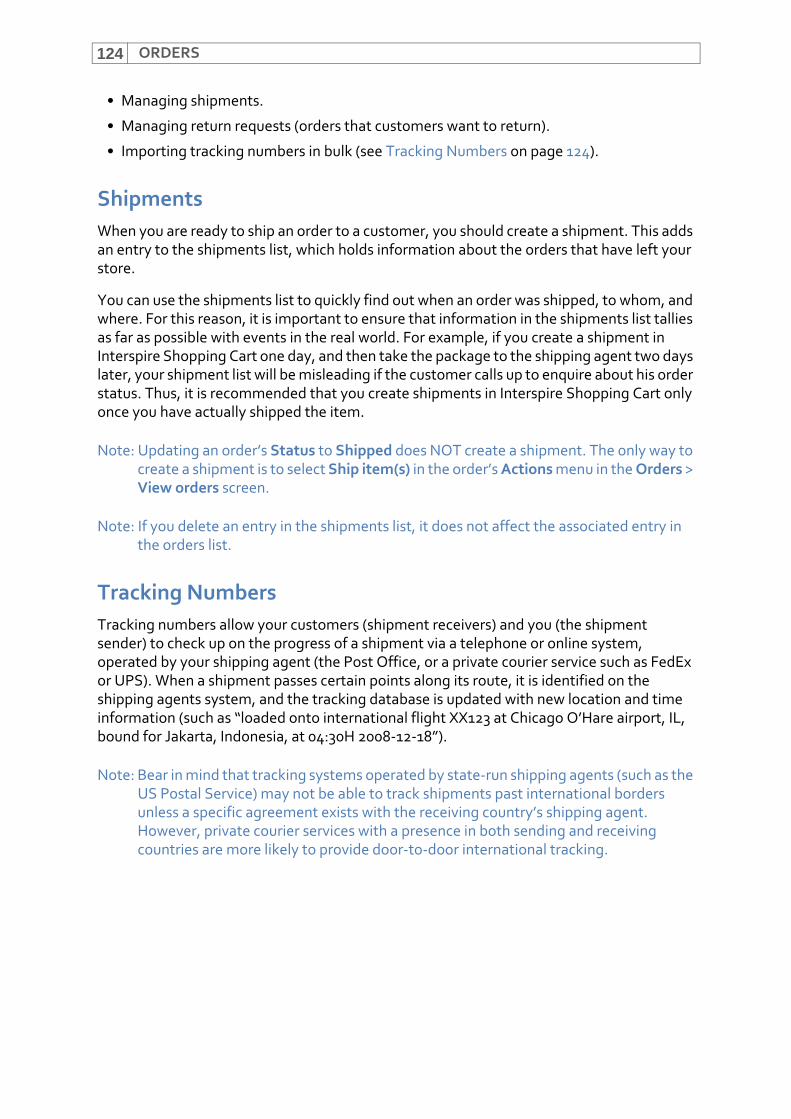
ORDERS124
• Managing shipments.
• Managing return requests (orders that customers want to return).
• Importing tracking numbers in bulk (see Tracking Numbers on page 124).
ShipmentsWhen you are ready to ship an order to a customer, you should create a shipment. This adds an entry to the shipments list, which holds information about the orders that have left your store.
You can use the shipments list to quickly find out when an order was shipped, to whom, and where. For this reason, it is important to ensure that information in the shipments list tallies as far as possible with events in the real world. For example, if you create a shipment in Interspire Shopping Cart one day, and then take the package to the shipping agent two days later, your shipment list will be misleading if the customer calls up to enquire about his order status. Thus, it is recommended that you create shipments in Interspire Shopping Cart only once you have actually shipped the item.
Note: Updating an order’s Status to Shipped does NOT create a shipment. The only way to create a shipment is to select Ship item(s) in the order’s Actions menu in the Orders > View orders screen.
Note: If you delete an entry in the shipments list, it does not affect the associated entry in the orders list.
Tracking NumbersTracking numbers allow your customers (shipment receivers) and you (the shipment sender) to check up on the progress of a shipment via a telephone or online system, operated by your shipping agent (the Post Office, or a private courier service such as FedEx or UPS). When a shipment passes certain points along its route, it is identified on the shipping agents system, and the tracking database is updated with new location and time information (such as “loaded onto international flight XX123 at Chicago O’Hare airport, IL, bound for Jakarta, Indonesia, at 04:30H 2008‐12‐18”).
Note: Bear in mind that tracking systems operated by state‐run shipping agents (such as the US Postal Service) may not be able to track shipments past international borders unless a specific agreement exists with the receiving country’s shipping agent. However, private courier services with a presence in both sending and receiving countries are more likely to provide door‐to‐door international tracking.
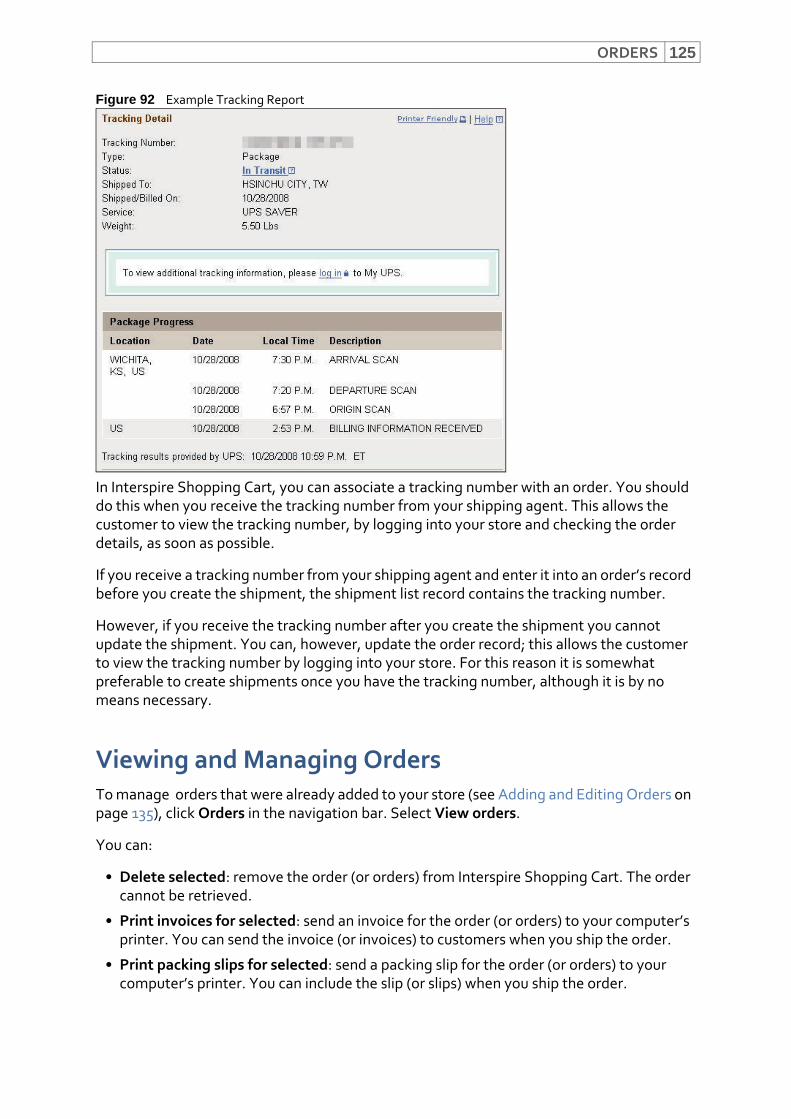
ORDERS 125
Figure 92 Example Tracking Report
In Interspire Shopping Cart, you can associate a tracking number with an order. You should do this when you receive the tracking number from your shipping agent. This allows the customer to view the tracking number, by logging into your store and checking the order details, as soon as possible.
If you receive a tracking number from your shipping agent and enter it into an order’s record before you create the shipment, the shipment list record contains the tracking number.
However, if you receive the tracking number after you create the shipment you cannot update the shipment. You can, however, update the order record; this allows the customer to view the tracking number by logging into your store. For this reason it is somewhat preferable to create shipments once you have the tracking number, although it is by no means necessary.
Viewing and Managing OrdersTo manage orders that were already added to your store (see Adding and Editing Orders on page 135), click Orders in the navigation bar. Select View orders.
You can:
• Delete selected: remove the order (or orders) from Interspire Shopping Cart. The order cannot be retrieved.
• Print invoices for selected: send an invoice for the order (or orders) to your computer’s printer. You can send the invoice (or invoices) to customers when you ship the order.
• Print packing slips for selected: send a packing slip for the order (or orders) to your computer’s printer. You can include the slip (or slips) when you ship the order.
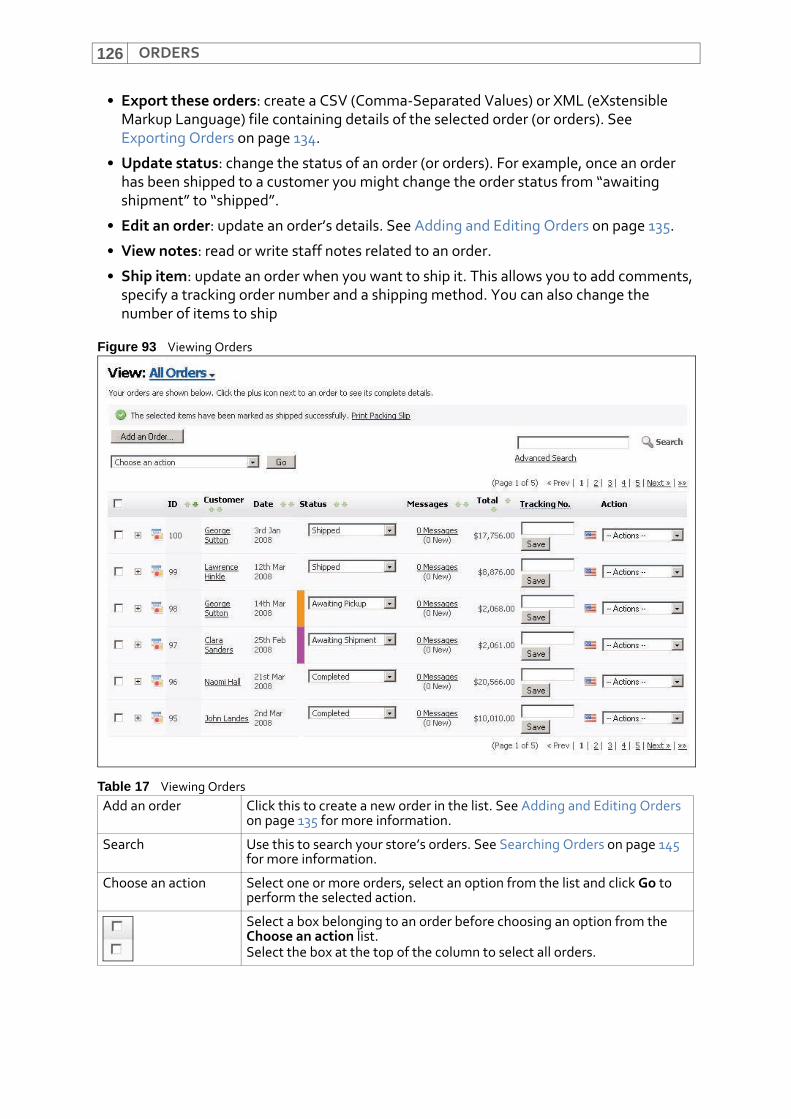
ORDERS126
• Export these orders: create a CSV (Comma‐Separated Values) or XML (eXstensible Markup Language) file containing details of the selected order (or orders). See Exporting Orders on page 134.
• Update status: change the status of an order (or orders). For example, once an order has been shipped to a customer you might change the order status from “awaiting shipment” to “shipped”.
• Edit an order: update an order’s details. See Adding and Editing Orders on page 135.
• View notes: read or write staff notes related to an order.
• Ship item: update an order when you want to ship it. This allows you to add comments, specify a tracking order number and a shipping method. You can also change the number of items to ship
Figure 93 Viewing Orders
Table 17 Viewing OrdersAdd an order Click this to create a new order in the list. See Adding and Editing Orders
on page 135 for more information.
Search Use this to search your store’s orders. See Searching Orders on page 145 for more information.
Choose an action Select one or more orders, select an option from the list and click Go to perform the selected action.
Select a box belonging to an order before choosing an option from the Choose an action list.Select the box at the top of the column to select all orders.
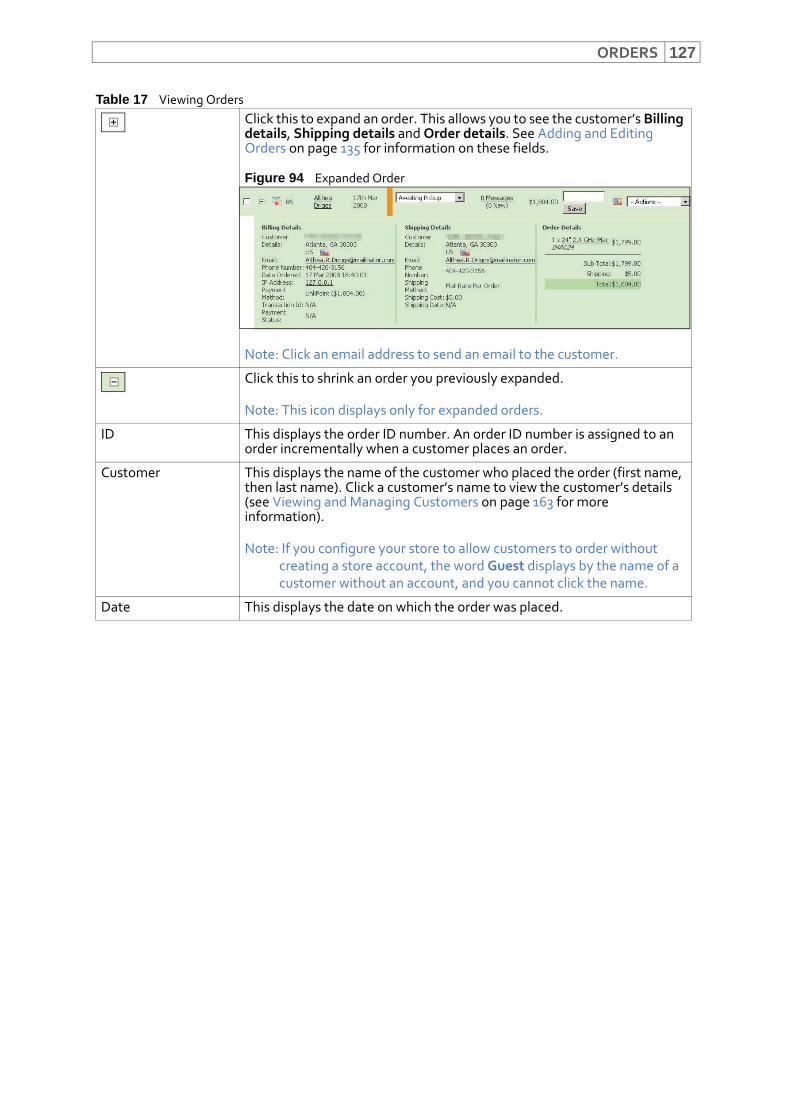
ORDERS 127
Click this to expand an order. This allows you to see the customer’s Billing details, Shipping details and Order details. See Adding and Editing Orders on page 135 for information on these fields.
Figure 94 Expanded Order
Note: Click an email address to send an email to the customer.
Click this to shrink an order you previously expanded.
Note: This icon displays only for expanded orders.
ID This displays the order ID number. An order ID number is assigned to an order incrementally when a customer places an order.
Customer This displays the name of the customer who placed the order (first name, then last name). Click a customer’s name to view the customer’s details (see Viewing and Managing Customers on page 163 for more information).
Note: If you configure your store to allow customers to order without creating a store account, the word Guest displays by the name of a customer without an account, and you cannot click the name.
Date This displays the date on which the order was placed.
Table 17 Viewing Orders
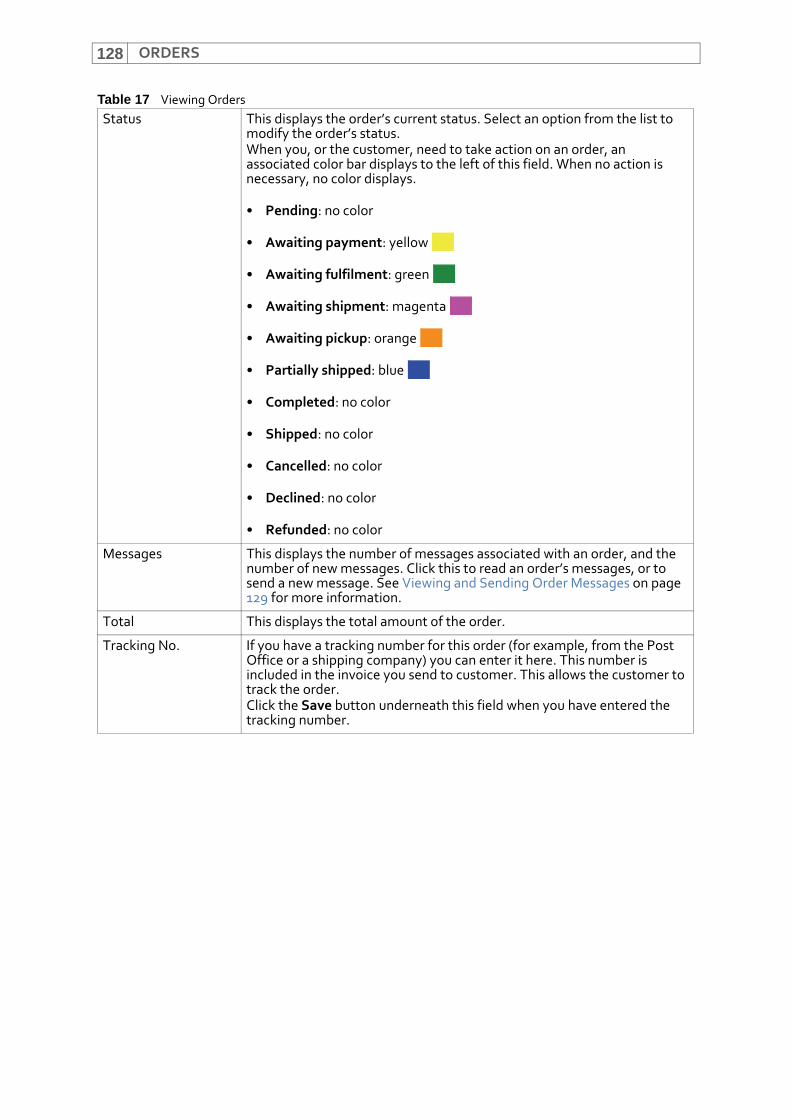
ORDERS128
Status This displays the order’s current status. Select an option from the list to modify the order’s status. When you, or the customer, need to take action on an order, an associated color bar displays to the left of this field. When no action is necessary, no color displays.
• Pending: no color
• Awaiting payment: yellow
• Awaiting fulfilment: green
• Awaiting shipment: magenta
• Awaiting pickup: orange
• Partially shipped: blue
• Completed: no color
• Shipped: no color
• Cancelled: no color
• Declined: no color
• Refunded: no color
Messages This displays the number of messages associated with an order, and the number of new messages. Click this to read an order’s messages, or to send a new message. See Viewing and Sending Order Messages on page 129 for more information.
Total This displays the total amount of the order.
Tracking No. If you have a tracking number for this order (for example, from the Post Office or a shipping company) you can enter it here. This number is included in the invoice you send to customer. This allows the customer to track the order.Click the Save button underneath this field when you have entered the tracking number.
Table 17 Viewing Orders
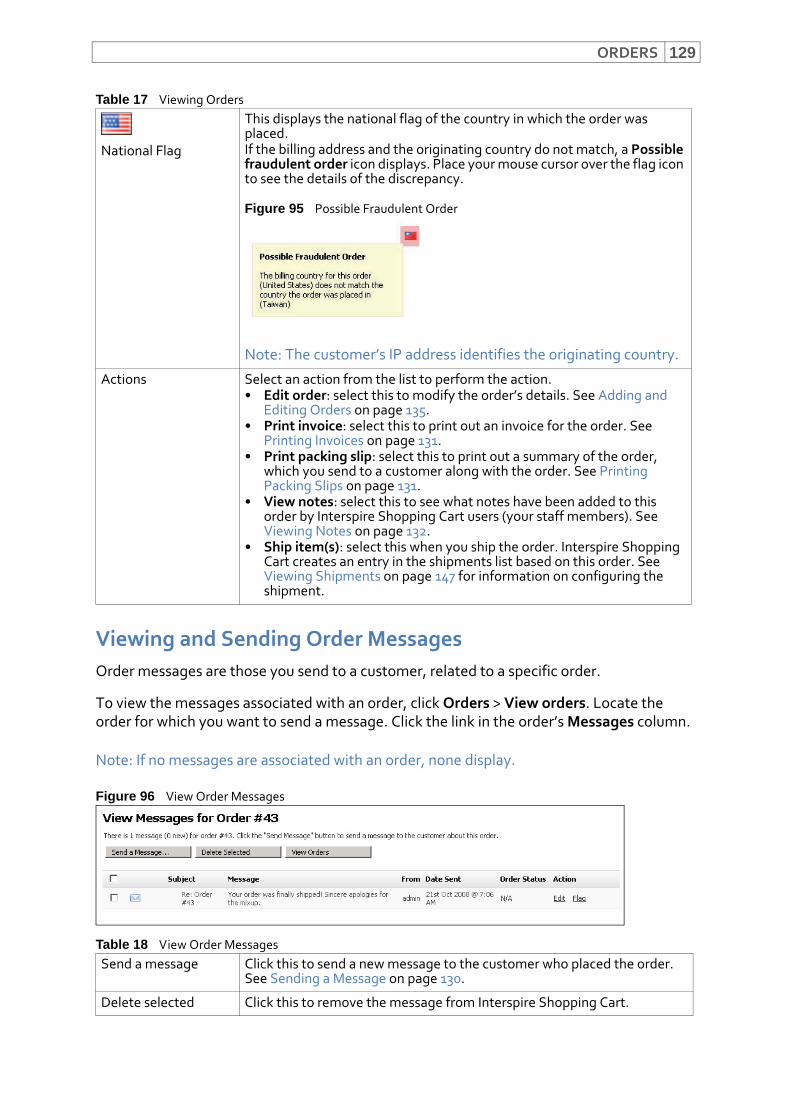
ORDERS 129
Viewing and Sending Order MessagesOrder messages are those you send to a customer, related to a specific order.
To view the messages associated with an order, click Orders > View orders. Locate the order for which you want to send a message. Click the link in the order’s Messages column.
Note: If no messages are associated with an order, none display.
Figure 96 View Order Messages
National Flag
This displays the national flag of the country in which the order was placed. If the billing address and the originating country do not match, a Possible fraudulent order icon displays. Place your mouse cursor over the flag icon to see the details of the discrepancy.
Figure 95 Possible Fraudulent Order
Note: The customer’s IP address identifies the originating country.
Actions Select an action from the list to perform the action.• Edit order: select this to modify the order’s details. See Adding and
Editing Orders on page 135.• Print invoice: select this to print out an invoice for the order. See
Printing Invoices on page 131.• Print packing slip: select this to print out a summary of the order,
which you send to a customer along with the order. See Printing Packing Slips on page 131.
• View notes: select this to see what notes have been added to this order by Interspire Shopping Cart users (your staff members). See Viewing Notes on page 132.
• Ship item(s): select this when you ship the order. Interspire Shopping Cart creates an entry in the shipments list based on this order. See Viewing Shipments on page 147 for information on configuring the shipment.
Table 18 View Order MessagesSend a message Click this to send a new message to the customer who placed the order.
See Sending a Message on page 130.
Delete selected Click this to remove the message from Interspire Shopping Cart.
Table 17 Viewing Orders
ORDERS130
Sending a MessageTo send a new order message to a customer:
1 Click Orders > View orders. Locate the order for which you want to send a message.
2 Click the link in the order’s Messages column, then click Send a message.
Figure 97 Send a New Message
Note: The message’s To field is completed automatically, and is not configurable.
3 The message’s Subject field is completed automatically, but you can modify it if you want.
4 Enter your message text in the Message field.
5 Click Send to send the message to the customer. Alternatively, click Cancel to return to the View order messages screen.
View orders Click this to return to the View orders screen.
• Select a message’s checkbox and click Delete selected to remove the message from Interspire Shopping Cart.
• Click the box at the top of the column to select all messages.
Subject This displays the subject of the email message.
Message This displays the email message’s text contents.
From This displays the username of the Interspire Shopping Cart user who sent the email.
Date sent This displays the date and time at which the email message was sent.
Order status This displays the current status of the order with which this message is associated.
Action • Click Edit to update a message with your changes. The fields that display are the same as those that display when you send a new message; see Sending a Message on page 130.
• Click Flag to flag the email. A flag icon displays next to the email’s Subject.
Table 18 View Order Messages
ORDERS 131
Printing InvoicesPrint the invoices you send to customers in the Orders > View orders screen. Locate the order for which you want to print an invoice, and select Print invoice from its Actions list.
A new window displays, showing the invoice as it will print out. A printer dialog also appears, showing your default printer details.
Note: The printer dialog that displays differs depending on your computer’s operating system and printer type.
Figure 98 Printing an Invoice
Configure your printer settings in the printer dialog, if necessary, and print the invoice as you would any other document.
Printing Packing SlipsPrint the packing slips you send to customers along with their orders in the Orders > View orders screen. Locate the order for which you want to print a packing slip, and select Print packing slip from its Actions list.
A new window displays, showing the packing slip as it will print out. A printer dialog also appears, showing your default printer details.
ORDERS132
Note: The printer dialog that displays differs depending on your computer’s operating system and printer type.
Figure 99 Printing a Packing Slip
Configure your printer settings in the printer dialog, if necessary, and print the packing slip as you would any other document.
Viewing NotesYou can add notes to an order in Interspire Shopping Cart. These notes can then be read by another Interspire Shopping Cart user (your staff members). Customers will not see the notes you add to orders.
To view, edit or add orders, click Orders > View orders. Locate the order for which you want to view or edit staff notes, and select View notes from its Actions list.
Note: You can also view and edit notes when you edit an order, or create an order. Use the screen’s Staff notes field. See Adding and Editing Orders on page 135.
ORDERS 133
Figure 100 Viewing Notes
Add the notes in the text box and click Save. Alternatively, click Cancel if you do not want to make changes.
Creating a ShipmentWhen you are ready to ship an order to its customer, you must create a shipment.
To create a shipment:
1 Click Orders > View orders.
2 Locate the order you want to ship, and select Ship item(s) from its Actions list.
Figure 101 Create a Shipment
3 Check that the Product column lists all the products that should be shipped to the customer, and that the Qty. to ship displays the correct number of each item for the order. If a Qty. to ship value is incorrect, select the correct value from the list.
4 Ensure that the Shipping Method is correct. If you have a tracking number to add (one may be provided to you by the Post Office or shipping company) enter it in the Tracking Number field. If you have any other information that you want to include with the order, do so in the Shipment comments field.
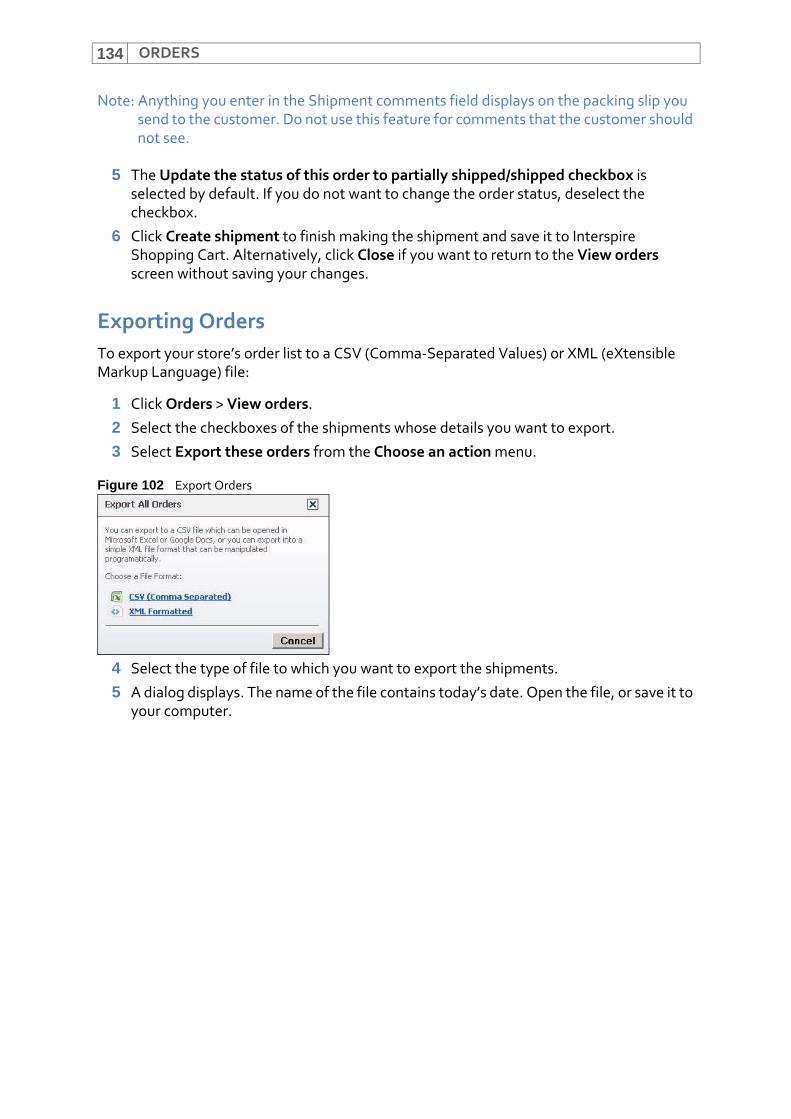
ORDERS134
Note: Anything you enter in the Shipment comments field displays on the packing slip you send to the customer. Do not use this feature for comments that the customer should not see.
5 The Update the status of this order to partially shipped/shipped checkbox is selected by default. If you do not want to change the order status, deselect the checkbox.
6 Click Create shipment to finish making the shipment and save it to Interspire Shopping Cart. Alternatively, click Close if you want to return to the View orders screen without saving your changes.
Exporting OrdersTo export your store’s order list to a CSV (Comma‐Separated Values) or XML (eXtensible Markup Language) file:
1 Click Orders > View orders.
2 Select the checkboxes of the shipments whose details you want to export.
3 Select Export these orders from the Choose an action menu.
Figure 102 Export Orders
4 Select the type of file to which you want to export the shipments.
5 A dialog displays. The name of the file contains today’s date. Open the file, or save it to your computer.
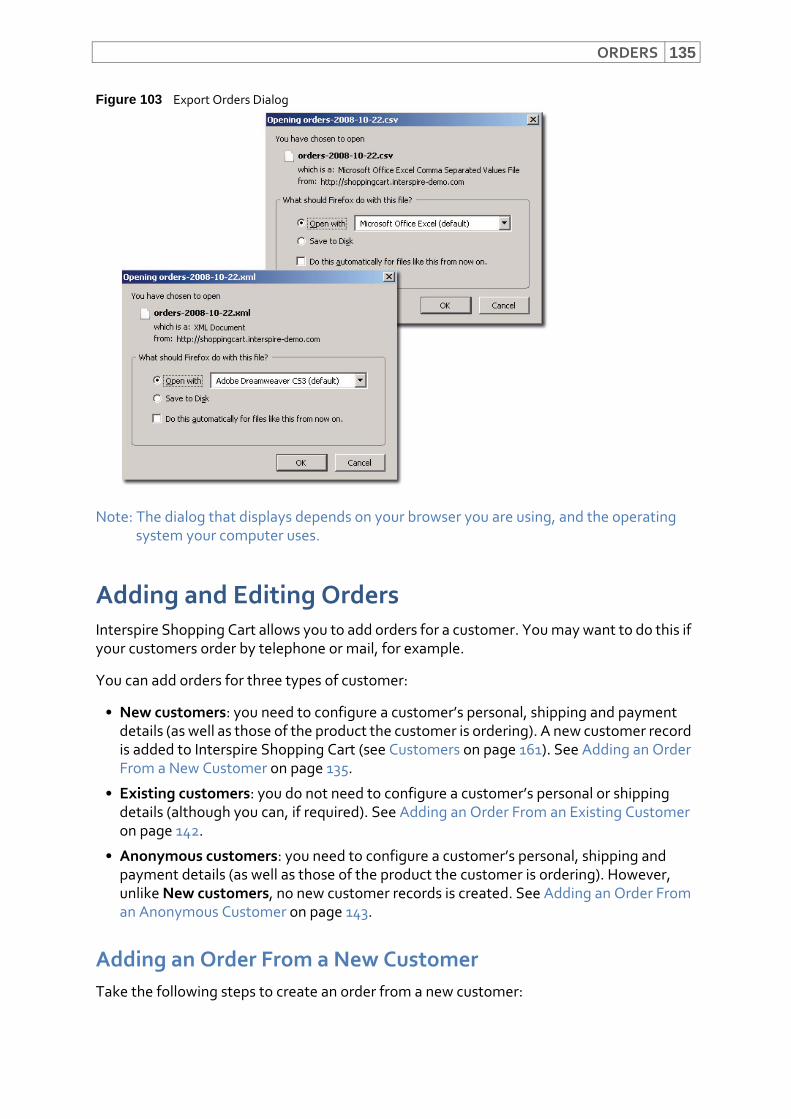
ORDERS 135
Figure 103 Export Orders Dialog
Note: The dialog that displays depends on your browser you are using, and the operating system your computer uses.
Adding and Editing OrdersInterspire Shopping Cart allows you to add orders for a customer. You may want to do this if your customers order by telephone or mail, for example.
You can add orders for three types of customer:
• New customers: you need to configure a customer’s personal, shipping and payment details (as well as those of the product the customer is ordering). A new customer record is added to Interspire Shopping Cart (see Customers on page 161). See Adding an Order From a New Customer on page 135.
• Existing customers: you do not need to configure a customer’s personal or shipping details (although you can, if required). See Adding an Order From an Existing Customer on page 142.
• Anonymous customers: you need to configure a customer’s personal, shipping and payment details (as well as those of the product the customer is ordering). However, unlike New customers, no new customer records is created. See Adding an Order From an Anonymous Customer on page 143.
Adding an Order From a New CustomerTake the following steps to create an order from a new customer:

ORDERS136
1 Click Orders > Add order.
2 The New customer tab displays by default.
Figure 104 Add Order: New Customer
ORDERS 137
3 Configure the fields in this screen.Table 19 Add Order: New Customer Customer details
Email address Enter the customer’s email address.
Login password Enter the password that the customer should use to log in to your store.
Confirm password Re‐enter the Login Password.
Customer group Select a customer group to which you want to assign the customer, if required.
Note: You must first create customer groups in the Customers > Customer groups screen. See Creating Customer Groups on page 172.
Store credit If you want to assign store credit to this customer, enter the amount with which you want to credit the customer.
Note: Enter a value here only if you are certain that you want to credit the customer with money.
Billing details Use this section to configure the address for billing the customer.
Note: Depending upon the payment method you choose, this address may need to correspond with an address associated with a payment method.
Use shipping address
Select this to use the address details you configured in the Shipping details section as the billing address as well.
First name Enter the customer’s first name.
Last name Enter the customer’s surname.
Company name Enter the name of the customer’s company.
Phone number Enter the customer’s telephone number.
Address line 1 Enter the customer’s street address.
Address line 2 Enter a second line of the customer’s street address, if required.
Suburb/City Enter the city, suburb, town or other conurbation in which the billing address is located.
Country Select the country in which the customer’s billing address is located.
State/Province Select the state, province, county, or other administrative region in which the customer’s billing address is located.
Note: If the country you select does not have associated states, no list displays. Enter the information manually.
Zip/Postcode Enter the ZIP code, postcode, or other postal identification code associated with the customer’s billing address.
Save this address Select the checkbox if you want to add the billing address to the customer’s record in Interspire Shopping Cart.
Note: If you do not save this for a new customer, you (or the customer) will need to re‐enter the information, or other information, next time you (or the customer) places an order.
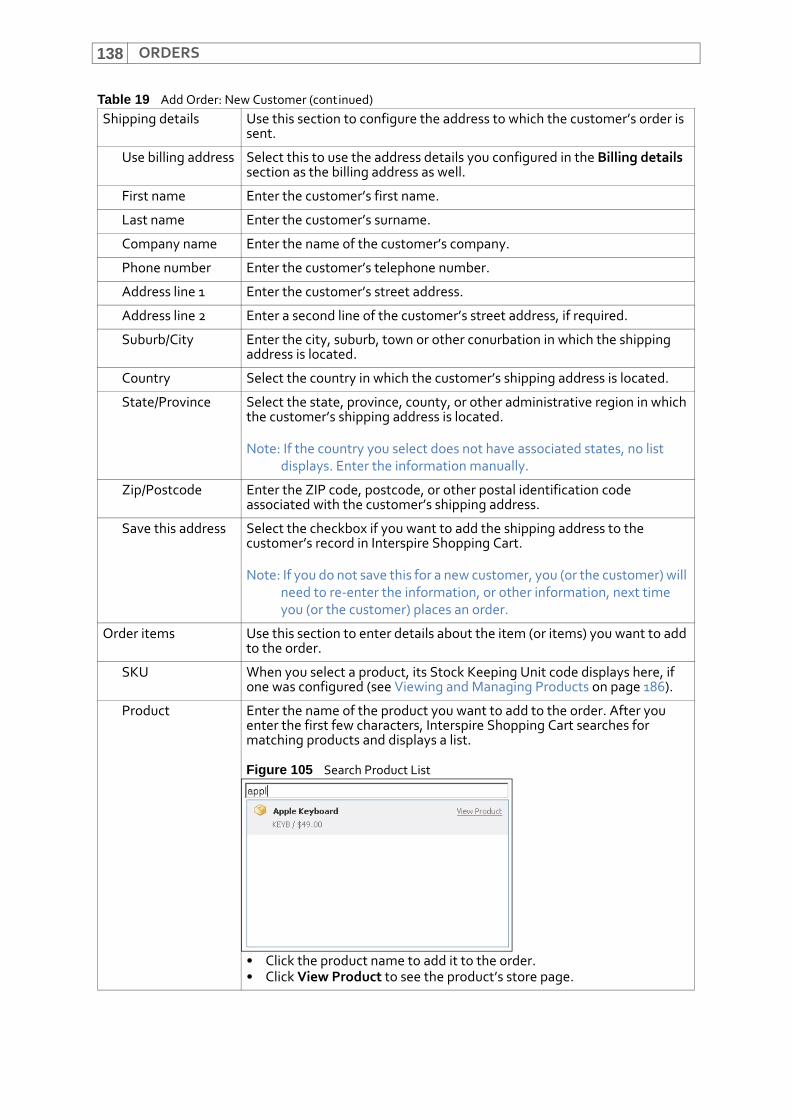
ORDERS138
Shipping details Use this section to configure the address to which the customer’s order is sent.
Use billing address Select this to use the address details you configured in the Billing details section as the billing address as well.
First name Enter the customer’s first name.
Last name Enter the customer’s surname.
Company name Enter the name of the customer’s company.
Phone number Enter the customer’s telephone number.
Address line 1 Enter the customer’s street address.
Address line 2 Enter a second line of the customer’s street address, if required.
Suburb/City Enter the city, suburb, town or other conurbation in which the shipping address is located.
Country Select the country in which the customer’s shipping address is located.
State/Province Select the state, province, county, or other administrative region in which the customer’s shipping address is located.
Note: If the country you select does not have associated states, no list displays. Enter the information manually.
Zip/Postcode Enter the ZIP code, postcode, or other postal identification code associated with the customer’s shipping address.
Save this address Select the checkbox if you want to add the shipping address to the customer’s record in Interspire Shopping Cart.
Note: If you do not save this for a new customer, you (or the customer) will need to re‐enter the information, or other information, next time you (or the customer) places an order.
Order items Use this section to enter details about the item (or items) you want to add to the order.
SKU When you select a product, its Stock Keeping Unit code displays here, if one was configured (see Viewing and Managing Products on page 186).
Product Enter the name of the product you want to add to the order. After you enter the first few characters, Interspire Shopping Cart searches for matching products and displays a list.
Figure 105 Search Product List
• Click the product name to add it to the order.• Click View Product to see the product’s store page.
Table 19 Add Order: New Customer (continued)
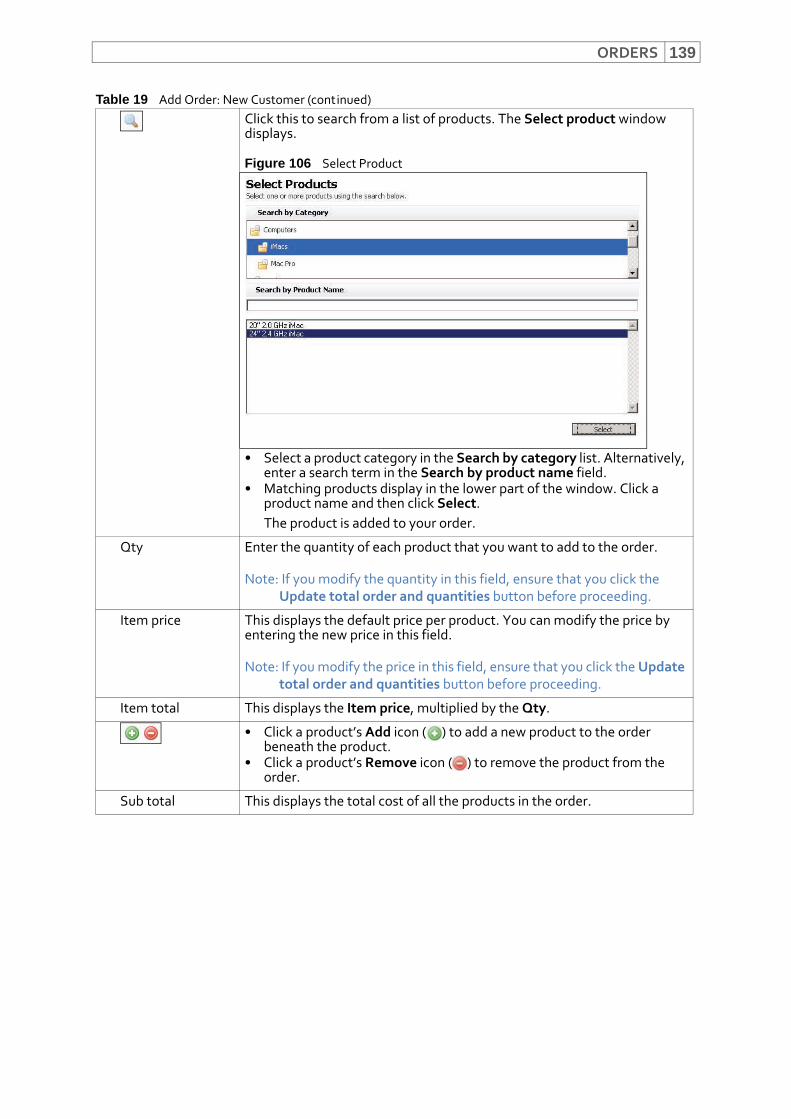
ORDERS 139
Click this to search from a list of products. The Select product window displays.
Figure 106 Select Product
• Select a product category in the Search by category list. Alternatively, enter a search term in the Search by product name field.
• Matching products display in the lower part of the window. Click a product name and then click Select.The product is added to your order.
Qty Enter the quantity of each product that you want to add to the order.
Note: If you modify the quantity in this field, ensure that you click the Update total order and quantities button before proceeding.
Item price This displays the default price per product. You can modify the price by entering the new price in this field.
Note: If you modify the price in this field, ensure that you click the Update total order and quantities button before proceeding.
Item total This displays the Item price, multiplied by the Qty.
• Click a product’s Add icon ( ) to add a new product to the order beneath the product.
• Click a product’s Remove icon ( ) to remove the product from the order.
Sub total This displays the total cost of all the products in the order.
Table 19 Add Order: New Customer (continued)
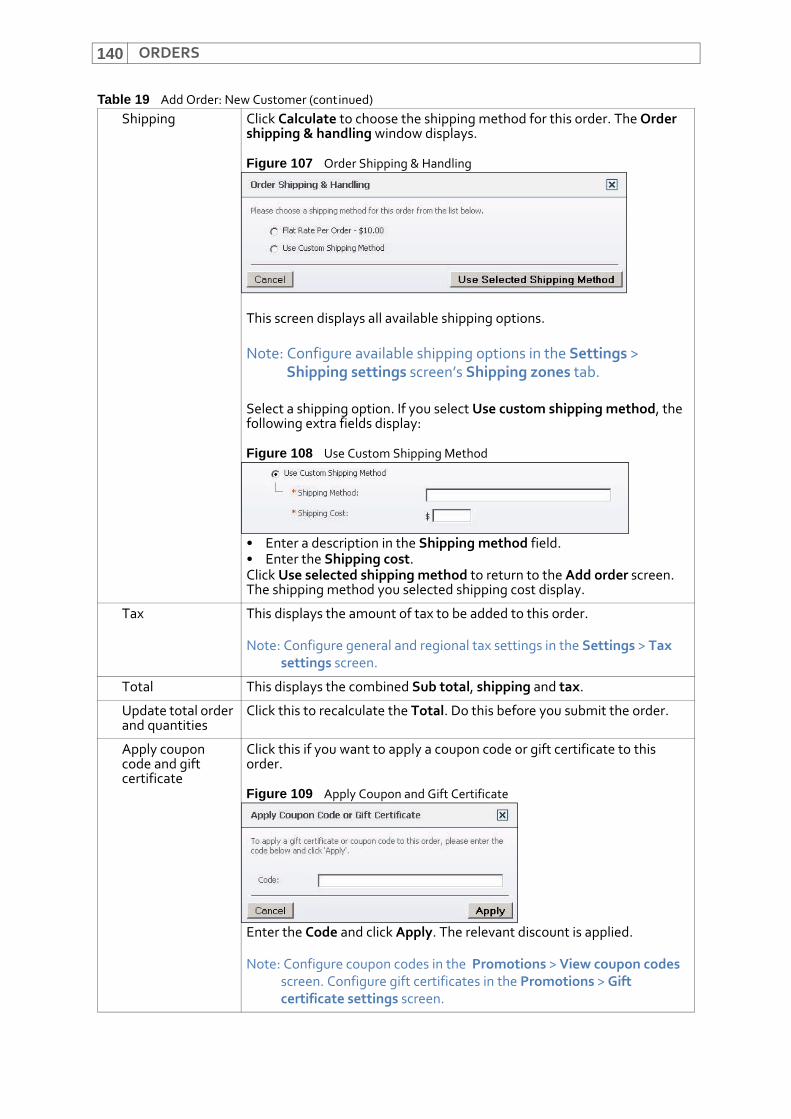
ORDERS140
Shipping Click Calculate to choose the shipping method for this order. The Order shipping & handling window displays.
Figure 107 Order Shipping & Handling
This screen displays all available shipping options.
Note: Configure available shipping options in the Settings > Shipping settings screen’s Shipping zones tab.
Select a shipping option. If you select Use custom shipping method, the following extra fields display:
Figure 108 Use Custom Shipping Method
• Enter a description in the Shipping method field.• Enter the Shipping cost.Click Use selected shipping method to return to the Add order screen. The shipping method you selected shipping cost display.
Tax This displays the amount of tax to be added to this order.
Note: Configure general and regional tax settings in the Settings > Tax settings screen.
Total This displays the combined Sub total, shipping and tax.
Update total order and quantities
Click this to recalculate the Total. Do this before you submit the order.
Apply coupon code and gift certificate
Click this if you want to apply a coupon code or gift certificate to this order.
Figure 109 Apply Coupon and Gift Certificate
Enter the Code and click Apply. The relevant discount is applied.
Note: Configure coupon codes in the Promotions > View coupon codes screen. Configure gift certificates in the Promotions > Gift certificate settings screen.
Table 19 Add Order: New Customer (continued)
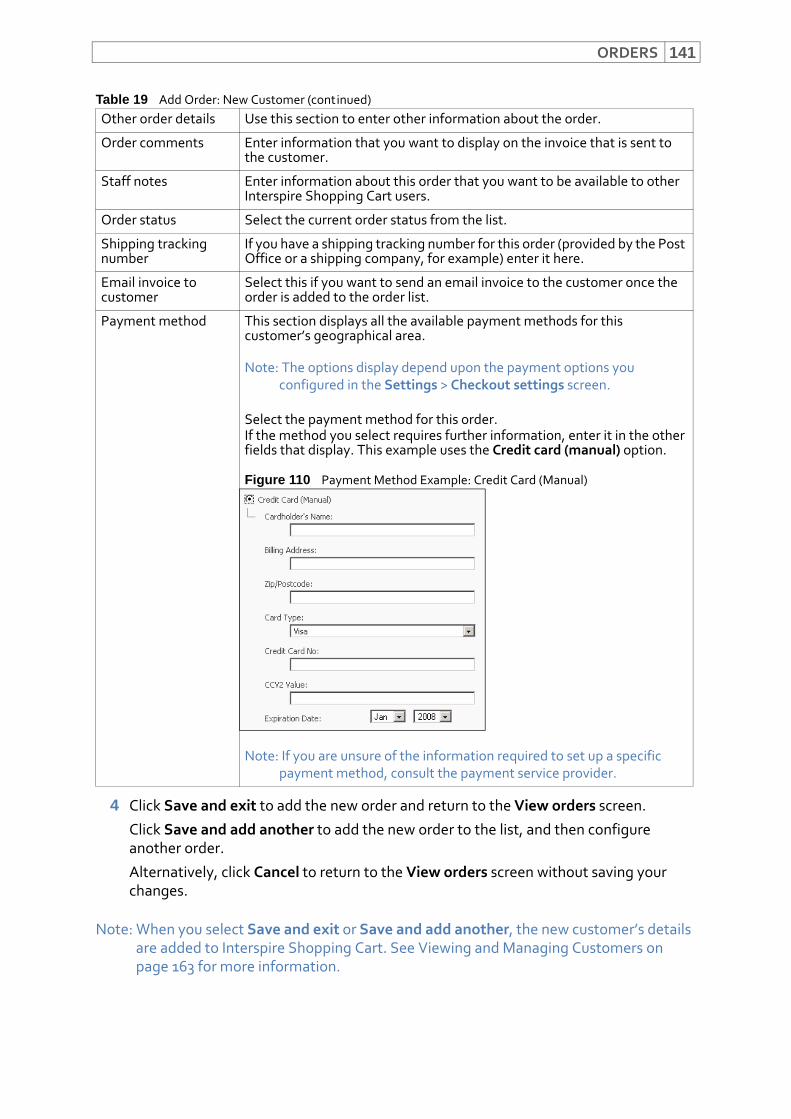
ORDERS 141
4 Click Save and exit to add the new order and return to the View orders screen.
Click Save and add another to add the new order to the list, and then configure another order.
Alternatively, click Cancel to return to the View orders screen without saving your changes.
Note: When you select Save and exit or Save and add another, the new customer’s details are added to Interspire Shopping Cart. See Viewing and Managing Customers on page 163 for more information.
Other order details Use this section to enter other information about the order.
Order comments Enter information that you want to display on the invoice that is sent to the customer.
Staff notes Enter information about this order that you want to be available to other Interspire Shopping Cart users.
Order status Select the current order status from the list.
Shipping tracking number
If you have a shipping tracking number for this order (provided by the Post Office or a shipping company, for example) enter it here.
Email invoice to customer
Select this if you want to send an email invoice to the customer once the order is added to the order list.
Payment method This section displays all the available payment methods for this customer’s geographical area.
Note: The options display depend upon the payment options you configured in the Settings > Checkout settings screen.
Select the payment method for this order. If the method you select requires further information, enter it in the other fields that display. This example uses the Credit card (manual) option.
Figure 110 Payment Method Example: Credit Card (Manual)
Note: If you are unsure of the information required to set up a specific payment method, consult the payment service provider.
Table 19 Add Order: New Customer (continued)
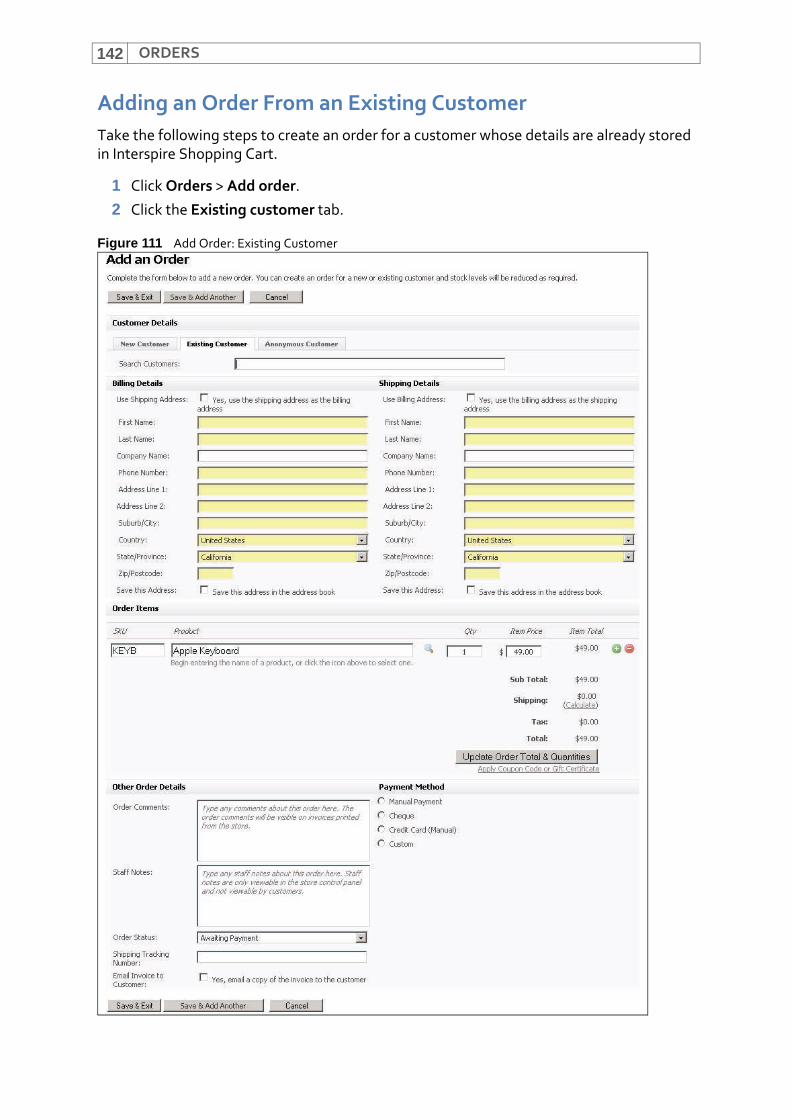
ORDERS142
Adding an Order From an Existing CustomerTake the following steps to create an order for a customer whose details are already stored in Interspire Shopping Cart.
1 Click Orders > Add order.
2 Click the Existing customer tab.
Figure 111 Add Order: Existing Customer

ORDERS 143
3 Configure the fields in this screen. The following table describes the labels not already described in Adding an Order From a New Customer on page 135.
4 Click Save and exit to add the new order and return to the View orders screen.
Click Save and add another to add the new order to the list, and then configure another order.
Alternatively, click Cancel to return to the View orders screen without saving your changes.
Adding an Order From an Anonymous CustomerTake the following steps to create an order for a new customer, whose details you do not want to store in Interspire Shopping Cart.
1 Click Orders > Add order.
2 Click the Anonymous customer tab.
Table 20 Add Order: Existing Customer Search customers Use this field to find the existing customer for whom you want to
configure the order.Enter the first few letters of the customer’s first or last name. Interspire Shopping Cart searches for all customers that match the search term.
Figure 112 Add Order: Search for Customer
• Select a customer from the list that displays.• You can also click Order history to see detailed information about the
customer, including a full list of the customer’s past orders. See Viewing and Managing Customers on page 163 for more information.
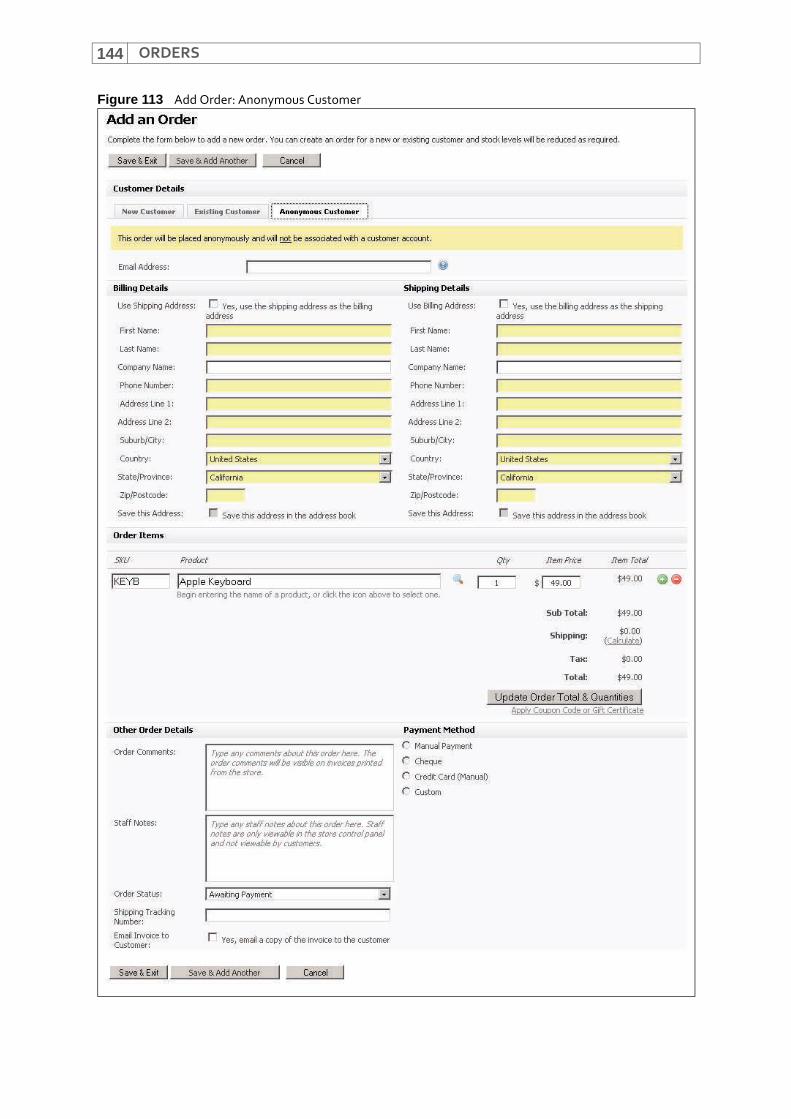
ORDERS144
Figure 113 Add Order: Anonymous Customer

ORDERS 145
3 Configure the fields in this screen. The following table describes the labels not already described in Adding an Order From a New Customer on page 135.
4 Click Save and exit to add the new order and return to the View orders screen.
Click Save and add another to add the new order to the list, and then configure another order.
Alternatively, click Cancel to return to the View orders screen without saving your changes.
Searching OrdersYou can search your order list in two ways:
• Quick order search: use the search box in an order screen to perform a quick search of the order list’s ID numbers, customer details and tracking numbers. See Quick Order Search on page 145.
• Advanced order search: click Orders > Search orders to perform an advanced search that allows you to make a variety of search selections, and search for ranges of order IDs, cost, and dates. See Advanced Order Search on page 145.
Quick Order SearchUse the Search function in the Orders > View orders screen to search your store’s orders.
Figure 114 Searching Orders
Enter the term for which you want to search, and click Search. Interspire Shopping Cart searches the ID, Customer (and other customer details) and Tracking No. fields, and displays the search results.
• Click Advanced search to perform a more in‐depth search; see Advanced Order Search on page 145.
• Click Clear search results to view all your store’s orders (this field displays only when you have already performed a search).
Advanced Order SearchTo perform an advanced search of your store’s orders, click Orders > Search orders.
Note: You can also click Advanced search in the Orders > View orders screen.
Enter your search parameters in the screen that displays.
Table 21 Add Order: Anonymous Customer Email address You may associate an email address with this anonymous order. If you
then select Email invoice to customer, the invoice is sent to the email address you enter.
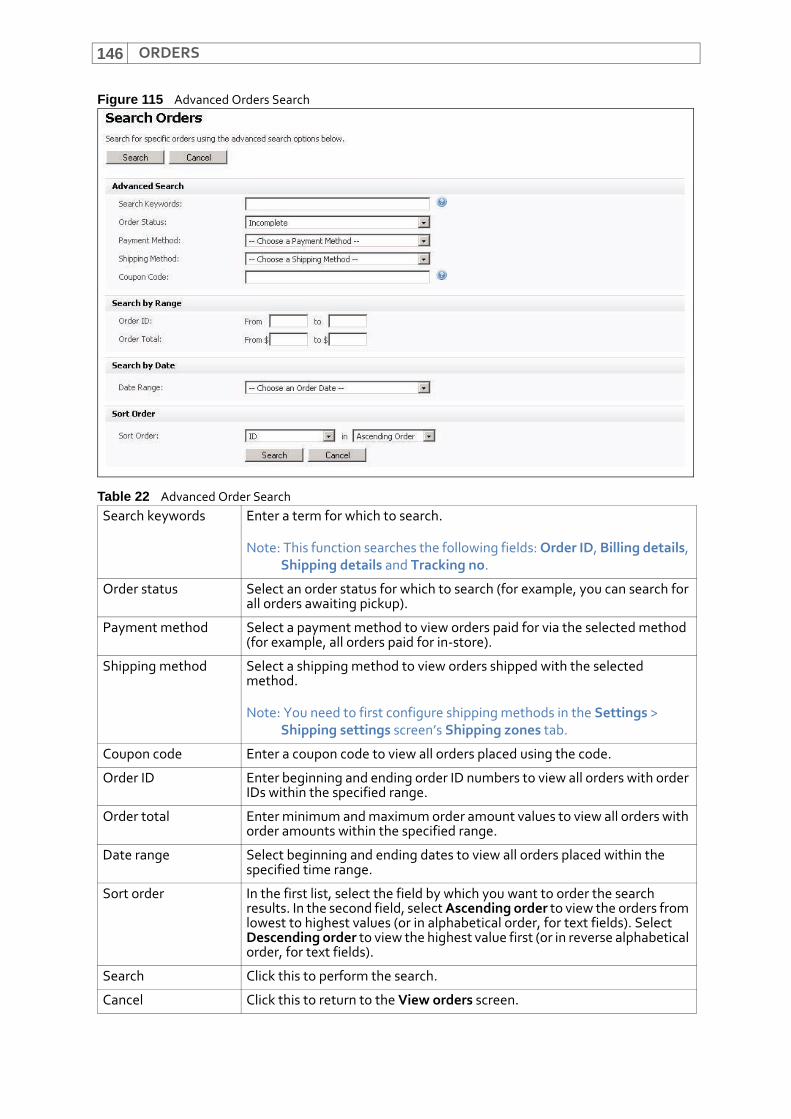
ORDERS146
Figure 115 Advanced Orders Search
Table 22 Advanced Order SearchSearch keywords Enter a term for which to search.
Note: This function searches the following fields: Order ID, Billing details, Shipping details and Tracking no.
Order status Select an order status for which to search (for example, you can search for all orders awaiting pickup).
Payment method Select a payment method to view orders paid for via the selected method (for example, all orders paid for in‐store).
Shipping method Select a shipping method to view orders shipped with the selected method.
Note: You need to first configure shipping methods in the Settings > Shipping settings screen’s Shipping zones tab.
Coupon code Enter a coupon code to view all orders placed using the code.
Order ID Enter beginning and ending order ID numbers to view all orders with order IDs within the specified range.
Order total Enter minimum and maximum order amount values to view all orders with order amounts within the specified range.
Date range Select beginning and ending dates to view all orders placed within the specified time range.
Sort order In the first list, select the field by which you want to order the search results. In the second field, select Ascending order to view the orders from lowest to highest values (or in alphabetical order, for text fields). Select Descending order to view the highest value first (or in reverse alphabetical order, for text fields).
Search Click this to perform the search.
Cancel Click this to return to the View orders screen.
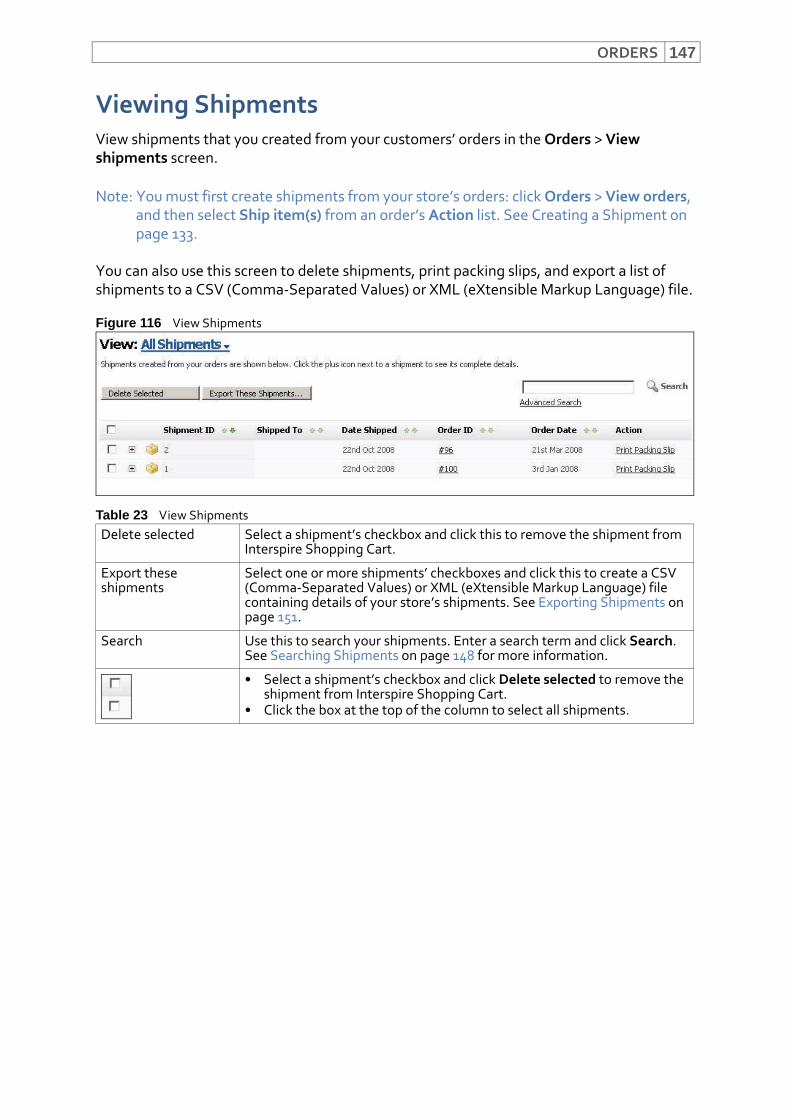
ORDERS 147
Viewing ShipmentsView shipments that you created from your customers’ orders in the Orders > View shipments screen.
Note: You must first create shipments from your store’s orders: click Orders > View orders, and then select Ship item(s) from an order’s Action list. See Creating a Shipment on page 133.
You can also use this screen to delete shipments, print packing slips, and export a list of shipments to a CSV (Comma‐Separated Values) or XML (eXtensible Markup Language) file.
Figure 116 View Shipments
Table 23 View ShipmentsDelete selected Select a shipment’s checkbox and click this to remove the shipment from
Interspire Shopping Cart.
Export these shipments
Select one or more shipments’ checkboxes and click this to create a CSV (Comma‐Separated Values) or XML (eXtensible Markup Language) file containing details of your store’s shipments. See Exporting Shipments on page 151.
Search Use this to search your shipments. Enter a search term and click Search. See Searching Shipments on page 148 for more information.
• Select a shipment’s checkbox and click Delete selected to remove the shipment from Interspire Shopping Cart.
• Click the box at the top of the column to select all shipments.
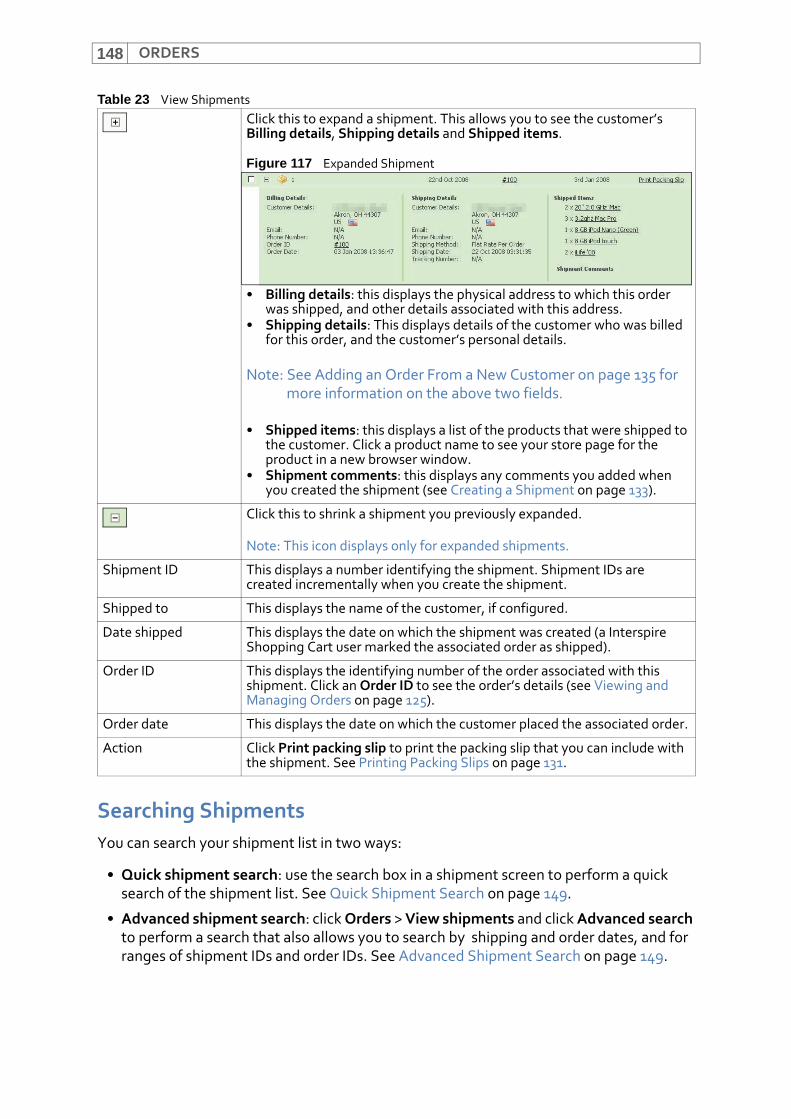
ORDERS148
Searching ShipmentsYou can search your shipment list in two ways:
• Quick shipment search: use the search box in a shipment screen to perform a quick search of the shipment list. See Quick Shipment Search on page 149.
• Advanced shipment search: click Orders > View shipments and click Advanced search to perform a search that also allows you to search by shipping and order dates, and for ranges of shipment IDs and order IDs. See Advanced Shipment Search on page 149.
Click this to expand a shipment. This allows you to see the customer’s Billing details, Shipping details and Shipped items.
Figure 117 Expanded Shipment
• Billing details: this displays the physical address to which this order was shipped, and other details associated with this address.
• Shipping details: This displays details of the customer who was billed for this order, and the customer’s personal details.
Note: See Adding an Order From a New Customer on page 135 for more information on the above two fields.
• Shipped items: this displays a list of the products that were shipped to the customer. Click a product name to see your store page for the product in a new browser window.
• Shipment comments: this displays any comments you added when you created the shipment (see Creating a Shipment on page 133).
Click this to shrink a shipment you previously expanded.
Note: This icon displays only for expanded shipments.
Shipment ID This displays a number identifying the shipment. Shipment IDs are created incrementally when you create the shipment.
Shipped to This displays the name of the customer, if configured.
Date shipped This displays the date on which the shipment was created (a Interspire Shopping Cart user marked the associated order as shipped).
Order ID This displays the identifying number of the order associated with this shipment. Click an Order ID to see the order’s details (see Viewing and Managing Orders on page 125).
Order date This displays the date on which the customer placed the associated order.
Action Click Print packing slip to print the packing slip that you can include with the shipment. See Printing Packing Slips on page 131.
Table 23 View Shipments
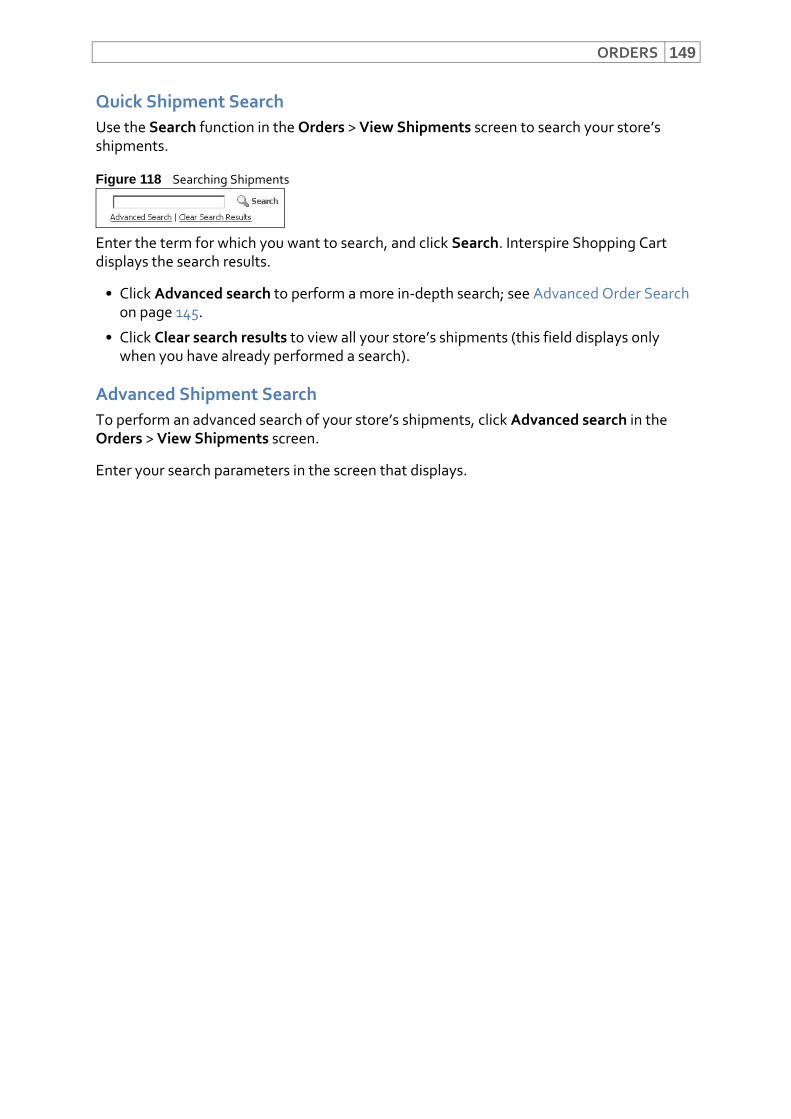
ORDERS 149
Quick Shipment SearchUse the Search function in the Orders > View Shipments screen to search your store’s shipments.
Figure 118 Searching Shipments
Enter the term for which you want to search, and click Search. Interspire Shopping Cart displays the search results.
• Click Advanced search to perform a more in‐depth search; see Advanced Order Search on page 145.
• Click Clear search results to view all your store’s shipments (this field displays only when you have already performed a search).
Advanced Shipment SearchTo perform an advanced search of your store’s shipments, click Advanced search in the Orders > View Shipments screen.
Enter your search parameters in the screen that displays.
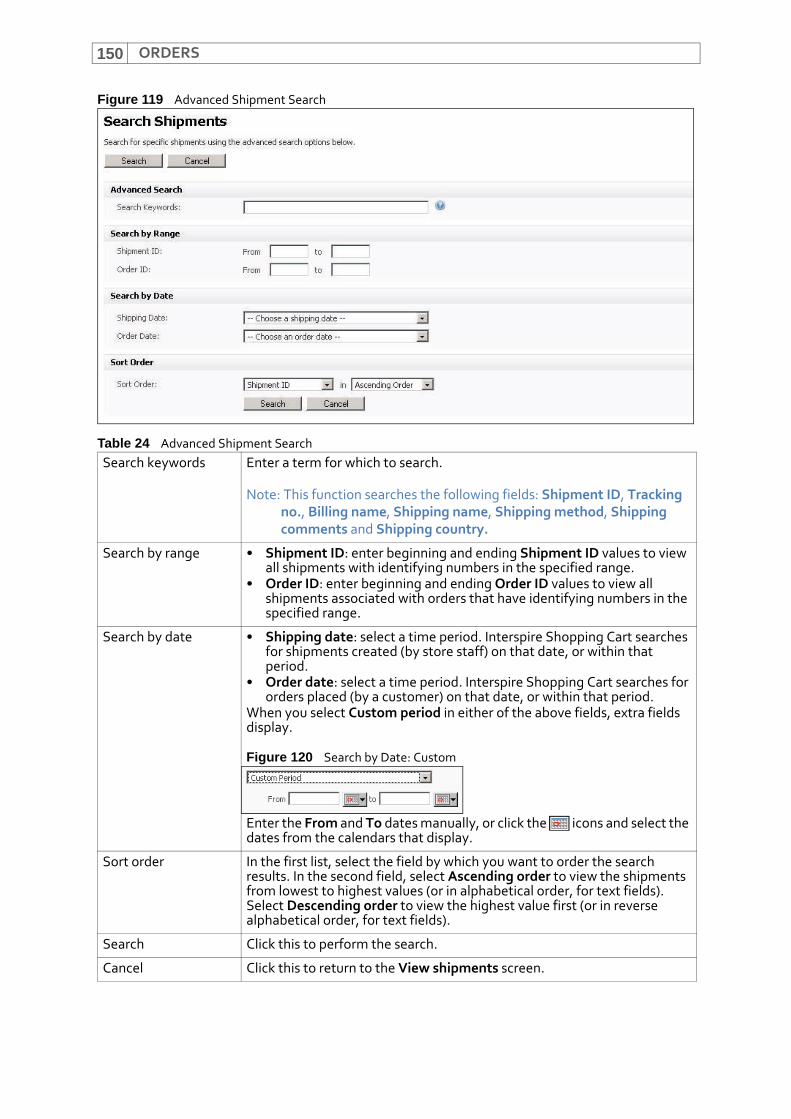
ORDERS150
Figure 119 Advanced Shipment Search
Table 24 Advanced Shipment SearchSearch keywords Enter a term for which to search.
Note: This function searches the following fields: Shipment ID, Tracking no., Billing name, Shipping name, Shipping method, Shipping comments and Shipping country.
Search by range • Shipment ID: enter beginning and ending Shipment ID values to view all shipments with identifying numbers in the specified range.
• Order ID: enter beginning and ending Order ID values to view all shipments associated with orders that have identifying numbers in the specified range.
Search by date • Shipping date: select a time period. Interspire Shopping Cart searches for shipments created (by store staff) on that date, or within that period.
• Order date: select a time period. Interspire Shopping Cart searches for orders placed (by a customer) on that date, or within that period.
When you select Custom period in either of the above fields, extra fields display.
Figure 120 Search by Date: Custom
Enter the From and To dates manually, or click the icons and select the dates from the calendars that display.
Sort order In the first list, select the field by which you want to order the search results. In the second field, select Ascending order to view the shipments from lowest to highest values (or in alphabetical order, for text fields). Select Descending order to view the highest value first (or in reverse alphabetical order, for text fields).
Search Click this to perform the search.
Cancel Click this to return to the View shipments screen.
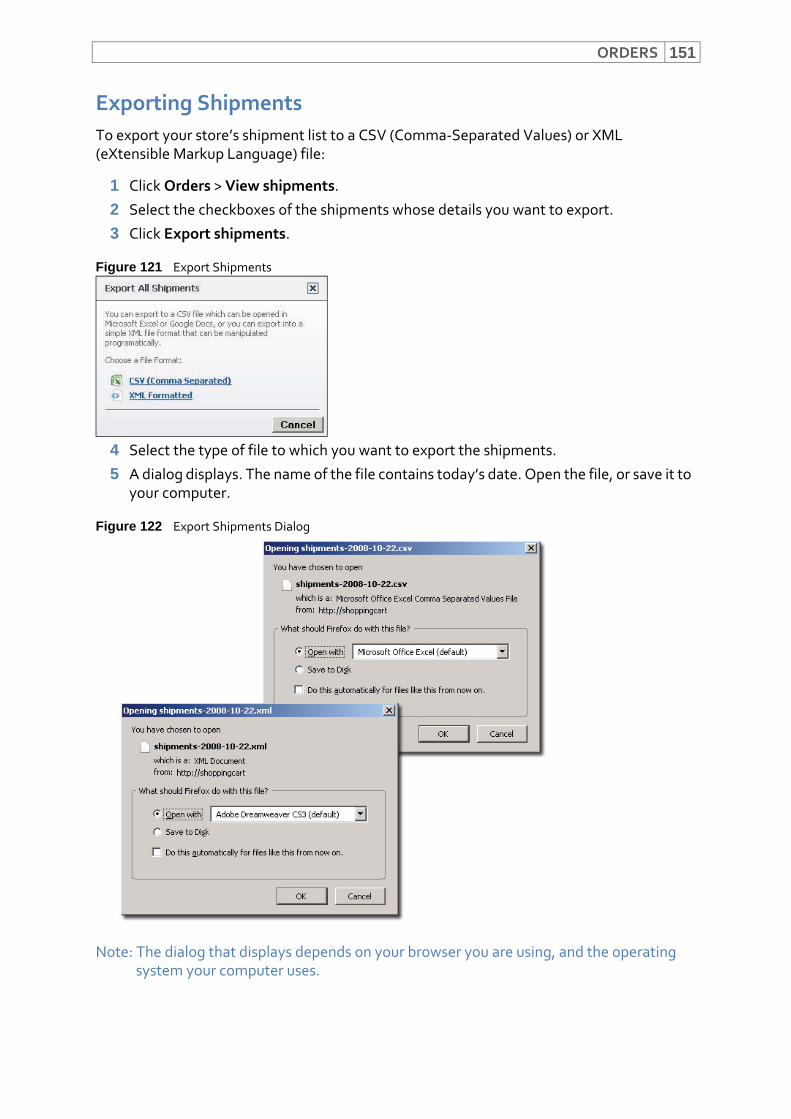
ORDERS 151
Exporting ShipmentsTo export your store’s shipment list to a CSV (Comma‐Separated Values) or XML (eXtensible Markup Language) file:
1 Click Orders > View shipments.
2 Select the checkboxes of the shipments whose details you want to export.
3 Click Export shipments.
Figure 121 Export Shipments
4 Select the type of file to which you want to export the shipments.
5 A dialog displays. The name of the file contains today’s date. Open the file, or save it to your computer.
Figure 122 Export Shipments Dialog
Note: The dialog that displays depends on your browser you are using, and the operating system your computer uses.
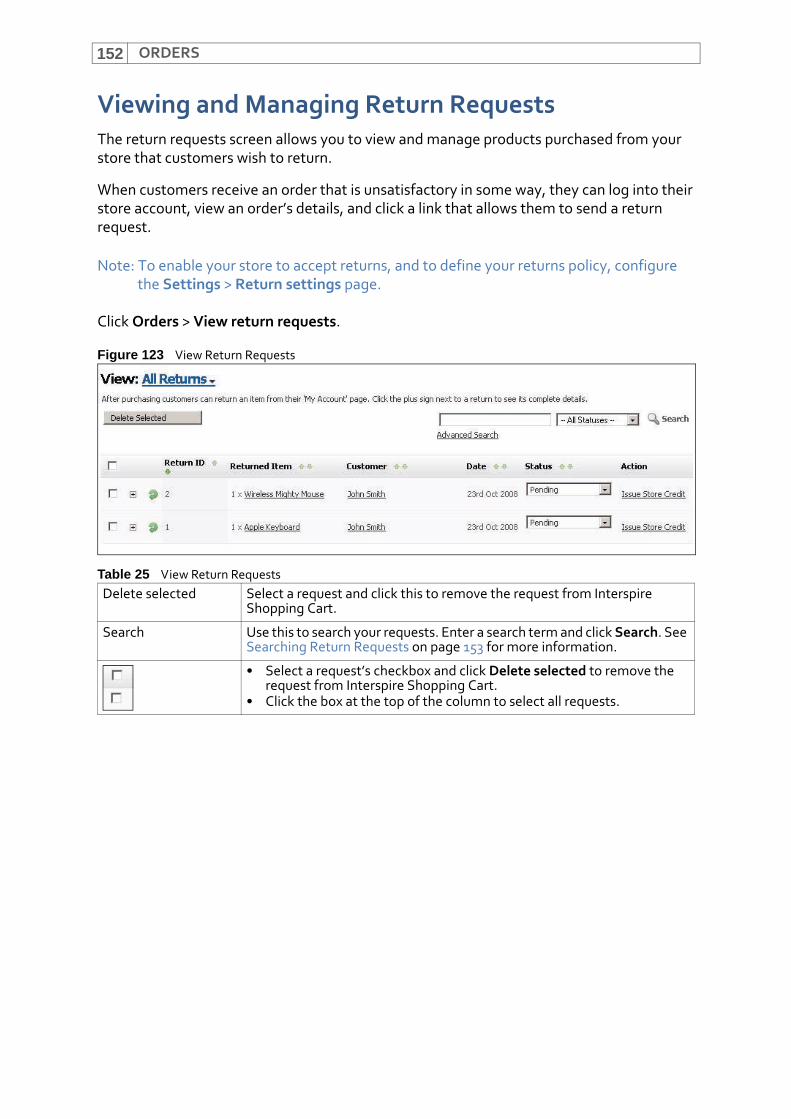
ORDERS152
Viewing and Managing Return RequestsThe return requests screen allows you to view and manage products purchased from your store that customers wish to return.
When customers receive an order that is unsatisfactory in some way, they can log into their store account, view an order’s details, and click a link that allows them to send a return request.
Note: To enable your store to accept returns, and to define your returns policy, configure the Settings > Return settings page.
Click Orders > View return requests.
Figure 123 View Return Requests
Table 25 View Return RequestsDelete selected Select a request and click this to remove the request from Interspire
Shopping Cart.
Search Use this to search your requests. Enter a search term and click Search. See Searching Return Requests on page 153 for more information.
• Select a request’s checkbox and click Delete selected to remove the request from Interspire Shopping Cart.
• Click the box at the top of the column to select all requests.
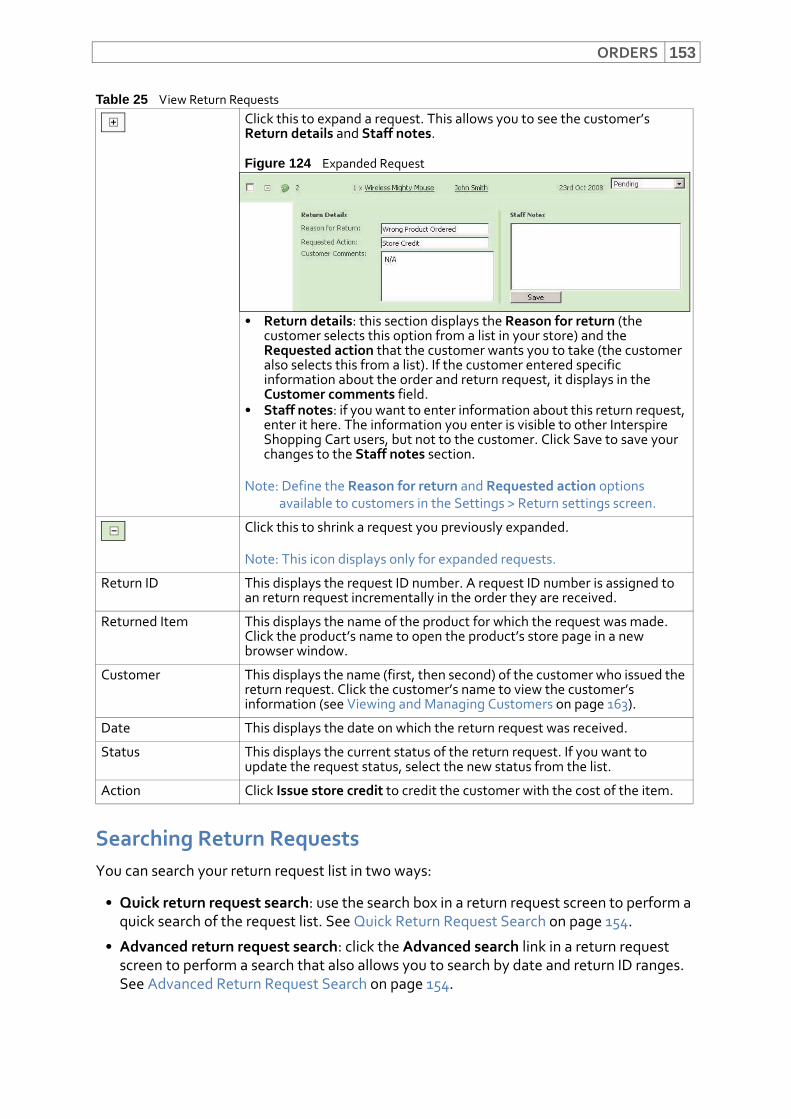
ORDERS 153
Searching Return RequestsYou can search your return request list in two ways:
• Quick return request search: use the search box in a return request screen to perform a quick search of the request list. See Quick Return Request Search on page 154.
• Advanced return request search: click the Advanced search link in a return request screen to perform a search that also allows you to search by date and return ID ranges. See Advanced Return Request Search on page 154.
Click this to expand a request. This allows you to see the customer’s Return details and Staff notes.
Figure 124 Expanded Request
• Return details: this section displays the Reason for return (the customer selects this option from a list in your store) and the Requested action that the customer wants you to take (the customer also selects this from a list). If the customer entered specific information about the order and return request, it displays in the Customer comments field.
• Staff notes: if you want to enter information about this return request, enter it here. The information you enter is visible to other Interspire Shopping Cart users, but not to the customer. Click Save to save your changes to the Staff notes section.
Note: Define the Reason for return and Requested action options available to customers in the Settings > Return settings screen.
Click this to shrink a request you previously expanded.
Note: This icon displays only for expanded requests.
Return ID This displays the request ID number. A request ID number is assigned to an return request incrementally in the order they are received.
Returned Item This displays the name of the product for which the request was made. Click the product’s name to open the product’s store page in a new browser window.
Customer This displays the name (first, then second) of the customer who issued the return request. Click the customer’s name to view the customer’s information (see Viewing and Managing Customers on page 163).
Date This displays the date on which the return request was received.
Status This displays the current status of the return request. If you want to update the request status, select the new status from the list.
Action Click Issue store credit to credit the customer with the cost of the item.
Table 25 View Return Requests
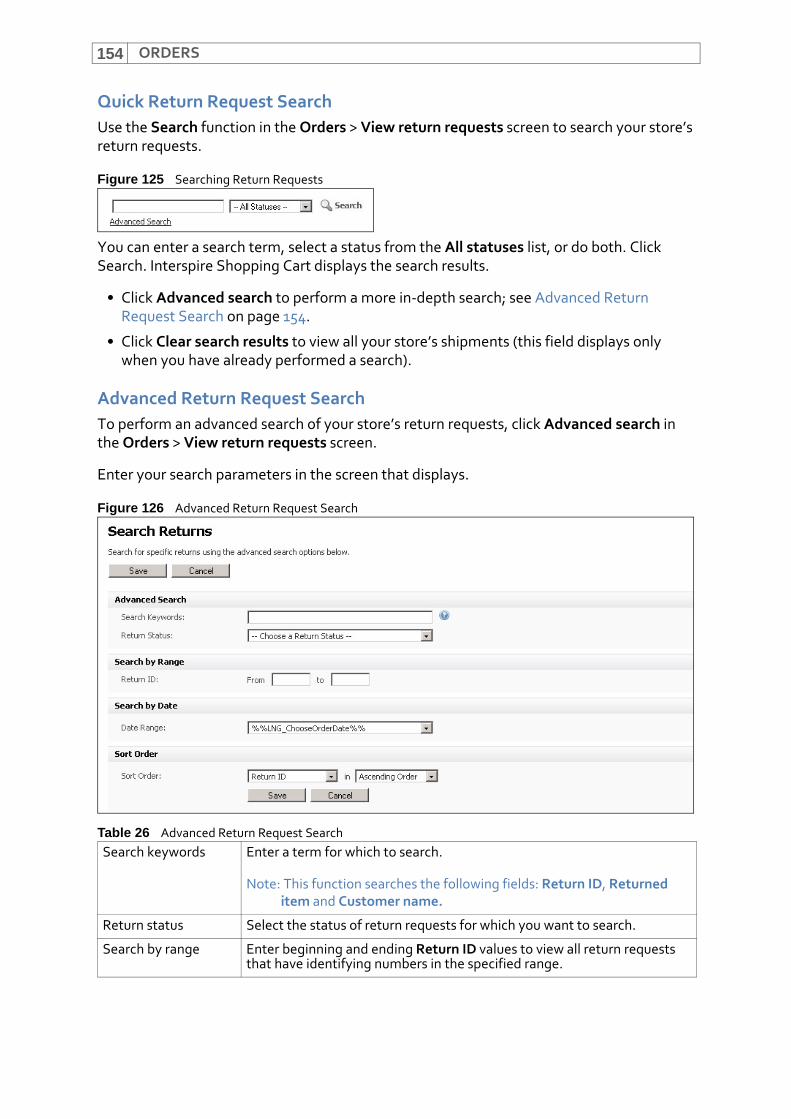
ORDERS154
Quick Return Request SearchUse the Search function in the Orders > View return requests screen to search your store’s return requests.
Figure 125 Searching Return Requests
You can enter a search term, select a status from the All statuses list, or do both. Click Search. Interspire Shopping Cart displays the search results.
• Click Advanced search to perform a more in‐depth search; see Advanced Return Request Search on page 154.
• Click Clear search results to view all your store’s shipments (this field displays only when you have already performed a search).
Advanced Return Request SearchTo perform an advanced search of your store’s return requests, click Advanced search in the Orders > View return requests screen.
Enter your search parameters in the screen that displays.
Figure 126 Advanced Return Request Search
Table 26 Advanced Return Request SearchSearch keywords Enter a term for which to search.
Note: This function searches the following fields: Return ID, Returned item and Customer name.
Return status Select the status of return requests for which you want to search.
Search by range Enter beginning and ending Return ID values to view all return requests that have identifying numbers in the specified range.
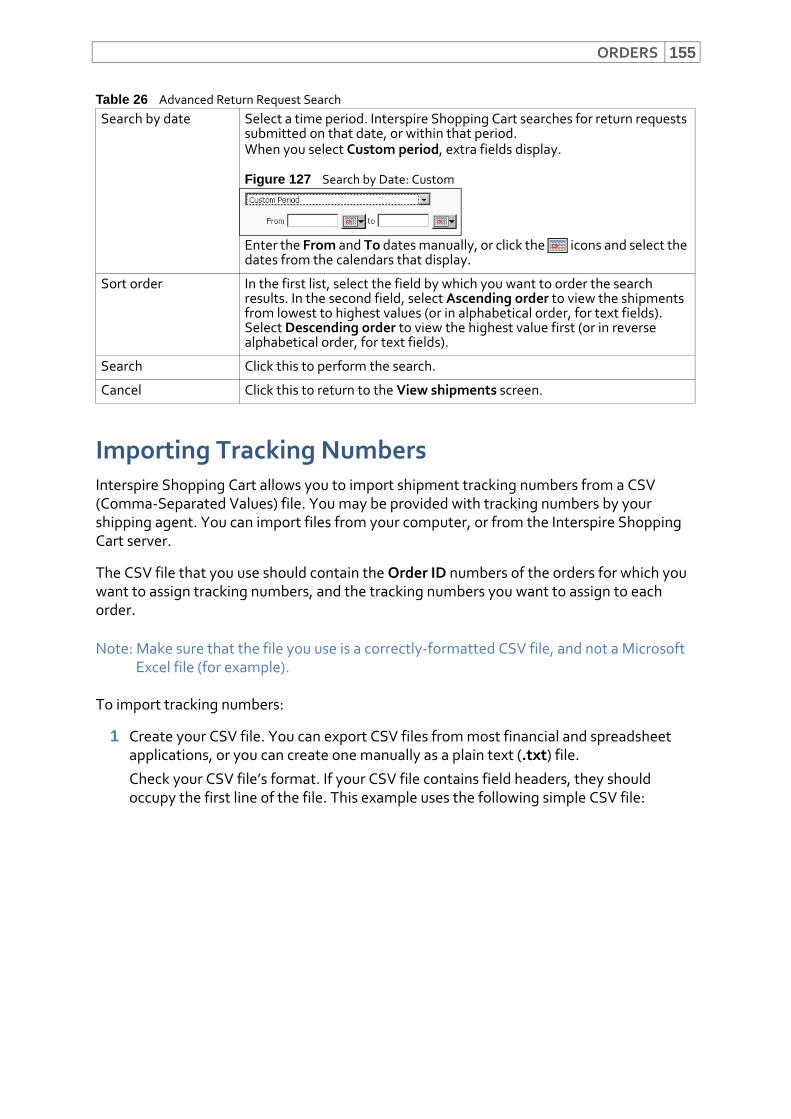
ORDERS 155
Importing Tracking NumbersInterspire Shopping Cart allows you to import shipment tracking numbers from a CSV (Comma‐Separated Values) file. You may be provided with tracking numbers by your shipping agent. You can import files from your computer, or from the Interspire Shopping Cart server.
The CSV file that you use should contain the Order ID numbers of the orders for which you want to assign tracking numbers, and the tracking numbers you want to assign to each order.
Note: Make sure that the file you use is a correctly‐formatted CSV file, and not a Microsoft Excel file (for example).
To import tracking numbers:
1 Create your CSV file. You can export CSV files from most financial and spreadsheet applications, or you can create one manually as a plain text (.txt) file.
Check your CSV file’s format. If your CSV file contains field headers, they should occupy the first line of the file. This example uses the following simple CSV file:
Search by date Select a time period. Interspire Shopping Cart searches for return requests submitted on that date, or within that period.When you select Custom period, extra fields display.
Figure 127 Search by Date: Custom
Enter the From and To dates manually, or click the icons and select the dates from the calendars that display.
Sort order In the first list, select the field by which you want to order the search results. In the second field, select Ascending order to view the shipments from lowest to highest values (or in alphabetical order, for text fields). Select Descending order to view the highest value first (or in reverse alphabetical order, for text fields).
Search Click this to perform the search.
Cancel Click this to return to the View shipments screen.
Table 26 Advanced Return Request Search
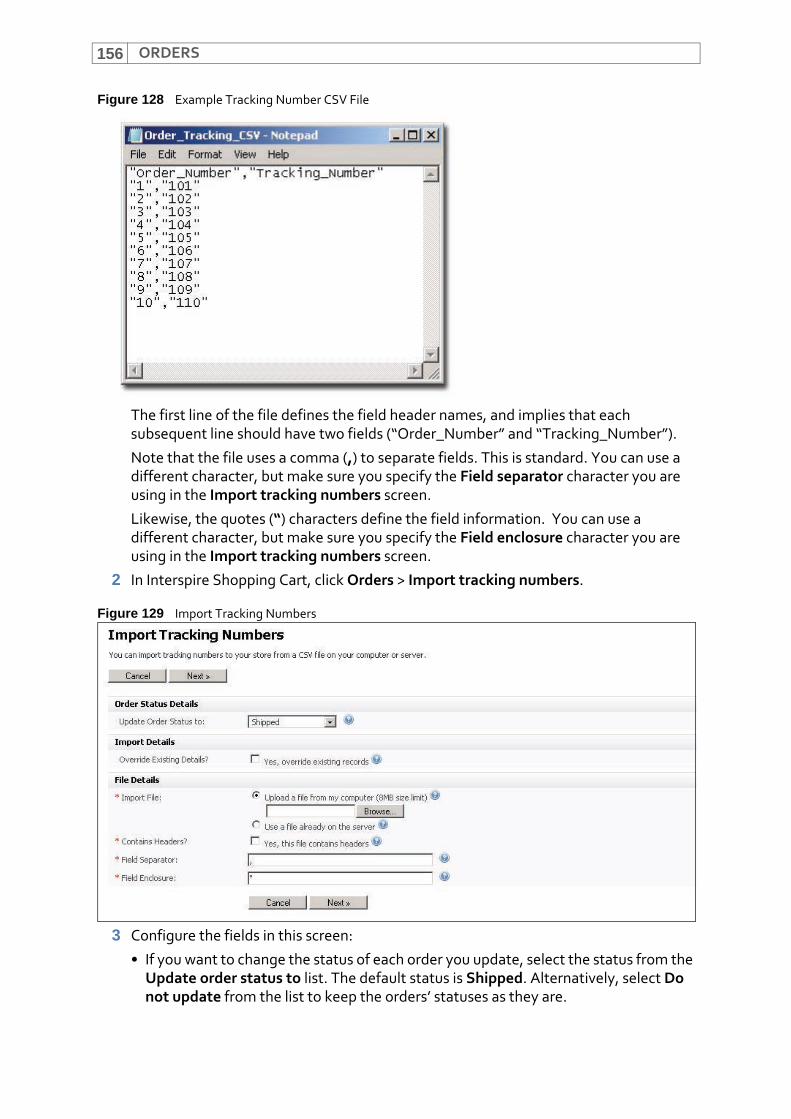
ORDERS156
Figure 128 Example Tracking Number CSV File
The first line of the file defines the field header names, and implies that each subsequent line should have two fields (“Order_Number” and “Tracking_Number”).
Note that the file uses a comma (,) to separate fields. This is standard. You can use a different character, but make sure you specify the Field separator character you are using in the Import tracking numbers screen.
Likewise, the quotes (“) characters define the field information. You can use a different character, but make sure you specify the Field enclosure character you are using in the Import tracking numbers screen.
2 In Interspire Shopping Cart, click Orders > Import tracking numbers.
Figure 129 Import Tracking Numbers
3 Configure the fields in this screen:
• If you want to change the status of each order you update, select the status from the Update order status to list. The default status is Shipped. Alternatively, select Do not update from the list to keep the orders’ statuses as they are.
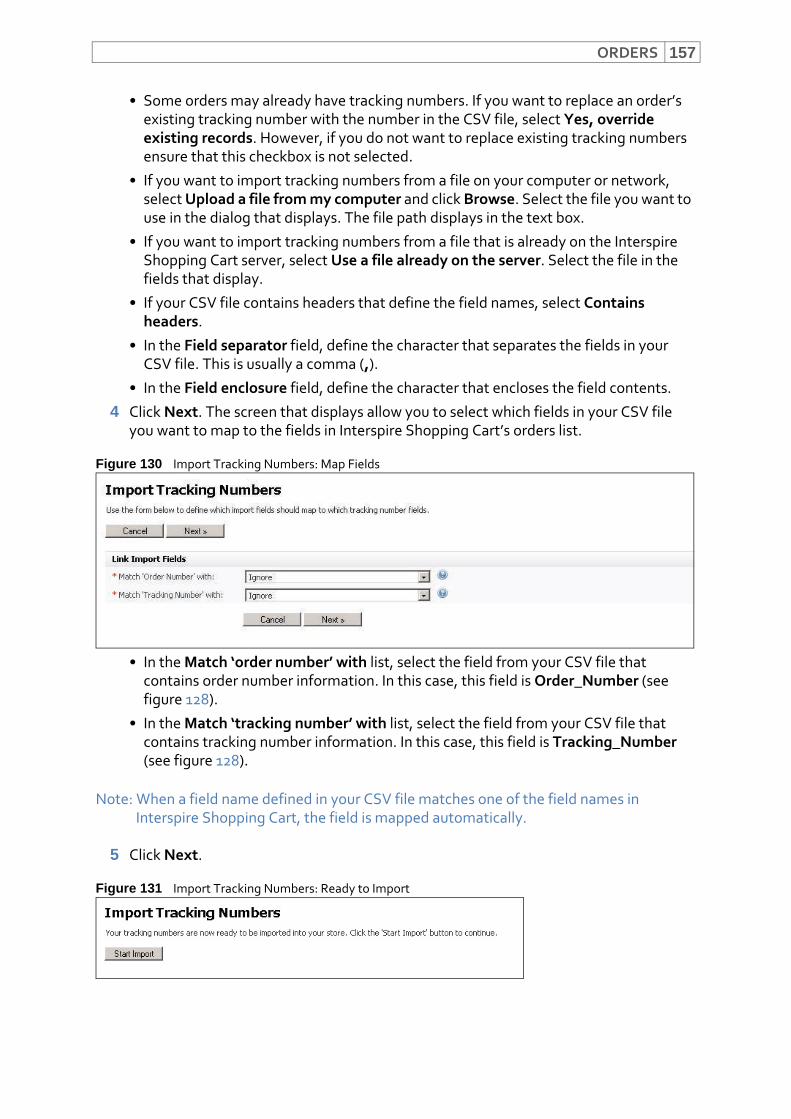
ORDERS 157
• Some orders may already have tracking numbers. If you want to replace an order’s existing tracking number with the number in the CSV file, select Yes, override existing records. However, if you do not want to replace existing tracking numbers ensure that this checkbox is not selected.
• If you want to import tracking numbers from a file on your computer or network, select Upload a file from my computer and click Browse. Select the file you want to use in the dialog that displays. The file path displays in the text box.
• If you want to import tracking numbers from a file that is already on the Interspire Shopping Cart server, select Use a file already on the server. Select the file in the fields that display.
• If your CSV file contains headers that define the field names, select Contains headers.
• In the Field separator field, define the character that separates the fields in your CSV file. This is usually a comma (,).
• In the Field enclosure field, define the character that encloses the field contents.
4 Click Next. The screen that displays allow you to select which fields in your CSV file you want to map to the fields in Interspire Shopping Cart’s orders list.
Figure 130 Import Tracking Numbers: Map Fields
• In the Match ‘order number’ with list, select the field from your CSV file that contains order number information. In this case, this field is Order_Number (see figure 128).
• In the Match ‘tracking number’ with list, select the field from your CSV file that contains tracking number information. In this case, this field is Tracking_Number (see figure 128).
Note: When a field name defined in your CSV file matches one of the field names in Interspire Shopping Cart, the field is mapped automatically.
5 Click Next.
Figure 131 Import Tracking Numbers: Ready to Import
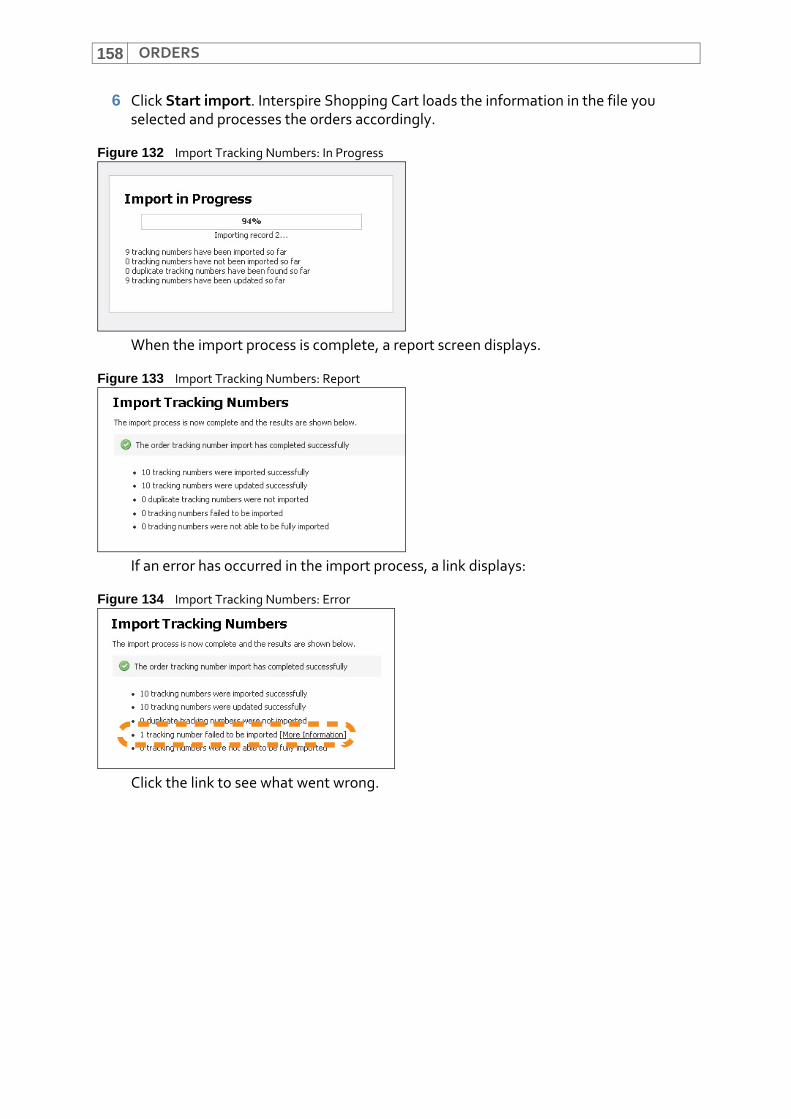
ORDERS158
6 Click Start import. Interspire Shopping Cart loads the information in the file you selected and processes the orders accordingly.
Figure 132 Import Tracking Numbers: In Progress
When the import process is complete, a report screen displays.
Figure 133 Import Tracking Numbers: Report
If an error has occurred in the import process, a link displays:
Figure 134 Import Tracking Numbers: Error
Click the link to see what went wrong.
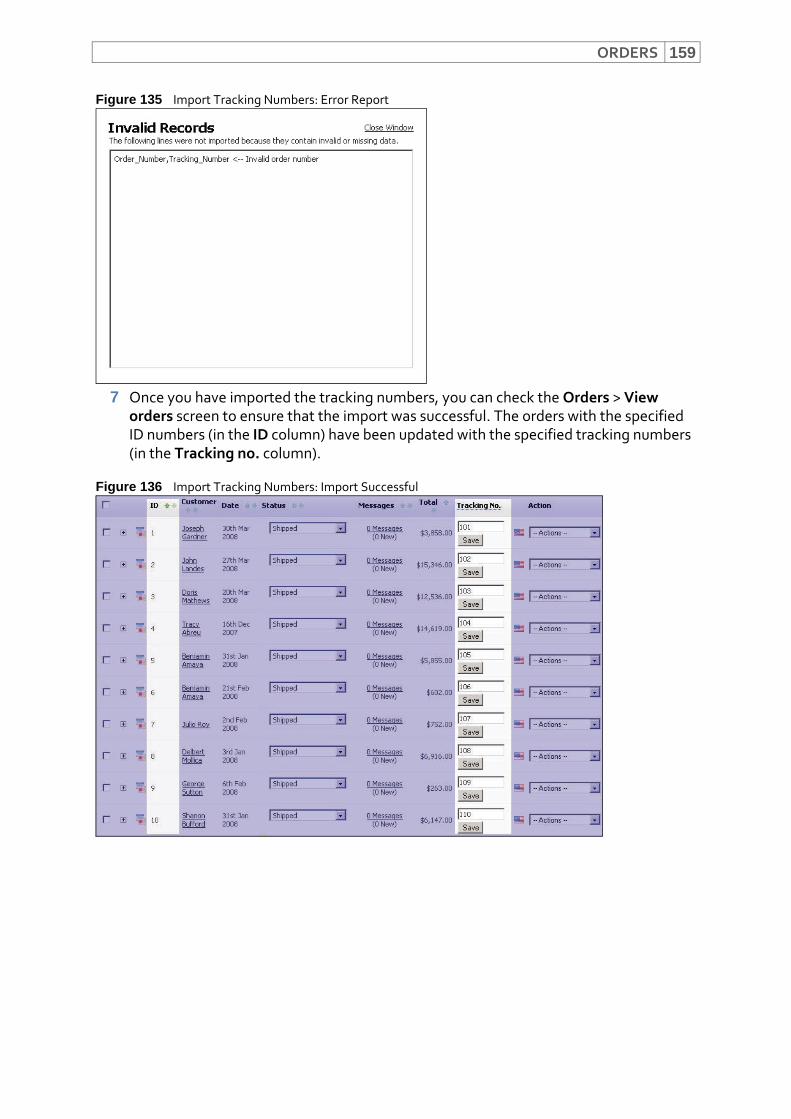
ORDERS 159
Figure 135 Import Tracking Numbers: Error Report
7 Once you have imported the tracking numbers, you can check the Orders > View orders screen to ensure that the import was successful. The orders with the specified ID numbers (in the ID column) have been updated with the specified tracking numbers (in the Tracking no. column).
Figure 136 Import Tracking Numbers: Import Successful

ORDERS160
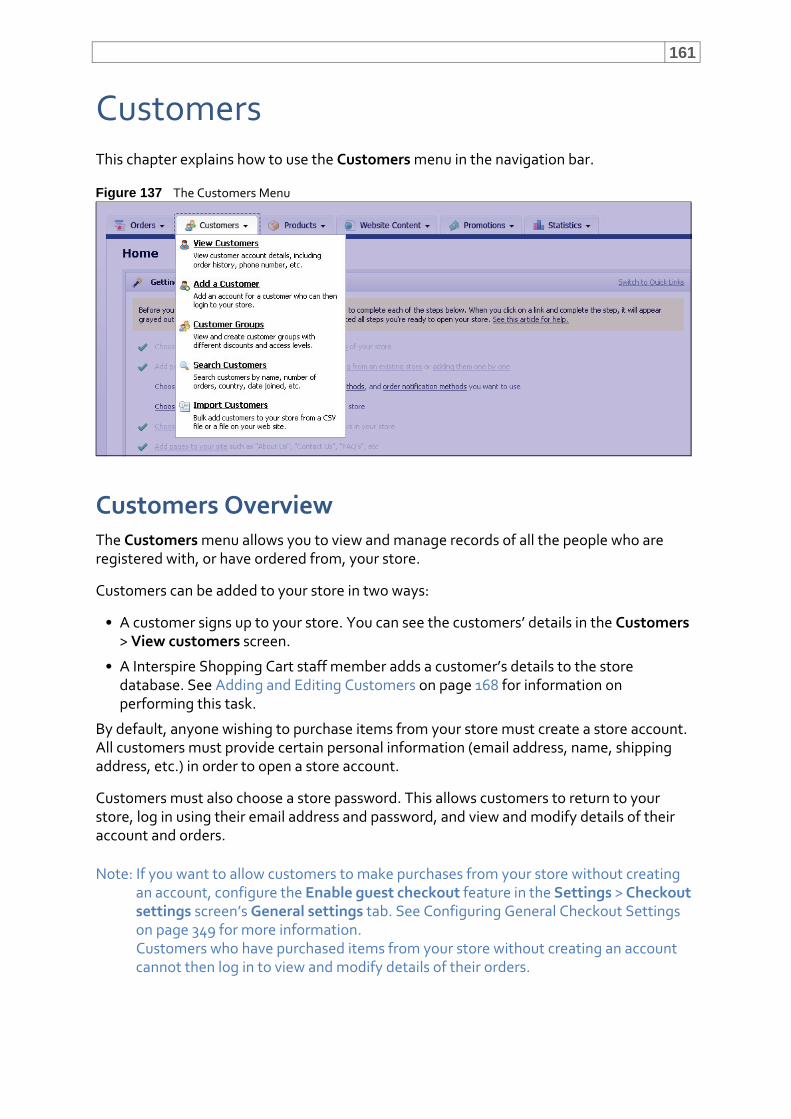
161
CustomersThis chapter explains how to use the Customers menu in the navigation bar.
Figure 137 The Customers Menu
Customers OverviewThe Customers menu allows you to view and manage records of all the people who are registered with, or have ordered from, your store.
Customers can be added to your store in two ways:
• A customer signs up to your store. You can see the customers’ details in the Customers > View customers screen.
• A Interspire Shopping Cart staff member adds a customer’s details to the store database. See Adding and Editing Customers on page 168 for information on performing this task.
By default, anyone wishing to purchase items from your store must create a store account. All customers must provide certain personal information (email address, name, shipping address, etc.) in order to open a store account.
Customers must also choose a store password. This allows customers to return to your store, log in using their email address and password, and view and modify details of their account and orders.
Note: If you want to allow customers to make purchases from your store without creating an account, configure the Enable guest checkout feature in the Settings > Checkout settings screen’s General settings tab. See Configuring General Checkout Settings on page 349 for more information. Customers who have purchased items from your store without creating an account cannot then log in to view and modify details of their orders.
CUSTOMERS162
The Customers menu allows you to perform a wide variety of customer‐related tasks, including:
• Viewing, searching and editing details of your store’s customers.
• Manually adding customer information (you may want to do this for telephone orders, for example).
• Creating customer groups, and assigning customers to groups. See Customer Groups on page 162.
• Uploading customer information in bulk via CSV file.
Customer GroupsCustomer groups allow you to extend special privileges to customers you place in the group. When you create a group, you can specify its special privileges and then place customers in the group. For example, you can create a group of “favorite customers” and offer them a 10% discount on all items in your store.
You can also limit certain product categories to customers who you place in a specific group. For example, in order to meet local legal regulations the owner of an online tactical military equipment store might need to reserve certain items for sale to currently‐serving military and law enforcement personnel only. To do this, whilst allowing anyone to purchase the other items in the store, the store owner would take the following steps:
1 Create store categories and subcategories, and arrange his products accordingly. For example:
2 Create a user group called “All customers” into which new customers are placed by default. Allow group members to see only the All customers category, and all subcategories.
Table 27 Example Store Categories
CATEGORY: SUBCATEGORY:
All Customers
Load‐carrying equipment
Clothing
Footwear
Eyewear
Survival equipment
Unrestricted weapon accessories
Current Only
Restricted weapon accessories
Uniform items
Body armor
CUSTOMERS 163
3 Create a second user group called “Current only” and allow group members to see items in the All customers category, and all subcategories, and also items in the Current only category, and all subcategories.
4 Create a new web page entitled “Items available to current military / law enforcement personnel only” which lists the items available but does not provide the opportunity to purchase them. The web page also contains instructions for eligible personnel to fax or email scanned copies of their service ID to the store for verification prior to purchase.
5 When a military or law enforcement ID is faxed or emailed to the store, the store owner moves the identified individual’s account into the “Current only” customer group, or creates a new customer entry in the group if the individual does not already possess one.
6 The store owner then emails the identified individual, stating that the individual is free to purchase restricted items from the store. The next time the individual logs in to the store, the restricted items are visible and available for sale.
To encourage more military and law enforcement personnel to the store, the store owner could also apply a percentage discount available only to identified personnel by modifying the storewide discount available to members of the “Current only” customer group.
Remember that the process above does NOT hide products or categories from all but the selected users. All products are visible to users who are not logged in, or who do not have accounts. Only when customers are logged in are they unable to see the categories and products that they may not purchase.
For this reason, if you want to restrict products and categories it is important that:
• You do not allow guest orders. Ensure that only registered customers may purchase products from your store.
• You clearly identify the items that are not available to all customers. Otherwise, customers who are unable to order restricted items will assume that your store is malfunctioning.
• If you provide a means for a customer to move from one customer group to another, ensure that customers are aware of how to do so, and what they can expect having done so.
Viewing and Managing CustomersTo view or manage existing customers of your store, click Customers in the navigation bar. Select View customers.
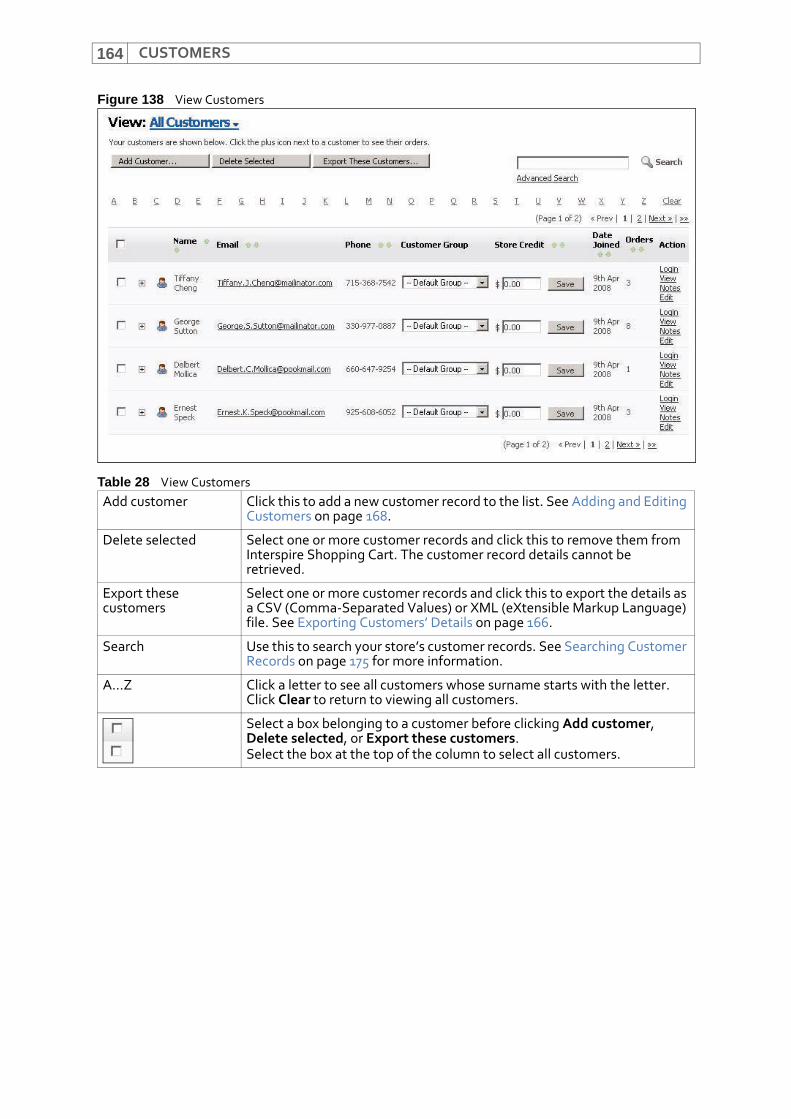
CUSTOMERS164
Figure 138 View Customers
Table 28 View CustomersAdd customer Click this to add a new customer record to the list. See Adding and Editing
Customers on page 168.
Delete selected Select one or more customer records and click this to remove them from Interspire Shopping Cart. The customer record details cannot be retrieved.
Export these customers
Select one or more customer records and click this to export the details as a CSV (Comma‐Separated Values) or XML (eXtensible Markup Language) file. See Exporting Customers’ Details on page 166.
Search Use this to search your store’s customer records. See Searching Customer Records on page 175 for more information.
A...Z Click a letter to see all customers whose surname starts with the letter. Click Clear to return to viewing all customers.
Select a box belonging to a customer before clicking Add customer, Delete selected, or Export these customers.Select the box at the top of the column to select all customers.
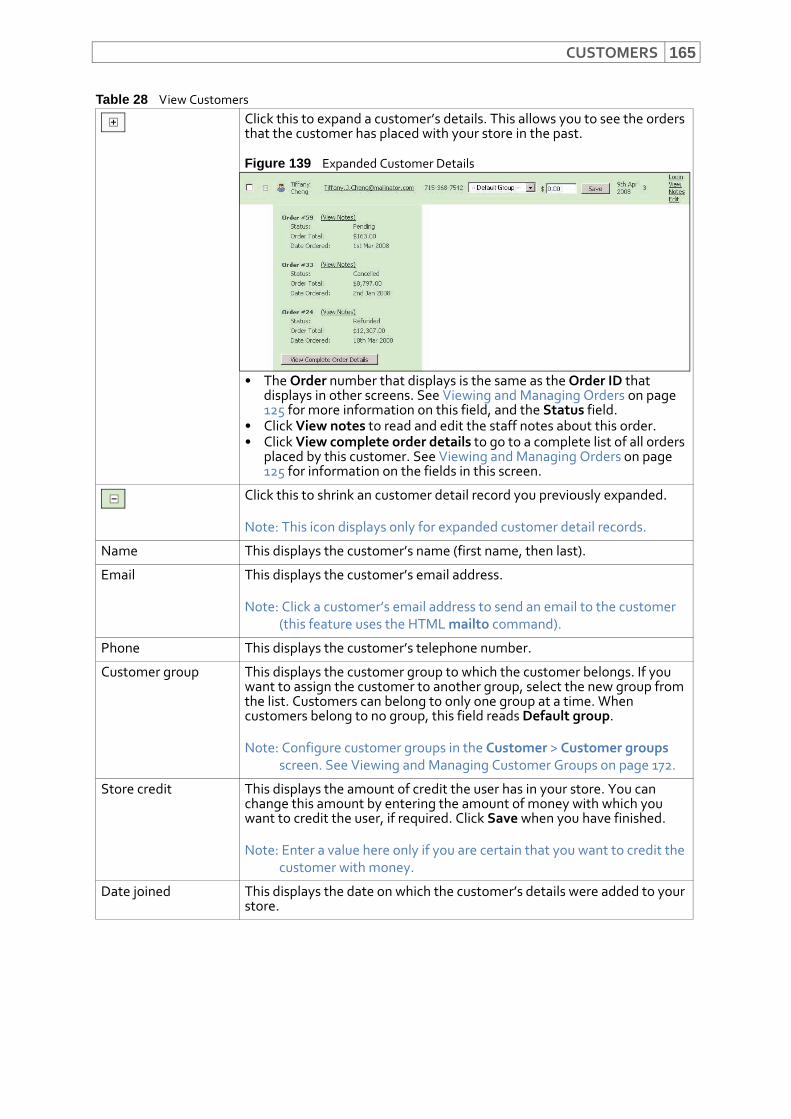
CUSTOMERS 165
Click this to expand a customer’s details. This allows you to see the orders that the customer has placed with your store in the past.
Figure 139 Expanded Customer Details
• The Order number that displays is the same as the Order ID that displays in other screens. See Viewing and Managing Orders on page 125 for more information on this field, and the Status field.
• Click View notes to read and edit the staff notes about this order.• Click View complete order details to go to a complete list of all orders
placed by this customer. See Viewing and Managing Orders on page 125 for information on the fields in this screen.
Click this to shrink an customer detail record you previously expanded.
Note: This icon displays only for expanded customer detail records.
Name This displays the customer’s name (first name, then last).
Email This displays the customer’s email address.
Note: Click a customer’s email address to send an email to the customer (this feature uses the HTML mailto command).
Phone This displays the customer’s telephone number.
Customer group This displays the customer group to which the customer belongs. If you want to assign the customer to another group, select the new group from the list. Customers can belong to only one group at a time. When customers belong to no group, this field reads Default group.
Note: Configure customer groups in the Customer > Customer groups screen. See Viewing and Managing Customer Groups on page 172.
Store credit This displays the amount of credit the user has in your store. You can change this amount by entering the amount of money with which you want to credit the user, if required. Click Save when you have finished.
Note: Enter a value here only if you are certain that you want to credit the customer with money.
Date joined This displays the date on which the customer’s details were added to your store.
Table 28 View Customers
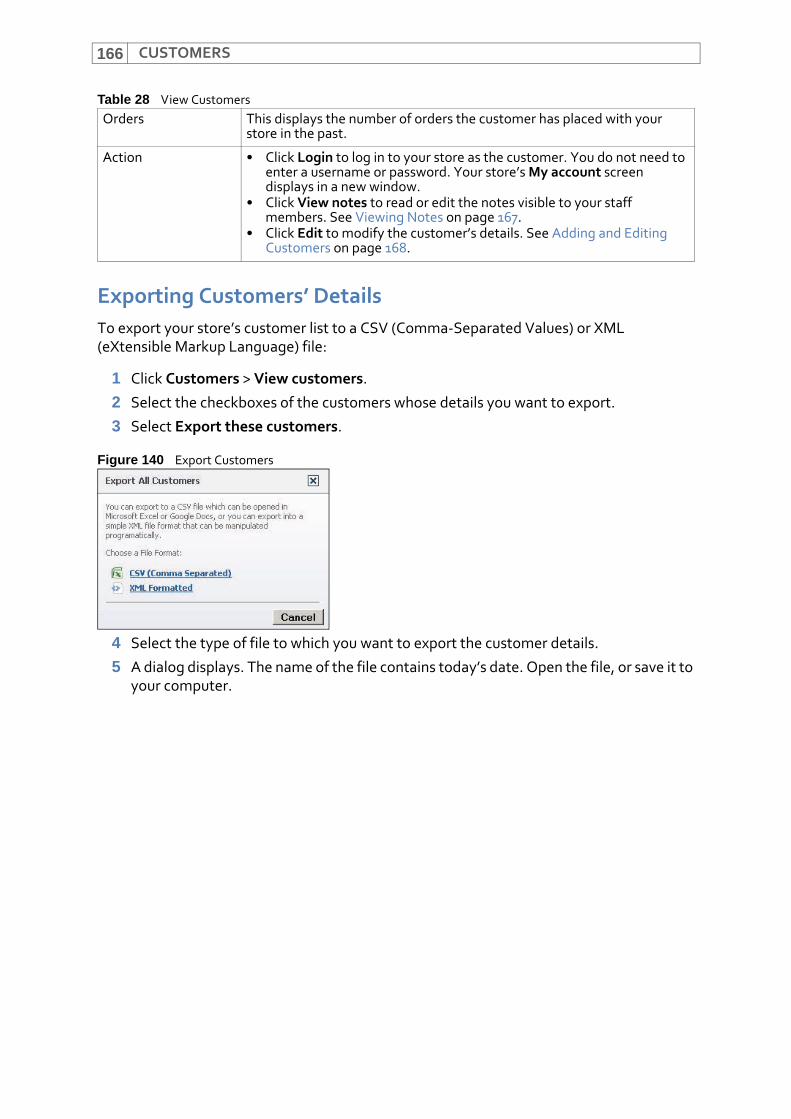
CUSTOMERS166
Exporting Customers’ DetailsTo export your store’s customer list to a CSV (Comma‐Separated Values) or XML (eXtensible Markup Language) file:
1 Click Customers > View customers.
2 Select the checkboxes of the customers whose details you want to export.
3 Select Export these customers.
Figure 140 Export Customers
4 Select the type of file to which you want to export the customer details.
5 A dialog displays. The name of the file contains today’s date. Open the file, or save it to your computer.
Orders This displays the number of orders the customer has placed with your store in the past.
Action • Click Login to log in to your store as the customer. You do not need to enter a username or password. Your store’s My account screen displays in a new window.
• Click View notes to read or edit the notes visible to your staff members. See Viewing Notes on page 167.
• Click Edit to modify the customer’s details. See Adding and Editing Customers on page 168.
Table 28 View Customers
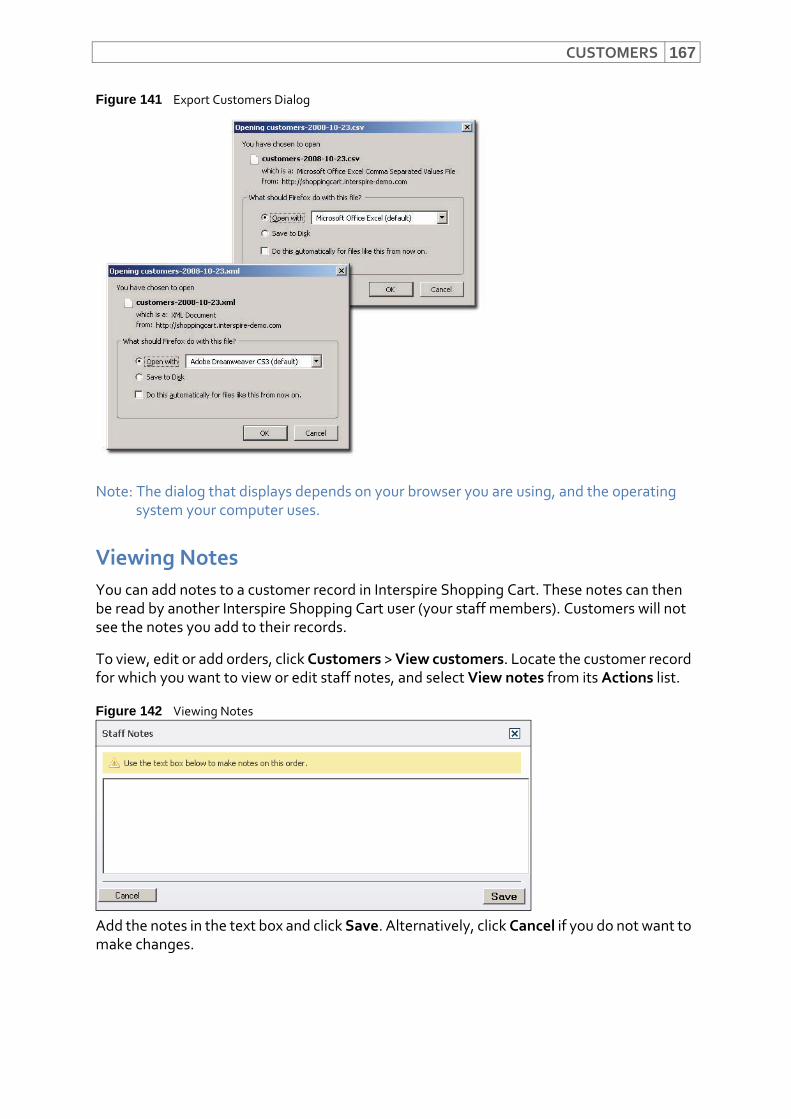
CUSTOMERS 167
Figure 141 Export Customers Dialog
Note: The dialog that displays depends on your browser you are using, and the operating system your computer uses.
Viewing NotesYou can add notes to a customer record in Interspire Shopping Cart. These notes can then be read by another Interspire Shopping Cart user (your staff members). Customers will not see the notes you add to their records.
To view, edit or add orders, click Customers > View customers. Locate the customer record for which you want to view or edit staff notes, and select View notes from its Actions list.
Figure 142 Viewing Notes
Add the notes in the text box and click Save. Alternatively, click Cancel if you do not want to make changes.

CUSTOMERS168
Adding and Editing CustomersTo add a customer to your store’s database, click Customers > Add a customer.
To edit a customer’s details, click the customer’s Edit link in the Customers > View customers screen.
There are two tabs in the Add a customer screen. First, configure the Customer details tab (see Customer Details on page 168), then configure the Customer address book tab, if required.
Note: You must save a customer’s details (in the Customer details tab) before configuring the Customer address book tab.
Customer DetailsUse this tab to configure a customer’s personal details, and the email address and password used to identify the customer in your store.
Figure 143 Add a Customer: Customer Details
Table 29 Add a Customer: Customer DetailsFirst name Enter the customer’s first name.
Last name Enter the customer’s surname.
Company name Enter the name of the customer’s business, if required.
Email address Enter the customer’s email address.
Note: The customer’s email address is also used as the customer’s store username.
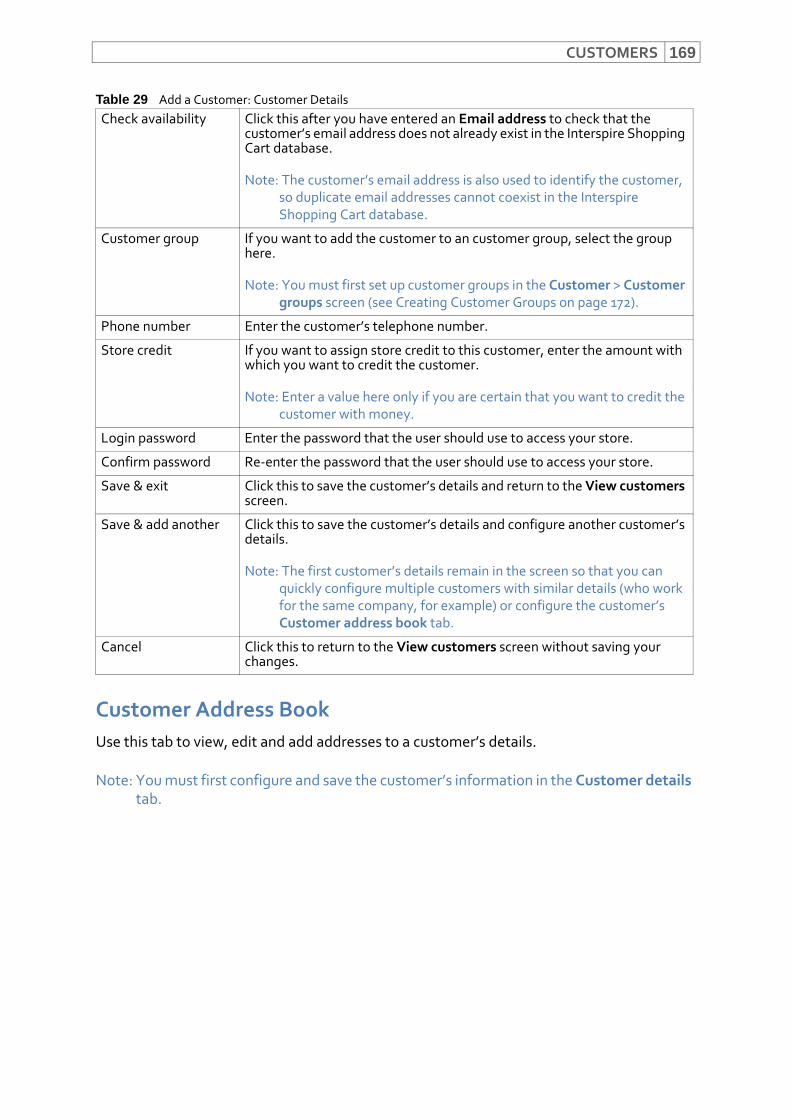
CUSTOMERS 169
Customer Address BookUse this tab to view, edit and add addresses to a customer’s details.
Note: You must first configure and save the customer’s information in the Customer details tab.
Check availability Click this after you have entered an Email address to check that the customer’s email address does not already exist in the Interspire Shopping Cart database.
Note: The customer’s email address is also used to identify the customer, so duplicate email addresses cannot coexist in the Interspire Shopping Cart database.
Customer group If you want to add the customer to an customer group, select the group here.
Note: You must first set up customer groups in the Customer > Customer groups screen (see Creating Customer Groups on page 172).
Phone number Enter the customer’s telephone number.
Store credit If you want to assign store credit to this customer, enter the amount with which you want to credit the customer.
Note: Enter a value here only if you are certain that you want to credit the customer with money.
Login password Enter the password that the user should use to access your store.
Confirm password Re‐enter the password that the user should use to access your store.
Save & exit Click this to save the customer’s details and return to the View customers screen.
Save & add another Click this to save the customer’s details and configure another customer’s details.
Note: The first customer’s details remain in the screen so that you can quickly configure multiple customers with similar details (who work for the same company, for example) or configure the customer’s Customer address book tab.
Cancel Click this to return to the View customers screen without saving your changes.
Table 29 Add a Customer: Customer Details
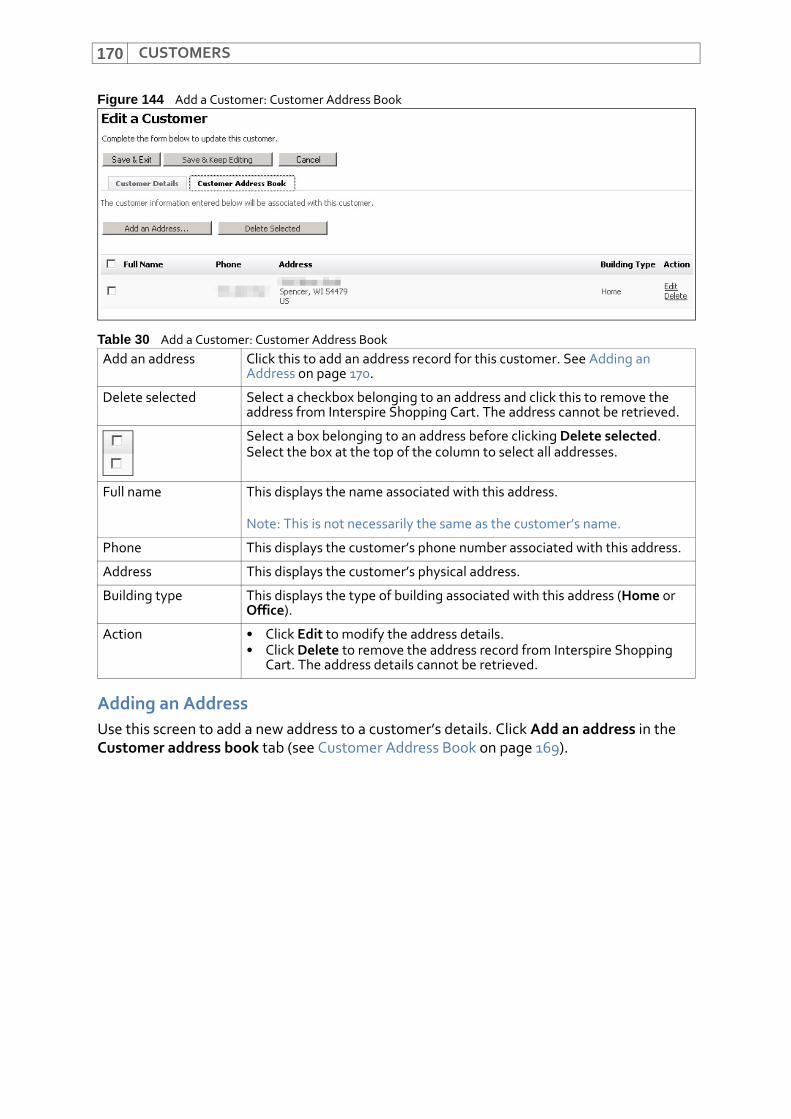
CUSTOMERS170
Figure 144 Add a Customer: Customer Address Book
Adding an AddressUse this screen to add a new address to a customer’s details. Click Add an address in the Customer address book tab (see Customer Address Book on page 169).
Table 30 Add a Customer: Customer Address BookAdd an address Click this to add an address record for this customer. See Adding an
Address on page 170.
Delete selected Select a checkbox belonging to an address and click this to remove the address from Interspire Shopping Cart. The address cannot be retrieved.
Select a box belonging to an address before clicking Delete selected.Select the box at the top of the column to select all addresses.
Full name This displays the name associated with this address.
Note: This is not necessarily the same as the customer’s name.
Phone This displays the customer’s phone number associated with this address.
Address This displays the customer’s physical address.
Building type This displays the type of building associated with this address (Home or Office).
Action • Click Edit to modify the address details.• Click Delete to remove the address record from Interspire Shopping
Cart. The address details cannot be retrieved.
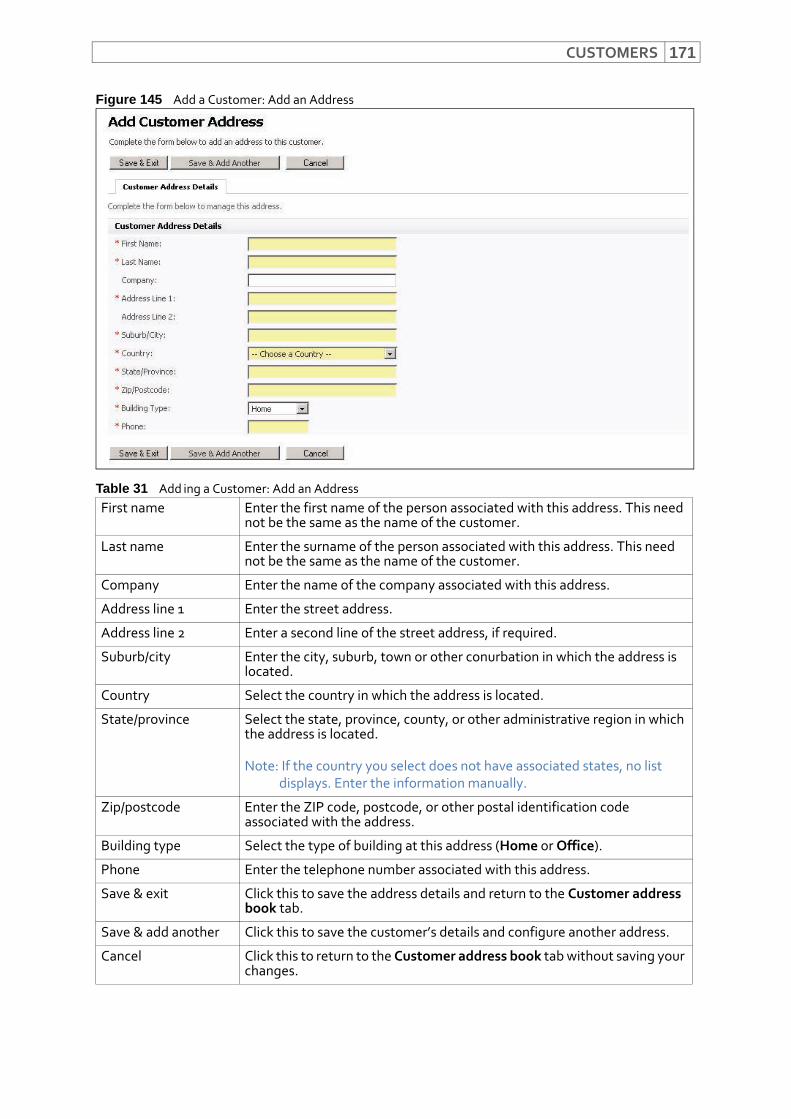
CUSTOMERS 171
Figure 145 Add a Customer: Add an Address
Table 31 Add ing a Customer: Add an AddressFirst name Enter the first name of the person associated with this address. This need
not be the same as the name of the customer.
Last name Enter the surname of the person associated with this address. This need not be the same as the name of the customer.
Company Enter the name of the company associated with this address.
Address line 1 Enter the street address.
Address line 2 Enter a second line of the street address, if required.
Suburb/city Enter the city, suburb, town or other conurbation in which the address is located.
Country Select the country in which the address is located.
State/province Select the state, province, county, or other administrative region in which the address is located.
Note: If the country you select does not have associated states, no list displays. Enter the information manually.
Zip/postcode Enter the ZIP code, postcode, or other postal identification code associated with the address.
Building type Select the type of building at this address (Home or Office).
Phone Enter the telephone number associated with this address.
Save & exit Click this to save the address details and return to the Customer address book tab.
Save & add another Click this to save the customer’s details and configure another address.
Cancel Click this to return to the Customer address book tab without saving your changes.

CUSTOMERS172
Viewing and Managing Customer GroupsUse customer groups to create and manage discounts and offers that apply to some customers but not others. Assign a customer to a customer group to allow the customer to take advantage of the discount or special offer that you define for the group. You can also restrict access to web pages, so that only customers belonging to certain groups can view the pages.
Note: Assign customers to customer groups in the Customers > View customers screen, the Customers > Add a customer screen, or the Orders > Add order screen’s New customer tab.
Click Customers > Customer groups.
Figure 146 Customer Groups
Creating Customer GroupsTo create a customer group:
1 Click Customers > Customer groups.
Table 32 Customer GroupsCreate a customer group
Click this to define a new customer group. See Creating Customer Groups on page 172.
Delete selected Select a checkbox belonging to a customer group and click this to remove the customer group from Interspire Shopping Cart. The group’s configuration and membership information cannot be retrieved.
Select a box belonging to an address before clicking Delete selected.Select the box at the top of the column to select all addresses.
Group name This displays the name you assign to the group.
Storewide discount This displays the discount available to members of the group on all products in your store.
Discount rules This displays the number of discount rules available to members of this group on specific products, and categories of products.
Customers in group This displays the number of customers associated with the group. When a group contains customers, click its View link to see a list of the group members (see Viewing and Managing Customers on page 163).
Action Click Edit to modify the group’s configuration. See Creating Customer Groups on page 172.
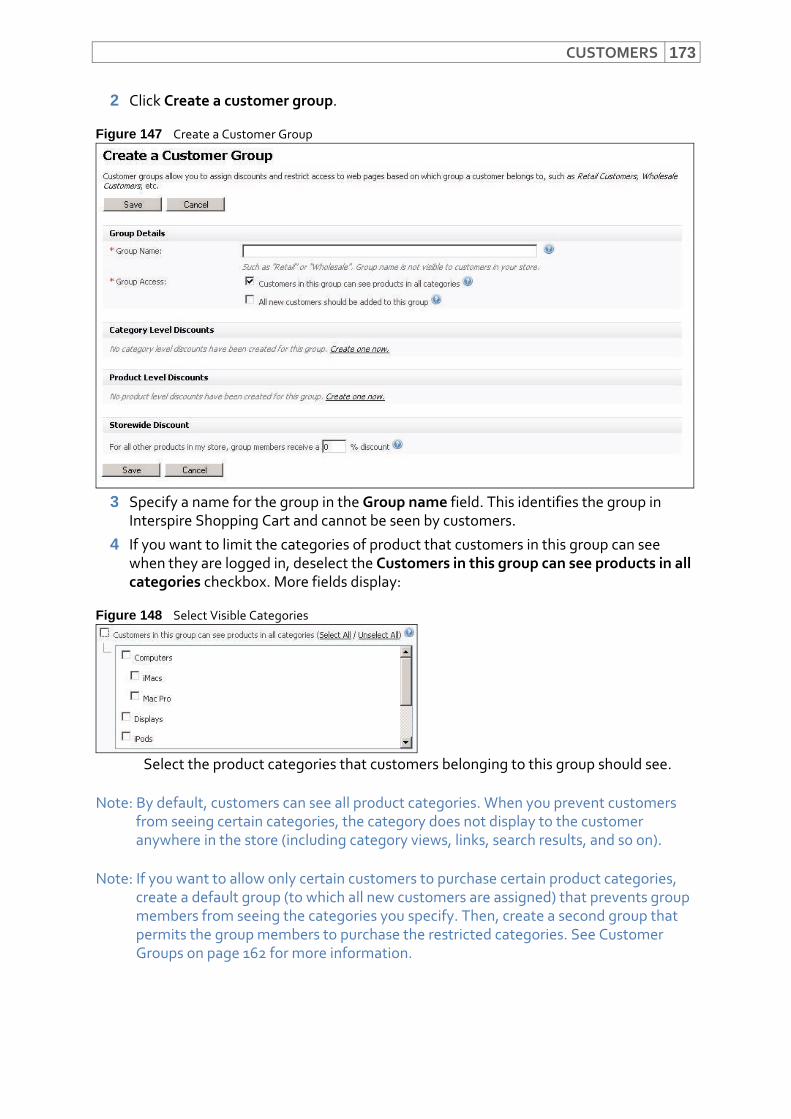
CUSTOMERS 173
2 Click Create a customer group.
Figure 147 Create a Customer Group
3 Specify a name for the group in the Group name field. This identifies the group in Interspire Shopping Cart and cannot be seen by customers.
4 If you want to limit the categories of product that customers in this group can see when they are logged in, deselect the Customers in this group can see products in all categories checkbox. More fields display:
Figure 148 Select Visible Categories
Select the product categories that customers belonging to this group should see.
Note: By default, customers can see all product categories. When you prevent customers from seeing certain categories, the category does not display to the customer anywhere in the store (including category views, links, search results, and so on).
Note: If you want to allow only certain customers to purchase certain product categories, create a default group (to which all new customers are assigned) that prevents group members from seeing the categories you specify. Then, create a second group that permits the group members to purchase the restricted categories. See Customer Groups on page 162 for more information.

CUSTOMERS174
5 If you want to create discounts for certain product categories, available to members of this group, click Create one now in the Category level discounts section.
Figure 149 Category Level Discount Configuration
• Select the product category for which you want to provide a discount in the Choose a category list.
• Enter the percentage discount for members of this group in the % field.
• Choose the categories for which to apply this discount. Select Products in this category only to apply the discount only to products in the specified category, and not to products in sub‐categories. Alternatively, if you want to apply the discount to products in the specified product category and all products in its sub‐categories, select Products in this category and all subcategories.
• Click the icon to add another category level discount rule for this customer group.
• Click the icon to remove the category level discount rule.
6 If you want to create discounts for certain products, available to members of this group, click Create one now in the Product level discounts section.
Figure 150 Product Level Discount Configuration
• To select a product, click the this product link.
Figure 151 Product Level Discount: Select Products
• Either select a category in the Search by category section, or enter a product name in the Search by product name field and hit RETURN. Select a product from the list that displays and click Select.
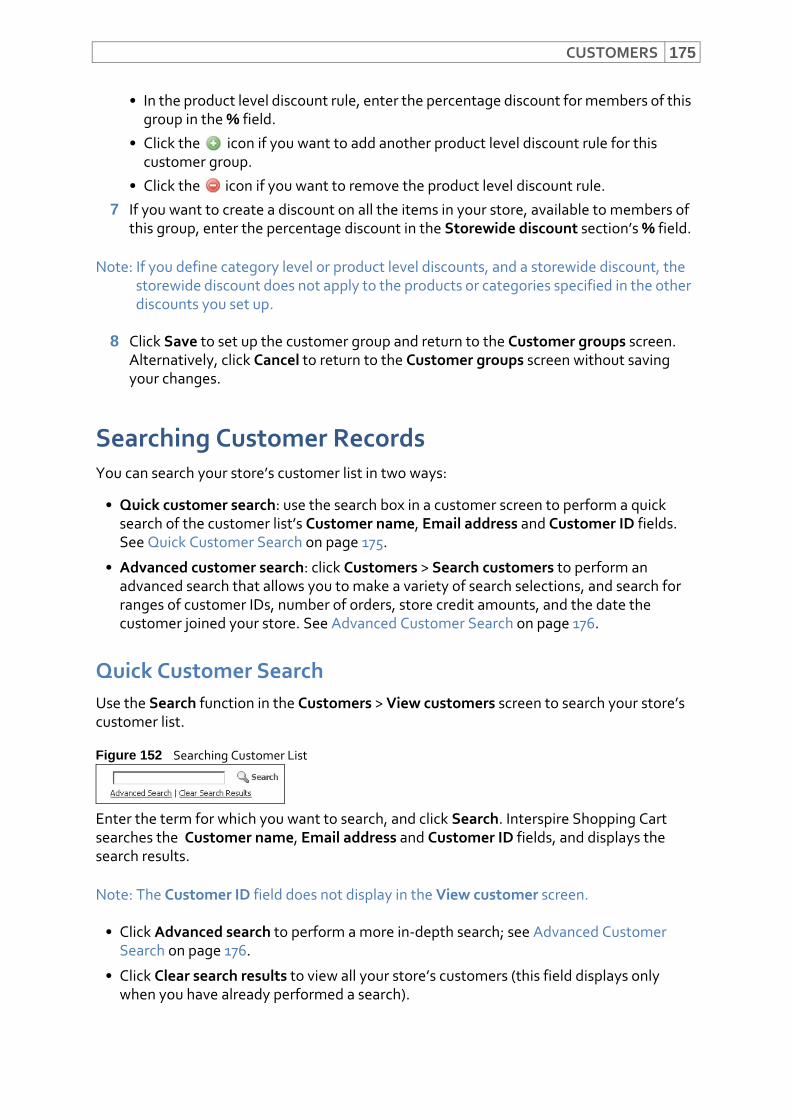
CUSTOMERS 175
• In the product level discount rule, enter the percentage discount for members of this group in the % field.
• Click the icon if you want to add another product level discount rule for this customer group.
• Click the icon if you want to remove the product level discount rule.
7 If you want to create a discount on all the items in your store, available to members of this group, enter the percentage discount in the Storewide discount section’s % field.
Note: If you define category level or product level discounts, and a storewide discount, the storewide discount does not apply to the products or categories specified in the other discounts you set up.
8 Click Save to set up the customer group and return to the Customer groups screen. Alternatively, click Cancel to return to the Customer groups screen without saving your changes.
Searching Customer RecordsYou can search your store’s customer list in two ways:
• Quick customer search: use the search box in a customer screen to perform a quick search of the customer list’s Customer name, Email address and Customer ID fields. See Quick Customer Search on page 175.
• Advanced customer search: click Customers > Search customers to perform an advanced search that allows you to make a variety of search selections, and search for ranges of customer IDs, number of orders, store credit amounts, and the date the customer joined your store. See Advanced Customer Search on page 176.
Quick Customer SearchUse the Search function in the Customers > View customers screen to search your store’s customer list.
Figure 152 Searching Customer List
Enter the term for which you want to search, and click Search. Interspire Shopping Cart searches the Customer name, Email address and Customer ID fields, and displays the search results.
Note: The Customer ID field does not display in the View customer screen.
• Click Advanced search to perform a more in‐depth search; see Advanced Customer Search on page 176.
• Click Clear search results to view all your store’s customers (this field displays only when you have already performed a search).
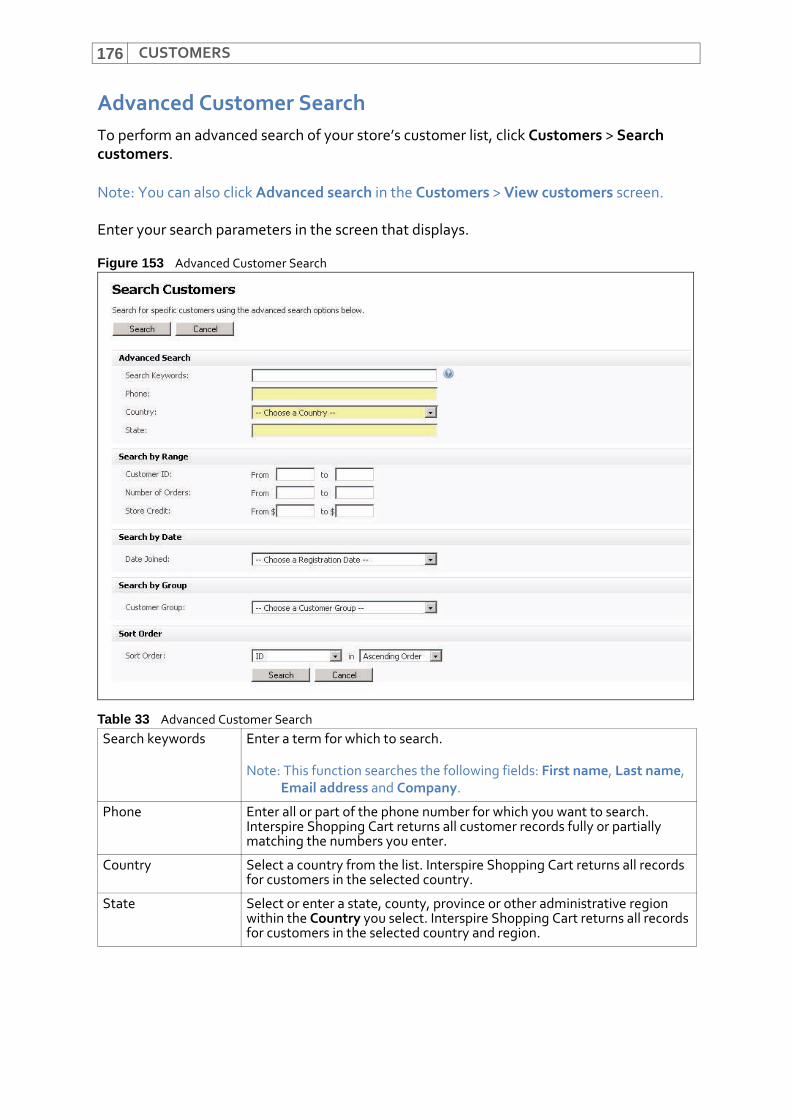
CUSTOMERS176
Advanced Customer SearchTo perform an advanced search of your store’s customer list, click Customers > Search customers.
Note: You can also click Advanced search in the Customers > View customers screen.
Enter your search parameters in the screen that displays.
Figure 153 Advanced Customer Search
Table 33 Advanced Customer SearchSearch keywords Enter a term for which to search.
Note: This function searches the following fields: First name, Last name, Email address and Company.
Phone Enter all or part of the phone number for which you want to search. Interspire Shopping Cart returns all customer records fully or partially matching the numbers you enter.
Country Select a country from the list. Interspire Shopping Cart returns all records for customers in the selected country.
State Select or enter a state, county, province or other administrative region within the Country you select. Interspire Shopping Cart returns all records for customers in the selected country and region.
CUSTOMERS 177
Importing CustomersInterspire Shopping Cart allows you to import customer details from a CSV (Comma‐Separated Values) file. You can import files from your computer, or from the Interspire Shopping Cart server.
The CSV file that you use should contain information that you can map to the following fields:
Note: The only mandatory field is Email address.
• Email Address
• Password
• First Name
• Last Name
• Company
Customer ID Enter beginning and ending customer ID numbers to view all customers with customer IDs within the specified range.
Note: Customer IDs are assigned incrementally, in the order in which the customers joined your store.
Number of orders Use these fields to search for customers who have placed a certain number of orders with your store. Enter the fewest and most number of orders for which you want to search.
Store credit Enter minimum and maximum values to search for customers whose amount of store credit is within the specified range.
Date joined Select a time period. Interspire Shopping Cart searches for customers who joined on that date, or within that period.When you select Custom period in either of the above fields, extra fields display.
Figure 154 Search by Date: Custom
Enter the From and To dates manually, or click the icons and select the dates from the calendars that display.
Customer group Select a customer group to search customers who belong to the group.You must first set up customer groups in the Customers > Customer group screen.
Sort order In the first list, select the field by which you want to order the search results. In the second field, select Ascending order to view the orders from lowest to highest values (or in alphabetical order, for text fields). Select Descending order to view the highest value first (or in reverse alphabetical order, for text fields).
Search Click this to perform the search.
Cancel Click this to return to the View customers screen.
Table 33 Advanced Customer Search

CUSTOMERS178
• Phone
• Shipping: Full Name
• Shipping: First Name
• Shipping: Last Name
• Shipping: Address 1
• Shipping: Address 2
• Shipping: City
• Shipping: Zip
• Shipping: State
• Shipping: Country
• Shipping: Phone
Note: Make sure that the file you use is a correctly‐formatted CSV file, and not a Microsoft Excel file (for example).
To import customer details:
1 Create your CSV file. You can export CSV files from most financial and spreadsheet applications, or you can create one manually as a plain text (.txt) file.
Check your CSV file’s format. If your CSV file contains field headers, they should occupy the first line of the file. This example uses the following simple CSV file, which defines field names and contains a single record’s entry:
Figure 155 Example Customer Information CSV File
Note: In order to display the first line in full in the above figure, its text is wrapped onto the subsequent three lines.
The first line of the file defines the field header names, and implies that each subsequent line should have sixteen fields.
Note that the file uses a comma (,) to separate fields. This is standard. You can use a different character, but make sure you specify the Field separator character you are using in the Import customers screen.
CUSTOMERS 179
Likewise, the quotes (“) characters define the field information. You can use a different character, but make sure you specify the Field enclosure character you are using in the Import customers screen.
2 In Interspire Shopping Cart, click Customers > Import customers.
Figure 156 Import Customer Details
3 Configure the fields in this screen:
• Customer records are identified by the email address in their record. There may be only one customer record for an email address. Some email addresses may already have accompanying details stored in Interspire Shopping Cart. If you want to replace an email address’s existing information with the information in the CSV file, select Yes, override existing records. However, if you do not want to replace existing information, ensure that this checkbox is not selected.
• If you want to import customer information from a file on your computer or network, select Upload a file from my computer and click Browse. Select the file you want to use in the dialog that displays. The file path displays in the text box.
• If you want to import customer information from a file that is already on the Interspire Shopping Cart server, select Use a file already on the server. Select the file in the fields that display.
• If your CSV file contains headers that define the field names, select Contains headers.
• In the Field separator field, define the character that separates the fields in your CSV file. This is usually a comma (,).
• In the Field enclosure field, define the character that encloses the field contents.
4 Click Next. The screen that displays allow you to select which fields in your CSV file you want to map to the fields in Interspire Shopping Cart’s customer list.
CUSTOMERS180
Figure 157 Import Customer Details: Map Fields
• In each list, select the field (defined in your CSV file) that should match the specified field in Interspire Shopping Cart.
Note: When a field name defined in your CSV file matches one of the field names in Interspire Shopping Cart, the field is mapped automatically.
5 Click Next.
Figure 158 Import Customer Details: Ready to Import
6 Click Start import. Interspire Shopping Cart loads the information in the file you selected and processes the orders accordingly.
Figure 159 Import Customer Details: In Progress
When the import process is complete, a report screen displays.
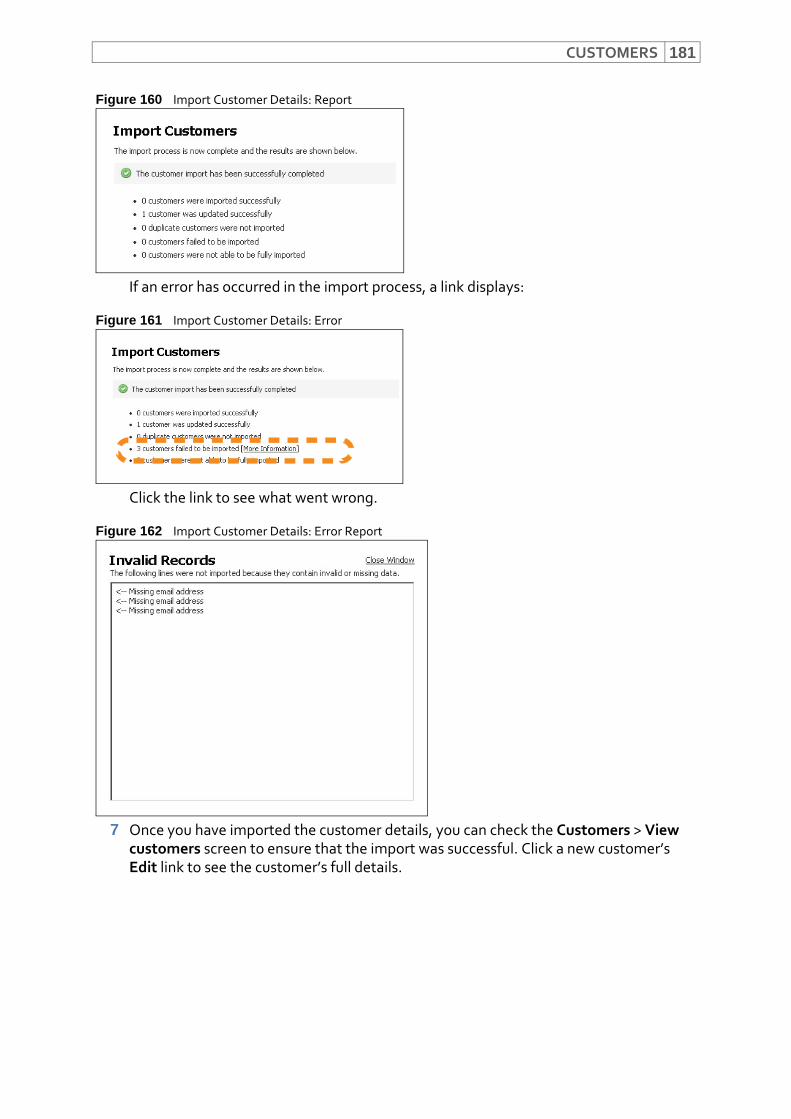
CUSTOMERS 181
Figure 160 Import Customer Details: Report
If an error has occurred in the import process, a link displays:
Figure 161 Import Customer Details: Error
Click the link to see what went wrong.
Figure 162 Import Customer Details: Error Report
7 Once you have imported the customer details, you can check the Customers > View customers screen to ensure that the import was successful. Click a new customer’s Edit link to see the customer’s full details.

CUSTOMERS182
Figure 163 Import Customer Details: Import Successful
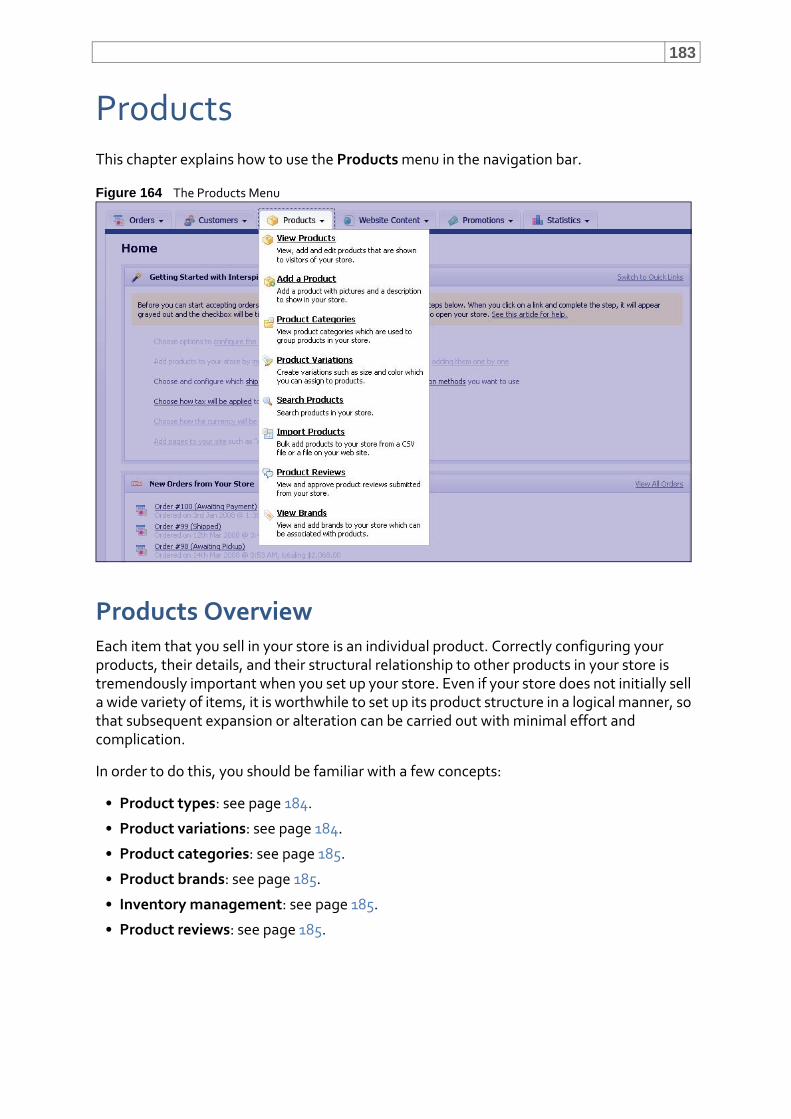
183
ProductsThis chapter explains how to use the Products menu in the navigation bar.
Figure 164 The Products Menu
Products OverviewEach item that you sell in your store is an individual product. Correctly configuring your products, their details, and their structural relationship to other products in your store is tremendously important when you set up your store. Even if your store does not initially sell a wide variety of items, it is worthwhile to set up its product structure in a logical manner, so that subsequent expansion or alteration can be carried out with minimal effort and complication.
In order to do this, you should be familiar with a few concepts:
• Product types: see page 184.
• Product variations: see page 184.
• Product categories: see page 185.
• Product brands: see page 185.
• Inventory management: see page 185.
• Product reviews: see page 185.
PRODUCTS184
Product TypesInterspire Shopping Cart defines two basic types of product: physical and downloadable. Your store can carry either type, or both.
Physical products are those that require shipping, whereas downloadable products are those (such as e‐books, software or digital art) that, after purchase, a customer can simply download from your store’s server. Customers can do this either by clicking a link that displays after they have successfully placed their order, or by logging into your store and checking their order status screen.
When a customer orders a physical product, a record is added to the orders list (see Viewing and Managing Orders on page 125) which can be turned into a shipment. However, when a downloadable product is purchased (and paid for) the record that is added to the order list is marked Completed and cannot be transformed into a shipment.
Product VariationsYou can create product variations for each of your store’s products. A product variation is a variable that describes different versions of the product. For example, you can sell a T‐shirt in a variety of sizes.
You can configure multiple variations. For example, you can sell a T‐shirt in a variety of sizes, and a variety of colors.
Product variations are contained within variation sets. Variation sets can contain multiple variations. When you have created a variation set, you can then apply the variation set to a product. Create another variation set to configure the variations available for a different product.
Among other things, variation sets allow you to create multiple variations with the same name (for example “color”), but with different value sets.
For example, you can create one variation set with the following variations:
• Color (black, white, blue, green)
• Size (S, M, L, XL, XXL)
and then apply the variation set to a T‐shirt in your store. You can then create a second variation set with the following variations:
• Color (black, olive, woodland camo, desert camo)
• Size: (28, 30, 32, 36, 38, 40, 42)
and then apply the variation set to a pair of trousers in your store.
Note: See Adding and Editing Product Variations on page 213 for information on creating a variation set. Once you have created a variation set, see Product Variations on page 199 for information on applying it to a product.
PRODUCTS 185
Product CategoriesProduct categories are groups of similar products that you specify. Customers can use product category pages to see all types of similar product, regardless of brand, on a single screen.
Categories use a parent‐child architecture. This means that you can set up a top‐level category (for example, “Hats”), and multiple sub‐categories (for example, “Men’s hats” and “Women’s hats”).
As with individual product pages, you can add descriptive text to a category or subcategory page, allowing you to introduce your store’s selection to the customer.
Product BrandsUse product brands to allow customers to browse all available products from a single manufacturer in a single page. First set up a brand, then assign products to the brand. Each brand available displays on your store’s main page.
In this way, customers have a variety of ways to reach each item in your store from the main page; by clicking on a brand name (for example, “Harley Davidson”), clicking on a category (for example, “Motorcycle boots”), performing a search (for example, “Harley boots”), or by clicking a featured product, bestselling product, or new product.
Inventory ManagementInterspire Shopping Cart allows you to track and manage your inventory in a variety of ways. Firstly, you can associate a unique SKU (Stock‐Keeping Unit) code to every product you sell, and every variation of a product. If you already use a stock‐keeping or part‐numbering system that uses a unit identification system based on unique alphanumeric codes, you can use Interspire Shopping Cart in conjunction with this system.
Interspire Shopping Cart also has an inventory management system that allows you to specify a “low stock level” and a “current stock level” for a product (or variation) when you first configure it. Interspire Shopping Cart tracks outgoing stock automatically, and provides you with a visual warning when the low stock level has been reached or exceeded. You can also have Interspire Shopping Cart email you when the low stock level is reached; see Configuring Website Settings on page 312.
Note: For information on tracking inventory once it has been shipped out to a customer, see Tracking Numbers on page 124.
Product ReviewsWhen customers see reviews and customer‐generated feedback on your store’s pages, they are far more likely to trust your store and make purchases from it. Interspire Shopping Cart allows your store’s customers (and other users) to submit reviews of your products. Each review contains a title, a star rating, and review text. These reviews display on the relevant product’s page.
PRODUCTS186
By default, anyone who visits your store can write a review of any of your products. Interspire Shopping Cart protects against automatic review submissions (nuisance reviews submitted by software bots) by using CAPTCHA security, which allows a user to submit a review only after reading and entering a string of characters displayed on‐screen in a manner that is not machine‐readable.
However, Interspire Shopping Cart cannot automatically detect inaccurate, offensive, stupid, malicious or otherwise undesirable reviews submitted by users. This can be done only by a human administrator. For this reason, you must approve each user‐submitted review before it displays on the site.
Once you have approved a review (and edited it, if necessary) the review displays on the product’s page in your store.
Note: CAPTCHA stands for “Completely Automated Public Turing test to tell Computers and Humans Apart”. A Turing test, named after mathematician and cryptographer Alan Turing, is a test intended to differentiate between an intelligent agent (such as a human), and an unintelligent agent (such as a piece of software). Ideally, only intelligent agents can pass a Turing test.
Viewing and Managing ProductsTo view or manage the products available in your store, click Products in the navigation bar. Select View products.

PRODUCTS 187
Figure 165 View Products
Table 34 View Products Add a product Click this to add a new product record to the list. See Adding and Editing
Products on page 191.
Delete selected Select one or more product records and click this to remove them from Interspire Shopping Cart. The product record details cannot be retrieved.
Bulk edit selected Select products and click this to edit the products’ details in a single screen. See Bulk Editing Products on page 189.
Export these products Select one or more product records and click this to export the details as a CSV (Comma‐Separated Values) or XML (eXtensible Markup Language) file. See Exporting Products’ Details on page 188.
Search Use this to search your store’s product. See Searching Product Details on page 214 for more information.
#, A...Z Click a letter to see all products whose name starts with the letter.Click # to see products whose name starts with a number, in numerical order.Click Clear to return to viewing all products.
Select a box belonging to a product before clicking Add a product, Delete selected, Bulk edit selected, or Export these products.Select the box at the top of the column to select all products.
Image This displays the thumbnail picture you associated with the product.
SKU This displays the Stock‐Keeping Unit you assigned to the product. Use SKUs to track and manage product inventory.
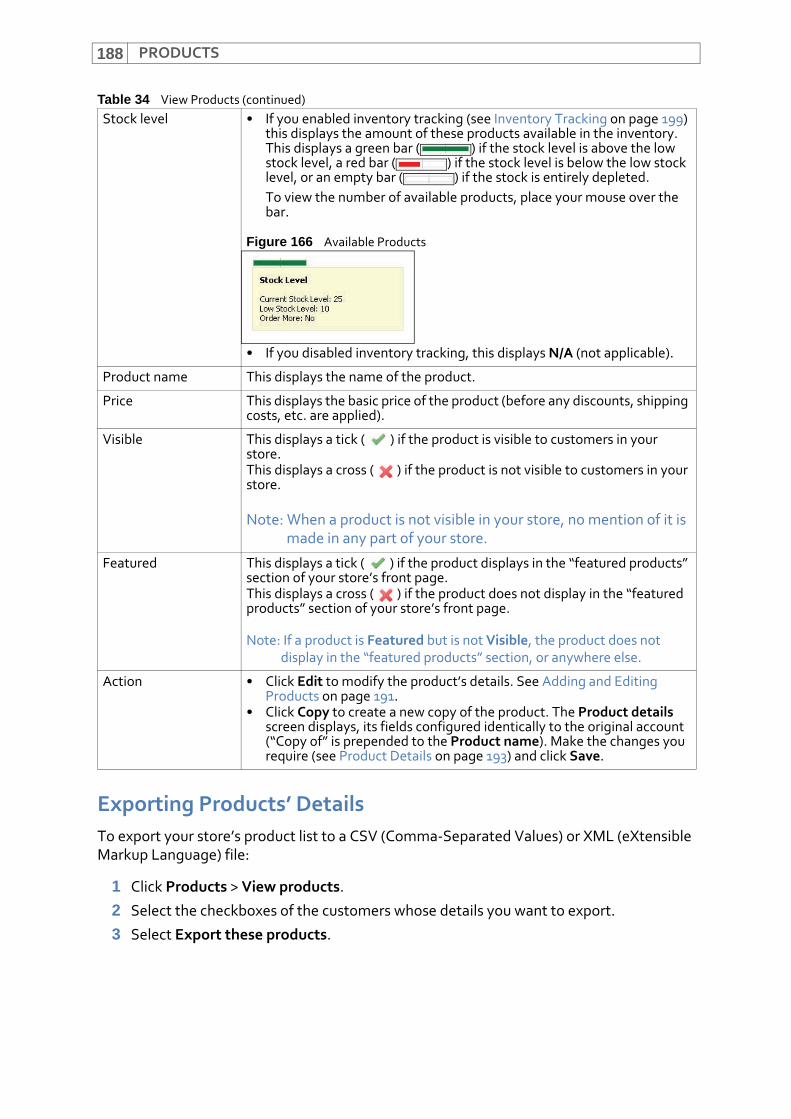
PRODUCTS188
Exporting Products’ DetailsTo export your store’s product list to a CSV (Comma‐Separated Values) or XML (eXtensible Markup Language) file:
1 Click Products > View products.
2 Select the checkboxes of the customers whose details you want to export.
3 Select Export these products.
Stock level • If you enabled inventory tracking (see Inventory Tracking on page 199) this displays the amount of these products available in the inventory. This displays a green bar ( ) if the stock level is above the low stock level, a red bar ( ) if the stock level is below the low stock level, or an empty bar ( ) if the stock is entirely depleted. To view the number of available products, place your mouse over the bar.
Figure 166 Available Products
• If you disabled inventory tracking, this displays N/A (not applicable).
Product name This displays the name of the product.
Price This displays the basic price of the product (before any discounts, shipping costs, etc. are applied).
Visible This displays a tick ( ) if the product is visible to customers in your store.This displays a cross ( ) if the product is not visible to customers in your store.
Note: When a product is not visible in your store, no mention of it is made in any part of your store.
Featured This displays a tick ( ) if the product displays in the “featured products” section of your store’s front page.This displays a cross ( ) if the product does not display in the “featured products” section of your store’s front page.
Note: If a product is Featured but is not Visible, the product does not display in the “featured products” section, or anywhere else.
Action • Click Edit to modify the product’s details. See Adding and Editing Products on page 191.
• Click Copy to create a new copy of the product. The Product details screen displays, its fields configured identically to the original account (“Copy of” is prepended to the Product name). Make the changes you require (see Product Details on page 193) and click Save.
Table 34 View Products (continued)
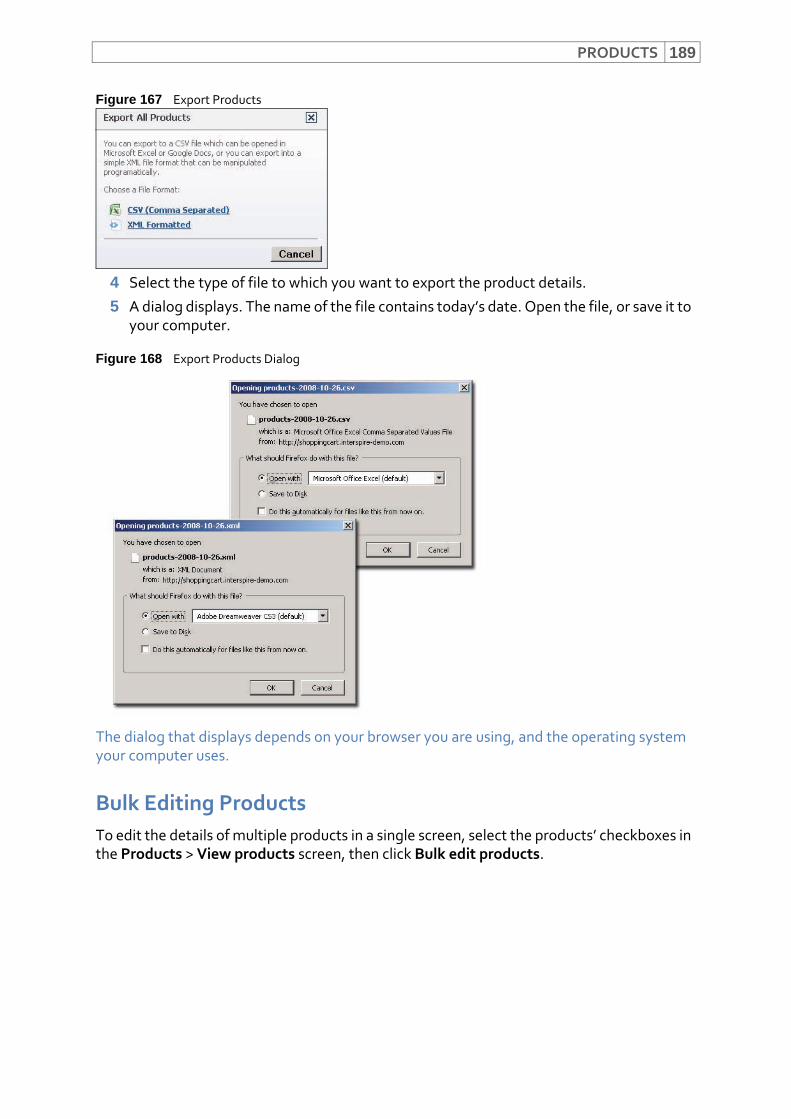
PRODUCTS 189
Figure 167 Export Products
4 Select the type of file to which you want to export the product details.
5 A dialog displays. The name of the file contains today’s date. Open the file, or save it to your computer.
Figure 168 Export Products Dialog
The dialog that displays depends on your browser you are using, and the operating system your computer uses.
Bulk Editing ProductsTo edit the details of multiple products in a single screen, select the products’ checkboxes in the Products > View products screen, then click Bulk edit products.
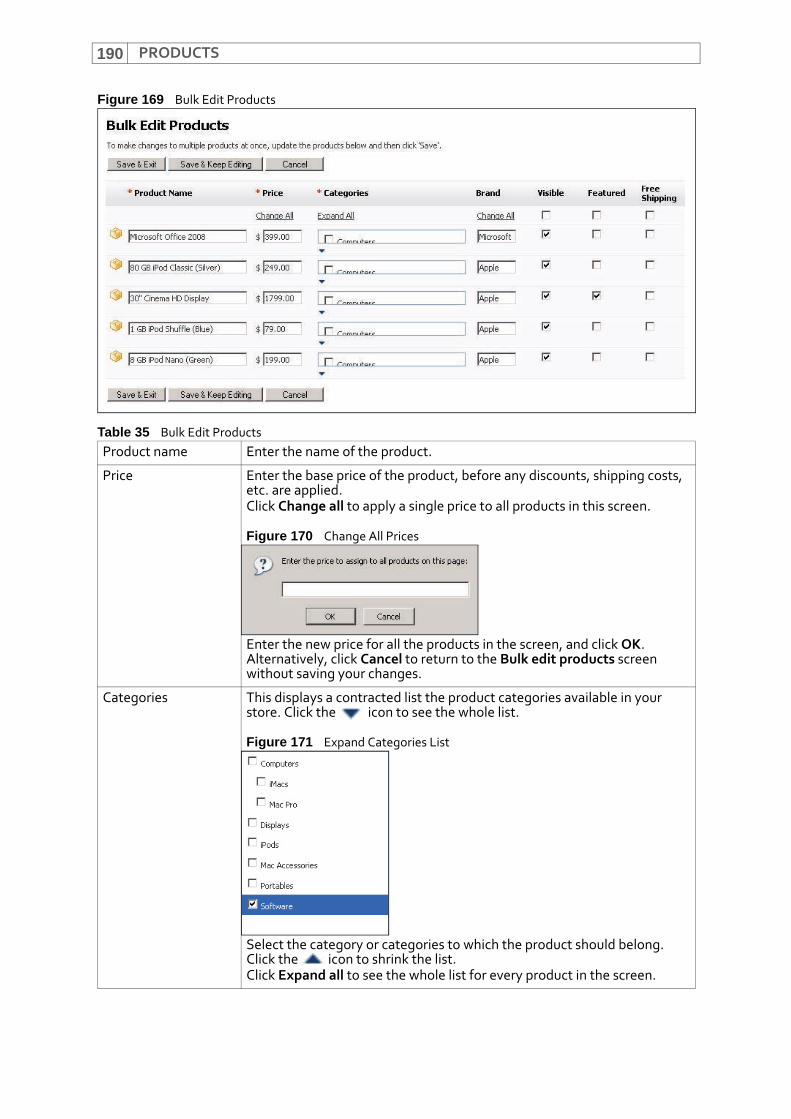
PRODUCTS190
Figure 169 Bulk Edit Products
Table 35 Bulk Edit ProductsProduct name Enter the name of the product.
Price Enter the base price of the product, before any discounts, shipping costs, etc. are applied.Click Change all to apply a single price to all products in this screen.
Figure 170 Change All Prices
Enter the new price for all the products in the screen, and click OK. Alternatively, click Cancel to return to the Bulk edit products screen without saving your changes.
Categories This displays a contracted list the product categories available in your store. Click the icon to see the whole list.
Figure 171 Expand Categories List
Select the category or categories to which the product should belong. Click the icon to shrink the list.Click Expand all to see the whole list for every product in the screen.

PRODUCTS 191
Adding and Editing ProductsTo add a new product to your store, configure the tabs in the Products > Add a product screen.
To edit an existing product, click a product’s Edit link in the Products > View products screen.
You can configure a physical product (one that requires shipment to a customer), or a downloadable product (one that does not require shipment to a customer, such as an e‐book or software product). Do this in the product’s Product details tab.
When you configure a physical product, the following tabs display:
• Product details
Brand Enter the name of the brand to which this product belongs. Click Change all to assign the same brand name to all products on this page.
Figure 172 Change All Brand Names
Enter the new brand name for all the products in the screen, and click OK. Alternatively, click Cancel to return to the Bulk edit products screen without saving your changes.
Visible Click a product’s checkbox to toggle its visibility on or off. When a product is visible, it can be seen and purchased in your store. When a product is invisible, it cannot be seen or purchased.Click the checkbox at the top of the column to toggle visibility on or off for all the products in the screen.
Featured Click a product’s checkbox to toggle its feature status on or off. When a product is featured, it is displayed in the “featured products” section of your store’s front page. When a product is not featured, it does not display in this section.Click the checkbox at the top of the column to toggle the featured status on or off for all the products in the screen.
Free Shipping Click a product’s checkbox to toggle free shipping on or off. When a product is eligible for free shipping, no shipping charges are applied when a customer purchases the product. You may want to do this for non‐physical products, such as e‐books, that do not require physical shipping.Click the checkbox at the top of the column to toggle free shipping on or off for all the products in the screen.
Save & exit Click this to save your changes and return to the View products screen.
Save & keep editing Click this to save your changes and remain in this screen to make further changes.
Cancel Click this to return to the View products screen without saving your changes.
Table 35 Bulk Edit Products
PRODUCTS192
• Related products
• Inventory tracking
• Product variations
• Custom/configurable fields
• Other details
• Discount rules
When you configure a downloadable product, the following tabs display:
• Product details
• Product files
• Related products
• Customer/configurable fields
• Other details
• Discount rules
Note: See Tabs Overview on page 192 for more information about each tab.
When you have finished configuring a product, click Save & exit to save your changes and return to the View products screen, or click Save & add another to save your changes. Alternatively, click Cancel to return to the View products screen without saving your changes.
Tabs Overview• Use the Product details tab to configure general product information. See Product Details on page 193.
• Use the Product files tab to configure and upload the files that a customer may download after purchasing a downloadable product. See Product Files on page 196.
• Use the Related products tab to configure information about similar products in your store. See Related Products on page 198.
• Use the Inventory tracking tab to specify whether inventory tracking is enabled for a product, which helps you to manage your store’s stock. See Inventory Tracking on page 199.
• Use the Product variations tab to set up different types of a product (different sizes or colors, for instance). See Product Variations on page 199.
• Use the Custom/configurable fields tab to define non‐standard information fields that you want to display in a product’s store page. See Custom and Configurable Fields on page 201.
• Use the Other details tab to configure a variety of information about a product, including how it displays in your store, warranty, delivery time, and gift wrapping options. You can also define search engine optimization (SEO) information. See Other Details on page 203.
PRODUCTS 193
• Use the Discount rules tab to define discounts available for bulk purchases of this product. See Discount Rules on page 207.
Product DetailsUse this tab to configure general product information. Click Products > Add a product > Product details.
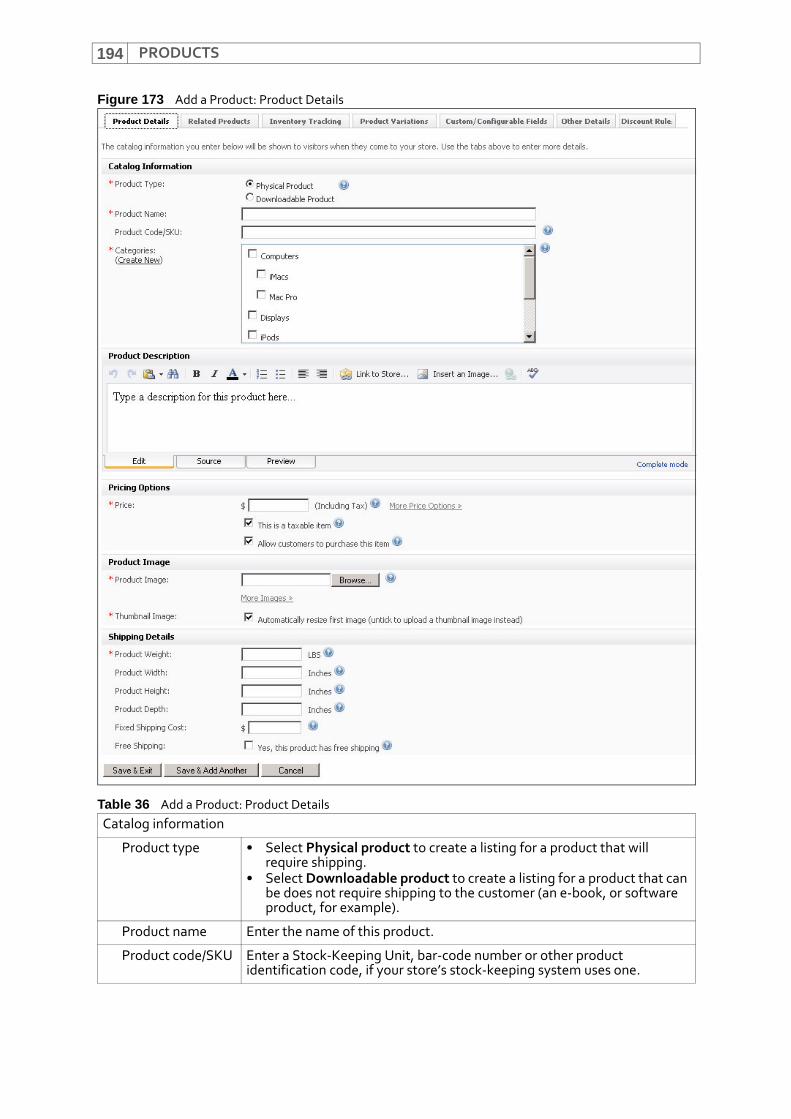
PRODUCTS194
Figure 173 Add a Product: Product Details
Table 36 Add a Product: Product DetailsCatalog information
Product type • Select Physical product to create a listing for a product that will require shipping.
• Select Downloadable product to create a listing for a product that can be does not require shipping to the customer (an e‐book, or software product, for example).
Product name Enter the name of this product.
Product code/SKU Enter a Stock‐Keeping Unit, bar‐code number or other product identification code, if your store’s stock‐keeping system uses one.
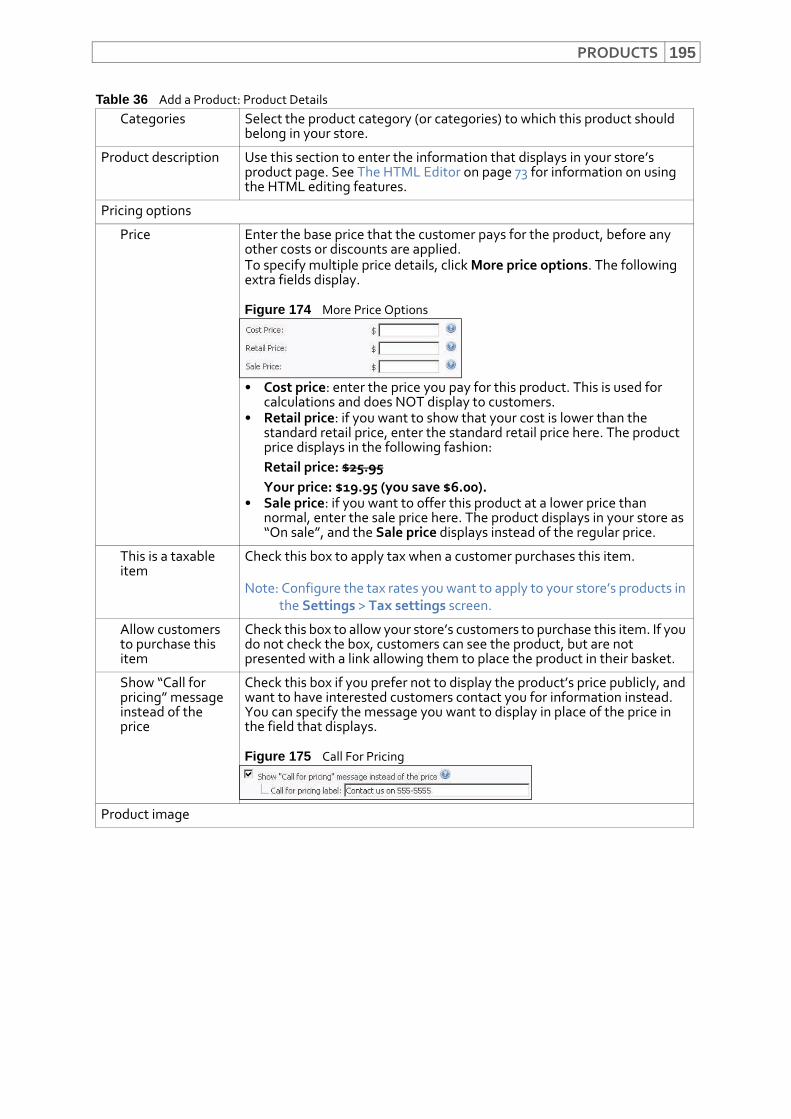
PRODUCTS 195
Categories Select the product category (or categories) to which this product should belong in your store.
Product description Use this section to enter the information that displays in your store’s product page. See The HTML Editor on page 73 for information on using the HTML editing features.
Pricing options
Price Enter the base price that the customer pays for the product, before any other costs or discounts are applied.To specify multiple price details, click More price options. The following extra fields display.
Figure 174 More Price Options
• Cost price: enter the price you pay for this product. This is used for calculations and does NOT display to customers.
• Retail price: if you want to show that your cost is lower than the standard retail price, enter the standard retail price here. The product price displays in the following fashion:Retail price: $25.95Your price: $19.95 (you save $6.00).
• Sale price: if you want to offer this product at a lower price than normal, enter the sale price here. The product displays in your store as “On sale”, and the Sale price displays instead of the regular price.
This is a taxable item
Check this box to apply tax when a customer purchases this item.
Note: Configure the tax rates you want to apply to your store’s products in the Settings > Tax settings screen.
Allow customers to purchase this item
Check this box to allow your store’s customers to purchase this item. If you do not check the box, customers can see the product, but are not presented with a link allowing them to place the product in their basket.
Show “Call for pricing” message instead of the price
Check this box if you prefer not to display the product’s price publicly, and want to have interested customers contact you for information instead. You can specify the message you want to display in place of the price in the field that displays.
Figure 175 Call For Pricing
Product image
Table 36 Add a Product: Product Details
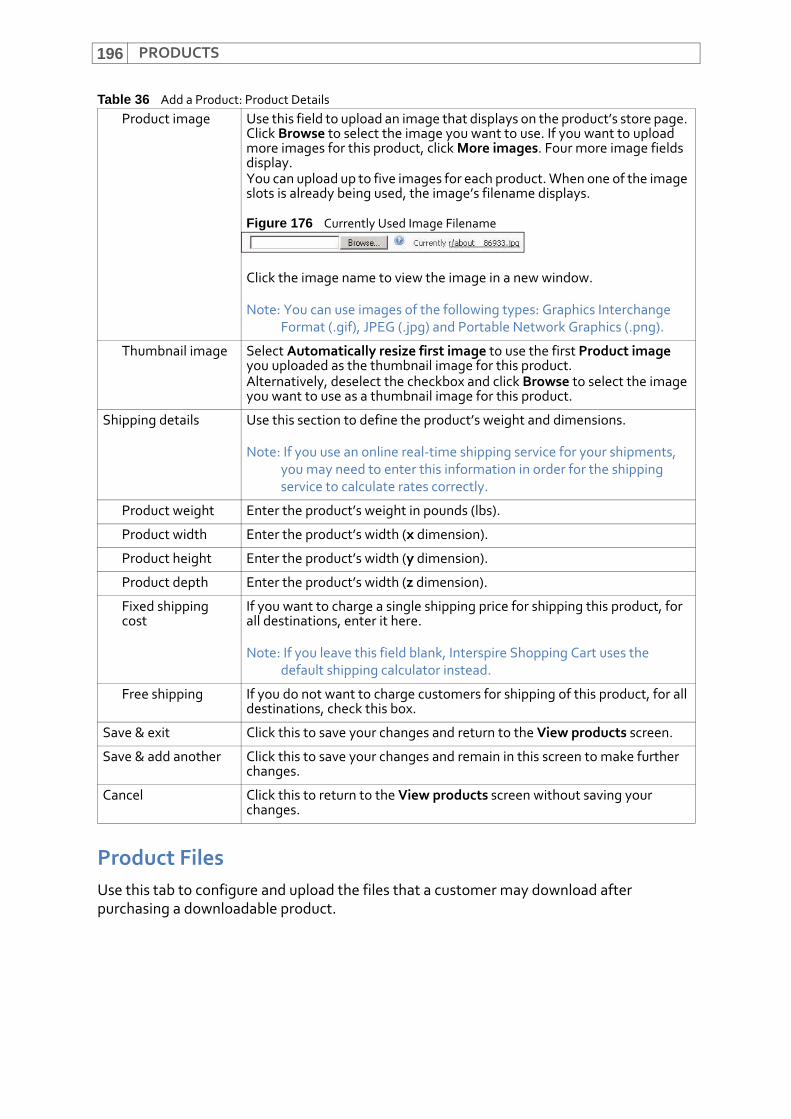
PRODUCTS196
Product FilesUse this tab to configure and upload the files that a customer may download after purchasing a downloadable product.
Product image Use this field to upload an image that displays on the product’s store page. Click Browse to select the image you want to use. If you want to upload more images for this product, click More images. Four more image fields display.You can upload up to five images for each product. When one of the image slots is already being used, the image’s filename displays.
Figure 176 Currently Used Image Filename
Click the image name to view the image in a new window.
Note: You can use images of the following types: Graphics Interchange Format (.gif), JPEG (.jpg) and Portable Network Graphics (.png).
Thumbnail image Select Automatically resize first image to use the first Product image you uploaded as the thumbnail image for this product.Alternatively, deselect the checkbox and click Browse to select the image you want to use as a thumbnail image for this product.
Shipping details Use this section to define the product’s weight and dimensions.
Note: If you use an online real‐time shipping service for your shipments, you may need to enter this information in order for the shipping service to calculate rates correctly.
Product weight Enter the product’s weight in pounds (lbs).
Product width Enter the product’s width (x dimension).
Product height Enter the product’s width (y dimension).
Product depth Enter the product’s width (z dimension).
Fixed shipping cost
If you want to charge a single shipping price for shipping this product, for all destinations, enter it here.
Note: If you leave this field blank, Interspire Shopping Cart uses the default shipping calculator instead.
Free shipping If you do not want to charge customers for shipping of this product, for all destinations, check this box.
Save & exit Click this to save your changes and return to the View products screen.
Save & add another Click this to save your changes and remain in this screen to make further changes.
Cancel Click this to return to the View products screen without saving your changes.
Table 36 Add a Product: Product Details

PRODUCTS 197
Figure 177 Add a Product: Product Files
Table 37 Add a Product: Product FilesDescription Enter some text describing the downloadable product. This displays in
your store’s order status screen (from which a customer downloads the item).
File to upload Use this to select the downloadable product.• If you want to upload a file on your computer or network, select
Upload a file from my computer and click Browse. Select the file you want to use in the dialog that displays. The file path displays in the text box.
• If you want to upload a file that is already on the Interspire Shopping Cart server, select Use a file already on the server. Select the file in the fields that display.
Disable downloads after
By default, once a customer has purchased a downloadable item from your store, the item is available to download from the customer’s orders page from that moment on, indefinitely. If you want to limit the time that the file is available for download, enter the limitation in the text box, and select the time unit from the list.
Note: If you limit the time that the file is available for download, ensure that you explicitly state the limitation on the product page, or elsewhere in your store.
Maximum downloads By default, once a customer has purchased a downloadable item from your store, the item is available to download as many times as the customer requires.If you want to limit the number of times a customer may download the product, enter the limit here.
Note: If you limit the number of times a customer may download the product, ensure that you explicitly state the limitation on the product page, or elsewhere in your store.
Note: Bear in mind that if you limit the number of times a customer may download a product, an interrupted download may mean that the customer is subsequently unable to receive the product. This is particularly relevant if you limit customers to a single download.
Attach file to product Click this to save your settings in this tab.
Note: This does not save your edits in other tabs ‐ ensure that you click Save & exit or Save & add another to save your changes.
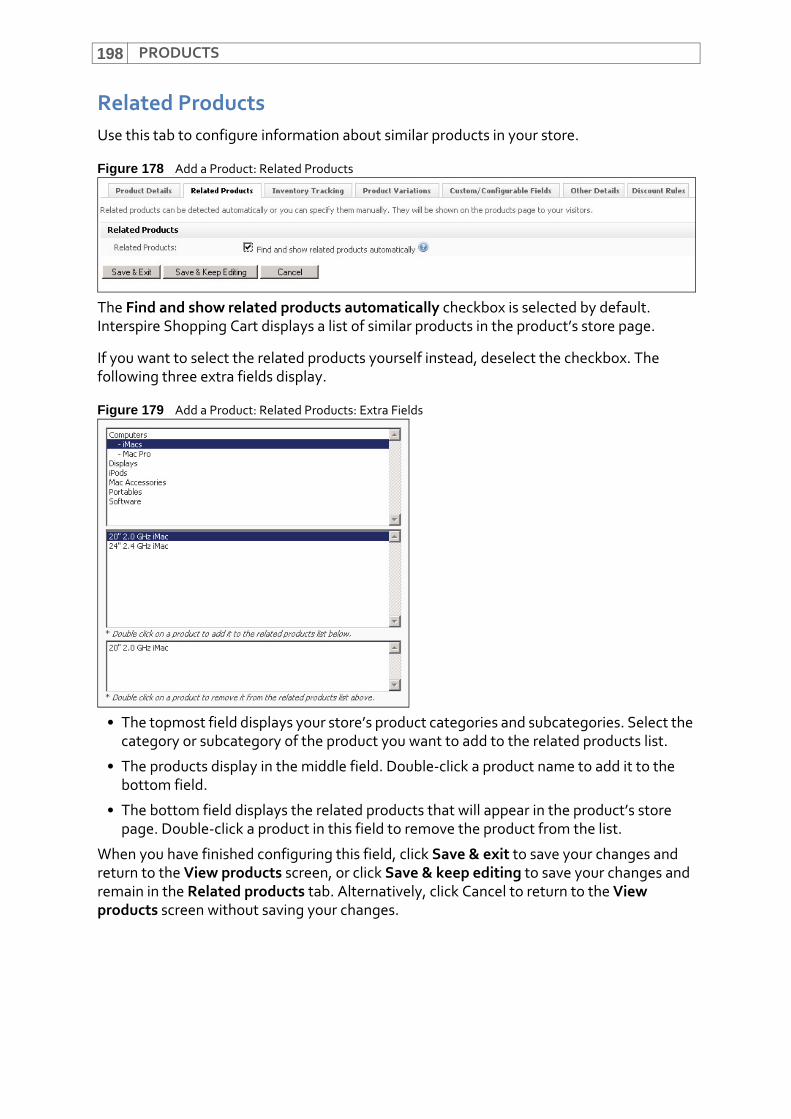
PRODUCTS198
Related ProductsUse this tab to configure information about similar products in your store.
Figure 178 Add a Product: Related Products
The Find and show related products automatically checkbox is selected by default. Interspire Shopping Cart displays a list of similar products in the product’s store page.
If you want to select the related products yourself instead, deselect the checkbox. The following three extra fields display.
Figure 179 Add a Product: Related Products: Extra Fields
• The topmost field displays your store’s product categories and subcategories. Select the category or subcategory of the product you want to add to the related products list.
• The products display in the middle field. Double‐click a product name to add it to the bottom field.
• The bottom field displays the related products that will appear in the product’s store page. Double‐click a product in this field to remove the product from the list.
When you have finished configuring this field, click Save & exit to save your changes and return to the View products screen, or click Save & keep editing to save your changes and remain in the Related products tab. Alternatively, click Cancel to return to the View products screen without saving your changes.
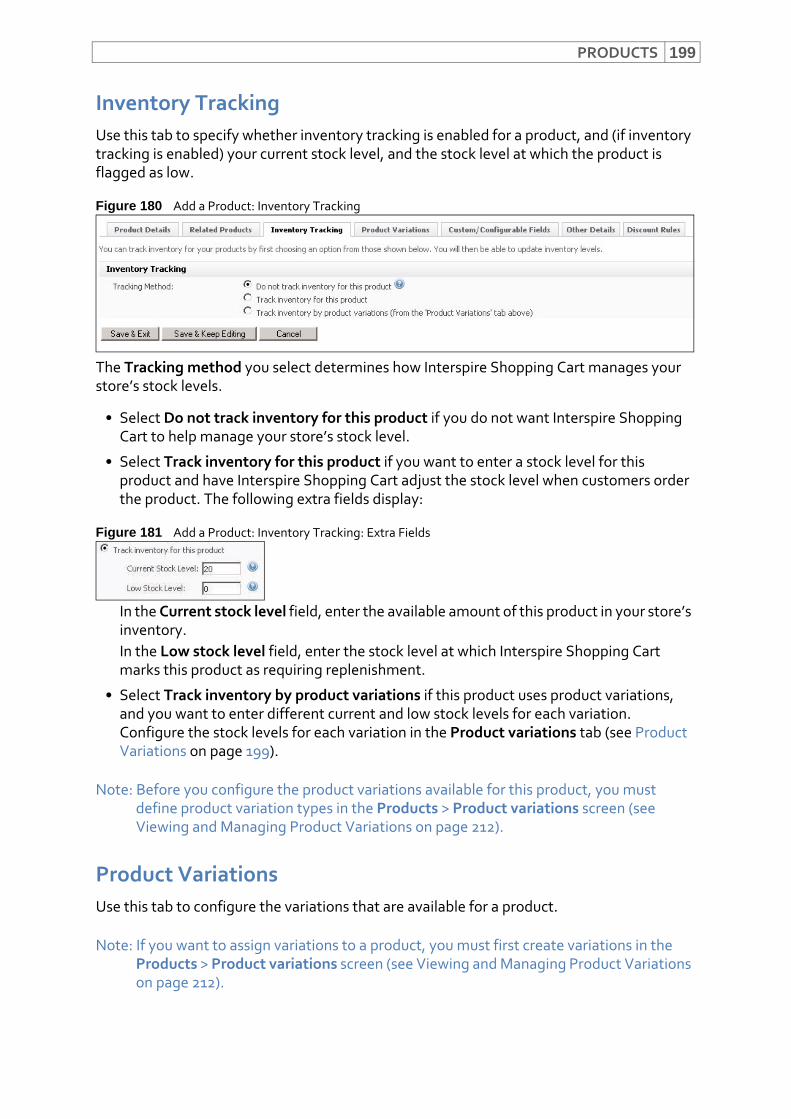
PRODUCTS 199
Inventory TrackingUse this tab to specify whether inventory tracking is enabled for a product, and (if inventory tracking is enabled) your current stock level, and the stock level at which the product is flagged as low.
Figure 180 Add a Product: Inventory Tracking
The Tracking method you select determines how Interspire Shopping Cart manages your store’s stock levels.
• Select Do not track inventory for this product if you do not want Interspire Shopping Cart to help manage your store’s stock level.
• Select Track inventory for this product if you want to enter a stock level for this product and have Interspire Shopping Cart adjust the stock level when customers order the product. The following extra fields display:
Figure 181 Add a Product: Inventory Tracking: Extra Fields
In the Current stock level field, enter the available amount of this product in your store’s inventory.In the Low stock level field, enter the stock level at which Interspire Shopping Cart marks this product as requiring replenishment.
• Select Track inventory by product variations if this product uses product variations, and you want to enter different current and low stock levels for each variation. Configure the stock levels for each variation in the Product variations tab (see Product Variations on page 199).
Note: Before you configure the product variations available for this product, you must define product variation types in the Products > Product variations screen (see Viewing and Managing Product Variations on page 212).
Product VariationsUse this tab to configure the variations that are available for a product.
Note: If you want to assign variations to a product, you must first create variations in the Products > Product variations screen (see Viewing and Managing Product Variations on page 212).
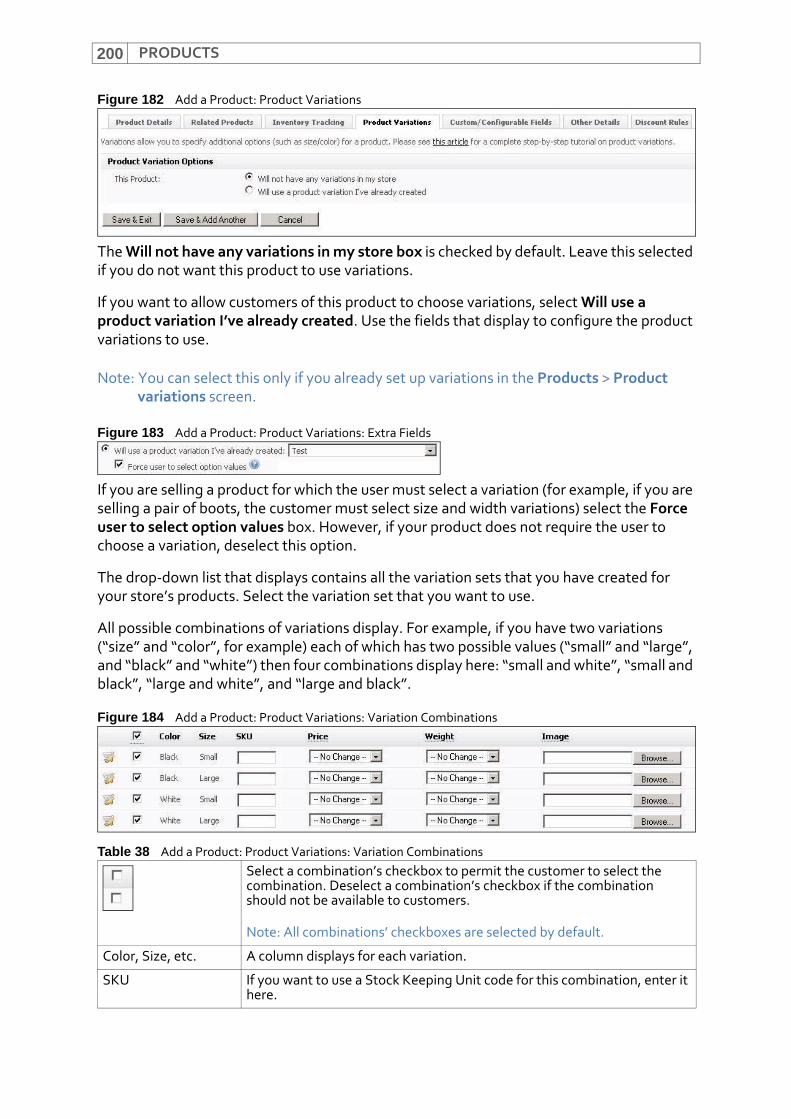
PRODUCTS200
Figure 182 Add a Product: Product Variations
The Will not have any variations in my store box is checked by default. Leave this selected if you do not want this product to use variations.
If you want to allow customers of this product to choose variations, select Will use a product variation I’ve already created. Use the fields that display to configure the product variations to use.
Note: You can select this only if you already set up variations in the Products > Product variations screen.
Figure 183 Add a Product: Product Variations: Extra Fields
If you are selling a product for which the user must select a variation (for example, if you are selling a pair of boots, the customer must select size and width variations) select the Force user to select option values box. However, if your product does not require the user to choose a variation, deselect this option.
The drop‐down list that displays contains all the variation sets that you have created for your store’s products. Select the variation set that you want to use.
All possible combinations of variations display. For example, if you have two variations (“size” and “color”, for example) each of which has two possible values (“small” and “large”, and “black” and “white”) then four combinations display here: “small and white”, “small and black”, “large and white”, and “large and black”.
Figure 184 Add a Product: Product Variations: Variation Combinations
Table 38 Add a Product: Product Variations: Variation Combinations Select a combination’s checkbox to permit the customer to select the combination. Deselect a combination’s checkbox if the combination should not be available to customers.
Note: All combinations’ checkboxes are selected by default.
Color, Size, etc. A column displays for each variation.
SKU If you want to use a Stock Keeping Unit code for this combination, enter it here.
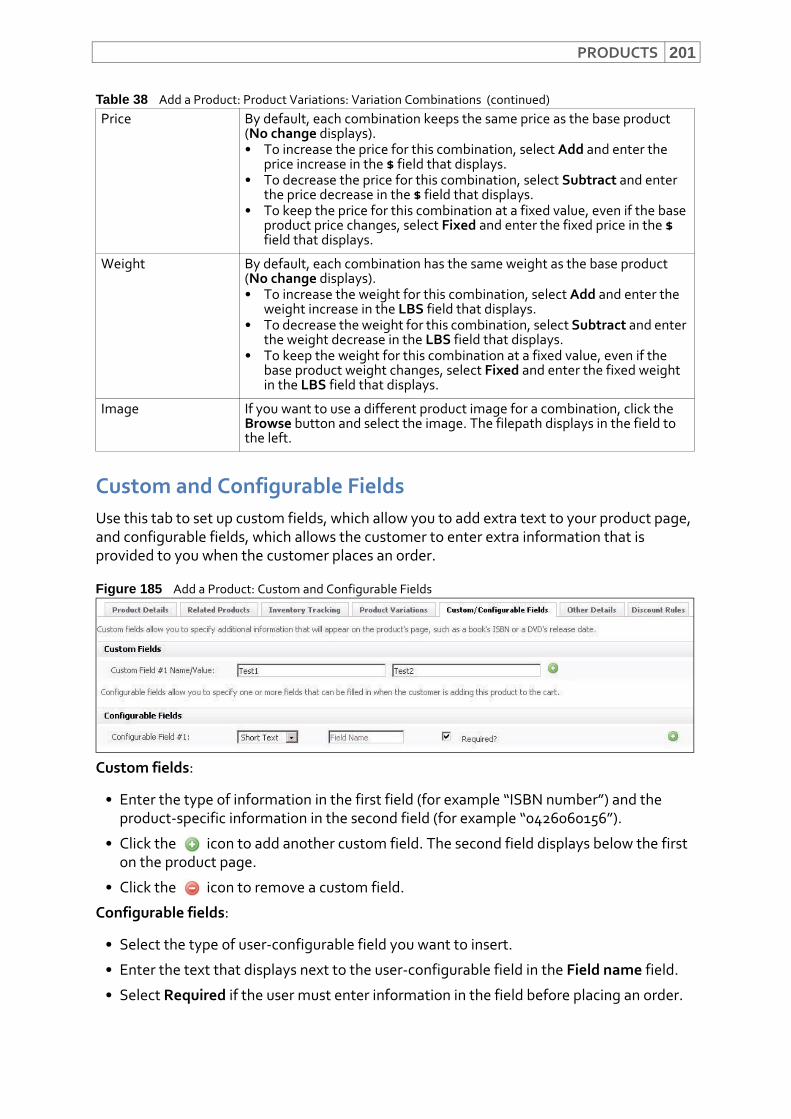
PRODUCTS 201
Custom and Configurable FieldsUse this tab to set up custom fields, which allow you to add extra text to your product page, and configurable fields, which allows the customer to enter extra information that is provided to you when the customer places an order.
Figure 185 Add a Product: Custom and Configurable Fields
Custom fields:
• Enter the type of information in the first field (for example “ISBN number”) and the product‐specific information in the second field (for example “0426060156”).
• Click the icon to add another custom field. The second field displays below the first on the product page.
• Click the icon to remove a custom field.
Configurable fields:
• Select the type of user‐configurable field you want to insert.
• Enter the text that displays next to the user‐configurable field in the Field name field.
• Select Required if the user must enter information in the field before placing an order.
Price By default, each combination keeps the same price as the base product (No change displays).• To increase the price for this combination, select Add and enter the
price increase in the $ field that displays.• To decrease the price for this combination, select Subtract and enter
the price decrease in the $ field that displays.• To keep the price for this combination at a fixed value, even if the base
product price changes, select Fixed and enter the fixed price in the $ field that displays.
Weight By default, each combination has the same weight as the base product (No change displays).• To increase the weight for this combination, select Add and enter the
weight increase in the LBS field that displays.• To decrease the weight for this combination, select Subtract and enter
the weight decrease in the LBS field that displays.• To keep the weight for this combination at a fixed value, even if the
base product weight changes, select Fixed and enter the fixed weight in the LBS field that displays.
Image If you want to use a different product image for a combination, click the Browse button and select the image. The filepath displays in the field to the left.
Table 38 Add a Product: Product Variations: Variation Combinations (continued)
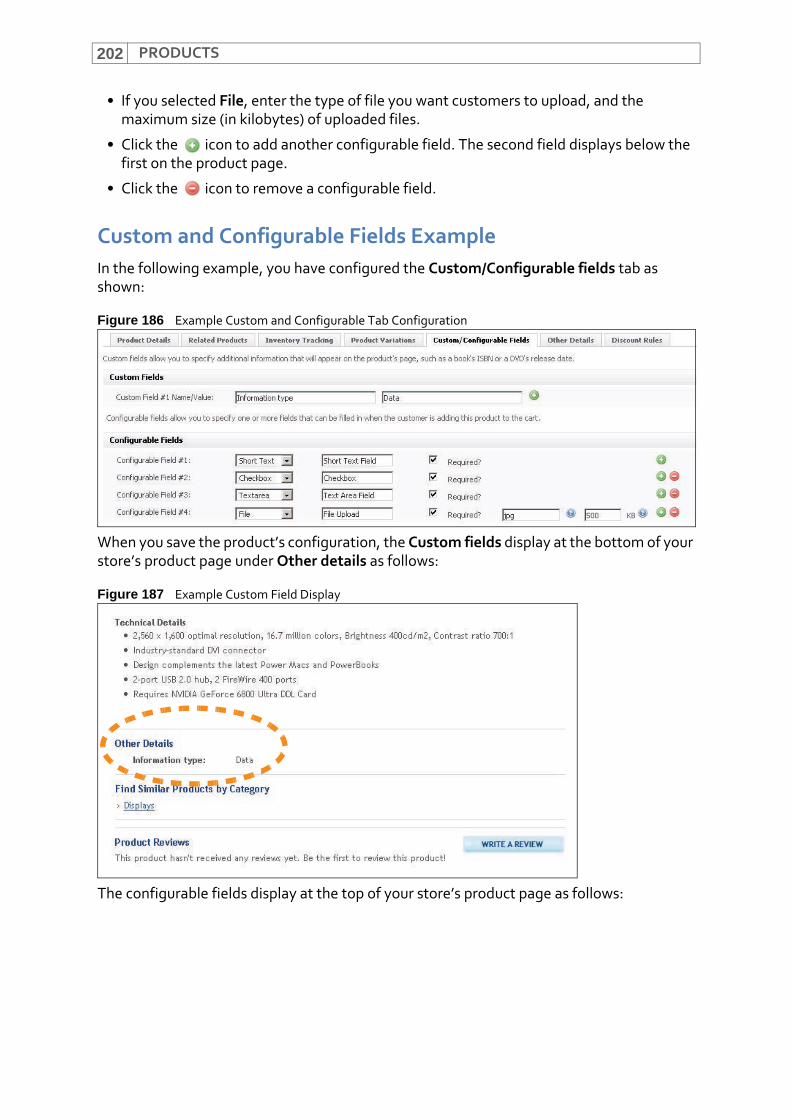
PRODUCTS202
• If you selected File, enter the type of file you want customers to upload, and the maximum size (in kilobytes) of uploaded files.
• Click the icon to add another configurable field. The second field displays below the first on the product page.
• Click the icon to remove a configurable field.
Custom and Configurable Fields ExampleIn the following example, you have configured the Custom/Configurable fields tab as shown:
Figure 186 Example Custom and Configurable Tab Configuration
When you save the product’s configuration, the Custom fields display at the bottom of your store’s product page under Other details as follows:
Figure 187 Example Custom Field Display
The configurable fields display at the top of your store’s product page as follows:
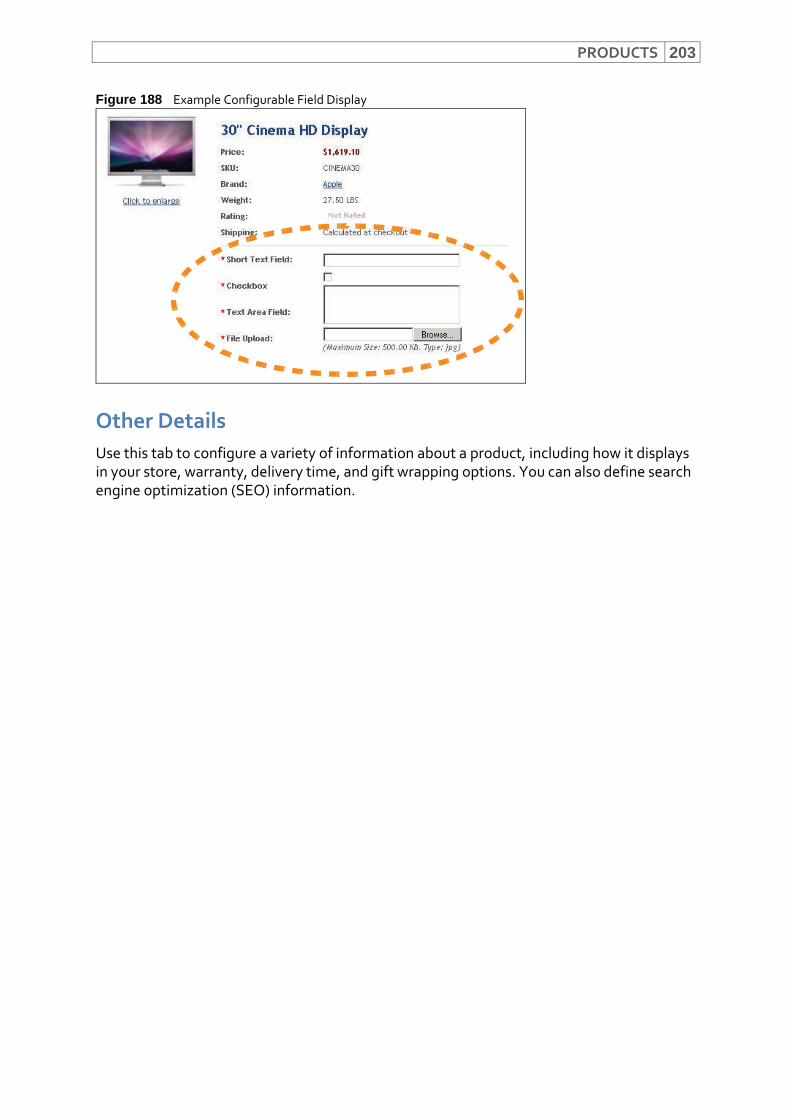
PRODUCTS 203
Figure 188 Example Configurable Field Display
Other DetailsUse this tab to configure a variety of information about a product, including how it displays in your store, warranty, delivery time, and gift wrapping options. You can also define search engine optimization (SEO) information.
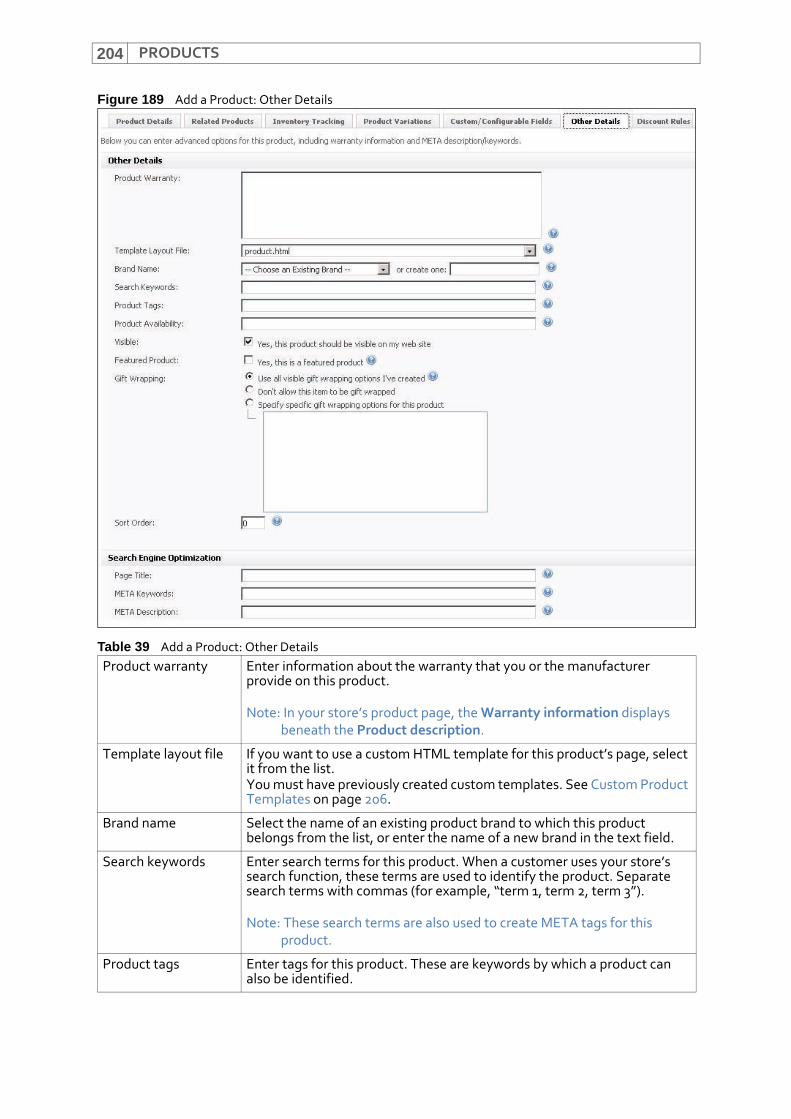
PRODUCTS204
Figure 189 Add a Product: Other Details
Table 39 Add a Product: Other DetailsProduct warranty Enter information about the warranty that you or the manufacturer
provide on this product.
Note: In your store’s product page, the Warranty information displays beneath the Product description.
Template layout file If you want to use a custom HTML template for this product’s page, select it from the list.You must have previously created custom templates. See Custom Product Templates on page 206.
Brand name Select the name of an existing product brand to which this product belongs from the list, or enter the name of a new brand in the text field.
Search keywords Enter search terms for this product. When a customer uses your store’s search function, these terms are used to identify the product. Separate search terms with commas (for example, “term 1, term 2, term 3”).
Note: These search terms are also used to create META tags for this product.
Product tags Enter tags for this product. These are keywords by which a product can also be identified.
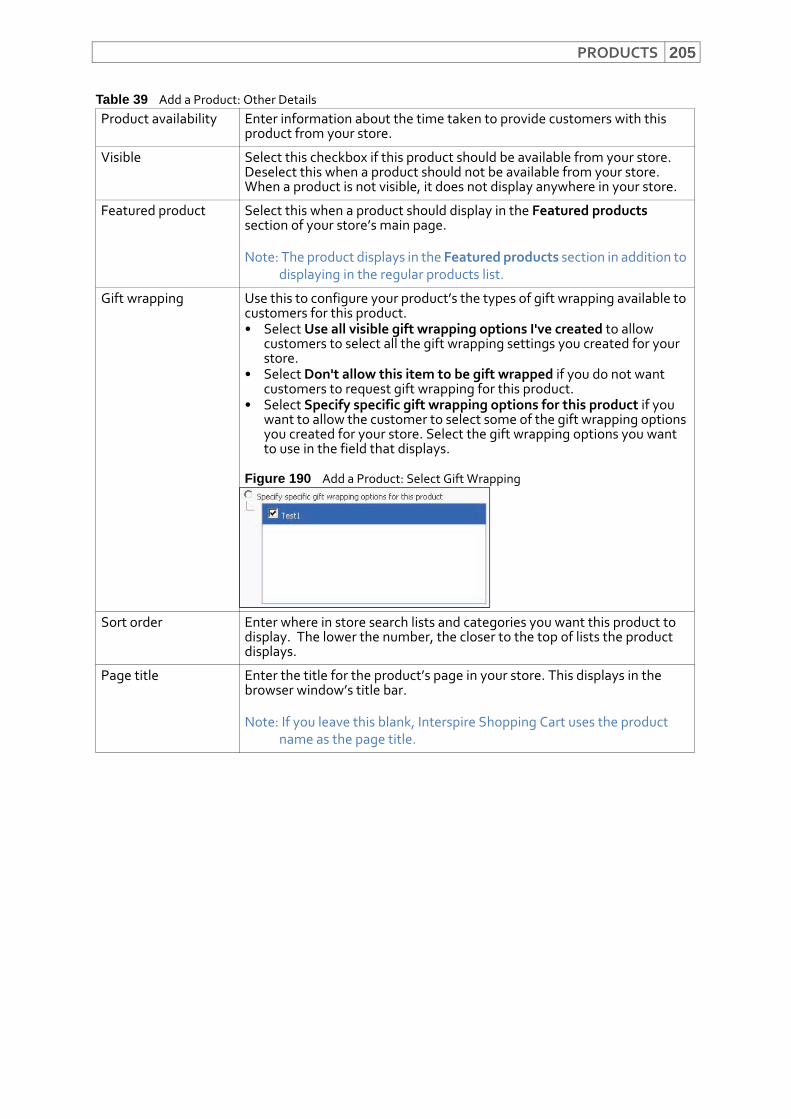
PRODUCTS 205
Product availability Enter information about the time taken to provide customers with this product from your store.
Visible Select this checkbox if this product should be available from your store. Deselect this when a product should not be available from your store. When a product is not visible, it does not display anywhere in your store.
Featured product Select this when a product should display in the Featured products section of your store’s main page.
Note: The product displays in the Featured products section in addition to displaying in the regular products list.
Gift wrapping Use this to configure your product’s the types of gift wrapping available to customers for this product.• Select Use all visible gift wrapping options I've created to allow
customers to select all the gift wrapping settings you created for your store.
• Select Don't allow this item to be gift wrapped if you do not want customers to request gift wrapping for this product.
• Select Specify specific gift wrapping options for this product if you want to allow the customer to select some of the gift wrapping options you created for your store. Select the gift wrapping options you want to use in the field that displays.
Figure 190 Add a Product: Select Gift Wrapping
Sort order Enter where in store search lists and categories you want this product to display. The lower the number, the closer to the top of lists the product displays.
Page title Enter the title for the product’s page in your store. This displays in the browser window’s title bar.
Note: If you leave this blank, Interspire Shopping Cart uses the product name as the page title.
Table 39 Add a Product: Other Details
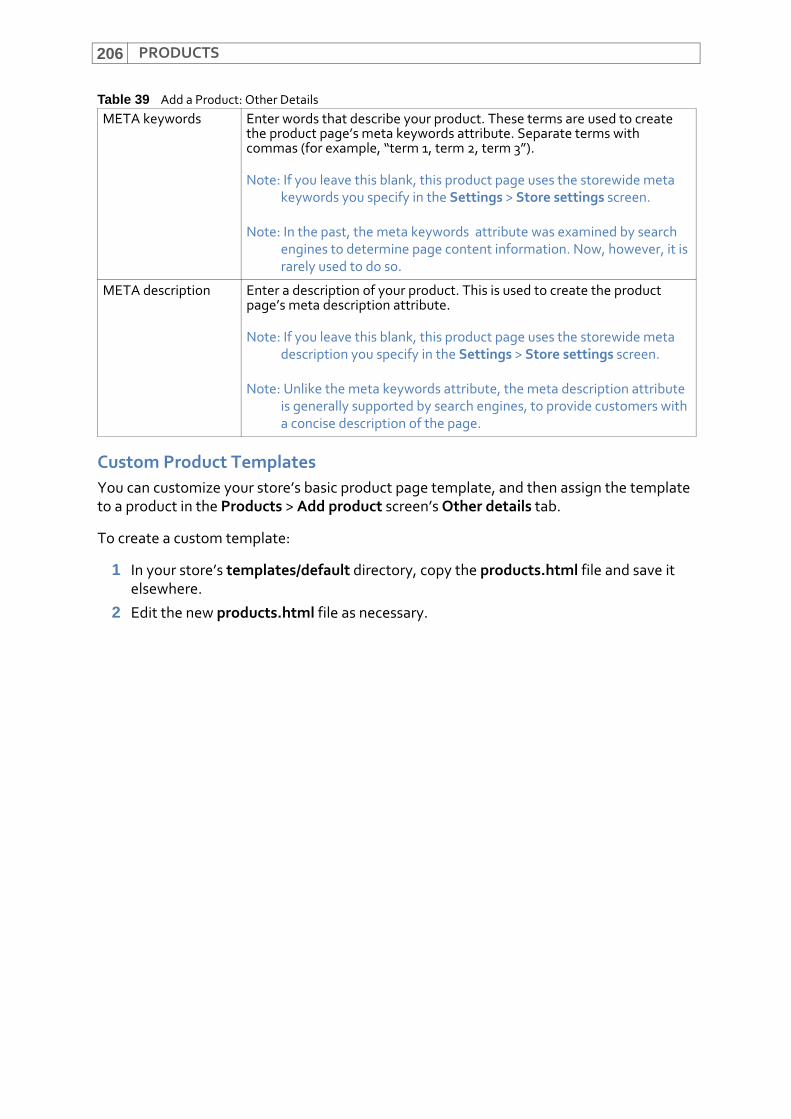
PRODUCTS206
Custom Product TemplatesYou can customize your store’s basic product page template, and then assign the template to a product in the Products > Add product screen’s Other details tab.
To create a custom template:
1 In your store’s templates/default directory, copy the products.html file and save it elsewhere.
2 Edit the new products.html file as necessary.
META keywords Enter words that describe your product. These terms are used to create the product page’s meta keywords attribute. Separate terms with commas (for example, “term 1, term 2, term 3”).
Note: If you leave this blank, this product page uses the storewide meta keywords you specify in the Settings > Store settings screen.
Note: In the past, the meta keywords attribute was examined by search engines to determine page content information. Now, however, it is rarely used to do so.
META description Enter a description of your product. This is used to create the product page’s meta description attribute.
Note: If you leave this blank, this product page uses the storewide meta description you specify in the Settings > Store settings screen.
Note: Unlike the meta keywords attribute, the meta description attribute is generally supported by search engines, to provide customers with a concise description of the page.
Table 39 Add a Product: Other Details
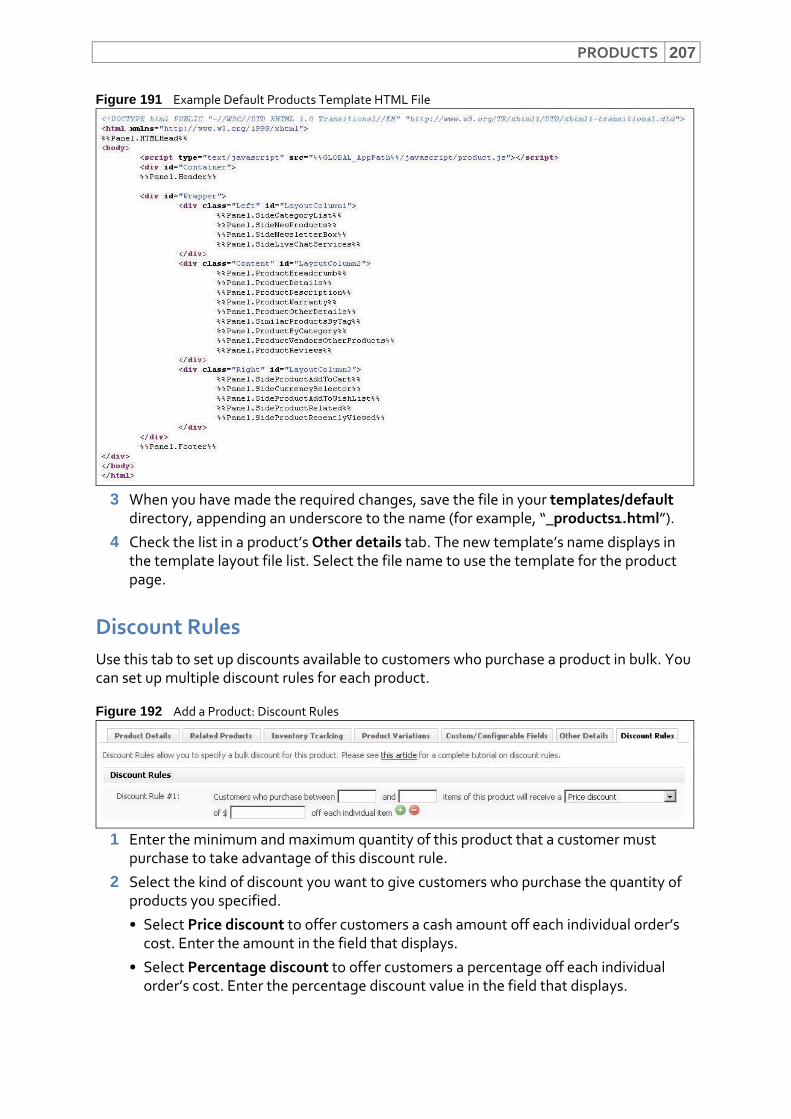
PRODUCTS 207
Figure 191 Example Default Products Template HTML File
3 When you have made the required changes, save the file in your templates/default directory, appending an underscore to the name (for example, “_products1.html”).
4 Check the list in a product’s Other details tab. The new template’s name displays in the template layout file list. Select the file name to use the template for the product page.
Discount RulesUse this tab to set up discounts available to customers who purchase a product in bulk. You can set up multiple discount rules for each product.
Figure 192 Add a Product: Discount Rules
1 Enter the minimum and maximum quantity of this product that a customer must purchase to take advantage of this discount rule.
2 Select the kind of discount you want to give customers who purchase the quantity of products you specified.
• Select Price discount to offer customers a cash amount off each individual order’s cost. Enter the amount in the field that displays.
• Select Percentage discount to offer customers a percentage off each individual order’s cost. Enter the percentage discount value in the field that displays.
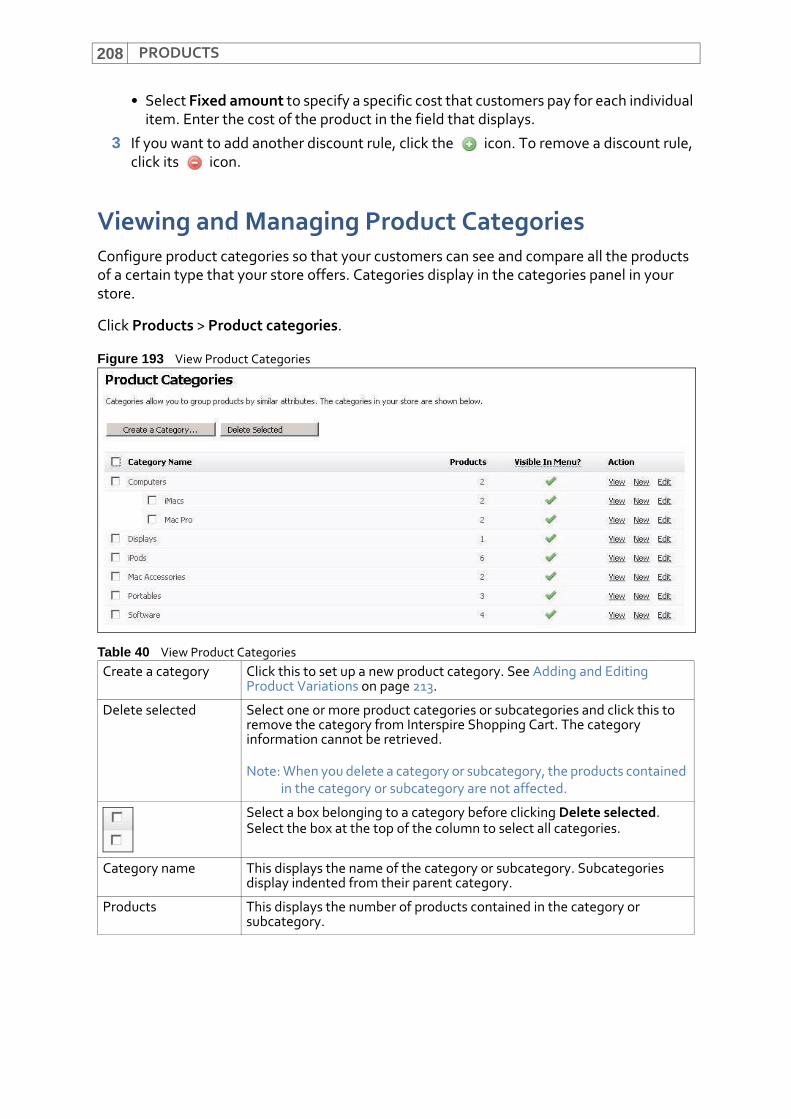
PRODUCTS208
• Select Fixed amount to specify a specific cost that customers pay for each individual item. Enter the cost of the product in the field that displays.
3 If you want to add another discount rule, click the icon. To remove a discount rule, click its icon.
Viewing and Managing Product CategoriesConfigure product categories so that your customers can see and compare all the products of a certain type that your store offers. Categories display in the categories panel in your store.
Click Products > Product categories.
Figure 193 View Product Categories
Table 40 View Product CategoriesCreate a category Click this to set up a new product category. See Adding and Editing
Product Variations on page 213.
Delete selected Select one or more product categories or subcategories and click this to remove the category from Interspire Shopping Cart. The category information cannot be retrieved.
Note: When you delete a category or subcategory, the products contained in the category or subcategory are not affected.
Select a box belonging to a category before clicking Delete selected.Select the box at the top of the column to select all categories.
Category name This displays the name of the category or subcategory. Subcategories display indented from their parent category.
Products This displays the number of products contained in the category or subcategory.
PRODUCTS 209
Adding and Editing Product CategoriesTo add a new product category page, click Products > Product categories. Click Create category.
To edit an existing product category page, click Products > Product categories and click a category’s Edit link.
Visible in menu • This displays when the category or subcategory can be seen in the categories panel in your store.
• This displays when the category or subcategory can be seen in the categories panel in your store.
Click an icon to toggle visibility on or off.
Action • Click View to see a category’s page in a new window as it displays in your store.
• Click New to set up a new product category. See Adding and Editing Product Categories on page 209.
• Click Edit to modify a product category’s settings. See Adding and Editing Product Categories on page 209.
Table 40 View Product Categories
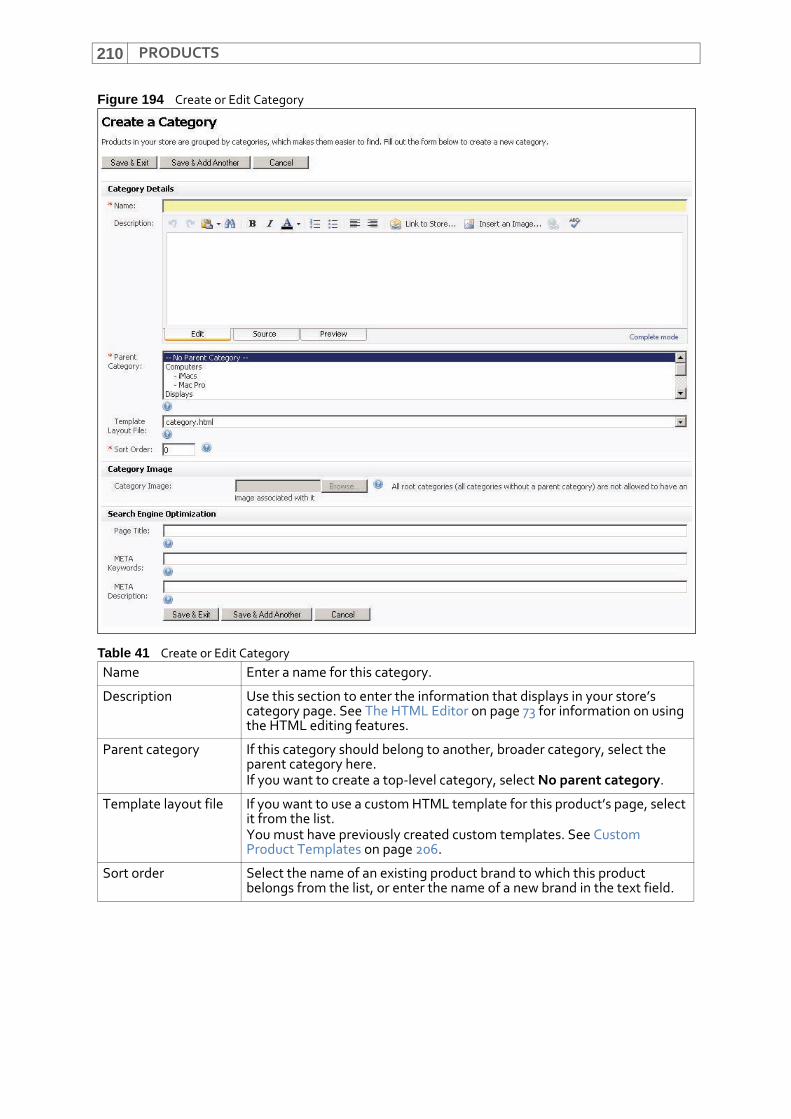
PRODUCTS210
Figure 194 Create or Edit Category
Table 41 Create or Edit CategoryName Enter a name for this category.
Description Use this section to enter the information that displays in your store’s category page. See The HTML Editor on page 73 for information on using the HTML editing features.
Parent category If this category should belong to another, broader category, select the parent category here. If you want to create a top‐level category, select No parent category.
Template layout file If you want to use a custom HTML template for this product’s page, select it from the list.You must have previously created custom templates. See Custom Product Templates on page 206.
Sort order Select the name of an existing product brand to which this product belongs from the list, or enter the name of a new brand in the text field.
PRODUCTS 211
Custom Category TemplatesYou can customize your store’s basic category page template, and then assign the template to a category.
Category image Use this field to upload an image that displays in the category’s parent category.
Note: Top‐level categories cannot use category images, since there is no parent page in which to display them.
For example if you run a camping store and are creating a category for tents, you can upload an image of a variety of tents.Click the image name to view the image in a new window.
Note: You can use images of the following types: Graphics Interchange Format (.gif), JPEG (.jpg) and Portable Network Graphics (.png).
Delete current image This displays when you are using a Category image. Select this and click Browse to remove the current image from the Interspire Shopping Cart server when you upload a new file.
Page title Enter the title for the category’s page in your store. This displays in the browser window’s title bar.
Note: If you leave this blank, Interspire Shopping Cart uses the category name as the page title.
META keywords Enter words that describe this category. These terms are used to create the category page’s meta keywords attribute. Separate terms with commas (for example, “term 1, term 2, term 3”).
Note: If you leave this blank, this product page uses the storewide meta keywords you specify in the Settings > Store settings screen.
Note: In the past, the meta keywords attribute was examined by search engines to determine page content information. Now, however, it is rarely used to do so.
META description Enter a description of this category. This is used to create the category page’s meta description attribute.
Note: If you leave this blank, this product page uses the storewide meta description you specify in the Settings > Store settings screen.
Note: Unlike the meta keywords attribute, the meta description attribute is generally supported by search engines, to provide customers with a concise description of the page.
Save & exit Click this to save your changes and return to the Product categories screen.
Save & add another Click this to save your changes and remain in this screen to make further changes.
Cancel Click this to return to the Product categories screen without saving your changes.
Table 41 Create or Edit Category

PRODUCTS212
To create a custom template:
1 In your store’s templates/default directory, copy the category.html file and save it elsewhere.
2 Edit the new category.html file as necessary.
Figure 195 Example Default Category Template HTML File
3 When you have made the required changes, save the file in your templates/default directory, appending an underscore to the name (for example, “_category1.html”).
4 Check the list in a category’s Template layout file list. The new template’s name displays. Select the file name to use the template for the category page.
Viewing and Managing Product VariationsTo view the product variation sets that you already created, click Products > Product variations.
Note: If you did not yet create any product variations, no variations display in this screen. Click Add a product variation to set up a new variation set (see Adding and Editing Product Variations on page 213).
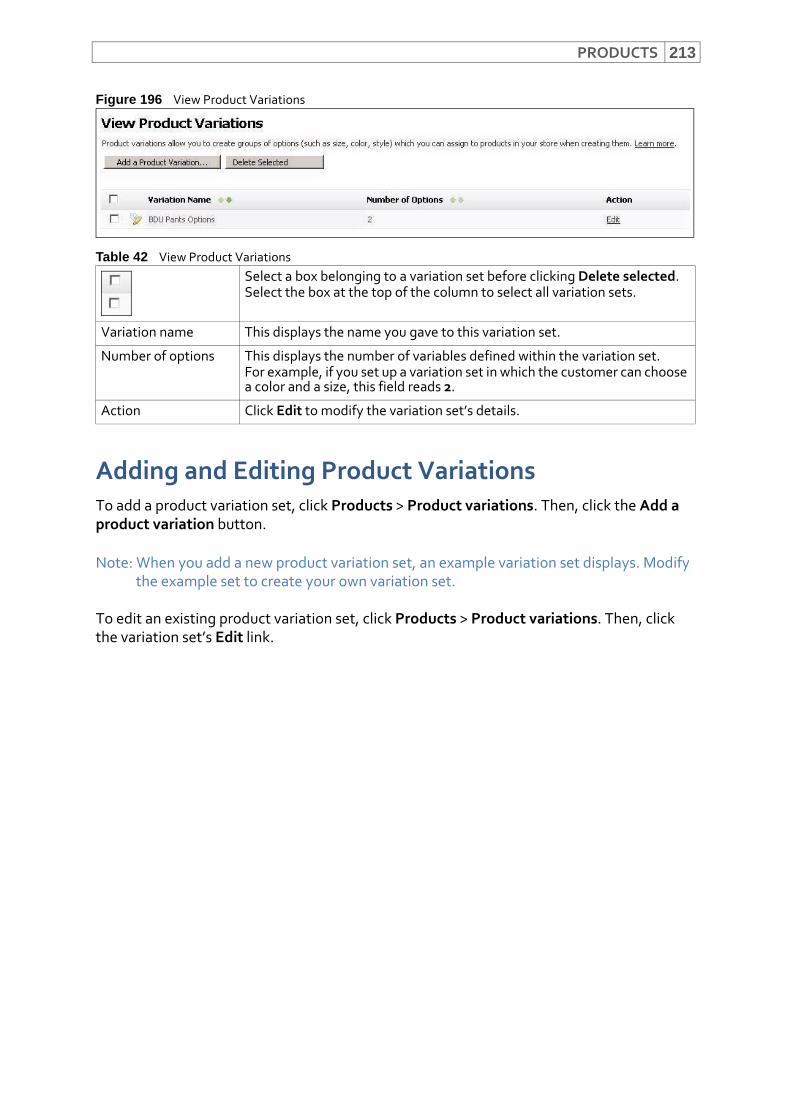
PRODUCTS 213
Figure 196 View Product Variations
Adding and Editing Product VariationsTo add a product variation set, click Products > Product variations. Then, click the Add a product variation button.
Note: When you add a new product variation set, an example variation set displays. Modify the example set to create your own variation set.
To edit an existing product variation set, click Products > Product variations. Then, click the variation set’s Edit link.
Table 42 View Product VariationsSelect a box belonging to a variation set before clicking Delete selected.Select the box at the top of the column to select all variation sets.
Variation name This displays the name you gave to this variation set.
Number of options This displays the number of variables defined within the variation set.For example, if you set up a variation set in which the customer can choose a color and a size, this field reads 2.
Action Click Edit to modify the variation set’s details.
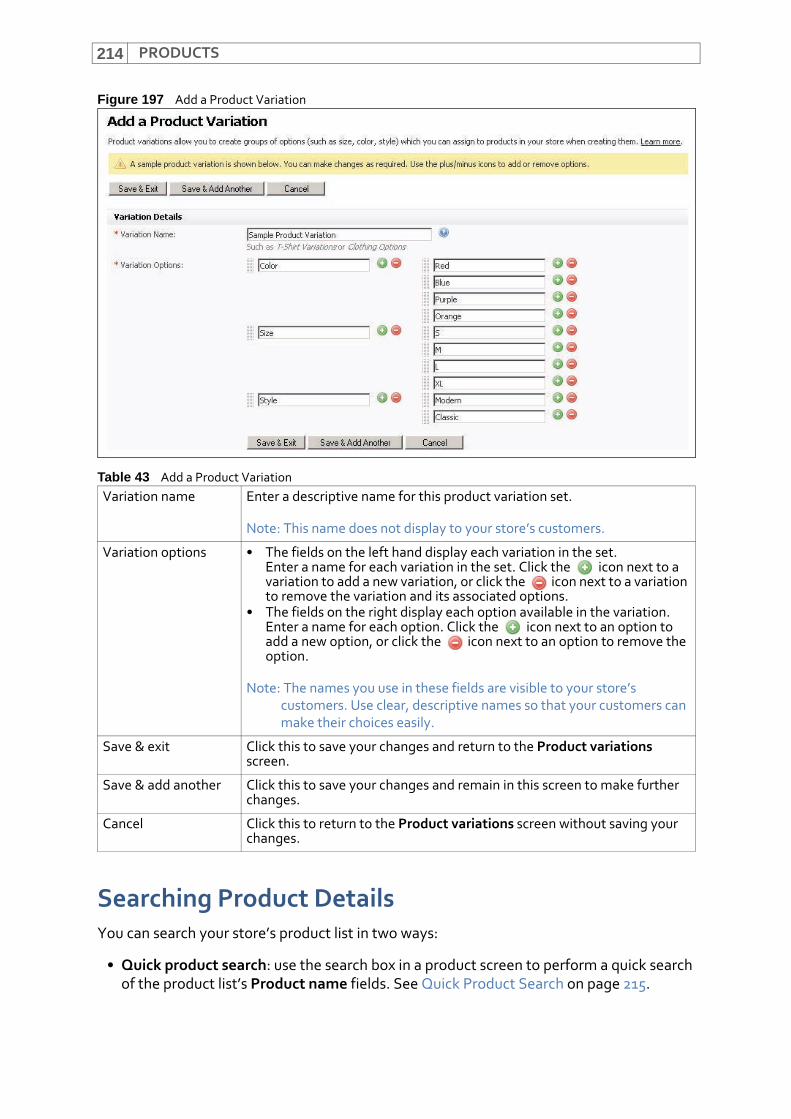
PRODUCTS214
Figure 197 Add a Product Variation
Searching Product DetailsYou can search your store’s product list in two ways:
• Quick product search: use the search box in a product screen to perform a quick search of the product list’s Product name fields. See Quick Product Search on page 215.
Table 43 Add a Product VariationVariation name Enter a descriptive name for this product variation set.
Note: This name does not display to your store’s customers.
Variation options • The fields on the left hand display each variation in the set. Enter a name for each variation in the set. Click the icon next to a variation to add a new variation, or click the icon next to a variation to remove the variation and its associated options.
• The fields on the right display each option available in the variation. Enter a name for each option. Click the icon next to an option to add a new option, or click the icon next to an option to remove the option.
Note: The names you use in these fields are visible to your store’s customers. Use clear, descriptive names so that your customers can make their choices easily.
Save & exit Click this to save your changes and return to the Product variations screen.
Save & add another Click this to save your changes and remain in this screen to make further changes.
Cancel Click this to return to the Product variations screen without saving your changes.
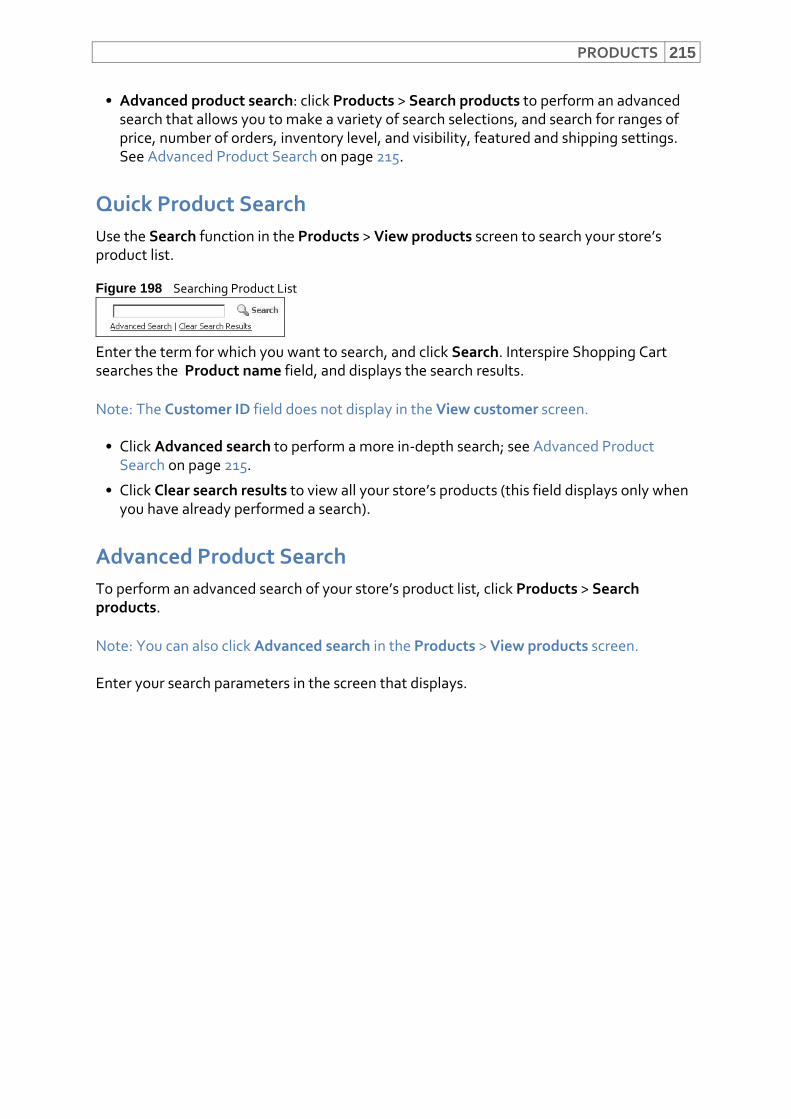
PRODUCTS 215
• Advanced product search: click Products > Search products to perform an advanced search that allows you to make a variety of search selections, and search for ranges of price, number of orders, inventory level, and visibility, featured and shipping settings. See Advanced Product Search on page 215.
Quick Product SearchUse the Search function in the Products > View products screen to search your store’s product list.
Figure 198 Searching Product List
Enter the term for which you want to search, and click Search. Interspire Shopping Cart searches the Product name field, and displays the search results.
Note: The Customer ID field does not display in the View customer screen.
• Click Advanced search to perform a more in‐depth search; see Advanced Product Search on page 215.
• Click Clear search results to view all your store’s products (this field displays only when you have already performed a search).
Advanced Product SearchTo perform an advanced search of your store’s product list, click Products > Search products.
Note: You can also click Advanced search in the Products > View products screen.
Enter your search parameters in the screen that displays.
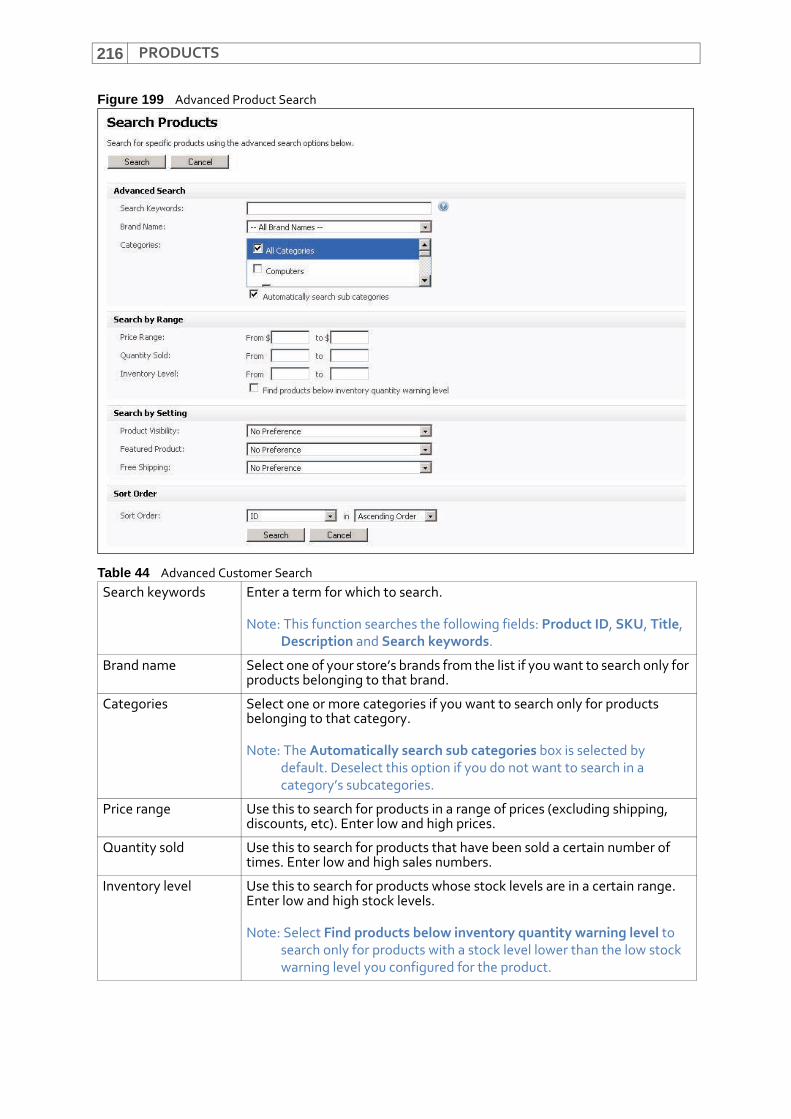
PRODUCTS216
Figure 199 Advanced Product Search
Table 44 Advanced Customer SearchSearch keywords Enter a term for which to search.
Note: This function searches the following fields: Product ID, SKU, Title, Description and Search keywords.
Brand name Select one of your store’s brands from the list if you want to search only for products belonging to that brand.
Categories Select one or more categories if you want to search only for products belonging to that category.
Note: The Automatically search sub categories box is selected by default. Deselect this option if you do not want to search in a category’s subcategories.
Price range Use this to search for products in a range of prices (excluding shipping, discounts, etc). Enter low and high prices.
Quantity sold Use this to search for products that have been sold a certain number of times. Enter low and high sales numbers.
Inventory level Use this to search for products whose stock levels are in a certain range. Enter low and high stock levels.
Note: Select Find products below inventory quantity warning level to search only for products with a stock level lower than the low stock warning level you configured for the product.
PRODUCTS 217
Importing Products’ DetailsInterspire Shopping Cart allows you to import products’ details from a CSV (Comma‐Separated Values) file. You can import files from your computer, or from the Interspire Shopping Cart server.
The CSV file that you use should contain information that you can map to the following fields:
Note: The only mandatory fields are Product name and Category.
• Product Name
• Category
• Brand Name
• Product Code/SKU
• Product Description
• Product Availability
• Price
• Cost Price
• Sale Price
• Retail Price
• Current Stock Level
• Taxable Product?
• Low Stock Level
• Product Warranty
Product visibility • Select Only visible products to search only for products that can be seen by customers in your store.
• Select Only invisible products to search only for products that cannot be seen by customers in your store.
• Select No preference to search for both visible and invisible products.
Featured product • Select Only featured products to search only for products that display in the “featured products” section of your store.
• Select Only non‐featured products to search only for products that do not display in the “featured products” section of your store.
• Select No preference to search for both featured and non‐featured products.
Free shipping • Select Only free shipping to search only for products for which you do not charge shipping.
• Select Only paid shipping to search only for products for which you charge shipping.
• Select No preference to search for both free and paid products.
Search Click this to perform the search.
Cancel Click this to return to the View products screen.
Table 44 Advanced Customer Search
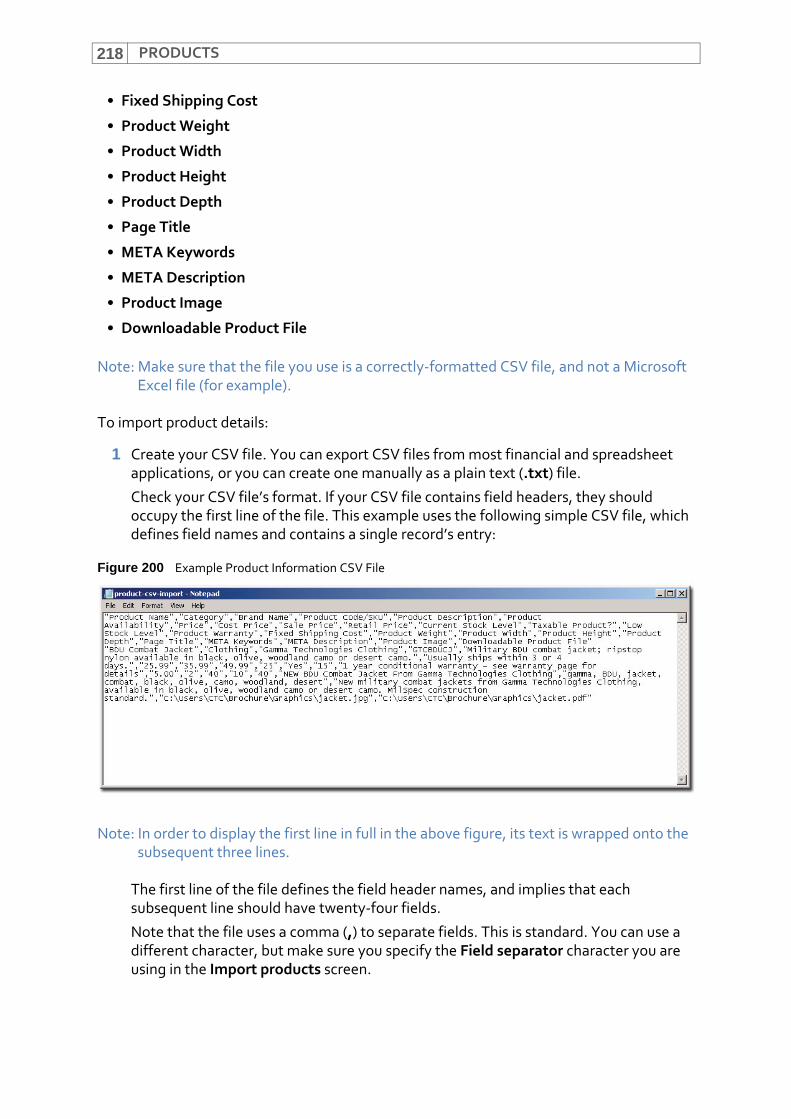
PRODUCTS218
• Fixed Shipping Cost
• Product Weight
• Product Width
• Product Height
• Product Depth
• Page Title
• META Keywords
• META Description
• Product Image
• Downloadable Product File
Note: Make sure that the file you use is a correctly‐formatted CSV file, and not a Microsoft Excel file (for example).
To import product details:
1 Create your CSV file. You can export CSV files from most financial and spreadsheet applications, or you can create one manually as a plain text (.txt) file.
Check your CSV file’s format. If your CSV file contains field headers, they should occupy the first line of the file. This example uses the following simple CSV file, which defines field names and contains a single record’s entry:
Figure 200 Example Product Information CSV File
Note: In order to display the first line in full in the above figure, its text is wrapped onto the subsequent three lines.
The first line of the file defines the field header names, and implies that each subsequent line should have twenty‐four fields.
Note that the file uses a comma (,) to separate fields. This is standard. You can use a different character, but make sure you specify the Field separator character you are using in the Import products screen.
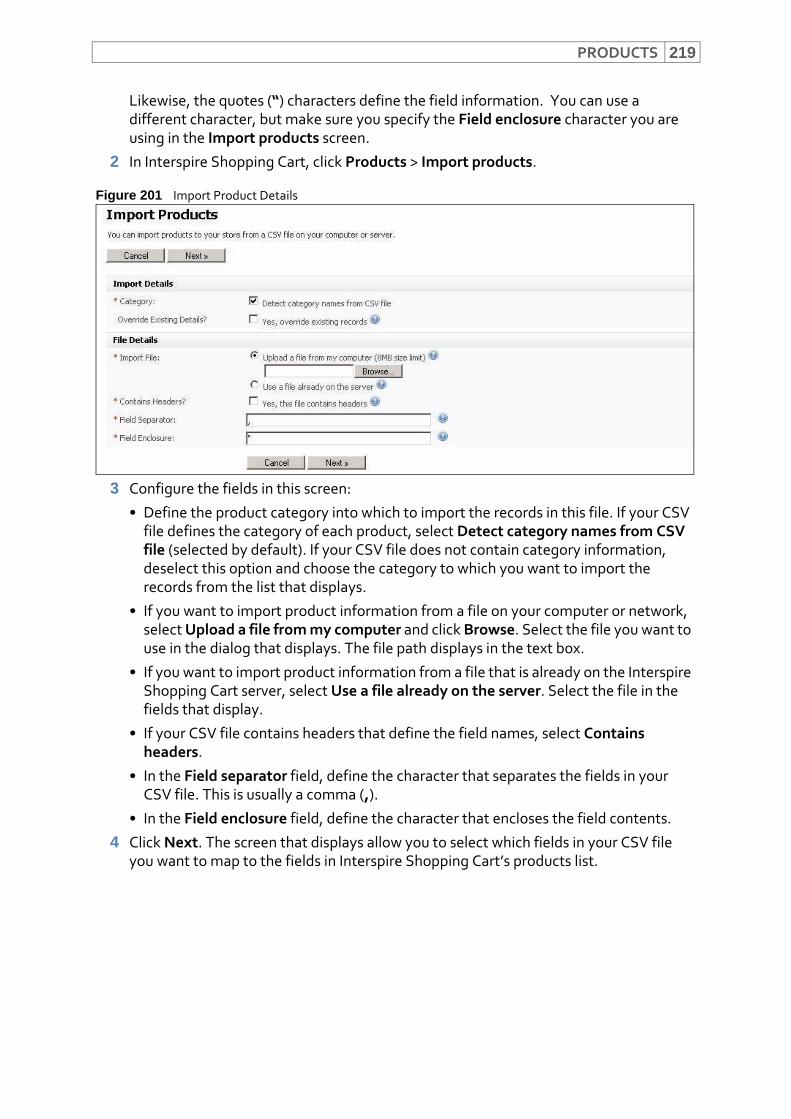
PRODUCTS 219
Likewise, the quotes (“) characters define the field information. You can use a different character, but make sure you specify the Field enclosure character you are using in the Import products screen.
2 In Interspire Shopping Cart, click Products > Import products.
Figure 201 Import Product Details
3 Configure the fields in this screen:
• Define the product category into which to import the records in this file. If your CSV file defines the category of each product, select Detect category names from CSV file (selected by default). If your CSV file does not contain category information, deselect this option and choose the category to which you want to import the records from the list that displays.
• If you want to import product information from a file on your computer or network, select Upload a file from my computer and click Browse. Select the file you want to use in the dialog that displays. The file path displays in the text box.
• If you want to import product information from a file that is already on the Interspire Shopping Cart server, select Use a file already on the server. Select the file in the fields that display.
• If your CSV file contains headers that define the field names, select Contains headers.
• In the Field separator field, define the character that separates the fields in your CSV file. This is usually a comma (,).
• In the Field enclosure field, define the character that encloses the field contents.
4 Click Next. The screen that displays allow you to select which fields in your CSV file you want to map to the fields in Interspire Shopping Cart’s products list.

PRODUCTS220
Figure 202 Import Product Details: Map Fields
• In each list, select the field (defined in your CSV file) that should match the specified field in Interspire Shopping Cart.
Note: When a field name defined in your CSV file matches one of the field names in Interspire Shopping Cart, the field is mapped automatically.
When you define the field (or fields) that contains category information, you have two options: Choose My category information is in one column in my CSV file if your CSV file defines only one category for each record. Alternatively, choose My category information is in more than one column in my CSV file if your CSV file defines multiple categories, in order to set up parent and child categories. New fields display that allow you to select the fields that determine the Root category (first level), Child category (second level) and Grandchild category (third level).
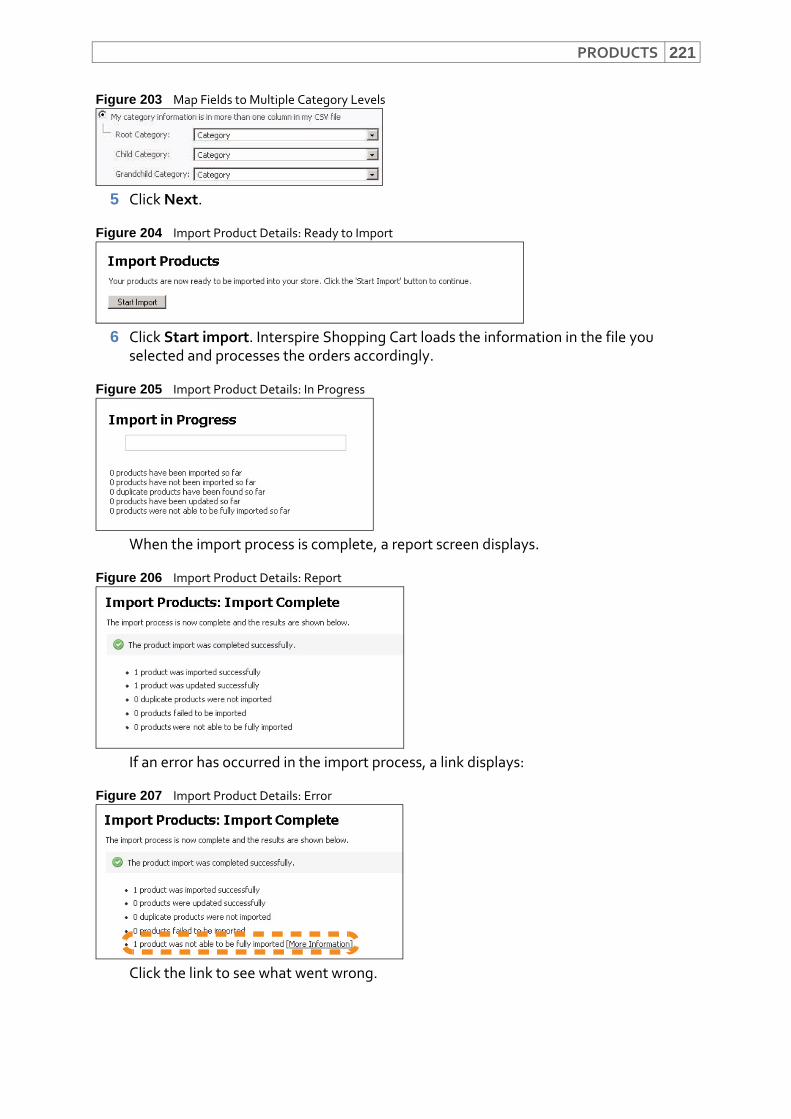
PRODUCTS 221
Figure 203 Map Fields to Multiple Category Levels
5 Click Next.
Figure 204 Import Product Details: Ready to Import
6 Click Start import. Interspire Shopping Cart loads the information in the file you selected and processes the orders accordingly.
Figure 205 Import Product Details: In Progress
When the import process is complete, a report screen displays.
Figure 206 Import Product Details: Report
If an error has occurred in the import process, a link displays:
Figure 207 Import Product Details: Error
Click the link to see what went wrong.
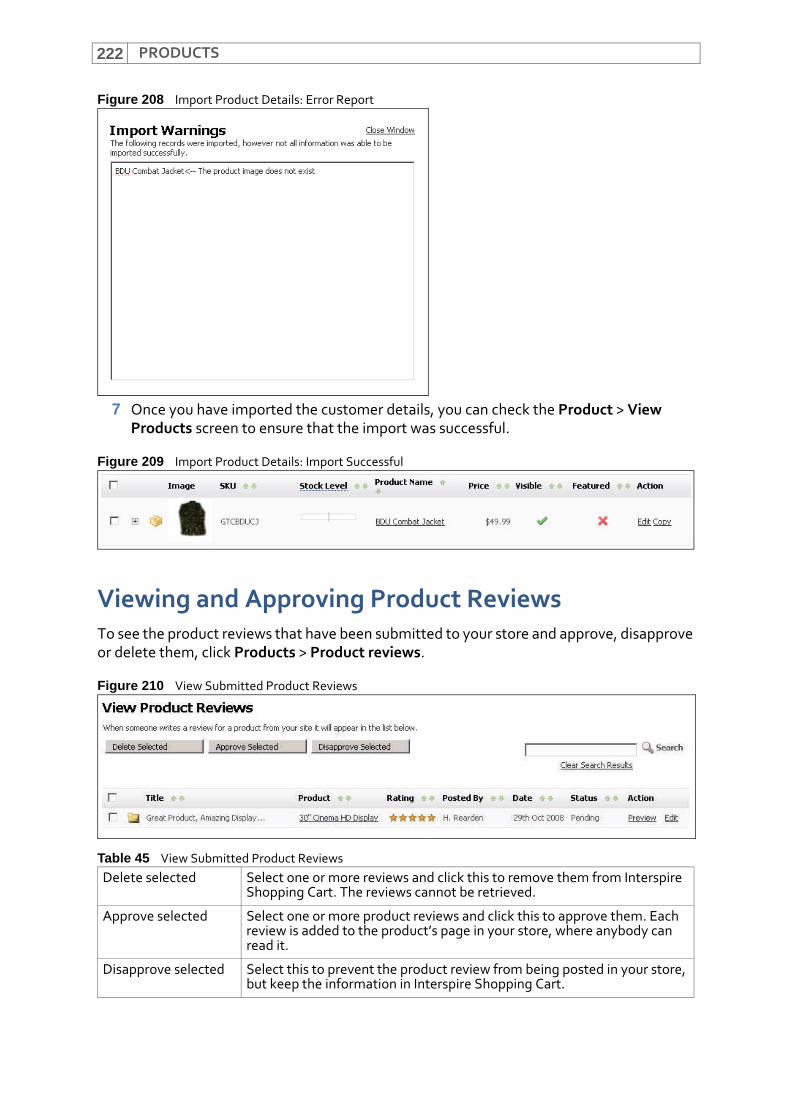
PRODUCTS222
Figure 208 Import Product Details: Error Report
7 Once you have imported the customer details, you can check the Product > View Products screen to ensure that the import was successful.
Figure 209 Import Product Details: Import Successful
Viewing and Approving Product ReviewsTo see the product reviews that have been submitted to your store and approve, disapprove or delete them, click Products > Product reviews.
Figure 210 View Submitted Product Reviews
Table 45 View Submitted Product ReviewsDelete selected Select one or more reviews and click this to remove them from Interspire
Shopping Cart. The reviews cannot be retrieved.
Approve selected Select one or more product reviews and click this to approve them. Each review is added to the product’s page in your store, where anybody can read it.
Disapprove selected Select this to prevent the product review from being posted in your store, but keep the information in Interspire Shopping Cart.
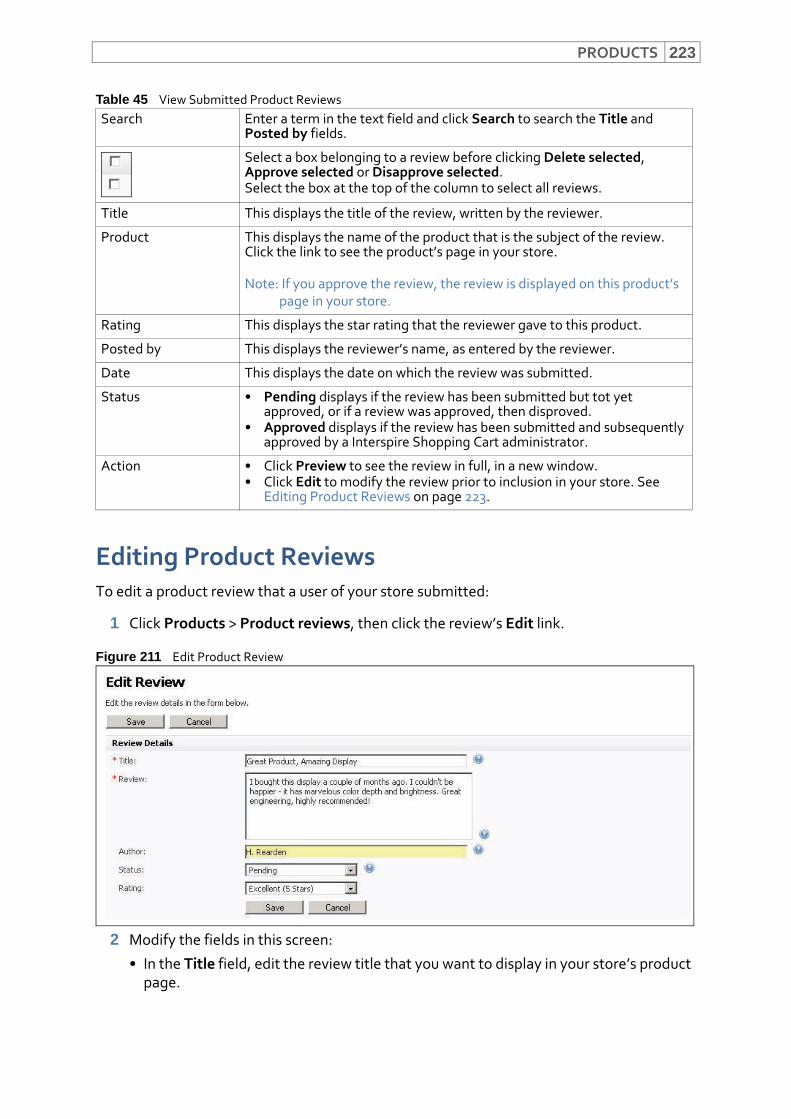
PRODUCTS 223
Editing Product ReviewsTo edit a product review that a user of your store submitted:
1 Click Products > Product reviews, then click the review’s Edit link.
Figure 211 Edit Product Review
2 Modify the fields in this screen:
• In the Title field, edit the review title that you want to display in your store’s product page.
Search Enter a term in the text field and click Search to search the Title and Posted by fields.
Select a box belonging to a review before clicking Delete selected, Approve selected or Disapprove selected.Select the box at the top of the column to select all reviews.
Title This displays the title of the review, written by the reviewer.
Product This displays the name of the product that is the subject of the review. Click the link to see the product’s page in your store.
Note: If you approve the review, the review is displayed on this product’s page in your store.
Rating This displays the star rating that the reviewer gave to this product.
Posted by This displays the reviewer’s name, as entered by the reviewer.
Date This displays the date on which the review was submitted.
Status • Pending displays if the review has been submitted but tot yet approved, or if a review was approved, then disproved.
• Approved displays if the review has been submitted and subsequently approved by a Interspire Shopping Cart administrator.
Action • Click Preview to see the review in full, in a new window.• Click Edit to modify the review prior to inclusion in your store. See
Editing Product Reviews on page 223.
Table 45 View Submitted Product Reviews
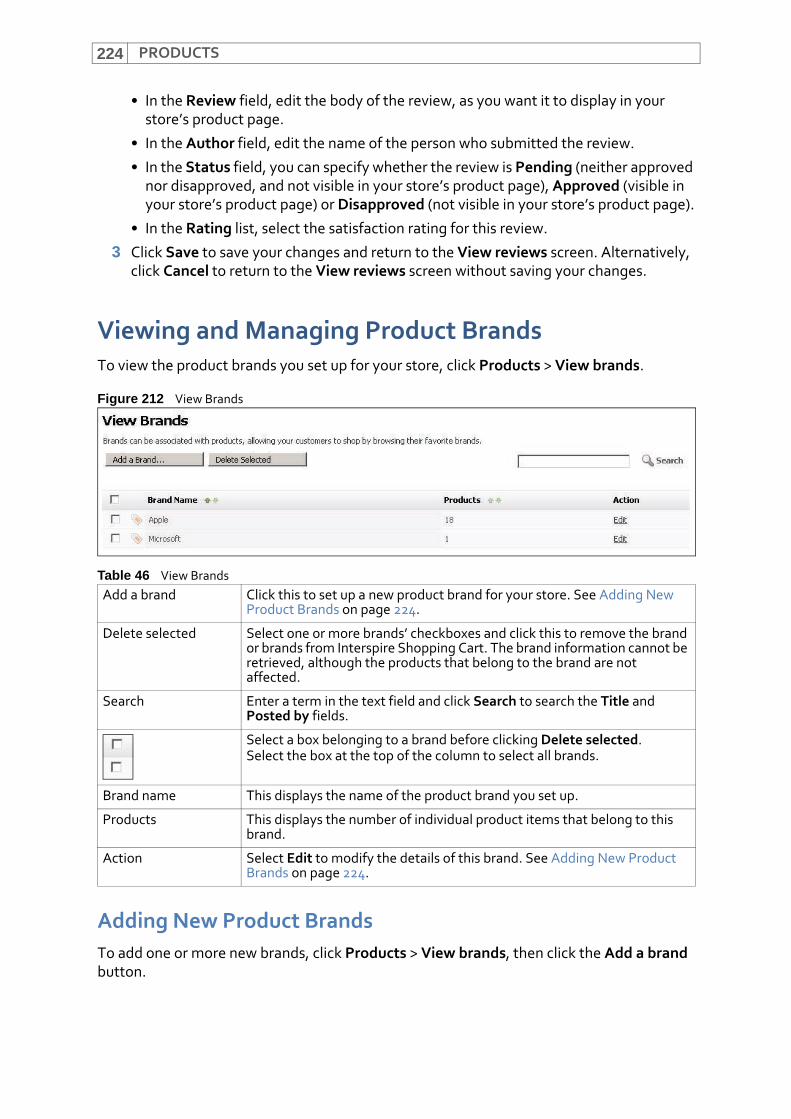
PRODUCTS224
• In the Review field, edit the body of the review, as you want it to display in your store’s product page.
• In the Author field, edit the name of the person who submitted the review.
• In the Status field, you can specify whether the review is Pending (neither approved nor disapproved, and not visible in your store’s product page), Approved (visible in your store’s product page) or Disapproved (not visible in your store’s product page).
• In the Rating list, select the satisfaction rating for this review.
3 Click Save to save your changes and return to the View reviews screen. Alternatively, click Cancel to return to the View reviews screen without saving your changes.
Viewing and Managing Product BrandsTo view the product brands you set up for your store, click Products > View brands.
Figure 212 View Brands
Adding New Product BrandsTo add one or more new brands, click Products > View brands, then click the Add a brand button.
Table 46 View BrandsAdd a brand Click this to set up a new product brand for your store. See Adding New
Product Brands on page 224.
Delete selected Select one or more brands’ checkboxes and click this to remove the brand or brands from Interspire Shopping Cart. The brand information cannot be retrieved, although the products that belong to the brand are not affected.
Search Enter a term in the text field and click Search to search the Title and Posted by fields.
Select a box belonging to a brand before clicking Delete selected.Select the box at the top of the column to select all brands.
Brand name This displays the name of the product brand you set up.
Products This displays the number of individual product items that belong to this brand.
Action Select Edit to modify the details of this brand. See Adding New Product Brands on page 224.

PRODUCTS 225
Note: If you want to specify a brand‐specific page title, meta keyword set and description, or brand image, edit the new brand once you have created it (see Editing Product Brands on page 225).
Figure 213 Add Brands
Enter the names of the brands that you want to create in the Brand names field, with one brand name on each line.
Click Save when you are finished to save your changes and return to the View brands screen. Alternatively, click Cancel to return to the View brands screen without saving your changes.
Editing Product BrandsTo edit the details of an existing brand:
1 Click Products > View brands, then click the brand’s Edit link.
Figure 214 Edit a Brand
2 Edit the fields in this screen:
• The Brand name field is the only mandatory field in this screen. Edit the name if required.
• Enter a Page title for this brand’s page in your store. This title displays in the toolbar of your customers’ browser.
PRODUCTS226
• Specify META keywords for this brand’s page in your store. Enter words that describe your product. These terms are used to create the brand page’s meta keywords attribute. Separate terms with commas (for example, “term 1, term 2, term 3”).
Note: If you leave this blank, this product page uses the storewide meta keywords you specify in the Settings > Store settings screen.
Note: In the past, the meta keywords attribute was examined by search engines to determine page content information. Now, however, it is now rarely used to do so.
• Specify a META description for this brand’s page in your store. Enter a description of your product. This is used to create the product page’s meta description attribute.
Note: If you leave this blank, this product page uses the storewide meta description you specify in the Settings > Store settings screen.
Note: Unlike the meta keywords attribute, the meta description attribute is generally supported by search engines, to provide customers with a concise description of the page.
• Specify a Brand image that displays for this image on your store’s Brands page: click Browse and select the image. The filepath displays in the field to the left.
3 Click Save to save your changes and return to the View brands screen.
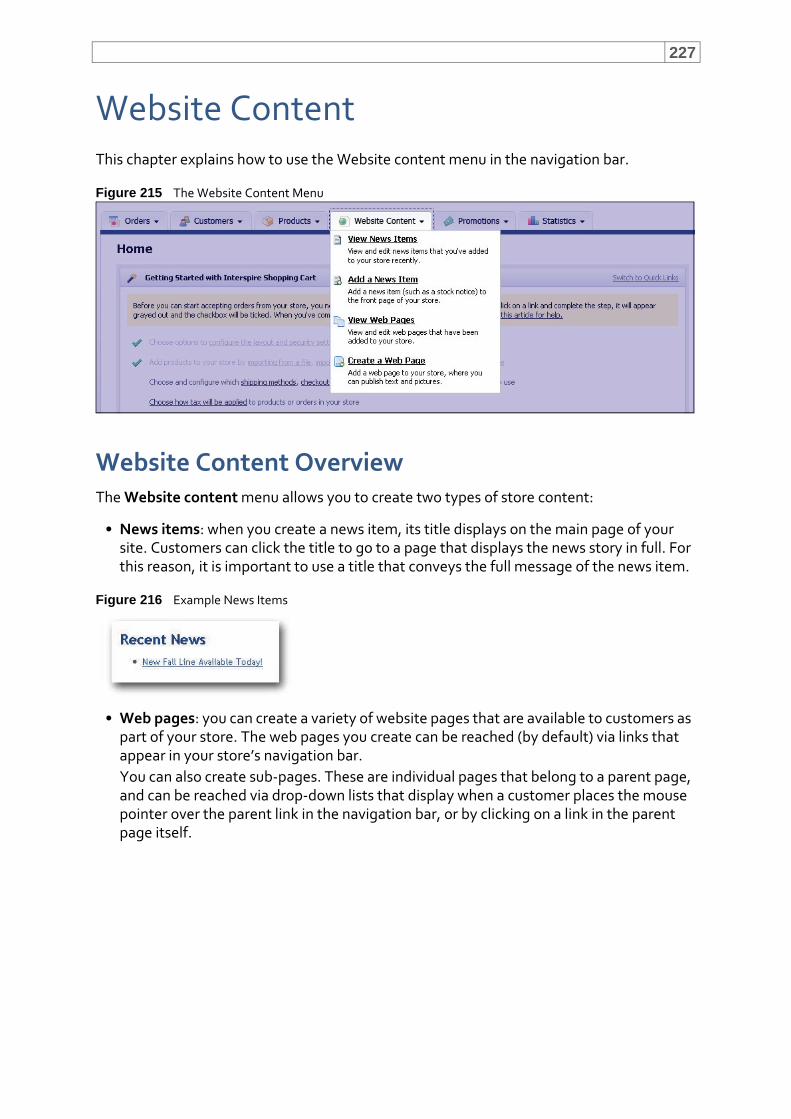
227
Website ContentThis chapter explains how to use the Website content menu in the navigation bar.
Figure 215 The Website Content Menu
Website Content OverviewThe Website content menu allows you to create two types of store content:
• News items: when you create a news item, its title displays on the main page of your site. Customers can click the title to go to a page that displays the news story in full. For this reason, it is important to use a title that conveys the full message of the news item.
Figure 216 Example News Items
• Web pages: you can create a variety of website pages that are available to customers as part of your store. The web pages you create can be reached (by default) via links that appear in your store’s navigation bar.You can also create sub‐pages. These are individual pages that belong to a parent page, and can be reached via drop‐down lists that display when a customer places the mouse pointer over the parent link in the navigation bar, or by clicking on a link in the parent page itself.
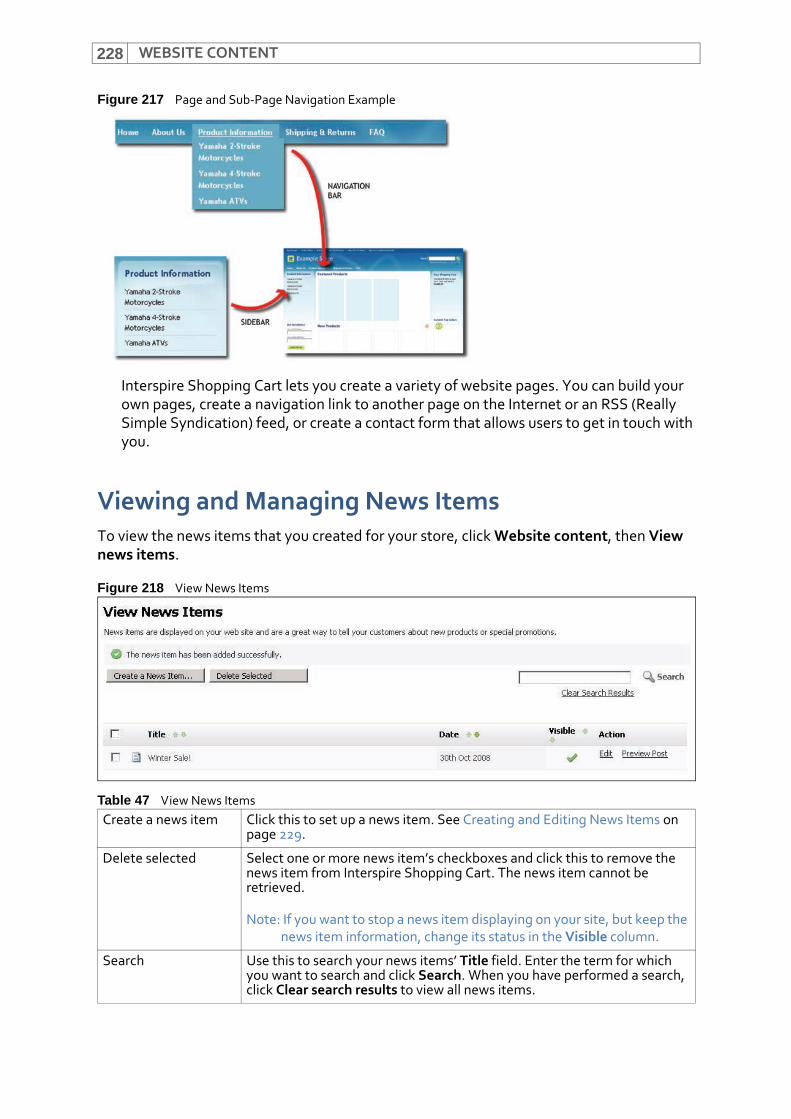
WEBSITE CONTENT228
Figure 217 Page and Sub‐Page Navigation Example
Interspire Shopping Cart lets you create a variety of website pages. You can build your own pages, create a navigation link to another page on the Internet or an RSS (Really Simple Syndication) feed, or create a contact form that allows users to get in touch with you.
Viewing and Managing News ItemsTo view the news items that you created for your store, click Website content, then View news items.
Figure 218 View News Items
Table 47 View News ItemsCreate a news item Click this to set up a news item. See Creating and Editing News Items on
page 229.
Delete selected Select one or more news item’s checkboxes and click this to remove the news item from Interspire Shopping Cart. The news item cannot be retrieved.
Note: If you want to stop a news item displaying on your site, but keep the news item information, change its status in the Visible column.
Search Use this to search your news items’ Title field. Enter the term for which you want to search and click Search. When you have performed a search, click Clear search results to view all news items.
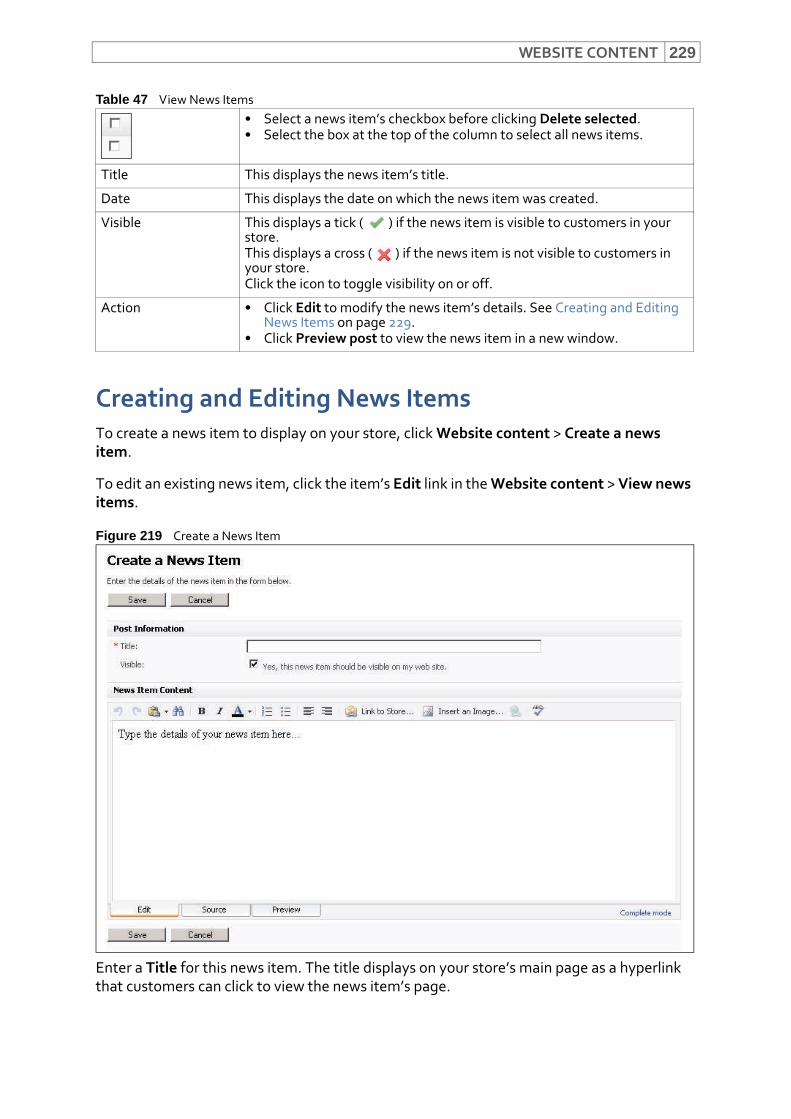
WEBSITE CONTENT 229
Creating and Editing News ItemsTo create a news item to display on your store, click Website content > Create a news item.
To edit an existing news item, click the item’s Edit link in the Website content > View news items.
Figure 219 Create a News Item
Enter a Title for this news item. The title displays on your store’s main page as a hyperlink that customers can click to view the news item’s page.
• Select a news item’s checkbox before clicking Delete selected.• Select the box at the top of the column to select all news items.
Title This displays the news item’s title.
Date This displays the date on which the news item was created.
Visible This displays a tick ( ) if the news item is visible to customers in your store.This displays a cross ( ) if the news item is not visible to customers in your store.Click the icon to toggle visibility on or off.
Action • Click Edit to modify the news item’s details. See Creating and Editing News Items on page 229.
• Click Preview post to view the news item in a new window.
Table 47 View News Items
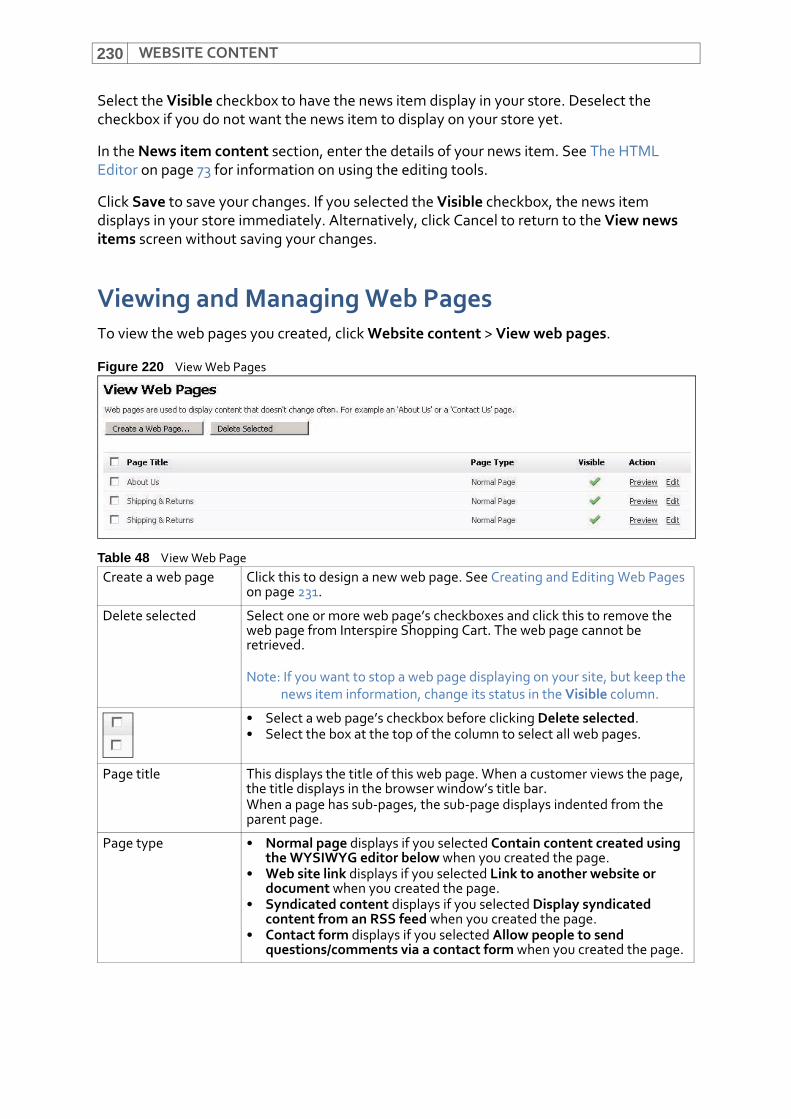
WEBSITE CONTENT230
Select the Visible checkbox to have the news item display in your store. Deselect the checkbox if you do not want the news item to display on your store yet.
In the News item content section, enter the details of your news item. See The HTML Editor on page 73 for information on using the editing tools.
Click Save to save your changes. If you selected the Visible checkbox, the news item displays in your store immediately. Alternatively, click Cancel to return to the View news items screen without saving your changes.
Viewing and Managing Web PagesTo view the web pages you created, click Website content > View web pages.
Figure 220 View Web Pages
Table 48 View Web PageCreate a web page Click this to design a new web page. See Creating and Editing Web Pages
on page 231.
Delete selected Select one or more web page’s checkboxes and click this to remove the web page from Interspire Shopping Cart. The web page cannot be retrieved.
Note: If you want to stop a web page displaying on your site, but keep the news item information, change its status in the Visible column.
• Select a web page’s checkbox before clicking Delete selected.• Select the box at the top of the column to select all web pages.
Page title This displays the title of this web page. When a customer views the page, the title displays in the browser window’s title bar. When a page has sub‐pages, the sub‐page displays indented from the parent page.
Page type • Normal page displays if you selected Contain content created using the WYSIWYG editor below when you created the page.
• Web site link displays if you selected Link to another website or document when you created the page.
• Syndicated content displays if you selected Display syndicated content from an RSS feed when you created the page.
• Contact form displays if you selected Allow people to send questions/comments via a contact form when you created the page.

WEBSITE CONTENT 231
Creating and Editing Web PagesYou can create four types of web page in Interspire Shopping Cart:
• Normal web page: a standard web site page that you create using Interspire Shopping Cart’s WYSIWYG (What You See Is What You Get) editor.
• Website link page: a link to another web page on the Internet.
• Syndicated content page: a link to an RSS (Really Simple Syndication) feed.
• Contact form page: a page that a customer can use to submit a feedback form to you.
Normal Web PageTo create a standard web page, click Website content > Create web page.
Select Contain content created using the WYSIWYG editor below in the This page will section.
Visible This displays a tick ( ) if the web page is visible to customers in your store.This displays a cross ( ) if the web page is not visible to customers in your store.Click the icon to toggle visibility on or off.
Action Click Preview to view the web page in a new window.Click Edit to modify the web page. See Creating and Editing Web Pages on page 231.
Table 48 View Web Page
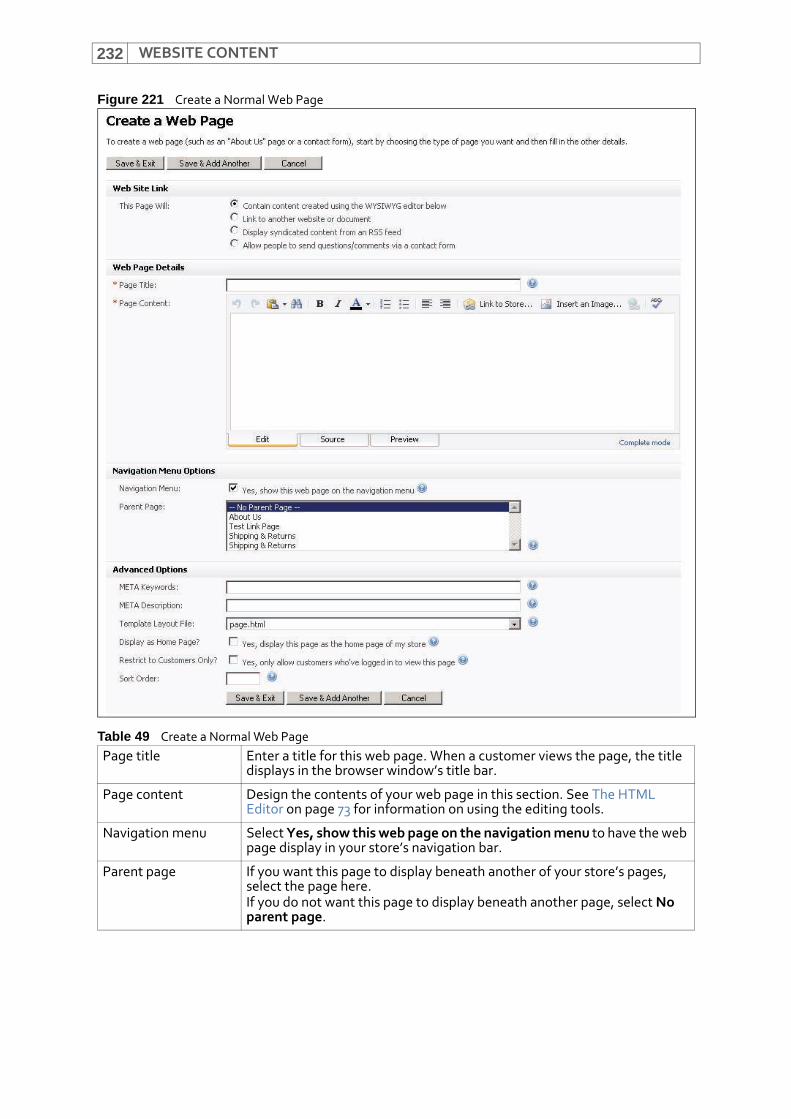
WEBSITE CONTENT232
Figure 221 Create a Normal Web Page
Table 49 Create a Normal Web PagePage title Enter a title for this web page. When a customer views the page, the title
displays in the browser window’s title bar.
Page content Design the contents of your web page in this section. See The HTML Editor on page 73 for information on using the editing tools.
Navigation menu Select Yes, show this web page on the navigation menu to have the web page display in your store’s navigation bar.
Parent page If you want this page to display beneath another of your store’s pages, select the page here.If you do not want this page to display beneath another page, select No parent page.
WEBSITE CONTENT 233
Website Link PageTo create a link to another web page on the Internet, click Website content > Create web page.
Select Link to another website or document in the This page will section.
META keywords Enter words that describe this page. These terms are used to create the page’s meta keywords attribute. Separate terms with commas (for example, “term 1, term 2, term 3”).
Note: If you leave this blank, this page uses the storewide meta keywords you specify in the Settings > Store settings screen.
Note: In the past, the meta keywords attribute was examined by search engines to determine page content information. Now, however, it is rarely used to do so.
META description Enter a description of your page. This is used to create the page’s meta description attribute.
Note: If you leave this blank, this page uses the storewide meta description you specify in the Settings > Store settings screen.
Note: Unlike the meta keywords attribute, the meta description attribute is generally supported by search engines, to provide customers with a concise description of the page.
Template layout file If you want to use a custom HTML template for this page, select it from the list.You must have previously created custom templates. See Custom Page Templates on page 237.
Display as home page Select this if you want to use this page as your store’s main page.
Restrict to customers only
Select this if you want only customers who have logged into your store to be able to view this page.
Sort order Use this field to control the order in which the web page titles display in the navigation bar. Page titles display from left to right in the numeric sort order you configure.
Save & exit Click this to save the web page and return to the View web pages screen.
Save & add another Click this to save the web page and continue configuring the page.
Cancel Click this to return to the View web pages screen without saving your changes.
Table 49 Create a Normal Web Page
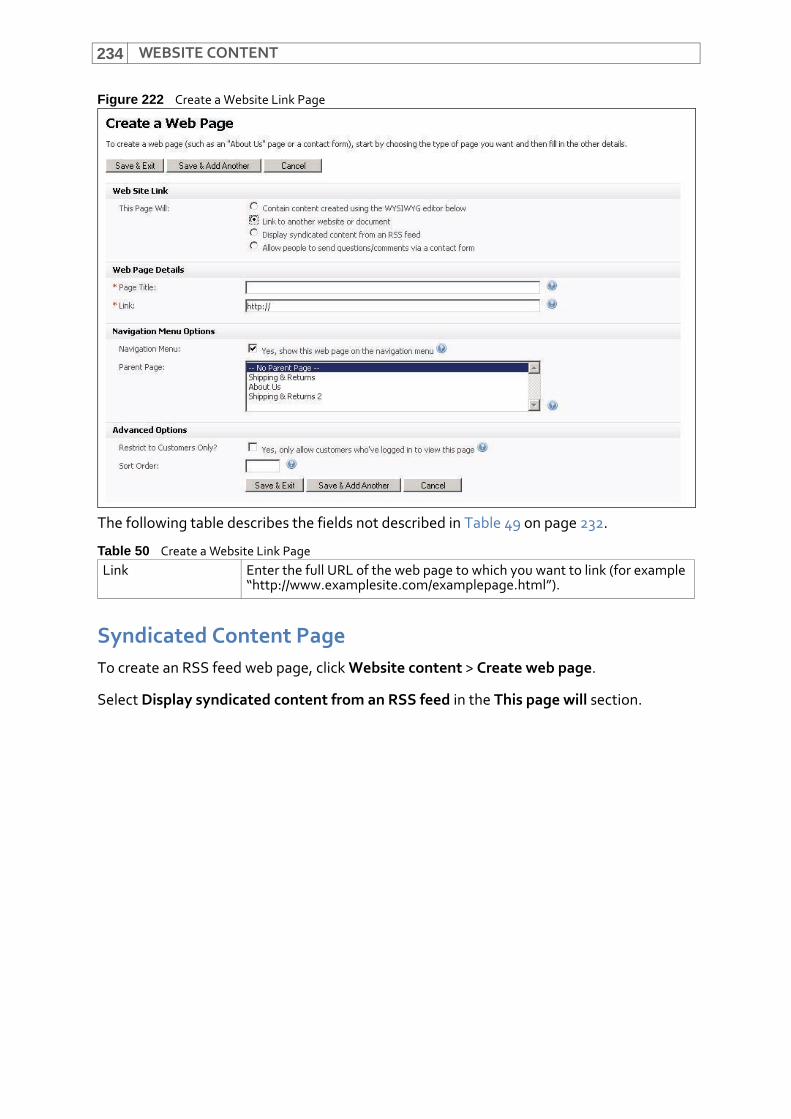
WEBSITE CONTENT234
Figure 222 Create a Website Link Page
The following table describes the fields not described in Table 49 on page 232.
Syndicated Content PageTo create an RSS feed web page, click Website content > Create web page.
Select Display syndicated content from an RSS feed in the This page will section.
Table 50 Create a Website Link PageLink Enter the full URL of the web page to which you want to link (for example
“http://www.examplesite.com/examplepage.html”).
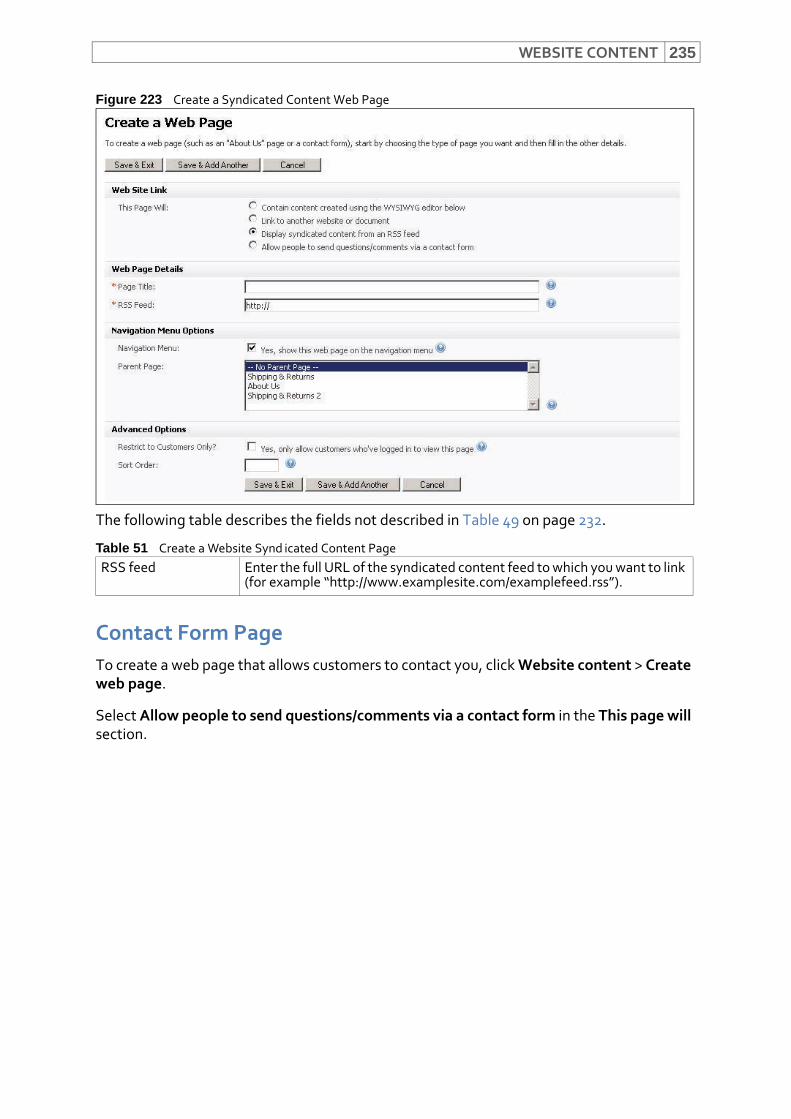
WEBSITE CONTENT 235
Figure 223 Create a Syndicated Content Web Page
The following table describes the fields not described in Table 49 on page 232.
Contact Form PageTo create a web page that allows customers to contact you, click Website content > Create web page.
Select Allow people to send questions/comments via a contact form in the This page will section.
Table 51 Create a Website Synd icated Content PageRSS feed Enter the full URL of the syndicated content feed to which you want to link
(for example “http://www.examplesite.com/examplefeed.rss”).
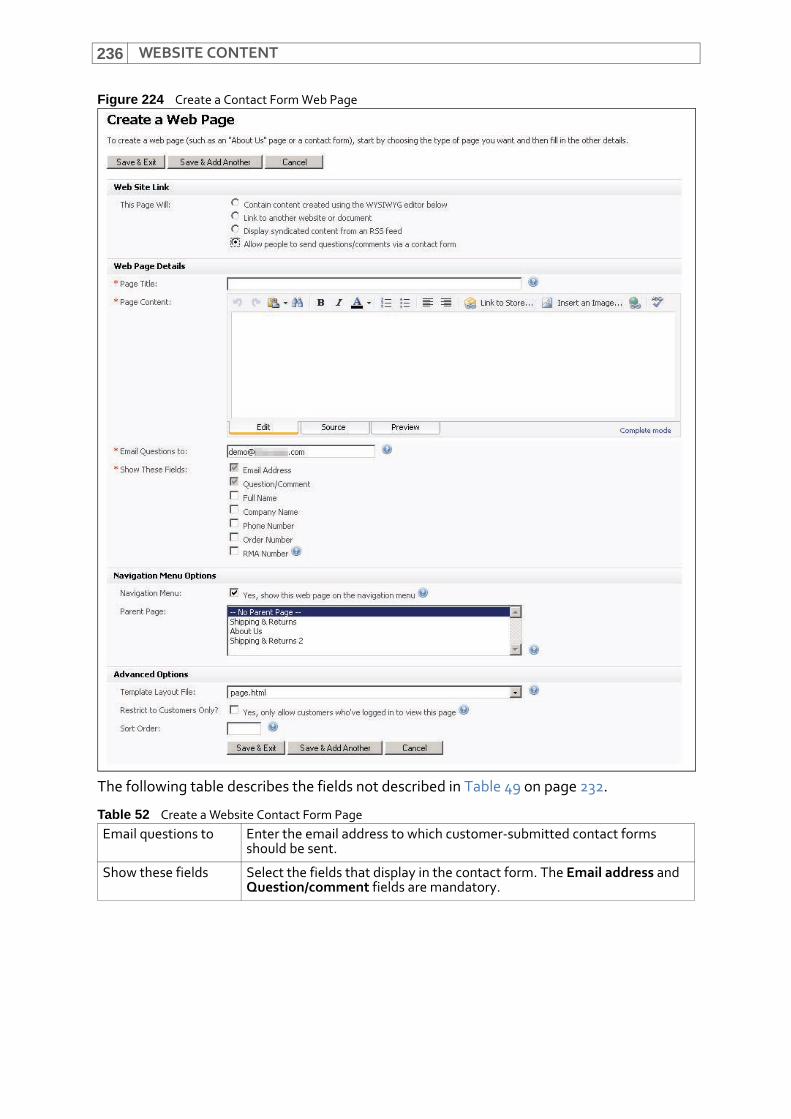
WEBSITE CONTENT236
Figure 224 Create a Contact Form Web Page
The following table describes the fields not described in Table 49 on page 232.
Table 52 Create a Website Contact Form PageEmail questions to Enter the email address to which customer‐submitted contact forms
should be sent.
Show these fields Select the fields that display in the contact form. The Email address and Question/comment fields are mandatory.
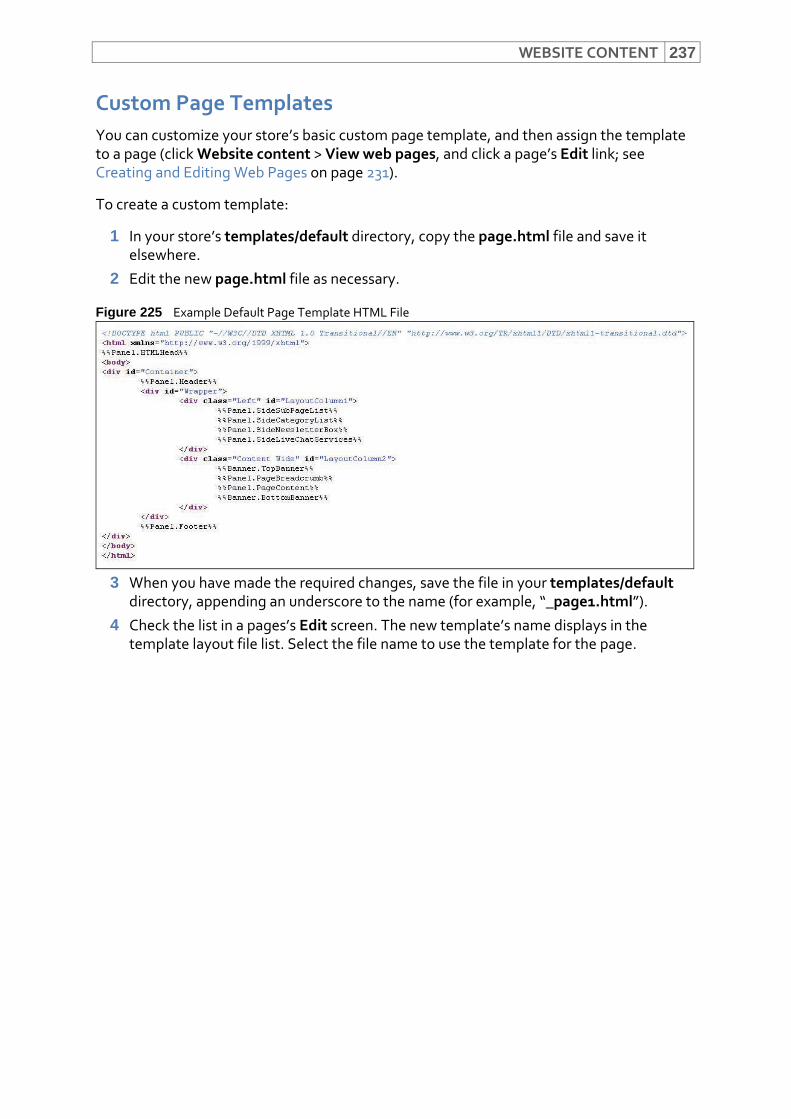
WEBSITE CONTENT 237
Custom Page TemplatesYou can customize your store’s basic custom page template, and then assign the template to a page (click Website content > View web pages, and click a page’s Edit link; see Creating and Editing Web Pages on page 231).
To create a custom template:
1 In your store’s templates/default directory, copy the page.html file and save it elsewhere.
2 Edit the new page.html file as necessary.
Figure 225 Example Default Page Template HTML File
3 When you have made the required changes, save the file in your templates/default directory, appending an underscore to the name (for example, “_page1.html”).
4 Check the list in a pages’s Edit screen. The new template’s name displays in the template layout file list. Select the file name to use the template for the page.

WEBSITE CONTENT238
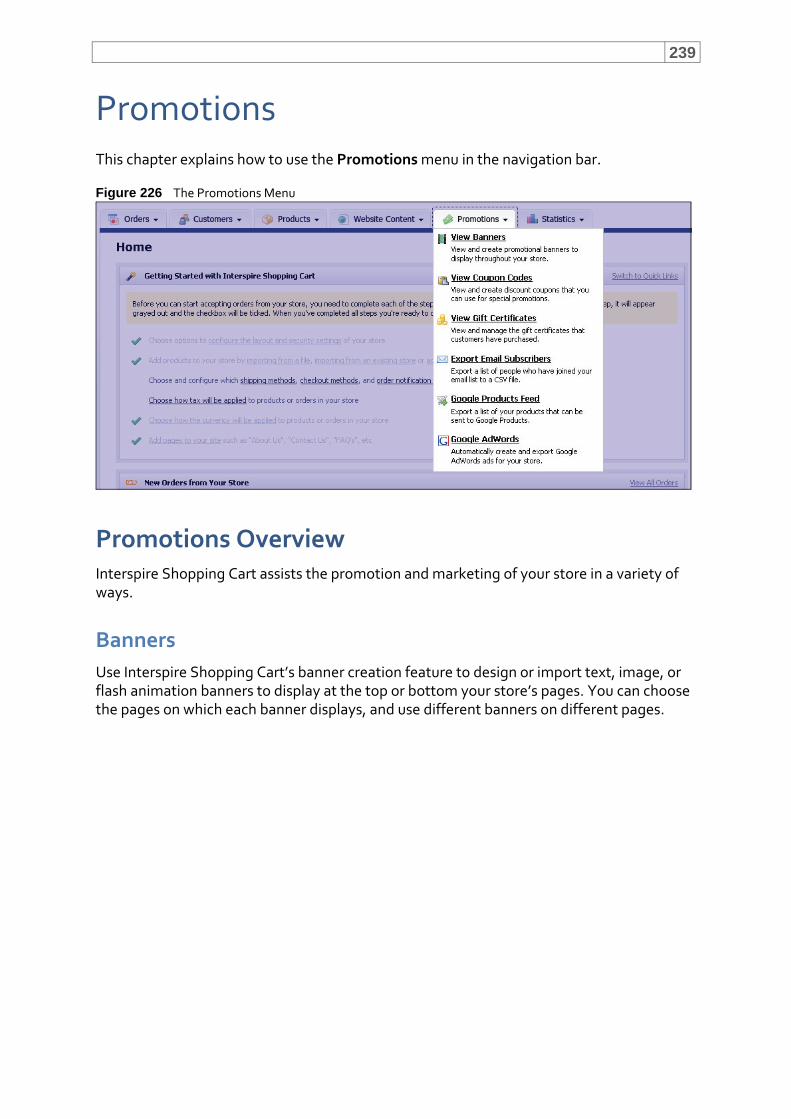
239
PromotionsThis chapter explains how to use the Promotions menu in the navigation bar.
Figure 226 The Promotions Menu
Promotions OverviewInterspire Shopping Cart assists the promotion and marketing of your store in a variety of ways.
BannersUse Interspire Shopping Cart’s banner creation feature to design or import text, image, or flash animation banners to display at the top or bottom your store’s pages. You can choose the pages on which each banner displays, and use different banners on different pages.
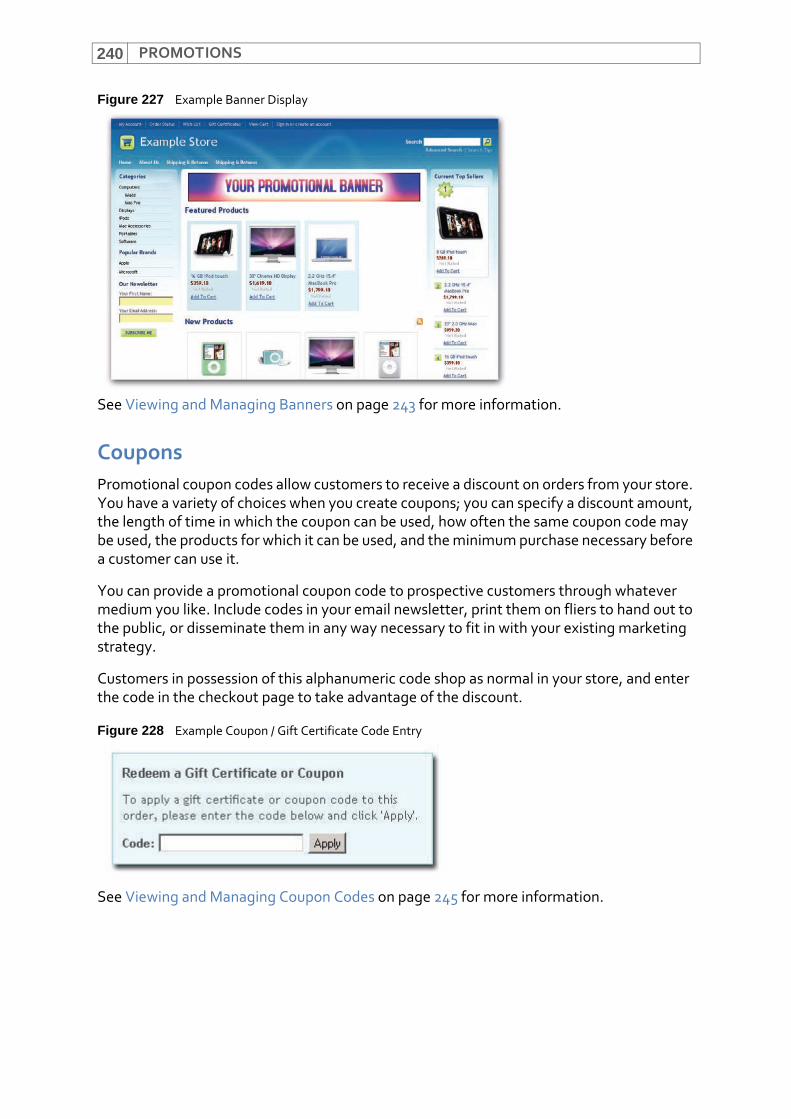
PROMOTIONS240
Figure 227 Example Banner Display
See Viewing and Managing Banners on page 243 for more information.
CouponsPromotional coupon codes allow customers to receive a discount on orders from your store. You have a variety of choices when you create coupons; you can specify a discount amount, the length of time in which the coupon can be used, how often the same coupon code may be used, the products for which it can be used, and the minimum purchase necessary before a customer can use it.
You can provide a promotional coupon code to prospective customers through whatever medium you like. Include codes in your email newsletter, print them on fliers to hand out to the public, or disseminate them in any way necessary to fit in with your existing marketing strategy.
Customers in possession of this alphanumeric code shop as normal in your store, and enter the code in the checkout page to take advantage of the discount.
Figure 228 Example Coupon / Gift Certificate Code Entry
See Viewing and Managing Coupon Codes on page 245 for more information.
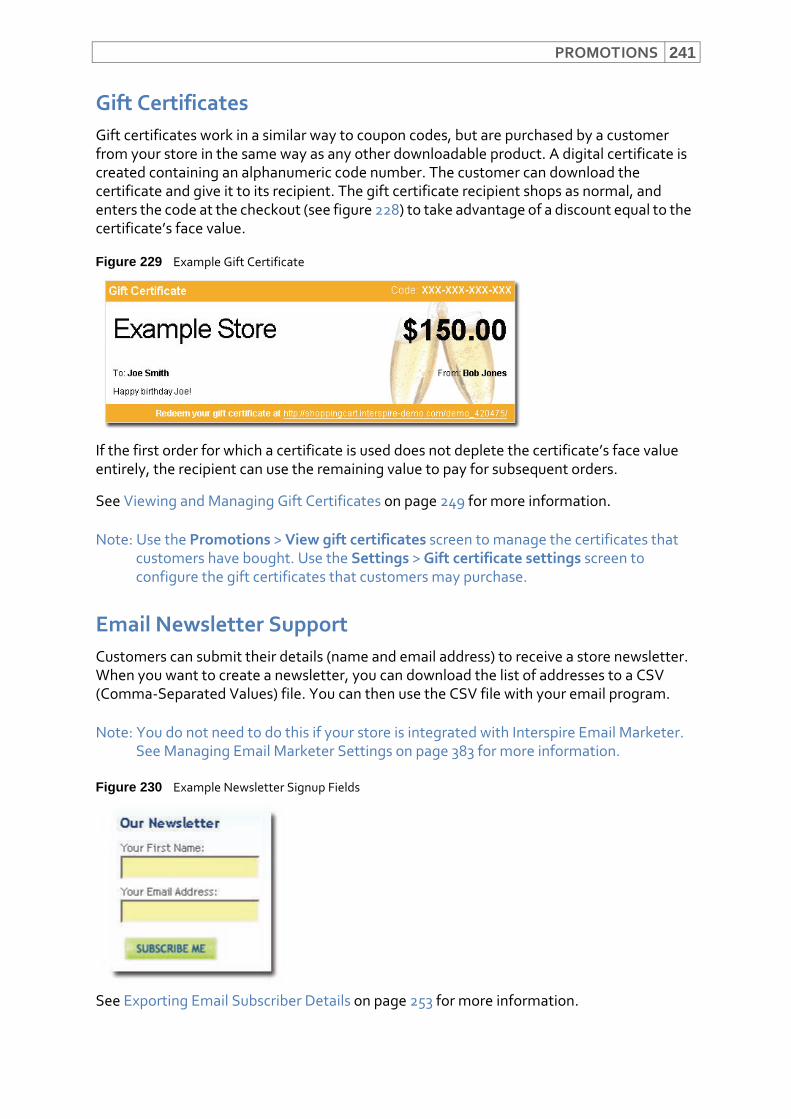
PROMOTIONS 241
Gift CertificatesGift certificates work in a similar way to coupon codes, but are purchased by a customer from your store in the same way as any other downloadable product. A digital certificate is created containing an alphanumeric code number. The customer can download the certificate and give it to its recipient. The gift certificate recipient shops as normal, and enters the code at the checkout (see figure 228) to take advantage of a discount equal to the certificate’s face value.
Figure 229 Example Gift Certificate
If the first order for which a certificate is used does not deplete the certificate’s face value entirely, the recipient can use the remaining value to pay for subsequent orders.
See Viewing and Managing Gift Certificates on page 249 for more information.
Note: Use the Promotions > View gift certificates screen to manage the certificates that customers have bought. Use the Settings > Gift certificate settings screen to configure the gift certificates that customers may purchase.
Email Newsletter SupportCustomers can submit their details (name and email address) to receive a store newsletter. When you want to create a newsletter, you can download the list of addresses to a CSV (Comma‐Separated Values) file. You can then use the CSV file with your email program.
Note: You do not need to do this if your store is integrated with Interspire Email Marketer. See Managing Email Marketer Settings on page 383 for more information.
Figure 230 Example Newsletter Signup Fields
See Exporting Email Subscriber Details on page 253 for more information.
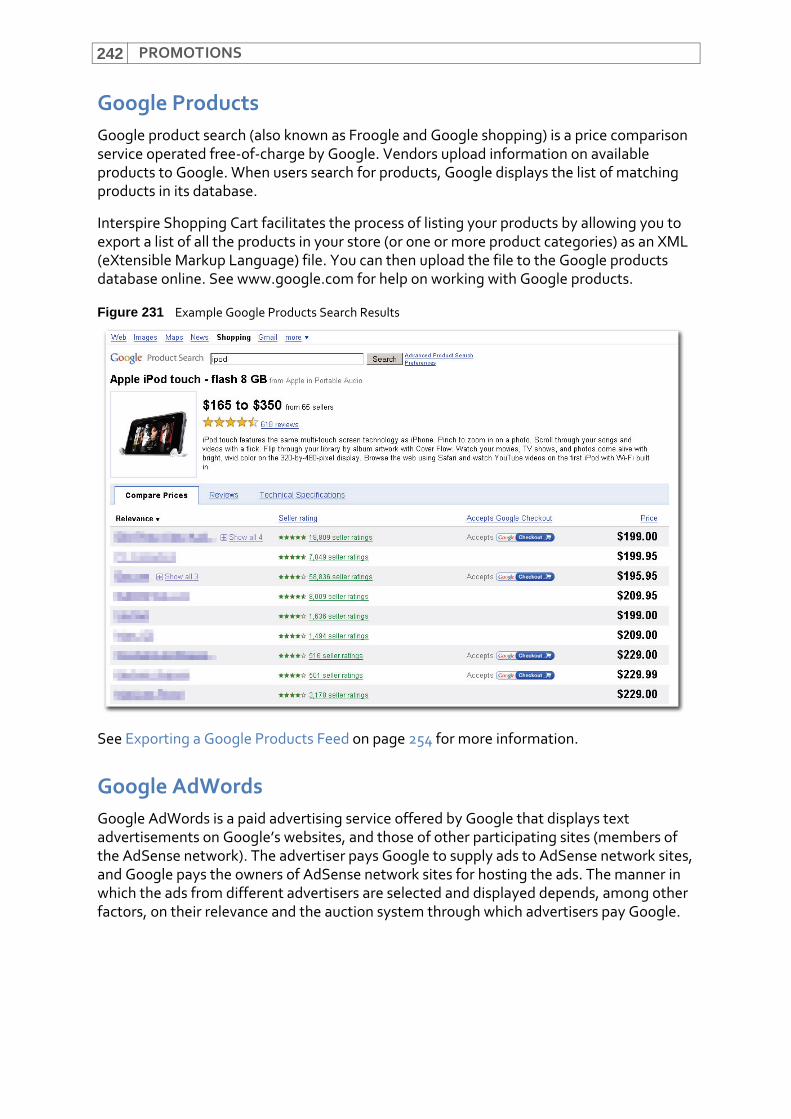
PROMOTIONS242
Google ProductsGoogle product search (also known as Froogle and Google shopping) is a price comparison service operated free‐of‐charge by Google. Vendors upload information on available products to Google. When users search for products, Google displays the list of matching products in its database.
Interspire Shopping Cart facilitates the process of listing your products by allowing you to export a list of all the products in your store (or one or more product categories) as an XML (eXtensible Markup Language) file. You can then upload the file to the Google products database online. See www.google.com for help on working with Google products.
Figure 231 Example Google Products Search Results
See Exporting a Google Products Feed on page 254 for more information.
Google AdWordsGoogle AdWords is a paid advertising service offered by Google that displays text advertisements on Google’s websites, and those of other participating sites (members of the AdSense network). The advertiser pays Google to supply ads to AdSense network sites, and Google pays the owners of AdSense network sites for hosting the ads. The manner in which the ads from different advertisers are selected and displayed depends, among other factors, on their relevance and the auction system through which advertisers pay Google.
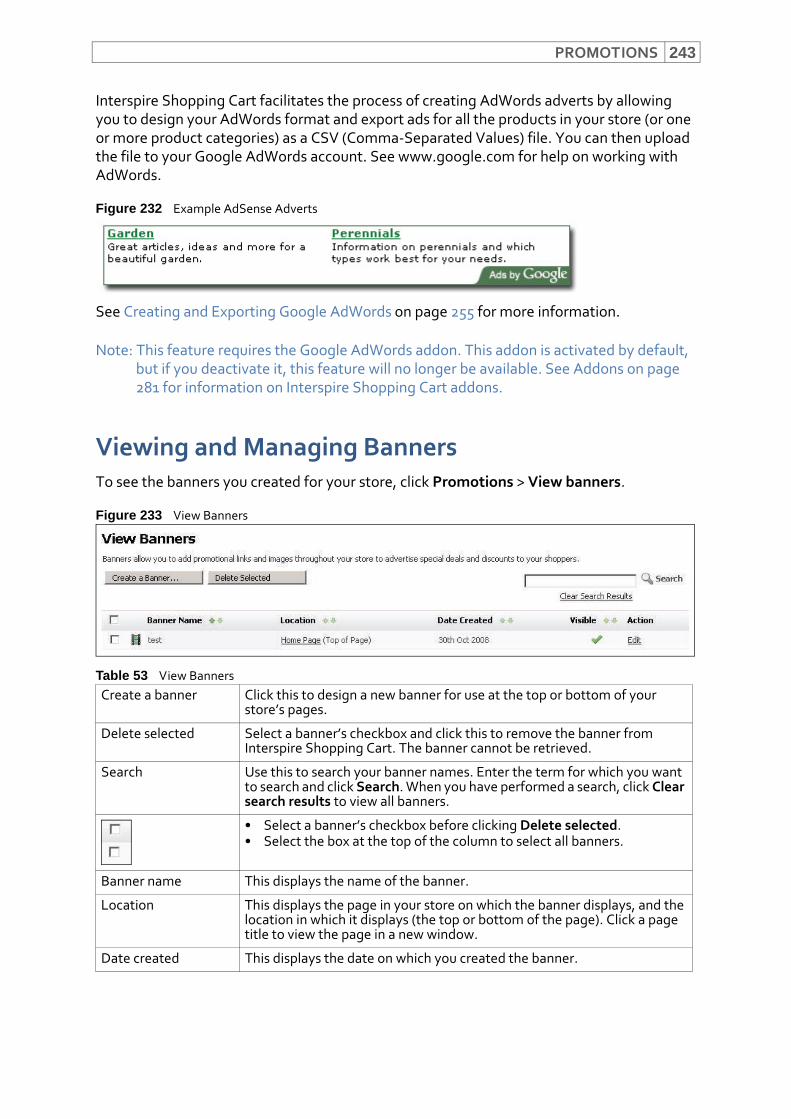
PROMOTIONS 243
Interspire Shopping Cart facilitates the process of creating AdWords adverts by allowing you to design your AdWords format and export ads for all the products in your store (or one or more product categories) as a CSV (Comma‐Separated Values) file. You can then upload the file to your Google AdWords account. See www.google.com for help on working with AdWords.
Figure 232 Example AdSense Adverts
See Creating and Exporting Google AdWords on page 255 for more information.
Note: This feature requires the Google AdWords addon. This addon is activated by default, but if you deactivate it, this feature will no longer be available. See Addons on page 281 for information on Interspire Shopping Cart addons.
Viewing and Managing BannersTo see the banners you created for your store, click Promotions > View banners.
Figure 233 View Banners
Table 53 View Banners Create a banner Click this to design a new banner for use at the top or bottom of your
store’s pages.
Delete selected Select a banner’s checkbox and click this to remove the banner from Interspire Shopping Cart. The banner cannot be retrieved.
Search Use this to search your banner names. Enter the term for which you want to search and click Search. When you have performed a search, click Clear search results to view all banners.
• Select a banner’s checkbox before clicking Delete selected.• Select the box at the top of the column to select all banners.
Banner name This displays the name of the banner.
Location This displays the page in your store on which the banner displays, and the location in which it displays (the top or bottom of the page). Click a page title to view the page in a new window.
Date created This displays the date on which you created the banner.
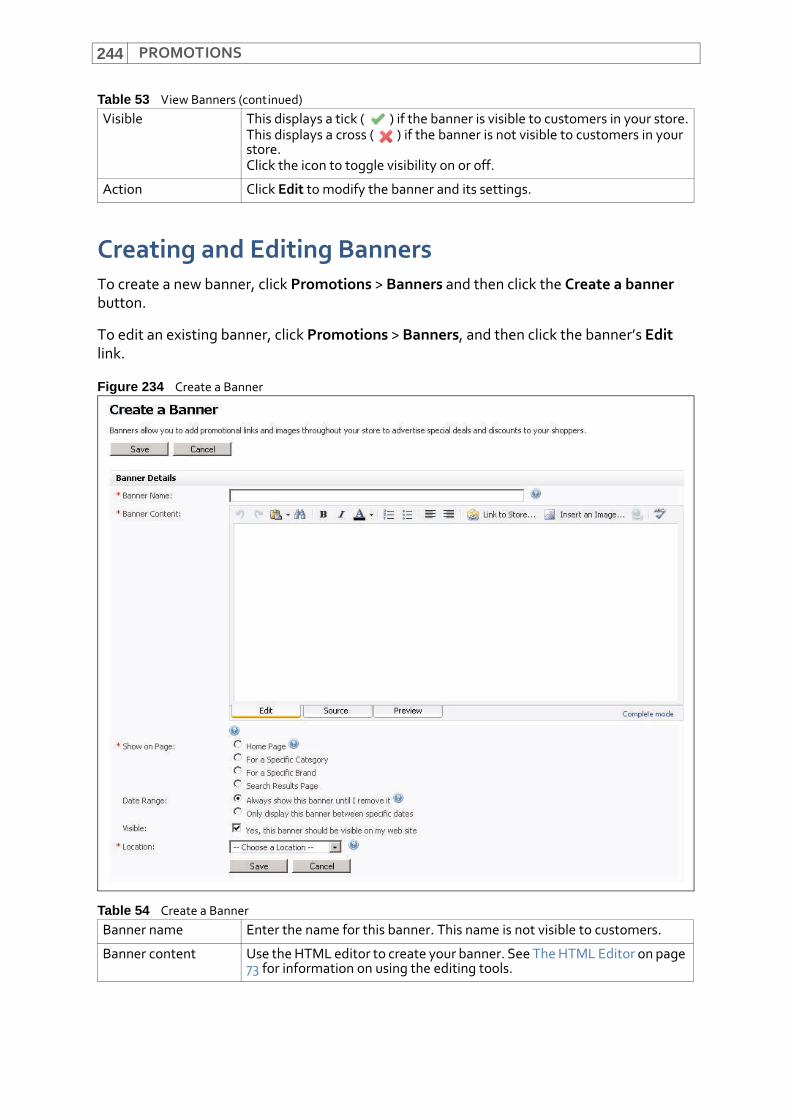
PROMOTIONS244
Creating and Editing BannersTo create a new banner, click Promotions > Banners and then click the Create a banner button.
To edit an existing banner, click Promotions > Banners, and then click the banner’s Edit link.
Figure 234 Create a Banner
Visible This displays a tick ( ) if the banner is visible to customers in your store.This displays a cross ( ) if the banner is not visible to customers in your store.Click the icon to toggle visibility on or off.
Action Click Edit to modify the banner and its settings.
Table 54 Create a Banner Banner name Enter the name for this banner. This name is not visible to customers.
Banner content Use the HTML editor to create your banner. See The HTML Editor on page 73 for information on using the editing tools.
Table 53 View Banners (continued)
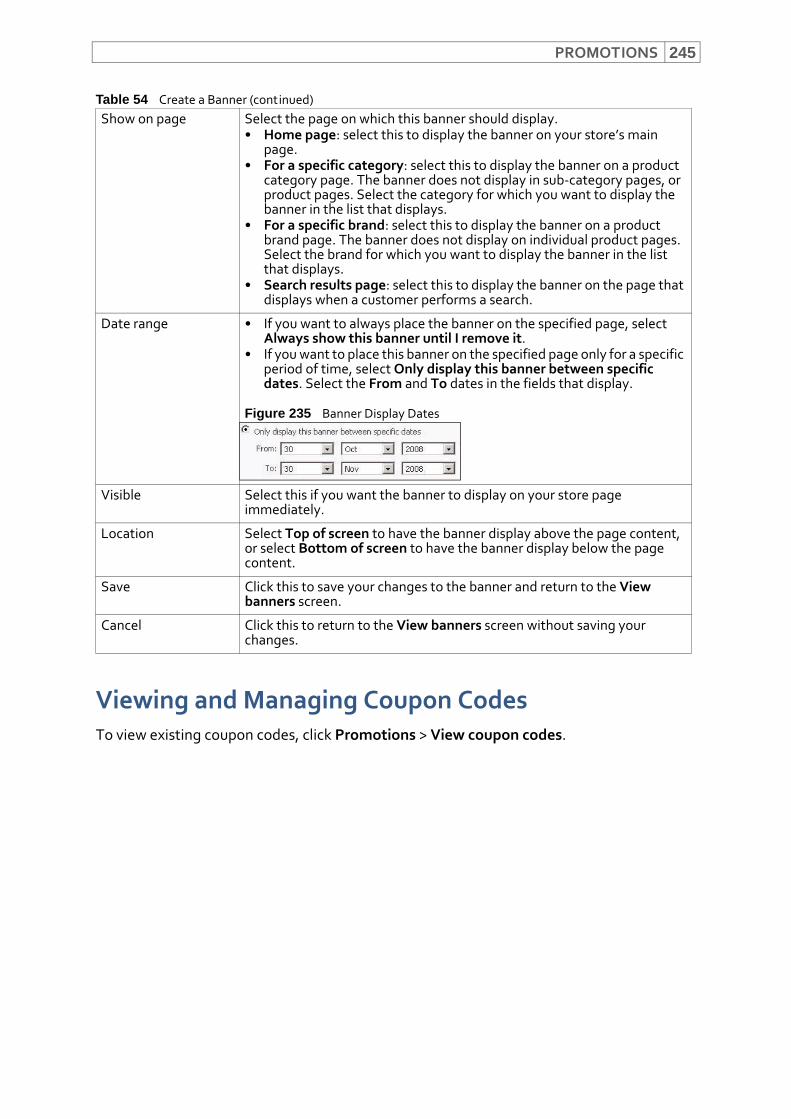
PROMOTIONS 245
Viewing and Managing Coupon CodesTo view existing coupon codes, click Promotions > View coupon codes.
Show on page Select the page on which this banner should display.• Home page: select this to display the banner on your store’s main
page. • For a specific category: select this to display the banner on a product
category page. The banner does not display in sub‐category pages, or product pages. Select the category for which you want to display the banner in the list that displays.
• For a specific brand: select this to display the banner on a product brand page. The banner does not display on individual product pages. Select the brand for which you want to display the banner in the list that displays.
• Search results page: select this to display the banner on the page that displays when a customer performs a search.
Date range • If you want to always place the banner on the specified page, select Always show this banner until I remove it.
• If you want to place this banner on the specified page only for a specific period of time, select Only display this banner between specific dates. Select the From and To dates in the fields that display.
Figure 235 Banner Display Dates
Visible Select this if you want the banner to display on your store page immediately.
Location Select Top of screen to have the banner display above the page content, or select Bottom of screen to have the banner display below the page content.
Save Click this to save your changes to the banner and return to the View banners screen.
Cancel Click this to return to the View banners screen without saving your changes.
Table 54 Create a Banner (continued)
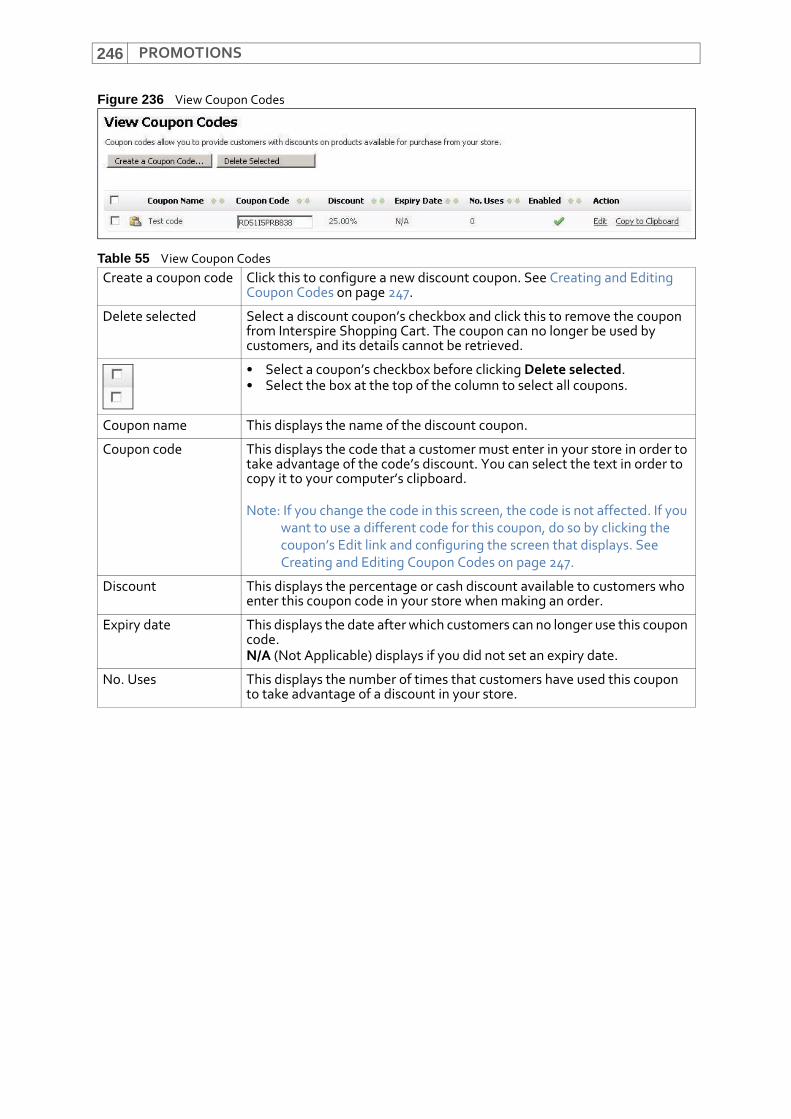
PROMOTIONS246
Figure 236 View Coupon Codes
Table 55 View Coupon Codes Create a coupon code Click this to configure a new discount coupon. See Creating and Editing
Coupon Codes on page 247.
Delete selected Select a discount coupon’s checkbox and click this to remove the coupon from Interspire Shopping Cart. The coupon can no longer be used by customers, and its details cannot be retrieved.
• Select a coupon’s checkbox before clicking Delete selected.• Select the box at the top of the column to select all coupons.
Coupon name This displays the name of the discount coupon.
Coupon code This displays the code that a customer must enter in your store in order to take advantage of the code’s discount. You can select the text in order to copy it to your computer’s clipboard.
Note: If you change the code in this screen, the code is not affected. If you want to use a different code for this coupon, do so by clicking the coupon’s Edit link and configuring the screen that displays. See Creating and Editing Coupon Codes on page 247.
Discount This displays the percentage or cash discount available to customers who enter this coupon code in your store when making an order.
Expiry date This displays the date after which customers can no longer use this coupon code.N/A (Not Applicable) displays if you did not set an expiry date.
No. Uses This displays the number of times that customers have used this coupon to take advantage of a discount in your store.
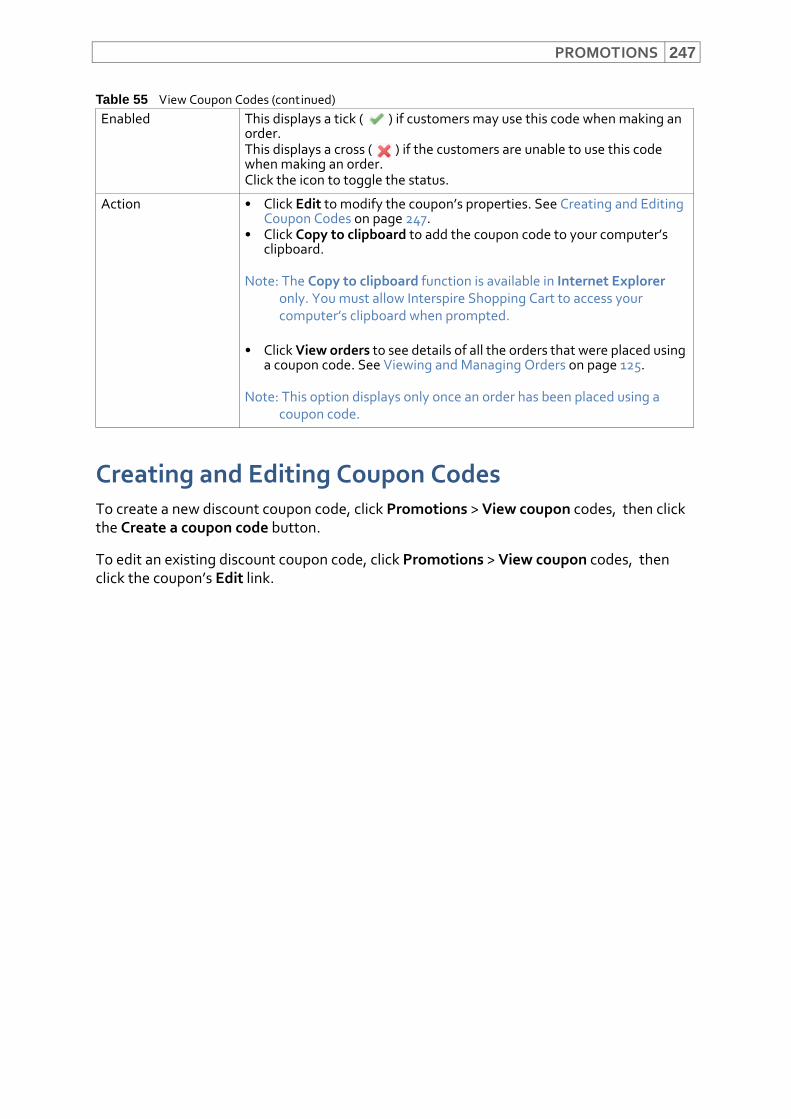
PROMOTIONS 247
Creating and Editing Coupon CodesTo create a new discount coupon code, click Promotions > View coupon codes, then click the Create a coupon code button.
To edit an existing discount coupon code, click Promotions > View coupon codes, then click the coupon’s Edit link.
Enabled This displays a tick ( ) if customers may use this code when making an order.This displays a cross ( ) if the customers are unable to use this code when making an order.Click the icon to toggle the status.
Action • Click Edit to modify the coupon’s properties. See Creating and Editing Coupon Codes on page 247.
• Click Copy to clipboard to add the coupon code to your computer’s clipboard.
Note: The Copy to clipboard function is available in Internet Explorer only. You must allow Interspire Shopping Cart to access your computer’s clipboard when prompted.
• Click View orders to see details of all the orders that were placed using a coupon code. See Viewing and Managing Orders on page 125.
Note: This option displays only once an order has been placed using a coupon code.
Table 55 View Coupon Codes (continued)
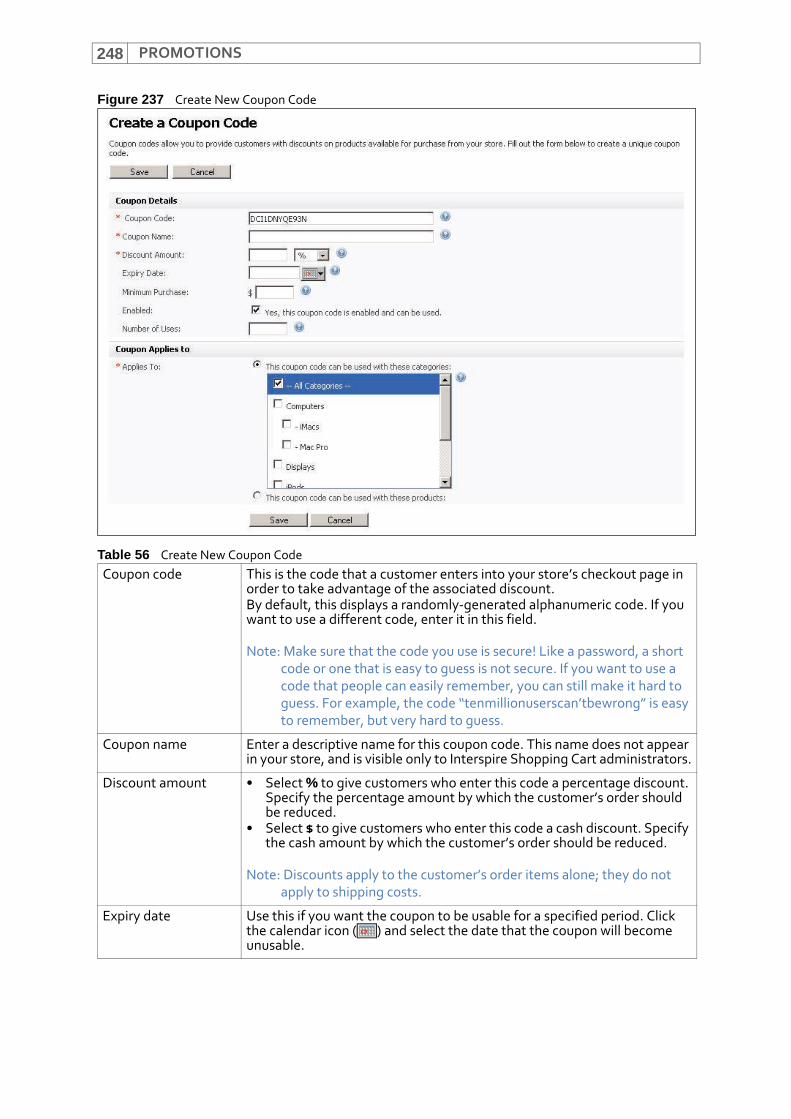
PROMOTIONS248
Figure 237 Create New Coupon Code
Table 56 Create New Coupon CodeCoupon code This is the code that a customer enters into your store’s checkout page in
order to take advantage of the associated discount.By default, this displays a randomly‐generated alphanumeric code. If you want to use a different code, enter it in this field.
Note: Make sure that the code you use is secure! Like a password, a short code or one that is easy to guess is not secure. If you want to use a code that people can easily remember, you can still make it hard to guess. For example, the code “tenmillionuserscan’tbewrong” is easy to remember, but very hard to guess.
Coupon name Enter a descriptive name for this coupon code. This name does not appear in your store, and is visible only to Interspire Shopping Cart administrators.
Discount amount • Select % to give customers who enter this code a percentage discount. Specify the percentage amount by which the customer’s order should be reduced.
• Select $ to give customers who enter this code a cash discount. Specify the cash amount by which the customer’s order should be reduced.
Note: Discounts apply to the customer’s order items alone; they do not apply to shipping costs.
Expiry date Use this if you want the coupon to be usable for a specified period. Click the calendar icon ( ) and select the date that the coupon will become unusable.
PROMOTIONS 249
Viewing and Managing Gift CertificatesTo view the gift certificates that have been purchased from your store, click Promotions > View gift certificates.
Note: To create gift certificates that customers may purchase from your store, use the Settings > Gift certificate settings screen. See Managing Gift Certificate Settings on page 357.
Minimum purchase Use this if you want this coupon code to become usable only when a customer’s order is over a specific cash value. Enter the cash value in the $ field. A customer whose order costs less than the value you specify (excluding shipping) cannot use this coupon code.
Note: The discount you specify applies to the whole order value (except shipping), and NOT just to the amount above the minimum order.
Enabled Select this if you want customers to be able to use this coupon code immediately. Deselect this if you do not want customers to use this code yet.
Number of uses If you want this coupon to be usable for a limited number of orders, enter the limit here.
Applies to Select the category of your store’s product for which this coupon code may be used. To allow this code to be used store‐wide, select All categories (default).
Note: If the products that a customer orders are not all covered by a coupon code, only the products that are covered by the code are discounted.
Note: Coupon code discounts do not apply to purchases of gift certificates.
Save Click this to save your changes and return to the View coupon codes screen.
Cancel Click this to return to the View coupon codes screen without saving your changes.
Table 56 Create New Coupon Code
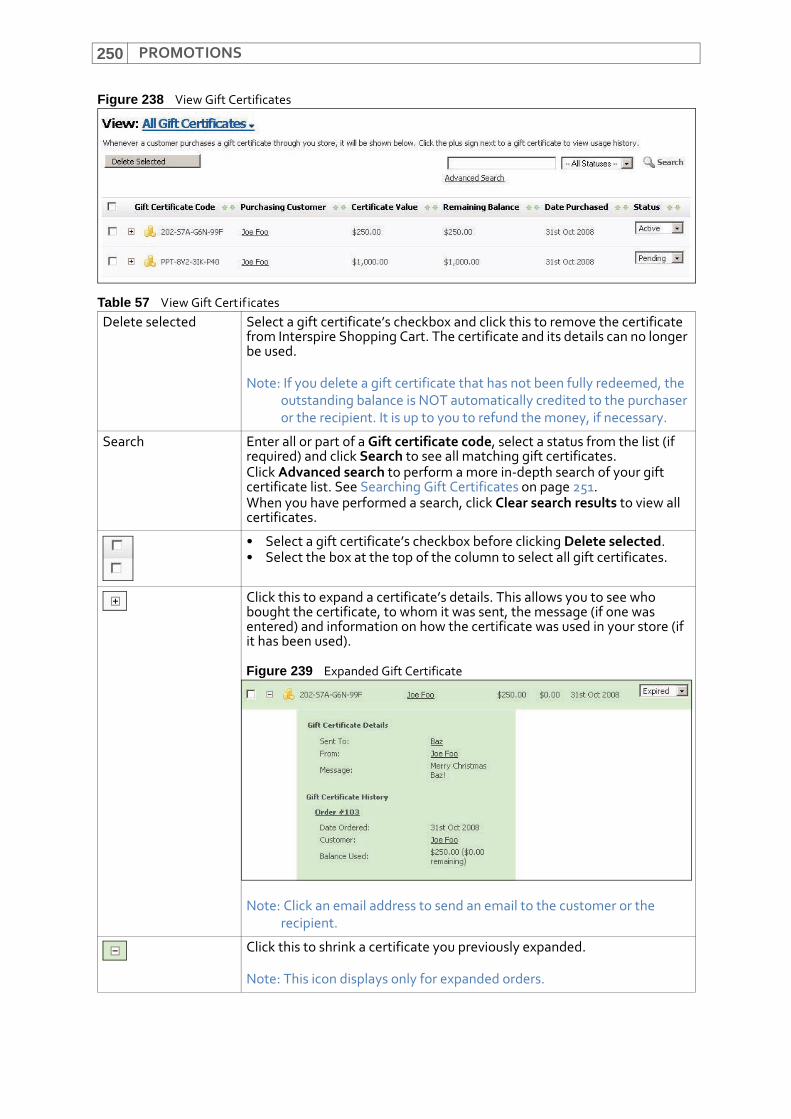
PROMOTIONS250
Figure 238 View Gift Certificates
Table 57 View Gift Certif icatesDelete selected Select a gift certificate’s checkbox and click this to remove the certificate
from Interspire Shopping Cart. The certificate and its details can no longer be used.
Note: If you delete a gift certificate that has not been fully redeemed, the outstanding balance is NOT automatically credited to the purchaser or the recipient. It is up to you to refund the money, if necessary.
Search Enter all or part of a Gift certificate code, select a status from the list (if required) and click Search to see all matching gift certificates.Click Advanced search to perform a more in‐depth search of your gift certificate list. See Searching Gift Certificates on page 251.When you have performed a search, click Clear search results to view all certificates.
• Select a gift certificate’s checkbox before clicking Delete selected.• Select the box at the top of the column to select all gift certificates.
Click this to expand a certificate’s details. This allows you to see who bought the certificate, to whom it was sent, the message (if one was entered) and information on how the certificate was used in your store (if it has been used).
Figure 239 Expanded Gift Certificate
Note: Click an email address to send an email to the customer or the recipient.
Click this to shrink a certificate you previously expanded.
Note: This icon displays only for expanded orders.
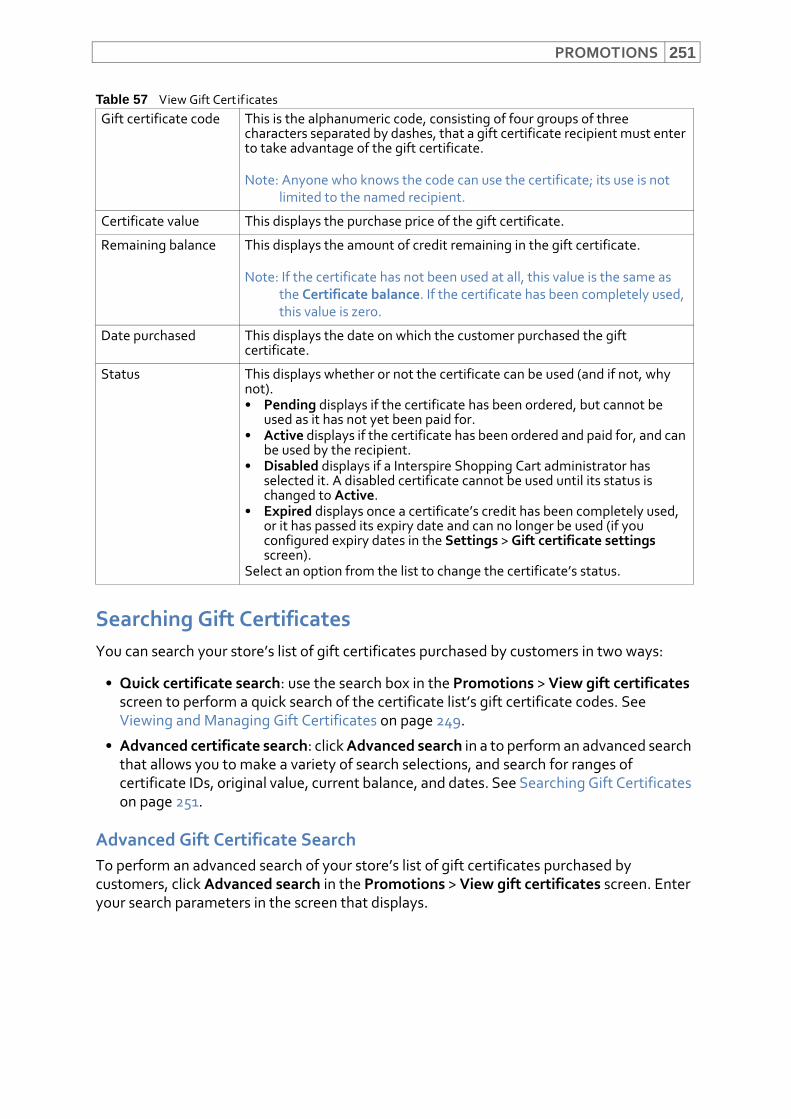
PROMOTIONS 251
Searching Gift CertificatesYou can search your store’s list of gift certificates purchased by customers in two ways:
• Quick certificate search: use the search box in the Promotions > View gift certificates screen to perform a quick search of the certificate list’s gift certificate codes. See Viewing and Managing Gift Certificates on page 249.
• Advanced certificate search: click Advanced search in a to perform an advanced search that allows you to make a variety of search selections, and search for ranges of certificate IDs, original value, current balance, and dates. See Searching Gift Certificates on page 251.
Advanced Gift Certificate SearchTo perform an advanced search of your store’s list of gift certificates purchased by customers, click Advanced search in the Promotions > View gift certificates screen. Enter your search parameters in the screen that displays.
Gift certificate code This is the alphanumeric code, consisting of four groups of three characters separated by dashes, that a gift certificate recipient must enter to take advantage of the gift certificate.
Note: Anyone who knows the code can use the certificate; its use is not limited to the named recipient.
Certificate value This displays the purchase price of the gift certificate.
Remaining balance This displays the amount of credit remaining in the gift certificate.
Note: If the certificate has not been used at all, this value is the same as the Certificate balance. If the certificate has been completely used, this value is zero.
Date purchased This displays the date on which the customer purchased the gift certificate.
Status This displays whether or not the certificate can be used (and if not, why not).• Pending displays if the certificate has been ordered, but cannot be
used as it has not yet been paid for.• Active displays if the certificate has been ordered and paid for, and can
be used by the recipient.• Disabled displays if a Interspire Shopping Cart administrator has
selected it. A disabled certificate cannot be used until its status is changed to Active.
• Expired displays once a certificate’s credit has been completely used, or it has passed its expiry date and can no longer be used (if you configured expiry dates in the Settings > Gift certificate settings screen).
Select an option from the list to change the certificate’s status.
Table 57 View Gift Certif icates
PROMOTIONS252
Figure 240 Search Gift Certificates
Table 58 Search Gift Certif icatesSearch keywords Enter a term for which to search.
Note: This function searches the Gift certificate ID and Gift certificate code fields.
Certificate status Select a status from the list to search only for gift certificates with that status.
Certificate ID Use this to search for a range of certificate ID numbers. Enter low and high ID numbers.
Note: Certificate ID does not display in the View gift certificate screen. It is assigned to gift certificates in the order in which they were purchased.
Certificate value Use this to search for certificates in a range of initial redemption values. Enter low and high values.
Remaining balance Use this to search for certificates in a range of remaining redemption values. Enter low and high values.
Date purchased Use this to view all certificates purchased within a specified time range. Select beginning and ending dates.
Expiry date Use this to view all certificates that will automatically expire within a specified time range. Select beginning and ending dates.
Sort order In the first list, select the field by which you want to order the search results. In the second field, select Ascending order to view the orders from lowest to highest values (or in alphabetical order, for text fields). Select Descending order to view the highest value first (or in reverse alphabetical order, for text fields).
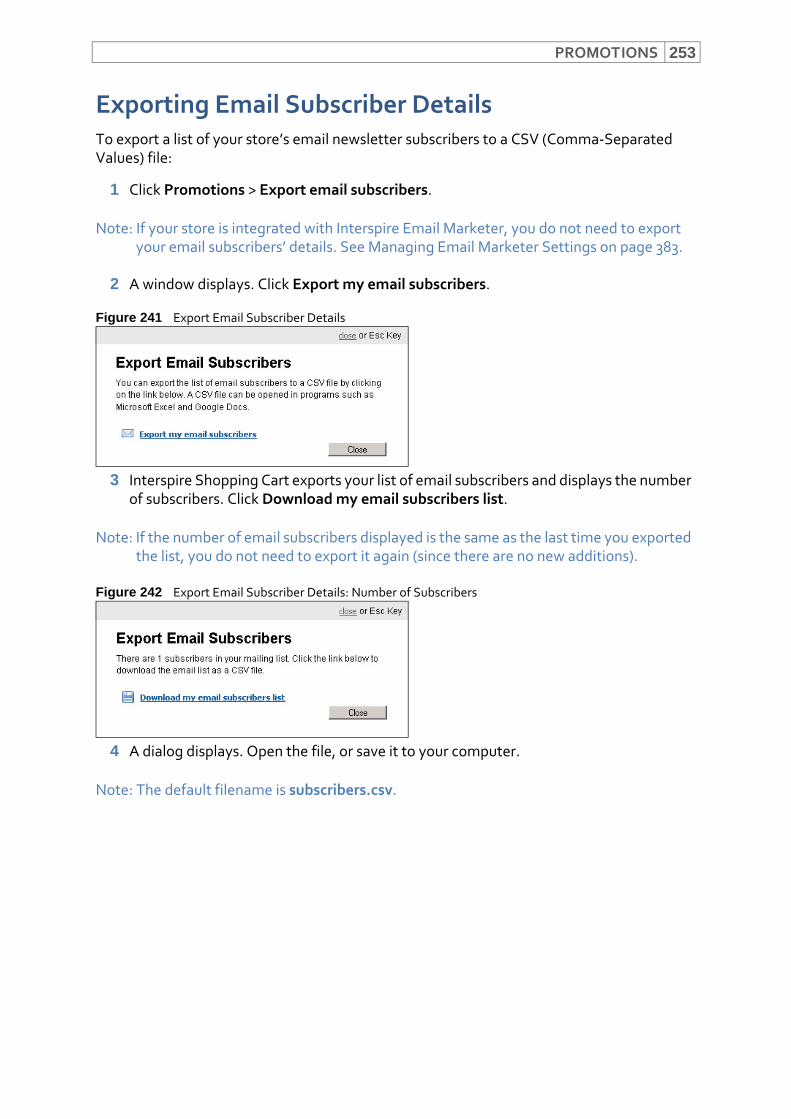
PROMOTIONS 253
Exporting Email Subscriber DetailsTo export a list of your store’s email newsletter subscribers to a CSV (Comma‐Separated Values) file:
1 Click Promotions > Export email subscribers.
Note: If your store is integrated with Interspire Email Marketer, you do not need to export your email subscribers’ details. See Managing Email Marketer Settings on page 383.
2 A window displays. Click Export my email subscribers.
Figure 241 Export Email Subscriber Details
3 Interspire Shopping Cart exports your list of email subscribers and displays the number of subscribers. Click Download my email subscribers list.
Note: If the number of email subscribers displayed is the same as the last time you exported the list, you do not need to export it again (since there are no new additions).
Figure 242 Export Email Subscriber Details: Number of Subscribers
4 A dialog displays. Open the file, or save it to your computer.
Note: The default filename is subscribers.csv.
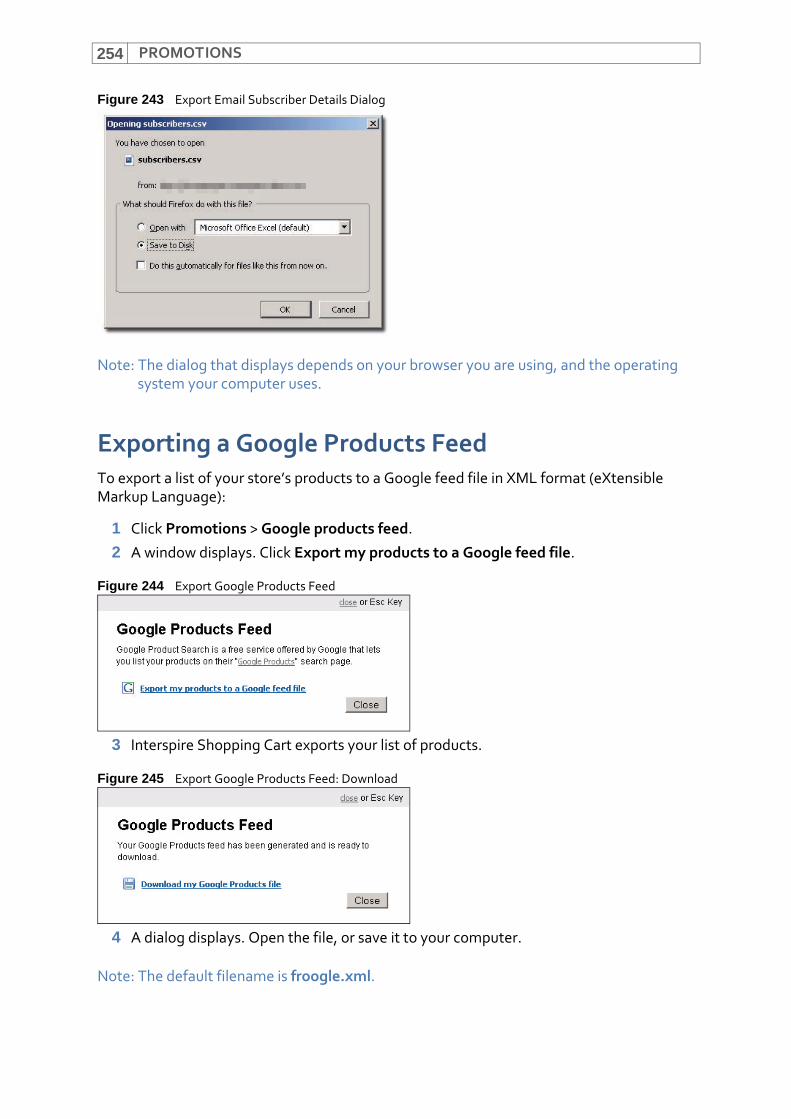
PROMOTIONS254
Figure 243 Export Email Subscriber Details Dialog
Note: The dialog that displays depends on your browser you are using, and the operating system your computer uses.
Exporting a Google Products FeedTo export a list of your store’s products to a Google feed file in XML format (eXtensible Markup Language):
1 Click Promotions > Google products feed.
2 A window displays. Click Export my products to a Google feed file.
Figure 244 Export Google Products Feed
3 Interspire Shopping Cart exports your list of products.
Figure 245 Export Google Products Feed: Download
4 A dialog displays. Open the file, or save it to your computer.
Note: The default filename is froogle.xml.
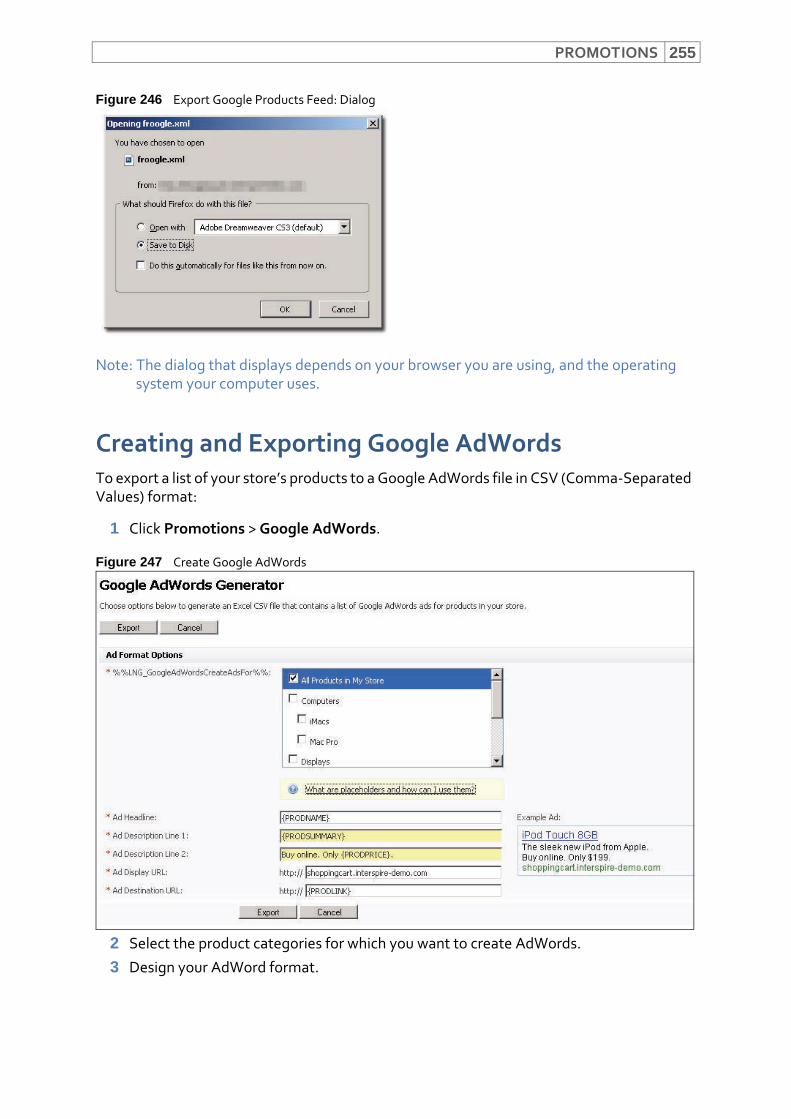
PROMOTIONS 255
Figure 246 Export Google Products Feed: Dialog
Note: The dialog that displays depends on your browser you are using, and the operating system your computer uses.
Creating and Exporting Google AdWordsTo export a list of your store’s products to a Google AdWords file in CSV (Comma‐Separated Values) format:
1 Click Promotions > Google AdWords.
Figure 247 Create Google AdWords
2 Select the product categories for which you want to create AdWords.
3 Design your AdWord format.
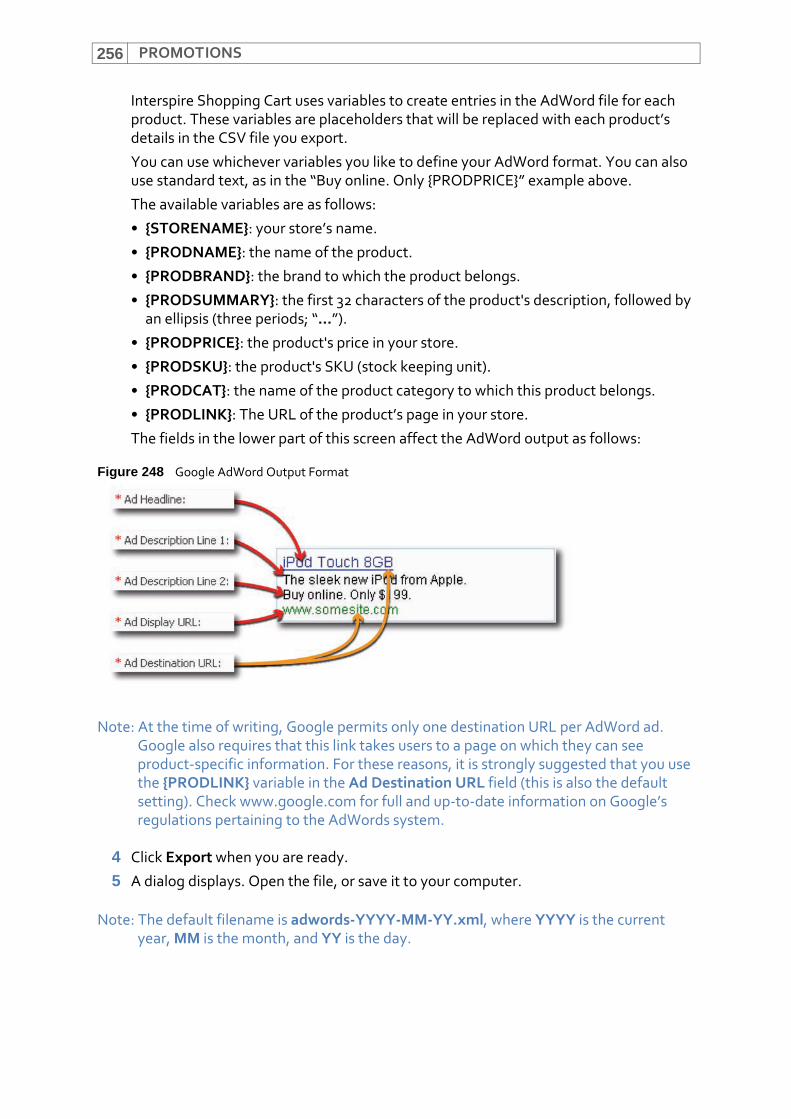
PROMOTIONS256
Interspire Shopping Cart uses variables to create entries in the AdWord file for each product. These variables are placeholders that will be replaced with each product’s details in the CSV file you export.
You can use whichever variables you like to define your AdWord format. You can also use standard text, as in the “Buy online. Only {PRODPRICE}” example above.
The available variables are as follows:
• {STORENAME}: your store’s name.
• {PRODNAME}: the name of the product.
• {PRODBRAND}: the brand to which the product belongs.
• {PRODSUMMARY}: the first 32 characters of the product's description, followed by an ellipsis (three periods; “...”).
• {PRODPRICE}: the product's price in your store.
• {PRODSKU}: the product's SKU (stock keeping unit).
• {PRODCAT}: the name of the product category to which this product belongs.
• {PRODLINK}: The URL of the product’s page in your store.
The fields in the lower part of this screen affect the AdWord output as follows:
Figure 248 Google AdWord Output Format
Note: At the time of writing, Google permits only one destination URL per AdWord ad. Google also requires that this link takes users to a page on which they can see product‐specific information. For these reasons, it is strongly suggested that you use the {PRODLINK} variable in the Ad Destination URL field (this is also the default setting). Check www.google.com for full and up‐to‐date information on Google’s regulations pertaining to the AdWords system.
4 Click Export when you are ready.
5 A dialog displays. Open the file, or save it to your computer.
Note: The default filename is adwords‐YYYY‐MM‐YY.xml, where YYYY is the current year, MM is the month, and YY is the day.

PROMOTIONS 257
Figure 249 Export Google AdWords: Dialog
Note: The dialog that displays depends on your browser you are using, and the operating system your computer uses.

PROMOTIONS258

259
StatisticsThis chapter explains how to use the Statistics menu in the navigation bar.
Figure 250 The Statistics Menu
Statistics OverviewUse Interspire Shopping Cart’s statistics pages to see a variety of statistics about your store’s orders, customers, products, and the searches of your store’s products that customers have performed.
• General Store Statistics: use this screen to view statistics about your store’s sales and customers. See Viewing General Store Statistics on page 262.
• Order Statistics: use this screen to view statistics about the orders placed with your store. See Viewing Order Statistics on page 267.
• Product Statistics: use this screen to view information about your store’s products, including each product’s performance and inventory level. See Viewing Product Statistics on page 270.
• Customer Statistics: use this screen to see information about your store’s customers, including the amount of revenue each customer has generated for your store. See Viewing Customer Statistics on page 274.
• Search Statistics: use this screen to see information about the words and phrases for which your store’s users are searching. See Viewing Search Statistics on page 277.
Interspire Shopping Cart allows you to define a date range for your statistics views, and offers graphic versions of some statistics in the form of graphs and pie charts.
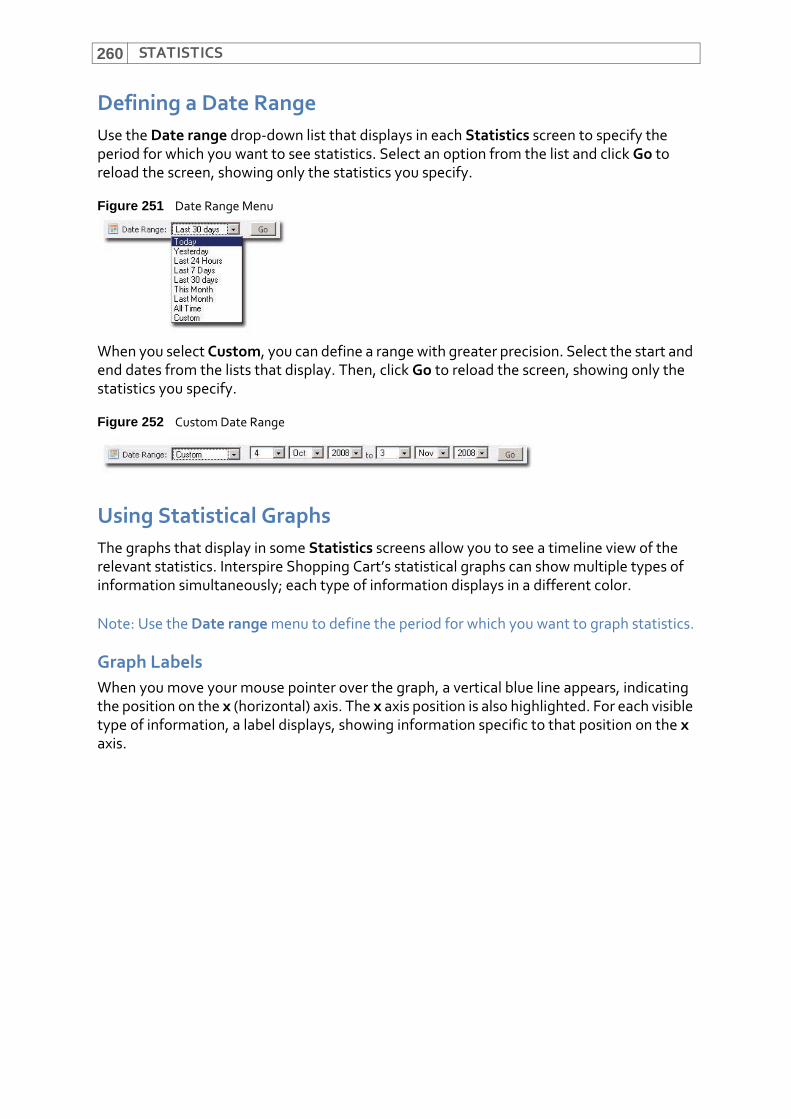
STATISTICS260
Defining a Date RangeUse the Date range drop‐down list that displays in each Statistics screen to specify the period for which you want to see statistics. Select an option from the list and click Go to reload the screen, showing only the statistics you specify.
Figure 251 Date Range Menu
When you select Custom, you can define a range with greater precision. Select the start and end dates from the lists that display. Then, click Go to reload the screen, showing only the statistics you specify.
Figure 252 Custom Date Range
Using Statistical GraphsThe graphs that display in some Statistics screens allow you to see a timeline view of the relevant statistics. Interspire Shopping Cart’s statistical graphs can show multiple types of information simultaneously; each type of information displays in a different color.
Note: Use the Date range menu to define the period for which you want to graph statistics.
Graph LabelsWhen you move your mouse pointer over the graph, a vertical blue line appears, indicating the position on the x (horizontal) axis. The x axis position is also highlighted. For each visible type of information, a label displays, showing information specific to that position on the x axis.
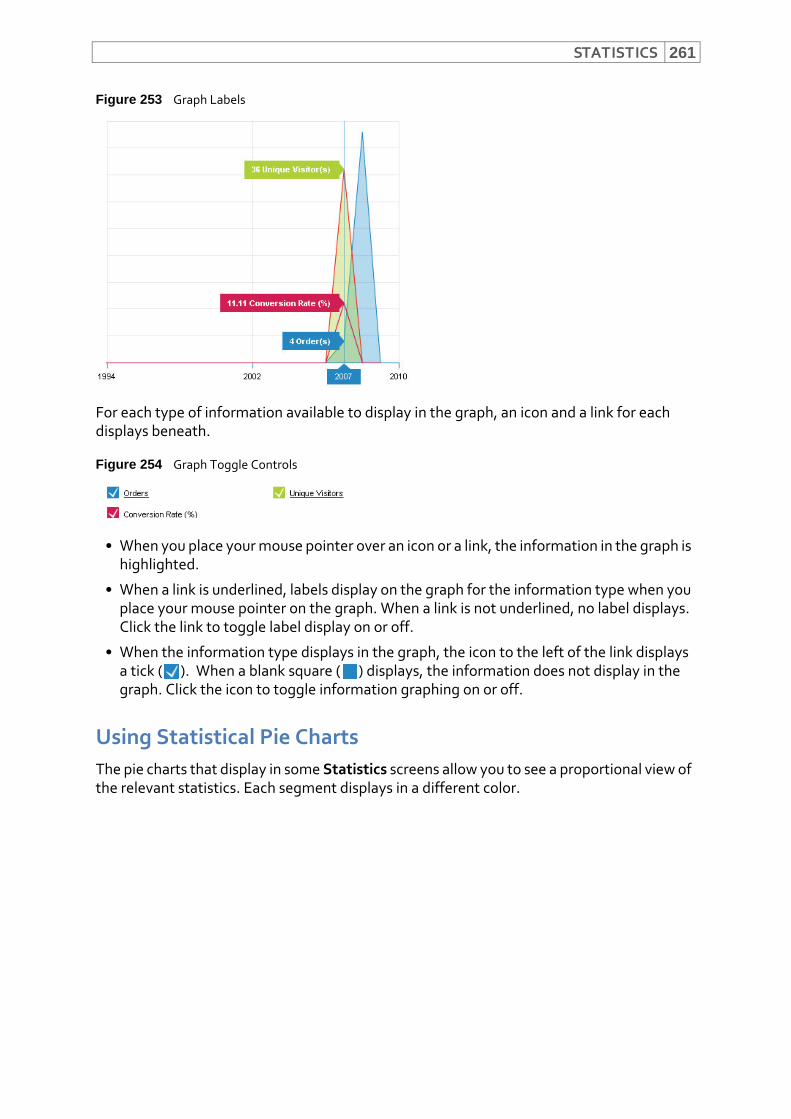
STATISTICS 261
Figure 253 Graph Labels
For each type of information available to display in the graph, an icon and a link for each displays beneath.
Figure 254 Graph Toggle Controls
• When you place your mouse pointer over an icon or a link, the information in the graph is highlighted.
• When a link is underlined, labels display on the graph for the information type when you place your mouse pointer on the graph. When a link is not underlined, no label displays. Click the link to toggle label display on or off.
• When the information type displays in the graph, the icon to the left of the link displays a tick ( ). When a blank square ( ) displays, the information does not display in the graph. Click the icon to toggle information graphing on or off.
Using Statistical Pie ChartsThe pie charts that display in some Statistics screens allow you to see a proportional view of the relevant statistics. Each segment displays in a different color.

STATISTICS262
Figure 255 Pie Chart Details
• To display information about a segment of the chart, place the mouse pointer over the segment, or an item in the key on the left. The segment’s name displays over the segment on the chart.
• To make a segment more visible by detaching it from the rest of the chart, click on the segment or the corresponding item in the key.
Deleting StatisticsTo delete all statistics collected up until the present, click Delete statistics in a statistics screen.
Viewing General Store StatisticsUse this screen to view statistics about your store’s sales and customers. Click Statistics in the navigation bar, then click Store overview.
• Use the Store snapshot tab to see a graph and statistics of your store’s visitors, orders and conversion rate.
• Use the Top 20 customers tab to see a pie chart and statistics of your store’s best customers.
• Use the Best selling products tab to see a pie chart and statistics of your store’s top‐selling products.
• Use the Order locations tab to see a map marked with the locations of your store’s customers.
Store SnapshotUse this tab to see a graph and statistics of your store’s visitors, orders and conversion rate.
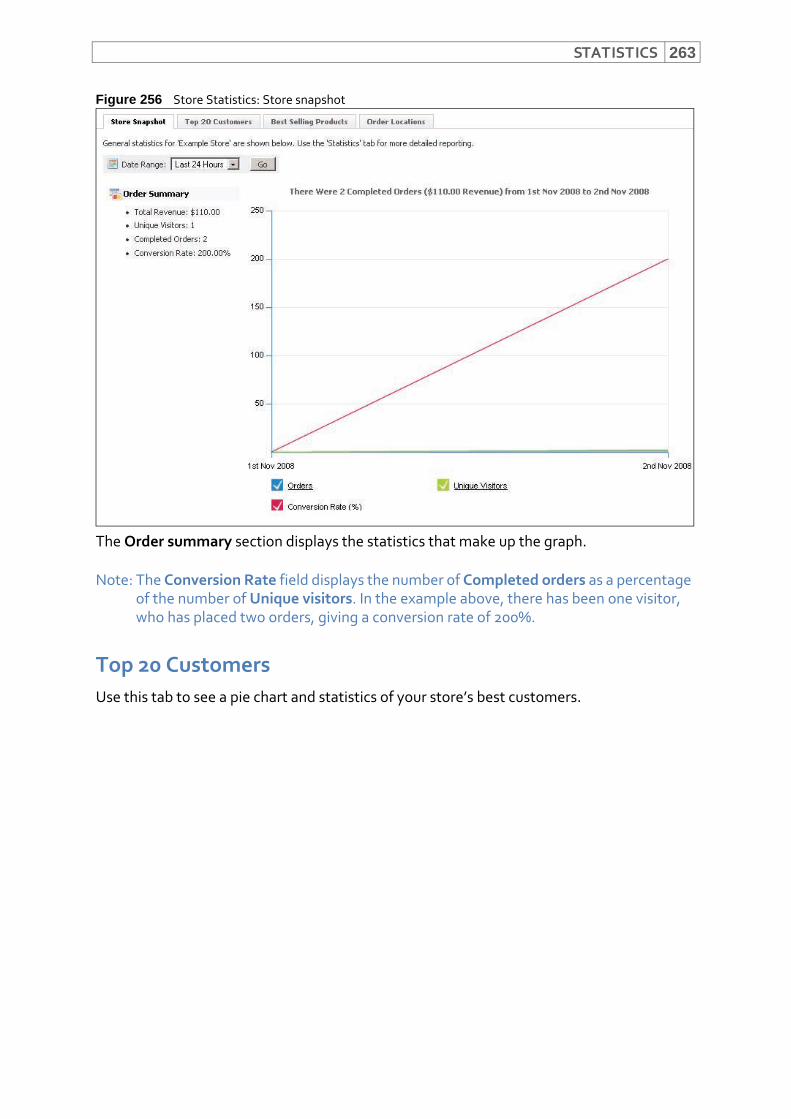
STATISTICS 263
Figure 256 Store Statistics: Store snapshot
The Order summary section displays the statistics that make up the graph.
Note: The Conversion Rate field displays the number of Completed orders as a percentage of the number of Unique visitors. In the example above, there has been one visitor, who has placed two orders, giving a conversion rate of 200%.
Top 20 CustomersUse this tab to see a pie chart and statistics of your store’s best customers.
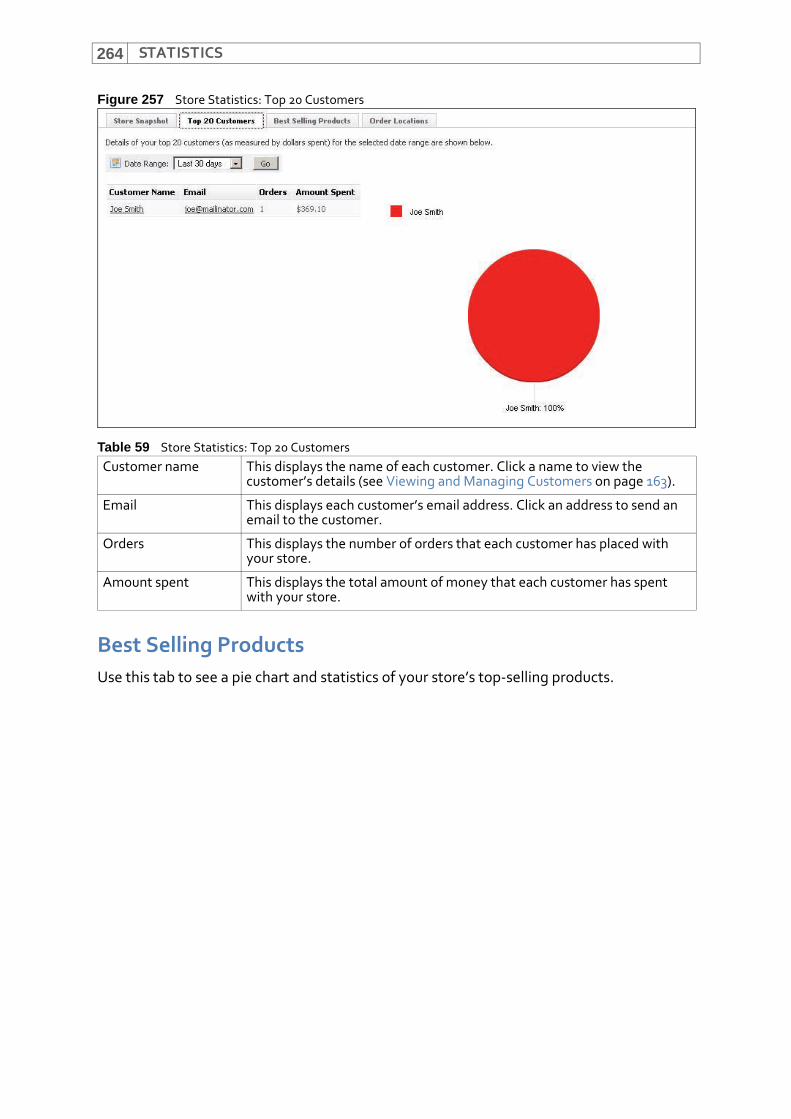
STATISTICS264
Figure 257 Store Statistics: Top 20 Customers
Best Selling ProductsUse this tab to see a pie chart and statistics of your store’s top‐selling products.
Table 59 Store Statistics: Top 20 CustomersCustomer name This displays the name of each customer. Click a name to view the
customer’s details (see Viewing and Managing Customers on page 163).
Email This displays each customer’s email address. Click an address to send an email to the customer.
Orders This displays the number of orders that each customer has placed with your store.
Amount spent This displays the total amount of money that each customer has spent with your store.
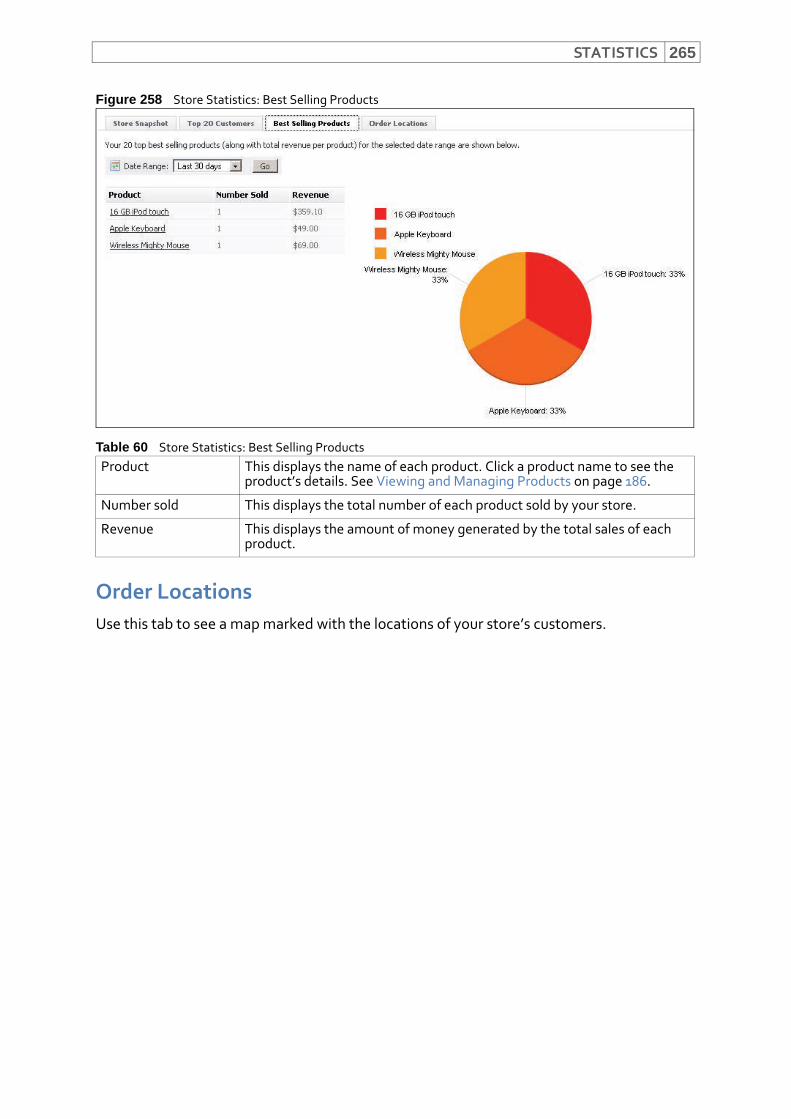
STATISTICS 265
Figure 258 Store Statistics: Best Selling Products
Order LocationsUse this tab to see a map marked with the locations of your store’s customers.
Table 60 Store Statistics: Best Selling ProductsProduct This displays the name of each product. Click a product name to see the
product’s details. See Viewing and Managing Products on page 186.
Number sold This displays the total number of each product sold by your store.
Revenue This displays the amount of money generated by the total sales of each product.
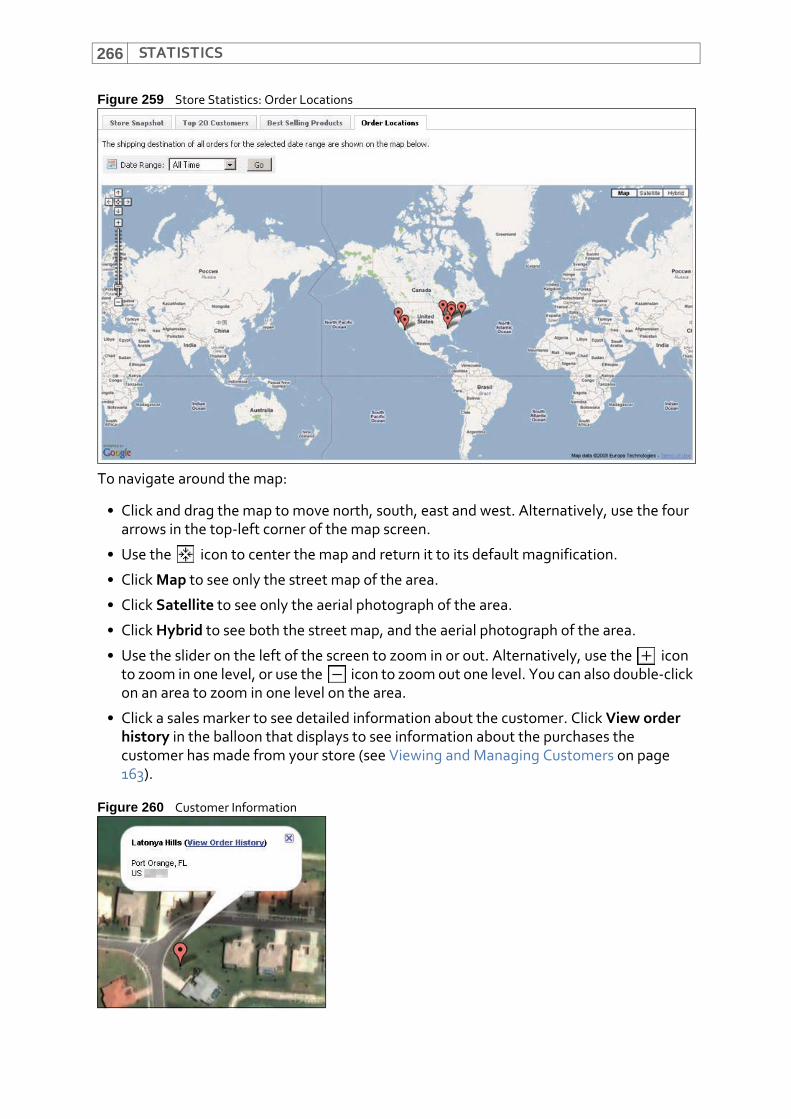
STATISTICS266
Figure 259 Store Statistics: Order Locations
To navigate around the map:
• Click and drag the map to move north, south, east and west. Alternatively, use the four arrows in the top‐left corner of the map screen.
• Use the icon to center the map and return it to its default magnification.
• Click Map to see only the street map of the area.
• Click Satellite to see only the aerial photograph of the area.
• Click Hybrid to see both the street map, and the aerial photograph of the area.
• Use the slider on the left of the screen to zoom in or out. Alternatively, use the icon to zoom in one level, or use the icon to zoom out one level. You can also double‐click on an area to zoom in one level on the area.
• Click a sales marker to see detailed information about the customer. Click View order history in the balloon that displays to see information about the purchases the customer has made from your store (see Viewing and Managing Customers on page 163).
Figure 260 Customer Information
STATISTICS 267
Viewing Order StatisticsUse this screen to view statistics about the orders placed with your store. Click Statistics in the navigation bar, then click Order statistics.
• Use the Orders overview tab to see a graph and statistics of your store’s visitors, orders and conversion rate.
• Use the Orders by items sold tab to see details of your store’s orders arranged by the number of items sold in each order.
• Use the Orders by revenue tab to see details of the number of orders placed with your store arranged by the number of orders in each price range.
Orders OverviewUse this tab to see a graph and statistics of your store’s visitors, orders and conversion rate.
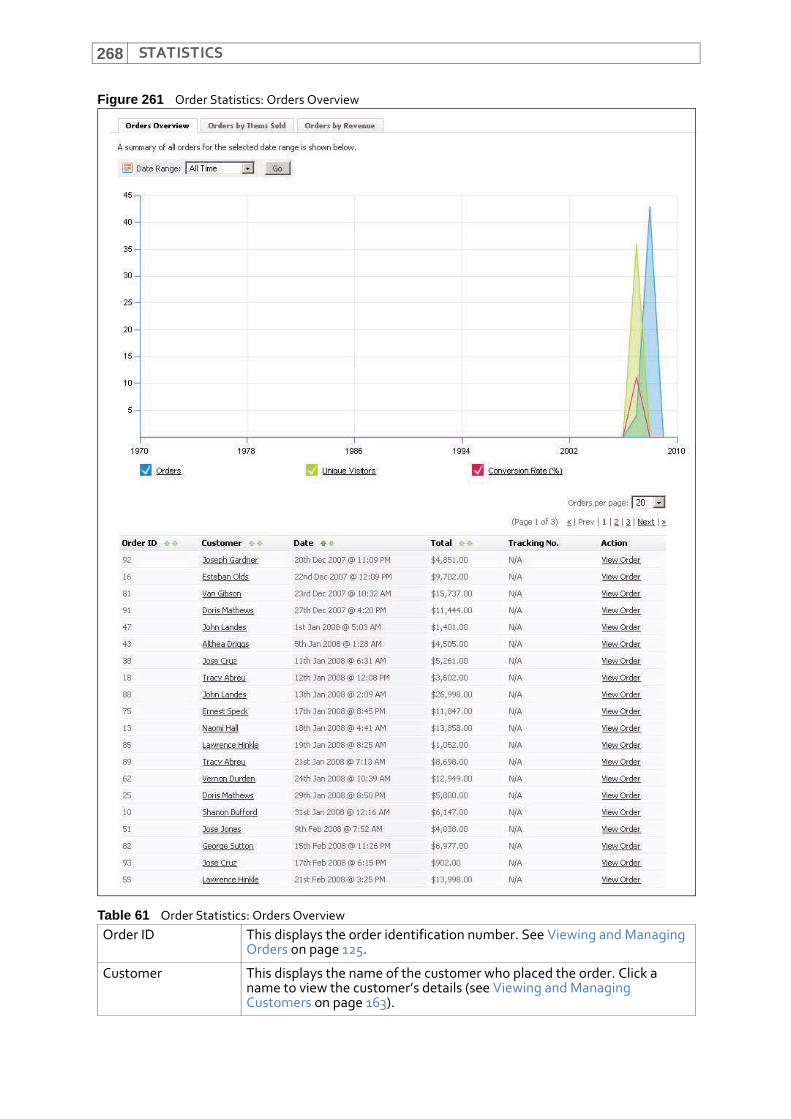
STATISTICS268
Figure 261 Order Statistics: Orders Overview
Table 61 Order Statistics: Orders OverviewOrder ID This displays the order identification number. See Viewing and Managing
Orders on page 125.
Customer This displays the name of the customer who placed the order. Click a name to view the customer’s details (see Viewing and Managing Customers on page 163).
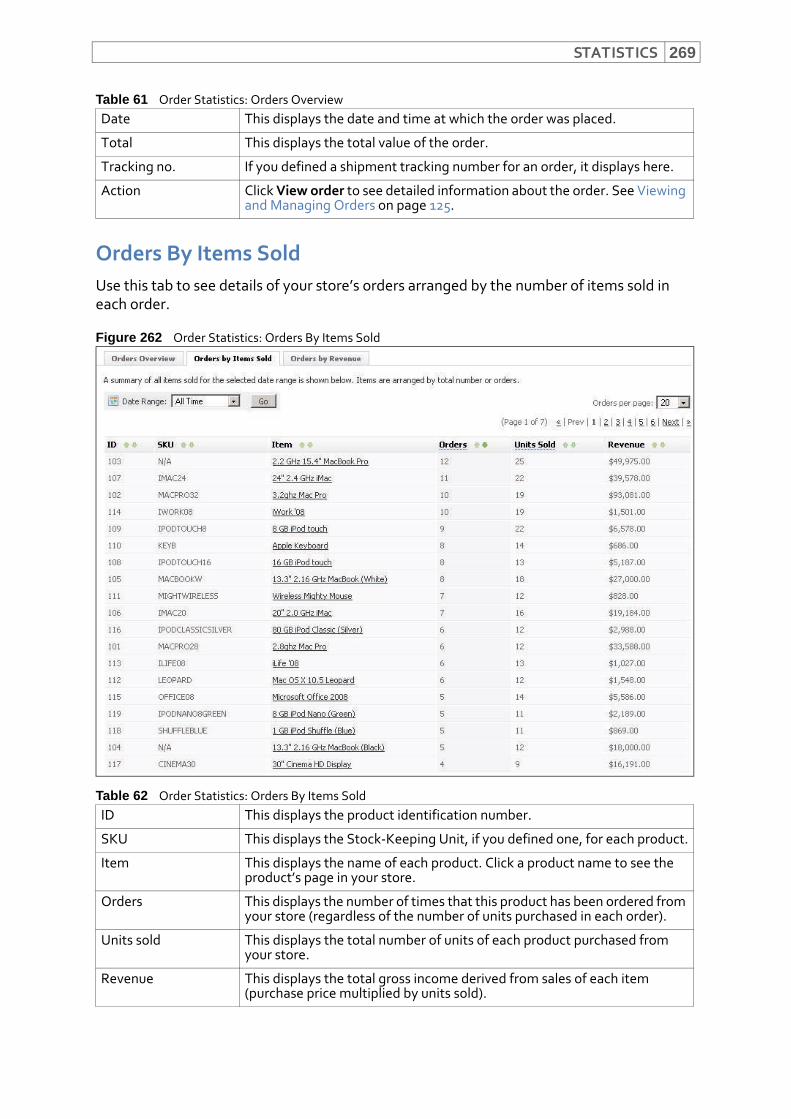
STATISTICS 269
Orders By Items SoldUse this tab to see details of your store’s orders arranged by the number of items sold in each order.
Figure 262 Order Statistics: Orders By Items Sold
Date This displays the date and time at which the order was placed.
Total This displays the total value of the order.
Tracking no. If you defined a shipment tracking number for an order, it displays here.
Action Click View order to see detailed information about the order. See Viewing and Managing Orders on page 125.
Table 62 Order Statistics: Orders By Items SoldID This displays the product identification number.
SKU This displays the Stock‐Keeping Unit, if you defined one, for each product.
Item This displays the name of each product. Click a product name to see the product’s page in your store.
Orders This displays the number of times that this product has been ordered from your store (regardless of the number of units purchased in each order).
Units sold This displays the total number of units of each product purchased from your store.
Revenue This displays the total gross income derived from sales of each item (purchase price multiplied by units sold).
Table 61 Order Statistics: Orders Overview
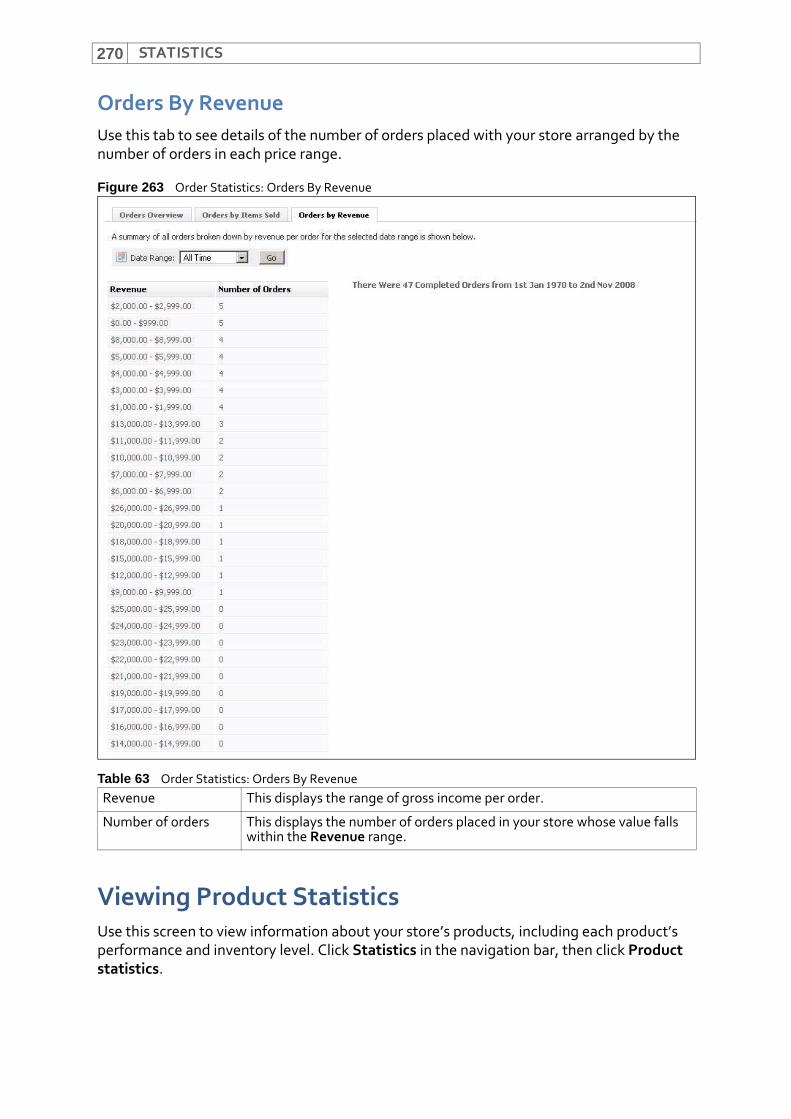
STATISTICS270
Orders By RevenueUse this tab to see details of the number of orders placed with your store arranged by the number of orders in each price range.
Figure 263 Order Statistics: Orders By Revenue
Viewing Product StatisticsUse this screen to view information about your store’s products, including each product’s performance and inventory level. Click Statistics in the navigation bar, then click Product statistics.
Table 63 Order Statistics: Orders By RevenueRevenue This displays the range of gross income per order.
Number of orders This displays the number of orders placed in your store whose value falls within the Revenue range.
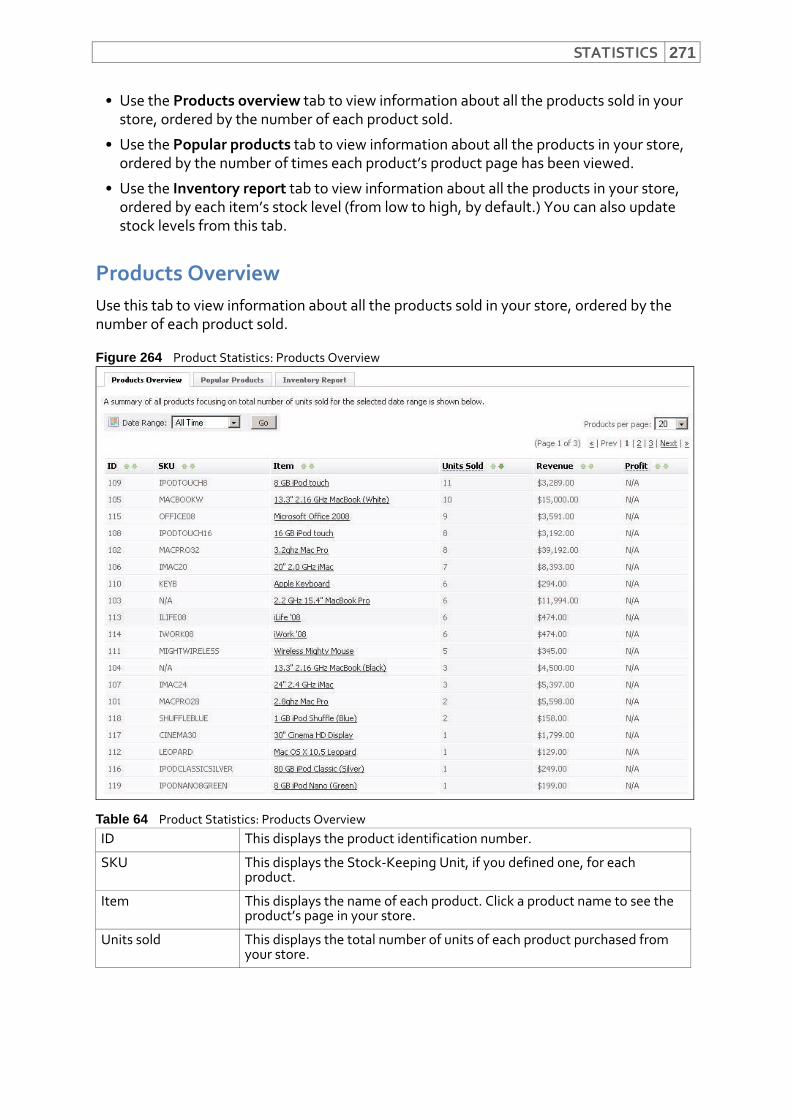
STATISTICS 271
• Use the Products overview tab to view information about all the products sold in your store, ordered by the number of each product sold.
• Use the Popular products tab to view information about all the products in your store, ordered by the number of times each product’s product page has been viewed.
• Use the Inventory report tab to view information about all the products in your store, ordered by each item’s stock level (from low to high, by default.) You can also update stock levels from this tab.
Products OverviewUse this tab to view information about all the products sold in your store, ordered by the number of each product sold.
Figure 264 Product Statistics: Products Overview
Table 64 Product Statistics: Products OverviewID This displays the product identification number.
SKU This displays the Stock‐Keeping Unit, if you defined one, for each product.
Item This displays the name of each product. Click a product name to see the product’s page in your store.
Units sold This displays the total number of units of each product purchased from your store.

STATISTICS272
Popular ProductsUse this tab to view information about all the products in your store, ordered by the number of times each product’s product page has been viewed.
Figure 265 Product Statistics: Popular Products
Revenue This displays the total gross income derived from sales of each item (purchase price multiplied by units sold).
Profit This displays the total gross profit derived from sales of this item (purchase price, minus cost price, multiplied by units sold). If you have not configured cost prices for an item, N/A (not applicable) displays.
Table 65 Product Statistics: Popular ProductsID This displays the product identification number.
SKU This displays the Stock‐Keeping Unit, if you defined one, for each product.
Item This displays the name of each product. Click a product name to see the product’s page in your store.
Views This displays the total number of times this product’s page in your store has been viewed.
Average rating This displays the average product score of all reviews for the product. If a product has received no (approved) reviews, Not rated displays.
Table 64 Product Statistics: Products Overview
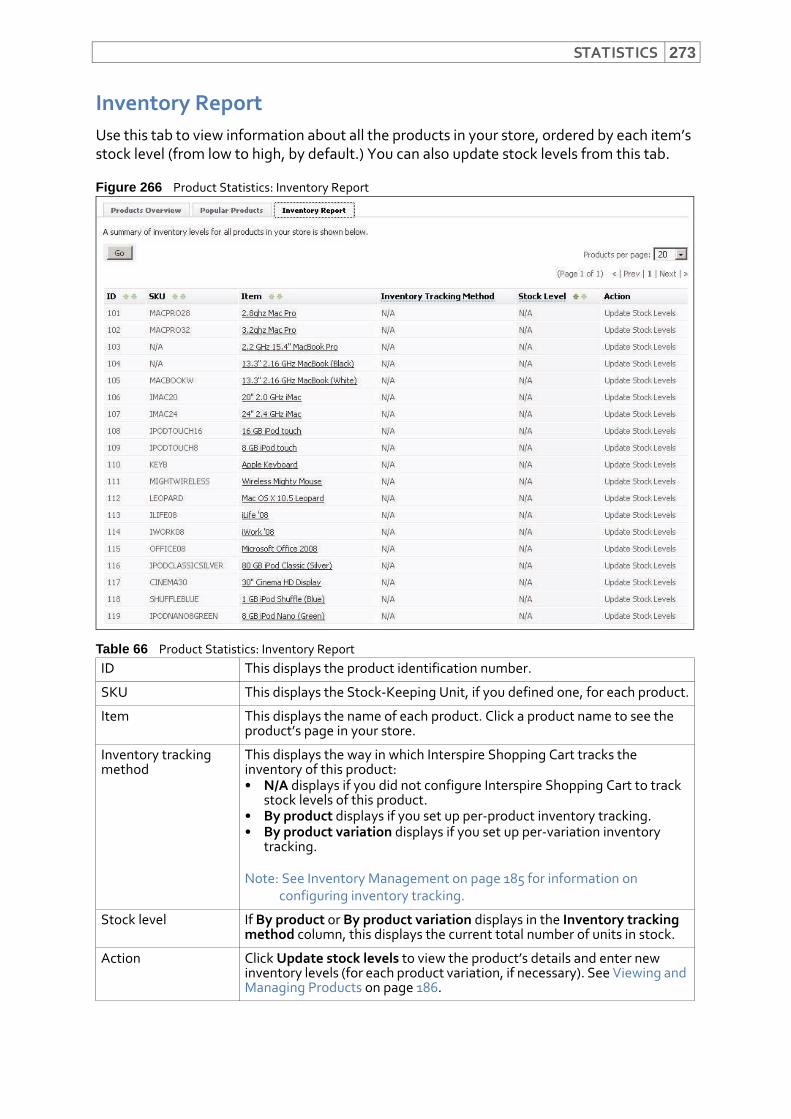
STATISTICS 273
Inventory ReportUse this tab to view information about all the products in your store, ordered by each item’s stock level (from low to high, by default.) You can also update stock levels from this tab.
Figure 266 Product Statistics: Inventory Report
Table 66 Product Statistics: Inventory ReportID This displays the product identification number.
SKU This displays the Stock‐Keeping Unit, if you defined one, for each product.
Item This displays the name of each product. Click a product name to see the product’s page in your store.
Inventory tracking method
This displays the way in which Interspire Shopping Cart tracks the inventory of this product:• N/A displays if you did not configure Interspire Shopping Cart to track
stock levels of this product.• By product displays if you set up per‐product inventory tracking.• By product variation displays if you set up per‐variation inventory
tracking.
Note: See Inventory Management on page 185 for information on configuring inventory tracking.
Stock level If By product or By product variation displays in the Inventory tracking method column, this displays the current total number of units in stock.
Action Click Update stock levels to view the product’s details and enter new inventory levels (for each product variation, if necessary). See Viewing and Managing Products on page 186.
STATISTICS274
Viewing Customer StatisticsUse this screen to see information about your store’s customers, including the amount of revenue each customer has generated for your store. Click Statistics in the navigation bar, then click Customer statistics.
• Use the Customers by date tab to see information about your store’s customers, visitors and conversion rate, arranged by the date on which they registered with your store.
• Use the Revenue per customer tab to see information about how much each of your customers has spent in your store.
Customers By DateUse this tab to see information about your store’s customers, visitors and conversion rate, arranged by the date on which they registered with your store.
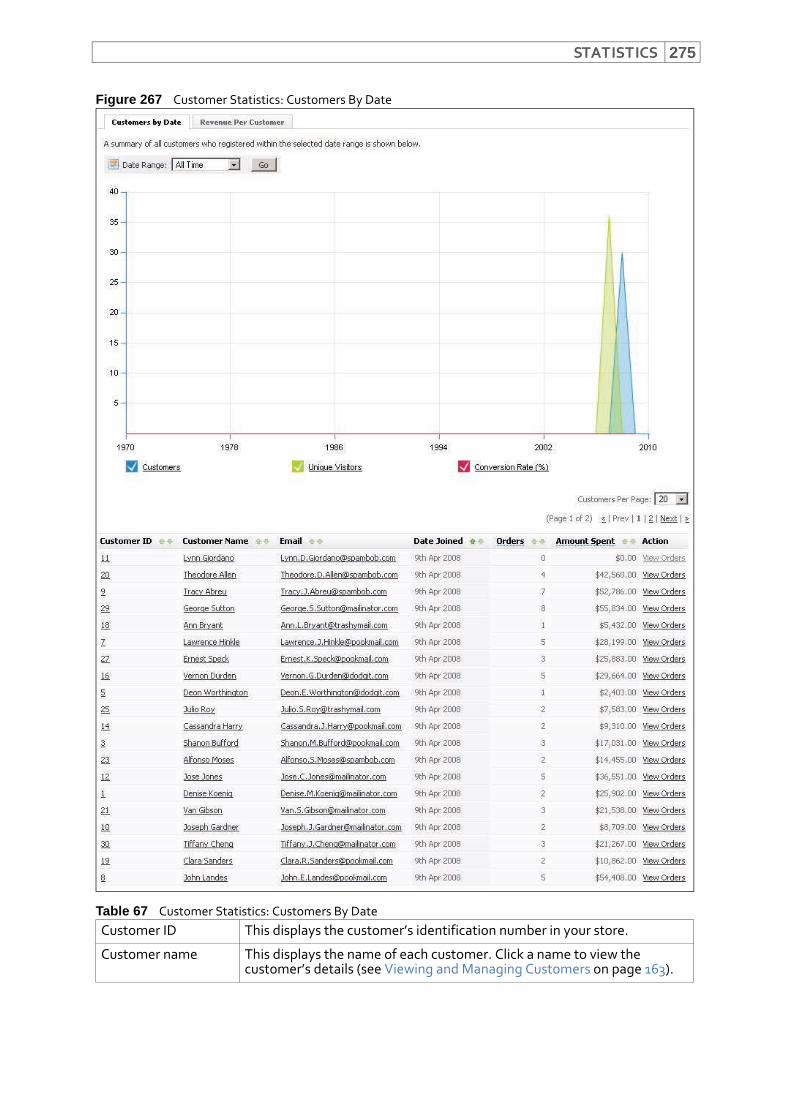
STATISTICS 275
Figure 267 Customer Statistics: Customers By Date
Table 67 Customer Statistics: Customers By Date Customer ID This displays the customer’s identification number in your store.
Customer name This displays the name of each customer. Click a name to view the customer’s details (see Viewing and Managing Customers on page 163).
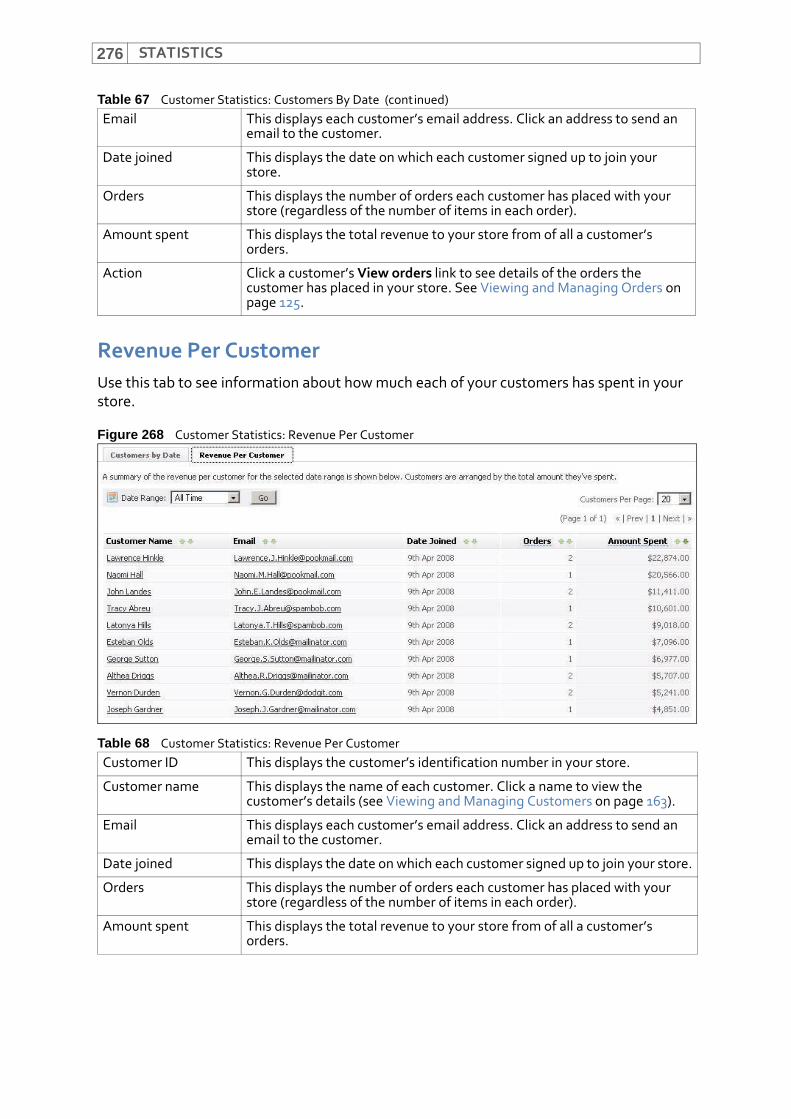
STATISTICS276
Revenue Per CustomerUse this tab to see information about how much each of your customers has spent in your store.
Figure 268 Customer Statistics: Revenue Per Customer
Email This displays each customer’s email address. Click an address to send an email to the customer.
Date joined This displays the date on which each customer signed up to join your store.
Orders This displays the number of orders each customer has placed with your store (regardless of the number of items in each order).
Amount spent This displays the total revenue to your store from of all a customer’s orders.
Action Click a customer’s View orders link to see details of the orders the customer has placed in your store. See Viewing and Managing Orders on page 125.
Table 68 Customer Statistics: Revenue Per CustomerCustomer ID This displays the customer’s identification number in your store.
Customer name This displays the name of each customer. Click a name to view the customer’s details (see Viewing and Managing Customers on page 163).
Email This displays each customer’s email address. Click an address to send an email to the customer.
Date joined This displays the date on which each customer signed up to join your store.
Orders This displays the number of orders each customer has placed with your store (regardless of the number of items in each order).
Amount spent This displays the total revenue to your store from of all a customer’s orders.
Table 67 Customer Statistics: Customers By Date (continued)
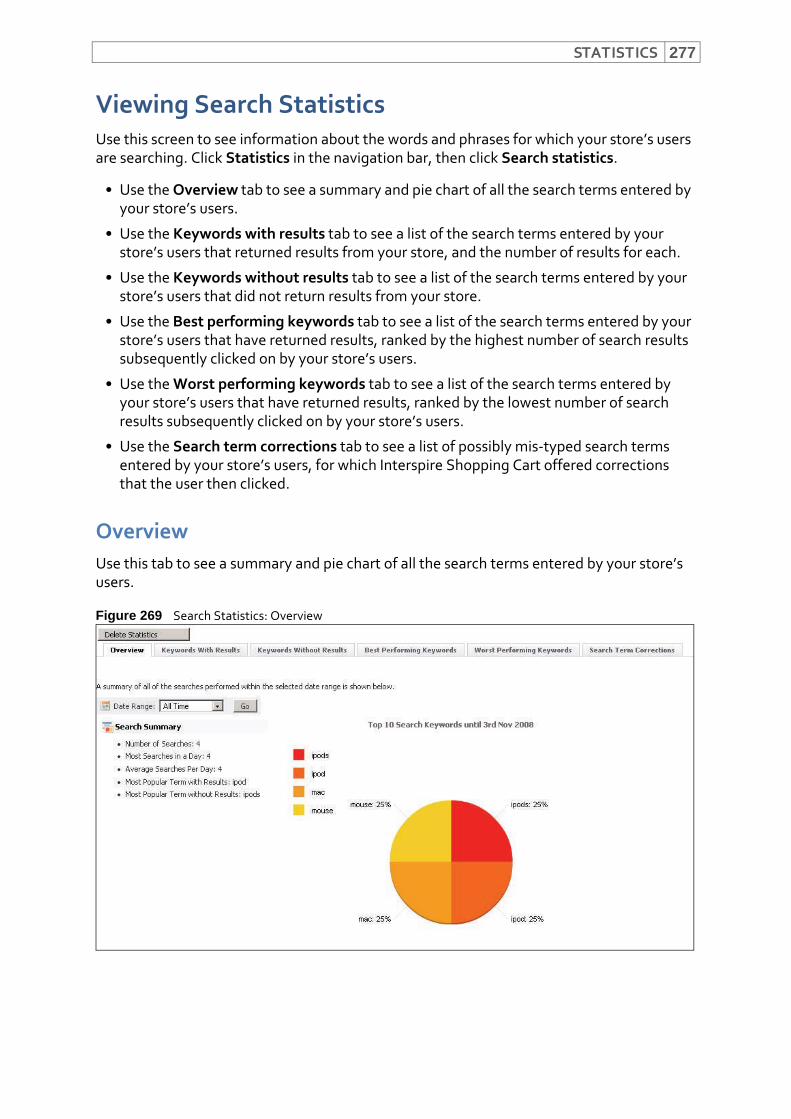
STATISTICS 277
Viewing Search StatisticsUse this screen to see information about the words and phrases for which your store’s users are searching. Click Statistics in the navigation bar, then click Search statistics.
• Use the Overview tab to see a summary and pie chart of all the search terms entered by your store’s users.
• Use the Keywords with results tab to see a list of the search terms entered by your store’s users that returned results from your store, and the number of results for each.
• Use the Keywords without results tab to see a list of the search terms entered by your store’s users that did not return results from your store.
• Use the Best performing keywords tab to see a list of the search terms entered by your store’s users that have returned results, ranked by the highest number of search results subsequently clicked on by your store’s users.
• Use the Worst performing keywords tab to see a list of the search terms entered by your store’s users that have returned results, ranked by the lowest number of search results subsequently clicked on by your store’s users.
• Use the Search term corrections tab to see a list of possibly mis‐typed search terms entered by your store’s users, for which Interspire Shopping Cart offered corrections that the user then clicked.
OverviewUse this tab to see a summary and pie chart of all the search terms entered by your store’s users.
Figure 269 Search Statistics: Overview
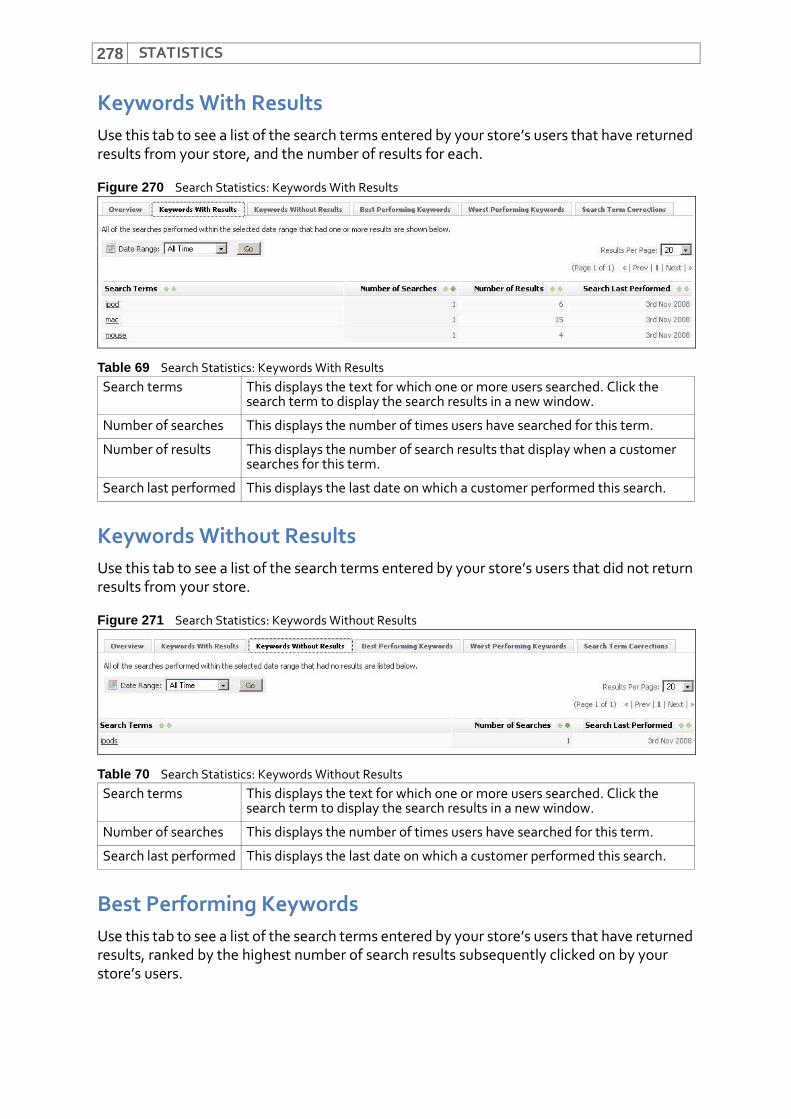
STATISTICS278
Keywords With ResultsUse this tab to see a list of the search terms entered by your store’s users that have returned results from your store, and the number of results for each.
Figure 270 Search Statistics: Keywords With Results
Keywords Without ResultsUse this tab to see a list of the search terms entered by your store’s users that did not return results from your store.
Figure 271 Search Statistics: Keywords Without Results
Best Performing KeywordsUse this tab to see a list of the search terms entered by your store’s users that have returned results, ranked by the highest number of search results subsequently clicked on by your store’s users.
Table 69 Search Statistics: Keywords With ResultsSearch terms This displays the text for which one or more users searched. Click the
search term to display the search results in a new window.
Number of searches This displays the number of times users have searched for this term.
Number of results This displays the number of search results that display when a customer searches for this term.
Search last performed This displays the last date on which a customer performed this search.
Table 70 Search Statistics: Keywords Without ResultsSearch terms This displays the text for which one or more users searched. Click the
search term to display the search results in a new window.
Number of searches This displays the number of times users have searched for this term.
Search last performed This displays the last date on which a customer performed this search.
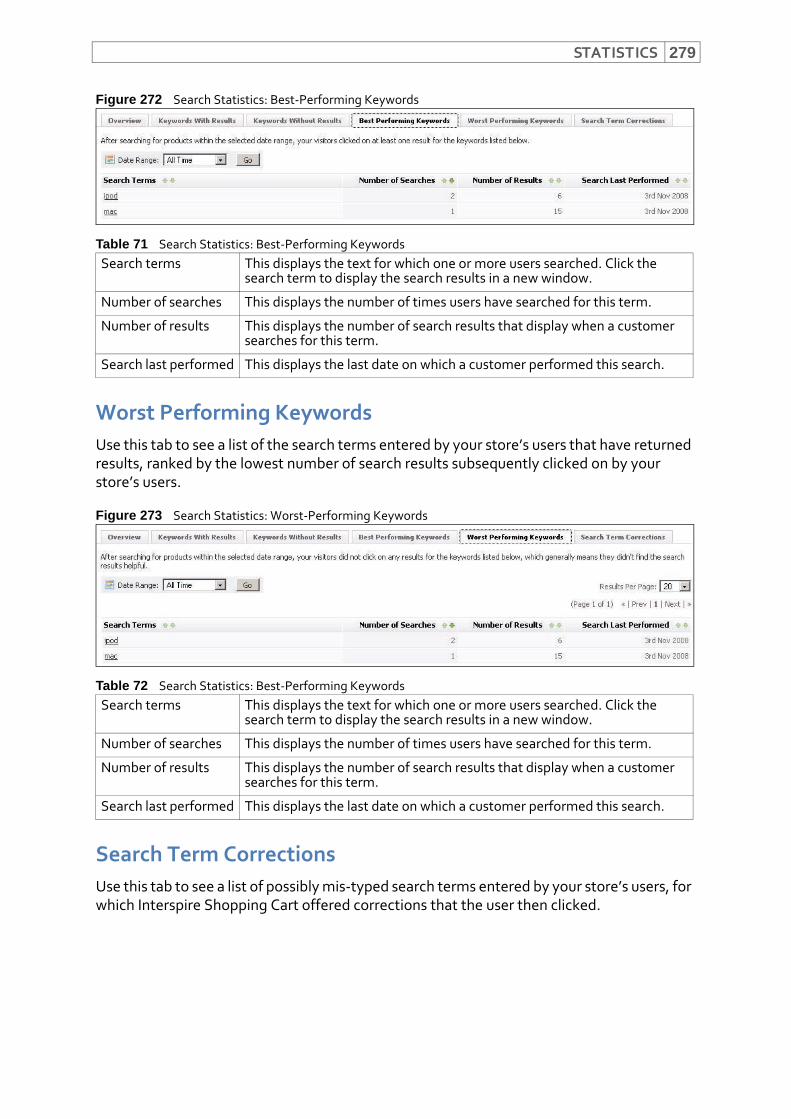
STATISTICS 279
Figure 272 Search Statistics: Best‐Performing Keywords
Worst Performing KeywordsUse this tab to see a list of the search terms entered by your store’s users that have returned results, ranked by the lowest number of search results subsequently clicked on by your store’s users.
Figure 273 Search Statistics: Worst‐Performing Keywords
Search Term CorrectionsUse this tab to see a list of possibly mis‐typed search terms entered by your store’s users, for which Interspire Shopping Cart offered corrections that the user then clicked.
Table 71 Search Statistics: Best‐Performing KeywordsSearch terms This displays the text for which one or more users searched. Click the
search term to display the search results in a new window.
Number of searches This displays the number of times users have searched for this term.
Number of results This displays the number of search results that display when a customer searches for this term.
Search last performed This displays the last date on which a customer performed this search.
Table 72 Search Statistics: Best‐Performing KeywordsSearch terms This displays the text for which one or more users searched. Click the
search term to display the search results in a new window.
Number of searches This displays the number of times users have searched for this term.
Number of results This displays the number of search results that display when a customer searches for this term.
Search last performed This displays the last date on which a customer performed this search.
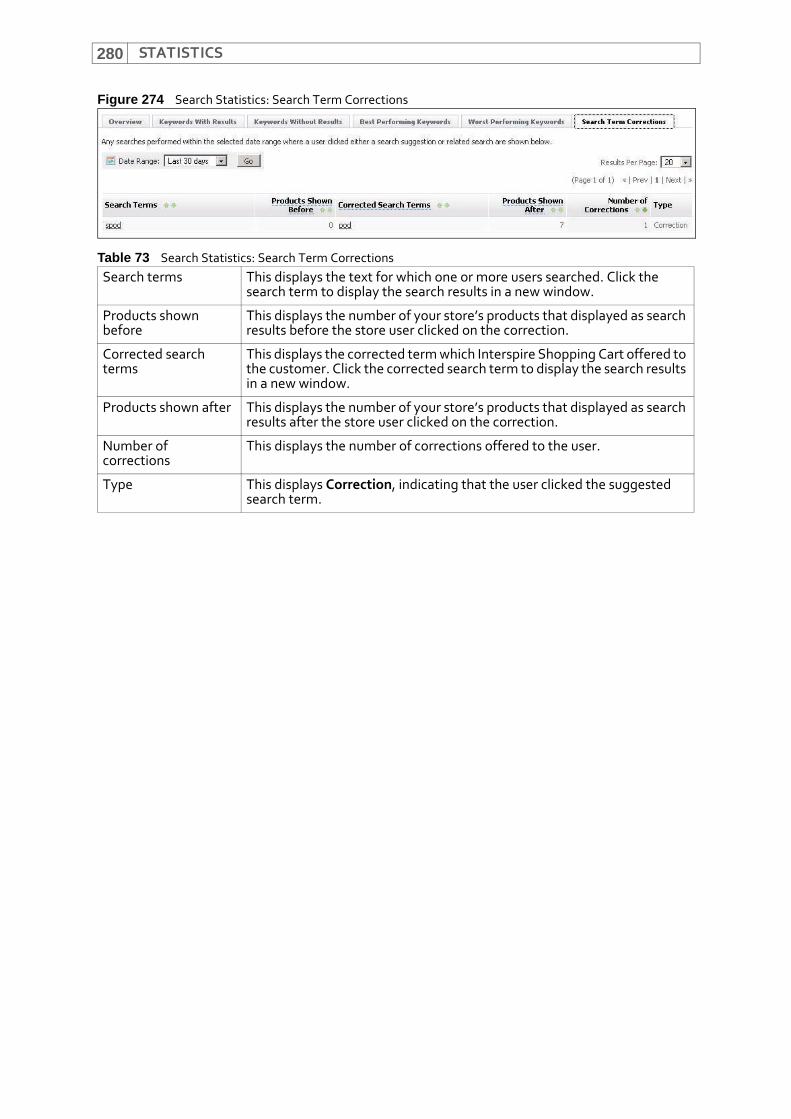
STATISTICS280
Figure 274 Search Statistics: Search Term Corrections
Table 73 Search Statistics: Search Term CorrectionsSearch terms This displays the text for which one or more users searched. Click the
search term to display the search results in a new window.
Products shown before
This displays the number of your store’s products that displayed as search results before the store user clicked on the correction.
Corrected search terms
This displays the corrected term which Interspire Shopping Cart offered to the customer. Click the corrected search term to display the search results in a new window.
Products shown after This displays the number of your store’s products that displayed as search results after the store user clicked on the correction.
Number of corrections
This displays the number of corrections offered to the user.
Type This displays Correction, indicating that the user clicked the suggested search term.

281
AddonsThis chapter describes how to use the Addons menu in the toolbar.
Figure 275 The Addons Menu
Addons OverviewAddons are additional features and tools that add functionality to your store and management interface. When you purchase Interspire Shopping Cart, some addons are already available. As other addons are developed and made available, you can download them and run them as part of Interspire Shopping Cart.
• Use the Addons > View addons screen to see the addons that have been downloaded and are available to use (whether or not you are actually using them at the moment). Interspire Shopping Cart also checks whether any new addons have been developed and released, and displays them in this screen.
• Use the Addons > Addons setup screen to specify which of Interspire Shopping Cart’s addons you want to use, and to configure the addons that you are using. You can also see instructions on using each addon in this screen.
Note: At the time of writing, the Google AdWords export addon is the only addon enabled by default.
Viewing AddonsClick Addons in the toolbar, then click View addons.
Note: The addons shown in this figure are those available at the time of writing. The addons that display in your screen may be different.
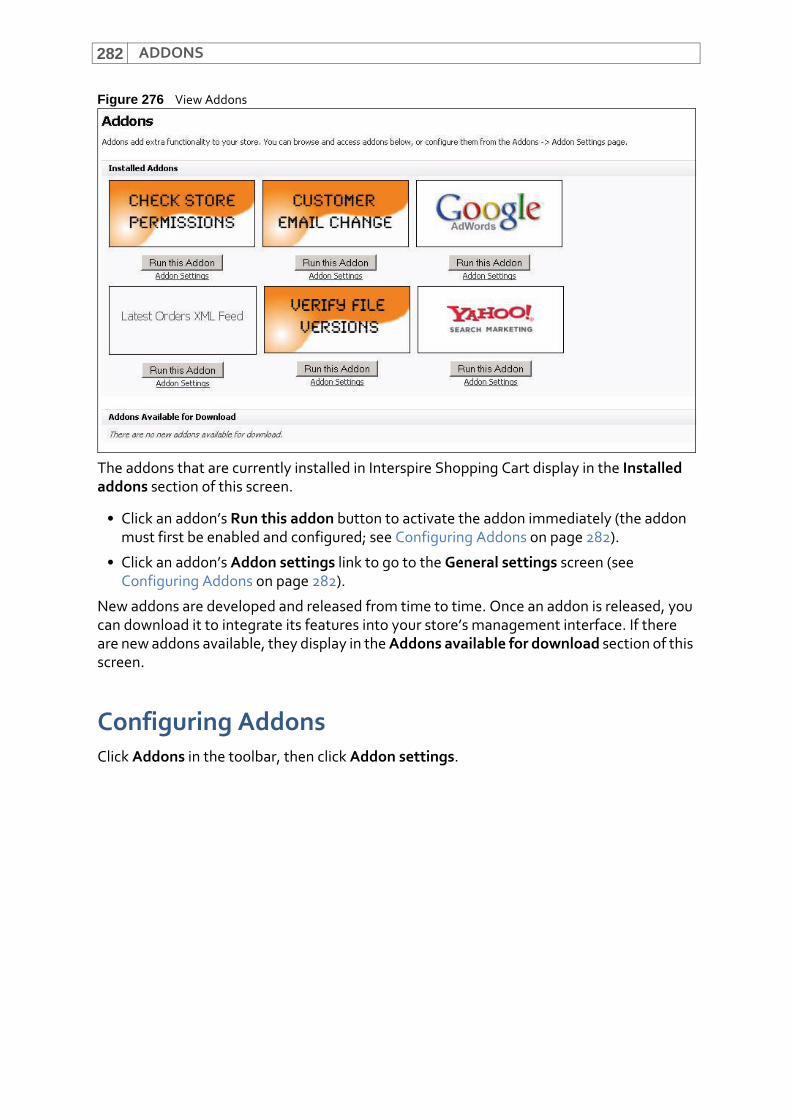
ADDONS282
Figure 276 View Addons
The addons that are currently installed in Interspire Shopping Cart display in the Installed addons section of this screen.
• Click an addon’s Run this addon button to activate the addon immediately (the addon must first be enabled and configured; see Configuring Addons on page 282).
• Click an addon’s Addon settings link to go to the General settings screen (see Configuring Addons on page 282).
New addons are developed and released from time to time. Once an addon is released, you can download it to integrate its features into your store’s management interface. If there are new addons available, they display in the Addons available for download section of this screen.
Configuring AddonsClick Addons in the toolbar, then click Addon settings.
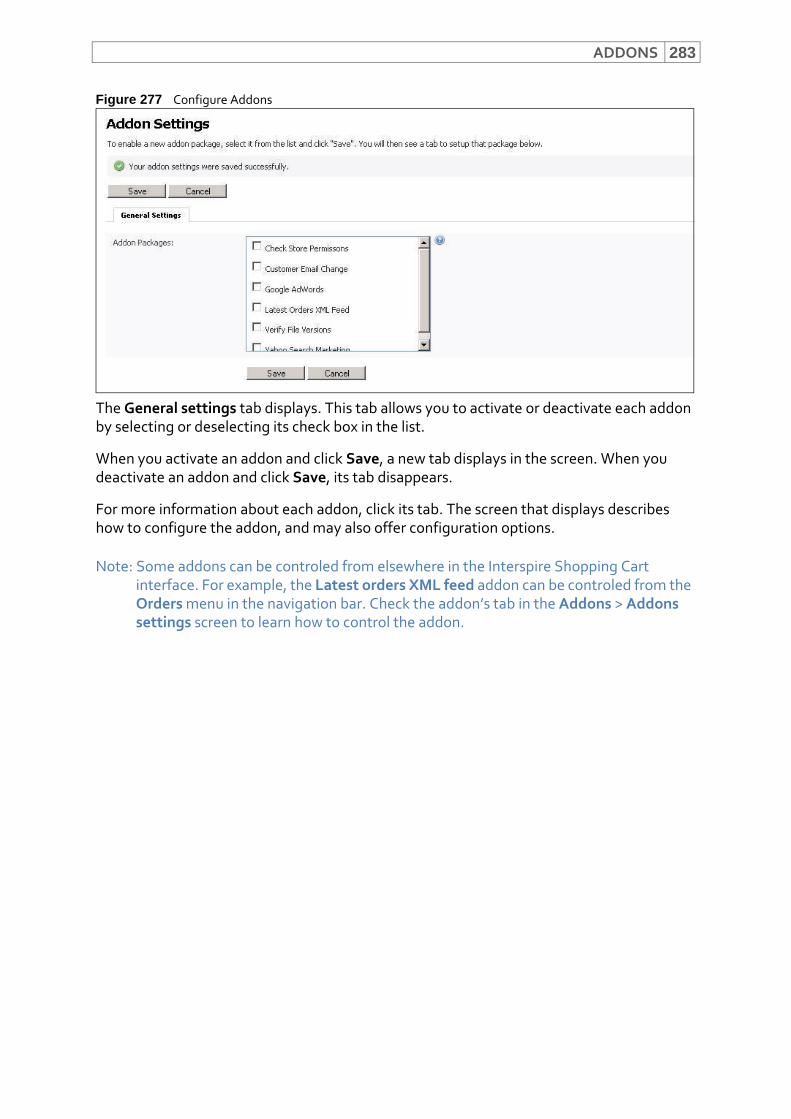
ADDONS 283
Figure 277 Configure Addons
The General settings tab displays. This tab allows you to activate or deactivate each addon by selecting or deselecting its check box in the list.
When you activate an addon and click Save, a new tab displays in the screen. When you deactivate an addon and click Save, its tab disappears.
For more information about each addon, click its tab. The screen that displays describes how to configure the addon, and may also offer configuration options.
Note: Some addons can be controled from elsewhere in the Interspire Shopping Cart interface. For example, the Latest orders XML feed addon can be controled from the Orders menu in the navigation bar. Check the addon’s tab in the Addons > Addons settings screen to learn how to control the addon.

ADDONS284
285
IVINTERSPIRE SHOPPING CART TOOLS
This section contains the following chapters:
This chapter describes how to use the Tools > Backups option in the toolbar. (287)
Importing and Exporting Stores (291)
Logs (295)
Viewing System Information (299)

286
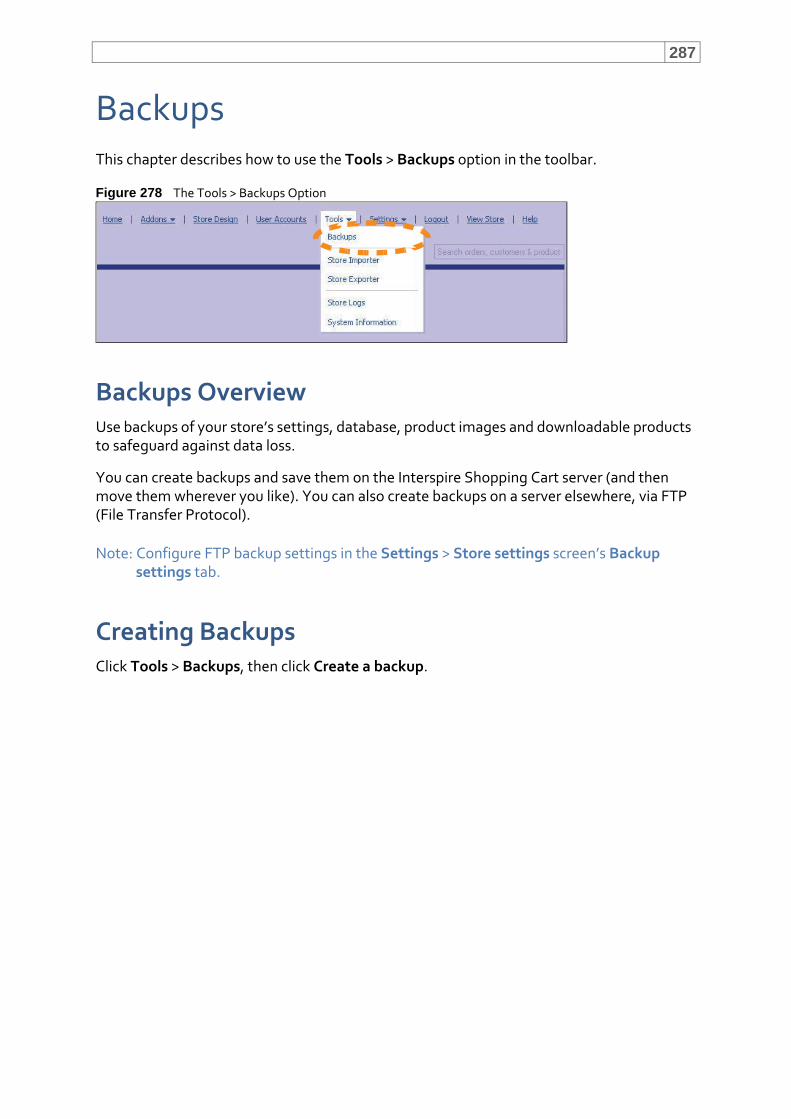
287
BackupsThis chapter describes how to use the Tools > Backups option in the toolbar.
Figure 278 The Tools > Backups Option
Backups OverviewUse backups of your store’s settings, database, product images and downloadable products to safeguard against data loss.
You can create backups and save them on the Interspire Shopping Cart server (and then move them wherever you like). You can also create backups on a server elsewhere, via FTP (File Transfer Protocol).
Note: Configure FTP backup settings in the Settings > Store settings screen’s Backup settings tab.
Creating BackupsClick Tools > Backups, then click Create a backup.
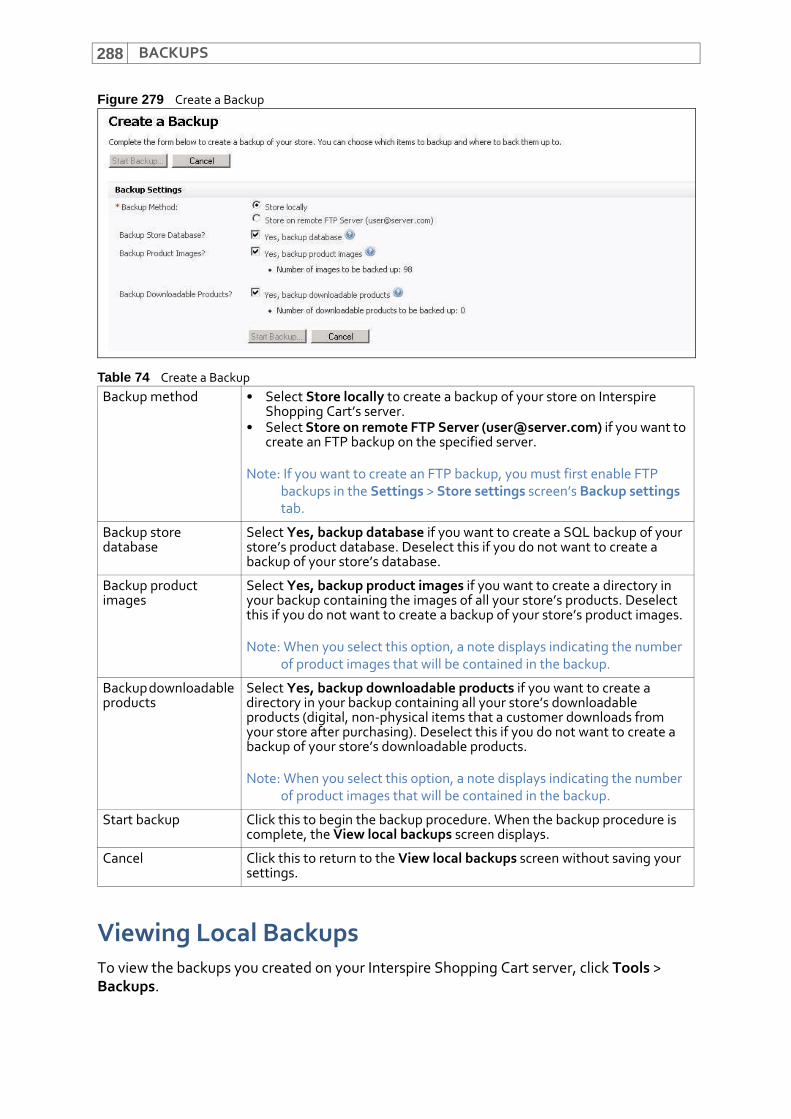
BACKUPS288
Figure 279 Create a Backup
Viewing Local BackupsTo view the backups you created on your Interspire Shopping Cart server, click Tools > Backups.
Table 74 Create a BackupBackup method • Select Store locally to create a backup of your store on Interspire
Shopping Cart’s server.• Select Store on remote FTP Server ([email protected]) if you want to
create an FTP backup on the specified server.
Note: If you want to create an FTP backup, you must first enable FTP backups in the Settings > Store settings screen’s Backup settings tab.
Backup store database
Select Yes, backup database if you want to create a SQL backup of your store’s product database. Deselect this if you do not want to create a backup of your store’s database.
Backup product images
Select Yes, backup product images if you want to create a directory in your backup containing the images of all your store’s products. Deselect this if you do not want to create a backup of your store’s product images.
Note: When you select this option, a note displays indicating the number of product images that will be contained in the backup.
Backup downloadable products
Select Yes, backup downloadable products if you want to create a directory in your backup containing all your store’s downloadable products (digital, non‐physical items that a customer downloads from your store after purchasing). Deselect this if you do not want to create a backup of your store’s downloadable products.
Note: When you select this option, a note displays indicating the number of product images that will be contained in the backup.
Start backup Click this to begin the backup procedure. When the backup procedure is complete, the View local backups screen displays.
Cancel Click this to return to the View local backups screen without saving your settings.
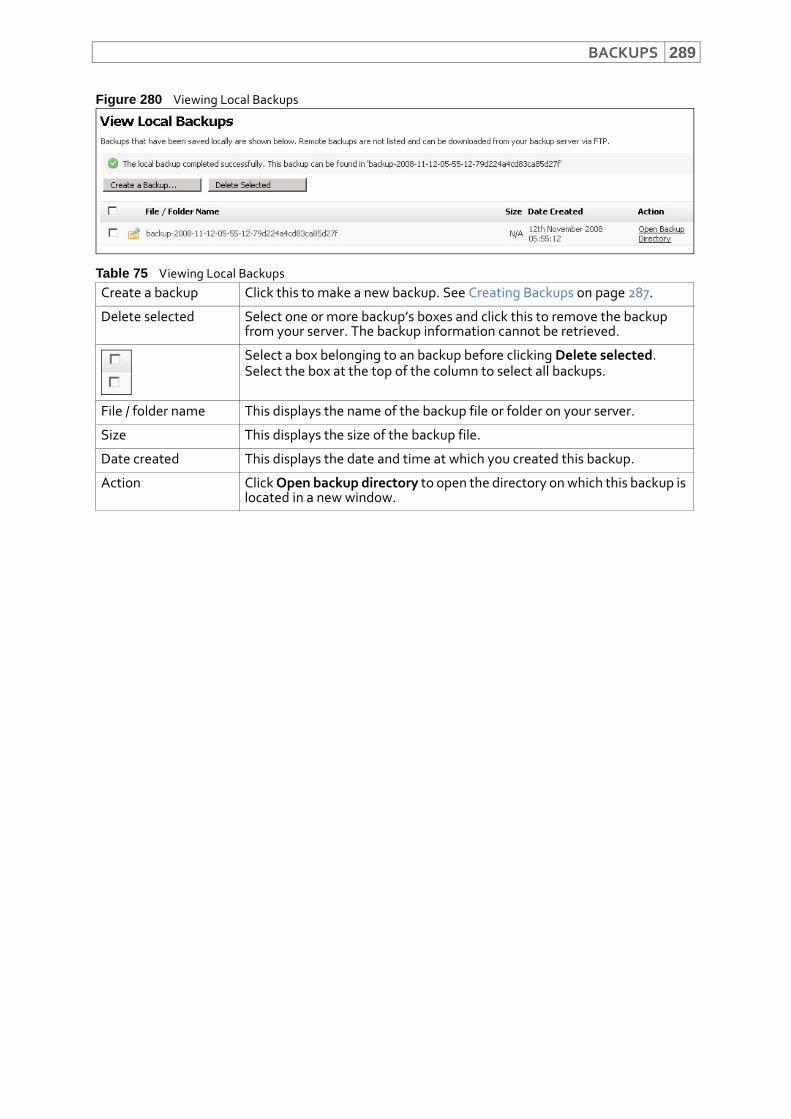
BACKUPS 289
Figure 280 Viewing Local Backups
Table 75 Viewing Local BackupsCreate a backup Click this to make a new backup. See Creating Backups on page 287.
Delete selected Select one or more backup’s boxes and click this to remove the backup from your server. The backup information cannot be retrieved.
Select a box belonging to an backup before clicking Delete selected.Select the box at the top of the column to select all backups.
File / folder name This displays the name of the backup file or folder on your server.
Size This displays the size of the backup file.
Date created This displays the date and time at which you created this backup.
Action Click Open backup directory to open the directory on which this backup is located in a new window.

BACKUPS290
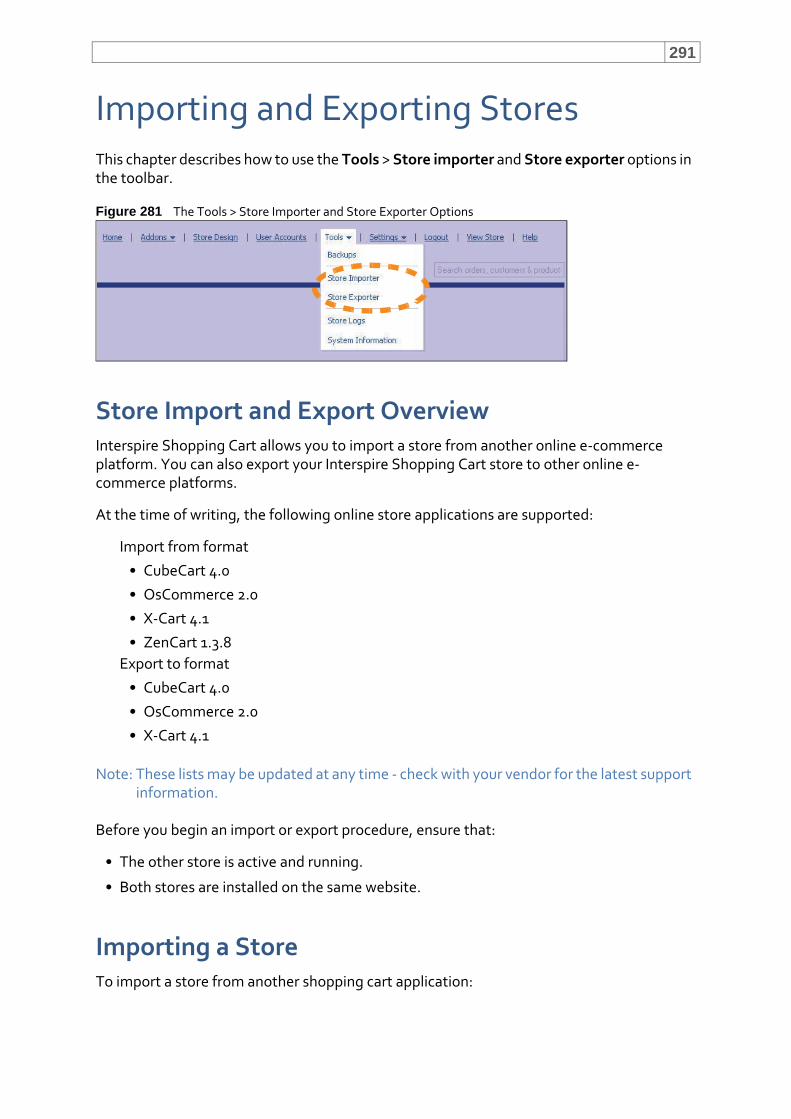
291
Importing and Exporting StoresThis chapter describes how to use the Tools > Store importer and Store exporter options in the toolbar.
Figure 281 The Tools > Store Importer and Store Exporter Options
Store Import and Export OverviewInterspire Shopping Cart allows you to import a store from another online e‐commerce platform. You can also export your Interspire Shopping Cart store to other online e‐commerce platforms.
At the time of writing, the following online store applications are supported:
Import from format
• CubeCart 4.0
• OsCommerce 2.0
• X‐Cart 4.1
• ZenCart 1.3.8Export to format
• CubeCart 4.0
• OsCommerce 2.0
• X‐Cart 4.1
Note: These lists may be updated at any time ‐ check with your vendor for the latest support information.
Before you begin an import or export procedure, ensure that:
• The other store is active and running.
• Both stores are installed on the same website.
Importing a StoreTo import a store from another shopping cart application:
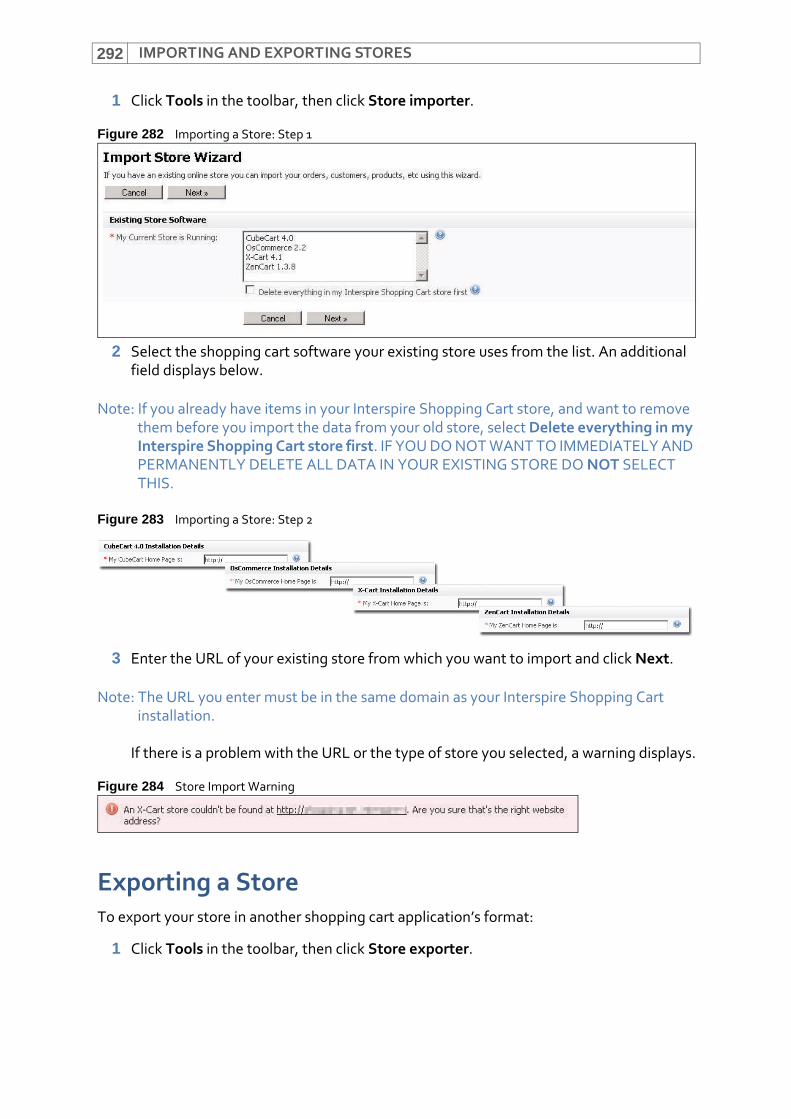
IMPORTING AND EXPORTING STORES292
1 Click Tools in the toolbar, then click Store importer.
Figure 282 Importing a Store: Step 1
2 Select the shopping cart software your existing store uses from the list. An additional field displays below.
Note: If you already have items in your Interspire Shopping Cart store, and want to remove them before you import the data from your old store, select Delete everything in my Interspire Shopping Cart store first. IF YOU DO NOT WANT TO IMMEDIATELY AND PERMANENTLY DELETE ALL DATA IN YOUR EXISTING STORE DO NOT SELECT THIS.
Figure 283 Importing a Store: Step 2
3 Enter the URL of your existing store from which you want to import and click Next.
Note: The URL you enter must be in the same domain as your Interspire Shopping Cart installation.
If there is a problem with the URL or the type of store you selected, a warning displays.
Figure 284 Store Import Warning
Exporting a StoreTo export your store in another shopping cart application’s format:
1 Click Tools in the toolbar, then click Store exporter.
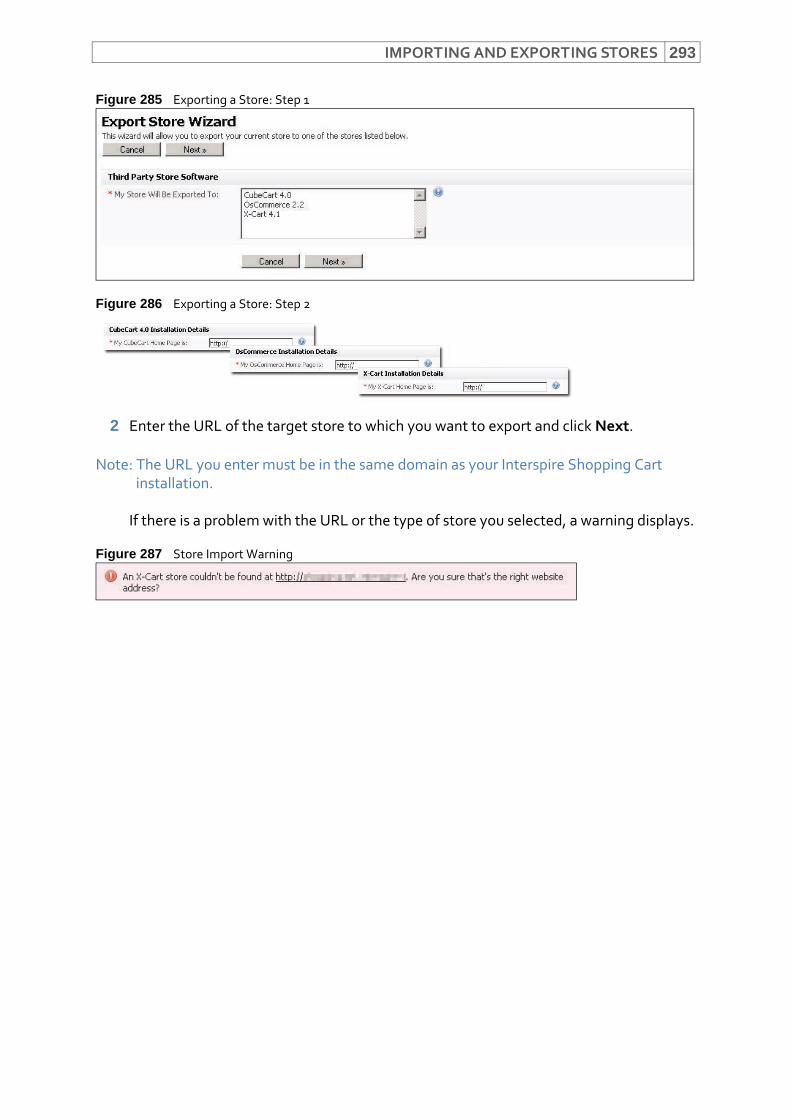
IMPORTING AND EXPORTING STORES 293
Figure 285 Exporting a Store: Step 1
Figure 286 Exporting a Store: Step 2
2 Enter the URL of the target store to which you want to export and click Next.
Note: The URL you enter must be in the same domain as your Interspire Shopping Cart installation.
If there is a problem with the URL or the type of store you selected, a warning displays.
Figure 287 Store Import Warning

IMPORTING AND EXPORTING STORES294
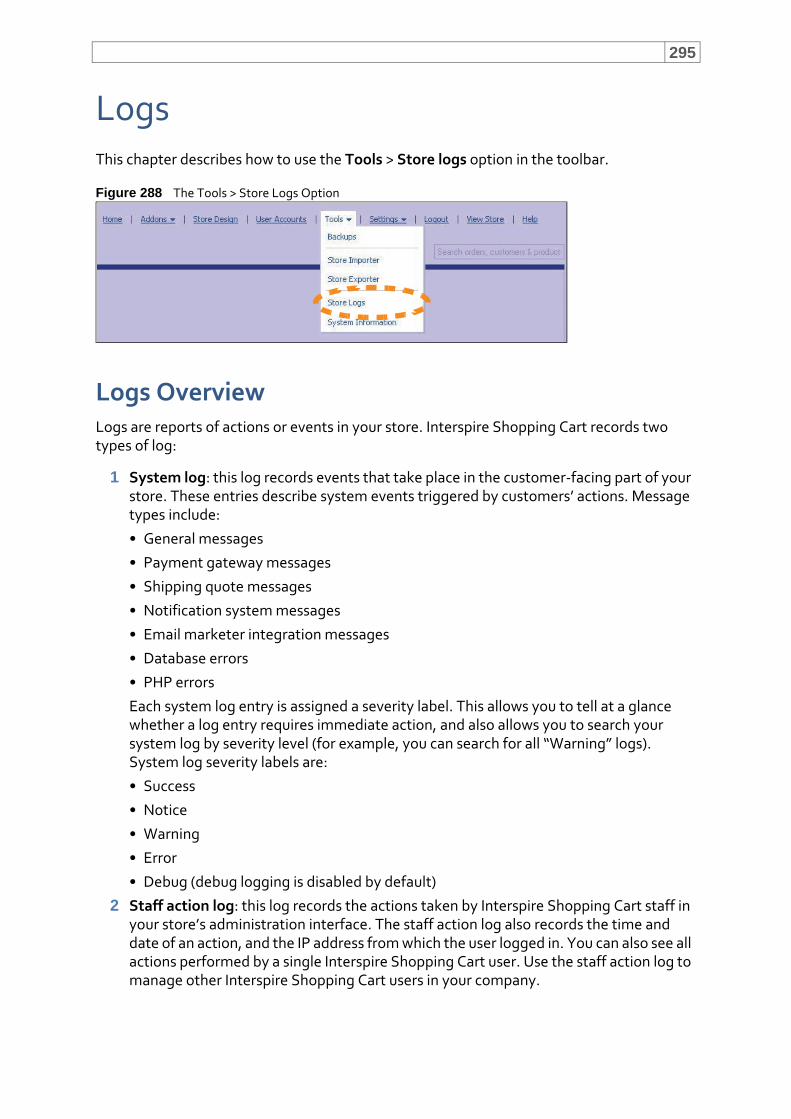
295
LogsThis chapter describes how to use the Tools > Store logs option in the toolbar.
Figure 288 The Tools > Store Logs Option
Logs OverviewLogs are reports of actions or events in your store. Interspire Shopping Cart records two types of log:
1 System log: this log records events that take place in the customer‐facing part of your store. These entries describe system events triggered by customers’ actions. Message types include:
• General messages
• Payment gateway messages
• Shipping quote messages
• Notification system messages
• Email marketer integration messages
• Database errors
• PHP errors
Each system log entry is assigned a severity label. This allows you to tell at a glance whether a log entry requires immediate action, and also allows you to search your system log by severity level (for example, you can search for all “Warning” logs). System log severity labels are:
• Success
• Notice
• Warning
• Error
• Debug (debug logging is disabled by default)
2 Staff action log: this log records the actions taken by Interspire Shopping Cart staff in your store’s administration interface. The staff action log also records the time and date of an action, and the IP address from which the user logged in. You can also see all actions performed by a single Interspire Shopping Cart user. Use the staff action log to manage other Interspire Shopping Cart users in your company.
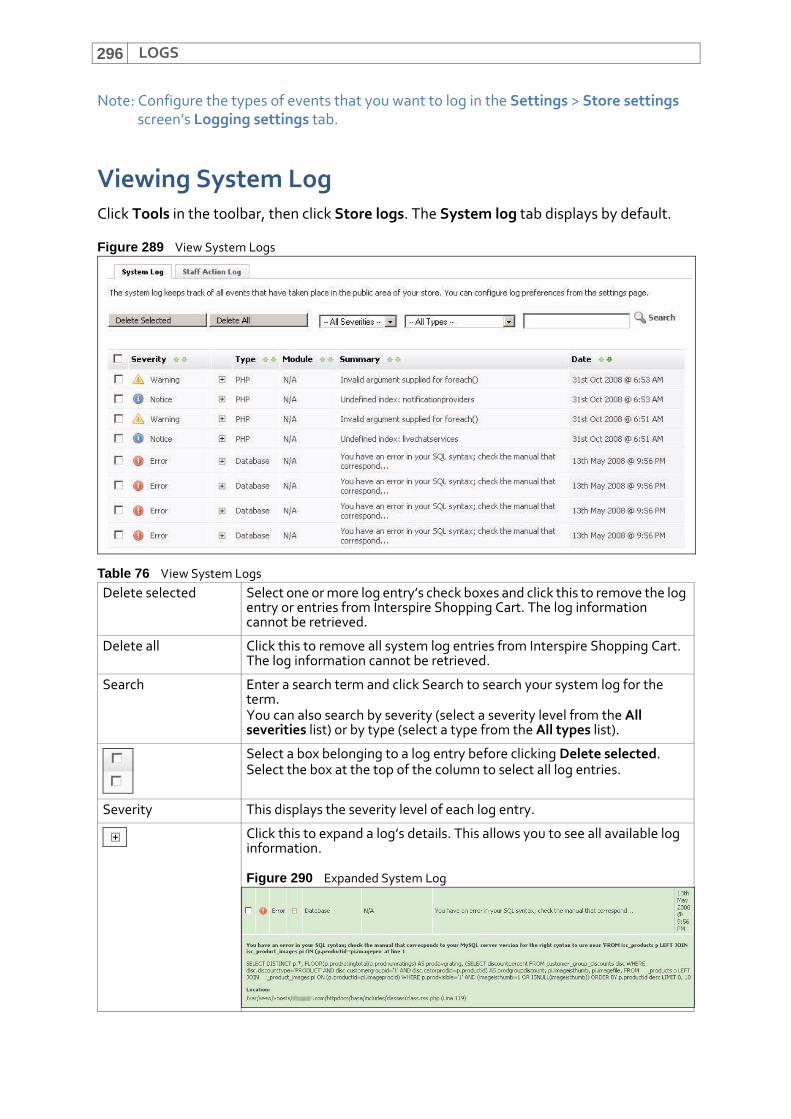
LOGS296
Note: Configure the types of events that you want to log in the Settings > Store settings screen’s Logging settings tab.
Viewing System LogClick Tools in the toolbar, then click Store logs. The System log tab displays by default.
Figure 289 View System Logs
Table 76 View System LogsDelete selected Select one or more log entry’s check boxes and click this to remove the log
entry or entries from Interspire Shopping Cart. The log information cannot be retrieved.
Delete all Click this to remove all system log entries from Interspire Shopping Cart. The log information cannot be retrieved.
Search Enter a search term and click Search to search your system log for the term.You can also search by severity (select a severity level from the All severities list) or by type (select a type from the All types list).
Select a box belonging to a log entry before clicking Delete selected.Select the box at the top of the column to select all log entries.
Severity This displays the severity level of each log entry.
Click this to expand a log’s details. This allows you to see all available log information.
Figure 290 Expanded System Log
LOGS 297
Viewing Staff Action LogsClick Tools in the toolbar, then click Store logs. Click the Staff action log tab.
Click this to shrink a log entry you previously expanded.
Note: This icon displays only for expanded orders.
Module For system logs, N/A (not applicable) displays.
Summary This displays a short description of the log entry’s cause.
Date This displays the date and time at which the log entry was created.
Table 76 View System Logs
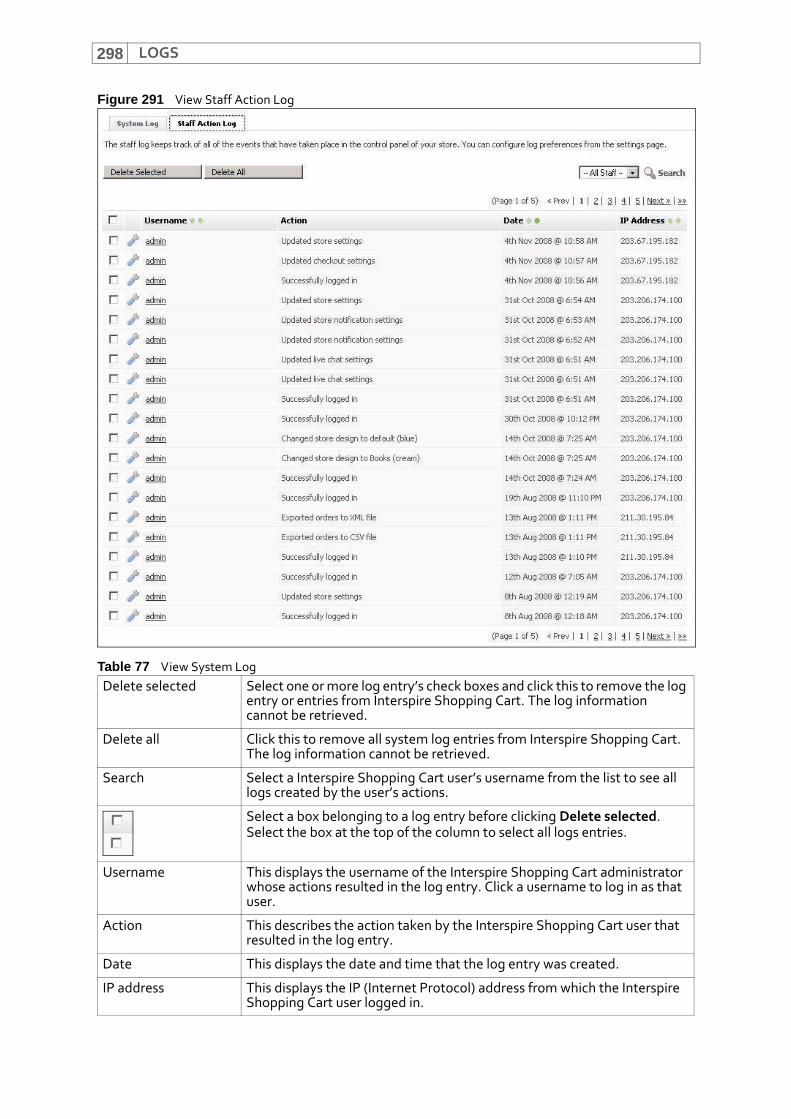
LOGS298
Figure 291 View Staff Action Log
Table 77 View System LogDelete selected Select one or more log entry’s check boxes and click this to remove the log
entry or entries from Interspire Shopping Cart. The log information cannot be retrieved.
Delete all Click this to remove all system log entries from Interspire Shopping Cart. The log information cannot be retrieved.
Search Select a Interspire Shopping Cart user’s username from the list to see all logs created by the user’s actions.
Select a box belonging to a log entry before clicking Delete selected.Select the box at the top of the column to select all logs entries.
Username This displays the username of the Interspire Shopping Cart administrator whose actions resulted in the log entry. Click a username to log in as that user.
Action This describes the action taken by the Interspire Shopping Cart user that resulted in the log entry.
Date This displays the date and time that the log entry was created.
IP address This displays the IP (Internet Protocol) address from which the Interspire Shopping Cart user logged in.
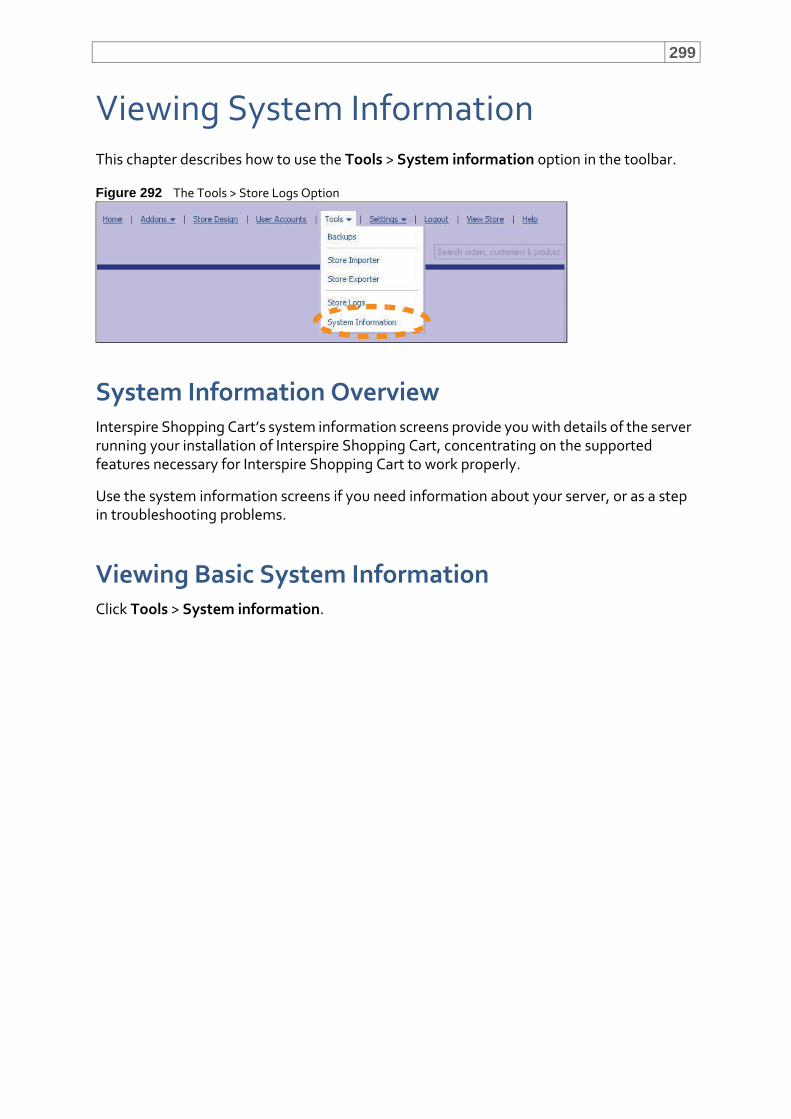
299
Viewing System InformationThis chapter describes how to use the Tools > System information option in the toolbar.
Figure 292 The Tools > Store Logs Option
System Information OverviewInterspire Shopping Cart’s system information screens provide you with details of the server running your installation of Interspire Shopping Cart, concentrating on the supported features necessary for Interspire Shopping Cart to work properly.
Use the system information screens if you need information about your server, or as a step in troubleshooting problems.
Viewing Basic System InformationClick Tools > System information.

VIEWING SYSTEM INFORMATION300
Figure 293 Basic System Information
Table 78 Basic System InformationProduct version This displays the Interspire Shopping Cart version number. You can check
that this is the most up‐to‐date version in the Home screen (see The Home Screen on page 47).
Product edition This displays the Interspire Shopping Cart edition name.
Hosting provider This displays the name of the organization currently hosting your installation of Interspire Shopping Cart.
PHP version This displays the PHP version number.
MySQL version This displays the MySQL database version number.
Server software This displays details of the software used by the server on which Interspire Shopping Cart is installed.
Operating system This displays the operating system of the server on which Interspire Shopping Cart is installed.
GD version This displays whether the server supports the PHP graphics library GD. Interspire Shopping Cart uses the GD library to create the CAPTCHA images embedded in parts of your store (such as the page in which customers can submit a product review).
Safe mode This displays whether the server is running PHP in safe mode. Safe mode disables or restricts a variety of PHP functions for security reasons. You may find that safe mode is enabled if you are using a shared server.
Note: Safe mode is not available in PHP v6.0.0.
Remote connection support
This displays whether or not your server permits remote connections (accessing your MySQL database from an external IP address).
Note: By default, MySQL servers allow connections from localhost only.
Multi‐byte functionality
This displays whether PHP supports multi‐byte character encoding. Multi‐byte encoding is used for variable‐width character sets, such as Chinese, Japanese and Korean (CJK).
PSpell functionality This displays whether PSpell (Portable Spell Checker Interface Library) is supported. PSpell enables access to, and configuration of, a system’s spell‐checking libraries.
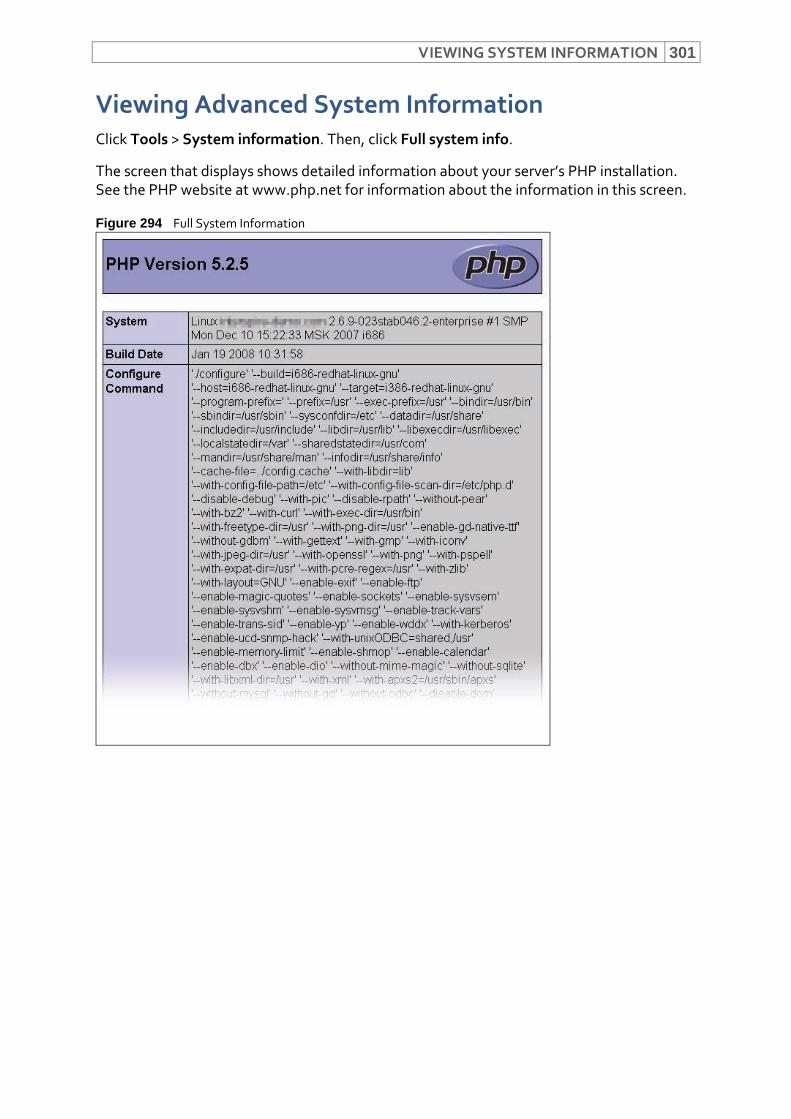
VIEWING SYSTEM INFORMATION 301
Viewing Advanced System InformationClick Tools > System information. Then, click Full system info.
The screen that displays shows detailed information about your server’s PHP installation. See the PHP website at www.php.net for information about the information in this screen.
Figure 294 Full System Information

VIEWING SYSTEM INFORMATION302
303
VINTERSPIRE SHOPPING CART
SETTINGS
This section contains the following chapters:
Managing Store Settings (305)
Managing Shipping Settings (329)
Managing Tax Rates (339)
Managing Currency Settings (343)
Managing Checkout Settings (349)
Managing Accounting Settings (355)
Managing Gift Certificate Settings (357)
Managing Analytics Settings (361)
Managing Affiliate Settings (363)
Managing Notification Settings (365)
Managing Live Chat Settings (369)
Managing Returns Settings (375)
Managing Gift Wrapping Settings (379)
Managing Email Marketer Settings (383)
Managing Knowledge Manager Integration Settings (385)

304
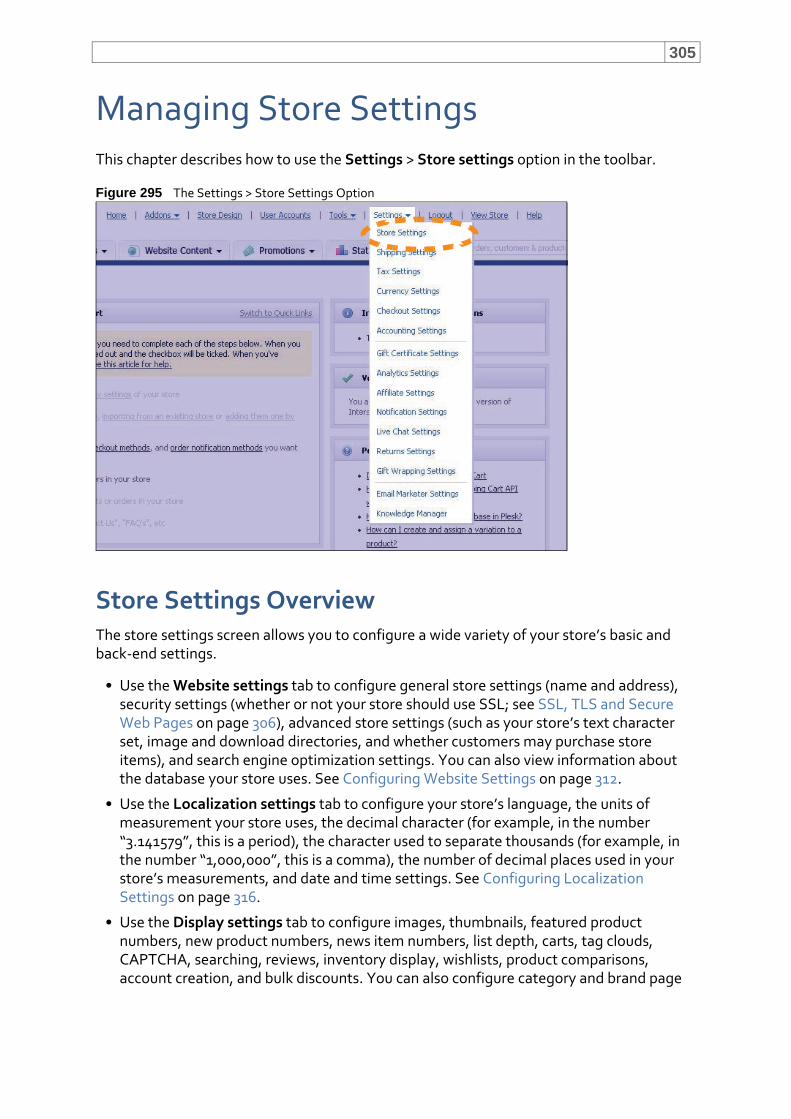
305
Managing Store SettingsThis chapter describes how to use the Settings > Store settings option in the toolbar.
Figure 295 The Settings > Store Settings Option
Store Settings OverviewThe store settings screen allows you to configure a wide variety of your store’s basic and back‐end settings.
• Use the Website settings tab to configure general store settings (name and address), security settings (whether or not your store should use SSL; see SSL, TLS and Secure Web Pages on page 306), advanced store settings (such as your store’s text character set, image and download directories, and whether customers may purchase store items), and search engine optimization settings. You can also view information about the database your store uses. See Configuring Website Settings on page 312.
• Use the Localization settings tab to configure your store’s language, the units of measurement your store uses, the decimal character (for example, in the number “3.141579”, this is a period), the character used to separate thousands (for example, in the number “1,000,000”, this is a comma), the number of decimal places used in your store’s measurements, and date and time settings. See Configuring Localization Settings on page 316.
• Use the Display settings tab to configure images, thumbnails, featured product numbers, new product numbers, news item numbers, list depth, carts, tag clouds, CAPTCHA, searching, reviews, inventory display, wishlists, product comparisons, account creation, and bulk discounts. You can also configure category and brand page
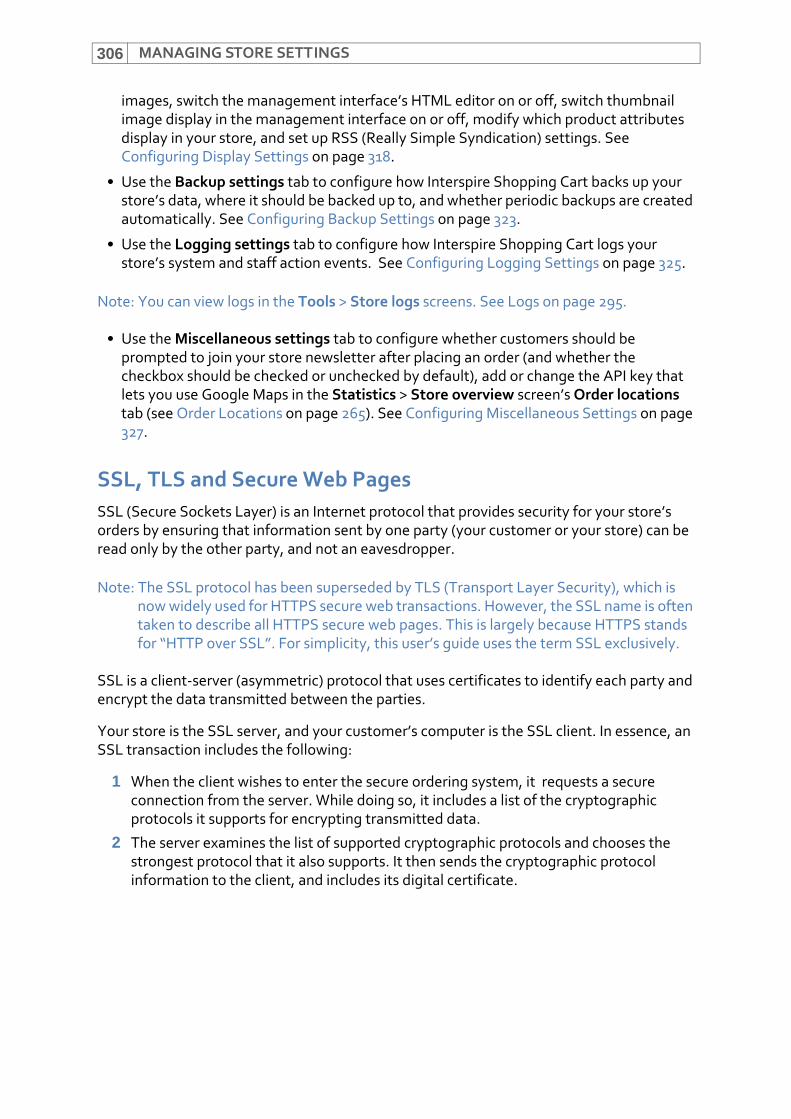
MANAGING STORE SETTINGS306
images, switch the management interface’s HTML editor on or off, switch thumbnail image display in the management interface on or off, modify which product attributes display in your store, and set up RSS (Really Simple Syndication) settings. See Configuring Display Settings on page 318.
• Use the Backup settings tab to configure how Interspire Shopping Cart backs up your store’s data, where it should be backed up to, and whether periodic backups are created automatically. See Configuring Backup Settings on page 323.
• Use the Logging settings tab to configure how Interspire Shopping Cart logs your store’s system and staff action events. See Configuring Logging Settings on page 325.
Note: You can view logs in the Tools > Store logs screens. See Logs on page 295.
• Use the Miscellaneous settings tab to configure whether customers should be prompted to join your store newsletter after placing an order (and whether the checkbox should be checked or unchecked by default), add or change the API key that lets you use Google Maps in the Statistics > Store overview screen’s Order locations tab (see Order Locations on page 265). See Configuring Miscellaneous Settings on page 327.
SSL, TLS and Secure Web PagesSSL (Secure Sockets Layer) is an Internet protocol that provides security for your store’s orders by ensuring that information sent by one party (your customer or your store) can be read only by the other party, and not an eavesdropper.
Note: The SSL protocol has been superseded by TLS (Transport Layer Security), which is now widely used for HTTPS secure web transactions. However, the SSL name is often taken to describe all HTTPS secure web pages. This is largely because HTTPS stands for “HTTP over SSL”. For simplicity, this user’s guide uses the term SSL exclusively.
SSL is a client‐server (asymmetric) protocol that uses certificates to identify each party and encrypt the data transmitted between the parties.
Your store is the SSL server, and your customer’s computer is the SSL client. In essence, an SSL transaction includes the following:
1 When the client wishes to enter the secure ordering system, it requests a secure connection from the server. While doing so, it includes a list of the cryptographic protocols it supports for encrypting transmitted data.
2 The server examines the list of supported cryptographic protocols and chooses the strongest protocol that it also supports. It then sends the cryptographic protocol information to the client, and includes its digital certificate.
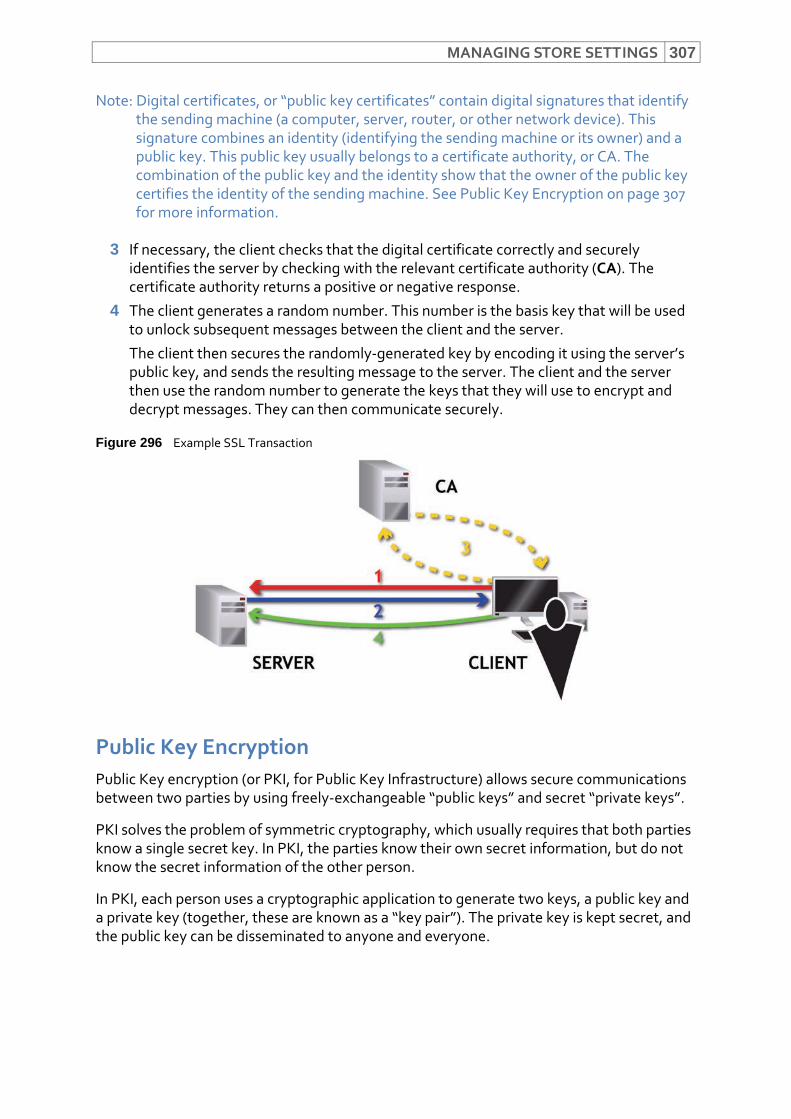
MANAGING STORE SETTINGS 307
Note: Digital certificates, or “public key certificates” contain digital signatures that identify the sending machine (a computer, server, router, or other network device). This signature combines an identity (identifying the sending machine or its owner) and a public key. This public key usually belongs to a certificate authority, or CA. The combination of the public key and the identity show that the owner of the public key certifies the identity of the sending machine. See Public Key Encryption on page 307 for more information.
3 If necessary, the client checks that the digital certificate correctly and securely identifies the server by checking with the relevant certificate authority (CA). The certificate authority returns a positive or negative response.
4 The client generates a random number. This number is the basis key that will be used to unlock subsequent messages between the client and the server.
The client then secures the randomly‐generated key by encoding it using the server’s public key, and sends the resulting message to the server. The client and the server then use the random number to generate the keys that they will use to encrypt and decrypt messages. They can then communicate securely.
Figure 296 Example SSL Transaction
Public Key EncryptionPublic Key encryption (or PKI, for Public Key Infrastructure) allows secure communications between two parties by using freely‐exchangeable “public keys” and secret “private keys”.
PKI solves the problem of symmetric cryptography, which usually requires that both parties know a single secret key. In PKI, the parties know their own secret information, but do not know the secret information of the other person.
In PKI, each person uses a cryptographic application to generate two keys, a public key and a private key (together, these are known as a “key pair”). The private key is kept secret, and the public key can be disseminated to anyone and everyone.
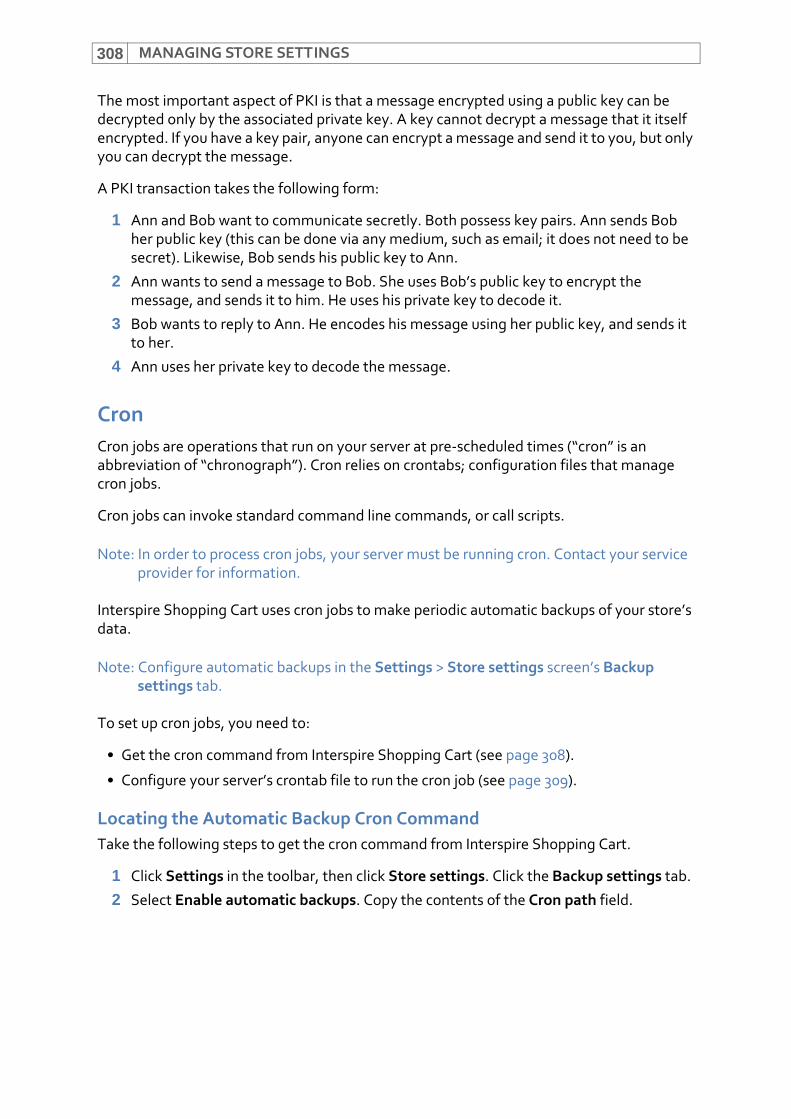
MANAGING STORE SETTINGS308
The most important aspect of PKI is that a message encrypted using a public key can be decrypted only by the associated private key. A key cannot decrypt a message that it itself encrypted. If you have a key pair, anyone can encrypt a message and send it to you, but only you can decrypt the message.
A PKI transaction takes the following form:
1 Ann and Bob want to communicate secretly. Both possess key pairs. Ann sends Bob her public key (this can be done via any medium, such as email; it does not need to be secret). Likewise, Bob sends his public key to Ann.
2 Ann wants to send a message to Bob. She uses Bob’s public key to encrypt the message, and sends it to him. He uses his private key to decode it.
3 Bob wants to reply to Ann. He encodes his message using her public key, and sends it to her.
4 Ann uses her private key to decode the message.
CronCron jobs are operations that run on your server at pre‐scheduled times (“cron” is an abbreviation of “chronograph”). Cron relies on crontabs; configuration files that manage cron jobs.
Cron jobs can invoke standard command line commands, or call scripts.
Note: In order to process cron jobs, your server must be running cron. Contact your service provider for information.
Interspire Shopping Cart uses cron jobs to make periodic automatic backups of your store’s data.
Note: Configure automatic backups in the Settings > Store settings screen’s Backup settings tab.
To set up cron jobs, you need to:
• Get the cron command from Interspire Shopping Cart (see page 308).
• Configure your server’s crontab file to run the cron job (see page 309).
Locating the Automatic Backup Cron CommandTake the following steps to get the cron command from Interspire Shopping Cart.
1 Click Settings in the toolbar, then click Store settings. Click the Backup settings tab.
2 Select Enable automatic backups. Copy the contents of the Cron path field.
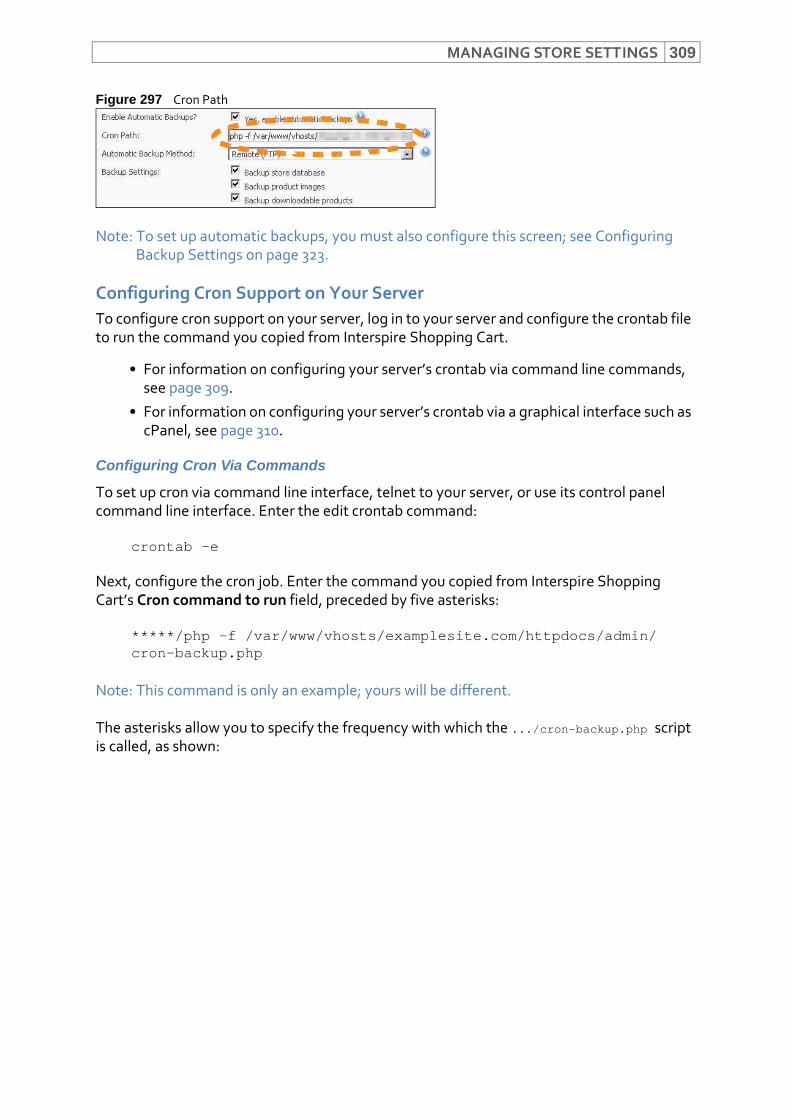
MANAGING STORE SETTINGS 309
Figure 297 Cron Path
Note: To set up automatic backups, you must also configure this screen; see Configuring Backup Settings on page 323.
Configuring Cron Support on Your ServerTo configure cron support on your server, log in to your server and configure the crontab file to run the command you copied from Interspire Shopping Cart.
• For information on configuring your server’s crontab via command line commands, see page 309.
• For information on configuring your server’s crontab via a graphical interface such as cPanel, see page 310.
Configuring Cron Via Commands
To set up cron via command line interface, telnet to your server, or use its control panel command line interface. Enter the edit crontab command:
crontab -e
Next, configure the cron job. Enter the command you copied from Interspire Shopping Cart’s Cron command to run field, preceded by five asterisks:
*****/php -f /var/www/vhosts/examplesite.com/httpdocs/admin/cron-backup.php
Note: This command is only an example; yours will be different.
The asterisks allow you to specify the frequency with which the .../cron-backup.php script is called, as shown:
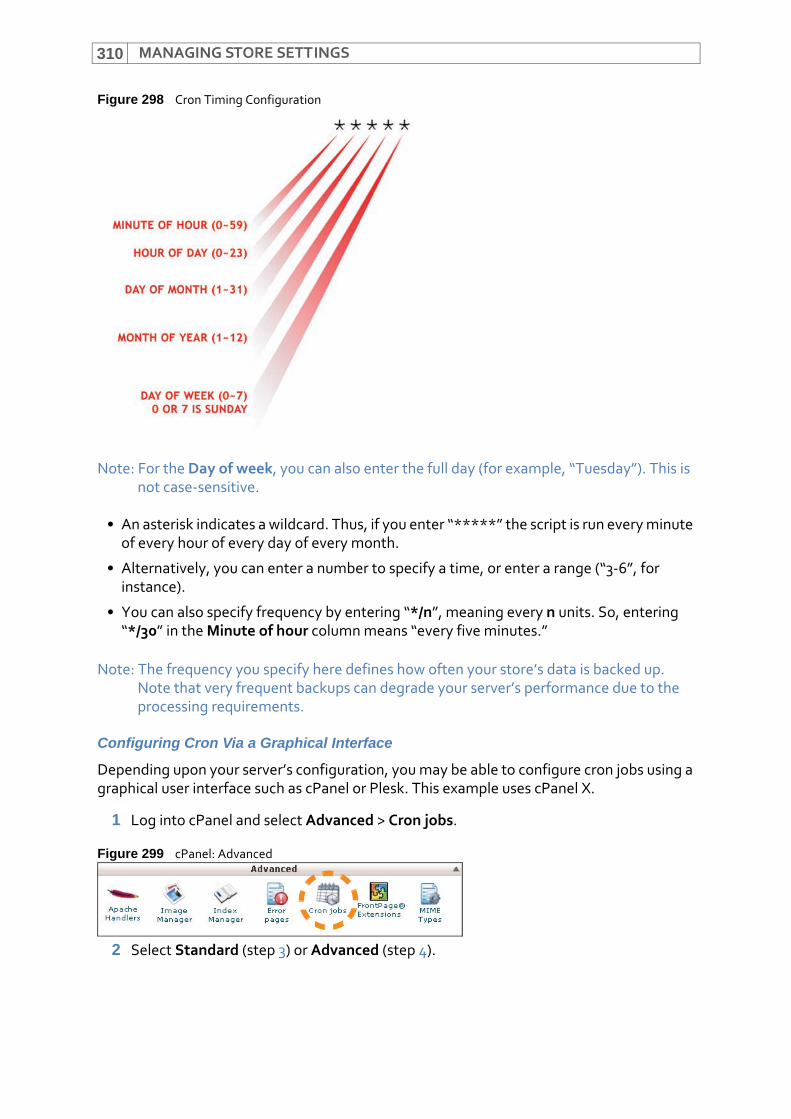
MANAGING STORE SETTINGS310
Figure 298 Cron Timing Configuration
Note: For the Day of week, you can also enter the full day (for example, “Tuesday”). This is not case‐sensitive.
• An asterisk indicates a wildcard. Thus, if you enter “*****” the script is run every minute of every hour of every day of every month.
• Alternatively, you can enter a number to specify a time, or enter a range (“3‐6”, for instance).
• You can also specify frequency by entering “*/n”, meaning every n units. So, entering “*/30” in the Minute of hour column means “every five minutes.”
Note: The frequency you specify here defines how often your store’s data is backed up. Note that very frequent backups can degrade your server’s performance due to the processing requirements.
Configuring Cron Via a Graphical Interface
Depending upon your server’s configuration, you may be able to configure cron jobs using a graphical user interface such as cPanel or Plesk. This example uses cPanel X.
1 Log into cPanel and select Advanced > Cron jobs.
Figure 299 cPanel: Advanced
2 Select Standard (step 3) or Advanced (step 4).
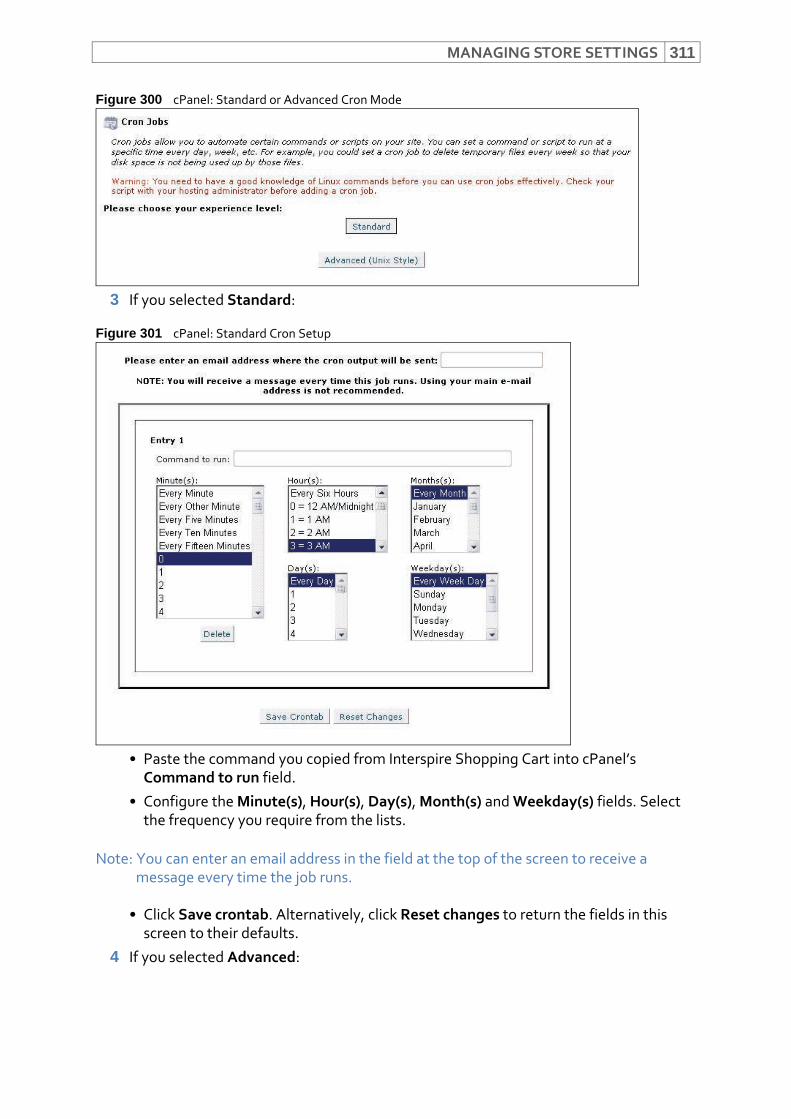
MANAGING STORE SETTINGS 311
Figure 300 cPanel: Standard or Advanced Cron Mode
3 If you selected Standard:
Figure 301 cPanel: Standard Cron Setup
• Paste the command you copied from Interspire Shopping Cart into cPanel’s Command to run field.
• Configure the Minute(s), Hour(s), Day(s), Month(s) and Weekday(s) fields. Select the frequency you require from the lists.
Note: You can enter an email address in the field at the top of the screen to receive a message every time the job runs.
• Click Save crontab. Alternatively, click Reset changes to return the fields in this screen to their defaults.
4 If you selected Advanced:
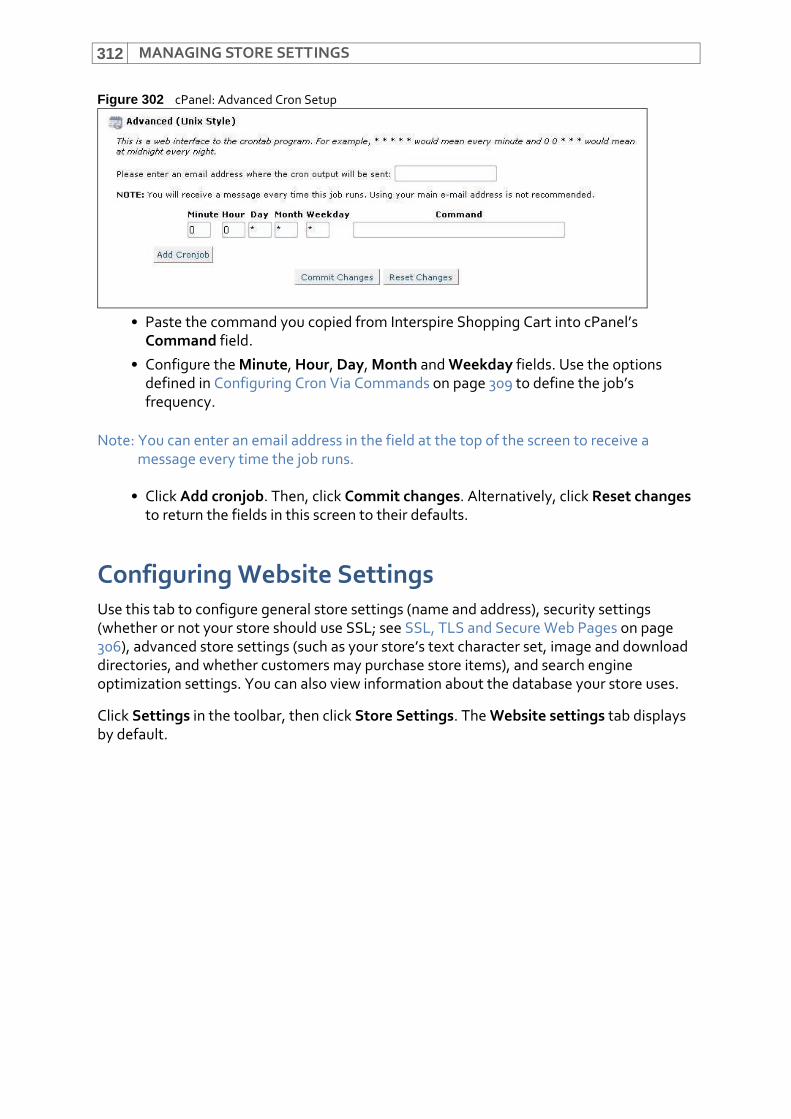
MANAGING STORE SETTINGS312
Figure 302 cPanel: Advanced Cron Setup
• Paste the command you copied from Interspire Shopping Cart into cPanel’s Command field.
• Configure the Minute, Hour, Day, Month and Weekday fields. Use the options defined in Configuring Cron Via Commands on page 309 to define the job’s frequency.
Note: You can enter an email address in the field at the top of the screen to receive a message every time the job runs.
• Click Add cronjob. Then, click Commit changes. Alternatively, click Reset changes to return the fields in this screen to their defaults.
Configuring Website SettingsUse this tab to configure general store settings (name and address), security settings (whether or not your store should use SSL; see SSL, TLS and Secure Web Pages on page 306), advanced store settings (such as your store’s text character set, image and download directories, and whether customers may purchase store items), and search engine optimization settings. You can also view information about the database your store uses.
Click Settings in the toolbar, then click Store Settings. The Website settings tab displays by default.
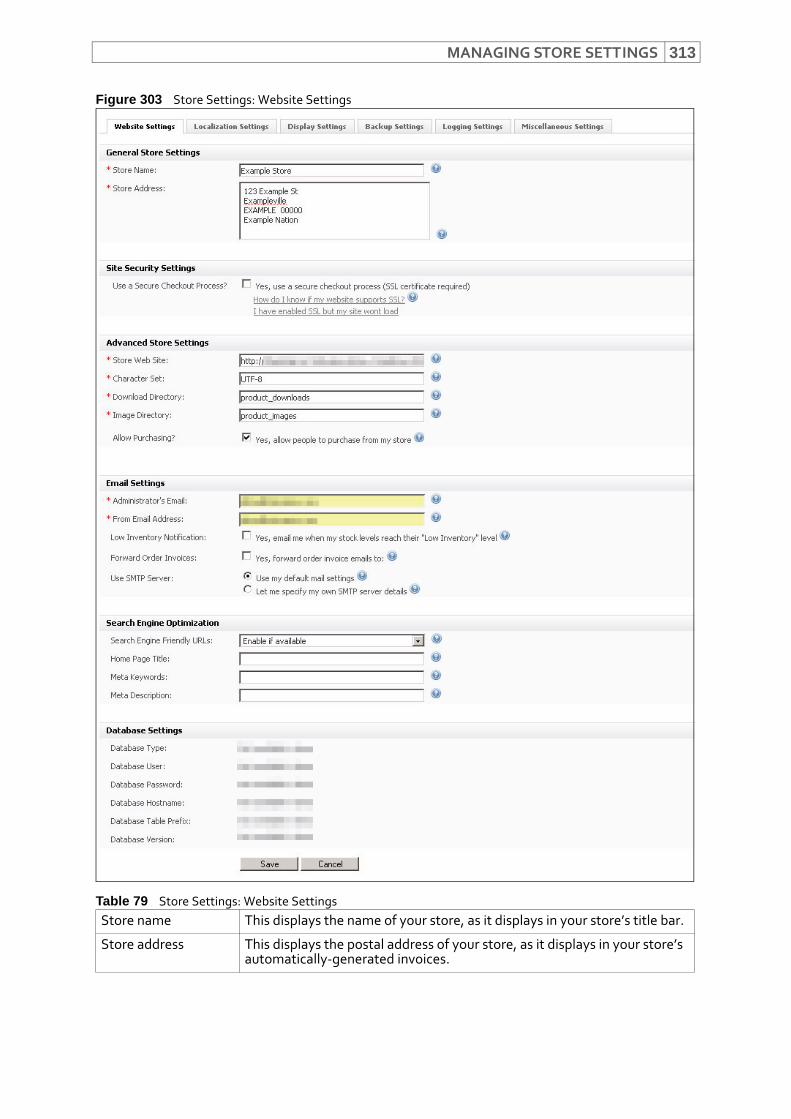
MANAGING STORE SETTINGS 313
Figure 303 Store Settings: Website Settings
Table 79 Store Settings: Website Settings Store name This displays the name of your store, as it displays in your store’s title bar.
Store address This displays the postal address of your store, as it displays in your store’s automatically‐generated invoices.
MANAGING STORE SETTINGS314
Use a secure checkout process?
Select Yes, use a secure checkout process if you want to use SSL (Secure Sockets Layer) for orders. See SSL, TLS and Secure Web Pages on page 306.
Store web site This displays the URL (Uniform Resource Locator) of your site.
Character set This displays the kind of text characters your store uses.
Download directory This displays the directory in which your downloadable products are stored.
Note: The file name displayed is relative. For example, if the filename displayed is downloads and your site is at http://www.examplestore.com, the full URL is http://www.examplestore.com/downloads.
Image directory This displays the directory in which your downloadable products are stored.
Note: The file name displayed is relative.
Allow purchasing? Select Yes, allow people to purchase from my store if you want to offer the products in your store for sale.Deselect this option if your store is not yet ready for customers, or if you want your store to function as an online catalog, without the opportunity to buy.
Administrator’s email This displays the email address of Interspire Shopping Cart’s administrator. This is the address to which all notifications are sent.
From email address This displays the email address that appears in the “From” field when emails are sent to your store’s customers via Interspire Shopping Cart.
Low inventory notification
If you have set up inventory tracking for your store’s products, and want to be notified when the low inventory level is reached for any tracked product, select Yes, email me when my stock levels reach their “Low Inventory” level and enter your email address in the field that displays.If you do not want to receive email notifications when a low stock level is reached, deselect this option.
Forward order invoices
If you want to have copies of all the invoices your store sends to customers, select Type the email addresses above, separated by commas and enter the addresses in the fields that display.
Table 79 Store Settings: Website Settings (continued)
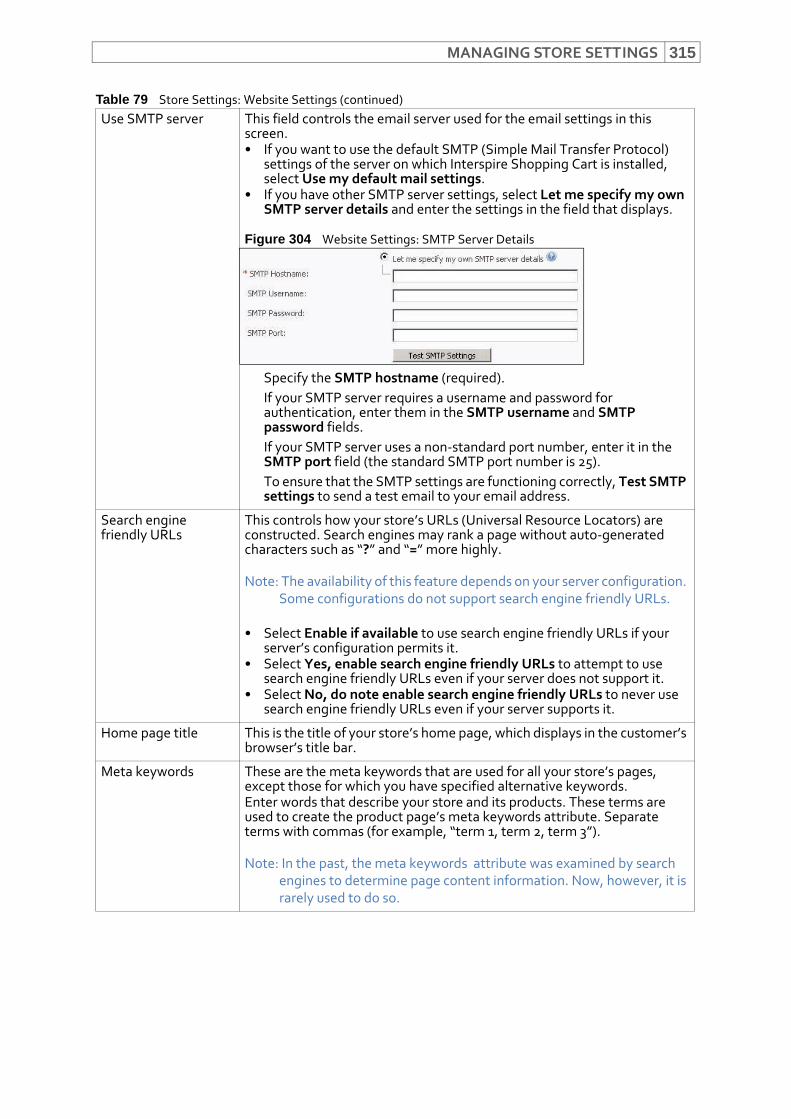
MANAGING STORE SETTINGS 315
Use SMTP server This field controls the email server used for the email settings in this screen.• If you want to use the default SMTP (Simple Mail Transfer Protocol)
settings of the server on which Interspire Shopping Cart is installed, select Use my default mail settings.
• If you have other SMTP server settings, select Let me specify my own SMTP server details and enter the settings in the field that displays.
Figure 304 Website Settings: SMTP Server Details
Specify the SMTP hostname (required). If your SMTP server requires a username and password for authentication, enter them in the SMTP username and SMTP password fields.If your SMTP server uses a non‐standard port number, enter it in the SMTP port field (the standard SMTP port number is 25).To ensure that the SMTP settings are functioning correctly, Test SMTP settings to send a test email to your email address.
Search engine friendly URLs
This controls how your store’s URLs (Universal Resource Locators) are constructed. Search engines may rank a page without auto‐generated characters such as “?” and “=” more highly.
Note: The availability of this feature depends on your server configuration. Some configurations do not support search engine friendly URLs.
• Select Enable if available to use search engine friendly URLs if your server’s configuration permits it.
• Select Yes, enable search engine friendly URLs to attempt to use search engine friendly URLs even if your server does not support it.
• Select No, do note enable search engine friendly URLs to never use search engine friendly URLs even if your server supports it.
Home page title This is the title of your store’s home page, which displays in the customer’s browser’s title bar.
Meta keywords These are the meta keywords that are used for all your store’s pages, except those for which you have specified alternative keywords.Enter words that describe your store and its products. These terms are used to create the product page’s meta keywords attribute. Separate terms with commas (for example, “term 1, term 2, term 3”).
Note: In the past, the meta keywords attribute was examined by search engines to determine page content information. Now, however, it is rarely used to do so.
Table 79 Store Settings: Website Settings (continued)
MANAGING STORE SETTINGS316
Configuring Localization SettingsUse this tab to configure your store’s language, the units of measurement your store uses, the decimal character (for example, in the number “3.141579”, this is a period), the character used to separate thousands (for example, in the number “1,000,000”, this is a comma), the number of decimal places used in your store’s measurements, and date and time settings.
Click Settings in the toolbar, then click Store Settings. Click the Localization settings tab.
Meta description This is the meta description that is used for all your store’s pages, except those for which you have specified alternative keywords.Enter a description of your product. This is used to create your store pages’ meta description attribute.
Note: Unlike the meta keywords attribute, the meta description attribute is generally supported by search engines, to provide customers with a concise description of the page.
Database type This displays the type of database Interspire Shopping Cart is using. See the Database version field for the database application’s version details.
Database user Enter the username you use to log into the database.
Database password If your database requires a password for login, enter it here.
Database hostname Enter the hostname or IP address of the database Interspire Shopping Cart uses.
Database table prefix Enter text to affix to tables. Use this if your database includes multiple tables.
Database version This displays the MySQL version number.
Save Click this to save your store’s settings.
Cancel Click this to return to your store’s previously‐saved settings.
Table 79 Store Settings: Website Settings (continued)
MANAGING STORE SETTINGS 317
Figure 305 Store Settings: Localization Settings
Table 80 Store Settings: Localization Settings Language This controls the language in which all store and the administration
interface text displays. Select your language from the list.
Weight measurement This controls the unit used in your store for measuring product weight. Select the appropriate unit of measurement from the list.
Length measurement This controls the unit used in your store for measuring product dimensions (length, width and height). Select the appropriate unit of measurement from the list.
Decimal token Enter the character used in your store to indicate a decimal point.
Thousands token Enter the character used in your store to denote groups of thousands (every three digits of a number).
Decimal places Enter the number of decimal places used for measurements in your store.
Your timezone Select your store’s time zone from the list.
Note: Your store time zone can be different from your store’s server time settings. For example, if your store is located in Texas, but your site is hosted in Hong Kong, you can select the relevant time zone for Texas. This will be used for date options on your site.
Enable DST correction?
If you want to add an extra hour to your store’s time, select this option.
Note: Select this option only when daylight savings time (DST) is actually in effect.
Display date format Configure the default standard date format for your store.
Note: For this, the Export date format, and the Extended display date format fields, see www.php.net/date for full information on PHP‐compatible date formats.
MANAGING STORE SETTINGS318
Configuring Display SettingsUse this tab to configure images, thumbnails, featured product numbers, new product numbers, news item numbers, list depth, carts, tag clouds, CAPTCHA, searching, reviews, inventory display, wishlists, product comparisons, account creation, and bulk discounts. You can also configure category and brand page images, switch the management interface’s HTML editor on or off, switch thumbnail image display in the management interface on or off, modify which product attributes display in your store, and set up RSS (Really Simple Syndication) settings.
Click Settings in the toolbar, then click Store Settings. Click the Display settings tab.
Export date format Configure the default date format used when exporting your store’s information.
Extended display date format
Configure the default extended date format for your store.
Save Click this to save your store’s settings.
Cancel Click this to return to your store’s previously‐saved settings.
Table 80 Store Settings: Localization Settings (continued)
MANAGING STORE SETTINGS 319
Figure 306 Store Settings: Display Settings
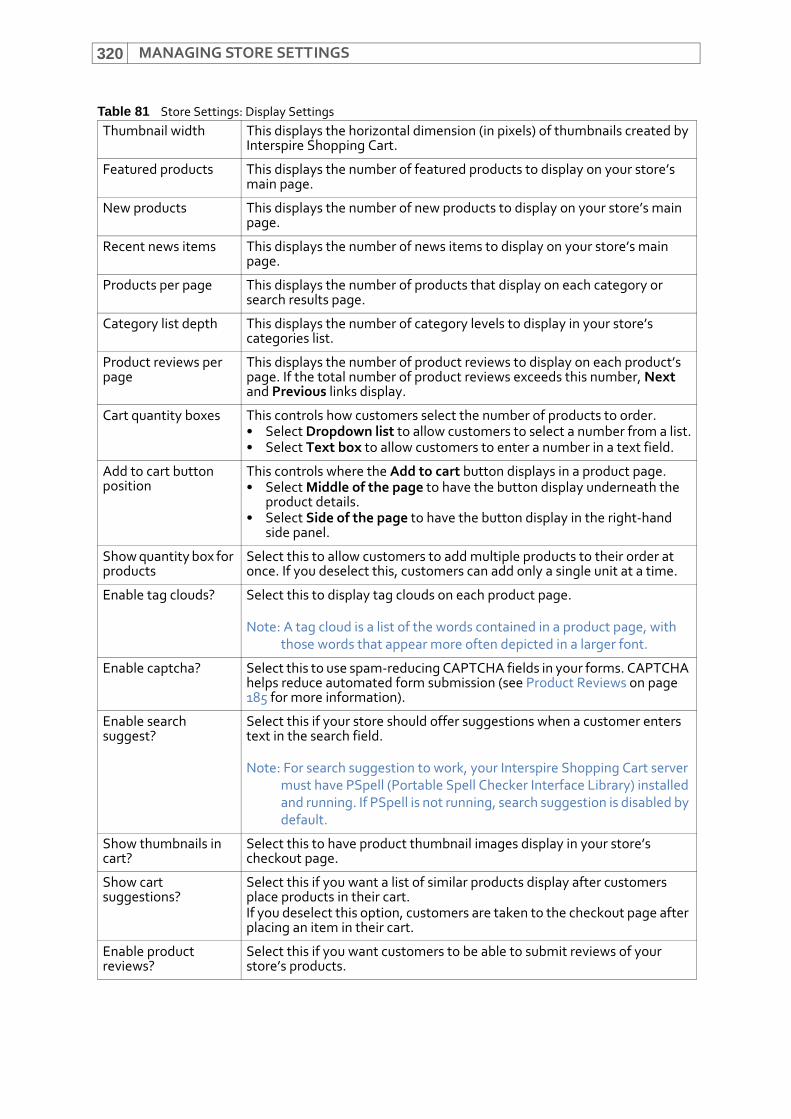
MANAGING STORE SETTINGS320
Table 81 Store Settings: Display Settings Thumbnail width This displays the horizontal dimension (in pixels) of thumbnails created by
Interspire Shopping Cart.
Featured products This displays the number of featured products to display on your store’s main page.
New products This displays the number of new products to display on your store’s main page.
Recent news items This displays the number of news items to display on your store’s main page.
Products per page This displays the number of products that display on each category or search results page.
Category list depth This displays the number of category levels to display in your store’s categories list.
Product reviews per page
This displays the number of product reviews to display on each product’s page. If the total number of product reviews exceeds this number, Next and Previous links display.
Cart quantity boxes This controls how customers select the number of products to order.• Select Dropdown list to allow customers to select a number from a list.• Select Text box to allow customers to enter a number in a text field.
Add to cart button position
This controls where the Add to cart button displays in a product page.• Select Middle of the page to have the button display underneath the
product details.• Select Side of the page to have the button display in the right‐hand
side panel.
Show quantity box for products
Select this to allow customers to add multiple products to their order at once. If you deselect this, customers can add only a single unit at a time.
Enable tag clouds? Select this to display tag clouds on each product page.
Note: A tag cloud is a list of the words contained in a product page, with those words that appear more often depicted in a larger font.
Enable captcha? Select this to use spam‐reducing CAPTCHA fields in your forms. CAPTCHA helps reduce automated form submission (see Product Reviews on page 185 for more information).
Enable search suggest?
Select this if your store should offer suggestions when a customer enters text in the search field.
Note: For search suggestion to work, your Interspire Shopping Cart server must have PSpell (Portable Spell Checker Interface Library) installed and running. If PSpell is not running, search suggestion is disabled by default.
Show thumbnails in cart?
Select this to have product thumbnail images display in your store’s checkout page.
Show cart suggestions?
Select this if you want a list of similar products display after customers place products in their cart.If you deselect this option, customers are taken to the checkout page after placing an item in their cart.
Enable product reviews?
Select this if you want customers to be able to submit reviews of your store’s products.
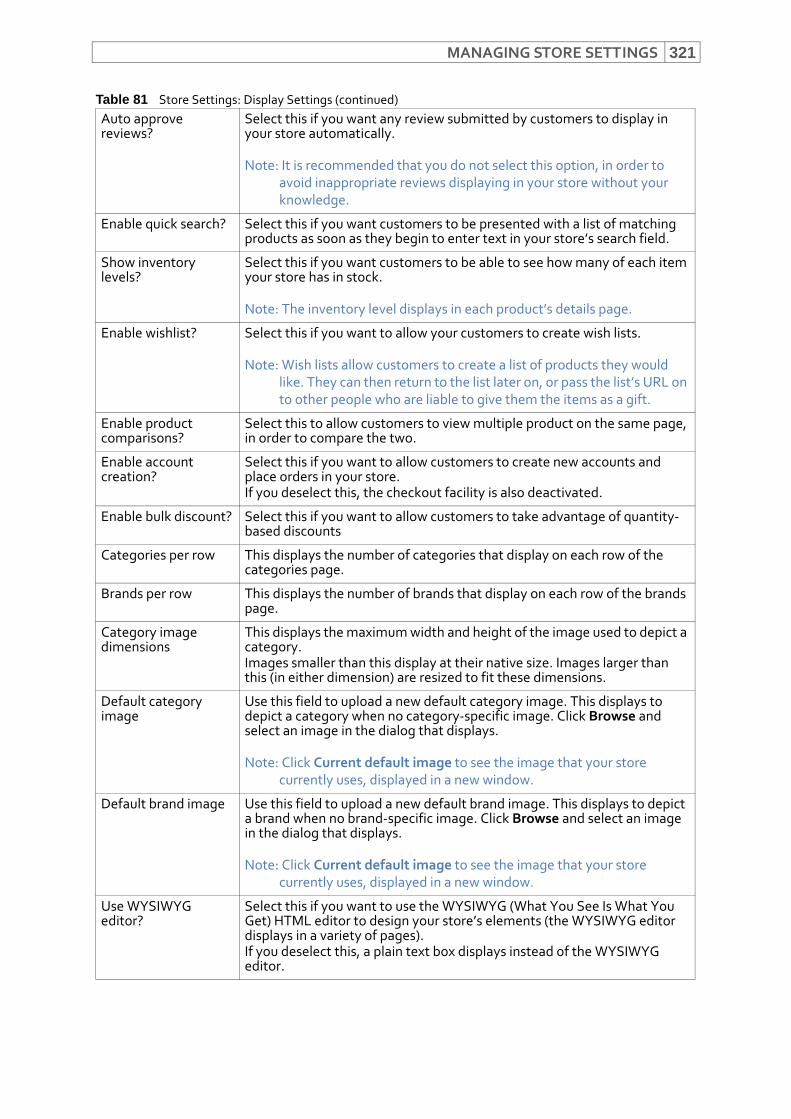
MANAGING STORE SETTINGS 321
Auto approve reviews?
Select this if you want any review submitted by customers to display in your store automatically.
Note: It is recommended that you do not select this option, in order to avoid inappropriate reviews displaying in your store without your knowledge.
Enable quick search? Select this if you want customers to be presented with a list of matching products as soon as they begin to enter text in your store’s search field.
Show inventory levels?
Select this if you want customers to be able to see how many of each item your store has in stock.
Note: The inventory level displays in each product’s details page.
Enable wishlist? Select this if you want to allow your customers to create wish lists.
Note: Wish lists allow customers to create a list of products they would like. They can then return to the list later on, or pass the list’s URL on to other people who are liable to give them the items as a gift.
Enable product comparisons?
Select this to allow customers to view multiple product on the same page, in order to compare the two.
Enable account creation?
Select this if you want to allow customers to create new accounts and place orders in your store.If you deselect this, the checkout facility is also deactivated.
Enable bulk discount? Select this if you want to allow customers to take advantage of quantity‐based discounts
Categories per row This displays the number of categories that display on each row of the categories page.
Brands per row This displays the number of brands that display on each row of the brands page.
Category image dimensions
This displays the maximum width and height of the image used to depict a category.Images smaller than this display at their native size. Images larger than this (in either dimension) are resized to fit these dimensions.
Default category image
Use this field to upload a new default category image. This displays to depict a category when no category‐specific image. Click Browse and select an image in the dialog that displays.
Note: Click Current default image to see the image that your store currently uses, displayed in a new window.
Default brand image Use this field to upload a new default brand image. This displays to depict a brand when no brand‐specific image. Click Browse and select an image in the dialog that displays.
Note: Click Current default image to see the image that your store currently uses, displayed in a new window.
Use WYSIWYG editor?
Select this if you want to use the WYSIWYG (What You See Is What You Get) HTML editor to design your store’s elements (the WYSIWYG editor displays in a variety of pages). If you deselect this, a plain text box displays instead of the WYSIWYG editor.
Table 81 Store Settings: Display Settings (continued)
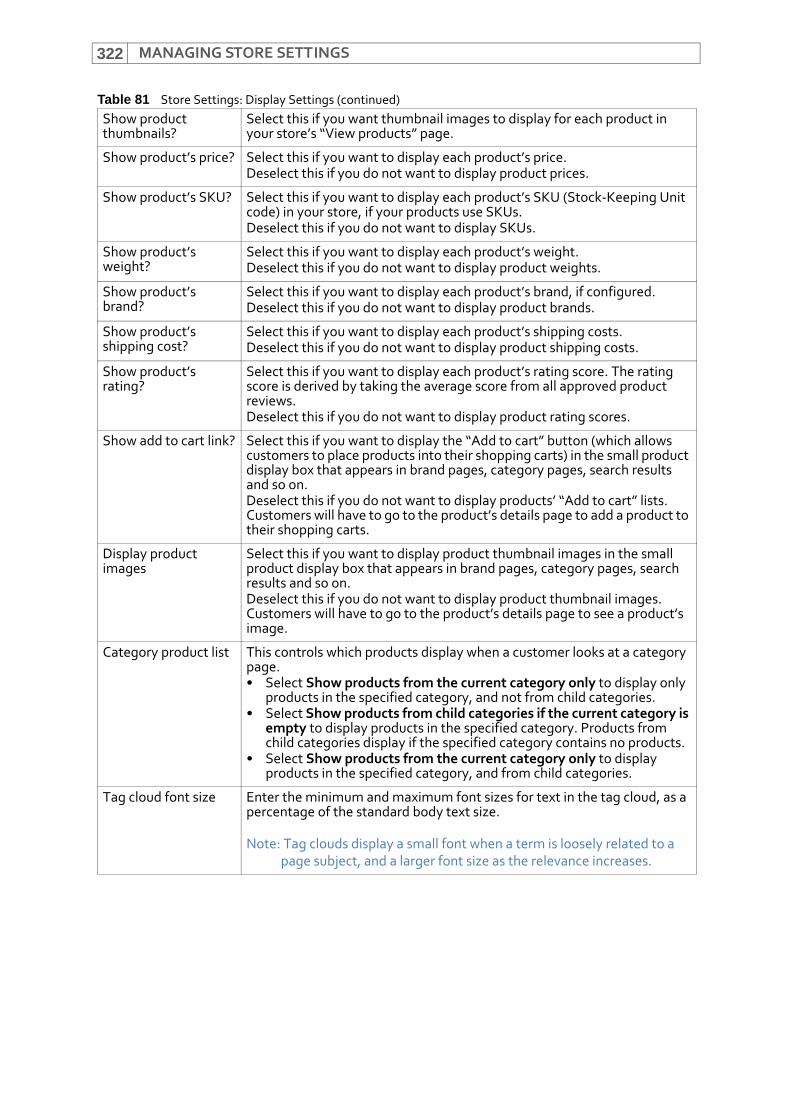
MANAGING STORE SETTINGS322
Show product thumbnails?
Select this if you want thumbnail images to display for each product in your store’s “View products” page.
Show product’s price? Select this if you want to display each product’s price.Deselect this if you do not want to display product prices.
Show product’s SKU? Select this if you want to display each product’s SKU (Stock‐Keeping Unit code) in your store, if your products use SKUs.Deselect this if you do not want to display SKUs.
Show product’s weight?
Select this if you want to display each product’s weight.Deselect this if you do not want to display product weights.
Show product’s brand?
Select this if you want to display each product’s brand, if configured.Deselect this if you do not want to display product brands.
Show product’s shipping cost?
Select this if you want to display each product’s shipping costs.Deselect this if you do not want to display product shipping costs.
Show product’s rating?
Select this if you want to display each product’s rating score. The rating score is derived by taking the average score from all approved product reviews.Deselect this if you do not want to display product rating scores.
Show add to cart link? Select this if you want to display the “Add to cart” button (which allows customers to place products into their shopping carts) in the small product display box that appears in brand pages, category pages, search results and so on.Deselect this if you do not want to display products’ “Add to cart” lists. Customers will have to go to the product’s details page to add a product to their shopping carts.
Display product images
Select this if you want to display product thumbnail images in the small product display box that appears in brand pages, category pages, search results and so on.Deselect this if you do not want to display product thumbnail images. Customers will have to go to the product’s details page to see a product’s image.
Category product list This controls which products display when a customer looks at a category page.• Select Show products from the current category only to display only
products in the specified category, and not from child categories.• Select Show products from child categories if the current category is
empty to display products in the specified category. Products from child categories display if the specified category contains no products.
• Select Show products from the current category only to display products in the specified category, and from child categories.
Tag cloud font size Enter the minimum and maximum font sizes for text in the tag cloud, as a percentage of the standard body text size.
Note: Tag clouds display a small font when a term is loosely related to a page subject, and a larger font size as the relevance increases.
Table 81 Store Settings: Display Settings (continued)
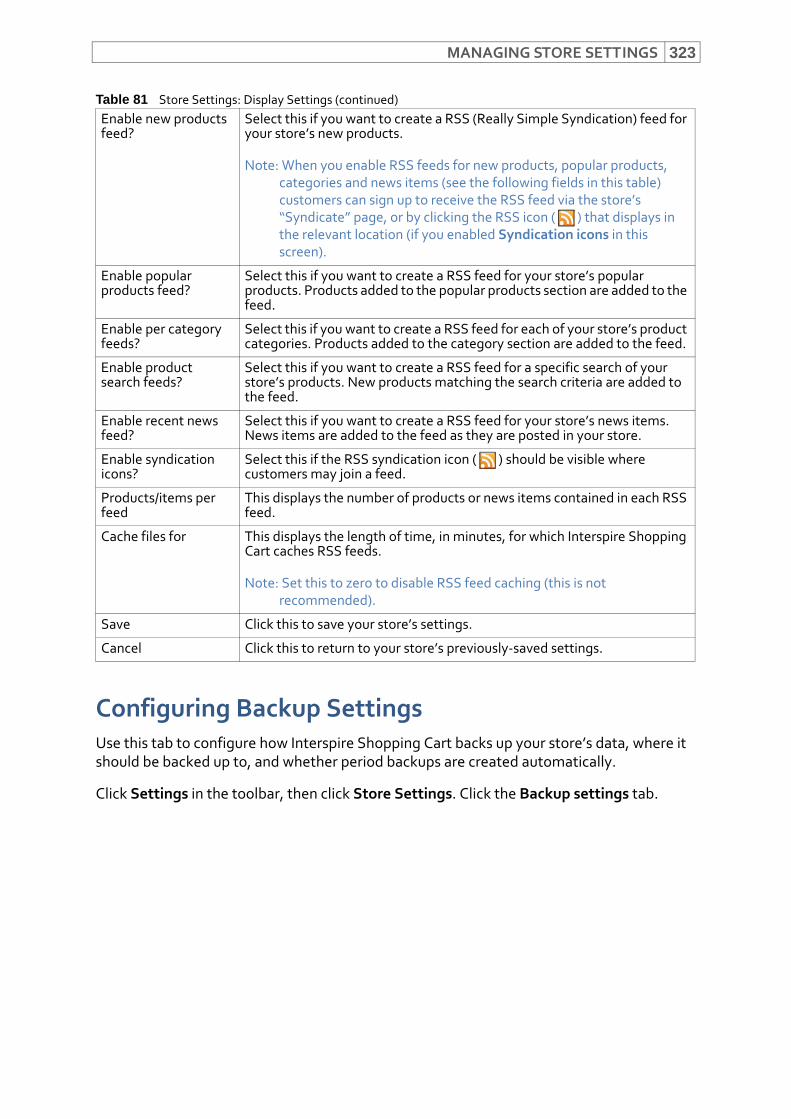
MANAGING STORE SETTINGS 323
Configuring Backup SettingsUse this tab to configure how Interspire Shopping Cart backs up your store’s data, where it should be backed up to, and whether period backups are created automatically.
Click Settings in the toolbar, then click Store Settings. Click the Backup settings tab.
Enable new products feed?
Select this if you want to create a RSS (Really Simple Syndication) feed for your store’s new products.
Note: When you enable RSS feeds for new products, popular products, categories and news items (see the following fields in this table) customers can sign up to receive the RSS feed via the store’s “Syndicate” page, or by clicking the RSS icon ( ) that displays in the relevant location (if you enabled Syndication icons in this screen).
Enable popular products feed?
Select this if you want to create a RSS feed for your store’s popular products. Products added to the popular products section are added to the feed.
Enable per category feeds?
Select this if you want to create a RSS feed for each of your store’s product categories. Products added to the category section are added to the feed.
Enable product search feeds?
Select this if you want to create a RSS feed for a specific search of your store’s products. New products matching the search criteria are added to the feed.
Enable recent news feed?
Select this if you want to create a RSS feed for your store’s news items. News items are added to the feed as they are posted in your store.
Enable syndication icons?
Select this if the RSS syndication icon ( ) should be visible where customers may join a feed.
Products/items per feed
This displays the number of products or news items contained in each RSS feed.
Cache files for This displays the length of time, in minutes, for which Interspire Shopping Cart caches RSS feeds.
Note: Set this to zero to disable RSS feed caching (this is not recommended).
Save Click this to save your store’s settings.
Cancel Click this to return to your store’s previously‐saved settings.
Table 81 Store Settings: Display Settings (continued)
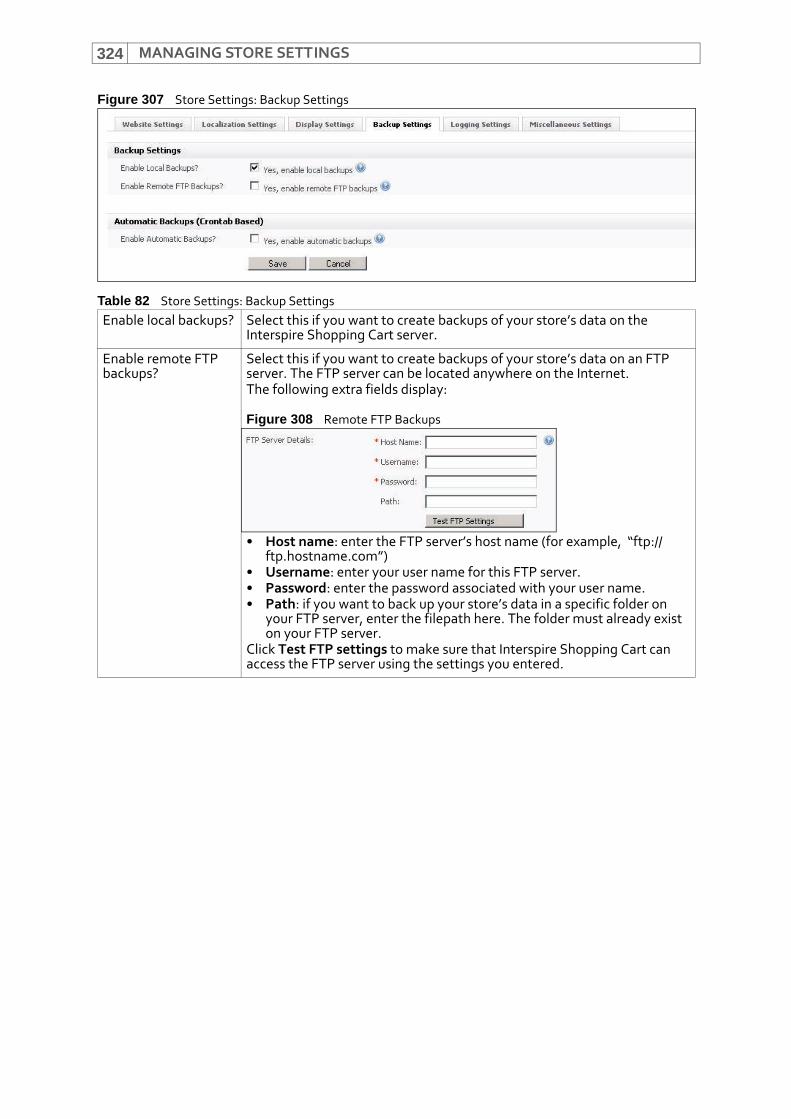
MANAGING STORE SETTINGS324
Figure 307 Store Settings: Backup Settings
Table 82 Store Settings: Backup SettingsEnable local backups? Select this if you want to create backups of your store’s data on the
Interspire Shopping Cart server.
Enable remote FTP backups?
Select this if you want to create backups of your store’s data on an FTP server. The FTP server can be located anywhere on the Internet.The following extra fields display:
Figure 308 Remote FTP Backups
• Host name: enter the FTP server’s host name (for example, “ftp://ftp.hostname.com”)
• Username: enter your user name for this FTP server.• Password: enter the password associated with your user name.• Path: if you want to back up your store’s data in a specific folder on
your FTP server, enter the filepath here. The folder must already exist on your FTP server.
Click Test FTP settings to make sure that Interspire Shopping Cart can access the FTP server using the settings you entered.
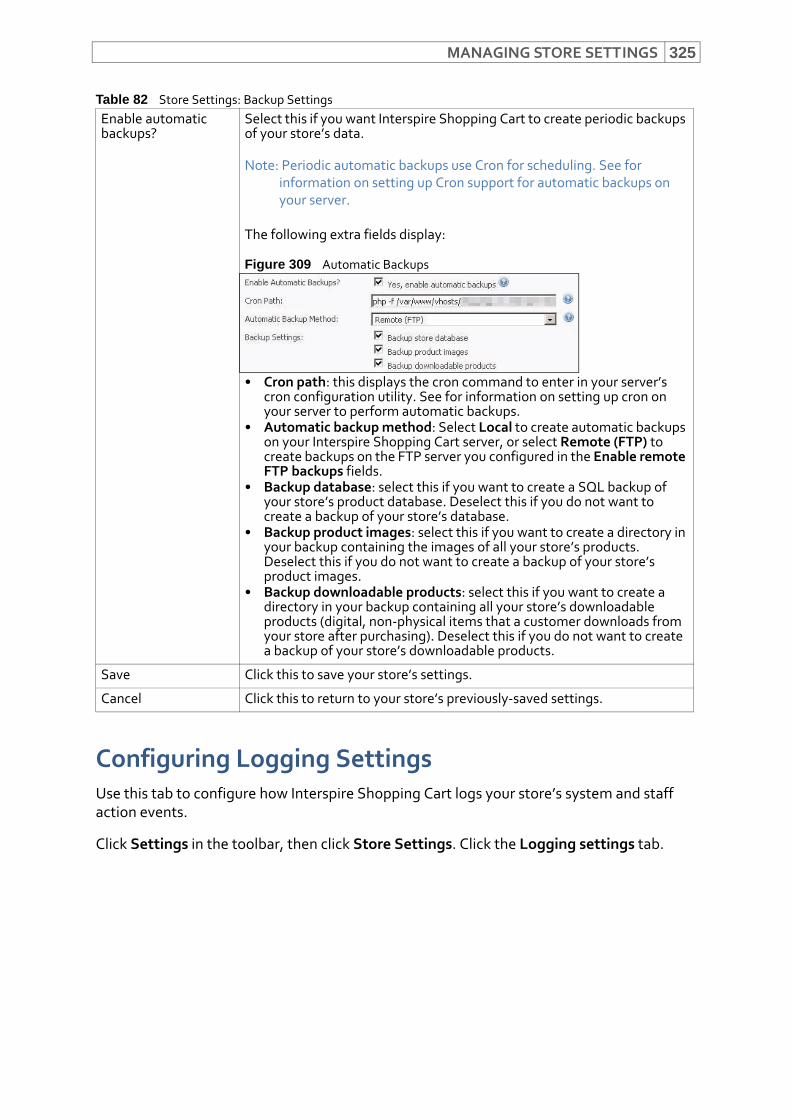
MANAGING STORE SETTINGS 325
Configuring Logging SettingsUse this tab to configure how Interspire Shopping Cart logs your store’s system and staff action events.
Click Settings in the toolbar, then click Store Settings. Click the Logging settings tab.
Enable automatic backups?
Select this if you want Interspire Shopping Cart to create periodic backups of your store’s data.
Note: Periodic automatic backups use Cron for scheduling. See for information on setting up Cron support for automatic backups on your server.
The following extra fields display:
Figure 309 Automatic Backups
• Cron path: this displays the cron command to enter in your server’s cron configuration utility. See for information on setting up cron on your server to perform automatic backups.
• Automatic backup method: Select Local to create automatic backups on your Interspire Shopping Cart server, or select Remote (FTP) to create backups on the FTP server you configured in the Enable remote FTP backups fields.
• Backup database: select this if you want to create a SQL backup of your store’s product database. Deselect this if you do not want to create a backup of your store’s database.
• Backup product images: select this if you want to create a directory in your backup containing the images of all your store’s products. Deselect this if you do not want to create a backup of your store’s product images.
• Backup downloadable products: select this if you want to create a directory in your backup containing all your store’s downloadable products (digital, non‐physical items that a customer downloads from your store after purchasing). Deselect this if you do not want to create a backup of your store’s downloadable products.
Save Click this to save your store’s settings.
Cancel Click this to return to your store’s previously‐saved settings.
Table 82 Store Settings: Backup Settings
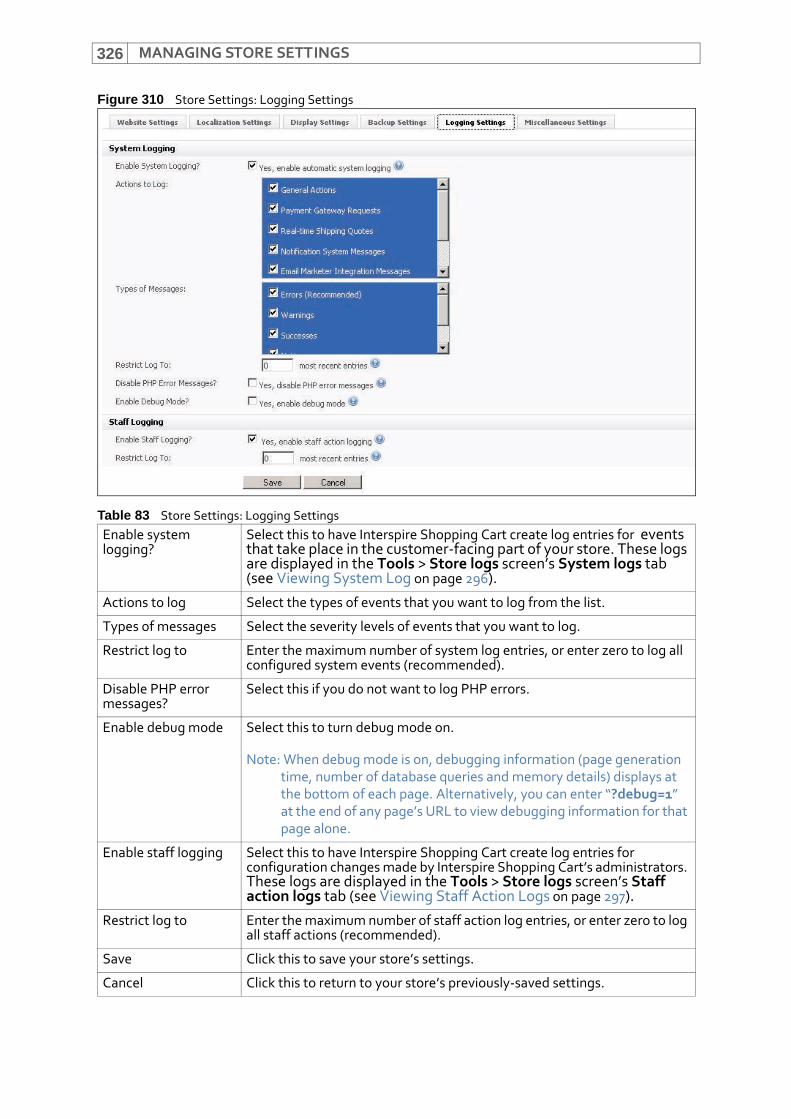
MANAGING STORE SETTINGS326
Figure 310 Store Settings: Logging Settings
Table 83 Store Settings: Logging SettingsEnable system logging?
Select this to have Interspire Shopping Cart create log entries for events that take place in the customer‐facing part of your store. These logs are displayed in the Tools > Store logs screen’s System logs tab (see Viewing System Log on page 296).
Actions to log Select the types of events that you want to log from the list.
Types of messages Select the severity levels of events that you want to log.
Restrict log to Enter the maximum number of system log entries, or enter zero to log all configured system events (recommended).
Disable PHP error messages?
Select this if you do not want to log PHP errors.
Enable debug mode Select this to turn debug mode on.
Note: When debug mode is on, debugging information (page generation time, number of database queries and memory details) displays at the bottom of each page. Alternatively, you can enter “?debug=1” at the end of any page’s URL to view debugging information for that page alone.
Enable staff logging Select this to have Interspire Shopping Cart create log entries for configuration changes made by Interspire Shopping Cart’s administrators. These logs are displayed in the Tools > Store logs screen’s Staff action logs tab (see Viewing Staff Action Logs on page 297).
Restrict log to Enter the maximum number of staff action log entries, or enter zero to log all staff actions (recommended).
Save Click this to save your store’s settings.
Cancel Click this to return to your store’s previously‐saved settings.
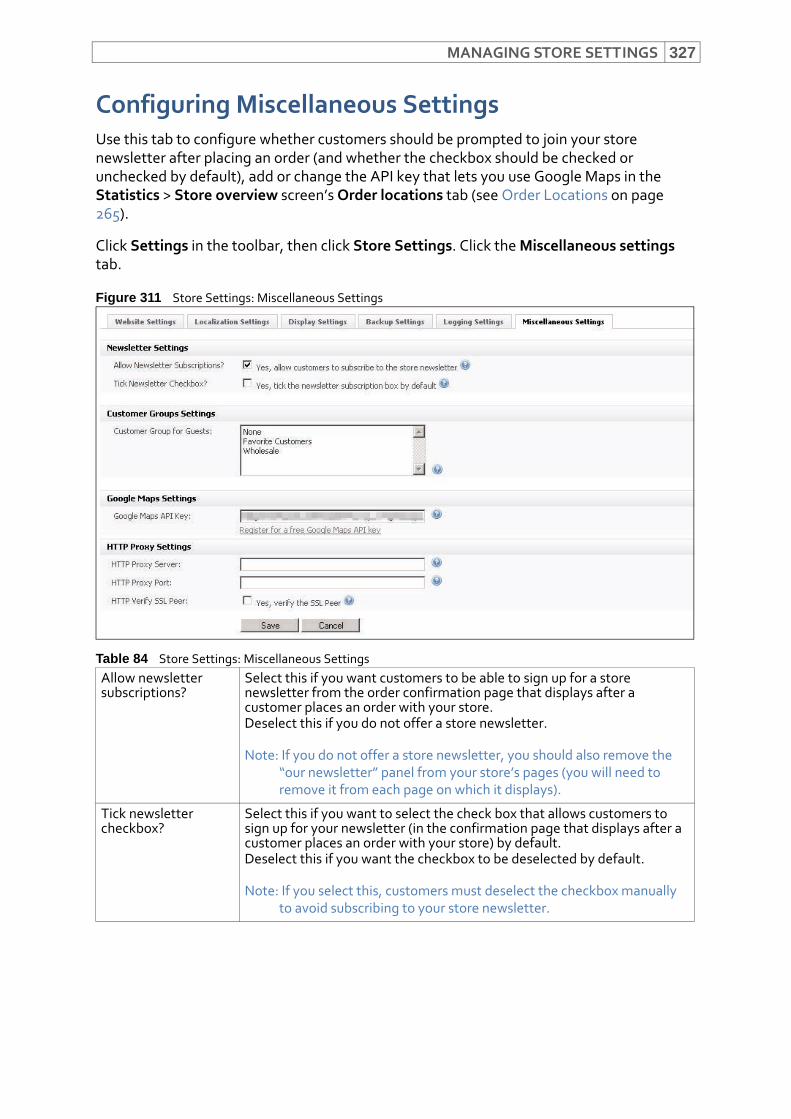
MANAGING STORE SETTINGS 327
Configuring Miscellaneous SettingsUse this tab to configure whether customers should be prompted to join your store newsletter after placing an order (and whether the checkbox should be checked or unchecked by default), add or change the API key that lets you use Google Maps in the Statistics > Store overview screen’s Order locations tab (see Order Locations on page 265).
Click Settings in the toolbar, then click Store Settings. Click the Miscellaneous settings tab.
Figure 311 Store Settings: Miscellaneous Settings
Table 84 Store Settings: Miscellaneous SettingsAllow newsletter subscriptions?
Select this if you want customers to be able to sign up for a store newsletter from the order confirmation page that displays after a customer places an order with your store.Deselect this if you do not offer a store newsletter.
Note: If you do not offer a store newsletter, you should also remove the “our newsletter” panel from your store’s pages (you will need to remove it from each page on which it displays).
Tick newsletter checkbox?
Select this if you want to select the check box that allows customers to sign up for your newsletter (in the confirmation page that displays after a customer places an order with your store) by default.Deselect this if you want the checkbox to be deselected by default.
Note: If you select this, customers must deselect the checkbox manually to avoid subscribing to your store newsletter.
MANAGING STORE SETTINGS328
Customer group for guests
Select the user group to which guest customers (those who do not have an account with your store) are placed. Select None if you do not want to assign guest customers to a group.
Note: To use this feature, you must first enable guest checkout in the Settings > Checkout settings screen.
Google maps API key This displays the API (Application programming interface) key you are currently using to make use of Google Maps. Interspire Shopping Cart uses Google maps for customer location in the Statistics > Store overview screen’s Order locations tab; see Order Locations on page 265.Click the Register for a free Google Maps API key to sign up to the Google Maps API, or to see the various rules and regulations that Google imposes on users of its system.
Note: Each directory or domain requires a different Google Maps API key.
HTTP proxy server If your service provider requires external requests to use a proxy server, enter the proxy server’s URL here. If you are unsure, contact your service provider.
HTTP proxy port If you are required to use a proxy server for external requests, enter the proxy server’s port number here. If you are unsure, contact your service provider.
HTTP verify SSL peer Select this if you use a HTTP proxy server and want to verify its SSL certificate.
Note: Some service providers require that you do not select this. If you are unsure, contact your service provider.
Save Click this to save your store’s settings.
Cancel Click this to return to your store’s previously‐saved settings.
Table 84 Store Settings: Miscellaneous Settings
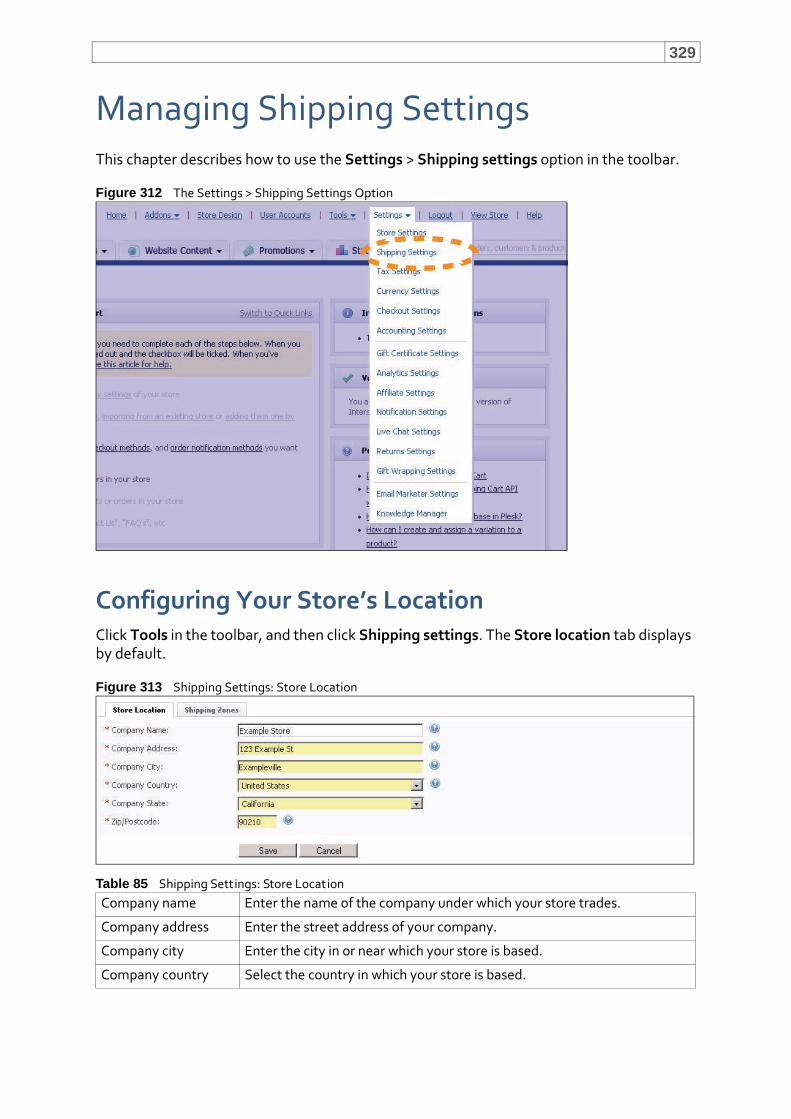
329
Managing Shipping SettingsThis chapter describes how to use the Settings > Shipping settings option in the toolbar.
Figure 312 The Settings > Shipping Settings Option
Configuring Your Store’s LocationClick Tools in the toolbar, and then click Shipping settings. The Store location tab displays by default.
Figure 313 Shipping Settings: Store Location
Table 85 Shipping Settings: Store LocationCompany name Enter the name of the company under which your store trades.
Company address Enter the street address of your company.
Company city Enter the city in or near which your store is based.
Company country Select the country in which your store is based.
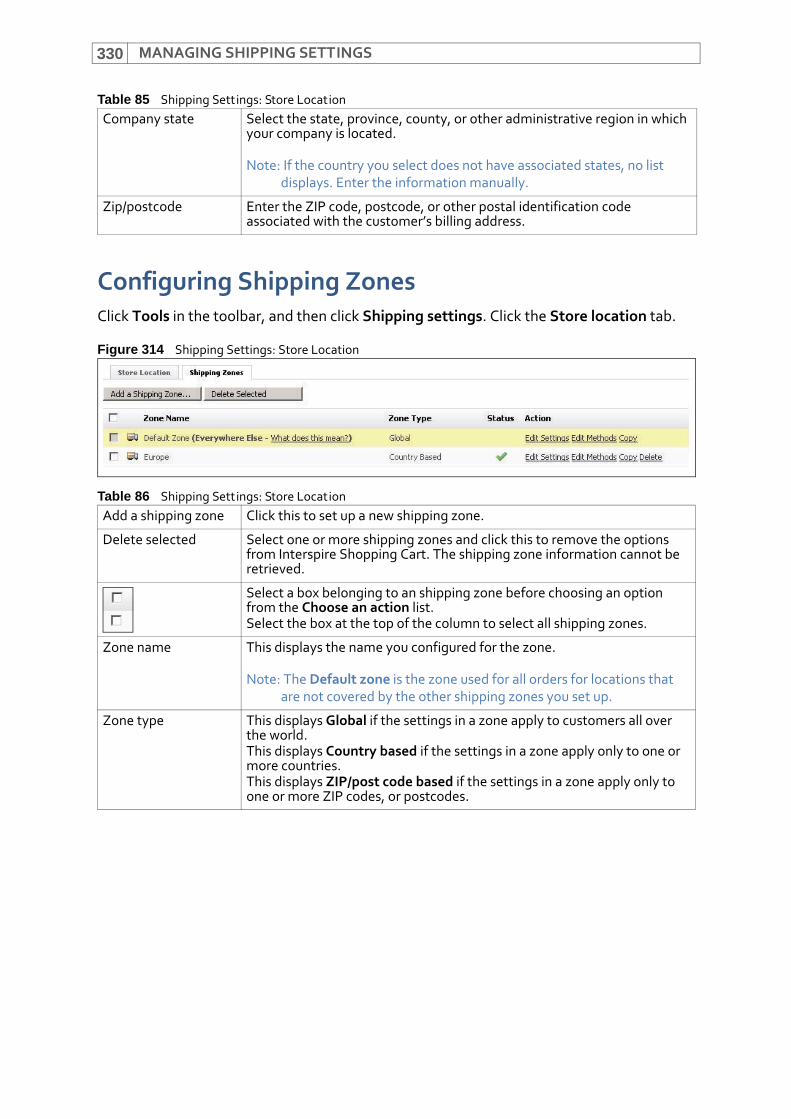
MANAGING SHIPPING SETTINGS330
Configuring Shipping ZonesClick Tools in the toolbar, and then click Shipping settings. Click the Store location tab.
Figure 314 Shipping Settings: Store Location
Company state Select the state, province, county, or other administrative region in which your company is located.
Note: If the country you select does not have associated states, no list displays. Enter the information manually.
Zip/postcode Enter the ZIP code, postcode, or other postal identification code associated with the customer’s billing address.
Table 86 Shipping Settings: Store LocationAdd a shipping zone Click this to set up a new shipping zone.
Delete selected Select one or more shipping zones and click this to remove the options from Interspire Shopping Cart. The shipping zone information cannot be retrieved.
Select a box belonging to an shipping zone before choosing an option from the Choose an action list.Select the box at the top of the column to select all shipping zones.
Zone name This displays the name you configured for the zone.
Note: The Default zone is the zone used for all orders for locations that are not covered by the other shipping zones you set up.
Zone type This displays Global if the settings in a zone apply to customers all over the world.This displays Country based if the settings in a zone apply only to one or more countries.This displays ZIP/post code based if the settings in a zone apply only to one or more ZIP codes, or postcodes.
Table 85 Shipping Settings: Store Location
MANAGING SHIPPING SETTINGS 331
Adding a Shipping ZoneTo add a new shipping zone for your store, click Settings in the toolbar, then click Shipping settings. Click the Shipping Zones tab, then click the Add a shipping zone button.
There are two steps to adding or editing a shipping zone:
1 Configure shipping zone settings (see Zone Settings on page 331): this screen displays when you click the Add a shipping zone button. This screen allows you to define the geographical area that the shipping zone covers. You can define the zone by specifying one or more countries, states (or provinces) or ZIP codes (or postcodes). When you have finished, click Next to move on to the next step.
2 Configure shipping zone methods (see Zone Methods on page 334): this screen displays when you click Next in the Zone settings screen. This screen allows you to set up the way in which you want to ship orders in this zone, and the relevant rates. You can specify shipping providers that provide real‐time shipping quotes, or configure a list of shipping costs by price, weight, or just a flat rate for each order.
Note: A shipping zone must have one or more shipping methods associated with it, otherwise it cannot be used.
Zone Settings1 Click the Add a shipping zone button in the Settings > Shipping settings screen’s
Shipping zones tab.
Status This displays a tick ( ) if the shipping zone is active.This displays a cross ( ) if the shipping zone is not active.
Note: When a shipping zone is not active, the default zone settings are used to process orders placed from addresses within the zone.
Action • Click Edit settings to modify the zone’s geographical settings (see Zone Settings on page 331).
• Click Edit methods to modify the zone’s postal methods and cost settings (see Zone Methods on page 334).
• Click Copy to begin configuring a new shipping zone, using the original zone’s settings as a basis. By default, “copy of” is prepended to the original zone name (you can change the name in the screen that displays). See Adding a Shipping Zone on page 331.
• Click Delete to remove the shipping zone from Interspire Shopping Cart. The zone information cannot be retrieved.
Table 86 Shipping Settings: Store Location
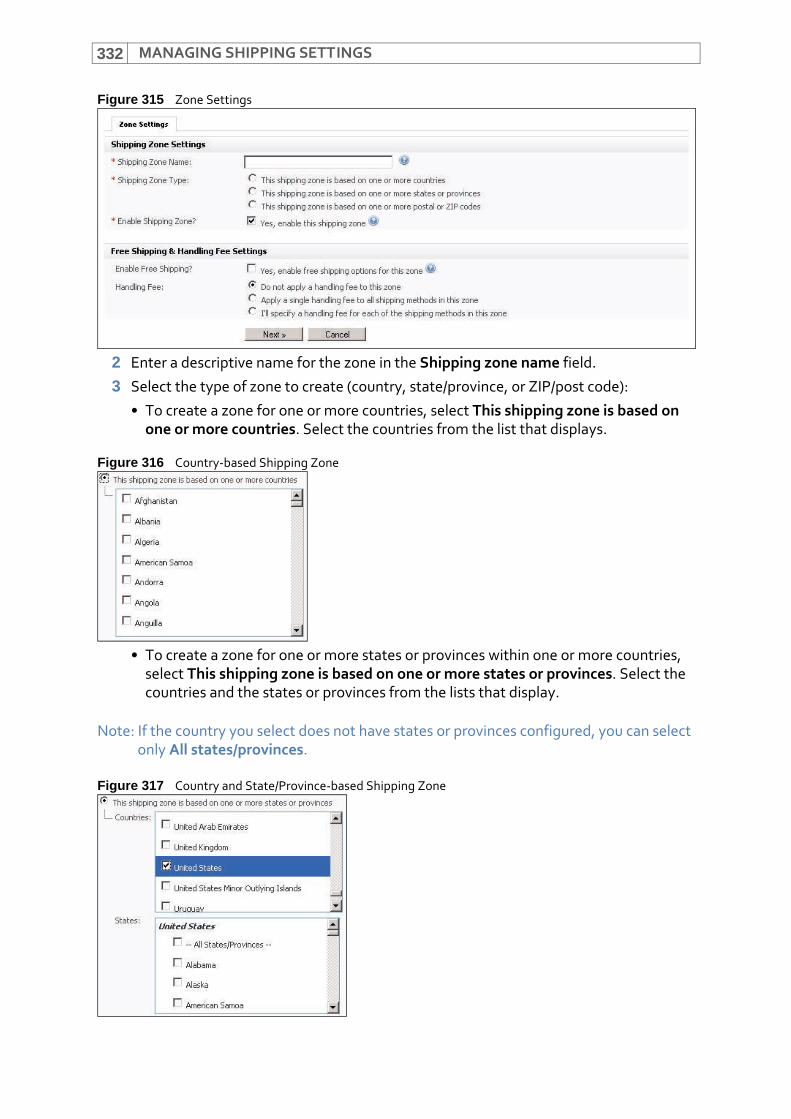
MANAGING SHIPPING SETTINGS332
Figure 315 Zone Settings
2 Enter a descriptive name for the zone in the Shipping zone name field.
3 Select the type of zone to create (country, state/province, or ZIP/post code):
• To create a zone for one or more countries, select This shipping zone is based on one or more countries. Select the countries from the list that displays.
Figure 316 Country‐based Shipping Zone
• To create a zone for one or more states or provinces within one or more countries, select This shipping zone is based on one or more states or provinces. Select the countries and the states or provinces from the lists that display.
Note: If the country you select does not have states or provinces configured, you can select only All states/provinces.
Figure 317 Country and State/Province‐based Shipping Zone
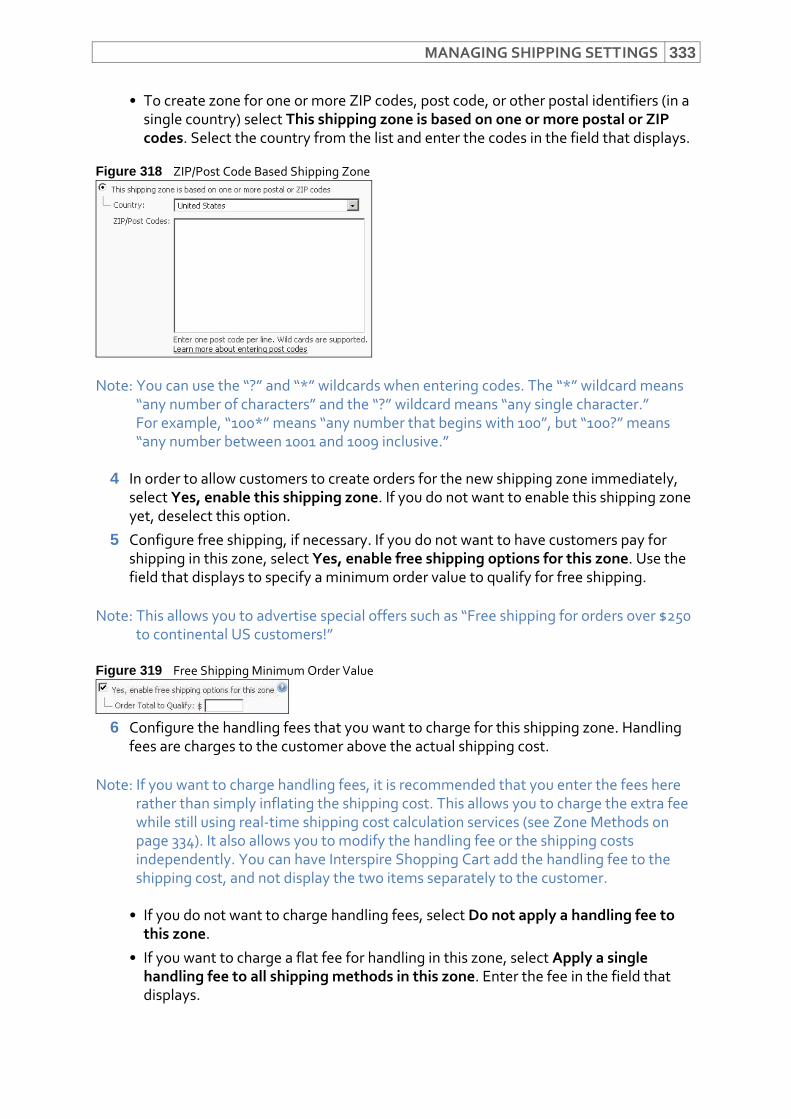
MANAGING SHIPPING SETTINGS 333
• To create zone for one or more ZIP codes, post code, or other postal identifiers (in a single country) select This shipping zone is based on one or more postal or ZIP codes. Select the country from the list and enter the codes in the field that displays.
Figure 318 ZIP/Post Code Based Shipping Zone
Note: You can use the “?” and “*” wildcards when entering codes. The “*” wildcard means “any number of characters” and the “?” wildcard means “any single character.” For example, “100*” means “any number that begins with 100”, but “100?” means “any number between 1001 and 1009 inclusive.”
4 In order to allow customers to create orders for the new shipping zone immediately, select Yes, enable this shipping zone. If you do not want to enable this shipping zone yet, deselect this option.
5 Configure free shipping, if necessary. If you do not want to have customers pay for shipping in this zone, select Yes, enable free shipping options for this zone. Use the field that displays to specify a minimum order value to qualify for free shipping.
Note: This allows you to advertise special offers such as “Free shipping for orders over $250 to continental US customers!”
Figure 319 Free Shipping Minimum Order Value
6 Configure the handling fees that you want to charge for this shipping zone. Handling fees are charges to the customer above the actual shipping cost.
Note: If you want to charge handling fees, it is recommended that you enter the fees here rather than simply inflating the shipping cost. This allows you to charge the extra fee while still using real‐time shipping cost calculation services (see Zone Methods on page 334). It also allows you to modify the handling fee or the shipping costs independently. You can have Interspire Shopping Cart add the handling fee to the shipping cost, and not display the two items separately to the customer.
• If you do not want to charge handling fees, select Do not apply a handling fee to this zone.
• If you want to charge a flat fee for handling in this zone, select Apply a single handling fee to all shipping methods in this zone. Enter the fee in the field that displays.
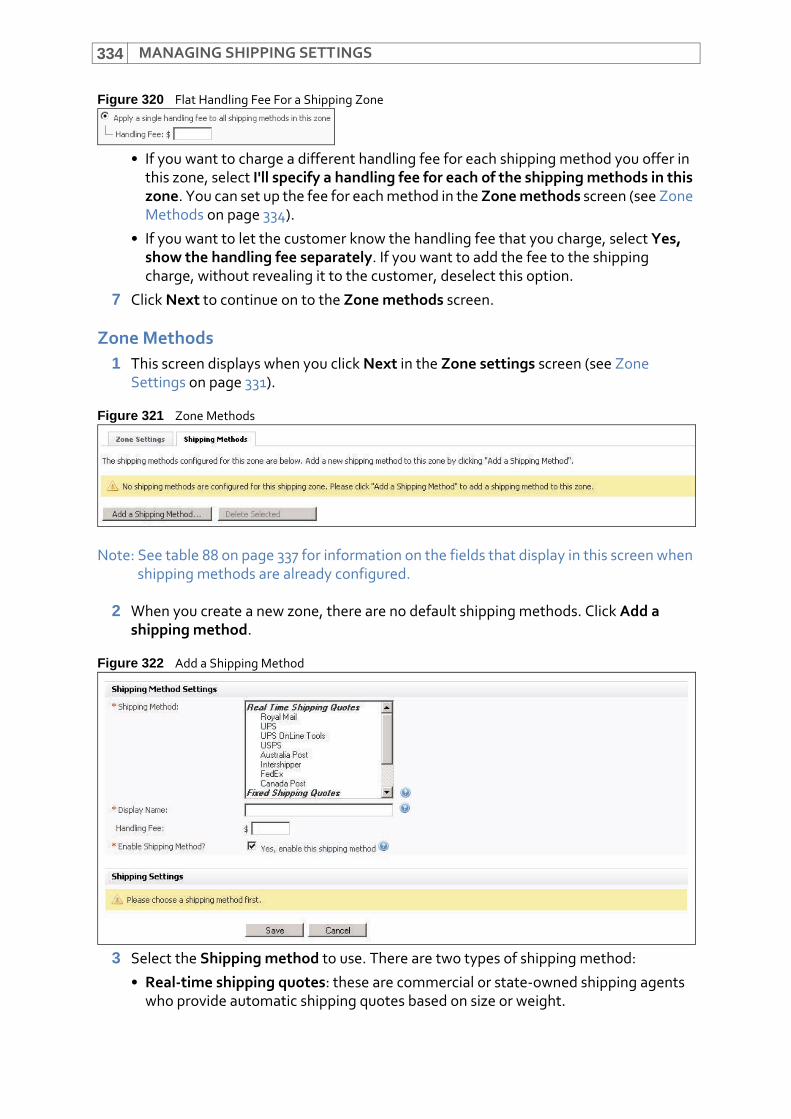
MANAGING SHIPPING SETTINGS334
Figure 320 Flat Handling Fee For a Shipping Zone
• If you want to charge a different handling fee for each shipping method you offer in this zone, select I'll specify a handling fee for each of the shipping methods in this zone. You can set up the fee for each method in the Zone methods screen (see Zone Methods on page 334).
• If you want to let the customer know the handling fee that you charge, select Yes, show the handling fee separately. If you want to add the fee to the shipping charge, without revealing it to the customer, deselect this option.
7 Click Next to continue on to the Zone methods screen.
Zone Methods1 This screen displays when you click Next in the Zone settings screen (see Zone
Settings on page 331).
Figure 321 Zone Methods
Note: See table 88 on page 337 for information on the fields that display in this screen when shipping methods are already configured.
2 When you create a new zone, there are no default shipping methods. Click Add a shipping method.
Figure 322 Add a Shipping Method
3 Select the Shipping method to use. There are two types of shipping method:
• Real‐time shipping quotes: these are commercial or state‐owned shipping agents who provide automatic shipping quotes based on size or weight.
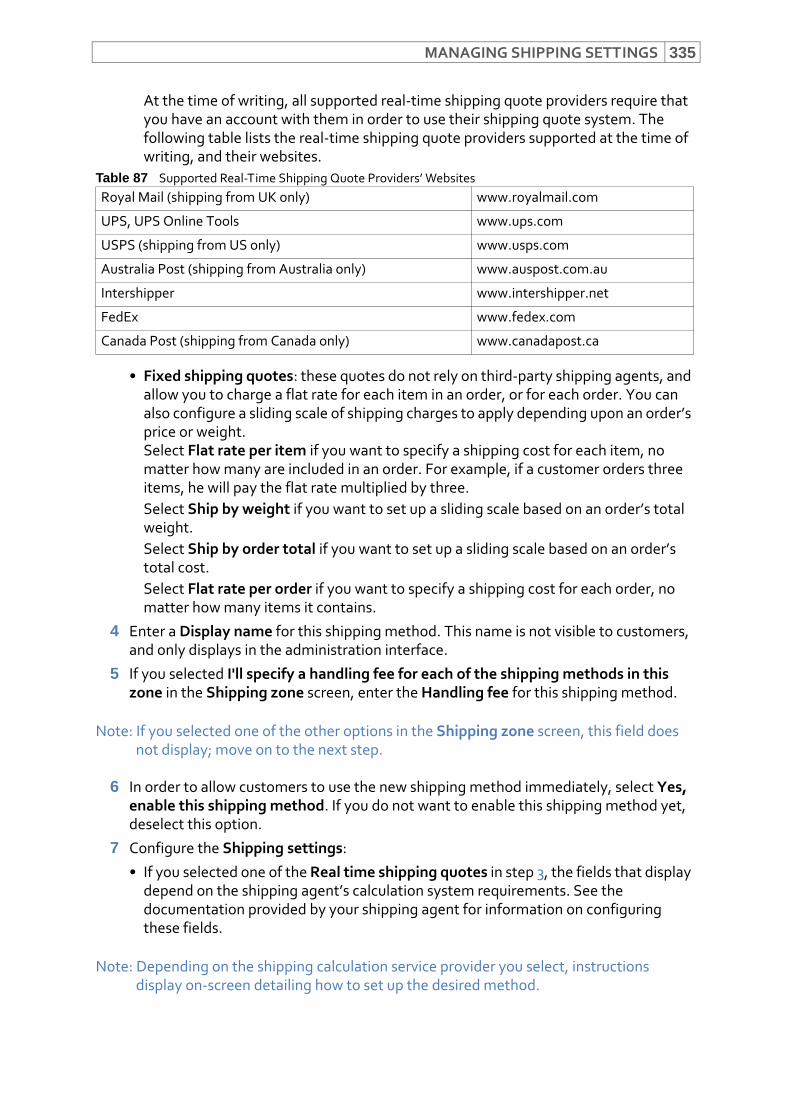
MANAGING SHIPPING SETTINGS 335
At the time of writing, all supported real‐time shipping quote providers require that you have an account with them in order to use their shipping quote system. The following table lists the real‐time shipping quote providers supported at the time of writing, and their websites.
• Fixed shipping quotes: these quotes do not rely on third‐party shipping agents, and allow you to charge a flat rate for each item in an order, or for each order. You can also configure a sliding scale of shipping charges to apply depending upon an order’s price or weight. Select Flat rate per item if you want to specify a shipping cost for each item, no matter how many are included in an order. For example, if a customer orders three items, he will pay the flat rate multiplied by three.Select Ship by weight if you want to set up a sliding scale based on an order’s total weight.Select Ship by order total if you want to set up a sliding scale based on an order’s total cost.Select Flat rate per order if you want to specify a shipping cost for each order, no matter how many items it contains.
4 Enter a Display name for this shipping method. This name is not visible to customers, and only displays in the administration interface.
5 If you selected I'll specify a handling fee for each of the shipping methods in this zone in the Shipping zone screen, enter the Handling fee for this shipping method.
Note: If you selected one of the other options in the Shipping zone screen, this field does not display; move on to the next step.
6 In order to allow customers to use the new shipping method immediately, select Yes, enable this shipping method. If you do not want to enable this shipping method yet, deselect this option.
7 Configure the Shipping settings:
• If you selected one of the Real time shipping quotes in step 3, the fields that display depend on the shipping agent’s calculation system requirements. See the documentation provided by your shipping agent for information on configuring these fields.
Note: Depending on the shipping calculation service provider you select, instructions display on‐screen detailing how to set up the desired method.
Table 87 Supported Real‐Time Shipping Quote Providers’ WebsitesRoyal Mail (shipping from UK only) www.royalmail.com
UPS, UPS Online Tools www.ups.com
USPS (shipping from US only) www.usps.com
Australia Post (shipping from Australia only) www.auspost.com.au
Intershipper www.intershipper.net
FedEx www.fedex.com
Canada Post (shipping from Canada only) www.canadapost.ca
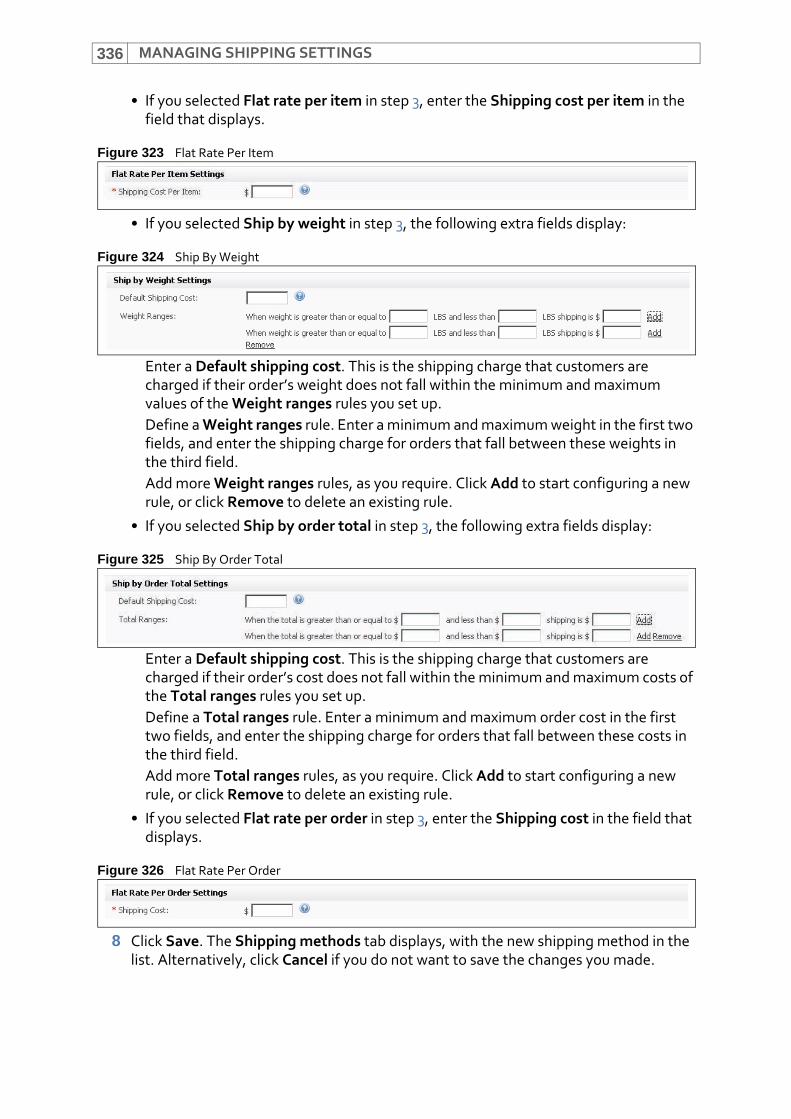
MANAGING SHIPPING SETTINGS336
• If you selected Flat rate per item in step 3, enter the Shipping cost per item in the field that displays.
Figure 323 Flat Rate Per Item
• If you selected Ship by weight in step 3, the following extra fields display:
Figure 324 Ship By Weight
Enter a Default shipping cost. This is the shipping charge that customers are charged if their order’s weight does not fall within the minimum and maximum values of the Weight ranges rules you set up.Define a Weight ranges rule. Enter a minimum and maximum weight in the first two fields, and enter the shipping charge for orders that fall between these weights in the third field.Add more Weight ranges rules, as you require. Click Add to start configuring a new rule, or click Remove to delete an existing rule.
• If you selected Ship by order total in step 3, the following extra fields display:
Figure 325 Ship By Order Total
Enter a Default shipping cost. This is the shipping charge that customers are charged if their order’s cost does not fall within the minimum and maximum costs of the Total ranges rules you set up.Define a Total ranges rule. Enter a minimum and maximum order cost in the first two fields, and enter the shipping charge for orders that fall between these costs in the third field.Add more Total ranges rules, as you require. Click Add to start configuring a new rule, or click Remove to delete an existing rule.
• If you selected Flat rate per order in step 3, enter the Shipping cost in the field that displays.
Figure 326 Flat Rate Per Order
8 Click Save. The Shipping methods tab displays, with the new shipping method in the list. Alternatively, click Cancel if you do not want to save the changes you made.
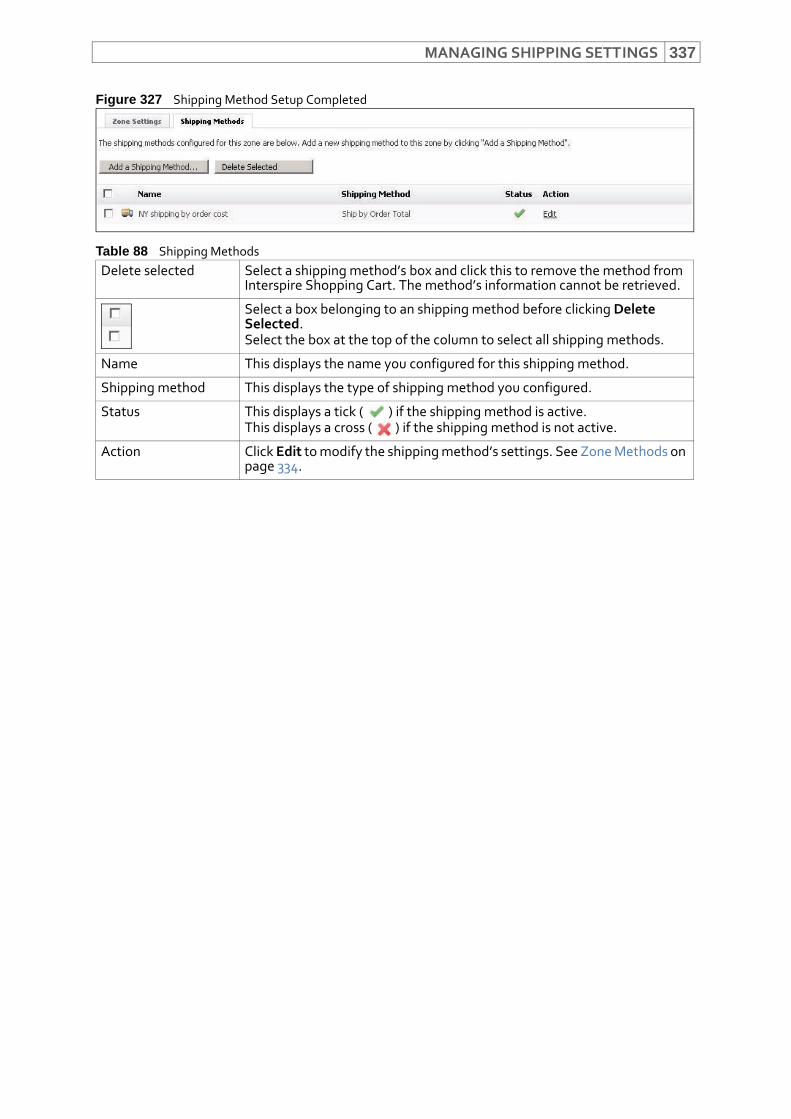
MANAGING SHIPPING SETTINGS 337
Figure 327 Shipping Method Setup Completed
Table 88 Shipping MethodsDelete selected Select a shipping method’s box and click this to remove the method from
Interspire Shopping Cart. The method’s information cannot be retrieved.
Select a box belonging to an shipping method before clicking Delete Selected.Select the box at the top of the column to select all shipping methods.
Name This displays the name you configured for this shipping method.
Shipping method This displays the type of shipping method you configured.
Status This displays a tick ( ) if the shipping method is active.This displays a cross ( ) if the shipping method is not active.
Action Click Edit to modify the shipping method’s settings. See Zone Methods on page 334.

MANAGING SHIPPING SETTINGS338
339
Managing Tax RatesThis chapter describes how to use the Settings > Tax settings option in the toolbar.
Figure 328 The Settings > Tax Settings Option
Note: You may be legally required to include a sales tax, or other taxes, on items you sell in your store. If you are not sure about the laws that apply to your jurisdiction, or your responsibilities when shipping orders to customers other jurisdictions, check with your local tax office, chamber of commerce, or similar authority.
Configuring Tax SettingsTo set up your store’s taxation policy:
1 Click Tools in the toolbar, and then click Tax settings.
Figure 329 Shipping Settings: Tax Settings
2 Define your basic tax policy:
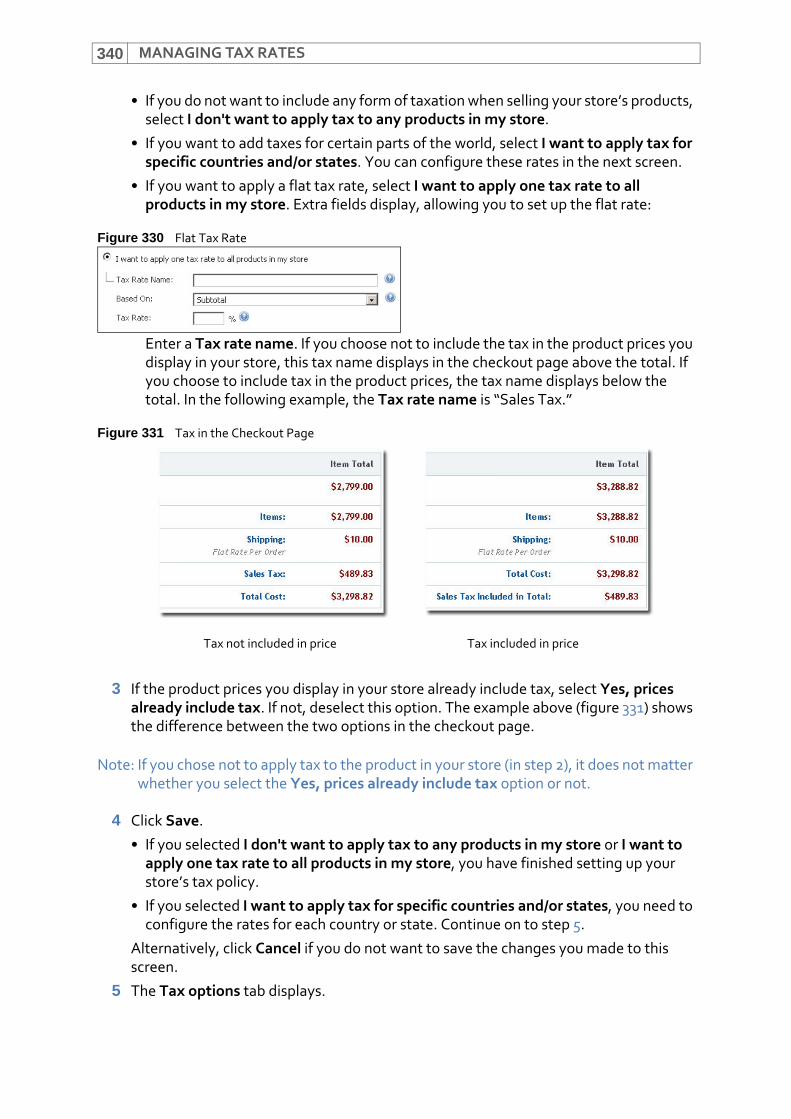
MANAGING TAX RATES340
• If you do not want to include any form of taxation when selling your store’s products, select I don't want to apply tax to any products in my store.
• If you want to add taxes for certain parts of the world, select I want to apply tax for specific countries and/or states. You can configure these rates in the next screen.
• If you want to apply a flat tax rate, select I want to apply one tax rate to all products in my store. Extra fields display, allowing you to set up the flat rate:
Figure 330 Flat Tax Rate
Enter a Tax rate name. If you choose not to include the tax in the product prices you display in your store, this tax name displays in the checkout page above the total. If you choose to include tax in the product prices, the tax name displays below the total. In the following example, the Tax rate name is “Sales Tax.”
Figure 331 Tax in the Checkout Page
3 If the product prices you display in your store already include tax, select Yes, prices already include tax. If not, deselect this option. The example above (figure 331) shows the difference between the two options in the checkout page.
Note: If you chose not to apply tax to the product in your store (in step 2), it does not matter whether you select the Yes, prices already include tax option or not.
4 Click Save.
• If you selected I don't want to apply tax to any products in my store or I want to apply one tax rate to all products in my store, you have finished setting up your store’s tax policy.
• If you selected I want to apply tax for specific countries and/or states, you need to configure the rates for each country or state. Continue on to step 5.
Alternatively, click Cancel if you do not want to save the changes you made to this screen.
5 The Tax options tab displays.
Tax not included in price Tax included in price
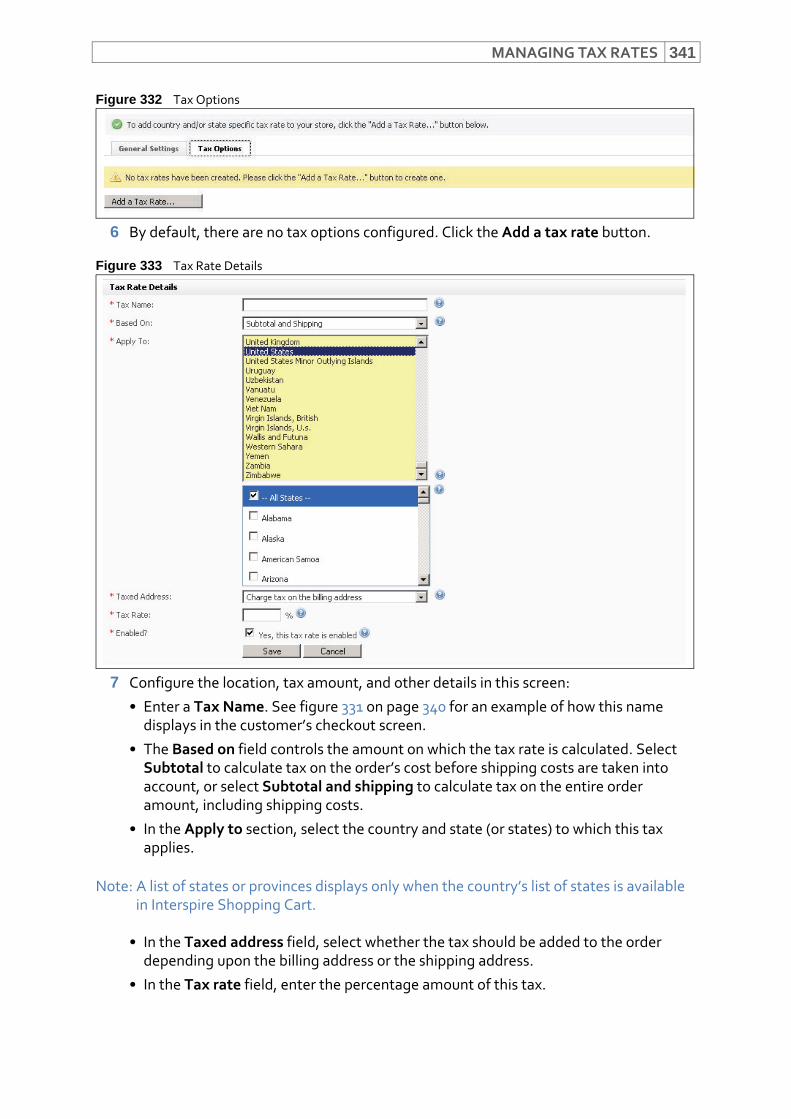
MANAGING TAX RATES 341
Figure 332 Tax Options
6 By default, there are no tax options configured. Click the Add a tax rate button.
Figure 333 Tax Rate Details
7 Configure the location, tax amount, and other details in this screen:
• Enter a Tax Name. See figure 331 on page 340 for an example of how this name displays in the customer’s checkout screen.
• The Based on field controls the amount on which the tax rate is calculated. Select Subtotal to calculate tax on the order’s cost before shipping costs are taken into account, or select Subtotal and shipping to calculate tax on the entire order amount, including shipping costs.
• In the Apply to section, select the country and state (or states) to which this tax applies.
Note: A list of states or provinces displays only when the country’s list of states is available in Interspire Shopping Cart.
• In the Taxed address field, select whether the tax should be added to the order depending upon the billing address or the shipping address.
• In the Tax rate field, enter the percentage amount of this tax.
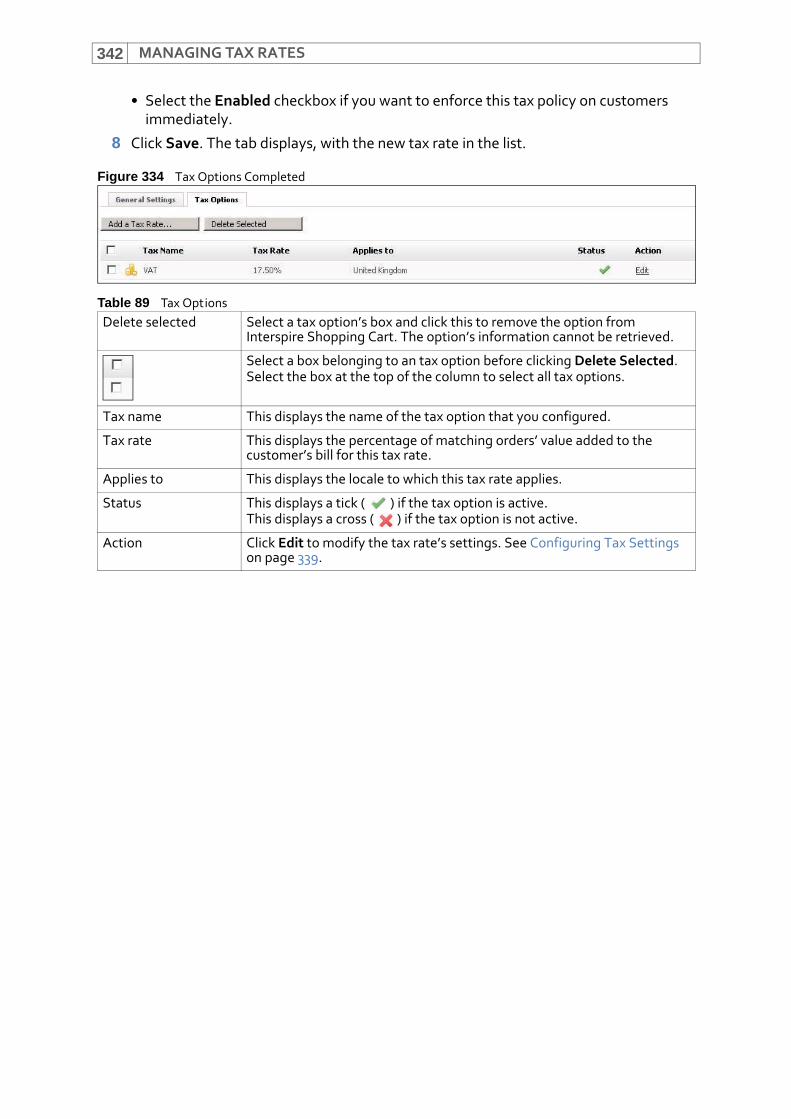
MANAGING TAX RATES342
• Select the Enabled checkbox if you want to enforce this tax policy on customers immediately.
8 Click Save. The tab displays, with the new tax rate in the list.
Figure 334 Tax Options Completed
Table 89 Tax OptionsDelete selected Select a tax option’s box and click this to remove the option from
Interspire Shopping Cart. The option’s information cannot be retrieved.
Select a box belonging to an tax option before clicking Delete Selected.Select the box at the top of the column to select all tax options.
Tax name This displays the name of the tax option that you configured.
Tax rate This displays the percentage of matching orders’ value added to the customer’s bill for this tax rate.
Applies to This displays the locale to which this tax rate applies.
Status This displays a tick ( ) if the tax option is active.This displays a cross ( ) if the tax option is not active.
Action Click Edit to modify the tax rate’s settings. See Configuring Tax Settings on page 339.
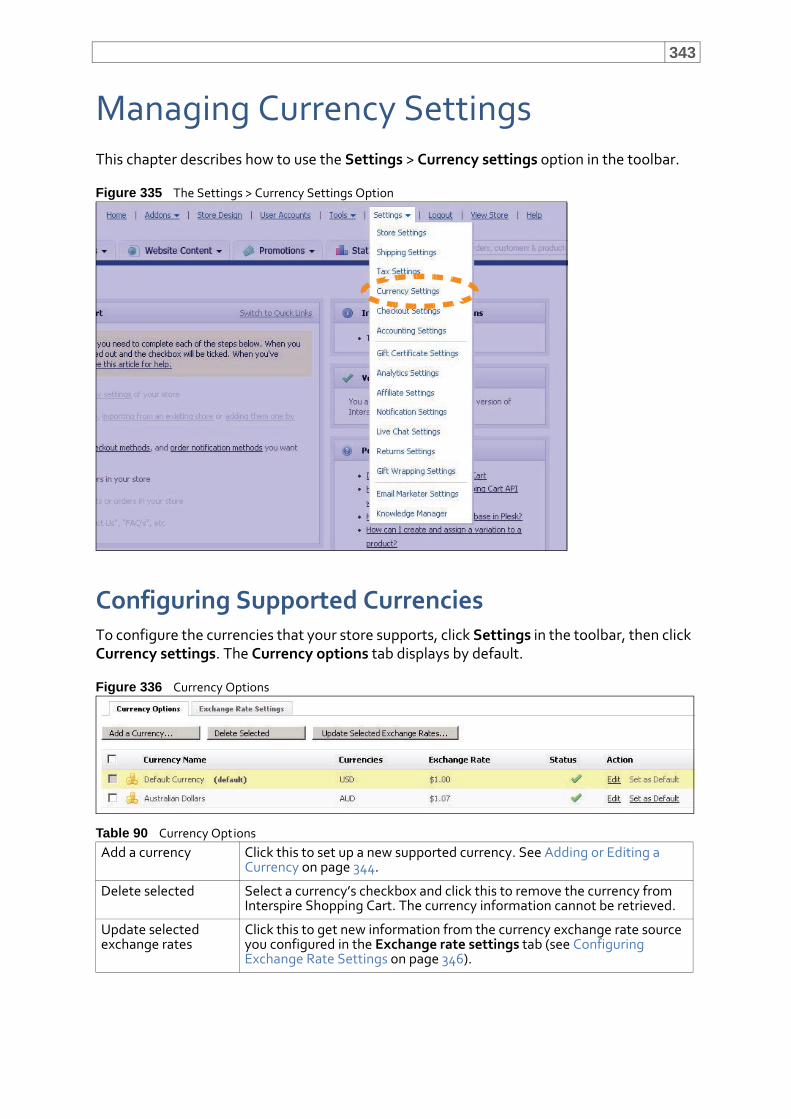
343
Managing Currency SettingsThis chapter describes how to use the Settings > Currency settings option in the toolbar.
Figure 335 The Settings > Currency Settings Option
Configuring Supported CurrenciesTo configure the currencies that your store supports, click Settings in the toolbar, then click Currency settings. The Currency options tab displays by default.
Figure 336 Currency Options
Table 90 Currency OptionsAdd a currency Click this to set up a new supported currency. See Adding or Editing a
Currency on page 344.
Delete selected Select a currency’s checkbox and click this to remove the currency from Interspire Shopping Cart. The currency information cannot be retrieved.
Update selected exchange rates
Click this to get new information from the currency exchange rate source you configured in the Exchange rate settings tab (see Configuring Exchange Rate Settings on page 346).
MANAGING CURRENCY SETTINGS344
Adding or Editing a Currency1 Click Settings in the toolbar, then click Currency settings. The Currency options tab
displays by default.
• To add a new currency to your store’s list of supported currencies, click the Add a currency button.
• To edit an existing entry in your store’s list of supported currencies, click the currency’s Edit link.
Select a box belonging to a currency entry before clicking Delete Selected.Select the box at the top of the column to select all tax currency entries.
Currency name This displays the name of the currency entry.
Note: Default displays for your store’s base currency. This is the currency used by default in your store, and in your management interface. If you want to create a new default currency, you must first configure the currency and then make it the default (by clicking its Set as default link in this screen).
Currencies This displays the name of the supported currency.
Exchange rate This displays the last‐retrieved exchange rate between this currency and the default currency.
Note: For the default currency, “1” displays.
Status This displays a tick ( ) if the currency is active.This displays a cross ( ) if the currency is not active.
Action Click Edit to modify a currency entry’s settings. See Adding or Editing a Currency on page 344.Click Set as default to use the currency as your store’s default for displaying prices, and so on.
Note: This option is not available for the default currency.
Table 90 Currency Options
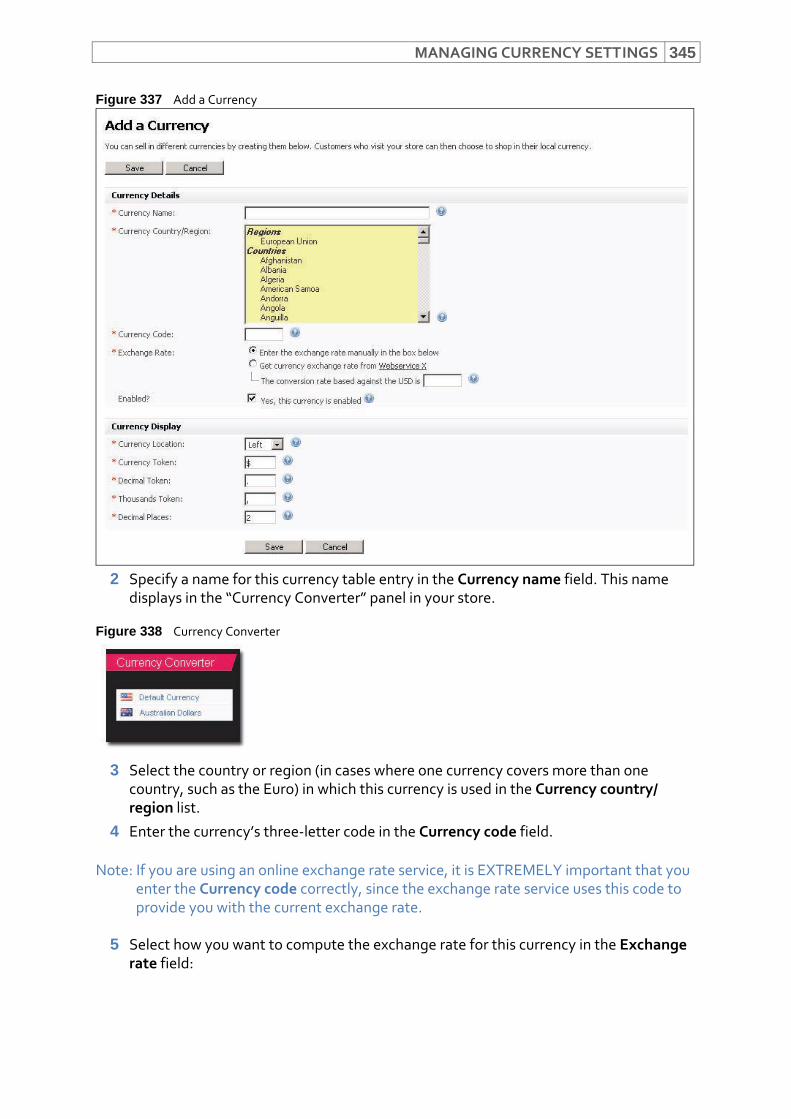
MANAGING CURRENCY SETTINGS 345
Figure 337 Add a Currency
2 Specify a name for this currency table entry in the Currency name field. This name displays in the “Currency Converter” panel in your store.
Figure 338 Currency Converter
3 Select the country or region (in cases where one currency covers more than one country, such as the Euro) in which this currency is used in the Currency country/region list.
4 Enter the currency’s three‐letter code in the Currency code field.
Note: If you are using an online exchange rate service, it is EXTREMELY important that you enter the Currency code correctly, since the exchange rate service uses this code to provide you with the current exchange rate.
5 Select how you want to compute the exchange rate for this currency in the Exchange rate field:
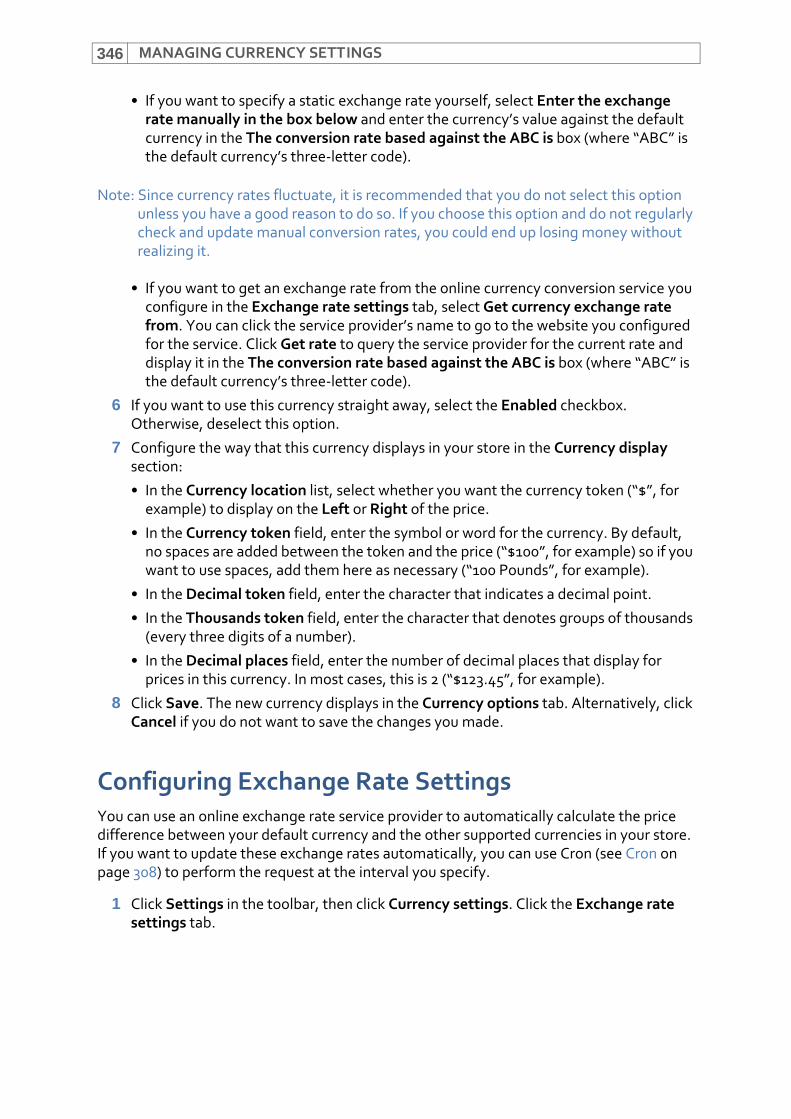
MANAGING CURRENCY SETTINGS346
• If you want to specify a static exchange rate yourself, select Enter the exchange rate manually in the box below and enter the currency’s value against the default currency in the The conversion rate based against the ABC is box (where “ABC” is the default currency’s three‐letter code).
Note: Since currency rates fluctuate, it is recommended that you do not select this option unless you have a good reason to do so. If you choose this option and do not regularly check and update manual conversion rates, you could end up losing money without realizing it.
• If you want to get an exchange rate from the online currency conversion service you configure in the Exchange rate settings tab, select Get currency exchange rate from. You can click the service provider’s name to go to the website you configured for the service. Click Get rate to query the service provider for the current rate and display it in the The conversion rate based against the ABC is box (where “ABC” is the default currency’s three‐letter code).
6 If you want to use this currency straight away, select the Enabled checkbox. Otherwise, deselect this option.
7 Configure the way that this currency displays in your store in the Currency display section:
• In the Currency location list, select whether you want the currency token (“$”, for example) to display on the Left or Right of the price.
• In the Currency token field, enter the symbol or word for the currency. By default, no spaces are added between the token and the price (“$100”, for example) so if you want to use spaces, add them here as necessary (“100 Pounds”, for example).
• In the Decimal token field, enter the character that indicates a decimal point.
• In the Thousands token field, enter the character that denotes groups of thousands (every three digits of a number).
• In the Decimal places field, enter the number of decimal places that display for prices in this currency. In most cases, this is 2 (“$123.45”, for example).
8 Click Save. The new currency displays in the Currency options tab. Alternatively, click Cancel if you do not want to save the changes you made.
Configuring Exchange Rate SettingsYou can use an online exchange rate service provider to automatically calculate the price difference between your default currency and the other supported currencies in your store. If you want to update these exchange rates automatically, you can use Cron (see Cron on page 308) to perform the request at the interval you specify.
1 Click Settings in the toolbar, then click Currency settings. Click the Exchange rate settings tab.
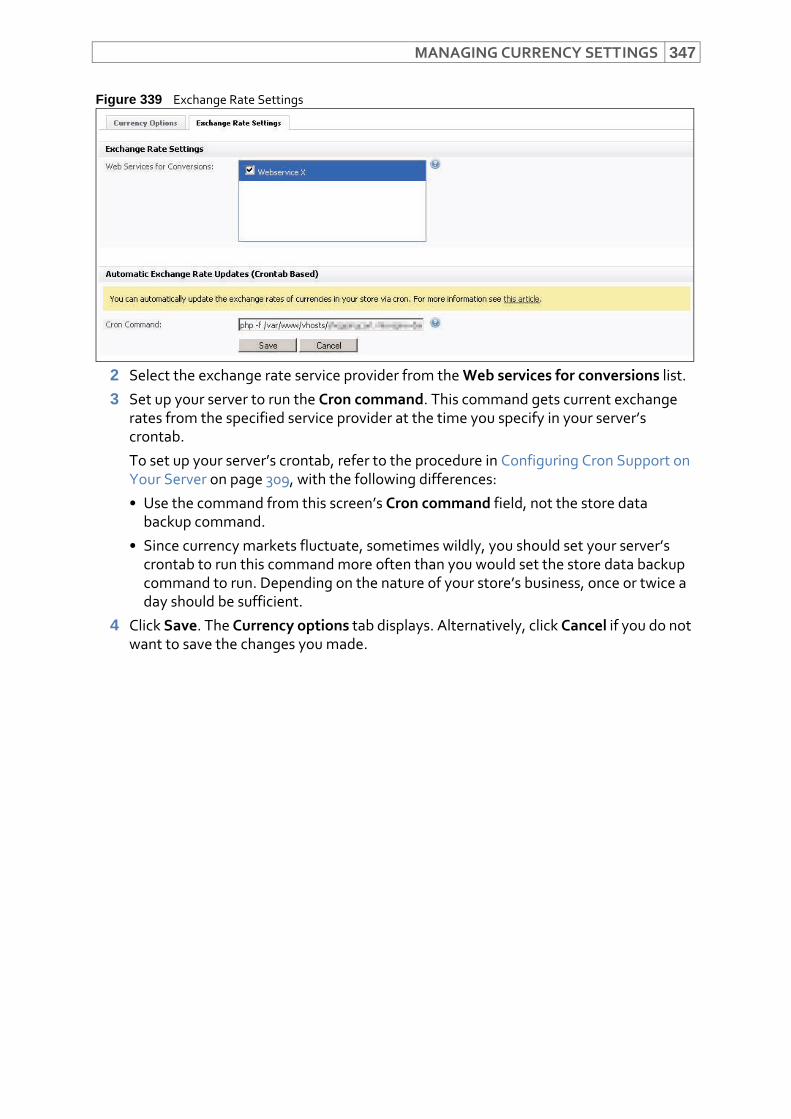
MANAGING CURRENCY SETTINGS 347
Figure 339 Exchange Rate Settings
2 Select the exchange rate service provider from the Web services for conversions list.
3 Set up your server to run the Cron command. This command gets current exchange rates from the specified service provider at the time you specify in your server’s crontab.
To set up your server’s crontab, refer to the procedure in Configuring Cron Support on Your Server on page 309, with the following differences:
• Use the command from this screen’s Cron command field, not the store data backup command.
• Since currency markets fluctuate, sometimes wildly, you should set your server’s crontab to run this command more often than you would set the store data backup command to run. Depending on the nature of your store’s business, once or twice a day should be sufficient.
4 Click Save. The Currency options tab displays. Alternatively, click Cancel if you do not want to save the changes you made.

MANAGING CURRENCY SETTINGS348
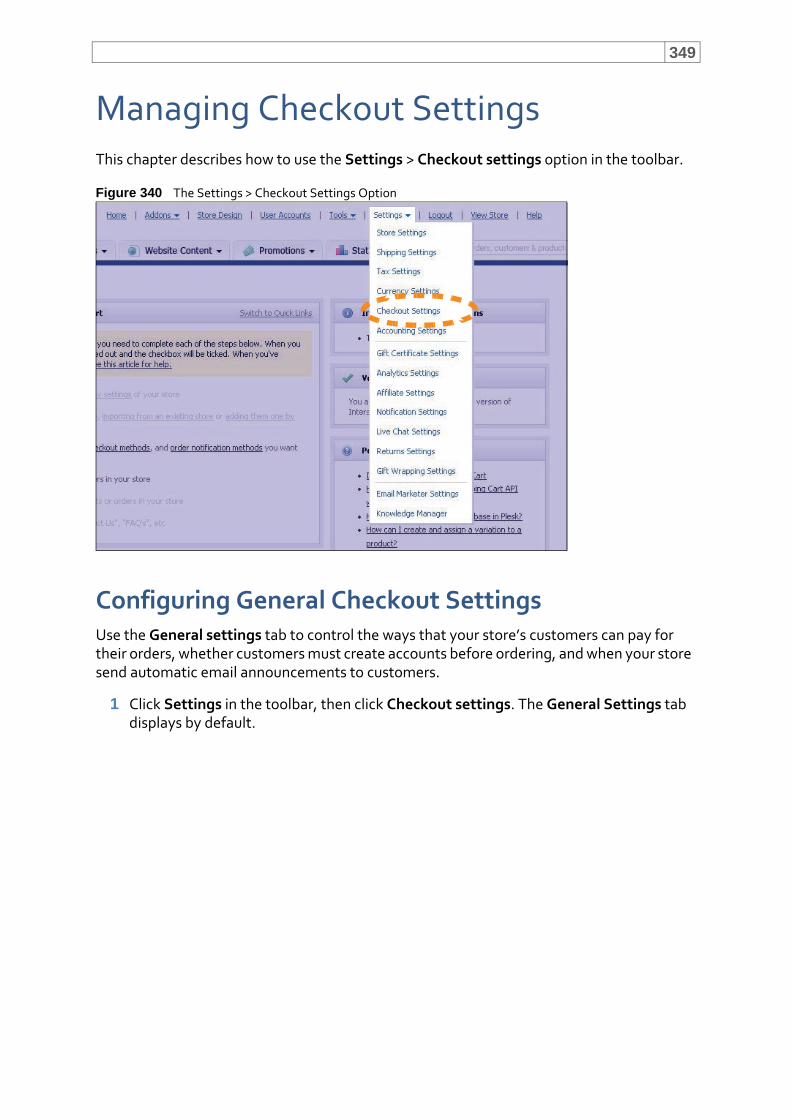
349
Managing Checkout SettingsThis chapter describes how to use the Settings > Checkout settings option in the toolbar.
Figure 340 The Settings > Checkout Settings Option
Configuring General Checkout SettingsUse the General settings tab to control the ways that your store’s customers can pay for their orders, whether customers must create accounts before ordering, and when your store send automatic email announcements to customers.
1 Click Settings in the toolbar, then click Checkout settings. The General Settings tab displays by default.
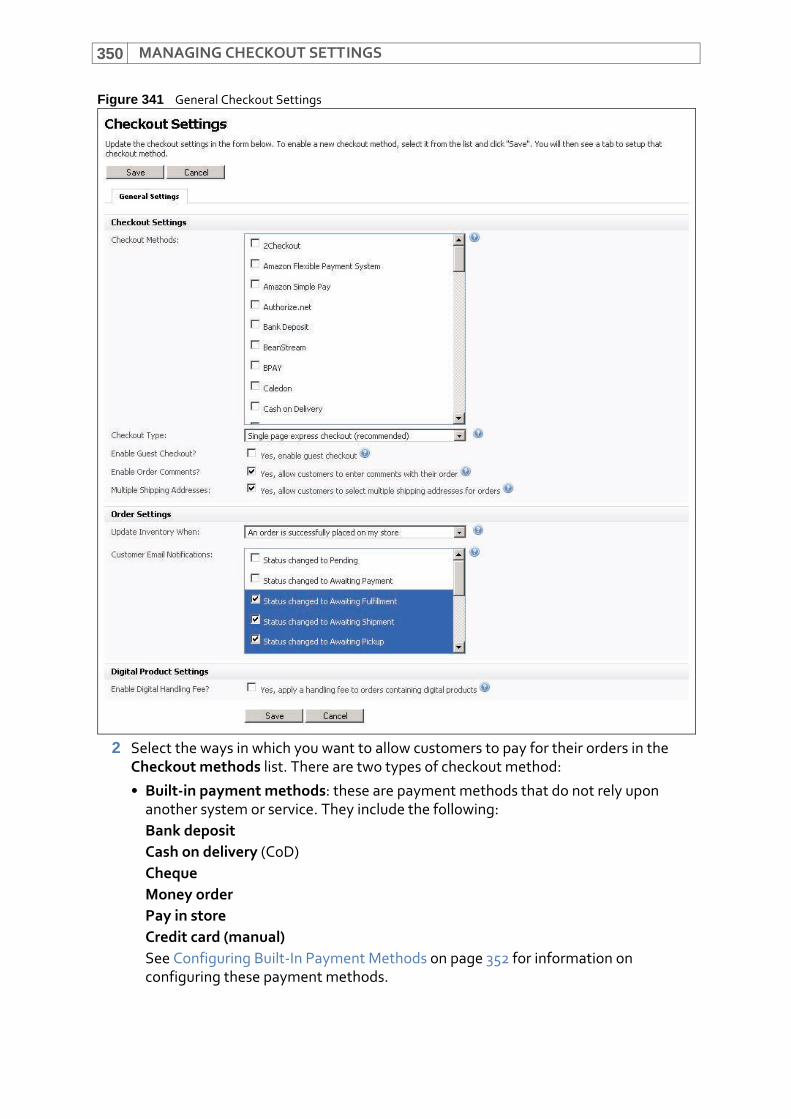
MANAGING CHECKOUT SETTINGS350
Figure 341 General Checkout Settings
2 Select the ways in which you want to allow customers to pay for their orders in the Checkout methods list. There are two types of checkout method:
• Built‐in payment methods: these are payment methods that do not rely upon another system or service. They include the following:Bank depositCash on delivery (CoD)ChequeMoney orderPay in storeCredit card (manual)See Configuring Built‐In Payment Methods on page 352 for information on configuring these payment methods.
MANAGING CHECKOUT SETTINGS 351
• Third‐party payment methods: these are payment methods that require a third‐party system or service to accept credit and debit transactions.
3 Select the Checkout type you want customers to use:
• Single page express checkout: this allows customers to enter a billing address, shipping address and shipping provider in a single screen, before reaching the order review page. This is recommended, as it is a smoother process for customers.
• Multiple page checkout: this allows customers to enter a billing address, shipping address and shipping provider in separate screens one after another, before reaching the order review page.
4 Configure guest checkout settings. If you allow guest checkout, customers do not have to create an account with you before they complete an order. If you want to enable guest checkout, select Yes, enable guest checkout. If you then want to create an account for customers who take advantage of the guest checkout system, select the Create an account for guest checkouts and assign them a random password field that appears.
If you do not want to allow customers without accounts to place orders with your store, deselect Yes, enable guest checkout.
5 If you want to allow customers to add a comment that are submitted with their orders, select Yes, allow customers to enter comments with their order.
Note: It is suggested that you allow order comments, since customers may have unusual shipping requirements or other important information to pass to your store.
6 If you want to allow customers to ship different items (in the same order) to different places, select Yes, allow customers to select multiple shipping addresses for orders.
7 If you use inventory tracking for your store’s products, select how you want stock inventory numbers to be updated in the Update inventory when list.
• Select An order is successfully placed on my store to have Interspire Shopping Cart update the inventory as soon as an order is received.
• Select An order status is changed to completed or shipped to have Interspire Shopping Cart update the inventory once a store administrator has actually shipped the items in the order.
Note: It is up to you how you decide to track inventory. However, if you modify inventory levels once they have actually been shipped, you can avoid potential inventory discrepancies resulting from cancelled or unpaid orders, should a store administrator fail to manually “replace” the ordered item in Interspire Shopping Cart’s inventory.
8 Choose the events that trigger an email to a customer in the Customer Email Notifications list.
9 If you want to charge a handling fee to digital products that customers download from your store, select Yes, apply a handling fee to orders containing digital products and enter the Handling fee in the field that displays. If you do not wish to charge handling fees, deselect this option.
10 Click Save.
MANAGING CHECKOUT SETTINGS352
If you have activated a new payment method, a new tab displays in the screen. If you deactivated a new payment method, its tab disappears.
For tabs belonging to built‐in payment methods, see Configuring Built‐In Payment Methods on page 352.
For third‐party payment methods, the fields that display in the method’s tab depend upon the system’s service provider. See the documentation provided by the service provider for information on configuring these fields.
Note: Depending on the payment service you select, instructions display on‐screen detailing how to set up the desired method.
Alternatively, click Cancel if you do not want to save the changes you made.
Configuring Built‐In Payment MethodsTo configure a built‐in payment method:
1 Click the payment method’s tab in the Settings > Checkout settings screen’s General settings tab.
Note: Built‐in payment methods are: Bank deposit, Cash on delivery (CoD), Cheque, Money order, Pay in store, and Credit card (manual). For other methods, see the documentation supplied by the payment method service provider.
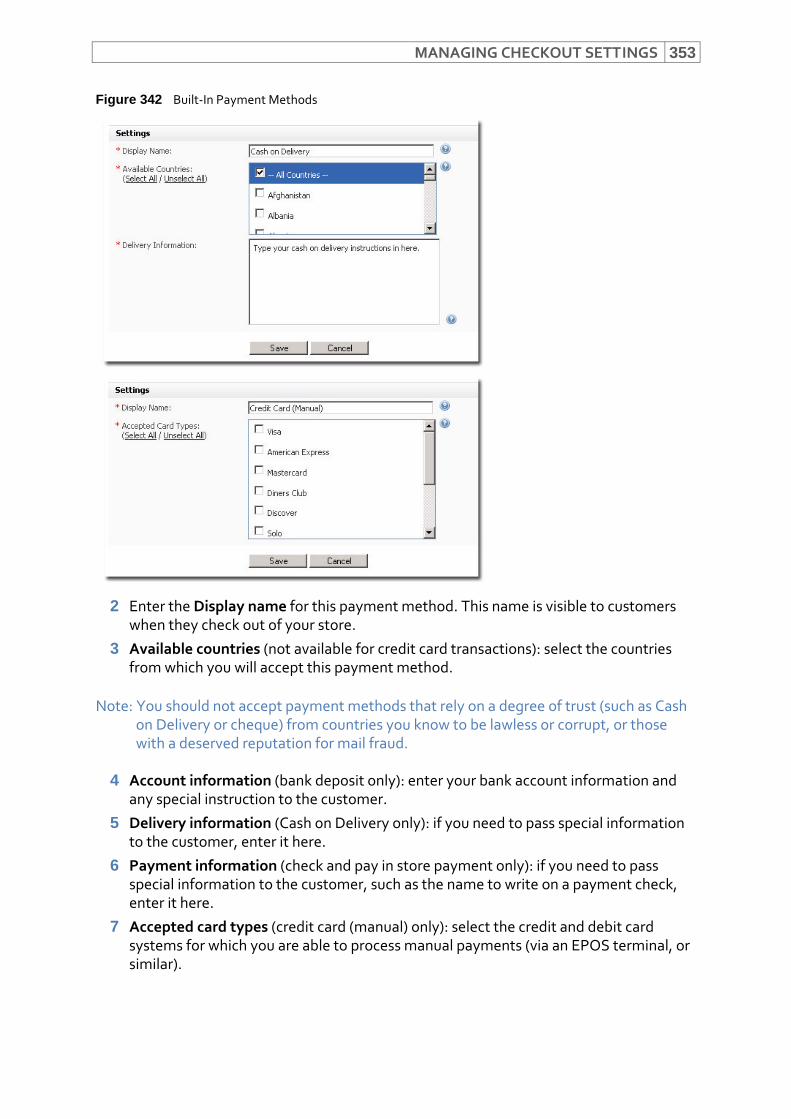
MANAGING CHECKOUT SETTINGS 353
Figure 342 Built‐In Payment Methods
2 Enter the Display name for this payment method. This name is visible to customers when they check out of your store.
3 Available countries (not available for credit card transactions): select the countries from which you will accept this payment method.
Note: You should not accept payment methods that rely on a degree of trust (such as Cash on Delivery or cheque) from countries you know to be lawless or corrupt, or those with a deserved reputation for mail fraud.
4 Account information (bank deposit only): enter your bank account information and any special instruction to the customer.
5 Delivery information (Cash on Delivery only): if you need to pass special information to the customer, enter it here.
6 Payment information (check and pay in store payment only): if you need to pass special information to the customer, such as the name to write on a payment check, enter it here.
7 Accepted card types (credit card (manual) only): select the credit and debit card systems for which you are able to process manual payments (via an EPOS terminal, or similar).
MANAGING CHECKOUT SETTINGS354
8 Click Save. The General settings tab displays. Alternatively, click Cancel if you do not want to save the changes you made.
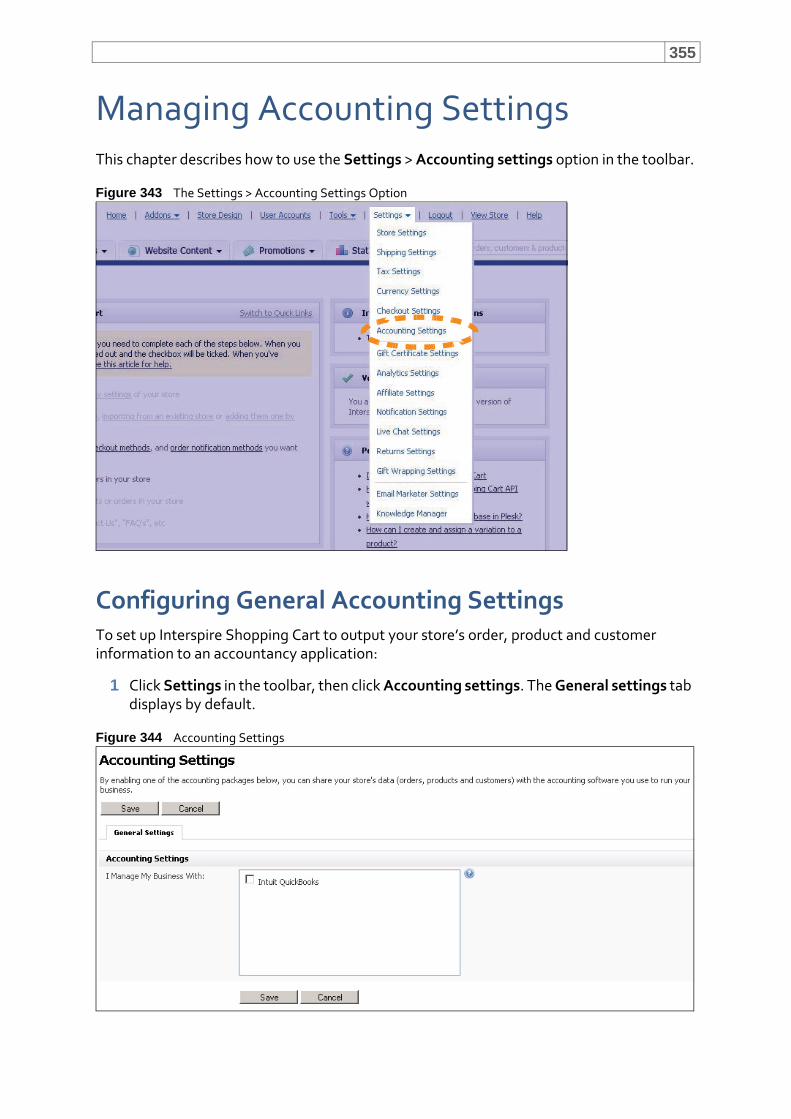
355
Managing Accounting SettingsThis chapter describes how to use the Settings > Accounting settings option in the toolbar.
Figure 343 The Settings > Accounting Settings Option
Configuring General Accounting SettingsTo set up Interspire Shopping Cart to output your store’s order, product and customer information to an accountancy application:
1 Click Settings in the toolbar, then click Accounting settings. The General settings tab displays by default.
Figure 344 Accounting Settings
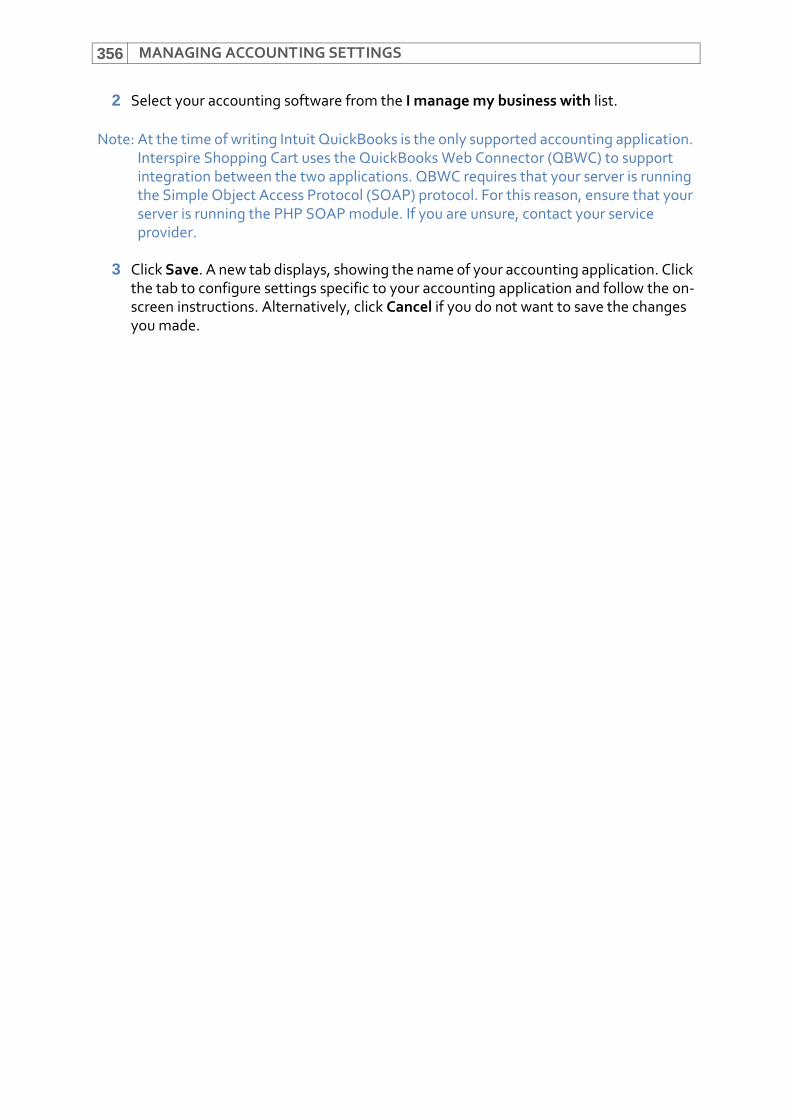
MANAGING ACCOUNTING SETTINGS356
2 Select your accounting software from the I manage my business with list.
Note: At the time of writing Intuit QuickBooks is the only supported accounting application. Interspire Shopping Cart uses the QuickBooks Web Connector (QBWC) to support integration between the two applications. QBWC requires that your server is running the Simple Object Access Protocol (SOAP) protocol. For this reason, ensure that your server is running the PHP SOAP module. If you are unsure, contact your service provider.
3 Click Save. A new tab displays, showing the name of your accounting application. Click the tab to configure settings specific to your accounting application and follow the on‐screen instructions. Alternatively, click Cancel if you do not want to save the changes you made.
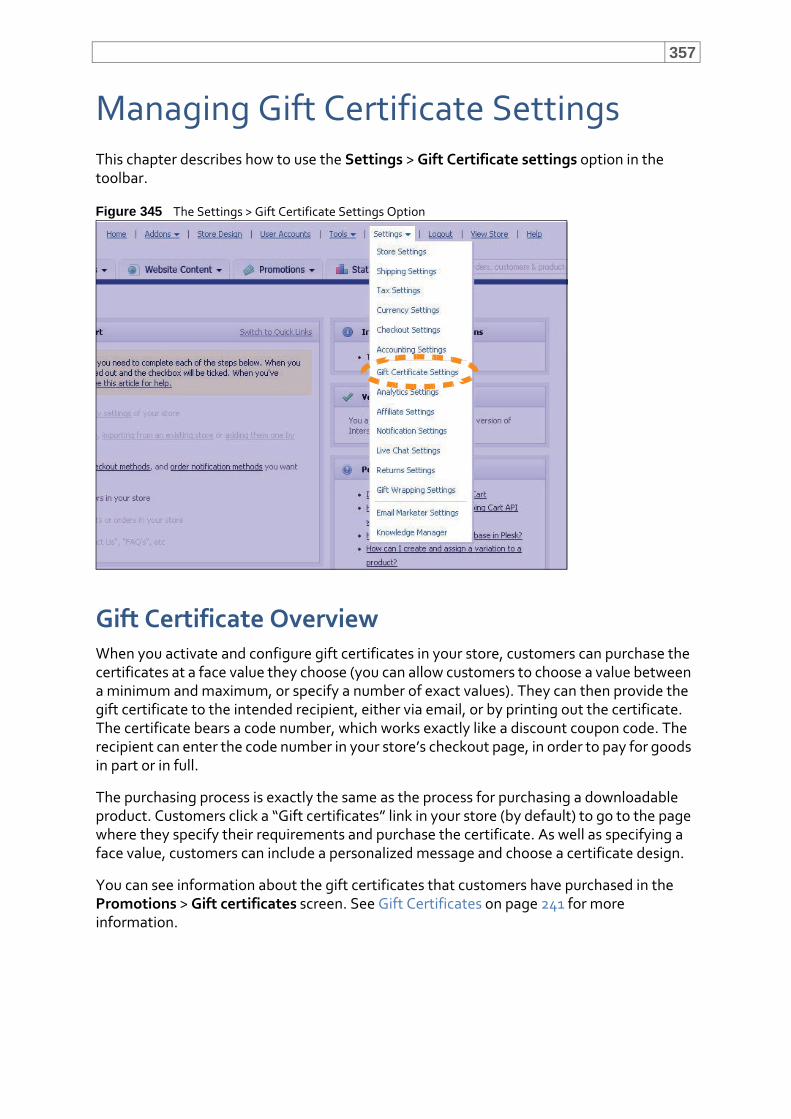
357
Managing Gift Certificate SettingsThis chapter describes how to use the Settings > Gift Certificate settings option in the toolbar.
Figure 345 The Settings > Gift Certificate Settings Option
Gift Certificate OverviewWhen you activate and configure gift certificates in your store, customers can purchase the certificates at a face value they choose (you can allow customers to choose a value between a minimum and maximum, or specify a number of exact values). They can then provide the gift certificate to the intended recipient, either via email, or by printing out the certificate. The certificate bears a code number, which works exactly like a discount coupon code. The recipient can enter the code number in your store’s checkout page, in order to pay for goods in part or in full.
The purchasing process is exactly the same as the process for purchasing a downloadable product. Customers click a “Gift certificates” link in your store (by default) to go to the page where they specify their requirements and purchase the certificate. As well as specifying a face value, customers can include a personalized message and choose a certificate design.
You can see information about the gift certificates that customers have purchased in the Promotions > Gift certificates screen. See Gift Certificates on page 241 for more information.
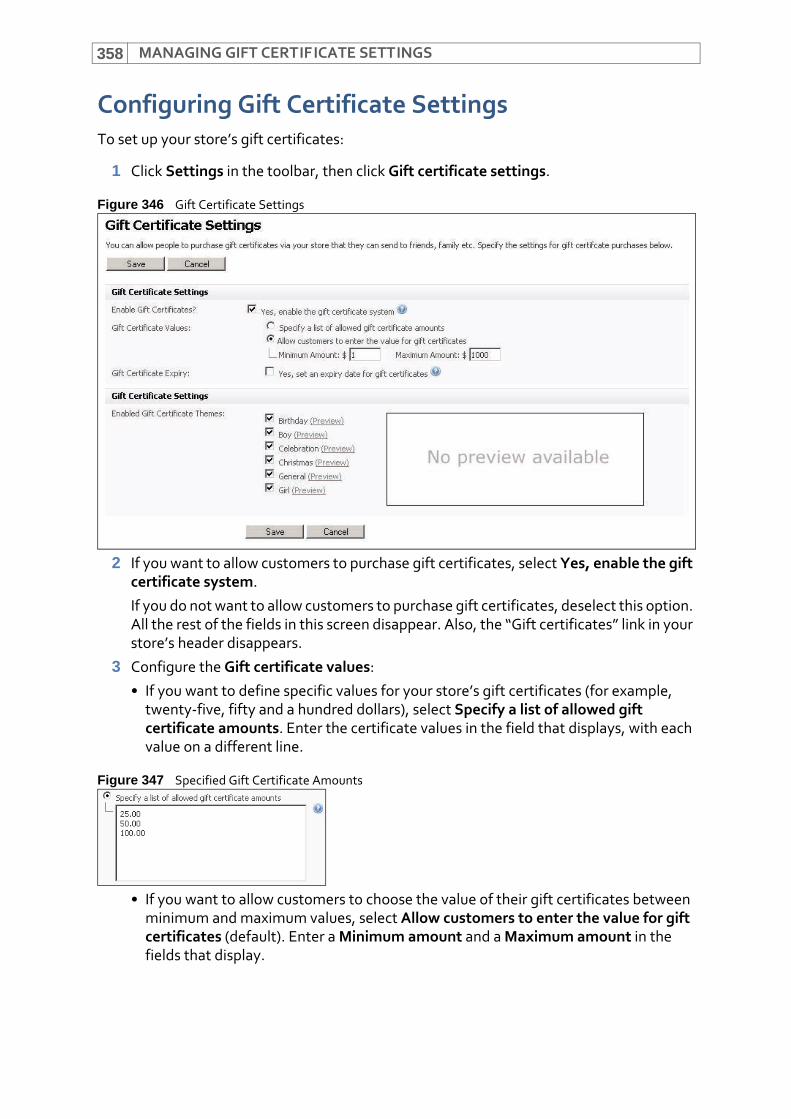
MANAGING GIFT CERTIFICATE SETTINGS358
Configuring Gift Certificate SettingsTo set up your store’s gift certificates:
1 Click Settings in the toolbar, then click Gift certificate settings.
Figure 346 Gift Certificate Settings
2 If you want to allow customers to purchase gift certificates, select Yes, enable the gift certificate system.
If you do not want to allow customers to purchase gift certificates, deselect this option. All the rest of the fields in this screen disappear. Also, the “Gift certificates” link in your store’s header disappears.
3 Configure the Gift certificate values:
• If you want to define specific values for your store’s gift certificates (for example, twenty‐five, fifty and a hundred dollars), select Specify a list of allowed gift certificate amounts. Enter the certificate values in the field that displays, with each value on a different line.
Figure 347 Specified Gift Certificate Amounts
• If you want to allow customers to choose the value of their gift certificates between minimum and maximum values, select Allow customers to enter the value for gift certificates (default). Enter a Minimum amount and a Maximum amount in the fields that display.
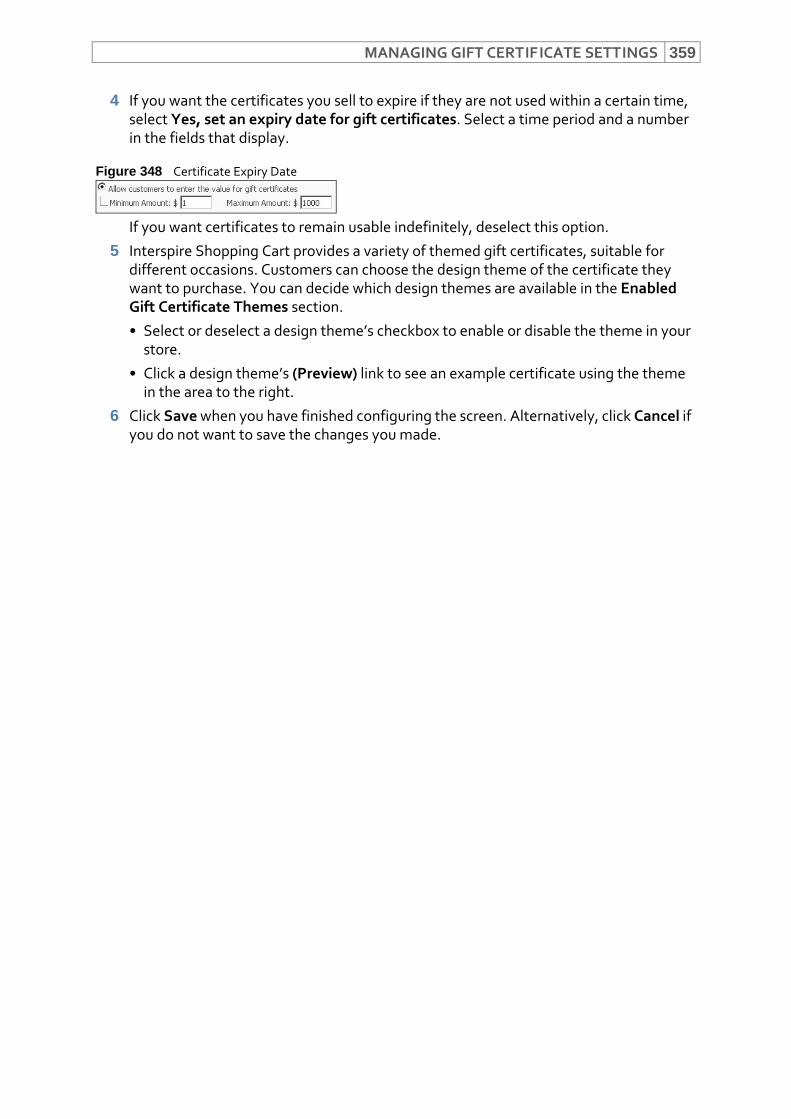
MANAGING GIFT CERTIFICATE SETTINGS 359
4 If you want the certificates you sell to expire if they are not used within a certain time, select Yes, set an expiry date for gift certificates. Select a time period and a number in the fields that display.
Figure 348 Certificate Expiry Date
If you want certificates to remain usable indefinitely, deselect this option.
5 Interspire Shopping Cart provides a variety of themed gift certificates, suitable for different occasions. Customers can choose the design theme of the certificate they want to purchase. You can decide which design themes are available in the Enabled Gift Certificate Themes section.
• Select or deselect a design theme’s checkbox to enable or disable the theme in your store.
• Click a design theme’s (Preview) link to see an example certificate using the theme in the area to the right.
6 Click Save when you have finished configuring the screen. Alternatively, click Cancel if you do not want to save the changes you made.

MANAGING GIFT CERTIFICATE SETTINGS360
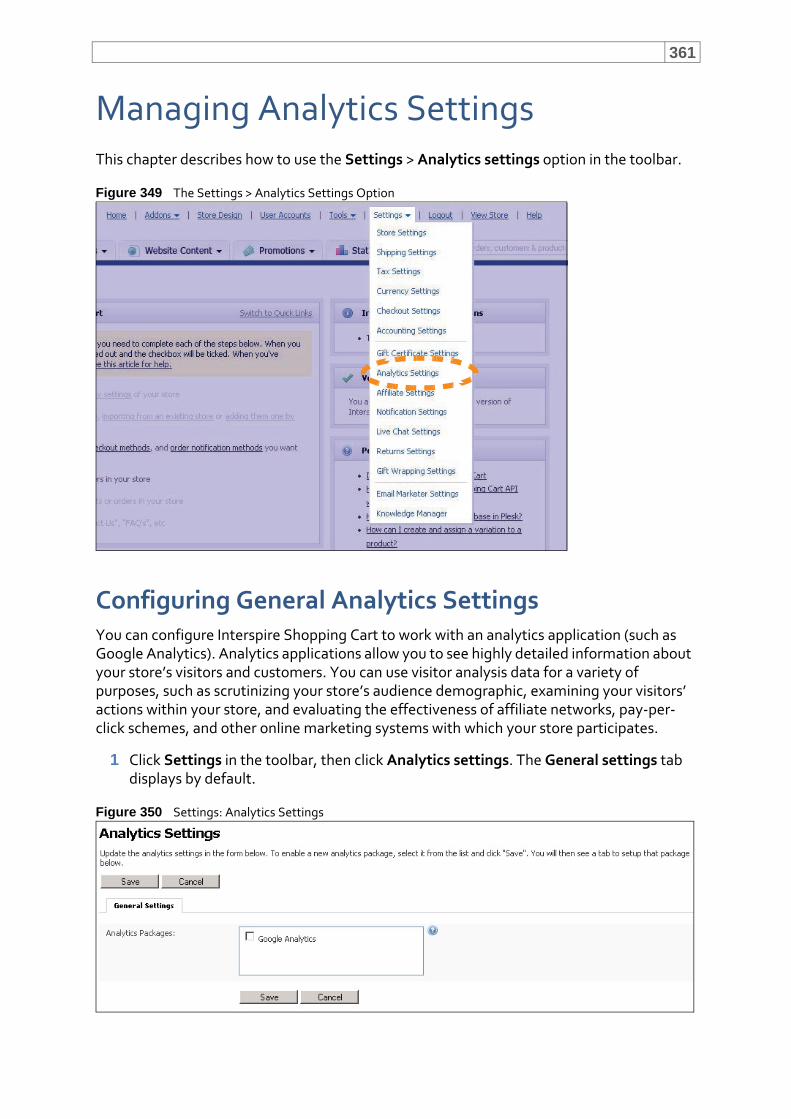
361
Managing Analytics SettingsThis chapter describes how to use the Settings > Analytics settings option in the toolbar.
Figure 349 The Settings > Analytics Settings Option
Configuring General Analytics SettingsYou can configure Interspire Shopping Cart to work with an analytics application (such as Google Analytics). Analytics applications allow you to see highly detailed information about your store’s visitors and customers. You can use visitor analysis data for a variety of purposes, such as scrutinizing your store’s audience demographic, examining your visitors’ actions within your store, and evaluating the effectiveness of affiliate networks, pay‐per‐click schemes, and other online marketing systems with which your store participates.
1 Click Settings in the toolbar, then click Analytics settings. The General settings tab displays by default.
Figure 350 Settings: Analytics Settings
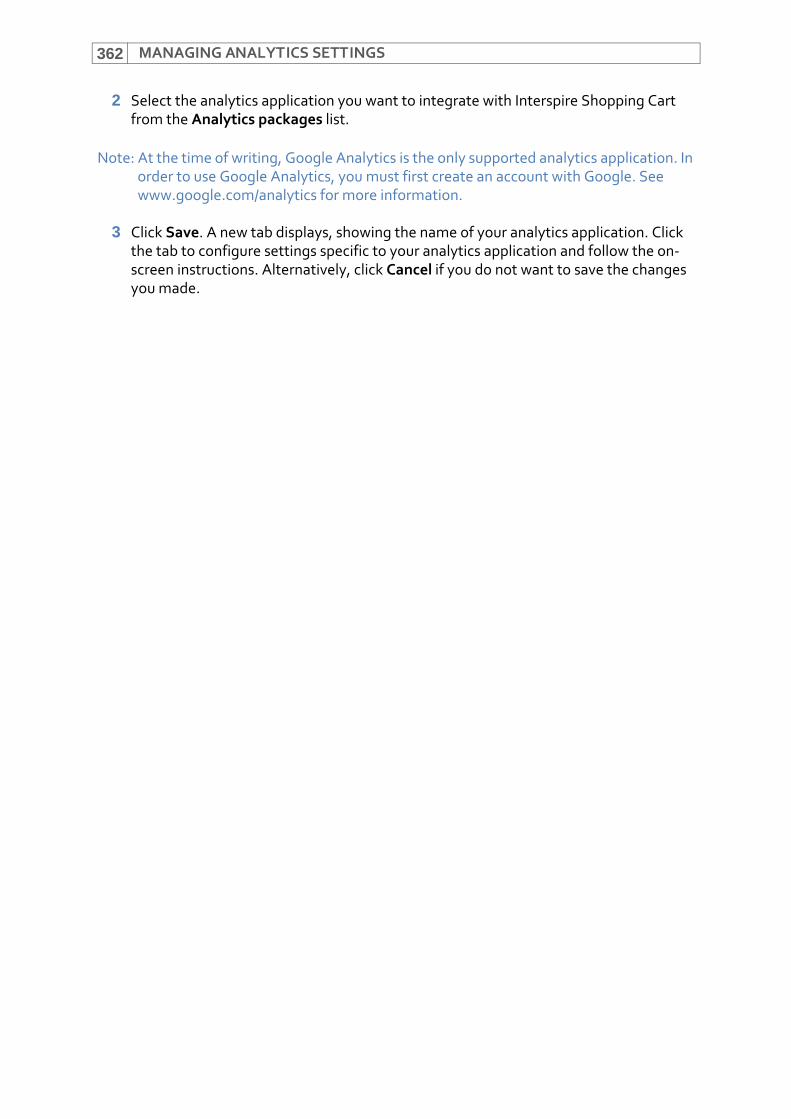
MANAGING ANALYTICS SETTINGS362
2 Select the analytics application you want to integrate with Interspire Shopping Cart from the Analytics packages list.
Note: At the time of writing, Google Analytics is the only supported analytics application. In order to use Google Analytics, you must first create an account with Google. See www.google.com/analytics for more information.
3 Click Save. A new tab displays, showing the name of your analytics application. Click the tab to configure settings specific to your analytics application and follow the on‐screen instructions. Alternatively, click Cancel if you do not want to save the changes you made.
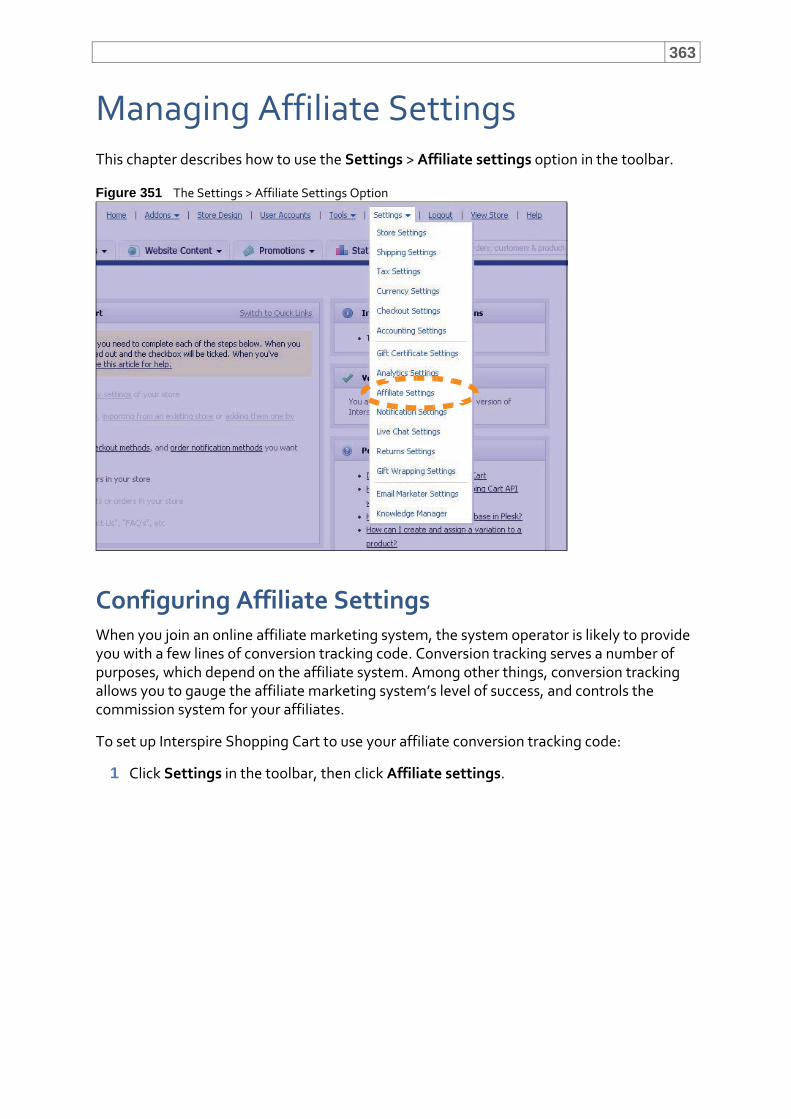
363
Managing Affiliate SettingsThis chapter describes how to use the Settings > Affiliate settings option in the toolbar.
Figure 351 The Settings > Affiliate Settings Option
Configuring Affiliate SettingsWhen you join an online affiliate marketing system, the system operator is likely to provide you with a few lines of conversion tracking code. Conversion tracking serves a number of purposes, which depend on the affiliate system. Among other things, conversion tracking allows you to gauge the affiliate marketing system’s level of success, and controls the commission system for your affiliates.
To set up Interspire Shopping Cart to use your affiliate conversion tracking code:
1 Click Settings in the toolbar, then click Affiliate settings.
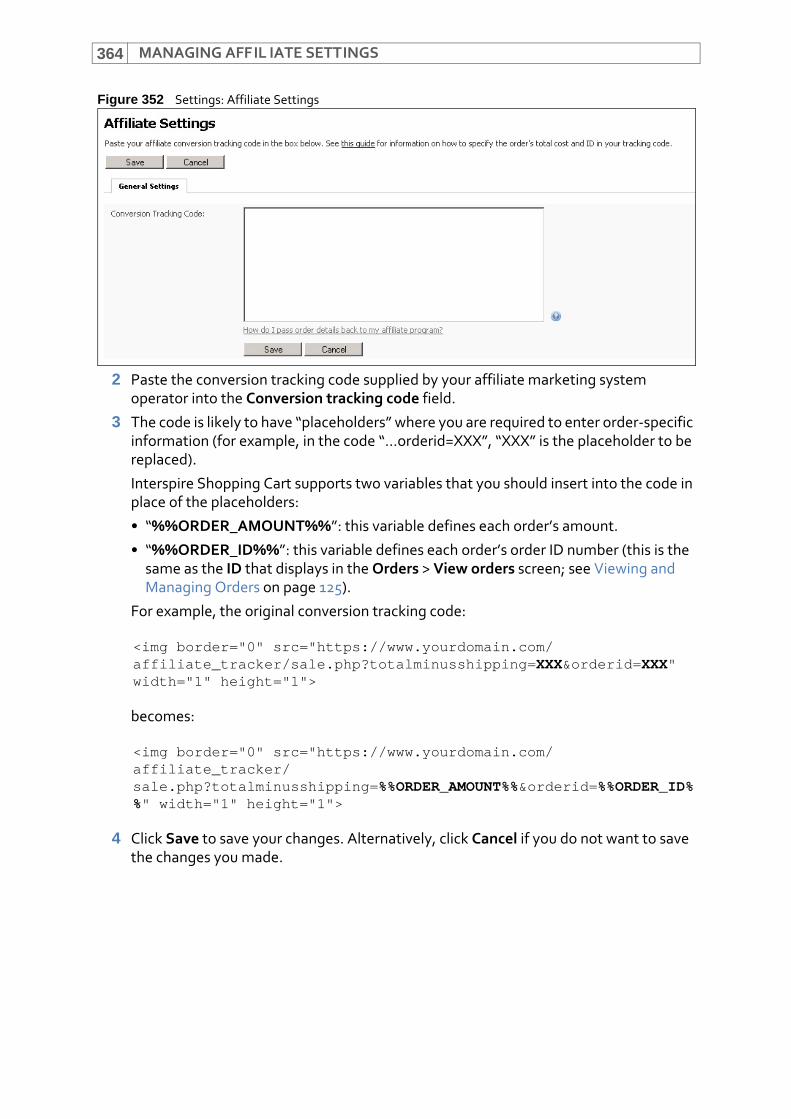
MANAGING AFFIL IATE SETTINGS364
Figure 352 Settings: Affiliate Settings
2 Paste the conversion tracking code supplied by your affiliate marketing system operator into the Conversion tracking code field.
3 The code is likely to have “placeholders” where you are required to enter order‐specific information (for example, in the code “...orderid=XXX”, “XXX” is the placeholder to be replaced).
Interspire Shopping Cart supports two variables that you should insert into the code in place of the placeholders:
• “%%ORDER_AMOUNT%%”: this variable defines each order’s amount.
• “%%ORDER_ID%%”: this variable defines each order’s order ID number (this is the same as the ID that displays in the Orders > View orders screen; see Viewing and Managing Orders on page 125).
For example, the original conversion tracking code:
<img border="0" src="https://www.yourdomain.com/affiliate_tracker/sale.php?totalminusshipping=XXX&orderid=XXX" width="1" height="1">
becomes:
<img border="0" src="https://www.yourdomain.com/affiliate_tracker/sale.php?totalminusshipping=%%ORDER_AMOUNT%%&orderid=%%ORDER_ID%%" width="1" height="1">
4 Click Save to save your changes. Alternatively, click Cancel if you do not want to save the changes you made.
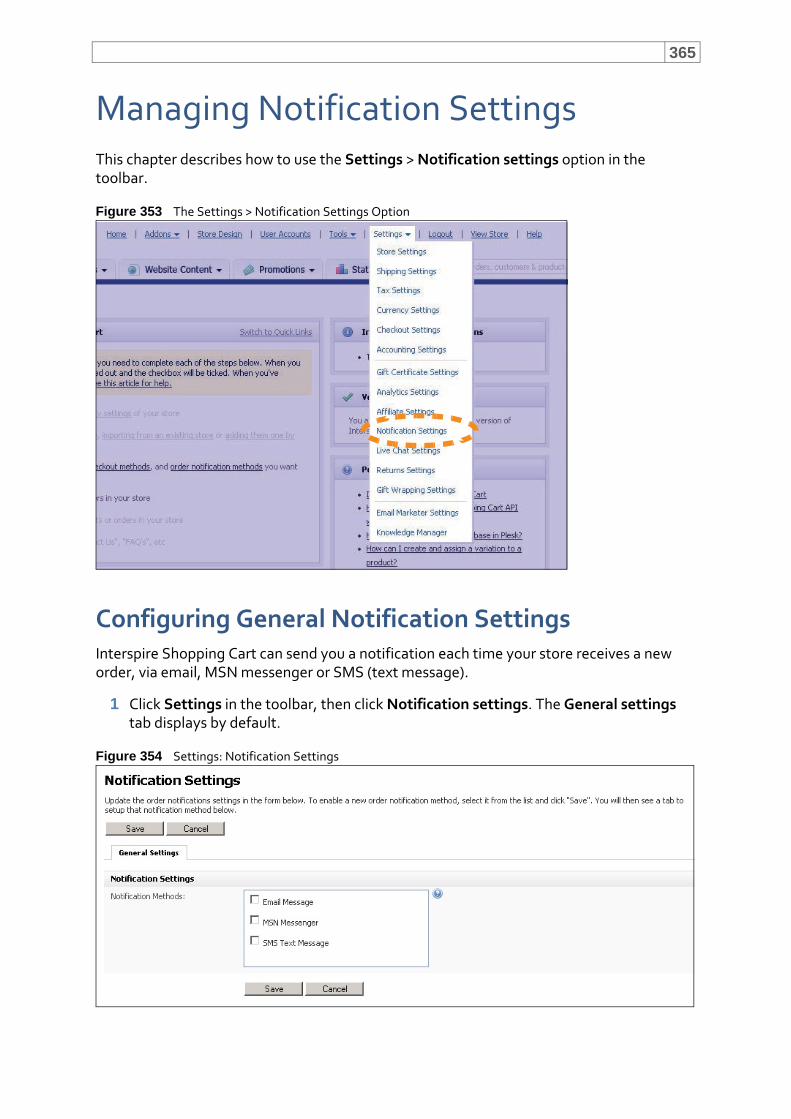
365
Managing Notification SettingsThis chapter describes how to use the Settings > Notification settings option in the toolbar.
Figure 353 The Settings > Notification Settings Option
Configuring General Notification SettingsInterspire Shopping Cart can send you a notification each time your store receives a new order, via email, MSN messenger or SMS (text message).
1 Click Settings in the toolbar, then click Notification settings. The General settings tab displays by default.
Figure 354 Settings: Notification Settings
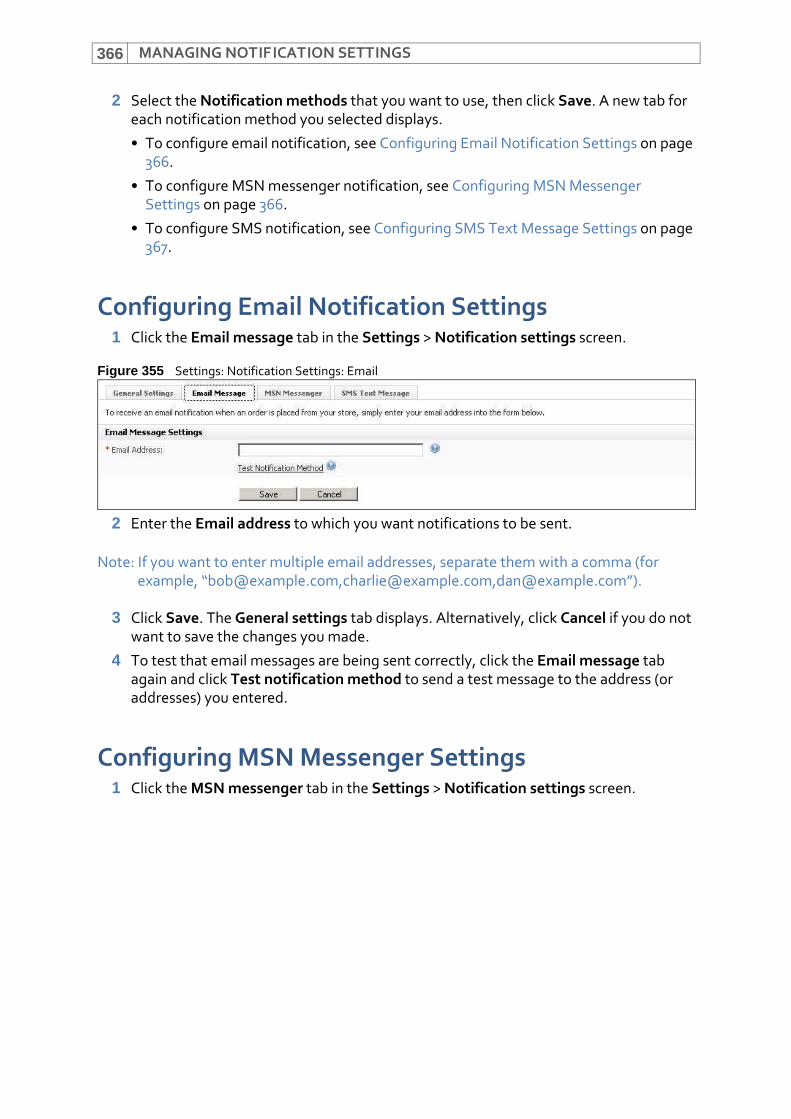
MANAGING NOTIFICATION SETTINGS366
2 Select the Notification methods that you want to use, then click Save. A new tab for each notification method you selected displays.
• To configure email notification, see Configuring Email Notification Settings on page 366.
• To configure MSN messenger notification, see Configuring MSN Messenger Settings on page 366.
• To configure SMS notification, see Configuring SMS Text Message Settings on page 367.
Configuring Email Notification Settings1 Click the Email message tab in the Settings > Notification settings screen.
Figure 355 Settings: Notification Settings: Email
2 Enter the Email address to which you want notifications to be sent.
Note: If you want to enter multiple email addresses, separate them with a comma (for example, “[email protected],[email protected],[email protected]”).
3 Click Save. The General settings tab displays. Alternatively, click Cancel if you do not want to save the changes you made.
4 To test that email messages are being sent correctly, click the Email message tab again and click Test notification method to send a test message to the address (or addresses) you entered.
Configuring MSN Messenger Settings1 Click the MSN messenger tab in the Settings > Notification settings screen.
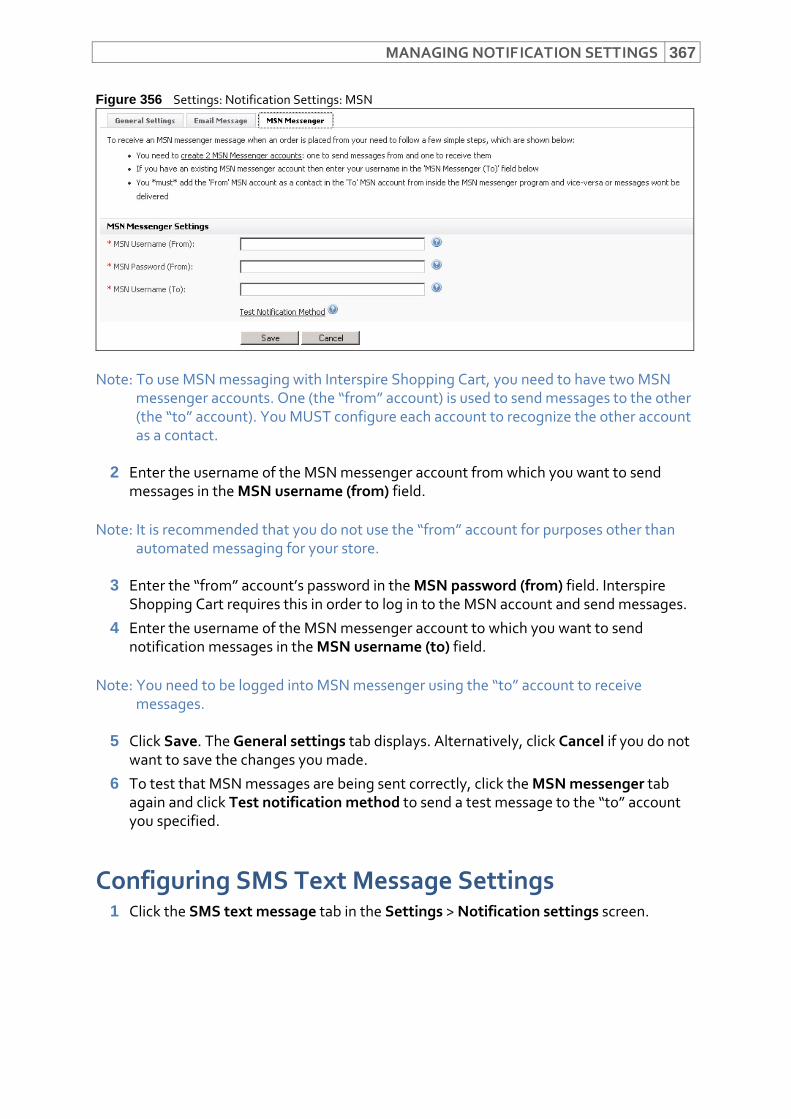
MANAGING NOTIFICATION SETTINGS 367
Figure 356 Settings: Notification Settings: MSN
Note: To use MSN messaging with Interspire Shopping Cart, you need to have two MSN messenger accounts. One (the “from” account) is used to send messages to the other (the “to” account). You MUST configure each account to recognize the other account as a contact.
2 Enter the username of the MSN messenger account from which you want to send messages in the MSN username (from) field.
Note: It is recommended that you do not use the “from” account for purposes other than automated messaging for your store.
3 Enter the “from” account’s password in the MSN password (from) field. Interspire Shopping Cart requires this in order to log in to the MSN account and send messages.
4 Enter the username of the MSN messenger account to which you want to send notification messages in the MSN username (to) field.
Note: You need to be logged into MSN messenger using the “to” account to receive messages.
5 Click Save. The General settings tab displays. Alternatively, click Cancel if you do not want to save the changes you made.
6 To test that MSN messages are being sent correctly, click the MSN messenger tab again and click Test notification method to send a test message to the “to” account you specified.
Configuring SMS Text Message Settings1 Click the SMS text message tab in the Settings > Notification settings screen.
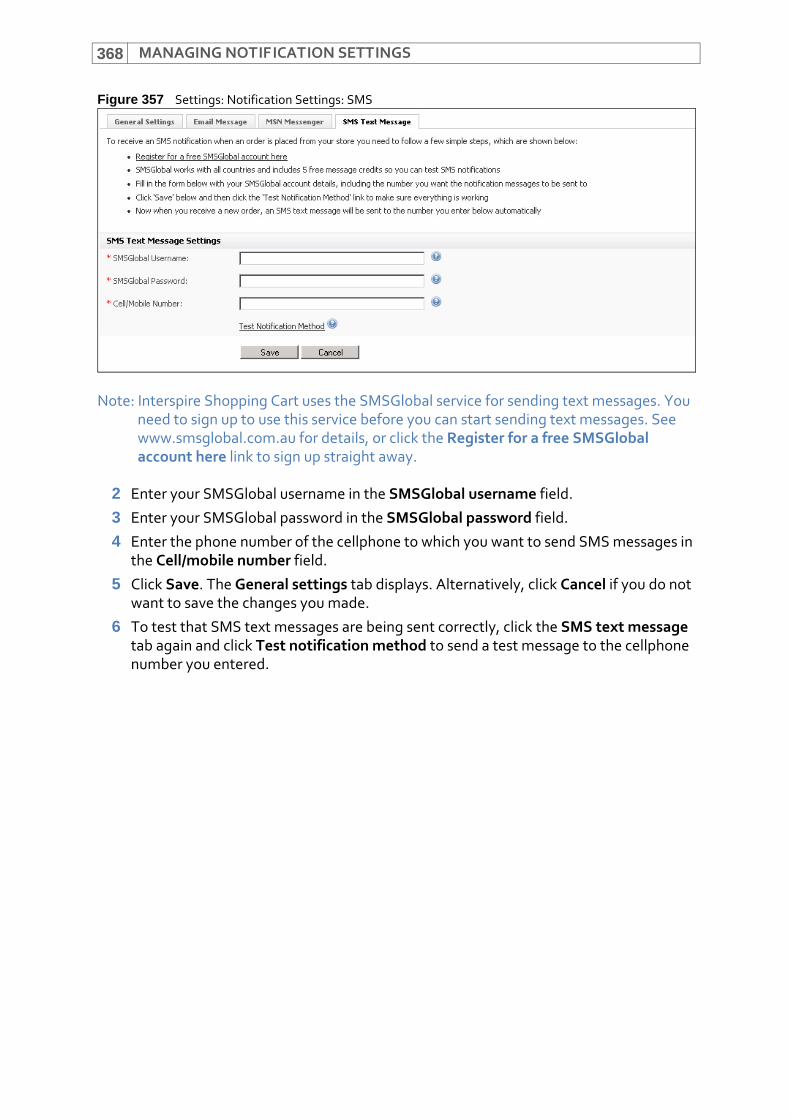
MANAGING NOTIFICATION SETTINGS368
Figure 357 Settings: Notification Settings: SMS
Note: Interspire Shopping Cart uses the SMSGlobal service for sending text messages. You need to sign up to use this service before you can start sending text messages. See www.smsglobal.com.au for details, or click the Register for a free SMSGlobal account here link to sign up straight away.
2 Enter your SMSGlobal username in the SMSGlobal username field.
3 Enter your SMSGlobal password in the SMSGlobal password field.
4 Enter the phone number of the cellphone to which you want to send SMS messages in the Cell/mobile number field.
5 Click Save. The General settings tab displays. Alternatively, click Cancel if you do not want to save the changes you made.
6 To test that SMS text messages are being sent correctly, click the SMS text message tab again and click Test notification method to send a test message to the cellphone number you entered.
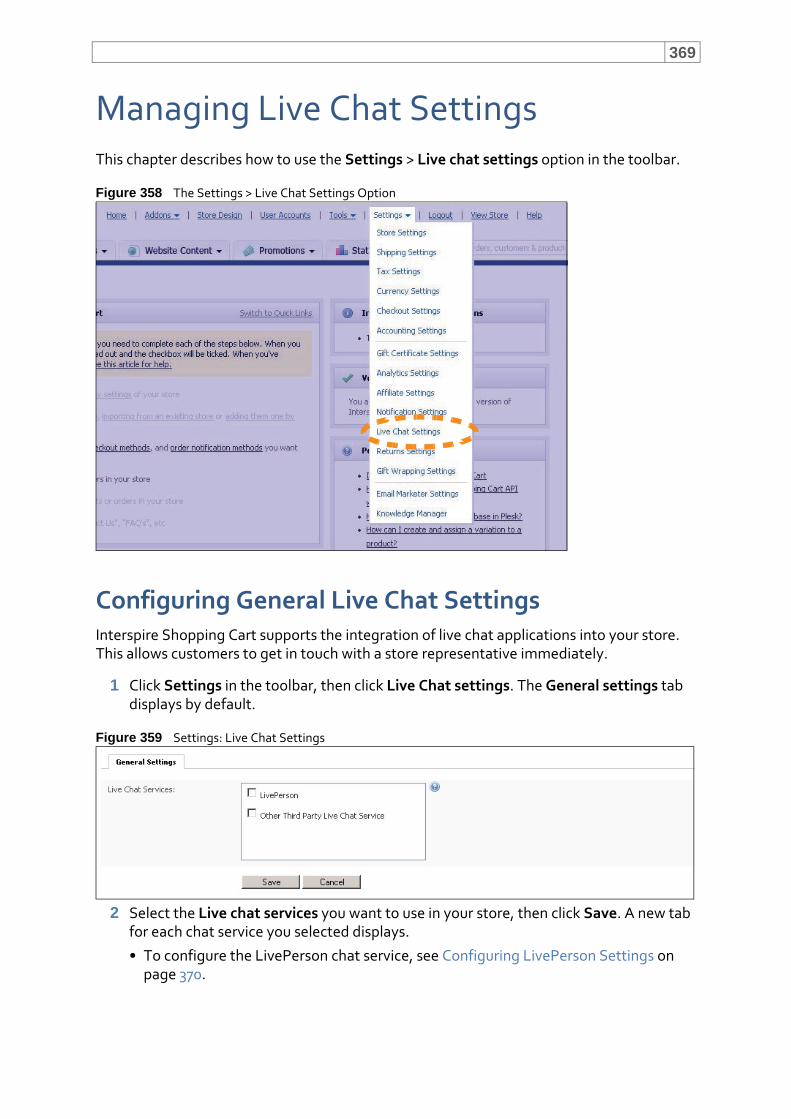
369
Managing Live Chat SettingsThis chapter describes how to use the Settings > Live chat settings option in the toolbar.
Figure 358 The Settings > Live Chat Settings Option
Configuring General Live Chat SettingsInterspire Shopping Cart supports the integration of live chat applications into your store. This allows customers to get in touch with a store representative immediately.
1 Click Settings in the toolbar, then click Live Chat settings. The General settings tab displays by default.
Figure 359 Settings: Live Chat Settings
2 Select the Live chat services you want to use in your store, then click Save. A new tab for each chat service you selected displays.
• To configure the LivePerson chat service, see Configuring LivePerson Settings on page 370.
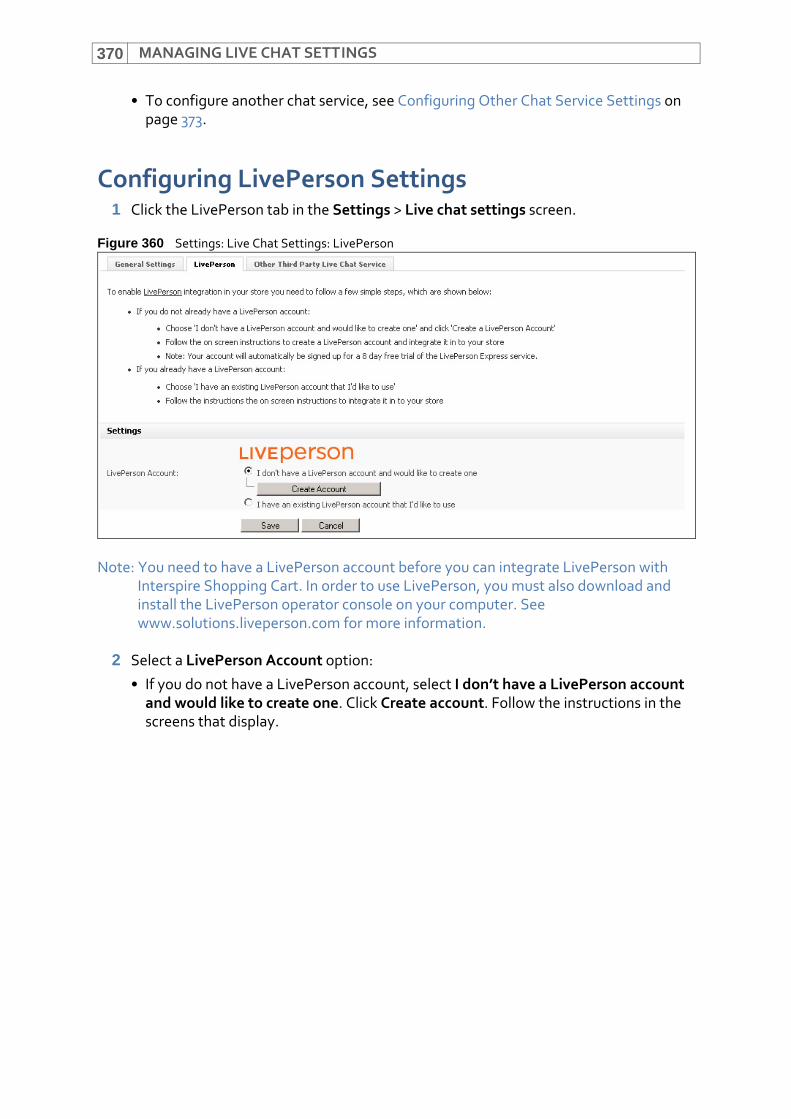
MANAGING LIVE CHAT SETTINGS370
• To configure another chat service, see Configuring Other Chat Service Settings on page 373.
Configuring LivePerson Settings1 Click the LivePerson tab in the Settings > Live chat settings screen.
Figure 360 Settings: Live Chat Settings: LivePerson
Note: You need to have a LivePerson account before you can integrate LivePerson with Interspire Shopping Cart. In order to use LivePerson, you must also download and install the LivePerson operator console on your computer. See www.solutions.liveperson.com for more information.
2 Select a LivePerson Account option:
• If you do not have a LivePerson account, select I don’t have a LivePerson account and would like to create one. Click Create account. Follow the instructions in the screens that display.
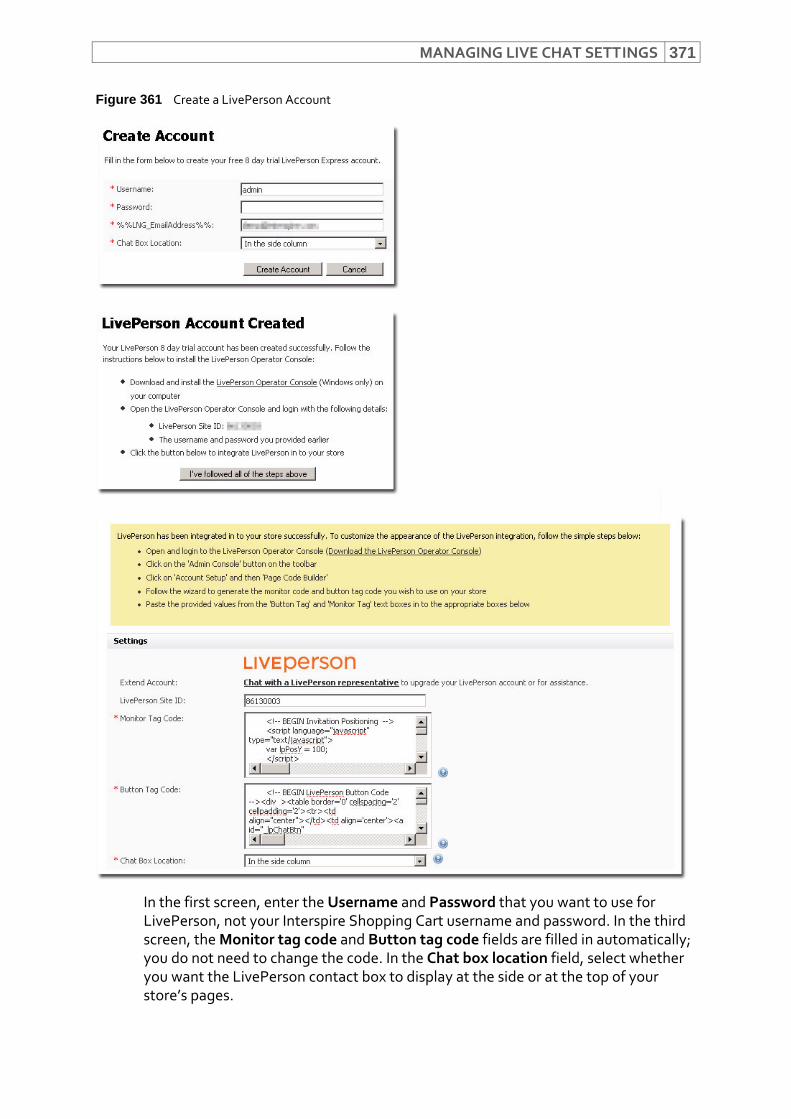
MANAGING LIVE CHAT SETTINGS 371
Figure 361 Create a LivePerson Account
In the first screen, enter the Username and Password that you want to use for LivePerson, not your Interspire Shopping Cart username and password. In the third screen, the Monitor tag code and Button tag code fields are filled in automatically; you do not need to change the code. In the Chat box location field, select whether you want the LivePerson contact box to display at the side or at the top of your store’s pages.

MANAGING LIVE CHAT SETTINGS372
• If you already have a LivePerson account, select I have an existing LivePerson account that I’d like to use. Follow the instructions in the text that displays.
Figure 362 LivePerson Wizard
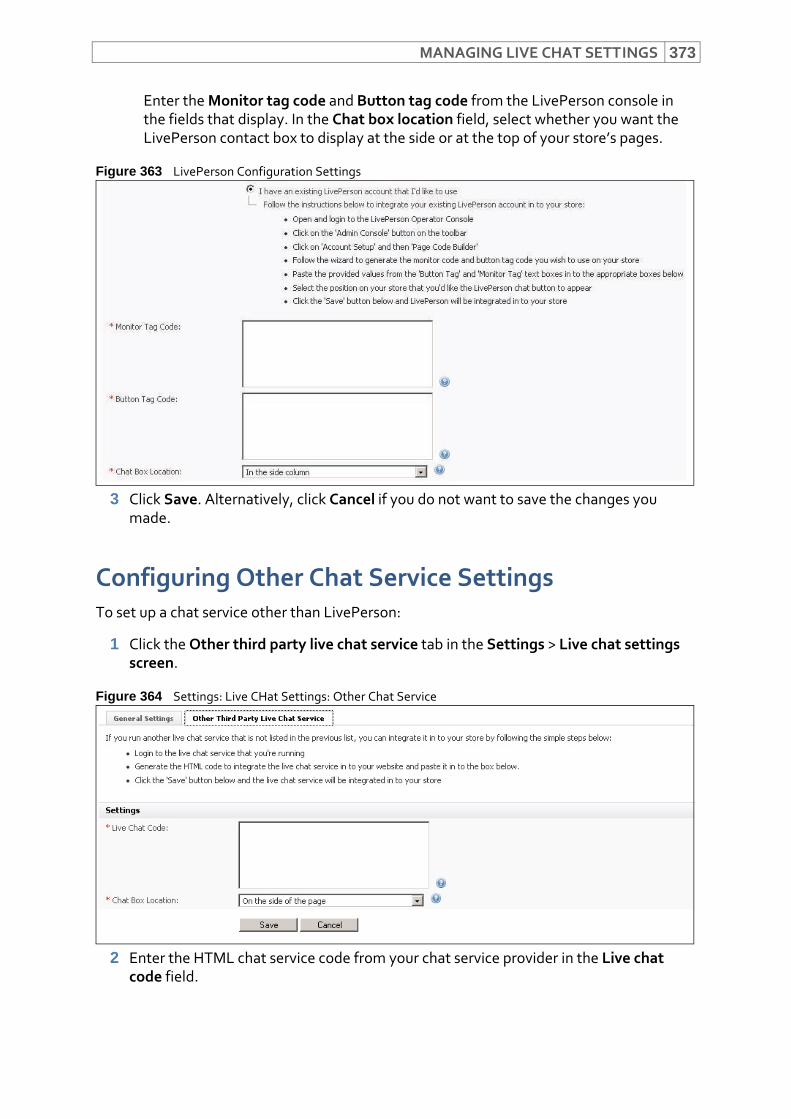
MANAGING LIVE CHAT SETTINGS 373
Enter the Monitor tag code and Button tag code from the LivePerson console in the fields that display. In the Chat box location field, select whether you want the LivePerson contact box to display at the side or at the top of your store’s pages.
Figure 363 LivePerson Configuration Settings
3 Click Save. Alternatively, click Cancel if you do not want to save the changes you made.
Configuring Other Chat Service SettingsTo set up a chat service other than LivePerson:
1 Click the Other third party live chat service tab in the Settings > Live chat settings screen.
Figure 364 Settings: Live CHat Settings: Other Chat Service
2 Enter the HTML chat service code from your chat service provider in the Live chat code field.
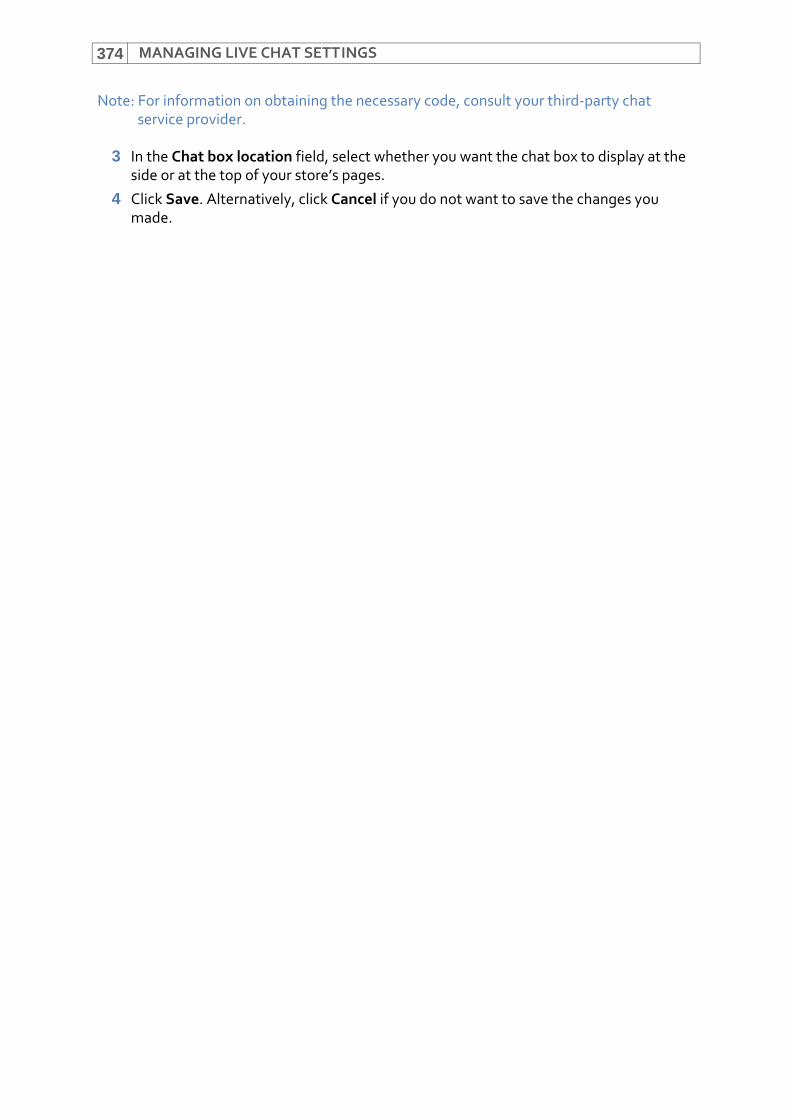
MANAGING LIVE CHAT SETTINGS374
Note: For information on obtaining the necessary code, consult your third‐party chat service provider.
3 In the Chat box location field, select whether you want the chat box to display at the side or at the top of your store’s pages.
4 Click Save. Alternatively, click Cancel if you do not want to save the changes you made.
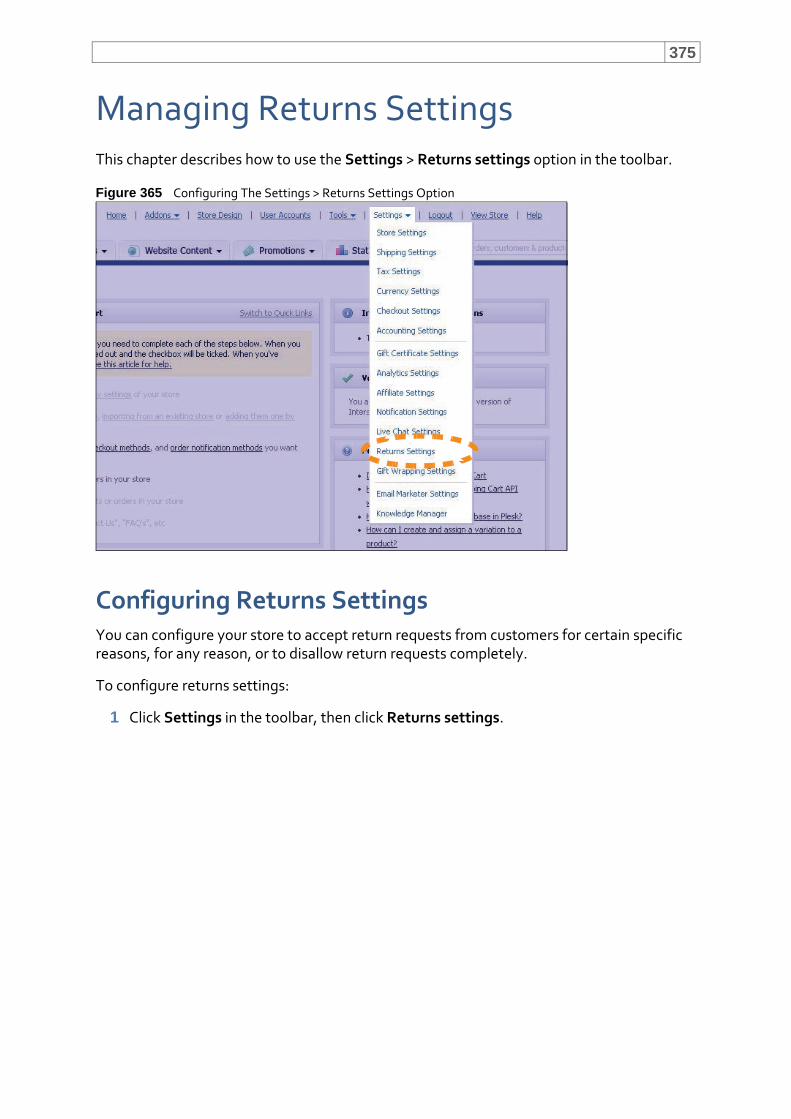
375
Managing Returns SettingsThis chapter describes how to use the Settings > Returns settings option in the toolbar.
Figure 365 Configuring The Settings > Returns Settings Option
Configuring Returns SettingsYou can configure your store to accept return requests from customers for certain specific reasons, for any reason, or to disallow return requests completely.
To configure returns settings:
1 Click Settings in the toolbar, then click Returns settings.

MANAGING RETURNS SETTINGS376
Figure 366 Settings: Return Settings
2 If you want to allow return requests, select Yes, enable returns requests. If you want to disallow return requests completely, deselect this option.
3 Once a customer has successfully submitted a return request, the customer should be given instructions describing how to return the order (for example, mailing instructions). Enter these instructions in the Return instructions field.
4 Enter a list of the reasons for which you are willing to accept return requests in the Return reasons field. Enter each reason on a new line. The customer must select a reason from a this list when submitting a return request.
5 Enter a list of the possible actions you can take when receiving a returned item (for example, repairing the item, replacing the item, or issuing store credit for the item’s value). The customer can select the preferred action when submitting a return request.
6 If you want to let other Interspire Shopping Cart administrators issue store credits when receiving a returned item, select Yes, allow staff to issue store credits for returned items. If you do not want to allow Interspire Shopping Cart administrators to do this, deselect this option.
7 Configure how you want Interspire Shopping Cart to send out automatic emails at different stages of the return process in the Return notifications section:
• If you want to receive return request alert emails, select Send me an email when I receive a new return request.
MANAGING RETURNS SETTINGS 377
• If you want to send a message to customers who submit return requests, notifying them that the request has been received, select Send a confirmation message to the customer.
• If you want to send a message to customers when a staff member changes the order’s status, select Send the customer an email when a return status is changed.
8 Click Save. Alternatively, click Cancel if you do not want to save the changes you made.

MANAGING RETURNS SETTINGS378
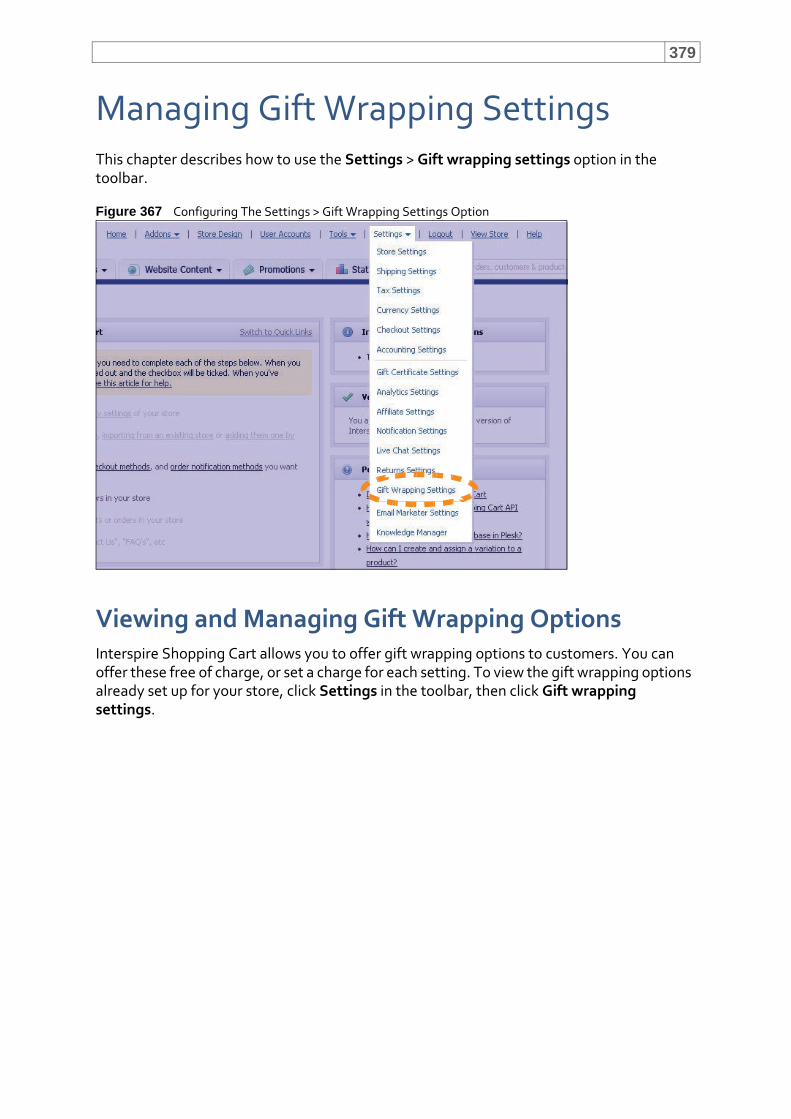
379
Managing Gift Wrapping SettingsThis chapter describes how to use the Settings > Gift wrapping settings option in the toolbar.
Figure 367 Configuring The Settings > Gift Wrapping Settings Option
Viewing and Managing Gift Wrapping OptionsInterspire Shopping Cart allows you to offer gift wrapping options to customers. You can offer these free of charge, or set a charge for each setting. To view the gift wrapping options already set up for your store, click Settings in the toolbar, then click Gift wrapping settings.
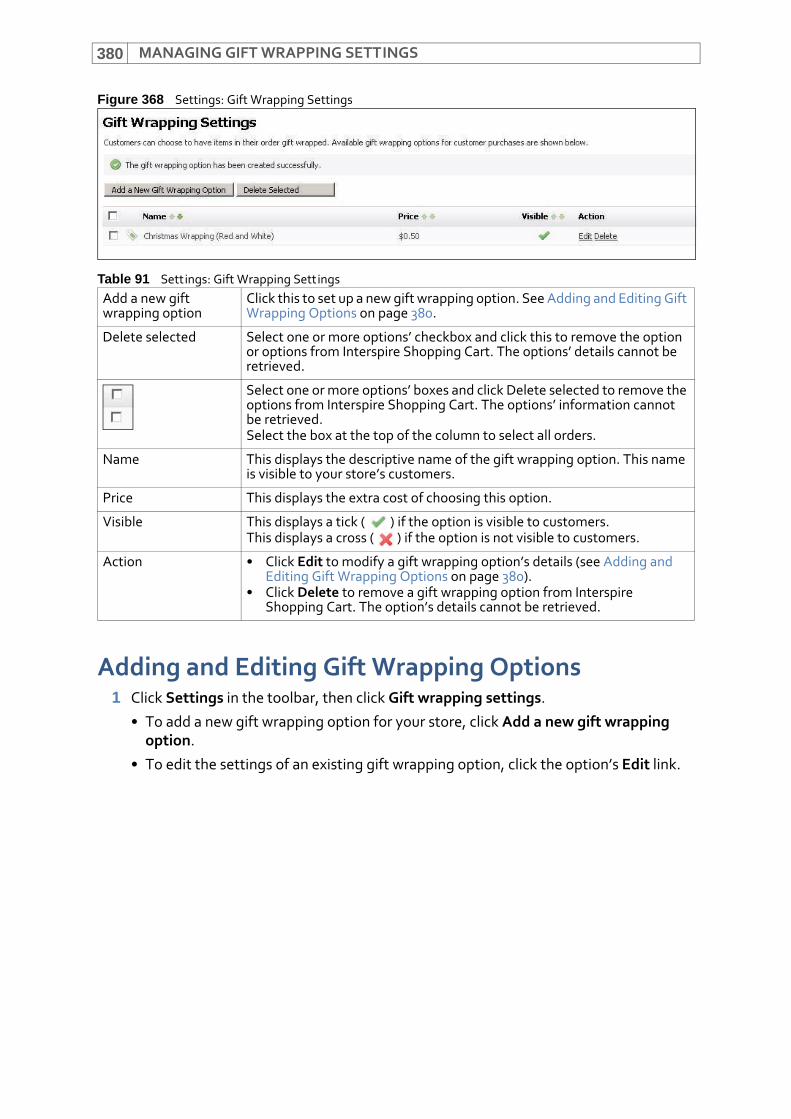
MANAGING GIFT WRAPPING SETTINGS380
Figure 368 Settings: Gift Wrapping Settings
Adding and Editing Gift Wrapping Options1 Click Settings in the toolbar, then click Gift wrapping settings.
• To add a new gift wrapping option for your store, click Add a new gift wrapping option.
• To edit the settings of an existing gift wrapping option, click the option’s Edit link.
Table 91 Settings: Gift Wrapping SettingsAdd a new gift wrapping option
Click this to set up a new gift wrapping option. See Adding and Editing Gift Wrapping Options on page 380.
Delete selected Select one or more options’ checkbox and click this to remove the option or options from Interspire Shopping Cart. The options’ details cannot be retrieved.
Select one or more options’ boxes and click Delete selected to remove the options from Interspire Shopping Cart. The options’ information cannot be retrieved.Select the box at the top of the column to select all orders.
Name This displays the descriptive name of the gift wrapping option. This name is visible to your store’s customers.
Price This displays the extra cost of choosing this option.
Visible This displays a tick ( ) if the option is visible to customers.This displays a cross ( ) if the option is not visible to customers.
Action • Click Edit to modify a gift wrapping option’s details (see Adding and Editing Gift Wrapping Options on page 380).
• Click Delete to remove a gift wrapping option from Interspire Shopping Cart. The option’s details cannot be retrieved.
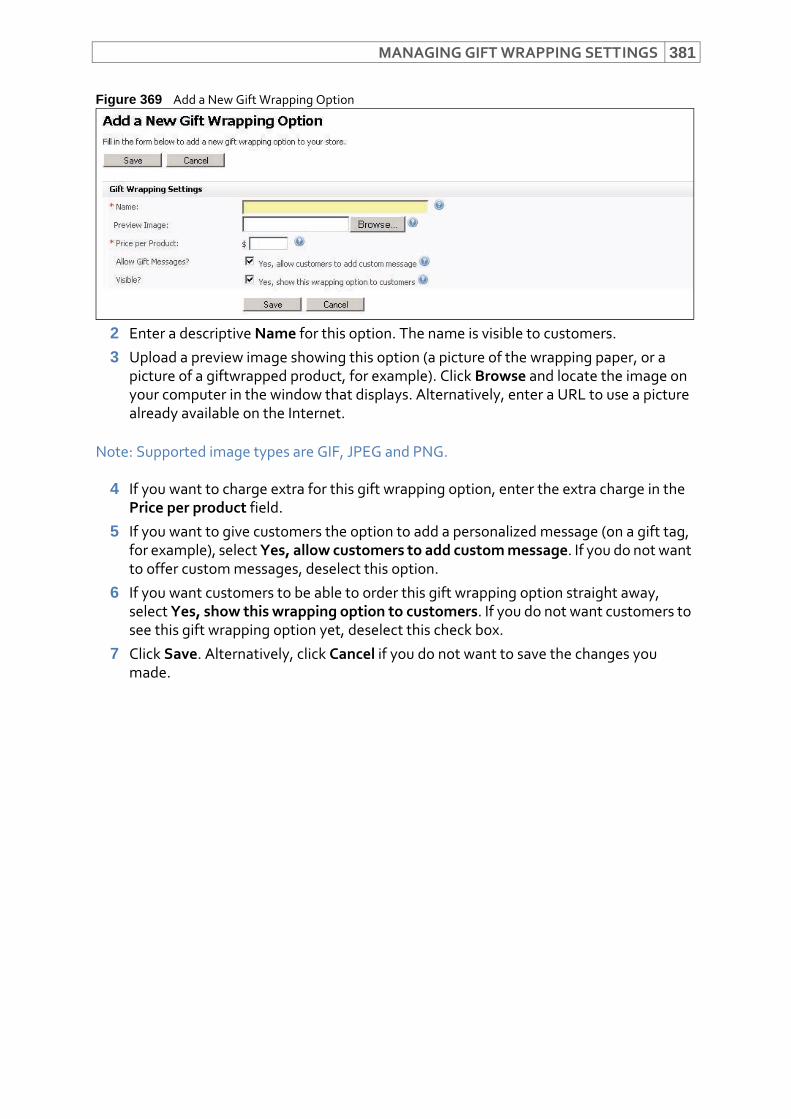
MANAGING GIFT WRAPPING SETTINGS 381
Figure 369 Add a New Gift Wrapping Option
2 Enter a descriptive Name for this option. The name is visible to customers.
3 Upload a preview image showing this option (a picture of the wrapping paper, or a picture of a giftwrapped product, for example). Click Browse and locate the image on your computer in the window that displays. Alternatively, enter a URL to use a picture already available on the Internet.
Note: Supported image types are GIF, JPEG and PNG.
4 If you want to charge extra for this gift wrapping option, enter the extra charge in the Price per product field.
5 If you want to give customers the option to add a personalized message (on a gift tag, for example), select Yes, allow customers to add custom message. If you do not want to offer custom messages, deselect this option.
6 If you want customers to be able to order this gift wrapping option straight away, select Yes, show this wrapping option to customers. If you do not want customers to see this gift wrapping option yet, deselect this check box.
7 Click Save. Alternatively, click Cancel if you do not want to save the changes you made.

MANAGING GIFT WRAPPING SETTINGS382
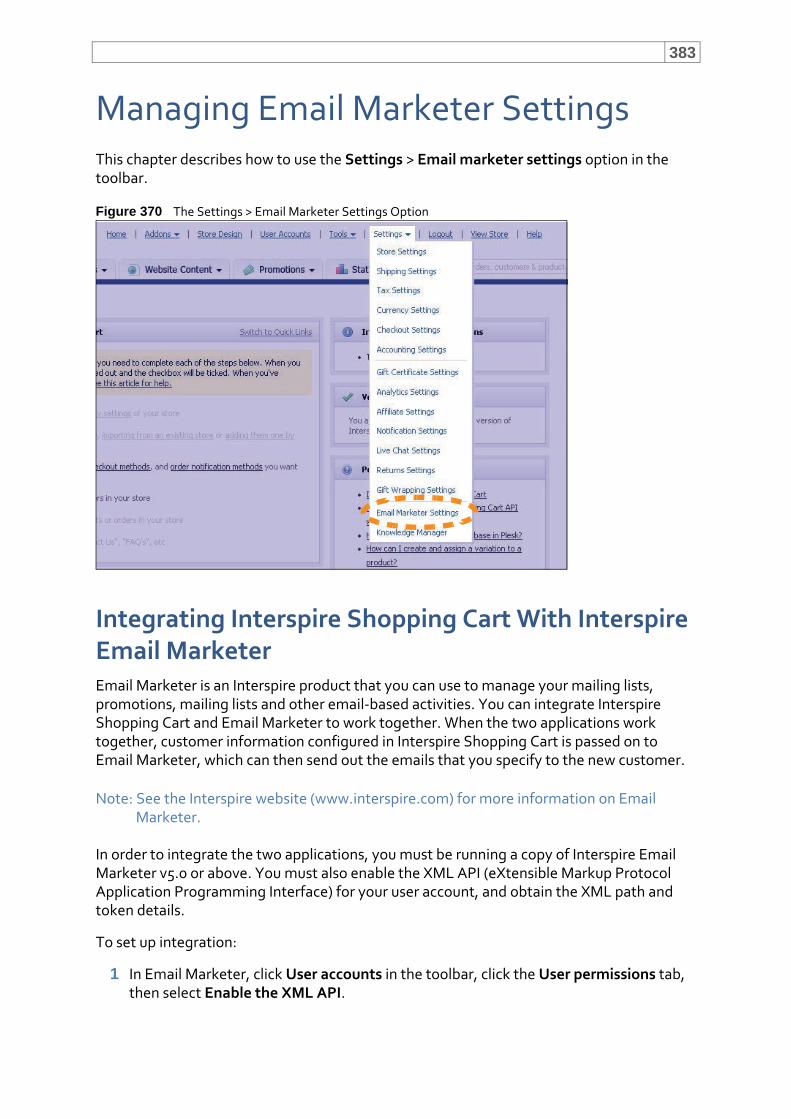
383
Managing Email Marketer SettingsThis chapter describes how to use the Settings > Email marketer settings option in the toolbar.
Figure 370 The Settings > Email Marketer Settings Option
Integrating Interspire Shopping Cart With Interspire Email MarketerEmail Marketer is an Interspire product that you can use to manage your mailing lists, promotions, mailing lists and other email‐based activities. You can integrate Interspire Shopping Cart and Email Marketer to work together. When the two applications work together, customer information configured in Interspire Shopping Cart is passed on to Email Marketer, which can then send out the emails that you specify to the new customer.
Note: See the Interspire website (www.interspire.com) for more information on Email Marketer.
In order to integrate the two applications, you must be running a copy of Interspire Email Marketer v5.0 or above. You must also enable the XML API (eXtensible Markup Protocol Application Programming Interface) for your user account, and obtain the XML path and token details.
To set up integration:
1 In Email Marketer, click User accounts in the toolbar, click the User permissions tab, then select Enable the XML API.
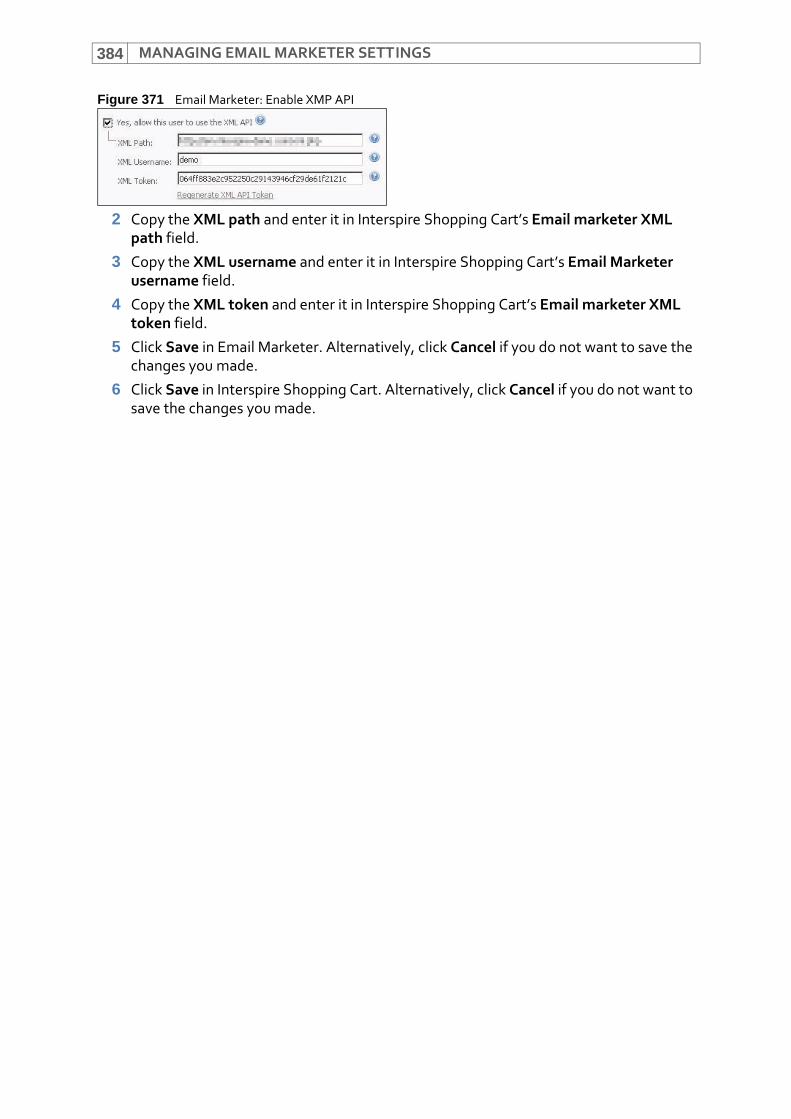
MANAGING EMAIL MARKETER SETTINGS384
Figure 371 Email Marketer: Enable XMP API
2 Copy the XML path and enter it in Interspire Shopping Cart’s Email marketer XML path field.
3 Copy the XML username and enter it in Interspire Shopping Cart’s Email Marketer username field.
4 Copy the XML token and enter it in Interspire Shopping Cart’s Email marketer XML token field.
5 Click Save in Email Marketer. Alternatively, click Cancel if you do not want to save the changes you made.
6 Click Save in Interspire Shopping Cart. Alternatively, click Cancel if you do not want to save the changes you made.

385
Managing Knowledge Manager Integration SettingsThis chapter describes how to use the Settings > Knowledge manager option in the toolbar.
Figure 372 The Settings > Knowledge Manager Option
Integrating Interspire Shopping Cart With Interspire Knowledge ManagerEmail Marketer is an Interspire product that you can use to set up an online knowledge base. You can set up Knowledge Manager to work with Interspire Shopping Cart. You can do this in two ways:
1 Configure Knowledge Manager to display similarly to Interspire Shopping Cart, and hyperlink Interspire Shopping Cart to Knowledge Manager via a “Help” or “FAQ” link. See Linking Interspire Shopping Cart to Knowledge Manager on page 386.
2 Integrate Knowledge Manager’s Active Response System with Interspire Shopping Cart. This is a system that allows customers to receive immediate responses to their queries, taken from the knowledge base. See Integrating Knowledge Manager’s Active Response System on page 386.
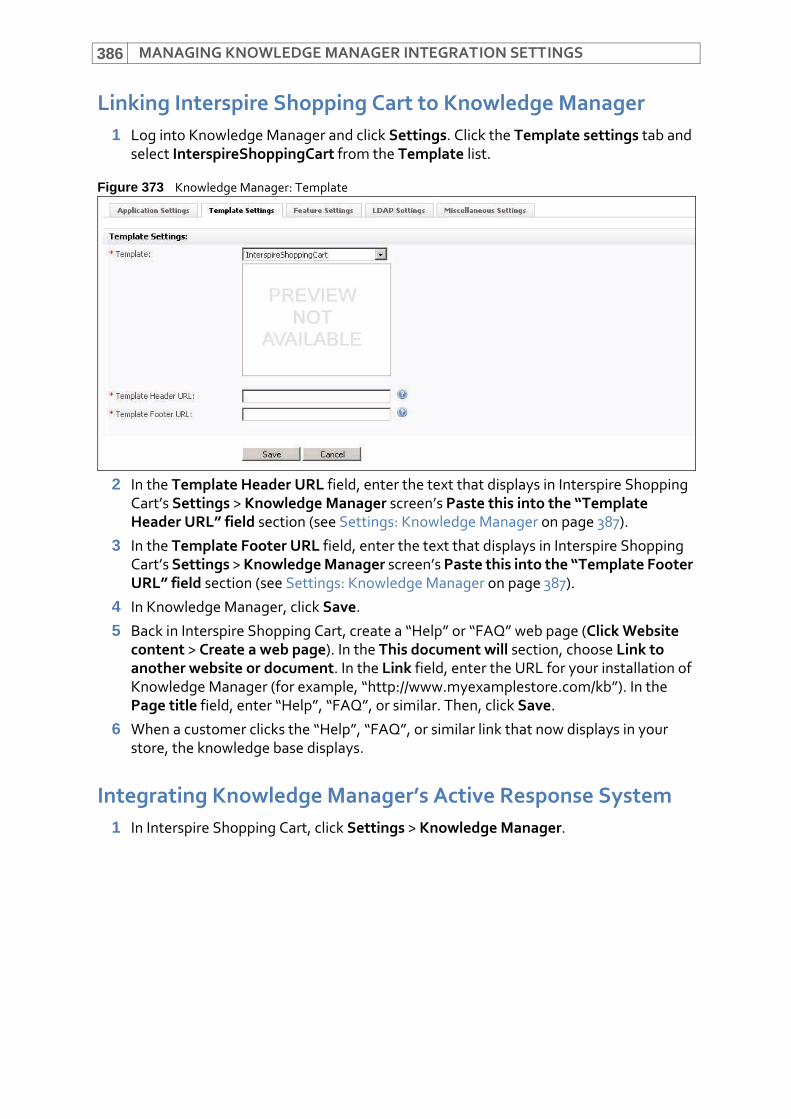
MANAGING KNOWLEDGE MANAGER INTEGRATION SETTINGS386
Linking Interspire Shopping Cart to Knowledge Manager1 Log into Knowledge Manager and click Settings. Click the Template settings tab and
select InterspireShoppingCart from the Template list.
Figure 373 Knowledge Manager: Template
2 In the Template Header URL field, enter the text that displays in Interspire Shopping Cart’s Settings > Knowledge Manager screen’s Paste this into the “Template Header URL” field section (see Settings: Knowledge Manager on page 387).
3 In the Template Footer URL field, enter the text that displays in Interspire Shopping Cart’s Settings > Knowledge Manager screen’s Paste this into the “Template Footer URL” field section (see Settings: Knowledge Manager on page 387).
4 In Knowledge Manager, click Save.
5 Back in Interspire Shopping Cart, create a “Help” or “FAQ” web page (Click Website content > Create a web page). In the This document will section, choose Link to another website or document. In the Link field, enter the URL for your installation of Knowledge Manager (for example, “http://www.myexamplestore.com/kb”). In the Page title field, enter “Help”, “FAQ”, or similar. Then, click Save.
6 When a customer clicks the “Help”, “FAQ”, or similar link that now displays in your store, the knowledge base displays.
Integrating Knowledge Manager’s Active Response System1 In Interspire Shopping Cart, click Settings > Knowledge Manager.
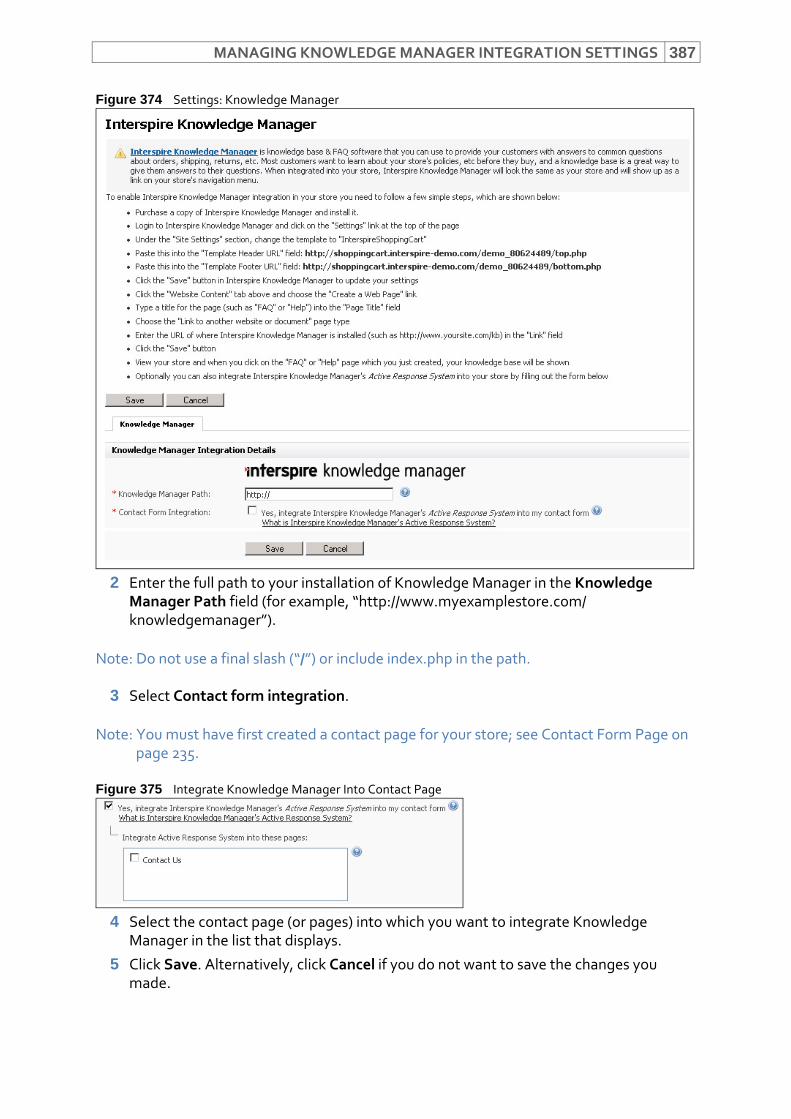
MANAGING KNOWLEDGE MANAGER INTEGRATION SETTINGS 387
Figure 374 Settings: Knowledge Manager
2 Enter the full path to your installation of Knowledge Manager in the Knowledge Manager Path field (for example, “http://www.myexamplestore.com/knowledgemanager”).
Note: Do not use a final slash (“/”) or include index.php in the path.
3 Select Contact form integration.
Note: You must have first created a contact page for your store; see Contact Form Page on page 235.
Figure 375 Integrate Knowledge Manager Into Contact Page
4 Select the contact page (or pages) into which you want to integrate Knowledge Manager in the list that displays.
5 Click Save. Alternatively, click Cancel if you do not want to save the changes you made.

MANAGING KNOWLEDGE MANAGER INTEGRATION SETTINGS388
389
VITROUBLESHOOTING AND INDEX
This section contains the following chapters:
Troubleshooting (391)
Index (395)

390

391
TroubleshootingThis chapter describes some common problems, and their likely solutions. Use this chapter to diagnose and solve problems you may have with Interspire Shopping Cart.
If you are not sure what effects a certain troubleshooting action will have, contact the relevant administrator or service provider, or get in touch with customer support. Make all configuration changes at your own risk!
Note: If you cannot perform a task that you think you should be able to, the most likely reason is that your user account does not have the required privileges. Before you take any other steps, use the User accounts screens (see Creating and Managing User Accounts on page 115), or check with your organization’s Interspire Shopping Cart administrator.
Problem: I Forgot My Password1 Go to the login screen (see Logging In to Interspire Shopping Cart on page 39).
2 Click the Forgot your password? link.
3 In the screen that displays, enter your Username.
4 Click Send email. An email is sent to the email address associated with your username in Interspire Shopping Cart. Follow the instructions in the email.
Problem: I Want to Limit the Countries I Sell to1 Click Settings in the toolbar, then click Shipping settings.
2 Select the country or countries to which you want to sell in the Available countries list.
3 Deselect all other countries in the list, and the All countries option.
4 Click Save.
Note: When customers from other countries attempt to place an order in your store, the message “Unfortunately we don't ship to your country. Please choose another shipping address and try again” displays.
Problem: I Want to Apply Free Shipping to A Single Product1 Click Products in the navigation bar, then click View products.
2 Locate the product for which you want to apply free shipping, then click its Edit link.
3 In the Shipping details section, select Yes, this product has free shipping.
4 Click Save.
Problem: I Want to Restore a Store BackupDepending upon the aspects of Interspire Shopping Cart you backed up, you may or may not need to follow all of the steps below. If your backup is missing any of the files/folders listed below then simply skip that step.
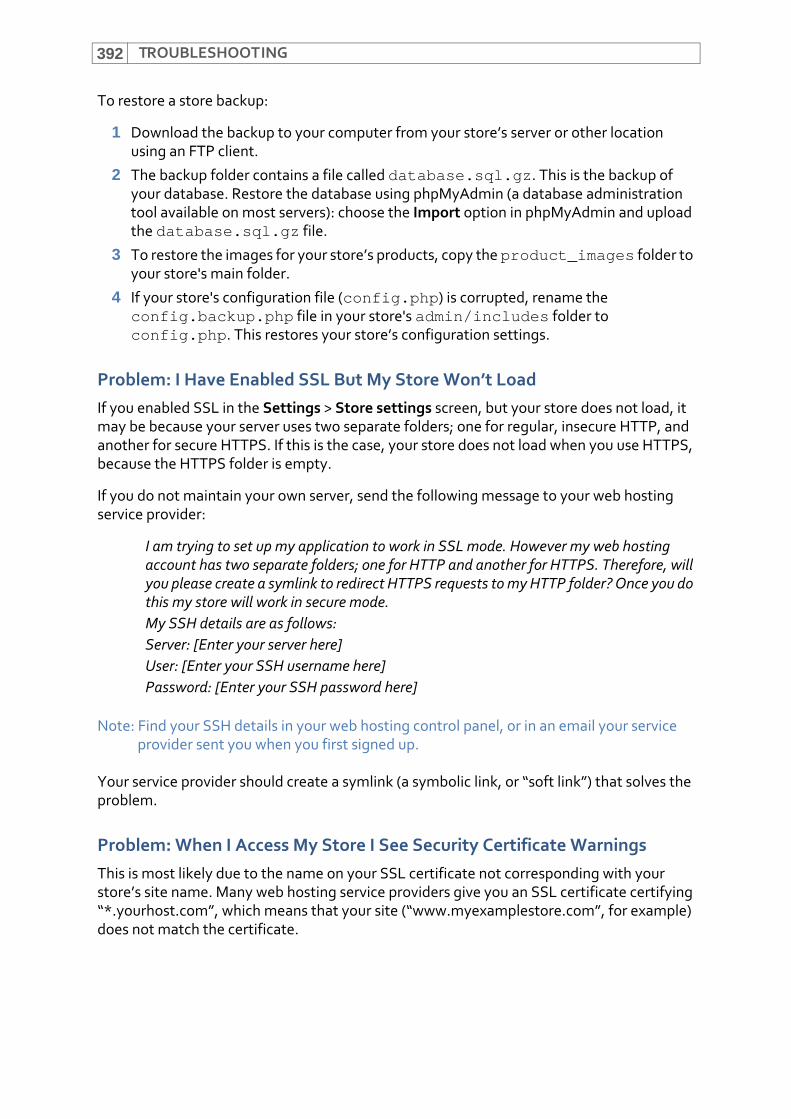
TROUBLESHOOTING392
To restore a store backup:
1 Download the backup to your computer from your store’s server or other location using an FTP client.
2 The backup folder contains a file called database.sql.gz. This is the backup of your database. Restore the database using phpMyAdmin (a database administration tool available on most servers): choose the Import option in phpMyAdmin and upload the database.sql.gz file.
3 To restore the images for your store’s products, copy the product_images folder to your store's main folder.
4 If your store's configuration file (config.php) is corrupted, rename the config.backup.php file in your store's admin/includes folder to config.php. This restores your store’s configuration settings.
Problem: I Have Enabled SSL But My Store Won’t LoadIf you enabled SSL in the Settings > Store settings screen, but your store does not load, it may be because your server uses two separate folders; one for regular, insecure HTTP, and another for secure HTTPS. If this is the case, your store does not load when you use HTTPS, because the HTTPS folder is empty.
If you do not maintain your own server, send the following message to your web hosting service provider:
I am trying to set up my application to work in SSL mode. However my web hosting account has two separate folders; one for HTTP and another for HTTPS. Therefore, will you please create a symlink to redirect HTTPS requests to my HTTP folder? Once you do this my store will work in secure mode.My SSH details are as follows:Server: [Enter your server here]User: [Enter your SSH username here]Password: [Enter your SSH password here]
Note: Find your SSH details in your web hosting control panel, or in an email your service provider sent you when you first signed up.
Your service provider should create a symlink (a symbolic link, or “soft link”) that solves the problem.
Problem: When I Access My Store I See Security Certificate WarningsThis is most likely due to the name on your SSL certificate not corresponding with your store’s site name. Many web hosting service providers give you an SSL certificate certifying “*.yourhost.com”, which means that your site (“www.myexamplestore.com”, for example) does not match the certificate.
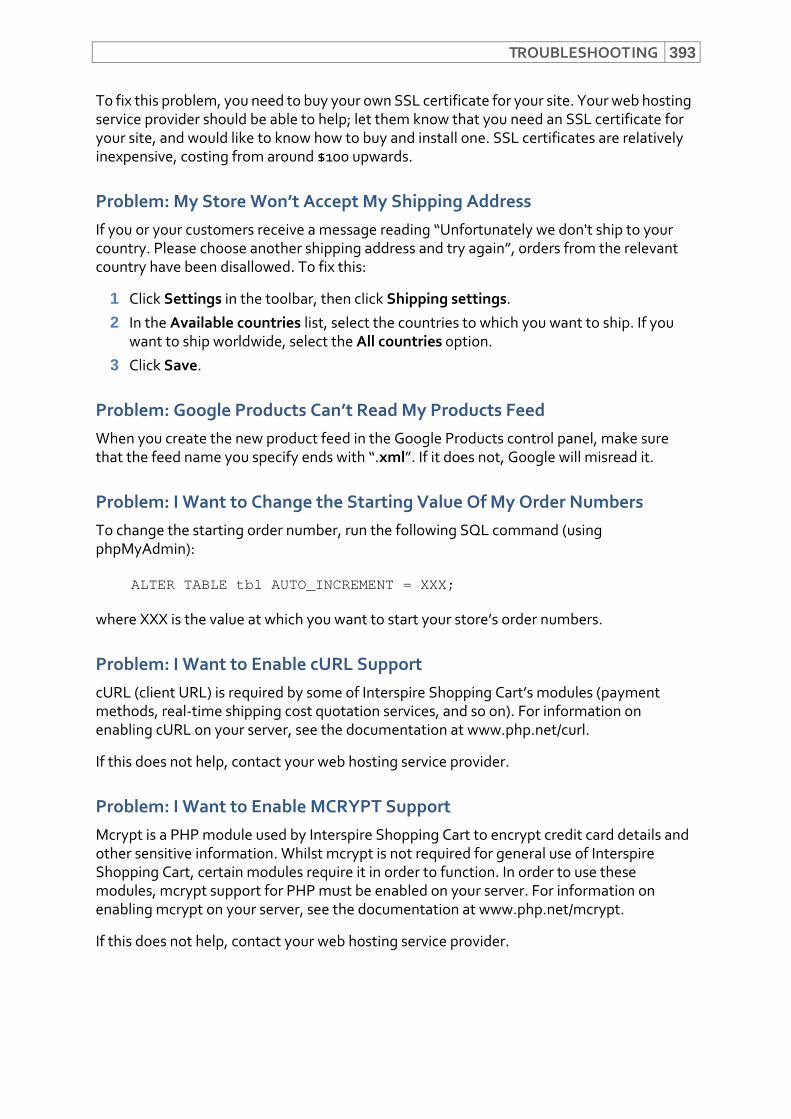
TROUBLESHOOTING 393
To fix this problem, you need to buy your own SSL certificate for your site. Your web hosting service provider should be able to help; let them know that you need an SSL certificate for your site, and would like to know how to buy and install one. SSL certificates are relatively inexpensive, costing from around $100 upwards.
Problem: My Store Won’t Accept My Shipping AddressIf you or your customers receive a message reading “Unfortunately we don't ship to your country. Please choose another shipping address and try again”, orders from the relevant country have been disallowed. To fix this:
1 Click Settings in the toolbar, then click Shipping settings.
2 In the Available countries list, select the countries to which you want to ship. If you want to ship worldwide, select the All countries option.
3 Click Save.
Problem: Google Products Can’t Read My Products FeedWhen you create the new product feed in the Google Products control panel, make sure that the feed name you specify ends with “.xml”. If it does not, Google will misread it.
Problem: I Want to Change the Starting Value Of My Order NumbersTo change the starting order number, run the following SQL command (using phpMyAdmin):
ALTER TABLE tbl AUTO_INCREMENT = XXX;
where XXX is the value at which you want to start your store’s order numbers.
Problem: I Want to Enable cURL SupportcURL (client URL) is required by some of Interspire Shopping Cart’s modules (payment methods, real‐time shipping cost quotation services, and so on). For information on enabling cURL on your server, see the documentation at www.php.net/curl.
If this does not help, contact your web hosting service provider.
Problem: I Want to Enable MCRYPT SupportMcrypt is a PHP module used by Interspire Shopping Cart to encrypt credit card details and other sensitive information. Whilst mcrypt is not required for general use of Interspire Shopping Cart, certain modules require it in order to function. In order to use these modules, mcrypt support for PHP must be enabled on your server. For information on enabling mcrypt on your server, see the documentation at www.php.net/mcrypt.
If this does not help, contact your web hosting service provider.
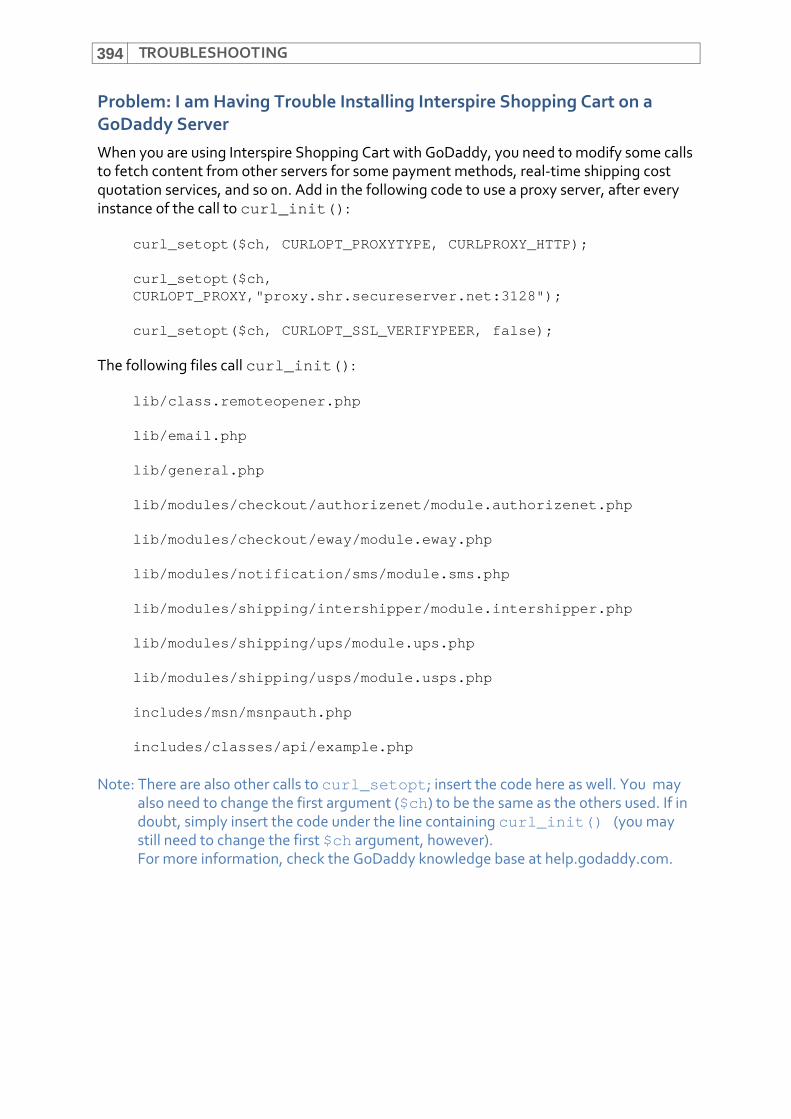
TROUBLESHOOTING394
Problem: I am Having Trouble Installing Interspire Shopping Cart on a GoDaddy ServerWhen you are using Interspire Shopping Cart with GoDaddy, you need to modify some calls to fetch content from other servers for some payment methods, real‐time shipping cost quotation services, and so on. Add in the following code to use a proxy server, after every instance of the call to curl_init():
curl_setopt($ch, CURLOPT_PROXYTYPE, CURLPROXY_HTTP);
curl_setopt($ch, CURLOPT_PROXY,"proxy.shr.secureserver.net:3128");
curl_setopt($ch, CURLOPT_SSL_VERIFYPEER, false);
The following files call curl_init():
lib/class.remoteopener.php
lib/email.php
lib/general.php
lib/modules/checkout/authorizenet/module.authorizenet.php
lib/modules/checkout/eway/module.eway.php
lib/modules/notification/sms/module.sms.php
lib/modules/shipping/intershipper/module.intershipper.php
lib/modules/shipping/ups/module.ups.php
lib/modules/shipping/usps/module.usps.php
includes/msn/msnpauth.php
includes/classes/api/example.php
Note: There are also other calls to curl_setopt; insert the code here as well. You may also need to change the first argument ($ch) to be the same as the others used. If in doubt, simply insert the code under the line containing curl_init() (you may still need to change the first $ch argument, however). For more information, check the GoDaddy knowledge base at help.godaddy.com.
INDEX 395
Index
A
accessing files 70account creation 305, 349account settings 116account, admin 121accounting settings 355accounts 43, 161accounts, creating and editing 115accounts, deleting 121accounts, user 115action reports 295action settings 306, 325action time and date 295action, form 100activating design mode 60active response system 386add to dictionary 76addons 43, 281addons setup 281addons, configuring 282addons, new 282addons, viewing 281address (store) 329address book, customers’ 169address, adding 170address, store 305, 312addresses, multiple 351admin account 121administrator actions 295AdSense 242advanced system information 301advertising banners 239AdWords 242, 281AdWords limitations 256AdWords variables 256AdWords, exporting 255aerial photography 266affiliate commission 363, 364affiliate networks 361affiliates 363, 364
align center 76align left 76align right 76aligning tables 97alignment, horizontal 98alignment, vertical 98alternative text 87analytics 361analytics packages 362anchors 77, 83animated banners 239announcements, email 349anonymous customers 135, 143API 115Apple QuickTime digital movie file 94application overview 31Application Processing Interfacesee API
approving product reviews 222architecture, categories 185arrow icons 42articles 42, 43ascending order 42aspect ratio of images 108assigning customers 172asymmetric protocols 306attribute settings 306audience demographic 361audio video interleave movie 94automated emails 60automatic backups 306, 323
B
background color, cell 98background color, table 97background image 85backup settings 306, 323
INDEX396
backups 287backups, creating 287backups, viewing 288bank deposit 350, 353banners 239banners, creating and editing 244banners, viewing and managing 243best performing keywords 278best‐selling products 264bestselling products 185bold 76borders 87, 97brand 78brand link 80brand names 225brand page image settings 306brands 185, 204brands, adding 224brands, product 225brands, viewing and managing 224browser window 74built‐in payment methods 350, 352built‐in templates 43bulk discount settings 305bulk discounts 207bulk editing product details 189bulleted list 76buttons, inserting 103
C
CAPTCHA 186CAPTCHA settings 305cart settings 305cash on delivery 350, 353categories 78, 173, 198categories, product 185, 208, 209, 219category architecture 185category discounts 174category limitations 162category link 79category pages 185category templates, custom 211cell background color 98
cell height 98cell padding 96cell properties, modifying 98cell spacing 96cell width 98cellphone notification 367, 368center alignment 76certificate code 357certificate values, gift 358certificates, gift 241, 249, 251, 357certificates, gift, configuring 358certificates, gift, enabling or disabling 358certificates, gift, expiry dates 359certificates, gift, themes 359certificates, security 306, 307changes, saving 64, 65character, decimal 305, 316character, insert 78charts, pie 261chat box location 374chat settings 369, 370, 373checkboxes 100checkboxes, inserting 104checking spelling 76checkout 351checkout methods 350checkout settings 349checkout type 351checkout, guest 351cheque 350, 353child categories 220city (store location) 329client‐server protocol 306cloud settings 305COD 350, 353code 69, 70, 71, 72code editor 73code highlighting 70code line numbering 70code syntax 71code window 71code, conversion tracking 363, 364code, shipment tracking 123codes, coupon 247color picker 78color, font 77column span 99columns 96columns, inserting and deleting 99, 110
INDEX 397
comments 351comments and questions 235comments, adding 126comments, order 123comments, shipping 133commission, affiliate 363, 364common tasks 48company settings 329comparison settings 305, 318complete mode 74, 111compressed audio music file 94configurable fields 201configuring logos 57configuring store logo 57confirmation notice 43connection, remote 300contact activity 43contact form website page 235contact lists 43containers, text and image 109content 63content, syndicated 234content, website 227controlling the interface 41conversion rate 267, 274conversion tracking code 363, 364copyright 4corrections, search terms 279countries, and payment methods 353coupon code 357coupon codes, creating and editing 247coupon codes, viewing and managing 245coupons 240create email link 85creating user accounts 115credit card 350, 353cron 308, 309cron commands 309cron timing 310cron, and your server 309cron, configuring 308cron, GUI 310crontabs 308cryptographic handshake procedure 306CSS 56CSV field matching 220CSV, problems 391CubeCart 291current stock level 199
custom fields 201custom store design 56custom store designs, ordering 56custom templates 43custom website pages 237customer address book 169customer comments 351customer details 168customer details, exporting 166customer discount 207customer email notifications 351customer feedback 185customer fields, mandatory 177customer groups 162, 172customer groups, creating 172customer groups, moving 163customer groups, viewing and managing 172customer import file format 178customer information 361customer information, uploading 162customer login 161customer records, searching 175customer revenue 274, 276customer statistics 259, 274customer support 3customers 161, 162customers, adding and editing 168customers, anonymous 143customers, date joined 274customers, existing 142customers, identifying 179customers, importing details 177customers, new 135customers, registered 163customers, top 20 263customers, viewing and managing 163customizing category templates 211customizing product templates 206
D
data backup settings 306, 323data backups 287data encryption 306
INDEX398
data protection, legal responsibilities 39data sets 49database 305, 312database backups 287database errors 295database settings 43date and time settings 305, 316date and time, action 295date range, custom 260date range, defining 259, 260date, customer signup 274deactivating design mode 60debug labels 295decimal character 305, 316decimal places 305, 316decreasing indent 77decryption 307default text formatting 77deleting product reviews 222deleting store data 292deleting user accounts 121delivery time 203demographic information 361deposit, bank 353descending order 42design 53design mode 56, 60, 63design mode, activating 60design mode, deactivating 60design mode, exiting 64, 65design preview 55design tools 73, 74, 107design, custom 56design, editing 55designing emails 60details, other 202, 203details, product 73details, product, searching 214dictionary 76digital certificates 306, 307digital products 351discount coupons 240discount rules 207discounts 162, 174, 175discounts, multiple 175discounts, storewide 175display 41display settings 305, 318display, store 56
do not track inventory 199downloadable product backups 287downloadable product directory 305, 312downloadable products 184, 191, 351downloading files 85downloading logos 59downloading store designs 57drag‐and‐drop 56drag‐and‐drop images 108drop above or below 66
E
edit panel 67editing emails 62editing HTML 110editing images 90editing layout 67, 69editing panels 67, 69editing product details 189editing product reviews 223editing store files 56editing store layout 65editing stylesheets 67, 69editing text 66editing user accounts 115editing web pages 73editing window 73, 74, 107editing, HTML 67editing, text 66edition, product 300editor, HTML 73editor, store 69editor, store element 63editor, WYSIWYG 231element, page 64elements 63elements, moving 65email address, customers’ 168email announcements, automatic 349email campaigns 45email confirmation messages 377email integration messages 295email links 77, 85
INDEX 399
email marketing integration 383email newsletter subscribers, exporting
details 253email newsletters 241, 383email notifications 351, 365, 366email settings 43email subjects 86email templates 43emails, automated 60emails, designing 60emails, editing 62emails, HTML 60emails, problems sending 391emails, return request alerts 376encryption 306, 307EPOS 353error labels 295error reports 295event log settings 296, 306, 325Excel 155existing customers 135, 142exiting design mode 65export formats 291export Google AdWords 281export warning 293exporting a store 292exporting customer details 166exporting product details 188express checkout 351external images 87extra features 281extra information 201
F
FAQ links 385favorite customers 162featured product settings 305, 318featured products 185features, extra 281feed, Google products 254feedback 185fees, handling 333, 351field enclosure 179
field mapping 157field matching 220field separation 178fields, custom and configurable 201fields, required 42file field, upload 202File Transfer Protocol 287filename 71files, accessing 70files, supporting 70, 71files, template 70, 71files, uploading 84financial information, exporting 355financial settings 355find and replace 75first screen 47flash, insert 90, 93, 94flash, modify 90, 93flat fee 333font color 77font format 77font name 77font size 77forgotten password 39, 391form action 100form fields, modifying 101form functions 77, 100, 101, 104form name 100form properties, modifying 101form submission method 101format 77formats, store export 291formats, store import 291formatting 77forms 100free shipping 333frequently asked questions links 385Froogle 242FTP 287fullscreen mode 74functions, extra 281
INDEX400
G
GD version 300general messages 295general product information 193general store statistics 262getting started 37, 43, 48gift certificate expiry dates 359gift certificate settings 357gift certificate themes 359gift certificate values 358gift certificates 241, 357gift certificates, configuring 358gift certificates, enabling or disabling 358gift certificates, searching 251gift certificates, viewing and managing 249gift wrapping 203, 205, 379gift wrapping options, adding and editing 380gift wrapping preview 381global settings 43Google AdWords 242, 281Google AdWords format 256Google AdWords limitations 256Google AdWords variables 256Google AdWords, exporting 255Google Analytics 361, 362Google Maps 265Google Maps settings 306, 327Google products 242Google products, exporting 254Google shopping 242grandchild categories 220graph labels 260Graphical User Interfacesee GUI
graphs, statistical 260groups, customer 162groups, moving 163guest checkout 161, 351guest orders 163GUI 3, 41
H
handling fees 333, 351handling fees, showing and hiding 334header logos 56height, cell 98height, image 88height, table 97help 41, 42, 43, 77help articles 42, 48help links 385hidden fields 100hidden fields, inserting 103hide handling fees 334highlight text 78highlighted text 66, 76highlighting 70home screen 43, 47horizontal alignment 98horizontal line 78horizontal rows 96horizontal space 88, 93hosting linked files 83hosting providers 300HTML 56, 63, 71, 74, 110HTML editor 67, 73, 96HTML editor settings 306HTML emails 60, 73HTML forms 77, 100HTML pages 78HTML tables 77, 96HTML template editor 73HTML template file size 61HTML, previewing 110hybrid maps 266hyperlink 83hyperlinks 73, 77, 82, 84
I
icons 42identifying customers 179identifying page elements 64
INDEX 401
image backups 287image borders 87image containers 109image directory 305, 312image editing 90image height 88image properties 78image properties, reset 90, 93image settings 305, 318image size, logo 57image styles 53image title 90image types 86image upload 87image width 87image, insert 90image, modifying 90, 96images 73, 78, 84images, insert 86images, manipulating 107images, modify 86, 94images, moving 108images, resizing 108import formats 291importing a store 291importing contacts, problems 391importing product details 217importing tracking numbers 157increase indent 77indent, decreasing 77indent, increase 77individual product pages 185information, system 299insert anchor 77insert character 78insert flash 90, 93, 94insert form 100insert horizontal line 78insert image 78, 86, 90insert link 78, 79, 82, 83insert media 95insert ordered lists 76insert table 96insert unordered list 76inserting 94inserting links 77inserting other media 94inserting tables 96interface 41
international shipping 124Interspire knowledge base 42, 77Intuit QuickBooks 356inventory display settings 305, 318inventory level 270inventory management 185inventory report 273inventory tracking 199, 351inventory tracking by product variations 199inventory, tracking 199inventory, update 351invoices 123, 125invoices, printing 131IP addresses 295italics 76items sold 269items, news 73, 227
J
justifying text 77
K
key encryption 307key pairs 307keywords 278keywords, best performing 278keywords, worst performing 279knowledge base 42, 43, 77knowledge base integration 385knowledge manager 385

INDEX402
L
labels, graph 260labels, severity 295lain text logos 57layout 53, 63, 69layout modification 63layout, email 60layouts 71learn more 42left alignment 76legal responsibilities (data protection) 39level, stock 199limitations, product type 162limiting products’ availability 163line 78line numbering 70, 71link page, website 233link to brand 80link to category 79link to page 81link to store 78link, insert 79, 83link, remove 83links 42, 82, 83, 84links, email 77, 85links, inserting 77list 76list boxes, inserting 105list depth settings 305list, bulleted 76list, orders 184lists 76lists, sorting 42live chat 369, 370live chat settings 373LivePerson 370, 372load image 87local backups, viewing 288localization settings 305, 316location 329location markers 266locations, order 265log out 43log settings 306, 325log severity labels 295log, staff action 295
log, system 296login 37, 39, 47, 161logo 53logo configuration 57logo design 57logo file upload 57logo formatting 57logo image size 57logo settings 57logos 56logos, downloading 59logos, plain text 57logs 295logs, staff action, viewing 297logs, system 295low stock level 185, 199
M
magnification, maps 266main page 63management, inventory 185mandatory customer fields 177map 266mapping fields 157mapping settings 306, 327maps, Google 265maps, hybrid 266markers, sales 266marketing 239marketing, affiliate 363, 364marketing, online 361match case 75match whole word only 75matching fields 220measurement, units 305, 316media file size limitation 94media properties, resetting 95media, insert 95message decryption 308message encryption 308message, gift certificate 357messages, order 129messenger, MSN 366, 367
INDEX 403
Microsoft Excel 155Microsoft Word 74MIDI‐sequention sound 94miscellaneous settings 306, 327mobile phone notification 367, 368mode, complete 74mode, fullscreen 74mode, simple 74modes, simple and complete 111modify anchor 77modify flash 90, 93modify form properties 101modify image 78, 90, 96modify images 86, 94modifying form fields 101modifying form properties 101modifying table properties 97modifying your store 63modules, addon 43money order 350more colors 77mouseover 41moving elements 65moving images 108MPEG 94MPEG audio stream 94MPEG compressed audio 94MPEG movie 94MPEG‐1 94MSN messenger 366, 367MSN notification, testing 367multi‐byte functionality 300multiple discounts 175multiple shipping addresses 351multiple variation sets 184multiple variations 184multiple‐page checkout 351MySQL version 300
N
name, font 77name, store 305, 312, 329named anchors 83
names, brand 225navigation bar 41, 44, 227navigation tools 42new customers 135new orders 48new product settings 305, 318new products 185new window, opening 83news item settings 305, 318news item title 229news items 73, 227news items, creating and editing 229news items, viewing and managing 228newsletter settings 306, 327newsletters 241, 383non‐standard characters 78notes 126notes, staff 123notes, viewing 132, 167notice labels 295notification method, testing 366notification methods 366notification settings 365notification system messages 295notification, SMS 367, 368notifications 48notifications, email 351, 366notifications, MSN 365notifications, return 376notifications, SMS 365numbered lists 76numbers, tracking 123, 155
O
online knowledge base 43online store applications, other 291operating system 300options, gift wrapping 379order amount 364order comments 123, 351order details 125order export 126order fields 201
INDEX404
order ID 123, 364order locations 265order management 125order messages 129order messages, sending 130order modification 123order number, matching 157order statistics 259, 267order status 123, 134ordered lists 76ordering custom store designs 56orders 123orders by items sold 269orders by revenue 270orders list 184orders overview 267orders, adding and editing 135orders, completed 184orders, exporting 134orders, new 48orders, searching 145OsCommerce 291other details 202, 203other media 94override existing tracking numbers 157overview, application 31overview, orders 267overview, products 271
P
packages, analytics 362packing slip 123, 125packing slips 123packing slips, printing 131padding 96page element 64page links 81page templates, custom 237pages 42pages, category 185pages, product 185pages, sub‐category 185pages, website 227
panels 69, 70, 71parent categories 220parent frame 83parent pages 227parent‐child architecture 185password, customers’ 168password, forgotten 39, 391password, random 351passwords 39, 161paste 74paste as plain text 74paste from MS Word 74pay in store 350, 353payment gateway messages 295payment information 123payment method, new 352payment methods, built‐in 350, 352payment methods, third‐party 351payment settings 349pay‐per‐click 361percentage discount 175performance, sales 270periodic backups 306, 323permissions, user 115PHP errors 295PHP safe mode 300PHP SOAP 356PHP version 300PHP, server information 301physical products 184, 191pie charts 261PKI 307PKI example 308placeholders 364places, decimal 305, 316plain text 74popular help articles 48popular products 272portable spell checker 300post code (store) 330post codes 333pre‐scheduled jobs 308preview 73, 85, 87preview design 55preview window 74preview, gift wrapping 381previewing HTML 110previewing templates 73price comparison 242
INDEX 405
printer dialog 132printing invoices 131printing packing slips 131private courier services 124private keys 307privileges, customer 162, 172privileges, user 115product 78, 133product attribute settings 306product availability, limiting 163product brand link 80product brands 185, 225product brands, adding 224product brands, viewing and managing 224product categories 173, 185, 208, 209, 219product category discounts 174product category link 79product comparison settings 305, 318product details 73, 193product details, editing (bulk) 189product details, exporting 188product details, importing 217product details, searching 214product discounts 174, 175product edition 300product files 196product image backups 287product levels 199product pages 185, 201product returns 375product review settings 305, 318product reviews 185, 186product reviews, editing 223product reviews, viewing and approving 222product statistics 259, 270product tags 204product template, customizing 206product type limitations 162product types 184product variations 184, 199, 212product variations, adding and editing 213product variations, inventory tracking 199product variations, selecting 200product version 300products 183products overview 271products, adding and editing 191products, best‐selling 264products, downloadable 184, 191
products, physical 184, 191products, popular 272products, viewing and managing 186promotions 239properties, cell 98properties, image 78properties, reset 90, 93properties, resetting 95properties, table 97providers, hosting 300provinces 332PSpell 300public key infrastructure 307public keys 307
Q
QBWC 356quantity to ship 133question marks 41questions and comments 235QuickBooks 356QuickBooks Web Connector (QBWC) 356
R
radio buttons 100, 104random password 351Really Simple Syndication 228reasons, return 376records, customer, searching 175redo 74registered customers 161, 163related product selection 198related products 198remember my details 39remote connection support 300remove link 83remove text formatting 77removing panels 67
INDEX406
removing store data 292replace and find 75report, inventory 273reports 295requests, return 152required fields 42reset properties 90, 93resetting properties 95resizing images 108resizing tables 96, 109responsibilities, legal 39results per page 42return instructions 376return notifications 376return reasons 376return request alert emails 376return requests 152return requests, enabling or disabling 376return requests, managing 124return requests, searching 153returns 375returns and store credit 376revenue 270revenue per customer 274, 276review settings 305, 318reviews 186reviews, editing 223reviews, product 185RGB 78right alignment 76right‐click tables 109row span 99rows 96rows, inserting and deleting 99, 110RSS 228, 234RSS settings 306rules, discount 207
S
safe mode 300sales manager permissions 115sales markers 266sales performance 270
sales staff permissions 115same frame 83satellite 266saving changes 64, 65scheduled jobs 308scripts 100search engine optimization 203search keywords 278search settings 305search statistics 259search statistics, viewing 277search term corrections 279search term statistics overview 277search terms 277searches, successful 278searches, unsuccessful 278secure ordering system 306Secure Sockets Layer 306secure web pages 305, 306, 312security certificates 306, 307selecting related products 198SEO 203separator, thousands 305, 316server configuration 43server information 299server information, advanced 301server software 300setting up addons 281settings 43settings, backups 287settings, user account 116severity labels, log 295ship items 133shipment list 124shipment list record 125shipment numbers 124shipment tracking number 123shipments 123shipments, creating 124, 133, 134shipments, exporting 151shipments, managing 124shipments, searching 148shipments, viewing 147shipped orders 124shipping addresses, multiple 351shipping comments 133shipping information 123shipping method handling fee 334shipping methods 126, 133
INDEX 407
shipping methods, adding 334shipping numbers 155shipping orders 126shipping quote messages 295shipping settings 329shipping zone methods 331shipping zone settings 331shipping zone, enable 333shipping zones 330shipping zones, adding 331shipping, free 333show handling fees 334similar products 198simple mode 74, 111Single Object Access Protocol (SOAP) 356single‐page express checkout 351size, text 77SKU 185SMS 365SMS notification 367, 368SMSGlobal 368snapshot, store 262snippets 70, 71SOAP 356software, server 300sorting lists 42source window 74spacing 96span, column 99span, row 99specifying criteria 49spell checker 300spellcheck 76SSL 305, 306, 312staff action logs 295staff action logs, viewing 297staff action settings 306, 325staff notes 123, 126staff notes, viewing 167star rating 185state (store) 330states 332statistical pie charts 261statistics 259statistics, deleting 262status modification 123status update 126status, order 123stock level 199, 270
stock level, current 199stock level, low 185, 199stock levels 199stock management 123, 185stock tracking 351Stock‐Keeping Unit (SKU) 185store (country) 329store accounts 161store address 305, 312store applications, other 291store backup settings 306, 323store backups 287store content 63store credit and product returns 376store data, deleting 292store design 53, 57store design, custom 56store design, editing 55store designs, downloading 57store display 56store editor 56, 63, 69store editor tools 70store elements 63store export 292store export formats 291store export warning 293store file editing 56store import 291store import formats 291store layout 63store layout, editing 65store location 329store log settings 306, 325store logo configuration 57store logs 295store name 305, 312store newsletter settings 306, 327store newsletters 383store notifications 48store passwords 161store settings 305store snapshot 262store statistics 259, 262store stock levels 199store update 56store version 56store web page links 81store, importing and exporting 291store, view 63

INDEX408
storewide discount 175street map 266style 83, 90, 97stylesheet 71stylesheets 69sub‐categories 185subcategories 198submission method, form 101sub‐pages 227subscribers, email newsletter 253subscript 77success label 295success notice 43superscript 77support 3supported image types 86supporting files 70, 71symmetric cryptography 307syndicated content 234syndication 228syndication settings 306syntax 71system administrator permissions 115system information 299system information, advanced 301system log 296system log settings 306, 325system logs 295system, operating 300systems settings 43
T
table background color 97table borders 97table functions 77, 96table height 97table properties, modifying 97table size 109table width 96tables 96tables, adding and deleting rows and
columns 110tables, aligning 97
tables, editing 96tables, inserting 96tables, resizing 96, 109tables, right‐click 109tabs 73, 74, 111tag cloud settings 305tags, product 204target window 83telephone orders 162template files 70, 71template layout file 204template styles 86template, customizing 206templates 43templates, custom 211, 237terms, search 277, 279text 74, 201text area, inserting 102text containers 109text editing 66text editor 73text fields, inserting 102text formatting 77text logos 57text message notification 367, 368text messages 365text modification 63text styes 53text, composing and editing 107text, highlighted 66, 76themes, gift certificate 359third‐party live chat services 373third‐party payment methods 351, 352thousands separator 305, 316thumbnail image settings, in management
interface 306thumbnail settings 305, 318time and date settings 305, 316time and date, action 295tips 41, 48title 227, 229title, image 90TLS 305, 306, 312toggle editor 71toggle thumbnails 85toolbar 41, 42, 43tools 43, 70tools, additional 281tools, design 73, 74
INDEX 409
tools, navigation 42tooltips 41top 20 customers 263track inventory 199tracking code, conversion 363, 364tracking method 199tracking number 123, 126tracking number import 124tracking number, matching 157tracking numbers 124, 125tracking numbers, importing 155, 157tracking numbers, overriding 157tracking, inventory 199, 351Transport Layer Security 306troubleshooting 391type limitations 162types of product 208types, product 184
U
unavailable products 163underline 76undo 74unit identification system 185units of measurement 305, 316unordered list 76update store 56updating inventory 351upload file field 202upload files 84upload images 87upload logo file 57uploading downloadable files 196uploading files 82, 84URL 83US Postal Service 124user account settings 116user accounts 43, 115user accounts, creating and editing 115user accounts, deleting 121user accounts, managing 115user actions 295user privileges 115
username 39
V
value of gift certificates 357variables, AdWords 256variation sets 184variation sets, multiple 184variations, multiple 184variations, product 184, 199, 212variations, product, adding and editing 213variations, selecting 200version 48version, GD 300version, MySQL 300version, PHP 300version, product 300vertical alignment 98vertical columns 96vertical space 88, 93view preview 87view store 63view, create 49viewing addons 281viewing customer statistics 274viewing product reviews 222viewing search statistics 277views 49visitor information 361visitors 267
W
warning labels 295warranty 203, 204wave PCM sound file 94web page editing 73web page links 81web page security 306web pages, restricting access 172
INDEX410
web pages, secure 305, 312website content 227website link page 233website page, contact form 235website page, RSS 234website pages 227website pages, creating and editing 231website pages, custom 237website pages, standard 231website pages, viewing and managing 230website settings 305, 312whole page, opening 83width, cell 98width, image 87width, table 96wildcards 310window type 83window, editing 74, 107windowed mode 74Windows media audio 94Windows media video 94wish list settings 305, 318Word 74workspace 41worst performing keywords 279wrapping options, adding and editing 380wrapping, gift 203, 205, 379WYSIWYG editor 73, 74, 231
X
X‐Cart 291XML API 115
Z
ZenCart 291ZIP code (store) 330ZIP codes 333zone methods 331, 334
zone settings 331zones, shipping 330zoom, maps 266