intaglio collagraph - wordpress.comintaglio collagraph introduction although relatively new,...
TRANSCRIPT
Bill Chambers 2008 www.billchambersprintmaker.wordpress.com Swansea Print Workshop www.swanseaprintworkshop.org.uk
Bill Chambers SPW 2007 1
Intaglio Collagraph Introduction Although relatively new, nowadays collagraph is amongst the more established printmaking processes and is widely used by artists and printmakers the world over. The process of making a collagraph plate and printing from it is actually very simple and needs very little in the way of specialist equipment or materials. Perhaps this is why the medium has become so popular. Providing a few basic rules are followed, collagraph is a technique that offers the printmaker almost unlimited scope for experimental and original work. Because of this, artists and printmakers invariably find their own methods of working with collagraph and often create new and wonderful effects by experimenting with the various materials used.
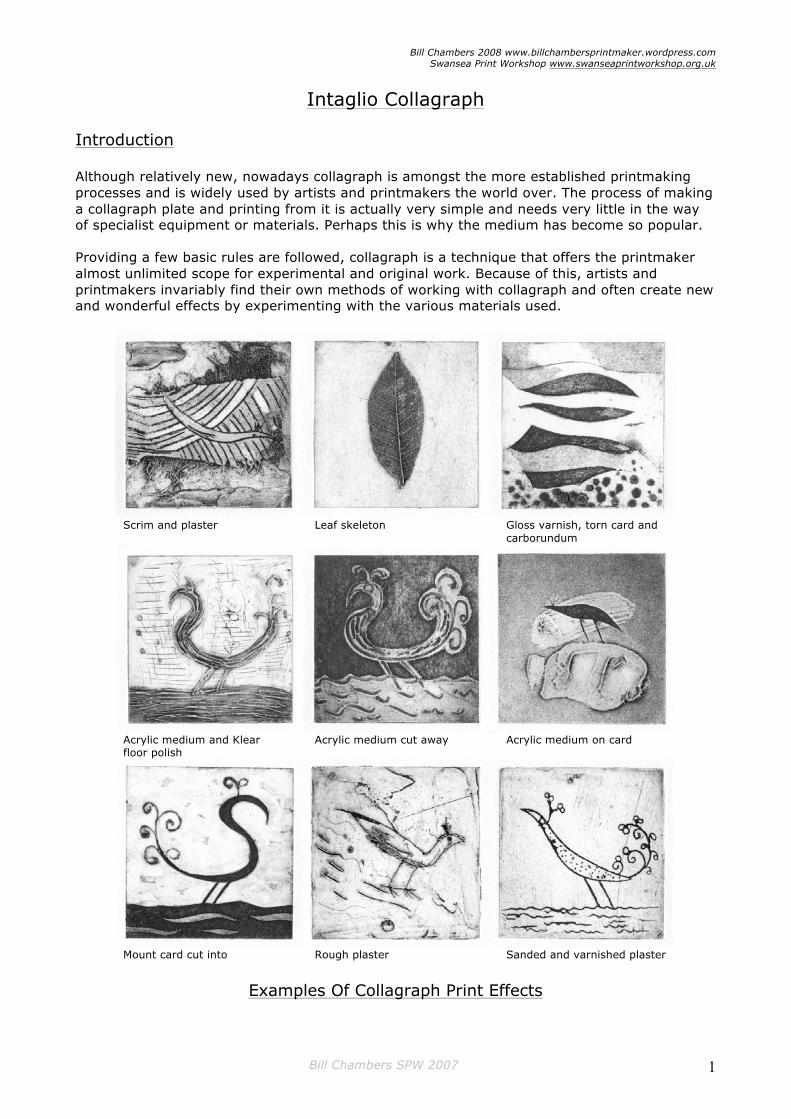
Scrim and plaster Leaf skeleton Gloss varnish, torn card and
carborundum
Acrylic medium and Klear Acrylic medium cut away Acrylic medium on card floor polish
Mount card cut into Rough plaster Sanded and varnished plaster
Examples Of Collagraph Print Effects
Bill Chambers 2008 www.billchambersprintmaker.wordpress.com Swansea Print Workshop www.swanseaprintworkshop.org.uk
Bill Chambers SPW 2007 2
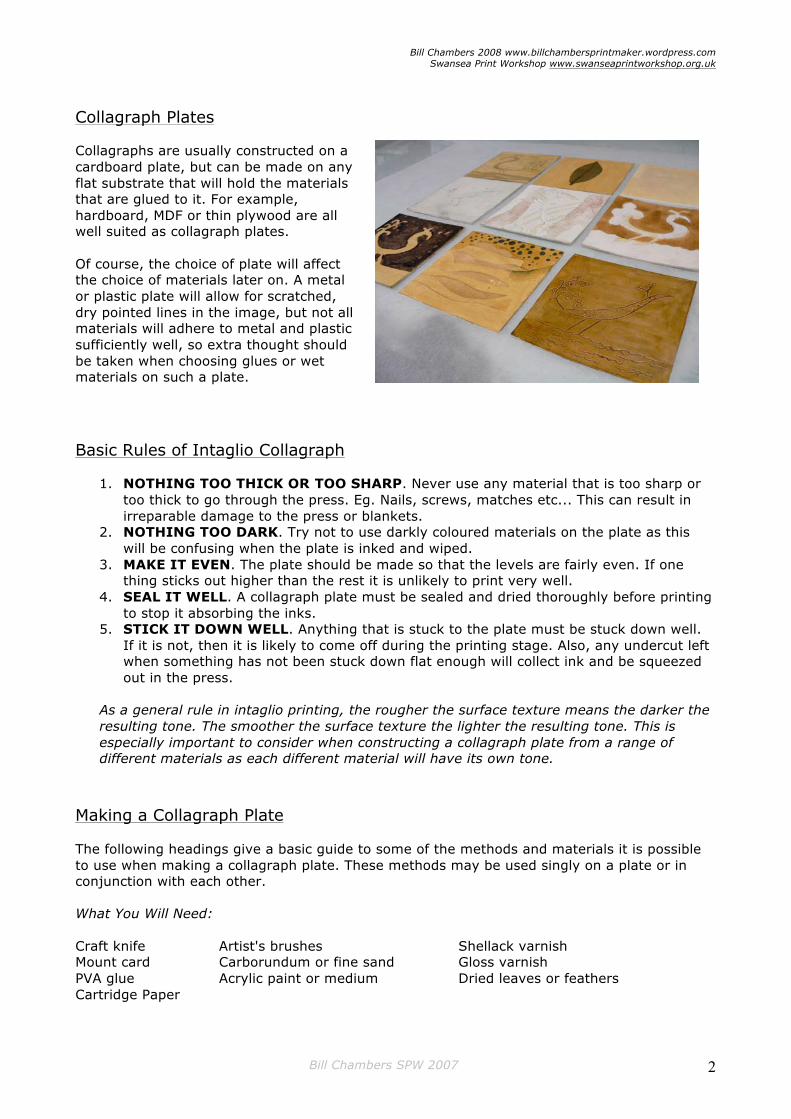
Collagraph Plates Collagraphs are usually constructed on a cardboard plate, but can be made on any flat substrate that will hold the materials that are glued to it. For example, hardboard, MDF or thin plywood are all well suited as collagraph plates. Of course, the choice of plate will affect the choice of materials later on. A metal or plastic plate will allow for scratched, dry pointed lines in the image, but not all materials will adhere to metal and plastic sufficiently well, so extra thought should be taken when choosing glues or wet materials on such a plate. Basic Rules of Intaglio Collagraph
1. NOTHING TOO THICK OR TOO SHARP. Never use any material that is too sharp or too thick to go through the press. Eg. Nails, screws, matches etc... This can result in irreparable damage to the press or blankets.
2. NOTHING TOO DARK. Try not to use darkly coloured materials on the plate as this will be confusing when the plate is inked and wiped.
3. MAKE IT EVEN. The plate should be made so that the levels are fairly even. If one thing sticks out higher than the rest it is unlikely to print very well.
4. SEAL IT WELL. A collagraph plate must be sealed and dried thoroughly before printing to stop it absorbing the inks.
5. STICK IT DOWN WELL. Anything that is stuck to the plate must be stuck down well. If it is not, then it is likely to come off during the printing stage. Also, any undercut left when something has not been stuck down flat enough will collect ink and be squeezed out in the press.
As a general rule in intaglio printing, the rougher the surface texture means the darker the resulting tone. The smoother the surface texture the lighter the resulting tone. This is especially important to consider when constructing a collagraph plate from a range of different materials as each different material will have its own tone.
Making a Collagraph Plate The following headings give a basic guide to some of the methods and materials it is possible to use when making a collagraph plate. These methods may be used singly on a plate or in conjunction with each other. What You Will Need: Craft knife Artist's brushes Shellack varnish Mount card Carborundum or fine sand Gloss varnish PVA glue Acrylic paint or medium Dried leaves or feathers Cartridge Paper
Bill Chambers 2008 www.billchambersprintmaker.wordpress.com Swansea Print Workshop www.swanseaprintworkshop.org.uk
Bill Chambers SPW 2007 3
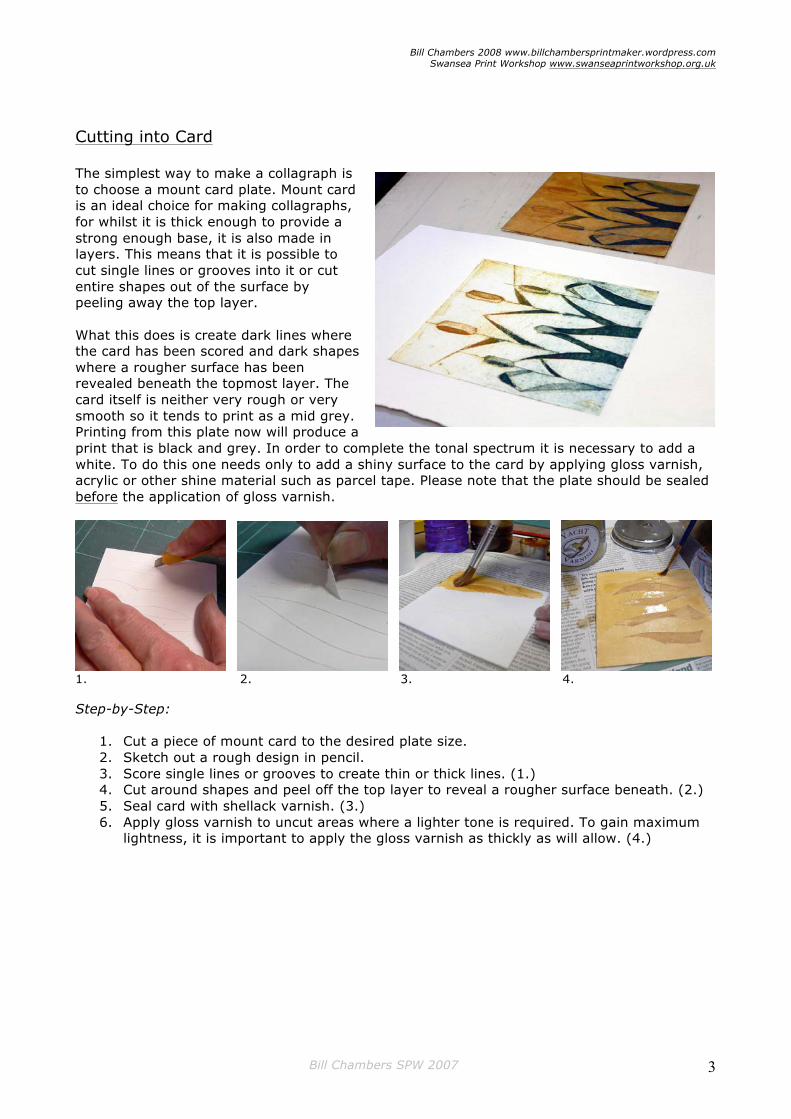
Cutting into Card The simplest way to make a collagraph is to choose a mount card plate. Mount card is an ideal choice for making collagraphs, for whilst it is thick enough to provide a strong enough base, it is also made in layers. This means that it is possible to cut single lines or grooves into it or cut entire shapes out of the surface by peeling away the top layer. What this does is create dark lines where the card has been scored and dark shapes where a rougher surface has been revealed beneath the topmost layer. The card itself is neither very rough or very smooth so it tends to print as a mid grey. Printing from this plate now will produce a print that is black and grey. In order to complete the tonal spectrum it is necessary to add a white. To do this one needs only to add a shiny surface to the card by applying gloss varnish, acrylic or other shine material such as parcel tape. Please note that the plate should be sealed before the application of gloss varnish.
1. 2. 3. 4. Step-by-Step:
1. Cut a piece of mount card to the desired plate size. 2. Sketch out a rough design in pencil. 3. Score single lines or grooves to create thin or thick lines. (1.) 4. Cut around shapes and peel off the top layer to reveal a rougher surface beneath. (2.) 5. Seal card with shellack varnish. (3.) 6. Apply gloss varnish to uncut areas where a lighter tone is required. To gain maximum
lightness, it is important to apply the gloss varnish as thickly as will allow. (4.)

Bill Chambers 2008 www.billchambersprintmaker.wordpress.com Swansea Print Workshop www.swanseaprintworkshop.org.uk
Bill Chambers SPW 2007 4
Adding Textured Materials Or Found Objects
Collagraph printmaking is especially good for reproducing in fine detail all sorts of textural patterns and effects. For this reason it is usually a good idea to think on a large and painterly scale when making a collagraph plate as working with texture can require space. Anything that is reasonably flat and has a distinct texture to it can be glue to the plate and become a part of the eventual print. Even plain cartridge paper can have a marked effect when cut and layered in the right way. Below is a list of suitable materials that have been tried and tested, but it is certain that there are many more: paper doily wrinkled tissue paper cartridge paper torn or cut lace wrinkled silver foil netting scrim dried and pressed leaves thread textured wallpaper feathers fine sand or carborundum
PVA, Foil and scrim Carborundum Leaves • It is essential that anything applied to the plate be stuck down well (PVA glue is usually the
strongest glue for sticking things to card) and that there should not be any undercuts where ink can collect.
• Fine sand or carborundum powder (used for grinding lithographic stones) can be sprinkled
over wet glue or acrylic to create extremely rough, sand papery areas that give dense black tones.
• Any organic material is best dried and pressed before applying to the plate. Do not use
green leaves or fresh grasses.
Bill Chambers 2008 www.billchambersprintmaker.wordpress.com Swansea Print Workshop www.swanseaprintworkshop.org.uk
Bill Chambers SPW 2007 5
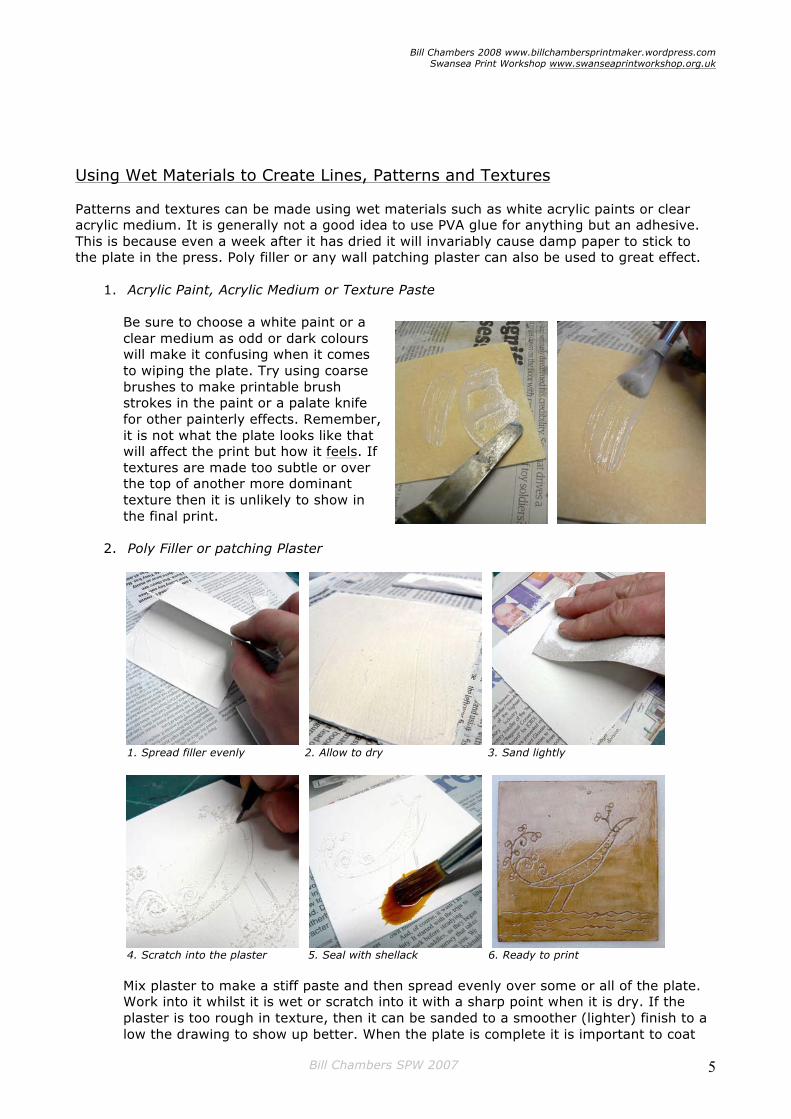
Using Wet Materials to Create Lines, Patterns and Textures Patterns and textures can be made using wet materials such as white acrylic paints or clear acrylic medium. It is generally not a good idea to use PVA glue for anything but an adhesive. This is because even a week after it has dried it will invariably cause damp paper to stick to the plate in the press. Poly filler or any wall patching plaster can also be used to great effect.
1. Acrylic Paint, Acrylic Medium or Texture Paste
Be sure to choose a white paint or a clear medium as odd or dark colours will make it confusing when it comes to wiping the plate. Try using coarse brushes to make printable brush strokes in the paint or a palate knife for other painterly effects. Remember, it is not what the plate looks like that will affect the print but how it feels. If textures are made too subtle or over the top of another more dominant texture then it is unlikely to show in the final print.
2. Poly Filler or patching Plaster
1. Spread filler evenly 2. Allow to dry 3. Sand lightly
4. Scratch into the plaster 5. Seal with shellack 6. Ready to print
Mix plaster to make a stiff paste and then spread evenly over some or all of the plate. Work into it whilst it is wet or scratch into it with a sharp point when it is dry. If the plaster is too rough in texture, then it can be sanded to a smoother (lighter) finish to a low the drawing to show up better. When the plate is complete it is important to coat

Bill Chambers 2008 www.billchambersprintmaker.wordpress.com Swansea Print Workshop www.swanseaprintworkshop.org.uk
Bill Chambers SPW 2007 6
the plaster areas once or twice with shellack varnish. This will harden the soft plaster and ensure that it is not crushed by the weight of the press.
3. Klear Acrylic Floor Polish
Acrylic floor polish provides a quick and easy way to add lines to a collagraph plate, providing the polish is laid down on a flat surface. Simply pour or paint the acrylic floor polish on to sealed card (or any other type of collagraph plate). Allow polish to dry for 5 - 10 minutes before gently scratching into the surface with an etching needle. Let the polish dry for a further hour before printing.
Painting into Carborundum Plates A carborundum plate is one that has been completely covered in a fine dusting of carborundum to create a sand papery surface all over. If printed, this plate would yield a rich velvety black across the entire print. In order to make an image therefore, a white acrylic medium is used to gradually fill in this extremely rough texture, thus creating a range of tones depending on how much the carborundum has been smoothed over. Step-by-step:
1. Cut a cardboard or hardboard plate to the desired size and shape.
2. Water down some PVA Glue in a jar so that it can be spread evenly over the whole plate. Print Plate
3. Lay out some newspaper and put the card on top. While the glue is still fresh, sprinkle carborundum liberally over the whole plate.
4. Allow the glue to dry before tapping any excess off onto the newspaper. Spare carborundum can be used again.
5. The plate then needs to be sealed using acrylic medium. If the medium is quite thick it should be watered down so that it does not fill in the texture of the plate too much.
6. When thoroughly dry, the plate is ready to start painting into. 7. Colour acrylic medium with a little white and use it to gradually paint over areas of the
plate. Carborundum is black so the colour of these areas should become whiter with each new layer of acrylic.
8. Eventually the whitest areas should be smooth to the touch.

Bill Chambers 2008 www.billchambersprintmaker.wordpress.com Swansea Print Workshop www.swanseaprintworkshop.org.uk
Bill Chambers SPW 2007 7
9. Beware of being too subtle with this process as it is likely that one coat will not have enough of an effect to show in the print, despite looking very prominent on the plate.
Sealing The Plate Collagraph plates should be sealed, preferably on both sides if using a cardboard base. This prevents the plate from acting like a sponge and the inks from soaking into it, rather than sitting on top of it. This makes for a better print but also means that the plate is not stained by the inks when it is printed. Some materials used on the plate will not need to be sealed, for example acrylic paint, tin foil and gloss varnish are all self-sealing. Paper, card, leaves and other absorbent materials will all need to be sealed and left to dry thoroughly before printing. In order to preserve any delicate textures or marks it is recommended that only a thin application of shellack varnish be used. Shellack, also known as button polish, is designed to be absorbed by the surface to which it is applied, therefore it does not tend to fill in subtle details on the plate. Printing The Plate
Because a collagraph is made from unconventional materials and is often very rough and uneven in its printing surface, the plate is treated differently to most intaglio plates (etching, drypoint etc.). The chief difference is that ink is applied with a brush and never with the aid of a hot plate. Step-by-step:
1. Take an ordinary 2 - 3" house painting brush. With scissors, cut the bristles down to within about 1" of the handle. This should give you a stiff "stippling" brush suitable for working the inks into a variety of surfaces.

Bill Chambers 2008 www.billchambersprintmaker.wordpress.com Swansea Print Workshop www.swanseaprintworkshop.org.uk
Bill Chambers SPW 2007 8
2. Prepare the inks by mixing a small amount of "Easy-Wipe" to the inks. This should allow the inks to be worked into the plate more easily.
3. Use a different brush for each colour if varying the colours on the plate. 4. Work the inks into every corner and recess of the plate. 5. Using a pad of scrim, gradually wipe back the inks until the image on the plate is
revealed. 6. For the first print, avoid using paper to wipe the plate as this can lead to the paper
sticking to the plate in the press. 7. Use a heavy weight (250 - 300g) paper to print onto to ensure that the surface of the
plate can be adequately embossed. 8. Allow the paper to soak for 10 minutes before printing. 9. Ensure that the press is adjusted to the right setting.
For Further Information Intaglio: Acrylic-Resist Etching, Collagraphy, Engraving, Drypoint, Mezzotint by Robert Adam and Carol Robertson Collagraphs and Mixed Media Printmaking (Printmaking Handbook) by Brenda Hartill and Richard Clarke Notes on Collagraph by Vineeta Voogt (available in the SPW library)