instrument java applications appdynamics pro documentation
TRANSCRIPT

Page 1
Instrument Java ApplicationsAppDynamics Pro DocumentationVersion 4.0.x
Page 2
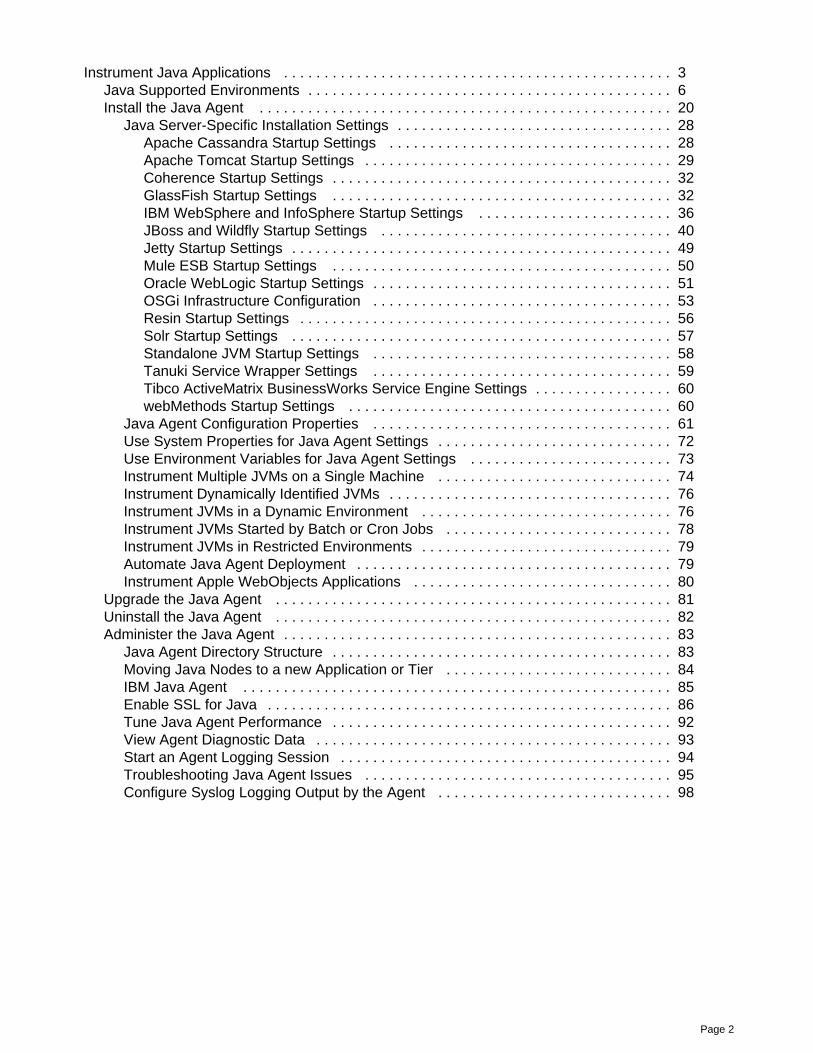
Instrument Java Applications . . . . . . . . . . . . . . . . . . . . . . . . . . . . . . . . . . . . . . . . . . . . . . . . 3 Java Supported Environments . . . . . . . . . . . . . . . . . . . . . . . . . . . . . . . . . . . . . . . . . . . . . 6
Install the Java Agent . . . . . . . . . . . . . . . . . . . . . . . . . . . . . . . . . . . . . . . . . . . . . . . . . . . 20 Java Server-Specific Installation Settings . . . . . . . . . . . . . . . . . . . . . . . . . . . . . . . . . . 28
Apache Cassandra Startup Settings . . . . . . . . . . . . . . . . . . . . . . . . . . . . . . . . . . . 28 Apache Tomcat Startup Settings . . . . . . . . . . . . . . . . . . . . . . . . . . . . . . . . . . . . . . 29
Coherence Startup Settings . . . . . . . . . . . . . . . . . . . . . . . . . . . . . . . . . . . . . . . . . . 32 GlassFish Startup Settings . . . . . . . . . . . . . . . . . . . . . . . . . . . . . . . . . . . . . . . . . . 32
IBM WebSphere and InfoSphere Startup Settings . . . . . . . . . . . . . . . . . . . . . . . . 36 JBoss and Wildfly Startup Settings . . . . . . . . . . . . . . . . . . . . . . . . . . . . . . . . . . . . 40
Jetty Startup Settings . . . . . . . . . . . . . . . . . . . . . . . . . . . . . . . . . . . . . . . . . . . . . . . 49 Mule ESB Startup Settings . . . . . . . . . . . . . . . . . . . . . . . . . . . . . . . . . . . . . . . . . . 50
Oracle WebLogic Startup Settings . . . . . . . . . . . . . . . . . . . . . . . . . . . . . . . . . . . . . 51 OSGi Infrastructure Configuration . . . . . . . . . . . . . . . . . . . . . . . . . . . . . . . . . . . . . 53
Resin Startup Settings . . . . . . . . . . . . . . . . . . . . . . . . . . . . . . . . . . . . . . . . . . . . . . 56 Solr Startup Settings . . . . . . . . . . . . . . . . . . . . . . . . . . . . . . . . . . . . . . . . . . . . . . . 57
Standalone JVM Startup Settings . . . . . . . . . . . . . . . . . . . . . . . . . . . . . . . . . . . . . 58 Tanuki Service Wrapper Settings . . . . . . . . . . . . . . . . . . . . . . . . . . . . . . . . . . . . . 59
Tibco ActiveMatrix BusinessWorks Service Engine Settings . . . . . . . . . . . . . . . . . 60 webMethods Startup Settings . . . . . . . . . . . . . . . . . . . . . . . . . . . . . . . . . . . . . . . . 60
Java Agent Configuration Properties . . . . . . . . . . . . . . . . . . . . . . . . . . . . . . . . . . . . . 61 Use System Properties for Java Agent Settings . . . . . . . . . . . . . . . . . . . . . . . . . . . . . 72
Use Environment Variables for Java Agent Settings . . . . . . . . . . . . . . . . . . . . . . . . . 73 Instrument Multiple JVMs on a Single Machine . . . . . . . . . . . . . . . . . . . . . . . . . . . . . 74
Instrument Dynamically Identified JVMs . . . . . . . . . . . . . . . . . . . . . . . . . . . . . . . . . . . 76 Instrument JVMs in a Dynamic Environment . . . . . . . . . . . . . . . . . . . . . . . . . . . . . . . 76
Instrument JVMs Started by Batch or Cron Jobs . . . . . . . . . . . . . . . . . . . . . . . . . . . . 78 Instrument JVMs in Restricted Environments . . . . . . . . . . . . . . . . . . . . . . . . . . . . . . . 79
Automate Java Agent Deployment . . . . . . . . . . . . . . . . . . . . . . . . . . . . . . . . . . . . . . . 79 Instrument Apple WebObjects Applications . . . . . . . . . . . . . . . . . . . . . . . . . . . . . . . . 80
Upgrade the Java Agent . . . . . . . . . . . . . . . . . . . . . . . . . . . . . . . . . . . . . . . . . . . . . . . . . 81 Uninstall the Java Agent . . . . . . . . . . . . . . . . . . . . . . . . . . . . . . . . . . . . . . . . . . . . . . . . . 82
Administer the Java Agent . . . . . . . . . . . . . . . . . . . . . . . . . . . . . . . . . . . . . . . . . . . . . . . . 83 Java Agent Directory Structure . . . . . . . . . . . . . . . . . . . . . . . . . . . . . . . . . . . . . . . . . . 83
Moving Java Nodes to a new Application or Tier . . . . . . . . . . . . . . . . . . . . . . . . . . . . 84 IBM Java Agent . . . . . . . . . . . . . . . . . . . . . . . . . . . . . . . . . . . . . . . . . . . . . . . . . . . . . 85
Enable SSL for Java . . . . . . . . . . . . . . . . . . . . . . . . . . . . . . . . . . . . . . . . . . . . . . . . . . 86 Tune Java Agent Performance . . . . . . . . . . . . . . . . . . . . . . . . . . . . . . . . . . . . . . . . . . 92
View Agent Diagnostic Data . . . . . . . . . . . . . . . . . . . . . . . . . . . . . . . . . . . . . . . . . . . . 93 Start an Agent Logging Session . . . . . . . . . . . . . . . . . . . . . . . . . . . . . . . . . . . . . . . . . 94
Troubleshooting Java Agent Issues . . . . . . . . . . . . . . . . . . . . . . . . . . . . . . . . . . . . . . 95 Configure Syslog Logging Output by the Agent . . . . . . . . . . . . . . . . . . . . . . . . . . . . . 98
Copyright © AppDynamics 2012-2015 Page 3
1.
2. 3.
1. 2. 3.
Instrument Java ApplicationsOn this page:
Before You BeginOverview of Instrumenting Your Java ApplicationConfigure and Download the Java AgentAutomatic Naming in a Self-Service Pro TrialInstall the Agent on the App ServerView Application Activity in the Controller
Related pages:
AppDynamics EssentialsQuick Install for the Standalone Machine Agent
Watch the video:
Getting Started: AppDynamics for Java
To monitor Java applications in the Controller, you need to install the AppDynamics Java Agent oneach server that hosts applications to be monitored. You then add the Java Agent binary to theJava application process, typically by passing the agent JAR file as a startup argument to theapplication. This enables the agent to instrument your application and report performance data tothe AppDynamics Controller.
This page describes how to install the Java Agent using the Agent Download Wizard in theController. If you downloaded the agent from the , see AppDynamics download zone Install the Java
. Agent
Before You Begin
Confirm you have access to a controller, the web application where you monitor yourapplication performance:
If you use a SaaS controller, AppDynamics sent you the controller host in yourWelcome Email.If you use the on-premise controller, you supplied the host and port at install time.
Verify you have root access to run the install on the machine.Verify support for your environment at . Java Supported Environments
Overview of Instrumenting Your Java Application
To instrument your JVM and begin monitoring:
Setup: Use the Agent Download Wizard to set up and download the agent.Install and configure: Unzip the agent on your server and add it to your JVM startup script.Apply load and view data: Restart your application and apply load to activate

Copyright © AppDynamics 2012-2015 Page 4
3.
instrumentation.
The following steps provide an overview of how to install that agent. For details, see Install the.Java Agent
Configure and Download the Java Agent
The Agent Download Wizard walks you through steps for configuring and downloading the JavaAgent. The wizard presents a few choices, including the type of JVM type (Sun or JRockit or IBMJVMs) of the application you want to monitor and whether it needs to connect to the Controller withSSL. For SSL, enter the SSL port to use (AppDynamics SaaS instances uses port 443 for SSL).
The wizard takes you through a slightly different flow for a self-service trial edition of the Controllerversus a non-trial edition:
you are using a self-service Pro Trial edition of AppDynamics Pro, the application and tierIfnames are generated for you and not shown as entries in the wizard. This helps you getstarted quickly. You can always change these values after you understand how you want tomodel your environment in AppDynamics. See the following section for theautomatic-naming format. If using a non-trial edition, you can configure the application to which the agent will reportdata and the tier to which the node belongs in the wizard. A node name, the value thatidentifies an individual JVM in the monitored environment, is generated and inserted into theagent configuration automatically.
When specifying an application name, keep in mind that this value identifies the businessapplication in the AppDynamics model of your environment to which this agent will report data.Conceptually, an AppDynamics business application does not necessarily correspond to the notionof an application in the monitored environment, where the application is usually thought of, forexample, as a WAR file deployed to an application server. A single business application inAppDynamics may contain multiple applications in the monitored environment. For moreinformation about modeling your environment in AppDynamics, .see AppDynamics Concepts
Each monitored JVM must have a unique node name in AppDynamics. This means that you needto run the wizard for each JVM to monitor, or, after downloading the agent, edit the configurationfile that specifies the agent naming properties, controller-info.xml, to at least change the nodename value before copying it to other nodes.
Automatic Naming in a Self-Service Pro Trial
If you are using a self-service trial edition of AppDynamics Pro, AppDynamics names your application,tier, and node dynamically. AppDynamics uses the following naming scheme to identify agents thatdo not otherwise identify themselves in controller-info.xml or using startup arguments to the JVM:
Application name: MyAppTier name: MyTierNode name: <app_server_type>@<hostname>:<port> (forexample: [email protected]:8080)
The automatically generated node name includes the port number that the server listens on. By
Copyright © AppDynamics 2012-2015 Page 5
1.
2.
1. 2. 3.
using the listening port number in the node name, automatic naming ensures that when there aremultiple instances of an application server on a single machine, all instances have unique nodenames.
Note that the port number used in the node name may not be the primary listening port for the server. Ifa server listens on multiple ports, automatic naming uses the lowest numbered port in the node name.For example, if a server uses port 8080 as a primary HTTP port but listens for shutdown requests onport 8005, the node will be named with the 8005 port.
For tiers, the Controller automatically recognizes distinct logical tiers based on traffic flow betweenand associates the nodes to individual tiers accordingly. the nodes All tiers belong to a single
business application, MyApp. As you learn more about how you want to organize your applicationsin AppDynamics, you can change the names of nodes, tiers, or business applications in theController UI or in the configuration.
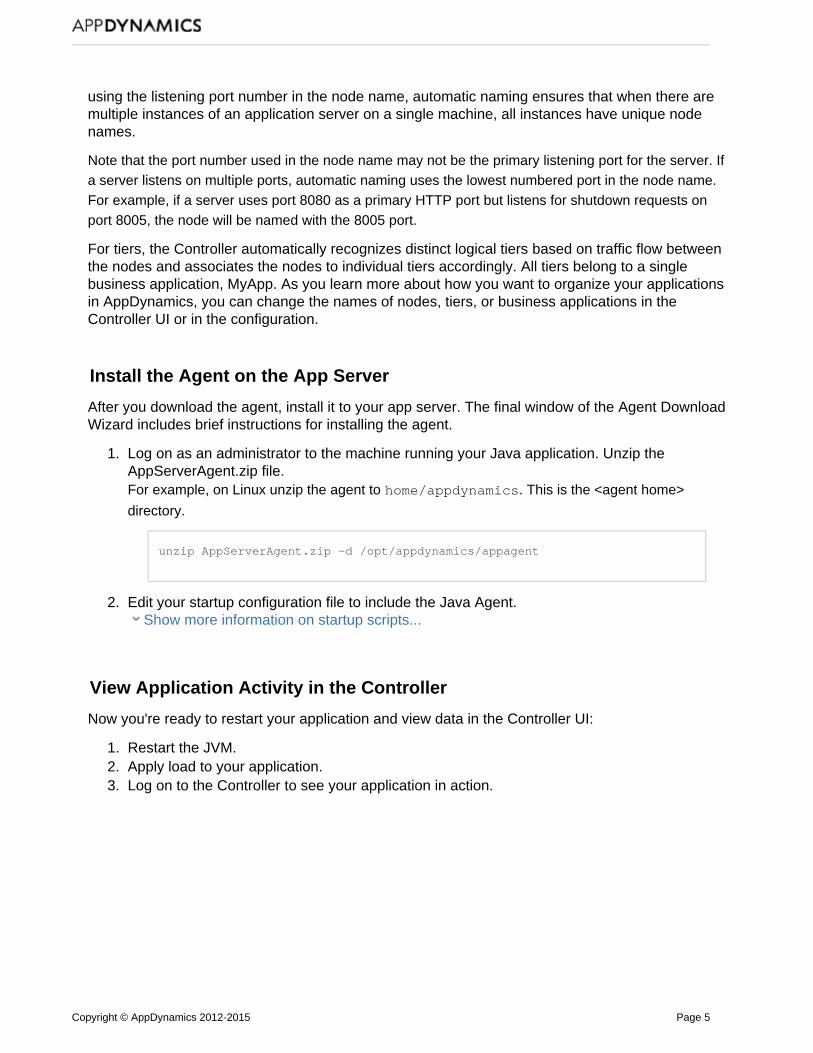
Install the Agent on the App Server
After you download the agent, install it to your app server. The final window of the Agent DownloadWizard includes brief instructions for installing the agent.
Log on as an administrator to the machine running your Java application. Unzip theAppServerAgent.zip file.For example, on Linux unzip the agent to home/appdynamics. This is the <agent home>
directory.
unzip AppServerAgent.zip -d /opt/appdynamics/appagent
Edit your startup configuration file to include the Java Agent. Show more information on startup scripts...
View Application Activity in the Controller
Now you're ready to restart your application and view data in the Controller UI:
Restart the JVM.Apply load to your application.Log on to the Controller to see your application in action.
Copyright © AppDynamics 2012-2015 Page 6
3.
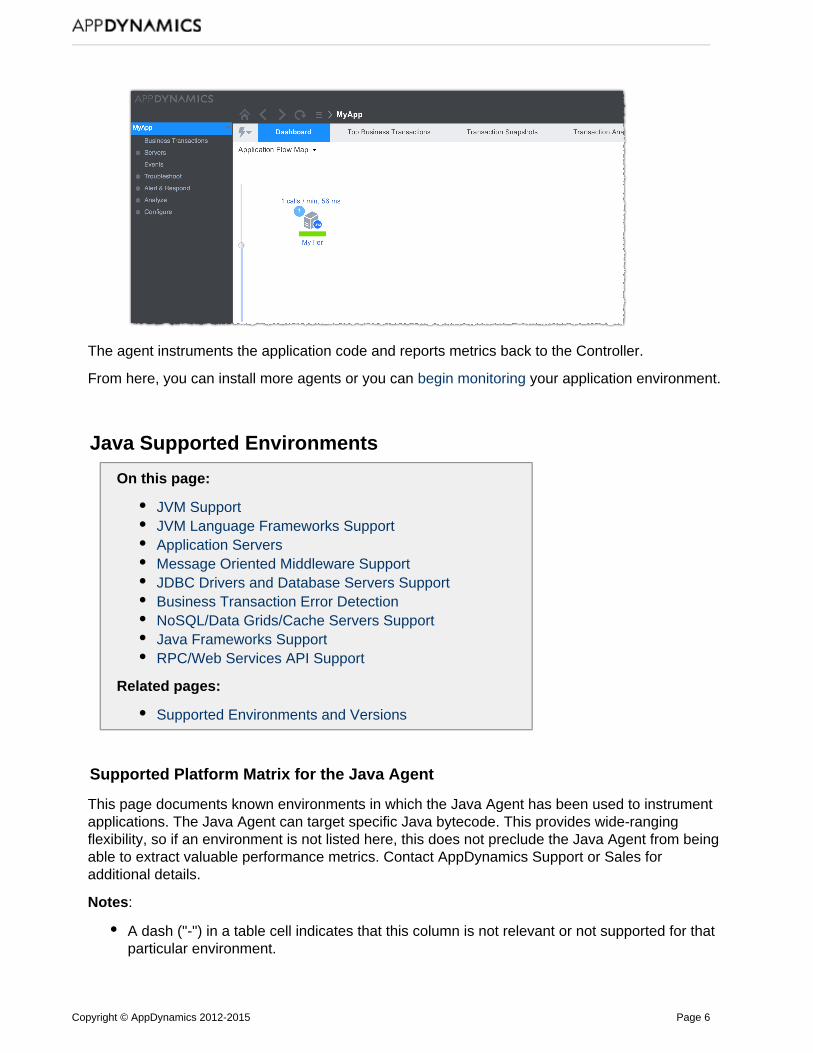
The agent instruments the application code and reports metrics back to the Controller.
From here, you can install more agents or you can begin monitoring .your application environment
Java Supported Environments
On this page:
JVM SupportJVM Language Frameworks SupportApplication ServersMessage Oriented Middleware SupportJDBC Drivers and Database Servers SupportBusiness Transaction Error DetectionNoSQL/Data Grids/Cache Servers SupportJava Frameworks SupportRPC/Web Services API Support
Related pages:
Supported Environments and Versions
Supported Platform Matrix for the Java Agent
This page documents known environments in which the Java Agent has been used to instrumentapplications. The Java Agent can target specific Java bytecode. This provides wide-rangingflexibility, so if an environment is not listed here, this does not preclude the Java Agent from beingable to extract valuable performance metrics. Contact AppDynamics Support or Sales foradditional details.
Notes:
A dash ("-") in a table cell indicates that this column is not relevant or not supported for thatparticular environment.

Copyright © AppDynamics 2012-2015 Page 7
In cases where no version is provided, assume that all versions are supported. ContactAppDynamics Support or Sales for confirmation.For environments that require additional configuration, a separate table describing or linkingto configuration information follows the support matrix.For environments supported by AppDynamics End User Monitoring, see Supported
.Environments and Versions - Web EUM
JVM Support
The AppDynamics Java Agent supports applications running with a JRE or a full JDK. These arethe known JVM environments in which the Java Agent has been used to instrument applications.
Vendor Implementation Version OperatingSystem
ObjectInstanceTracking
AutomaticLeakDetection
Custom Memory Structures
ContentInspection
AccessTracking
Oracle Java HotSpot 7Update45+
SolarisSparc 64,Windows,Linux
- - - -
Oracle Java SE(StandardEdition)
81 SolarisSparc 64,Windows,Linux
Yes Yes Yes Yes
BEA JRockit 1.5 - - Yes Yes Yes
BEA JRockit 1.6, 1.7 - - Yes Yes -
Oracle JRockit JVM 28.1+ Linux Intel64Windows
- - - -
IBM JVM 1.5.x,1.6.x,1.7.x
- - Yes, asnoted2
Yes, asnoted2,3
-
SUN JVM 1.5,1.6, 1.7
- Yes Yes Yes Yes
OpenSource
OpenJDK 1.6 Linux,windows,everywhere
- Yes - -
HP OpenVMS - - - - - -
Notes:
Copyright © AppDynamics 2012-2015 Page 8
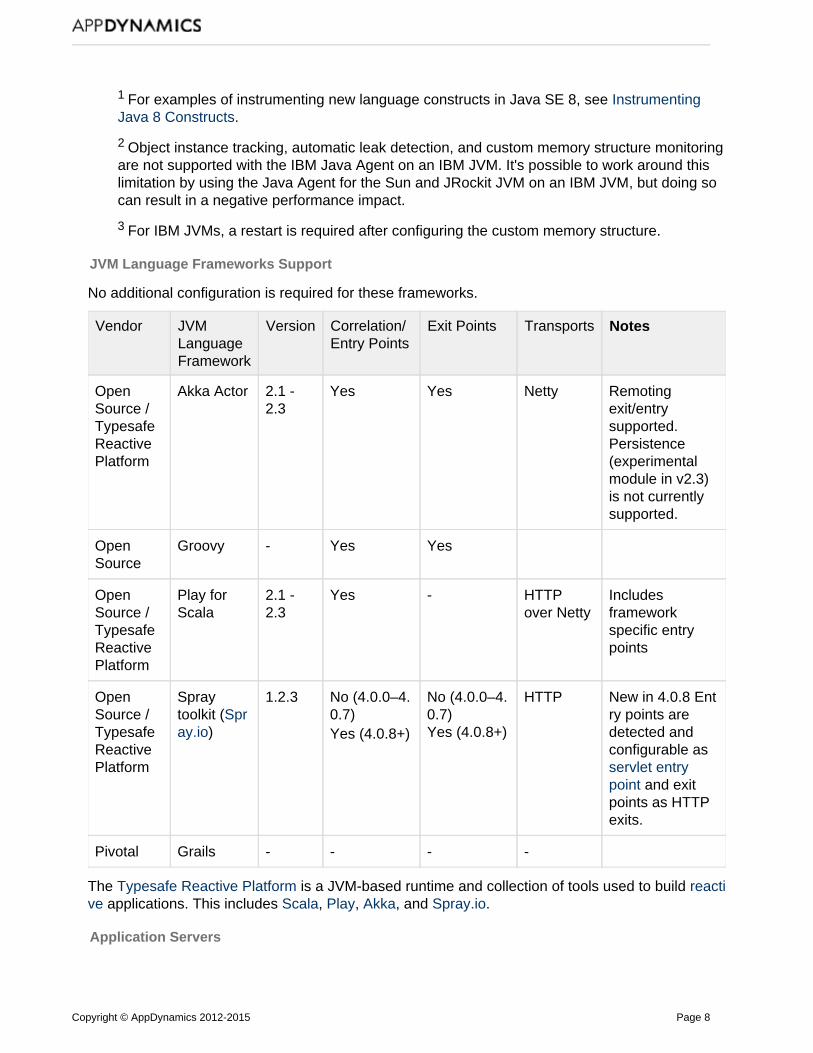
1 For examples of instrumenting new language constructs in Java SE 8, see InstrumentingJava 8 Constructs.
2 Object instance tracking, automatic leak detection, and custom memory structure monitoringare not supported with the IBM Java Agent on an IBM JVM. It's possible to work around thislimitation by using the , but doing soJava Agent for the Sun and JRockit JVM on an IBM JVM
can result in a negative performance impact.
3 For IBM JVMs, a restart is required after configuring the custom memory structure.
JVM Language Frameworks Support
No additional configuration is required for these frameworks.
Vendor JVMLanguage Framework
Version Correlation/Entry Points
Exit Points Transports Notes
OpenSource / TypesafeReactivePlatform
Akka Actor 2.1 -2.3
Yes Yes Netty Remotingexit/entrysupported. Persistence(experimentalmodule in v2.3)is not currentlysupported.
OpenSource
Groovy - Yes Yes
OpenSource / TypesafeReactivePlatform
Play forScala
2.1 -2.3
Yes - HTTPover Netty
Includesframeworkspecific entrypoints
OpenSource / TypesafeReactivePlatform
Spraytoolkit (Spr
)ay.io
1.2.3 No (4.0.0–4.0.7)Yes (4.0.8+)
No (4.0.0–4.0.7)Yes (4.0.8+)
HTTP New in 4.0.8 Entry points aredetected andconfigurable as servlet entrypoint and exitpoints as HTTPexits.
Pivotal Grails - - - -
The is a JVM-based runtime and collection of tools used to build Typesafe Reactive Platform reacti applications. This includes , , , and . ve Scala Play Akka Spray.io
Application Servers
Copyright © AppDynamics 2012-2015 Page 9
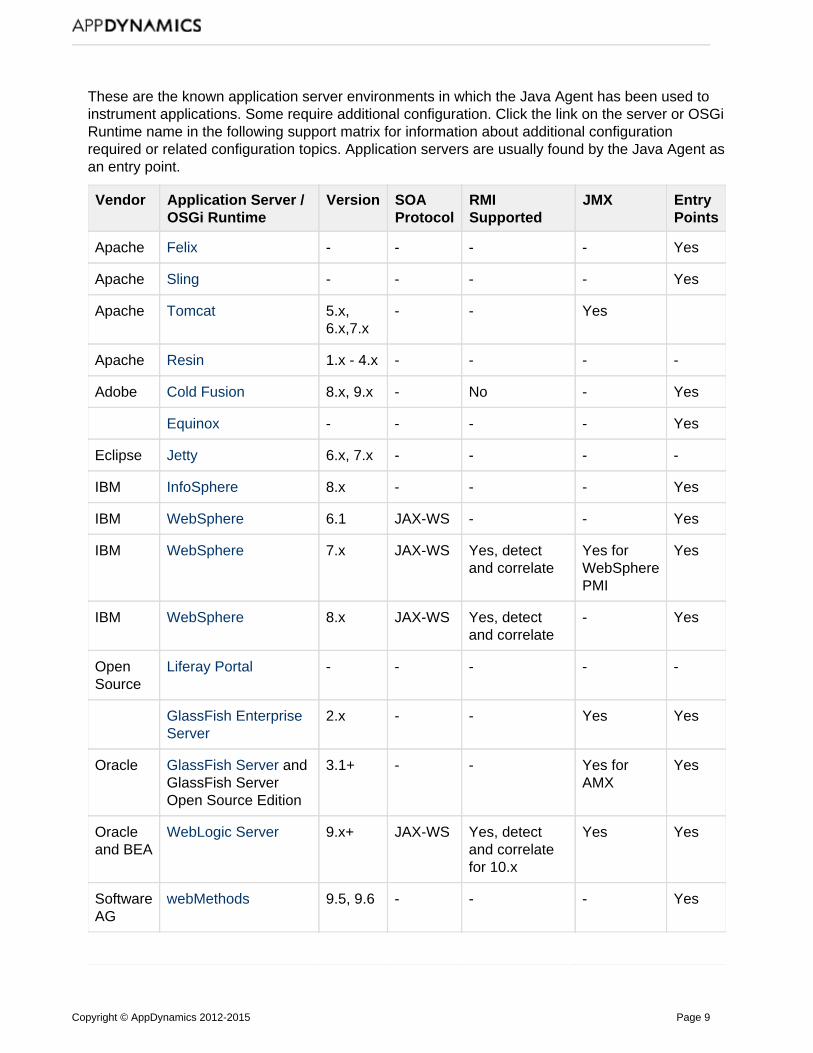
These are the known application server environments in which the Java Agent has been used toinstrument applications. Some require additional configuration. Click the link on the server or OSGiRuntime name in the following support matrix for information about additional configurationrequired or related configuration topics. Application servers are usually found by the Java Agent asan entry point.
Vendor Application Server / OSGi Runtime
Version SOAProtocol
RMISupported
JMX EntryPoints
Apache Felix - - - - Yes
Apache Sling - - - - Yes
Apache Tomcat 5.x,6.x,7.x
- - Yes
Apache Resin 1.x - 4.x - - - -
Adobe Cold Fusion 8.x, 9.x - No - Yes
Equinox - - - - Yes
Eclipse Jetty 6.x, 7.x - - - -
IBM InfoSphere 8.x - - - Yes
IBM WebSphere 6.1 JAX-WS - - Yes
IBM WebSphere 7.x JAX-WS Yes, detectand correlate
Yes forWebSpherePMI
Yes
IBM WebSphere 8.x JAX-WS Yes, detectand correlate
- Yes
OpenSource
Liferay Portal - - - - -
GlassFish EnterpriseServer
2.x - - Yes Yes
Oracle GlassFish Server and GlassFish ServerOpen Source Edition
3.1+ - - Yes forAMX
Yes
Oracleand BEA
WebLogic Server 9.x+ JAX-WS Yes, detectand correlatefor 10.x
Yes Yes
SoftwareAG
webMethods 9.5, 9.6 - - - Yes
Copyright © AppDynamics 2012-2015 Page 10
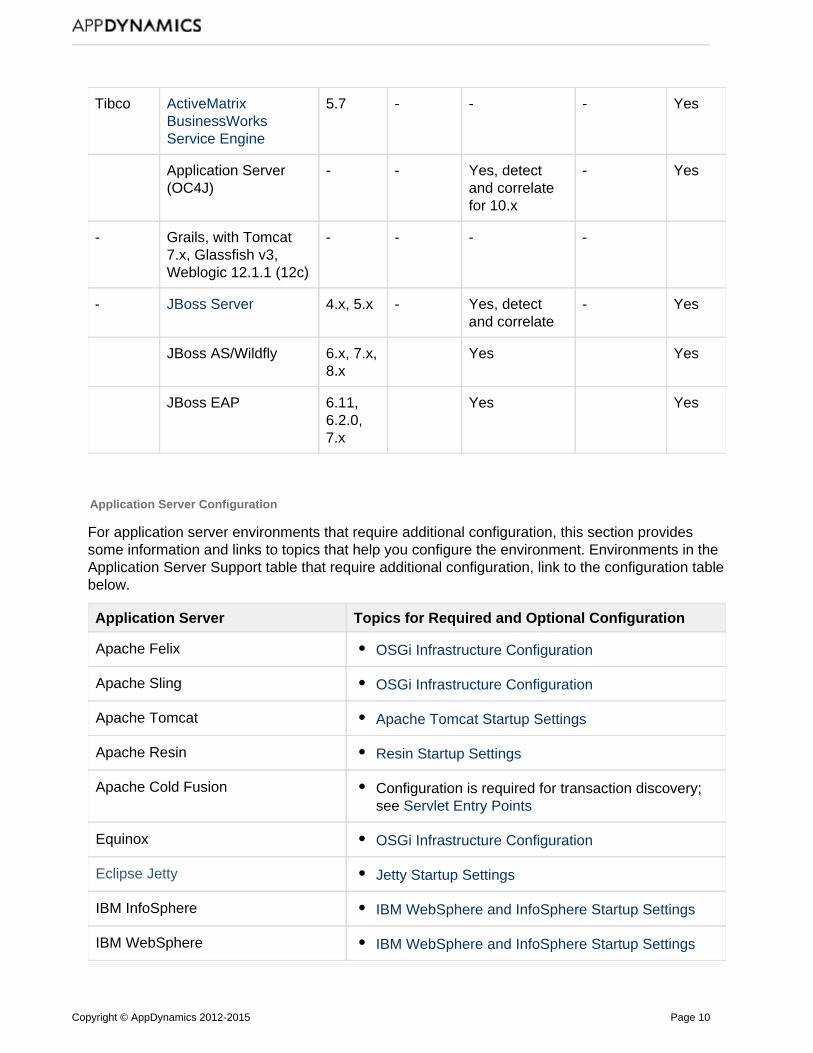
Tibco ActiveMatrixBusinessWorksService Engine
5.7 - - - Yes
Application Server(OC4J)
- - Yes, detectand correlatefor 10.x
- Yes
- Grails, with Tomcat7.x, Glassfish v3, Weblogic 12.1.1 (12c)
- - - -
- JBoss Server 4.x, 5.x - Yes, detectand correlate
- Yes
JBoss AS/Wildfly 6.x, 7.x,8.x
Yes Yes
JBoss EAP 6.11,6.2.0,7.x
Yes Yes
Application Server Configuration
For application server environments that require additional configuration, this section providessome information and links to topics that help you configure the environment. Environments in theApplication Server Support table that require additional configuration, link to the configuration tablebelow.
Application Server Topics for Required and Optional Configuration
Apache Felix OSGi Infrastructure Configuration
Apache Sling OSGi Infrastructure Configuration
Apache Tomcat Apache Tomcat Startup Settings
Apache Resin Resin Startup Settings
Apache Cold Fusion Configuration is required for transaction discovery;see Servlet Entry Points
Equinox OSGi Infrastructure Configuration
Eclipse Jetty Jetty Startup Settings
IBM InfoSphere IBM WebSphere and InfoSphere Startup Settings
IBM WebSphere IBM WebSphere and InfoSphere Startup Settings
Copyright © AppDynamics 2012-2015 Page 11
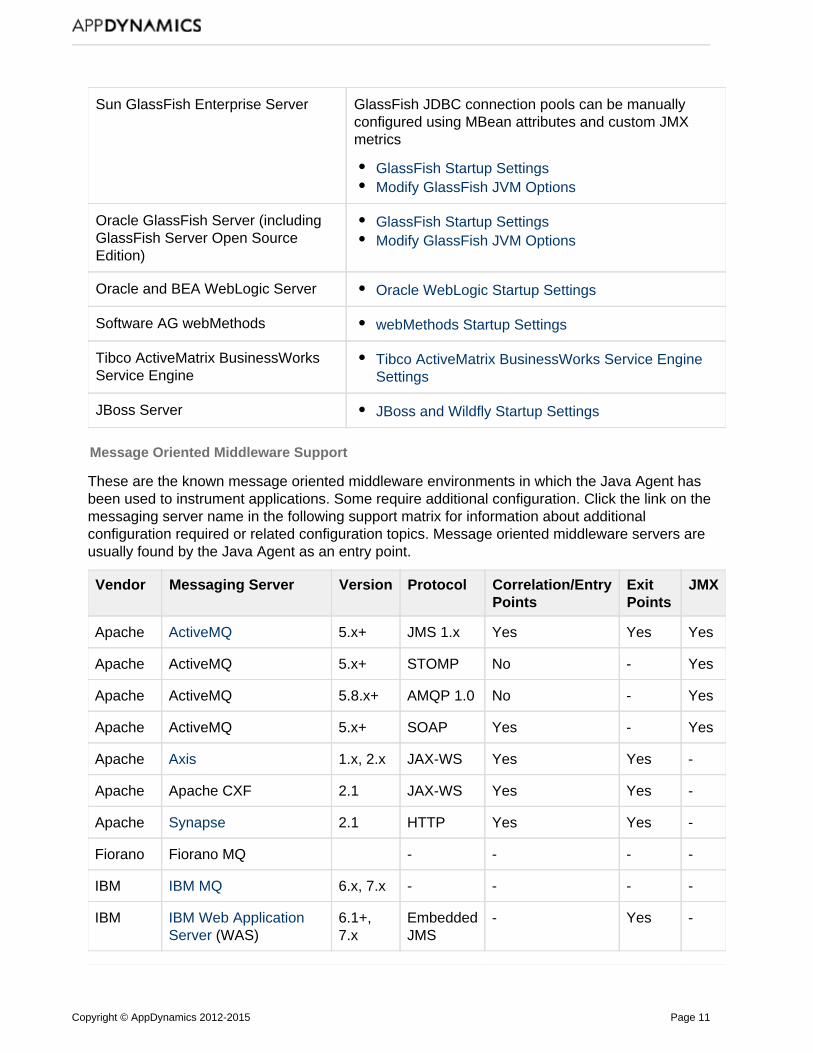
Sun GlassFish Enterprise Server GlassFish JDBC connection pools can be manuallyconfigured using MBean attributes and custom JMXmetrics
GlassFish Startup SettingsModify GlassFish JVM Options
Oracle GlassFish Server (includingGlassFish Server Open Source
)Edition
GlassFish Startup SettingsModify GlassFish JVM Options
Oracle and BEA WebLogic Server Oracle WebLogic Startup Settings
Software AG webMethods webMethods Startup Settings
Tibco ActiveMatrix BusinessWorksService Engine
Tibco ActiveMatrix BusinessWorks Service EngineSettings
JBoss Server JBoss and Wildfly Startup Settings
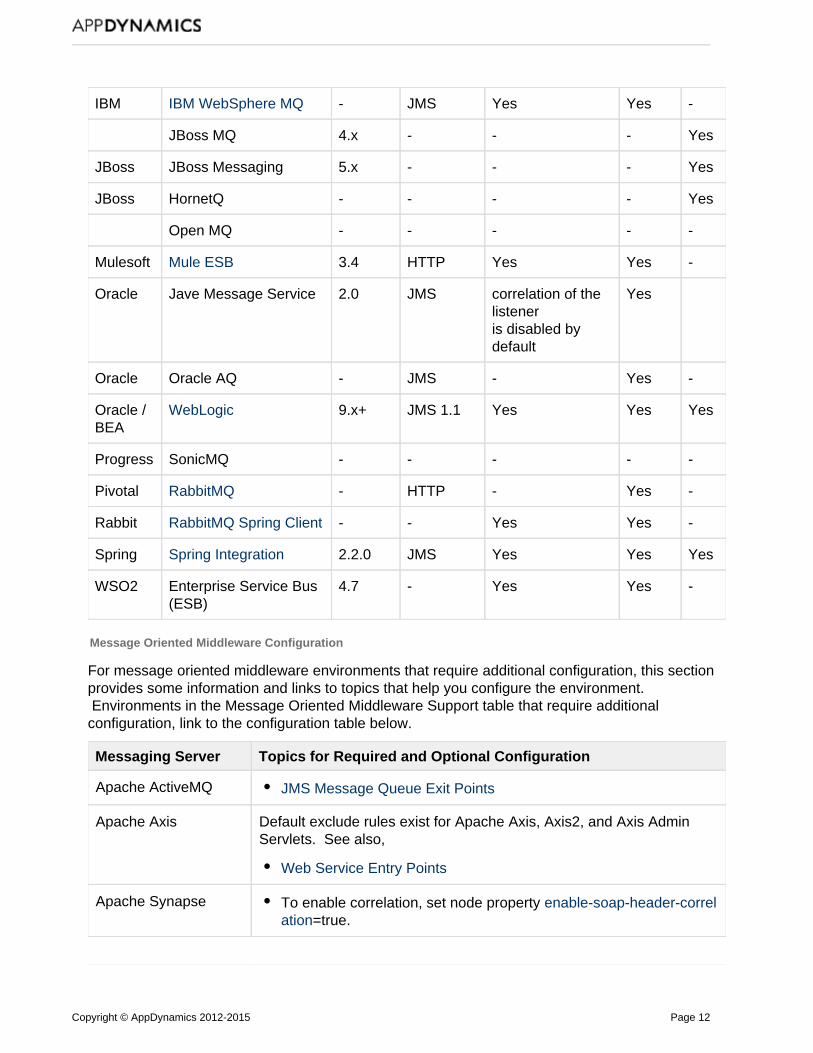
Message Oriented Middleware Support
These are the known message oriented middleware environments in which the Java Agent hasbeen used to instrument applications. Some require additional configuration. Click the link on themessaging server name in the following support matrix for information about additionalconfiguration required or related configuration topics. Message oriented middleware servers areusually found by the Java Agent as an entry point.
Vendor Messaging Server Version Protocol Correlation/EntryPoints
ExitPoints
JMX
Apache ActiveMQ 5.x+ JMS 1.x Yes Yes Yes
Apache ActiveMQ 5.x+ STOMP No - Yes
Apache ActiveMQ 5.8.x+ AMQP 1.0 No - Yes
Apache ActiveMQ 5.x+ SOAP Yes - Yes
Apache Axis 1.x, 2.x JAX-WS Yes Yes -
Apache Apache CXF 2.1 JAX-WS Yes Yes -
Apache Synapse 2.1 HTTP Yes Yes -
Fiorano Fiorano MQ - - - -
IBM IBM MQ 6.x, 7.x - - - -
IBM IBM Web ApplicationServer (WAS)
6.1+,7.x
EmbeddedJMS
- Yes -
Copyright © AppDynamics 2012-2015 Page 12
IBM IBM WebSphere MQ - JMS Yes Yes -
JBoss MQ 4.x - - - Yes
JBoss JBoss Messaging 5.x - - - Yes
JBoss HornetQ - - - - Yes
Open MQ - - - - -
Mulesoft Mule ESB 3.4 HTTP Yes Yes -
Oracle Jave Message Service 2.0 JMS correlation of thelistener is disabled bydefault
Yes
Oracle Oracle AQ - JMS - Yes -
Oracle /BEA
WebLogic 9.x+ JMS 1.1 Yes Yes Yes
Progress SonicMQ - - - - -
Pivotal RabbitMQ - HTTP - Yes -
Rabbit RabbitMQ Spring Client - - Yes Yes -
Spring Spring Integration 2.2.0 JMS Yes Yes Yes
WSO2 Enterprise Service Bus(ESB)
4.7 - Yes Yes -
Message Oriented Middleware Configuration
For message oriented middleware environments that require additional configuration, this sectionprovides some information and links to topics that help you configure the environment. Environments in the Message Oriented Middleware Support table that require additionalconfiguration, link to the configuration table below.
Messaging Server Topics for Required and Optional Configuration
Apache ActiveMQ JMS Message Queue Exit Points
Apache Axis Default exclude rules exist for Apache Axis, Axis2, and Axis AdminServlets. See also,
Web Service Entry Points
Apache Synapse To enable correlation, set node property enable-soap-header-correl=true.ation

Copyright © AppDynamics 2012-2015 Page 13
IBM MQ No additional configuration is required.
IBM Web ApplicationServer
No additional configuration is required. See also,
JMS Message Queue Exit Points
IBM WebSphere MQ IBM Websphere MQ Message Queue Exit Points
Mule ESB Mule ESB Startup SettingsMule ESB SupportSee also HTTP Exit Points for Java
BEA WebLogic Oracle WebLogic Startup Settings
Pivotal RabbitMQ No additional configuration is required. See also,
RabbitMQ Message Queue Exit Points
RabbitMQ SpringClient
No addition configuration is required, See also,
Message Queue Exit Points for Java
Spring Integration Spring Integration SupportSee also, JMS Message Queue Exit Points
JDBC Drivers and Database Servers Support
These are the known JDBC driver and database server environments in which the Java Agent hasbeen used to instrument applications. AppDynamics can follow transactions using these drivers tothe designated database.
JDBCVendor
Driver Version Driver Type DatabaseServer
DatabaseVersion
Apache 10.9.1.0 Embedded or client Derby -
Apache - - Cassandra -
Progress DataDirect data connectivity for ODBC andJBDC driver access, dataintegration, and SaaS and cloudcomputing solutions
- -
IBM JDBC 3.0 version3.57.82 or JDBC4.0 version 4.7.85
DB2 Universal JDBC driver DB2 9.x
IBM JDBC 3.0 version3.66.46 or JDBC4.0 version4.16.53
DB2 Universal JDBC driver DB2 10.1
Copyright © AppDynamics 2012-2015 Page 14
IBM - Type IV Informix -
Microsoft 4 Type II MS SQLServer
2012*
OracleMySQL,MySQLCommunity
5.x Type II, Type IV MySQL 5.x
OpenSource
Connector/J5.1.27
Type IV MySQL 5.x
OpenSource
- Type IV Postgres 8.x, 9.x
Oracle 9.x Type II, Type IV OracleDatabase
8i+
Sybase jConnect Type IV Sybase -
Teradata Teradata -
Notes:
Type II is a C or OCI driverType IV is a thin database client and is a pure Java driver
Business Transaction Error Detection
The Java Agent supports the following logging frameworks for business transaction errordetection:
Apache Log4j and Log4j 2 java.util.loggingSimple Logging Facade for Java (SLF4J)Logback
To instrument other types of loggers, see .Configure a Custom Logger
NoSQL/Data Grids/Cache Servers Support
These are the known NoSQL, data grids and cache server environments in which the JavaAgent has been used to instrument applications. Some require additional configuration. Click thelink on the database, data grid or cache name in the following support matrix for information aboutadditional configuration required or related configuration topics.
Vendor Database/Data Grid/Cache Version Correlation/EntryPoints
JMX
Apache Casandra (DataStax, REST) andCassandra CQL3
1.x Correlation Yes
Copyright © AppDynamics 2012-2015 Page 15
Apache Apache Lucene - Apache Solr 1.4.1 Entry Points Yes
JBoss JBoss Cache TreeCache - - -
Terracotta EhCache - - -
OpenSource
Memcached - - -
OpenSource
MongoDB - - -
Oracle Coherence 3.7.1 Custom-Exit Yes
JBoss Infinispan 5.3.0+ Correlation -
NoSQL/Data Grids/Cache Servers Configuration
For NoSQL, data grids, and cache server environments that require additional configuration, thissection provides some information and links to topics that help you configure the environment. Environments in the NoSQL/Data Grids/Cache Servers Support table that require additionalconfiguration, link to the configuration table below.
Database/Data Grid/Cache Topics for Required or OptionalConfiguration
Apache Cassandra (DataStax, REST) andCassandra CQL3
Cassandra Exit Points for JavaApache Cassandra Startup Settings
Apache Lucene - Apache Solr Solr Startup Settings
JBoss JBoss Startup Settings
Terracotta EhCache EhCache Exit Points
Open Source Memcached Memcached Exit Points
Open Source MongoDB Configure Backend Detection for Java
Oracle Coherence Coherence Startup Settings
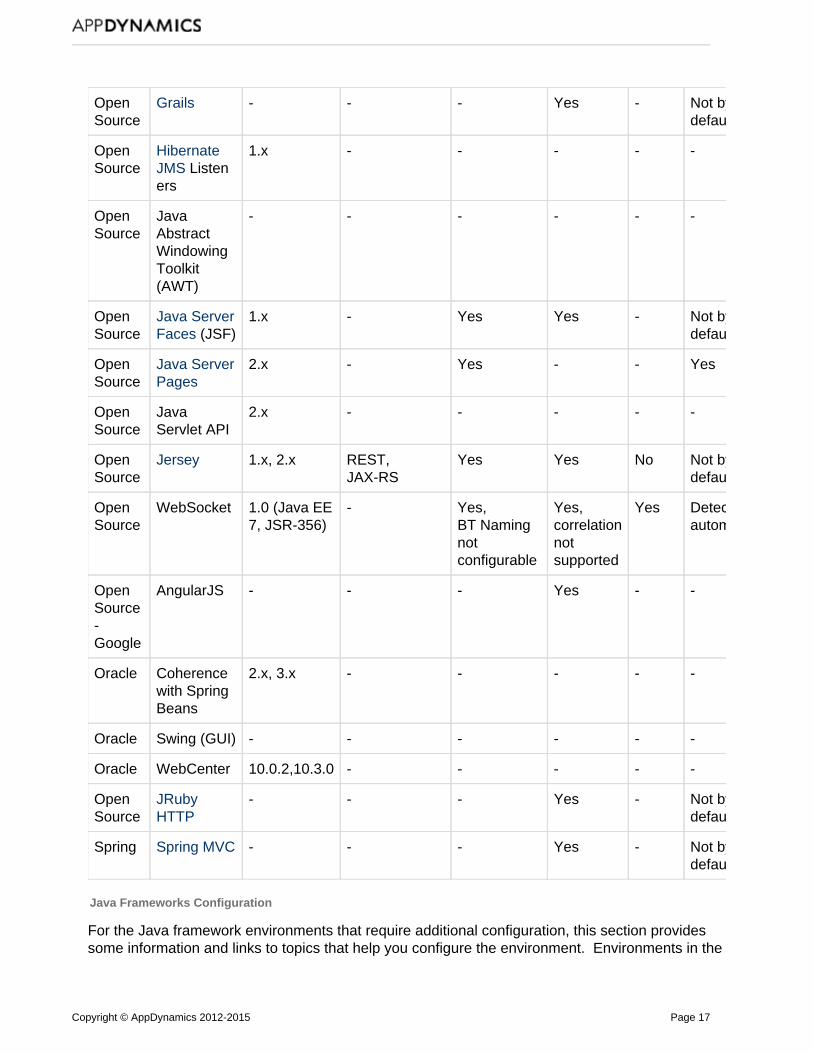
Java Frameworks Support
These are the known Java framework environments in which the Java Agent has been used toinstrument applications. Some require additional configuration. Click the link on the Javaframework name in the following support matrix for information about additional configurationrequired or related configuration topics.
Vendor Framework Version SOA protocol(WebServices)
AutoNaming
EntryPoints
ExitPoints
Detection
Copyright © AppDynamics 2012-2015 Page 16
Adobe BlazeDS - HTTP andJMS adaptor
- Yes -
Adobe ColdFusion 8.x, 9.x - - Yes - Configurationrequired fortransactiondiscovery
Apache Cassandrawith Thrift framework
- - - Yes Yes Apache ThriftEntry andExit pointsare detected
Apache Struts 1.x, 2.x - - Yes StrutsActions aredetected asentry points,strutsinvocationhandler isinstrumented
Apache Tapestry 5 - - Yes - Not bydefault
Wicket - - No Yes - Not bydefault
Apple WebObjects 5.4.3 HTTP Yes Yes - Yes
CometD 2.6 HTTP Yes Yes - -
Eclipse RCP (RichClientPlatform)
- - - - - -
Google GoogleWeb Toolkit(GWT)
2.5.1 HTTP Yes Yes - -
JBoss JBossWSNativeStack
4.x, 5.x Native Stack - - - -
OpenSource
Direct WebRemoting(DWR)
- - - - - -
OpenSource
EnterpriseJava Beans(EJB)
2.x, 3.x - - Yes - -
Copyright © AppDynamics 2012-2015 Page 17
OpenSource
Grails - - - Yes - Not bydefault
OpenSource
HibernateJMS Listeners
1.x - - - - -
OpenSource
JavaAbstractWindowingToolkit(AWT)
- - - - - -
OpenSource
Java ServerFaces (JSF)
1.x - Yes Yes - Not bydefault
OpenSource
Java ServerPages
2.x - Yes - - Yes
OpenSource
JavaServlet API
2.x - - - - -
OpenSource
Jersey 1.x, 2.x REST,JAX-RS
Yes Yes No Not bydefault
OpenSource
WebSocket 1.0 (Java EE7, JSR-356)
- Yes,BT Namingnotconfigurable
Yes,correlationnotsupported
Yes Detection isautomatic
OpenSource-Google
AngularJS - - - Yes - -
Oracle Coherencewith SpringBeans
2.x, 3.x - - - - -
Oracle Swing (GUI) - - - - - -
Oracle WebCenter 10.0.2,10.3.0 - - - - -
OpenSource
JRubyHTTP
- - - Yes - Not bydefault
Spring Spring MVC - - - Yes - Not bydefault
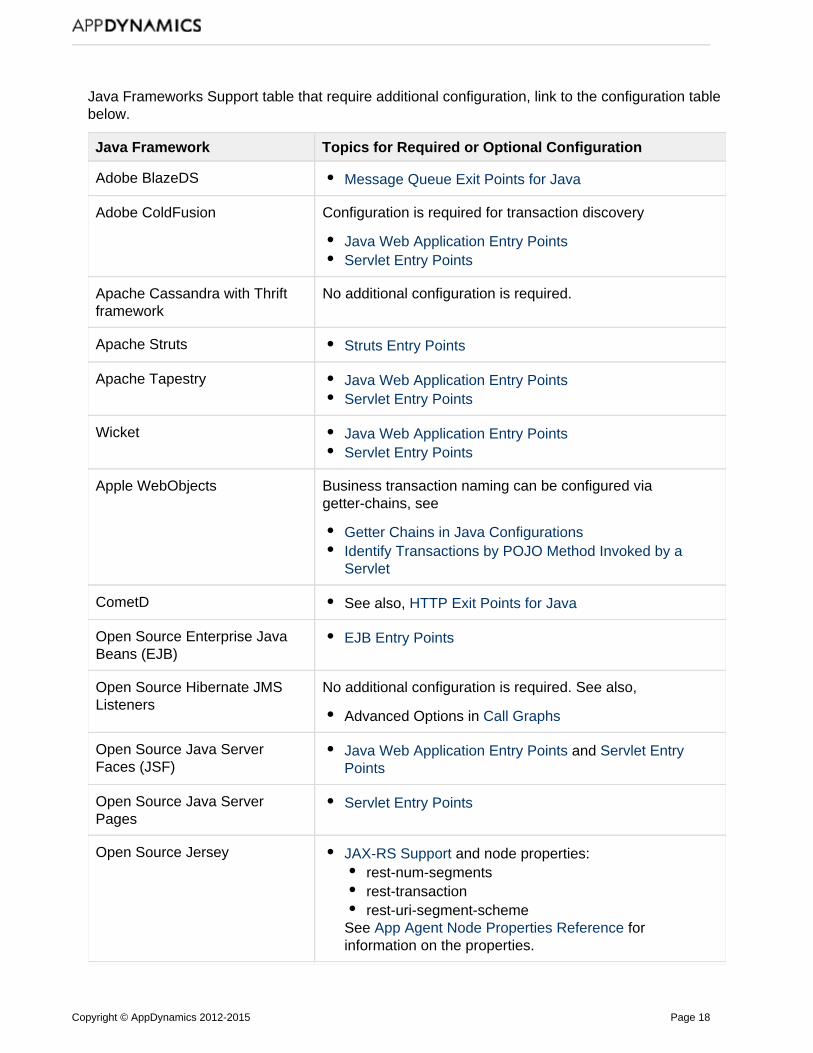
Java Frameworks Configuration
For the Java framework environments that require additional configuration, this section providessome information and links to topics that help you configure the environment. Environments in the
Copyright © AppDynamics 2012-2015 Page 18
Java Frameworks Support table that require additional configuration, link to the configuration tablebelow.
Java Framework Topics for Required or Optional Configuration
Adobe BlazeDS Message Queue Exit Points for Java
Adobe ColdFusion Configuration is required for transaction discovery
Java Web Application Entry PointsServlet Entry Points
Apache Cassandra with Thriftframework
No additional configuration is required.
Apache Struts Struts Entry Points
Apache Tapestry Java Web Application Entry PointsServlet Entry Points
Wicket Java Web Application Entry PointsServlet Entry Points
Apple WebObjects Business transaction naming can be configured viagetter-chains, see
Getter Chains in Java ConfigurationsIdentify Transactions by POJO Method Invoked by aServlet
CometD See also, HTTP Exit Points for Java
Open Source Enterprise JavaBeans (EJB)
EJB Entry Points
Open Source Hibernate JMSListeners
No additional configuration is required. See also,
Advanced Options in Call Graphs
Open Source Java ServerFaces (JSF)
Java Web Application Entry Points and Servlet EntryPoints
Open Source Java ServerPages
Servlet Entry Points
Open Source Jersey JAX-RS Support and node properties:rest-num-segmentsrest-transactionrest-uri-segment-scheme
See forApp Agent Node Properties Referenceinformation on the properties.
Copyright © AppDynamics 2012-2015 Page 19
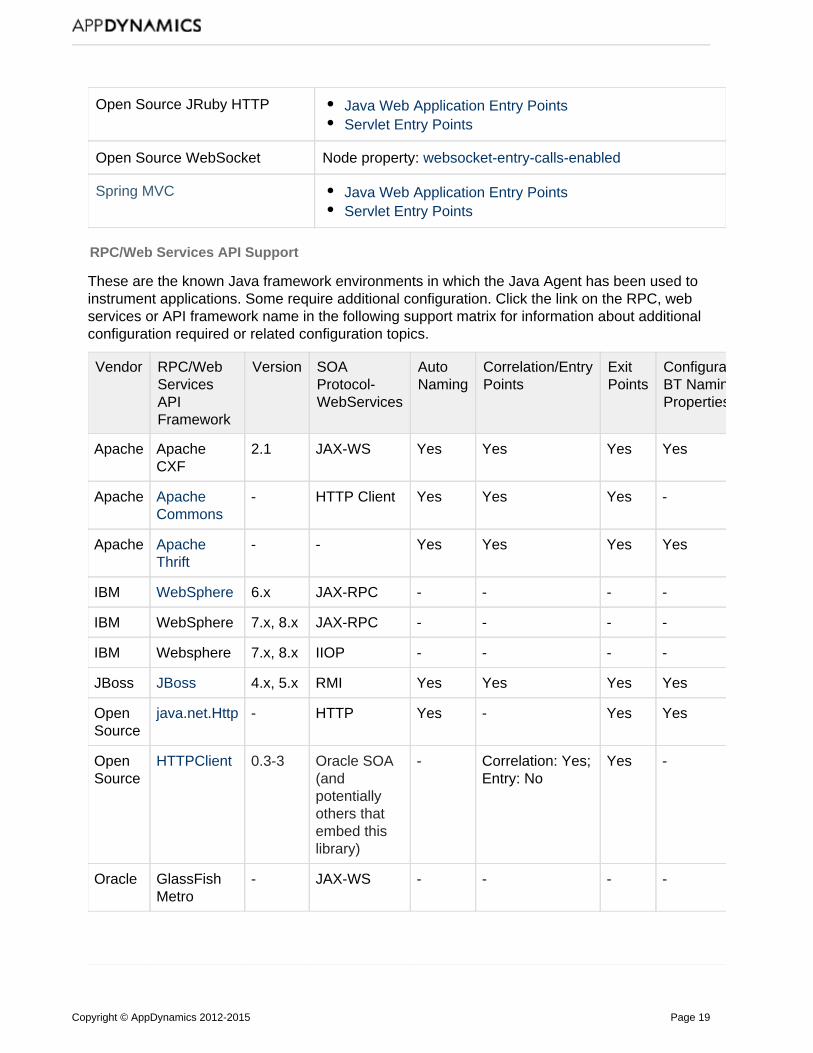
Open Source JRuby HTTP Java Web Application Entry PointsServlet Entry Points
Open Source WebSocket Node property: websocket-entry-calls-enabled
Spring MVC Java Web Application Entry PointsServlet Entry Points
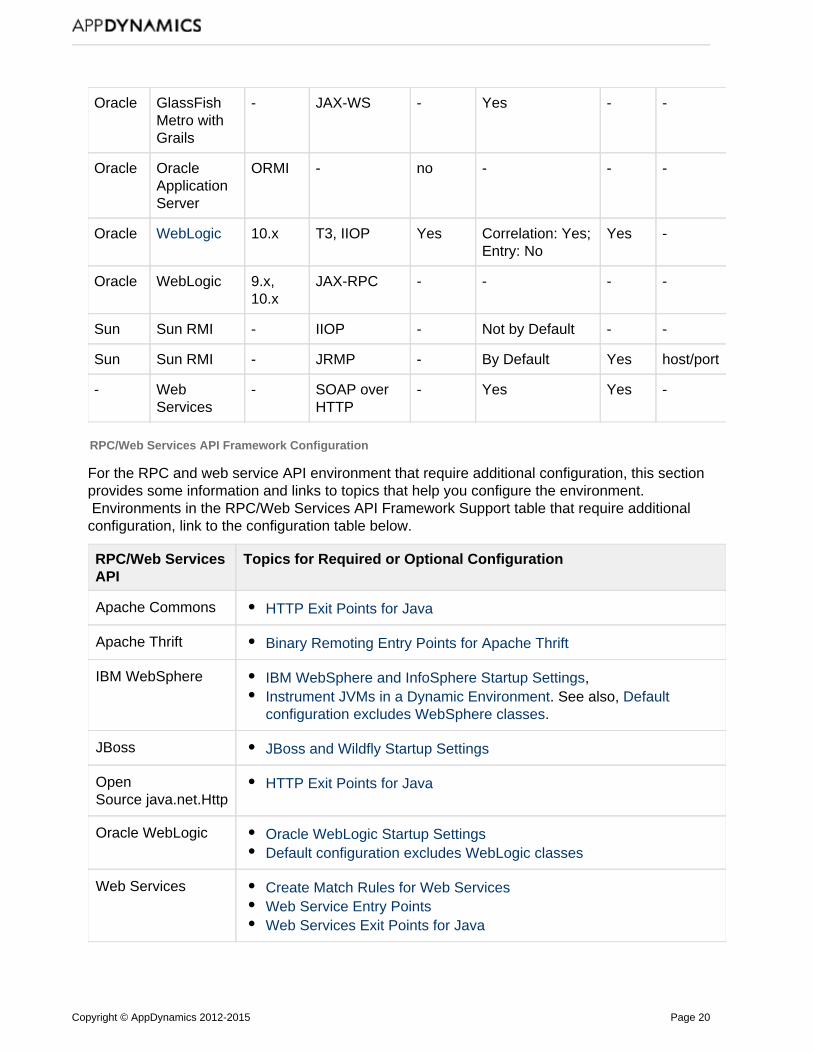
RPC/Web Services API Support
These are the known Java framework environments in which the Java Agent has been used toinstrument applications. Some require additional configuration. Click the link on the RPC, webservices or API framework name in the following support matrix for information about additionalconfiguration required or related configuration topics.
Vendor RPC/WebServicesAPIFramework
Version SOAProtocol-WebServices
AutoNaming
Correlation/EntryPoints
ExitPoints
ConfigurableBT NamingProperties
Apache ApacheCXF
2.1 JAX-WS Yes Yes Yes Yes
Apache ApacheCommons
- HTTP Client Yes Yes Yes -
Apache ApacheThrift
- - Yes Yes Yes Yes
IBM WebSphere 6.x JAX-RPC - - - -
IBM WebSphere 7.x, 8.x JAX-RPC - - - -
IBM Websphere 7.x, 8.x IIOP - - - -
JBoss JBoss 4.x, 5.x RMI Yes Yes Yes Yes
OpenSource
java.net.Http - HTTP Yes - Yes Yes
OpenSource
HTTPClient 0.3-3 Oracle SOA(andpotentiallyothers thatembed thislibrary)
- Correlation: Yes;Entry: No
Yes -
Oracle GlassFishMetro
- JAX-WS - - - -
Copyright © AppDynamics 2012-2015 Page 20
Oracle GlassFishMetro withGrails
- JAX-WS - Yes - -
Oracle OracleApplicationServer
ORMI - no - - -
Oracle WebLogic 10.x T3, IIOP Yes Correlation: Yes;Entry: No
Yes -
Oracle WebLogic 9.x,10.x
JAX-RPC - - - -
Sun Sun RMI - IIOP - Not by Default - -
Sun Sun RMI - JRMP - By Default Yes host/port
- WebServices
- SOAP overHTTP
- Yes Yes -
RPC/Web Services API Framework Configuration
For the RPC and web service API environment that require additional configuration, this sectionprovides some information and links to topics that help you configure the environment. Environments in the RPC/Web Services API Framework Support table that require additionalconfiguration, link to the configuration table below.
RPC/Web ServicesAPI
Topics for Required or Optional Configuration
Apache Commons HTTP Exit Points for Java
Apache Thrift Binary Remoting Entry Points for Apache Thrift
IBM WebSphere IBM WebSphere and InfoSphere Startup Settings,Instrument JVMs in a Dynamic Environment. See also, Default
.configuration excludes WebSphere classes
JBoss JBoss and Wildfly Startup Settings
OpenSource java.net.Http
HTTP Exit Points for Java
Oracle WebLogic Oracle WebLogic Startup SettingsDefault configuration excludes WebLogic classes
Web Services Create Match Rules for Web ServicesWeb Service Entry PointsWeb Services Exit Points for Java
Copyright © AppDynamics 2012-2015 Page 21
Install the Java Agent
On this page:
Planning for Java Agent InstallationJava Agent Resource OverheadDownload and Unzip the Java AgentAgent Configuration Options and PrecedenceConfigure the Java Agent Connection to the ControllerConfigure Java Agent Account Information (Multi-tenantmode or SaaS Installations Only) Configure the Business Application, Tier, and NodeAdd the Java Agent as a javaagent Argument to the JVMAttach the Java Agent to a Running JVM ProcessVerify InstallationAdditional Installation Scenarios
Related pages:
Java Agent Configuration Properties
Installing the AppDynamics Java Agent requires putting the agent software on the applicationmachine, configuring the agent settings, and adding the Java Agent to the JVM. You add the agentto the JVM by including it as a argument in the startup script for the JVM.
To avoid permission issues, you should install the agent as the same user that owns the JVM oras an administrator on the host machine. In any case, the user that runs the JVM must have writeprivileges to the and directories in the Java Agent home.conf logs
While it's possible for the Java Agent to run on the same JVM as other Byte Code Injection (BCI)agents as long as the other agents do not interfere with the Java Agent class transformation,AppDynamics advises against it. As always, you should thoroughly test your deployment in astaging environment to detect possible conflicts.
Planning for Java Agent Installation
Before installing the Java Agent, be prepared with the following information.
Planning Item Description
Where is the startupscript for the JVM?
If using a Java servicewrapper, you need toknow the location of thewrapper configuration.
This is where you can add startup arguments in the script file andsystem properties, if needed.
Copyright © AppDynamics 2012-2015 Page 22
What host and port is theController running on?
For SaaS customers, AppDynamics provides this information toyou. For on-premise Controllers, this information is configuredduring Controller installation. See ( or Install the Controller Configur
).e Windows for Controller Hosting
To what AppDynamicbusiness application doesthis JVM belong?
Usually, all JVMs in your distributed application infrastructurebelong to the same AppDynamics business application. You assigna name to the business application. For details see AppDynamics
.Concepts
To what AppDynamicstier does this JVMbelong?
You assign a name to the tier. For details see AppDynamics.Concepts
In addition to the JVM startup script file, two other files are important during installation:
is the agent binary file. javaagent.jar The -javaagent argument should specify thefully-qualified path to this file. No separate classpath arguments need to be added.
undercontroller-info.xml is where you<agent_home>/ver<ver_number>/confadd the configuration mentioned in the planning list. This file contains configuration settingsspecific to the agent version you are using, and take precedence over the same file in the <
directory. For most settings you should use this version-specific file. agent_home>/conf
The following sections take you through the steps for downloading and installing the Java Agentmanually. Alternatively, configure the agent using Agent Download Wizard, as described in Instru
.ment Java Applications
Java Agent Resource Overhead
While relatively lightweight, the Java Agent does add a certain amount of overhead to the overallresource consumption of an application. The existing resource allocation for most applications canabsorb the additional overhead imposed by the agent, so you do not normally need to increase the
. resource allocation for the application when installing the agent
However, the exact CPU or memory overhead added by the agent can vary depending upon yourapplication and how you have configured AppDynamics.
If your application operates within a small margin of its existing memory resource allocation, youmay choose to increase the allocation for the application. AppDynamics recommends allocatingthe following amounts of additional Heap and PermGen space to accommodate the agent:
Maximum heap size (-Xmx): 100 MB in addition to the amount required by the applicationMaximum PermGen ( ) heap size (-XX:MaxPermSize): 20 MB permanent generation in
addition to the amount required by the application
In terms of CPU consumption, the agent can add between 0% to 2% additional overhead on CPUusage.
Certain resource-intensive AppDynamics features, such as asynchronous transaction tracking, can
Copyright © AppDynamics 2012-2015 Page 23
1. 2.
1. 2. 3. 4.
increase resource consumption as well. AppDynamics recommends that you monitor the memoryconsumption of your application to ensure that there are sufficient resources allocated to it.
Download and Unzip the Java Agent
Download the Java Agent ZIP file from .AppDynamics Download CenterExtract the ZIP file to the destination directory as the same user or administrator of the JVM.Take note of the following:
Extract the Java Agent to a directory that is outside of your containerAll files should be readable by the Java AgentRuntime directory should be writable by the Java Agent
Note: Be sure to avoid installing the agent into a directory used by the application server, such asto the Tomcat webapps directory. To avoid this possibility, install the Java Agent to a directoryoutside of application server home directory, such as to \usr\local\agentsetup\appserveragent.
Agent Configuration Options and Precedence
You can configure the Java app agent settings, such as its Controller connection settings, usingone of several mechanisms. Those mechanisms and the order of priority (in the case of conflictingsettings) are:
Environment variable System property <agent_home>/ver<version_number/conf/controller-info.xml <agent_home>/conf/controller-info.xml
When reading its configuration, the agent checks each of these sources in the order shown anduses the value from the first source that contains a non-empty value for a particular setting.
If you used the download Wizard in the UI to get the agent, you can find the settings in the versionspecific controller-info.xml file.
Configure the Java Agent Connection to the Controller
Configure properties for the Controller host name and its port number.
Configure in controller-info.xml
Configure using SystemProperties
Required Default
<controller-host> Dappdynamics.controller.hostName Yes None
Copyright © AppDynamics 2012-2015 Page 24
<controller-port> -Dappdynamics.controller.port Yes For On-premiseControllerinstallations: Bydefault, port 8090 isused for HTTP and8181 is used for HTTPScommunication. For SaaS Controller
By default,service:port 80 is used forHTTP and 443 is usedfor HTTPScommunication.
Optional settings for Java Agent-to-Controller communication
To configure the Java Agent to use SSL, see Java Agent Configuration Propertiesand .Enable SSL (Java)To configure the Java Agent to use proxy settings see Java Agent Configuration Properties
Configure Java Agent Account Information (Multi-tenant mode or SaaS InstallationsOnly)
This step is required only when the AppDynamics Controller is configured in Controller or when you .Tenant Mode use a SaaS Controller
Skip this step if you are using single-tenant mode, which is the default in an on-premiseinstallation.
Specify the properties for Account Name and Account Key. This information is provided inthe Welcome email from the AppDynamics Support Team. You can also find this informationin the <controller_install>/initial_account_access_info.txt file.
Configure using controller-info.xml
Configure using System Properties
Required Default
<account-name> Dappdynamics.agent.accountName Required only ifyour Controller isconfigured for mul
or ti-tenant modeyour controller ishosted.
None.
<account-access-key> Dappdynamics.agent.accountAccessKey Required only ifyour Controller isconfigured for mul
or ti-tenant modeyour controller ishosted.
None.
Copyright © AppDynamics 2012-2015 Page 25
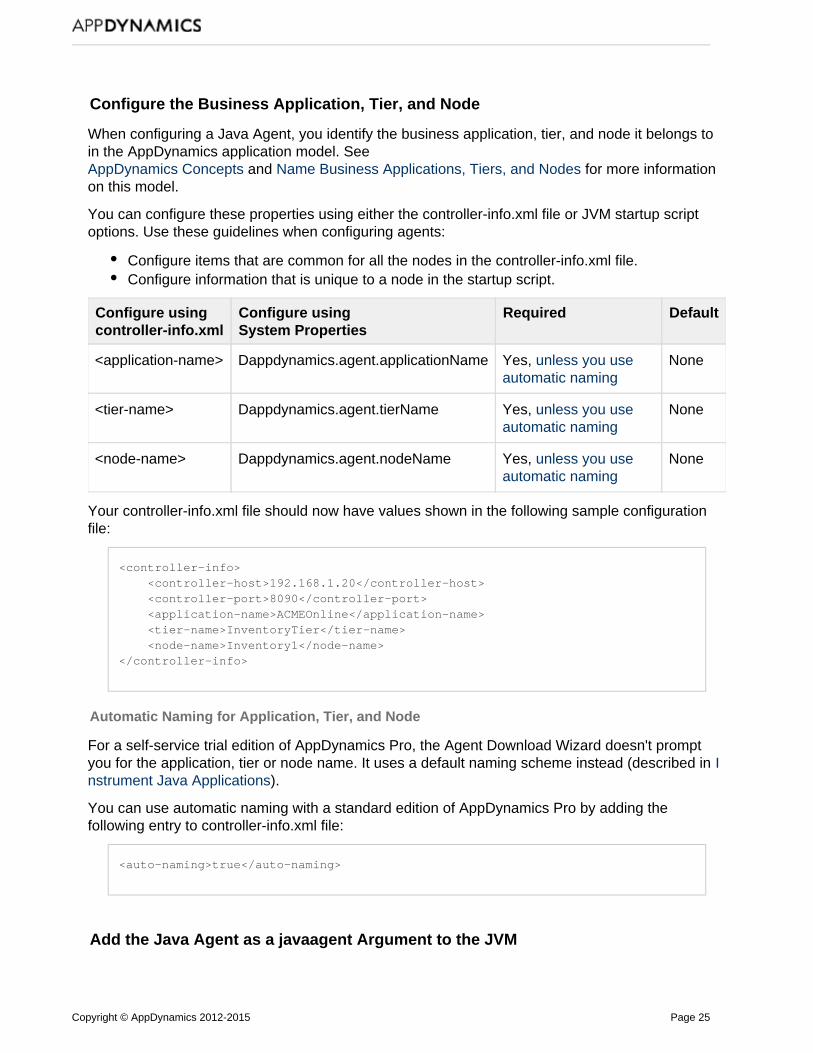
Configure the Business Application, Tier, and Node
When configuring a Java Agent, you identify the business application, tier, and node it belongs toin the AppDynamics application model. See
and for more informationAppDynamics Concepts Name Business Applications, Tiers, and Nodeson this model.
You can configure these properties using either the controller-info.xml file or JVM startup scriptoptions. Use these guidelines when configuring agents:
Configure items that are common for all the nodes in the controller-info.xml file.Configure information that is unique to a node in the startup script.
Configure using controller-info.xml
Configure using System Properties
Required Default
<application-name> Dappdynamics.agent.applicationName Yes, unless you useautomatic naming
None
<tier-name> Dappdynamics.agent.tierName Yes, unless you useautomatic naming
None
<node-name> Dappdynamics.agent.nodeName Yes, unless you useautomatic naming
None
Your controller-info.xml file should now have values shown in the following sample configurationfile:
<controller-info> <controller-host>192.168.1.20</controller-host> <controller-port>8090</controller-port> <application-name>ACMEOnline</application-name> <tier-name>InventoryTier</tier-name> <node-name>Inventory1</node-name></controller-info>
Automatic Naming for Application, Tier, and Node
For a self-service trial edition of AppDynamics Pro, the Agent Download Wizard doesn't promptyou for the application, tier or node name. It uses a default naming scheme instead (described in I
).nstrument Java Applications
You can use automatic naming with a standard edition of AppDynamics Pro by adding thefollowing entry to controller-info.xml file:
<auto-naming>true</auto-naming>
Add the Java Agent as a javaagent Argument to the JVM
Copyright © AppDynamics 2012-2015 Page 26
1.
Add the Java Agent binary to the monitored process by adding a javaagent argument with the locationof the Java Agent JAR file to the start-up script of the JVM:
-javaagent:<agent_home>/javaagent.jar
Installing the agent with the javaagent argument requires a restart of the JVM. If it's not possible orconvenient to restart the JVM when performing the configuration, you can attach the agent to therunning process, as described in the following section.
Use the server-specific instructions below to add this argument for different application serverJVMs:
Java Server-Specific Installation SettingsJava Agent Configuration PropertiesUse System Properties for Java Agent SettingsUse Environment Variables for Java Agent SettingsInstrument Multiple JVMs on a Single MachineInstrument Dynamically Identified JVMsInstrument JVMs in a Dynamic EnvironmentInstrument JVMs Started by Batch or Cron JobsInstrument JVMs in Restricted EnvironmentsAutomate Java Agent DeploymentInstrument Apple WebObjects Applications
Attach the Java Agent to a Running JVM Process
Attaching the agent to a running JVM allows you to install the Java Agent without requiring a JVMrestart. This approach would normally be used alongside adding the -javaagent to theargumentJVM startup script or some other persistent approach, to ensure that the agent is loaded again atthe next JVM restart. However, dynamic attachment allows you to install the agent when restartingthe JVM is not possible or convenient.
Dynamic agent attachment works if:
The JVM is version 1.6 or later.The JVM is an Oracle (HotSpot) JVMs (unavailable for IBM or JRockit JVMs).
A few other points to consider are:
Do not attach the agent dynamically to an environment that is already instrumented (eitherby the AppDynamics Java Agent or another type other agent). Doing so can causeunforeseeable issues and errors. Attaching the AppDynamics Java Agent to a running environment will impact theperformance of the application while the agent performs the class retransformation neededto instrument the application. The agent overhead will return to its whnormal operating levelen it finishes the process, but it is important to consider the potential performance impact toproduction services.
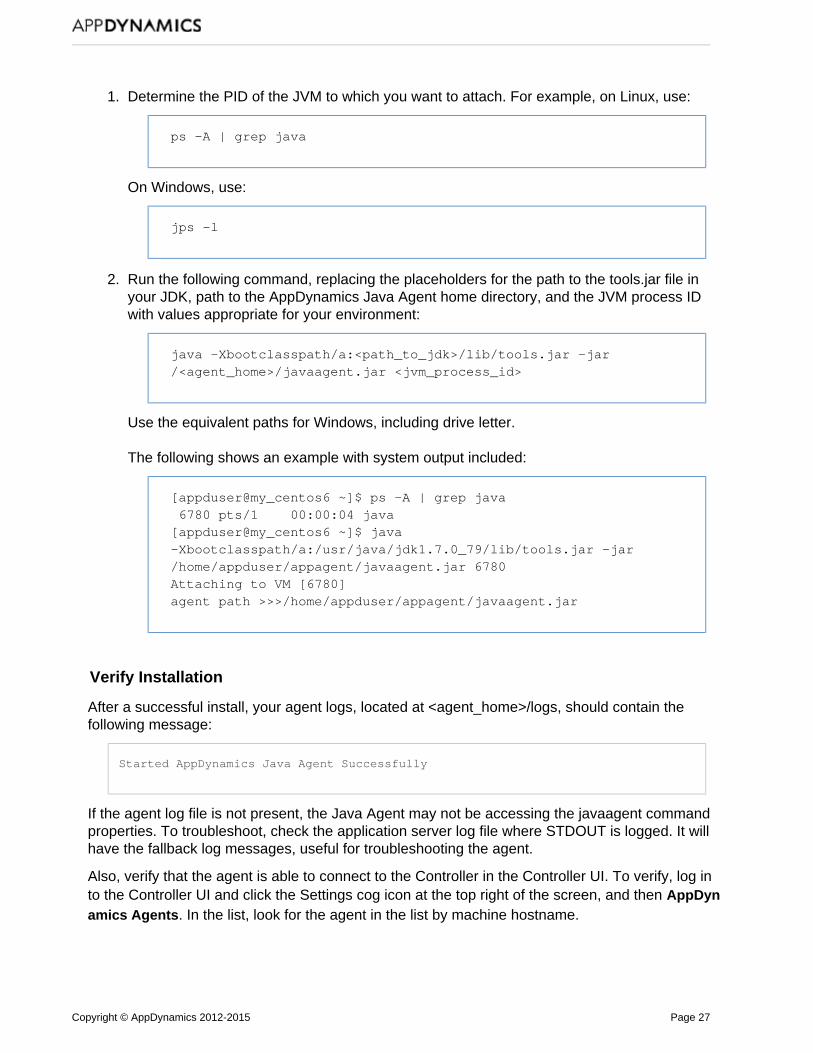
To attach the agent to the JVM, follow these steps:
Copyright © AppDynamics 2012-2015 Page 27
1.
2.
Determine the PID of the JVM to which you want to attach. For example, on Linux, use:
ps -A | grep java
On Windows, use:
jps -l
Run the following command, replacing the placeholders for the path to the tools.jar file inyour JDK, path to the AppDynamics Java Agent home directory, and the JVM process IDwith values appropriate for your environment:
java -Xbootclasspath/a:<path_to_jdk>/lib/tools.jar -jar/<agent_home>/javaagent.jar <jvm_process_id>
Use the equivalent paths for Windows, including drive letter.
The following shows an example with system output included:
[appduser@my_centos6 ~]$ ps -A | grep java 6780 pts/1 00:00:04 java[appduser@my_centos6 ~]$ java-Xbootclasspath/a:/usr/java/jdk1.7.0_79/lib/tools.jar -jar/home/appduser/appagent/javaagent.jar 6780Attaching to VM [6780]agent path >>>/home/appduser/appagent/javaagent.jar
Verify Installation
After a successful install, your agent logs, located at <agent_home>/logs, should contain thefollowing message:
Started AppDynamics Java Agent Successfully
If the agent log file is not present, the Java Agent may not be accessing the javaagent commandproperties. To troubleshoot, check the application server log file where STDOUT is logged. It willhave the fallback log messages, useful for troubleshooting the agent.
Also, verify that the agent is able to connect to the Controller in the Controller UI. To verify, log into the Controller UI and click the Settings cog icon at the top right of the screen, and then AppDyn
. In the list, look for the agent in the list by machine hostname. amics Agents
Copyright © AppDynamics 2012-2015 Page 28
1. 2.
Additional Installation Scenarios
Refer to the links below for typical installation scenarios, especially for cases where there aremultiple JVMs on the same machine:
Instrument Multiple JVMs on a Single MachineUse System Properties for Java Agent SettingsInstrument JVMs in a Dynamic EnvironmentInstrument JVMs Started by Batch or Cron Jobs
Java Server-Specific Installation Settings
The following pages describe individual considerations and instructions for installing the JavaAgent for some of the application servers supported for the Java Agent.
Apache Cassandra Startup SettingsApache Tomcat Startup SettingsCoherence Startup SettingsGlassFish Startup SettingsIBM WebSphere and InfoSphere Startup SettingsJBoss and Wildfly Startup SettingsJetty Startup SettingsMule ESB Startup SettingsOracle WebLogic Startup SettingsOSGi Infrastructure ConfigurationResin Startup SettingsSolr Startup SettingsStandalone JVM Startup SettingsTanuki Service Wrapper SettingsTibco ActiveMatrix BusinessWorks Service Engine SettingswebMethods Startup Settings
Apache Cassandra Startup Settings
On this page:
Instrument Cassandra in a Windows EnvironmentInstrument Cassandra in a Linux Environment
The Java Agent bootstraps using the javaagent command line option. Add this option to thecassandra (Linux) or cassandra.bat (Windows) file.
Instrument Cassandra in a Windows Environment
Open the apache-cassandra-x.x.x\bin\cassandra.bat file.Add the Java Agent javaagent path to the JAVA_OPTS variable. Make sure to include thedrive in the full path to the Java Agent directory.
Copyright © AppDynamics 2012-2015 Page 29
2.
3.
1. 2.
3.
-javaagent:<agent_home>\javaagent.jar
For example:
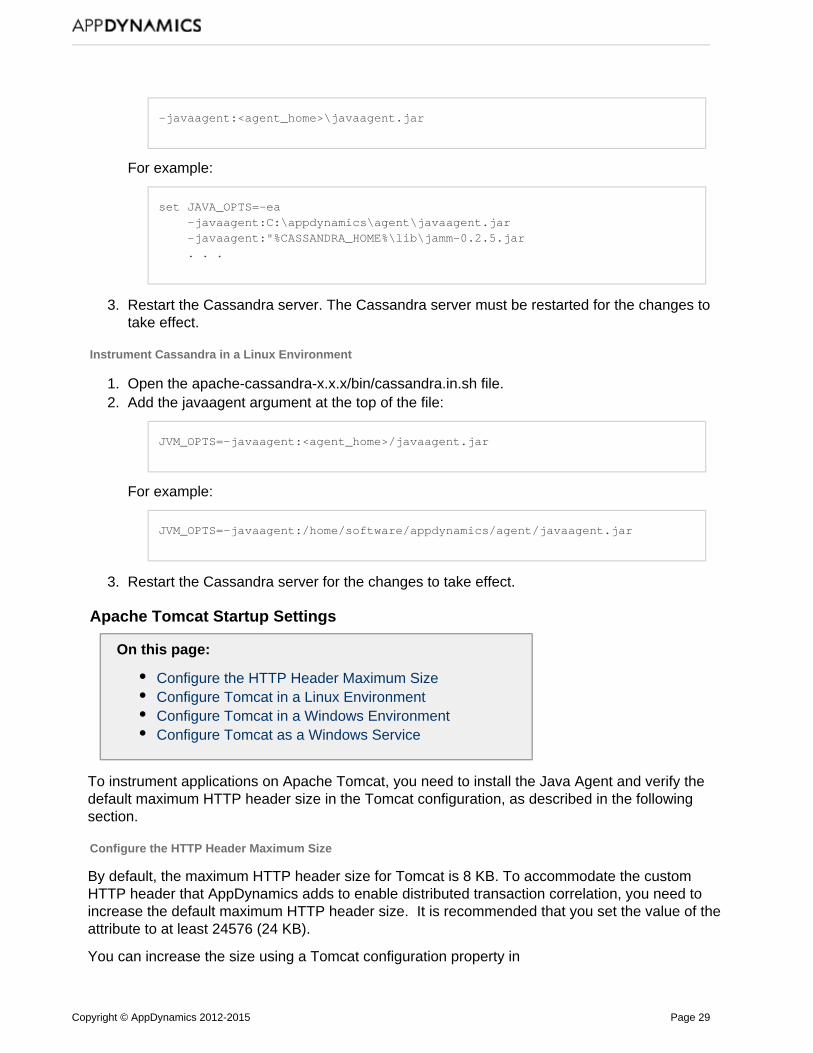
set JAVA_OPTS=-ea -javaagent:C:\appdynamics\agent\javaagent.jar -javaagent:"%CASSANDRA_HOME%\lib\jamm-0.2.5.jar . . .
Restart the Cassandra server. The Cassandra server must be restarted for the changes totake effect.
Instrument Cassandra in a Linux Environment
Open the apache-cassandra-x.x.x/bin/cassandra.in.sh file.Add the javaagent argument at the top of the file:
JVM_OPTS=-javaagent:<agent_home>/javaagent.jar
For example:
JVM_OPTS=-javaagent:/home/software/appdynamics/agent/javaagent.jar
Restart the Cassandra server for the changes to take effect.
Apache Tomcat Startup Settings
On this page:
Configure the HTTP Header Maximum SizeConfigure Tomcat in a Linux EnvironmentConfigure Tomcat in a Windows EnvironmentConfigure Tomcat as a Windows Service
To instrument applications on Apache Tomcat, you need to install the Java Agent and verify thedefault maximum HTTP header size in the Tomcat configuration, as described in the followingsection.
Configure the HTTP Header Maximum Size
By default, the maximum HTTP header size for Tomcat is 8 KB. To accommodate the customHTTP header that AppDynamics adds to enable distributed transaction correlation, you need toincrease the default maximum HTTP header size. It is recommended that you set the value of theattribute to at least 24576 (24 KB).
You can increase the size using a Tomcat configuration property in
Copyright © AppDynamics 2012-2015 Page 30
1. 2.
3.
4.
1. 2.
<tomcat_home>/conf/server.xml. The maximum permitted header length is controlled by the maxH HTTP attribute.ttpHeaderSize
Configure Tomcat in a Linux Environment
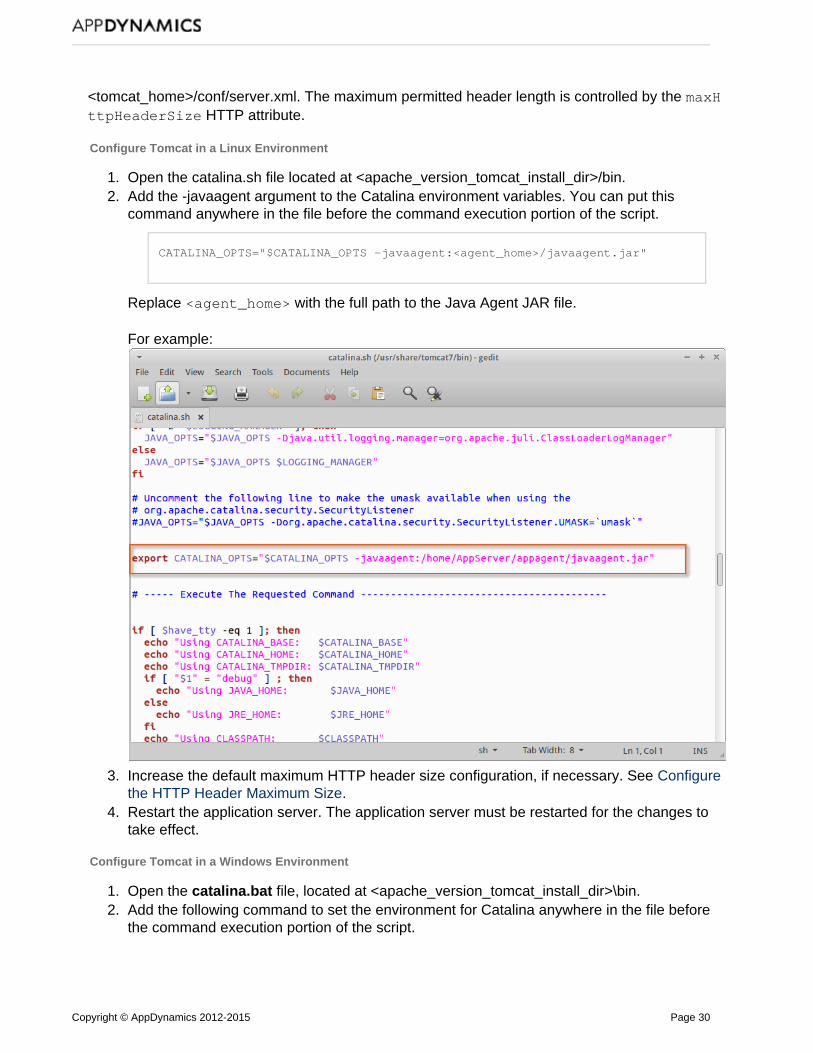
Open the catalina.sh file located at <apache_version_tomcat_install_dir>/bin.Add the -javaagent argument to the Catalina environment variables. You can put thiscommand anywhere in the file before the command execution portion of the script.
CATALINA_OPTS="$CATALINA_OPTS -javaagent:<agent_home>/javaagent.jar"
Replace with the full path to the Java Agent JAR file.<agent_home>
For example:
Increase the default maximum HTTP header size configuration, if necessary. See Configure. the HTTP Header Maximum Size
Restart the application server. The application server must be restarted for the changes totake effect.
Configure Tomcat in a Windows Environment
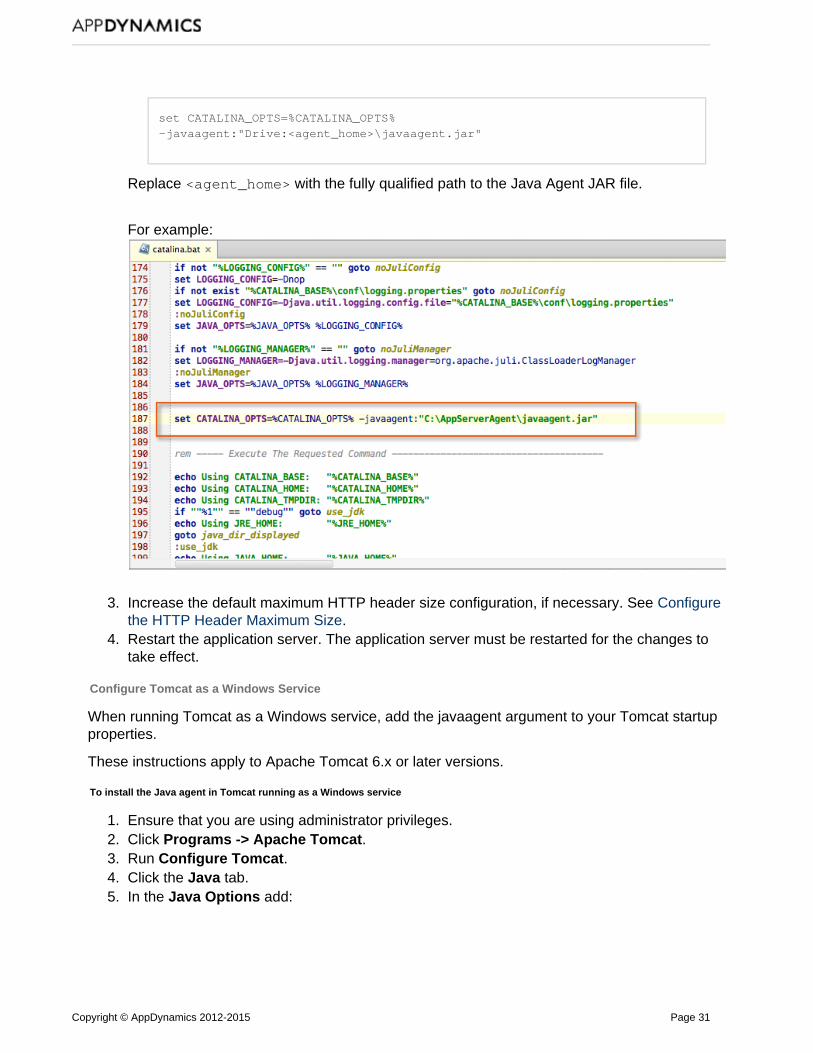
Open the file, located at <apache_version_tomcat_install_dir>\bin.catalina.batAdd the following command to set the environment for Catalina anywhere in the file beforethe command execution portion of the script.
Copyright © AppDynamics 2012-2015 Page 31
2.
3.
4.
1. 2. 3. 4. 5.
set CATALINA_OPTS=%CATALINA_OPTS%-javaagent:"Drive:<agent_home>\javaagent.jar"
Replace with the fully qualified path to the Java Agent JAR file. <agent_home>
For example:
Increase the default maximum HTTP header size configuration, if necessary. See Configure
. the HTTP Header Maximum SizeRestart the application server. The application server must be restarted for the changes totake effect.
Configure Tomcat as a Windows Service
When running Tomcat as a Windows service, add the javaagent argument to your Tomcat startupproperties.
These instructions apply to Apache Tomcat 6.x or later versions.
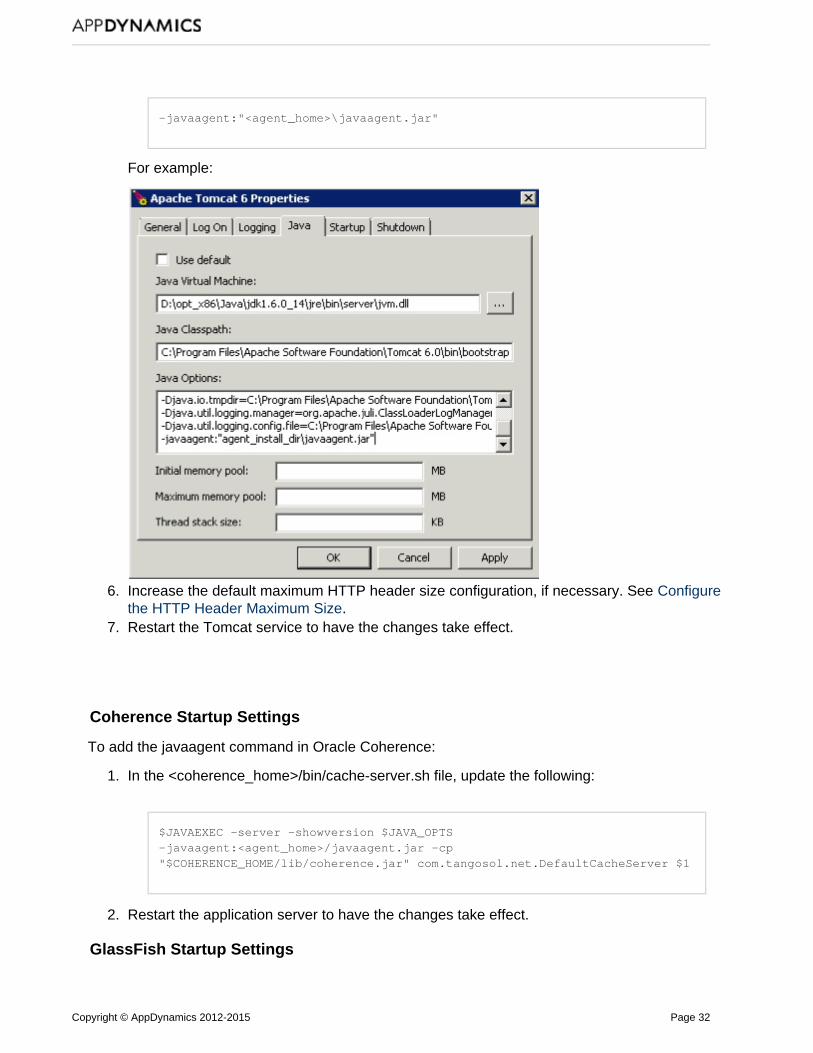
To install the Java agent in Tomcat running as a Windows service
Ensure that you are using administrator privileges.Click .Programs -> Apache TomcatRun .Configure TomcatClick the tab.JavaIn the add:Java Options
Copyright © AppDynamics 2012-2015 Page 32
5.
6.
7.
1.
2.
-javaagent:"<agent_home>\javaagent.jar"
For example:
Increase the default maximum HTTP header size configuration, if necessary. See Configure. the HTTP Header Maximum Size
Restart the Tomcat service to have the changes take effect.
Coherence Startup Settings
To add the javaagent command in Oracle Coherence:
In the <coherence_home>/bin/cache-server.sh file, update the following:
$JAVAEXEC -server -showversion $JAVA_OPTS-javaagent:<agent_home>/javaagent.jar -cp"$COHERENCE_HOME/lib/coherence.jar" com.tangosol.net.DefaultCacheServer $1
Restart the application server to have the changes take effect.
GlassFish Startup Settings
Copyright © AppDynamics 2012-2015 Page 33
1. 2. 3.
4. 5.
On this page:
Instrument GlassFish 3.0Instrument GlassFish 3.1Verify the ConfigurationAbout Glassfish AMX Support
The Java Agent bootstraps using the javaagent command line option.
Instrument GlassFish 3.0
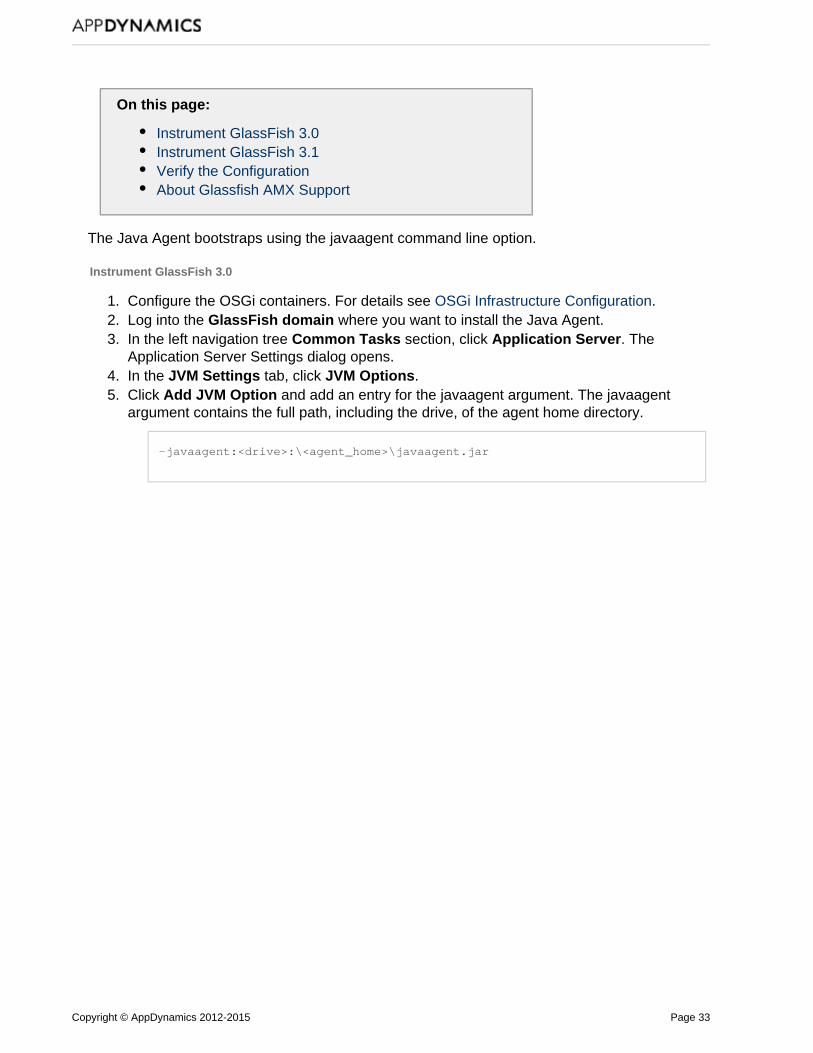
Configure the OSGi containers. For details see .OSGi Infrastructure ConfigurationLog into the where you want to install the Java Agent.GlassFish domainIn the left navigation tree section, click . TheCommon Tasks Application ServerApplication Server Settings dialog opens.In the tab, click .JVM Settings JVM OptionsClick and add an entry for the javaagent argument. The javaagentAdd JVM Optionargument contains the full path, including the drive, of the agent home directory.
-javaagent:<drive>:\<agent_home>\javaagent.jar
Copyright © AppDynamics 2012-2015 Page 34
5.
6.
1.
2.
3.
4.
5.
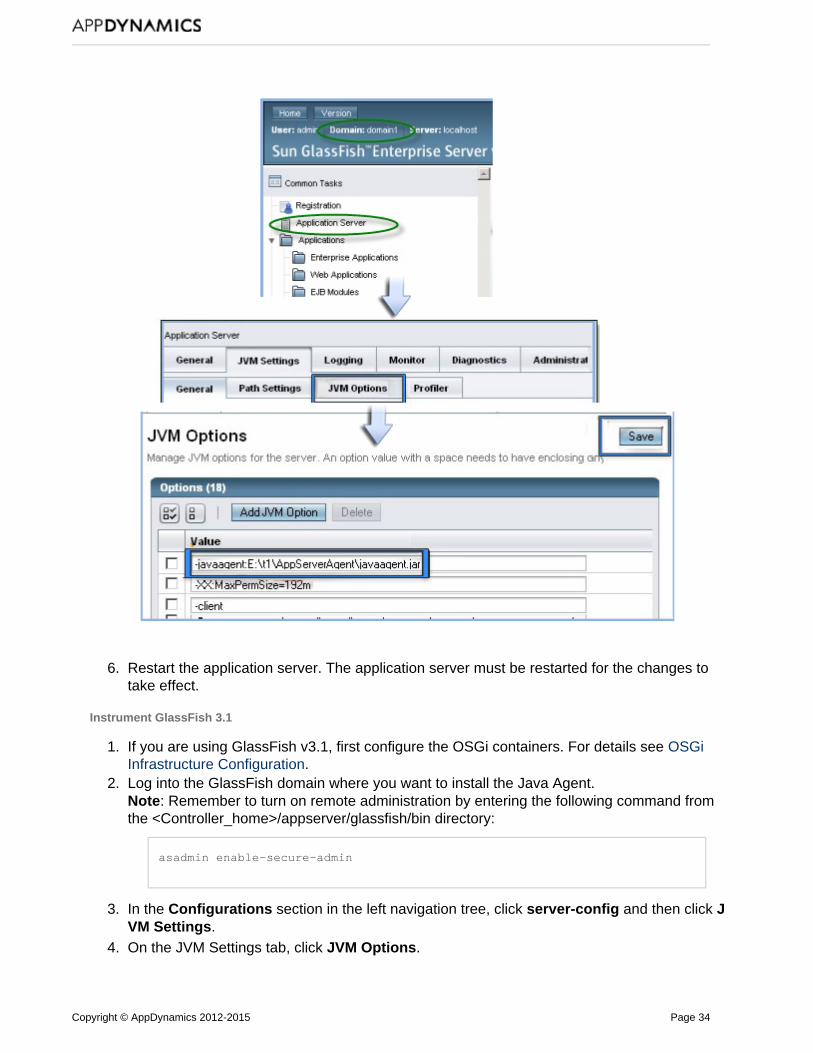
Restart the application server. The application server must be restarted for the changes totake effect.
Instrument GlassFish 3.1
If you are using GlassFish v3.1, first configure the OSGi containers. For details see OSGi.Infrastructure Configuration
Log into the GlassFish domain where you want to install the Java Agent.Note: Remember to turn on remote administration by entering the following command fromthe <Controller_home>/appserver/glassfish/bin directory:
asadmin enable-secure-admin
In the section in the left navigation tree, click and then click Configurations server-config J.VM Settings
On the JVM Settings tab, click . JVM Options
Copyright © AppDynamics 2012-2015 Page 35
5.
6.
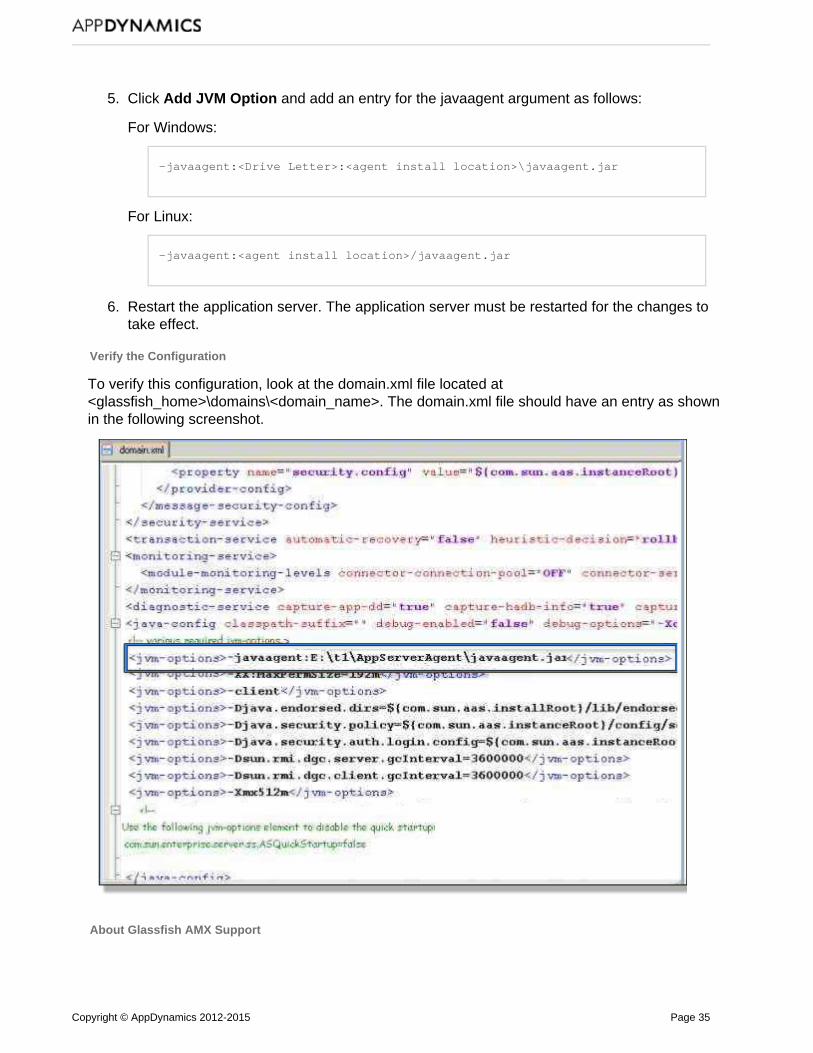
Click and add an entry for the javaagent argument as follows:Add JVM Option
For Windows:
-javaagent:<Drive Letter>:<agent install location>\javaagent.jar
For Linux:
-javaagent:<agent install location>/javaagent.jar
Restart the application server. The application server must be restarted for the changes totake effect.
Verify the Configuration
To verify this configuration, look at the domain.xml file located at<glassfish_home>\domains\<domain_name>. The domain.xml file should have an entry as shownin the following screenshot.
About Glassfish AMX Support
Copyright © AppDynamics 2012-2015 Page 36
1.
2. 3. 4. 5. 6. 7.
8.
AppDynamics supports Glassfish AMX MBeans.
Set the boot-amx node property to enable AMX MBeans. See .boot-amx
You will see the AMX domain in the MBean Browser in the JMX tab of the node dashboard.
IBM WebSphere and InfoSphere Startup Settings
On this page:
Instrument WebSphere 7.x or InfoSphere 8.xInstrument WebSphere 6.xInstrument WebSphere 5.xVerifying the Java Agent ConfigurationSecurity RequirementsRunning WebSphere with Security EnabledInstrument WebSphere in z/OS or MainframeEnvironments
The Java Agent bootstraps using the javaagent command line option.
Instrument WebSphere 7.x or InfoSphere 8.x
Log in to the Administrator console of the WebSphere node where you want to install theApp Server Agent.In the Administration Console click .ServersExpand Server Type and click .WebSphere application serversClick the name of your server.Expand Java and Process Management and click .Process DefinitionUnder the Additional Properties section, click .Java Virtual MachineEnter the javaagent option with the full path to the AppDynamics javaagent.jar file in theGeneric JVM arguments field.
For Windows:
-javaagent:<Drive Letter>:<agent install location>\javaagent.jar
For Linux:
-javaagent:<agent install location>/javaagent.jar
Click .OK
May require OSGI bootdelegationWebsphere uses Equinox as its OSGi container. In some cases you may also need to addthe Java agent packages to the OSGi bootdelegation system property as follows:
Copyright © AppDynamics 2012-2015 Page 37
1.
2. 3.
4.
Instrument WebSphere 6.x
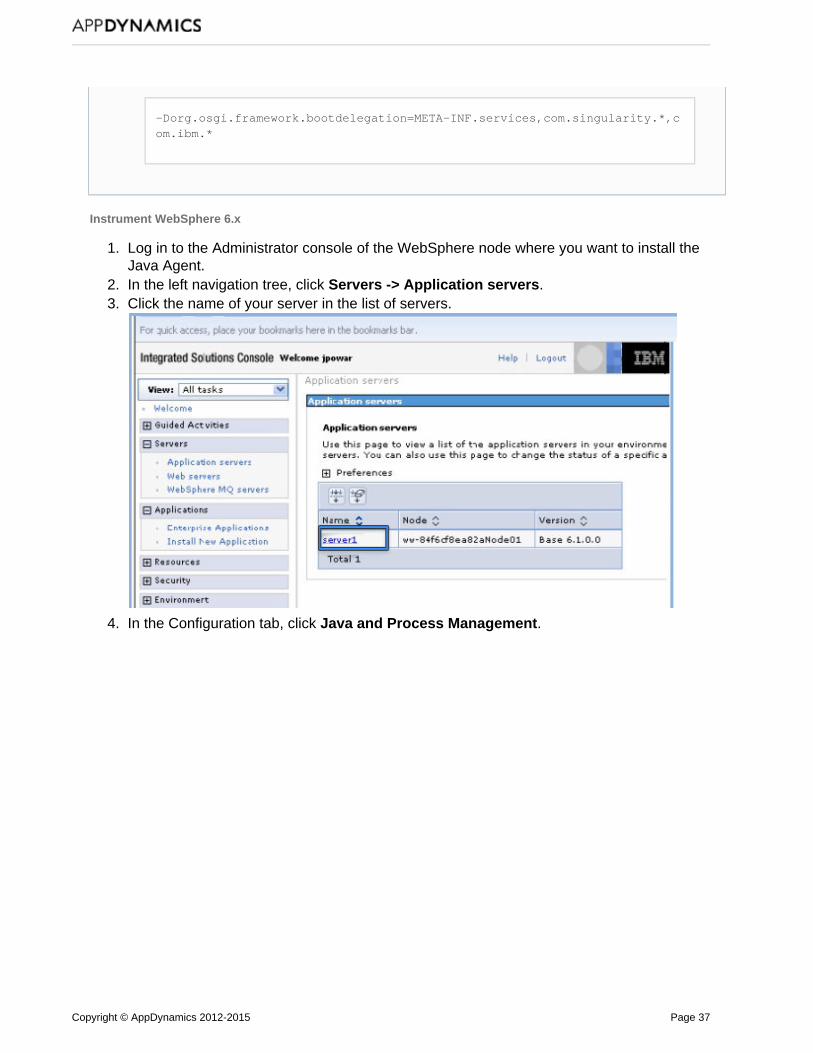
Log in to the Administrator console of the WebSphere node where you want to install theJava Agent.In the left navigation tree, click .Servers -> Application serversClick the name of your server in the list of servers.
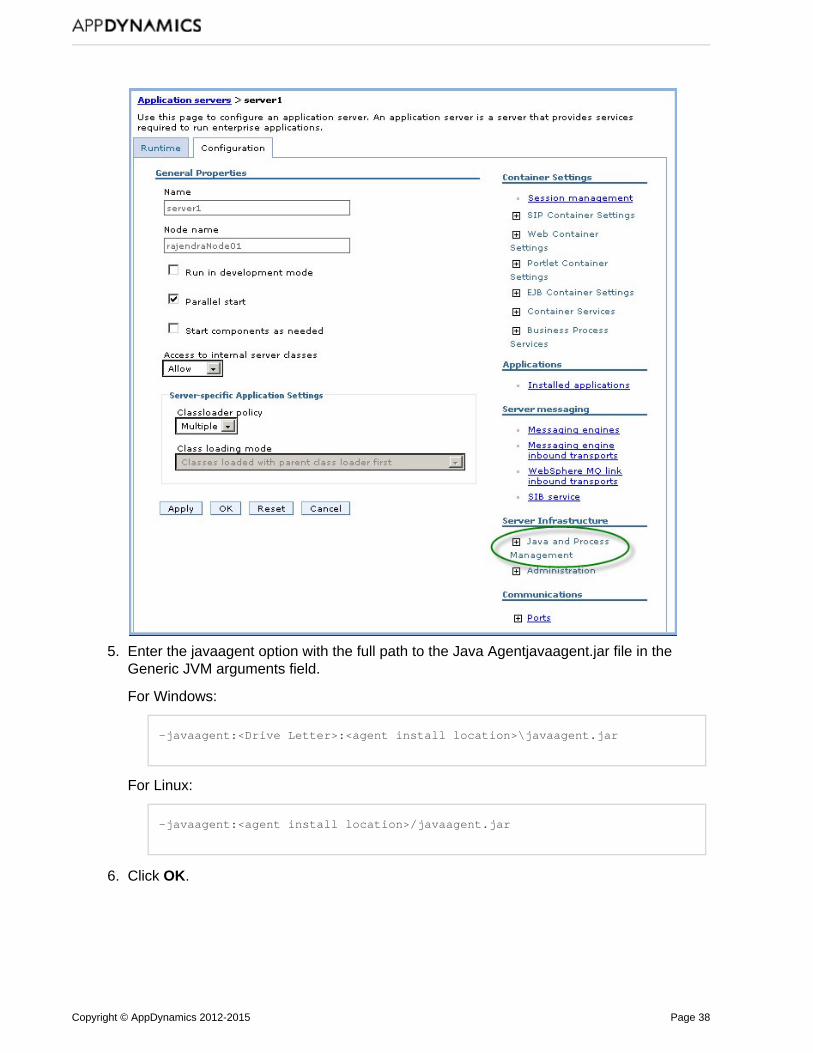
In the Configuration tab, click .Java and Process Management
-Dorg.osgi.framework.bootdelegation=META-INF.services,com.singularity.*,com.ibm.*
Copyright © AppDynamics 2012-2015 Page 38
4.
5.
6.
Enter the javaagent option with the full path to the Java Agentjavaagent.jar file in theGeneric JVM arguments field.
For Windows:
-javaagent:<Drive Letter>:<agent install location>\javaagent.jar
For Linux:
-javaagent:<agent install location>/javaagent.jar
Click . OK

Copyright © AppDynamics 2012-2015 Page 39
1.
2. 3. 4. 5. 6. 7.
8.
Instrument WebSphere 5.x
Log in to the Administrator console of the WebSphere node where you want to install theApp Server Agent.In the Administrative Console, click .ServersClick .Application ServersClick the name of your server.Under Additional Properties, click .Process DefinitionOn the next page, under Additional Properties, click .Java Virtual MachineEnter the javaagent option with the full path to the Java Agent javaagent.jar file inthe Generic JVM arguments field.
For Windows:
-javaagent:<Drive Letter>:<agent install location>\javaagent.jar
For Linux:
-javaagent:<agent install location>/javaagent.jar
Copyright © AppDynamics 2012-2015 Page 40
8. Click .OK
Verifying the Java Agent Configuration
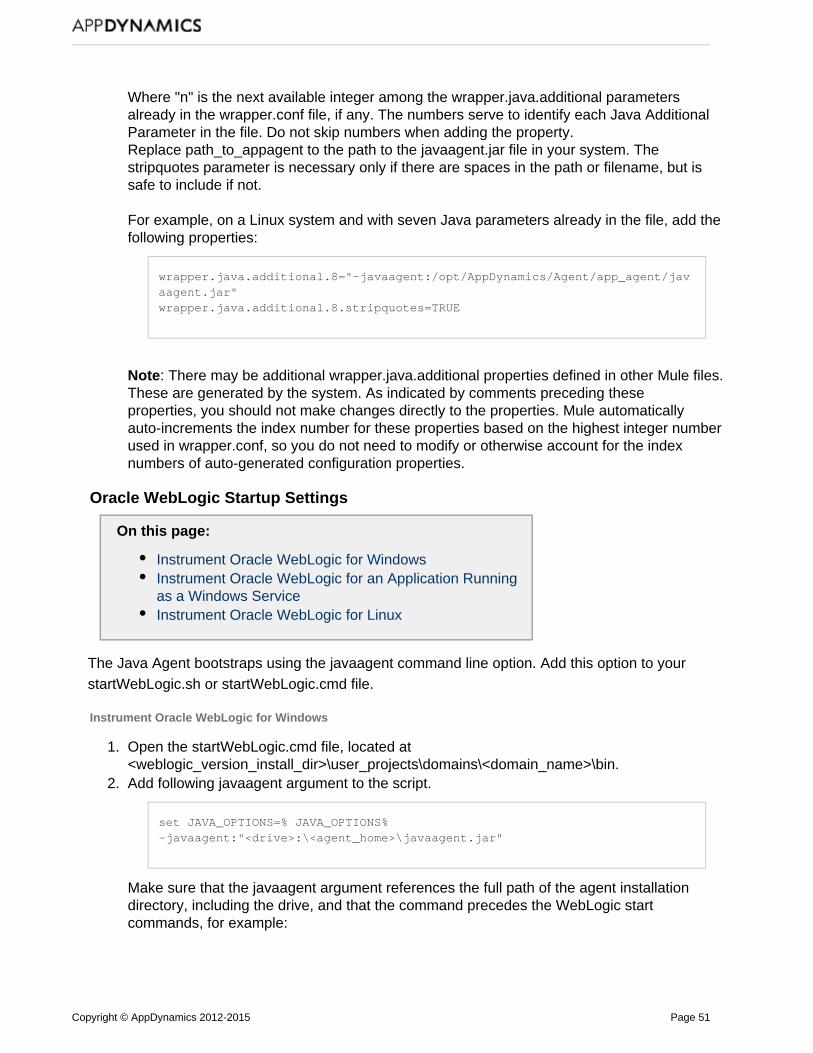
Verify the configuration settings by checking the server.xml file of the WebSphere node where youinstalled the Java Agent. The server.xml file should have this entry:
<jvmEntries ...genericJvmArguments='-javaagent:E:\test1\AppServerAgent\javaagent.jar'disableJIT="false"/>
Security Requirements
Full permissions are required for the agent to function correctly with WebSphere. Grant allpermissions on both the server level and the profile level.
Running WebSphere with Security Enabled
If you want to run WebSphere while J2EE security or Global security is enabled, you need to makechanges to WebSphere's server.policy file to prevent problems within the interaction betweenWebSphere and the Java Agent. Make the change listed below to the server.policy file, which islocated in <websphere_home>/properties or in <websphere_profile_home>/properties.Add the following block to the WebSphere server.policy file:
grant codeBase "file:\* AGENT_DEPLOYMENT_DIRECTORY \*/-" { permission java.security.AllPermission;};
Instrument WebSphere in z/OS or Mainframe Environments
See .Instrument JVMs in a Dynamic Environment
JBoss and Wildfly Startup Settings
On this page:
Quick InstallStartup Argument Configuration Considerations Adding the Java Agent to JBoss in Standalone ModeAdding the Java Agent to JBoss in Domain ModeMaking the LogManager Location DynamicTroubleshooting
Instrumenting JBoss applications with the AppDynamics agent requires adding up to three items ofinformation as Java options to the JBoss startup configuration:
Location of the Java AgentAppDynamics package names
Copyright © AppDynamics 2012-2015 Page 41
1.
2.
3.
4.
JBoss log manager package name and JAR location
For most deployments (that is, those using a recent version of JBoss and the AppDynamics JavaAgent) all three items are required. The following section takes you through the steps forconfiguring these items in such cases.
Quick Install
If using a recent version of JBoss (AS 7.x or EAP 6.x or later) and running in standalone mode,you can instrument JBoss with the AppDynamics Java agent by adding the three startup options tothe startup script for your JBoss instance, typically standalone.sh. For older versions of JBoss or ifrunning in domain mode, be sure to verify the settings you need by reading the Startup ArgumentConfiguration Considerations section.
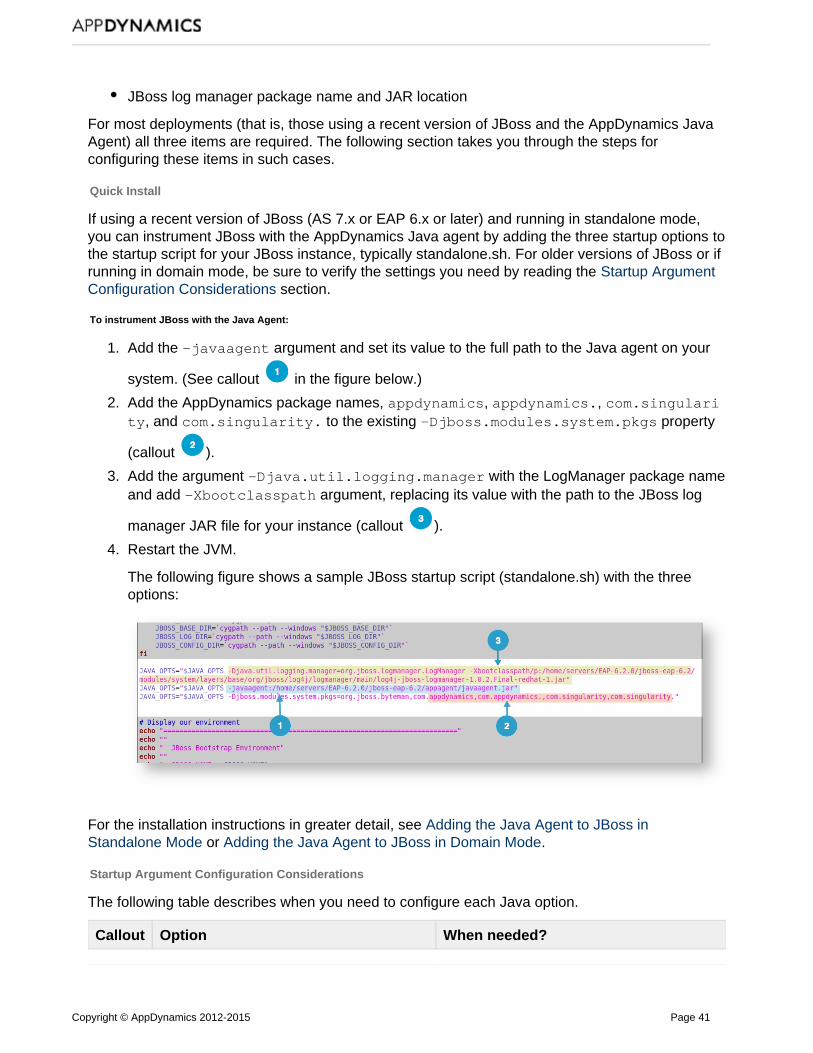
To instrument JBoss with the Java Agent:
Add the argument and set its value to the full path to the Java agent on your-javaagent
system. (See callout in the figure below.)
Add the AppDynamics package names, , , appdynamics appdynamics. com.singulari, and to the existing propertyty com.singularity. -Djboss.modules.system.pkgs
(callout ).
Add the argument with the LogManager package name-Djava.util.logging.managerand add argument, replacing its value with the path to the JBoss log-Xbootclasspath
manager JAR file for your instance (callout ).
Restart the JVM.
The following figure shows a sample JBoss startup script (standalone.sh) with the threeoptions:
For the installation instructions in greater detail, see Adding the Java Agent to JBoss in or .Standalone Mode Adding the Java Agent to JBoss in Domain Mode
Startup Argument Configuration Considerations
The following table describes when you need to configure each Java option.
Callout Option When needed?
Copyright © AppDynamics 2012-2015 Page 42
Location of the Java Agent Always
AppDynamics packages as systempackages
If using an OSGi-compliant version ofJBoss, including:
AS 7.x+EAP 6.x+
Log manager settings, which include:
Location of the log manager JAR file(as a -Xbootclasspath argument) Package name for the log manager(org.jboss.logmanager.LogManager)added as a system package
If using:
AppDynamics Agent version 3.9 orlaterAn IBM JVMA Sun JVM with Remote JMX (notethat this requirement is not related tothe AppDynamics Java Agent)
The section describes how to configure the settings in the standalone startup script.Quick InstallBut the exact file where you configure the settings depends on the operating mode of JBoss, itsversion, and even practices that are specific for your organization and environment.
The following sections describes some of the considerations for where to configure the settings.
Standalone mode
For standalone:
In Linux, add the settings to standalone.conf or standalone.sh.In Windows, add the settings to standalone.conf.bat.
If using JBoss 4.x or 5.x, add the configuration to run.sh for Linux or run.bat for Windows.
For an example of this configuration, see . Adding the Java Agent to JBoss in Standalone Mode
Domain mode
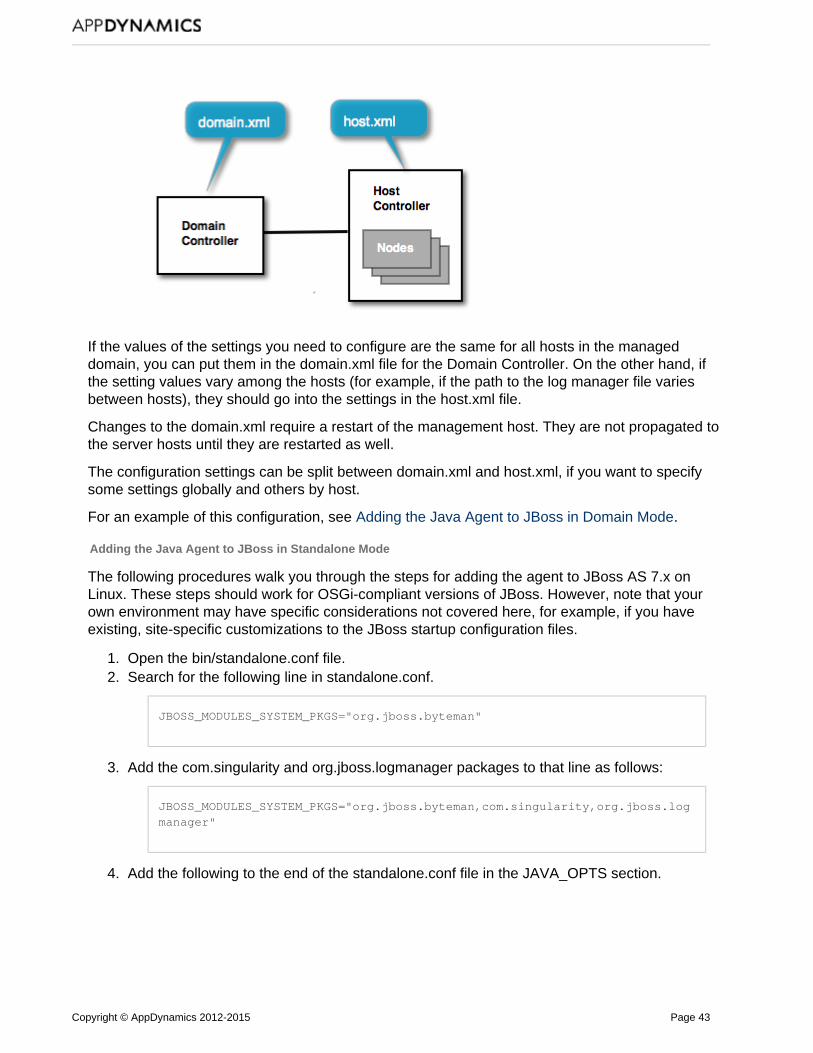
For domain mode, the location in which you need to configure the settings depends upon thenature of your environment.
Keep in mind that a domain is made up of:
A domain controller, which is the administration and configuration server for the JBossenvironment. The domain.xml configuration file is the global configuration for the managedhosts. Host controllers, which manage a particular host with one or more application server nodes.There can be any number of host controllers and nodes. The hosts.xml file contains settingsfor the nodes on that host machine.
Copyright © AppDynamics 2012-2015 Page 43
1. 2.
3.
4.
If the values of the settings you need to configure are the same for all hosts in the manageddomain, you can put them in the domain.xml file for the Domain Controller. On the other hand, ifthe setting values vary among the hosts (for example, if the path to the log manager file variesbetween hosts), they should go into the settings in the host.xml file.
Changes to the domain.xml require a restart of the management host. They are not propagated tothe server hosts until they are restarted as well.
The configuration settings can be split between domain.xml and host.xml, if you want to specifysome settings globally and others by host.
For an example of this configuration, see .Adding the Java Agent to JBoss in Domain Mode
Adding the Java Agent to JBoss in Standalone Mode
The following procedures walk you through the steps for adding the agent to JBoss AS 7.x onLinux. These steps should work for OSGi-compliant versions of JBoss. However, note that yourown environment may have specific considerations not covered here, for example, if you haveexisting, site-specific customizations to the JBoss startup configuration files.
Open the bin/standalone.conf file.Search for the following line in standalone.conf.
JBOSS_MODULES_SYSTEM_PKGS="org.jboss.byteman"
Add the com.singularity and org.jboss.logmanager packages to that line as follows:
JBOSS_MODULES_SYSTEM_PKGS="org.jboss.byteman,com.singularity,org.jboss.logmanager"
Add the following to the end of the standalone.conf file in the JAVA_OPTS section.
Copyright © AppDynamics 2012-2015 Page 44
4.
5.
6.
-Djava.util.logging.manager=org.jboss.logmanager.LogManager-Xbootclasspath/p:<path_to_jboss_logmanager>/jboss-logmanager-<version>.jar
Replace and with the path and log manager<path_to_jboss_logmanager> <version>JAR filename for your system. See forMaking the LogManager Location Dynamicinformation on making the path dynamic. In the standalone.sh file, add the following javaagent argument.
export JAVA_OPTS="$JAVA_OPTS -javaagent:/agent_install_dir/javaagent.jar"
Put the argument above the following section of standalone.sh
...while true;doif [ "x$LAUNCH_JBOSS_IN_BACKGROUND" = "X" ]; then # Execute the JVM in the foreground eval \"$JAVA\" -D\"[Standalone]\"$JAVA_OPTS \ \"-Dorg.jboss.boot.log.file=$JBOSS_LOG_DIR/boot.log\" \ \"-Dlogging.configuration=file:$JBOSS_CONFIG_DIR/logging.properties\"\ -jar \"$JBOSS_HOME/jboss-modules.jar\" \
Restart the application server.
Adding the Java Agent to JBoss in Domain Mode
The following steps walk you through the configuration for a JBoss installation running in domainmode.
For this type of deployment:
If all the server instances in the server group are part of the same business application, thenconfigure in domain.xml; otherwise,-Dappdynamics.agent.applicationNameconfigure the application name in the host.xml file for each specific server.
The argument specifies the name of the-Dappdynamics.agent.applicationNameBusiness Application to use for the data reported by this Java Agent to the AppDynamicsController.If all the server instances in the server group are part of the same tier then configure -Dapp
in domain.xml, otherwise configure the tier name in host.xmldynamics.agent.tierNamefor each specific server.
The argument specifies the name of the tier to use for-Dappdynamics.agent.tierNamethe data reported by this Java Agent to the AppDynamics Controller.
Edit the JBoss domain.xml and host.xml files as indicated in the following sections and then restartthe application server.
Copyright © AppDynamics 2012-2015 Page 45
1.
2.
3.
Modify the Domain.xml file
Locate and edit domain.xml for the domain. This is usually located under$JBOSS_HOME/domain/configuration/.Find the the element and add a property named system-properties jboss.modules.s
with a value of to the existing system properties. Forystem.pkgs com.singularityexample:
<system-properties> <!-- IPv4 is not required, but setting this helps avoid unintendeduse of IPv6 --> <property name="java.net.preferIPv4Stack" value="true"/> <property name="jboss.modules.system.pkgs"value="com.singularity"/></system-properties>
This property tells the JBoss class loader to load the AppDynamics packages. This isrequired for the Java Agent to run.Under the server group name where you want to enable your agents, add the JVM optionsusing the appropriate values for your agent location, JBoss application name, and tier name.
<server-group name="main-server-group" profile="full"> <jvm name="default"> <heap size="1303m" max-size="1303m"/> <permgen max-size="256m"/> <jvm-options> <option value="-javaagent:<agent_install_dir>/javaagent.jar"/> <option value="-Dappdynamics.agent.applicationName=JBOSS-EAP-APP"/> <option value="-Dappdynamics.agent.tierName=JBOSS-EAP-TIER"/> </jvm-options> </jvm> <socket-binding-group ref="full-sockets"/> </server-group>
Modify the Host.xml file
Add the JVM option in host.xml file (usually located under-Dappdynamics.agent.nodeName$JBOSS_HOME/domain/configuration/). This option tells the Java Agent the node name to use toconnect to the AppDynamics Controller. Use the appropriate values for your node names.
For example:
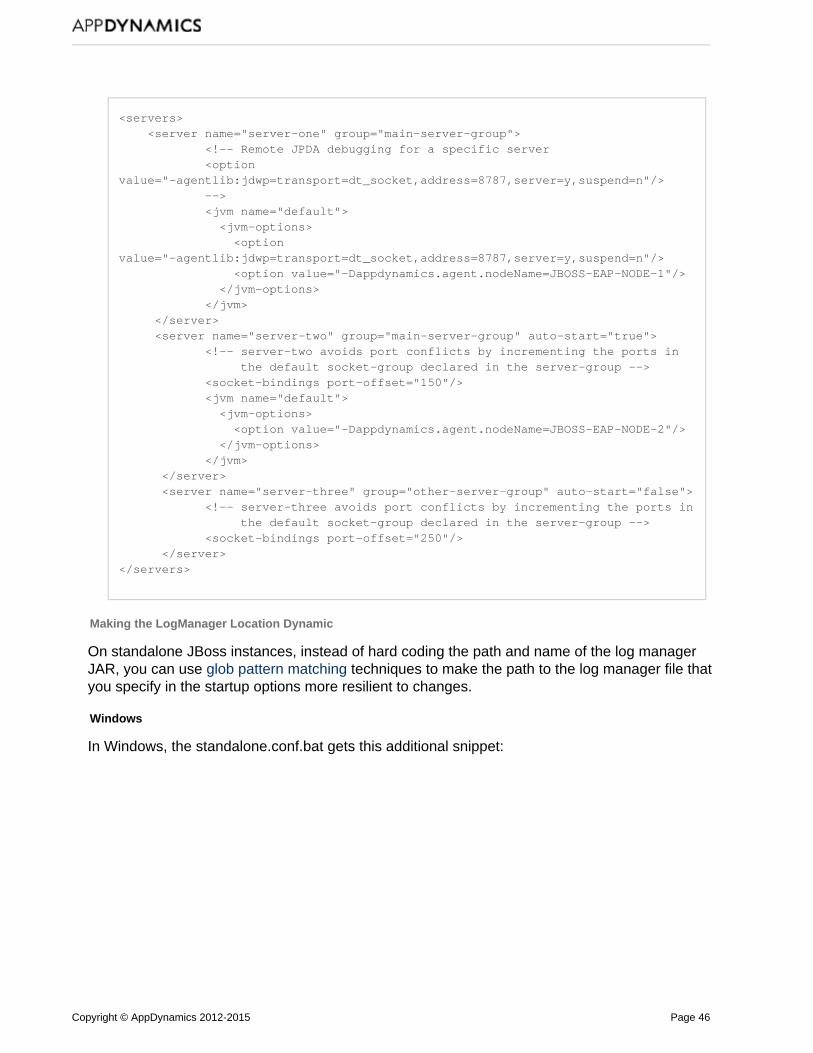
Copyright © AppDynamics 2012-2015 Page 46
<servers> <server name="server-one" group="main-server-group"> <!-- Remote JPDA debugging for a specific server <optionvalue="-agentlib:jdwp=transport=dt_socket,address=8787,server=y,suspend=n"/> --> <jvm name="default"> <jvm-options> <optionvalue="-agentlib:jdwp=transport=dt_socket,address=8787,server=y,suspend=n"/> <option value="-Dappdynamics.agent.nodeName=JBOSS-EAP-NODE-1"/> </jvm-options> </jvm> </server> <server name="server-two" group="main-server-group" auto-start="true"> <!-- server-two avoids port conflicts by incrementing the ports in the default socket-group declared in the server-group --> <socket-bindings port-offset="150"/> <jvm name="default"> <jvm-options> <option value="-Dappdynamics.agent.nodeName=JBOSS-EAP-NODE-2"/> </jvm-options> </jvm> </server> <server name="server-three" group="other-server-group" auto-start="false"> <!-- server-three avoids port conflicts by incrementing the ports in the default socket-group declared in the server-group --> <socket-bindings port-offset="250"/> </server></servers>
Making the LogManager Location Dynamic
On standalone JBoss instances, instead of hard coding the path and name of the log managerJAR, you can use techniques to make the path to the log manager file thatglob pattern matchingyou specify in the startup options more resilient to changes.
Windows
In Windows, the standalone.conf.bat gets this additional snippet:
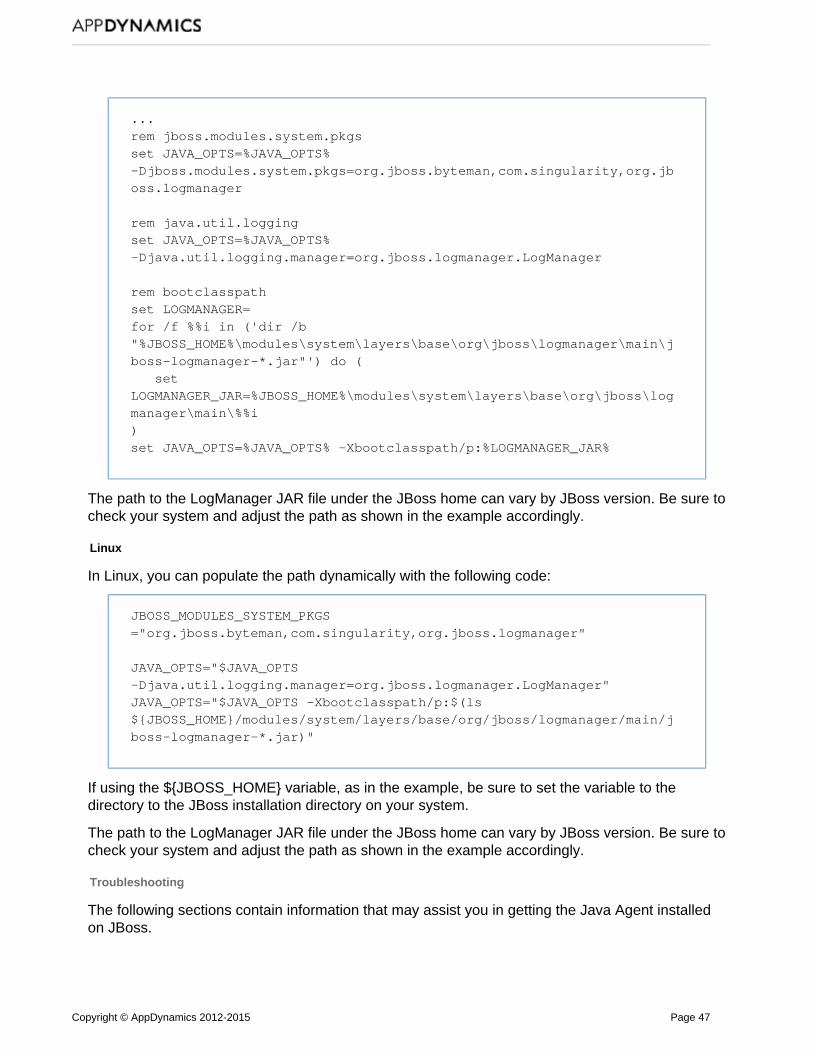
Copyright © AppDynamics 2012-2015 Page 47
...rem jboss.modules.system.pkgsset JAVA_OPTS=%JAVA_OPTS%-Djboss.modules.system.pkgs=org.jboss.byteman,com.singularity,org.jboss.logmanager
rem java.util.logging set JAVA_OPTS=%JAVA_OPTS%-Djava.util.logging.manager=org.jboss.logmanager.LogManager
rem bootclasspathset LOGMANAGER= for /f %%i in ('dir /b"%JBOSS_HOME%\modules\system\layers\base\org\jboss\logmanager\main\jboss-logmanager-*.jar"') do ( setLOGMANAGER_JAR=%JBOSS_HOME%\modules\system\layers\base\org\jboss\logmanager\main\%%i ) set JAVA_OPTS=%JAVA_OPTS% -Xbootclasspath/p:%LOGMANAGER_JAR%
The path to the LogManager JAR file under the JBoss home can vary by JBoss version. Be sure tocheck your system and adjust the path as shown in the example accordingly.
Linux
In Linux, you can populate the path dynamically with the following code:
JBOSS_MODULES_SYSTEM_PKGS="org.jboss.byteman,com.singularity,org.jboss.logmanager"
JAVA_OPTS="$JAVA_OPTS-Djava.util.logging.manager=org.jboss.logmanager.LogManager"JAVA_OPTS="$JAVA_OPTS -Xbootclasspath/p:$(ls${JBOSS_HOME}/modules/system/layers/base/org/jboss/logmanager/main/jboss-logmanager-*.jar)"
If using the ${JBOSS_HOME} variable, as in the example, be sure to set the variable to thedirectory to the JBoss installation directory on your system.
The path to the LogManager JAR file under the JBoss home can vary by JBoss version. Be sure tocheck your system and adjust the path as shown in the example accordingly.
Troubleshooting
The following sections contain information that may assist you in getting the Java Agent installedon JBoss.
Copyright © AppDynamics 2012-2015 Page 48
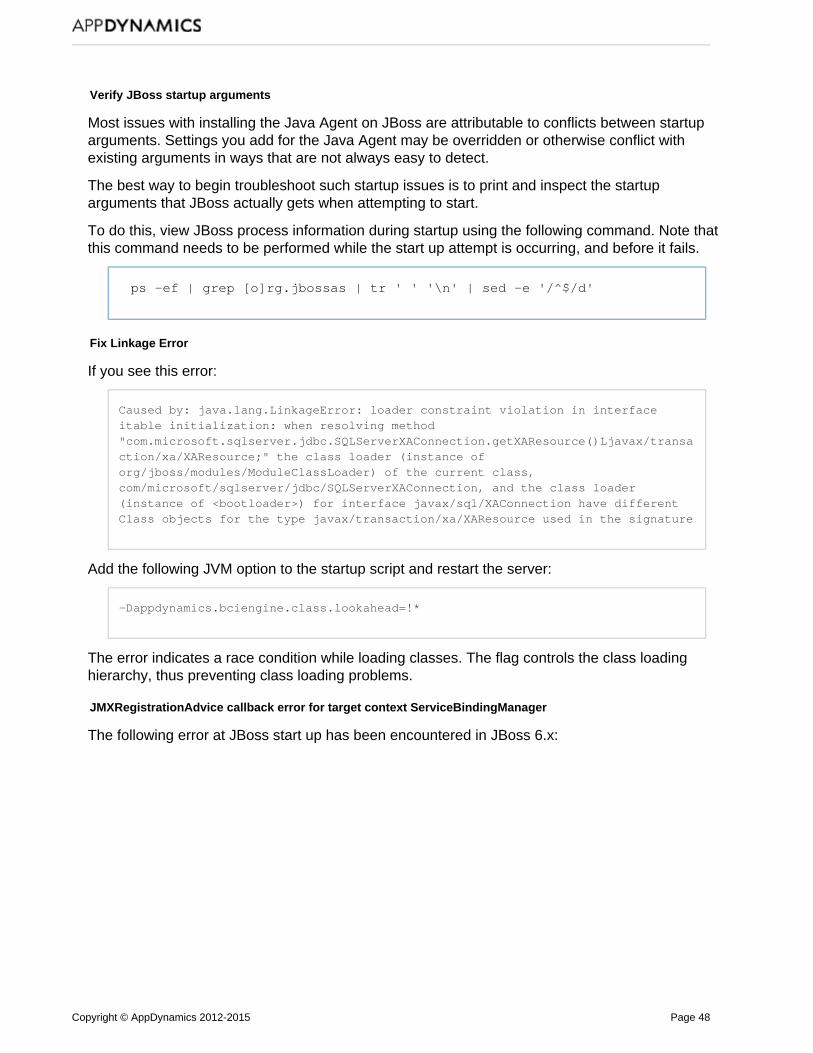
Verify JBoss startup arguments
Most issues with installing the Java Agent on JBoss are attributable to conflicts between startuparguments. Settings you add for the Java Agent may be overridden or otherwise conflict withexisting arguments in ways that are not always easy to detect.
The best way to begin troubleshoot such startup issues is to print and inspect the startuparguments that JBoss actually gets when attempting to start.
To do this, view JBoss process information during startup using the following command. Note thatthis command needs to be performed while the start up attempt is occurring, and before it fails.
ps -ef | grep [o]rg.jbossas | tr ' ' '\n' | sed -e '/^$/d'
Fix Linkage Error
If you see this error:
Caused by: java.lang.LinkageError: loader constraint violation in interfaceitable initialization: when resolving method"com.microsoft.sqlserver.jdbc.SQLServerXAConnection.getXAResource()Ljavax/transaction/xa/XAResource;" the class loader (instance oforg/jboss/modules/ModuleClassLoader) of the current class,com/microsoft/sqlserver/jdbc/SQLServerXAConnection, and the class loader(instance of <bootloader>) for interface javax/sql/XAConnection have differentClass objects for the type javax/transaction/xa/XAResource used in the signature
Add the following JVM option to the startup script and restart the server:
-Dappdynamics.bciengine.class.lookahead=!*
The error indicates a race condition while loading classes. The flag controls the class loadinghierarchy, thus preventing class loading problems.
JMXRegistrationAdvice callback error for target context ServiceBindingManager
The following error at JBoss start up has been encountered in JBoss 6.x:
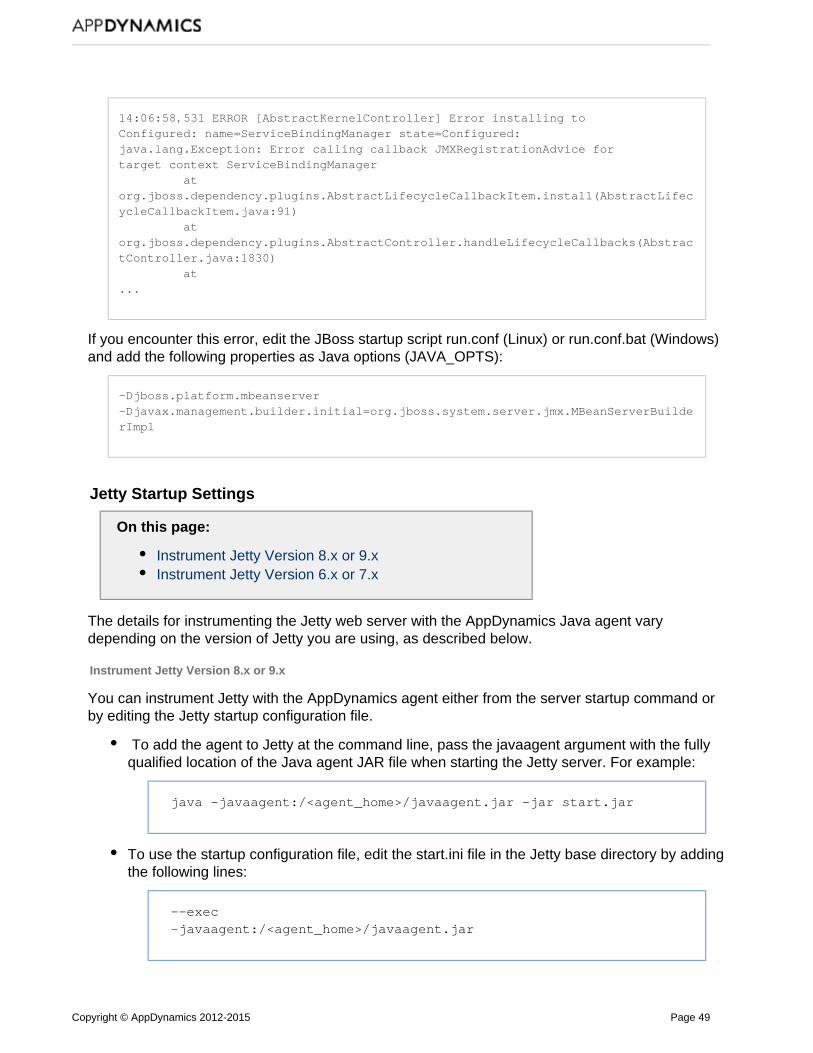
Copyright © AppDynamics 2012-2015 Page 49
14:06:58,531 ERROR [AbstractKernelController] Error installing to Configured: name=ServiceBindingManager state=Configured: java.lang.Exception: Error calling callback JMXRegistrationAdvice for target context ServiceBindingManager at org.jboss.dependency.plugins.AbstractLifecycleCallbackItem.install(AbstractLifecycleCallbackItem.java:91) at org.jboss.dependency.plugins.AbstractController.handleLifecycleCallbacks(AbstractController.java:1830) at ...
If you encounter this error, edit the JBoss startup script run.conf (Linux) or run.conf.bat (Windows)and add the following properties as Java options (JAVA_OPTS):
-Djboss.platform.mbeanserver-Djavax.management.builder.initial=org.jboss.system.server.jmx.MBeanServerBuilderImpl
Jetty Startup Settings
On this page:
Instrument Jetty Version 8.x or 9.xInstrument Jetty Version 6.x or 7.x
The details for instrumenting the Jetty web server with the AppDynamics Java agent varydepending on the version of Jetty you are using, as described below.
Instrument Jetty Version 8.x or 9.x
You can instrument Jetty with the AppDynamics agent either from the server startup command orby editing the Jetty startup configuration file.
To add the agent to Jetty at the command line, pass the javaagent argument with the fullyqualified location of the Java agent JAR file when starting the Jetty server. For example:
java -javaagent:/<agent_home>/javaagent.jar -jar start.jar
To use the startup configuration file, edit the start.ini file in the Jetty base directory by addingthe following lines:
--exec-javaagent:/<agent_home>/javaagent.jar
Copyright © AppDynamics 2012-2015 Page 50
1. 2.
3. 4.
1.
2.
3.
Be sure to specify the location of the AppDynamics javaagent.jar file in the javaagent argument asappropriate for your system. Restart the Jetty server after modifying the configuration file to haveyour changes take effect.
Instrument Jetty Version 6.x or 7.x
For Jetty version 6.x or 7.x, you can add the javaagent command line option to your jetty.sh file, asfollows:
Open the jetty.sh start script file.Add the following javaagent argument to the beginning of the script.
java -javaagent:/<agent_home>/javaagent.jar
Save the script file.Restart the application server for the changes to take effect.
Mule ESB Startup Settings
On this page:
Configuring the Tanuki Service Wrapper
Related pages:
Mule ESB Support
To load the Java Agent in Mule ESB, pass the Java Agent JAR location as a JVM argument toMule.
Mule ESB 3.X or later uses the Tanuki configuration environment. To specify JVM argumentsin your Mule ESB environment, you need to configure them as additional parameters to the Tanuki
configuration file, wrapper.conf, as described below. Java Service Wrapper
Configuring the Tanuki Service Wrapper
Open the Java Service Wrapper configuration file: <MULE_HOME>/conf/wrapper.conf Find the location indicated for Java Additional Parameters:
# Java Additional Parameterswrapper.java.additional.1=
Add the path to the Java Agent JAR file as a JVM argument using a wrapper.java.additional. parameter, as follows.n
wrapper.java.additional.n="-javaagent:/path_to_appagent/javaagent.jar"wrapper.java.additional.n.stripquotes=TRUE
Copyright © AppDynamics 2012-2015 Page 51
3.
1.
2.
Where "n" is the next available integer among the wrapper.java.additional parametersalready in the wrapper.conf file, if any. The numbers serve to identify each Java AdditionalParameter in the file. Do not skip numbers when adding the property.Replace path_to_appagent to the path to the javaagent.jar file in your system. Thestripquotes parameter is necessary only if there are spaces in the path or filename, but issafe to include if not.
For example, on a Linux system and with seven Java parameters already in the file, add thefollowing properties:
wrapper.java.additional.8="-javaagent:/opt/AppDynamics/Agent/app_agent/javaagent.jar"wrapper.java.additional.8.stripquotes=TRUE
Note: There may be additional wrapper.java.additional properties defined in other Mule files.These are generated by the system. As indicated by comments preceding theseproperties, you should not make changes directly to the properties. Mule automaticallyauto-increments the index number for these properties based on the highest integer numberused in wrapper.conf, so you do not need to modify or otherwise account for the indexnumbers of auto-generated configuration properties.
Oracle WebLogic Startup Settings
On this page:
Instrument Oracle WebLogic for WindowsInstrument Oracle WebLogic for an Application Runningas a Windows ServiceInstrument Oracle WebLogic for Linux
The Java Agent bootstraps using the javaagent command line option. Add this option to yourstartWebLogic.sh or startWebLogic.cmd file.
Instrument Oracle WebLogic for Windows
Open the startWebLogic.cmd file, located at<weblogic_version_install_dir>\user_projects\domains\<domain_name>\bin.Add following javaagent argument to the script.
set JAVA_OPTIONS=% JAVA_OPTIONS%-javaagent:"<drive>:\<agent_home>\javaagent.jar"
Make sure that the javaagent argument references the full path of the agent installationdirectory, including the drive, and that the command precedes the WebLogic startcommands, for example:
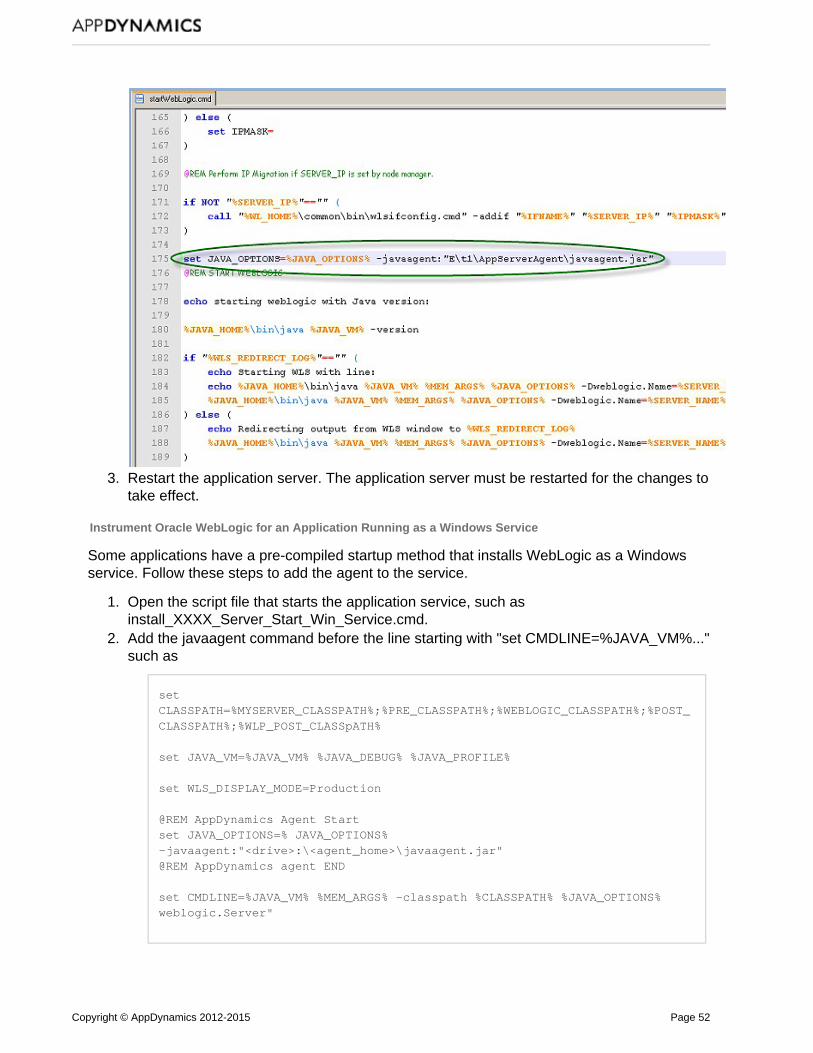
Copyright © AppDynamics 2012-2015 Page 52
2.
3.
1.
2.
3.
Restart the application server. The application server must be restarted for the changes totake effect.
Instrument Oracle WebLogic for an Application Running as a Windows Service
Some applications have a pre-compiled startup method that installs WebLogic as a Windowsservice. Follow these steps to add the agent to the service.
Open the script file that starts the application service, such asinstall_XXXX_Server_Start_Win_Service.cmd.Add the javaagent command before the line starting with "set CMDLINE=%JAVA_VM%..."such as
setCLASSPATH=%MYSERVER_CLASSPATH%;%PRE_CLASSPATH%;%WEBLOGIC_CLASSPATH%;%POST_CLASSPATH%;%WLP_POST_CLASSpATH%
set JAVA_VM=%JAVA_VM% %JAVA_DEBUG% %JAVA_PROFILE%
set WLS_DISPLAY_MODE=Production
@REM AppDynamics Agent Startset JAVA_OPTIONS=% JAVA_OPTIONS%-javaagent:"<drive>:\<agent_home>\javaagent.jar"@REM AppDynamics agent END
set CMDLINE=%JAVA_VM% %MEM_ARGS% -classpath %CLASSPATH% %JAVA_OPTIONS%weblogic.Server"
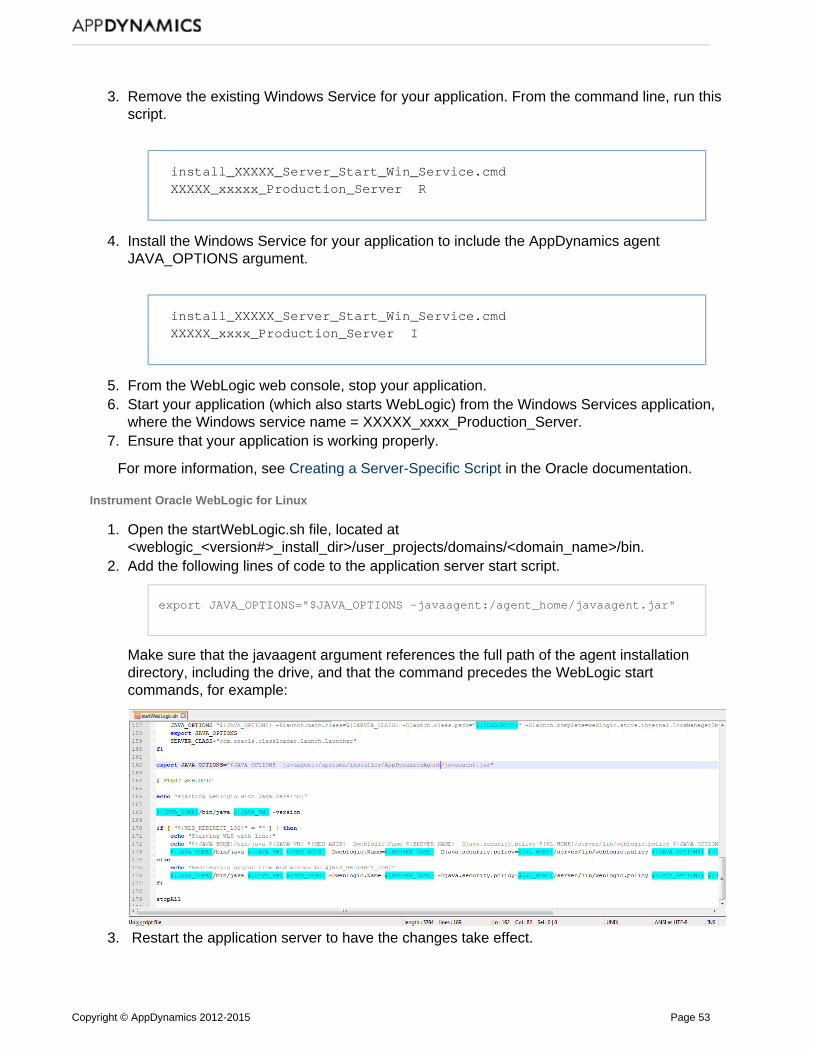
Copyright © AppDynamics 2012-2015 Page 53
3.
4.
5. 6.
7.
1.
2.
3.
Remove the existing Windows Service for your application. From the command line, run thisscript.
install_XXXXX_Server_Start_Win_Service.cmd XXXXX_xxxxx_Production_Server R
Install the Windows Service for your application to include the AppDynamics agentJAVA_OPTIONS argument.
install_XXXXX_Server_Start_Win_Service.cmd XXXXX_xxxx_Production_Server I
From the WebLogic web console, stop your application.Start your application (which also starts WebLogic) from the Windows Services application,where the Windows service name = XXXXX_xxxx_Production_Server.Ensure that your application is working properly.
For more information, see in the Oracle documentation.Creating a Server-Specific Script
Instrument Oracle WebLogic for Linux
Open the startWebLogic.sh file, located at<weblogic_<version#>_install_dir>/user_projects/domains/<domain_name>/bin.Add the following lines of code to the application server start script.
export JAVA_OPTIONS="$JAVA_OPTIONS -javaagent:/agent_home/javaagent.jar"
Make sure that the javaagent argument references the full path of the agent installationdirectory, including the drive, and that the command precedes the WebLogic startcommands, for example:
Restart the application server to have the changes take effect.
Copyright © AppDynamics 2012-2015 Page 54
1.
2.
1.
2.
OSGi Infrastructure Configuration
On this page:
Configure Eclipse EquinoxConfigure Apache SlingConfigure Apache Felix for GlassFishConfigure JIRA or ConfluenceConfigure Other OSGi-based Containers
The GlassFish application server versions 3.x and later uses OSGi architecture. By default, OSGicontainers follow a specific model for bootstrap class delegation. Classes that are not specified inthe container's CLASSPATH are not delegated to the bootstrap classloader; therefore you mustconfigure the OSGi containers for the Java Agentclasses.
For more information see .GlassFish OSGi Configuration per Domain
To ensure that the OSGi container identifies the Java Agent, specify the following package prefix:
org.osgi.framework.bootdelegation=com.singularity.*
This prefix follows the regular boot delegation model so that the Java Agent classes are visible.
If you already have existing boot delegations, add "com.singularity.*" to the existing pathseparated by a comma. For example:
org.osgi.framework.bootdelegation=com.sun.btrace., com.singularity.
Configure Eclipse Equinox
If running Eclipse Equinox under Glassfish:
Open the config.ini file located at <glassfish installdirectory>/glassfish/osgi/equinox/configuration.Add the following package prefix to the config.ini file:
org.osgi.framework.bootdelegation=com.singularity.*
If running Eclipse Equinox under the WebSphere Application Server Liberty profile:
Open the bootstrap.properties file in the JVM directory < >/usr/servers/<WLP_home server_n> for editing.ame
Add the following line:
org.osgi.framework.bootdelegation=com.singularity.*
For more information see .Getting Started with Equinox
Copyright © AppDynamics 2012-2015 Page 55
1.
2.
1. 2.
1. 2. 3.
4.
Configure Apache Sling
Open the sling.properties file. The location of the sling.properties varies depending on theJava platform.In the Sun/Oracle implementation, the sling.properties file is located at <java.home>/lib. Add following package prefix to the sling.properties file:
org.osgi.framework.bootdelegation=com.singularity.*
Configure Apache Felix for GlassFish
Open the config.properties file, located at <glassfish-install>/glassfish/osgi/felix/conf.Add following package prefix to the config.properties file.
org.osgi.framework.bootdelegation=com.singularity.*
GlassFish 3.1.2
In the boot delegation list in the <GlassFish_Home_Directory>\glassfish\config\osgi.properties file,add:
com.singularity.*
For example:
org.osgi.framework.bootdelgation=${eclipselink.bootdelegation}, com.sun.btrace,com.singularity.*
Configure JIRA or Confluence
For JIRA 5.1.8 and newer and Confluence 5.3 and newer:
Open the startup script (i.e., catalina.sh) for editing. Look for the command block (look for " ") start elif [ "$1" = "start" ] ; then
Add the following Java system property alongside the existing properties in both blockelses:
-Datlassian.org.osgi.framework.bootdelegation=META-INF.services,com.yourkit,com.singularity.*,com.jprofiler,com.jprofiler.*,org.apache.xerces,org.apache.xerces.*,org.apache.xalan,org.apache.xalan.*,sun.*,com.sun.jndi,com.icl.saxon,com.icl.saxon.*,javax.servlet,javax.servlet.*,com.sun.xml.bind.*
Add the property to the run command block as well to instrument the application started inrun mode. For example:
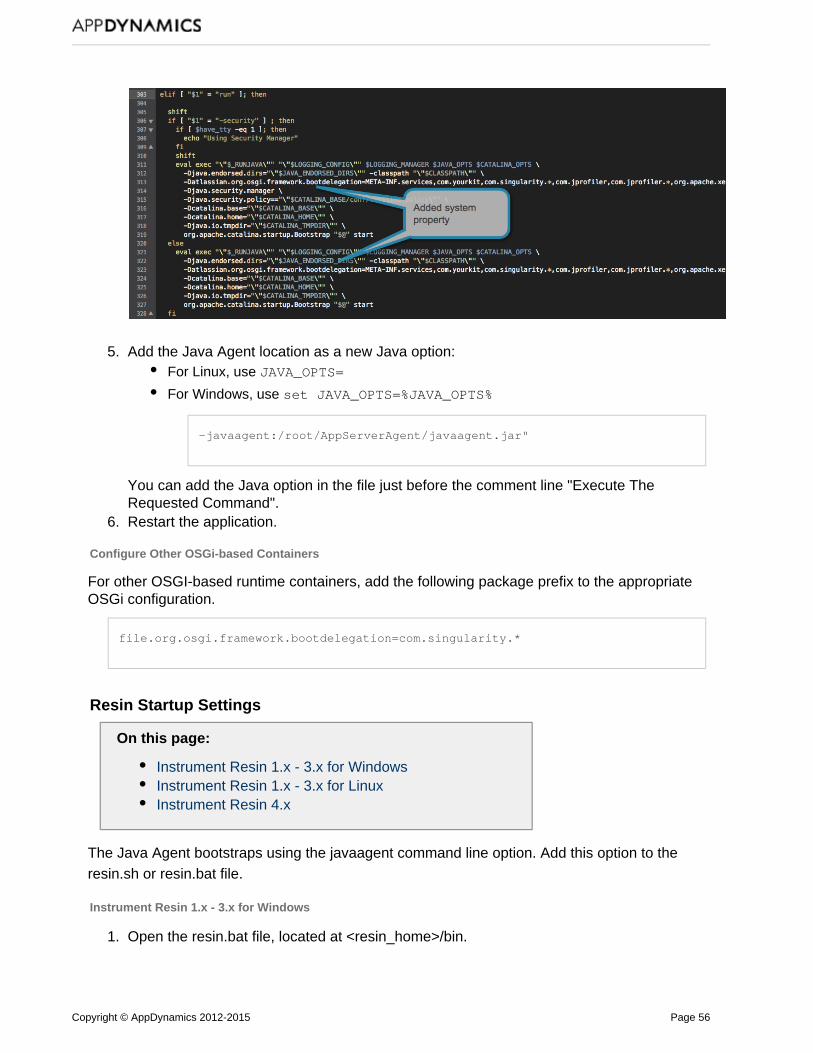
Copyright © AppDynamics 2012-2015 Page 56
4.
5.
6.
1.
2.
Add the Java Agent location as a new Java option:
For Linux, use JAVA_OPTS=
For Windows, use set JAVA_OPTS=%JAVA_OPTS%
-javaagent:/root/AppServerAgent/javaagent.jar"
You can add the Java option in the file just before the comment line "Execute TheRequested Command".Restart the application.
Configure Other OSGi-based Containers
For other OSGI-based runtime containers, add the following package prefix to the appropriateOSGi configuration.
file.org.osgi.framework.bootdelegation=com.singularity.*
Resin Startup Settings
On this page:
Instrument Resin 1.x - 3.x for WindowsInstrument Resin 1.x - 3.x for LinuxInstrument Resin 4.x
The Java Agent bootstraps using the javaagent command line option. Add this option to theresin.sh or resin.bat file.
Instrument Resin 1.x - 3.x for Windows
Open the resin.bat file, located at <resin_home>/bin.
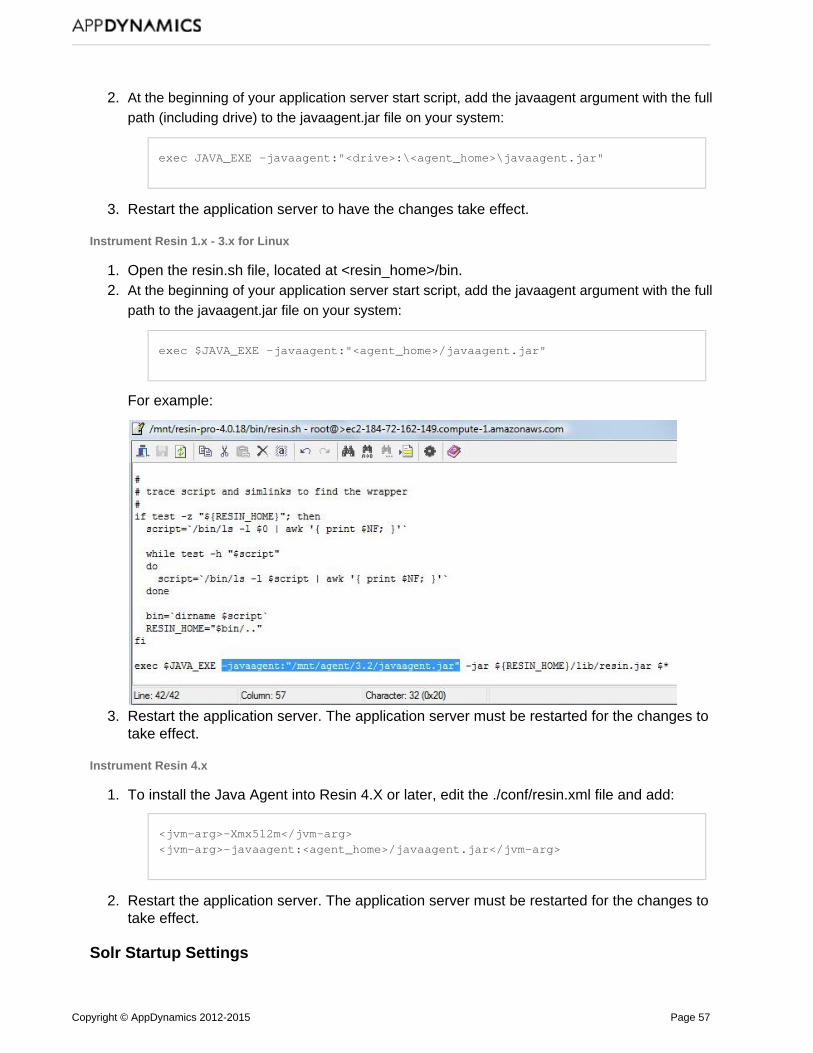
Copyright © AppDynamics 2012-2015 Page 57
2.
3.
1. 2.
3.
1.
2.
At the beginning of your application server start script, add the javaagent argument with the fullpath (including drive) to the javaagent.jar file on your system:
exec JAVA_EXE -javaagent:"<drive>:\<agent_home>\javaagent.jar"
Restart the application server to have the changes take effect.
Instrument Resin 1.x - 3.x for Linux
Open the resin.sh file, located at <resin_home>/bin.At the beginning of your application server start script, add the javaagent argument with the fullpath to the javaagent.jar file on your system:
exec $JAVA_EXE -javaagent:"<agent_home>/javaagent.jar"
For example:
Restart the application server. The application server must be restarted for the changes totake effect.
Instrument Resin 4.x
To install the Java Agent into Resin 4.X or later, edit the ./conf/resin.xml file and add:
<jvm-arg>-Xmx512m</jvm-arg><jvm-arg>-javaagent:<agent_home>/javaagent.jar</jvm-arg>
Restart the application server. The application server must be restarted for the changes totake effect.
Solr Startup Settings
Copyright © AppDynamics 2012-2015 Page 58
1. 2.
1. 2.
1. 2.
On this page:
Add the javaagent Command in a Windows EnvironmentAdd the javaagent Command in a Linux Environment
The Java Agent bootstraps using the javaagent command line option. Add this option to your Solrserver.
Add the javaagent Command in a Windows Environment
Open the Windows command line utility.Execute the following commands to add the javaagent argument to the Solr server:
>cd $Solr_Installation_Directory>java -javaagent:"<drive>:\<agent install directory>\javaagent.jar" -jarstart.jar
For the argument value, reference the full path to the Java Agent installation directory, including the drive.
Add the javaagent Command in a Linux Environment
Open the terminal.Execute the following commands to add the javaagent argument to the Solr server:
>cd $Solr_Installation_Directory>java -javaagent:"<agent install directory>/javaagent.jar" -jar start.jar
For the argument value, reference the full path to the Java Agent installation directory.
Standalone JVM Startup Settings
On this page:
Add the javaagent Command in a Windows EnvironmentAdd the javaagent Command in a Linux Environment
AppDynamics works just as well with JVMs that are not application servers or containers.
The Java Agent bootstraps using the javaagent command line option, a standard Java option andcan be used with any JVM. Add this option to your standalone JVM.
Add the javaagent Command in a Windows Environment
Open the command line utility for Windows.Add javaagent argument to the standalone JVM:
Copyright © AppDynamics 2012-2015 Page 59
2.
1. 2.
1. 2.
>java -javaagent:"Drive:\<agent install directory>\javaagent.jar"<fully_qualified_class_name_with_main_method>
The javaagent argument value must reference the full path to the Java Agent installationFor example:directory, including the drive.
>java -javaagent:"C:\AppDynamics\agentDir\javaagent.jar" com.main.HelloWorld
Add the javaagent Command in a Linux Environment
Open the terminal.Add the javaagent argument to the standalone JVM:
>java -javaagent:"/<agent install directory>/javaagent.jar"<fully_qualified_class_name_with_main_method>
The javaagent argument value must reference the full path to the Java Agent installationFor example:directory, including the drive.
>java -javaagent:"/mnt/AppDynamics/agentDir/javaagent.jar"com.main.HelloWorld
Tanuki Service Wrapper Settings
On this page:
Configure the Tanuki Service Wrapper
Related pages:
Tanuki Service Wrapper PropertiesExample ConfigurationMore Help On Tanuki Service Wrapper
The Java Agent bootstraps using the javaagent command line option. Add this option to the TanukiService wrapper.conf file.
Configure the Tanuki Service Wrapper
Open the wrapper.conf file.Use the wrapper.java.additional.<n> property to add the javaagent option.
wrapper.java.additional.6=-javaagent:/C:/agent/javaagent.jar
Copyright © AppDynamics 2012-2015 Page 60
1.
2.
Tibco ActiveMatrix BusinessWorks Service Engine Settings
Related pages:
https://docs.tibco.com/https://tibbr.tibcommunity.com/
With Tibco ActiveMatrix BusinessWorks Service Engine, each application is started in its ownJVM. Therefore, for each application you want to monitor, you need to configure the Java agent inthe startup settings for the configuration file of that application.
The file to configure is usually the TRA file named for the application. For example:
<application_name>.tra
To instrument the Tibco application
Open the TRA file for the application you want to monitor and add the following to the file:
java.extended.properties=-javaagent:/opt/appagent/javaagent.jar
Restart the application to have the changes take effect using the command line toolbwengine.sh (or .exe) or the Tibco Admin UI.
Since Tibco traffic commonly takes the form of incoming SOAP actions sent via HTTP requests toa single URL (i.e., /BusinessServices/WebGateway), it's likely that you will need to create a POJOsplit rule in the AppDynamics configuration to differentiate business transactions for Tibco. Forinformation, see . Identify Transactions by POJO Method Invoked by a Servlet
webMethods Startup Settings
On this page:
Instrumenting webMethods with the Tanuki Wrapper
Related pages:
Tanuki Service Wrapper Settings
You can instrument the webMethods Integration Server or My webMethods Server by adding the Java agent to the startup script of the server.
The Java agent settings can go in the runtime.bat/runtime.sh file or the server.bat/server.sh fileunder the bin subdirectory of the server home.
Instrumenting webMethods with the Tanuki Wrapper
For webMethods servers that use the Tanuki Java service wrapper for start up, you need toconfigure the agent in the wrapper.conf file.
Note that the order of arguments in the file is important. Specifically, when instrumenting an
Copyright © AppDynamics 2012-2015 Page 61
OSGI-based platform, the agent configuration must precede the bootclasspath argument.
For example, the following listing shows the Java options used in a sample wrapper.conf file:
# Java Additional Parameters...wrapper.java.additional.4=-XX:MaxPermSize=256M wrapper.java.additional.5=-javaagent:"/opt/appd/appagent/javaagent.jar" wrapper.java.additional.6=-Xbootclasspath/a:"%OSGI_INSTALL_AREA%/lib/runtime/platform-jaasproxy.jar"
Java Agent Configuration Properties
On this page:
Using a Single Agent with Multiple JVMsExample Agent Configuration Using controller-info.xmlExample Agent Configuration Using System Propertiesat the Command LineJava Agent Properties
Related pages:
Instrument Dynamically Identified JVMsUse System Properties for Java Agent SettingsInstrument JVMs in a Dynamic Environment
You can configure the App Server Agent properties using:
Settings in the controller-info.xml fileSystem properties (-D options) passed to the JVM at start upEnvironment variables read at start up
To avoid conflicts, that agent follows the following order of precedence: environment variable,system properties, and then controller-info.xml file.
Using a Single Agent with Multiple JVMs
For shared binaries among multiple JVM instances, AppDynamics recommends using acombination of the XML file and the startup properties to configure the app agent. Configure all theproperties common to all the JVMs in the controller-info.xml file. Configure the properties unique toa JVM using the system properties in the start-up script.
For example:
For multiple JVMs belonging to the same application serving different tiers, configure theapplication name in the controller-info.xml file and the tier name and node name using thesystem properties.
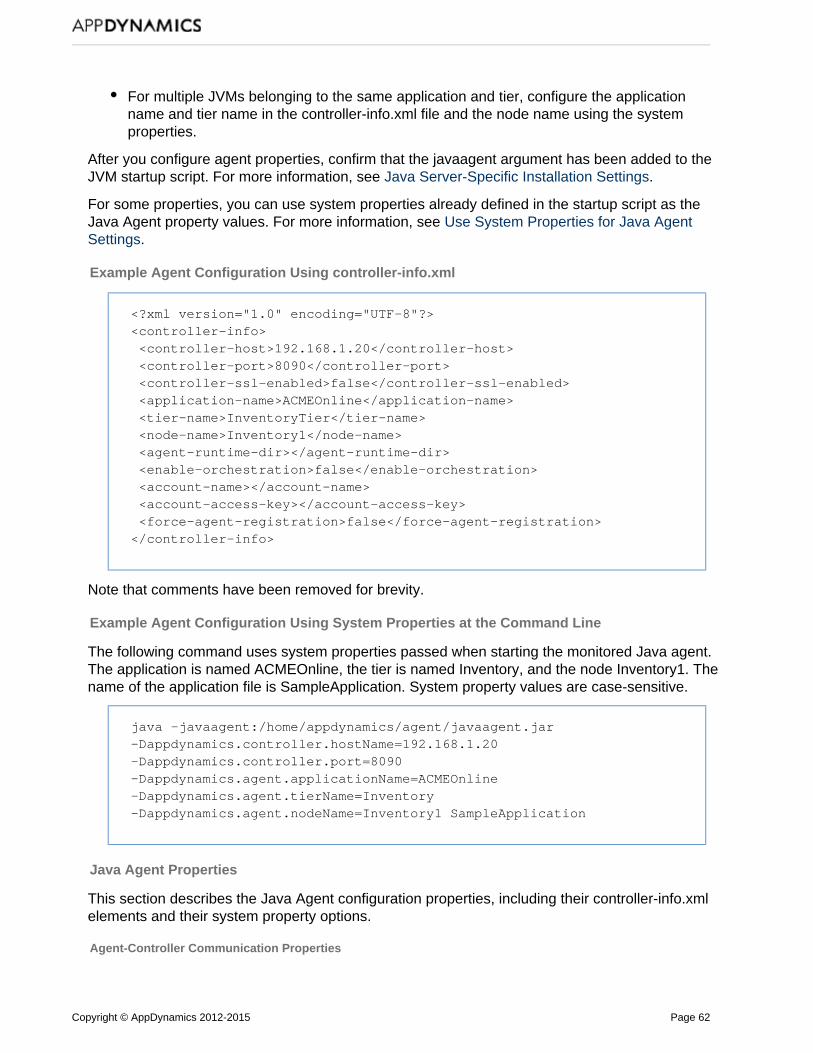
Copyright © AppDynamics 2012-2015 Page 62
For multiple JVMs belonging to the same application and tier, configure the applicationname and tier name in the controller-info.xml file and the node name using the systemproperties.
After you configure agent properties, confirm that the javaagent argument has been added to theJVM startup script. For more information, see .Java Server-Specific Installation Settings
For some properties, you can use system properties already defined in the startup script as theJava Agent property values. For more information, see Use System Properties for Java Agent
.Settings
Example Agent Configuration Using controller-info.xml
<?xml version="1.0" encoding="UTF-8"?><controller-info> <controller-host>192.168.1.20</controller-host> <controller-port>8090</controller-port> <controller-ssl-enabled>false</controller-ssl-enabled> <application-name>ACMEOnline</application-name> <tier-name>InventoryTier</tier-name> <node-name>Inventory1</node-name> <agent-runtime-dir></agent-runtime-dir> <enable-orchestration>false</enable-orchestration> <account-name></account-name> <account-access-key></account-access-key> <force-agent-registration>false</force-agent-registration></controller-info>
Note that comments have been removed for brevity.
Example Agent Configuration Using System Properties at the Command Line
The following command uses system properties passed when starting the monitored Java agent.The application is named ACMEOnline, the tier is named Inventory, and the node Inventory1. Thename of the application file is SampleApplication. System property values are case-sensitive.
java -javaagent:/home/appdynamics/agent/javaagent.jar-Dappdynamics.controller.hostName=192.168.1.20-Dappdynamics.controller.port=8090-Dappdynamics.agent.applicationName=ACMEOnline-Dappdynamics.agent.tierName=Inventory-Dappdynamics.agent.nodeName=Inventory1 SampleApplication
Java Agent Properties
This section describes the Java Agent configuration properties, including their controller-info.xmlelements and their system property options.
Agent-Controller Communication Properties
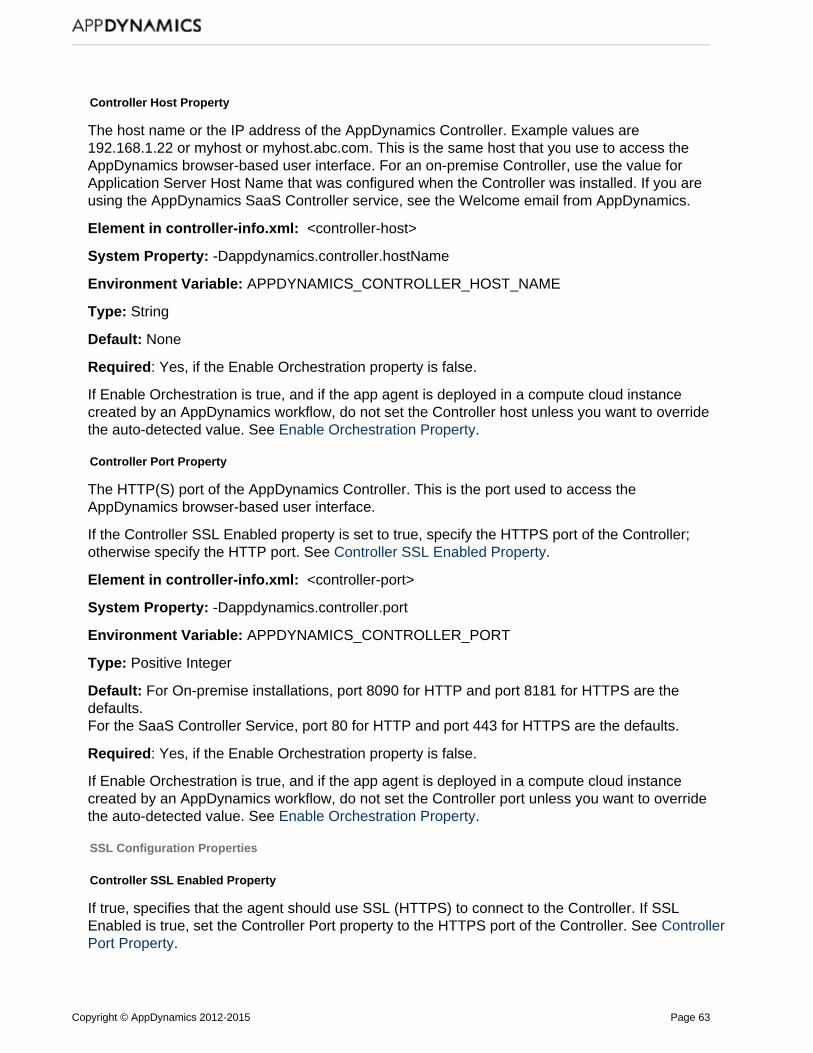
Copyright © AppDynamics 2012-2015 Page 63
Controller Host Property
The host name or the IP address of the AppDynamics Controller. Example values are192.168.1.22 or myhost or myhost.abc.com. This is the same host that you use to access theAppDynamics browser-based user interface. For an on-premise Controller, use the value forApplication Server Host Name that was configured when the Controller was installed. If you areusing the AppDynamics SaaS Controller service, see the Welcome email from AppDynamics.
Element in controller-info.xml: <controller-host>
System Property: -Dappdynamics.controller.hostName
Environment Variable: APPDYNAMICS_CONTROLLER_HOST_NAME
Type: String
Default: None
Required: Yes, if the Enable Orchestration property is false.
If Enable Orchestration is true, and if the app agent is deployed in a compute cloud instancecreated by an AppDynamics workflow, do not set the Controller host unless you want to overridethe auto-detected value. See .Enable Orchestration Property
Controller Port Property
The HTTP(S) port of the AppDynamics Controller. This is the port used to access theAppDynamics browser-based user interface.
If the Controller SSL Enabled property is set to true, specify the HTTPS port of the Controller;otherwise specify the HTTP port. See .Controller SSL Enabled Property
Element in controller-info.xml: <controller-port>
System Property: -Dappdynamics.controller.port
Environment Variable: APPDYNAMICS_CONTROLLER_PORT
Type: Positive Integer
Default: For On-premise installations, port 8090 for HTTP and port 8181 for HTTPS are thedefaults.For the SaaS Controller Service, port 80 for HTTP and port 443 for HTTPS are the defaults.
Required: Yes, if the Enable Orchestration property is false.
If Enable Orchestration is true, and if the app agent is deployed in a compute cloud instancecreated by an AppDynamics workflow, do not set the Controller port unless you want to overridethe auto-detected value. See .Enable Orchestration Property
SSL Configuration Properties
Controller SSL Enabled Property
If true, specifies that the agent should use SSL (HTTPS) to connect to the Controller. If SSLEnabled is true, set the Controller Port property to the HTTPS port of the Controller. See Controller
.Port Property
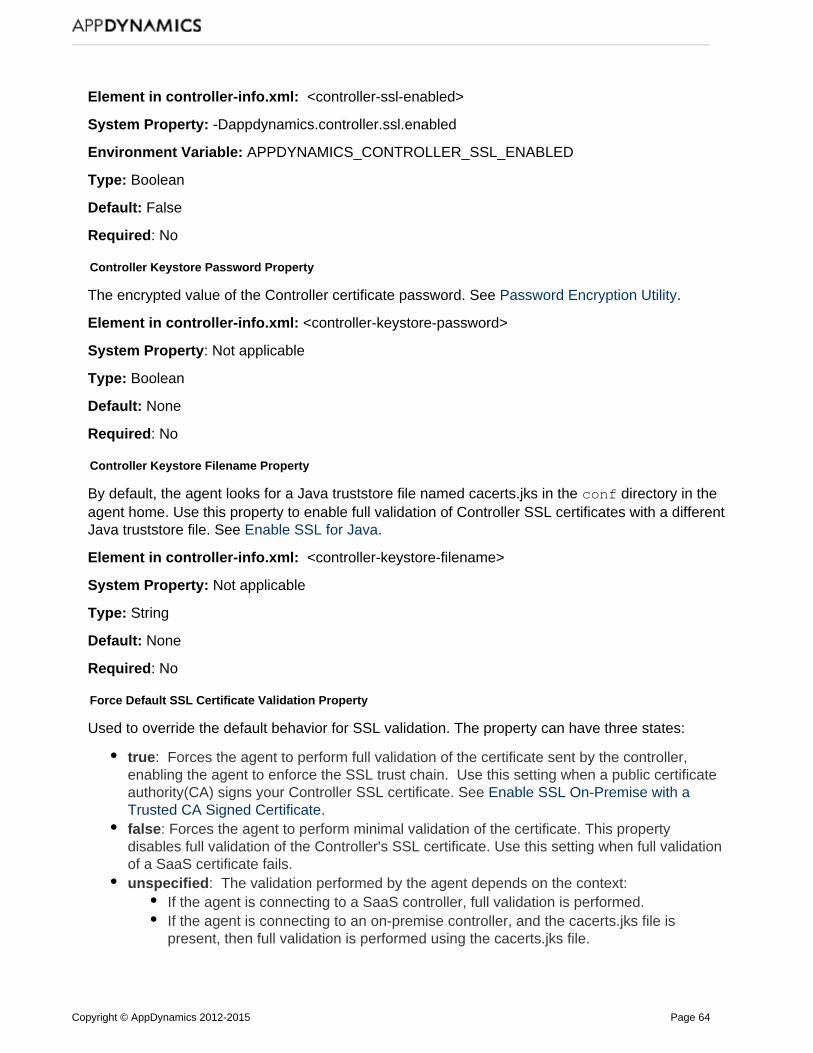
Copyright © AppDynamics 2012-2015 Page 64
Element in controller-info.xml: <controller-ssl-enabled>
System Property: -Dappdynamics.controller.ssl.enabled
Environment Variable: APPDYNAMICS_CONTROLLER_SSL_ENABLED
Type: Boolean
Default: False
Required: No
Controller Keystore Password Property
The encrypted value of the Controller certificate password. See .Password Encryption Utility
Element in controller-info.xml: <controller-keystore-password>
System Property: Not applicable
Type: Boolean
Default: None
Required: No
Controller Keystore Filename Property
By default, the agent looks for a Java truststore file named cacerts.jks in the directory in theconfagent home. Use this property to enable full validation of Controller SSL certificates with a differentJava truststore file. See .Enable SSL for Java
Element in controller-info.xml: <controller-keystore-filename>
System Property: Not applicable
Type: String
Default: None
Required: No
Force Default SSL Certificate Validation Property
Used to override the default behavior for SSL validation. The property can have three states:
: Forces the agent to perform full validation of the certificate sent by the controller,trueenabling the agent to enforce the SSL trust chain. Use this setting when a public certificateauthority(CA) signs your Controller SSL certificate. See Enable SSL On-Premise with a
.Trusted CA Signed Certificate: Forces the agent to perform minimal validation of the certificate. This propertyfalse
disables full validation of the Controller's SSL certificate. Use this setting when full validationof a SaaS certificate fails.
: unspecified The validation performed by the agent depends on the context:If the agent is connecting to a SaaS controller, full validation is performed.If the agent is connecting to an on-premise controller, and the cacerts.jks file ispresent, then full validation is performed using the cacerts.jks file.
Copyright © AppDynamics 2012-2015 Page 65
If the agent is connecting to an on-premise controller, and there is no cacerts.jks file,then minimal validation is performed
Element in controller-info.xml: Not applicable
System Property: -Dappdynamics.force.default.ssl.certificate.validation
Type: Boolean
Default: None
Required: No
Agent Identification Properties
Automatic Naming Property
If enabled and other agent identification properties are not specified in other settings, the tier andapplication for the agent are automatically named. The default names are in the format MyApp andMyTier.
Element in controller-info.xml: <auto-naming>
System Property: Not applicable
Type: Boolean
Default: None
Required: No
Application Name Property
The name of the logical business application that this JVM node belongs to. Note that this is notthe deployment name(ear/war/jar) on the application server.
If a business application of the configured name does not exist, it is created automatically.
Element in controller-info.xml: <application-name>
System Property: -Dappdynamics.agent.applicationName
Environment Variable: APPDYNAMICS_AGENT_APPLICATION_NAME
Type: String
Default: None
Required: Yes
Tier Name Property
The name of the tier that this JVM node belongs to. Note that this is not the deployment name(ear/war/jar) on the application server.
If the JVM or application server startup script already has a system property that references a tier,such as -Dserver.tier, you can use ${server.tier} as the tier name. For more information, see Use
.System Properties for Java Agent Settings
Copyright © AppDynamics 2012-2015 Page 66
The agent registers the named tier with the Controller, if the tier does not already exist, the firsttime it connects with the Controller. If a tier with the name already exists in the Controller model,the agent is associated with the existing tier.
See .Name Business Applications, Tiers, and Nodes
Element in controller-info.xml: <tier-name>
System Property: -Dappdynamics.agent.tierName
Environment Variable: APPDYNAMICS_AGENT_TIER_NAME
Type: String
Default: None
Required: Yes
Node Name Property
The name of the node. Where JVMs are dynamically created, use the system property to set thenode name.
If your JVM or application server startup script already has a system property that can be used asa node name, such as -Dserver.name, you could use ${server.name} as the node name. Youcould also use expressions such as ${server.name}_${host.name}.MyNode to define the nodename. See for more information.Use System Properties for Java Agent Settings
In general, the node name must be unique within the business application and physical host. If youwant to use the same node name for multiple nodes on the same physical machine, createmultiple virtual hosts using the Unique Host ID property. See .Unique Host ID Property
See .Name Business Applications, Tiers, and Nodes
Element in controller-info.xml: <node-name>
System Property: -Dappdynamics.agent.nodeName
Environment Variable: APPDYNAMICS_AGENT_NODE_NAME
Type: String
Default: None
Required: Yes
New
Reuse Node Name Property
The system property provides for the reuse of node names in AppDynamics.
This property is useful for monitoring environments where there are many JVMs with short lifespans. It causes AppDynamics to reuse the node names of historical JVMs for new JVMs. Thisavoids a proliferation of differently named nodes in AppDynamics over time, particularly when thenodes are essentially identical processes that run over different times. An example of thisenvironment is a z/OS Dynamic Workload Manager based-environment where new JVMs arelaunched and shut down based on actual work load.
Copyright © AppDynamics 2012-2015 Page 67
AppDynamics generates a node name with App, Tier and Sequence number. The node names arepooled. For example, the sequence numbers are reused when the nodes are purged (based onthe node lifetime).
The node name is generated by the Controller. The Controller reuses node names based on thenode retention period property.
Element in controller-info.xml: <node-name>
System Property: -Dappdynamics.agent.reuse.nodeName
Type: Boolean
Default: String
Required: No
Example: With the following configuration, the agent directs the Controller to generate a nodename with the prefix "reportGen". Node names will have suffixes --1, --2, and so on, depending onhow many nodes are running in parallel. The name of a node that is shut down and qualifies as ahistorical node may be reused by a new node.
-Dappdynamics.agent.reuse.nodeName=true-Dappdynamics.agent.reuse.nodeName.prefix=reportGen
Reuse Node Name Prefix Property
This property directs the Controller to generate node names dynamically with the prefix specified.
System Property: -Dappdynamics.agent.reuse.nodeName.prefix
Element in controller-info.xml: <node-name>
Type: Boolean
Default: false; when set to , you do not need to specify a node name.true
Required: No
Example: Using the following property specifications, the agent directs the Controller to generatea node name with the prefix "reportGen". Node names will have suffixes --1, --2, and so on,depending on how many nodes are running in parallel.
-Dappdynamics.agent.reuse.nodeName=true-Dappdynamics.agent.reuse.nodeName.prefix=reportGen
Multi-Tenant Mode Properties
If the AppDynamics Controller is running in multi-tenant mode or if you are using the AppDynamicsSaaS Controller, specify the account name and account access key for this agent to authenticatewith the Controller. If you are using the AppDynamics SaaS Controller, the account name isprovided in the Welcome email sent by AppDynamics. You can also find this information in the<controller_home>/initial_account_access_info.txt file.
If the Controller is running in single-tenant mode (the case for most on-premise installations), thereis no need to configure these values.
Account Name Property
Copyright © AppDynamics 2012-2015 Page 68
Description: This is the account name used to authenticate with the Controller.
Element in controller-info.xml: <account-name>
System Properties: -Dappdynamics.agent.accountName
Environment Variable: APPDYNAMICS_AGENT_ACCOUNT_NAME
Type: String
Default: None
Required: Yes for AppDynamics SaaS Controller and other multi-tenant users; no forsingle-tenant users.
Account Access Key Property
The account access key used to authenticate with the Controller.
Element in controller-info.xml: <account-access-key>
System Properties: -Dappdynamics.agent.accountAccessKey
Environment Variable: APPDYNAMICS_AGENT_ACCOUNT_ACCESS_KEY
Type: String
Default: None
Required: Yes for AppDynamics SaaS Controller and other multi-tenant users; no forsingle-tenant users.
Proxy Properties for the Controller
These properties configure the agent to connect to the Controller through a proxy.
Proxy Host Property
The proxy host name or IP address.
Element in controller-info.xml: Not applicable
System Property: -Dappdynamics.http.proxyHost
Type: String
Default: None
Required: No
Proxy Port Property
The proxy HTTP(S) port.
Element in controller-info.xml: Not applicable
Proxy authentication cannot be used in conjunction with SSL. To connect the agentthrough a proxy via SSL, the proxy must be open (no authentication).
Copyright © AppDynamics 2012-2015 Page 69
System Property: -Dappdynamics.http.proxyPort
Type: Positive Integer
Default: None
Required: No
Proxy User Name Property
The name of the user that is authenticated by the proxy host.
Element in controller-info.xml: Not applicable
System Property: -Dappdynamics.http.proxyUser
Type: String
Default: None
Required: No
Proxy Password Property
The absolute path to the file containing the password of the user that is authenticated by the proxyhost. The password must be the first line of the file and can be in clear (unencrypted) text or inhash format, for example, as produced by htdigest: myname:myrealm:17020d0183c61c191b4
. 28ac4ff51feec
Element in controller-info.xml: Not applicable
System Property: -Dappdynamics.http.proxyPasswordFile
Type: String
Default: None
Required: No
Example: -Dappdynamics.http.proxyPasswordFile=/path/to/file-with-password
Other Properties
Enable Orchestration Property
When set to true, enables auto-detection of the controller host and port when the app server is acompute cloud instance created by an AppDynamics orchestration workflow. See Controller Host
and .Property Controller Port Property
In a cloud compute environment, auto-detection is necessary for the Create Machine tasks in theworkflow to run correctly.
If the host machine on which this agent resides is not created through AppDynamics workfloworchestration, this property should be set to false.
Element in controller-info.xml: <enable-orchestration>
System Property: Not applicable
Copyright © AppDynamics 2012-2015 Page 70
Type: Boolean
Default: False
Required: No
Agent Runtime Directory Property
Sets the runtime directory for all runtime files (logs, transaction configuration) for nodes that usethis agent installation. If this property is specified, all agent logs are written to<Agent-Runtime-Directory>/logs/node-name and transaction configuration is written to the<Agent-Runtime-Directory>/conf/node-name directory.
Element in controller-info.xml: <agent-runtime-dir>
System Property: -Dappdynamics.agent.runtime.dir
Environment Variable: APPDYNAMICS_AGENT_BASE_DIR
Type: String
Default: <agent_home>/nodes
Required: No
Redirect Log Files Property
Sets the destination directory to which to redirect log files for a node.
Element in controller-info.xml: Not applicable
System Property: -Dappdynamics.agent.logs.dir
Type: String
Default: < >/logs/<Node_Name>agent_home
Required: No
Force Agent Registration Property
Set to true only under the following conditions:
The Agent has been moved to a new application and/or tier from the UIandYou want to override that move by specifying a new application name and/or tier name inthe agent configuration.
Element in controller-info.xml: <force-agent-registration>
System Property: Not applicable
Type: Boolean
Default: False
Required: No
Auto Node Name Prefix Property
Copyright © AppDynamics 2012-2015 Page 71
Set this property if you want the Controller to generate node names automatically using a prefixthat you provide.
The Controller generates node names based on the prefix concatenated with a number, which asuffix consisting of a number that is incremented sequentially with each new node. For example, ifyou assign a value of "mynode" to this property, the Controller generates node names "mynode-1","mynode-2" and so on.
This property provides a similar function to the Reuse Node Name Prefix Property property.However, this property is not meant to be used in combination with reusing node names;use Reuse Node Name Prefix Property for those cases instead.
Element in controller-info.xml: Not applicable
System Property: -Dappdynamics.agent.auto.node.prefix=<your_prefix>
Type: String
Default: Serial number maintained by the Controller appended to the tier name
Required: No
Cron/Batch JVM Property
Set this property to true if the JVM is a batch/cron process or if you are instrumenting the main()method. This property can be used to stall the shutdown to allow the agent to send metrics beforeshutdown.
Element in controller-info.xml: Not applicable
System Property: -Dappdynamics.cron.vm
Type: Boolean
Default: False
Required: No
Unique Host ID Property
Logically partitions a single physical host or virtual machine such that it appears to the Controllerthat the application is running on different machines. Set the value to a string that is unique acrossthe entire managed infrastructure. The string may not contain any spaces. If this property is set onthe app agent, it must be set on the machine agent as well.
See .Configure Multiple Standalone Machine Agents for One Machine for Java
System Property: -Dappdynamics.agent.uniqueHostId
Environment Variable: APPDYNAMICS_AGENT_UNIQUE_HOST_ID_ENV_VAR
Type: String
Default: None
Required: No
Hot Spot Learning on Controller
Copyright © AppDynamics 2012-2015 Page 72
Enables or disables hotspot learning on the Controller. Prior to 3.9, hot spot learning wasperformed by the App Agent for Java. To improve performance and more accurately collectsnapshot information, this functionality was moved to the Controller in 3.9. Setting this option tofalse will disable everything related to this new feature. For more information on hotspots, see Tra
and .nsaction Snapshots Call Graphs
System Property: -Dappdynamics.hotspot.learn.enabled
Type: String
Default: true
Required: No
Use System Properties for Java Agent Settings
On this page:
Referencing System PropertiesCombining Properties
Related pages:
AppDynamics ConceptsInstall the Java Agent
You can use system properties to set the Java agent configuration properties dynamically.
This approach to agent configuration is most useful in environments that consist of multiple JVMsrunning on the same machine. In this type of environment, it's likely that Java system propertiesare already used to distinguish the JVMs. If so, you can also use the value of those properties toset the agent node or tier name, as described here.
Referencing System Properties
You can reference system properties from the command line or in the agent configuration file tospecify the node name, tier name, or other agent configuration properties dynamically.
For example, consider an Java application started with a script named startserver.sh. The scriptdefines a system property as follows:
-Dserver.name=$1
The property will get the value of the first argument passed when starting theserver.namescript. For example, the following command to start the JVM would bind the server.name propertyto the value ecommerce01:
startserver.sh ecommerce01
You can use this value in your agent configuration by setting the -Dappdynamics.agent.nodeNameproperty at startup as follows.
Copyright © AppDynamics 2012-2015 Page 73
-Dappdynamics.agent.nodeName=$server.name
Or, you can use the value in the controller-info.xml file, using the following format:
${system_property_name}
For example:
<controller-info> ... <node-name>${server.name}</node-name></controller-info>
If the JVM is started using the sample command discussed previously, the agent will useecommerce01 as the node name.
Note that is simply the parameter name in the example scenario. Be sure to useserver.namethe name of a system property in your environment for the Java agent node name.
Combining Properties
You can combine multiple system properties to name nodes or tiers. For example, incontroller-info.xml, combine properties as follows:
${system_property_name_1}${system_property_name_2}
You can combine system properties with literals. In the following example "_" and "inventory" areliterals.
${myhost.name}_${myserver.name}.inventory
You can use existing system properties for the Controller host and port settings as well; however,combining properties as shown here is not supported for those settings.
Use Environment Variables for Java Agent Settings
On this page:
About Environment VariablesEnvironment Variables Used by the Agent
As an alternative to using system properties or controller-info.xml to configure the application
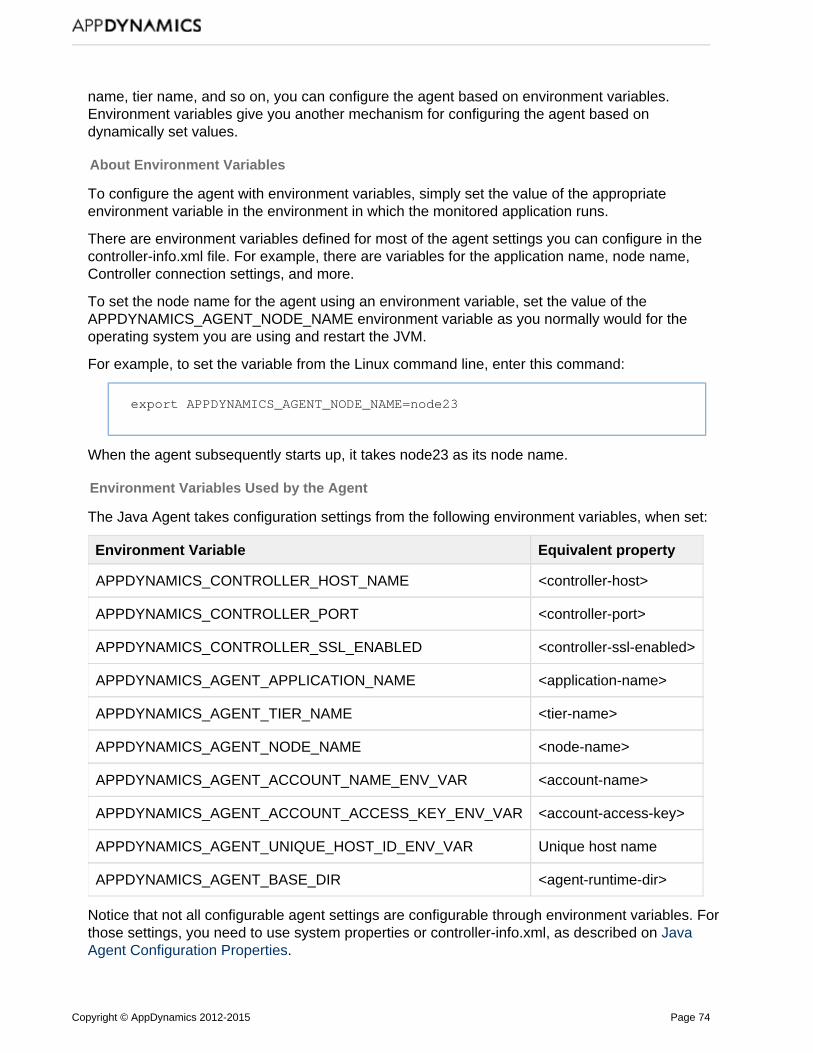
Copyright © AppDynamics 2012-2015 Page 74
name, tier name, and so on, you can configure the agent based on environment variables.Environment variables give you another mechanism for configuring the agent based ondynamically set values.
About Environment Variables
To configure the agent with environment variables, simply set the value of the appropriateenvironment variable in the environment in which the monitored application runs.
There are environment variables defined for most of the agent settings you can configure in thecontroller-info.xml file. For example, there are variables for the application name, node name,Controller connection settings, and more.
To set the node name for the agent using an environment variable, set the value of theAPPDYNAMICS_AGENT_NODE_NAME environment variable as you normally would for theoperating system you are using and restart the JVM.
For example, to set the variable from the Linux command line, enter this command:
export APPDYNAMICS_AGENT_NODE_NAME=node23
When the agent subsequently starts up, it takes node23 as its node name.
Environment Variables Used by the Agent
The Java Agent takes configuration settings from the following environment variables, when set:
Environment Variable Equivalent property
APPDYNAMICS_CONTROLLER_HOST_NAME <controller-host>
APPDYNAMICS_CONTROLLER_PORT <controller-port>
APPDYNAMICS_CONTROLLER_SSL_ENABLED <controller-ssl-enabled>
APPDYNAMICS_AGENT_APPLICATION_NAME <application-name>
APPDYNAMICS_AGENT_TIER_NAME <tier-name>
APPDYNAMICS_AGENT_NODE_NAME <node-name>
APPDYNAMICS_AGENT_ACCOUNT_NAME_ENV_VAR <account-name>
APPDYNAMICS_AGENT_ACCOUNT_ACCESS_KEY_ENV_VAR <account-access-key>
APPDYNAMICS_AGENT_UNIQUE_HOST_ID_ENV_VAR Unique host name
APPDYNAMICS_AGENT_BASE_DIR <agent-runtime-dir>
Notice that not all configurable agent settings are configurable through environment variables. Forthose settings, you need to use system properties or controller-info.xml, as described on Java
. Agent Configuration Properties
Copyright © AppDynamics 2012-2015 Page 75
1. 2.
1. 2.
Instrument Multiple JVMs on a Single Machine
On this page:
Configure the Agents for the Same TierConfigure the Agents for Different Tiers
This topic describes how to configure the Java Agent multiple JVMs that reside on a singlemachine. The JVMs may serve the same or different tiers in the AppDynamics model.
In either case:
All of the common information should be configured using controller-info.xml.All of the information unique to a JVM should be configured using the system properties (-D
in the startup script.option)Information in the startup scripts always overrides the information in the controller-info.xmlfile.
Configure the Agents for the Same Tier
For this case, you only need to differentiate the node names in the JVM startup script and use, as follows: controller-info.xml for the other settings
Configure the application and tier name in controller-info.xml.Add the javaagent argument and system property for the node name to the batch file orstartup script of each JVM.
java -javaagent:<agent_home>/javaagent.jar-Dappdynamics.agent.nodeName=$nodeName
Separate the system properties with a white space character.
The following illustration displays how this configuration is applied to the ACME Bookstore.
Configure the Agents for Different Tiers
For this case, you differentiate the node and tier names in the JVM startup script and and, as follows:controller-info.xml for the other settings
Configure the application name in controller-info.xml.Add the javaagent argument and the system properties to the startup script to each of yourJVM:
java -javaagent:<agent_home>/javaagent.jar-Dappdynamics.agent.tierName=$tierName-Dappdynamics.agent.nodeName=$nodeName
Separate the system properties with a white space character.
Copyright © AppDynamics 2012-2015 Page 76
1. 2.
Some application server management consoles allow you to specify start-up arguments using aweb interface. See .Java Server-Specific Installation Settings
Instrument Dynamically Identified JVMs
On this page:
Configure the Node Name of the Java AgentConfiguration notes
This topic describes how to configure the App Agent for Java in environments where the JVMs aredynamic.
Configure the Node Name of the Java Agent
Add the application and tier name to the controller-info.xml file.Add the javaagent argument and the following system properties (-D options) to the startupscript of the JVMs:
java -javaagent:<agent_home>/javaagent.jar-Dappdynamics.agent.nodeName=${NODE_NAME}
Configuration notes
The system properties are separated by a white space character.The <agent_home> references the full path of the Java Agent installation directory.The token ${NODE_NAME} identifies the JVMs dynamically and names these JVMs basedon the parameter value passed during the execution of the startup script for your JVMprocess.The application and tier names can also be configured using the system properties. Forexample, you can configure the agent to direct the Controller to create node names using aprefix and to reuse node names so the Controller is not overloaded, using the Dappdynami
and ocs.agent.reuse.nodeName.prefix Dappdynamics.agent.reuse.nodeName
ptions respectively. For more details see .Java Agent Configuration PropertiesSome application server management consoles allow you to specify startup argumentsusing a web interface. For details see .Java Server-Specific Installation Settings
Instrument JVMs in a Dynamic Environment
On this page:
Considerations for a Dynamic EnvironmentConfiguring the Agent for Dynamic EnvironmentsExample Settings
In certain types of application environments, a large number of nodes can be spawneddynamically and live for a relatively brief period of time. For example, with WebSphere on z/OS
Copyright © AppDynamics 2012-2015 Page 77
IBM Mainframes, a dynamic workload manager can spawn transient JVMs for an existingapplication server (called a servant) based on application load or other policies. The spawnedJVMs are identical, but each has a different process ID. Similarly, in dynamic hosted environmentssuch as AWS, Rackspace, and others, nodes can be brought up and taken down frequently.
Considerations for a Dynamic Environment
The AppDynamics app agent operates substantially the same way in a dynamic environment as itdoes in a traditional data center. However, a few considerations apply when deploying agents inthese environments:
Ensure that the agents can reach your Controller. Particularly if your Controller operateson-premises while the agents run on hosted servers, you need to ensure that the agents canaccess the Controller through the firewalls in your environment. Configure custom node expiration handling. By default, the Controller manages the lifecyclefor a node based on default timeout settings. You will likely want to reduce the defaultexpiration times for nodes, as described in . To manage this directly,Remove Unused Nodesrather than relying on activity timeouts, a strategy would be to run a script in the JVM beforeit shuts down that invokes the mark-nodes-historical resource in the AppDynamics REST
to declare itself historical to the Controller. APIDepending on the nature of your environment, it may not make sense to track each JVMinstance as a distinct node in AppDynamics, since the set of nodes in this case would beboundless. Also, since the JVMs are identical, representing them as different nodes inAppDynamics does not best reflect the logical model of the environment. The followingsection provides more information.
Configuring the Agent for Dynamic Environments
You can configure AppDynamics to reuse node names for these types of environments. With nodename reuse enabled, after a node is shut down and marked as historical in AppDynamics, thename of the node becomes available for reuse in subsequently registered nodes. You can alsospecify a node name prefix when reusing node names to indicate the association between allconcurrently running JVMs for the dynamic application.
To configure the agent for this environment, use the following properties:
Reuse Node Name Property to enable re-use of node names, andAuto Node Name Prefix Property to set the prefix used for automatically-named nodes
When enabled, the Controller manages name assignments for the agents. It forms node names byappending a sequentially incremented number as the suffix to the prefix you specify. Be sure toavoid specifying the node name using any other mechanism (such as in controller-info.xml file orvia a system property).
Example Settings
The following listing shows sample settings for the properties as they may appear in a startupscript:
-Dappdynamics.agent.reuse.nodeName=true-Dappdynamics.agent.reuse.nodeName.prefix=CloudActivator_
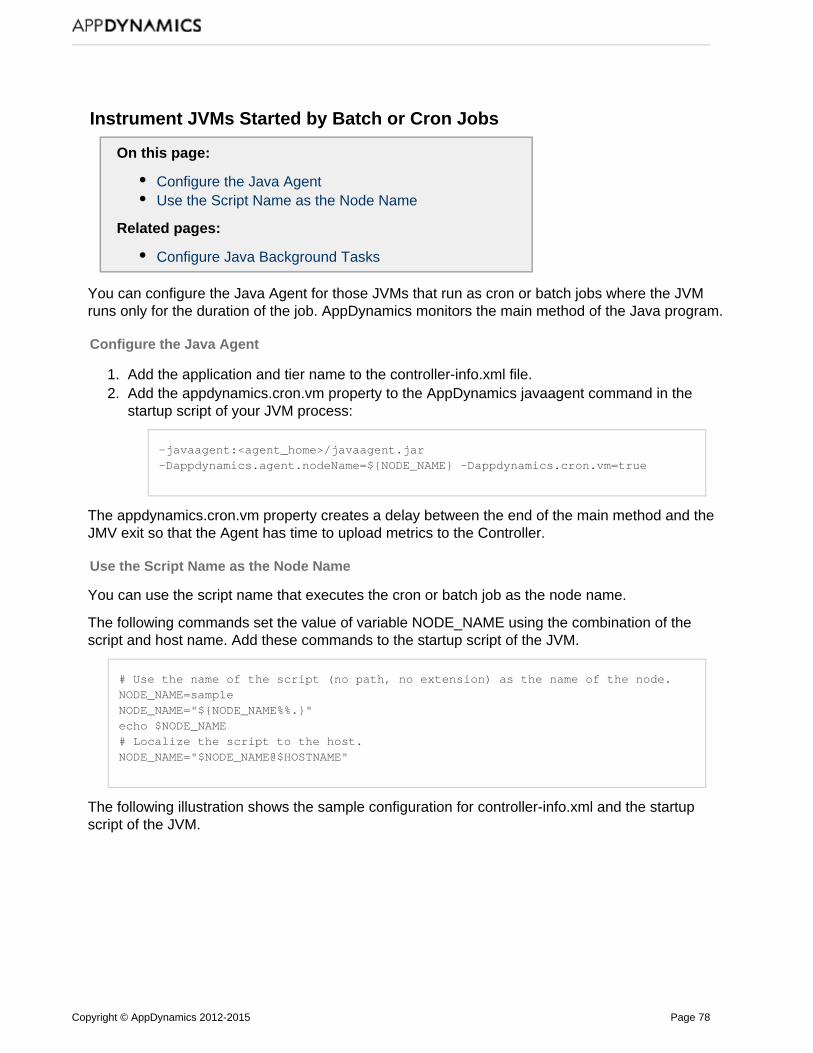
Copyright © AppDynamics 2012-2015 Page 78
1. 2.
Instrument JVMs Started by Batch or Cron Jobs
On this page:
Configure the Java AgentUse the Script Name as the Node Name
Related pages:
Configure Java Background Tasks
You can configure the Java Agent for those JVMs that run as cron or batch jobs where the JVMruns only for the duration of the job. AppDynamics monitors the main method of the Java program.
Configure the Java Agent
Add the application and tier name to the controller-info.xml file.Add the appdynamics.cron.vm property to the AppDynamics javaagent command in thestartup script of your JVM process:
-javaagent:<agent_home>/javaagent.jar-Dappdynamics.agent.nodeName=${NODE_NAME} -Dappdynamics.cron.vm=true
The appdynamics.cron.vm property creates a delay between the end of the main method and theJMV exit so that the Agent has time to upload metrics to the Controller.
Use the Script Name as the Node Name
You can use the script name that executes the cron or batch job as the node name.
The following commands set the value of variable NODE_NAME using the combination of thescript and host name. Add these commands to the startup script of the JVM.
# Use the name of the script (no path, no extension) as the name of the node.NODE_NAME=sampleNODE_NAME="${NODE_NAME%%.}"echo $NODE_NAME# Localize the script to the host.NODE_NAME="$NODE_NAME@$HOSTNAME"
The following illustration shows the sample configuration for controller-info.xml and the startupscript of the JVM.

Copyright © AppDynamics 2012-2015 Page 79
1. 2. 3. 4.
Instrument JVMs in Restricted Environments
Some restricted environments do not allow any changes to the JVM startup script. For theseenvironments AppDynamics provides the appdynamics.agent.startup.hook property. This "startuphook" allows a single point of deployment for the agent. You create a Java main method that isinvoked programmatically, before your startup script is executed.
To create the "startup hook" Agent Program
Implement a class with Java main method.Create a JAR file for this class.In the manifest of the JAR file, specify the class created in step 1.Add the following javaagent argument and system properties (-D options) to your startupscript:
-javaagent:<agent_home>/javaagent.jar-Dappdynamics.agent.startup.hook=<JAR-file>
Automate Java Agent Deployment
Copyright © AppDynamics 2012-2015 Page 80
Related pages:
https://github.com/edmunds/cookbook-appdynamicsDeploy Multiple Standalone Machine Agents
This topic lists sample tools created by AppDynamics users for deploying Java Agentsautomatically. You can use these samples for ideas on how to automate AppDynamics agentdeployment for your own environment.
In the samples, the agents are deployed independently of the application deployment
ChefExample1 and ChefExample2 use Opscode Chef recipes provide examples ofautomate deployment on Java platforms. See for informationhttp://www.opscode.com/chef/about Chef.JavaExample1 uses a script, configuration file and package repository.
Click below to download the samples.
ChefExample1.tarChefExample2.tarJavaExample1.tar
Also see a sample Chef cookbook for AppDynamics in the Edmunds.com, Inc., repository https://g. ithub.com/edmunds/cookbook-appdynamics
Instrument Apple WebObjects Applications
This topic helps you instrument applications written with WebObjects 5.4.3 on OSX 10.9 systems.
We will use one of the developer examples to illustrate how to instrument an application createdwith Apple WebObjects. After installing WebObjects, you can find most of the artifacts in thefollowing directories:
/Developer/Examples/JavaWebObjects/Developer/Applications/WebObjects
When you run the HelloWorld application at a/Developer/Examples/JavaWebObjects/HelloWorld, script file is generated:
/Developer/Examples/JavaWebObjects/HelloWorld/dist/legacy/HelloWorld.woa/HelloWorld
Open the generated script file for editing. Towards the end of the file, line 310 in the followingexample, appears the Java execute line:
Add the standard Java Agent arguments to the Java execution script for the HelloWorldapplication:
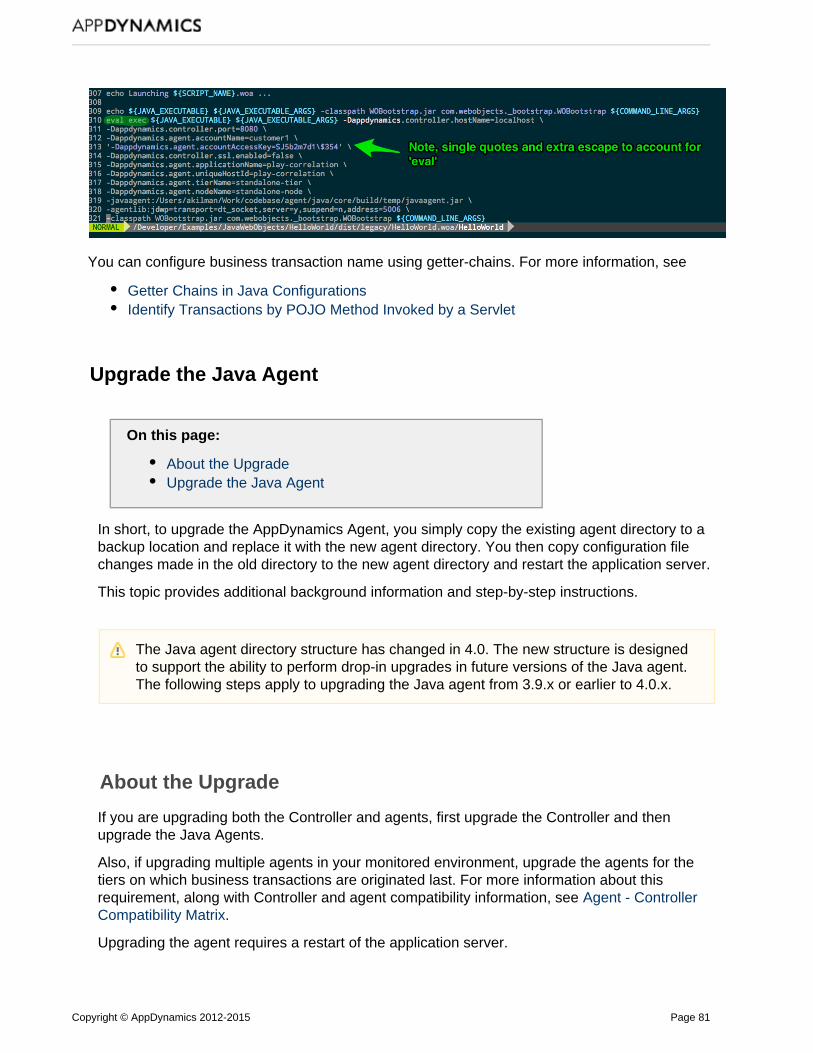
Copyright © AppDynamics 2012-2015 Page 81
You can configure business transaction name using getter-chains. For more information, see
Getter Chains in Java ConfigurationsIdentify Transactions by POJO Method Invoked by a Servlet
Upgrade the Java Agent
On this page:
About the UpgradeUpgrade the Java Agent
In short, to upgrade the AppDynamics Agent, you simply copy the existing agent directory to abackup location and replace it with the new agent directory. You then copy configuration filechanges made in the old directory to the new agent directory and restart the application server.
This topic provides additional background information and step-by-step instructions.
About the Upgrade
If you are upgrading both the Controller and agents, first upgrade the Controller and thenupgrade the Java Agents.
Also, if upgrading multiple agents in your monitored environment, upgrade the agents for thetiers on which business transactions are originated last. For more information about thisrequirement, along with Controller and agent compatibility information, see Agent - Controller
. Compatibility Matrix
Upgrading the agent requires a restart of the application server.
The Java agent directory structure has changed in 4.0. The new structure is designedto support the ability to perform drop-in upgrades in future versions of the Java agent.The following steps apply to upgrading the Java agent from 3.9.x or earlier to 4.0.x.
Copyright © AppDynamics 2012-2015 Page 82
1. 2.
3.
4.
5.
6.
7.
8.
Before starting, download the latest version of the Java Agent for your JVM from the AppDynamics Download Center.
Upgrade the Java Agent
Shut down the application server where the Java Agent is installed.Create a backup copy of the current agent installation directory.
Extract the Java Agent archive to a new directory
Rename the existing agent directory.
Rename the new directory to the original name of the old agent directory. The new agentdirectory and its containing files should have the same directory path as the originalone. Using the same directory path avoids the task of manually changing the agent-relatedconfigurations in your JVM startup script.
Copy from the old agent directory to the following locationcontroller-info.xml config
in the new directory:
<agent_home>/<version>/conf
For example:
appd_javaagent/ver4.0.0.0/conf
If you previously made changes to the or other configuration files,app-agent-config.xml
copy those changes to the new file as well.
Restart the application server.
When done you can archive the original directory and remove it from the application server home.
Uninstall the Java Agent
Related pages:
Manage App Server and Machine AgentsInstall the Java AgentJava Agent Configuration Properties
If you delete an app agent from the Controller UI, as described in Manage App Server and, but do not shut down the JVM that the Java Agent runs on, the Java Agent willMachine Agents
reappear in the UI the next time it connects to the Controller.
Copyright © AppDynamics 2012-2015 Page 83
1. 2. 3.
4.
To prevent a Java Agent from connecting to the Controller, you need to remove the JavaAgent settings from the JVM configuration. This frees the license associated with the agent in theController and makes it available for use by another app agent. This topic describes how touninstall a Java Agent from the JVM configuration.
To uninstall the Java Agent
Stop the application server on which the Java Agent is configured.Remove the -javaagent argument in the startup script of the JVM.Remove any system properties configured for the Java Agent from the startup script of yourJVM.Restart the application server.
Administer the Java Agent
This section covers set up and deployment topics supplemental to those covered in Install the. It also covers some miscellaneous tasks associated with administering an agent, suchJava Agent
as moving it to a new node or using agent logging.
The topics include:
Java Agent Directory StructureMoving Java Nodes to a new Application or TierIBM Java AgentEnable SSL for JavaTune Java Agent PerformanceView Agent Diagnostic DataStart an Agent Logging SessionTroubleshooting Java Agent IssuesConfigure Syslog Logging Output by the Agent
Java Agent Directory Structure
On this page:
Java Agent Directory Contents Contents of the conf DirectoryModifying the Log Directory Location
Unzipping the Java Agent distribution archive extracts the following files and directories to thecurrent directory.
Java Agent Directory Contents
conf: Common configuration files. The configuration files in this directory are used by anagent if a more specific version of the configuration file does not exist in the version specificconf directory, . ver<version_number>/conf
javaagent.jar: The common JAR file used to bootstrap the Java agent. To enable theagent, pass the fully qualified location of this file as the --javaagent argument value to theJVM at startup.
Copyright © AppDynamics 2012-2015 Page 84
readme.txt: Instructions and notes for installing the Java agent. utils: Binary files for utilities shared across versions of the agent. ver<version_number>: The file, configuration files, and otherjavaagent.jarresources specific for this version of the Java agent. This directory contains most of thethings that make the Java agent work, and is named to reflect the Java version number. In 4.0, the . directory contains: ver4.0.0.0
conf: The configuration files used by this version of the Java agent, including contr, , and more. These settings in theseoller-info.xml app-agent-config.xml
files take precedence over configuration file in the directory. <agent_home>/conf
external-services: Dynamically loaded modules that extend the agent, such asthe dynamic service.Application Analyticsjavaagent.jar: A version-specific JAR file that serves as the Java agent binary. Donot use this Java agent JAR when configuring instrumenting directly. Use javaagent
in the root directory instead. .jar
lib: Libraries that support the operation of this version of the Java agent. logs: Log files written by the agent.sdk: Samples, APIs, and Javadoc for extending the capabilities of the AppDynamicsJava agent.utils: Binary files for utilities that are specific to this version of the agent.
Contents of the conf Directory
The files located in this directory are commonly used for agent configuration and deployment.
transactions.xml: Configuration settings for business transactions identified by theagent.controller-info.xml: Configuration settings that identify the node, tier, and applicationassociated with the data that this agent reports to the AppDynamics Controller, along withconnection settings for the Controller. For more information, see Java Agent Configuration
.Propertiesapp-agent-config.xml: Local configuration settings for this agent. The settings in thisfile override any equivalent settings specified globally for the AppDynamics deployment.This file is typically used for short-term properties settings or for debugging agent issues.jmx: Files for configuring the JMX and Websphere PMI metrics.logging/ Flags to control logging levels for the agent. It is highlylog4j.xml:recommended not to change the default logging levels.
Modifying the Log Directory Location
To specify a different log directory, use the following system property:
-Dappdynamics.agent.logs.dir
Moving Java Nodes to a new Application or Tier
On this page:

Copyright © AppDynamics 2012-2015 Page 85
OverviewChange the Application or Tier from the UIForce node re-registration using the controller-info.xmlfile
Related pages:
AppDynamics Concepts
If your JVM machine has both a Java agent and a Machine Agent, you cannot change theassociations in the Machine Agent controller-info.xml file. You can only change these associationseither through the UI or by modifying the App Agent for Java controller-info.xml file.
Overview
There are two ways to associate a Java node with a new application or tier:
Changing them from the AppDynamics UI. You do not need to restart the JVM.Updating the controller-info.xml file and restarting the JVM.
When you change the tier or application for a Java node using the AppDynamics UI, it is notoverridden by the configuration local to the agent, unless the force-agent-registration flag in
is true.controller-info.xml
Change the Application or Tier from the UI
To change the tier or application association from the UI, find and select the node in the leftnavigation tree and click . You can then choose theActions -> Move Node new application or tier
from the menus. It may take several minutes to complete.
When you change the associations for an App Agent for Java, the Controller registers anApplication Changes event. You can review the details of the event in the view. Monitor Events
Changing application or tier associations in the UI does not modify the agent's controller-info.xmlfile. However if you restart the JVM, the Controller keeps the changes you made in the UI. While itis not necessary, you may wish to keep consistency between the controller-info.xml file and the UI,since the configuration file may serve as informal documentation for your monitored environment.To learn how to change the settings in controller-info.xml, see information on how the Java Agentidentifies the AppDynamics business application, tier, and node in . Install the Java Agent
Force node re-registration using the controller-info.xml file
If you have moved a node in the UI and you want to move it again elsewhere usingcontroller-info.xml, set the force-agent-registration property in the configuration file to 'true' and
. See .restart the JVM Force Agent Registration Property
IBM Java Agent
On this page:
Supported JVMs
Copyright © AppDynamics 2012-2015 Page 86
Instrumenting the IBM Java AgentInstrumenting WebSphere/InfoSphere with WebLogicSecurity Enabled
Under most circumstances, the IBM Java Agent works the same as the Java Agent. This topicgathers information specific to the IBM Java Agent.
Supported JVMs
IBM JVM 1.5.x, 1.6.x, 1.7.x
Instrumenting the IBM Java Agent
To change instrumentation for the IBM Java Agent, the IBM JVM must be restarted. By default theIBM Java Agent does not apply BCI changes without restarting the JVM. This is because in theIBM VM (J9 1.6.0) the implementation of re-transformation affects performance (changes the JITbehavior such that less optimization occurs).
The following changes require that you restart the IBM JVM.
Automatic leak detectionCustom memory structuresInformation pointsAggressive snapshot policy (also called hotspot instrumentation)Custom POJO rules for transaction detectionCustom exit point rulesEnd user experience monitor (EUM), when you enable it and/or disable it after first enablingit
Instrumenting WebSphere/InfoSphere with WebLogic Security Enabled
If your WebSphere/InfoSphere environment includes a security-enabled WebLogic ApplicationServer, several InfoSphere Master Data Management (MDM) Server clients require securityconfiguration.
For more information, see Configuring Java clients to work with WebLogic security in the IBM.documentation
Enable SSL for Java
On this page:
Before You BeginSaaS ControllerOn-Premise Controller with a Trusted CA SignedCertificateOn-Premise Controller with an Internally SignedCertificateOn-Premise Controller with a Self-Signed Certificate
Related pages:
Copyright © AppDynamics 2012-2015 Page 87
SecurityInstall the Java Agent
This topic covers how to configure the Java Agent to connect to the Controller using SSL. Itassumes that you use a SaaS Controller or have configured the on-premise Controller to use SSL.
The Java Agent supports extending and enforcing the SSL trust chain when in SSL mode.
Before You Begin
Before you configure the Java Agent to enable SSL, gather the following information:
Identify the Controller SSL port.For SaaS Controllers the SSL port is 443.For on-premise Controllers the default SSL port is 8181, but you may configure theController to listen for SSL on another port.
Identify the signature method for the Controller's SSL certificate:A publicly known certificate authority (CA) signed the certificate. This applies forVerisign, Thawte, and other commercial CAs.A CA internal to your organization signed the certificate. Some companies maintaininternal certificate authorities to manage trust and encryption within their domain.The Controller uses a self-signed certificate.
Decide how to specify the configuration:Add the configuration parameters to<agent_home>/ver<version_number>/conf/controller-info.xml, orInclude system properties in the -javaagent argument in your JVM startup script.
. See Where to Configure App Agent Properties
SSL Utilities
We provide two utilities to help you implement SSL.
Keystore Certificate Extractor Utility
The Keystore Certificate Extractor Utility exports certificates from the Controller's Java keystoreand writes them to an agent truststore. It installs to the following location:
<agent_home>/ver<version_number>/utils/keystorereader/kr.jar
To avoid copying the Controller keystore to an agent machine, you can run this utility from theController server. Access the agent distribution on the Controller at the following location:
<controller_home>/appserver/glassfish/domains/domain1/appagent
To use the Keystore Certificate Extractor, execute kr.jar and pass the following parameters:
The full path to the Controller's keystore:
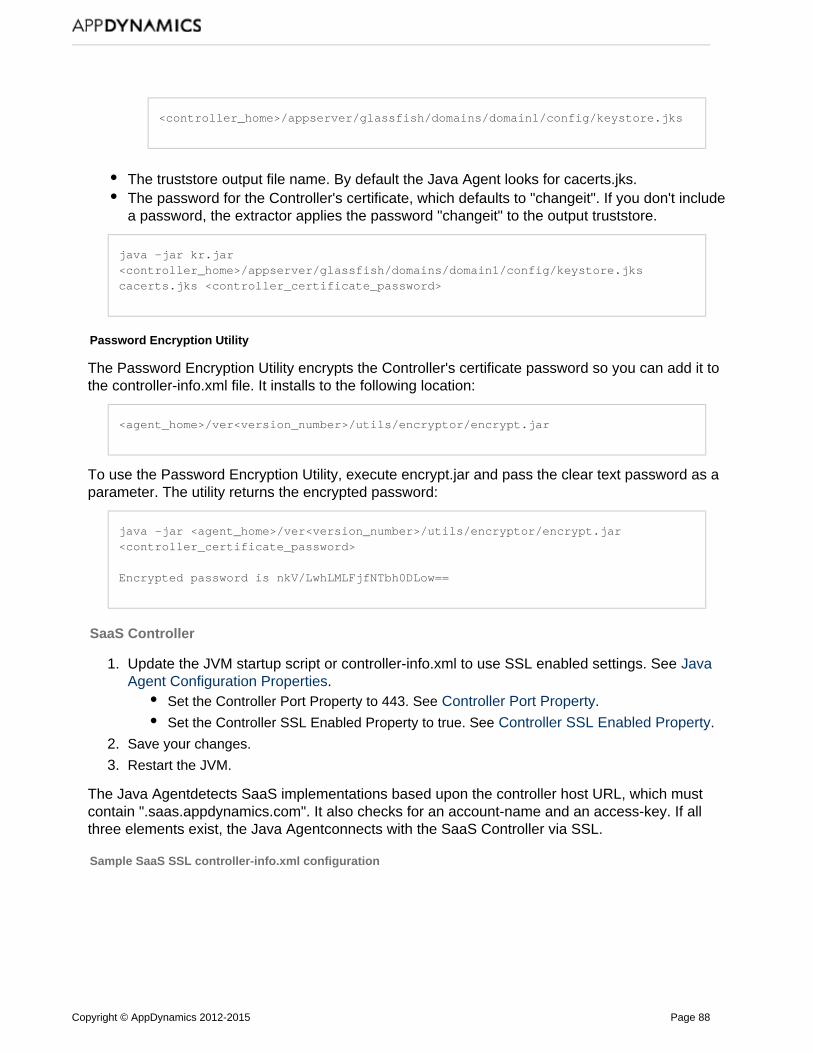
Copyright © AppDynamics 2012-2015 Page 88
1.
2.
3.
<controller_home>/appserver/glassfish/domains/domain1/config/keystore.jks
The truststore output file name. By default the Java Agent looks for cacerts.jks.The password for the Controller's certificate, which defaults to "changeit". If you don't includea password, the extractor applies the password "changeit" to the output truststore.
java -jar kr.jar<controller_home>/appserver/glassfish/domains/domain1/config/keystore.jkscacerts.jks <controller_certificate_password>
Password Encryption Utility
The Password Encryption Utility encrypts the Controller's certificate password so you can add it tothe controller-info.xml file. It installs to the following location:
<agent_home>/ver<version_number>/utils/encryptor/encrypt.jar
To use the Password Encryption Utility, execute encrypt.jar and pass the clear text password as aparameter. The utility returns the encrypted password:
java -jar <agent_home>/ver<version_number>/utils/encryptor/encrypt.jar<controller_certificate_password>
Encrypted password is nkV/LwhLMLFjfNTbh0DLow==
SaaS Controller
Update the JVM startup script or controller-info.xml to use SSL enabled settings. See Java.Agent Configuration Properties
Set the Controller Port Property to 443. See Controller Port Property.
Set the Controller SSL Enabled Property to true. See Controller SSL Enabled Property.
Save your changes.
Restart the JVM.
The Java Agentdetects SaaS implementations based upon the controller host URL, which mustcontain ".saas.appdynamics.com". It also checks for an account-name and an access-key. If allthree elements exist, the Java Agentconnects with the SaaS Controller via SSL.
Sample SaaS SSL controller-info.xml configuration
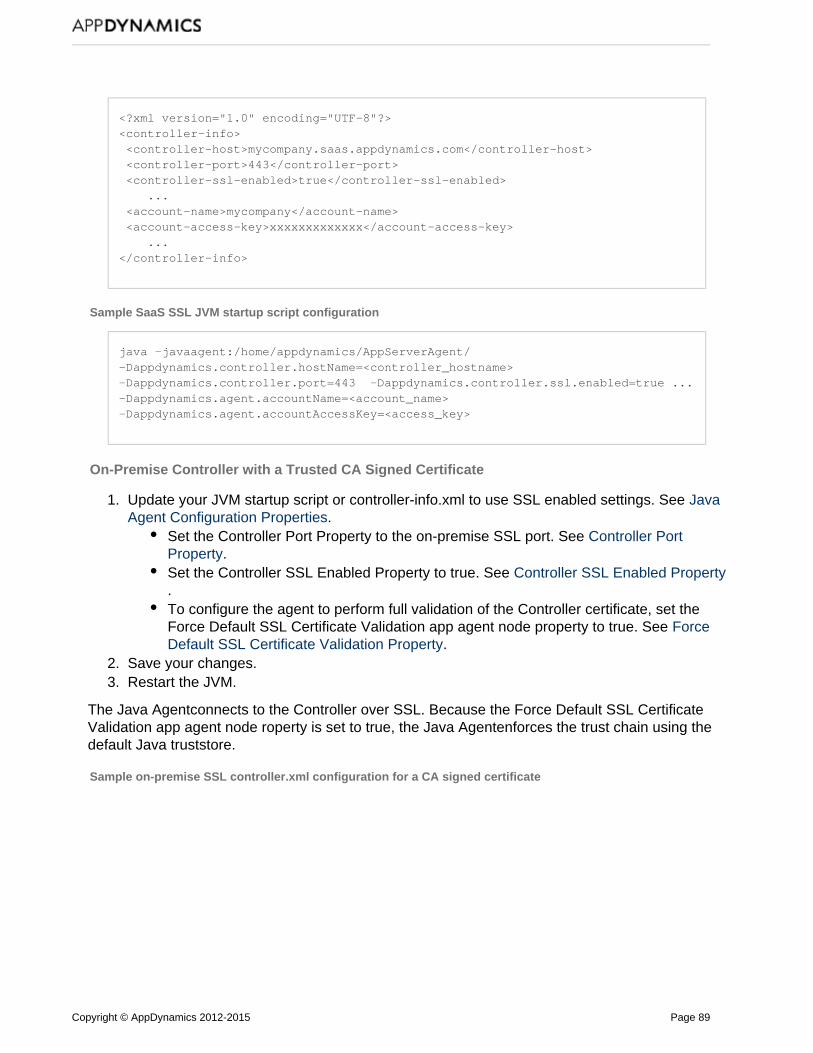
Copyright © AppDynamics 2012-2015 Page 89
1.
2. 3.
<?xml version="1.0" encoding="UTF-8"?><controller-info> <controller-host>mycompany.saas.appdynamics.com</controller-host> <controller-port>443</controller-port> <controller-ssl-enabled>true</controller-ssl-enabled> ... <account-name>mycompany</account-name> <account-access-key>xxxxxxxxxxxxx</account-access-key> ...</controller-info>
Sample SaaS SSL JVM startup script configuration
java -javaagent:/home/appdynamics/AppServerAgent/-Dappdynamics.controller.hostName=<controller_hostname>-Dappdynamics.controller.port=443 -Dappdynamics.controller.ssl.enabled=true ...-Dappdynamics.agent.accountName=<account_name>-Dappdynamics.agent.accountAccessKey=<access_key>
On-Premise Controller with a Trusted CA Signed Certificate
Update your JVM startup script or controller-info.xml to use SSL enabled settings. See Java.Agent Configuration Properties
Set the Controller Port Property to the on-premise SSL port. See Controller Port.Property
Set the Controller SSL Enabled Property to true. See Controller SSL Enabled Property.To configure the agent to perform full validation of the Controller certificate, set theForce Default SSL Certificate Validation app agent node property to true. See Force
.Default SSL Certificate Validation PropertySave your changes.Restart the JVM.
The Java Agentconnects to the Controller over SSL. Because the Force Default SSL CertificateValidation app agent node roperty is set to true, the Java Agentenforces the trust chain using thedefault Java truststore.
Sample on-premise SSL controller.xml configuration for a CA signed certificate
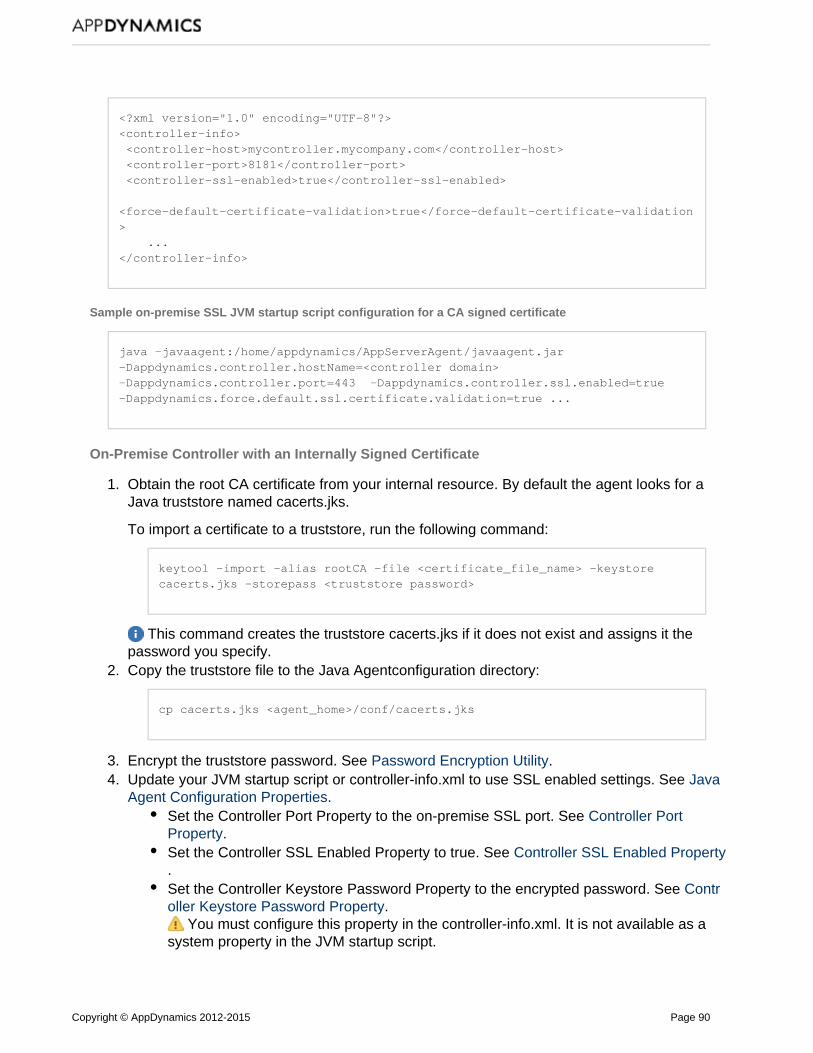
Copyright © AppDynamics 2012-2015 Page 90
1.
2.
3. 4.
5.
<?xml version="1.0" encoding="UTF-8"?><controller-info> <controller-host>mycontroller.mycompany.com</controller-host> <controller-port>8181</controller-port> <controller-ssl-enabled>true</controller-ssl-enabled> <force-default-certificate-validation>true</force-default-certificate-validation> ...</controller-info>
Sample on-premise SSL JVM startup script configuration for a CA signed certificate
java -javaagent:/home/appdynamics/AppServerAgent/javaagent.jar-Dappdynamics.controller.hostName=<controller domain>-Dappdynamics.controller.port=443 -Dappdynamics.controller.ssl.enabled=true-Dappdynamics.force.default.ssl.certificate.validation=true ...
On-Premise Controller with an Internally Signed Certificate
Obtain the root CA certificate from your internal resource. By default the agent looks for aJava truststore named cacerts.jks.
To import a certificate to a truststore, run the following command:
keytool -import -alias rootCA -file <certificate_file_name> -keystorecacerts.jks -storepass <truststore password>
This command creates the truststore cacerts.jks if it does not exist and assigns it thepassword you specify.Copy the truststore file to the Java Agentconfiguration directory:
cp cacerts.jks <agent_home>/conf/cacerts.jks
Encrypt the truststore password. See .Password Encryption UtilityUpdate your JVM startup script or controller-info.xml to use SSL enabled settings. See Java
.Agent Configuration PropertiesSet the Controller Port Property to the on-premise SSL port. See Controller Port
.PropertySet the Controller SSL Enabled Property to true. See Controller SSL Enabled Property.Set the Controller Keystore Password Property to the encrypted password. See Contr
.oller Keystore Password Property You must configure this property in the controller-info.xml. It is not available as a
system property in the JVM startup script.
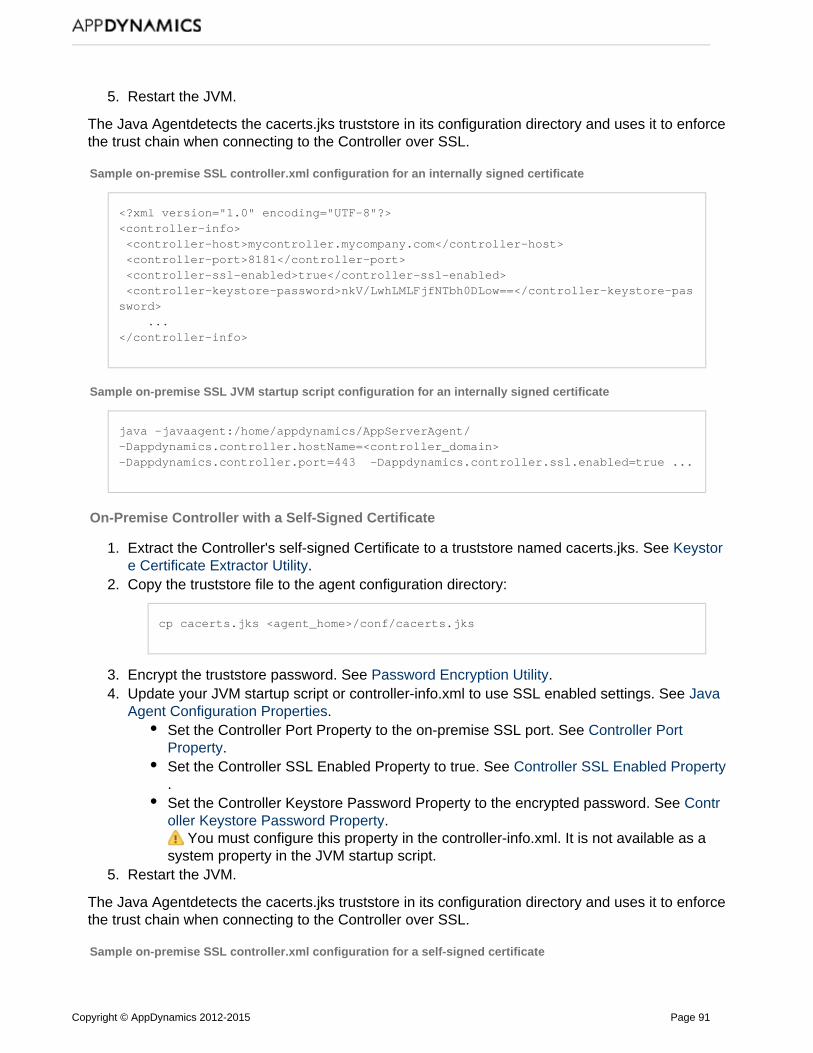
Copyright © AppDynamics 2012-2015 Page 91
5.
1.
2.
3. 4.
5.
Restart the JVM.
The Java Agentdetects the cacerts.jks truststore in its configuration directory and uses it to enforcethe trust chain when connecting to the Controller over SSL.
Sample on-premise SSL controller.xml configuration for an internally signed certificate
<?xml version="1.0" encoding="UTF-8"?><controller-info> <controller-host>mycontroller.mycompany.com</controller-host> <controller-port>8181</controller-port> <controller-ssl-enabled>true</controller-ssl-enabled> <controller-keystore-password>nkV/LwhLMLFjfNTbh0DLow==</controller-keystore-password> ...</controller-info>
Sample on-premise SSL JVM startup script configuration for an internally signed certificate
java -javaagent:/home/appdynamics/AppServerAgent/-Dappdynamics.controller.hostName=<controller_domain>-Dappdynamics.controller.port=443 -Dappdynamics.controller.ssl.enabled=true ...
On-Premise Controller with a Self-Signed Certificate
Extract the Controller's self-signed Certificate to a truststore named cacerts.jks. See Keystor.e Certificate Extractor Utility
Copy the truststore file to the agent configuration directory:
cp cacerts.jks <agent_home>/conf/cacerts.jks
Encrypt the truststore password. See .Password Encryption UtilityUpdate your JVM startup script or controller-info.xml to use SSL enabled settings. See Java
.Agent Configuration PropertiesSet the Controller Port Property to the on-premise SSL port. See Controller Port
.PropertySet the Controller SSL Enabled Property to true. See Controller SSL Enabled Property.Set the Controller Keystore Password Property to the encrypted password. See Contr
.oller Keystore Password Property You must configure this property in the controller-info.xml. It is not available as a
system property in the JVM startup script.Restart the JVM.
The Java Agentdetects the cacerts.jks truststore in its configuration directory and uses it to enforcethe trust chain when connecting to the Controller over SSL.
Sample on-premise SSL controller.xml configuration for a self-signed certificate

Copyright © AppDynamics 2012-2015 Page 92
<?xml version="1.0" encoding="UTF-8"?><controller-info> <controller-host>mycontroller.mycompany.com</controller-host> <controller-port>8181</controller-port> <controller-ssl-enabled>true</controller-ssl-enabled> <controller-keystore-password>nkV/LwhLMLFjfNTbh0DLow==</controller-keystore-password> ...</controller-info>
Sample on-premise SSL JVM startup script configuration for a self-signed certificate
java \-javaagent:/home/appdynamics/AppServerAgent/\-Dappdynamics.controller.hostName=<controller domain>\-Dappdynamics.controller.port=443 \-Dappdynamics.controller.ssl.enabled=true...
Tune Java Agent Performance
On this page:
Business Transaction ThresholdsSnapshot Collection ThresholdsTuning Call Graph SettingsMemory Monitoring
Related pages:
Configure Transaction ThresholdsConfigure Call GraphsTroubleshoot Java Memory Leaks
This topic discusses how to get the best performance from Java Agents. You can viewperformance statistics for deployed app agents in the window.diagnostic data
The performance of Java Agents is affected by the frequency at which it runs scheduled tasks.This topic provides guidelines for these settings.
Business Transaction Thresholds
AppDynamics determines whether transactions are slow, very slow, or stalled based on thethresholds for Business Transactions. AppDynamics recommends using standard deviation baseddynamic thresholds. See .Configure Transaction Thresholds
Snapshot Collection Thresholds
Snapshot collection thresholds determine when snapshots are collected for a BusinessTransaction. Too many snapshots can affect performance and therefore snapshot collection
Copyright © AppDynamics 2012-2015 Page 93
thresholds should be considered carefully in production or load testing scenarios. See Configure.Transaction Thresholds
Disable Scheduled Snapshots
For more information see .Transaction Snapshots
Suggested Scheduling Settings
10 minutes for deployments with less than 10 BTs20 minutes for deployments from 10 to 50 BTs30 minutes for deployments from 50 to 100 BTs60 minutes for deployments larger than 100 BTs
Suggested Diagnostic Session Settings
Settings for Slow requests (%value): 20 – 30Settings for Error requests (%value): 10 20–Click .Apply to all Business Transactions
Tuning Call Graph Settings
To configure call graph settings, click and the Configure -> Instrumentation Call Graph Settingstab. See .Configure Call Graphs
Suggested SQL Query Time and Parameters
Minimum SQL Query Time : 100 ms (Default is 10)Enable .Filter SQL Parameter Values
Memory Monitoring
Memory monitoring features such as leak detection, object instance tracking, and custom memoryshould be enabled only for a specific node or nodes when debugging a memory problem.Automatic leak detection is on-demand, and therefore, the leak detection will execute only for thespecified duration.
When you observe periods of growth in the heap utilization (%), you should enable on-demandmemory leak capture. See .Troubleshoot Java Memory Leaks
View Agent Diagnostic Data
On this page:
Related pages:
Troubleshoot Node Problems

Copyright © AppDynamics 2012-2015 Page 94
1. 2. 3. 4.
1. 2. 3.
4.
The agent diagnostic data shows you information about the performance of App Server agents.
To view the data for an agent.
Navigate to the App Server node in the application treeIn the Node Dashboard, click the Agents tab.Click the Agent Diagnostic Stats subtab.Click View Diagnostics for all Agents to see stats for all agents.
Start an Agent Logging Session
Related pages:
Request Agent Log Files
You can initiate a timed logging session to help you troubleshoot Java agent issues. In thesession, you specify the type of log information you want to capture and the duration of thesession.
In the tab of the node dashboard, scroll down to the Agent Logs panel.AgentsClick .Start Agent Logging SessionChoose the duration for which you want to log and select the check boxes for the types ofrequests that you want to log.
Click .Start Agent Logging Session
The selected logging sessions appear in the logging list.
The logged request and response output appears in the Controller and the agent log.
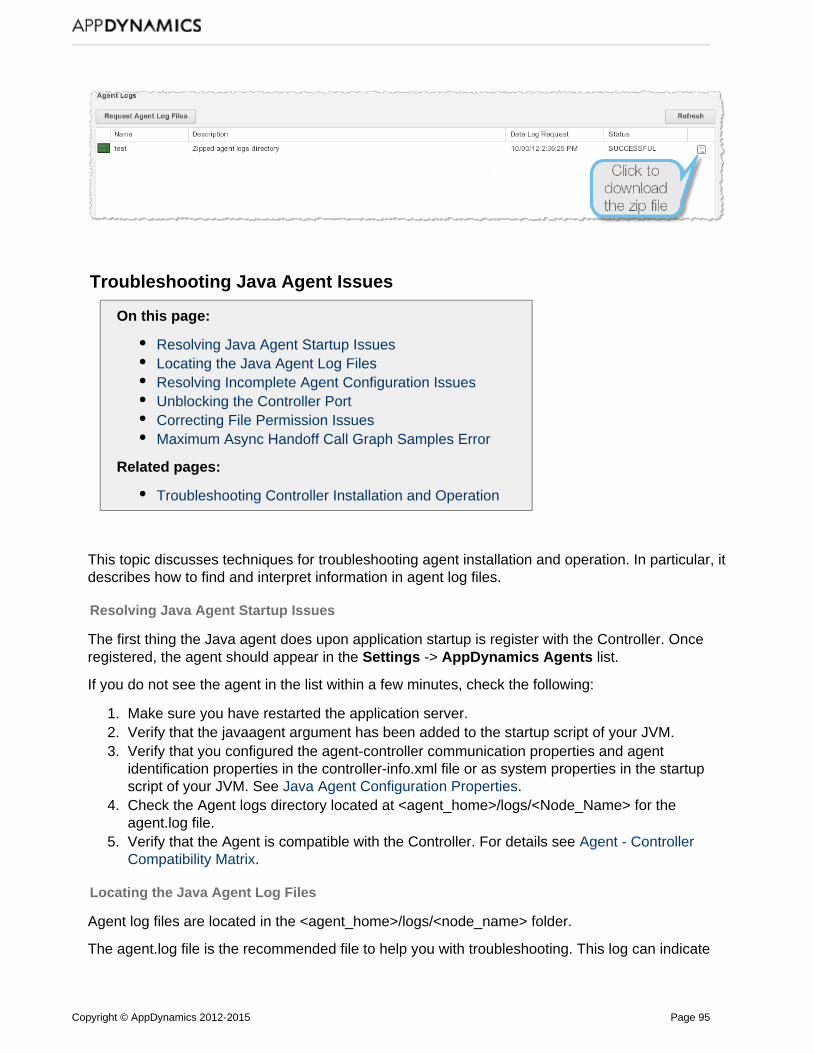
Copyright © AppDynamics 2012-2015 Page 95
1. 2. 3.
4.
5.
Troubleshooting Java Agent Issues
On this page:
Resolving Java Agent Startup IssuesLocating the Java Agent Log FilesResolving Incomplete Agent Configuration IssuesUnblocking the Controller PortCorrecting File Permission IssuesMaximum Async Handoff Call Graph Samples Error
Related pages:
Troubleshooting Controller Installation and Operation
This topic discusses techniques for troubleshooting agent installation and operation. In particular, itdescribes how to find and interpret information in agent log files.
Resolving Java Agent Startup Issues
The first thing the Java agent does upon application startup is register with the Controller. Onceregistered, the agent should appear in the -> list.Settings AppDynamics Agents
If you do not see the agent in the list within a few minutes, check the following:
Make sure you have restarted the application server.Verify that the javaagent argument has been added to the startup script of your JVM.Verify that you configured the agent-controller communication properties and agentidentification properties in the controller-info.xml file or as system properties in the startupscript of your JVM. See Java Agent Configuration Properties.Check the Agent logs directory located at <agent_home>/logs/<Node_Name> for theagent.log file.Verify that the Agent is compatible with the Controller. For details see Agent - ControllerCompatibility Matrix.
Locating the Java Agent Log Files
Agent log files are located in the <agent_home>/logs/<node_name> folder.
The agent.log file is the recommended file to help you with troubleshooting. This log can indicate
Copyright © AppDynamics 2012-2015 Page 96
the following:
Incomplete information in your Agent configurationThe Controller port is blockedIncorrect file permissions
Error messages related to starting the Java Agent use this format:
ERROR com.singularity.JavaAgent - Could Not Start Java Agent
Resolving Incomplete Agent Configuration Issues
The following table lists the typical error messages for incomplete Agent configuration:
Error Message Solution
Cannot connect to the Agent - ERRORcom.singularity.XMLConfigManager - Incomplete Agent Identity data, InvalidController Port Value
This indicates that the value for the Controller port incontroller-info.xml is missing. Add the Controller portand host value to resolve:
For on-premise Controller installations: 8090 forHTTP and 8181 for HTTPS. For Controller SaaS service, use the defaultHTTPS port 443.
Caused by:com.singularity.ee.agent.configuration.a:
Could not resolve agent-controller basicconfiguration
This is usually caused because of incorrectconfiguration in the Controller-info.xml file.
Ensure that the information for agent communication(Controller host and port) and agent identification(application, tier and node names) is correctlyconfigured.
Alternatively, you can also use the system properties(-D options) or environment variables to configurethese settings.
For more information about agent properties see .Java Agent Configuration Properties
Unblocking the Controller Port
The following table lists the typical error message when the Controller port is blocked in yournetwork:
Error Message Solution
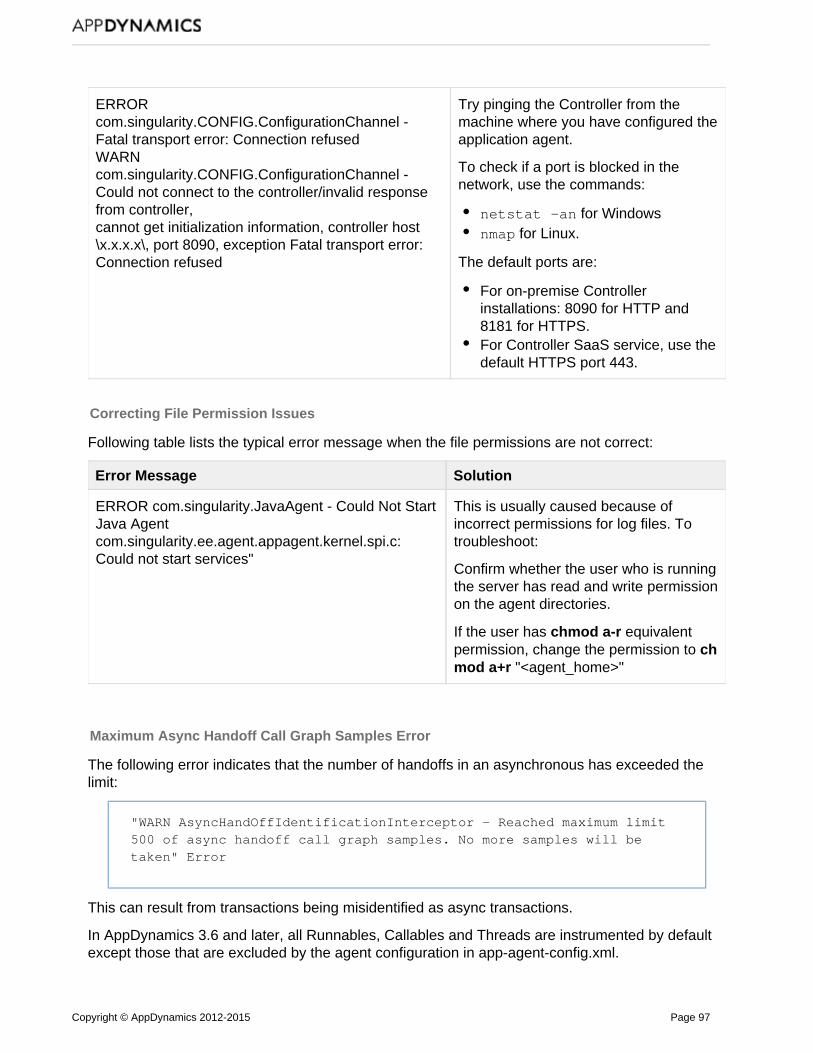
Copyright © AppDynamics 2012-2015 Page 97
ERRORcom.singularity.CONFIG.ConfigurationChannel -Fatal transport error: Connection refused WARNcom.singularity.CONFIG.ConfigurationChannel -Could not connect to the controller/invalid responsefrom controller, cannot get initialization information, controller host\x.x.x.x\, port 8090, exception Fatal transport error:Connection refused
Try pinging the Controller from themachine where you have configured theapplication agent.
To check if a port is blocked in thenetwork, use the commands:
netstat -an for Windowsnmap for Linux.
The default ports are:
For on-premise Controllerinstallations: 8090 for HTTP and8181 for HTTPS. For Controller SaaS service, use thedefault HTTPS port 443.
Correcting File Permission Issues
Following table lists the typical error message when the file permissions are not correct:
Error Message Solution
ERROR com.singularity.JavaAgent - Could Not StartJava Agentcom.singularity.ee.agent.appagent.kernel.spi.c:Could not start services"
This is usually caused because ofincorrect permissions for log files. Totroubleshoot:
Confirm whether the user who is runningthe server has read and write permissionon the agent directories.
If the user has equivalentchmod a-rpermission, change the permission to ch
"<agent_home>"mod a+r
Maximum Async Handoff Call Graph Samples Error
The following error indicates that the number of handoffs in an asynchronous has exceeded thelimit:
"WARN AsyncHandOffIdentificationInterceptor - Reached maximum limit500 of async handoff call graph samples. No more samples will betaken" Error
This can result from transactions being misidentified as async transactions.
In AppDynamics 3.6 and later, all Runnables, Callables and Threads are instrumented by defaultexcept those that are excluded by the agent configuration in app-agent-config.xml.
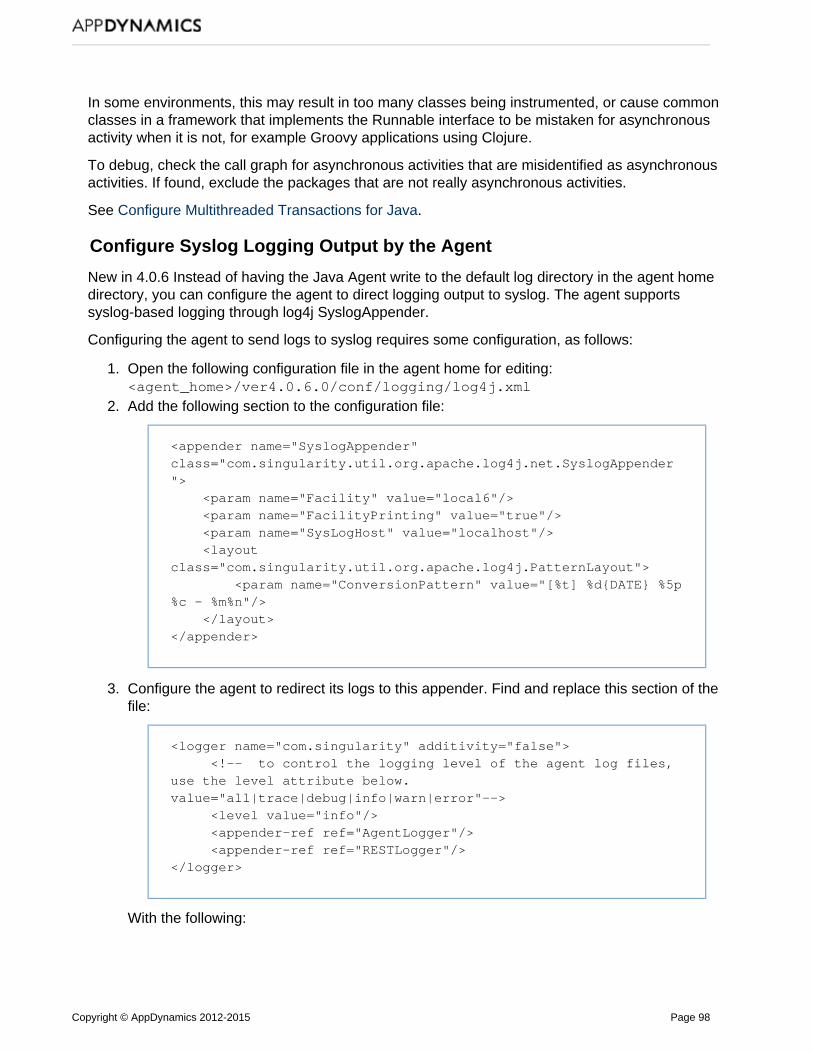
Copyright © AppDynamics 2012-2015 Page 98
1.
2.
3.
In some environments, this may result in too many classes being instrumented, or cause commonclasses in a framework that implements the Runnable interface to be mistaken for asynchronousactivity when it is not, for example Groovy applications using Clojure.
To debug, check the call graph for asynchronous activities that are misidentified as asynchronousactivities. If found, exclude the packages that are not really asynchronous activities.
See .Configure Multithreaded Transactions for Java
Configure Syslog Logging Output by the Agent
New in 4.0.6 Instead of having the Java Agent write to the default log directory in the agent homedirectory, you can configure the agent to direct logging output to syslog. The agent supportssyslog-based logging through log4j SyslogAppender.
Configuring the agent to send logs to syslog requires some configuration, as follows:
Open the following configuration file in the agent home for editing:<agent_home>/ver4.0.6.0/conf/logging/log4j.xml
Add the following section to the configuration file:
<appender name="SyslogAppender"class="com.singularity.util.org.apache.log4j.net.SyslogAppender"> <param name="Facility" value="local6"/> <param name="FacilityPrinting" value="true"/> <param name="SysLogHost" value="localhost"/> <layoutclass="com.singularity.util.org.apache.log4j.PatternLayout"> <param name="ConversionPattern" value="[%t] %d{DATE} %5p%c - %m%n"/> </layout></appender>
Configure the agent to redirect its logs to this appender. Find and replace this section of thefile:
<logger name="com.singularity" additivity="false"> <!-- to control the logging level of the agent log files,use the level attribute below.value="all|trace|debug|info|warn|error"--> <level value="info"/> <appender-ref ref="AgentLogger"/> <appender-ref ref="RESTLogger"/> </logger>
With the following:

Copyright © AppDynamics 2012-2015 Page 99
3.
4.
<logger name="com.singularity" additivity="false"> <!-- to control the logging level of the agent log files,use the level attribute below.value="all|trace|debug|info|warn|error"--> <level value="info"/> <appender-ref ref="SyslogAppender"/> <appender-ref ref="RESTLogger"/></logger>
Save the file and restart the JVM.